Digital Device DPU-4270 Plasma Display Monitor User Manual
Digital Device Inc. Plasma Display Monitor
Users Manual

8VHUV0DQXDO
3'379021,725
Please read this manual carefully before using your plasma TV and keep the manual handy for future reference.
CAUTION
RISK OF ELECTRICAL
SHOCK, DO NOT OPEN
TO REDUCE THE RISK OF ELECTRIC SHOCK DO NOT REMOVE COVER (OR BACK).
NO USER SERVICEABLE PARTS INSIDE. REFER TO QUALIFIED SERVICE PERSONNEL.
Warning
TO PREVENT FIRE OR ELECTRIC SHOCK HAZARD, DO NOT EXPOSE THIS PRODUCT TO RAIN OR MOISTURE. ALSO DO NOT USE THIS UNIT'S
POLARIZED PLUG WITH AN EXTENSION CORD RECEPTACLE OR OTHER OUTLETS, UNLESS THE PRONGS CAN BE FULLY INSERTED. REFRAIN
FROM OPENING THE CABINET AS THERE ARE HIGH-VOLTAGE COMPONENTS INSIDE. REFER SERVICING TO QUALIFIED SERVICE PERSONNEL.
Warning:
Still image (immovable) screen may cause permanent damage to PDP.
1) Lengthy displayed still images from Video games, banners, graphics and others may fatally damage the screen.
2) When using the PDP in 4:3 formats with sidebars for a long period of time, it may cause damage to the plasma panel.
It is recommended that you use 16:9 or other formats.(Image Sticking can be avoided by using "Panel" function of the Setting's
sub menu. However, once image sticking occurs, it may not disappear completely. An image will be dimmed as the image is
displayed long time or repeatedly)
Any damage to the PDP caused by improper usage (such as image sticking) shall not be covered by the warranty.
The lightning flash with the arrowhead symbol, within an equilateral triangle, is
intended to alert the user to the presence of uninsulated "dangerous voltage"
within the product's enclosure that may be of sufficient magnitude to constitute an
electric shock to persons.
The exclamation point within an equilateral triangle is intended to alert the user to
the presence of important operating and maintenance (servicing) instructions in the
literature accompanying the appliance.
02
WARNING

03
SAFTY INSTRUCTIONS
Important safeguard for you and your new product
Your product has been manufactured and tested with your safety in mind. However, improper use can
result in potential electrical shock or fire hazards. To avoid defeating the safeguards that have been built
into your new product, please read and observe the following safety points when installing and using
your new product, and save them for future reference.
Observing the simple precautions discussed in this booklet can help you get many years of enjoyment and
safe operation that are built into your new product.
1. Read Instructions
All the safety and operating instructions
should be read before the product is operated.
2. Follow Instructions
All operating and use instructions should be
followed.
3. Retain Instructions
The safety and operating instructions should be
retained for future reference.
4. Heed Warnings
All warnings on the product and in the operating
instructions should be adhered to.
5. Water and Moisture
Do not use this product near water, for
example, near a bath tub, wash bowl, kitchen
sink, or laundry tub, in a wet basement, or near a
swimming pool.
6. Accessories, Carts, and Stands
Do not place this product on a slippery or tilted
surface, or on an unstable cart, stand, tripod,
bracket, or table.
The product may slide or fall, causing serious
injury to a child or adult, and serious damage to
the product.
Use only with a cart, stand, tripod, bracket,
or table recommended by the manufacturer,
or sold with the product. Any mounting of
the product should follow the manufacturer's
instructions, and should use a mounting accessory
recommended by the manufacturer.
7. Transporting Product
A product and cart combination
should be moved with care.
Quick stops, excessive
force, and uneven surfaces
may cause the product
and cart combination to overturn.
8. Attachments
Do not use attachments not recommended by
the product manufacturer as they may cause
hazards.
9. Ventilation
Slots and openings in the cabinet are provided for
ventilation and to ensure reliable operation of the
product and to protect it from overheating, and
these openings must not be blocked or covered.
The openings should never be blocked by placing
the product on a bed, sofa, rug, or other similar
surface. This product should not be placed in a
built-in installation such as a bookcase or rack
unless proper ventilation is provided or the
manufacturer's instructions have been adhered
to.
10. Power Sources
This product should be operated only from the
type of power source indicated on the marking
label. If you are not sure of the type of power
supply to your home, consult your product dealer
or local power company.
For products intended to operate from battery
power, or other sources, refer to the operating
instructions.
PORTABLE CART WARNING

04
SAFTY INSTRUCTIONS
< Safety Instructions continued >
11. Outdoor Antenna Grounding
If an outside antenna or cable system is
connected to the product, be sure the antenna
or cable system is grounded so as to provide
some protection against voltage surges and
built-up static charges.
12. Lightning
For added protection for this product (receiver)
during a lightning storm, or when it is left
unattended and unused for long periods of
time, unplug it from the wall outlet and
disconnect the antenna or cable system.
This will prevent damage to the product due to
lightning and power-line surges.
13. Power Lines
An outside antenna system should not be
located in the vicinity of overhead power lines
or other electric light or power circuits, or where
it can fall into such power lines or circuits. When
installing an outside antenna system, extreme
care should be taken to keep from touching
such power lines or circuits as contact with
them might be fatal.
14. Overloading
Do not overload wall outlets and extension
cords as this can result in a risk of fire or electric
shock.
14. Heat
The product should be situated away from heat
sources such as radiators, heat registers, stoves,
or other products (including amplifiers) that
produce heat.
15. Cleaning
Unplug this product from the wall outlet before
cleaning. Do not use liquid cleaners or aerosol
cleaners. Use a dry cloth for cleaning.
16. Servicing
Do not attempt to service this product yourself
as opening or removing covers may expose you
to dangerous voltage or other hazards.
Refer all servicing to qualified service personnel.
17. Damage Requiring Service
Unplug this product from the wall outlet and refer
servicing to qualified service personnel under the
following conditions:
Example of antenna grounding
As per national electrical code
Antenna lead in wire
Antenna discharge
unit
Grounding conductors
Ground clamps
Power service
grounding
Electrode system
Electric service
equipment
Ground clamp
- When the power-supply cord or plug is damaged.
- If liquid has been spilled, or objects have fallen into
the product.
- If the product has been exposed to rain or water.
- If the product does not operate normally by following
the operating instructions. Adjust only those controls
that are covered by the operating instructions as an
improper adjustment of other controls may result in
damage and will often require extensive work by a
qualified technician to restore the product to its normal
operation.
- If the product has been dropped or the cabinet has
been damaged in any way.
- When the product exhibits a distinct change in
performance.

06
FEATURES & PACKAGE
1. Features and Package
1.1 Features
Various Input signals
- The display has a two tuner to input television
RF signal (Only TV model), you can view two
different channels at the same time.
- In additional to Video, S-VHS, SCART RGB,
Component, Analog RGB(D-sub 15Pin) and
Digital RGB(DVI) signals,
- Depending on the model, the display support
video input for different color television system
as follow: NTSC, PAL, SECAM, PAL-N, PAL-M,
PAL-60, NTSC4.43.
- The display has a Component Video input
terminal to receive signals, including 480i, 480p,
720p and 1080i.
- The display has an RGB (Analog and Digital)
input terminal to receive signal, including VGA,
SVGA, XGA and SXGA.
Intelligent Window
- The display perform High quality video
enhancement as follow: Noise reduction,
Motion adaptive de-interlacing, Digital
Color/Luminance Transient Improvement, Film
Mode Detection.
- PIP (Picture in Picture) & Double screen
function
- Selectable Aspect Ratio
(16:9, 4:3, Panorama, Zoom1/2)
- Zoom-in
- Freeze Picture
Powerful and easy function
- Menu driven On Screen Display (OSD) for all
functions.
- 10 countries Language OSD
- IR Remote control for all functions
- 1 User's Manual - 1 Remote control - 2 "AAA"size batteries
- AV cable (1 RCA Cable, 1 RGB Cable) - 1 AC power cord
* Optional Accessary :
Speaker, Stand Unit, Wall Mount Bracket
* Operating position: Table top or Desk Top
User's Manual
G
G
G
- 1 Plasma TV set
P
P
O
O
W
W
E
E
R
R
M
M
U
U
T
T
E
E
V
V
I
I
D
D
E
E
O
O
1
1
V
V
I
I
D
D
E
E
O
O
2
2
D
D
V
V
D
D
R
R
G
G
B
B
D
D
V
V
I
I
H
H
D
D
/
/
D
D
V
V
D
D
T
T
V
V
R
R
E
E
C
C
A
A
L
L
L
L
A
A
U
U
T
T
O
O
S
S
T
T
I
I
L
L
L
L
S
S
T
T
E
E
R
R
E
E
O
O
S
S
L
L
E
E
E
E
P
P
S
S
C
C
R
R
E
E
E
E
N
N
T
T
E
E
X
X
T
T
M
M
E
E
N
N
U
U
?
?
C
C
H
H
V
V
O
O
L
L
+
+
_
_
P
P
r
r
e
e
v
v
.
.
C
C
H
H
A
A
D
D
D
D
/
/
D
D
E
E
L
L
P
P
I
I
P
P
O
O
N
N
/
/
O
O
F
F
F
F
S
S
W
W
A
A
P
P
T
T
W
W
I
I
N
N
P
P
I
I
C
C
C
C
H
H
+
+
P
P
O
O
S
S
I
I
T
T
I
I
O
O
N
N
P
P
I
I
P
P
A
A
V
V
A
A
U
U
D
D
I
I
O
O
C
C
H
H
-
-
P
P
I
I
C
C
T
T
U
U
R
R
E
E
S
S
O
O
U
U
N
N
D
D
Z
Z
O
O
O
O
M
M
+
+
Z
Z
O
O
O
O
M
M
-
-
S
S
E
E
L
L
1
1
1
1
?
?
1
1
2
2
3
3
4
4
5
5
6
6
7
7
8
8
9
9
1
1
0
0
0
0
0
0
1.2 Package Contents
07
)/$%&).)4)/.3
)/$EFINITIONS
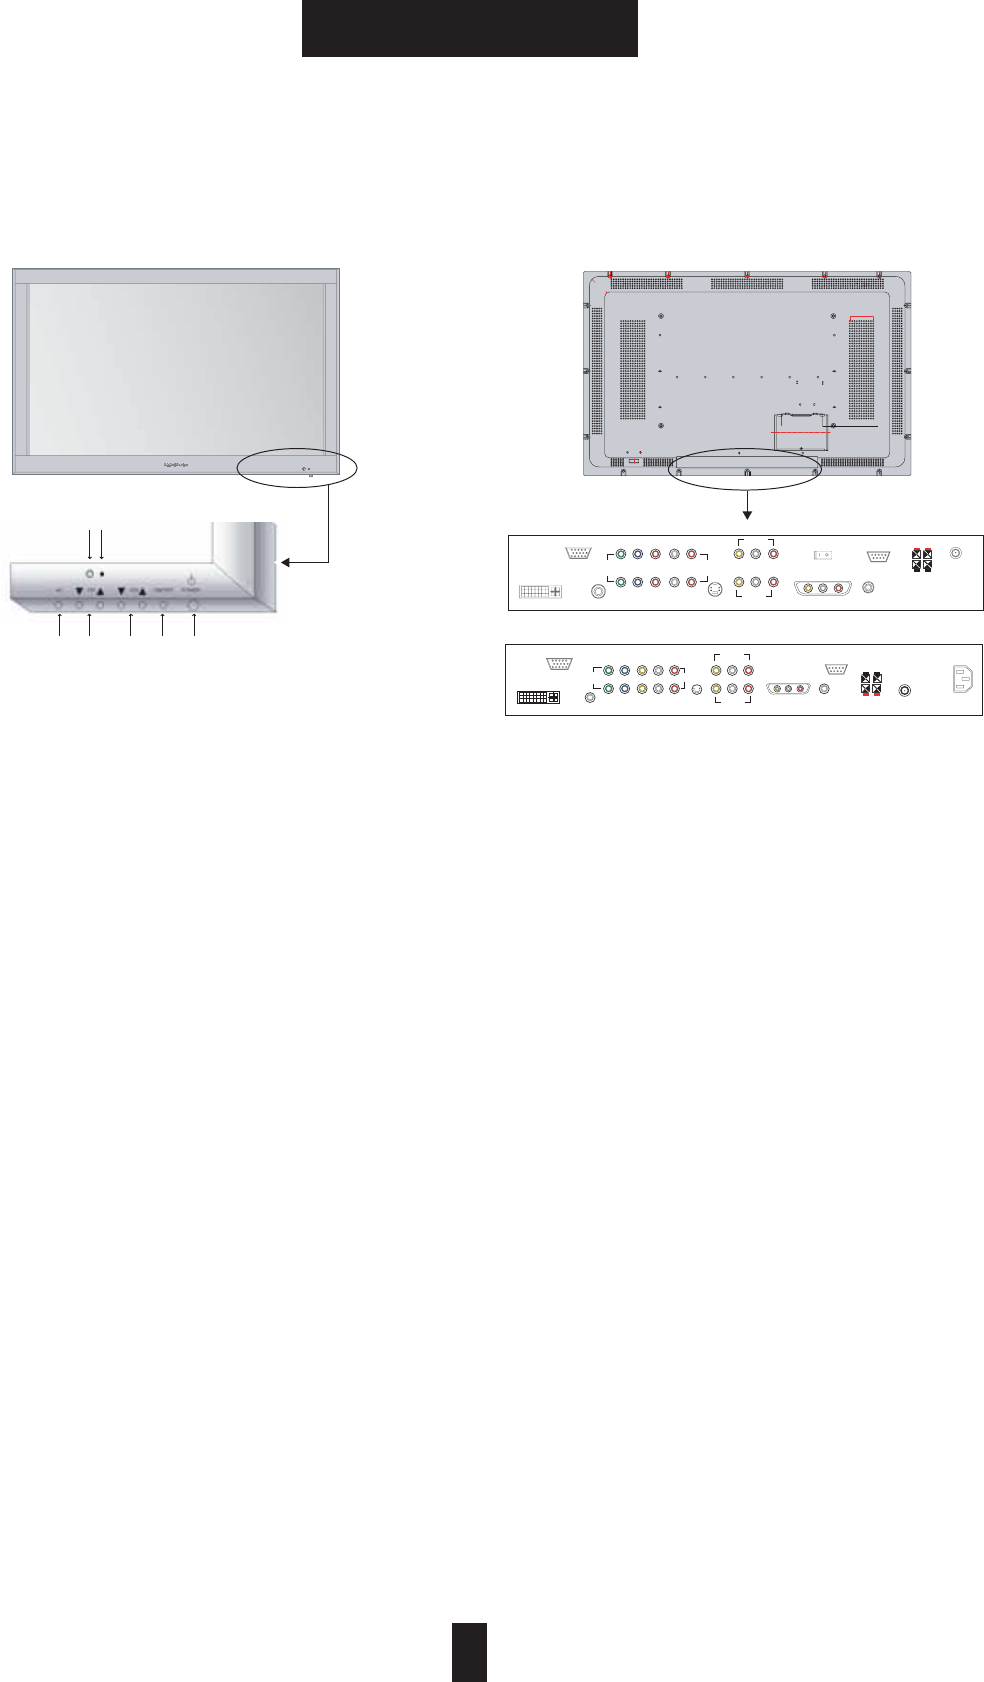
&RONT0ANEL#ONTROLS
ྙG-AIN0OWER/./&&
0RESSTOTURNON3TANDBY-ODEANDOFF
ྚG3TANDBY0OWER/.
0RESSTOTURNON/PERATION-ODEANDOFF
ྛG6OLUME50$/7.
0RESSTOINCREASEANDDECREASETHEVOLUME
ྜG#HANNEL50$/7.
0RESSTOCHANGETHECHANNELAT46MODE
ྜྷG!6
0RESSTOSELECTALLAVAILABLESOURCE
4636(36IDEO6IDEO!NALOG2'"
$IGITAL2'"#OMPONENT#OMPONENT
ྞG0OWER)NDICATOR
2EDCOLOR3TANDBYMODE
'REENCOLOR/PERATIONMODE
ྟG)22ECEIVERG
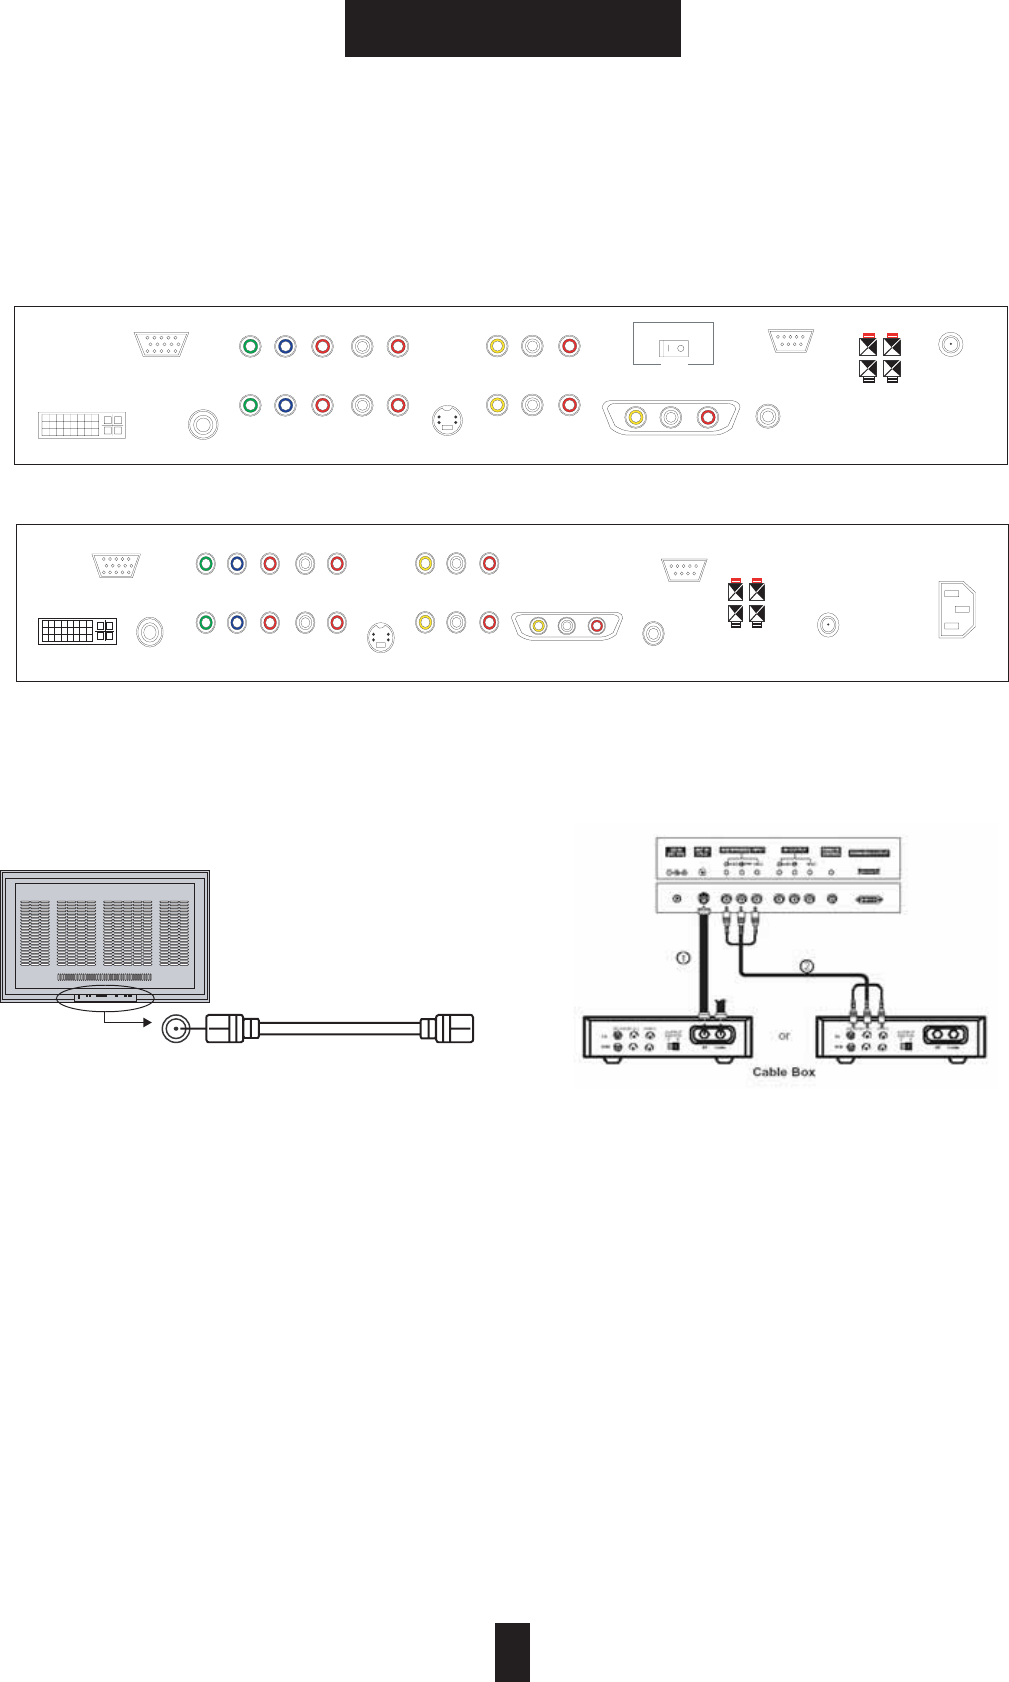
2EAR#ABINET)/gS
ྙ!#0OWER)NPUT
ྚ$IGITAL2'"$6)))NPUT
ྛ!NALOG2'"$SUBPIN#ONNECTOR)NPUT
ྜ$IGITAL2'"!NALOG2'"!UDIO)NPUT
ྜྷ#OMPONENT6IDEOI^I)NPUT
ྞ#OMPONENT,INE,EVEL!UDIO)NPUT
ྟ36(3)NPUT
ྠ6IDEO)NPUT,INE,EVEL!UDIO)NPUT
ྡ"UILTIN3PEAKER3WITCH
ྡྷ3#!24)NPUT/UTPUT0!,3%#!-OPTION
6IDEO)NPUT,INE,EVEL!UDIO)NPUT.43#OPTION
ྣ-ONITOR#OMPOSITE6IDEO/UTPUT
,INE,EVEL!UDIO/UTPUT
ྤ)22EMOTE#ONTROL
7IRED2EMOTE#ONTROLOPTION
ྥ23#0ORT
ྦ3PEAKER/UTPUT,EFT2IGHT
ྦྷ2&46CONNECTORFORANTENNA)NPUTOPTION
;.OTE=3EEPAGEFORAVAILABLE!6)NPUT/UTPUT4ERMINAL
ྜྷGGGGGྜGGGGGGGྛGGGGGGྚGGGGྙ
ྟGྞ
ྦ
ྦྷ
INCH
(+)
( - )
ྙ
ྚ
ྜ
ྜྷྞ
ྟྡྷྤ
ྥྦྦྷ
INCH
(+)
( - )
21 2))
%8,/7,163($.(5
sGGGGGy
ྚྛ
ྜ
ྜྷྞ
ྟ
ྠ
ྣ
ྠ
ྣ
ྡྷ
ྡ
ྥ
ྤ
75
R15
R30
INCH2EAR#ABINETDRAWING
ྛ
08
FEATURES & PACKAGE
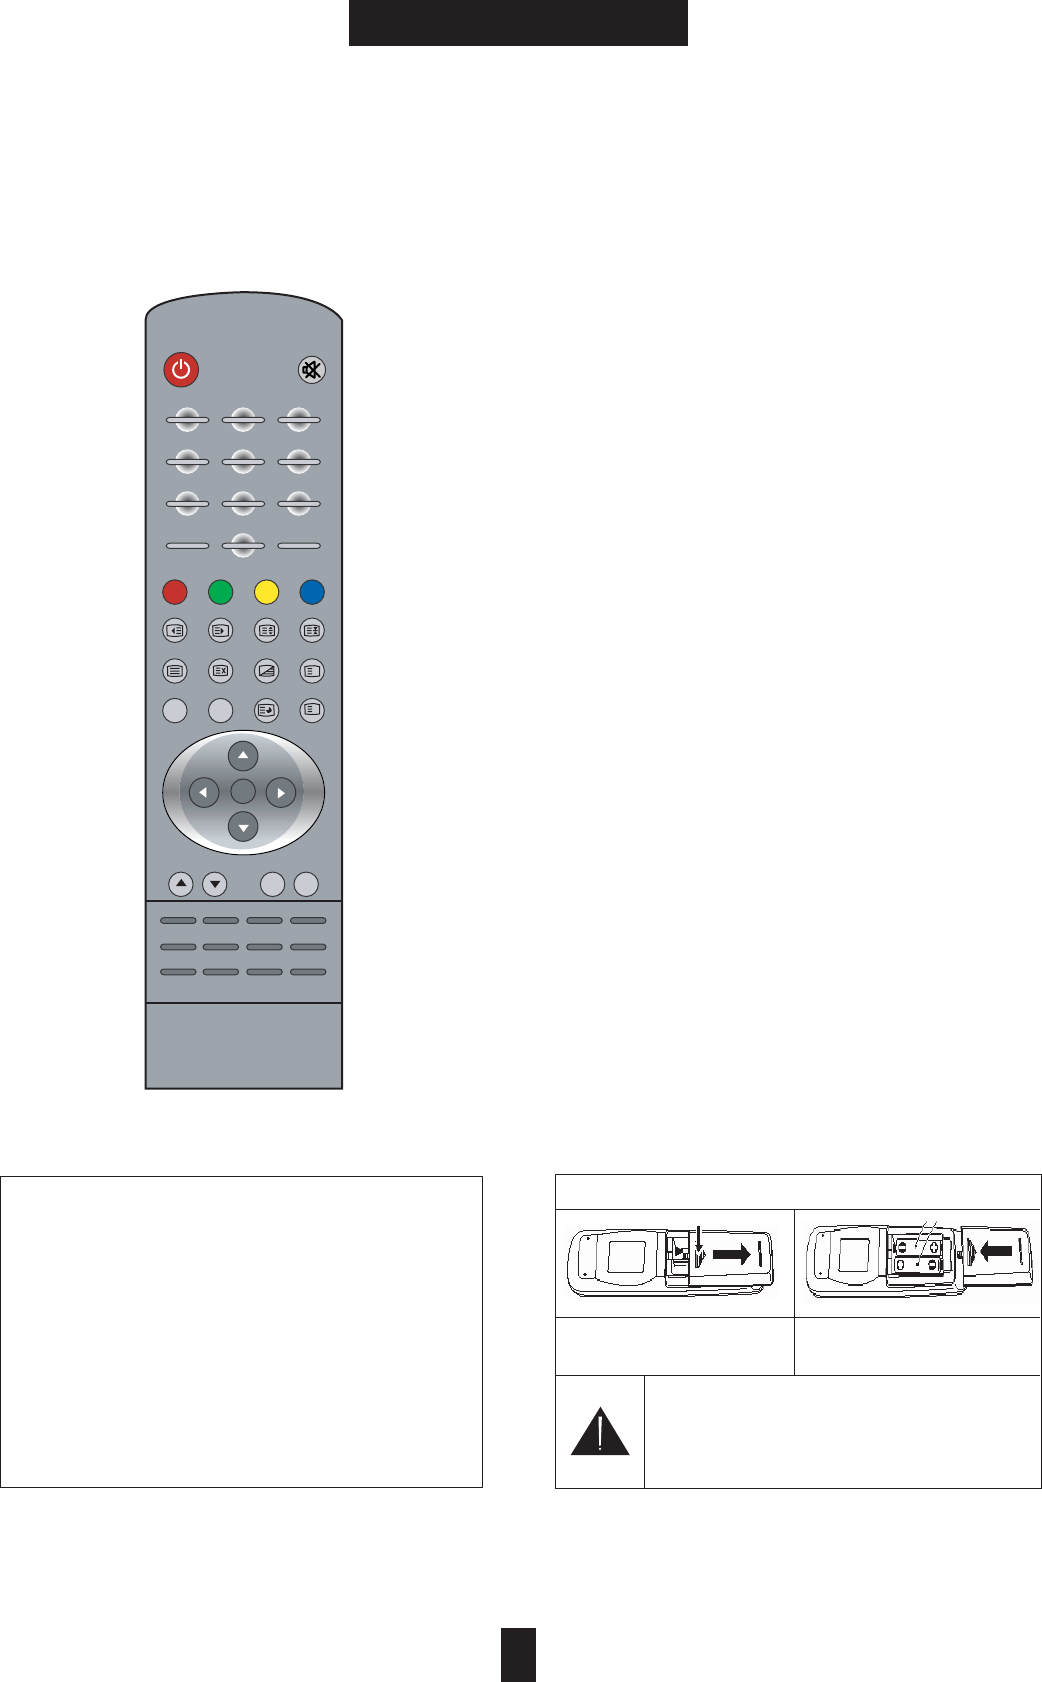
Installing the batteries in the remote control unit.
To Remove cover, Slide out-
wards while pressing down.
Place two batteries in the remote
control, then close the cover.
CAUTION
Risk of explosion if battery is replaced by an
incorrect type. Dispose of used batteries
according to the instructions.
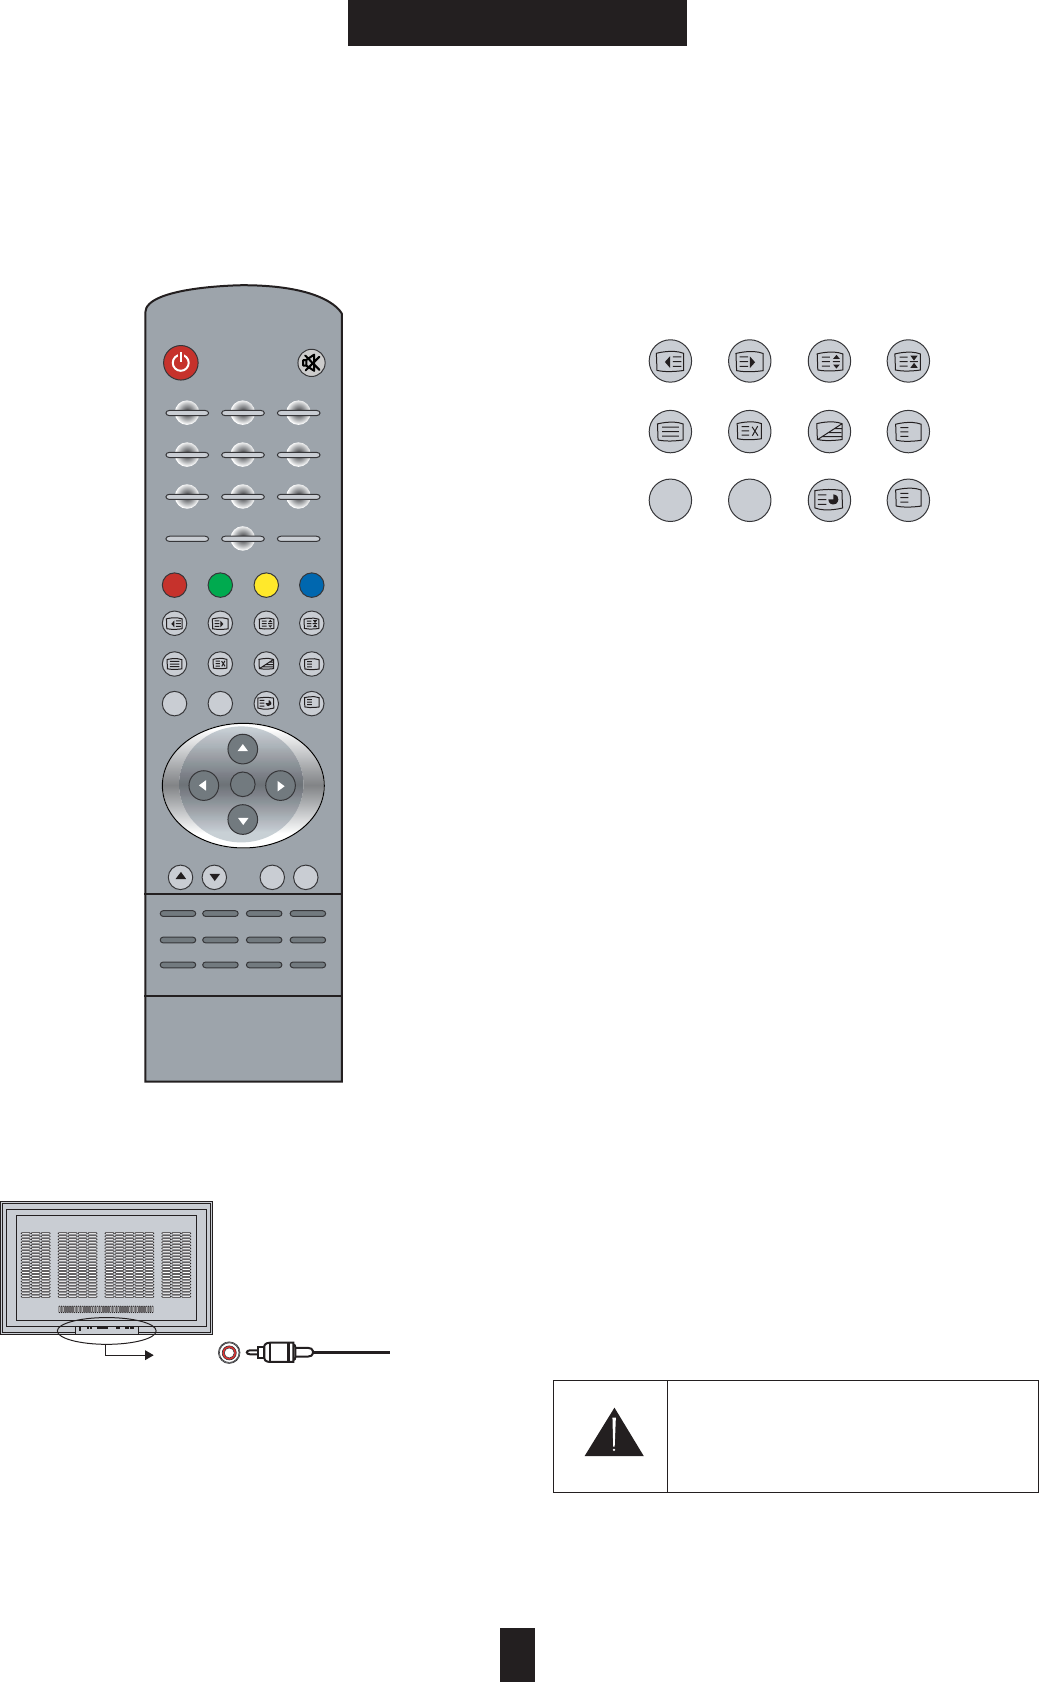
3. Remote Control
3.1 Remote Control Basic ̺POWER : Switchs the TV between ON and Standby.
̻Number & Prev.CH Button
Number Buttons : Used to enter channels selected.
Prev. CH : Selects the previous channel.
̼Layout Control Buttons
PIP : PIP mode On/OFF
TWIN PIC : Double window mode ON/OFF
SWAP : Interchange the main and the sub source
POSITION : Location selection of sub picture
SIZE : Size selection of sub picture
̽Menu Control Buttons
Menu : Displays the on-screen menu.
TV Menu : Displays the TV menu screen.
LANG : Changes the language of on-screen menu.
SEL : Select to the desired menu item.
Curser Buttons : Control the cursor in the menu.
̾CHANNEL & Volume Buttons
CH ¦/¤: Select the DOWN/UP Channel.
VOLUME -/+ : Increases/Decreases sound level.
̿AV Source Selection Buttons
Directly Source Selection Buttons
SOURCE : Toggle source selection
ྙ
ྚ
ྛ
ྜ
ྜྷ
When handling the remote control unit.
- Do not drop or shake the remote control.
- Do not use the remote control unit in a location
subject to
direct sunlight, heat radiation from a
heater, or in a place
subject to excessive humidity.
- When the remote control units batteries begin
to wear out,
the operable distance will gradually
become shorter. When
this occurs, replace all
batteries with new ones as soon as
possible.
ྞ
----->
32:(5 087(
AnalogRGB VIDEO1 COMPONENT1 TV
DigitalRGB VIDEO2 COMPONENT12 S-VHS
6(/
1
1
?
i
35(9&+
3,36:$3326,7,216,=(
7:,13,&6&5((1=22067,//
7(;73,&785(6281'67(5(2
$'''(//$1*790(180(18
&+ 92/
16
SLEEP RECALL AUTO SOURCE
----->
----->
----->
----->
----->
͑͑͑͜͞
09
REMOTE CONTROL
3. Remote Control
3.1 Remote Control Basic ཿTEXT : Selects TELETEXT mode.
See the page 24 in which the teletext function button
is explained in detail.
ྀADD/DEL
:
Memories or Deletes the selected channel.
ཱྀSLEEP : Sets the sleep timer.
ྂRECALL : Displays the setting status of PDP.
ྃAUTO : Optimizes the picture at Component
and RGB mode.
྄MUTE : Switches the sound on or off.
྅Screen Control Buttons
SCREEN : Adjusts the size of the screen.
(16:9, 4:3 etc.)
ZOOM : Enlarges or reduces the picture size.
STILL : Still the picture.
PICTURE : Selects the picture mode selection.
(User-Soft-Dark-Bright)
྆Sound Control Buttons
SOUND : Selects the sound mode. (User- Movie-
Music-News)
STEREO : Selects the MONO, STEREO or SAP
mode at TV.
3.2 Wired Remote Control
ྙConnect as the drawing shown.
ྚPower on.
[Note] IR Remote Controller is not included in
the product package.
CAUTION
IR Remote Jack is not sound jack.
Do not connect with any sound source
̠
̡
̥
----->
----->
----->
----->
̦
----->
̧
32:(5 087(
AnalogRGB VIDEO1 COMPONENT1 TV
DigitalRGB VIDEO2 COMPONENT12 S-VHS
6(/
1
1
?
i
35(9&+
3,36:$3326,7,216,=(
7:,13,&6&5((1=22067,//
7(;73,&785(6281'67(5(2
$'''(//$1*790(180(18
&+ 92/
16
SLEEP RECALL AUTO SOURCE
1
1
?
i
7:,13,&6&5((1=22067,//
7(;73,&785(6281'67(5(2
$'''(//$1*790(180(18
IR Rmote Remote control
̢ ̣̤
͑͑͑͜͞
10
INSTALLATION
4. Installation
!6)NPUT/UTPUT4ERMINAL
($!6)NPUT/UTPUT4ERMINAL46
v!6)NPUT/UTPUT4ERMINAL46
#ONNECTION
46
ྙ#ONNECTASTHEDRAWINGSHOWN
ྚ0OWERON
ྛ0RESSTHE;46=BUTTON
;.OTE=
)NAPOORSIGNALAREAPURCHASEANDINSTALLA
SIGNALAMPLIFIERFORBETTERQUALITY
#OAXIAL#ABLEISNOTINCLUDEDINTHEPRODUCTPACKAGE
46WITH#ABLE463ETTOP"OX
#ONNECTION
ྙ 3ELECT OR WITH CHANNEL SWITCH ON CABLE
BOX
ྚG 4UNE THE 46 CHANNEL TO THE SAME SELECTED
OUTPUTCHANNELOFCABLEBOX
ྛ3ELECTCHANNELSAT THECABLEBOXORWITHTHE
CABLEBOXREMOTECONTROL).054
#ONNECTION
ྙ#ONNECTTHEAUDIOANDVIDEOCABLESFROMTHE
CABLEBOXgSOUTPUTJACKSTOTHE46INPUTJACKSAS
SHOWNINTHEFIGURE
ྚ0RESSTHE6IDEOOR
ྛ3ELECT CHANNELS WITH THE CABLE BOX REMOTE
CONTROL
237,21
2))
21
%8,/7,163($.(5
k}pOwP k}pVyniOzP
yniOwP
jvtwvulu{XOwPGjvtwvulu{XOzP
jvtwvulu{YOwPGjvtwvulu{YOzP
GGGGGGwGGGGGGwGGGGGGsGGGGGGy
GGGGGGwGGGGGGwGGGGGGsGGGGGGy
zT}oz
}pklvX
tvup{vyGv|{
}GGGGGGGsGGGGGGGy
}GGGGGGGsGGGGGGGy
zjhy{V}pklvYOvw{pvuP pyGyltv{l
yzTYZYj
zwlhrly
v|{
sGGGGGy
hu{Gpuw|{
}GGGGGGGsGGGGGGGy
zjhy{V}pklvYOvw{pvuP
}GGGGGGGsGGGGGGGy
k}pOwP k}pVyniOzP
yniOwP
jvtwvulu{XOwPGGGGjvtwvulu{XOzP
jvtwvulu{YOwPGGGGjvtwvulu{YOzP
GGGGGGGGwGGGGGGGGwGGGGGGGGsGGGGGGGGy
GGGGGGGGwGGGGGGGGwGGGGGGGGsGGGGGGGGy
zT}oz
}pklvX
tvup{vyGv|{
}GGGGGGGsGGGGGGGy
}GGGGGGGsGGGGGGGy
pyGyltv{l
yzTYZYj
zwlhrly
v|{
sGGGGGy
hu{Gpuw|{
hjGwv~ly
Coaxial Cable
ANT INPUT
11
INSTALLATION
4. Installation
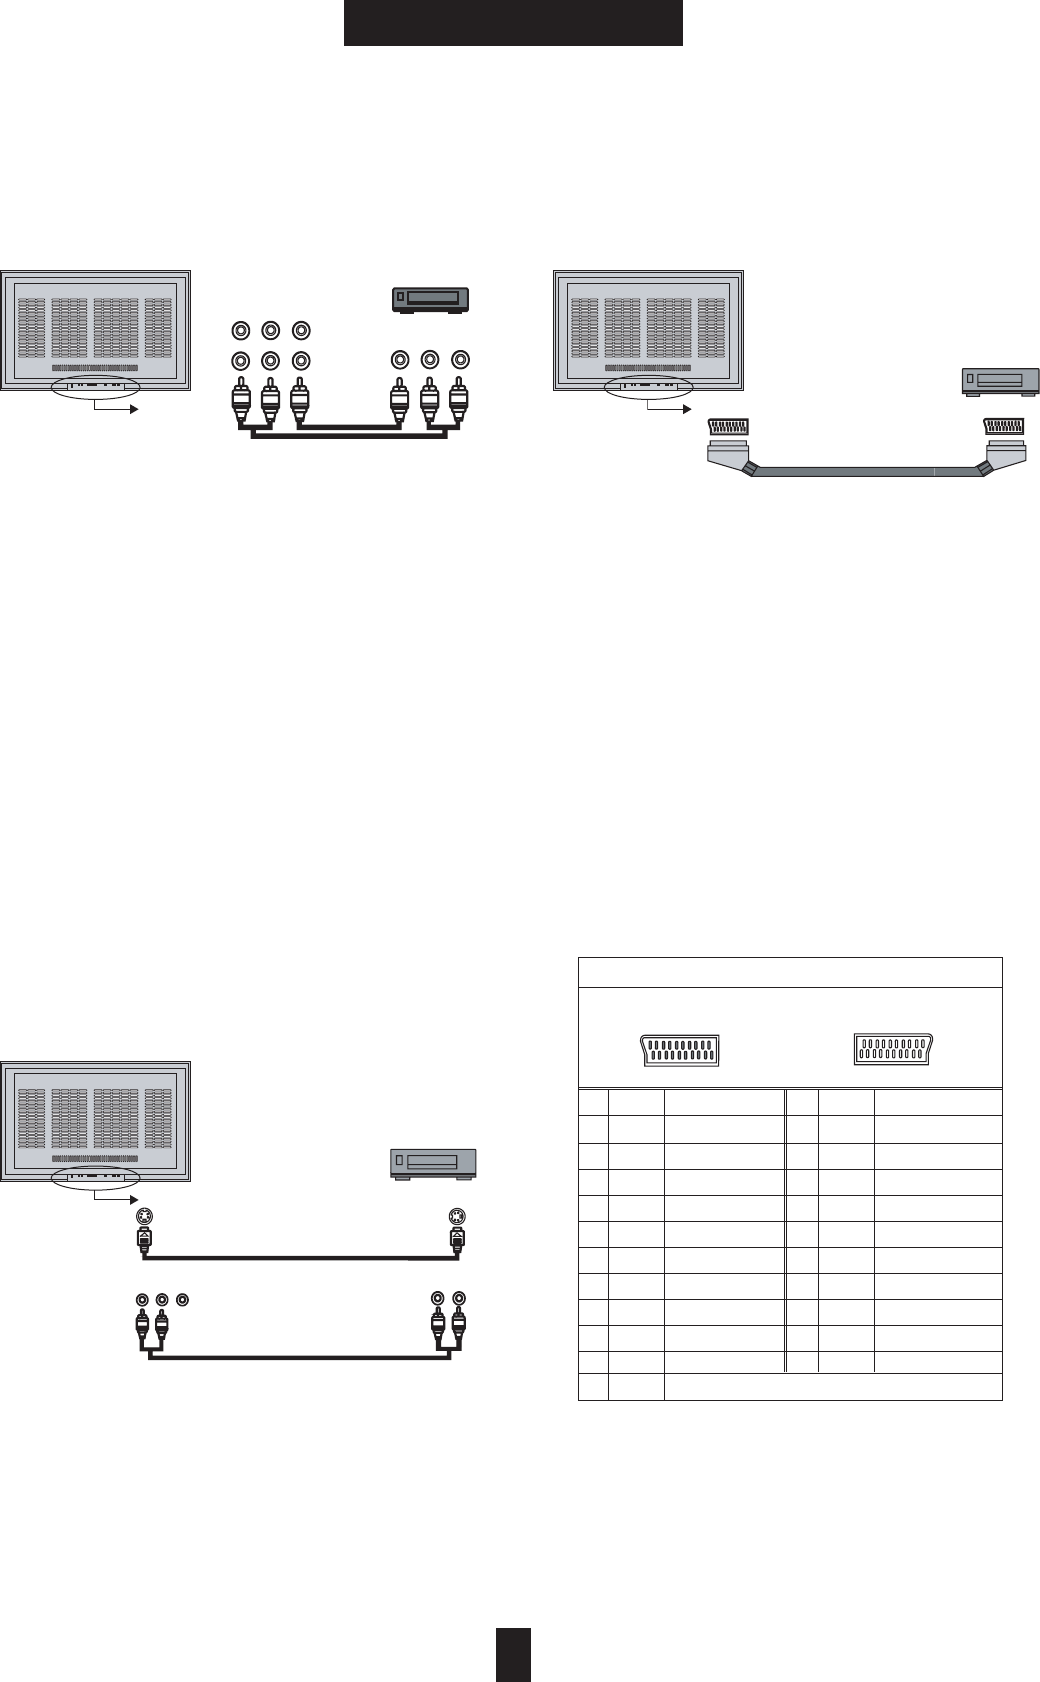
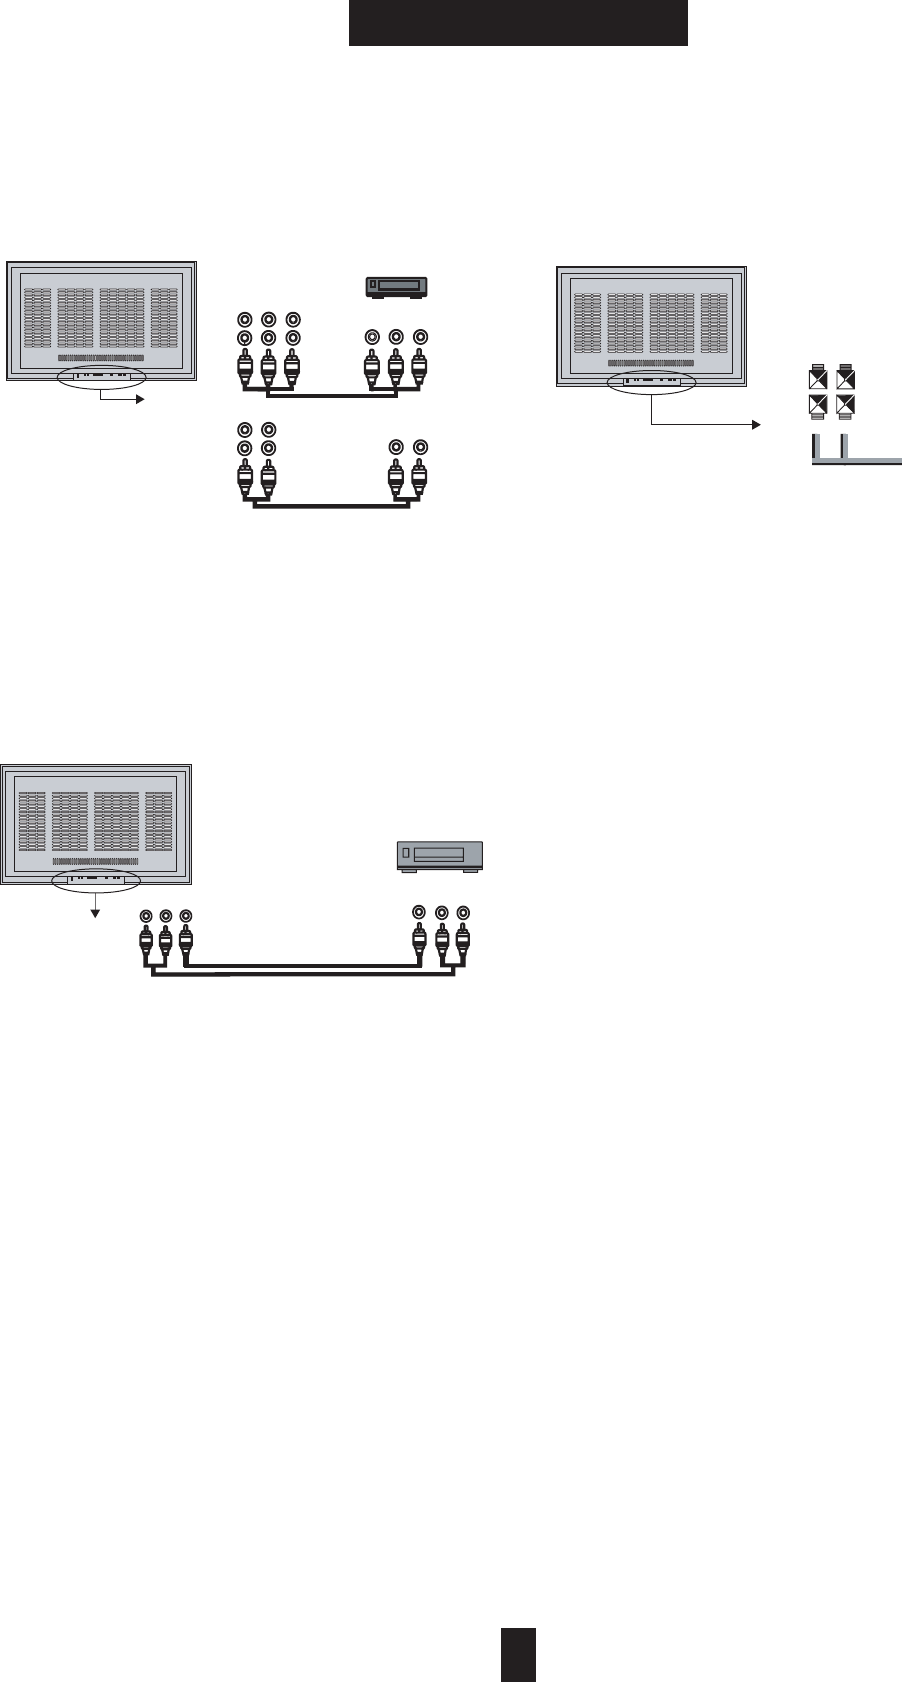
4.2.3) Video1/2
ྙConnect as the drawing shown.
ྚPower on.
ྛPress the [VIDEO1]/[VIDEO2] button.
- When connecting the TV to external
equipment, match the jack colors (Video=
yellow, Audio Left = white, and Audio Right =
red).
- To avoid picture noise (interference), leave an
adequate distance between the External Video
Equipment and TV.
- Use the ISM Method of Panel Function Menu
to avoid having a fixed image remain on the
screen for a long time. Typically a frozen still
picture from a VCR. If the LetterBox picture
format is used, the fixed image may remain
visible on the screen.
4.2.4) S-VHS
ྙConnect as the drawing shown.
ྚPower on.
ྛPress the [S-VHS] button.
[Caution]
Audio input must be connected with [Video1].
[Note]
S-VHS cable is not included in the product package.
4.2.5) SCART connection
̺Connect as the drawing shown.
̻Power on.
̼Press the [VIDEO2] button.
[Caution]
1. Do not use Scart and video2 port simultaneously.
2. Connected devices will not display properly in case
both Scart and Video 2 ports are connected.
3. Mode switching between Scart-RGB and Scart-
Composite is done automatically.
[Note] SCART cable is not included in the
product package.
S-VHS OUTPUT
VCR
RLVR
L
AUDIO Cable
(MONO)
VIDEO1
S-VHS Cable
S-VHS
SCART I/O SCART I/O
VCR
SCART Cable
RLV
VIDEO2
VIDEO1
R
L
V
Video Cable
Audio Cable
(MONO)
COMPOSITE VIDEO OUT
VCR
YX
X` X
YYW
YX
YYW
XX`
At the Video/TV At the Cable
SCART PIN Description
Pin
1
2
3
4
5
6
7
8
9
10
Name
AOR
AIR
AOL
AGND
BGND
AIL
B
SWITCH
G GND
CLKOUT
Description
Audio Out Right
Audio In Right
Audio Out Left + Mono
Audio Ground
RGB Ble Ground
Audio Left + Mono
RGB Blue In
Audio/RGB Switch/16:9
RGB Green Ground
Pin
11
12
13
14
15
16
17
18
19
20
Name
G
DATA
R GND
DATAGND
R
BLNK
VGND
BLNKGND
VOUT
VIN
Description
RGB Green In
RGB Red Ground
Data Ground
RGB Red In
Composite Video Ground
Blanking Signal Ground
Composite Video Out
Composite Video In
21 SHIELD Ground/shield(Chassis)
12
INSTALLATION
4. Installation
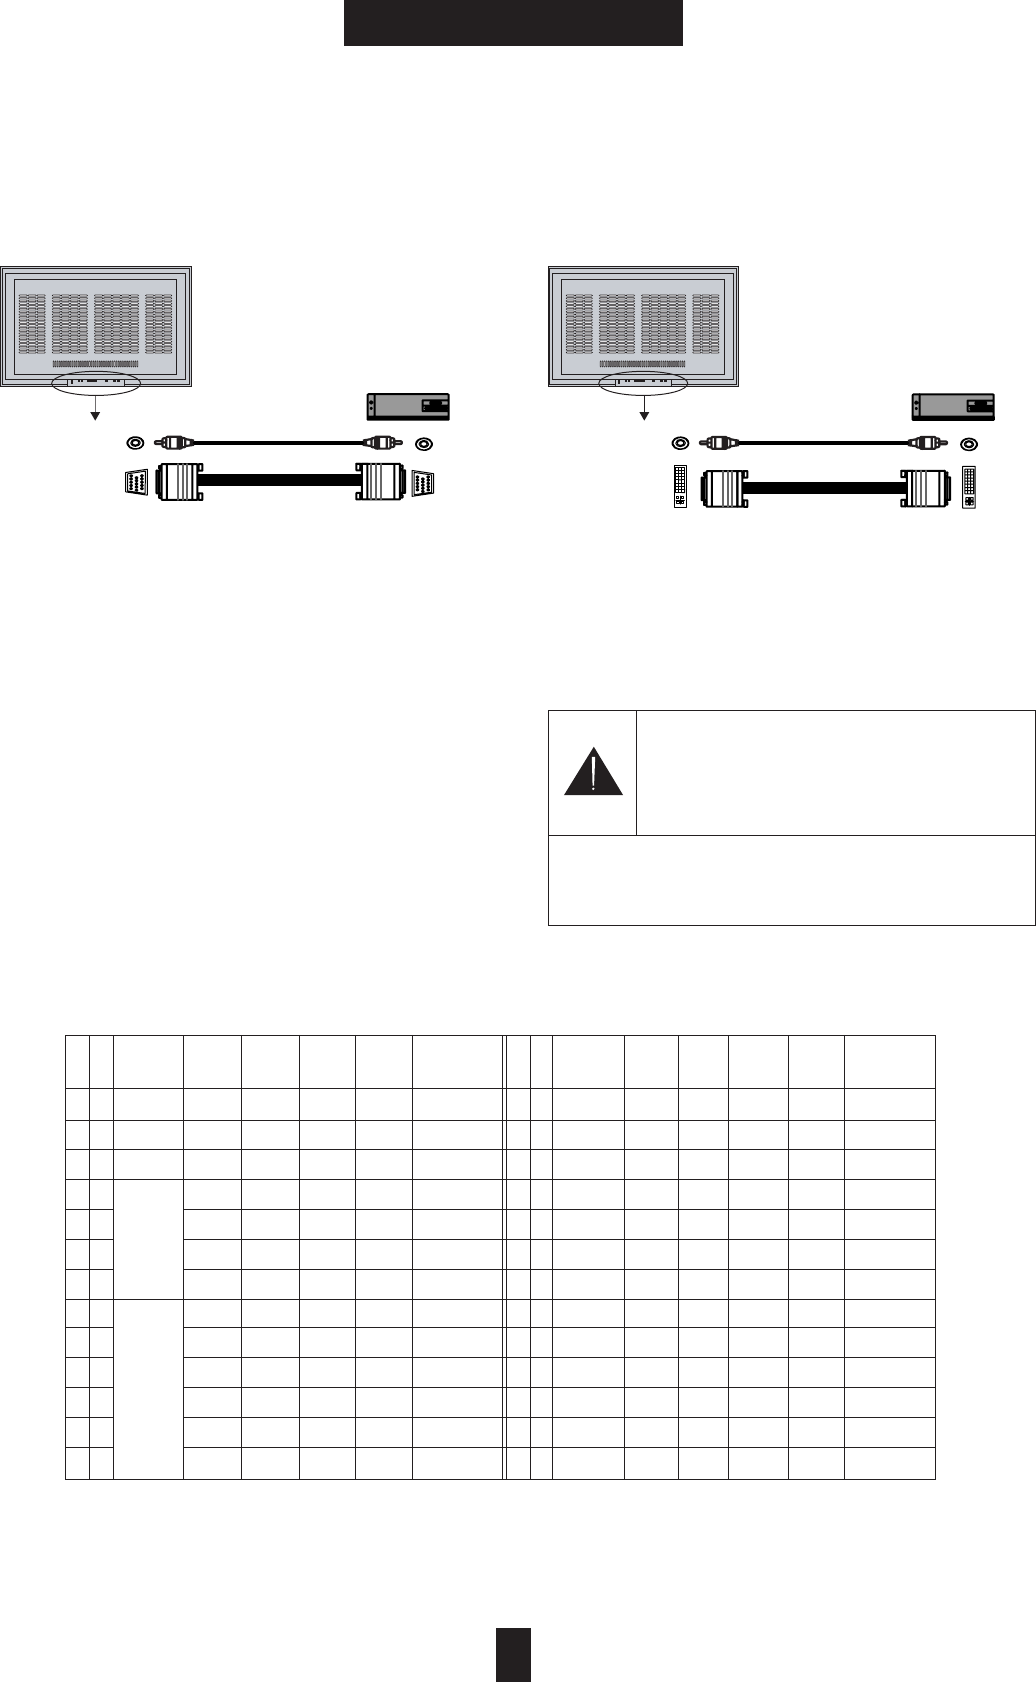
4.2.6) Analog RGB
ྙConnect as the drawing shown.
ྚPower on.
ྛPress the [ANALOG RGB] button.
4.2.7) Digital RGB
̺Connect as the drawing shown.
̻Power on.
̼Press the [DIGITAL RGB] button.
G
* The table below shows all of the display modes that are supported.
Caution
There is only one Stereo Phone Jack for
Analog RGB and Digital RGB. Only one Sound
source is available at the same time.
[Note] DVI jack not support HDMI.
DVI Cable and Phone Cable is not included
in the product package.
RGB(P)
COMPUTER
RGB(S)
RGB(P)
RGB(S)
DVI(S) DVI(S)
COMPUTER
RGB(S) RGB(S)
DVI(P) DVI(P)
DVI(S) DVI(S)
̺
̺
̺
̺
̺
̺
̺
̺
̺
̺
̺
̺
̺
̺
̺
̺
̺
̺
̺
̺
̺
̺
̺
̺
̺
̺
̺
̺
̺
̺
̺
̺
̺
̺
̺
̺
̺
̺
̺
̺
̺
̺
640x350
640x440
720x400
640x480
800x600
1024x768
1152x864
1280x960
1280x1024
85
85
85
60
72
75
85
56
60
72
75
85
75
37.9
37.9
37.9
31.5
37.9
37.5
43.3
35.1
37.9
48.1
46.9
53.7
80
pos
neg
neg
neg
neg
neg
neg
pos
pos
pos
pos
pos
pos
neg
pos
pos
neg
neg
neg
neg
pos
pos
pos
pos
pos
pos
Standard
Standard
Standard
Ind standard
Standart
Standard
Standard
Guideline
Guidline
Standard
Standard
Standard
Standard
60
70
75
85
90
60
70
75
60
75
60
75
48.4
56.5
60
68.7
67.5
60
85.9
64
80
neg
neg
pos
pos
pos
pos
pos
pos
pos
neg
neg
pos
pos
pos
pos
pos
pos
pos
Guideline
Standard
Standard
Standard
Standard
Standard
Standard
Standard
Standard
R
G
B
D
V
I
Resolution
(Pixel)
Vert
Refresh
(Hz)
H Freq
(KHz)
H Sync
Polarity
V Sync
Polarity Comment
R
G
B
D
V
I
Resolution
(Pixel)
Vert
Refresh
(Hz)
H Freq
(KHz)
H Sync
Polarity
V Sync
Polarity Comment
13
INSTALLATION
4. Installation
4.2.8) COMPONENT 1/2 Video
̺Connect as the drawing shown.
̻Power on.
̼Press the [COMPONENT1]/[COMPONENT2]
button.
4.2.9) MONITOR output
̺Connect as the drawing shown.
̻Power on.
[CAUTION]
Monitor output can view [TV]/[VIDEO1]/[VIDEO2].
4.2.10) Speaker out
ྙPower off.
ྚConnect as the drawing shown.
ྛPower on.
ྜAdjusting audio setting.
G
VIDEO Cable
COMPOSITE VIDEO INPUT
VCR
Pr Pb Y
Component Video Cable
(MONO)
COMPONENT VIDEO OUT
Interlaced DVD, Progressive DVD, Settop Box
Component 1
Component 2
RL
R
L
Audio Cable
(MONO)
SOUND OUT
Component 1 Sound Input
Component 1 Sound Input
Pr Pb Y
SPEAKER OUT
(-)
(+)
LR
SPEAKER
Monitor Out
RL V
(MONO)
AUDIO Cable
VL R

14
BASIC OPERATION
5. Basic Operation
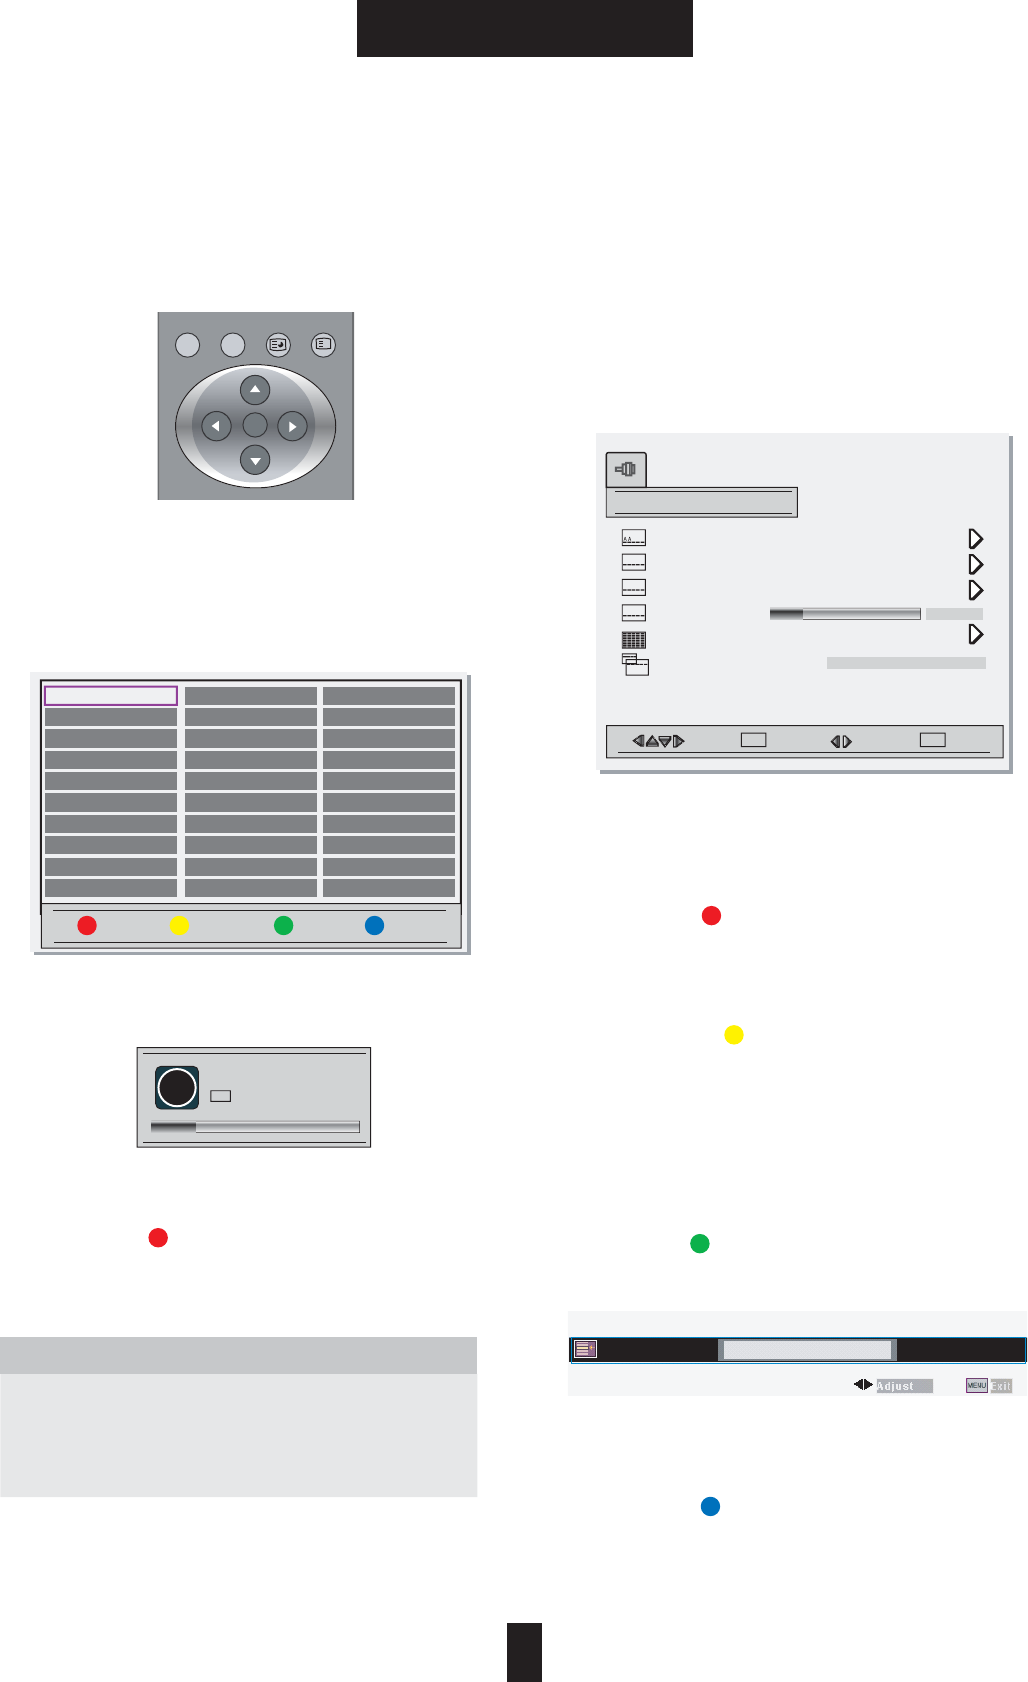
5.1.2) Manual Channel Memory at NTSC
Follow these steps for setting the Channel
Memory manually:
ྙSelect the channel by pressing the number
button(s).
ྚGPress the [TV MENU] button.
ྛSelect [Auto Fine Tune] by using the [¤/¦]
button.
̽Select [Off] by using the [ඔ/ඖ] button.
ྜྷSelect [Fine Tune] by using the [̵/̷] button.
ྞPress the [ඔ/ඖ] button for the tuning
adjustment.
ྟSelect [Channel] by using the [̵/̷] button.
ྠSelect [Add] or [Remove] by pressing the [ඔ/
ඖ] button.
ྡPress the [Menu] button to exit the Channel
Memory setting.
If the [Auto Fine Tune] mode would be set [On],
[Fine Tune] mode should not be adjusted.
[Note] HRC and IRC are two special NTSC cable
standards in the US.
5.1 TV Channel Memory
5.1.1) Auto Channel Memory
Follow these steps for setting the Channel
Memory automatically:
ྙPress the [TV MENU] button.
ྚSelect [Source] by using the [̵/̷] button.
ྛSelect TV signal input mode by pressing the
[ඔ/ඖ] button.
ྜSelect [Auto Memory] by using the [̵/̷]
button.
ྜྷPress the [ඖ] button to start the channel
search.
If you want to stop auto memory, press the
[MENU] button. Only the channels searched up
to that time are memorized.
6(/
i
$'''(//$1*790(180(18
Tuning
Auto Memory
AAAA
Channel
Edit Labels
Auto Fine Tune
Fine Tune
Source
Region
Move
Add Remove
-12-
Select Adjust
SEL MENU
MENU
Cancel
MENU
Off On
Air
USA
i
Channel Searching...
/(6
i
8 1(081(097*1$//('''$
15
BASIC OPERATION
5. Basic Operation
-ANUAL#HANNEL-EMORYAT0!,-ODE
&OLLOWTHESESTEPSFORSETTINGTHE#HANNEL
-EMORYMANUALLY
ྙ3ELECTTHECHANNELWHICHYOUWANTTOSTART
MANUALTUNING
ྚ0RESSTHE;46-%.5=BUTTON
ྛ3ELECT;-ANUAL3EARCH=BYUSINGTHE;̵̷=
BUTTON
ྜ0RESSTHE;ඖ=BUTTONTOSEARCHTHENEXT
CHANNEL
ྜྷG3ELECT;0ROGRAM4ABLE=BYUSINGTHE;̷̵
ඔඖ=BUTTON
ྞ0RESSTHE;=BUTTONTOSELECT3AVEMODE
ྟ0RESSTHE;-ENU=BUTTONTOEXITTHE-ANUAL
3EARCHSETTING
463YSTEM
0!,4HISSETTINGISMAINLYUSEDIN%UROPEAN
#OUNTRIESANDINCLUDES0!,3%#!-"'()$+
0!,3%#!-4HISSETTINGISMAINLYUSEDIN
&2!.#%ANDINCLUDES0!,3%#!-,,g"'()$+
%DITING0ROGRAM
3TEP3ELECTION0ROGRAM4ABLE
̺0RESSTHE;46-%.5=BUTTON
̻ 3ELECT ;0ROGRAM 4ABLE= BY USING THE ;¤¦=
BUTTON
̼ 0RESS THE ;Ù= BUTTON TO SEARCH THE NEXT
CHANNEL
3TEP%DITING0ROGRAM
!$ELETE
̺ 3ELECT THE DELETING CHANNEL BY USING THE
CURSORBUTTONS
̻0RESSTHE;=BUTTONTODELETECHANNEL
"#HANGE
̺ 3ELECT THE CHANGING CHANNEL BY USING THE
CURSORBUTTONS
̻ 0RESS THE ; = BUTTON TO SELECT CHANNEL
CHANGINGMODE
̼ 3ELECT THE CHANGING CHANNEL POSITION BY
USINGTHECURSORBUTTONS
#2ENAME
̺ 3ELECT THE CHANNEL BY USING THE CURSOR
BUTTONS
̻0RESSTHE;=BUTTONTOSELECT2ENAMEMODE
̼2ENAME THE CHANNEL BY USING THE CURSOR
BUTTONS
$3AVE
ྙ3ELECTTHESAVINGCHANNELBYUSINGTHECURSOR
BUTTONS
ྚ0RESSTHE;=BUTTONTOSAVECHANNEL
Tuning
$XWR0HPRU\
AA
0DQXDO6HDUFK
3URJUDP7DEOH
)LQH7XQH
(GLW/DEHOV
796\VWHP
Move
3$/
Select Adjust
SEL MENU
MENU
Delete
Cancel
MENU
i
Channel Searching...
Change Rename Save
1 -----
2 -----
3 -----
4 -----
5 -----
6 -----
7 -----
8 -----
9 -----
10 -----
11 -----
12 -----
13 -----
14 -----
15 -----
16 -----
17 -----
18 -----
19 -----
20 -----
21 -----
22 -----
23 -----
24 -----
25 -----
26 -----
27 -----
28 -----
29 -----
30 -----

16
BASIC OPERATION
5. Basic Operation
5.2 Picture Control
5.2.1) At Full Screen Mode
Follow these steps to adjust the Picture at Full
Screen Mode:
ྙPress the [MENU] button.
ྚPSelect the [Picture] mode by using the [ඔ/
ඖ] button.
ྛMove the desired mode by using the [̵/̷]
button.
ྜPress the [ඔඖ] button for a adjusting the
picture.
ྜྷPress the [MENU] button to exit the
adjustment menu.
5.2.2) At PIP or Twin Screen Mode
Follow these steps to adjust the Picture at PIP or
Twin Screen Mode
ྙSelect the adjusting picture's layer by using [
̵/̷] button.
ྚPress the [MENU] button.
ྛMove the desired mode by using the [̵/̷]
button.
ྜPress the [ඔ/ඖ] button for a adjusting the
picture.
ྜྷPress the [MENU] button to exit the
adjustment menu
Conventional Function
Picture Mode
Press the [PICTURE] button or Selection [Picture
Mode] at MENU.
You can select the desire mode. (Soft, Bright,
Dark, User)
[Note] If the Picutre Mode would not be set
User, Brightness and Contrast should not be
adjusted.
Calibration Mode
Corrects the picture balance at Component 1/2.
You can select the desire preset.
TV, Video 1/2
S-VHS, SRGB Component 1/2 Analog RGB Digital RGB
Picture Mode
Brightness
Contrast
Sharpness
Color
Tiint
Phase
Frequency
̺
̺
̺
̺
̺
̺
T
T
̺
̺
̺
̺
̺
̺
̺
̺
̺
̺
̺
̺
T
T
̺
̺
̺
̺
̺
̺
T
T
T
T
* Picture menu are
different to each
input source
mode. You can see
the difference at
right chart.
6(/
i
$'''(//$1*790(180(18
Move Select Adjust
SEL MENU
MENU
Picture
Brightness
Contrast
Sharpness
Color
Tint
-12-
-12-
-12-
-12-
-12-
Picture Mode
soft
17
BASIC OPERATION
5. Basic Operation
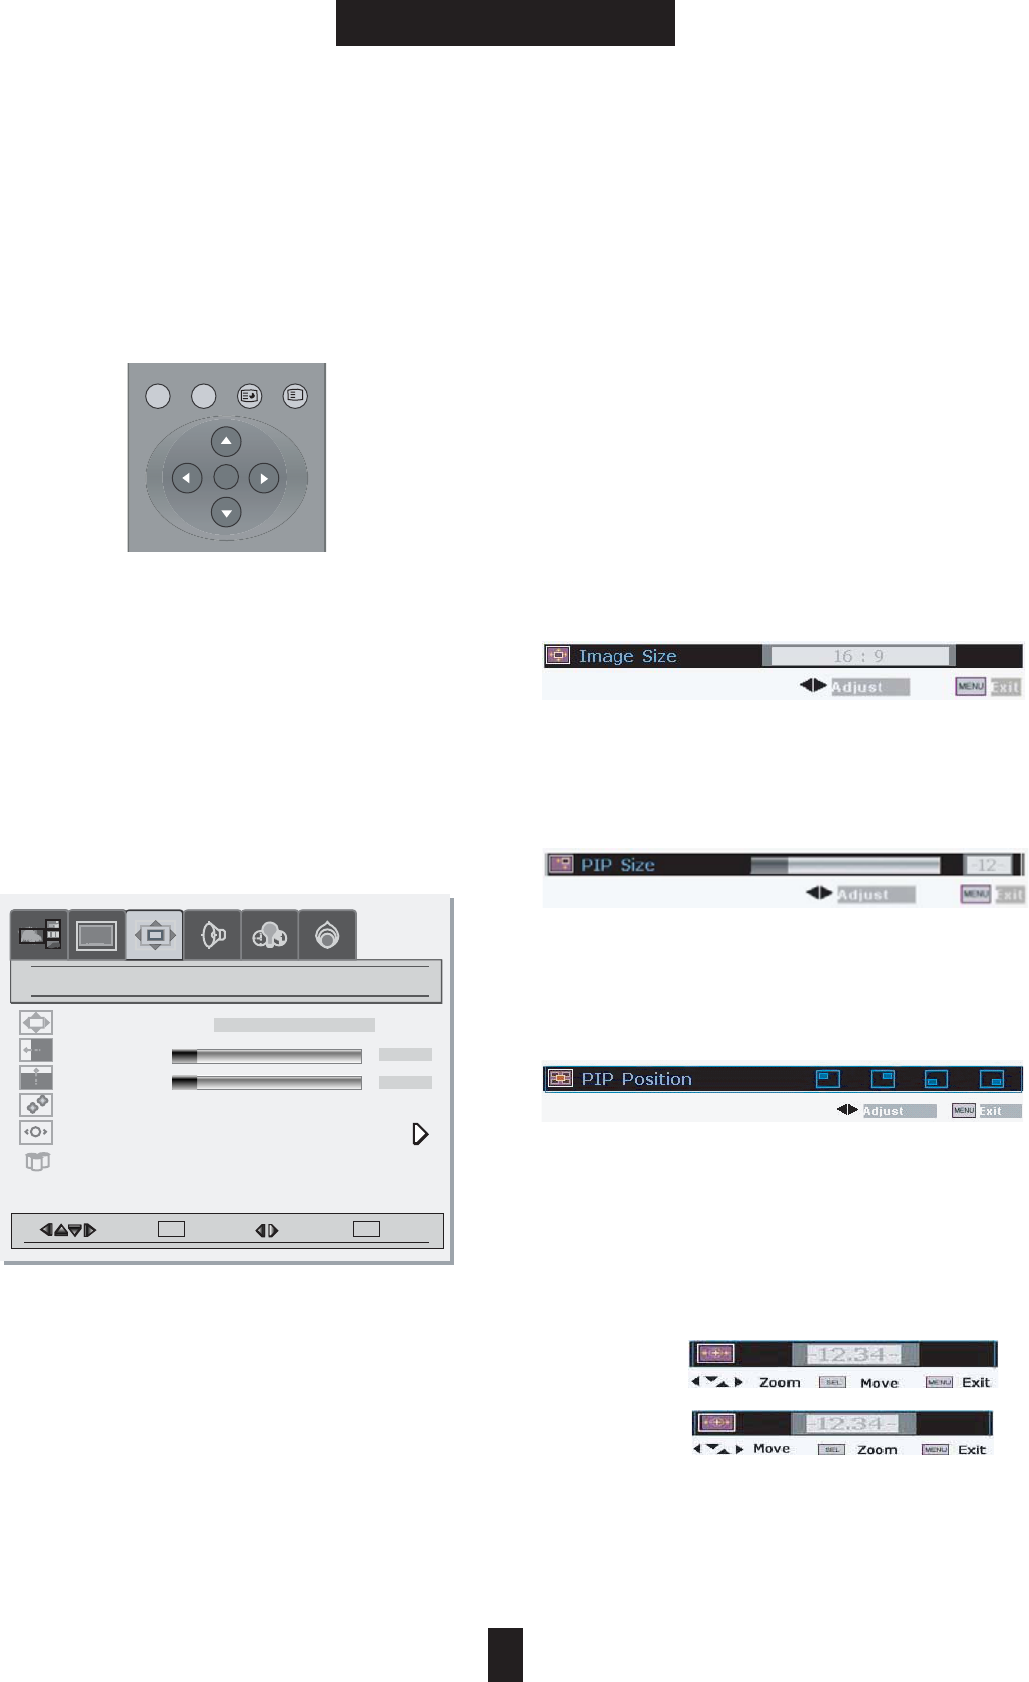
5.3 Screen
5.3.1) At Full Screen Mode
Follow these steps below to set Screen Menu:
ྙPress the [MENU] button.
ྚSelect the desired mode using the [ඔ/ඖ]/[
̵/̷] button.
ྛPress the [̵/̷] button to select the desired
menu.
ྜPress the [ඔ/ඖ] button to adjust the desired
menu.
ྜྷPress the [MENU] button to exit the
adjustment menu.
5.3.2) At PIP or Twin Screen Mode
Follow these steps to adjust the Picture at PIP or
Twin Screen Mode
ྙSelect the adjusting picture's layer by using [
̵/̷] button.
ྚPress the [MENU] button.
ྛMove the desired mode by using the [̵/̷]
button.
ྜPress the [ඔ/ඖ] button for a adjusting the
picture.
ྜྷPress the [MENU] button to exit the
adjustment menu.
Conventional Function
Image Size
This function allows to adjust the aspect ratio of
the screen, Press the [SCREEN] button or
Selection [Image Size] at MENU.
PIP Size
This function allows to adjust the size of the pip
screen, Press the [SIZE] button or Selection [PIP
Size] at MENU
PIP Position
This function allows to adjust the size of the pip
position, Press the [POSITION] button or
Selection [PIP Position] at MENU
Zoom
This function allows to enlarge or reduce the
picture size, Press the [ZOOM] button or
Selection [Zoom] at MENU.
Press the [Curser]/[SEL] buttons to adjust the
zoom ratio or position.
Zoom menu
Move menu
6(/
i
$'''(//$1*790(180(18
Move Select Adjust
SEL MENU
MENU
Picture
Image Size
H position
V position
Freeze Window
Zoom
Color Temp
fill all
off on
5500K 6500K 7500K 8500K
+
-12-
-12-
Screen
18
BASIC OPERATION
5. Basic Operation
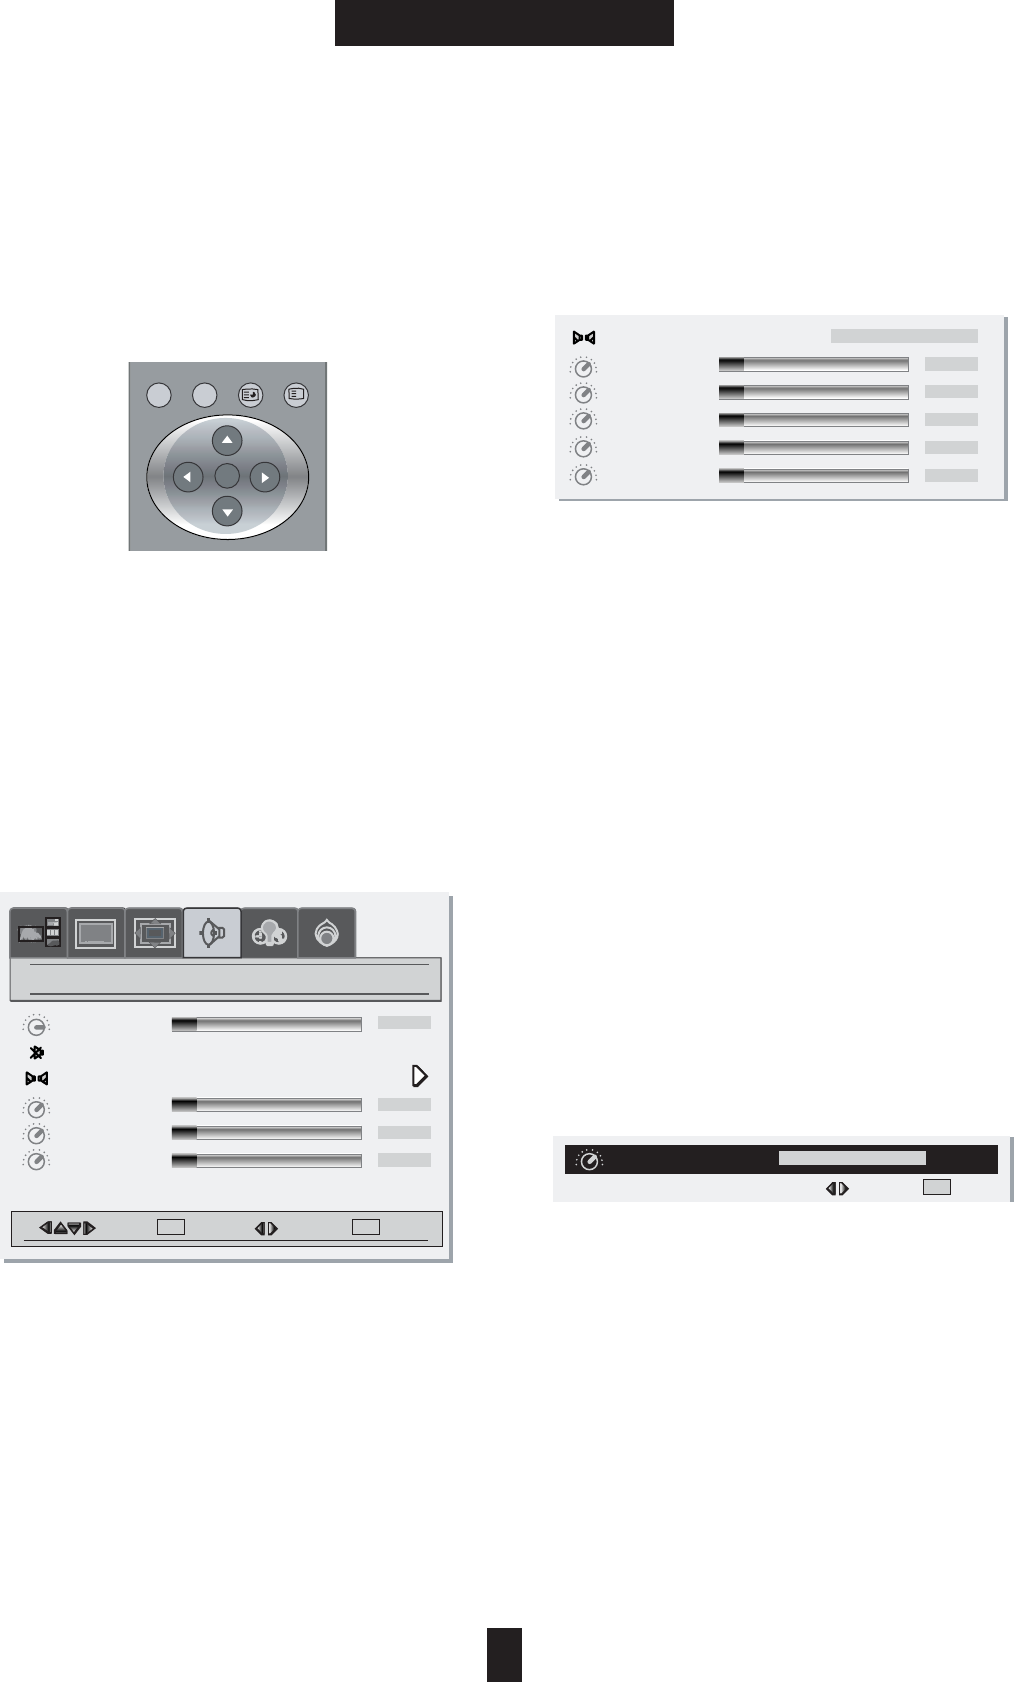
5.4 Sound Control
5.4.1) Sound Control
Follow these steps to adjust the Sound:
ྙPress the [MENU] button.
ྚSelect the [Audio] mode by using the [ඔ/ඖ]
button.
ྛMove the desired mode by using the [̵/̷]
button.
ྜPress the [ඔ/ඖ] button for a adjusting the
picture.
ྜྷPress the [MENU] button to exit the
adjustment menu.
Bass
: Changes the level of low frequency sound.
Treble
: Changes the level of high frequency sound.
Balance
: Changes the balabce of the left and right
channels.
5.4.2) At Equalizer mode
Follow these steps to adjust the Equalizer Mode:
ྙSelect the User mode by using the [ඔ/ඖ]
button.
ྚPress the [̵/̷] button to select the desired
menu.
ྛPress the [ඔ/ඖ] button to adjust the desired
menu.
ྜPress the [MENU] button to exit.
*Note : When the change sound mode, off the
Bass and Treble values. If the Sound mode
would not be set User, Equalizer should not be
adjusted.
Conventional Function
Sound Mode
Press the [SOUND] button or Selection [Sound
Mode] at MENU
You can select the desire mode. (User, News,
Movie, Music)
6(/
i
$'''(//$1*790(180(18
Move Select Adjust
SEL MENU
MENU
Picture
Volume
Mute
Sound Mode
Bass
Tre ble
Balance
-12-
-12-
-12-
-12-
Audio
Off On
Sound Mode
120Hz
500Hz
1.5kHz
-12-
-12-
-12-
User
5kHz
-12-
10kHz
-12-
Sound Mode
User
Adjust MENU
MENU
19
BASIC OPERATION
5. Basic Operation
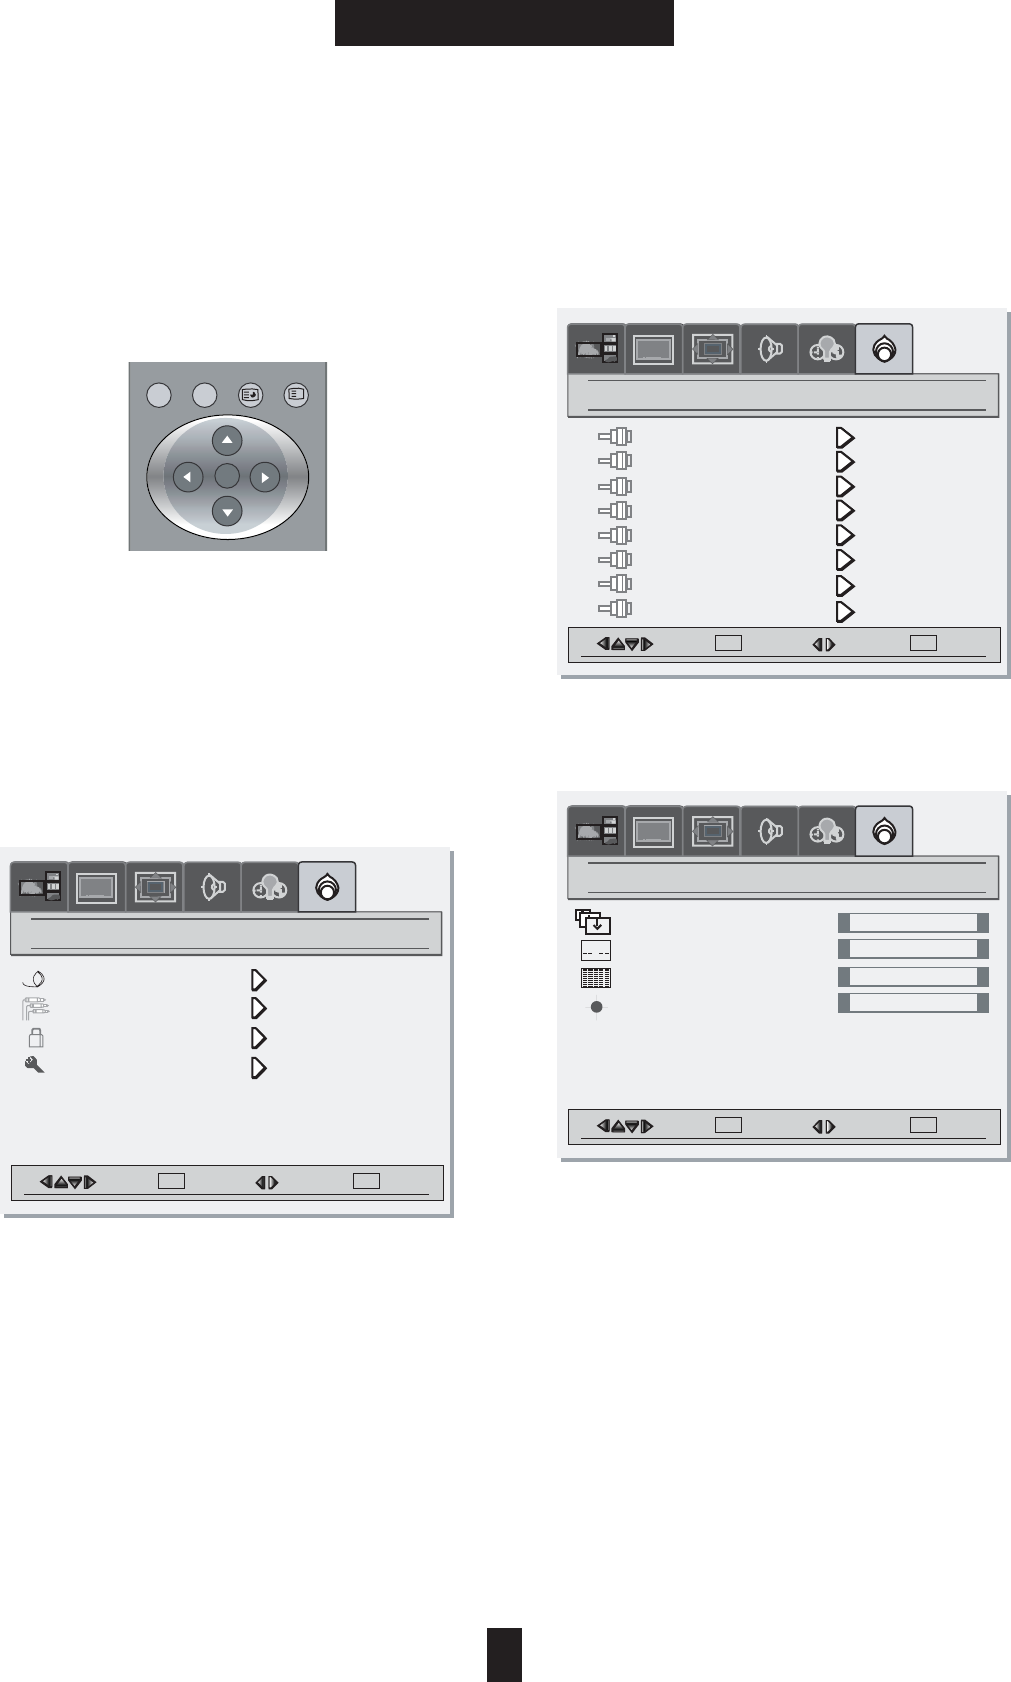
5.5 Setting
5.5.1) Setting
Follow these steps to adjust the Setting:
ྙPress the [ MENU].
ྚSelect the desired mode by using the [ඔ/ඖ
]/[̵/̷] button.
ྛPress the [̵/̷] button to select the desired
menu.
ྜPress the [ඔ/ඖ] button to adjust the
desired menu.
ྜྷPress the [MENU] button to exit.
Tuning( TV mode Only): See the 14 ~ 15 page.
Contents Blocking (NTSC system only)
:This menu automatically locks out programs
that are deemed inappropriate for children. See
the 25 page.
5.5.2) Input Source
Select desire Input Source by using the [ඔ/ඖ]/[
̵/̷] button:
5.5.3) Panel Function
Select desire Panel function by using the [ඔ/ඖ
]/[̵/̷] button.
Gamma : Select desire gamma mode. (Mode1,
Mode2, Mode3, mode4) Please use follow
functions to prevent image sticking.
ISM (Image Sticking Minimization mode)
: When the fixed patterns are displayed for a
long time, the brightness will be reduced
gradually.
Pixel Shift : This function scrolls the screen
automatically.
Inverse Image : This function inverts the screen.
6(/
i
$'''(//$1*790(180(18
Move Select Adjust
SEL MENU
MENU
Picture
Tuning
Input Source
Content Blocking
Panel
Setting
Move Select Adjust
SEL MENU
MENU
Picture
Gamma
ISM
Pixel Shift
Inverse Image
Panel
Move Select Adjust
SEL MENU
MENU
Picture
Input Source
Analog RGB
Digital RGB
TV
S-VHS
Video1
Video2
Component1
Component2
AA
Mode1
Off
Off
Off

20
BASIC OPERATION
5. Basic Operation
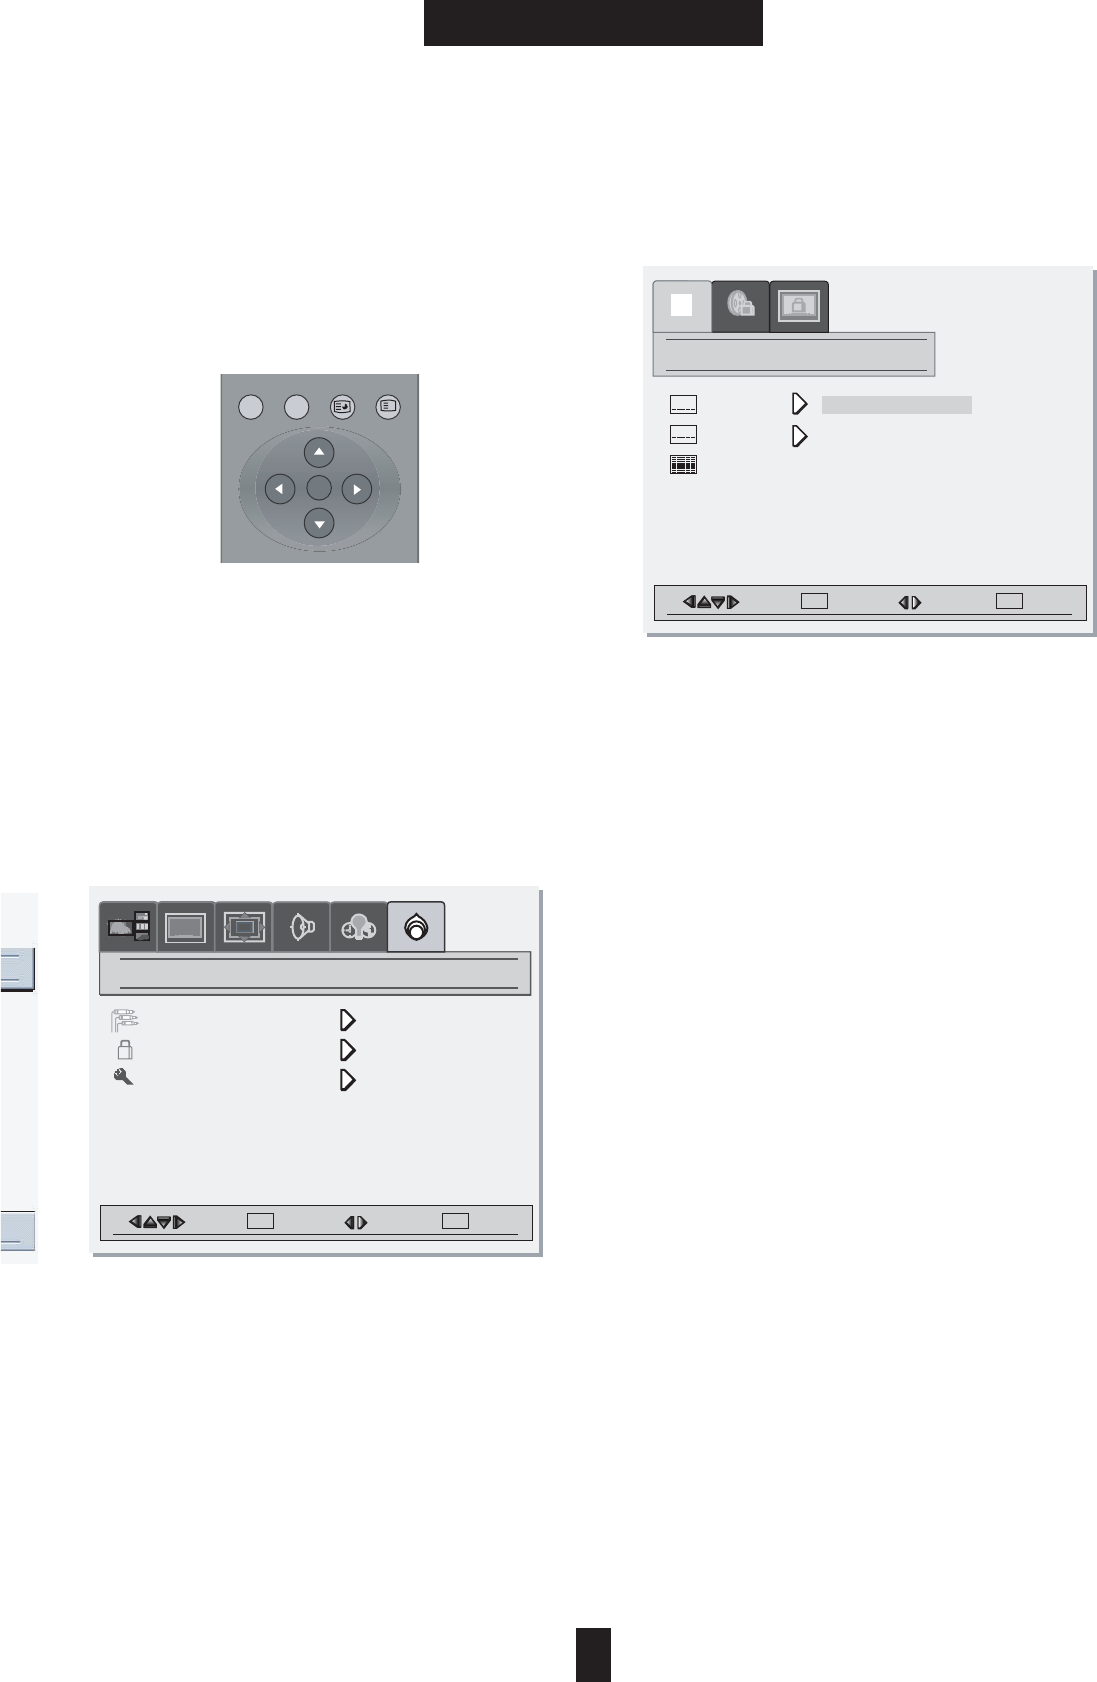
5.6 Layout Control
5.6.1) Setting
Follow these steps below to set Screen Layout
Menu:
ྙPress the [ MENU].
ྚMove to the Layout by using the [ඔ/ඖ]
button.
ྛMove to desired mode by pressing the [̵/̷
] button.
ྜPress the [ඖ] button to select the desired
mode.
5.6.2) Layer Description
Full Screen
You can view full screen by select this menu
PIP
You can view large and small screen at the same
time by select this menu
Twin Screen
You can view 1:1 screen at the same time by
5.6.3) PIP and Twin Screen Control
Select desire Input Source by using the [ඔ/ඖ]/[
̵/̷] button:
Input Source Selection
ྙSelect the changing picture's layer by using [
̵/̷] button.
ྚSelect the Source by using the Source
Selection Buttons.
Selecting Speaker out
Select the changing picture's layer by using [ඔ/
ඖ button.
Swaping the source
Press the [SWAP] button.
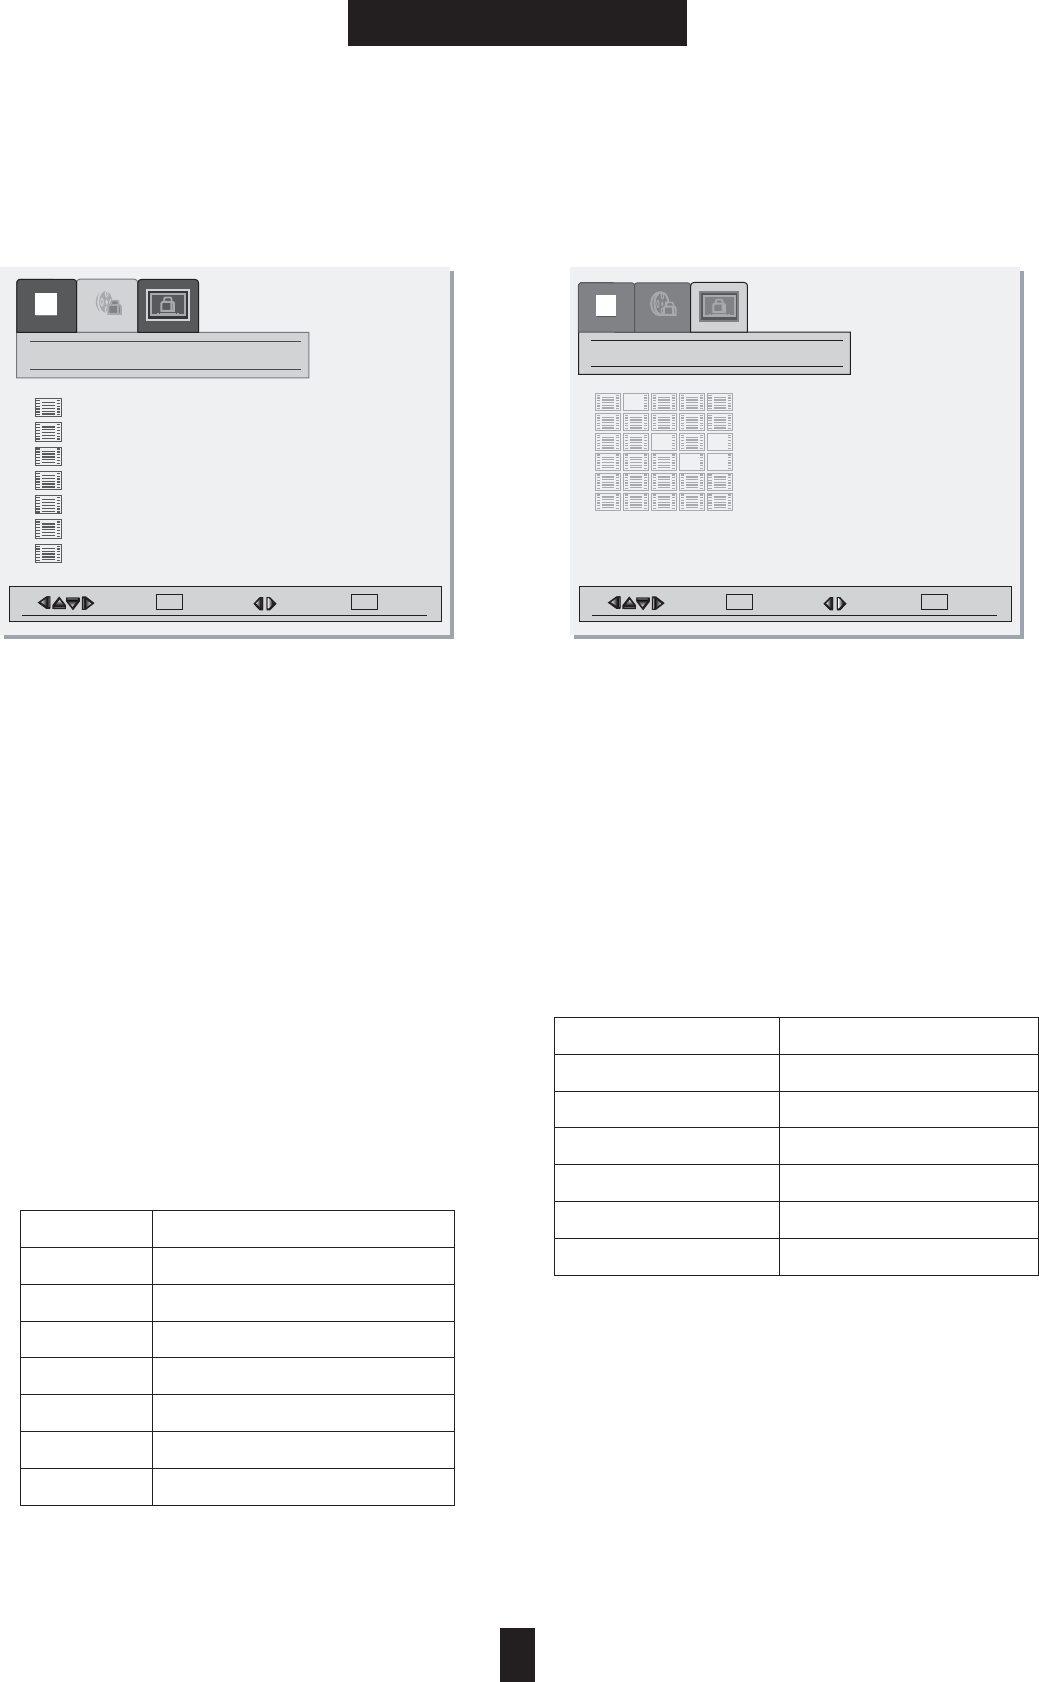
Possible PIP Mode
This Chart describe possible PIP or Twin PIC
mode.
6(/
i
$'''(//$1*790(180(18
Move Select Adjust
SEL MENU
MENU
Layout
Full Screen
PIP
Twin Screen
Picture2
Picture1
TV Video1 Video2 S-video Component1 Component2 AnalogRGB Digital RGB
TV
Video1
Video2
S-Video
Component1
Component2
Analog RGB
Digital RGB
21
BASIC OPERATION
5. Basic Operation
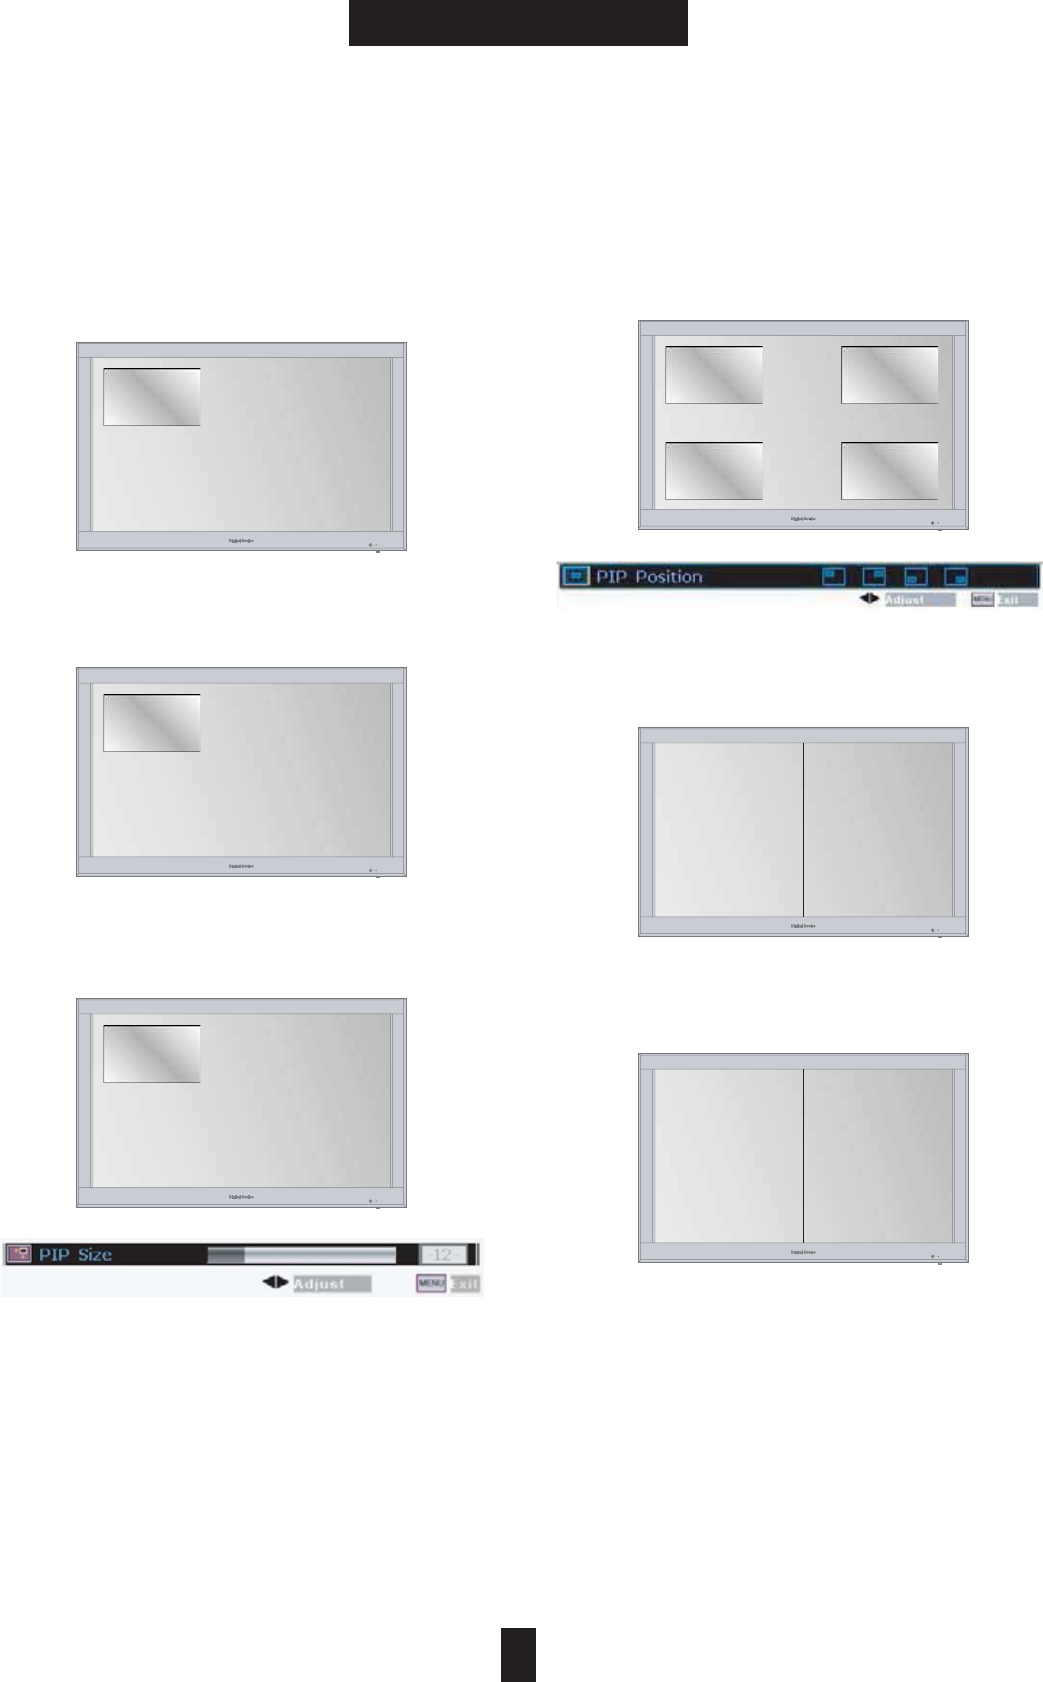
5.6.3) PIP Modes
Watching PIP Screen
Press the [PIP ON/OFF] button.
Selecting Picture
Select the Picture1/Picture2 by pressing [̵/̷]
buttons.
Changing the size
Press the [SIZE] button and Adjust by pressing [
ඔඖ] button.
Change the screen2 position
Press the [POSITON] button and Adjust by
pressing [ඔඖ] button.
Twin PIC
Press the [Twin PIC] button.
Swapping
Press the [SWAP] button.
Picture2
Picture1
Picture2
Picture1
Picture2
Picture1
Picture2
Picture1
Picture2 Picture1
Picture1 Picture2
22
BASIC OPERATION
5. Basic Operation
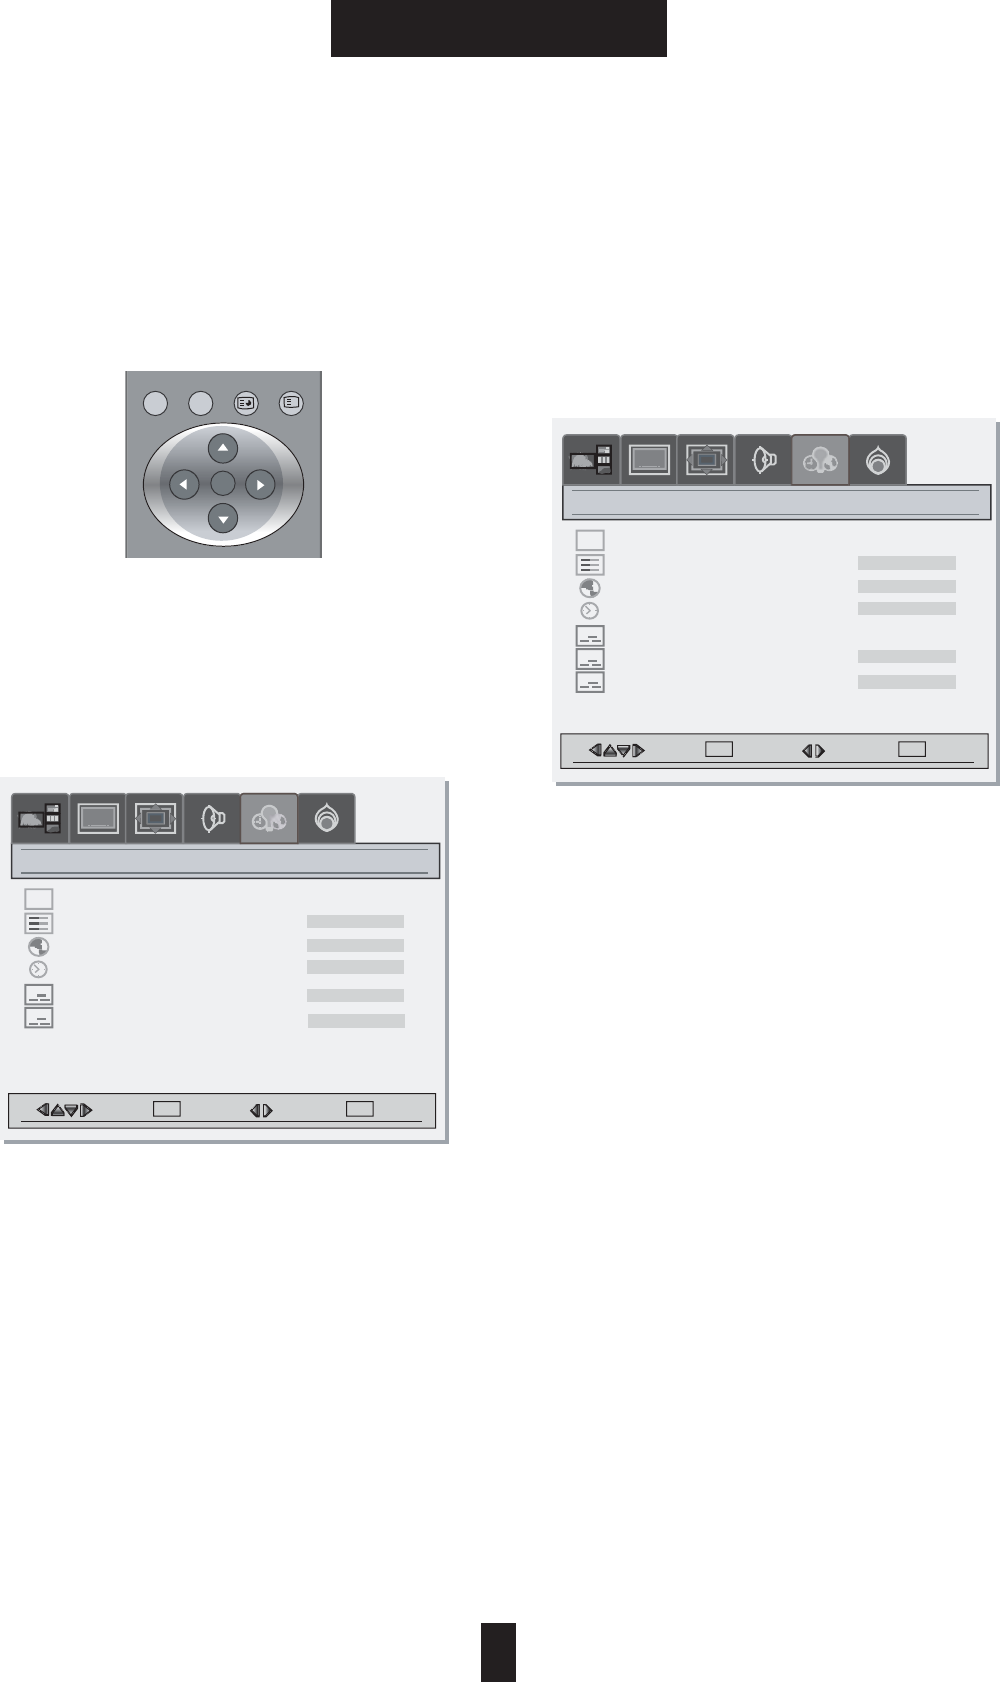
/PTIONS#APTION
/3$3ETTING
&OLLOWTHESESTEPSFORSETTINGTHE/3$
ྙ0RESSTHE;-%.5=BUTTON
ྚ3ELECTTHE;/PTION=MODEBYUSINGTHE;ඔඖ
=BUTTON
ྛ-OVETOTHESETTING/3$&UNCTIONBY
PRESSINGTHE;̵̷=BUTTON
ྜ3ELECTTHEDESIREDMODEBYUSINGPRESSING
THE;ඔඖ=BUTTON
ྜྷ0RESSTHE;-%.5=BUTTONTOEXIT
;.OTE=0AL/NLY
4ELETEXT-ODE3ELECTTHE4ELETEXTCHARACTERSET
$ECODER)FADECODERORADESCRAMBLERISCONNECTED
)NPUT3OURCEWILLBECHANGEDTO3#!24AUTOMATICALLY
#LOSED#APTION3ETTING
&OLLOWTHESESTEPSFORSETTINGTHECLOSED#APTION
ྙ0RESSTHE;-%.5=BUTTON
ྚ3ELECTTHE;/PTION=MODEBYUSINGTHE;ඔඖ=
BUTTON
ྛG3TEP#APTION/N/FF3ELECTION
A-OVETHE;#LOSED#APTION=BYUSINGTHE;̵
̷=BUTTON
B3ELECTTO;/N=BYUSINGTHE;ඔඖ=BUTTON
ྜG3TEP#APTION-ODE3ELECTION
####448$3
A -OVE THE ;#LOSED #APTION -ODE= BY USING
THE;̵̷=BUTTON
B0RESSTHE;ඔඖ=BUTTONTOSELECTTHEDESIRED
MODE
ྜྷG3TEP#APTION"ACKGROUND3ELECTION
/PAQUE4RANSLUCENT
A-OVETHE;#LOSED#APTION"ACK=BYUSINGTHE
;̵̷=BUTTON
B0RESSTHE;ඔඖ=BUTTONTOSELECTTHEDESIRED
MODE
ྞ 0RESS THE ;-%.5= BUTTON TO EXIT THE /PTION
MENU
;.OTE=)NTHEEVENTYOURECEIVEAPOORSIGNALAN
EMPTY BLACK BOX MAY APPEAR AND DISAPPEAR
EVEN WHEN THE TEXT MODE IS SELECTED 4HIS IS
NORMALFUNCTIONINSUCHANEVENT
Option
Option
Move Select Adjust
SEL MENU
MENU
Move Select Adjust
SEL MENU
MENU
i
8 1(081(097*1$//('''$
/(6
Osd Timeout
Menu Background
Language
Sleep Time
5 sec 15 sec 60 sec
zz
7HOHWH[W0RGH
'HFRUGHU
Osd Timeout
Menu Background
Language
Sleep Time
5 sec 15 sec 60 sec
zz
Close Caption
Close Caption Video
Off On
Opaque
English
0LQ
3DQ(XUR
2Q
Opaque
English
123 Min
CC 1
Close Cation Back Transparent
23
BASIC OPERATION
5. Basic Operation
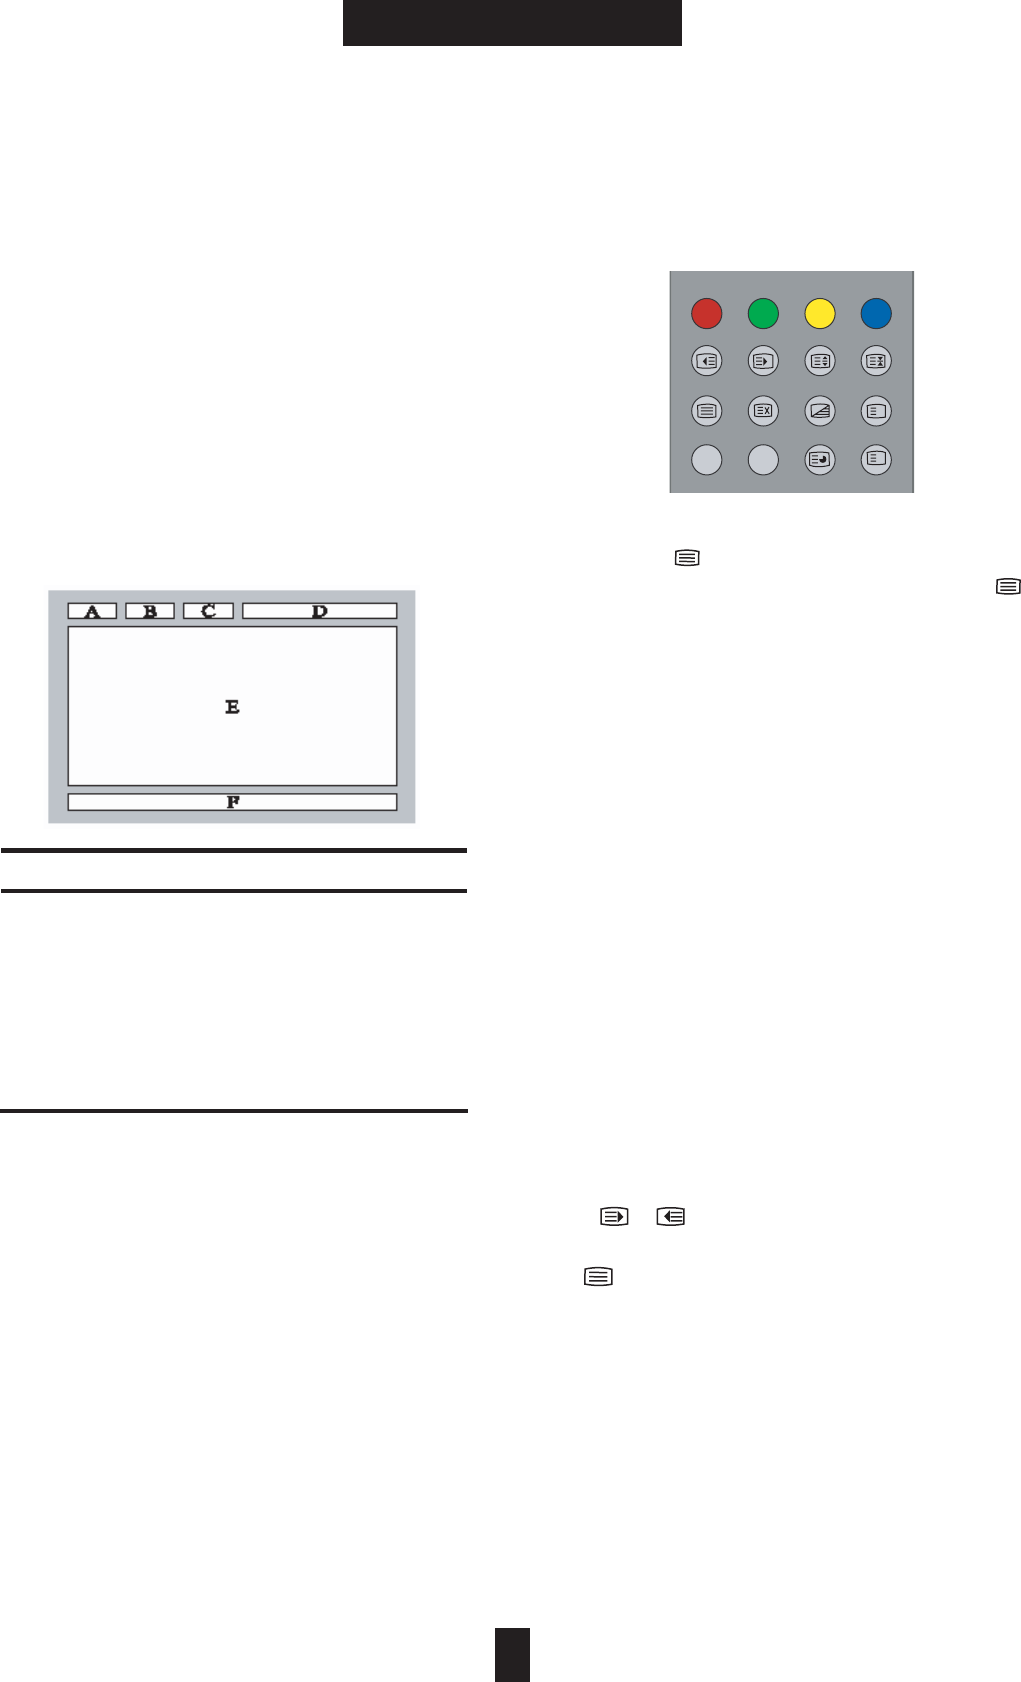
5.8 Teletext (PAL Only)
5.8.1) Teletext Feature
Most television channels provide written
information services via teletext. Information
provided includes:
---> Television programme times
---> News bulletins and weather forecasts
---> Sports results
---> Travel information
This information is divided into numbered
pages (see diagram).
Teletext information is often divided between
several pages displayed in sequence, which can
be accessed by:
---> Entering the page number
---> Selecting a title in a list
---> Selecting a coloured heading
(FASTEXT system)
You can display Teletext information at any time
on your television. For Teletext information to
be displayed correctly, channel reception must
be stable; otherwise:
---> Information may be missing
---> Some pages may not be displayed.
5.8.2) Displaying the Teletext Information
ྙ
Press the [ ] button to enter the Teletext mode.
ྚ
To exit from the Teletext display, Press the [ ]
button again.
5.8.3) Selecting a Text Pages
ྙUsing the Number Buttons.
Enter the three-digit page number given in the
content by pressing the corresponding Number
buttons. : The selected Page number appears at
the top of the screen and page appears after a
short time.
ྚGFASTTEXT System
If the FASTEXT system is used by the
broadcasting company, the different topics
covered on a Teletext page are color-coded
and can be selected by pressing the coloured
buttons on the remote control.
Press the coloured button corresponding to the
topic that you wish to select; the available topics
are given on the status line.
ྛDisplay the Previous or Next page.
ྜGSub-page can scrolled by using the
[ ]/[ ] buttons.
ྜྷTo exit from the Teletext display, Press the
[ ] button.
Part Content
A Selected page number.
B Broadcasting channel identity.
C Current page number or search indications.
D Date and time.
EText.
F Status information./ FASTEXT information.
1
1
1
1
?
i
3,36:$3326,7,216,=(
7:,13,&6&5((1=22067,//
7(;73,&785(6281'67(5(2
$'''(//$1*790(180(18

24
BASIC OPERATION
5. Basic Operation
5.8.4) Selecting Display Options
Index Page[ ]
ྙYou can switch directly to the programmed
preview or the overview page of the station you
are currently viewing by pressing the INDEX
button.
Page Hold [ ]
ྙSome Teletext pages contain more
information than can be displayed
simultaneously and are therefore sub-divided
into a series of two or more pages.
ྚThe first sub-page of a series of four sub-
pages will, for example, be indicated by a 1/4
displayed on the top right hand side of the text
page.
ྛThese sub-pages are automatically rotated,
each page being displayed for a set time before
being replaced by the next page. If you need to
read a certain page for longer than is allowed, or
retain a particular sub page, then the HOLD
button should be pressed. The HOLD symbol
will be displayed on the top left hand side
instead of the page number and page
acquisition will be stopped.
ྜNormal operation is restored by pressing the
HOLD button again or by entering a new page
number.
Subcode[ ]
ྙFor Teletext information that is longer than
one page, it may take some time for the
automatically changing of sub-pages to reach
the sub-page you require. It is possible,
however, to enter the sub-page you require and
continue watching a normal TV program until
the correct sub-page has been reached.
ྚPress SUBCODE button.
ྛEnter the desired sub-page number.
ྜWhen the requested sub-page is reached, the
main page number will be superimposed on the
normal TV picture.
ྜྷPress the Teletext button to display the stored
sub-page.
Reveal [ ]
ྙSome Teletext pages play a role in concealing
part of the display in, for example, a quiz page
with concealed answers.
ྚThe REVEL button release the concealed text
as long as the Reveal button is not pressed
again.
Size[ ]
ྙBy pressing the SIZE button , either the top
half or the buttom half or the bottom half of the
Text display can be expanded.
ྚPress the Size button once and the top half of
the display expanded.
ྛPress again and the bottom half is expanded.
ྜPress again and the display return to normal
size characters.
Cancel[ ]
ྙThe CANCEL button suppress the Text display
and restores the normal TV picture while the
receiver remains in the Teletext mode.
ྚThis function allows you to request Teletext
pages and alter Teletext controls without
interrupting a TV program.
ྛIf a new page is requested while Teletext is
cancelled, the page header is displayed in a box
on the screen for 5 seconds.
i
?
1
1
?
i
3,36:$3326,7,216,=(
7:,13,&6&5((1=22067,//
7(;73,&785(6281'67(5(2
$'''(//$1*790(180(18
25
BASIC OPERATION
5. Basic Operation
5.9 Contents Blocking(V-Chip)
: NTSC Only
5.9.1) Contents Blocking
Follow these steps for setting the Contents
Blocking:
ྙPress the [MENU] button.
ྚSelect the [Setting] mode by using the [ඔVඖ
] button.
ྛMove the [Content Blocking] mode by using
the [̵V̷] button.
ྜSelect the [Content Blocking] mode by
pressing the [ඖ] button.
ྜྷStep1. Input Password.
ྞStep2. Setting the Movie Blocking Grade.
ྟStep3. Setting the TV Blocking Grade.
ྠPress the [MENU] button to exit the Content
Blocking Controls.
5.9.2) Input Password
A. Input
You have to input the password for the setting
the Contents Blocking Function.
ྙMove the [Enter] mode by using the [̵V̷]
button.
ྚSelect the [Enter] mode by pressing the [ඖ]
button.
ྛInput the Password by using the cursor
buttons.
ඔVඖ: Move the position of password number.
̵V̷ ]: Increase or Decrease number.
ྜPress the [SEL] button to enter the sub menu.
B. Change
ྙMove the [Change] mode by using the [̵V̷]
button.
ྚSelect the [Change] mode by pressing the [ඖ
] button.
ྛChange the Password by using the cursor
buttons.
ྜPress the [SEL] button to change password.
C. Clear
Resetting the password to default number.
Default password is 000000.
ྙMove the [Clear] mode by using the [̵V̷]
button.
ྚSelect the [Clear] mode by pressing the [ඖ]
button.
Move Select Adjust
SEL MENU
MENU
Picture
Input Source
Content Blocking
Panel
Setting
Move Select Adjust
SEL MENU
MENU
password
enter
change
clear
123
456
789
0
000000 OK
AAAA
6(/
i
$'''(//$1*790(180(18
Move Select Adjust
SEL MENU
MENU
Move Select Adjust
SEL MENU
MENU
26
BASIC OPERATION
5. Basic Operation
5.9.3) Movie Blocking
ྙGInput the password.
ྚGPress the [Menu] button to exit the
[Password] Mode.
ྛSelect the Movie blocking mode by the using
[ඔVඖ] button.
ྜSet the Movie Blocking categories by using
the cursor buttons.
G
̵V̷G: Move the desired blocking category.
[SEL] : Lock or Unlock the category.
ྜྷPress the [Menu] button to exit the [Movie
blocking] Mode.
[Note] Contents Blocking is automatically block
certain categories that are "more restrictive". For
example, if you select G category, all categories
will automatically be blocked.
MPAA
(Motion Picture Association of America)
Guide Line.
5.9.4 ) TV Blocking
ྙInput the password.
ྚGPress the [Menu] button to exit
the [Password] Mode.
ྛSelect the [TV blocking] mode by the using
[
ඔVඖ]
button.
ྜSet the TV blocking categories by using the
cursor buttons.
[ඔVඖ]̵V̷G: Move the desired blocking category.
SEL : Lock or Unlock the category.
ྜྷPress the [Menu] button to exit the [TV
blocking] Mode.
Category Descripton
GGeneral audience. (on restrictions)
PG Parental guidance suggested
PG-13 Parents strongly cautioned
RRestricted.
NC-17 No children under age 17
XAdult only.
NR Not rated
TV Guide Line Additional Option
Y: Young Children FV: Fantasy violence
Y7: Children 7 and over D: Sexually Suggestive Dialog
G: General audience L: Adult Language
PG: Parental guidance S: Sexual situation
14: Viewers 14 and over V: Violence
MA: Mature audience
G
movie blocking
123
456
789
0
GG
GG
PGPG
GG
GG
GG
GG
tv blocking
123
456
789
0
GGGGGGGG
GGGGGGGGGG
GGGGGG
GGGGGG
GGGGGGGGGG
GGGGGGGGGG

27
TROUBLE SHOOTING
6. Trouble Shooting
The power does not
turn on.
Power to the TV is not
plugged in. Check source of power to the TV.
Symptom Cause Possible Solution
The remote control does
not work.
Sensor is blocked.
Batteries in remote control
are weak.
Clear path for sensors.
Clean sensor lens.
Replace batteries.
No signal is displayed. Video source incorrect.
Check video source connection.
Make sure TV is set to correct video
source.
Picture scrolls or is
fuzzy. Antenna type or location. Change antenna.
Try antenna in different location.
Picture appears but
No sound.
Volume set at the minimum.
Speakers aren't connected.
Audio input set incorrectly.
Increase the Volume.
Connect the speakers properly.
Check Audio input connection.
Part of picture is cut off
Or picture is not centered.
Improper Position setting.
The signal is unstable.
Adjust the Position properly.
When RGB, DTV/HD mode,
Set to the proper resolution and
Adjust the Freq. And Phase setting.
(Refer to page 22.)
Picture is too large or
Too small.
Improper the screen size
Setting.
Adjust the screen size setting.
(Refer to page 20, 23.)
The brightness is reduced
gradually.
Fixed patterns are
displayed for a long time.
Image Sticking Minimization Mode.

28
CLEANING &
MAINTENANCE
7. Cleaning & Maintenance
Identifying Problems
- Do not put the PDP near extermely not, cold,
humid or dusty places.
- Do not put the PDP near appliances that create magnetic fields.
- Keep the ventilation openings clear.
Liquids
- Do not place liquids near or on the PDP.
Cabinet
- Never open the cabinet or touch parts inside.
- Wipe your PDP with a clean, dry cloth, Never use water, cleaning fluids, wax, or chemicals.
- Do not put heavy objects on top of the cabinet.
Temperature
-If your PDP is suddenly moved from a cold to a warm place, unplug the power cord for at least two
hours so that moisture that formed inside the unit can dry completely.
FCC Compliance Statements
Note: This equipment has been tested and found to comply with the limits for a
Class B digital device, pursuant to part 15 of the FCC Rules. These limits are
designed to provide reasonable protection against harmful interference in a
residential installation. This equipment generates, uses and can radiate radio
frequency energy and, if not installed and used in accordance with the
instructions, may cause harmful interference to radio communications.
However, there is no guarantee that interference will not occur in a particular
installation. If this equipment does cause harmful interference to radio or
television reception, which can be determined by turning the equipment off and
on, the user is encouraged to try to correct the interference by one or more of
the following measures:
• Reorient or relocate the receiving antenna
• Increase the separation between the equipment and receiver.
• Connect the equipment into an outlet on a circuit different from that to
which the receiver is connected.
• Consult the dealer or an experienced radio / TV technician for help.
Warning : Your are cautioned that any change or modifications to the equipment not
expressly approved by the party responsible for compliance could void your authority
to operate such equipment.