Digital Device LD-3270T Digital Device User Manual
Digital Device Inc. Digital Device
User manual

Please read this manual carefully before using your TFT LCD and keep the manual handy for future reference.
CAUTION
RISK OF ELECTRICAL
SHOCK, DO NOT OPEN
TO REDUCE THE RISK OF ELECTRIC SHOCK DO NOT REMOVE COVER (OR BACK).
NO USER SERVICEABLE PARTS INSIDE. REFER TO QUALIFIED SERVICE PERSONNEL.
Warning
TO PREVENT FIRE OR ELECTRIC SHOCK HAZARD, DO NOT EXPOSE THIS PRODUCT TO RAIN OR MOISTURE.
ALSO DO NOT USE THIS UNIT'S POLARIZED PLUG WITH AN EXTENSION CORD RECEPTACLE OR OTHER OUTLETS,
UNLESS THE PRONGS CAN BE FULLY INSERTED. REFRAIN FROM OPENING THE CABINET AS THERE ARE HIGH
-VOLTAGE COMPONENTS INSIDE. REFER SERVICING TO QUALIFIED SERVICE PERSONNEL.
Warning:
Still image (immovable) screen may cause permanent damage to LCD.
1) Lengthy displayed still images from Video games, banners, graphics and others may fatally damage the screen.
2) When using the LCD in 4:3 formats with sidebars for a long period of time, it may cause damage to the TFT LCD
panel. It is recommended that you use 16:9 or other formats.(Image Sticking can be avoided by using "Panel"
function of the Setting's sub menu. However, once image sticking occurs, it may not disappear completely.
An image will be dimmed as the image is displayed long time or repeatedly)
Any damage to the LCD caused by improper usage (such as image sticking) shall not be covered by the warranty.
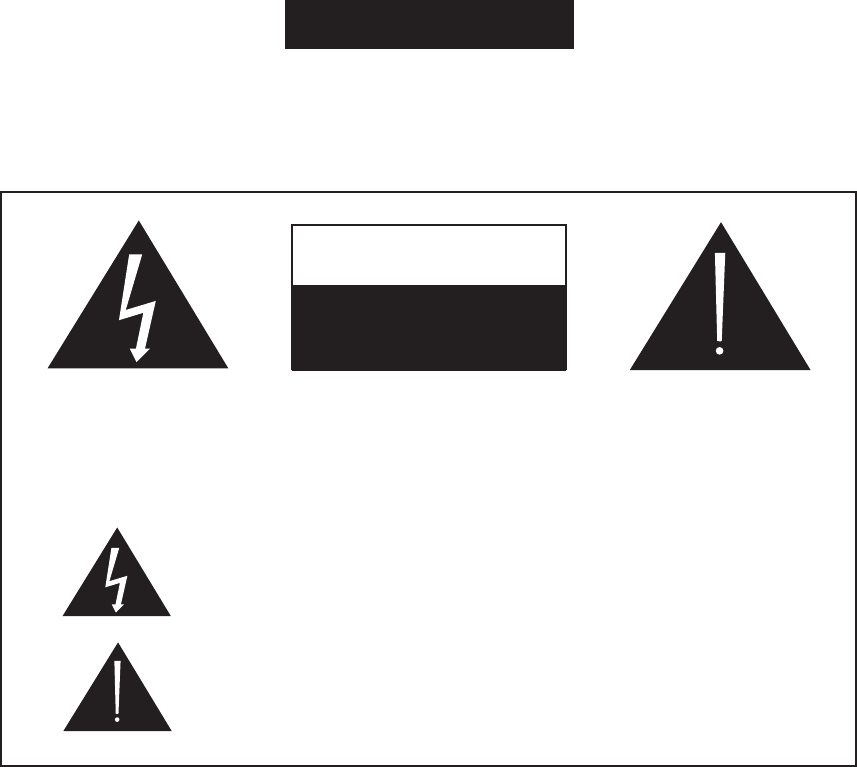
The lightning flash with the arrowhead symbol, within an equilateral
triangle, is intended to alert the user to the presence of uninsulated
"dangerous voltage" within the product's enclosure that may be of
sufficient magnitude to constitute an electric shock to persons.
The exclamation point within an equilateral triangle is intended to
alert the user to the presence of important operating and
maintenance (servicing) instructions in the literature accompanying
the appliance.
WARNING

SAFTY INSTRUCTIONSSAFTY INSTRUCTIONS
Important safeguard for you and your new product
Your product has been manufactured and tested with your safety in mind. However,
improper use can result in potential electrical shock or fire hazards. To avoid defeating
the safeguards that have been built into your new product, please read and observe the
following safety points when installing and using your new product, and save them for
future reference.
Observing the simple precautions discussed in this booklet can help you get many years
of enjoyment and safe operation that are built into your new product.
1. Read Instructions
All the safety and operating instructions
should be read before the product is
operated.
2. Follow Instructions
All operating and use instructions should be
followed.
3. Retain Instructions
The safety and operating instructions should
be retained for future reference.
4. Heed Warnings
All warnings on the product and in the
operating instructions should be adhered to.
5. Water and Moisture
Do not use this product near water, for
example, near a bath tub, wash bowl,
kitchen sink, or laundry tub, in a wet
basement, or near a swimming pool.
6. Accessories, Carts, and Stands
Do not place this product on a slippery or
tilted surface, or on an unstable cart, stand,
tripod,bracket,ortable.
The product may slide or fall, causing
serious injury to a child or adult, and serious
damage to the product.
Use only with a cart, stand, tripod,
bracket, or table recommended by the
manufacturer, or sold with the product.
Any mounting of the product should follow
the manufacturer's instructions, and should
use a mounting accessory recommended by
the manufacturer.
7. Transporting Product
A product and cart combination
should be moved with care.
Quick stops, excessive
force, and uneven surfaces
may cause the product
and cart combination to overturn.
8. Attachments
Do not use attachments not recommended by
the product manufacturer as they may
cause hazards.
9. Ventilation
Slots and openings in the cabinet are provided
for ventilation and to ensure reliable operation
of the product and to protect it from
overheating, and these openings must not be
blocked or covered.
The openings should never be blocked by
placing the product on a bed, sofa, rug, or
other similar surface. This product should not
be placed in a built-in installation such as a
bookcase or rack unless proper ventilation is
provided or the manufacturer's instructions
have been adhered to.
10. Power Sources
This product should be operated only from the
type of power source indicated on the
marking label. If you are not sure of the type
of power supply to your home, consult your
product dealer or local power company.
For products intended to operate from battery
power, or other sources, refer to the
operating instructions.
PORTABLE CART WARNING
< Safety Instructions continued >
11. Outdoor Antenna Grounding
If an outside antenna or cable system is
connected to the product, be sure the
antenna or cable system is grounded so as
to provide some protection against voltage
surges and built-up static charges.
12. Lightning
For added protection for this product
(receiver) during a lightning storm, or when
it is left unattended and unused for long
periods of time, unplug it from the wall
outlet and disconnect the antenna or cable
system.
This will prevent damage to the product due
to lightning and power-line surges.
13. Power Lines
An outside antenna system should not be
located in the vicinity of overhead power
lines or other electric light or power circuits,
or where it can fall into such power lines or
circuits. When installing an outside antenna
system, extreme care should be taken to
keep from touching such power lines or
circuits as contact with them might be fatal.
14. Overloading
Do not overload wall outlets and extension
cords
as this can result in a risk of fire or
electric shock.
14. Heat
The product should be situated away from heat
sources such as radiators, heat registers, stoves,
or other products (including amplifiers) that
produce heat.
15. Cleaning
Unplug this product from the wall outlet before
cleaning. Do not use liquid cleaners or aerosol
cleaners. Use a dry cloth for cleaning.
16. Servicing
Do not attempt to service this product yourself
as opening or removing covers may expose you
to dangerous voltage or other hazards.
Refer all servicing to qualified service personnel.
17. Damage Requiring Service
Unplug this product from the wall outlet and refer
servicing to qualified service personnel under the
following conditions:
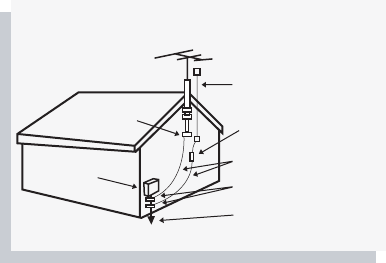
Example of antenna grounding
As per national electrical code
Antenna lead in wire
Antenna discharge
unit
Grounding conductors
Ground clamps
Power service
grounding
Electrode system
Electric service
equipment
Ground clamp
- When the power-supply cord or plug is
damaged.
- If liquid has been spilled, or objects have fallen
into the product.
- If the product has been exposed to rain or
water.
- If the product does not operate normally by
following the operating instructions. Adjust only
those controls that are covered by the operating
instructions as an improper adjustment of other
controls may result in damage and will often
require extensive work by a qualified technician
to restore the product to its normal operation.
- If the product has been dropped or the cabinet
has been damaged in any way.
- When the product exhibits a distinct change in
performance.

Contents
4
Manual Contents
Features and Package Contents
I/O Definitions
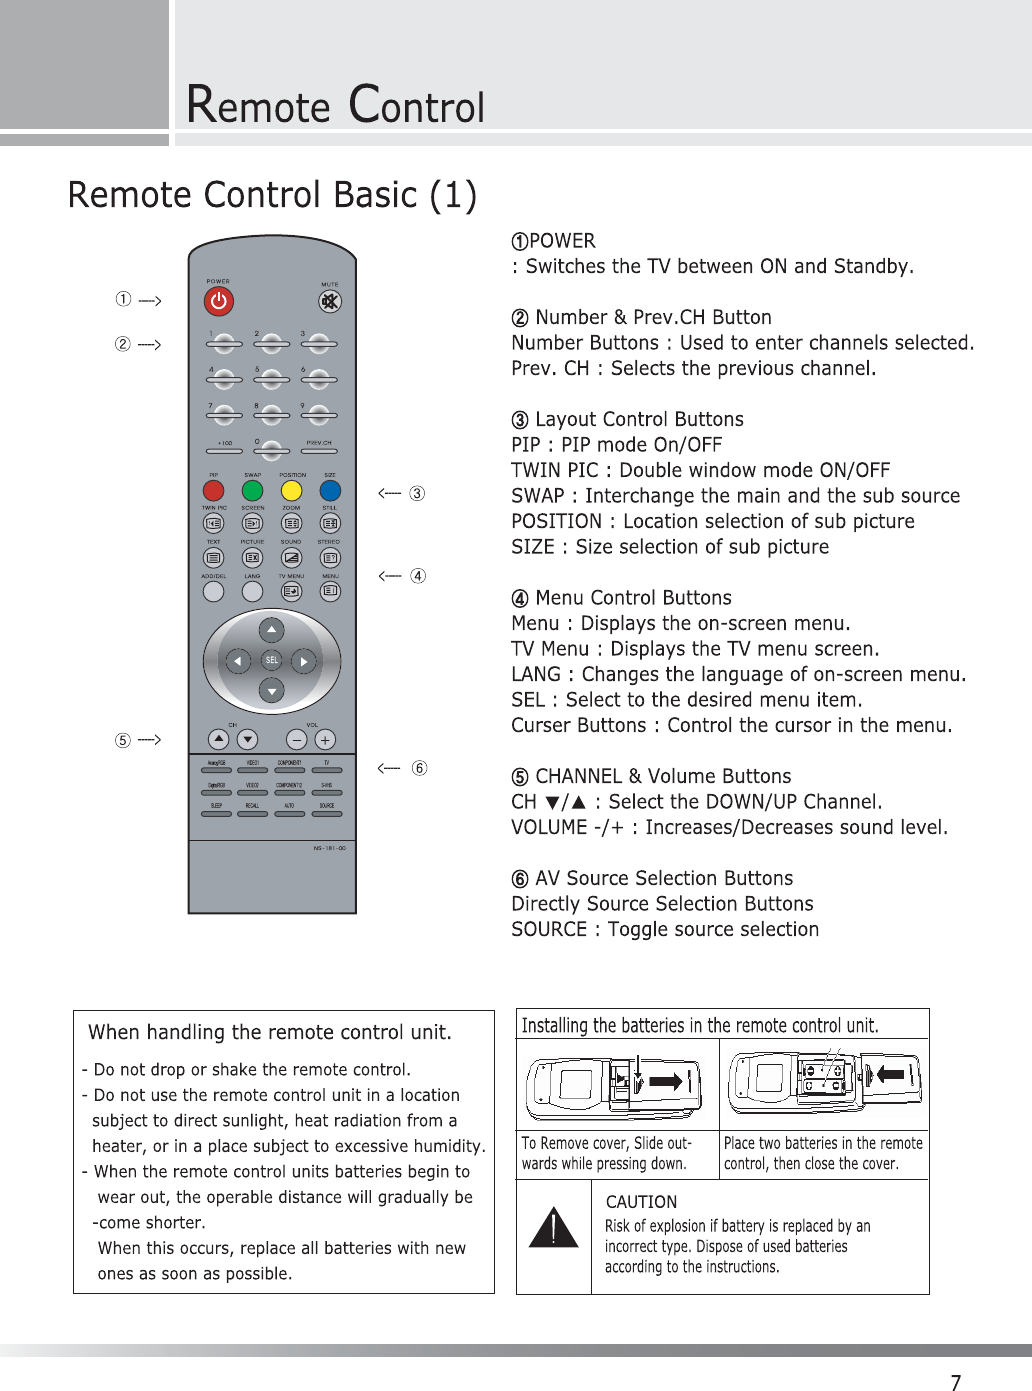
Remote Control
Basic Operation
Screen Layout
Picture
Screen set
Audio
Options
TV / SET
Troubleshooting
- Features
- Packages Contents
- Front Panel Control
- Rear Cabinet I/O's
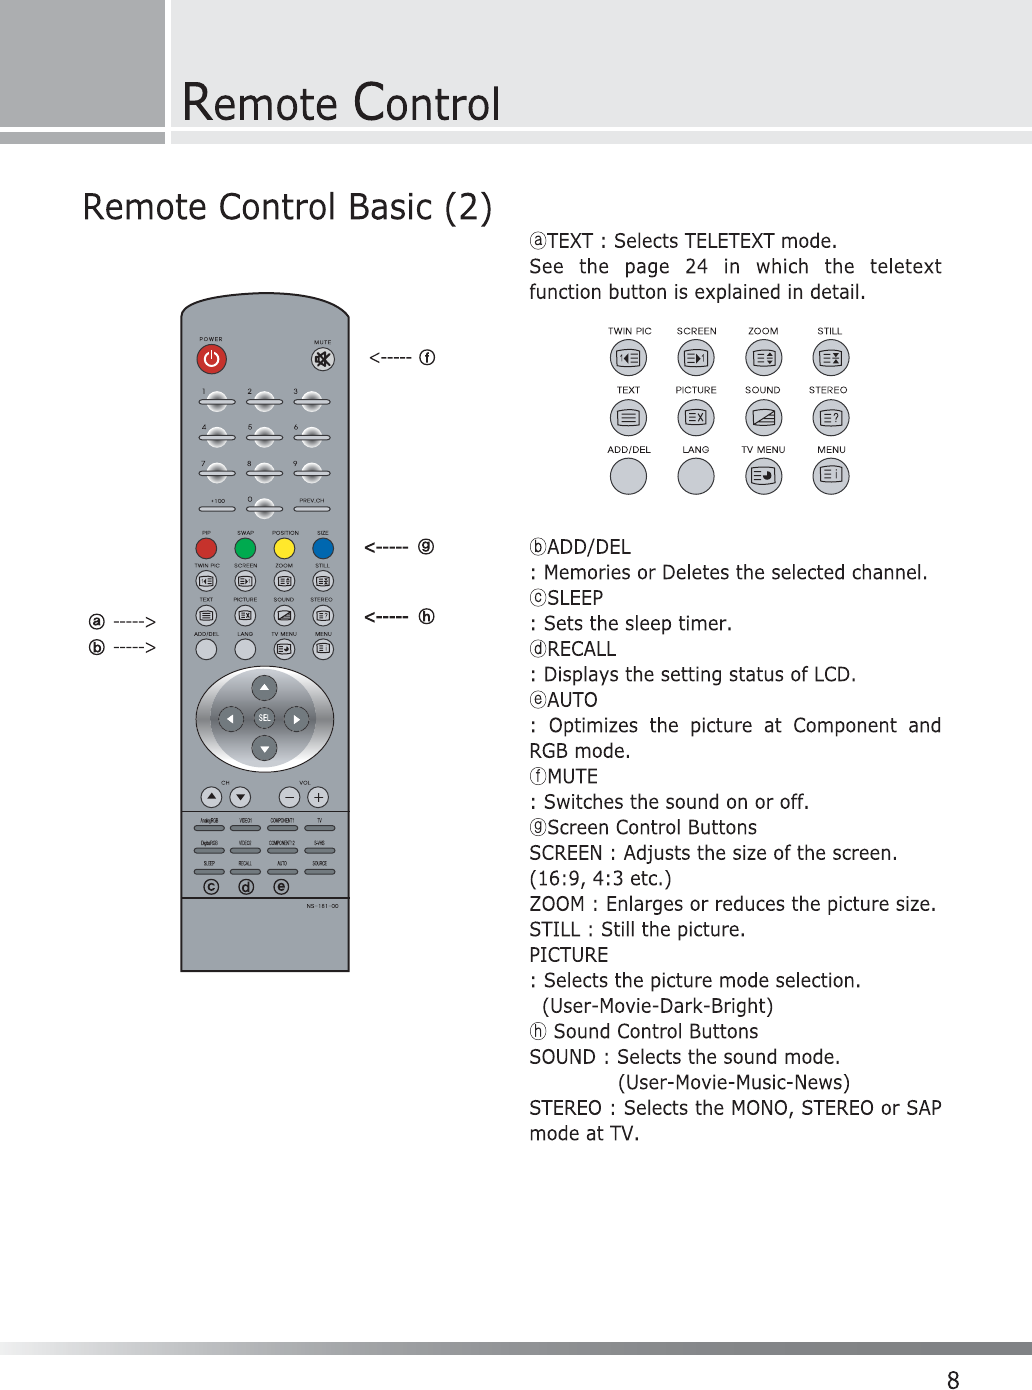
- Remote Control Basic (1)
- Remote Control Basic (2)
- AV Input / Output Terminal
-TV
- Cable TV/External Speaker
- Video (Composite)
-S-VHS
- SCART Video and SCART connection (PAL only)
- VIDEO Output connection (NTSC only)
- HDTV/DVD component video
- Analog RGB / DVI
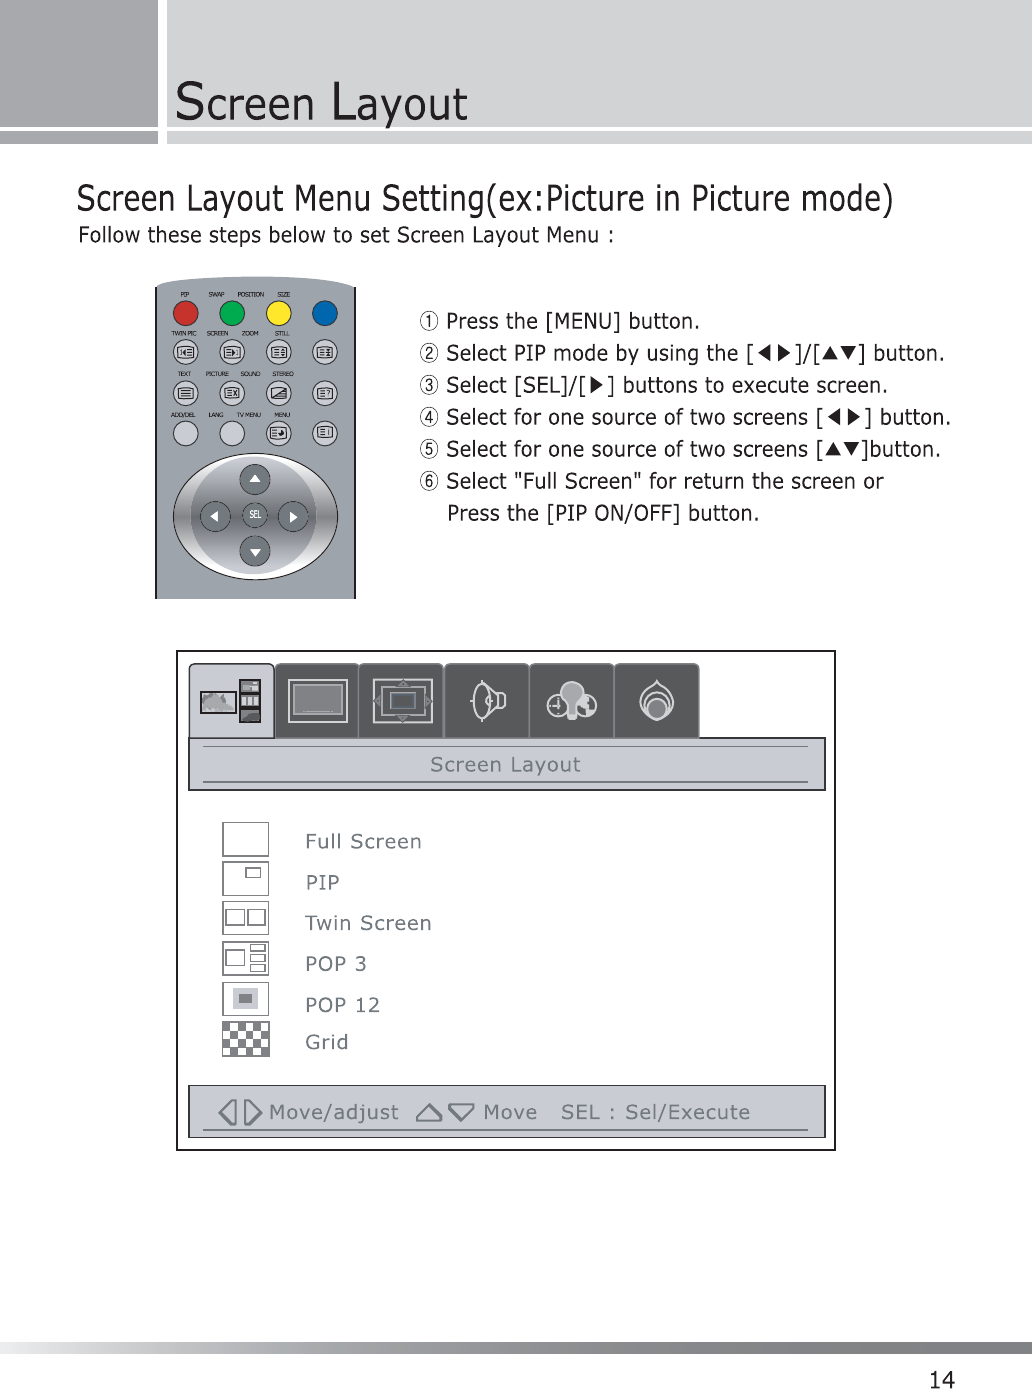
- Screen Layout Menu Setting
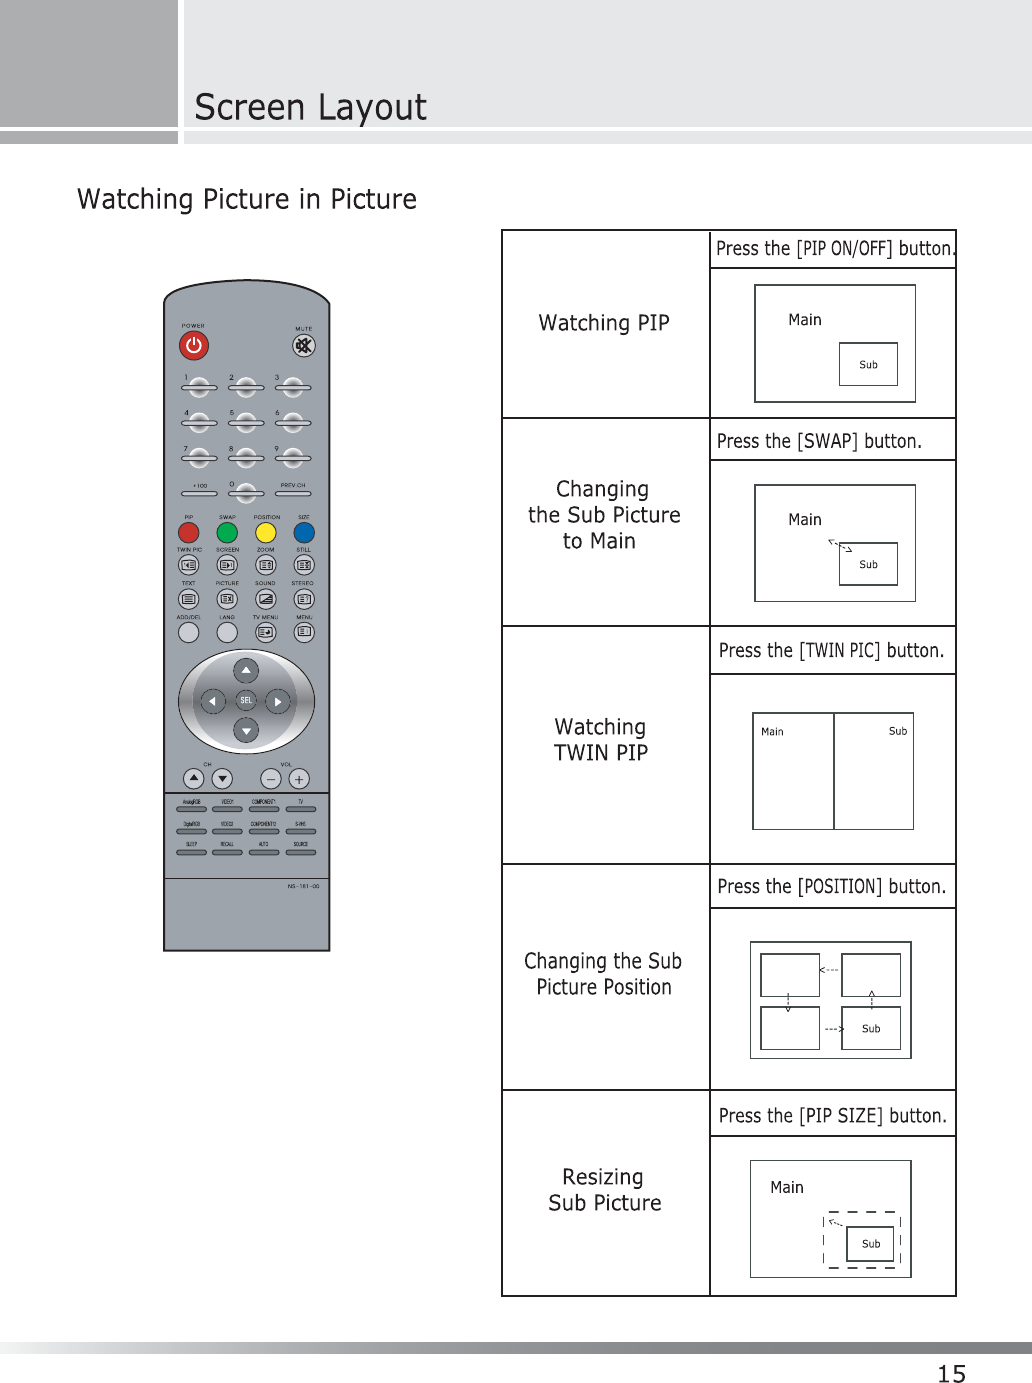
- Watching Picture in Picture
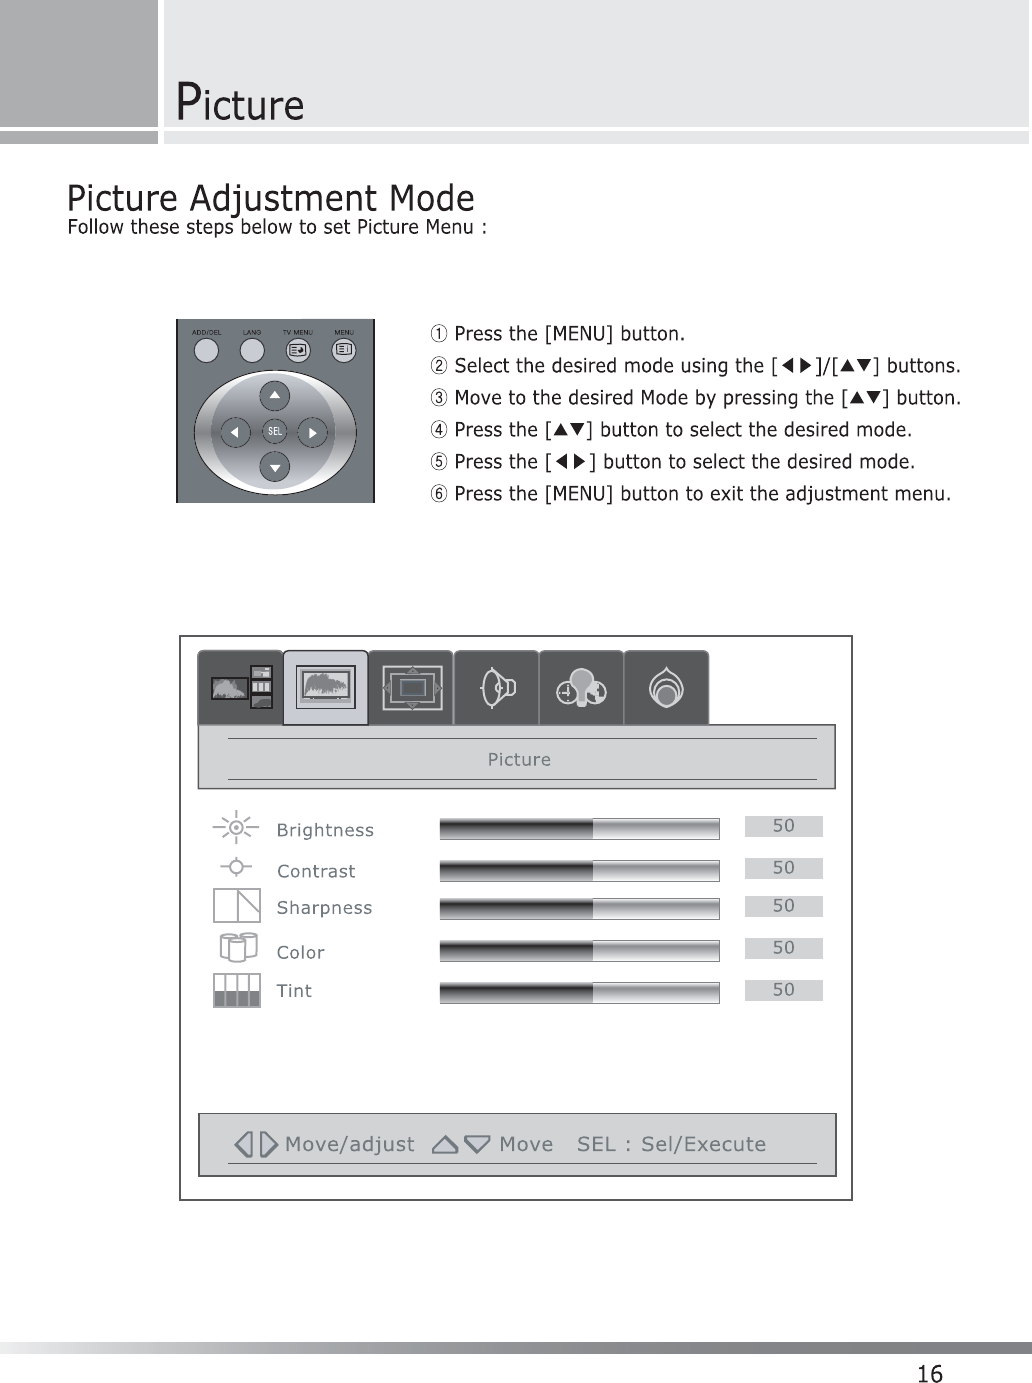
- Picture Adjustment Mode
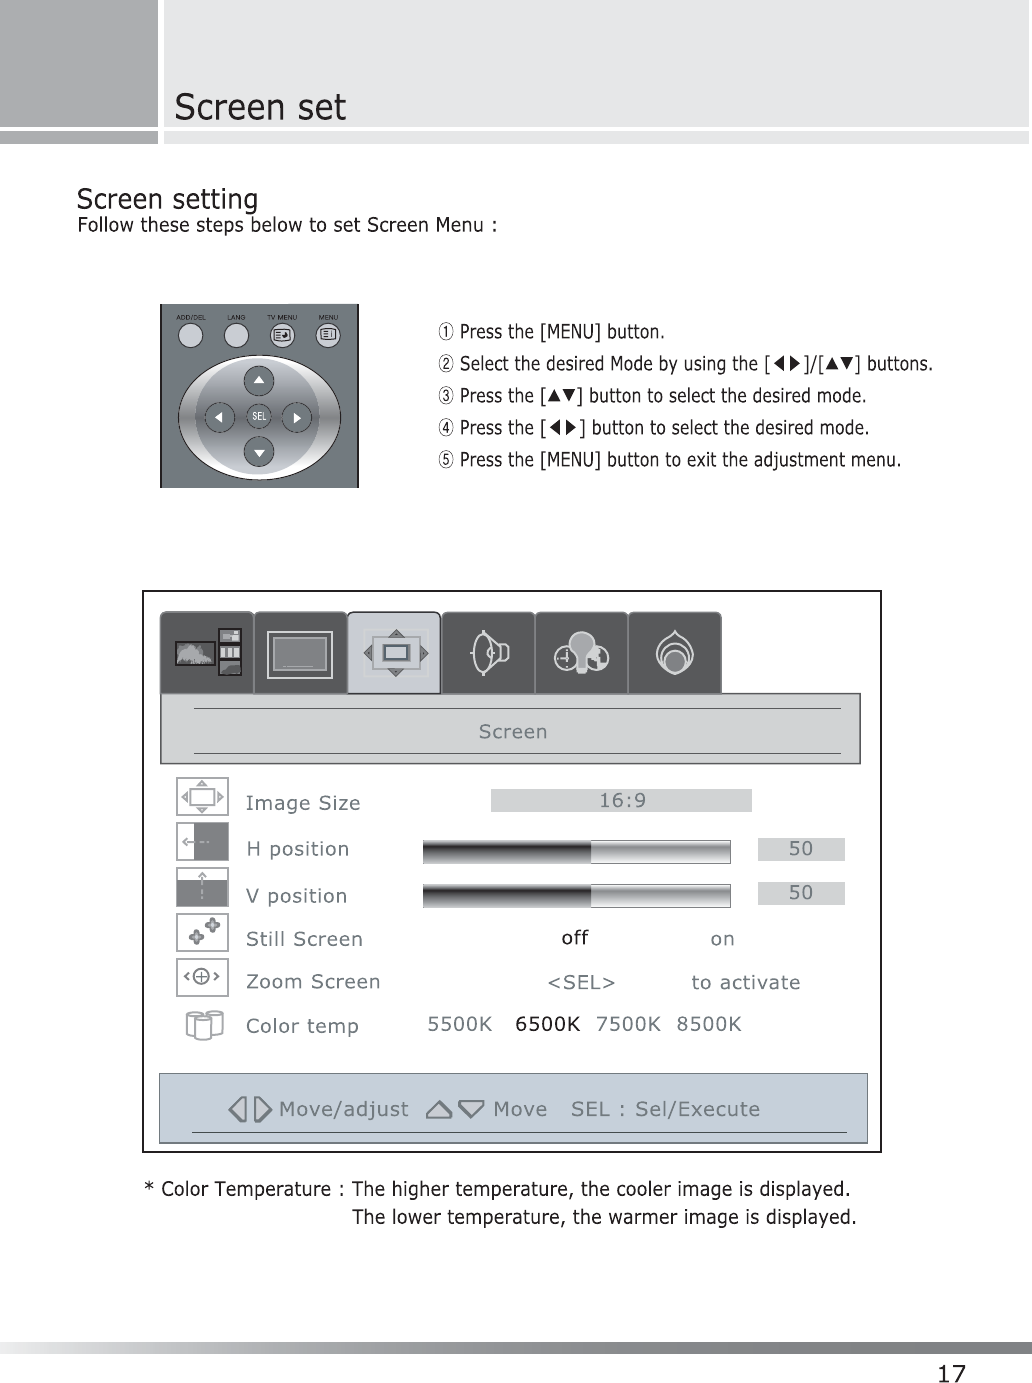
- Screen Setting
- Audio Mode Setting
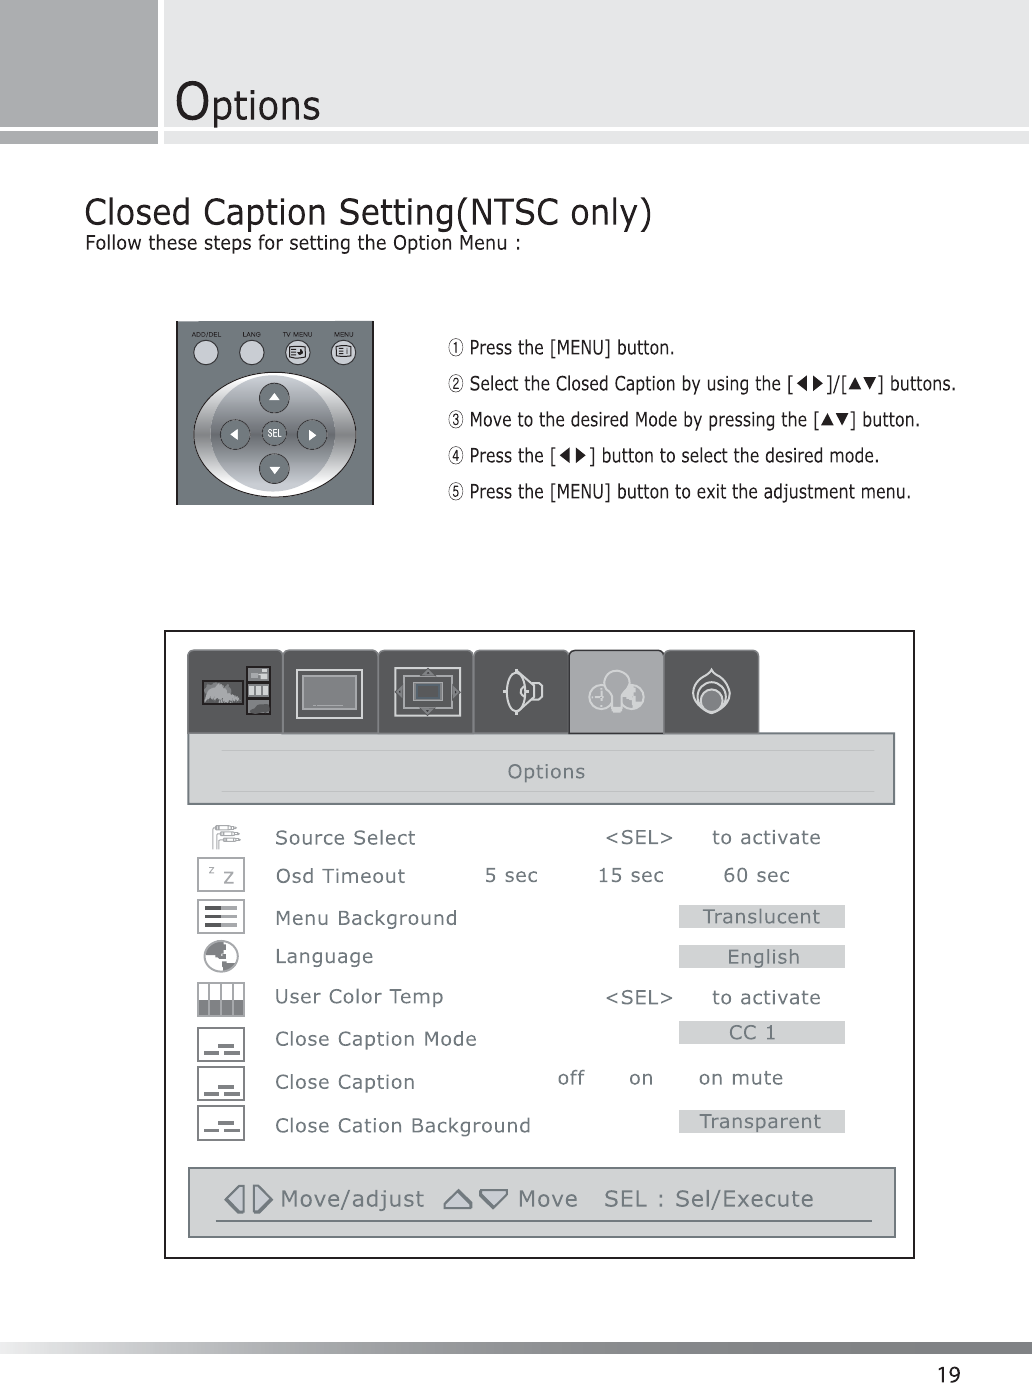
- Closed Caption Setting (NTSC only)
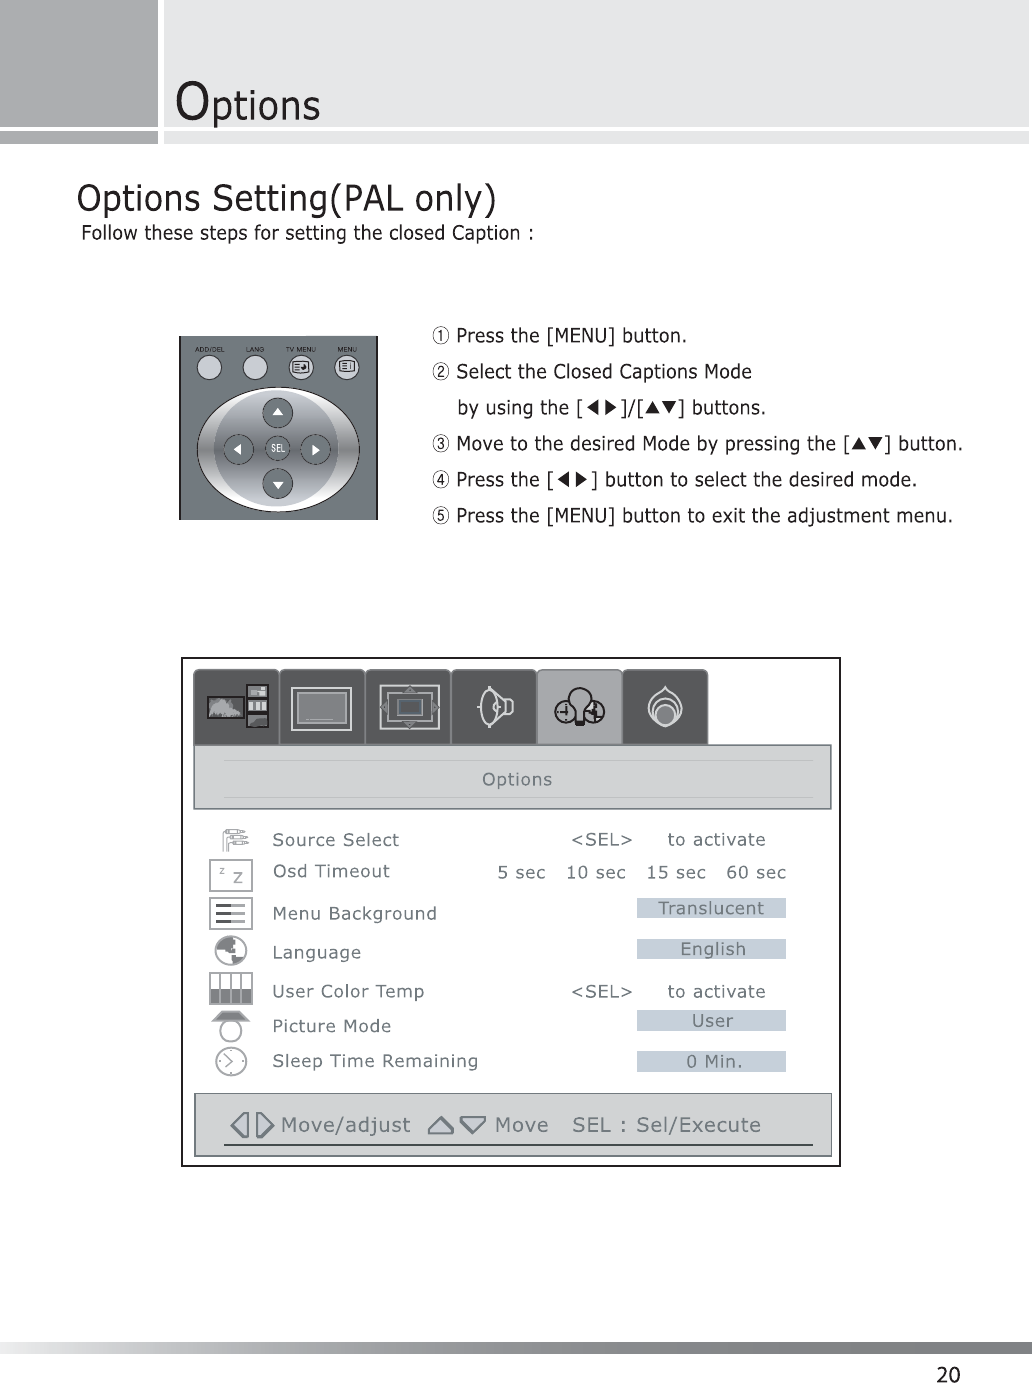
- Option Setting (PAL only)
- Teletext
- Displaying the Teletext Informations
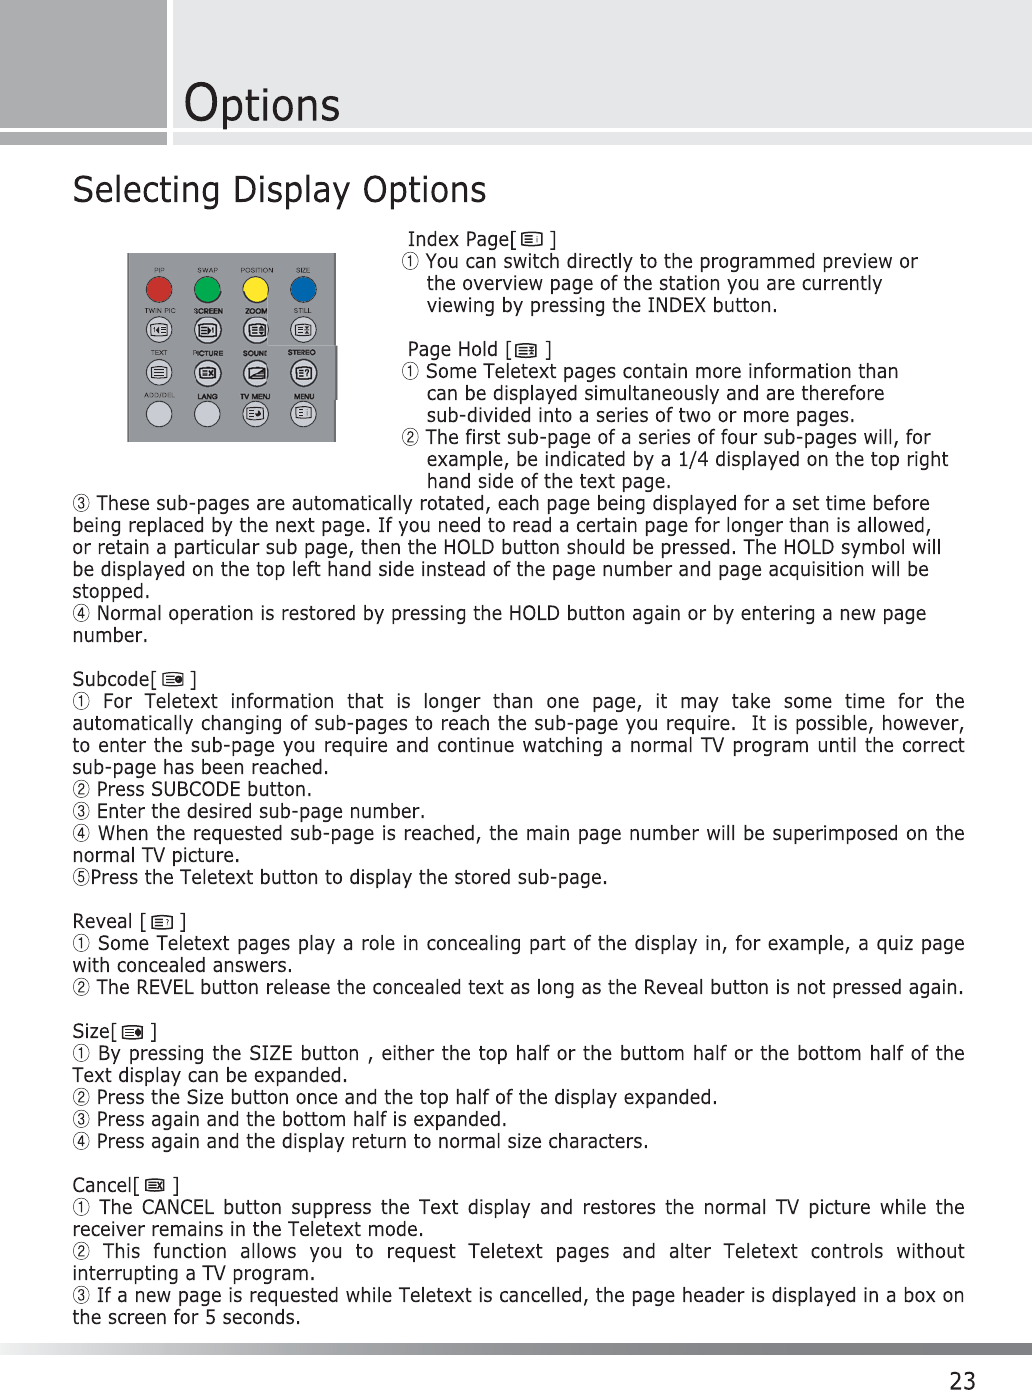
- Selecting Display Option
- Source Select (NTSC only)
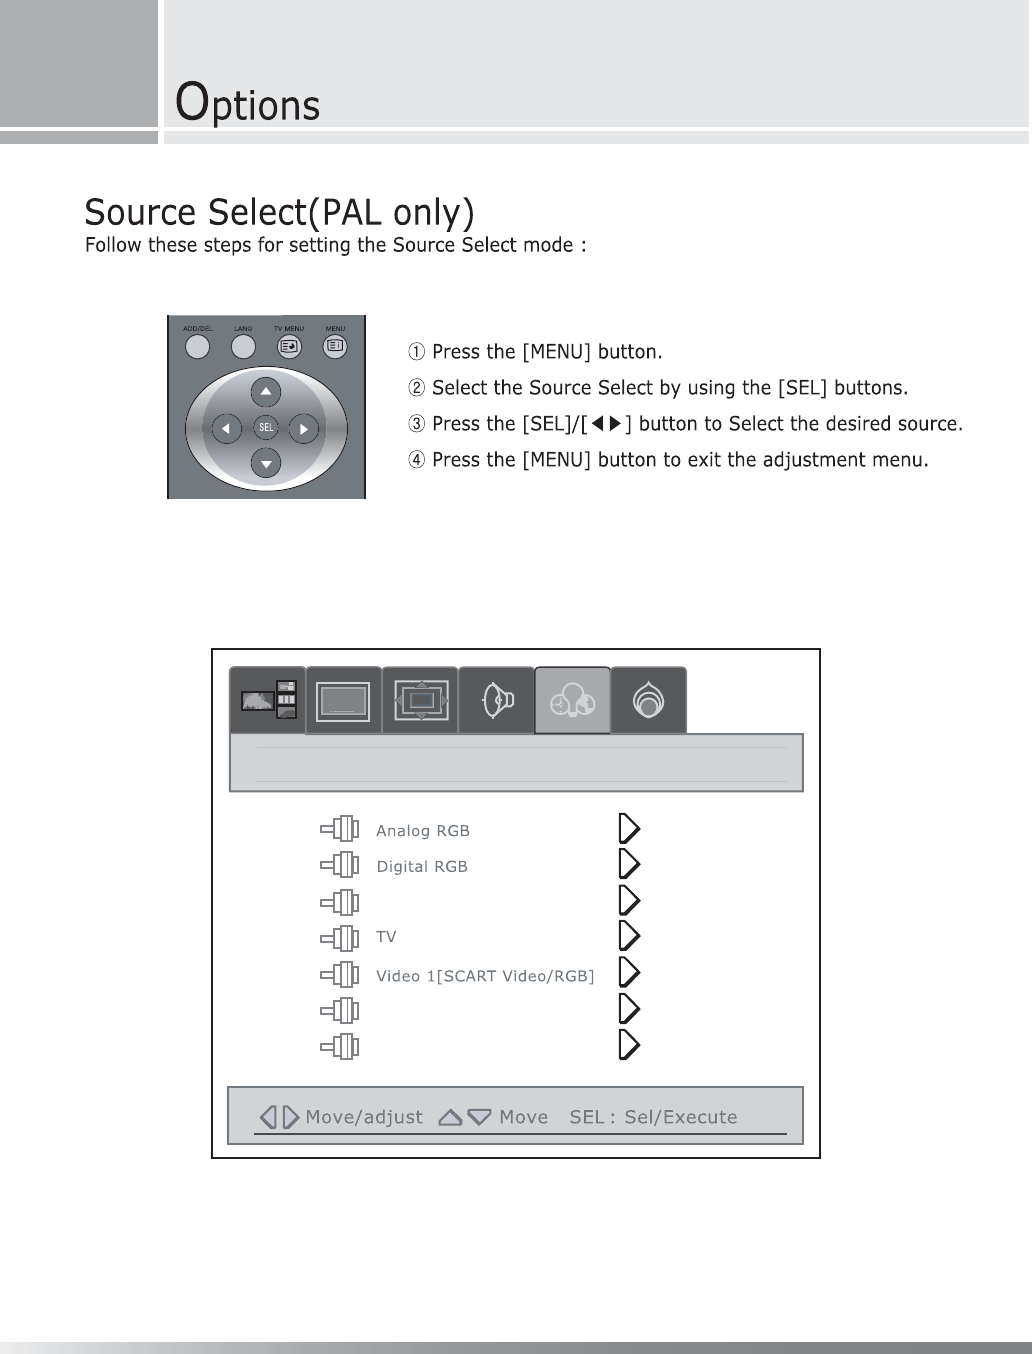
- Source Select (PAL only)
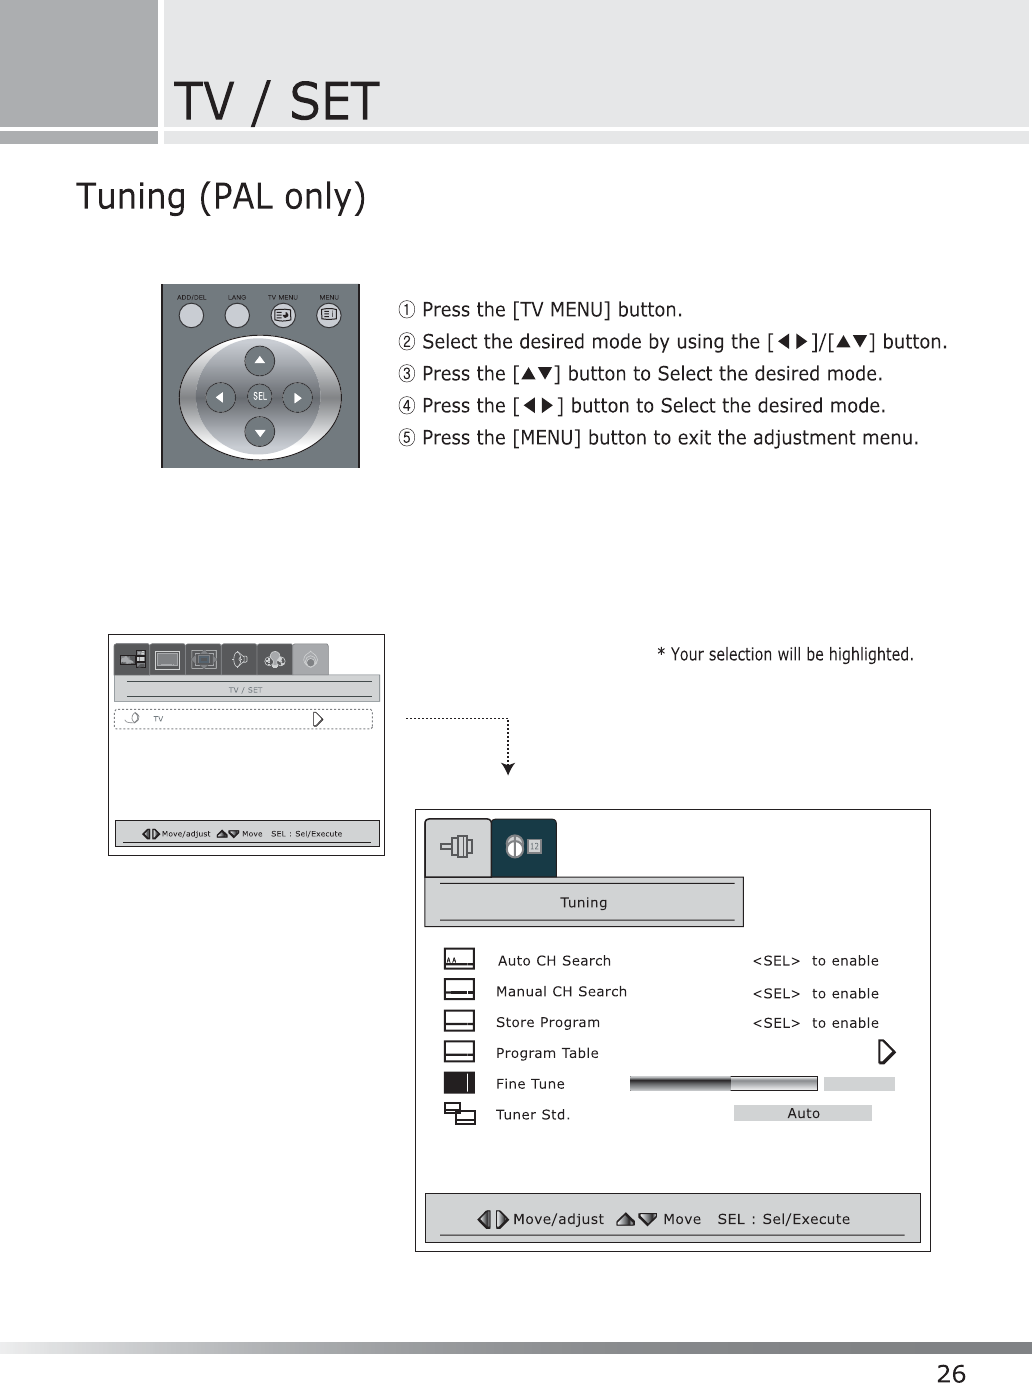
- TV Tuning (PAL only)
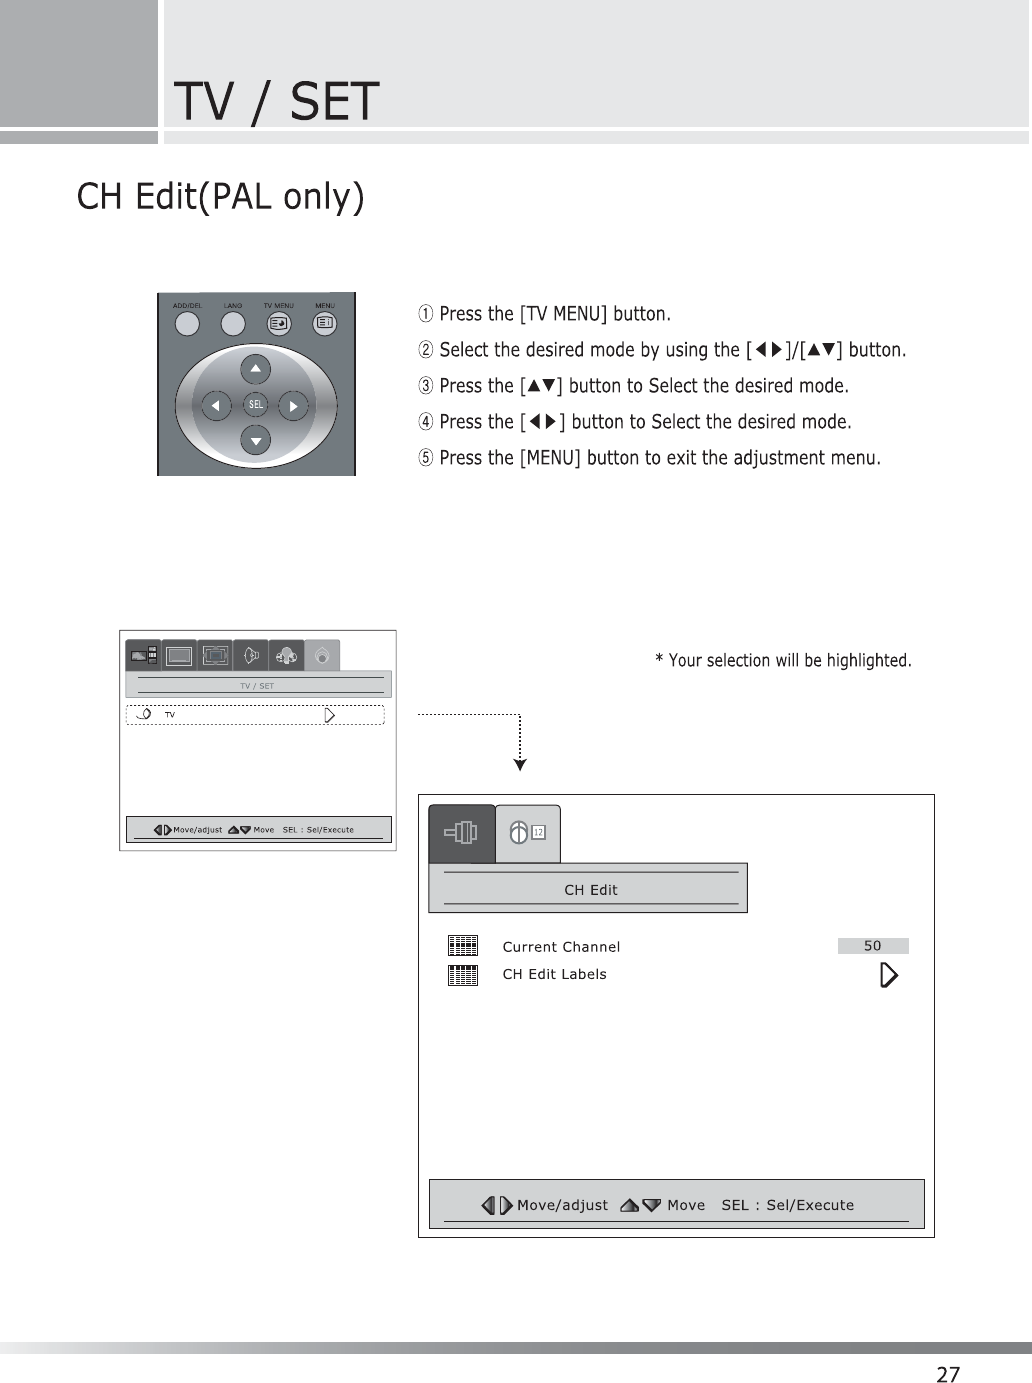
- TV CH Edit (PAL only)
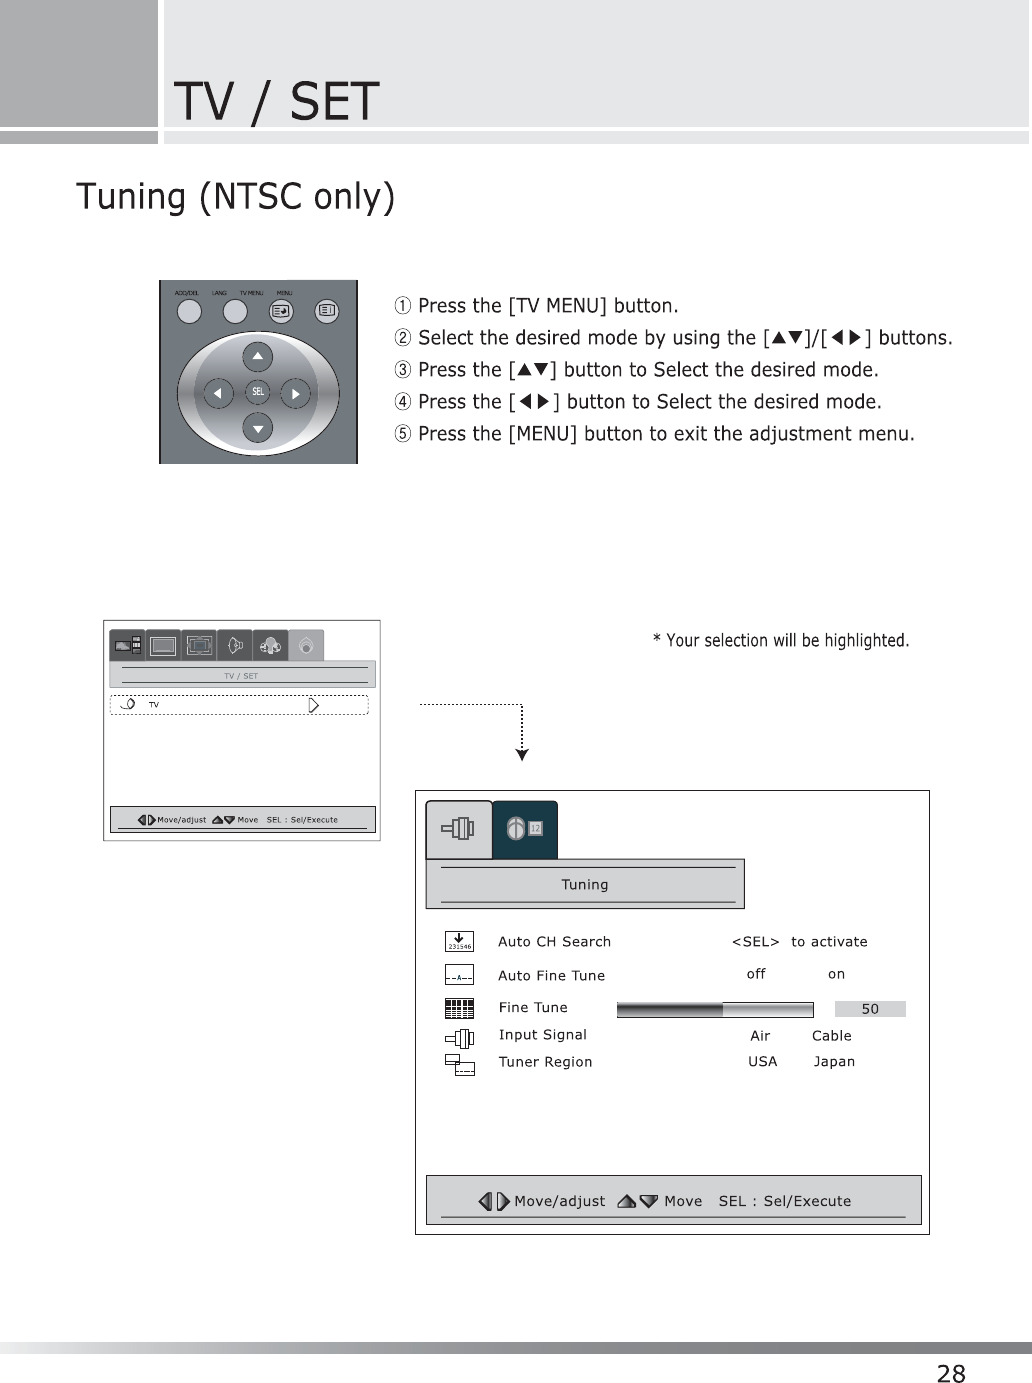
-Tuning(NTSConly)
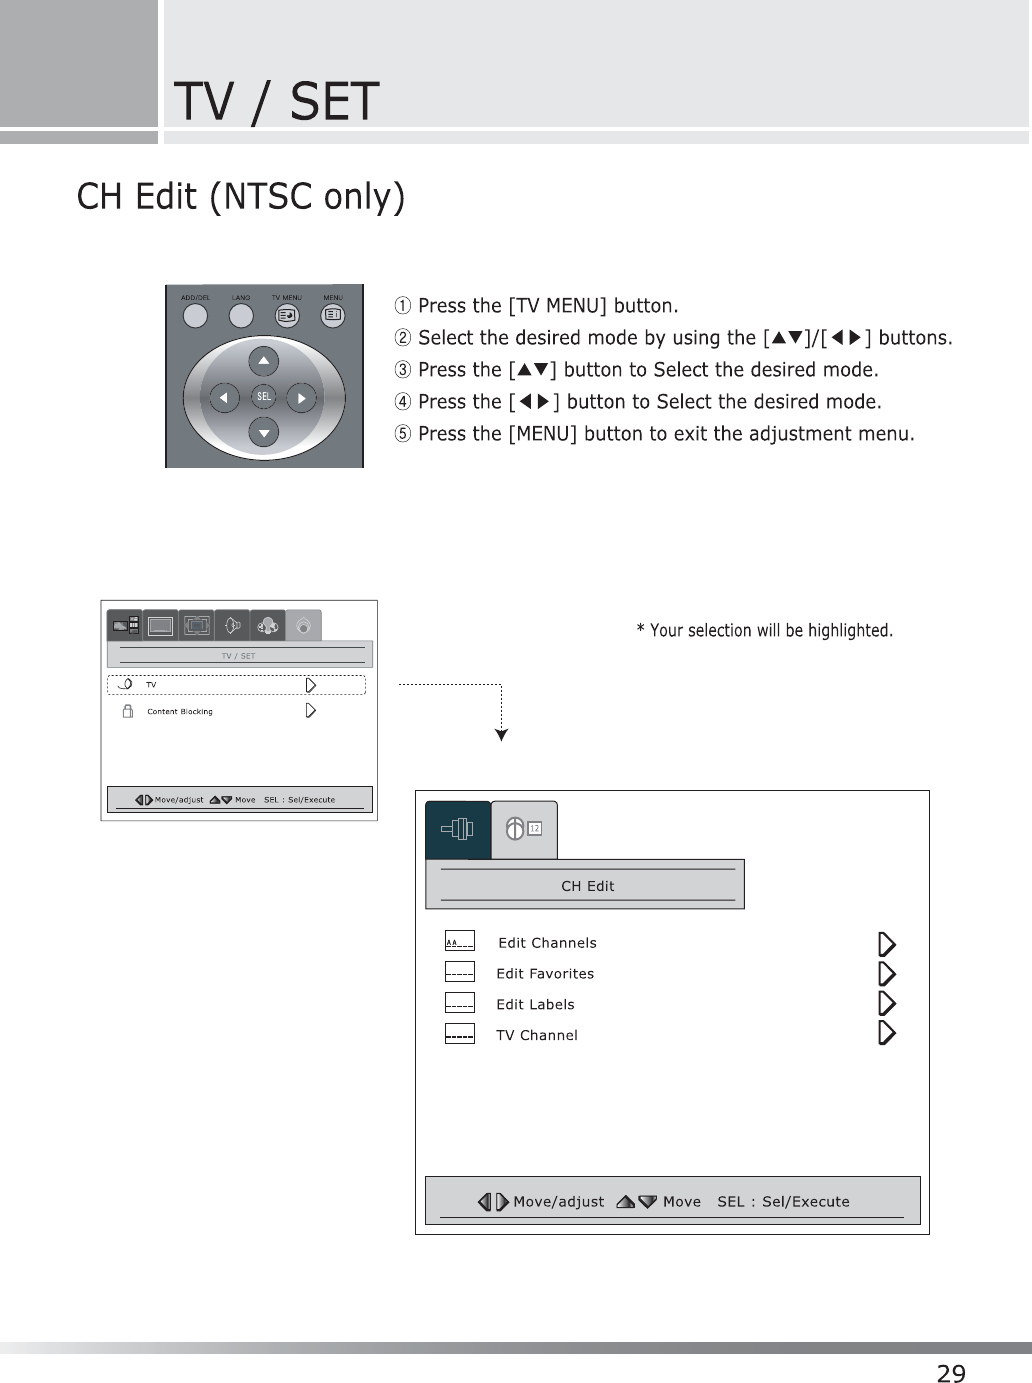
-CHEdit(NTSConly)
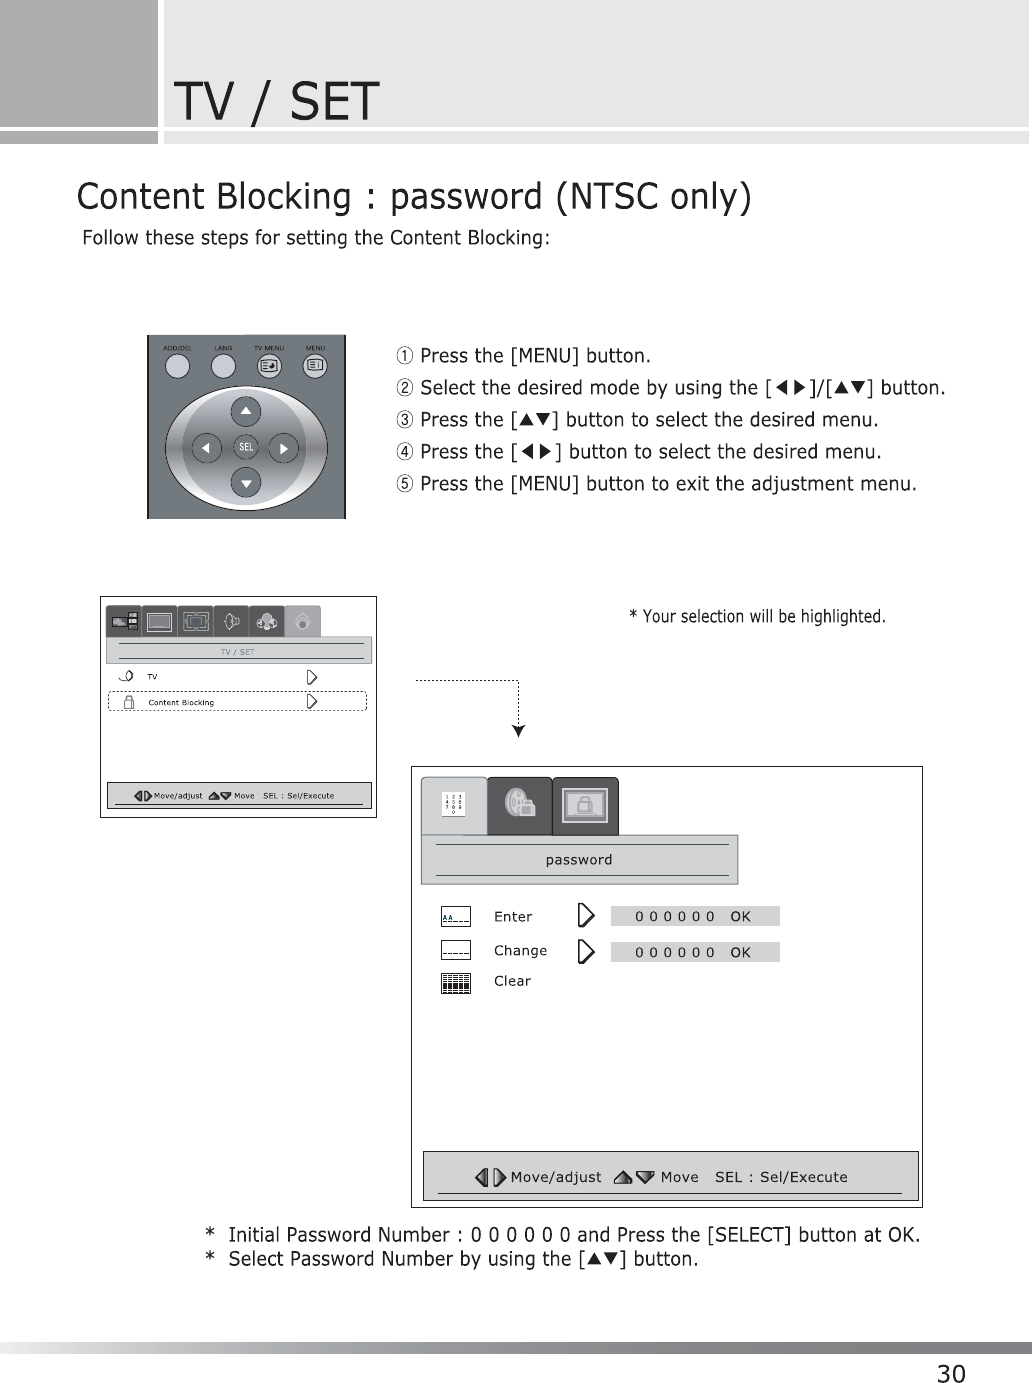
- Password (NTSC only)
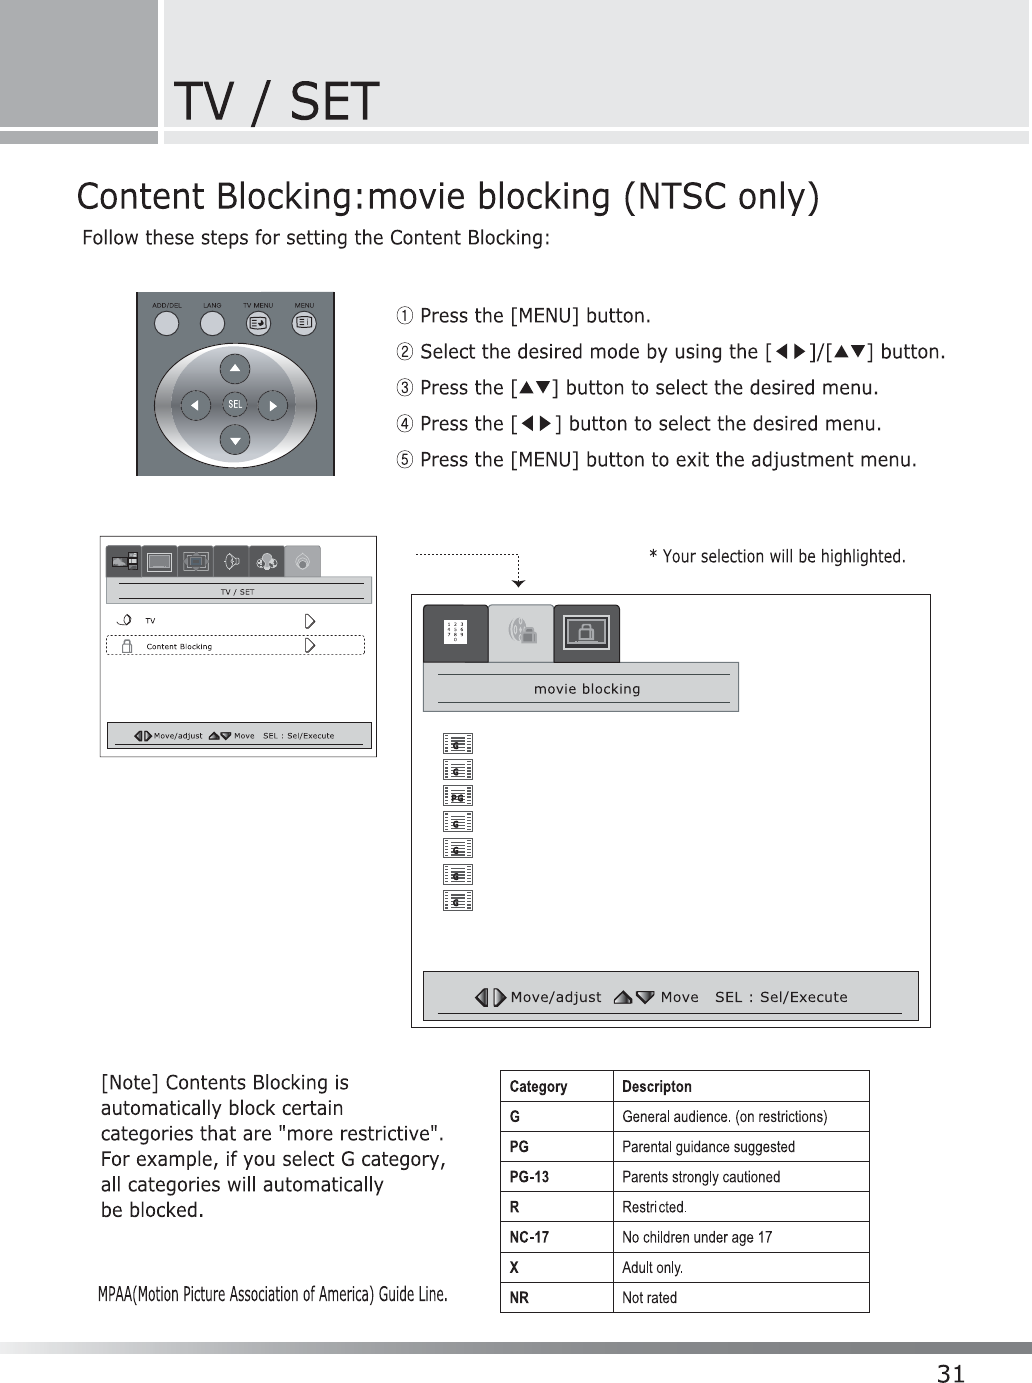
- Movie blocking (NTSC only)
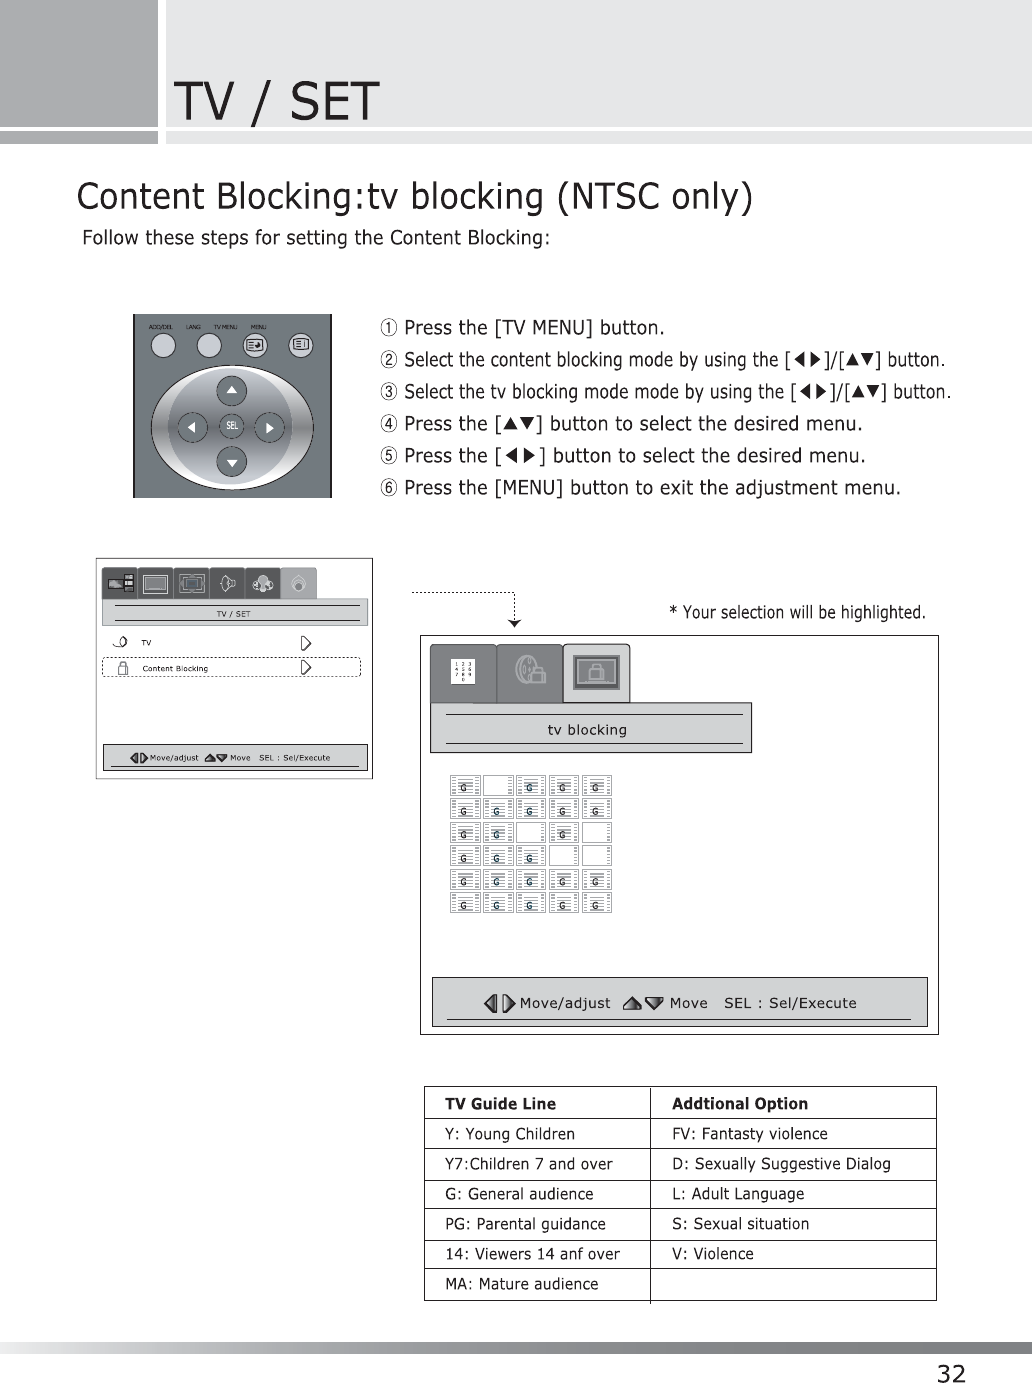
- TV blocking (NTSC only)
04
05
05
06
06
07
08
09
09
10
11
11
12
12
13
13
14
15
16
17
18
19
20
21
22
23
24
25
26
27
28
29
30
31
32
33

Features and Package
- Menu driven On Screen Display(OSD) for Brightness and Contrast, Sharpness, Hue and
Saturation, NTSC / PAL, Channel, PIP(Picture in Picture), Aspect Ratio, Input Source,
Audio, Audio Adjust, Language, Functions.
- Cable TV ready (NTSC system)
- IR Remote control for all functions
- Built-in Television Tuner(option)
- Zoom-in (up to 500%)
- Speaker output : 2channel- Left, Right
(Built-in speaker-26inch only/External speaker-30/32inch)
- Selectable Aspect Ratio (16:9, 4:3, wide, Zoom1, Zoom2)
- PIP(Picture in Picture), Twin Screen, POP3, POP12, Grid
- Multiple Mounting Options : Wall mounting or Stand
- Monitor Composite Video Output
- Large Viewing Angle (170˚)
- Input Video sources : 1 RGB (Analog RGB)
1 DVI (Digital RGB)
1 RS-232C(SoftWare Upgrade)
1CompositeVideoInputs(or1compositeA/V&1ScartInput)
1 Composite Video Outputs (or 1 composite A/V & 1 Scart Output)
1 S-VHS Input
1 DVD/DTV/HD Component Video Input
1 RF(Tuner TV)
- LCD TV set
- User's Manual
- IR Remote control unit
- 2 "AAA " size batteries
-AVcable
-ACpowercord
Features
Package Contents
5
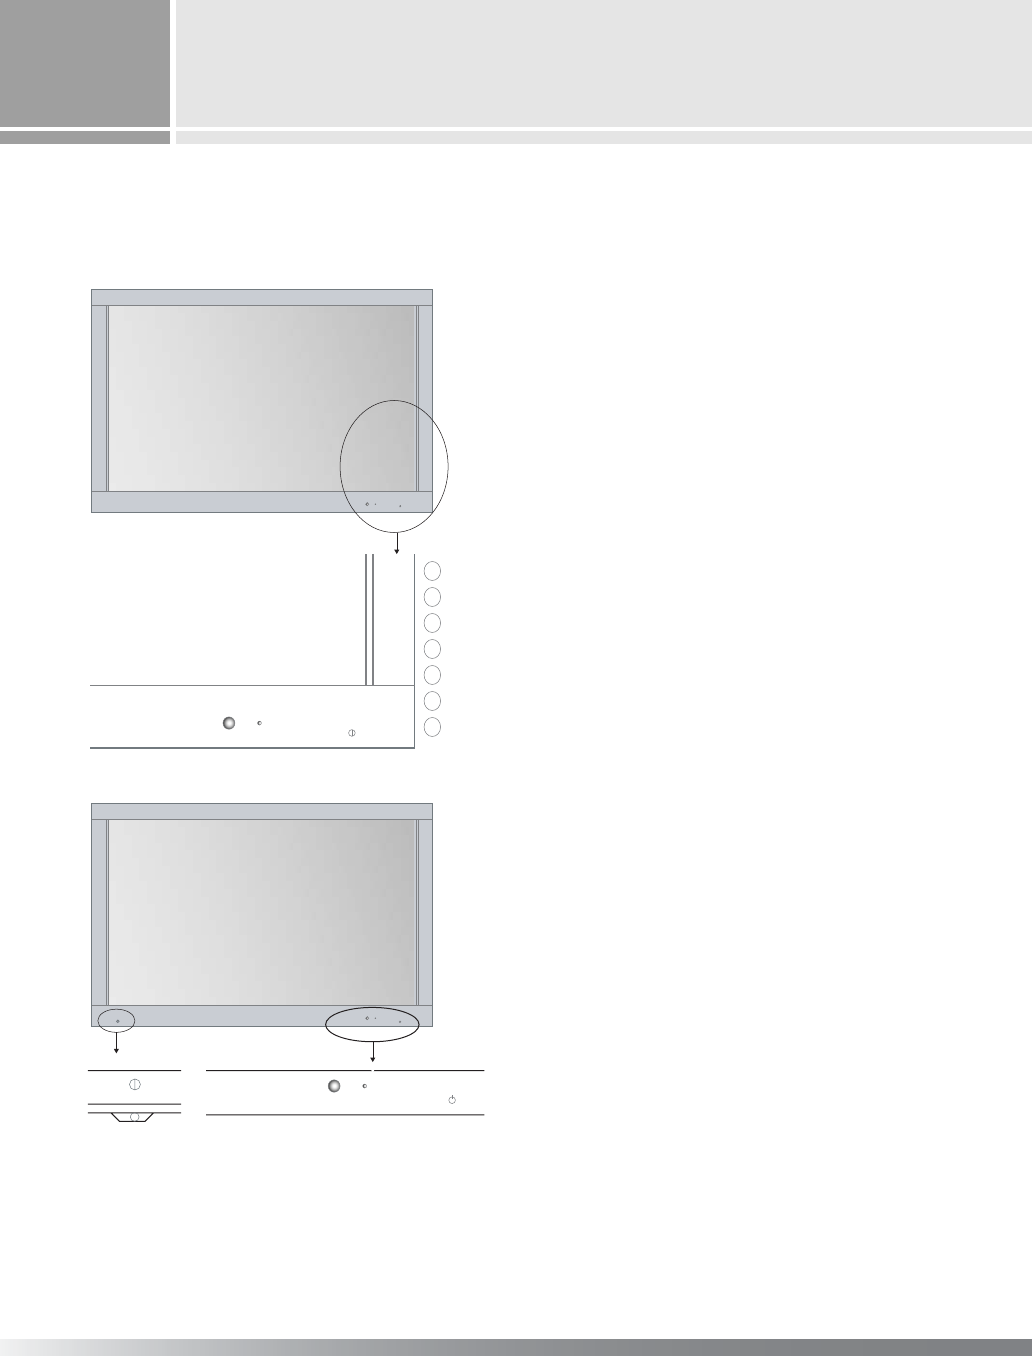
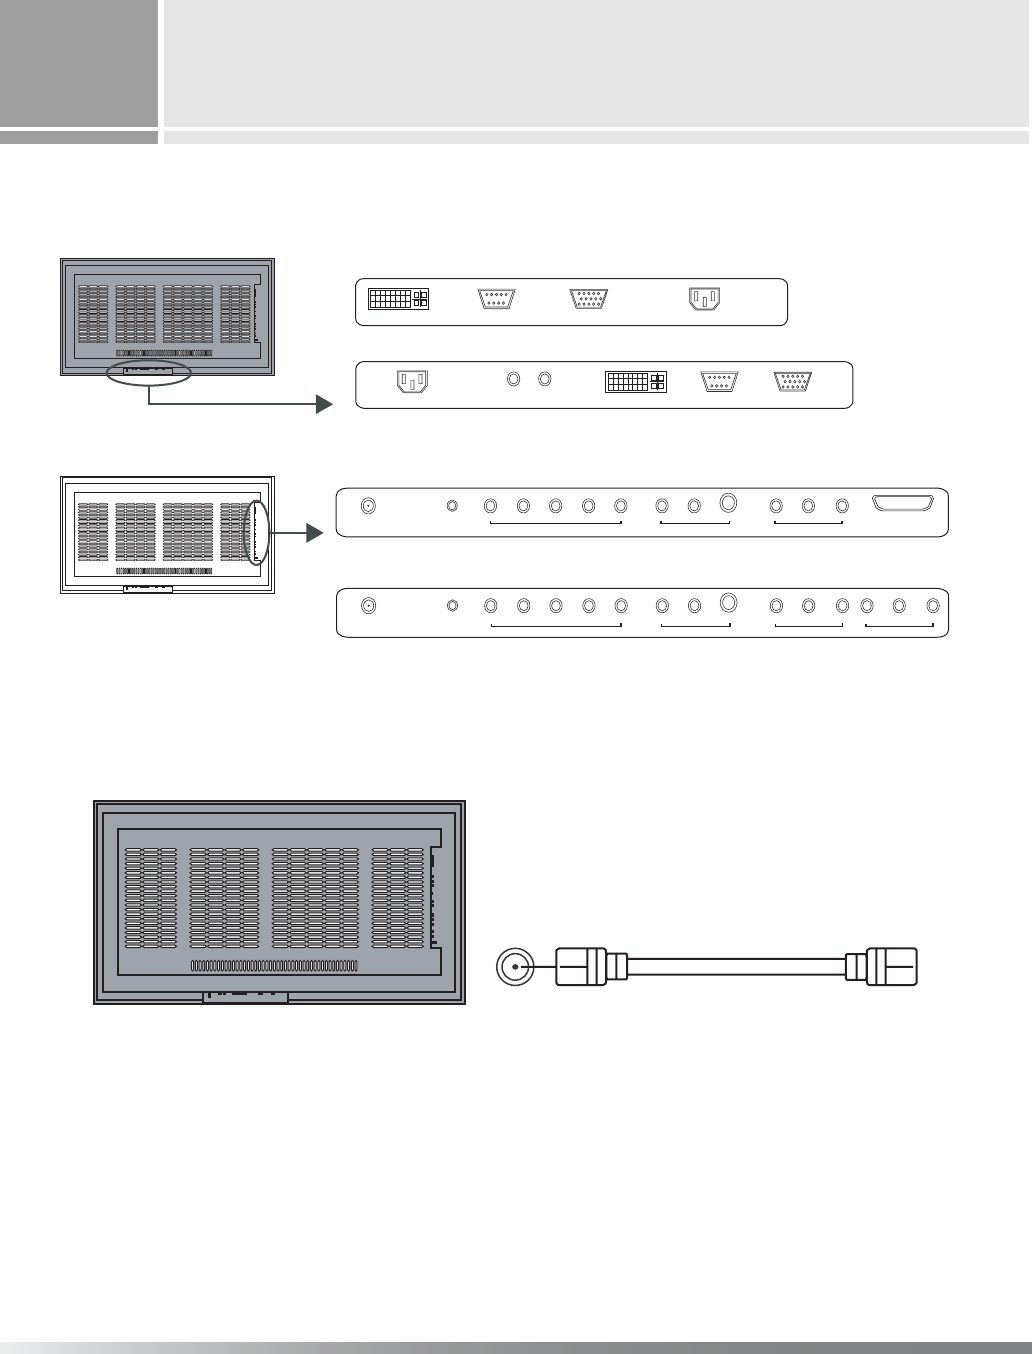
I/O Definitions
Front Panel Controls
6
▲V O L ▼▲ C H ▼ POW ER
MENU SEL
▲V O L ▼ ▲C H ▼ P OW ER
MENU SEL
ON/OFF
ON/OFF
①Main Power ON/OFF
: Press to turn on(Standby Mode) and off.
②Standby Power ON
: Touch to turn on(Operation Mode) and off.
③Channel UP/DOWN
: Touch to change the channel at TV mode.
④Volume UP/DOWN
: Touch to increase and decrease the volume.
⑤SEL : Touch to select all available Menu.
⑥MENU : Touch to Menu
⑦IR Receiver
⑧Power Indicator : Red color (Standby mode),
Green color (Operation mode)
POW ER
MENU
SEL
VOL+
VOL-
CH+
CH-
POW ER
26inch
30inch
- AC POWER Input
- RF(TV) connector for antenna Input
- Monitor Composite Video Output
- Monitor Line Level Audio Output
- S-VHS Input
- S-VHS Line Level Audio Input
- Composite Video Input
- Composite Line Level Audio Input
- SCART Input/Output
- HDTV/DVD Component Video Input
- HDTV/DVD Line Level Audio Input
- RGB D-sub connector Input
- RGB Audio Input
- DVI(digital RGB) Input
- IR Remote Control
- Speaker Output : Left, Right
Built-in Speaker(26inch only:option)
- RS-232(SoftWare Upgrade)
Rear cabinet I/O's
̺
̿
̾
̽
̼
̻
̀́
̺̿̾ ̽ ̼̻
̀́
Basic Operation
9
26"
30"/32"
PAL
NTSC
2. TV
Coaxial Cable
ANT INPUT
ྙConnect as the drawing shown.
ྚPower on.
ྛPress the [TV] button.
DVI RS-232C RGB AC POWER
LR
AC POWER SPEAKER DVI RS-232C RGB
ANT INPUT DVD/HD INPUT S-VHS INPUT COMPOSITE INPUT SCART
PC(S) L R Pr Pb Y L R S-VHS L R VIDEO
ANT INPUT DVD/HD INPUT S-VHS INPUT COMPOSITE INPUT COMPOSITE OUTPUT
PC(S) L R Pr Pb Y L R S-VHS L R VIDEO VIDEO L R
1. AV Input/Output Terminal
[Note]
In a poor signal area, purchase and install a signal amplifier for better quality.
B
asic Operation
10
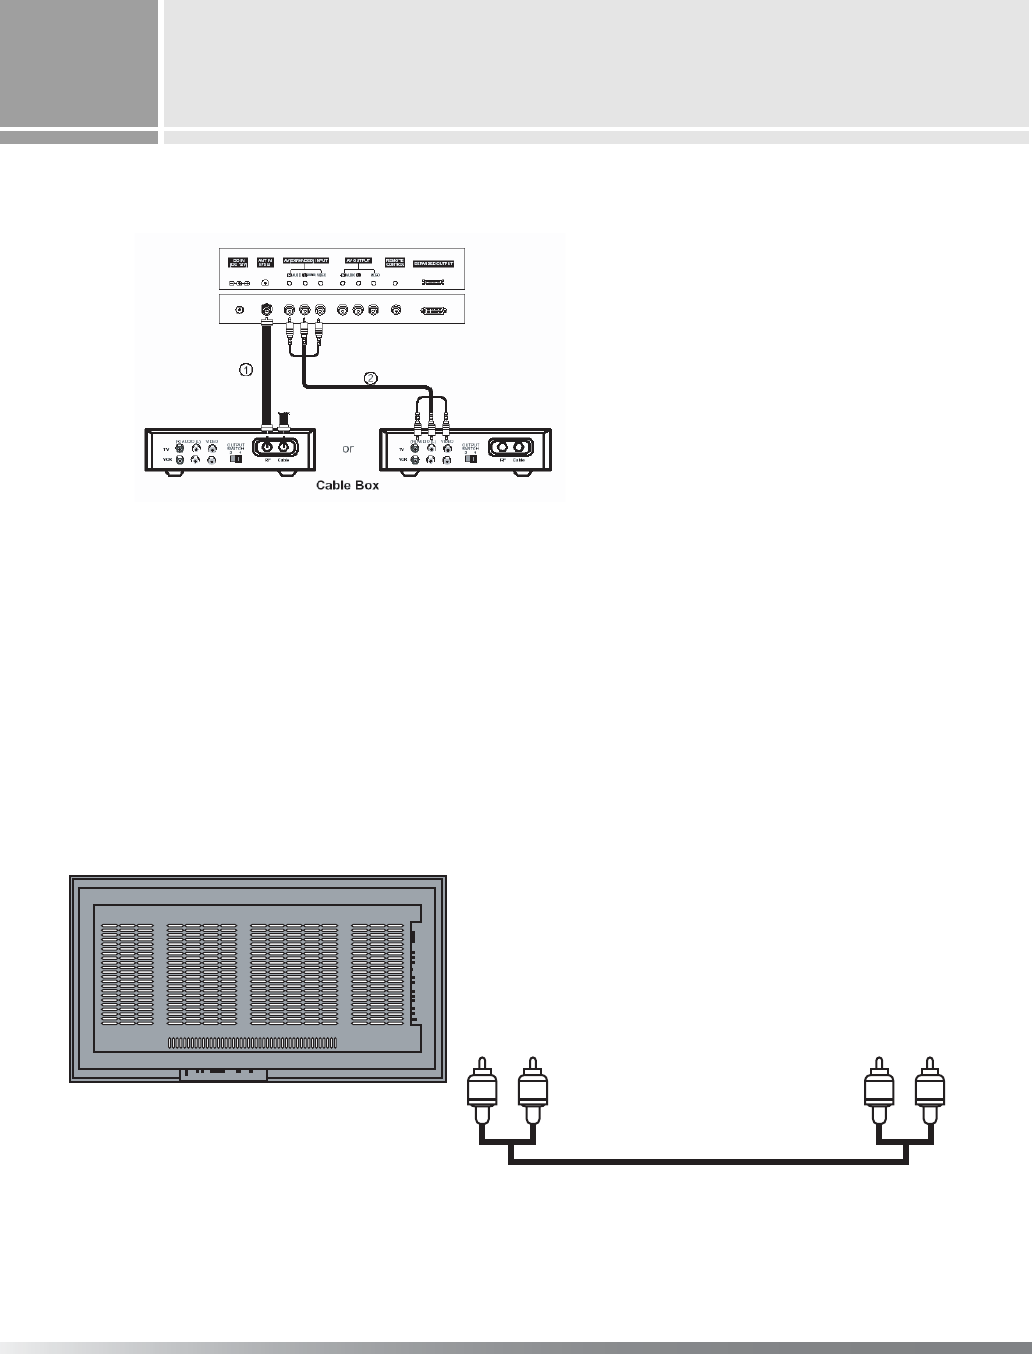
3. TV with Cable TV Settop Box
Connection 1
ྙSelect 3 or 4 with channel switch on cable box.
ྚGTune the TV channel to the same selected output channel of cable box.
ྛSelect channels at the cable box or with the cable box remote control INPUT.
Connection 2
ྙConnect the audio and video cables from the cable box's output jacks to the TV input jacks, as shown in the figure.
ྚPress the Video 1 or 2
ྛSelect channels with the cable box remote control.
ྙConnect as the drawing shown.
ྚPower on.
4. External Speaker
[Note] 26inch:5W x 5W, 8Ω
30inch:10W x 10W, 8Ω
SPEAKER

B
asic Operation
11
Composite
RLV VL R
COMPOSITE VIDEO OUT
VCR
5. VIDEO(Composite)
ྙConnect as the drawing shown.
ྚPower on.
ྛPress the [VIDEO1/ 2] button.( [VIDEO2] button for PAL System )
S-VHS S-VHS OUTPUT
VCR
S-VHS Cable
AUDIO Cable
VIDEO1 (MONO)LR LR
6. S-VHS
ྙConnect as the drawing shown.
ྚPower on.
ྛPress the [S-VHS] button.

Basic Operation
12
VCR
SCART I/O
SCART I/O
SCART Cable
VIDEO 1
RLV VL R
COMPOSITE VIDEO OUT
VIDEO
8. VIDEO Output connection(NTSC only)
ྙConnect as the drawing shown.
ྚPower on.
7. SCART Video and SCART RGB connection(PAL only)
ྙConnect as the drawing shown.
ྚPower on.
ྛPress the [VIDEO1] button.
Basic Operation
13
TV/HD/DVD(P)
Pr Pb Y Pr Pb Y
COMPOSITE VIDEO OUT
Settop Box, Progressive DVD
COMPOSITE VIDEO OUT
DVD Player
RL RL
AUDIO Cable
COMPONENT VIDEO Cable
DTV/HD(S) SOUND OUT
RGB(P)
DVI(P)
RGB(P)
DVI(P)
COMPUTER
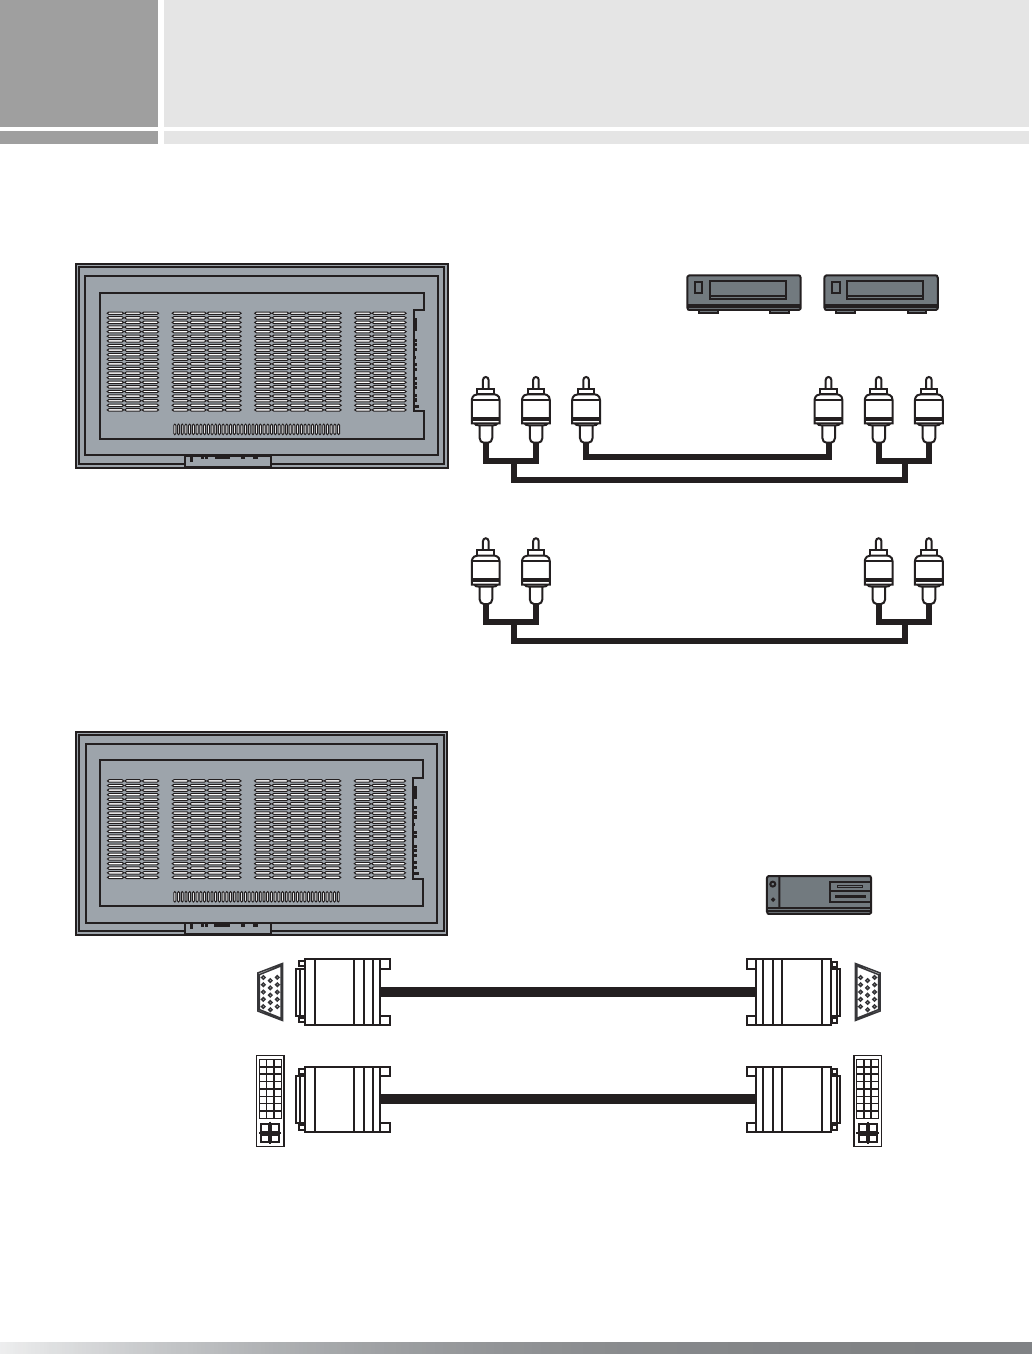
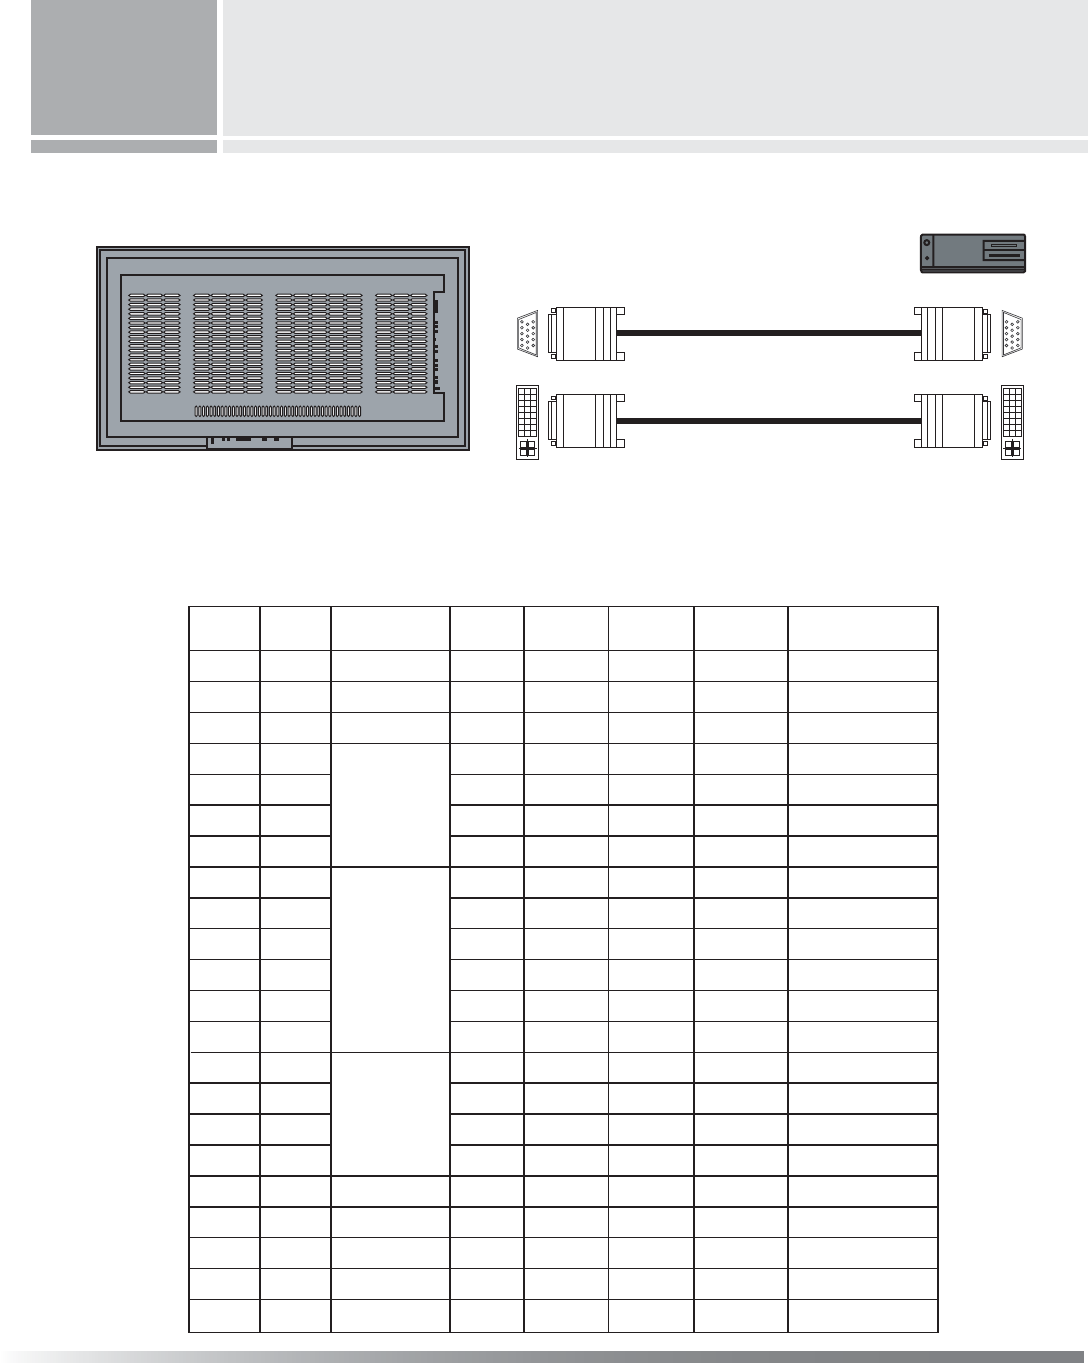
9. HDTV/DVD component video(Progressive DVD, DTV 480p to 1080i)
DVD component video(Interlaced DVD)
ྙConnect as the drawing shown.
ྚPower on.
ྛPress the [COMPONENT1]
/[COMPONENT2] button.
ྙConnect as the drawing shown.
ྚPower on.
ྛPress the [Analog RGB] button for Analog RGB.
ྜPress the [Digital RGB] button for Digital RGB (DVI-D).
10. Analog RGB/DVI(option)
%DVLF2SHUDWLRQ
/
/
/
/
/
/
/
/
/
/
/
/
/
/
/
/
/
/
/
/
5HVROXWLRQ
3L[HO
/
/
/
/
/
/
/
/
/
/
/
/
/
/
/
/
/
/
/
/
/
/
NEG
POS
POS
NEG
NEG
NEG
NEG
POS
POS
POS
POS
POS
POS
NEG
NEG
POS
POS
POS
POS
POS
POS
POS
3TANDARD
3TANDARD
3TANDARD
)NDSTANDARD
3TANDARD
3TANDARD
3TANDARD
'UIDELINE
'UIDELINE
3TANDARD
3TANDARD
3TANDARD
3TANDARD
'UIDELINE
3TANDARD
3TANDARD
3TANDARD
3TANDARD
3TANDARD
3TANDARD
3TANDARD
3TANDARD
POS
NEG
NEG
NEG
NEG
NEG
NEG
POS
POS
POS
POS
POS
POS
NEG
NEG
POS
POS
POS
POS
POS
POS
POS
Dqdorj
5*%
k
5*%
9HUW5HIUHVK
+]
+)UHT
.+]
+6\QF
3RODQLW\
+6\QF
3RODQLW\ &RPPHQW
5*%3
'9,3
5*%3
'9,3
&20387(5
ྙ&RQQHFWDVWKHGUDZLQJVKRZQ
ྚ3RZHURQ
ྛ3UHVVWKH>$QDORJ5*%@EXWWRQIRU$QDORJ5*%
ྜ3UHVVWKH>'LJLWDO5*%@EXWWRQIRU'LJLWDO5*%'9,'
$QDORJ5*%'9,RSWLRQ


Teletext (PAL Only)
Teletext Feature
Most television channels provide written information services via teletext. Information provided includes:
---> Television programme times
---> News bulletins and weather forecasts
---> Sports results
---> Travel information
This information is divided into numbered pages (see diagram).
Teletext information is often divided between several pages displayed in sequence, which can be
accessed by:
---> Entering the page number
---> Selecting a title in a list
---> Selecting a coloured heading
(FASTEXT system)
You can display Teletext information at any time on your television. For Teletext information to be
displayed correctly, channel reception must be stable; otherwise:
---> Information may be missing
---> Some pages may not be displayed.
Part Content
A Selected page number.
B Broadcasting channel identity.
C Current page number or search indications.
D Date and time.
EText.
F Status information./ FASTEXT information.
Options
21

Displaying the Teletext Information
ྙPress the [ ] button to enter the Teletext mode.
ྚTo exit from the Teletext display, Press the [ ] button again.
Selecting a Text Pages
ྙUsing the Number Buttons.
Enter the three-digit page number given in the content by pressing the corresponding Number buttons.
: The selected Page number appears at the top of the screen and page appears after a short time.
ྚFASTTEXT System
If the FASTEXT system is used by the broadcasting company, the different topics covered
on a Teletext page are color-coded and can be selected by pressing the coloured buttons
on the remote control.
Press the coloured button corresponding to the topic that you wish to select; the available topics
are given on the status line.
ྛDisplay the Previous or Next page.
ྜSub-page can scrolled by using the [ ]/[ ] buttons.
ྜྷTo exit from the Teletext display, Press the [ ] button.
1
1
?
i
3,36:$3326,7,216,=(
7:,13,&6&5((1=22067,//
7(;73,&785(6281'67(5(2
$'''(//$1*790(180(18
11
22
Options
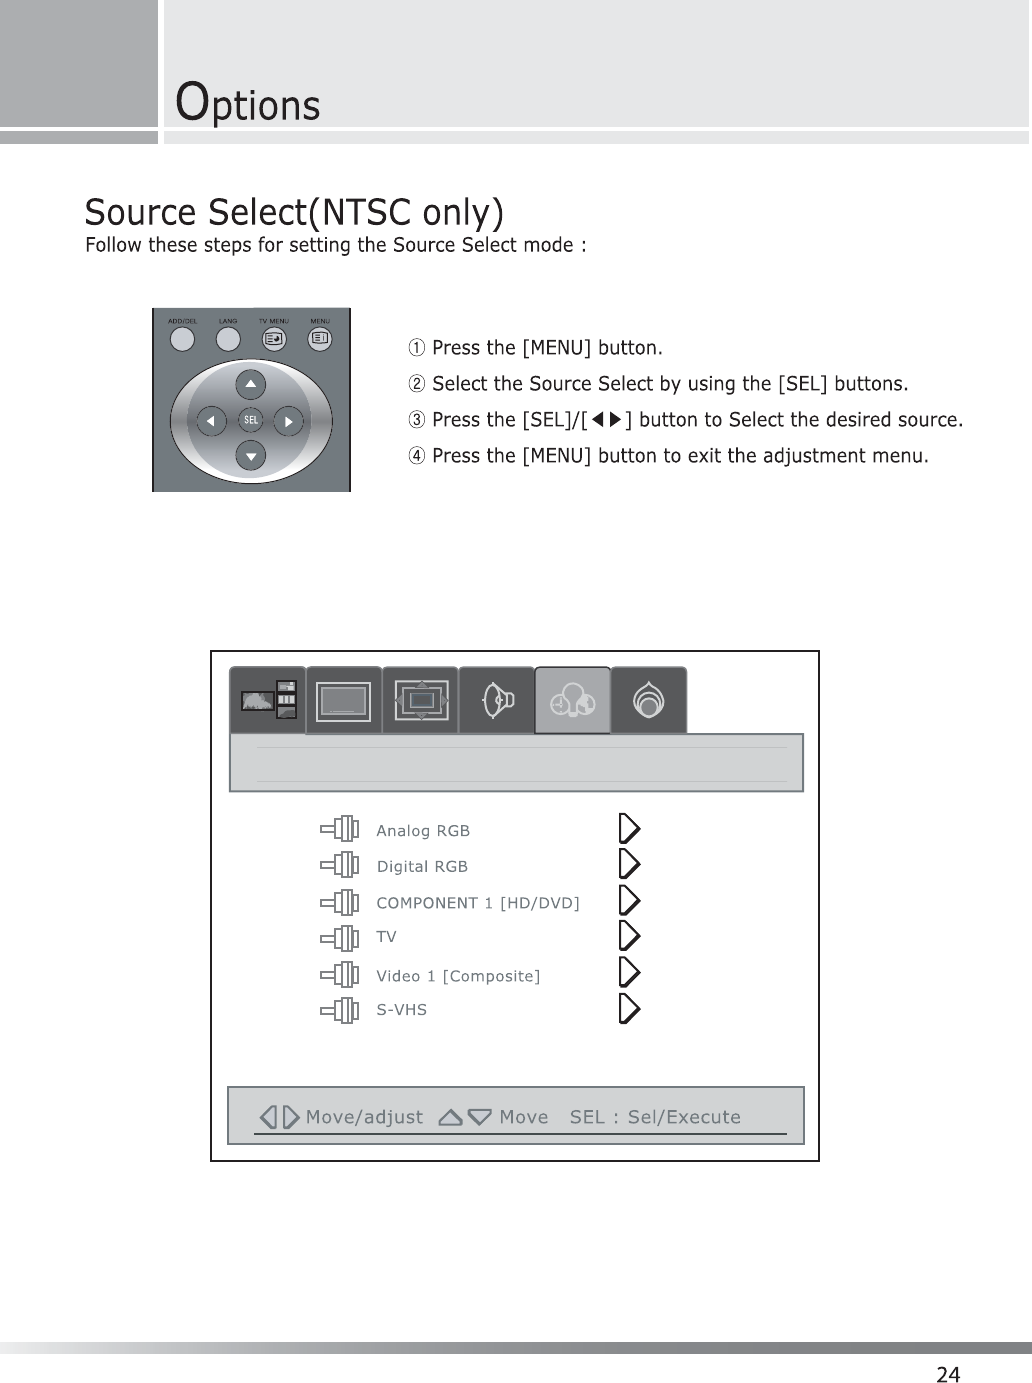
COMPONENT 1[HD/DVD]
Video 2[Composite]
S-VHS
Video 2[Composite]
S-VHS
25
T
rouble shooting
33
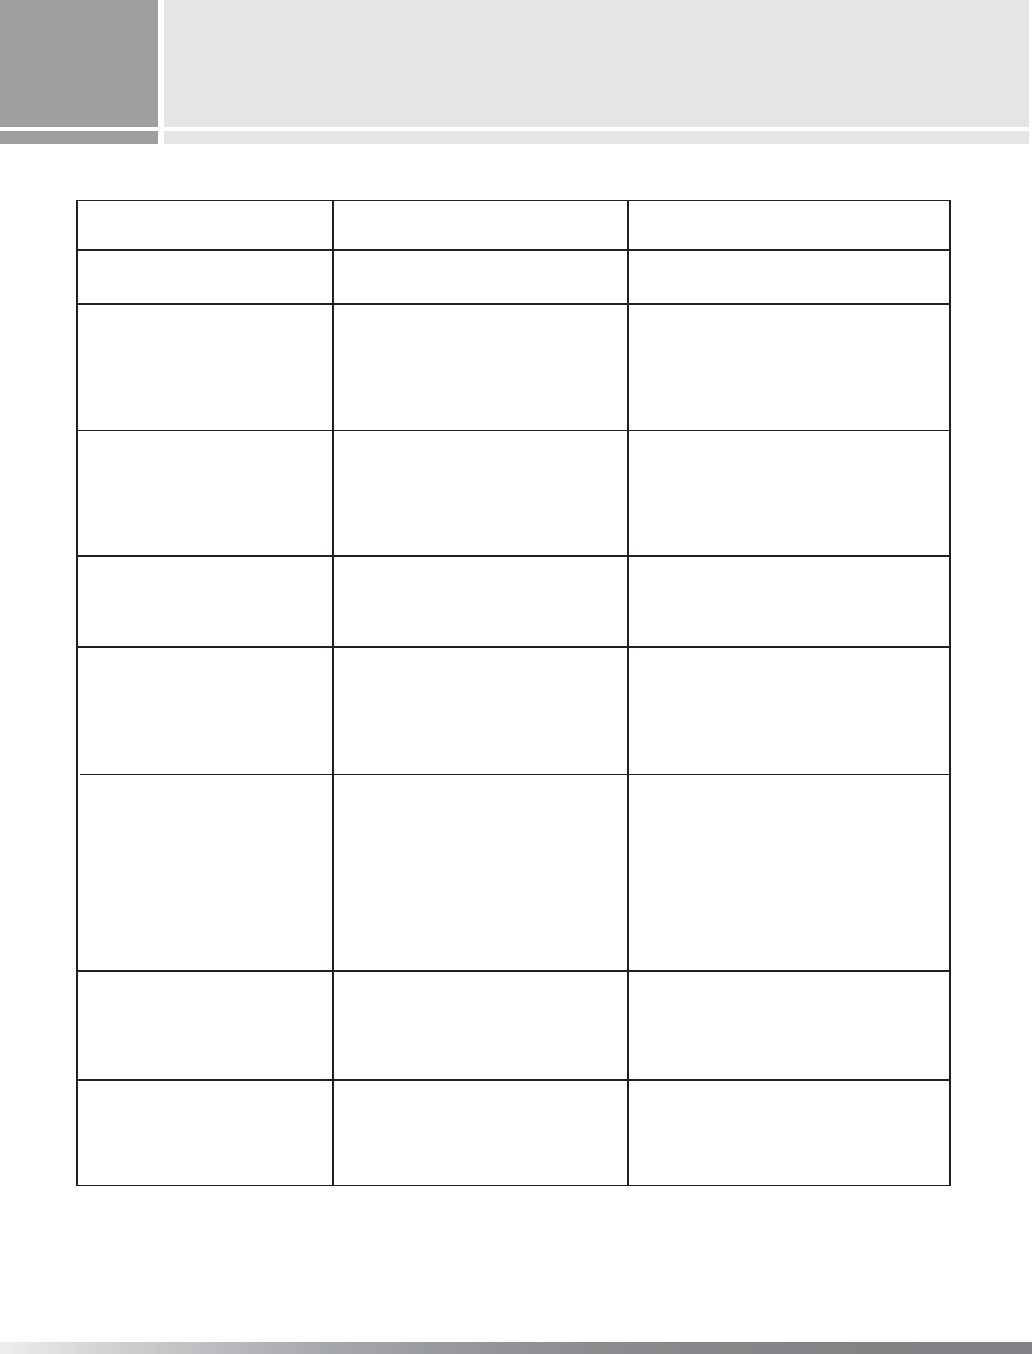
Symptom Cause Possible solution
The power does not turn on. Power to the TV is not plugged in. Check source of power to the TV.
The remote control does
not work.
Sensor is blocked.
Batteries in remote control
are weak.
Clear path for sensors.
Clean sensor lens.
Replace batteries.
No signal is displayed. Video source incorrect.
Check video source connection.
Make sure TV is set to correct video
source.
Picture scrolls or is fuzzy. Antenna type or location. Change antenna.
Try antenna in different location.
Picture appears
butNosound.
Part of picture is cut off
or picture is not centered.
Picture is too large
or too small.
The brightness is reduced
gradually.
Volume set at the minimum.
Speakers aren't connected.
Audio input set incorrectly.
Improper position setting.
The signal is unstable.
Improper the screen size setting.
Fixed patterns are displayed
for a long time.
Increase the volume.
Connect the speakers properly.
Check audio input connection.
Adjust the position properly.
When RGB, DTV/HD mode,
Set to the proper resolution and
Adjust the Freq. and phase setting.
Adjust the screen size setting.
Image sticking minimization mode.
FCC Compliance Statements
Note: This equipment has been tested and found to comply with the limits for a
Class B digital device, pursuant to part 15 of the FCC Rules. These limits are
designed to provide reasonable protection against harmful interference in a
residential installation. This equipment generates, uses and can radiate radio
frequency energy and, if not installed and used in accordance with the
instructions, may cause harmful interference to radio communications.
However, there is no guarantee that interference will not occur in a particular
installation. If this equipment does cause harmful interference to radio or
television reception, which can be determined by turning the equipment off and
on, the user is encouraged to try to correct the interference by one or more of
the following measures:
x Reorient or relocate the receiving antenna
x Increase the separation between the equipment and receiver.
x Connect the equipment into an outlet on a circuit different from that to
which the receiver is connected.
x Consult the dealer or an experienced radio / TV technician for help.
Warning : Your are cautioned that any change or modifications to the equipment not
expressly approved by the party responsible for compliance could void your authority
to operate such equipment.
G