DigitalWay MPIO-FL400 MP3 Player User Manual
DigitalWay Co., Ltd. MP3 Player
Users Manual

NOTE: This equipment has been tested and found to comply with the limits for a
Class B digital device, pursuant to part 15 of the FCC Rules.
These limits are designed to provide reasonable protection against harmful
interference in a residential installation.
This equipment generates, uses and can radiate radio frequency energy and, if not
installed and used in accordance with the instructions, may cause harmful
interference to radio communications. However, there is no guarantee that
interference will not occur in a particular installation. If this equipment does cause
harmful interference to radio or television reception, which can be determined by
turning the equipment off and on, the user is encouraged to try to correct the
interference by one or more of the following measures:
- Reorient or relocate the receiving antenna.
- Increase the separation between the equipment and receiver.
- Connect the equipment into an outlet on a circuit different from that to which
the receiver is connected.
- Consult the dealer or an experienced radio/TV technician for help.
CAUTION : Changes or modifications not expressly approved by the party
responsible for compliance could void the user’s authority to operate the equipment.
Information to the user
1. Product Composition
The accessories may look different from the image shown here and subject to change without
prior notice.
① Main Composition
FL400, Earphones, Mini USB, USB Extension Cable, Clip, Manual (or Quick Start Guide), CD,
Warranty Card
② Optional Accessories
Necklace, Arm-Band, Case
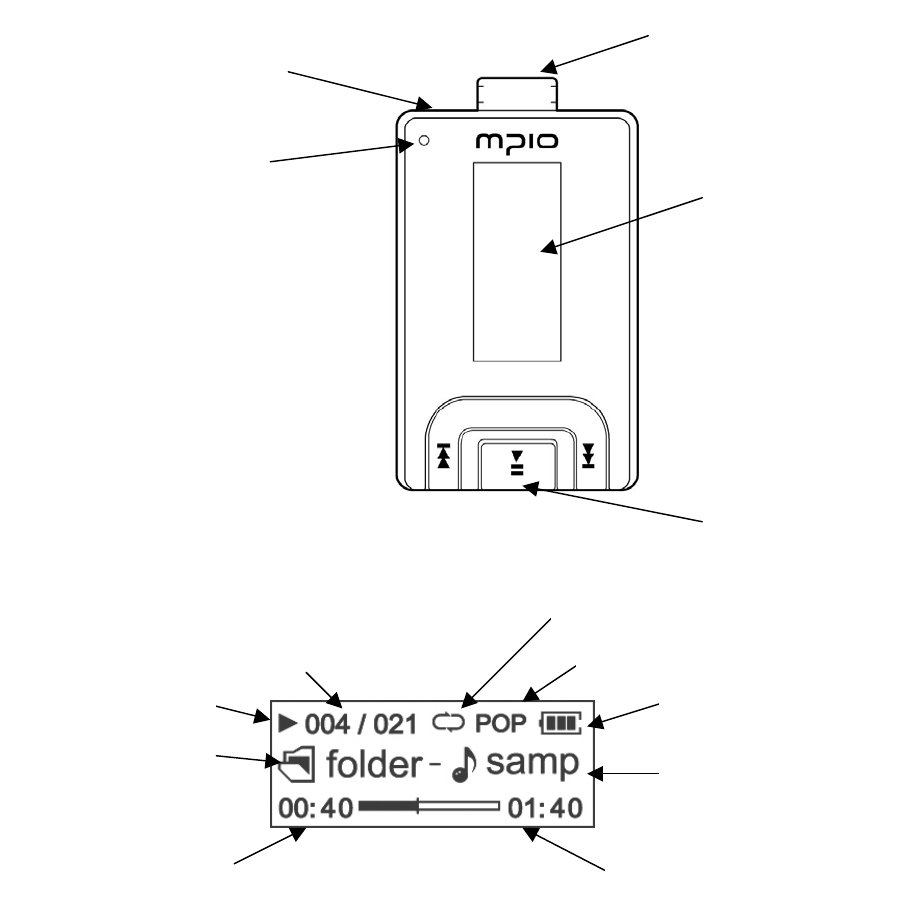
2. Control’s Overview
3. Information during playback on LCD
Remained battery
Music information
Playback time
Repeat
EQ
Current track/All tracks
Folder name
Current time
LCD Window
Mic
Reset
Earphone & USB
Status
Control Button
2. Before you Use
2.1 Connecting to the PC
Connect the player to the PC USB port using the USB cable.
! If you use Windows 98/98SE, you should install Windows 98 driver first before connecting
the player to the PC.
* Windows ME, Windows 2000, and Windows XP operating system supports USB 2.0 or 1.1
storage device by default. Therefore, the player will be automatically recognized as a moveable
disc without installing the driver. Once connected, you can use the player right away.
2.2 Saving music and data file
!!! Illegal download or duplication of MP3 files protected by the copyright is prohibited by law.
This product bears any responsibility on the issues related with the copyright.
* Using as a removeable disc
① Connect the player to the PC using the USB cable.
② Check the “USB Connected” message on the product LCD window.
③ Open the Windows Explorer in your PC.
④ Your computer will recognize FL400 as a removeable disc.
(You can check it in My Computer.)
⑤ You can save/delete the data, or create a folder using the same method as you handle
the computer hard disk.
(Save the data using ⓐ or ⓑ method as described below.)
ⓐ Copy and paste:
Select the data to save and click the right mouse button. Then, select the Copy menu
and paste the data in a moveable disc.
ⓑ Drag and drop:
Select the data to save and drag it while holding down the left mouse button, and
release the button on the moveable disc that was automatically recognized.
⑥ Then, the selected data will be saved in a moveable disc.
2.3 Disconnecting the Player from the PC
It is important to follow this procedure to disconnect the USB cable from your player and
the PC. If you don’t, you risk losing files as they are transferring to your player.
1. Click the USB icon on the Windows taskbar usually located at the bottom right of the
desktop.

2. From the popup menu, select the Stop command.
3. After a notification message displays, you may disconnect the cable from the player.
Windows 98 user
- Windows 98 does not provide any command that enables to disconnect the player from the
PC safely. Therefore, check the data transfer status before disconnecting the player from the
PC.
3. Learning Basic Usage
3.1 Battery charging
- The product battery can be re-charged by power supply through the PC USB
terminal.
① Remove the Necklace-earphone and Connect the Mini USB to FL400.
② Extend the connection by usage of USB Extension cable.
③ Connect the other end of the USB cable to the USB cable connection terminal located at the
left side of the player(PC).
3.2 Power On (Play)/Off (Stop)
① When you press the button longer, the logo screen will appear and then, the power is
turned on and the file list will be shown.
② To turn it off, press and hold the button.
※ Playing back previous/next file
Push button or button during playback to play the previous or next file.
* If you push button within 10 seconds after file playback, the beginning of the current
file will be played back.
* If you push button after 10 seconds from file playback, the previous file will be played
back.
※ Fast Forward/ Fast Rewind function
If you push and hold (right) button , the player performs the fast forward function.
If you push and hold (left) button , the player performs the fast rewind function.
※ Pause/ Releasing pause
During playback, press the button to pause.
Press the button again to resume playback.
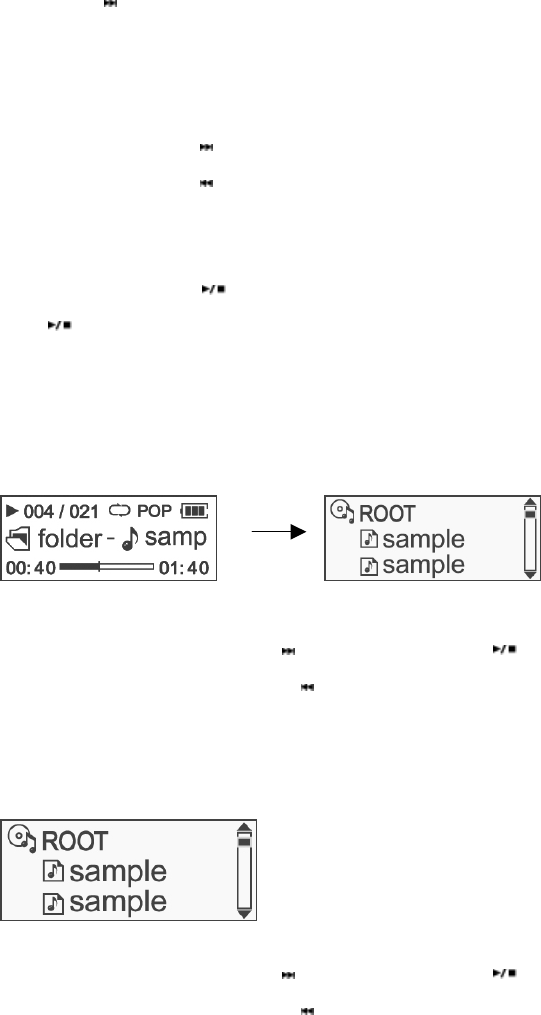
3.4 Navigation
(1) Navigating music files during playback or while paused
① Press the MENU button shortly to switch to the file list screen from playback or pause screen.
② Push + or – button to move to the target file.
To move to the sub-folder, push the button or press the button.
To move to the upper folder, push the button.
(2) Navigation for playback
① Press the MENU button shortly, Display on LCD switches playback to file list status.
② You can move between files by pushing + or – button
To move to the sub-folder, push the button or press the button.
To move to the upper folder, push the button.
3.5 Controlling Volumes
① Volume up: Push the + button.
② Volume down: Push the - button.
* Volume levels: 0 ~ 40

4. Switching the Mode (Listen to Music <-> Listen to FM Radio)
※ If you press the MENU button longer in playback or pause status, you can switch
to MP3, FM Radio, Voice mode by using mode menu.
① Press the MENU button longer in playback or pause status.
② Push +/- button to move intended menu and choose mode.
③ Push the MENU button shortly and change the mode by using + or – button.
(Figure1. Example in changing to Radio mode from Mp3 playback)
5. Listening to FM radio
① Press the MENU button longer in the playback or pause status, or during navigation.
② Push the + or - button to move to the mode menu and then, push the MENU shortly to enter
the mode-change.
③ Choose the Radio and change the mode.
④ You can find the frequency by pushing the stick to or directions.
(1) Switching between channel mode and scan mode
You can switch the reception mode of FM (channel <->scan) by pressing the MENU button.
※Scan Mode
You can change to receiving frequency by pushing the stick or directions.
※Auto Scan Function
Push and hold the or button, the frequency will change automatically to good receiving.
※ Channel Mode
If you choose the ‘ON’ at Auto Preset setting in Radio menu, the player will scan and save all
possible broadcasting frequency automatically. After that, you can listen to radio in channel
mode.
You can move to channels that saved frequency by pushing the or button.
(2) Saving Channel
This is a function that saves the received frequency in channel during scan mode.
You can save frequencies up to 20 channels
<In FM radio mode>
①Change to receiving frequency by pushing the or button and
choose the channel to save.
② When you press the button, the list window will appear.
③ Push the + or – button to move channel number and push the button to save the
channel.
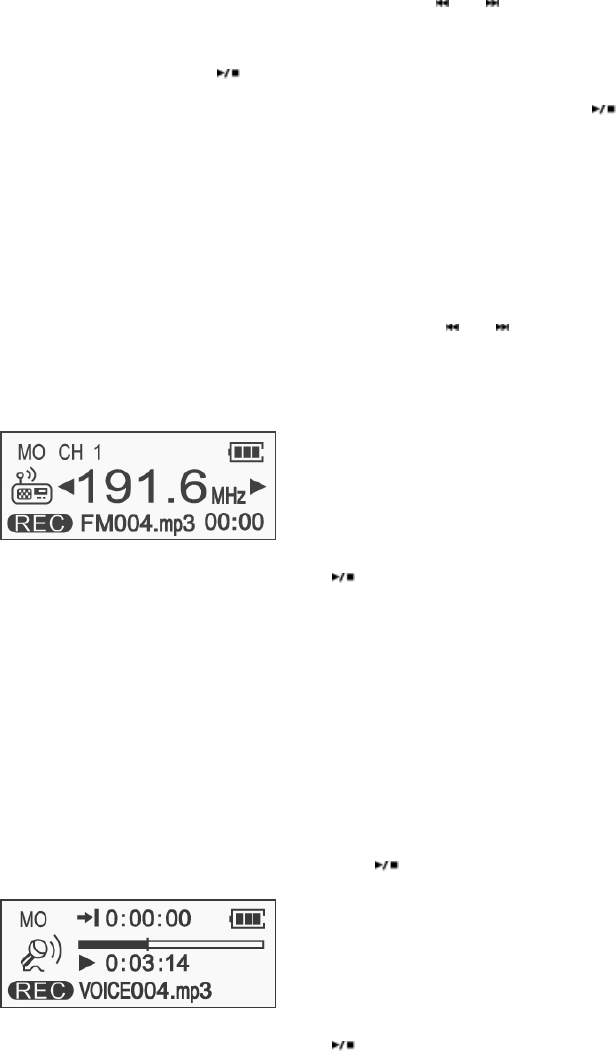
(3) Recording FM radio
You can record the receiving FM radio.
① Change To FM radio mode
② Change to receiving frequency by pushing the or button and
choose the channel to record.
③ Choose Recorder in mode menu, then the player start recording.
④ To finish the recording, press the button.
* The FM radio recorded files are stored in the RECORD folder by the file name of FM001.mp3,
FM002.mp3 etc.
6. Recording Voice
① Press the MENU button longer in the playback or pause status, or during navigation.
② Push the +or – button to move to the mode menu
③ Push the MENU button to enter in the mode menu, and then choose the Recorder.
④ To start recording the voice, press the button.
⑤ To finish the recording, press the button.
* The voice recorded files are stored in the RECORD folder by the file name of VOICE 001.MP3,
VOICE002.MP3 etc.

7. Technical Specification
Dimensions 46 x 28 x 13mm
Weight 25.5g
LCD 1" (128 x 48, White FSTN)
Internal Memory 256/ 512MB / 1GB / 2GB
Decoding Format MPEG 1/2/2.5 Layer3,
WMA(PD DRM),OGG,(Q1~Q10)
Voice Recording MP3
Frequency Range 20Hz ~ 20kHz
S/N ratio 90dB
Audio
Output Power 15mW/Channl (EU : 6mW/Channel)
Frequency Band 87.5MHz ~108MHz(Kor,USA,EU)
76 MHz ~ 102MHz(Japan)
S/N ratio 50dB
FM Radio
FM Recording MP3
Menu language English, Korean, Traditional Chinese,
Simplified Chinese, Japanese,
Language
ID 3 Tag language 55 languages
PC Interface USB 2.0
File Transfer Rate Approx. 16Mbps
Supported OS Windows 98SE/ME/2000/XP
Mac 9.2.2 ~
PC Interface
Mass Storage Class O
Operating Temperature -5℃ ~ 40℃
* Actual usable capacity can be changed via the logic file system regardless of the physical
capacity of FL400.
* The warranty does not cover PC connections with the use of extended cords like the USB hub,
etc.
* Data transfer rate may vary depending on the computer systems.
* Battery Life may vary depending on the usage, configuration and condition.
8. Computer system requirements
(1) PC
① System: USB Interface (Rev 1.1) standard equipment and built-in
CD-ROM driver
② CPU: Pentium 133 MHz or higher
③ Memory: 64MB or higher
④ Hard disk space: 20MB or higher
⑤ Operating system: Windows 98/Me/2000/XP
(2) Macintosh
① System: USB Interface (Rev V1.1) standard equipment and built-in
CD-ROM driver
EX) Power Mac G3(Blue & White)/G4/G4 Cube, iMac/iBook,
Powerbook, Powerbook G4
② Memory : 64MB or higher
③ Hard disk space : 20MB or higher
④ Operating system : MacOS 8.62~9.2, MacOS X(10.1)(iTunes 2,3,4 Plug-In)M PC
* The warranty does not cover PC connections with the use of extended cords like the USB hub,
etc.