KURZ_RENKFORCE_RF100_XL_3D_DRUCKER_de_en Ver. 01 001592620 An Ml KURZ RENKFORCE RF100 XL 3D DRUCKER De En
User Manual: KURZ_RENKFORCE_RF100_XL_3D_DRUCKER_de_en - Ver. 01 Renkforce RF100 XL 3D printer incl. filament from Conrad.com
Open the PDF directly: View PDF ![]() .
.
Page Count: 4
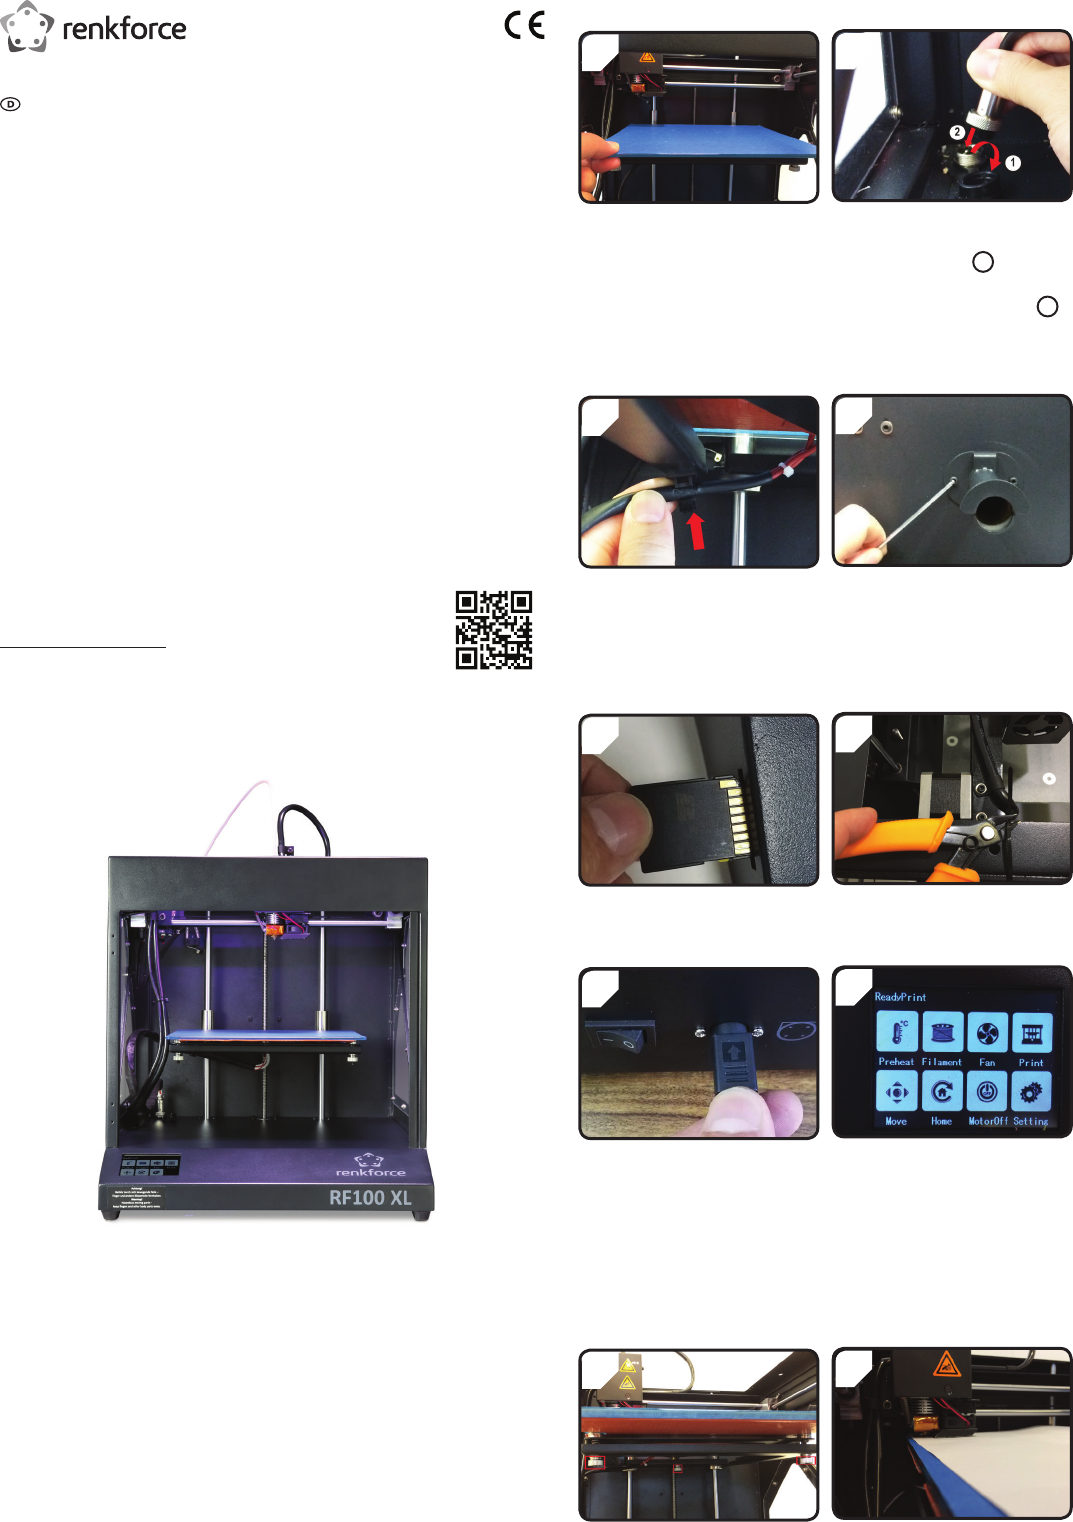
Einrichtung des Zubehörs
2
Nur bei Best.-Nr. 1592461
• Schutzdeckel des Stromanschluss für
die Heizplatte öffnen (
1
).
• Stecker des Heizplattenstromkabels mit
dem Stromanschluss verbinden (
2
).
• Verbindung sichern: Überwurfmutter
des Steckers auf den
Heizplattenanschluss drehen.
• Druckbett auegen.
1
4
• Mit zwei Schrauben und dem 2,5 mm
Innensechskantschlüssel die Filament-
Spulenhalterung hinten am 3D Drucker
montieren.
„Nase“ am Ende der Halterung zeigt
nach oben.
Nur bei Best.-Nr. 1592461
• Heizplattenkabel in die Kabelhalterung
(auf der Druckbettunterseite) stecken.
3
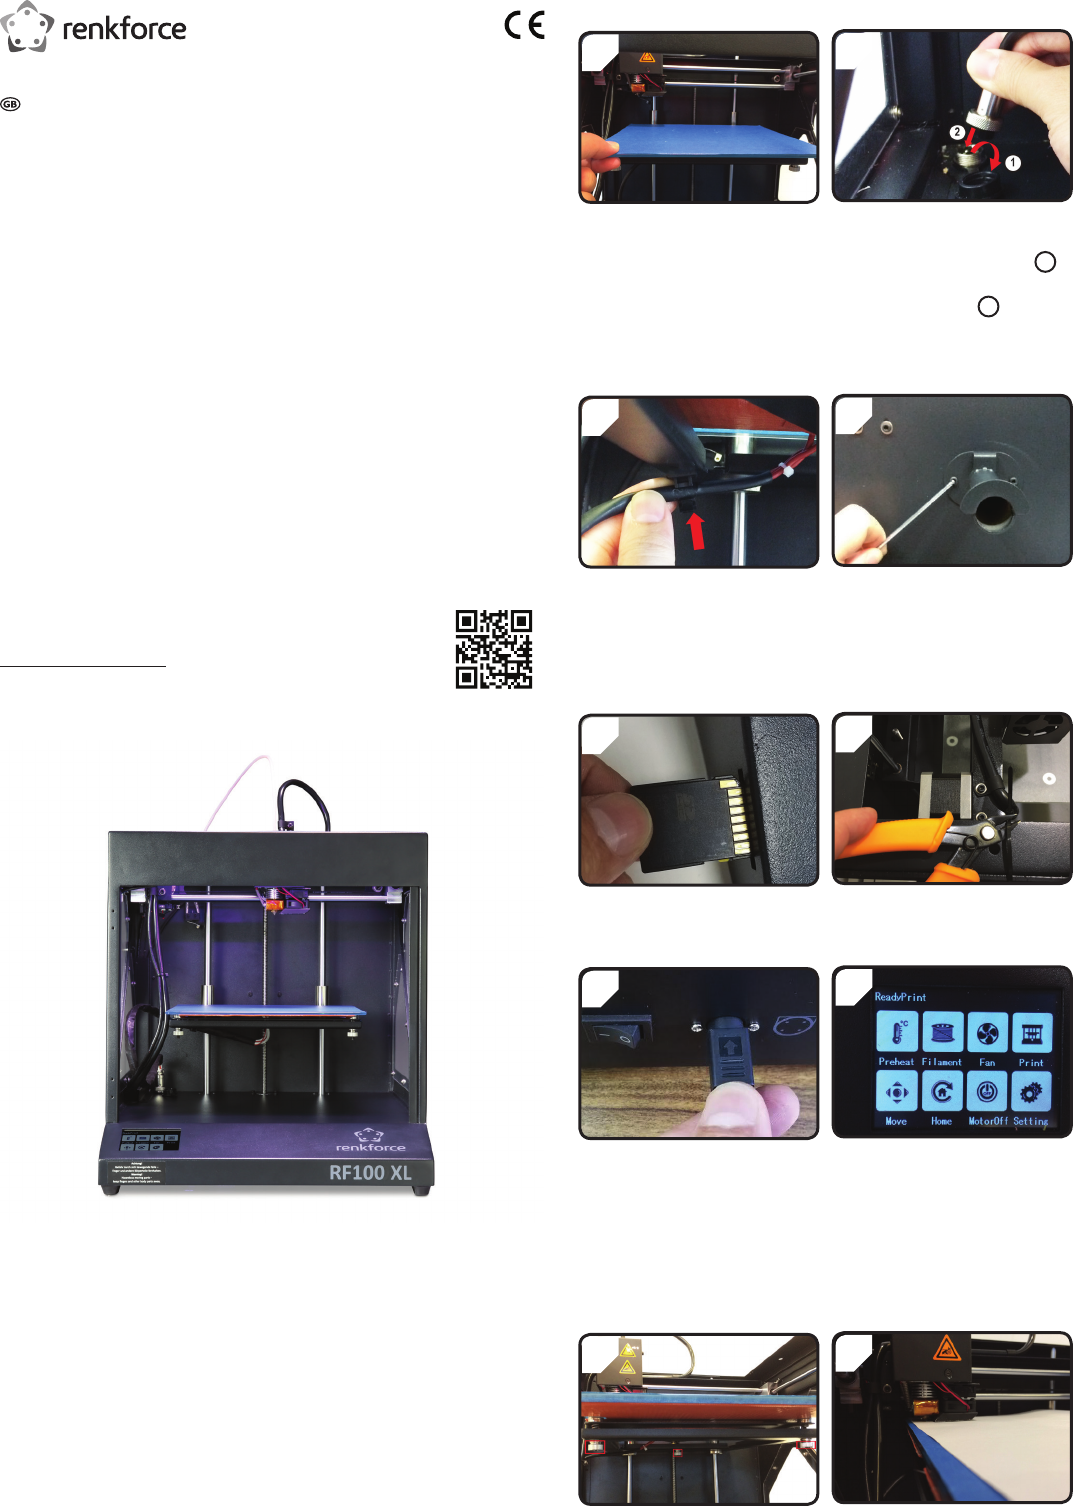
6
• Kabelbinder auf beiden Seiten mit
dem Seitenschneider durchtrennen.
• SD-Karte mit der Aufkleberseite nach
unten einstecken.
5
8
• Im Touchdisplay erscheint
< ReadyPrint >. 3D Drucker ist nun
einsatzbereit.
• Erst Netzkabel mit dem Netzteil
verbinden, dann Stromkabel des
Netzteils mit dem 3D Drucker
verbinden.
• Netzstecker des Stromkabels mit der
Netzsteckdose verbinden.
• 3D Drucker einschalten.
7
Druckbettkalibrierung
2
• A4-Papier als Messhilfe zwischen
Düse und Druckbett legen.
• 3 Nivellierschrauben unter dem
Druckbett bis zum Anschlag
festziehen.
1
Kurzanleitung
RF100 XL 3D Drucker Fertiggerät
Best.-Nr. 1592461 RF100 XL Plus
Best.-Nr. 1592620 RF100 XL
Lieferumfang
• 3D Drucker Fertiggerät
• 250 g Original Renkforce PLA-Filament
(1,75 mm weiß)
• 8 GB SD-Karte mit „Cura“ Software,
100+ druckfertige 3D Modelldateien
• Netzteil
• Netzkabel
• Kurzanleitung (auf Deutsch, Englisch)
• Filament-Spulenhalterung
• Filamentschlauch
• USB-Kabel
• Spachtel
• Pinzette
• Seitenschneider
• 2,0 mm Innensechskantschlüssel
• 2,5 mm Innensechskantschlüssel
• 2x Schraube
• Glas-Druckbett mit vorinstallierter
Druckbettfolie (bei Best.-Nr. 1592620)
- inkl. Heizplatte und beiliegenden Blue Tape
(bei Best.-Nr. 1592461)
• 5 x Original Renkforce Filamentmuster
(Kupfer-, Holz-, Glow-in-the-Dark-,
Colorchange- und Elastikmaterial
- jeweils 1,75 mm - 50 g)
• 50 g ABS-Filament (1,75 mm schwarz)
(bei Best.-Nr. 1592461)
Ausführliche Bedienungsanleitungen
Eine ausführliche Bedienungsanleitung können Sie auf
www.conrad.com/downloads herunterladen oder Sie können den
angezeigten QR-Code scannen. Befolgen Sie die Anweisungen auf der
Website.
Produktbild
Produktmerkmale
• Max. Größe des Druckobjekts
200 x 200 x 200 mm
• Druck diverser Materialien
wie PLA, Holz, Elastikmaterial, Kupfer;
- zusätzlich ABS (bei Best.-Nr. 1592461)
• Druckschichtdicke 0,1 mm - 0,2 mm
• Druckgeschwindigkeit 30 mm/s - 300 mm/s
• Farb-Touchdisplay
• Düsengröße 0,4 mm
• Unterstützt das Drucken von SD-Karte,
PC und USB
• mitgelieferte „Cura“ Software
• Einzel-Extruder

4
• SCHRITT 3 für den zweiten,
dritten und vierten Punkt
wiederholen (Kalibriersequenz und
Bewegungsrichtung der Düse werden
dargestellt).
• Im Menü < ReadyPrint > zuerst
< Set > (Einstellen), dann < Leveling >
(Nivellieren) wählen.
• < First > (Erster Punkt) betätigen. Düse
bewegt sich zum ersten Punkt.
• Durch Drehen der ersten
Nivellierschraube den Abstand
zwischen Düse und Druckbett regeln.
• Das Papier sollte leicht geklemmt
werden, das beim Bewegen des
Papiers ein leichter Widerstand
spürbar ist.
3
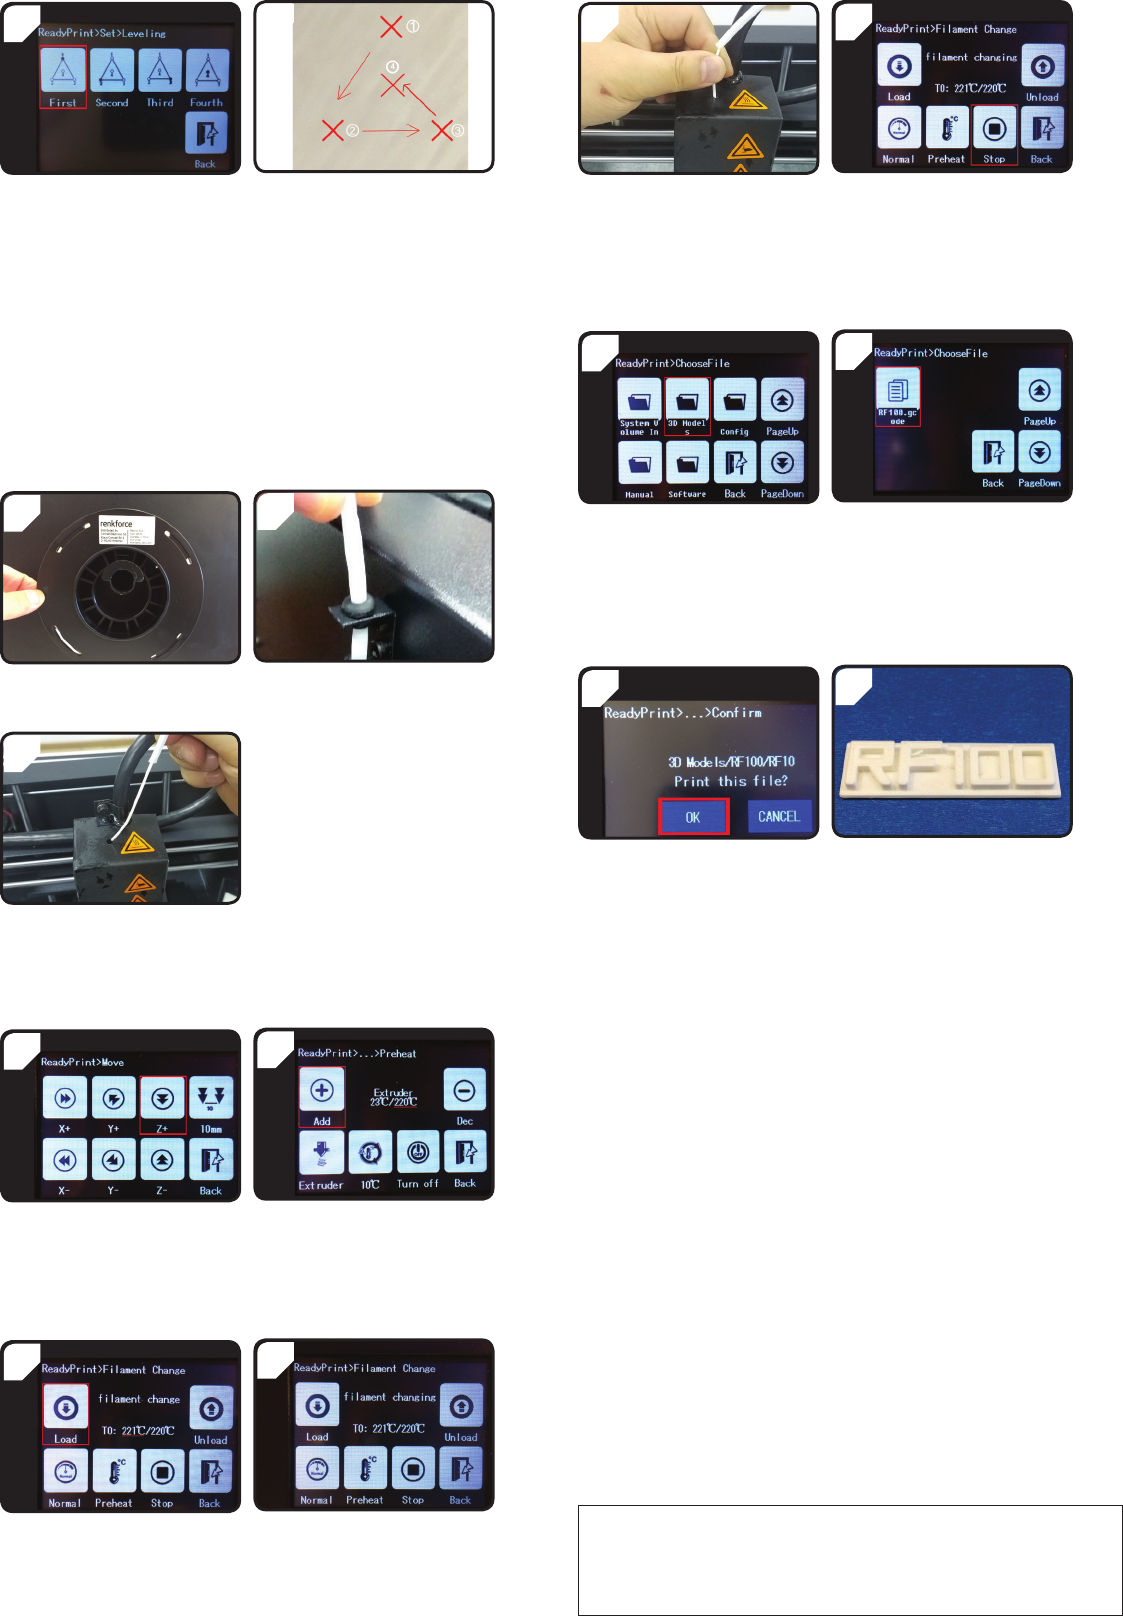
Filamenteinrichtung
2
• Filament-Schlauch in die
Schlauchhalterung einsetzen.
• Filament an der Spulenhalterung
anbringen.
1
• Das Filament soweit in den Schlauch
einführen, bis ca. 5 cm am Extruder-
Ende zu sehen sind.
3
Filamenteinzug
2
• Im Menü < ReadyPrint > zuerst
< Filament >, dann < Preheat >
(Vorheizen) auswählen.
• < Add > mehrfach betätigen, bis die
Solltemperatur von 220 °C erreicht ist.
• Im Menü < ReadyPrint > < Move >
(Bewegen) auswählen und dann zwei
Mal < Z+ > betätigen, um den Abstand
zwischen Düse und Druckbett zu
vergrößern.
1
4
• Im LC-Display erscheint die
Statusanzeige < lament changing >.
3D Drucker ist nun bereit zum
Filamenteinzug.
• Im Menü < Filament >, warten bis die
aktuelle Temperatur (hier 221 °C) die
Solltemperatur erreicht hat.
• < Load > (Einziehen) betätigen.
3
Dies ist eine Publikation der Conrad Electronic SE, Klaus-Conrad-Str. 1, D-92240 Hirschau (www.conrad.com).
Alle Rechte vorbehalten, einschl. Übersetzung. Die Vervielfältigung durch irgendeine Methode, d.h. Fotokopie, Mikrolm
oder in einer digitalen, elektronischen, optischen oder in anderer Form erfordert die vorherige schriftliche Genehmigung
vonseiten des Herausgebers. Die Vervielfältigung durch Drucken, auch teilweise, ist ebenso untersagt. Die Publikation
entspricht dem technischen Stand bei Drucklegung.
Copyright 2017 by Conrad Electronic SE. *1592461_1592620_V1_1017_02_LS_qsg_DE
6
• Wenn das Filament aus der Düse
austritt, < Stop > betätigen.
• Entfernen Sie die Filamentreste mit
einer Pinzette.
• Filament mit leichtem Druck vorwärts
schieben bis das Filament langsam in
den Extruder eingezogen wird.
• Filament loslassen.
5
Druckvorgang starten
2
• Im Ordner < 3D Models > ein
druckfertiges Modell auswählen, z. B.
< RF100.gcode >.
• Im Menü < ReadyPrint > zuerst
< Print > (Drucken) , dann ggf.
mehrfach < PageDown > (Nächste
Seite) bis der Ordner < 3D Models >
zu sehen ist.
• Ordner < 3D Models > öffnen.
1
4
• FERTIG.• Druck bestätigen mit < OK >.
3
Setting up the equipment
2
Only with item no. 1592461
• Lift up the protective cover on the
heating plate power connection (
1
).
• Plug the heating plate power cable into
the power connection (
2
).
• Secure the connection: turn the lock nut
in the heating plate connecting plug.
• Install the print bed.
1
4
• Using two screws and the 2.5 mm hex
key, attach the lament spool holder at
the back of the 3D printer.
The "nose" on the end of the bracket
points upward.
Only with item no. 1592461
• Insert the heating plate cable into the
cable holder (on the lower side of the
print bed).
3
6
• Cut through the cable tie on both sides
using the side cutters.
• Insert the SD card with the label side
facing downwards.
5
8
• < ReadyPrint > appears on the touch
screen display. The 3D printer is now
ready for use.
• First connect the mains cable to the
power adaptor, then connect the power
adaptor power cable to the 3D printer.
• Plug the mains plug on the power
cable into the mains socket.
• Switch the 3D printer on.
7
Print bed calibration
2
• Place an A4 sheet of paper between
the nozzle and the print bed to use as
a measurement guide.
• Tighten the 3 levelling screws under
the print bed as far as they will go.
1
Quick guide
RF100 XL 3D printer fully-assembled
Item no. 1592461 RF100 XL Plus
Item no. 1592620 RF100 XL
Delivery content
• 3D printer fully-assembled
• 250 g original Renkforce PLA lament
(1.75 mm white)
• 8 GB SD card with “Cura" software,
100+ ready-to-print 3D model les
• Power adapter
• Mains cable
• Quick installation guide (in German and
English)
• Filament spool holder
• Filament tube
• USB cable
• Scraper
• Tweezers
• Side cutters
• 2.0 mm hex key
• 2.5 mm hex key
• 2x screw
• Glass print bed with pre-installed print bed
lm (with item no. 1592620)
- includes heating plate and accompanying
blue tape (with item no. 1592461)
• 5 x original Renkforce lament samples
(copper, wood, glow-in-the-dark, colour-
change and elastic
- each one 1.75 mm - 50 g)
• 50 g ABS lament (1.75 mm black)
(with item no. 1592461)
Detailed Operating Manuals
A detailed operating manual can be downloaded from
www.conrad.com/downloads or you can scan the QR code on this page.
Follow the instructions on the website.
Product picture
Features
• Max. size of the printed object
200 x 200 x 200 mm
• Print various materials
such as PLA, wood, elastic, copper;
- additional ABS (with item no. 1592461)
• Printed layer thickness 0.1 mm - 0.2 mm
• Print speed 30 mm/s - 300 mm/s
• Colour touch screen display
• Nozzle size 0.4 mm
• Supports printing from SD card, PC and
USB
• "Cura" software included
• Single extruder
4
• Repeat STEP 3 for the second, third,
and fourth point (calibration sequence
and motion direction of the nozzle are
shown).
• In the < ReadyPrint > menu, rst select
< Set > then < Levelling >.
• Press < First > (rst point). Nozzle
moves to the rst point.
• The distance between the nozzle and
print bed is controlled by turning the
rst levelling screw.
• The paper should be lightly clamped,
so that you feel slight resistance when
moving the paper.
3
Installing the lament
2
• Insert the lament tube into the tube
holder.
• Mount the lament on the spool holder.
1
• Insert the lament into the tube until
approximately 5 cm is visible at the
extruder end.
3
Filament feed
2
• In the < ReadyPrint > menu, rst select
< Filament >, then < Preheat >.
• Press < Add > several times until
the target temperature of 220 °C is
reached.
• In the < ReadyPrint > menu, select
< Move > and then press < Z+ > twice
to increase the distance between the
nozzle and the print bed.
1
4
• The LCD panel displays the status
notication < lament changing >. The
3D printer is now ready for the lament
feed-in.
• In the < Filament > menu, wait until the
actual temperature (in this case 221 °C)
has reached the target temperature.
• Press < Load >.
3
This is a publication by Conrad Electronic SE, Klaus-Conrad-Str. 1, D-92240 Hirschau (www.conrad.com).
All rights reserved, including translation. Reproduction by any method, i.e. photocopy, microlm, or in digital, electronic,
optical or in any form, requires prior written approval from the publisher. Reproduction by printing, even in part, is also
prohibited. This publication represents the technical status at the time of printing.
Copyright 2017 by Conrad Electronic SE. *1592461_1592620_V1_1017_02_LS_qsg_EN
6
• If lament comes out of the nozzle,
press < Stop >.
• Remove the lament remnants with a
pair of tweezers.
• Slide the lament forward gently until
the lament is slowly fed into the
extruder.
• Release the lament.
5
Starting the printing process
2
• In the < 3D models > folder, select a
ready-to-print model,
e.g. < RF100.gcode >.
• In the < ReadyPrint > menu, rst select
< Print > then < PageDown >, several
times if necessary, until the folder
< 3D Models > is shown.
• Open the < 3D Models > folder.
1
4
• DONE.• Conrm printing with < OK >.
3
