800764 1.3 Faros Quick Guide E Motion En
User Manual:
Open the PDF directly: View PDF ![]() .
.
Page Count: 12
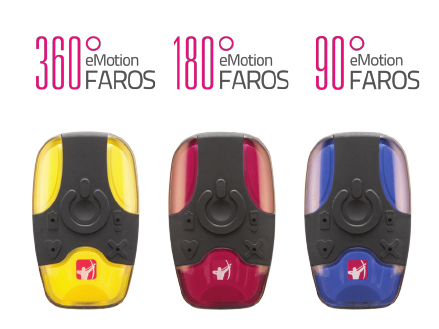
EMOTION FAROS
QUICK GUIDE
800764-1.3 Faros Quick Guide
Date of Issue: October 21, 2015
PACKAGE CONTENT
Faros sensor is a compact wireless solution for
Electrocardiography (ECG) applications.
This package contains the following:
1. Faros Sensor
2. USB cable
3. Cable set or Stingray Adapter and Chest Strap
4. eMotion Faros Manager and eMotion EDF Viewer
software.
Accessories:
USB Cable – 900826
Stingray Adapter – 900809
Chest Strap – 900810
Docking Station – VP00489
Fast-Fix Electrode – 900811
Cable sets:
2-electrodes – 900865
3-electrodes – 900866
5-electrodes – 900867
More information concerning device and use can be
found from eMotion Faros Series Manual. Manual is
included on Faros Sensor memory in PDF-format.
Before operating the eMotion Faros, please read the
manual thoroughly and retain it for future reference.
2
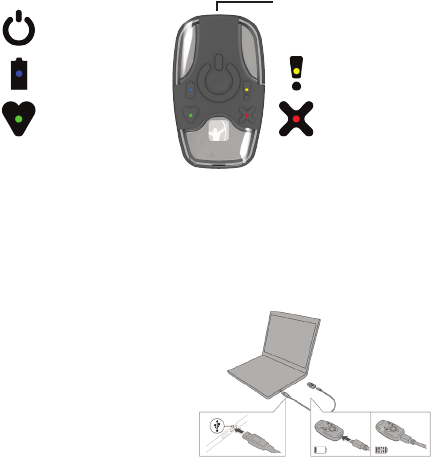
FAROS SENSOR
BEFORE USE CHARGE THE BATTERY. Use the delivered
USB cable to connect the sensor to your computer.
• Plug the USB Cable to your computer
• Plug other end to your Faros Sensor
• Blue light indicator starts to blink
• Blue light indicator is lit when battery is fully charged
Recommended recharge
time is 1.5 hours. After
recharging un-plug the
USB-Cable from Faros
and Computer.
Pushbutton
Blue Indicator
Battery States
Green Indicator
Measurement and PC
connection States
Orange Indicator
Notication
Red Indicator
Error States
USB-connector
3
MEASUREMENT PREPARATION
Orange Indicator
Notication
MEASUREMENT PREPARATION
With eMotion Faros Manager software you can manage data
acquistion conguration.
eMotion Faros Device Manager Overview
• Connect your eMotion Faros Sensor to computer
• Browse to FAROS_xxx hard drive and open the
Software folder. Open Manager folder and run
“eMotionFarosManager.exe”
• Synchronize sensor time and set the conguration
which you want to use for data acquisition
• When you are ready click ‘Save’ button to apply settings
• Click ‘Close’ to exit application
Sensor records data on internal memory or communicates
remotely with Bluetooth enabled device.
Bluetooth communication is available on Faros 180 and 360
models only.
4
MEASUREMENT PREPARATION

MEASUREMENT PREPARATION
Faros default conguration is Datalogger mode. Manager
conguration options are showed based on your Faros
sensor model.
5
MEASUREMENT PREPARATION
PERFORMING MEASUREMENT
The eMotion Faros ECG Sensor has one pushbutton. The
device starts when you push the button. Green LED indicates
the measuring mode. The device shuts down when you push
the button continuously for 5 seconds.
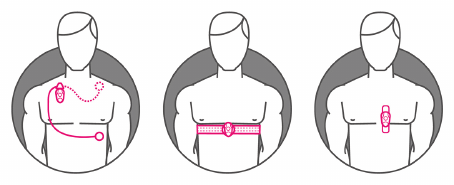
Wear your applied part according to illustrations below.
Connect your Faros sensor and start measurement.
1. Faros with Cable Set
2. Faros with Chest Strap and Stingray
3. Faros with Fast-Fix Electrode
Full electrode and sensor placement pictures are available on
eMotion Faros Series Manual which is located on the device
memory as PDF le.
6
MEASUREMENT PREPARATION
REVIEWING MEASUREMENT
EDF data can be reviewed using eMotion EDF Viewer
software. Application is located on Faros Sensor’s internal
memory.
eMotion EDF Viewer can be used without installation from
Faros internal memory or it can be installed on computer.
Installation is recommended.
Open eMotion EDF Viewer
1. Connect your Faros Sensor to computer using
USB Cable
2. Browse to FAROS_xxx hard drive and Software Folder
3. Open eMotion EDF Viewer and run the application
Review measurement data
1. Click ‘Open EDF’ in main view
2. Select FAROS_xxx hard drive and open “DATA” folder
3. Folder names indicate the date of performed
measurement
4. Select desired measurement and .edf-le and click
‘Open’
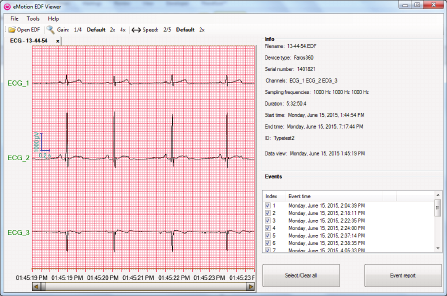
Selected data appears on eMotion EDF Viewer. Data can be
reviewed using scrollbar or arrow buttons on keyboard.
7
REVIEWING MEASUREMENT
REVIEWING MEASUREMENT
Data window presents the recorded ECG data. Possible
events are shown in data. Info window contains Faros sensor
conguration which was used in measurement. Duration,
start and end time are presented. Manually created event(s)
are listed in the Events window. An event report can be
created from selected patient events by clicking the Event
report button.
8
REVIEWING MEASUREMENT
SAFE AND EFFECTIVE USE
eMotion Faros ECG sensor doesn’t require any particular
maintenance procedure except recharging the battery. For
a correct functioning please follow these simple precautions:
• Handle this device carefully
• Store the device away from dusty or dirty areas
• Keep the device away from moisture or extreme
temperature
• Disconnect Cable Set from Sensor when device
is unused
• Connect Cable Set only to Faros Sensor
• Do not disassemble Faros Sensor or accessories
• If a problem occurs use pushbutton to reset the device
• For disinfection use non-ufng cloth dampened in
non-alcoholic disinfection uid or non-alcoholic cleaning
and disinfection wipes for medical devices, such as
mikrozid® sensitive wipes
Do not try to repair, or modify the sensor. If you cannot solve
the problem of the device, please contact
mega@megaemg.com for support.
9
REVIEWING MEASUREMENT
TROUBLESHOOTING
Device does not start measurement (error light indicator
blinks three (3) times)
• Recharge the sensor
• Synchronize device clock via Faros Manager Software
• Save settings
To reset the device
• Push the pushbutton until all light indicators ash
eMotion Faros Series Manual can be found from your Faros
Sensor memory. Before operating the eMotion Faros, please
read the manual thoroughly and retain it for future reference.
If a problem occurs, contact us. Contact information
presented on last page.
10

FAQ
How can I change the measurement modes of the device?
Go to the device hard drive Faros XXX (XXX is model, 90, 180 or 360). From this
hard drive, you can nd the Faros Manager software with which you are able to
change the measurement settings. For further information on how to use Faros
Manager, please see eMotion Faros Series Manual, chapter 3
My Faros sensor does not start, what might cause this
problem?
It is important to remember that eMotion Faros sensor uses the energy of the
battery also when it is on standby mode (“power off” mode). For example, the
device’s inner clock uses the battery also when it is turned off to keep up with
the time. This is why we recommend you to recharge the sensor before every
measurement, or at least when the sensor has been on standby mode for several
days.
11

CONTACT
Mega Electronics Ltd
Pioneerinkatu 6
70800 Kuopio, Finland
Phone +358 (0)17 581 7700
Fax +358 (0)17 580 0978
Email mega@megaemg.com
Website www.megaemg.com
12
