59545/59655 82207728
User Manual: 82207728
Open the PDF directly: View PDF ![]() .
.
Page Count: 8
59545 / 59645 / 59655 Rev. 3 1002 K6858707
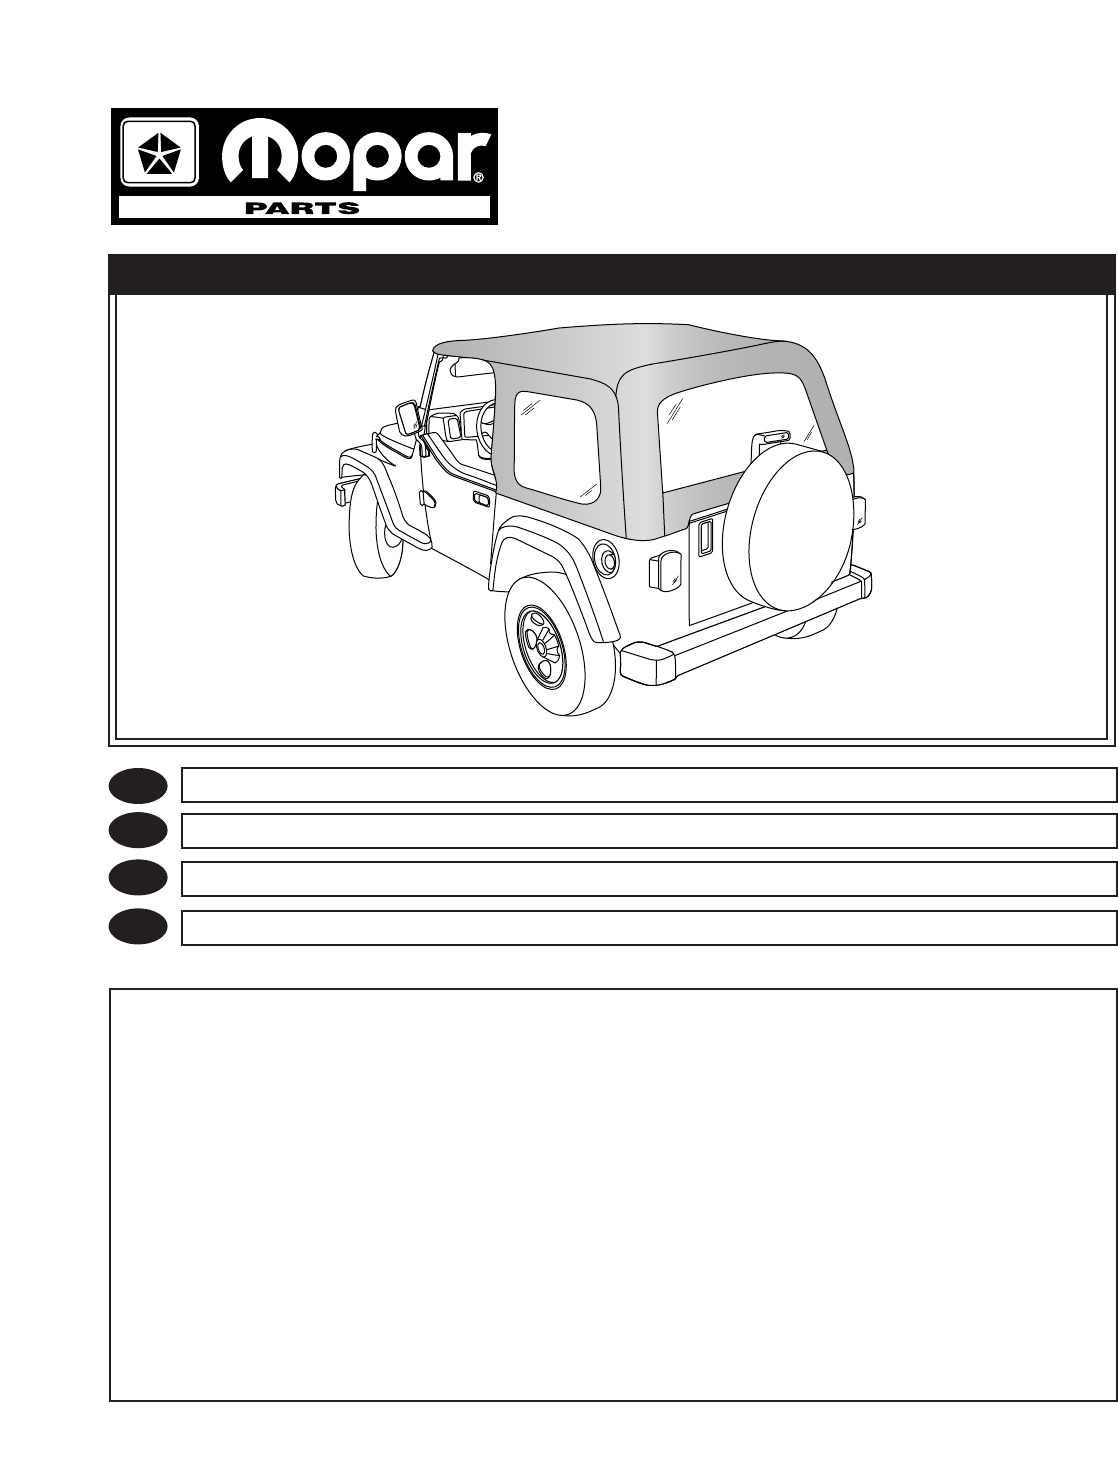
GENUINE ACCESSORIES
1 of 8
INSTALLATION INSTRUCTION
Parts must not be fitted until registration of the vehicle has been obtained.
INSTRUCCIONES DE MONTAJE
No se permite montar las piezas antes de registrar el vehiculo.
NOTICE DE MONTAGE
Ne pas monter les pièces avant l’enregistrement du véhicule.
GB
E
F
JP
1997 82202125 59545
1997 82202126 59545
1997 82202127 59545
1997 82204553 59545
2001 82206623 59645
2001 82206624 59645
2003 82207728 59655
2003 82207729 59655
©DAIMLERCHRYSLER
Subject to alteration without notice
Reservadas modificaciones lecnicas
Sous réserve de modifications techniques
Top Kit
59545 / 59645 / 59655 Rev. 3 1002 K6858707
GENUINE ACCESSORIES
2 of 8
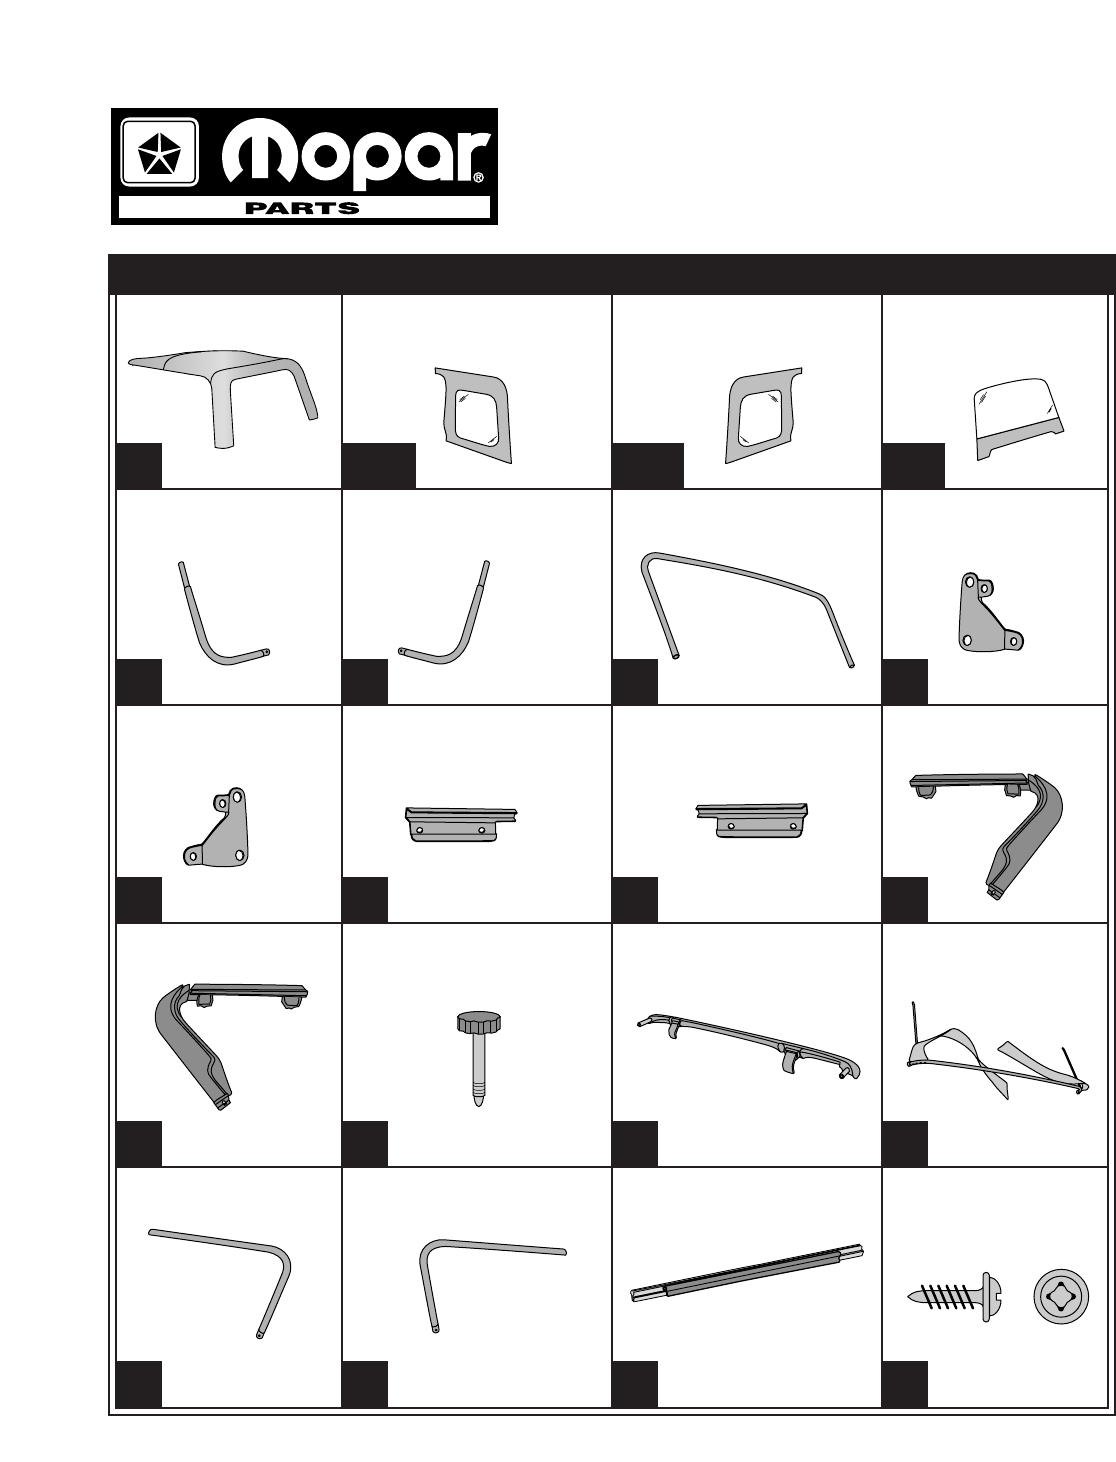
BB
Fabric Top
Rear Bow Assy. -
Driver’s Side Section
Rear Bow Assy. -
Passenger’s Side Section
Rear Bow Assy. Pivot Bracket - Driver’s
Quarter Window -
Driver’s
Quarter Window -
Passenger’s
CC
Rear Window
AAA
DCB
Pivot Bracket - Passenger’s Tailgate Mount - Driver’s Tailgate Mount - Passenger’s Door Surround - Driver’s
HGF
E
I
Door Surround - Passenger’s Door Surround Knob Header Assembly Center Bow
LKJ M
Side Bow - Driver’s Side Bow - Passenger’s Tailgate Bar #8 x 1/2" Pan Head Washer
Screw
PON Q
X12
GENUINE ACCESSORIES
3 of 8
59545 / 59645 / 59655 Rev. 3 1002 K6858707
#8 x 1/2" Self Drilling
Screw
Pan Head Screw Oval Screw Pivot Bracket Bolt
TSR U
X2 X14 X2 X4
Pivot Knuckle Bolt M5 x 30 Machine Screw Bushing M5 Hex Nut
XWV Y
X4 X2
#12 x 3/8" Tapping Screw .5ml Tube Red Loctite Rear Window Roll-Up
Straps (2 per package)
DD EEZ
X4
X4 X2
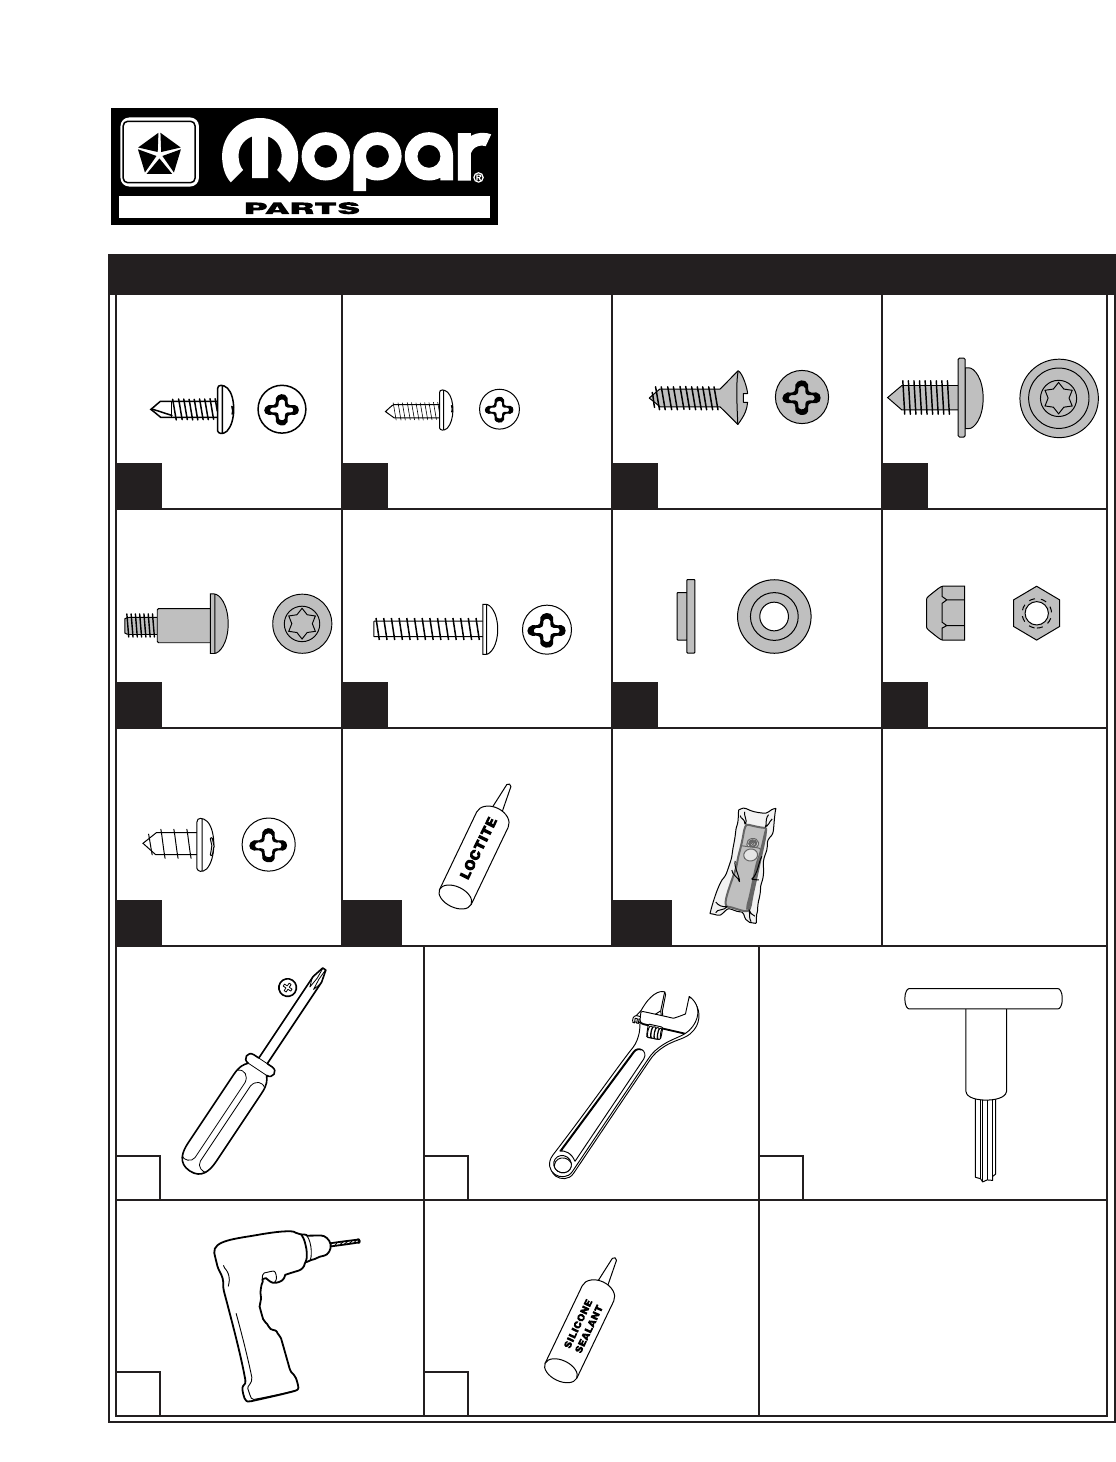
1 2 3
4 5
Phillips
Screwdriver
Drill Silicone
Sealant
Adjustable
Wrench
T-30 Torx
1/8"
Sizes 1, 2 and 3
59545 / 59645 / 59655 Rev. 3 1002 K6858707
4 of 8
3
4 5
1 2
GENUINE ACCESSORIES
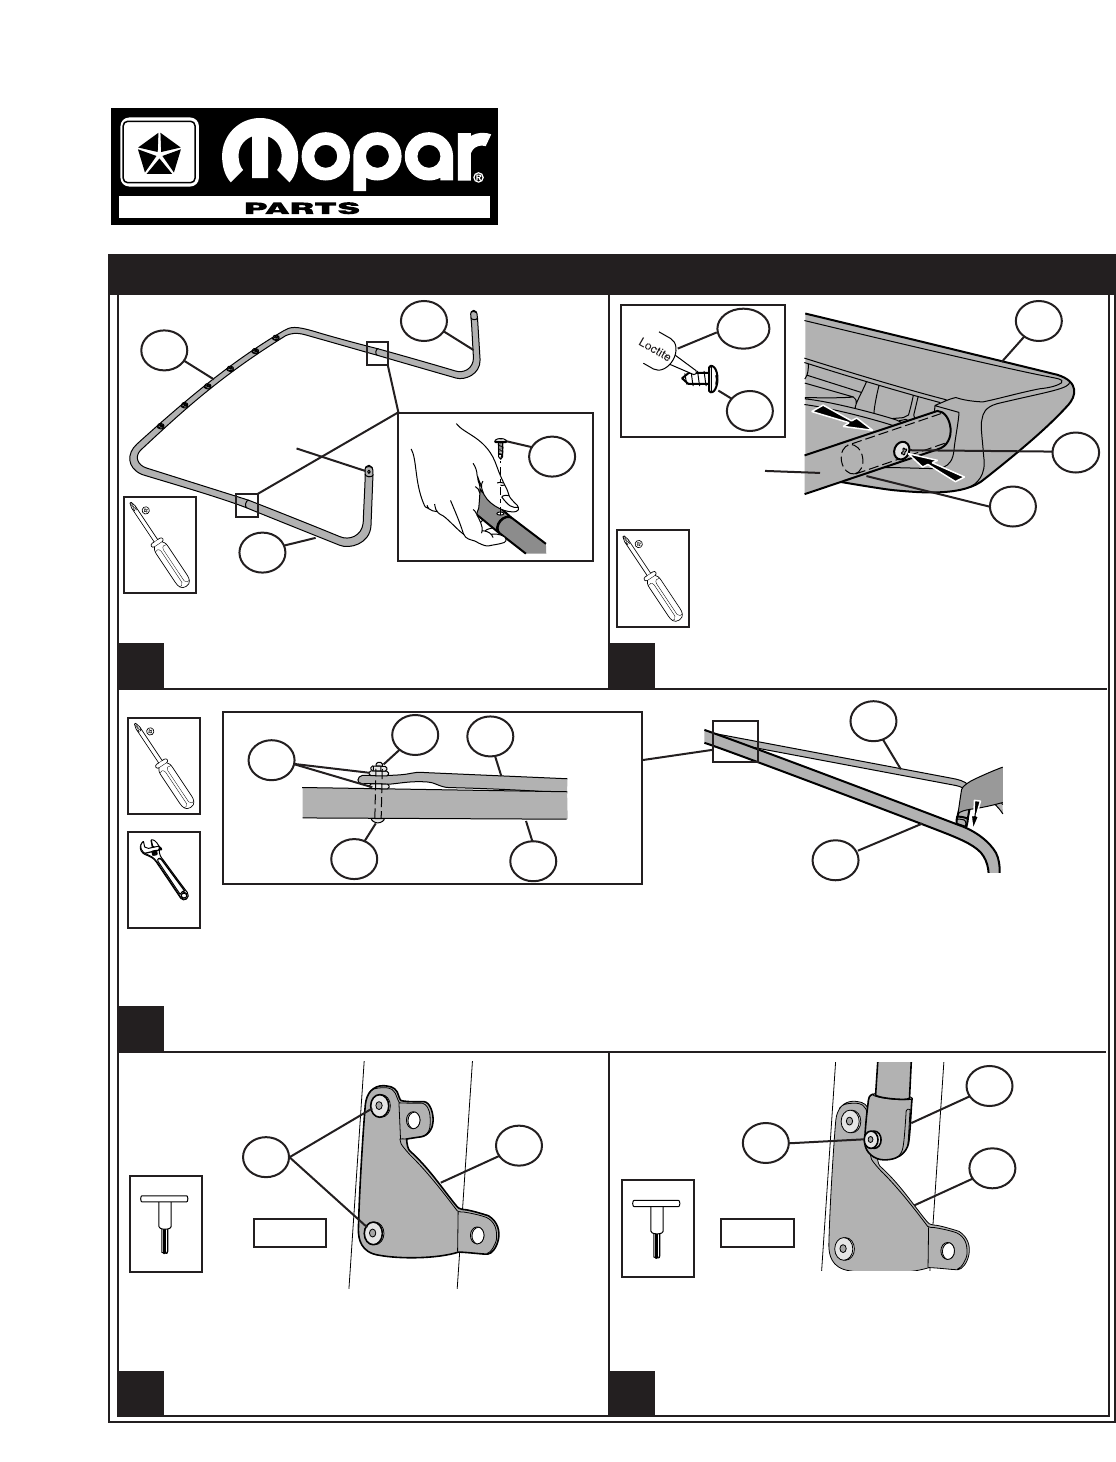
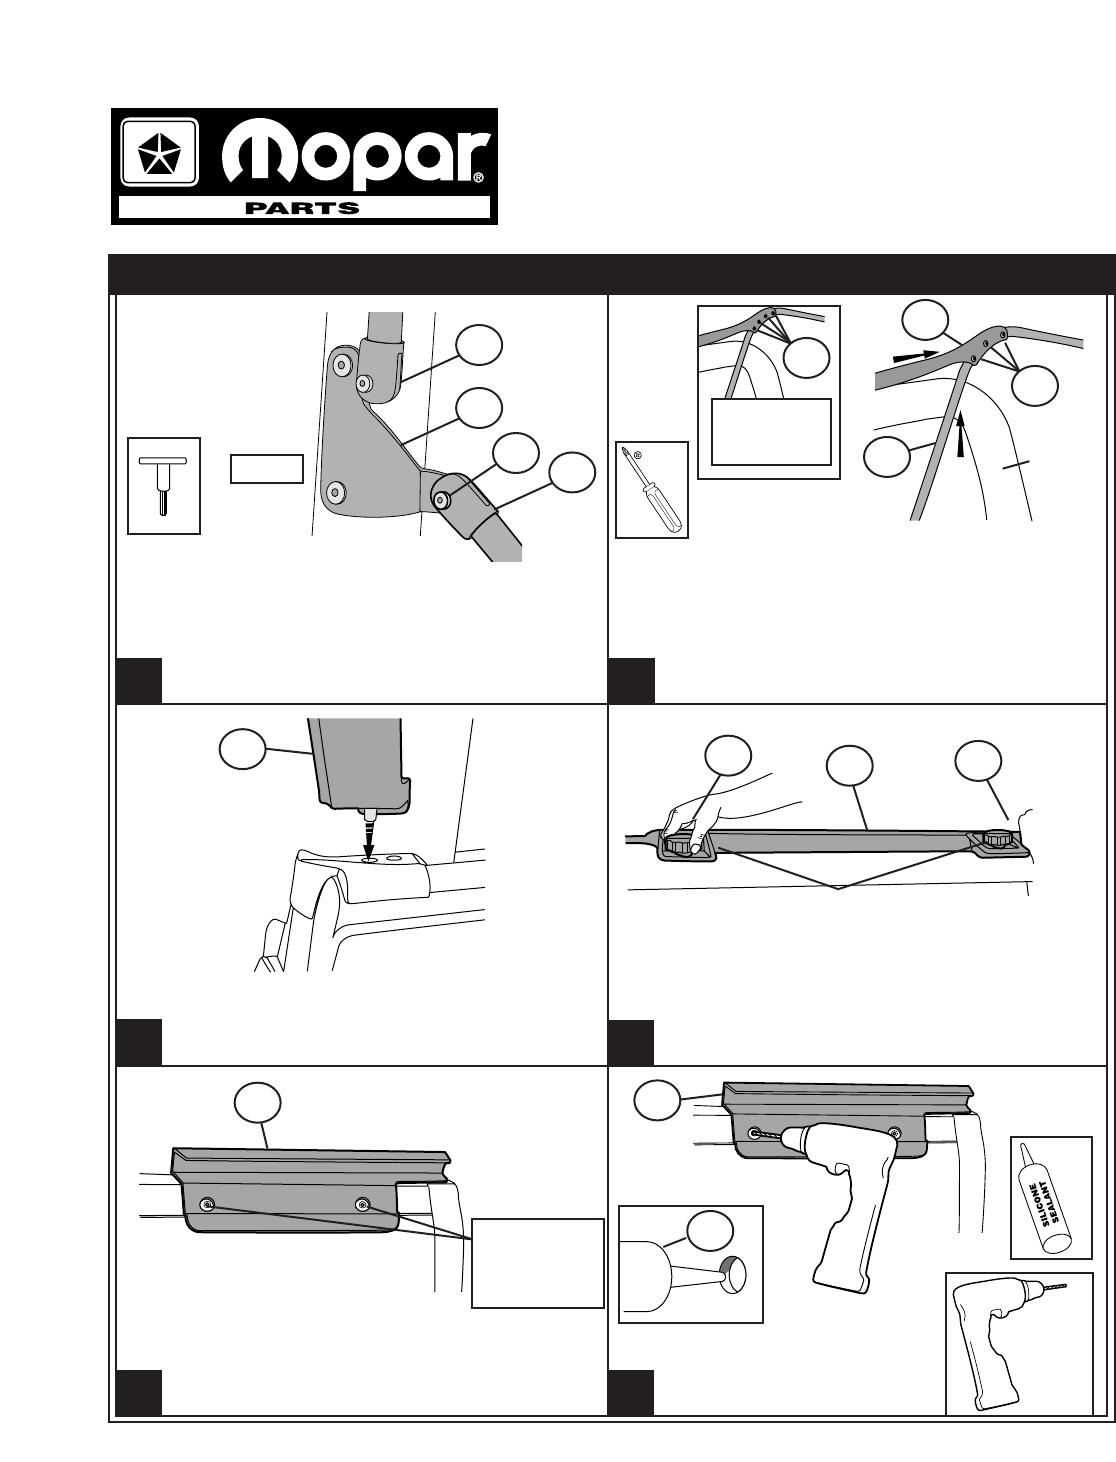
Orient the legs with the holes in the pivot knuckles
toward the outside. Slide the pieces together, align-
ing the pre-drilled screw holes. Install a #8 x 1/2
Self Drilling Screw, from the parts kit, in each leg.
D
B
C
R
Orient the Side Bows with the holes in the pivot
knuckles toward the outside. Slide the other
end over the section of tube and into the head-
er. Install the #12 x 3/8" Tapping Screws, one
on each side of the bow, on each side of the
header (4 screws). Place a drop of Loctite on
the threads of each screw before installing.
ORIENT LEGS WITH
HOLES OUT
DD
Z
L
N
Z
X2
X4
ORIENT LEGS WITH
HOLES OUT
X2
Locate the Center Bow Assembly with the fabric Stay Pads attached. Lay the bumpers of the Center Bow on top
of the Side Bows and align the holes in the Center Bow with the holes in the Side Bows. Push an M5 x 30 Pan
Head Screw through the Side Bow from the outside, install a bushing with the shoulder facing away from the Side
Bow, slide the rod of the Center Bow over the screw, install a second bushing with the shoulder facing into the
hole in the Center Bow. Install the nut. Tighten the assembly so that the Center Bow is allowed to rotate freely.
N
M
N
M
OUTSIDE
W
Y
X
X2
Unzip the vertical padded cover over the sport bar
and pull the pad away from the bar to expose the
bracket location holes. Orient the Pivot Brackets over
the existing holes in the sport bar and install them
with the Pivot Bracket Bolts (two bolts per bracket).
DRIVER’SSIDE
DRIVER’SSIDE
SPORT BAR
E
U
Front
Install the Side Bow Pivot Knuckles onto the upper
flange of the Pivot Bracket. Align the knuckle with the
bracket and snap it into place. Install a Pivot Knuckle
Bolt.
DRIVER’SSIDE
E
Front
N
V
X2 X2
1
1
1
2
33
59545 / 59645 / 59655 Rev. 3 1002 K6858707
GENUINE ACCESSORIES
5 of 8
6 7
Install the Rear Bow Pivot Knuckle Assemblies onto
the lower flange of the Pivot Bracket with the holes
in the Pivot Knuckles facing the outside of the vehi-
cle. Align the knuckle with the bracket and snap it
into place. Install a Pivot Knuckle Bolt.
DRIVER’SSIDE
E
Front
N
V
X2
B
K
9
Press the channels along the top of the Door
Surround around the horizontal sport bar, above
the door opening. Insert two knobs into the Door
Surround and tighten them down.
K
I
X2
CHANNELS VIEW FROM INSIDE
ABOVE DRIVER'SSIDE
Locate the left and right Tailgate Retainer
Mounts. Place the holes in the mounts
over the dimples in the vehicle body.
Drill a 1/8" hole at the marked
locations. Deburr the holes and
seal the edges of the holes with
Silicone Sealant.
8
I
INSERT PIN INTO
HOLE IN BELT RAIL
Locate the left and right Door Surrounds. Insert
the pin in the bottom of the Door Surround into
the hole in the belt rail behind the door.
X2
DRIVER'SSIDE
10 11
PLACE HOLES IN
TAILGATE MOUNT
OVER DIMPLES IN
BODY
X2
4
DRIVER'SSIDE
DRIVER'SSIDE
GG
1/8"
X4
X4
55
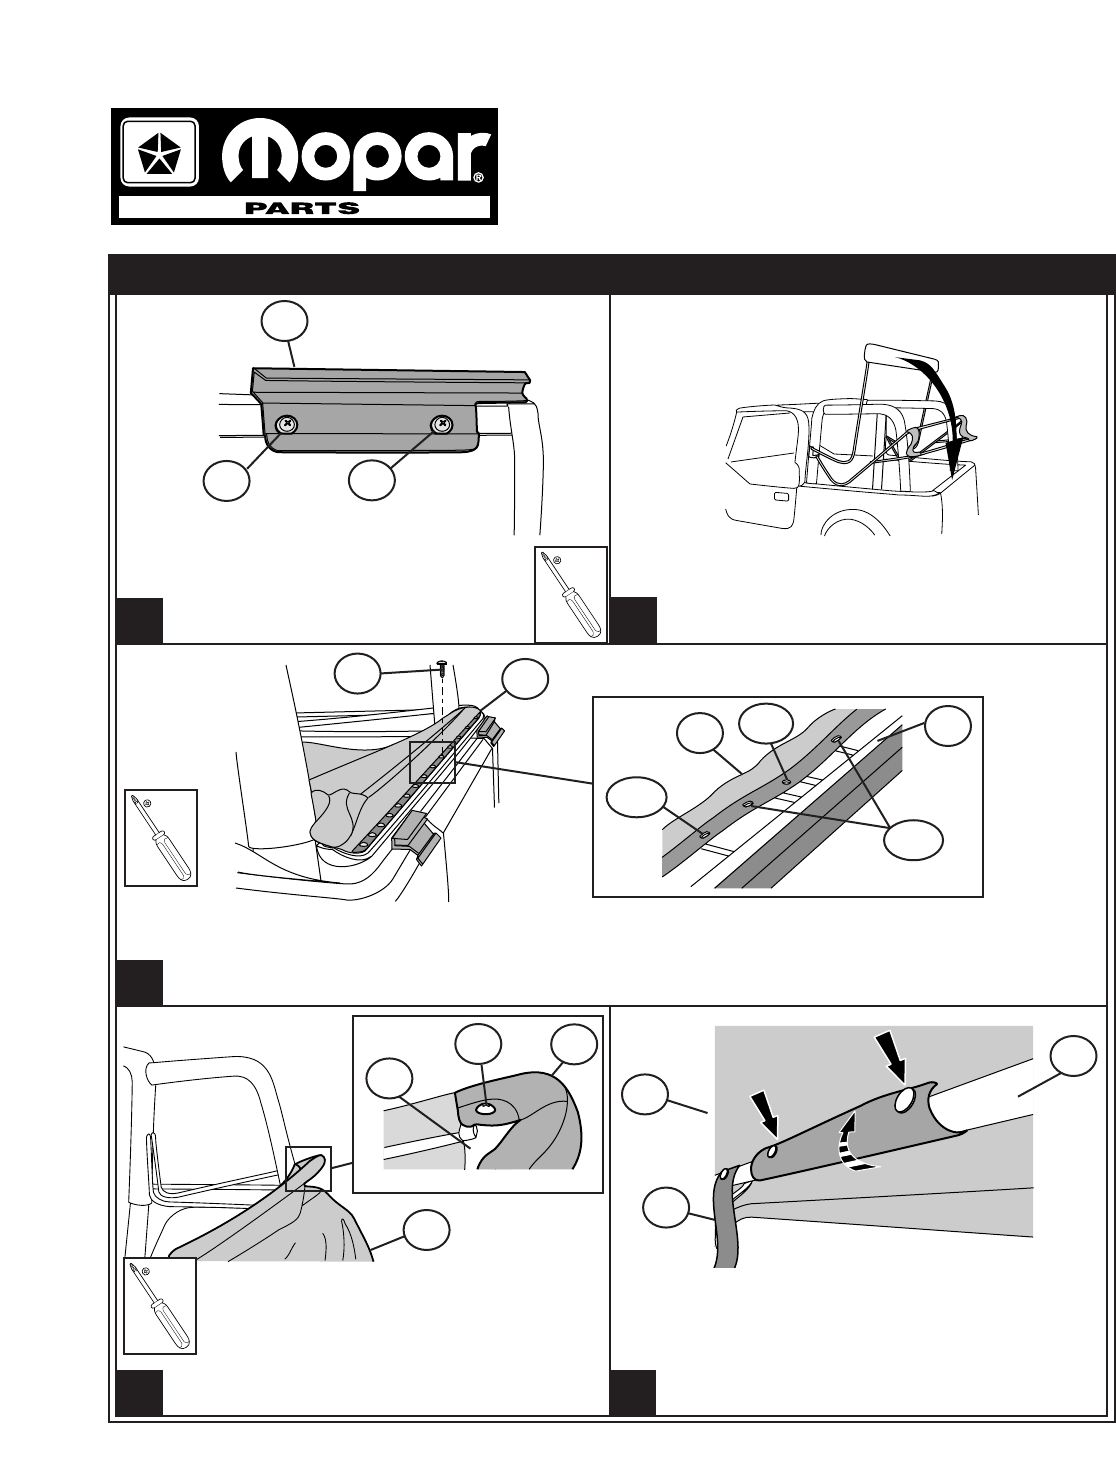
Rotate the front bow assembly forward, laying the
header on top of the windshield. Raise the Rear Bow
and pull the fabric Stay Pad attached to the Center
Bow straight back to the Rear Bow, without twisting.
Align the holes in the Stay Pad with the holes in the
corner of the Rear Bow. Install #8 x 1/2" Pan Head
Washer Screws in the holes on each side.
M
D
X2
Q
31
2002 and
Earlier
Models
Q
SPORT
BAR
59545 / 59645 / 59655 Rev. 3 1002 K6858707
GENUINE ACCESSORIES
13
6 of 8
14
15 16
Install the Tailgate Retainer Mounts
with two #8 x 1/2" Pan Head Washer
Screws for each mount.
12 1
DRIVER'SSIDE
G
QQ
X2
Fold the bows and the header down on
the rear of the vehicle.
Lay the Top, backing side up in the rear of the vehicle with the plastic strip facing up and aligned with the
front edge of the header. Locate the round hole that marks the center of the plastic strip (all other holes are
slotted). Install a Pan Head Screw in the round hole to secure the fabric to the header as well as to center
the top. Then proceed to install screws in the rest of the fourteen holes along the front of the header.
A
A1st
2nd
3rd
S
X14
Flip the fabric over so that it wraps around the
header and drape the top fabric over the tailgate.
Raise the header slightly and work the pockets
in the fabric over the corners of the header.
Install an Oval Head Screw in each corner to
secure the fabric to the header.
A
A
L
L
T
X2
1
1
Raise the header and bow assembly toward the
windshield and into position.
Inside the top, snap the fabric to the Rear Bow
(four snaps). Snap the Rear Window Roll-Up
Straps to the outer snap on the bow on each side.
REAR OPENING
A
D
X2
EE

59545 / 59645 / 59655 Rev. 3 1002 K6858707
GENUINE ACCESSORIES
19 20
21 22
7 of 8
17 18
Make sure that the Center Bow is centered in the
hook and loop flap inside the top. Do not fasten the
flap at this time.Pull down on the Rear Bow and
work the plastic sewn to the rear corners of the top
into the retainer on the vehicle.
A
X2
A
Close the header latches to secure the front of the
top to the windshield. Catch the hook in the slot in
the windshield frame and then close the lever over
it so that it lays flat against the windshield frame.
X2
Wrap the hook and loop flap inside the top
around the Center Bow and fasten it to itself.
SPORT BAR
M
A
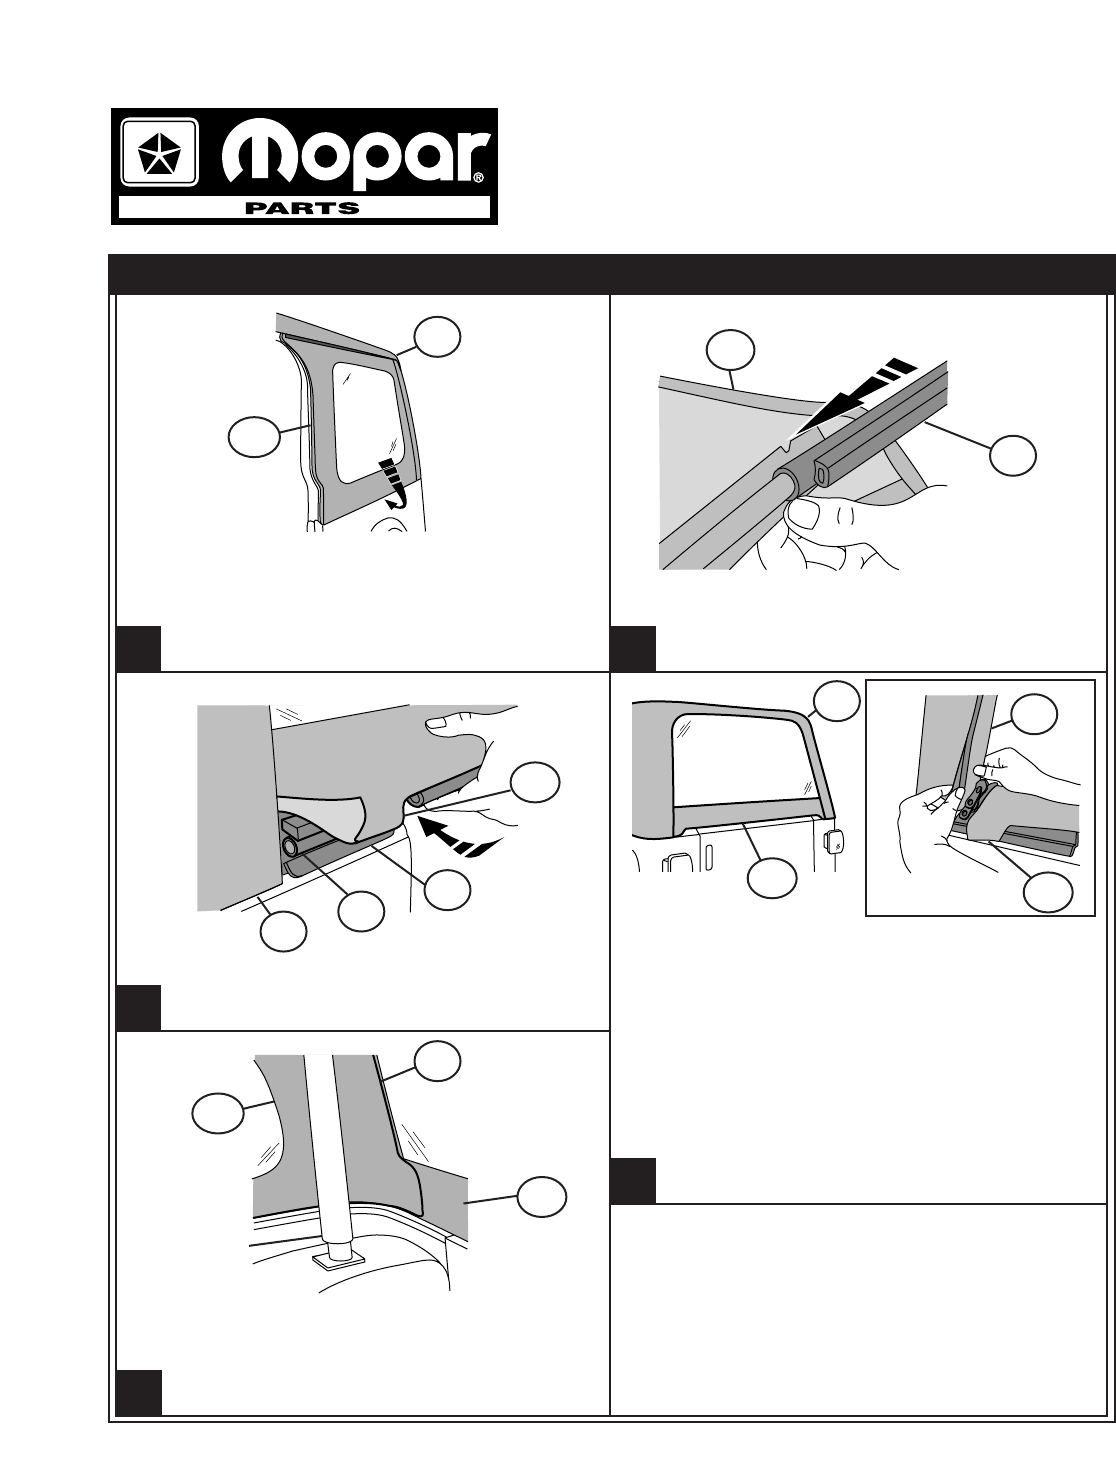
Locate the left and right Quarter Panels and orient
them with the zipper along the top and rear of the
panel. Start the zipper at the front top corner of the
Quarter Panel, next to the door. Hold the end of
the zipper and close the zipper slider 10" - 12"
along the top of the panel.
VIEW FROM INSIDE VEHICLE
VIEW FROM INSIDE VEHICLE
A
Roll the two plastic strips above each door open-
ing into the channel in the Door Surround on each
side of the vehicle.
X2
A
AA
AA
AX2
I
Roll the plastic along the front of the Quarter
Panel into the channel of the Door Surround on
the vehicle.
AA
X2 A
59545 / 59645 / 59655 Rev. 3 1002 K6858707
GENUINE ACCESSORIES
23 24
25
26
27
8 of 8
P
CC
Slide the "C" channel on the Tailgate Retainer onto
the tubed strip sewn to the Rear Window.
Close the zippers on the Quarter Panels the rest of
the way. Start at the rear and roll the plastic on
the bottom of the panel into the retainer on the
vehicle. Fasten the hook and loop strips along the
top and rear of the panel to the Top.
AA
X2 A
Insert the Tailgate Bar into the Tailgate Mounts on
each side of the tailgate opening.
CC
P
A
G
To start the zipper, pull the two sliders as far down as
possible on the driver's side of the window in order to
catch the sliders to the pin. Once the zipper is
caught, start the top slider 1/2". Then hold up the top
of the window with one hand and close the zipper
with the other. The zipper is sandwiched between lay-
ers of fabric in the corners so be careful not to catch
extra fabric in the zipper. Close the zipper.
Make sure that the Tailgate Bar is centered and is
securely in the mounts. Then tuck the flaps on the
Rear Window under the top fabric.
CC CC
AA
Inside the top locate the flaps sewn to the top on
each side of the rear window opening. Pull the
flaps over to cover the zipper and tuck them in.
SPORT BAR
A
VIEW FROM INSIDE VEHICLE
CC
AA
