AA D783B TB_Remote_Station_Guide_Jul82 TB Remote Station Guide Jul82
AA-D783B-TB_Remote_Station_Guide_Jul82 AA-D783B-TB_Remote_Station_Guide_Jul82
User Manual: AA-D783B-TB_Remote_Station_Guide_Jul82
Open the PDF directly: View PDF ![]() .
.
Page Count: 116 [warning: Documents this large are best viewed by clicking the View PDF Link!]
- 001
- 002
- 003
- 004
- 005
- 006
- 007
- 008
- 1-01
- 1-02
- 1-03
- 1-04
- 2-01
- 2-02
- 2-03
- 2-04
- 2-05
- 2-06
- 2-07
- 2-08
- 2-09
- 2-10
- 2-11
- 2-12
- 2-13
- 2-14
- 2-15
- 2-16
- 2-17
- 2-18
- 2-19
- 2-20
- 3-01
- 3-02
- 3-03
- 3-04
- 4-01
- 4-02
- 4-03
- 4-04
- 4-05
- 4-06
- A-01
- A-02
- B-01
- B-02
- B-03
- B-04
- C-01
- C-02
- C-03
- C-04
- D-01
- D-02
- E-01
- E-02
- E-03
- E-04
- E-05
- E-06
- E-07
- E-08
- E-09
- E-10
- E-11
- E-12
- E-13
- E-14
- E-15
- E-16
- E-17
- E-18
- E-19
- E-20
- E-21
- E-22
- E-23
- E-24
- E-25
- E-26
- E-27
- E-28
- E-29
- E-30
- E-31
- E-32
- E-33
- E-34
- E-35
- E-36
- E-37
- E-38
- E-39
- E-40
- E-41
- E-42
- E-43
- E-44
- E-45
- E-46
- E-47
- E-48
- E-49
- E-50
- F-01
- F-02
- F-03
- F-04
- index-1
- index-2
- index-3
- index-4
- index-5
- index-6
- replyA
- replyB
TOPS-10
Remote Station Guide
AA-D783B-TB
July 1982
This manual is for use at a PDP-11-based remote station that
has access to a TOPS-10 host.
It
contains information
on
both
hardware and software for users and remote station operators.
This manual supersedes the TOPS-10 DN200 Remote Station
Guide,
AA-D783A-
TB.
OPERATING SYSTEM:
SOFTWARE:
TOPS-10
V7.01
CHK11
V3(66)
DN82/DN200 V23(152)
NETLDR V3(144)
OPR V4(344)
GLXLlB
V1
(767)
Software and manuals should
be
ordered by title and order number.
In
the
United States, send orders
to
the nearest distribution center. Outside the United States, orders should
be
directed
to
the nearest
DIGITAL Field Sales Office or representative.
Northeast/Mid-Atlantic Region Central Region Western Region
Digital Equipment Corporation
PO
Box CS2008
Nashua, New Hampshire
03061
Telephone:(603)884-6660
Digital Equipment Corporation Digital Equipment Corporation
Accessories and Supplies Center Accessories and Supplies Center
1050 East Remington Road 632 Caribbean Drive
Schaumburg, Illinois 60195 Sunnyvale, California 94086
Telephone:(312)64Q-5612 Telephone:(408)734-4915
digital
equipment
corporation.
marlboro.
massachusetts
First Printing, October 1978
Revised, July 1982
Copyright ©, 1978, 1982, Digital Equipment Corporation. All Rights Reserved.
The information
in
this document
is
subject to change 'without notice and should
not be construed
as
a commitment by Digital Equipment Corporation. Digital
Equipment Corporation assumes no responsibility for any errors that may
appear
in
this document.
The software described
in
this document is furnished under a license and may
only be used or copied
in
accordance with the terms of such license.
No responsibility is assumed for the use or reliability of software
on
equipment
that is not supplied by DIGITAL or its affiliated companies.
The following are trademarks of Digital Equipment Corporation:
DEC DECnet lAS
DECUS DECsystem-10 MASSBUS
DECSYSTEM-20 PDT PDP
DECwriter RSTS UNIBUS
DIBOL RSX VAX
EduSystem VMS VT
~D~DDmD
RT
The postage-prepaid READER'S COMMENTS form
on
the last page of this
document requests the user's critical evaluation to assist us
in
preparing future
documentation.
CHAPTER
1
1.1
1.1.1
1.1.2
CHAPTER 2
2.1
2.1.1
2.1.2
2.1.3
2.1.4
2.1.5
2.1.6
2.1.7
2.1.8
2.1.9
2.2
2.2.1
2.2.2
2.2.3
2.2.4
CHAPTER 3
3.1
3.2
3.3
3.4
CHAPTER
4
4.1
4.2
APPENDIX A
CONTENTS
INTRODUCTION
TOPS-10
REMOTE
STATIONS
AND
CONCENTRATORS
. . . .
1-1
The
DN80-Series
Remote
Station
and
Concentrator
1-2
The
DN200
Remote
Station
. . . . . . . . . . . .
1-2
OPERATOR
PROCEDURES
STARTUP . . . . • • • . . . . • • . . . . .
2-1
Starting
the
Station
• . • • . . • . • . . . . .
2-2
Restarting
the
Station
. . . . . . . .
..
.
2-3
Logging
in
at
the
TOPS-10
Host
from
the
Remote
Station
...•.•••...•........
2-4
The
Operator
Interface
. . . . . • . . . . . . .
2-5
Relocating
Your
Station
Devices
. . .
2-8
Starting
Printer
Scheduling
.....
2-9
Starting
Card
Reader
Scheduling
•.......
2-9
Starting
Both
Printer
and
Card
Reader
Scheduling
.....••..
Using
OPSER . . . • . . . . .
AVAILABLE EQUIPMENT . . . . . . . . . .
LA36,
the
Operator's
Console.
Card
Reader
Printer
Terminals
• • . . . . . .
USER
PROCEDURES
USER
FACILITIES
. . . .
THE
NETWORK
COMMAND
. . • . . . . . .
PRINTING
OUTPUT
. • . . . . • . . . . . . • .
SUBMITTING
BATCH
JOBS . . • . . . . . . .
TROUBLE-SHOOTING
2-10
2-10
2-11
2-11
2-13
2-16
2-18
3-1
3-2
. •
3-2
.
3-3
NORMAL
OPERATION
WHEN
PROBLEMS
OCCUR
. . .
4-1
4-2
ROM
SWITCHES
iii
APPENDIX B
B.1
B.2
APPENDIX C
APPENDIX D
APPENDIX E
APPENDIX F
FIGURE
1-1
1-2
1-3
1-4
2-1
2-2
2-3
2-4
2-5
2-6
2-7
B-1
B-2
C-1
TABLE
1-1
2-1
2-2
2-3
2-4
2-5
4-2
A-I
B-1
C-1
C-2
E-1
E-2
E-3
F-4
CONTENTS
(Cant.)
NETLDR
COMMAND
STRINGS
DEFAULT
LOAD
REQUESTS
LOADING
EXAMPLES
. . . • .
PUNCHED
CARD
CODES
GLOSSARY
REMOTE
STATION
OPR
COMMANDS
USING SPECIAL PRINT
FORMS
FIGURES
. .
B-2
.
B-2
The
DN82
Remote
Station
DN82
Control
Panel
. . . • • • • . • • .
••
•
1-
2
· . . .
1-2
The
DN200
Remote
Station
• • • • • • • • • .
1-
2
• • • • .
1-
3
DN200
Control
Panel
The
System
Operator
The
Host
Operator
The
Remote
Operator
Card
Reader
. . • •
· .
..
......
.
2-
6
• • • • • • •
2-
6
Front
Panel
of
Card
Reader
.
Back
Panel
of
Card
Reader
LP05
Line
Printer
.•..
• • •
2-6
2-14
2-14
2-15
2-17
A
Default
Load
Path
.......••.
B-2
Using
an
Alternate
Load
Path
......
. ·
B-3
A
Punched
Card
. . . . • • . • . · . .
C-1
TABLES
Remote
Station
Components
· · · · · · ·
1-1
Mode
and
Baud
Rate
Switches
· · ·
2-12
Console
Lamps
· · · · · · · · · ·
2-13
Card
Reader
Switches
and
Lamps
· · · · ·
2-14
Card
Reader
Back
Panel
Switches
· · · ·
2-15
Printer
Alarm
Indicators
· · · · · · · ·
2-18
Station
Messages
· · · · · · · · · ·
4-3
Remote
Station
ROM
Switches
· · · · · · ·
A-I
NETLDR
Bootstrap
Switches
· · · ·
B-1
ASCII
Character
Set
· · · · · · · · · · · · · ·
C-2
ASCII
Characters
by
Punched
Rows · · · ·
C-5
OPR Command
Functions
· · · · · · · · · · ·
E-1
OPR
Objects
. . · · · · · · ·
E-2
OPR
Commands
. . · · ·
E-4
LPFORM.
INI
Switches
· · · · · · ·
F-1
iv
PREFACE
This
~uide
provides
information
on
using
and
operating
PDP-II-based
remote
stations
that
can
be
connected
to
a
host
system
running
TOPS-IO.
Everyone
using
the
remote
station
should
read
Chapter
1,
"Introduction":
operators
should
read
Chapter
2,
"Operator
Procedures,"
and
Chapter
4,
"Trouble-Shooting."
Users
can
benefit
from
reading
Chapter
3,
"User
Procedures,"
Sections
2.1.3,
"Logging
in
at
the
TOPS-IO
Host
from
the
Remote
Station,"
and
2.2.4,
"Terminals."
The
appendixes
contain
descriptions
of
ROM
switches,
the
NETLDR
program,
how
to
read
dump
files,
punched
card
codes,
a
glossary,
procedures
for
using
special
print
forms,
and
OPR
commands
that
can
be
issued
at
a
remote
station.
SUPPORTING
DOCUMENTATION
Not
all
the
TOPS-IO
Software
Notebooks
will
normally
be
available
at
the
remote
site,
but
the
following
documents
should
be:
Getting
Started
with
DECsystem-lO
(TOPS-IO)
Operating
System
Commands
Manual
[DEC-IO-XGSDA-A-D]
[AA-0916D-TB]
The
following
documents
describe
other
aspects
of
the
system:
Networks
Software
Installation
Guide
and
its
update
TOPS-IO/TOPS-20
Batch
Reference
Manual
Operator's
Guide
and
its
updates
Operator's
Command
Language
Reference
Manual
DDTll
Manual
INITIA
System
Initialization
CUSP
v
[AA-5156E-TB]
[AD-5156E-TI]
[AA-H374A-TK]
[AA-H283A-TB]
[AD-H2 8
3A-TI]
[AD-H28
3A-T2]
[AD-H283A-T3]
[AA-H599A-TB]
[AA-J495A-TB]
[Software
Notebooks]
NETLDR
Remote
Node Load
and
Dump
Utility
[Software
Notebooks]
OPSER
Operator
Service
Program
[Software
Notebooks1
CHKII
Reference
Manual
[Software
Notebooks]
(System
Programming
Procedures
and
Techniques)
The
following
symbols
have
been
used
in
this
manual:
Symbol
<key>
[ ]
<entry>
red
print
black
print
Meaning
The
RETURN
key
on
the
operator's
console.
The TOPS-IO
prompt
character.
A
key
on
the
DN82
or
DN200
control
panel.
Symbol
indicates
specifications)
.
"is
defined
as"
Required
space
in
syntax
specifications.
(in
An
optional
entry
(in
syntax
specifications).
syntax
An
entry
of
the
previous
type
can
be
repeated
(in
syntax
specifications).
An
entry
in
syntax
specifications.
Grey-shaded
entries
pertain
to
the
DN200
only.
What
you
type
on
your
terminal.
In
examples,
the
system
response.
vi
REVISION
HISTORY
This
manual
supersedes
the
TOPS-IO
DN200
Remote
Station
Guide.
It
provides
guidance
for
using
and
operating
PDP-II-based
remote
stations
connected
to
a TOPS-I0
host
system.
It
further
provides
extensive
information
on
remote
stations
and
concentrators,
with
specifics
on
two
types:
1.
The
DN80-series
remote
station
and
concentrator
2.
The
DN200
remote
station
and
concentrator
The
major
differences
between
this
manual
and
the
one
preceding
are
the
updating
of
TOPS-I0
Version
6.03A
to
TOPS-I0
Version
7.01,
and
the
resulting
software
updates:
CHKll
DN82/DN200
NETLDR
OPR
GLXLIB
GALAXY
Version
3 (66)
Version
23
(152)
Version
3
(144)
Version
4
(344)
Version
1
(767)
Version
4.1
The
previous
manual
did
not
include
details
on
the
Operator
Interface
which
is
a new
feature
of
the
GALAXY
system.
It
also
did
not
include
the
following
essential
Appendices:
"Glossary"
"Remote
Station
OPR
Command"
"Using
Special
Print
Forms"
This
manual
eliminates
the
Appendix,
"Reading
Dump
Files,"
that
was
in
the
previous
manual.
Information
about
the
GALAXY
batch
and
spooling
system
is
also
updated
to
reflect
changes
from
Version
2
to
Version
4.1.
Some
of
those
changes
are
discussions
on
OPR
found
in
this
manual:
1.
"The
Operator
Interface,"
Section
2.1.4
a.
System
Operators
b.
Host
Operators
c.
Remote
Operators
2.
"Remote
Station
OPR
ommands,"
Appendix
E
covers
OPR
commands
available
to
operators.
vii

CHAPTER
1
INTRODUCTION
1.1
TOPS-lO
REMOTE
STATIONS
AND
CONCENTRATORS
Two
types
of
remote
stations/terminal
concentrators
based
on
PDP-II
hardware
can
be
connected
over
a
synchronous
line
to
a
host
system
running
TOPS-10.
When
these
remote
stations
contain
terminals,
they
are
also
called
remote
concentrators.
The
DN82
is
a
remote
station
and
concentrator
based
on
a
PDP-11/40;
as
a
remote
station
alone
(containing
only
a
card
reader
and
a
line
printer),
it
is
called
a
DN80i
as
a
concentrator
alone,
it
is
called
a DN81.
The
DN200
is
a
remote
station
and
concentrator
based
on
a
PDP-11/34.
A
systems
programmer
or
installer
at
the
TOPS-10
host
assembles
the
software
for
each
remote
station,
and
stores
the
resulting
binary
file
on
disk
at
the
host.
(Assembly
of
the
software
at
the
TOPS-10
host
site
is
described
in
the
Networks
Software
Installation
Guide.)
An
operator
at
the
remote
station
can
then
initiate
a
request
to
the
TOPS-10
host
to
down-line
load
the
remote
station
software
over
the
synchronous
line.
A.t.···.!.·Sk
..
:.;
.••.
~.·
..•.
·.···
•••.
i.···.:~.·.··
•...
;.;. '
..
~
....
~
..
g
...•
~
....
:
..
!~.{~
..
~
..
~
...
~~.}~~.:~.:.;.:
..
P.:
...
·~.~;e::?"·~~,;,
:i~~~~~~~~1~'·~f
".
.
h'
.
..~:.:S
~;t];:
........
··:.'l:.·u.·.·.··.s
..
··.·.
1
.·;'.·:.".:·;··.o.·.·'.O.tslrap:
t'urns~.<QrL:t
e;;
t:};;Q,Pc',;
~;:;
.,~,.~
ti'
v .
p:t'~(.ir.?irO.·"
..
~t~t:t'.~;:::t1Jp:b!:ln:g,::::.:~
......
~
...
,
,.
9S:::a,::::l:o:~
':
:e;qtt~.~
....
;:7~p:~t~~::':h9.~.~·~:·f
'At
a
DN80-series
station,
the
remote
station
operator
must
start
the
station
at
the
bootstrap
address
(see
Section
2.1.1,
"Starting
the
Station").
When
the
host
loads
the
software
into
the
remote
station,
the
station
can
operate
and
terminals
attached
to
the
station
can
communicate
with
the
TOPS-10
host.
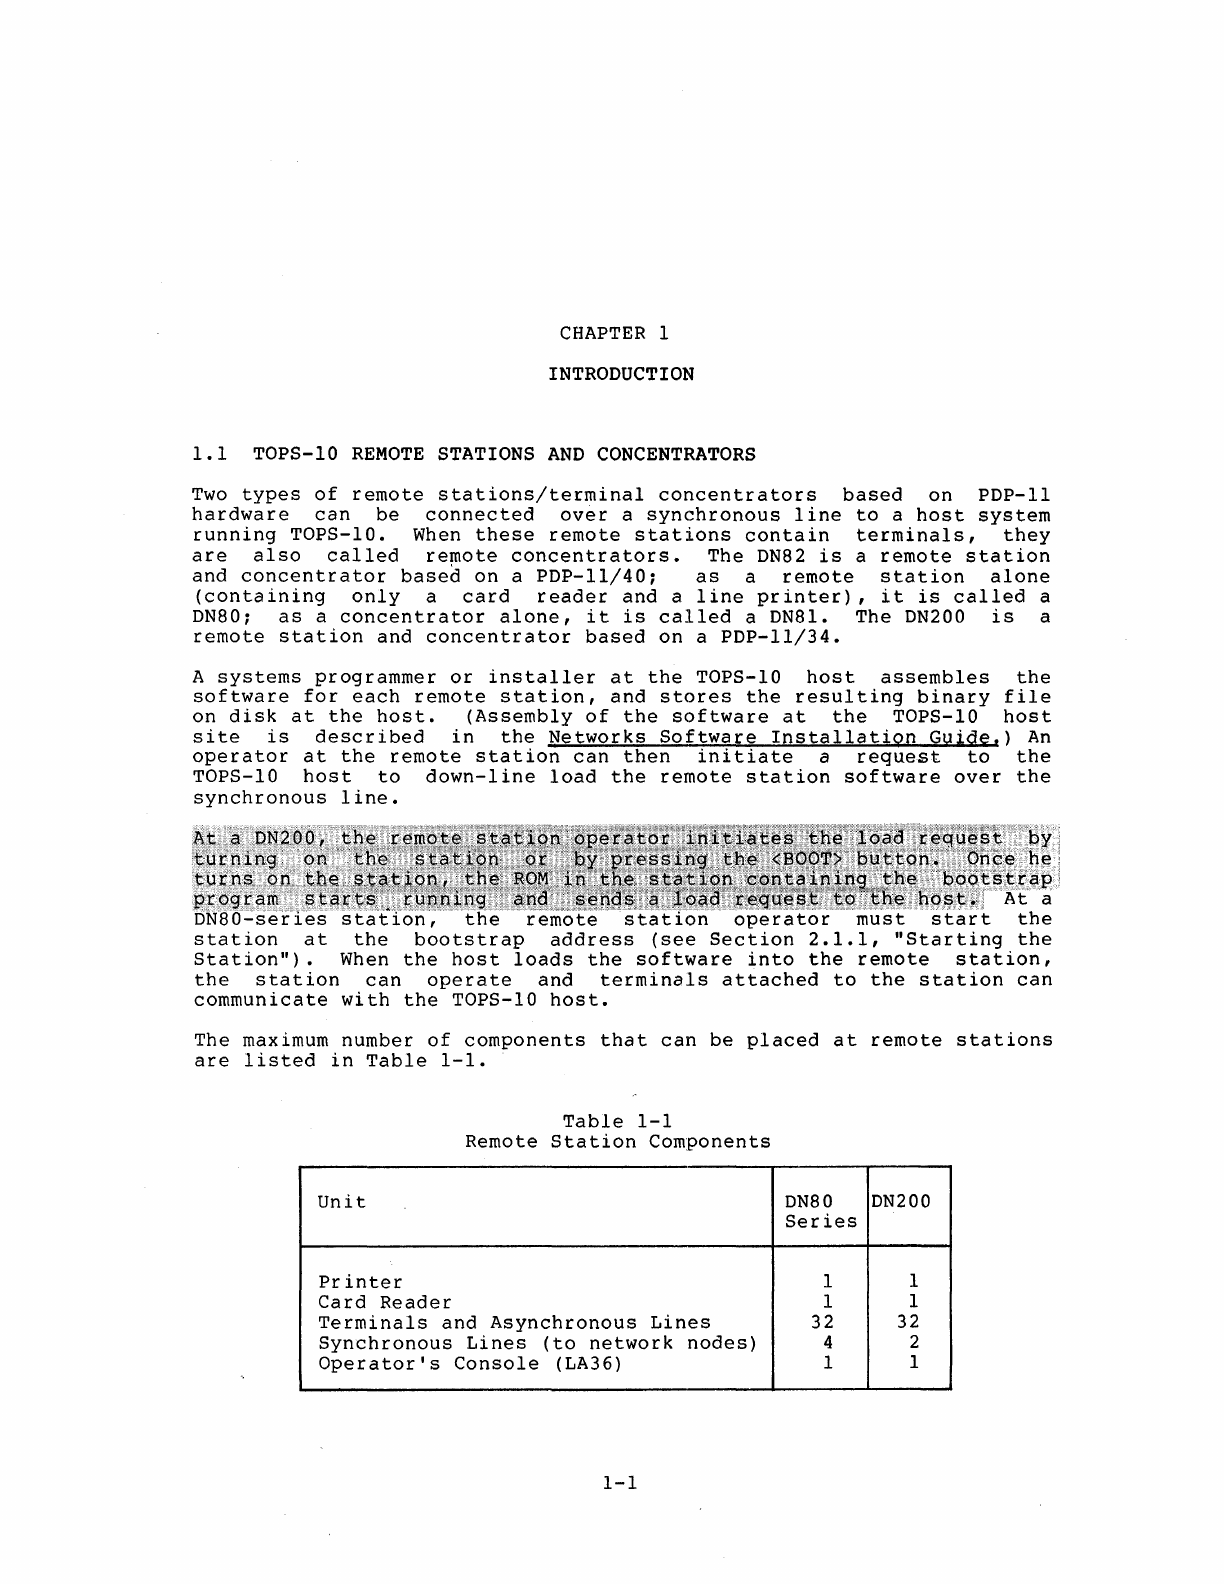
The
maximum
number
of
components
that
can
be
placed
at
remote
stations
are
listed
in
Table
1-1.
Table
1-1
Remote
Station
Components
Unit
DN80 DN200
Series
Printer
1 1
Card
Reader
1 1
Terminals
and
Asynchronous
Lines
32 32
Synchronous
Lines
(to
network
nodes)
4 2
Operator's
Console
(LA36) 1 1
1-1
INTRODUCTION
Because
you
can
obtain
synchronous
lines
for
these
remote
stations
in
a
variety
of
speeds,
consult
your
Field
~ervice
or
Sales
Representative
for
information
on
the
maximum
speed
possible
with
your
lines.
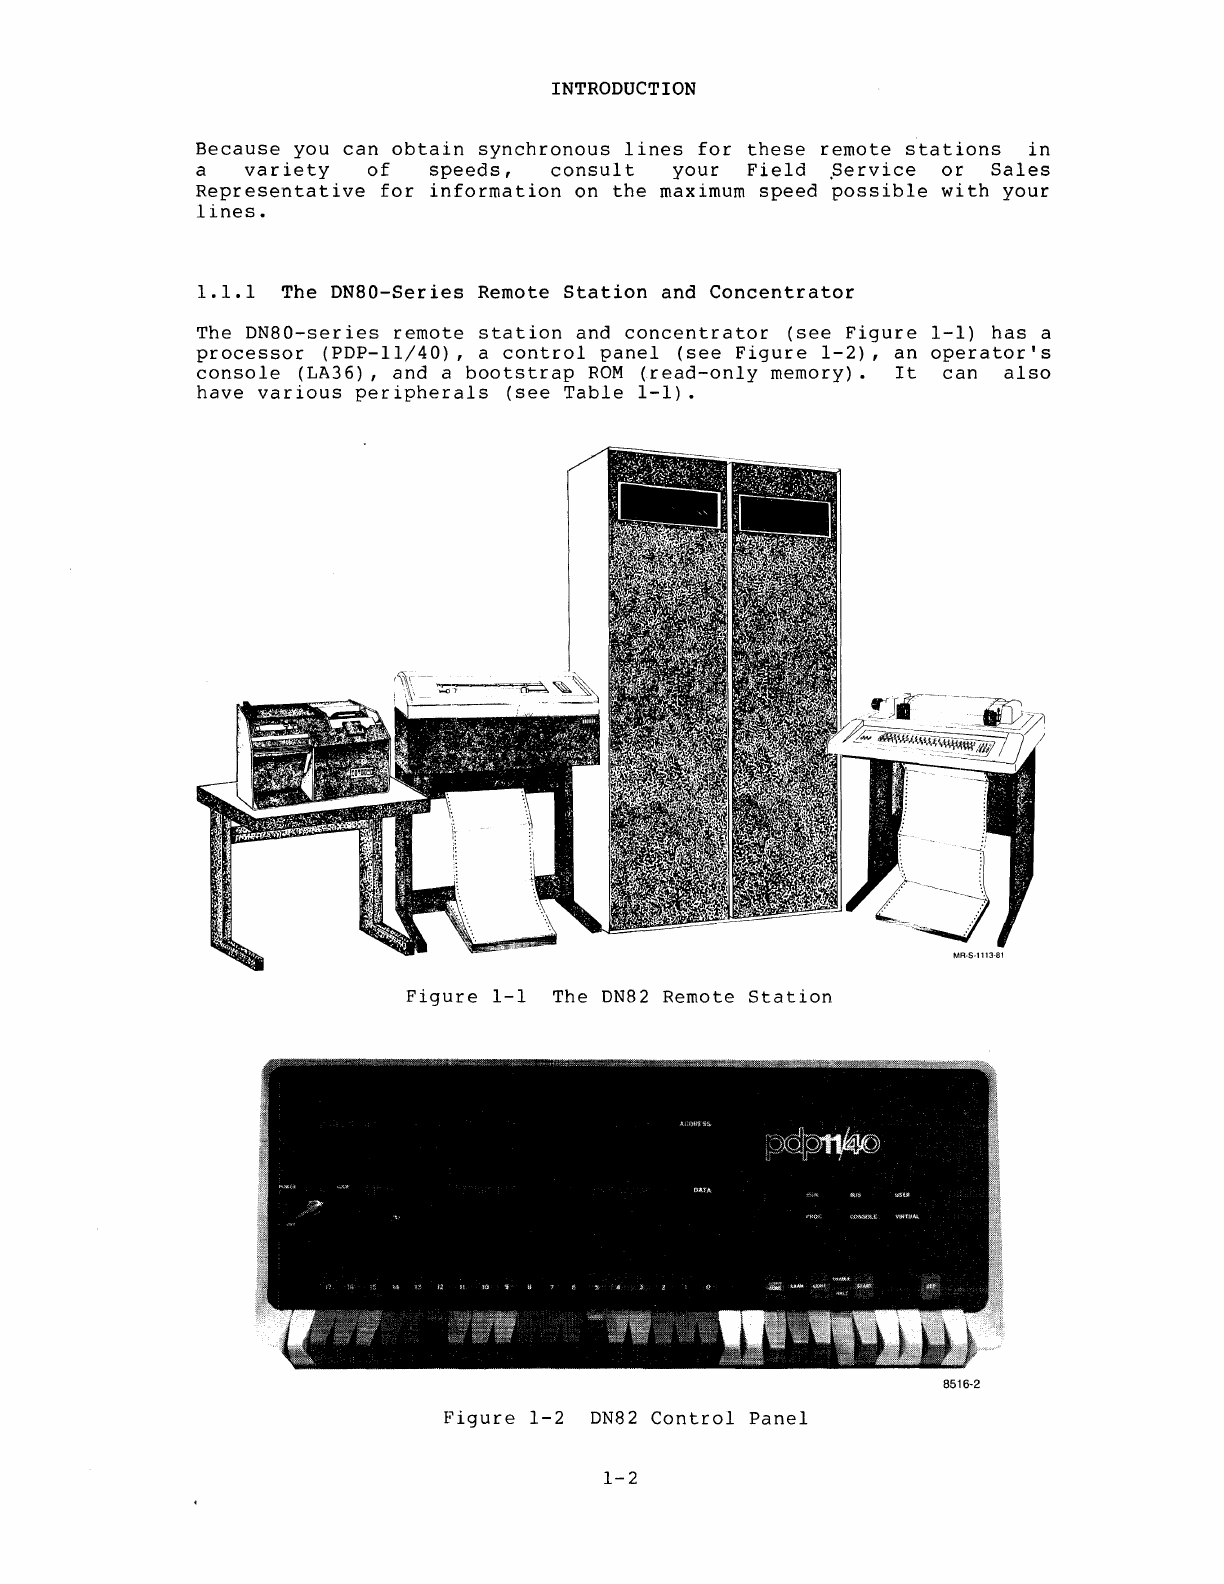
1.1.1
The
DN80-Series
Remote
Station
and
Concentrator
The
DN80-series
remote
station
and
concentrator
(see
Figure
1-1)
has
a
processor
(PDP-ll/40),
a
control
panel
(see
Figure
1-2),
an
operator's
console
(LA36),
and
a
bootstrap
ROM
(read-only
memory).
It
can
also
have
various
peripherals
(see
Table
1-1).
Figure
1-1
The
DN82
Remote
Station
851&2
Figure
1-2
DN82
Control
Panel
1-2
INTRODUCTION
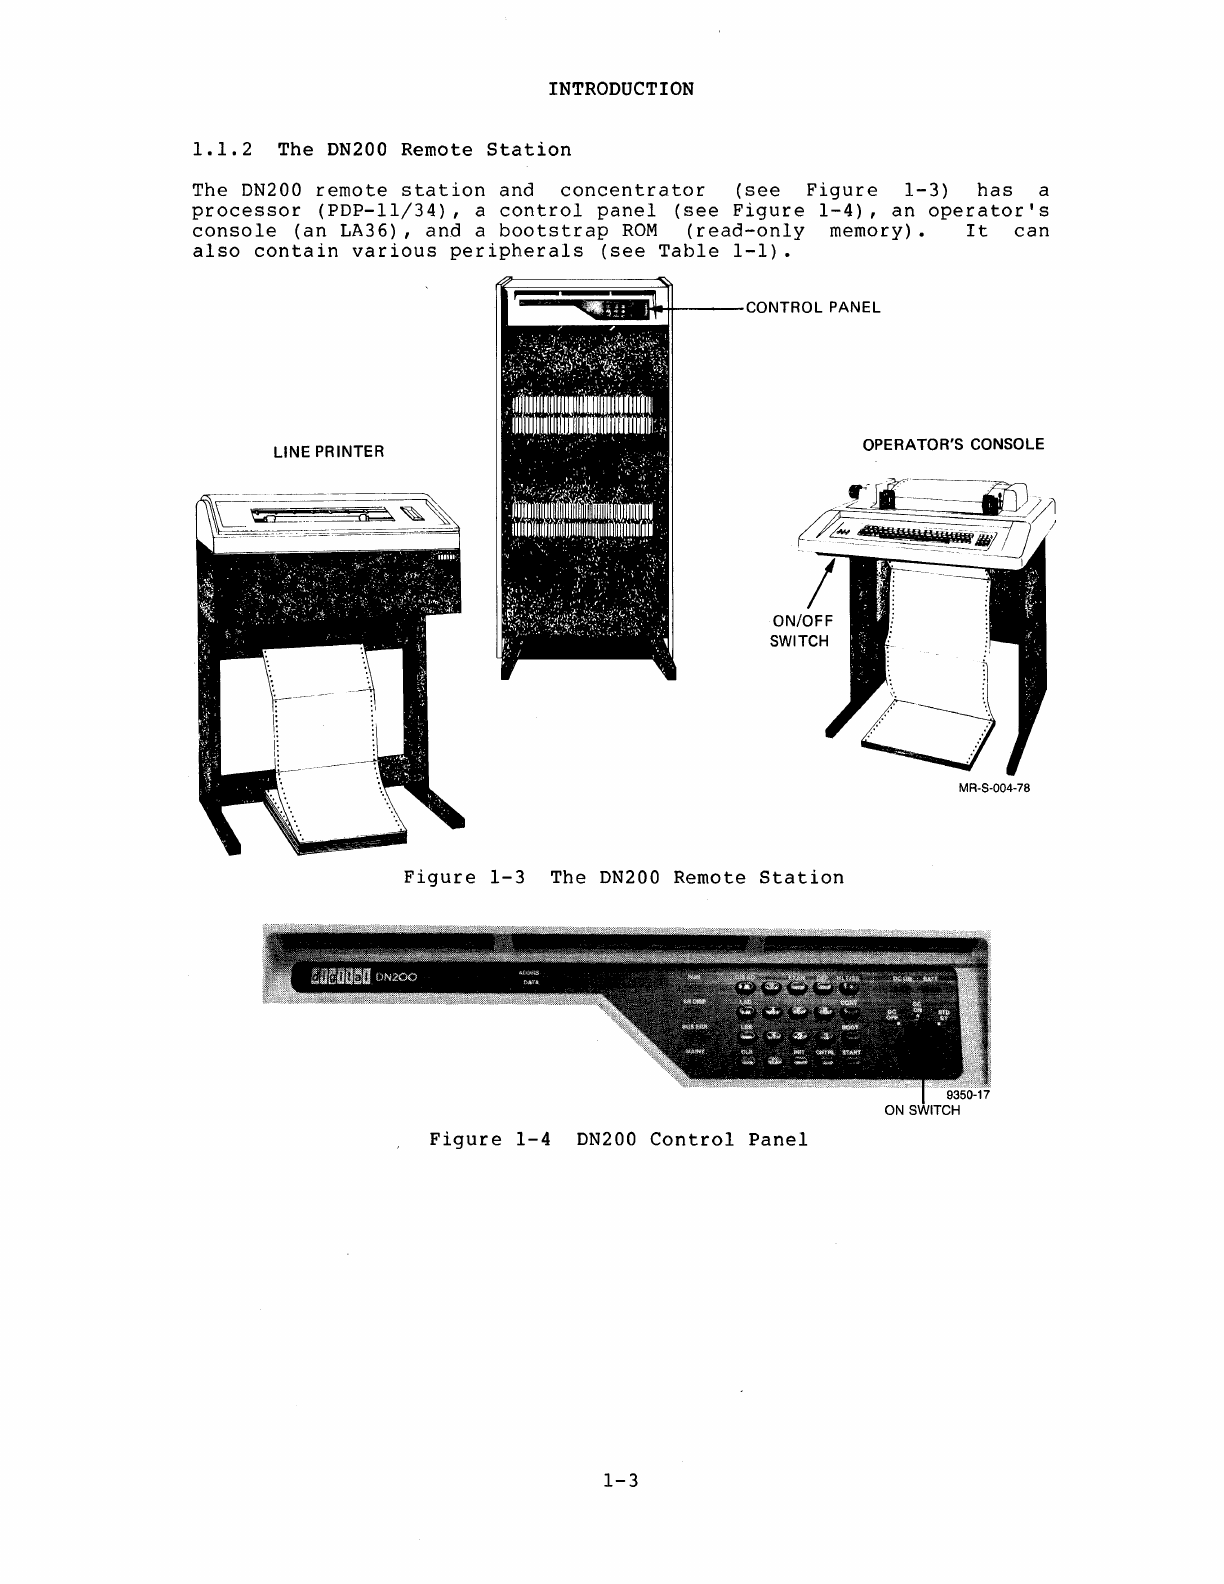
1.1.2
The
DN200
Remote
Station
The
DN200
remote
station
and
concentrator
(see
Figure
1-3)
has
a
processor
(PDP-ll/34),
a
control
panel
(see
Figure
1-4),
an
operator's
console
(an
LA36),
and
a
bootstrap
ROM
(read-only
memory).
It
can
also
contain
various
peripherals
(see
Table
1-1).
~::::~~iiii~------CONTROLPANEL
LINE PRINTER OPERATOR'S CONSOLE
MR-S-004-78
Figure
1-3
The
DN200
Remote
Station
Figure
1-4
DN200
Control
Panel
1-3

CHAPTER
2
OPERATOR
PROCEDURES
2.1
STARTUP
The
DN80-series
or
DN200
remote
station
is
a
minicomputer
that
allows
remote
connections
to
a TOPS-I0
hosto
The
station
is
in
operation
when
its
operator
turns
on
and
starts
the
station,
and
after
the
host
loads
the
station
with
the
appropriate
software.
:Q,~";:/~l~i~'~~D'~~~
';
"'&This
boot
network
loading
program,
NETLDR,
to
copy
the
remote
station
software
from
the
disk
at
the
TOPS-I0
host
into
the
remote
station
and
to
start
the
remote
station
running.
This
process
is
called
"bootstrapping"
because
the
station
loads
itself
by
its
own
efforts.
(The
network
and
remote
station
software
have
previously
been
stored
at
the
TOPS-I0
host
site.
)
At a
DN80-series
station,
the
operator
must
turn
on
the
station
and
start
the
station
at
the
starting
address.
Once a
DN80-series
station
is
started
at
its
starting
address,
the
bootstrap
operation
begins.
Once
the
bootstrap
loading
process
is
complete,
CHKll,
a
hardware
checking
program,
runs
to
verify
that
the
hardware
components
are
attached
and
working.
When
CHKll
is
done,
it
passes
control
to
the
remote
station
software.
The
remote
station
continues
to
run
until:
1.
The
operator
turns
off
its
power.
2.
The
operator
halts
its
processor.
3.
A
power
failure
occurs.
4.
A
software-detected
error
causes
a
'crash'
followed
by
a
halt.
5.
A
hardware
error
causes
the
processor
to
halt.
2-1
OPERATOR
PROCEDURES
Normally,
for
all
remote
stations,
a
reboot
occurs
automatically
after
a
crash;
and
a
restart
occurs
automatically
after
a
power
failure.
If
a
DN80-series
remote
station
halts,
you
can
restart
it
at
the
starting
address.
After
failures
of
the
remote
station
hardware
or
software
that
alter
memory
or
change
the
code,
the
software
must
be
reloaded
into
the
remote
station
from
the
TOPS-10
host.
2.1.1
Starting
the
Station
To
start
your
remote
station
for
the
first
time,
begin
by
turning
on
your
operator's
console
(LA36)
and
the
station
power.
The
switch
for
the
operator's
console
is
at
the
left
of
the
console
keyboard.
You
turn
on
the
power
for
the
DN80-series
stations
with
the
cylindrical
key
on
the
control
panel,
while
the
power
switch
for
the
DN200
is
on
its
control
panel
(see
Figures
1-2
and
1-4).
The
operator's
console
must
be
filled
with
paper
and
its
'300'
switch
must
be
down.
(All
other
switches
on
the
left
side
of
the
operator's
console
should
be
up.)
The
modem
through
which
the
remote
station
is
to
communicate
with
the
TOPS-10
host
must
be
properly
connected,
and
its
power
must
be
on.
'When
'YQQt.urn
on
your
DN200
remote
statiqn,
t,he
b()dt:'s~'~:a;p;:::,;~P:t:Q~x:~~;,'::::i~rl>;:
'fts
ROM
~~ar
ts
to
execute.
The
ROM
sends
a
carr
lage""~~:t'u,p:1:;a,n:~~;1'~n~:;
.f'~e:d
:to'yourqonsole
and
wai
ts
.for
you
to
tYPf::;!
OIl
tlle;99nsole:;'
,,~,',":,:::;;:'~:::;i
After
you
turn
on
your
DN80-series
remote
station,
you
can
start
it
at
its
starting
address.
When
you
enter
its
starting
address,
its
ROM
bootstrap
program
starts
to
execute.
You
can
type
switches
to
the
ROM
and/or
a command
string
to
be
forwarded
to
NETLDR.
(ROM
switches
are
described
in
Appendix
A;
NETLDR
commands,
in
Appendix
B.)
With
ROM
switches,
you
can
specify
a
synchronous
line
number,
a
host
node
number,
and
a
remote
station
serial
number,
or
you
can
also
use
all
defaults.
The command
string
for
NETLDR
can
contain
a
file
specification
and
switches
to
specify
whether
to
load,
or
to
load
and
start
the
remote
station.
When
you
type
on
the
console,
use
the
following
form:
command ::=<ROM
switches>
<NETLDR
command
string>
To
use
all
defaults
(that
is,
to
use
a
predefined
set
of
switches
and
NETLDR
command
string),
press
~
or
wait
(about
two
minutes)
for
the
station
to
time-out
and
send
the
default
load
request.
2-2
OPERATOR
PROCEDURES
When
you
type
ROM
switches
and
a
NETLDR
command
string,
type
ROM
switches
first.
If
you
enter
ROM
switches
and
NETLDR
switches
together,
separate
the
two
types
of
switches
with
a
space.
NOTE
Always
follow
ROM
switches
with
a
space,
even
when
not
entering
NETLDR
switches.
To
correct
a
typing
mistake
before
you
press
~
,press
the
DELETE
key
to
delete
the
entire
line.
If
you
make
an
error
and
do
not
realize
it
until
after
you
have
pressed
~,
either
wait
until
you
get
an
error
message
and
enter
the
correct
values
or
use
the
restart
procedure.
After
you
type
in
NETLDR
switches
and
press
~,
current
console
type-in
at
your
remote
station
ends.
When
console
type-in
ends,
the
ROM
sends
a
load
request
to
an
adjacent
node
alpng
the
synchronous
line
you
have
selected.
The
adjacent
node
then
attempts
to
load
your
remote
station.
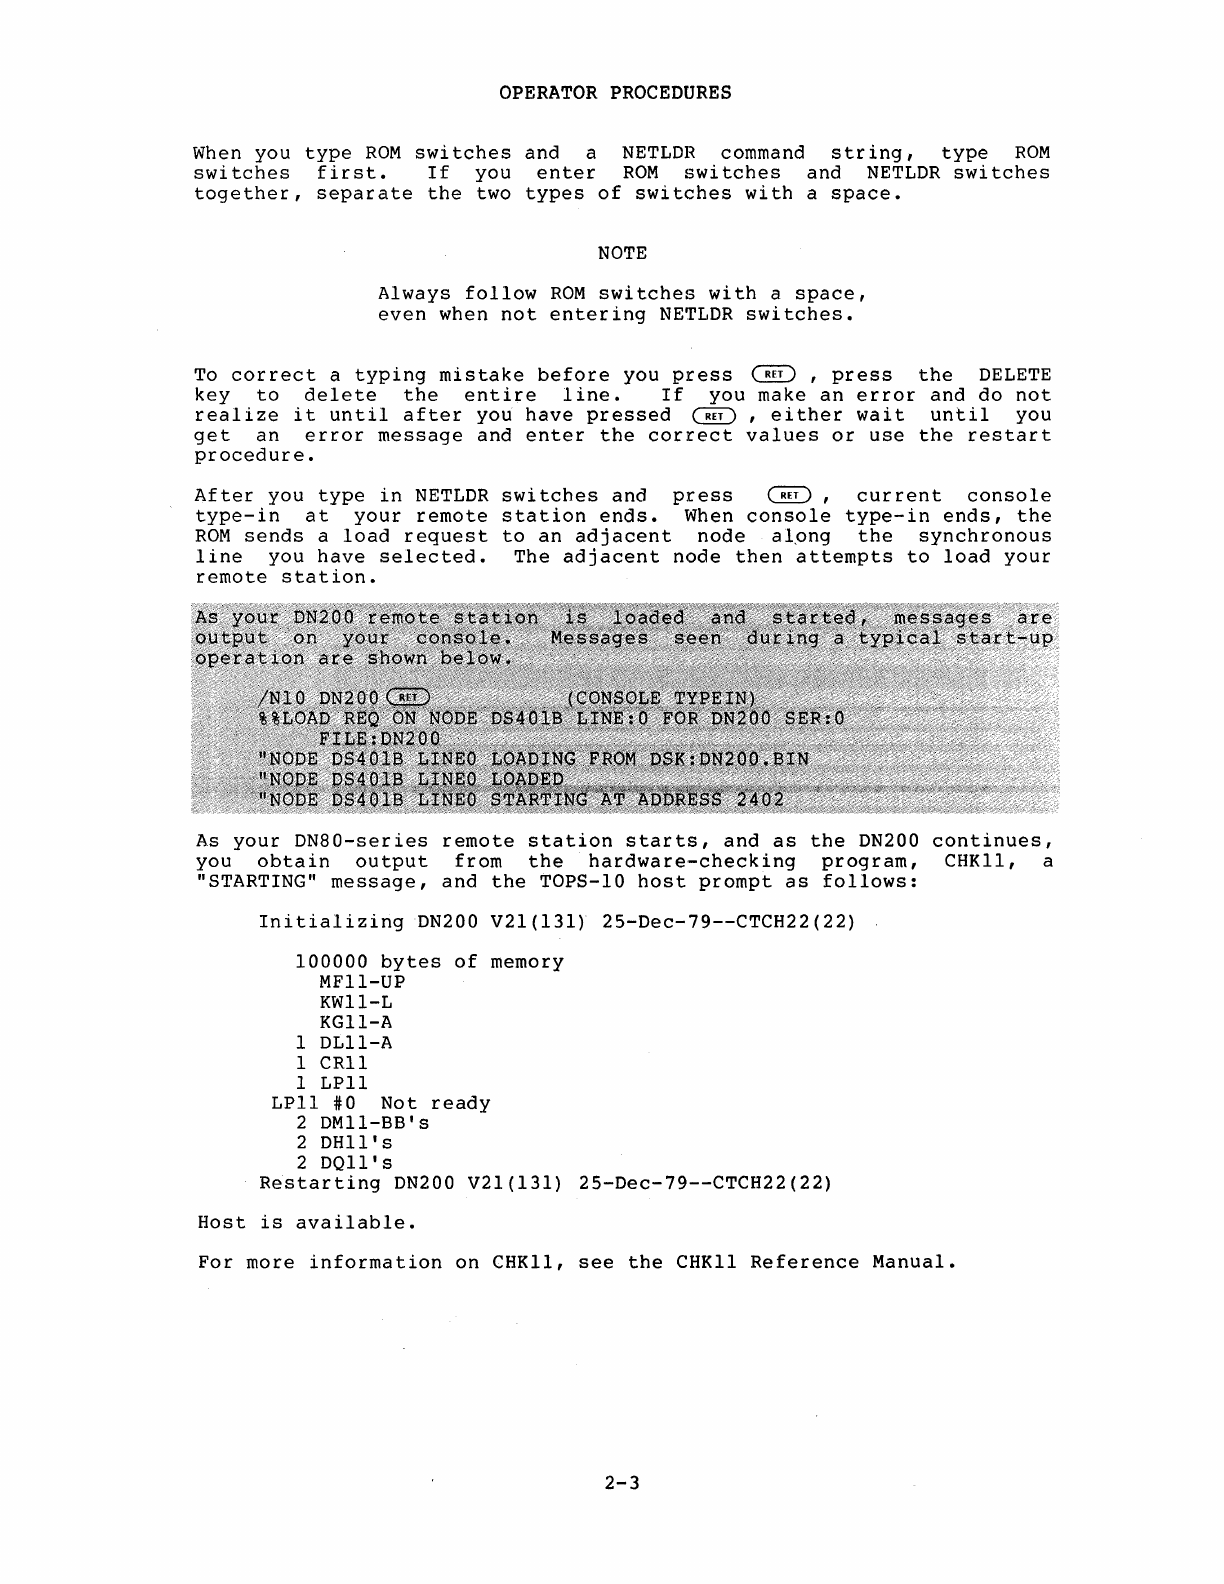
As
your
DN80-series
remote
station
starts,
and
as
the
DN200
continues,
you
obtain
output
from
the
hardware-checking
program,
CHK11, a
"STARTING"
message,
and
the
TOPS-10
host
prompt
as
follows:
Initializing
ON200
V21(131)
25-0ec-79--CTCH22(22)
100000
bytes
of
memory
MF11-UP
KW11-L
KG11-A
1
OL11-A
1 CR11
1
LP11
LP11
#0
Not
ready
2
OM11-BB's
2
OH11's
2
OQ11's
Restarting
ON200
V21(131)
25-0ec-79--CTCH22(22)
Host
is
available.
For
more
information
on
CHK11,
see
the
CHK11
Reference
Manual.
2-3
OPERATOR
PROCEDURES
2.1.2
Restarting
the
Station
At a
DN80-series
station,
once
your
station
has
been
loaded,
started,
and
has
been
successfully
running,
it
continues
to
run
until
a
power
failure
or
a
software
crash
occurs.
The
station
recovers
automatically
from
these
conditions,
generally
being
reloaded
from
the
host
site
whenever
necessary.
To
restart
your
station
manually,
be
sure
the
power
is
on
and
press:
ENABLE/HALT
address
LOAD
ADRS
START
You
must
enter
the
starting
address
in
the
switch
register
with
the
Switch
Register
switches.
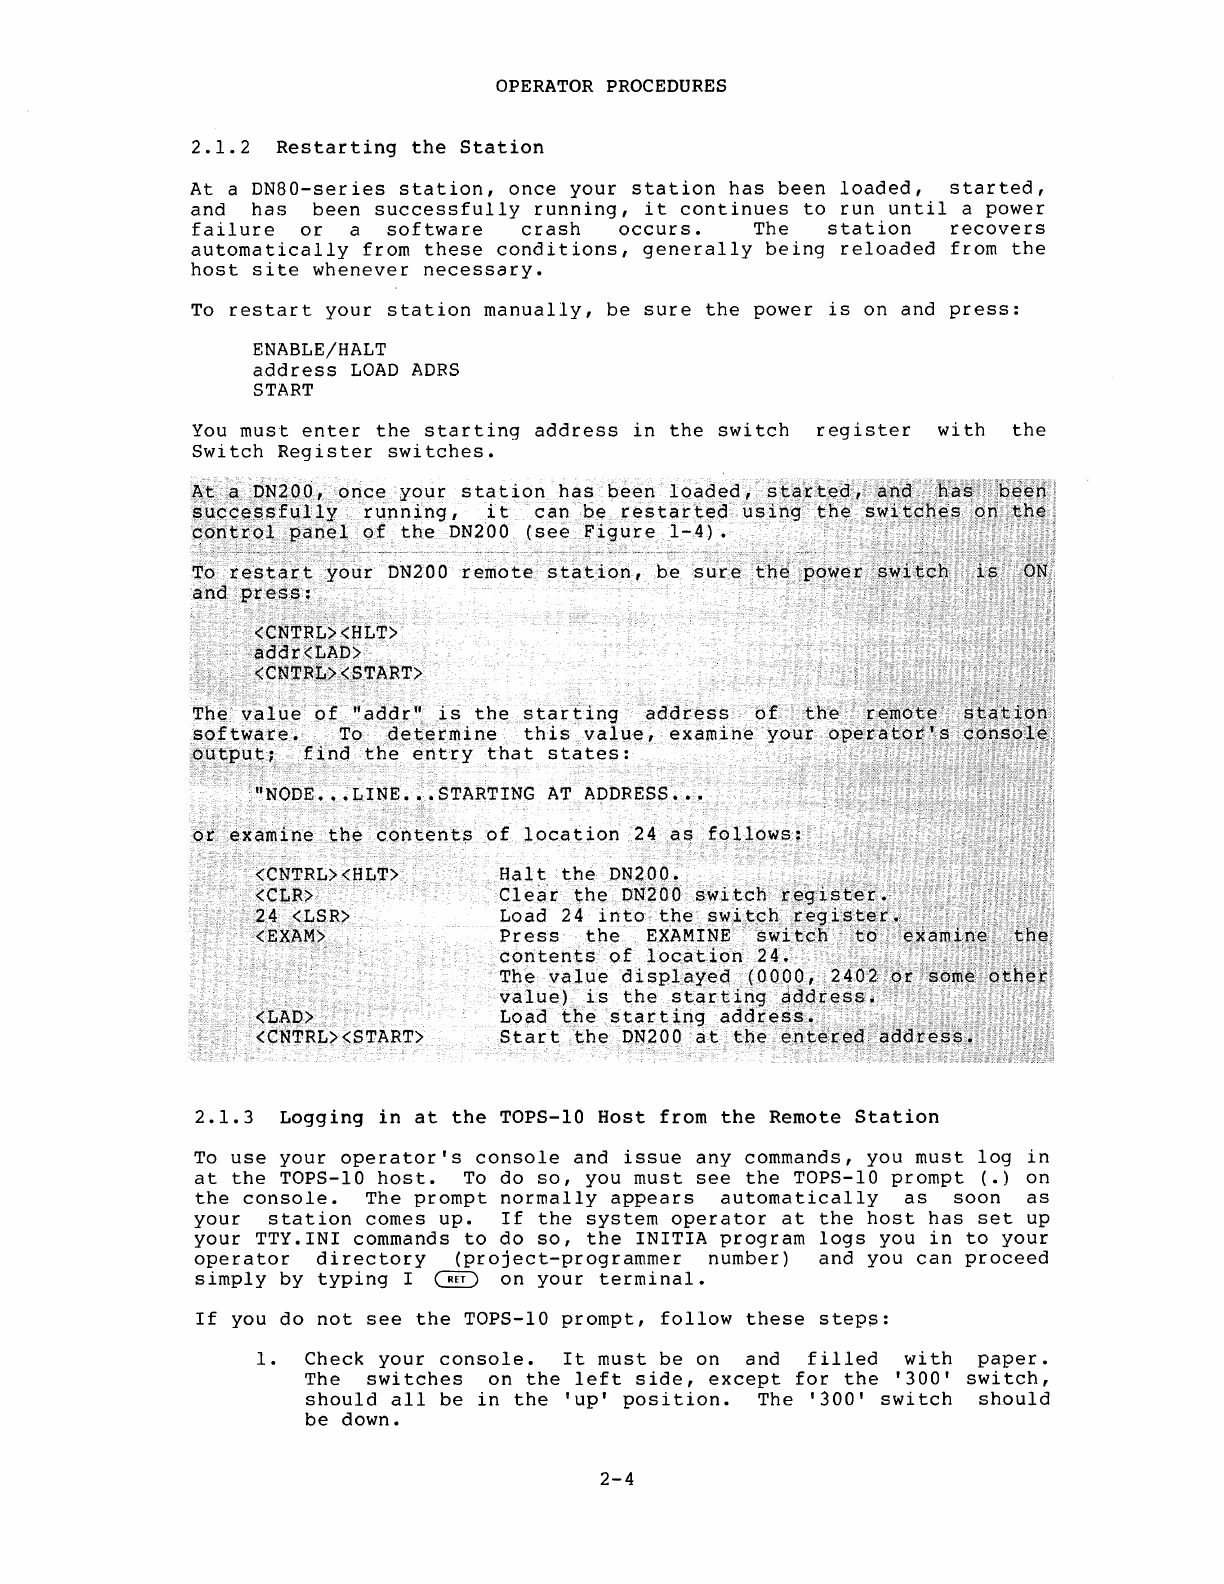
AtaDN2
00,
once
your
station
hGis
been
loaded,sta'rte"d','a;nd"
;:tl'a's::'::;:beeri'
succ~ssfUlly
running
lit
can
bE;
restarted
using
the
s\'l~
tc.n~~,pn;~J:l~,:
8ontrQl,panel
of
the
DN200
(see
Figure
1-4).
,;'
<
'~"
":
To
restart
your
DN200
remote
station,
be
sure
the:pqwE;r
and
Press;
<CNTRL>
<tILT>
"addr<tAD>
'
<CNT:RL><START>
The
valu€of
"addr
",
is
the
starting
address
of
the
r~m6'te'S#~~~c>if'i
software.
«
To
determine
<this
value,
examine
your
operato~Js
'GQl}~~~:~:::
oU<~P~~i,
find
the
entry
that
states:
"NODE
•••
LINE
•••
STARTING
AT
ADDRESS
••.
or
examine
the
content~
<CNTRL><HLT>
< <
<CLR>
24
<LSR>
<'EXAM>
<LJ\P>
<CNTRL>
<START>
Halt
the
DN200.
Clear
the
DN20()
switch
regist:er.::
Load
24
into
t,hesw,itchregistet'.:
,«<'
<
Press
the
EXAMINE
swi
tch
,to',
'examine.:
"tji~i
contents
of
locat
ion
24.
,
c'
:'
The
value
displayed
(0000,
240?,'or:'sO'IJie'oihfi,:i;
value)
is
the
starting
address."
"'"
,,;'
Load
the
starting
addre$s~
"
Start
the
DN200
at
the
ente<r:e~aqdre,ss';;,
2.1.3
Logging
in
at
the
TOPS-IO
Host
from
the
Remote
Station
To
use
your
operator's
console
and
issue
any
commands,
you
must
log
in
at
the
TOPS-IO
host.
To
do
so,
you
must
see
the
TOPS-IO
prompt
(.)
on
the
console.
The
prompt
normally
appears
automatically
as
soon
as
your
station
comes
up.
If
the
system
operator
at
the
host
has
set
up
your
TTY.INI
commands
to
do
so,
the
INITIA
program
logs
you
in
to
your
operator
directory
(project-programmer
number)
and
you
can
proceed
simply
by
typing
I
~
on
your
terminal.
If
you
do
not
see
the
TOPS-IO
prompt,
follow
these
steps:
1.
Check
your
console.
It
must
be
on
and
filled
with
paper.
The
switches
on
the
left
side,
except
for
the
'300'
switch,
should
all
be
in
the
'up'
position.
The
'300'
switch
should
be
down.
2-4
OPERATOR
PROCEDURES
2.
Press
«
TRL/
9
The
TOPS-IO
prompt
appears
below
the
following
type
of
message:
Host
is
available.
Connecting
to
host
system.
---System
herald---TTY215
system
...
Connected
to
Node
CTCH22(22)
Line
#0
DSKB:
3.
Type
the
word
LOGIN
and
press
~
number
prompt
(#)
appears.
on
your
terminal.
A
4.
Type
your
project-programmer
number
(PPN)
and
press
~.
(Remote
station
operators
often
log
in
under
the
[PPN]=[lnn,2],
where
nn
is
their
station
number
[also
called
node
number].)
To
determine
your
PPN,
contact
the
System
Administrator.
The
Password:
prompt
appears.
5.
Type
your
password,
which
is
not
printed,
and
press
~
on
your
terminal.
(You
can
abbreviate
these
steps
by
typing
6.
LOGIN PPN
password
~
).
The
TOPS-IO
host
then
sends
time,
the
date,
and
the
receive
system
messages
sent
TOPS-IO
host
may
also
run
you
automatically.
In
this
appears.
you
a
message
containing
the
day
of
the
week.
You
may
also
from
the
central
site.
The
OPR,
the
operator
interface,
for
case,
the
OPR
prompt,
OPR),
7.
You
are
now
logged
in
and
can
perform
your
normal
duties.
The
following
lines
illustrate
your
output:
. LOGIN
#172,2
Password:
12:00
11-Sep-80
or
.LOGIN
172,2
.R
OPR
OPR)
Thur
The
operator's
console
at
the
remote
station
must
be
kept
on
and
filled
with
paper
whenever
the
station
is
operating.
2-5

OPERATOR
PROCEDURES
2.1.4
The
Operator
Interface
In
a
TOPS-IO
network,
there
can
be
three
types
of
operators,
each
with
specific
privileges.
The
system
administrator
at
the
host
assigns
these
privileges
to
your
operator's
PPN
with
the
system
program
REACT.
As a
remote
station
operator,
you
obtain
these
privileges
when
you
log
in
with
your
operator's
PPN.
The
three
types
of
operators
are:
•
System
operators
•
Host
operators
•
Remote
operators
A
system
operator
has
the
most
global
privileges
and
capabilities.
The
system
operator
can
control
all
devices
anywhere
in
the
network
controlled
by
his
host,
both
at
the
central
site
and
at
remote
sites.
An
operator
who
logs
in
as
[1,2]
automatically
receives
system
operator
privileges.
(See
Figure
2-1.)
,-----------------,
I I
I I
I I
I I
I I
I I
I '
, '
THE
,,-~..
I
SYSTEM ,
~~J
_
DOMAIN
OF
I
OPERATOR 1
'--J'
THE SYSTEM OPERATOR ,
L
________________
.-l
MR-S-1110-81
Figure
2-1
The
System
Operator
A
host
operator
is
an
operator
who
can
control
all
devices
at
the
host
where
he
is
physically
located.
He
cannot
control
devices
at
any
other
host
or
at
any
remote
node.
(See
Figure
2-2.)
1---
I
,
, ,
I
'r-~"
,
THE
;~-:
HOST I
.:.r_
I
OPERATOR,
,.
,1
I
L
__
-=:--J
__
--.J
Figure
2-2
DOMAIN
OF
THE
HOST
OPERATOR
The
Host
Operator
2-6
OPERATOR PROCEDURES
A
remote
operator
can
control
all
devices
at
the
remote
node
where
his
terminal
is
connected;
he
cannot
control
devices
at
the
central
host
or
at
any
other
remote
node.
(See
Figure
2-3.)
DOMAIN
OF
THE REMOTE OPERATOR
.---------,
I
,;;.:!....:
I THE
I
O~REMOTE
I . I OPERATOR
I
--J
I
I I
L
______
--'
MR-S-1112-81
Figure
2-3
The
Remote
Operator
As
the
operator
at
a
remote
station,
you
run
OPR
to
control
your
local
line
printer
and
card
reader,
and
perform
any
other
operator
duties.
OPR
is
the
Operator
Interface
through
which
you
communicate
with
ORION. ORION,
in
turn,
communicates
with
other
components
of
GALAXY
and
the
TOPS-IO
operating
system.
You
issue
commands
to
OPR
to
communicate
with
the
TOPS-IO
operating
system,
to
control
the
devices
at
your
remote
station,
and
to
control
the
jobs
that
are
sent
from
and
received
at
your
remote
station.
If
your
host
does
not
automatically
start
OPR
for
your
remote
station,
you
can
start
OPR
with
the
following
commands.
To
run
aPR
you
must
be
logged
into
a
privileged
account
.
. R
aPR
@)
The
system
returns
the
aPR
prompt:
aPR>
See
Appendix
E
for
descriptions
of
the
OPR
commands
available
to
remote
operators.
At
the
TOPS-IO
host,
the
operator
runs
LPTSPL
and
CDRIVE.
spoolers
at
the
host
support
the
devices
at
your
station.
The
usual
As
you
issue
aPR
commands,
they
are
sent
to
ORION. ORION
puts
a
timestamp
on
each
command,
logs
the
command
in
the
operator's
log
file
(normally
stored
in
[3,3]OPERAT.LOG)
,
and
executes
the
command.
When
execution
is
complete,
ORION
sends
you
a
message
of
the
following
form:
hh:mm:ss
aPR
object
--action--
or
hh:mm:ss
--informational
message--
2-7

OPERATOR PROCEDURES
For
example,
when
you
issue
a
command
to
start
your
printer,
the
following
prompts
appear:
OPR> START
(object)
PRINTER
(Unit
Number)
a
~
OPR>
hh:mm:ss
Printer
a
[nodename
(node
number)]--Startup
Scheduled--
OPR>
If
you
misspell
an
OPR
command,
or
give
an
incomplete
command,
an
error
message
preceded
by
a
question
mark
appears.
OPR
error
messages
of
this
type
are
all
self-explanatory.
You
can
obtain
the
valid
part
of
an
incorrect
command
by
pressing
(CTRL/~
For
example,
say
you
are
running
OPR
and
issue
the
following
incomplete
command:
OPR>
SHOW
STATUS P
C~D
OPR
sends
you
the
following
message:
OPR>SHOW
STATUS P
?CONFIRMATION
Required
OPR>
If
you
type
(CTRL/0 ,
the
valid
part
of
the
command
appears:
OPR>
0~~~
OPR>
SHOW
STATUS
You
can
type?
to
see
what
arguments
are
valid.
OPR>
SHOW
STATUS?
one
of
the
following:
BATCH-STREAM
NETWORK-NODE
PRINTER
READER
OPR>SHOW
STATUS
In
addition,
you
may
use
escape
recognition
when
typing
OPR
commands.
The
ESCape
key
allows
recognition
input
and
guide
words
to
appear
on
your
console
when
you
give
an
OPR
command.
The
ESCape
key
may
be
labeled
ESC,
SEL,
PRE,
or
ALT,
depending
on
the
type
of
console
terminal
your
installation
is
using.
Type
the
OPR
command
START
with
the
use
of
the
ESCape
key
for
recognition
and
guide
words.
CESe)
G~
.
~
OPR> START
(object)
PRINTER
(uni
t
number)
a
CRET-)
OPR>
hh:mm:ss
Printer
a
[nodename
(nodenumber)]--Startup
Scheduled
OPR>
If
the
terminal
bell
rings,
you
have
not
typed
enough
characters
to
uni~uely
identify
a
command.
If
this
happens,
type
another
character
of
the
command
and
press
the
ESCape
key.
Continue
to
do
this
until
the
characters
you
typed
are
unique
for
the
specific
command.
2-8
OPERATOR PROCEDURES
The
operations
that
you
can
perform
with
OPR
at
your
remote
station
include:
•
scheduling
jobs
for
your
devices
•
suspending
the
scheduling
of
jobs
•
setting
parameters
for
your
devices
•
displaying
the
status
of
devices
and
jobs
•
canceling
jobs
•
controlling
output
on
your
printer
•
enabling
and
disabling
the
display
of
system
messages
2.1.5
Relocating
Your
Station
Devices
You
can
use
the
LOCATE
monitor
command
to
specify
another
node
as
your
logical
node,
to
establish
your
job
at
that
node.
Type
the
following:
LOCATE
node
number
~
The
node
number
is
the
number
of
the
node
where
you
want
to
locate
the
input/output
devices
for
your
job.
It
must
be
a
node
number
recognized
by
the
host.
It
acts
as
the
default
node
number
for
all
subsequent
PRINT
and
SUBMIT
commands.
You
can
verify
the
node
number
for
the
other
node
with
the
NETWORK
command,
which
lists
all
nodes
defined
in
the
network.
After
giving
the
LOCATE
command,
you
can
have
devices
at
the
new
logical
node
perform
the
input
and
output
for
your
jobs.
For
example,
the
following
command
relocates
input
and
output
at
node
22
(not
your
node):
.LOC
22
~
Node
CTCH22
(22)
DN82
V23(152)
16-Jan-81
Located
To
relocate
devices
at
your
own
physical
location,
reissue
the
LOCATE
monitor
command
with
no
arguments.
If,
during
your
session,
the
node
to
which
you
have
LOCATED
becomes
inaccessible,
you
are
returned
to
your
physical
location.
You
can
use
the
SHOW
STATUS
NETWORK-NODE
or
the
NETWORK
command
to
check
on
other
nodes
in
your
system.
As a
remote
operator,
you
cannot
execute
the
ROUTE
command
to
direct
output
to
~nother
node
in
the
system.
You
must
ask
the
operator
at
the
host
to
perform
routing.
You
may
wish
to
have
some
or
all
of
your
output
routed
to
another
node
if,
for
example,
your
line
printer
is
out
of
service
or
a
job
requires
special
forms
not
available
at
your
node.
(See
also
Appendix
F,
Using
Special
Print
Forms.)
2-9
OPERATOR
PROCEDURES
2.1.6
Starting
Printer
Scheduling
Before
you
start
scheduling
jobs
for
your
printer,
the
TOPS-10
host
operator
should
have
a
copy
of
LPTSPL
(the
line
printer
spooler)
running.
One
copy
of
LPTSPL
can
handle
up
to
15
local
and
remote
printers.
Only
the
TOPS-10
host
operator
can
start
the
spoolers.
You
can
issue
commands
to
start
scheduling
at
any
time,
but
requests
are
processed
only
if
the
spoolers
are
running.
To
verify
that
LPTSPL
is
running,
type
the
following:
~;YS
[1,2]
C~E~.J
All
the
OPR
jobs
running
on
the
host
are
listed;
LPTSPL
should
be
among
them.
If
not,
contact
the
system
operator
at
the
host.
For
example:
.SYS
[1,2]C
RET
)
1
DET
INITIA
6+11
SL
8
11
DET
LPTSPL
37+34
HB
1:00
This
runs
the
SYSTAT
program
to
display
jobs
on
the
system.
To
run
OPR
and
start
printer
scheduling,
follow
these
steps:
1.
At
the
OPR
prompt,
type
START
PRINTER 0
~
scheduling.
2.
Verify
that
your
printer
is
on.
The
following
lines
illustrate
your
output:
. H
OPR
(RET)
OPR)
START
PRINTER 0
(~0
OPR)
to
start
hh:mm:ss
Printer
0
[nodename
(node
number)]--Startup
Scheduled--
OPR)
2.1.7
Starting
Card
Reader
Scheduling
Before
you
start
scheduling
jobs
for
your
card
reader,
the
TOPS-10
host
operator
must
have
a
copy
of
CDRIVE
(the
card
reader
spooler)
running.
One
copy
of
CDRIVE
can
handle
up
to
15
local
and
remote
card
readers.
To
start
scheduling
for
your
card
reader,
you
must
also
communicate
with
OPR.
2-10
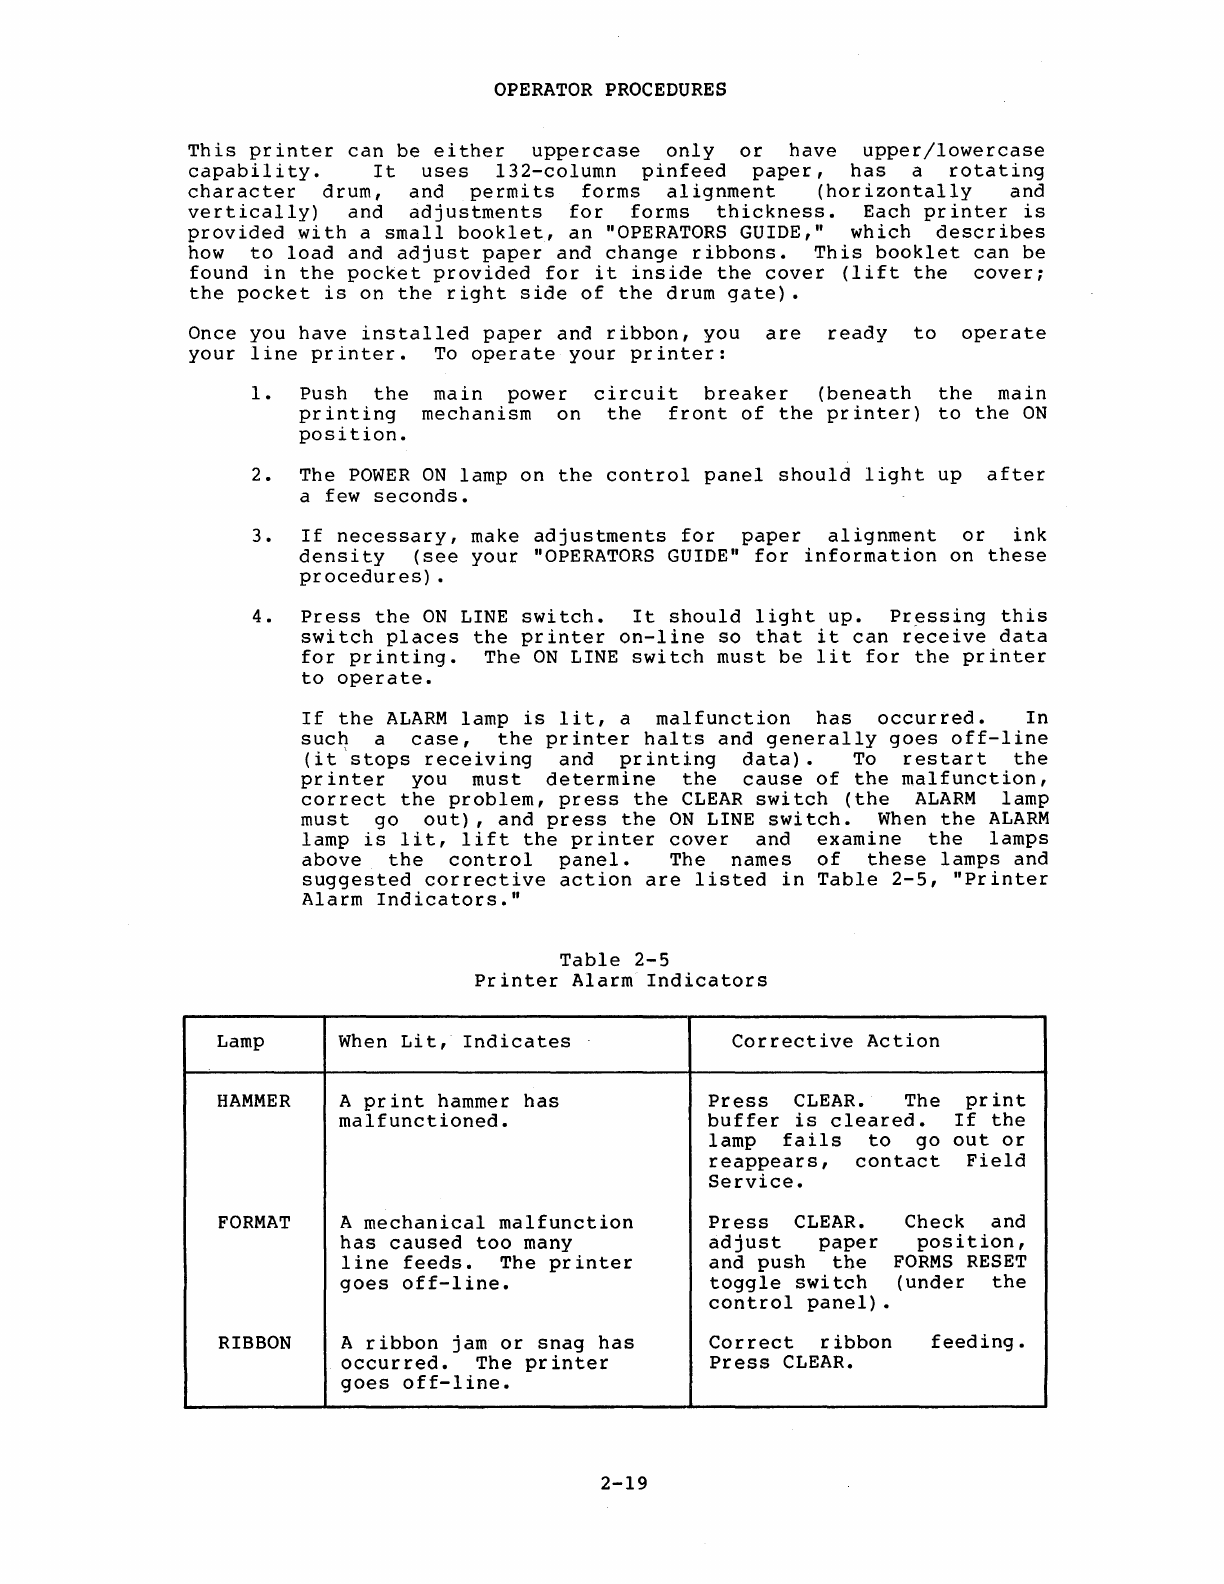
OPERATOR
PROCEDURES
To
start
scheduling,
type
the
following:
R
OPR
@)
1.
At
the
OPR)
prompt,
type
START
READER
0
@)
2.
Verify
that
your
card
reader
is
on.
Your
output
will
look
as
follows:
OPR)START
READER
0
OPR)
hh:mm:ss
Reader
0
[nodename
(node
number)]--Startup
Scheduled--
OPR)
2.1.8
Starting
both
Printer
and
Card
Reader
Scheduling
You
can
run
OPR
at
your
remote
station
to
start
scheduling
for
both
the
printer
and
card
reader
as
follows:
. R
OPR@)
OPR) START PRINTER 0
~
OPR)
hh:mm:ss
Printer
0
[nodename
(node
l1umber)]--Startup
Scheduled--
OPR) START
READER
a
~
OPR)
hh:mm:ss
Reader
0
[nodename
(node
number)]--Startup
Scheduled--
OPR)
The
system
operator
at
the
host
can
also
place
printer
and
card
reader
commands
in
the
system
file
[1,4]SYSTEM.CMD.
This
file
is
called
with
a
TAKE
command
from
the
system
file
[1,4]OPR.ATO.
With
your
startup
commands
in
a
system
file
on
the
host,
scheduling
for
your
devices
should
occur
automatically.
If
not,
contact
the
system
operator
at
the
host.
For
more
information
on
OPR,
see
Appendix
E,
"Remote
Station
OPR
Commands,"
and
the
Operator's
Command
Language
Reference
Manual.
2.1.9
Using
OPSER
Generally,
you
should
run
OPR
at
your
operator
terminal
and
perform
other,
duties
from
another
terminal.
However,
if
you
wish
to
use
your
operator
terminal
for
several
functions,
you
can
use
OPSER.
With
OPSER
you
can
run
up
to
14
subjobs
from
a
single
terminal.
(For
more
information
on
OPSER,
see
the
OPSER
help
file
(type
HELP OPSER
@)
or
see
the
TOPS-10
Operating
System
Commands
Manual.)
To
use
OPSER
to
run
OPR
and
perform
some
other
functions,
follow
these
steps:
1.
Type
the
following:
R OPSER
~
This
runs
the
OPSER
program
and
initiates
an
OPSER
job.
The
OPSER
prompt
(*)
appears.
2-11
OPERATOR PROCEDURES
2.
Type
the
following:
: LOGIN PPN
CRI!:)
(Commands
to
OPSER
always
start
with
a
colon.)
Use
your
own
PPN.
This
logs
in
a
subjob
which
you
will
use
to
run
OPR.
Output
of
the
following
form
appears:
3.
Type:
h h :
mm
: s s
(0
)
Job
xx
[LGNJSP
hh:mm:ss
[ ]
system
name
TTYno.
Other
jobs
same
PPN:xx]
date
day
: DEFINE
OPREM=
C~i)
This
names
your
subjob
OPREM.
(You
can
use
another
name
but
it
cannot
contain
more
than
five
characters.)
4.
Type:
OPREM-R
OPR
~
(Commands
to
OPSER
subjobs
do
not
need
colons.)
This
loads
OPR
under
control
of
the
subjob.
Output
of
the
following
form
appears:
*OPREM-R OPR
!hh:mm:ss
(OPREM)
OPR>
5.
Enter
OPR
commands
for
your
remote
station
devices.
The
help
facility
is
also
available
to
you
at
this
command
level.
Precede
each
command
with
the
name
of
your
subjob
followed
by
a
hyphen.
For
example,
OPREM-START PRINTER 0
~~)
or
OPREM-START
READER
0
~~!.)
6.
To
issue
more
commands
,to
OPSER,
precede
each
wi
th
a
colon
( : ) .
7.
To
see
the
state
of
each
of
your
subjobs,
use
:WHAT
ALL.
To
kill
all
your
subjobs,
use
:KILL
ALL.
To
kill
a
specific
subjob,
use
:KILL
subjob-name.
2.2
AVAILABLE EQUIPMENT
The
typical
TOPS-IO
remote
station
contains
an
operator's
console
(LA36);
it
can
also
contain
a
card
reader,
a
line
printer
and
user
terminals.
These
pieces
of
equipment
are
briefly
described
in
this
chapter
and
in
supporting
hardware
documents
that
are
provided
with
your
equipment.
2-12
OPERATOR
PROCEDURES
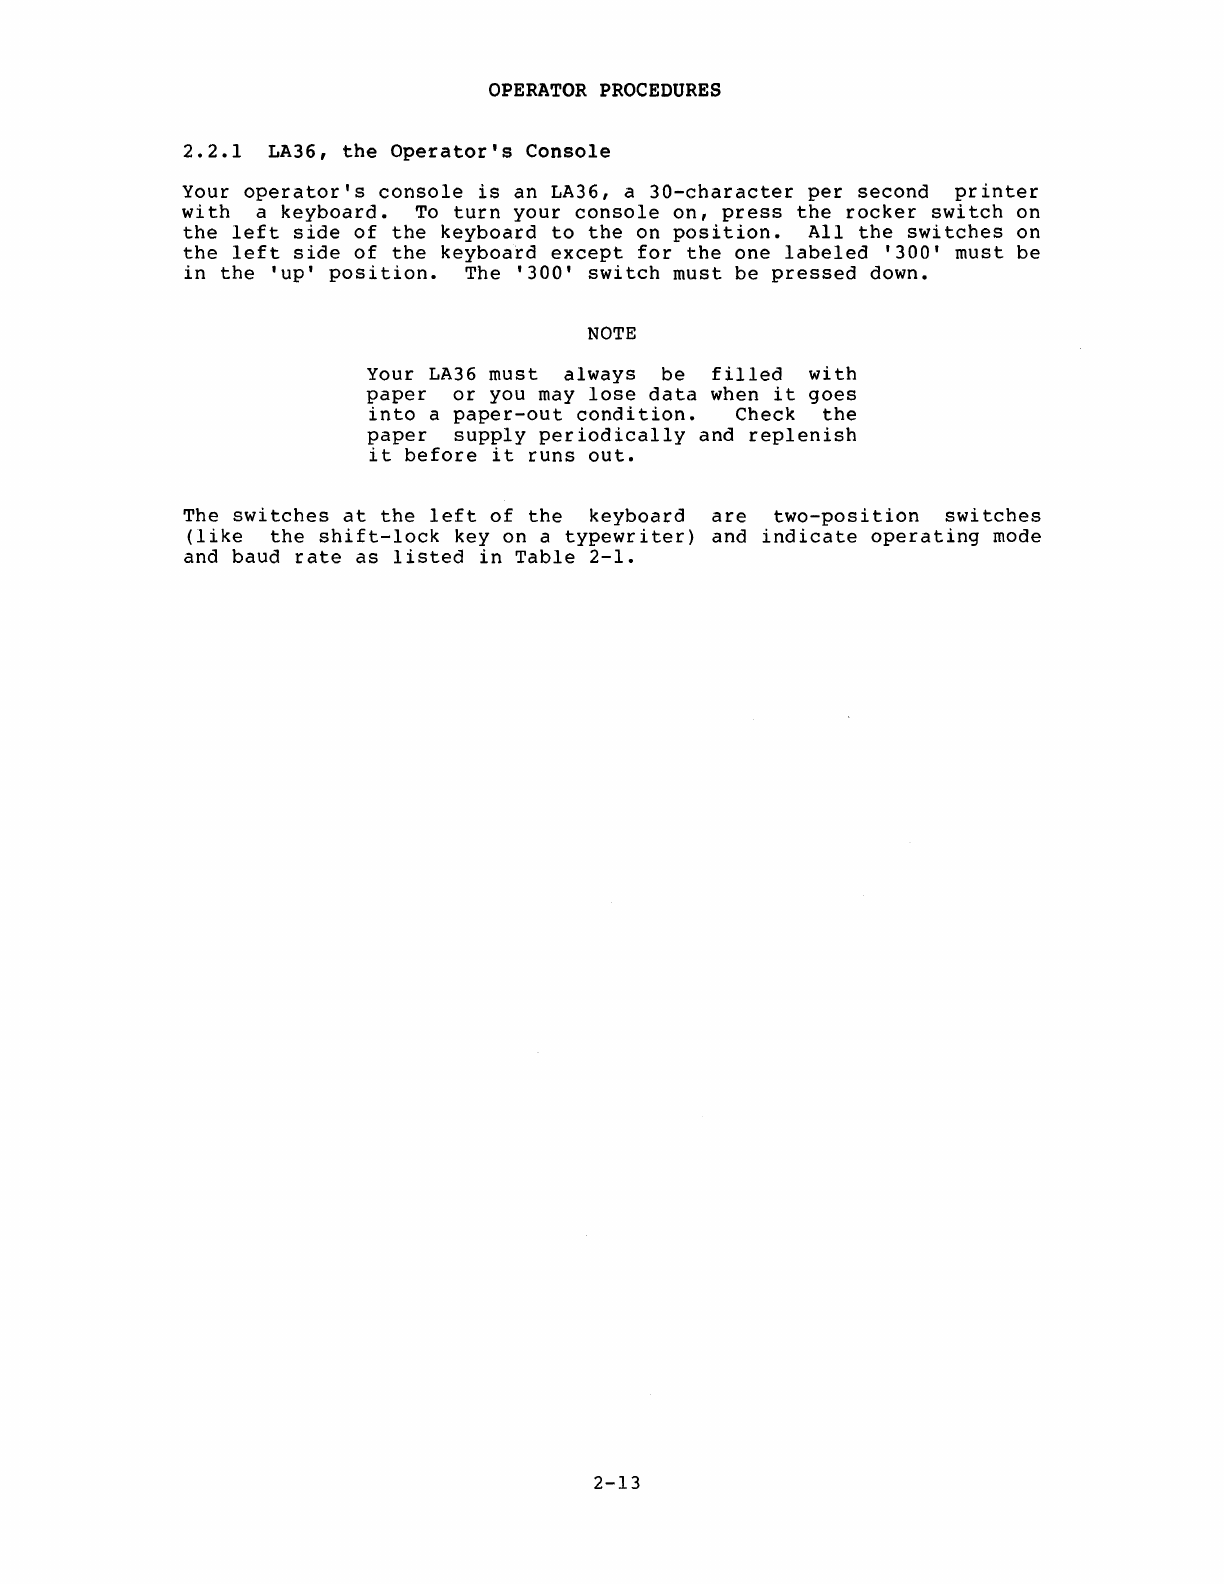
2.2.1
LA36,
the
Operator's
Console
Your
operator's
console
is
an
LA36,
a
30-character
per
second
printer
with
a
keyboard.
To
turn
your
console
on,
press
the
rocker
switch
on
the
left
side
of
the
keyboard
to
the
on
position.
All
the
switches
on
the
left
side
of
the
keyboard
except
for
the
one
labeled
'300'
must
be
in
the
'up'
position.
The
'300'
switch
must
be
pressed
down.
NOTE
Your
LA36
must
always
be
filled
with
paper
or
you
may
lose
data
when
it
goes
into
a
paper-out
condition.
Check
the
paper
supply
periodically
and
replenish
it
before
it
runs
out.
The
switches
at
the
left
of
the
keyboard
are
two-position
switches
(like
the
shift-lock
key
on
a
typewriter)
and
indicate
operating
mode
and
baud
rate
as
listed
in
Table
2-1.
2-13
Up/Down
Up
Down
Up
Down
Down
Up
Up
Down
Down
Down
Up
Down
Always
Up
Up
Down
Always
Up
}
}
OPERATOR
PROCEDURES
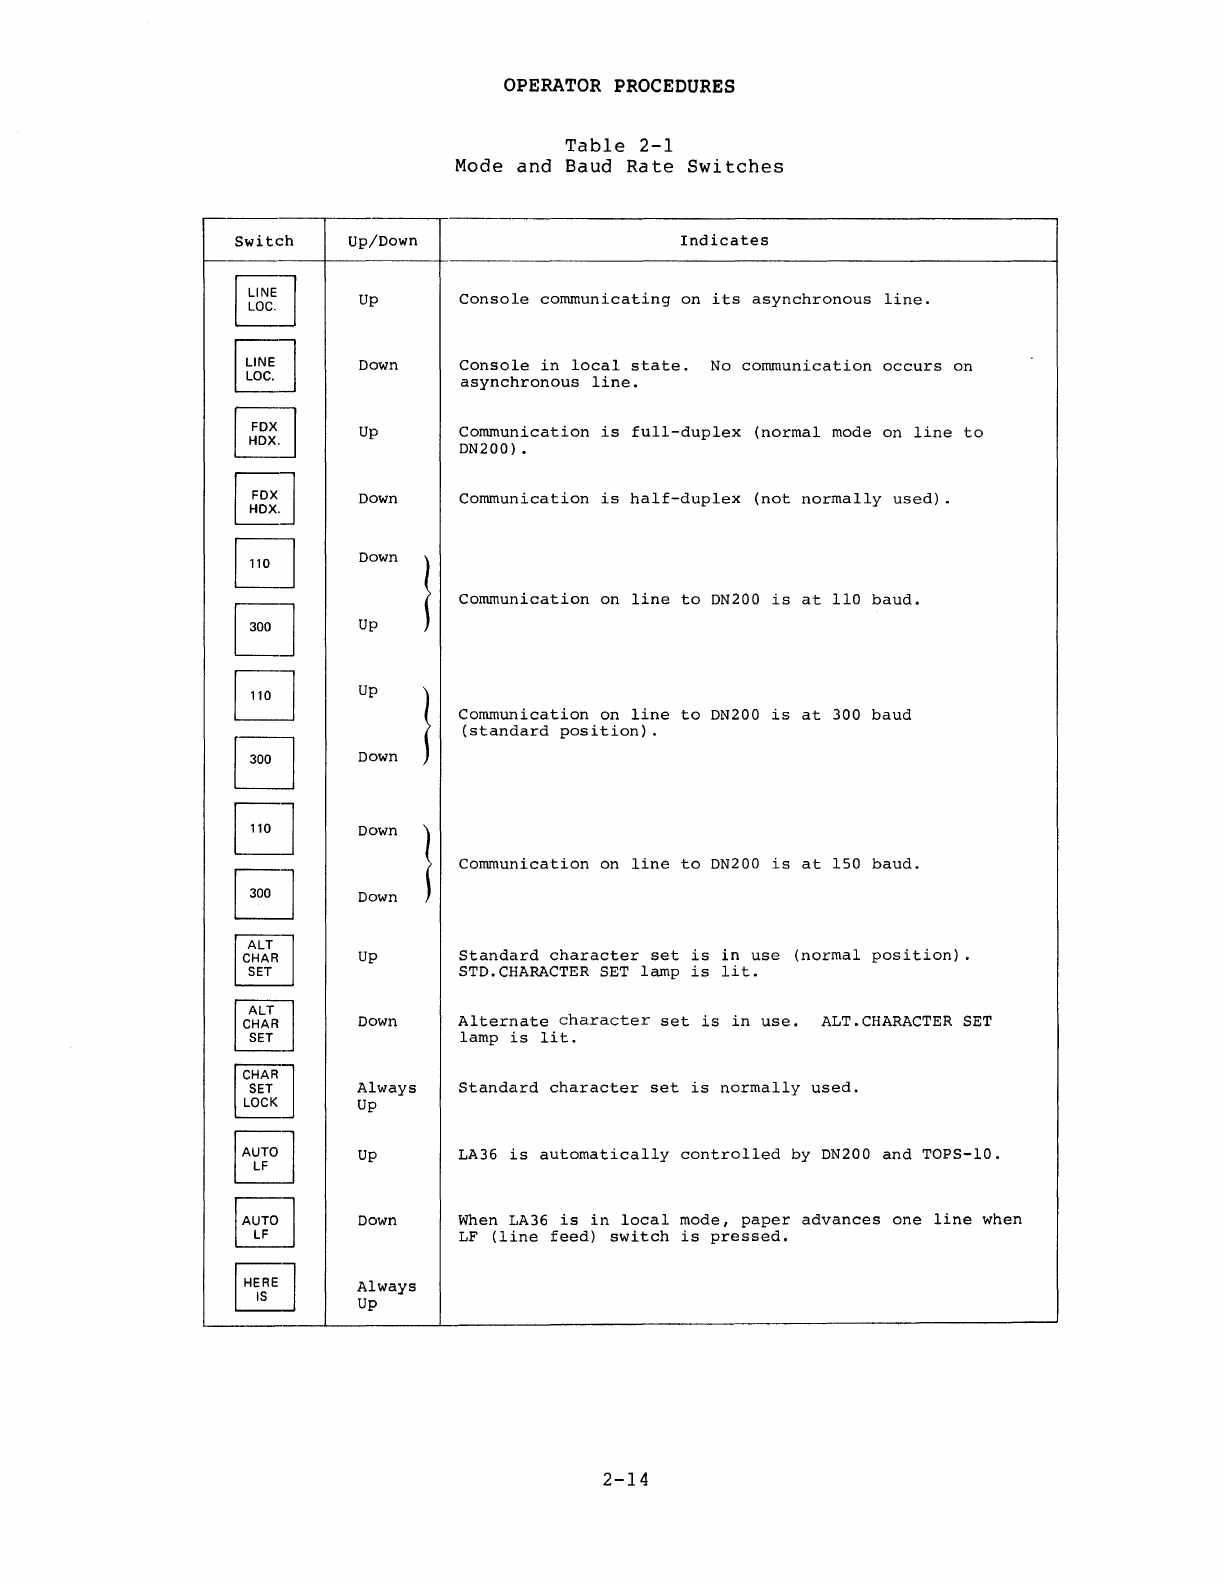
Table
2-1
Mode
and
Baud
Rate
Switches
Indicates
Console
communicating
on
its
asynchronous
line.
Console
in
local
state.
No
communication
occurs
on
asynchronous
line.
Communication
is
full-duplex
(normal
mode
on
line
to
DN200) .
Communication
is
half-duplex
(not
normally
used).
Communication
on
line
to
DN200
is
at
110
baud.
Communication
on
line
to
DN200
is
at
300
baud
(standard
position).
Communication
on
line
to
DN200
is
at
150
baud.
Standard
character
set
is
in
use
(normal
position)
.
STD.
CHARACTER
SET
lamp
is
lit.
Alternate
character
set
is
in
use.
ALT.
CHARACTER
SET
lamp
is
lit.
Standard
character
set
is
normally
used.
LA36
is
automatically
controlled
by
DN200
and
TOPS-10.
When LA36
is
in
local
mode,
paper
advances
one
line
when
LF
(line
feed)
switch
is
pressed.
2-14
OPERATOR
PROCEDURES
Lamps
on
the
operator's
console
are
described
below.
Lamp
STD.
CHARACTER
SET
ALT.
CHARACTER
SET
PAPER
OUT
DEVICE SELECT
SELECT AVAIL
2.2.2
Card
Reader
Table
2-2
Console
Lamps
When
Lit,
Indicates
The
standard
character
set
is
in
use
(ALT
CHAR
SET
switch
is
up).
The
alternate
character
set
is
in
use
(ALT
CHAR
SET
switch
is
down).
For
normal
operation,
the
ALT
CHAR
SET
switch
must
be
up.
The
LA36
is
out
of
paper.
Replenish
the
paper
supply.
(Open
the
inner
cover
of
the
LA36,
open
the
pinfeed
gates,
thread
paper
from
below
the
printer
past
the
gates,
and
hook
the
perforations
over
the
pins.
Close
the
gates
and
the
printer
cover.)
To
resume
operations,
you
must
either
press
the
LINE/LOC.
switch
down,
and
then
reset
it
in
the
upper
position,
or
turn
your
LA36
off
then
on
again.
Data
may
be
lost
by
these
operations.
This
lamp
should
always
be
out.
If
on,
call
your
Field
Service
representative.
This
lamp
should
always
be
out.
If
on,
call
your
Field
Service
representative.
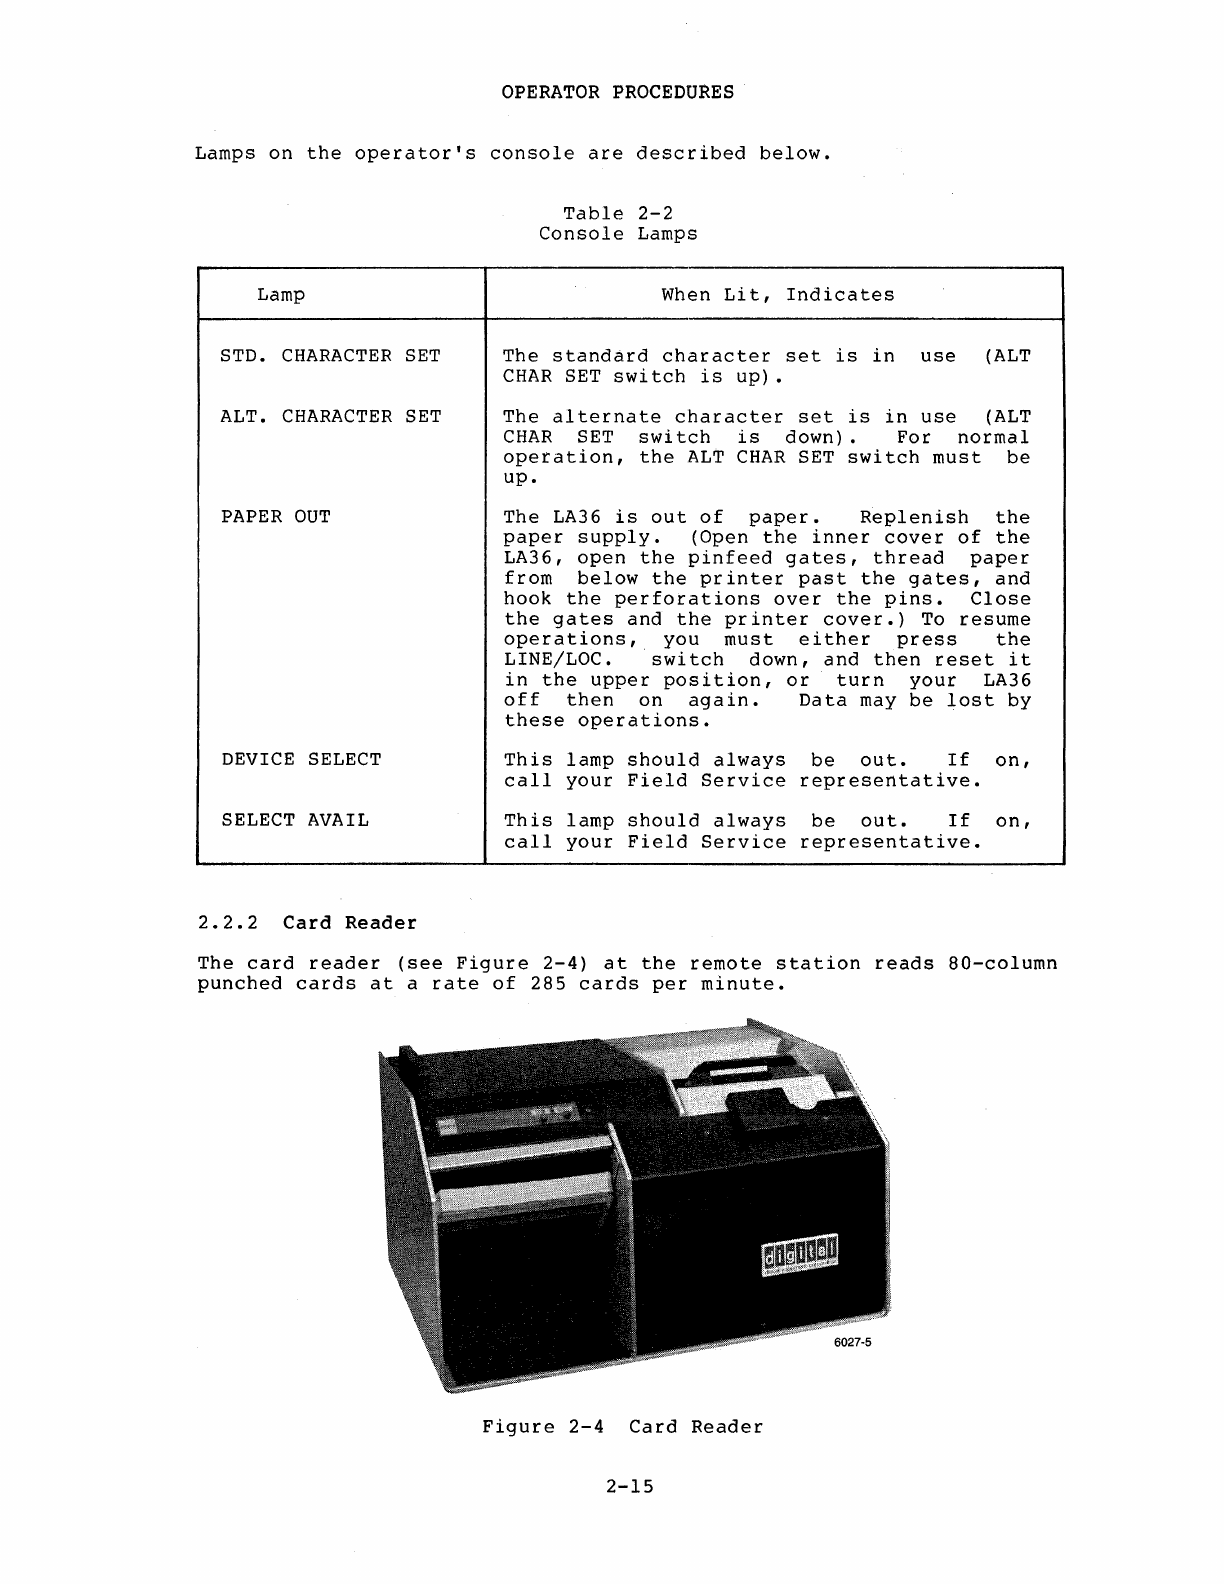
The
card
reader
(see
Figure
2-4)
at
the
remote
station
reads
80-column
punched
cards
at
a
rate
of
285
cards
per
minute.
Figure
2-4
Card
Reader
2-15

OPERATOR
PROCEDURES
It
has
an
input
hopper
(upper
right),
an
optical
card-reading
station,
an
output
hopper
(lower
left),
switches
to
control
its
operation
(on
front
panel),
and
indicator
lamps.
Toggle
switches
on
its
back
panel
are
used
to
turn
on
and
set
up
the
card
reader
(see
Figures
2-5
and
2-6)
•
I
POWER
I
r----'
r----'
r-----'
..
------,
I ' , I I I ; I
I
READ
'I
'I
PICK : I
STACK'
'HOPPER I
I CHECK I
,CHECK
I :
CHECK:
:
CHECKl
I , I I I I I I
L
_____
.I
L
_____
J L
_____
J L
_____
J
I STOP I I RESET I
o 0
MR-S-064-78
Figure
2-5
Front
Panel
of
Card
Reader
The
switches
and
lamps
on
the
front
panel
of
the
card
reader
are
explained
in
Table
2-3.
Switch/Lamp
POWER
READ
CHECK
PICK
CHECK
STACK
CHECK
HOPPER
CHECK
Table
2-3
Card
Reader
Switches
and
Lamps
When
Lit,
Indicates
Power
is
on.
Card
just
encountered
may
be
damaged.
Card
just
encountered
may
be
damaged,
deck
may
be
warped
or
reader
may
need
cleaning.
Card
just
read
may
be
damaged,
or
there
may
be
a
card
jam.
Either:
Input
hopper
is
empty
and
no
EOF
card
has
been
encountered
Or:
Output
hopper
is
full.
2-16
Corrective
Action
None.
Remove
(and
repunch)
faulty
card
and
press
RESET.
Reread
the
card.
Correct
card
or
deck
condition
and
press
RESET.
Reread
the
card.
Clear
jam
or
repunch
damaged
card.
Press
RESET
and
reread
the
last
card.
Reread
the
last
followed
by
an
card.
card
EOF
Empty
the
output
hopper
and
press
RESET
to
continue.
Reread
the
last
card
read.
OPERATOR
PROCEDURES
Table
2-3
(cont.)
Card
Reader
Switches
and
Lamps
Switch/Lamp
When
Lit,Indicates
Corrective
Action
STOP
switch
Press
to
stop
reading
and
red
lamp
cards.
Red
lamp
is
lit,
RESET
green
lamp
goes
out.
RESET
switch
and
Press
to
light
green
green
lamp
lamp,
start
blower
and
start
reading
cards.
Figure
2-6
illustrates
switches
on
the
back
panel
of
the
card
reader
and
Table
2-4
explains
their
use.
Switch
POWER
LAMP
TEST
SHUTDOWN
MODE
LAMP TEST
® SHUTDOWN
MAN@
AUTO
MODE
REMOTE G LOCAL
MR-S-012-78
Figure
2-6
Back
Panel
of
Card
Reader
Table
2-4
Card
Reader
Back
Panel
Switches
Use
Raise
to
turn
on
card
reader.
Press
to
light
indicators
on
front
panel
(checks
for
faulty
lamps).
Set
to
specify
operation
of
input
hopper
blower
at:
MANual
to
operate
blower
continuously.
AUTOmatic
to
shut
off
blower
when
not
reading
cards.
Set
mode
to
specify
on-line
and
off-line
reader
operation
at:
REMOTE
to
place
reader
on-line
under
program
control
when
RESET
is
pressed.
LOCAL
to
use
RESET
and
STOP
switches
to
operate
the
reader
off-line
for
testing.
2-17
OPERATOR
PROCEDURES
To
operate
the
card
reader,
perform
the
following
steps:
1.
Turn
on
card
reader
power.
2.
Load
input
hopper
with
cards
(face
down,
column
1
to
left);
up
to
550
cards
can
be
accommodated
at
one
time.
3.
Place
the
card
weight
on
top
of
the
cards
in
the
hopper.
4.
Press
RESET.
You
can
load
and
unload
cards
continuously
while
the
reader
is
in
operation.
If
you
use
your
card
reader
almost
continuously,
clean
it
once
a
week.
Wipe
the
exterior
with
a
soft
cloth
and
vacuum
the
card
dust
out
of
the
card
path
(turn
off
the
power,
blowout
the
path
from
the
input
hopper
to
the
stacker,
and
vacuum
it).
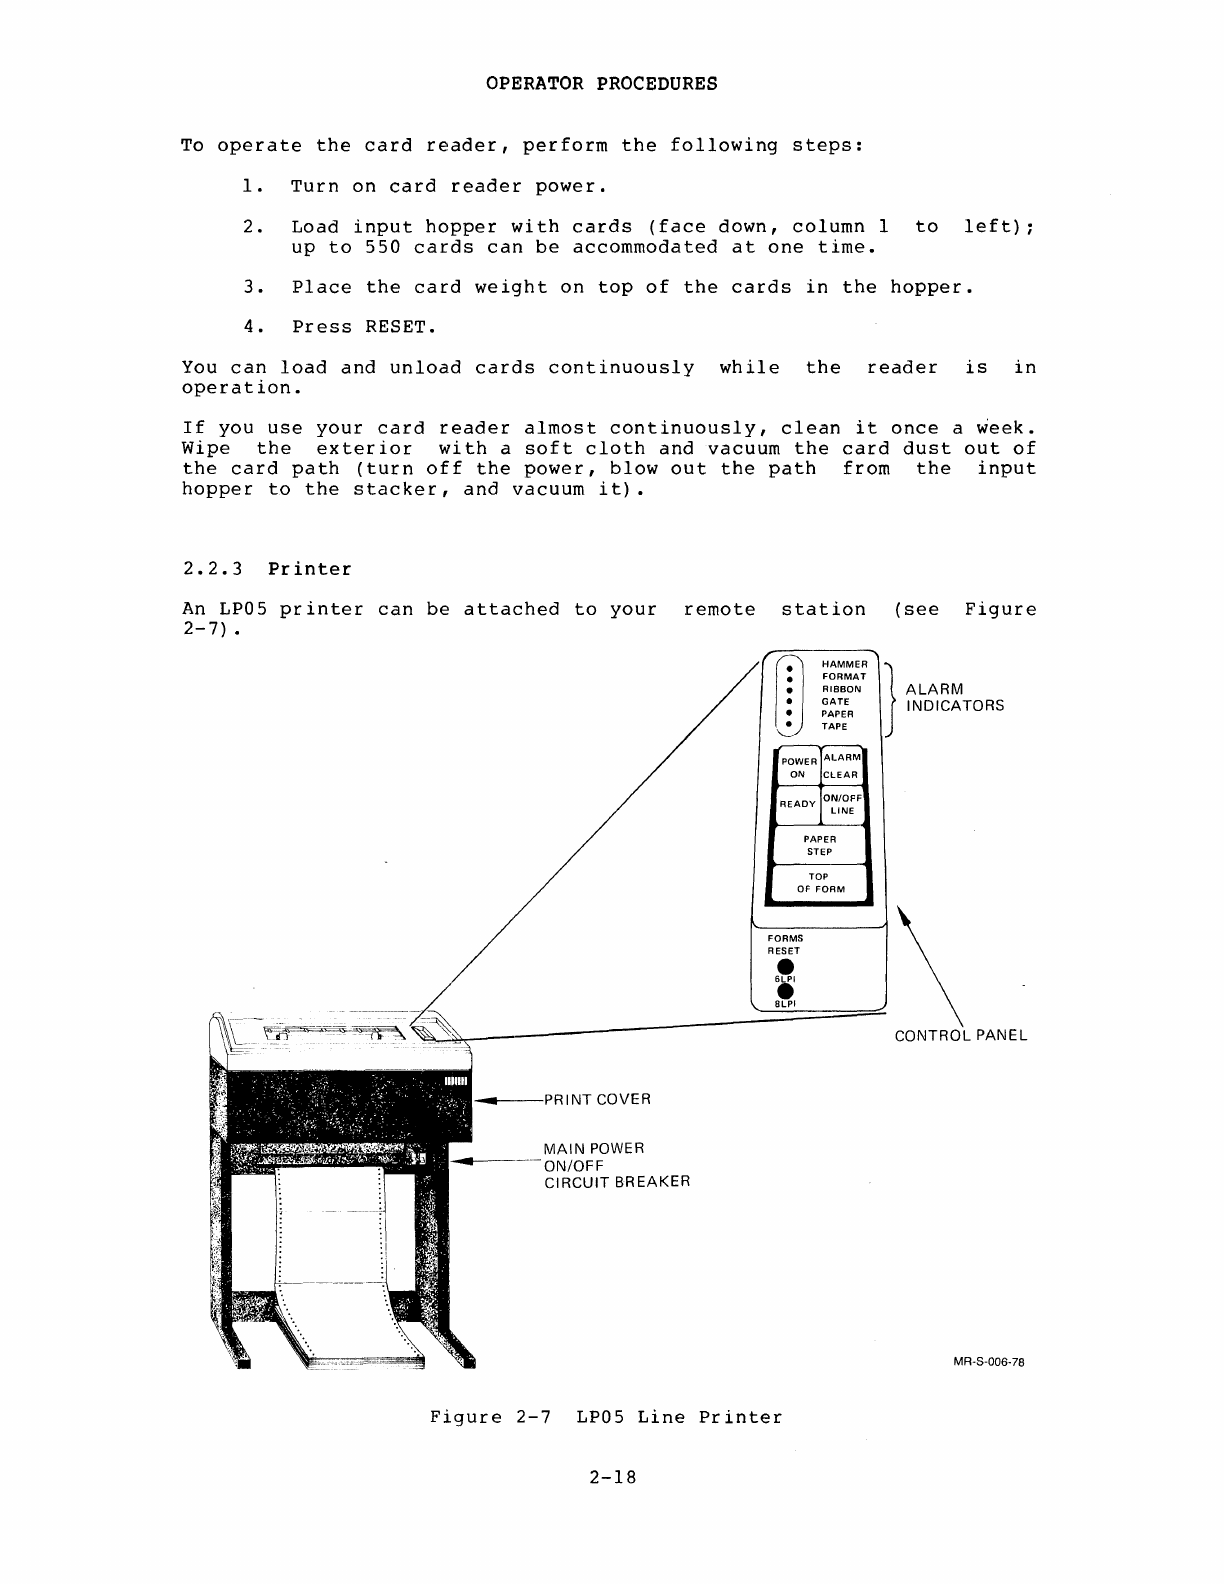
2.2.3
Printer
An
LP05
printer
can
be
attached
to
your
remote
station
(see
Figure
2-7)
.
MAIN
POWER
----ON/OFF
CIRCUIT
BREAKER
POWER
ALARM
ON
CLEAR
READY
ON/OFF
LINE
PAPER
STEP
TOP
OF
FORM
FORMS
RESET
•
6lPI
•
alPI
Figure
2-7
LP05
Line
Printer
2-18
}
ALARM
INDICATORS
MR-S-006-78
OPERATOR
PROCEDURES
This
printer
can
be
either
uppercase
only
or
have
upper/lowercase
capability.
It
uses
l32-column
pinfeed
paper,
has
a
rotating
character
drum,
and
permits
forms
alignment
(horizontally
and
vertically)
and
adjustments
for
forms
thickness.
Each
printer
is
provided
with
a
small
booklet,
an
"OPERATORS
GUIDE,"
which
describes
how
to
load
and
adjust
paper
and
change
ribbons.
This
booklet
can
be
found
in
the
pocket
provided
for
it
inside
the
cover
(lift
the
cover;
the
pocket
is
on
the
right
side
of
the
drum
gate)
•
Once
you
have
installed
paper
and
ribbon,
you
are
ready
to
operate
your
line
printer.
To
operate
your
printer:
1.
Push
the
printing
position.
main
power
mechanism
on
circuit
breaker
(beneath
the
main
the
front
of
the
printer)
to
the
ON
2.
The
POWER
ON
lamp
on
the
control
panel
should
light
up
after
a few
seconds.
3.
If
necessary,
make
adjustments
for
paper
alignment
or
ink
density
(see
your
"OPERATORS
GUIDE"
for
information
on
these
procedures)
.
4.
Press
the
ON
LINE
switch.
It
should
light
up.
Pr~ssing
this
switch
places
the
printer
on-line
so
that
it
can
receive
data
for
printing.
The
ON
LINE
switch
must
be
lit
for
the
printer
to
operate.
Lamp
HAMMER
FORMAT
RIBBON
If
the
ALARM
lamp
is
lit,
a
malfunction
has
occurred.
In
such
a
case,
the
printer
halts
and
generally
goes
off-line
(it'stops
receiving
and
printing
data).
To
restart
the
printer
you
must
determine
the
cause
of
the
malfunction,
correct
the
problem,
press
the
CLEAR
switch
(the
ALARM
lamp
must
go
out),
and
press
the
ON
LINE
switch.
When
the
ALARM
lamp
is
lit,
lift
the
printer
cover
and
examine
the
lamps
above
the
control
panel.
The
names
of
these
lamps
and
suggested
corrective
action
are
listed
in
Table
2-5,
"Printer
Alarm
Indicators."
Table
2-5
Printer
Alarm
Indicators
When
Lit,
Indicates
A
print
hammer
has
malfunctioned.
A
mechanical
malfunction
has
caused
too
many
line
feeds.
The
printer
goes
off-line.
A
ribbon
jam
or
snag
has
occurred.
The
printer
goes
off-line.
2-19
Corrective
Action
Press
CLEAR.
The
print
buffer
is
cleared.
If
the
lamp
fails
to
go
out
or
reappears,
contact
Field
Service.
Press
CLEAR.
Check
and
adjust
paper
position,
and
push
the
FORMS
RESET
toggle
switch
(under
the
control
panel).
Correct
ribbon
Press
CLEAR.
feeding.
Lamp
GATE
PAPER
TAPE
OPERATOR
PROCEDURES
Table
2-5
(cont.)
Printer
Alarm
Indicators
When
Lit,Indicates
Drum
gate
is
not
latched.
Printer
buffer
is
cleared.
There
is
a
paper
jam,
paper
out
or
paper
runaway
condition.
The
printer
goes
off-line.
An
invalid
tape
channel
command
has
occurred.
Printer
goes
off-line.
Corrective
Action
Latch
the
gate
properly
and
press
CLEAR.
Fix
the
paper
condition
and
press
CLEAR.
Press
CLEAR.
2.2.4
Terminals
You
can
have
many
types
of
terminals
attached
to
your
remote
station
to
operate
as
user
terminals.
The
LA36
is
described
in
Section
2.2.1,
"LA36,
the
Operator's
Console."
Other
terminals
are
fully
described
in
their
accompanying
booklets.
The
log-in
procedure
for
a
video
display
terminal
is
the
same
as
that
described
for
the
operator
in
Section
2.1.3,
"Logging
in
at
the
TOPS-IO
Host,"
(turn
on
your
terminal,
issue
the
command
LOGIN,
respond
to
prompts
with
your
PPN
and
your
password)
.
To
log
off
the
TOPS-IO
host,
type
the
following:
K/F~
To
exit
from
an
OPSER
subjob,
type
K/F
~
to
the
OPSER
subjob.
To
exit
from
OPSER,
type
:EXIT
to
OPSER.
The
TOPS-IO
host
sends
a
sign-off
message
of
the
following
form:
Job
40
User
OPERATOR
[172,2]
Logged-off
TTY235
at
11:06:31
on
25
Dec-79
Runtime:
...
KCS:
••.
Connect
time:
.•.
Disk
Reads:
...
,
Writes:
...
,
Blocks
saved:
•••
Do
not
turn
off
your
CTY
even
after
you
log
off
so
that
it
remains
available
to
receive
messages
sent
to
the
remote
site.
2-20
CHAPTER
3
USER
PROCEDURES
3.1
USER
FACILITIES
A
user
at
a
remote
station
with
a
terminal
has
access
to
all
the
system
commands
and
programs
that
are
available
to
a
user
at
a
TOPS-IO
host.
The
remote
site
user
can
also
use
the
physical
facilities
at
the
host,
such
as
magnetic
tapes
and
plotters,
by
issuing
the
appropriate
commands
and
making
requests
to
the
operator
at
the
host
site.
Users
at
remote
sites
with
a
card
reader
can
also
submit
jobs
on
punched
cards.
For
information
about
TOPS-IO
commands
and
system
programs,
see
the
TOPS-IO
Operating
System
Commands
Manual;
for
information
about
commands
on
punched
cards
and
use
of
the
batch
system,
see
the
TOPS-IO/TOPS-20
Batch
Reference
Manual.
Use
the
normal
log-in
procedure
to
log
in
on
the
TOPS-IO
host
from
a
remote
station.
For
example,
your
output
might
look
as
follows
after
completion
of
login:
Host
is
available.
Connecting
to
host
system.
---
SRIO
---
10:43:10
TTY2l2
system
Connected
to
Node
CURLY
(47)
LINE# 2
Please
LOGIN
or
ATTACH
.LOGIN
PPN
~
JOB
61
RZ51B
--SRIO--
TTYxx
Password:
12:00
5-May-80
Mon
If
the
system
herald
is
not
for
the
host
where
you
wish
to
log
in,
use
the
SET
HOST
command
to
connect
to
the
right
host
as
follows:
.SET
HOST
71
~
---KLI090---
10:54:06
TTY212
system
Connected
to
Node
CTCH22
(22)
Line
# 2
Please
LOGIN
or
ATTACH
To
see
the
node
numbers
for
other
network
nodes,
use
the
NETWORK
command.
3-1
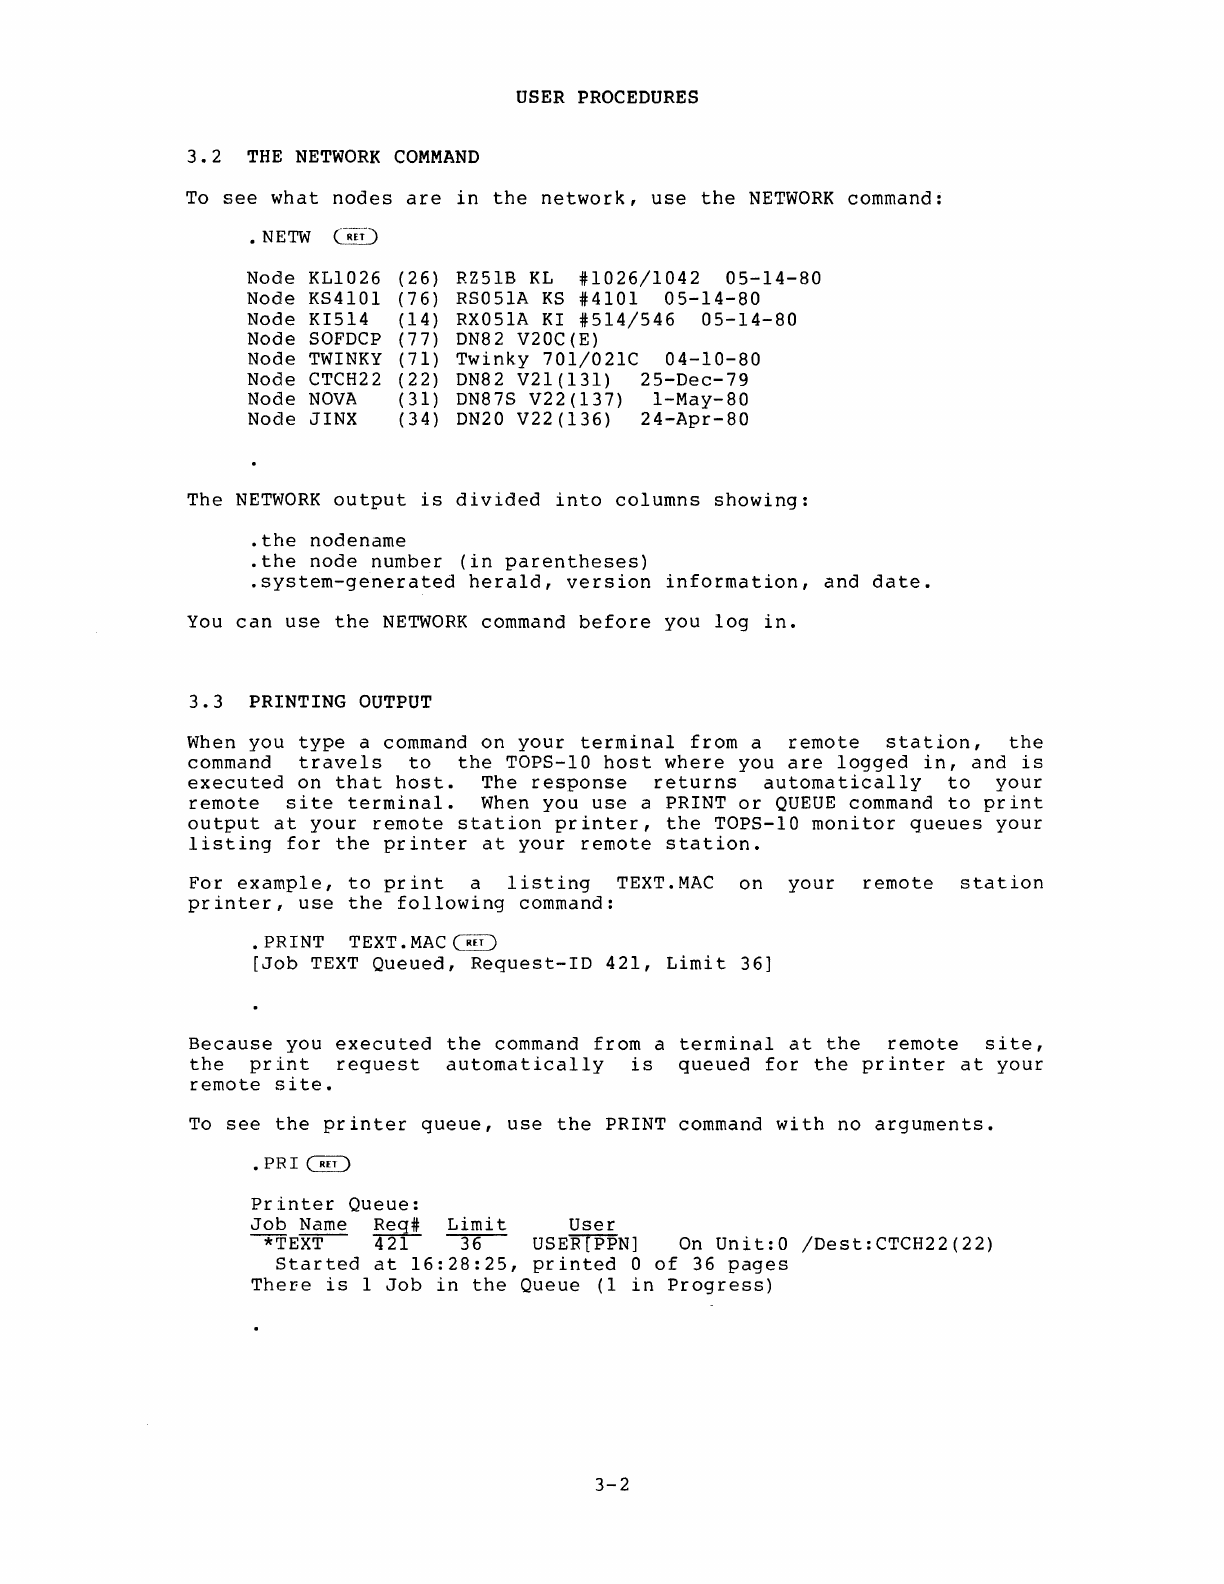
USER PROCEDURES
3.2
THE
NETWORK
COMMAND
To
see
what
nodes
are
in
the
network,
use
the
NETWORK
command:
.
NETW
C~~D
Node
KLI026
Node
KS4101
Node
KI514
Node
SOFDCP
Node
TWINKY
Node
CTCH22
Node
NOVA
Node
JINX
(26)
(76)
(14
)
(77)
(71
)
(
22)
(31
)
(
34)
RZ51B
KL
#1026/1042
05-14-80
RS051A
KS
#4101
05-14-80
RX051A KI
#514/546
05-14-80
DN82
V20C(E)
Twinky
701/021C
04-10-80
DN82 V21
(131)
25-Dec-79
DN87S
V22(137)
I-May-80
DN20
V22(136)
24-Apr-80
The
NETWORK
output
is
divided
into
columns
showing:
.the
nodename
.the
node
number
(in
parentheses)
.system-generated
herald,
version
information,
and
date.
You
can
use
the
NETWORK
command
before
you
log
in.
3.3
PRINTING
OUTPUT
When
you
type
a
command
on
your
terminal
from
a
remote
station,
the
command
travels
to
the
TOPS-10
host
where
you
are
logged
in,
and
is
executed
on
that
host.
The
response
returns
automatically
to
your
remote
site
terminal.
When
you
use
a PRINT
or
QUEUE
command
to
print
output
at
your
remote
station
printer,
the
TOPS-10
monitor
queues
your
listing
for
the
printer
at
your
remote
station.
For
example,
to
print
a
listing
TEXT.
MAC
on
your
remote
station
printer,
use
the
following
command:
. PRINT TEXT.
MAC
~
[Job
TEXT
Queued,
Request-ID
421,
Limit
36]
Because
you
executed
the
command
from
a
terminal
at
the
remote
site,
the
print
request
automatically
is
queued
for
the
printer
at
your
remote
site.
To
see
the
printer
queue,
use
the
PRINT
command
with
no
arguments
.
.
PRI~
Printer
Queue:
Job
Name
Req#
Limit
User
~E~
~
36
USER[PPN]
On
Unit:O
/Dest:CTCH22(22)
Started
at
16:28:25,
printed
0
of
36
pages
There
is
1
Job
in
the
Queue
(1
in
Progress)
3-2
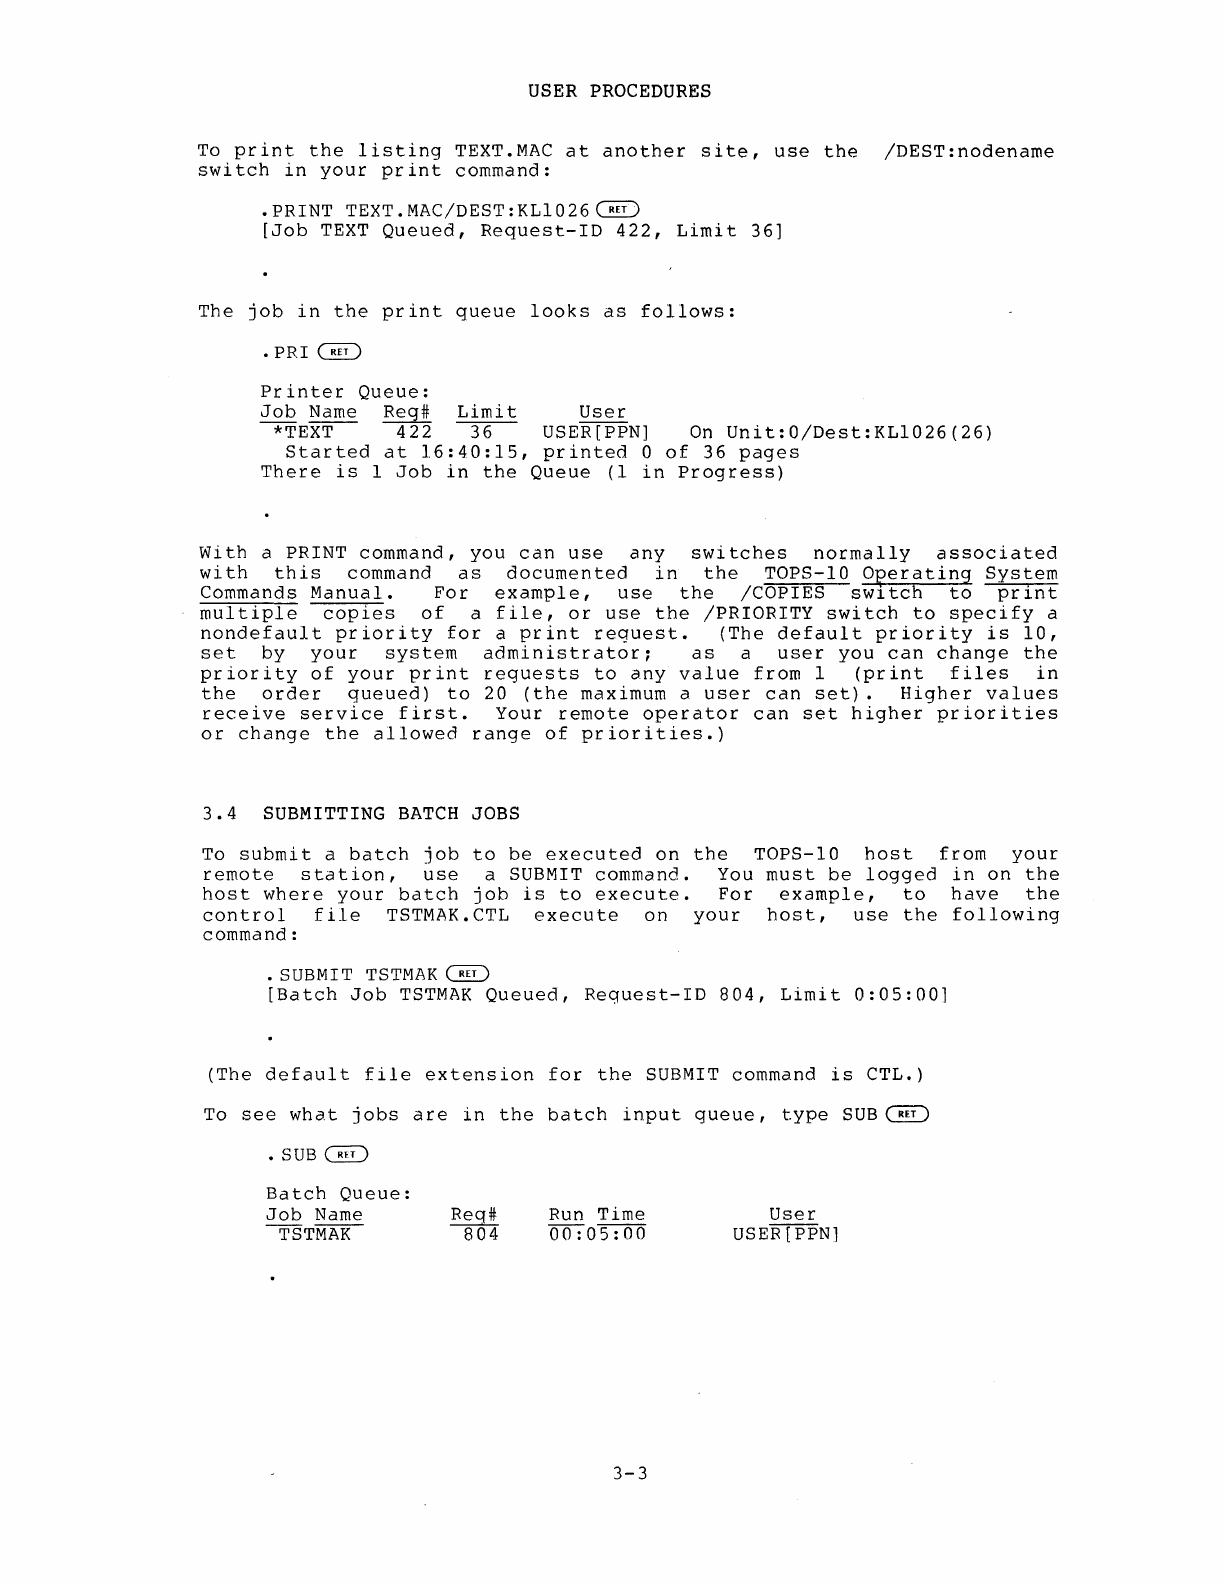
USER PROCEDURES
To
print
the
listing
TEXT.MAC
at
another
site,
use
the
/DEST:nodename
switch
in
your
print
command:
.PRINT
TEXT.MAC/DEST:KLI026~
[Job
TEXT
Queued,
Request-ID
422,
Limit
36]
The
job
in
the
print
queue
looks
as
follows:
.PRI~
Printer
Queue:
Job
Name
Req#
Limit
User
~E~
~
~
USER[PPN]
On
Unit:0/Dest:KLI026(26)
Started
at
16:40:15,
printed
0
of
36
pages
There
is
1
Job
in
the
Queue
(1
in
Progress)
With
a
PRINT
command,
you
can
use
any
switches
normally
associated
with
this
command
as
documented
in
the
TOPS-I0
O~erating
System
Commands
Manual.
For
example,
use
the
/COPIES
sWltch
to
print
multiple
copies
of
a
file,
or
use
the
/PRIORITY
switch
to
specify
a
nondefault
priority
for
a
print
request.
{The
default
priority
is
10,
set
by
your
system
administrator;
as
a
user
you
can
change
the
priority
of
your
print
requests
to
any
value
from
1
(print
files
in
the
order
queued)
to
20
(the
maximum
a
user
can
set).
Higher
values
receive
service
first.
Your
remote
operator
can
set
higher
priorities
or
change
the
allowed
range
of
priorities.)
3.4
SUBMITTING
BATCH
JOBS
To
submit
a
batch
job
to
be
executed
on
the
TOPS-I0
host
from
your
remote
station,
use
a SUBMIT
command.
You
must
be
logged
in
on
the
host
where
your
batch
job
is
to
execute.
For
example,
to
have
the
control
file
TSTMAK.CTL
execute
on
your
host,
use
the
following
command:
. SUBMIT
TSTMAK
~
[Batch
Job
TSTMAK
Queued,
Reguest-ID
804,
Limit
0:05:00]
(The
default
file
extension
for
the
SUBMIT
command
is
CTL.)
To
see
wha.t
jobs
are
in
the
batch
input
queue,
type
SUB
~
.SUB~
Batch
Queue:
Job
Name
TSTMAK
Req#
804
Run
Time
00:05:00
3-3
User
USER[PPNl
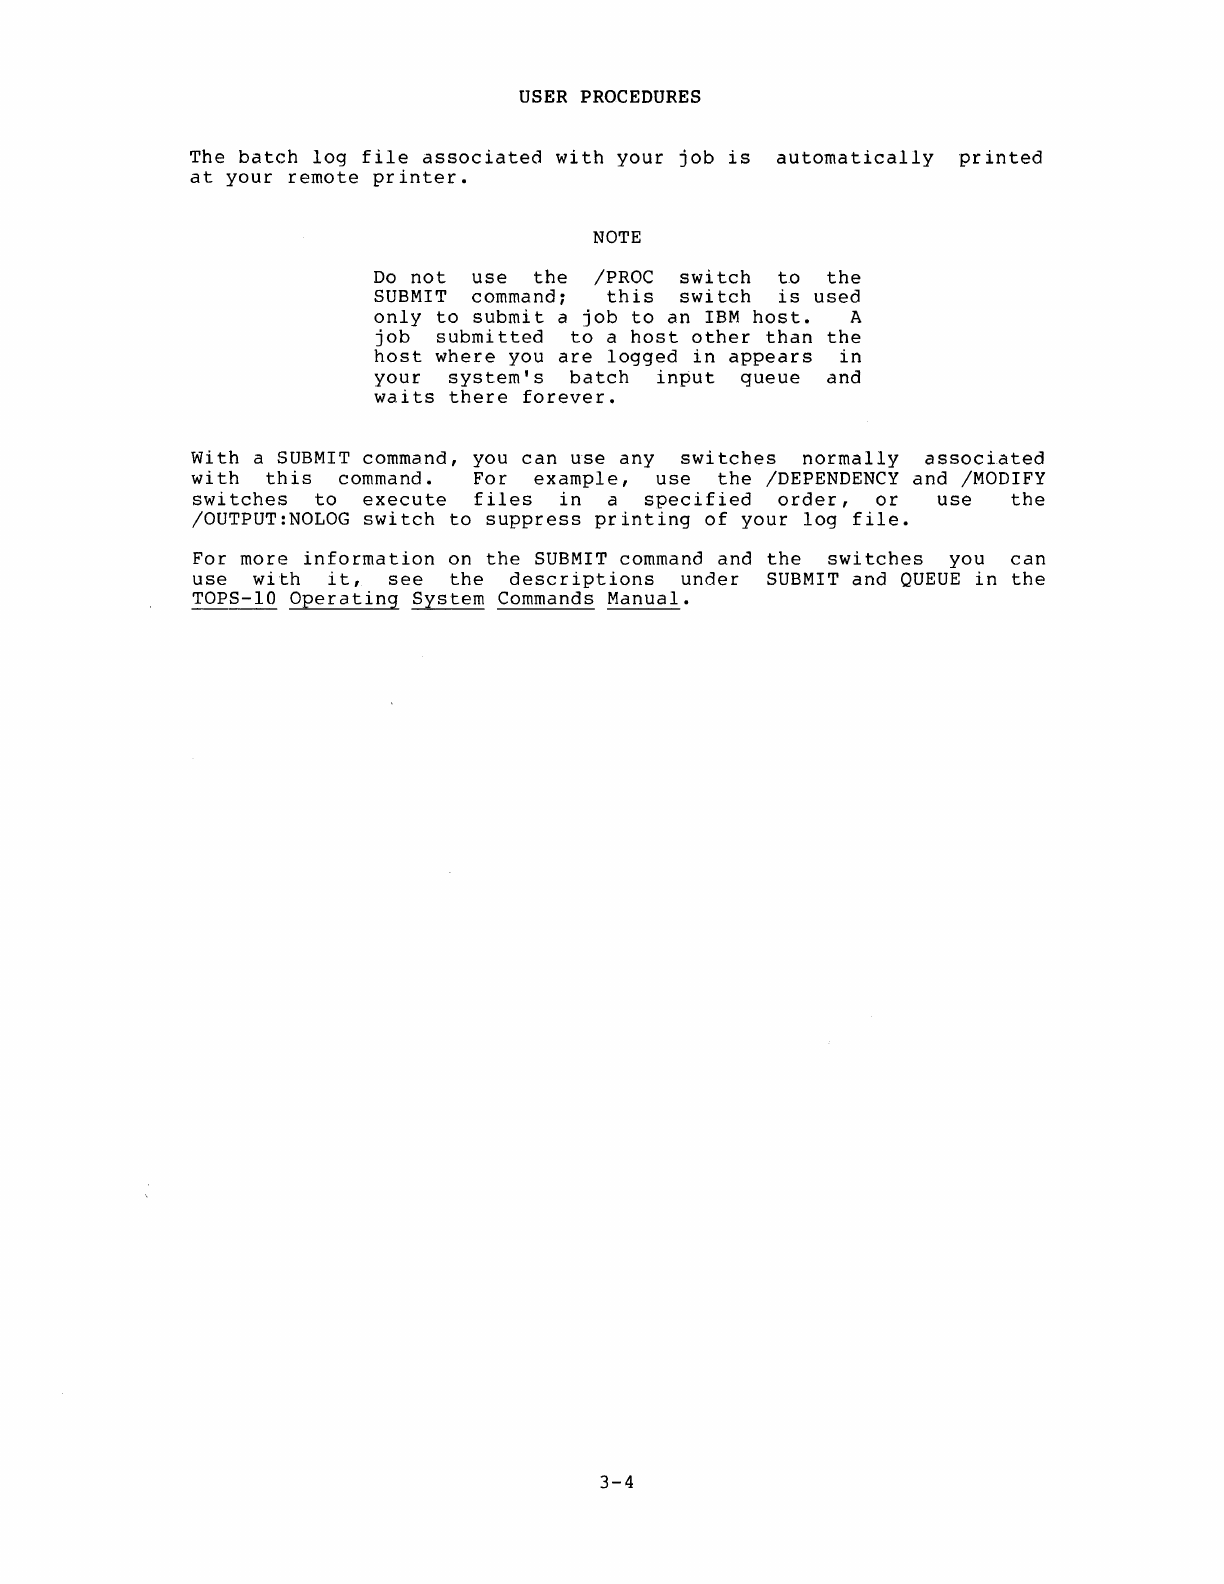
USER
PROCEDURES
The
batch
log
file
associated
with
your
job
is
automatically
printed
at
your
remote
printer.
NOTE
Do
not
use
the
/PROC
switch
to
the
SUBMIT
command;
this
switch
is
used
only
to
submit
a
job
to
an
IBM
host.
A
job
submitted
to
a
host
other
than
the
host
where
you
are
logged
in
appears
in
your
system's
batch
input
queue
and
waits
there
forever.
With
a SUBMIT
command,
you
can
use
any
switches
normally
associated
with
this
command.
For
example,
use
the
/DEPENDENCY
and
/MODIFY
switches
to
execute
files
in
a
specified
order,
or
use
the
/OUTPUT:NOLOG
switch
to
suppress
printing
of
your
log
file.
For
more
information
on
the
SUBMIT
command
and
the
switches
you
can
use
with
it,
see
the
descriptions
under
SUBMIT
and
QUEUE
in
the
TOPS-IO
Operating
System
Commands
Manual.
3-4
CHAPTER
4
TROUBLE-SHOOTING
4.1
NORMAL
OPERATION
When
you
start
your
remote
station,
CHK11,
the
hardware
verification
program,
runs
to
provide
a
cursory
check
of
the
hardware
components.
If
CHK11
executes
completely
and
issues
no
error
messages,
your
hardware
is
probably
functioning
properly,
and
your
station
should
operate
normally.
If
CHK11
indicates
that
your
station
has
some
hardware
problems,
you
can
try
to
restart
it
once
more.
If
the
problems
persist,
contact
your
Field
Service
representative.
When
the
remote
station
is
loaded
and
started
for
the
first
time,
the
hardware
diagnostic
program
CHK11
runs.
This
program
tries
to
use
each
component
of
the
remote
station
and
issues
a
message
describing
the
results.
The
following
illustrates
typical
CHK11
output
on
a
DN200.
INITIALIZING
DN200
V17(67)
29-DEC-79
--
160000
BYTES
OF
MEMORY
MF11-UP
KW11-L
1 DL11-A
1
CR11
1 LP11
LP11 #0
NOT
RDY
1
DMC11
STARTING
DN200
V17(67)
29-DEC-79--
The number
of
bytes
of
memory
is
an
octal
value
representing
the
number
of
available
bytes
in
the
remote
station
processor
(160000=28K
words;
100000=16K
words)
.
If
there
is
a
hardware
failure,
CHK11
outputs
a
message:
ERROR
DETECTED
AT
PC
xxx
where
xxx
is
the
program
counter.
4-1

TROUBLE-SHOOTING
A
message
preceding
the
PC
address
message
gives
the
name
of
the
device
that
has
failed.
For
example,
if
your
synchronous
line
interface
(DMCII)
has
failed,
CHKII
provides
a
message
of
the
following
form:
I DMCII
?DMCII
#0
(ADR=160540)
ERROR
DETECTED
AT
PC
54522
When
such
errors
occur,
contact
your
Field
Service
representative
to
isolate
and
correct
your
hardware
problems.
For
more
information
on
CHRII,
see
the
CHKII
Reference
Manual.
4.2
WHEN
PROBLEMS
OCCUR
If
the
remote
station
starts,
but
you
do
not
receive
the
TOPS-IO
system
prompt,
the
TOPS-IO
site
may
not
be
operating
or
an
intermediate
node
may
be
down.
(An
intermediate
node
is
a
node
between
your
remote
station
and
the
TOPS-IO
host.)
If
an
intermediate
node
is
down,
you
must
usually
wait
until
it
returns
to
the
network.
If
there
is
an
alternate
path
by
which
you
can
contact
the
TOPS-IO
host,
the
system
automatically
connects
the
remote
station
by
that
path.
For
information
on
alternate
paths,
see
Appendix
B
of
this
manual,
"NETLDR Command
Str
ings."
At
a
remote
station,
your
operator's
console
can
receive
a
variety
of
error
messages.
These
messages
can
be
issued
by
the
TOPS-IO
monitor,
by
the
programs
running
at
the
host
site
under
control
of
the
monitor,
by
GALAXY
programs
such
as
LPTSPL,
and
by
the
programs
run
at
the
remote
station
(the
remote
station
code
and
CHKII).
If
you
are
running
OPR,
messages
from
TOPS-IO
and
from
GALAXY
are
trapped
by
OPR.
If
a
program
running
at
the
host
gets
into
a
nonfunctioning
condition
and
issues
a
stopcode,
it
presents
error
messages
that
contain
information
on
the
crash
block
and
the
module
that
has
had
a
problem.
The
message
always
starts
with
a
message
of
the
following
form:
timestamp
--
Program
xxx
Job
xx
[PPN]
name
at
Terminal
yyy
?
Stop
code
-
zzz
-
in
module
name
Reason:
explanation
Program
is
program
name
Contents
of
the
ACs
Last
stack
locations
You
may
also
see
messages
of
the
following
form
when
there
are
problems
with
GALAXY
running
at
the
host:
OPR>
hh:mm:ss
OPR
--
QUASAR
is
not
running
4-2
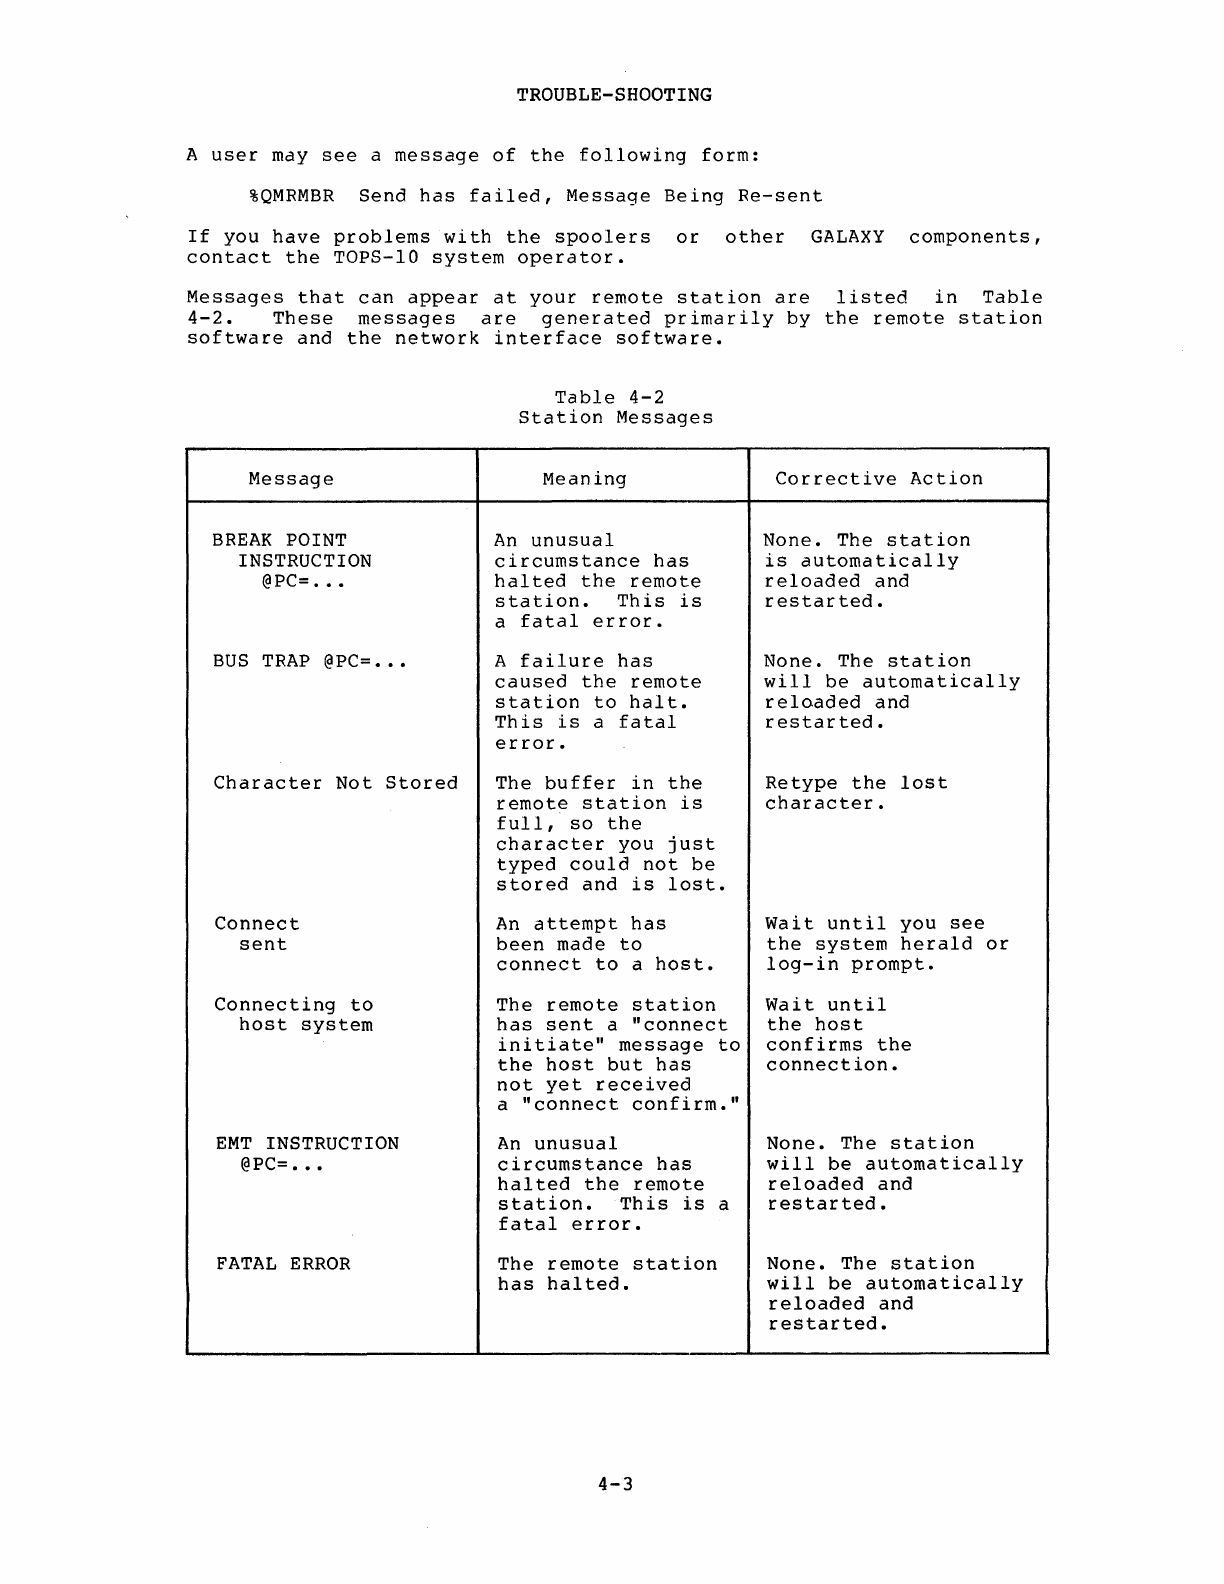
TROUBLE-SHOOTING
A
user
may
see
a
message
of
the
following
form:
%QMRMBR
Send
has
failed,
Message
Being
Re-sent
If
you
have
problems
with
the
spoolers
or
other
GALAXY
components,
contact
the
TOPS-IO
system
operator.
Messages
that
can
appear
at
your
remote
station
are
listed
in
Table
4-2.
These
messages
are
generated
primarily
by
the
remote
station
software
and
the
network
interface
software.
Message
BREAK
POINT
INSTRUCTION
@PC=
.••
BUS
TRAP
@PC=
•.•
Character
Not
Stored
Connect
sent
Connecting
to
host
system
EMT
INSTRUCTION
@PC=
.•.
FATAL
ERROR
Table
4-2
Station
Messages
Meaning
An
unusual
circumstance
has
halted
the
remote
station.
This
is
a
fatal
error.
A
failure
has
caused
the
remote
station
to
halt.
This
is
a
fatal
error.
The
buffer
in
the
remote
station
is
full,
so
the
character
you
just
typed
could
not
be
stored
and
is
lost.
An
attempt
has
been
made
to
connect
to
a
host.
The
remote
station
has
sent
a
"connect
initiate"
message
to
the
host
but
has
not
yet
received
a
"connect
confirm."
An
unusual
circumstance
has
halted
the
remote
station.
This
is
a
fatal
error.
The
remote
station
has
halted.
4-3
Corrective
Action
None.
The
station
is
automatically
reloaded
and
restarted.
None.
The
station
will
be
automatically
reloaded
and
restarted.
Retype
the
lost
character.
Wait
until
you
see
the
system
herald
or
log-in
prompt.
Wait
until
the
host
confirms
the
connection.
None.
The
station
will
be
automatically
reloaded
and
restarted.
None.
The
station
will
be
automatically
reloaded
and
restarted.
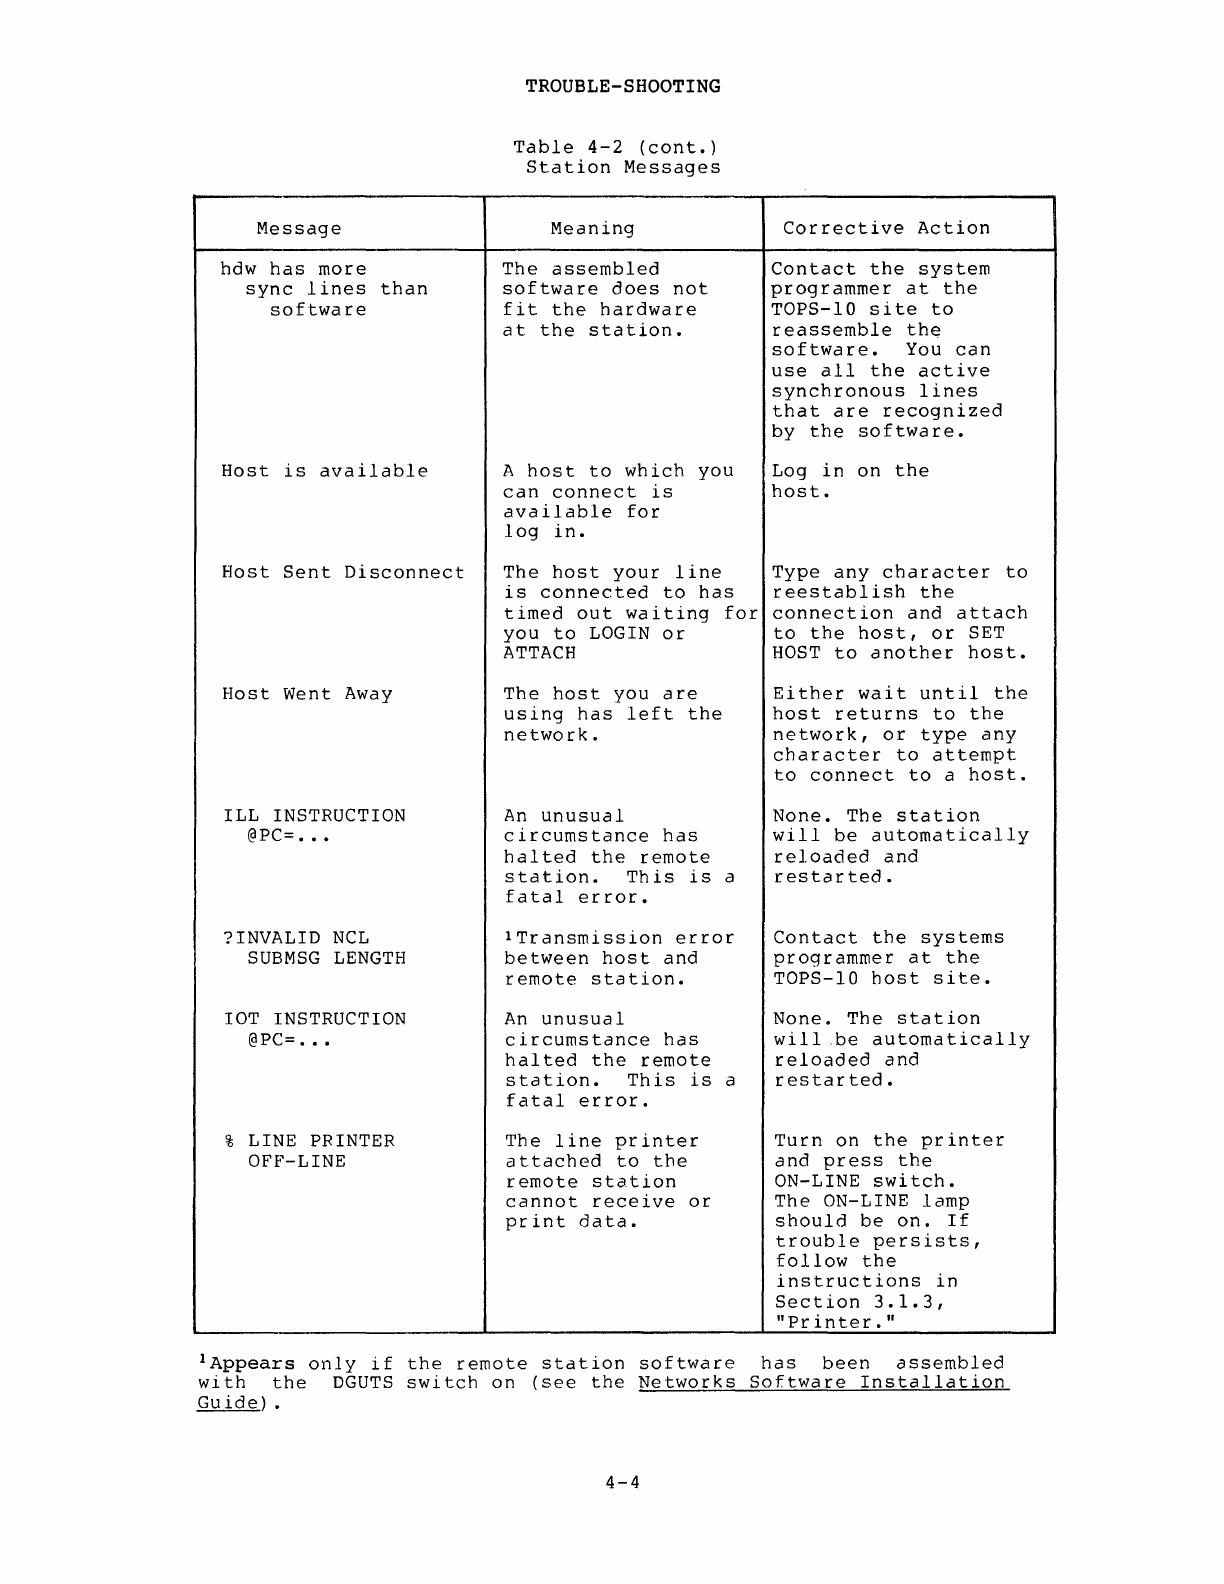
Message
hdw
has
more
sync
lines
than
software
Host
is
available
Host
Sent
Disconnect
Host
Went
Away
ILL
INSTRUCTION
@PC=
..•
?INVALID
NCL
SUBMSG
LENGTH
lOT
INSTRUCTION
@PC=
...
%
LINE
PRINTER
OFF-LINE
TROUBLE-SHOOTING
Table
4-2
(cont.)
Station
Messages
Meaning
The
assembled
software
does
not
fit
the
hardware
at
the
station.
A
host
to
which
you
can
connect
is
available
for
log
in.
The
host
your
line
is
connected
to
has
timed
out
waiting
for
you
to
LOGIN
or
ATTACH
The
host
you
are
using
has
left
the
network.
An
unusual
circumstance
has
halted
the
remote
station.
This
is
a
fatal
error.
lTransmission
error
between
host
and
remote
station.
An
unusual
circumstance
has
halted
the
remote
station.
This
is
a
fatal
error.
The
line
printer
attached
to
the
remote
station
cannot
receive
or
print
data.
Corrective
Action
Contact
the
system
programmer
at
the
TOPS-IO
site
to
reassemble
th~
software.
You
can
use
all
the
active
synchronous
lines
that
are
recognized
by
the
software.
Log
in
on
the
host.
Type
any
character
to
reestablish
the
connection
and
attach
to
the
host,
or
SET
HOST
to
another
host.
Either
wait
until
the
host
returns
to
the
network,
or
type
any
character
to
attempt
to
connect
to
a
host.
None.
The
station
will
be
automatically
reloaded
and
restarted.
Contact
the
systems
programmer
at
the
TOPS-IO
host
site.
None.
The
station
will
be
automatically
reloaded
and
restarted.
Turn
on
the
printer
and
press
the
ON-LINE
switch.
The
ON-LINE
lamp
should
be
on.
If
trouble
persists,
follow
the
instructions
in
Section
3.1.3,
"Printer."
lAppears
only
if
the
remote
station
software
has
been
assembled
with
the
DGUTS
switch
on
(see
the
Networks
Software
Installation
Guide)
.
4-4
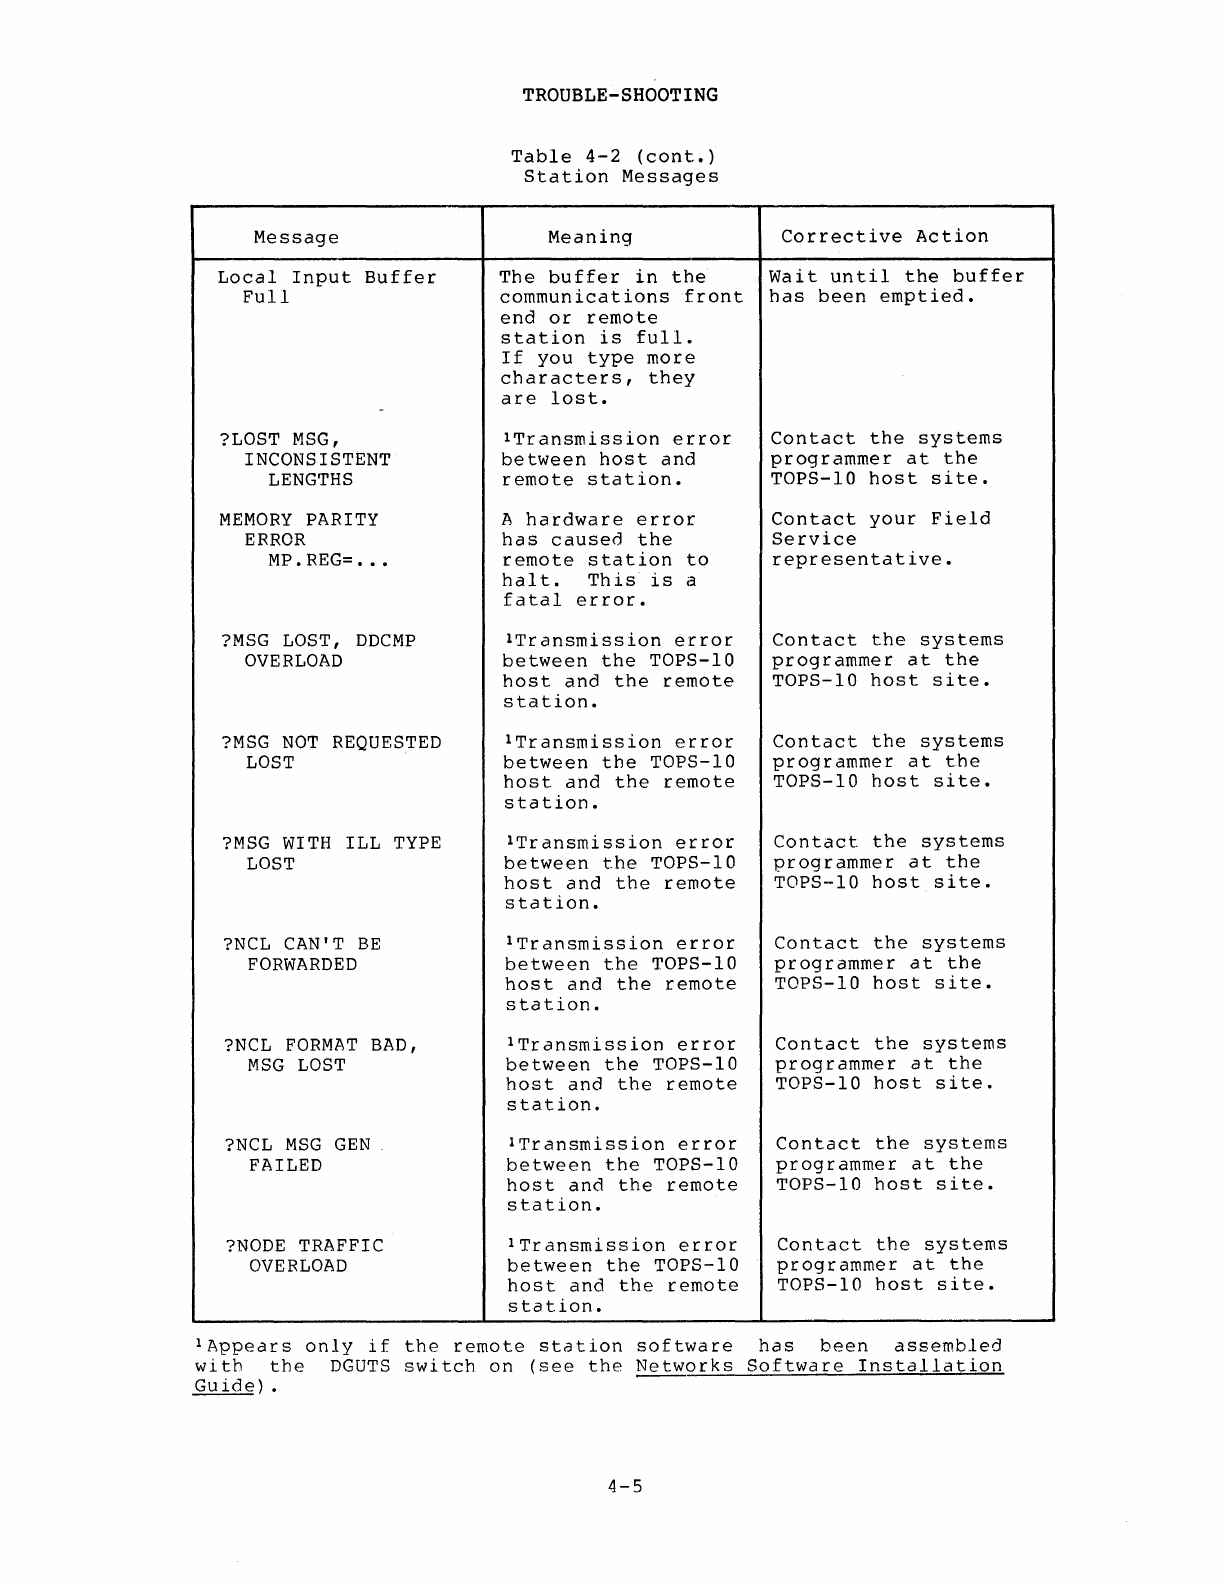
Message
Local
Input
Buffer
Full
?LOST MSG,
INCONSISTENT
LENGTHS
MEMORY
PARITY
ERROR
MP.
REG=
•••
?MSG
LOST,
DDCMP
OVERLOAD
?MSG
NOT
REQUESTED
LOST
?MSG
WITH
ILL
TYPE
LOST
?NCL
CAN'T
BE
FORWARDED
?NCL
FORMAT
BAD,
MSG
LOST
?NCL
MSG
GEN
FAILED
?NODE
TRAFFIC
OVERLOAD
TROUBLE-SHOOTING
Table
4-2
(cont.)
Station
Messages
Meaning
The
buffer
in
the
communications
front
end
or
remote
station
is
full.
If
you
type
more
characters,
they
are
lost.
ITransmission
error
between
host
and
remote
station.
A
hardware
error
has
caused
the
remote
station
to
halt.
This
is
a
fatal
error.
ITransmission
error
between
the
TOPS-IO
host
and
the
remote
station.
ITransmission
error
between
the
TOPS-IO
host
and
the
remote
station.
ITransmission
error
between
the
TOPS-IO
host
and
the
remote
station.
ITransmission
error
between
the
TOPS-IO
host
and
the
remote
station.
lTransmission
error
between
the
TOPS-IO
host
and
the
remote
station.
ITransmission
error
between
the
TOPS-IO
host
and
the
remote
station.
lTransmission
error
between
the
TOPS-IO
host
and
the
remote
station.
Corrective
Action
Wait
until
the
buffer
has
been
emptied.
Contact
the
systems
programmer
at
the
TOPS-IO
host
site.
Contact
your
Field
Service
representative.
Contact
the
systems
programmer
at
the
TOPS-IO
host
site.
Contact
the
systems
programmer
at
the
TOPS-IO
host
site.
Contact
the
systems
programmer
at
the
TOPS-IO
host
site.
Contact
the
systems
programmer
at
the
TOPS-IO
host
site.
Contact
the
systems
programmer
at
the
TOPS-IO
host
site.
Contact
the
systems
programmer
at
the
TOPS-IO
host
site.
Contact
the
systems
programmer
at
the
TOPS-IO
host
site.
lAppears
only
if
the
remote
station
software
has
been
assembled
with
the
DGUTS
switch
on
(see
the
Networks
Software
Installation
Guide)
.
4-5
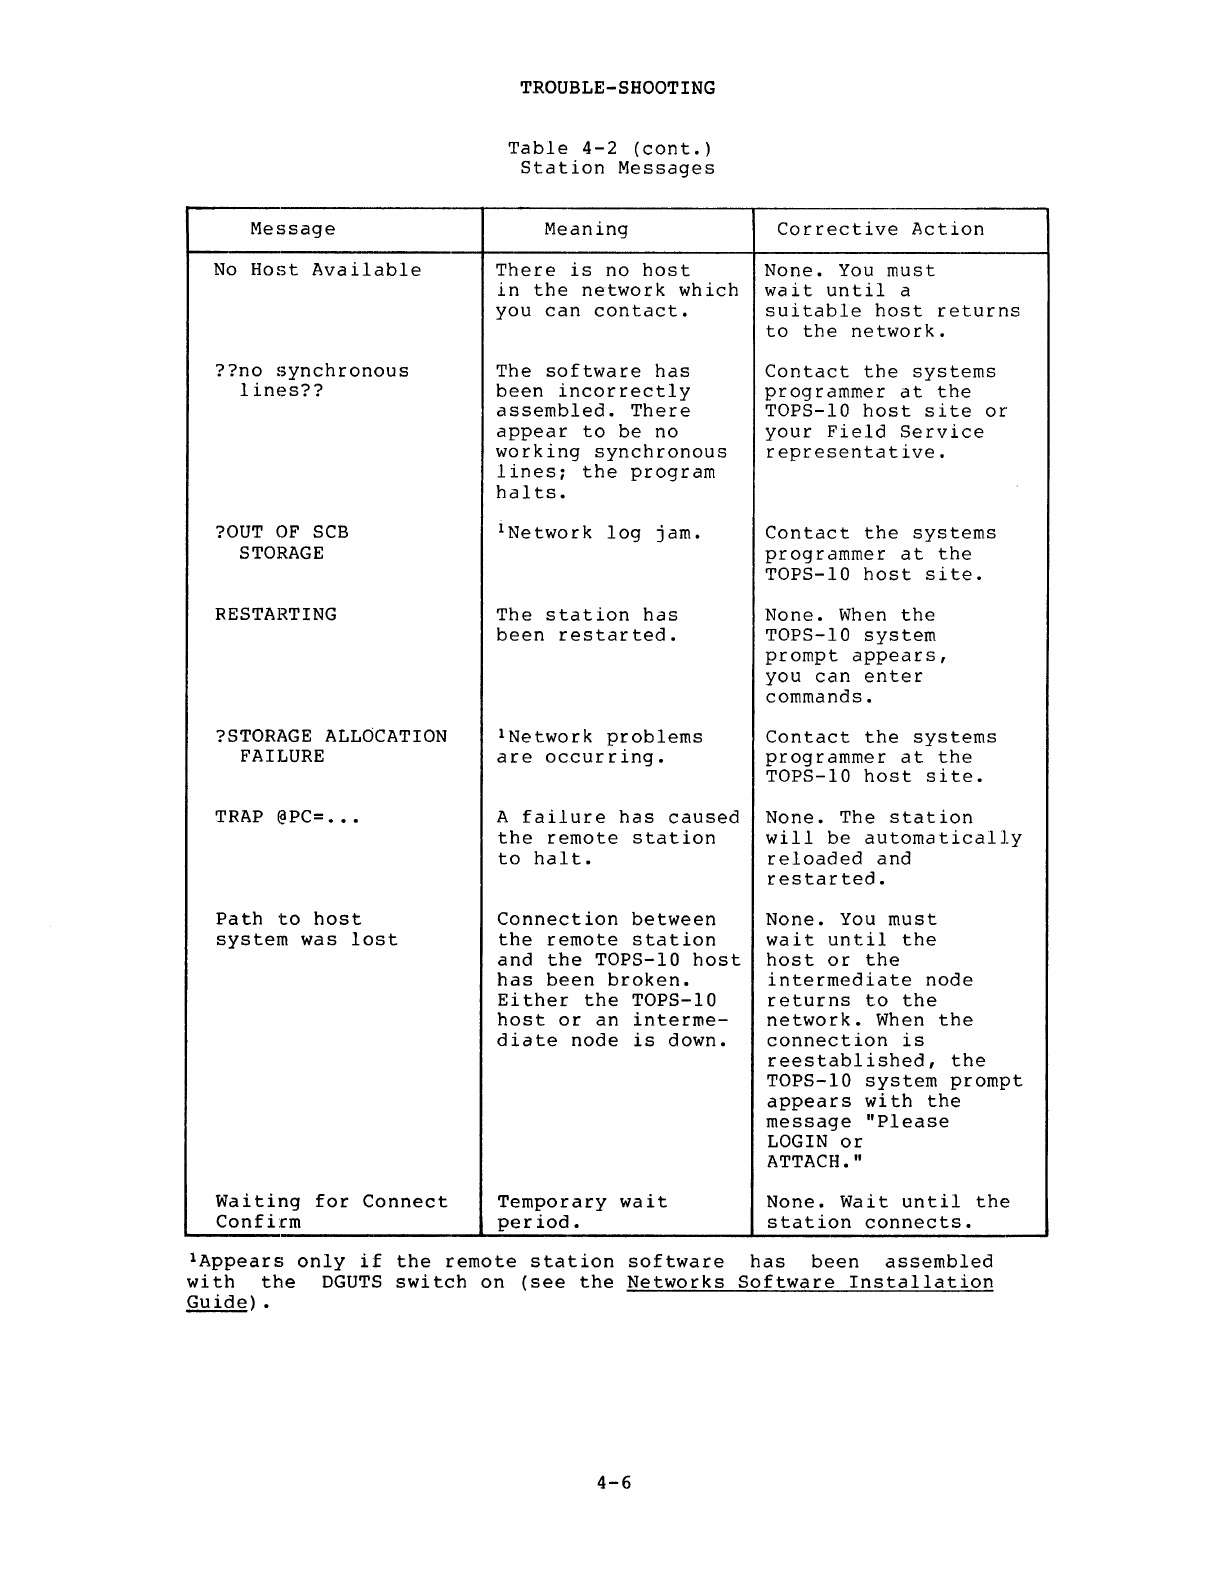
Message
No
Host
Available
??no
synchronous
lines??
?OUT
OF
SCB
STORAGE
RESTARTING
?STORAGE ALLOCATION
FAILURE
TRAP
@PC=
•••
Path
to
host
system
was
lost
Waiting
for
Connect
Confirm
TROUBLE-SHOOTING
Table
4-2
(cont.)
Station
Messages
Meaning
There
is
no
host
in
the
network
which
you
can
contact.
The
software
has
been
incorrectly
assembled.
There
appear
to
be
no
working
synchronous
lines;
the
program
halts.
INetwork
log
jam.
The
station
has
been
restarted.
INetwork
problems
are
occurring.
A
failure
has
caused
the
remote
station
to
halt.
Connection
between
the
remote
station
and
the
TOPS-IO
host
has
been
broken.
Either
the
TOPS-IO
host
or
an
interme-
diate
node
is
down.
Temporary
wait
period.
Corrective
Action
None.
You
must
wait
until
a
suitable
host
returns
to
the
network.
Contact
the
systems
programmer
at
the
TOPS-IO
host
site
or
your
Field
Service
representative.
Contact
the
systems
programmer
at
the
TOPS-IO
host
site.
None.
When
the
TOPS-IO
system
prompt
appears,
you
can
enter
commands.
Contact
the
systems
programmer
at
the
TOPS-IO
host
site.
None.
The
station
will
be
automatically
reloaded
and
restarted.
None.
You
must
wait
until
the
host
or
the
intermediate
node
returns
to
the
network.
When
the
connection
is
reestablished,
the
TOPS-IO
system
prompt
appears
with
the
message
"Please
LOGIN
or
ATTACH."
None.
Wait
until
the
station
connects.
lAppears
only
if
the
remote
station
software
has
been
assembled
with
the
DGUTS
switch
on
(see
the
Networks
Software
Installation
Guide)
.
4-6
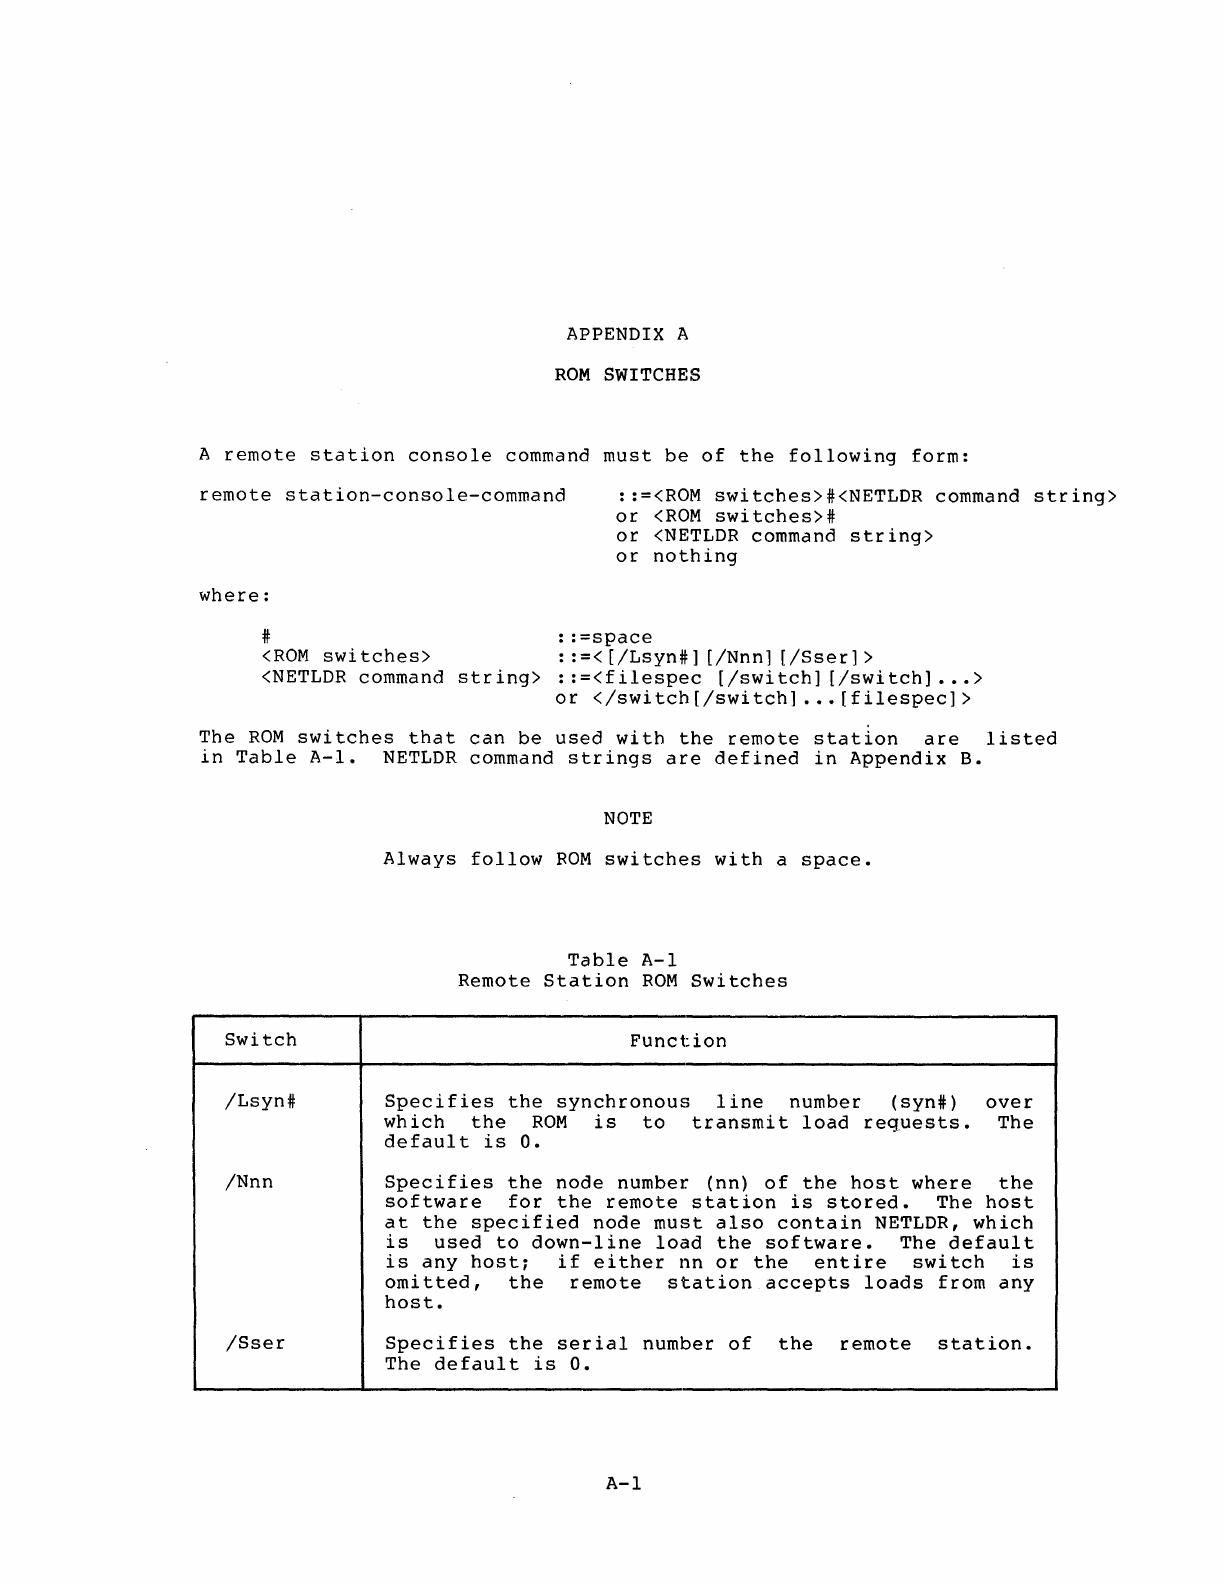
APPENDIX A
ROM
SWITCHES
A
remote
station
console
command
must
be
of
the
following
form:
remote
station-console-command
::=<ROM
switches>#<NETLDR
command
string>
or
<ROM
switches>#
where:
or
<NETLDR
command
string>
or
nothing
#
::=space
<ROM
switches>
::=<[/Lsyn#]
[/Nnnl
[/Sser]>
<NETLDR
command
string>
:
:=<filespec
[/switch]
[/switch]
•••
>
or
</switch[/switch]
.••
[filespec]>
The
ROM
switches
that
can
be
used
with
the
remote
station
are
listed
in
Table
A-l.
NETLDR
command
strings
are
defined
in
Appendix
B.
Switch
/Lsyn#
/Nnn
/Sser
NOTE
Always
follow
ROM
switches
with
a
space.
Table
A-l
Remote
Station
ROM
Switches
Function
Specifies
the
synchronous
line
number
(syn#)
over
which
the
ROM
is
to
transmit
load
requests.
The
default
is
o.
Specifies
the
node
number
(nn)
of
the
host
where
the
software
for
the
remote
station
is
stored.
The
host
at
the
specified
node
must
also
contain
NETLDR,
which
is
used
to
down-line
load
the
software.
The
default
is
any
host;
if
either
nn
or
the
entire
switch
is
omitted,
the
remote
station
accepts
loads
from
any
host.
Specifies
the
serial
number
of
the
remote
station.
The
default
is
o.
A-l

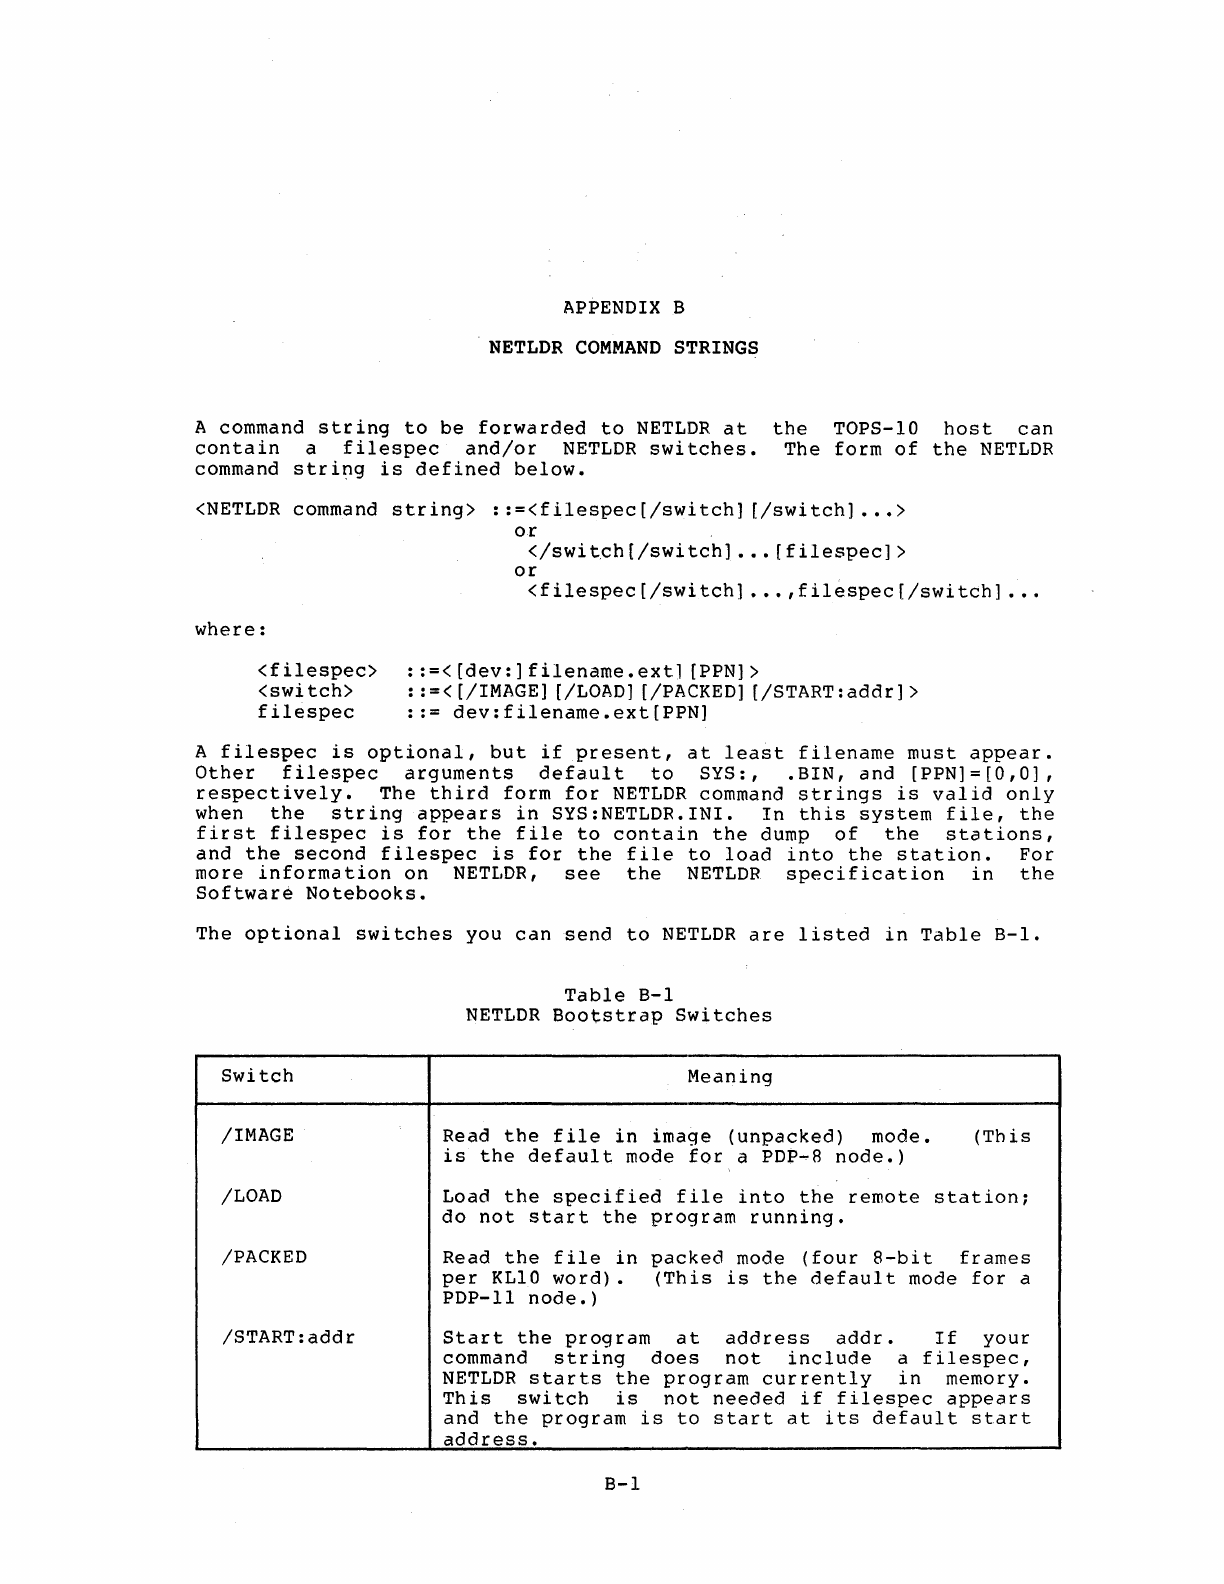
APPENDIX
B
.
NETLDR
COMMAND
STRINGS
A command
string
to
be
forwarded
to
NETLDR
at
the
TOPS-10
host
can
contain
a
filespec
and/or
NETLDR
switches.
The
form
of
the
NETLDR
command
stri~g
is
defined
below.
<NETLDR
command
string>
::=<filespec[/switch]
[/switch]
•••
>
or
where:
<filespec>
<switch>
filespec
</swi
t.ch
[/swi
tch]
•••
[f
il
espec]
>
or
<filespec
[/switch]
•••
,filespec
[/switch]
.•.
: :=<
[dev:]
filename.extl
[PPN] >
::=<[/IMAGE]
[/LOAD] [/PACKED]
[/START:addr]>
::=
dev:filename.ext[PPN]
A
filespec
is
optional,
but
if
present,
at
least
filename
must
appear.
Other
filespec
arguments
default
to
SYS:,
.BIN,
and
[PPN]=[O,O],
respectively.
The
third
form
for
NETLDR
command
strings
is
valid
only
when
the
string
appears
in
SYS:NETLDR.INI.
In
this
system
file,
the
first
filespec
is
for
the
file
to
contain
the
dump
of
the
stations,
and
the
second
filespec
is
for
the
file
to
load
into
the
station.
For
more
information
on
NETLDR,
see
the
NETLDR
specification
in
the
Software
Notebooks.
The
optional
switches
you
can
send
to
NETLDR
are
listed
in
Table
B-1.
Switch
/IMAGE
/LOAD
/PACKED
/START:addr
Table
B-1
NETLDR
Bootstrap
Switches
Meaning
Read
the
file
in
image
(unpacked)
mode.
is
the
default
mode
for
a
PDP~8
node.)
(Th
is
Load
the
specified
file
into
the
remote
station;
do
not
start
the
program
running.
Read
the
file
in
packed
mode
(four
8-bit
frames
per
KLI0
word).
(This
is
the
default
mode
for
a
PDP-II
node.)
Start
the
program
at
address
addr.
If
your
command
string
does
not
include
a
filespec,
NETLDR
starts
the
program
currently
in
memory.
This
switch
is
not
needed
if
filespec
appears
and
the
program
is
to
start
at
its
default
start
address.
B-1
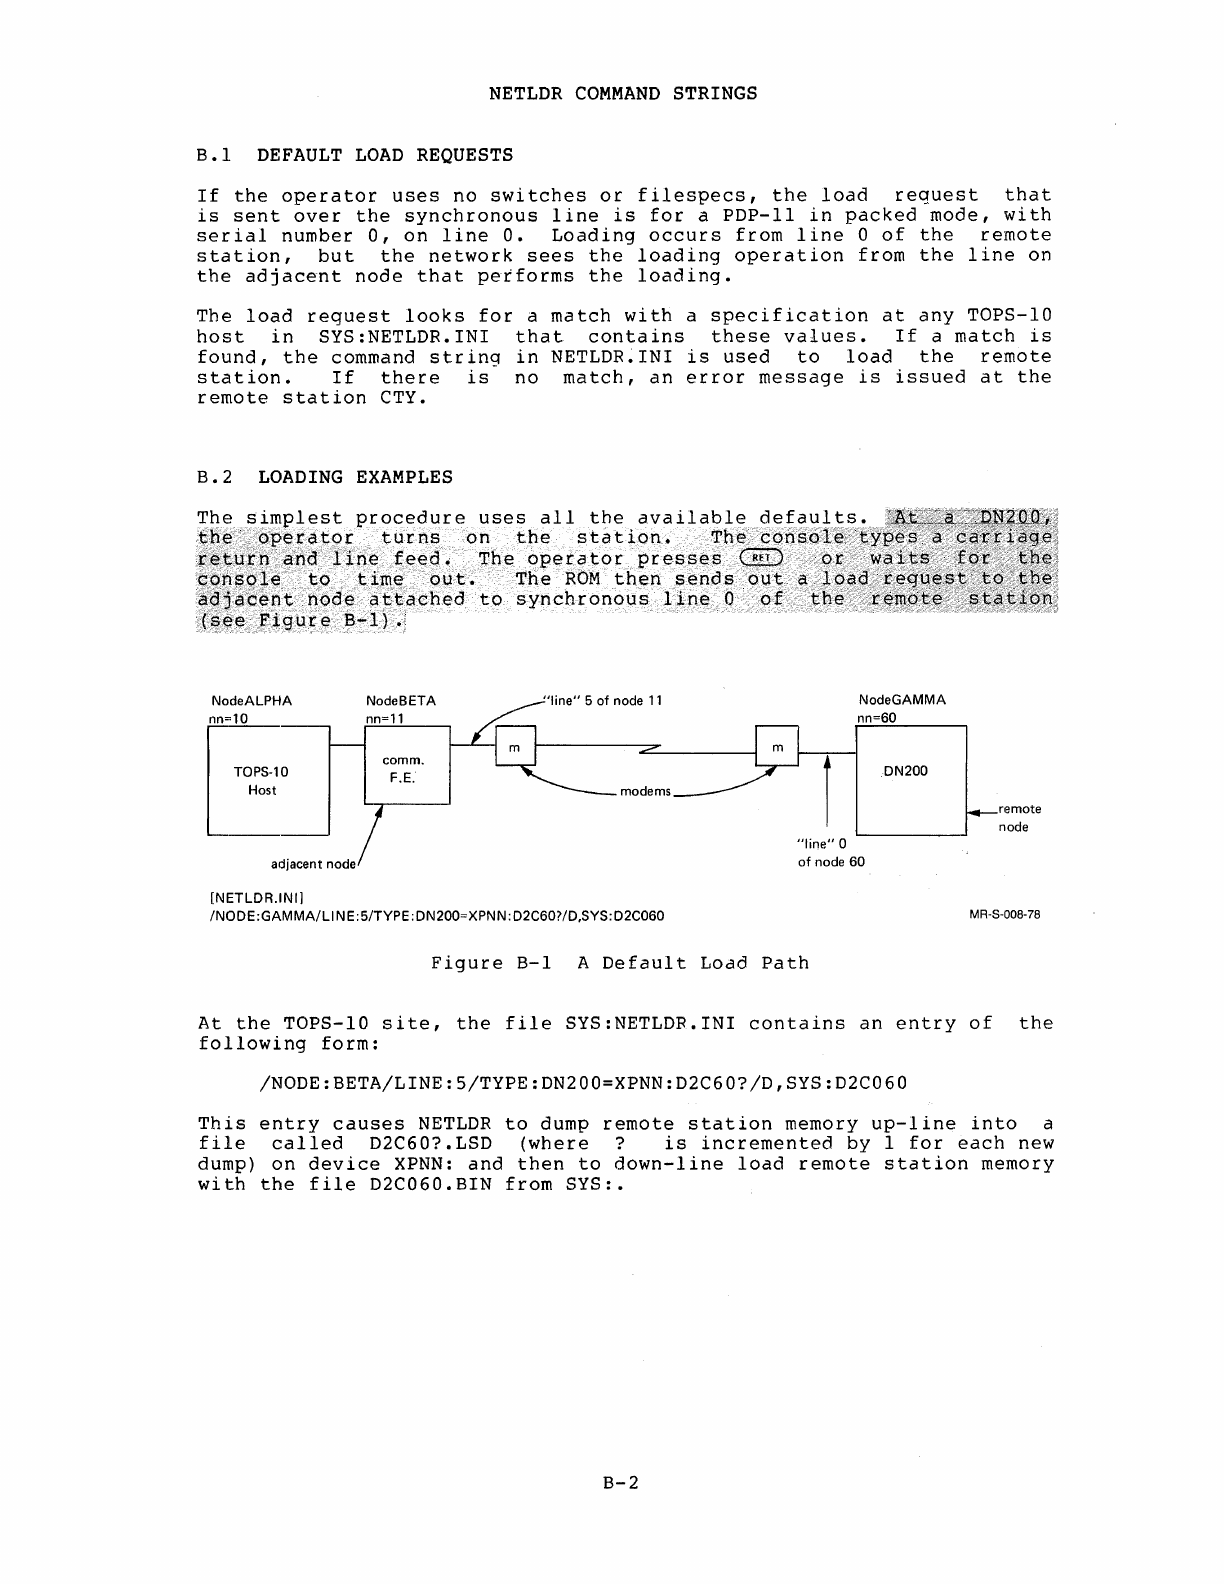
NETLDR
COMMAND
STRINGS
B.l
DEFAULT
LOAD
REQUESTS
If
the
operator
uses
no
switches
or
filespecs,
the
load
request
that
is
sent
over
the
synchronous
line
is
for
a
PDP-II
in
packed
mode,
with
serial
number
0,
on
line
O.
Loading
occurs
from
line
0
of
the
remote
station,
but
the
network
sees
the
loading
operation
from
the
line
on
the
adjacent
node
that
performs
the
loading.
The
load
request
looks
for
a
match
with
a
specification
at
any
TOPS-IO
host
in
SYS:NETLDR.INI
that
contains
these
values.
If
a
match
is
found,
the
command
string
in
NETLDR~INI
is
used
to
load
the
remote
station.
If
there
is
no
match,
an
error
message
is
issued
at
the
remote
station
CTY.
B.2
LOADING
EXAMPLES
The
simplest
procedure
uses
all
the
available
defaults.~,I~~:;·~'::
tl1e.,ope~ato~
turns
on
the
station.
The
console;·'t:yp~{s';a·.
'~¥J
return,a:nd
line
feed
,;
The
operator
presses(R£T)or,w~its):~{<>iF'b<:§'h'~0
~Oh~()le.
to
.
time
.
out.
The
ROM
then
.
send
s
out
et~lQ~dBe9tl~st;,'tc.):"tB~::
aajefcent:
node
attached
to
synchronous
line
0
ofthe'<r:em~i~,~:~'>:s:t~~tP'li}~
(geeFigure
a-I
).
i
NodeALPHA
nn=10
TOPS-l0
Host
adjacent node
NodeBETA
nn=11
comm.
F.E.
[NETLDR.INIJ
/NODE:GAMMA/LlNE:5/TYPE:DN200=XPNN:D2C60?/D,SYS:D2C060
"line"
0
NodeGAMMA
nn=60
.DN200
of
node 60
Figure
B-1 A
Default
Load
Path
remote
node
MR-S-008-78
At
the
TOPS-IO
site,
the
file
SYS:NETLDR.INI
contains
an
entry
of
the
following
form:
/NODE:BETA/LINE:5/TYPE:DN200=XPNN:D2C60?/D,SYS:D2C060
This
entry
causes
NETLDR
to
dump
remote
station
memory
up-line
into
a
file
called
D2C60?LSD
(where
?
is
incremented
by
1
for
each
new
dump)
on
device
XPNN:
and
then
to
down-line
load
remote
station
memory
with
the
file
D2C060.BIN
from
SYS:.
B-2
NETLDR
COMMAND
STRINGS
As NETLDR
loads
the
remote
station,
the
following
messages
appear
on
the
console
at
the
remote
station:
%%LOAD
REQ
ON
NODE
BETA(ll)
LINE:5
FOR
DN200 SER:O
FILE:SYS:D2C060
"
NODE
BETA(ll)
"
NODE
BETA{ll)
"
NODE
BETA{ll)
"
NODE
BETA(ll)
"
NODE
BETA{ll)
LINE
LINE
LINE
LINE
LINE
5
DUMPING
ONTO
XPNN:D2C600.LSD
5
DUMPED
FROM
0
THROUGH
157776
5
LOADING
FROM
SYS:D2C060
5
LOADED
5 STARTING
AT
ADDRESS
2000
INITIALIZING
DN200
V17(67)
21-AUG-78
--
160000
BYTES
OF
MEMORY
MFII-UP
KWII-L
(CHKll
output)
RESTARTING DN200
V17(67)
21-AUG-78
The
"RESTARTING
..•
"
message
appears
as
the
software
in
the
remote
station
begins
to
execute.
CHKll
output
is
described
in
Section
4.1,
"Using
CHKll
to
Check
the
Hardware."
ROM
switches
give
you
flexibility
in
establishing
alternate
load
paths.
For
example,
if
your
remote
station
can
communicate
over
more
than
one
synchronous
line,
you
can
send
your
load
request
over
a
specific
line
by
using
the
/L
ROM
switch.
Given
a
configuration
of
two
hosts
as
in
Figure
B-2,
and
a
failure
in
node
BETA,
you
can
load
your
node
GAMMA
from
host
OMEGA
as
follows:
.
/Ll/N14
~
B-3
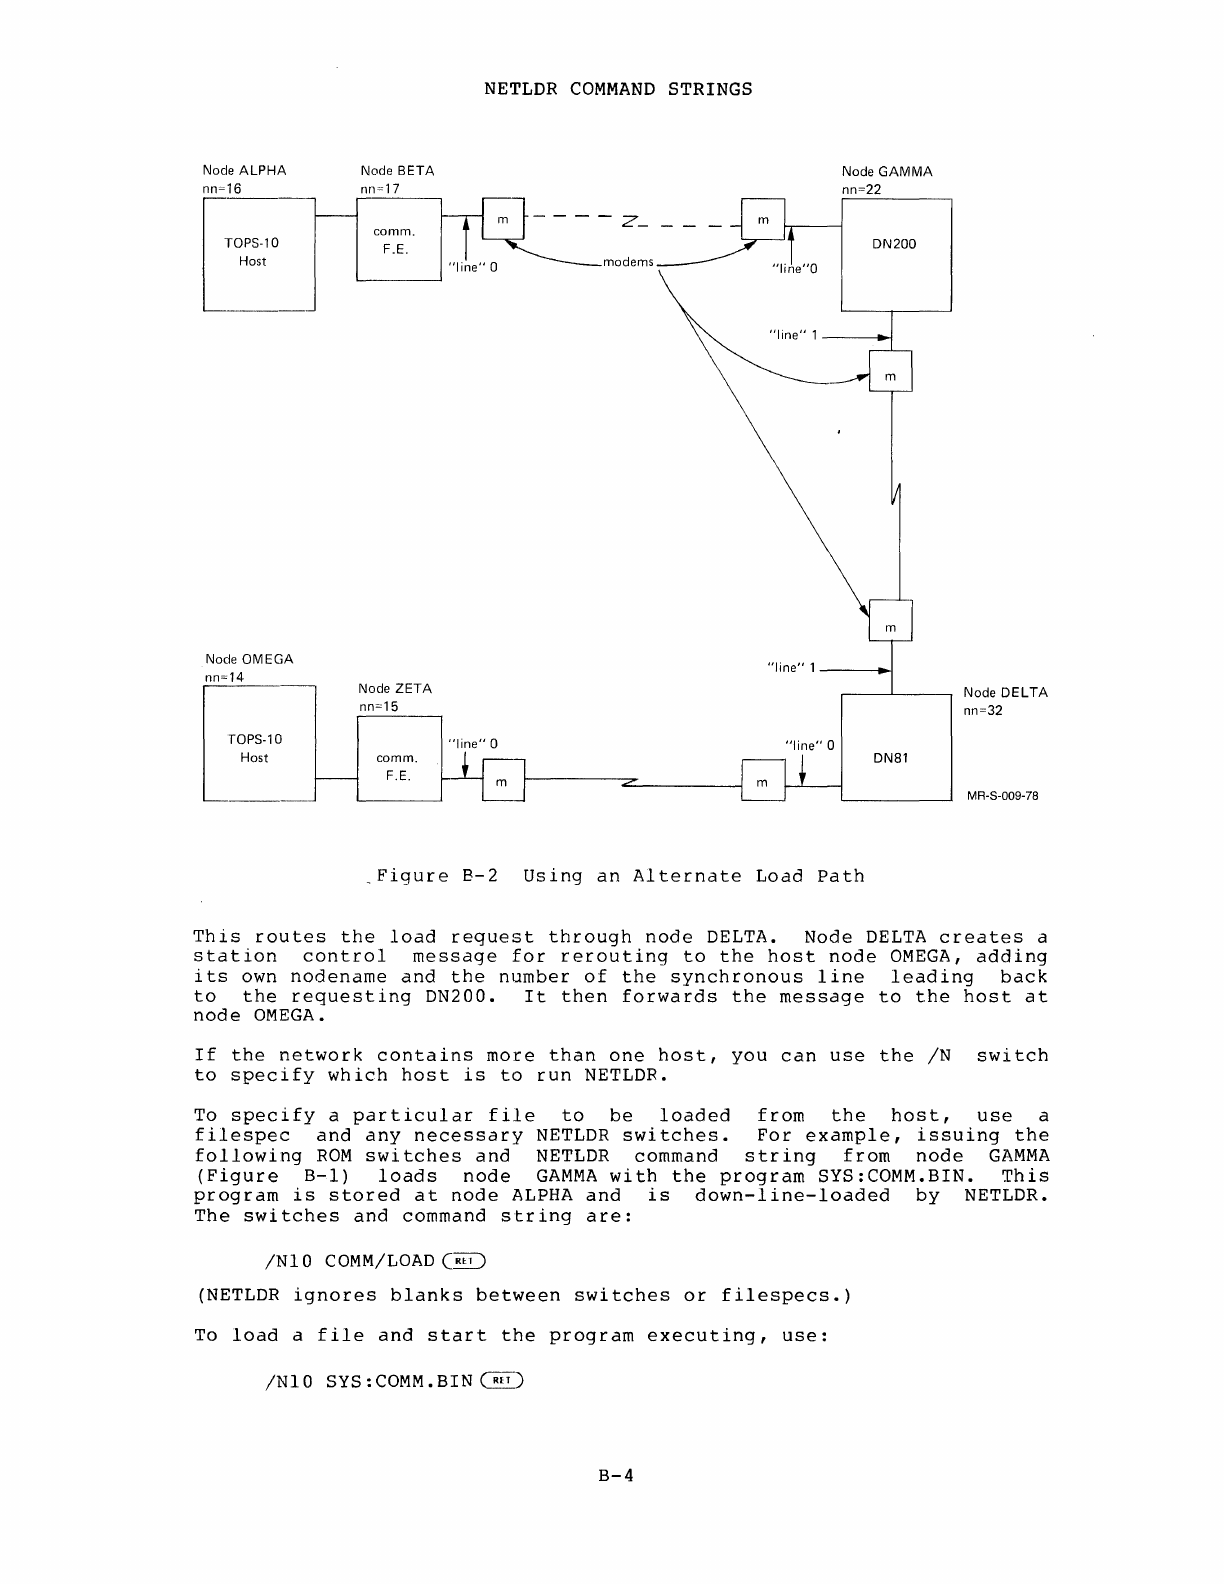
Node
ALPHA
Node
BETA
[
"'C::
PS
.
,O
--
r-
nn,~~m
F.E.
Host
----
Node
OMEGA
nn=14
[
rOPS.10
Host
---
Node
ZETA
nn=15
comm.
F.E.
NETLDR
COMMAND
STRINGS
r£ml-- - - Z
"Iile,~modems
"line"
0
Node
GAMMA
nn=22
DN200
"line"
1
__
--I~
"line"
0 DN81
_Figure
B-2
Using
an
Alternate
Load
Path
Node
DELTA
nn=32
MR-S-009-78
This
routes
the
load
request
through
node
DELTA.
Node
DELTA
creates
a
station
control
message
for
rerouting
to
the
host
node
OMEGA,
adding
its
own
nodename
and
the
number
of
the
synchronous
line
leading
back
to
the
requesting
DN200.
It
then
forwards
the
message
to
the
host
at
node
OMEGA.
If
the
network
contains
more
than
one
host,
you
can
use
the
IN
switch
to
specify
which
host
is
to
run
NETLDR.
To
specify
a
particular
file
to
be
loaded
from
the
host,
use
a
filespec
and
any
necessary
NETLDR
switches.
For
example,
issuing
the
following
ROM
switches
and
NETLDR
command
string
from
node
GAMMA
(Figure
B-1)
loads
node
GAMMA
with
the
program
SYS:COMM.BIN.
This
program
is
stored
at
node
ALPHA
and
is
down-line-loaded
by
NETLDR.
The
switches
and
command
string
are:
/NI0
COMM/LOAD
C~
(NETLDR
ignores
blanks
between
switches
or
filespecs.)
To
load
a
file
and
start
the
program
executing,
use:
/NIO
SYS :COMM.BIN
Gil)
B-4

APPENDIX
C
PUNCHED
CARD
CODES
ASCII
data
on
cards
is
punched
in
a
specified
format.
Punched
cards
are
80
columns
wide
(usually
numbered
1
through
80)
and
12
rows
high
(rows
are
numbered,
top
to
bottom,
as
12, 11,
and
0
to
9)
(see
Figure
C-1)
.
All
the
ASCII
characters,
including
printing
characters
and
nonprinting
control
characters,
can
be
represented
by
the
appropriate
punches
on
a
card.
In
some
cases
where
the
punching
device
does
not
have
specific
keys
for
punching
the
code
for
a
particular
character,
overpunching
or
multipunching
is
used
to
create
the
desired
punches.
All
possible
combinations
of
punches
can
be
achieved
by
using
the
numerics
(which
punch
rows
0
to
9),
the
minus
(which
punches
row
11),
and
the
ampersand
(&)
(which
punches
row
12).
(Some
keypunch
machines
use
other
symbols
to
punch
in
the
upper
card
rows.)
Each
character
occupies
a
single
column
on
the
card;
up
to
5
punched
holes
may
be
required
to
completely
specify
ihe
code
for
a
character.
character. 0 $
GQ
12
11
•
0 • •
•
2
3 •
4
rows 5
6
7 •
8 •
9 • V
columns
1
to
80
MR-S-014-78
Figure
C-1
A
Punched
Card
Table
C-1
lists
the
ASCII
characters
in
order
by
their
octal
representation.
Each
character
is
followed
by
a
list
of
rows
that
must
be
punched
in
the
card
to
represent
the
character.
For
example,
to
represent
a
1,
row 1
of
the
card
must
contain
a
punched
hole;
to
represent
a
$,
rows
11,
3
and
8,
must
contain
punched
holes.
Table
C-2
lists
the
ASCII
characters
according
to
the
punched
rows
required
to
represent
them.
C-l
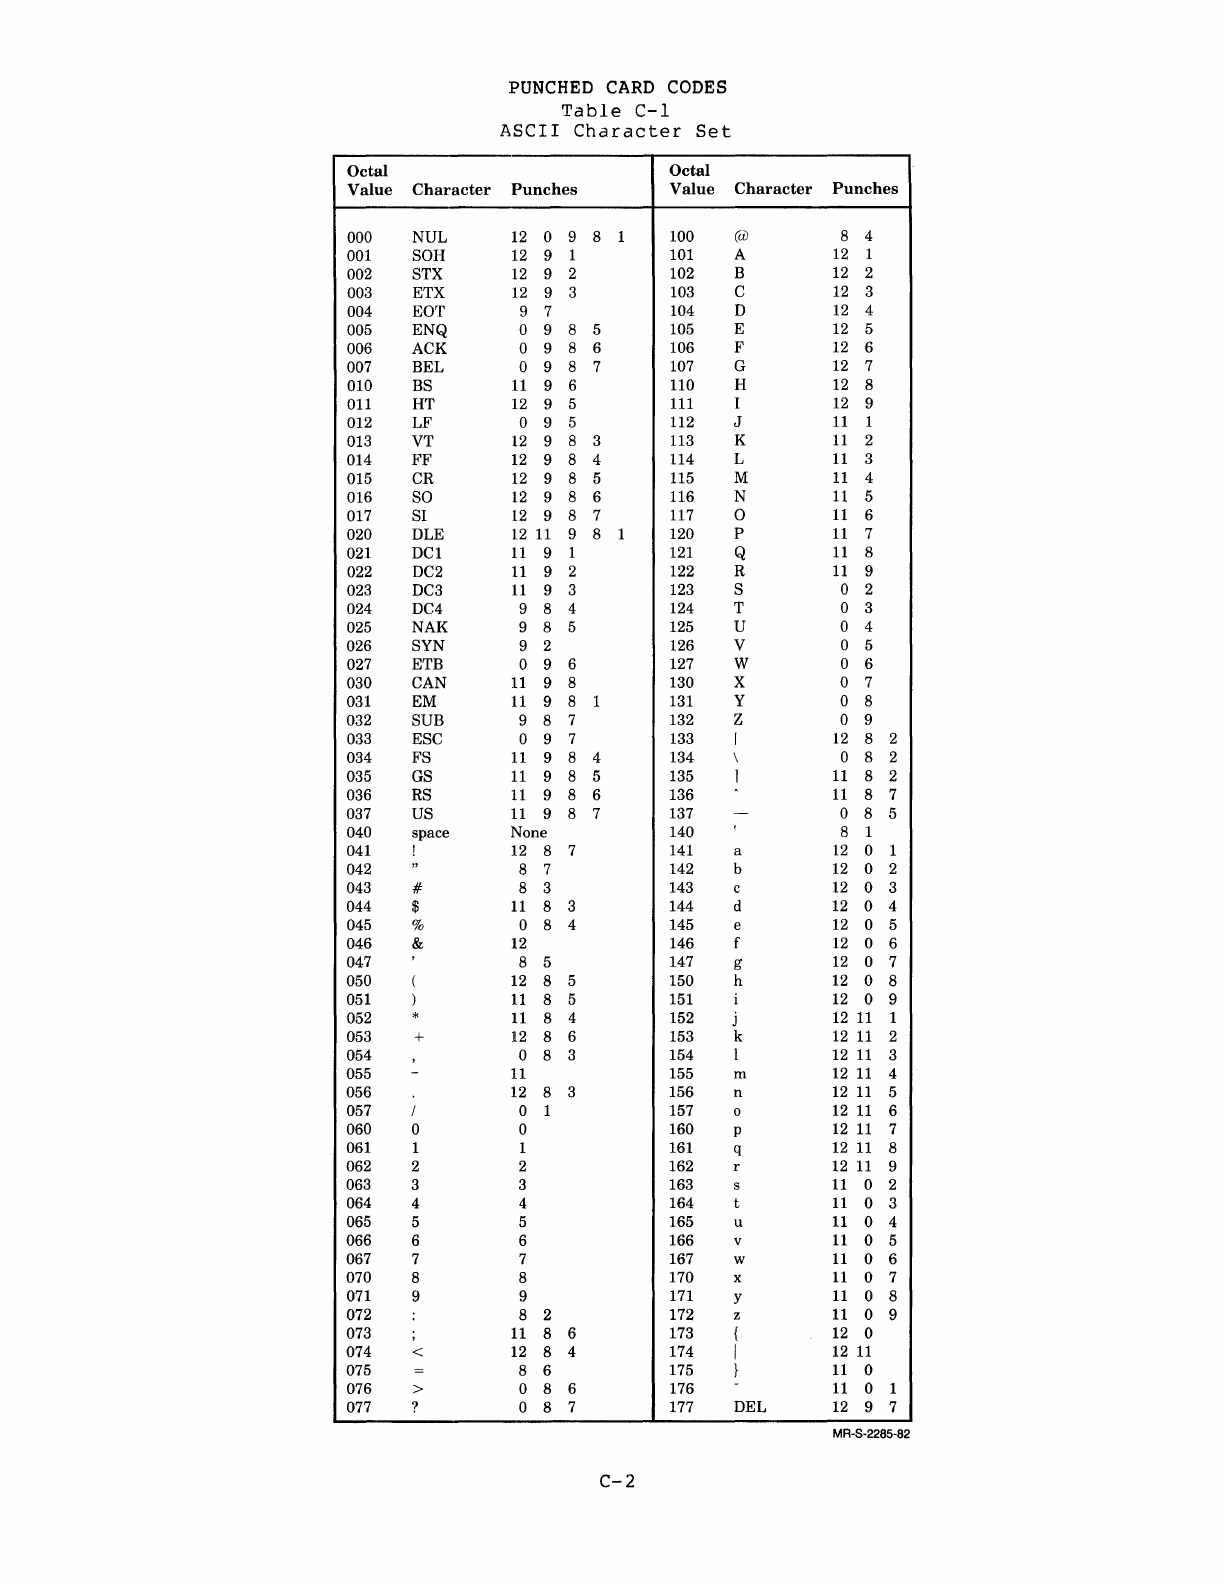
Octal
Value
Character
000
NUL
001
SOH
002
STX
003
ETX
004
EaT
005
ENQ
006
ACK
007
BEL
010
BS
011
HT
012
LF
013
VT
014
FF
015
CR
016
SO
017
SI
020
DLE
021
DC1
022
DC2
023
DC3
024
DC4
025
NAK
026
SYN
027
ETB
030
CAN
031
EM
032
SUB
033
ESC
034 FS
035
GS
036
RS
037
US
040
space
041
!
042
"
043
#
044
$
045
%
046 &
047
,
050
(
051
)
052
*
053
+
054 ,
055
-
056
057
/
060
0
061
1
062
2
063
3
064
4
065
5
066 6
067
7
070 8
071
9
072
:
073
;
074 <
075
=
076 >
077
?
PUNCHED
CARD
CODES
Table
C-l
ASCII
Character
Set
Octal
Punches
Value
12
0 9 8 1
100
12
9 1
101
12
9 2
102
12
9 3
103
9 7
104
0 9 8 5
105
0 9 8 6 106
0 9 8 7
107
11
9 6
110
12
9 5
111
0 9 5
112
12
9 8 3
113
12
9 8 4
114
12
9 8 5
115
12
9 8 6 116
12
9 8 7
117
12
11
9 8 1
120
11
9 1
121
11
9 2
122
11
9 3
123
9 8 4
124
9 8 5
125
9 2
126
0 9 6
127
11
9 8
130
11
9 8 1
131
9 8 7
132
0 9 7
133
11
9 8 4
134
11
9 8 5
135
11
9 8 6 136
11
9 8 7
137
None
140
12
8 7
141
8 7
142
8 3
143
11
8 3
144
0 8 4
145
12
146
8 5
147
12
8 5
150
11
8 5
151
11
8 4
152
12
8 6
153
0 8 3
154
11
155
12
8 3
156
0 1
157
0
160
1
161
2
162
3
163
4
164
5
165
6
166
7
167
8
170
9
171
8 2
172
11
8 6
173
12
8 4
174
8 6
175
0 8 6
176
0 8 7
177
C-2
Character
Punches
@ 8 4
A
12
1
B
12
2
C
12
3
D
12
4
E
12
5
F
12
6
G
12
7
H
12
8
I
12
9
J
11
1
K
11
2
L
11
3
M
11
4
N
11
5
a
11
6
P
11
7
Q
11
8
R
11
9
S 0 2
T 0 3
U 0 4
V 0 5
W 0 6
X 0 7
Y 0 8
Z 0 9
r
12
8 2
\ 0 8 2
1
11
8 2
11
8 7
-0 8 5
8 1
a
12
0 1
b
12
0 2
c
12
0 3
d
12
0 4
e
12
0 5
f
12
0 6
g
12
0 7
h
12
0 8
i
12
0 9
j
12
11
1
k
12
11
2
I
12
11
3
m
12
11
4
n
12
11
5
0
12
11
6
P
12
11
7
q
12
11
8
r
12
11
9
s
11
0 2
t
11
0 3
u
11
0 4
v
11
0 5
w
11
0 6
x
11
0 7
y
11
0 8
z
11
0 9
{
12
0
I
12
11
}
11
0
11
0 1
DEL
12
9 7
MR-S-2285-82

PUNCHED
CARD
CODES
Table
C-2
ASCII
Characters
by
Punched
Rows
Punches
Character
Punches
Character
None
space
12
0 4 d
12
&
12
0 5 e
11
-
12
0 6 f
0 0
12
0 7 g
1 1
12
0 8 h
2 2
12
0 9 i
3 3
12
9 1
SOH
4 4
12
9 2
STX
5 5
12
9 3
ETX
6 6
12
9 5
HT
7 7
12
9 7
DEL
8 8
12
8 2 I
9 9
12
8 3
12
11
I
12
8 4 <
12
0 {
12
8 5 (
12
1 A
12
8 6 +
12
2 B
12
8 7 !
12
3 C
11
0 1 -
12
4 D
11
0 2 s
12
5 E
11
0 3 t
12
6 F
11
0 4 u
12
7 G
11
0 5 v
12
8 H
11
0 6 w
12
9 I
11
0 7 x
11
0 }
11
0 8 y
11
1 J
11
0 9 z
11
2 K
11
9 1
DC1
11
3 L
11
9 2
DC2
11
4 M
11
9 3
DC3
11
5 N
11
9 6
BS
11
6 a
11
9 8
CAN
11
7 P
11
8 2 1
11
8 Q
11
8 3 $
11
9 R
11
8 4 *
0 1 /
11
8 5 )
0 2 S
11
8 6 ;
0 3 T
11
8 7
0 4 U 0 9 5
LF
0 5 V 0 9 6
ETB
0 6 W 0 9 7
ESC
0 7 X 0 8 2 \
0 8 Y 0 8 3 ,
0 9 Z 0 8 4 %
9 2
SYN
0 8 5 -
9 7
EaT
0 8 6 >
8 1 . 0 8 7 ?
8 2 : 9 8 4
DC4
8 3 # 9 8 5
NAK
8 4 @ 9 8 7
SUB
8 5 ,
12
9 8 3
VT
8 6 =
12
9 8 4 FF
8 7 "
12
9 8 5
CR
12
11
1 j
12
9 8 6
SO
12
11
2 k
12
9 8 7
SI
12
11
3 1
11
9 8 1
EM
12
11
4 m
11
9 8 4
FS
12
11
5 n
11
9 8 5
GS
12
11
6 0
11
9 8 6
RS
12
11
7 p
11
9 8 7
US
12
11
8 q 0 9 8 5
ENQ
12
11
9 r 0 9 8 6
ACK
12
0 1 a 0 9 8 7
BEL
12
0 2 b
12
11
9 8 1
DLE
12
0 3 c
12
0 9 8 1
NUL
MR-S-2286-82
C-3

APPENDIX
D
GLOSSARY
This
glossary
contains
terms
that
are
used
in
this
document.
Term
assemble
asynchronous
line
binary
file
bootstrap
down-line
load
host
load
request
Meaning
To
take
a
program
written
in
the
assembly
language
of
a
computer
and
prepare
a
program
in
the
machine
language
of
that
computer.
(For
example,
to
take
a
MACRO
program
and
create
a
binary
program
from
it.)
A
line
(cable)
over
which
asynchronous
communications
occur.
Such
lines
are
often
used
to
connect
terminals
to
a
processor.
Asynchronous
transmission
is
data
transmission
in
which
time
intervals
between
transmitted
characters
need
not
be
of
equal
length.
Asynchronous
transmission
is
typically
done
at
moderate
rates
of
speed.
A
file
stored
on
a
computer
in
which
all
entries
are
in
a
binary
format.
A
routine
that
initiates
the
reading
of
another
routine
and
whose
first
instructions
bring
in
the
rest
of
the
routine.
Bootstrapping
makes
it
possible
for
a
tiny
routine
(one
stored,
for
example,
in
a
bootstrap
ROM)
to
initiate
the
automatic
loading
of
a
larger
routine.
To
load
a
program
from
a
host
processor
over
a
line
to
a
remote
processor.
The
direction
of
transmission
is
away
from
the
host.
A
complete
computer
facility
with
a
central
processor,
mass
storage
devices
(such
as
disks),
peripherals
(such
as
printers),
and
a
monitor
command
routine
(MCR)
or
command
decoder.
The
MCR
is
part
of
the
TOPS-IO
operating
system.
The
message
sent
by
the
remote
station
ROM
to
a
host.
It
asks
the
host
to
load
the
remote
station
and
can
specify
the
route
for
loading
over
the
network.
D-1
Term
modem
node
remote
station
ROM
synchronous
line
TOPS-IO
up-line
dump
GLOSSARY
A
device
signals
circuits.
sets.
Meaning
that
modulates
and
demodulates
transmitted
over
communications
Some modems
are
also
called
data
A
processor
in
the
TOPS-IO
network.
Every
processor
in
the
network
is
a
node,
whether
it
is
a
remote
station,
a
communications
front
end,
or
a
host
itself.
Equipment
that
communicates
with
a
host,
but
that
is
distant
from
it.
A
remote
station
normally
has
at
least
a
card
reader
and
a
printer;
it
can
also
have
interactive
terminals.
Read-Only
Memory, a memory
that
can
be
read
but
never
written
into.
The
ROM
in
the
remote
station
contains
a
bootstrap
program
that
brings
in
another
program
from
the
host.
The
program
from
the
host
runs
the
remote
station.
A
line
(cable)
over
which
synchronous
communications
occur.
Such
lines
are
used
to
connect
processors.
Synchronous
transmission
is
data
transmission
in
which
time
intervals
between
transmitted
characters
are
of
equal
length.
Synchronous
transmission
is
typically
done
at
relatively
high
speeds.
The
total
operating
system.
TOPS-IO
manages
all
hardware
and
software
resources.
To
send
a
core-image
dump
from
a
remote
location
to
a
host.
D-2
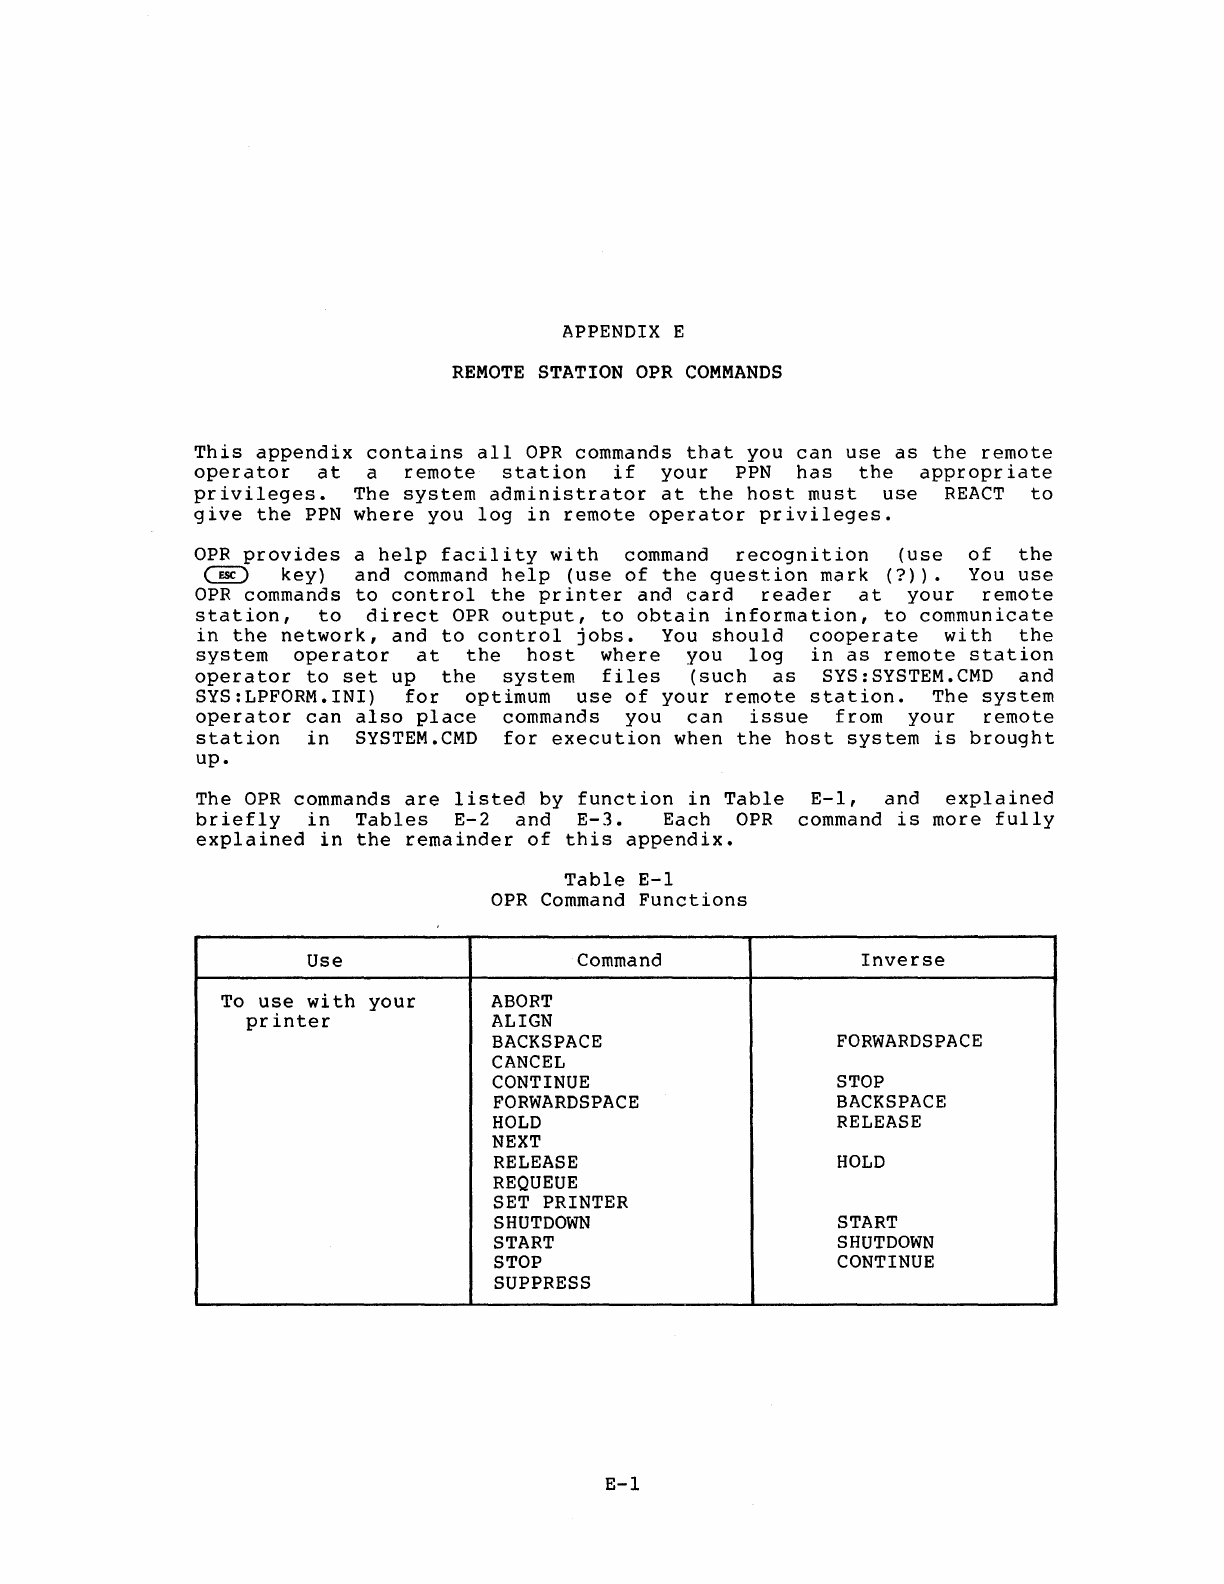
APPENDIX E
REMOTE
STATION
OPR
COMMANDS
This
appendix
contains
all
OPR
commands
that
you
can
use
as
the
remote
operator
at
a
remote
station
if
your
PPN
has
the
appropriate
privileges.
The
system
administrator
at
the
host
must
use
REACT
to
give
the
PPN
where
you
log
in
remote
operator
privileges.
aPR
provides
a
help
facility
with
command
recognition
(use
of
the
~
key)
and
command
help
(use
of
the
question
mark
(?)).
You
use
aPR
commands
to
control
the
printer
and
card
reader
at
your
remote
station,
to
direct
OPR
output,
to
obtain
information,
to
communicate
in
the
network,
and
to
control
jobs.
You
should
cooperate
with
the
system
operator
at
the
host
where
you
log
in
as
remote
station
operator
to
set
up
the
system
files
(such
as
SYS:SYSTEM.CMD
and
SYS:LPFORM.INI)
for
optimum
use
of
your
remote
station.
The
system
operator
can
also
place
commands
you
can
issue
from
your
remote
station
in
SYSTEM.CMD
for
execution
when
the
host
system
is
brought
up.
The
OPR
commands
are
listed
by
function
in
Table
briefly
in
Tables
E-2
and
E-3.
Each
OPR
explained
in
the
remainder
of
this
appendix.
Table
E-l
OPR
Command
Functions
Use
Command
To
use
with
your
ABORT
printer
ALIGN
BACKSPACE
CANCEL
CONTINUE
FORWARDSPACE
HOLD
NEXT
RELEASE
REQUEUE
SET PRINTER
SHUTDOWN
START
STOP
SUPPRESS
E-l
E-l,
and
explained
command
is
more
fully
Inverse
FORWARDSPACE
STOP
BACKSPACE
RELEASE
HOLD
START
SHUTDOWN
CONTINUE
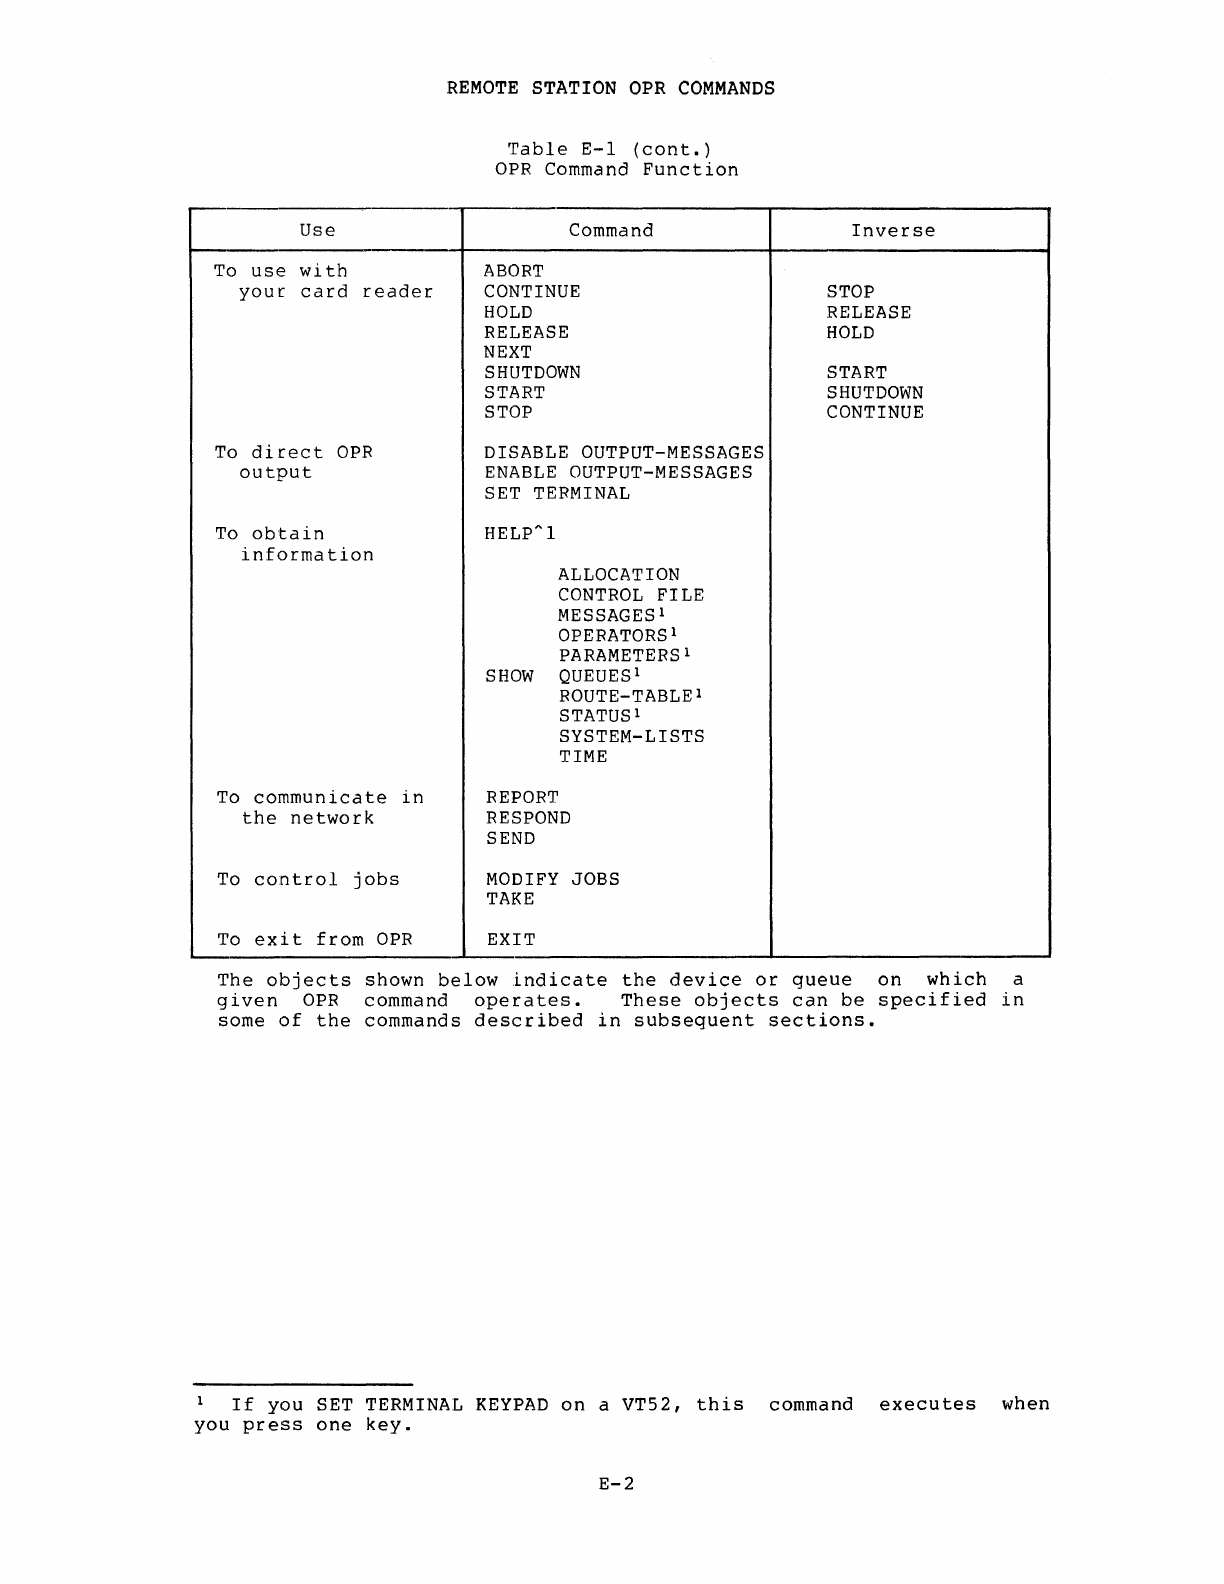
~.
Use
To
use
wi
th
your
card
reader
To
direct
OPR
output
To
obtain
information
To
communicate
in
the
network
To
control
jobs
To
exit
from
OPR
REMOTE
STATION
OPR
COMMANDS
'rable
E-1
(cont.)
OPR
Command
Function
Command
ABORT
CONTINUE
HOLD
RELEASE
NEXT
SHUTDOWN
START
STOP
DISABLE OUTPUT-MESSAGES
ENABLE
OUTPUT-MESSAGES
SET TERMINAL
HELP"l
ALLOCATION
CONTROL
FILE
MESSAGESl
OPERATORSl
PARAMETERSl
SHOW
QUEUESl
ROUTE-TABLEl
STATUSl
SYSTEM-LISTS
TIME
REPORT
RESPOND
SEND
MODIFY
JOBS
TAKE
EXIT
Inverse
STOP
RELEASE
HOLD
START
SHUTDOWN
CONTINUE
The
objects
shown
below
indicate
the
device
or
queue
on
which
a
given
OPR
command
operates.
These
objects
can
be
specified
in
some
of
the
commands
described
in
subsequent
sections.
If
you
SET TERMINAL
KEYPAD
on
a
VT52,
this
command
executes
when
you
press
one
key.
E-2
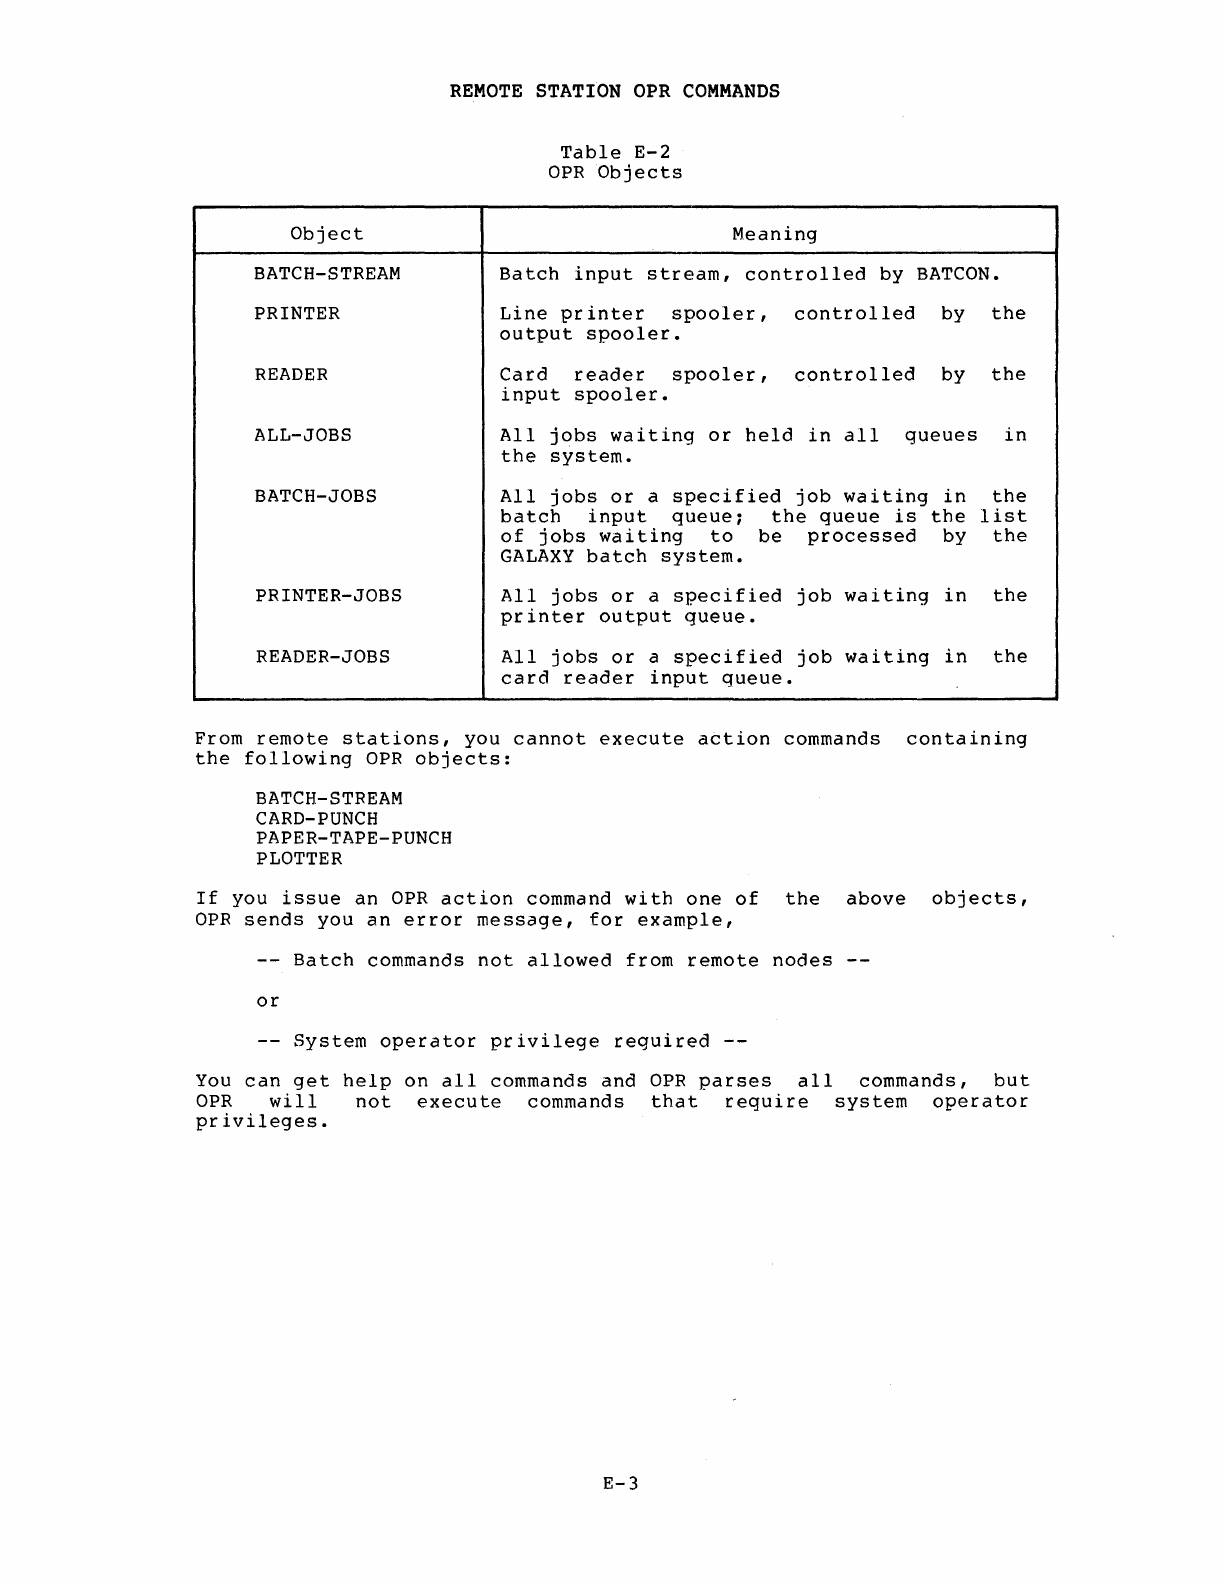
REMOTE
STATION
OPR
COMMANDS
Object
BATCH-STREAM
PRINTER
READER
ALL-JOBS
BATCH-JOBS
PRINTER-JOBS
READER-JOBS
Table
E-2
aPR
Objects
Meaning
Batch
input
stream,
controlled
by
BATCON.
Line
printer
spooler,
controlled
by
the
output
spooler.
Card
reader
spooler,
controlled
by
the
input
spooler.
All
jobs
waiting
or
held
in
all
queues
in
the
system.
All
jobs
or
a
specified
job
waiting
in
the
batch
input
queue;
the
queue
is
the
list
of
jobs
waiting
to
be
processed
by
the
GALAXY
batch
system.
All
jobs
or
a
specified
job
waiting
in
the
printer
output
queue.
All
jobs
or
a
specified
job
waiting
in
the
card
reader
input
queue.
From
remote
stations,
you
cannot
execute
action
commands
containing
the
following
aPR
objects:
BATCH-STREAM
CARD-PUNCH
PAPER-TAPE-PUNCH
PLOTTER
If
you
issue
an
aPR
action
command
with
one
of
the
above
objects,
aPR
sends
you
an
error
message,
for
example,
Batch
commands
not
allowed
from
remote
nodes
--
or
System
operator
privilege
required
--
You
can
get
help
on
all
commands
and
aPR
parses
all
commands,
but
aPR
will
not
execute
commands
that
require
system
operator
privileges.
E-3
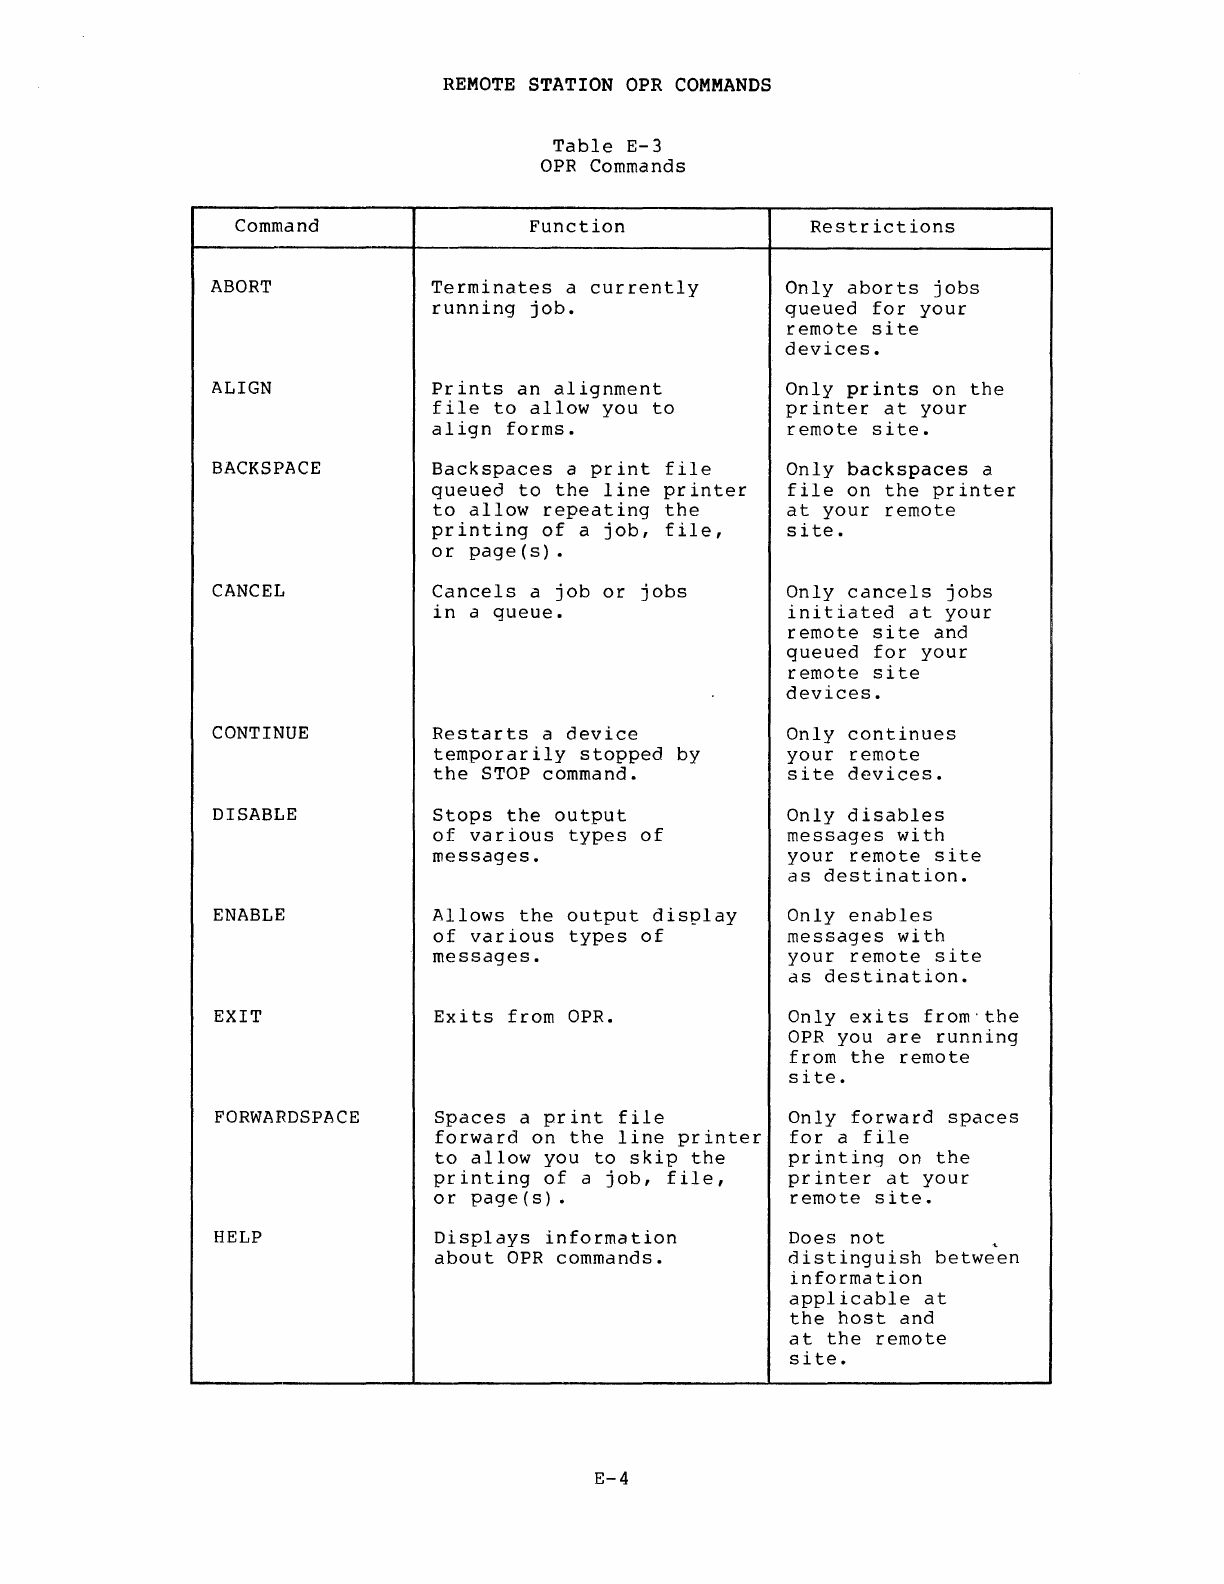
Command
ABORT
ALIGN
BACKSPACE
CANCEL
CONTINUE
DISABLE
ENABLE
EXIT
FORWARDSPACE
HELP
REMOTE
STATION
OPR
COMMANDS
Table
E-3
OPR
Commands
Function
Terminates
a
currently
running
job.
Prints
an
alignment
file
to
allow
you
to
align
forms.
Backspaces
a
print
file
queued
to
the
line
printer
to
allow
repeating
the
printing
of
a
job,
file,
or
page
(s)
.
Cancels
a
job
or
jobs
in
a
queue.
Restarts
a
device
temporarily
stopped
by
the
STOP
command.
Stops
the
output
of
various
types
of
messages.
Allows
the
output
display
of
various
types
of
messages.
Exits
from
OPR.
Spaces
a
print
file
forward
on
the
line
printer
to
allow
you
to
skip
the
printing
of
a
job,
file,
or
page(s).
Displays
information
about
OPR
commands.
E-4
Restrictions
Only
aborts
jobs
queued
for
your
remote
site
devices.
Only
prints
on
the
printer
at
your
remote
site.
Only
backspaces
a
file
on
the
printer
at
your
remote
si
te.
Only
cancels
jobs
initiated
at
your
remote
site
and
queued
for
your
remote
site
devices.
Only
continues
your
remote
site
devices.
Only
disables
messages
with
your
remote
site
as
destination.
Only
enables
messages
with
your
remote
site
as
destination.
Only
exits
from'the
OPR
you
are
running
from
the
remote
site.
Only
forward
spaces
for
a
file
printing
on
the
printer
at
your
remote
site.
Does
not
•
distinguish
between
information
applicable
at
the
host
and
at
the
remote
site.
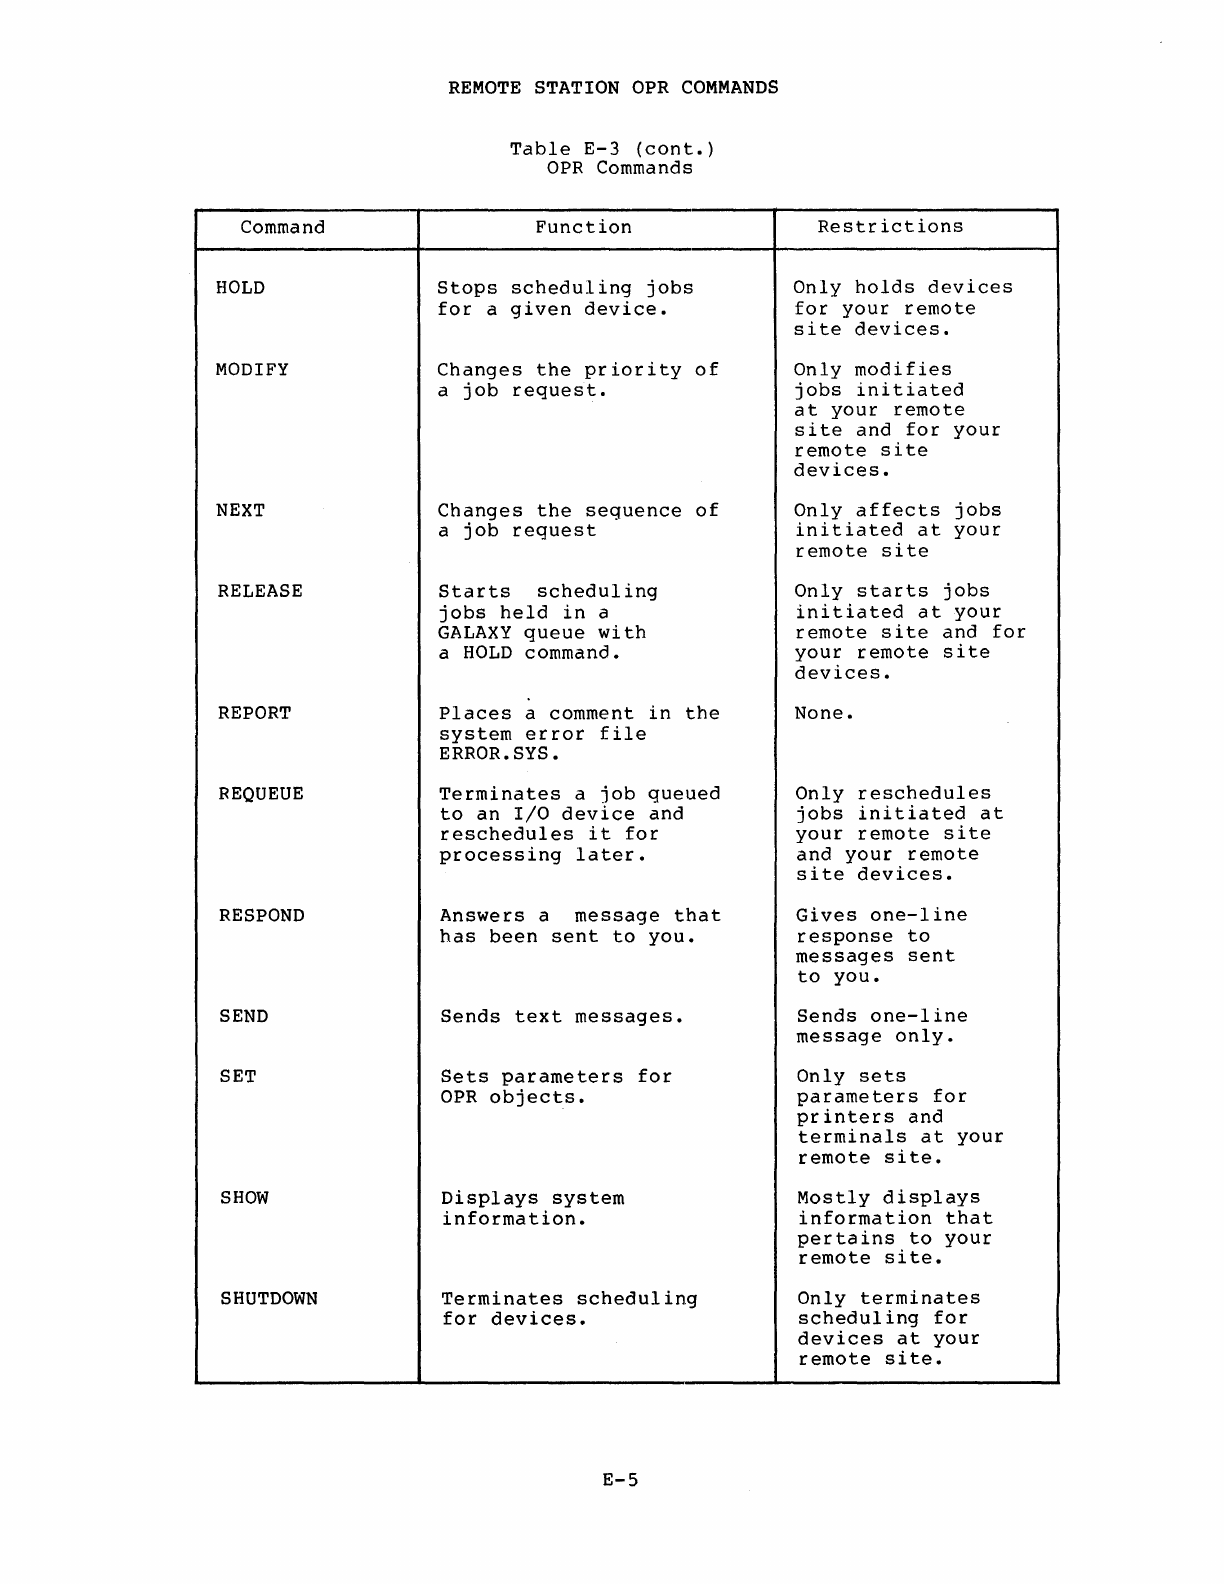
Command
HOLD
MODIFY
NEXT
RELEASE
REPORT
REQUEUE
RESPOND
SEND
SET
SHOW
SHUTDOWN
REMOTE
STATION
OPR
COMMANDS
Table
E-3
(cont.)
OPR
Commands
Function
Stops
scheduling
jobs
for
a
given
device.
Changes
the
priority
of
a
job
request.
Changes
the
sequence
of
a
job
request
Starts
scheduling
jobs
held
in
a
GALAXY
queue
with
a
HOLD
command.
Places
a comment
in
the
system
error
file
ERROR.SYS.
Terminates
a
job
queued
to
an
I/O
device
and
reschedules
it
for
processing
later.
Answers
a
message
that
has
been
sent
to
you.
Sends
text
messages.
Sets
parameters
for
OPR
objects.
Displays
system
information.
Terminates
scheduling
for
devices.
E-5
Restrictions
Only
holds
devices
for
your
remote
site
devices.
Only
modifies
jobs
initiated
at
your
remote
site
and
for
your
remote
site
devices.
Only
affects
jobs
initiated
at
your
remote
site
Only
starts
jobs
initiated
at
your
remote
site
and
for
your
remote
site
devices.
None.
Only
reschedules
jobs
initiated
at
your
remote
site
and
your
remote
site
devices.
Gives
one-line
response
to
messages
sent
to
you.
Sends
one-line
message
only.
Only
sets
parameters
for
printers
and
terminals
at
your
remote
site.
Mostly
displays
information
that
pertains
to
your
remote
site.
Only
terminates
scheduling
for
devices
at
your
remote
site.
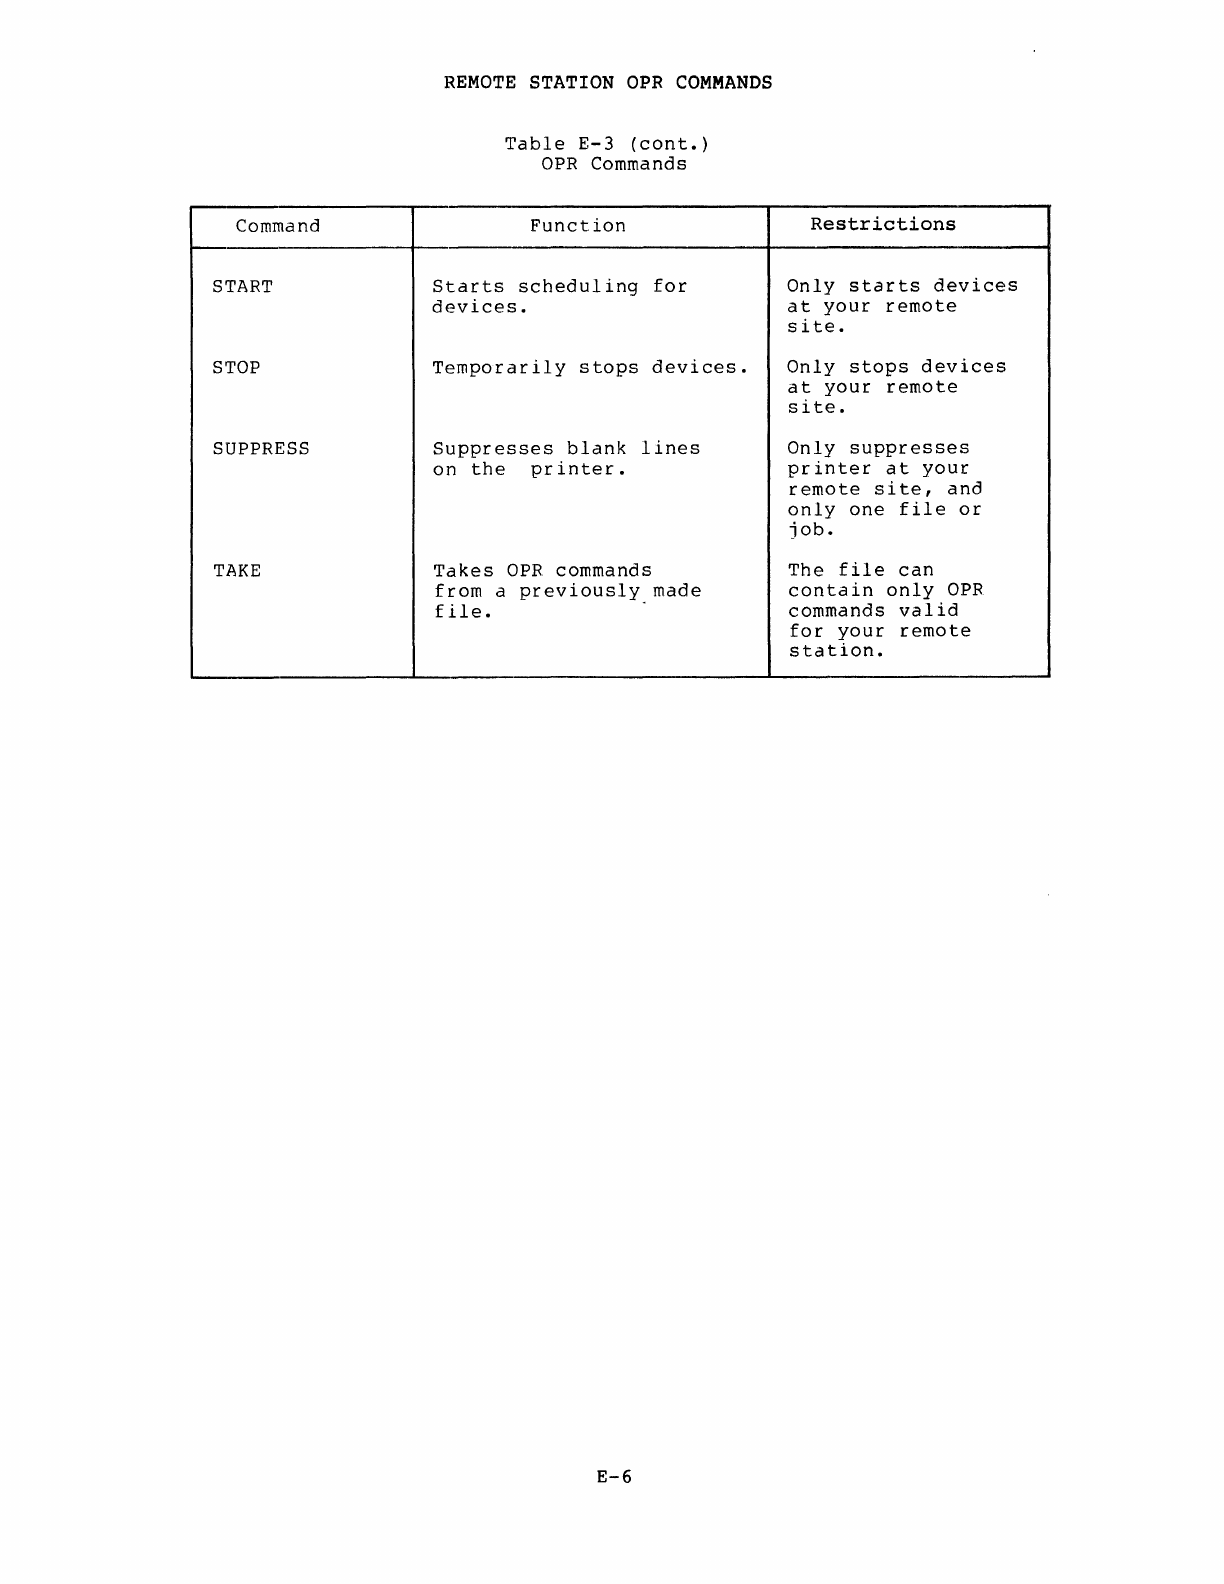
Command
REMOTE
STATION
OPR
COMMANDS
Table
E-3
(cont.)
OPR
Commands
Function
Restrictions
---.----------------;----,-----------------------------+-----------------------~
START
STOP
SUPPRESS
TAKE
Starts
scheduling
for
devices.
Temporarily
stops
devices.
Suppresses
blank
lines
on
the
printer.
Takes
OPR
commands
from
a
previously
made
file.
.
E-6
Only
starts
devices
at
your
remote
site.
Only
stops
devices
at
your
remote
site.
Only
suppresses
printer
at
your
remote
site,
and
only
one
file
or
job.
The
file
can
contain
only
OPR
commands
valid
for
your
remote
station.
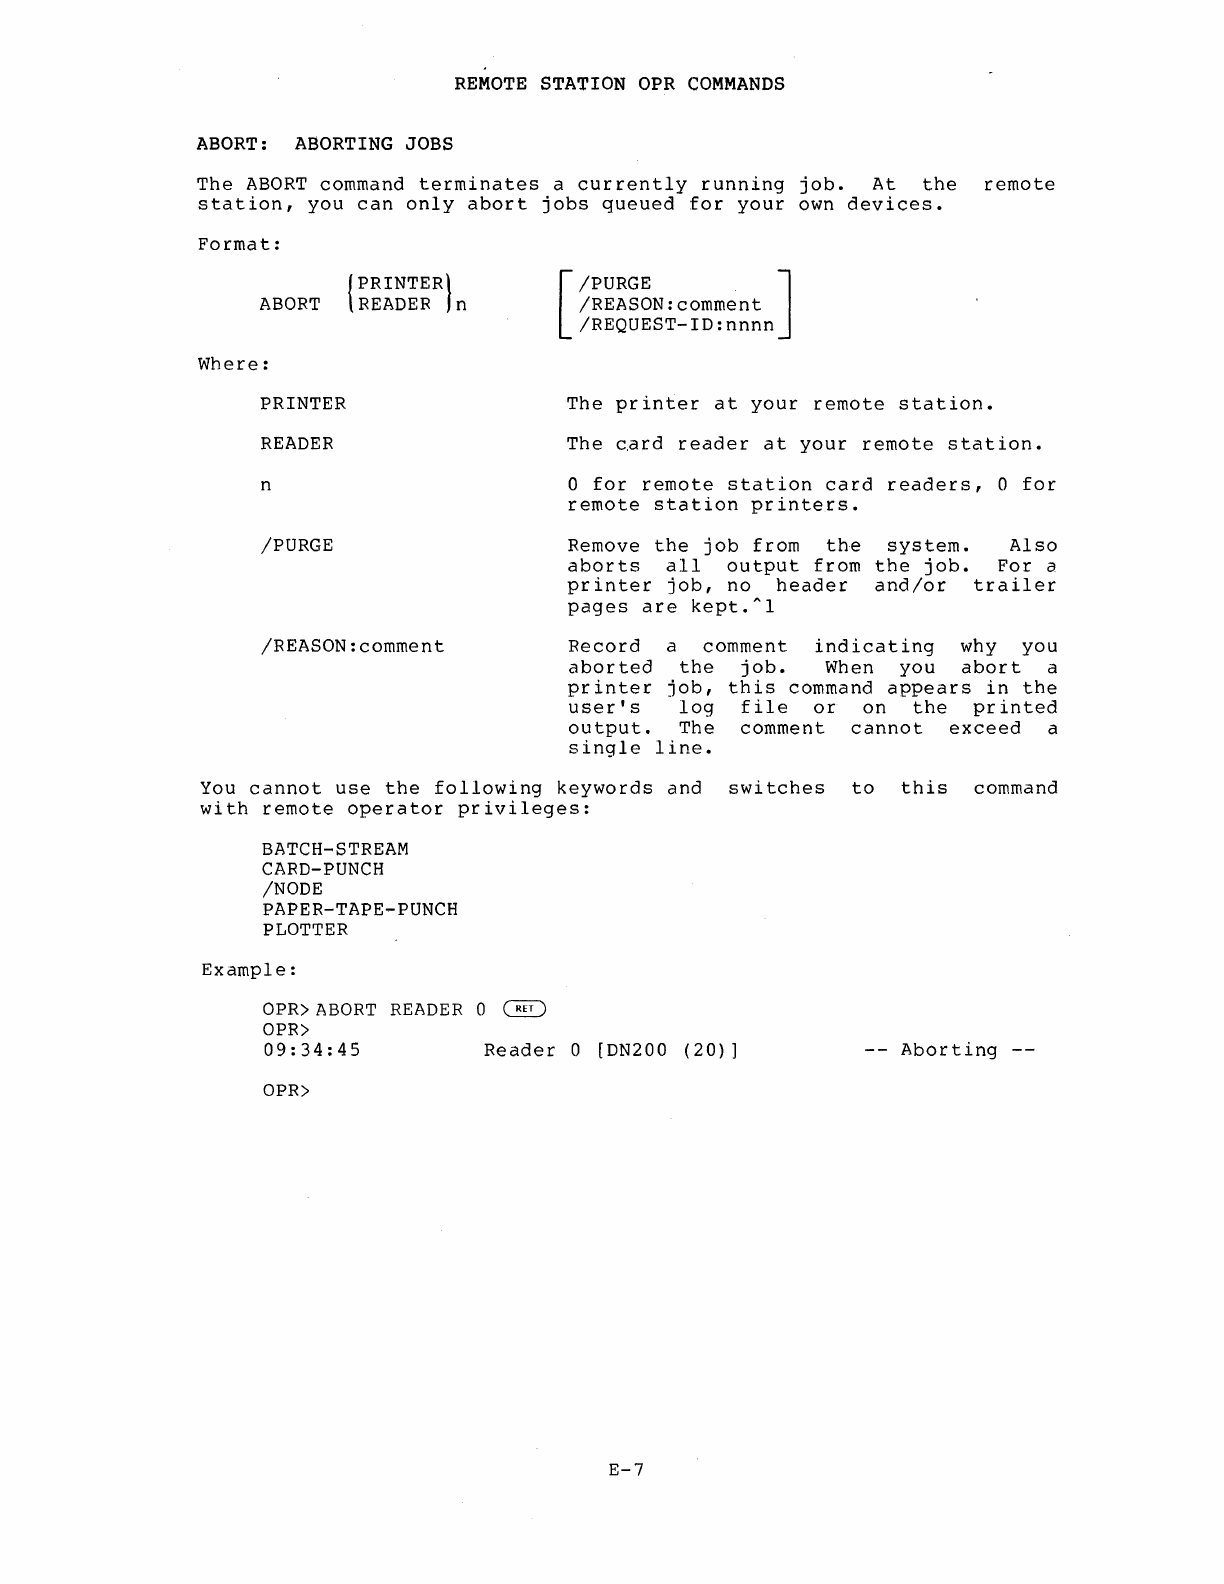
REMOTE
STATION OPR
COMMANDS
ABORT: ABORTING JOBS
The
ABORT
command
terminates
a
currently
running
job.
At
the
remote
station,
you
can
only
abort
jobs
queued
for
your
own
devices.
Format:
ABORT
Where:
PRINTER
READER
n
/PURGE
{PRINTER}
READER
n
/REASON:comment
[
/PURGE . ]
/REASON:comment
/REQUEST-ID:nnnn
The
printer
at
your
remote
station.
The
card
reader
at
your
remote
station.
o
for
remote
station
card
readers,
0
for
remote
station
printers.
Remove
the
job
from
the
system.
Also
aborts
all
output
from
the
job.
For
a
printer
job,
no
header
and/or
trailer
pages
are
kept.Al
Record
a
comment
indicating
why
you
aborted
the
job.
When
you
abort
a
printer
job,
this
command
appears
in
the
user's
log
file
or
on
the
printed
output.
The
comment
cannot
exceed
a
single
line.
You
cannot
use
the
following
keywords
and
switches
to
this
command
with
remote
operator
privileges:
BATCH-STREAM
CARD-PUNCH
/NODE
PAPER-TAPE-PUNCH
PLOTTER
Example:
OPR>ABORT
READER
0
~
aPR>
09:34:45
Reader
0 [DN200
(20)]
aPR>
E-7
--
Aborting
--
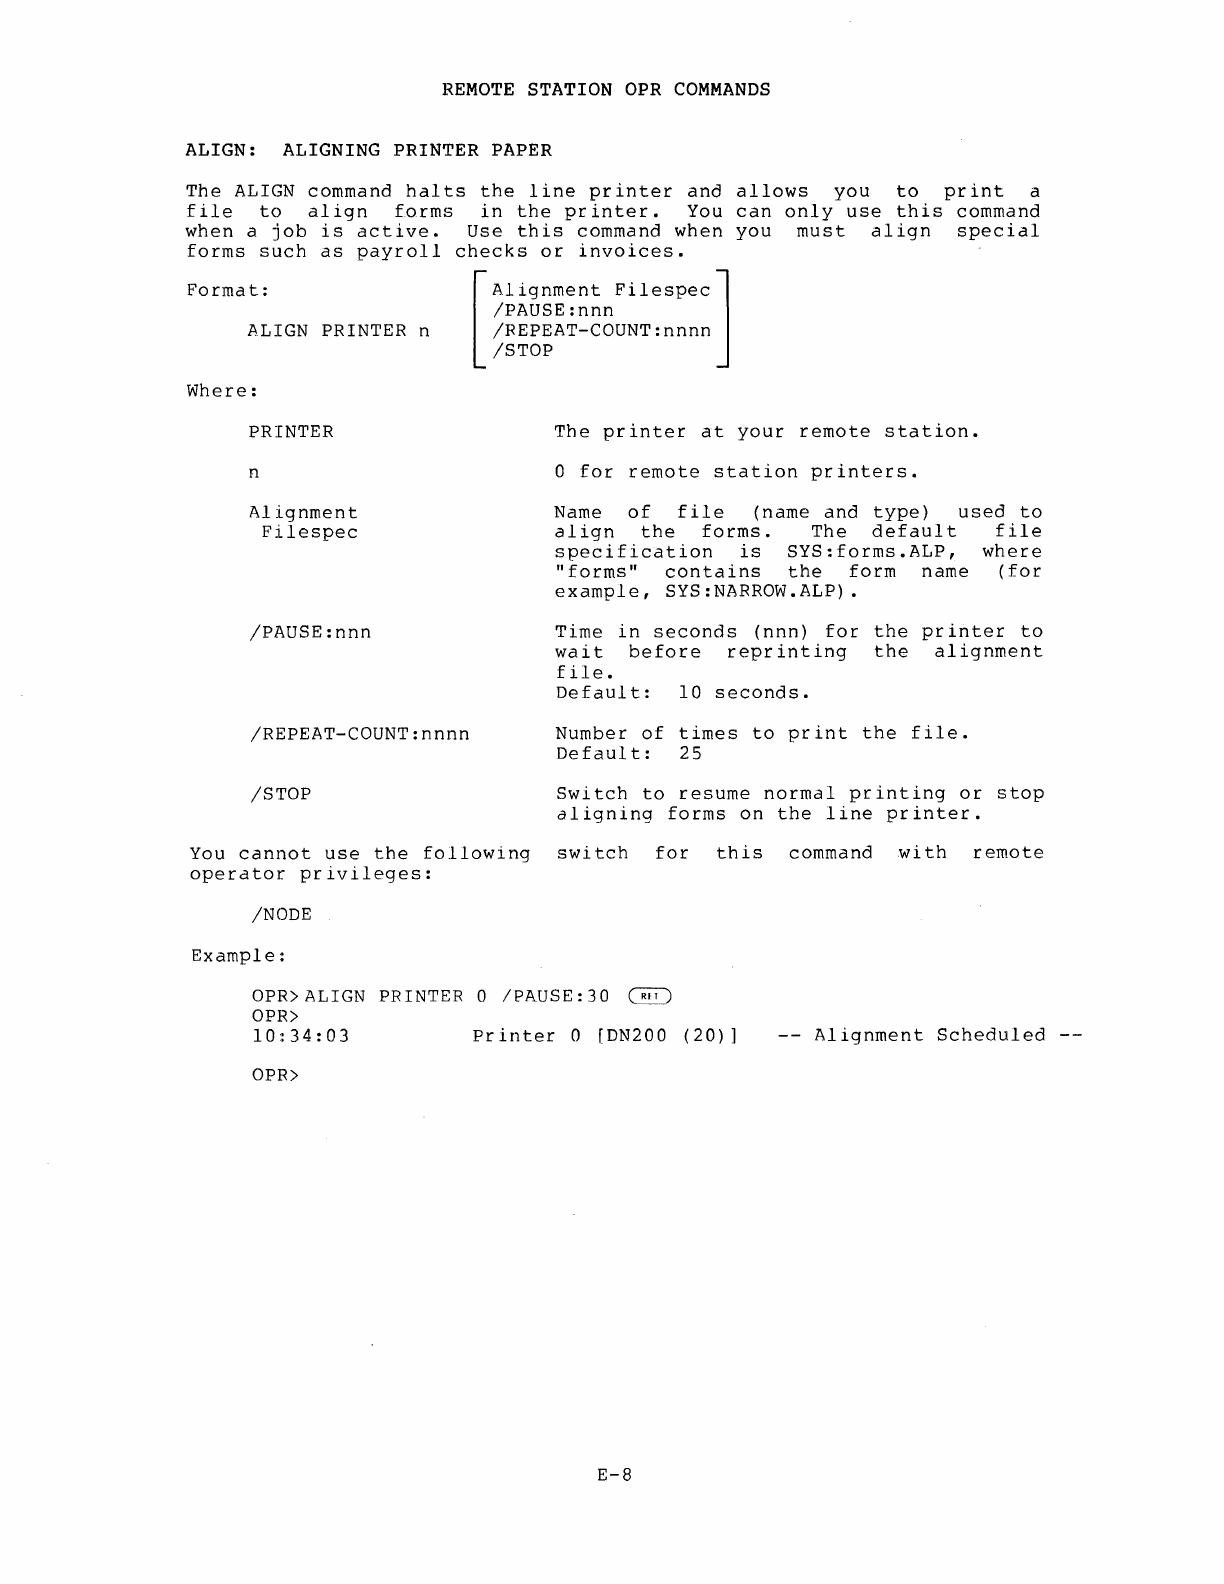
REMOTE
STATION
OPR
COMMANDS
ALIGN:
ALIGNING
PRINTER
PAPER
The
ALIGN
command
halts
the
line
printer
and
allows
you
to
print
a
file
to
align
forms
in
the
printer.
You
can
only
use
this
command
when
a
job
is
active.
Use
this
command
when
you
must
align
special
forms
such
as
payroll
checks
or
invoices.
Format:
[~~!0~~~~~nFilespec]
ALIGN PRINTER n
/REPEAT-COUNT:nnnn
/STOP
Where:
PRINTER
n
Alignment
Filespec
/PAUSE:nnn
/REPEAT-COUNT:nnnn
/STOP
The
printer
at
your
remote
station.
o
for
remote
station
printers.
Name
of
file
(name
and
type)
used
to
align
the
forms.
The
default
file
specification
is
SYS:forms.ALP,
where
"forms"
contains
the
form
name
(for
example,
SYS:NARROW.ALP).
Time
in
seconds
(nnn)
for
the
printer
to
wait
before
reprinting
the
alignment
file.
Default:
10
seconds.
Number
of
times
to
print
the
file.
Default:
25
Switch
to
resume
normal
printing
or
stop
aligning
forms
on
the
line
printer.
You
cannot
use
the
following
switch
for
this
command
with
remote
operator
privileges:
/NODE
Example:
OPR>ALIGN PRINTER 0
/PAUSE:30
Ci~J
OPR>
10:34:03
Printer
0 [DN200
(20)]
OPR>
E-8
--
Alignment
Scheduled
--
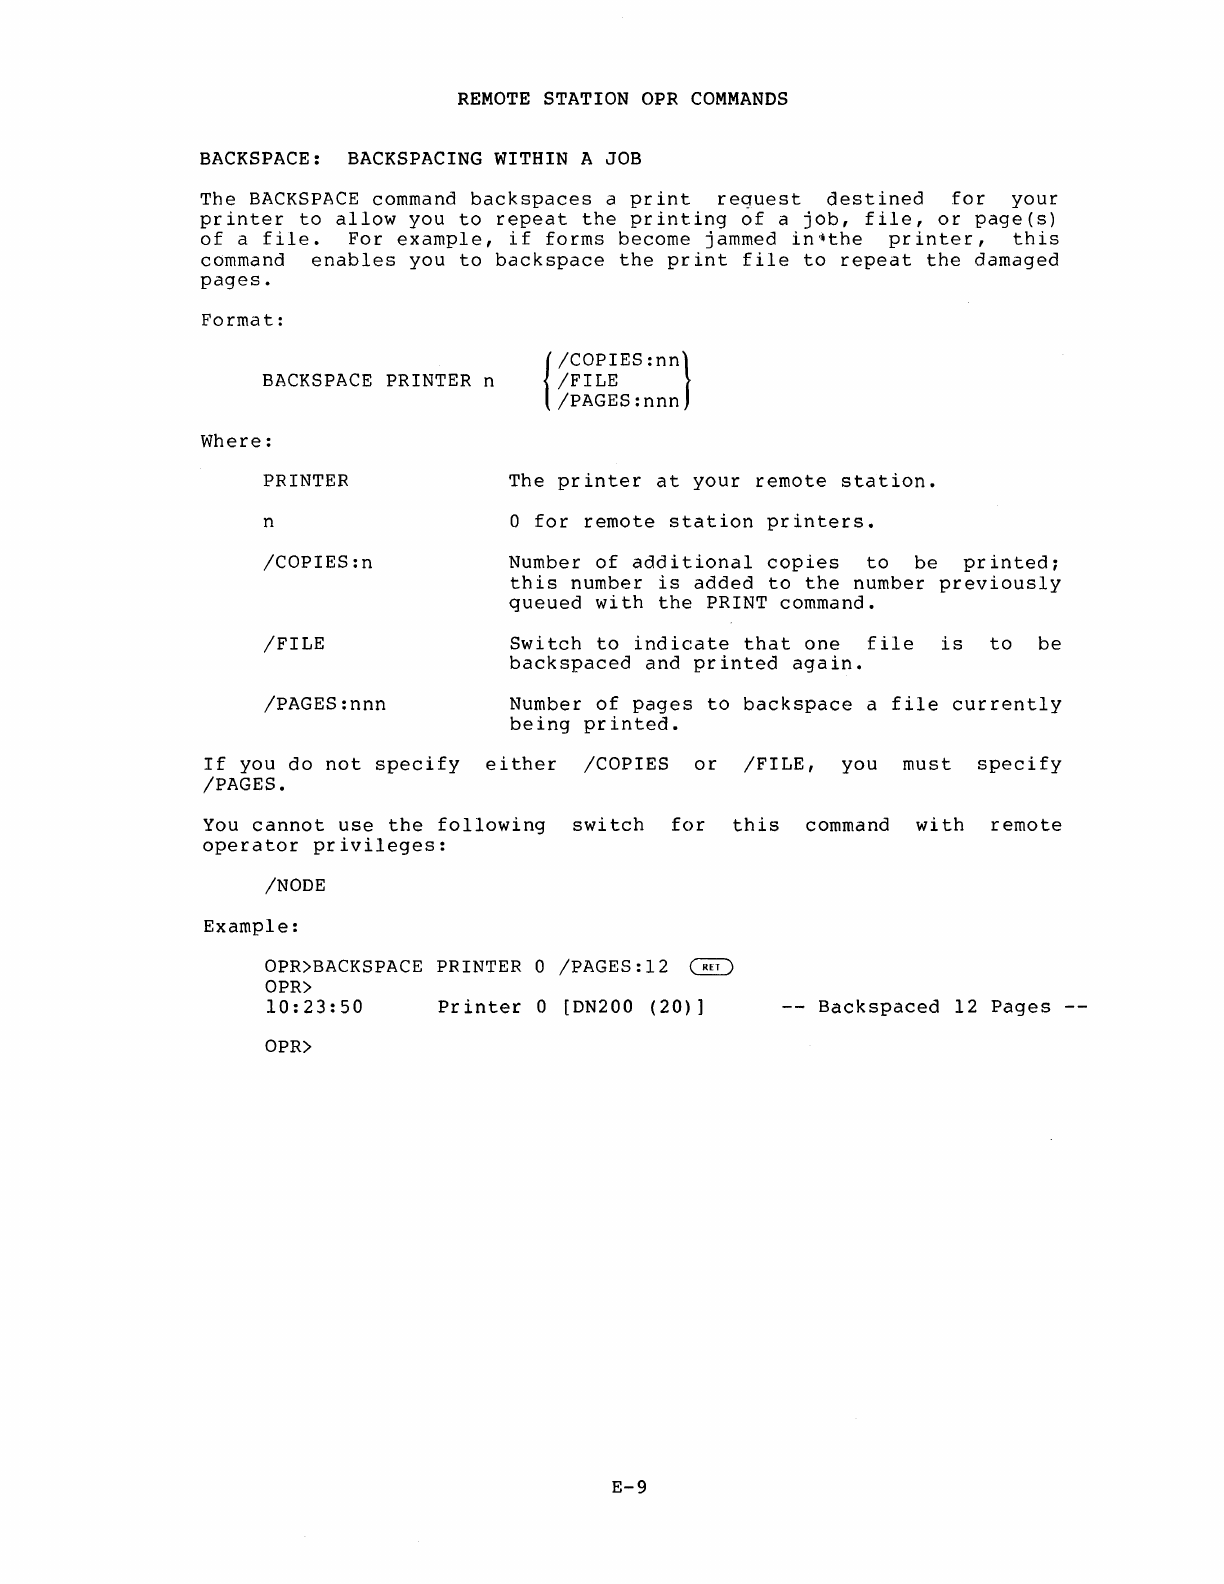
REMOTE
STATION
OPR
COMMANDS
BACKSPACE: BACKSPACING WITHIN A JOB
The
BACKSPACE
command
backspaces
a
print
request
destined
for
your
printer
to
allow
you
to
repeat
the
printing
of
a
job,
file,
or
page(s)
of
a
file.
For
example,
if
forms
become
jammed
in~the
printer,
this
command
enables
you
to
backspace
the
print
file
to
repeat
the
damaged
pages.
Format:
BACKSPACE
PRINTER n
Where:
PRINTER
n
/COPIES:n
/FILE
/PAGES:nnn
{
/COPIEs:nn}
/FILE
/PAGES:nnn
The
printer
at
your
remote
station.
o
for
remote
station
printers.
Number
of
additional
copies
to
be
printed;
this
number
is
added
to
the
number
previously
queued
with
the
PRINT
command.
Switch
to
indicate
that
one
file
is
to
be
backspaced
and
printed
again.
Number
of
pages
to
backspace
a
file
currently
being
printed.
If
you
do
not
specify
either
/COPIES
or
/FILE,
you
must
specify
/PAGES.
You
cannot
use
the
following
switch
for
this
command
with
remote
operator
privileges:
/NODE
Example:
OPR)BACKSPACE PRINTER 0
/PAGES:12
~
OPR)
10:23:50
Printer
0 [DN200
(20)]
OPR)
E-9
--
Backspaced
12
Pages
--
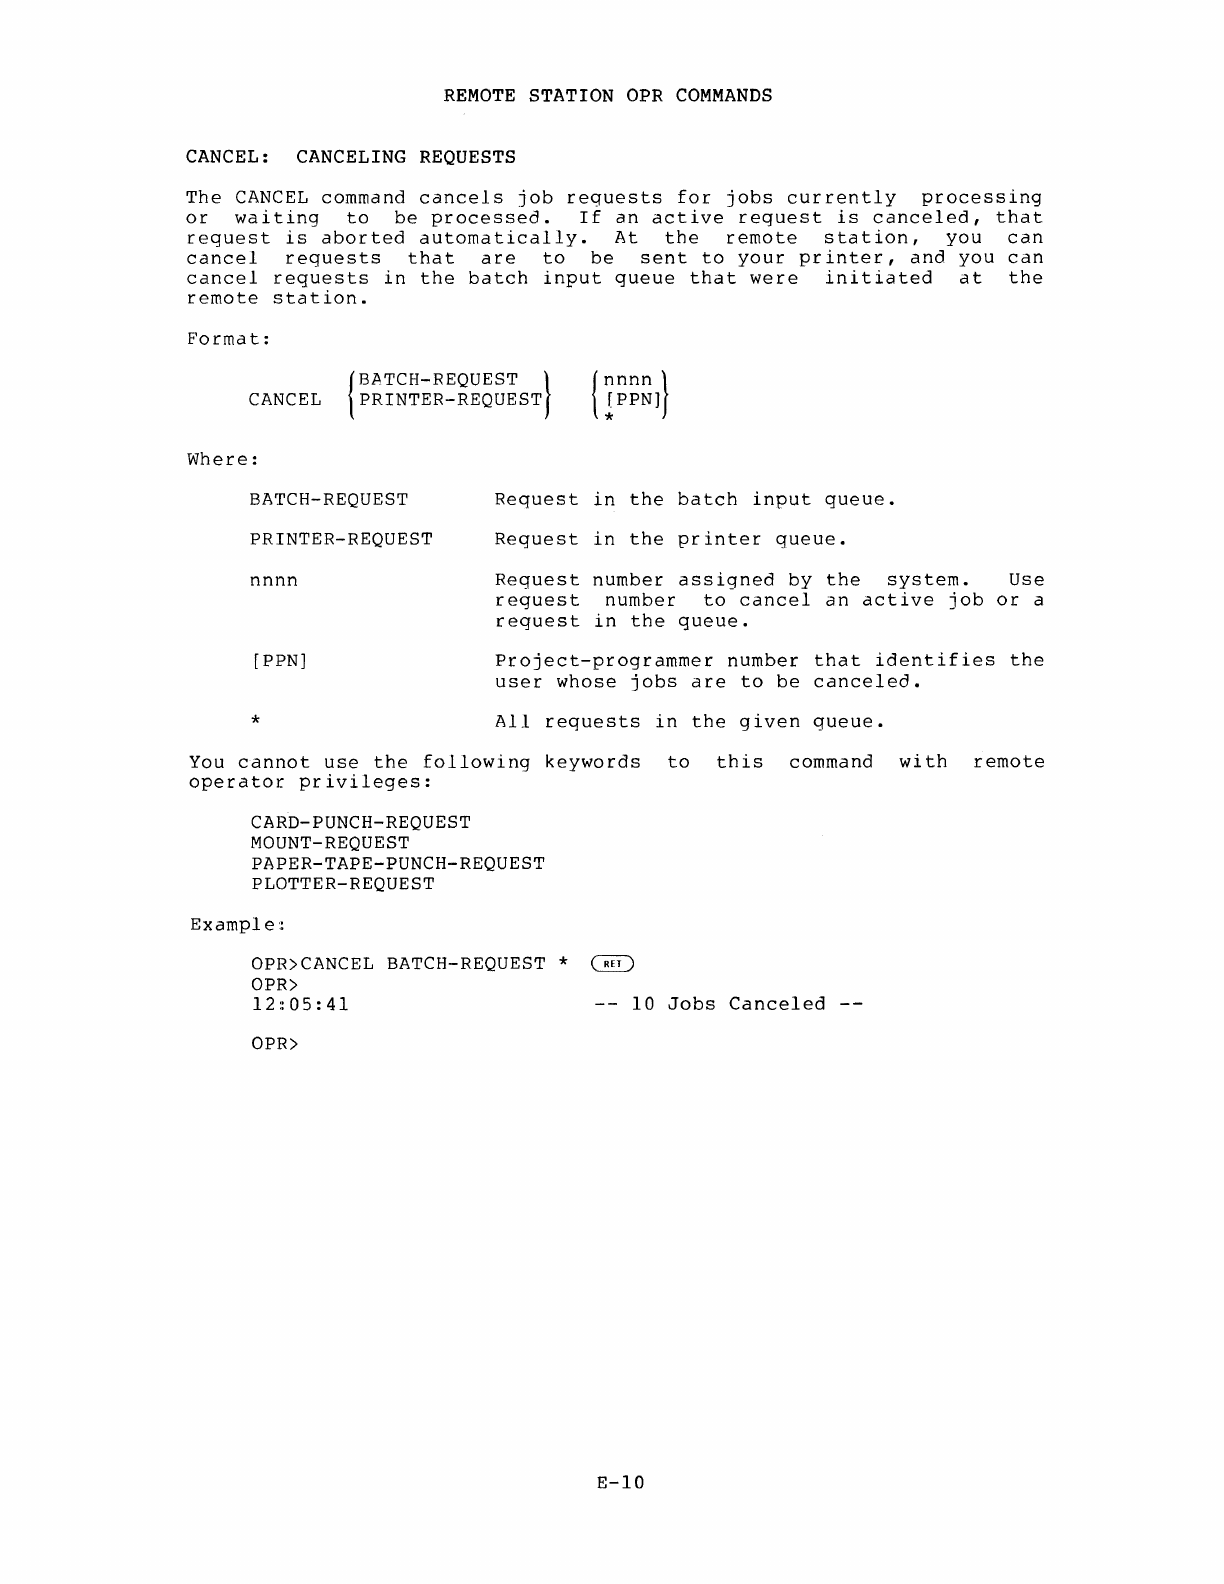
REMOTE
STATION OPR
COMMANDS
CANCEL: CANCELING REQUESTS
The
CANCEL
command
cancels
job
requests
for
jobs
currently
processing
or
waiting
to
be
processed.
If
an
active
request
is
canceled,
that
request
is
aborted
automatically.
At
the
remote
station,
you
can
cancel
requests
that
are
to
be
sent
to
your
printer,
and
you
can
cancel
requests
in
the
batch
input
queue
that
were
initiated
at
the
remote
station.
Format:
fBATCH-REQUEST }
CANCEL
\ PRINTER-REQUEST
Where:
BATCH-REQUEST
PRINTER-REQUEST
nnnn
[PPN]
*
Request
in
the
batch
input
queue.
Request
in
the
printer
queue.
Request
number
assigned
by
the
system.
Use
request
number
to
cancel
an
active
job
or
a
request
in
the
queue.
Project-programmer
number
that
identifies
the
user
whose
jobs
are
to
be
canceled.
All
requests
in
the
given
queue.
You
cannot
use
the
following
keywords
to
this
command
with
remote
operator
privileges:
CARD-PUNCH-REQUEST
MOUNT-REQUEST
PAPER-TAPE-PUNCH-REQUEST
PLOTTER-REQUEST
Example
::
OPR>CANCEL BATCH-REQUEST *
~
OPR>
12~05:41
--
10
Jobs
Canceled
--
OPR>
E-IO
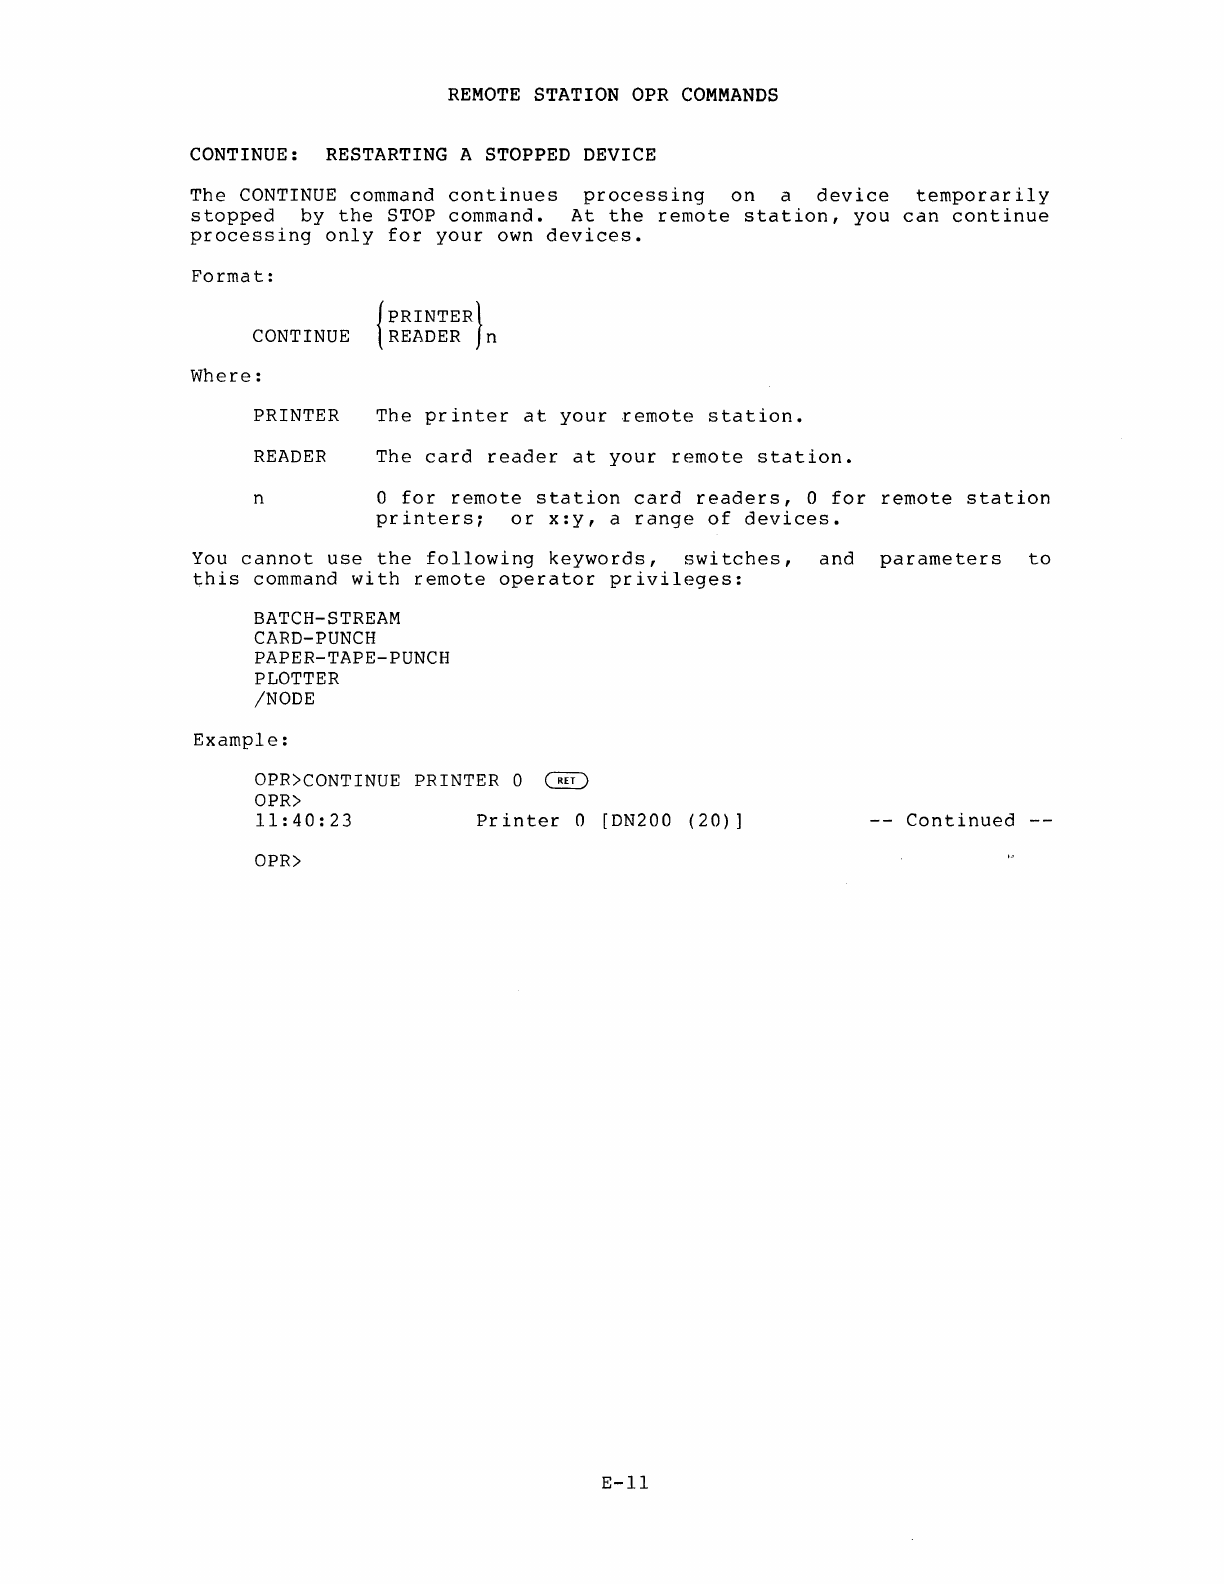
REMOTE
STATION OPR
COMMANDS
CONTINUE: RESTARTING A STOPPED DEVICE
The
CONTINUE
command
continues
processing
on
a
device
temporarily
stopped
by
the
STOP
command.
At
the
remote
station,
you
can
continue
processing
only
for
your
own
devices.
Format:
CONTINUE
Where:
PRINTER
READER
{PRINTER)
READER
n
The
printer
at
your
remote
station.
The
card
reader
at
your
remote
station.
n o
for
remote
station
card
readers,
0
for
remote
station
printers;
or
x:y,
a
range
of
devices.
You
cannot
use
the
following
keywords,
switches,
and
parameters
to
this
command
with
remote
operator
privileges:
BATCH-STREAM
CARD-PUNCH
PAPER-TAPE-PUNCH
PLOTTER
/NODE
Example:
OPR>CONTINUE PRINTER 0
~
OPR>
11:40:23
Printer
0 [DN200
(20)]
OPR>
E-11
Continued
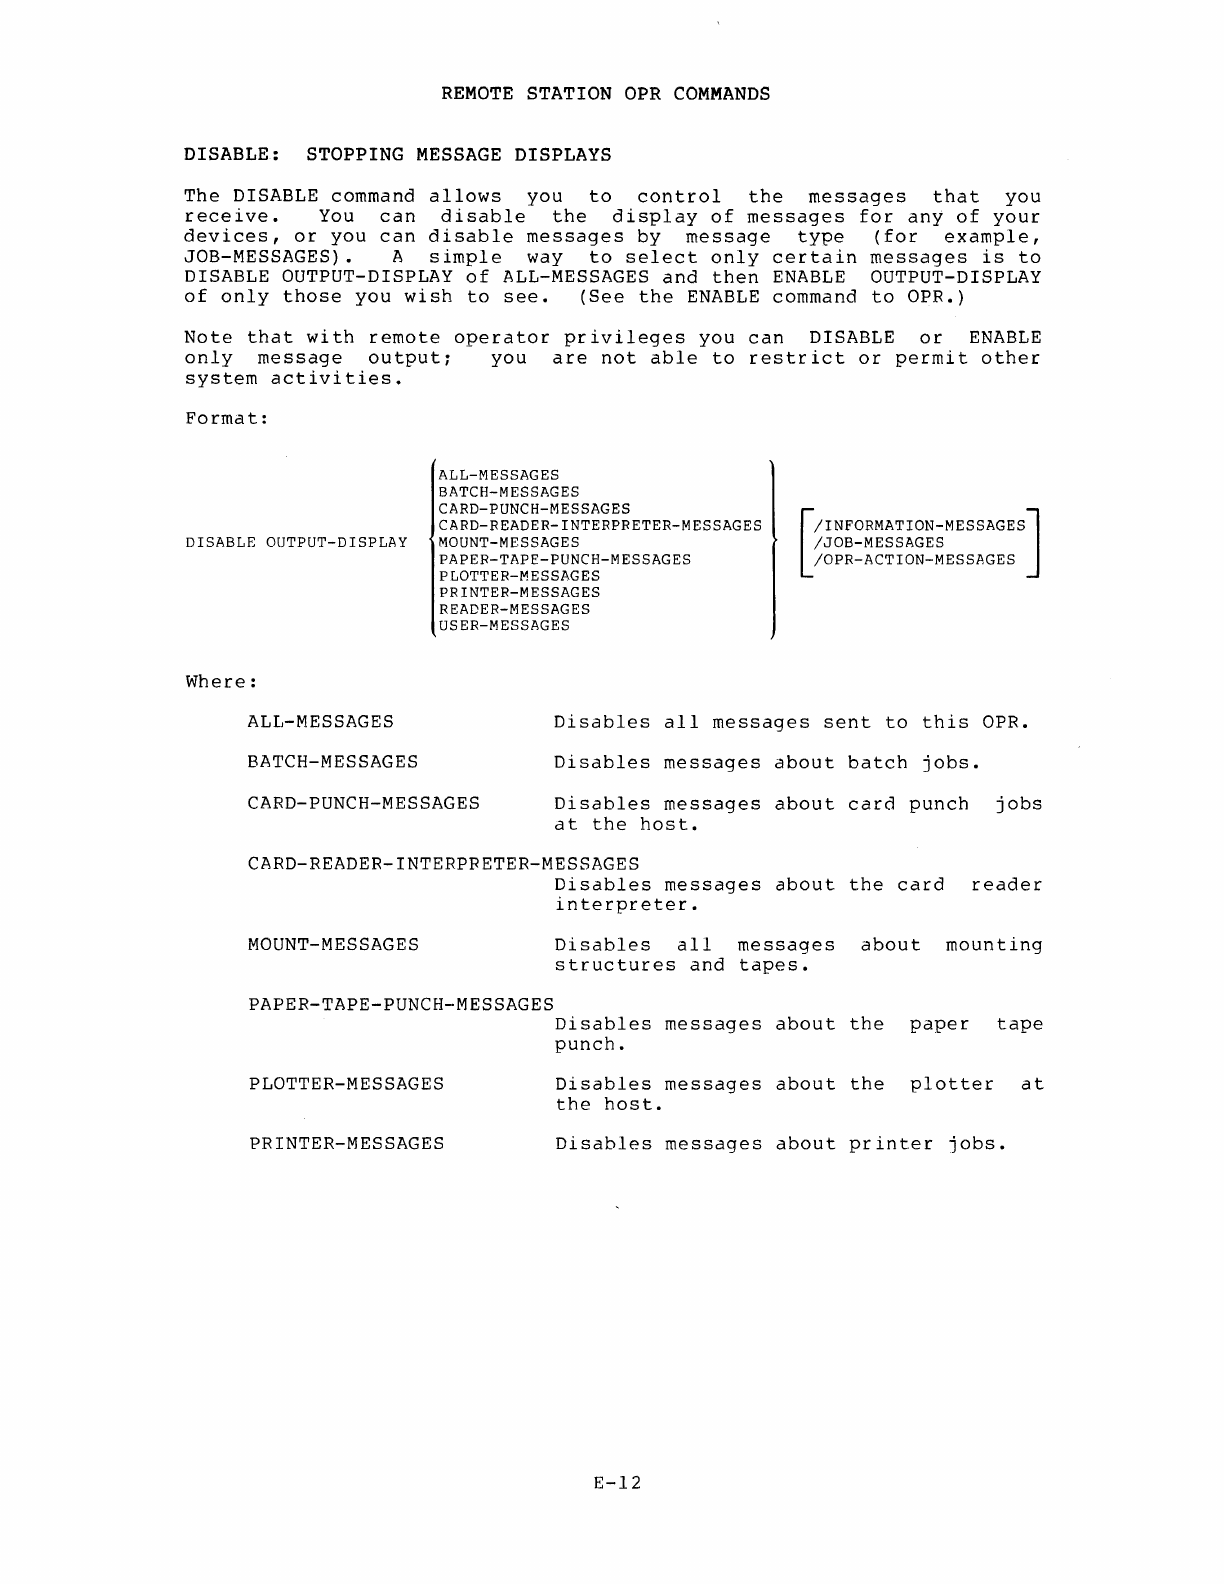
REMOTE
STATION
OPR
COMMANDS
DISABLE:
STOPPING
MESSAGE
DISPLAYS
The
DISABLE
command
allows
you
to
control
the
messages
that
you
receive.
You
can
disable
the
display
of
messages
for
any
of
your
devices,
or
you
can
disable
messages
by
message
type
(for
example,
JOB-MESSAGES) • A
simple
way
to
select
only
certain
messages
is
to
DISABLE OUTPUT-DISPLAY
of
ALL-MESSAGES
and
then
ENABLE
OUTPUT-DISPLAY
of
only
those
you
wi
sh
to
see.
(See
the
ENABLE
command
to
OPR.)
Note
that
with
remote
operator
privileges
you
can
DISABLE
or
ENABLE
only
message
output;
you
are
not
able
to
restrict
or
permit
other
system
activities.
Format:
ALL-MESSAGES
BATCH-MESSAGES
CARD-PUNCH-MESSAGES
CARD-READER-INTERPRETER-MESSAGES
[
/INFORMATION-MESSAGESJ
/JOB-MESSAGES
/OPR-ACTION-MESSAGES
DISABLE OUTPUT-DISPLAY MOUNT-MESSAGES
PAPER-TAPE-PUNCH-MESSAGES
PLOTTER-MESSAGES
PRINTER-MESSAGES
READER-MESSAGES
USER-MESSAGES
Where:
ALL-MESSAGES
BATCH-MESSAGES
CARD-PUNCH-MESSAGES
Disables
all
messages
sent
to
this
aPR.
Disables
messages
about
batch
jobs.
Disables
messages
about
card
punch
jobs
at
the
host.
CARD-READER-INTERPRETER-MESSAGES
MOUNT-MESSAGES
PAPER-TAPE-PUNCH-MESSAGES
PLOTTER-MESSAGES
PRINTER-MESSAGES
Disables
messages
about
the
card
reader
interpreter.
Disables
all
messages
about
mounting
structures
and
tapes.
Disables
messages
about
the
paper
tape
punch.
Disables
messages
about
the
plotter
at
the
host.
Disables
messages
about
printer
jobs.
E-12
REMOTE
STATION
OPR
COMMANDS
READER-MESSAGES
USER-MESSAGES
/INFORMATION-MESSAGES
/JOB-MESSAGES
/OPR-ACTION-MESSAGES
Example:
Disables
messages
about
card
jobs.
Disables
user
messages.
reader
Disables
informational
messages
for
the
specified
device
or
message
type.
Disables
messages
about
jobs
for
the
specified
device
or
message
type.
Disables
messages
for
which
action
is
needed
for
the
device
or
message
type.
operator
specified
OPR) DISABLE OUTPUT-DISPLAY USER-MESSAGES
/JOB-MESSAGES
~
OPR)
E-13
REMOTE
STATION OPR
COMMANDS
ENABLE: STARTING
MESSAGE
DISPLAYS
The
ENABLE
command
allows
you
to
control
the
messages
displayed
at
your
OPR
terminal.
Note
that
with
remote
operator
privileges
you
can
DISABLE
or
ENABLE
only
message
output;
you
are
not
able
to
restrict
or
permit
other
system
activities.
Format:
ALL-MESSAGES
BATCH-MESSAGES
CARD-PUNCH-MESSAGES
CARD-READER-INTERPRETER-MESSAGES
ENABLE
OUTPUT-DISPLAY
MOUNT-MESSAGES
PAPER-TAPE-PUNCH-MESSAGES
PLOTTER-MESSAGES
PRINTER-MESSAGES
READER-MESSAGES
USER-MESSAGES
[
/INFORMATION-MESSAGES]
/JOB-MESSAGES
/OPR-ACTION-MESSAGES
Where:
ALL-MESSAGES
BATCH-MESSAGES
CARD-PUNCH-MESSAGES
Enables
the
display
of
all
messages
for
the
OPR
you
are
running.
Enables
the
display
of
messages
about
batch
jobs.
Enables
the
display
of
messages
about
the
card
punch
at
the
host.
CARD-READER-INTERPRETER-MESSAGES
MOUNT-MESSAGES
Enables
the
display
the
card
reader
messages
occur
when
wrong
format
or
commands.
of
messages
about
interpreter.
Such
cards
are
in
the
contain
illegal
Enables
the
display
of
messages
about
mounting
tapes
and
disks.
E-14
REMOTE
STATION OPR
COMMANDS
PAPER-TAPE-PUNCH-MESSAGES
PLOTTER-MESSAGES
PRINTER-MESSAGES
READER-MESSAGES
USER-MESSAGES
/INFORMATION-MESSAGES
/JOB-MESSAGES
/OPR-ACTION-MESSAGES
Example:
Enables
the
display
of
messages
about
the
paper
tape
punch
at
the
host.
Enables
the
display
of
messages
about
the
plotter
at
the
host.
Enables
the
display
of
messages
about
printer
jobs.
Enables
the
display
of
messages
about
card
reader
jobs.
Enables
the
display
of
user
messages.
Enables
the
display
of
informational
messages
about
a
specified
device
or
type
of
message.
Enables
the
display
of
messages
about
jobs
destined
for
a
specified
device
or
type
of
message.
Enables
the
display
of
messages
that
require
operator
action
(for
example,
please
or
forms-change
requests).
OPR)
ENABLE
OUTPUT-DISPLAY PRINTER-MESSAGES /JOB-MESSAGES
C~I)
OPR)
E-15
REMOTE
STATION
aPR
COMMANDS
EXIT:
LEAVING
aPR
The
EXIT command
removes
you
from
OPR
command
level
and
returns
you
to
TOPS-IO
monitor
level.
When
you
exit
from
aPR,
any
messages
intended
for
your
remote
station
are
routed
to
the
operator
at
the
TOPS-IO
host.
It
is
good
practice
to
have
the
operator's
console
at
your
remote
station
dedicated
to
running
aPR
and
not
to
exit
from
aPR
while
your
station
is
running.
Format:
EXIT
Example:
OPR)EXIT
~
E-16
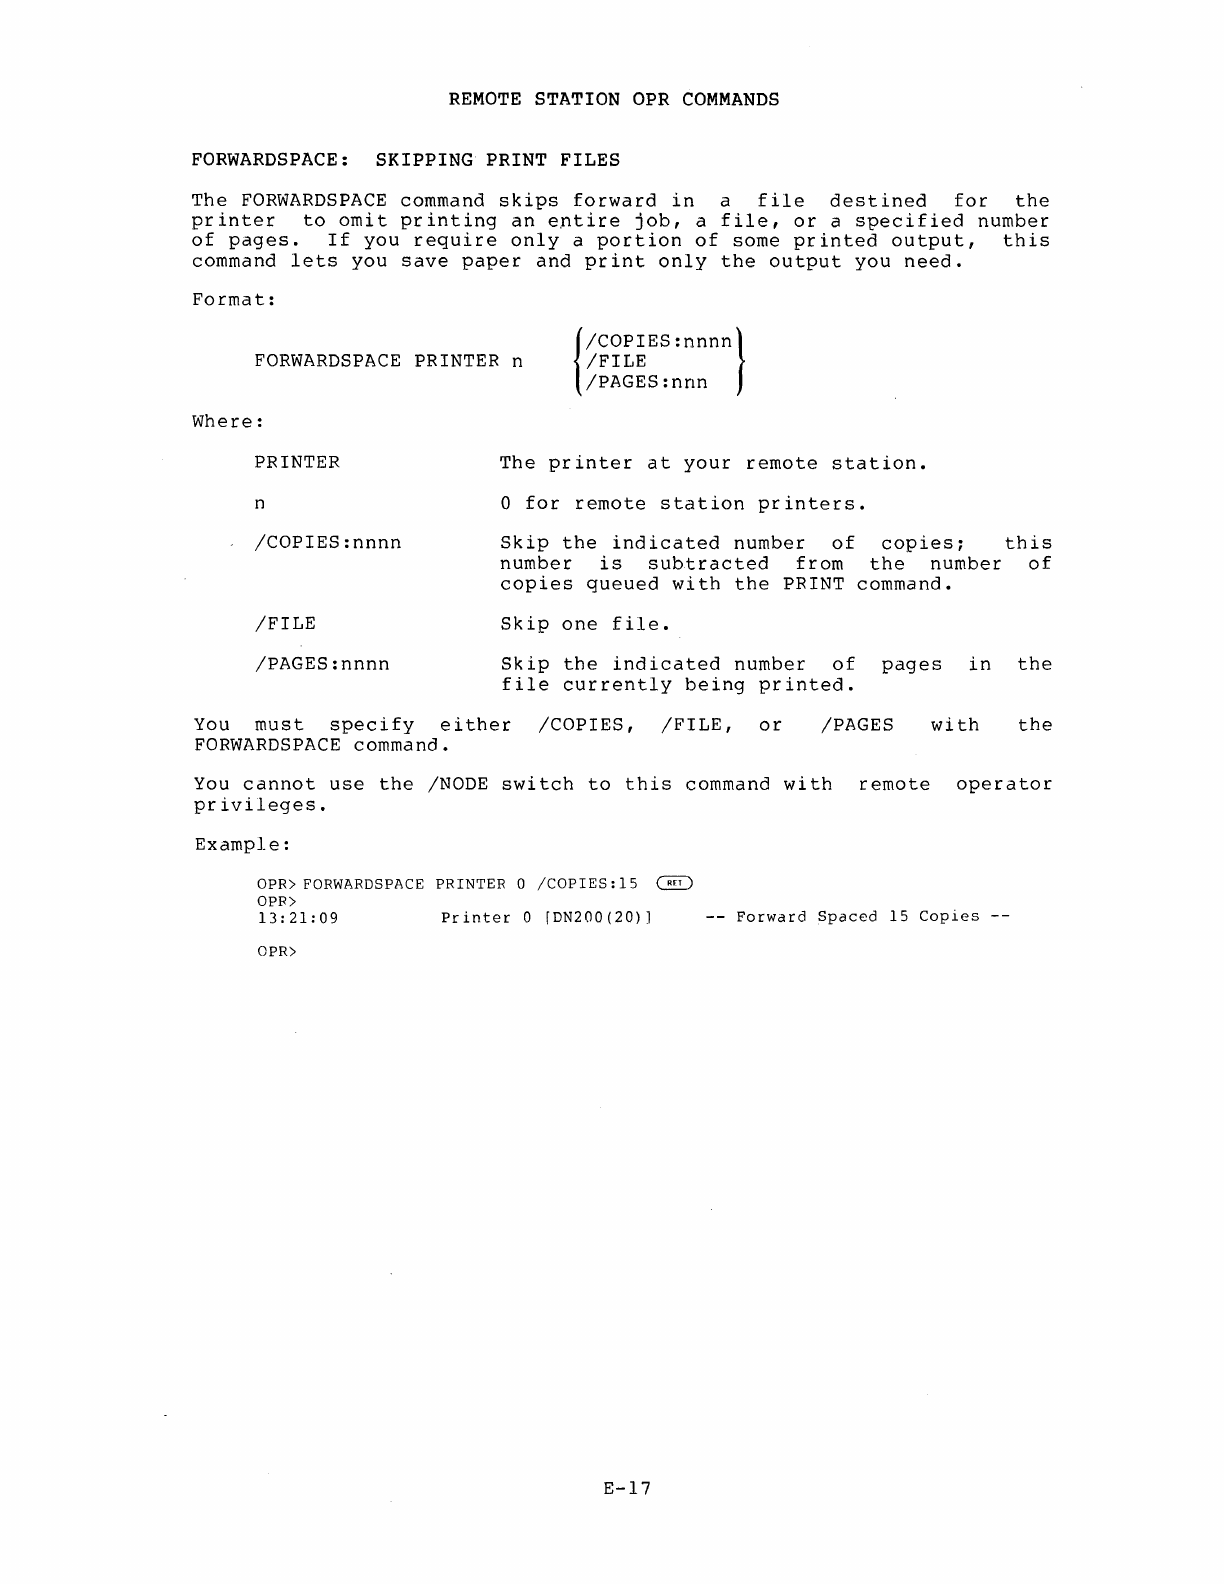
REMOTE
STATION OPR
COMMANDS
FORWARDSPACE:
SKIPPING
PRINT
FILES
The
FORWARDSPACE
command
skips
forward
in
a
file
destined
for
the
printer
to
omit
printing
an
entire
job,
a
file,
or
a
specified
number
of
pages.
If
you
require
only
a
portion
of
some
printed
output,
this
command
lets
you
save
paper
and
print
only
the
output
you
need.
Format:
FORWARDSPACE
PRINTER n {
/COPIEs:nnnn}
/FILE
Where:
PRINTER
n
/COPIES:nnnn
/FILE
/PAGES:nnn
The
printer
at
your
remote
station.
o
for
remote
station
printers.
Skip
the
indicated
number
of
copies;
number
is
subtracted
from
the
number
copies
queued
with
the
PRINT
command.
Skip
one
file.
this
of
/PAGES:nnnn
Skip
the
indicated
number
of
pages
in
the
file
currently
being
printed.
You
must
specify
either
/COPIES,
/FILE,
or
FORWARDSPACE
command.
/PAGES
with
the
You
cannot
use
the
/NODE
switch
to
this
command
with
remote
operator
privileges.
Example:
OPR>
FORWARDSPACE
PRINTER 0
/COPIES:
15
@)
OPR>
13:21:09
Printer
0
[DN200(20)]
--
Forward
Spaced
15
Copies
--
OPR>
E-17
REMOTE
STATION OPR
COMMANDS
HELP: OBTAINING INFORMATION
The
HELP
command
displays
information
about
any
of
the
OPR
commands
on
your
terminal.
If
you
type
HELP,
OPR
displays
a
list
of
available
OPR
commands.
To
obtain
information
about
a
specific
OPR
command,
type
HELP
and
the
command
name.
For
information
about
all
OPR
commands,
type
HELP * You
can
obtain
HELP
information
on
all
OPR
commands
from
your
remote
station,
not
just
on
commands
useful
at
the
remote
station.
HELP
is
also
available
through
the
question
mark
(?)
and
~
key.
The
question
mark
prompts
you
to
fill
in
your
command
line
properly;
the
~
key
fills
in
what
it
can,
and
provides
guidewords.
Format:
HELP
Where:
command
Any
OPR
command
name.
Examples:
OPR>HELP RESPOND
C~l_IJ
OPR>
OPR>
The
RESPOND
command
allows
you
to
reply
to
any
message
that
requires
a
response.
The
format
is:
RESPOND
<message-number>
response
where
<message-number>
is
an
outstanding
message
number
followed
by
a
single
or
multiple
line
response.
E-18
REMOTE
STATION
OPR
COMMANDS
HOLD:
HOLDING JOBS
IN
A
QUEUE
The
HOLD
command
stops
scheduling
jobs
that
are
waiting
in
a
GALAXY
queue.
After
you
issue
a
HOLD
command,
jobs
can
be
submitted,
but
they
are
not
scheduled
for
processing
until
you
issue
a RELEASE
command.
If
a
job
has
already
been
processed,
it
cannot
be
held.
At
the
remote
station,
you
can
only
use
the
HOLD
command
to
hold
batch
jobs
submitted
from
your
station
and
printer
jobs
destined
for
your
remote
s
ta
t
io"n.
Format:
{
BATCH-JOBS }
HOLD
PRINTER-JOBS
Where:
BATCH-JOBS
PRINTER-JOBS
nnnn
[PPN]
*
{
nnnn
}
lPPN]
Jobs
in
the
batch
input
queue.
Jobs
in
the
print
queue.
Request
number
assigned
by
the
system.
Project-programmer
number
th~t
identifies
the
user.
All
job
requests
in
the
specified
queue.
You
cannot
use
the
following
keywords
and
switch
to
this
command
with
remote
operator
privileges:
CARD-PUNCH-JOBS
PAPER-TAPE-PUNCH-JOBS
PLOTTER-JOBS
INODE
Example:
aPR)
HOLD
PRINTER-JOBS
*
~
OPR)
13:19:04
--
10
Jobs
Held
OPR)
E-19
REMOTE
STATION OPR
COMMANDS
MODIFY: MODIFYING REQUESTS
The
MODIFY
command
allows
you
to
change
the
priority
of
a
batch
job
or
printer
request.
Higher
priority
numbers
are
processed
first.
At
the
remote
station,
you
can
change
only
the
priority
of
jobs
queued
for
your
line
printer
and
the
priority
of
jobs
in
the
batch
input
queue
initiated
at
your
remote
station.
Format:
{
BATCH-REQUEST }
MODIFY
PRINTER-REQUEST {
nnnn
}
lPPN]
PRIORITY
nn
Where:
BATCH-REQUEST
PRINTER-REQUEST
nnnn
[PPN]
*
PRIORITY
nn
A
request
in
the
batch
input
queue.
A
request
in
the
print
queue.
Request
number
assigned
by
the
system.
Project-programmer
number
that
identifies
the
user.
All
job
requests
held
in
the
queue
for
your
station.
The
priority
(nn)
you
assign
to
the
request.
When a
user
makes
a
print
request
(issues
a
PRINT
command),
the
request
receives
the
system
default
priority
(nn),
normally
10,
specified
by
the
system
administrator
at
the
host.
As
the
remote
station
operator,
you
can
use
the
MODIFY
command
to
change
the
priority
of
a
print
request.
The
system
recognizes
priorities
in
the
range
1
to
63,
with
higher
numbers
receIvIng
service
first.
A
job
with
a
priority
outside
the
allowed
range
is
queued
but
not
serviced
(printed
or
executed).
You
can
change
the
range
of
priorities
for
the
printer
with
the
SET
PRINTER
PRIORITY-LIMITS
command,
and
you
can
change
the
priority
of
a
specific
job
with
the
OPR
MODIFY
command.
Users
can
change
the
priorities
of
their
own
jobs
with
the
/PRIORITY
switch
to
the
PRINT
or
SUBMIT
command.
A
user
can
specify
priority
only
as
high
as
20;
you
can
use
priority
1
to
print
files
in
the
order
you
queue
them,
rather
than
smallest
first.
For
batch
jobs,
priority
1
has
the
same
effect,
but
may
delay
the
running
of
the
job
until
the
queue
is
empty
of
all
other
jobs.
For
batch
jobs,
it
is
preferable
to
use
the
/DEPENDENCY
switch
with
the
/MODIFY
and
SUBMIT
commands
to
have
batch
jobs
run
in
a
specific
order.
E-20
REMOTE
STATION
OPR
COMMANDS
You
cannot
use
the
following
keywords
and
switch
to
this
command
with
remote
operator
privileges:
ACTIVE-SWAPPING-LIST
CARD-PUNCH-REQUEST
CRASH-DUMP-LIST
/NODE
PAPER-TAPE-PUNCH-REQUEST
PLOTTER-REQUEST
SYSTEM-SEARCH-LIST
Example:
OPR>MODIFY PRINTER-REQUEST
[27,5117]
PRIORITY 5
~
OPR>
14:01:29
--
10
Requests
Modified
--
OPR>
E-21
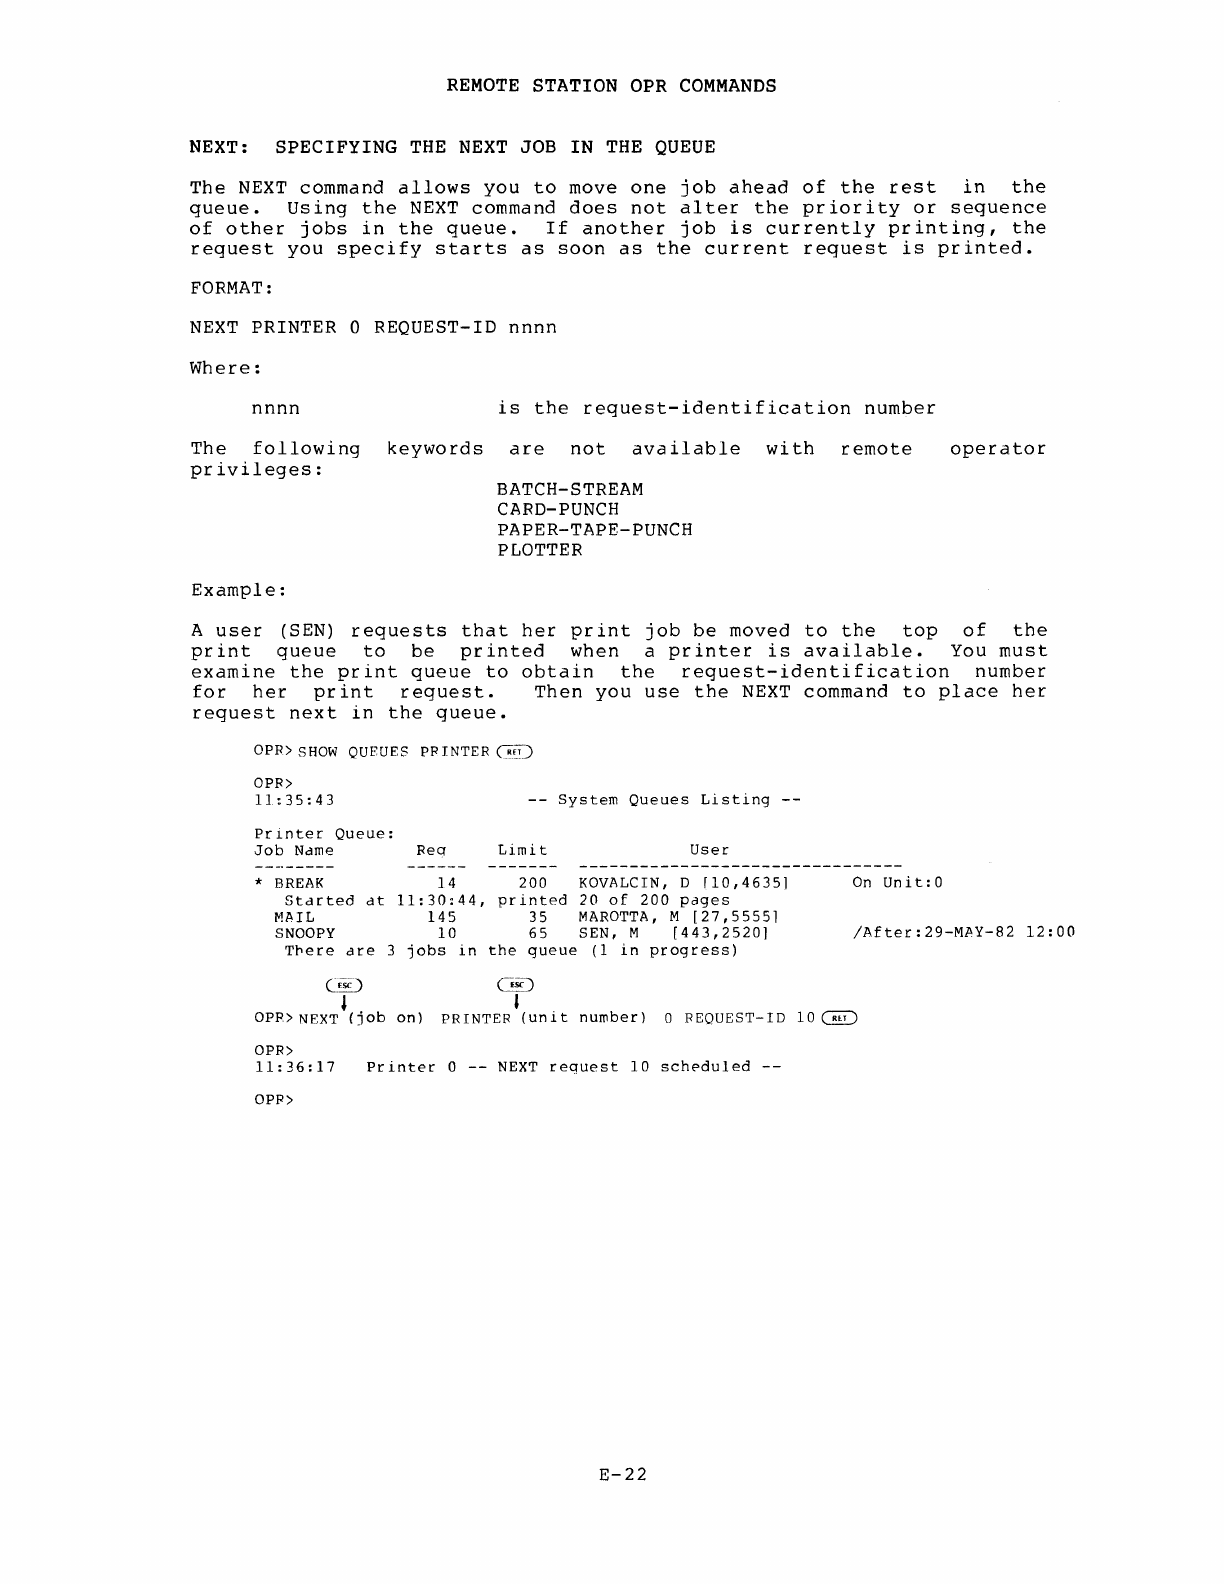
REMOTE
STATION OPR
COMMANDS
NEXT:
SPECIFYING
THE
NEXT
JOB
IN
THE
QUEUE
The
NEXT
command
allows
you
to
move
one
job
ahead
of
the
rest
in
the
queue.
Using
the
NEXT
command
does
not
alter
the
priority
or
sequence
of
other
jobs
in
the
queue.
If
another
job
is
currently
printing,
the
request
you
specify
starts
as
soon
as
the
current
request
is
printed.
FOHMAT:
NEXT
PRINTER 0 HEQUEST-ID
nnnn
Where:
nnnn
is
the
request-identification
number
The
following
keywords
are
not
available
with
remote
privileges:
Example:
BATCH-STREAM
CARD-PUNCH
PAPER-TAPE-PUNCH
PLOTTER
operator
A
user
(SEN)
requests
that
her
print
job
be
moved
to
the
top
of
the
print
queue
to
be
printed
when
a
printer
is
available.
You
must
examine
the
print
queue
to
obtain
the
request-identification
number
for
her
print
request.
Then
you
use
the
NEXT
command
to
place
her
request
next
in
the
queue.
OPR>
SHOW
QUEUES
PH
INTER
G"ED
aPR>
11:35:43
Printer
Queue:
Job
Ndme
Req
--
System
Queues
Listing
Limi
t
User
*
BREAK
14
200
KOVALCIN, 0
[10,46351
Stdrteo
dt
11:30:44,
printed
20
of
200
pages
MAIL
145
35
MAROTTA,
M
[27,55551
SNOOPY
10
65
SEN,
M
[443,25201
Tpere
dre
3
jobs
in
the
queue
(1
in
progress)
OD
,
On
Unit:O
/After:29-MAY-82
12:00
C~)
I .
aPR>
NEXT
(J
ob
on)
PRINTER
(unit
number)
o
HEQUEST-IO
10
~
aPR>
11:36:17
OPP>
Printer
0
--
NEXT
request
10
scheduled
--
E-22
REMOTE
STATION OPR
COMMANDS
RELEASE: RELEASING JOBS
IN
THE
QUEUE
The
RELEASE
command
restarts
the
scheduling
of
jobs
for
your
station.
Any
jobs
held
with
the
HOLD
command
are
scheduled
for
processing
after
you
issue
the
RELEASE
command.
At
the
remote
station,
you
can
use
the
RELEASE
command
to
release
only
print
jobs
queued
for
your
station
and
jobs
in
the
batch
queu~
initiated
from
your
station.
Format:
{
BATCH-JOBS }
RELEASE
PRINTER-JOBS
{
nnnn
}
lPPN]
Where:
BATCH-JOBS
PRINTER-JOBS
nnnn
[PPN]
*
Jobs
in
the
batch
input
queue.
Jobs
in
the
print
queue.
Request
number
assigned
by
the
system.
Project-programmer
number
that
identifies
the
user.
All
job
requests
held
in
the
queue.
You
cannot
use
the
following
keywords
to
this
command
with
remote
operator
privileges:
CARD-PUNCH-JOBS
/NODE
PAPER-TAPE-PUNCH-JOBS
PLOTTER JOBS
Example:
OPR>RELEASE BATCH-JOBS *
~
aPR>
14:23:45
--
2
Jobs
Released
aPR>
E-23
REMOTE
STATION
OPR
COMMANDS
REPORT: RECORDING
COMMENTS
The
REPORT
command
allows
you
to
report
existing
conditions
in
the
system
log
file
named
ERROR.SYS. REPORT
is
useful
when
you
do
not
wish
to
specify
a
reason
with
the
/REASON
switch
to
an
ABORT
or
REQUEUE
command.
When
you
issue
a REPORT
command,
your
message
is
placed
in
the
ORION
log
file
[3,3]OPERAT.LOG
and
in
ERROR.SYS.
You
can
enter
a
single-
or
multiple-line
messag€.
To
enter
line
comment,
enter
the
text
and
terminate
it
with
~
.
multiline
comment,
press
~
before
entering
your
text,
the
text
and
terminate
your
message
with
~TRL/~·.
Format:
REPORT
[user
Name]
[device]
[text]
Where:
a
single
To
enter
a
then
enter
User
Name
User
name
to
identify
the
person
making
the
report.
Device
Text
Examples:
The
device
that
is
the
subject
of
this
report.
(Omit
the
device
name
if
the
report
does
not
concern
a
device.)
A
comment
describing
the
condition
to
be
logged.
OPR>REPORT
OP170
CDR170:
too
many
pick
checks
~
aPR>
hh:mm:ss
--
ERROR.SYS
entry
made
by
the
REPORT Command
OPR>REPORT
(by)
OP170
PTR?
confirm
for
multiple
line
response
or
single
line
response
OPR>REPORT
OP170
PTRC~
Enter
Text
and
Terminate
with
~Z
The
printer
at
this
station
is
giving
a
lot
of
print
hammer
dlarms.
F.S.
has
been
called.
~
~~
OPR>
hh:mm:ss
ERROR.SYS
entry
made
by
the
REPORT Command
--
The
SYSERR
entry
has
the
following
form:
sequence-number.
hh:mm:ss
SYSTEM
LOG
ENTRY
BY
OP170
FOR
DEVICE
PRT
on
TTY #
XXX
MESSAGE:
(text
of
message)
E-24
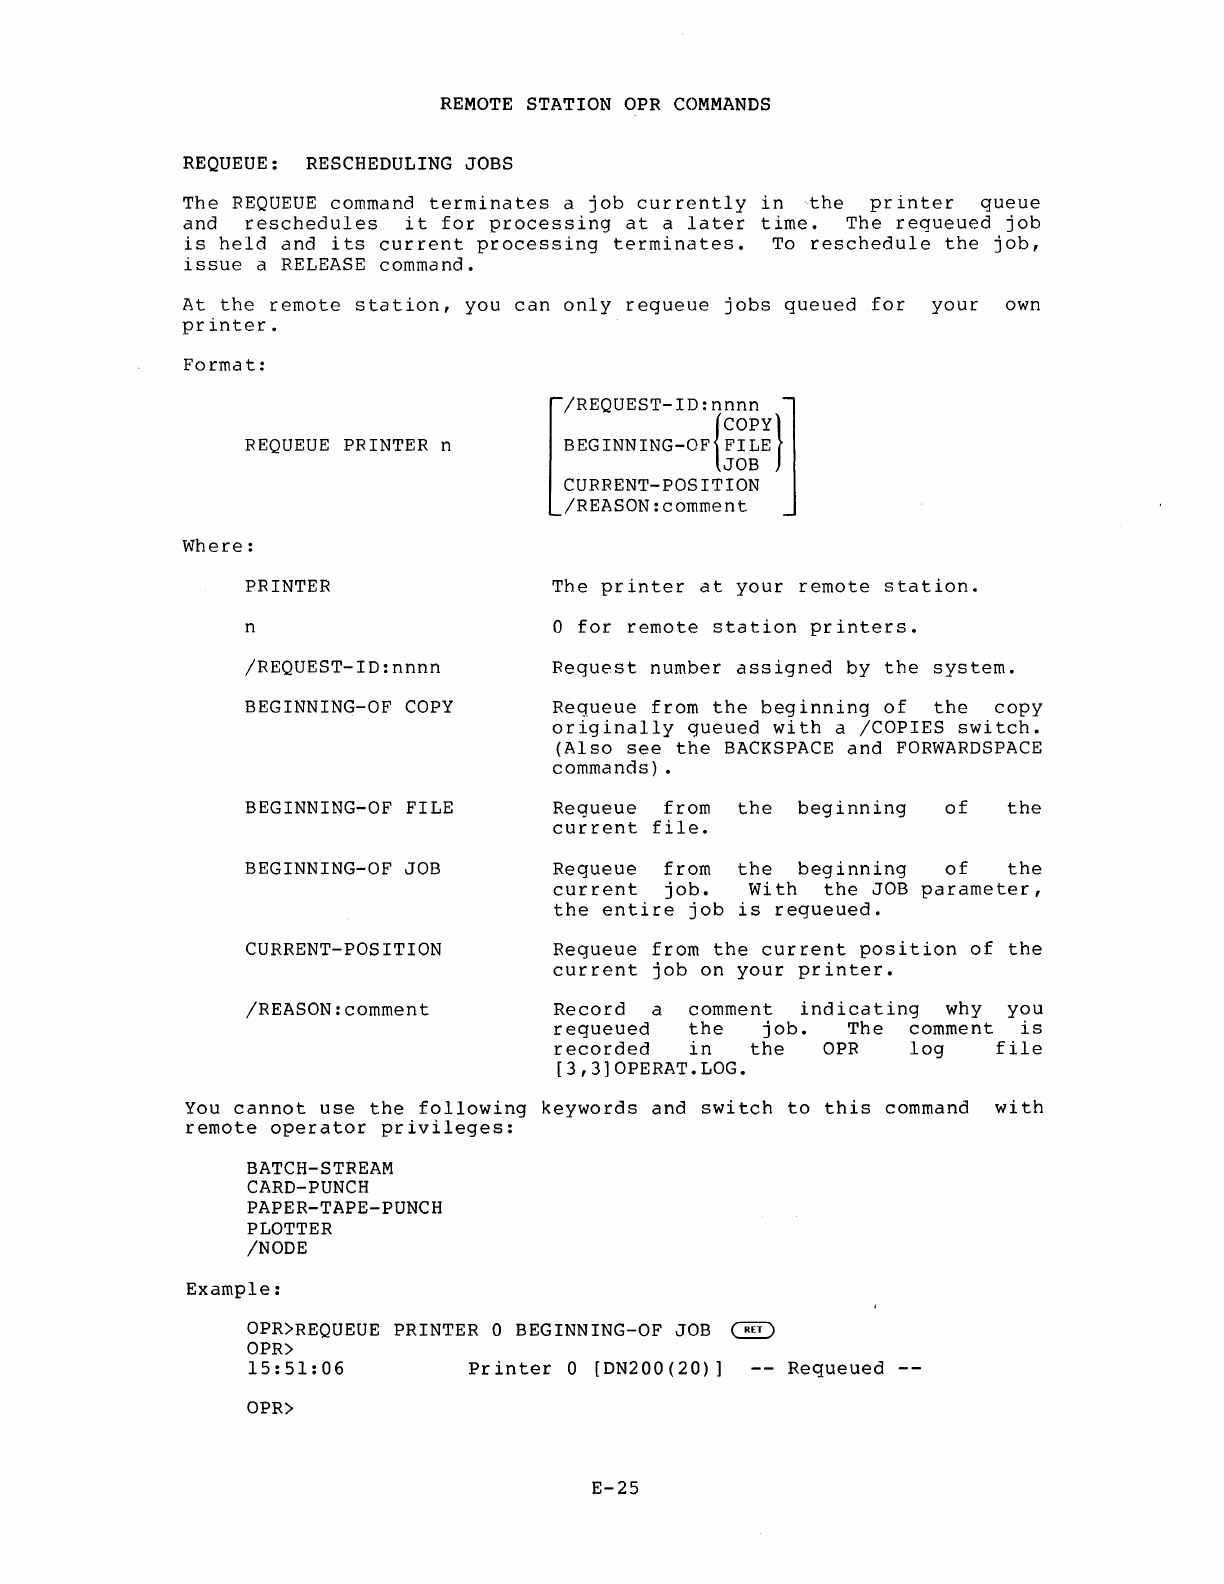
REMOTE
STATION OPR
COMMANDS
REQUEUE: RESCHEDULING JOBS
The
REQUEUE
command
terminates
a
job
currently
in
the
printer
queue
and
reschedules
it
for
processing
at
a
later
time.
The
requeued
job
is
held
and
its
current
processing
terminates.
To
reschedule
the
job,
issue
a RELEASE
command.
At
the
remote
station,
you
can
only
requeue
jobs
queued
for
your
own
printer.
Format:
REQUEUE
PRINTER n
Where:
PRINTER
n
/REQUEST-ID:nnnn
BEGINNING-OF
COPY
BEGINNING-OF
FILE
BEGINNING-OF JOB
CURRENT-POSITION
/REASON:comment
[
/REQUEST-ID:nnnn
]
BEGINNING-OF{~~~~}
CURRENT-POSITION
/REASON:comment
The
printer
at
your
remote
station.
o
for
remote
station
printers.
Request
number
assigned
by
the
system.
Requeue
from
the
beginning
of
the
copy
originally
queued
with
a
/COPIES
switch.
(Also
see
the
BACKSPACE
and
FORWARDSPACE
commands)
.
Requeue
from
the
beginning
current
file.
of
the
Requeue
from
the
beginning
of
the
current
job.
With
the
JOB
parameter,
the
entire
job
is
requeued.
Requeue
from
the
current
position
of
the
current
job
on
your
printer.
Record
a
comment
indicating
why
you
requeued
the
job.
The
comment
1S
recorded
in
the
OPR
log
file
[3,3]OPERAT.LOG.
You
cannot
use
the
following
keywords
and
switch
to
this
command
with
remote
operator
privileges:
BATCH-STREAM
CARD-PUNCH
PAPER-TAPE-PUNCH
PLOTTER
/NODE
Example:
OPR)REQUEUE PRINTER 0 BEGINNING-OF JOB
~
OPR)
15:51:06
Printer
0
[DN200(20)]
Requeued
--
OPR)
E-25
REMOTE
STATION
OPR
COMMANDS
RESPOND:
ANSWERING
MESSAGES
The
RESPOND
command
allows
you
to
answer
a
message
sent
from
a
user
waiting
for
a
response.
When a
user
sends
a
message
that
requires
a
response,
OPR
assigns
a
number
to
the
message
so
that
you
can
keep
track
of
it.
Your
response
can
be
a
single
line
or
multiple
lines.
View
outstanding
messages
with
the
SHOW
MESSAGES
command.
With
remote
operator
privileges,
you
can
respond
only
to
messages
that
have
been
sent
to
your
station.
Format:
RESPOND
nnn
Text
Where:
nnn
Outstanding
message
number.
Text
Response
to
the
outstanding
message.
Examples:
OPR>SHOW
MESSAGES
~)
hh:mm:ss
--
System
Messages
Outstanding
--
<2>
Printer
0
[DN200(20)]
Please
Load
Forms
Type
'NARROW'
Type
'RESPOND
<NUMBER>
CONTINUE'
WHEN
READY
OPR>
RESPOND
2 CONTINUE
~
Printer
0
[DN200(20)]
--
LOADING
VFU
WITH
'NARROW'
--
OPR>
RESPOND
2
~Q
multiple
line
response
C<c}:~~iv
OPR>
E-26
REMOTE
STATION
OPR
COMMANDS
SEND:
SENDING
MESSAGES
The
SEND
command
sends
messages
to
the
operator
at
the
host,
to
a
job,
to
a
terminal,
or
to
all
terminals
in
the
network.
To
send
a
single
line
message,
enter
the
text
and
terminate
it
with
~.
To
enter
a
multiline
message,
press
~
before
entering
your
text,
then
enter
the
text
and
terminate
your
message
with
(CTRL/~
Format:
SEND
{
~~~:nnnn
}
[/NODE:nodename]
OPERATOR
TERMINAL
nnnn
Text
Where:
ALL
JOB:nnnn
OPERATOR
TERMINAL
nnnn
/NODE:nodename
Text
Sends
the
message
to
all
terminals
in
the
network.
Sends
the
message
to
the
job
with
the
specified
number.
Sends
the
message
to
the
operator
at
the
host.
Sends
the
message
to
the
terminal
with
the
specified
number.
Sends
the
message
to
the
node
given.
Contains
the
text
of
the
message
to
be
sent.
You
cannot
use
the
following
keyword
to
this
command
with
remote
operator
privileges:
BATCH-STREAM
Example:
OPR>
SEND
OPERATOR
please
send
the
new
stand-alone
schedule
~
OPR>
14:22:50
--SEND
Command
Completed--
OPR>
At
the
central
site,
the
operator's
terminal
buzzer
sounds
and
the
following
message
is
displayed:
aPR>
hh:mm:ss
From
Operator
DN200(20):
=>
please
send
the
new
stand-alone
schedule
aPR>
E-27
REMOTE
STATION
OPR
COMMANDS
SET PRINTER: SETTING PRINTER CHARACTERISTICS
The
SET PRINTER command
sets
characteristics
for
the
printer
at
your
remote
station.
You
can
specify
the
name
of
a FORMS-TYPE,
the
action
to
take
when a
job
exceeds
the
output
line
limit
that
you
specify,
the
PAGE-LIMITS,
and
the
PRIORITY-LIMITS
for
jobs
in
the
queue
for
your
printer.
Use
the
SHOW
PRINTER
PARAMETERS
command
to
see
what
values
have
been
set.
Some
are
initially
set
by
default.
You
cannot
set
parameters
for
a
printer
at
another
node.
With
remote
operator
privileges
you
cannot
use
the
SET command
to
set
parameters
for
other
system
devices
and
activities,
except
for
your
terminal.
(See
SET
TERMINAL
command.)
Format:
SET PRINTER
Where:
PRINTER
n
FORMS-TYPE
name
n
FORMS-TYPE
name
LIMIT-EXCEEDED-ACTION
{~~~RT}
IGNORE
PAGE-LIMITS
{~~~n}
PRIORITY-LIMITS
{~~m}
The
printer
at
your
remote
station.
o
for
remote
station
printers.
The
name
of
the
form
you
should
put
in
the
printer.
The
name
is
specified
by
your
systems
programmer,
or
system
administrator,
in
SYS:LPFORM.INI.
LIMIT-EXCEEDED-ACTION
PAGE-LlMITS
ABORT
ASK
PROCEED
Action
to
take
if
the
print
job
specified
output
page
limit.
action
to
take
as
follows:
The
print
job
terminates.
exceeds
the
Specify
the
You
are
asked
what
to
do
(abort
or
continue).
The
print
job
continues
and
the
page
limit
is
ignored.
Maximum
number
of
pages
allowed
for
printed
o~t~ut
specified
as
a
number
(nnnn),
or
m1n1mum
to
maximum
number
of
pages
given
as
a
range
(n:m).
If
you
give
a
minimum,
jobs
containing
less
than
that
number
of
pages
are
not
printed;
if
you
give
a maximum,
jobs
containing
more
than
that
number
of
pages
are
not
printed.
E-28
PRIORITY-LIMITS
Example:
REMOTE
STATION
OPR
COMMANDS
.
Priority
limits
of
a
particular
print~r.
A
normal
printer
job
for
your
printer
receives
the
system
default
priority
(nn)
specified
by
your
system
administrator.
As
the
printer
operator,
you
can
give
apriority
range
for
your
printer
with
the
SET
command.
The
priority
must
be
in
the
range
1-63,
with
higher
numbers
receiving
service
first.
The
user
can
modify
the
priority
of
a
job
with
the
MODIFY
command
or
set
the
priority
of
a
job
with
a /PRIORITY
switch.
A
job
with
priority
outside
the
allowed
range
is
queued
but
not
printed.
An
unprivileged
user
can
specify
priority
only
as
high
as
20;
he
can
use
priority
1
to
print
files
in
the
order
entered,
not
smallest
first.
aPR>
SET
PRINTER 0 LIMIT-EXCEEDED-ACTION
ASK
~
aPR>
E-29
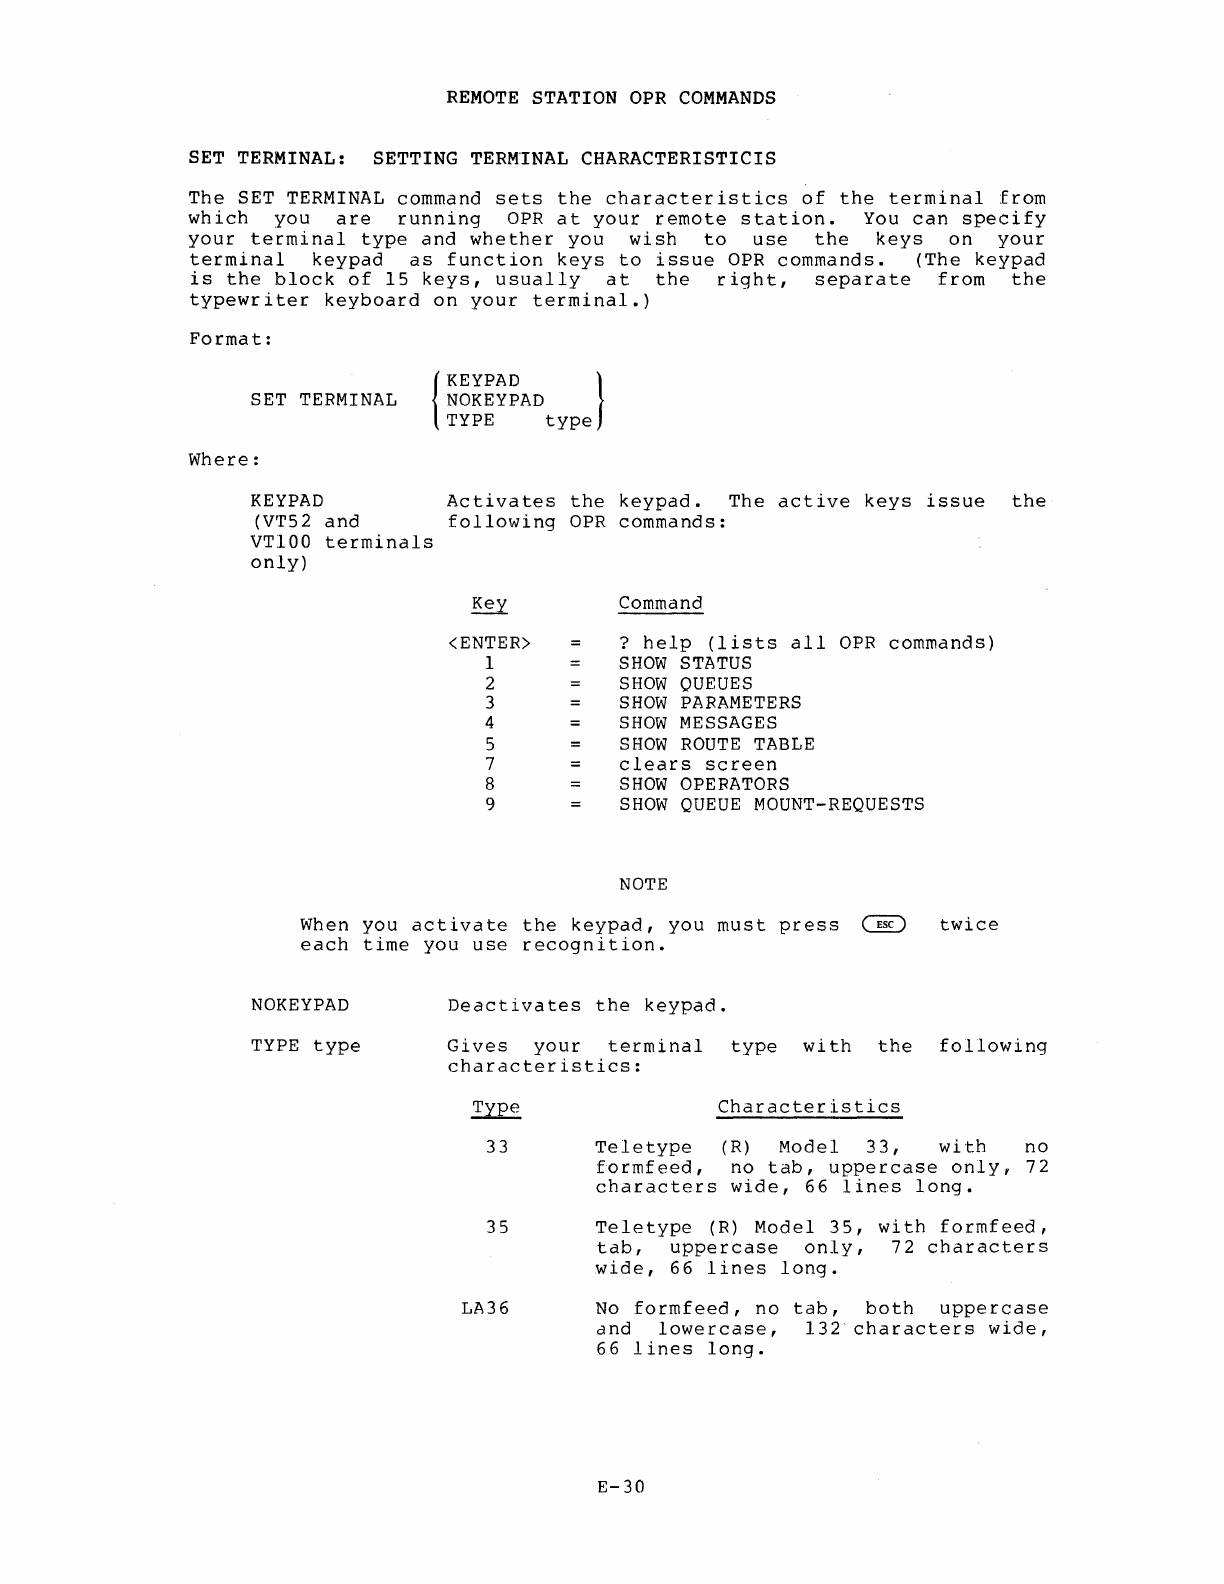
REMOTE
STATION OPR
COMMANDS
SET TERMINAL: SETTING
TERMTNAL
CHARACTERISTICIS
The
SET TERMINAL
command
sets
the
characteristics
of
the
terminal
from
which
you
are
running
aPR
at
your
remote
station.
You
can
specify
your
terminal
type
and
whether
you
wish
to
use
the
keys
on
your
terminal
keypad
as
function
keys
to
issue
aPR
commands.
(The
keypad
is
the
block
of
15
keys,
usually
at
the
right,
separate
from
the
typewriter
keyboard
on
your
terminal.)
Format:
SET TERMINAL {
KEYPAD
}
NOKEYPAD
TYPE
type
Where:
KEYPAD
(VT52
and
VT100
terminals
only)
Activates
the
keypad.
The
active
keys
issue
following
aPR
commands:
<ENTER>
1
2
3
4
5
7
8
9
Command
?
help
(lists
all
OPR
commands)
SHOW
STATUS
SHOW
QUEUES
SHOW
PARAMETERS
SHOW
MESSAGES
SHOW
ROUTE
TABLE
clears
screen
SHOW
OPERATORS
SHOW
QUEUE
MOUNT-REQUESTS
NOTE
the
When
you
activate
the
keypad,
you
must
press
~
each
time
you
use
recognition.
twice
NOKEYPAD
TYPE
type
Deactivates
the
keypad.
Gives
your
terminal
type
with
the
following
characteristics:
Type
33
35
LA36
Characteristics
Teletype
(R)
Model
33,
with
no
formfeed,
no
tab,
uppercase
only,
72
characters
wide,
66
lines
long.
Teletype
(R)
Model
35,
with
formfeed,
tab,
uppercase
only,
72
characters
wide,
66
lines
long.
No
formfeed,
no
tab,
both
uppercase
dnd
lowercase,
132'characters
wide,
66
lines
long.
E-30
Example:
REMOTE
STATION
OPR
COMMANDS
Type
LA120
VT05
VT50
VT52
VT61
VT100
Characteristics
Both
uppercase
and
lowercase,
132
characters
wide,
66
lines
long.
No
formfeea,
with
tab,
uppercase
only,
72
characters
wide,
20
lines
long.
No
formfeea,
no
tab,
uppercase
only,
80
characters
wide,
12
lines
long.
No
formfeed,
with
tab,
both
upper
and
lowercase,
80
characters
wide,
24
lines
long.
No
formfeed,
with
tab,
both
upper
and
lowercase,
80
characters
wide,
24
lines
long,
local
text
editing.
No
formfeed,
with
tab,
both
upper
and
lowercase,
80
or
132
characters
wide,
24
lines
long,
smooth
low-speed
scroll,
XON, XOFF.
OPR>SET TERMINAL TYPE
LA36~
Example
using
the
keypad
on
a
VT52:
OPR> SET TERMINAL
KEYPAD
~
OPR> <8>
OPR>
14:03:31
Node
KL1026
CTCH22
OPR>
system
remote
--Operators--
Terminal
221
4
E-31
Job
61
2
User
USER
[67,1001]
OPR[122,2]
REMOTE
STATION
OPR
COMMANDS
SHOW:
DISPLAYING
SYSTEM
INFORMATION
The
SHOW
command
displays
information
about
the
system.
Use
it
to
display
the
date
and
time,
the
outstanding
messages
for
your
remote
station,
the
parameters
set
for
your
printer,
the
queues
and
route
tables,
the
network
operators,
and
the
status
of
printers
and
card
readers.
You
can
obtain
information
about
a
specific
node
with
the
INODE
switch.
Because
this
command
has
several
keywords
with
several
switches
and
parameters,
each
keyword
applicable
at
a
remote
station
is
described
separately.
Format:
SHOW
Keyword
Where:
Keyword
nodename
[/NODE:nodenamel
ALLOCATION
CONTROL-FILE
MESSAGES
OPERATORS
PARAMETERS
QUEUES
ROUTE-TABLE
STATUS
SYSTEM-LISTS
TIME
The
name
of
information.
colon
(::);
GD
.
the
node
about
which
you
want
Always
follow
a
nodename
with
a
double
you
can
obtain
the
double
colon
with
E-32
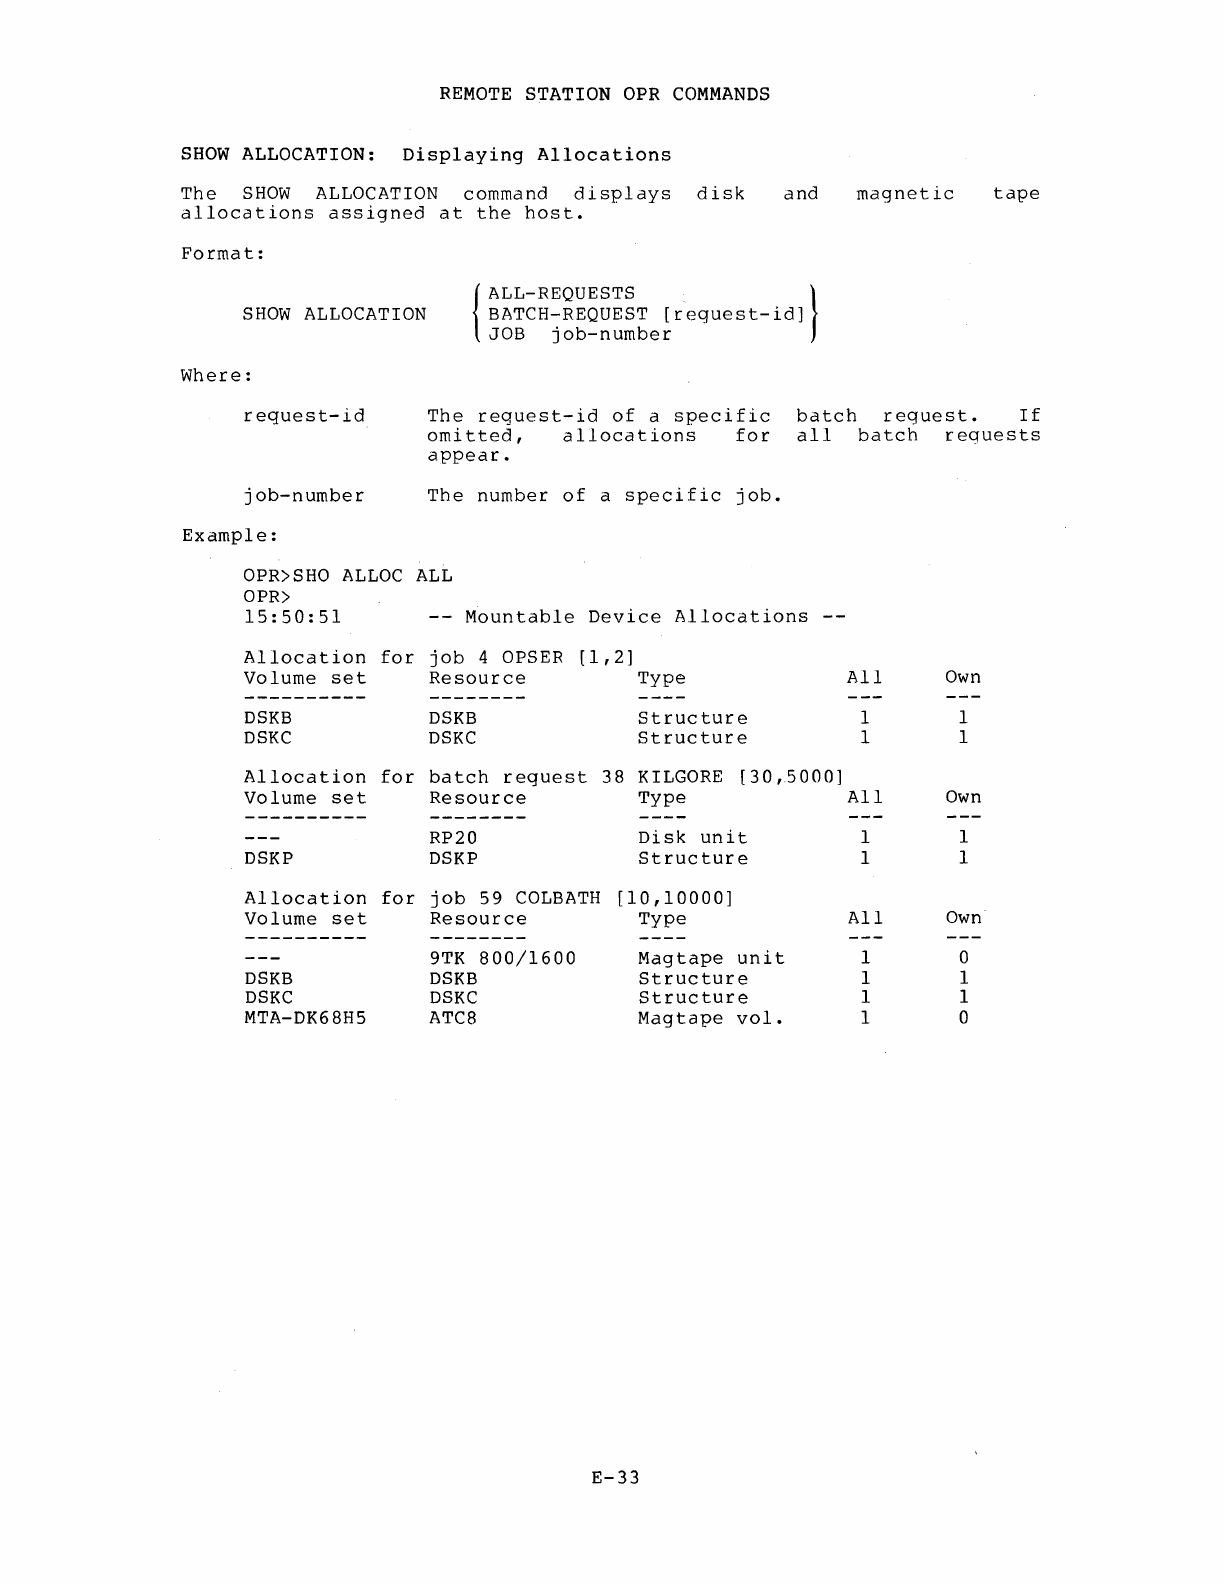
REMOTE
STATION
OPR
COMMANDS
SHOW
ALLOCATION:
Displaying
Allocations
The
SHOW
ALLOCATION
command
displays
disk
allocations
assigned
at
the
host.
and
Format:
SHOW
ALLOCATION
Where:
{
ALL-REQUESTS }
BATCH-REQUEST
[request-id]
JOB
job-number
magnetic
tape
request-id
The
request-id
of
a
specific
omitted,
allocations
for
appear.
batch
request.
If
all
batch
requests
job-number
The
number
of
a
specific
job.
Example:
OPR>SHO
ALLOC
ALL
OPR>
15:50:51
Mountable
Device
Allocations
--
Allocation
for
job
4 OPSER
[1,2]
Volume
set
Resource
Type
All
Own
----------
--------
OSKB OSKB
Structure
1 1
OSKC
OSKC
Structure
1 1
Allocation
for
batch
request
38
KILGORE
[30,5000]
Volume
set
Resource
Type
All
Own
----------
--------
RP20
oisk
unit
1 1
OSKP OSKP
Structure
1 1
Allocation
for
job
59
COLBATH
[10,10000]
Volume
set
Resource
Type
All
Own
----------
--------
9TK
800/1600
Magtape
unit
1 0
OSKB
OSKB
Structure
1 1
OSKC
OSKC
Structure
1 1
MTA-DK68H5
ATC8
Magtape
vol.
1 0
E-33

REMOTE
STATION
OPR
COMMANDS
SHOW
CONTROL-FILE:
Displaying
Batch-Stream
Control
Files
The
SHOW
CONTROL-FILE command
displays
the
correct
contents
of
the
control
in
use
from
a
particular
batch
stream.
Format:
SHOW
CONTROL-FILE BATCH-STREAM m
[LINES:m]
Where:
n
m
Example:
OPR>
SHO
aPR>
16:06:22
aPR>
The
number
of
the
batch
stream.
The
number
of
lines
to
display
from
the
control
file
(1
to
15).
CONTROL-FILE
BA
0
/LINFS:3
Batch-Stream
0 JOB
#55
--Show
control
file--
JOB
ONE
Req
#789
for
USER
[30,4000]
*Input
from
DSKP:TEST.CTL
[30,4000]*
*FORERR.RLS=FORERR.MAC
.i
••
DIRECT/CHECKSUM
E-34
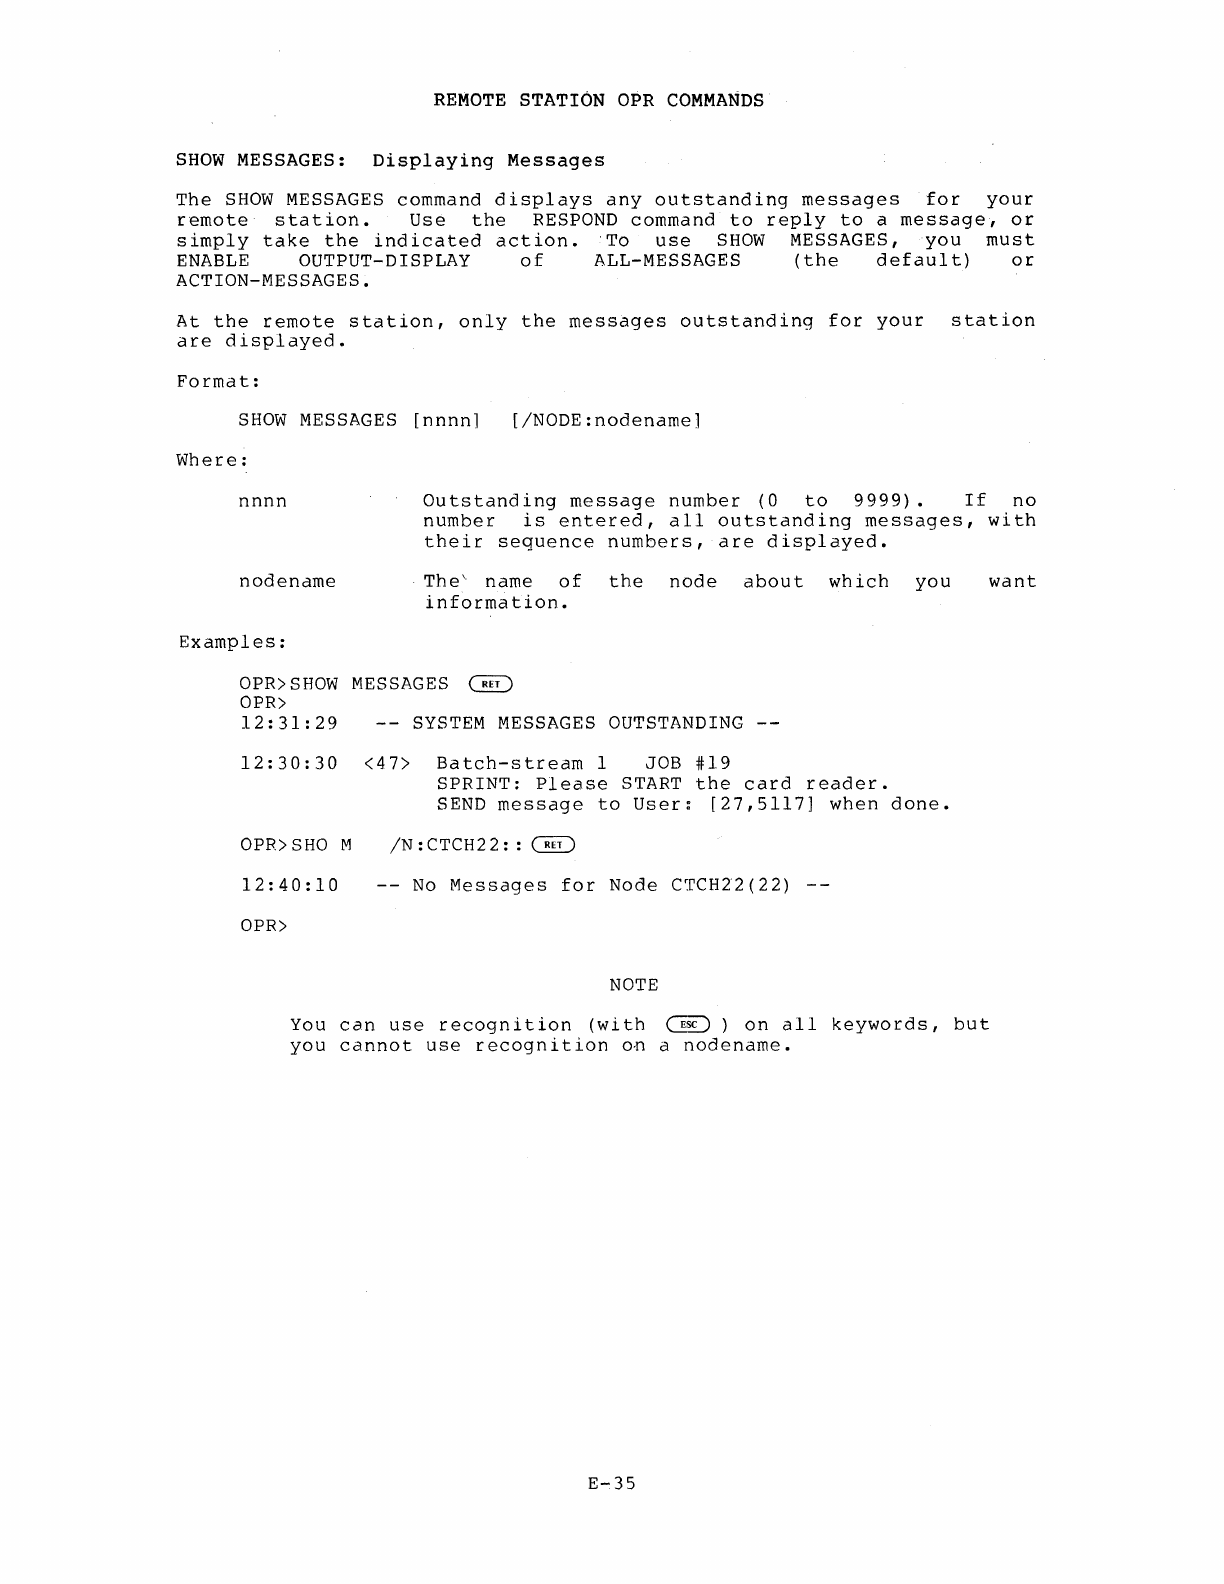
REMOTE
STATION OPR
COMMANDS
SHOW
MESSAGES:
Displaying
Messages
The
SHOW
MESSAGES
command
displays
any
outstanding
messages
for
your
remote
station.
Use
the
RESPOND
command
to
reply
to
a
messagej
or
simply
take
the
indicated
action.
'To
use
SHOW
MESSAGES,
you
must
ENABLE
OUTPUT-DISPLAY
of
ALL-MESSAGES
(the
default)
or
ACTION-MESSAGES.
At
the
remote
station,
only
the
messages
outstanding
for
your
station
are
displayed.
Format:
SHOW
MESSAGES
[nnnn]
[/NODE:nodename]
Where:
nnnn
Outstanding
message
number
(0
to
9999).
If
no
number
is
entered,
all
outstanding
messages,
with
their
sequence
numbers,
are
displayed.
nodename
.
The'
name
of
the
node
about
which
you
information.
Examples:
OPR>
SHOW
MESSAGES G!D
OPR>
12:31:29
--
SYSTEM
MESSAGES OUTSTANDING
12:30:30
<47>
Batch-stream
1 JOB
#19
SPRINT:
Please
START
the
card
reader.
SEND
message
to
User:
[27,5117]
when
done.
OPR>SHO M
/N:CTCH22::
G!D
12:40:10
--
No
Messages
for
Node
CTCH22(22)
--
OPR>
NOTE
You
can
use
recognition
(with
~)
on
all
keywords,
but
you
cannot
use
recognition
on
a
nodename.
E-35
want
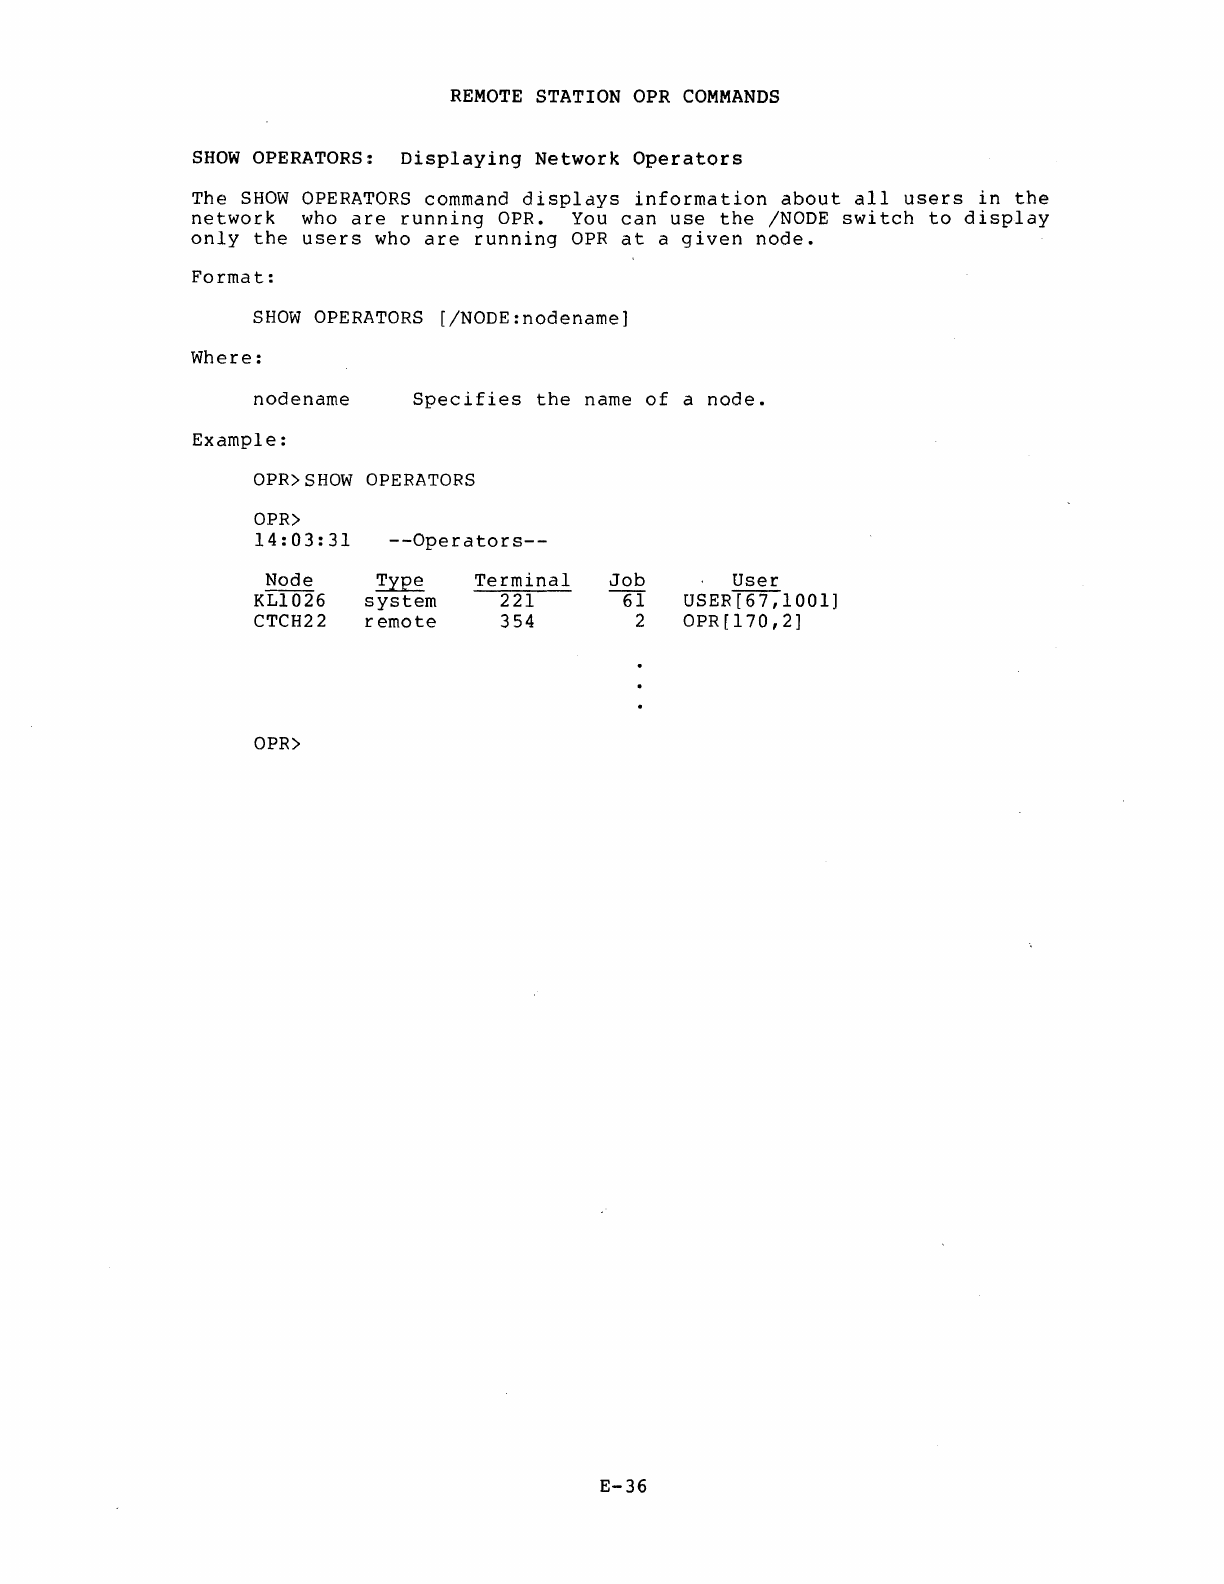
REMOTE
STATION OPR
COMMANDS
SHOW
OPERATORS:
Displaying
Network
Operators
The
SHOW
OPERATORS
command
displays
information
about
all
users
in
the
network
who
are
running
OPR. You
can
use
the
/NODE
switch
to
display
only
the
users
who
are
running
OPR
at
a
given
node.
Format:
SHOW
OPERATORS
[/NODE:nodename]
Where:
nodename
Specifies
the
name
of
a
node.
Example:
OPR>SHOW
OPERATORS
OPR>
14:03:31
Node
KLl026
CTCH22
OPR>
--Operators--
~
system
remote
Terminal
221
354
Job
6I
2
E-36
User
USER[6'7;l
001]
OPR[170,2]
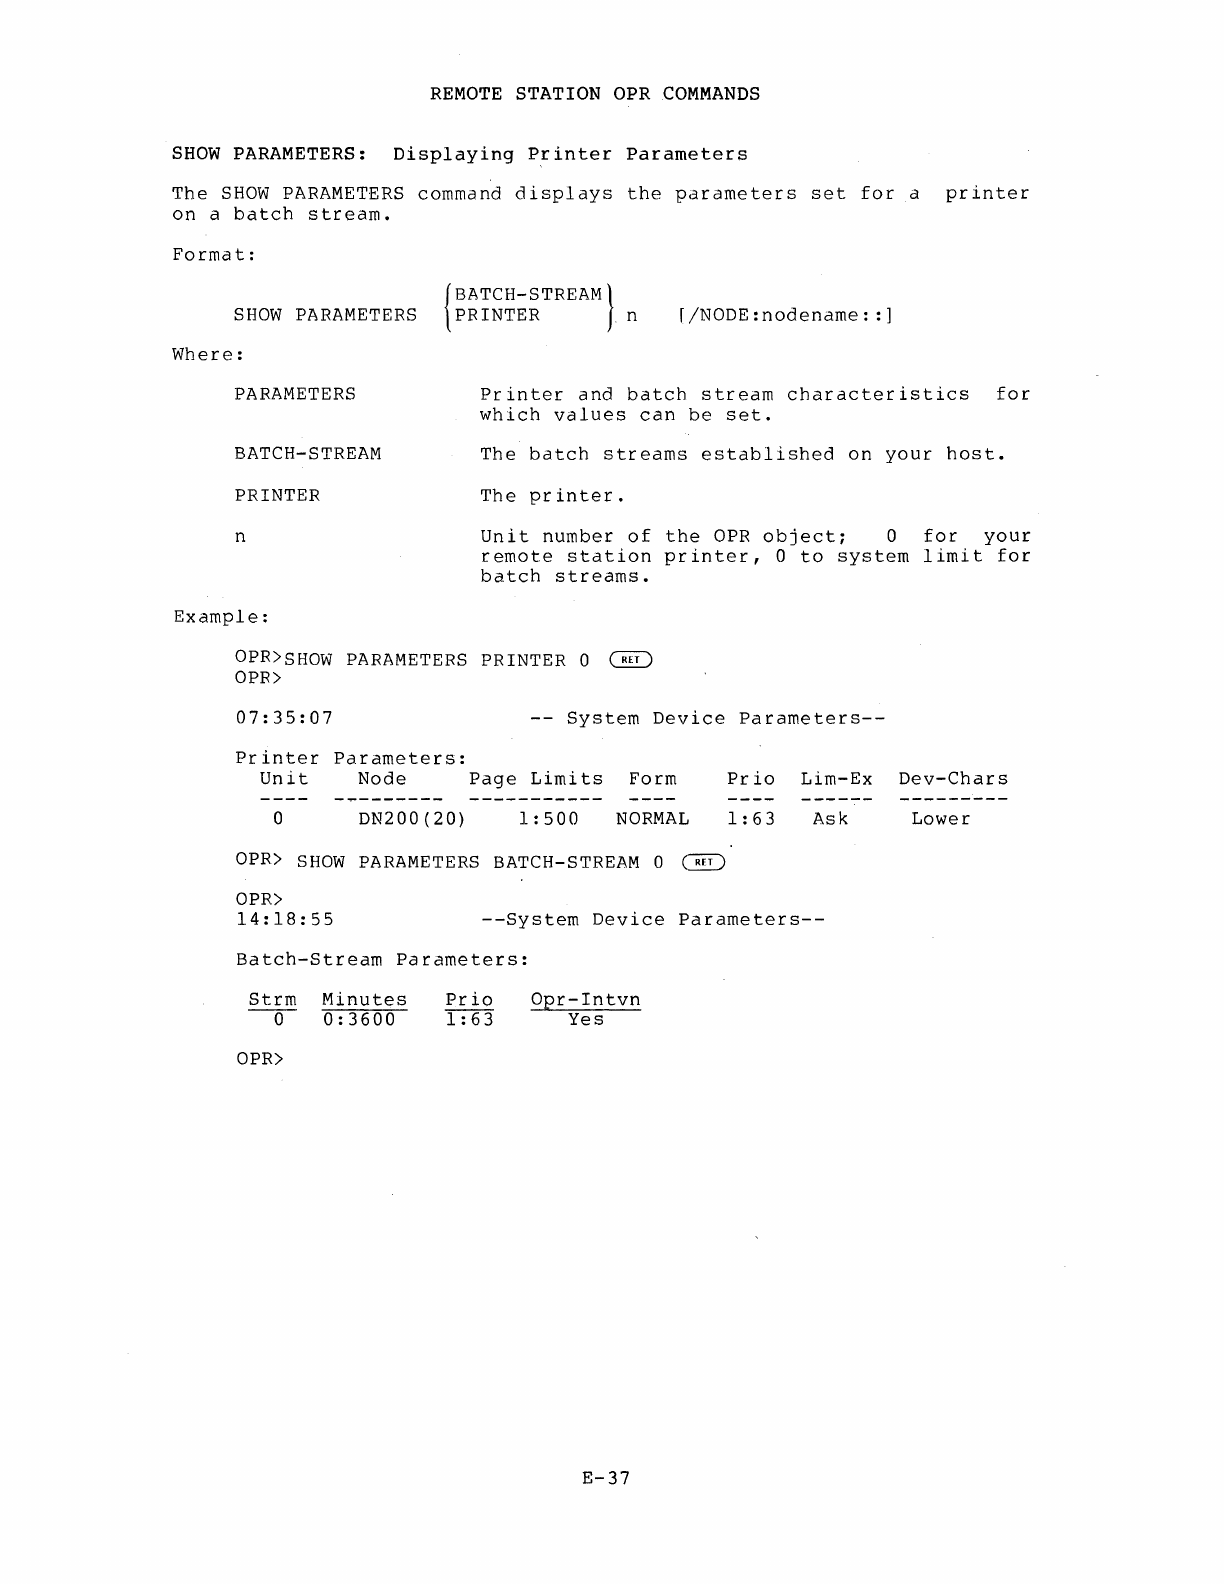
REMOTE
STATION OPR
COMMANDS
SHOW
PARAMETERS:
Displaying
Printer
Parameters
The
SHOW
PARAMETERS
command
displays
the
parameters
set
for
a
printer
on
a
batch
stream.
Format:
SHOW
PARAMETERS
Where:
PARAMETERS
BATCH-STREAM
PRINTER
n
Example:
fBATCH-STREAM)
1 PRINTER . n
[/NODE:nodename:
:]
Printer
and
batch
stream
characteristics
for
which
values
can
be
set.
The
batch
streams
established
on
your
host.
The
printer.
Unit
number
of
the
OPR
object;
0
for
your
remote
station
printer,
0
to
system
limit
for
batch
streams.
OPR>SHOW
PARAMETERS PRINTER 0
~
OPR>
07:35:07
--
System
Device
Parameters--
Printer
Parameters:
Unit
Node
Page
Limits
Form
Prio
Lim-Ex
Dev-Chars
o
DN200(20)
1:500
NORMAL
1:63
Ask
OPR>
SHOW
PARAMETERS
BATCH-STREAM 0
~
OPR>
14:18:55
--System
Device
Parameters--
Batch-Stream
Parameters:
Strm
Minutes
-0-
0:3600
OPR>
Prio
1:63
Opr-Intvn
Yes
E-37
Lower
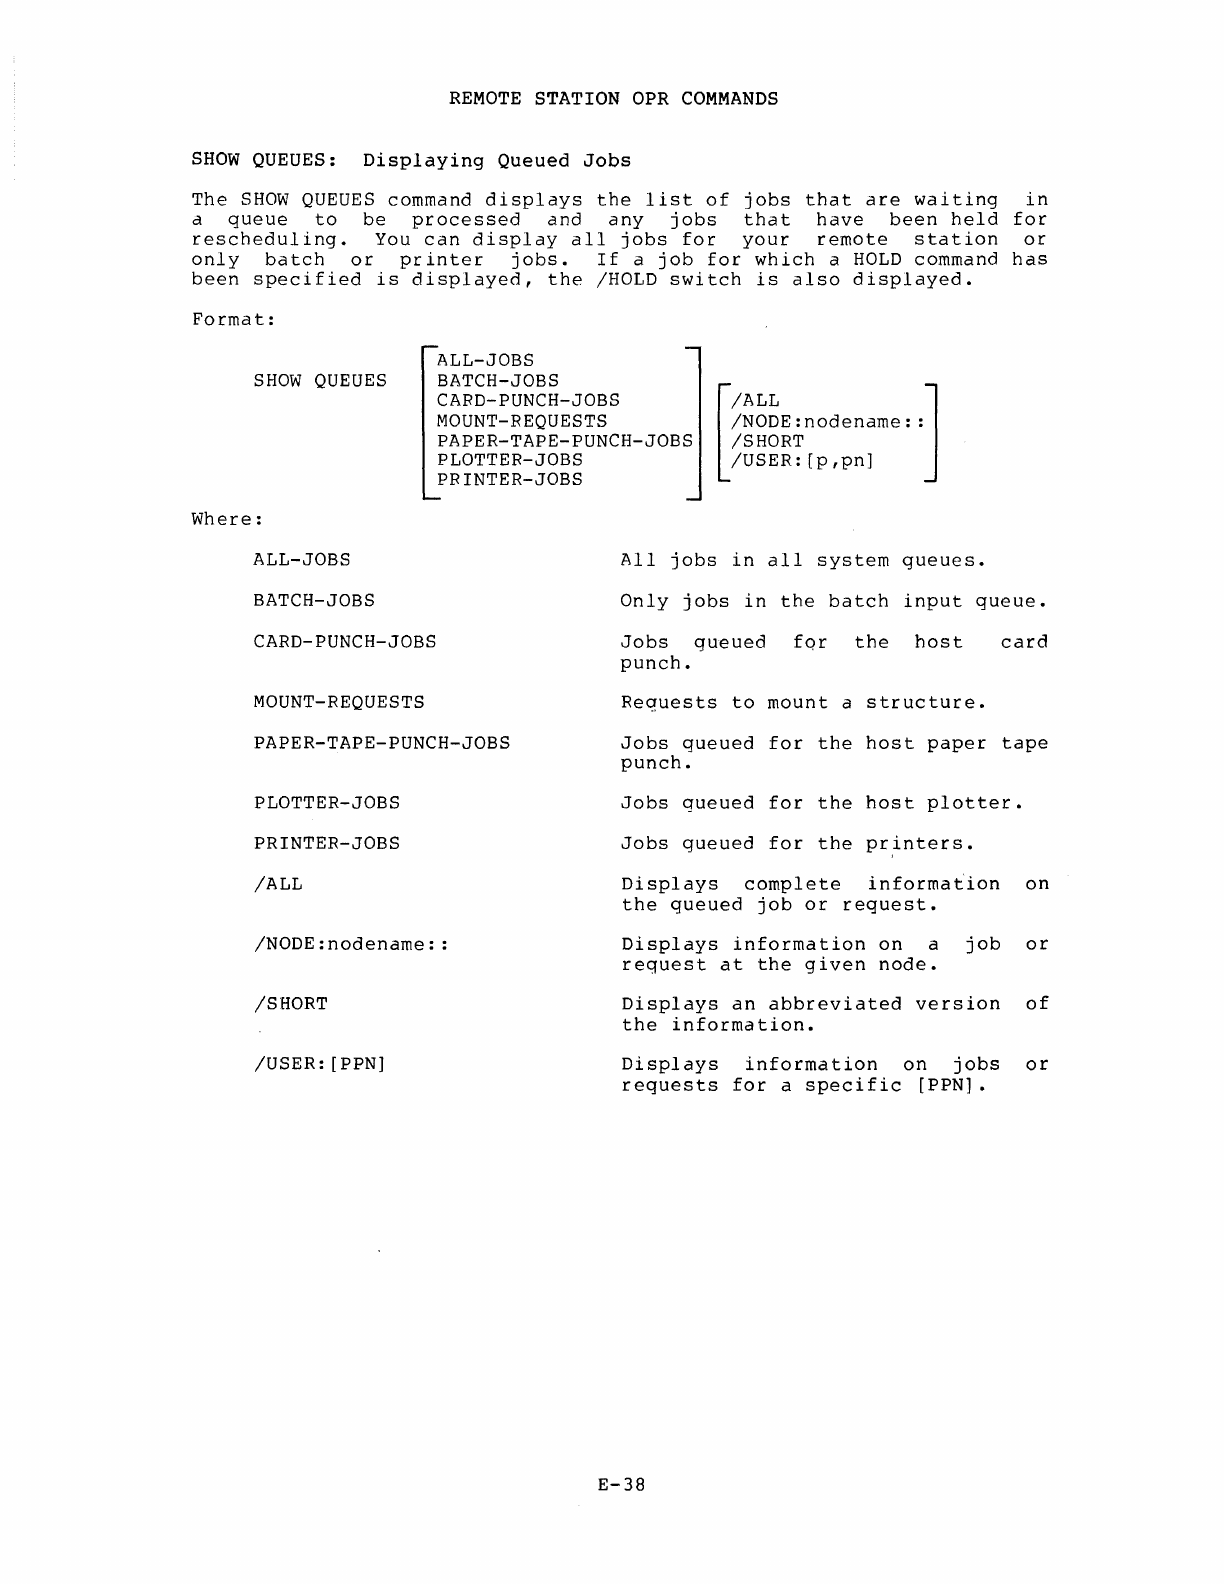
REMOTE
STATION OPR
COMMANDS
SHOW
QUEUES:
Displaying
Queued
Jobs
The
SHOW
QUEUES
command
displays
the
list
of
jobs
that
are
waiting
in
d
queue
to
be
processed
and
any
jobs
that
have
been
held
for
rescheduling.
You
can
display
all
jobs
for
your
remote
station
or
only
batch
or
printer
jobs.
If
a
job
for
which
a
HOLD
command
has
been
specified
is
displayed,
the
IHOLD
switch
is
also
displayed.
Format:
SHOW
QUEUES
Where:
ALL-JOBS
BATCH-JOBS
CARD-PUNCH-JOBS
MOUNT-REQUESTS
ALL-JOBS
BATCH-JOBS
CARD-PUNCH-JOBS
MOUNT-REQUESTS
PAPER-TAPE-PUNCH-JOBS
PLOTTER-JOBS
PRINTER-JOBS
[
/ALL
]
INODE:
nodename
: :
ISHORT
IUSER:
[p
,pn]
All
jobs
in
all
system
queues.
Only
jobs
in
the
batch
input
queue.
Jobs
queued
fqr
the
host
punch.
Requests
to
mount
a
structure.
card
PAPER-TAPE-PUNCH-JOBS
Jobs
queued
for
the
host
paper
tape
punch.
PLOTTER-JOBS
PRINTER-JOBS
/ALL
INODE:nodename:
:
/SHORT
IUSER:
[PPN]
Jobs
queued
for
the
host
plotter.
Jobs
queued
for
the
prfnters.
Displays
complete
informaiion
on
the
queued
job
or
request.
Displays
information
on
a
job
or
request
at
the
given
node.
Displays
an
abbreviated
version
of
the
information.
Displays
information
on
jobs
or
requests
for
a
specific
[PPN].
E-38
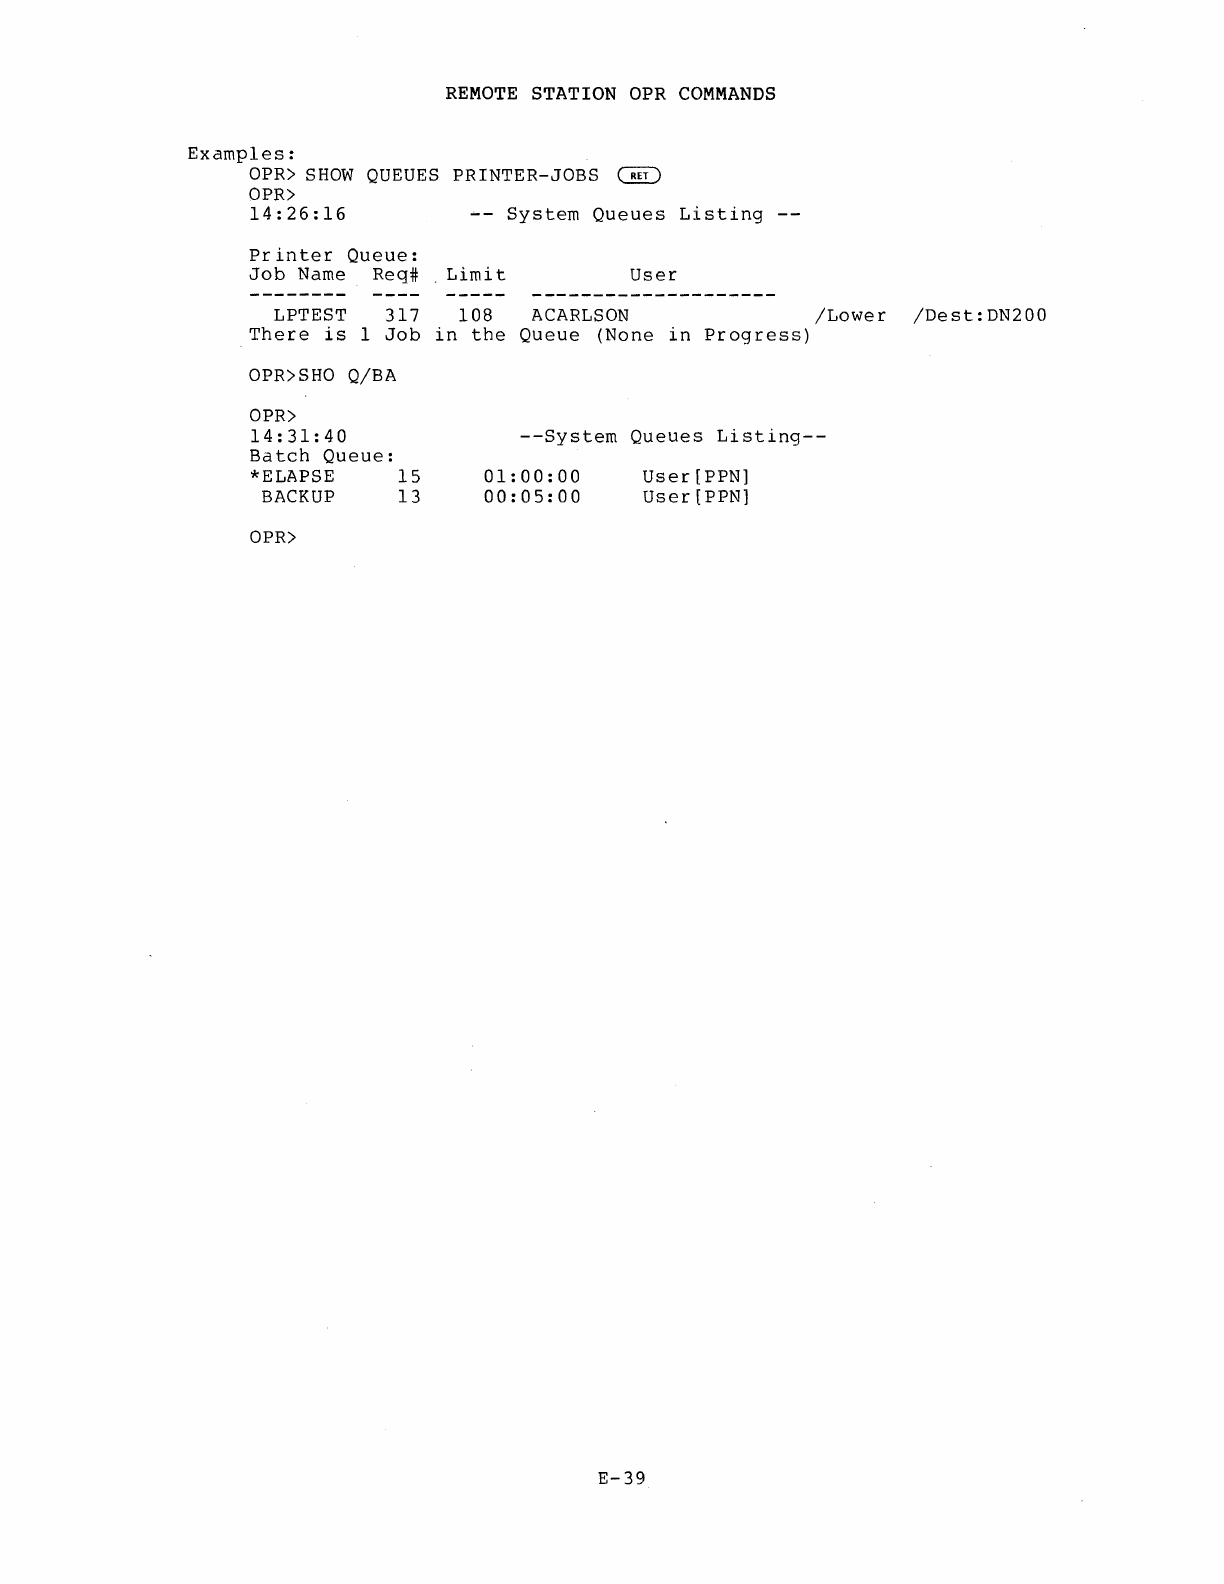
REMOTE
STATION
OPR
COMMANDS
Examples:
OPR)
SHOW
QUEUES
PRINTER-JOBS
~
OPR)
14:26:16
~-
System
Queues
Listing
Printer
Queue:
Job
Name
Req#.
Limit
User
LPTEST
317
108
ACARLSON
/Lower
/Dest:DN200
There
is
1
Job
in
the
Queue
(None
in
Progress)
OPR)SHO Q/BA
OPR)
14:31:40
Batch
Queue:
*ELAPSE
15
BACKUP
13
OPR)
--System
Queues
Listing--
01:00:00
00:05:00
User
[PPN]
User
[PPN]
E-39
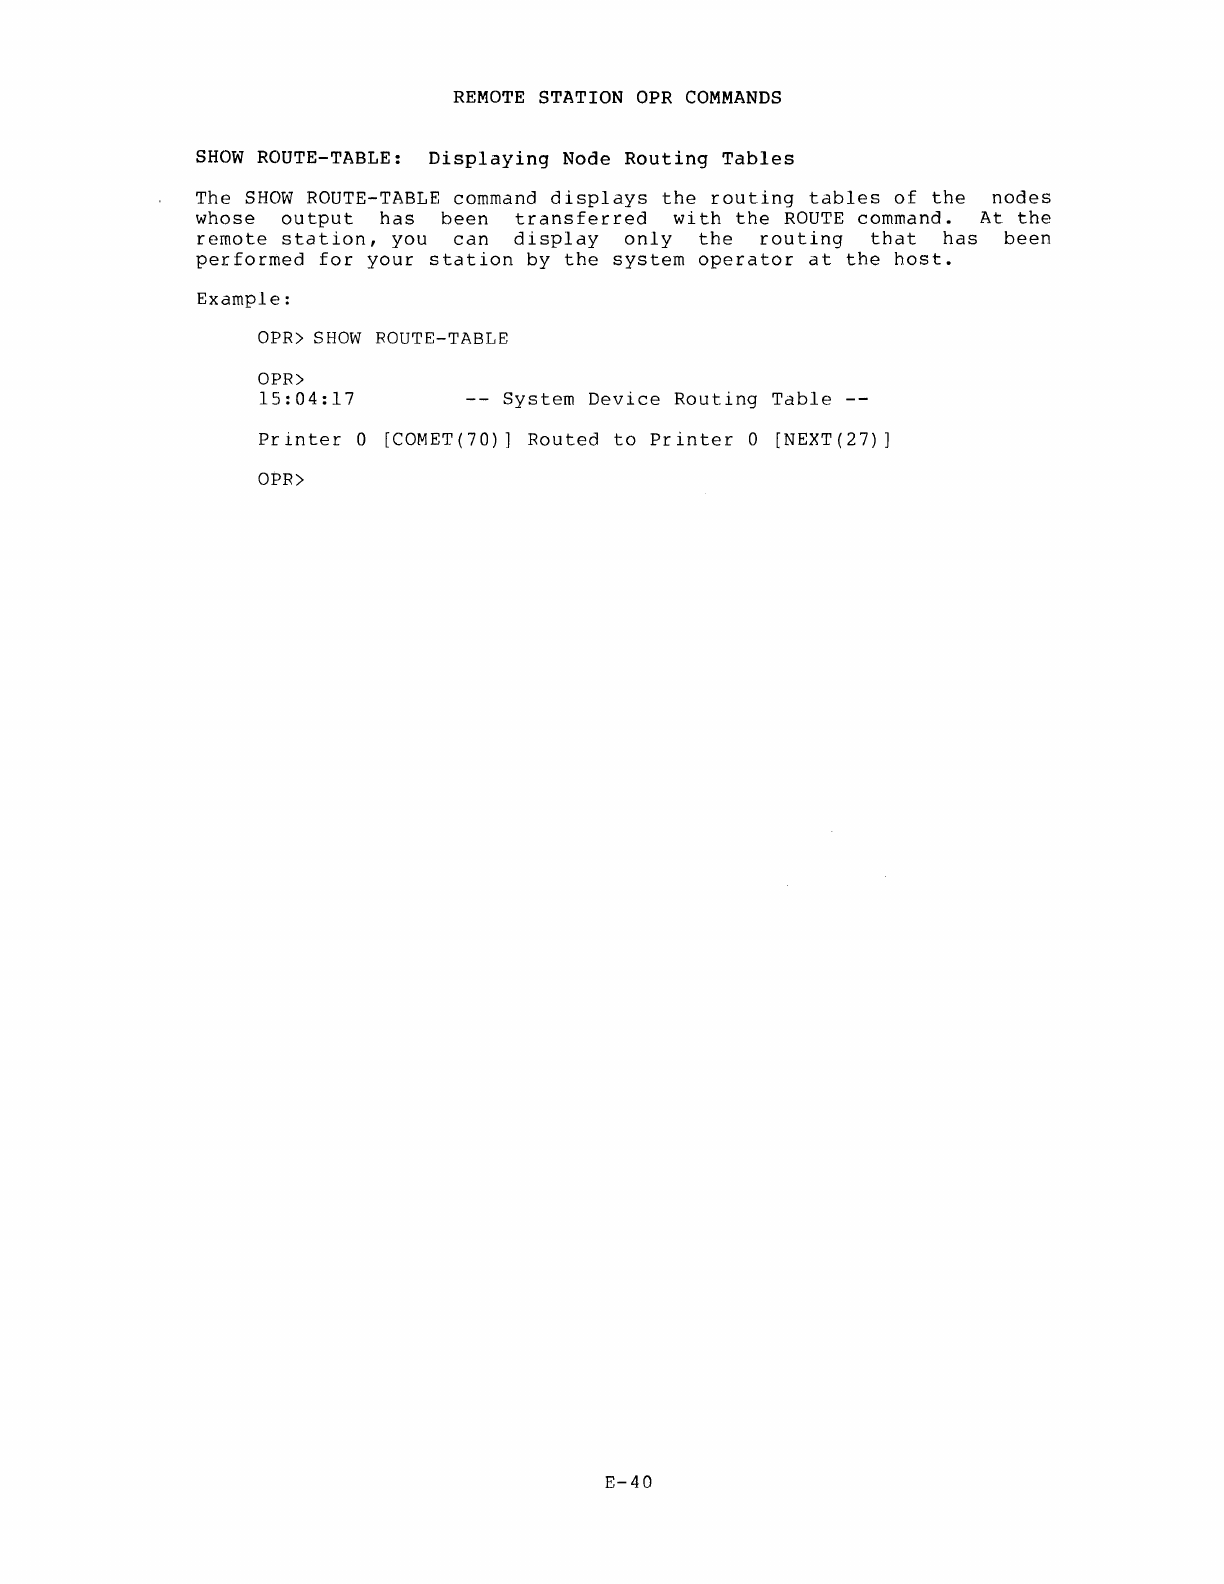
REMOTE
STATION
OPR
COMMANDS
SHOW
ROUTE-TABLE:
Displaying
Node
Routing
Tables
The
SHOW
ROUTE-TABLE
command
displays
the
routing
tables
of
the
nodes
whose
output
has
been
transferred
with
the
ROUTE
command.
At
the
remote
station,
you
can
display
only
the
routing
that
has
been
performed
for
your
station
by
the
system
operator
at
the
host.
Example:
aPR>
SHOW
ROUTE-TABLE
aPR>
15:04:17
--
System
Device
Routing
Table
--
Printer
0 [COMET(70) ]
Routed
to
Printer
0
[NEXT(27)
]
aPR>
E-40
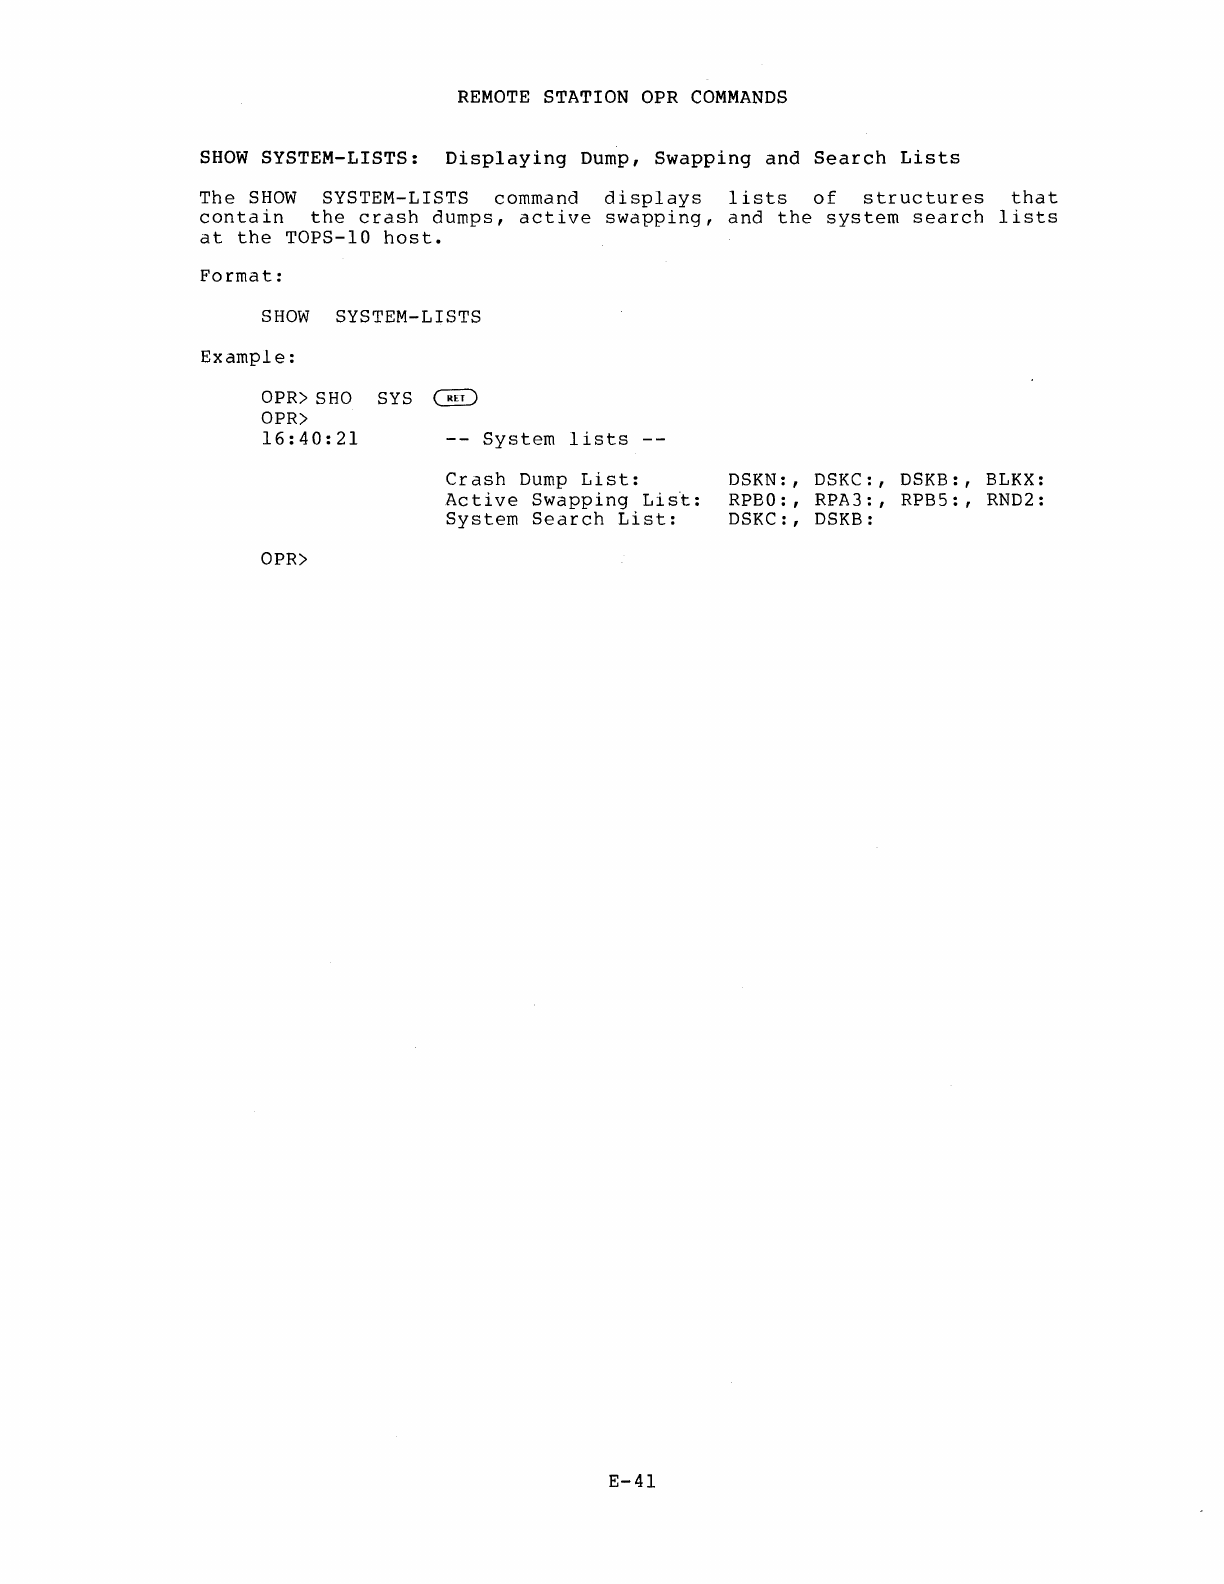
REMOTE
STATION
aPR
COMMANDS
SHOW
SYSTEM-LISTS:
Displaying
Dump,
Swapping
and
Search
Lists
The
SHOW
SYSTEM-LISTS command
displays
lists
of
structures
that
contain
the
crash
dumps,
active
swapping,
and
the
system
search
lists
at
the
TOPS-lO
host.
Format:
SHOW
SYSTEM-LISTS
Example:
aPR>
SHO
SYS
~
aPR>
16:40:21
--
System
lists
--
Crash
Dump
List:
Active
Swapping
List:
System
Search
List:
aPR>
E-4l
DSKN:,
DSKC:, DSKB:,
BLKX:
RPBO:,
RPA3:,
RPB5:,
RND2:
DSKC:,
DSKB:
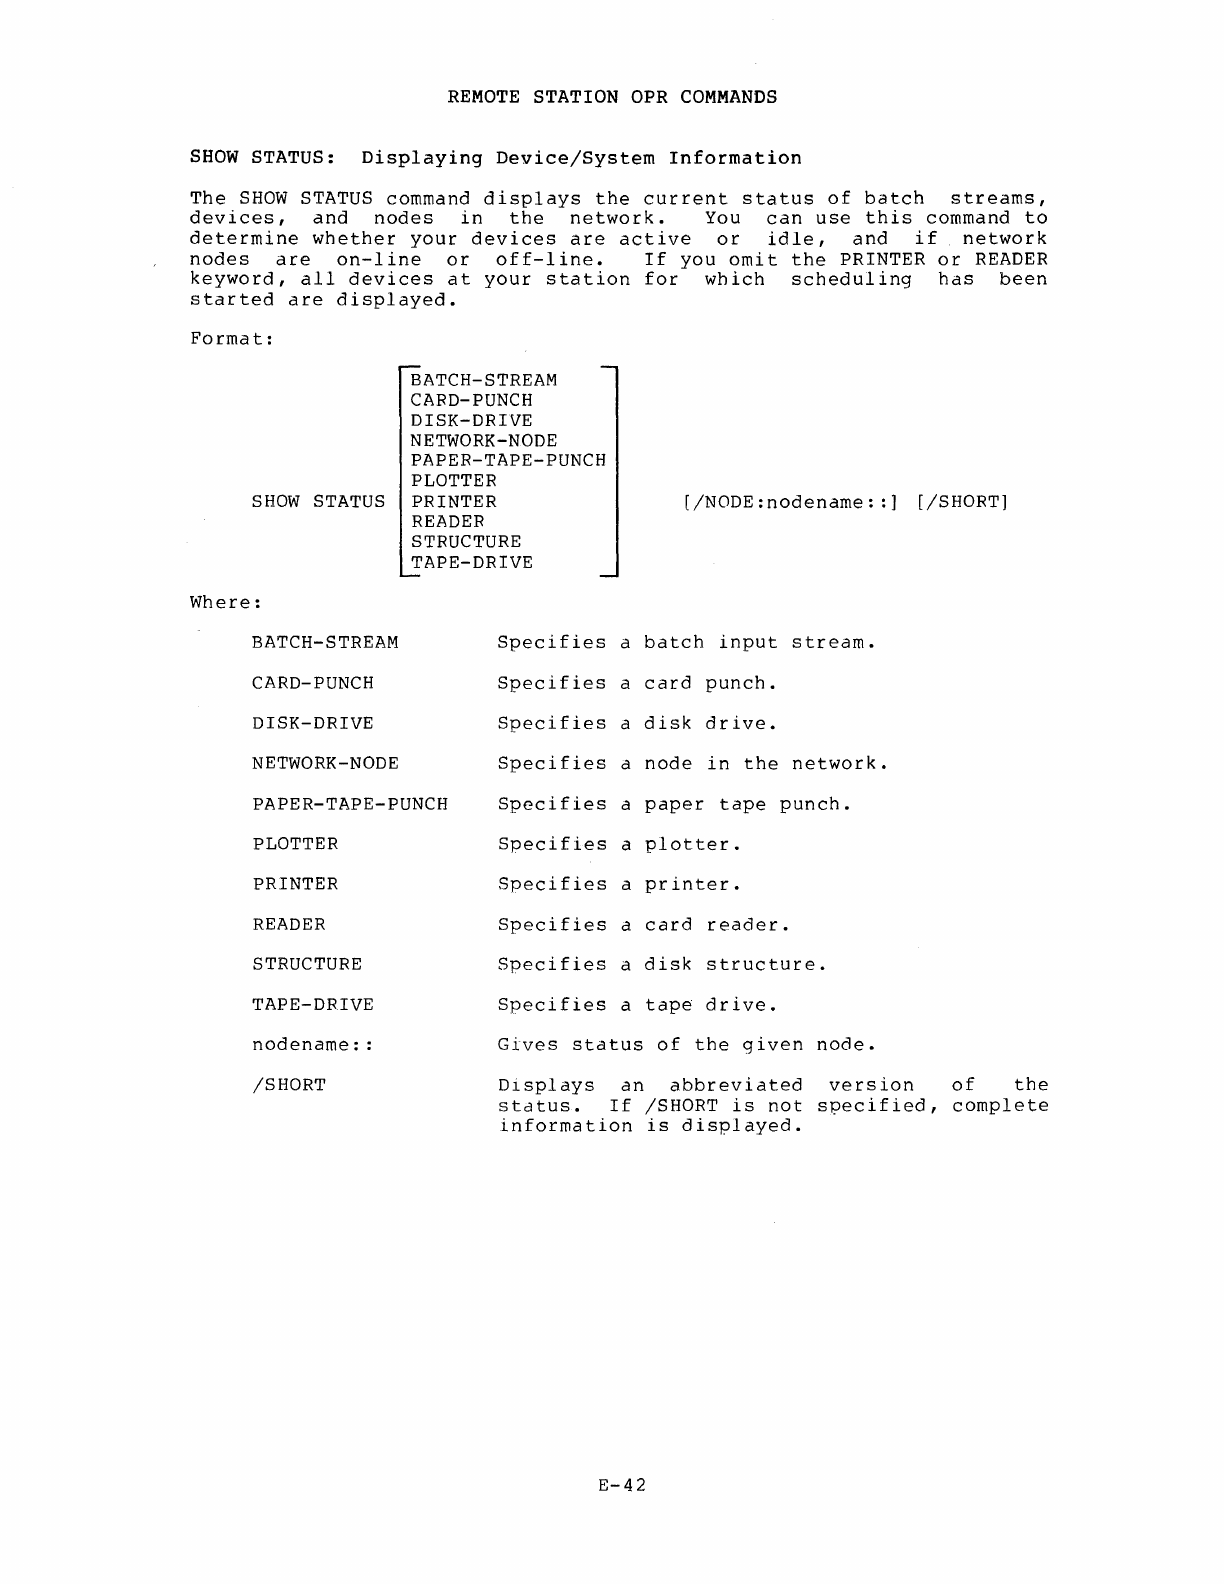
REMOTE
STATION OPR
COMMANDS
SHOW
STATUS:
Displaying
Device/System
Information
The
SHOW
STATUS
command
displays
the
current
status
of
batch
streams,
devices,
and
nodes
in
the
network.
You
can
use
this
command
to
determine
whether
your
devices
are
active
or
idle,
and
if
network
nodes
are
on-line
or
off-line.
If
you
omit
the
PRINTER
or
READER
keyword,
all
devices
at
your
station
for
which
scheduling
has
been
started
are
displayed.
Format:
BATCH-STREAM
CARD-PUNCH
DISK-DRIVE
NETWORK-NODE
PAPER-TAPE-PUNCH
PLOTTER
SHOW
STATUS PRINTER
READER
STRUCTURE
TAPE-DRIVE
[/NODE
:nodename:
:]
[/SHORT]
Where:
BATCH-STREAM
CARD-PUNCH
DISK-DRIVE
NETWORK-NODE
PAPER-TAPE-PUNCH
PLOTTER
PRINTER
READER
STRUCTURE
TAPE-DRIVE
nodename:
:
/SHORT
Specifies
a
batch
input
stream.
Specifies
a
card
punch.
Specifies
a
disk
drive.
Specifies
a
node
in
the
network.
Specifies
a
paper
tape
punch.
Specifies
a
plotter.
Specifies
a
printer.
Specifies
a
card
reader.
Specifies
a
disk
structure.
Specifies
a
tape
drive.
Gives
status
of
the
given
node.
Displays
an
abbreviated
version
of
the
status.
If
/SHORT
is
not
specified,
complete
information
is
displayed.
E-42

REMOTE
STATION
OPR
COMMANDS
"Examples:
OPR>SHOW
STATUS PRINTER
~
--
System
Device
Status
--
Printer
Status:
Unit
Node
Status
Jobname
Req#
User
o
DN200(20)
Active
NRM
14
[27,5117]
Started
at
19:28:55,
printed
0
of
27
pages
NOTE
The
last
three
columns
appear
only
if
there
is
an
active
device.
OPR>
SHO
ST
NET
~
OPR>
14:43:13
Node
Name
KL1026(26)
COMET(70)
--System
Network
Status--
Status
On-line
Off-line
(There
are
2
Nodes
in
the
Network)
OPR>SHO ST
NET
/NODE:
COMET::
~
E-43
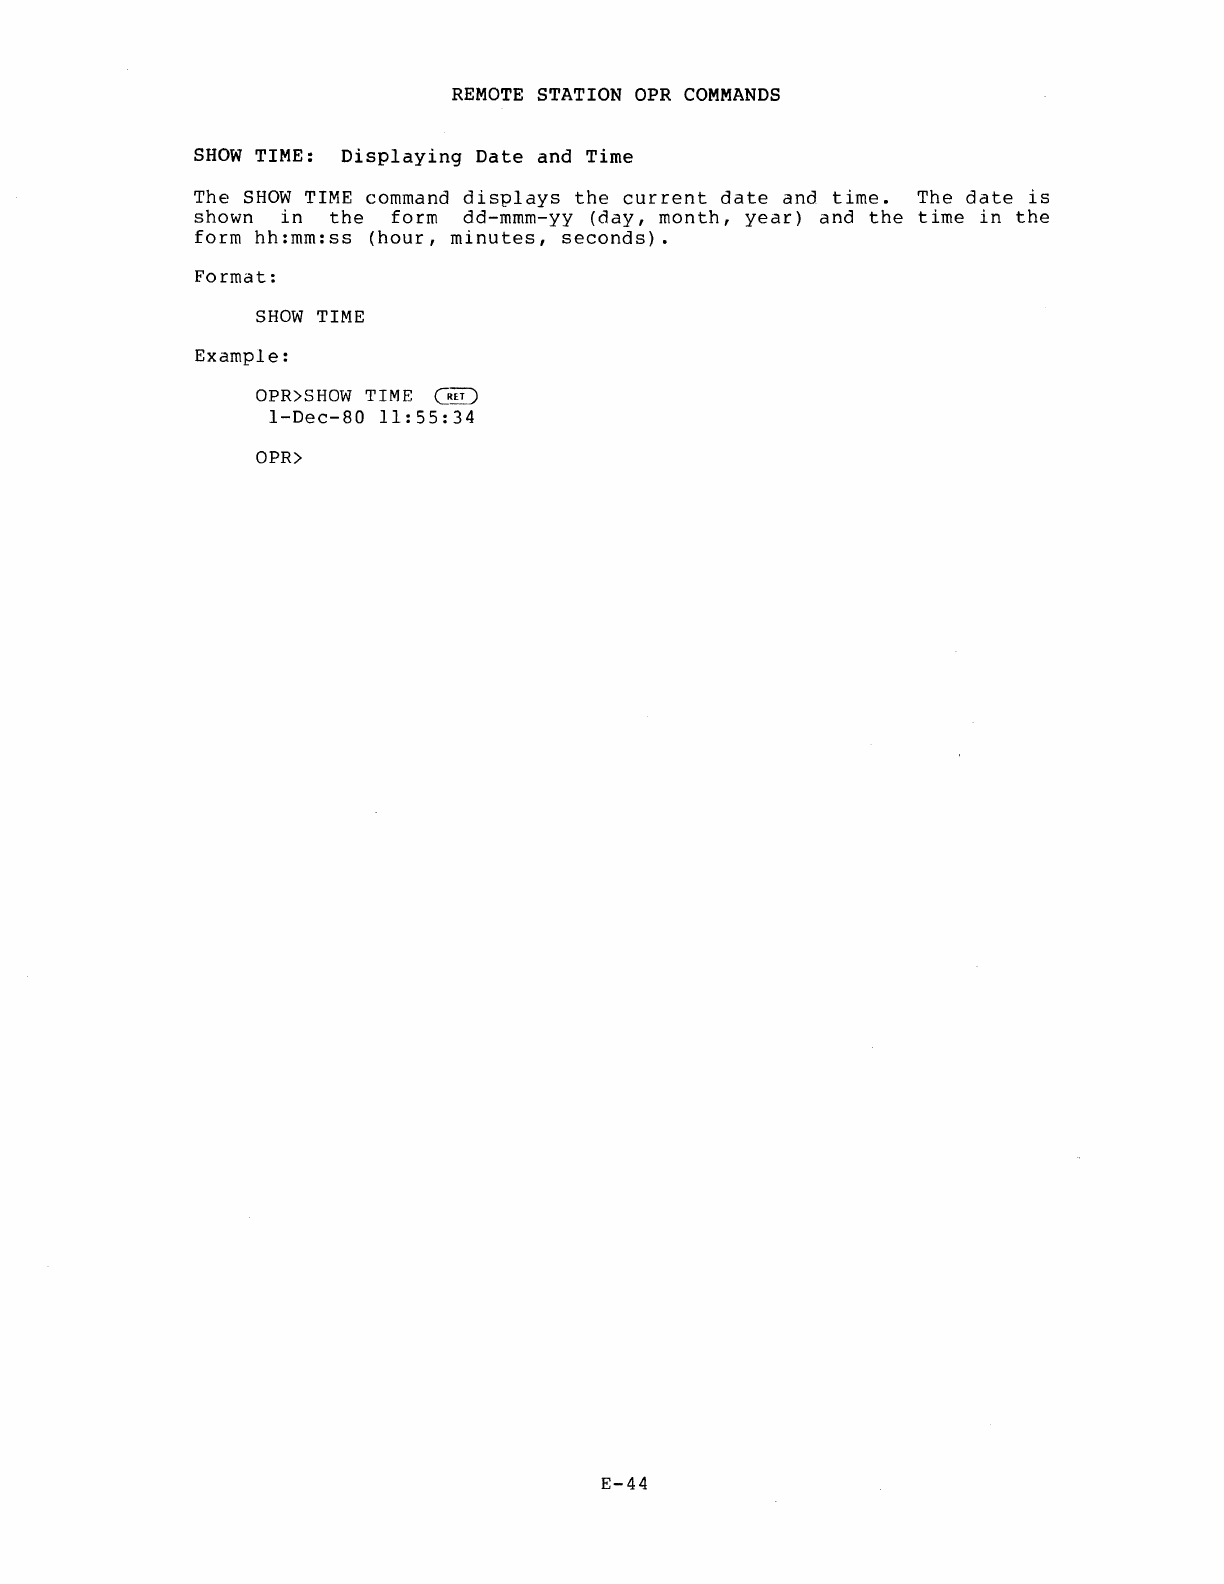
REMOTE
STATION
aPR
COMMANDS
SHOW
TIME:
Displaying
Date
and
Time
The
SHOW
TIME
command
displays
the
current
date
and
time.
The
date
is
shown
in
the
form
dd-mmm-yy
(day,
month,
year)
and
the
time
in
the
form
hh:mm:ss
(hour,
minutes,
seconds).
Format:
SHOW
TIME
Example:
OPR>SHOW
TIME
C~
I-Dec-80
11:55:34
OPR>
E-44
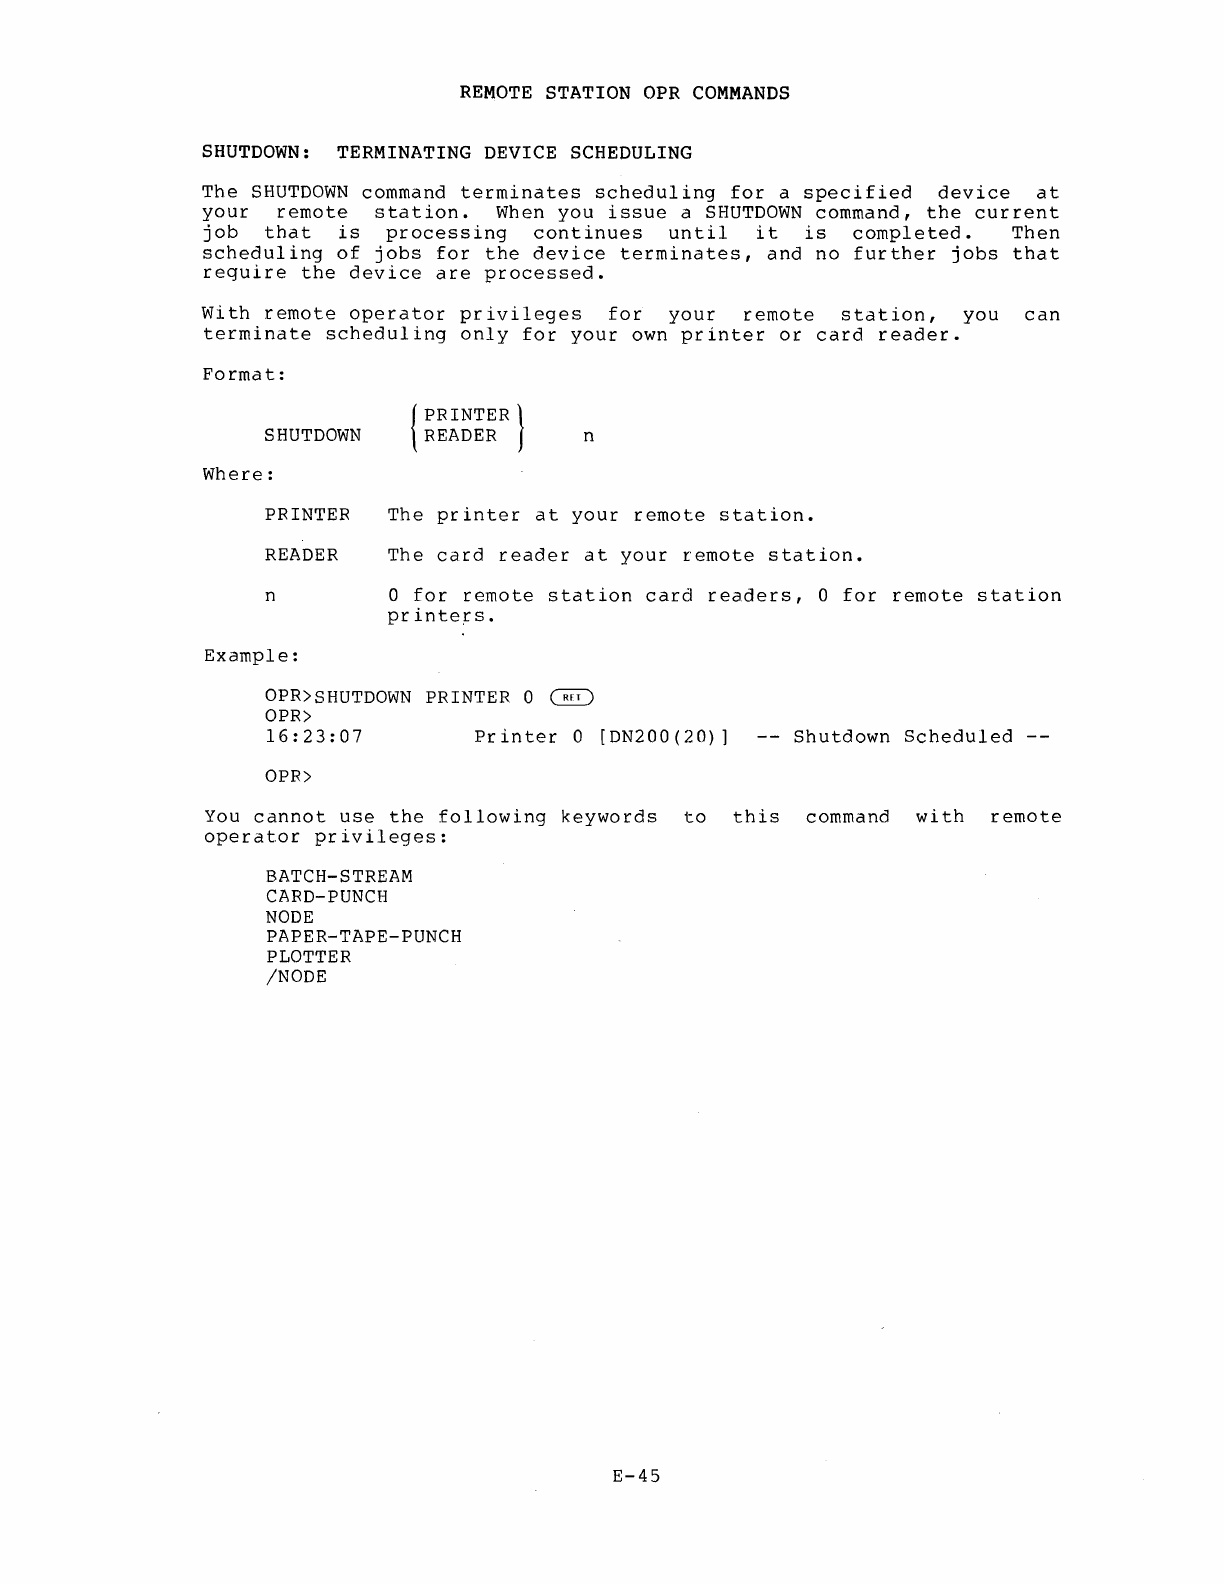
REMOTE
STATION
CPR
COMMANDS
SHUTDOWN:
TERMINATING
DEVICE
SCHEDULING
The
SHUTDOWN
command
terminates
scheduling
for
a
specified
device
at
your
remote
station.
When
you
issue
a
SHUTDOWN
command,
the
current
job
that
is
processing
continues
until
it
is
completed.
Then
scheduling
of
jobs
for
the
device
terminates,
and
no
further
jobs
that
require
the
device
are
processed.
With
remote
operator
privileges
for
your
remote
station,
you
can
terminate
scheduling
only
for
your
own
printer
or
card
reader.
Format:
SHUTDOWN
Where:
f
PRINTER}
\
READER
n
PRINTER
The
printer
at
your
remote
station.
READER
The
card
reader
at
your
remote
station.
n o
for
remote
station
card
readers,
0
for
remote
station
printe~s.
Example:
OPR>SHUTDOWN
PRINTER 0
~
OPR>
16:23:07
Printer
0
[DN200(20)]
--
Shutdown
Scheduled
--
OPR>
You
cannot
use
the
following
keywords
to
this
command
with
remote
operator
privileges:
BATCH-STREAM
CARD-PUNCH
NODE
PAPER-TAPE-PUNCH
PLOTTER
/NODE
E-45
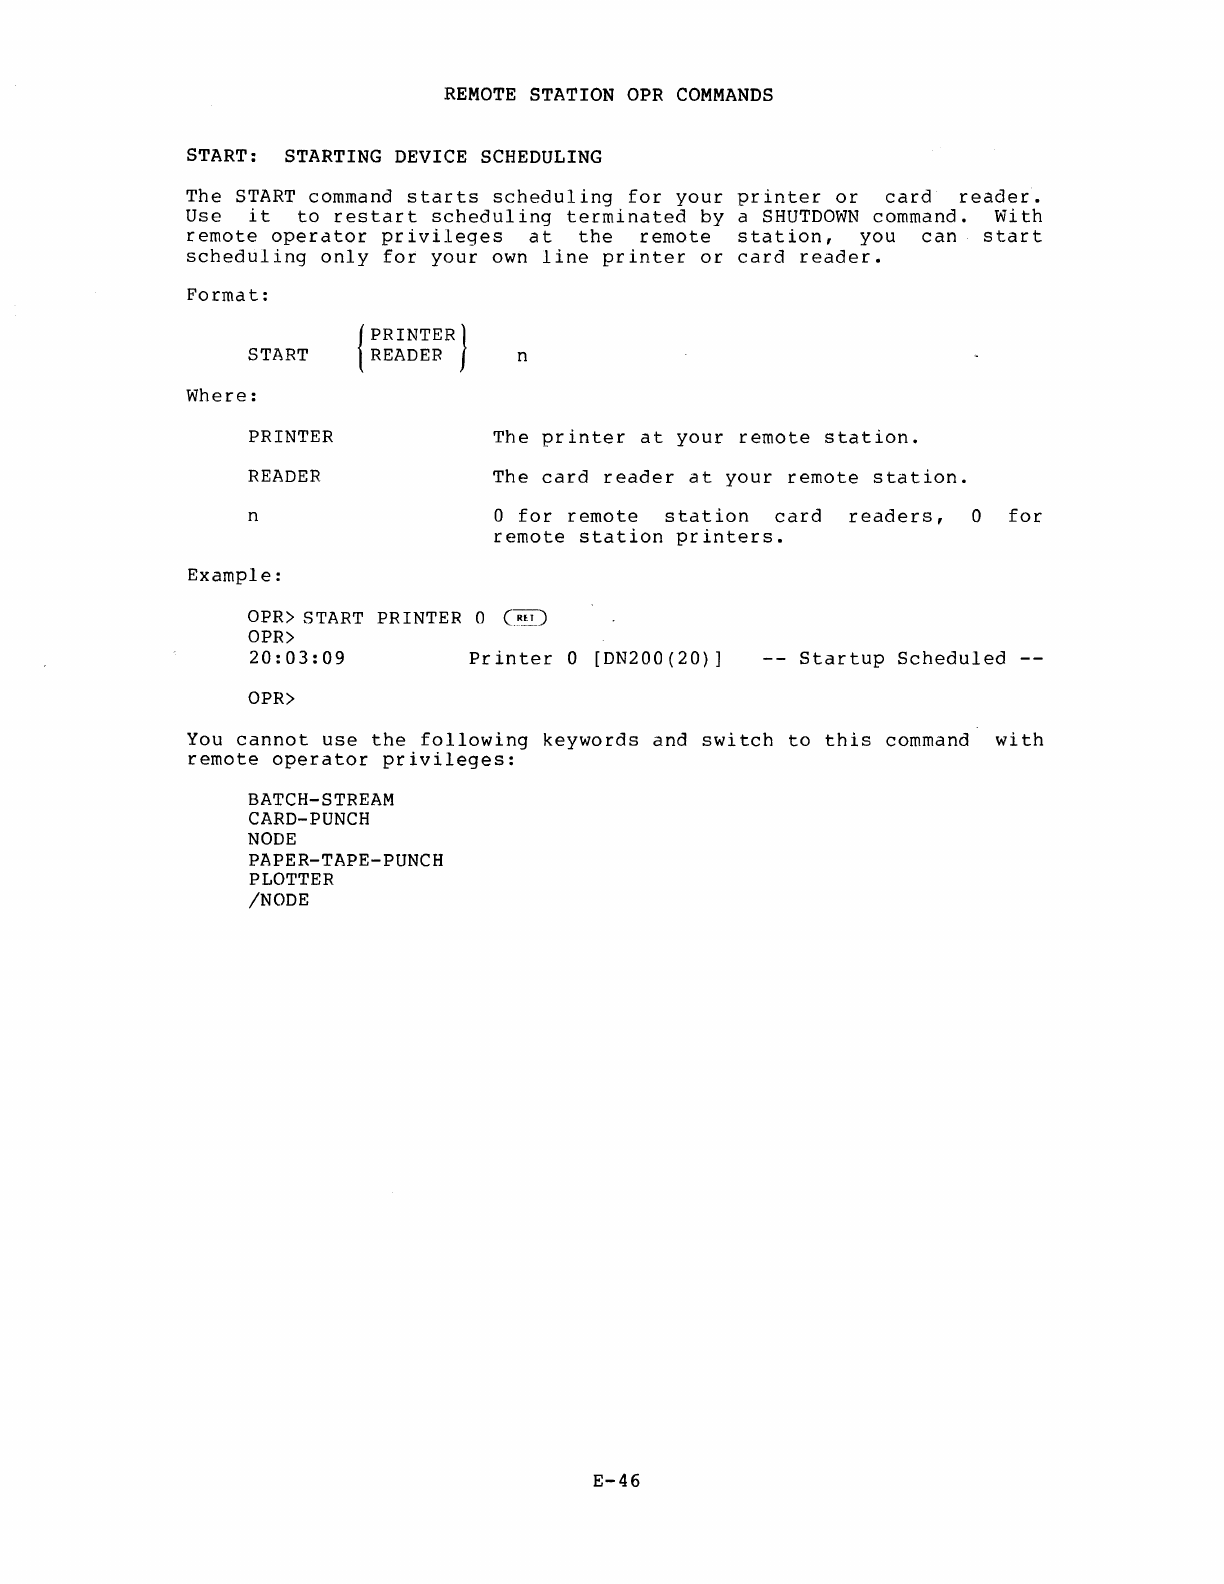
REMOTE
STATION OPR
COMMANDS
START: STARTING DEVICE SCHEDULING
The
START
command
starts
scheduling
for
your
printer
or
card
reader.
Use
it
to
restart
scheduling
terminated
by
a
SHUTDOWN
command.
With
remote
operator
privileges
at
the
remote
station,
you
can
start
scheduling
only
for
your
own
line
printer
or
card
reader.
Format:
START
Where:
PRINTER
READER
n
Example:
{PRINTER}
READER
n
The
printer
at
your
remote
station.
The
card
reader
at
your
remote
station.
o
for
remote
station
card
readers,
0
for
remote
station
printers.
aPR>
START PRINTER 0
C~
aPR>
20:03:09
Printer
0
[DN200(20)]
--
Startup
Scheduled
--
aPR>
You
cannot
use
the
following
keywords
and
switch
to
this
command
with
remote
operator
privileges:
BATCH-STREAM
CARD-PUNCH
NODE
PAPER-TAPE-PUNCH
PLOTTER
INODE
E-46
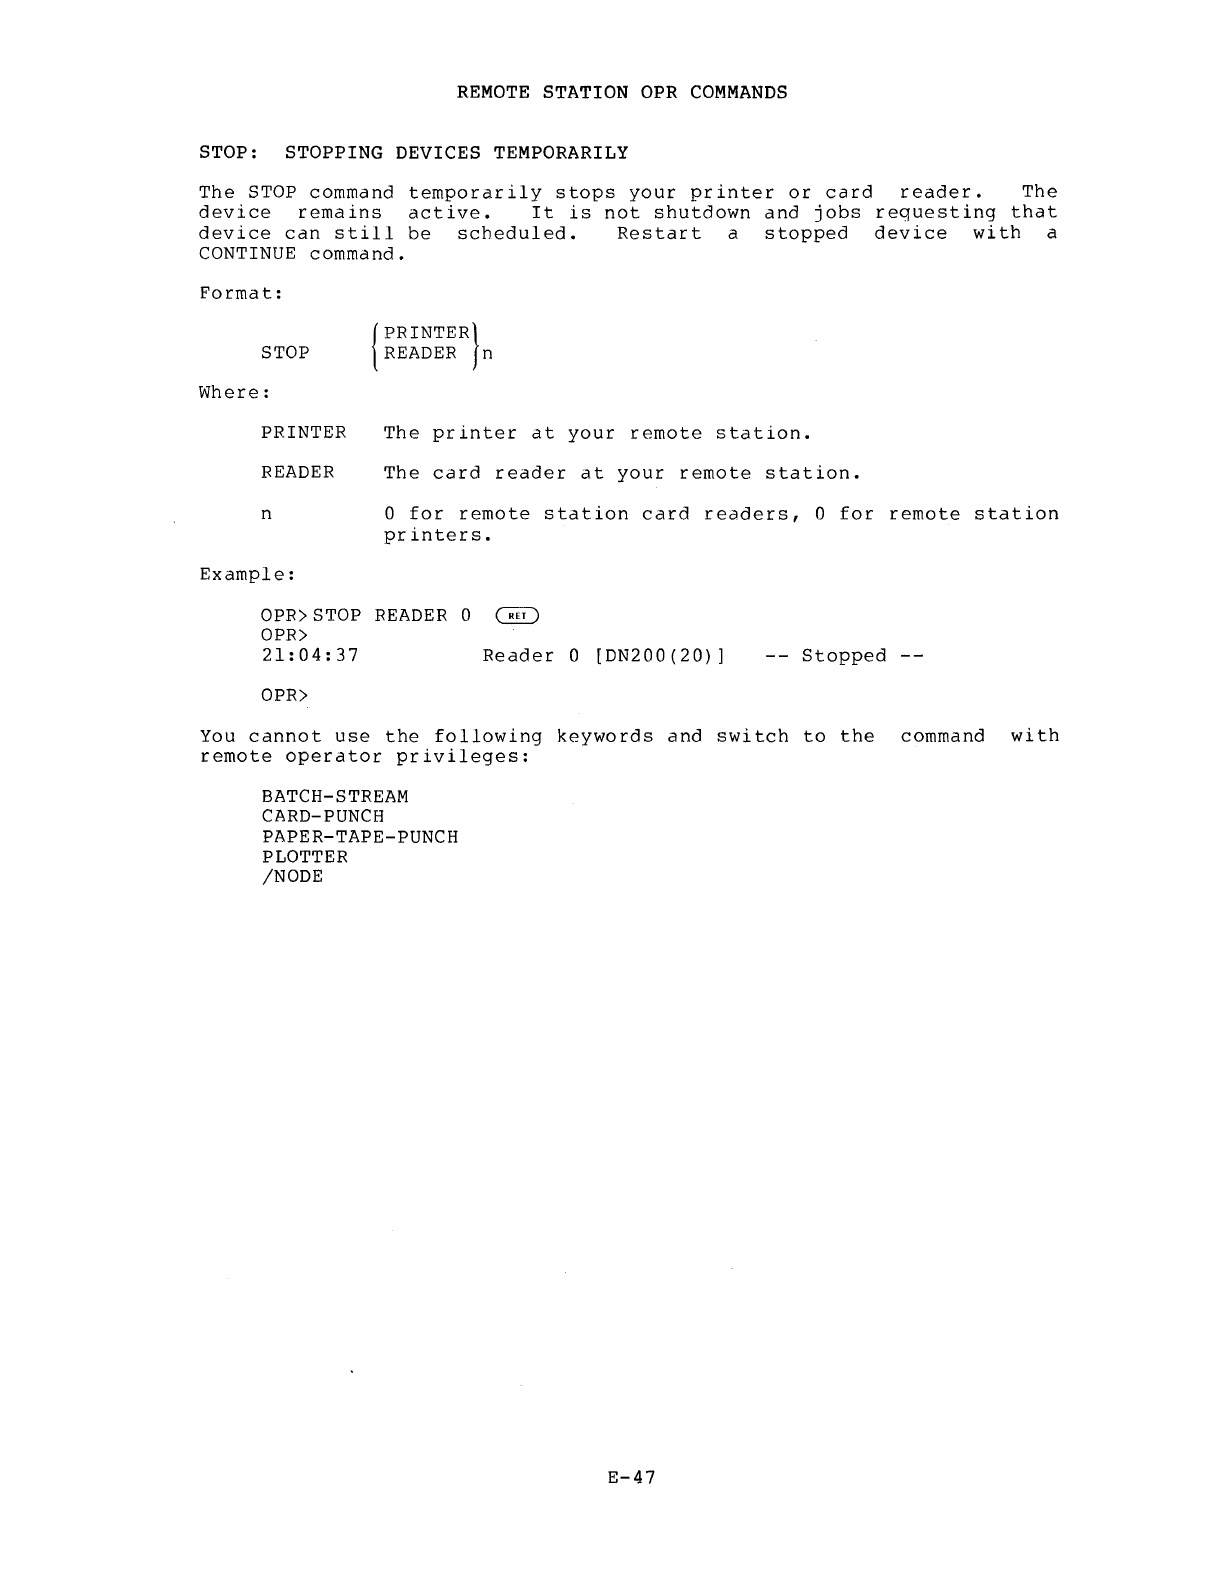
REMOTE
STATION OPR
COMMANDS
STOP:
STOPPING DEVICES TEMPORARILY
The
STOP
command
temporarily
stops
your
printer
or
card
reader.
The
device
remains
active.
It
is
not
shutdown
and
jobs
requesting
that
device
can
still
be
scheduled.
Restart
a
stopped
device
with
a
CONTINUE
command.
Format:
STOP
Where:
{PRINTER}
READER
n
PRINTER
The
printer
at
your
remote
station.
READER
The
card
reader
at
your
remote
station.
n o
for
remote
station
card
readers,
0
for
remote
station
printers.
Example:
OPR>STOP
READER
0
~
aPR>
21:04:37
Reader
0
[DN200(20)]
aPR>
--
Stopped
--
You
cannot
use
the
following
keywords
and
switch
to
the
command
with
remote
operator
privileges:
BATCH-STREAM
CARD-PUNCH
PAPER-TAPE-PUNCH
PLOTTER
INODE
E-47
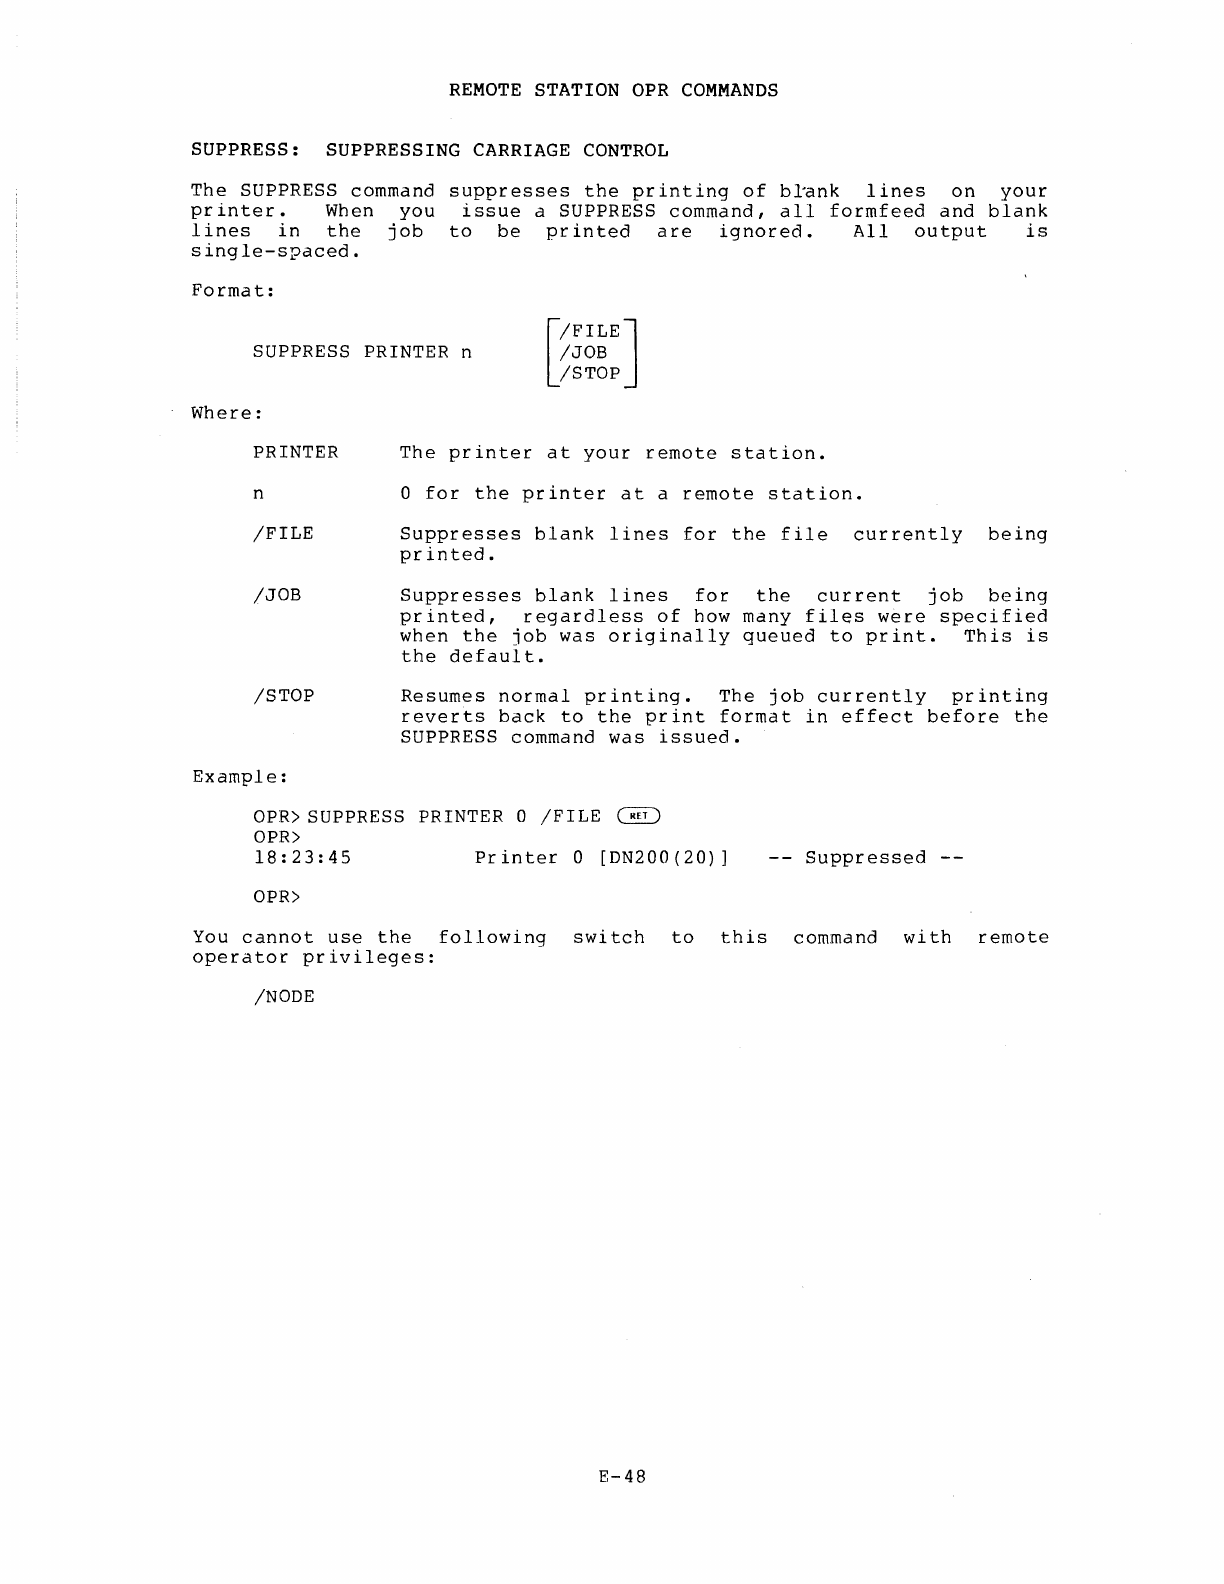
REMOTE
STATION OPR
COMMANDS
SUPPRESS:
SUPPRESSING CARRIAGE
CONTROL
The
SUPPRESS
command
suppresses
the
printing
of
bl'ank
lines
on
your
printer.
When
you
issue
a SUPPRESS
command,
all
formfeed
and
blank
lines
in
the
job
to
be
printed
are
ignored.
All
output
is
single-spaced.
Format:
SUPPRESS PRINTER n
/JOB
[
/FILE]
Where:
PRINTER
n
/FILE
/JOB
/STOP
Example:
/STOP
The
printer
at
your
remote
station.
o
for
the
printer
at
a
remote
station.
Suppresses
blank
lines
for
the
file
currently
being
printed.
Suppresses
blank
lines
for
the
current
job
being
printed,
regardless
of
how
many
files
were
specified
when
the
job
was
originally
queued
to
print.
This
is
the
default.
Resumes
normal
printing.
The
job
currently
printing
reverts
back
to
the
print
format
in
effect
before
the
SUPPRESS
command
was
issued.
OPR) SUPPRESS PRINTER 0
/FILE
~
OPR)
18:23:45
Printer
0
[DN200(20)]
--
Suppressed
--
OPR)
You
cannot
use
the
following
switch
to
this
command
with
remote
operator
privileges:
/NODE
E-48
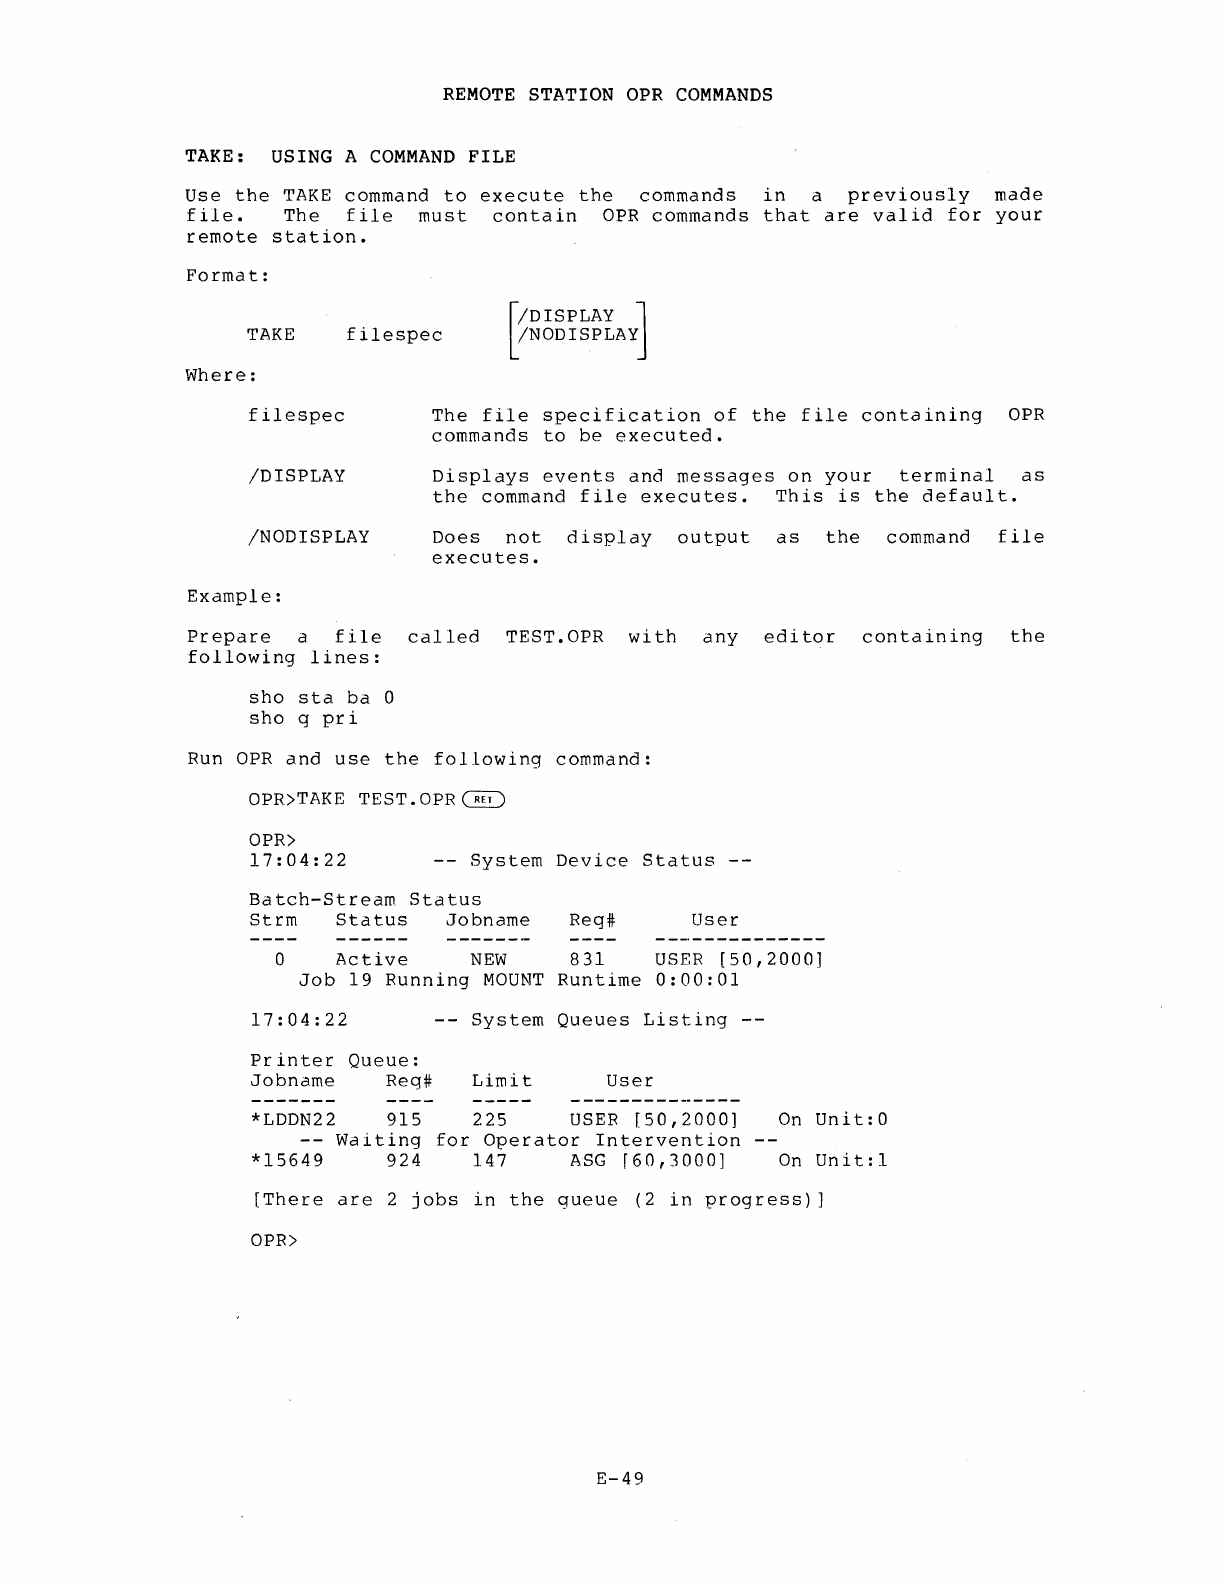
REMOTE
STATION OPR
COMMANDS
TAKE: USING A
COMMAND
FILE
Use
the
TAKE
command
to
execute
the
commands
in
a
previously
made
file.
The
file
must
contain
OPR
commands
that
are
valid
for
your
remote
station.
Format:
TAKE
Where:
filespec
[
/DISPLAY
J
/NODISPLAY
filespec
The
file
specification
of
the
file
containing
OPR
commands
to
be
executed.
/DISPLAY
Displays
events
and
messages
on
your
terminal
as
the
command
file
executes.
This
is
the
default.
/NODISPLAY
Does
not
display
output
as
the
command
file
executes.
Example:
Prepare
a
file
called
TEST.OPR
with
any
editor
containing
the
following
lines:
sho
sta
ba
0
sho
g
pri
Run
OPR
and
use
the
following
command:
OPR>TAKE
TEST.OPR
~
OPR>
17:04:22
--
System
Device
Status
--
Batch-Stream
Status
Strm
Status
Jobname
Reg#
User
o
Active
NEW
831
USER
[50,2000]
Job
19
Running
MOUNT
Runtime
0:00:01
17:04:22
System
Queues
Listing
--
Printer
Queue:
Jobname
Req#
Limi
t
User
*LDDN22
915
225
USER
[50,2000]
On
Unit:O
Waiting
for
Operator
Intervention
*15649
924
147
ASG
[60,3000]
On
Unit:l
[There
are
2
jobs
in
the
queue
(2
in
progress)]
aPR>
E-49

APPENDIX F
USING
SPECIAL
PRINT
FORMS
Using
special
forms
at
a
remote
site
is
no
different
from
using
special
forms
at
the
host.
You
place
specifications
describing
forms
to
be
printed
on
your
printer
in
SYS:LPFORM.INI,
the
file
at
the
host
that
contains
the
specifications
for
the
special
forms.
The
system
administrator
must
set
up
the
file
protection
for
LPFORM.INI
so
that
you,
as
the
remote
operator,
can
alter
it.
SYS:LPFORM.INI
must
always
exist.
Each
line
in
LPFORM.INI
is
of
the
form:
formname/SW/SW/SW
.•.
or
formname:locator/SW/SW/SW
.••
Where:
formname
:locator
/SW
Switch
/ALCNT:n
is
a
1-
to
6-character
(SIXBIT)
form
name.
Use
form
names
descriptive
of
the
forms
needed
at
your
site.
names
the
printer
whose
form
the
line
in
LPFORM.INI
describes.
The
locator
can
be:
ALL
LOCAL
REMOTE
LPTxxy
all
printers
(default)
local
host
printer
all
remote
station
printers
printer
unit
y
at
node
xx
specifies
one
or
more
switches
(see
Table
E-4)
Table
F-4
LPFORM.INI
Switches
Function
The
number
of
times
alignment
file.
The
(n)
to
default
the
switch
is
optionally
used
/ALIGN
switch.
print
the
is
5
times;
with
the
/ALIGN[:filespec]
A
I-
to
6-character
(S
IXBIT)
alignment
file
name
.
used
to
position
the
specified
form.
If
the
filespec
is
omitted,
the
default
is
formname.ALP;
if
the
extension
is
omitted,
the
default
extension
is
.ALP.
F-1
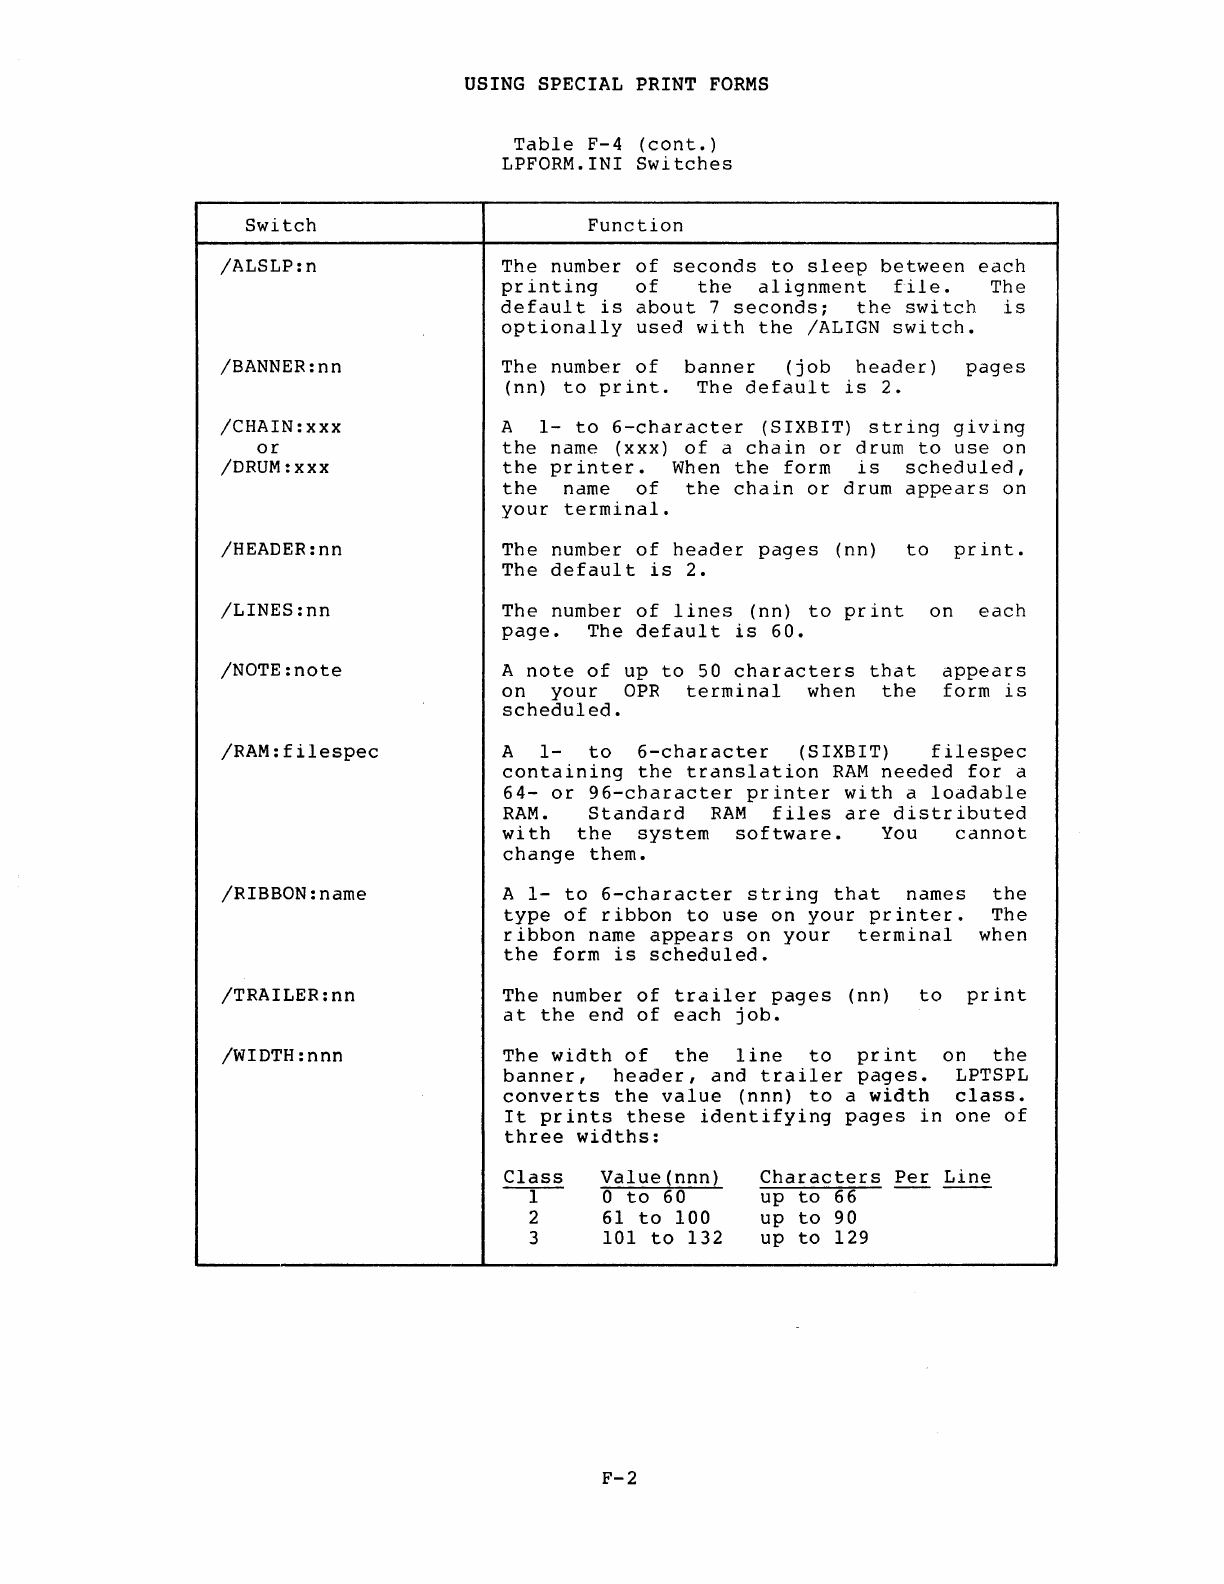
Switch
/ALSLP:n
/BANNER:nn
/CHAIN:xxx
or
/DRUM:xxx
/HEADER:nn
/LINES:nn
/NOTE:note
/RAM:filespec
/RIBBON:name
/TRAILER:nn
/WIDTH:nnn
USING
SPECIAL PRINT
FORMS
Table
F-4
(cont.)
LPFORM.INI
Switches
Function
The number
of
seconds
to
sleep
between
each
printing
of
the
alignment
file.
The
default
is
about
7
seconds;
the
switch
is
optionally
used
with
the
/ALIGN
switch.
The
number
of
(nn)
to
print.
banner
(job
header)
The
default
is
2.
pages
A
1-
to
6-character
(SIXBIT)
string
giving
the
name
(xxx)
of
a
chain
or
drum
to
use
on
the
printer.
When
the
form
is
scheduled,
the
name
of
the
chain
or
drum
appears
on
your
terminal.
The number
of
header
pages
(nn)
to
print.
The
default
is
2.
The
number
of
lines
(nn)
to
print
on
each
page.
The
default
is
60.
A
note
of
up
to
50
characters
that
appears
on
your
OPR
terminal
when
the
form
is
scheduled.
A
1-
to
6-character
(SIXBIT)
filespec
containing
the
translation
RAM
needed
for
a
64-
or
96-character
printer
with
a
loadable
RAM.
Standard
RAM
files
are
distributed
with
the
system
software.
You
cannot
change
them.
A
1-
to
6-character
string
that
names
type
of
ribbon
to
use
on
your
printer.
ribbon
name
appears
on
your
terminal
the
form
is
scheduled.
the
The
when
The
number
of
trailer
pages
(nn)
to
print
at
the
end
of
each
job.
The
width
of
the
line
to
print
banner,
header,
and
trailer
pages.
converts
the
value
(nnn)
to
a
width
It
prints
these
identifying
pages
in
three
widths:
on
the
LPTSPL
class.
one
of
Class
-1-
Value(nnn)
o
to
60
Characters
Per
Line
up
to
66
2
3 61
to
100
101
to
132
F-2
up
to
90
up
to
129
USING
SPECIAL
PRINT
FORMS
When
a
request
for
a
new
form
is
made,
LPTSPL
searches
LPFORM.INI
for
the
first
line
containing
the
requested
formname
and
the
appropriate
locator.
When a
match
is
found,
the
switches
specified
are
used.
LPTSPL
uses
the
first
correct
match
it
finds,
readinq
LPFORM.INI
line-by-line.
-
The
user
at
a
remote
site
terminal
can
type:
PRINT
filename/FORMS:narrow~
(A
user
at
any
other
site
must
use
the
/DEST
switch
to
print
at
your
remote
station.)
Executing
this
PRINT
command
places
a
print
request
in
the
queue
for
the
printer
at
your
remote
station.
As
the
operator
at
the
remote
station,
you
can
check
the
print
queue
periodically
to
see
if
any
requests
are
waiting.
For
example,
you
can
use
the
SHOW
QUEUE
PRINTER
command
to
see
the
queue:
OPR>
SHO
Q
PRI
~
OPR>
15:19:18
System
Queues
Listing
--
User
Printer
Queue
Job
Name
Req#
SWIT~
657
Limit
-7-
USER
[27,5000]/FORMS:NARROW/DEST:COMET(20)
There
is
1
job
in
the
queue
(none
in
progress)
OPR>
When
you
see
a
print
request
waiting,
issue
a SET PRINTER FORMS-TYPE
command
to
activate
use
of
the
system
file
SYS:LPFORM.INI.
For
example,
your
host
system
area
contains
an
LPFORM.INI
file
with
a
forms
specification
as
follows:
NARROW:
LPT200/VFU:NORMAL/WIDTH:72
width
of
form
vertical
format
unit
printer
unit
number
node
number
form
name
When
a
print
request
for
execute
your
SET
command.
the
special
For
example,
form
OPR> SET
OPR>
14:13:21
OPR>
14:13:21
PRINTER
0 FORMS-TYPE
NARROW
~
Printer
0
--
Set
Accepted
Printer
0
--
Begin
appears
in
Job
LPTSPL
Req
#657
for
USER
[27,5000]
OPR>
14:13:21
<26>
Printer
0
Please
load
forms
type
'NARROW'
the
Type
'Respond
<number>
CONTINUE'
When
Ready
F-3
queue,
USING
SPECIAL PRINT
FORMS
The
message
you
see
gives
a
message
number
«26>
in
the
example)
and
shows
the
form
name
(NARROW).
This
must
be
the
same
name
as
given
by
the
user
in
his
print
request.
If
no
job
is
currently
printing
on
your
printer,
the
messages
appear
immediately
at
your
terminal:
otherwise,
they
appear
only
after
your
current
job
is
completed.
The
system
operator
or
host
operator
at
the
site
where
you
log
in
can
also
place
SET commanos
in
the
system
file
SYS:SYSTEM.CMD.
For
example,
SYSTEM.CMD
might
contain
the
following
set
command
for
your
site:
SET PRINTER
O/NODE:20::
PAGE-LIMIT
2000
node
number
unit
number
When
you
see
the
"load
forms
type"
message,
go
to
the
printer
and
insert
the
appropriate
forms.
Be
sure
to
place
the
printer
on
line
when
done.
Then
issue
a
RESPOND
command
to
restart
printing~
for
example,
use
the
following:
CONTINUE
(RET)
Printer
0
Loading
VFU
with
'NORMAL'
--
Printer
0 End
OPR>RES 26
OPR>
14:15~14
OPR>
14:16:44
OPR>
14:16:44
Printer
0 End
Job
LPTSPL Reg
#657
for
USER
[27,5000]
OPR>
To
return
to
normal
forms,
use:
SET PRIN 0
FORM
NORMAL
and
repeat
the
above
procedure,
changing
the
form
and
issuing
the
RESPOND
command.
These
are
the
normal
procedures
for
controlling
forms
at
your
remote
site.
F-4
ABORT
command,
E-7
ALIGN
command,
E-8
Aligning
printer
forms,
E-8
Allocations,
displaying,
E-33
Alternate
load
path,
B-4
ASCII
character
set,
C-2
Back
panel,
card
reader,
2-17
Back
panel
switches,
card
reader,
2-17
BACKSPACE
command,
E-9
Backspacing
print
requests,
E-9
Batch
control
files,
displaying,
E-34
Batch
jobs,
submitting,
3-3
Baud
rate
switches,
2-13
BOOT,
1-1,
2-1
Bootstrap
switches,
NETLDR,
B-1
Bootstrapping,
2-1
CANCEL
command,
E-IO
Canceling
print
requests,
E-IO
Card,
punched,
C-l
Card
reader,
2-15
back
panel,
2-17
back
panel
switches,
2-17
front
panel,
2-16
lamps,
2-16
operations,
2-18
starting,
2-10
switches,
2-16
Carriage
control,
suppressing,
E-48
CDRIVE,
2-7
Character
set,
ASCII,
C-2
Characters,
Ascii,
C-5
CHKll,
4-1
CHKll
messages,
4-1
Command,
ABORT,
E-7
ALIGN,
E-8
BACKSPACE,
E-9
CANCEL,
E-IO
INDEX
Index-l
Command
(Con
t.
)
CONTINUE,
E-ll
DISABLE,
E-12
ENABLE,
E-14
EXIT,
E-16
FORWARDSPACE,
E-17
HELP,
E-18
HOLD,
E-19
LOCATE,
2-9
MODIFY,
E-20
NETWORK,
3-2
NEXT,
E-22
PRINT,
3-2
QUEUE,
3-2
RELEASE,
E-23
REPORT,
E-24
REQUEUE,
E-25
RESPOND,
E-26
Route,
2-9
SEND,
E-27
SET HOST,
3-1
SET PRINTER,
E-28
SET TERMINAL,
E-30
SHOW,
E-32
SHOW
ALLOCATION,
E-33
SHOW
CONTROL-FILE,
E-34
SHOW
MESSAGES,
E-35
SHOW
OPERATORS,
E-36
SHOW
PAR.AMETERS,
E-37
SHOW
QUEUES,
E-38
SHOW
ROUTE-TABLE,
E-40
SHOW
status,
E-42
SHOW
STATUS
NETWORKS,
2-9
SHOW
SYSTEM-LISTS,
E-4l
SHOW
TIME,
E-44
SHUTDOWN,
E-45
START,
E-46
START PRINTER,
2-10
STOP,
E-47
SUBMIT,
3-3
SUPPRESS,
E-48
TAKE,
E-49
Command
file,
using
a,
E-49
Command
functions,
OPR,
E-l
Commands,
OPR,
E-4
Comments,
recording,
E-24
Components,
DN200,
1-3
DN80-series,
1-2
remote
station,
1-1
Concentrator,
DN200,
1-3

Concentrator
(Cont.)
DN80-series,
1-2
Concentrators,
remote,
1-1
Console,
lamps,
2-15
operator's,
2-13
CONTINUE
command,
E-ll
Control
files,
displaying
batch,
E-34
Control
panel,
DN200,
1-3
DN82,
1-2
Date
and
time,
displaying,
E-44
Default
load
path,
B-2
Default
load
requests,
B-2
Device,
displaying
information,
E-42
relocating
station,
2-9
restarting,
E-ll
starting,
2-11
stopping,
E-47
Device
scheduling,
starting,
E-46
terminating,
E-45
DISABLE
command,
E-12
Displaying,
allocations,
E-33
batch
control
files,
E-34
date
and
time,
E-44
device
information,
E-42
messages,
E-35
network
operators,
E-36
printer
parameters,
E-37
queued
jobs,
E-38
routing,
E-40
system
information,
E-32,
E-42
system
lists,
E-4l
DN200,
1-1
components,
1-3
concentrator,
1-3
control
panel,
1-3
remote
station,
1-3
starting
the,
1-1
DN80,
1-1
DN80-series,
components,
1-2
concentrator,
1-2
remote
station,
1-2
starting
the
station,
1-1
DN80-series
station,
starting
the,
1-1
INDEX
(CaNT.)
Index-2
DN82,
1-1
control
panel,
1-2
remote
station,
1-2
ENABLE
command,
E-14
Error,
hardware,
4-1
messages,
4-2
reporting,
E-24
system
messages,
4-2
Error
messages,
aPR,
2-8
<ESC>
key,
2-8
EXIT
command,
E-16
Exiting
from
subjob,
2-20
Exiting
aPR,
E-16
File,
using
a
command,
E-49
Files,
skipping
print,
E-17
Forms,
aligning
printer,
E-8
special
print,
F-l
FORWARDSPACE
command,
E-17
Front
panel,
card
reader,
2-16
Functions,
aPR
command,
E-l
Glossary,
D-l
Hardware,
2-12
error,
4-1
HELP
command,
E-18
HOLD
command,
E-19
Holding
queued
jobs,
E-19
Host,
operator,
2-6
system,
1-1
TOPS-lO,
1-1
Information,
displaying
device,
E-42
displaying
system,
E-32,
E-42
obtaining,
E-18
Installation,
software,
1-1
Jobs,
displaying
queued,
E-38
holding
queued,
E-19
releasing
queued,
E~23
rescheduling,
E-25
specifying
queued,
E-22
terminating,
E-7
Key,
<ESC>,
2-8
LA36
terminal,
2-13
Lamps,
card
reader,
2-16
console,
2-15
Line
printer,
LP05,
2-18
Lists,
displaying
system,
E-4l
Load
path,
alternate,
B-4
default,
B-2
Load
requests,
default,
B-2
LOCATE
command,
2-9
Logg
ing
in,
2-4
subjobs,
2-12
Logging
in
subjob,
2-12
Logging
out,
2-20
Logout
messages,
2-20
LP05
line
printer,
2-18
LPFORM.
INI,
F-l
switches,
F-l
LPTSPL,
2-7
Message,
starting
displays,
E-14
stopping
displays,
E-12
Messages,
2-3
CHKll,
4-1
displaying,
E-35
error,
4-2
logout,
2-20
NETLDR,
B-3
aPR
error,
2-8
ORION,
2-7
responding
to,
E~18,
E-26
sending,
E-27
INDEX
(CaNT.)
Index-3
Messages
(Cont.)
startup,
2-3,
2-5
Station,
4-3
system
error,
4-2
Mode
switches,
2-13
MODIFY
command,
E-20
Modifying
requests,
E-20
NETLDR
bootstrap
switches,
B-1
NETLDR
messages,
B-3
NETLDR
program,
2-1
NETLDR.INI,
B-2
NETWORK
command,
3-2
Network
operators,
displaying,
E-36
NEXT
command,
E-22
Objects,
aPR,
E-3
Obtaining
information,
E-18
Operations,
card
reader,
2-18
printer,
2-19
Operator,
2-6
host,
2-6
p r i
viI
eg
e
s,
2 - 6
remote,
2-7
system,
2-6
Operator
procedures,
2-1
Operator's
console,
2-13
Operators,
displaying
network,
E-36
aPR,
error
messages,
2-8
exiting,
E-16
starting,
2-7
aPR
command
functions,
E-l
aPR
commands,
E-4
aPR
objects,
E-3
OPSER,
2-11
ORION
messages,
2-7
Parameters,
displaying
printer,
E-37
setting
printer,
E-28
setting
terminal,
E-30
Path,
alternate
load,
B-4
default
load,
B-2
PDP-II,
1-1
PRINT
command,
3-2
Print
files,
skipping,
E-17
Print
forms,
special,
F-l·
Print
requests,
backspacing,
E-9
canceling,
E-IO
Printer,
alarm
indicators,
2-19
alarm
lamp,
2-19
LP05
line,
2-18
operations,
2-19
starting,
2-10
Printer
forms,
aligning,
E-8
Printer
parameters,
displaying,
E-37
setting,
E-28
Printing,
3-2
Privileges,
operator,
2-6
Procedures,
operator,
2-1
Program,
NETLDR,
2-1
Punched
card,
C-l
QUEUE
command,
3-2
Queued
jobs,
displaying,
E-38
holding,
E-19
releasing,
E-23
specifying,
E-22
Reader,
card,
2-15
Recognition,
Us
ing,
2-8
Recording
comments,
E-24
RELEASE
command,
E-23
Releasing
queued
jobs,
E-23
Relocating
station
device,
2-9
Remote,
concentrators,
1-1
operator,
2-7
station
components,
1-1
Remote
station,
1-1
DN200,
1-3
DN80-series,
1-2
DN82,
1-2
ROM
switches,
A-I
starting,
2-1
Remote
station
DN82,
1-2
INDEX
(CONT.)
Index-4
Remote
station
ROM
switches,
A-I
Remote
station
tasks,
2-9
REPORT
command,
E-24
Reporting,
error,
E-24
Requests,
default
load,
B-2
modifying,
E-20
REQUEUE
command,
E-25
Rescheduling
jobs,
E-25
RESPOND
command,
E-26
Responding
to
messages,
E-18,
E-26
Restarting
device,
E-ll
Restarting
station,
2-4
ROM,
1-1,
2-1
ROM
switches,
Remote
station,
A-I
Routing,
displaying,
E-40
Scheduling,
starting
device,
E-46
terminating
device,
E-45
SEND
command,
E-27
Sending
messages,
E-27
Set,
ASCII
character,
C-2
SET
HOST
command,
3-1
SET PRINTER
command,
E-28
SET TERMINAL
command,
E-30
Setting,
printer
parameters,
E-28
terminal
parameters,
E-30
SHOW
ALLOCATION
command,
E-33
SHOW
command,
E-32
SHOW
CONTROL-FILE
command,
E-34
SHOW
MESSAGES
command,
E-35
SHOW
OPERATORS
command,
E-36
SHOW
PARAMETERS
command,
E-37
SHOW
QUEUES
command,
E-38
SHOW
ROUTE-TABLE
command,
E-40
SHOW
status
command,
E-42
SHOW
STATUS
NETWORKS
command,
2-9
SHOW
SYSTEM-LISTS
command,
E-4l
SHOW
TIME
command,
E-44
SHUTDOWN
command,
E-45
Skipping
print
files,
E-17
Software
installation,
1-1
Special
print
forms,
F-l
Specifying
queued
jobs,
E-22
START
command,
E-46
START
PRINTER
command,
2-10
START
READER,
2-10
Starting,
card
reader,
2-10
device,
2-11
device
scheduling,
E-46
messages
displays,
E-14
aPR,
2-7
printer,
2-10
remote
station,
2-1
station,
2-2
the
DN200,
1-1
the
DN80-series
station,
1-1
Startup
messages,
2-3,
2-5
Station,
messages,
4-3
remote,
1-1
restarting,
2-4
starting,
2-2
starting
the
DN80-series,
1-1
Station
components,
remote,
1-1
Station
device,
relocating,
2-9
Status
command,
SHOW,
E-42
STOP
command,
E-47
Stopping,
device,
E-47
message
displays,
E-12
Subjob,
exiting
from,
2-20
logging
in,
2-12
Subjobs,
2-11
SUBMIT
command,
3-3
Submitting
batch
jobs,
3-3
SUPPRESS
command,
E-48
INDEX
(CaNT.)
Index-5
Suppressing
carriage
control,
E-48
Switches,
baud
rate,
2-13
card
reader,
2-16
card
reader
back
panel,
2-17
LPFORM.INI,
F-l
mode,
2-13
NETLDR
bootstrap,
B-1
Remote
station
ROM,
A-I
System,
displaying
information,
E-42
host,
1-1
operator,
2-6
System
information,
displaying,
E-32
System
lists,
displaying,
E-4l
TAKE
command,
E-49
Tasks,
remote
station,
2-9
Terminal,
LA36,
2-13
Terminal
parameters,
setting,
E-30
Terminating,
device
scheduling,
E-45
jobs,
E-7
Time,
displaying
date
and,
E-44
TOPS-IO
host,
1-1
Trouble-shooting,
4-2
Using,
a command
file,
E-49
recognition,
2-8

READER'S COMMENTS
TOPS-10
Remote Station Guide
AA-D783B-
TB
NOTE: This form is for document comments only. DIGITAL will use comments submitted on
this form at the company's discretion.
If
you require a written reply and are eligible to
receive one under Software Performance F{eport (SPR) service, submit your com-
ments
on
an
SPR form.
Did you find this manual understandable, usable, and well-organized? Please make sugges-
tions for improvement.
Did you find errors
in
this manual?
If
so, specify the error and the page number.
Please indicate the type of reader that you most nearly represent.
o Assembly language programmer
o Higher-level language programmer
o Occasional programmer (experienced)
o User with little programming experience
o Student programmer
o Other (please
specify)~~~~~~~~~~~~~~~~~~~~~
Name~
__________________
~
______
~
_____
Date
___________________
~
Organization Telephone
____________
_
Street
__________________
~
____________________________________
__
City
_____________________________
State
_____
Zip Code
_____
_
or Country
I
I
I
I
. - -
-~-.-
-oDOmNotoTear
a
-
Fm
O
•
ld
HD~e
and Tape ----------------------f
~
-111-
-------
~~~~;:;~~
--
-III
if
Mailed in the
United States I
I
BUSINESS REPLY
MAIL
FIRST
CLASS
PERMIT
NO. 33
MAYNARD
MASS.
POSTAGE
WILL
BE
PAID
BY ADDRESSEE
SOFTWARE PUBLICATIONS
200 FOREST STREET MR01-2/L
12
MARLBOROUGH, MA 01752
-----
Do
Not Tear -Fold
Here
and Tape - - - - - - - - - - - - - - - - - - - - - - - - - - - - - - - - - - - - - - - - - - - -
