AtliWeb 40 Alti Web
User Manual: AltiWeb
Open the PDF directly: View PDF ![]() .
.
Page Count: 22
- AltiWeb 4.0
- Overview
- Installing AltiWeb
- AltiWeb Directory Structure
- Applet Subdirectory Files
- Collecting Form Data, IVR Data and URL History
- Tagging Pages for URL History
- Scenario 1—Caller Data from Web Page
- Customizing Contactaltigen.htm
- Scenario 2—Caller Data from Auto Attendant
- Customizing Contact.htm
- Configuring Auto Attendant for Scenario 2
- Troubleshooting
- Uninstalling AltiWeb

Overview
Center 4.0 User Guide 1
AltiWeb 4.0
AltiWeb 4.0
Overview
AltiWare OE 4.0 integrates VoIP, Auto Attendant, and Microsoft Internet
Information Services (IIS) to provide the AltiWeb feature that allows
internet users to talk to an extension via VoIP and share web pages.
System Requirements
•Client/Server System only: AltiWare OE Release 4.0 or higher
running on Windows 2000 or Windows NT.
•Client System: Microsoft Internet Explorer 5.5 or better, or Netscape
4.7 or better; NetMeeting 3.01; and Sound Card.
•Web Server: Microsoft Internet Information Services (IIS) 4.0/5.0.
AltiWeb Components
Figure 1. AltiWeb Component Overview
AtliWeb 40.fm Page 1 Thursday, September 7, 2000 12:08 AM
AltiWeb 4.0
2Center 4.0 User Guide
Installing AltiWeb
Make sure AltiWare OE Release 4.0 has been installed on the AltiServ
system and the link to TCP/ IP is enabled before continuing with CDR
Search setup.
1. Log in to the client machine using a domain account and make sure it
is connected to the network on which AltiServ is running.
2. Exit any/all Windows applications.
3. Insert the AltiWeb CD into the CD ROM drive of the IIS web server.
4. Run the Setup.exe program by selecting Start Run and typing
D:/Setup.exe, where D is the letter of your CD ROM drive. Follow the
step by step installation instructions as they appear on the screen.
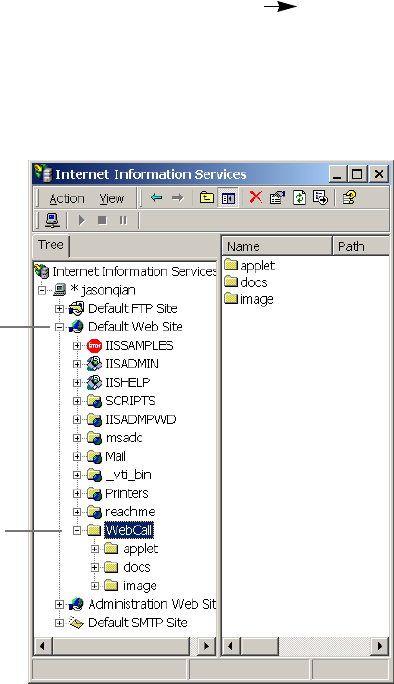
5. AltiWeb installs into the Home directory of the IIS server. To verify
installation, start IIS, and select Default Web Site. The WebCall
directory appears at the bottom of the directory, as shown below.
Figure 2. Logical AltiWeb installation in IIS
Default Web Site
WebCall
AtliWeb 40.fm Page 2 Thursday, September 7, 2000 12:08 AM
AltiWeb Directory Structure
Center 4.0 User Guide 3
AltiWeb 4.0
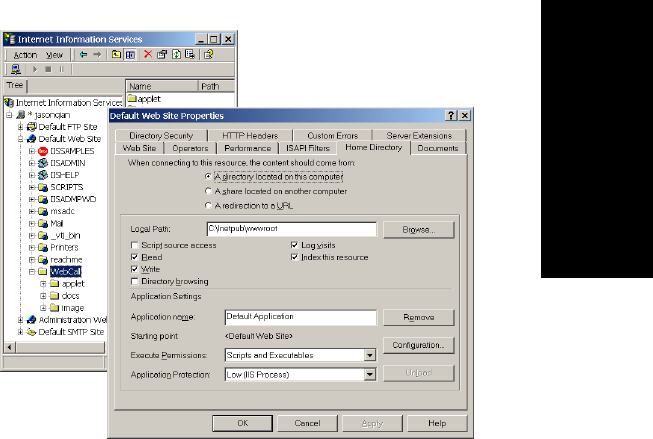
6. To verify the physical location of the AltiWeb directory, right-click
Default Web Site and select Properties. On the Home Directory tab of
the Properties dialog, the Local Path field shows AltiWeb’s physical
location on the drive (in this case C:\Inetpub\wwwroot\altiweb).
Figure 3. Local Path in IIS Properties dialog
AltiWeb Directory Structure
The AltiWeb directory contains the following subdirectories
•Applet—Sample files you can use to set up AltiWeb. Refer to the
following sections for details.
•Docs—Documentation on AltiWeb
•Images—Graphics used in the html files residing in the Applet
directory
AtliWeb 40.fm Page 3 Thursday, September 7, 2000 12:08 AM
AltiWeb 4.0
4Center 4.0 User Guide
Applet Subdirectory Files
The Applet subdirectory contains sample pages you can use to set up Web
Call, as well as files necessary for proper AltiWeb functioning.
•Contact.htm—Customer Information page for use with Auto
Attendant
•contactaltigen.htm—Customer Information page for use without
Auto Attendant
•customerid.htm—Page where caller enters customer ID
•directory.htm—Template for creating an in-house AltiWeb directory
(for internal use only)
•IVR_top.htm—Frameset for top.htm and IVRApplet.htm
•IVRApplet.htm—Sends connected information to the main AltiWeb
applet
•NetMeeting.htm—Error message indicating NetMeeting not found
and providing opportunity to download
•Nsapplet.zip—Contains files necessary for the proper functioning of
AltiWeb (Do not modify this file.)
•Nsplugin.zip—Contains files necessary for the proper functioning of
AltiWeb (Do not modify this file.)
•productid.htm—Page where caller enters product ID
•sales_cid.htm—Frameset for customerid.htm
•sales_pid.htm—Frameset for productid.htm
•Top.htm—Collects caller input and sends the result to the next
IVRApplet.htm
•AltiWeb.cab—Contains files necessary for the proper functioning of
AltiWeb (Do not modify this file.)
•AltiWeb.htm—Page displaying AltiWeb window
•AltiWeb.js—JavaScript file necessary for the proper functioning of
AltiWeb
•Wizard.htm—Error message advising caller to run the initial
configuration for NetMeeting
AtliWeb 40.fm Page 4 Thursday, September 7, 2000 12:08 AM
Collecting Form Data, IVR Data and URL History
Center 4.0 User Guide 5
AltiWeb 4.0
Collecting Form Data, IVR Data and URL History
You can configure AltiWeb to display Form Data, IVR Data, and URL
History when a web call is answered by an extension with the AltiAgent
application.
Tagging Pages for URL History
To appear in the URL history, the pages the caller visits prior to the call
must be tagged, as shown below:
<head>
<script language="JavaScript" src="altiweb.js"></script>
<script language="JavaScript">
tagURL(location.href)
</script>
</head>
For more information on configuring:
• IVR Data: Refer to “Configuring Auto Attendant for Scenario 2” on
page 15.
•Form Data: “Customizing Contactaltigen.htm” on page 9 or “Cus-
tomizing Contact.htm” on page 14.
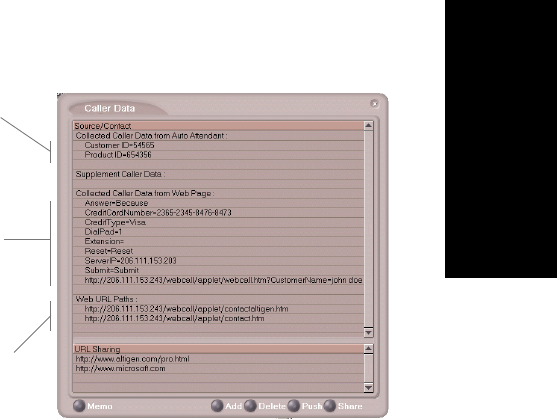
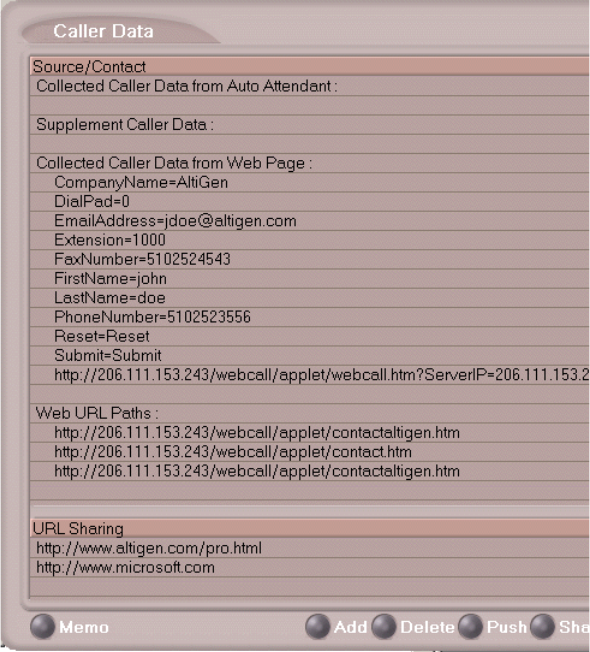
The URL History shows all
URL paths to tagged html
pages the caller visited prior
to the call.
The Form Data come
from the <form
name=infoForm> fields
in the source code of
Contact.htm or
Contactaltigen.htm
pages
The IVR data comes
from the Auto Attendant
/ Collect Digit action.
Figure 4. Caller Data window in AltiAgent
AtliWeb 40.fm Page 5 Thursday, September 7, 2000 12:08 AM
AltiWeb 4.0
6Center 4.0 User Guide
Scenario 1—Caller Data from Web Page
The following scenario, based on contactaltigen.htm, exemplifies the
simplest implementation of AltiWeb.
1. A web caller browses the company web site and has a question
regarding some product information.
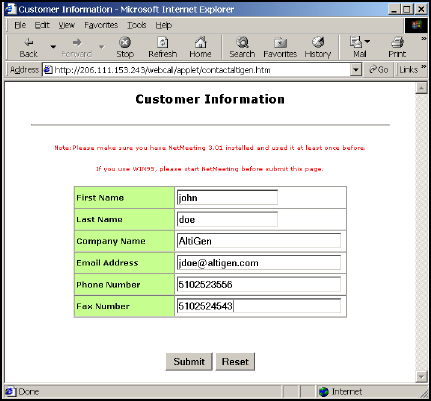
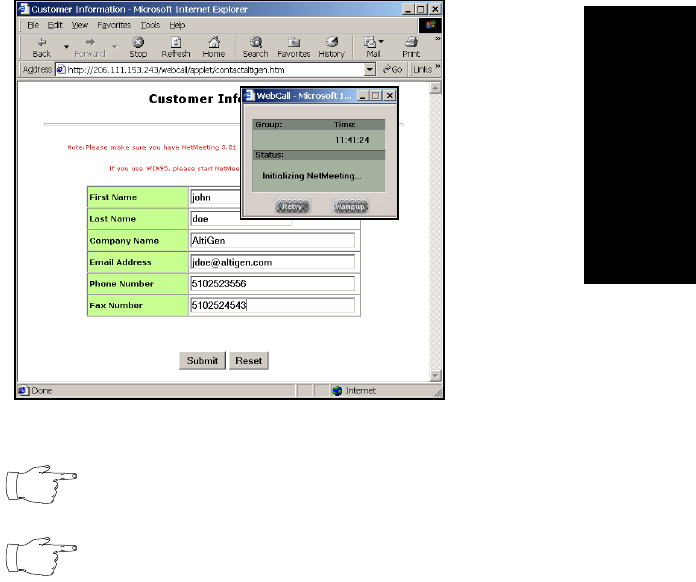
2. The web caller clicks the "contact us" link on the web page. The
Customer Information page (contactaltigen.htm) opens.
Figure 5. Contactaltigen.htm page
Screenshot of
contactaltigen.com, with
fields populated.
AtliWeb 40.fm Page 6 Thursday, September 7, 2000 12:08 AM
Scenario 1—Caller Data from Web Page
Center 4.0 User Guide 7
AltiWeb 4.0
3. The web caller enters the required information, then clicks the Submit
button. The AltiWeb window (altiweb.htm) appears.
Figure 6. The AltiWeb window
If NetMeeting is not installed on the caller’s computer (or
it’s not configured correctly), an error message displays.
This scenario directly dials a pre-set extension. You can
also set the AltiWeb window to display a DialPad the
caller can use to dial any extension. For details, refer to
“Customizing Contactaltigen.htm” on page 9.
4. Once NetMeeting successfully connects to an AltiGen VoIPport, the
web caller is routed to the proper extension.
AtliWeb 40.fm Page 7 Thursday, September 7, 2000 12:08 AM
AltiWeb 4.0
8Center 4.0 User Guide
5. If the call goes to an AltiAgent user, the Caller Data window shows the
Form Data and URL history.
Figure 7. Caller Data window in AltiAgent
6. From this point, in addition to voice communication, the agent can
push and share web pages with the caller. For procedures, refer to the
Refer to the Chapter 4, "Using Center as a Workgroup Member," in the
Center 4.0 User Guide.
AtliWeb 40.fm Page 8 Thursday, September 7, 2000 12:08 AM

Customizing Contactaltigen.htm
Center 4.0 User Guide 9
AltiWeb 4.0
Customizing Contactaltigen.htm
You can use the Contact.htm page to collect caller information, and
automatically direct the call to a specific extension.This collected
information is then displayed on the agent’s screen.
To Alter Form Data
Using Notepad or another html editor, modify Contactaltigen.htm source
code as follows:
1. Change the ServerIP
Set the value of the ServerIP to the IP address of the server on which
AltiWare resides.
<input type="hidden" name="ServerIP" value="206.111.153.203">
2. Set DialPad visibility
By default, the code is set to hide the Dial Pad (value = "0") and to dial
a specific number (value = "300"). To show the Dial pad, change the
values as shown below:
Show DialPad, Let Caller Dial Extension
<input type="hidden" name="Extension" value=""><input type="hidden"
name="DialPad" value="1">
Hide DialPad, Autoconnect to Extension 300
<input type="hidden" name="Extension" value="300"><input type="hidden"
name="DialPad" value="0">
3. Alter the data collection fields:
Shown below is the form row that collects the caller’s first name.
Copy, modify or delete variables to your company’s specifications.
<tr>
<td width="240" bgcolor="#CCFF99"><font size="2"
face="Verdana"><b>First Name </b></font></td>
<td width="282"><font face="Verdana"><input
type="text" size="20" maxlength="40" name="FirstName"
tabindex="1"> </font></td>
</tr>
AtliWeb 40.fm Page 9 Thursday, September 7, 2000 12:08 AM
AltiWeb 4.0
10 Center 4.0 User Guide
Scenario 2—Caller Data from Auto Attendant
The following scenario, based on contact.htm, exemplifies a customized
implementation of AltiWeb.
1. A web caller browses the company web site and has a question
regarding some product information.
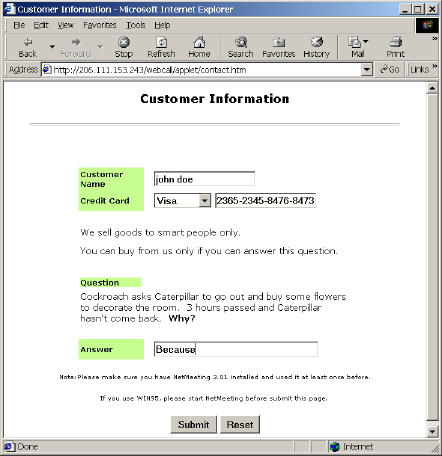
2. The web caller clicks the "contact us" link on the web page. The
Customer Information page (contact.htm) opens.
Figure 8. Contact.htm page
AtliWeb 40.fm Page 10 Thursday, September 7, 2000 12:08 AM
Scenario 2—Caller Data from Auto Attendant
Center 4.0 User Guide 11
AltiWeb 4.0
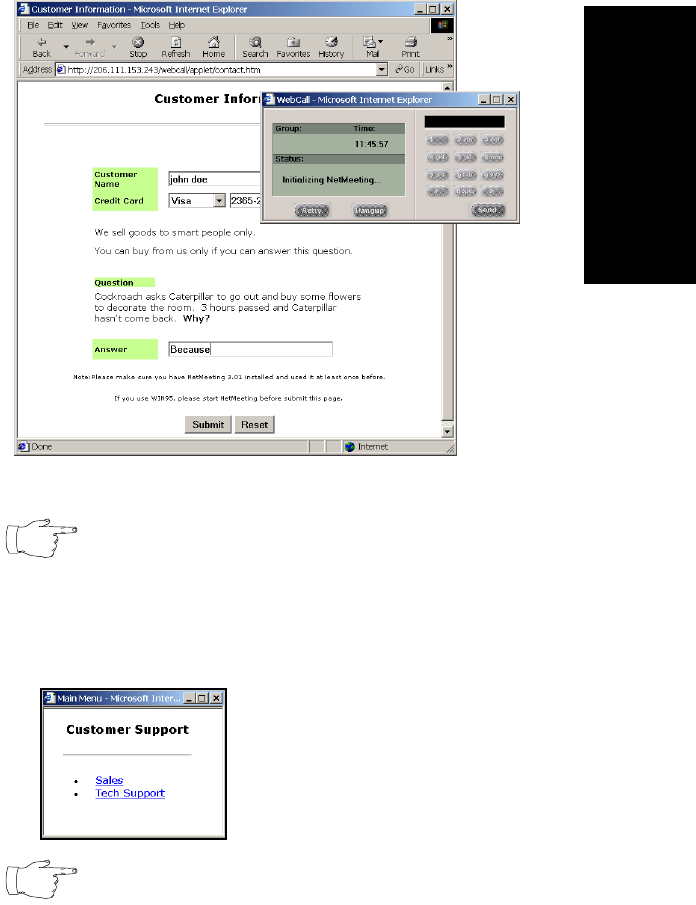
3. The web caller enters the required information, then clicks the Submit
button. The AltiWeb window (altiweb.htm) appears.
Figure 9. The AltiWeb window with DialPad visible
If NetMeeting is not installed on the caller’s computer (or
it’s not configured correctly), an error message displays.
4. Once NetMeeting successfully connects to an AltiGen VoIPport, the
web caller sees the Customer Support page, and hears a prompt
requesting the selection of Sales or Tech support.
The DialPad is visible to allow the web caller to close the
Auto Attendant windows and dial a number directly, is so
desired.
AtliWeb 40.fm Page 11 Thursday, September 7, 2000 12:08 AM

AltiWeb 4.0
12 Center 4.0 User Guide
5. The caller selects Sales, and the customer ID window
(customerid.htm) appears.
6. Once the caller enters the customer ID and clicks Submit, the Product
ID window (productid.htm) appears.
7. After the caller enters the product ID and clicks Submit, the web caller
is routed to the proper extension.
AtliWeb 40.fm Page 12 Thursday, September 7, 2000 12:08 AM

Scenario 2—Caller Data from Auto Attendant
Center 4.0 User Guide 13
AltiWeb 4.0
8. If the call goes to an AltiAgent user, the Caller Data window shows
Form data, IVR data and URL history.
Figure 10. Caller Data window in AltiAgent
9. From this point, in addition to voice communication, the agent and
caller can share web pages. For procedures, refer to the Refer to the
Chapter 4, "Using Center as a Workgroup Member," in the Center 4.0
User Guide.
AtliWeb 40.fm Page 13 Thursday, September 7, 2000 12:08 AM
AltiWeb 4.0
14 Center 4.0 User Guide
Customizing Contact.htm
You can use the Contact.htm page to collect caller information, and then
automatically direct the call to a specific extension.This caller information
is then displayed on the agent’s screen.
To Alter Form Data
Using Notepad or another html editor, modify Contact.htm source code as
follows:
1. Change the ServerIP
Set the value of the ServerIP to the IP address of the server on which
AltiWare resides.
<input type="hidden" name="ServerIP" value="206.111.153.203">
2. Set DialPad visibility
By default, the code in contact.htm is set to show the Dial Pad (value =
"1") and not to dial a specific number (value = ""). To hide the DialPad,
change the values as shown below:
Hide DialPad, Autoconnect to Extension 300
<input type="hidden" name="Extension" value="300"><input type="hidden"
name="DialPad" value="0">
Show DialPad, Let Caller Dial Extension
<input type="hidden" name="Extension" value=""><input type="hidden"
name="DialPad" value="1">
3. Alter the data collection fields
Shown below is the form row that collects the caller’s full name.
Copy, modify or delete variables to your company’s specifications.
<tr>
<td align="left" width="128" bgcolor="#CCFF99">
<b><small><font face="Verdana">Customer Name </font></small></
b></td>
<td width=22 align=left></td>
<td align=left width=282>
<font face=Verdana>
<input type="text" name="CustomerName" maxlength=40 size=20
tabindex=1> </font></td>
</tr>
AtliWeb 40.fm Page 14 Thursday, September 7, 2000 12:08 AM
Configuring Auto Attendant for Scenario 2
Center 4.0 User Guide 15
AltiWeb 4.0
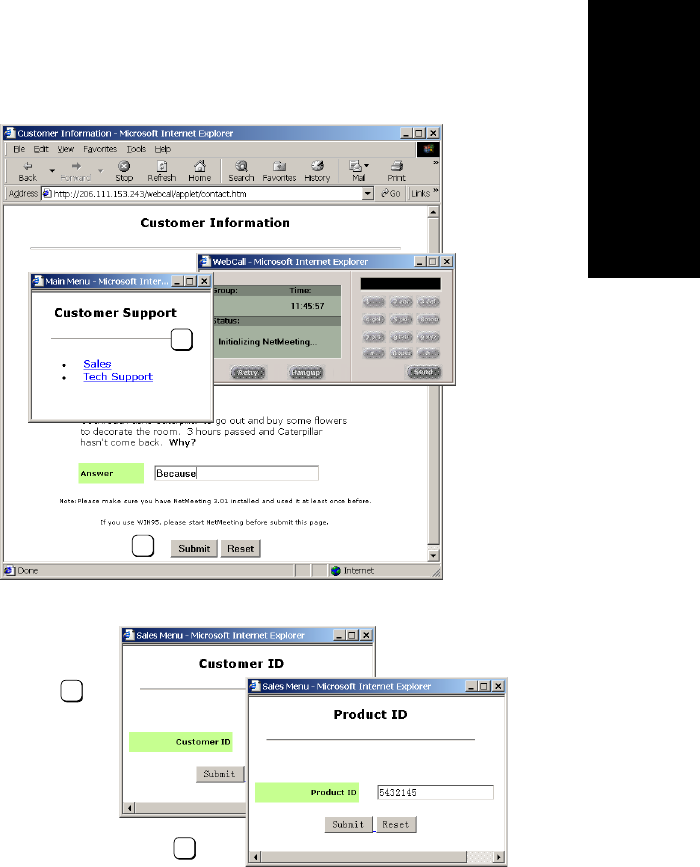
Configuring Auto Attendant for Scenario 2
Scenario 2 demonstrates how to use Auto Attendant in conjunction with
AltiWeb. For example, when the web caller clicks the Submit button (1),
Web Call connects and the Customer Support page appears. When the
customer clicks Sales (2), the Customer ID (3) and Product ID (4) pages
follow before the caller is put through.
Figure 11. Using Auto Attendant to push pages to the caller
sales_cid.htm
sales_pid.htm
IVR_top.htm
1
2
3
4
AtliWeb 40.fm Page 15 Thursday, September 7, 2000 12:08 AM
AltiWeb 4.0
16 Center 4.0 User Guide
Configuring Auto Attendant
For detailed instructions, refer to Chapter 7, "Auto
Attendant Configuration," in the System Administration
Manual.
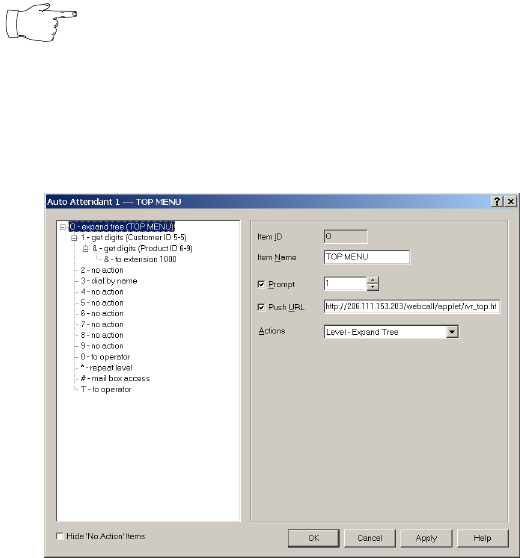
1. Run Auto Attendant.
2. Select 0-expand tree.
3. Make the following entries, then click Apply.
• Type an Item Name, if desired.
• To assign a voice message, check Prompt and select the number of
the appropriate message.
• Check Push URL, and type the path the page you want to display.
• Select Level-Expand Tree in the Actions dropdown.
AtliWeb 40.fm Page 16 Thursday, September 7, 2000 12:08 AM
Configuring Auto Attendant for Scenario 2
Center 4.0 User Guide 17
AltiWeb 4.0
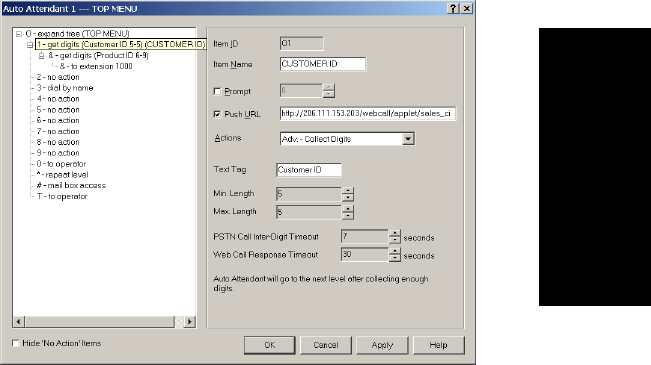
4. Select 1-get digits.
5. Make the following entries, and click Apply.
• Type an Item Name, if desired.
• Check Push URL, and type the path the page you want to display
(e.g., sales_cid.htm.)
• Select Adv.-Collect Digits from the Actions dropdown.
• Set the Min. and Max. Lengths that the caller must enter.
• Adjust the Web Call Response Timeout to give the web caller
enough time to provide all meaningful information.
AtliWeb 40.fm Page 17 Thursday, September 7, 2000 12:08 AM
AltiWeb 4.0
18 Center 4.0 User Guide
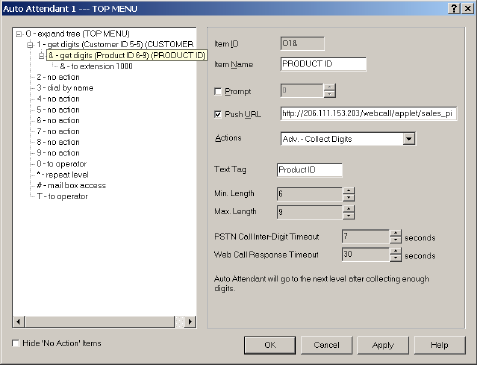
6. Select &-get digits.
7. Make the following entries, then click Apply.
• Type an Item Name, if desired.
• Check Push URL, and type the path the page you want to display
(e.g., sales_pid.htm.)
• Select Adv.-Collect Digits from the Actions dropdown.
• Set the Min. and Max. Lengths that the caller must enter.
• Adjust the Web Call Response Timeout to give the web caller
enough time to provide all meaningful information.
AtliWeb 40.fm Page 18 Thursday, September 7, 2000 12:08 AM
Configuring Auto Attendant for Scenario 2
Center 4.0 User Guide 19
AltiWeb 4.0
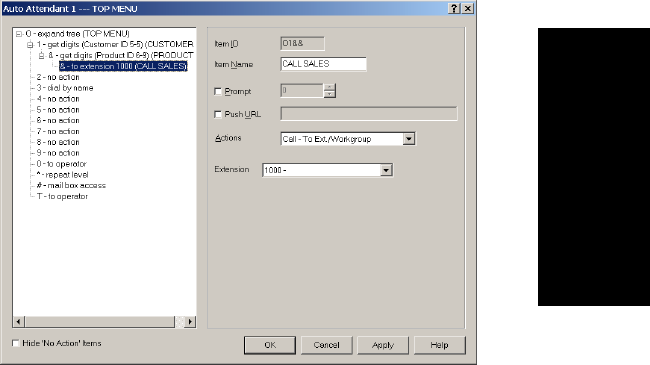
8. Select &-to extension.
9. Make the following entries, then click OK.
• Type an Item Name, if desired.
• Select Call.-Ext/Workgroup from the Actions dropdown.
• Select the Extension.
AtliWeb 40.fm Page 19 Thursday, September 7, 2000 12:08 AM

AltiWeb 4.0
20 Center 4.0 User Guide
Troubleshooting
If a web caller cannot connect, and an error message displays, the cause
may be one of the following:
Error Message Cause
Server connection failed.
Please try again later
• AltiServ IP address is not correct
• AltiServ is not running
• Firewall is not open
Option Pack is not installed.
Please try again later.
• AltiServ does not have Center 4.0
Option Pack License.
No more available sessions.
Please try again later.
• All session licenses are used or there
are no session licenses at all.
AtliWeb 40.fm Page 20 Thursday, September 7, 2000 12:08 AM

Uninstalling AltiWeb
Center 4.0 User Guide 21
AltiWeb 4.0
Uninstalling AltiWeb
1. From the Windows Start menu, select Programs AltiWeb 4.0
AltiWeb 4.0.
2. Click OK when the dialog box asks if you want to uninstall the
program, and respond to any additional prompts.
Alternatively
1. In the Control Panel, select Add/Remove Programs.
2. Choose AltiWeb 4.0 and click the Add/Remove or Change/Remove
button, depending on which version of Windows you’re running.
3. Click OK to in the dialog box to confirm you want to remove the
service, and respond to any additional prompts.
AtliWeb 40.fm Page 21 Thursday, September 7, 2000 12:08 AM
AltiWeb 4.0
22 Center 4.0 User Guide
AtliWeb 40.fm Page 22 Thursday, September 7, 2000 12:08 AM
