Avaya IP Office Microsoft CRM 3.0 Integration User Guide 3 0
User Manual: Avaya IP Office Microsoft CRM 3.0 Integration User Guide Avaya IP Office Information - www.telecomuserguides.com
Open the PDF directly: View PDF ![]() .
.
Page Count: 29
- Avaya Microsoft CRM Integration Introduction
- Installing Avaya Microsoft CRM Integration Solution
- Configuring Avaya Microsoft CRM Integration Solution
- Using Avaya Microsoft CRM Integration Solution
- Appendix A: Manual Installation
- Index

IP Office
Avaya Microsoft CRM 3.0 Integration
Solution Installation & User Guide
15-601033 Issue 4a (13 February 2006)

© 2006 Avaya Inc. All Rights Reserved.
Notice
While reasonable efforts were made to ensure that the information in this document was complete and accurate at the time of
printing, Avaya Inc. can assume no liability for any errors. Changes and corrections to the information in this document may be
incorporated in future releases.
Documentation Disclaimer
Avaya Inc. is not responsible for any modifications, additions, or deletions to the original published version of this documentation
unless such modifications, additions, or deletions were performed by Avaya.
Link Disclaimer
Avaya Inc. is not responsible for the contents or reliability of any linked Web sites referenced elsewhere within this
Documentation, and Avaya does not necessarily endorse the products, services, or information described or offered within
them. We cannot guarantee that these links will work all of the time and we have no control over the availability of the linked
pages.
License
USE OR INSTALLATION OF THE PRODUCT INDICATES THE END USER’S ACCEPTANCE OF THE TERMS SET FORTH
HEREIN AND THE GENERAL LICENSE TERMS AVAILABLE ON THE AVAYA WEBSITE AT
http://support.avaya.com/LicenseInfo/ (“GENERAL LICENSE TERMS”). IF YOU DO NOT WISH TO BE BOUND BY THESE
TERMS, YOU MUST RETURN THE PRODUCT(S) TO THE POINT OF PURCHASE WITHIN TEN (10) DAYS OF DELIVERY
FOR A REFUND OR CREDIT.
Avaya grants End User a license within the scope of the license types described below. The applicable number of licenses and
units of capacity for which the license is granted will be one (1), unless a different number of licenses or units of capacity is
specified in the Documentation or other materials available to End User. “Designated Processor” means a single stand-alone
computing device. “Server” means a Designated Processor that hosts a software application to be accessed by multiple users.
“Software” means the computer programs in object code, originally licensed by Avaya and ultimately utilized by End User,
whether as stand-alone Products or pre-installed on Hardware. “Hardware” means the standard hardware Products, originally
sold by Avaya and ultimately utilized by End User.
License Type(s): Designated System(s) License (DS).
End User may install and use each copy of the Software on only one Designated Processor, unless a different number of
Designated Processors is indicated in the Documentation or other materials available to End User. Avaya may require the
Designated Processor(s) to be identified by type, serial number, feature key, location or other specific designation, or to be
provided by End User to Avaya through electronic means established by Avaya specifically for this purpose.
Copyright
Except where expressly stated otherwise, the Product is protected by copyright and other laws respecting proprietary rights.
Unauthorized reproduction, transfer, and or use can be a criminal, as well as a civil, offense under the applicable law.
Third-Party Components
Certain software programs or portions thereof included in the Product may contain software distributed under third party
agreements (“Third Party Components”), which may contain terms that expand or limit rights to use certain portions of the
Product (“Third Party Terms”). Information identifying Third Party Components and the Third Party Terms that apply to them is
available on Avaya’s web site at: http://support.avaya.com/ThirdPartyLicense/
Avaya Fraud Intervention
If you suspect that you are being victimized by toll fraud and you need technical assistance or support, call Technical Service
Center Toll Fraud Intervention Hotline at +1-800-643-2353 for the United States and Canada. Suspected security vulnerabilities
with Avaya Products should be reported to Avaya by sending mail to: securityalerts@avaya.com.
For additional support telephone numbers, see the Avaya Support web site (http://www.avaya.com/support).
Trademarks
Avaya and the Avaya logo are registered trademarks of Avaya Inc. in the United States of America and other jurisdictions.
Unless otherwise provided in this document, marks identified by “®,” “™” and “SM” are registered marks, trademarks and service
marks, respectively, of Avaya Inc. All other trademarks are the property of their respective owners.
Documentation information
For the most current versions of documentation, go to the Avaya Support web site (http://www.avaya.com/support) or the IP
Office Knowledge Base (http://marketingtools.avaya.com/knowledgebase/).
Avaya Support
Avaya provides a telephone number for you to use to report problems or to ask questions about your contact center. The
support telephone number is 1- 800- 242- 2121 in the United States. For additional support telephone numbers, see the Avaya
Web site: http://www.avaya.com/support.

Table Of Contents
Avaya Microsoft CRM Integration Introduction.......................................................................1
Installing Avaya Microsoft CRM Integration Solution.............................................................3
Installation .................................................................................................................................................. 3
System Requirements ................................................................................................................................ 3
Licences ..................................................................................................................................................... 4
Hardware Requirements............................................................................................................................. 4
Server Installation....................................................................................................................................... 4
Avaya Microsoft CRM Integration Solution Client Installation ....................................................................5
.NET Framework ........................................................................................................................................ 5
Configuring Avaya Microsoft CRM Integration Solution ........................................................7
Launching Microsoft CRM Integration Solution .......................................................................................... 7
Avaya Microsoft CRM Integration Options ................................................................................................. 8
Avaya Microsoft CRM Integration Options - Preferences...........................................................................9
Avaya Microsoft CRM Integration Options - Configuration....................................................................... 11
Call Data Tagging..................................................................................................................................... 13
Additional Examples ............................................................................................................................ 13
Account – Account Number ................................................................................................................. 13
Case – incident (case number)............................................................................................................ 13
Toast......................................................................................................................................................... 14
The System Tray ...................................................................................................................................... 15
Using Avaya Microsoft CRM Integration Solution ................................................................ 17
Creating a New Microsoft CRM record..................................................................................................... 17
Making a Call............................................................................................................................................ 18
Making a call from an Account............................................................................................................. 18
Making a call from a Contact ............................................................................................................... 18
Making a call from a Lead.................................................................................................................... 18
Making a call from a Phone Activity Record ........................................................................................ 19
Answering a Call....................................................................................................................................... 20
Through the Toast................................................................................................................................ 20
Using the Active Calls window............................................................................................................. 20
Active Calls............................................................................................................................................... 21
Resolve Multiple Matches......................................................................................................................... 22
Appendix A: Manual Installation............................................................................................. 23
Manual Installation Microsoft CRM Server Resources ............................................................................. 23
Overview.............................................................................................................................................. 23
Manual Steps....................................................................................................................................... 23
Sections Supported.............................................................................................................................. 24
Full Lead Example ............................................................................................................................... 24
Client Installation Notes ....................................................................................................................... 24
TAPI Driver .......................................................................................................................................... 24
Index..........................................................................................................................................25

Avaya Microsoft CRM 3.0 Integration Solution Installation & User Guide Page 1
IP Office 15-601033 Issue 4a (13 February 2006)
Avaya Microsoft CRM Integration
Introduction
The Avaya Microsoft™ CRM Integration Solution allows a business to connect Microsoft Dynamics®
CRM 3.0 to Avaya IP Office. It integrates contact points in such a way that will transform the way your
business interacts with your customers, this is accomplished by integrating incoming calls directly to the
desktop of the user through the use of screen pop technology and by providing outbound dial capability
directly from the Microsoft CRM entity.
This document is specifically for use with the Avaya Microsoft™ CRM 3.0 Integration Solution.

Avaya Microsoft CRM 3.0 Integration Solution Installation & User Guide Page 3
IP Office 15-601033 Issue 4a (13 February 2006)
Installing Avaya Microsoft CRM Integration
Solution
Installation
The Avaya Microsoft CRM Integration Solution requires the following applications to be installed on the
Server PC prior to installing the Avaya Microsoft CRM Integration Solution.
• Microsoft Dynamics® CRM 3.0
• IIS 5.0 +
The Avaya Microsoft CRM Integration Solution requires the following applications installed on the Client
PC. The client machine will be checked at installation for these components and they will be installed if
not found.
• Microsoft .NET 2.0
• IP Office TAPI 2.1 Driver (1.0.0.27)
The Avaya Microsoft CRM Integration Solution is supported on the following client operating systems:
• Microsoft Windows 2000™ Professional
• Microsoft Windows XP™ Professional
Refer to the latest IP Office Technical Tips for further details on operating system support.
System Requirements
The following applications are required for the Avaya Microsoft CRM Integration Solution.
Application Software Version Component Location
Microsoft Dynamics® CRM Server
(Professional or Small Business
Edition)
3.0 Server
IIS * 5.0 + Server
IP Office Core 3.0 + Telephone System
IP Office TAPI** 2.1 (1.0.0.27) Client
Microsoft .Net Framework** 2.0 Client
Avaya Microsoft CRM Integration
Solution** 3.0 Client
Internet Explorer * 6.0 + Client
* These are part of the Microsoft CRM Server/Client requirements.
** These are deployed by the Avaya Microsoft CRM Integration Solution.

Installing Avaya Microsoft CRM Integration Solution
Avaya Microsoft CRM 3.0 Integration Solution Installation & User Guide Page 4
IP Office 15-601033 Issue 4a (13 February 2006)
Licences
• The Microsoft CRM Integration Users Licence is required for Avaya Microsoft CRM Integration
Solution. Refer to the IP Office Installation Manual.
Hardware Requirements
We recommend the following minimum PC specification is used for Avaya Microsoft CRM Integration
Solution Client application.
• Processor: Pentium 4.
• Clock Speed: 1.4 GHz.
• Memory: 512 MB.
Server Installation
The Server Installation adds the Dial capability to the Account/Contact/Lead and Phone Activity Record
screens.
The Avaya Microsoft CRM Integration Solution modifies the isv.config.xml file and the web.config file to
provide ISV integration.
The Avaya Microsoft CRM Integration Solution is available on an IP Office CD.
1. Insert the IP Office CD into the CD Drive.
2. If the CD does not autorun. Open My Computer and select the CD Drive.
3. Double Click the Setup.exe file
4. Click Next.
5. Select the folder for installation.
6. Select the Microsoft CRM Server. Follow the on screen prompts.
7. At the completed installation screen click Finish to complete the installation.
8. Restart the IIS Service.

Installing Avaya Microsoft CRM Integration Solution
Avaya Microsoft CRM 3.0 Integration Solution Installation & User Guide Page 5
IP Office 15-601033 Issue 4a (13 February 2006)
Avaya Microsoft CRM Integration Solution Client
Installation
The Avaya Microsoft CRM Integration Solution Client and Server components are available from a single
CD. During the installation of the client software the IP Office TAPI and Microsoft .NET 2.0 are also
installed.
1. Insert the CD into the CD Drive.
2. If the CD does not autorun. Open My Computer and select the CD Drive.
3. Double Click the Setup.exe file
4. Select the IP Office.
5. Click Next.
6. Select the Folder for installation.
7. Select Microsoft CRM Client. Follow the on screen prompts.
8. The Microsoft .NET 2.0 Framework is installed.
9. Select IP Office Unit & Click Next.
10. Select the User Name & Password of the User you want to associate with the Avaya Microsoft
CRM Integration Solution. Click Next.
11. At the completed installation screen click Finish to complete the installation.
The Application is now installed to the following path on the Start Menu. Start/Programs/IP Office/MS
CRM Integration. It is also added to the Startup folder, this will automatically start the application when
you start your PC.
.NET Framework
The Microsoft .NET Framework 2.0 is automatically installed when the Avaya Microsoft CRM Integration
Solution Client is selected. The Microsoft .NET 2.0 is required for the Client components of the Avaya
Microsoft CRM Integration Solution. It is only installed if the Microsoft .NET 2.0 is not detected on the
destination machine.
Avaya Microsoft CRM 3.0 Integration Solution Installation & User Guide Page 7
IP Office 15-601033 Issue 4a (13 February 2006)
Configuring Avaya Microsoft CRM
Integration Solution
Launching Microsoft CRM Integration Solution
Follow the steps to start the Avaya Microsoft CRM Integration Solution.
1. Click the Start button on the Windows Taskbar.
2. Point to Programs.
3. Point to IP Office.
4. Click MS CRM Integration.
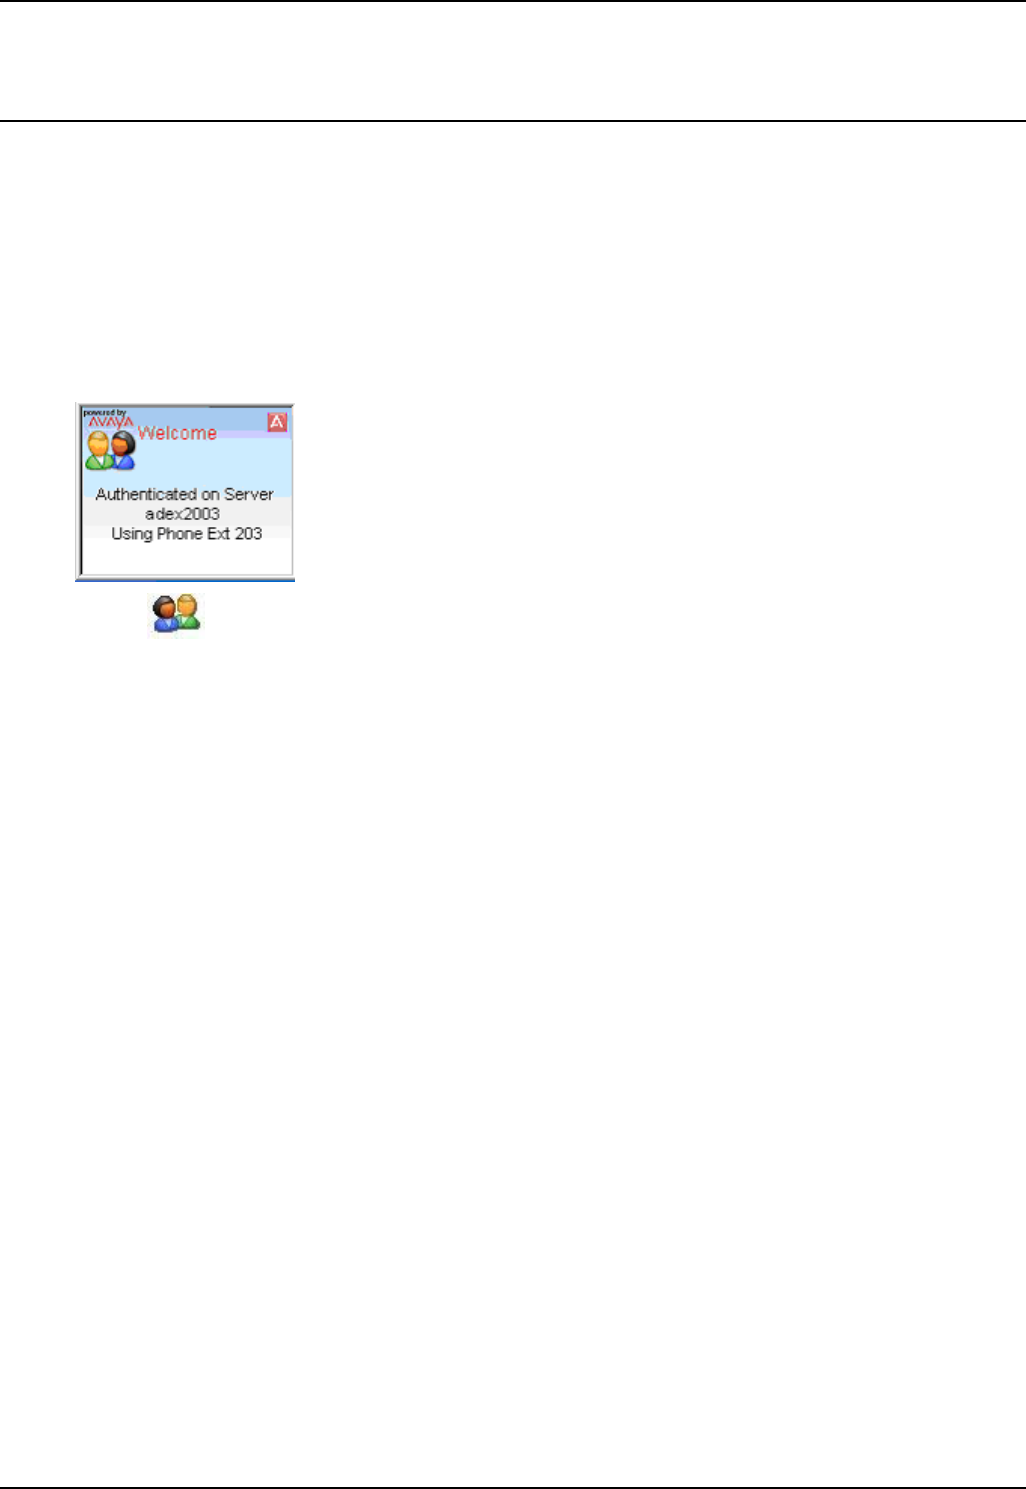
5. The following message is display when login is successful. You have been authenticated by
the Microsoft CRM Server (name).
• This icon appears in the status bar when the application is loaded.

Configuring Avaya Microsoft CRM Integration Solution
Avaya Microsoft CRM 3.0 Integration Solution Installation & User Guide Page 8
IP Office 15-601033 Issue 4a (13 February 2006)
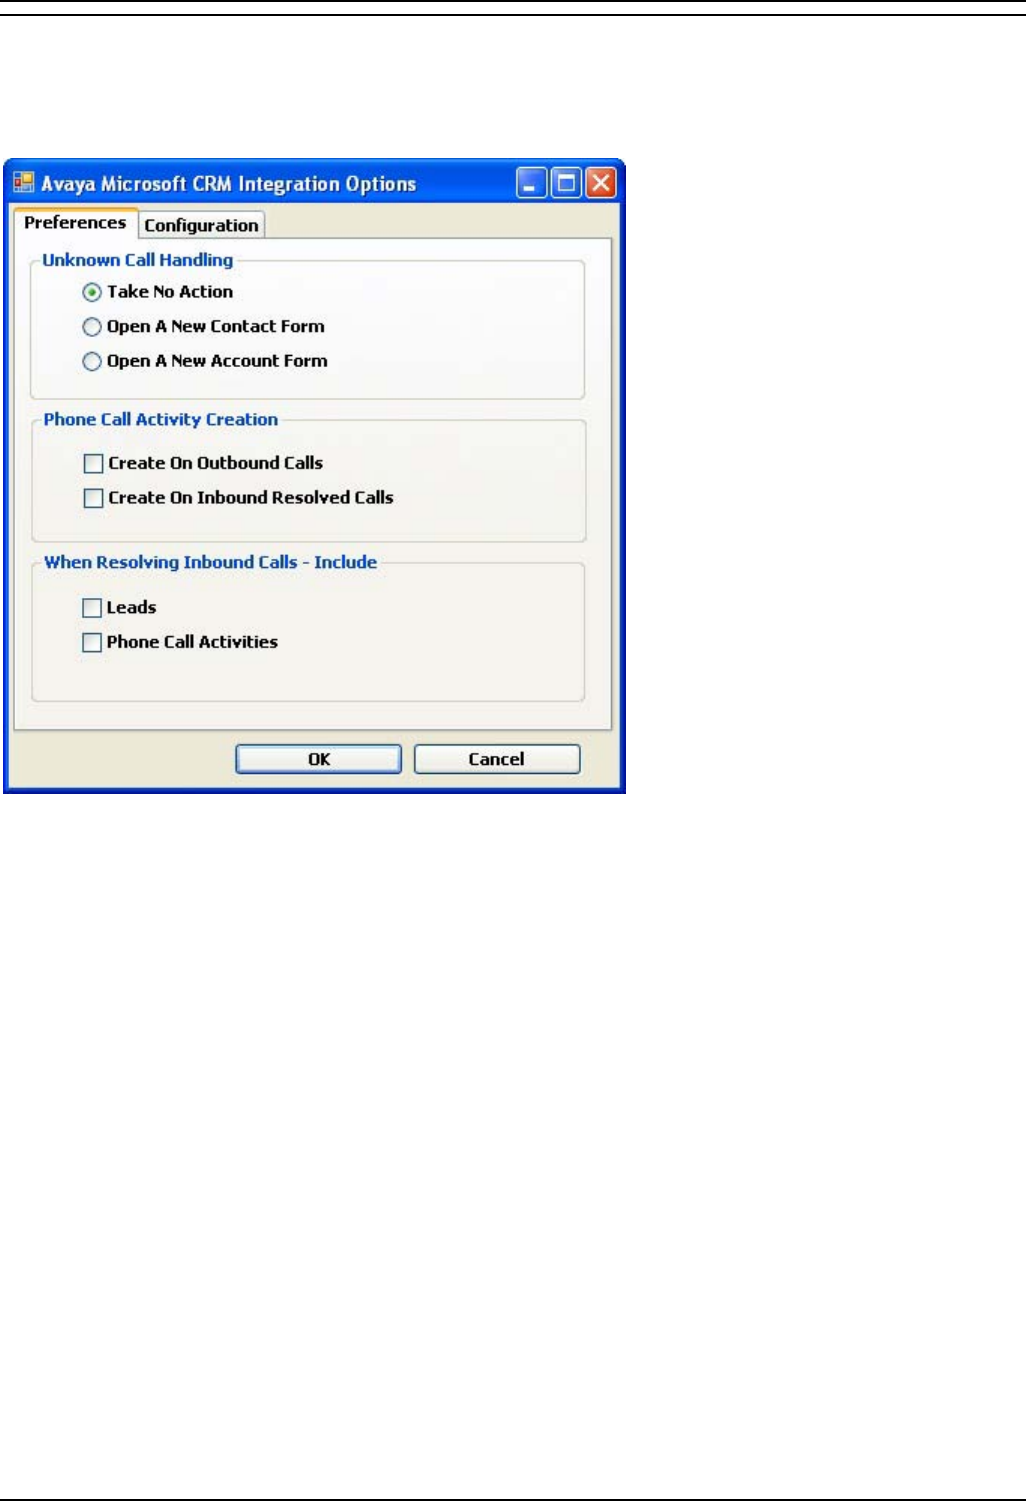
Avaya Microsoft CRM Integration Options
The Avaya Microsoft CRM Integration Options consists of Preferences and Configuration tabs.
Configuring Avaya Microsoft CRM Integration Solution
Avaya Microsoft CRM 3.0 Integration Solution Installation & User Guide Page 9
IP Office 15-601033 Issue 4a (13 February 2006)
Avaya Microsoft CRM Integration Options - Preferences
The Preferences tab allows you to change the preferences for Call Handling, Activity Creation and
Resolution of inbound calls.
Unknown Call Handling
The Unknown Call Handling allows you to control the behavior of the Avaya Microsoft CRM Integration
Solution when you receive an inbound unknown caller. You can select one of the following behaviors.
• Take No Action - No Action will be taken.
• Open A New Contact Form - The Avaya Microsoft CRM Integration Solution will automatically
open a new contact form, allowing you to enter contact information about the caller.
• Open A New Account Form - The Avaya Microsoft CRM Integration Solution will automatically
open a new account form, allowing you to create a new account for the caller.

Configuring Avaya Microsoft CRM Integration Solution
Avaya Microsoft CRM 3.0 Integration Solution Installation & User Guide Page 10
IP Office 15-601033 Issue 4a (13 February 2006)
Phone Call Activity Creation
The Phone Call Activity Creation allows you to control the creation of phone call activity records. A
phone call activity record can only be created for calls which are resolved to a single entity. They are
only created when a call is connected.
Create On Outbound Calls - Check this check box to create a phone call activity record for outbound
calls.
Create On Inbound Resolved Calls - Check this check box to create a phone call activity record for
inbound resolved calls.
When Resolving Inbound Calls - Include
The When Resolving Inbound Calls allows you to control what is included when trying to resolve
multiple matches. Refer to Resolve Multiple Matches for more information.
Leads - Check this check box to include leads in the criteria for resolving multiple matches.
Phone Call Activities - Check this check box to include phone call activities in the criteria for resolving
multiple matches.
Click OK to save any changes. To exit and discard any changes click Cancel. Changes made to the
Preferences tab are dynamic. The application does not need to be restarted for the changes to take
effect.

Configuring Avaya Microsoft CRM Integration Solution
Avaya Microsoft CRM 3.0 Integration Solution Installation & User Guide Page 11
IP Office 15-601033 Issue 4a (13 February 2006)
Avaya Microsoft CRM Integration Options - Configuration
The Configuration tab allows configuration of the Avaya Microsoft CRM Integration Solution.
Call Control Information - TAPI Driver Settings
The Call Control Information - TAPI Driver Settings are settings associated with the TAPI driver. These
settings are derived from the TAPI configuration settings.
User Name: This is name of the User. This is Read Only if the TAPI driver is configured to a
Single User. Otherwise it will be left blank.
PBX IP Address: The IP Address of the IP Office. This is Read Only if the TAPI driver is
configured to a Single User.
Advanced Call Control Configuration
The Advanced Call Control Configuration are settings which allow the Avaya Microsoft CRM Integration
Solution to be configured for a specific extension number.
Use Explicit Extension Number: Check this box to specify a explicit extension number
Extension Number: This is the Extension number associated with the extension name.
If your TAPI is configured for first party, then the extension number must match the users IP Office
extension.

Configuring Avaya Microsoft CRM Integration Solution
Avaya Microsoft CRM 3.0 Integration Solution Installation & User Guide Page 12
IP Office 15-601033 Issue 4a (13 February 2006)
Call Options
The Call Options allow you to configure a number of aspects for internal and external call handling.
Internal Ext No Digits: This is the number of digits which define an internal extension. When you
dial a number which has more than the number of digits specified here, it is automatically treated
as an external call. Calls with the same number or fewer digits are as treated internal calls and do
not screen pop.
External Access No: Enter the prefix required to access an external line.
Microsoft Dynamics CRM Server Settings
The Microsoft Dynamics CRM Server Settings allows you to configure the Microsoft CRM Server.
Server Name: Enter the Microsoft CRM server name. This is the server which you are connected.
Click OK to save any changes. To exit and discard any changes click Cancel. Changes made to the
Configuration tab are not dynamic. The application needs to be restarted for the changes to take effect.

Configuring Avaya Microsoft CRM Integration Solution
Avaya Microsoft CRM 3.0 Integration Solution Installation & User Guide Page 13
IP Office 15-601033 Issue 4a (13 February 2006)
Call Data Tagging
Call Data Tags enable advanced scenarios to be built around your Microsoft CRM 3.0 and Avaya
Microsoft CRM Integration Solution. In situations where CLI/ANI matching is not sufficient, you can add
screening and specific data collection interactions with your customers using the VoiceMail Pro. The
Voicemail Pro assisted transfer action can be used to pass data to users and pop matching records
based on that data.
Based on your solutions requirements, you could obtain and verify the data collected, and then transfer
the call with a data tag, that will utilize your specific criteria to lookup the required, account, contact or
case, once the call is offered.
The tags are conformant xml fragments, they are comprised of an element AV_M and two attributes the
Microsoft CRM entity (account, contact, or incident) and the schema name of the field to match on, in
this example ‘contactid’ and the data is the record key.
<AV_M O="contact" S="contactid" >{e44e6dbf-bd2a-da11-badb-505054503030}</AV_M>
<AV_M – element name.
O="contact" – crm entity.
S="contactid" – attribute to search on.
> - end of element attributes
{e44e6dbf-bd2a-da11-badb-505054503030} – the data to match on, this should be unique </AV_M> -
Closing tag.
The xml element name, attributes names and Microsoft CRM entity and schema names are case
sensitive.
Additional Examples
Account – Account Number
<AV_M O="account" S="accountnumber" >TL00001</AV_M>
Case – incident (case number)
<AV_M O="incident" S="ticketnumber" >CAS-01001</AV_M>

Configuring Avaya Microsoft CRM Integration Solution
Avaya Microsoft CRM 3.0 Integration Solution Installation & User Guide Page 14
IP Office 15-601033 Issue 4a (13 February 2006)
Toast
The Avaya Microsoft CRM Integration Solution allows system alerts to be popped to the desktop through
toast.
The toast will display a variety of system alerts;
• Inbound calls
• Tapi login
• Microsoft CRM authentication
• Multiple matches against CRM records.
• Microsoft CRM authentication errors
• Tapi login errors
The toast alert also allows you to answer an inbound call;
• Click the text message displayed in the center of the toast alert.
The toast alert will close automatically. To manually close the toast click the icon in the top right hand
corner of the toast alert.

Configuring Avaya Microsoft CRM Integration Solution
Avaya Microsoft CRM 3.0 Integration Solution Installation & User Guide Page 15
IP Office 15-601033 Issue 4a (13 February 2006)
The System Tray
Once installed the Microsoft CRM Integration Solution is loaded into the System Tray.
The Microsoft CRM integration solution can be accessed by either double clicking the icon or by
right clicking and selecting an option from a menu.
Open: Selecting Open will open the Avaya Microsoft CRM Integration Active Calls window.
Pause: Selecting Pause will prevent Avaya Microsoft CRM Integration Solution from opening any
records. It will not stop the Toast from popping.
Options...: Selecting Options... will open the Avaya Microsoft CRM Integration Options.
About: Displays the About box, provides details of the version number.
Help: Opens the Avaya Microsoft CRM Integration Solution help system.
Exit: Selecting this will Exit the Avaya Microsoft CRM Integration Solution.

Avaya Microsoft CRM 3.0 Integration Solution Installation & User Guide Page 17
IP Office 15-601033 Issue 4a (13 February 2006)
Using Avaya Microsoft CRM Integration
Solution
Creating a New Microsoft CRM record
Upon receipt of an unknown inbound call, the Microsoft CRM Integration Solution allows you to create a
New Contact, New Account or take No Action. This is configured in the Preferences in the Avaya
Microsoft CRM Integration Options. Refer to Unknown Call Handling in the Preferences for more
details on the configuration options available.
When a new Account, Contact or Phone Activity Record are created the callers number is
automatically populated into the record. NO other details are automatically populated. These will need to
be inserted manually. When entering a phone number it must be as non formatted text, no alpha
characters such as brackets, dashes or spaces must be inserted into the phone number field.
When creating a new CRM record, the Dial capability will not appear until the record is saved.
Using Avaya Microsoft CRM Integration Solution
Avaya Microsoft CRM 3.0 Integration Solution Installation & User Guide Page 18
IP Office 15-601033 Issue 4a (13 February 2006)
Making a Call
There are a number of ways to make a call using Avaya Microsoft CRM Integration Solution. You can
make a call from Accounts, Contacts, Leads and Phone Activity Records.
Making a call from an Account
Click the icon.
The Place a Call window will appear.
Click the number required from the options available. Alternatively, click Dial Default. This will dial the
number with the icon adjacent to it. The Dial Default cannot be changed. Phone numbers will only be
displayed if there is a phone number in the relevant field in the Account record.
The following fields on the Account are used by the Microsoft CRM Integration Solution for dialing;
• Main Phone
• Other Phone
• Phone
Making a call from a Contact
Click the icon.
The Place a Call window will appear.
Click the number required from the options available. Alternatively, click Dial Default. This will dial the
number with the icon adjacent to it. The Dial Default cannot be changed. Phone numbers will only be
displayed if there is a phone number in the relevant field in the Contact record.
The following fields on the Contact are used by the Microsoft CRM Integration Solution for dialing;
• Business Phone
• Home Phone
• Mobile Phone
• Phone
Making a call from a Lead
Click the icon.
The Place a Call window will appear.
Click the number required from the options available. Alternatively, click Dial Default. This will dial the
number with the icon adjacent to it. The Dial Default cannot be changed. Phone numbers will only be
displayed if there is a phone number in the relevant field in the Lead record.
The following fields on the Lead are used by the Microsoft CRM Integration Solution for dialing;
• Business Phone
• Home Phone
• Other Phone
• Mobile Phone

Using Avaya Microsoft CRM Integration Solution
Avaya Microsoft CRM 3.0 Integration Solution Installation & User Guide Page 19
IP Office 15-601033 Issue 4a (13 February 2006)
Making a call from a Phone Activity Record
Click the icon.
The Place a Call window will appear.
Click the number required from the options available. Alternatively, click Dial Default. This will dial the
number with the icon adjacent to it. The Dial Default cannot be changed. Phone numbers will only be
displayed if there is a phone number in the relevant field in the Phone Activity record.
The following field on the Phone Activity Record are used by the Microsoft CRM Integration Solution for
dialing;
• Phone Number
Using Avaya Microsoft CRM Integration Solution
Avaya Microsoft CRM 3.0 Integration Solution Installation & User Guide Page 20
IP Office 15-601033 Issue 4a (13 February 2006)
Answering a Call
Using the Avaya Microsoft CRM Integration Solution there are a number of ways to answer your call
through the PC.
Through the Toast
The toast alert also allows you to answer an inbound call;
• Click the text message displayed in the center of the toast alert.
For more information on the toast, see Toast.
Using the Active Calls window
Calls can be answered from the Active Calls window. An Inbound call will be displayed in the Active
Calls window. To answer the double click the call.
For more information on the toast, see Active Calls.

Using Avaya Microsoft CRM Integration Solution
Avaya Microsoft CRM 3.0 Integration Solution Installation & User Guide Page 21
IP Office 15-601033 Issue 4a (13 February 2006)
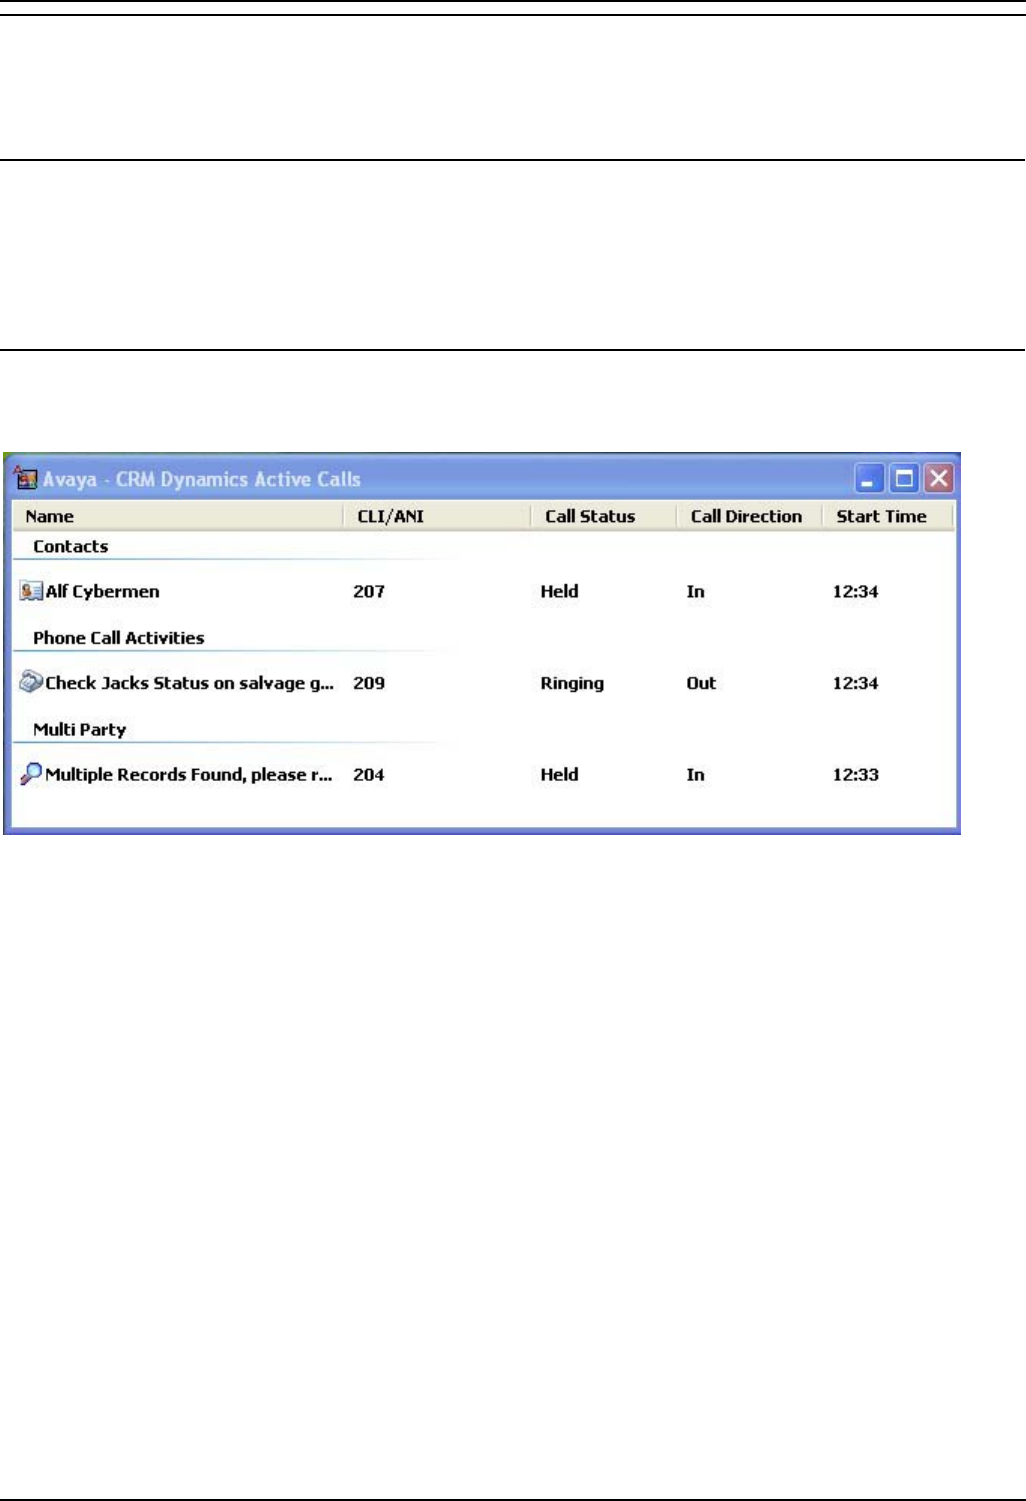
Active Calls
The Active calls window displays all the active inbound or outbound calls.
The active call window displays a call depending on the association made between the inbound or
outbound call. Calls are categorized in groups depending on the association or activity. They are
represented as either Contacts, Accounts, Leads, Phone Call Activities, Multi Party, Cases or No
Matching CRM Records.
Within each call the following information is displayed;
• Name - This is the information associated with the call. The content of these fields will depend if
the data is populated in the Microsoft CRM Solution.
• Contacts - Within each Contact, the Name field is used to present the Name in the Active
Calls window.
• Accounts - Within each Account, the Name field is used to present the name in the
Active Calls window.
• Leads - Within each Lead, the Name field is used to present the name in the Active Calls
window.
• Phone Activity - Within each Phone Activity record, the Subject field is used to present
the name in the Active Calls window.
• Multi Party - This is a system message. The callers number occurs in a number of
records and needs to be resolved. Refer to Resolve Multiple Matches for more
information.
• Cases - Within each Case, the Title field is used to present the name in the Active Calls
window. (Cases are only displayed via Data Tagging).
• Callers Number - The Callers Number associated with the telephone call.
• Call Status - Displays the status of the call. Calls can either be Ringing, Connected or Held.
• Call Direction - This is the direction of the call.
• Start Time - This is the time the call started.
Using Avaya Microsoft CRM Integration Solution
Avaya Microsoft CRM 3.0 Integration Solution Installation & User Guide Page 22
IP Office 15-601033 Issue 4a (13 February 2006)
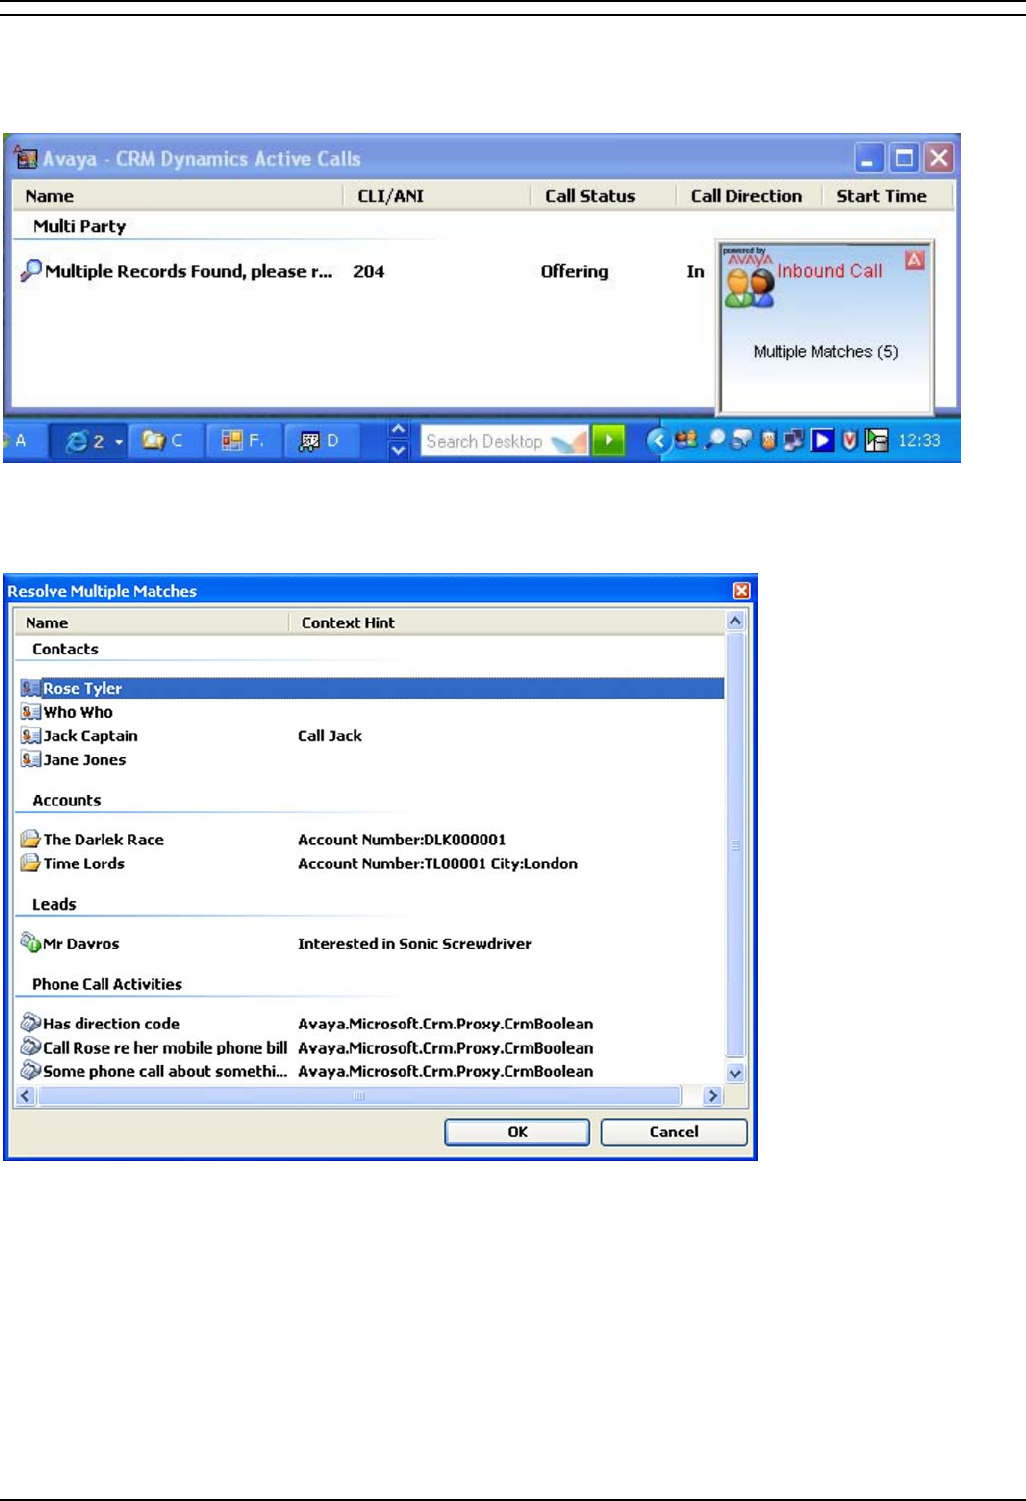
Resolve Multiple Matches
Resolving multiple matches occur when the callers number is associated with more than one record.
When you receive a Callers Number which has Multiple Matches, you can either Click the text in the
Toast or from the Active Call window select the call.
The records can be Contacts, Accounts, Leads and Phone Call Activities.
To resolve the call. Select the record you want to associate the call with. The contents of the Resolve
Multiple Matches window is configurable refer to When Resolving Inbound Calls - Include in the
Microsoft CRM Integration Preferences.

Avaya Microsoft CRM 3.0 Integration Solution Installation & User Guide Page 23
IP Office 15-601033 Issue 4a (13 February 2006)
Appendix A: Manual Installation
Manual Installation Microsoft CRM Server Resources
The following instructions are provided to allow manual installation of the Microsoft CRM server side
resources and configuration if required, and to provide clarity on the actions carried out during
deployment via the application installation package.
Overview
The following instructions are designed to provide guidance on installing the necessary Avaya resources
and configuration settings, manually.
You should be experienced with the MSCRM 3.0 configuration files and IIS web site
configuration/administration before attempting to make any changes. Please backup any files before you
start applying changes.
Manual Steps
1. Create a directory under the MSCRM web site physical location and copy the server side
resources from the distribution package (CD or download).
2. Using Internet Information Services (IIS) Manager, create a virtual directory under the MSCRM
web site, the alias should be named "AVCRMRes", the physical location should be an
appropriate directory on the system containing the server side resources (AvDial.htm and the
image files), created earlier.
Ensure that the "Enable Default Content" option is set and includes "Default.htm", in the
Documents Tab of the “AVCRMRes” properties page.
3. Add the button configuration statements to the ISV.Config.xml file (_Resources).
Dial Button - toolbar button statement to be added to entities
If there are existing customizations, then the button statement needs to be added. The complete Toolbar
statement is shown for context.
<ToolBar ValidForCreate="0" ValidForUpdate="1">
<Button Title="Dial" ToolTip="Dial a numbe1r using Avaya IP Office"
Icon="/AvCRMRes/Avmos_16_15697.gif" Url="/AvCRMRes/AvDial.htm" PassParams="1"
WinParams="help:no;status:no;dialogHeight:300px;dialogWidth:400px" WinMode="1" Client="Web"/>
<ToolBarSpacer/>
</ToolBar>

Appendix A: Manual Installation
Avaya Microsoft CRM 3.0 Integration Solution Installation & User Guide Page 24
IP Office 15-601033 Issue 4a (13 February 2006)
Sections Supported
The customization can be added to the following entities:
<Entity name="account">
<Entity name="contact">
<Entity name="lead">
Full Lead Example
The following shows the full entity after the customization has been completed.
<Entity name="lead">
<ToolBar ValidForCreate="0" ValidForUpdate="1">
<Button Title="Dial" ToolTip="Dial a number using Avaya IP Office"
Icon="/AvCRMRes/Avmos_16_15697.gif" Url="/AvCRMRes/AvDial.htm" PassParams="1"
WinParams="help:no;status:no;dialogHeight:300px;dialogWidth:400px" WinMode="1" Client="Web"/>
<ToolBarSpacer/>
</ToolBar>
</Entity>
4. Enable the ISV options by adding "Web" in the MSCRM web sites Web.Config (<add
key="ISVIntegration" value="Web"/>).
Note: XML tags are case sensitive so due care when making changes should be applied.
Client Installation Notes
The default website within IIS, by default, uses the port number 80. In the event that the MSCRM
installation has had the option to create a new website selected, it will use port number 5555.
The client installation will assume the web server connection to be port 80. If a new MSCRM website has
been created then client will need to be re-configured to authenticate with the server successfully. On the
client machine, this can be achieved with the following steps:
1. Navigate to the following directory : Program Files\Avaya\Avaya Microsoft CRM Integration
Solution
2. Edit the following file : AvayaMSCRMEx.exe.config
<setting name=”crmportNumber” serializeAs=”String”>
<value>5555</value>
3. Save changes and restart the CRM client application.
TAPI Driver
The TAPI driver is installed during the client deployment. Uninstalling the application will remove the
TAPI driver, if you have any other applications that are dependant on TAPI, you should reinstall the TAPI
driver from the IP Office User CD.
If the User CD is uninstalled, the TAPI driver, may be removed, you should run Repair to have the Avaya
Microsoft CRM application replace the driver if necessary.

Avaya Microsoft CRM 3.0 Integration Solution Installation & User Guide Page 25
IP Office 15-601033 Issue 4a (13 February 2006)
Index
.
.NET 5
A
About 11
Account
Select 13
Account 13
Account Out Dialing 13
Account Toolbar 13
Account/Contact 4
Actioned 13
Avaya
open 11
C
CD Drive 4, 5
Client 3
Configureand Exit 11
CRM Integration 1
D
Dial button
Press 13
Dial button 13
Display 11
E
Exit
Avaya 11
I
Install/modify 4
Installation 3
IP Office 1
IP Office Microsoft CRM Client Integration
application 5
IP Office Microsoft CRM Integration Solution 1,
3
IP Office Microsoft CRM Server Integration 4
IP Office Unit
Select 4
IP Office Unit 4, 5
ISV 4
Isv.config file
assumes 4
modifies 4
Isv.config file 4
L
Login 7
M
Microsoft CRM Applications 1
Microsoft CRM Integration 4
Microsoft CRM Integration-Users Licence 3
Microsoft CRM Server 3, 7
Microsoft Windows 2000™ Professional 3
Microsoft Windows XP™ Professional 3
N
Name
Microsoft CRM Server 11
Name 11
Net Framework 3, 5
Next 5
O
OS 5
P
Password 5
PC 5, 11
PC Specification 3
Place
Call window 13
Press
Install Now button 5
Press 5
Programs
Point 7
Programs 7
R
Refer
IP Office Licence 3
Refer 3
S
Select
Microsoft CRM Server Integration Software
4
Select 4
Server Installation 4
Server PC 3
Server/Client 3
Software Version 3
System Requirements 3
T
TAPI 3, 5
Telephone System 3
U
Unknown Caller Action 11
User 5
User Name 5
W
Web.config file 4
Windows 5
Windows Taskbar
Start button 7
Windows Taskbar 7
Windowsupdate.microsoft.com 5

Index
Avaya Microsoft CRM 3.0 Integration Solution Installation & User Guide Page 26
IP Office 15-601033 Issue 4a (13 February 2006)
Performance figures and data quoted in this document are typical, and must be specifically
confirmed in writing by Avaya before they become applicable to any particular order or contract.
The company reserves the right to make alterations or amendments to the detailed
specifications at its discretion. The publication of information in this document does not imply
freedom from patent or other protective rights of Avaya or others.
Intellectual property related to this product (including trademarks) and registered to Lucent
Technologies have been transferred or licensed to Avaya.
All trademarks identified by the ® or ™ are registered trademarks or trademarks, respectively,
of Avaya Inc. All other trademarks are the property of their respective owners.
This document contains proprietary information of Avaya and is not to be disclosed or used
except in accordance with applicable agreements.
Any comments or suggestions regarding this document should be sent to
"wgctechpubs@avaya.com".
© 2006 Avaya Inc. All rights reserved.
Avaya
Unit 1, Sterling Court
15 - 21 Mundells
Welwyn Garden City
Hertfordshire
AL7 1LZ
England
Tel: +44 (0) 1707 392200
Fax: +44 (0) 1707 376933
Web: http://www.avaya.com/ipoffice/knowledgebase
