Basler Ace USB 3.0 User’s Manual
User Manual:
Open the PDF directly: View PDF ![]() .
.
Page Count: 375 [warning: Documents this large are best viewed by clicking the View PDF Link!]
- Contacting Basler Support Worldwide
- Table of Contents
- 1 Specifications, Requirements, and Precautions
- 2 Installation
- 3 Tools for Changing Camera Parameters
- 4 Camera Functional Description
- 5 Physical Interface
- 5.1 General Description of the Camera Connections
- 5.2 Camera Connector Pin Numbering and Assignments
- 5.3 Camera Connector Types
- 5.4 LED Indicator
- 5.5 Camera Cabling Requirements
- 5.6 Camera Power
- 5.7 Opto-isolated Input (Pin 2/Line 1)
- 5.8 Opto-isolated Output (Pin 4/Line 2)
- 5.9 Direct-coupled General Purpose I/O (GPIO; Pin 1/Line 3, Pin 3/Line 4)
- 5.10 Temporal Performance of I/O Lines
- 5.11 Configuring Input Lines and Signals
- 5.12 Configuring Output Lines and Signals
- 5.13 Significance of I/O Line Status
- 5.14 Checking I/O Line Status
- 6 Image Acquisition Control
- 6.1 Overview
- 6.2 Acquisition Start and Stop Commands and the Acquisition Mode
- 6.3 The Frame Burst Start Trigger
- 6.4 The Frame Start Trigger
- 6.5 Setting the Exposure Time
- 6.6 Electronic Shutter Operation
- 6.7 Overlapping Image Acquisitions
- 6.8 Acquisition Monitoring Tools
- 6.9 Acquisition Timing Chart
- 6.10 Maximum Allowed Frame Rate
- 6.11 Use Case Descriptions and Diagrams
- 7 Features
- 7.1 Feature Availability Charts
- 7.2 Gain
- 7.3 Black Level
- 7.4 Remove Parameter Limits
- 7.5 Digital Shift
- 7.6 Image Region of Interest (ROI)
- 7.7 Sequencer
- 7.8 Binning
- 7.9 Decimation
- 7.10 Scaling
- 7.11 Mirror Image
- 7.12 Luminance Lookup Table
- 7.13 Gamma Correction
- 7.14 Color Creation and Enhancement
- 7.15 Auto Functions
- 7.16 Timestamp Value
- 7.17 Event Notification
- 7.18 Test Images
- 7.19 Device Information Parameters
- 7.20 User Defined Values
- 7.21 User Sets
- 7.22 Line Pitch
- 7.23 Chunk Features
- 8 Troubleshooting and Support
- Revision History
- Index
Basler ace
USER’S MANUAL FOR USB 3.0 CAMERAS
Document Number: AW001234
Version: 08 Language: 000 (English)
Release Date: 06 July 2016
The manual includes information about the following
prototype cameras: acA2040-55, acA2040-120,
acA2440-35, and acA2440-75.
For customers in the USA
This equipment has been tested and found to comply with the limits for a Class A digital device,
pursuant to Part 15 of the FCC Rules. These limits are designed to provide reasonable protection
against harmful interference when the equipment is operated in a commercial environment. This
equipment generates, uses, and can radiate radio frequency energy and, if not installed and used
in accordance with the instruction manual, may cause harmful interference to radio
communications. Operation of this equipment in a residential area is likely to cause harmful
interference in which case the user will be required to correct the interference at his own expense.
You are cautioned that any changes or modifications not expressly approved in this manual could
void your authority to operate this equipment.
The shielded interface cable recommended in this manual must be used with this equipment in
order to comply with the limits for a computing device pursuant to Subpart B of Part 15 of FCC
Rules.
For customers in Canada
This apparatus complies with the Class A limits for radio noise emissions set out in Radio
Interference Regulations.
Pour utilisateurs au Canada
Cet appareil est conforme aux normes Classe A pour bruits radioélectriques, spécifiées dans le
Règlement sur le brouillage radioélectrique.
Life Support Applications
These products are not designed for use in life support appliances, devices, or systems where
malfunction of these products can reasonably be expected to result in personal injury. Basler
customers using or selling these products for use in such applications do so at their own risk and
agree to fully indemnify Basler for any damages resulting from such improper use or sale.
Warranty Note
Do not open the housing of the camera. The warranty becomes void, if the housing is opened.
All material in this publication is subject to change without notice and is copyright
Basler AG.
Contacting Basler Support Worldwide
Europe, Middle East, Africa
Basler AG
An der Strusbek 60–62
22926 Ahrensburg
Germany
Tel. +49 4102 463 515
Fax +49 4102 463 599
support.europe@baslerweb.com
The Americas
Basler, Inc.
855 Springdale Drive, Suite 203
Exton, PA 19341
USA
Tel. +1 610 280 0171
Fax +1 610 280 7608
support.usa@baslerweb.com
Asia - Pacific Region
Basler Asia Pte. Ltd.
35 Marsiling Industrial Estate Road 3
#05–06
Singapore 739257
Tel. +65 6367 1355
Fax +65 6367 1255
support.asia@baslerweb.com
www.baslerweb.com

Table of Contents AW00123408000
iBasler ace USB 3.0
Table of Contents
1 Specifications, Requirements, and Precautions . . . . . . . . . . . . . . . . . . . . . . . 1
1.1 Models . . . . . . . . . . . . . . . . . . . . . . . . . . . . . . . . . . . . . . . . . . . . . . . . . . . . . . . . . . . . . . 1
1.2 Specification Notes. . . . . . . . . . . . . . . . . . . . . . . . . . . . . . . . . . . . . . . . . . . . . . . . . . . . . 2
1.3 General Specifications . . . . . . . . . . . . . . . . . . . . . . . . . . . . . . . . . . . . . . . . . . . . . . . . . . 3
1.3.1 Cameras with CCD Sensor . . . . . . . . . . . . . . . . . . . . . . . . . . . . . . . . . . . . . . . . 3
1.3.2 Cameras with CMOS Sensor. . . . . . . . . . . . . . . . . . . . . . . . . . . . . . . . . . . . . . . 7
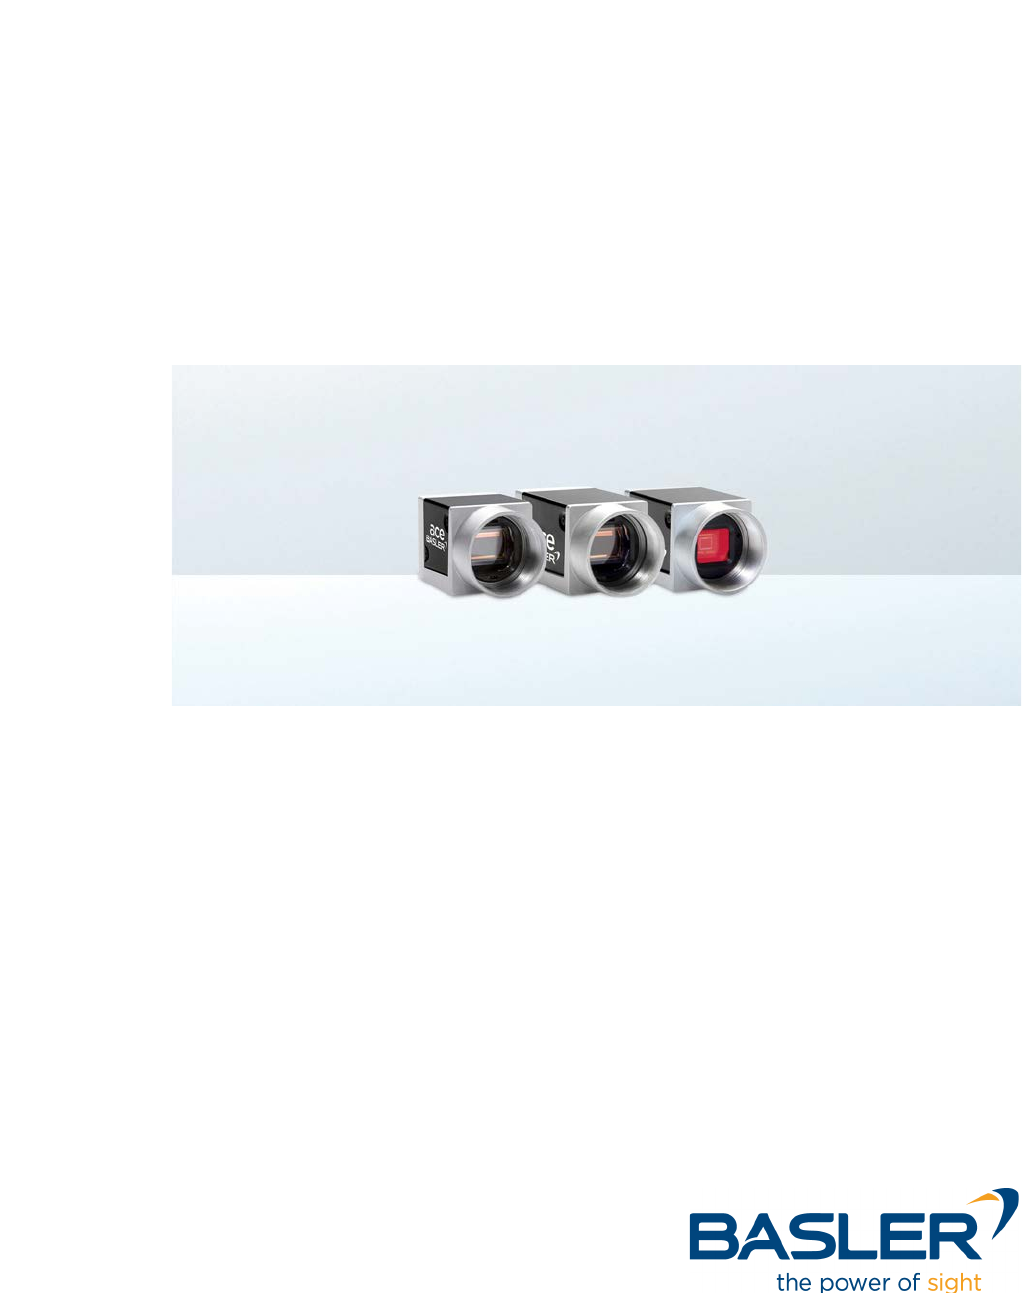
1.4 Spectral Response . . . . . . . . . . . . . . . . . . . . . . . . . . . . . . . . . . . . . . . . . . . . . . . . . . . . 27
1.4.1 Mono Camera Spectral Response. . . . . . . . . . . . . . . . . . . . . . . . . . . . . . . . . . 27
1.4.1.1 Cameras with CCD Sensor . . . . . . . . . . . . . . . . . . . . . . . . . . . . . . . 27
1.4.1.2 Cameras with CMOS Sensor . . . . . . . . . . . . . . . . . . . . . . . . . . . . . 29
1.4.2 Color Camera Spectral Response . . . . . . . . . . . . . . . . . . . . . . . . . . . . . . . . . . 34
1.4.2.1 Cameras with CCD Sensor . . . . . . . . . . . . . . . . . . . . . . . . . . . . . . . 34
1.4.2.2 Cameras with CMOS Sensor . . . . . . . . . . . . . . . . . . . . . . . . . . . . . 36
1.5 Mechanical Specifications . . . . . . . . . . . . . . . . . . . . . . . . . . . . . . . . . . . . . . . . . . . . . . 41
1.5.1 Camera Dimensions and Mounting Points. . . . . . . . . . . . . . . . . . . . . . . . . . . . 41
1.5.2 Maximum Allowed Lens Thread Length. . . . . . . . . . . . . . . . . . . . . . . . . . . . . . 44
1.6 Mounting Instructions . . . . . . . . . . . . . . . . . . . . . . . . . . . . . . . . . . . . . . . . . . . . . . . . . . 46
1.6.1 Tightening Sequence When Using the M2 Screws . . . . . . . . . . . . . . . . . . . . . 46
1.6.2 Tightening Sequence When Using the M3 Screws . . . . . . . . . . . . . . . . . . . . . 47
1.7 Mechanical Stress Test Results . . . . . . . . . . . . . . . . . . . . . . . . . . . . . . . . . . . . . . . . . . 48
1.8 Software Licensing Information . . . . . . . . . . . . . . . . . . . . . . . . . . . . . . . . . . . . . . . . . . 49
1.9 Avoiding EMI and ESD Problems. . . . . . . . . . . . . . . . . . . . . . . . . . . . . . . . . . . . . . . . . 50
1.10 Environmental Requirements . . . . . . . . . . . . . . . . . . . . . . . . . . . . . . . . . . . . . . . . . . . . 51
1.10.1 Temperature and Humidity . . . . . . . . . . . . . . . . . . . . . . . . . . . . . . . . . . . . . . . 51
1.10.2 Heat Dissipation. . . . . . . . . . . . . . . . . . . . . . . . . . . . . . . . . . . . . . . . . . . . . . . . 52
1.10.3 Over Temperature Behavior . . . . . . . . . . . . . . . . . . . . . . . . . . . . . . . . . . . . . . 52
1.10.3.1 Monitoring the Internal Temperature. . . . . . . . . . . . . . . . . . . . . . . . 55
1.11 Precautions. . . . . . . . . . . . . . . . . . . . . . . . . . . . . . . . . . . . . . . . . . . . . . . . . . . . . . . . . . 56
2 Installation . . . . . . . . . . . . . . . . . . . . . . . . . . . . . . . . . . . . . . . . . . . . . . . . . . . . . 60
3 Tools for Changing Camera Parameters. . . . . . . . . . . . . . . . . . . . . . . . . . . . . 62
3.1 Basler pylon Camera Software Suite . . . . . . . . . . . . . . . . . . . . . . . . . . . . . . . . . . . . . . 62
3.1.1 pylon Viewer . . . . . . . . . . . . . . . . . . . . . . . . . . . . . . . . . . . . . . . . . . . . . . . . . . 62
3.1.2 pylon USB Configurator . . . . . . . . . . . . . . . . . . . . . . . . . . . . . . . . . . . . . . . . . . 63
3.1.3 pylon SDKs . . . . . . . . . . . . . . . . . . . . . . . . . . . . . . . . . . . . . . . . . . . . . . . . . . . 63
4 Camera Functional Description . . . . . . . . . . . . . . . . . . . . . . . . . . . . . . . . . . . . 64
4.1 Overview for Cameras with CCD Sensor . . . . . . . . . . . . . . . . . . . . . . . . . . . . . . . . . . . 64
4.2 Overview for Cameras with CMOS Sensor . . . . . . . . . . . . . . . . . . . . . . . . . . . . . . . . . 66

AW00123408000 Table of Contents
Basler ace USB 3.0 ii
5 Physical Interface . . . . . . . . . . . . . . . . . . . . . . . . . . . . . . . . . . . . . . . . . . . . . . 68
5.1 General Description of the Camera Connections . . . . . . . . . . . . . . . . . . . . . . . . . . . . . 68
5.2 Camera Connector Pin Numbering and Assignments . . . . . . . . . . . . . . . . . . . . . . . . . 69
5.2.1 6-pin Connector Pin Numbering and Assignments . . . . . . . . . . . . . . . . . . . . . 69
5.2.2 USB 3.0 Micro-B Port Pin Numbering and Assignments . . . . . . . . . . . . . . . . . 70
5.3 Camera Connector Types. . . . . . . . . . . . . . . . . . . . . . . . . . . . . . . . . . . . . . . . . . . . . . . 70
5.3.1 6-pin Connector . . . . . . . . . . . . . . . . . . . . . . . . . . . . . . . . . . . . . . . . . . . . . . . . 70
5.3.2 USB 3.0 Micro-B Port. . . . . . . . . . . . . . . . . . . . . . . . . . . . . . . . . . . . . . . . . . . . 70
5.4 LED Indicator . . . . . . . . . . . . . . . . . . . . . . . . . . . . . . . . . . . . . . . . . . . . . . . . . . . . . . . . 70
5.5 Camera Cabling Requirements . . . . . . . . . . . . . . . . . . . . . . . . . . . . . . . . . . . . . . . . . . 71
5.5.1 USB 3.0 Cable . . . . . . . . . . . . . . . . . . . . . . . . . . . . . . . . . . . . . . . . . . . . . . . . . 71
5.5.2 I/O Cable . . . . . . . . . . . . . . . . . . . . . . . . . . . . . . . . . . . . . . . . . . . . . . . . . . . . . 71
5.6 Camera Power . . . . . . . . . . . . . . . . . . . . . . . . . . . . . . . . . . . . . . . . . . . . . . . . . . . . . . . 73
5.7 Opto-isolated Input (Pin 2/Line 1). . . . . . . . . . . . . . . . . . . . . . . . . . . . . . . . . . . . . . . . . 74
5.7.1 Electrical Characteristics . . . . . . . . . . . . . . . . . . . . . . . . . . . . . . . . . . . . . . . . . 74
5.8 Opto-isolated Output (Pin 4/Line 2) . . . . . . . . . . . . . . . . . . . . . . . . . . . . . . . . . . . . . . . 77
5.8.1 Electrical Characteristics . . . . . . . . . . . . . . . . . . . . . . . . . . . . . . . . . . . . . . . . . 77
5.9 Direct-coupled General Purpose I/O (GPIO; Pin 1/Line 3, Pin 3/Line 4) . . . . . . . . . . . 80
5.9.1 Introduction . . . . . . . . . . . . . . . . . . . . . . . . . . . . . . . . . . . . . . . . . . . . . . . . . . . 80
5.9.2 Setting a GPIO Line for Input or Output. . . . . . . . . . . . . . . . . . . . . . . . . . . . . . 81
5.9.3 Operation as an Input. . . . . . . . . . . . . . . . . . . . . . . . . . . . . . . . . . . . . . . . . . . . 82
5.9.3.1 Electrical Characteristics . . . . . . . . . . . . . . . . . . . . . . . . . . . . . . . . . 82
5.9.4 Operation as an Output . . . . . . . . . . . . . . . . . . . . . . . . . . . . . . . . . . . . . . . . . . 84
5.9.4.1 Electrical Characteristics . . . . . . . . . . . . . . . . . . . . . . . . . . . . . . . . . 84
5.10 Temporal Performance of I/O Lines . . . . . . . . . . . . . . . . . . . . . . . . . . . . . . . . . . . . . . . 86
5.10.1 Introduction . . . . . . . . . . . . . . . . . . . . . . . . . . . . . . . . . . . . . . . . . . . . . . . . . . . 86
5.10.2 Factors Determining I/O Temporal Performance . . . . . . . . . . . . . . . . . . . . . . . 90
5.10.3 Measured Propagation Delays. . . . . . . . . . . . . . . . . . . . . . . . . . . . . . . . . . . . . 92
5.11 Configuring Input Lines and Signals . . . . . . . . . . . . . . . . . . . . . . . . . . . . . . . . . . . . . . . 93
5.11.1 Selecting an Input Line as the Source Signal for a Camera Function . . . . . . . 93
5.11.2 Input Line Debouncers. . . . . . . . . . . . . . . . . . . . . . . . . . . . . . . . . . . . . . . . . . . 94
5.11.3 Input Line Inverter . . . . . . . . . . . . . . . . . . . . . . . . . . . . . . . . . . . . . . . . . . . . . . 96
5.12 Configuring Output Lines and Signals . . . . . . . . . . . . . . . . . . . . . . . . . . . . . . . . . . . . . 97
5.12.1 Selecting a Source Signal for an Output Line . . . . . . . . . . . . . . . . . . . . . . . . . 97
5.12.2 Line Minimum Output Pulse Width. . . . . . . . . . . . . . . . . . . . . . . . . . . . . . . . . . 99
5.12.3 Setting the Status of an Individual User Settable Output Line . . . . . . . . . . . . 101
5.12.4 Setting and Checking the Status of All User Settable Output Lines. . . . . . . . 102
5.12.5 Output Line Inverter . . . . . . . . . . . . . . . . . . . . . . . . . . . . . . . . . . . . . . . . . . . . 104
5.12.6 Working With the Timer Output Signal. . . . . . . . . . . . . . . . . . . . . . . . . . . . . . 105
5.12.6.1 Setting the Timer Trigger Source. . . . . . . . . . . . . . . . . . . . . . . . . . 105
5.12.6.2 Setting the Timer Delay Time . . . . . . . . . . . . . . . . . . . . . . . . . . . . 106
5.12.6.3 Setting the Timer Duration Time . . . . . . . . . . . . . . . . . . . . . . . . . . 107
5.13 Significance of I/O Line Status . . . . . . . . . . . . . . . . . . . . . . . . . . . . . . . . . . . . . . . . . . 107
5.13.1 Line Status for Input Lines . . . . . . . . . . . . . . . . . . . . . . . . . . . . . . . . . . . . . . . 107
5.13.2 Line Status for Output Lines. . . . . . . . . . . . . . . . . . . . . . . . . . . . . . . . . . . . . . 109

Table of Contents AW00123408000
iii Basler ace USB 3.0
5.14 Checking I/O Line Status . . . . . . . . . . . . . . . . . . . . . . . . . . . . . . . . . . . . . . . . . . . . . . 111
5.14.1 Checking the Status of All I/O Lines . . . . . . . . . . . . . . . . . . . . . . . . . . . . . . . 111
5.14.2 Checking the Status of an Individual I/O Line . . . . . . . . . . . . . . . . . . . . . . . . 112
6 Image Acquisition Control. . . . . . . . . . . . . . . . . . . . . . . . . . . . . . . . . . . . . . . 113
6.1 Overview. . . . . . . . . . . . . . . . . . . . . . . . . . . . . . . . . . . . . . . . . . . . . . . . . . . . . . . . . . . 113
6.2 Acquisition Start and Stop Commands and the Acquisition Mode . . . . . . . . . . . . . . . 118
6.3 The Frame Burst Start Trigger . . . . . . . . . . . . . . . . . . . . . . . . . . . . . . . . . . . . . . . . . . 120
6.3.1 Frame Burst Start Trigger Mode . . . . . . . . . . . . . . . . . . . . . . . . . . . . . . . . . . 120
6.3.1.1 Frame Burst Start Trigger Mode = Off. . . . . . . . . . . . . . . . . . . . . . 120
6.3.1.2 Frame Burst Start Trigger Mode = On. . . . . . . . . . . . . . . . . . . . . . 120
6.3.2 Acquisition Burst Frame Count . . . . . . . . . . . . . . . . . . . . . . . . . . . . . . . . . . . 122
6.3.3 Setting the Frame Burst Start Trigger Mode and Related Parameters . . . . . 123
6.3.4 Using a Software Frame Burst Start Trigger . . . . . . . . . . . . . . . . . . . . . . . . . 124
6.3.4.1 Introduction . . . . . . . . . . . . . . . . . . . . . . . . . . . . . . . . . . . . . . . . . . 124
6.3.4.2 Setting the Parameters Related to Software Frame Burst Start
Triggering and Applying a Software Trigger Signal. . . . . . . . . . . . 125
6.3.5 Using a Hardware Frame Burst Start Trigger . . . . . . . . . . . . . . . . . . . . . . . . 126
6.3.5.1 Introduction . . . . . . . . . . . . . . . . . . . . . . . . . . . . . . . . . . . . . . . . . . 126
6.3.5.2 Setting the Parameters Related to Hardware Frame Burst
Start Triggering and Applying a Hardware Trigger Signal. . . . . . . 127
6.4 The Frame Start Trigger. . . . . . . . . . . . . . . . . . . . . . . . . . . . . . . . . . . . . . . . . . . . . . . 128
6.4.1 Frame Start Trigger Mode . . . . . . . . . . . . . . . . . . . . . . . . . . . . . . . . . . . . . . . 129
6.4.1.1 Frame Start Trigger Mode = Off . . . . . . . . . . . . . . . . . . . . . . . . . . 129
6.4.1.2 Frame Start Trigger Mode = On . . . . . . . . . . . . . . . . . . . . . . . . . . 130
6.4.1.3 Setting The Frame Start Trigger Mode and Related Parameters . 131
6.4.2 Using a Software Frame Start Trigger . . . . . . . . . . . . . . . . . . . . . . . . . . . . . . 133
6.4.2.1 Introduction . . . . . . . . . . . . . . . . . . . . . . . . . . . . . . . . . . . . . . . . . . 133
6.4.2.2 Setting the Parameters Related to Software Frame Start
Triggering and Applying a Software Trigger Signal. . . . . . . . . . . . 134
6.4.3 Using a Hardware Frame Start Trigger . . . . . . . . . . . . . . . . . . . . . . . . . . . . . 135
6.4.3.1 Introduction . . . . . . . . . . . . . . . . . . . . . . . . . . . . . . . . . . . . . . . . . . 135
6.4.3.2 Exposure Modes . . . . . . . . . . . . . . . . . . . . . . . . . . . . . . . . . . . . . . 136
6.4.3.3 Frame Start Trigger Delay. . . . . . . . . . . . . . . . . . . . . . . . . . . . . . . 143
6.4.3.4 Setting the Parameters Related to Hardware Frame
Start Triggering and Applying a Hardware Trigger Signal. . . . . . . 143
6.5 Setting the Exposure Time . . . . . . . . . . . . . . . . . . . . . . . . . . . . . . . . . . . . . . . . . . . . . 145
6.5.1 Exposure Times for All Models Except the acA2000-165 and acA2040-90 . 146
6.5.2 Exposure Times for the acA2000-165 and acA2040-90 . . . . . . . . . . . . . . . . 147
6.5.3 Setting the Parameter Value . . . . . . . . . . . . . . . . . . . . . . . . . . . . . . . . . . . . . 147
6.6 Electronic Shutter Operation . . . . . . . . . . . . . . . . . . . . . . . . . . . . . . . . . . . . . . . . . . . 148
6.6.1 Global Shutter (All Cameras Except acA1920-25, acA2500-14,
acA3800-14, acA4600-10). . . . . . . . . . . . . . . . . . . . . . . . . . . . . . . . . . . . . . . 148
6.6.1.1 Sensor Readout Mode . . . . . . . . . . . . . . . . . . . . . . . . . . . . . . . . . 150
6.6.2 Rolling Shutter (acA1920-25, acA2500-14, acA3800-14, acA4600-10 Only) 151
6.6.2.1 Rolling Mode . . . . . . . . . . . . . . . . . . . . . . . . . . . . . . . . . . . . . . . . . 151
6.6.2.2 Global Reset Release Mode . . . . . . . . . . . . . . . . . . . . . . . . . . . . . 154

AW00123408000 Table of Contents
Basler ace USB 3.0 iv
6.6.2.3 The Flash Window. . . . . . . . . . . . . . . . . . . . . . . . . . . . . . . . . . . . . 157
6.7 Overlapping Image Acquisitions . . . . . . . . . . . . . . . . . . . . . . . . . . . . . . . . . . . . . . . . . 161
6.7.1 Overlapping Image Acquisitions for All Models Except acA1920-25,
acA2500-14, acA3800-14, acA4600-10. . . . . . . . . . . . . . . . . . . . . . . . . . . . . 161
6.7.2 Overlapping Image Acquisitions for acA1920-25, acA2500-14,
acA3800-14, acA4600-10 . . . . . . . . . . . . . . . . . . . . . . . . . . . . . . . . . . . . . . . 164
6.8 Acquisition Monitoring Tools. . . . . . . . . . . . . . . . . . . . . . . . . . . . . . . . . . . . . . . . . . . . 167
6.8.1 Exposure Active Signal . . . . . . . . . . . . . . . . . . . . . . . . . . . . . . . . . . . . . . . . . 167
6.8.2 Flash Window Signal . . . . . . . . . . . . . . . . . . . . . . . . . . . . . . . . . . . . . . . . . . . 169
6.8.3 Acquisition Status Indicator . . . . . . . . . . . . . . . . . . . . . . . . . . . . . . . . . . . . . . 171
6.8.4 Trigger Wait Signals. . . . . . . . . . . . . . . . . . . . . . . . . . . . . . . . . . . . . . . . . . . . 172
6.8.4.1 Frame Burst Trigger Wait Signal . . . . . . . . . . . . . . . . . . . . . . . . . . 172
6.8.4.2 The Frame Trigger Wait Signal . . . . . . . . . . . . . . . . . . . . . . . . . . . 174
6.8.5 Camera Events and Acquisition Status . . . . . . . . . . . . . . . . . . . . . . . . . . . . . 179
6.9 Acquisition Timing Chart. . . . . . . . . . . . . . . . . . . . . . . . . . . . . . . . . . . . . . . . . . . . . . . 180
6.10 Maximum Allowed Frame Rate. . . . . . . . . . . . . . . . . . . . . . . . . . . . . . . . . . . . . . . . . . 184
6.10.1 Using Basler pylon to Check the Maximum Allowed Frame Rate . . . . . . . . . 185
6.10.2 Increasing the Maximum Allowed Frame Rate . . . . . . . . . . . . . . . . . . . . . . . 186
6.11 Use Case Descriptions and Diagrams . . . . . . . . . . . . . . . . . . . . . . . . . . . . . . . . . . . . 187
7 Features. . . . . . . . . . . . . . . . . . . . . . . . . . . . . . . . . . . . . . . . . . . . . . . . . . . . . . 195
7.1 Feature Availability Charts . . . . . . . . . . . . . . . . . . . . . . . . . . . . . . . . . . . . . . . . . . . . . 195
7.2 Gain . . . . . . . . . . . . . . . . . . . . . . . . . . . . . . . . . . . . . . . . . . . . . . . . . . . . . . . . . . . . . . 198
7.2.1 Analog and Digital Control . . . . . . . . . . . . . . . . . . . . . . . . . . . . . . . . . . . . . . . 198
7.2.2 Setting the Gain . . . . . . . . . . . . . . . . . . . . . . . . . . . . . . . . . . . . . . . . . . . . . . . 200
7.3 Black Level . . . . . . . . . . . . . . . . . . . . . . . . . . . . . . . . . . . . . . . . . . . . . . . . . . . . . . . . . 203
7.3.1 Setting the Black Level. . . . . . . . . . . . . . . . . . . . . . . . . . . . . . . . . . . . . . . . . . 204
7.4 Remove Parameter Limits . . . . . . . . . . . . . . . . . . . . . . . . . . . . . . . . . . . . . . . . . . . . . 206
7.5 Digital Shift . . . . . . . . . . . . . . . . . . . . . . . . . . . . . . . . . . . . . . . . . . . . . . . . . . . . . . . . . 207
7.5.1 Digital Shift with 12 Bit Pixel Formats . . . . . . . . . . . . . . . . . . . . . . . . . . . . . . 207
7.5.2 Digital Shift with 8 Bit Pixel Formats . . . . . . . . . . . . . . . . . . . . . . . . . . . . . . . 209
7.5.3 Precautions When Using Digital Shift . . . . . . . . . . . . . . . . . . . . . . . . . . . . . . 211
7.5.4 Enabling and Setting Digital Shift. . . . . . . . . . . . . . . . . . . . . . . . . . . . . . . . . . 212
7.6 Image Region of Interest (ROI). . . . . . . . . . . . . . . . . . . . . . . . . . . . . . . . . . . . . . . . . . 213
7.6.1 Center X and Center Y. . . . . . . . . . . . . . . . . . . . . . . . . . . . . . . . . . . . . . . . . . 219
7.6.2 Changing ROI Parameters "On-the-Fly" . . . . . . . . . . . . . . . . . . . . . . . . . . . . 220
7.7 Sequencer . . . . . . . . . . . . . . . . . . . . . . . . . . . . . . . . . . . . . . . . . . . . . . . . . . . . . . . . . 221
7.7.1 Introduction . . . . . . . . . . . . . . . . . . . . . . . . . . . . . . . . . . . . . . . . . . . . . . . . . . 221
7.7.2 The Sequencer and the Active Set . . . . . . . . . . . . . . . . . . . . . . . . . . . . . . . . 222
7.7.2.1 Camera Parameters . . . . . . . . . . . . . . . . . . . . . . . . . . . . . . . . . . . 223
7.7.2.2 Sequencer Set Related Parameters and Sequencer Set Advance 224
7.7.3 Sequencer Configuration . . . . . . . . . . . . . . . . . . . . . . . . . . . . . . . . . . . . . . . . 229
7.7.3.1 General Information. . . . . . . . . . . . . . . . . . . . . . . . . . . . . . . . . . . . 229
7.7.3.2 Carrying Out Configuration . . . . . . . . . . . . . . . . . . . . . . . . . . . . . . 230
7.7.3.3 Using the Load Command. . . . . . . . . . . . . . . . . . . . . . . . . . . . . . . 232

Table of Contents AW00123408000
vBasler ace USB 3.0
7.7.4 Sequencer Operation. . . . . . . . . . . . . . . . . . . . . . . . . . . . . . . . . . . . . . . . . . . 233
7.7.4.1 Sequencer Use Case Descriptions and Diagrams . . . . . . . . . . . . 236
7.8 Binning . . . . . . . . . . . . . . . . . . . . . . . . . . . . . . . . . . . . . . . . . . . . . . . . . . . . . . . . . . . . 250
7.8.1 Binning on Monochrome Cameras . . . . . . . . . . . . . . . . . . . . . . . . . . . . . . . . 250
7.8.2 Binning on Color Cameras. . . . . . . . . . . . . . . . . . . . . . . . . . . . . . . . . . . . . . . 253
7.8.3 Setting Binning. . . . . . . . . . . . . . . . . . . . . . . . . . . . . . . . . . . . . . . . . . . . . . . . 254
7.8.4 Considerations When Using Binning . . . . . . . . . . . . . . . . . . . . . . . . . . . . . . . 256
7.9 Decimation . . . . . . . . . . . . . . . . . . . . . . . . . . . . . . . . . . . . . . . . . . . . . . . . . . . . . . . . . 258
7.9.1 Decimation Vertical (acA3800-14 and acA4600-10 Only) . . . . . . . . . . . . . . . 258
7.9.2 Decimation Horizontal (acA3800-14 and acA4600-10 Only) . . . . . . . . . . . . . 261
7.9.3 Considerations When Using Decimation . . . . . . . . . . . . . . . . . . . . . . . . . . . . 262
7.10 Scaling . . . . . . . . . . . . . . . . . . . . . . . . . . . . . . . . . . . . . . . . . . . . . . . . . . . . . . . . . . . . 263
7.10.1 Considerations When Using Scaling . . . . . . . . . . . . . . . . . . . . . . . . . . . . . . . 264
7.11 Mirror Image . . . . . . . . . . . . . . . . . . . . . . . . . . . . . . . . . . . . . . . . . . . . . . . . . . . . . . . . 265
7.11.1 Reverse X . . . . . . . . . . . . . . . . . . . . . . . . . . . . . . . . . . . . . . . . . . . . . . . . . . . 265
7.11.2 Reverse Y . . . . . . . . . . . . . . . . . . . . . . . . . . . . . . . . . . . . . . . . . . . . . . . . . . . 268
7.12 Luminance Lookup Table . . . . . . . . . . . . . . . . . . . . . . . . . . . . . . . . . . . . . . . . . . . . . . 271
7.13 Gamma Correction . . . . . . . . . . . . . . . . . . . . . . . . . . . . . . . . . . . . . . . . . . . . . . . . . . . 275
7.14 Color Creation and Enhancement . . . . . . . . . . . . . . . . . . . . . . . . . . . . . . . . . . . . . . . 277
7.14.1 Color Creation . . . . . . . . . . . . . . . . . . . . . . . . . . . . . . . . . . . . . . . . . . . . . . . . 277
7.14.1.1 Bayer Color Filter Alignment . . . . . . . . . . . . . . . . . . . . . . . . . . . . . 278
7.14.1.2 Pixel Formats Available on Color Cameras. . . . . . . . . . . . . . . . . . 280
7.14.2 Integrated IR Cut Filter. . . . . . . . . . . . . . . . . . . . . . . . . . . . . . . . . . . . . . . . . . 282
7.14.3 Color Enhancement Features . . . . . . . . . . . . . . . . . . . . . . . . . . . . . . . . . . . . 283
7.14.3.1 Balance White . . . . . . . . . . . . . . . . . . . . . . . . . . . . . . . . . . . . . . . . 283
7.14.3.2 PGI Feature Set . . . . . . . . . . . . . . . . . . . . . . . . . . . . . . . . . . . . . . 286
7.14.3.3 Light Source Presets. . . . . . . . . . . . . . . . . . . . . . . . . . . . . . . . . . . 289
7.14.3.4 Color Adjustment (All Color Cameras Except
acA2000-165 and acA2040-90) . . . . . . . . . . . . . . . . . . . . . . . . . . 290
7.14.3.5 Color Transformation. . . . . . . . . . . . . . . . . . . . . . . . . . . . . . . . . . . 295
7.14.3.6 A Procedure for Setting the Color Enhancements . . . . . . . . . . . . 297
7.15 Auto Functions . . . . . . . . . . . . . . . . . . . . . . . . . . . . . . . . . . . . . . . . . . . . . . . . . . . . . . 299
7.15.1 Common Characteristics . . . . . . . . . . . . . . . . . . . . . . . . . . . . . . . . . . . . . . . . 299
7.15.2 Auto Function Operating Modes . . . . . . . . . . . . . . . . . . . . . . . . . . . . . . . . . . 300
7.15.3 Auto Function ROIs . . . . . . . . . . . . . . . . . . . . . . . . . . . . . . . . . . . . . . . . . . . . 301
7.15.3.1 Assignment of an Auto Function to an Auto Function ROI . . . . . . 302
7.15.3.2 Positioning of an Auto Function ROI Relative to the Image ROI. . 303
7.15.3.3 Setting an Auto Function ROI . . . . . . . . . . . . . . . . . . . . . . . . . . . . 305
7.15.4 Gain Auto. . . . . . . . . . . . . . . . . . . . . . . . . . . . . . . . . . . . . . . . . . . . . . . . . . . . 307
7.15.5 Exposure Auto . . . . . . . . . . . . . . . . . . . . . . . . . . . . . . . . . . . . . . . . . . . . . . . . 309
7.15.6 Auto Function Profile . . . . . . . . . . . . . . . . . . . . . . . . . . . . . . . . . . . . . . . . . . . 312
7.15.7 Balance White Auto . . . . . . . . . . . . . . . . . . . . . . . . . . . . . . . . . . . . . . . . . . . . 313
7.15.8 Pattern Removal Auto . . . . . . . . . . . . . . . . . . . . . . . . . . . . . . . . . . . . . . . . . . 314
7.15.8.1 Monochrome Cameras . . . . . . . . . . . . . . . . . . . . . . . . . . . . . . . . . 314
7.15.8.2 Color Cameras . . . . . . . . . . . . . . . . . . . . . . . . . . . . . . . . . . . . . . . 317
7.15.9 Using an Auto Function . . . . . . . . . . . . . . . . . . . . . . . . . . . . . . . . . . . . . . . . . 317

AW00123408000 Table of Contents
Basler ace USB 3.0 vi
7.16 Timestamp Value . . . . . . . . . . . . . . . . . . . . . . . . . . . . . . . . . . . . . . . . . . . . . . . . . . . . 318
7.17 Event Notification . . . . . . . . . . . . . . . . . . . . . . . . . . . . . . . . . . . . . . . . . . . . . . . . . . . . 319
7.18 Test Images . . . . . . . . . . . . . . . . . . . . . . . . . . . . . . . . . . . . . . . . . . . . . . . . . . . . . . . . 322
7.18.1 Test Image Descriptions . . . . . . . . . . . . . . . . . . . . . . . . . . . . . . . . . . . . . . . . 324
7.19 Device Information Parameters . . . . . . . . . . . . . . . . . . . . . . . . . . . . . . . . . . . . . . . . . 327
7.20 User Defined Values. . . . . . . . . . . . . . . . . . . . . . . . . . . . . . . . . . . . . . . . . . . . . . . . . . 330
7.21 User Sets . . . . . . . . . . . . . . . . . . . . . . . . . . . . . . . . . . . . . . . . . . . . . . . . . . . . . . . . . . 331
7.21.1 Selecting a User Set . . . . . . . . . . . . . . . . . . . . . . . . . . . . . . . . . . . . . . . . . . . 333
7.21.2 Saving a User Set . . . . . . . . . . . . . . . . . . . . . . . . . . . . . . . . . . . . . . . . . . . . . 334
7.21.3 Loading User Set into the Active User Set. . . . . . . . . . . . . . . . . . . . . . . . . . . 335
7.21.4 Designating a User Set as the User Set Default . . . . . . . . . . . . . . . . . . . . . . 336
7.22 Line Pitch . . . . . . . . . . . . . . . . . . . . . . . . . . . . . . . . . . . . . . . . . . . . . . . . . . . . . . . . . . 338
7.23 Chunk Features . . . . . . . . . . . . . . . . . . . . . . . . . . . . . . . . . . . . . . . . . . . . . . . . . . . . . 342
7.23.1 What are Chunk Features? . . . . . . . . . . . . . . . . . . . . . . . . . . . . . . . . . . . . . . 342
7.23.2 Using Chunk Features . . . . . . . . . . . . . . . . . . . . . . . . . . . . . . . . . . . . . . . . . . 342
7.23.3 Data Chunks . . . . . . . . . . . . . . . . . . . . . . . . . . . . . . . . . . . . . . . . . . . . . . . . . 343
7.23.3.1 Gain Chunk . . . . . . . . . . . . . . . . . . . . . . . . . . . . . . . . . . . . . . . . . . 343
7.23.3.2 Line Status All Chunk . . . . . . . . . . . . . . . . . . . . . . . . . . . . . . . . . . 344
7.23.3.3 Exposure Time Chunk . . . . . . . . . . . . . . . . . . . . . . . . . . . . . . . . . . 345
7.23.3.4 Timestamp Chunk . . . . . . . . . . . . . . . . . . . . . . . . . . . . . . . . . . . . . 346
7.23.3.5 Sequencer Set Active Chunk. . . . . . . . . . . . . . . . . . . . . . . . . . . . . 347
7.23.3.6 Counter Value Chunk . . . . . . . . . . . . . . . . . . . . . . . . . . . . . . . . . . 348
7.23.3.7 CRC Checksum Chunk . . . . . . . . . . . . . . . . . . . . . . . . . . . . . . . . . 350
7.23.4 Chunk Mode Active . . . . . . . . . . . . . . . . . . . . . . . . . . . . . . . . . . . . . . . . . . . . 351
7.23.5 Retrieving Data Chunks . . . . . . . . . . . . . . . . . . . . . . . . . . . . . . . . . . . . . . . . . 352
8 Troubleshooting and Support . . . . . . . . . . . . . . . . . . . . . . . . . . . . . . . . . . . . 354
8.1 Tech Support Resources . . . . . . . . . . . . . . . . . . . . . . . . . . . . . . . . . . . . . . . . . . . . . . 354
8.2 Obtaining an RMA Number. . . . . . . . . . . . . . . . . . . . . . . . . . . . . . . . . . . . . . . . . . . . . 354
8.3 Before Contacting Basler Technical Support . . . . . . . . . . . . . . . . . . . . . . . . . . . . . . . 355
Revision History. . . . . . . . . . . . . . . . . . . . . . . . . . . . . . . . . . . . . . . . . . . . . . . . . . . . . . . . . . 358
Index. . . . . . . . . . . . . . . . . . . . . . . . . . . . . . . . . . . . . . . . . . . . . . . . . . . . . . . . . . . . . . . . . . . . . 363

Specifications, Requirements, and Precautions AW00123408000
1Basler ace USB 3.0
1 Specifications, Requirements,
and Precautions
This chapter lists the camera models covered by the manual. It provides the general specifications
for those models and the basic requirements for using them.
This chapter also includes specific precautions that you should keep in mind when using the
cameras. We strongly recommend that you read and follow the precautions.
1.1 Models
The current Basler ace USB 3.0 camera models are listed in the top row of the specification tables
on the next pages of this manual. The camera models are differentiated by their sensor size, their
maximum frame rate at full or default resolution, and whether the camera’s sensor is mono or color.
Unless otherwise noted, the material in this manual applies to all of the camera models listed in the
tables. Material that only applies to a particular camera model or to a subset of models, such as to
color cameras only, will be so designated.

AW00123408000 Specifications, Requirements, and Precautions
Basler ace USB 3.0 2
1.2 Specification Notes
Sensor Size
Full resolution: Unless indicated otherwise, the given numbers of pixels refer to the sensor’s full
resolution. This is also the maximum possible resolution for an image.
Default resolution: For some cameras, a slightly decreased resolution is set as the default after
camera restart or power up (if one of the factory setups is used). In these cases the default settings
for OffsetX and OffsetY may be greater than zero. The decreased resolution is referred to as the
"default resolution". If implemented, the default resolution is indicated in the tables below, in addition
to full resolution.
When a camera is set to default resolution, you can change to full resolution by making sure OffsetX
and OffsetY are set to zero and by setting the Width and Height parameters to the maximum values.
Max. Frame Rate
"Max. Fame Rate" refers to the maximum allowed frame rate that is possible at default resolution.
If no default resolution is implemented, the maximum allowed frame rate refers to camera operation
at full resolution.
If a camera can be set for normal or fast sensor readout mode, maximum allowed frame rates are
indicated for both sensor readout modes. If only one maximum allowed frame rate is indicated it
implies normal sensor readout.
Special operating conditions may allow cameras to achieve higher frame rates than specified
otherwise. In these cases, the maximum frame rates are labeled "special conditions" and are
given with the applicable special operating conditions.
Note that adverse effects for frame acquisition can occur (e.g. loss of frames) when operating a
camera at a "special conditions" frame rate.
For more information about the sensor readout mode, see Section 6.6.1.1 on page 150.
For more information about the maximum allowed frame rate and how to increase it, see
Section 6.10 on page 184 and Section 6.10.2 on page 186, respectively.
Pixel Formats
The indicated Bayer filter alignments refer to the physical alignments of filters with respect to
sensors. For most cameras, the physical alignment also holds for the images when the various
camera features are used. That is, for most cameras, the physical alignment is identical to the
effective alignment. For some cameras, however, the indicated physical Bayer filter alignment is
identical to the effective alignment only when neither ReverseX nor ReverseY are enabled. Different
effective alignments apply when ReverseX and/or ReverseY are enabled.
For more information about the ReverseX and ReverseY features and related effective Bayer filter
alignments, see Section 7.11 on page 265.

Specifications, Requirements, and Precautions AW00123408000
3Basler ace USB 3.0
1.3 General Specifications
1.3.1 Cameras with CCD Sensor
Specification acA640-90um/uc acA640-120um/uc
Sensor Size
(H x V pixels)
um: 659 x 494
uc: 658 x 492
um: 659 x 494
uc: 658 x 492
Sensor Type Sony ICX424AL/AQ
Progressive scan CCD
Global shutter
Sony ICX618 ALA/AQA
Progressive scan CCD
Global shutter
Optical Size 1/3" 1/4"
Effective Sensor Diagonal 6.1 mm 4.7 mm
Pixel Size (H x V) 7.4 µm x 7.4 µm 5.6 µm x 5.6 µm
Max. Frame Rate
(at full resolution)
100 fps 120 fps
Mono/Color Mono or color
(color models include a Bayer pattern RGB filter on the sensor)
Data Output Type USB 3.0, nominal max. 5 Gbit/s (SuperSpeed)
Pixel Formats Mono Models: Mono 8 Mono 12p
Mono 12
Color Models: Mono 8 RGB 8
Bayer BG 8 BGR 8
Bayer BG 12 YCbCr422_8
Bayer BG 12p
ADC Bit Depth 12 bits
Synchronization Via hardware trigger signal, software trigger or free run
Exposure Time Control Via hardware trigger signal or programmable via the camera API
Camera Power
Requirements
Nominal +5 VDC; SELV and LPS compliant and in accord with the Universal Serial
Bus 3.0 specification; supplied via the camera’s USB 3.0 port.
≈ 2.7 W (typical) @ 5 VDC,
≈ 3.0 W (max.)
≈ 2.4 W (typical and max.) @ 5 VDC
I/O Lines 1 opto-isolated input line, 1 opto-isolated output line, and 2 direct-coupled GPIO
lines; power supplies must meet the SELV and LPS requirements
Lens Mount C-mount, CS-mount
Table 1: General Specifications

AW00123408000 Specifications, Requirements, and Precautions
Basler ace USB 3.0 4
Size (L x W x H) 29.3 mm x 29 mm x 29 mm (without cylindric housing extension or connectors)
48.2 mm x 29 mm x 29 mm (with cylindric housing extension and connectors)
Weight < 80 g
Conformity CE, UL Listed, FCC, GenICam V. 2.x (including PFNC V. 2.x and SFNC V. 2.x),
IP30, RoHS, USB3 Vision, USB-IF in preparation
The CE Conformity Declaration is available on the Basler website:
www.baslerweb.com
Software Basler pylon Camera Software Suite (version 4.0 or higher)
Available for Windows (x86, x64) and Linux (x86 32 bit, x86 64 bit, ARM).
Specification acA640-90um/uc acA640-120um/uc
Table 1: General Specifications

Specifications, Requirements, and Precautions AW00123408000
5Basler ace USB 3.0
Specification acA1300-30um/uc acA1600-20um/uc
Sensor Size
(H x V pixels)
um: 1296 x 966
uc: 1294 x 964
um: 1626 x 1236
uc: 1624 x 1234
Sensor Type Sony ICX445 AL/AQ
Progressive scan CCD
Global shutter
Sony ICX274 AL/AQ
Progressive scan CCD
Global shutter
Optical Size 1/3" 1/1.8"
Effective Sensor Diagonal 6.1 mm 9.0 mm
Pixel Size (H x V) 3.75 µm x 3.75µm 4.4 µm x 4.4 µm
Max. Frame Rate
(at full resolution)
31 fps 20 fps
Mono/Color Mono or color
(color models include a Bayer pattern RGB filter on the sensor)
Data Output Type USB 3.0, nominal max. 5 Gbit/s (SuperSpeed)
Pixel Formats Mono Models: Mono 8 Mono 12p
Mono 12
Color Models: Mono 8 RGB 8
Bayer BG 8 BGR 8
Bayer BG 12 YCbCr422_8
Bayer BG 12p
ADC Bit Depth 12 bits
Synchronization Via hardware trigger signal, software trigger or free run
Exposure Time Control Via hardware trigger signal or programmable via the camera API
Camera Power
Requirements
Nominal +5 VDC; SELV and LPS compliant and in accord with the Universal Serial
Bus 3.0 specification; supplied via the camera’s USB 3.0 port.
≈2.5 W (typical) @ 5 VDC,
≈3.0 W (max.)
≈ 3.5 W (typical and max.) @ 5 VDC
I/O Lines 1 opto-isolated input line, 1 opto-isolated output line, and 2 direct-coupled GPIO
lines; power supplies must meet the SELV and LPS requirements
Lens Mount C-mount, CS-mount
Size (L x W x H) 29.3 mm x 29 mm x 29 mm (without cylindric housing extension or connectors)
48.2 mm x 29 mm x 29 mm (with cylindric housing extension and connectors)
Weight < 80 g
Conformity CE, UL Listed, FCC, GenICam V. 2.x (including PFNC V. 2.x and SFNC V. 2.x),
IP30, RoHS, USB3 Vision, USB-IF (in preparation)
The CE Conformity Declaration is available on the Basler website:
www.baslerweb.com
Table 2: General Specifications

AW00123408000 Specifications, Requirements, and Precautions
Basler ace USB 3.0 6
Software Basler pylon Camera Software Suite (version 4.0 or higher)
Available for Windows (x86, x64) and Linux (x86 32 bit, x86 64 bit, ARM).
Specification acA1300-30um/uc acA1600-20um/uc
Table 2: General Specifications

Specifications, Requirements, and Precautions AW00123408000
7Basler ace USB 3.0
1.3.2 Cameras with CMOS Sensor
Specification acA640-750um acA640-750uc
Sensor Size
(H x V pixels)
672 x 512 (full resolution)
640 x 480 (default resolution; see Section 1.2 on page 2)
Sensor Type ON Semiconductor®
PYTHON NOIP1SN0300A
Progressive scan CMOS
Global shutter
ON Semiconductor®
PYTHON NOIP1SE0300A
Progressive scan CMOS
Global shutter
Optical Size 1/4"
Effective Sensor Diagonal 3.9 mm
Pixel Size (H x V) 4.8 µm x 4.8 µm
Max. Frame Rate
(at default resolution)
751 fps (at fast sensor readout; see Section 1.2 on page 2)
554 fps (at normal sensor readout)
Mono/Color Mono or color (color cameras include a Bayer pattern RGB filter on the sensor)
Data Output Type USB 3.0, nominal max. 5 Gbit/s (SuperSpeed)
Pixel Formats Mono 8 Mono 10p
Mono 10
Mono 8 RGB8
Bayer BG 8 BGR8
Bayer BG 10 YCbCr422_8
Bayer BG 10p
Synchronization Via hardware trigger signal, software trigger or free run
Exposure Time Control Via hardware trigger signal or programmable via the camera API
Camera Power
Requirements
Nominal +5 VDC; SELV and LPS compliant and in accord with the Universal Serial
Bus 3.0 specification; supplied via the camera’s USB 3.0 port.
Mono Models: ≈ 2.8 W (typical) @ 5 VDC, ≈ 3.1 W (max.)
Color Models: ≈ 3.0 W (typical) @ 5 VDC, ≈ 3.3 W (max.)
I/O Lines 1 opto-isolated input line, 1 opto-isolated output line, and 2 direct-coupled GPIO
lines; power supplies must meet the SELV and LPS requirements
Lens Mount C-mount
Size (L x W x H) 29.3 mm x 29 mm x 29 mm (without cylindric housing extension or connectors)
48.2 mm x 29 mm x 29 mm (with cylindric housing extension and connectors)
Weight < 80 g
Conformity CE, UL in preparation, FCC, GenICam V. 2.x (including PFNC V. 2.x and SFNC
V. 2.x), IP30, RoHS, USB3 Vision, USB-IF (in preparation)
The CE Conformity Declaration is available on the Basler website:
www.baslerweb.com
Software Basler pylon Camera Software Suite (version 4.0 or higher)
Available for Windows (x86, x64) and Linux (x86 32 bit, x86 64 bit, ARM).
Table 3: General Specifications

AW00123408000 Specifications, Requirements, and Precautions
Basler ace USB 3.0 8
Specification acA800-510um acA800-510uc
Sensor Size
(H x V pixels)
832 x 632 (full resolution)
800 x 600 (default resolution; see Section 1.2 on page 2)
Sensor Type ON Semiconductor®
PYTHON NOIP1SN0500A
Progressive scan CMOS
Global shutter
ON Semiconductor®
PYTHON NOIP1SE0500A
Progressive scan CMOS
Global shutter
Optical Size 1/3.3"
Effective Sensor Diagonal 4.8 mm
Pixel Size (H x V) 4.8 µm x 4.8 µm
Max. Frame Rate
(at default resolution)
511 fps (at fast sensor readout; see Section 1.2 on page 2)
393 fps (at normal sensor readout)
Mono/Color Mono or color (color cameras include a Bayer pattern RGB filter on the sensor)
Data Output Type USB 3.0, nominal max. 5 Gbit/s (SuperSpeed)
Pixel Formats Mono 8 Mono 10p
Mono 10
Mono 8 RGB8
Bayer BG 8 BGR8
Bayer BG 10 YCbCr422_8
Bayer BG 10p
Synchronization Via hardware trigger signal, software trigger or free run
Exposure Time Control Via hardware trigger signal or programmable via the camera API
Camera Power
Requirements
Nominal +5 VDC; SELV and LPS compliant and in accord with the Universal Serial
Bus 3.0 specification; supplied via the camera’s USB 3.0 port.
Mono Models: ≈ 2.8 W (typical), @ 5 VDC, ≈ 3.1 W (max.)
Color Models: ≈ 3.0 W (typical), @ 5 VDC, ≈ 3.3 W (max.)
I/O Lines 1 opto-isolated input line, 1 opto-isolated output line, and 2 direct-coupled GPIO
lines; power supplies must meet the SELV and LPS requirements
Lens Mount C-mount
Size (L x W x H) 29.3 mm x 29 mm x 29 mm (without cylindric housing extension or connectors)
48.2 mm x 29 mm x 29 mm (with cylindric housing extension and connectors)
Weight < 80 g
Conformity CE, UL in preparation, FCC, GenICam V. 2.x (including PFNC V. 2.x and SFNC V.
2.x), IP30, RoHS, USB3 Vision, USB-IF in preparation
The CE Conformity Declaration is available on the Basler website:
www.baslerweb.com
Software Basler pylon Camera Software Suite (version 4.0 or higher)
Available for Windows (x86, x64) and Linux (x86 32 bit, x86 64 bit, ARM).
Table 4: General Specifications

Specifications, Requirements, and Precautions AW00123408000
9Basler ace USB 3.0
Specification acA1300-200um acA1300-200uc
Sensor Size (H x V pixels) 1280 x 1024 (full resolution)
Sensor Type ON Semiconductor®
PYTHON NOIP1SN1300A
Progressive scan CMOS
Global shutter
ON Semiconductor®
PYTHON NOIP1SE1300A
Progressive scan CMOS
Global shutter
Optical Size 1/2"
Effective Sensor Diagonal 7.9 mm
Pixel Size (H x V) 4.8 µm x 4.8 µm
Max. Frame Rate
(at full resolution)
203 fps (at fast sensor readout; see Section 1.2 on page 2)
169 fps (at normal sensor readout)
Mono/Color Mono or color (color cameras include a Bayer pattern RGB filter on the sensor)
Data Output Type USB 3.0, nominal max. 5 Gbit/s (SuperSpeed)
Pixel Formats Mono 8 Mono 10p
Mono 10
Mono 8 RGB8
Bayer BG 8 BGR8
Bayer BG 10 YCbCr422_8
Bayer BG 10p
Synchronization Via hardware trigger signal, software trigger or free run
Exposure Time Control Via hardware trigger signal or programmable via the camera API
Camera Power
Requirements
Nominal +5 VDC; SELV and LPS compliant and in accord with the Universal Serial
Bus 3.0 specification; supplied via the camera’s USB 3.0 port.
Mono Models: ≈ 2.8 W (typical), @ 5 VDC, ≈ 3.1 W (max.)
Color Models: ≈ 3.0 W (typical), @ 5 VDC, ≈ 3.3 W (max.)
I/O Lines 1 opto-isolated input line, 1 opto-isolated output line, and 2 direct-coupled GPIO
lines; power supplies must meet the SELV and LPS requirements
Lens Mount C-mount
Size (L x W x H) 29.3 mm x 29 mm x 29 mm (without cylindric housing extension or connectors)
48.2 mm x 29 mm x 29 mm (with cylindric housing extension and connectors)
Weight < 80 g
Conformity CE, UL in preparation, FCC, GenICam V. 2.x (including PFNC V. 2.x and SFNC V.
2.x), IP30, RoHS, USB3 Vision, USB-IF in preparation
The CE Conformity Declaration is available on the Basler website:
www.baslerweb.com
Software Basler pylon Camera Software Suite (version 4.0 or higher)
Available for Windows (x86, x64) and Linux (x86 32 bit, x86 64 bit, ARM).
Table 5: General Specifications

AW00123408000 Specifications, Requirements, and Precautions
Basler ace USB 3.0 10
Specification acA1920-25um/uc
Sensor Size
(H x V pixels)
um: 1920 x 1080
uc: 1920 x 1080
Sensor Type Aptina MT9P031
Progressive scan CMOS
Rolling shutter
Optical Size 1/3.7"
Effective Sensor Diagonal 4.9 mm
Pixel Size (H x V) 2.2 µm x 2.2 µm
Max. Frame Rate
(at full resolution)
26 fps
Mono/Color Mono or color
(color cameras include a Bayer pattern RGB filter on the sensor)
Data Output Type USB 3.0, nominal max. 5 Gbit/s (SuperSpeed)
Pixel Formats Mono Models: Mono 8 Mono 12p
Mono 12
Color Models: Mono 8 Bayer GB 12p
Bayer GB 8 YCbCr422_8
Bayer GB 12
Synchronization Via hardware trigger signal, software trigger or free run
Exposure Time Control Programmable via the camera API
Camera Power
Requirements
Nominal +5 VDC; SELV and LPS compliant and in accord with the Universal Serial
Bus 3.0 specification; supplied via the camera’s USB 3.0 port.
≈ 2.2 W (typical and max.) @ 5 VDC
I/O Lines 1 opto-isolated input line, 1 opto-isolated output line, and 2 direct-coupled GPIO
lines; power supplies must meet the SELV and LPS requirements
Lens Mount C-mount
Size (L x W x H) 29.3 mm x 29 mm x 29 mm (without cylindric housing extension or connectors)
48.2 mm x 29 mm x 29 mm (with cylindric housing extension and connectors)
Weight < 80 g
Conformity CE, UL Listed, FCC, GenICam V. 2.x (including PFNC V. 2.x and SFNC V. 2.x),
IP30, RoHS, USB3 Vision, USB-IF in preparation
The CE Conformity Declaration is available on the Basler website:
www.baslerweb.com
Software Basler pylon Camera Software Suite (version 4.0 or higher)
Available for Windows (x86, x64) and Linux (x86 32 bit, x86 64 bit, ARM).
Table 6: General Specifications

Specifications, Requirements, and Precautions AW00123408000
11 Basler ace USB 3.0
Specification acA1920-40um acA1920-40uc
Sensor Size
(H x V pixels)
1936 x 1216 (full resolution)
1920 x 1200 (default resolution; see Section 1.2 on page 2)
Sensor Type Sony IMX249LLJ-C
Progressive scan CMOS
Global shutter
Sony IMX249LQJ-C
Progressive scan CMOS
Global shutter
Optical Size 1/1.2"
Effective Sensor Diagonal 13.3 mm
Pixel Size (H x V) 5.86 µm x 5.86 µm
Max. Frame Rate
(at default resolution)
41 fps
Mono/Color Mono or color (color cameras include a Bayer pattern RGB filter on the sensor)
Data Output Type USB 3.0, nominal max. 5 Gbit/s (SuperSpeed)
Pixel Formats Mono 8 Mono 12p
Mono 12
Mono 8 RGB8
Bayer RG 8 BGR8
Bayer RG 12 YCbCr422_8
Bayer RG 12p
Synchronization Via hardware trigger signal, software trigger or free run
Exposure Time Control Via hardware trigger signal or programmable via the camera API
Camera Power
Requirements
Nominal +5 VDC; SELV and LPS compliant and in accord with the Universal Serial
Bus 3.0 specification; supplied via the camera’s USB 3.0 port.
Mono Models: ≈ 2.5 W (typical) @ 5 VDC, ≈ 2.7 W (max.)
Color Models: ≈ 2.7 W (typical) @ 5 VDC, ≈ 2.9 W (max.)
I/O Lines 1 opto-isolated input line, 1 opto-isolated output line, and 2 direct-coupled GPIO
lines; power supplies must meet the SELV and LPS requirements
Lens Mount C-mount
Size (L x W x H) 29.3 mm x 29 mm x 29 mm (without cylindric housing extension or connectors)
48.2 mm x 29 mm x 29 mm (with cylindric housing extension and connectors)
Weight < 80 g
Conformity CE, UL in preparation, FCC, GenICam V. 2.x (including PFNC V. 2.x and SFNC
V. 2.x), IP30, RoHS, USB3 Vision, USB-IF in preparation
The CE Conformity Declaration is available on the Basler website:
www.baslerweb.com
Software Basler pylon Camera Software Suite (version 4.0 or higher)
Available for Windows (x86, x64) and Linux (x86 32 bit, x86 64 bit, ARM).
Table 7: General Specifications

AW00123408000 Specifications, Requirements, and Precautions
Basler ace USB 3.0 12
Specification acA1920-150um acA1920-150uc
Sensor Size (H x V pixels) 1984 x 1264 (full resolution)
1920 x 1200 (default resolution; see Section 1.2 on page 2)
Sensor Type ON Semiconductor®
PYTHON NOIP1SN2000A
Progressive scan CMOS
Global shutter
ON Semiconductor®
PYTHON NOIP1SE2000A
Progressive scan CMOS
Global shutter
Optical Size 2/3"
Effective Sensor Diagonal 10.9 mm
Pixel Size (H x V) 4.8 µm x 4.8 µm
Max. Frame Rate
(at full resolution)
150 fps (at fast sensor readout, see Section 1.2 on page 2, and special conditions*)
112 fps (at normal sensor readout)
Mono/Color Mono or color (color cameras include a Bayer pattern RGB filter on the sensor)
Data Output Type USB 3.0, nominal max. 5 Gbit/s (SuperSpeed)
Pixel Formats Mono 8 Mono 10p
Mono 10
Mono 8 RGB8
Bayer BG 8 BGR8
Bayer BG 10 YCbCr422_8
Bayer BG 10p
Synchronization Via hardware trigger signal, software trigger or free run
Exposure Time Control Via hardware trigger signal or programmable via the camera API
Camera Power
Requirements
Nominal +5 VDC; SELV and LPS compliant and in accord with the Universal Serial
Bus 3.0 specification; supplied via the camera’s USB 3.0 port.
Mono Models: ≈ 3.7 W (typical) @ 5 VDC, ≈ 4.0 W (max.)
Color Models: ≈ 3.9 W (typical) @ 5 VDC, ≈ 4.2 W (max.)
I/O Lines 1 opto-isolated input line, 1 opto-isolated output line, and 2 direct-coupled GPIO
lines; power supplies must meet the SELV and LPS requirements
Lens Mount C-mount
Size (L x W x H) 29.3 mm x 29 mm x 29 mm (without cylindric housing extension or connectors)
48.2 mm x 29 mm x 29 mm (with cylindric housing extension and connectors)
Weight < 80 g
Conformity CE, UL in preparation, FCC, GenICam V. 2.x (including PFNC V. 2.x and SFNC
V. 2.x), IP30, RoHS, USB3 Vision, USB-IF in preparation
The CE Conformity Declaration is available on the Basler website:
www.baslerweb.com
Software Basler pylon Camera Software Suite (version 4.0 or higher)
Available for Windows (x86, x64) and Linux (x86 32 bit, x86 64 bit, ARM).
Table 8: General Specifications

Specifications, Requirements, and Precautions AW00123408000
13 Basler ace USB 3.0
* This frame rate can be reached when removing the default limit for the DeviceLinkThroughput
parameter and allowing approximately 380 MB/s. Note that adverse effects for image acquisition
can occur when using a camera at a "special conditions" frame rate. We strongly recommend to
only use high-quality accessories. You can obtain them from Basler AG (see the Basler website).

AW00123408000 Specifications, Requirements, and Precautions
Basler ace USB 3.0 14
Specification acA1920-155um acA1920-155uc
Sensor Size
(H x V pixels)
1936 x 1216 (full resolution)
1920 x 1200 (default resolution; see Section 1.2 on page 2)
Sensor Type Sony IMX174LLJ-C
Progressive scan CMOS
Global shutter
Sony IMX174LQJ-C
Progressive scan CMOS
Global shutter
Optical Size 1/1.2"
Effective Sensor Diagonal 13.4 mm
Pixel Size (H x V) 5.86 µm x 5.86 µm
Max. Frame Rate 155 fps (at default resolution; see Section 1.2 on page 2)
164 fps (special conditions)*
Mono/Color Mono or color
(color cameras include a Bayer pattern RGB filter on the sensor)
Data Output Type USB 3.0, nominal max. 5 Gbit/s (SuperSpeed)
Pixel Formats Mono 8 Mono 12p
Mono 12
Mono 8 RGB 8
Bayer RG 8 BGR 8
Bayer RG 12 YCbCr422_8
Bayer RG 12p
Synchronization Via hardware trigger signal, software trigger or free run
Exposure Time Control Via hardware trigger signal or programmable via the camera API
Camera Power
Requirements
Nominal +5 VDC; SELV and LPS compliant and in accord with the Universal Serial
Bus 3.0 specification; supplied via the camera’s USB 3.0 port.
Mono Models: ≈ 3.2 W (typical) @ 5 VDC, ≈ 3.5 W (max.)
Color Models: ≈ 3.4 W (typical) @ 5 VDC, ≈ 3.7 W (max.)
I/O Lines 1 opto-isolated input line, 1 opto-isolated output line, and 2 direct-coupled GPIO
lines; power supplies must meet the SELV and LPS requirements
Lens Mount C-mount
Size (L x W x H) 29.3 mm x 29 mm x 29 mm (without cylindric housing extension or connectors)
48.2 mm x 29 mm x 29 mm (with cylindric housing extension and connectors)
Weight < 80 g
Conformity CE, UL in preparation, FCC, GenICam V. 2.x (including PFNC V. 2.x and SFNC
V. 2.x), IP30, RoHS, USB3 Vision, USB-IF in preparation
The CE Conformity Declaration is available on the Basler website:
www.baslerweb.com
Software Basler pylon Camera Software Suite (version 4.0 or higher)
Available for Windows (x86, x64) and Linux (x86 32 bit, x86 64 bit, ARM).
Table 9: General Specifications

Specifications, Requirements, and Precautions AW00123408000
15 Basler ace USB 3.0
* This frame rate can be reached when removing the default limit for the DeviceLinkThroughput
parameter and allowing approximately 380 MB/s. Note that adverse effects for image acquisition
can occur when using a camera at a "special conditions" frame rate. We strongly recommend to
only use high-quality accessories. You can obtain them from Basler AG (see the Basler website).

AW00123408000 Specifications, Requirements, and Precautions
Basler ace USB 3.0 16
* At full resolution and maximum bandwidth
Specification acA2000-165um/umNIR acA2000-165uc
Sensor Size
(H x V pixels)
2048 x 1088 2040 x 1086
Sensor Type CMOSIS CMV2000-2E5M/2E12M
Progressive scan CMOS
Global shutter
CMOSIS CMV2000-2E5C
Progressive scan CMOS
Global shutter
Optical Size 2/3"
Effective Sensor Diagonal 12.8 mm
Pixel Size (H x V) 5.5 µm x 5.5 µm
Max. Frame Rate* 168 fps
Mono/Mono (NIR)/Color Mono or mono (NIR) or color
(color models include a Bayer pattern RGB filter on the sensor)
Data Output Type USB 3.0, nominal max. 5 Gbit/s (SuperSpeed)
Pixel Formats Mono 8 Mono 12p
Mono 12
Bayer BG 8 Bayer BG 12p
Bayer BG 12
Synchronization Via hardware trigger signal, software trigger or free run
Exposure Time Control Via hardware trigger signal or programmable via the camera API
Camera Power
Requirements
Nominal +5 VDC; SELV and LPS compliant and in accord with the Universal Serial
Bus 3.0 specification; supplied via the camera’s USB 3.0 port.
≈ 2.9 W (typical) @ 5 VDC, ≈ 3.2 W (max.)
I/O Lines 1 opto-isolated input line, 1 opto-isolated output line, and 2 direct-coupled GPIO
lines; power supplies must meet the SELV and LPS requirements
Lens Mount C-mount
Size (L x W x H) 29.3 mm x 29 mm x 29 mm (without cylindric housing extension or connectors)
48.2 mm x 29 mm x 29 mm (with cylindric housing extension and connectors)
Weight < 80 g
Conformity CE, U Listed, FCC, GenICam V. 2.x (including PFNC V. 2.x and SFNC V. 2.x), IP30,
RoHS, USB3 Vision, USB-IF in preparation
The CE Conformity Declaration is available on the Basler website:
www.baslerweb.com
Software Basler pylon Camera Software Suite (version 4.0 or higher)
Available for Windows (x86, x64) and Linux (x86 32 bit, x86 64 bit, ARM).
Table 10: General Specifications

Specifications, Requirements, and Precautions AW00123408000
17 Basler ace USB 3.0
Specification acA2040-55um acA2040-55uc
Sensor Size
(H x V pixels)
2064 x 1544 (full resolution)
2048 x 1536 (default resolution; see Section 1.2 on page 2)
Sensor Type Sony IMX265LLR-C
Progressive scan CMOS
Global shutter
Sony IMX265LQR-C
Progressive scan CMOS
Global shutter
Optical Size 1/1.8"
Effective Sensor Diagonal 8.9 mm
Pixel Size (H x V) 3.45 µm x 3.45 µm
Max. Frame Rate 55 fps (at default and full resolution; see Section 1.2 on page 2)
Mono/Color Mono or color
(color cameras include a Bayer pattern RGB filter on the sensor)
Data Output Type USB 3.0, nominal max. 5 Gbit/s (SuperSpeed)
Pixel Formats Mono 8 Mono 12p
Mono 12
Mono 8 RGB 8
Bayer RG 8 BGR 8
Bayer RG 12 YCbCr422_8
Bayer RG 12p
Synchronization Via hardware trigger signal, software trigger or free run
Exposure Time Control Via hardware trigger signal or programmable via the camera API
Camera Power
Requirements
Nominal +5 VDC; SELV and LPS compliant and in accord with the Universal Serial
Bus 3.0 specification; supplied via the camera’s USB 3.0 port.
Mono Models: ≈ 2.5 W (typical) @ 5 VDC
Color Models: ≈ 2.6 W (typical) @ 5 VDC
I/O Lines 1 opto-isolated input line, 1 opto-isolated output line, and 2 direct-coupled GPIO
lines; power supplies must meet the SELV and LPS requirements
Lens Mount C-mount
Size (L x W x H) 29.3 mm x 29 mm x 29 mm (without cylindric housing extension or connectors)
48.2 mm x 29 mm x 29 mm (with cylindric housing extension and connectors)
Weight < 80 g
Conformity CE, UL in preparation, FCC, GenICam V. 2.x (including PFNC V. 2.x and SFNC V.
2.x), IP30, RoHS, USB3 Vision, USB-IF in preparation
The CE Conformity Declaration is available on the Basler website:
www.baslerweb.com
Software Basler pylon Camera Software Suite (version 4.0 or higher)
Available for Windows (x86, x64) and Linux (x86 32 bit, x86 64 bit, ARM).
Table 11: General Specifications

AW00123408000 Specifications, Requirements, and Precautions
Basler ace USB 3.0 18
* At full resolution and maximum bandwidth
Specification acA2040-90um/umNIR acA2040-90uc
Sensor Size
(H x V pixels)
2048 x 2048 2040 x 2046
Sensor Type CMOSIS CMV4000-2E5M/2E12M
Progressive scan CMOS
Global shutter
CMOSIS CMV4000-2E5C
Progressive scan CMOS
Global shutter
Optical Size 1"
Effective Sensor Diagonal 16.0 mm
Pixel Size (H x V) 5.5 µm x 5.5 µm
Max. Frame Rate* 90 fps
Mono/Mono (NIR)/Color Mono or mono (NIR) or color
(color models include a Bayer pattern RGB filter on the sensor)
Data Output Type USB 3.0, nominal max. 5 Gbit/s (SuperSpeed)
Pixel Formats Mono 8 Mono 12p
Mono 12
Bayer BG 8 Bayer BG 12p
Bayer BG 12
Synchronization Via hardware trigger signal, software trigger or free run
Exposure Time Control Via hardware trigger signal or programmable via the camera API
Camera Power
Requirements
Nominal +5 VDC; SELV and LPS compliant and in accord with the Universal Serial
Bus 3.0 specification; supplied via the camera’s USB 3.0 port.
≈ 2.9 W (typical) @ 5 VDC, ≈ 3.2 W (max.)
I/O Lines 1 opto-isolated input line, 1 opto-isolated output line, and 2 direct-coupled GPIO
lines; power supplies must meet the SELV and LPS requirements
Lens Mount C-mount
Size (L x W x H) 29.3 mm x 29 mm x 29 mm (without cylindric housing extension or connectors)
48.2 mm x 29 mm x 29 mm (with cylindric housing extension and connectors)
Weight < 80 g
Conformity CE, UL Listed, FCC, GenICam V. 2.x (including PFNC V. 2.x and SFNC V. 2.x),
IP30, RoHS, USB3 Vision, USB-IF in preparation
The CE Conformity Declaration is available on the Basler website:
www.baslerweb.com
Software Basler pylon Camera Software Suite (version 4.0 or higher)
Available for Windows (x86, x64) and Linux (x86 32 bit, x86 64 bit, ARM).
Table 12: General Specifications

Specifications, Requirements, and Precautions AW00123408000
19 Basler ace USB 3.0
Specification acA2040-120um acA2040-120uc
Sensor Size
(H x V pixels)
2064 x 1544 (full resolution)
2048 x 1536 (default resolution; see Section 1.2 on page 2)
Sensor Type Sony IMX252LLR-C
Progressive scan CMOS
Global shutter
Sony IMX252LQR-C
Progressive scan CMOS
Global shutter
Optical Size 1/1.8"
Effective Sensor Diagonal 8.9 mm
Pixel Size (H x V) 3.45 µm x 3.45 µm
Max. Frame Rate 119 fps (at full resolution and special conditions)*
120 fps (at default resolution and special conditions; see Section 1.2 on page 2)*
Mono/Color Mono or color
(color cameras include a Bayer pattern RGB filter on the sensor)
Data Output Type USB 3.0, nominal max. 5 Gbit/s (SuperSpeed)
Pixel Formats Mono 8 Mono 12p
Mono 12
Mono 8 RGB 8
Bayer RG 8 BGR 8
Bayer RG 12 YCbCr422_8
Bayer RG 12p
Synchronization Via hardware trigger signal, software trigger or free run
Exposure Time Control Via hardware trigger signal or programmable via the camera API
Camera Power
Requirements
Nominal +5 VDC; SELV and LPS compliant and in accord with the Universal Serial
Bus 3.0 specification; supplied via the camera’s USB 3.0 port.
Mono Models: ≈ 3.1 W (typical) @ 5 VDC
Color Models: ≈ 3.5 W (typical) @ 5 VDC
I/O Lines 1 opto-isolated input line, 1 opto-isolated output line, and 2 direct-coupled GPIO
lines; power supplies must meet the SELV and LPS requirements
Lens Mount C-mount
Size (L x W x H) 29.3 mm x 29 mm x 29 mm (without cylindric housing extension or connectors)
48.2 mm x 29 mm x 29 mm (with cylindric housing extension and connectors)
Weight < 80 g
Conformity CE, UL in preparation, FCC, GenICam V. 2.x (including PFNC V. 2.x and SFNC
V. 2.x), IP30, RoHS, USB3 Vision, USB-IF in preparation
The CE Conformity Declaration is available on the Basler website:
www.baslerweb.com
Software Basler pylon Camera Software Suite (version 4.0 or higher)
Available for Windows (x86, x64) and Linux (x86 32 bit, x86 64 bit, ARM).
Table 13: General Specifications

AW00123408000 Specifications, Requirements, and Precautions
Basler ace USB 3.0 20
* This frame rate can be reached when removing the default limit for the DeviceLinkThroughput
parameter and allowing approximately 380 MB/s. Note that adverse effects for image acquisition
can occur when using a camera at a "special conditions" frame rate. We strongly recommend to
only use high-quality accessories. You can obtain them from Basler AG (see the Basler website).

Specifications, Requirements, and Precautions AW00123408000
21 Basler ace USB 3.0
Specification acA2440-35um acA2440-35uc
Sensor Size
(H x V pixels)
2464 x 2056 (full resolution)
2448 x 2048 (default resolution; see Section 1.2 on page 2)
Sensor Type Sony IMX264LLR-C
Progressive scan CMOS
Global shutter
Sony IMX264LQR-C
Progressive scan CMOS
Global shutter
Optical Size 2/3"
Effective Sensor Diagonal 11.1 mm
Pixel Size (H x V) 3.45 µm x 3.45 µm
Max. Frame Rate 35 fps (at default resolution; see Section 1.2 on page 2)*
Mono/Color Mono or color
(color cameras include a Bayer pattern RGB filter on the sensor)
Data Output Type USB 3.0, nominal max. 5 Gbit/s (SuperSpeed)
Pixel Formats Mono 8 Mono 12p
Mono 12
Mono 8 RGB 8
Bayer RG 8 BGR 8
Bayer RG 12 YCbCr422_8
Bayer RG 12p
Synchronization Via hardware trigger signal, software trigger or free run
Exposure Time Control Via hardware trigger signal or programmable via the camera API
Camera Power
Requirements
Nominal +5 VDC; SELV and LPS compliant and in accord with the Universal Serial
Bus 3.0 specification; supplied via the camera’s USB 3.0 port.
Mono Models: ≈ 2.5 W (typical) @ 5 VDC
Color Models: ≈ 2.7 W (typical) @ 5 VDC
I/O Lines 1 opto-isolated input line, 1 opto-isolated output line, and 2 direct-coupled GPIO
lines; power supplies must meet the SELV and LPS requirements
Lens Mount C-mount
Size (L x W x H) 29.3 mm x 29 mm x 29 mm (without cylindric housing extension or connectors)
48.2 mm x 29 mm x 29 mm (with cylindric housing extension and connectors)
Weight < 80 g
Conformity CE, UL in preparation, FCC, GenICam V. 2.x (including PFNC V. 2.x and SFNC V.
2.x), IP30, RoHS, USB3 Vision, USB-IF in preparation
The CE Conformity Declaration is available on the Basler website:
www.baslerweb.com
Software Basler pylon Camera Software Suite (version 4.0 or higher)
Available for Windows (x86, x64) and Linux (x86 32 bit, x86 64 bit, ARM).
Table 14: General Specifications

AW00123408000 Specifications, Requirements, and Precautions
Basler ace USB 3.0 22
Specification acA2440-75um acA2440-75uc
Sensor Size
(H x V pixels)
2464 x 2056 (full resolution)
2448 x 2048 (default resolution; see Section 1.2 on page 2)
Sensor Type Sony IMX250LLR-C
Progressive scan CMOS
Global shutter
Sony IMX250LQR-C
Progressive scan CMOS
Global shutter
Optical Size 2/3"
Effective Sensor Diagonal 11.1 mm
Pixel Size (H x V) 3.45 µm x 3.45 µm
Max. Frame Rate 75 fps (at default resolution; see Section 1.2 on page 2)
Mono/Color Mono or color
(color cameras include a Bayer pattern RGB filter on the sensor)
Data Output Type USB 3.0, nominal max. 5 Gbit/s (SuperSpeed)
Pixel Formats Mono 8 Mono 12p
Mono 12
Mono 8 RGB 8
Bayer RG 8 BGR 8
Bayer RG 12 YCbCr422_8
Bayer RG 12p
Synchronization Via hardware trigger signal, software trigger or free run
Exposure Time Control Via hardware trigger signal or programmable via the camera API
Camera Power
Requirements
Nominal +5 VDC; SELV and LPS compliant and in accord with the Universal Serial
Bus 3.0 specification; supplied via the camera’s USB 3.0 port.
Mono Models: ≈ 3.2 W (typical) @ 5 VDC
Color Models: ≈ 3.4 W (typical) @ 5 VDC
I/O Lines 1 opto-isolated input line, 1 opto-isolated output line, and 2 direct-coupled GPIO
lines; power supplies must meet the SELV and LPS requirements
Lens Mount C-mount
Size (L x W x H) 29.3 mm x 29 mm x 29 mm (without cylindric housing extension or connectors)
48.2 mm x 29 mm x 29 mm (with cylindric housing extension and connectors)
Weight < 80 g
Conformity CE, UL in preparation, FCC, GenICam V. 2.x (including PFNC V. 2.x and SFNC V.
2.x), IP30, RoHS, USB3 Vision, USB-IF in preparation
The CE Conformity Declaration is available on the Basler website:
www.baslerweb.com
Software Basler pylon Camera Software Suite (version 4.0 or higher)
Available for Windows (x86, x64) and Linux (x86 32 bit, x86 64 bit, ARM).
Table 15: General Specifications

Specifications, Requirements, and Precautions AW00123408000
23 Basler ace USB 3.0
Specification acA2500-14um/uc
Sensor Size
(H x V pixels)
um: 2592 x 1944
uc: 2590 x 1942
Sensor Type Aptina MT9P031
Progressive scan CMOS
Rolling shutter
Optical Size 1/2.5"
Effective Sensor Diagonal 7.2 mm
Pixel Size (H x V) 2.2 µm x 2.2 µm
Max. Frame Rate
(at full resolution)
14 fps
Mono/Color Mono or color (color models include a Bayer pattern RGB filter on the sensor)
Data Output Type USB 3.0, nominal max. 5 Gbit/s (SuperSpeed)
Pixel Formats Mono Models: Mono 8 Mono 12p
Mono 12
Color Models: Mono 8 Bayer GB 12p
Bayer GB 8 YCbCr422_8
Bayer GB 12
Synchronization Via hardware trigger signal, software trigger or free run
Exposure Time Control Programmable via the camera API
Camera Power
Requirements
Nominal +5 VDC; SELV and LPS compliant and in accord with the Universal Serial
Bus 3.0 specification; supplied via the camera’s USB 3.0 port
≈ 2.2 W (typical and max.) @ 5 VDC
I/O Lines 1 opto-isolated input line, 1 opto-isolated output line, and 2 direct-coupled GPIO
lines; power supplies must meet the SELV and LPS requirements
Lens Mount C-mount, CS-mount
Size (L x W x H) 29.3 mm x 29 mm x 29 mm (without cylindric housing extension or connectors)
48.2 mm x 29 mm x 29 mm (with cylindric C-mt. housing extension and connectors)
Weight < 80 g
Conformity CE, UL Listed, FCC, GenICam V. 2.x (including PFNC V. 2.x and SFNC V. 2.x),
IP30, RoHS, USB3 Vision, USB-IF in preparation
The CE Conformity Declaration is available on the Basler website:
www.baslerweb.com
Software Basler pylon Camera Software Suite (version 4.0 or higher)
Available for Windows (x86, x64) and Linux (x86 32 bit, x86 64 bit, ARM).
Table 16: General Specifications

AW00123408000 Specifications, Requirements, and Precautions
Basler ace USB 3.0 24
Specification acA2500-60um acA2500-60uc
Sensor Size (H x V pixels) 2592 x 2048
Sensor Type ON Semiconductor®
PYTHON NOIP1SN5000A
Progressive scan CMOS
Global shutter
ON Semiconductor®
PYTHON NOIP1SE5000A
Progressive scan CMOS
Global shutter
Optical Size 1"
Effective Sensor Diagonal 15.9 mm
Pixel Size (H x V) 4.8 µm x 4.8 µm
Max. Frame Rate
(at full resolution)
60 fps (at fast sensor readout, see Section 1.2 on page 2, and special conditions)*
47 fps (at normal sensor readout and at special conditions)*
Mono/Color Mono or color (color cameras include a Bayer pattern RGB filter on the sensor)
Data Output Type USB 3.0, nominal max. 5 Gbit/s (SuperSpeed)
Pixel Formats Mono 8 Mono 10p
Mono 10
Mono 8 RGB8
Bayer BG 8 BGR8
Bayer BG 10 YCbCr422_8
Bayer BG 10p
Synchronization Via hardware trigger signal, software trigger or free run
Exposure Time Control Via hardware trigger signal or programmable via the camera API
Camera Power
Requirements
Nominal +5 VDC; SELV and LPS compliant and in accord with the Universal Serial
Bus 3.0 specification; supplied via the camera’s USB 3.0 port.
Mono Models: ≈ 3.6 W (typical) @ 5 VDC, ≈ 3.9 W (max.)
Color Models: ≈ 3.8 W (typical) @ 5 VDC, ≈ 4.1 W (max.)
I/O Lines 1 opto-isolated input line, 1 opto-isolated output line, and 2 direct-coupled GPIO
lines; power supplies must meet the SELV and LPS requirements
Lens Mount C-mount
Size (L x W x H) 29.3 mm x 29 mm x 29 mm (without cylindric housing extension or connectors)
48.2 mm x 29 mm x 29 mm (with cylindric housing extension and connectors)
Weight < 80 g
Conformity CE, UL in preparation, FCC, GenICam V. 2.x (including PFNC V. 2.x and SFNC V.
2.x), IP30, RoHS, USB3 Vision, USB-IF in preparation
The CE Conformity Declaration is available on the Basler website:
www.baslerweb.com
Software Basler pylon Camera Software Suite (version 4.0 or higher)
Available for Windows (x86, x64) and Linux (x86 32 bit, x86 64 bit, ARM).
Table 17: General Specifications

Specifications, Requirements, and Precautions AW00123408000
25 Basler ace USB 3.0
* This frame rate can be reached when removing the default limit for the DeviceLinkThroughput
parameter and allowing approximately 380 MB/s. Note that adverse effects for image acquisition
can occur when using a camera at a "special conditions" frame rate. We strongly recommend to
only use high-quality accessories. You can obtain them from Basler AG (see the Basler website).

AW00123408000 Specifications, Requirements, and Precautions
Basler ace USB 3.0 26
Specification acA3800-14um/uc acA4600-10uc
Sensor Size
(H x V pixels)
um: 3840 x 2748
uc: 3840 x 2748
uc: 4608 x 3288
Sensor Type Aptina MT9J003
Progressive scan CMOS
Rolling shutter
Aptina MT9F002
Progressive scan CMOS
Rolling shutter
Optical Size 1/2.3"
Effective Sensor Diagonal 7.9 mm 8.0 mm
Pixel Size (H x V) 1.67 µm x 1.67 µm 1.4 µm x 1.4 µm
Max. Frame Rate 14 fps (at full resolution) 10 fps (at full resolution)
Mono/Color Mono or color (color models include a
Bayer pattern RGB filter on the sensor)
Color (includes a Bayer pattern RGB
filter on the sensor)
Data Output Type USB 3.0, nominal max. 5 Gbit/s (SuperSpeed)
Pixel Formats Mono Model:
Mono 8 Mono 12p
Mono 12
Color Model:
Mono 8 Bayer BG 12p
Bayer BG 8 YCbCr422_8
Bayer BG 12
Color Model:
Mono 8 Bayer BG 12p
Bayer BG 8 YCbCr422_8
Bayer BG 12
Synchronization Via hardware trigger signal, software trigger or free run
Exposure Time Control Programmable via the camera API
Camera Power
Requirements
Nominal +5 VDC; SELV and LPS compliant and in accord with the Universal Serial
Bus 3.0 specification; supplied via the camera’s USB 3.0 port
≈ 2.5 W (typical) @ 5 VDC, ≈ 2.8 W (max.)
I/O Lines 1 opto-isolated input line, 1 opto-isolated output line, 2 direct-coupled GPIO lines;
power supplies must meet the SELV and LPS requirements
Lens Mount C-mount, CS-mount C-mount
Size (L x W x H) 29.3 mm x 29 mm x 29 mm (without cylindric housing extension or connectors)
48.2 mm x 29 mm x 29 mm (with cylindric C-mt. housing extension and connectors)
Weight < 80 g
Conformity CE, UL Listed, FCC, GenICam V. 2.x (including PFNC V. 2.x and SFNC
V. 2.x), IP30, RoHS, USB3 Vision, USB-IF in preparation
The CE Conformity Declaration is available on the
Basler website: www.baslerweb.com
Software Basler pylon Camera Software Suite (version 4.0 or higher)
Available for Windows (x86, x64) and Linux (x86 32 bit, x86 64 bit, ARM).
Table 18: General Specifications

Specifications, Requirements, and Precautions AW00123408000
27 Basler ace USB 3.0
1.4 Spectral Response
1.4.1 Mono Camera Spectral Response
The following graphs show the spectral response for each available monochrome camera model.
1.4.1.1 Cameras with CCD Sensor
The spectral response curves exclude lens characteristics and light source
characteristics.
Wavelength (nm)
Relative Response
Fig. 1: acA640-90um Spectral Response (From Sensor Data Sheet)
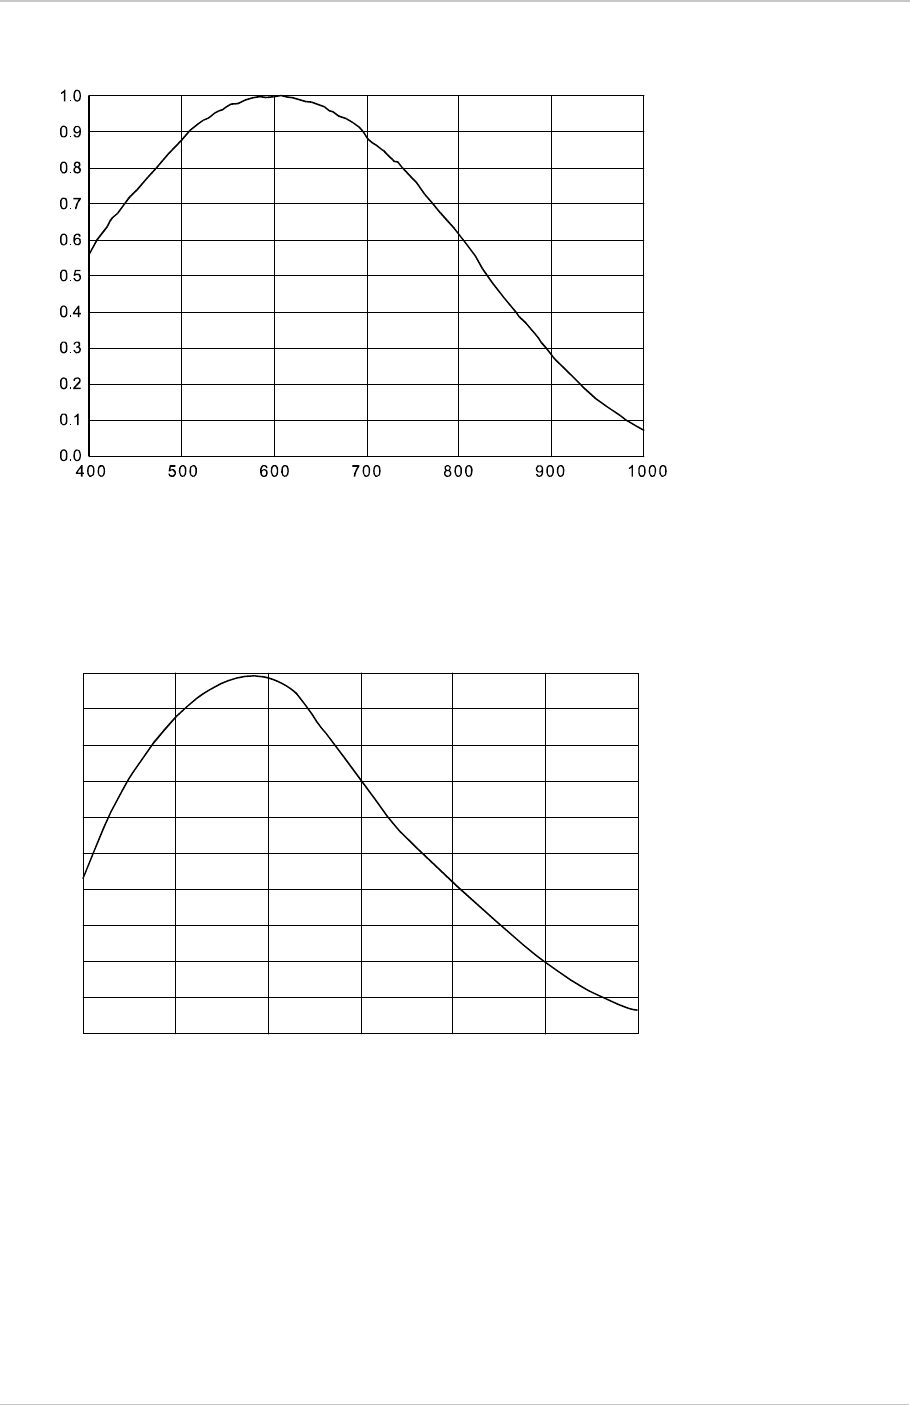
AW00123408000 Specifications, Requirements, and Precautions
Basler ace USB 3.0 28
Wavelength (nm)
Relative Response
Fig. 2: acA640-120um Spectral Response (From Sensor Data Sheet)
1.0
0.9
0.8
0.7
0.6
0.5
0.4
0.3
0.2
0.1
0.0
400 500 600 700 800 900 1000
Wavelength (nm)
Relative Response
Fig. 3: acA1300-30um Spectral Response (From Sensor Data Sheet)
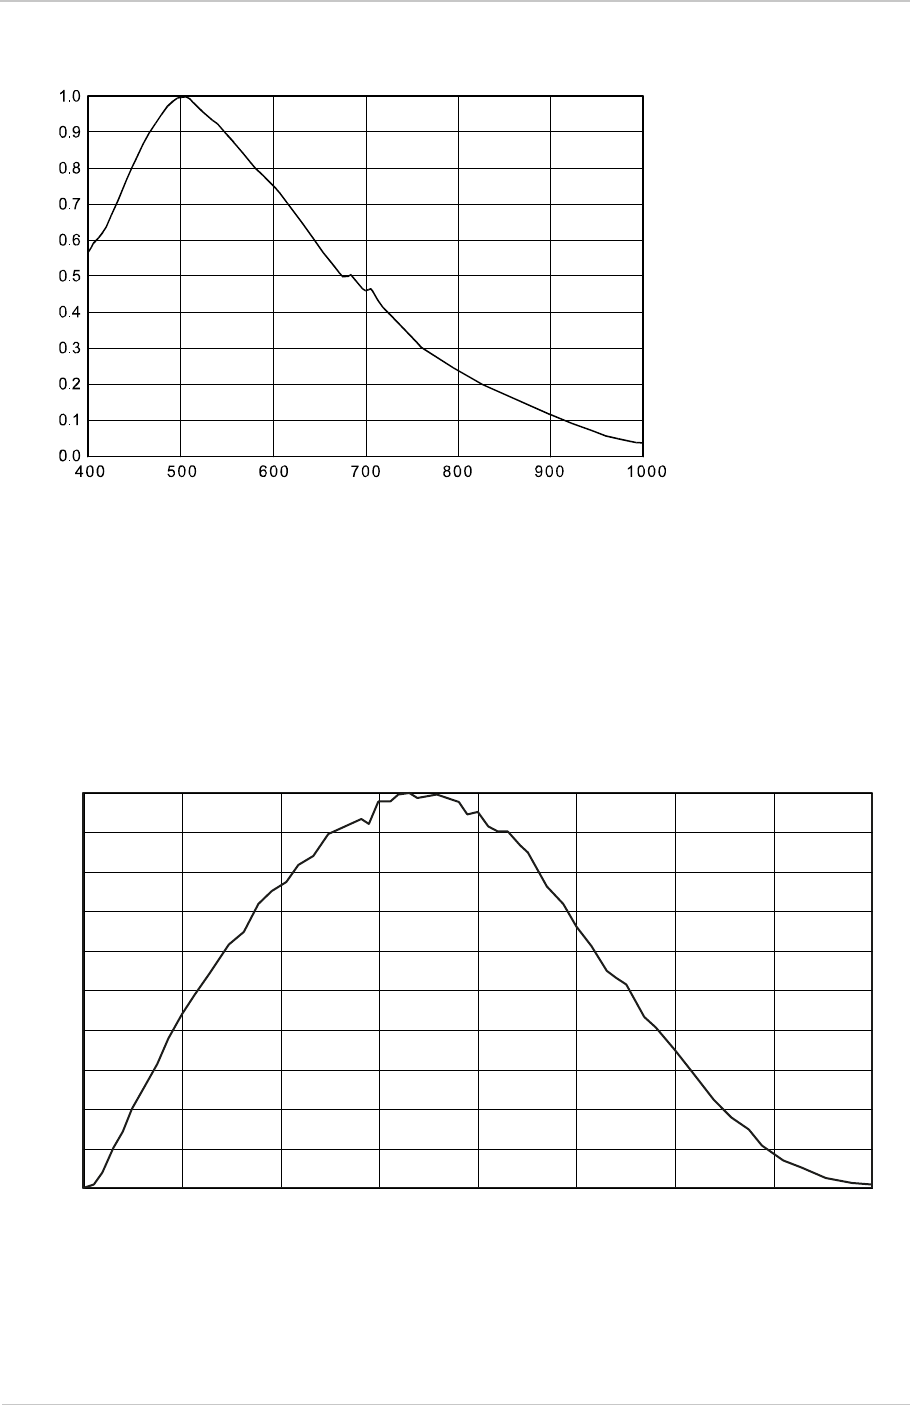
Specifications, Requirements, and Precautions AW00123408000
29 Basler ace USB 3.0
1.4.1.2 Cameras with CMOS Sensor
Wavelength (nm)
Relative Response
Fig. 4: acA1600-20um Spectral Response (From Sensor Data Sheet)
0.2
0.0
0.4
0.6
0.8
1.0
300 400 500 600 700 800 900 1000 1100
Wavelength (nm)
Relative Response
Fig. 5: acA640-750um, acA800-510um, acA1300-200um, acA1920-150um, and acA2500-60um,
Spectral Response (From Sensor Data Sheet)
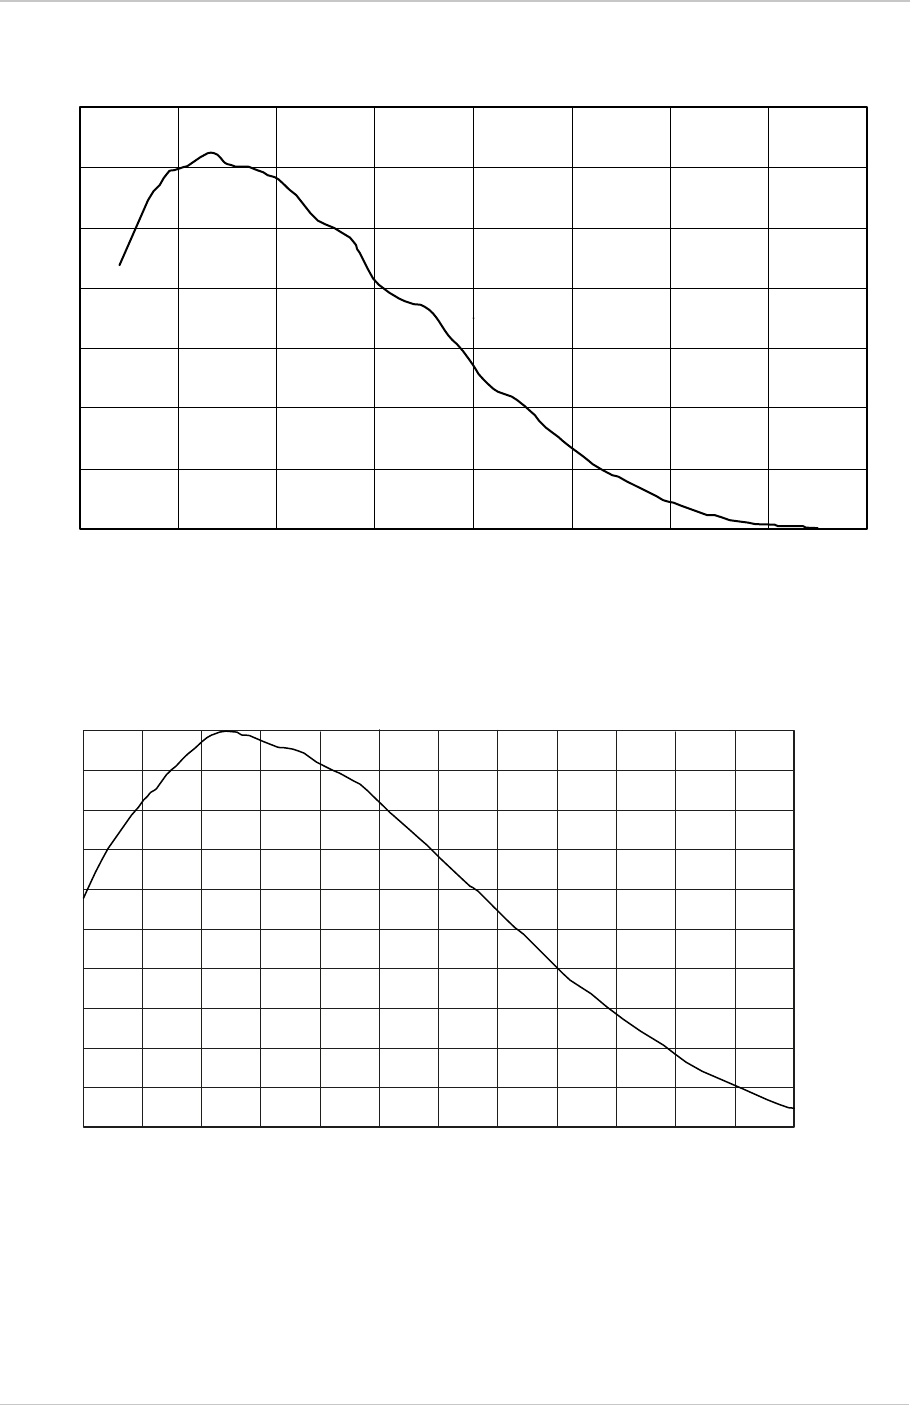
AW00123408000 Specifications, Requirements, and Precautions
Basler ace USB 3.0 30
350 450 550 650 750 850 950 1050 1150
0
10
20
30
40
50
60
70
Wavelength (nm)
Quantum Efficiency (%)
Fig. 6: acA1920-25um Spectral Response (From Sensor Data Sheet)
Wavelength (nm)
Relative Response
Fig. 7: acA1920-40um and acA1920-155um Spectral Response (From Sensor Data Sheet)
0.0
0.2
0.4
0.6
0.8
1.0
400 500 600 700 800 900 1000
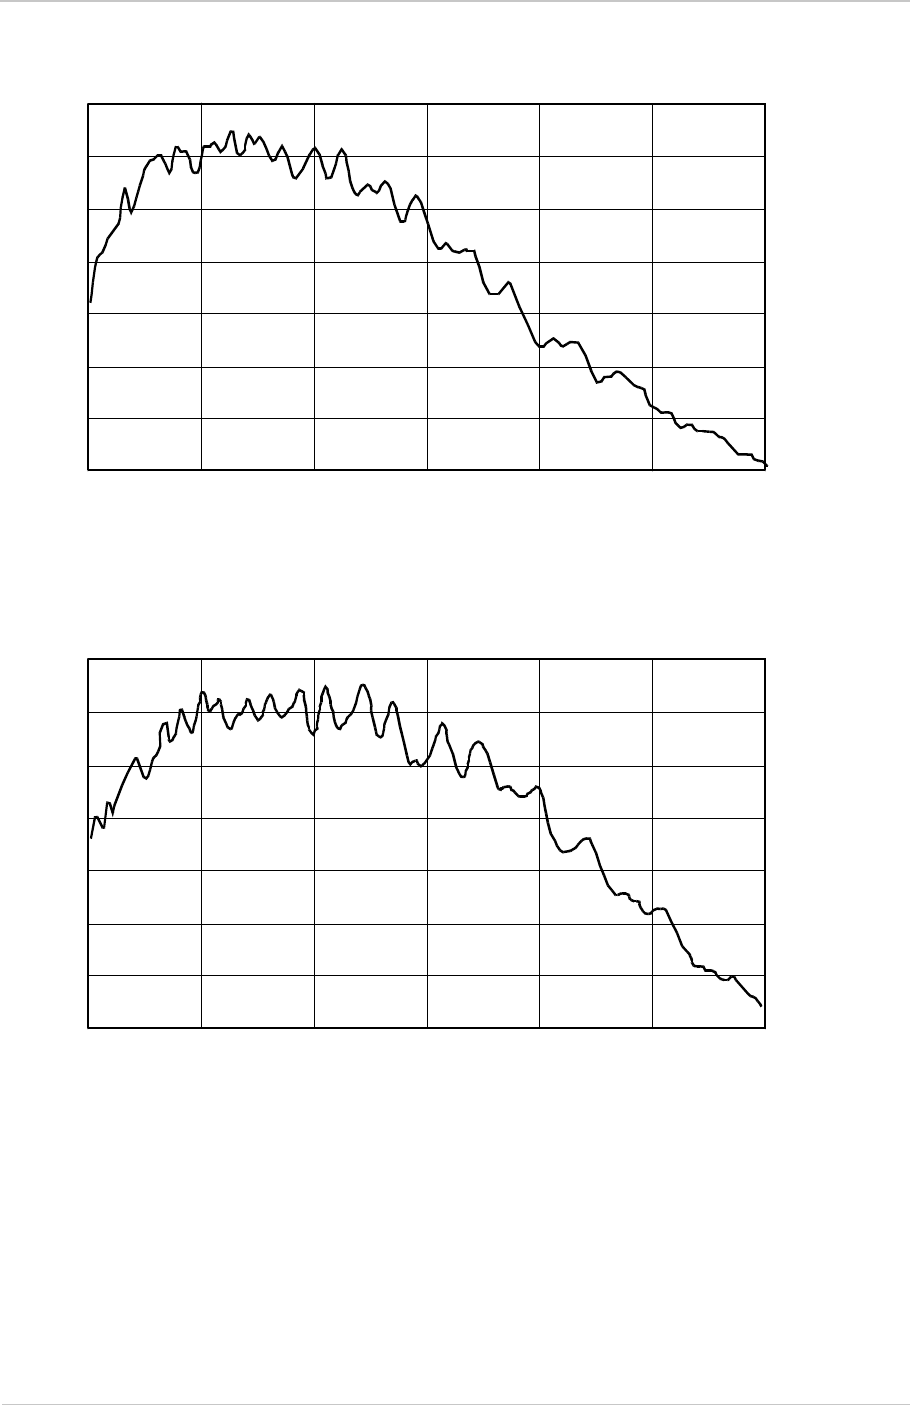
Specifications, Requirements, and Precautions AW00123408000
31 Basler ace USB 3.0
0
400 500 600 700 800 900 1000
10
20
30
40
50
60
70
Wavelength (nm)
Quantum Efficiency (%)
Fig. 8: acA2000-165um, acA2040-90um Spectral Response (From Sensor Data Sheet)
0
400 500 600 700 800 900 1000
10
20
30
40
50
60
70
Wavelength (nm)
Quantum Efficiency (%)
Fig. 9: acA2000-165umNIR, acA2040-90umNIR Spectral Response (From Sensor Data Sheet)
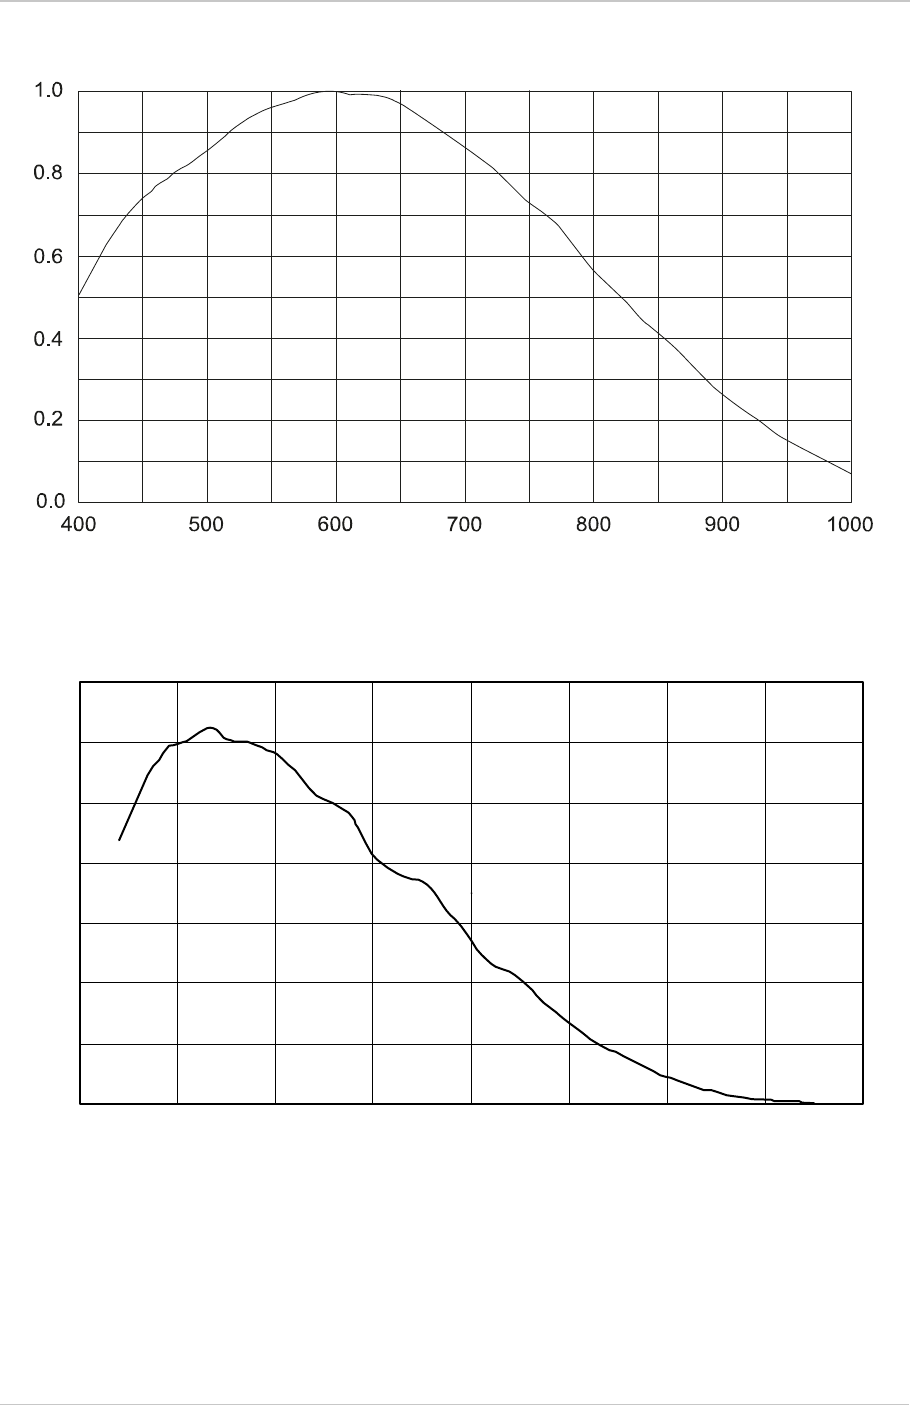
AW00123408000 Specifications, Requirements, and Precautions
Basler ace USB 3.0 32
Fig. 10: acA2040-55um, acA2040-120um, acA2440-35um, and acA2440-75um (From Sensor Data Sheet)
Relative Response
Wavelength (nm)
350 450 550 650 750 850 950 1050 1150
0
10
20
30
40
50
60
70
Wavelength (nm)
Quantum Efficiency (%)
Fig. 11: acA2500-14um Spectral Response (From Sensor Data Sheet)

Specifications, Requirements, and Precautions AW00123408000
33 Basler ace USB 3.0
400 500 600 700
0.1
0.2
0.3
0.4
0.0
0.5
800 900 1000
Wavelength (nm)
Quantum Efficiency (%)
Fig. 12: acA3800-14um Spectral Response (From Sensor Data Sheet)
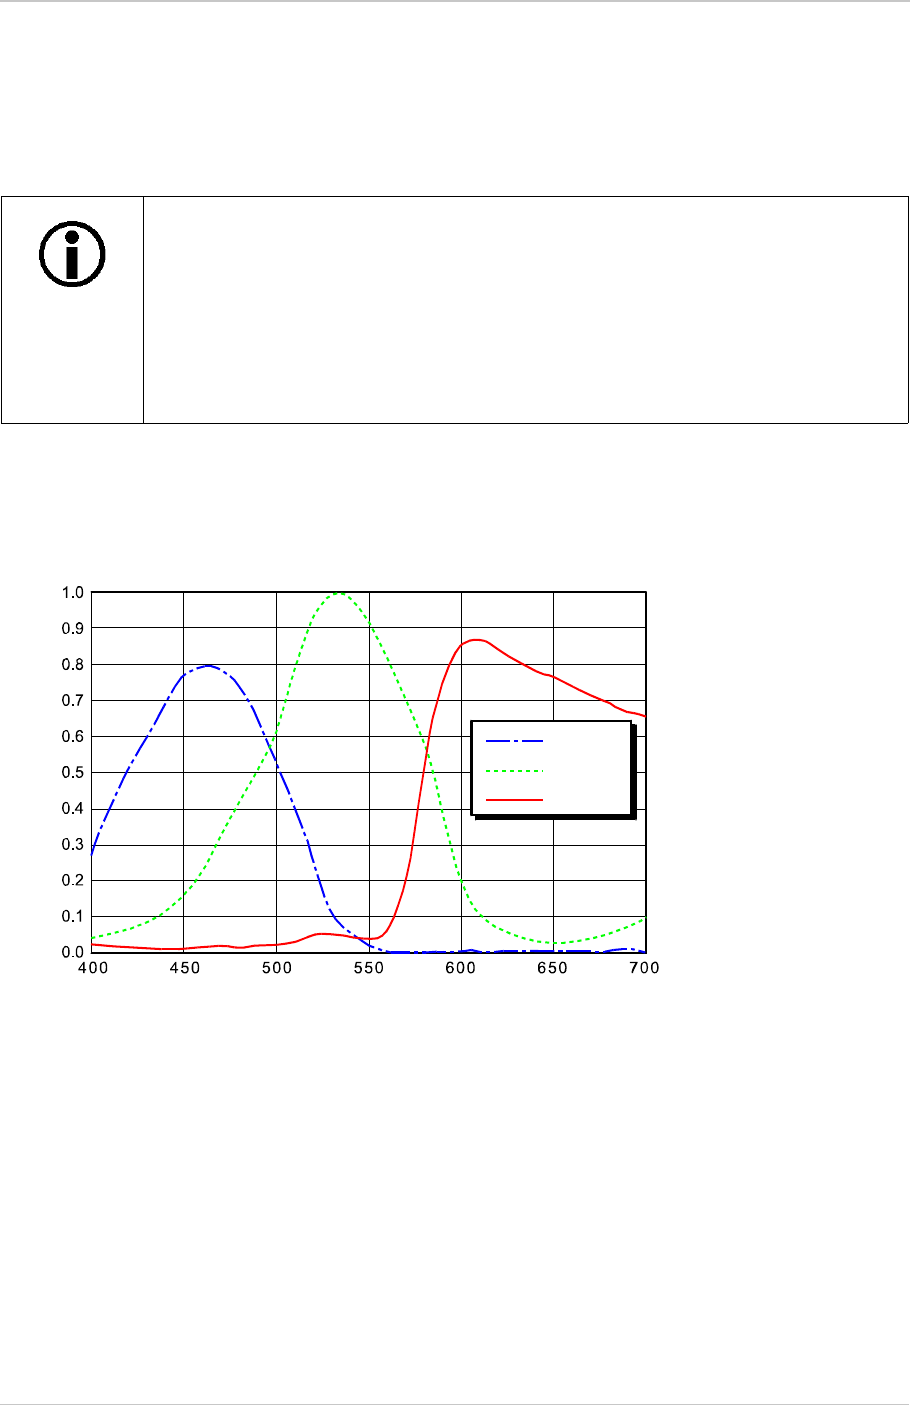
AW00123408000 Specifications, Requirements, and Precautions
Basler ace USB 3.0 34
1.4.2 Color Camera Spectral Response
The following graphs show the spectral response for each available color camera model.
1.4.2.1 Cameras with CCD Sensor
The spectral response curves exclude lens characteristics, light source
characteristics, and IR-cut filter characteristics.
To obtain best performance from color models of the camera, use of a dielectric
IR cut filter is recommended. The filter should transmit in a range from 400 nm to
700 ... 720 nm, and it should cut off from 700 ... 720 nm to 1100 nm.
A suitable IR cut filter is built into the cylindric housing extension in color models
of the camera.
Wavelength (nm)
Relative Response
Blue
Green
Red
Fig. 13: acA640-90uc Spectral Response (From Sensor Data Sheet)
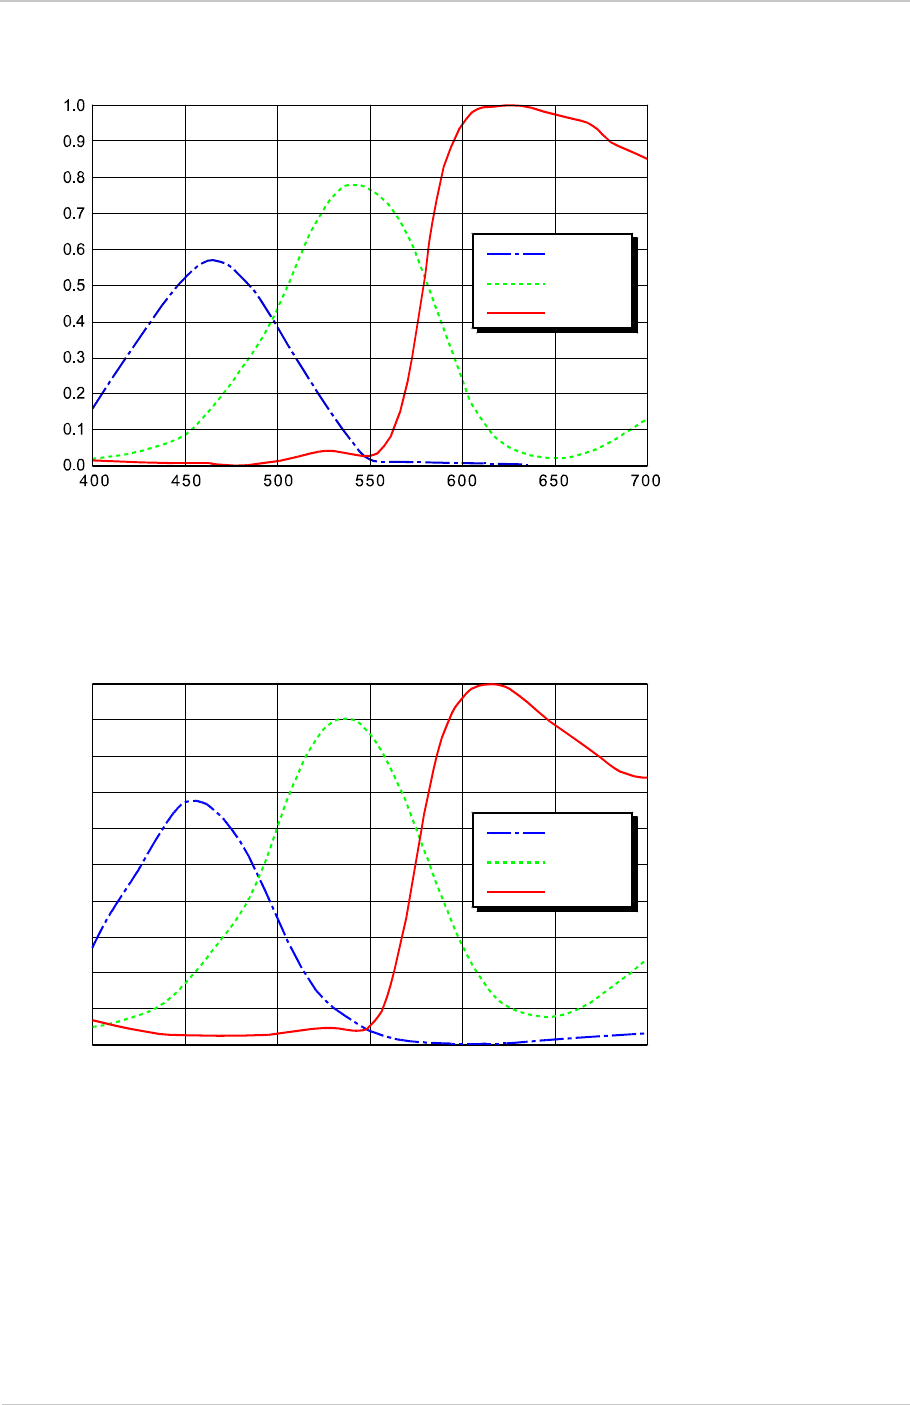
Specifications, Requirements, and Precautions AW00123408000
35 Basler ace USB 3.0
Wavelength (nm)
Relative Response
Blue
Green
Red
Fig. 14: acA640-120uc Spectral Response (From Sensor Data Sheet)
1.0
0.9
0.8
0.7
0.6
0.5
0.4
0.3
0.2
0.1
0.0
400 450 500 550 600 650 700
Wavelength (nm)
Relative Response
Blue
Green
Red
Fig. 15: acA1300-30uc Spectral Response (From Sensor Data Sheet)
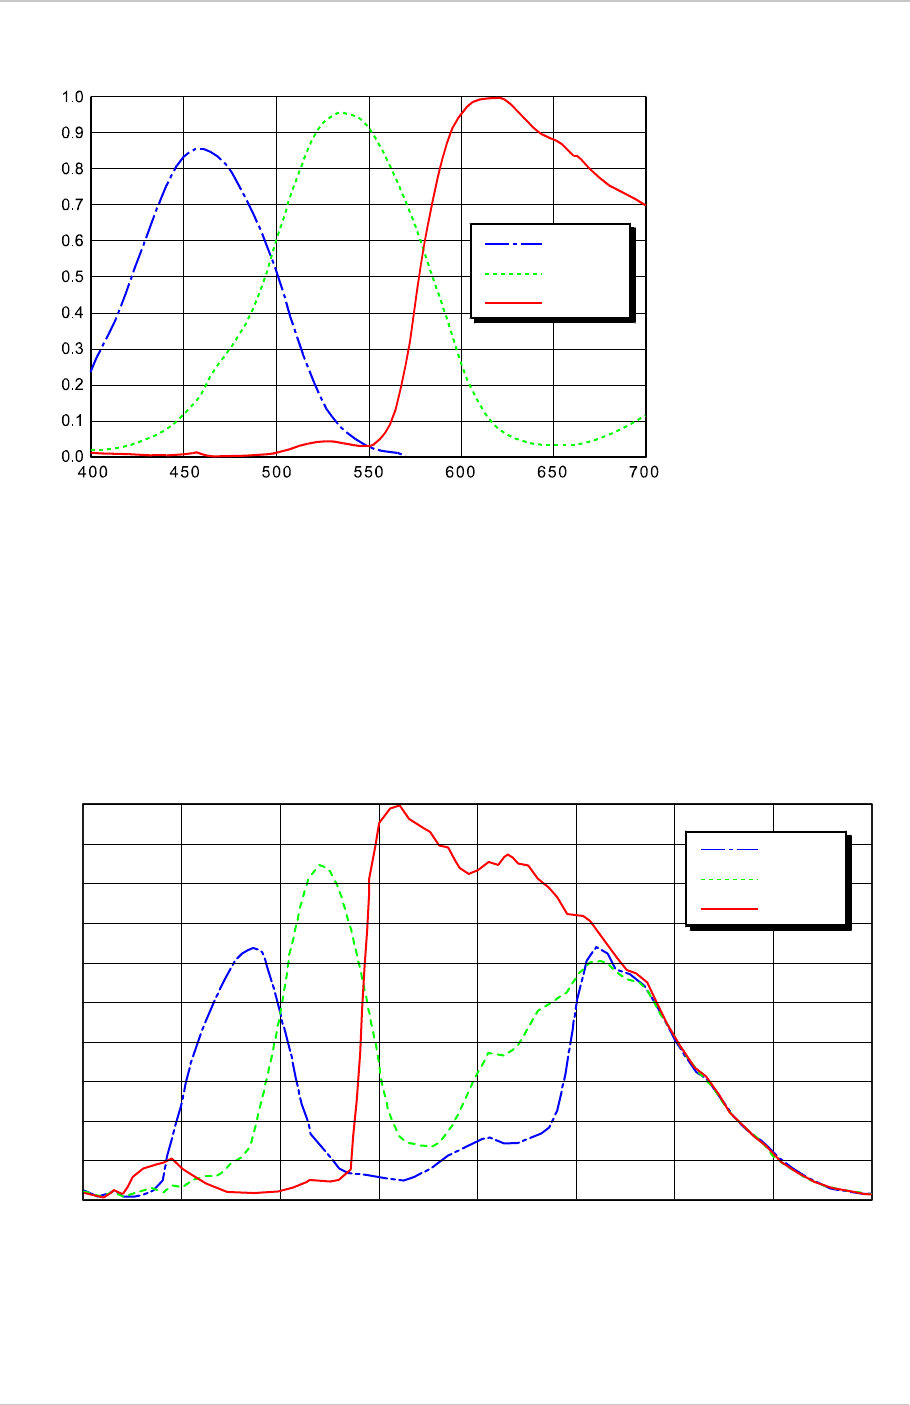
AW00123408000 Specifications, Requirements, and Precautions
Basler ace USB 3.0 36
1.4.2.2 Cameras with CMOS Sensor
Wavelength (nm)
Relative Response
Blue
Green
Red
Fig. 16: acA1600-20uc Spectral Response (From Sensor Data Sheet)
0.2
0.0
0.4
0.6
0.8
1.0
300 400 500 600 700 800 900 1000 1100
Wavelength (nm)
Relative Response
Blue
Green
Red
Fig. 17: acA640-750uc, acA800-510uc, acA1300-200uc, acA1920-150uc, and acA2500-60um,
Spectral Response (From Sensor Data Sheet)
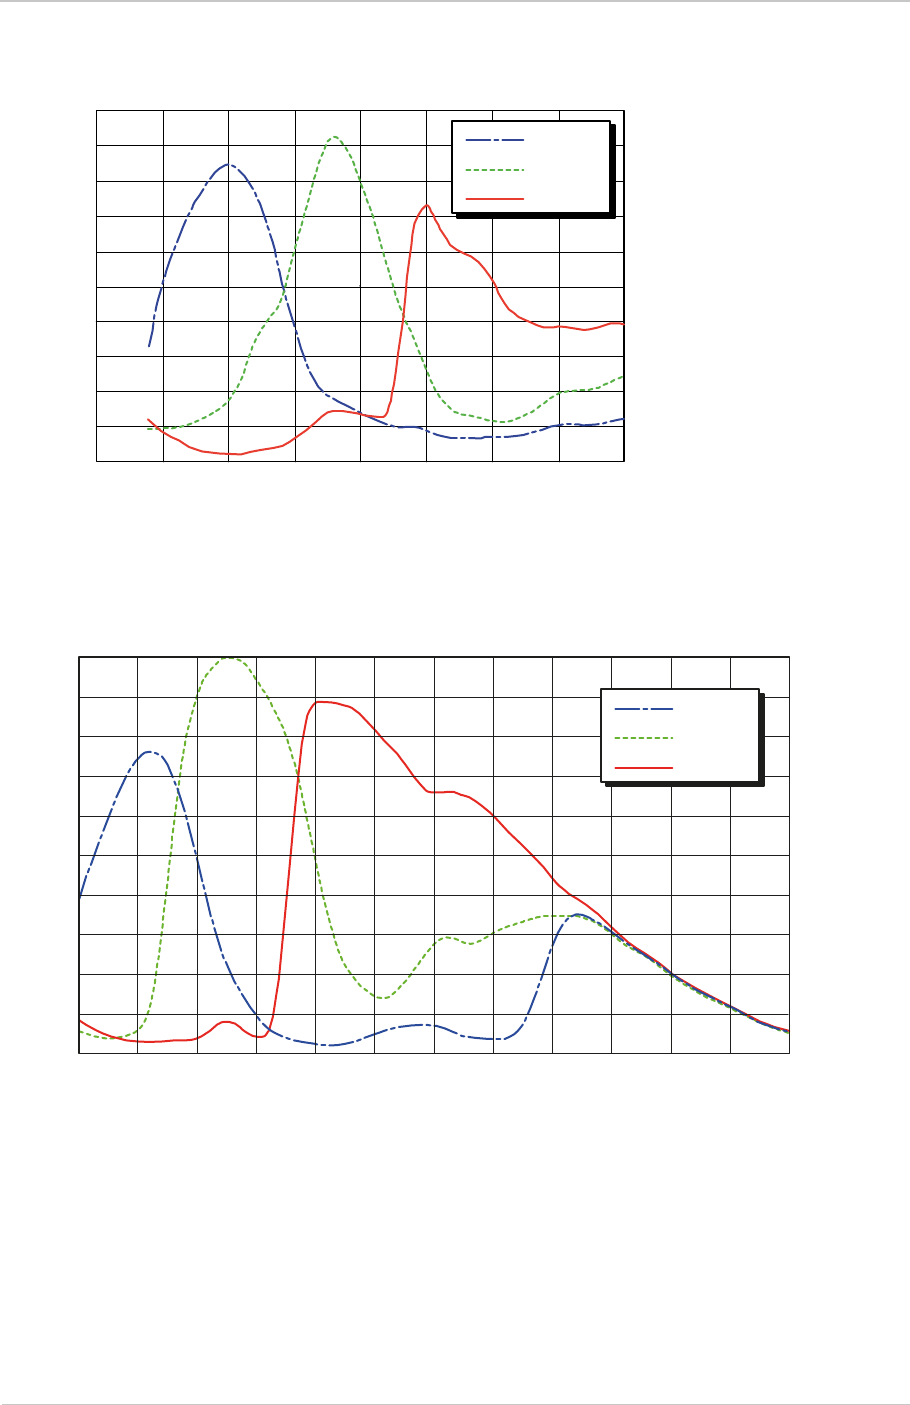
Specifications, Requirements, and Precautions AW00123408000
37 Basler ace USB 3.0
350 400 450 500 550 600 650 700 750
0
5
10
15
20
25
30
35
40
45
50
Wavelength (nm)
Quantum Efficiency (%)
Blue
Green
Red
Fig. 18: acA1920-25uc Spectral Response (From Sensor Data Sheet)
Wavelength (nm)
Relative Response
Fig. 19: acA1920-40uc and acA1920-155uc (From Sensor Data Sheet)
0.2
0.4
0.6
0.8
1.0
400 500 600 700 800 900 1000
0.0
Blue
Green
Red
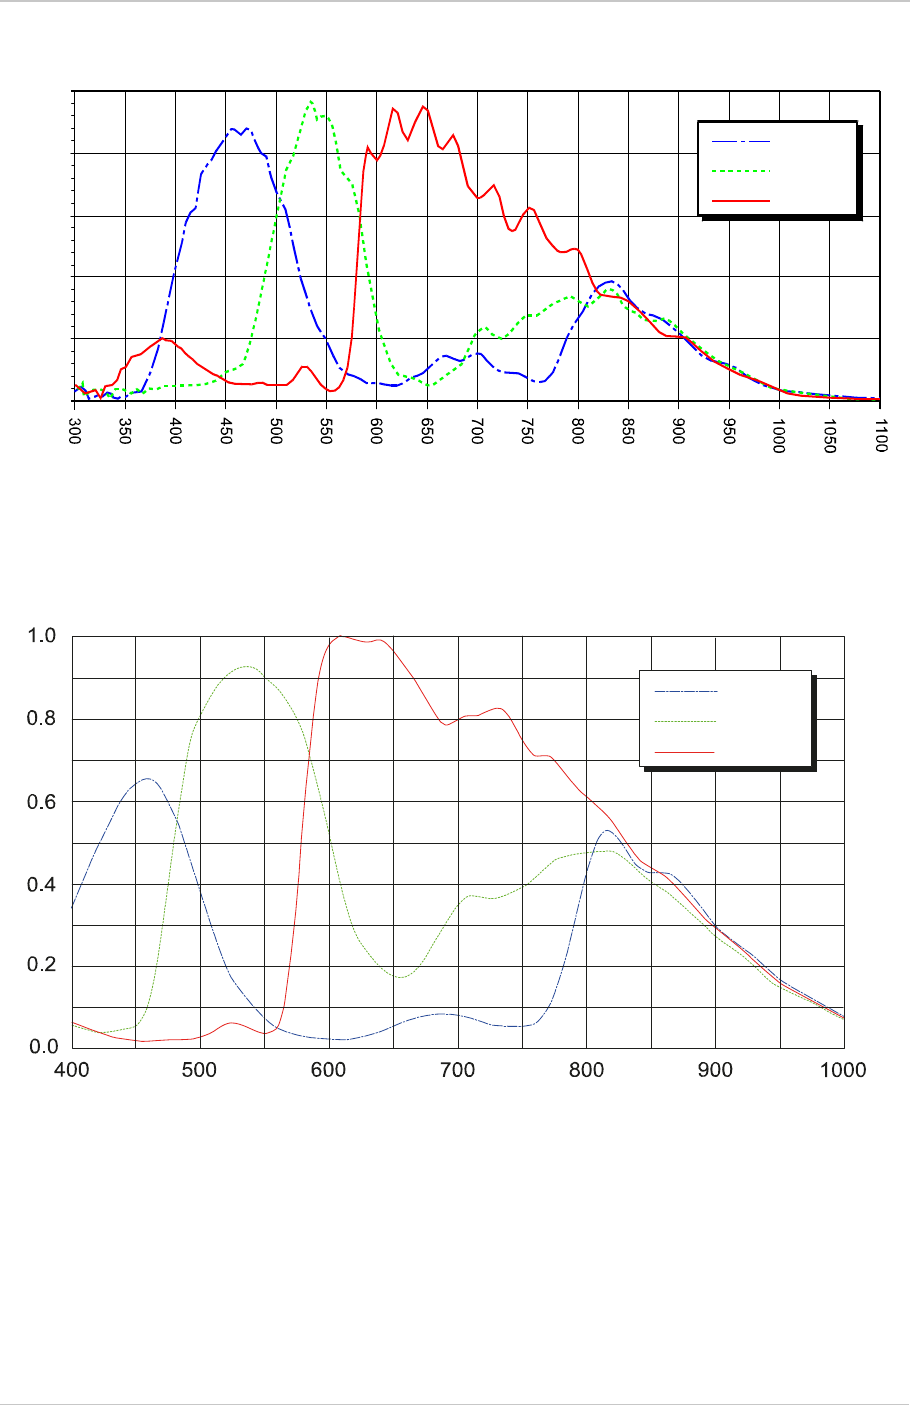
AW00123408000 Specifications, Requirements, and Precautions
Basler ace USB 3.0 38
0
10
20
30
40
50
Wavelength (nm)
Quantum Efficiency (%)
Blue
Green
Red
Fig. 20: acA2000-165uc, acA2040-90uc Spectral Response (From Sensor Data Sheet)
Fig. 21: acA2040-55uc, acA2040-120uc, acA2440-35uc, and acA2440-75uc (From Sensor Data Sheet)
Relative Response
Wavelength (nm)
Blue
Green
Red
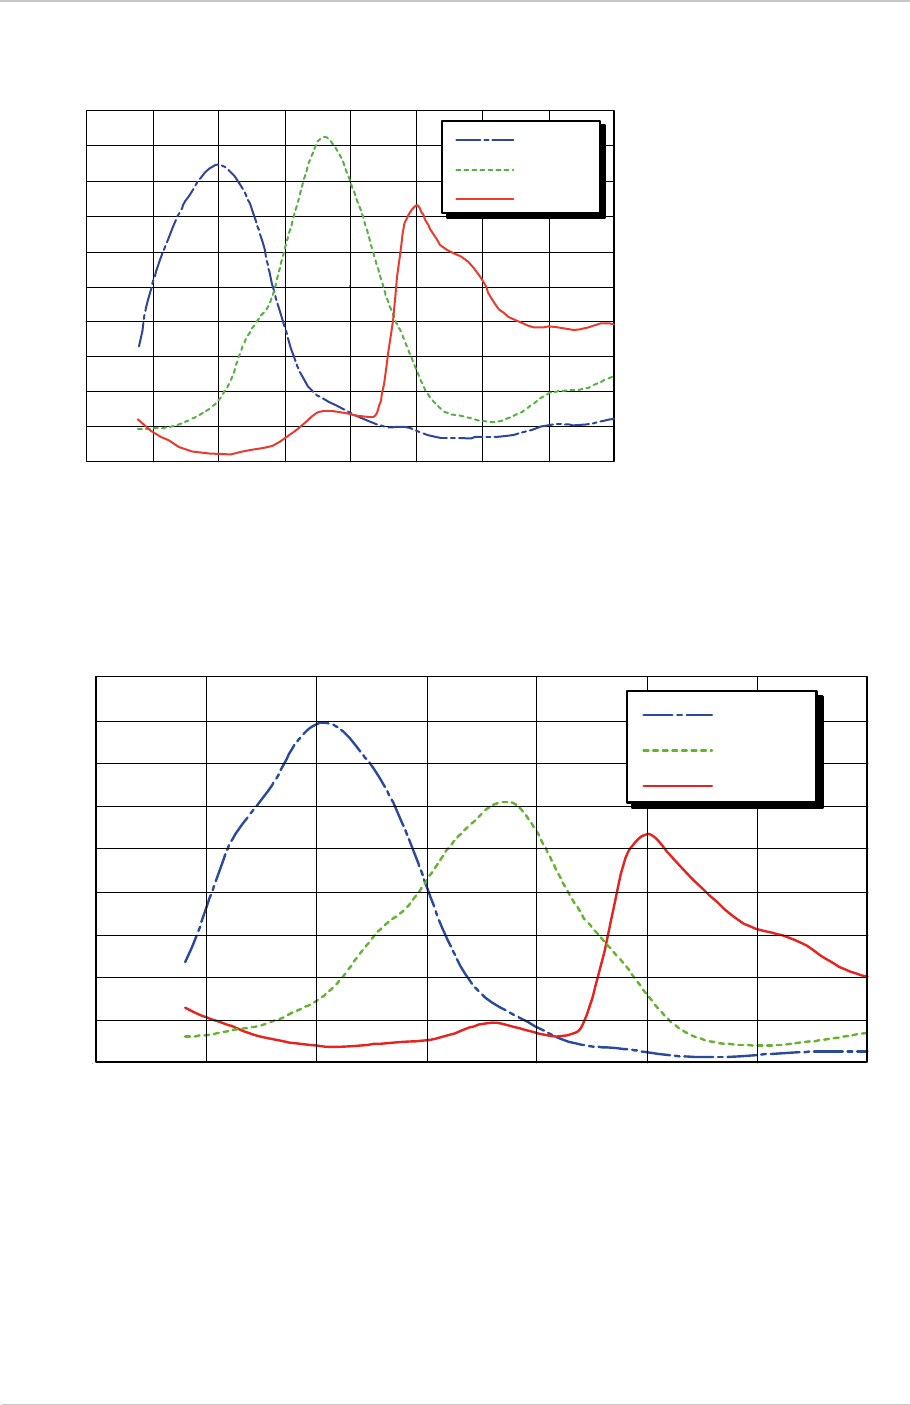
Specifications, Requirements, and Precautions AW00123408000
39 Basler ace USB 3.0
350 400 450 500 550 600 650 700 750
0
5
10
15
20
25
30
35
40
45
50
Wavelength (nm)
Quantum Efficiency (%)
Blue
Green
Red
Fig. 22: acA2500-14uc Spectral Response (From Sensor Data Sheet)
400 500 600 700
0.1
0.2
0.3
0.4
0.0
Wavelength (nm)
Quantum Efficiency (%)
Blue
Green
Red
Fig. 23: acA3800-14uc Spectral Response (From Sensor Data Sheet)
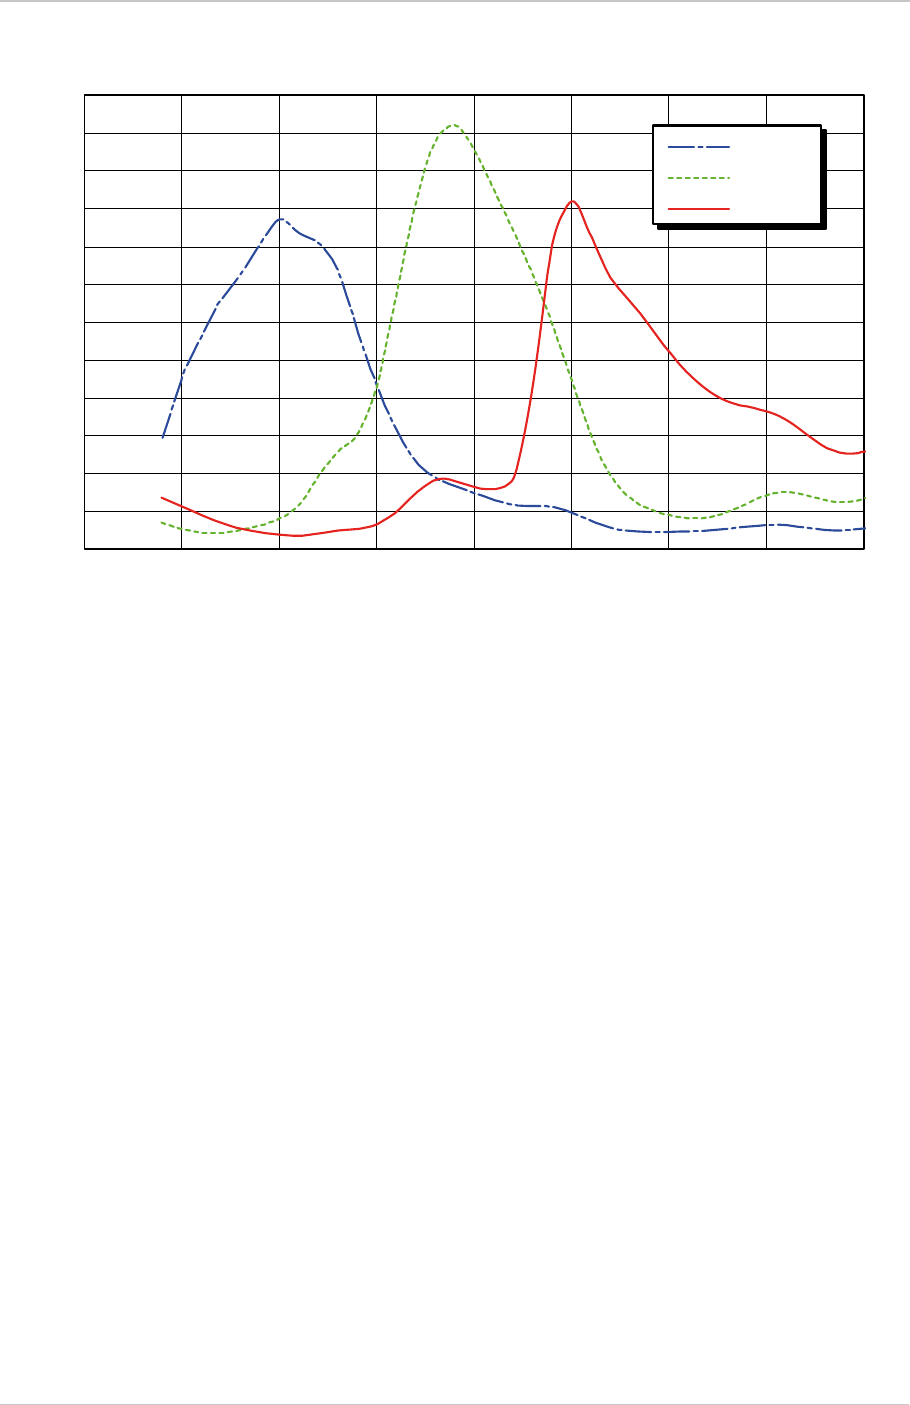
AW00123408000 Specifications, Requirements, and Precautions
Basler ace USB 3.0 40
0.5
400 500 600 700
0.6
0.1
0.2
0.3
0.4
0.0
Wavelength (nm)
Quantum Efficiency (%)
Blue
Green
Red
Fig. 24: acA4600-10uc Spectral Response (From Sensor Data Sheet)

Specifications, Requirements, and Precautions AW00123408000
41 Basler ace USB 3.0
1.5 Mechanical Specifications
The camera housing conforms to protection class IP30 assuming that the lens mount is covered by
a lens or by the plastic cap that is shipped with the camera.
1.5.1 Camera Dimensions and Mounting Points
The dimensions in millimeters for cameras equipped with a C-mount are as shown in Figure 25. The
dimensions in millimeters for cameras equipped with a CS-mount are as shown in Figure 26.
Note that some camera models are not available with CS-mount. For details, see Section 1.3.2 on
page 7.
Camera housings are equipped with mounting screw holes on the bottom as shown in the drawings.
For mounting instructions, see Section 1.6 on page 46.

AW00123408000 Specifications, Requirements, and Precautions
Basler ace USB 3.0 42
Fig. 25: Mechanical Dimensions (in mm) for Cameras with the C-mount
16.5
23.7 (dimension for M3)
29
12
22 (dimension for M2)
20.7
Bottom
Ø 27.87
12 29.3
17.526
29
6.9
15
Top
Photosensitive surface
of the sensor
14.5
20
5.5
29
3 x M3; 3 deep
Not to Scale
4 x M2; 3 deep
22.2
7.6
29
41.3
18
Reference Plane
2 x M2; 4 deep
4.5
8.5
14.5
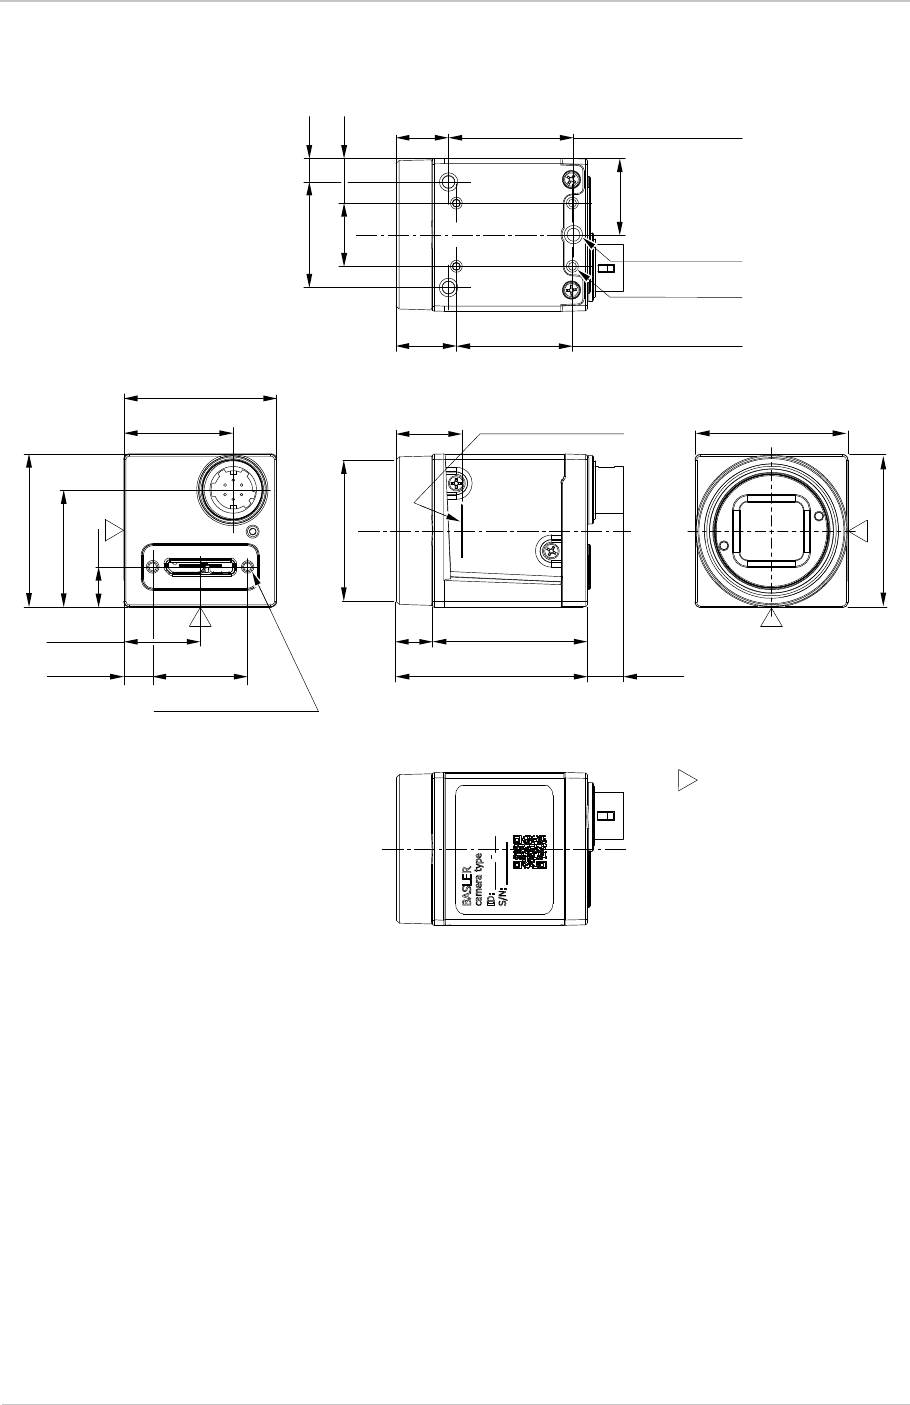
Specifications, Requirements, and Precautions AW00123408000
43 Basler ace USB 3.0
Fig. 26: Mechanical Dimensions (in mm) for Cameras with the CS-mount
11.5
23.7 (dimension for M3)
29
12
22 (dimension for M2)
20.7
Bottom
Ø 28.15
729.3
12.526
29
6.9
10
Top
Photosensitive surface
of the sensor
14.5
20
5.5
29
3 x M3; 3 deep
Not to Scale
4 x M2; 3 deep
22.2
7.6
29
36.3
18
Reference Plane
2 x M2; 4 deep
4.5
8.5
14.5

AW00123408000 Specifications, Requirements, and Precautions
Basler ace USB 3.0 44
1.5.2 Maximum Allowed Lens Thread Length
All cameras (mono and color) with C-mount and CS-mount are normally equipped with a plastic
filter holder. The length of the threads on any lens you use with the cameras depends on the lens
mount:
Camera with C-mount (see Figure 27):
The thread length can be a maximum of 9.6 mm, and the lens can intrude into the camera body
a maximum of 10.8 mm.
Camera with CS-mount (see Figure 28):
The thread length can be a maximum of 4.6 mm, and the lens can intrude into the camera body
a maximum of 5.8 mm.
You can obtain lenses with correct thread lengths from Basler (see www.baslerweb.com).
NOTICE
If either of the above limits is exceeded, the lens mount or the filter holder will be damaged or
destroyed and the camera will no longer operate properly.
Note that on color cameras, the filter holder will be populated with an IR cut filter. On monochrome
cameras, the filter holder will be present, but will not be populated with an IR cut filter.
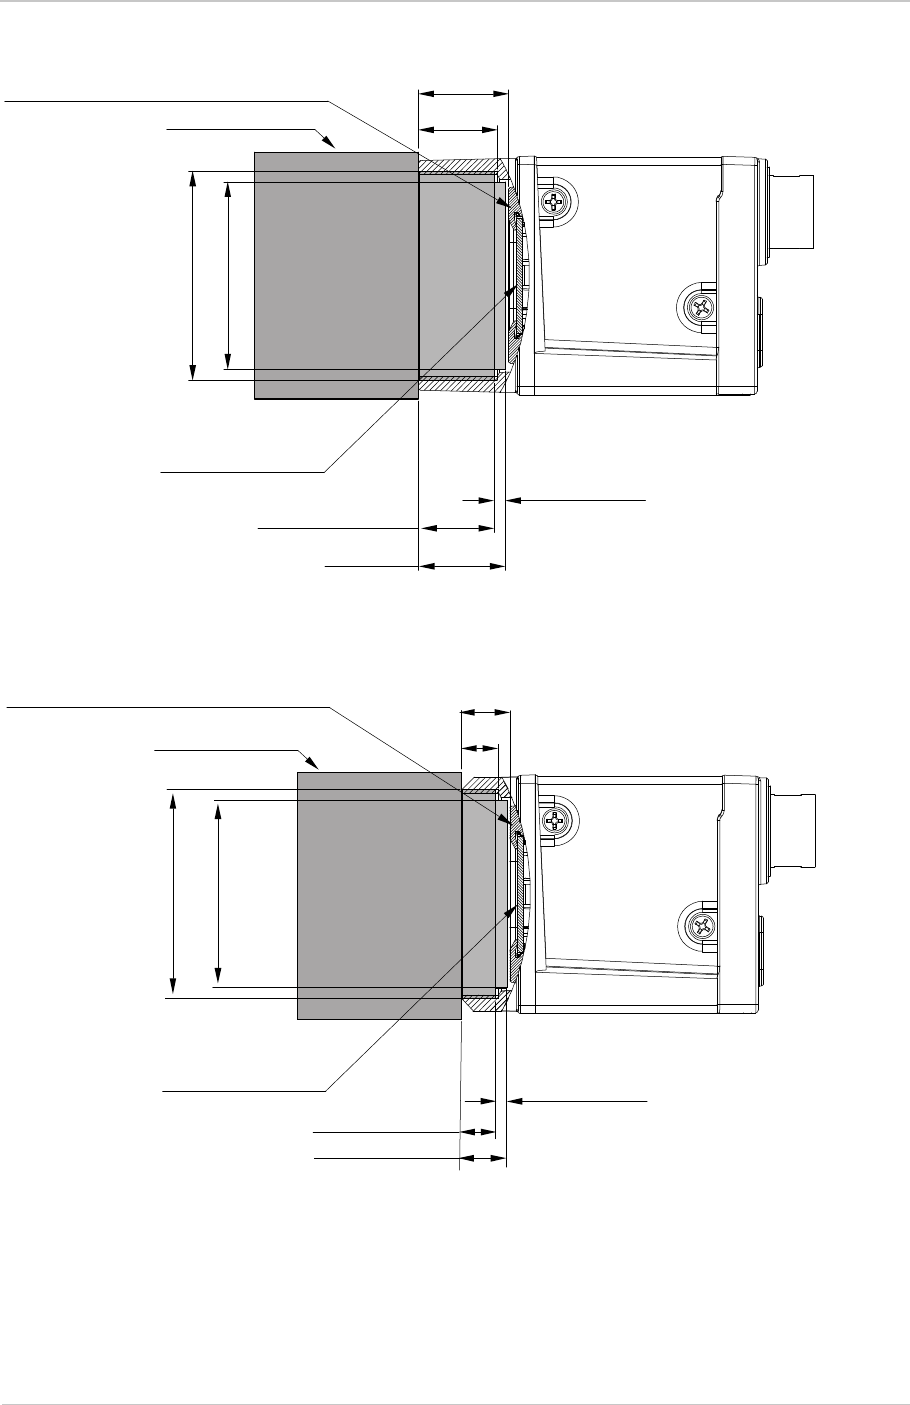
Specifications, Requirements, and Precautions AW00123408000
45 Basler ace USB 3.0
(11)
Not to Scale
C-mount Thread
Unthreaded
C-mount Lens (9.6)
Ø 23.1 Max
IR Cut Filter
(color cameras only)
Thread: 9.6 Max
10.8 Max
Filter Holder (mono and color cameras)
Fig. 27: Maximum Lens Thread Length (Dimensions in mm) for Cameras with the C-mount
(6)
Not to Scale
CS-mount Thread
Unthreaded
CS-mount Lens (4.6)
Ø2 3.1 Max
IR Cut Filter
(color cameras only)
Thread: 4.6 Max
5.8 Max
Filter Holder (mono and color cameras)
Fig. 28: Maximum Lens Thread Length (Dimensions in mm) for Cameras with the CS-mount
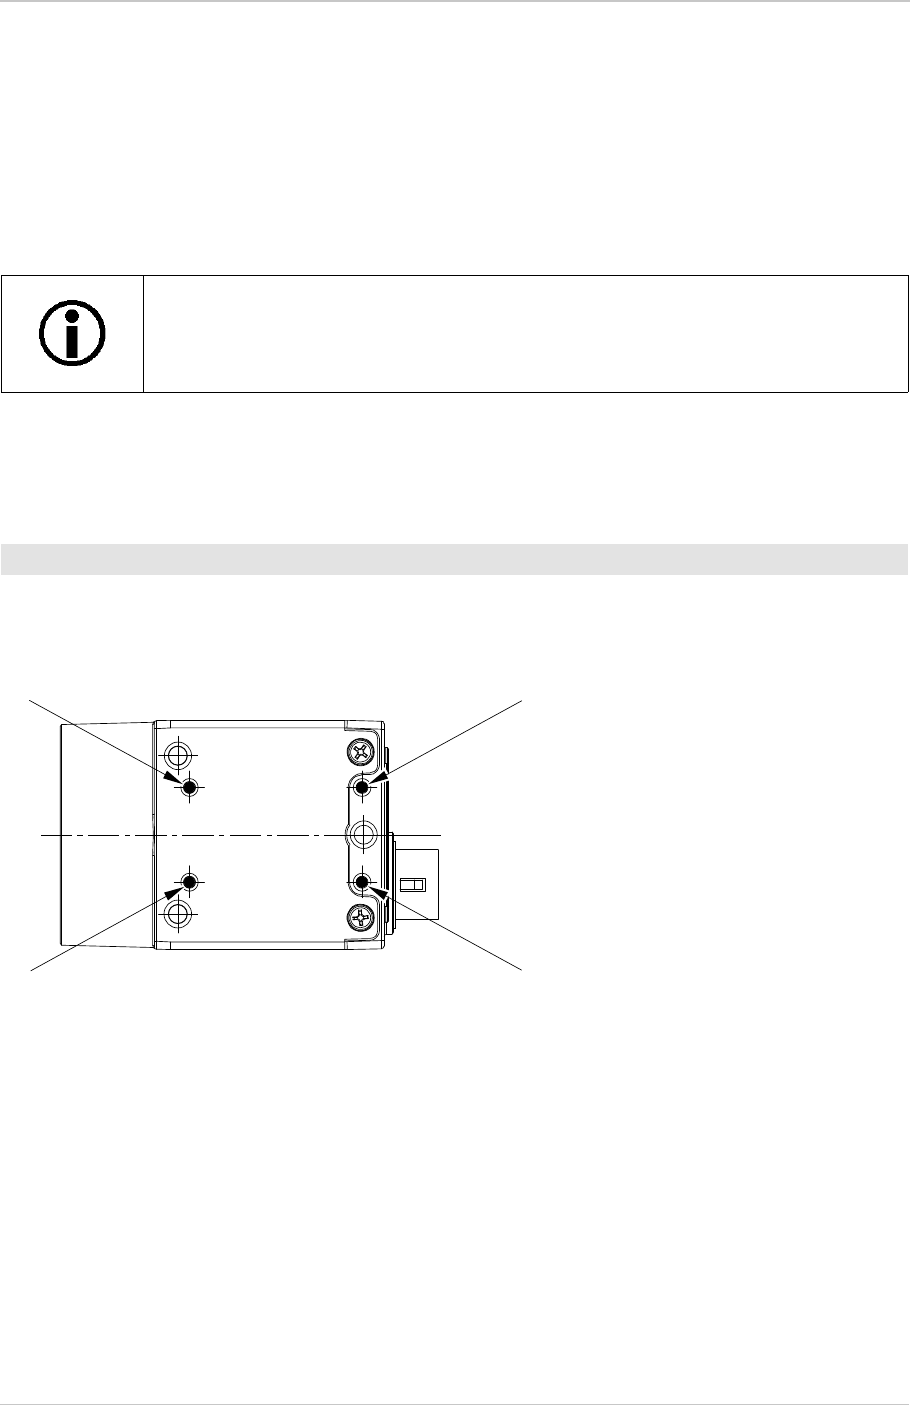
AW00123408000 Specifications, Requirements, and Precautions
Basler ace USB 3.0 46
1.6 Mounting Instructions
To ensure optimum alignment of the camera when mounting the camera in your system, you must
follow a certain tightening sequence when tightening screws.
Depending on whether you use M2 or M3 screws, a different tightening sequence applies.
1.6.1 Tightening Sequence When Using the M2 Screws
1. Tighten the screws for the mounting screw holes (a) in Figure 29.
2. Tighten the screws for the mounting screw holes (b) in Figure 29.
Fig. 29: Designations of the Mounting Screw Holes for the M2 Screws.
The tightening sequences are illustrated in Figure 29 and Figure 30 for cameras
with C-mounts. However, the tightening sequences apply equally to cameras with
CS-mounts.
To tighten the M2 screws:
(a)
(a)
(b)
(b)
Bottom
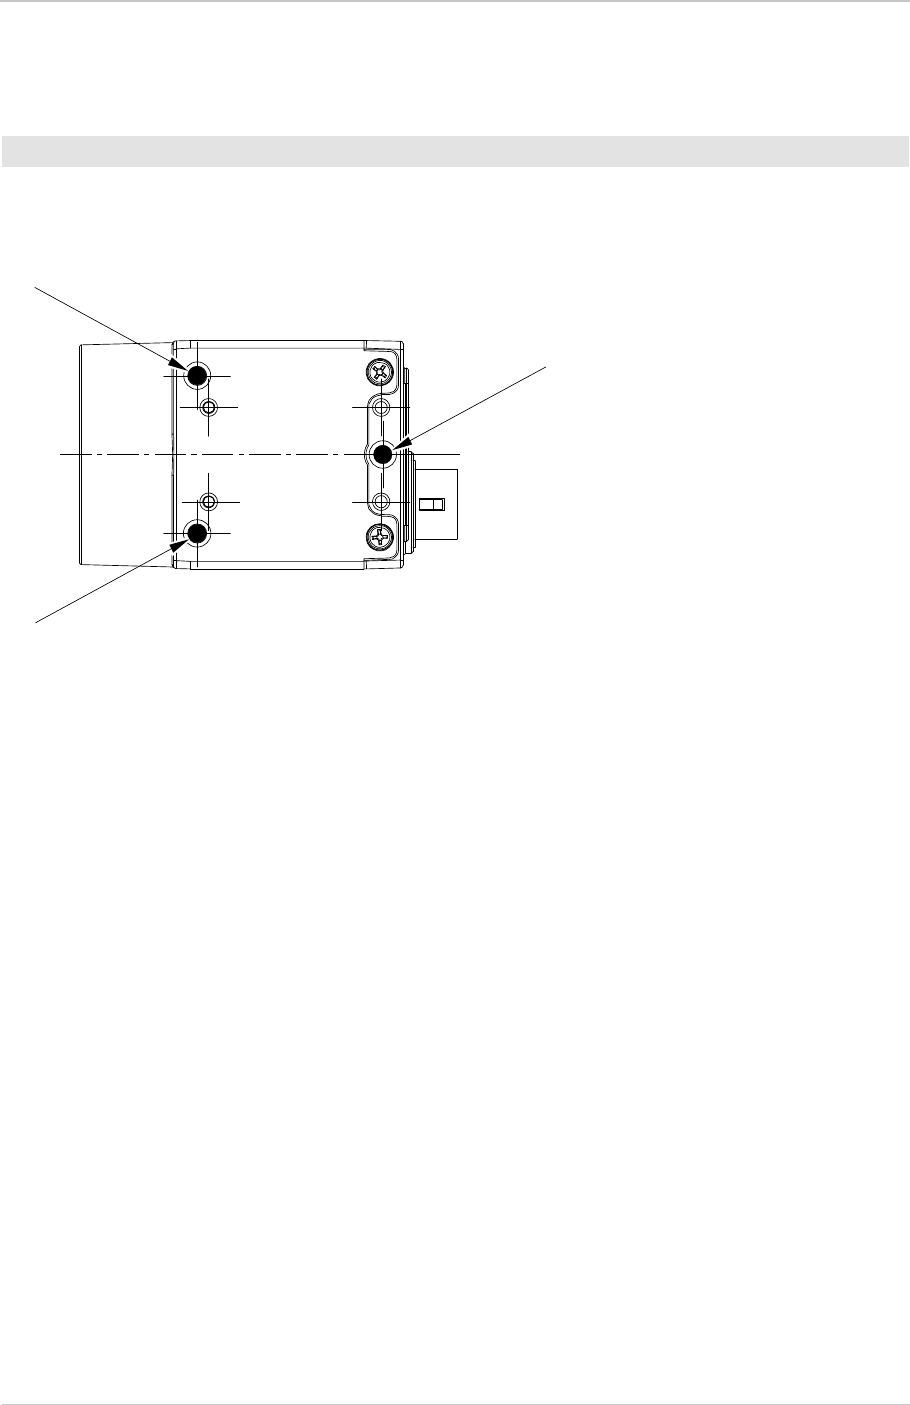
Specifications, Requirements, and Precautions AW00123408000
47 Basler ace USB 3.0
1.6.2 Tightening Sequence When Using the M3 Screws
1. Tighten the screws for the mounting screw holes (a) in Figure 30.
2. Tighten the screw for mounting screw hole (b) in Figure 30.
Fig. 30: Designations of the Mounting Screw Holes for the M3 Screws.
To tighten the M3 screws:
(a)
(a)
(b)
Bottom

AW00123408000 Specifications, Requirements, and Precautions
Basler ace USB 3.0 48
1.7 Mechanical Stress Test Results
Cameras were submitted to an independent mechanical testing laboratory and subjected to the
stress tests listed below. The mechanical stress tests were performed on selected camera models.
After mechanical testing, the cameras exhibited no detectable physical damage and produced
normal images during standard operational testing.
The mechanical stress tests were performed with a dummy lens connected to a C-mount. The
dummy lens was 35 mm long and had a mass of 66 g. Using a heavier or longer lens requires an
additional support for the lens.
Test Standard Conditions
Vibration
(sinusoidal, each axis)
DIN EN 60068-2-6 10-58 Hz / 1.5 mm_58-500 Hz / 20 g_1 Octave/Minute
10 repetitions
Shock (each axis) DIN EN 60068-2-27 20 g / 11 ms / 10 shocks positive
20 g / 11 ms / 10 shocks negative
Bump (each axis) DIN EN 60068-2-29 20 g / 11 ms / 100 shocks positive
20 g / 11 ms / 100 shocks negative
Vibration
(broad-band random,
digital control, each axis)
DIN EN 60068-2-64 15-500 Hz / 0.05 PSD (ESS standard profile) / 00:30 h
Table 19: Mechanical Stress Tests

Specifications, Requirements, and Precautions AW00123408000
49 Basler ace USB 3.0
1.8 Software Licensing Information
The software in the camera includes the LZ4 implementation. The copyright information for this
implementation is as follows:
LZ4 - Fast LZ compression algorithm
Copyright (C) 2011-2013, Yann Collet.
BSD 2-Clause License: (http://www.opensource.org/licenses/bsd-license.php)
Redistribution and use in source and binary forms, with or without modification, are permitted
provided that the following conditions are met:
1. Redistributions of source code must retain the above copyright notice, this list of conditions
and the following disclaimer.
2. Redistributions in binary form must reproduce the above copyright notice, this list of conditions
and the following disclaimer in the documentation and/or other materials provided with the
distribution.
THIS SOFTWARE IS PROVIDED BY THE COPYRIGHT HOLDERS AND CONTRIBUTORS "AS
IS" AND ANY EXPRESS OR IMPLIED WARRANTIES, INCLUDING, BUT NOT LIMITED TO, THE
IMPLIED WARRANTIES OF MERCHANTABILITY AND FITNESS FOR A PARTICULAR
PURPOSE ARE DISCLAIMED. IN NO EVENT SHALL THE COPYRIGHT OWNER OR
CONTRIBUTORS BE LIABLE FOR ANY DIRECT, INDIRECT, INCIDENTAL, SPECIAL,
EXEMPLARY, OR CONSEQUENTIAL DAMAGES (INCLUDING, BUT NOT LIMITED TO,
PROCUREMENT OF SUBSTITUTE GOODS OR SERVICES; LOSS OF USE, DATA, OR
PROFITS; OR BUSINESS INTERRUPTION) HOWEVER CAUSED AND ON ANY THEORY OF
LIABILITY, WHETHER IN CONTRACT, STRICT LIABILITY, OR TORT (INCLUDING
NEGLIGENCE OR OTHERWISE) ARISING IN ANY WAY OUT OF THE USE OF THIS
SOFTWARE, EVEN IF ADVISED OF THE POSSIBILITY OF SUCH DAMAGE.

AW00123408000 Specifications, Requirements, and Precautions
Basler ace USB 3.0 50
1.9 Avoiding EMI and ESD Problems
The cameras are frequently installed in industrial environments. These environments often include
devices that generate electromagnetic interference (EMI) and they are prone to electrostatic
discharge (ESD). Excessive EMI and ESD can cause problems with your camera such as false
triggering or can cause the camera to suddenly stop capturing images. EMI and ESD can also have
a negative impact on the quality of the image data transmitted by the camera.
To avoid problems with EMI and ESD, you should follow these general guidelines:
Always use high quality shielded cables. The use of high quality cables is one of the best
defenses against EMI and ESD.
Try to use camera cables that are only as long as necessary and try to run the camera cables
and power cables parallel to each other. Avoid coiling camera cables. If the cables are too
long, use a meandering path rather then coiling the cables.
Avoid placing camera cables parallel to wires carrying high-current, switching voltages such as
wires supplying stepper motors or electrical devices that employ switching technology. Placing
camera cables near to these types of devices can cause problems with the camera.
Attempt to connect all grounds to a single point, e.g., use a single power outlet for the entire
system and connect all grounds to the single outlet. This will help to avoid large ground loops.
(Large ground loops can be a primary cause of EMI problems.)
Use a line filter on the main power supply.
Install the camera and camera cables as far as possible from devices generating sparks. If
necessary, use additional shielding.
Decrease the risk of electrostatic discharge by taking the following measures:
Use conductive materials at the point of installation (e.g., floor, workplace).
Use suitable clothing (cotton) and shoes.
Control the humidity in your environment. Low humidity can cause ESD problems.
The Basler application note called Avoiding EMI and ESD in Basler Camera
Installations provides much more detail about avoiding EMI and ESD.
This application note can be obtained from the Downloads section of our website:
www.baslerweb.com
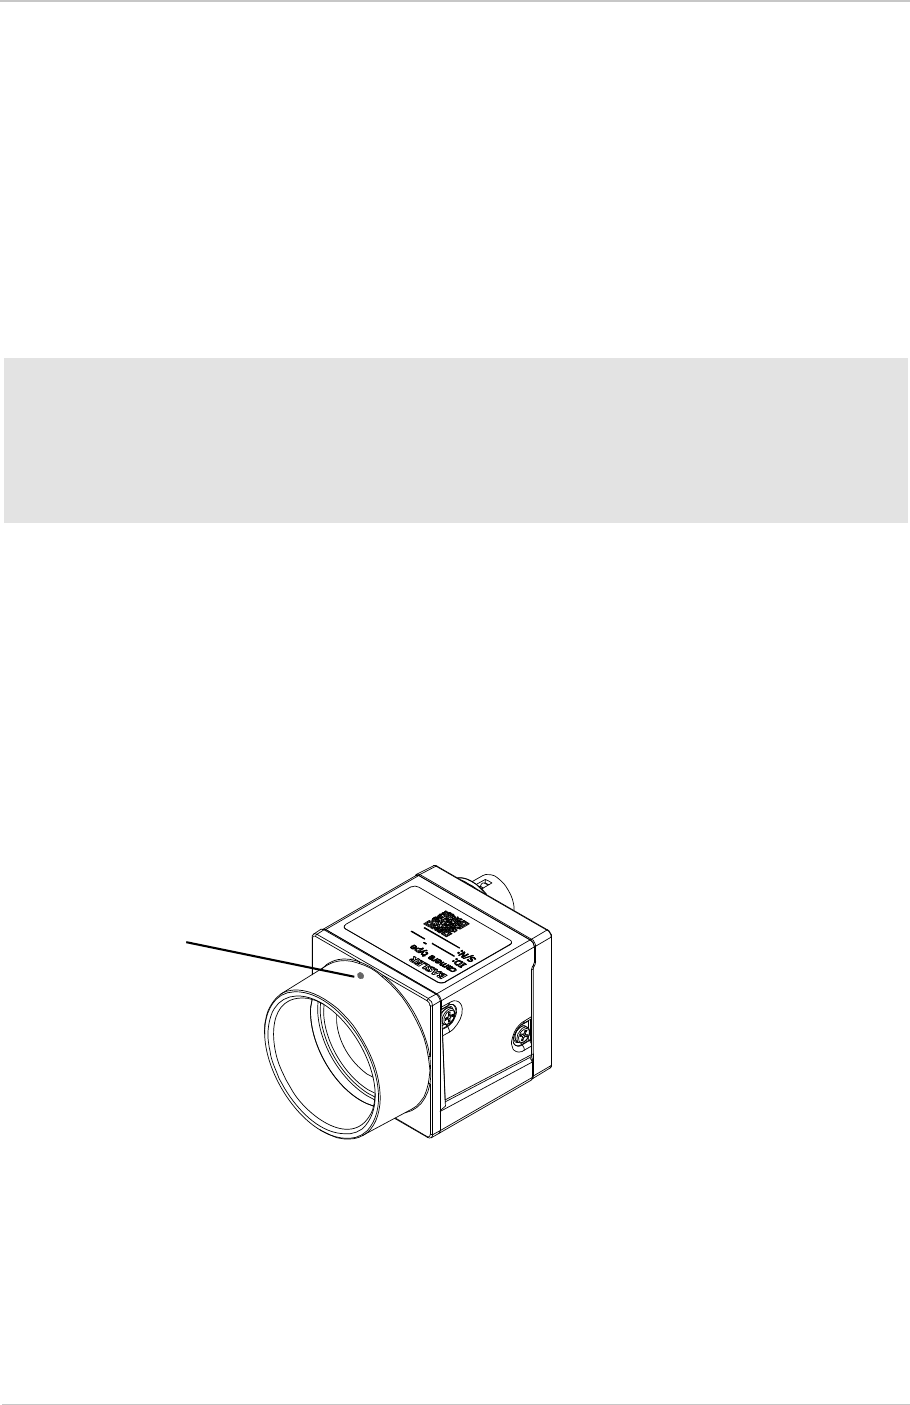
Specifications, Requirements, and Precautions AW00123408000
51 Basler ace USB 3.0
1.10 Environmental Requirements
1.10.1 Temperature and Humidity
Housing temperature during operation: 0 °C ... +50 °C (+32 °F ... +122 °F)
Housing temperature during operation
for acA2000-165 and acA2040-90 only: 0 °C ... +60 °C (+32 °F ... +140 °F)
Humidity during operation: 20 % ... 80 %, relative, non-condensing
Storage temperature: -20 °C ... +80 °C (-4 °F ... +176 °F)
Storage humidity: 20 % ... 80 %, relative, non-condensing
Temperature Measuring Spot
You must determine the camera housing temperature on a specific measuring spot. Its location on
the camera housing is indicated in the figure below.
Fig. 31: Location of the Housing Temperature Measuring Spot on the Camera Housing
Housing temperature according to UL 60950-1: max. 70 °C (+158 °F)
Ambient temperature according to UL 60950-1: max. 30 °C (+86 °F)
UL 60950-1 test conditions: no lens attached to the camera and without efficient heat
dissipation; ambient temperature kept at 30 °C (+86 °F).
Housing temperature
measuring spot

AW00123408000 Specifications, Requirements, and Precautions
Basler ace USB 3.0 52
1.10.2 Heat Dissipation
You must provide sufficient heat dissipation to maintain the camera housing temperature at the
maximum value or below as specified for the camera during operation (see above). Since each
installation is unique, we only provide the following general guidelines:
Make sure a lens is mounted on the camera.
In all cases, you should monitor the temperature of the camera housing and ensure that the
temperature does not exceed the maximum specified value for the housing temperature during
operation. Keep in mind that the camera will gradually become warmer during the first hour of
operation. After one hour, the housing temperature should stabilize and no longer increase.
Provide sufficient heat dissipation by e.g. mounting the camera on a substantial, thermally
conductive component that can act as a heat sink and by using a fan to provide an air flow over
the camera.
1.10.3 Over Temperature Behavior
The following camera models include a certain over temperature behavior: acA640-750u,
acA800-510u, acA1300-200u, acA1920-40u, acA1920-150u, acA1920-155u, acA2040-55u,
acA2040-120u, acA2500-60u, acA2440-35u, and acA2440-75u.
At elevated temperature, the camera can be damaged. To decrease risk of overheating, and to
allow timely action for improved heat dissipation, the following mechanisms are implemented:
When a temperature is reached where damage is imminent, the camera enters the over
temperature mode. In this mode, the camera is powered down to prevent damage to the
camera due to overheating. The camera no longer acquires images but delivers the internally
generated test image 2 (see Section 7.18.1 on page 324).
Events can be sent to notify that the camera’s device temperature has reached a critical level
(Critical Temperature event) or, upon further heating, that the camera has entered the over
temperature mode (Over Temperature event).
You can read the TemperatureState parameter value to see whether the camera is close to
overheating or is already in over temperature mode. For information about reading the
parameter value, see Section 1.10.3.1 on page 55.
The mechanisms are based on the device temperature. It is measured inside the camera and
reported in intervals of 1 °C. Currently, only the core board temperature can be selected as the
device temperature.
You can monitor the internal temperature by reading the DeviceTemperature parameter value (see
Section 1.10.3.1 on page 55).
To ensure good image quality, we recommend not to operate the camera at
elevated temperatures.
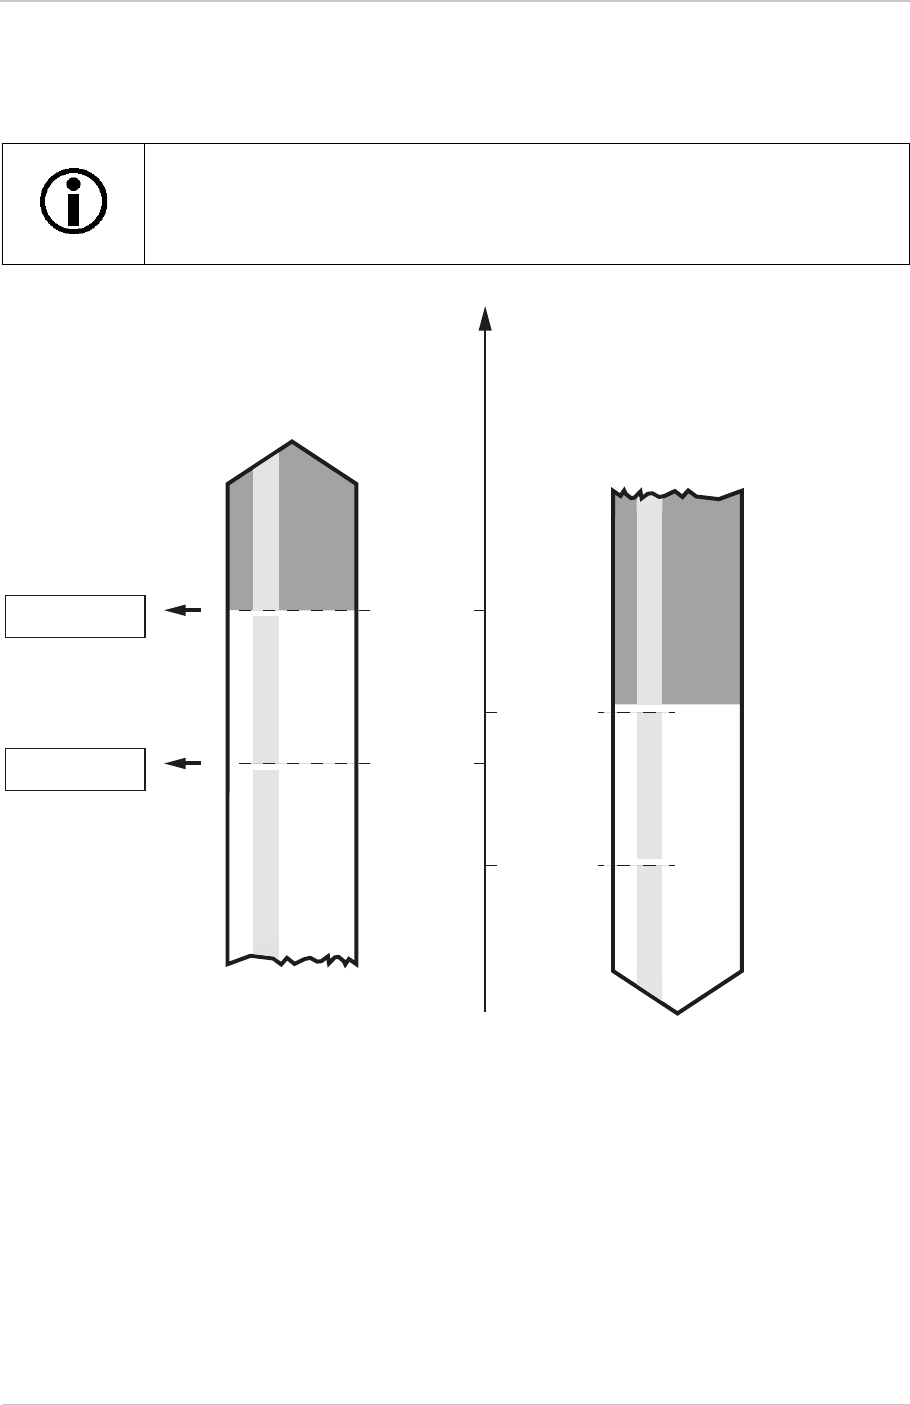
Specifications, Requirements, and Precautions AW00123408000
53 Basler ace USB 3.0
The mechanisms are activated at different internal temperatures, depending on whether the
camera follows a heating or cooling path. The mechanisms are illustrated for both paths in
Figure 32 and are described in detail below.
Fig. 32: Over Temperature Behavior and Related Mechanisms According to Heating and Cooling Paths.
Heating Path
When the device temperature reaches 81 °C (177.8 °F) the following occurs:
The TemperatureState parameter value changes from OK to Critical.
A Critical Temperature event is sent (see Section 7.17 on page 319). Note that the next
Critical Temperature event can only be sent after the device temperature has fallen to at
least 75 °C (167.0 °F).
The following explanations assume that event notification is enabled.
To be able to receive events, make sure event notification is enabled and some
additional software-related settings are made (see Section 7.17 on page 319).
Over Temperature
Event
Critical Temperature
Event
Temperature State
Device Temperature
errorOK
over temperature
mode
critical
81 °C
(177.8 °F)
90 °C
(194.0 °F)
Temperature State
critical errorOK
75 °C
(167.0 °F)
84 °C
(183.2 °F)
over temperature
mode

AW00123408000 Specifications, Requirements, and Precautions
Basler ace USB 3.0 54
When the device temperature reaches 90 °C (194.0 °F), the following occurs:
The camera enters the over temperature mode.
The TemperatureState parameter value changes from Critical to Erro"
An Over Temperature event is sent (see Section 7.17 on page 319). Note that the next Over
Temperature event can only be sent after the device temperature has fallen to at least 84 °C
(183.2 °F).
Cooling Path
When the camera cools from a temperature where the over temperature mode is active to a
device temperature of 84 °C (183.2 °F), the following occurs:
The camera leaves the over temperature mode and returns to normal operation. Thereby,
the same camera settings are used as before when the camera changed to over
temperature mode.
The TemperatureState parameter value changes from Error to Critical.
When cooling continues and the device temperature reaches 75 °C (+167.0 °F), the following
occurs:
The TemperatureState parameter value changes from Critical to OK.
When the camera enters the over temperature mode, take prompt action to cool
the camera. Otherwise, irreversible damage to the camera can occur.
The camera’s powering down is meant to protect the camera by allowing it to cool.
However, if the environmental temperature is sufficiently high, the camera’s
internal temperature will nonetheless stay high or increase even further.
Provide sufficient heat dissipation (see Section 1.10.2 on page 52) to quickly
decrease the camera’s internal temperature and exit the over temperature
mode.
Provide sufficient heat dissipation to ensure that the camera will ideally never
return to the over temperature mode.
Note that normal operation of the camera requires that
the camera’s device temperature is below 75 °C (+167.0 °F)
and that
the housing temperature stays within the specified range of the "housing
temperature during operation" (see Section 1.10.1 on page 51).
Note that elevated temperatures worsen image quality and shorten the
camera’s lifetime. The lifetime is also shortened with increasing number of
high-temperature incidents.

Specifications, Requirements, and Precautions AW00123408000
55 Basler ace USB 3.0
1.10.3.1 Monitoring the Internal Temperature
You can monitor the internal temperature by reading the DeviceTemperature parameter value [°C]
and the TemperatureState parameter value.
To read the DeviceTemperature parameter value, you must select an internal temperature as
the device temperature. Currently, only the core board temperature can be selected as the
device temperature.
The parameter values for the TemperatureState parameter can be Normal, Critical, and Error.
For information about their meanings, see Figure 32 and the related descriptions.
The following code snippet illustrates using the API to select the core board temperature as the
device temperature, read the current device temperature, and get informed about the current
temperature state:
// Select the kind of internal temperature as the device temperature
camera.DeviceTemperatureSelector.SetValue(DeviceTemperatureSelector_C
oreboard);
// Determine the kind of internal temperature that was selected
// as the device temperature
DeviceTemperatureSelectorEnums e =
camera.DeviceTemperatureSelector.GetValue();
// Read the device temperature
double d = camera.DeviceTemperature.GetValue();
// Determine the current temperature state
TemperatureStateEnums e = camera.TemperatureState.GetValue();
You can also use the Basler pylon Viewer application to easily read the parameter.
For more information about the pylon API and the pylon Viewer, see Section 3.1 on page 62.
AW00123408000 Specifications, Requirements, and Precautions
Basler ace USB 3.0 56
1.11 Precautions
DANGER
Electric Shock Hazard
Risk of Burn or Death.
The power supplies used for supplying
power to the I/O lines and
camera power
must meet the Safety Extra Low Voltage (SELV) and Limited Power Source (LPS)
requirements.
If you use a powered hub as part of the USB 3.0 connection, the powered hub
must meet the SELV and LPS requirements.
WARNING
Fire Hazard
Risk of Burn
The power supplies used for supplying
power to the I/O lines and
camera power
must meet the Limited Power Source (LPS) requirements.
If you use a powered hub as part of the USB 3.0 connection, the powered hub
must meet the LPS requirements.
NOTICE
Voltage outside of the specified range can cause damage.
You must supply camera power that complies with the Universal Serial Bus 3.0 specification.
The camera’s nominal operating voltage is +5 VDC, effective on the camera’s connector.

Specifications, Requirements, and Precautions AW00123408000
57 Basler ace USB 3.0
For more specific information about the lens thread length, see Section 1.5.2 on page 44.
NOTICE
Constant operating conditions for acA1920-150um/uc and acA2500-60um/uc cameras.
The cameras require constant ambient temperature and are designed for continuous operation
only.
Make sure the cameras are constantly powered up: Interrupt the connection or switch of the
connected computer only when required for installation or maintenance.
If you do not observe these instructions, the lifetime of the camera will be reduced significantly.
NOTICE
Avoid dust on the sensor.
The camera is shipped with a protective plastic cap on the lens mount. To avoid collecting dust on
the camera’s IR cut filter (color cameras) or sensor (mono cameras), make sure that you always
put the plastic cap in place when there is no lens mounted on the camera.
To avoid collecting dust on the camera’s IR cut filter (color cameras) or sensor (mono cameras),
make sure to observe the following:
Always put the plastic cap in place when there is no lens mounted on the camera.
Make sure that the camera is pointing down every time you remove or replace the plastic cap
or a lens.
Never apply compressed air to the camera. This can easily contaminate optical components,
particularly the sensor.
NOTICE
On all cameras, the lens thread length is limited.
All cameras (mono and color) are equipped with a plastic filter holder located in the cylindric
housing extension. The location of the filter holder limits the length of the threads on any lens you
use with the camera. If a lens with a very long thread length is used, the filter holder or the lens
mount will be damaged or destroyed and the camera will no longer operate properly.
NOTICE
Using a wrong pin assignment can severely damage the camera:
Make sure the cable and plug you connect to the 6-pin I/O connector follow the correct pin
assignment.

AW00123408000 Specifications, Requirements, and Precautions
Basler ace USB 3.0 58
NOTICE
An incorrect plug can damage the 6-pin connector:
The plug on the cable that you attach to the camera’s 6-pin I/O connector must have 6
female pins. Using a plug designed for a smaller or a larger number of pins can damage the
connector.
The plug on the cable that you attach to the camera’s USB 3.0 Micro-B port must be
designed for use with the USB 3.0 Micro-B port. Trying to use any other type of plug can
destroy the port.

Specifications, Requirements, and Precautions AW00123408000
59 Basler ace USB 3.0
Warranty Precautions
To ensure that your warranty remains in force:
Do not remove the camera’s serial number label
If the label is removed and the serial number can’t be read from the camera’s registers, the warranty
is void.
Do not open the camera housing
Do not open the housing. Touching internal components may damage them.
Keep foreign matter outside of the camera
Be careful not to allow liquid, flammable, or metallic material inside of the camera housing. If
operated with any foreign matter inside, the camera may fail or cause a fire. For the special case of
cleaning the camera’s sensor, see the instructions below.
Avoid electromagnetic fields
Do not operate the camera in the vicinity of strong electromagnetic fields. Avoid electrostatic
charging.
Transport properly
Transport the camera in its original packaging only. Do not discard the packaging.
Clean properly
Note:
Before starting the cleaning procedure, cut off all power to the camera by unplugging the plugs
from the USB 3.0 Micro-B port and from the 6-pin I/O connector.
Make sure all window cleaner or detergent has vaporized after the cleaning procedure, before
reconnecting the plugs.
Avoid cleaning the surface of the camera’s sensor, if possible. If you must clean it, use a soft, lint
free cloth dampened with a small quantity of high quality window cleaner. Because electrostatic
discharge can damage the sensor, you must use a cloth that will not generate static during cleaning
(cotton is a good choice).
To clean the surface of the camera housing, use a soft, dry cloth. To remove severe stains, use a
soft cloth dampened with a small quantity of neutral detergent, then wipe dry.
Do not use solvents or thinners to clean the housing; they can damage the surface finish.
Ensure Continuous Operation
Operate acA1920-150um/uc and acA2500-60um/uc cameras continuously under constant ambient
temperature.
Read the manual
Read the manual carefully before using the camera!
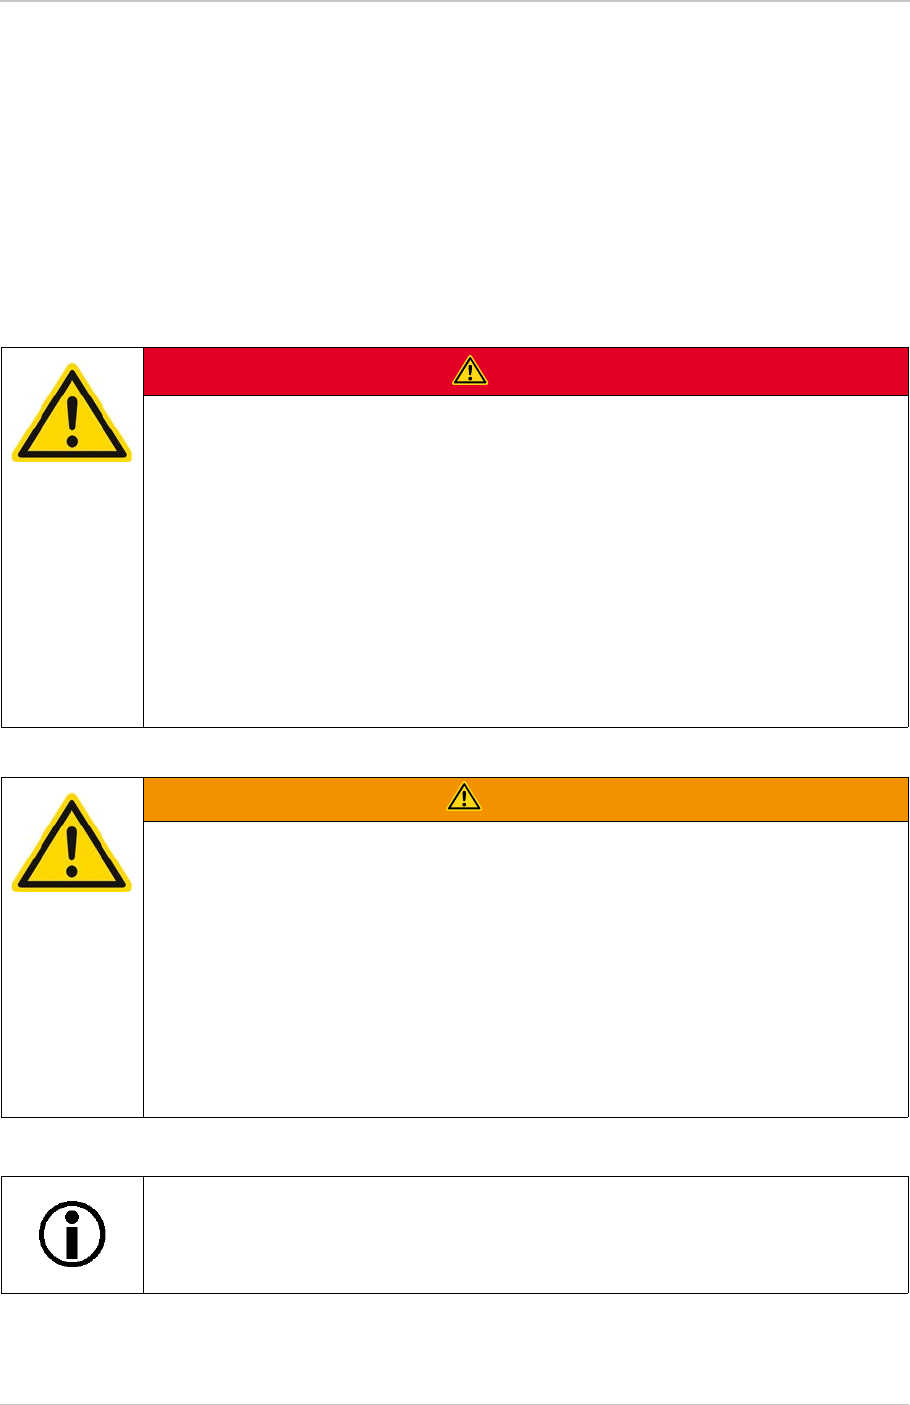
AW00123408000 Installation
Basler ace USB 3.0 60
2 Installation
The information needed for installing the camera and related software is included in the Installation
and Setup Guide for Cameras Used With pylon for Windows (AW000611).
You can download the document from the Basler website: www.baslerweb.com
Drivers and Tools for changing camera parameters are indicated in the next chapter.
DANGER
Electric Shock Hazard
Risk of Burn or Death.
The power supplies used for supplying
power to the I/O lines and
camera power
must meet the Safety Extra Low Voltage (SELV) and Limited Power Source (LPS)
requirements.
If you use a powered hub as part of the USB 3.0 connection, the powered hub
must meet the SELV and LPS requirements.
WARNING
Fire Hazard
Risk of Burn
The power supplies used for supplying
power to the I/O lines and
camera power
must meet the Limited Power Source (LPS) requirements.
If you use a powered hub as part of the USB 3.0 connection, the powered hub
must meet the LPS requirements.
The camera is designed to be connected to a USB 3.0 port installed in your
computer. When connected to a USB 2.0 port, the Basler ace USB 3.0 camera will
be detected but will not operate.

Installation AW00123408000
61 Basler ace USB 3.0
Note: We highly recommend using components such as host adapters with
specific chipsets, cables, and hubs that are offered as Basler accessories. They
were extensively tested for optimum performance.
For more information about accessories available from Basler and about
purchasing, go to the Basler website: www.baslerweb.com
Default factory parameter settings for acA2000-165u and acA2040-90u cameras
will initially prevent them from operating at their maximum specified frame rates.
This provision was made to avoid problems that might result from insufficient
available USB 3.0 bandwidth made available by your application.
The following initial factory-set maximum frame rates apply:
acA2000-165u: approximately 90 fps
acA2040-90u: approximately 50 fps.
You can easily increase the camera parameter settings and operate the cameras
at the maximum specified frame rates if sufficient USB 3.0 bandwidth is available.

AW00123408000 Tools for Changing Camera Parameters
Basler ace USB 3.0 62
3 Tools for Changing Camera
Parameters
3.1 Basler pylon Camera Software Suite
The Basler pylon Camera Software Suite is designed to operate all Basler cameras that have an
IEEE 1394a/b interface, a GigE interface or a USB 3.0 interface. The Basler pylon Camera Software
Suite will also operate newer Basler camera models with a Camera Link interface.
The pylon camera drivers offer reliable, real-time image data transport into the memory of your
computer at a very low CPU load.
The options available with the Basler pylon Camera Software Suite let you
change parameters and control the camera by using a standalone GUI known as the Basler
pylon Viewer.
change parameters and control the camera from within your software application using the
Basler pylon SDKs.
obtain information about the USB camera device and other USB devices connected to your
host computer by using the Basler pylon USB Configurator.
The remaining sections in this chapter provide an introduction to the tools.
3.1.1 pylon Viewer
The pylon Viewer is included in the Basler pylon Camera Software Suite. It is a standalone
application that lets you view and change most of the camera’s parameter settings via a GUI-based
interface. Using the pylon Viewer is a very convenient way to get your camera up and running
quickly during your initial camera evaluation or a camera design-in for a new project.
For more information about using the pylon Viewer, see the Installation and Setup Guide for
Cameras Used with Basler pylon for Windows (AW000611).

Tools for Changing Camera Parameters AW00123408000
63 Basler ace USB 3.0
3.1.2 pylon USB Configurator
The pylon USB Configurator is included in the Basler pylon Camera Software Suite besides the
Basler pylon IP Configurator and the Basler pylon Camera Link Configurator. The pylon USB
Configurator is a standalone application. It allows you to
obtain information about the architecture of the device tree to which your camera is connected
and about the USB devices, including your camera
automatically generate support information for Basler technical support.
For more information about generating support information, see Section 8.3 on page 355.
For more information about using the pylon USB Configurator, see the Installation and Setup Guide
for Cameras Used with Basler pylon for Windows (AW000611).
3.1.3 pylon SDKs
Three pylon SDKs are part of the Basler pylon Camera Software Suite:
pylon SDK for C++ (Windows and Linux)
pylon SDK for C (Windows)
pylon SDK for .NET / C# (Windows)
Each SDK includes an application programming interface (API), a set of sample programs, and
documentation:
You can access all of the camera’s parameters and control the camera’s full functionality from
within your application software by using the matching pylon API (C++, C, or .NET).
The sample programs illustrate how to use the pylon API to parameterize and operate the
camera.
For each environment (C++, C, and .NET), a Programmer's Guide and Reference
Documentation is available. The documentation gives an introduction to the pylon API and
provides information about all methods and objects of the API.

AW00123408000 Camera Functional Description
Basler ace USB 3.0 64
4 Camera Functional
Description
This chapter provides an overview of the camera’s functionality from a system perspective. The
overview will aid your understanding when you read the more detailed information included in the
later chapters of the user’s manual.
4.1 Overview for Cameras with CCD
Sensor
Cameras with CCD sensor are listed in Section 1.3.1 on page 3.
The cameras provide features such as global shutter and electronic exposure time control.
Exposure start and exposure time can be controlled by parameters transmitted to the camera via
the Basler pylon API and the USB 3.0 interface. There are also parameters available to set the
camera for single frame acquisition or continuous frame acquisition.
Exposure start can also be controlled via an externally generated "frame start trigger" signal applied
to a camera input line (hardware frame start trigger; HWFSTrig). The HWFSTrig signal facilitates
periodic or non-periodic frame acquisition start. Exposure modes are available that allow the length
of exposure time to be set for a pre-programmed period of time or to be directly controlled by the
HWFSTrig signal.
Accumulated charges are read out of the sensor when exposure ends. At readout, accumulated
charges are transported from the sensor’s light-sensitive elements (pixels) to the vertical shift
registers (see Figure 33 on page 65). The charges from the bottom row of pixels in the array are
then moved into a horizontal shift register. Next, the charges are shifted out of the horizontal
register. All shifting is clocked according to the camera’s internal data rate. Shifting continues in a
row-wise fashion until all image data has been read out of the sensor.
As the charges move out of the horizontal shift register, they are converted to voltages proportional
to the size of each charge. Each voltage is then amplified by a Variable Gain Control (VGC) and
digitized by an Analog-to-Digital converter (ADC). After each voltage has been amplified and
digitized, it passes through an FPGA and into an image buffer.
The pixel data leaves the image buffer and passes back through the FPGA to a controller where it
is assembled into data packets. The packets are then transmitted by bulk transfer via a USB 3
compliant cable to a USB 3 host adapter of the host computer. The controller also handles
transmission and receipt of control data such as changes to the camera’s parameters.
The image buffer between the sensor and the controller allows data to be read out of the sensor at
a rate that is independent of the data transmission rate between the camera and the host computer.
This ensures that the data transmission rate has no influence on image quality.
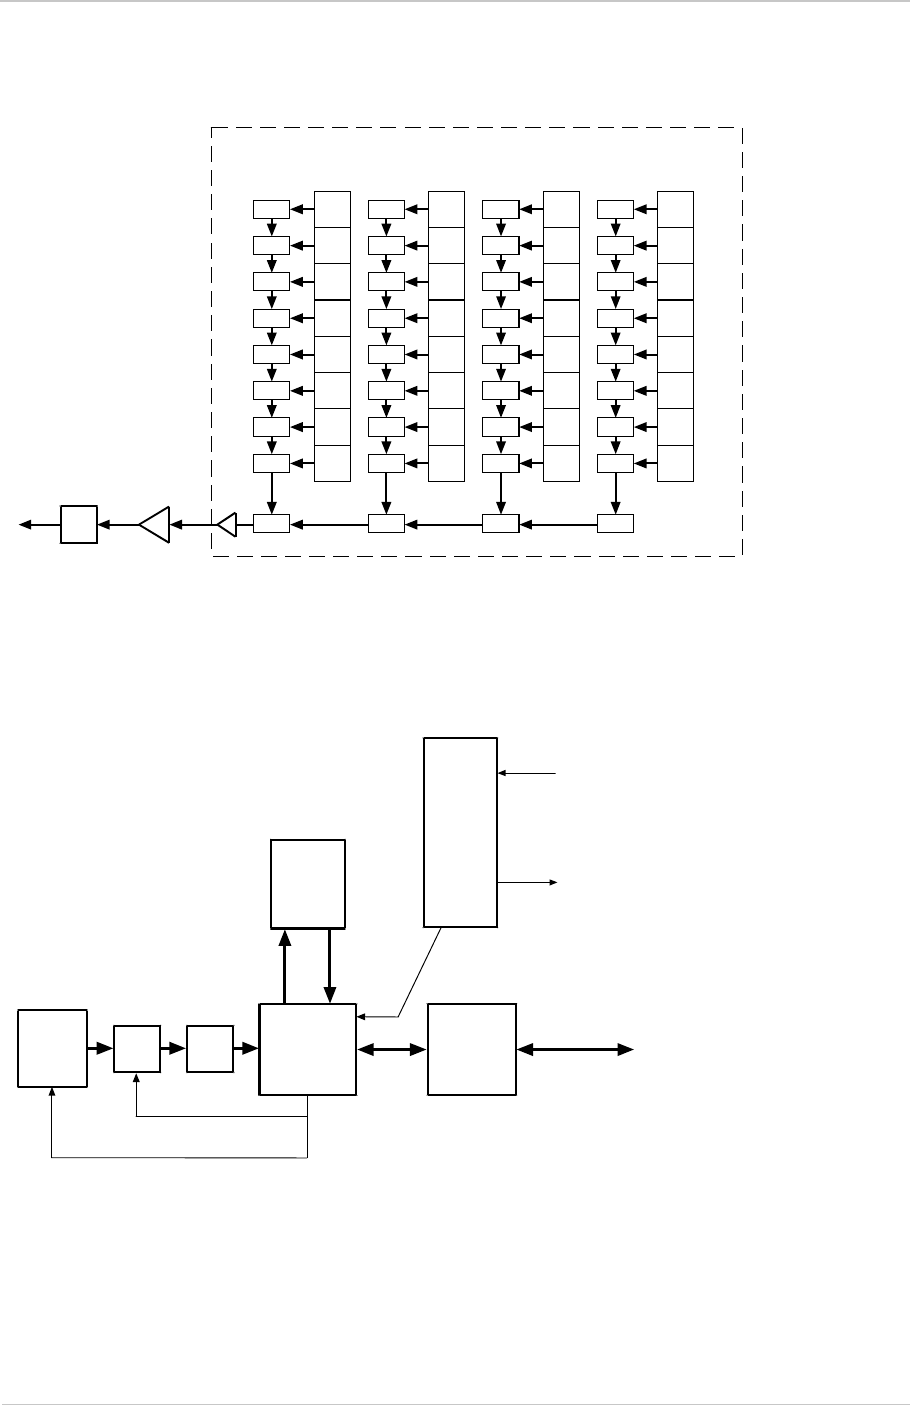
Camera Functional Description AW00123408000
65 Basler ace USB 3.0
Progressive Scan CCD Sensor
Vert.
Shift
Reg.
Vert.
Shift
Reg.
Vert.
Shift
Reg.
Vert.
Shift
Reg.
Pixels Pixels Pixels Pixels
Horizontal
Shift Register
ADC VGC
Fig. 33: CCD Sensor Architecture - Progressive Scan Sensors
Sensor ADC FPGA Controller
Image
Buffer
Image
Data Image
Data
I/O
Frame Burst Start Trigger Signal
or Frame Start Trigger Signal or
Frame Counter Reset Signal or
Trigger InputCounter Reset Signal
Frame Burst Trigger Wait Signal or
Frame Trigger Wait Signal or
Exposure Active Signal or
Timer 1 Signal
Image and
Control Data
and
Power
Computer
Image
and
Control
Data
VGC
Control: ROI
Fig. 34: Camera Block Diagram
Control: Gain, Black Level

AW00123408000 Camera Functional Description
Basler ace USB 3.0 66
4.2 Overview for Cameras with CMOS
Sensor
Cameras with CMOS sensor are listed in Section 1.3.2 on page 7.
The cameras provide functionalities such as an electronic rolling shutter or a global shutter (see
Section 6.6 on page 148), and electronic exposure time control.
Exposure start and exposure time can be controlled by parameters transmitted to the camera via
the Basler pylon API and the USB 3.0 interface. There are also parameters available to set the
camera for single frame acquisition or continuous frame acquisition.
Exposure start can also be controlled via an externally generated "frame start trigger" signal applied
to a camera input line (hardware frame start trigger; HWFSTrig). The HWFSTrig signal facilitates
periodic or non-periodic frame acquisition start. Exposure modes are available that allow the length
of exposure time to be set for a pre-programmed period of time or, with the exception of some
camera models, to be directly controlled by the HWFSTrig signal.
During exposure, electrical charges accumulate in the sensor’s pixels. After exposure was ended,
the accumulated charges are read out of the sensor. At readout, the charges are transported from
the row’s light-sensitive elements (pixels) to the analog processing controls (see Figure 35 on
page 67). As the charges move through the analog controls, they are converted to voltages
proportional to the size of each charge. Each voltage is then amplified by a Variable Gain Control
(VGC). Next the voltages are digitized by an Analog-to-Digital converter (ADC). After the voltages
have been amplified and digitized, they are passed through the sensor’s digital controls for
additional signal processing. The digitized pixel data leaves the sensor, passes through an FPGA,
and moves into a buffer.
The pixel data leaves the buffer and passes back through the FPGA to a controller where it is
assembled into data packets. The packets are then transmitted by bulk transfer via a USB 3
compliant cable to a USB 3 host adapter of the host computer. The controller also handles
transmission and receipt of control data such as changes to the camera’s parameters.
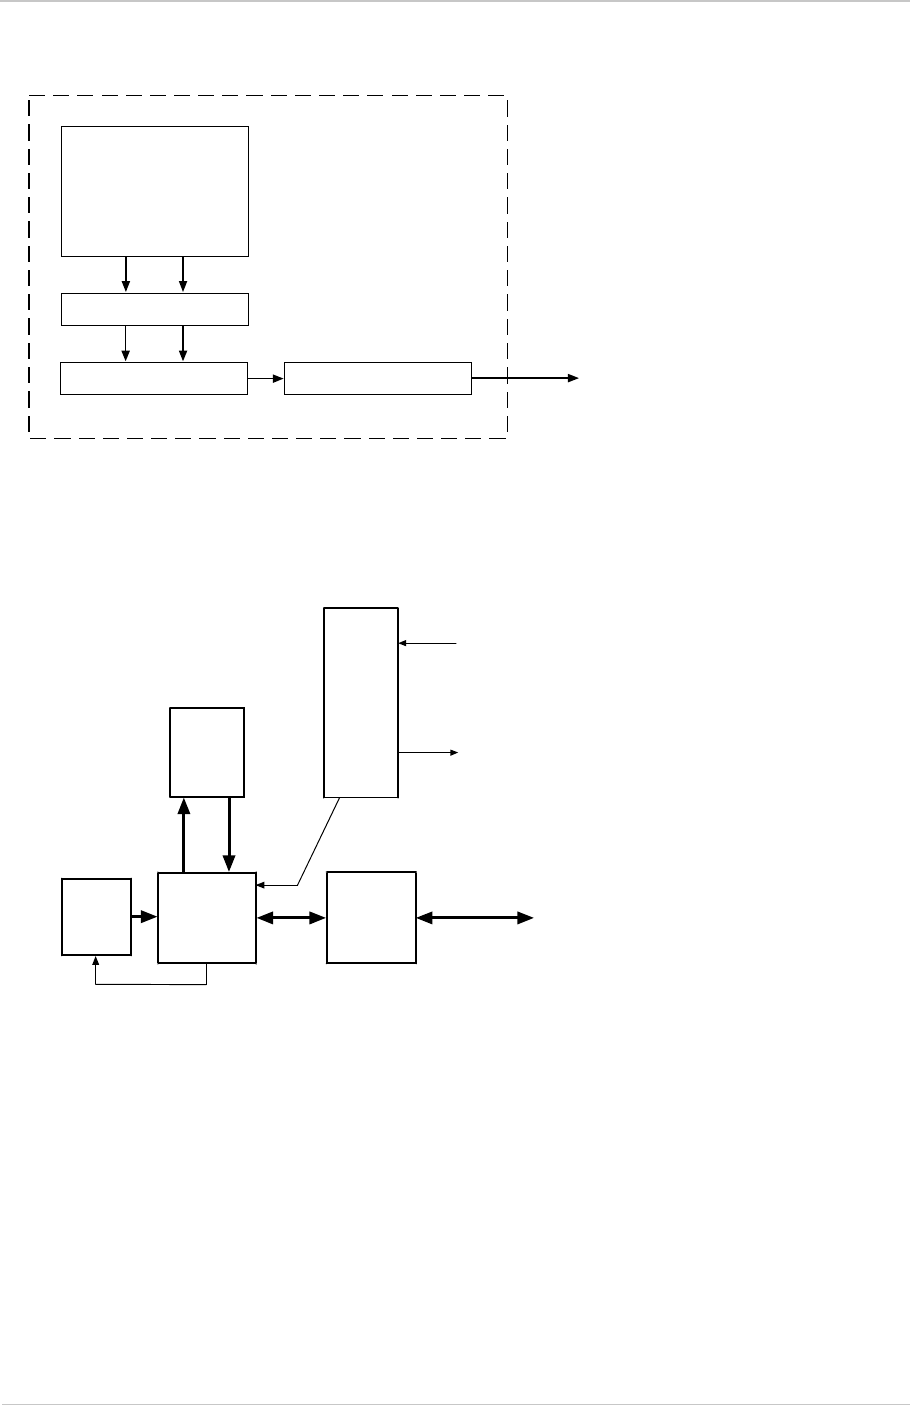
Camera Functional Description AW00123408000
67 Basler ace USB 3.0
CMOS Sensor
Pixel
Array
Digitized
Pixel Data
ADC
Analog Processing
Digital Processing
Fig. 35: CMOS Sensor Architecture
Sensor FPGA Controller
Buffer
Image
Data Image
Data
I/O
Computer
Control:
ROI, Gain,
Black Level
Frame Burst Trigger Signal or
Frame Start Trigger Signal or
Frame Counter Reset Signal or
Trigger Input Counter Reset Signal
Frame Burst Trigger Wait Signal or
Frame Trigger Wait Signal or
Exposure Active Signal* or
Flash Window Signal or
Timer 1 Signal
*not available for acA3800-14 and
aA4600-10 cameras
Fig. 36: Camera Block Diagram
Image and
Control Data
and
Power
Image
and
Control
Data

AW00123408000 Physical Interface
Basler ace USB 3.0 68
5 Physical Interface
This chapter provides detailed information, such as pinouts and voltage requirements, for the
physical interface on the camera. This information will be especially useful during your initial
design-in process. The chapter also includes information abut the required cables connecting to the
camera.
5.1 General Description of the
Camera Connections
The camera is interfaced to external circuitry via connectors located on the back of the housing:
A 6-pin connector used to provide access to the camera’s I/O lines
A USB 3.0 Micro-B port used to provide a (nominal) 5 Gbit/s SuperSpeed data transfer
connection.
There is also a LED indicator located on the back of the camera.
Figure 37 shows the location of the two connectors and the LED.
Note that Basler recommends specific external components - host adapters,
cables, hubs - for use with Basler ace USB 3.0 cameras. For recommended
external components, see the Basler website: www.baslerweb.com
Fig. 37: Camera Connectors
6-pin Connector (I/O)
Green LED Indicator
USB 3.0 Micro-B Port
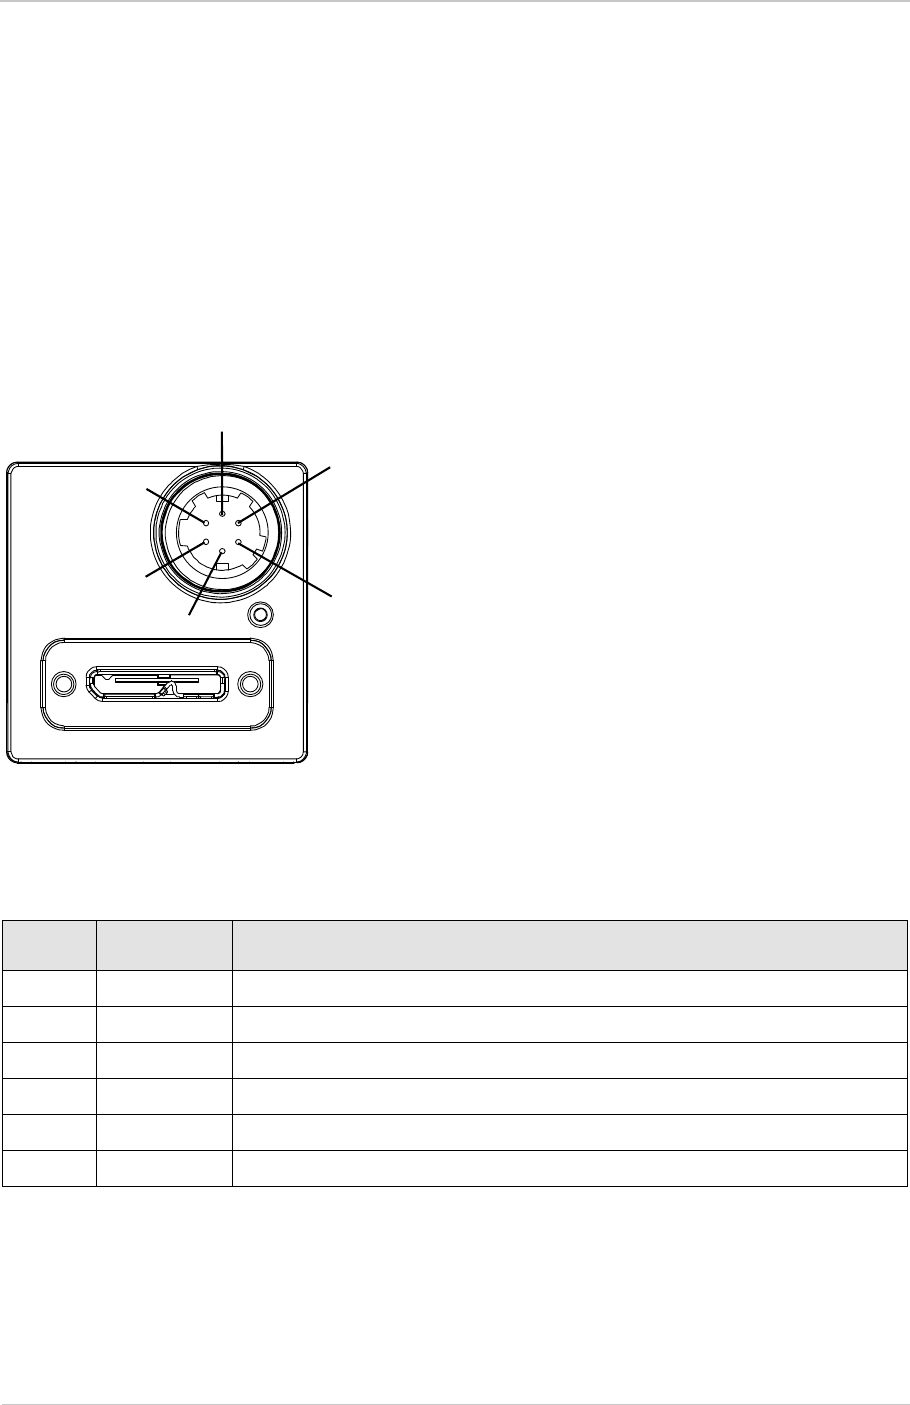
Physical Interface AW00123408000
69 Basler ace USB 3.0
5.2 Camera Connector Pin Numbering and
Assignments
5.2.1 6-pin Connector Pin Numbering and
Assignments
The 6-pin connector is used to access the physical input and output lines on the camera.
The pin numbering for the 6-pin connector is as shown in Figure 38.
The pin assignments and designations for the 6-pin connector are shown in Table 20.
.
Pin Designation Function
1 Line 3 Direct-coupled General Purpose I/O (GPIO)
2 Line 1 Opto-isolated I/O IN
3 Line 4 Direct-coupled General Purpose I/O (GPIO)
4 Line 2 Opto-isolated I/O OUT
5 - Ground for opto-isolated I/O
6 - Ground for direct-coupled GPIO
Table 20: Pin Assignments for the 6-pin Connector and Related Designations
Fig. 38: Pin Numbering for the 6-pin Connector
4
3
5
6
1
2

AW00123408000 Physical Interface
Basler ace USB 3.0 70
5.2.2 USB 3.0 Micro-B Port Pin Numbering and Assign-
ments
The USB 3.0 Micro-B port provides a USB 3.0 connection to supply power to the camera and to
transmit image data and control signals.
Pin numbering and pin assignments adhere to the Universal Serial Bus 3.0 standard.
5.3 Camera Connector Types
5.3.1 6-pin Connector
The 6-pin connector on the camera is a Hirose micro receptacle (part number HR10A-7R-6PB) or
the equivalent.
The recommended mating connector is the Hirose micro plug (part number HR10A-7P-6S) or the
equivalent.
Contact your Basler sales representative to order cable assemblies.
5.3.2 USB 3.0 Micro-B Port
The USB 3.0 Micro-B port for the camera’s USB 3.0 connection is a standard Micro-B USB 3.0
connector with screw lock.
The recommended mating connector is any standard Micro-B USB 3.0 plug.
Suitable cables terminated with screw-lock connectors are available from Basler. Contact your
Basler sales representative to order cable assemblies.
5.4 LED Indicator
There is a green LED indicator on the back of the camera housing (see Figure 37). When the LED
is lit, it indicates that the camera is operating.

Physical Interface AW00123408000
71 Basler ace USB 3.0
5.5 Camera Cabling Requirements
5.5.1 USB 3.0 Cable
Use a high-quality USB 3.0 cable. If possible only use a cable that was obtained from Basler. To
avoid EMI, the cable must be shielded. Close proximity to strong high-frequency electromagnetic
fields should be avoided in your installation.
To obtain a suitable cable from Basler. Contact your Basler sales representative to order cable
assemblies.
5.5.2 I/O Cable
A single I/O cable is used to connect to the camera’s I/O lines. In your installation, close proximity
to strong high-frequency electromagnetic fields should be avoided.
The end of the I/O cable that connects to the camera must be terminated with a Hirose micro plug
(plug type HR10A-7P-6S) or the equivalent. The cable must be wired to conform with the pin
assignments shown in the pin assignment table.
The maximum length of the I/O cable is at least 10 m. The cable must be shielded and have twisted
pair wire to ensure that input signals are correctly received.
The required 6-pin Hirose plug is available from Basler. Basler also offers cable assemblies that are
terminated with a 6-pin Hirose plug on one end and unterminated on the other. Contact your Basler
sales representative to order connectors or cables.
Note that Basler highly recommends USB 3.0 and I/O cables that are offered as
Basler accessories. For recommended accessories, see the Basler website:
www.baslerweb.com
NOTICE
An incorrect plug can damage the 6-pin I/O connector.
The plug on the cable that you attach to the camera’s 6-pin I/O connector must have 6 female
pins. Using a plug designed for a smaller or a larger number of pins can damage the connector.

AW00123408000 Physical Interface
Basler ace USB 3.0 72
Note that direct-coupled GPIO lines have the advantage of working with very short
delays compared to opto-isolated I/O lines.
Note also that the direct-coupled GPIOs are distinctly more susceptible to EMI
than the opto-isolated I/Os. Under harsh EMI conditions, GPIOs can turn out not
to be usable at all.
Accordingly, use of the GPIOs in an environment with elevated risk of EMI calls for
taking additional measures like, e.g. using shorter cables.
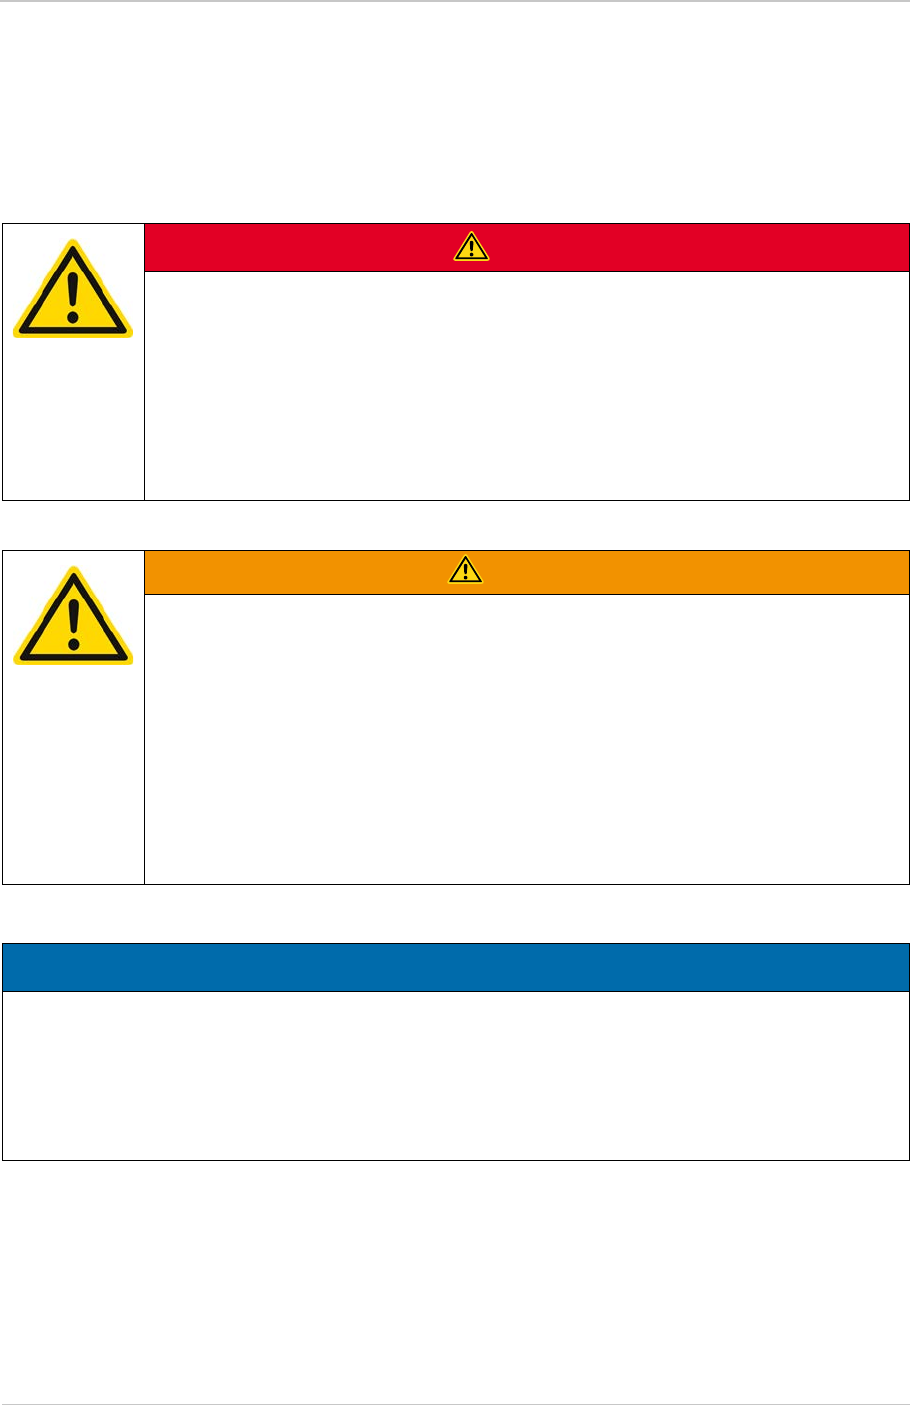
Physical Interface AW00123408000
73 Basler ace USB 3.0
5.6 Camera Power
Camera power must be supplied to the camera via the USB 3.0 cable plugged into the camera’s
USB 3.0 Micro-B port.
Power consumption is as shown in the specification tables in Chapter 1 of this manual.
DANGER
Electric Shock Hazard
Risk of Burn or Death.
The power supply used for supplying camera power must meet the Safety Extra
Low Voltage (SELV) and Limited Power Source (LPS) requirements.
If you use a powered hub as part of the USB 3.0 connection, the powered hub
must meet the SELV and LPS requirements.
WARNING
Fire Hazard
Risk of Burn
The power supply used for supplying camera power must meet the Limited Power
Source (LPS) requirements.
A suitable power supply is available from Basler. Contact your Basler sales
representative to order a power supply.
If you use a powered hub as part of the USB 3.0 connection, the powered hub
must meet the LPS requirements.
NOTICE
Voltage outside of the specified range can cause damage.
The camera’s nominal operating voltage is +5 VDC, effective at the camera’s USB 3.0 port.
You must supply camera power in accord with the Universal Serial Bus 3.0 specification and
involve a power supply that meets the Safety Extra Low Voltage (SELV) and Limited Power
Source (LPS) requirements.
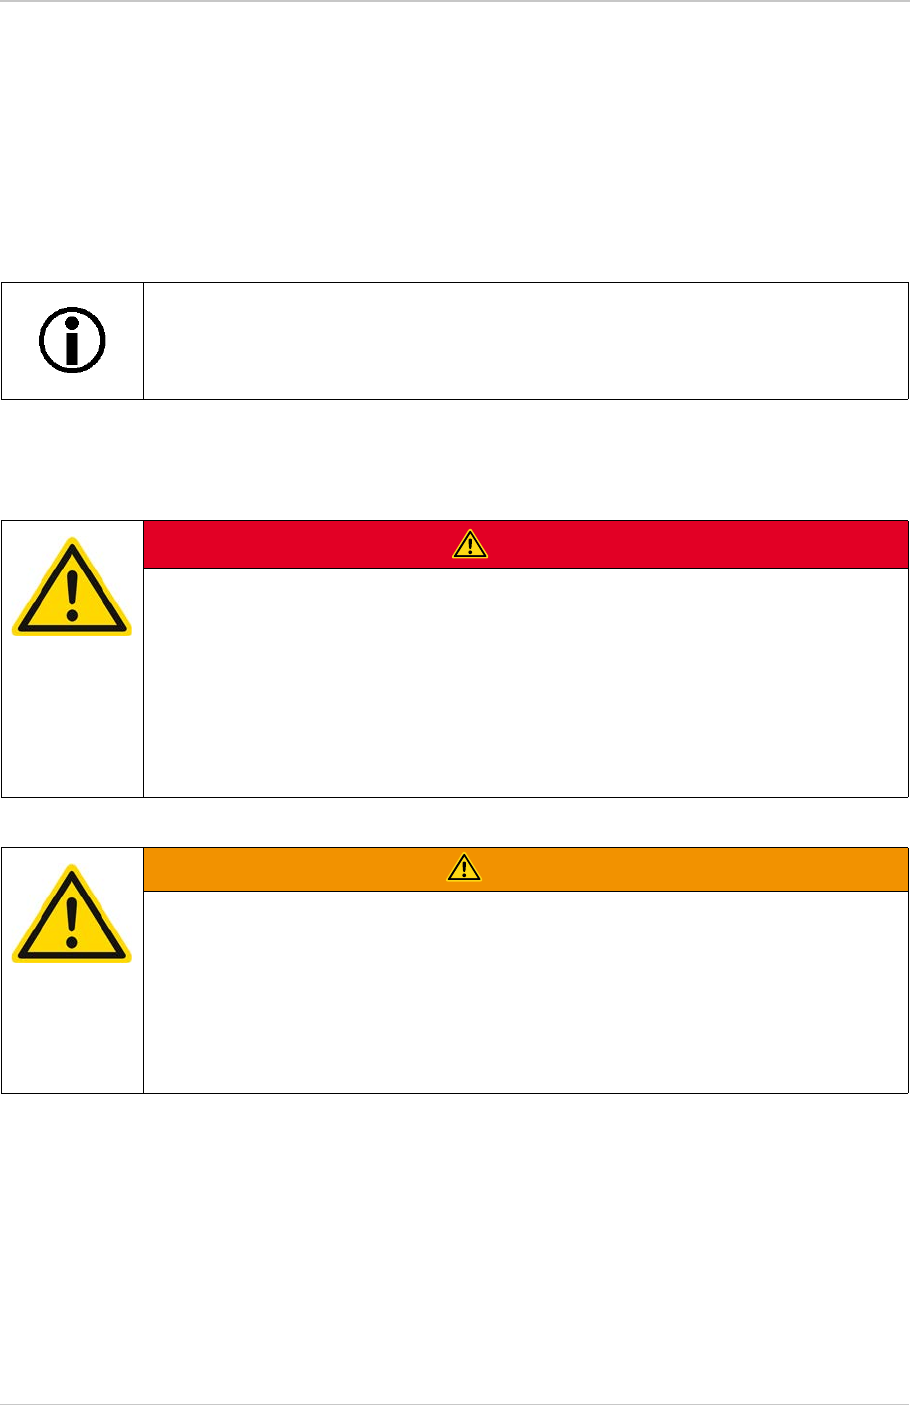
AW00123408000 Physical Interface
Basler ace USB 3.0 74
5.7 Opto-isolated Input (Pin 2/Line 1)
The camera is equipped with one dedicated opto-isolated input line designated as Line 1. The input
line is accessed via the 6-pin connector on the back of the camera (pin 2, see Figure 38).
In addition, the camera has two direct-coupled GPIO lines, Line 3 and Line 4, that can both be used
as input lines. They are described in Section 5.9 on page 80.
5.7.1 Electrical Characteristics
The opto-isolated input line has the advantage of being distinctly more robust
against EMI than a GPIO line used as an input. However, when using the opto-
isolated input line, the delays involved are longer than for a GPIO line.
DANGER
Electric Shock Hazard
Risk of Burn or Death.
The power supply used must meet the Safety Extra Low Voltage (SELV) and
Limited Power Source (LPS) requirements.
A suitable power supply is available from Basler. Contact your Basler sales
representative to order a power supply.
WARNING
Fire Hazard
Risk of Burn
The power supply used must meet the Limited Power Source (LPS) requirements.
A suitable power supply is available from Basler. Contact your Basler sales
representative to order a power supply.

Physical Interface AW00123408000
75 Basler ace USB 3.0
The following voltage requirements and information apply to the camera’s opto-isolated I/O input
line (pin 2 of the 6-pin connector; Line 1).
Note: A minimum current of 5 mA must be provided to the I/O input line.
Figure 39 shows a schematic for the opto-isolated input line. The absolute maximum input supply
voltage is +30.0 VDC. The current draw for the input line is between 5 mA and 15 mA.
As an example, the use of a TTL or CMOS logic gate in the external circuit is shown.
NOTICE
Voltage outside of the safe operating voltage range can cause damage.
The safe operating I/O supply voltage range
for the opto-isolated input line differs from the safe operating voltage range for the opto-
isolated output line (see Section 5.8.1 on page 77) and direct-coupled GPIO lines
(Section 5.9 on page 80).
for the I/O input lines of Basler ace USB 3.0 cameras can differ from the safe operating
voltage ranges for the I/O input lines of other Basler cameras.
You must supply power within the safe operating voltage range.
Voltage Significance
+30.0 VDC Absolute maximum. The absolute maximum must never be exceeded. Otherwise, the
camera can be damaged and the warranty becomes void.
+0 to +24 VDC Safe operating I/O input voltage range.
+0 to +1.4 VDC The voltage indicates a logical 0 (inverter disabled).
"voltage level low" of Section 5.13 on page 107.
> +1.4 to +2.2 VDC Region where the transition threshold occurs; the logical status is not defined in this
region.
> +2.2 VDC The voltage indicates a logical 1 (inverter disabled).
"voltage level high" of Section 5.13 on page 107.
Table 21: Voltage Requirements and Information for the Opto-isolated Input Line
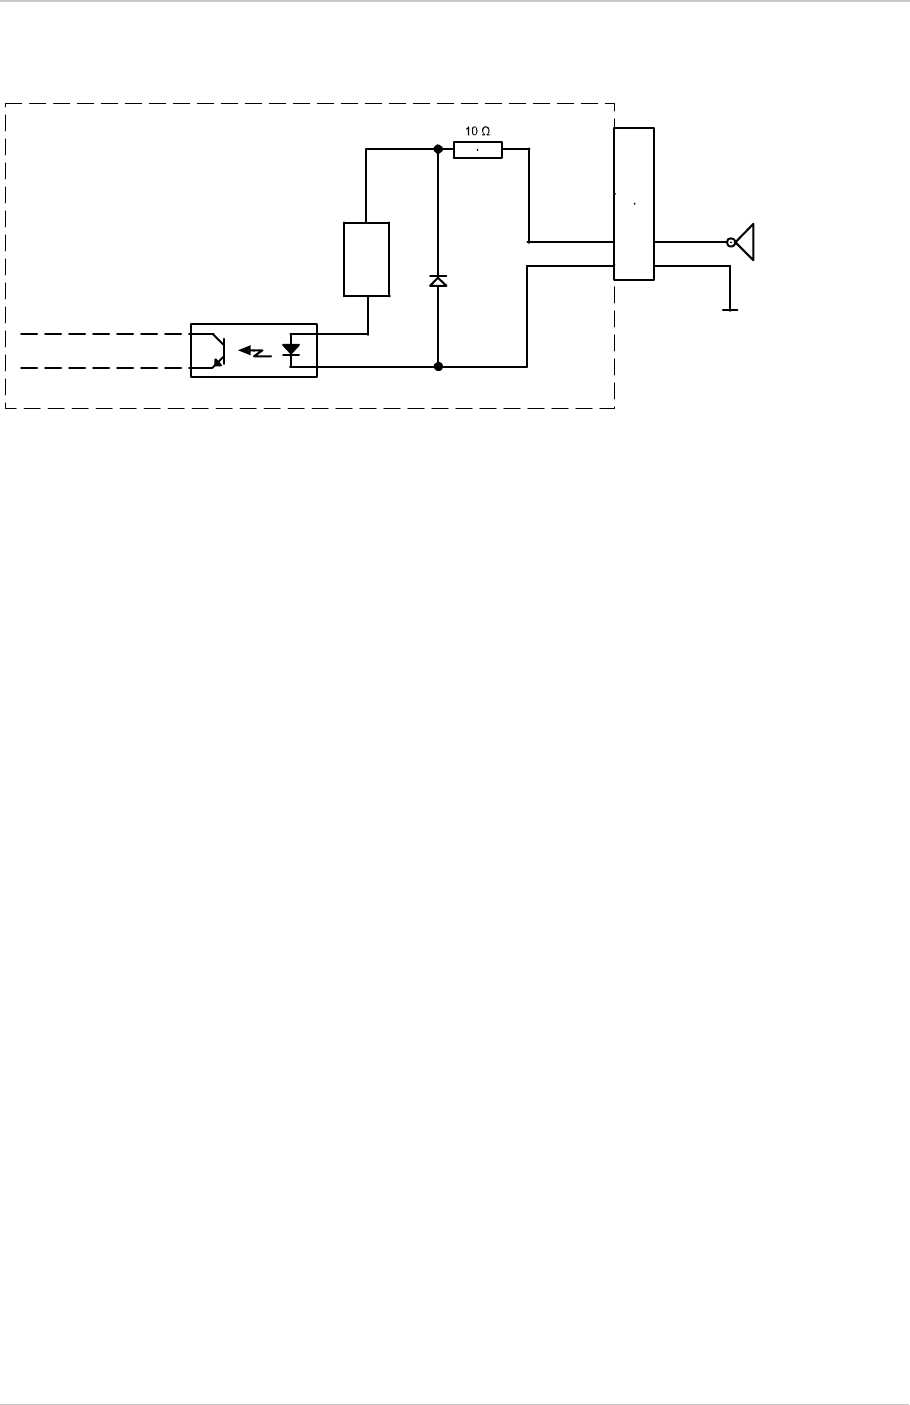
AW00123408000 Physical Interface
Basler ace USB 3.0 76
For more information about input line pin assignments and pin numbering, see Section 5.2 on
page 69.
For more information about how to use an externally generated frame start trigger (ExFSTrig) signal
to control acquisition start, see Section 6.4 on page 128.
For more information about configuring the input line, see Section 5.11 on page 93.
6-pin
Receptacle
1
6
3
4
2
5
Camera
Logic Gate
Current
Limiter
Ground for
Opto-isolated I/O
Fig. 39: Opto-isolated Input Line Schematic with a Typical External Circuit (Simplified)

Physical Interface AW00123408000
77 Basler ace USB 3.0
5.8 Opto-isolated Output (Pin 4/Line 2)
The camera is equipped with one dedicated opto-isolated output line designated as Line 2. The
output line is accessed via the 6-pin connector on the back of the camera (pin 4, see Figure 38).
In addition, the camera has two direct-coupled GPIO lines, Line 3 and Line 4, that can both be used
as output lines. They are described in Section 5.9 on page 80.
5.8.1 Electrical Characteristics
The opto-isolated output line has the advantage of being distinctly more robust
against EMI than a GPIO line used as an output. However, when using the opto-
isolated output line, the delays involved are longer than for a GPIO line.
DANGER
Electric Shock Hazard
Risk of Burn or Death.
The power supply used must meet the Safety Extra Low Voltage (SELV) and
Limited Power Source (LPS) requirements.
A suitable power supply is available from Basler. Contact your Basler sales
representative to order a power supply.
WARNING
Fire Hazard
Risk of Burn
The power supply used must meet the Limited Power Source (LPS) requirements.
A suitable power supply is available from Basler. Contact your Basler sales
representative to order a power supply.

AW00123408000 Physical Interface
Basler ace USB 3.0 78
Voltages
The following voltage requirements and information apply to the opto-isolated I/O output line (pin 4
of the 6-pin connector; Line 2).
Currents
The leakage current in the "off" state should usually not exceed approximately 60 µA and will
typically be much lower (e.g. approximately 4 µA at 25 °C (+77 °F) housing temperature).
The actual leakage current depends on camera operating temperature and production spread
of electronic components.
The maximum load current allowed through the output circuit is 50 mA.
There is no specific minimum load current but you need to consider several facts:
the leakage current will have stronger effect when load currents are low
the propagation delay of the output increases as load currents decrease
higher-impedance circuits tend to be more susceptible to EMI
higher currents yield higher voltage drop on long cables.
NOTICE
Voltage outside of the safe operating voltage range can cause damage.
The safe operating I/O supply voltage range for the opto-isolated output line differs from the
safe operating voltage range for the opto-isolated input line (see Section 5.7.1 on page 74).
The safe operating I/O supply voltage range for the I/O output lines of Basler ace USB 3.0
cameras can differ from the safe operating voltage ranges for the I/O output lines of other
Basler cameras.
You must supply power within the safe operating voltage range.
Voltage Significance
+30.0 VDC Absolute maximum.The absolute maximum must never be exceeded. Otherwise, the
camera can be damaged and the warranty becomes void.
+3.3 to +24 VDC Safe operating I/O output supply voltage range.
< +3.3 VDC The I/O output can operate erratically.
Table 22: Voltage Requirements and Information for the Opto-isolated Output Line
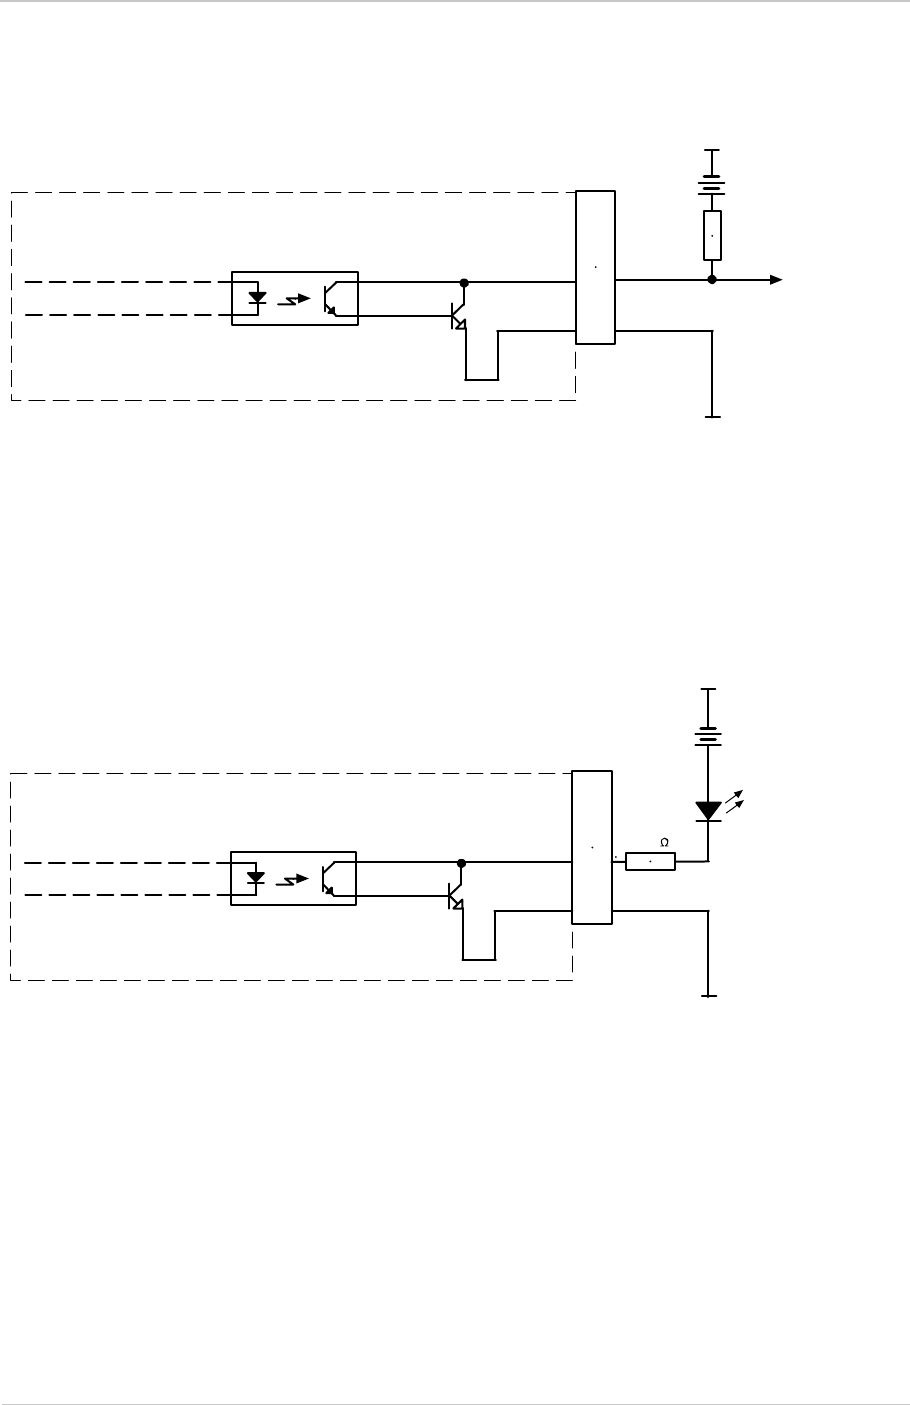
Physical Interface AW00123408000
79 Basler ace USB 3.0
Figure 40 shows a schematic for the opto-isolated output line.
.
Figure 41 shows a typical circuit you can use to monitor the output line with an LED. In this example,
the voltage for the external circuit is +24 VDC. Current in the circuit is limited by an external resistor.
For more information about output line pin assignments and pin numbering, see Section 5.2 on
page 69.
For more information about the Exposure Active signal, see Figure 6.8.1 on page 167.
Q1
6-pin
Receptacle +3.3 to +24
VDC
Voltage
Output
Signal
to You
1
6
3
4
2
5
Camera
Ground for
Opto-isolated I/O
Ground for
Opto-isolated I/O
Fig. 40: Opto-isolated Output Line Schematic with a Typical Voltage Output Circuit (Simplified)
Q1
6-pin
Receptacle
+24
VDC
LED
Output
to You
1
6
3
4
2
5
Camera
2.2 k
Ground for
Opto-isolated I/O
Ground for
Opto-isolated I/O
Fig. 41: Opto-isolated Output Line Schematic with a Typical LED Output Signal at +24 VDC for the External Circuit
(Simplified)
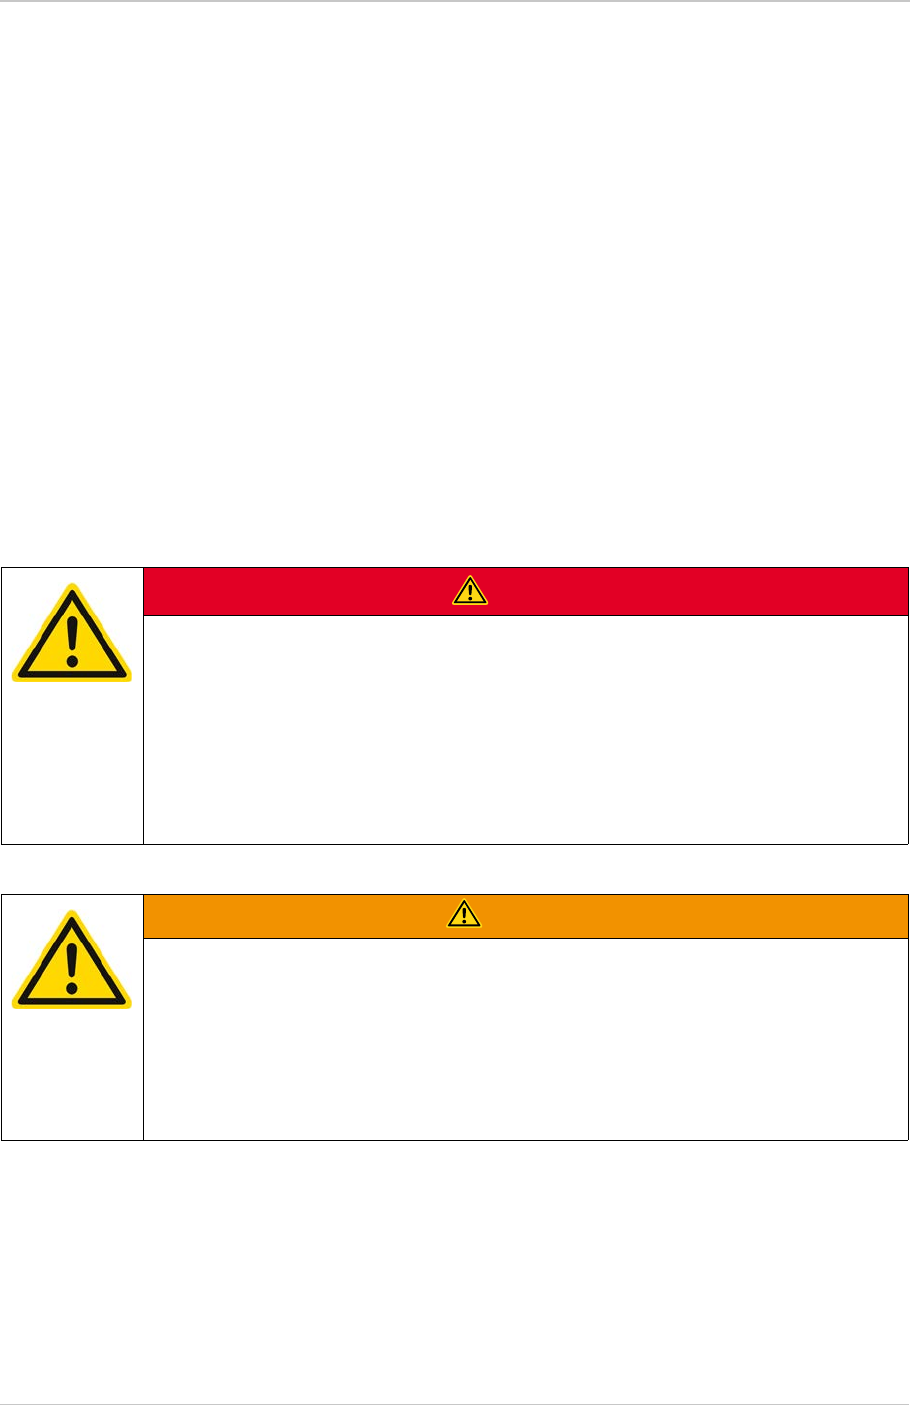
AW00123408000 Physical Interface
Basler ace USB 3.0 80
5.9 Direct-coupled General Purpose I/O
(GPIO; Pin 1/Line 3, Pin 3/Line 4)
5.9.1 Introduction
The camera has two direct-coupled GPIO lines that are accessed via pins 1 and 3 of the 6-pin
connector on the back of the camera (see Figure 38).
The GPIO lines can be set to operate as inputs to the camera or to operate as camera outputs.
The GPIO lines are designated as Line 3 and Line 4 (see also Section 5.2.1 on page 69).
The direct-coupled GPIO lines are compatible with TTL signals.
The next sections describe the differences in the GPIO electrical functionality when the lines are set
to operate as inputs and when they are set to operate as outputs.
DANGER
Electric Shock Hazard
Risk of Burn or Death.
The power supply used must meet the Safety Extra Low Voltage (SELV) and
Limited Power Source (LPS) requirements.
A suitable power supply is available from Basler. Contact your Basler sales
representative to order a power supply.
WARNING
Fire Hazard
Risk of Burn
The power supply used must meet the Limited Power Source (LPS) requirements.
A suitable power supply is available from Basler. Contact your Basler sales
representative to order a power supply.

Physical Interface AW00123408000
81 Basler ace USB 3.0
5.9.2 Setting a GPIO Line for Input or Output
You can set a GPIO line to operate as an input or output line. To set the mode of operation, you
must set the line mode for the GPIO line.
Setting a GPIO Line for Input or Output
1. Set the LineSelector parameter to select the GPIO line that you want to configure.
2. Set the LineMode parameter as desired to Input or Output.
You can set the LineSelector and LineMode parameter values from within your application software
by using the Basler pylon API. The following code snippet illustrates using the API to select a GPIO
line and to set the LineMode parameter value. As an example, the code snippet assumes that you
want to select Line 3 and set it to Input:
// Select GPIO line Line 3
camera.LineSelector.SetValue(LineSelector_Line3).
// Set the line mode for the selected GPIO line
camera.LineMode.SetValue(LineMode_Input);
You can also use the Basler pylon Viewer application to easily set the parameters.
For more information about the pylon API and the pylon Viewer, see Section 3.1 on page 62.
NOTICE
Applying incorrect electrical signals to the camera’s GPIO lines can severely damage the camera.
1. Before you connect any external circuitry to a GPIO line, we strongly recommend that you
set a GPIO line to operate as an input or as an output (according to your needs).
2. Once a line is properly set, make sure that you only apply electrical signals to the line that are
appropriate for the line’s current setting.
Direct-coupled GPIO lines have the advantage of working with very short delays
compared to opto-isolated I/O lines.
The direct-coupled GPIO lines are, however, distinctly more susceptible to
electromagnetic interference.
We therefore strongly recommend to only use the direct-coupled GPIO lines when
significant electromagnetic interference will not occur.
To set a GPIO line for input or output using Basler pylon:

AW00123408000 Physical Interface
Basler ace USB 3.0 82
5.9.3 Operation as an Input
This section describes the electrical operation of a GPIO line when the line has been set to operate
as an input.
5.9.3.1 Electrical Characteristics
The following I/O supply voltage requirements apply to a direct-coupled GPIO line when the line is
set as an input.
Your application must be able to accept 2 mA (sink current) from the direct-coupled GPIO input line
without exceeding +0.8 VDC, the upper limit of the low status. The current draw for high-level input
current is < 100 µA.
Figure 42 shows the applicable electrical circuit when a GPIO line is set to operate as an input. The
figure is drawn to specifically apply to pin 1 (Line 3) as an example. However, with the necessary
modifications, the figure applies equally to pin 3 (Line 4).
The figure shows, as an example, the use of a TTL or CMOS logic gate in the external circuit. A
different example for an external circuit is shown in Figure 43.
NOTICE
Voltage outside of the safe operating voltage range can cause damage.
You must supply power within the safe operating voltage range.
Voltage Significance
+30.0 VDC Absolute maximum. The absolute maximum must never be exceeded. Otherwise, the
camera can be damaged and the warranty becomes void.
+0 to + 5.0 VDC Safe operating input voltage range (the minimum external pull up voltage is 3.3 VDC as
illustrated in Figure 43).
+0 to +0.8 VDC The voltage indicates a logical 0 (inverter disabled).
"voltage level low" of Section 5.13 on page 107.
> +0.8 to +2.0 VDC Region where the transition threshold occurs; the logical status is not defined in this
region.
> +2.0 VDC The voltage indicates a logical 1 (inverter disabled).
"voltage level high" of Section 5.13 on page 107.
Table 23: Voltage Requirements for a Direct-coupled GPIO Line Set as an Input
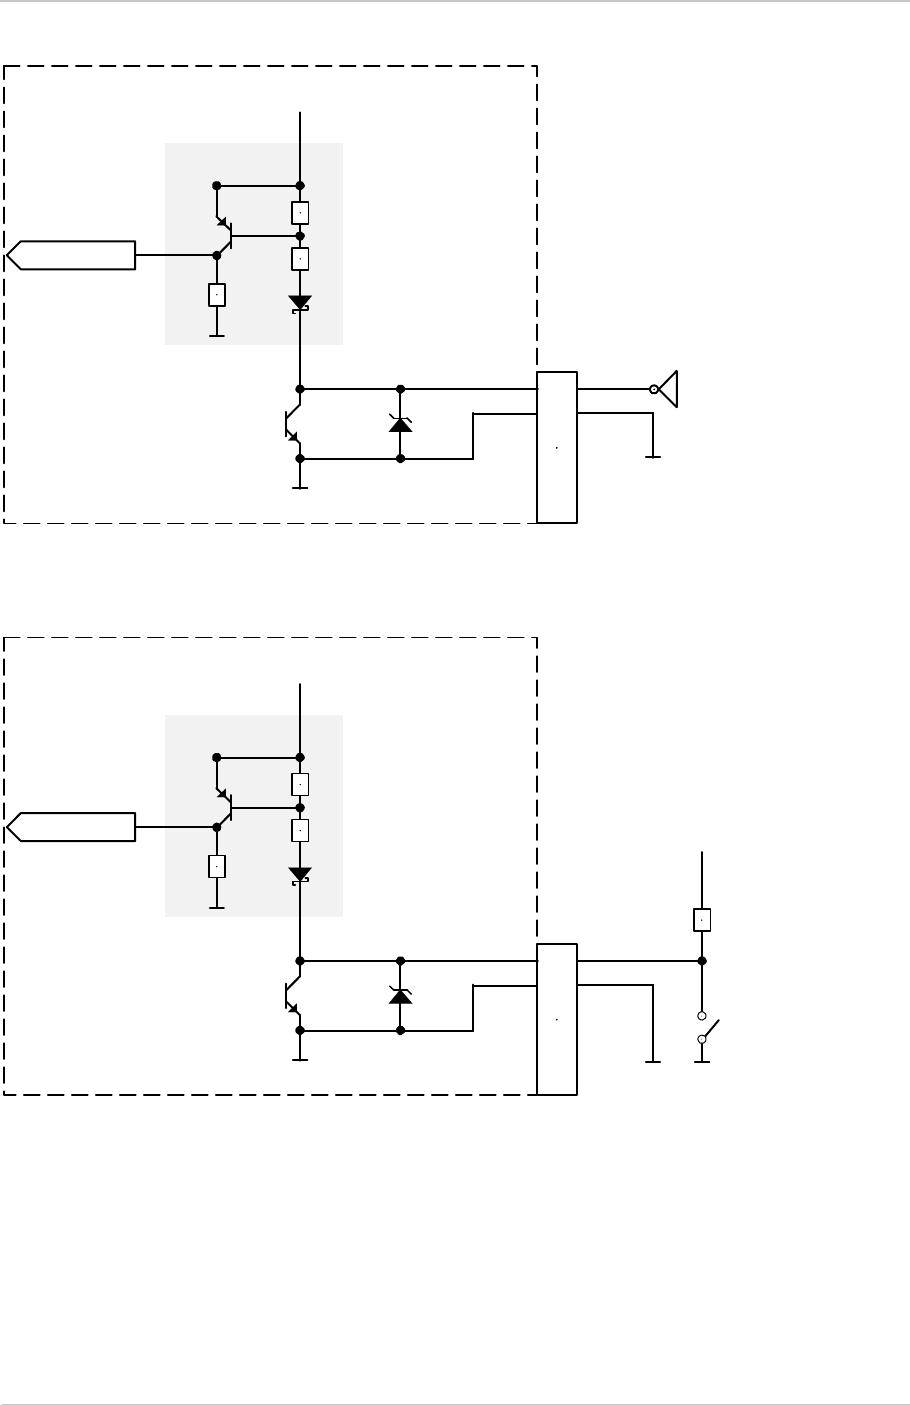
Physical Interface AW00123408000
83 Basler ace USB 3.0
For more information about GPIO pin assignments and pin numbering, see Section 5.2.1 on
page 69.
For more information about setting the GPIO line operation, see Section 5.11 on page 93 and
Section 5.12 on page 97.
6-pin
Receptacle
6-pin
Receptacle
+3.3 VDC
(Typical)
1
6
3
4
2
5
Camera
Logic Gate
Input Buffer
FPGA Input
Ground for
Direct-coupled
GPIO
Fig. 42: Direct-coupled GPIO Line Schematic with the GPIO Line Set as an Input and with a Typical External Circuit
Using a Logic Gate (Illustration for Pin 1 as an Example; Simplified)
FPGA Input
6-pin
Receptacle
+3.3 VDC
(Typical)
1
6
3
4
2
5
Camera
Input Buffer
+3.3 V ... +5.0 V
Ground for
Direct- coupled
GPIO
Fig. 43: Direct-coupled GPIO Line Schematic with the GPIO Line Set as an Input and with a Typical External Circuit
(Illustration for Pin 1 as an Example; Simplified)

AW00123408000 Physical Interface
Basler ace USB 3.0 84
5.9.4 Operation as an Output
This section describes the electrical operation of the GPIO line when the line has been set to
operate as an output.
5.9.4.1 Electrical Characteristics
Voltages
The following I/O supply voltage requirements apply to a direct-coupled GPIO line when it is
set as an output and when it is in the "off" state:
The following applies to a direct-coupled GPIO line when it s set as an output:
The camera uses an open collector with only a weak internal pull-up resistor (approximately
2kΩ). It is therefore likely that many applications will have to provide an additional pull-up
resistor.
When the direct-coupled GPIO line is in the "on" state, the residual voltage will typically be
approximately 0.4 V at 50 mA and 25 °C housing temperature. The actual residual voltage,
however, depends on camera operating temperature, load current, and production spread.
NOTICE
Voltage outside of the safe operating voltage range can cause damage.
You must supply power within the safe operating voltage range.
To ensure that the specified voltage levels for signals transmitted out of the
camera will be reached even under less than favorable conditions (e.g. for long
cable lengths, harsh EMI environment, etc.), we recommend to generally use an
external pull up resistor or to connect a "high side load".
Voltage Significance
+30.0 VDC Absolute maximum. The absolute maximum must never be exceeded. Otherwise,
the camera can be damaged and the warranty becomes void.
+3.3 to +24 VDC Safe operating direct-coupled GPIO output supply voltage range.
< +3.3 VDC The direct-coupled GPIO output can operate erratically.
Table 24: Voltage Requirements for a Direct-coupled GPIO Line Set as an Output
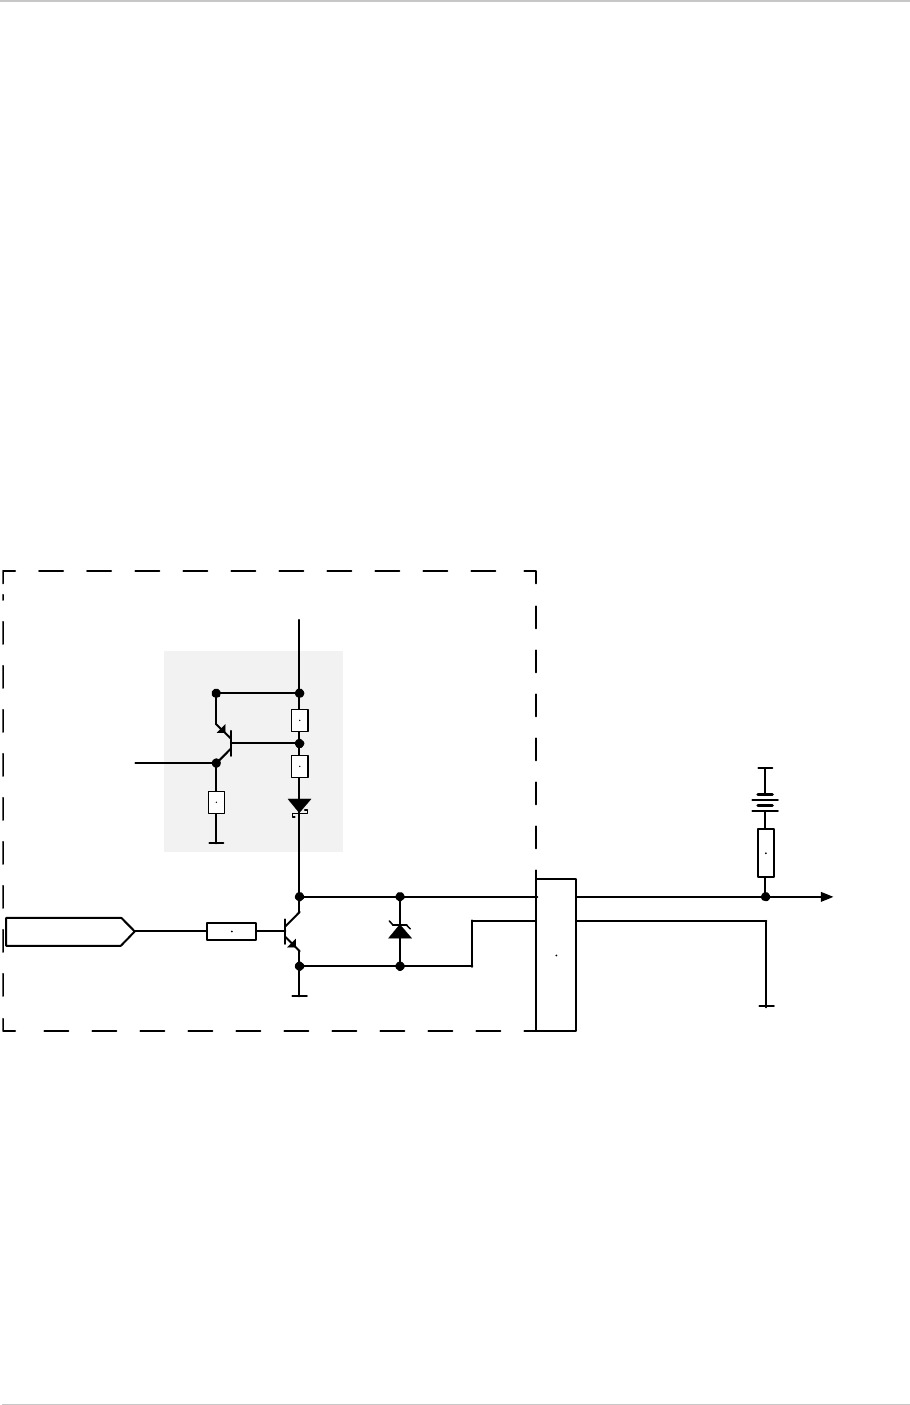
Physical Interface AW00123408000
85 Basler ace USB 3.0
Currents
The leakage current in the "off" state should usually not exceed approximately 60 µA and will
typically be much lower (e.g. approximately 4 µA at 25 °C (+77 °F) housing temperature).
The actual leakage current depends on camera operating temperature and production spread
of electronic components.
The maximum load current allowed through the output circuit is 50 mA.
There is no specific minimum load current but you need to consider several facts:
the leakage current will have stronger effect when load currents are low
the propagation delay of the output increases as load currents decrease
higher-impedance circuits tend to be more susceptible to EMI
higher currents yield higher voltage drop on long cables.
As shown in Figure 44, shows the applicable electrical circuit when a GPIO line is set to operate as
an output. The figure is drawn to specifically apply to pin 1 (Line 3) as an example but, with the
necessary modifications, it equally applies to pin 3 (Line 4).
For more information about GPIO pin assignments and pin numbering, see Section 5.2.1 on
page 69.
For more information about setting the GPIO line operation, see Section 5.11 on page 93 and
Section 5.12 on page 97.
6-pin
Receptacle
+3.3 VDC
(Typical)
Pull Up Resistor
Camera
+3.3t o +24
VDC
Voltage
Output
Signal
to You
Ground for Direct-
coupled GPIO
FPGA Output
1
6
3
4
2
5
Fig. 44: Direct-coupled GPIO Line Schematic with the GPIO Line Set as an Output and with a Typical Voltage
Output Circuit (Illustration for Pin 1 as an Example; Simplified)

AW00123408000 Physical Interface
Basler ace USB 3.0 86
5.10 Temporal Performance of I/O Lines
This section describes delays ("propagation delays") resulting from the operation of the camera’s
input and output lines. For image acquisition, the propagation delays must be added to the delays
described in Chapter 6 on page 113.
You will need the information included in this section most likely only if you need microsecond
accuracy when controlling camera operation via I/O lines.
All examples in this section assume that the I/O line inverters are disabled.
5.10.1 Introduction
As indicated in Section 5.2 on page 69, the camera provides two different kinds of I/O lines:
opto-isolated I/O lines
direct-coupled General Purpose I/O (GPIO) lines.
The related electrical characteristics and circuit schematics are given in Section 5.7 through
Section 5.9.
With regard to use, the two kinds of I/O lines differ mainly in these respects:
The opto-isolated I/O lines have the advantage of being distinctly more robust against EMI
than the GPIO lines.
The propagation delays ("response times") differ between the two kinds of I/O lines.
A propagation delay is the time that elapses between the moment when a signal voltage passes
through the transition threshold and the moment when the related line status changes – or vice
versa (see Figure 45 for camera input and Figure 46 for camera output).
The following important characteristics are apparent from Figure 45 and Figure 46:
The propagation delays for the opto-isolated I/O lines are in most cases longer than for the
GPIO lines. In other words, the opto-isolated I/O lines are usually "slower" than the GPIO lines.
For each analog signal, the rising edge and the falling edge are associated with different
propagation delays. The edge with the shorter propagation delay (the "fast" edge) is indicated
in the figures by an asterisk.
For recommendations for use, see Section on page 91.

Physical Interface AW00123408000
87 Basler ace USB 3.0
Note: In order to avoid loosing an external trigger signal make sure its pulse width
will be long enough to provide sufficient time for the camera’s input circuit to react:
The minimum required pulse width will be longer for the
opto-isolated input line compared to a GPIO line and for a
trigger signal using the active low state for triggering compared to a trigger
signal using the active high state.
As a general rule of thumb, an external trigger pulse width of 100 µs should be
long enough for most cases.
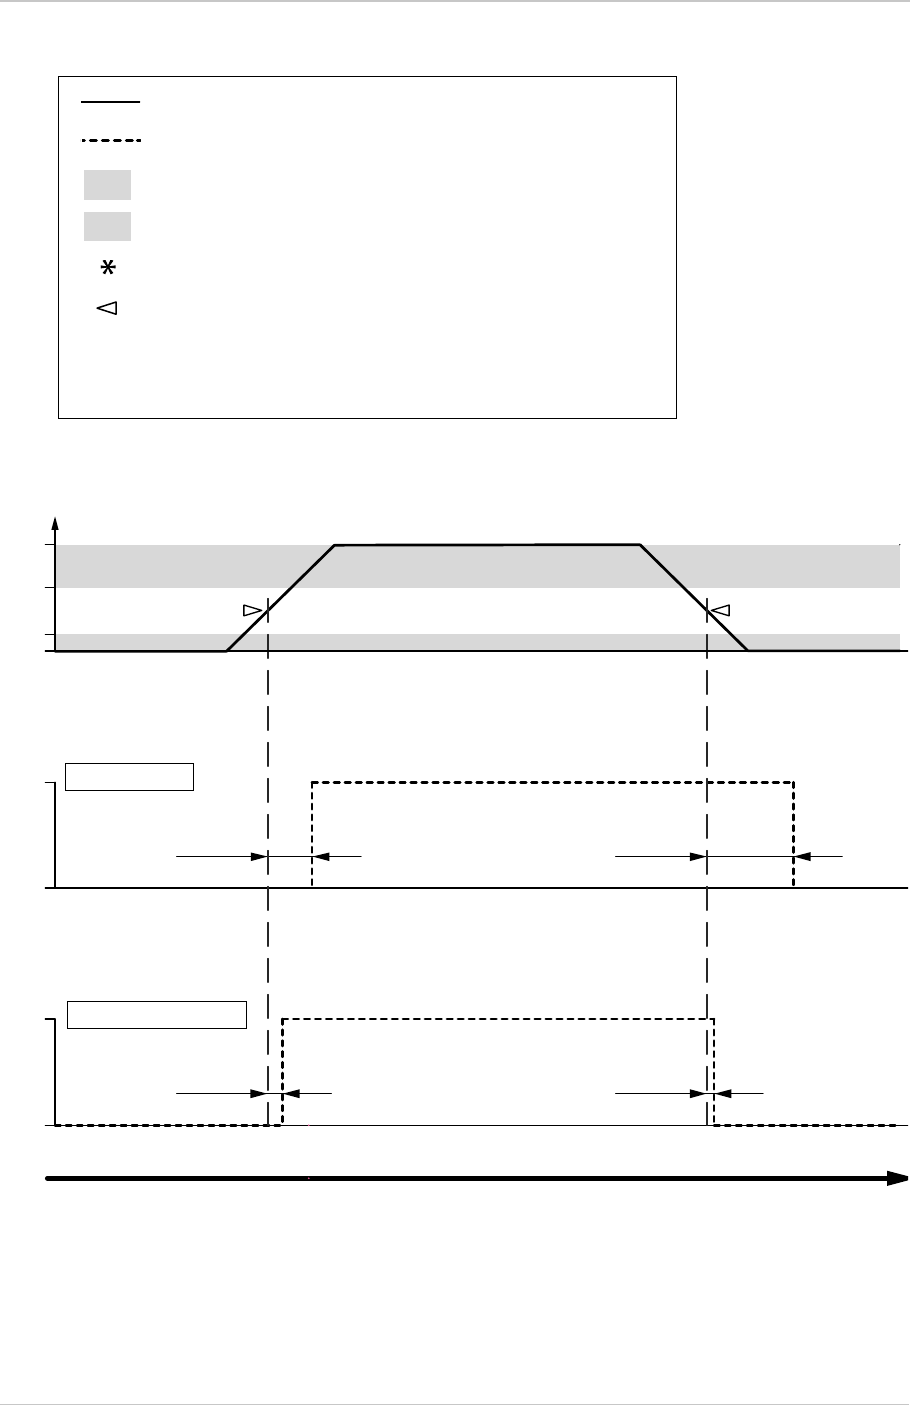
AW00123408000 Physical Interface
Basler ace USB 3.0 88
Fig. 45: Analog External Signal and Associated Internal Line Status with Propagation Delays for Opto-isolated Input
and Direct-coupled GPIO Inputs (Line Inverters Disabled)
*
*
tPLH tPHL
tPLH tPHL
Voltage [VDC]
0
#
1
Time
0
1
0
LOW
HIGH
Drawing not to scale
Internal Line Status
Internal Line Status
= Propagation delay for the low-high line status change
= Voltage region considered to indicate a "high" internal logical level
= Voltage region considered to indicate a "low" internal logical level
= Transition threshold
= Propagation delay for the high-low line status change
tPLH
tPHL
HIGH
LOW
= "Fast" edge
= Internal line status (logical levels)
= Analog external signal
Direct-coupled GPIO IN
Opto-isolated IN
#: 3.3 - 24 VDC for opto-isolated input, >2.0 - 5.0 VDC for direct-coupled GPIO IN

Physical Interface AW00123408000
89 Basler ace USB 3.0
Fig. 46: Internal Line Status and Associated Output Signals with Propagation Delays for Opto-isolated Output and
Direct-coupled GPIO Outputs (Line Inverters Disabled)
*
*
Voltage [VDC]
0
5
Voltage [VDC]
0
5
tPLH tPHL
tPLH tPHL
Direct-coupled GPIO OUT
1
0
Time
Internal Line Status
= Propagation delay for the low-high line status change
= Transition threshold
= Propagation delay for the high-low line status change
tPLH
tPHL Drawing not to scale
= "Fast" edge
Opto-isolated OUT
= Internal line status (logical levels)
= Analog signal

AW00123408000 Physical Interface
Basler ace USB 3.0 90
5.10.2 Factors Determining I/O Temporal Performance
A number of factors control the exact durations of propagation delays. The influence of some of the
factors is, however, ill constrained or unknown. As a consequence, generally valid and exact
quantitative predictions of propagation delays are impossible.
The following factors apply:
Among the insight that can be gained from Table 25 is the fact, production spread can result in
different propagation delays even for cameras that were produced in one batch and that are
operated under identical conditions.
Factors Influencing Camera I/O
Propagation Delays Input Output
Opto-isolated
IN Direct-coupled
GPIOs Opto-isolated
OUT Direct-coupled
GPIOs
Operating temperature:
Unknown but temperature must
be within specified range; see
Section 1.10.1 on page 51.
•º•º
Production spread:
Unknown •º•º
Aging (optocouplers):
Unknown ••
External I/O supply voltage:
Depends on application but must
be within specified ranges; see
Section 5.7 through Section 5.9.
••
º
Load resistance:
Depends on application •º
Load current:
Depends on application but must
be within specified ranges; see
Section 5.7 through Section 5.9.
•º
Table 25: Factors Influencing Camera I/O Propagation Delays ( • = major influence, º = minor influence)

Physical Interface AW00123408000
91 Basler ace USB 3.0
Opto-isolated I/Os and Direct-coupled GPIOs
Generally use the "fast" edge of a signal for tight temporal control and to minimize unwanted
influence on propagation delays.
The propagation delays for a "fast" edge will rarely exceed 15 µs for an opto-isolated I/O line,
and rarely 1 µs for a direct-coupled GPIO line. Under very unfavorable conditions, propagation
delays related to "slow" edges can take milliseconds.
To minimize propagation delays related to a "fast" edge, increase the load resistance.
To minimize propagation delays related to a "slow" edge, use an I/O supply voltage
between 3.3 VDC and 5 VDC and decrease the load resistance such that a load current
between 30 mA and 40 mA will result.
Use the direct-coupled GPIO lines when you need to minimize propagation delays but mind
their greater susceptibility to EMI compared to the opto-isolated I/Os.
Opto-isolated I/Os
When you apply current to the input and output lines for extended periods or even for most of
the time you will promote aging of the optocouplers. Keep the times when current flows to a
minimum to preserve stable propagation delays.
Signal edge-to-edge variation (jitter) resulting from I/O operation itself is negligible
but can be introduced by your trigger signal.
To avoid jitter, make sure the rise and fall times of your trigger signals are short,
preferably < 500 ns. The camera’s inherent jitter is less than 100 ns, peak to peak.

AW00123408000 Physical Interface
Basler ace USB 3.0 92
5.10.3 Measured Propagation Delays
The measured propagation delays reported in this section (see Table 26 and Table 27) are likely to
be near-minimum values related to "slow" edges.
The measured propagation delays were derived from a camera production lot of 2000 cameras and
are only valid for the specific camera operating conditions listed below. The specific camera
operating conditions were only chosen as an example. No inferences can be made for
propagation delays in different operating conditions.
Specific operating conditions:
Housing temperature: +25 °C.
Load resistance: RL = 170 Ω
I/O supply voltage: US = 5 VDC
For the graphical illustration of propagation delays, see Figure 45 and Figure 46.
Propagation Delays for Inputs
Fast Edge Slow Edge
Opto-isolated input 4.5 - 7.5 µs (rising edge) 19 - 28 µs (falling edge)
Direct-coupled GPIO IN < 0.5 µs (falling edge) < 1 µs (rising edge)
Table 26: Propagation Delays for the Camera Inputs (+25 °C, RL = 170 Ω, US = 5 VDC)
Propagation Delays for Outputs
Fast Edge Slow Edge
Opto-isolated output 3 - 6 µs (falling edge) 27 - 38 µs (rising edge)
Direct-coupled GPIO OUT < 0.5 µs (falling edge) < 2.5 µs (rising edge)
Table 27: Propagation Delays for the Camera Outputs (+25 °C, RL = 170 Ω, US = 5 VDC,
Transition Threshold = 2.0 V)

Physical Interface AW00123408000
93 Basler ace USB 3.0
5.11 Configuring Input Lines and Signals
5.11.1 Selecting an Input Line as the Source Signal for a
Camera Function
You can select input line Line 1 and GPIO lines Line 3 and Line 4, if configured for input, to act as
the source signal for the following camera functions:
Frame Burst Start trigger
Frame Start trigger
Counter 1 reset
Whenever a proper electrical signal is applied to the selected line, the camera will recognize the
signal as signal for the selected camera function.
For example, when Line 1 was selected to act as the source signal for the frame burst start trigger,
camera will recognize an electrical signal applied to Line 1 as a frame burst start trigger.
Note: When you apply an electrical signal to the input line the electrical signal must be appropriately
timed for the function.
For detailed information about selecting an input line to act as the source signal for
the frame burst start trigger and for details about how the frame burst start trigger operates,
see Section 6.3 on page 120.
the frame start trigger and for details about how the frame start trigger operates, see
Section 6.4 on page 128.
counter 1 reset and for details about how the counter value chunk feature operates, see
Section 7.23.3.6 on page 348.
By default, input line Line 1 is selected as the source signal for the frame start
trigger.
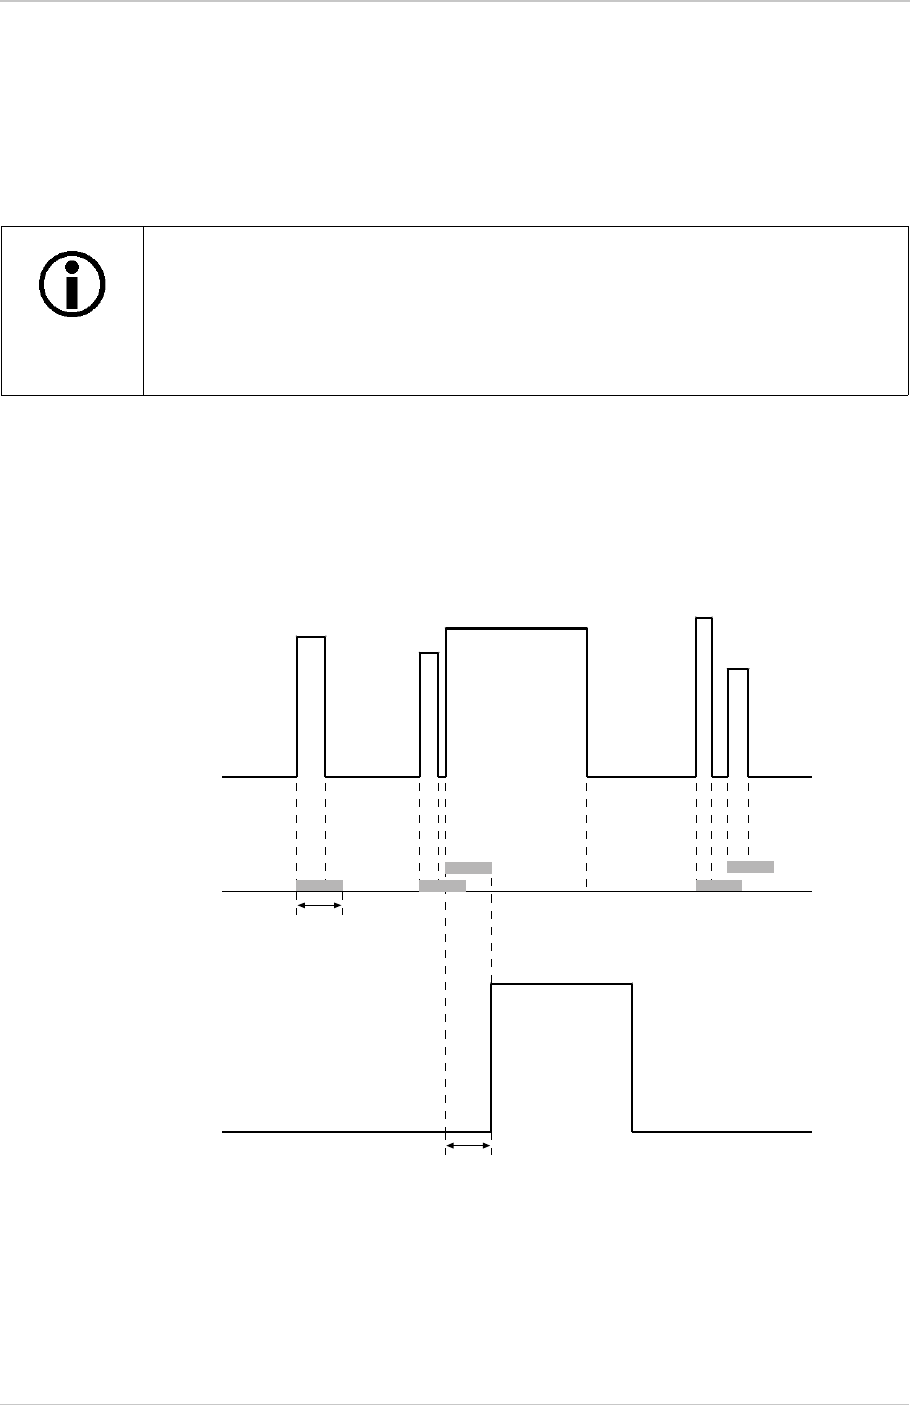
AW00123408000 Physical Interface
Basler ace USB 3.0 94
5.11.2 Input Line Debouncers
The debouncer feature aids in discriminating between valid and invalid input signals and only lets
valid signals pass to the camera. The debouncer value specifies the minimum time that an input
signal must remain high or remain low in order to be considered a valid input signal.
Note that the debouncer delays a valid signal between its arrival at the camera and its transfer. The
duration of the delay will be determined by the debouncer value.
Figure 47 illustrates how the debouncer filters out invalid input signals, i.e. signals that are shorter
than the debouncer value. The diagram also illustrates how the debouncer delays a valid signal.
We recommend setting the debouncer value so that it is slightly greater than the
longest expected duration of an invalid signal.
Setting the debouncer to a value that is too short will result in accepting invalid
signals. Setting the debouncer to a value that is too long will result in rejecting valid
signals.
Fig. 47: Filtering of Input Signals by the Debouncer
Unfiltered arriving signals
Debouncer
Transferred valid signal
delay
Timing charts are not drawn to scale
debouncer
value

Physical Interface AW00123408000
95 Basler ace USB 3.0
Setting the Debouncer
You can set a debouncer value for input line Line 1 and for GPIO lines Line 3 and Line 4 if
configured for input:
The debouncer value is determined by the value of the Line Debouncer Time parameter value. The
parameter is set in microseconds and can be set in a range from 0 to 20,000 µs.
1. Use the Line Selector to select, for example, input line Line 1.
2. Set the value of the Line Debouncer Time parameter.
You can set the Line Selector and the value of the Line Debouncer Time parameter from within your
application software by using the Basler pylon API. The following code snippet illustrates using the
API to set the selector and the parameter value:
// Select the input line
camera.LineSelector.SetValue(LineSelector_Line1);
// Set the parameter value e.g. to 10 microseconds
camera.LineDebouncerTime.SetValue(10.0);
You can also use the Basler pylon Viewer application to easily set the parameters.
For more information about the pylon API and the pylon Viewer, see Section 3.1 on page 62.
To set the debouncer:

AW00123408000 Physical Interface
Basler ace USB 3.0 96
5.11.3 Input Line Inverter
You can set input line Line 1 and GPIO lines Line 3 and Line 4, if configured for input, to invert or
not to invert the incoming electrical signal. Therefore, the inverter setting is one of the factors
defining whether a given electrical signal level will be considered to correspond to a "high" or "low"
logical line status.
1. Use the Line Selector to select, for example, Line 1.
2. Set the value of the Line Inverter parameter to true to enable inversion on the selected line or
to false to disable inversion.
You can set the Line Selector and the Line Inverter parameter value from within your application
software by using the pylon API. The following code snippet illustrates using the API to set the
selector and the parameter value:
// Select the input line
camera.LineSelector.SetValue(LineSelector_Line1);
// Enable the line inverter on the selected line
camera.LineInverter.SetValue(true);
You can also use the Basler pylon Viewer application to easily set the parameters.
For more information about the pylon API and the pylon Viewer, see Section 3.1 on page 62
If you enable or disable the inverter one frame acquisition will automatically occur.
To set the invert function for an input line:

Physical Interface AW00123408000
97 Basler ace USB 3.0
5.12 Configuring Output Lines and Signals
5.12.1 Selecting a Source Signal for an Output Line
To make a physical output line useful, you must select a source signal for the line. You can select
output line Line 2 and GPIO lines Line 3 and Line 4, if configured for output.
The camera has several standard output signals available and any one of them can be selected to
act as the source signal for an output line.
The camera has these standard output signals available:
Frame Burst Trigger Wait
Frame Trigger Wait
Exposure Active (not available for acA3800-14 and acA4600-10 cameras)
Flash Window
Timer 1 Active
User Output 1, User Output 2 or User Output 3, depending on the output line. For more
information, see Section 5.12.3 on page 101.
1. Use the Line Selector to select, for example, output line Line 2.
2. Set the value of the Line Source Parameter to one of the available output signals or to user
settable. This will set the source signal for the output line.
The following code snippet illustrates using the API to set the selector and the parameter value:
// Select the output line Line 2
camera.LineSelector.SetValue(LineSelector_Line2);
// Select the Flash Window signal as the source signal
camera.LineSource.SetValue(LineSource_FlashWindow);
You can set the Line Selector and the Line Source parameter value from within your application
software by using the Basler pylon API.
You can also use the Basler pylon Viewer application to easily set the parameters.
To set a camera output signal as the source signal for an output line:
By default, the User Output 1 signal is selected as the source signal for
output line Line 2.
The Exposure Active signal is not available for acA3800-14 and acA4600-10
cameras. We recommend using the Flash Window signal instead.

AW00123408000 Physical Interface
Basler ace USB 3.0 98
For more information about
the pylon API and the pylon Viewer, see Section 3.1 on page 62.
the frame burst trigger wait signals and frame trigger wait signals, see Section 6.8.4 on
page 172.
the exposure active signal, see Section 6.8.1 on page 167.
the flash window signal, see Section 6.6.2.3 on page 157 and Section 6.8.2 on page 169.
working with the timer output signal, see Section 5.12.6 on page 105
setting the status of a user settable output line, see Section 5.12.3 on page 101.
the electrical characteristics of the opto-isolated output line, see Section 5.8 on page 77.
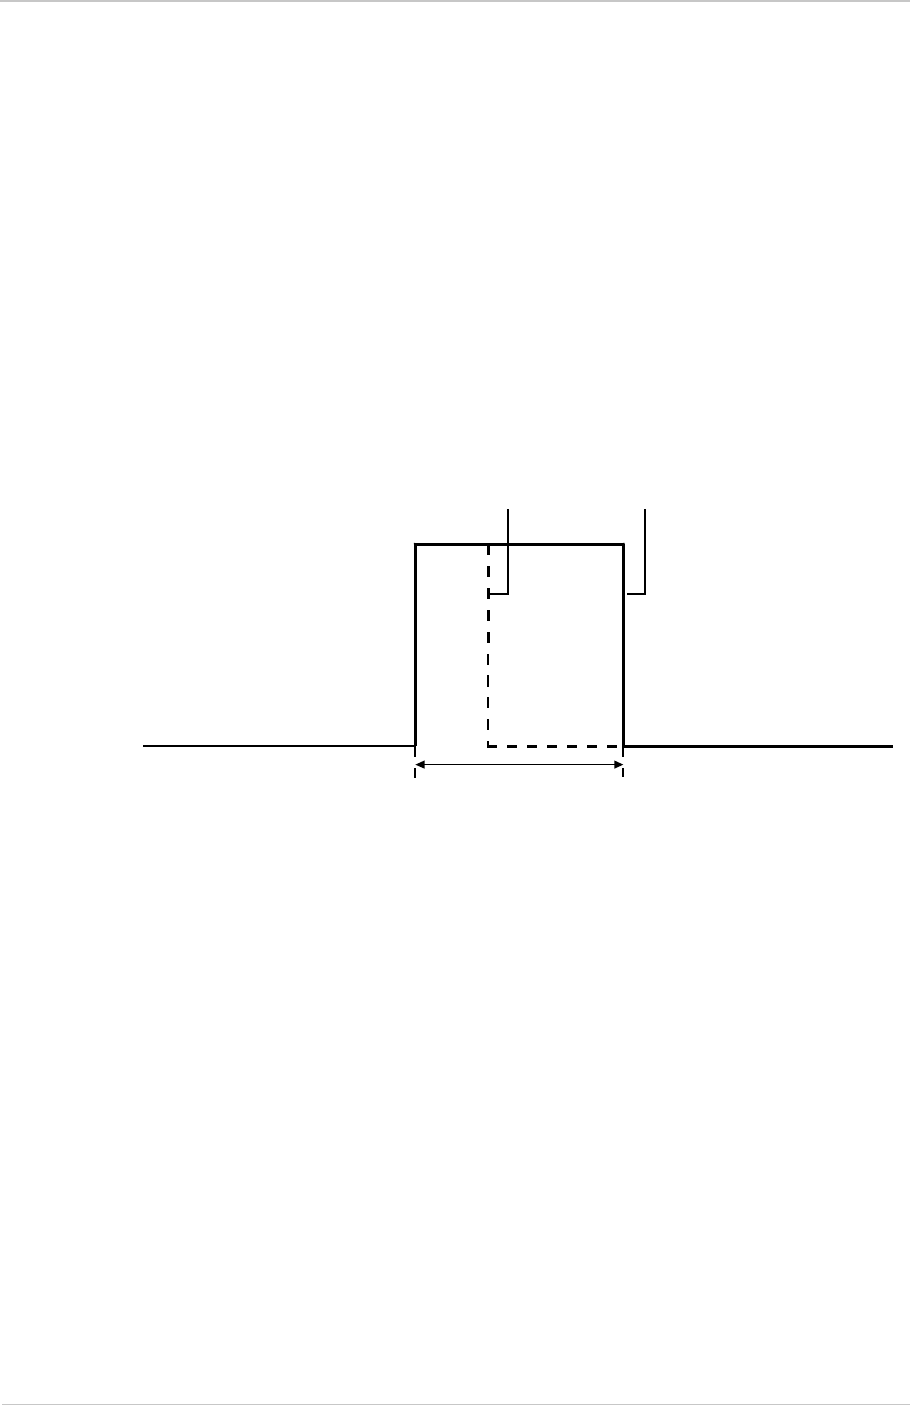
Physical Interface AW00123408000
99 Basler ace USB 3.0
5.12.2 Line Minimum Output Pulse Width
It can occur that an output signal sent by the camera will not be detected by some receivers. This
can happen when the output signal is too narrow or if it reaches its new signal level too slowly.
To ensure reliable detection, the Line Minimum Output Pulse Width feature allows you to increase
the signal width ("pulse width") to a minimum width:
If the signal width of the original output signal is narrower than the set minimum the Line
Minimum Output Pulse Width feature will increase the signal width to the set minimum before
the signal is sent out of the camera (see the figure below).
If the signal width of the original output signal is equal to or wider than the set minimum the
Line Minimum Output Pulse Width feature will have no effect. The signal will be sent out of the
camera with unmodified signal width.
Fig. 48: Increasing the Signal Width of an Output Signal
Not to Scale
Output signal
Minimum output width
(max. 100 µs)
Without signal
width increase With signal
width increase

AW00123408000 Physical Interface
Basler ace USB 3.0 100
Setting the Line Minimum Output Pulse Width
The minimum output pulse width is determined by the value of the LineMinimumOutputPulseWidth
parameter. The parameter can be set in a range from 0 to 100 µs.
1. Use the Line Selector to select a camera output line, for example Line 2.
2. Set the value of the LineMinimumOutputPulseWidth parameter.
You can set the Line Selector and the value of the LineMinimumOutputPulseWidth parameter from
within your application software by using the pylon API.
The following code snippet illustrates using the API to set the selector and the parameter value. As
an example, the opto-isolated output line (Line 2) is selected and the minimum output pulse width
is set to 10.0 µs:
// Select the output line
camera.LineSelector.SetValue(LineSelector_Line2);
// Set the parameter value to 10.0 microseconds
camera.LineMinimumOutputPulseWidth.SetValue(10.0);
For detailed information about using the pylon API, refer to the Basler pylon Programmer’s Guide
and API Reference.
You can also use the Basler pylon Viewer application to easily set the parameters.
For more information about the pylon Viewer, see Section 3.1 on page 62.
To set the line minimum output pulse width parameter value using Basler pylon:

Physical Interface AW00123408000
101 Basler ace USB 3.0
5.12.3 Setting the Status of an Individual User Settable
Output Line
As mentioned in the previous section, you can designate a camera’s output line as "user settable"
by means of the UserOutput parameters. If you have designated an output line as user settable,
you can use the UserOutputValue parameter to set the status of the output line.
For each output line, a specific UserOutput parameter is available to set the line as "user settable":
UserOutput 1 is available for output line Line 2
UserOutput 2 is available for GPIO line Line 3 if the line is configured for output
UserOutput 3 is available for GPIO line Line 4 if the line is configured for output.
1. Use the User Output Selector to select, for example, output line Line 2.
2. Set the value of the User Output Value parameter to true (1) or false (0). This will set the status
of the output line.
You can set the Output Selector and the User Output Value parameters from within your application
software by using the Basler pylon API. The following code snippet illustrates using the API to
designate an output line as user settable, set the status of the output line, and get informed about
its current status:
// Set output line Line 2 to user settable
camera.LineSelector.SetValue(LineSelector_Line2);
camera.LineSource.SetValue(LineSource_UserOutput1);
// Set the status of output line Line 2
camera.UserOutputSelector.SetValue(UserOutputSelector_UserOutput1);
camera.UserOutputValue.SetValue(true);
// Get informed about the current user output value setting for output line Line 2
bool b = camera.UserOutputValue.GetValue();
You can also use the Basler pylon Viewer application to easily set the parameters.
For more information about the pylon API and the pylon Viewer, see Section 3.1 on page 62.
To set the status of a user settable output line:
If you have the line inverter enabled on an output line and the line is designated
as user settable, the user setting initially sets the status of the line which is then
inverted by the line inverter.
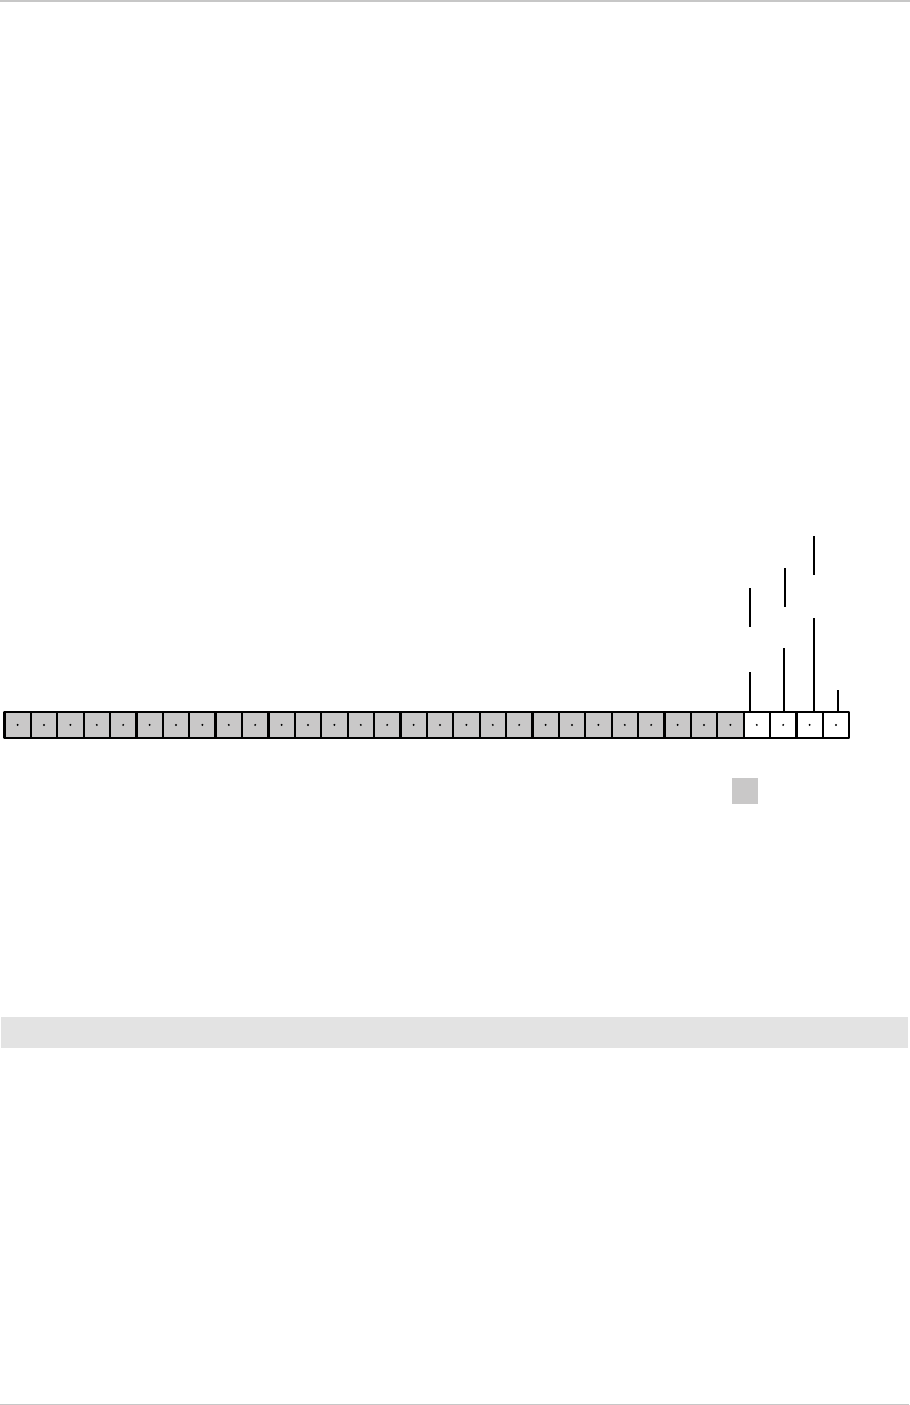
AW00123408000 Physical Interface
Basler ace USB 3.0 102
5.12.4 Setting and Checking the Status of All User
Settable Output Lines
You can set and check the current status of all output lines with a single operation by using the
UserOutputValueAll parameter value. The UserOutputValueAll parameter value is expressed as a
hexadecimal number in the Basler pylon Viewer and as a 32-bit word in the Basler pylon API (with
0 as a constant value on bit 0).
As shown in Figure 49, each bit from bit 1 through 3 is associated with a different user settable
output line. The status of each output line is expressed by its related binary parameter value: If a bit
is 0, it indicates that the line status of the associated line is currently low. If a bit is 1, it indicates that
the line status of the associated line is currently high.
When you read the hexadecimal number of the UserOutputValueAll parameter value, convert it to
its binary equivalent to make the current status of each output line immediately apparent.
Fig. 49: Bit Field of the UserOutputValueAll Parameter: Bit Numbers and Assignment of Output Lines
See Section 5.13.1 on page 107 for details about the relation between line status and its
determining factors, e.g. electrical signal level, line inverter setting, and user output setting.
1. Set the value of the UserOutputValueAll parameter to set all user output values. For example:
If you wanted to set each one of bits 1 through 3 to 1 you would set the UserOutputValueAll
parameter value to xE or to 14 (the hexadecimal and decimal equivalents of 1110).
2. Read the value of the UserOutputValueAll parameter to determine the current settings of all
user output values.
You can set and read the UserOutputValueAll parameter value from within your application software
by using the Basler pylon API. The following code snippet illustrates using the API to read the
parameter value. In this example, the UserOutputValueAll parameter value is set to 0:
To set and check the status of all user outputs with a single operation:
xxx0
Parameter value of UserOutputValue for Line 2
Parameter value of UserOutputValue for Line 3 (configured for output)
Parameter value of UserOutputValue for Line 4 (configured for output)
Reserved
Bit 1
Bit 2
Bit 3
Bit 0

Physical Interface AW00123408000
103 Basler ace USB 3.0
// Setting all user output values with a single operation
camera.UserOutputValueAll.SetValue(0);
// Reading all user output values with a single operation
int64_t i = camera.UserOutputValueAll.GetValue();
Set the value of the User Output Value parameter to true (1) or false (0). This will set the status
of the output line.

AW00123408000 Physical Interface
Basler ace USB 3.0 104
5.12.5 Output Line Inverter
You can set output line Line 2 and GPIO lines Line 3 and Line 4 if configured for output, to invert or
not to invert the electrical output signal.
1. Use the Line Selector to select, for example, Line 2.
2. Set the value of the Line Inverter parameter to true to enable inversion on the selected line or
to false to disable inversion.
You can set the Line Selector and the Line Inverter parameter value from within your application
software by using the pylon API. The following code snippet illustrates using the API to set the
selector and the parameter value:
// Enable the line inverter on output line Line 2
camera.LineSelector.SetValue(LineSelector_Line2);
camera.LineInverter.SetValue(true);
You can also use the Basler pylon Viewer application to easily set the parameters.
For more information about the pylon API and the pylon Viewer, see Section 3.1 on page 62.
If you enable or disable the inverter one frame acquisition will automatically occur.
To set the invert function for an output line:

Physical Interface AW00123408000
105 Basler ace USB 3.0
5.12.6 Working With the Timer Output Signal
As mentioned in Section 5.12.1 on page 97, the source signal for an output line can be set to
Timer 1 Active . The camera has one timer designated as Timer 1. When you set the source signal
for the output line to Timer 1 Active, Timer 1 will be used to supply the signal to the output line.
Timer 1 operates as follows:
A trigger source event occurs that starts the timer.
A delay period begins to expire.
When the delay expires, the timer signal goes high and a duration period begins to expire.
When the duration period expires, the timer signal goes low.
The following trigger source events are available:
All cameras except acA3800-14 and acA4600-10 cameras: Exposure Start is currently the
only trigger source event available to start Timer 1.
acA3800-14 and acA4600-10 cameras only: Flash Window Start is currently the only trigger
source event available to start Timer 1.
If you require the timer signal to be high when the timer is triggered and to go low when the delay
expires, simply set the output line to invert.
Timer 1 Active can serve as the source signal for output line Line 2 and for the GPIO lines Line 3
and Line 4 if configured for output. For information about selecting the Timer 1 Active as the source
signal for an output line, see Section 5.12.1 on page 97.
5.12.6.1 Setting the Timer Trigger Source
1. Use the Timer Selector to select Timer 1.
2. Set the value of the Timer Trigger Source parameter to Exposure Start. This will set the
selected timer to use the start of exposure to start timer 1.
To set the timer trigger source for Timer 1:
Trigger source event occurs
Delay
Duration
Fig. 50: Timer Signal

AW00123408000 Physical Interface
Basler ace USB 3.0 106
You can set the Trigger Selector and the Timer Trigger Source parameter value from within your
application software by using the Basler pylon API. The following code snippet illustrates using the
API to set the selector and the parameter value:
camera.TimerSelector.SetValue(TimerSelector_Timer1);
camera.TimerTriggerSource.SetValue(TimerTriggerSource_ExposureStart);
You can also use the Basler pylon Viewer application to easily set the parameters.
For more information about the pylon API and the pylon Viewer, see Section 3.1 on page 62.
5.12.6.2 Setting the Timer Delay Time
You can set the Timer 1 delay by setting the Timer Delay parameter. The units for setting this
parameter are µs and the value can be set in increments of 1 µs.
1. Use the Timer Selector to select Timer 1.
2. Set the value of the Timer Delay parameter.
You can set the Timer Selector and the Timer Delay parameter value from within your application
software by using the Basler pylon API. The following code snippet illustrates using the API to set
the selector and the parameter value:
camera.TimerSelector.SetValue(TimerSelector_Timer1);
camera.TimerDelay.SetValue(100.0);
You can also use the Basler pylon Viewer application to easily set the parameters.
For more information about the pylon API and the pylon Viewer, see Section 3.1 on page 62.
The Exposure Start signal is not available for acA3800-14 and acA4600-10
cameras. For these cameras, the Flash Window Start signal is available as the
Timer Trigger Source.
If the exposure time is too short for the flash window to open (see the note in
Section 6.6.2 on page 151) timer 1 will start nonetheless when exposure starts for
the last row of the current ROI. This assumes that Flash Window Start is selected
as the Timer Trigger Source.
To set the delay for Timer 1:

Physical Interface AW00123408000
107 Basler ace USB 3.0
5.12.6.3 Setting the Timer Duration Time
You can set the Timer 1 duration by setting the Timer Duration parameter. The units for setting this
parameter are µs and the value can be set in increments of 1 µs.
1. Use the Timer Selector to select Timer 1.
2. Set the value of the Timer Duration parameter.
You can set the Timer Selector and the Timer Duration parameter value from within your application
software by using the Basler pylon API. The following code snippet illustrates using the API to set
the selector and the parameter value:
camera.TimerSelector.SetValue(TimerSelector_Timer1);
camera.TimerDuration.SetValue(10.0);
You can also use the Basler pylon Viewer application to easily set the parameters.
For more information about the pylon API and the pylon Viewer, see Section 3.1 on page 62.
5.13 Significance of I/O Line Status
5.13.1 Line Status for Input Lines
This section informs about the relation between input line status and certain external conditions.
The opto-isolated and the GPIO input lines are considered.
The line status information depends, among others, on whether the input line inverter is disabled or
enabled (Section 5.11.3 on page 96).
Make sure the ground for opto-isolated I/O and the ground of the power supply for the opto-isolated
input line are connected to the same ground.
For applicable pins, see Table 20 on page 69, and for line schematics, see Figure 39, Figure 42,
and Figure 43.
To set the duration for Timer 1:

AW00123408000 Physical Interface
Basler ace USB 3.0 108
Line Status for Opto-isolated Input Line (Line 1)
Line Status for Direct-coupled GPIO Lines (Line 3, Line 4), Set for Input
External Conditions Resulting Status
Line Inverter Status Electrical Status Logical Line Status
Parameter Value Binary Expression
Disabled Input Open or
Connection at z Status
False 0
Voltage Level Low False 0
Voltage Level High True 1
Enabled Input Open or
Connection at z Status
True 1
Voltage Level Low True 1
Voltage Level High False 0
Table 28: Line Status for Different External Conditions: Line 1 (Opto-isolated Input)
External Conditions Resulting Status
Line Inverter Status Electrical Status Logical Line Status
Parameter Value Binary Expression
Disabled Input Open or
Connection at z Status
True 1
Voltage Level Low False 0
Voltage Level High True 1
Enabled Input Open or
Connection at z Status
False 0
Voltage Level Low True 1
Voltage Level High False 0
Table 29: Line Status for Different External Conditions: Line 3, Line 4 (Direct-coupled GPIO Input)

Physical Interface AW00123408000
109 Basler ace USB 3.0
5.13.2 Line Status for Output Lines
This section informs about the relation between output line status and certain external conditions.
The opto-isolated and the GPIO output lines are considered.
The line status information depends, among others, on whether the output line inverter is disabled
or enabled (Section 5.12.5 on page 104) and on the current setting of the UserOutputValue
parameter (Section 5.12.3 on page 101).
Two types of installation are considered (see Figure 51):
The output line is connected to the external power supply with no external pull-up resistor
involved (A: "external pull-up resistor disconnected"; not useful for the opto-isolated output
line).
The output line is connected to the external power supply via an external pull-up resistor (B:
"external pull-up resistor connected").
Fig. 51: Use of an External Pull-up Resistor With an Output Line: A: No External Pull-up Resistor Connected,
B: External Pull-up Resistor Connected
Make sure the ground for opto-isolated I/O and the ground of the power supply for the opto-isolated
output line are connected to the same ground.
For applicable pins, see Table 20 on page 69, and for line schematics, see Figure 40, Figure 41,
and Figure 44.
The output circuits display open collector circuit behavior. The GPIO lines are,
however, equipped with a weak internal pull up resistor.
6-pin
Receptacle
Voltage
Output
Signal
to You
Camera
6-pin
Receptacle
Voltage
Output
Signal
to You
Camera Pull-up
Resistor
AB
Ground for
Opto-isolated I/O Ground for
Opto-isolated I/O
Ground for
Opto-isolated I/O

AW00123408000 Physical Interface
Basler ace USB 3.0 110
Line Status for Opto-isolated Output Line (Line 2)
Line Status for Direct-coupled GPIO Lines (Line 3, Line 4), Set for Output
External Conditions Resulting Status
External
Pull Up
Connection
Status
Line Inverter
Status User Output
Status Logical Line
Status
Parameter
Value
Binary
Expression Voltage Level
Pull-Up
Connected
Disabled Disabled True 1 High
Enabled False 0 Low
Enabled Disabled False 0 Low
Enabled True 1 High
Pull-Up
Disconnected
Disabled Disabled True 1 Not defined
Enabled False 0 Low
Enabled Disabled False 0 Low
Enabled True 1 Not defined
Table 30: Line Status for Different External Conditions: Line 2 (Opto-isolated Output)
External Conditions Resulting Status
External
Pull Up
Connection
Status
Line Inverter
Status User Output
Status Logical Line
Status
Parameter
Value
Binary
Expression Voltage Level
Pull-Up
Connected
Disabled Disabled True 1 High
Enabled False 0 Low
Enabled Disabled False 0 Low
Enabled True 1 High
Pull-Up
Disconnected
Disabled Disabled True 1 High
Enabled False 0 Low
Enabled Disabled False 0 Low
Enabled True 1 High
Table 31: Line Status for Different External Conditions: Lines 3 and 4 (Direct-coupled GPIO Output)
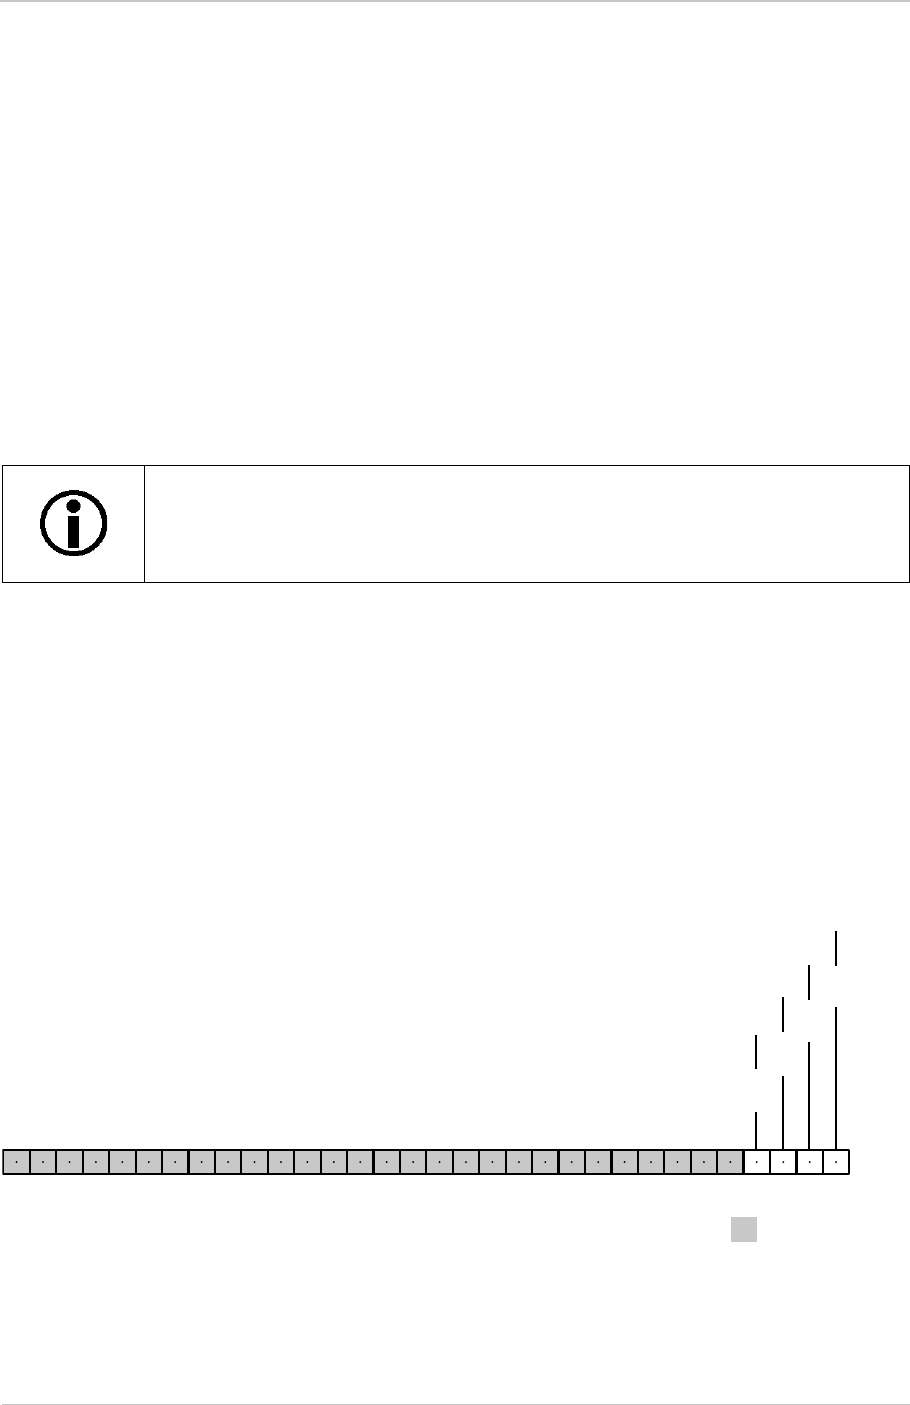
Physical Interface AW00123408000
111 Basler ace USB 3.0
5.14 Checking I/O Line Status
5.14.1 Checking the Status of All I/O Lines
You can check the current status of all input and output lines with a single operation by reading the
value of the LineStatusAll parameter.
The status depends on whether an electrical signal is applied to the line, on the voltage level, and
on the settings of the line inverter and user output (output lines). In addition, the "line logic" as set
by the factory, determines fundamentally whether a given electrical signal level will be considered
to correspond to a "true" or "false" line status. Positive line logic is used for the input lines.
The LineStatusAll parameter value is expressed as a hexadecimal number in the Basler pylon
Viewer and as a 32-bit word that you can read using the Basler pylon API.
As shown in Figure 52, each bit from bit 0 through 3 is associated with a different I/O line. The status
of each I/O line is expressed by its related binary parameter value: If a bit is 0, it indicates that the
line status of the associated line is currently low. If a bit is 1, it indicates that the line status of the
associated line is currently high.
When you read the hexadecimal number of the LineStatusAll parameter value, convert it to its
binary equivalent to make the current status of each I/O line immediately apparent.
Fig. 52: Bit Field of the LineStatusAll Parameter: Bit numbers and Assignment of I/O Lines
The line status of a GPIO line (Line 3, Line 4) does not depend on the configuration
of the GPIO line for input or output.
xxxx
Indicates line status for Line 1 (input)
Indicates line status for Line 2 (output)
Indicates line status for Line 3 (GPIO)
Indicates line status for Line 4 (GPIO)
Reserved
Bit 1
Bit 2
Bit 3
Bit 0

AW00123408000 Physical Interface
Basler ace USB 3.0 112
See Section 5.13.1 on page 107 for details about the relation between line status and its
determining factors, e.g. electrical signal level, line inverter setting, and user output setting.
For information about checking and setting the status of output lines, see Section 5.12.3 on
page 101 and Section 5.12.4 on page 102.
1. Read the value of the LineStatusAll parameter to determine the current status of all I/O lines.
You can read the Line Status All parameter value from within your application software by using the
Basler pylon API. The following code snippet illustrates using the API to read the parameter value:
// Getting informed about the line status of all I/O lines
int64_t i = camera.LineStatusAll.GetValue();
You can also use the Basler pylon Viewer application to easily set the parameters.
For more information about the pylon API and the pylon Viewer, see Section 3.1 on page 62.
5.14.2 Checking the Status of an Individual I/O Line
The following example illustrates checking the line status of output line Line 2.
1. Use the Line Selector parameter to select, for example, the opto-isolated output line Line 2
(pin 4).
2. Read the value of the Line Status parameter to determine the current status of the line. "True"
means the line’s status is currently high and "false" means the line’s status is currently low.
You can set the Line Selector and read the Line Status parameter value from within your application
software by using the Basler pylon API. The following code snippet illustrates using the API to set
the selector and read the parameter value:
// Select output line Line 2 and read the status
camera.LineSelector.SetValue(LineSelector_Line2);
bool b = camera.LineStatus.GetValue();
You can also use the Basler pylon Viewer application to easily set the parameters.
For more information about the pylon API and the pylon Viewer, see Section 3.1 on page 62.
To check the status of all I/O lines with a single operation using the pylon API:
To check the status of an I/O line:

Image Acquisition Control AW00123408000
113 Basler ace USB 3.0
6 Image Acquisition Control
This section provides detailed information about controlling image acquisition. You will find
information about triggering image acquisition, about setting the exposure time for image
acquisition, about controlling the camera’s image acquisition rate, and about how the camera’s
maximum allowed image acquisition rate can vary depending on the current camera settings.
6.1 Overview
This section presents an overview of the elements available for controlling the acquisition of
images. Reading this section will give you an idea about how these elements fit together and will
help you understand the detailed information in the sections below.
Four major elements are involved in controlling the acquisition of images:
Acquisition start and acquisition stop commands and the acquisition mode parameter
Frame burst start trigger
Frame start trigger
Exposure time control
Keep in mind that "frame" is typically used to mean a single acquired image.
When reading the material in this chapter, also refer to Figure 53 on page 115 and to the use case
diagrams in Section 6.11 on page 187. These diagrams illustrate the roles of the acquisition start
and stop commands, the acquisition mode, the frame burst start trigger, and the frame start trigger.
Acquisition Start and Stop Commands and the Acquisition Mode
The Acquisition Start command prepares the camera to acquire frames. The camera cannot acquire
frames unless an Acquisition Start command has first been executed.
The Acquisition Mode parameter has a direct bearing on how the Acquisition Start command
operates.
If the Acquisition Mode parameter is set to Single Frame, you can only acquire one frame after
executing an Acquisition Start command. When one frame has been acquired, the Acquisition Start
command will expire. Before attempting to acquire another frame, you must execute a new
Acquisition Start command.
The examples in this section mainly refer to I/O lines that are dedicated for either
input (Line1) or output (Line2). Note, however, that you can also configure the
GPIO lines (Line 3, Line 4) for input or output.

AW00123408000 Image Acquisition Control
Basler ace USB 3.0 114
If the Acquisition Mode parameter is set to Continuous, an Acquisition Start command does not
expire after a single frame is captured. Once an Acquisition Start command has been executed, you
can acquire as many frames as you like. The Acquisition Start command will remain in effect until
you execute an Acquisition Stop command. Once an Acquisition Stop command has been
executed, the camera will not be able to acquire frames until a new Acquisition Start command is
executed.
Frame Burst Start Trigger and the Trigger Mode
The frame burst start trigger is essentially an enabler for the frame start trigger.
The Trigger Mode parameter with parameter values off and on has a direct bearing on how the
Frame Burst Start Trigger works.
If the Trigger Mode parameter for the frame burst start trigger is set to off, the camera will generate
all required frame burst start trigger signals internally, and you do not need to apply frame burst start
trigger signals to the camera.
If the Trigger Mode parameter for the frame burst start trigger is set to on, the initial acquisition
status of the camera will be "waiting for frame burst start trigger" (see Figure 53 on page 115). When
the camera is in this acquisition status, it cannot react to frame start trigger signals. When a frame
burst start trigger signal is applied to the camera, the camera will exit the "waiting for frame burst
start trigger" acquisition status and enter a "waiting for frame start trigger" acquisition status. The
camera can then react to frame start trigger signals. The camera will continue to react to frame start
trigger signals until the number of frame start trigger signals it has received is equal to an integer
parameter setting called the Acquisition Burst Frame Count. At that point, the camera will return to
the "waiting for frame burst start trigger" acquisition status and will remain in that status until a new
frame burst start trigger signal is applied.
As an example, assume that the Trigger Mode parameter is set to on, the Acquisition Burst Frame
Count parameter is set to three, and the camera is in a "waiting for frame burst start trigger"
acquisition status. When a frame burst start trigger signal is applied to the camera, it will exit the
"waiting for frame burst start trigger" acquisition status and enter the "waiting for frame start trigger"
acquisition status. Once the camera has received three frame start trigger signals, it will return to
the "waiting for frame burst start trigger" acquisition status. At that point, you must apply a new
frame burst start trigger signal to the camera to make it exit "waiting for frame burst start trigger".
Frame Start Trigger and the Trigger Mode
Assuming that a frame burst start trigger signal has just been applied to the camera, the camera
will exit from the "waiting for frame burst start trigger" acquisition status and enter a "waiting for
frame start trigger" acquisition status. Applying a frame start trigger signal to the camera at this point
will exit the camera from the "waiting for frame start trigger" acquisition status and will begin the
process of exposing and reading out a frame (see Figure 53 on page 115). As soon as the camera
is ready to accept another frame start trigger signal, it will return to the "waiting for frame start
trigger" acquisition status. A new frame start trigger signal can then be applied to the camera to
begin another frame exposure.
The Trigger Mode parameter with parameter values off and on has a direct bearing on how the
Frame Start Trigger works.
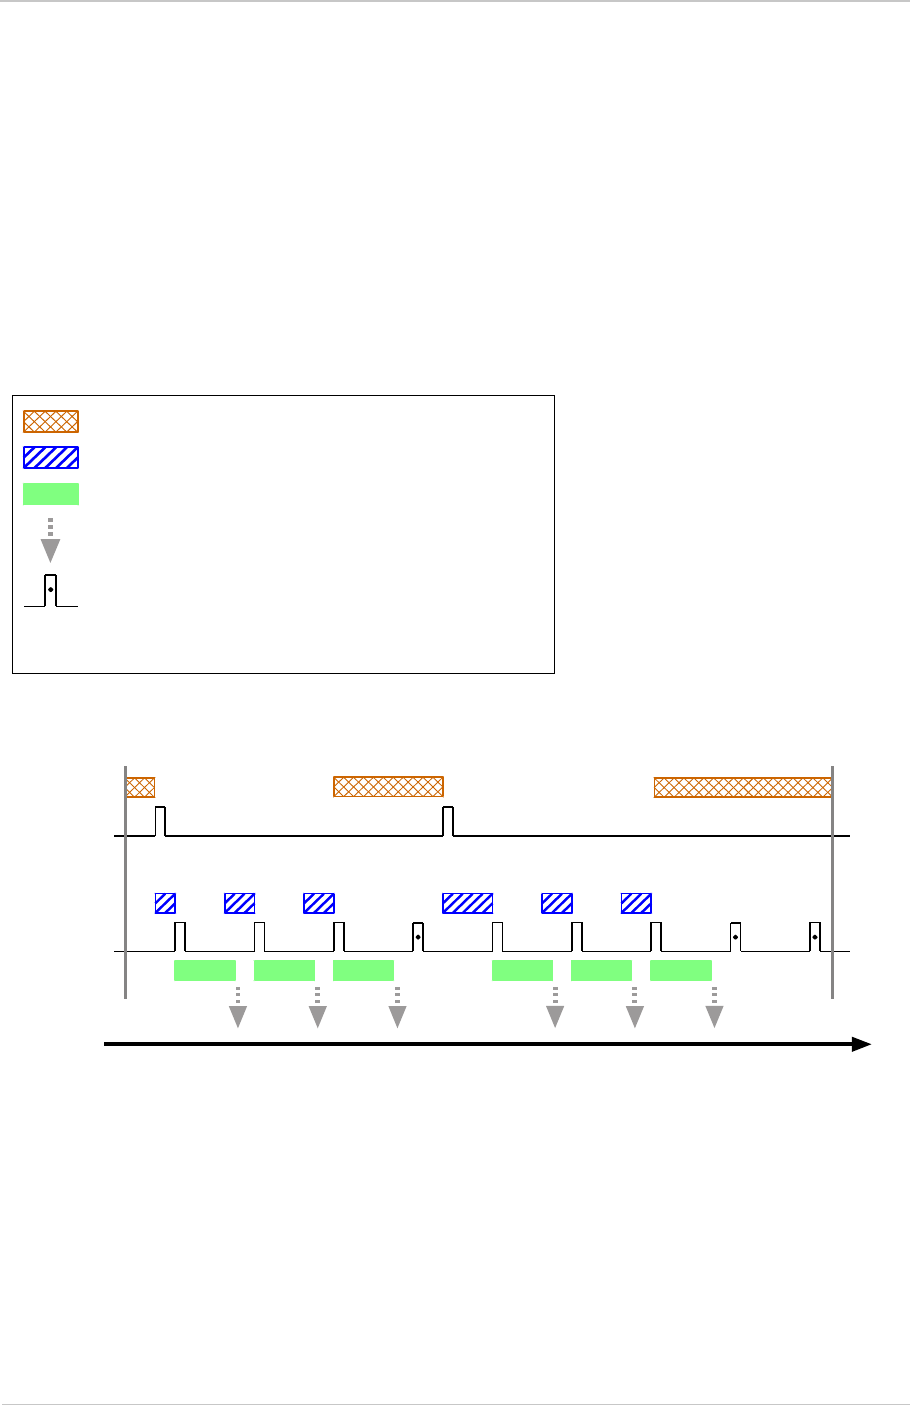
Image Acquisition Control AW00123408000
115 Basler ace USB 3.0
If the Trigger Mode parameter for the frame start trigger is set to off, the camera will generate all
required frame start trigger signals internally, and you do not need to apply frame start trigger
signals to the camera. The rate at which the camera will generate the signals and acquire frames
will be determined by the way that you set several frame rate related parameters.
If the Trigger Mode parameter for the frame start trigger is set to on, you must trigger frame start by
applying frame start trigger signals to the camera. Each time a trigger signal is applied, the camera
will begin a frame exposure. When frame start is being triggered in this manner, it is important that
you do not attempt to trigger frames at a rate that is greater than the maximum allowed. (There is
a detailed explanation about the maximum allowed frame rate in Section 6.10 on page 184.) Frame
start trigger signals applied to the camera when it is not in a "waiting for frame start trigger"
acquisition status will be ignored.
= a frame start trigger signal that will be ignored because the camera
is not in a "waiting for frame start trigger" status
= camera is waiting for a frame burst start trigger signal
= camera is waiting for a frame start trigger signal
= frame exposure and readout
Acquisition Burst Frame Count parameter setting = 3
= frame transmission
Fig. 53: Frame Burst Start and Frame Start Triggering
Frame Start
Trigger Signal
Frame Burst
Start Trigger
Signal
Time
Acquisition
Start
Command
Executed
Acquisition
Stop
Command
Executed

AW00123408000 Image Acquisition Control
Basler ace USB 3.0 116
Applying Trigger Signals
The paragraphs above mention "applying a trigger signal". There are two ways to apply a frame
burst start or a frame start trigger signal to the camera: via software or via hardware.
To apply trigger signals via software, you must first select the acquisition start or the frame start
trigger and then indicate that software will be used as the source for the selected trigger signal. At
that point, each time a Trigger Software command is executed, the selected trigger signal will be
applied to the camera.
To apply trigger signals via hardware, you must first select the frame burst start or the frame start
trigger and indicate that input line 1 or Line 3 or 4 if configured for input will be used as the source
for the selected trigger signal. At that point, each time a proper electrical signal is applied to the
selected input line, an occurrence of the selected trigger signal will be recognized by the camera.
The Trigger Selector
The concept of the "trigger selector" is very important to understand when working with the
acquisition start and frame start triggers. Many of the parameter settings and the commands that
apply to the triggers have names that are not specific to a particular type of trigger, for example, the
frame burst start trigger has a mode setting and the frame start trigger has a mode setting. But in
Basler pylon there is a single parameter, the Trigger Mode parameter, that is used to set the mode
for both of these triggers. Also, the Trigger Software command mentioned earlier can be executed
for either the frame burst start trigger or the frame start trigger. So if you want to set the Trigger
Mode or execute a Trigger Software command for the frame burst start trigger rather than the frame
start trigger, how do you do it? The answer is, by using the Trigger Selector parameter. Whenever
you want to work with a specific type of trigger, your first step is to set the Trigger Selector parameter
to the trigger you want to work with (either the frame burst start trigger or the frame start trigger). At
that point, the changes you make to the Trigger Mode, Trigger Source, etc., will be applied to the
selected trigger only.
Exposure Time Control
As mentioned earlier, when a frame start trigger signal is applied to the camera, the camera will
begin to acquire a frame. A critical aspect of frame acquisition is how long the pixels in the camera’s
sensor will be exposed to light during the frame acquisition.
A parameter called ExposureTime will determine the exposure time for each frame.in the following
cases:
When the camera is set for software frame start triggering
When the camera is set for hardware frame start triggering and for the "timed" exposure mode
When the camera is triggered internally ("free run") which is enabled when the camera’s
Trigger Mode is set to "Off".
For hardware frame start triggering there is - for most camera models - the exposure mode.
available with two settings, "timed" and "trigger width".
With the "timed" exposure mode, the ExposureTime parameter will determine the exposure
time for each frame.
With the "trigger width" exposure mode, the way that you manipulate the rise and fall of the
hardware signal will determine the exposure time. The "trigger width" exposure mode is
especially useful, if you want to change the exposure time from frame to frame.

Image Acquisition Control AW00123408000
117 Basler ace USB 3.0
Trigger width exposure mode is not available on acA1920-25um/uc,
acA2500-14um/uc, acA3800-14um/uc, and acA4600-10um/uc cameras.

AW00123408000 Image Acquisition Control
Basler ace USB 3.0 118
6.2 Acquisition Start and Stop Commands
and the Acquisition Mode
Executing an Acquisition Start command prepares the camera to acquire frames. You must execute
an Acquisition Start command before you can begin acquiring frames.
Executing an Acquisition Stop command terminates the camera’s ability to acquire frames. When
the camera receives an Acquisition stop command:
If the camera is not in the process of acquiring a frame, its ability to acquire frames will be
terminated immediately.
If the camera is in the process of acquiring a frame, the frame acquisition process will be
allowed to finish and the camera’s ability to acquire new frames will be terminated.
The camera’s Acquisition Mode parameter has two settings: Single Frame and Continuous. The
use of Acquisition Start and Acquisition Stop commands and the camera’s Acquisition Mode
parameter setting are related.
If the camera’s Acquisition Mode parameter is set to Single Frame, after an Acquisition Start
command has been executed, a single frame can be acquired. When acquisition of one frame is
complete, the camera will execute an Acquisition Stop command internally and will no longer be
able to acquire frames. To acquire another frame, you must execute a new Acquisition Start
command.
If the camera’s Acquisition Mode parameter is set to Continuous, after an Acquisition Start
command has been executed, frame acquisition can be triggered as desired. Each time a frame
trigger is applied while the camera is in a "waiting for frame trigger" acquisition status, the camera
will acquire and transmit a frame. The camera will retain the ability to acquire frames until an
Acquisition Stop command is executed. Once the Acquisition Stop command is received, the
camera will no longer be able to acquire frames.
When the camera's acquisition mode is set to Single Frame, the maximum
possible acquisition frame rate for a given ROI cannot be achieved. This is true
because the camera performs a complete internal setup cycle for each single
frame and because it cannot be operated with "overlapped" acquisition.
To achieve the maximum possible acquisition frame rate, set the acquisition mode
to Continuous and use "overlapped" acquisition. If available, also use the fast
sensor readout mode and acquire images with default resolution.
For more information about overlapped acquisition, see Section 6.4.3.2 on
page 136, about the fast sensor readout mode see Section 6.6.1.1 on page 150,
and about default resolution, see Section 1.2 on page 2.

Image Acquisition Control AW00123408000
119 Basler ace USB 3.0
Setting the Acquisition Mode and Issuing Start/Stop Commands
You can set the Acquisition Mode parameter value and you can execute Acquisition Start or
Acquisition Stop commands from within your application software by using the Basler pylon API.
The code snippet below illustrates using the API to set the Acquisition Mode parameter value and
to execute an Acquisition Start command, where Line 1 is taken as an example. Note that the
snippet also illustrates setting several parameters regarding frame triggering. These parameters
are discussed later in this chapter.
camera.AcquisitionMode.SetValue( AcquisitionMode_SingleFrame );
camera.TriggerSelector.SetValue( TriggerSelector_FrameStart );
camera.TriggerMode.SetValue( TriggerMode_On );
camera.TriggerSource.SetValue ( TriggerSource_Line1 );
camera.TriggerActivation.SetValue( TriggerActivation_RisingEdge );
camera.ExposureMode.SetValue( ExposureMode_Timed );
camera.ExposureTime.SetValue( 3000.0 );
camera.AcquisitionStart.Execute( );
You can also use the Basler pylon Viewer application to easily set the parameters.
For more information about the pylon API and the pylon Viewer, see Section 3.1 on page 62.

AW00123408000 Image Acquisition Control
Basler ace USB 3.0 120
6.3 The Frame Burst Start Trigger
(When reading this section, it is helpful to refer to Figure 53 on page 115.)
The frame burst start trigger is used in conjunction with the frame start trigger to control the
acquisition of frames. In essence, the frame burst start trigger is used as an enabler for the frame
start trigger. Frame burst start trigger signals can be generated within the camera or may be applied
externally as software or hardware frame burst start trigger signals.
When the frame burst start trigger is enabled, the camera’s initial acquisition status is "waiting for
frame burst start trigger". When the camera is in this acquisition status, it will ignore any frame start
trigger signals it receives. If a frame burst start trigger signal is applied to the camera, it will exit the
"waiting for frame burst start trigger" acquisition status and enter the "waiting for frame start trigger"
acquisition status. In this acquisition status, the camera can react to frame start trigger signals and
will begin to expose a frame each time a proper frame start trigger signal is applied.
A primary feature of the frame burst start trigger is that after a frame burst start trigger signal has
been applied to the camera and the camera has entered the "waiting for frame start trigger"
acquisition status, the camera will return to the "waiting for frame burst start trigger" acquisition
status once a specified number of frame start triggers has been received. Before more frames can
be acquired, a new frame burst start trigger signal must be applied to the camera to exit it from
"waiting for frame burst start trigger" status. Note that this feature only applies when the Trigger
Mode parameter for the frame burst start trigger is set to on. This feature is explained in greater
detail in the following sections.
6.3.1 Frame Burst Start Trigger Mode
The main parameter associated with the frame burst start trigger is the Trigger Mode parameter.
The Trigger Mode parameter for the frame burst start trigger has two available settings: off and on.
6.3.1.1 Frame Burst Start Trigger Mode = Off
When the Trigger Mode parameter for the frame burst start trigger is set to off, the camera will
generate all required frame burst start trigger signals internally, and you do not need to apply frame
burst start trigger signals to the camera.
6.3.1.2 Frame Burst Start Trigger Mode = On
When the Trigger Mode parameter for the frame burst start trigger is set to on, the camera will
initially be in a "waiting for frame burst start trigger" acquisition status and cannot react to frame start
trigger signals. You must apply a frame burst start trigger signal to the camera to exit the camera
from the "waiting for frame burst start trigger" acquisition status and enter the "waiting for frame start
trigger" acquisition status. The camera can then react to frame start trigger signals and will continue
to do so until the number of frame start trigger signals it has received is equal to the current

Image Acquisition Control AW00123408000
121 Basler ace USB 3.0
Acquisition Burst Frame Count parameter setting. The camera will then return to the "waiting for
frame burst start trigger" acquisition status. In order to acquire more frames, you must apply a new
frame burst start trigger signal to the camera to exit it from the "waiting for frame burst start trigger"
acquisition status.
When the Trigger Mode parameter for the frame burst start trigger is set to on, you must select a
source signal to serve as the frame burst start trigger. The Trigger Source parameter specifies the
source signal. The available selections for the Trigger Source parameter are:
Software – When the source signal is set to software, you apply a frame burst start trigger
signal to the camera by executing a Trigger Software command for the frame burst start trigger
on the host computer.
Software Signal 1, Software Signal 2, Software Signal 3 (the latter is not available on
acA1920-155, acA2040-55, acA2040-120, acA2440-35, and acA2440-75 cameras) – Specific
software commands, analogous to the Software command.
Line 1 – When the source signal is set to Line 1, you apply a frame burst start trigger signal to
the camera by injecting an externally generated electrical signal (commonly referred to as a
hardware trigger signal) into physical input line Line 1 on the camera.
Line 3 – Analogous to the Line 1 source signal. However, the Line 3 is a GPIO line and must
be configured for input.
Line 4 – Analogous to the Line 3 source signal.
If the Trigger Source parameter for the frame burst start trigger is set to Line 1, Line 3 or Line 4 you
must also set the Trigger Activation parameter. The available settings for the Trigger Activation
parameter are:
Rising Edge - specifies that a rising edge of the electrical signal will act as the frame burst start
trigger.
Falling Edge - specifies that a falling edge of the electrical signal will act as the frame burst
start trigger.
When the Trigger Mode parameter for the frame burst start trigger is set to
on, the camera’s Acquisition Mode parameter must be set to Continuous.

AW00123408000 Image Acquisition Control
Basler ace USB 3.0 122
6.3.2 Acquisition Burst Frame Count
When the Trigger Mode parameter for the frame burst start trigger is set to on, you must set the
value of the camera’s Acquisition Burst Frame Count parameter. The value of the Acquisition Frame
Count can range from 1 to 255.
With frame burst start triggering on, the camera will initially be in a "waiting for frame burst start
trigger" acquisition status. When in this acquisition status, the camera cannot react to frame start
trigger signals. If a frame burst start trigger signal is applied to the camera, the camera will exit the
"waiting for frame burst start trigger" acquisition status and will enter the "waiting for frame start
trigger" acquisition status. It can then react to frame start trigger signals. When the camera has
received a number of frame start trigger signals equal to the current Acquisition Burst Frame Count
parameter setting, it will return to the "waiting for frame burst start trigger" acquisition status. At that
point, you must apply a new frame burst start trigger signal to exit the camera from the "waiting for
frame burst start trigger" acquisition status.

Image Acquisition Control AW00123408000
123 Basler ace USB 3.0
6.3.3 Setting the Frame Burst Start Trigger Mode and
Related Parameters
You can set the Trigger Mode and Trigger Source parameters for the frame burst start trigger and
also set the Acquisition Burst Frame Count parameter value from within your application software
by using the Basler pylon API.
The following code snippet illustrates using the API to set the Trigger Mode to on, the Trigger
Source to software, and the Acquisition Burst Frame Count to 5:
// Set the acquisition mode to Continuous (the acquisition mode must
// be set to Continuous when frame burst start triggering is on)
camera.AcquisitionMode.SetValue( AcquisitionMode_Continuous );
// Select the frame burst start trigger
camera.TriggerSelector.SetValue(TriggerSelector_FrameBurstStart);
// Set the mode for the selected trigger
camera.TriggerMode.SetValue( TriggerMode_On );
// Set the source for the selected trigger
camera.TriggerSource.SetValue ( TriggerSource_Software );
// Set the acquisition burst frame count
camera.AcquisitionBurstFrameCount.SetValue( 5 );
The following code snippet illustrates using the API to set the Trigger Mode to on, the Trigger
Source to Line 1, the Trigger Activation to rising edge, and the Acquisition Burst Frame Count to 5:
// Set the acquisition mode to Continuous (the acquisition mode must
// be set to Continuous when frame burst start triggering is on)
camera.AcquisitionMode.SetValue( AcquisitionMode_Continuous );
// Select the frame burst start trigger
camera.TriggerSelector.SetValue(TriggerSelector_FrameBurstStart);
// Set the mode for the selected trigger
camera.TriggerMode.SetValue( TriggerMode_On );
// Set the source for the selected trigger
camera.TriggerSource.SetValue ( TriggerSource_Line1 );
// Set the activation mode for the selected trigger to rising edge
camera.TriggerActivation.SetValue( TriggerActivation_RisingEdge );
// Set the acquisition burst frame count
camera.AcquisitionBurstFrameCount.SetValue( 5 );
You can also use the Basler pylon Viewer application to easily set the parameters.
For more information about the pylon API and the pylon Viewer, see Section 3.1 on page 62.

AW00123408000 Image Acquisition Control
Basler ace USB 3.0 124
6.3.4 Using a Software Frame Burst Start Trigger
6.3.4.1 Introduction
If the camera’s Frame Burst Start Trigger Mode parameter is set to on and the Frame Burst Start
Trigger Source parameter is set to software, you must apply a software frame burst start trigger
signal to the camera before you can begin frame acquisition.
A software frame burst start trigger signal is applied by:
Setting the Trigger Selector parameter to Acquisition Start.
Executing a Trigger Software command.
The camera will initially be in a "waiting for frame burst start trigger" acquisition status. It cannot
react to frame trigger signals when in this acquisition status. When a software frame burst start
trigger signal is received by the camera, it will exit the "waiting for frame burst start trigger"
acquisition status and will enter the "waiting for frame start trigger" acquisition status. It can then
react to frame start trigger signals. When the number of frame start trigger signals received by the
camera is equal to the current Acquisition Burst Frame Count parameter setting, the camera will
return to the "waiting for frame burst start trigger" acquisition status. When a new software frame
burst start trigger signal is applied to the camera, it will again exit from the "waiting for frame burst
start trigger" acquisition status and enter the "waiting for frame start trigger" acquisition status.
(Note that as long as the Trigger Selector parameter is set to Frame Burst Start, a software frame
burst start trigger will be applied to the camera each time a Trigger Software command is executed.)

Image Acquisition Control AW00123408000
125 Basler ace USB 3.0
6.3.4.2 Setting the Parameters Related to Software Frame Burst
Start Triggering and Applying a Software Trigger Signal
You can set all of the parameters needed to perform software frame burst start triggering from within
your application software by using the Basler pylon API. The following code snippet illustrates using
the API to set the parameter values and to execute the commands related to software frame burst
start triggering with the camera set for continuous acquisition mode:
// Set the acquisition mode to Continuous (the acquisition mode must
// be set to Continuous when frame burst start triggering is on)
camera.AcquisitionMode.SetValue( AcquisitionMode_Continuous );
// Select the frame burst start trigger
camera.TriggerSelector.SetValue(TriggerSelector_FrameBurstStart);
// Set the mode for the selected trigger
camera.TriggerMode.SetValue( TriggerMode_On );
// Set the source for the selected trigger
camera.TriggerSource.SetValue ( TriggerSource_Software );
// Set the acquisition burst frame count
camera.AcquisitionBurstFrameCount.SetValue( 5 );
// Execute an acquisition start command to prepare for frame acquisition
camera.AcquisitionStart.Execute( );
while ( ! finished )
{
// Execute a trigger software command to apply a software acquisition
// start trigger signal to the camera
camera.TriggerSoftware.Execute( );
// Perform the required functions to parameterize the frame start
// trigger, to trigger 5 frame starts, and to retrieve 5 frames here
}
camera.AcquisitionStop.Execute( );
// Note: as long as the Trigger Selector is set to Frame Burst Start, executing
// a Trigger Software command will apply a software frame burst start trigger
// signal to the camera
You can also use the Basler pylon Viewer application to easily set the parameters.
For more information about the pylon API and the pylon Viewer, see Section 3.1 on page 62.

AW00123408000 Image Acquisition Control
Basler ace USB 3.0 126
6.3.5 Using a Hardware Frame Burst Start Trigger
6.3.5.1 Introduction
If the Trigger Mode parameter for the frame burst start trigger is set to on and the Trigger Source
parameter is, for example, set to Line 1, an externally generated electrical signal injected into
physical input line Line 1 on the camera will act as the frame burst start trigger signal for the camera.
This type of trigger signal is generally referred to as a hardware trigger signal or as an external
frame burst start trigger signal (ExFBTrig).
A rising edge or a falling edge of the ExFBTrig signal can be used to trigger frame burst start. The
Trigger Activation parameter is used to select rising edge or falling edge triggering.
When the Trigger Mode parameter is set to on, the camera will initially be in a "waiting for frame
burst start trigger" acquisition status. It cannot react to frame start trigger signals when in this
acquisition status. When the appropriate ExFBTrig signal is applied to Line 1 (e.g, a rising edge of
the signal for rising edge triggering), the camera will exit the "waiting for frame burst start trigger"
acquisition status and will enter the "waiting for frame start trigger" acquisition status. It can then
react to frame start trigger signals. When the number of frame start trigger signals received by the
camera is equal to the current Acquisition Burst Frame Count parameter setting, the camera will
return to the "waiting for frame burst start trigger" acquisition status. When a new ExFBTrig signal
is applied to Line 1, the camera will again exit from the "waiting for frame burst start trigger"
acquisition status and enter the "waiting for frame start trigger" acquisition status.
For more information about setting the camera for hardware frame burst start triggering and
selecting the input line to receive the ExFBTrig signal, see Section 6.3.5.2.
For more information about the electrical characteristics of Line 1, see Section 5.7.1 on page 74,
and of GPIO Line 3 and Line 4, set for input, see Section 5.9.3.1 on page 82.

Image Acquisition Control AW00123408000
127 Basler ace USB 3.0
6.3.5.2 Setting the Parameters Related to Hardware Frame Burst
Start Triggering and Applying a Hardware Trigger Signal
You can set all of the parameters needed to perform hardware frame burst start triggering from
within your application by using the Basler pylon API. The following code snippet illustrates using
the API to set the parameter values required to enable rising edge hardware frame burst start
triggering with, for example, Line 1 as the trigger source:
// Set the acquisition mode to Continuous (the acquisition mode must
// be set to Continuous when frame burst start triggering is on)
camera.AcquisitionMode.SetValue( AcquisitionMode_Continuous );
// Select the frame burst start trigger
camera.TriggerSelector.SetValue( TriggerSelector_FrameBurstStart );
// Set the mode for the selected trigger
camera.TriggerMode.SetValue( TriggerMode_On );
// Set the source for the selected trigger
camera.TriggerSource.SetValue ( TriggerSource_Line1 );
// Set the activation mode for the selected trigger to rising edge
camera.TriggerActivation.SetValue( TriggerActivation_RisingEdge );
// Set the acquisition burst frame count
camera.AcquisitionBurstFrameCount.SetValue( 5 );
// Execute an acquisition start command to prepare for frame acquisition
camera.AcquisitionStart.Execute( );
while ( ! finished )
{
// Apply a rising edge of the externally generated electrical signal
// (ExFBTrig signal) to input line Line 1 on the camera
// Perform the required functions to parameterize the frame start
// trigger, to trigger 5 frame starts, and to retrieve 5 frames here
}
camera.AcquisitionStop.Execute( );
You can also use the Basler pylon Viewer application to easily set the parameters.
For more information about the pylon API and the pylon Viewer, see Section 3.1 on page 62.

AW00123408000 Image Acquisition Control
Basler ace USB 3.0 128
6.4 The Frame Start Trigger
The frame start trigger is used to begin frame acquisition. Assuming that the camera is in a "waiting
for frame start trigger" acquisition status, it will begin a frame acquisition each time it receives a
frame start trigger signal.
Note that in order for the camera to be in a "waiting for frame start trigger" acquisition status:
The Acquisition Mode parameter must be set correctly.
A proper Acquisition Start command must be applied to the camera.
A proper frame burst start trigger signal must be applied to the camera (if the Trigger Mode
parameter for the frame burst start trigger is set to on).
For more information about the Acquisition Mode parameter and about Acquisition Start and
Acquisition Stop commands, see Section 6.1 on page 113 and Section 6.2 on page 118.
For more information about the frame burst start trigger, and about the acquisition status, see
Section 6.1 on page 113 and Section 6.3 on page 120.
Referring to the use case diagrams that appear in Section 6.9 on page 180 can help you
understand the explanations of the frame start trigger.

Image Acquisition Control AW00123408000
129 Basler ace USB 3.0
6.4.1 Frame Start Trigger Mode
The main parameter associated with the frame start trigger is the Trigger Mode parameter. The
Trigger Mode parameter for the frame start trigger has two available settings: off and on.
6.4.1.1 Frame Start Trigger Mode = Off
When the Frame Start Trigger Mode parameter is set to off, the camera will generate all required
frame start trigger signals internally, and you do not need to apply frame start trigger signals to the
camera.
With the trigger mode set to off, the way that the camera will operate the frame start trigger depends
on the setting of the camera’s Acquisition Mode parameter:
If the Acquisition Mode parameter is set to Single Frame, the camera will automatically
generate a single frame start trigger signal whenever it receives an Acquisition Start command.
If the Acquisition Mode parameter is set to Continuous, the camera will automatically begin
generating frame start trigger signals when it receives an Acquisition Start command. The
camera will continue to generate frame start trigger signals until it receives an Acquisition Stop
command.
The rate at which the frame start trigger signals are generated can be determined by the
camera’s Acquisition Frame Rate parameter:
If the parameter is not enabled, the camera will generate frame start trigger signals at the
maximum rate allowed with the current camera settings.
If the parameter is enabled and is set to a value less than the maximum allowed frame rate
with the current camera settings, the camera will generate frame start trigger signals at the
rate specified by the parameter setting.
If the parameter is enabled and is set to a value greater than the maximum allowed frame
rate with the current camera settings, the camera will generate frame start trigger signals at
the maximum allowed frame rate.
Exposure Time Control with the Frame Start Trigger Off
When the Trigger Mode parameter for the frame start trigger is set to off, the exposure time for each
frame acquisition is determined by the value of the camera’s ExposureTime parameter.
For more information about the camera’s ExposureTime parameter, see Section 6.5 on page 145.
Keep in mind that the camera will only react to frame start triggers when it is in a
"waiting for frame start trigger" acquisition status. For more information about the
acquisition status, see Section 6.1 on page 113 and Section 6.3 on page 120.

AW00123408000 Image Acquisition Control
Basler ace USB 3.0 130
6.4.1.2 Frame Start Trigger Mode = On
When the Trigger Mode parameter for the frame start trigger is set to on, you must apply a frame
start trigger signal to the camera each time you want to begin a frame acquisition. The Trigger
Source parameter specifies the source signal that will act as the frame start trigger signal. The
available selections for the Trigger Source parameter are:
Software - When the source signal is set to software, you apply a frame start trigger signal to
the camera by executing a Trigger Software command for the frame start trigger on the host
computer.
Software Signal 1, Software Signal 2, Software Signal 3 (the latter is not available on
acA1920-155, acA2040-55, acA2040-120, acA2440-35, and acA2440-75 cameras) – Specific
software commands, analogous to the Software command.
Line 1 – When the source signal is set to Line 1, you apply a frame start trigger signal to the
camera by injecting an externally generated electrical signal (commonly referred to as a
hardware trigger signal) into physical input line Line 1 on the camera.
Line 3 – Analogous to the Line 1 source signal. However, the GPIO line Line 3 must be
configured for input.
Line 4 – Analogous to the Line 3 source signal.
If the Trigger Source parameter is set to Line 1, Line 3 or Line 4 you must also set the Trigger
Activation parameter. The available settings for the Trigger Activation parameter are:
Rising Edge – specifies that a rising edge of the electrical signal will act as the frame start
trigger.
Falling Edge – specifies that a falling edge of the electrical signal will act as the frame start
trigger.
For more information about using a software trigger to control frame acquisition start, see
Section 6.4.2 on page 133.
For more information about using a hardware trigger to control frame acquisition start, see
Section 6.4.3 on page 135.
By default, input line Line 1 is selected as the source signal for the frame start
trigger.
Keep in mind that the camera will only react to frame start trigger signals when it
is in a "waiting for frame start trigger" acquisition status. For more information
about the acquisition status, see Section 6.1 on page 113 and Section 6.3 on
page 120.

Image Acquisition Control AW00123408000
131 Basler ace USB 3.0
Exposure Time Control with the Frame Start Trigger On
When the Trigger Mode parameter for the frame start trigger is set to on and the Trigger Source
parameter is set to software, the exposure time for each frame acquisition is determined by the
value of the camera’s ExposureTime parameter.
When the Trigger Mode parameter is set to on and the Trigger Source parameter is set to input line
Line 1, the exposure time for each frame acquisition can be controlled with the ExposureTime
parameter or it can be controlled by manipulating the hardware trigger signal.
For more information about controlling exposure time when using a software trigger, see
Section 6.4.2 on page 133.
For more information about controlling exposure time when using a hardware trigger, see
Section 6.4.3 on page 135.
6.4.1.3 Setting The Frame Start Trigger Mode and Related Parameters
You can set the Trigger Mode and related parameter values for the frame start trigger from within
your application software by using the Basler pylon API. If your settings make it necessary, you can
also set the Trigger Source parameter.
The following code snippet illustrates using the API to set the Trigger Mode for the frame start
trigger to on and the Trigger Source to input line Line 1:
// Select the frame start trigger
camera.TriggerSelector.SetValue(TriggerSelector_FrameStart);
// Set the trigger mode for the selected trigger
camera.TriggerMode.SetValue(TriggerMode_On);
// Set the source for the selected trigger
camera.TriggerSource.SetValue(TriggerSource_Line1);
The following code snippet illustrates using the API to set the Acquisition Mode to Continuous, the
Trigger Mode to off, and the Acquisition Frame Rate to 60:
// Set the acquisition mode to Continuous
camera.AcquisitionMode.SetValue(AcquisitionMode_Continuous);
// Select the frame start trigger
camera.TriggerSelector.SetValue(TriggerSelector_FrameStart);
// Set the mode for the selected trigger
Camera.TriggerMode.SetValue( TriggerMode_Off );
// Set the exposure time
Camera.ExposureTime.SetValue( 3000.0 );
// Enable the acquisition frame rate parameter and set the frame rate. (Enabling
// the acquisition frame rate parameter allows the camera to control the frame
// rate internally.)
camera.AcquisitionFrameRateEnable.SetValue(true);
camera.AcquisitionFrameRate.SetValue(60.0);

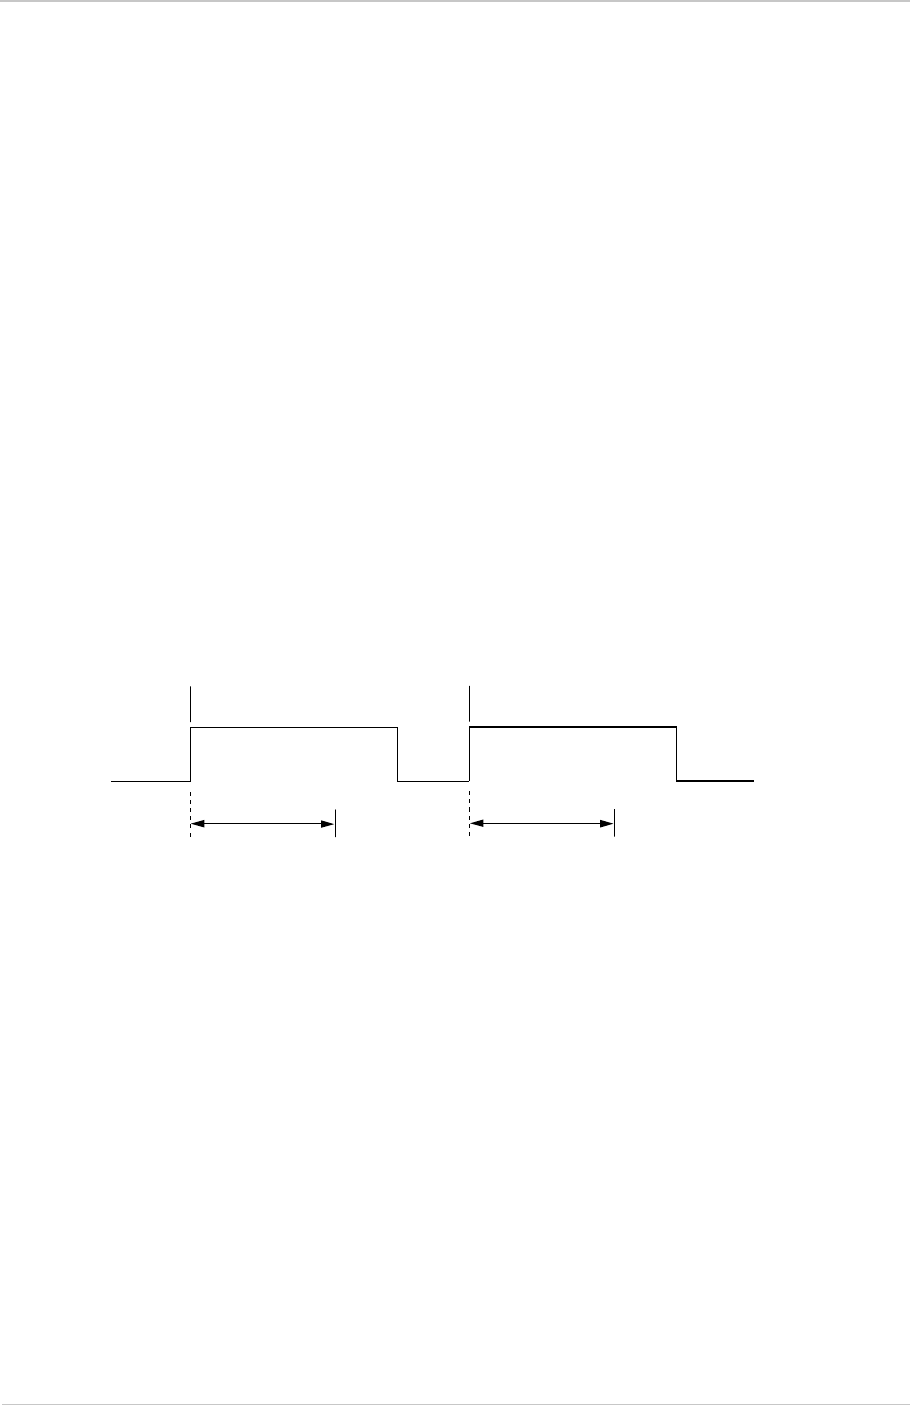
Image Acquisition Control AW00123408000
133 Basler ace USB 3.0
6.4.2 Using a Software Frame Start Trigger
6.4.2.1 Introduction
If the Trigger Mode parameter for the frame start trigger is set to on and the Trigger Source
parameter is set to software, you must apply a software frame start trigger signal to the camera to
begin each frame acquisition. Assuming that the camera is in a "waiting for frame start trigger"
acquisition status, frame exposure will start when the software frame start trigger signal is received
by the camera. Figure 54 illustrates frame acquisition with a software frame start trigger signal.
When the camera receives a software trigger signal and begins exposure, it will exit the "waiting for
frame start trigger" acquisition status because at that point, it cannot react to a new frame start
trigger signal. As soon as the camera is capable of reacting to a new frame start trigger signal, it
will automatically return to the "waiting for frame start trigger" acquisition status.
When you are using a software trigger signal to start each frame acquisition, the camera’s Exposure
Mode parameter must be set to timed. The exposure time for each acquired frame will be
determined by the value of the camera’s ExposureTime parameter.
When you are using a software trigger signal to start each frame acquisition, the frame rate will be
determined by how often you apply a software trigger signal to the camera, and you should not
attempt to trigger frame acquisition at a rate that exceeds the maximum allowed for the current
camera settings. (There is a detailed explanation about the maximum allowed frame rate in
Section 6.10 on page 184). Software frame start trigger signals that are applied to the camera when
it is not ready to receive them will be ignored.
Section 6.4.2.2 on page 134 includes more detailed information about applying a software frame
start trigger signal to the camera using Basler pylon.
For more information about determining the maximum allowed frame rate, see Section 6.10 on
page 184.
Exposure
(duration determined by the
ExposureTime parameter)
Software Frame Start
Trigger Signal Received
Frame
Acquisition
Exposure
Software Frame Start
Trigger Signal Received
Fig. 54: Frame Acquisition with a Software Frame Start Trigger

AW00123408000 Image Acquisition Control
Basler ace USB 3.0 134
6.4.2.2 Setting the Parameters Related to Software Frame Start
Triggering and Applying a Software Trigger Signal
You can set all of the parameters needed to perform software frame start triggering from within your
application software by using the Basler pylon API. The following code snippet illustrates using the
API to set the parameter values and to execute the commands related to software frame start
triggering with the camera set for continuous acquisition mode. In this example, the trigger mode
for the frame burst start trigger will be set to off:
// Set the acquisition mode to Continuous
camera.AcquisitionMode.SetValue(AcquisitionMode_Continuous);
// Select the frame burst start trigger
camera.TriggerSelector.SetValue(TriggerSelector_FrameBurstStart);
// Set the mode for the selected trigger
camera.TriggerMode.SetValue(TriggerMode_Off);
// Disable the acquisition frame rate parameter (this will disable the camera’s
// internal frame rate control and allow you to control the frame rate with
// software frame start trigger signals)
camera.AcquisitionFrameRateEnable.SetValue(false);
// Select the frame start trigger
camera.TriggerSelector.SetValue(TriggerSelector_FrameStart);
// Set the mode for the selected trigger
camera.TriggerMode.SetValue(TriggerMode_On);
// Set the source for the selected trigger
camera.TriggerSource.SetValue(TriggerSource_Software);
// Set for the timed exposure mode
camera.ExposureMode.SetValue(ExposureMode_Timed);
// Set the exposure time
camera.ExposureTime.SetValue(3000.0);
// Execute an acquisition start command to prepare for frame acquisition
camera.AcquisitionStart.Execute( );
while ( ! finished )
{
// Execute a Trigger Software command to apply a frame start
// trigger signal to the camera
camera.TriggerSoftware.Execute( );
// Retrieve acquired frame here
}
camera.AcquisitionStop.Execute( );
// Note: as long as the Trigger Selector is set to FrameStart, executing
// a Trigger Software command will apply a software frame start trigger
// signal to the camera
You can also use the Basler pylon Viewer application to easily set the parameters.
For more information about the pylon API and the pylon Viewer, see Section 3.1 on page 62.

Image Acquisition Control AW00123408000
135 Basler ace USB 3.0
6.4.3 Using a Hardware Frame Start Trigger
6.4.3.1 Introduction
If the Trigger Mode parameter for the frame start trigger is set to on and the Trigger Source
parameter is set to Line 1, an externally generated electrical signal injected into physical input line
Line 1 on the camera will act as the frame start trigger signal for the camera. This type of trigger
signal is generally referred to as a hardware trigger signal or as an external frame start trigger signal
(ExFSTrig).
A rising edge or a falling edge of the ExFSTrig signal can be used to trigger frame acquisition. The
Trigger Activation parameter is used to select rising edge or falling edge triggering.
Assuming that the camera is in a "waiting for frame start trigger" acquisition status, frame
acquisition will start whenever the appropriate edge transition is received by the camera.
When the camera receives a hardware trigger signal and begins exposure, it will exit the "waiting
for frame start trigger" acquisition status because at that point, it cannot react to a new frame start
trigger signal. As soon as the camera is capable of reacting to a new frame start trigger signal, it
will automatically return to the "waiting for frame start trigger" acquisition status.
When the camera is operating under control of an ExFSTrig signal, the period of the ExFSTrig
signal will determine the rate at which the camera is acquiring frames:
For example, if you are operating a camera with an ExFSTrig signal period of 20 ms (0.020 s):
So in this case, the frame rate is 50 fps.
For more information about setting the camera for hardware frame start triggering and selecting the
input line to receive the ExFSTrig signal, see Section 6.4.3.4 on page 143.
For more information about the electrical characteristics of Line 1, see Section 5.7.1 on page 74.
For more information about determining the maximum allowed frame rate, see Section 6.10 on
page 184.
If you are triggering frame acquisition with an ExFSTrig signal and you attempt to
acquire frames at too high a rate, some of the frame trigger signals that you apply
will be received by the camera when it is not in a "waiting for frame start trigger"
acquisition status. The camera will ignore any frame start trigger signals that it
receives when it is not "waiting for frame start trigger". (This situation is commonly
referred to as "over triggering" the camera.
To avoid over triggering, you should not attempt to acquire frames at a rate that
exceeds the maximum allowed with the current camera settings.
1
ExFSTrig period in seconds
------------------------------------------------------------------------- F r a m e R a t e=
1
0.020
---------------50fps=
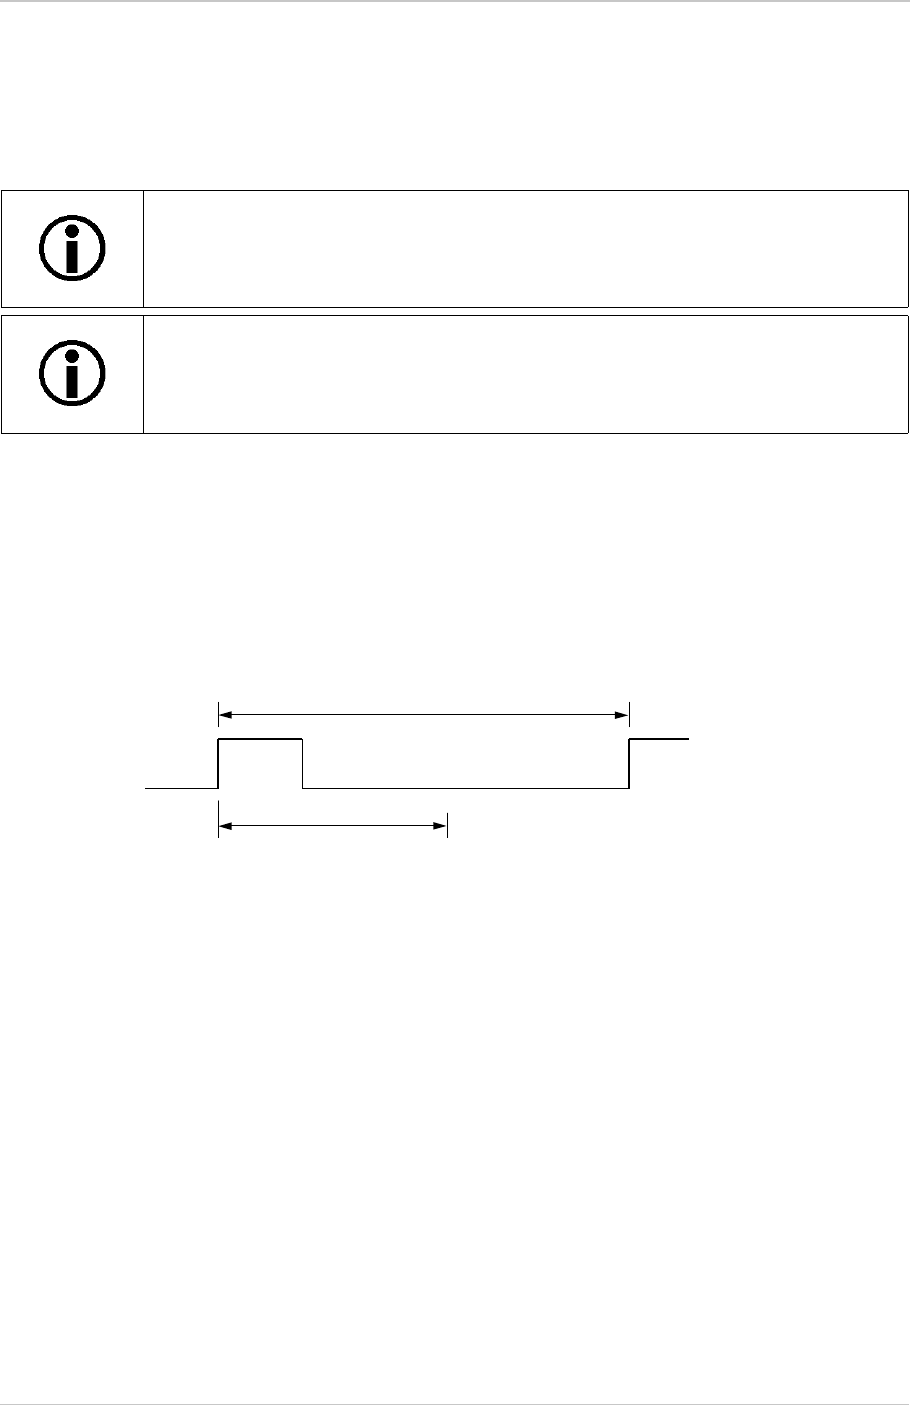
AW00123408000 Image Acquisition Control
Basler ace USB 3.0 136
6.4.3.2 Exposure Modes
If you are triggering the start of frame acquisition by a trigger signal generated externally via
hardware (ExFSTrig), two exposure modes are available: timed and trigger width exposure.
Timed Exposure Mode
When timed exposure mode is selected, the exposure time for each frame acquisition is determined
by the value of the camera’s ExposureTime parameter. If the camera is set for rising edge triggering,
the exposure time starts when the ExFSTrig signal rises. If the camera is set for falling edge
triggering, the exposure time starts when the ExFSTrig signal falls. Figure 55 illustrates timed
exposure with the camera set for rising edge triggering.
Trigger width exposure mode is not available on acA1920-25um/uc,
acA2500-14um/uc, acA3800-14um/uc, and acA4600-10um/uc cameras.
You must set TriggerMode and TriggerSource before setting ExposureMode.
Otherwise, the set ExposureMode will not operate.
ExFSTrig Signal Period
Exposure
(duration determined by the
ExposureTime parameter)
ExFSTrig Signal
Fig. 55: Timed Exposure with Rising Edge Triggering
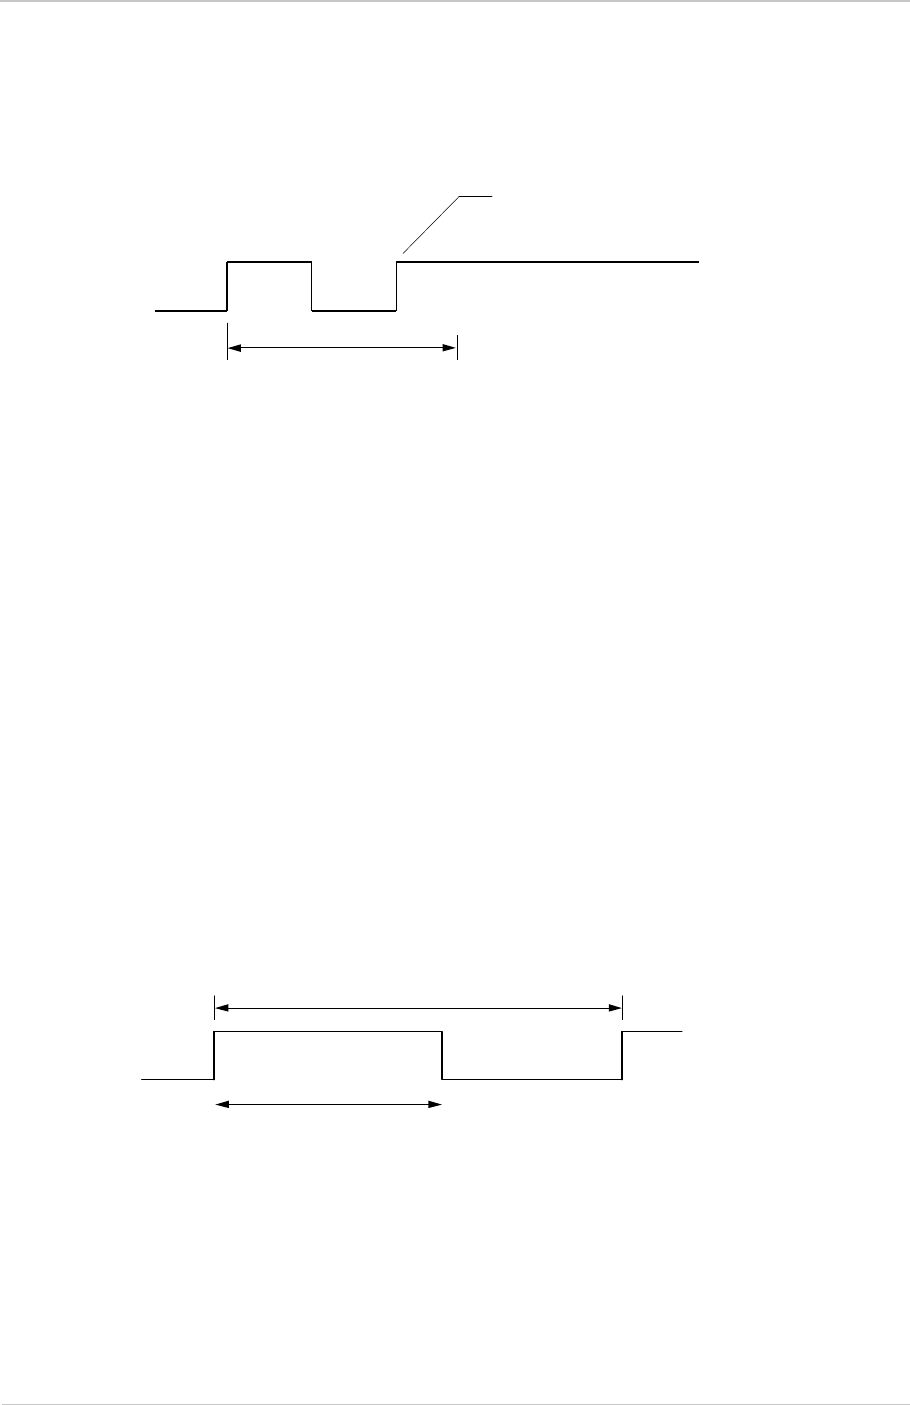
Image Acquisition Control AW00123408000
137 Basler ace USB 3.0
Note that, if you attempt to trigger a new exposure start while the previous exposure is still in
progress, the trigger signal will be ignored, and a Frame Start Overtrigger event will be generated.
This situation is illustrated in Figure 56 for rising edge triggering.
For more information about the Frame Start Overtrigger event, see Section 7.17 on page 319.
For more information about the camera’s ExposureTime parameter, see Section 6.5 on page 145.
Trigger Width Exposure Mode (acA640-90, acA640-120, acA1300-30, and
acA1600-20)
When trigger width exposure mode is selected, the length of the exposure for each frame
acquisition will be directly controlled by the ExFSTrig signal. If the camera is set for rising edge
triggering, the exposure time begins when the ExFSTrig signal rises and continues until the
ExFSTrig signal falls. If the camera is set for falling edge triggering, the exposure time begins when
the ExFSTrig signal falls and continues until the ExFSTrig signal rises. Figure 57 illustrates trigger
width exposure with the camera set for rising edge triggering.
Trigger width exposure is especially useful, if you intend to vary the length of the exposure time for
each captured frame.
To avoid overtriggering, use of the Frame Trigger Wait signal is strongly recommended. To use the
Frame Trigger Wait signal, you must set the ExposureOverlapTimeMax parameter. Its parameter
setting is used to operate the Frame Trigger Wait signal.
You should set the ExposureOverlapTimeMax parameter value to represent the shortest exposure
time you intend to use. For example, assume that you will be using trigger width exposure mode
This rise in the trigger signal will be
ignored, and a Frame Start Overtrigger
event will be generated
Exposure
(duration determined by the
ExposureTime parameter)
ExFSTrig Signal
Fig. 56: Overtriggering with Timed Exposure
ExFSTrig Signal Period
ExFSTrig Signal
Exposure
Fig. 57: Trigger Width Exposure with Rising Edge Triggering

AW00123408000 Image Acquisition Control
Basler ace USB 3.0 138
and that you intend to use the ExFSTrig signal to vary the exposure time in a range from 3000 µs
to 5500 µs. In this case you would set the Exposure Overlap Time Max parameter to 3000 µs.
For more information about the Frame Trigger Wait signal, see Section 6.8.4.2 on page 174.
Trigger Width Exposure Mode for Cameras with Exposure Time Offset
Trigger width exposure is especially useful if you intend to vary the length of the exposure time for
each captured frame.
Some cameras provide an additional exposure time, the so-called exposure time offset (C4), that is
automatically appended to the user-controlled exposure time.
The following cameras provide an exposure time offset: acA640-750, acA800-510, acA1300-200,
acA1920-40, acA1920-150, acA1920-155um, acA2000-165, acA2040-55, acA2040-90, acA2040-
120, acA2440-35, acA2440-75, acA2500-60.
Accordingly, when trigger width exposure mode is selected, the exposure time for each frame
acquisition is the sum of two individual time periods (see Figure 59):
The first time period is the exposure time that is controlled by the ExFSTrig signal: If the
camera is set for rising edge triggering, the first time period - and therewith the exposure time -
begins when the ExFSTrig signal rises. The first time period ends when the ExFSTrig signal
falls.
If the camera is set for falling edge triggering, the first time period begins when the ExFSTrig
signal falls. The first time period ends when the ExFSTrig signal rises.
The second time period is the exposure time offset, C4. It is automatically appended by the
camera’s sensor to the first time period. The length of the exposure time offset usually
depends on the bit depth of the current pixel format (8 bit, 10 bit or 12 bit) and, for some
camera models, on the currently available USB 3.0 bandwidth (expressed as "Device Link
Throughput").
For exposure time offsets, C4, and their dependencies, see Table 32 and Figure 58.
Note that C4 is generally smaller than the camera’s minimum allowed exposure time. For the
cameras’ minimum allowed exposure times, see Table 33 on page 146 and Table 34 on page 147.

Image Acquisition Control AW00123408000
139 Basler ace USB 3.0
Camera Model Pixel Format
Bit Depth [bit] Device Link Throughput [MByte/s] Exposure Time Offset,
C4 [µs]
acA640-750 8 N/A 32
acA800-510 N/A 32
acA1300-200 N/A 32
acA1920-40 N/A 15
acA1920-150 N/A 65
acA1920-155 N/A 15
acA2000-165,
acA2040-90
≤ 108.000 42
>108.000 to ≤ 140.000 32
>140.000 to ≤ 160.020 28
>160.020 to ≤ 180.000 25
>180.000 to ≤ 192.112 24
>192.112 to ≤ 216.000 42
>216.000 to ≤ 280.000 32
>280.000 to ≤ 320.040 28
>320.040 to ≤ 360.000 25
>360.000 to ≤ 384.224 24
acA2040-55 N/A 15
acA2040-120 N/A 15
acA2440-35 N/A 15
acA2440-75 N/A 15
acA2500-60 N/A 37
acA640-750 10 N/A 32
acA800-510 N/A 32
acA1300-200 N/A 32
acA1920-150 N/A 56.5
acA2500-60 N/A 56.5
acA1920-40 12 N/A 15
acA1920-155 N/A 15
acA2000-165,
acA2040-90
All allowed values 28
Table 32: Exposure Time Offset, C4, Depending on Pixel Format Bit Depth and Device Link Throughput
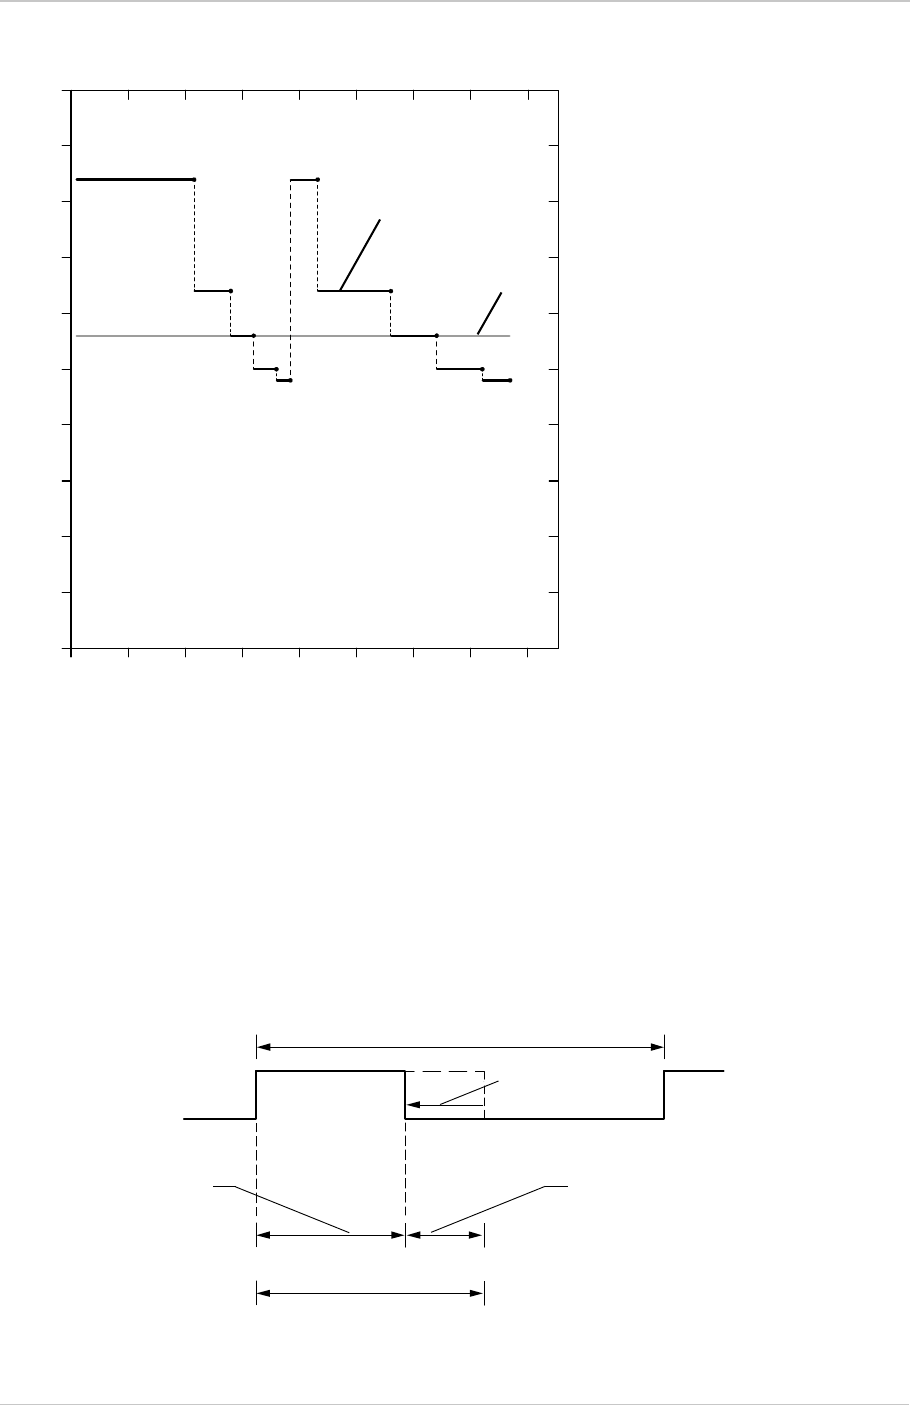
AW00123408000 Image Acquisition Control
Basler ace USB 3.0 140
Fig. 58: Exposure Time Offsets Depending on Device Link Throughput (acA200-165u and acA2040-90u Cameras
Only; All 8 bit- and 12 bit-Pixel Formats)
To obtain the wanted exposure time with trigger width exposure mode:
1. Subtract the value for C4 (see Table 32 and Figure 58) that applies to your camera model, from
the wanted exposure time.
2. Use the resulting time as the signal high time for the ExFSTrig signal if the signal is not
inverted or as the low time if the signal is inverted.
Fig. 59: Trigger Width Exposure with Adjusted Rising Edge Triggering; (Exposure Start Delay Is Omitted)
50
45
40
35
30
25
20
15
10
5
01000 200 300 400
Device Link Throughput [MByte/s]
Exposure Time Offset, C4 [µs]
acA2000-165 and
acA2040-90; 8 bit
acA1920-155;
8 bit, 12 bit
acA2000-165 and
acA2040-90; 12 bit
ExFSTrig Signal Period
Offset-adjusted
ExFSTrig Signal
Exposure (Total; Wanted)
Exposure, Controlled
by Timing-adjusted
ExFSTrig Signal Exposure, controlled by
Exposure Time Offset; C4
Offset Adjustment

Image Acquisition Control AW00123408000
141 Basler ace USB 3.0
Example
Let’s assume you are operating an acA2000-165u camera at a device link throughput value of
250 MByte/s, the camera is set for rising edge triggering, and you want to use am exposure time of
100 µs. Under these conditions 32 µs of exposure time (see Table 32) will be added automatically
to the exposure time that is controlled by the ExFSTrig signal.
To achieve the wanted exposure time of 100 µs, you would therefore keep the ExFSTrig signal high
for 68 µs (= 100 µs - 32 µs). Subsequently, the camera would add automatically 32 µs, giving a total
of 100 µs exposure time which is the wanted exposure time.
Parameters for Controlling Overlap
When you operate the camera in trigger width exposure mode, use of the Frame Trigger Wait signal
is strongly recommended to avoid overtriggering.To use the Frame Trigger Wait signal, you must
set the Exposure Overlap Time Max parameter. Its parameter setting is used to operate the Frame
Trigger Wait signal.
You can avoid overtriggering the camera by always doing the following:
Setting the camera’s Exposure Overlap Time Max parameter so that it represents the smallest
exposure time you intend to use.
Making sure that your exposure time is always equal to or greater than the setting for the
Exposure Overlap Time Max parameter.
Monitoring the camera’s Frame Trigger Wait signal and only using the ExFSTrig signal to start
exposure when the Frame Trigger Wait signal is high.
You should set the Exposure Overlap Time Max parameter value to represent the shortest exposure
time you intend to use. For example, assume that you will be using trigger width exposure mode
and that you intend to use the ExFSTrig signal to vary the exposure time in a range from 3000 µs
to 5500 µs. In this case you would set the camera’s Exposure Overlap Time Max parameter to
3000 µs.
You will have to do offset adjustment of the ExFSTrig signal only if you use the
trigger width exposure mode. In all other exposure modes (where the
ExposureTime parameter controls exposure time), the camera automatically
adjusts for the exposure time offset, C4.
Note that the C4 exposure time offset does not affect the moment of exposure
start.
For acA640-750, acA800-510, acA1300-200, acA1920-40, acA1920-150,
acA1920-155, acA2040-55, acA2040-120, acA2440-35, acA2440-75, and
acA2500-60 cameras, the Exposure Overlap Time Max parameter is used in the
context of exposure overlap time modes. For more information, see the next
section.

AW00123408000 Image Acquisition Control
Basler ace USB 3.0 142
For more information about the Frame Trigger Wait signal, see Section 6.8.4.2 on page 174.
You can use the Basler pylon API to set the Exposure Overlap Time Max parameter value from
within your application software. The following code snippet illustrates using the API to set the
parameter value:
camera.ExposureOverlapTimeMax.SetValue( 3000.0 );
You can also use the Basler pylon Viewer application to easily set the parameters.
For more information about the pylon API and the pylon Viewer, see Section 3.1 on page 62.
Particular Implementation for Cameras with Exposure Overlap Time Modes
For acA640-750, acA800-510, acA1300-200, acA1920-40, acA1920-150, acA1920-155,
acA2040-55, acA2040-120, acA2440-35, acA2440-75, and acA2500-60 cameras, you can choose
between Exposure Overlap Time Modes:
If you set the Manual mode, use of the Frame Trigger Wait signal is strongly recommended to
avoid overtriggering. To use the Frame Trigger Wait signal, you must set the Exposure Overlap
Time Max parameter, described in the preceding section.
If you set the Automatic mode, the camera will automatically use the maximum possible
overlap time for each acquisition. The Automatic mode will be particularly useful with long
exposure times. Note that the Frame Trigger Wait signal is not available when the Automatic
mode is selected. The Automatic mode is the default mode.
You can use the Basler pylon API to set the Exposure Overlap Time Modes and the Exposure
Overlap Time Max parameter value from within your application software. The following code
snippet illustrates using the API to set the parameter values:
// Set (and read) the Manual mode for the ExposureOverlapTimeMode
// and set an ExposureOverlapTimeMax parameter value
camera.ExposureOverlapTimeMode.SetValue(ExposureOverlapTimeMode_Manual);
ExposureOverlapTimeModeEnums e = camera.ExposureOverlapTimeMode.GetValue();
// Set an ExposureOverlapTimeMax parameter value
camera.ExposureOverlapTimeMax.SetValue( 3000.0 );
// Set (and read) the Automatic mode for the ExposureOverlapTimeMode
camera.ExposureOverlapTimeMode.SetValue(ExposureOverlapTimeMode_Automatic);
ExposureOverlapTimeModeEnums e = camera.ExposureOverlapTimeMode.GetValue();
You can also use the Basler pylon Viewer application to easily set the parameters.
To avoid overtriggering, use of the Frame Trigger Wait signal is strongly recommended. To use the
Frame Trigger Wait signal, you must set the camera’s ExposureOverlapTimeMax parameter. This
parameter setting is used to operate the Frame Trigger Wait signal.
For more information about the pylon API and the pylon Viewer, see Section 3.1 on page 62.

Image Acquisition Control AW00123408000
143 Basler ace USB 3.0
6.4.3.3 Frame Start Trigger Delay
The frame start trigger delay feature lets you specify a delay (in microseconds) that is applied
between the receipt of a hardware frame start trigger and when the trigger becomes effective.
The frame start trigger delay can be specified in the range from 0 to 1000000 µs (equivalent to 1 s).
When the delay is set to 0 µs, no delay will be applied.
To set the frame start trigger delay:
Set the camera’s Trigger Selector parameter to frame start.
Set the value of the Trigger Delay parameter.
6.4.3.4 Setting the Parameters Related to Hardware Frame
Start Triggering and Applying a Hardware Trigger Signal
You can set all of the parameters needed to perform hardware frame start triggering from within your
application by using the Basler pylon API. The following code snippet illustrates using the API to set
the camera for single acquisition mode with the trigger mode for the frame burst start trigger set to
off. We will use the timed exposure mode with input line Line 1 as the trigger source and with rising
edge triggering. In this example, we will use a trigger delay:
// Set the acquisition mode to single frame
camera.AcquisitionMode.SetValue( AcquisitionMode_SingleFrame );
// Select the frame burst start trigger
camera.TriggerSelector.SetValue(TriggerSelector_FrameBurstStart);
// Set the mode for the selected trigger
camera.TriggerMode.SetValue( TriggerMode_Off );
// Select the frame start trigger
camera.TriggerSelector.SetValue( TriggerSelector_FrameStart );
// Set the mode for the selected trigger
camera.TriggerMode.SetValue( TriggerMode_On );
// Set the source for the selected trigger
camera.TriggerSource.SetValue ( TriggerSource_Line1 );
// Set the trigger activation mode to rising edge
camera.TriggerActivation.SetValue(TriggerActivation_RisingEdge);
// Set the trigger delay for one millisecond (1000us == 1ms == 0.001s)
camera.TriggerDelay.SetValue(1.78);
// Set for the timed exposure mode
camera.ExposureMode.SetValue(ExposureMode_Timed);
// Set the exposure time
camera.ExposureTime.SetValue(3000.0);
The frame start trigger delay will not operate, if the Frame Start Trigger Mode
parameter is set to off or if you are using a software frame start trigger.

AW00123408000 Image Acquisition Control
Basler ace USB 3.0 144
// Execute an acquisition start command to prepare for frame acquisition
camera.AcquisitionStart.Execute( );
// Frame acquisition will start when the externally generated
// frame start trigger signal (ExFSTrig signal)goes high
The following code snippet illustrates using the API to set the parameter values and execute the
commands related to hardware frame start triggering with the camera set for continuous acquisition
mode and the trigger mode for the frame burst start trigger set to off. We will use the trigger width
exposure mode with input line Line 1 as the trigger source and with rising edge triggering:
// Set the acquisition mode to Continuous
camera.AcquisitionMode.SetValue(AcquisitionMode_Continuous);
// Select the frame burst start trigger
camera.TriggerSelector.SetValue(TriggerSelector_FrameBurstStart);
// Set the mode for the selected trigger
camera.TriggerMode.SetValue(TriggerMode_Off);
// Disable the acquisition frame rate parameter (this will disable the camera’s
// internal frame rate control and allow you to control the frame rate with
// external frame start trigger signals)
camera.AcquisitionFrameRateEnable.SetValue(false);
// Select the frame start trigger
Camera.TriggerSelector.SetValue( TriggerSelector_FrameStart );
// Set the mode for the selected trigger
Camera.TriggerMode.SetValue( TriggerMode_On );
// Set the source for the selected trigger
camera.TriggerSource.SetValue ( TriggerSource_Line1 );
// Set the trigger activation mode to rising edge
camera.TriggerActivation.SetValue( TriggerActivation_RisingEdge );
// Set for the trigger width exposure mode
camera.ExposureMode.SetValue( ExposureMode_TriggerWidth );
// Set the exposure overlap time max- the shortest exposure time
// we plan to use is 1500 us
camera.ExposureOverlapTimeMax.SetValue( 1500 );
// Prepare for frame acquisition here
camera.AcquisitionStart.Execute( );
while ( ! finished )
{
// Frame acquisition will start each time the externally generated
// frame start trigger signal (ExFSTrig signal)goes high
// Retrieve the captured frames
}
camera.AcquisitionStop.Execute( );
You can also use the Basler pylon Viewer application to easily set the parameters.
For more information about the pylon API and pylon Viewer, see Section 3.1 on page 62.

Image Acquisition Control AW00123408000
145 Basler ace USB 3.0
6.5 Setting the Exposure Time
This section describes how the exposure time can be adjusted "manually", i.e., by
setting the value of the ExposureTime parameter.
The camera also has an Exposure Auto function that can automatically adjust the
exposure time. Manual adjustment of the ExposureTime parameter will only
work correctly if the Exposure Auto function is disabled.
For more information about auto functions in general, see Section 7.15 on
page 299.
For more information about the Exposure Auto function in particular, see
Section 7.15.5 on page 309.

AW00123408000 Image Acquisition Control
Basler ace USB 3.0 146
6.5.1 Exposure Times for All Models Except the
acA2000-165 and acA2040-90
The section presents the minimum and maximum parameter values for the ExposureTime
parameter (Table 33). All camera models are included except the acA2000-165um/umNIR/uc and
acA2040-90um/umNIR/uc cameras that are considered in Section 6.5.2.
Camera Model Exposure Times [µs]
Minimum Allowed Maximum Possible Increment
8 bit 12 bit
acA640-90um/uc 17 10000000 1
acA640-120um/uc 4 10000000 1
acA640-750um/uc 59 1000000 1
acA800-510um/uc 59 1000000 1
acA1300-30um/uc 16 10000000 1
acA1300-200um/uc 59 1000000 1
acA1600-20um/uc 25 10000000 1
acA1920-25um/uc 35 9999990 35
acA1920-40um/uc 34 40 10000000 1
acA1920-150um/uc 105 1000000 1
acA1920-155um/uc 20 21 10000000 1
acA2040-55um/uc 27 10000000 1
acA2040-120um/uc 20 21 10000000 1
acA2440-35um/uc 29 10000000 1
acA2440-75um/uc 21 22 10000000 1
acA2500-14um/uc 35 9999990 35
acA2500-60um/uc 81 100000 1
acA3800-14um/uc 35 1600000 1
acA4600-10uc 35 1460000 1
Table 33: Minimum Allowed Exposure Time Settings for All Pixel Format Bit Depths Unless Indicated Otherwise,
Maximum Possible Exposure Time Settings and Increments.

Image Acquisition Control AW00123408000
147 Basler ace USB 3.0
6.5.2 Exposure Times for the acA2000-165 and
acA2040-90
The section presents the minimum allowed and maximum possible parameter values for the
ExposureTime parameter (Table 34) for acA2000-165um/umNIR/uc and
acA2040-90um/umNIR/uc cameras. The other camera models are considered in Section 6.5.1.
The minimum allowed exposure times depend on the bit depth of the current pixel format and on
the currently available USB 3.0 bandwidth (see Table 34 and Figure 58).
6.5.3 Setting the Parameter Value
You can use the Basler pylon API to set the ExposureTime parameter value from within your
application software. The following code snippet illustrates using the API to set the parameter value:
// Set the exposure time to 3500 µs
camera.ExposureTime.SetValue(3500.0);
You can also use the Basler pylon Viewer application to easily set the parameter.
For more information about the pylon API and pylon Viewer, see Section 3.1 on page 62.
Camera Model Pixel
Format
Bit Depth
[bit]
Device Link Throughput
[MByte/s] Exposure Time [µs]
Minimum
Allowed Maximum
Possible Increment
acA2000-165
um/umNIR/uc,
and
acA2040-90
um/umNIR/uc
8≤ 108.000 42 10000000 1
>108.000 to ≤ 140.000 32
>140.000 to ≤ 160.020 28
>160.020 to ≤ 180.000 25
>180.000 to ≤ 192.112 24
>192.112 to ≤ 216.000 42
>216.000 to ≤ 280.000 32
>280.000 to ≤ 320.040 28
>320.040 to ≤ 360.000 25
>360.000 to ≤ 384.224 24
12 All allowed values 28 10000000 1
Table 34: Minimum Allowed and Maximum Possible Exposure Times With Dependencies

AW00123408000 Image Acquisition Control
Basler ace USB 3.0 148
6.6 Electronic Shutter Operation
All ace cameras are equipped with imaging sensors that have an electronic shutter. There are two
types of sensors that differ by design and support either the global or the rolling shutter mode .
Some of the sensors with a rolling shutter also support the global reset release shutter mode which
is a variant of the rolling shutter mode.
All ace models except the acA1920-25um/uc, acA2500-14um/uc, acA3800-14um/uc, and
acA4600-10uc use sensors with only global shutter modes. Some of the sensors with global shutter
allow to choose between "normal" or "fast" sensor readout.
The sensors of the acA1920-25um/uc, acA2500-14um/uc, acA3800-14um/uc, and acA4600-10uc
camera models support the rolling shutter mode and the global reset release shutter mode.
The following sections describe the differences between the shutter modes.
6.6.1 Global Shutter (All Cameras Except acA1920-25,
acA2500-14, acA3800-14, acA4600-10)
All camera models other than the acA1920-25um/uc, acA2500-14um/uc, acA3800-14um/uc, and
acA4600-10uc are equipped with an electronic global shutter. On cameras equipped with a global
shutter, when frame acquisition is triggered, exposure begins for all lines in the sensor as shown in
Figure 60. Exposure continues for all lines in the sensor until the programmed exposure time ends
(or when the frame start trigger signal ends the exposure time, if the camera is using the trigger
width exposure mode). At the end of the exposure time, exposure ends for all lines in the sensor.
Immediately after the end of exposure, pixel data readout begins and proceeds in a linewise fashion
until all pixel data is read out of the sensor.
A main characteristic of a global shutter is that for each frame acquisition, all of the pixels in the
sensor start exposing at the same time and all stop exposing at the same time. This means that
image brightness tends to be more uniform over the entire area of each acquired image, and it helps
to minimize problems with acquiring images of objects in motion.
The cameras can provide an exposure active output signal that will go high when the exposure time
for the first line begins and will go low when the exposure time for the last line ends.
The sensor readout time (see Figure 60) is the sum of the line readout times and therefore also
depends on ROI height. You can determine the readout time for a frame by checking the value of
the camera’s SensorReadoutTime parameter.
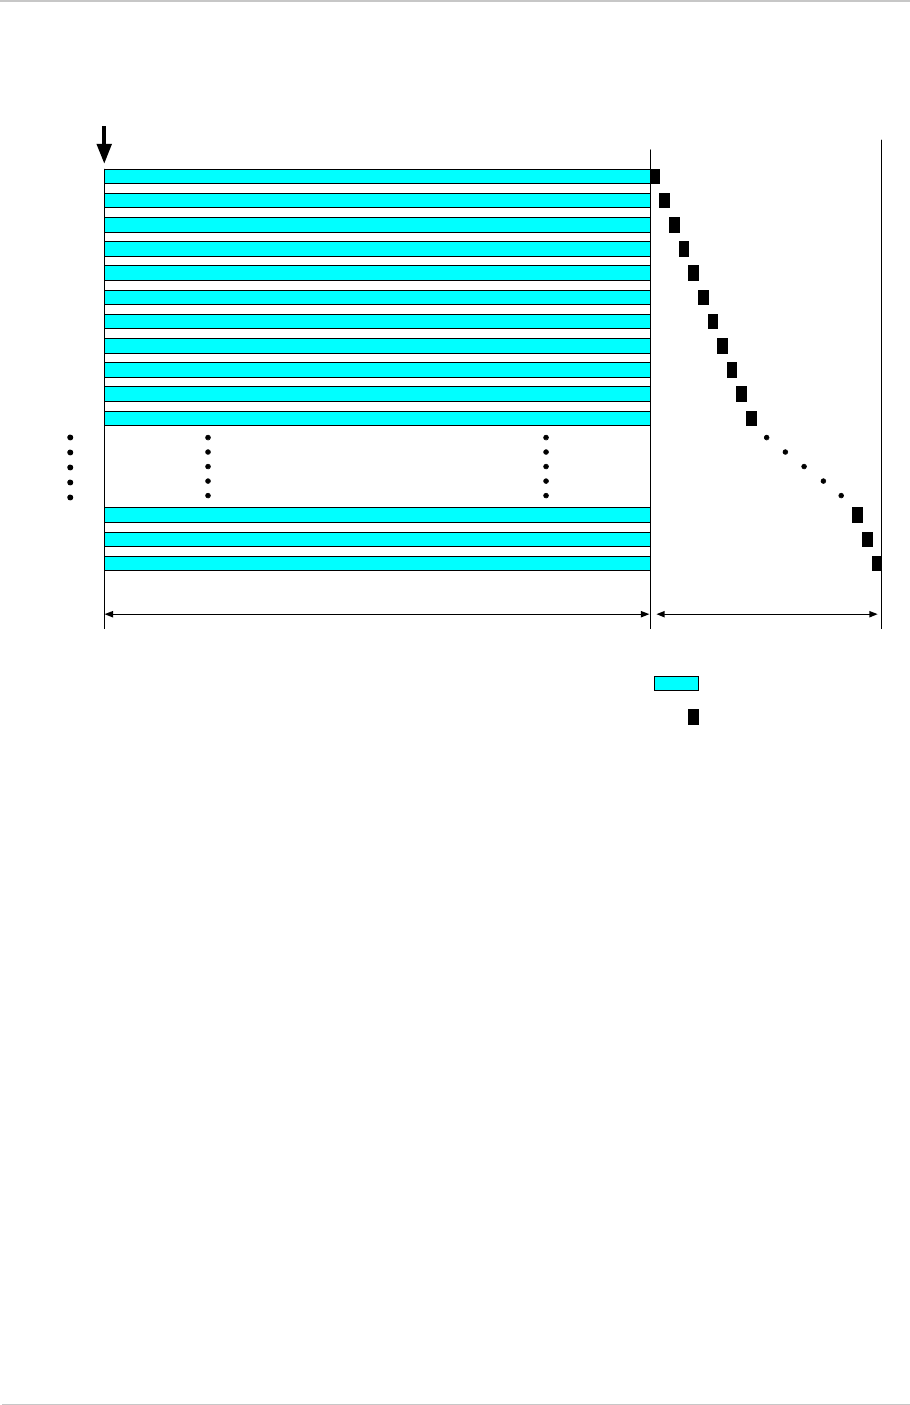
Image Acquisition Control AW00123408000
149 Basler ace USB 3.0
For more information about the exposure active output signal, see Section 6.8.1 on page 167.
For more information about the SensorReadoutTime parameter, see Section 6.9 on page 180.
Line 1
Line 2
Line 4
Line 3
Line 5
Line 6
Line 8
Line 7
Line 9
Line 10
Line 11
Line N-2
Line N
Line N-1
Sensor Readout TimeExposure Time
= line exposure
= line readout
Frame Start
Triggered
Fig. 60: Global Shutter

AW00123408000 Image Acquisition Control
Basler ace USB 3.0 150
6.6.1.1 Sensor Readout Mode
The acA640-750um/uc, acA800-510um/uc, acA1300-200um/uc, acA1920-150um/uc, and
acA2500-60uc cameras are equipped with sensors that allow to set the sensor readout mode. Two
modes are available, "normal" and "fast".
In fast sensor readout mode, the readout time for each line of pixels (the line readout time) is
shortened compared to the normal readout mode. As a consequence, the overall sensor readout
time is shortened. This allows you to increase the maximum frame rate compared to operation in
normal sensor readout mode. Note, however, that the image quality can deteriorate when using fast
sensor readout mode.
Remember that you can further decrease the readout time for the pixel data of a frame by
decreasing the ROI height (see Section 6.6.1 on page 148).
You can determine the readout time for a frame by checking the value of the camera’s
SensorReadoutTime parameter (Section 6.9 on page 180).
Setting the Sensor Readout Mode
The following code snippet illustrates using the API to set and read the parameter values for the
Sensor Readout Mode (values: Normal, Fast):
// Set and read the sensor readout mode parameter value
camera.SensorReadoutMode.SetValue(SensorReadoutMode_SensorReadoutMode_Normal);
camera.SensorReadoutMode.SetValue(SensorReadoutMode_SensorReadoutMode_Fast);
SensorReadoutModeEnums e = camera.SensorReadoutMode.GetValue();
You can also use the Basler pylon Viewer application to easily set the parameter.
For more information about the pylon API and pylon Viewer, see Section 3.1 on page 62.

Image Acquisition Control AW00123408000
151 Basler ace USB 3.0
6.6.2 Rolling Shutter (acA1920-25, acA2500-14, acA3800-14,
acA4600-10 Only)
The acA1920-25um/uc, acA2500-14um/uc, acA3800-14um/uc, and acA4600-10uc cameras are
equipped with an electronic rolling shutter. The rolling shutter is used to control the start and stop
of sensor exposure. The rolling shutter used in these cameras has two shutter modes: rolling and
global reset release.
6.6.2.1 Rolling Mode
When the shutter is in the rolling mode, it exposes and reads out the pixel lines with a temporal
offset (designated as tRow) from one line to the next (see Figure 61). When frame start is triggered,
the camera resets the top line of pixels of the ROI (line one) and begins exposing that line. The
camera resets line two tRow later and begins exposing the line. The camera resets line three tRow
later and begins exposing the line. And so on until the bottom line of pixels is reached.
The exposure time is the same for all lines and is determined by the ExposureTime parameter
setting.
The pixel values for each line are read out at the end of exposure for the line. Because the readout
time for each line is also tRow, the temporal shift for the end of readout is identical to the temporal
shift for the start of exposure.
The Sensor Readout Time is the sum of the readout times of all lines. The Total Readout Time
equals the Sensor Readout Time plus the Exposure Overhead time C1. The Exposure Overhead
time is needed to prepare the sensor for the next acquisition.
Camera Model Temporal Shift tRow
8 bit Pixel Format 12 bit p Pixel Format 12 bit Pixel Format
acA1920-25um/uc 35.000 µs 35.000 µs 35.000 µs
acA2500-14um/uc 35.000 µs 35.000 µs 35.000 µs
acA3800-14um/uc 24.725 µs 28.475 µs 30.975 µs
acA4600-10uc 30.750 µs 33.875 µs 37.000 µs
Table 35: Temporal Shift for Start of Exposure Between Two Consecutive Lines

AW00123408000 Image Acquisition Control
Basler ace USB 3.0 152
Camera Model Exposure Overhead C1
8 bit Pixel Format 12 bit p Pixel Format 12 bit Pixel Format
acA1920-25um 490 µs 490 µs 490 µs
acA2500-14um 490 µs 490 µs 490 µs
acA3800-14um 3536 µs 4072 µs 4430 µs
Table 36: Exposure Overhead Time for Mono Cameras in Rolling Mode
Camera Model Exposure Overhead C1
8 bit Pixel Format 12 bit p Pixel Format 12 bit Pixel Format
acA1920-25uc 525 µs 525 µs 525 µs
acA2500-14uc 525 µs 525 µs 525 µs
acA3800-14uc 3561 µs 4101 µs 4461 µs
acA4600-10uc 4521 µs 4980 µs 5439 µs
Table 37: Exposure Overhead Time for Color Cameras in Rolling Mode
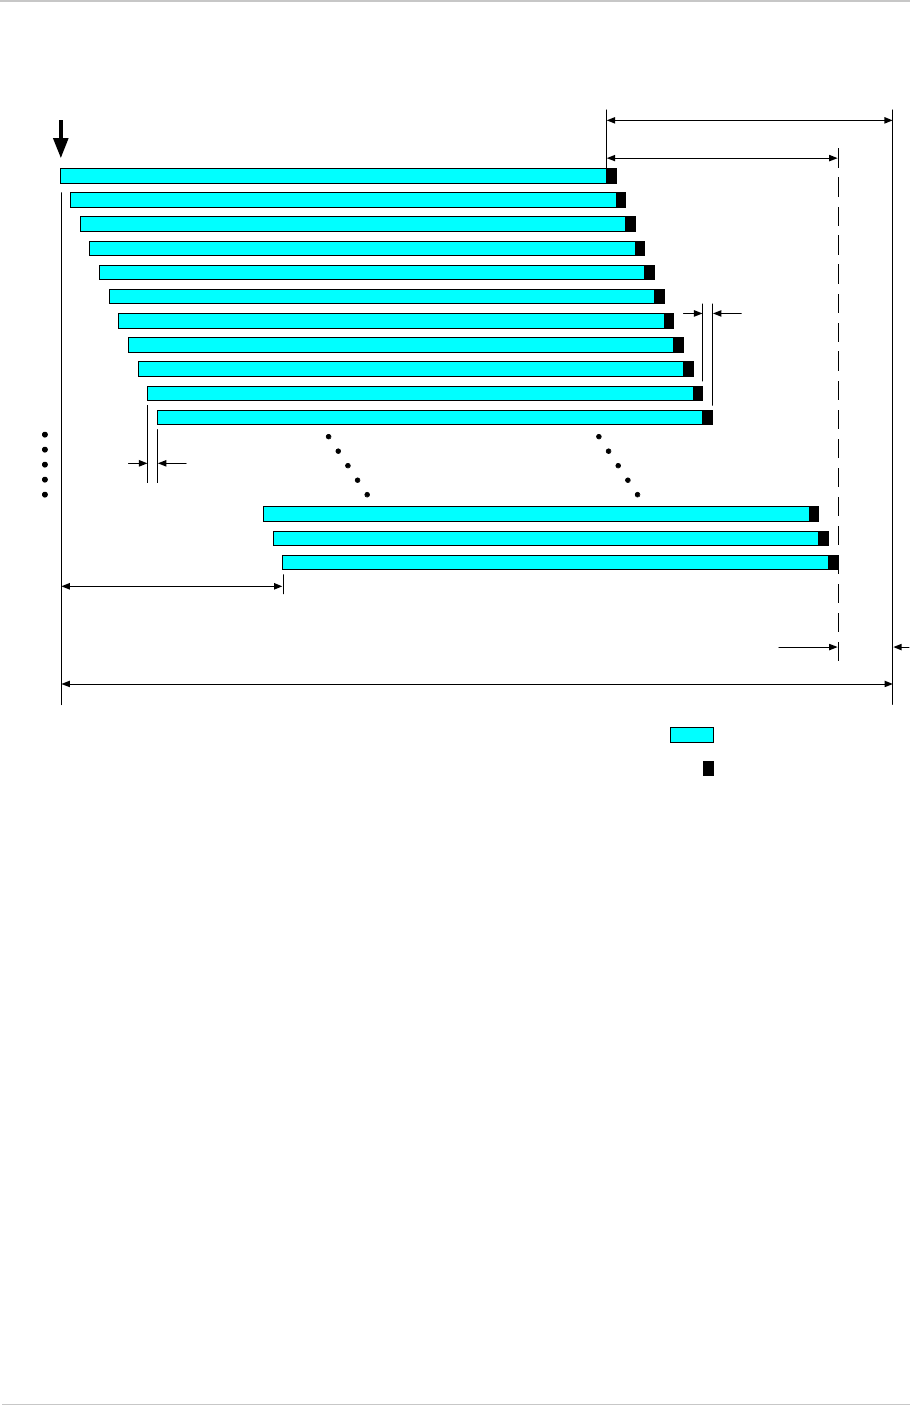
Image Acquisition Control AW00123408000
153 Basler ace USB 3.0
You can calculate the reset runtime using this formula:
Reset Runtime = tRow x (ROI Height -1)
You can calculate the total readout time using this formula:
Total Readout Time = [ tRow x (ROI Height) ] + C1µs
You can calculate the total runtime using this formula:
Total Runtime = ExposureTime Parameter Setting + Total Readout Time
Line 1
Line 2
Line 4
Line 3
Line 5
Line 6
Line 8
Line 7
Line 9
Line 10
Line 11
Line N-2
Line N
Line N-1
tRow
Reset Runtime
Sensor Readout Time
tRow
Total Runtime
= line exposure
= line readout
Frame Start
Triggered
Fig. 61: Rolling Shutter in Rolling Mode
Total Readout Time
C1

AW00123408000 Image Acquisition Control
Basler ace USB 3.0 154
Using the Exposure Active and Flash Window Output Signals
The acA1920-25 and acA2500-14 cameras can provide an exposure active output signal that goes
high when the exposure time for line one begins and goes low when the exposure time for line one
ends.
The exposure active signal is not available for acA3800-14 and acA4600-10 cameras. However, the
flash window signal is available and may in some cases serve as an alternative (see Section 6.8.2
on page 169)
If the camera is operating in rolling mode and you are using the camera to capture images of moving
objects, the use of flash lighting is most strongly recommended. The camera supplies a flash
window output signal to facilitate the use of flash lighting.
For more information about the exposure active output signal, see Section 6.8.1 on page 167.
For more information about the ExposureTime parameter, see Section 6.5 on page 145.
For more information about the flash window, see Section 6.6.2.3 on page 157.
6.6.2.2 Global Reset Release Mode
The global reset release mode is a variant of the rolling mode.
When the shutter is operating in global reset release mode, all of the lines in the sensor reset and
begin exposing when frame start is triggered (see Figure 62). However, in the end of exposure,
there is a temporal offset (designated as tRow) from one line to the next. The tRow values are the
same as for the rolling mode (see Table 35 on page 151).
The pixel values for each line are read out at the end of exposure time for the line. The readout time
for each line is also equal to tRow.
The exposure time for line one is determined by the ExposureTime parameter setting. The
exposure for line two will end tRow after the exposure ends for line one. The exposure for line three
will end tRow after the exposure ends for line two. And so on until the bottom line of pixels is
reached.
The Sensor Readout Time is the sum of the readout times of all lines. The Total Readout Time
equals the Sensor Readout Time plus the Exposure Overhead time C1.
In rolling mode, the flash window signal is not available when the exposure time
for the first row elapses before exposure for the last row of the current ROI has
started, i.e., more specifically, when Exposure Time ≤ Reset Runtime.

Image Acquisition Control AW00123408000
155 Basler ace USB 3.0
Camera Model Exposure Overhead C1
8 bit Pixel Format 12 bit p Pixel Format 12 bit Pixel Format
acA1920-25um 810 µs 810 µs 810 µs
acA2500-14um 810 µs 810 µs 810 µs
acA3800-14um 22285 µs 28516 µs 48371 µs
Table 38: Exposure Overhead Time for Mono Cameras in Global Reset Release Mode
Camera Model Exposure Overhead C1
8 bit Pixel Format 12 bit p Pixel Format 12 bit Pixel Format
acA1920-25uc 810 µs 810 µs 810 µs
acA2500-14uc 810 µs 810 µs 810 µs
acA3800-14uc 22310 µs 28545 µs 48402 µs
acA4600-10uc 23273 µs 30513 µs 61217 µs
Table 39: Exposure Overhead Time for Color Cameras in Global Reset Release Mode
If you want to use a flash window the global reset release mode gives you
advantages over using the rolling mode:
In global reset release mode the flash window width extends over the entire
exposure time of a line in a sensor. In rolling mode, however, the flash
window width can only extend over part of the exposure time of a sensor line
(compare Figure 62and Figure 63). Therefore, at a given frame rate, the
global reset release mode allows for longer useful exposure times.
In global reset release mode a flash window is always available, whereas in
rolling mode it is not if Exposure Time ≤ Reset Runtime.
In global reset release mode the flash window opens immediately after the
frame start trigger has occurred. For switching a flash on and off you
therefore do not have to wait and do not depend on the flash window signal
but can use the Exposure Active signal instead, if available. For more
information about the Exposure Active signal, see Section 6.8.1 on page 167.
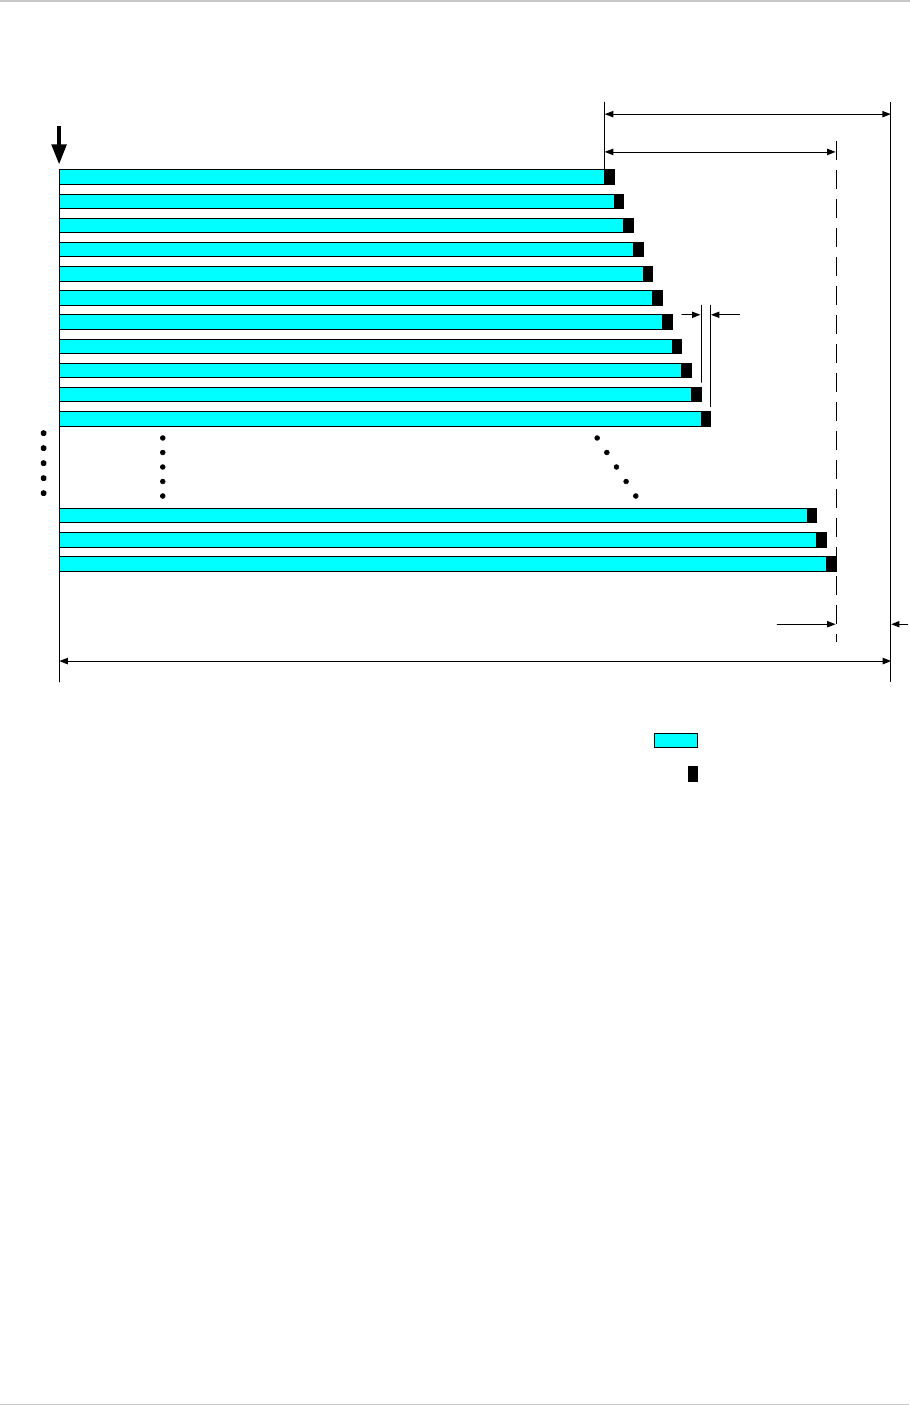
AW00123408000 Image Acquisition Control
Basler ace USB 3.0 156
You can calculate the total readout time using this formula:
Total Readout Time = [ tRow x (ROI Height) ] + C1µs
You can calculate the total runtime using the following formula:
Total Runtime = ExposureTime Parameter Setting + Total Readout Time
The cameras can provide an exposure active output signal that goes high when the exposure time
for line one begins and goes low when the exposure time for line one ends.
When the camera is operating in global release mode, the use of flash lighting is most strongly
recommended. The camera can supply a flash window output signal to facilitate the use of flash
lighting.
For more information about the exposure active output signal, see Section 6.8.1 on page 167.
For more information about the ExposureTime parameter, see Section 6.5 on page 145.
For more information about the flash window, see Section 6.6.2.3 on page 157.
Line 1
Line 2
Line 4
Line 3
Line 5
Line 6
Line 8
Line 7
Line 9
Line 10
Line 11
Line N-2
Line N
Line N-1
Sensor Readout Time
tRow
Total Runtime
= line exposure time
= line readout time
Frame Start
Triggered
Fig. 62: Rolling Shutter in Global Reset Release Mode
Total Readout Time
C1

Image Acquisition Control AW00123408000
157 Basler ace USB 3.0
For more information about the flash window output signal, see Section 6.8.2 on page 169.
Setting the Shutter Mode
The cameras have two shutter modes: rolling and global reset release.
You can set the shutter mode from within your application software by using the Basler pylon API.
The following code snippets illustrate using the API to set the shutter modes:
// Set the shutter mode to rolling
camera.ShutterMode.SetValue(ShutterMode_Rolling);
// Set the shutter mode to global reset release
camera.ShutterMode.SetValue(ShutterMode_GlobalResetRelease);
You can also use the Basler pylon Viewer application to easily set the mode.
6.6.2.3 The Flash Window
Flash Window in Rolling Mode
If you are using the rolling mode, capturing images of moving objects requires the use of flash
exposure. If you don’t use flash exposure when capturing images of moving objects, the images will
be distorted due to the temporal shift between the start of exposure for each line.
You can avoid distortion problems by using flash lighting and by applying the flash during the "flash
window" for each frame. The flash window is the period of time during a frame acquisition when all
of the lines in the sensor are open for exposure.
Figure 63 illustrates the flash window for the rolling mode.
You can calculate when the flash window opens (i.e., the time from the point where the frame is
triggered until the point where the window opens) using this formula:
Time to Flash Window Open = tRow x (ROI Height -1)
You can calculate the flash window width (i.e., how long the flash window remains open) using this
formula:
Flash Window Width = ExposureTime Parameter Setting - [ (tRow x (ROI Height -1) ]
The tRow values are the same as for both, rolling and global reset release mode and are given in
Table 35 on page 151.
To facilitate the use of flash lighting, you can use the flash window output signal (see Section 6.8.2
on page 169). The flash window signal goes high when the flash window opens and goes low when
the flash window closes.
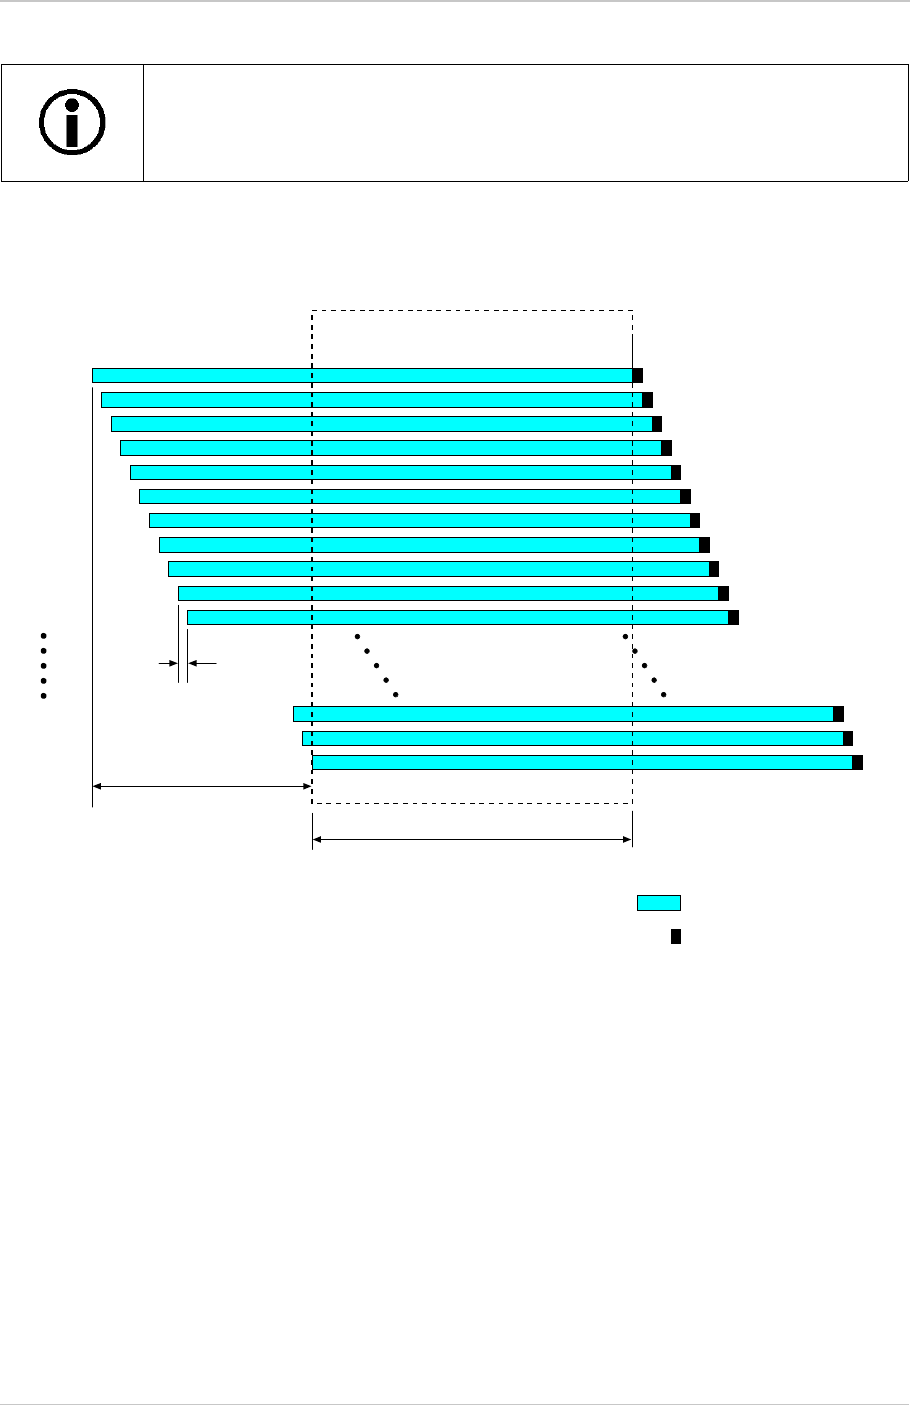
AW00123408000 Image Acquisition Control
Basler ace USB 3.0 158
For more information about the ExposureTime parameter, see Section 6.5 on page 145.
In rolling mode, the flash window signal is not available when the exposure time
for the first row elapses before exposure for the last row of the current ROI has
started, i.e., more specifically, when Exposure Time ≤ Reset Runtime.
Line 1
Line 2
Line 4
Line 3
Line 5
Line 6
Line 8
Line 7
Line 9
Line 10
Line 11
Line N-2
Line N
Line N-1
Time to Flash Window Open
tRow
Flash Window Width
= line exposure time
= line readout time
Flash Window
Fig. 63: Flash Window for Rolling Shutter in Rolling Mode

Image Acquisition Control AW00123408000
159 Basler ace USB 3.0
Flash Window in Global Reset Release Mode
If you are using the global reset release mode, you should use flash exposure for capturing images
of both stationary and moving objects. If you don’t use flash exposure when capturing images of
stationary objects, the brightness in each acquired image will vary significantly from top to bottom
due to the differences in the exposure times of the lines. If you don’t use flash exposure when
capturing images of moving objects, the brightness in each acquired image will vary significantly
from top to bottom due to the differences in the exposure times of the lines and the images will be
distorted due to the temporal shift between the end of exposure for each line.
You can avoid these problems by using flash lighting and by applying the flash during the "flash
window" for each frame. The flash window is the period of time during a frame acquisition when all
of the lines in the sensor are open for exposure.
Figure 64 illustrates the flash window for the global reset release mode.
In global reset release mode, the flash window opens when the frame is triggered and closes after
a time period equal to the ExposureTime parameter setting. Thus, the flash window width (i.e., how
long the flash window will remain open) is equal to the ExposureTime parameter setting.
To facilitate the use of flash lighting, you can use the flash window output signal (see Section 6.8.2
on page 169). The flash window signal goes high when the flash window opens and goes low when
the flash window closes.
For more information about the ExposureTime parameter, see Section 6.5 on page 145.
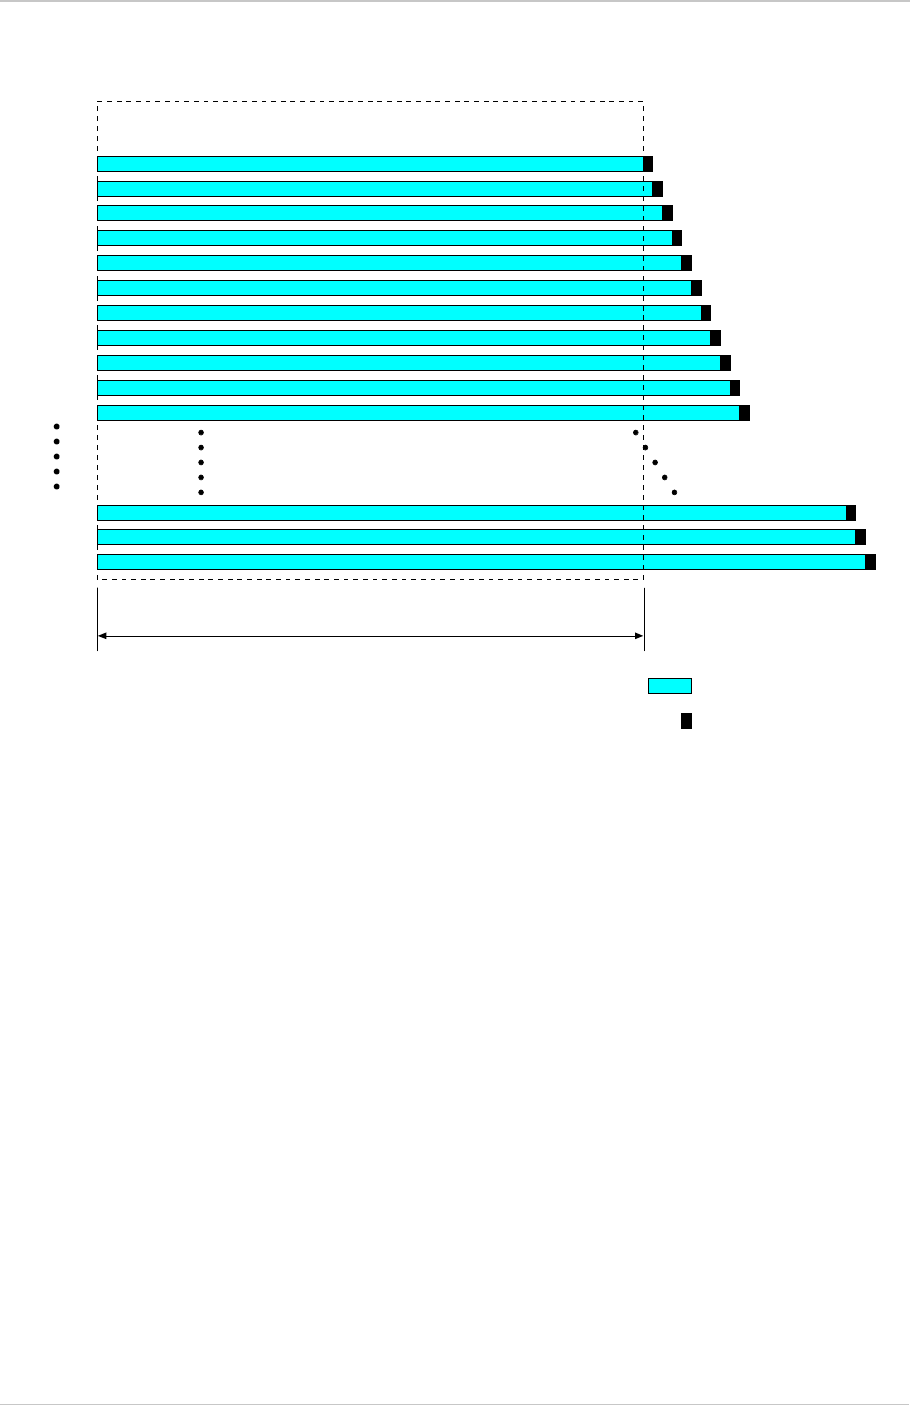
AW00123408000 Image Acquisition Control
Basler ace USB 3.0 160
Line 1
Line 2
Line 4
Line 3
Line 5
Line 6
Line 8
Line 7
Line 9
Line 10
Line 11
Line N-2
Line N
Line N-1
Flash Window Width
= line exposure time
= line readout time
Flash Window
Fig. 64: Flash Window for Rolling Shutter in Global Reset Release Mode
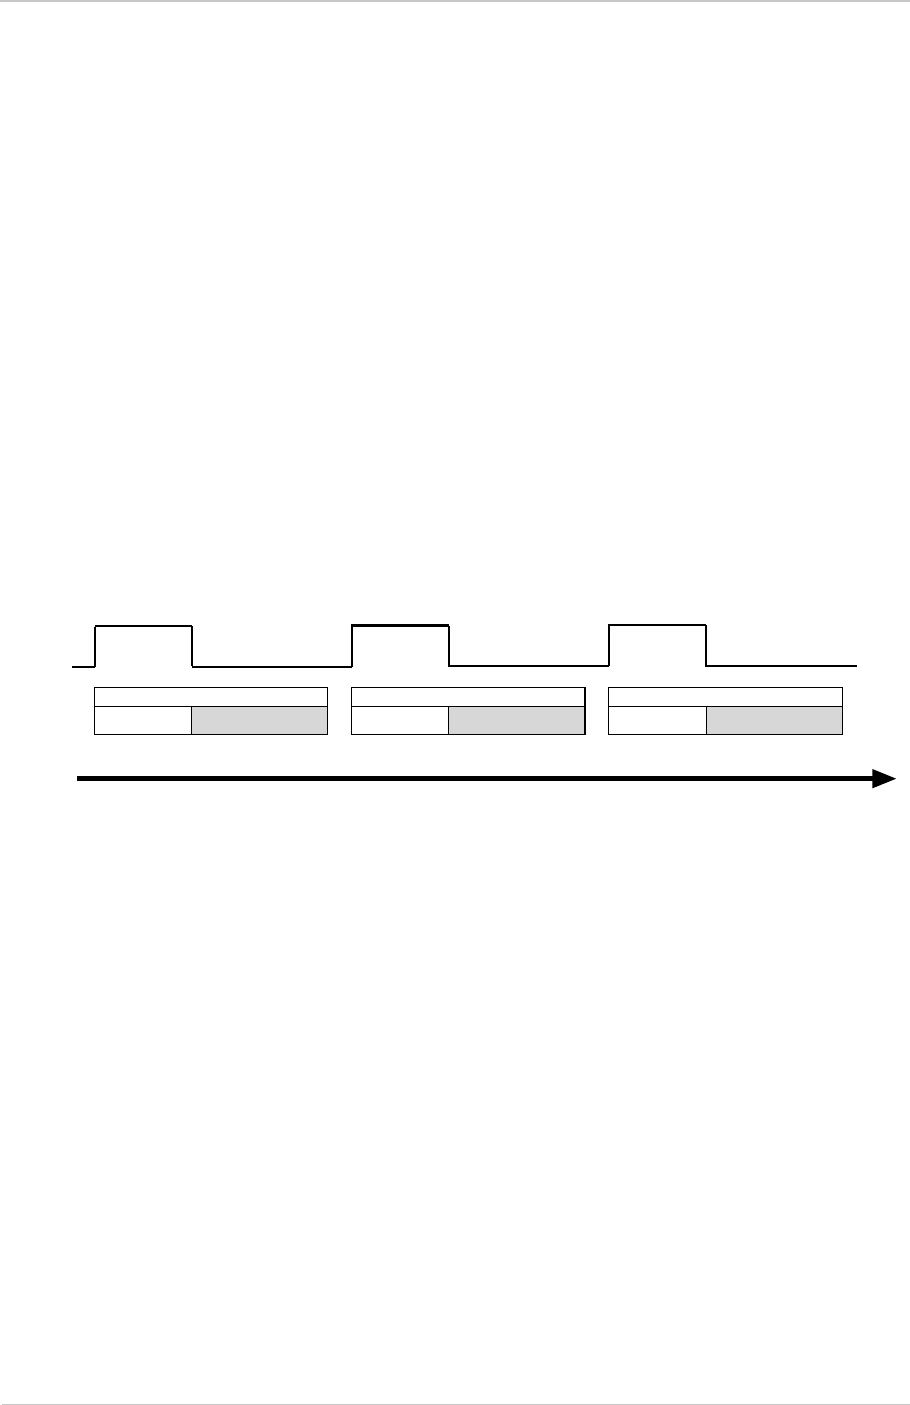
Image Acquisition Control AW00123408000
161 Basler ace USB 3.0
6.7 Overlapping Image Acquisitions
6.7.1 Overlapping Image Acquisitions for All Models
Except acA1920-25, acA2500-14, acA3800-14,
acA4600-10
The frame acquisition process on the camera includes two distinct parts. The first part is the
exposure of the pixels in the imaging sensor. Once exposure is complete, the second part of the
process – readout of the pixel values from the sensor – takes place. In regard to this frame
acquisition process, there are two common ways for the camera to operate: with “non-overlapped”
exposure and with “overlapped” exposure.
In the non-overlapped mode of operation, each time a frame is acquired the camera completes the
entire exposure/sensor readout process before acquisition of the next frame is started. The
exposure for a new frame does not overlap the sensor readout for the previous frame. This situation
is illustrated in Figure 65 with the camera set for the trigger width exposure mode.
In the overlapped mode of operation, the exposure of a new frame begins while the camera is still
reading out the sensor data for the previously acquired frame. This situation is illustrated in
Figure 66 with the camera set for the trigger width exposure mode.
Frame Acquisition N
Exposure Sensor Readout
Frame Acquisition N+1
Exposure Sensor Readout
Frame Acquisition N+2
Exposure Sensor Readout
Time
ExFSTrig
Signal
Fig. 65: Non-overlapped Exposure and Sensor Readout
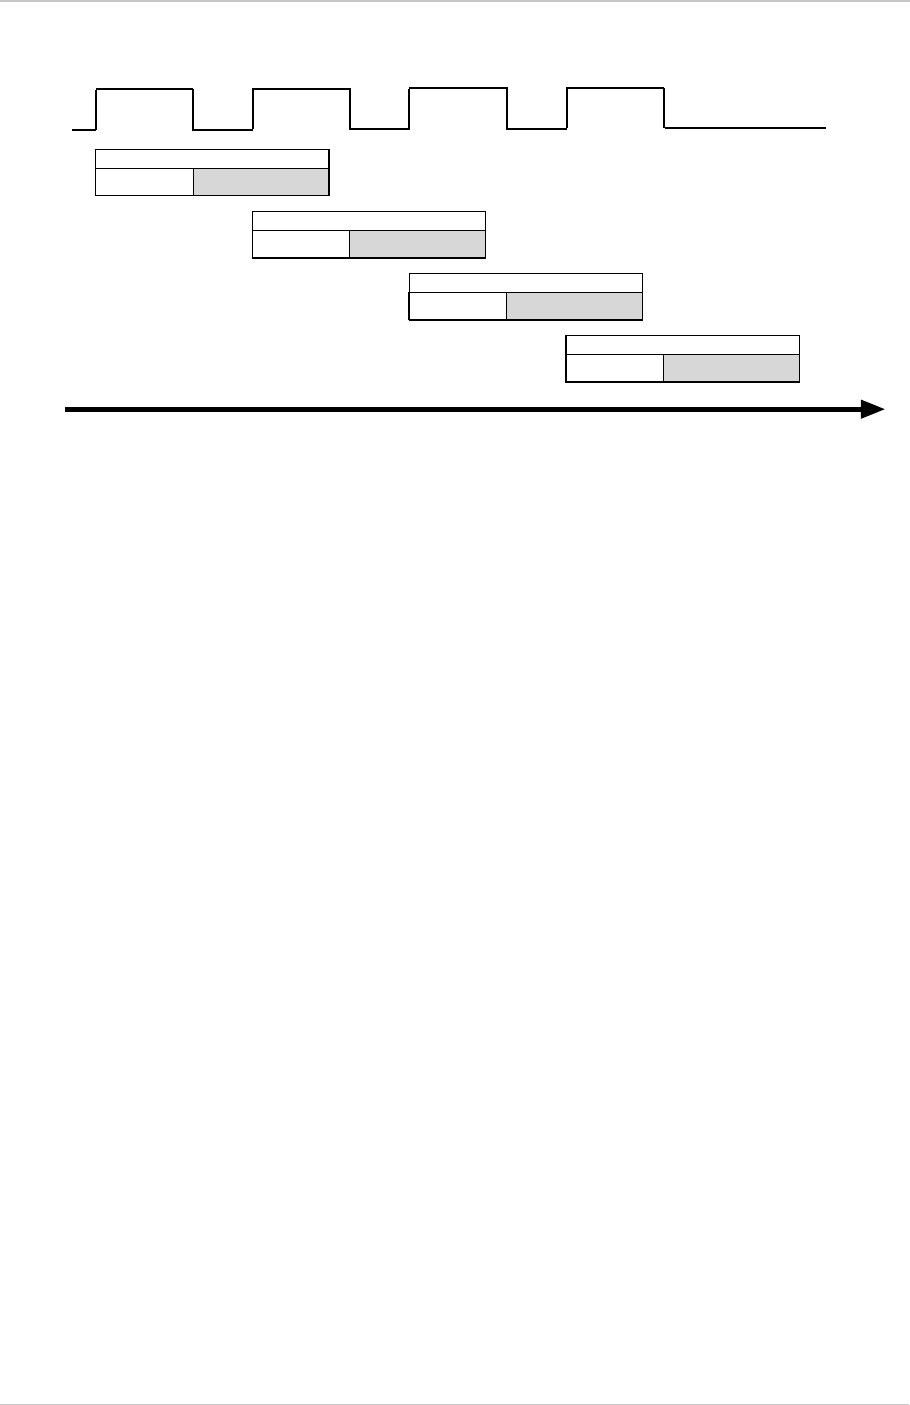
AW00123408000 Image Acquisition Control
Basler ace USB 3.0 162
Determining whether your camera is operating with overlapped or non-overlapped exposure and
readout is not a matter of issuing a command or switching a setting on or off. Rather the way that
you operate the camera will determine whether the exposures and readouts are overlapped or not.
If we define the “frame period” as the time from the start of exposure for one frame acquisition to
the start of exposure for the next frame acquisition, then:
Exposure will not overlap when: Frame Period > Exposure Time + Sensor Readout Time
Exposure will overlap when: Frame Period ≤ Exposure Time + Sensor Readout Time
You can determine the sensor readout time by reading the value of the Sensor Readout Time
parameter. The parameter indicates what the readout time will be in microseconds given the
camera’s current settings. You can read the Readout Time parameter value from within your
application software by using the Basler pylon API. The following code snippet illustrates using the
API to get the parameter value:
double d = camera.SensorReadoutTime.GetValue();
You can also use the Basler pylon Viewer application to easily get the parameter value.
For more information about the pylon API and the pylon Viewer, see Section 3.1 on page 62.
Frame Acquisition N
Exposure Sensor Readout
Frame Acquisition N+1
Exposure Sensor Readout
Frame Acquisition N+2
Exposure Sensor Readout
Time
Frame Acquisition N+3
Exposure Sensor Readout
ExFSTrig
Signal
Fig. 66: Overlapped Exposure and Sensor Readout
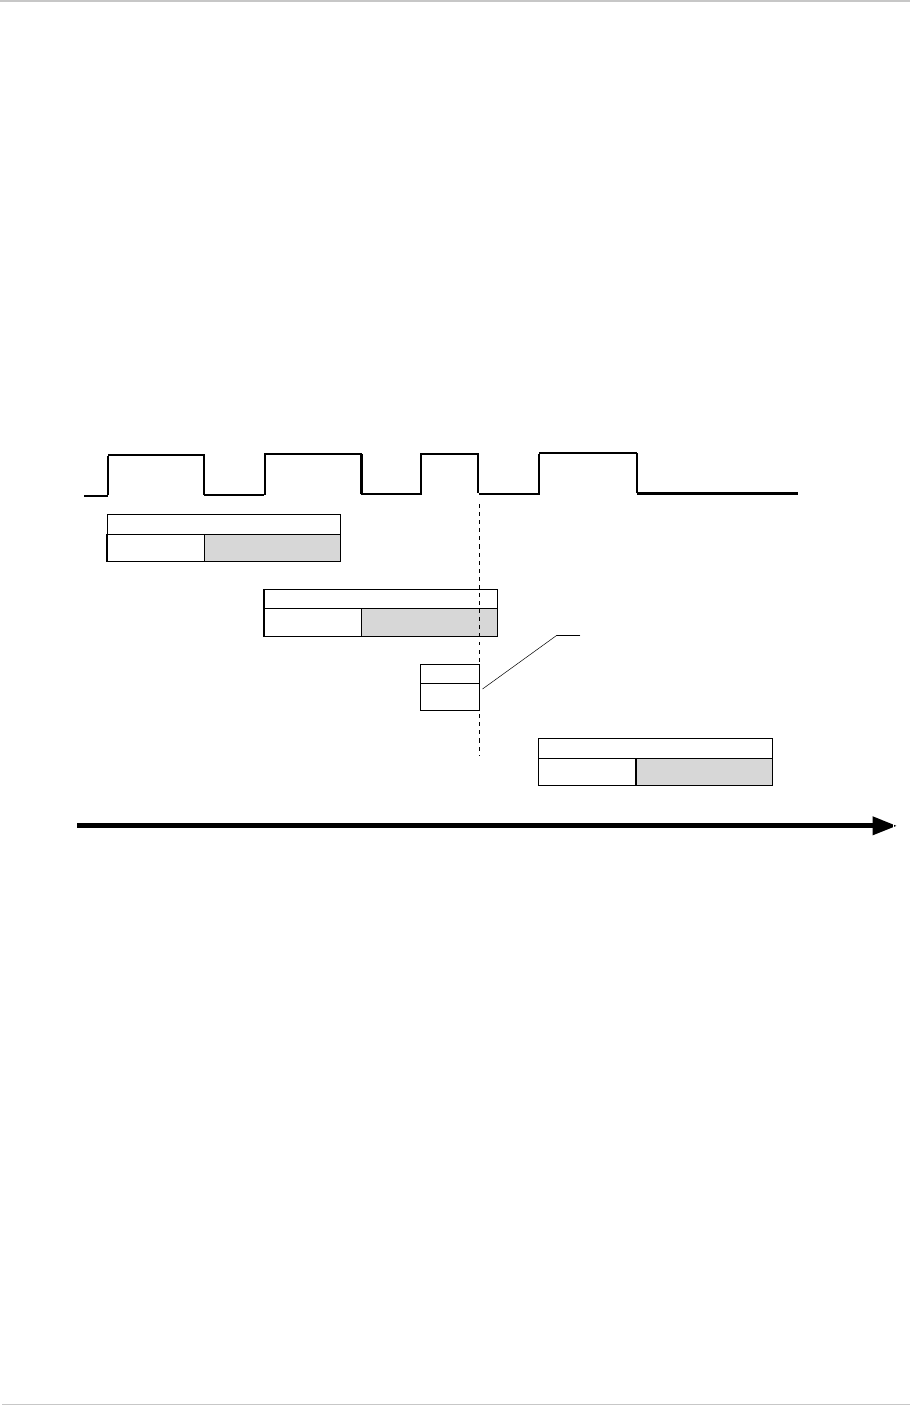
Image Acquisition Control AW00123408000
163 Basler ace USB 3.0
Guideline for Overlapped Operation with Trigger Width Exposure
If the camera is set for the trigger width exposure mode and you are operating the camera in a way
that readout and exposure will be overlapped, there is an important guideline you must keep in
mind:
You must not end the exposure time of the current frame acquisition until readout of the
previously acquired frame is complete.
If this guideline is violated, the camera will drop the frame for which the exposure was just ended
and will declare a Frame Start Overtrigger event. This situation is illustrated in Figure 67 with the
camera set for the trigger width exposure mode with rising edge triggering.
You can avoid violating this guideline by using the camera’s Frame Trigger Wait signal to determine
when exposure can safely begin and by properly setting the camera’s Exposure Overlap Time Max
parameter.
For more information about the Frame Trigger Wait signal and the Exposure Overlap Time Max
parameter, see Section 6.8.4.2 on page 174.
For more information about trigger width exposure, see Section 6.4.3.2 on page 136.
Frame Acquisition N
Exposure Sensor Readout
Frame Acquisition N+1
Exposure Sensor Readout
Exp
This exposure was ended too
early. The frame will be dropped
and an overtrigger event declared.
Time
Frame Acquisition N+3
Exposure Sensor Readout
ExFSTrig
Signal
Fig. 67: Overtriggering Caused by an Early End of Exposure
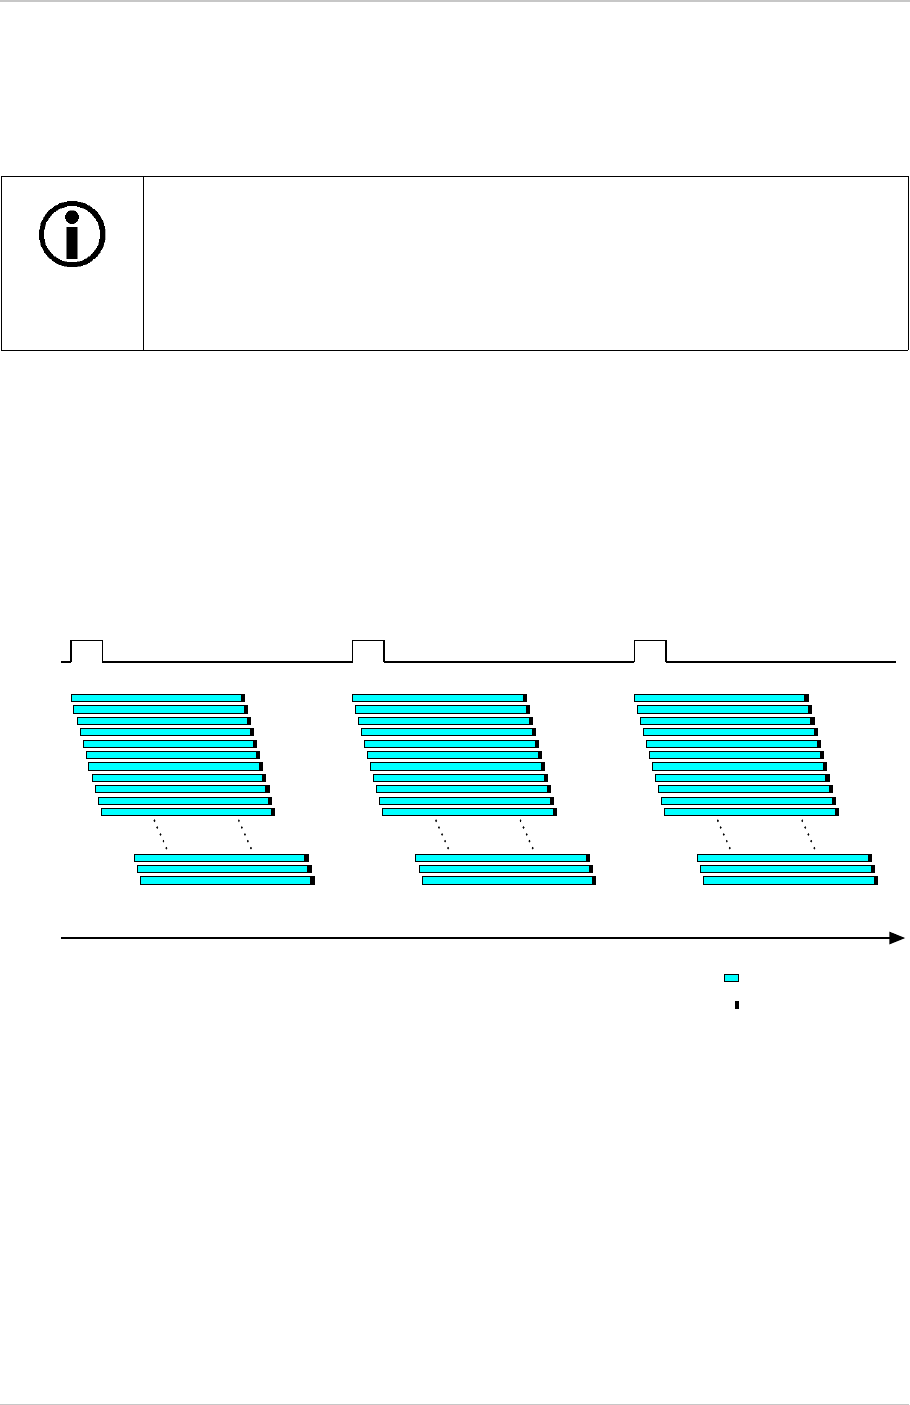
AW00123408000 Image Acquisition Control
Basler ace USB 3.0 164
6.7.2 Overlapping Image Acquisitions for acA1920-25,
acA2500-14, acA3800-14, acA4600-10
When using a camera with a rolling shutter, there are two common ways for the camera to operate:
with “non-overlapped” acquisition and with “overlapped” acquisition.
In the non-overlapped mode of operation, each time a frame is acquired the camera completes the
entire acquisition process for a frame, consisting of exposure plus sensor readout, before
acquisition of the next frame is started. The acquisition of a new frame does not overlap any part of
the acquisition process for the previous frame. This situation is illustrated in Figure 68 with the
camera using an external frame start trigger.
In the overlapped mode of operation, the acquisition for a new frame begins while the camera is still
completing the acquisition process for the previous frame. This situation is illustrated in Figure 69.
Overlapped frame acquisition cannot be performed when the camera’s
shutter is set for global reset release mode. Overlapped frame acquisition can
only be performed when the camera’s shutter is in the rolling mode.
acA3800-14 and acA4600-10 cameras allow overlapped frame acquisition
only when they are triggered internally ("free run"), i.e. when Trigger Mode is
set to Off for the Frame Burst Start trigger and for the Frame Start Trigger.
Frame Acquisition N Frame Acquisition N+1 Frame Acquisition N+2
= Line Exposure
= Line Readout
Time
ExFSTrig
Signal
Fig. 68: Non-overlapped Acquisition

Image Acquisition Control AW00123408000
165 Basler ace USB 3.0
Determining whether your camera is operating with overlapped or with non-overlapped acquisition
is not a matter of issuing a command or switching a setting on or off. Rather the way that you
operate the camera will determine whether the frame acquisitions are overlapped or not. If we
define the “frame period” as the time from the start of exposure for line one in the frame N
acquisition to the start of exposure for line one in frame N+1 acquisition, then:
Exposure will not overlap when:
Frame Period > ExposureTime Parameter Setting + Total Sensor Readout Time
Exposure will overlap when:
Frame Period ≤ ExposureTime Parameter Setting + Total Sensor Readout Time
You can determine the total sensor readout time for a frame by reading the value of the Sensor
Readout Time parameter. This parameter indicates the time in microseconds from the beginning of
readout for line one to the end of readout for line N (the last line). You can read the Readout Time
parameter value from within your application software by using the Basler pylon API. The following
code snippet illustrates using the API to get the parameter value:
double d = camera.SensorReadoutTime.GetValue();
You can also use the Basler pylon Viewer application to easily get the parameter value.
For more information about the pylon API and the pylon Viewer, see Section 3.1 on page 62.
Frame Acquisition N Frame Acquisition N+1 Frame Acquisition N+2
= Line Exposure
= Line Readout
Time
ExFSTrig
Signal
Fig. 69: Overlapped Exposure and Sensor Readout
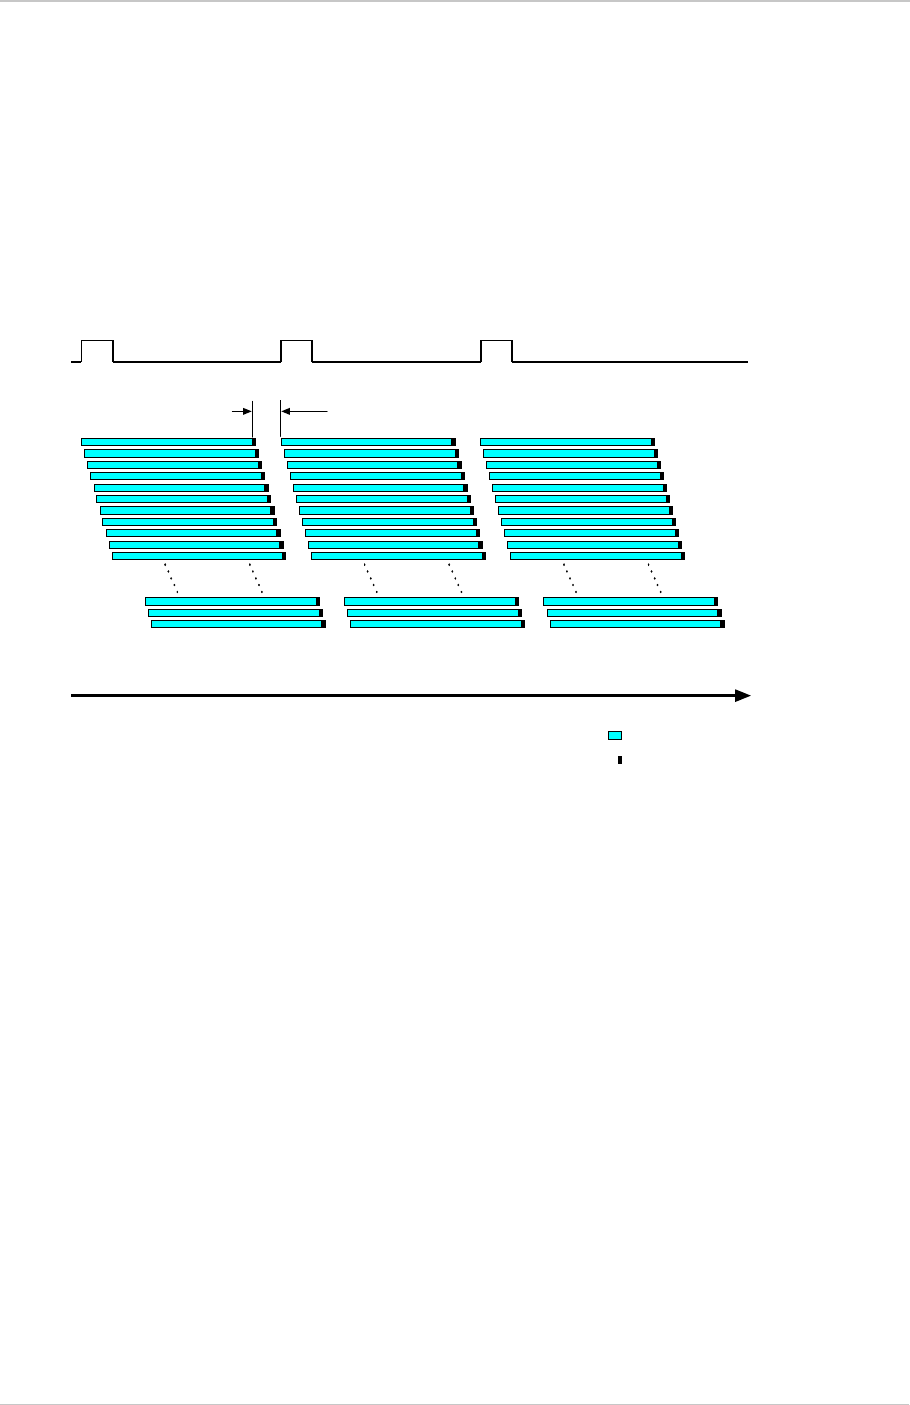
AW00123408000 Image Acquisition Control
Basler ace USB 3.0 166
Guideline for Overlapped Acquisition
If you are operating the camera in such a way that frame acquisitions will be overlapped, there is
an important guideline you must keep in mind:
You must wait a minimum of 400 µs after the end of exposure for line one in frame N before you
can trigger acquisition of frame N+1. This requirement is illustrated in Figure 70
If this guideline is violated, the camera will ignore the frame start trigger signal and will declare a
Frame Start Overtrigger event.
You can avoid violating this guideline by using the camera’s Frame Trigger Wait signal to determine
when exposure can safely begin.
Frame Acquisition N Frame Acquisition N+1 Frame Acquisition N+2
= Line Exposure
= Line Readout
Time
ExFSTrig
Signal
400 µs Min.
Fig. 70: Acquisition Overlap Guideline
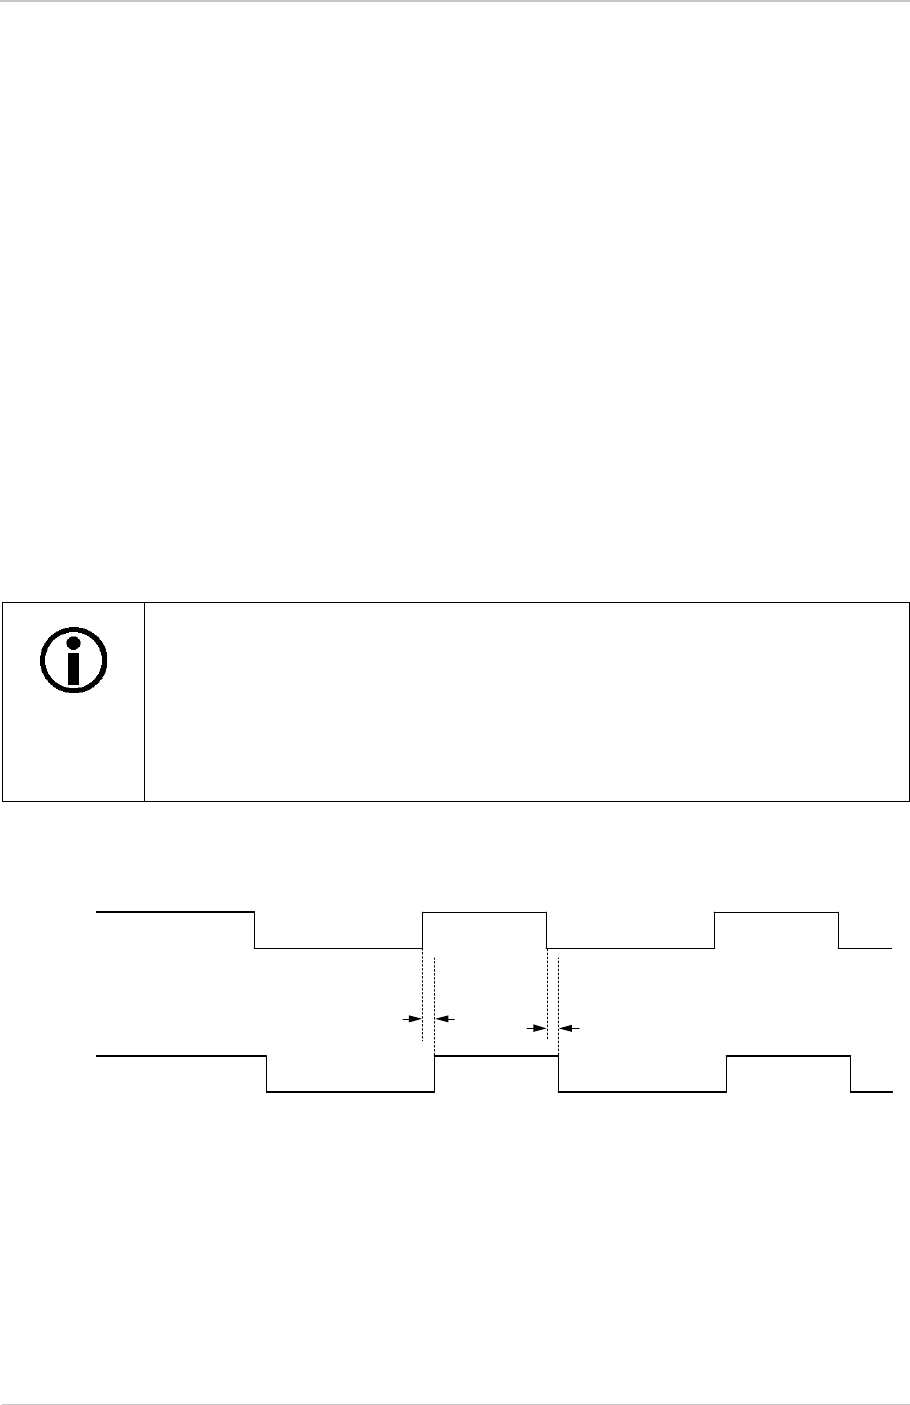
Image Acquisition Control AW00123408000
167 Basler ace USB 3.0
6.8 Acquisition Monitoring Tools
6.8.1 Exposure Active Signal
Exposure Active on Global Shutter Cameras (All Models Except the acA1920-25,
acA2500-14, acA3800-14, acA4600-10)
Cameras with a global shutter imaging sensor can provide an "exposure active" (ExpAc) output
signal. On these cameras, the high state of the signal indicates a logical one on the FPGA output
side (Figure 71, see also Figure 40). This signal can be used as a flash trigger and is also useful
when you are operating a system where either the camera or the object being imaged is movable.
For example, assume that the camera is mounted on an arm mechanism and that the mechanism
can move the camera to view different portions of a product assembly. Typically, you do not want
the camera to move during exposure. In this case, you can monitor the ExpAc signal to know when
exposure is taking place and thus know when to avoid moving the camera.
When you use the exposure active signal, be aware that there is a delay in the rise
and the fall of the signal in relation to the start and the end of exposure (see
Figure 71).
Using a GPIO line, set for output, will bring about shorter delays, compared to
using the opto-isolated output line. The exact delays depend on several factors
See Section 5.10.2 on page 90 for details.
Exposure
Frame N Exposure
Frame N+1 Exposure
Frame N+2
Exposure
ExpAc
Signal
Opto-coupled OUT: 27 µs to 38 µs (Example Only)
Timing charts are not drawn to scale.
The times stated are only given as examples. They are only valid
for the operating conditions given in Section 5.10.3.
Fig. 71: Exposure Active Signal on Cameras with a Global Shutter
GPIO OUT: <2.5 µs (Example Only) Opto-coupled OUT: 3 µs to 6 µs (Example Only)
GPIO OUT: <0.5 µs (Example Only)
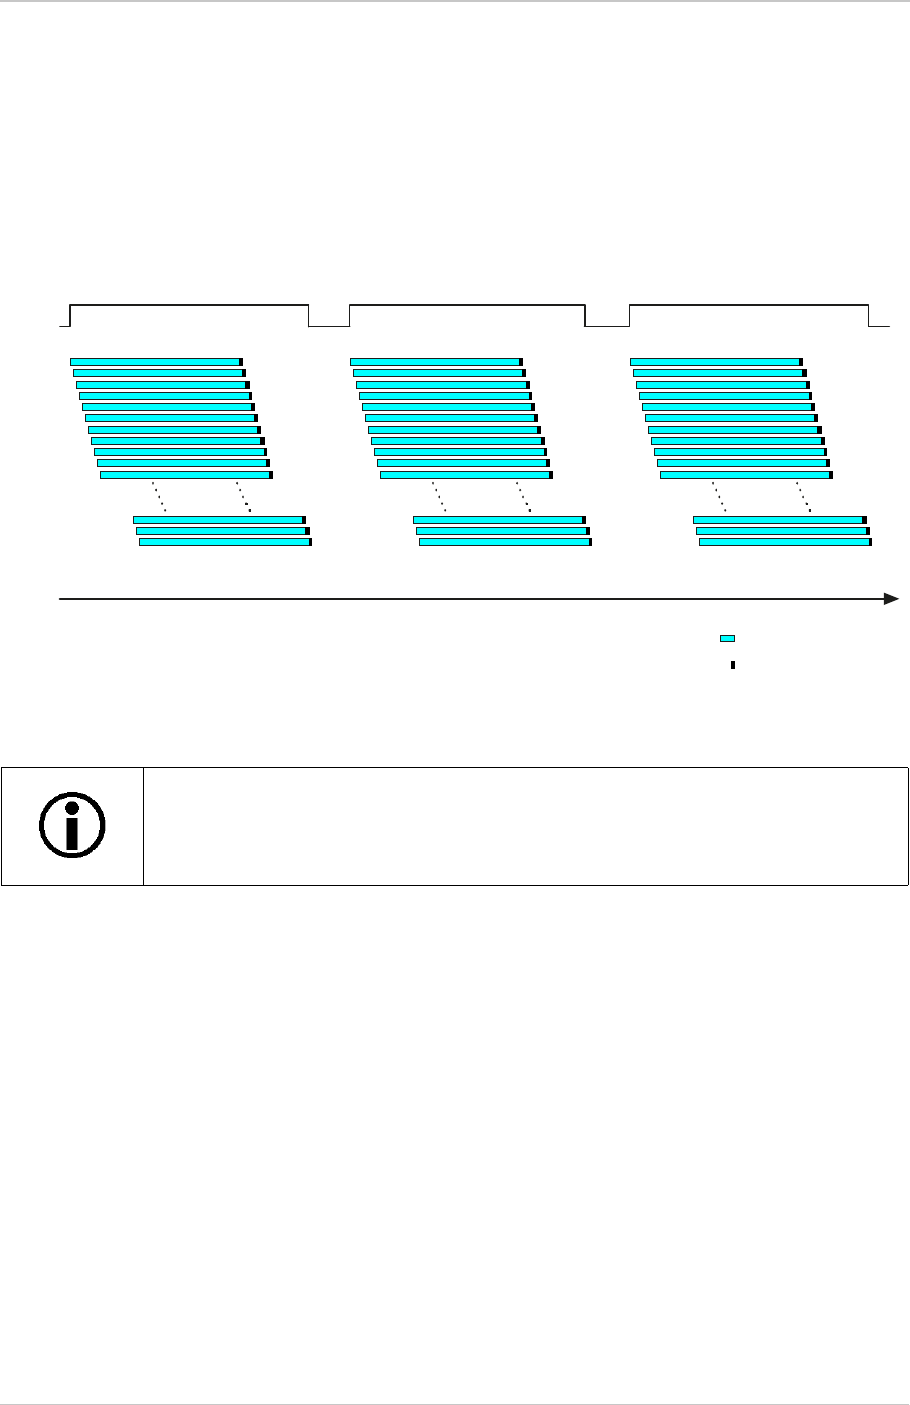
AW00123408000 Image Acquisition Control
Basler ace USB 3.0 168
Exposure Active on Rolling Shutter Cameras (acA1920-25, acA2500-14 Only)
Some cameras with a rolling shutter imaging sensor can provide an "exposure active" (ExpAc)
output signal. On these cameras, the signal goes high when exposure for the first line in a frame
begins and goes low when exposure for the last line ends as shown in Figure 72. This behavior
applies to both, the rolling mode and global reset release mode.
Selecting the Exposure Active Signal as the Source Signal for an Output Line
The exposure active output signal can be selected to act as the source signal for an output line, e.g.
Line 2. Selecting a source signal for the output line is a two step process:
Use the Line Selector to select the output line, e.g. Line 2.
Set the value of the Line Source Parameter to the exposure active output signal.
You can set the Line Selector and the Line Source parameter value from within your application
software by using the Basler pylon API. The following code snippet illustrates using the API to set
the selector and the parameter value:
camera.LineSelector.SetValue(LineSelector_Line2);
camera.LineSource.SetValue(LineSource_ExposureActive);
The exposure active signal is not available for acA3800-14, and acA4600-10
cameras. However, the flash window signal is available and may in some cases
serve as an alternative (see Section 6.8.2 on page 169).
Frame Acquisition N Frame Acquisition N+1 Frame Acquisition N+2
= Line Exposure
= Line Readout
Time
Exposure
Active
Signal
Fig. 72: Exposure Active Signal on Cameras Operating in Rolling Mode
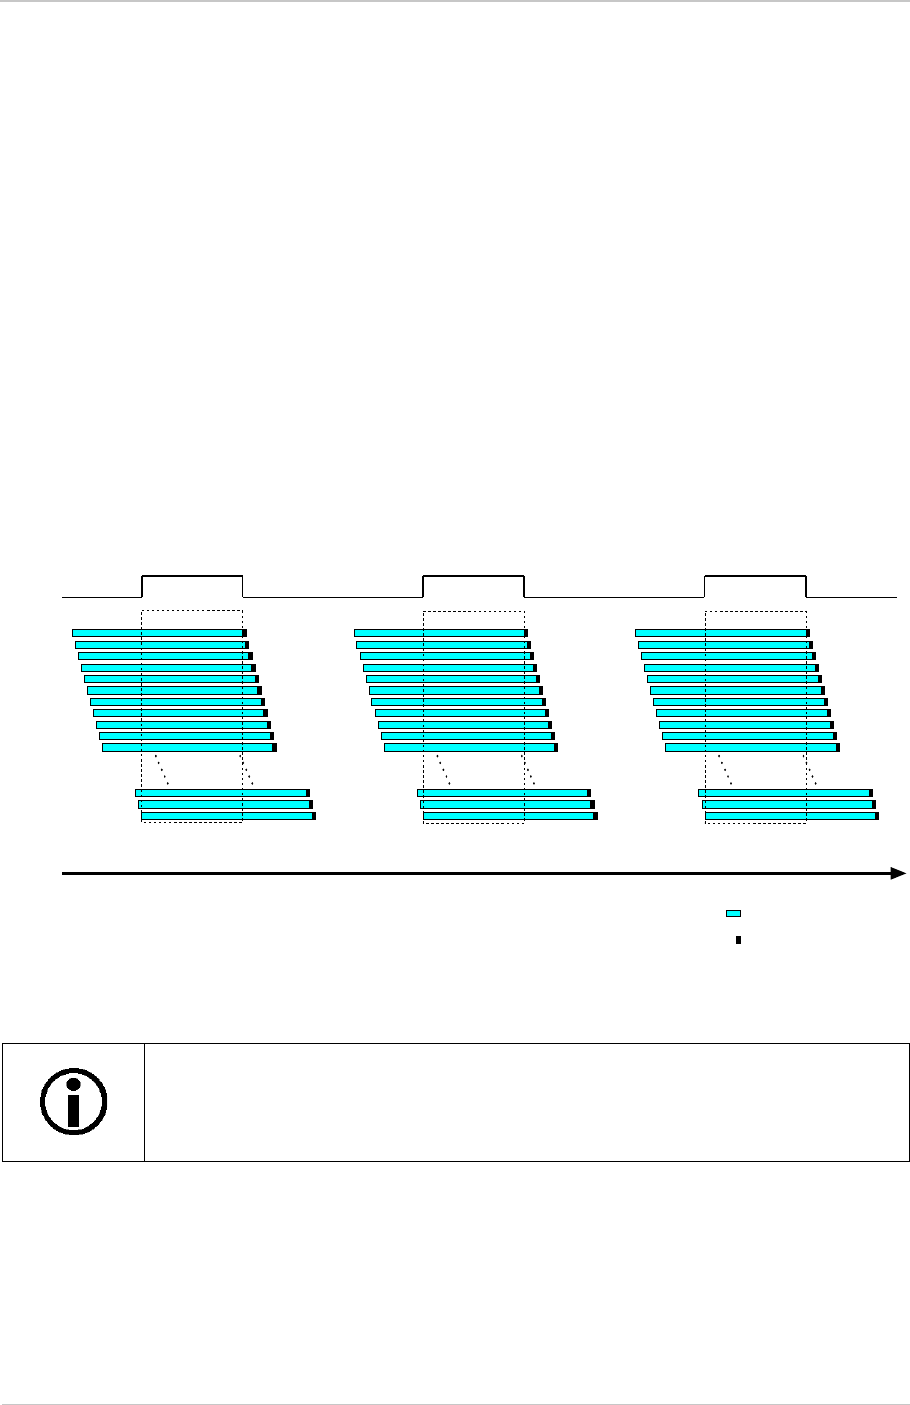
Image Acquisition Control AW00123408000
169 Basler ace USB 3.0
You can also use the Basler pylon Viewer application to easily set the parameters.
For more information about the pylon API and the pylon Viewer, see Section 3.1 on page 62.
For more information about changing the selection of a camera output signal as the source signal
for an output line, see Section 5.12.1 on page 97.
For more information about the electrical characteristics of output line Line 2, see Section 5.8.1 on
page 77, and of GPIO Line 3 and Line 4, set for output, see Section 5.9.4.1 on page 84.
6.8.2 Flash Window Signal
Cameras with a rolling shutter imaging sensor (acA1920-25, acA2500-14, acA3800-14,
acA4600-10 models) can provide a flash window output signal to aid you in the use of flash lighting.
The flash window signal will go high when the flash window for each image acquisition opens and
will go low when the flash window closes. Figure 73 illustrates the flash window signal on a camera
with the shutter operating in the rolling mode.
For more information about the rolling shutter and the flash window, see Section 6.6.2 on page 151.
The flash window signal is also available on cameras with a global shutter imaging
sensor. On global shutter cameras, the flash window signal is simply the
equivalent of the exposure active signal.
Frame Acquisition N Frame Acquisition N+1 Frame Acquisition N+2
= Line Exposure
= Line Readout
Time
Flash
Window
Signal Flash Window Flash Window Flash Window
Fig. 73: Flash Window Signal on Cameras Operating in Rolling Mode

AW00123408000 Image Acquisition Control
Basler ace USB 3.0 170
Selecting the Flash Window Signal as the Source Signal for an Output Line
The flash window output signal can be selected to act as the source signal for a camera output line,
e.g. Line 2. Selecting a source signal for the output line is a two step process:
Use the Line Selector to select the output line, e.g. Line 2.
Set the value of the Line Source Parameter to the flash window signal.
You can set the Line Selector and the Line Source parameter value from within your application
software by using the Basler pylon API. The following code snippet illustrates using the API to set
the selector and the parameter value:
camera.LineSelector.SetValue(LineSelector_Line2);
camera.LineSource.SetValue(LineSource_FlashWindow);
You can also use the Basler pylon Viewer application to easily set the parameters.
For more information about the pylon API and the pylon Viewer, see Section 3.1 on page 62.
For more information about changing the selection of an output signal as the source signal for the
output line, see Section 5.12.1 on page 97.
For more information about the electrical characteristics of camera output lines, see Section 5.8.1
on page 77 and Section 5.9.4.1 on page 84.

Image Acquisition Control AW00123408000
171 Basler ace USB 3.0
6.8.3 Acquisition Status Indicator
If a camera receives a software frame burst start trigger signal when it is not in a "waiting for frame
burst start trigger" acquisition status, it will simply ignore the trigger signal and will generate a frame
burst start overtrigger event.
If a camera receives a software frame start trigger signal when it is not in a "waiting for frame start
trigger" acquisition status, it will simply ignore the trigger signal and will generate a frame start
overtrigger event.
The camera’s acquisition status indicator gives you the ability to check whether the camera is in a
"waiting for frame burst start trigger" acquisition status or in a "waiting for frame start trigger"
acquisition status. If you check the acquisition status before you apply each software frame burst
start trigger signal or each software frame start trigger signal, you can avoid applying trigger signals
to the camera that will be ignored.
The acquisition status indicator is designed for use when you are using host control of image
acquisition, i.e., when you are using software frame burst start trigger and frame start trigger
signals.
To determine the acquisition status of the camera via the Basler pylon API:
Use the Acquisition Status Selector to select the Frame Burst Trigger Wait status or the Frame
Trigger Wait status.
Read the value of the Acquisition Status parameter.
If the value is set to "false", the camera is not waiting for the trigger signal.
If the value is set to "true", the camera is waiting for the trigger signal.
You can check the acquisition status from within your application software by using the Basler pylon
API. The following code snippet illustrates using the API to check the acquisition status:
// Check the frame burst start trigger acquisition status
// Set the acquisition status selector
camera.AcquisitionStatusSelector.SetValue(AcquisitionStatusSelector_FrameBurst-
TriggerWait);
// Read the acquisition status
bool a = camera.AcquisitionStatus.GetValue();
// Check the frame start trigger acquisition status
// Set the acquisition status selector
camera.AcquisitionStatusSelector.SetValue(AcquisitionStatusSelector_FrameTrig-
gerWait);
// Read the acquisition status
bool b = camera.AcquisitionStatus.GetValue();
You can also use the Basler pylon Viewer application to easily set the parameters.
For more information about the pylon API and pylon Viewer, see Section 3.1 on page 62.

AW00123408000 Image Acquisition Control
Basler ace USB 3.0 172
6.8.4 Trigger Wait Signals
If a camera receives a hardware frame burst start trigger signal when it is not in a "waiting for frame
burst start trigger" acquisition status, it will simply ignore the trigger signal and will generate a frame
burst start overtrigger event.
If a camera receives a hardware frame start trigger signal when it is not in a "waiting for frame start
trigger" acquisition status, it will simply ignore the trigger signal and will generate a frame start
overtrigger event.
The camera’s frame burst trigger wait signal gives you the ability to check whether the camera is in
a "waiting for frame burst start trigger" acquisition status. If you check the frame burst trigger wait
signal before you apply each hardware frame burst start trigger signal, you can avoid applying
frame burst start trigger signals to the camera that will be ignored.
The camera’s frame trigger wait signal gives you the ability to check whether the camera is in a
"waiting for frame start trigger" acquisition status. If you check the frame trigger wait signal before
you apply each hardware frame start trigger signal, you can avoid applying frame start trigger
signals to the camera that will be ignored.
These signals are designed to be used when you are triggering frame burst start or frame start via
a hardware trigger signal.
6.8.4.1 Frame Burst Trigger Wait Signal
As you are acquiring frames, the camera automatically monitors the frame burst start trigger status
and supplies a signal that indicates the current status. The Frame Burst Trigger Wait signal will go
high whenever the camera enters a "waiting for frame burst start trigger" status. The signal will go
low when an external frame burst start trigger (ExFBSTrig) signal is applied to the camera and the
camera exits the "waiting for frame burst start trigger status". The signal will go high again when the
camera again enters a "waiting for frame burst trigger" status and it is safe to apply the next frame
burst start trigger signal.
If you base your use of the ExFBSTrig signal on the state of the frame burst trigger wait signal, you
can avoid "frame burst start overtriggering", i.e., applying a frame burst start trigger signal to the
camera when it is not in a "waiting for frame burst start trigger" acquisition status. If you do apply a
frame burst start trigger signal to the camera when it is not ready to receive the signal, it will be
ignored and a frame burst start overtrigger event will be reported.
Figure 74 illustrates the Frame Burst Trigger Wait signal with the Acquisition Burst Frame Count
parameter set to 3 and with exposure and readout overlapped on a camera with a global shutter.
The figure assumes that the trigger mode for the frame start trigger is set to off, so the camera is
internally generating frame start trigger signals.
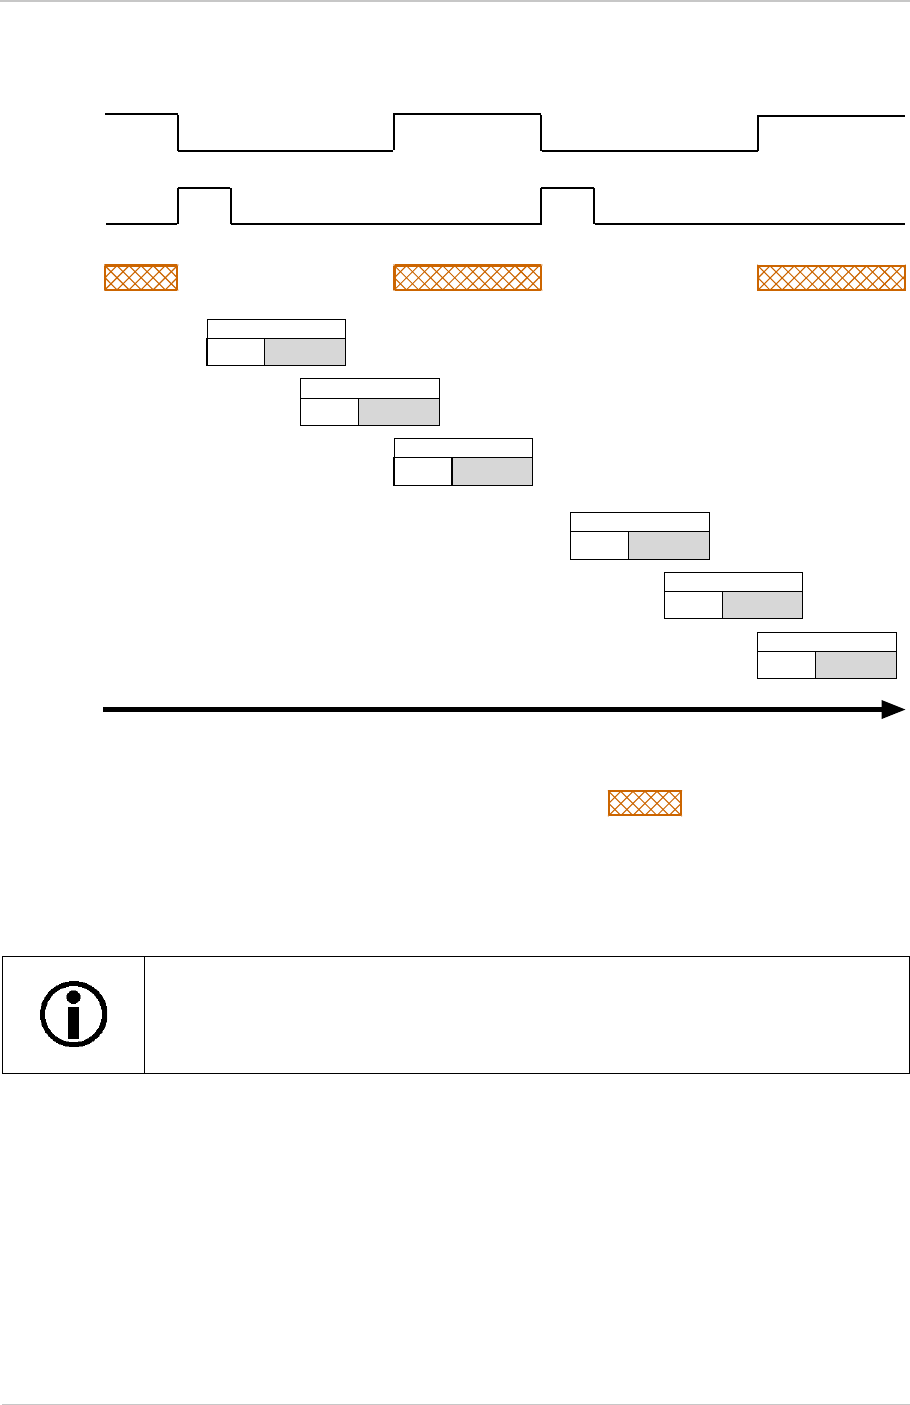
Image Acquisition Control AW00123408000
173 Basler ace USB 3.0
For more information about event notification, see Section 7.17 on page 319.
The frame burst trigger wait signal will only be available when hardware frame
burst start triggering is enabled.
Time
= Camera is in a "waiting for
frame burst start trigger" status
Frame Burst
Trigger Wait
Signal
Frame Acquisition
Exp. Sensor
Readout
Frame Acquisition
Exp.
Frame Acquisition
Exp.
Frame Acquisition
Exp.
Frame Acquisition
Exp.
Frame Acquisition
Exp.
Frame Burst
Trig Signal
Fig. 74: Frame Burst Trigger Wait Signal
Sensor
Readout
Sensor
Readout
Sensor
Readout
Sensor
Readout
Sensor
Readout

AW00123408000 Image Acquisition Control
Basler ace USB 3.0 174
Selecting the Frame Burst Trigger Wait Signal as the Source Signal for an
Output Line
The frame burst trigger wait signal can be selected to act as the source signal for a camera output
line, e.g. line Line 2. Selecting a source signal for an output line is a two step process:
Use the Line Selector to select the output line, e.g. Line 2.
Set the value of the Line Source Parameter to the frame burst trigger wait signal.
You can set the Line Selector and the Line Source parameter value from within your application
software by using the Basler pylon API. The following code snippet illustrates using the API to set
the selector and the parameter value:
camera.LineSelector.SetValue(LineSelector_Line2);
camera.LineSource.SetValue(LineSource_FrameBurstTriggerWait);
You can also use the Basler pylon Viewer application to easily set the parameters.
For more information about the pylon API and the pylon Viewer, see Section 3.1 on page 62.
For more information about changing the selection of an output signal as the source signal for an
output line, see Section 5.12.1 on page 97.
For more information about the electrical characteristics of camera output lines, see Section 5.8.1
on page 77 and Section 5.9.4.1 on page 84.
6.8.4.2 The Frame Trigger Wait Signal
Overview
As you are acquiring frames, the camera automatically monitors the frame start trigger status and
supplies a signal that indicates the current status. The Frame Trigger Wait signal will go high
whenever the camera enters a "waiting for frame start trigger" status. The signal will go low when
an external frame start trigger (ExFSTrig) signal is applied to the camera and the camera exits the
"waiting for frame start trigger status". The signal will go high again when the camera again enters
a "waiting for frame trigger" status and it is safe to apply the next frame start trigger signal.
If you base your use of the ExFSTrig signal on the state of the frame trigger wait signal, you can
avoid "frame start overtriggering", i.e., applying a frame start trigger signal to the camera when it is
not in a "waiting for frame start trigger" acquisition status. If you do apply a frame start trigger signal
to the camera when it is not ready to receive the signal, it will be ignored and a frame start
overtrigger event will be reported.
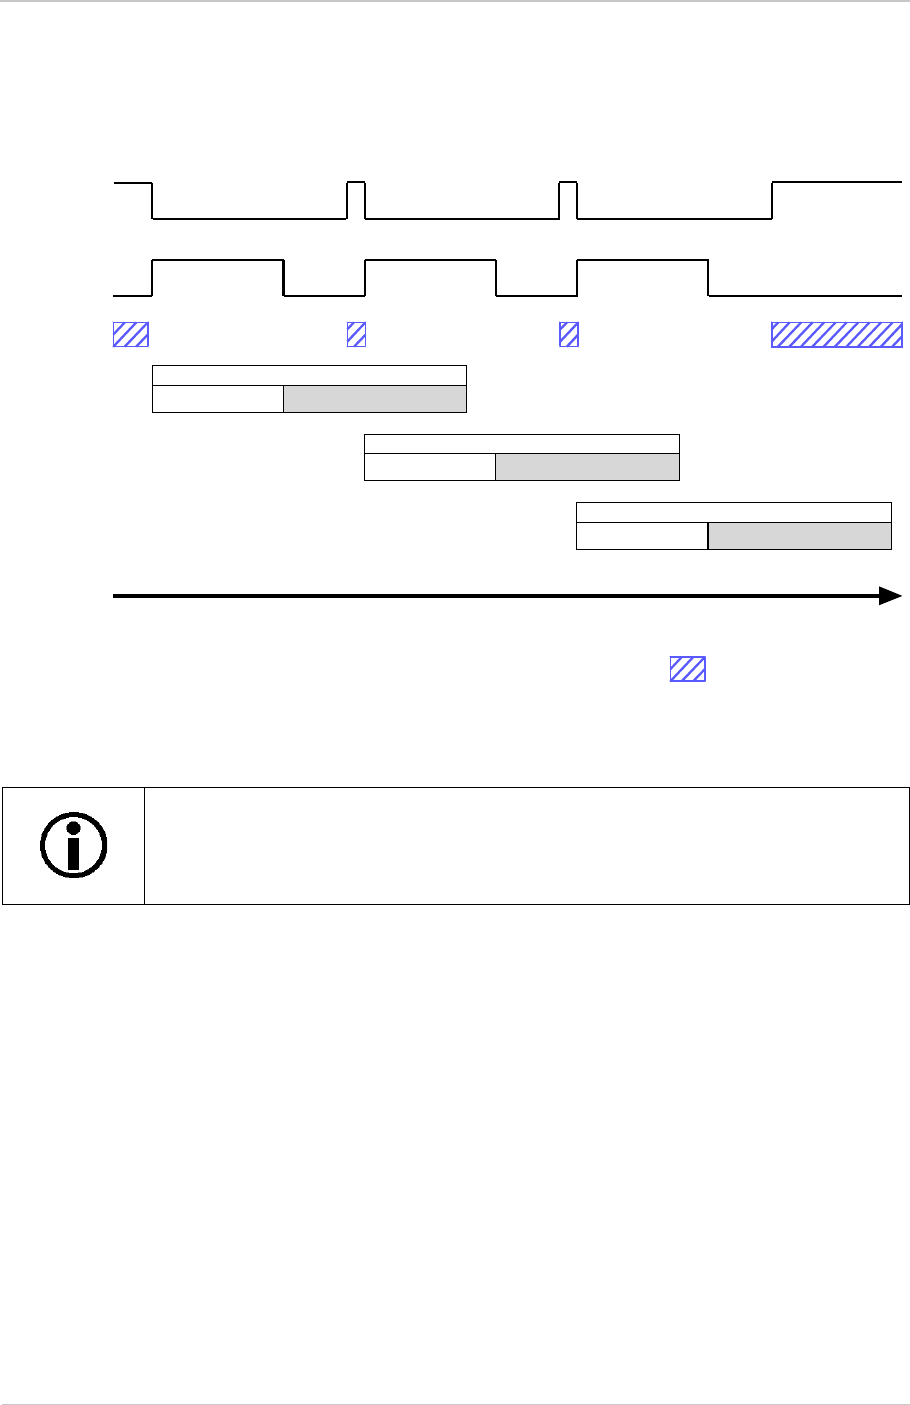
Image Acquisition Control AW00123408000
175 Basler ace USB 3.0
Figure 75 illustrates the Frame Trigger Wait signal on a camera with a global shutter. The camera
is set for the trigger width exposure mode with rising edge triggering and with exposure and readout
overlapped.
For more information about event notification, see Section 7.17 on page 319.
For more information about hardware triggering, see Section 6.3.5 on page 126 and Section 6.4.3
on page 135.
The frame trigger wait signal will only be available when hardware frame start
triggering is enabled.
Frame Acquisition N
Exposure Sensor Readout
Time
Frame Trigger
Wait Signal
Frame Acquisition N+1
Exposure
Frame Acquisition N+2
Exposure
ExFSTrig
Signal
= Camera is in a "waiting for
frame start trigger" status
Fig. 75: Frame Trigger Wait Signal
Sensor Readout
Sensor Readout

AW00123408000 Image Acquisition Control
Basler ace USB 3.0 176
Frame Trigger Wait Signal Details (All Models Except acA1920-25um/uc,
acA2500-14um/uc, acA3800-14um/uc, acA4600-10uc)
When the camera is set for the timed exposure mode, the rise of the Frame Trigger Wait signal is
based on the current ExposureTime parameter setting and on when readout of the current frame
will end. This functionality is illustrated in Figure 76.
If you are operating the camera in the timed exposure mode, you can avoid overtriggering by always
making sure that the Frame Trigger Wait signal is high before you trigger the start of frame capture.
Frame Acquisition N
Exposure Sensor Readout
Time
Frame Trig
Wait Signal
Frame Acquisition N+1
Exposure
Frame Acquisition N+2
Exposure
ExFSTrig
Signal
Exp. Time Setting
Exp. Time Setting
The rise of the Frame Trigger
Wait signal is based on the
end of frame readout and on
the current Exposure Time
parameter setting
= Camera is in a "waiting for
frame start trigger" status
Fig. 76: Frame Trigger Wait Signal with the Timed Exposure Mode
Sensor Readout
Sensor Readout
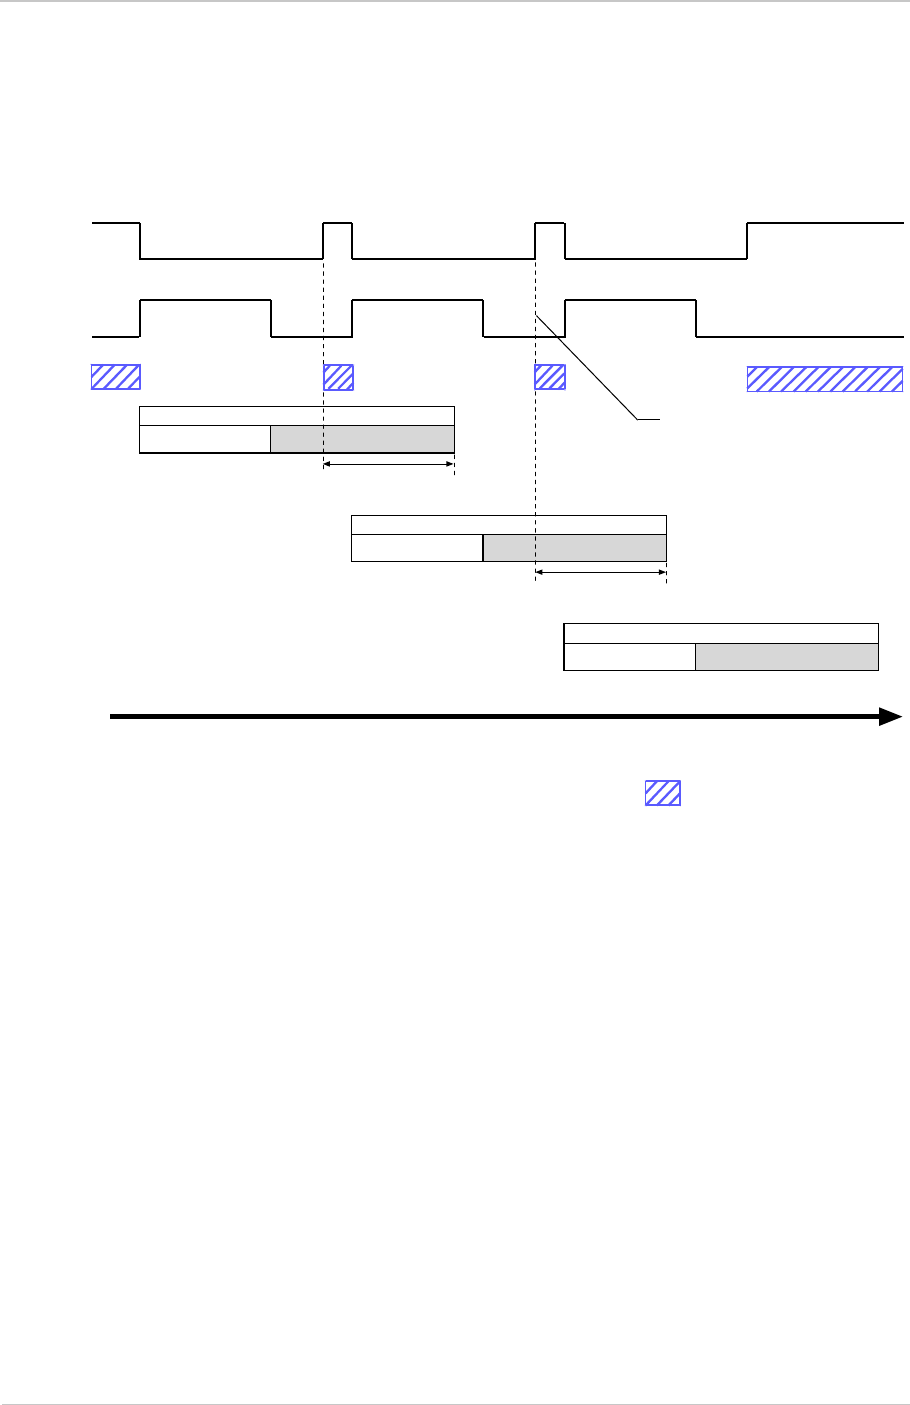
Image Acquisition Control AW00123408000
177 Basler ace USB 3.0
When the camera is set for the trigger width exposure mode, you can avoid overtriggering by
monitoring the rise of the Frame Trigger Wait signal. It is based on the Exposure Overlap Time Max
parameter setting and on when readout of the current frame will end. This functionality is illustrated
in Figure 77.
For information about the Exposure Overlap Time Max parameter and its use in the context of
exposure overlap time modes, see Section 6.4.3.2 on page 136.
For more information about the electrical characteristics of camera output lines, see Section 5.8.1
on page 77 and Section 5.9.4.1 on page 84.
Frame Trigger Wait Signal Details (acA1920-25um/uc, acA2500-14um/uc,
acA3800-14um/uc, acA4600-10uc Only)
For cameras with a rolling shutter, the rise of the Frame Trigger Wait signal is based on the minimum
time required between the end of exposure of the first line in a frame and the start of exposure for
the first line in the following frame. This functionality is illustrated in Figure 78.
If you are operating a camera with a rolling shutter, you can avoid overtriggering by always making
sure that the Frame Trigger Wait signal is high before you trigger the start of frame capture.
Frame Acquisition N
Exposure Readout
Time
Frame Trig
Wait Signal
Frame Acquisition N+1
Exposure
Frame Acquisition N+2
Exposure
ExFSTrig
Signal
Exp. Overlap Time
Max Setting
Exp. Overlap Time
Max Setting
The rise of the Frame Trigger
Wait signal is based on the end
of frame readout and on the
current Exposure Overlap Time
Max parameter setting
= Camera is in a "waiting for
frame start trigger" status
Fig. 77: Frame Trigger Wait Signal with the Trigger Width Exposure Mode
Sensor Readout
Sensor Readout
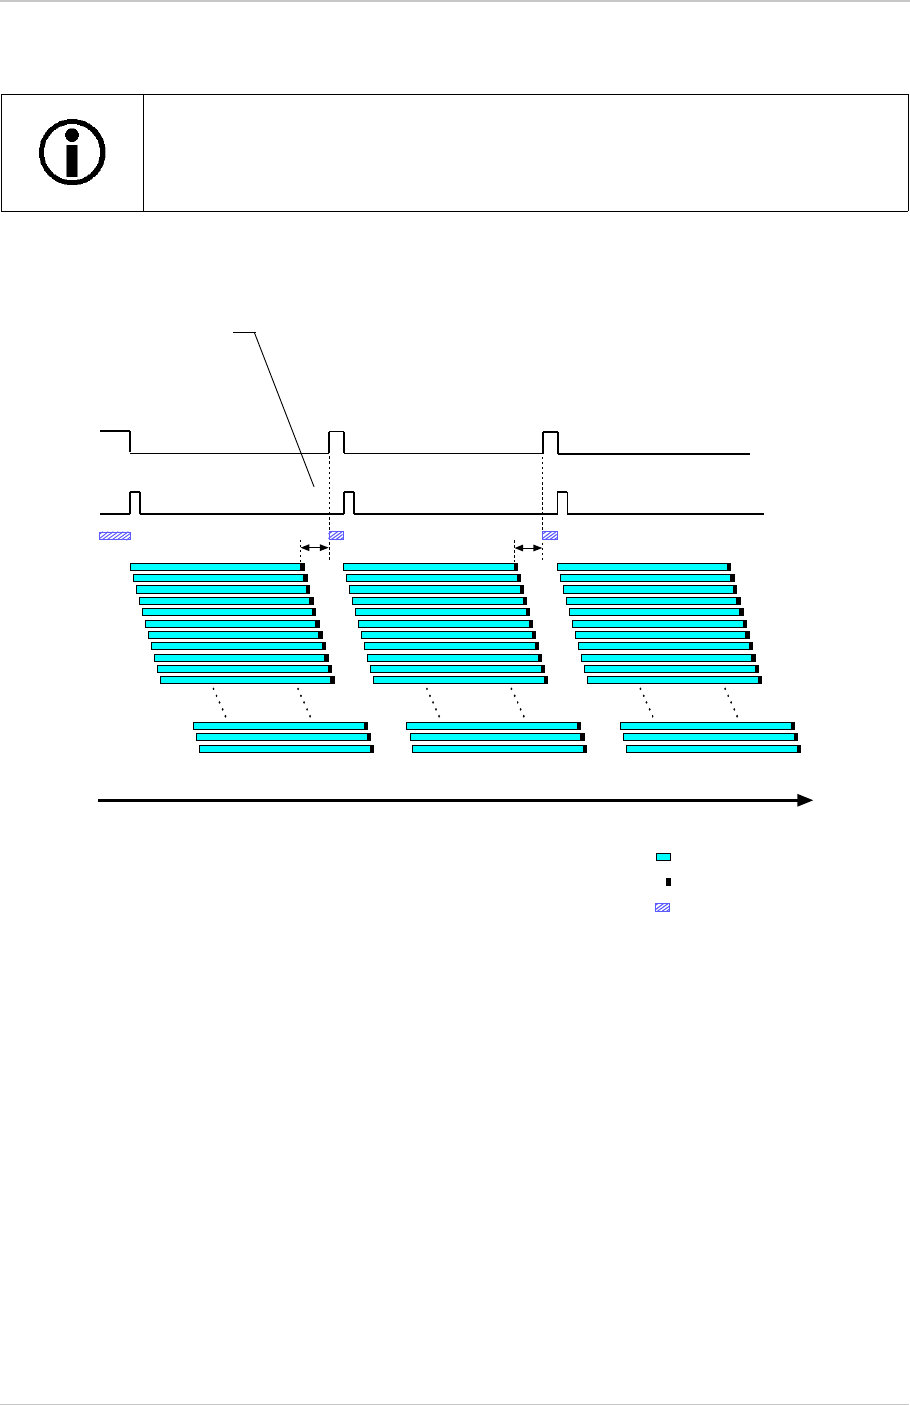
AW00123408000 Image Acquisition Control
Basler ace USB 3.0 178
acA3800-14 and acA4600-10 cameras allow overlapped frame acquisition only
when they are triggered internally ("free run"), i.e. when Trigger Mode is set to Off
for the Frame Burst Start trigger and for the Frame Start Trigger.
Frame Acquisition N Frame Acquisition N+1 Frame Acquisition N+2
= Line Exposure
= Line Readout
Time
ExFSTrig
Signal
Frame Trigger
Wait Signal
= Camera in a "waiting for
frame start trigger" status
The rise of the Frame Trigger Wait
signal is based on the minimum
time (400 µs) required between the
end of exposure for the first line in
frame N and the start of exposure
for the first line in Frame N+1
Fig. 78: Frame Trigger Wait Signal on a Rolling Shutter Camera

Image Acquisition Control AW00123408000
179 Basler ace USB 3.0
Selecting the Frame Trigger Wait Signal as the Source Signal for an Output Line
The frame trigger wait signal can be selected to act as the source signal for a camera output line,
e.g. Line 2. Selecting a source signal for an output line is a two step process:
Use the Line Selector to select the output line, e.g. Line 2.
Set the value of the Line Source Parameter to the frame trigger wait signal.
You can set the Line Selector and the Line Source parameter value from within your application
software by using the Basler pylon API. The following code snippet illustrates using the API to set
the selector and the parameter value:
camera.LineSelector.SetValue(LineSelector_Line2);
camera.LineSource.SetValue(LineSource_FrameTriggerWait);
You can also use the Basler pylon Viewer application to easily set the parameters.
For more information about the pylon API and the pylon Viewer, see Section 3.1 on page 62.
For more information about changing the selection of an output signal as the source signal for the
output line, see Section 5.12.1 on page 97.
For more information about the electrical characteristics of camera output lines, see Section 5.8.1
on page 77 and Section 5.9.4.1 on page 84.
6.8.5 Camera Events and Acquisition Status
Certain camera events allow you to get informed about the current camera acquisition status:
EventFrameBurstStartWait event: The camera is waiting for a frame burst start trigger.
EventFrameBurstStart event: A frame burst start trigger has occurred.
EventFrameStartWait event: The camera is waiting for a frame start trigger.
EventFrameStart event: A frame start trigger has occurred.
EventExposureEnd event: The end of an exposure has occurred.
For more information about the camera events and event notification, see Section 7.17 on
page 319.

AW00123408000 Image Acquisition Control
Basler ace USB 3.0 180
6.9 Acquisition Timing Chart
A timing chart for frame acquisition and transmission is given in Figure 79. The chart assumes that
exposure is triggered by an externally generated frame start trigger (ExFSTrig) signal with rising
edge activation and that the camera is set for the timed exposure mode.
As can be seen from the timing chart, there is a slight delay between the rise of the ExFSTrig signal
and the start of exposure. After the exposure time for a frame acquisition is complete, the camera
begins reading out the acquired frame data from the imaging sensor and makes them available for
transmission as called by the host computer.
The exposure start delay is the amount of time between the point where the trigger signal
transitions and the point where exposure actually begins.
The exposure start delay varies from camera model to camera model. The table below shows the
exposure start delay for each camera model (see Table 40 on page 181).
The sensor readout time is the amount of time it takes to read out the data for an acquired frame
from the imaging sensor.
The frame transmission time is the amount of time it takes to transmit an acquired frame from the
camera to the host computer via the bus.
The frame transmission time can vary between frames and partly depends on when the host
computer calls for data transmission.
The transmission start delay is the amount of time between the point where the camera begins
reading out the acquired frame data from the sensor to the point where it begins transmitting the
data for the acquired frame from the buffer to the host computer.
The transmission start delay can vary between frames and largely depends on when the host
computer starts calling for data transmission.
Note that a propagation delay of unspecified duration precedes the exposure start delay when
applying an ExFSTrig signal. For more information about propagation delays, see Section 5.10 on
page 86.

Image Acquisition Control AW00123408000
181 Basler ace USB 3.0
* The shortest delays apply when maximum bandwidth is available. The delays increase as
available bandwidth decreases.
Camera Model Frame Acquisitions
Not Overlapped Frame Acquisitions
Overlapped
Exposure Start Delay [µs] Exposure Start Delay With
Maximum Jitter Included [µs]
8 bit 12 bit
acA640-90um/uc 22
acA640-120um/uc 18
acA640-750um/uc 3.6 8.4
acA800-510um/uc 3.6 8.4
acA1300-30um/uc 35
acA1300-200um/uc 3.6 8.4
acA1600-20um/uc 46
acA1920-25um/uc 35
acA1920-40um/uc 58 75 N/A
acA1920-150um/uc 3.4 13.5
acA1920-155um/uc 17 21 N/A
acA2000-165um/uc 0.9 to 1.3* 0.9 to 20.3*
acA2000-165umNIR 0.9 to 1.3* 0.9 to 20.3*
acA2040-55um/uc 36 N/A
acA2040-90um/uc 0.9 to 1.3* 0.9 to 20.3*
acA2040-90umNIR 0.9 to 1.3* 0.9 to 20.3*
acA2040-120um/uc 15 18 N/A
acA2440-35um/uc 42 N/A
acA2440-75um/uc 18 21 N/A
acA2500-14um/uc 848 (also for global reset release
mode)
848 to 883
acA2500-60u 3.4 13.5
acA3800-14um/uc 2970 for mono cameras, 2620 for
color cameras; (also for global
reset release mode)
acA4600-10uc 7855 (also for global reset
release mode)
Table 40: Exposure Start Delays for all Pixel Format Bit Depths Unless Indicated Otherwise

AW00123408000 Image Acquisition Control
Basler ace USB 3.0 182
FTWait
Signal
ExFSTrig
Signal
Exposure
Frame
Readout
Frame
Transmission
Exposure
Frame N
Frame N+1 Sensor Readout
Frame N+1 Transmission to Host Computer
Frame N Sensor Readout
Frame N Transmission to Host Computer
Exposure
Frame N+1 Exposure
Frame N+2
Transmission Start DelayTransmission Start Delay
Timing charts are not drawn to scale
Exposure Start Delay Exposure Start Delay
Fig. 79: Exposure Start Controlled with an ExFSTrig Signal

Image Acquisition Control AW00123408000
183 Basler ace USB 3.0
Note that you may have to add additional delays to the exposure start delay:
If you use a hardware signal to trigger image acquisition, you must add a delay due to the input
line response time (for input line Line 1 or the GPIO lines Line 3, Line 4, if configured for input).
Note that such delays are associated with the frame burst start trigger signal and the frame
start trigger signal.
If you use the debouncer feature, you must add the delay due to the debouncer setting.
For more information about the debouncer feature, see Section 5.11.2 on page 94.
If you have set a frame start trigger delay, you must add the set delay.
For more information about the frame start trigger delay, see Section 6.4.3.3 on page 143.
For example, assume that you are using an acA640-120 camera and that you have set the camera
for hardware triggering. Also assume that you have selected input line Line 1 to accept the
hardware trigger signal, that the input line response time is 1.5 µs, that the delay due to the
debouncer setting for input line Line 1 is 5 µs, and that you set the frame start trigger delay to
200 µs.
In this case:
Total Start Delay =
= Exposure Start Delay (Table 40) + Input Line Response time + Debouncer Setting + Frame Start Trigger Delay
Total Start Delay = 18 µs + 1.5 µs + 5 µs + 200 µs = 224.5 µs
You can determine the sensor readout time by reading the value of the Sensor Readout Time
parameter. The parameter indicates what the readout time will be in microseconds given the
camera’s current settings. You can read the Sensor Readout Time parameter value from within your
application software by using the Basler pylon API. The following code snippet illustrates using the
API to get the parameter value:
double d = camera.SensorReadoutTime.GetValue();
You can also use the Basler pylon Viewer application to easily get the parameter value.
For more information about the pylon API and the pylon Viewer, see Section 3.1 on page 62.

AW00123408000 Image Acquisition Control
Basler ace USB 3.0 184
6.10 Maximum Allowed Frame Rate
In general, the maximum allowed acquisition frame rate on any ace USB 3.0 camera can be limited
by these factors:
The exposure time for the acquisition of frames. If you use very long exposure times, you can
acquire fewer frames per second.
The amount of time it takes to read an acquired frame out of the imaging sensor and to prepare
it for transmission out of the camera. The amount of time varies with the height of the frame.
Frames with a smaller height take less time. The frame height is determined by the camera’s
ROI Height setting.
The amount of time it takes to transmit an acquired frame from the camera to your host
computer. The amount of time depends on the bandwidth assigned to the camera.
If the global reset release shutter mode on acA1920-25um/uc, acA2500-14um/uc,
acA3800-14um/uc, and acA4600-10uc cameras is selected, overlapped image acquisition is
not possible. This decreases the camera’s maximum allowed frame rate.
For more information about the global reset release shutter mode, see the "Global Reset
Release Mode" Section 6.6.2.2 on page 154.
There are two ways for determining the maximum allowed acquisition frame rate with your current
camera settings:
You can use the online frame rate calculator found in the Support section of the Basler website
(Support > Tools > Frame Rate Calculator):
www.baslerweb.com
You can use the Basler pylon API to read the value of the camera’s Resulting Frame Rate
parameter (see the next page).
For more information about Image ROI Height settings, see Section 7.6 on page 213.
When the camera's acquisition mode is set to Single Frame, the maximum
possible acquisition frame rate for a given ROI cannot be achieved. This results
because the camera performs a complete internal setup cycle for each single
frame and
because it cannot be operated with overlapping sensor readout and exposure
("overlapped acquisition").
To achieve the maximum possible acquisition frame rate, set the camera for the
continuous acquisition mode and use overlapped acquisition.
For more information about overlapped acquisition, see Section 6.7 on page 161.

Image Acquisition Control AW00123408000
185 Basler ace USB 3.0
6.10.1 Using Basler pylon to Check the Maximum
Allowed Frame Rate
You can use the Basler pylon API to read the current value of the Resulting Frame Rate parameter
from within your application software using the Basler pylon API. The following code snippet
illustrates using the API to get the parameter value:
// Get the resulting frame rate
double d = camera.ResultingFrameRate.GetValue();
The Resulting Frame Rate parameter takes all camera settings that can influence the frame rate
into account and indicates the maximum allowed frame rate given the current settings.
You can also use the Basler pylon Viewer application to easily read the parameter.
For more information about the pylon API and pylon Viewer, see Section 3.1 on page 62.
Factory parameter settings for acA2000-165u and acA2040-90u cameras will
initially cause them to operate at less than their maximum specified frame rates:
acA2000-165u: approximately 90 fps
acA2040-90u: approximately 50 fps.
The factory parameter settings were chosen to avoid problems that might result
from insufficient USB 3.0 bandwidth available in your application.
You can easily change the parameter settings to operate the cameras at the
maximum specified frame rates when sufficient USB 3.0 bandwidth is available.

AW00123408000 Image Acquisition Control
Basler ace USB 3.0 186
6.10.2 Increasing the Maximum Allowed Frame Rate
You may find that you would like to acquire frames at a rate higher than the maximum allowed with
the camera’s current settings. In this case, you must adjust one or more of the factors that can
influence the maximum allowed rate and then check to see if the maximum allowed rate has
increased:
Decreasing the height of the Image ROI can have a significant impact on the maximum
allowed frame rate. If possible in your application, decrease the height of the Image ROI.
If you are using normal exposure times and you are using the camera at it’s maximum
resolution, your exposure time will not normally restrict the frame rate. However, if you are
using long exposure times or small regions of interest, it is possible that your exposure time is
limiting the maximum allowed frame rate. If you are using a long exposure time or a small ROI,
try using a shorter exposure time and see if the maximum allowed frame rate increases. (You
may need to compensate for a lower exposure time by using a brighter light source or
increasing the opening of your lens aperture.)
The frame transmission time will not normally restrict the frame rate. But if you are using
multiple cameras connected to one hub, you may find that the transmission time is restricting
the maximum allowed rate. In this case, you could use a multiport host adapter in the computer
instead of a hub.
If you are working with an acA1920-25, acA2500-14, acA3800-14 or acA4600-10 camera:
Use the rolling mode rather than the global reset release mode. The rolling mode allows overlapping
frame acquisition while the global reset release mode does not. Overlapping frame acquisitions is,
however, necessary for achieving the highest frame rates.
If you are working with an acA640-750, acA800-510, acA1300-200, acA1920-150 or acA2500-60
camera:
Using the fast sensor readout mode instead of the normal sensor readout mode can increase
the maximum allowed frame rate. For more information about sensor readout modes, see
Section 6.6.1.1 on page 150.
You can increase the maximum allowed frame rate by decreasing the ROI width, provided the
ROI width is above 256 pixels. For small ROIs less than 256 pixels wide, maximum allowed
frame rate can not be decreased by decreasing the ROI width.
For more information about Image ROI settings, see Section 7.6 on page 213.
For more information about the rolling mode, see Section 6.6.2 on page 151.
An important thing to keep in mind is a common mistake new camera users
frequently make when they are working with exposure time. They will often use a
very long exposure time without realizing that this can severely limit the camera’s
maximum allowed frame rate. As an example, assume that your camera is set to
use a 1/2 second exposure time. In this case, because each frame acquisition will
take at least 1/2 second to be completed, the camera will only be able to acquire
a maximum of two frames per second. Even if the camera’s nominal maximum
frame rate is, for example, 100 frames per second, it will only be able to acquire
two frames per second because the exposure time is set much higher than
normal.

Image Acquisition Control AW00123408000
187 Basler ace USB 3.0
6.11 Use Case Descriptions and Diagrams
The following pages contain a series of use case descriptions and diagrams. The descriptions and
diagrams are designed to illustrate how frame burst start triggering and frame start triggering work
in some common situations and with some common combinations of parameter settings.
These use cases do not represent every possible combination of the parameters associated with
frame burst start and frame start triggering. They are simply intended to aid you in developing an
initial understanding of how these two triggers interact.
In each use case diagram, the black box in the upper left corner indicates how the parameters are
set.
Use Case 1 - Frame Burst Start and Frame Start Triggers Both Off (Free Run)
Use case one is illustrated on page 188.
In this use case, the Acquisition Mode parameter is set to Continuous. The Trigger Mode parameter
for the frame burst start trigger and the Trigger Mode parameter for the frame start trigger are both
set to off. The camera will generate all required frame burst start and frame start trigger signals
internally. When the camera is set this way, it will constantly acquire images without any need for
triggering by the user. This use case is commonly referred to as "free run".
The rate at which the camera will acquire images will be determined by the camera’s Acquisition
Frame Rate parameter unless the current camera settings result in a lower frame rate. If the
Acquisition Frame Rate parameter is disabled, the camera will acquire frames at the maximum
allowed frame rate.
Cameras are used in free run for many applications. One example is for aerial photography. A
camera set for free run is used to capture a continuous series of images as an aircraft overflies an
area. The images can then be used for a variety of purposes including vegetation coverage
estimates, archaeological site identification, etc.
For more information about the Acquisition Frame Rate parameter, see Section 6.4.1.1 on
page 129.
The use case diagrams are representational. They are not drawn to scale and are
not designed to accurately describe precise camera timings.
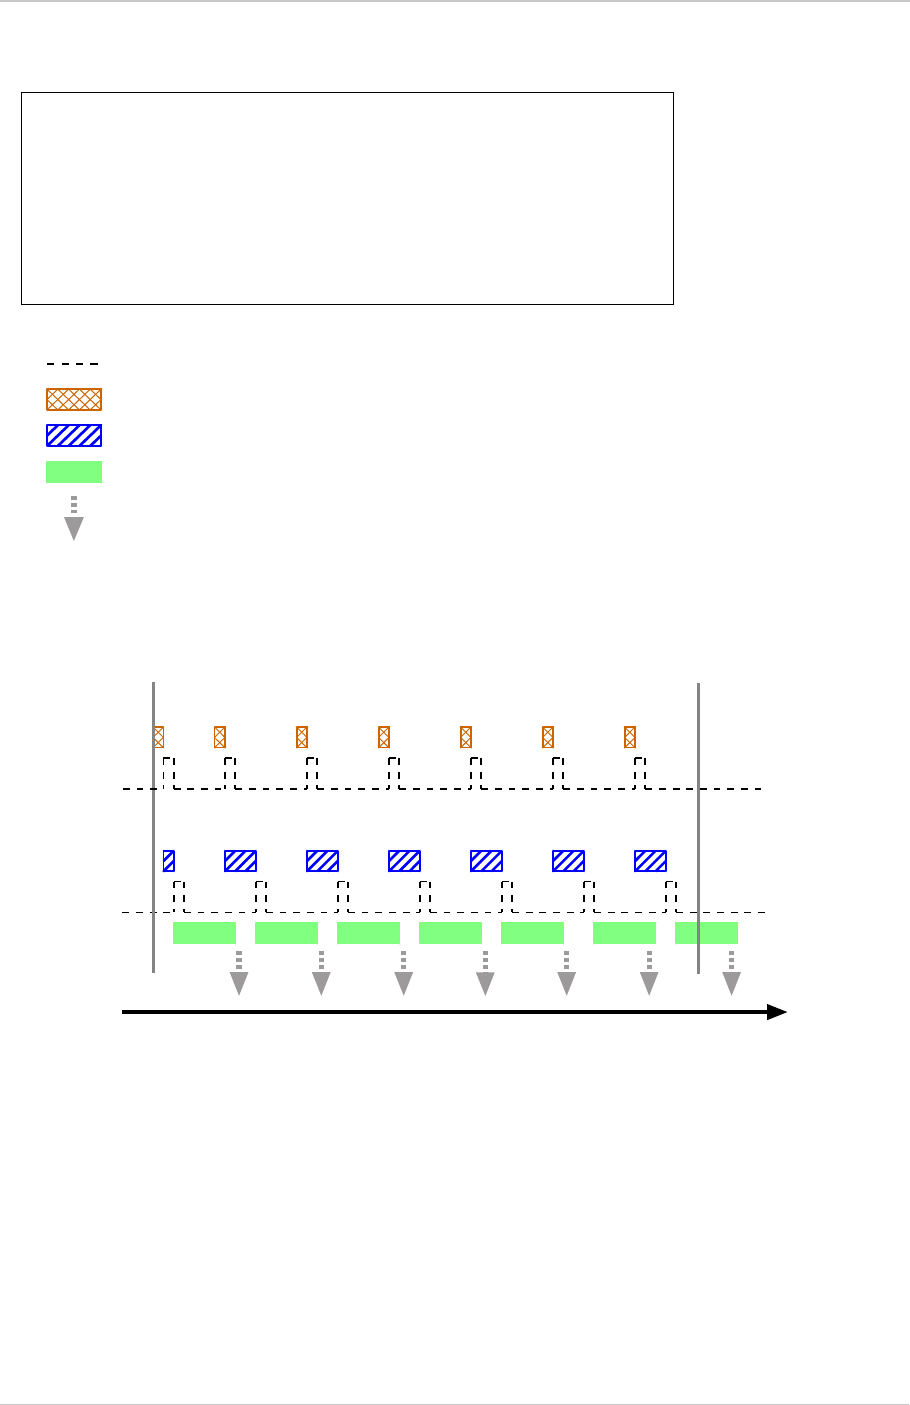
AW00123408000 Image Acquisition Control
Basler ace USB 3.0 188
Fig. 80: Use Case 1 - Frame Burst Start Trigger Off and Frame Start Trigger Off
Use Case: "Free Run" (Frame Burst Start Trigger Off and Frame Start Trigger Off)
The frame burst start trigger is off. The camera will generate frame burst
start trigger signals internally with no action by the user.
The frame start trigger is off. The camera will generate frame start trigger
signals internally with no action by the user.
Settings: Acquisition Mode = Continuous
Trigger Mode for the frame burst start trigger = Off
Trigger Mode for the frame start trigger = Off
Time
Frame Burst Start
Trigger Signal
Frame Start
Trigger Signal
= a trigger signal generated by the camera internally
= camera is waiting for a frame start trigger
= frame exposure and readout
= camera is waiting for a frame burst start trigger
= frame transmission
Acquisition
Start
Command
Executed
Acquisition
Stop
Command
Executed

Image Acquisition Control AW00123408000
189 Basler ace USB 3.0
Use Case 2 - Frame Burst Start Trigger Off - Frame Start Trigger On
Use case two is illustrated on page 190.
In this use case, the Acquisition Mode parameter is set to Continuous. The Trigger Mode parameter
for the frame burst start trigger is set to off and the Trigger Mode parameter for the frame start trigger
is set to on.
Because the frame burst start trigger is set to off, the user does not need to apply frame burst start
trigger signals to the camera. The camera generates all required frame burst start trigger signals
internally.
Because the frame start trigger is set to on, the user must apply a frame start trigger signal to the
camera in order to begin each frame exposure. In this case, we have set the frame start trigger
signal source to input line Line 1 and the activation to rising edge, so the rising edge of an externally
generated electrical signal applied to Line 1 will serve as the frame start trigger signal.
This type of camera setup is used frequently in industrial applications. One example might be a
wood products inspection system used to inspect the surface of pieces of plywood on a conveyor
belt as they pass by a camera. In this situation, a sensing device is usually used to determine when
a piece of plywood on the conveyor is properly positioned in front of the camera. When the plywood
is in the correct position, the sensing device transmits an electrical signal to input line 1 on the
camera. When the electrical signal is received on line 1, it serves as a frame start trigger signal and
initiates a frame acquisition. The frame acquired by the camera is forwarded to an image processing
system, which will inspect the image and determine, if there are any defects in the plywood’s
surface.
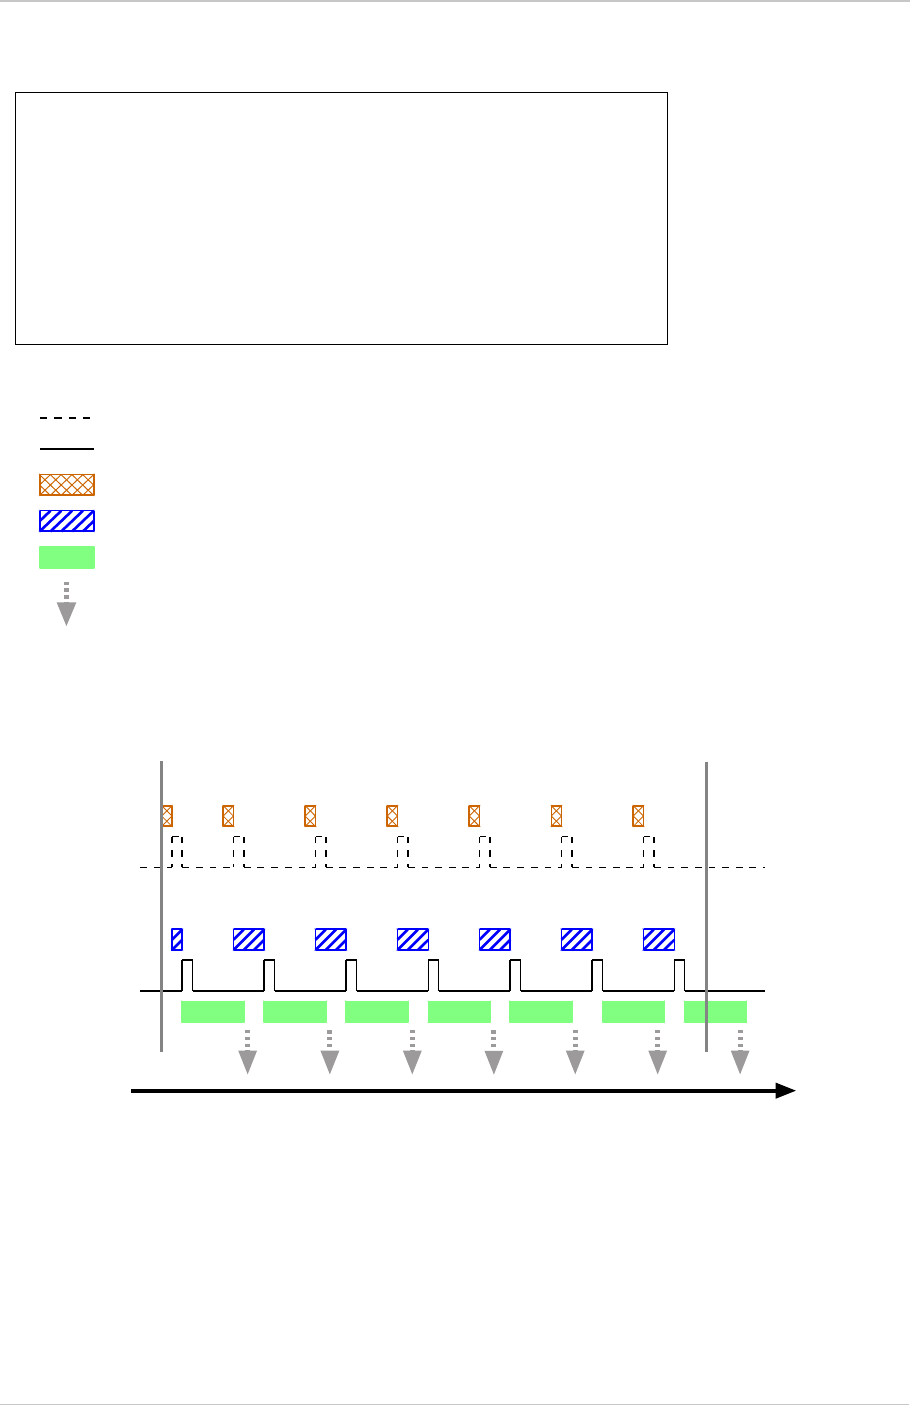
AW00123408000 Image Acquisition Control
Basler ace USB 3.0 190
Fig. 81: Use Case 2 - Frame Burst Start Trigger Off and Frame Start Trigger On
Use Case: Frame Burst Start Trigger Off and Frame Start Trigger On
The frame burst start trigger is off. The camera will generate frame burst
start trigger signals internally with no action by the user.
The frame start trigger is on, and the frame start trigger source is set to
input line Line 1. The user must apply a frame start trigger signal to Line 1
to start each frame exposure.
Settings: Acquisition Mode = Continuous
Trigger Mode for the frame burst start trigger = Off
Trigger Mode for the frame start trigger = On
Trigger Source for the frame start trigger = Line 1
Trigger Activation for the frame start trigger = Rising Edge
Time
Frame Burst Start
Trigger Signal
Frame Start
Trigger Signal
(applied to Line 1)
= a trigger signal generated by the camera internally
= a trigger signal applied by the user
= camera is waiting for a frame burst start trigger signal
= frame exposure and readout
= camera is waiting for a frame start trigger signal
= frame transmission
Acquisition
Start
Command
Executed
Acquisition
Stop
Command
Executed

Image Acquisition Control AW00123408000
191 Basler ace USB 3.0
Use Case 3 - Frame Burst Start Trigger On - Frame Start Trigger Off
Use case three is illustrated on page 192.
In this use case, the Acquisition Mode parameter is set to Continuous. The Trigger Mode parameter
for the frame burst start trigger is set to on and the Trigger Mode parameter for the frame start trigger
is set to off.
Because the frame burst start trigger mode is set to on, the user must apply a frame burst start
trigger signal to the camera. In this case, we have set the frame burst start trigger signal source to
input line Line 1 and the activation to rising edge, so an externally generated electrical signal
applied to Line 1 will serve as the frame burst start trigger signal. The Acquisition Burst Frame
Count parameter has been set to 3.
When a rising edge of the electrical signal is applied to Line 1, the camera will exit the "waiting for
frame burst start trigger" acquisition status and enter a "waiting for frame start trigger" acquisition
status. Once the camera has acquired 3 frames, it will re-enter the "waiting for frame burst start
trigger" acquisition status. Before any more frames can be acquired, a new rising edge must be
applied to input line 1 to make the camera exit the "waiting for frame burst start trigger" acquisition
status.
Because the frame start trigger is set to off, the user does not need to apply frame start trigger
signals to the camera. The camera will generate all required frame start trigger signals internally.
The rate at which the frame start trigger signals will be generated is normally determined by the
camera’s Acquisition Frame Rate parameter. If the Acquisition Frame Rate parameter is disabled,
the camera will acquire frames at the maximum allowed frame rate.
This type of camera setup is used frequently in intelligent traffic systems. With these systems, a
typical goal is to acquire several images of a car as it passes through a toll booth. A sensing device
is usually placed at the start of the toll booth area. When a car enters the area, the sensing device
applies an electrical signal to input line 1 on the camera. When the electrical signal is received on
input line 1, it serves as a frame burst start trigger signal and the camera exits from the "waiting for
frame burst start trigger" acquisition status and enters a "waiting for frame trigger" acquisition
status. In our example, the next 3 frame start trigger signals internally generated by the camera
would result in frame acquisitions. At that point, the number of frames acquired would be equal to
the setting for the Acquisition Burst Frame Count parameter. The camera would return to the
"waiting for frame burst start trigger" acquisition status and would no longer react to frame start
trigger signals. It would remain in this condition until the next car enters the booth area and activates
the sensing device.
This sort of setup is very useful for traffic system applications because multiple frames can be
acquired with only a single frame burst start trigger signal and because frames will not be acquired
when there are no cars passing through the booth (this avoids the need to store images of an empty
toll booth area.)
For more information about the Acquisition Frame Rate parameter, see Section 6.3.1.1 on
page 120.
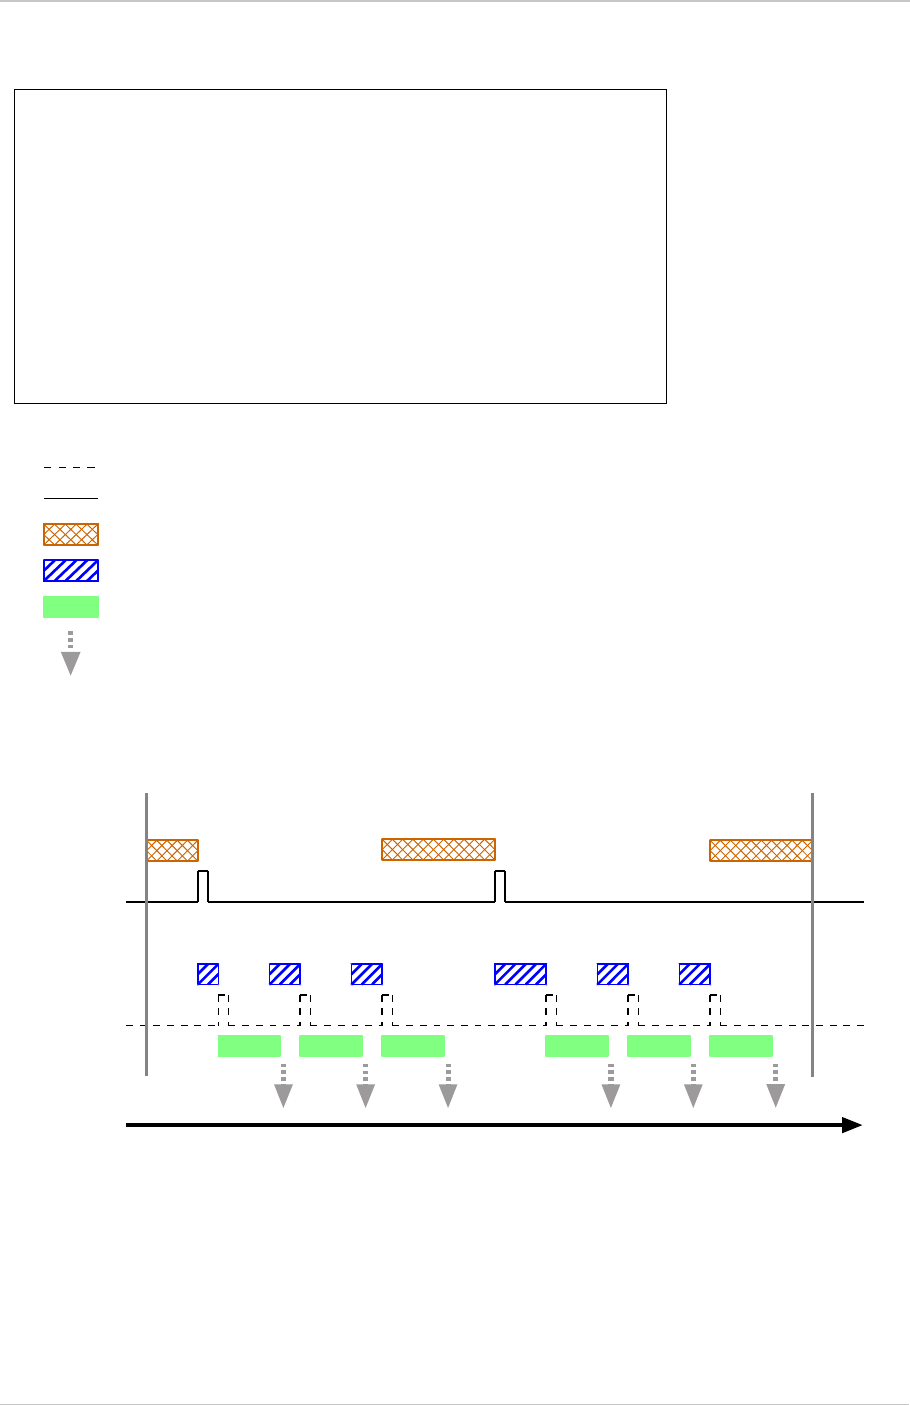
AW00123408000 Image Acquisition Control
Basler ace USB 3.0 192
Fig. 82: Use Case 3 - Frame Burst Start Trigger On and Frame Start Trigger Off
Use Case: Fame Burst Start Trigger On and Frame Start Trigger Off
The frame burst start trigger is on, and the frame burst start trigger source
is set to input line Line 1. The user must apply a frame burst start trigger
signal to Line 1 to make the camera exit the "waiting for frame burst start
trigger" acquisition status. Because the acquisition burst frame count is set
to 3, the camera will re-enter the "waiting for frame burst start trigger"
acquisition status after 3 frames have been acquired.
The frame start trigger is off. The camera will generate frame start trigger
signals internally with no action by the user.
Settings: Acquisition Mode = Continuous
Trigger Mode for the frame burst start trigger = On
Trigger Source for the frame burst start trigger = Line 1
Trigger Activation for the frame burst start trigger = Rising Edge
Acquisition Burst Frame Count = 3
Trigger Mode for the frame start trigger = Off
Time
Frame Burst Start
Trigger Signal
(applied to Line 1)
Frame Start
Trigger Signal
= a trigger signal generated by the camera internally
= a trigger signal applied by the user
= camera is waiting for a frame burst start trigger signal
= camera is waiting for a frame start trigger signal
= frame exposure and readout
= frame transmission
Acquisition
Start
Command
Executed
Acquisition
Stop
Command
Executed

Image Acquisition Control AW00123408000
193 Basler ace USB 3.0
Use Case 4 - Frame Burst Start and Frame Start Triggers Both On
Use case four is illustrated on page 194.
In this use case, the Acquisition Mode parameter is set to Continuous. The Trigger Mode parameter
for the frame burst start trigger is set to on and the Trigger Mode parameter for the frame start trigger
is set to on.
Because the frame burst start trigger mode is set to on, the user must apply a frame burst start
trigger signal to the camera. In this case, we have set the frame burst start trigger signal source to
software, so the execution of a frame burst trigger software command will serve as the frame burst
start trigger signal. The Acquisition Burst Frame Count parameter is set to 3.
When a frame burst trigger software command is executed, the camera will exit the "waiting for
frame burst start trigger" acquisition status and enter a "waiting for frame start trigger" acquisition
status. Once the camera has acquired 3 frames, it will re-enter the "waiting for frame burst start
trigger" acquisition status. Before any more frames can be acquired, a new frame burst trigger
software command must be executed to make the camera exit the "waiting for frame burst start
trigger" acquisition status.
Because the frame start trigger is set to on, the user must apply a frame start trigger signal to the
camera in order to begin each frame acquisition. In this case, we have set the frame start trigger
signal source to input line Line 1 and the activation to rising edge, so the rising edge of an externally
generated electrical signal applied to input line Line 1 will serve as the frame start trigger signal.
Keep in mind that the camera will only react to a frame start trigger signal when it is in a "waiting for
frame start trigger" acquisition status.
A possible use for this type of setup is a conveyor system that moves objects past an inspection
camera. Assume that the system operators want to acquire images of 3 specific areas on each
object, that the conveyor speed varies, and that they do not want to acquire images when there is
no object in front of the camera. A sensing device on the conveyor could be used in conjunction
with a computer to determine when an object is starting to pass the camera. When an object is
starting to pass, the computer will execute a frame burst start trigger software command, causing
the camera to exit the "waiting for frame burst start trigger" acquisition status and enter a "waiting
for frame start trigger" acquisition status.
An electrical device attached to the conveyor could be used to generate frame start trigger signals
and to apply them to input line Line 1 on the camera. Assuming that this electrical device was based
on a position encoder, it could account for the speed changes in the conveyor and ensure that frame
trigger signals are generated and applied when specific areas of the object are in front of the
camera. Once 3 frame start trigger signals have been received by the camera, the number of
frames acquired would be equal to the setting for the Acquisition Burst Frame Count parameter, and
the camera would return to the "waiting for frame burst start trigger" acquisition status. Any frame
start trigger signals generated at that point would be ignored.
This sort of setup is useful because it will only acquire frames when there is an object in front of the
camera and it will ensure that the desired areas on the object are imaged. (Transmitting images of
the "space" between the objects would be a waste of bandwidth and processing them would be a
waste of processor resources.)
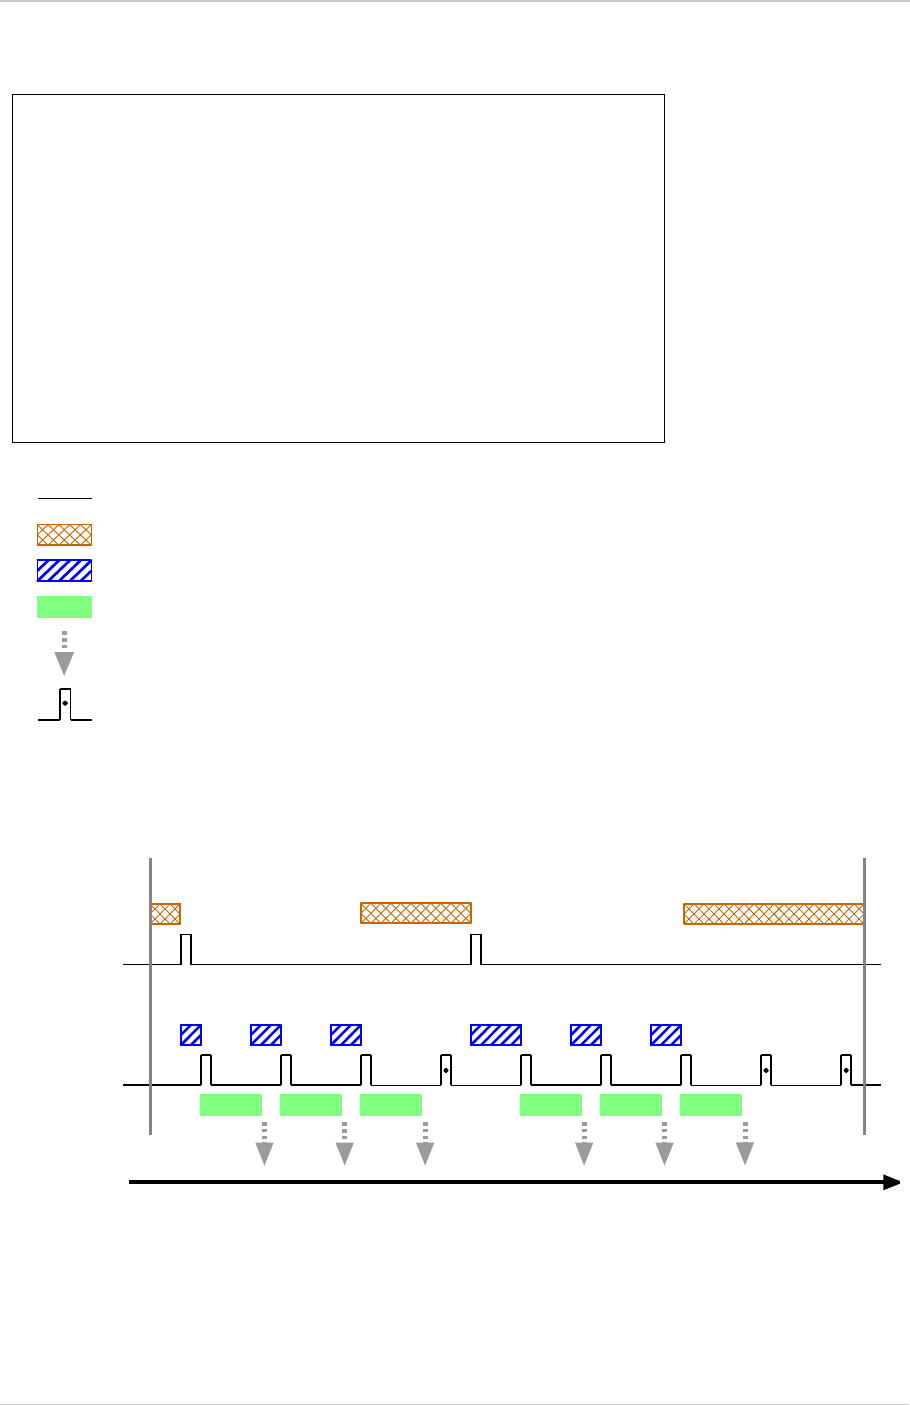
AW00123408000 Image Acquisition Control
Basler ace USB 3.0 194
Fig. 83: Use Case 4 - Frame Burst Start Trigger On and Frame Start Trigger On
Use Case: Frame Burst Start Trigger On and Frame Start Trigger On
The frame burst start trigger is on, and the frame burst start trigger source
is set to software. The user must execute a frame burst start trigger
software command to make the camera exit the "waiting for frame burst
start trigger" acquisition status. Because the acquisition burst frame count
is set to 3, the camera will re-enter the "waiting for frame burst start trigger"
acquisition status after 3 frame start trigger signals have been applied.
The frame start trigger is on, and the frame start trigger source is set to
input line Line 1. The user must apply a frame start trigger signal to input
line Line 1 to start each frame exposure.
Settings: Acquisition Mode = Continuous
Trigger Mode for the frame burst start trigger = On
Trigger Source for the frame burst start trigger = Software
Acquisition Burst Frame Count = 3
Trigger Mode for the frame start trigger = On
Trigger Source for the frame start trigger = Line 1
Trigger Activation for the frame start trigger = Rising Edge
Time
Frame Burst Start
Trigger Software
Command
Executed
Frame Start
Trigger Signal
(applied to Line 1)
= a trigger signal applied by the user
= a frame start trigger signal that will be ignored because the camera
is not in a "waiting for frame start trigger" status
= camera is waiting for a frame burst start trigger signal
= camera is waiting for a frame start trigger signal
= frame exposure and readout
= frame transmission
Acquisition
Start
Command
Executed
Acquisition
Stop
Command
Executed

Features AW00123408000
195 Basler ace USB 3.0
7 Features
This chapter provides detailed information about the features available on each camera. This
chapter also includes explanations and how to operate the features and gives the associated
parameters.
7.1 Feature Availability Charts
The feature availability charts below allow you to see at a glance which features are implemented
on which camera model.
A solid bullet ( • ) indicates that a feature is implemented. A void space indicates that the pertinent
feature is not implemented.

AW00123408000 Features
Basler ace USB 3.0 196
Monochrome Cameras
Camera
Model Feature
Gain
Black Level
Remove Parameter Limits
Digital Shift
Image Region of Interest (ROI)
Center X
Center Y
Sequencer
Binning Horizontal
Binning Vertical
Decimation Horizontal
Decimation Vertical
Scaling
Reverse X
Reverse Y
LUT
Gamma
Gain Auto
Exposure Auto
Balance White Auto
Pattern Removal Auto
Event Notification
Test Image
Device Information Parameters
User Defined Values
User Sets
Chunk Features
Line Pitch
PGI Feature Set
acA640-90um •••••••••• • •••• ••••••
acA640-120um •••••••••• • •••• ••••••
acA640-750um ••• •••••• •••••• ••••••
acA800-510um ••• •••••• •••••• ••••••
acA1300-30um •••••••••• • •••• ••••••
acA1300-200um ••• •••••• •••••• ••••••
acA1600-20um •••••••••• • •••• ••••••
acA1920-25um •••••••••• • •••• ••••••
acA1920-40um •••••••••• •••••• ••••••
acA1920-150um ••• •••••• •••••• ••••••
acA1920-155um •••••••••• •••••• ••••••
acA2000-165um/
umNIR •••••••••• • •••••• ••••••
acA2040-55um •••••••••• •••••• ••••••
acA2040-90um/
umNIR •••••••••• • •••••• ••••••
acA2040-120um •••••••••• •••••• ••••••
acA2440-35um •••••••••• •••••• ••••••
acA2440-75um •••••••••• •••••• ••••••
acA2500-14um •••••••••• • •••• ••••••
acA2500-60um ••• ••• ••• •••••• •••••●
acA3800-14um •••••••••••••• •••• ••••••••
Table 41: Availability of Features in Monochrome Cameras

Features AW00123408000
197 Basler ace USB 3.0
Color Cameras
Camera
Model Feature
Gain
Black Level
Remove Parameter Limits
Digital Shift
Image Region of Interest (ROI)
Center X
Center Y
Sequencer
Binning Horizontal
Binning Vertical
Decimation Horizontal
Decimation Vertical
Scaling
Reverse X
Reverse Y
LUT
Gamma
Gain Auto
Exposure Auto
Balance White Auto
Pattern Removal Auto
Event Notification
Test Image
Device Information Parameters
User Defined Values
User Sets
Chunk Features
Line Pitch
PGI Feature Set
acA640-90uc •••••••• • ••••• •••••••
acA640-120uc •••••••• • ••••• ••••••
acA640-750uc ••• •••• ••••••• •••••• •
acA800-510uc ••• •••• ••••••• •••••• •
acA1300-30uc •••••••• • ••••• ••••••
acA1300-200uc ••• •••• ••••••• •••••• •
acA1600-20uc •••••••• • ••••• ••••••
acA1920-25uc •••••••••• • ••••• ••••••
acA1920-40uc •••••••• ••••••• •••••• •
acA1920-150uc •••••••• ••••••• •••••• •
acA1920-155uc •••••••• ••••••• •••••• •
acA2000-165uc •••••••• • ••••••• ••••••
acA2040-55uc •••••••• ••••••• •••••• •
acA2040-90uc •••••••• • ••••••• ••••••
acA2040-120uc •••••••• ••••••• •••••• •
acA2440-35uc •••••••• ••••••• •••••• •
acA2440-75uc •••••••• ••••••• •••••• •
acA2500-14uc •••••••••• • ••••• ••••••
acA2500-60uc ••• •••• ••••••• •••••●•
acA3800-14uc •••••••• •••• ••••• ••••••
acA4600-10uc •••••••• •••• ••••• ••••••
Table 42: Availability of Features in Color Cameras
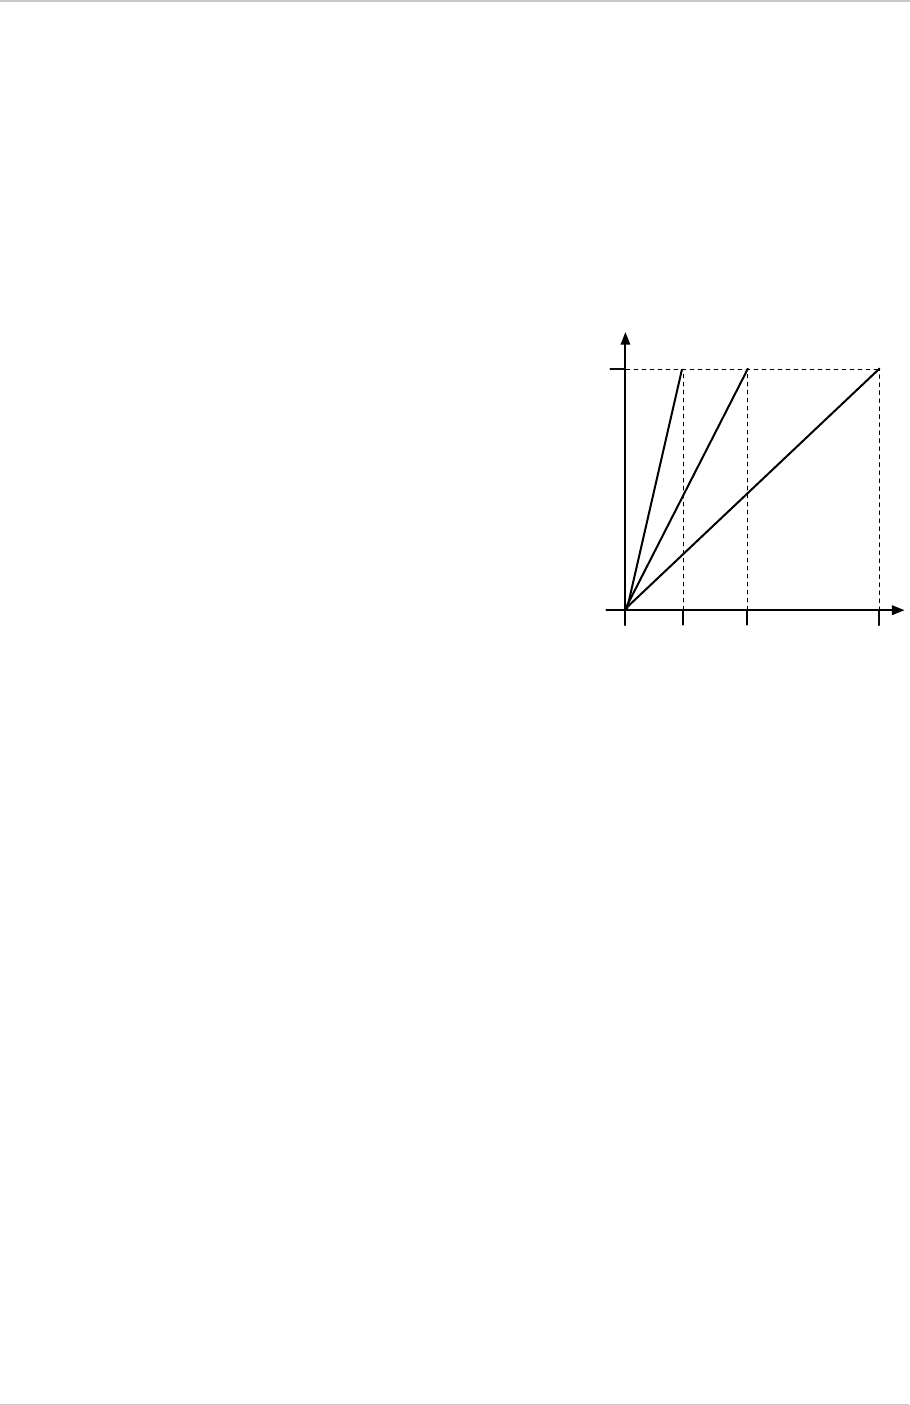
AW00123408000 Features
Basler ace USB 3.0 198
7.2 Gain
For information about the availability of the gain feature on a specific camera model, see Table 41
on page 196 and Table 42 on page 197. If your camera model is without gain, use the digital shift
feature to obtain a similar effect.
For more information about the digital shift feature, see Section 7.5 on page 207.
The camera’s gain feature allows to adjust
the camera’s gain. As shown in Figure 84,
increasing the gain increases the slope of
the response curve for the camera. This
results in a higher gray value output from
the camera for a given amount of output
from the imaging sensor. Decreasing the
gain decreases the slope of the response
curve and results in a lower gray value for a
given amount of sensor output.
Increasing the gain is useful when at your
brightest exposure, a gray value lower than
255 (in modes that output 8 bits per pixel) or
4095 (in modes that output 12 bits per
pixels) is reached. For example, if you
found that at your brightest exposure the
gray values output by the camera were no
higher than 127 (in an 8 bit mode), you
could increase the gain to 6 dB (an amplification factor of 2) and thus reach gray values of 254.
7.2.1 Analog and Digital Control
Depending on the sensor and pixel format used, the mechanisms for GainAll control can vary: For
some cameras, control is analog up to and including a certain boundary GainAll parameter value
[dB] (see Table 43), above which GainAll control is digital. For some cameras, Gain All control is
entirely digital, for others entirely analog.
The boundary GainAll parameter value is constant and independent of the chosen pixel format, of
whether the parameter limits for Gain All are disabled, and of whether binning vertical is enabled.
For some camera models, the maximum allowed GainAll parameter value decreases when a pixel
format with a higher bit depth is selected (see Table 44). Gain All control is entirely analog if the
maximum allowed GainAll parameter value falls below the boundary GainAll parameter value.
0
0
100
0 db6dB12 dB
5025
4095 1023 255
Fig. 84: Gain in dB, Shown for 8 bit, 10 bit, and 12 bit Output
Gray Values
(12-bit) (8-bit)
Sensor Output Signal (%)
(10-bit)

Features AW00123408000
199 Basler ace USB 3.0
For information about the digital shift feature, see Section 7.5 on page 207.
Camera Model Mechanism of
GainAll Control Boundary Gain All Para-
meter Value [dB];
GainAll Control Is Digital
Above the Value
acA640-90um/uc analog/digital 11.524
acA640-120um/uc analog/digital 14.755
acA640-750um/uc digital only N/A
acA800-510um/uc digital only N/A
acA1300-30um/uc analog/digital 7.575
acA1300-200um/uc digital only N/A
acA1600-20um/uc analog/digital 10.1
acA1920-25um/uc digital only N/A
acA1920-40um/uc analog/digital 24
acA1920-150um/uc digital only N/A
acA1920-155um/uc analog/digital 24
acA2000-165um/umNIR/uc digital only N/A
acA2040-55um/uc analog/digital 24
acA2040-90um/umNIR/uc digital only N/A
acA2040-120um/uc analog/digital 24
acA2440-35um/uc analog/digital 24
acA2440-75um/uc analog/digital 24
acA2500-14um/uc digital only N/A
acA2500-60um/uc digital only N/A
acA3800-14um/uc digital only N/A
acA4600-10uc digital only N/A
Table 43: Mechanisms of GainAll Control and Boundary Values (If Applicable)

AW00123408000 Features
Basler ace USB 3.0 200
7.2.2 Setting the Gain
The camera’s gain is determined by the value of the GainAll parameter. The regular parameter
value is adjusted on a scale ranging from zero to a maximum value. The minimum regular value
depends on whether vertical binning is enabled (see Table 44). The maximum allowed parameter
value can depend on whether the camera is set for a pixel format that yields an effective pixel bit
depth of 8 bit per pixel (e.g. Mono 8, RGB 8, Bayer BG 8, YCbCr422_8), of 10 bit (e.g. Mono 10,
Mono 10 p, Bayer BG 10, Bayer BG 10 p) or of 12 bit (e.g. Mono 12, Mono 12 p, Bayer BG 12,
Bayer BG 12 p).
Table 44 shows the minimum and maximum settable gain for each camera model. The values
indicate regular settings, i.e. the parameter limits are not removed.
This section (Section 7.2) describes how gain can be adjusted "manually", i.e., by
setting the value of the gain All parameter.
The camera also has a Gain Auto function that can automatically adjust the gain.
"Manual" adjustment of the GainAll parameter will only work, if the Gain
Auto function is disabled. If the Gain Auto function is enabled the GainAll
parameter will merely be in a "read only" state.
For more information about auto functions in general, see Section 7.15 on
page 299. For more information about the Gain Auto function, see Section 7.15.4
on page 307.

Features AW00123408000
201 Basler ace USB 3.0
Camera Model GainAll Parameter Values [dB]
Min Regular Min Regular
with Vertical
Binning
(Mono
Cameras)
Max Allowed
(8 bit depth) Max Allowed
(10 bit depth) Max Allowed
(12 bit depth)
acA640-90um/uc 0.0 -3.231 29.9047 N/A 7.539
acA640-120um/uc 0.0 0.0 33.1357 N/A 17.95
acA640-750um/uc 0.0 0.0 12.0 12.0 N/A
acA800-510um/uc 0.0 0.0 12.0 12.0 N/A
acA1300-30um/uc 0.0 -3.59 19.745 N/A 3.59
acA1300-200um/uc 0.0 0.0 12.0 12.0 N/A
acA1600-20um/uc 0.0 -3.59 22.258 N/A 6.103
acA1920-25um/uc 0.0 0.0 23.79814 N/A 23.79814
acA1920-40um/uc 0.0 0.0 36.0 N/A 24.0
acA1920-150um/uc 0.0 0.0 12.0 12.0 N/A
acA1920-155um/uc 0.0 0.0 36.0 N/A 24.0
acA2000-165um/umNIR/uc 0.0 0.0 23.5935 N/A 23.5935
acA2040-55um/uc 0.0 0.0 36 N/A 24
acA2040-90um/umNIR/uc 0.0 0.0 23.5935 N/A 23.5935
acA2040-120um/uc 0.0 0.0 36 N/A 24
acA2440-35um/uc 0.0 0.0 36 N/A 24
acA2440-75um/uc 0.0 0.0 36 N/A 24
acA2500-14um/uc 0.0 0.0 23.79814 N/A 23.79814
acA2500-60um/uc 0.0 0.0 12.0 12.0 N/A
acA3800-14um/uc 0.0 0.0 16.67569 N/A 16.67569
acA4600-10uc 0.0 N/A 17.76052 N/A 17.76052
Table 44: Minimum and Maximum Gain All Parameter Values (Parameter Limits Not Removed)

AW00123408000 Features
Basler ace USB 3.0 202
1. Set the Gain Selector to All.
2. Set the Gain parameter to your desired value.
You can set the Gain Selector and the GainAll parameter value from within your application software
by using the Basler pylon API. The following code snippet illustrates using the API to set the selector
and the parameter value:
camera.GainSelector.SetValue(GainSelector_All);
camera.Gain.SetValue(0.0359);
You can also use the Basler pylon Viewer application to easily set the parameters.For more
information about the pylon API and the pylon Viewer, see Section 3.1 on page 62.
To set the Gain parameter value using Basler pylon:
The minimum regular setting for the GainAll parameter is the minimum setting
that applies when the remove parameter limits feature is not used.
The minimum setting for the GainAll parameter can be decreased from the regular
setting to negative values by using the remove parameter limits feature.
For more information about the remove parameter limits feature, see Section 7.4
on page 206.

Features AW00123408000
203 Basler ace USB 3.0
7.3 Black Level
For information about the availability of the black level feature on a specific camera model, see
Table 41 on page 196 and Table 42 on page 197.
Adjusting the camera’s black level will result in an offset to the pixel values output by the camera.
Increasing the black level setting will result in a positive offset in the pixel values output for the
pixels. Decreasing the black level setting will result in a negative offset in the pixel values output for
the pixels.
For example, if the black level parameter value is increased by 1 the pixel value for each pixel is
increased by 1. If the black level parameter value is decreased by 1 the pixel value for each pixel
is decreased by 1.

AW00123408000 Features
Basler ace USB 3.0 204
7.3.1 Setting the Black Level
The black level can be adjusted by changing the value of the Black Level parameter.
The range of the allowed settings for the Black Level parameter value in DN varies by camera
model as shown in Table 45.
Camera Model Black Level Setting
Min Allowed Max Allowed
(8 bit depth) Max Allowed
(10 bit or 12 bit depth)
acA640-90um/uc 0.0 15.98438 255.75
acA640-120um/uc 0.0 15.98438 255.75
acA640-750um/uc 0.0 63.75 255.0
acA800-510um/uc 0.0 63.75 255.0
acA1300-30um/uc 0.0 15.98438 255.75
acA1300-200um/uc 0.0 63.75 255.0
acA1600-20um/uc 0.0 15.98438 255.75
acA1920-25um/uc 0.0 15.9375 255.0
acA1920-40um/uc 0.0 31.9375 511.0
acA1920-150um/uc 0.0 63.75 255.0
acA1920-155um/uc 0.0 31.9375 511.0
acA2000-165um/umNIR/uc 0.0 15.9375 255.0
acA2040-55um/uc 0.0 31.9375 511.0
acA2040-90um/umNIR/uc 0.0 15.9375 255.0
acA2040-120um/uc 0.0 31.9375 511.0
acA2440-35um/uc 0.0 31.9375 511.0
acA2440-75um/uc 0.0 31.9375 511.0
acA2500-14um/uc 0.0 15.9375 255.0
acA2500-60um/uc 0.0 63.75 255.0
acA3800-14um/uc 0.0 63.9375 1023
acA4600-10uc 0.0 63.9375 1023
Table 45: Minimum and Maximum Black Level Settings ([DN])

Features AW00123408000
205 Basler ace USB 3.0
1. Set the Black Level Selector to All.
2. Set the Black Level parameter to your desired value.
You can set the Black Level Selector and the Black Level parameter value from within your
application software by using the Basler pylon API. The following code snippet illustrates using the
API to set the selector and the parameter value:
camera.BlackLevelSelector.SetValue(BlackLevelSelector_All);
camera.BlackLevel.SetValue(1.0);
You can also use the Basler pylon Viewer application to easily set the parameters.
For more information about the pylon API and the pylon Viewer, see Section 3.1 on page 62.
To set the Black Level parameter value using Basler pylon:

AW00123408000 Features
Basler ace USB 3.0 206
7.4 Remove Parameter Limits
For each camera feature, the allowed range of any associated parameter values is normally limited.
The factory limits are designed to ensure optimum camera operation and, in particular, good image
quality. For special camera uses, however, it may be helpful to set parameter values outside of the
factory limits.
The remove parameter limits feature lets you remove the factory limits for parameters associated
with certain camera features. When the factory limits are removed, the parameter values can be set
within extended limits. Typically, the range of the extended limits is dictated by the physical
restrictions of the camera’s electronic devices, such as the absolute limits of the camera’s variable
gain control.
The values for any extended limits can be determined by using the Basler pylon Viewer or from
within your application via the pylon API.
Parameter limits can be removed for the following parameters:
All parameter for setting gain (remove parameter limits generally available)
ExposureTime (remove parameter limits available for some camera models)
Removing the parameter limits on the gain feature will only remove the lower regular limit. When
the lower regular limit is removed the gain All parameter value can be decreased to a negative
value.
For more information about the gain feature, see Section 7.2 on page 198.
Removing Parameter Limits
1. Use the Parameter Limits Selector to select the parameter whose limits you want to remove.
2. Set the value of the Remove Parameter Limits parameter.
You can set the Parameter Limits Selector and the value of the Remove Parameter Limits
parameter from within your application software by using the Basler pylon API. The following code
snippet illustrates using the API to set the selector and the parameter value:
// Select the feature whose factory limits will be removed.
camera.RemoveParameterLimitSelector.SetValue(RemoveParameterLimitSelector_Gain);
// Remove the limits for the selected feature.
camera.RemoveParameterLimit.SetValue(true);
You can also use the Basler pylon Viewer application to easily set the parameters. Note that the
remove parameter limits feature will only be available at the "guru" viewing level.
For more information about the pylon API and the pylon Viewer, see Section 3.1 on page 62.
To remove the limits for a parameter value:
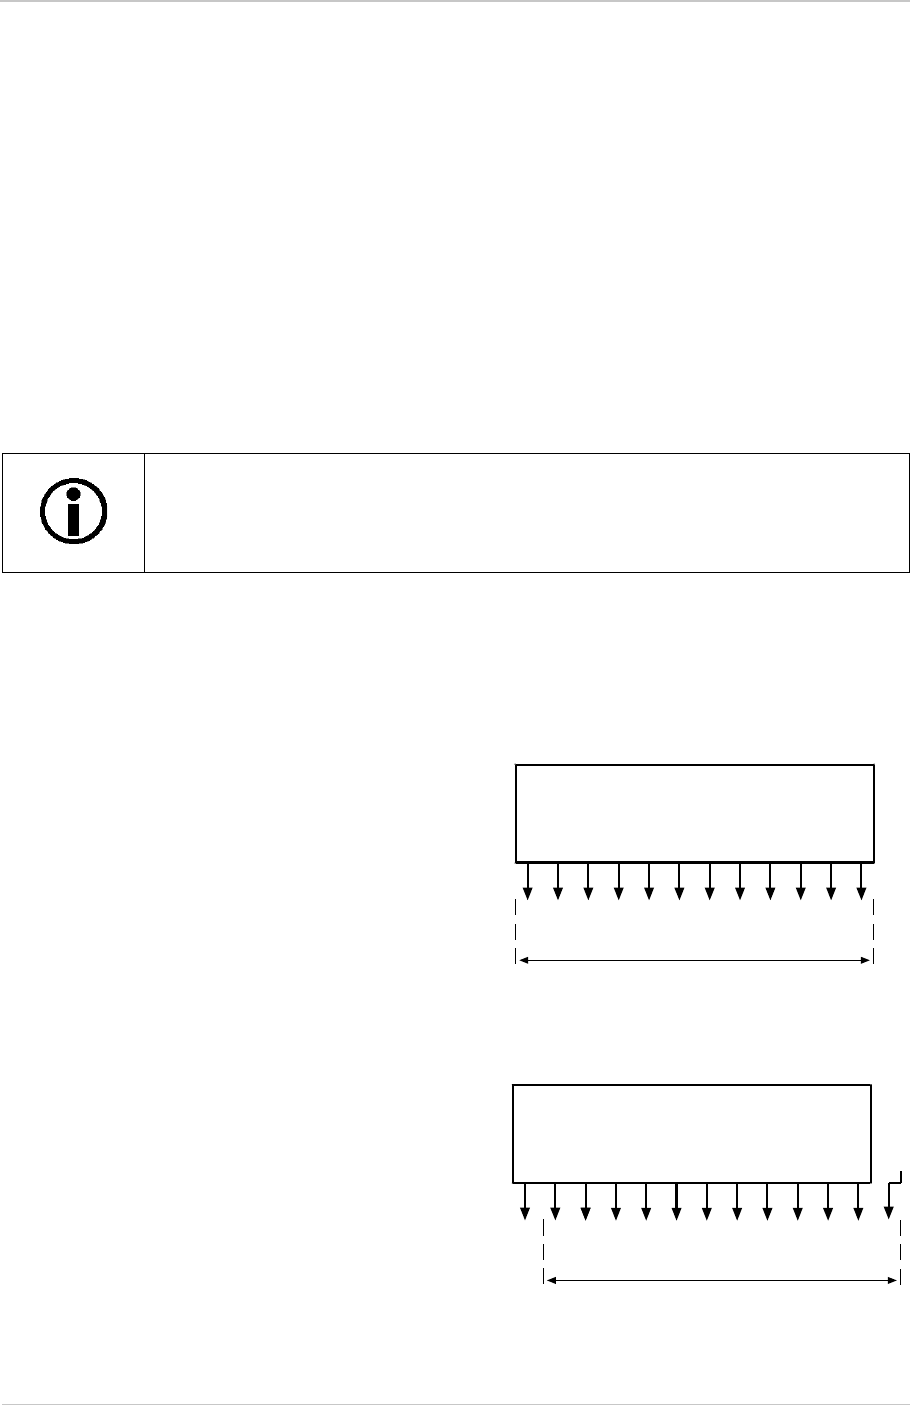
Features AW00123408000
207 Basler ace USB 3.0
7.5 Digital Shift
For information about the availability of digital shift on a specific camera model, see Table 41 on
page 196 and Table 42 on page 197.
The digital shift feature lets you change the groups of bits that are output from the ADCs in the
camera. Using the digital shift feature will effectively multiply the output of the camera by 2 times, 4
times, 8 times, or 16 times. The next two sections describe how the digital shift feature works when
the camera is set for a 12 bit pixel format and when it is set for a 8 bit pixel format. There is also a
section describing precautions that you must observe when using the digital shift feature and a
section that describes enabling and setting the digital shift feature.
7.5.1 Digital Shift with 12 Bit Pixel Formats
No Shift
As mentioned in the Functional Description section of
this manual, the camera uses 12 bit ADCs to digitize
the output from the imaging sensor. When the camera
is set for a pixel format that outputs pixel data at 12 bit
effective depth, by default, the camera transmits the
12 bits that are output from the ADC.
Shift by 1
When the camera is set to shift by 1, the output from
the camera will include bit 10 through bit 0 from the
ADC along with a zero as an LSB.
The result of shifting once is that the output of the
camera is effectively multiplied by 2. For example,
assume that the camera is set for no shift, that it is
viewing a uniform white target, and that under these
conditions the reading for the brightest pixel is 100.
If you changed the digital shift setting to shift by 1,
the reading would increase to 200.
If the digital shift feature is not available for your camera you can use the gain
feature to obtain an effect similar to adjusting digital shift.
For more information about the gain feature, see Section 7.2 on page 198.
ADC
No Shift
M
S
B
L
S
B
bit
0
bit
1
bit
2
bit
3
bit
4
bit
5
bit
6
bit
7
bit
8
bit
9
bit
10
bit
11
ADC
Shifted Once
M
S
B
L
S
B
bit
0
bit
1
bit
2
bit
3
bit
4
bit
5
bit
6
bit
7
bit
8
bit
9
bit
10
bit
11 "0"
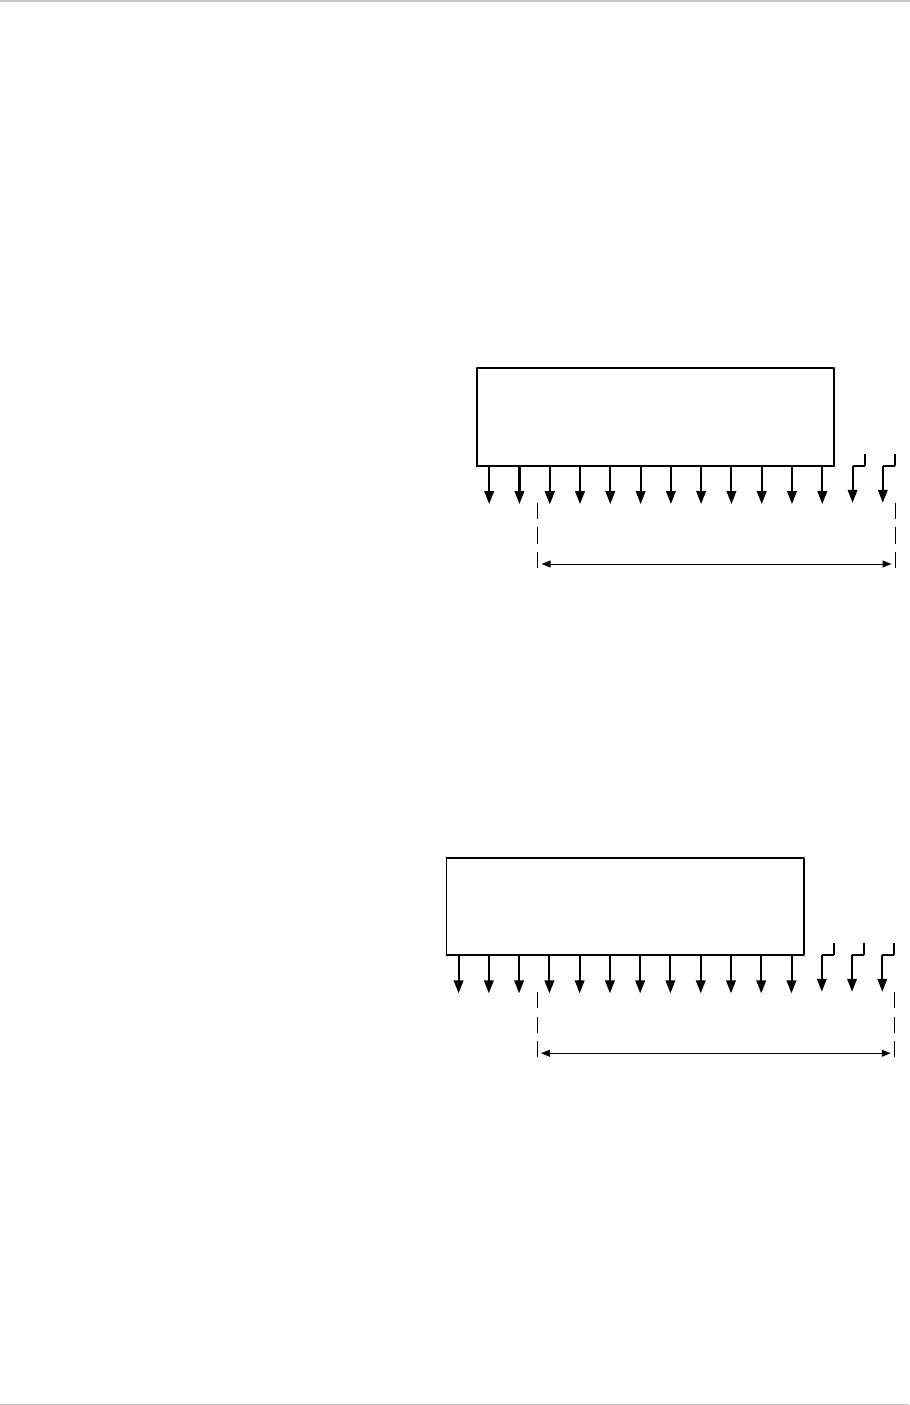
AW00123408000 Features
Basler ace USB 3.0 208
When the camera is set to shift by 1, the least significant bit output from the camera for each pixel
value will be 0. This means that no odd gray values can be output and that the gray value scale will
only include values of 2, 4, 6, 8, 10, and so on. This absence of some gray values is commonly
referred to as "missing codes".
If the pixel values being output by the camera’s sensor are high enough to set bit 11 to 1, we
recommend not using shift by 1. If you do nonetheless, all bits output from the camera will
automatically be set to 1. Therefore, you should only use the shift by 1 setting when your pixel
readings with a 12 bit pixel format selected and with digital shift disabled are all less than 2048.
Shift by 2
When the camera is set to shift by 2, the output
from the camera will include bit 9 through bit 0
from the ADC along with 2 zeros as LSBs.
The result of shifting twice is that the output of
the camera is effectively multiplied by 4.
When the camera is set to shift by 2, the 2 least
significant bits output from the camera for each
pixel value will be 0. This means that the gray
value scale will only include every 4th value, for
example, 4, 8, 16, 20, and so on.
If the pixel values being output by the camera’s sensor are high enough to set bit 10 or bit 11 to 1,
we recommend not using shift by 2. If you do nonetheless, all bits output from the camera will
automatically be set to 1. Therefore, you should only use the shift by 2 setting when your pixel
readings with a 12 bit pixel format selected and with digital shift disabled are all less than 1024.
Shift by 3
When the camera is set to shift by 3, the
output from the camera will include bit 8
through bit 0 from the ADC along with 3
zeros as LSBs.
The result of shifting 3 times is that the
output of the camera is effectively multiplied
by 8.
When the camera is set to shift by 3, the 3
least significant bits output from the camera
for each pixel value will be 0. This means that the gray value scale will only include every 8th gray
value, for example, 8, 16, 24, 32, and so on.
If the pixel values being output by the camera’s sensor are high enough to set bit 9, bit 10, or bit 11
to 1, we recommend not using shift by 3. If you do nonetheless, all bits output from the camera will
automatically be set to 1. Therefore, you should only use the shift by 3 setting when your pixel
readings with a 12 bit pixel format selected and with digital shift disabled are all less than 512.
ADC
Shifted Twice
M
S
B
L
S
B
bit
0
bit
1
bit
2
bit
3
bit
4
bit
5
bit
6
bit
7
bit
8
bit
9
bit
10
bit
11 "0" "0"
ADC
Shifted Three Times
M
S
B
L
S
B
bit
0
bit
1
bit
2
bit
3
bit
4
bit
5
bit
6
bit
7
bit
8
bit
9
bit
10
bit
11 "0" "0" "0"
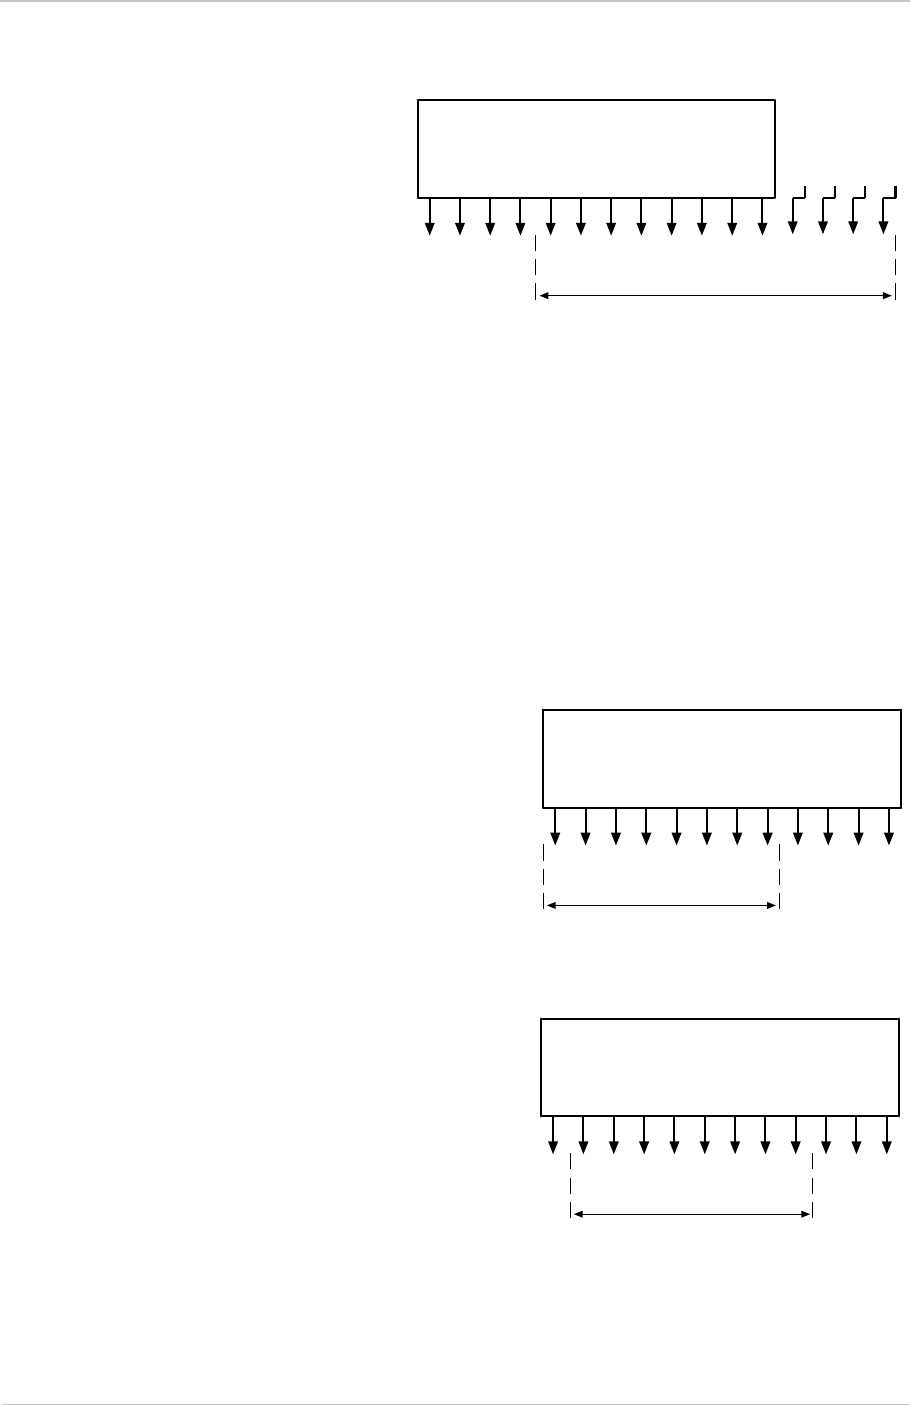
Features AW00123408000
209 Basler ace USB 3.0
Shift by 4
When the camera is set to shift by 4, the
output from the camera will include bit 7
through bit 0 from the ADC along with 4
zeros as LSBs.
The result of shifting 4 times is that the
output of the camera is effectively
multiplied by 16.
When the camera is set to shift by 4, the 4
least significant bits output from the
camera for each pixel value will be 0. This means that the gray value scale will only include every
16th gray value, for example, 16, 32, 48, 64, and so on.
If the pixel values being output by the camera’s sensor are high enough to set bit 8, bit 9, bit 10, or
bit 11 to 1, we recommend not using shift by 4. If you do nonetheless, all bits output from the camera
will automatically be set to 1. Therefore, you should only use the shift by 4 setting when your pixel
readings with a 12 bit pixel format selected and with digital shift disabled are all less than 256.
7.5.2 Digital Shift with 8 Bit Pixel Formats
No Shift
As mentioned in the Functional Description section of
this manual, the camera uses a 12 bit ADC to digitize
the output from the imaging sensor. When the camera
is set for a pixel format that outputs pixel data at 8 bit
effective depth, by default, the camera drops the 4
least significant bits from the ADC and transmits the 8
most significant bits (bit 11 through 4).
Shift by 1
When the camera is set to shift by 1, the output from
the camera will include bit 10 through bit 3 from the
ADC.
The result of shifting once is that the output of the
camera is effectively multiplied by 2. For example,
assume that the camera is set for no shift, that it is
viewing a uniform white target, and that under these
conditions the reading for the brightest pixel is 10. If
you changed the digital shift setting to shift by 1, the
reading would increase to 20.
If the pixel values being output by the camera’s sensor are high enough to set bit 11 to 1, we
recommend not using shift by 1. If you do nonetheless, all bits output from the camera will
ADC
Shifted Four Times
M
S
B
L
S
B
bit
0
bit
1
bit
2
bit
3
bit
4
bit
5
bit
6
bit
7
bit
8
bit
9
bit
10
bit
11 "0" "0" "0" "0"
ADC
Not Shifted
M
S
B
L
S
B
bit
0
bit
1
bit
2
bit
3
bit
4
bit
5
bit
6
bit
7
bit
8
bit
9
bit
10
bit
11
ADC
Shifted Once
M
S
B
L
S
B
bit
0
bit
1
bit
2
bit
3
bit
4
bit
5
bit
6
bit
7
bit
8
bit
9
bit
10
bit
11
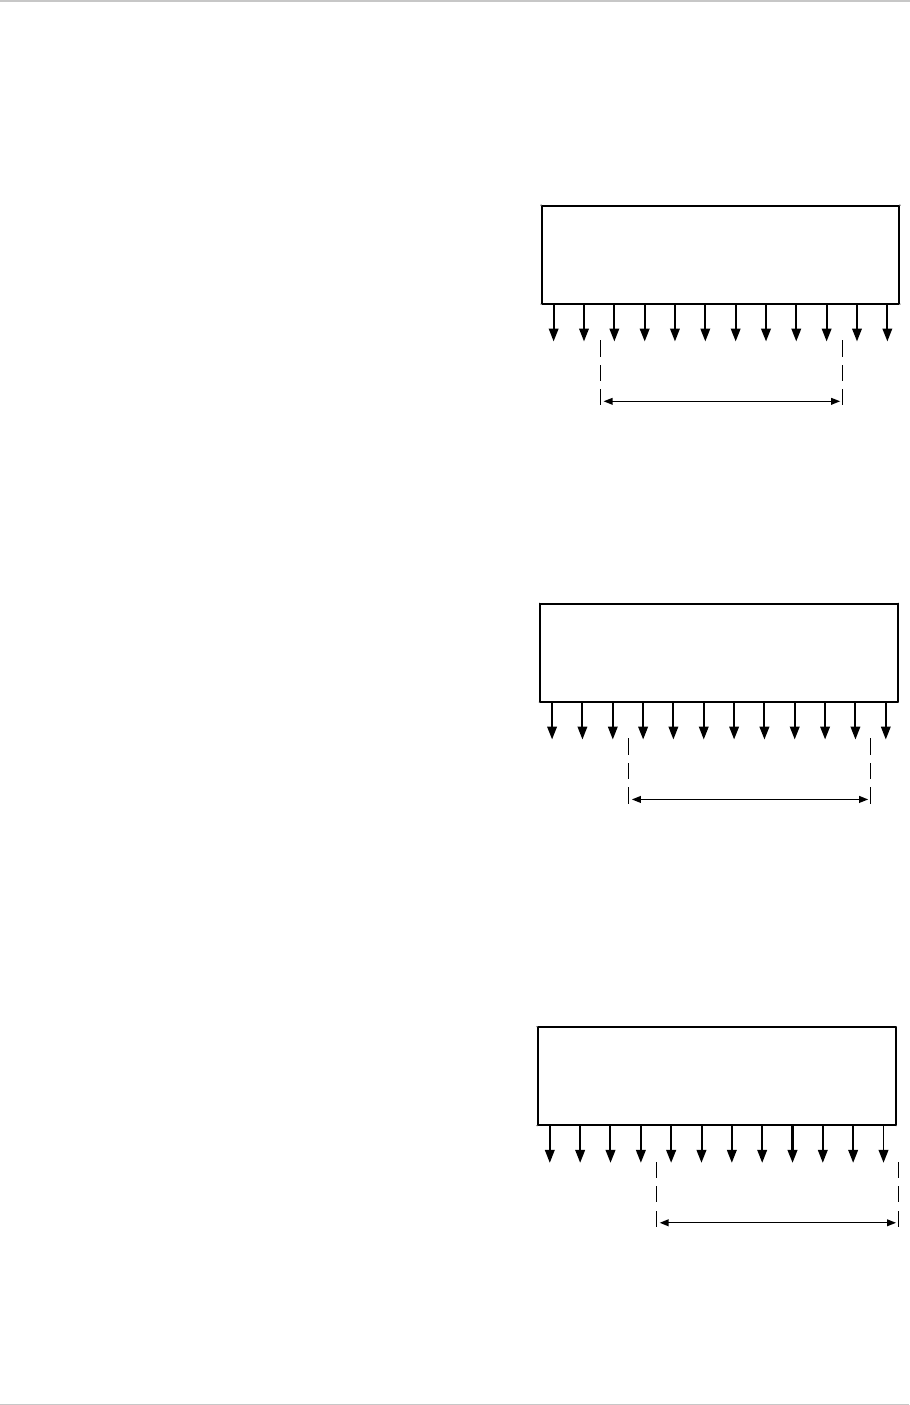
AW00123408000 Features
Basler ace USB 3.0 210
automatically be set to 1. Therefore, you should only use the shift by 1 setting when your pixel
readings with an 8 bit pixel format selected and with digital shift disabled are all less than 128.
Shift by 2
When the camera is set to shift by 2, the output from the
camera will include bit 9 through bit 2 from the ADC.
The result of shifting twice is that the output of the
camera is effectively multiplied by 4.
If the pixel values being output by the camera’s sensor
are high enough to set bit 10 or bit 11 to 1, we
recommend not using shift by 2. If you do nonetheless,
all bits output from the camera will automatically be set
to 1. Therefore, you should only use the shift by 2
setting when your pixel readings with an 8 bit pixel format selected and with digital shift disabled are
all less than 64.
Shift by 3
When the camera is set to shift by 3, the output from
the camera will include bit 8 through bit 1 from the
ADC.
The result of shifting three times is that the output of
the camera is effectively multiplied by 8.
If the pixel values being output by the camera’s sensor
are high enough to set bit 9, bit 10, or bit 11 to 1, we
recommend not using shift by 3. If you do nonetheless,
all bits output from the camera will automatically be set
to 1. Therefore, that you should only use the shift by 3
setting when your pixel readings with an 8 bit pixel format selected and with digital shift disabled are
all less than 32.
Shift by 4
When the camera is set to shift by 4, the output from
the camera will include bit 7 through bit 0 from the
ADC.
The result of shifting four times is that the output of
the camera is effectively multiplied by 16.
If the pixel values being output by the camera’s
sensor are high enough to set bit 8, bit 9, bit 10, or bit
11 to 1, we recommend not using shift by 4. If you do
nonetheless, all bits output from the camera will
automatically be set to 1. Therefore, you should only use the multiply by 4 setting when your pixel
readings with an 8 bit pixel format selected and with digital shift disabled are all less than 16.
ADC
Shifted Twice
M
S
B
L
S
B
bit
0
bit
1
bit
2
bit
3
bit
4
bit
5
bit
6
bit
7
bit
8
bit
9
bit
10
bit
11
ADC
Shifted Three Times
M
S
B
L
S
B
bit
0
bit
1
bit
2
bit
3
bit
4
bit
5
bit
6
bit
7
bit
8
bit
9
bit
10
bit
11
ADC
Shifted Four Times
M
S
B
L
S
B
bit
0
bit
1
bit
2
bit
3
bit
4
bit
5
bit
6
bit
7
bit
8
bit
9
bit
10
bit
11

Features AW00123408000
211 Basler ace USB 3.0
7.5.3 Precautions When Using Digital Shift
There are several checks and precautions that you must follow before using the digital shift feature.
The checks and precautions differ depending on whether the camera will be set for a 12 bit pixel
format or for an 8 bit pixel format in your application.
If you will be using a 12 bit pixel format, make this check:
Use the pylon Viewer or the pylon API to set the camera for a 12 bit pixel format and no digital shift.
Check the output of the camera under your normal lighting conditions and note the readings for the
brightest pixels.
If any of the readings are above 2048, do not use digital shift.
If all of the readings are below 2048, you can safely use the shift by 1 setting.
If all of the readings are below 1024, you can safely use the shift by 1 or 2 settings.
If all of the readings are below 512, you can safely use the shift by 1, 2, or 3 settings.
If all of the readings are below 256, you can safely use the shift by 1, 2, 3, or 4 settings.
If you will be using an 8 bit format, make this check:
Use the pylon Viewer or the pylon API to set the camera for a 8 bit pixel format and no digital shift.
Check the output of the camera under your normal lighting conditions and note the readings for the
brightest pixels.
If any of the readings are above 128, do not use digital shift.
If all of the readings are below 128, you can safely use the shift by 1 setting.
If all of the readings are below 64, you can safely use the shift by 1 or 2 settings.
If all of the readings are below 32, you can safely use the shift by 1, 2, or 3 settings.
If all of the readings are below 16, you can safely use the shift by 1, 2, 3, or 4 settings.

AW00123408000 Features
Basler ace USB 3.0 212
7.5.4 Enabling and Setting Digital Shift
You can enable or disable the digital shift feature by setting the value of the Digital Shift parameter.
When the parameter is set to zero, digital shift will be disabled. When the parameter is set to 1, 2,
3, or 4, digital shift will be set to shift by 1, shift by 2, shift by 3, or shift by 4 respectively.
You can set the Digital Shift parameter values from within your application software by using the
Basler pylon API. The following code snippet illustrates using the API to set the parameter values:
// Disable digital shift
camera.DigitalShift.SetValue( 0 );
// Enable digital shift by 2
camera.DigitalShift.SetValue( 2 );
You can also use the Basler pylon Viewer application to easily set the parameters.
For more information about the pylon API and the pylon Viewer, see Section 3.1 on page 62.
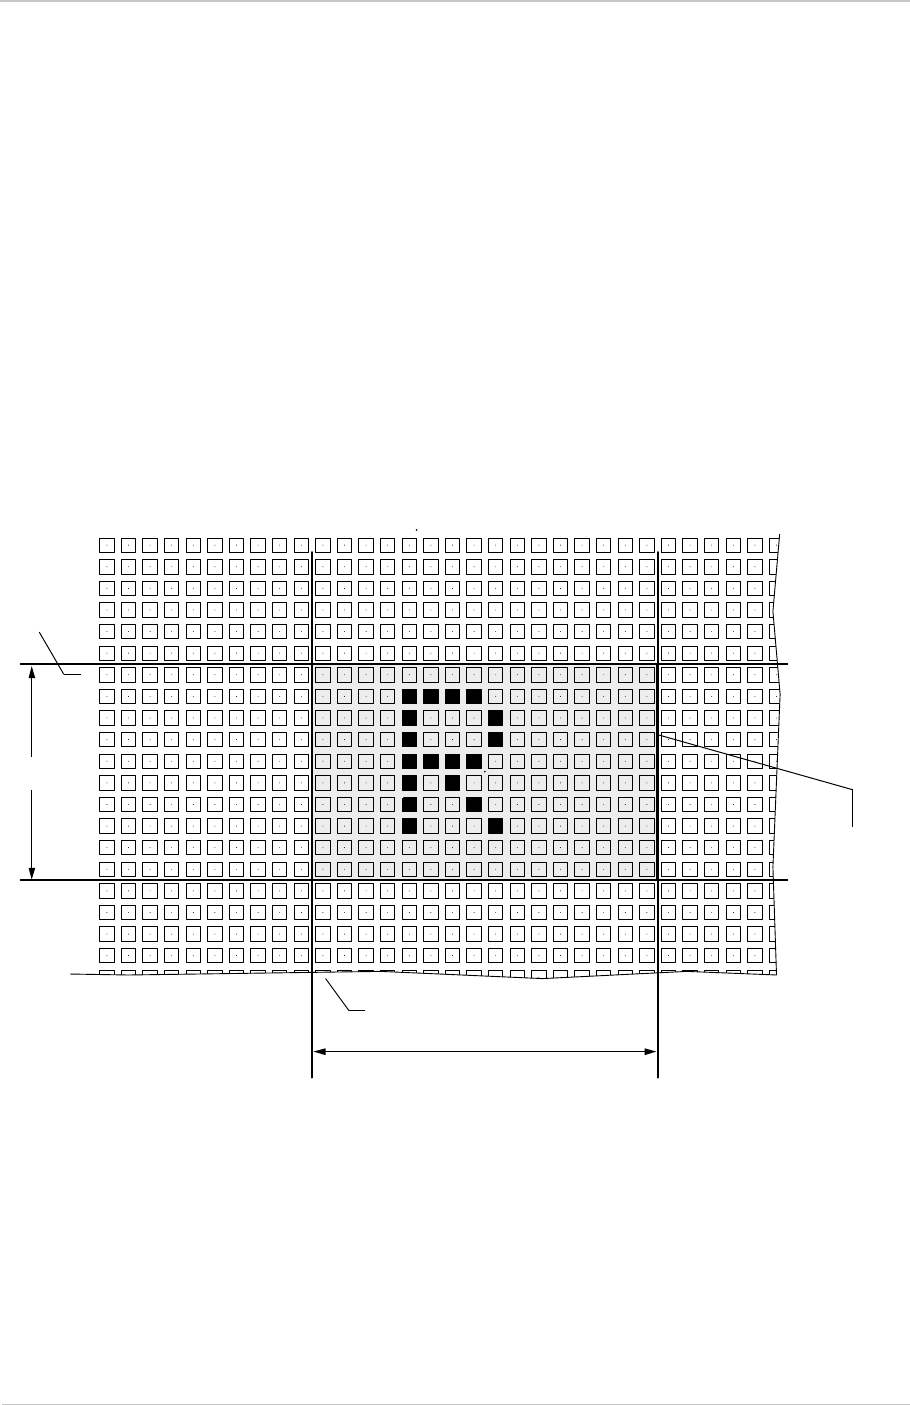
Features AW00123408000
213 Basler ace USB 3.0
7.6 Image Region of Interest (ROI)
The image region of interest (ROI) feature lets you specify a portion of the sensor array and after
each image is acquired, only the pixel information from the specified portion of the array is
transmitted out of the camera.
The region of interest is referenced to the top left corner of the sensor array. The top left corner is
designated as column 0 and row 0 as shown in Figure 85.
The location and size of the region of interest is defined by declaring an offset X (coordinate), a
width, an offset Y (coordinate), and a height. For example, suppose that you specify the offset X as
10, the width as 16, the offset Y as 6, and the height as 10. The region of the array that is bounded
by these settings is shown in Figure 85.
The camera will only transmit pixel data from within the region defined by your settings. Information
from the pixels outside of the region of interest is discarded.
One of the main advantages of the image ROI feature is that decreasing the height of the ROI can
increase the camera’s maximum allowed acquisition frame rate.
For more information about how changing the ROI height affects the maximum allowed frame rate,
see Section 6.10 on page 184.
012345678910 11 12 13 14 15 16 17 18 19 20 21 22 23 24 25 26 27 28 29 30
0
1
2
3
4
5
6
7
8
9
10
11
12
13
14
15
16
17
18
19
Offset
Y
Row
Column
Offset X
Width
Height
Fig. 85: Region of Interest
The camera
will only
transmit the
pixel data
from this
region

AW00123408000 Features
Basler ace USB 3.0 214
Guidelines for Setting the Image ROI
By default, the image ROI is set to use the full resolution of the camera’s sensor. You can change
the size and the position of the image ROI by changing the value of the camera’s OffsetX, OffsetY,
Width, and Height parameters.
The value of the OffsetX parameter determines the starting column for the region of interest.
The value of the OffsetY parameter determines the starting row for the region of interest.
The value of the Width parameter determines the width of the region of interest.
The value of the Height parameter determines the height of the region of interest.
The value of the WidthMax parameter determines the maximum allowed width of the region of
interest for the current OffsetX setting.
The value of the HeightMax parameter determines maximum allowed height of the region of
interest for the current OffsetY setting.
When you are setting the camera’s region of interest, you must follow these guidelines:
On all camera models:
The sum of the OffsetX setting plus the Width setting must not exceed the width of the
camera’s sensor. For example, on the acA1920-25um, the sum of the OffsetX setting plus the
Width setting must not exceed 1920.
The sum of the OffsetY setting plus the Height setting must not exceed the height of the
camera’s sensor. For example, on the acA1920-25um, the sum of the OffsetY setting plus the
Height setting must not exceed 1080.
Settings with Binning Disabled
The minimum settings and minimum increments for OffsetX, OffsetY, Width, and Height are given
below, where a distinction is made between mono and color cameras. It is assumed that binning is
disabled.
If you want to set Offset X, make sure the Center X feature for automatic ROI
centering is disabled.
If you want to set Offset Y, make sure the Center Y feature for automatic ROI
centering is disabled.
For more information about automatic ROI centering and the effects on CenterX
and CenterY settings, see Section 7.6.1 on page 219.

Features AW00123408000
215 Basler ace USB 3.0
Camera Model ROI Position and Size (Mono Cameras)
Offset X Offset Y Width Height
Mini-
mum Mini-
mum
Incre-
ment
Mini-
mum Mini-
mum
Incre-
ment
Mini-
mum Mini-
mum
Incre-
ment
Mini-
mum Mini-
mum
Incre-
ment
acA640-90um01011111
acA640-120um01011111
acA640-750um 0 16 0 1 16 16 1 1
acA800-510um 0 16 0 1 16 16 1 1
acA1300-30um 01011111
acA1300-200um 0 16 0 1 16 16 1 1
acA1600-20um 01011111
acA1920-25um 0101641641
acA1920-40um04024411
acA1920-150um 0 32 0 1 32 32 1 1
acA1920-155um 04024411
acA2000-165um01018811
acA2000-165umNIR01018811
acA2040-55um04024411
acA2040-90um01018811
acA2040-90umNIR01018811
acA2040-120um04024411
acA2440-35um04024411
acA2440-75um04024411
acA2500-14um0101641641
acA2500-60um 0 32 0 1 32 32 1 1
acA3800-14um0101641641
Minimum Settings and Increments for Image ROI Position and Size in Mono Cameras (without Binning)

AW00123408000 Features
Basler ace USB 3.0 216
Settings With Binning Enabled
Camera Model ROI Position and Size (Color Cameras)
Offset X Offset Y Width Height
Mini-
mum Mini-
mum
Incre-
ment
Mini-
mum Mini-
mum
Incre-
ment
Mini-
mum Mini-
mum
Incre-
ment
Mini-
mum Mini-
mum
Incre-
ment
acA640-90uc 02022222
acA640-120uc 0 2 022222
acA640-750uc 0 16 0 2 16 16 2 2
acA800-510uc 0 16 0 2 16 16 2 2
acA1300-30uc 0 2 022222
acA1300-200uc 0 16 0 2 16 16 2 2
acA1600-20uc 0 2 022222
acA1920-25uc 0 2 0 2 64 2 64 2
acA1920-40uc04024422
acA1920-150uc 0 32 0 2 32 32 2 2
acA1920-155uc04024422
acA2000-165uc 0 2 028822
acA2040-55uc04024422
acA2040-90uc02028822
acA2040-120uc 0 4 024422
acA2440-35uc04024422
acA2440-75uc04024422
acA2500-14uc 0 2 0 2 64 2 64 2
acA2500-60uc 0 32 0 2 32 32 2 2
acA3800-14uc 0 2 0 2 64 2 64 2
acA4600-10uc 0 2 0 2 64 2 64 2
Table 46: Minimum Settings and Increments for Image ROI Position and Size in Color Cameras (without Binning)
Normally, the OffsetX, OffsetY, Width, and Height parameter settings refer to the
physical columns and rows of pixels in the sensor. But if binning is enabled, these
parameters are set in terms of "virtual" columns and rows. For more information,
see Section 7.8.1 on page 250.

Features AW00123408000
217 Basler ace USB 3.0
Camera Model Minimum Physical
ROI Height Minimum Virtual
ROI Height
No Vertical
Binning Vertical Binning by
2 Enabled Vertical Binning by
3 Enabled Vertical Binning by
4 Enabled
acA640-90um 1 1 1 1
acA640-120um 1 1 1 1
acA640-750um 1 N/A N/A N/A
acA800-510um 1 N/A N/A N/A
acA1300-30um 1 1 1 1
acA1300-200um 1 N/A N/A N/A
acA1600-20um 1 1 1 1
acA1920-25um 64 32 22 16
acA1920-25uc 64 32 22 16
acA1920-40um 1 1 1 1
acA1920-150um 1 N/A N/A N/A
acA1920-155um 1 1 1 1
acA2000-165um 1 1 1 1
acA2000-165umNIR 1 1 1 1
acA2040-55um 1 1 1 1
acA2040-90um 1 1 1 1
acA2040-90umNIR1111
acA2040-120um 1 1 1 1
acA2440-35um 1 1 1 1
acA2440-75um 1 1 1 1
acA2500-14um64322216
acA2500-14uc64322216
acA2500-60um 1 N/A N/A N/A
acA3800-14um 64 32 N/A 16
Table 47: Minimum ROI Height Settings when Vertical Binning is Disabled and Enabled (Mono Cameras,
acA1920-25uc, and acA2500-14uc)

AW00123408000 Features
Basler ace USB 3.0 218
You can set the OffsetX, OffsetY, Width, and Height parameter values from within your application
software by using the Basler pylon API. The following code snippets illustrate using the API to get
the mximum allowed settings for the Width and Height parameters. They also illustrate setting the
Offset X, OffsetY, Width, and Height parameter values:
Camera Model Minimum Physical
ROI Width Minimum Virtual
ROI Width
No Horizontal
Binning Horizontal
Binning by 2
Enabled
Horizontal
Binning by 3
Enabled
Horizontal
Binning by 4
Enabled
acA640-90um 1 1 1 1
acA640-120um 1 1 1 1
acA640-750um 256 N/A N/A N/A
acA800-510um 256 N/A N/A N/A
acA1300-30um 1 1 1 1
acA1300-200um 256 N/A N/A N/A
acA1600-20um 1 1 1 1
acA1920-25um 64 32 22 16
acA1920-25uc 64 32 22 16
acA1920-40um 4 4 4 4
acA1920-150um 256 N/A N/A N/A
acA1920-155um 4 4 4 4
acA2000-165um 8 8 8 8
acA2000-165umNIR 8 8 8 8
acA2040-55um 4 4 4 4
acA2040-90um 8 8 8 8
acA2040-90umNIR 8 8 8 8
acA2040-120um 4 4 4 4
acA2440-35um 4 4 4 4
acA2440-75um 4 4 4 4
acA2500-14um 64 32 22 16
acA2500-14uc 64 32 22 16
acA2500-60um 256 N/A N/A N/A
acA3800-14um 64 32 N/A 16
Table 48: Minimum ROI Width Settings when Horizontal Binning is Disabled and Enabled (Monochrome Cameras,
acA1920-25uc, and acA2500-14uc)

Features AW00123408000
219 Basler ace USB 3.0
int64_t i = camera.WidthMax.GetValue();
camera.Width.SetValue(1294);
camera.OffsetX.SetValue(0);
int64_t i = camera.HeightMax.GetValue();
camera.Height.SetValue(964);
camera.OffsetY.SetValue(0);
You can also use the Basler pylon Viewer application to easily set the parameters.
For more information about the pylon API and the pylon Viewer, see Section 3.1 on page 62.
7.6.1 Center X and Center Y
The ROI feature also includes Center X and Center Y capabilities for horizontal and vertical
centering. When CenterX is enabled, the camera will automatically center the ROI along the
sensor’s X axis. When CenterY is enabled, the camera automatically centers the ROI along the
sensor’s Y axis.
Enabling ROI Centering
You can enable ROI centering from within your application software by using the Basler pylon API.
The following code snippet illustrates using the API to enable automatic ROI centering:
camera.CenterX.SetValue(true);
camera.CenterY.SetValue(true);
When CenterX is enabled, the OffsetX setting is adjusted accordingly and
becomes read only.
Note: When CenterX is disabled, the original OffsetX setting that applied when
CenterX was enabled, is not automatically restored. If you want to return to the
original OffsetX setting, you have to do so "manually".
The enabling of CenterY has an analogous effect on OffsetY settings.

AW00123408000 Features
Basler ace USB 3.0 220
7.6.2 Changing ROI Parameters "On-the-Fly"
Making ROI parameter changes “on-the-fly” means making the parameter changes while the
camera is capturing images continuously. On-the-fly changes are only allowed for the parameters
that determine the position of the ROI, i.e., the OffsetX and OffsetY parameters. Changes to the
ROI size are not allowed on-the-fly.

Features AW00123408000
221 Basler ace USB 3.0
7.7 Sequencer
7.7.1 Introduction
The sequencer feature allows you to apply different sets of configuration parameter settings, called
sequencer sets, to a sequence of image acquisitions. As the images are acquired, one sequencer
set after the other is applied. This makes it possible to quickly respond to changing imaging
requirements while acquiring images. For example, imaging requirements will change when the
illumination changes.
After camera startup or reset, the sequencer sets will be available with default parameter values
according to the settings of the default user set. Each sequencer set is identified by an index
number that can range from zero through 31. Accordingly, up to 32 different sequencer sets are
available.
To have sequencer sets available for your specific requirements, you will, however, usually want to
configure the sequencer sets. This will include changing parameter values to make them
appropriate for your requirements (see Section 7.7.3 on page 229). To change the parameter
values of a sequencer set, you must first load the sequencer set into the active set. For more
information about sequencer configuration, see Section 7.7.3 on page 229. For more information
about the active set, see Section 7.21 on page 331.
Sequencer Modes
The sequencer feature is enabled when you set it to either of two different modes:
In the sequencer configuration mode, the sequencer sets can be configured but not be used
for image acquisition.
The sequencer configuration mode must be set to On and the sequencer mode must be set to
Off.
In the sequencer mode (also called "sequencer mechanism"), the sequencer sets can be
used for image acquisition but not be configured.
The sequencer mode must be set to On.
The sequencer feature is disabled when the sequencer configuration mode and the sequencer
mode are both set to Off.
When the auto functions feature is enabled, the sequencer feature will not be
available. For more information about the auto functions feature, see Section 7.15
on page 299.

AW00123408000 Features
Basler ace USB 3.0 222
7.7.2 The Sequencer and the Active Set
During operation, the camera is controlled by a set of configuration parameters settings that reside
in the camera’s volatile memory. This set of parameter settings is known as the "active set" .
When you use the pylon API or the pylon Viewer to make a change to a camera parameter such as
the Gain, you are making a change to the active set. And because the active set controls camera
operation, you will see a change in camera operation when you change a parameter value in the
active set. For more information about the active set, see Section 7.21 on page 331.
The parameters in the active set can be divided into two types:
Non-sequencer parameters: The parameter values in the active set cannot be changed using
the sequencer feature. This also means that the non-sequencer parameter values cannot be
configured for user sets.
Sequencer parameters: The parameter values in the active set can be changed almost
instantaneously by loading a sequencer set.
The "current set" is the sequencer set whose parameter values were loaded into the active set
with the latest sequencer set advance. The parameter values remain in the active set until they
are replaced by the parameter values of the next sequencer set.
The sequencer parameters can be divided into two types (see Figure 86):
When the sequencer feature is in sequencer mode, the parameter values of the
current sequencer set cannot be changed using the pylon API or the pylon Viewer.
Only those sequencer set parameter values are displayed that were active before
the sequencer was enabled. You can not "see" the parameter values delivered by
the current set.
We recommend that you do not attempt to read or change any of the sequence
parameters when the sequencer feature is enabled.
Because your parameter values for the sequencer sets only reside in volatile
memory, the parameter values will be lost and reset to the default values if the
camera is reset or switched off. You will then have to populate the sequencer sets
with your parameter values again.
Note also that sequencer sets can not be saved in user sets.
When the camera enters the over temperature mode. while the sequencer is in
sequencer mode, the sequencer stops operating. When the camera exits the over
temperature mode the sequencer does not resume operation. However, the
parameter values for the sequencer sets are preserved in volatile memory.

Features AW00123408000
223 Basler ace USB 3.0
Camera parameters for camera control (e.g. exposure time, gain, ROI position and size,
see also Section 7.7.2.1).
Sequencer set related parameters for sequencer control. The parameters define the
details of advancing from one sequencer set to the next. This includes the possibility of
choosing between different "paths" for advance, thus allowing to choose between different
sequencer sets (see Figure 86 and Section 7.7.2.2).
Fig. 86: Sequencer Parameters of Sequencer Set with Index Number J (Most Parameter Values as Examples)
7.7.2.1 Camera Parameters
Each sequencer set controls the parameter values for the following camera parameters.
PixelFormat 1) CenterX
ExposureTime CenterY
AcquisitionFrameRate ReverseX
AcquisitionFrameRateEnable ReverseY 2)
TimerDelay (for Timer 1) ScalingHorizontal
TimerDuration (for Timer 1) BinningHorizontal
CounterEventSource BinningVertical
CounterResetSource LUTEnable 3)
CounterDuration (for Counter 2) BalanceRatio
Gain ColorAdjustmentHue 4) 5)
BlackLevel ColorAdjustmentSaturation 4) 5)
DigitalShift ColorTransformationValue 4)
OffsetX ChunkModeActive
OffsetY ChunkEnable
Camera parameter values
Sequencer set J
Path 0:
Sequencer Set Next:
0
Trigger Source:
Line 3
Level High
Path 1:
Sequencer Set Next:
(J+1)
Trigger Source:
Line 4
Level High
Sequencer set related parameter values

AW00123408000 Features
Basler ace USB 3.0 224
1) Parameter is not available for use with the sequencer for the following cameras: acA1920-40,
acA1920-155, acA2000-165, acA2040-55, acA2040-90, acA2040-120, acA2440-35, and
acA2440-75.
2) Parameter is only available for the following cameras: acA640-750, acA800-510, acA1300-
200, acA1920-40, acA1920-150, acA1920-155, acA2000-165, acA2040-55, acA2040-90,
acA2040-120, acA2440-35, and acA2440-75.
3) Parameter is only available for use with the sequencer if the Gamma parameter is set to 1 and
if no light source preset is selected.
4) Parameter is only available for color cameras.
5) Parameter is not available for acA2000-165uc and acA2040-90uc cameras.
7.7.2.2 Sequencer Set Related Parameters and Sequencer Set
Advance
Sequencer Set Related Parameters
To each sequencer set the parameter values for the following sequencer set related parameters
apply.
The Sequencer Set Start parameter defines the first sequencer set that will be loaded into the
active set after the following two actions have occurred:
the sequencer mode was set to On and
the first frame start trigger was issued.
For all Basler USB 3.0 ace cameras, the Sequencer Set Start parameter value must always be
set to 0. This selects sequencer set 0 as the first sequencer set to be loaded and used for an
image acquisition.
The Sequencer Set Selector parameter selects a sequencer set by its index number. Selecting
a sequencer set is necessary when configuring a sequencer set (see Section 7.7.3 on
Width TestImageSelector
Height
SequencerSetStart CounterEventSource
SequencerSetSelector CounterResetSource
SequencerSetPath CounterDuration (for Counter 2)
SequencerSetNext
SequencerTriggerSource
SequencerTriggerActivation

Features AW00123408000
225 Basler ace USB 3.0
page 229) or when loading a sequencer set into the active set (see Section 7.7.3.3 on
page 232).
The Sequencer Set Path parameter selects a path by its index number. Two different paths are
available, path 0 and path 1. Each path allows to configure a distinct scheme for advancing
from one sequencer set to the next.
Path 0 and path 1 serve different purposes and should be configured accordingly:
Path 1 provides the scheme that allows to cycle through the available sequencer sets. This
is the mechanism for the standard use of the sequencer feature,
Path 0 allows to return to sequencer set 0 at any time and therefore provides a way for
resetting the cycling through the sequencer sets that is carried out according to path 1.
For each path, the following parameters must be set (see also Figure 86):
SequencerSetNext: Selects the sequencer set to be loaded next into the active set after the
present one when a trigger occurs for the related trigger source (see next entry). The next
sequencer set will replace the present one in the active set.
SequencerTriggerSource: Selects the trigger source for the trigger that will load the next
sequencer set into the active set. The following sequencer trigger sources are available (for
more information, see the section below). Note however, that different sets of trigger
sources are available for path 0 and path1 (for the differences, see Table 49 on page 226):
Line 1: Line IN
Line 3: GPIO
Line 4: GPIO
Software Signal 1: Software command
Software Signal 2: Software command
Software Signal 3: Software command (not available on acA1920-155 cameras).
Counter 2 End
Frame Start
Note that Line 3 and Line 4 can be selected regardless of whether they are configured for
input or output.
For each selected sequencer trigger source, the following parameter must be set (see also
Figure 86):
SequencerTriggerActivation: Selects the line status required to trigger loading of the next
sequencer set into the active set. The only available parameter value is Level High.
We strongly encourage setting different sequencer trigger sources for path 0
and path 1.

AW00123408000 Features
Basler ace USB 3.0 226
Synchronous and Asynchronous Sequencer Set Advance
The mechanisms for sequencer set advance vary between sequencer trigger sources:
The triggers from some sequencer trigger sources only select the next sequencer set and the
loading into the active set occurs with the subsequent frame start trigger.
The triggers from the other sequencer trigger sources select and load the next sequencer set.
The mechanisms are presented in greater detail in the following table and sections:
Sequencer Trigger Sources and Sequencer Set Advance
Two different types of trigger sources are available for advancing from one sequencer set to the
next:
When a trigger source for a so-called synchronous trigger is selected the trigger will select
the next sequencer set but the actual advance to the next sequencer set will happen with the
next frame start trigger. Each sequencer set advance is therefore closely tied to a frame start
trigger and will accordingly be synchronous to the frame start trigger.
The sequencer trigger sources for synchronous triggers are Line 1, Line 3, Line 4, frame start,
and Counter 2 End (see also Section 7.7.2.2 on page 224).
When a trigger source for a so-called asynchronous trigger is selected the advance to the
next sequencer set will immediately be initialized by the trigger, but will happen with some
unspecified delay. The sequencer set advance is therefore not tied to frame start triggers and,
accordingly, will be asynchronous to the frame start trigger.
The sequencer trigger sources for asynchronous triggers are Software Signal 1, Software
Signal 2, Software Signal 3 (see also Section 7.7.2.2 on page 224).
Sequencer
Trigger Source Selects Next
Sequencer Set Loads Next
Sequencer Set
Into the Active Set
Frame Start
Trigger Loads Next
Sequencer Set
Into the Active Set
Type of Sequencer
Trigger Source
for
Path 0 for
Path 1 Sync. Async.
Line 1 •• • •
Line 2 •• • •
Line 3 •• • •
Software Signal 1 •• • •
Software Signal 2 •• • •
Software Signal 3* •• • •
Counter 2 End •••
Frame Start •••
Table 49: Sequencer Trigger Sources by Path and Related Mechanism for Sequencer Set Advance.
* Not available on acA1920-155, acA2040-55, acA2040-120, acA2440-35, and acA2440-75 cameras.

Features AW00123408000
227 Basler ace USB 3.0
Trigger Sources for Synchronous Sequencer Set Advance
When triggers are applied from synchronous trigger sources, the advance from one sequencer set
to the next will be closely tied to the frame start triggers:
When frame start trigger is the trigger source, the next sequencer set will be immediately
loaded into the active set as soon as a frame start trigger occurs and applied to the image
acquisition. Only available for path 1.
When Line 1 (dedicated input line) or Line 3 or Line 4 (GPIO lines set for input) is the trigger
source and when the related trigger signal occurs the signal will go high and thereby select the
next sequencer set for sequencer set advance. When a subsequent frame start trigger occurs,
the state of the trigger signal for sequencer set advance is evaluated. As the level will be high,
the related sequencer set is loaded into the active set and is applied to the image acquisition.
The Counter 2 End trigger source is useful when you want that a user set is applied to a
number of consecutive image acquisitions.
Counter 2 End refers to Counter 2 that counts consecutive frame start triggers. When Counter
2 End is the trigger source, advance to the next sequencer set will only be possible after
Counter 2 has reached the set Counter Duration value. The counting starts from 1 to the set
Counter Duration value and will then resume again from 1. The Counter Duration value can be
set to an integer value between 1 and 256. The trigger source is generated within the camera.
Only available for path 1.
You can achieve operation with tightly constrained timing between sequencer set advance and
frame start triggers if you use an external signal for the frame start triggers and use the "fast" GPIO
lines, Line 3 and Line 4, as trigger sources for paths 0 and 1. The timing will be even tighter
constrained if you use one GPIO line as trigger source for path 0 and the other GPIO line as the
trigger source for both, frame start trigger and path 1 triggering. In this case, you would ideally use
the falling edges of the GPIO input signals as they are the "fast" edges.
See Section 5.10 on page 86 for information about making optimum use of the temporal
performance of the GPIO lines. See Section 5.9 on page 80 about the limitations of use of GPIO
lines in an environment with significant electromagnetic interference.

AW00123408000 Features
Basler ace USB 3.0 228
Trigger Sources for Asynchronous Sequencer Set Advance
When triggers are applied from asynchronous trigger sources, the triggers will be the software
commands Software Signal 1, Software Signal 2,and Software Signal 3. The software
commands will not only select sequencer sets but also load them into the active set.
Due to signal processing and transmission, there is an unspecified delay between
issuing the command and the sequencer set loading. Accordingly, the number of
image acquisitions that may occur between sending the software command and it
becoming effective can’t be predicted.
We therefore strongly discourage using an asynchronous sequencer set advance
trigger source for real-time applications.
If you use a software signal to trigger sequencer set advance for path 1 you can
skip sequencer sets with regard to image acquisition by triggering sequencer set
advance at a higher rate than the current frame acquisition rate.
Skipping is possible because sequencer set advance triggered by software
signals is asynchronous, i.e. is not tied to frame start triggers (see also Table 52
and use case 3).

Features AW00123408000
229 Basler ace USB 3.0
7.7.3 Sequencer Configuration
7.7.3.1 General Information
When configuring the sequencer, the following rules apply:
Required parameter values
Sequencer Set Start values must always be set to 0. This ensures that sequencer set 0 is
always the first set available for image acquisition after sequencer start or reset.
The Sequencer Trigger Activation parameter must always be set to Level High (positive logic).
The other path-related parameter values must differ between paths 0 and 1, in particular the
Sequencer Trigger Source parameter value. We recommend to first set the path-specific
sequencer trigger sources for sequencer set 0 and then the path-specific sequencer trigger
sources for the other sequencer sets.
Each sequencer set must include exactly one subset of parameter values relating to path 0
and exactly one subset relating to path 1.
This ensures that each sequencer set "knows" what role to play within each path, i.e. within
each sequencer set advance scheme.
Additional rules for configuring sequencer set 0
For Sequencer Set 0, the Sequencer Set Next value must be set to path 0. In addition, the
Sequencer Set Next value must be set to Sequencer Set 1 for path 1 in order to be able to
"leave" user set 0 during image acquisition and to realize the application described in
Section 7.7.4 on page 233.
Additional rules for configuring sequencer sets for path 1
The sequencer sets must be configured in order of ascending and consecutive index numbers.
For all sequencer sets except for the one with the highest index number: The Sequencer Set
Next parameter value set for sequencer set J must always be set to sequencer set index
number (J+1). For example, for path 1 used with sequencer set 2 the Sequencer Set Next
parameter value must be set to 3.
For the sequencer set with the highest index number: The Sequencer Set Next parameter
value for path 1 used with the sequencer set with the highest index number must be set to 0.
For example, if four sequencer sets are to be used, the Sequencer Set Next parameter value
for path 1 used with the fourth sequencer set (index number = 3) must be set to 0.
This ensures that each sequencer set cycle (according to path 1) resumes with sequencer set 0.

AW00123408000 Features
Basler ace USB 3.0 230
7.7.3.2 Carrying Out Configuration
Carry out the following routine for each sequencer set you want to configure.
1. Make sure the value of the Sequencer Mode is set to Off.
2. Make sure the value of the Sequencer Configuration Mode is set to On.
3. To configure the desired sequencer set, select its index number.
4. Set the camera parameter values as desired.
5. Set the sequencer set-related parameter values for path 0.
6. Set the sequencer set-related parameter values for path 1.
Note: The following step will replace any previous parameter settings for the selected se-
quencer set.
7. Store the sequencer set with its changed parameter values.
The sequencer set is available for use by the sequencer feature with new parameter values.
You can configure the sequencer and sequencer sets from within your application software by using
the Basler pylon API. The following code snippet illustrates configuring the parameters for
sequencer start and for sequencer set 0, and storing sequencer set 0 using the API to set the
parameter values.
The example assumes that you have already set the current camera parameter values as desired
for sequencer set 0. The example assumes that you are setting the parameter values for sequencer
set 0 as given in Figure 86 on page 223 and Table 50 on page 236.
Before configuring sequencer sets: Make sure the sequencer mode is set to Off
and the sequencer configuration mode is set to On.
Otherwise the parameter values of the current sequencer set cannot be read or
changed using the pylon API or the pylon Viewer. Only those sequencer set
parameter values will be displayed that were active before the sequencer mode
was set to On.
You will not be able to "see" the new parameter values set for the current
sequencer set.
We recommend that you do not attempt to read or change any of the sequencer
parameters when the sequencer mode is set to On.
It may occur that you will not configure all parameter values used with a sequencer
set (see Section 7.7.2 on page 222). In these cases, the previous parameter
values will persist in the active set.
To configure and store a sequencer set:

Features AW00123408000
231 Basler ace USB 3.0
// Disable the sequencer feature
camera.SequencerMode.SetValue(SequencerMode_Off);
// Enable the sequencer configuration mode
camera.SequencerConfigurationMode.SetValue(SequencerConfigurationMode_On);
// Select the first sequencer set (always sequencer set 0)
camera.SequencerSetStart.SetValue(0);
// Select a sequencer set by its index number
camera.SequencerSetSelector.SetValue(0);
// Select path 0 for the selected sequencer set
camera.SequencerPathSelector.SetValue(0);
// Select the sequencer set that will be applied after the current sequencer set
camera.SequencerSetNext.SetValue(0);
// Select the trigger source for sequencer set advance
camera.SequencerTriggerSource.SetValue(SequencerTriggerSource_Line_3);
// Select the logic for the sequencer set advance trigger source for path 0(always
LevelHigh)
camera.SequencerTriggerActivation.SetValue(SequencerTriggerActivation_Level-
High);
// Select path 1 for the selected sequencer set
camera.SequencerPathSelector.SetValue(1);
// Select the sequencer set that will be applied after the current sequencer set
camera.SequencerSetNext.SetValue(1);
// Select the trigger source for sequencer set advance
camera.SequencerTriggerSource.SetValue(SequencerTriggerSource_Line_4);
// Select the logic for the sequencer set advance trigger source for path 1(always
LevelHigh)
camera.SequencerTriggerActivation.SetValue(SequencerTriggerActivation_Level-
High);
// Save the camera parameter values and the sequencer set-related parameter values
for the selected sequencer set
camera.SequencerSetSave.Execute( );
You can also use the Basler pylon Viewer application to easily set the parameters.
For more information about the pylon API and the pylon Viewer, see Section 3.1 on page 62.

AW00123408000 Features
Basler ace USB 3.0 232
7.7.3.3 Using the Load Command
There is also the Sequencer Set Load command that can be useful when working with the
sequencer sets for testing purposes. If you select a sequencer set by using its index number and
then you execute the Sequencer Set Load command, the sequencer-controlled parameter values
in the active set will be replaced by the values stored for the selected sequencer set.
This ability can be useful in two situations. First, if you simply want to see how the parameters
currently stored for one of the sequencer sets will affect camera operation, you can load the
parameters from that sequencer set into the active set and see what happens. Second, if you want
to prepare a new sequencer set and you know that an existing set is already close to what you will
need, you can load the existing sequencer set into the active set, make some small changes to the
active set, and then save the active set as a new sequencer set.
Make sure the sequencer mode is set to Off before issuing the Sequence Set Load command.
The following code snippet illustrates using the API to load the sequencer set parameter values
from sequencer set 1 into the active set:
// Select sequencer set 1 by its index number
camera.SequencerSetSelector.SetValue(1);
// Load the sequencer parameter values from the sequencer set into the active set
camera.SequencerSetLoad.Execute( );
You can also use the Basler pylon Viewer application to easily set the parameters.
Replacing the sequence-controlled parameter values in the active set via the
Sequencer Set Load command is associated with a delay between sending the
software command and it becoming effective. The delay will depend on the
specific installation and the current load on the network. Accordingly, the number
of image acquisitions that can occur between sending the command and it
becoming effective can not be predicted. The Sequencer Set Load command is
therefore not suitable for real-time applications, it can, however, be useful for
testing purposes.

Features AW00123408000
233 Basler ace USB 3.0
7.7.4 Sequencer Operation
In this section, you will find a duplicate description of sequencer operation in sequencer mode:
a general overview employing a state diagram (Figure 87), and
a more elaborate presentation of selected use cases (Figure 88 through Figure 90).
As explained in Section 7.7.1, there are a sequencer configuration mode for sequencer
configuration and the sequencer mode that allows to apply different sequencer sets in quick
succession to different frame acquisitions.
In the sequencer mode, one sequencer set after the other can be loaded into the active set
("sequencer set advance") as frames are acquired. The loading is controlled by using certain
sequencer trigger sources that can be selected for two schemes of sequencer set advance, called
paths. For more information about sequencer trigger sources, sequencer set advance, and paths,
see Section 7.7.2.2.
The actual sequence of sequencer sets that will be loaded into the active set as images are
acquired depends on the number of configured sequencer sets, on the use of the sequencer trigger
sources selected for path 0 and path 1, and on the use of the paths. For more information about
sequencer trigger sources and paths, see Section 7.7.2.2.
As mentioned in Section 7.7.2.2, paths 0 and path 1 play different roles: The cycling through the
available sequencer sets can be accomplished using the path 1 sequencer trigger source. Using
the path 0 sequencer trigger source will load sequencer set 0 into the active set. This will reset the
cycling and allow its restart.
Note: You may occasionally encounter a transitional "dummy" sequencer set with index number -1.
Ignore this set. It occurs for technical reasons only and cannot be used for image acquisition.
To ensure reliable coordination between synchronous sequencer set advance and
frame start triggering, allow sufficient time to elapse between the moment when
the sequencer set advance trigger signal has reached the high status and the
subsequent frame start trigger signal going high.
In particular, consider the propagation delays associated with the camera’s input
lines: To minimize propagation delays, we recommend choosing the GPIO input
lines as the sources for both, the sequencer set advance trigger signal and the
frame start trigger signal. In this context, we recommend not using the opto-
isolated input line unless robustness against EMI is required.
You can achieve the tightest timing control if you set the frame start trigger signal
as the source for the sequencer set advance trigger signal.
We also recommend using the "fast" edges of the input lines.
For more information about propagation delays of the input lines, see Section 5.10
on page 86.

AW00123408000 Features
Basler ace USB 3.0 234
Sequencer States Occurring During Start and in "Sequencer Mode"
In the state diagram (Figure 87) a total of four sequencer sets is considered. The diagram illustrates
sequencer start, sequencer operation in "sequencer mode", and sequencer stop. Operation in
"sequencer configuration mode" (see Section 7.7.3 on page 229) is not illustrated.
As illustrated in Figure 88, the camera must not acquire images when the sequencer feature is
enabled. Setting the sequencer mode to On will enable the sequencer feature. When a frame
start trigger occurs the sequencer set configured as Sequencer Set Start will be loaded into the
active set and will be used for the first image acquisition. Sequencer Set Start will always be
sequencer set 0 (see Section 7.7.2.2 on page 224).
By using the trigger for path 1, you can cycle through the available sequencer sets. By using
the trigger for path 0 you can return at any time to sequencer set 0 and therewith reset the
cycling.
Setting the sequencer mode to Off will disable the sequencer feature for use with frame
acquisitions.
The parameter values that were in the active set immediately before the sequencer feature was
enabled will reappear in the active set and will overwrite the values of the latest sequencer set.
Effect on Frame Rate
For all cameras except the acA1920-25 and acA2500-14 cameras, the loading of sequencer sets
into the camera’s active set has no effect on the camera’s frame rate as long as all image
acquisitions are carried out along the same path, i.e. along path 1. Switching between paths 0 and
1 can decrease the frame rate.
For the acA1920-25 and acA2500-14 cameras, the loading of sequencer sets into the camera’s
active set will decrease the camera’s frame rate. The frame rate will, however, not decrease as long
as no new sequencer set is loaded.
Using the sequencer feature will affect the frame rates of all cameras if dictated by parameter values
that are controlled by sequencer sets (ExposureTime, AcquisitionFrameRate).
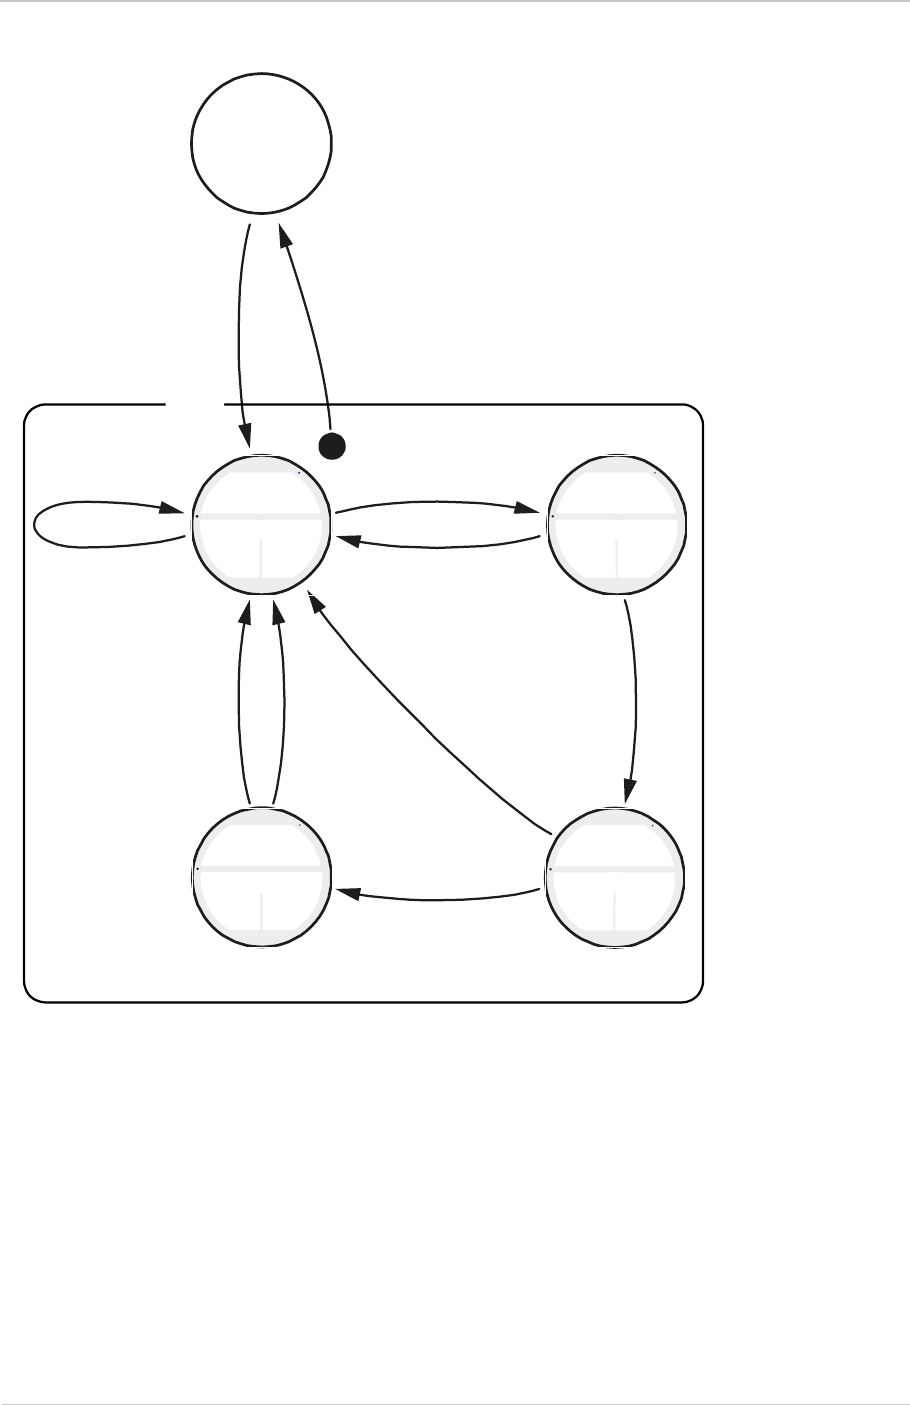
Features AW00123408000
235 Basler ace USB 3.0
Fig. 87: State Diagram for the "Sequencer Mode" (Start and Operation; Four Sequencer Sets as an Example)
Sequencer set 0
in the active set
Camera not
acquiring im-
ages (i.e. idle),
sequencer
not operating
Trigger for path 0
Trigger for path 0
Sequencer set 1
in the active set
Sequencer set 3
in the active set Sequencer set 2
in the active set
Trigger for path 0
Trigger for path 1
Trigger for path 1
Trigger for
path 0
Trigger for path 1
Sequencer mode = OFF
Trigger for path 1
Sequencer mode = ON
&
Frame Start Trigger

AW00123408000 Features
Basler ace USB 3.0 236
7.7.4.1 Sequencer Use Case Descriptions and Diagrams
The following use case descriptions and diagrams illustrate operation of the sequencer feature in
sequencer mode. The use cases refer to some common situations and combinations of parameter
settings.
These use cases do not represent every possible combination of the parameters settings
associated with the sequencer. The use cases are simply intended to aid you in developing an initial
understanding of the relation between parameter settings and sequencer operation.
In each use case diagram, the black box in the upper left corner indicates how the parameters are
set.
All trigger signals shown in the use case diagrams assume rising edge triggering. Note, however,
that the timing of triggers involving a GPIO line is tighter constrained when set for falling edge
triggering (see Section 5.10 on page 86).
The use cases assume that a total of four sequencer sets is available.
Use Case 1 - Cycling Through Sequencer Sets According to Path 1
Use case one is illustrated in Figure 88 on page 240 and assumes that the following sequencer-
related parameter values are set.
The use case diagrams are representational. They are not drawn to scale and are
not designed to accurately describe precise camera timings.
Sequencer Set Related Settings Sequencer
Set 0 Sequencer
Set 1 Sequencer
Set 2 Sequencer
Set 3
Path 0 Next sequencer set after current one 0** 0** 0** 0**
Trigger source Line 3 (GPIO) Line 3 (GPIO)* Line 3 (GPIO)* Line 3 (GPIO)*
Trigger activation Level High** Level High** Level High** Level High**
Path 1 Next sequencer set after current one 1** 2** 3** 0
Trigger source Line 4 (GPIO) Line 4 (GPIO)* Line 4 (GPIO)* Line 4 (GPIO)*
Trigger activation Level High** Level High** Level High** Level High**
Table 50: Settings for Sequencer Operation According to Use Case 1.
* Only one trigger source for a path allowed.
**Applies Always, Not Only in this Example

Features AW00123408000
237 Basler ace USB 3.0
Use Case One in Overview
Use case one demonstrates synchronous triggering cycling through all the available four sequencer
sets, not disturbed by a reset. The possibility of repeatedly applying a sequencer set to a
succession of frame acquisitions is also shown.
The GPIO lines are configured for input and allow to control sequencer set advance for path 0 and
path 1 by external triggers. The frame start trigger is controlled by external signals via the opto-
isolated input line Line 1. Accordingly, sequencer operation and frame acquisition are all controlled
by external triggers. This allows tight synchronization between triggers for sequencer set advance
and frame start triggers.
The trigger assigned to path 1 goes low between most frame start triggers and, if desired, goes high
well ahead before the frame start triggers rise. This ensures that the trigger signals assigned to
path 1 have reached the desired signal levels in time before they will be evaluated by the frame start
trigger with respect to sequencer set advance.
Another aspect of sequencer set advance becomes apparent: The signal levels of the external
triggers assigned to path 1 and path 0 will matter for sequencer set advance only at the moment
when they are evaluated by the frame start trigger (not shown for path 0 in this use case). The
moment occurs when the frame start trigger signal rises assuming the frame start trigger signal is
set for rising edge triggering. The signal levels of the external triggers assigned to path 1 and path 0
that occur between frame start triggers have no effect on sequencer set advance.
Use Case One in Detail
Assuming that the sequencer sets are configured according to Table 50 on page 236 and the
camera is not acquiring images, the sequencer feature operates as follows:
When the Sequencer Mode parameter value is set to On the sequencer feature becomes
enabled for the application of sequencer sets during image acquisitions. The transitional
"dummy" sequencer set with index number -1 is loaded into the active set, overwriting the
previous sequencer parameter values (Section 7.7.2 on page 222).
A trigger signal assigned to path 1 is received, setting the signal level to high.
When the frame start trigger signal was received the trigger signal assigned to path 1 is found
to be high. As a result, the frame start trigger triggers the loading of the next sequencer set,
that is sequencer set 0, into the active set. Sequencer set 0 overwrites the parameter values of
sequencer set -1 in the active set.
A frame acquisition is carried out using the parameter values of sequencer set 0. The image
data are processed and transmitted out of the camera.
The trigger signal assigned to path 1 goes low.
The trigger signal assigned to path 1 goes high.
When the next frame start trigger signal was received the trigger signal assigned to path 1 is
found to be high. As a result, the frame start trigger triggers the loading of the next sequencer
set, that is sequencer set 1, into the active set. The parameter values for sequencer set 1
overwrite the parameter values for sequencer set 0 in the active set.
A frame acquisition is carried out using the parameter values of sequencer set 1. The image
data are processed and transmitted out of the camera.

AW00123408000 Features
Basler ace USB 3.0 238
The trigger signal assigned to path 1 goes low.
The trigger signal assigned to path 1 goes high.
When the next frame start trigger signal was received the trigger signal assigned to path 1 is
found to be high. As a result, the frame start trigger triggers the loading of the next sequencer
set, that is sequencer set 2, into the active set. The parameter values for sequencer set 2
overwrite the parameter values for sequencer set 1 in the active set.
A frame acquisition is carried out using the parameter values of sequencer set 2. The image
data are processed and transmitted out of the camera.
The trigger signal assigned to path 1 goes low.
The trigger signal assigned to path 1 goes high.
When the next frame start trigger signal was received the trigger signal assigned to path 1 is
found to be high. As a result, the frame start trigger triggers the loading of the next sequencer
set, that is sequencer set 3, into the active set. The parameter values for sequencer set 3
overwrite the parameter values for sequencer set 2in the active set.
A frame acquisition is carried out using the parameter values of sequencer set 3. The image
data are processed and transmitted out of the camera.
The trigger signal assigned to path 1 goes low.
The trigger signal assigned to path 1 goes high.
When the next frame start trigger signal was received the trigger signal assigned to path 1 is
found to be high. As a result, the frame start trigger triggers the loading of the next sequencer
set, that is sequencer set 0, into the active set. The parameter values for sequencer set 0
overwrite the parameter values for sequencer set 3in the active set. A new cycle of sequencer
sets starts.
A frame acquisition is carried out using the parameter values of sequencer set 0. The image
data are processed and transmitted out of the camera.
The trigger signal assigned to path 1 goes low.
The trigger signal assigned to path 1 goes high.
When the next frame start trigger signal was received the trigger signal assigned to path 1 is
found to be high. As a result, the frame start trigger triggers the loading of the next sequencer
set, that is sequencer set 1, into the active set. The parameter values for sequencer set 1
overwrite the parameter values for sequencer set 0 in the active set.
A frame acquisition is carried out using the parameter values of sequencer set 1. The image
data are processed and transmitted out of the camera.
The trigger signal assigned to path 1 stays low.
When the next frame start trigger signal was received the trigger signal assigned to path 1 is
found to be low. As a result, the frame start trigger does not trigger the loading of a new
sequencer set. The parameter values of sequencer set 1 remain in the active set.
Note that this frame acquisition illustrates how sequencer sets can be used in succession.
A frame acquisition is carried out using the parameter values of sequencer set 1. The image
data are processed and transmitted out of the camera.
The trigger signal assigned to path 1 stays low.
The trigger signal assigned to path 1 goes high.
When the next frame start trigger signal was received the trigger signal assigned to path 1 is
found to be high. As a result, the frame start trigger triggers the loading of the next sequencer

Features AW00123408000
239 Basler ace USB 3.0
set, that is sequencer set 2, into the active set. The parameter values for sequencer set 2
overwrite the parameter values for sequencer set 1 in the active set.
A frame acquisition is carried out using the parameter values of sequencer set 2. The image
data are processed and transmitted out of the camera.
The trigger signal assigned to path 1 stays high.
When the next frame start trigger signal was received the trigger signal assigned to path 1 is
found to be high. As a result, the frame start trigger triggers the loading of the next sequencer
set, that is sequencer set 3, into the active set. The parameter values for sequencer set 3
overwrite the parameter values for sequencer set 2 in the active set.
Note by comparison with previous frame start triggers that signal levels of the sequencer set
trigger assigned to path 1 that occur occur between frame start triggers have no effect on se-
quencer set advance.
An image acquisition is carried out using the parameter values of sequencer set 3. The image
data are processed and transmitted out of the camera.
The trigger signal assigned to path 1 goes low.
The trigger signal assigned to path 1 goes high.
When the next frame start trigger signal was received the trigger signal assigned to path 1 is
found to be high. As a result, the frame start trigger triggers the loading of the next sequencer
set, that is sequencer set 0, into the active set. The parameter values for sequencer set 0
overwrite the parameter values for sequencer set 3 in the active set. A new cycle of sequencer
sets starts.
An frame acquisition is carried out using the parameter values of sequencer set 0. The image
data are processed and transmitted out of the camera.
The trigger signal assigned to path 1 goes low.
When the sequencer feature was disabled by setting the Sequencer Mode parameter value to
Off, frame exposure and sensor readout were already complete but image transmission out of
the camera was not. In this case, the complete frame will be transmitted even after the
sequencer feature was disabled.
The previous sequencer parameter values, occurring in the active set before the sequencer fea-
ture was enabled, are loaded into the active set again, overwriting the parameter values of se-
quencer set 0.
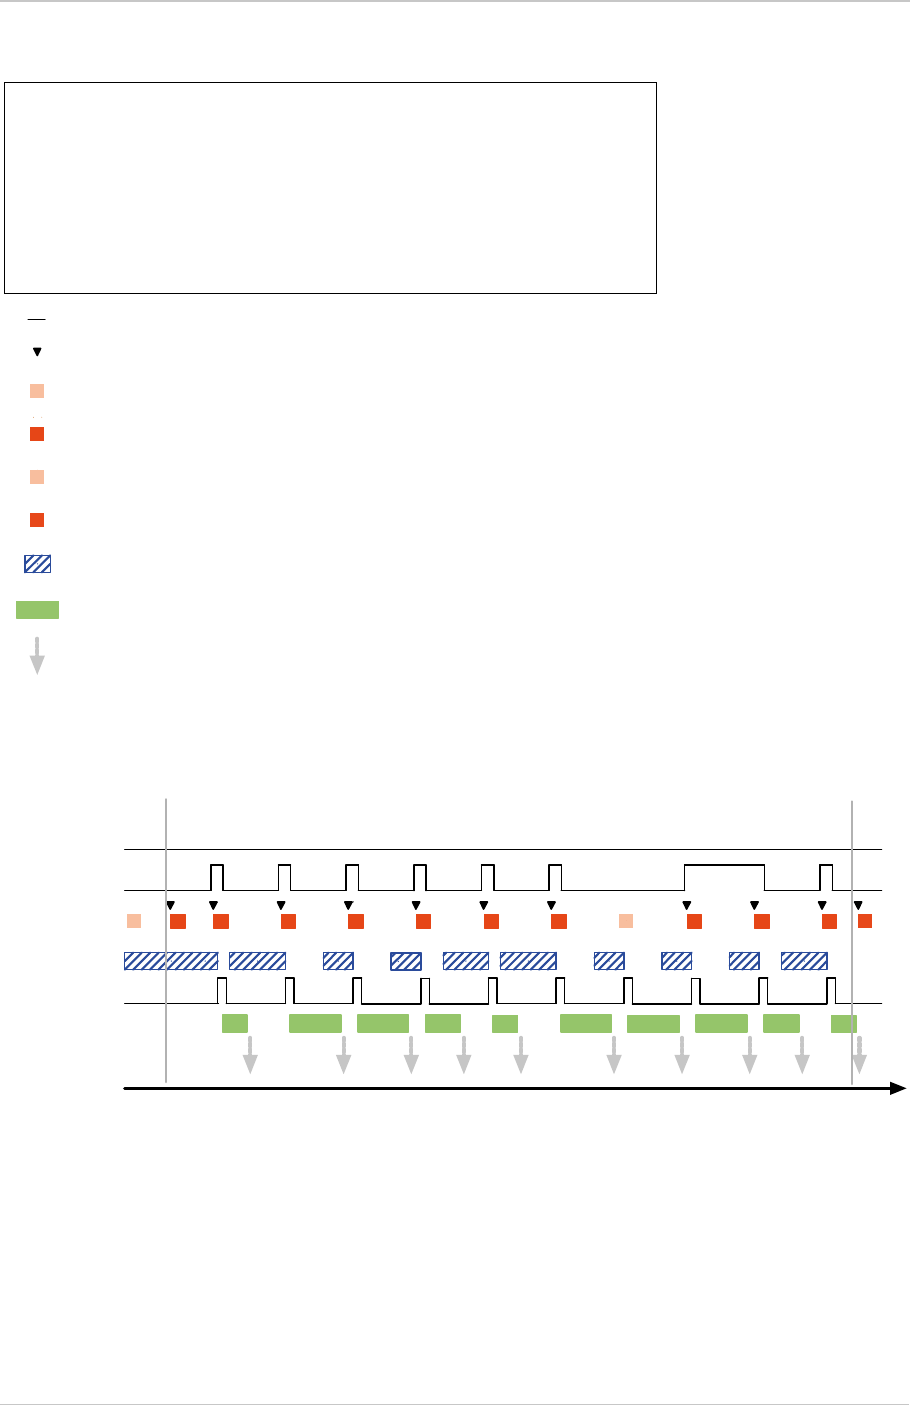
AW00123408000 Features
Basler ace USB 3.0 240
0
P
1
P
Use Case: Synchronous cycling through sequencer sets, according to path 1,
cycling not interrupted by reset
Settings: Acquisition Mode = Continuous
Trigger Mode for the frame start trigger = On
Trigger Activation for the frame start trigger: Rising Edge
Frame start triggers applied externally via Line 1
Synchronous triggers assigned to the GPIO lines, (configured for input):
Line 4 for path 1 triggers; sequencer set advance
Line 3 for path 0 triggers; reset of sequencer set advance
0 12 3 2 3 00 1-1 1 P
P
Time
Line 3 (GPIO)
Trigger Source,
Path 0
= camera loads a sequencer set into the active set and thus makes it the current sequencer set
= current sequencer set that is used for image acquisition; sequencer set was just loaded
= current sequencer set that is used for image acquisition; already present in the active set
= current sequencer set; present in the active set immediately before the sequencer feature is enabled
= current sequencer set; sequencer set was already in the active set before it was overwritten by sequencer set -1;
sequencer set was just loaded again
Sequencer
Mode Set to
On
Line 4 (GPIO)
Trigger Source,
Path 1
Frame Start
Trigger Signal
Sequencer
Mode Set to
Off
= trigger signal generated externally
= frame exposure and readout
= frame transmission
= camera is waiting for a frame start trigger
Fig. 88: Use Case 1 - Synchronous Cycling Through Sequencer Sets According to Path 1, No Reset

Features AW00123408000
241 Basler ace USB 3.0
Use Case 2 - Sequencer Set Advance Based on Counter 2 End, One Reset
Use case two is illustrated in Figure 89 on page 245 and assumes that the following sequencer-
related parameter values are set.
Use Case Two in Overview
Use case two demonstrates synchronous triggering and cycling through all the available four
sequencer sets based on the Counter 2 End trigger source. An addition, one reset of the cycling
occurs.
Sequencer set triggering according to path 0 is controlled by an external trigger via GPIO line
Line 3, configured for input.
In this use case, the cycling through the sequencer sets according to path 1 is based on the
Counter 2 End trigger source that in turn, is based on Counter 2 and its Counter Duration setting.
The cycling is synchronous because the counting of Counter 2 is linked to the frame start triggers:
When a sequencer set has Counter 2 End as the trigger source for sequencer set advance, the
related frame start triggers will be counted by Counter 2 and the sequencer set will be applied to
the frame acquisitions. The same sequencer set will be applied to the following frame acquisitions
until the set end of Counter 2 counting is reached. The end of counting is set by the Counter
Duration parameter value applicable to Counter 2. When the end is reached, the counting will
resume with number one for the next frame start trigger and will apply to the next sequencer set.
As the receding series of frame acquisitions, before, the new series of frame acquisitions will be
subject to Counter 2 counting and the Counter Duration parameter value.
Sequencer Set-related Settings Sequencer
Set 0 Sequencer
Set 1 Sequencer
Set 2 Sequencer
Set 3
Path 0 First sequencer set of path 0** 0** 0** 0**
Next sequencer set after current one 0** 0** 0** 0**
Trigger source Line 3 (GPIO) Line 3 (GPIO)* Line 3 (GPIO)* Line 3 (GPIO)*
Trigger activation Level High** Level High** Level High** Level High**
Path 1 First sequencer set of path 0** 0** 0** 0**
Next sequencer set after current one 1** 2** 3** 0
Trigger source Counter 2 End Counter 2
End*
Counter 2
End*
Counter 2
End*
Counter Duration 1 1 2 1
Trigger activation Level High** Level High** Level High** Level High**
Table 51: Settings for Sequencer Operation According to Use Case 2.
* Only one trigger source for a path allowed.
**Applies Always, Not Only in this Example

AW00123408000 Features
Basler ace USB 3.0 242
Use Case Two in Detail
Assuming that the sequencer sets are configured according to Table 51 on page 241 and the
camera is not acquiring images, the sequencer feature operates as follows:
When the Sequencer Mode parameter value is set to On the sequencer feature becomes
enabled for the application of sequencer sets during image acquisitions. The transitional
"dummy" sequencer set with index number -1 is loaded into the active set, overwriting the
previous sequencer parameter values (Section 7.7.2 on page 222).
When a frame start trigger signal is received, sequencer set 0 is automatically loaded into the
active set and is used for the image acquisition. The image data are processed and
transmitted out of the camera.
The current frame start trigger count of Counter 2 is found to be 1. The Counter Duration setting,
applicable to sequencer set 0 and defining the maximum Counter 2 count, is also found to be
1. Accordingly, the Counter 2 count related to sequencer set 0 has already reached its maximum
and must start again with the next frame acquisition.
When the next frame start trigger signal was received sequencer set 1 is loaded into the active
set and is used for the image acquisition. The image data are processed and transmitted out of
the camera.
Sequencer set 1 was loaded because the Counter 2 count for sequencer set 0 was found to
already have reached its maximum allowed value in the preceding frame acquisition.
The current frame start trigger count of Counter 2 is found to be 1. The Counter Duration setting,
applicable to sequencer set 1 and defining the maximum Counter 2 count, is also found to be
1. Accordingly, the Counter 2 count related to sequencer set 1 has already reached its maximum
and must start again with the next frame acquisition.
When the next frame start trigger signal was received sequencer set 2 is loaded into the active
set and is used for the image acquisition. The image data are processed and transmitted out of
the camera.
Sequencer set 2 was loaded because the Counter 2 count for sequencer set 1 was found to
already have reached its maximum allowed value in the preceding frame acquisition.
The current frame start trigger count of Counter 2 is found to be 1. The Counter Duration setting,
applicable to sequencer set 2 and defining the maximum Counter 2 count, is found to be 2. Ac-
cordingly, the Counter 2 count related to sequencer set 2 has not yet reached its maximum and
can therefore can continue counting with next frame acquisition.
When the next frame start trigger signal was received sequencer set 2 was still present in the
active set and is used for the image acquisition. The image data are processed and
transmitted out of the camera.
Sequencer set 2 was used again because the Counter 2 count for sequencer set 2 was found
not to already have reached its maximum allowed value in the preceding frame acquisition.
The current frame start trigger count of Counter 2 is found to be 2. The Counter Duration setting,
applicable to sequencer set 2 and defining the maximum Counter 2 count, is also found to be
2. Accordingly, the Counter 2 count related to sequencer set 2 has now reached its maximum
and must start again with the next frame acquisition.
When the next frame start trigger signal was received sequencer set 3 is loaded into the active
set and is used for the image acquisition. The image data are processed and transmitted out of
the camera.

Features AW00123408000
243 Basler ace USB 3.0
Sequencer set 3 was loaded because the Counter 2 count for sequencer set 2 was found to
have reached its maximum allowed value in the preceding frame acquisition.
The current frame start trigger count of Counter 2 is found to be 1. The Counter Duration setting,
applicable to sequencer set 3 and defining the maximum Counter 2 count, is found to be 1. Ac-
cordingly, the Counter 2 count related to sequencer set 3 has already reached its maximum and
must start again with the next frame acquisition.
When the next frame start trigger signal was received sequencer set 0 is loaded into the active
set and is used for the image acquisition. The image data are processed and transmitted out of
the camera.
Sequencer set 0 was loaded because the Counter 2 count for sequencer set 1 was found to
already have reached its maximum allowed value in the preceding frame acquisition. With the
use of sequencer set 0 a new cycle of sequencer sets has begun.
The current frame start trigger count of Counter 2 is found to be 1. The Counter Duration setting,
applicable to sequencer set 0 and defining the maximum Counter 2 count, is found to be 1. Ac-
cordingly, the Counter 2 count related to sequencer set 0 has already reached its maximum and
can therefore must start again with the next frame acquisition.
When the next frame start trigger signal was received sequencer set 1 is loaded into the active
set and is used for the image acquisition. The image data are processed and transmitted out of
the camera.
Sequencer set 1 was loaded because the Counter 2 count for sequencer set 0 was found to
already have reached its maximum allowed value in the preceding frame acquisition.
The current frame start trigger count of Counter 2 is found to be 1. The Counter Duration setting,
applicable to sequencer set 1 and defining the maximum Counter 2 count, is also found to be
1. Accordingly, the Counter 2 count related to sequencer set 1 has already reached its maximum
and must start again with the next frame acquisition.
When the next frame start trigger signal was received sequencer set 2 is loaded into the active
set and is used for the image acquisition. The image data are processed and transmitted out of
the camera.
Sequencer set 2 was loaded because the Counter 2 count for sequencer set 1 was found to
already have reached its maximum allowed value in the preceding frame acquisition.
The current frame start trigger count of Counter 2 is found to be 1. The Counter Duration setting,
applicable to sequencer set 2 and defining the maximum Counter 2 count, is found to be 2. Ac-
cordingly, the Counter 2 count related to sequencer set 2 has not yet reached its maximum and
can therefore must start again with the next frame acquisition.
A trigger signal according to path 0 was received, resetting the sequencer set cycle.
When the next frame start trigger signal was received sequencer set 0 is loaded into the active
in accord with the preceding reset signal and is used for the image acquisition. The image data
are processed and transmitted out of the camera.
The current frame start trigger count of Counter 2 is found to be 1. The Counter Duration setting,
applicable to sequencer set 0 and defining the maximum Counter 2 count, is found to be 1. Ac-
cordingly, the Counter 2 count related to sequencer set 0 has already reached its maximum and
must start again with the next frame acquisition.
When the next frame start trigger signal was received sequencer set 1 is loaded into the active
set and is used for the image acquisition. The image data are processed and transmitted out of
the camera.
Sequencer set 1 was loaded because the Counter 2 count for sequencer set 0 was found to
already have reached its maximum allowed value in the preceding frame acquisition.

AW00123408000 Features
Basler ace USB 3.0 244
The current frame start trigger count of Counter 2 is found to be 1. The Counter Duration setting,
applicable to sequencer set 1 and defining the maximum Counter 2 count, is also found to be
1. Accordingly, the Counter 2 count related to sequencer set 1 has already reached its maximum
and must start again with the next frame acquisition.
When the Sequencer Mode parameter value is set to Off the sequencer feature becomes
disabled for the application of sequencer sets during image acquisitions. The sequencer
parameter values that were the current ones before the sequencer feature was enabled, are
loaded into the active set again. The sequencer set 1 parameter values in the active set are
overwritten.

Features AW00123408000
245 Basler ace USB 3.0
2
0
P
1
P
Use Case: Synchronous cycling through sequencer sets, according to path 1,
cycling interrupted by synchronous reset according to path 0
Settings: Acquisition Mode = Continuous
Trigger Mode for the frame start trigger = On
Trigger Activation for the frame start trigger: Rising Edge
Frame start triggers applied externally via Line 1
Synchronous trigger source for sequencer set advance: Counter 2 End
Synchronous trigger source for reset of sequencer set advance:
GPIO line Line 3
102 2 0 10 1-1
21
11 111
11 1
P2 3P
Time
Line 3 (GPIO)
Trigger Source,
Path 0
= camera loads a sequencer set into the active set making it the current set
= current sequencer set that is used for image acquisition; sequencer set was just loaded
= current sequencer set that is used for image acquisition; already present in the active set
= current sequencer set that is in the active set immediately before the sequencer feature is enabled
= current sequencer set; was in the active set immediately before the sequencer feature was enabled
Sequencer
Mode Set to
On
Counter 2 End
Trigger Source,
Path 1
Frame Start
Trigger Signal
Sequencer
Mode Set to
Off
= trigger signal generated externally
= frame exposure and readout
= frame transmission
= camera is waiting for a frame start trigger
Fig. 89: Use Case 2 - Synchronous Cycling Through Sequencer Sets Based on Counter 2 End (Path 1), One Reset.
= counting of frame start triggers, counted by Counter 2 and limited by Counter Duration; number: current count

AW00123408000 Features
Basler ace USB 3.0 246
Use Case 3 - Sequencer Set Advance based on a Software Signal, One Reset
Use case three is illustrated in Figure 90 on page 249 and assumes that the following sequencer-
related parameter values are set.
Use Case Three in Overview
Use case three demonstrates the use of software commands for completely asynchronous control
of cycling through the available four sequencer sets and of cycling reset.
Software Signal 1 is the trigger source for path 0 (reset). Software Signal 3 is the trigger source for
path 1 (advance). The triggering is asynchronous to the frame start triggers. In addition, delays of
arbitrary duration are involved between issuing a trigger and it becoming effective. Accordingly, the
resulting sequencer operation is characterized by some degree of chance.
Sequencer Set-related Settings Sequencer
Set 0 Sequencer
Set 1 Sequencer
Set 2 Sequencer
Set 3
Path 0 First sequencer set of path 0** 0** 0** 0**
Next sequencer set after current one 0** 0** 0** 0**
Trigger source Software
Signal 1
Software
Signal 1*
Software
Signal 1*
Software
Signal 1*
Trigger activation Level High** Level High** Level High** Level High**
Path 1 First sequencer set of path 0** 0** 0** 0**
Next sequencer set after current one 1** 2** 3** 0
Trigger source Software
Signal 3
Software
Signal 3*
Software
Signal 3*
Software
Signal 3*
Trigger activation Level High** Level High** Level High** Level High**
Table 52: Settings for Sequencer Operation According to Use Case 3.
* Only one trigger source for a path allowed.
**Applies Always, Not Only in this Example

Features AW00123408000
247 Basler ace USB 3.0
Use Case Three in Detail
Assuming that the sequencer sets are configured according to Table 52 on page 246 and the
camera is not acquiring images, the sequencer feature operates as follows:
When the Sequencer Mode parameter value is set to On the sequencer feature becomes
enabled for the application of sequencer sets during image acquisitions. The transitional
"dummy" sequencer set with index number -1 is loaded into the active set, overwriting the
previous sequencer parameter values (Section 7.7.2 on page 222).
When a frame start trigger signal is received, sequencer set 0 is automatically loaded into the
active set and is used for the image acquisition. The image data are processed and
transmitted out of the camera.
When the next frame start trigger signal was received sequencer set 0 was still present in the
active set and is used for the image acquisition. The image data are processed and
transmitted out of the camera.
The first Software Signal 3 trigger is sent. It will, however, only later become effective.
When the next frame start trigger signal was received sequencer set 0 was still present in the
active set and is used for the image acquisition. The image data are processed and
transmitted out of the camera. The Software Signal 3 trigger has not yet become effective.
The first Software Signal 3 trigger becomes effective after some delay, loading sequencer set 1
into the active set.
When the next frame start trigger signal was received sequencer set 1 is present in the active
set and is used for the image acquisition. The image data are processed and transmitted out of
the camera.
The second Software Signal 3 trigger is sent. It will, however, only later become effective.
The second Software Signal 3 trigger becomes effective after some delay, loading sequencer
set 2 into the active set.
When the next frame start trigger signal was received sequencer set 2 is present in the active
set and is used for the image acquisition. The image data are processed and transmitted out of
the camera.
The third Software Signal 3 trigger is sent. It will, however, only later become effective.
The fourth Software Signal 3 trigger is sent. It will, however, only later become effective.
The third Software Signal 3 trigger becomes effective after some delay, loading sequencer set
3 into the active set.
The fourth Software Signal 3 trigger becomes effective after some delay, loading sequencer
set 0 into the active set, starting a new cycle of sequencer sets.
When the next frame start trigger signal was received sequencer set 0 is present in the active
set and is used for the image acquisition. The image data are processed and transmitted out of
the camera. Note that sequencer set 3 was skipped for frame acquisition.
The fifth Software Signal 3 trigger is sent. It will, however, only later become effective.
When the next frame start trigger signal was received sequencer set 0 is present in the active
set and is used for the image acquisition. The image data are processed and transmitted out of
the camera.
The fifth Software Signal 3 trigger becomes effective after some delay, loading sequencer set 1
into the active set.

AW00123408000 Features
Basler ace USB 3.0 248
The first Software Signal 1 trigger is sent. It will, however, only later become effective.
When the next frame start trigger signal was received sequencer set 1 is present in the active
set and is used for the image acquisition. The image data are processed and transmitted out of
the camera.
The first Software Signal 1 trigger becomes effective after some delay, loading sequencer set 0
into the active set and thereby resetting the cycling through the sequencer sets.
When the next frame start trigger signal was received sequencer set 0 is present in the active
set and is used for the image acquisition. The image data are processed and transmitted out of
the camera.
When the next frame start trigger signal was received sequencer set 0 is present in the active
set and is used for the image acquisition. The image data are processed and transmitted out of
the camera.
When the Sequencer Mode parameter value is set to Off the sequencer feature becomes
disabled for the application of sequencer sets during image acquisitions. The sequencer
parameter values that were the current ones before the sequencer feature was enabled, are
loaded into the active set again. The sequencer set 0 parameter values in the active set are
overwritten.
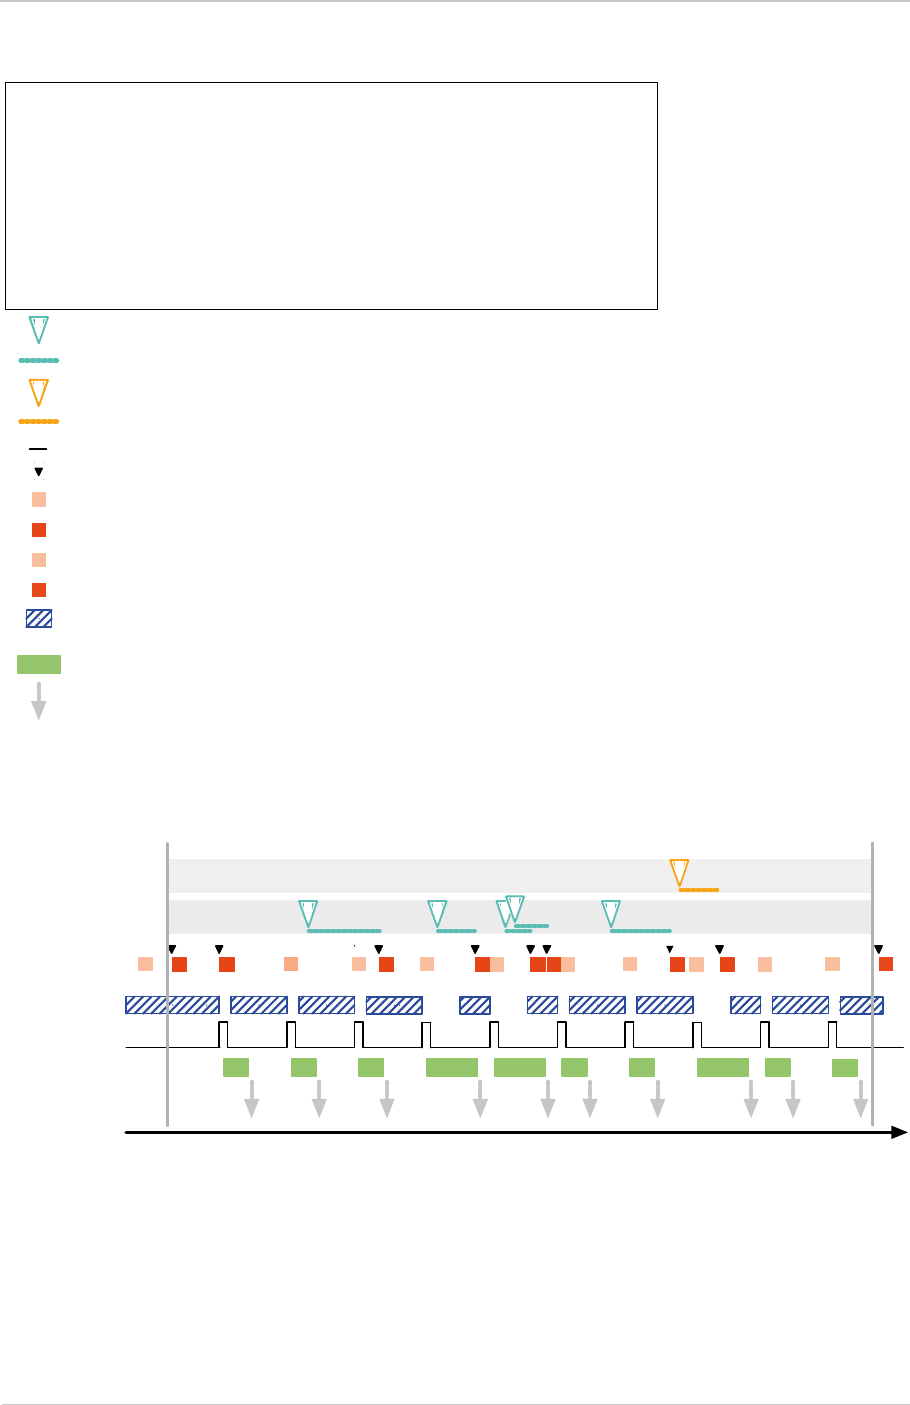
Features AW00123408000
249 Basler ace USB 3.0
3
1
0
P
1
P
Use Case: Asynchronous cycling through sequencer sets, according to path 1,
cycling interrupted by asynchronous reset according to path 0
Settings: Acquisition Mode = Continuous
Trigger Mode for the frame start trigger = On
Trigger Activation for the frame start trigger: Rising Edge
Frame start triggers applied externally via Line 1
Asynchronous trigger source for sequencer set advance:
Software Signal 3
Asynchronous trigger source for reset of sequencer set advance:
Software Signal 1
2 0 1 00-1
3
1
3 3
31
3
P
P
3
01
00 0 0
2 0 1
Time
Software Signal 1
Trigger Source,
Path 0
= delay between sending the advance command and it becoming effective
= delay between sending the reset command and it becoming effective
= trigger signal generated externally
= Software Signal trigger source (Software Signal 1) for asynchronous reset of sequencer set advance
Sequencer
Mode Set to
On
Software Signal 3
Trigger Source,
Path 1
Frame Start
Trigger Signal
Sequencer
Mode Set to
Off
= Software Signal trigger source (Software Signal 3) for asynchronous sequencer set advance
= frame exposure and readout
= frame transmission
= camera is waiting for a frame start trigger
Fig. 90: Use Case 3 - Asynchronous Cycling Through Sequencer Sets According to Path 1, One Reset
= camera loads a sequencer set into the active set making it the current set
= current sequencer set that is used for image acquisition; sequencer set was just loaded
= current sequencer set that is used for image acquisition; already present in the active set
= current sequencer set that is in the active set immediately before the sequencer feature is enabled
= current sequencer set; was in the active set before it was overwritten by sequencer set -1

AW00123408000 Features
Basler ace USB 3.0 250
7.8 Binning
For information about the availability of binning on a specific camera model, see Table 41 on
page 196 and Table 42 on page 197.
The binning feature is usually only available on monochrome cameras.
For information about color binning, see Section 7.8.2 on page 253.
7.8.1 Binning on Monochrome Cameras
Normal Implementation
Binning increases the camera’s response to light by summing the charges from adjacent pixels into
one pixel. Two types of binning are available: vertical binning and horizontal binning.
With vertical binning, adjacent pixels from 2 rows, 3 rows, or a maximum of 4 rows in the imaging
sensor array are summed and are reported out of the camera as a single pixel. Figure 91 illustrates
vertical binning.
When vertical binning is used, vertical decimation is not available. When
horizontal binning is used, horizontal decimation is not available.
However: When vertical binning is used, horizontal decimation is available.
When horizontal binning is used, vertical decimation is available.
For more information about decimation, see Section 7.9.1 on page 258.
When binning is used, scaling is not available.
For more information about scaling, see Section 7.10 on page 263.
Vertical Binning by 2 Vertical Binning by 3 Vertical Binning by 4
Fig. 91: Vertical Binning on Monochrome Cameras

Features AW00123408000
251 Basler ace USB 3.0
With horizontal binning, adjacent pixels from 2 columns, 3 columns, or a maximum of 4 columns are
summed and are reported out of the camera as a single pixel. Figure 92 illustrates horizontal
binning.
You can combine vertical and horizontal binning. This, however, can cause objects to appear
distorted in the image. For more information about possible image distortion due to combined
vertical and horizontal binning, see Section 7.8.4 on page 256.
Particular Implementation for the acA1920-25um and acA2500-14um
For the acA1920-25um and acA2500-14um, vertical binning works in a different way:
Vertical binning by 2 and by 4:
The gray values of adjacent pixels from 2 rows or from 4 rows are averaged.
As a consequence, the signal to noise ratio will be increased while the camera’s response to
light will not be increased.
Vertical binning by 3:
The gray values of adjacent pixels from 3 rows are combined.
As a consequence, the signal to noise ratio will be decreased while the camera’s response to
light will be slightly increased.
We recommend using vertical binning by 2 or by 4.
Horizontal Binning by 2 Horizontal Binning by 3 Horizontal Binning by 4
Fig. 92: Horizontal Binning on Monochrome Cameras

AW00123408000 Features
Basler ace USB 3.0 252
Particular Implementation for the acA3800-14um
Horizontal binning by 3 is not available for acA3800-14um cameras.
Particular Implementation with Binning Modes
For the acA640-750um, acA800-510um, acA1300-200um, acA1920-40um, acA1920-150um,
acA1920-155um, acA2040-55um, acA2040-120um, acA2440-35um, acA2440-75um,
acA2500-60um you can choose between Summing and Averaging as binning modes. In these
modes pixel gray values are added or averaged (arithmetic mean).
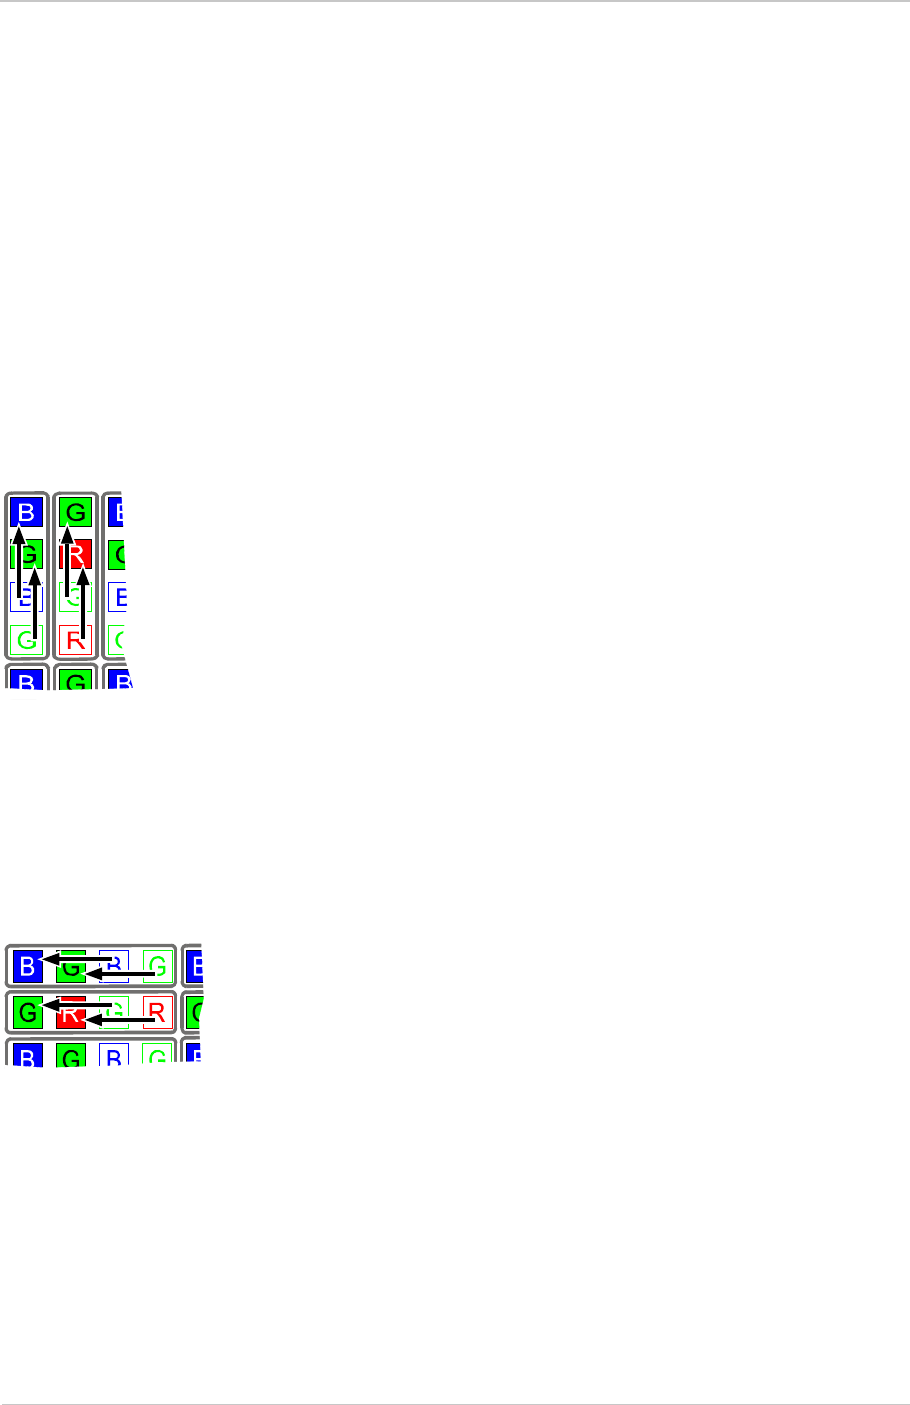
Features AW00123408000
253 Basler ace USB 3.0
7.8.2 Binning on Color Cameras
For information about the availability of binning in color cameras, see Table 42 on page 197.
Normal Implementation
For color binning, pixel values for identical colors are binned vertically and/or horizontally.
For vertical color binning, the gray values of adjacent pixels of the same color from 2 rows, 3 rows,
or a maximum of 4 rows in the imaging sensor array are averaged and are reported out of the
camera as a single pixel. The number of binned pixels depends on the vertical color binning setting
(see the example in Figure 93).
As the gray values are averaged during vertical color binning and not summed, the signal to noise
ratio will be increased while the camera’s response to light will not be increased.
For horizontal color binning, the gray values of adjacent pixels of the same color from 2 columns,
3 columns, or a maximum of 4 columns in the imaging sensor array are summed and are reported
out of the camera as a single pixel. The number of binned pixels depends on the horizontal color
binning setting (see example in Figure 94).
Fig. 93: Vertical Color Binning by 2
Example:
Vertical Color Binning by 2
(Shown for 2 Columns)
Fig. 94: Horizontal Color Binning by 2
Example:
Horizontal Color Binning by 2
(Shown for 2 Rows)

AW00123408000 Features
Basler ace USB 3.0 254
Combining Horizontal and Vertical Color Binning
You can combine vertical and horizontal color binning (see the example in Figure 95).
You can combine vertical and horizontal binning. This, however, may cause objects to appear
distorted in the image. For more information about possible image distortion due to combined
vertical and horizontal binning, see Section 7.8.4 on page 256.
7.8.3 Setting Binning
You can enable vertical binning by setting the Binning Vertical parameter. Setting the parameter’s
value to 2, 3, or 4 enables vertical binning by 2, by 3, or by 4, respectively. Setting the parameter’s
value to 1 disables vertical binning.
You can enable horizontal binning by setting the Binning Horizontal parameter. Setting the
parameter’s value to 2, 3, or 4 enables horizontal binning by 2, by 3, or by 4, respectively. Setting
the parameter’s value to 1 disables horizontal binning.
You can set the Binning Vertical or the Binning Horizontal parameter value from within your
application software by using the Basler pylon API. The following code snippet illustrates using the
API to set the parameter values:
// Enable vertical binning by 2
camera.BinningVertical.SetValue( 2 );
// Enable horizontal binning by 4
camera.BinningHorizontal.SetValue( 4 );
// Disable vertical and horizontal binning
camera.BinningVertical.SetValue( 1 );
camera.BinningHorizontal.SetValue( 1 );
If your camera provides binning modes also set the binning mode to summing or averaging for
horizontal and vertical binning:
Fig. 95: Combining Vertical and Horizontal Color Binning
Example: Horizontal and Vertical Color Binning by 2

Features AW00123408000
255 Basler ace USB 3.0
// Enable summing for horizontal binning
camera.BinningHorizontalMode.SetValue(BinningHorizontalMode_Summing);
BinningHorizontalModeEnums
e = camera.BinningHorizontalMode.GetValue();
// Enable averaging for horizontal binning
camera.BinningHorizontalMode.SetValue(BinningHorizontalMode_Averag-
ing);
BinningHorizontalModeEnums
e = camera.BinningHorizontalMode.GetValue();
// Enable summing for vertical binning
camera.BinningVerticalMode.SetValue(BinningVerticalMode_Summing);
BinningVerticalModeEnums e = camera.BinningVerticalMode.GetValue();
// Enable averaging for vertical binning
camera.BinningVerticalMode.SetValue(BinningVerticalMode_Averaging);
BinningVerticalModeEnums e = camera.BinningVerticalMode.GetValue();
You can also use the Basler pylon Viewer application to easily set the parameters.
For more information about the pylon API and the pylon Viewer, see Section 3.1 on page 62.

AW00123408000 Features
Basler ace USB 3.0 256
7.8.4 Considerations When Using Binning
Increased Response to Light
Using binning can greatly increase the camera’s response to light (sensitivity). When binning is
enabled, acquired images may look overexposed. If this is the case, you can reduce the lens
aperture, the intensity of your illumination, the camera’s exposure time setting, or the camera’s gain
setting.
When using vertical binning on monochrome cameras, the limits for the minimum gain settings are
automatically lowered. This allows you to use lower gain settings than would otherwise be available.
For the lowered limits for the minimum gain settings, see Section 7.2.2 on page 200.
Decreased Resolution
Using binning effectively decreases the resolution of the camera’s imaging sensor. For example,
the sensor in the acA640-90um camera normally has a resolution of 659 (H) x 494 (V). If you set
this camera to use horizontal binning by 3 and vertical binning by 3, the effective resolution of the
sensor is decreased to 219 (H) by 164 (V).
Binning’s Effect on ROI Settings
When you have the camera set to use binning, keep in mind that the settings for your image region
of interest (ROI) will refer to the binned rows and columns in the sensor and not to the physical rows
and columns in the sensor as they normally would. Another way to think of this is by using the
concept of a "virtual sensor".
For example, assume that you are using an acA640-90um camera set for 3 by 3 binning as
described above. In this case, you would act as if you were actually working with a 219 column by
164 row sensor when setting your ROI parameters. The maximum ROI width would be 219 and the
maximum ROI height would be 164. When you set the Offset X and the Width for the ROI, you will
be setting these values in terms of virtual sensor columns. And when you set the Offset Y and the
Height for the ROI, you will be setting these values in terms of virtual sensor rows and columns.
For more information about the image region of interest (ROI) feature, see Section 7.6 on page 213.
Effective Image ROI and Effective Offset X and Offset Y
Note that neither width nor height of the (physical) sensor used in the above example were evenly
divisible by 3. Each division left a remainder of two. Therefore, the sensor resolution actually used
for binning was 657 (H) x 492 (V), and the remaining two columns (numbers 658 and 659) and rows
(numbers 493 and 494) were excluded from binning and image transmission.
In other words, and expressed in therms of the physical sensor: An effective image ROI was formed
whose resolution of 657 (H) x 492 (V) was smaller than the resolution of the originally set image
ROI. Only the pixels within the effective image ROI were used for binning. And only these pixels

Features AW00123408000
257 Basler ace USB 3.0
define the "virtual sensor" for the transmitted image. The "excess" columns and rows were excluded
from binning and from the virtual sensor.
Carry out the following routine whenever setting binning values:
1. Set the binning as desired.
The related spatial information (offset, ROI width, ROI height) is expressed in terms of virtual
sensor rows and columns.
2. Acquire an image.
3. Check, whether the scene you want to image is fully imaged.
4. If necessary, adjust the settings for the virtual rows or columns to fully image the scene of
interest.
Possible Image Distortion
Objects will only appear undistorted in the image, if the numbers of binned lines and columns are
equal. With all other combinations, the imaged objects will appear distorted. If, for example, vertical
binning by 2 is combined with horizontal binning by 4 the widths of the imaged objects will appear
shrunk by a factor of 2 compared to the heights.
If you want to preserve the aspect ratios of imaged objects when using binning, you must use
vertical and horizontal binning where equal numbers of lines and columns are binned, e.g. vertical
binning by 3 combined with horizontal binning by 3.
To ensure that the scene of interest appears fully on the binned image:
AW00123408000 Features
Basler ace USB 3.0 258
7.9 Decimation
The decimation feature lets you perform vertical and/or horizontal sub-sampling of an acquired
frame.
7.9.1 Decimation Vertical (acA3800-14 and
acA4600-10 Only)
The decimation vertical feature lets you specify the extent of vertical sub-sampling of the acquired
frame, i.e. you can define rows that you want to be left out from transmission.
The acA3800-14 and acA4600-10 cameras support
decimation in vertical direction.
Examples
(Blue rows will be transmitted):
If vertical decimation is set to
1: the complete frame will be transmitted out of the
camera (no sub-sampling is realized); see
Figure 96.
This is valid for mono and color cameras.
2 for mono cameras: only every second row of the
acquired frame will be transmitted out of the camera
(Figure 97).
2 for color cameras: only every second pair of rows
of the acquired frame will be transmitted out of the
camera (Figure 98).
When vertical decimation is used, vertical binning is not available. When
horizontal decimation is used, horizontal binning is not available.
However: When vertical decimation is used, horizontal binning is available.
When horizontal decimation is used, vertical binning is available.
For more information about decimation, see Section 7.9.1 on page 258.
When decimation is used, scaling is not available.
For more information about scaling, see Section 7.10 on page 263.
Fig. 96: Decimation Disabled
Features AW00123408000
259 Basler ace USB 3.0
By using the vertical decimation feature, you can increase the frame rate of the camera.
Setting Vertical Decimation
You can enable vertical decimation for the acA2000-165 and acA2040-90 cameras by setting the
Decimation Vertical parameter. The parameter value can be set to 1, 2, and 4. Setting the parameter
value to 1 disables vertical decimation.
You can set the Decimation Vertical parameter value from within your application software by using
the Basler pylon API. The following code snippet illustrates using the API to set the parameter
values:
// Enable Vertical Decimation by 2
camera.DecimationVertical.SetValue(2);
// Disable Vertical Decimation
camera.DecimationVertical.SetValue(1);
You can also use the Basler pylon Viewer application to easily set the parameters.
For more information about the pylon API and the pylon Viewer, see Section 3.1 on page 62.
ROI height
If you use the Vertical Decimation feature and you set the decimation parameter
back to 1 to deactivate vertical decimation, the ROI height can be smaller than the
maximum possible width due to rounding errors.
In this case you can manually set the ROI width back to the maximum possible
height.
Fig. 98: Decimation of 2 (Color Cameras)
Fig. 97: Decimation of 2 (Mono Cameras)
AW00123408000 Features
Basler ace USB 3.0 260
Vertical Decimation’s Effect on ROI Settings
If vertical decimation is activated, the camera
automatically adapts the ROI settings to the modified
image size based on the formulas below.
For evaluating the new ROI height, the camera takes
into account the number of physical lines that are
between the first transmitted line (L1) and the last
transmitted line (Ln), i.e. the so-called covered lines
(see Figure 99). The line Ln + 1 in our example would
not be part of the covered lines when the decimation
feature is activated.
Calculating the covered lines (C)
For mono cameras:
(C) = H_old x D_old - D_old + 1
For color cameras:
(C) = H_old x D_old - 2 x D_old +2
As soon as the covered lines are determined, the camera
calculates the new ROI height:
For mono cameras:
New ROI height = Round up (C / D_new)
C = Coverage
D_new = New decimation value
D_old = Old decimation value
H_new = New ROI height
H_old = Old ROI height
For color cameras:
New ROI height = 2 x Round up ((C / 2) / D_new)
If you use the decimation vertical feature and you reset the decimation vertical
parameter back to 1, i.e. you deactivate vertical decimation, the ROI height can be
smaller than the maximum possible height (determined by the pixel resolution in
vertical direction).
In this case you can manually set the ROI height back to the maximum possible
height.
Fig. 99: Covered Lines (Mono Camera)
L1
Ln

Features AW00123408000
261 Basler ace USB 3.0
7.9.2 Decimation Horizontal (acA3800-14 and
acA4600-10 Only)
The Horizontal Decimation feature (sub-sampling in horizontal direction) lets you specify the extent
of horizontal sub-sampling of the acquired frame, i.e. you can define pixel columns that you want to
be left out from transmission.
In contrast to vertical decimation, the frame rate will not increase when using horizontal decimation.
Setting Horizontal Decimation
You can enable Horizontal decimation by setting the DecimationHorizontal parameter. Setting the
parameter’s value to 1 disables horizontal decimation.
You can set the DecimationHorizontal parameter value from within your application software by
using the Basler pylon API. The following code snippet illustrates using the API to set the parameter
value:
// Enable Horizontal Decimation by 8
Camera.DecimationHorizontal.SetValue(8);
// Disable Vertical Decimation
Camera.DecimationHorizontal.SetValue(1);
You can also use the Basler pylon Viewer application to easily set the parameter.
ROI width
If you use the Horizontal Decimation feature and you set the decimation parameter
back to 1 to deactivate horizontal decimation, the ROI width can be smaller than
the maximum possible width due to rounding errors.
In this case you can manually set the ROI width back to the maximum possible
width.

AW00123408000 Features
Basler ace USB 3.0 262
7.9.3 Considerations When Using Decimation
Reduced Resolution
Using vertical decimation effectively reduces the vertical resolution of the camera’s imaging sensor.
Likewise, horizontal decimation, effectively reduces the horizontal resolution of the camera’s
imaging sensor.
Image Distortion
When only vertical decimation is used, the imaged objects will appear shrunk in vertical direction.
If, for example, vertical decimation is set to 2, the imaged objects will appear shrunk by a factor of
2 compared to the horizontal direction and compared to an image without decimation. Likewise.
horizontal decimation will shrink a frame in horizontal direction.
Binning and Vertical Decimation
If vertical binning is used, vertical decimation is automatically disabled, and vice versa, i.e. if vertical
decimation is used, vertical binning is disabled.
Horizontal binning works independently from the decimation feature.

Features AW00123408000
263 Basler ace USB 3.0
7.10 Scaling
For information about the availability of the scaling feature on a specific camera model, see
Table 41 on page 196 and Table 42 on page 197.
The scaling feature allows you to shrink the size of a frame and to expand a shrunk frame up to its
original size. Thereby, pixel values are added and averaged as required to map them from one
(current) frame to the virtual pixels of the other frame. The scaling feature does not allow to expand
a shrunk frame beyond its original size.
When using the scaling feature, a factor is applied to the width of the current frame (horizontal
scaling). A factor of 1.0 causes no change to the original size of a frame. A factor less than 1.0
causes the width of the frame to shrink.
When horizontal scaling is applied, the scaling feature automatically applies the same factor to the
height of the frame (vertical scaling). Thereby, the aspect ratio of the original frame is preserved.
By applying a factor that is greater than the previous one but still below 1.0, you can expand the
size of the shrunk frame up to its original size (factor 1.0).
The factors available for scaling obey the following:
ORW: original ROI width [pixels]
SRW: scaled ROI width [pixels]
DSC = 16/x; where x is any natural number ranging from 16 to 128.
Accordingly, the factors range from 1.0 (no shrinking) to 0.125 (most extreme shrinking).
The scaled ROI width calculates as:
SRW [pixels] = (ORW × DSC) - 2
When scaling is used, binning and decimation are not available.
For more information about binning, see Section 7.8 on page 250.
For more information about decimation, see Section 7.9 on page 258.
Frequently, scaling involves the rounding of frame dimensions. The rounding
effects will be cumulative when applying a sequence of different scaling factors.
When reversing the scaling, e.g. to return to a previous frame size, the frame
dimensions lost during rounding are not restored. Accordingly, the previous frame
size will not exactly be reached.
You can correct for the cumulative rounding losses by setting the previous frame
size manually. Alternatively, instead of applying one scaling factor immediately
after another, you can in between return to a "reference" frame size, e.g. to full
resolution, and set the frame size manually to correct for rounding errors.

AW00123408000 Features
Basler ace USB 3.0 264
Setting Scaling
You can use the scaling feature by setting the ScalingHorizontal parameter. value from within your
application software by using the Basler pylon API. The following code snippet illustrates using the
API to set the parameter value. The example illustrates setting the width of the current frame to one
half of the original length:
// Set horizontal scaling
camera.ScalingHorizontal.SetValue(0.5);
double d = camera.ScalingHorizontal.GetValue();
You can also use the Basler pylon Viewer application to easily set the parameters.
For more information about the pylon API and the pylon Viewer, see Section 3.1 on page 62.
7.10.1 Considerations When Using Scaling
Scaling’s Effect on ROI Settings
When you have the camera set to use scaling, keep in mind that the settings for your image region
of interest (ROI) will refer to the rows and columns of the modified frame and not to the physical
rows and columns in the sensor as they normally would. Another way to think of this is by using the
concept of a "virtual sensor".
For example, assume that you are using an acA3800-14um camera with a scaling factor of 0.5
applied to full resolution (3840 × 2748 pixels). In this case, you would act as if you were actually
working with a 1918 column by 1372 row sensor when setting your ROI parameters. The maximum
ROI width would be 219 and the maximum ROI height would be 164. When you set the Offset X
and the Width for the ROI, you will be setting these values in terms of virtual sensor columns. And
when you set the Offset Y and the Height for the ROI, you will be setting these values in terms of
virtual sensor rows and columns.
For more information about the image region of interest (ROI) feature, see Section 7.6 on page 213.

Features AW00123408000
265 Basler ace USB 3.0
7.11 Mirror Image
7.11.1 Reverse X
For information about the availability of Reverse X on a specific camera model, see Table 41 on
page 196 and Table 42 on page 197.
Normal Implementation
The Reverse X feature is a horizontal mirror image feature. When the Reverse X feature is enabled,
the pixel values for each line in a captured image will be swapped end-for-end about the line’s
center. This means that for each line, the value of the first pixel in the line will be swapped with the
value of the last pixel, the value of the second pixel in the line will be swapped with the value of the
next-to-last pixel, and so on.
Figure 100 shows a normal image on the left and an image captured with Reverse X enabled on
the right.
Fig. 100: Reverse X Mirror Imaging
Normal Image Mirror Image
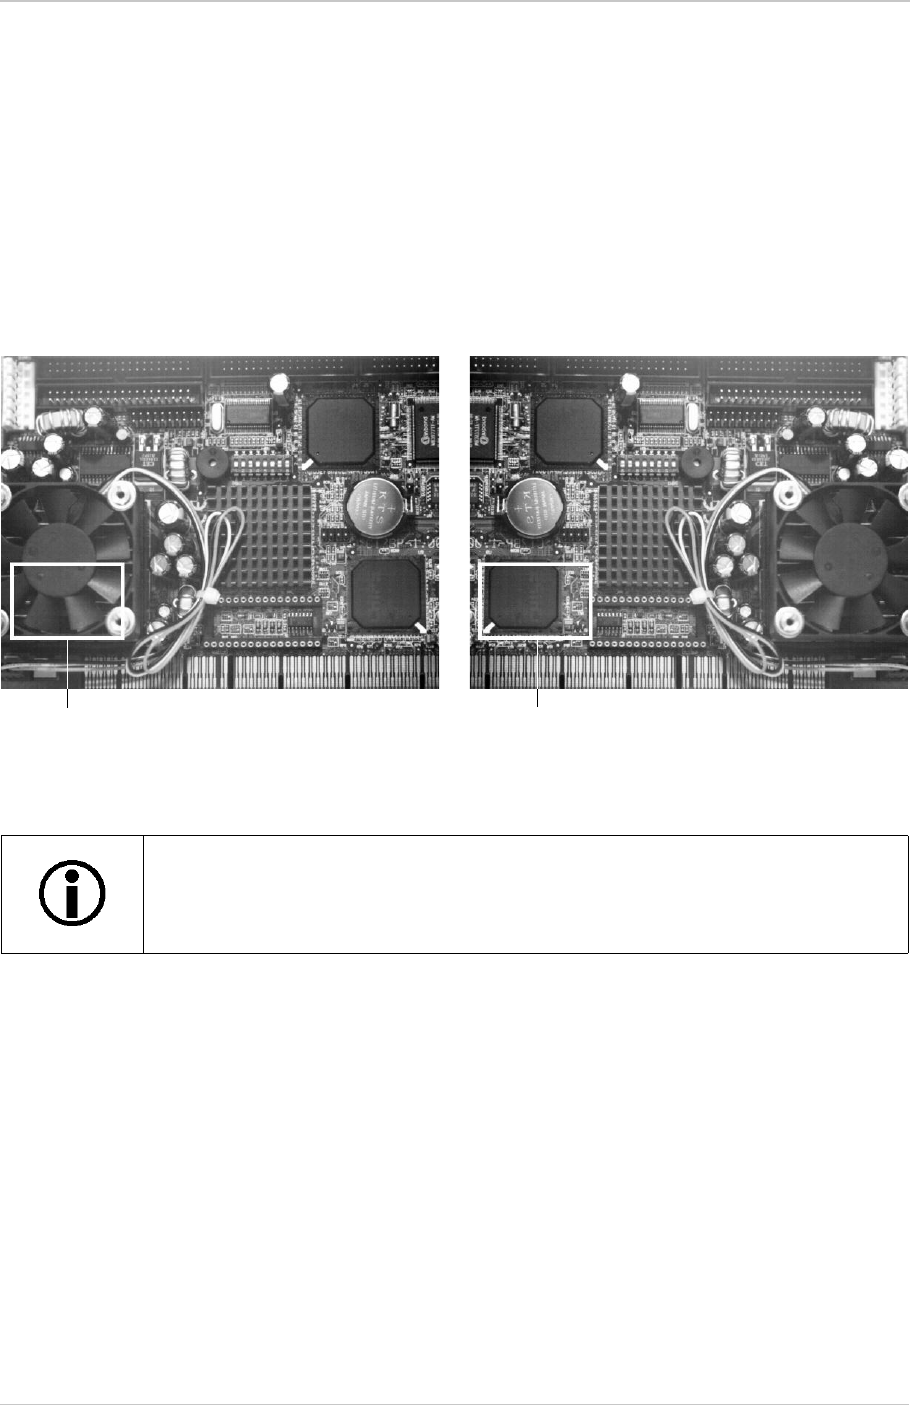
AW00123408000 Features
Basler ace USB 3.0 266
Using ROIs with Reverse X
You can use the image ROI feature when using the Reverse X feature. Note, however, that the
position of an ROI relative to the sensor remains the same regardless of whether or not the Reverse
X feature is enabled (see Figure 101).
As a consequence, an ROI will display different images depending on whether or not the Reverse
X feature is enabled.
Auto function ROIs will behave analogously to image ROIs.
For more information about auto functions, see Section 7.15 on page 299.
For color cameras, provisions are made ensuring that the effective color filter
alignment remains constant for normal and mirror images, that is, the same
alignment applies to normal and mirror images.
Fig. 101: Using an ROI with Reverse X Mirror Imaging
Normal Image Mirror Image
ROI ROI

Features AW00123408000
267 Basler ace USB 3.0
Particular Implementation with Variable Effective Bayer Filter Alignments
For the acA640-750uc, acA800-510uc, acA1300-200uc, acA1920-40uc, acA1920-150uc,
acA1920-155uc, acA2040-55uc, acA2040-120uc, acA2440-35uc, acA2440-75uc, acA2500-60uc
the effective Bayer filter alignments vary when Reverse X is used.
The Bayer filter alignments given in Section 1.3 on page 3 and Table 38 on page 195 refer to the
physical Bayer filter alignments with respect to the sensors’ pixels. The physical alignments also
apply to the images, when mirror image features are not enabled.
However, when mirror image features are enabled, effective alignments apply that differ
systematically from the physical alignments. And accordingly, the related pixel formats apply. For
example, when you use a camera with BG physical alignment and only ReverseX enabled, the
pixels of the image are based on an effective GB alignment and the Bayer GB pixel formats apply.
Note: When ReverseX and ReverseY are used at the same time the resulting effective alignment
does not depend on the sequence of enabling.
Setting Reverse X
You can enable or disable the ReverseX feature by setting the ReverseX parameter value. You can
set the parameter value from within your application software by using the Basler pylon API. The
following code snippet illustrates using the API to set the parameter value:
// Enable reverse X
camera.ReverseX.SetValue(true);
You can also use the Basler pylon Viewer application to easily set the parameter.
For more information about the pylon API and the pylon Viewer, see Section 3.1 on page 62.
Physical Bayer Filter
Alignment Effective Bayer Filter Alignment
No Mirror Image
Feature Enabled Only ReverseX
Enabled Only ReverseY
Enabled ReverseX and
ReverseY
Enabled
BG BG GB GR RG
RG RG GR GB BG
Table 53: Effective Bayer Filter Alignments for Reverse X and for Reverse X and Y Combined
AW00123408000 Features
Basler ace USB 3.0 268
7.11.2 Reverse Y
For information about the availability of ReverseY on a specific camera model, see Table 41 on
page 196 and Table 42 on page 197.
Normal Implementation
The ReverseY feature is a vertical mirror image feature. When the reverse Y feature is enabled, the
lines in a captured image will be swapped top-to-bottom. This means that the top line, in the image
will be swapped with the bottom line, the next-to-top line will be swapped with the next-to-bottom
line. and so on.
Figure 102 shows a normal image on the left and, and an image captured with ReverseY enabled
on the right.
Using ROIs with Reverse Y
You can use the ROI feature when using the Reverse X feature. Note, however, that the position of
an ROI relative to the sensor remains the same regardless of whether or not the Reverse Y feature
is enabled (see Figure 103).
As a consequence, an image ROI will display different images depending on whether or not the
Reverse Y feature is enabled.
Auto function ROIs will behave analogously to image ROIs.
Fig. 102: Reverse Y Mirror Imaging
Normal Image Reverse Y Mirror Image
Features AW00123408000
269 Basler ace USB 3.0
For more information about auto functions, see Section 7.15 on page 299.
Particular Implementation with Variable Effective Bayer Filter Alignments
For the acA640-750uc, acA800-510uc, acA1300-200uc, acA1920-40uc, acA1920-150uc,
acA1920-155uc, acA2040-55uc, acA2040-120uc, acA2440-35uc, acA2440-75uc, acA2500-60uc
the effective Bayer filter alignments vary when Reverse Y is used.
The Bayer filter alignments given in Section 1.3 on page 3 and Table 38 on page 195 refer to the
physical Bayer filter alignments with respect to the sensors’ pixels. The physical alignments also
apply to the images, when mirror image features are not enabled.
However, when mirror image features are enabled, effective alignments apply that differ
systematically from the physical alignments. And accordingly, the related pixel formats apply. For
example, when you use a camera with BG physical alignment and only Reverse Y enabled, the
pixels of the image are based on an effective GR alignment and the Bayer GR pixel formats apply.
For color cameras, provisions are made ensuring that the effective color filter
alignment will be constant for normal and mirror images.
Fig. 103: Using an ROI with Reverse Y Mirror Imaging
Normal Image Mirror Image
ROI ROI

AW00123408000 Features
Basler ace USB 3.0 270
Note: When Reverse X and Reverse Y are used at the same time the resulting effective alignment
does not depend on the sequence of enabling.
Setting Reverse Y
You can enable or disable the Reverse Y feature by setting the ReverseY parameter value. You can
set the parameter value from within your application software by using the Basler pylon API. The
following code snippet illustrates using the API to set the parameter value:
// Enable reverse Y
camera.ReverseY.SetValue(true);
You can also use the Basler pylon Viewer application to easily set the parameter.
For more information about the pylon API and the pylon Viewer, see Section 3.1 on page 62.
Physical Bayer Filter
Alignment Effective Bayer Filter Alignment
No Mirror Image Feature
Enabled Only Reverse Y Enabled Reverse X and
Reverse Y Enabled
BG BG GR RG
GB GB RG GR
RG RG GB BG
Table 54: Effective Bayer Filter Alignments for Reverse Y and for Reverse X and Y Combined

Features AW00123408000
271 Basler ace USB 3.0
7.12 Luminance Lookup Table
Normal Implementation
Using the Luminance Lookup Table for Cameras with 12 bit ADC Data and Pixel
Format Set for 12 Bit Output
Whenever the camera is set for a 12 bit pixel format (e.g., Mono 12), the 12 bits transmitted out of
the camera for each pixel normally represent the 12 bits reported by the camera’s ADC. The
luminance lookup table feature lets you use a custom 12 bit to12 bit lookup table to map the 12 bits
reported out of the ADC to 12 bits that will be transmitted by the camera.
The lookup table is essentially just a list of 4096 values, however, not every value in the table is
actually used. If we number the values in the table from 0 through 4095, the table works like this:
The number at location 0 in the table represents the 12 bits that will be transmitted out of the
camera when the ADC reports that a pixel has a value of 0.
The numbers at locations 1 through 7 are not used.
The number at location 8 in the table represents the 12 bits that will be transmitted out of the
camera when the ADC reports that a pixel has a value of 8.
The numbers at locations 9 through 15 are not used.
The number at location 16 in the table represents the 12 bits that will be transmitted out of the
camera when the ADC reports that a pixel has a value of 16.
The numbers at locations 17 through 23 are not used.
The number at location 24 in the table represents the 12 bits that will be transmitted out of the
camera when the ADC reports that a pixel has a value of 24.
And so on.
As you can see, the table does not include a user defined 12 bit value for every pixel value that the
sensor can report. So what does the camera do when the ADC reports a pixel value that is between
two values that have a defined 12 bit output? In this case, the camera performs a straight line
interpolation to determine the value that it should transmit. For example, assume that the ADC
reports a pixel value of 12. In this case, the camera would perform a straight line interpolation
between the values at location 8 and location 16 in the table. The result of the interpolation would
be reported out of the camera as the 12 bit output.
Another thing to keep in mind about the table is that location 4088 is the last location that will have
a defined 12 bit value associated with it. (Locations 4089 through 4095 are not used.) If the ADC
reports a value above 4088, the camera will not be able to perform an interpolation. In cases where
the ADC reports a value above 4088, the camera simply transmits the 12 bit value from location
4088 in the table.
The advantage of the luminance lookup table feature is that it allows a user to customize the
response curve of the camera. The graphs below show the effect of two typical lookup tables. The
first graph is for a lookup table where the values are arranged so that the output of the camera
increases linearly as the digitized sensor output increases. The second graph is for a lookup table
where the values are arranged so that the camera output increases quickly as the digitized sensor
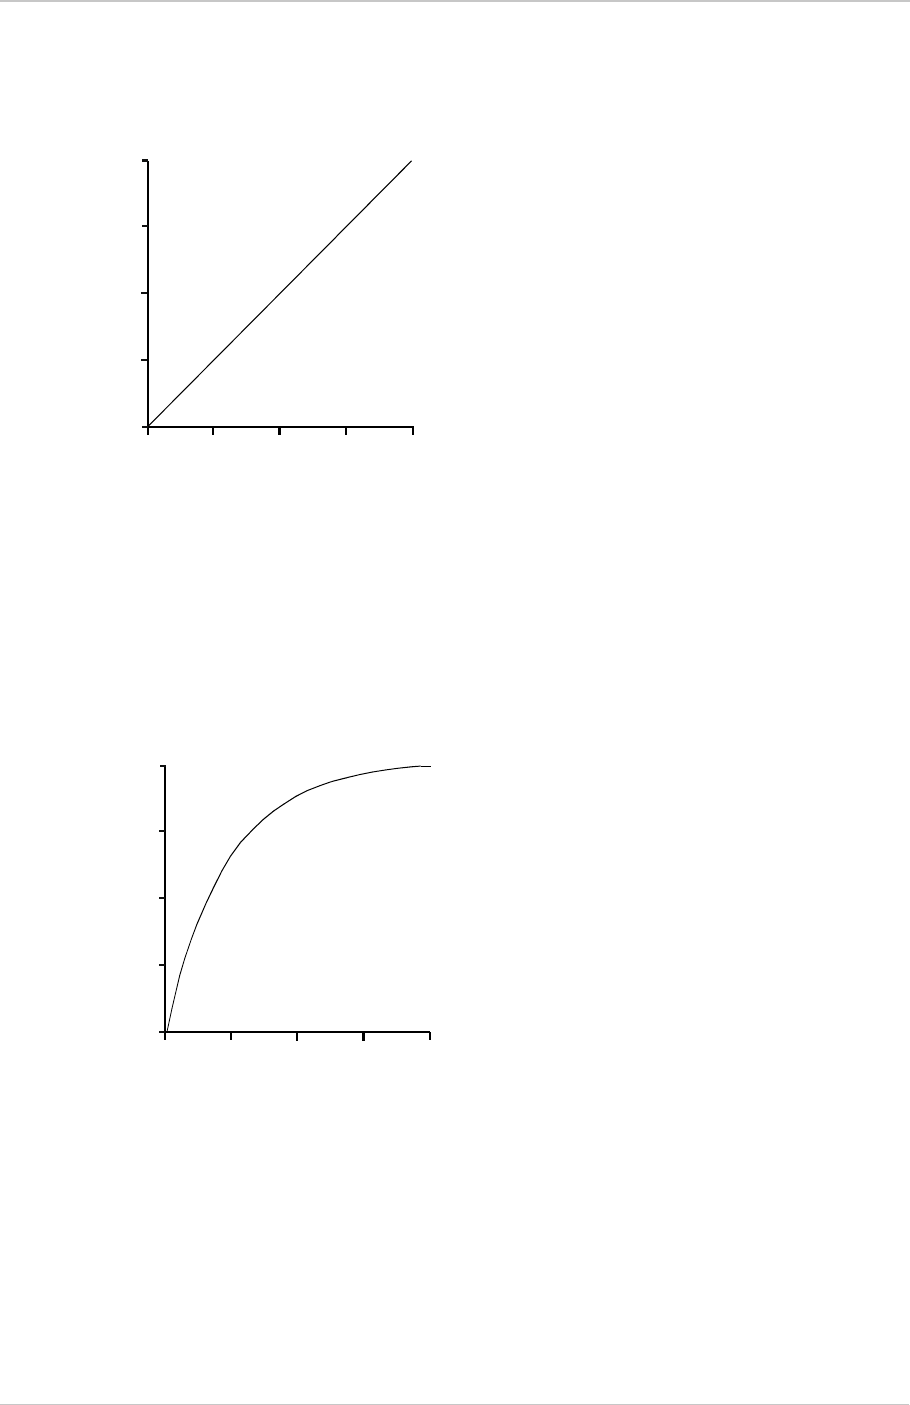
AW00123408000 Features
Basler ace USB 3.0 272
output moves from 0 through 2048 and increases gradually as the digitized sensor output moves
from 2049 through 4096.
0 1024 2048 3072 4095
12 Bit Digitized Sensor Reading
0
1024
2048
3072
4095
12 Bit
Camera
Output
Fig. 104: Lookup Table with Values Mapped in a Linear Fashion
0 1024 2048 3072 4095
12 Bit Digitized Sensor Reading
0
1024
2048
3072
4095
12 Bit
Camera
Output
Fig. 105: Lookup Table with Values Mapped for Higher Camera Output at Low Sensor Readings

Features AW00123408000
273 Basler ace USB 3.0
Using the Luminance Lookup Table for Cameras with 12 bit ADC Data and Pixel
Format Set for 8 Bit Output
As mentioned above, when the camera is set for a pixel format where it outputs 12 bits, the lookup
table is used to perform a 12 bit to 12 bit conversion. But the lookup table can also be used in 12
bit to 8 bit fashion. To use the table in 12 bit to 8 bit fashion, you enter 12 bit values into the table
and enable the table as you normally would. But instead of setting the camera for a pixel format that
results in a camera output with 12 bits effective, you set the camera for a pixel format that results
in 8 bit output (e.g., Mono 8). In this situation, the camera will first use the values in the table to do
a 12 bit to 12 bit conversion. It will then drop the 4 least significant bits of the converted value and
will transmit the 8 most significant bits.
Particular Implementation for the acA640-750, acA800-510, acA1300-200,
acA1920-150, and acA2500-60
For cameras providing 10 bit as the highest pixel format bit depth, the luminance lookup table
values must be entered as 10 bit values.
Changing the Values in the Luminance Lookup Table and Enabling the Table
You can change the values in the luminance lookup table (LUT) and enable the use of the lookup
table. The following example refers to using 12 bit ADC data:
Use the LUT Selector to select a lookup table. (Currently there is only one lookup table
available, i.e., the "luminance" lookup table described above.)
Use the LUT Index parameter to select a value in the lookup table. The LUT Index parameter
selects the value in the table to change. The index number for the first value in the table is 0,
for the second value in the table is 1, for the third value in the table is 2, and so on.
Use the LUT Value parameter to set the selected value in the lookup table.
Use the LUT Index parameter and LUT value parameters to set other table values as desired.
Use the LUT Enable parameter to enable the table.
You can set the LUT Selector, the LUT Index parameter and the LUT Value parameter from within
your application software by using the Basler pylon API. The following code snippet illustrates using
the API to set the selector and the parameter values:
// Select the lookup table
camera.LUTSelector.SetValue(LUTSelector_Luminance);
// Write a lookup table to the device.
// The following lookup table causes an inversion of the sensor values
// ( bright -> dark, dark -> bright )
for ( int i = 0; i < 4096; i += 8 )
{
camera.LUTIndex.SetValue( i );
camera.LUTValue.SetValue( 4095 - i );
}


Features AW00123408000
275 Basler ace USB 3.0
7.13 Gamma Correction
The gamma correction feature lets you modify the brightness of the pixel values output by the
camera’s sensor to account for a non-linearity in the human perception of brightness. For color
cameras, gamma correction is always performed in the RGB color space.
To accomplish gamma correction, a gamma correction value (γ) is applied to the pixel value of each
pixel according to the following formula (shown for the red pixel value (R) of a color camera as an
example):
The formula uses uncorrected and corrected pixel brightnesses that are normalized by the
maximum pixel brightness. The maximum pixel brightness equals 255 for 8 bit output and 4095 for
12 bit output.
The gamma correction value can be set in a range from 0 to 3.99998.
When the gamma correction value is set to 1, the output pixel brightness will not be corrected. The
gamma correction value of 1 is the default value after camera reset or power up.
A gamma correction value between 0 and 1 will result in increased overall brightness, and a gamma
correction value greater than 1 will result in decreased overall brightness.
In all cases, black (output pixel brightness equals 0) and white (output pixel brightness equals 255
at 8 bit output and 4095 at 12 bit output) will not be corrected.
Setting Gamma Correction
If color binning is enabled for the acA1920-25uc, gamma correction will be applied
after color binning was performed. For more information about color binning, see
Section 7.8.2 on page 253.
When using a light source preset for a color camera, a gamma correction value of
approximately 0.4 will automatically be applied, corresponding to an sRGB
gamma correction value.
Under these circumstances, we recommend not to explicitly set a gamma
correction value. If you do nonetheless you will alter the effect of the selected light
source preset.
For more information about light source presets, see Section 7.3.3 on page 204.
Rcorrected
Runcorrected
Rmax
---------------------------
γRmax
×=

AW00123408000 Features
Basler ace USB 3.0 276
You can use the Gamma parameter to set the gamma correction value.
Set the Gamma parameter value from within your application software by using the Basler pylon
API. The following code snippet illustrates using the API to set the parameter value to 1.2 as an
example:
// Set the Gamma value to 1.2
camera.Gamma.SetValue(1.2);
You can also use the Basler pylon Viewer application to easily set the parameters.
For more information about the pylon API and the pylon Viewer, see Section 3.1 on page 62.
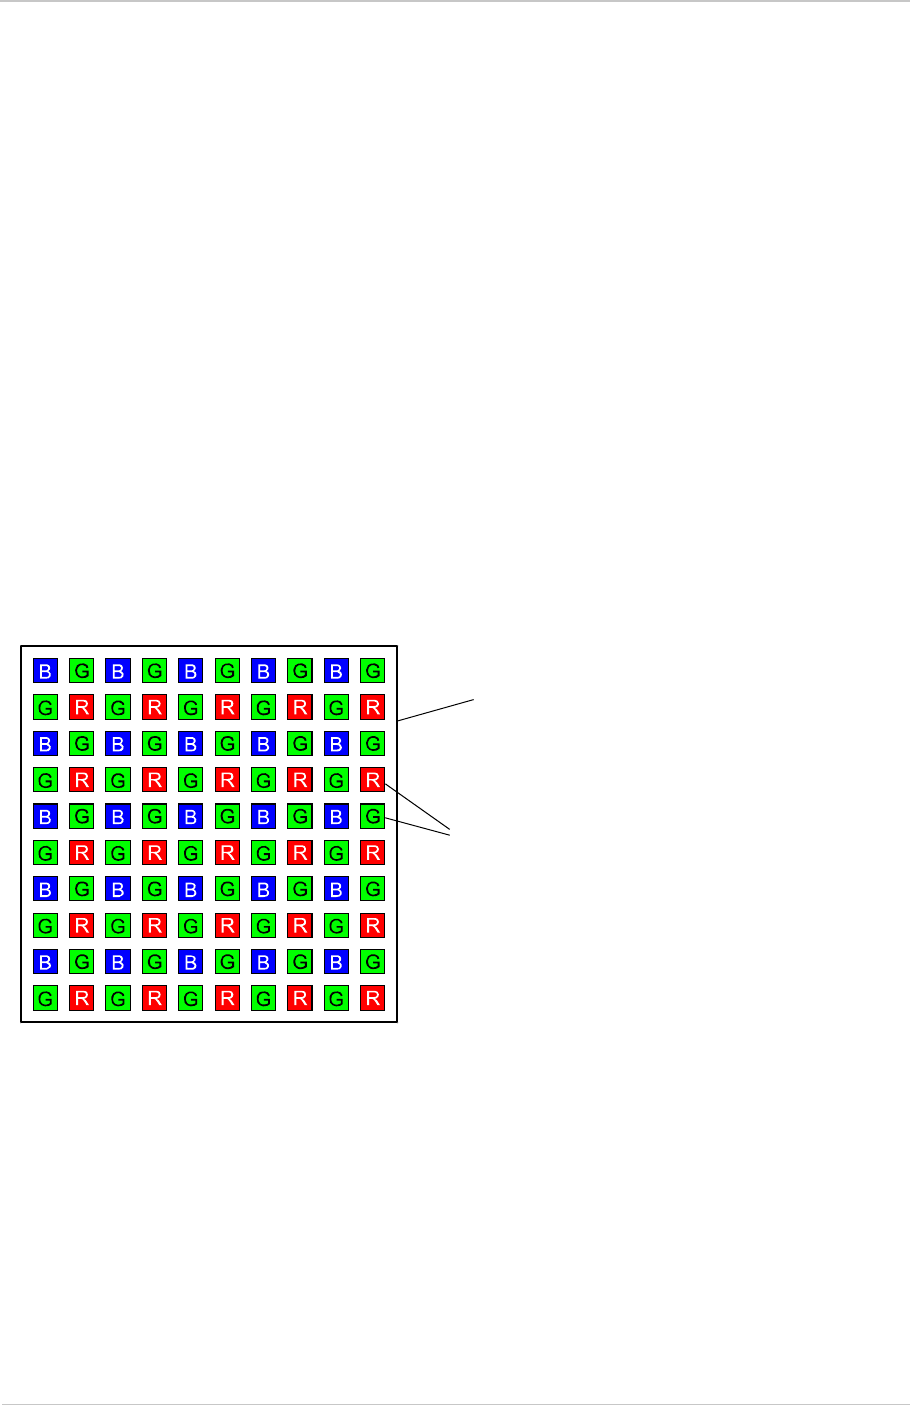
Features AW00123408000
277 Basler ace USB 3.0
7.14 Color Creation and Enhancement
This chapter provides information about how color images are created on different camera models
and about the features available for adjusting the appearance of the colors.
7.14.1 Color Creation
The sensors in the color versions of the Basler ace USB 3.0 cameras are equipped with an additive
color separation filter known as a Bayer filter. The pixel formats available on color cameras for pixel
data output are related to the Bayer pattern. You therefore need a basic knowledge of the Bayer
filter to understand the pixel formats. With the Bayer filter, each individual pixel is covered by a part
of the filter that allows light of only one color to strike the pixel. The pattern of the Bayer filter used
on the camera is as shown in Figure 106 (the alignment of the Bayer filter to the pixels in the
acquired images (with respect to the sensor) is shown as an example only; the figure shows the
"BG" filter alignment. For an explanation, see Section 7.14.1.1 on page 278). As the figure
illustrates, within each square of four pixels, one pixel sees only red light, one sees only blue light,
and two pixels see only green light. (This combination mimics the human eye’s sensitivity to color.)
Sensor
Pixels
Fig. 106: Bayer Filter Pattern With "BG" Physical Alignment as an Example

AW00123408000 Features
Basler ace USB 3.0 278
7.14.1.1 Bayer Color Filter Alignment
All color camera models have sensors equipped with a Bayer filter. The alignment of the filter to the
sensor’s pixels varies with camera model (see Table 53).
Bayer BG alignment, for example, means that pixel one and pixel two of the first line in each image
transmitted will be blue and green respectively. And for the second line transmitted, pixel one and
pixel two will be green and red respectively. Since the pattern of a Bayer filter and its alignment on
the sensor (physical alignment) are fixed, you can use this information to determine the color of all
of the other pixels in the image (effective alignment). For some camera models (see below) the
effective Bayer filter alignment in the image differs from the physical alignment on the sensor when
Reverse X or Reverse Y or enabled. However, these differences are systematic (see Section 7.11
on page 265). The PixelColorFilter parameter indicates the effective alignment of the Bayer filter.

Features AW00123408000
279 Basler ace USB 3.0
* This Bayer filter alignment applies only when neither ReverseX nor ReverseY are enabled. For
more information about the ReverseX and ReverseY features, see Section 7.11 on page 265.
Because the size and position of the region of interest on color cameras with a Bayer filter must be
adjusted in increments of 2 or of multiples of 2, the color filter alignment will remain constant
regardless of the camera’s region of interest (ROI) settings (see Section 7.6 on page 213).
Color Camera Model Bayer Filter Alignment
BG GB RG
acA640-90uc •
acA640-120uc •
acA640-750uc •*
acA800-510uc •*
acA1300-30uc •
acA1300-200uc •*
acA1600-20uc •
acA1920-25uc •
acA1920-40uc •*
acA1920-150uc •*
acA1920-155uc •*
acA2000-165uc •
acA2040-55uc •*
acA2040-90uc •
acA2040-120uc •*
acA2440-35uc •*
acA2440-75uc •*
acA2500-14uc •
acA2500-60uc •*
acA3800-14uc •
acA4600-10uc •
Table 55: Bayer Filter to Sensor Alignment

AW00123408000 Features
Basler ace USB 3.0 280
7.14.1.2 Pixel Formats Available on Color Cameras
On color cameras, the following pixel formats are available (column for Mono format with light gray
shading):
* The Bayer filter alignment given refers to the physical Bayer filter alignment with respect to the
sensor’s pixels. The identical alignments also apply to the images (effective alignments), provided
mirror image features are not enabled.
Color
Camera Model
Bayer BG 8
Bayer GB 8
Bayer RG 8
Bayer BG 10
Bayer BG 10p
Bayer BG 12
Bayer GB 12
Bayer RG 12
Bayer BG 12p
Bayer GB 12p
Bayer RG 12p
RGB 8
BGR 8
YCbCr 422_8
Mono 8
acA640-90uc •••••••
acA640-120uc •••••••
acA640-750uc* ••• ••••
acA800-510uc* ••• ••••
acA1300-30uc •••••••
acA1300-200* ••• ••••
acA1600-20uc •••••••
acA1920-25uc •••••
acA1920-40uc* • • •••••
acA1920-150uc* ••• ••••
acA1920-155uc* • • •••••
acA2000-165uc •••
acA2040-55uc* • • •••••
acA2040-90uc •••
acA2040-120uc* • • •••••
acA2440-35uc* • • •••••
acA2440-75uc* • • •••••
acA2500-14uc •••••
acA2500-60uc* ••• ••••
acA3800-14uc •••••
acA4600-10uc •••••
Table 56: Pixel Formats Available on Color Cameras ( • = format available)

Features AW00123408000
281 Basler ace USB 3.0
When mirror image features are enabled, the effective alignments differ systematically from the
physical alignments. The applicable pixel formats vary with the effective alignments.
For more information about effective alignments related to mirror image features, see Section 7.11
on page 265.
Bayer Formats
Depending on the camera model, the cameras equipped with a Bayer pattern color filter can output
color images based on the Bayer pixel formats given in Table 56.
When a color camera is set for one of these Bayer pixel formats, the pixel data is not processed or
interpolated in any way. For each pixel covered with a red portion of the filter, you get 8, 10 or 12
bits of red data. For each pixel covered with a green portion of the filter, you get 8, 10 or 12 bits of
green data. And for each pixel covered with a blue portion of the filter, you get 8, 10 or 12 bits of
blue data. (This type of pixel data is sometimes referred to as "raw" output.)
RGB8 and BGR8 Formats
When a color camera is set for the RGB8 or BGR8 pixel format, the camera outputs 8 bit of red data,
8 bit of green data, and 8 bit of blue data for each pixel in the acquired frame. The pixel formats
differ by different output sequences for the red, green, and blue data.
YUV Formats
Most color cameras with a Bayer filter can output color images based on pixel data in YCbCr422_8
format.
When a color camera is set for this format, each pixel value in the captured image goes through a
two step conversion process as it exits the sensor and passes through the camera’s electronics.
This process yields Y, Cb, and Cr color information for each pixel.
In the first step of the process, a demosaicing algorithm is performed to get RGB data for each pixel.
This is required because color cameras with a Bayer filter on the sensor gather only one color of
light for each individual pixel.
The second step of the process is to convert the RGB information to the YCbCr color model. The
conversion algorithm uses the following formulas:
Y = 0.299 R + 0.587 G + 0.114 B
Cb = - 0.16874 R - 0.33126 G + 0.5000 B + 128
Cr = 0.5000 R - 0.41869 G - 0.08131 B + 128
You can find detailed information about the mono and color pixel formats in the
Pixel Format Naming Convention, Version 2.0 and above. You can obtain the
document from the Automated Imaging Association (AIA).

AW00123408000 Features
Basler ace USB 3.0 282
After conversion to the YCbCr color model is complete, the pixel data is transmitted to the host
computer.
Mono Format
Most cameras equipped with a Bayer pattern color filter can output monochrome images based on
pixel data in the Mono 8 format.
When a color camera is set for Mono 8, the pixel values in each captured image are first
demosaiced and converted to the YCbCr color model as described above. The camera then
transmits the 8 bit Y value for each pixel to the host computer. In the YCbCr color model, the Y
component for each pixel represents a brightness value. This brightness value can be considered
as equivalent to the value that would be sent from a pixel in a monochrome camera. So in essence,
when a color camera is set for Mono 8, it outputs an 8 bit monochrome image. (This type of output
is sometimes referred to as "Y Mono 8".)
7.14.2 Integrated IR Cut Filter
All color camera models are equipped with an IR-cut filter as standard equipment. The filter is
mounted in a filter holder located in the cylindric housing extension of the camera.
Monochrome cameras include a filter holder in the cylindric housing extension of the camera, but
the holder is not populated with an IR-cut filter.
For more information about the location of the IR cut filter in the camera, see Section 1.5.2 on
page 44.
NOTICE
On all cameras, the lens thread length is limited.
All cameras (mono and color) are equipped with a plastic filter holder located in the cylindric
housing extension of the camera.
The location of the filter holder limits the length of the threads on any lens you use with the
camera. If a lens with a very long thread length is used, the filter holder or the lens mount will be
damaged or destroyed and the camera will no longer operate.

Features AW00123408000
283 Basler ace USB 3.0
7.14.3 Color Enhancement Features
Due to the presence of a Bayer filter in the color cameras (see Section 7.14.1 on page 277), the
pixel values read out from the sensor reside in RGB color space. And for each pixel, the pixel value
for only one color (red, green or blue) will be available ("raw" data).
The color enhancement features, however, require that red, green, and blue pixel values are
available for each pixel.
To meet this requirement, automatic demosaicing is executed on the raw data before any color
enhancement feature processes pixel data. The automatic process is also called a color
transformation from RGB color space to RGB color space.
Note: All color enhancements described in this section are performed on pixel data in RGB color
space, regardless of the pixel format chosen for pixel data output to the computer.
7.14.3.1 Balance White
The balance white feature allows you to perform white balancing. The feature acts on data triplets
that are available for each pixel and reside in the RGB color space. So the feature lets you perform
red, green, and blue adjustments for each pixel such that white objects in the camera’s field of view
appear white in the acquired images.
With exception of the balance white feature and the PGI feature set, the color
enhancement features are not available for the following cameras: acA640-750uc,
acA800-510uc, acA1300-200uc, acA1920-150uc, and acA2500-60uc.
If color binning is enabled for the acA1920-25uc, white balancing is applied after
color binning was performed. For more information about color binning, see
Section 7.7.2 on page 222.

AW00123408000 Features
Basler ace USB 3.0 284
Setting the White Balance
With the white balancing scheme used on the cameras, the red intensity, green intensity, and blue
intensity can be individually adjusted. For each color, a Balance Ratio parameter is used to set the
intensity of the color. If the Balance Ratio parameter for a color is set to a value of 1, the intensity
of the color will be unaffected by the white balance mechanism. If the ratio is set to a value lower
than 1, the intensity of the color will be reduced. If the ratio is set to a value greater than 1, the
intensity of the color will be increased. The increase or decrease in intensity is proportional. For
example, if the Balance Ratio for a color is set to 1.25, the intensity of that color will be increased
by 25 %.
The Balance Ratio parameter value can range from 0.00 to 15.99976. But you should be aware that,
if you set the balance ratio for a color to a value lower than 1, this will not only decrease the intensity
of that color relative to the other two colors, but will also decrease the maximum intensity that the
color can achieve. For this reason, Basler doesn’t normally recommend setting a balance ratio less
than 1 unless you want to correct for the strong predominance of one color.
This section describes how a color camera’s white balance can be adjusted
"manually", i.e., by setting the value of the Balance Ratio parameters for red,
green, and blue.
The camera also has a Balance White Auto function that can automatically adjust
the white balance. Manual adjustment of the Balance Ratio parameters for
red, green, and blue will only work, if the Balance White Auto function is
disabled.
For more information about auto functions in general, see Section 7.15 on
page 299.
For more information about the Balance White Auto function, see Section 7.15.7
on page 313.
When you set the Light Source Preset to match your light source characteristics
and/or make changes to the entries in the color transformation matrix, the camera
will automatically make adjustments to the white balance settings so that they are
best suited for the current settings.
For more information about using the color transformation matrix, see
Section 7.14.3.5 on page 295.

Features AW00123408000
285 Basler ace USB 3.0
Particular Importance for the acA3800-14uc and acA4600-10uc
As a result of the cameras’ sensor design, images output by the acA3800-14uc and acA4600-10us
cameras can display an artifact color shift. You can remove the artifact color shift by using the
balance white feature.
Several conditions ("imaging conditions"; see below) govern the occurrence of the artifact color
shift. Accordingly, for color shift removal, you must apply the balance white feature whenever at
least one of the relevant imaging conditions changes.
Among the imaging conditions are the following:
Optical system: exchange of lens, change of aperture, change of focus
Illumination: change of the type of illumination, change of the arrangement of light sources,
change of brightness
Camera settings and features: The artifact color shift depends on several camera settings and
features, in particular exposure time, Black Level, Digital Shift, Binning Horizontal, Binning
Vertical, LUT, some image ROI-related settings (Width, Height, OffsetX, OffsetY, CenterX,
CenterY).
Setting the Balance White Feature
1. Set the Balance Ratio Selector to red, green, or blue.
2. Set the Balance Ratio parameter to the desired value for the selected color.
You can set the Balance Ratio Selector and the Balance Ratio parameter value from within your
application software by using the Basler pylon API. The following code snippet illustrates using the
API to set the selector and the parameter value for green as an example:
// Select the color for white balancing and set the related BalanceRatio value
camera.BalanceRatioSelector.SetValue(BalanceRatioSelector_Green);
camera.BalanceRatio.SetValue(1.25);
You can also use the Basler pylon Viewer application to easily set the parameters.
For more information about the pylon API and the pylon Viewer, see Section 3.1 on page 62.
Keep in mind from the above that color shift removal requires that you apply the
balance white feature in many situations when you normally would not do so, for
example after having changed the lens focus.
To set the Balance Ratio parameter value for color using Basler pylon:

AW00123408000 Features
Basler ace USB 3.0 286
7.14.3.2 PGI Feature Set
The PGI feature set allows to optimize the image quality of color images.
For information about the availability of the PGI feature set on a specific color camera model, see
Table 42 on page 197.
The following image optimization features are included:
Basler PGI demosaicing
Noise Reduction
Sharpness Enhancement.
Below, the features are briefly described. For more detailed information, see the White Paper
"Better Image Quality with Basler PGI". The document is available on the Basler website:
www.baslerweb.com
Basler PGI Demosaicing
Baser PGI demosaicing involves regions of 5×5 pixels on the sensor for color interpolation and is
therefore more elaborate than the "simple" 2×2 demosaicing used otherwise by the camera. The
Basler PGI 5×5 demosaicing can only operate in the context of the Basler PGI feature set.
When Basler PGI demosaicing is enabled, the following happens:
The 5×5 color interpolation becomes effective.
Basler PGI image quality optimization occurs automatically, bringing about most of the
possible improvement.
The Noise Reduction and Sharpness Enhancement features become available for further
"manual" image quality optimization.
The PGI feature set can only be used when either of the following "allowed" pixel
formats is enabled: RGB8, BGR8, YCbCr422_8.
The PGI feature set can not be used with a Mono format, e.g. Mono 8, or a raw
pixel format, e.g. Bayer BG10.
The PGI feature set is mainly tailored to meet the needs of human vision.
Basler PGI demosaicing can only be enabled when one of the "allowed" pixel
formats (see above) is enabled.

Features AW00123408000
287 Basler ace USB 3.0
Noise Reduction
The noise reduction feature allows to reduce random color variation in an image. The feature should
be applied with caution at the user’s visual discretion. Noise reduction will best be used together
with sharpness enhancement.
The NoiseReduction parameter value can range from 0.0 to 2.0. If NoiseReduction is set to a too
high parameter value fine structure in the image can become indistinct or can disappear.
Sharpness Enhancement
The sharpness enhancement feature allows to increase the sharpness of an image at the user’s
visual discretion.
The SharpnessEnhancement parameter value can range from 1.0 to 3.98438. Best results will in
most cases be obtained at low parameter value settings and when used together with noise
reduction.

AW00123408000 Features
Basler ace USB 3.0 288
Setting the Basler PGI Feature Set
1. Select one of the "allowed" pixel formats (see above).
2. Select the Basler PGI demosaicing mode to enable 5×5 color interpolation and effect
Basler PGI image quality optimization.
3. If desired, set the noise reduction feature to the visual optimum.
4. If desired, set the sharpness enhancement feature to the visual optimum.
You can set the Basler PGI Feature Set from within your application software by using the Basler
pylon API. The following code snippets illustrate using the API to set the parameter values:
// Select 5x5 demosaicing and start Basler PGI image quality optimization
camera.DemosaicingMode.SetValue(DemosaicingMode_BaslerPGI);
DemosaicingModeEnums e = camera.(DemosaicingMode_GetValue);
// Select 2x2 demosaicing and disable Basler PGI image quality optimization
camera.DemosaicingMode.SetValue(DemosaicingMode_Simple);
DemosaicingModeEnums e = camera.(DemosaicingMode_GetValue);
// Set noise reduction, a Basler PGI feature
camera.NoiseReduction.SetValue(0.5);
double d = camera.NoiseReduction.GetValue();
// Set sharpness enhancement, a Basler PGI feature
camera.SharpnessEnhancement.SetValue(1.0);
double d = camera.SharpnessEnhancement.GetValue();
You can also use the Basler pylon Viewer application to easily set the parameters.
For more information about the pylon API and the pylon Viewer, see Section 3.1 on page 62.
To set the Basler PGI Feature Set using Basler pylon:
Make sure the balance white feature was applied before using the PGI Feature
Set.

Features AW00123408000
289 Basler ace USB 3.0
7.14.3.3 Light Source Presets
According to its specific spectral characteristics ("color temperature") the light used for image
acquisition can cause color shifts in the image. You can correct for the specific color shifts due to a
specific light source by selecting the related light source preset.
You can correct for the following kinds of light sources:
Off - No light source preset is selected and no gamma correction will automatically be applied
(gamma correction value = 1). We recommend setting the gamma parameter value to 0.41667.
This setting will adjust the pixel values for display on an sRGB monitor without, however,
taking account of a specific light source.
Daylight 5000 K - This setting will make appropriate corrections for images captured with
daylight lighting that has a color temperature of about 5000 K. When you select this setting, the
camera will also adjust the white balance settings and the color adjustment settings so that
they are appropriate for a daylight light source with a color temperature of about 5000 K. This
correction will be set as the default after camera reset or power up.
Daylight 6500 K - This setting will make appropriate corrections for images captured with
daylight lighting that has a color temperature of about 6500 K. When you select this setting, the
camera will also adjust the white balance settings and the color adjustment settings so that
they are appropriate for a daylight light source with a color temperature of about 6500 K.
Tungsten 2800 K - This setting will make appropriate corrections for images captured with
tungsten lighting that has a color temperature of about 2500 K to 3000 K. When you select this
setting, the camera will also adjust the white balance settings and the color adjustment settings
so that they are appropriate for a tungsten incandescent light source.
The correction for a specific light source uses a color transformation matrix that is automatically
populated by coefficients ("color transformation values") suitable for the set light source. The color
For the light source presets to work properly, the white balance must be correct.
See Section 7.14.3.1 on page 283 for more information about the white balance,
Section 7.14.3.4 on page 290 for more information about color adjustment, and
Section 7.14.3.6 on page 297 for an overall procedure for setting the color
enhancement features.
When using a light source preset for a color camera, a gamma correction value of
approximately 0.4 will automatically be applied, corresponding to an sRGB
gamma correction value.
Under these circumstances, we recommend not to explicitly set a gamma
correction value. If you do nonetheless you will alter the effect of the selected light
source preset.
If you select "Off" as the light source preset no gamma correction value will
automatically be applied.
For more information about the gamma correction feature, see Section 7.13 on
page 275.

AW00123408000 Features
Basler ace USB 3.0 290
transformation values modify color-specific gain for red, green, and blue. The identity matrix is used
when "Off" is selected as the light source preset.
Setting the Light Source Presets
You can use the Light Source Preset parameter value to set the correction for a specific light source
or chose no correction. You can set the parameter value from within your application software by
using the Basler pylon API. The following code snippet illustrates using the API to set the selector
and the parameter value:
// Set the LightSourcePreset parameter value to "Off" (no correction)
camera.LightSourcePreset.SetValue(LightSourcePreset_Off);
//Set the LightSourcePreset parameter value to "Daylight5000K"
camera.LightSourcePreset.SetValue(LightSourcePreset_Daylight5000K);
// Set the LightSourcePreset parameter value to "Daylight6500K"
camera.LightSourcePreset.SetValue(LightSourcePreset_Daylight6500K);
// Set the LightSourcePreset parameter value to "Tungsten2800K"
camera.LightSourcePreset.SetValue(LightSourcePreset_Tungsten2800K);
7.14.3.4 Color Adjustment (All Color Cameras Except
acA2000-165 and acA2040-90)
The camera’s color adjustment feature lets you adjust hue and saturation for the primary and
secondary colors in the RGB color space. Each adjustment affects those colors in the image where
the adjusted primary or secondary color predominates. For example, the adjustment of red affects
the colors in the image with a predominant red component.
Although color adjustment can be used without also using a light source preset,
we nonetheless strongly recommend to use both in combination if a suitable light
source preset if available. This will allow you to make full use of the camera’s color
enhancement capabilities.
If no suitable light source preset is available you can perform the desired color
corrections using the color transformation matrix.
See Section 7.14.3.5 on page 295 for more information about the color
transformation matrix.

Features AW00123408000
291 Basler ace USB 3.0
The RGB Color Space
The RGB color space includes light with the primary colors red, green, and blue and all of their
combinations. When red, green, and blue light are combined and when the intensities of R, G, and
B are allowed to vary independently between 0% and 100%, all colors within the RGB color space
can be formed. Combining colored light is referred to as additive mixing.
When two primary colors are mixed at equal intensities, the secondary colors will result. The mixing
of red and green light produces yellow light (Y), the mixing of green and blue light produces cyan
light (C), and the mixing of blue and red light produces magenta light (M).
When the three primary colors are mixed at maximum intensities, white will result. In the absence
of light, black will result.
The color space can be represented as a color cube (see Figure 107 on page 292) where the
primary colors R, G, B, the secondary colors C, M, Y, and black and white define the corners. All
shades of gray are represented by the line connecting the black and the white corner (see
Figure 107 on page 292)
For ease of imagination, the color cube can be projected onto a plane (as shown in Figure 107)
such that a color hexagon is formed. The primary and secondary colors define the corners of the
color hexagon in an alternating fashion. The edges of the color hexagon represent the colors
resulting from mixing the primary and secondary colors. The center of the color hexagon represents
all shades of gray including black and white.
The representation of any arbitrary color of the RGB color space will lie within the color hexagon.
The color will be characterized by its hue and saturation:
Hue specifies the kind of coloration, for example, whether the color is red, yellow, orange etc.
Saturation expresses the colorfulness of a color. At maximum saturation, no shade of gray is
present. At minimum saturation, no "color" but only some shade of gray (including black and
white) is present.
If color binning is enabled for the acA1920-25uc or acA2500-14uc, color
adjustment will be applied after color binning was performed. For more information
about color binning, see Section 7.8.2 on page 253.
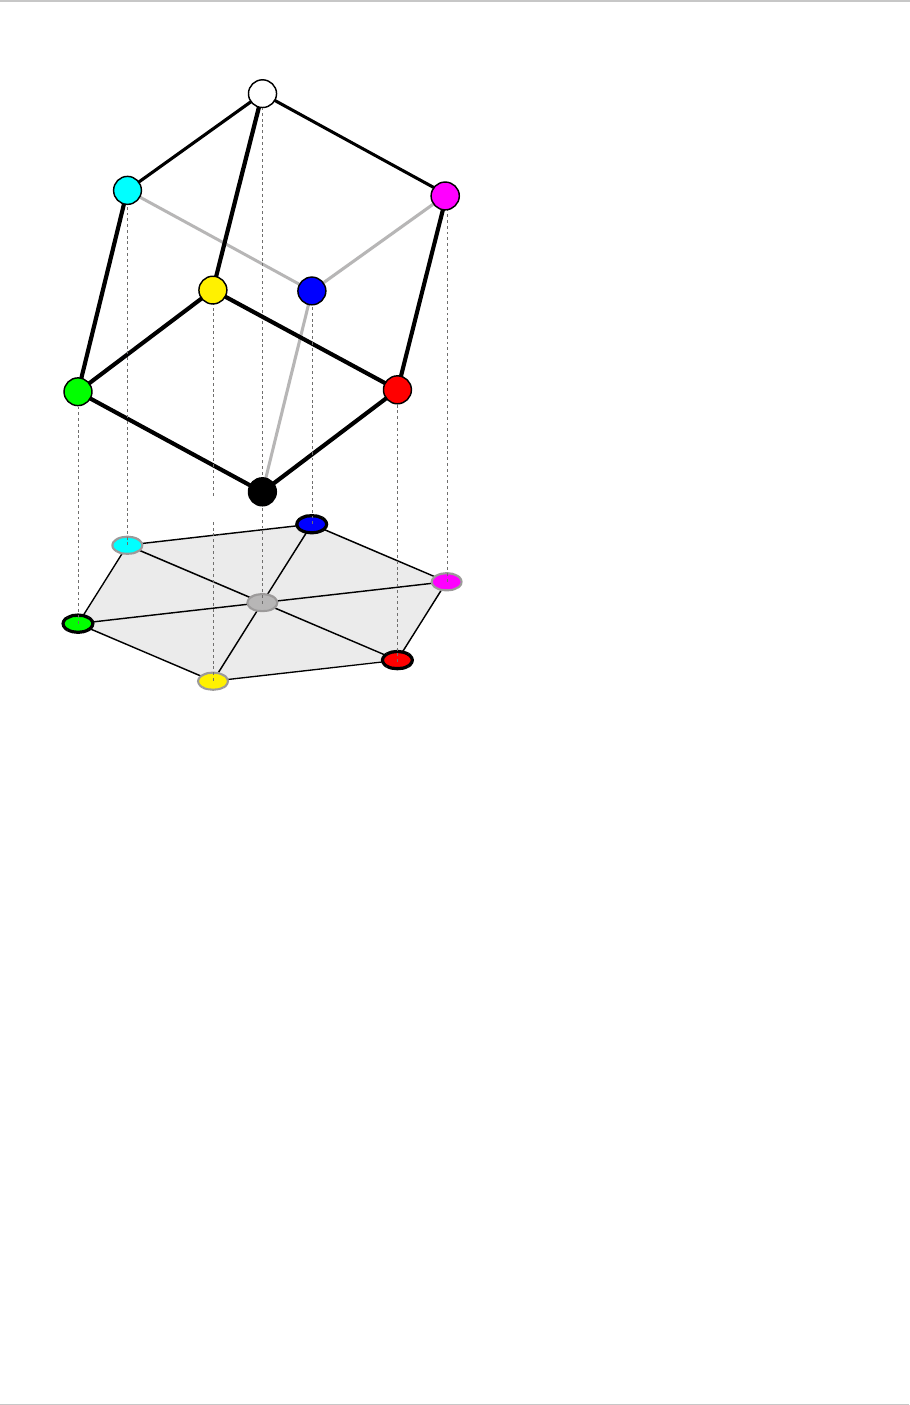
AW00123408000 Features
Basler ace USB 3.0 292
C
R
Black
White
R
C
M
B
G
Y
M
B
G
Y
Fig. 107: RGB Color Cube With YCM Secondary Colors, Black, and White, Projected On a Plane

Features AW00123408000
293 Basler ace USB 3.0
Hue and Saturation Adjustment
The color adjustment feature lets you adjust hue and saturation for the primary and the secondary
colors. Each adjustment affects those areas in the image where the adjusted color predominates.
For example, the adjustment of red affects the colors in the image with a predominantly red
component.
Keep in mind that when you adjust a color, the nearest neighboring colors in the color hexagon will
also be affected to some degree. For example, when you adjust red, yellow and magenta will also
be affected.
Hue: In the color hexagon, the adjustment of hue can be considered as a rotation between
hues. Primary colors can be rotated towards, and as far as, their neighboring secondary
colors. And secondary colors can be rotated towards, and as far as, their neighboring primary
colors.
For example, when red is rotated in negative direction towards yellow, then, for example, purple
in the image can be changed to red and red in the image can be changed to orange.
Red can be rotated as far as yellow, where red will be completely transformed into yellow.
When red is rotated in a positive direction towards magenta, then, for example, orange in the
image can be changed to red and red in the image can be changed to purple.
Red can be rotated as far as magenta, where red will be completely transformed into magenta.
Saturation: Adjusting saturation changes the colorfulness (intensity) of a color. The color
adjustment feature lets you adjust saturation for the primary and secondary colors.
For example, if saturation for red is increased, the colorfulness of red colors in the image will
increase. If red is set to minimum saturation, red will be replaced by gray for "red" colors in the
image.
R
C
Saturation
Adjustment
Hue
Adjustment
Decrease
Increase
B
G
Y
M
-
+
Gray
Fig. 108: Hue and Saturation Adjustment In the Color Hexagon. Adjustments Are Indicated for Red
as an Example

AW00123408000 Features
Basler ace USB 3.0 294
Color Adjustment Parameters
You can use the Color Adjustment Selector parameter to select a color to adjust. The colors you
can select are red, yellow, green, cyan, blue, and magenta.
You can use the Color Adjustment Hue parameter to set the hue for the selected color as a floating
point value in a range from -4.0 to +3.96875. Hue is not changed when the parameter value is set
to 0. The default value after camera reset or power up is close to 0.
You can use the Color Adjustment Saturation parameter to set the saturation for the selected color
as a floating point value in a range from 0.0 to +1.99219. Saturation is not changed when the
parameter value is set to 1. The default value after camera reset or power up is close to 1.
Enabling and Setting Color Adjustment
You can set the Color Adjustment Hue and Color Adjustment Saturation parameter values from
within your application software by using the Basler pylon API. The following code snippets illustrate
using the API to set the parameter values:
// Select red as the color to adjust
camera.ColorAdjustmentSelector.SetValue(ColorAdjustmentSelector_Red);
// Set the red hue parameter value
camera.ColorAdjustmentHue.SetValue(-1.125);
// Set the red saturation parameter value
camera.ColorAdjustmentSaturation.SetValue(1.375);
// Select cyan as the color to adjust
camera.ColorAdjustmentSelector.SetValue(ColorAdjustmentSelector_Cyan);
// Set the cyan hue parameter value
camera.ColorAdjustmentHue.SetValue(-1.6875);
// Set the cyan saturation parameter value
camera.ColorAdjustmentSaturation.SetValue(0.85);
You can also use the Basler pylon Viewer application to easily set the parameters.
For more information about the pylon API and the pylon Viewer, see Section 3.1 on page 62.

Features AW00123408000
295 Basler ace USB 3.0
7.14.3.5 Color Transformation
Introduction
The main objective for using a color transformation matrix is to make corrections to the color
information delivered by the camera’s sensor. The correction can account for the kind of light source
used during image acquisition and compensate for imperfections in the sensor’s color generation
process.
Color correction by means of the color transformation matrix is intended for use by
only someone who is thoroughly familiar with matrix color transformations. It is
nearly impossible to enter correct values in the transformation matrix by
trial and error.
For color transformation to work properly, the white balance must be correct.
See Section 7.14.3.1 on page 283 for more information about the white balance
and see Section 7.14.3.6 on page 297 for an overall procedure for setting the color
enhancement features.
Although the color transformation matrix can be used without using a light source
preset, we nonetheless strongly recommend to also use the suitable light source
preset if available, to make full use of the camera’s color enhancement
capabilities.
If no suitable light source preset is available you can perform the desired color
corrections using the color transformation matrix.
If color binning is enabled for the acA1920-25uc or acA2500-14uc, the color
transformation matrix will be applied after color binning was performed. For more
information about color binning, see Section 7.8.2 on page 253.

AW00123408000 Features
Basler ace USB 3.0 296
The Color Transformation Matrix
The color transformation feature processes red, green, and blue pixel data made available for each
pixel (Section 7.14.3 on page 283) and uses a transformation matrix to deliver modified red, green,
and blue pixel data for each pixel.
The RGB to RGB color matrix transformation for each pixel is performed by premultiplying a 3 x 1
matrix containing R, G, and B pixel values, by a 3 x 3 matrix containing color transformation values
that modify color-specific gain.
You can set each color transformation value according to your choice. Each GainXY position can
be populated with a floating point value ranging from -8.0 to +7.96875 by using the Color
Transformation Value Selector to select one of the GainXY positions in the matrix and using the
Color Transformation Value parameter to enter a value for that position and thereby replace the
previous value.
A reference article that explains the basics of color matrix transformation for image data can be
found at:
http://www.its.bldrdoc.gov/publications/2437.aspx
Setting Color Transformation Matrix Values
You can set the Color Transformation Value Selector and Color Transformation Values from within
your application software by using the Basler pylon API. The following code snippet illustrates using
the API to set the values in the matrix. Note that the values in this example are just randomly
selected numbers and do not represent values that you should actually use.
// Select a position in the matrix
camera.ColorTransformationValueSelector.SetValue(ColorTransformationValueSelector_Gain00);
// Set the value for the selected position as a floating point value
camera.ColorTransformationValue.SetValue(1.5625);
// Select a position in the matrix
camera.ColorTransformationValueSelector.SetValue(ColorTransformationValueSelector_Gain01);
// Set the value for the selected position as a floating point value
camera.ColorTransformationValue.SetValue(-0.4375);
You can also use the Basler pylon Viewer application to easily set the parameters.
For more information about the pylon API and the pylon Viewer, see Section 3.1 on page 62.
When setting the transformation values, you will find that the transformation matrix
is already populated with color transformation values. They will correspond to unit
vectors, be related to previously set light source presets or result from a previous
application of the color transformation feature.
Gain00 Gain01 Gain02
Gain10 Gain11 Gain12
Gain20 Gain21 Gain22
R
G
B
R ′
G ′
B ′
=

Features AW00123408000
297 Basler ace USB 3.0
7.14.3.6 A Procedure for Setting the Color Enhancements
When setting the color enhancements on the camera, we recommend using the procedure outlined
below. Since it makes changing camera parameters quick and easy, we also recommend using the
Basler pylon Viewer software when you are making adjustments.
Note: The procedure aims at producing a color reproduction on a monitor that is optimized for
human vision. The optimum for machine vision may require different color enhancement settings.
1. Arrange your camera so that it is viewing a scene similar to what it will view during actual oper-
ation. Make sure that the lighting for the scene is as close as possible to the actual lighting you
will be using during normal operation. (Using lighting that represents your normal operating
conditions is extremely important.)
We recommend placing a standard color chart within your camera’s field of view when you are
adjusting the color enhancements. This will make it much easier to know when the colors are
properly adjusted. One widely used chart is the ColorChecker® chart (also known as the
Macbeth chart).
2. Make sure the settings for gain, black level, digital shift, auto target brightness are at their
minimums.
3. Set the Light Source Preset parameter to the value that is most appropriate for your lighting.
For example, If you use tungsten incandescent light select the Tungsten2800K light source
preset.
4. Begin capturing images and check the basic image appearance. Set the exposure time, black
level, and gain so that you are acquiring good quality images. It is important to make sure that
the images are not over exposed. Over exposure can have a significant negative effect on the
fidelity of the color in the acquired images. Generally, the settings for black level, digital shift,
auto target brightness, and particularly so for gain, should be as low as possible.
5. Adjust the white balance. Make sure a white or light gray object is imaged while white balance
is carried out. An easy way to set the white balance is to use the "once" function on the
camera’s balance white auto feature.
6. Set the gamma value if necessary. When gamma is set correctly, there should be a smooth
transition from the lightest to the darkest gray scale targets on your color chart or on a gray
scale.
If the camera is set to light source preset parameter value Daylight5000K (default),
Daylight6500K or Tungsten2800K, the camera will provide gamma encoded images
(according to sRGB) that should be displayed on the monitor with great color fidelity.
Accordingly, there should be little need to change the default setting of one for the gamma
parameter.
If the camera is set to the light source preset parameter value "Off" the camera will provide
images without gamma encoding. In this case we recommend setting the gamma
parameter value to 0.41667.
7. Examine the colors and see if they are satisfactory at this point. If not, chose a different setting
for the Light Source Preset parameter. Try each mode and determine which one gives you the
best color results.
To set the color enhancements:

AW00123408000 Features
Basler ace USB 3.0 298
8. The color fidelity should now be quite good. If you want to make additional changes, adjust the
hue and saturation by using the color adjustment feature. Keep in mind that when you adjust a
color, the colors on each side of it in the color hexagon will also be affected to some degree.
For example, when you adjust red, yellow and magenta will also be affected.
When you are making hue and saturation adjustments, it is a good idea to start by concentrating
on one line in the color chart. Once you have the colors in a line properly adjusted, you can
move on to each of the other lines in turn.
9. If available for your camera model, reduce noise in the image and enhance its sharpness by
enabling the PGI Feature Set. If you desire a stronger effect, carry out further adjustments by
using the related parameters.
For Information about the PGI feature set, see Section 7.14.3.2 on page 286.
When you first start working with the color enhancement tools, it is easy to badly
misadjust the color adjustment settings and not be able to bring them back into
proper adjustment. You can reset the parameter settings by camera reset of power
up.
Certain conditions outside the camera, such as the lighting, the camera lens, filter
or the monitor settings are relevant to the reproduction of color in the image. If you
change any of these conditions you will have to repeat the above procedure to
preserve optimum color reproduction.

Features AW00123408000
299 Basler ace USB 3.0
7.15 Auto Functions
7.15.1 Common Characteristics
Auto functions control image properties and are generally the "automatic" counterparts of certain
features such as the gain feature or the white balance feature, which normally require "manually"
setting the related parameter values. Auto functions are particularly useful when an image property
must be adjusted quickly to achieve a specific target value and when a specific target value must
be kept constant in a series of images.
An Auto Function Region of Interest (Auto Function ROI) lets you designate a specific part of the
image as the base for adjusting an image property. Each auto function uses the pixel data from an
Auto Function ROI for automatically adjusting a parameter value and, accordingly, for controlling
the related image property. Some auto functions use their own individual Auto Function ROI and
some auto functions share a single Auto Function ROI.
An auto function automatically adjusts a parameter value until the related image property reaches
a target value. Note that the manual setting of the parameter value is not preserved. For example,
when the Gain Auto function adjusts the gain parameter value, the manually set gain parameter
value is not preserved.
For some auto functions, the target value is fixed. For other auto functions, the target value can be
set, as can the limits between which the related parameter value will be automatically adjusted. For
example, the gain auto function lets you set an average gray value for the image as a target value
and also set a lower and an upper limit for the gain parameter value.
Generally, the different auto functions can operate at the same time. For more information, see the
following sections describing the individual auto functions.
For more information about binning, see Section 7.8 on page 250.
A target value for an image property can only be reached, if it is in accord with all
pertinent camera settings and with the general circumstances used for capturing
images. Otherwise, the target value will only be approached.
For example, with a short exposure time, insufficient illumination, and a low setting
for the upper limit of the gain parameter value, the Gain Auto function may not be
able to achieve the current target average gray value setting for the image.
You can use an auto function when binning is enabled (monochrome cameras and
the acA1920-25uc only). An auto function uses the binned pixel data and controls
the image property of the binned image.

AW00123408000 Features
Basler ace USB 3.0 300
7.15.2 Auto Function Operating Modes
The following auto function modes of operation are available:
All auto functions provide the "once" mode of operation. When the "once" mode of operation is
selected, the parameter values are automatically adjusted until the related image property
reaches the target value. After the automatic parameter value adjustment is complete, the auto
function will automatically be set to "off" and the new parameter value will be applied to the
following images.
The parameter value can be changed by using the "once" mode of operation again, by using
the "continuous" mode of operation, or by manual adjustment.
Some auto functions also provide a "continuous" mode of operation where the parameter value
is adjusted repeatedly while images are acquired.
Depending on the current frame rate, the automatic adjustments will usually be carried out for
every or every other image.
The repeated automatic adjustment will proceed until the "once" mode of operation is used or
until the auto function is set to "off", in which case the parameter value resulting from the latest
automatic adjustment will operate, unless the parameter is manually adjusted.
When an auto function is set to "off", the parameter value resulting from the latest automatic
adjustment will operate, unless the parameter is manually adjusted.
If an auto function is set to the "once" operation mode and if the circumstances
will not allow reaching a target value for an image property, the auto function
will try to reach the target value for a maximum of 30 images and will then be
set to "off".
You can enable auto functions and change their settings while the camera is
capturing images ("on the fly").
If you have set an auto function to "once" or "continuous" operation mode while
the camera was continuously capturing images, the auto function will become
effective with a short delay and the first few images may not be affected by the
auto function.

Features AW00123408000
301 Basler ace USB 3.0
7.15.3 Auto Function ROIs
Each auto function uses the pixel data from an Auto Function ROI for automatically adjusting a
parameter value, and accordingly, for controlling the related image property. Some auto functions
always share an Auto Function ROI and some auto functions can use their own individual Auto
Function ROIs. Within these limitations, auto functions can be assigned to Auto Function ROIs as
desired.
Each Auto Function ROI has its own specific set of parameter settings, and the parameter settings
for the Auto Function ROIs are not tied to the settings for the ROI that is used to define the size of
captured images (Image ROI). For each Auto Function ROI, you can specify a portion of the sensor
array and only the pixel data from the specified portion will be used for auto function control. Note
that an Auto Function ROI can be positioned anywhere on the sensor array.
An Auto Function ROI is referenced to the top left corner of the sensor array. The top left corner of
the sensor array is designated as column 0 and row 0 as shown in Figure 109.
The location and size of an Auto Function ROI is defined by declaring an X offset (coordinate), a
width, a Y offset (coordinate), and a height. For example, suppose that you specify the X offset as
14, the width as 5, the Y offset as 7, and the height as 6. The area of the array that is bounded by
these settings is shown in Figure 109.
Only the pixel data from the area of overlap between the Auto Function ROI defined by your settings
and the Image ROI will be used by the related auto function.
01
0
2345678910 11 12 13 14 15 16 17 18 19 20 21 22 23 24 25 26 27 28 29 30
1
2
3
4
5
6
7
8
9
10
11
12
13
14
15
16
17
18
19
Y
Offset
Row
Column
X Offset
Width
Auto
Function
Region of
Interest
Height
Image
Region of
Interest
Fig. 109: Auto Function Region of Interest and Image Region of Interest

AW00123408000 Features
Basler ace USB 3.0 302
7.15.3.1 Assignment of an Auto Function to an Auto Function ROI
By default, the Gain Auto and the Exposure Auto auto functions are assigned to Auto Function
ROI 1 and the Balance White Auto auto function is assigned to Auto Function ROI 2. The
assignments can, however, be set as desired. For example, the Balance White Auto auto function
can be assigned to Auto Function ROI 1 or all auto functions can be assigned to the same Auto
Function ROI.
One limitation must be borne in mind: For the purpose of making assignments, the Gain Auto and
the Exposure Auto auto functions are always considered as a single "brightness" auto function and
therefore the assignment is always identical for both auto functions. For example, if you assign the
"brightness" auto function to Auto Function ROI 2 the Gain Auto and the Exposure Auto auto
functions should both assigned to Auto Function ROI 2. This does not imply, however, that the Gain
Auto and the Exposure Auto auto functions must always be used at the same time.
You can assign auto functions to Auto Function ROIs from within your application software by using
the pylon API.
As an example, the following code snippet illustrates using the API to assign the Gain Auto and
Exposure Auto auto function - considered as a single "brightness" auto function - and the Balance
White auto function to Auto Function ROI 1.
The snippet also illustrates disabling the unused Auto Function ROI 2 to avoid assigning any auto
function to more than one Auto Function ROI.
// Select Auto Function ROI 1
// Assign auto functions to the selected Auto Function ROI
camera.AutoFunctionROISelector.SetValue(AutoFunctionROISelector_ROI1);
camera.AutoFunctionROIUseBrightness.SetValue(true);
camera.AutoFunctionROIUseWhiteBalance.SetValue(true);
// Select the unused Auto Function ROI 2
// Disable the unused Auto Function ROI
camera.AutoFunctionROISelector.SetValue(AutoFunctionROISelector_ROI2);
camera.AutoFunctionROIUseBrightness.SetValue(false);
camera.AutoFunctionROIUseWhiteBalance.SetValue(false);
You can also use the Basler pylon Viewer application to easily set the parameters.
We strongly recommend not to assign an auto function to more than one Auto
Function ROI although multiple assignments can be made

Features AW00123408000
303 Basler ace USB 3.0
7.15.3.2 Positioning of an Auto Function ROI Relative to the Image ROI
The size and position of an Auto Function ROI can be, but need not be, identical to the size and
position of the Image ROI. Note that the overlap between Auto Function ROI and Image ROI
determines whether and to what extent the auto function will control the related image property.
Only the pixel data from the areas of overlap will be used by the auto function to control the image
property of the entire image.
Different degrees of overlap are illustrated in Figure 110. The hatched areas in the figure indicate
areas of overlap.
If the Auto Function ROI is completely included in the Image ROI (see (a) in Figure 110), the
pixel data from the Auto Function ROI will be used to control the image property.
If the Image ROI is completely included in the Auto Function ROI (see (b) in Figure 110), only
the pixel data from the Image ROI will be used to control the image property.
If the Image ROI only partially overlaps the Auto Function ROI (see (c) in Figure 110), only the
pixel data from the area of partial overlap will be used to control the image property.
If the Auto Function ROI does not overlap the Image ROI (see (d) in Figure 110), the Auto
Function will not or only to a limited degree control the image property. For details, see the
sections below, describing the individual auto functions.
We strongly recommend completely including the Auto Function ROI within the
Image ROI, or, depending on your needs, choosing identical positions and sizes
for Auto Function ROI and Image ROI.
You can use auto functions when also using the Reverse X feature. For
information about the behavior and roles of Auto Function ROI and Image ROI
when also using the Reverse X feature, see the "Reverse X" section.
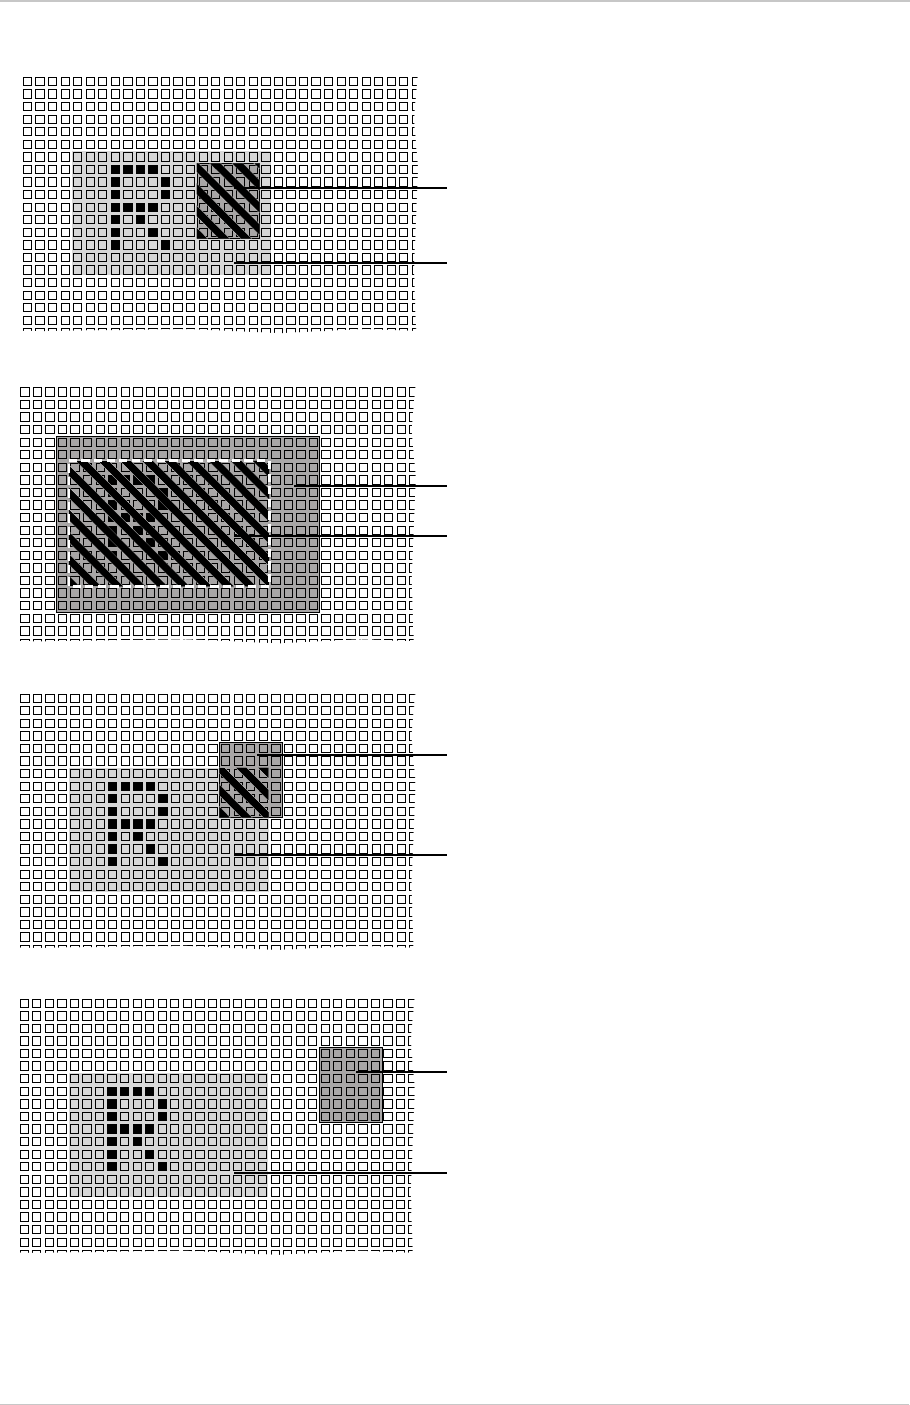
AW00123408000 Features
Basler ace USB 3.0 304
01
0
2345678910 11 12 13 14 15 16 17 18 19 20 21 22 23 24 25 26 27 28 29 30
1
2
3
4
5
6
7
8
9
10
11
12
13
14
15
16
17
18
19
01
0
2345678910 11 12 13 14 15 16 17 18 19 20 21 22 23 24 25 26 27 28 29 30
1
2
3
4
5
6
7
8
9
10
11
12
13
14
15
16
17
18
19
01
0
2345678910 11 12 13 14 15 16 17 18 19 20 21 22 23 24 25 26 27 28 29 30
1
2
3
4
5
6
7
8
9
10
11
12
13
14
15
16
17
18
19
Fig. 110: Various Degrees of Overlap Between the Auto Function ROI and the Image ROI
Image ROI
Auto Function ROI
(a)
(c)
(d)
Image ROI
Image ROI
Auto Function ROI
Auto Function ROI
01
0
2345678910 11 12 13 14 15 16 17 18 19 20 21 22 23 24 25 26 27 28 29 30
1
2
3
4
5
6
7
8
9
10
11
12
13
14
15
16
17
18
19
Auto Function ROI
Image ROI
(b)

Features AW00123408000
305 Basler ace USB 3.0
7.15.3.3 Setting an Auto Function ROI
Setting an Auto Function ROI is a two-step process: You must first select the Auto Function ROI
related to the auto function that you want to use and then set the size and the position of the Auto
Function ROI.
By default, an Auto Function ROI is set to the full resolution of the camera’s sensor. You can change
the size and the position of an Auto Function ROI by changing the value of the Auto Function ROI’s
X Offset, Y Offset, Width, and Height parameters.
The value of the X Offset parameter determines the starting column for the Auto Function ROI.
The value of the Y Offset parameter determines the starting row for the Auto Function ROI.
The value of the Width parameter determines the width of the Auto Function ROI.
The value of the Height parameter determines the height of the Auto Function ROI.
When you are setting an Auto Function ROI, you must follow these guidelines:
The sum of the Offset X setting plus the Width setting must not exceed the width of the
camera’s sensor. For example, on the acA1920-25um, the sum of the Offset X setting plus the
Width setting must not exceed 1920.
The sum of the Offset Y setting plus the Height setting must not exceed the height of the
camera’s sensor. For example, on the acA1920-25um, the sum of the Offset Y setting plus the
Height setting must not exceed 1080.
The X Offset, Y Offset, Width, and Height parameters can be set in increments of 1.
For more information about the concept of a "virtual sensor", see Section 7.8.4 on page 256.
You can select an Auto Function ROI and set the Offset X, Offset X, Width, and Height parameter
values for the Auto Function ROI from within your application software by using the Basler pylon
API. The following code snippets illustrate using the API to select an Auto Function ROI and to get
the maximum allowed settings for the Width and Height parameters. The code snippets also
On color cameras, we strongly recommend setting the Offset X, Offset Y, Width,
and Height parameters for an Auto Function ROI in increments of 2 to make the
Auto Function ROI match the color filter pattern of the sensor. For example, you
should set the X Offset parameter to 0, 2, 4, 6, 8, etc.
Normally, the Offset X, Offset Y, Width, and Height parameter settings for an Auto
Function ROI refer to the physical columns and lines in the sensor. But if binning
is enabled (monochrome cameras only), these parameters are set in terms of
"virtual" columns and lines, i.e. the settings for an Auto Function ROI will refer to
the binned lines and columns in the sensor and not to the physical lines in the
sensor as they normally would.

AW00123408000 Features
Basler ace USB 3.0 306
illustrate setting the Offset X, Offset Y, Width, and Height parameter values. As an example, Auto
Function ROI 1 is selected:
// Select the appropriate auto function ROI for gain auto and exposure
// auto control. Currently, auto function ROI1 is predefined to gather
// the pixel data needed for gain auto and exposure auto control.
// Set the position and size of the auto function ROI
// Note: The code uses ROI instead of the former AOI. For example, ROI1
// was previously named AOI1 in the code.
camera.AutoFunctionROISelector.SetValue(AutoFunctionROISelector_ROI1 );
camera.AutoFunctionROIOffsetX.SetValue( 0 );
camera.AutoFunctionROIOffsetY.SetValue( 0 );
camera.AutoFunctionROIWidth.SetValue(1294); camera.AutoFunctionROI-
Width.GetMax();
camera.AutoFunctionROIHeight.SetValue(964);
camera.AutoFunctionROIHeight.GetMax();
You can also use the Basler pylon Viewer application to easily set the parameters.
For more information about the pylon API and the pylon Viewer, see Section 3.1 on page 62.

Features AW00123408000
307 Basler ace USB 3.0
7.15.4 Gain Auto
Gain Auto is the "automatic" counterpart to manually setting the gain All parameter. When the gain
auto function is operational, the camera will automatically adjust the gain All parameter value within
set limits until a target average gray value for the pixel data from the related Auto Function ROI is
reached.
The gain auto function can be operated in the "once" and continuous" modes of operation.
If the related Auto Function ROI does not overlap the Image ROI (see the "Auto Function ROI"
section) the pixel data from the Auto Function ROI will not be used to control the gain. Instead, the
current manual setting for the gain All parameter value will control the gain.
Either Auto Function ROI can be selected to work with the balance white auto function.
The gain auto function and the exposure auto function can be used at the same time. In this case,
however, you must also set the auto function profile feature.
For more information about setting the gain "manually", see Section 7.2 on page 198.
For more information about the auto function profile feature, see Section 7.15.6 on page 312.
The limits within which the camera will adjust the gain All parameter are defined by the Auto Gain
Upper Limit and the Auto Gain Lower Limit parameters. The minimum and maximum allowed
settings for the Auto Gain Upper Limit and Auto Gain Lower Limit parameters depend on the current
pixel data format, on the current settings for binning, and on whether or not the parameter limits for
manually setting the gain feature are disabled.
The Auto Target Brightness parameter defines the target average gray value that the gain auto
function will attempt to achieve when it is automatically adjusting the gain All value. The target
average gray value can range from 0 (black) to 255 (white) when the camera is set for an 8 bit pixel
format or from 0 (black) to 4095 (white) when the camera is set for a 12 bit pixel format.
1. Select the Auto Function ROI, for example ROI1.
2. Set the value of the Offset X, Offset Y, Width, and Height parameters for the ROI.
3. Set the Gain Selector to All.
4. Set the value of the Auto Gain Lower Limit and Auto Gain Upper Limit parameters.
5. Set the value of the Auto Target Brightness parameter.
6. Set the value of the Gain Auto parameter for the "once" or the "continuous" mode of operation.
You can set the gain auto function from within your application software by using the pylon API. The
following code snippets illustrate using the API to set the gain auto function:
// Select auto function ROI 1 (as an example) to allow
// Gain Auto to control image brightness.
camera.AutoFunctionROISelector.SetValue
(AutoFunctionROISelector_ROI1);
To set the gain auto function using Basler pylon:

AW00123408000 Features
Basler ace USB 3.0 308
camera.AutoFunctionROIUseBrightness.SetValue(true);
// Set the position and size of the auto function ROI
camera.AutoFunctionROIOffsetX.SetValue(0);
camera.AutoFunctionROIOffsetY.SetValue(0);
camera.AutoFunctionROIWidth.SetValue(1294);
camera.AutoFunctionROIHeight.SetValue(964);
// Set the maximum possible size of the selected auto function ROI
camera.AutoFunctionROIOffsetX.SetValue(0);
camera.AutoFunctionROIOffsetY.SetValue(0);
camera.AutoFunctionROIWidth.SetValue( camera.AutoFunctionROI-
Width.GetMax() );
camera.AutoFunctionROIHeight.SetValue( camera.AutoFunctionROI-
Height.GetMax() );
// Select gain all and set the upper and lower gain limits for
// the gain auto function
camera.GainSelector.SetValue(GainSelector_All);
camera.AutoGainLowerLimit.SetValue(0.0);
camera.AutoGainUpperLimit.SetValue(19.745);
// Set the lowest possible lower limit and the highest possible
// upper limit for the gain auto function
camera.AutoGainLowerLimit.SetValue( camera.AutoGainLowerLimit.Get-
Min());
camera.AutoGainUpperLimit.SetValue(
camera.AutoGainUpperLimit.GetMax());
// Set the target gray value for the selected auto function
// The parameter value range refers to the theoretically maximum
// available range of gray values for the set pixel format.
// For example, if an 8 bit pixel format is set, a parameter value
// of 0.50196 will correspond to a gray value of 128.
camera.AutoTargetBrightness.SetValue(0.50196);
// Set the mode of operation for the gain auto function
camera.GainAuto.SetValue(GainAuto_Once);
You can also use the Basler pylon Viewer application to easily set the parameters.
For more information about the pylon API and the pylon Viewer, see Section 3.1 on page 62.

Features AW00123408000
309 Basler ace USB 3.0
For general information about auto functions, see Section 7.15 on page 299.
For information about Auto Function ROIs and how to set them, see Section 7.15.3 on page 301.
7.15.5 Exposure Auto
Exposure Auto is the "automatic" counterpart to manually setting the Exposure Time parameter.
The exposure auto function automatically adjusts the Exposure Time parameter value within set
limits until a target average gray value for the pixel data from the selected Auto Function ROI is
reached.
Either Auto Function ROI can be selected to work with the exposure auto function.
The exposure auto function can be operated in the "once" and continuous" modes of operation.
If the Auto Function ROI does not overlap the Image ROI (see the "Auto Function ROI" section) the
pixel data from the Auto Function ROI will not be used to control the exposure time. Instead, the
current manual setting of the Exposure Time parameter value will control the exposure time.
The exposure auto function and the gain auto function can be used at the same time. In this case,
however, you must also set the auto function profile feature.
When trigger width exposure mode is selected, the exposure auto function is not available.
For more information about setting the exposure time "manually", see Section 6.9 on page 180.
For more information about the trigger width exposure mode, see Section 6.4.3.2 on page 136.
For more information about the auto function profile feature, see Section 7.15.6 on page 312.
The limits within which the camera will adjust the Exposure Time parameter are defined by the Auto
Exposure Time Upper Limit and the Auto Exposure Time Lower Limit parameters. The current
minimum and the maximum allowed settings for the Auto Exposure Time Upper Limit parameter
and the Auto Exposure Time Lower Limit parameters depend on the minimum allowed and
maximum possible exposure time for your camera model.
The Auto Target Brightness parameter defines the target average gray value that the exposure auto
function will attempt to achieve when it is automatically adjusting the Exposure Time value. The
target average gray value may range from 0 (black) to 255 (white) when the camera is set for an 8
bit pixel format or from 0 (black) to 4095 (white) when the camera is set for a 12 bit pixel format.
The exposure auto function will not work, if the camera’s exposure mode is set to
trigger width. For more information about the trigger width exposure mode, see
Section 6.4.3.2 on page 136.

AW00123408000 Features
Basler ace USB 3.0 310
1. Select the Auto Function ROI, for example ROI 1.
2. Set the value of the Offset X, Offset Y, Width, and Height parameters for the ROI.
3. Set the value of the Auto Exposure Time Lower Limit and Auto Exposure Time Upper Limit
parameters.
4. Set the value of the Auto Target Brightness parameter.
5. Set the value of the Exposure Auto parameter for the "once" or the "continuous" mode of
operation.
You can set the exposure auto function from within your application software by using the pylon API.
The following code snippets illustrate using the API to set the exposure auto function:
// Select auto function ROI 1 (as an example) to allow
// Exposure Auto to control image brightness.
camera.AutoFunctionROISelector.SetValue
(AutoFunctionROISelector_ROI1);
camera.AutoFunctionROIUseBrightness.SetValue(true);
// Set the position and size of the auto function ROI
camera.AutoFunctionROIOffsetX.SetValue(0);
camera.AutoFunctionROIOffsetY.SetValue(0);
camera.AutoFunctionROIWidth.SetValue(1294);
camera.AutoFunctionROIHeight.SetValue(964);
// Set the maximum possible size of the selected auto function ROI
camera.AutoFunctionROIOffsetX.SetValue(0);
camera.AutoFunctionROIOffsetY.SetValue(0);
camera.AutoFunctionROIWidth.SetValue( camera.AutoFunctionROI-
Width.GetMax() );
camera.AutoFunctionROIHeight.SetValue( camera.AutoFunctionROI-
Height.GetMax() );
// Set the exposure time limits for exposure auto control
camera.AutoExposureTimeLowerLimit.SetValue(1000.0);
If the Auto Exposure Time Upper Limit parameter is set to a sufficiently high value
the camera’s frame rate can be decreased.
To set the exposure auto function using Basler pylon:

Features AW00123408000
311 Basler ace USB 3.0
camera.AutoExposureTimeUpperLimit.SetValue(500000.0);
// Set the target gray value for the selected auto function
// The parameter value range refers to the theoretically maximum
// available range of gray values for the set pixel format.
// For example, if an 8 bit pixel format is set, a parameter value
// of 0.50196 will correspond to a gray value of 128.
camera.AutoTargetBrightness.SetValue(0.50196);
// Set the mode of operation for the exposure auto function
camera.ExposureAuto.SetValue(ExposureAuto_Continuous);
You can also use the Basler pylon Viewer application to easily set the parameters.
For more information about the pylon API and the pylon Viewer, see Section 3.1 on page 62.
For general information about auto functions, see Section 7.15 on page 299.
For information about Auto Function ROIs and how to set them, see Section 7.15.3 on page 301.
For information about minimum allowed and maximum possible exposure time, see Section 6.9 on
page 180.

AW00123408000 Features
Basler ace USB 3.0 312
7.15.6 Auto Function Profile
If you want to use the gain auto function and the exposure auto function at the same time, the auto
function profile feature also takes effect. The auto function profile specifies whether the gain or the
exposure time will be kept as low as possible when the camera is making automatic adjustments to
achieve a target average gray value for the pixel data from the Auto Function ROI that was related
to the gain auto function and the exposure auto function. By default, the auto function profile feature
minimizes gain.
If you want to use the gain auto and the exposure auto functions at the same time, set both functions
for the continuous mode of operation.
Setting the camera with Basler pylon to use the gain auto function and the exposure auto function
at the same time involves several steps:
1. Set the value of the Auto Function Profile parameter to specify whether gain or exposure time
will be minimized during automatic adjustments.
2. Set the value of the Gain Auto parameter to the "continuous" mode of operation.
3. Set the value of the Exposure Auto parameter to the "continuous" mode of operation.
You can set the auto function profile from within your application software by using the pylon API.
The following code snippet illustrates using the API to set the auto function profile. As an example,
Gain Auto is set to be minimized during adjustments:
// Use Gain Auto and Exposure Auto simultaneously
camera.AutoFunctionProfile.SetValue(AutoFunctionProfile_MinimizeGain);
camera.GainAuto.SetValue(GainAuto_Continuous);
camera.ExposureAuto.SetValue(ExposureAuto_Continuous);
You can also use the Basler pylon Viewer application to easily set the parameters.
For more information about the pylon API and the pylon Viewer, see Section 3.1 on page 62.
To set the auto function profile using Basler pylon:

Features AW00123408000
313 Basler ace USB 3.0
7.15.7 Balance White Auto
Balance White Auto is the "automatic" counterpart to manually setting the white balance. The
balance white auto function is only available on color models.
Automatic white balancing is a two-step process. First, the Balance Ratio parameter values for red,
green, and blue are each set to 1.5. Then, assuming a "gray world" model, the Balance Ratio
parameter values are automatically adjusted such that the average values for the "red" and "blue"
pixels match the average value for the "green" pixels.
Either Auto Function ROI can be selected to work with the balance white auto function.
If the selected Auto Function ROI does not overlap the Image ROI (see the "Auto Function ROI"
section) the pixel data from the Auto Function ROI will not be used to control the white balance of
the image. However, as soon as the Balance White Auto function is set to "once" operation mode,
the Balance Ratio parameter values for red, green, and blue are each set to 1.5. These settings will
control the white balance of the image.
For more information about setting the white balance "manually", see Section 7.14.3.1 on
page 283.
1. Select the Auto Function ROI, for example, ROI 2.
2. Set the value of the Offset X, Offset Y, Width, and Height parameters for the ROI.
3. Set the value of the Exposure Auto parameter for the "once" or the "continuous" mode of
operation.
You can set the white balance auto functionality from within your application software by using the
pylon API. The following code snippets illustrate using the API to set the balance auto functionality:
// Select auto function ROI 2
camera.AutoFunctionROISelector.SetValue
(AutoFunctionROISelector_ROI2);
// Set the position and size of selected auto function ROI. In this
//example, we set
// auto function ROI to cover the entire sensor.
camera.AutoFunctionROIOffsetX.SetValue( 0 );
camera.AutoFunctionROIOffsetY.SetValue( 0 );
camera.AutoFunctionROIWidth.SetValue( camera.AutoFunctionROI-
Width.GetMax() );
camera.AutoFunctionROIHeight.SetValue( camera.AutoFunctionROI-
Height.GetMax() );
// Set mode of operation for balance white auto function
camera.BalanceWhiteAuto.SetValue(BalanceWhiteAuto_Once);
To set the balance white function using Basler pylon:

AW00123408000 Features
Basler ace USB 3.0 314
You can also use the Basler pylon Viewer application to easily set the parameters.
For more information about the pylon API and the pylon Viewer, see Section 3.1 on page 62.
For general information about auto functions, see Section 7.15 on page 299.
For information about Auto Function ROIs and how to set them, see Section 7.15.3 on page 301.
7.15.8 Pattern Removal Auto
7.15.8.1 Monochrome Cameras
As a result of the camera’s sensor design, images output by the monochrome acA3800-14um
cameras can display a superposed artifact pattern resembling a checker pattern.
You can suppress the formation of the "checker pattern" to a great extent (pattern removal) by
ensuring that the appropriate correction coefficients are applied to the original pixel values.
Correction coefficients are automatically applied with each image acquisition and their application
can not be disabled. Pattern Removal Auto is the auto function that allows you to ensure that the
values of the correction coefficients are appropriate for each image acquisition. The values are only
valid for the specific imaging conditions (see below) that were present when the correction
coefficients were configured using Pattern Removal Auto.
The checker pattern originates from details of the sensor design: Neighboring pixels forming groups
of four will respond identically to light only if its incidence is perpendicular to the sensor’s surface.
If the light arrives at an oblique angle, the four pixels of each group will respond slightly differently,
giving raise to the checker pattern in the image.
When to Use Pattern Removal Auto
Several conditions ("imaging conditions"; see below) govern the occurrence of the artifact checker
pattern. Accordingly, for nearly complete checker pattern removal, you must ensure that the
correction coefficient values are appropriate for the current imaging conditions: Whenever at least
one of the relevant imaging conditions changes you must use the Pattern Removal Auto Function
to generate new correction coefficient values. Otherwise, values will be used that are most likely
invalid. In this case the checker pattern will not or only to a limited extent be removed while pixel
values will be modified to some unknown and unwanted extents.
You must therefore generate new correction coefficient values when you enable or change one or
more of the relevant "imaging conditions": Among them are the following:
Optical system: exchange of lens, change of aperture, change of focus
Illumination: change of the type of illumination, change of the arrangement of light sources,
change of brightness
Camera settings and features: The checker pattern depends on several camera settings and
features, in particular exposure time, Black Level, Digital Shift, Binning Horizontal, Binning
Vertical, LUT, some image ROI-related settings (Width, Height, OffsetX, OffsetY, CenterX,
CenterY).

Features AW00123408000
315 Basler ace USB 3.0
The Pattern Removal Auto Function and Its Operation
The pattern removal auto function differs in some respects from other auto functions:
It does not employ any Auto Function Region of Interest (Auto Function ROI).
A "target" value does not exist. Instead, the auto function aims at generating correction
coefficient values that will remove the checker pattern as far as possible.
Only the "once" mode of operation is available to generate correction coefficient values.
The generation of appropriate correction coefficient values involves a sequence of three image
aquisitions. After each acquisition correction coefficient values are generated and are used as input
for the next acquisition. The values resulting from the third acquisition are the "final" ones and are
used to perform pattern removal for all subsequent acquisitions until different correction coefficient
values are loaded into the active set.
You can use hardware triggering, software triggering or internal triggering ("free run"). The
generation of correction coefficient values after each frame start trigger occurs instantaneously and
has no effect on the camera’s frame rate. You can use the Single Frame or Continuous acquisition
mode.
Newly generated correction values will be stored in the camera’s volatile memory (the active set)
and will be lost if the camera is reset or if power is switched off. You can, however, save them in
one of the user sets 1 thorough 3. This provides you with the possibility of having correction values
immediately available whenever you want to use them. In these cases, however, make sure the
camera is operated at exactly the imaging conditions that were present when the correction
coefficients values were generated.
Make sure the Sequencer feature and all auto functions except Pattern Removal
Auto are disabled when generating new correction coefficient values.
We strongly recommend to generate new correction coefficient values whenever
you change the imaging conditions.
We recommend not to use the Pattern Removal Auto Function when other auto
functions are used unless the automatic changes are very limited and close to the
imaging conditions for which the correction values were generated.
A similar restriction applies when using Pattern Removal Auto Function with the
Sequencer feature. Note that correction coefficient values can not be stored in
sequencer sets.

AW00123408000 Features
Basler ace USB 3.0 316
For more information about the active set and user sets, see Section 7.21 on page 331.
For more information about the sequencer, see Section 7.7 on page 221.
Pattern Removal and Camera Startup
When the camera is switched on or reset, correction values from one of the user sets will be loaded
into the active set if the user set was configured as user set default. Otherwise, factory-generated
correction values will be loaded that are only appropriate for the imaging conditions chosen by the
factory. Most likely, your imaging conditions will differ and you must therefore generate new
correction values for your imaging conditions.
Generating Correction Coefficient Values for Pattern Removal
1. If possible, establish homogeneous illumination for the scene to be imaged.
2. Deactivate all camera settings and features (e.g. auto functions, sequencer) that would
interfere with the generation of correction coefficient values.
3. Adjust the optical system, illumination, camera settings (e.g. exposure time, Digital Shift, Black
Level) as desired for the coming image acquisitions. For best results, the image should display
some average gray.
4. Set Pattern Removal Auto to Once.
5. Acquire three images to generate correction coefficient values. Ideally, the imaged scene will
not change between acquisitions.
After the third acquisition, the optimum correction coefficient values are generated for the cur-
rent imaging conditions. Pattern Removal Auto is automatically set to Off.
Enabling the Pattern Removal Auto Function Using the pylon API
You can enable the Pattern Removal Auto Function from within your application software by using
the Basler pylon API.
The following code snippet illustrates using the API to enable Pattern Removal Auto:
Camera.PatternRemovalAuto.SetValue(PatternRemovalAuto_Once);
After three image acquisitions the new correction values are generated and the camera
automatically sets Pattern Removal Auto to Off (PatternRemovalAuto_Off).
For more information about the pylon API and the pylon Viewer, see Section 3.1 on page 62.
For general information about auto functions, see Section 7.15 on page 299.
To generate correction coefficient values for pattern removal:

Features AW00123408000
317 Basler ace USB 3.0
7.15.8.2 Color Cameras
In acA3800-14uc and acA4600-10uc color cameras, groups of four pixels each display the same
characteristic as their monochrome counterparts, that is, within a group, each pixel tends to show
a different response to light. The resulting artifact effect produces slight color shifts. These can be
corrected by using the white balance feature.
As with monochrome cameras, the artifact effect varies with certain "imaging conditions", that are
defined by the optical system, the illumination, and several camera settings (see Section 7.15.8.1
on page 314). Accordingly, to correct for artifact color shifts, you must perform white balance
whenever at least one of the relevant imaging conditions changes. This means also that you may
have to perform white balance when you normally would not, for example after having changed the
lens focus.
7.15.9 Using an Auto Function
The following instructions apply to all auto functions except the Pattern Removal Auto Function.
Using the Pattern Removal Auto Function is described in Section 7.15.8 on page 314.
1. Select an Auto Function ROI.
2. Assign the auto function you want to use to the selected Auto Function ROI.
3. Unassign the auto function you want to use from the other Auto Function ROI.
4. Set the position and size of the Auto Function ROI.
5. If necessary, set the lower and upper limits for the auto function’s parameter value.
6. If necessary, set the target value.
7. If necessary, set the auto function profile to define priorities between auto functions.
8. Enable the auto function by setting it to "once" or "continuous".
For more information about the individual settings, see the previous sections that describe the
individual auto functions.
To use an auto function using Basler pylon:

AW00123408000 Features
Basler ace USB 3.0 318
7.16 Timestamp Value
The Timestamp Value feature allows you to obtain a timestamp by software command. The
timestamp can be useful for comparing the camera’s internal timing with the timings of other
devices.
The timestamp is a 64 bit latched value and is based on a counter that counts the number of
"timestamp clock ticks" [ns] generated by the camera.
1. Execute the TimestampLatch command.
2. Retrieve the TimestampLatchValue parameter value.
You can execute the TimestampLatch command and retrieve the TimestampLatchValue parameter
value from within your application software by using the Basler pylon API. The following code
snippet illustrates the procedure using the API:
// execute a command to obtain a timestamp and retrieve the timestamp value [ns]
camera.TimestampLatch.Execute();
int64_t i = camera.TimestampLatchValue.GetValue();
You can also use the Basler pylon Viewer application to easily obtain the timestamp.
For more information about the pylon Camera Software Suite and the pylon Viewer, see Section 3.1
on page 62.
Note that there is an unspecified and variable delay between sending the software
command and it becoming effective, i.e. the moment when the clock tics are
actually read.
To obtain the timestamp value:

Features AW00123408000
319 Basler ace USB 3.0
7.17 Event Notification
When event notification is set to "on", the camera can generate an "event" and transmit a related
event message to the computer whenever a specific situation has occurred.
The camera can generate and transmit events for the following types of situations:
The camera is ready to receive a frame start trigger (FrameStartWait event).
A frame start trigger has occurred (FrameStart event).
Overtriggering of the frame start trigger has occurred (FrameStartOvertrigger event).
This happens, if the camera receives a frame start trigger signal when it is not in a "waiting for
frame start trigger" acquisition status.
The camera is ready to receive a frame burst start trigger (FrameBurstStartWait event).
A frame burst start trigger has occurred (FrameBurstStart event).
Overtriggering of the frame burst start trigger has occurred (FrameBurstStartOvertrigger
event).
This happens, if the camera receives a frame burst start trigger signal when it is not in a "waiting
for frame burst start trigger" acquisition status.
The end of an exposure has occurred (ExposureEnd event).
The camera’s device temperature has reached a critical level (Critical Temperature event) or,
upon further heating, the camera has entered the over temperature mode (Over Temperature
event). For more information about the related temperature levels and the over temperature
mode, see Section 1.10.3 on page 52.
An event message will be sent to the computer when transmission time is available. Note, however
that event messages can be lost when the camera operates at high frame rates. No mechanism is
available to monitor the number of event messages lost.
Note also that an event message is only useful when its cause still applies at the time when the
event is received by the computer.
If the frame start overtrigger event is only available when image acquisition is
carried out using an external hardware trigger.

AW00123408000 Features
Basler ace USB 3.0 320
An Example of Event Notification
An example related to the Frame Start Overtrigger event illustrates how event notification works.
The example assumes that your system is set for event notification (see below) and that the camera
has received an external frame start trigger when the camera is not in a "waiting for frame start
trigger" acquisition status. In this case:
1. A Frame Start Overtrigger event is created. The event contains the event in the strict sense
plus supplementary information:
An Event Type Identifier. In this case, the identifier would show that a frame start overtrigger
type event has occurred.
A Timestamp. This is a timestamp indicating when the event occurred. (The time stamp
timer starts running at power off/on or at camera reset. The timestamp [ns] is a 64 bit value.)
2. The event message will be sent to the computer if transmission time is available and if no
major number of younger event messages were generated.
a. After the camera sends an event message, it waits for an acknowledgement. If no
acknowledgement is received within a specified timeout, the camera will resend the event
message. If an acknowledgement is still not received, the timeout and resend mechanism
will repeat until a specified maximum number of retries is reached. If the maximum number
of retries is reached and no acknowledge has been received, the message will be dropped.
While the camera is waiting for an acknowledgement, no new event messages can be
transmitted.
3. Event notification involves making some additional software-related steps and settings. For
more information, see the "Camera Events" code sample included with the pylon software
development kit.

Features AW00123408000
321 Basler ace USB 3.0
Setting Your System for Event Notification
Event notification must be enabled in the camera and some additional software-related settings
must be made. This is described in the "Camera Events" code sample included with the pylon
software development kit.
Event notification must be specifically set up for each type of event using the parameter names of
event and supplementary information. The following table lists the relevant parameter names:
l
* Only available for acA640-750u, acA800-510u, acA1300-200u, acA1920-40u, acA1920-150u,
acA1920-155u, acA2040-55u, acA2040-120u, acA2440-35u, acA2440-75u, and acA2500-60u
cameras.
You can enable event notification and make the additional settings from within your application
software by using the pylon API. The pylon Camera Software Suite includes a
"Grab_CameraEvents" code sample that illustrates the entire process.
For more detailed information about using the pylon API, refer to the Basler pylon Programmer’s
Guide and API Reference.
Event Event Parameter Name Supplementary Information
Parameter Name
Frame Start EventFrameStart EventFrameStartTimestamp
Frame Start Overtrigger EventFrameStartOvertrigger EventFrameStartOvertriggerTimestamp
Frame Start Wait EventFrameStartWait EventFrameStartWaitTimestamp
Frame Burst Start EventFrameBurstStart EventFrameBurstStartTimestamp
Frame Burst Start
Overtrigger
EventFrameBurstStartOvertrigger EventFrameBurstStartOvertriggerTimestamp
Frame Burst Start Wait EventFrameBurstStartWait EventFrameBurstStartWaitTimestamp
Exposure End EventExposureEnd EventExposureEndFrameID
EventExposureEndTimestamp
Critical Temperature* EventCriticalTemperature EventCriticalTemperatureTimestamp
Over Temperature* EventOverTemperature EventOverTemperatureTimestamp
Table 57: Parameter Names of Events and Supplementary Information

AW00123408000 Features
Basler ace USB 3.0 322
7.18 Test Images
All cameras include the ability to generate test images. Test images are used to check the camera’s
basic functionality and its ability to transmit an image to the host computer. Test images can be used
for service purposes and for failure diagnostics. For test images, the image is generated internally
by the camera’s logic and does not use the optics, the imaging sensor, or the ADC. Five test images
are available for monochrome cameras and six test images for color cameras.
The Effect of Camera Settings on Test Images
When any of the test image is active, the camera’s analog features such as gain, black level, and
exposure time have no effect on the images transmitted by the camera. For test images 1, 2, 3 and
6, the cameras digital features, such as the luminance lookup table, will also have no effect on the
transmitted images. But for test images 4 and 5, the camera’s digital features will affect the images
transmitted by the camera. This makes test images 4 and 5 a good way to check the effect of using
a digital feature such as the luminance lookup table.
Enabling a Test Image
The Test Image Selector is used to set the camera to output a test image. You can set the value of
the Test Image Selector to one of the test images, e.g. to test image 1 (see below), for test image
1, or to "off".
You can set the Test Image Selector from within your application software by using the Basler pylon
API. The following code snippets illustrate using the API to set the selector:
// Set for no test image
camera.TestImageSelector.SetValue(TestImageSelector_Off);
// Set for the first test image
camera.TestImageSelector.SetValue(TestImageSelector_Testimage1);
You can also use the Basler pylon Viewer application to easily set the parameters.
For more information about the pylon API and the pylon Viewer, see Section 3.1 on page 62.

Features AW00123408000
323 Basler ace USB 3.0
Test Image Reset and Hold
When the Test Image Reset and Hold command is issued, all gradients will be displayed at their
starting positions and will stay fixed.
The command can be applied to both, static and dynamic test images. However, the command is
always "true" for static test images and therefore is only useful for dynamic (moving gradient-) test
images.
Test Image Reset and Hold allows you to obtain a defined and fixed state for each test image.
You can issue the Test Image Reset and Hold command from within your application software by
using the Basler pylon API. The following code snippet illustrates using the API:
// Set test image reset and hold and read the current setting
camera.TestImageResetAndHold.SetValue(true);
bool b = camera.TestImageResetAndHold.GetValue();
You can also use the Basler pylon Viewer application to easily set the parameter.
For more information about the pylon API and the pylon Viewer, see Section 3.1 on page 62.

AW00123408000 Features
Basler ace USB 3.0 324
7.18.1 Test Image Descriptions
Test Image 1 - Fixed Diagonal Gray Gradient (8 bit)
The 8 bit fixed diagonal gray gradient test image is best suited for use when the camera is set for
monochrome 8 bit output. The test image consists of fixed diagonal gray gradients ranging from 0
to 255.
If the camera is set for 8 bit output and is operating at full resolution, test image one will look similar
to Figure 111.
The mathematical expression for this test image:
Gray Value = [column number + row number] MOD 256
Test Image 2 - Moving Diagonal Gray Gradient (8 bit)
The 8 bit moving diagonal gray gradient test image is similar to test image 1, but it is not stationary.
The image moves by one pixel from right to left whenever a new image acquisition is initiated. The
test pattern uses a counter that increments by one for each new image acquisition.
The mathematical expression for this test image is:
Gray Value = [column number + row number + counter] MOD 256
Fig. 111: Test Image One

Features AW00123408000
325 Basler ace USB 3.0
Test Image 3 - Moving Diagonal Gray Gradient (10 bit or 12 bit)
The moving diagonal gray gradient test image 3 is similar to test image 2, but it is a 10 bit or 12 bit
pattern (depending on camera model). The image moves by one pixel from right to left whenever a
new image acquisition is initiated. The test pattern uses a counter that increments by one for each
new image acquisition.
The mathematical expression for this test image is:
For 10 bit output: Gray Value = [column number + row number + counter] MOD 1024
For 12 bit output: Gray Value = [column number + row number + counter] MOD 4096
Test Image 4 - Moving Diagonal Gray Gradient Feature Test (8 bit)
The basic appearance of test image 4 is similar to test image 2 (the 8 bit moving diagonal gray
gradient image). The difference between test image 4 and test image 2 is this: if a camera feature
that involves digital processing is enabled, test image 4 will show the effects of the feature while
test image 2 will not. This makes test image 4 useful for checking the effects of digital features such
as the luminance lookup table.
Test Image 5 - Moving Diagonal Gray Gradient Feature Test (12 bit)
The basic appearance of test image 5 is similar to test image 3. The difference between test image
5 and test image 3 is this: if a camera feature that involves digital processing is enabled, test image
5 will show the effects of the feature while test image 3 will not. This makes test image 5 useful for
checking the effects of digital features such as the luminance lookup table.
When a camera model listed in Section 1.10.3 on page 52 reaches the device
temperature of 90 °C (+194.0 °F), the camera enters the over temperature mode.
In this mode, the camera no longer acquires images but delivers test image 2.
For more information about the over temperature mode and how to leave it, see
Section 1.10.3 on page 52 and Section 1.10.3 on page 52Section 1.10.2 on
page 52, respectively.

AW00123408000 Features
Basler ace USB 3.0 326
Test Image 6 - Moving Diagonal Color Gradient
The moving diagonal color gradient test image is only available on color cameras. As shown in
Figure 112, test image six consists of diagonal color gradients (when a Mono pixel format is
selected, gray gradients will appear). The image moves by one pixel from right to left whenever you
signal the camera to capture a new image.
Fig. 112: Test Image Six

Features AW00123408000
327 Basler ace USB 3.0
7.19 Device Information Parameters
Each camera includes a set of "device information" parameters. These parameters provide some
basic information about the camera. The device information parameters include:
Device Vendor Name (read only) - contains the camera vendor’s name.
Device Model Name (read only) - contains the model name of the camera.
Device Manufacturer Info (read only) - can contain some information about the camera
manufacturer. This string usually indicates "none".
Device Version (read only) - contains the device version number for the camera.
Device Firmware Version (read only) - contains the version of the firmware in the camera.
Device Serial Number (read only) - contains the serial number of the camera.
Device User ID (read / write) - is used to assign a user defined name to a device. This name
will be displayed in the Basler pylon Viewer and the Basler pylon USB Configurator. The name
will also be visible in the "friendly name" field of the device information objects returned by
pylon’s device enumeration procedure.
Device Scan Type (read only) - contains the scan type of the camera, for example, area scan.
Sensor Width (read only) - contains the physical width of the sensor in pixels.
Sensor Height (read only) - contains the physical height of the sensor in pixels.
Max Width (read only) - Indicates the camera’s maximum region of interest (ROI) width setting
for the current OffsetX settings.
Max Height (read only) - Indicates the camera’s maximum region of interest (ROI) height
setting for the current OffsetY settings.
You can read the values for all of the device information parameters or set the value of the Device
User ID parameter from within your application software by using the Basler pylon API. The
following code snippets illustrate using the API to read the parameters or write the Device User ID:
// Read the Device Vendor Name parameter
GenICam::gcstring s = camera.DeviceVendorName.GetValue();
// Read the Device Model Name parameter
GenICam::gcstring s = camera.DeviceModelName.GetValue();
// Read the Device Manufacturer Info parameter
GenICam::gcstring s = camera.DeviceManufacturerInfo.GetValue();
// Read the Device Version parameter
GenICam::gcstring s = camera.DeviceVersion.GetValue();
// Read the Device Firmware Version parameter

AW00123408000 Features
Basler ace USB 3.0 328
GenICam::gcstring s = camera.DeviceFirmwareVersion.GetValue();
// Read the Device Serial Number parameter
GenICam::gcstring s = camera.DeviceSerialNumber.GetValue();
// Write and read the Device User ID parameter
camera.DeviceUserID.SetValue("CAM_1");
GenICam::gcstring s = camera.DeviceUserID.GetValue();
// Read the Device Scan Type parameter
DeviceScanTypeEnums e = camera.DeviceScanType.GetValue();
// Set the Device Link Selector parameter
camera.DeviceLinkSelector.SetValue(0);
// Set the Device Link Speed parameter
camera.DeviceLinkSelector.SetValue(0);
// Set the Device Link Throughput Limit Mode parameter
camera.DeviceLinkSelector.SetValue(0);
camera.DeviceLinkThroughputLimitMode.SetValue(DeviceLinkThroughputLimitMode_On);
// Set the Device Link Throughput Limit parameter ([Bps])
camera.DeviceLinkSelector.SetValue(0);
camera.DeviceLinkThroughputLimit.SetValue(419430400);
// Read the Device Link Current Throughput parameter ([Bps])
camera.DeviceLinkSelector.SetValue(0);
int64_t i = camera.DeviceLinkCurrentThroughput.GetValue();
// Read the Device SFNC Version Major parameter
int64_t i = camera.DeviceSFNCVersionMajor.GetValue();
// Read the Device SFNC Version Minor parameter
int64_t i = camera.DeviceSFNCVersionMinor.GetValue();
// Read the Device SFNC Version Sub Minor parameter
int64_t i = camera.DeviceSFNCVersionSubMinor.GetValue();

Features AW00123408000
329 Basler ace USB 3.0
// Read the SensorWidth parameter
int64_t i = camera.SensorWidth.GetValue();
// Read the SensorHeight parameter
int64_t i = camera.SensorHeight.GetValue();
// Read the WidthMax parameter
int64_t i = camera.WidthMax.GetValue();
// Read the HeightMax parameter
int64_t i = camera.HeightMax.GetValue();
You can also use the Basler pylon Viewer application to easily read the parameters and to read or
write the Device User ID.
You can also use the Basler pylon USB Configurator to read the Device User ID.
For more information about the pylon API, the pylon Viewer, and the pylon USB Configurator, see
Section 3.1 on page 62.

AW00123408000 Features
Basler ace USB 3.0 330
7.20 User Defined Values
The camera can store five "user defined values". Each value is a 32 bit signed integer value that
you can set and read as desired. The values simply serve as convenient storage locations for the
camera user and have no impact on the operation of the camera.
The values are designated as Value 1 through Value 5.
Setting User Defined Values
1. Set the User Defined Value Selector the desired value, e.g. to Value 1.
2. Set the User Defined Value parameter to the desired value for the selected value.
You can use the pylon API to set the User Defined Value Selector and the User Defined Value
parameter value from within your application software. The following code snippet illustrates using
the API to set the selector and the parameter value for Value 1 to 1000:
// Set user defined value 1
camera.UserDefinedValueSelector.SetValue( UserDefinedValueSelec-
tor_Value1 );
camera.UserDefinedValue.SetValue(1000);
// Get the value of user defined Value 1
camera.UserDefinedValueSelector.SetValue( UserDefinedValueSelec-
tor_Value1 );
int64_t i = camera.UserDefinedValue.GetValue();
You can also use the Basler pylon Viewer application to easily set the parameters.
For more information about the Basler pylon API and the pylon Viewer, see Section 3.1 on page 62.
To set a user defined value using Basler pylon:
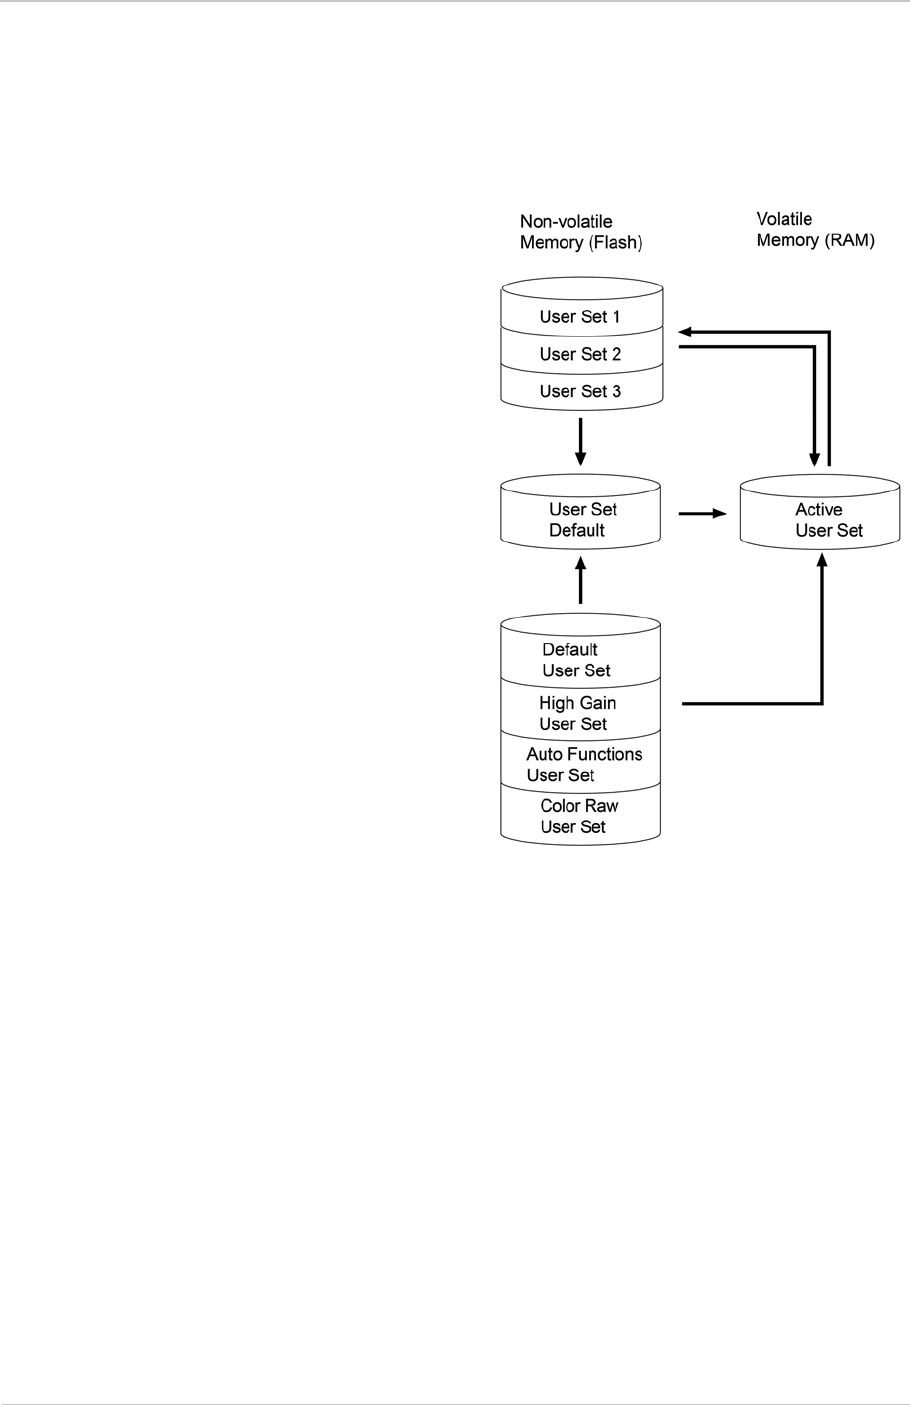
Features AW00123408000
331 Basler ace USB 3.0
7.21 User Sets
Normal Implementation
A user set is a group of parameter values with all
the settings needed to control the camera.
There are three basic types of user sets:
a selection of user sets -
some that can be configured by the user
and
some with factory setups that can not be
changed
the user set configured as the default
("user set default").
the active user set.
The Active User Set
The active user set contains most of the camera’s
current parameter settings and is part of the active
set. The active set contains all of the camera’s
current parameter settings and thus determines
the camera’s performance, and therefore, what
your image currently looks like. When you change
parameter settings using the pylon API or the
pylon Viewer, you are making changes to the
active set. The active set is located in the camera’s
volatile memory and the settings are lost, if the
camera is reset or if power is switched off.
The User Sets to Be Configured by the User
As mentioned above, the active configuration set is stored in the camera’s volatile memory and the
settings are lost, if the camera is reset or if power is switched off. The camera can save most of the
settings from the current active set to a reserved area in the camera’s non-volatile memory. A user
set that has been saved in the non-volatile memory is not lost when the camera is reset or switched
off. There are three reserved areas in the camera’s non-volatile memory available for saving user
sets that can be configured by the user. The three available user sets are called User Set 1, User
Set 2, and User Set 3.
When the camera is running, a saved user set can be loaded into the active set. A saved user set
can also be designated as the User Set Default, i.e. as the "startup" set, that will be loaded into the
active set whenever the camera is powered on or reset. Instructions for loading a saved user set
into the active set and for designating which set will be the startup set appear below in
Section 7.21.3 on page 335 and Section 7.21.4 on page 336, respectively.
Fig. 113: User Sets

AW00123408000 Features
Basler ace USB 3.0 332
The User Sets with Factory Setups
When a camera is manufactured, numerous tests are performed on the camera and three factory
optimized setups are determined. The three user sets with factory optimized setups are:
The Default User Set with a standard factory setup that is optimized for average conditions and
will provide good camera performance in many common applications. In the standard factory
setup, the gain is set to a low value, and all auto functions are set to off.
The High Gain User Set is similar to the Default User Set, but the gain is set to + 6 dB.
The Auto Functions User Set is similar to the Default User Set, but the Gain Auto and the
Exposure Auto auto functions are both enabled and are set to the continuous mode of
operation. During automatic parameter adjustment, gain will be kept to a minimum.
The Color Raw User Set is available in some color cameras. The user set is similar to the
Default User Set, but no color enhancement feature is active.
The user sets with factory setups are saved in permanent files in the camera’s non-volatile memory.
They are not lost when the camera is reset or switched off and they can not be changed.
For more information about auto functions, see Section 7.15 on page 299.
For more information about color enhancement features, see Section 7.14.3 on page 283.
The User Set Default
You can designate one of the six user sets (the Default User Set, High Gain User Set, Auto
Functions User Set, User Set 1, User Set 2, User Set 3) as the User Set Default, i.e. as the startup
user set. The startup user set will automatically be loaded into the active set whenever the camera
starts up at power on or after a reset. Instructions for designating a user set as the User Set Default
appear below.
The values for sequencer sets cannot be saved in any user set.
The values for the luminance lookup table are not saved in any user set and
are lost when the camera is reset or switched off. If you are using the lookup
table feature, you must reenter the lookup table values after each camera
startup or reset.
The current luminance lookup table is not changed when a user set is loaded
into the active user set.

Features AW00123408000
333 Basler ace USB 3.0
7.21.1 Selecting a User Set
If you want to load any of the user sets into the Active User Set or if you want to configure User Set
1, User Set 2 or User Set 3, you must first select the desired user set.
When the camera is delivered, the Default User Set will be selected.
1. Set the User Set Selector to the desired user set (one of the factory setups, User Set 1, User
Set 2 or User Set 3).
You can set the User Set Selector from within your application software by using the Basler pylon
API. The following code snippet illustrates using the API to set the selector:
If you want to select the Default User Set:
camera.UserSetSelector.SetValue(UserSetSelector_Default);
If you want to select the High Gain User Set:
camera.UserSetSelector.SetValue(UserSetSelector_HighGain);
If you want to select the Auto Functions User Set:
camera.UserSetSelector.SetValue(UserSetSelector_AutoFunctions);
If you want to select the Color Raw User Set:
camera.UserSetSelector.SetValue(UserSetSelector_ColorRaw);
If you want to select e.g. User Set 1:
camera.UserSetSelector.SetValue(UserSetSelector_UserSet1);
You can also use the Basler pylon Viewer to easily set the selector.
For more information about the Basler pylon API and the pylon Viewer, see Section 3.1 on page 62.
To select a User Set using Basler pylon:

AW00123408000 Features
Basler ace USB 3.0 334
7.21.2 Saving a User Set
After having set parameter values as desired, you can save them for further use into User Set 1,
User Set 2 or User Set 3. Saving the parameter values also means saving them from the current
active set into a user set in the camera’s non-volatile memory.
1. Make changes to the camera’s settings until the camera is operating in a manner that you
would like to save.
2. Set the User Set Selector to User Set 1, User Set 2, or User Set 3.
3. Execute a User Set Save command to save the active set to the selected user set.
You can set the User Set Selector and execute the User Set Save command from within your
application software by using the pylon API. The following code snippet illustrates using the API to
set the selector to e.g. User Set 1 and execute the command:
camera.UserSetSelector.SetValue(UserSetSelector_UserSet1);
camera.UserSetSave.Execute( );
For detailed information about using the pylon API, refer to the Basler pylon Programmer’s Guide
and API Reference.
You can also use the Basler pylon Viewer application to easily set the parameters.
For more information about the Basler pylon API and the pylon Viewer, see Section 3.1 on page 62.
To save a User Set from the active set into the non-volatile memory using Basler pylon:
Saving an active set to a user set in the camera’s non-volatile memory will
overwrite any parameters that were previously saved in that user set.
Saving a user set into the non-volatile memory active set is only allowed when the
camera is idle, i.e. when it is not acquiring images continuously or does not have
a single image acquisition pending.

Features AW00123408000
335 Basler ace USB 3.0
7.21.3 Loading User Set into the Active User Set
You can load any user set from the camera’s non-volatile memory into the camera’s active user set.
Accordingly, you can load the user sets with factory setup (Default User Set, High Gain User Set,
Auto Function User Set) and the user sets with parameter values previously saved by the user
(User Set 1, User Set 2, User Set 3 or a subset) into the camera’s non-volatile memory.
When you load a user set, the loaded set overwrites the parameter settings in the active set. Since
the settings in the active set control the current operation of the camera, the settings from the
loaded set will now be controlling the camera.
1. Set the User Set Selector to the desired User Set, e.g. User Set 2.
2. Execute a User Set Load command to load the selected user set into the active user set.
You can set the User Set Selector and execute the User Set Load command from within your
application software by using the pylon API. The following code snippets illustrate using the API to
set the selector and execute the command:
If you want to load e.g. User Set 2:
camera.UserSetSelector.SetValue(UserSetSelector_UserSet2);
camera.UserSetLoad.Execute( );
If you want to load the Default User Set:
camera.UserSetSelector.SetValue(UserSetSelector_Default);
camera.UserSetLoad.Execute( );
If you want to load the High Gain User Set:
camera.UserSetSelector.SetValue(UserSetSelector_HighGain);
camera.UserSetLoad.Execute( );
If you want to load the Auto Functions User Set:
camera.UserSetSelector.SetValue(UserSetSelector_AutoFunctions);
camera.UserSetLoad.Execute( );
If you want to load the Color Raw User Set:
camera.UserSetSelector.SetValue(UserSetSelector_ColorRaw);
camera.UserSetLoad.Execute( );
To load a User Set from the non-volatile memory into the active user set using
Basler pylon:

AW00123408000 Features
Basler ace USB 3.0 336
You can also use the Basler pylon Viewer to easily set the selector.
For more information about the Basler pylon API and the pylon Viewer, see Section 3.1 on page 62.
7.21.4 Designating a User Set as the User Set Default
You can designate any user set from the camera’s non-volatile memory as the User Set Default.
Accordingly, you can designate the user sets with factory setup (Default User Set, High Gain User
Set, Auto Function User Set) and the user sets with parameter values previously saved by the user
(User Set 1, User Set 2, User Set 3 or a subset).
The configuration set that you designate as the User Set Default will act as the startup set and will
be loaded into the active user set whenever the camera starts up at power on or after a reset.
Loading a user set into the active set is only allowed when the camera is idle, i.e.
when it is not acquiring images continuously or does not have a single frame
acquisition pending.
Loading the Default User Set with the standard factory setup into the active set is
a good course of action, if you have grossly misadjusted the settings in the camera
and you are not sure how to recover. The standard factory setup is optimized for
use in typical situations and will provide good camera performance in most cases.
Selecting which user set will serve as the User Set Default is only allowed when
the camera is idle, i.e. when it is not acquiring images continuously or does not
have a single frame acquisition pending.
Selecting the user set with the standard factory setup as the User Set Default and
then loading the Default User Set into the active set is a good course of action, if
you have grossly misadjusted the settings in the camera and you are not sure how
to recover. The standard factory setup is optimized for use in typical situations and
will provide good camera performance in most cases.

Features AW00123408000
337 Basler ace USB 3.0
The User Set Default Selector is used to select the startup set:
1. Set the User Set Default Selector to the desired User Set.
You can set the User Set Default Selector from within your application software by using the pylon
API. The following code snippets illustrate using the API to set the selector:
If you want to designate the Default User Set as User Set Default:
camera.UserSetDefault.SetValue(UserSetDefault_Default);
If you want to designate the High Gain User Set as User Set Default:
camera.UserSetDefault.SetValue(UserSetDefault_HighGain);
If you want to designate the Auto Functions User Set as User Set Default:
camera.UserSetDefault.SetValue(UserSetDefault_AutoFunctions);
If you want to designate the Color Raw User Set as User Set Default:
camera.UserSetDefault.SetValue(UserSetDefault_ColorRaw);
If you want to designate e.g. User Set 1 as User Set Default:
camera.UserSetDefault.SetValue(UserSetDefault_UserSet1);
For more information about the Basler pylon API and the pylon Viewer, see Section 3.1 on page 62.
To designate a user set as the user set default using Basler pylon:

AW00123408000 Features
Basler ace USB 3.0 338
7.22 Line Pitch
For information about the availability of the line pitch feature on a specific camera model, see
Table 41 on page 196 and Table 42 on page 197.
The line pitch feature is useful if you want that the data size, related to a line of pixels, will be
perfectly aligned with cache lines. Data alignment can improve performance and is in general
desired for embedded systems.
"Line pitch" designates the number of bytes that relate to all pixel data of a line of pixels, subject to
the current ROI width and the current pixel format.
Generally, the line pitch obtained from an image acquisition (the "original" line pitch) will not include
the right number of bytes for perfect alignment with cache lines of given sizes (typically 32 or 64
bytes). For perfect alignment, the line pitch must be a multiple of a given cache line size. To allow
perfect alignment, the line pitch feature will expand the original line pitch as far as necessary to
produce the "minimum required line pitch". The expansion is accomplished by appending the
minimum required bytes as zeros to the original pixel data (data structure padding).
Example: Assume a camera is set for an ROI width of 352 pixels and for Mono 8 pixel format. Also
assume, that the pixel data from each ROI line must align with a cache line size of 64 bytes.
For each frame and with the above settings, each pixel will deliver one byte and each ROI line will
include 352 bytes of pixel data (the original line pitch; see Figure 114 on page 339). This amount of
data can not be aligned with 64-byte cache lines as 352 can not be divided by 64 without remainder.
Alignment is, however, possible, when the line data are padded with 32 bytes (as zeros) to produce
the minimum required line pitch of 384 bytes.
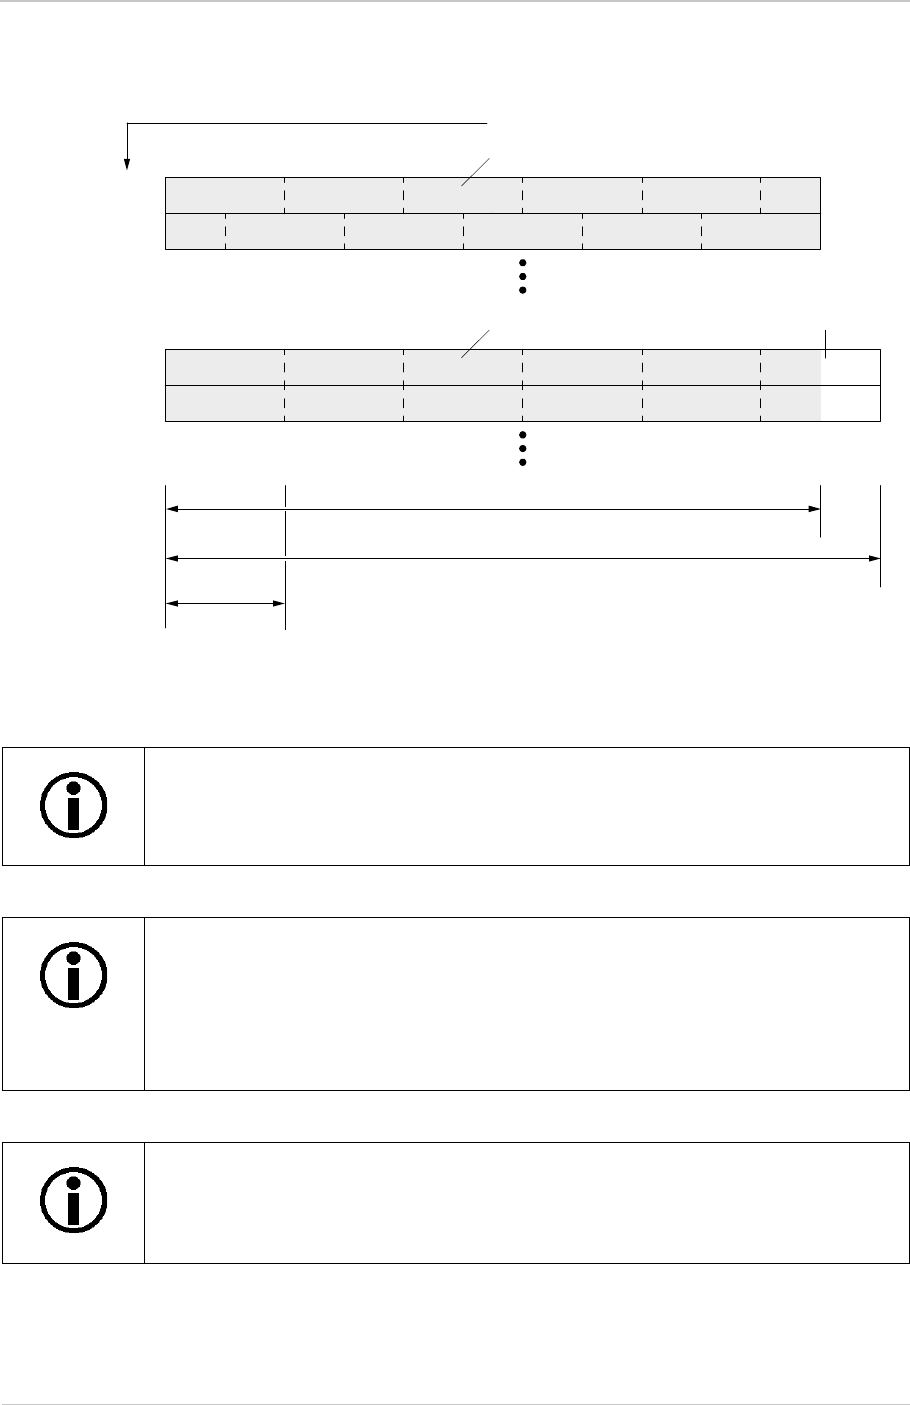
Features AW00123408000
339 Basler ace USB 3.0
The line pitch feature is not available for packed pixel formats providing 12 bit
output per pixel (Mono 12p, Bayer XX 12p).
The line pitch feature can be used in combination with features that involve the
concept of virtual pixels (e.g. the binning feature). In these cases, the line pitch
feature acts on data from virtual pixels.
Note that the line pitch feature acts as the last feature, before the data are
transmitted out of the camera.
Chunk data, that may be appended to a frame, must not be considered when
calculating the desired line pitch.
For more information about the chunk feature, see Section 7.23 on page 342.
Fig. 114: Storage of Pixel Data from the First Two ROI Lines, Without and With Padding for 64-byte Alignment
Original line pitch (352 bytes)
Cache line size
(64 bytes)
Minimum required line pitch (384 bytes)
0x…160
0x…000
Original pixel data
Starting addresses for pixel data of individual ROI lines
Without padding
64 bytes 128 bytes 192 bytes 256 bytes 320 bytes 352 bytes
0x…180
0x…000
Original pixel data Padding (zeros)
With padding
64 bytes 128 bytes 192 bytes 256 bytes 320 bytes 384 bytes

AW00123408000 Features
Basler ace USB 3.0 340
Minimum Required Line Pitch
To achieve the required padding, you must set the LinePitch parameter value. This value will
actually be the minimum required line pitch value that is calculated as shown below (employing the
floor function).
NPX = Current number of pixels per line (subject to the current ROI width)
BD [byte] = Current bit depth of pixel data (one or two bytes per pixel, subject to the current pixel
format; see above)
CLP [byte] = Current line pitch; see formula 1
RLP [byte] = Required minimum line pitch; see formula 2
ALIG [byte] = Data size to which the line pitch must be aligned (equivalent to cache line size)
Formula 1:
Formula 2:
1. Determine the current line pitch
by using formula 1 or
by reading the LinePitch parameter value or
by reading the Stride parameter value.
2. Calculate the required minimum line pitch using formula 2.
3. Enable the LinePitch feature.
4. Set the LinePitch parameter using the value calculated in step 2 to achieve the required
padding.
To calculate the required minimum line pitch:
When you enable the LinePitch feature, the feature will automatically provide
padding for 4-byte alignment, without the need for setting the LinePitch parameter
value.
CLP NPX BD×=
RLPCLP ALIG 1–()+
ALIG
-----------------------------------------------ALIG×()=

Features AW00123408000
341 Basler ace USB 3.0
You can manually adjust the line pitch from within your application software by using the Basler
pylon API. The following code snippet illustrates using the API to set the parameter values. As an
example, the settings are consistent with the example given above (32-byte alignment):
// Enable the line pitch feature and get informed about the enabling
camera.LinePitchEnable.SetValue(true);
bool b = camera.LinePitchEnable.GetValue();
// Read the current line pitch
int64_t i = camera.LinePitch.GetValue();
// Set the minimum required line pitch
camera.LinePitch.SetValue(384);
You can also use the Basler pylon Viewer application to easily set the parameters.
For more information about the pylon API and the pylon Viewer, see Section 3.1 on page 62.

AW00123408000 Features
Basler ace USB 3.0 342
7.23 Chunk Features
7.23.1 What are Chunk Features?
In most cases, enabling a camera feature will simply change the behavior of the camera. The Test
Image feature is a good example of this type of camera feature. When the Test Image feature is
enabled, the camera outputs a test image rather than a captured image.
When chunk features are enabled, the camera
develops some sort of information about each image that it acquires and
adds the information to each image as a trailing data "chunk" when the image is transferred to
the host computer.
Examples of this type of camera feature are the Gain chunk feature and the Timestamp chunk
feature:
When the Gain chunk feature is used, the camera checks, after an image is captured, the Gain
All parameter value used for the image acquisition and develops a data chunk.
When the Timestamp chunk feature is used, the camera develops a time stamp data chunk.
The gain data chunk and the timestamp data chunk are appended as trailing data to the related
image data as the image is transferred from the camera.
After the data chunks were transmitted to the computer they must be retrieved. For more
information about retrieving chunk data, see Section 7.23.5 on page 352.
7.23.2 Using Chunk Features
Using chunk features is a three step process:
Use the Chunk Selector parameter to select the desired chunk feature, e.g. the Gain chunk
feature.
Set the Chunk Enable parameter to true to prepare the selected chunk feature to be
appended to image data
Set the Chunk Mode Active parameter to true to generate chunk data for the selected chunk
feature and append them to the related image data.
If you want to use more than one chunk feature, you can prepare several chunk features by using
Chunk Selector and Chunk Enable before setting the Chunk Mode Active parameter.
For more information about the three steps, see below.
Chunk features are not available for the acA1920-155 camera.

Features AW00123408000
343 Basler ace USB 3.0
7.23.3 Data Chunks
You can select the individual data chunks to be appended to image data by selecting the kind if data
chunk and then enabling it. For details, see below.
7.23.3.1 Gain Chunk
The gain chunk feature adds a chunk to each acquired image containing the gain All parameter
value used for the image acquisition.
1. Use the Chunk Selector to select the Gain chunk.
2. Use the Chunk Enable parameter to set the value of the gain chunk to true.
Once the gain chunk is enabled and Chunk Mode Active (see Section 7.23.4 on page 351) is
enabled, the camera appends a gain chunk to each acquired image.
After an image with an appended chunk has been received by your computer the chunk must be
retrieved. For information about retrieving data chunks, see Section 7.23.5 on page 352.
You can set the Chunk Selector and Chunk Enable parameter value from within your application
software by using the Basler pylon Camera Software Suite. The following code snippet illustrates
using the API to activate the chunk mode, select the gain chunk, and enable the gain chunk:
// make chunk mode active, select and enable Gain chunk
camera.ChunkSelector.SetValue(ChunkSelector_Gain);
camera.ChunkEnable.SetValue(true);
You can also use the Basler pylon Viewer application to easily set the parameters.
For more information about the pylon Camera Software Suite and the pylon Viewer, see Section 3.1
on page 62.
To enable the gain chunk:

AW00123408000 Features
Basler ace USB 3.0 344
7.23.3.2 Line Status All Chunk
The line status all chunk feature adds a chunk to each acquired image containing the line status all
parameter value
1. Use the Chunk Selector to select the Line Status All chunk.
2. Use the Chunk Enable parameter to set the value of the line status all chunk to true.
Once the line status all chunk is enabled and Chunk Mode Active (see Section 7.23.4 on page 351)
is enabled, the camera appends a line status all chunk to each acquired image.
After an image with an appended chunk has been received by your computer the chunk must be
retrieved. For information about retrieving data chunks, see Section 7.23.5 on page 352.
You can set the Chunk Selector and Chunk Enable parameter value from within your application
software by using the Basler pylon Camera Software Suite. The following code snippet illustrates
using the API to activate the chunk mode, select the line status all chunk, and enable the line status
all chunk:
// make chunk mode active, select and enable Line Ststus All chunk
camera.ChunkSelector.SetValue(ChunkSelector_LineStatusAll);
camera.ChunkEnable.SetValue(true);
You can also use the Basler pylon Viewer application to easily set the parameters.
For more information about the pylon Camera Software Suite and the pylon Viewer, see Section 3.1
on page 62.
To enable the line status all chunk:

Features AW00123408000
345 Basler ace USB 3.0
7.23.3.3 Exposure Time Chunk
The exposure time chunk feature adds a chunk to each acquired image containing the exposure
time parameter value in µs used for the image acquisition.
1. Use the Chunk Selector to select the Exposure Time chunk.
2. Use the Chunk Enable parameter to set the value of the chunk to true.
Once the exposure time chunk is enabled and Chunk Mode Active (see Section 7.23.4 on
page 351) is enabled, the camera appends an exposure time stamp chunk to each acquired image.
After an image with an appended chunk has been received by your computer the chunk must be
retrieved. For information about retrieving data chunks, see Section 7.23.5 on page 352.
You can set the Chunk Selector and Chunk Enable parameter value from within your application
software by using the Basler pylon Camera Software Suite. The following code snippet illustrates
using the API to activate the chunk mode, select the exposure time chunk, and enable the exposure
time chunk:
// make chunk mode active, select and enable Exposure Time chunk
camera.ChunkSelector.SetValue(ChunkSelector_ExposureTime);
camera.ChunkEnable.SetValue(true);
You can also use the Basler pylon Viewer application to easily set the parameters.
For more information about the pylon Camera Software Suite and the pylon Viewer, see Section 3.1
on page 62.
To enable the exposure time chunk:

AW00123408000 Features
Basler ace USB 3.0 346
7.23.3.4 Timestamp Chunk
The Timestamp chunk feature adds a chunk to each acquired image containing a timestamp that
was generated when frame acquisition was triggered.
The timestamp is a 64 bit value. The timestamp is based on a counter that counts the number of
"timestamp clock ticks" generated by the camera. The unit for each tick is 1 ns (as specified by the
Gev Timestamp Tick Frequency). The counter starts at camera power on, camera reset or at
counter reset.
1. Use the Chunk Selector to select the Timestamp chunk.
2. Use the Chunk Enable parameter to set the value of the chunk to true.
Once the Timestamp chunk is enabled and Chunk Mode Active (see Section 7.23.4 on page 351)
is enabled, the camera appends a Timestamp chunk to each acquired image.
After an image with an appended chunk has been received by your computer the chunk must be
retrieved. For information about retrieving data chunks, see Section 7.23.5 on page 352.
You can set the Chunk Selector and Chunk Enable parameter value from within your application
software by using the Basler pylon API. The following code snippet illustrates using the API to
activate the chunk mode, and enable the Timestamp chunk:
// make chunk mode active and enable Timestamp chunk
camera.ChunkSelector.SetValue(ChunkSelector_Timestamp);
camera.ChunkEnable.SetValue(true);
You can also use the Basler pylon Viewer application to easily set the parameters.
For more information about the pylon Camera Software Suite and the pylon Viewer, see Section 3.1
on page 62.
To enable the timestamp chunk:

Features AW00123408000
347 Basler ace USB 3.0
7.23.3.5 Sequencer Set Active Chunk
The Sequencer Set Active chunk feature is available in acA1920-25, acA2040-55, acA2040-120,
acA2440-35, acA2440-75, acA3800-14, and acA4600-10 cameras.
The Sequencer Set Active chunk feature adds a chunk to each acquired image. The chunk contains
the index number of the sequencer set that was in the active set when the frame start acquisition
trigger occurred.
1. Make sure the Sequencer feature is enabled.
2. Use the Chunk Selector to select the Sequencer Set Active chunk.
3. Use the Chunk Enable parameter to set the value of the chunk to true.
Once the Sequencer Set Active chunk is enabled and Chunk Mode Active (see Section 7.23.4 on
page 351) is enabled, the camera appends a chunk with the applicable sequencer set index
number to each acquired image.
After an image with an appended chunk has been received by your computer the chunk must be
retrieved. For information about retrieving data chunks, see Section 7.23.5 on page 352.
You can set the Chunk Selector and Chunk Enable parameter value from within your application
software by using the Basler pylon API. The following code snippet illustrates using the API to
activate the chunk mode, and enable the Sequencer Set Active chunk:
// make chunk mode active and enable Sequencer Set Active chunk
camera.ChunkSelector.SetValue(ChunkSelector_SequencerSetActive);
camera.ChunkEnable.SetValue(true);
You can also use the Basler pylon Viewer application to easily set the parameters.
For more information about the pylon Camera Software Suite and the pylon Viewer, see Section 3.1
on page 62.
To enable the sequencer set active chunk:
The Sequencer Set Active chunk feature is only available when the
Sequencer feature is available.
The Sequencer Set Active chunk feature can only be enabled when the
Sequencer feature was enabled.
For more information about the Sequencer feature, see.Section 7.7 on
page 221

AW00123408000 Features
Basler ace USB 3.0 348
7.23.3.6 Counter Value Chunk
The counter value chunk feature numbers items sequentially as they occur. When the feature is
enabled, a chunk is added to each image containing the value of the counter.
The counter value used for the chunk is taken from Counter 1 and relates to Frame Start trigger as
the counter event source.
The Counter 1 value is a 32 bit number. The counter starts initially at 1 and increments by 1 for each
frame start trigger. The counter counts up to 4294967295 unless it is reset before. After reaching
the maximum value or after reset, the counter starts at 0 and then continues counting.
Note: When continuous capture is stopped while the camera is acquiring frame start triggers
continuously, several numbers in the counting sequence can be skipped. This happens due to the
internal buffering scheme of image data used in the camera.
1. Use the chunk selector to select the counter value chunk.
2. Use the Chunk Enable parameter to set the value of the chunk to true.
Once the counter value chunk is enabled and Chunk Mode Active (see Section 7.23.4 on page 351)
is enabled, the camera appends a counter value chunk to each acquired image.
After an image with an appended chunk has been received by your computer the chunk must be
retrieved. For information about retrieving data chunks, see Section 7.23.5 on page 352.
You can set the Chunk Selector and Chunk Enable parameter value from within your application
software by using the Basler pylon API. The following code snippet illustrates using the API to
activate the chunk mode, and enable the counter value chunk:
// make chunk mode active and enable Counter Value chunk
camera.ChunkSelector.SetValue(ChunkSelector_CounterValue);
camera.ChunkEnable.SetValue(true);
You can also use the Basler pylon Viewer application to easily set the parameters.
For more information about the pylon API and the pylon Viewer, see Section 3.1 on page 62.
To enable the counter value chunk:

Features AW00123408000
349 Basler ace USB 3.0
Counter Reset
Whenever the camera is powered off, the counter resets to 0.
During operation, you can reset the counter via the I/O IN line (Line 1), one of the GPIO lines (Line
3, Line 4) if configured for input or via software. You can also disable the ability to perform a reset
by setting the counter reset source to off. By default, the counter reset source is set to off.
To use the counter reset feature:
Set the counter reset source to Line1, Line 3, Line 4, Software, or Off.
Execute the command if using software as the counter reset source.
You can set the counter reset parameter values from within your application software by using the
Basler pylon API. The following code snippets illustrate using the API to configure and set the frame
counter reset and to execute a reset via software.
// Select counter 1 and assign Frame Start as event source
camera.CounterSelector.SetValue(CounterSelector_Counter1);
camera.CounterEventSource.SetValue(CounterEventSource_FrameStart);
// Select reset by signal applied to input line 1
camera.CounterResetSource.SetValue(CounterResetSource_Line1);
// Select reset by software
camera.CounterResetSource.SetValue(CounterResetSource_Software);
// Execute counter reset
camera.CounterReset.Execute();
// Disable reset
camera.CounterResetSource.SetValue(CounterResetSource_Off);
You can also use the Basler pylon Viewer application to easily set the parameters.
For more information about the pylon API and the pylon Viewer, see Section 3.1 on page 62.
For more information about using line 1 as the source signal for a counter reset, see Section 5.7 on
page 74 and about using Line 3 and Line 4, see Section 5.9.3 on page 82.

AW00123408000 Features
Basler ace USB 3.0 350
7.23.3.7 CRC Checksum Chunk
The CRC (Cyclic Redundancy Check) checksum chunk feature adds a chunk to each acquired
image containing a CRC checksum calculated using the X-modem method. As shown in Figure 115,
the checksum is calculated using all of the related image data and all of the appended chunks
except for the CRC chunk itself. If enabled, the CRC checksum chunk is always the last chunk
appended to the image data.
Fig. 115: CRC Checksum
1. Use the Chunk Selector to select the CRC checksum chunk.
2. Use the Chunk Enable parameter to set the value of the chunk to true.
Once the CRC checksum chunk is enabled and Chunk Mode Active (see Section 7.23.4 on
page 351) is enabled, the camera appends a CRC checksum chunk to each acquired image.
To retrieve CRC checksum information from a chunk appended to an image that has been received
by your PC, the image and its appended chunks must first be parsed. Once the chunk parser has
been used, you can retrieve the CRC checksum information.
For more information about retrieving chunk data, see Section 7.23.5 on page 352.
Note that the CRC checksum information provided by the chunk parser is not the CRC checksum
itself. Rather it is a true/false result. When the image and appended chunks pass through the parser,
the parser calculates a CRC checksum based on the received image and chunk information. It then
compares the calculated CRC checksum with the CRC checksum contained in the CRC checksum
chunk. If the two match, the result indicates that the image data is OK. If the two do not match, the
result indicates that the image is corrupted.
You can set the Chunk Selector and Chunk Enable parameter value from within your application
software by using the Basler pylon API. You can also run the parser and retrieve the chunk data.
The following code snippets illustrate using the API to activate the chunk mode, enable the CRC
checksum chunk, run the parser, and retrieve the CRC checksum chunk data:
// Make chunk mode active, select and enable CRC checksum chunk
camera.ChunkSelector.SetValue(ChunkSelector_PayloadCRC16);
camera.ChunkEnable.SetValue(true);
You can also use the Basler pylon Viewer application to easily set the parameters.
For more information about the pylon API and the pylon Viewer, see Section 3.1 on page 62.
To enable the CRC checksum chunk:
Chunk 1 (image data (payload) &
chunk ID & length) Chunk 2
Data
Chunk 3
Data
Chunk N
CRC
CRC checksum is calculated on this data
...

Features AW00123408000
351 Basler ace USB 3.0
7.23.4 Chunk Mode Active
When Chunk Mode Active is enabled, the camera is in a state where it can generate and append
chunk data to image data and transmit them to the computer. This is only done for the chunk
features that were previously selected and prepared using the Chunk Selector and Chunk Enable
parameters (see Section 7.23.2 on page 342).
Note: Using only the Chunk Selector and Chunk Enable parameters is not sufficient for generating
and appending chunk data. To accomplish this, Chunk Mode Active must also be enabled. Disabling
Chunk Mode Active prevents chunk data from being appended to image data.
1. Set the Chunk Mode Active parameter to true.
You can set the Chunk Mode Active parameter value from within your application software by using
the Basler pylon API. The following code snippet illustrates using the API to set the parameter
value:
camera.ChunkModeActive.SetValue(true);
Also note that when you enable ChunkModeActive, the PayloadType for the camera changes from
"Pylon::PayloadType_Image" to "Pylon::PayloadType_ChunkData".
For detailed information about using the pylon API, refer to the Basler pylon Programmer’s Guide
and API Reference.
You can also use the Basler pylon Viewer application to easily set the parameters.
Image data are counted as chunk 1 (for more details, see Section 7.23.5 on
page 352). Despite this, image data (i.e. the data for chunk 1) can be obtained
even when Chunk Mode Active is disabled.
To Enable Chunk Mode Active:
AW00123408000 Features
Basler ace USB 3.0 352
7.23.5 Retrieving Data Chunks
When Chunk Enable and Chunk Mode Active are enabled, the selected data chunks are appended
to each acquired image when the image is transferred to the host computer (see Section 7.23.3 on
page 343), creating a set of chunks. The set of chunks must be parsed to retrieve the chunk data
via a GenICam node map (see below).
The set of chunks includes chunk 1 with the image data ("image data payload") and related
supplementary data (chunk ID and length of the image data payload), followed by the selected data
chunks, each one consisting of the chunk payload and supplementary data.
The PayloadSize parameter value for the device (i.e. for the camera) indicates the calculated
maximum size ("maximum buffer size") that can be expected to occur for a set of chunks. The
calculated maximum size is derived from the current camera parameter settings (ROI size, pixel
format, selected data chunks, etc.).
The actual size of a set of chunks as received by the computer ("grab result") can be read form the
PayloadSize value for the grab result. The actual size will be equal to or smaller than the
calculated maximum size.
A set of chunks (chunks one through N) is illustrated in Figure 116. The example assumes that the
CRC Checksum chunk was enabled.
Fig. 116: Example of a Set of Chunks Related to One Image Acquisition
Make sure all camera parameters are set as desired before reading the
PayloadSize parameter value.
Chunk
1
(Image data payload)
Chunk
1
(ID)
Chunk
N
CRC
Chunk
1
(Length) ...
Chunk
2
(Length)
Chunk
N
(Length)
Chunk
N
(ID)
Chunk
2
(ID)
Chunk
2
(Payload)
32 bit 32 bit 32 bit 32 bit 32 bit 32 bitLength Length Length
Chunk 1 Chunk 2 Chunk N
Actual payload size of the grab result

Features AW00123408000
353 Basler ace USB 3.0
Parsing the Appended Chunks
After the image data chunk and appended chunks were transferred to the computer, the sequence
of chunks must be parsed to retrieve the chunk data via a GenICam node map.
If you use code written in C++ the appended data chunks are parsed automatically after the
image data were written into the computer’s memory. For each set of chunks, the decoding
starts from the end of the last data chunk. The chunk data can be accessed using the chunk
data node map.
For more information about accessing chunk data, see the documentation for the C++ API in
the Basler pylon Programmer’s Guide and API Reference for C++ and the included
"Grab_ChunkImage" code sample.
If you use code written in C or C# you must run the image data chunk and the appended
chunks through the chunk parser that is included in the C API for Basler pylon software and via
the device node map.
For more information about accessing chunk data, see the documentation for the C or C# API
in the Basler pylon Programmer’s Guide and API Reference for C or C#, respectively.

AW00123408000 Troubleshooting and Support
Basler ace USB 3.0 354
8 Troubleshooting and Support
This chapter outlines the resources available to you, if you need help working with your camera.
8.1 Tech Support Resources
If you need advice about your camera or if you need assistance troubleshooting a problem with your
camera, you can contact the Basler technical support team for your area. Basler technical support
contact information is located in the front pages of this manual.
You will also find helpful information such as frequently asked questions, downloads, and
application notes in the Support and Downloads sections of our website:
www.baslerweb.com
If you do decide to contact Basler technical support, please take a look at Section 8.3 on page 355
before you call. The section gives information about assembling relevant data that will help the
Basler technical support team to help you with your problem.
8.2 Obtaining an RMA Number
Whenever you want to return material to Basler, you must request a Return Material Authorization
(RMA) number before sending it back. The RMA number must be stated in your delivery
documents when you ship your material to us! Please be aware that, if you return material without
an RMA number, we reserve the right to reject the material.
You can find detailed information about how to obtain an RMA number in the Support section of our
website: www.baslerweb.com

Troubleshooting and Support AW00123408000
355 Basler ace USB 3.0
8.3 Before Contacting Basler
Technical Support
To help you as quickly and efficiently as possible when you have a problem with a Basler camera,
it is important that you collect several pieces of information before you contact Basler technical
support. Basler technical support contact information is shown in the title section of this manual.
Three different methods are available of providing data to Basler technical support. The methods
complement each other. We therefore recommend using them all for optimum assistance:
by automatically generating support information using the Basler pylon USB Configurator . A
report is generated with information about the USB device tree displayed in the device pane
and detailed information about each device.
by sending an email to Basler technical support, already partially prepared by the Basler pylon
USB Configurator
by using the form given below.
1. Click the question mark ? in the menu bar of the Basler pylon USB Configurator.
2. Click Generate Support Information... in the dropdown menu.
The Support Information window opens displaying a report.
3. Click the Copy to Clipboard button to keep the support information for inclusion in an email to
Basler technical support.
1. Click the question mark ? in the menu bar of the Basler pylon USB Configurator.
2. Click Contact Basler Support... in the dropdown menu.
A pylon Support Request window for an email to Basler technical support opens. It includes in-
formation about the currently used versions of pylon and the computer’s operating system.
3. Include the previously generated support information (see above).
4. If you are outside Europe replace support.europe@baslerweb.com by the address of your local
Basler technical support.
1. Copy the form that appears below, fill it out, and send it - with sample images if appropriate -
with your email to Basler technical support
or
fax the completed form with the requested files attached to your local dealer or to Basler tech-
nical support.
To automatically generate support information:
To use a prepared email:
To use the form:

AW00123408000 Troubleshooting and Support
Basler ace USB 3.0 356
1 The camera’s product ID:
2 The camera’s serial number:
3 Host adapter and chipset that
you use with the camera:
Do you use a hub? Yes No
4 Describe the problem in as much
detail as possible:
(If you need more space,
use an extra sheet of paper.)
5 If known, what’s the cause
of the problem?
6 When did the problem occur? After start. While running.
After a certain action (e.g., a change of parameters):
7 How often did/does the problem
occur?
Once. Every time.
Regularly when:
Occasionally when:

Troubleshooting and Support AW00123408000
357 Basler ace USB 3.0
8 How severe is the problem? Camera can still be used.
Camera can be used after I take this action:
Camera can no longer be used.
9 Did your application ever run
without problems?
Yes No
10 Parameter set
It is very important for Basler technical support to get a copy of the exact camera parameters that
you were using when the problem occurred.
To make note of the parameters, use the Basler pylon Viewer.
If you cannot access the camera, please try to state the following parameter settings:
Image Size (ROI):
Pixel Format:
Exposure Time:
Frame Rate:
11 Live image/test image
If you are having an image problem, try to generate and save live images that show the problem.
Also generate and save test images. Please save the images in BMP format, zip them, and send
them to Basler technical support.

AW00123408000 Revision History
Basler ace USB 3.0 358
Revision History
Doc. ID Number Date Changes
AW00123401000 04 Jun 2013 Initial release of the document. Applies to prototypes only.
AW00123402000 16 Apr 2014 First release of this document for series cameras and some prototype
cameras.
Updated Asian contact information.
Updated names throughout the manual related to the release of the Basler
pylon 4 Camera Software Suite.
Included information throughout the document about the following cameras:
acA640-90um/uc, acA1920-25um/uc (series cameras)
acA2000um/umNIR/uc, acA2040-80um/umNIR/uc, acA3800-14um/uc,
and acA4600-10uc (prototype cameras).
Replaced "pixel data format" by "pixel format" throughout the document.
Replaced "pixel size" by "pixel edge length" in Section 1.2 on page 2.
Added information about the CS-mount in Section 1.2 on page 2.
Added "Mounting Instructions" as Section 1.5 on page 41,
Updated the LZ4 license text in Section 1.7 on page 44.
Modified Section 1.9.2 on page 46 to better avoid EMI problems.
Expanded the precautions about avoiding dust on the sensor, about using
the correct plug, and about cleaning properly in Section 1.10 on page 47.
Added a reference to the "Recommended Components
for Basler USB 3.0 Cameras" document in Section 2 on page 43.
Added a reference to cable documentation in Section 5.5 on page 56.
Added the following sections:
Section 5.10 on page 71
Section 5.11.2 on page 79
Section 5.12 on page 82
Section 5.13 on page 92
Section 6 on page 99
Section 7 on page 179
Section 8 on page 197
Described how to use the Basler pylon USB Configurator for contacting
Basler technical support in Section 9.3 on page 308.
AW00123403000 05 Sep 2014 Internal release.
AW00123404000 17 Jun 2015 Minor additions and corrections throughout the manual relating to former
prototype cameras.
Added information for former prototype cameras: acA2000-165,
acA2040-90, acA3800-14 and acA4600-10 throughout the manual.
Added new prototype cameras: acA645-100um/uc, acA1920-155um/uc.
Replaced "lens adapter" by "lens mount" and "cylindric housing extension"
throughout the manual.
Added precautions related to SELV/LPS requirements for power supplies in
Section 1 on page 1 and Section 5 on page 53.

Revision History AW00123408000
359 Basler ace USB 3.0
cont’d
Removed pixel formats RGB 8 and BGR 8 from Table 7 on page 12.
Modified the sensor size for the acA1600-20um in Section 1.2 on page 2.
Removed the availability of CS-mounts for acA1920-20um/uc cameras in
Section 1.2 on page 2 and added a related note in Section 1.4.1 on
page 36.
Indicated UL certification for cameras in Section 1.2 on page 2.
Added a note about the availability of CE conformity declarations to the
tables in Section 1.2 on page 2.
Added information about the availability of pylon for Linux in Section 1.2 on
page 2.
Added information about mechanical stress tests in Section 1.6 on page 43.
Added max. ambient temperature (UL 60950-1) in Section 1.9.1 on
page 46.
Added information in Section 2 on page 43 and Section 6.10 on page 167
about restricted initial maximum allowed acquisition frame rates for
acA2000-165u and acA2040-90u cameras.
Added an explanation about the pylon Viewer’s significance for the camera
configuration mechanism in Section 3.1.1 on page 46
Modified the descriptions of voltage requirements in Section 5.7.1 on
page 59, Section 5.8.1 on page 62, Section 5.9.2 on page 67, and
Section 5.9.3 on page 69.
Added a note about the occurrence of a frame acquisition when enabling or
disabling the inverter in Section 5.11.3 on page 81 and Section 5.12.5 on
page 89.
Added a note in Section 5.12.6.1 on page 90 about the triggering of Timer 1
in the absence of a flash window start signal.
Revised Section 5.13 on page 92.
Added trigger sources for the frame start trigger in Section 6.4.1.2 on
page 115.
Added in Section 6.6.2 on page 134 a note about the unavailability of the
flash window signal in ERS mode when very short exposure times are
used.
Updated the maximum allowed gain settings for acA3800-14u and
acA4600-10u cameras in Table 36 on page 198.
Added Section 8.6 on page 216 describing the sequencer feature.
Added a section about the effective image ROI in Section 8.7.4 on
page 249.
Added a note about the unavailability of vertical and horizontal binning by 3
for acA3800-14um cameras in Section 8.7.1 on page 245.
Added a note about checking ROI settings when changing a binning
parameter value in Section 8.7.4 on page 249.
Highlighted the distinction between "active set" and "active user set" in
Section 8.17 on page 290.
Added the Line Status All chunk as Section 8.18.3.2 on page 299.
Doc. ID Number Date Changes

AW00123408000 Revision History
Basler ace USB 3.0 360
AW00123405000 18 Dec 2015 Minor changes and corrections throughout the manual.
Added information for the following new cameras: acA640-750u,
acA800-510u, acA1300-200u, acA1920-40u, acA1920-150u, 1920-155u,
and acA2500-60u throughout the manual.
Indicated the housing temperature measuring point in Section 1.10.2 on
page 52.
Allotted camera specifications and spectral response curves to different
sections, according to sensor technology (CCD, CMOS) in Section 1.2 on
page 2 and Section 1.3 on page 22.
Included information about changed effective Bayer filter alignment with
mirror images in Section 1.2 on page 2, Section 7.1.2 on page 195, and
Section 7.11 on page 265
Added the "Over Temperature Behavior" Chapter 1.10.3 on page 52.
Re-phrased Chapter 3 on page 62.
Removed the reference to DG001115 in Section 2 on page 60.
Added a note in Section 6.6.2.3 on page 157 about the unavailability of the
flash window signal in ERS mode when very short exposure times are
used.
Modified Section 6.8.1 on page 167 to distinguish between involvement of
opto-isolated and GPIO lines.
Indicated the logical meanings of ExpAc levels in Section 6.8.1 on
page 167. Corrected info box in Section 6.8.1 on page 167: The
acA1920-25 and acA2500-14 cameras are no longer listed as lacking the
exposure active signal.
Included information about removing artificial color shift in Section 7.3.1 on
page 198.
Replaced AOI by ROI in code snippets in Section 7.15 on page 299.
Added the "Pattern Removal" Section 7.15.8 on page 314.
Added information in Section 7.18 on page 322 about operation with 10 bit
output and indicated activation of test image 2 by over temperature mode.
AW00123406000 21 Dec 2015 Removed information about the acA645-100um/uc throughout the manual.
Doc. ID Number Date Changes

Revision History AW00123408000
361 Basler ace USB 3.0
AW00123407000 21 May 2016 Removed prototype status for the acA1920-150 and acA2500-60 cameras.
Changed "Subpart J" to "Subpart B" on the second page.
Removed the notes throughout the manual, that indicated the unavailability
of the digital shift, sequencer, and mirror features and of test image reset
and hold for acA1920-40u and acA1920-155u cameras.
Transferred the "Color Creation and Enhancement" chapter into Chapter 7.
Added pixel formats (Mono 8, RGB 8, BGR 8, YCbCr422_8) to the
specifications for color cameras (acA640-750, acA800-510, acA1300-200,
acA1920-40, acA1920-150,acA1920-155, acA2500-60) in Section 1.3.2 on
page 7.
Updated camera power requirements differentiating between mono and
color cameras in Section 1.3.2 on page 7 for these cameras: acA640-750,
acA800-510, acA1300-200, acA1920-40, acA1920--150, acA1920-155,and
acA2500-60.
Updated and modified Section 1.10.3 on page 52.
Added precautions calling for continuous camera operation in Section 1.11
on page 56
Updated version PFNC version number in Section 1.3 on page 3 and
Section 7.14.1.2 on page 280.
Removed exposure time control via hardware trigger signal (trigger width
exposure) for cameras with Aptina sensor (acA1920-25, acA2500-14,
acA3800-14, acA4600-10) in Section 1.3.2 on page 7.
Corrected camera event names in Table 6.8.5 on page 179.
Added Mono formats to Table 38 on page 195.
Updated exposure time offsets for the acA1920-40, acA1920-150,
acA1920-155, and acA2500--60 cameras in Section 6.4.3.2 on page 136.
Removed the information from Section 6.4.3.2 on page 136 about the
acA1920-155 not supporting trigger width exposure.
Updated minimum allowed exposure times for the acA1920--150 and
acA2500--60 cameras in Section 6.5.1 on page 146.
Removed availability of the fast readout mode for the acA1920-155 and
acA1920-40 cameras in Section 6.6.1.1 on page 150.
Made terminology compatible in Section 6.6.2 on page 151 through
Section 6.8.2 on page 169 with terminology as apparent from the pylon
viewer.
Re-arranged table entries from Table 35 through Table 39.
Corrected camera event names in Table 6.8.5 on page 179.
Added Mono formats to Table 38 on page 195.
Added the "PGI Feature Set" Section 7.3.2 on page 201.
Doc. ID Number Date Changes

AW00123408000 Revision History
Basler ace USB 3.0 362
AW00123407000 21 May 2016 cont’d
Added Section 7.2.1 on page 198 to explain analog and digital GainAll
control.
Indicated conditions in Section 7.7.2.1 on page 223 for including
LUTEnable in sequencer operation.
Indicated different trigger source availabilities of trigger sources for
sequencer paths 0 and 1 in Section 7.7.2.2 on page 224.
Changed parameter name "Device ID" to "Device Serial Number" in
Section 7.19 on page 327.
AW00123408000 06 Jul 2016 Added information for the following new cameras: acA2040-55u,
acA2040-120u, acA2440-35u, and acA2440-75u throughout the manual.
Updated the max. frame rates for acA1920-150u and acA2500-60u
cameras in Section 1.3.2 on page 7.
Added Section 5.9.2 on page 81 about setting the line mode for a GPIO
line.
Modified the exposure time offset values for acA1920-40u and
acA2040-90u cameras in Section 6.4.3.2 on page 136.
Added a section about RGB8 and BRG8 in Section 7.14.1.2 on page 280.
Added the frame start wait and frame burst start wait events in
Section 6.8.5 on page 179 and Section 7.17 on page 319.
Added the Color Raw user set in Section 7.21 on page 331.
Rearranged information in Section 7.23 on page 342.
Doc. ID Number Date Changes

Index AW00123408000
363 Basler ace USB 3.0
Index
Numerics
6-pin connector ........................................68
pin assignment...................................69
pin numbering ....................................69
A
acquisition
monitoring ........................................167
status ...............................................171
timing chart ......................................180
acquisition mode
continuous........................................113
single frame .....................................113
Acquisition Start command ....................113
Acquisition Stop command ....................114
active set................................................222
additive mixing .......................................291
Auto functions
balance white auto...........................313
exposure auto ..................................309
gain auto ..........................................307
general.............................................299
pattern removal................................314
profile ...............................................312
averaging ...............................................252
B
balance ratio ..........................................284
balance white.........................................313
automatic adjustment.......................313
balance ratio ....................................284
manual adjustment...........................284
Bayer filter
alignment (effective).........................278
alignment (physical).........................278
explained..........................................277
binning
color cameras ..................................253
decreased resolution........................256
effect on image ROI settings............256
horizontal .........................................251
image distortion................................257
monochrome cameras .....................250
response to light...............................256
vertical..............................................250
binning mode......................................... 252
averaging......................................... 252
summing.......................................... 252
black level.............................................. 203
block diagram .................................... 65, 67
boundary parameter value..................... 198
C
camera
dimensions ........................................ 41
models................................................. 1
mounting............................................ 46
power................................................. 73
CCD sensor............................................. 64
chunk
counter value chunk ........................ 348
CRC checksum chunk..................... 350
exposure time chunk ....................... 345
gain chunk....................................... 343
line status all chunk......................... 344
retrieving.......................................... 352
sequencer set active chunk............. 347
timestamp chunk ............................. 346
chunk enable ......................................... 342
chunk features....................................... 342
chunk mode active................................. 342
chunk selector ....................................... 342
CMOS sensor.......................................... 66
C-mount............................................. 41, 42
color
additive mixing................................. 291
adjustment....... 289, 290, 293, 294, 298
parameters................................ 294
creation............................................ 277
cube......................................... 291, 292
enhancement........... 283, 295, 297, 298
fidelity .............................................. 297
filter alignment......................... 266, 278
hexagon........................... 291, 293, 298
primary ............................ 290, 291, 293
secondary........................ 290, 291, 293
space............................... 275, 290, 291
RGB .......................................... 283
temperature..................................... 289
transformation ......... 284, 289, 295, 296

AW00123408000 Index
Basler ace USB 3.0 364
color interpolation
see demosaicing
color transformation
RGB to RGB.....................................283
conformity...................................................4
counter value chunk ...............................348
CRC checksum chunk............................350
critical temperature
event ..................................................52
CS-mount ...........................................41, 43
D
data chunk
see chunk
debouncer ................................................94
decimation
horizontal..........................................261
setting...............................................261
vertical..............................................258
demosaicing
2x2
5x5
Basler PGI........................................286
mode ................................................288
simple...............................................286
demosaicing mode
Basler PGI
simple
device information parameters...............327
device temperature.............................52, 55
digital shift ..............................................207
dimensions
see camera dimensions
direct-coupled (GPIO) input......................82
direct-coupled (GPIO) output ...................84
direct-coupled I/O lines.............................80
E
effective sensor diagonal............................3
electromagnetic interference....................50
electronic shutter
global................................................148
rolling................................................151
electrostatic discharge..............................50
EMI...........................................................50
environmental requirements.....................51
ESD..........................................................50
event
critical temperature .......................... 321
exposure end...................................321
frame burst start .............................. 321
frame burst start overtrigger ............ 321
frame start ....................................... 321
frame start overtrigger ..................... 321
frame start wait................................ 321
over temperature ............................. 321
event notification....................................319
exposure active...................................... 154
exposure mode
timed........................................ 116, 136
trigger width.............................116, 137
exposure overlap time mode ................. 142
exposure time chunk.............................. 345
exposure time offset .............................. 138
ExposureTime parameter ...................... 145
F
filter alignment ...............................266, 278
filter holder............................................... 44
flash window .......................................... 157
frame...................................................... 113
frame burst start trigger ......................... 114
frame rate
increasing ........................................ 186
maximum allowed............................ 184
frame rate calculator..............................184
frame start trigger .................................. 114
G
gain........................................................ 198
mechanisms of control..................... 198
gain chunk ............................................. 343
gamma correction.................................. 275
GPIO lines ............................................... 80
H
heat dissipation..................................51, 52
housing temperature
during operation................................. 51
during storage.................................... 51
measuring spot.................................. 51

Index AW00123408000
365 Basler ace USB 3.0
I
I/O cable ..................................................71
I/O line status.........................................107
image quality............................................52
input
direct-coupled (GPIO)........................82
opto-isolated ......................................74
input line
configuration ......................................93
debouncer..........................................94
inverter...............................................96
internal temperature (core board) ............52
IR cut filter................................................44
cut off .................................................34
transmission.......................................34
IR-cut filter..............................................282
L
LED indicator .....................................68, 70
lens mount
C-mount .......................................41, 42
CS-mount.....................................41, 43
lens thread length (maximum allowed) ....44
licensing
LZ4.....................................................49
light source
color temperature.............................289
Daylight 5000 K................................289
Daylight 6500 K................................289
Off ....................................................289
preset...............................................289
Tungsten 2800 K..............................289
light source preset..................................289
line mode .................................................81
line pitch.................................................338
line status all chunk................................344
LPS
see power supply...............................56
luminance lookup table ..........................271
LUT ........................................................271
M
mechanical stress tests............................48
mirror image...........................................265
mode
acquisition........................................113
binning .............................................252
demosaicing .................................... 288
exposure.......................... 116, 136, 137
exposure overlap time..................... 142
line..................................................... 81
over temperature....................... 52, 222
sensor readout ................................ 150
shutter ............................................. 151
trigger .............................................. 114
mount
see lens mount
mounting instructions............................... 46
mounting points ....................................... 41
mounting screw holes.............................. 41
N
noise reduction ...................................... 286
O
optical format
see optical size
optical size................................................. 3
opto-isolated input ................................... 74
opto-isolated output................................. 77
output
direct-coupled (GPIO) ....................... 84
opto-isolated...................................... 77
output line
configuration...................................... 97
inverter ............................................ 104
timer ................................................ 105
output signal
exposure active ............................... 154
over temperature
behavior............................................. 52
event.................................................. 52
mode ......................................... 52, 222
overheating.............................................. 52
P
pattern removal...................................... 314
PGI feature set .............................. 286, 298
pin assignment (6-pin connector) ............ 69
pin numbering (6-pin connector).............. 69
pixel format................................................ 3
primary color.......................... 290, 291, 293
propagation delays .................................. 86
pulse width (minimum)............................. 97

AW00123408000 Index
Basler ace USB 3.0 366
R
readout mode .........................................150
see sensor readout mode
region of interest (ROI)...........................213
remove parameter limits.........................206
RMA number ..........................................354
S
scaling ....................................................263
secondary color..................... 290, 291, 293
SELV
see power supply
sensor architecture
CCD ...................................................65
CMOS ................................................67
sensor readout .......................................150
sensor readout mode
fast ...................................................150
normal ..............................................150
sequencer...............................................221
sequencer set active chunk....................347
set of chunks ..........................................352
sharpness enhancement........................286
shutter mode
global reset release..................151, 154
rolling................................................151
spectral response
color cameras.....................................34
mono cameras ...................................27
storage
humidity..............................................51
temperature........................................51
summing.................................................252
T
technical support ....................................354
temperature
device...........................................52, 55
housing...............................................51
internal (core board)...........................52
storage ...............................................51
temperature state ...............................52, 55
test images.............................................322
tightening sequence ...........................46, 47
timed exposure mode.....................116, 136
timestamp chunk ....................................346
timestamp value .....................................318
trigger
frame burst start .............................. 114
frame start ....................................... 114
source.............................................. 116
trigger mode........................................... 114
trigger width exposure mode ......... 116, 137
U
USB 3.0
cable .................................................. 71
USB 3.0 Micro-B port............................... 68
USB 3.0 powered hub
LPS.................................................... 56
SELV ................................................. 56
use cases
sequencer operation........................ 236
triggering.......................................... 187
user defined values................................ 330
user set.................................................. 331
active ............................................... 331
auto functions .................................. 332
color raw .......................................... 332
configuring ....................................... 331
default.............................................. 332
high gain.......................................... 332
loading ............................................. 335
saving .............................................. 334
selecting .......................................... 333
user set default ...................................... 332
V
virtual sensor ......................................... 256
W
white balance
see balance white
