Beginners Guide To React
User Manual:
Open the PDF directly: View PDF ![]() .
.
Page Count: 70

The beginners
GUIDE TO
REACT &
REDUX
The Complete React Web
Development Course (with Redux)

Section 1
React 101
•Install Visual Studio Code
•Install Node.js
•Setting up a Web Server
•Setting Up Babel
•Exploring JSX & JSX Expressions
•ES6 Variables & Arrow Functions
•Events & Attributes
•Manual Data Binding
•Forms & Input
•Arrays in JSX
In this section we will dive into the very basic fundamentals of
React and setting up your own web developer environment to
write and execute your own code. We will go through installing a
very popular text editor release by Microsoft called Visual Studio
Code to installing Node.js on your machine and then onto setting
up your very own local web server and installing Babel.
Once we have setup your developer environment we will continue
to learn the fundamentals of JavaScript (ES6) and JSX syntax to
build our foundational skills on both languages and technologies
on which the React Library is built upon.
After learning the basics we will move onto the next sections where
we will start learning more about the React component
architecture and will build our own applications.
It will soon become apparent why React is considered a very
popular frontend JavaScript library as you are not required to learn
a new language but rather learn an application architecture based
on components.

Installing Visual Studio Code
There are many free and paid text editors out there available to download and
use to write your own code, popular editors include Atom, Sublime Text,
Notepad++ and Visual Studio Code to name a few. We will be using Visual
Studio code as our text editor of choice to write our code as it allows us to
install some useful packages to help write our code.
To install Visual Studio code simply visit the following website and download and install the application onto your
machine: https://code.visualstudio.com/
Visual Studio Code has some useful extensions which you can install:
•Bracket Pair Colorizer
•ES7 React/Redux/GraphQL/React-Native Snippet
•Liver Server
•Prettier - Code Formatter
•Babel ES6/ES7

Installing Node.js
Node is JavaScript on the server. You can visit the following website to
download node onto your machine: https://nodejs.org/en/
Download the latest version of node that is available on their website.
To check that you have node.js installed on your machine, simply open up your terminal and enter the following
command:
$ node —v
This will allow us to double check that node was installed onto our machine as we now have this new command and it also
shows us what version of node you have installed on your machine. When installing node we also got NPM (node package
manager) which allows us to install various dependencies/packages such as React or Yarn and other libraries. NPM and Yarn
aims to do the same job. To check that you have npm installed enter the following command in your terminal:
$ nom —v
To install yarn on your machine globally run the following command in your terminal:
$ npm install —g yarn
On windows machines you will need to restart your machine to complete the installation. To check that yarn has installed
successfully, run the following code in your terminal:
$ yarn ——version

Setting up a web server
To setup a developer web server we can achieve this in two ways using live-server.
Firstly you will need to create a directory (folder) for your application. This folder will act as a place for all your project code.
This folder can be called anything for example ‘indecision-app’. In this example we will create a sub-folder called public and
store our basic HTML file.
If we open VS Code and have installed live-server extension we can simply open up our html document and right-click to
open the file with live-server. Every-time we update our project files in the folder, the live-server will refresh the browser
which will update our application with the changes automatically.
Alternatively, we can use npm or yarn to install live-server globally onto our machines using either command in the terminal:
$ npm install —g live-server or $ yarn global add live-server
To check that we have installed live-server on our machine correctly we would run the command:
$ live-server —v
To run live server from the terminal, navigate to your file directory using cd and the file path. Note: you can use cd to change
directory, ls (or dir on windows) to list all the files within the folder. You can use cd ~ to navigate back to your user folder.
Once you have navigated to your project directory run the following code:
$ live-server public
Note: you would run live-server followed by the folder name in the directory you wish to serve through the live web server
(in our example we had a sub-folder called public which contained our HTML file). Any changes made in the folder will
automatically update in the browser.

Setting up Babel
Babel is a compiler and allows you to write for example JSX, ES6, ES7 code and have it compile down to regular ES5 code,
allowing your code to work on browsers which only support ES5 syntax.
https://babeljs.io/
Babel on its own has no functionality. Babel is a compiler but its not going to compile anything by default. We have to add
various plugins and presets in order to get any sort of change in our code (e.g. taking JSX code and converting it into ES5
createElement calls). A preset is just a group of plugins.
We are going to install babel locally on our machines so that when we write our code in JSX/ES6/ES7 it will compile locally
to our ES5 code (i.e. we want to write our code locally on our machine and update without using Babel on the web).
The babel website has a docs page which provide documentation on plugins available to you to install. We will install two
presets: react preset and env preset. These presets have all the necessary plugins we require and we would not need to
install the plugins individually by ourselves (as this could get out of hand very quickly). The env preset will include ES2015,
ES2016 and ES2017 plugins which will give us access to the new JavaScript features (e.g. arrow functions, const and let
variables, spread operator etc).
In our local environment we are going to install three things:
Babel itself, env preset and react preset.
In your terminal run the following command to install babel @v6.24.1 globally on your machine.
$ npm install —g babel-cli@6.24.1 or $yarn global add babel-cli@6.24.1

This will give us a new command in our terminal which we can run while in our project directory. Run the following code to
check if Babel has been installed successfully. This should print out the help output in your terminal and will indicate if Babel
has been installed successfully on your local machine.
$ babel ——help
To clear the terminal enter the command line:
$ clear
The react and env presets will be installed locally in our projects (i.e. these codes will live in our projects so that babel CLI
can take advantage of these codes to transform our code down to ES5 syntax). Within the project directory enter the
following command:
$ npm init or $ yarn init
This command will setup our project to use node/yarn and specify the local dependencies. This will walk us through series of
questions such as the app name, version, description,
entry point, repository, author and license (MIT).
All this does is, it generates a brand new file in our
project called package.json (note we could have created
this file ourselves without the npm/yarn init command).
The whole point of package.json is to outline all the
dependencies that the project needs in order to run. This
will make it easy to install everything.
We are going to add our dependencies to this package.json file using the following commands in the terminal:
$ npm install babel-preset-react@6.24.1 babel-preset-env@1.5.2 or
$ yarn add babel-preset-react@6.24.1 babel-preset-env@1.5.2
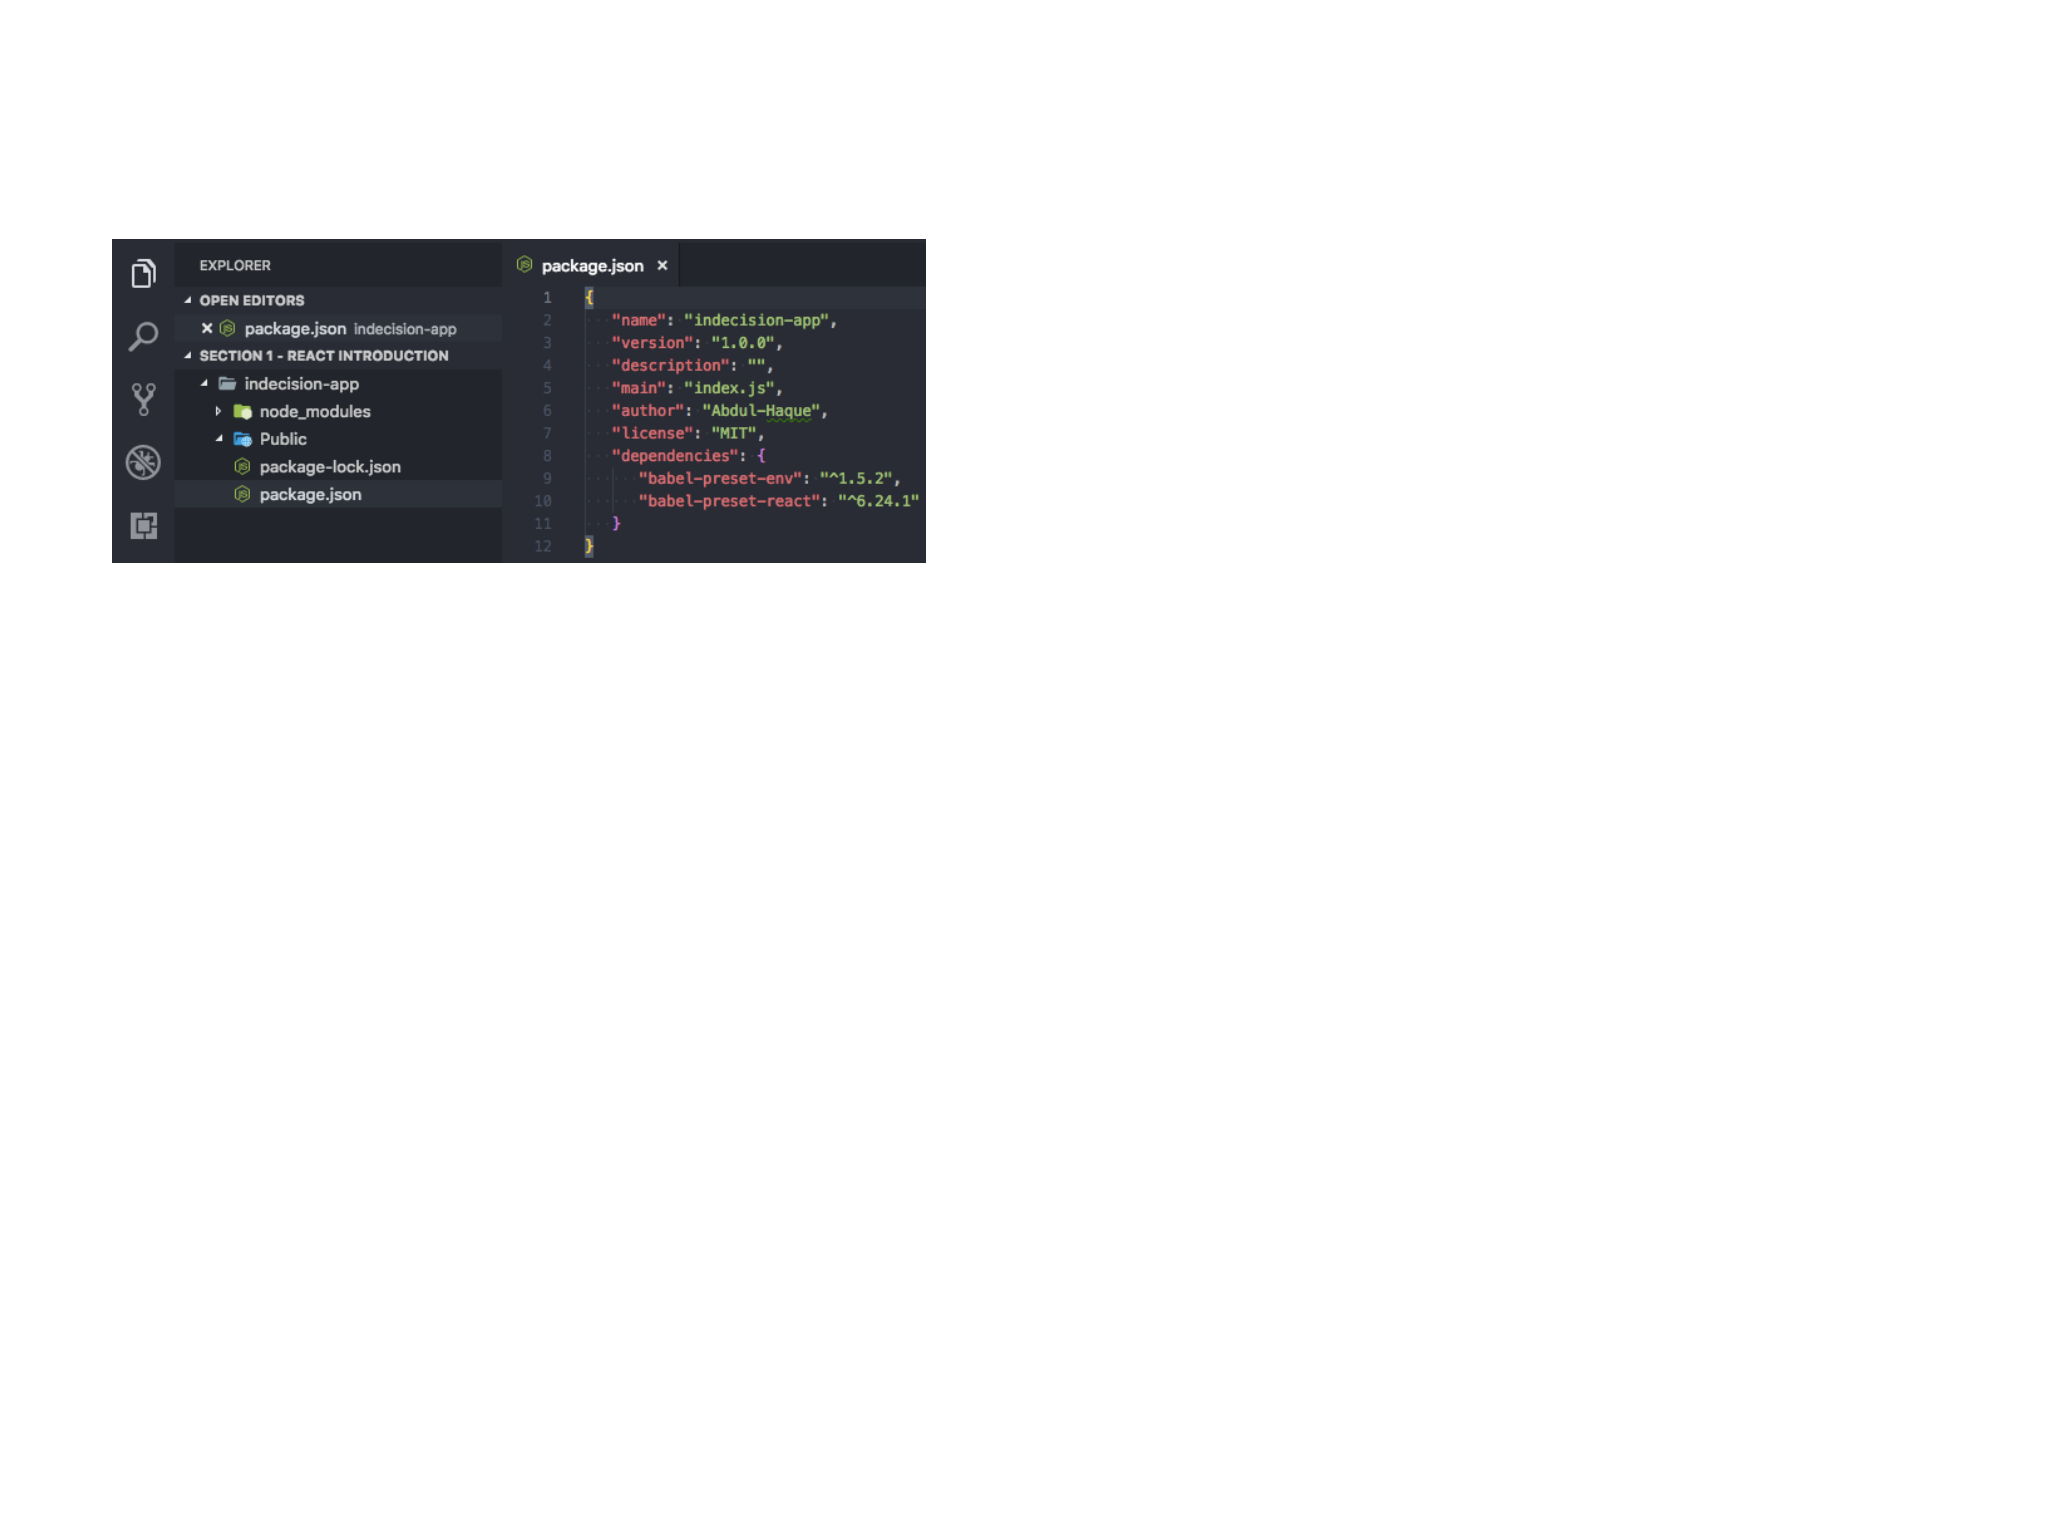
This will install the two dependencies and will update the package.json file in our app folder which will now list our
dependencies for our app. Notice that a new folder has been created called node_modules. This is where all the modules
and dependencies will live.
The dependencies will have their own package.json file which will
list the dependencies they require to run. This will install the all the
sub-dependencies of their own in the node_modules folder. The
package.json file makes it easy to install all the dependencies and
sub-dependencies your application will need.
We will never need to go into the node_modules folder to change
any of the code. This folder is a auto-generated folder from the
package.json file and we can always delete and reinstall this folder/modules using the dependencies information from the
package.json file (we would use the command $ npm install or $ yarn install to install the node_modules folder again).
This command has also generated a package-lock.json file (if you used yarn this file will be called yarn.lock) in our project
folder. We will not need to edit/manually change this file. This file lists out all the dependencies in the node_module folder,
the version used and where exactly it got that package from. This helps npm/yarn behind the scenes.
We are now able to use Babel locally on our machines within our project directory to compile our React JSX code into
regular ES2015 code. In the terminal we will need to run the following command with a few arguments:
$ babel src/app.js ——out—file=public/scripts/app.js ——presets=env, react ——watch
The first argument specifies the path to our code we wan to compile (in our example above it lives in the src folder and the
file is called app.js).
The second argument specifies the output file (in our example above it lives in the public/scripts folder and is also called
app.js). This file will always be overridden by Babel.
The third argument specifies the presets we would like to use (this is a comma separated list of the presets we wish to use).
Finally, the last argument will watch for any changes in the first specified file to update (compile) the second specified file
automatically.
Babel will compile the JSX/ES6/ES7 code in one file into regular ES2015 code the browser will understand in the other file.

Exploring JSX
In JSX you can only have a single root element. If you want to add more elements side by side we will need to wrap it within
a single root element for example:
var template = <div><h1 id=“someid”>Header Text</h1><p>Paragraph Text</p></div>;
var appRoot = document.getElementById(‘app’);
ReactDOM.render(template, appRoot);
When we are creating JSX expressions, we can get really complex expressions to include a lot of information/nested
elements - however, we must have a single root element.
We can make our JSX expression more readable by formatting the elements on separate lines i.e. format as we would do in
our html code for example:
var template = (
<div>
<h1 id=“someid”>Header Text</h1>
<p>Paragraph Text</p>
</div>
);
The above would still be seen as valid JSX expression and table will successfully render the expression down to ES2015.

The above is more readable to the eye and easily understood. We can make the expression even more complex and as long
as there is a single parent root element (the <div> wrapper) then this will be seen by Babel as valid JSX. Below is another
example of a complex JSX expression with nested elements.
var template = (
<div>
<h1 id=“someid”>Header Text</h1>
<p>Paragraph Text</p>
<ol>
<li>Item One</li>
<li>Item Two</li>
</ol>
</div>
);
All this is doing is creating nested React.createElement() functions calls to create each element in the ES2015 syntax.
React.createElement(‘ol‘, null,
React.createElement(‘li’, null, ‘Item One’),
React.createElement(‘li’, null, ‘Item Two’)
)
This is why we do not write our React code in React.createElement calls as it is difficult to read and write, instead we use JSX.

We can make our JSX code dynamic by using variables to store data and then referencing these variables within our JSX
expressions. For Example:
var userName = ‘John Doe’;
var template = (
<div>
<h1> { userName .toUpperCase()} </h1>
</div>
We use the curly brackets to write any JavaScript expressions. Therefore we can enter the JavaScript variable within the curly
braces to output the variable value in our JSX code. This allows our JSX to be dynamic rather than static.
In our JavaScript expressions we can use different types such as strings, numbers, operators, arrays, objects, functions etc.
To render an object in React we must specify the object property, for example:
var user { name: ‘John Doe’, age: 28, location: ‘Derby’ } ;
var template = (
<div>
<h1> Name: { user.name } </h1>
<h1> Age: { user.age } </h1>
<h1> Location: { user.location } </h1>
</div>
);
We have now dynamically injected our data from our variables into our JSX expression.

We should now have knowledge on how to use JavaScript expression in React, how to render JavaScript strings and number
types and that we cannot render object but we can render the object properties.
There are still many more other JavaScript types. We are going to continue to look at JavaScript expressions and how we
can make truly dynamic and useful JSX.
Conditional Rendering and conditional logic in general is at the very core of software development. The same will be true
for our React interfaces for example, is the user logged into the app? If true, then show the logout button, else show the
login button.
To perform Conditional rendering in our JSX we will need to use JavaScript expressions. We can continue using the regular
conditional statements we have been using in vanilla JavaScript and do not need to learn any weird syntax.
The conditional JavaScript tools that are available are:
1) If Statements.
2) Ternary operators.
3) Logical and operator.
IF STATEMENTS:
A if statement is not an expression and therefore cannot live inside the curly brackets (i.e. JavaScript expression). However,
calling a function is an expression. We can add whatever we want in our function including if statements. The return value
from the function will show up in the JSX. For example:
var user = {
user: ‘John Doe’,
age: 28,
location: ‘Derby’
}

function getLocation(){
if (location) {
return location;
} else {
return ‘unknown’;
}
};
var template = (
<div> <h1> { getLocation(user.location) } </h1> </div>
) ;
We can use the function to operate the if statement and whatever is returned from our function can be used in our
JavaScript expression to pass the data into our JSX to display.
We can use other JSX expression such as {123} and {<h3>Heading 3</h3>} and this will render in our browser. This is
equivalent to writing JSX expression outside of the curly brackets. This is useful as it allows us to setup getLocation() to
return a separate JSX expression. For example:
function getLocation(){
if (location) {
<h1> { getLocation(user.location) } </h1>
} else {

return undefined;
}
};
var template = (
<div> { getLocation(user.location) } </div>
) ;
Important Note: undefined is implicitly returned if you do not explicitly return it. Therefore the above getLocation() function
can be simplified without returning the else statements:
function getLocation(){
if (location) {
<h1> { getLocation(user.location) } </h1>
}
};
This will implicitly return undefined when the statement returns false. If the Statement returns true this will return the JSX
expression value within the other JSX expression curly brackets. This will then render in our browser.
TERNARY OPERATORS:
A ternary operator is a expression and not a statement and therefore we do not need to add it to a function. A ternary
operator allows us to write if statements more concisely. For example:
True ? ‘Return True’ : ' Return False’; [This will return ‘Return True’ as the statement is true]

False ? ‘Return True’ : ' Return False’; [This will return ‘Return False’ as the statement is false]
These two ternary operator will check whether the statement is true or false. If true it will return the first value else it will
return the false value. Therefore the first example will return ‘Return True’ while the second example will return ‘Return False’.
We use the ? to return something when the statement equates to true while we use the : to return something when the
statement equates to false.
The first part of the ternary operator is the statement we wish to check the value i.e. whether it will return true or false.
Depending on the answer we want to return the first value else we return the second value. For example:
{ app.option.length >0 ? <p>’Here are your options’</p> : <p>’No options’</p> }
LOGICAL AND OPERATOR:
Much like the undefined, null and the boolean values true and false are all ignored by JSX. Therefore we can write a JSX
expression of {true}, {false}, {null} or {undefined} and all will be ignored by JSX and will not be rendered on the screen. This is
a very useful feature.
If we want to display a JSX expression e.g. <p> tag for age, only if the user is 18yrs or older else we do not want to display
the age of the use if they are under age. We could use the function technique, however, we are going to explore this new
technique which is just as concise as the ternary operator.
The Logical And Operator uses the && to check if two arguments returns true to run the code. If both do not return true we
do not want to run the code. We will examine the Logical AND Operator to understand the technique and how it can be
used to solve the above problem without using to the function technique.
true && ‘Some Age’;
If we run the above, this will return the value ‘Some Age’. So in Logical And Operator if the first value is true it is not going to
use/return that first value; however, if the second value is also true it will use/return the second value.

False && ‘Some Age’;
If we now run the above, this will return false. So in this instance, where the first value is false, that value is what actually gets
used/returned and ignores the second value ever exists.
Therefore if we check for age and the user is below 18 a boolean (false) is returned and this is ignored by JSX. We can use
this tools and technique to add this conditional rendering in our JSX.
The ternary function is great for when you want to do one of two things, while the Logical And Operator is useful for when
you want a condition to do one thing else you want to do nothing at all.
We can make our Logical And Operator even more complex by checking two things in our first value to equate to true or
false for example we can check if the age exists at all and is above 18 to return our JSX. For example:
{ (user.age && user.age >=18) && <p>Age: { user.age } </p> }
We have now explored the very basics of conditional rendering techniques we will use over and over again. Eventually, over
time and lots of practice, we will eventually master all three strategies. However, we should now be confident of being able
to make our JSX expressions more dynamic.

ES6 Aside: Let & const
ES6 introduces let and const variables keywords which are alternatives to the var variable keyword. Is there anything
inherently broken with var? No. The only problem with var is that it can be easily misused creating unnecessarily weird
situations. For example: not only can you reassign a var variable but you can also redefine the variable. This means if
recreate a var variable without knowing that you have created it elsewhere in your code, you are essentially overriding the
original variable value and therefore you will run into hard to debug issues.
var nameVar = ‘John Doe’;
var nameVar = ‘Mike’;
The let and const variables prevents you from reassigning/redefining existing variables.
The let variable allows you to reassign the variable however you cannot redefine the variable (i.e. you cannot redeclare the
same variable. You can however reassign it to another type e.g. a string to a number).
let nameLet = ‘John Doe’;
let nameLet = ‘Mike’; > Uncaught SyntaxError: Identifier ‘nameLet’ has already been declared at…
The const variable does not allow you to reassign nor redefine the variable again.
const nameConst = ‘Frank’;
const nameConst = ‘Barry’; > Uncaught SyntaxError: Identifier ‘nameLet’ has already been declared at…
nameConst = ‘Barry’; > Uncaught TypeError: Assignment to content variable at…

By default you should always use the const variable when creating a new variable, however, if you need to reassign the
variable then you should switch to the let variable instead. You should stop using the var variable.
There are a few other differences between var, let and const variables i.e. the scoping of the variables are also different.
The var, let and const variable are all function—scoped meaning that the variable within the function cannot be accessed
outside the function.
function getName(){
name = ‘Paul’;
}
getName();
console.log(name); > Uncaught ReferenceError: name is not defined at…
Note: we could create the variable called name outside the function and set the value to the function which will work.
The let and const variables are all block-scoped whereas var is not. Bock Scoping is where the variable are also bound to the
code block (e.g. the code block for an if statement or a code block for a for loop). For example: if we had a variable in an if
statement this variable can be accessible outside this code block provided this variable uses var instead of let and const.
const fullName = ‘John Doe’;
If(fullName) {
const firstName = fullName.split(‘ ‘);
}
console.log(firstName) > Uncaught ReferenceError: name is not defined at…
Remember the rule: ‘const first; if we need to reassign, let; … var never!’

ES6 Aside: Arrow Functions
Arrow functions is a new ES6 syntax and is used heavily throughout React, therefore, it is important to have a basic grasp of
how arrow functions operate.
We are going to compare and contrast a regular ES2015 function with a ES6 Function. The function we are going to create
will square a number.
ES2015 Regular Function Syntax:
const square = function(x) {
return x * x;
};
console.log(square(5));
ES6 Arrow Function Syntax:
const square = (x) => {
return x * x
};
Arrow functions do not need the function keyword. We start with the function argument(s) followed by an arrow and then the
function body.

Arrow functions are always anonymous (unlike ES2015 functions where we can give the function a name). To give an arrow
function a name we must always declare a const or let variable first and assign the arrow function to it as we did above.
Example of ES2015 Function with a Name:
function square (x) {
return x* x;
};
console.log(square(5));
If an arrow function body returns only a single expression we can use the new syntax. We no longer require the curly
brackets. The expression is implicitly returned and therefore we do not need to write the return keyword (compared to the
ES2015 syntax where we need to explicitly return):
const square = (x) => x * x
The argument object s and this keywords are no longer bound to the arrow function. This means that if you try to access the
arguments, it is not going to work.
ES2015 Example:
const add = function (a, b) {
console.log(arguments);
return a + b;
};
console.log(add(1, 2, 3);
The arguments will have access to the 100 object even though this has not been defined in the function and is outside the
function.

However this has gone away with arrow functions as we cannot access objects outside the arrow function.
const add = (a, b) => {
console.log(arguments);
return a + b;
};
console.log(add(1, 2, 3) > Uncaught ReferenceError: argument is not defined at…
In ES2015 when we use a regular functions and we define it on an object property, the this keyword is bound by that object
e.g. we have access to the values for example:
const user = {
name: ‘John’,
cities: [‘Bristol’, ‘Bath’, 'Birmingham’]
printPlacesLived: function () {
this.names;
this.cities.forEach(function(city) {
console.log(this.name + ‘ has lived in ‘ + city);
});
}
};
The forEach function takes in a single function as a parameter and will be called once for each item in the array with a single
argument called city. However, this will return an error in the JavaScript console of Uncaught TypeError: Cannot read
property ‘name’ of undefined at… This is because the this.name is not accessible inside the forEach function but is

accessible in the printPlacesLived function which is and object inside of the user object. The past workaround was to create
a const variable called that and assign the this value to it and then in the nested function use the that.name which will make
the function work without causing the error message.
With arrow functions, they no longer bind their own values, instead they use the value of the context they were created in i.e.
it would just use its parent ‘this’ value. We no longer require the ES2015 workaround.
const user = {
name: ‘John’,
cities: [‘Bristol’, ‘Bath’, 'Birmingham’]
printPlacesLived: function () {
this.names;
this.cities.forEach((city) => {
console.log(this.name + ‘ has lived in ‘ + city);
});
}
};
There is no need for the const that = this workaround as arrow functions will use the value from the parent this keyword.
There are places where you would not want to use the arrow function for the very reason above such as methods for
example if we turned the printPlacesLived method into an arrow function this will return and error message of Uncaught
TypeError: Cannot read property ‘name, cities’ of undefined at… because the arrow function is no longer equal to the user
object and will look to its parent level which is the global scope and therefore undefined causing the error.
ES6 does introduce a new method syntax where we can remove the ES2015 function keyword and have the above work.
printPlacesLive() {…};

Map is an array method like the forEach() but it works a little differently. This function gets called one time for every item in
the array. Just like the forEach we have access to the item via the first argument (e.g. we can call them city). The difference is
that the forEach method just lets you do something each time e.g. print to the screen, whereas, the map allows you to
actually transform each item and return a new item back. We can therefore transform our array and get a new array back.
const userMap = {
name: ‘Peter Parker’,
cities: [‘New York’, ‘London’, ‘Rome’]
printPlacesLived() {
return this.cities.map((city) => this.name + ‘ has live in ’ + city);
}
};
console.log(printPlacesLived());
This will return a new array object of [‘Peter Parker has lived in New York’, ‘Peter Parker has lived in London’, ‘Peter Parker has
lived in Rome’]. Maps are used a lot in React development.

Events & Attributs
Responding to user interactions via events is at the core of all web apps.
Attributes sit within the opening tag of an html element for example id and class are attributes. The class attributes are used
to add an identifier across multiple elements while id is a unique identifier.
However, in JSX some attributes remain the same while others have been renamed. An example of a renamed attribute is
class which JSX refers to as className.
Regular HTML Attribute:
<div class=‘row’></div>
JSX HTML Attribute:
<div className=‘row’></div>
Certain keywords are reserved words in JavaScript such as let, const, class etc. and therefore certain HTML attributes
required a name change in order to work with JSX. The React document page provides a full list of HTML attributes that have
been renamed (scroll down to the All supported HTML Attributes section):
https://reactjs.org/docs/dom-elements.html
In JSX al the keywords have become camelCase for example autofocus is now autoFocus in JSX.
We would use the onClick attribute to create a function that would be run every time the button is clicked. We would
reference the function within a JSX expression.
<button onClick={addOne}>Click Me</>
The function should be created elsewhere before the JSX expression i.e. define the function before calling it.

const addOne = () => {
console.log(‘addOne’);
} ;
This will display the addOne every time we click on the button which will indicate the function is being fired off every time
the button is clicked. This allows us to create meaningful events for when the user interacts with our application but running
functions.
Note we can add function inline with our JSX rather than separating the function out and this is perfectly viable, however,
your code could end up looking unreadable. Good practice is to reference your function elsewhere and then call on that
function within your JSX.
const template = {
<button onClick={ () =>{
console.log(‘addOne’);
} }></button>
}
We have now explored a little user interaction between the user and the React app.

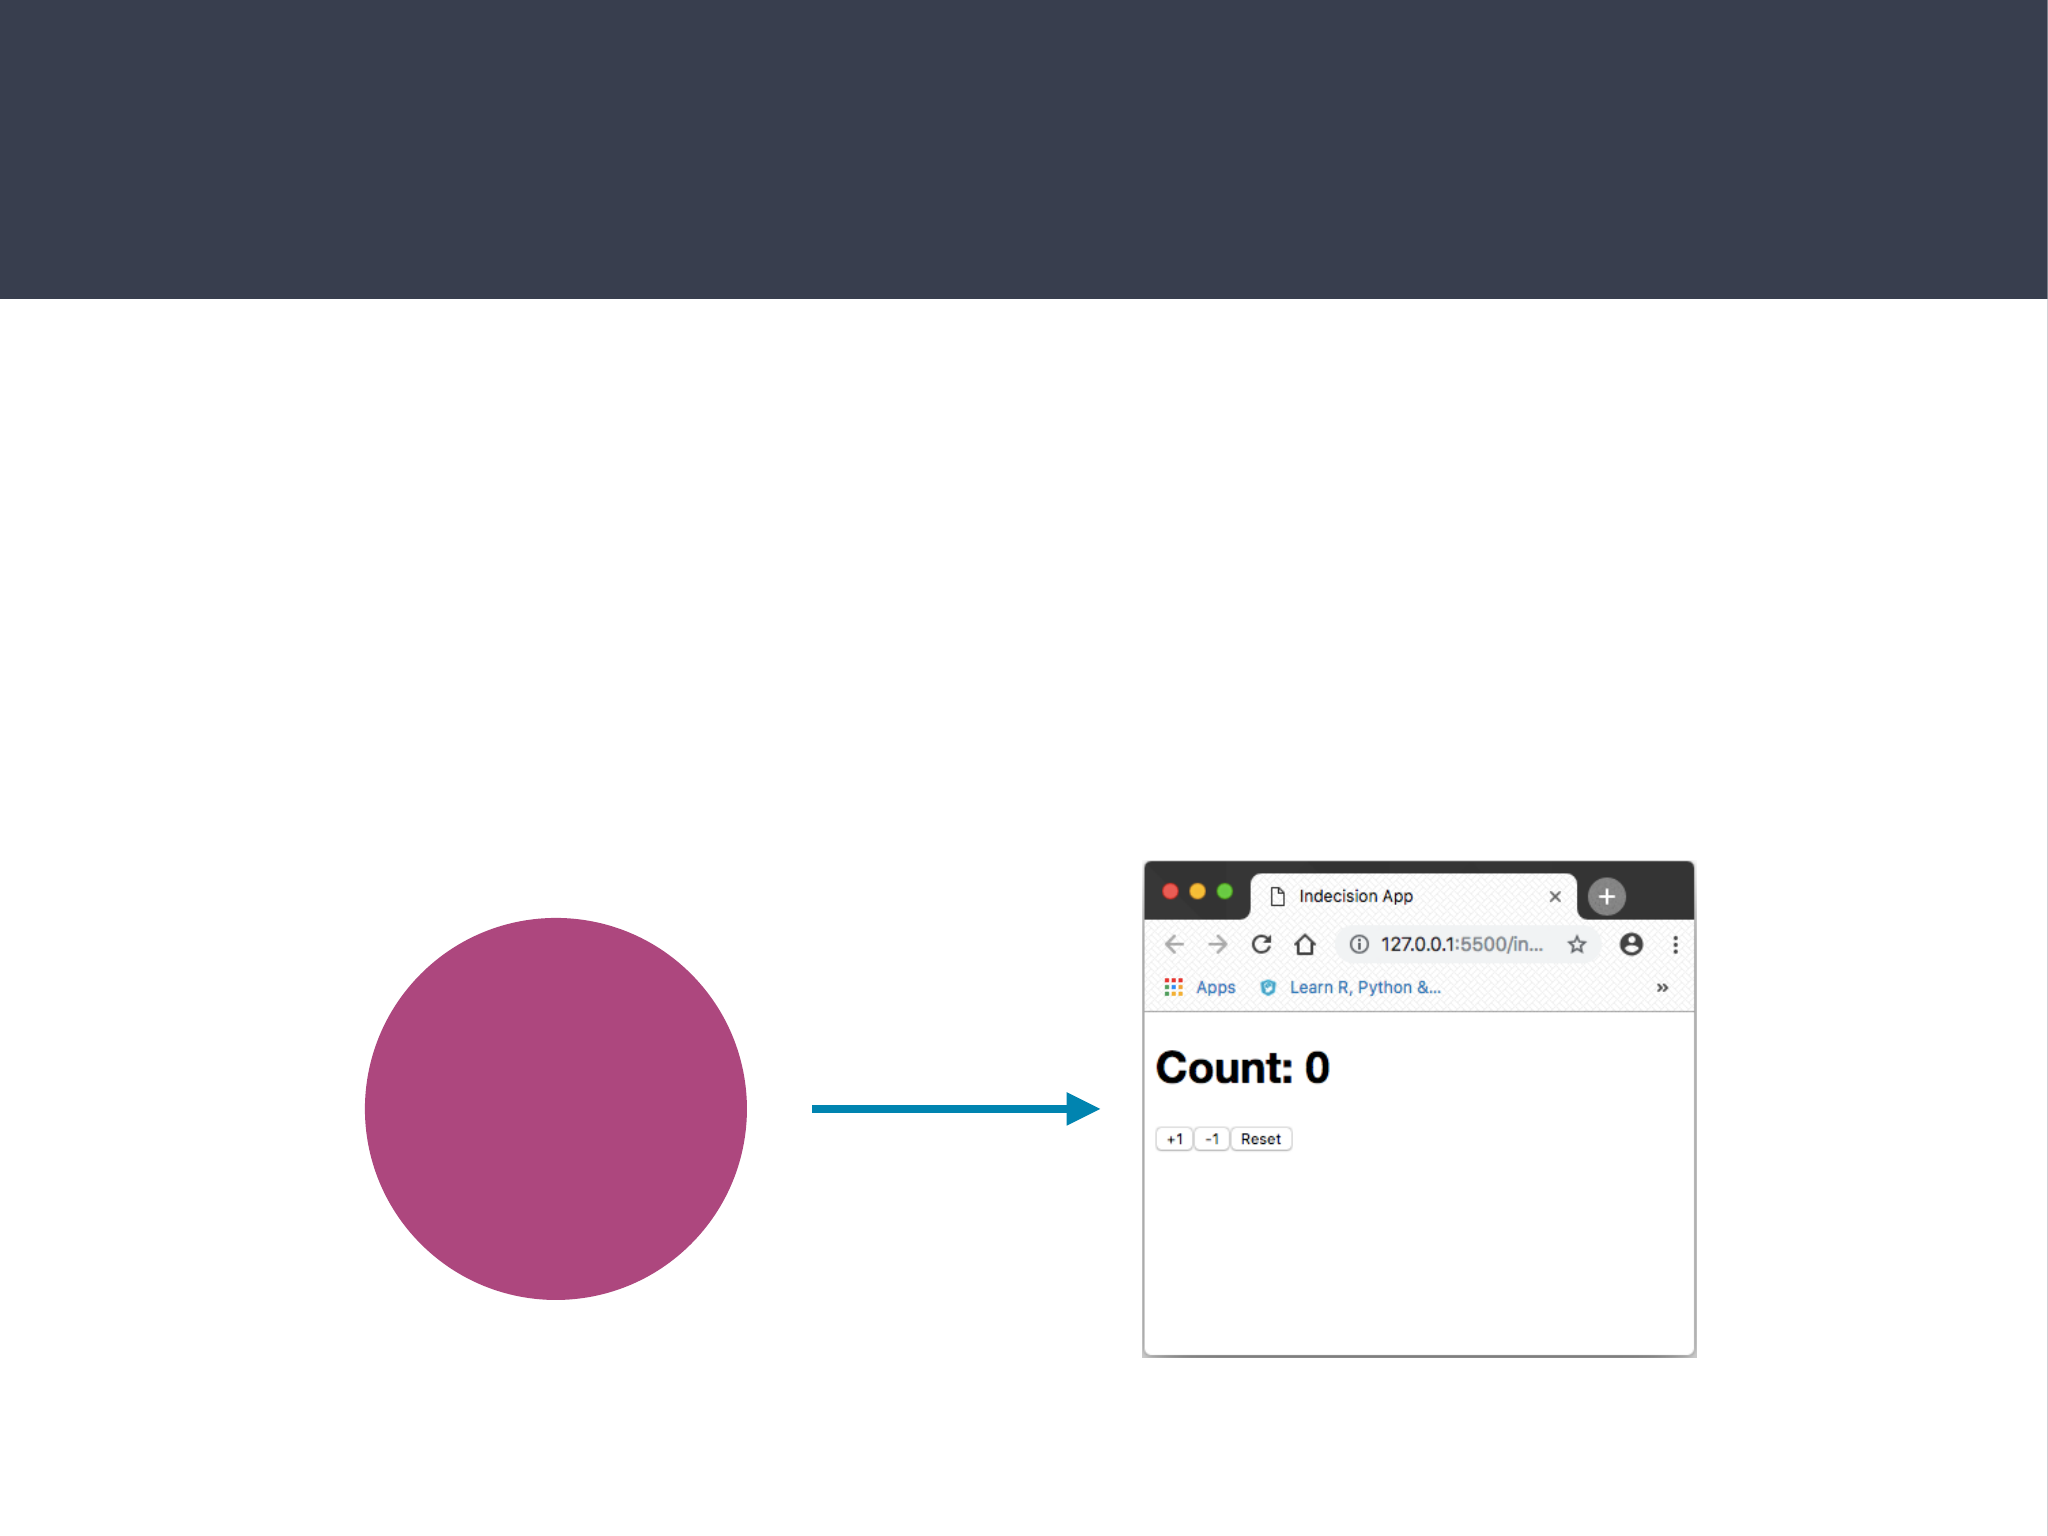
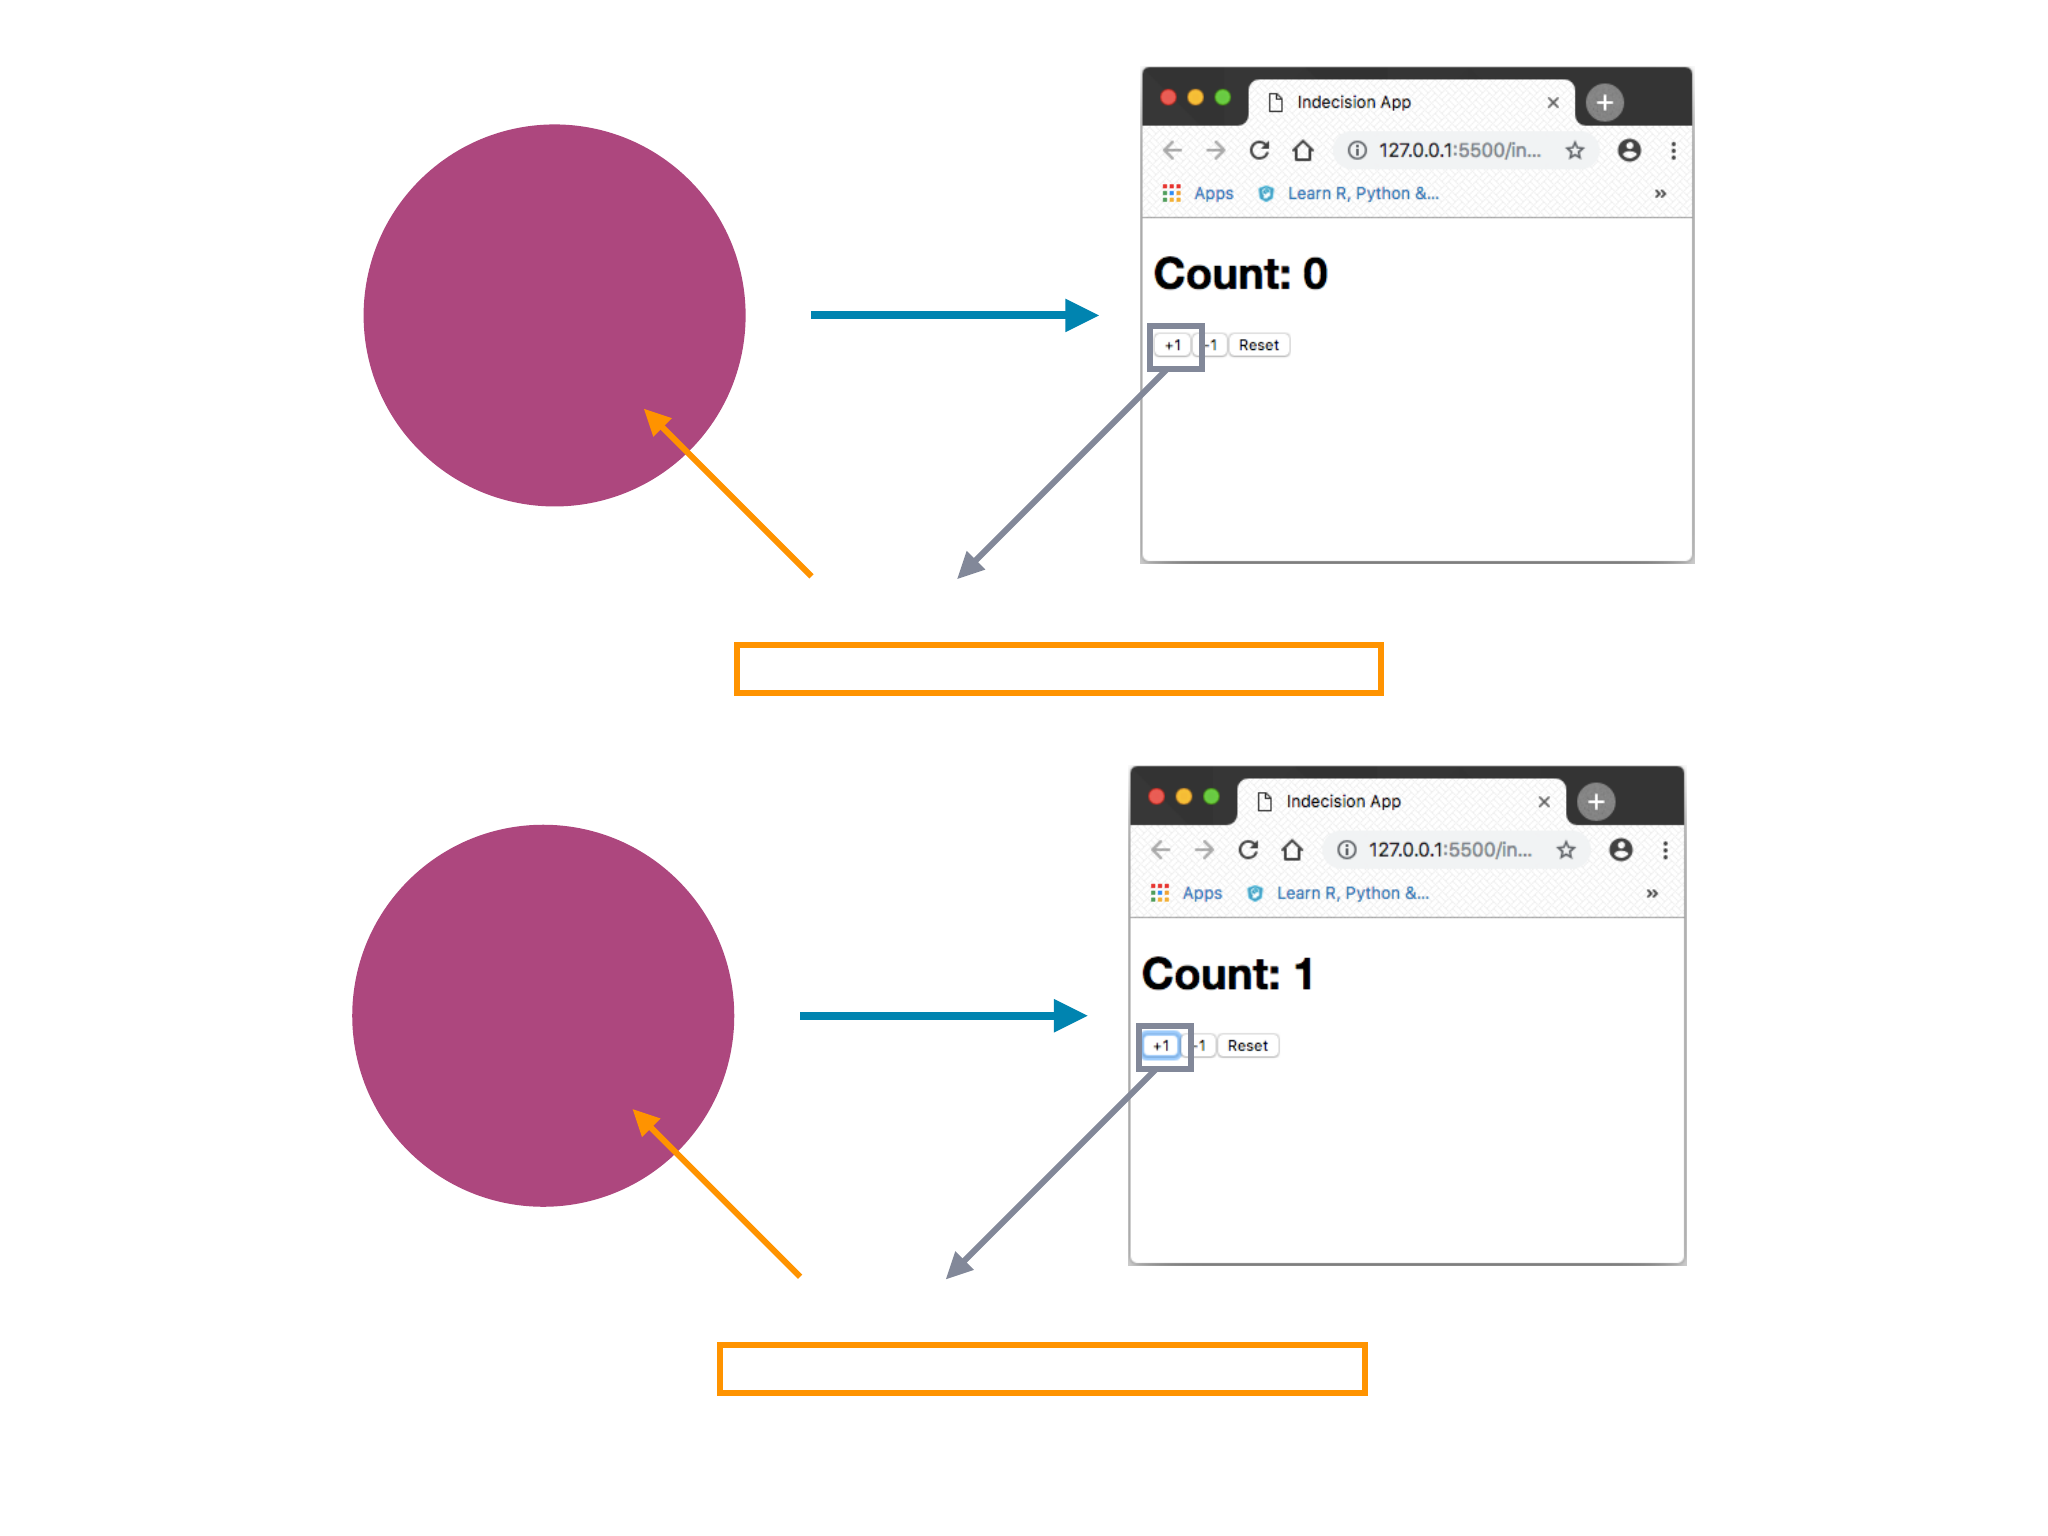
Manual Data Binding
let count = 0;
count addOne = () => { count++ };
const template = (
<div>
<h1>Count: { count }</h1>
<button onClick={addOne}>+1</button>
<div>
);
const appRoot = document.getElementById(‘app’);
ReactDOM.render(template, appRoot);
The above function will not update the count shown in the <h1> because the <h1> element has already been rendered to
the screen and the application is not re-rendering to show the new count value.
JSX does not have built in data binding. When we create JSX, all the data that gets used inside of it, that happens at the time
the code runs. Therefore, count is always going to be 0.
To fix this we need to rerun our template code and the ReactDOM.render function again when our data changes. We would
use React Components to do that later on, but for now we will explore how to manually do this to understand how React
works before we dive into React.

const renderCounterApp = () => {
const template = (
<div>
<h1>Count: { count }</h1>
<button onClick={addOne}>+1</button>
<div>
);
ReactDOM.render(template, appRoot);
};
renderCounterApp();
With this new function renderCounterApp, this will render our application. We would want to initialise the function so that
when we run our application for the very first time we would render the template to the screen. However, whenever we make
changes to the data using event functions, we would want to call on that same function to re-render the template with the
new data which allows our application to update in real-time.
This simple technique above illustrates exactly how React does this thing really well and we will look at the advanced
techniques in more details later. It is important to understand that this is essentially what is happening behind the scenes in
React.
React is actually very efficient behind the scenes as it does not re-render the whole application every time there is a change.
React uses some virtualDOM algorithms in JavaScript to determine the minimal number of changes that needs to be made
in order to correctly render the new application. Therefore, the whole application does not need to re-render which would
be very taxing and make the application not scalable. Using ReactDOM.render we are getting all the capabilities of React
and we are using the virtualDOM algorithm to efficiently render and re-render our application.

Forms & inputs
The structure of forms will looks exactly the same as regular HTML, angular or any other templating frameworks. Forms are
usually used to allow the user to input in information using the form and then doing something when the user submits the
form. This allows applications to be more interactive. To create a form in html you will use a <form> tag and place everything
you want in your form within these tags.
<form>
<input type=‘text’ name=‘identifier’ />
<button>Add Option</button>
</form>
The input tag has some attributes which remain the same as regular html. The type indicates the type of input field, while the
name provides a unique identifier for the field which would allows us to collect the data from the input field when we listen
for the form submission.
The above will create a textbook input field and a button. When we enter something in the input field and press the button
this will refresh the page but add to the end of the url an ?option=input-field-value — for example if we used the text test and
pressed the button our url would look something like:
http://127.0.0.1:5500/indecision-app/Public/index.html?option=test
We do not want to go through this method a full refresh of the page, that sort of technique is useful for older server side
rendered applications. We want to handle the form submission on the client, we want to run some JavaScript code that
pushes and item onto the array and re-renders the application. To do that we would need to setup an event handler for the
form submission.

In the React documents there is a page on all the different event handlers we could use in our react application (supported
events: Form Events = onChange, onInput, onInvalid, onSubmit. These are the various event handlers for forms):
https://reactjs.org/docs/events.html
We would want to use the onSubmit event handler on our <form> tag. When we use the event handler we need to set it to a
JavaScript expression where we want to reference a function we want to have fired when the event happens.
const onFormSubmit = (e) => {…}
<form onSubmit={ onFormSubmit } >
<input type=“text” name=‘option'>
</form>
When using event handler functions, we usually have access to an event (e) object that is passed in as a parameter within our
event handler function. This event object holds various information and methods we can use. For forms we have a event
object method which allows us to prevent the full page refresh when the user submits a form.
const onFormSubmit = (e) => {
e.preventDefault();
} ;
In our onSubmit we want to reference the function but do not want to call the function because if we call the function it is
equivalent to calling undefined.
<form onSubmit={ onFormSubmit } >…</form> make reference to the function and not call it.
<form onSubmit={ onFormSubmit() } >…</form> using () at the end of the function will try to call it.
We can use the event object to call on the target.elements to have reference to all the elements from our form which are
referenced by name. In the above example we can look at the input field with the name=‘option’ and return the value.
e.target.elements.option.value

We can use the value and set it to a variable and then have our function to perform actions using that information.
const onFormSubmit = (e) => {
e.preventDefault();
const option = e.target.elements.option.value;
if(option) {
app.options.push(option);
e.target.elements.option.value = ‘’;
};
} ;
Forms are a useful way of recording information from users of your application and then perform some sort of function using
that information that is returned from the e event object, the above example takes the input field value and stores it in the
app.options array object.

Arrays in JSX
So far we know that JSX supports both strings and numbers, it does not support objects and it ignores booleans, null and
undefined.
The good news is that JSX also supports arrays and it actually works with them really well. We would put the array in an JSX
expression to render onto the screen.
{
[98, 99, 100]
}
The above is the same as writing the JSX expression of:
{98}{99}{100};
This will add each array item side by side which will display 9899100 in the browser. This is what is happening behind the
scenes i.e. it is taking your array and breaking them our as individual JSX expression and is rendering them all to the screen.
We know that numbers and strings will show up on the browser. Booleans, null and unidentified can also be used in arrays
however they will not show up in the browser.
{
[99, 98, 97, ‘Mike’, null, undefined, true, false]
}
We cannot use objects within arrays as they are not supported by JSX expressions.
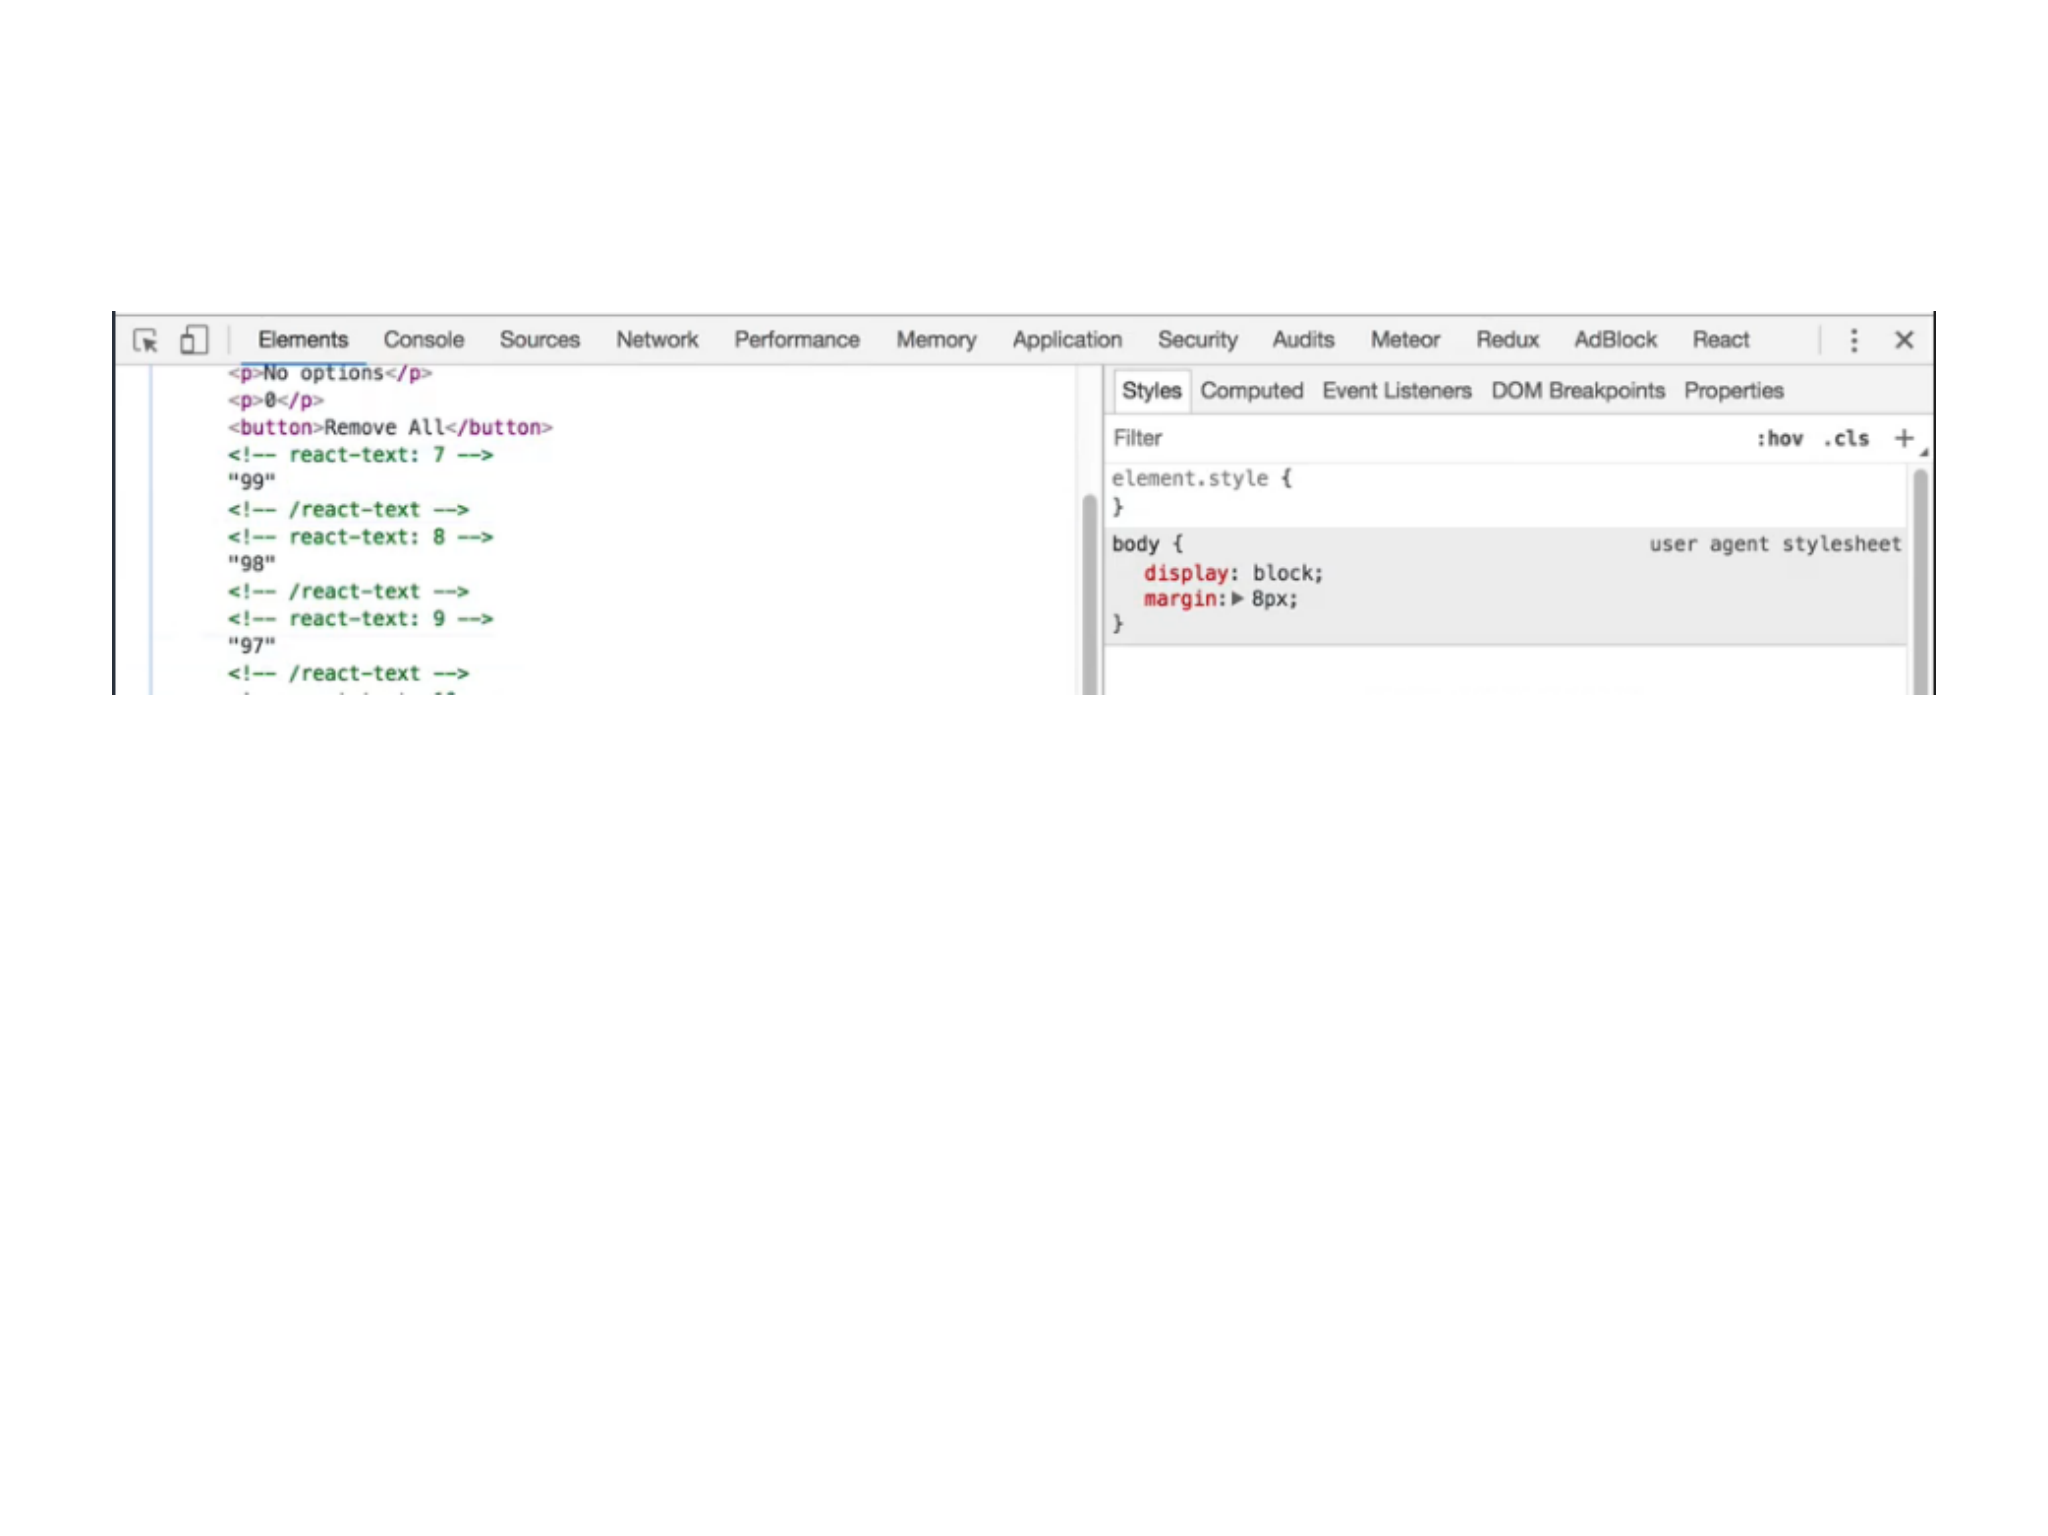
If we inspect the developer tools in our browser and within the Elements tab, we can see exactly what gets rendered in the
DOM for the array object. React creates various comments (react text nodes) for our array object, and this is how React keeps
track of various items and where they are rendered inside the DOM. This also allows React to update an individual array item
if the value changes as opposed to needing to update everything contained within the array. This makes React efficient
when working with arrays.
We already know that we can render JSX within JSX for example:
{<p>Paragraph</p>}
Therefore, we can also render arrays of JSX.
{ [<p>a</p>, <p>b</p>, <p>c</p>] }
When we use JSX in arrays we are going to see a warning error of:
Warning: Each child in an array or iterator should have a unique “key” prop. Check the top—level render call using <div> see
… for more information.
All we have to do in the JSX is to add in a key prop attribute which must be unique amongst the array.
{ [<p key=‘1’>a</p>, <p key=‘2’>b</p>, <p key=‘3’>c</p>] }
This allows React behind the scenes optimise the application using the key properties to monitor changes to each individual
JSX so that only the changes value is re-rendered rather than the whole array.
We can use the map() function to loop through an array and return a new array items. This allows us to take the original array
and and iterate through the items to create new JSX expression array items.

For example we have an array of numbers we want to use the map to iterate through the array to create JSX paragraph tags
for each item in the array so that we can display each item in the array within in the browser.
const numbers = [50, 100, 150];
cost template = (
{
<div>
numbers.map((x) => {
return <p key={x}>Number: {x}</p>
})
<div>
}
);
What this does it takes the numbers array and iterates through each item in the array. Each item will pass in as an argument
called x and this value is used within our JSX to generate a paragraph tag for each item, essentially creating/rendering the
html element for our application which will be rendered in the DOM:
<div>
<p key=50>Number: 50</p>
<p key=100>Number: 100</p>
<p key=150>Number: 150</p>
<div>

Section one review
We have now covered the fundamentals of JSX. We started off knowing absolutely nothing about React and JSX, but we are
now at a place where we can now build out a little application such as a task list and task selector app.
What we have learned:
-How to setup your environment and Babel.
-How JSX works.
-How to inject values in our JSX.
-Add conditional rendering.
-Setup event handlers e.g. form submits and button click and generate dynamic elements based off some application
data.
-How to pre-render and re-render the UI to keep up to date with our app data.
Extra Knowledge/Tips:
We can make <button> elements disabled using the disabled attribute. If this is set to true then the button will be disabled
and if set to false then the button will not be disabled. We can set the disabled attribute to a JSX expression which will allow
our button to be disabled/not disabled based on a condition that can evaluate to true or false:
<button disabled={app.option.length ===0}></button>
This will evaluate to true if the options array is equal to zero, whereas if an item is added to the array then the JSX expression
will evaluate to false. This will make the button act dynamically based on the application data.
Wrap up:
Now that we understand the fundamentals of JSX, in the next section we will look at the intermediate concept of React
Components.

Section 2
React
component
•Thinking in React
•ES6 Classes
•Creating a React Component
•Nesting Components
•Component Props
•Events & Methods
•Component State
•Props vs State
In this section we are going to learn all about React Components.
React components allows us to break up our application into small
reusable chunks. Each little component has its own set of JSX that
it renders to the browser screen, it can handle events for those JSX
elements and it allows us to create these little self-contained units.
At the end of this section we should be able to think in React for
our application and be able to create our own React Components.
We are also going to analyse the difference between Component
Props and State and when we would use them.

Thinking In React
What is a React Component? We should think of it as an individual piece of the UI.
These components are reused all over the place within the application for example the navigation bar can appear in
multiple pages. We would have a single component for the navigation and we could reuse it wherever we need the
navigation bar to appear in our application.
We can analyse web applications and break them down into different UI components. The data in the components could
change, but the underlying structure of the JSX for the component remains the same.
Below is a basic structure of React components we could make if we were to break up the Twitter UI elements for the below
image.
We would have a parent component
(page) which will wrap around all the
individual child components (UI) that
make up the parent page.
The child components are reusable UI
and are siblings to each other. A Child
Component can have its own children
components.
Just like HTML, we will also be nesting
React components.

ES6 Classes
The purpose of Classes is to be able to reuse code. A Class is like a blue print and we will be able to make multiple instances
of that class for the individual items.
To create a class we would use the class keyword followed by the class name (just like how we name our variables and
functions). The convention for class names is to have the first character of the class name to be upper case. This will let other
developers know that this is the name of a class and not just some other object. Within the curly brackets this is where we
would define our class.
class Person {} ;
To create an instance of the class we would create a new variable and set it using the new keyword followed by the class
name and then the opening and closing brackets calling it as a function.
const customer = new Person();
When we create a new instance of our class, we have the ability to pass in any amount of data/arguments which can be of
any data type (e.g. string, number, boolean, object, array etc.), however, nothing will happen with our data unless we define
them within our class using something called a constructor.
Constructors are functions that get called when we make a new instance of the class and it will get called with all of our
arguments passed into the new instance of the class. Example of adding a constructor to our Person class:
class Person {
constructor(name) {

this.name = name;
}
};
const customer = new Person(‘John Doe’);
console.log(customer); <JavaScript console> Person { name: “John Doe” }
We now have a blueprint to allow us to create multiple instances of the Person class but the name argument can be unique
to each instances.
Do you have to provide all the constructor arguments? No. This will return the class object with undefined for each property
(<JavaScript console> Person { name: undefined }).
We can also add a default value to our arguments by assigning it a value (we do not need a default value for all our
arguments):
constructor(firstName = ‘Anonymous’, lastName) {
this.firstName = firstName;
this.lastName = lastName;
}
We can create instances of Person and we can define what makes each Person unique. However, what about the things that
each Person shares? We can setup methods that allows us to reuse codes across every instance of the class.
Unlike constructor which has a specific name and gets implicitly called when we make a new instance of the class, methods
on the other hand has a name that we can pick (it can be anything we like) and the function will only run if we explicitly call it.
Note: we cannot use a comma after the constructor closing curly bracket to separate the constructor from the method as this
illegal and will cause an error.

class Person() {
constructor(firstName = ‘Anonymous’, lastName) {
this.firstName = firstName;
this.lastName = lastName;
}
getGreeting(){
return ‘Hello’;
}
};
const customer = new Person(‘John’, ‘Doe’);
console.log(customer.getGreeting());
The customer class has access to the getGreeting() method from the Person class and so we can explicitly call the method.
This will return a static ‘Hello’ greeting for all instances that calls on this method regardless if this is a different person.
We can make the greeting message dynamic/unique to the class for example we can greet using the first and last name. In
our method we have access to the ‘this’ keyword which relates to the current instance.
getGreeting(){
return this.firstName;
}
We can use concatenation or use template literals to make the message more complex. The getGreeting() method is now
accessible to all our instances and has the same behaviour without us having to redefine our properties.
return ‘Hello ’ + this.firstName + ‘ ’ + this.lastName;
return `Hello ${this.firstName} ${this.lastName}`;

Now that we know the fundamentals of a ES6 classes and how to set them up, we are now going to focus on a advance ES6
class topic which is how to setup/create a subclass using the ES6 syntax.
If we were going to create a website for students we would create a class call Students. We would realise that the student is
actually just a Person with some modification i.e the Person would have a firstName, lastName and age. The student also has
a qualification/subjects studied that we would like to keep a track of. So instead of copying and pasting the code from the
Person class into the Student class and modifying to meet the needs of the Student class, we can extend Person from
Student. This will provide us with all the functionality of the Person class but also allows us to override functionality we might
want to change.
In order to achieve the above we would create the class name, after the class name and before the opening curly bracket we
will add the ‘extends’ keyword to indicate that we want this new class to extend from an existing class.
class Student extends Person {};
The Student class extends from the Person class and this allows us to continue to use the Person properties and methods on
the Student class and this will continue to run the code and function the same.
const customerOne = new Student(‘John’, ‘Doe’, 28);
console.log(customerOne.getGreeting());
We have now created a sub-class of Person called Student but we want to modify.override the Person constructor to take in
an extra argument for the subject. In order to do this we would use the constructor function and pass in our arguments list
and then setup our function body. We would not need to setup the properties and defaults for the extended class again,
however, we must call on the parent constructor function to run. To do this we would use the super() function — super refers
to the Parent (extended) class and is the same as accessing the Parent constructor() function.
class Students extends Person {
constructor(firstName, lastName, age, subject){
super(firstName, lastName, age);
this.subject = subject;

}
};
We no longer need to re-write the code from the Person class as we are passing in the values that come through into the
super function and allowing that to be passed into the parent Person constructor to set the correct values.
const studentOne = new Student(‘John’, ‘Doe’, 28, ‘Maths’);
console.log(studentOne);
<JavaScript console> Student { firstName: “John”, lastName: “Doe”, age: 28, subject: “Maths” }
Adding a new method on the sub-class remains exactly the same i.e. define the name of the function and add the function
to the function body. This can then be called/accessed on the class instance.
We can also override a Parent method behaviour in our sub-class by redefining the method. We can completely override the
method or we can get the parent method and modify it:
Original Parent getDescription() method:
getDescription() {
return `${firstName} is ${age} year(s) old.`;
}
Completely override the Parent method behaviour:
getDescription() {
return ‘original behaviour completely overridden’;
}
Modify the Parent method:
getDescription() {
let description = super.getDescriptiom();
if(this.subject) {
return description += ` They are studying ${this.subject}`;
}
return description;
}
We can use super again to get the parent class but this time we use the . followed by the method name and assign this to a
variable we can return. We can now modify the original method and add the subject to the end using the if statement to
check if there is a subject for the student.
We have now learnt how to extend from another class and do something new and this is really important because this is
exactly what you would be doing with React Components. React requires new Components to extend from the original
React Components class. It is therefore very important to get a good understanding and a grasp of creating ES6 classes and
sub-classes.
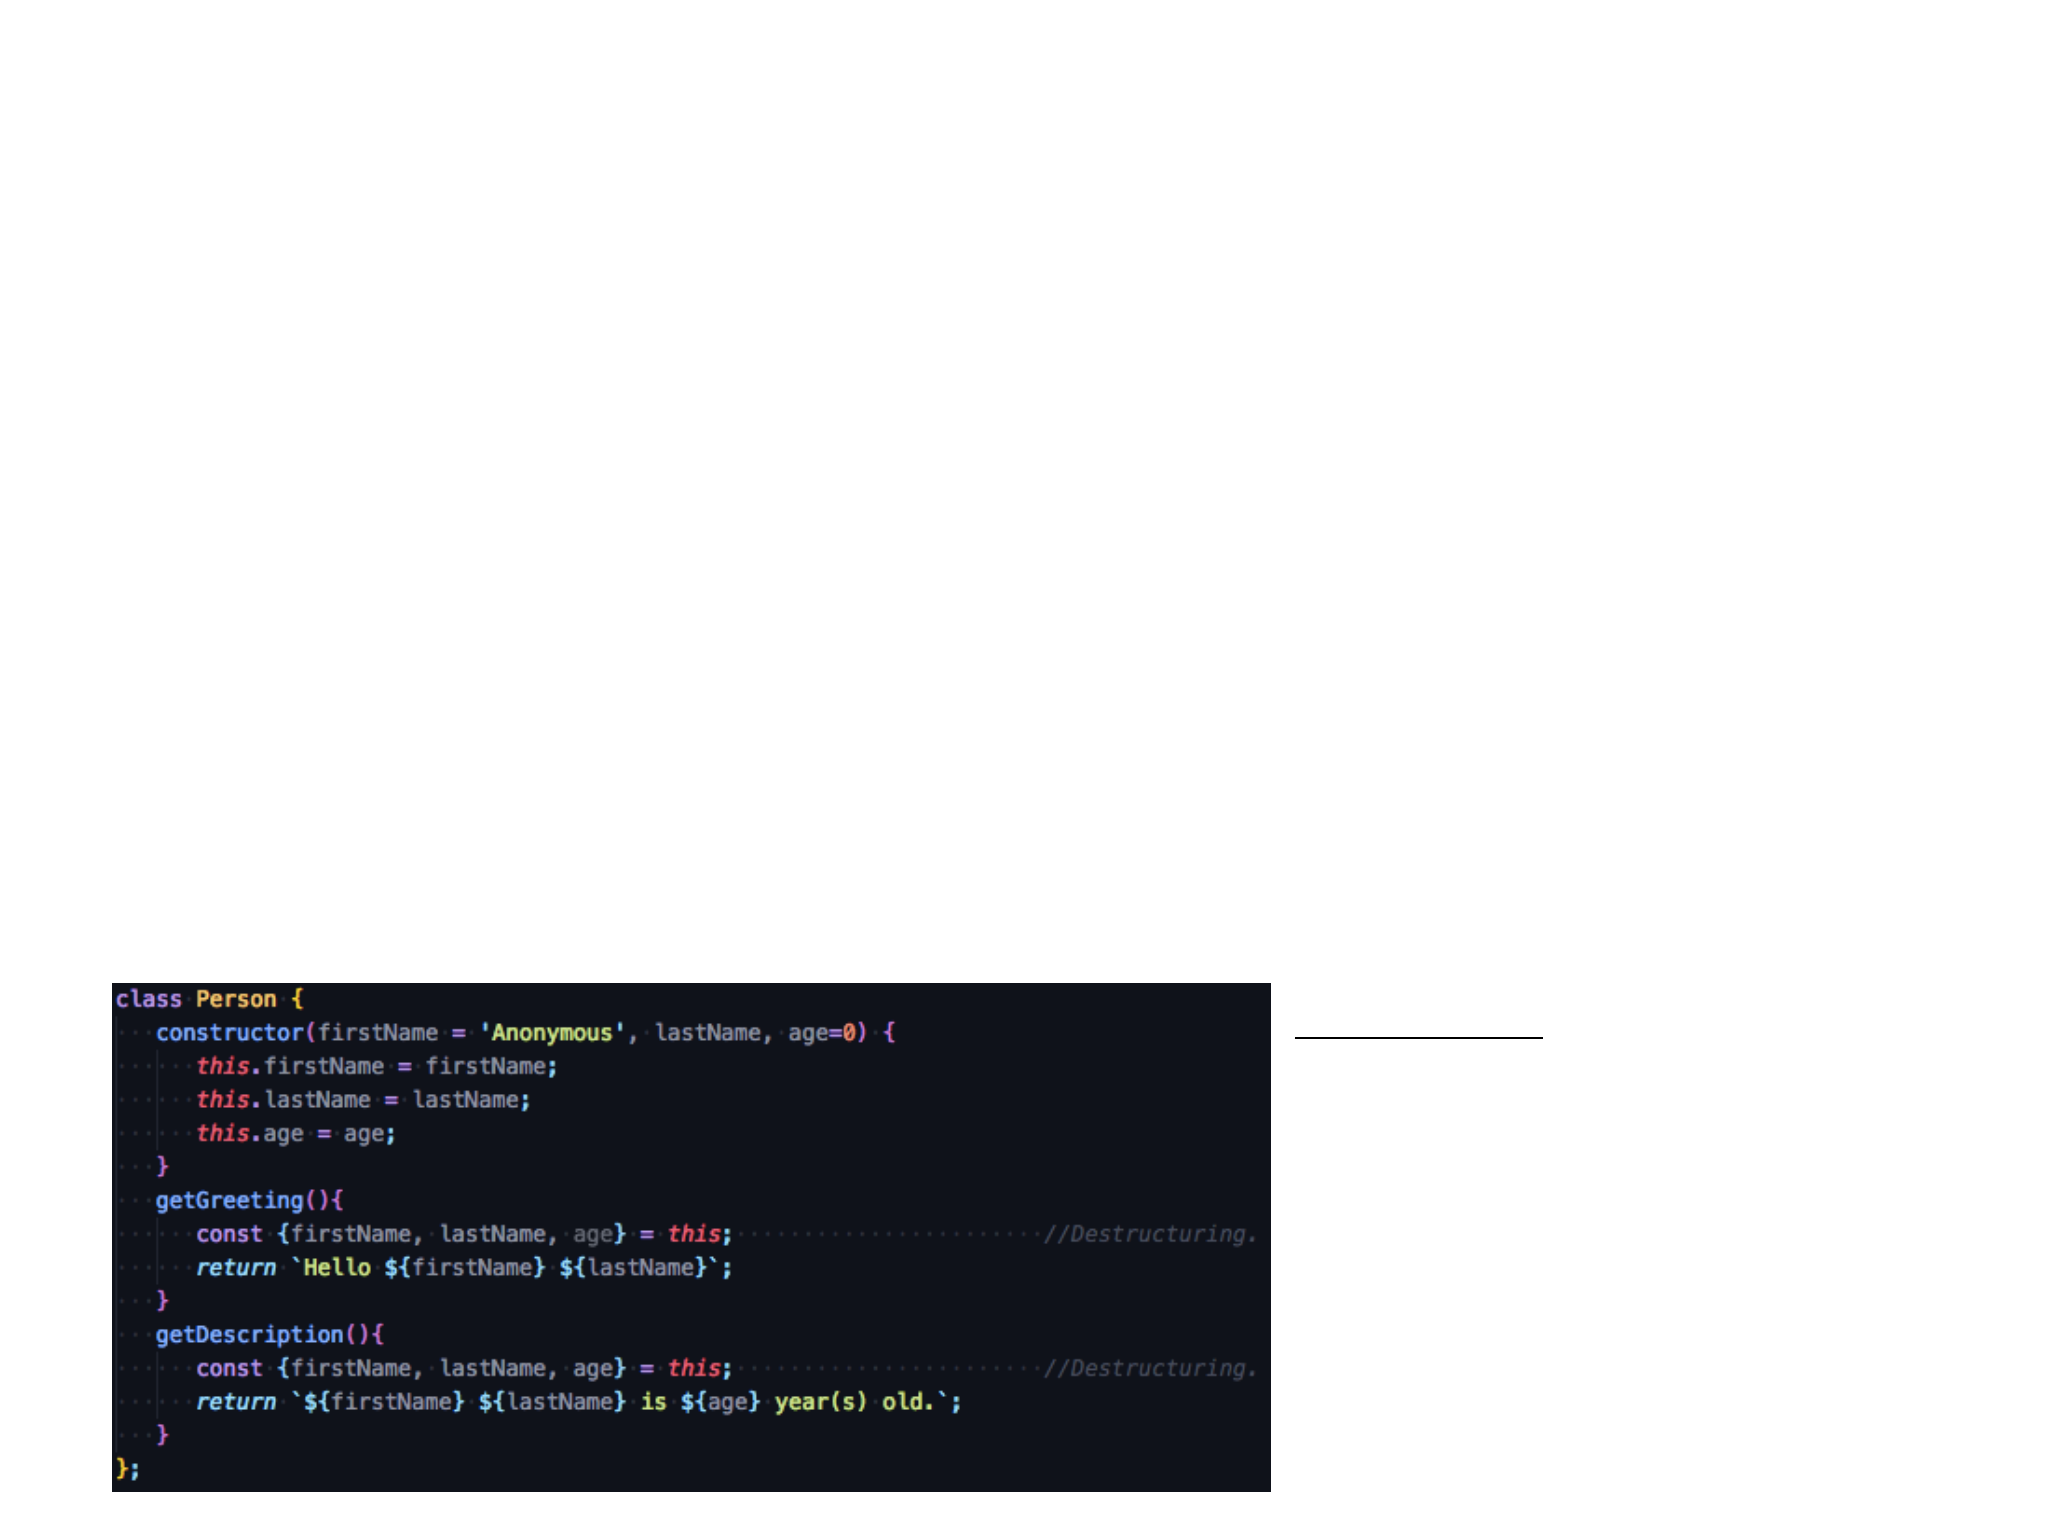
Tips/Techniques:
Destructuring is an important and useful
technique as it allows you to extract values
from the ‘this’ keyword and assign it to
variables which we can then reference in
our functions without making references to
the ‘this’ keyword. This helps make the
code look much more cleaner and
readable.

Creating a react component
A React Component is simply a ES6 class. To create a component we will be creating our own class that extends from the
React Component class. We already know that there are two globals we get from our two scripts, React and ReactDOM. We
are going to grab the Component class from the React global library.
class Header extends React.Component {
render() {
return <p>This is from Header</p>;
}
};
In ES6 classes we can have no method defined and that is completely valid. Whereas, with React Component we must
define render (this is a special method and we must always call render when we use React Component class, else it will not
work and error).
The render returns all the JSX expressions we want to render i.e. show up in our browser.
To render the component to the screen we would use the ReactDOM.render() method passing in our two arguments.
ReactDOM.render(jsx, document.getElementById(‘app’));
The jsx will be our variable holding all our JSX expression we want to inject/parse into our <div id=‘app’></div> element in
our html. In this jsx variable we can pass in what looks to be custom html element tags but are simply tags that reference our
class names which have our JSX expressions.

const jsx = (
<div>
<Header />
</div>
)
This will render our header component’s JSX expression and display it in our browser screen. We have now created a React
component. What makes React Components great is that we are able to reuse these components (code) multiple times by
just using the component tags for example we can have two or more instances of the <Header/> tag being rendered to the
screen without us having to retype/repeating the same code:
const jsx = (
<div>
<Header />
<Header />
</div>
)
Note React enforces the upper case letters of class names (ES6 does not require the upper case names of classes but is
merely a convention) therefore, when naming our React Components we must use upper case for the first letter in our class
name. If we use all lower case for our class component name, this will not fail but it will not render the component to the
browser screen. This is how React distinguishes the html element tags from our custom Components tags behind the
scenes. Therefore, it is good practice to keep to this naming convention when creating ES6 classes.

Nesting react component
Nesting components is essential for creating meaningful React apps. We can create a parent component and then have all
the other components created nested within the parent component. This allows us to get rid of the const jsx variable and we
can now use our parent component directly in the ReactDOM.render() function directly. For example:
Class IndecisionApp extends React.Comonent = {
render() {
return (
<div>
<Header />
<Action />
<Options />
<div>
)
};
};
ReactDOM.render(<IndecisionApp />, document.getElementById(‘app’));
We have nested all the various components within the IndecisionApp component which acts as the parent component. We
can render all the various components for this application through this Parent component.

Component props
React Component Props are at the very core of allowing our components to communicate with one another. The data we
pass in when we initialise an instance of our components is known as props. This allows our components to be reusable and
unique based on the information passed into our component. We use key:value pairs in our components elements, similar
to how we do this in HTML attributes.
<Header title=‘Title Header’ />
To have access to this data value, we would go to the component class and within the render() method we have access to
the this keyword which gives us access to the data passed in for the current instance of the class.
class Header extends React.Component {
render() {
console.log(this.props); <JavaScript console>Object {title: “Title Header”}
return(
<h1>{ this.props.title }</h1>
)
};
};
What this does, it takes the HTML attribute looking data and it converts it into an object of a key:value pairs. We can use this
string value using JSX expression to make the render of the title dynamic based on the data passed into our components.
Whenever we use the <Header /> component we can now pass in data to change the header to a relevant header title.

When we create instances of our React Components we can also choose to pass some data into it. The data looks very much
like HTML attributes but is in reality just a set of key value pairs where the key is always some sort of string and the value can
be anything (any JavaScript data type) we would like for example a string, number, array etc.
When we pass in pass in data into a component we can use that data inside of the component itself. We can use that
information to correctly render our components. All of the props are available on this.props and we can access the specific
data by adding the key string.
Props allows us to setup one way communication for example:
The Parent component can communicate with its child components and the child component can communicate with its
children components (sub-child). We can also add props when we use the ReactDOM.render() method by adding the props
attributes to the React Component.

Events & methods
In Section 1 we looked at how we could create event handlers that will call on global functions, however, in React we would
want to create self-contained methods within the React Component class. This method will appear in the class components
before the render() method.
class Action extends React.Component {
handlePick() {
alert(‘Run handlePick’);
};
render() {
return(
<button onClick={this.hadlePick}>Click Me</button>
)
};
} ;
On the button we have a onClick event handler which will call the handlePick function which is a self-contained function of
the class which is why we can use the this keyword to access it. We do not want to execute the method right away and
therefore we would only make reference to the method in our onClick event handler (and do not add () at the end). When
the button is clicked this would execute the handlePick() function.
Component State
Component State allows our components to manage some data (think of data as an object with various key value pairs).
When that data changes, the component will automatically re-render to reflect those changes. In component state, all we
have to do is manipulate the data and the component will take care of the re-rendering of itself i.e. we do not need to
manually call the render function every time the data changes.
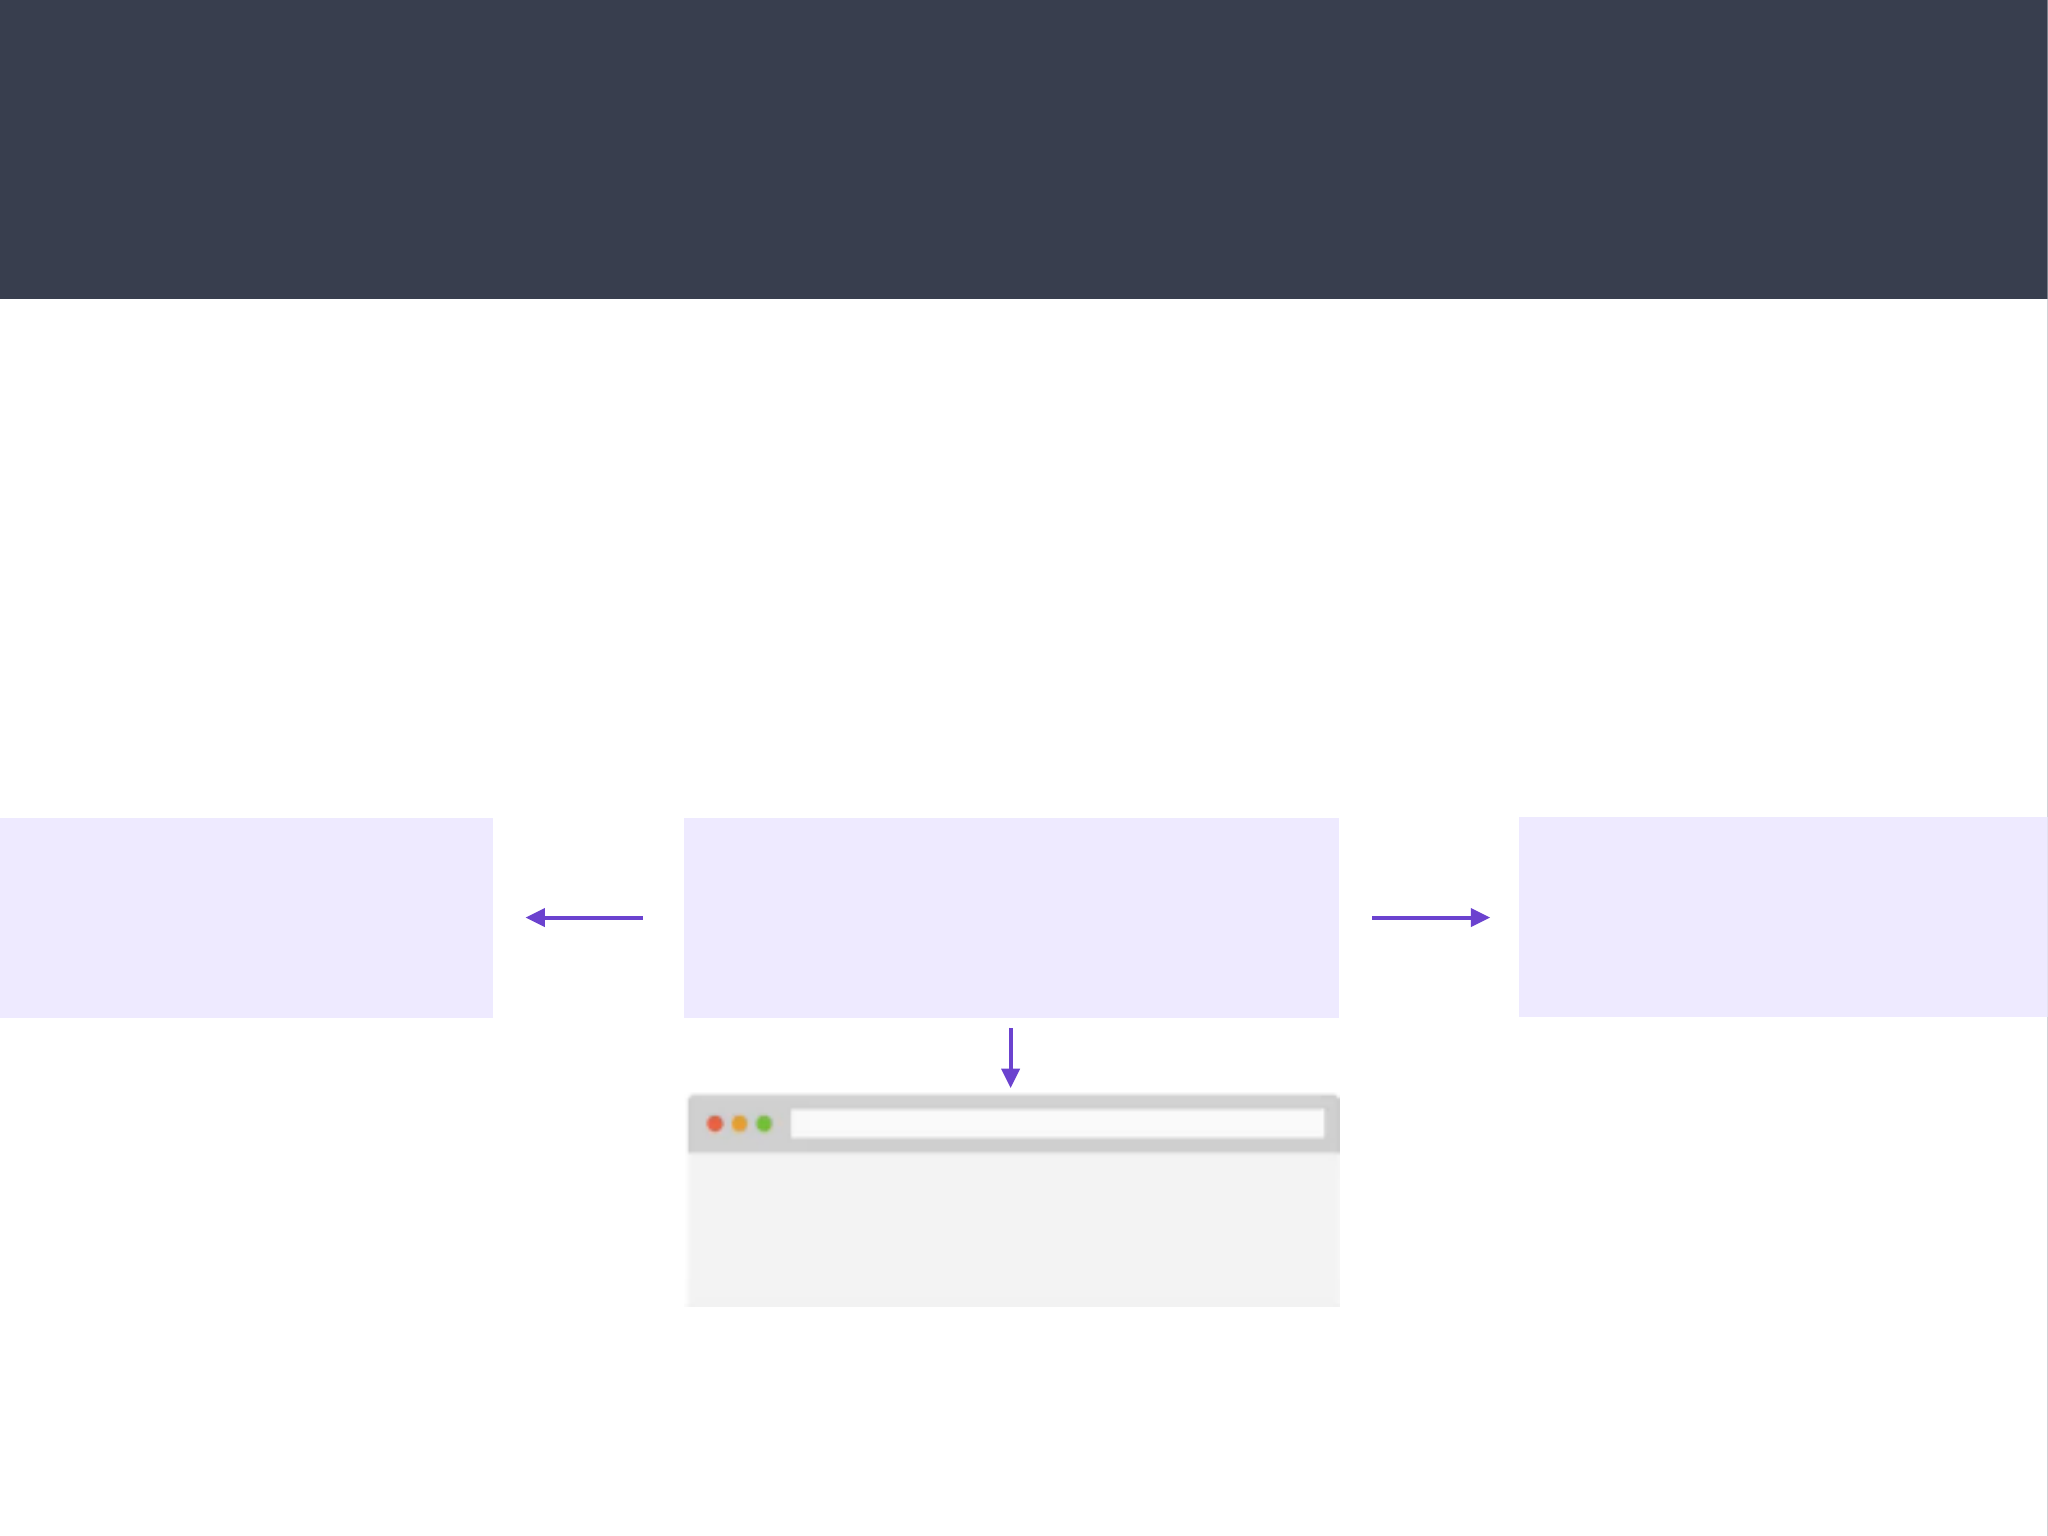
How to setup a Component State:
Step 1. Setup a default state object.
Step 2. The component rendered with default state values. *
* Implicitly run behind the scenes.
<Counter />
{
count: 0
}
render
Step 3. Change state based on event.
Step 4. Component re-rendered using new state values. *
Step 5. Start again at step 3.
<Counter />
{
count: 0
}
render
HandleAddOne(){
//Increase “count” state by 1
}
<Counter />
{
count: 0
}
re-render
HandleAddOne(){
//Increase “count” state by 1
}

Component State is essential for interactive applications. The above diagram is an abstract flow of react component state. So
to recap: the state is just an object with a set of key value pairs, we define our initial data (state) and this gets rendered to the
screen when the application initialises. The state object can be changed by the user i.e. based off some event for example a
button click, form submission or finishing of a http request that returns JSON data etc. When the state changes the
application will automatically re-render itself. React will update the UI on the screen with the updated data.
To set a state we would add this.state in the constructor and set this to an object defining all of the pieces of state we want to
track for example:
class Counter extends React.Component {
constructor (props) {
super(props);
this.state = {
count: 0
};
}
render() {
return (
<h1>Count: {this.state.count}</h1>
)
};
} ;
We now have a default state for our components which renders on initialisation of the application (steps 1 and 2).

We can create events to change the state. However, we must use a special method to change the state object which will re—
render our application when the state changes an that is called setState() for example:
class Counter extends React.Component {
this.state = {
count: 0
};
handleAddOne() {
this.setState( (prevState) => {
return {
count: prevState.count + 1
};
});
}
render() {
return (
<h1>Count: {this.state.count}</h1>
<button onClick={handleAddOne}>+1</button>
)
};
};

ALTERNATE METHOD (AVOID USING):
The setState() method allows us to manipulate the state object but then refresh the application to render the changes
automatically (steps 3 and 4). This methods gets called with a single argument using an arrow function to define our updates
we want to make (an updater function). To define our updates we return an object where we state the various state values we
want to change and the new values we want to assign. I our updater function (arrow function) we have access to our current
state via the first argument commonly called prevState (but we can call this anything e.g. prevState, state, x etc.). We can use
this value and select a specific key property from the state to update/manipulate its value. The setState() will update the state
and re-render the application component to render the change onscreen automatically. We can call on this event handler as
many times as we want to update the state and have it refresh the render (step 5).
Common things related to this.setState():
1) If you have multiple pieces of state on your component, you do not need to provide them in the setState() return object.
You only provide the key of the state(s) you wish to change. When we are defining the updates in the setState() updater
function (anonymous function), we are not overriding the state object completely. We are just changing specific values
i.e. it is the same as writing this.state.count = this.state.count +1 which is changing the value of the specific object key
value.
2) The setState() function will automatically render the component after the updater function has run to update the specific
state key value. This will render the new value onto the screen without you manually calling a render method to update
the components render to the screen.
3) If we do not care about the previous state value we do not need to pass in the prevState argument in our updater
function argument, for example if we do not care about the previous count state value:
handleReset() {
this.setState( () => {
return {
count: 0
};
});
}

There is an alternative way that we can use this.setState() method. This method also allows you to pass in an object directly
into the method instead of using a function. This is the previous (older) approach. The updater function is the more recent
and more preferred method and rumours has it that in future versions of React, the updater function will be the only way to
update the state and render the application using the setState() method.
The older obsolete syntax example:
handleReset() {
this.setState({
count: 0
});
}
There is nothing wrong with this syntax, however, the problem is where you are trying to update the state based on the
current state value. For example if we have back to back calls:
handleReset() {
this.setState({
count: 0
});
this.setState({
count: this.setState.count +1
});
}

The problem we have with this is that when we click the handleReset() function this will not reset the state to 0 and add +1,
instead it will continue to +1 only. The reason for this is because our calls to the State are Asynchronous. This means just
because we started the process of changing the count, this doesn’t mean the count will be changed. In our second setState
function we are still getting back the old state value. We have started the process of getting the count to zero but it hasn’t
completed yet. So when we have the second process called this is grabbing the old state value. React behind the scenes is
very efficient and does everything all at once and batches together our setState() operations allowing it to rerun less often,
only then does it bring the state up to speed. We would end up running into weird situations like this one where we are
accessing stale and outdated data.
So what is the solution to the above? The solution is aways to use the this.setState() with an updater function. It never suffers
from the same problem because it does not access this.state, instead React passes in the prevState as an argument. For
example the below will return 1 correctly:
handleReset() {
this.setState( () => {
return {
count: 0
};
});
this.setState( (prevState) => {
return {
count: prevState +1
};
});
}

The reason this works correctly in this instance is because the first setState() called, React goes ahead and calls our function.
It is going to pass in the previous state which we did not use here and it is going to get the object back. So React knows that
you want to change the count to 0. It will go off to do its asynchronous computation in the virtual DOM. Before it actually
finished all of that and before the component gets re-rendered, another this.setState() call comes in. React sees this and asks
itself whether it wants to render this twice or should it render this once. React will try to batch these together in order to
figure out what needs to change here and make sure the DOM reflects that and only then will it update. This will prevent it
from being updating a bunch of times which can get really inefficient.
So what happens is React know right away when this second call comes in that the state just computed and the count was
zero. This is now out of date, so it goes ahead and tries to figure out what changes were made and actually passes that state
in. It passes in the state where the count is zero and not the original state before the first this.setState() call. This would mean
when we add +1, it is being added to 0 and not whatever the original outdated state value was before the function was
called.
There is nothing inherently wrong with passing an object into the this.setState(), as long as you don’t need access to the
previous state values.
It is advisable to stay away from this alternative method as there are rumours that React going forward will only use updater
functions within the this.setState() function method which is the preferred syntax. It allows us to build our applications
without running into pitfalls like the above example.
Summary: props vs state
We know that something at some point rendered MyComponent (whether rendered by another Parent Component or
ReactDOM render call). We also know that MyComponent could have optionally rendered a Child Component.
We know that data props flow in one direction. This allows us to pass things between components e.g. the Parent could pass
some data, if any, to MyComponent and MyCompnent could pass some data, if any, to its Child.
We also know that my component if going to render something to the screen i.e. rendered output. This is JSX and we have
access to props and state when we are rendering.
<MyComponent />
<MyParent />
<MyChild />
props(if any)
props(if any)
Access to Props/State when rendering

Similarity:
Both Props and State are just objects.
Both Props and State can be used when we are rendering the component.
Changes to Props and State causes re-renders.
Differences:
Props come from above, whether it’s a Parent Component or just some JSX that gets passed into the React Render state.
Whereas the State is defined in the component itself.
Props cannot be changed by the component itself. If you want to want to track changing the data, you have to use a State
because the State can be changed by the component itself.
<MyComponent />
Props State
•An Object
•Can be used when rendering
•Changes (from above) causes re-render
•Comes from above
•Can’t be changed by component itself
•An object
•Can be used when rendering
•Changes causes re-render
•Defined in component itself
•Can be changed by component itself

Section 3
Stateless
Functional
components
•The Stateless Functional Component
•Default Prop Values
•Lifecycle Methods
•Local Storage
In this section we are going to learn a new way to create React
Components. We already know how to create a class based
components in the previous section and in this section we will
learn how to create a stateless functional component.
We will compare and contrast the two types of React Component
and view their own set of advantages and disadvantages. This will
allow us to have an understanding of when we would use a class
based function and when we would decide to use a stateless
functional component.

The stateless functional component
The Stateless Functional Component is an alternative to the Class Based Component. We would use a combination of both
Components within your Projects.
A Stateless Functional Component has 3 characteristics:
1. A React Component (just like class based components).
2. It is also just a Function (unlike class based components).
3. It is Stateless.
Example Syntax for a Stateless Functional Component:
const User = () => { const User = function () {
return ( return (
<div><p>User Name</p></div> <div><p>User Name</p></div>
) )
}; };
Stateless Functional Components don’t allow you to manage state but they do allow you to manage props. These
components do not have access to ‘this’. To get the props, they get passed in from the function as the first argument (which
is your object with all of your key value pairs). For example:

const User = (props) => {
return (
<div>
<p>Name: {props.name}</p>
<p>Age: {props.age}</p>
</div>
)
};
ReactDOM.render(<User name=“John Doe” age={28} />, document.getElementById(‘app’));
While we cannot use state inside our Stateless Functional Components, we can indeed use Props.
The advantages of Stateless Functional Components are: they are faster than class based components (so when we can we
should use them i.e. in cases of simple presentational component), they are a little easier to read and write and finally they
are much easier to test.
Process of creating a Stateless Functional Component is simple:
1. Create a new const with component name (first letter capital).
2. Set it to a function (this function is equivalent to the render() function.
3. If there are props, the first argument to your function should pass in this object so that your component has access to the
props key value pairs.
4. Return your JSX expressions to render.

Default prop values
Whether our components are classes or functions, they can have props passed into them, however, what if a prop is not
passed into them? We can assign a default prop values.
To add a default value to our component props we can add a property after we define the component. For example if we
want to add a default title property:
const Header = (props) => {
return (
<div> <h1>{props.title}</h1> <h2>{props.subtitle}</h2> </div>
)
};
Header.defaultProps = {
title: ‘Default Title’
};
This will allow us to have a default title if no properties are passed into the Header component and where we want a
different title for other pages we would add the prop values in our JSX to override the default values to render something
different. This allows for a much flexible component.

We can add a default prop value to our class component state. This allows our component to be flexible for example:
class Counter extends React.Component {
constructor(props) {
super(props);
this.state = {
count: props.count
}
}
render() {
return ( <div> <h1>Count: {this.state.count}</h1> </div> )
};
};
Counter.defaultProps = {
count: 0
};
ReactDOM.render(<Counter count={30} />, document.getElementById(‘app’));
We can pass in a count prop value to override the default property value. This makes our Counter class component flexible
as we can allow the user to define/override the default values. Note the this.state count key value references to the
props.count value (this will default to 0 if no attributes for count is passed into the component).
REACT DEV TOOLS
There is a set of React Dev Tools that we can install in our browsers as extensions (which are available on both Google
Chrome and Mozilla Firefox). This will add a new tab into the developer tools for React with React specific information. This
will make debugging a whole lot easier.
If you google the term Google React Devtools or Firefox React Devtools, this will bring up a link for you to install the
extension in your browser of choice. Once you install the extension you will need to reopen the tab/browser to see the
changes in the dev tool tabs.
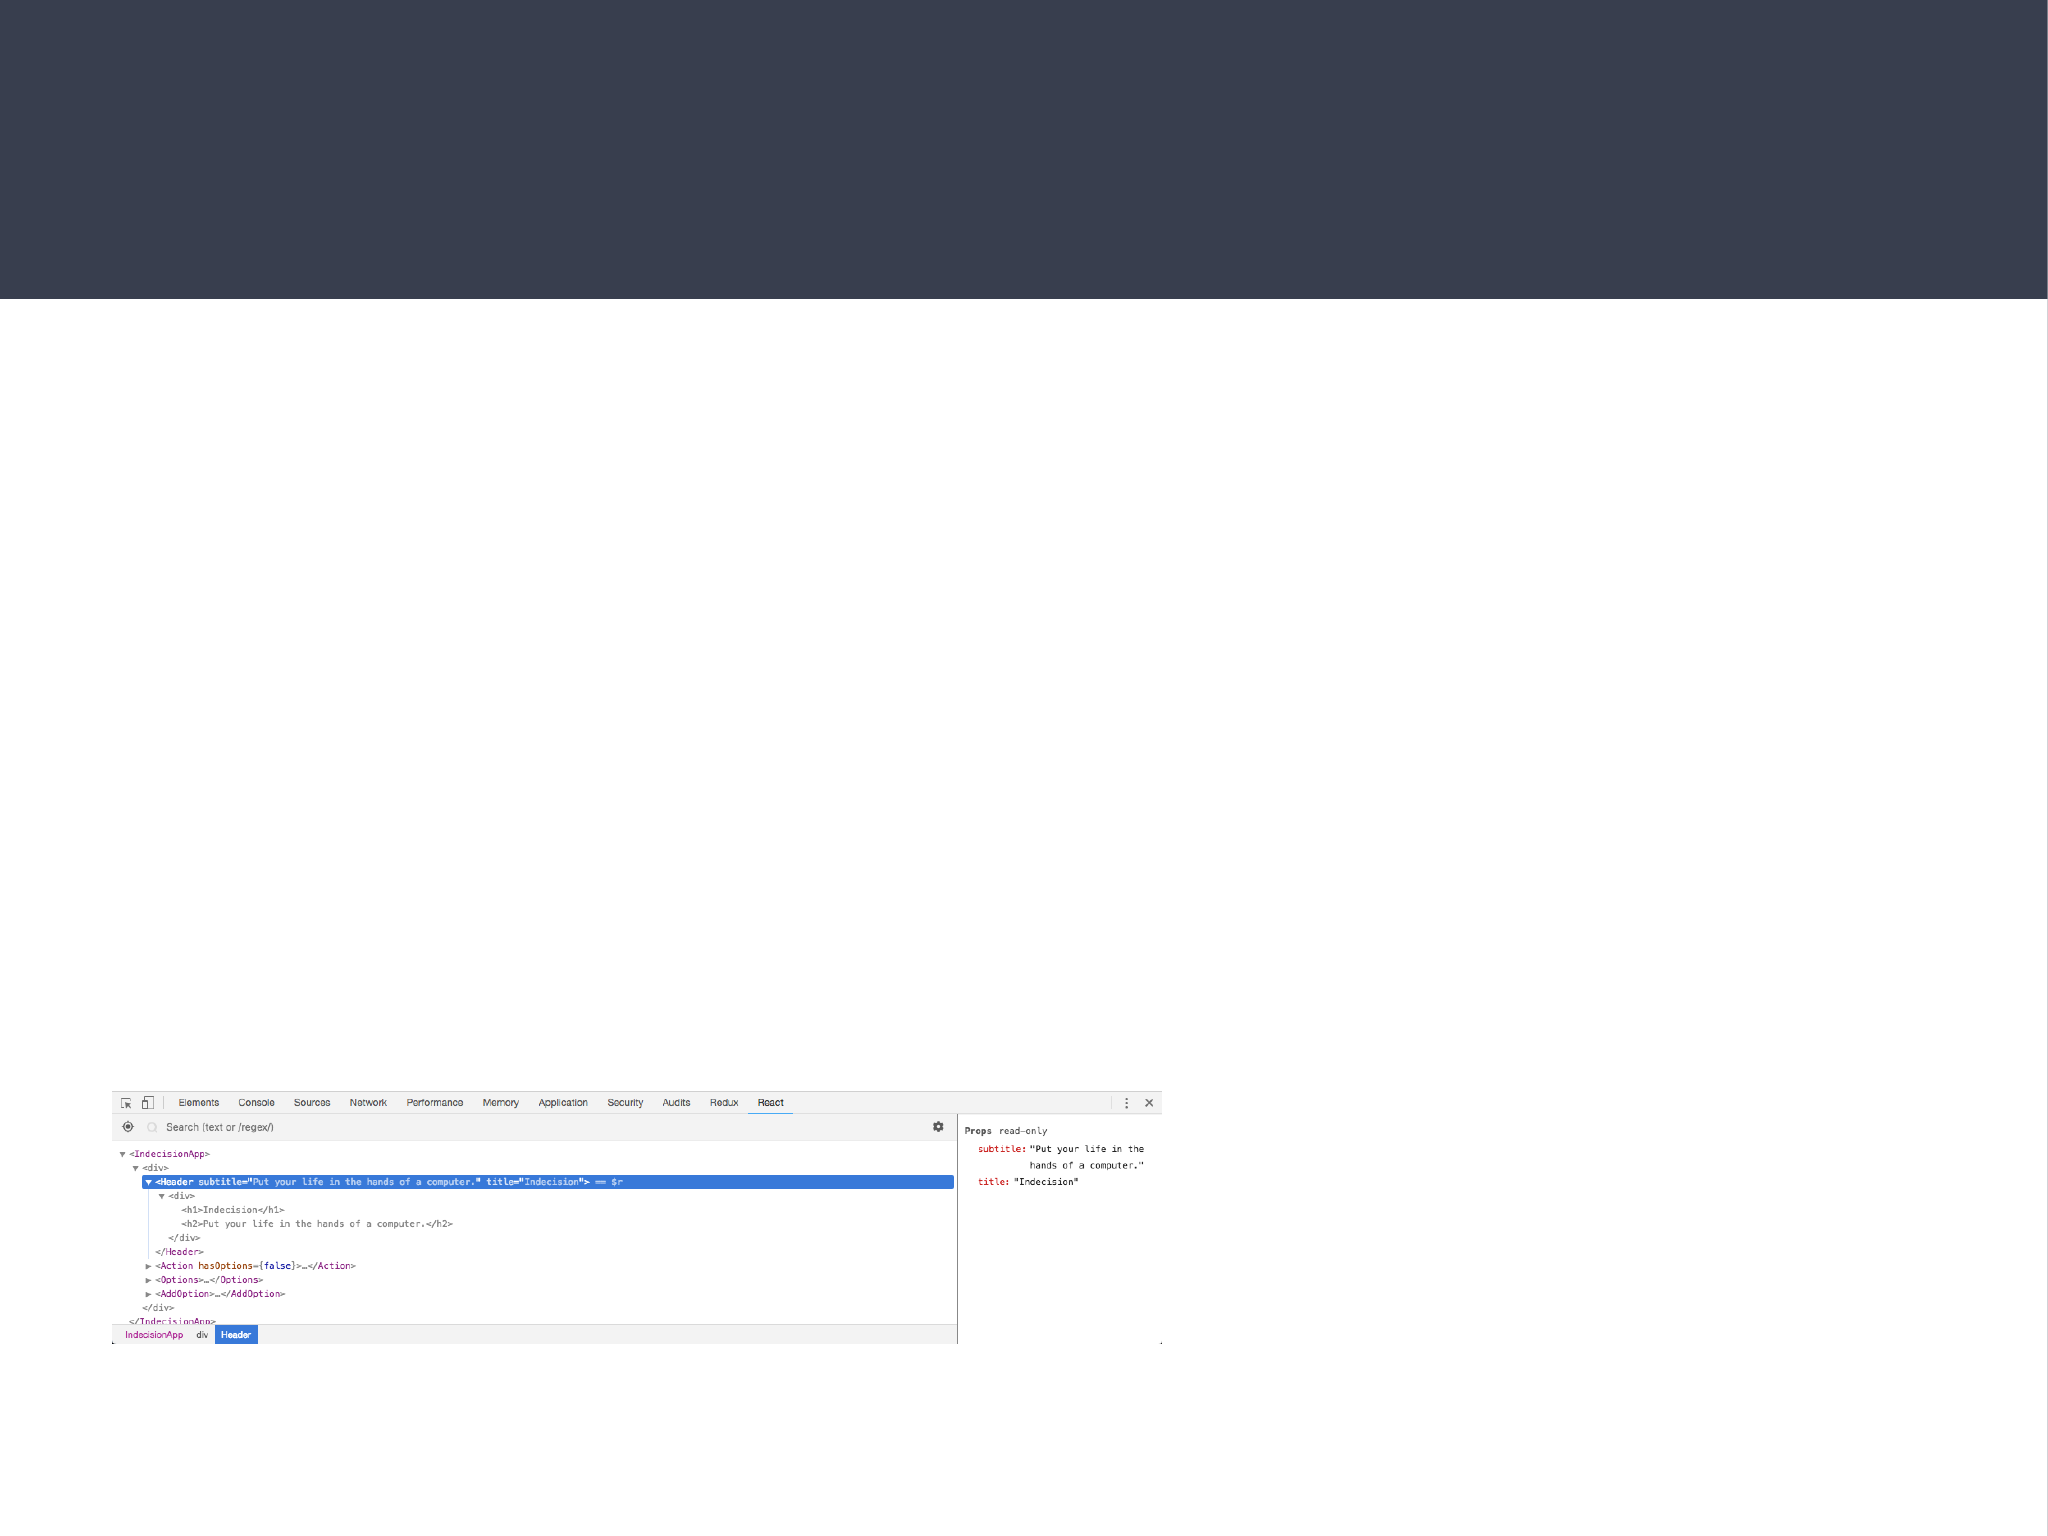
What you see in the React tab is similar to what we would see in the Elements tab. In the Elements tab we get our html
markup while in the React tab we get our JSX tree view. This will show the parent component and the child component and
the JSX expressions within each component. The components are highlighted while regular html are shown in grey. On the
right hand side we have access to more data to the component that is currently selected i.e. the Props and State of the
component.
As you application grows, you can also search for components to make it easier to locate the component you are looking for.
This allows you to isolate the component. We can play around within the React Tools to make changes and these will take
affect in the application which is really useful for
testing. However, the tool is also in development
and not everything will work (e.g. we can change
the value of state objects but cannot add a new
one through the React devtools).
Finally, when you highlight a component, the React
devtools assigns a ==$r variable. We have access
to this variable in the JavaScript console tab of our developer tools by typing $r which will show all the Props/States and
functions for the selected component.

Lifecycle Methods
Lifecycle Methods fire off at various times in a given component life. These are built in methods available on our class based
components but not available to our stateless functional components. This is one of the reason for why stateless functional
components are much faster because they do not need to handle state nor lifecycle methods.
Example of lifecycle methods include the ability to populate an array with data from a database when the component first
gets mounted to the browser or we can watch the state change to make saves/updates to our database whenever the
component updates with new data.
Lifecycle Methods:
componentDidMount() — this will fire when the instance of the class based component first mounts.
componentDidUpdate(prevProp, prevState) — this will fire when the component updates i.e. when the props or state value
changes. With this lifecycle method we have access to the this.prop and this.state for the new prop and state values. We can
also access previous props and previous states by passing in the two arguments. The first is for the previous props while the
second argument is for the previous state.
componentWillUnmount() — this will fire just before the component goes away i.e. when the given component unmount (the
whole component is removed from the browser screen).
There are many more lifecycle methods which are available to read on:
https://reactjs.org/docs/state-and-lifecycle.html
The categories for lifecycle methods are:
1) Mounting
2) Updating
3) Unmounting

Local Storage
Local Storage is simply a key value store, for example we can name a key person and give it a value of John. We can later on
fetch the value of John based off of the key name.
We use the localStorage object and call on a few methods on that object:
localStorage.setItem(‘key’, ‘value’);
localStorage.getItem(‘key’);
localStorage.removeItem(‘key’);
localStorage.clear();
The setItem method takes in two arguments i.e. the key and value and the getItem method takes in one argument of the key
which will return the corresponding value. If we reload the webpage we can still have access to the key:value items because
this is saved to local storage and the items persist. The removeItem method takes in one argument which is the key and it
removes the item (key:value pair) from local storage. Finally, the localStorage.clear() method will clear everything stored in
local storage.
This is a great starter database mechanism to explore the general principals before exploring actual databases.
It is important to note that localStorage only works with string data only. Even if we use numbers, it will actually implicitly
convert it to a string. To convert the string back into a number we would use the parseInt() method.
How would we work with objects and arrays in localStorage? We would use JSON.
JSON is a string representation of a JavaScript object or an array. JSON stands for JavaScript Object Notation. There are two
JSON method we would always use:
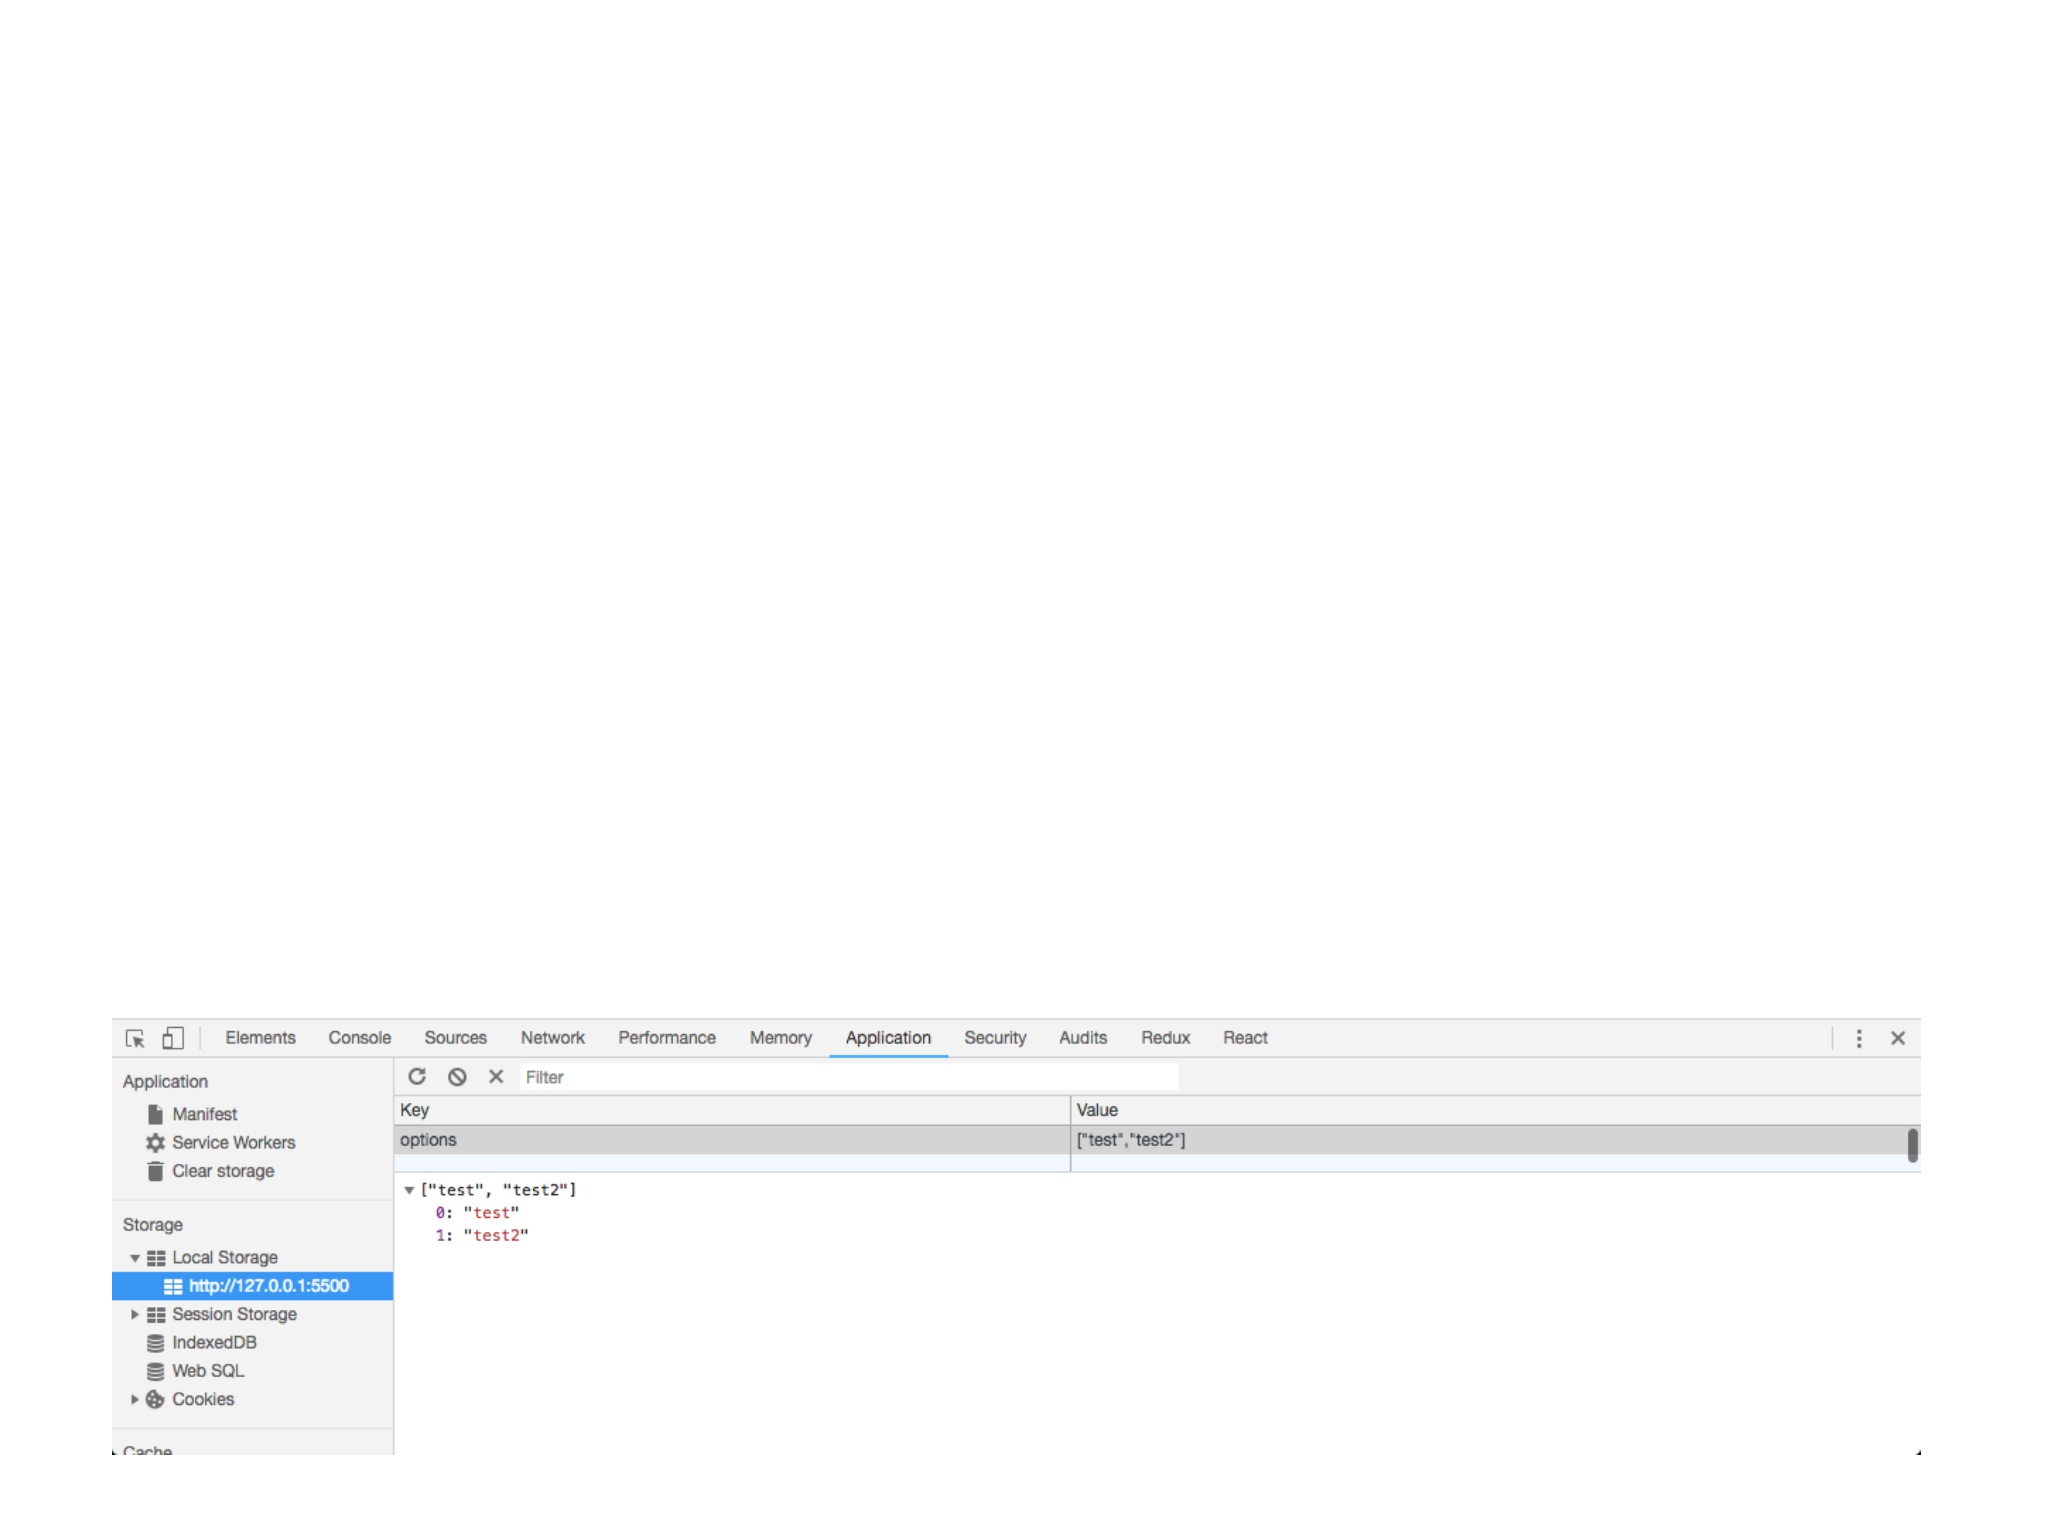
JSON.stringify()
JSON.parse()
The stringify method is going to take a regular JavaScript object and get the string representation, while the parse method
takes the string representation and returns a true JavaScript object. In JSON all of the keys are wrapped in double quotes
which is one of the many rules JSON enforces.
Example Code:
const json = JSON.stringfy( {age: 26} ); —> json returns string representation of “{“age”: 26}”
JSON.parse(json); —> returns Object {age: 26}
JSON.parse(json).age —> returns 26
If we try to parse in erroneous data into the parse method this will through a ‘Uncaught SyntaxError: Unexpected Token in
JSON at…’ in these cases would use the JavaScript try/catch function to try a JavaScript code and where it fails use the catch
to do something else.
We can see the key value pairs in our browser dev tools by going into the Applications tab within the Local Storage area we
can view all our key value pairs that is saved.

Section 4
Webpack
•What is Webpack?
•Installing & Configuring Webpack
•ES6 Import/Export
•Default Exports
•Importing npm Modules
•Setting up Babel with Webpack
•Source Maps with Webpack
•Webpack Dev Server
•ES6 Class Properties
In this section we are going to learn all about a tool called
Webpack.
Webpack is an asset bundler, meaning that it will take in all our files
that makes up our application, combine it with things from third
party libraries and then spit out a single JavaScript file.
This allows us to break our application into multiple smaller files
e.g. having a single file for each component.
We will learn how to configure Webpack and how to use all the
features that is available to us such as ES6 Import/Export, Default
exports, importing npm modules, setting up Babel with Webpack,
setting up a Webpack dev server and many more.

What is Webpack?
We could define Webpack as a module bundler for modern JavaScript applications, however, this does not really explain or
show what Webpack does or how it helps build better applications. There are many advantages to Webpack:
1. Webpack allows us to organise our JavaScript. At the end of the day when we run our application through Webpack, we
are going to get back a single JavaScript file (called the bundle) which contains everything our application needs to run.
This will contain the depnedencies and application code. Our index.html will only need a single <script> tag to this
single file as apposed to multiple <script> tags for multiple JavaScript files which will get unwieldy. Having too many
<script> tags can also slow down your web application because it would need to make multiple request for all the file to
load the website.
2. Gulp and Grunt are alternative tools which concatenates/minifies all your JavaScript into a single file. However, Webpack
is a little unique: It is breaking up all of the files in our application into their own little islands, and these islands can then
communicate using the ES6 import/export syntax. This mean Webpack allows us to break up our application into
multiple files that can communicate with one another. This allows our application to be modular and more scalable.
3. Webpack allows us to grab our third party dependencies that were installed by npm or yarn and live in the
node_modules directory. This means we can install/uninstall/update our dependencies using the package.json file and
our application will take care of the rest.
Before Webpack we had a public folder which had everything our application needed. We have our html file and all of our
JavaScript code and also our third party dependancies codes all living in the public directory. We would have loaded them
all via <script> tags in our html file, but in the correct order because we are relying on the global JavaScript namespace e.g.
react.js has to come first to setup the global variable, then react-dom.js, utils.js and finally app.js which has to come last in
order to take advantages of the things created in the other files.
This caused issues with managing all the dependencies which was annoying and polluting the global namespace adding a
bunch global variables which didn’t need to be in the global namespace (causing weird situations such as accidentally
wiping/overriding variables without noticing).
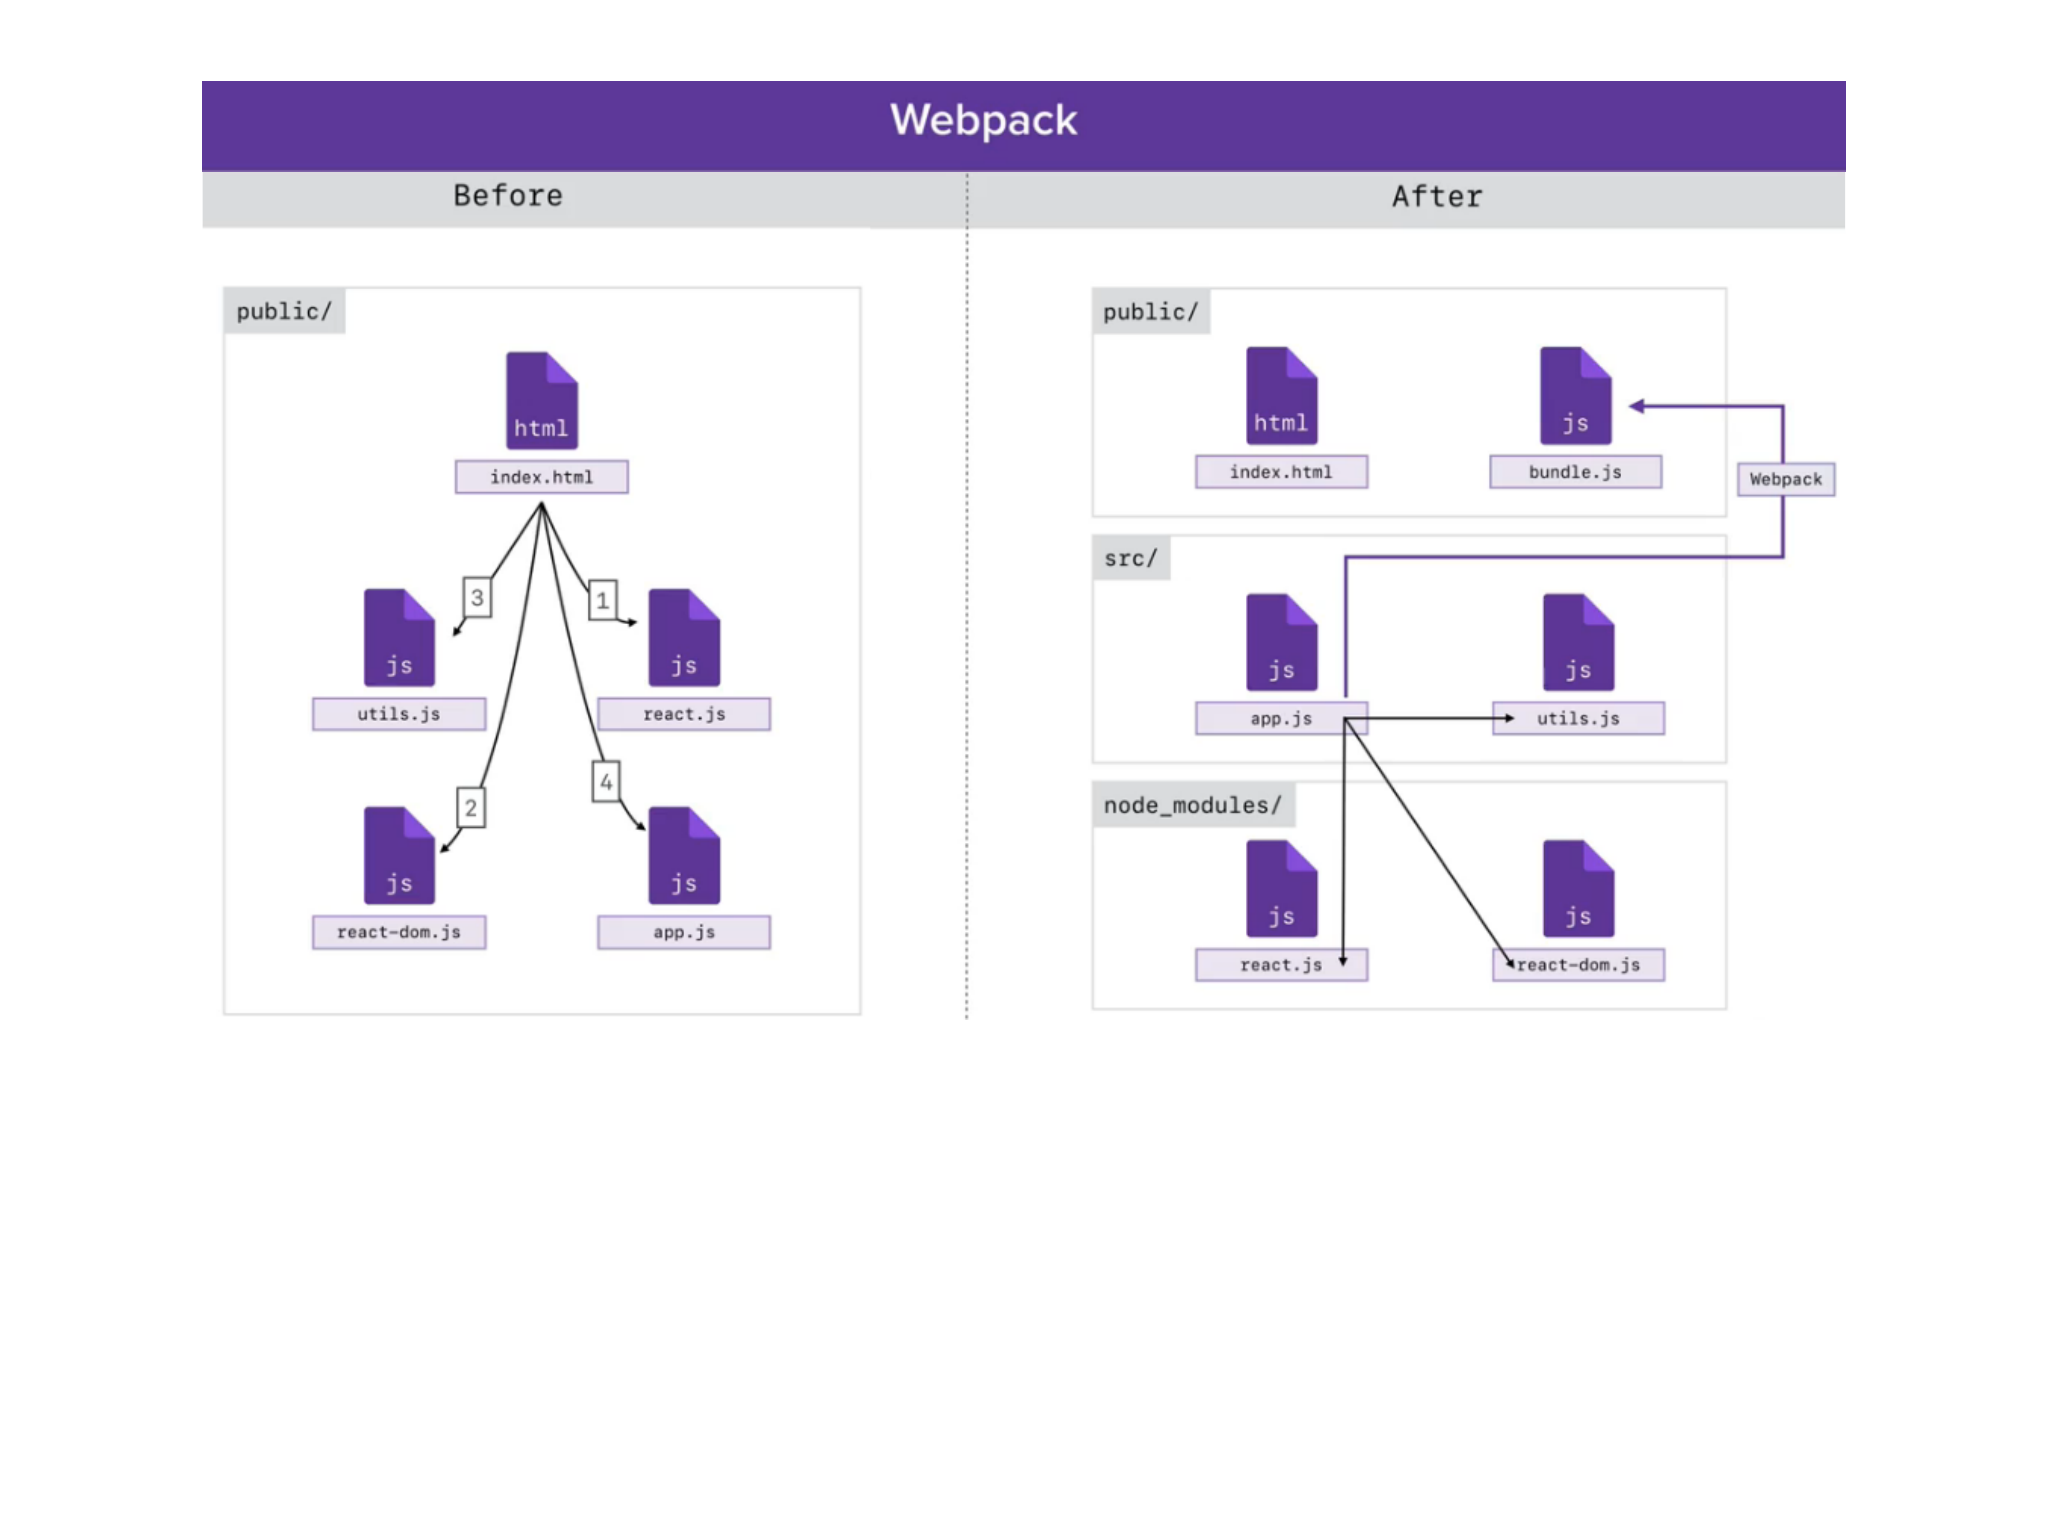
Wepack allows us to break up our application into a directory structure. We have a public directory to serve up the web
application assets, while the src directory contains the client side JavaScript and a node_modules directory which contains
all the application third party dependencies such as react.
Webpack is a module bundler, so the JavaScript files are going to be setup to depend on one another. We would create a
little dependency tree by defining the dependencies clearly within the app.js file which will be considered as the main file.
When Webpack is run, it will start with app.js file (as the main file) and get everything it needs to run the application. We will
end up with a single file in the public folder called bundle.js and this single file will be loaded in the html file using the
<script> tag. Not only does Webpack compress the JavaScript code but it can also run the Babel command for us.
