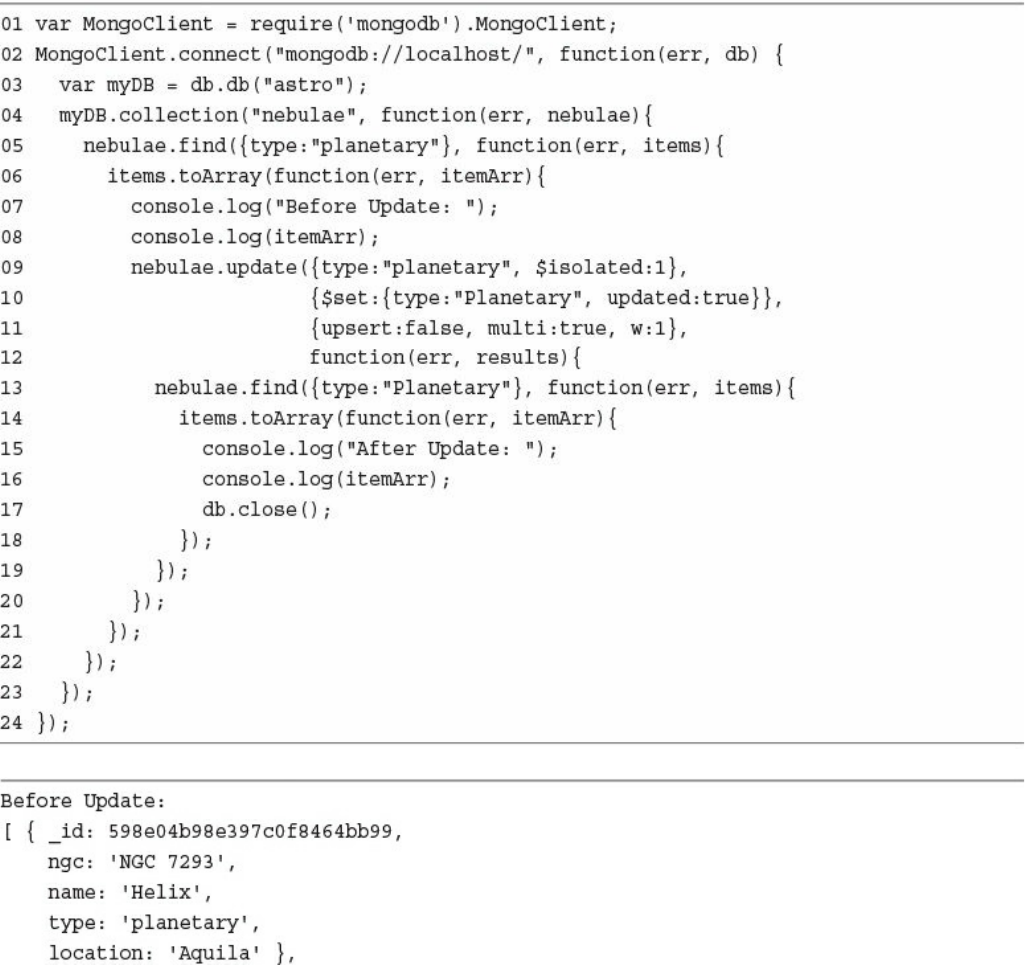
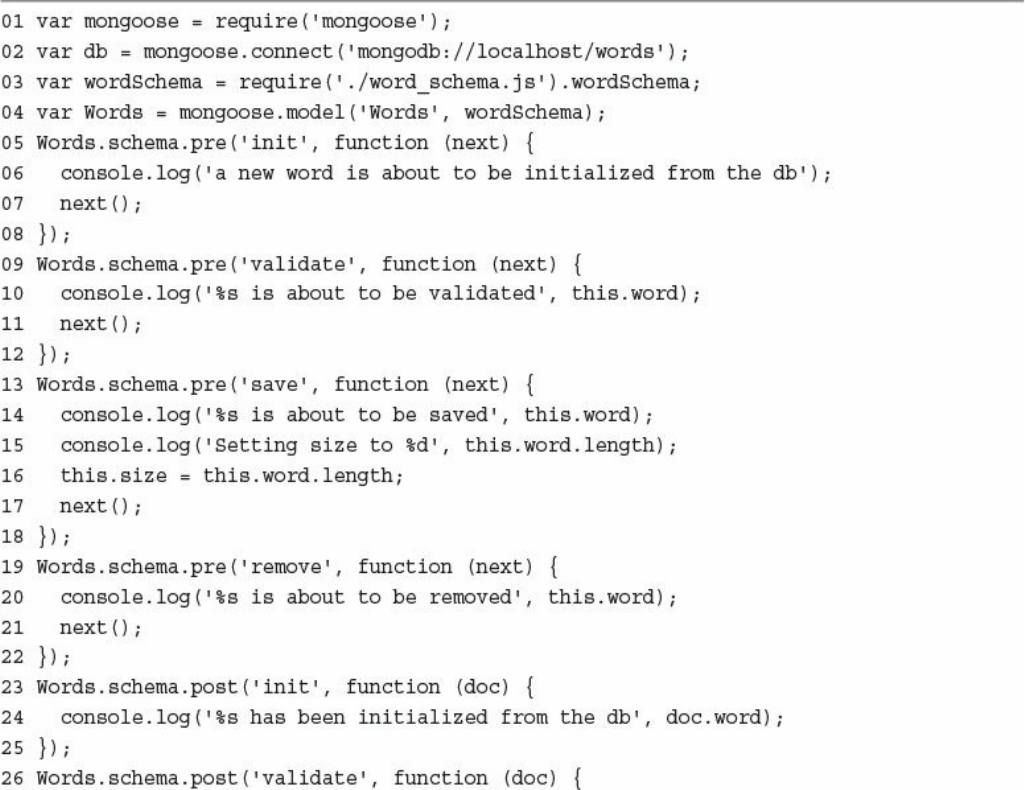
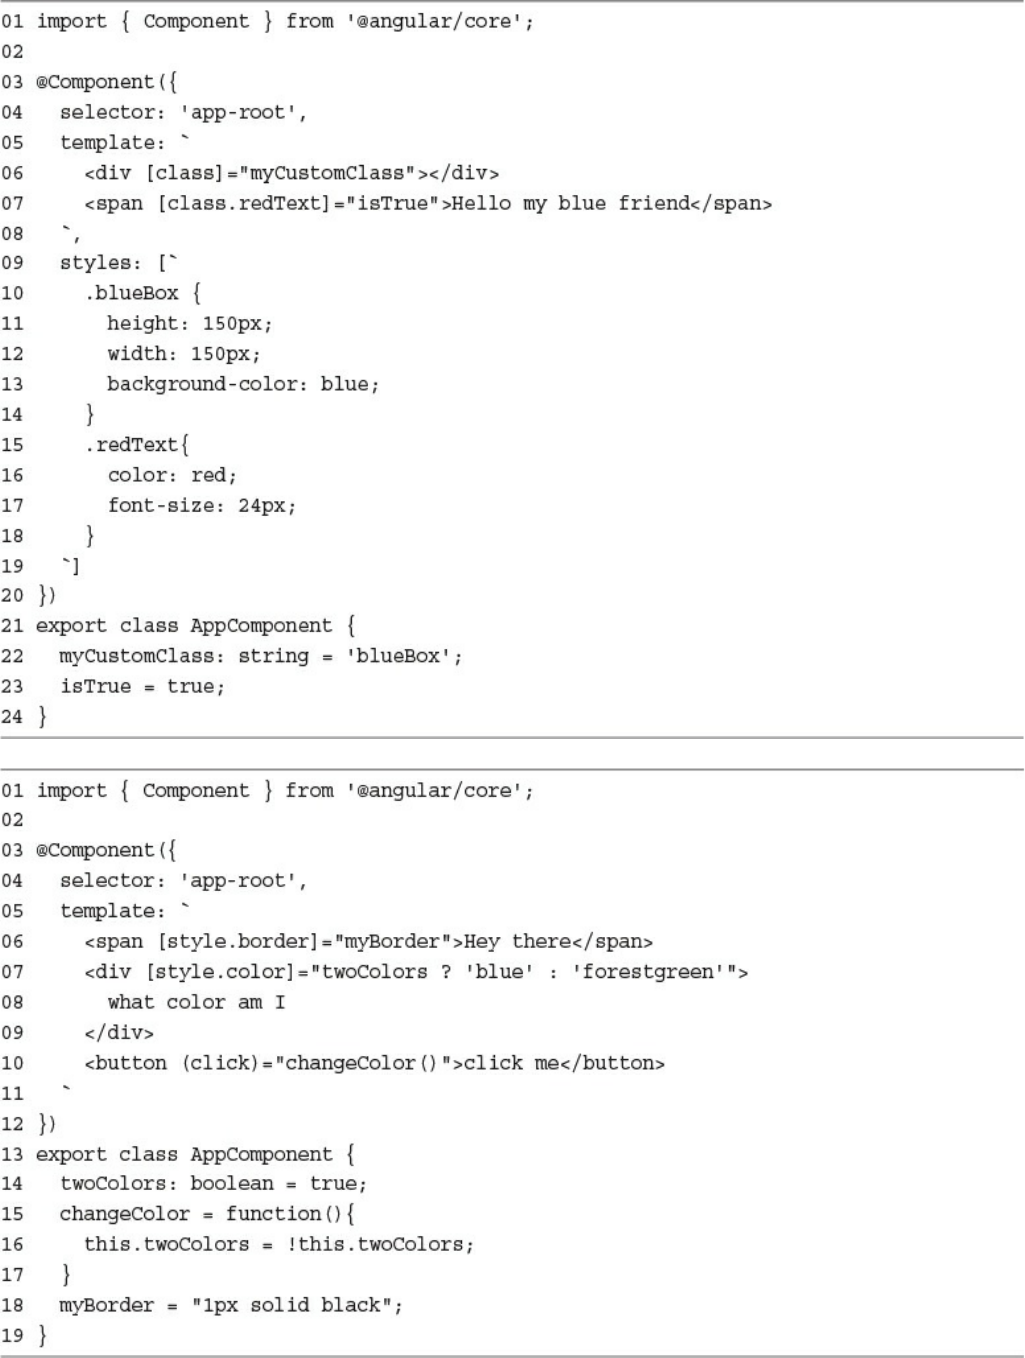
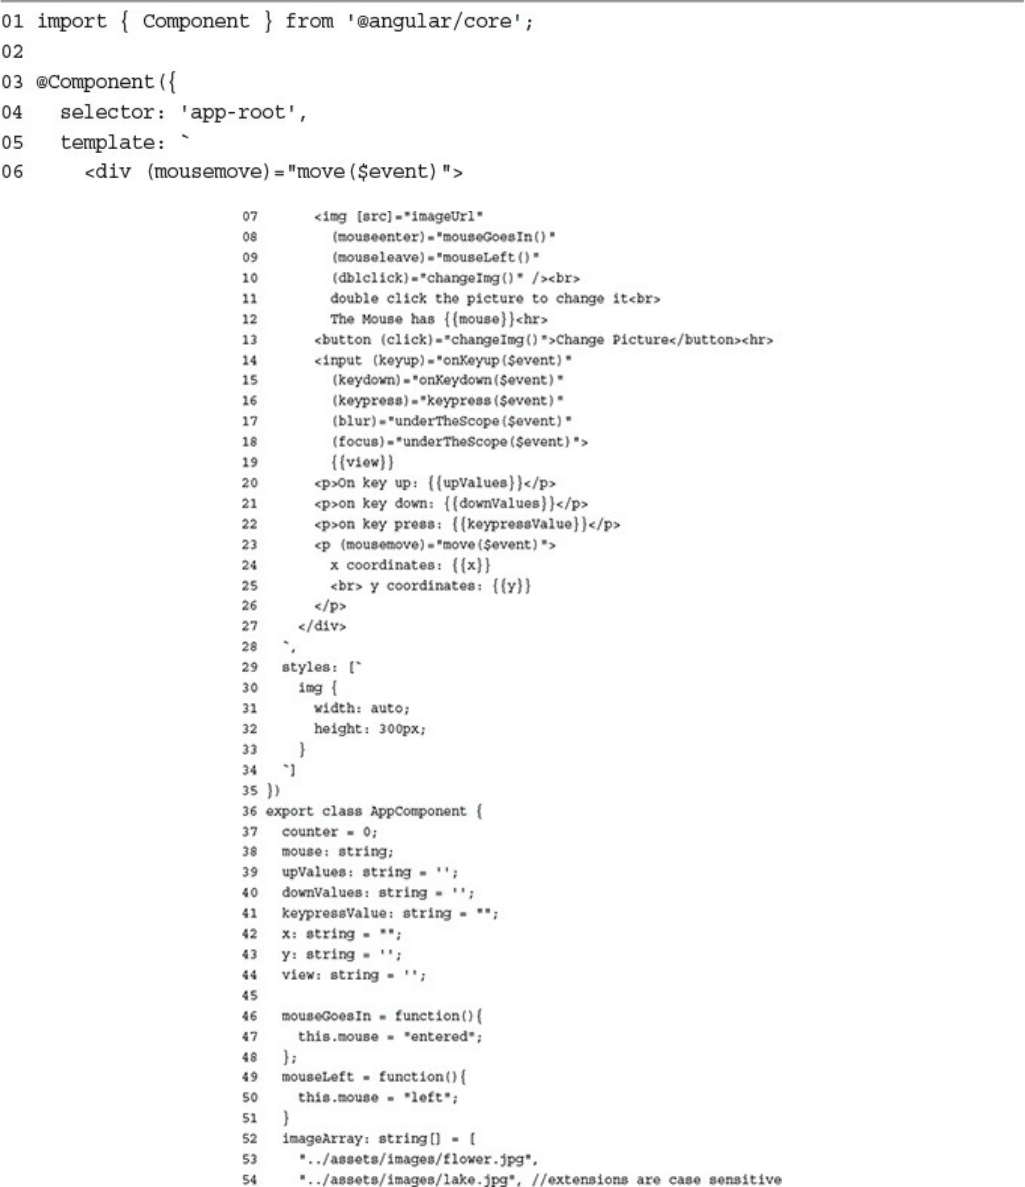
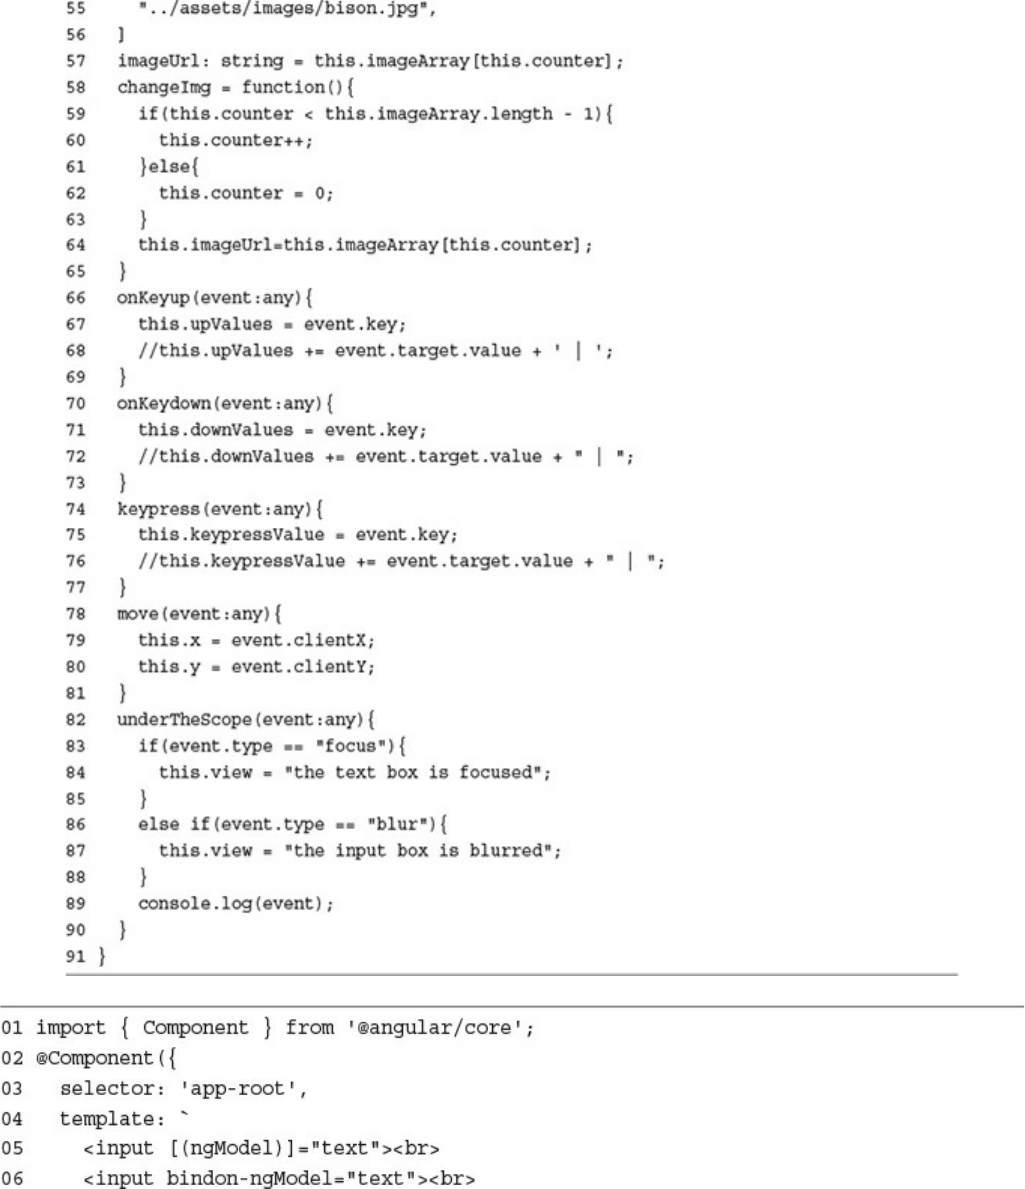
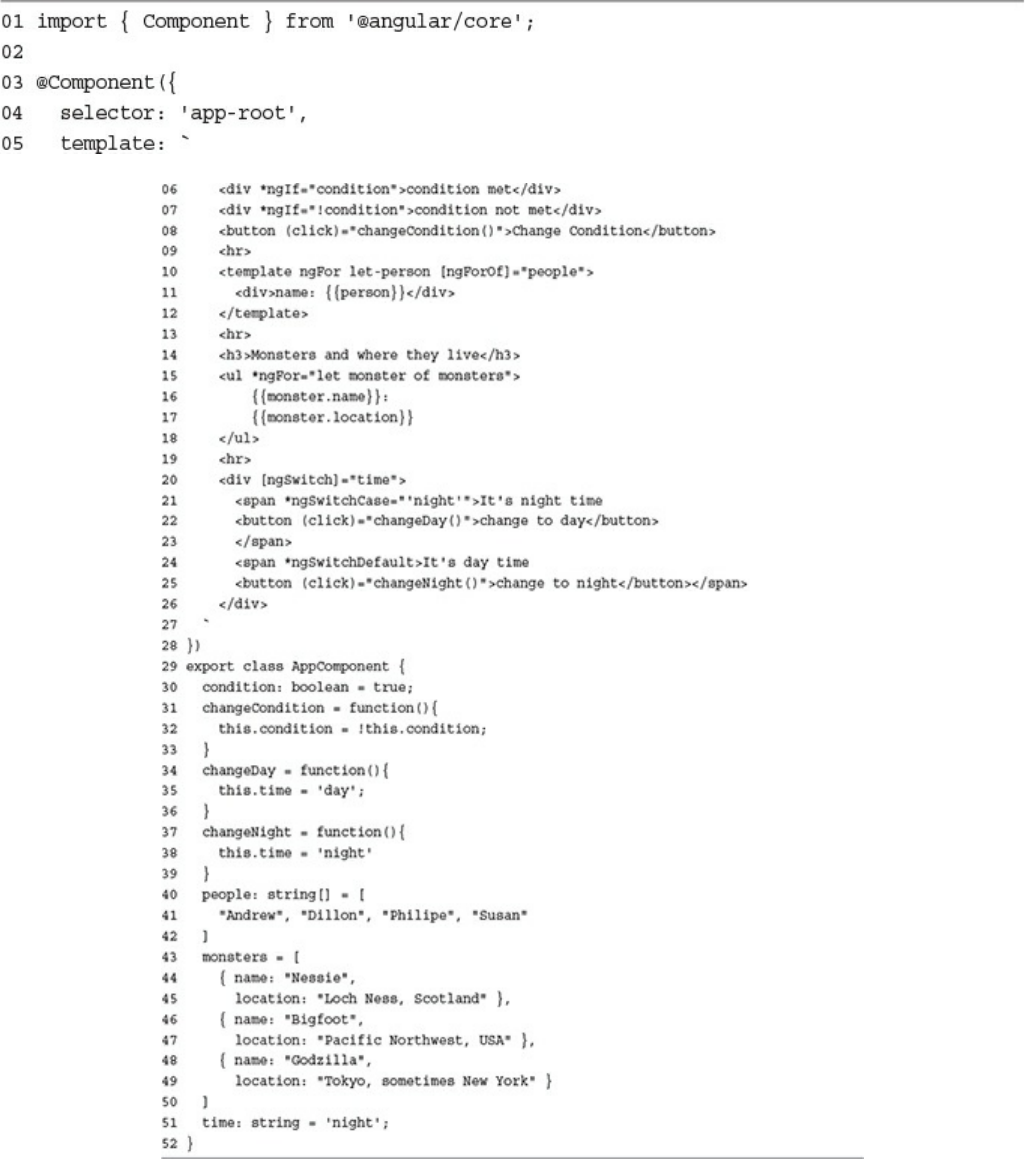
Node.js, MongoDB And Angular Web Development: The Definitive Guide To Using MEAN Stack Build Applications (Developer' Brad Dayley & Brendan Caleb Mongo DB Development
User Manual:
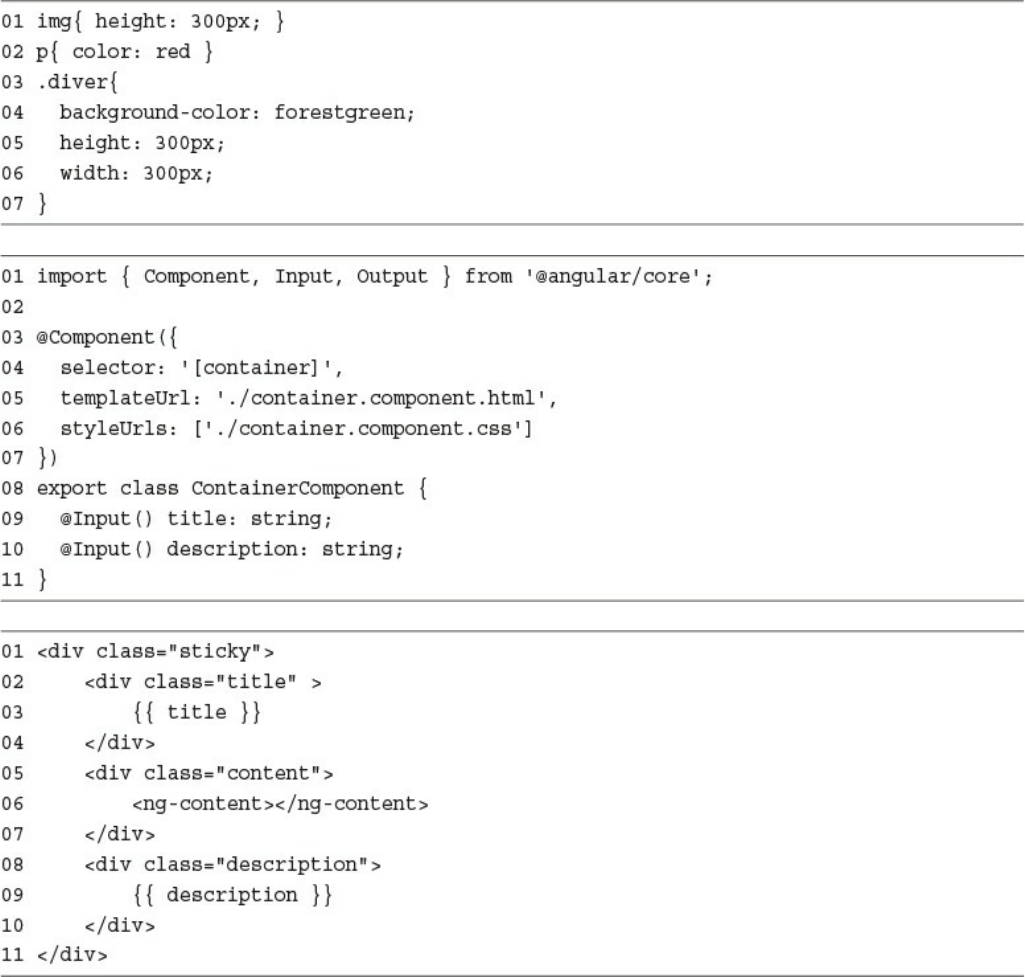
Open the PDF directly: View PDF ![]() .
.
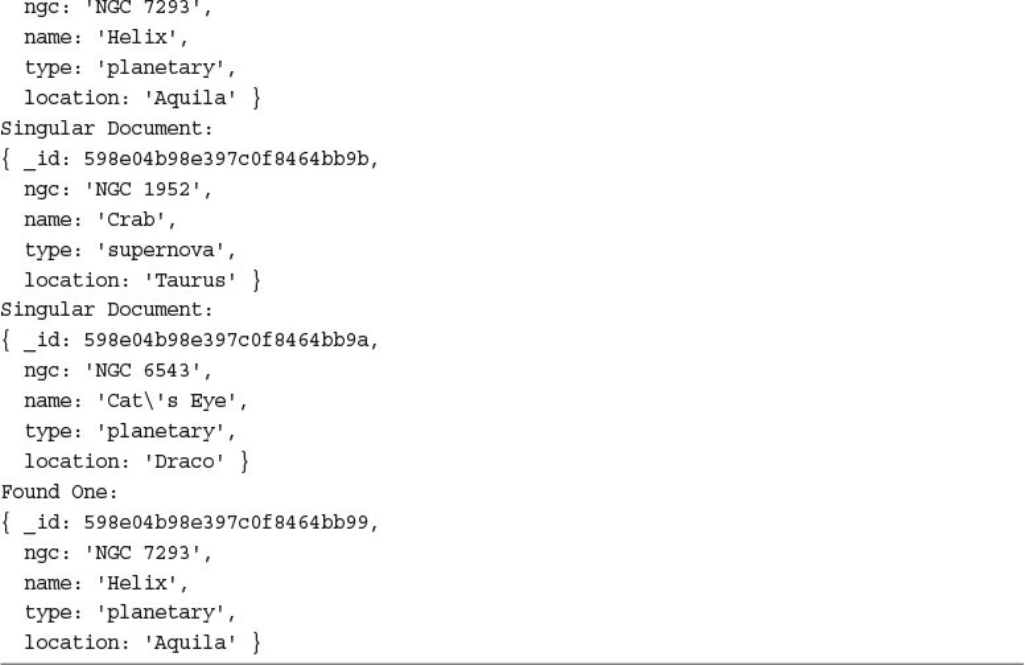
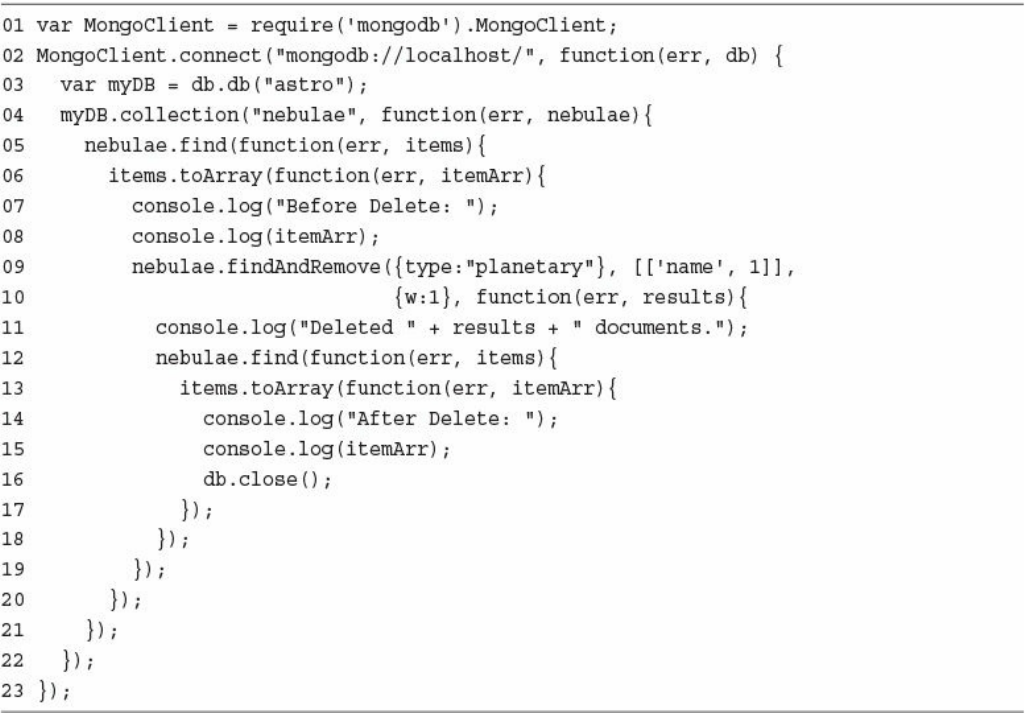
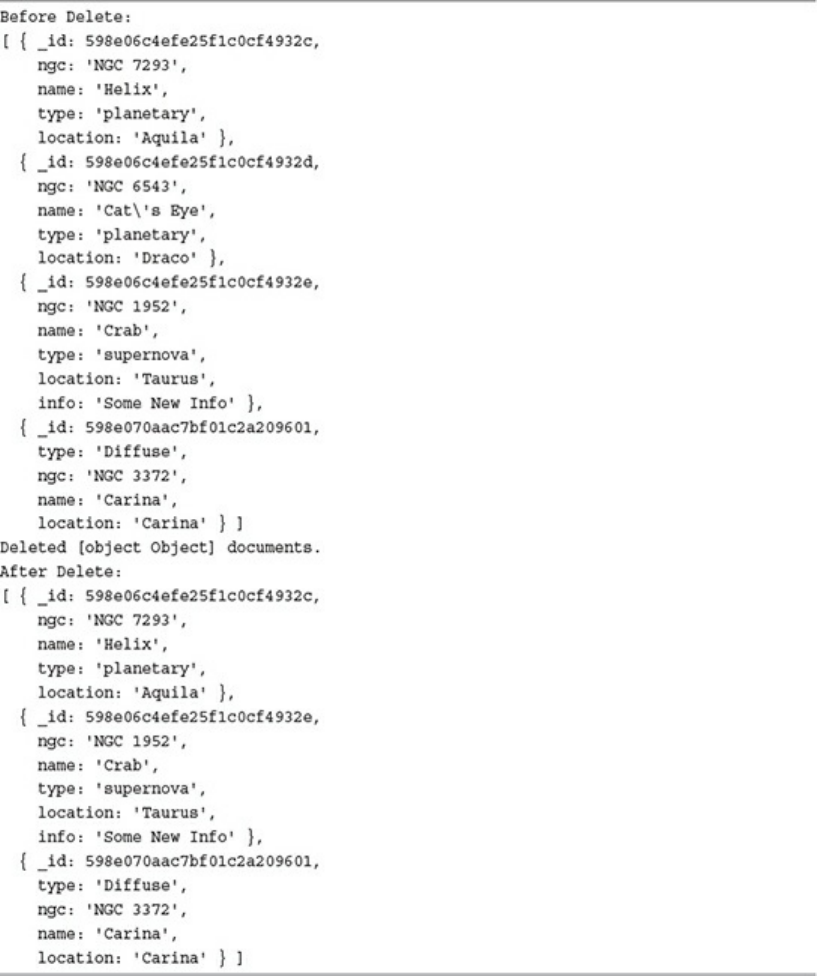
Page Count: 1056 [warning: Documents this large are best viewed by clicking the View PDF Link!]
- Title Page
- Copyright Page
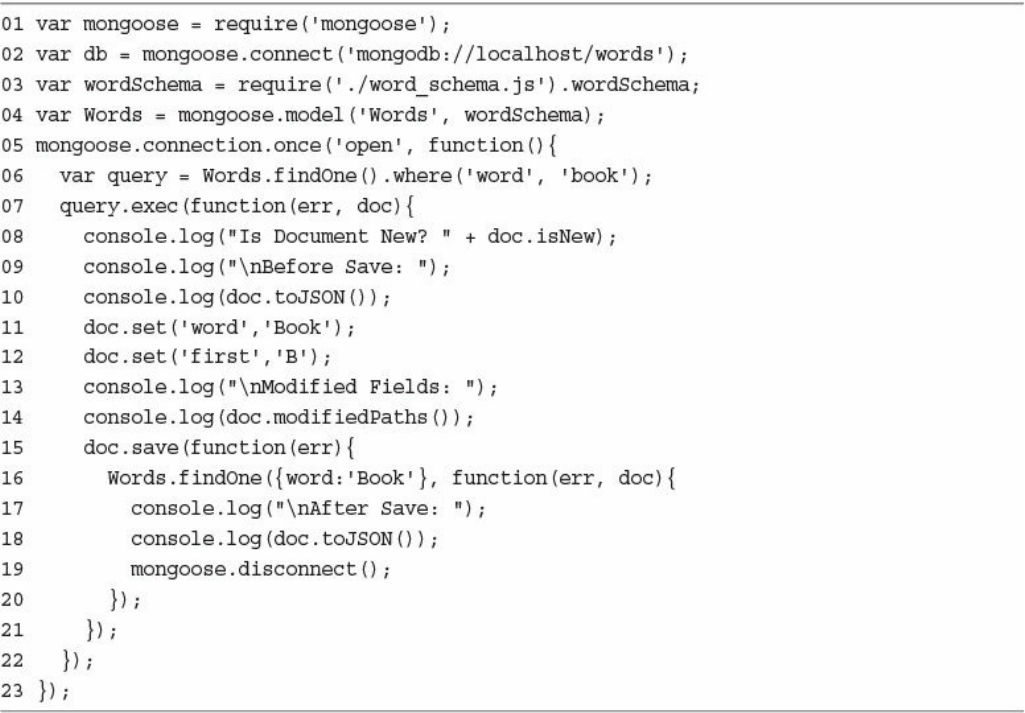
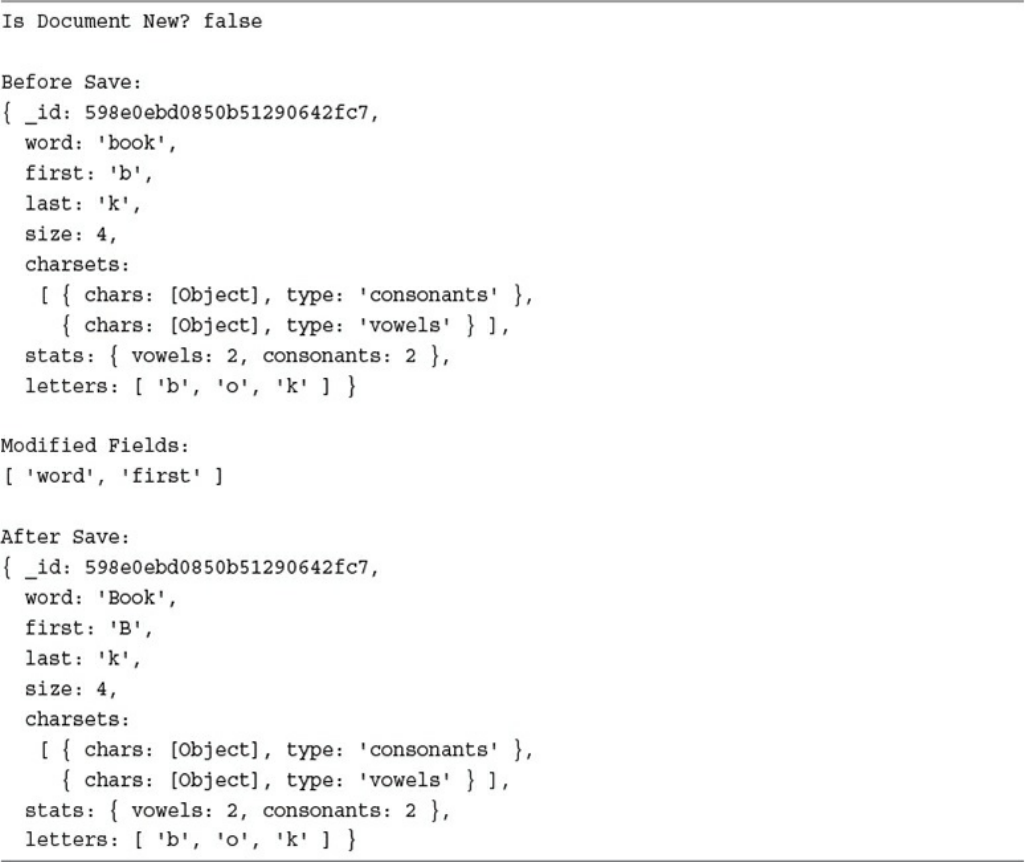
- Contents At a Glance
- Contents
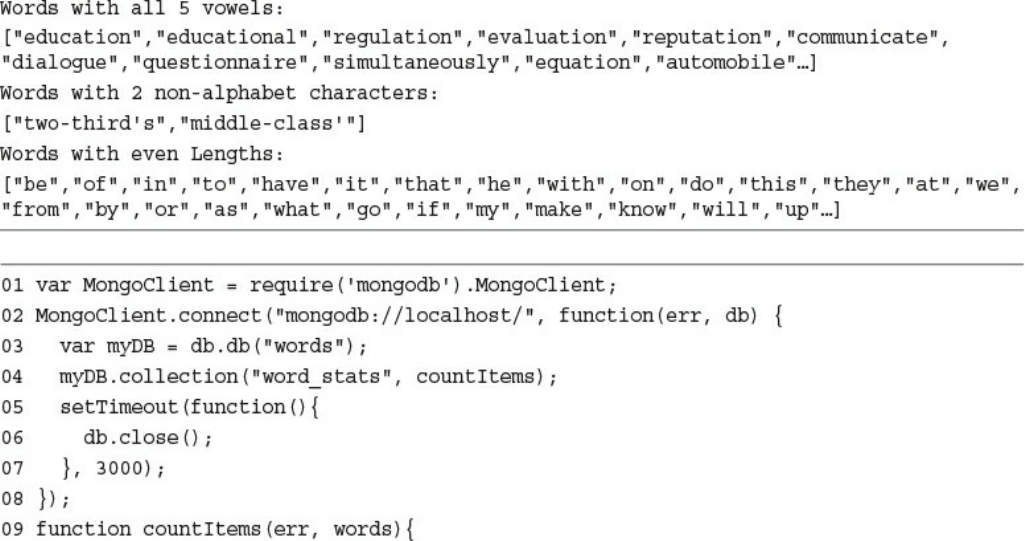
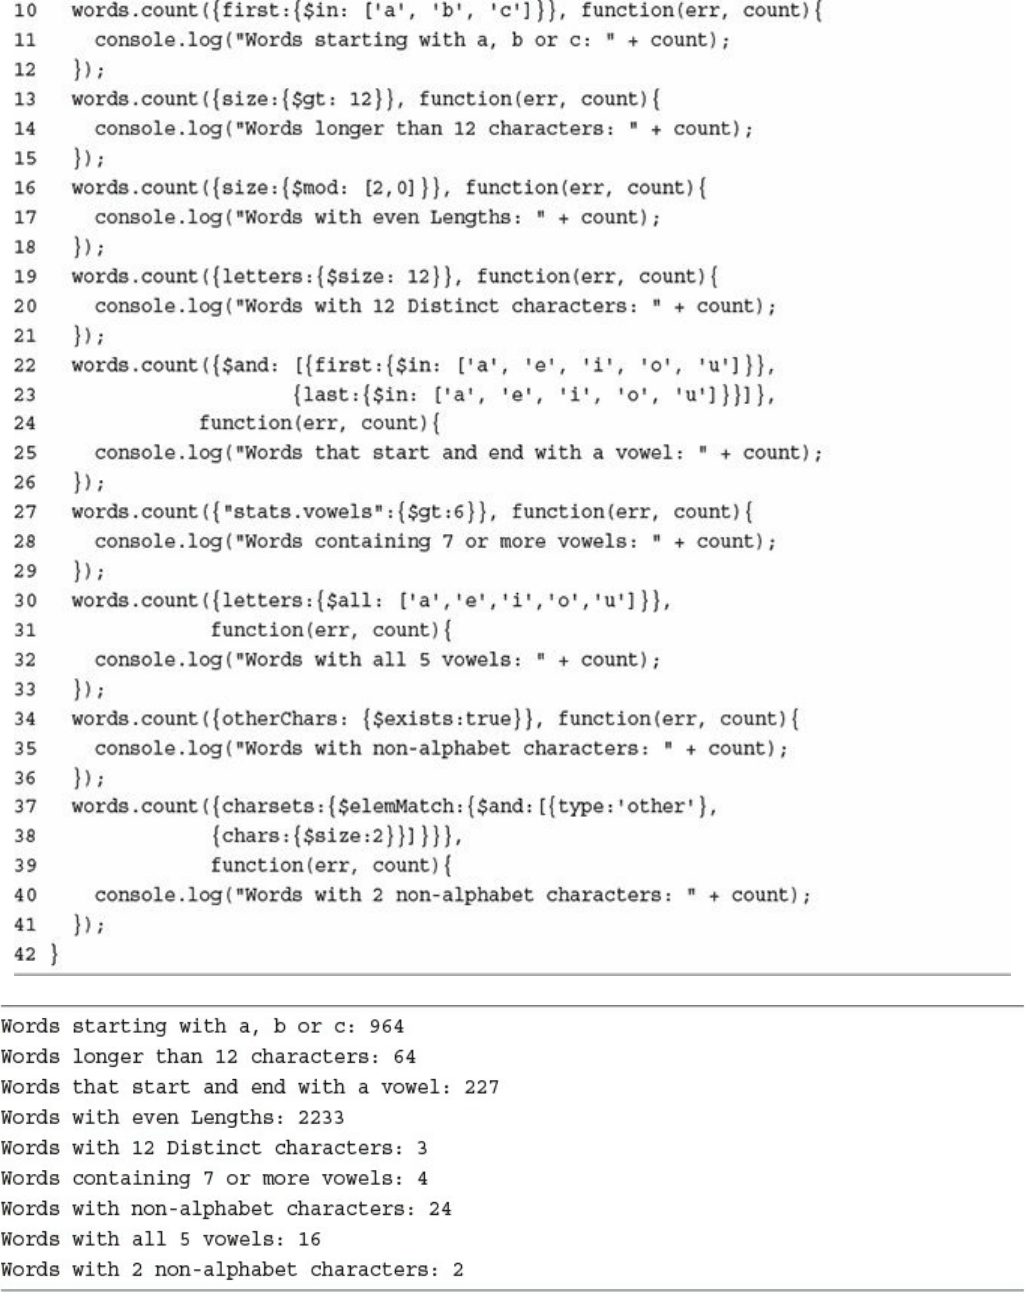
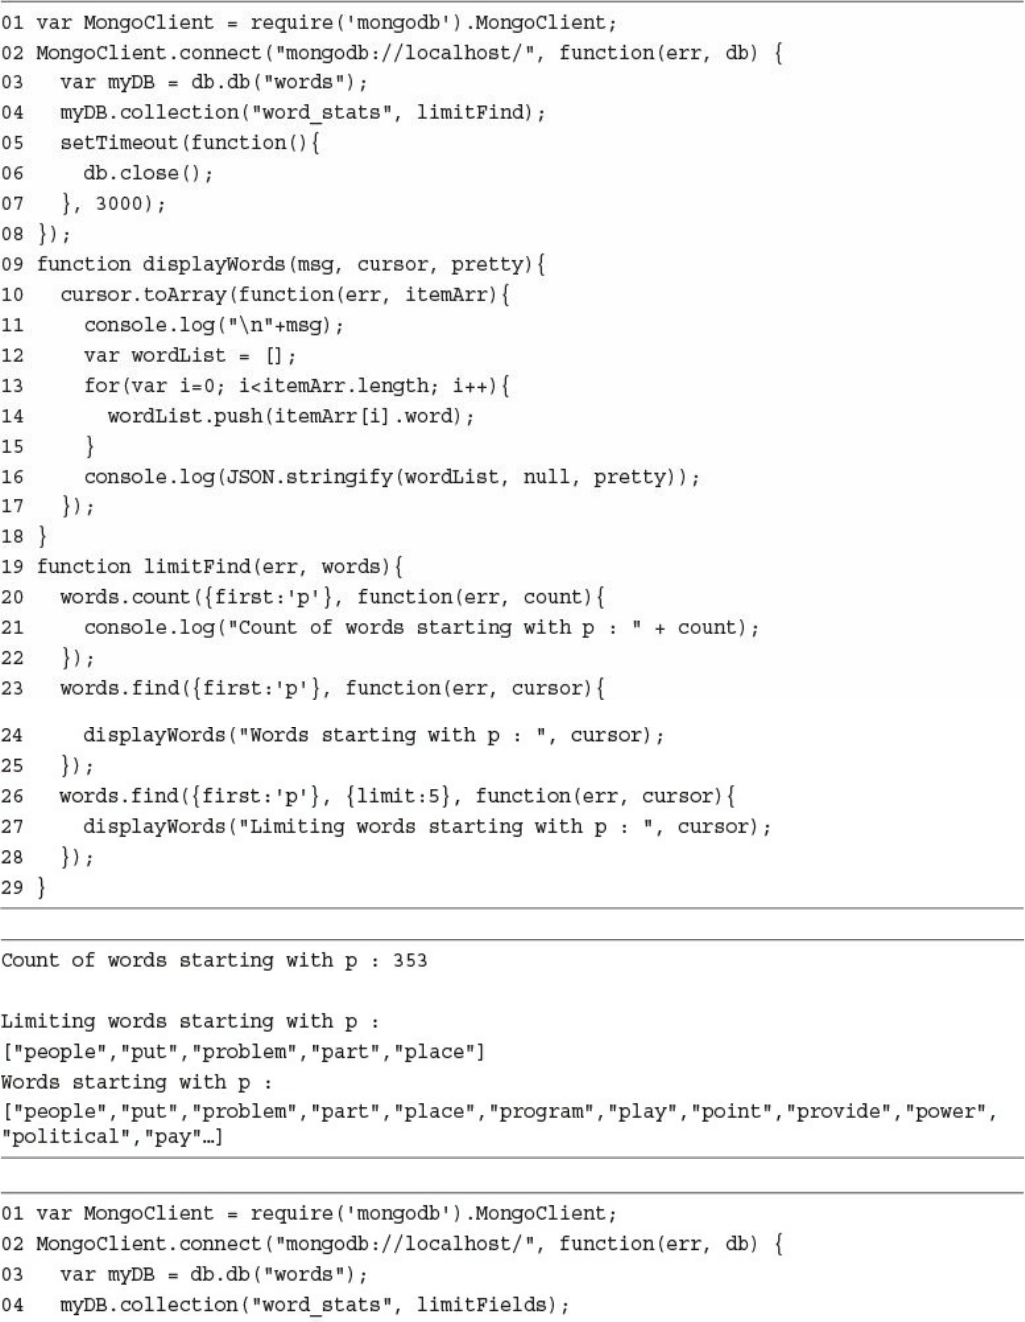
- About the Author
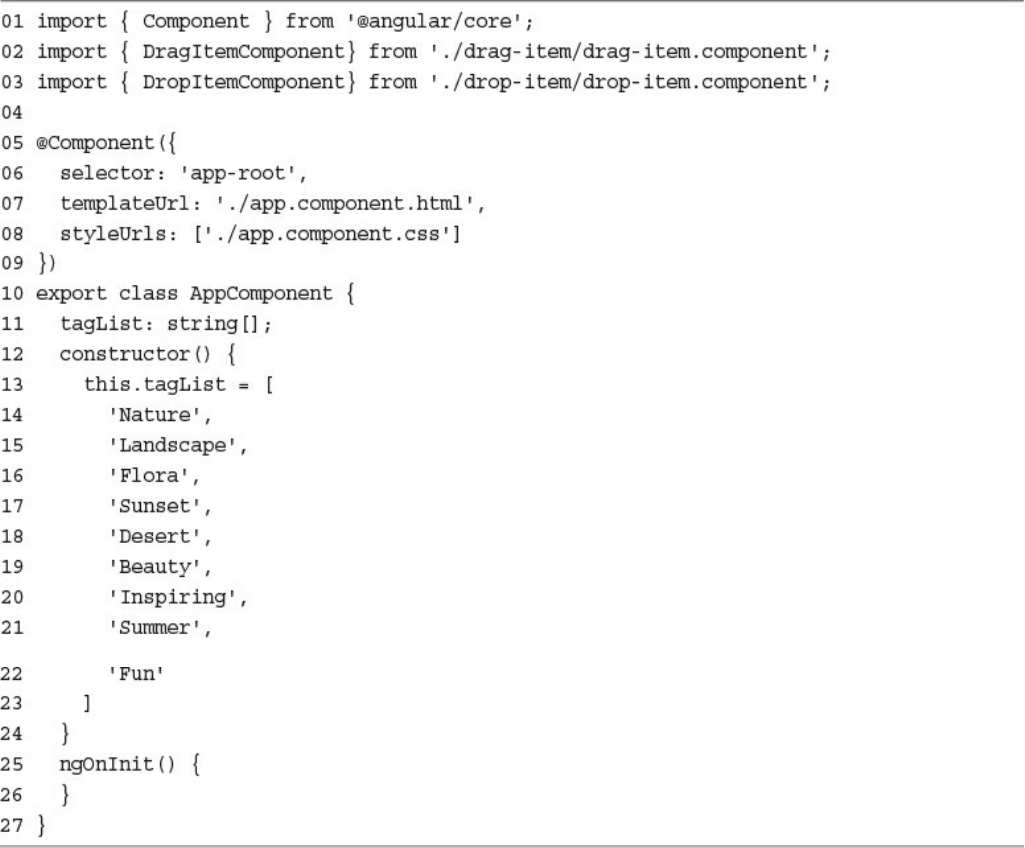
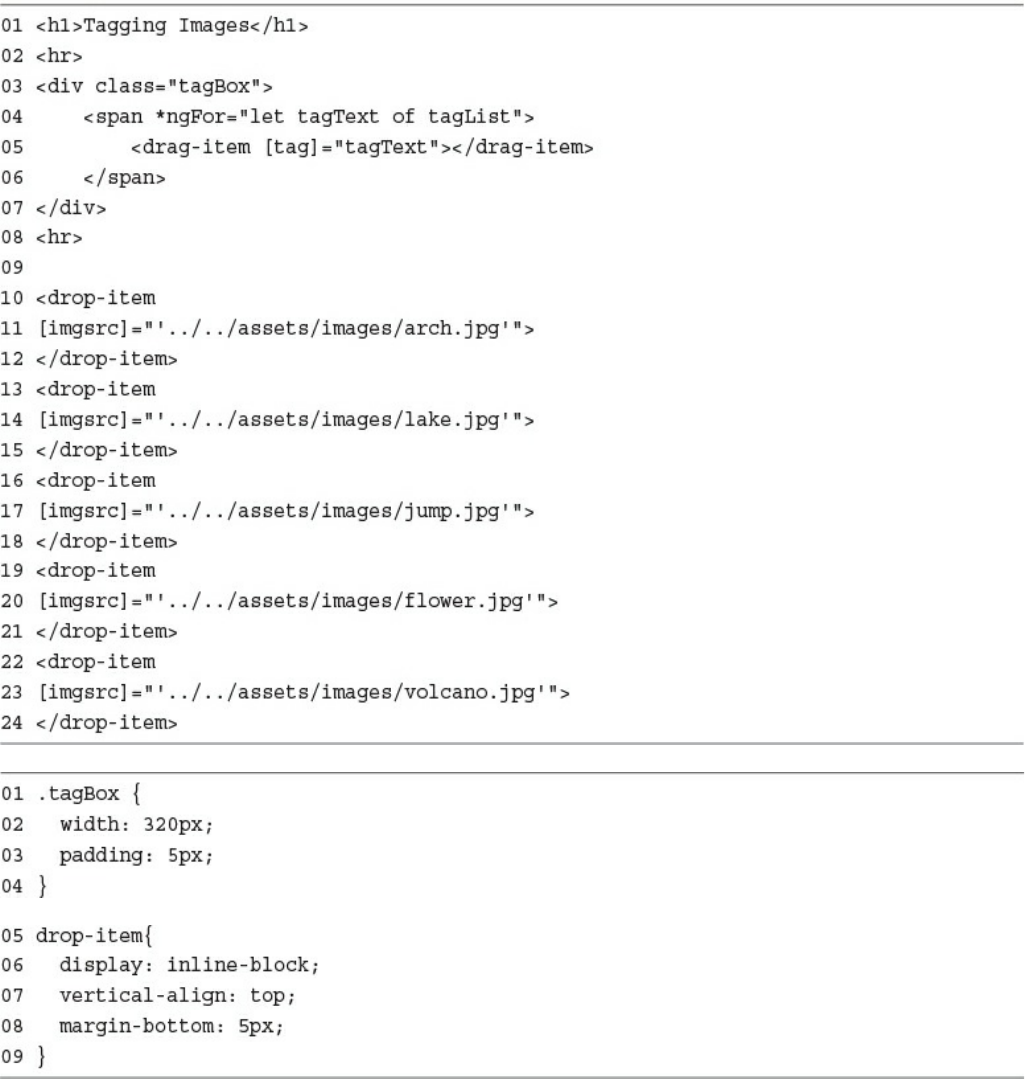
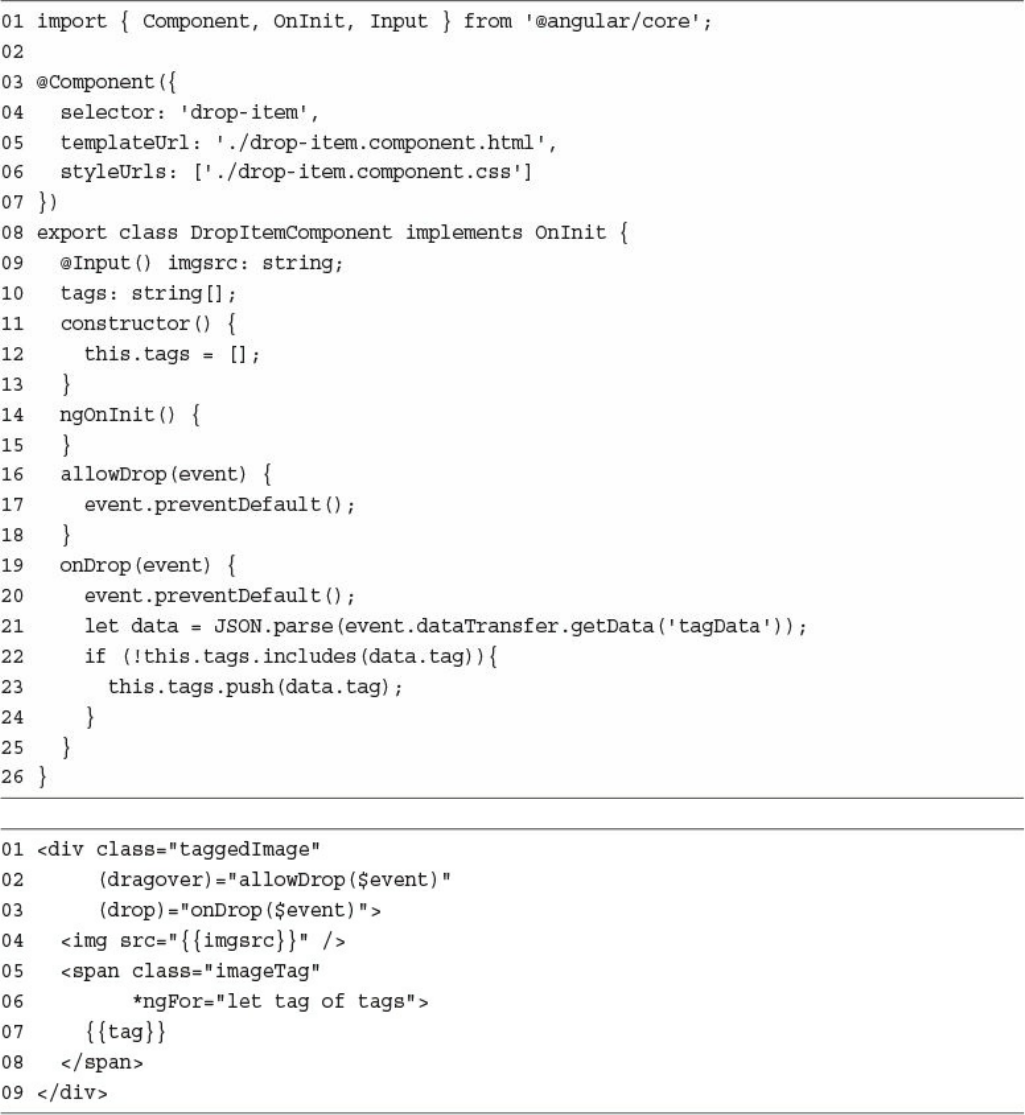
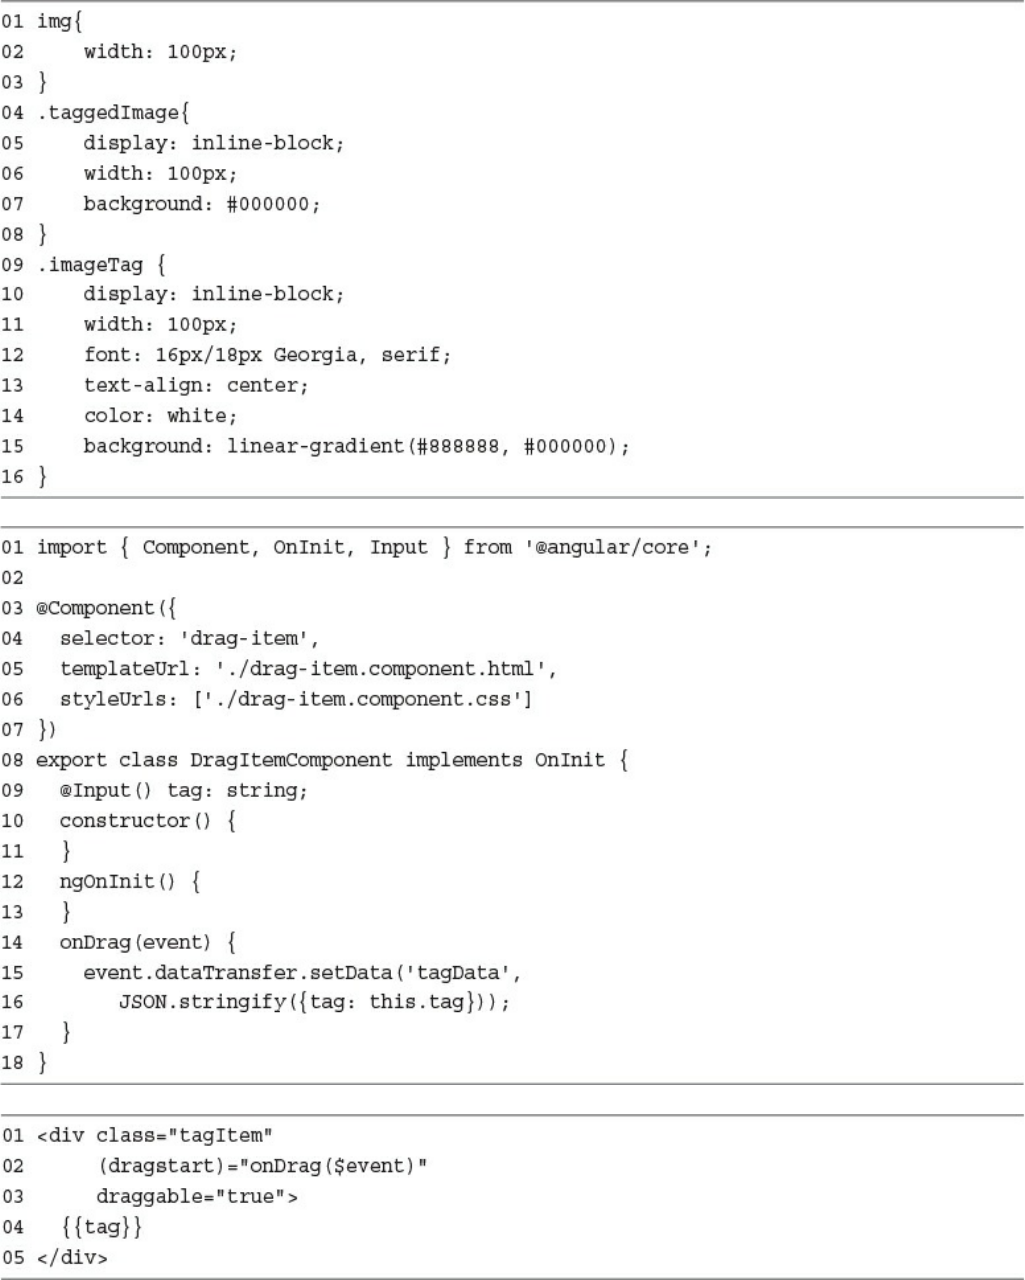
- Acknowledgments
- Accessing the Free Web Edition
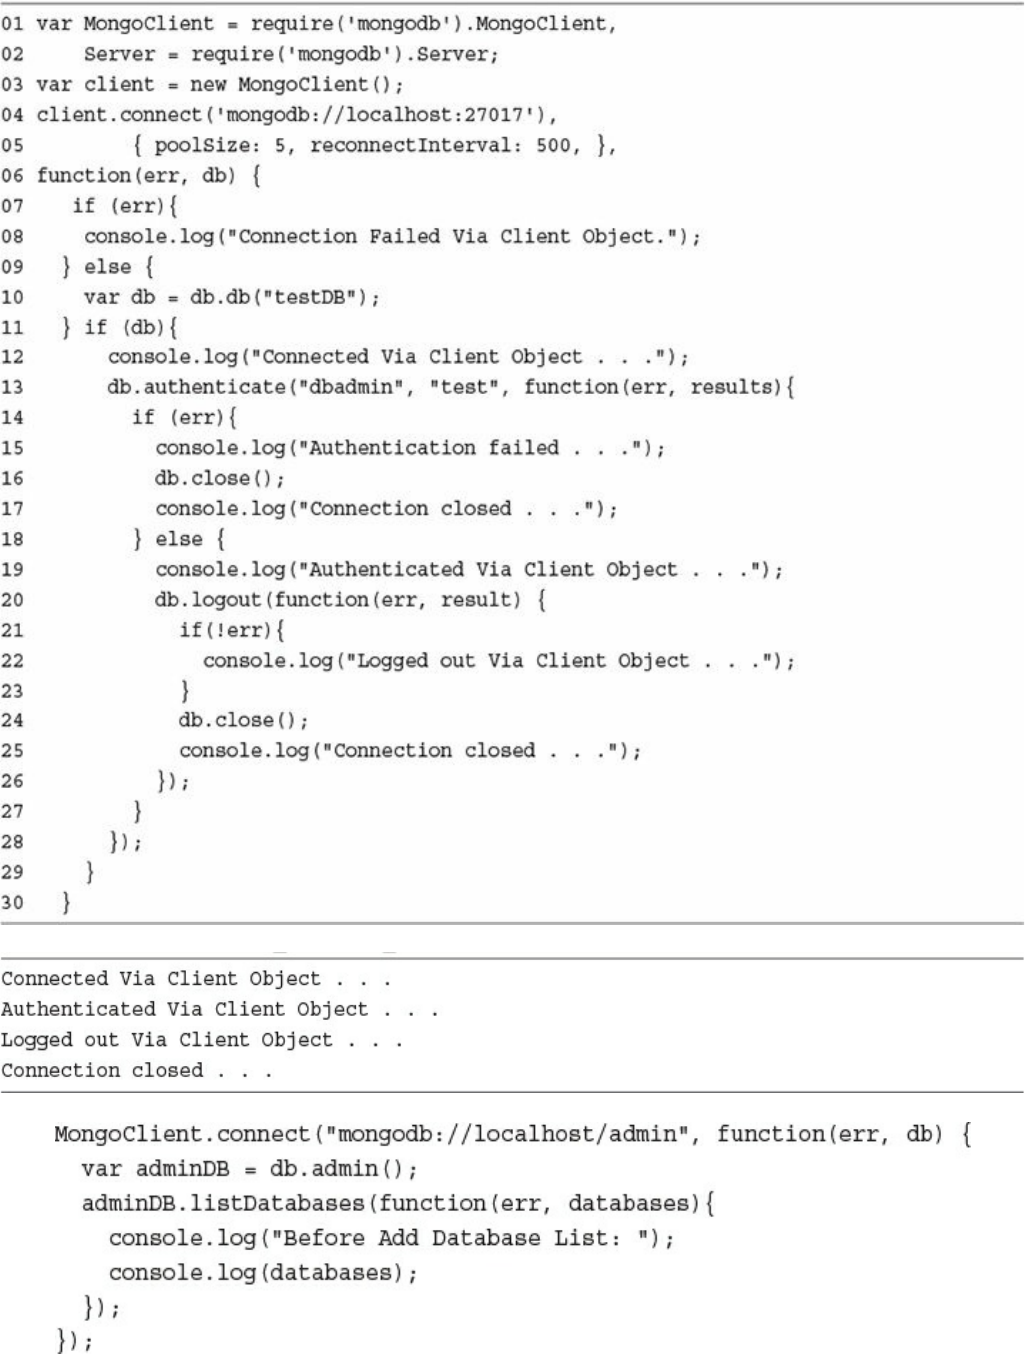
- Introduction
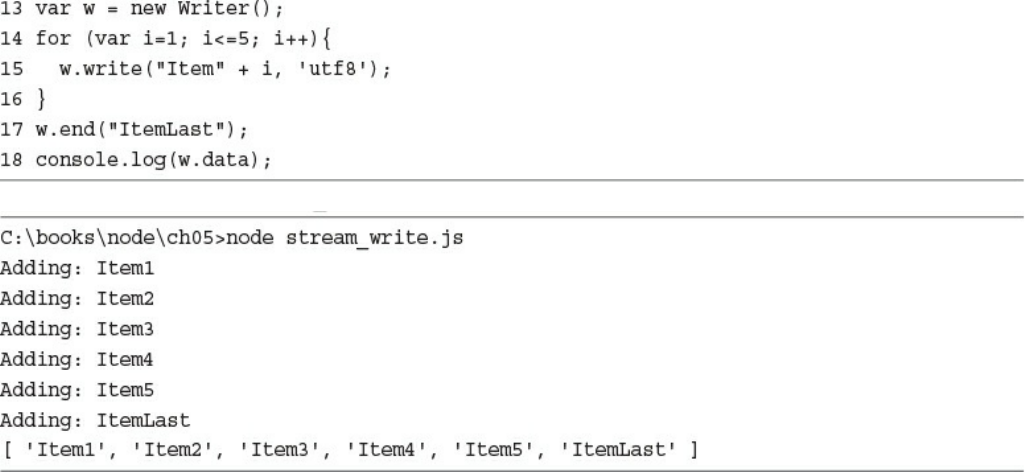
- I: Getting Started
- II: Learning Node.js
- 3 Getting Started with Node.js
- 4 Using Events, Listeners, Timers, and Callbacks in Node.js
- 5 Handling Data I/O in Node.js
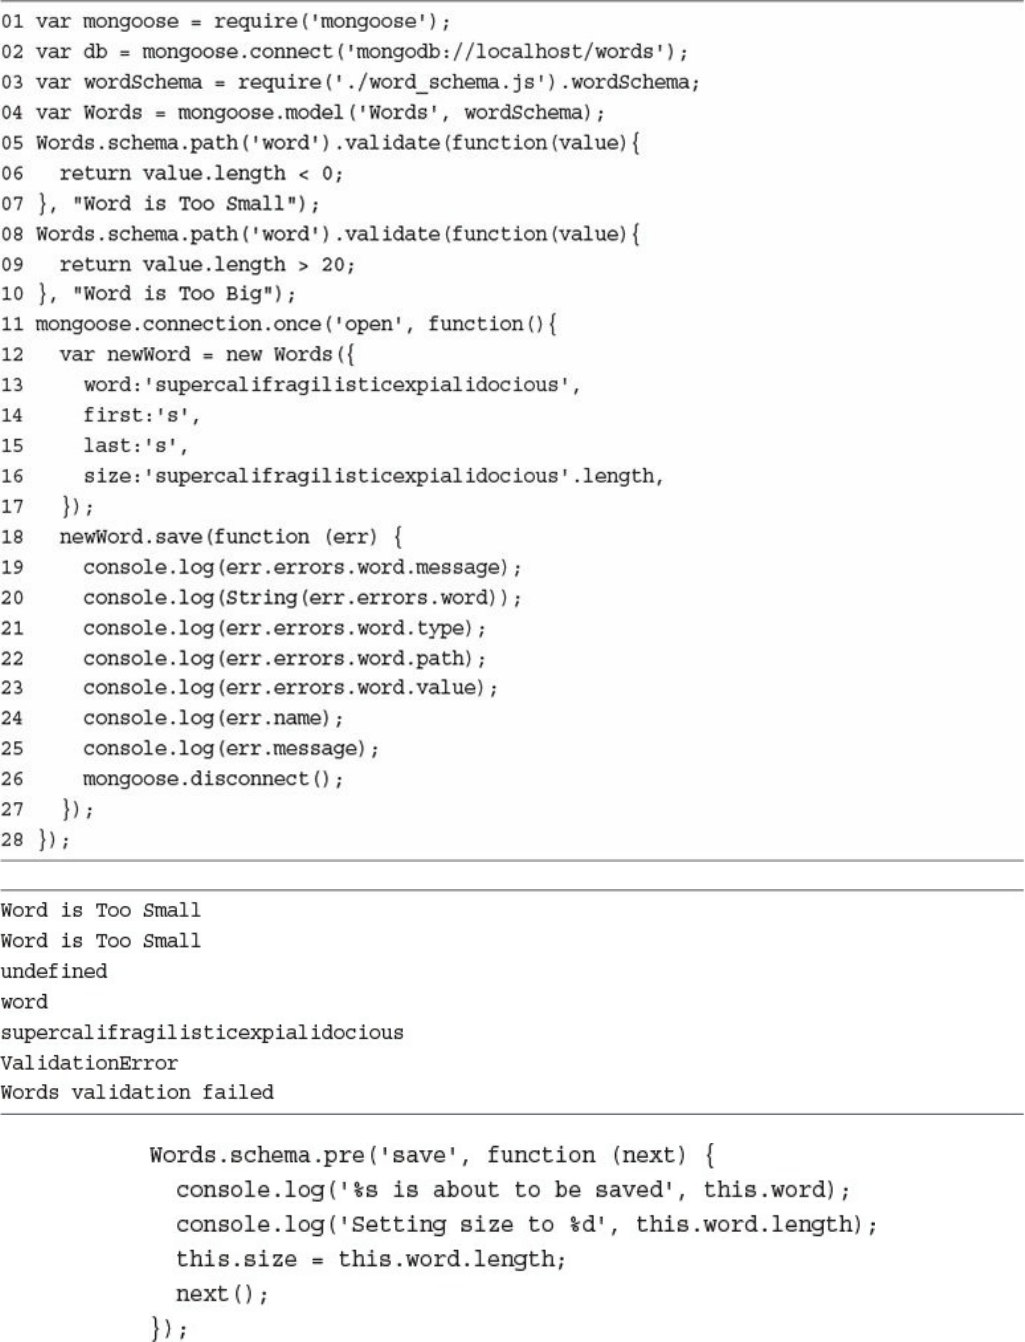
- 6 Accessing the File System from Node.js
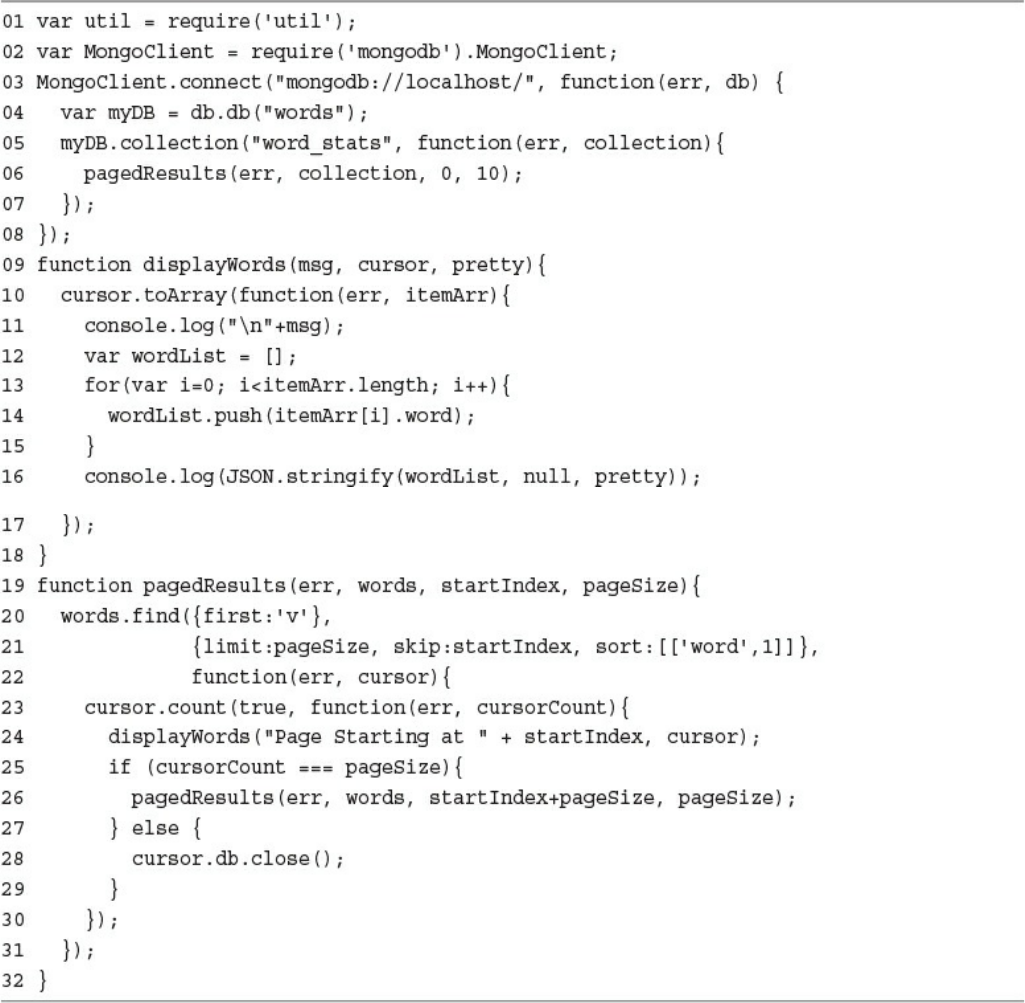
- 7 Implementing HTTP Services in Node.js
- 8 Implementing Socket Services in Node.js
- 9 Scaling Applications Using Multiple Processors in Node.js
- 10 Using Additional Node.js Modules
- III: Learning MongoDB
- 11 Understanding NoSQL and MongoDB
- Why NoSQL?
- Understanding MongoDB
- MongoDB Data Types
- Planning Your Data Model
- Normalizing Data with Document References
- Denormalizing Data with Embedded Documents
- Using Capped Collections
- Understanding Atomic Write Operations
- Considering Document Growth
- Identifying Indexing, Sharding, and Replication Opportunities
- Large Collections Versus Large Numbers of Collections
- Deciding on Data Life Cycles
- Considering Data Usability and Performance
- Summary
- Next
- 12 Getting Started with MongoDB
- 13 Getting Started with MongoDB and Node.js
- 14 Manipulating MongoDB Documents from Node.js
- Understanding Database Change Options
- Understanding Database Update Operators
- Adding Documents to a Collection
- Getting Documents from a Collection
- Updating Documents in a Collection
- Atomically Modifying Documents in a Collection
- Saving Documents in a Collection
- Upserting Documents in Collection
- Deleting Documents from a Collection
- Removing a Single Document from a Collection
- Summary
- Next
- 15 Accessing MongoDB from Node.js
- 16 Using Mongoose for Structured Schema and Validation
- Understanding Mongoose
- Connecting to a MongoDB Database Using Mongoose
- Defining a Schema
- Compiling a Model
- Understanding the Query Object
- Understanding the Document Object
- Finding Documents Using Mongoose
- Adding Documents Using Mongoose
- Updating Documents Using Mongoose
- Removing Documents Using Mongoose
- Aggregating Documents Using Mongoose
- Using the Validation Framework
- Implementing Middleware Functions
- Summary
- Next
- 17 Advanced MongoDB Concepts
- 11 Understanding NoSQL and MongoDB
- IV: Using Express to Make Life Easier
- 18 Implementing Express in Node.js
- 19 Implementing Express Middleware
- V: Learning Angular
- 20 Jumping into TypeScript
- 21 Getting Started with Angular
- 22 Angular Components
- 23 Expressions
- 24 Data Binding
- 25 Built-in Directives
- VI: Advanced Angular
- 26 Custom Directives
- 27 Events and Change Detection
- 28 Implementing Angular Services in Web Applications
- 29 Creating Your Own Custom Angular Services
- 30 Having Fun with Angular
- Index

About This E-Book
EPUB is an open, industry-standard format for e-books. However, support for EPUB
and its many features varies across reading devices and applications. Use your
device or app settings to customize the presentation to your liking. Settings that you
can customize often include font, font size, single or double column, landscape or
portrait mode, and figures that you can click or tap to enlarge. For additional
information about the settings and features on your reading device or app, visit the
device manufacturer’s Web site.
Many titles include programming code or configuration examples. To optimize the
presentation of these elements, view the e-book in single-column, landscape mode
and adjust the font size to the smallest setting. In addition to presenting code and
configurations in the reflowable text format, we have included images of the code
that mimic the presentation found in the print book; therefore, where the reflowable
format may compromise the presentation of the code listing, you will see a “Click
here to view code image” link. Click the link to view the print-fidelity code image.
To return to the previous page viewed, click the Back button on your device or app.


Node.js, MongoDB and Angular Web
Development
Second Edition
Brad Dayley
Brendan Dayley
Caleb Dayley
Node.js, MongoDB and Angular Web Development, Second Edition
Copyright © 2018 by Pearson Education, Inc.
All rights reserved. No part of this book shall be reproduced, stored in a retrieval
system, or transmitted by any means, electronic, mechanical, photocopying,
recording, or otherwise, without written permission from the publisher. No patent
liability is assumed with respect to the use of the information contained herein.
Although every precaution has been taken in the preparation of this book, the
publisher and author assume no responsibility for errors or omissions. Nor is any
liability assumed for damages resulting from the use of the information contained
herein.
ISBN-13: 978-0-13-465553-6
ISBN-10: 0-13-465553-2
Library of Congress Control Number: 2017954802
Printed in the United States of America
1 17
Trademarks
All terms mentioned in this book that are known to be trademarks or service marks
have been appropriately capitalized. Pearson cannot attest to the accuracy of this
information. Use of a term in this book should not be regarded as affecting the
validity of any trademark or service mark.
Warning and Disclaimer
Every effort has been made to make this book as complete and as accurate as
possible, but no warranty or fitness is implied. The information provided is on an “as
is” basis. The author and the publisher shall have neither liability nor responsibility
to any person or entity with respect to any loss or damages arising from the
information contained in this book.
Special Sales
For information about buying this title in bulk quantities, or for special sales
opportunities (which may include electronic versions; custom cover designs; and
content particular to your business, training goals, marketing focus, or branding
interests), please contact our corporate sales department at
corpsales@pearsoned.com or (800) 382-3419.
For government sales inquiries, please contact governmentsales@pearsoned.com.
For questions about sales outside the U.S., please contact intlcs@pearson.com.
Editor
Mark Taber
Senior Project Editor
Tonya Simpson
Copy Editor
Geneil Breeze
Indexer
Erika Millen
Compositor
codeMantra
Proofreader
Abigail Manheim
Technical Editor
Jesse Smith
Cover Designer
Chuti Prasertsith
Contents at a Glance
Introduction
I: Getting Started
1 Introducing the Node.js-to-Angular Stack
2 JavaScript Primer
II: Learning Node.js
3 Getting Started with Node.js
4 Using Events, Listeners, Timers, and Callbacks in Node.js
5 Handling Data I/O in Node.js
6 Accessing the File System from Node.js
7 Implementing HTTP Services in Node.js
8 Implementing Socket Services in Node.js
9 Scaling Applications Using Multiple Processors in Node.js
10 Using Additional Node.js Modules
III: Learning MongoDB
11 Understanding NoSQL and MongoDB
12 Getting Started with MongoDB
13 Getting Started with MongoDB and Node.js
14 Manipulating MongoDB Documents from Node.js
15 Accessing MongoDB from Node.js
16 Using Mongoose for Structured Schema and Validation
17 Advanced MongoDB Concepts
IV: Using Express to Make Life Easier
18 Implementing Express in Node.js
19 Implementing Express Middleware
V: Learning Angular
20 Jumping into TypeScript
21 Getting Started with Angular
22 Angular Components
23 Expressions
24 Data Binding
25 Built-in Directives
VI: Advanced Angular
26 Custom Directives
27 Events and Change Detection
28 Implementing Angular Services in Web Applications
29 Creating Your Own Custom Angular Services
30 Having Fun with Angular
Index
Contents
Introduction
I: Getting Started
1 Introducing the Node.js-to-Angular Stack
Understanding the Basic Web Development Framework
User
Browser
Webserver
Backend Services
Understanding the Node.js-to-Angular Stack Components
Node.js
MongoDB
Express
Angular
Summary
Next
2 JavaScript Primer
Defining Variables
Understanding JavaScript Data Types
Using Operators
Arithmetic Operators
Assignment Operators
Applying Comparison and Conditional Operators
Implementing Looping
while Loops
do/while Loops
for Loops
for/in Loops
Interrupting Loops
Creating Functions
Defining Functions
Passing Variables to Functions
Returning Values from Functions
Using Anonymous Functions
Understanding Variable Scope
Using JavaScript Objects
Using Object Syntax
Creating Custom-Defined Objects
Using a Prototyping Object Pattern
Manipulating Strings
Combining Strings
Searching a String for a Substring
Replacing a Word in a String
Splitting a String into an Array
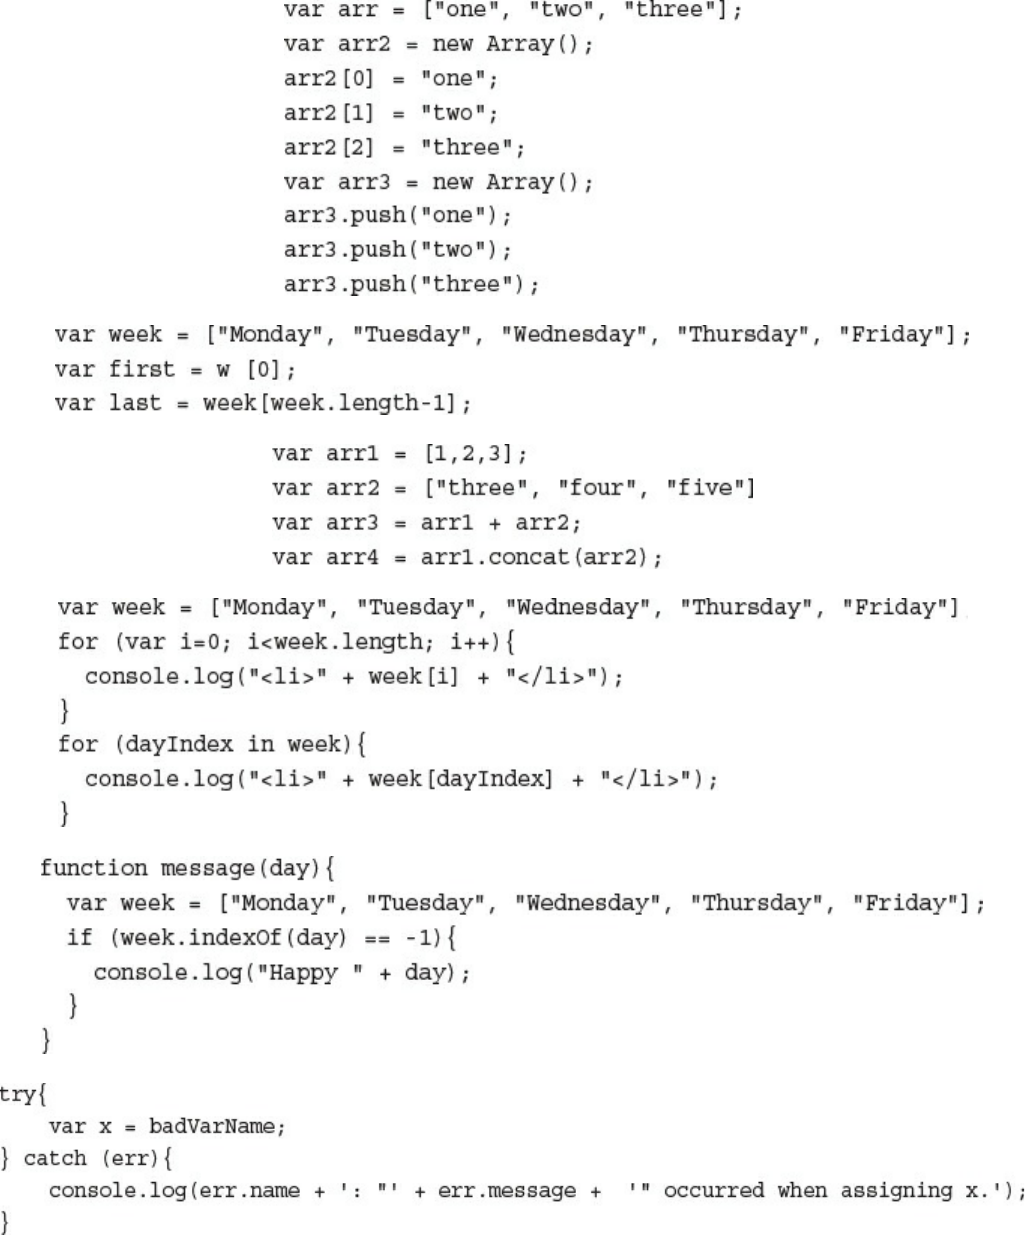
Working with Arrays
Combining Arrays
Iterating Through Arrays
Converting an Array into a String
Checking Whether an Array Contains an Item
Adding and Removing Items to Arrays
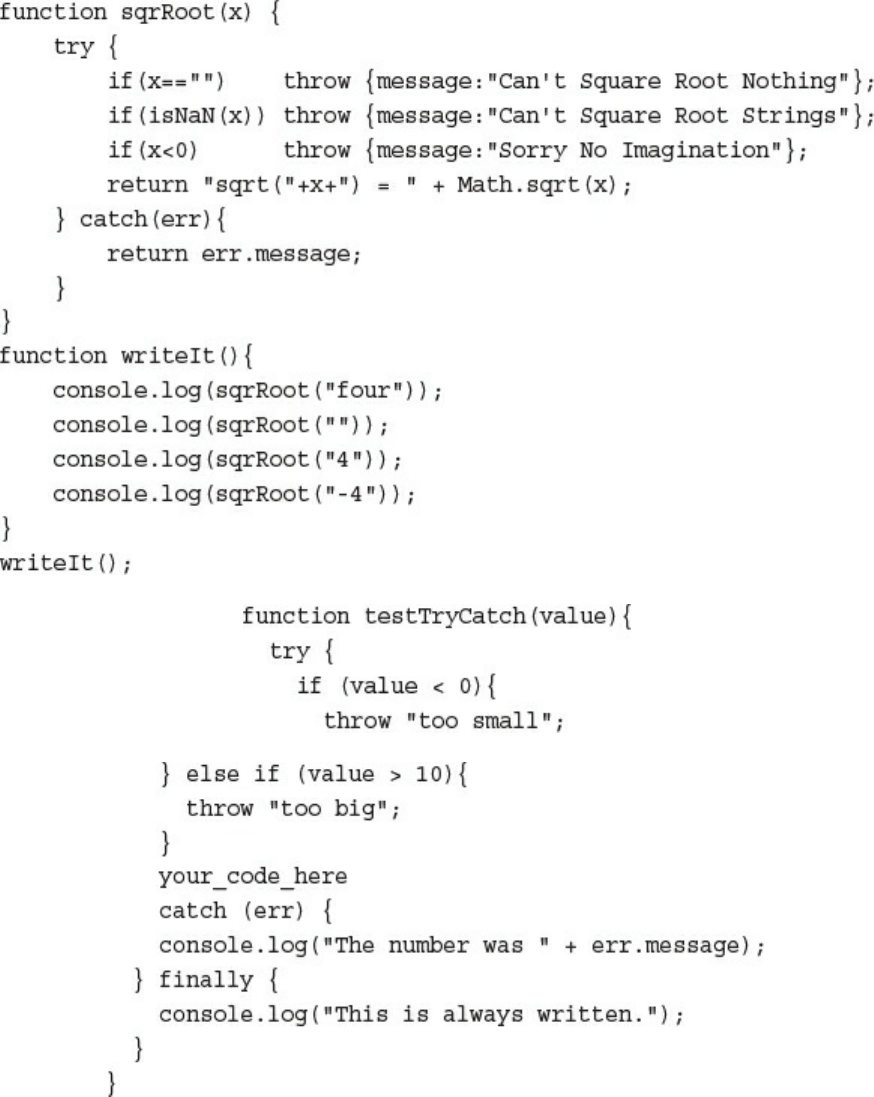
Adding Error Handling
try/catch Blocks
Throw Your Own Errors
Using finally
Summary
Next
II: Learning Node.js
3 Getting Started with Node.js
Understanding Node.js
Who Uses Node.js?
What Is Node.js Used For?
What Does Node.js Come With?
Installing Node.js
Looking at the Node.js Install Location
Verify Node.js Executables
Selecting a Node.js IDE
Working with Node Packages
What Are Node Packaged Modules?
Understanding the Node Package Registry
Using the Node Package Manager
Searching for Node Package Modules
Installing Node Packaged Modules
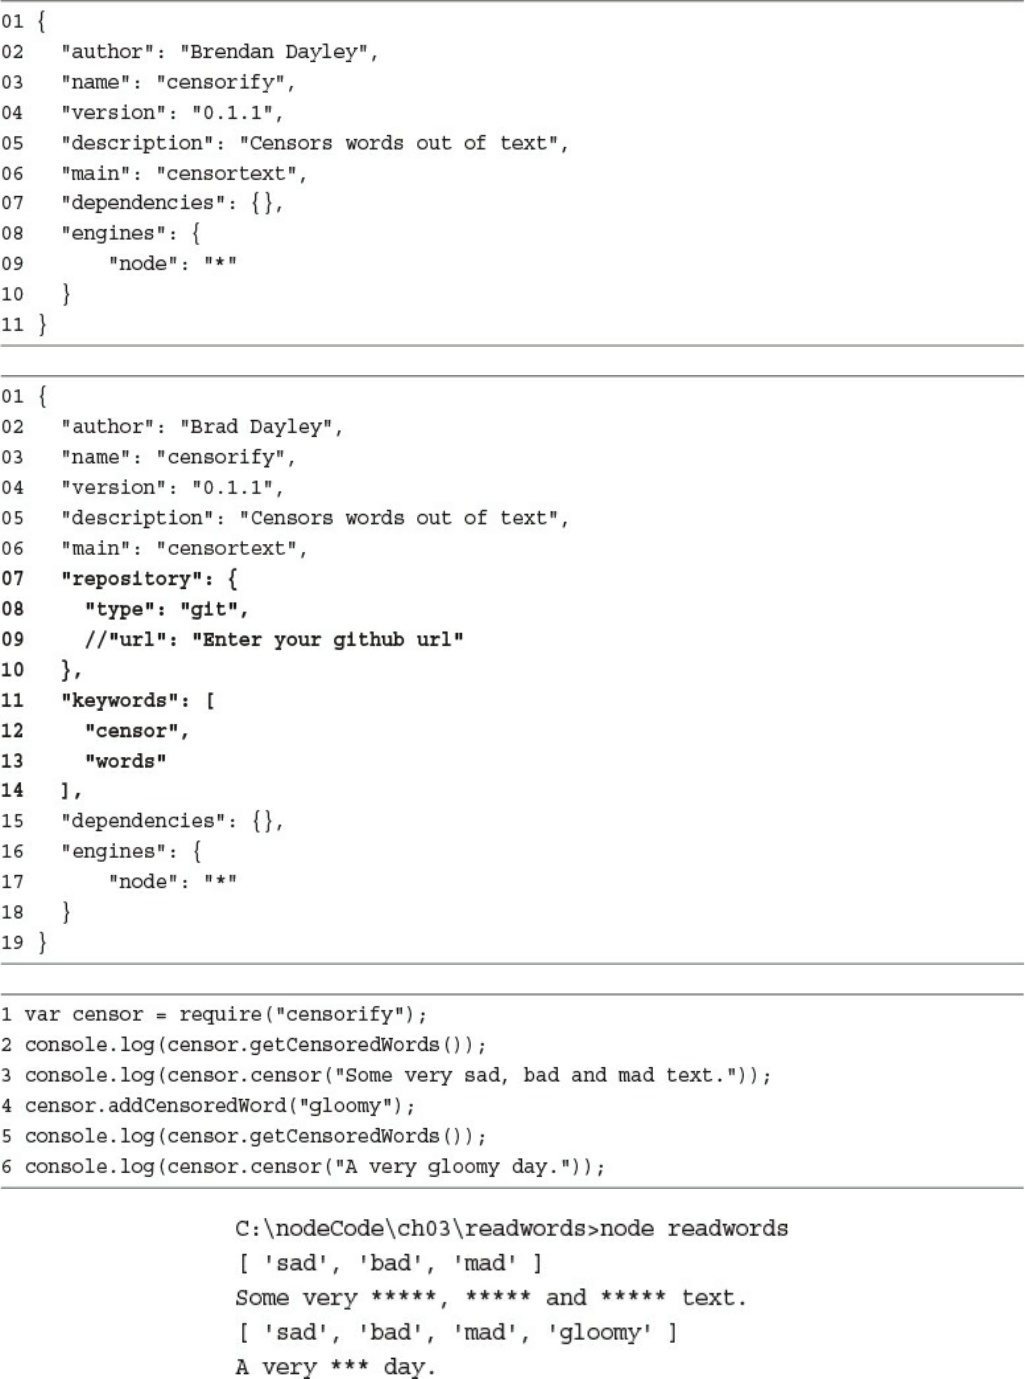
Using package.json
Creating a Node.js Application
Creating a Node.js Packaged Module
Publishing a Node.js Packaged Module to the NPM Registry
Using a Node.js Packaged Module in a Node.js Application
Writing Data to the Console
Summary
Next
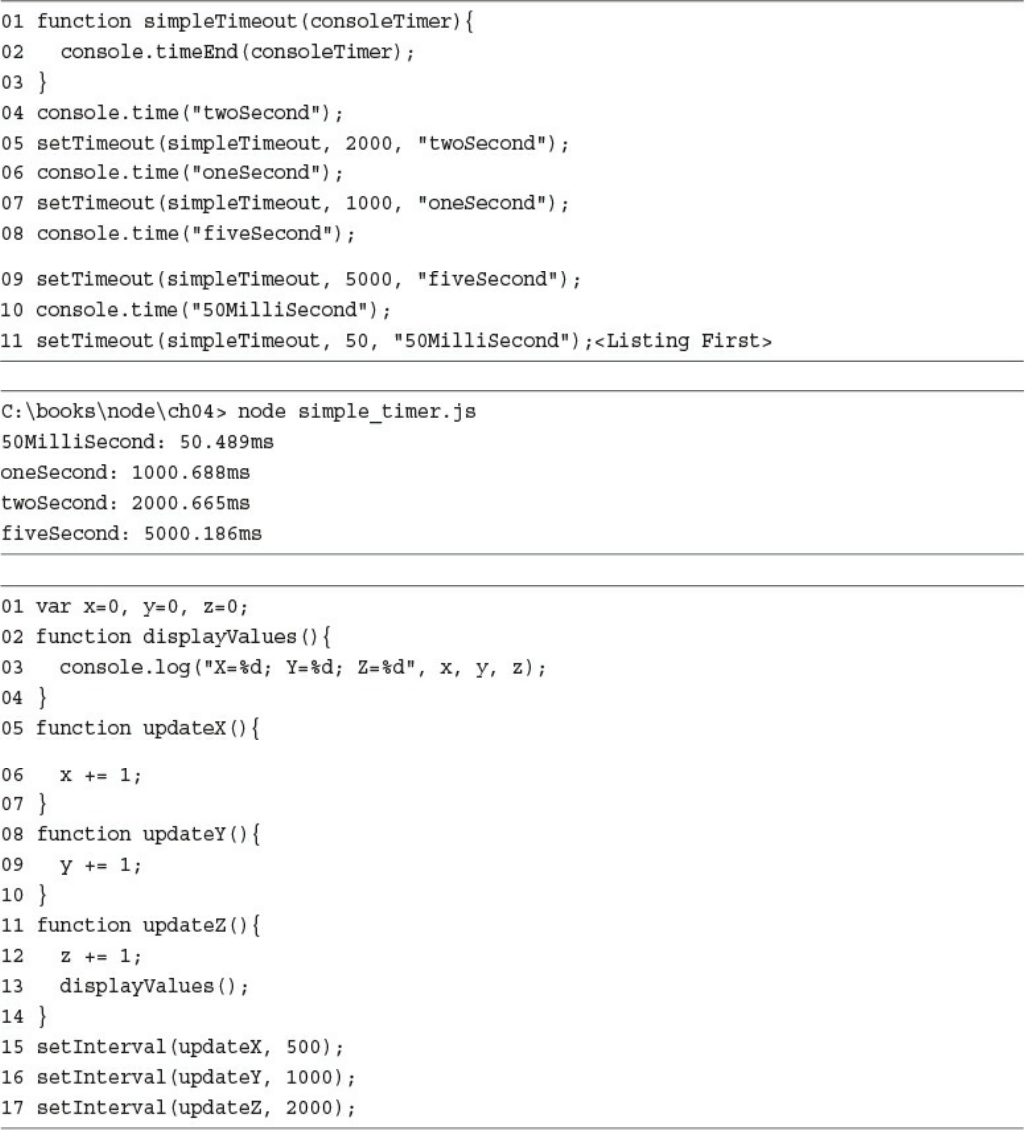
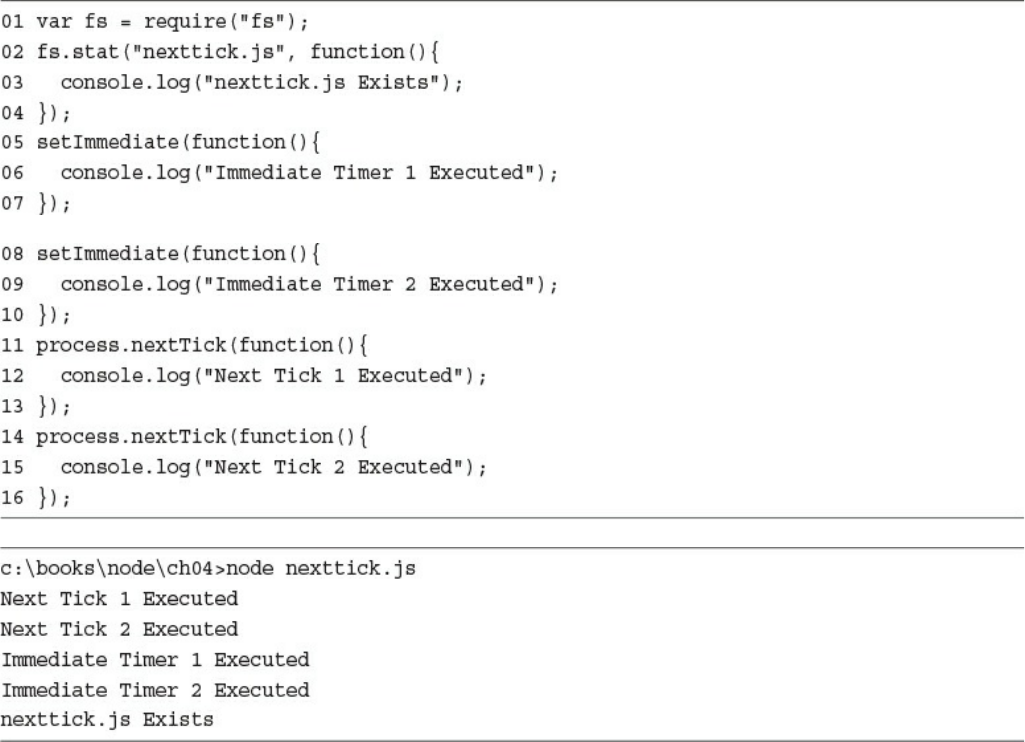
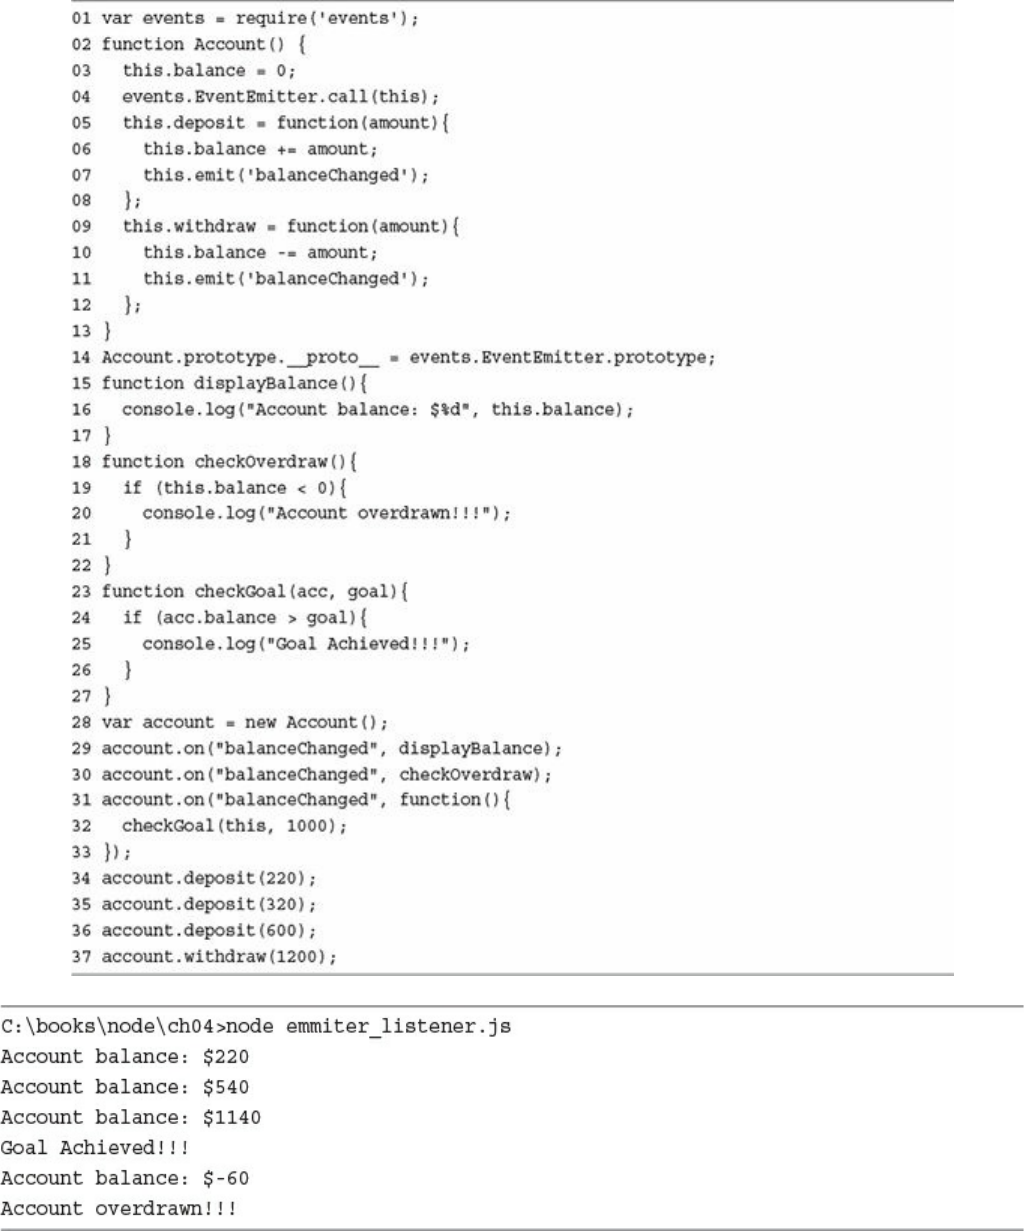
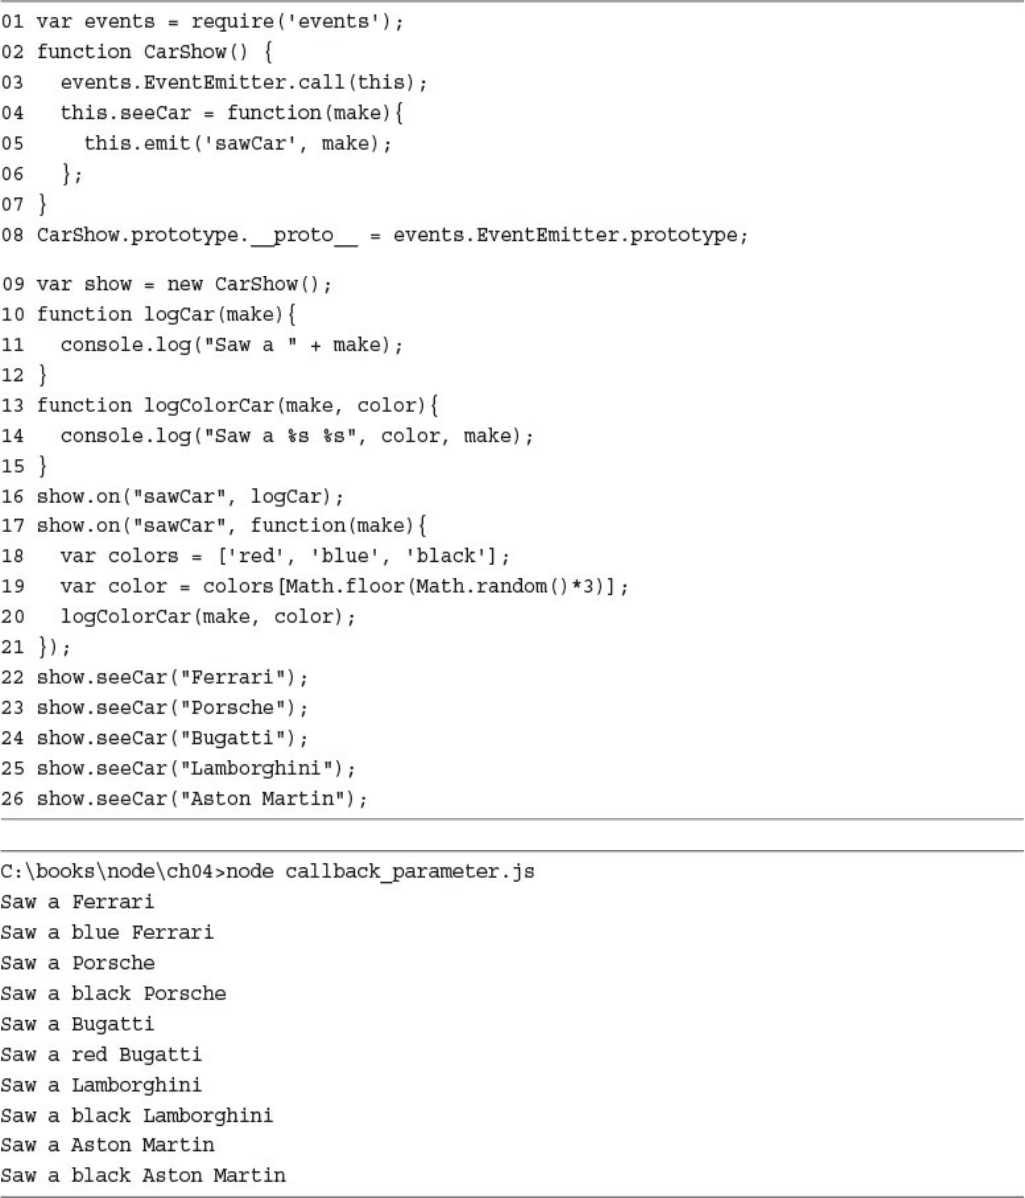
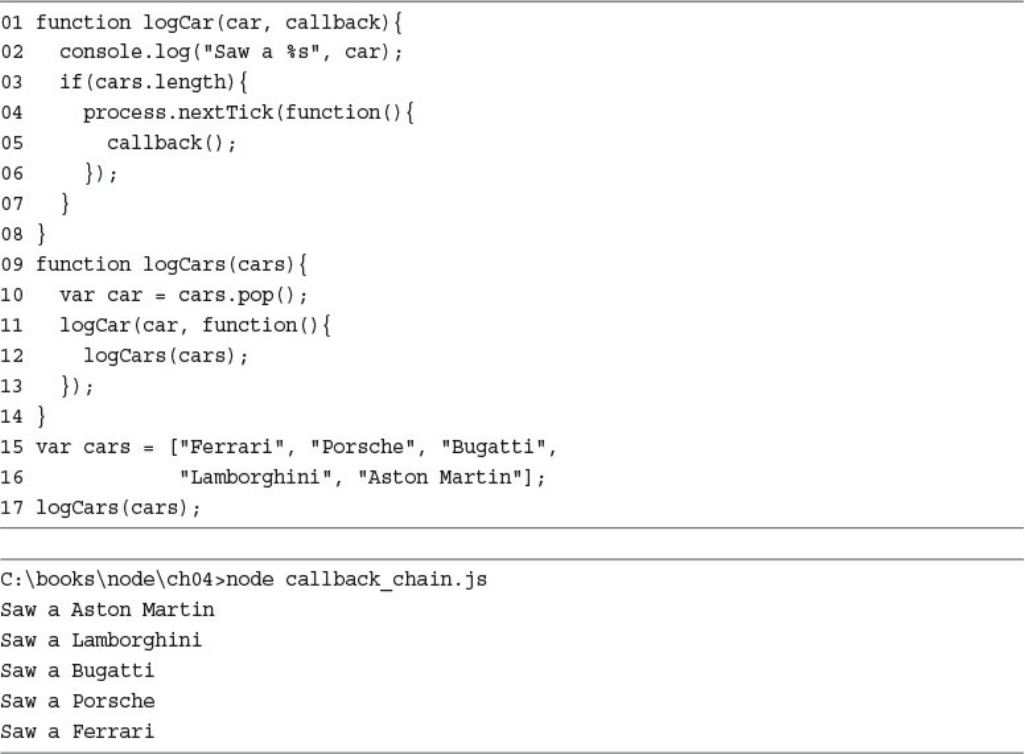
4 Using Events, Listeners, Timers, and Callbacks in Node.js
Understanding the Node.js Event Model
Comparing Event Callbacks and Threaded Models
Blocking I/O in Node.js
The Conversation Example
Adding Work to the Event Queue
Implementing Timers
Using nextTick to Schedule Work
Implementing Event Emitters and Listeners
Implementing Callbacks
Passing Additional Parameters to Callbacks
Implementing Closure in Callbacks
Chaining Callbacks
Summary
Next
5 Handling Data I/O in Node.js
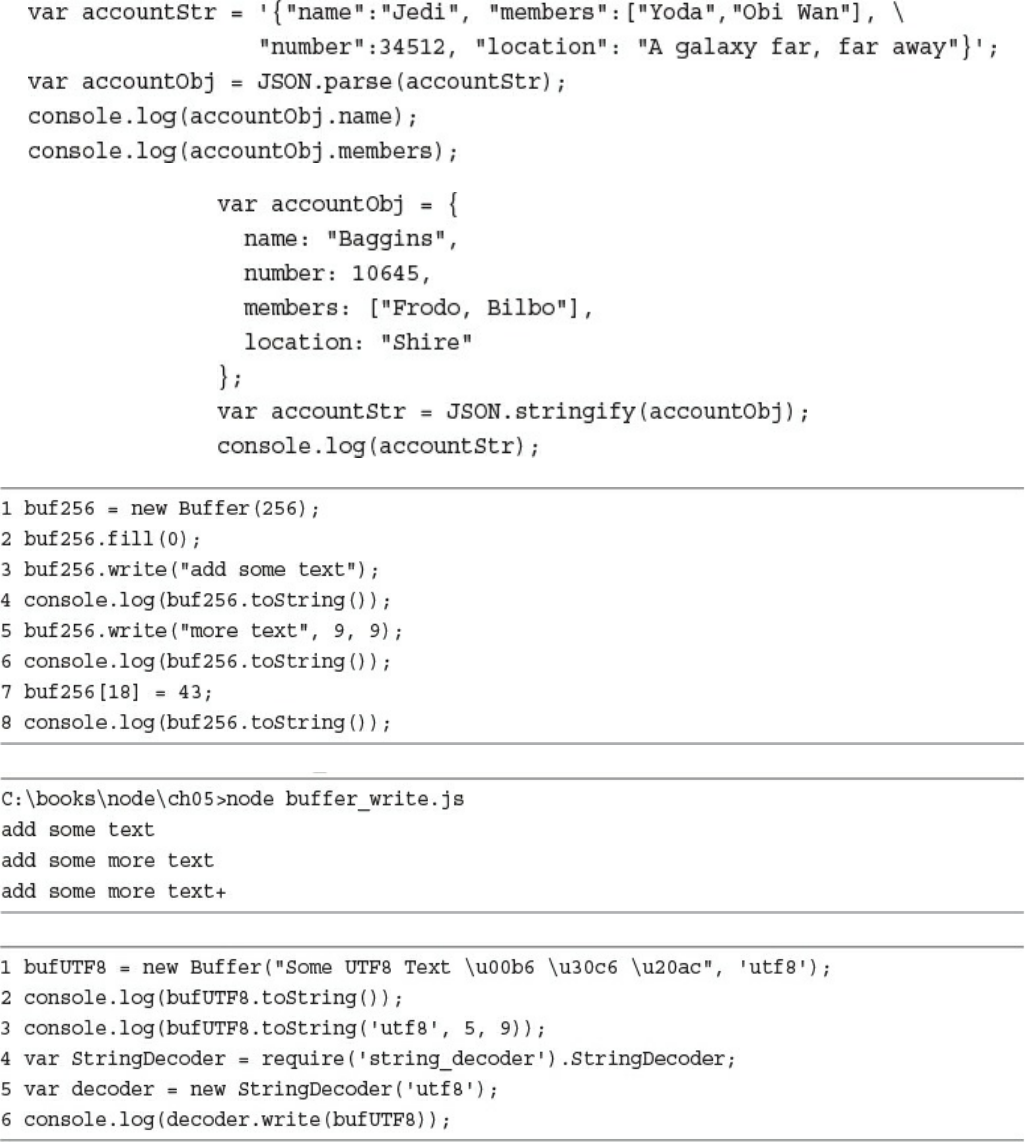
Working with JSON
Converting JSON to JavaScript Objects
Converting JavaScript Objects to JSON
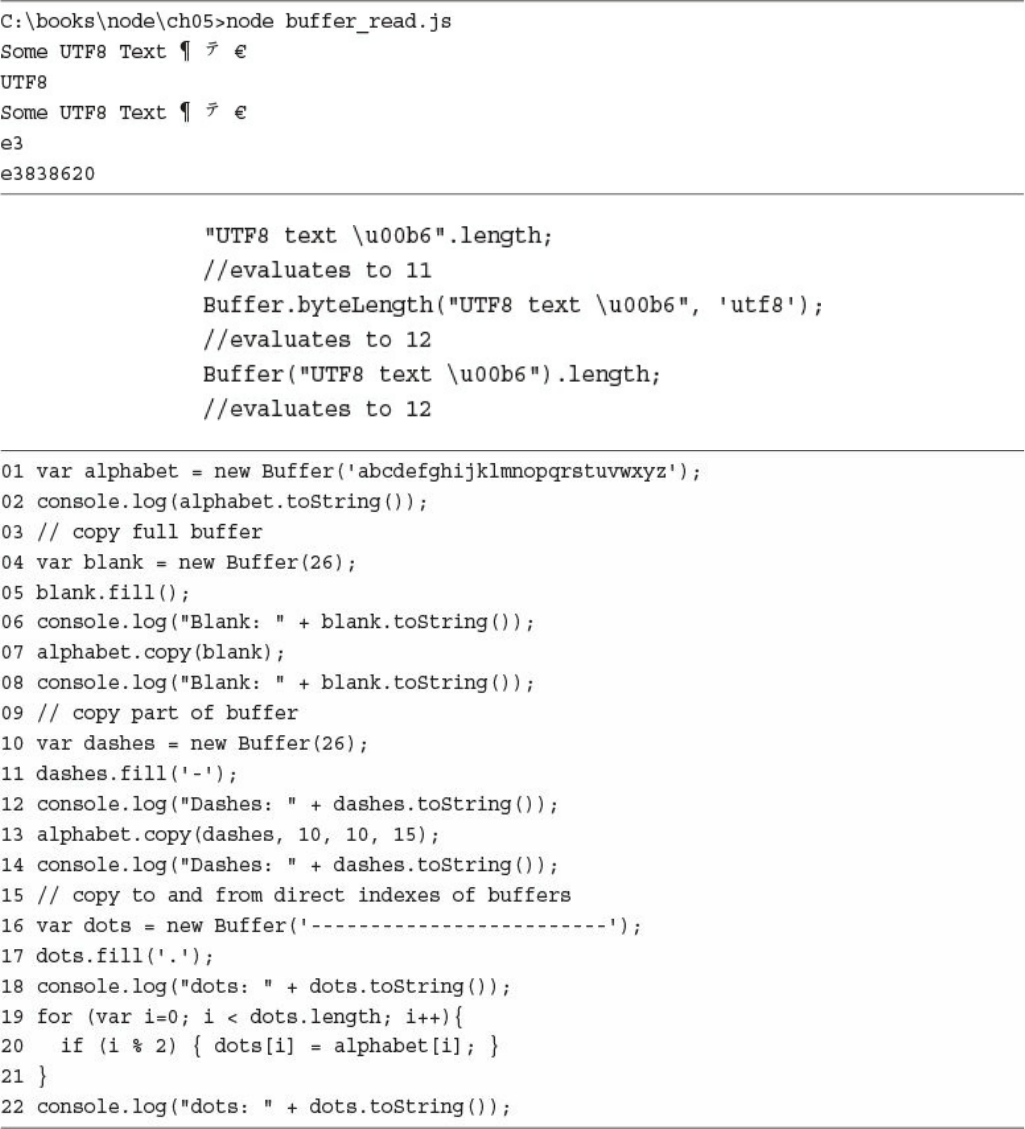
Using the Buffer Module to Buffer Data
Understanding Buffered Data
Creating Buffers
Writing to Buffers
Reading from Buffers
Determining Buffer Length
Copying Buffers
Slicing Buffers
Concatenating Buffers
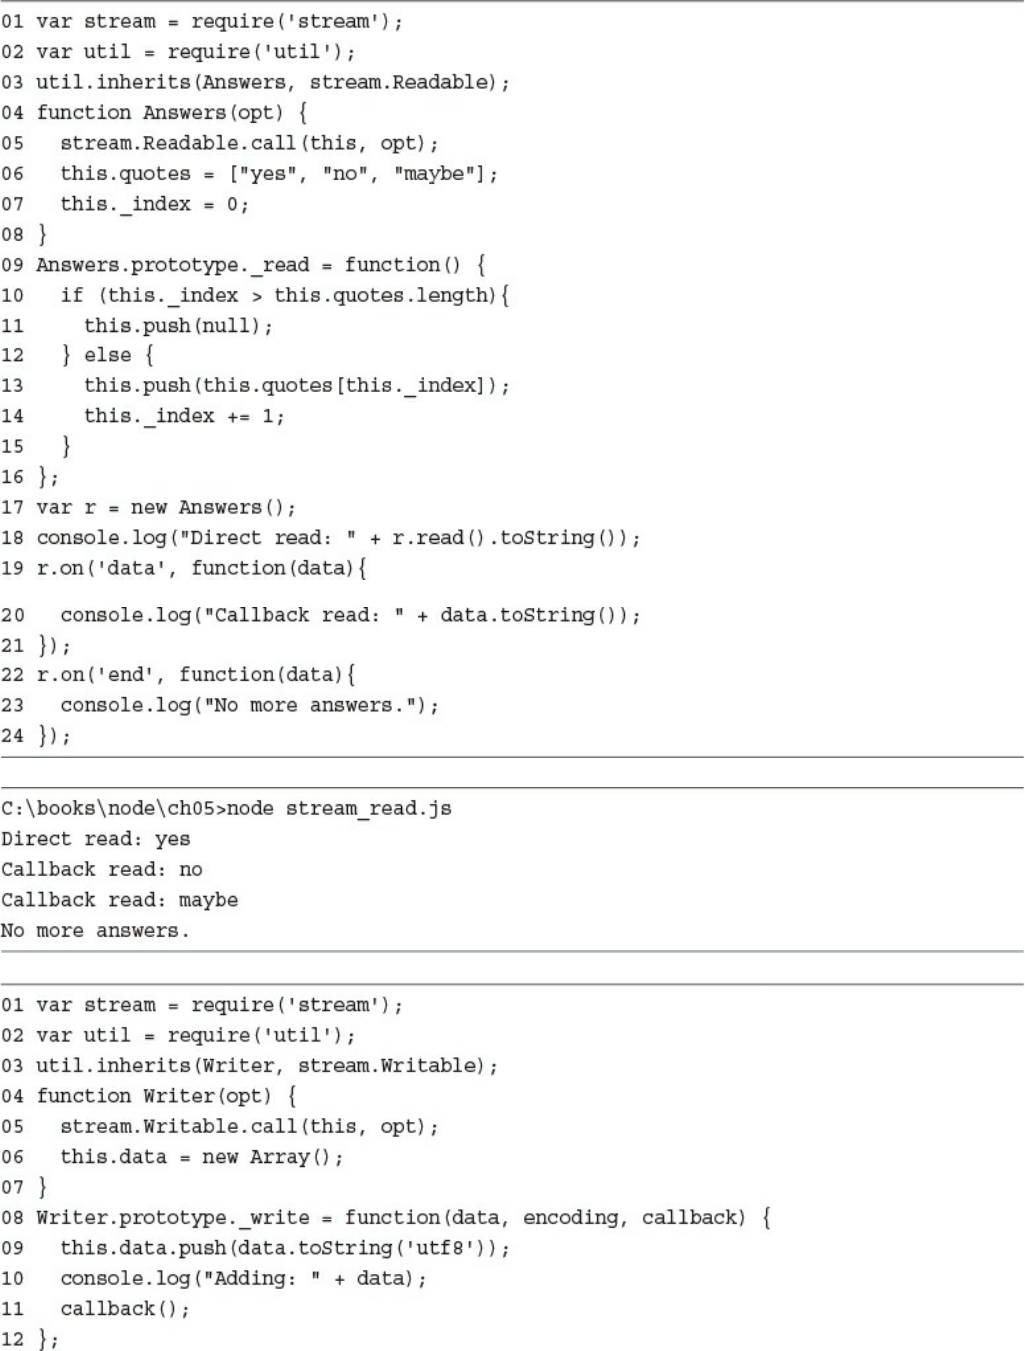
Using the Stream Module to Stream Data
Readable Streams
Writable Streams
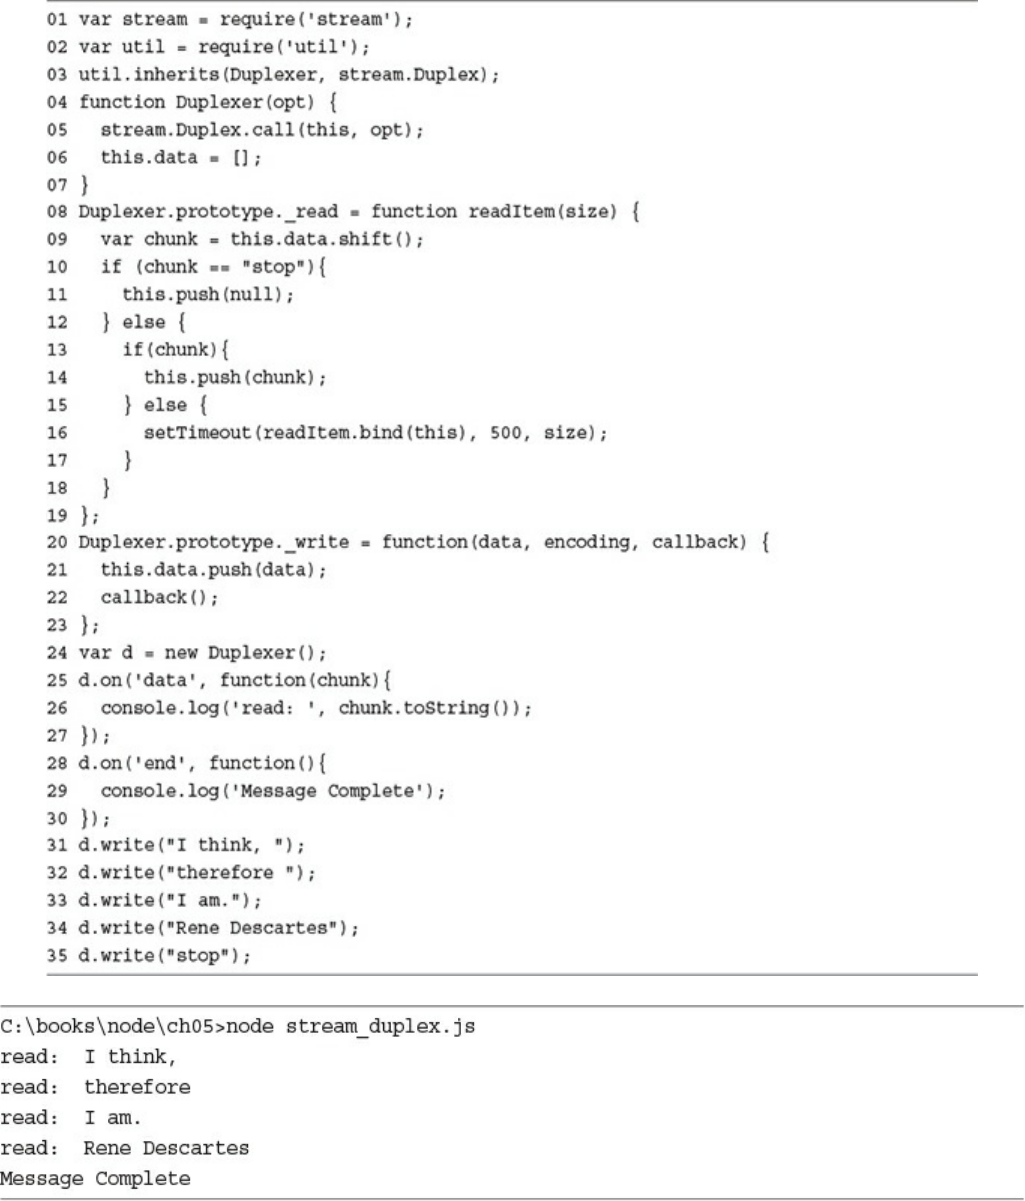
Duplex Streams
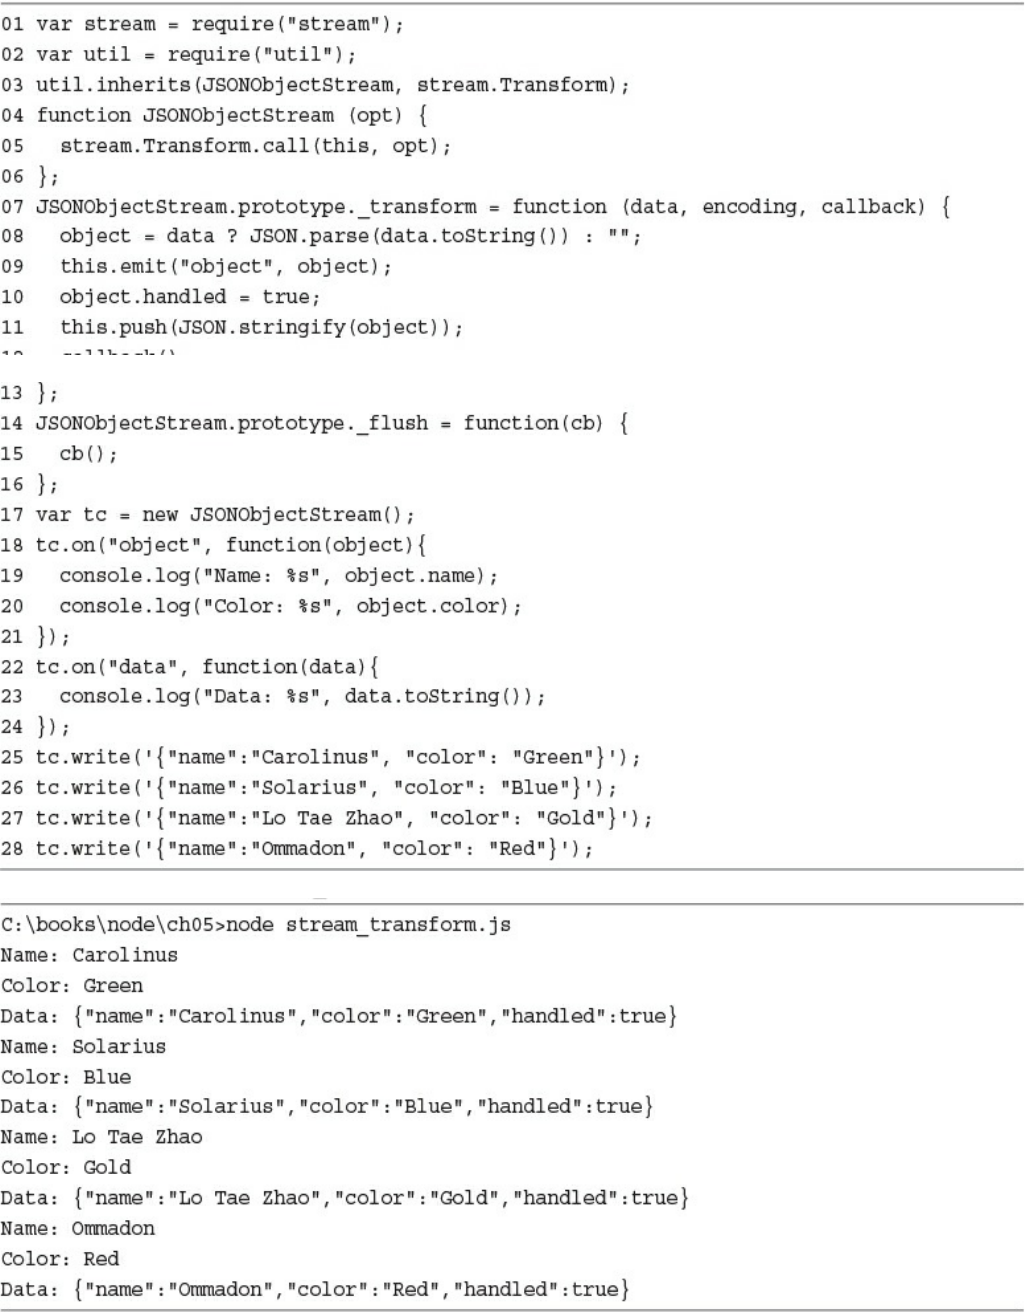
Transform Streams
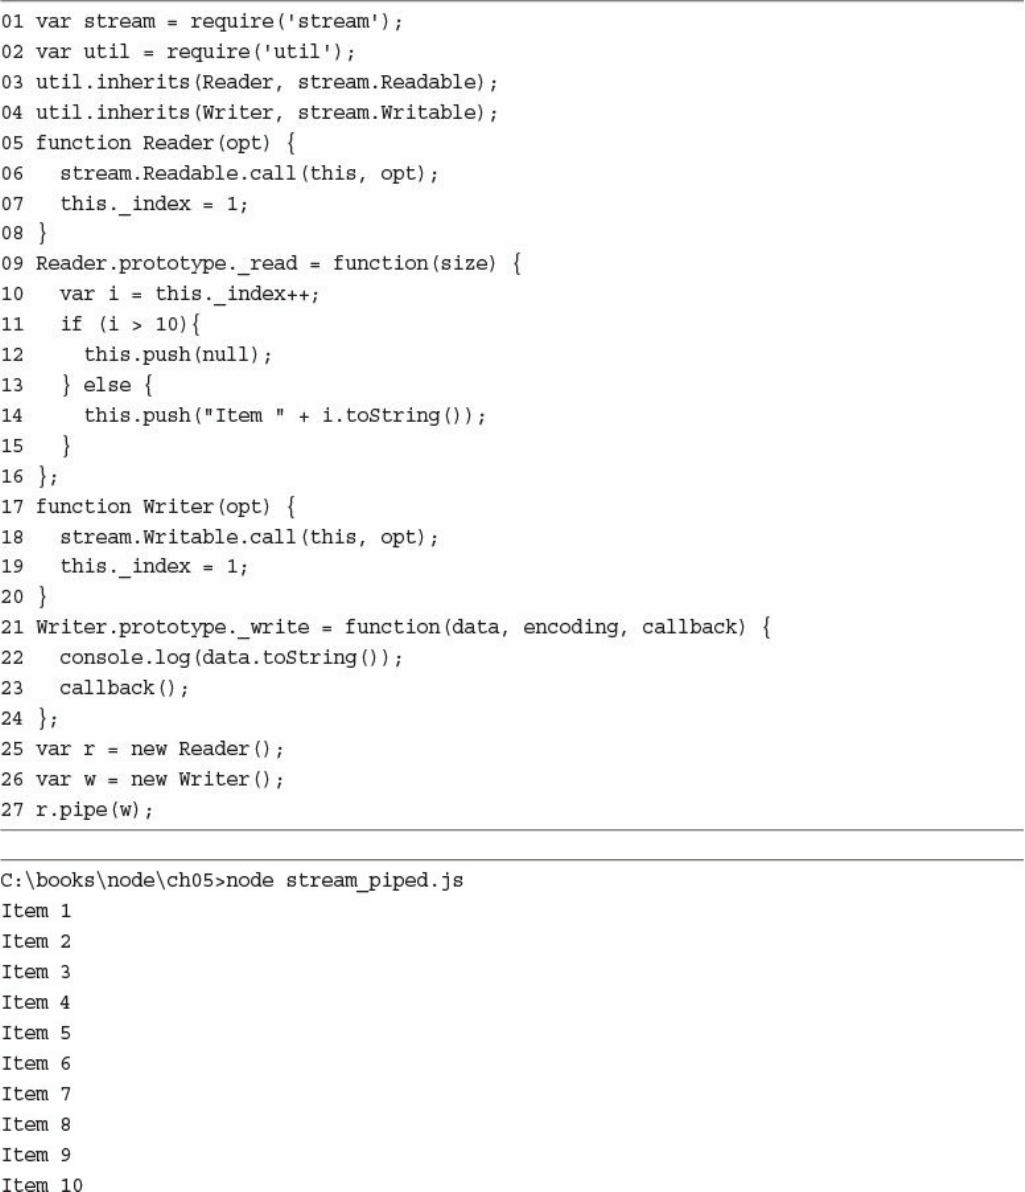
Piping Readable Streams to Writable Streams
Compressing and Decompressing Data with Zlib
Compressing and Decompressing Buffers
Compressing/Decompressing Streams
Summary
Next
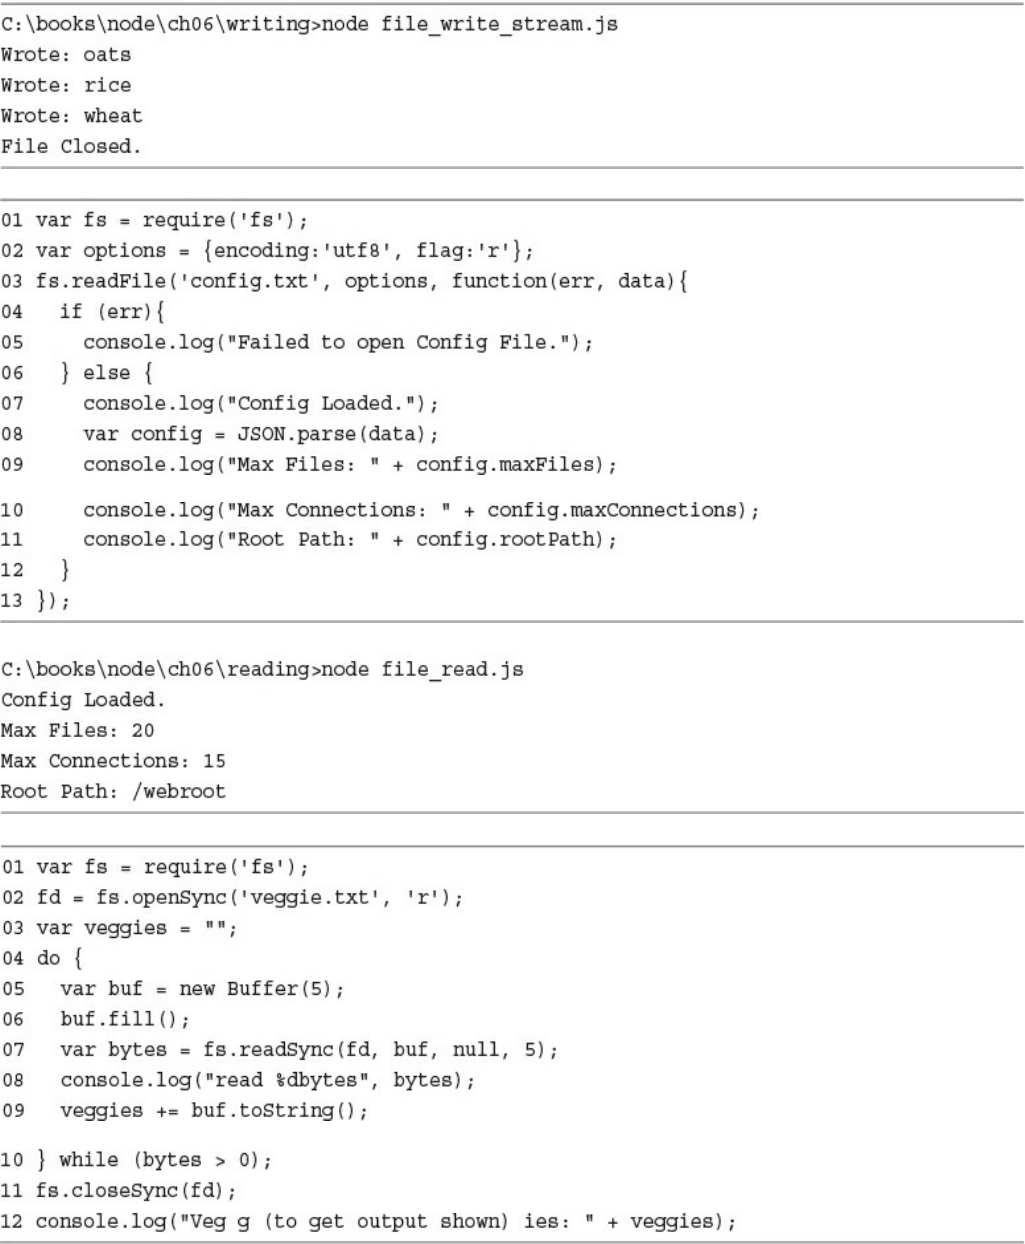
6 Accessing the File System from Node.js
Synchronous Versus Asynchronous File System Calls
Opening and Closing Files
Writing Files
Simple File Write
Synchronous File Writing
Asynchronous File Writing
Streaming File Writing
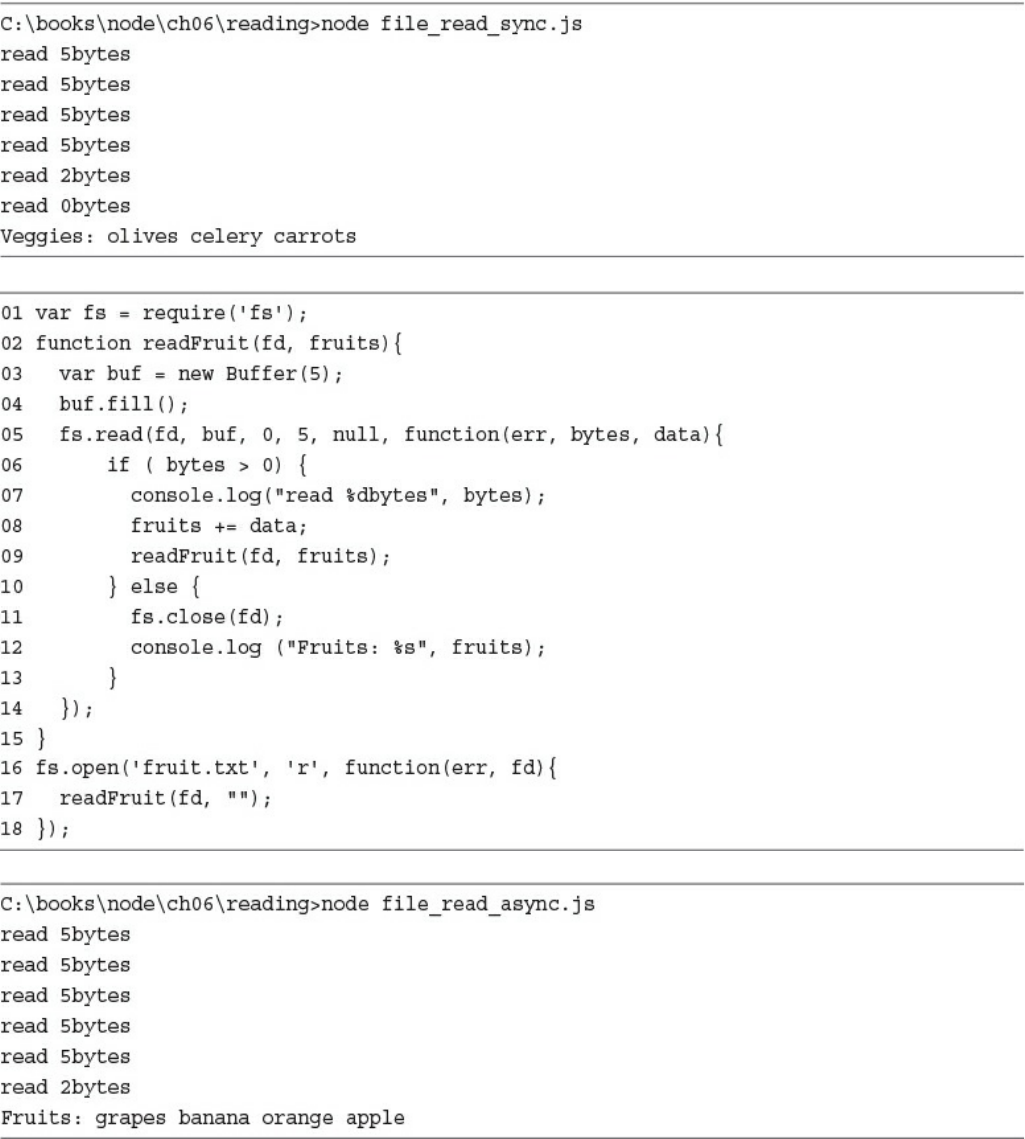
Reading Files
Simple File Read
Synchronous File Reading
Asynchronous File Reading
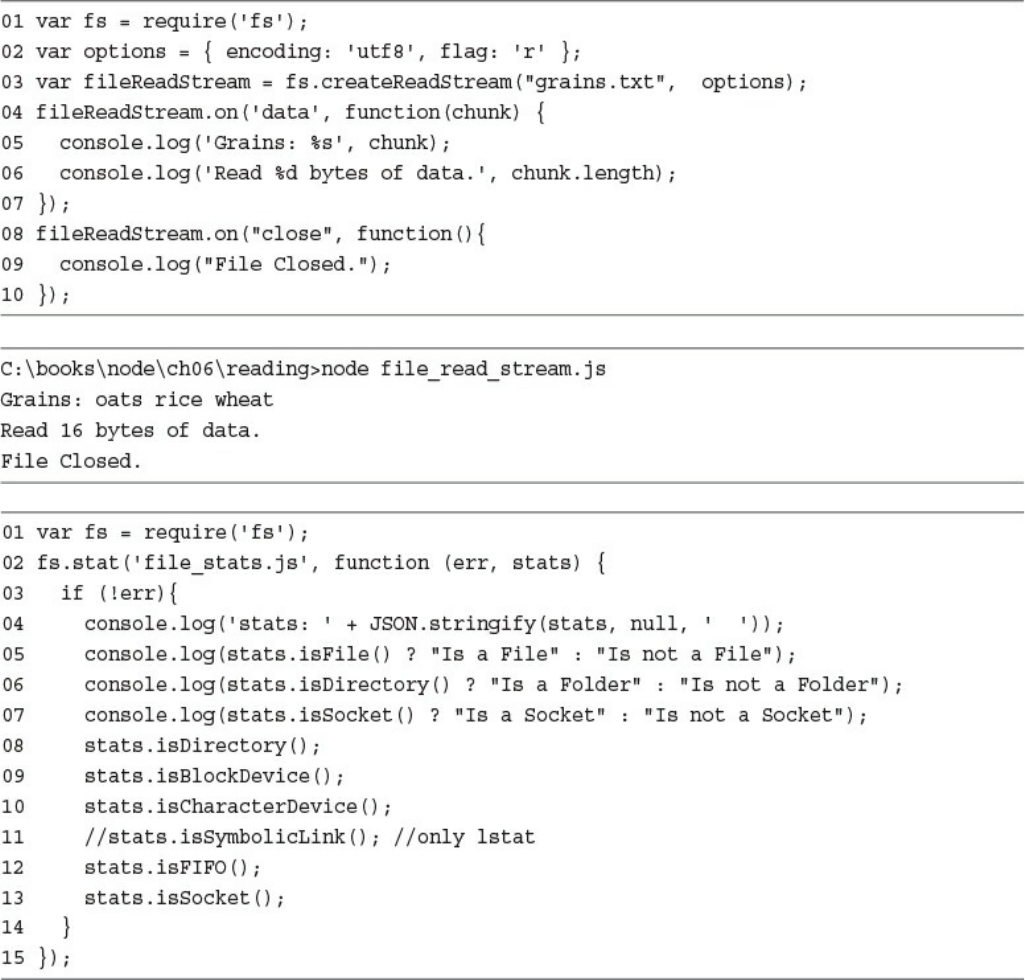
Streaming File Reading
Other File System Tasks
Verifying Path Existence
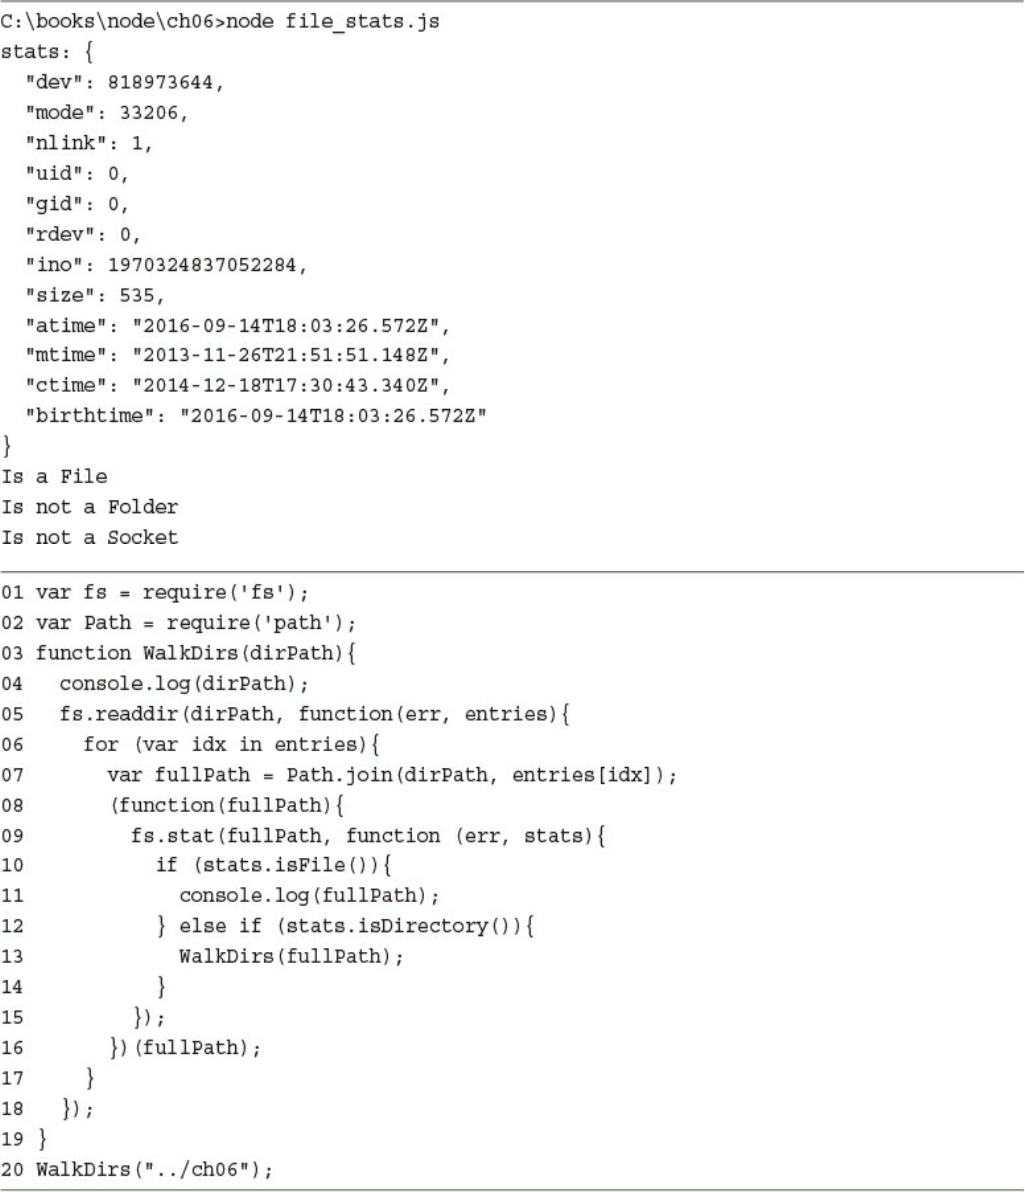
Getting File Info
Listing Files
Deleting Files
Truncating Files
Making and Removing Directories
Renaming Files and Directories
Watching for File Changes
Summary
Next
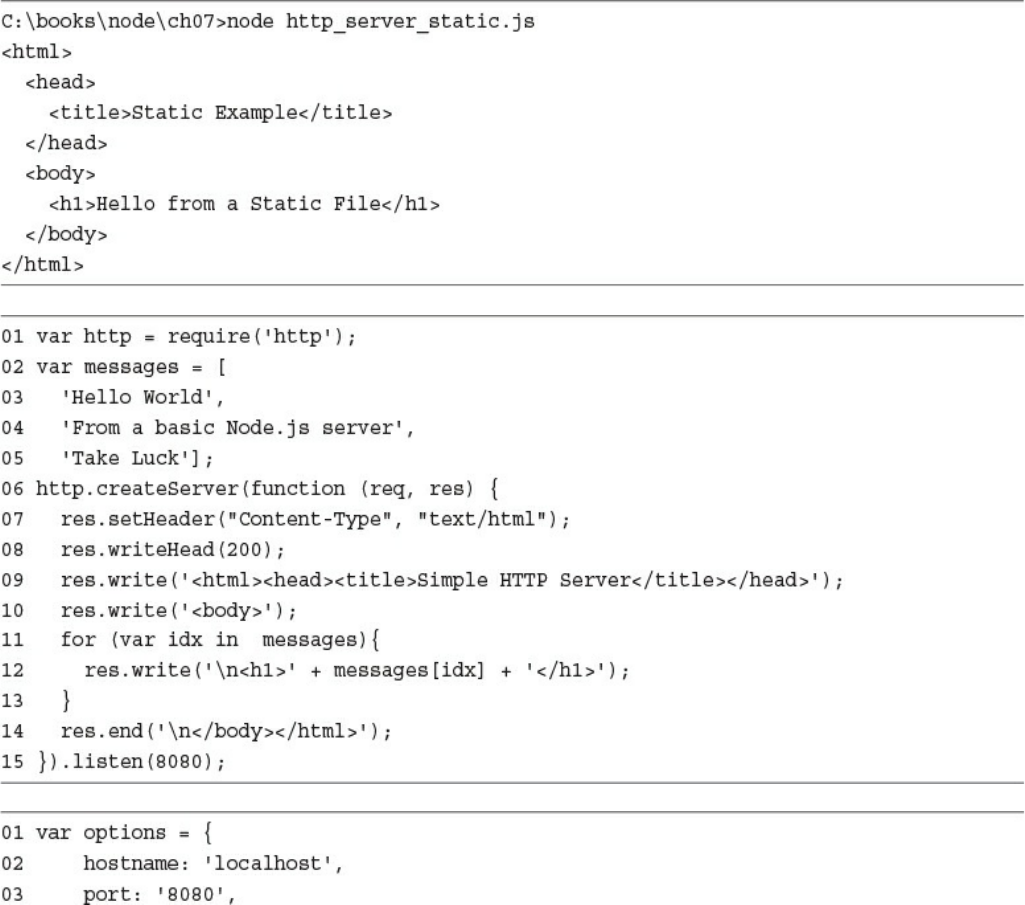
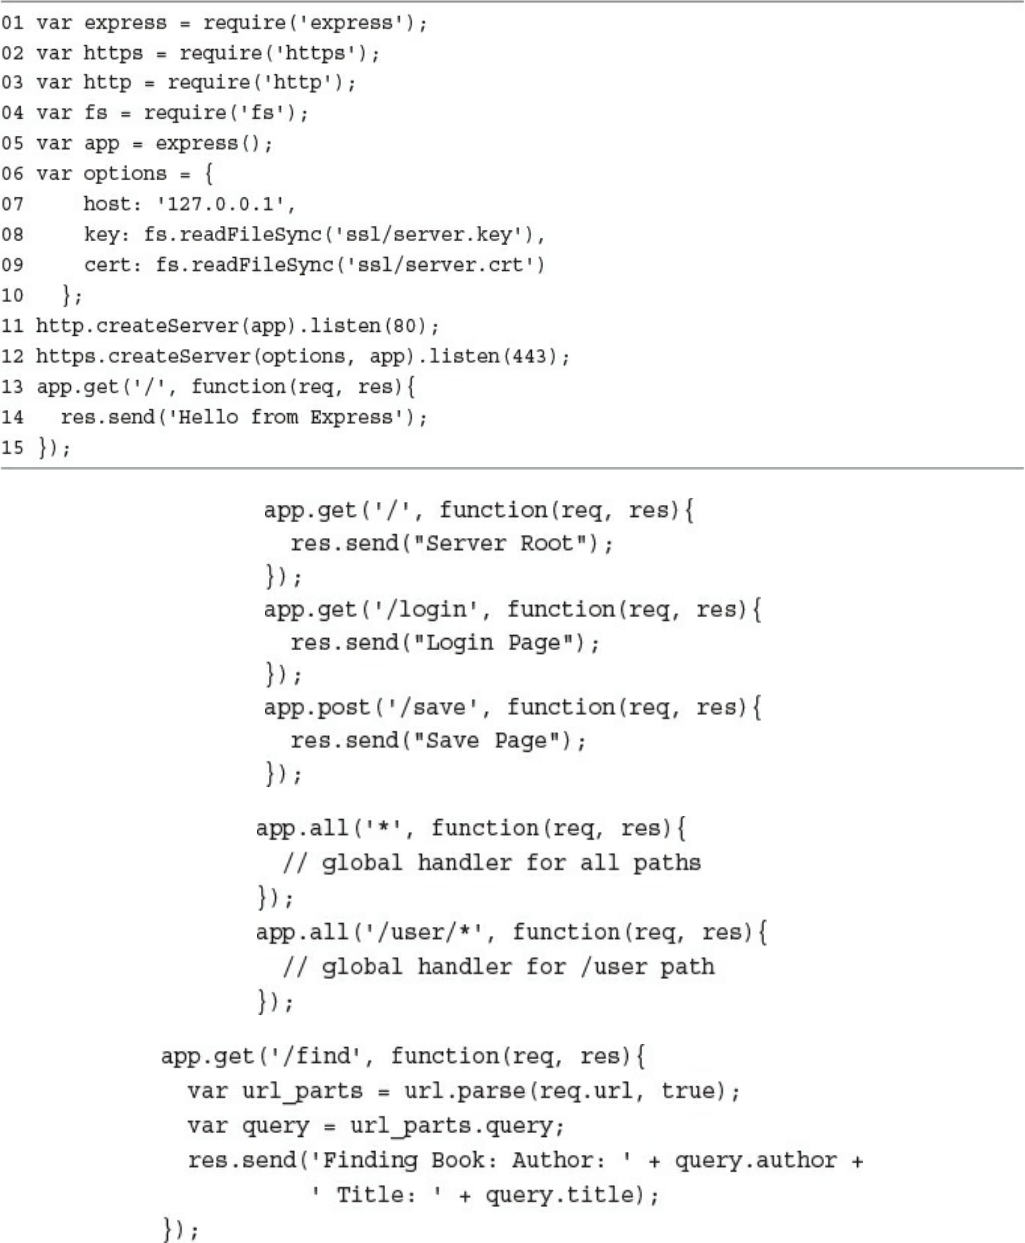
7 Implementing HTTP Services in Node.js
Processing URLs
Understanding the URL Object
Resolving the URL Components
Processing Query Strings and Form Parameters
Understanding Request, Response, and Server Objects
The http.ClientRequest Object
The http.ServerResponse Object
The http.IncomingMessage Object
The http.Server Object
Implementing HTTP Clients and Servers in Node.js
Serving Static Files
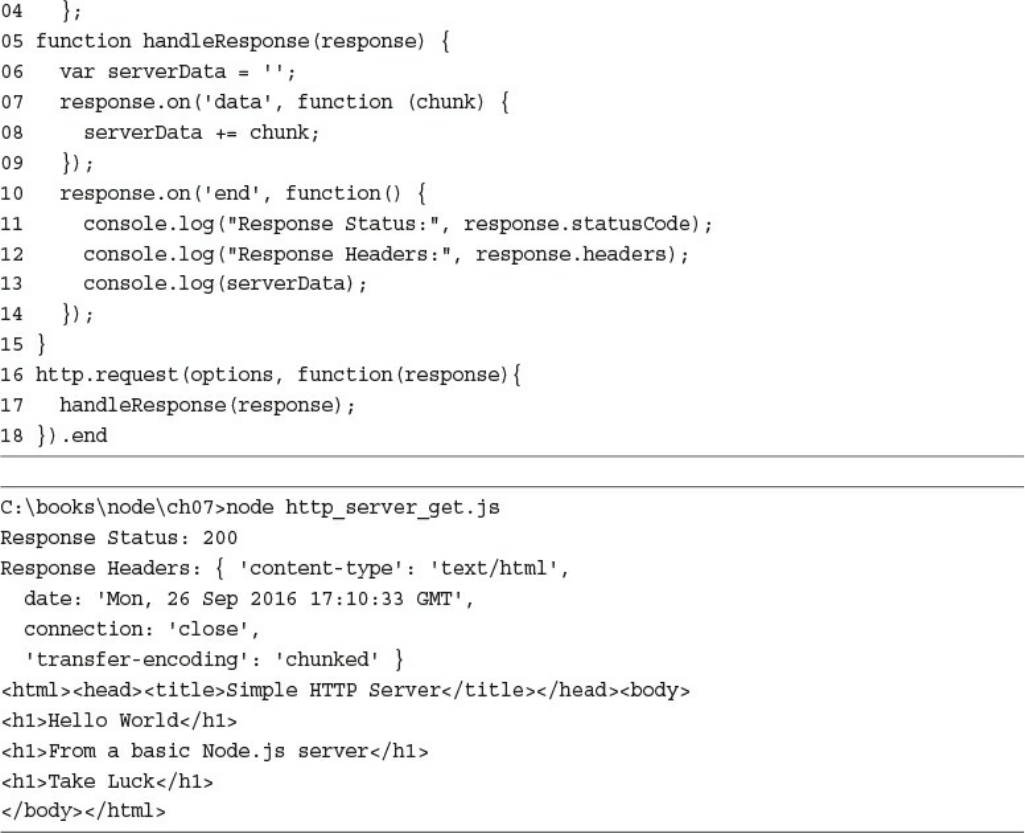
Implementing Dynamic GET Servers
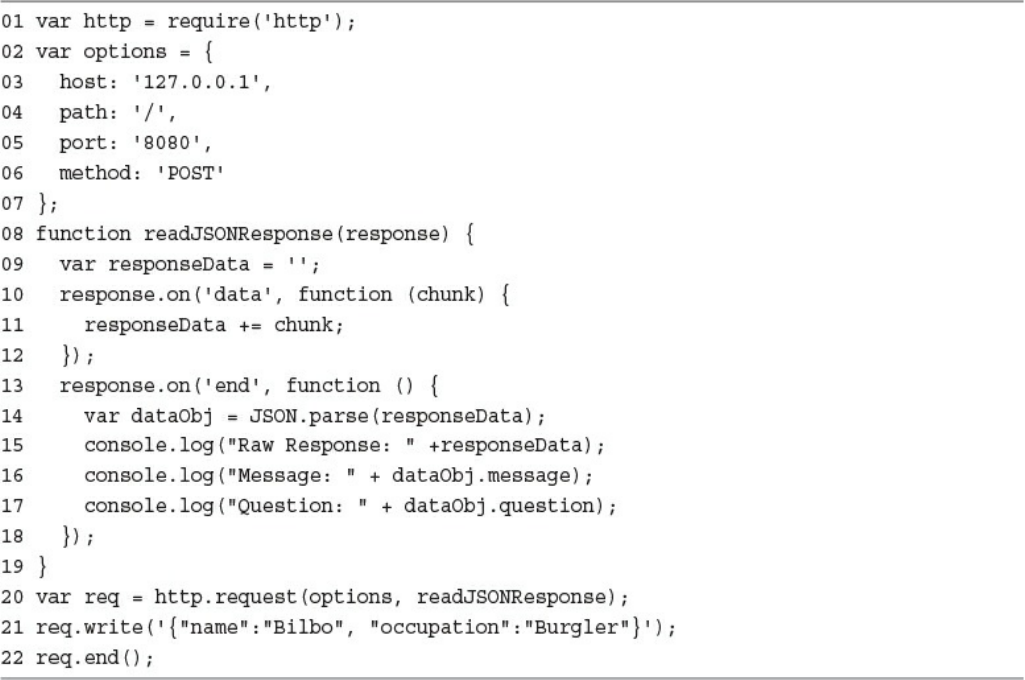
Implementing POST Servers
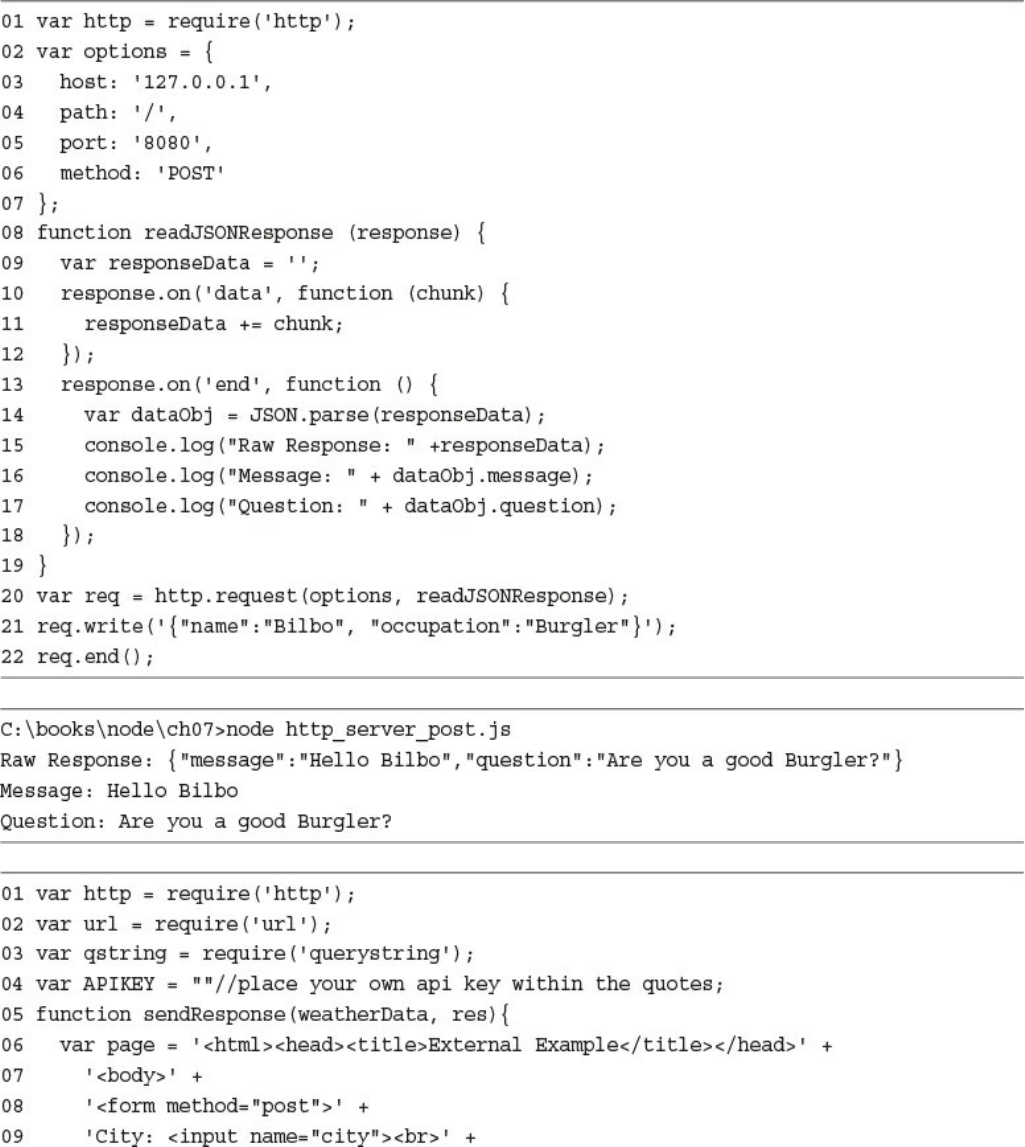
Interacting with External Sources
Implementing HTTPS Servers and Clients
Creating an HTTPS Client
Creating an HTTPS Server
Summary
Next
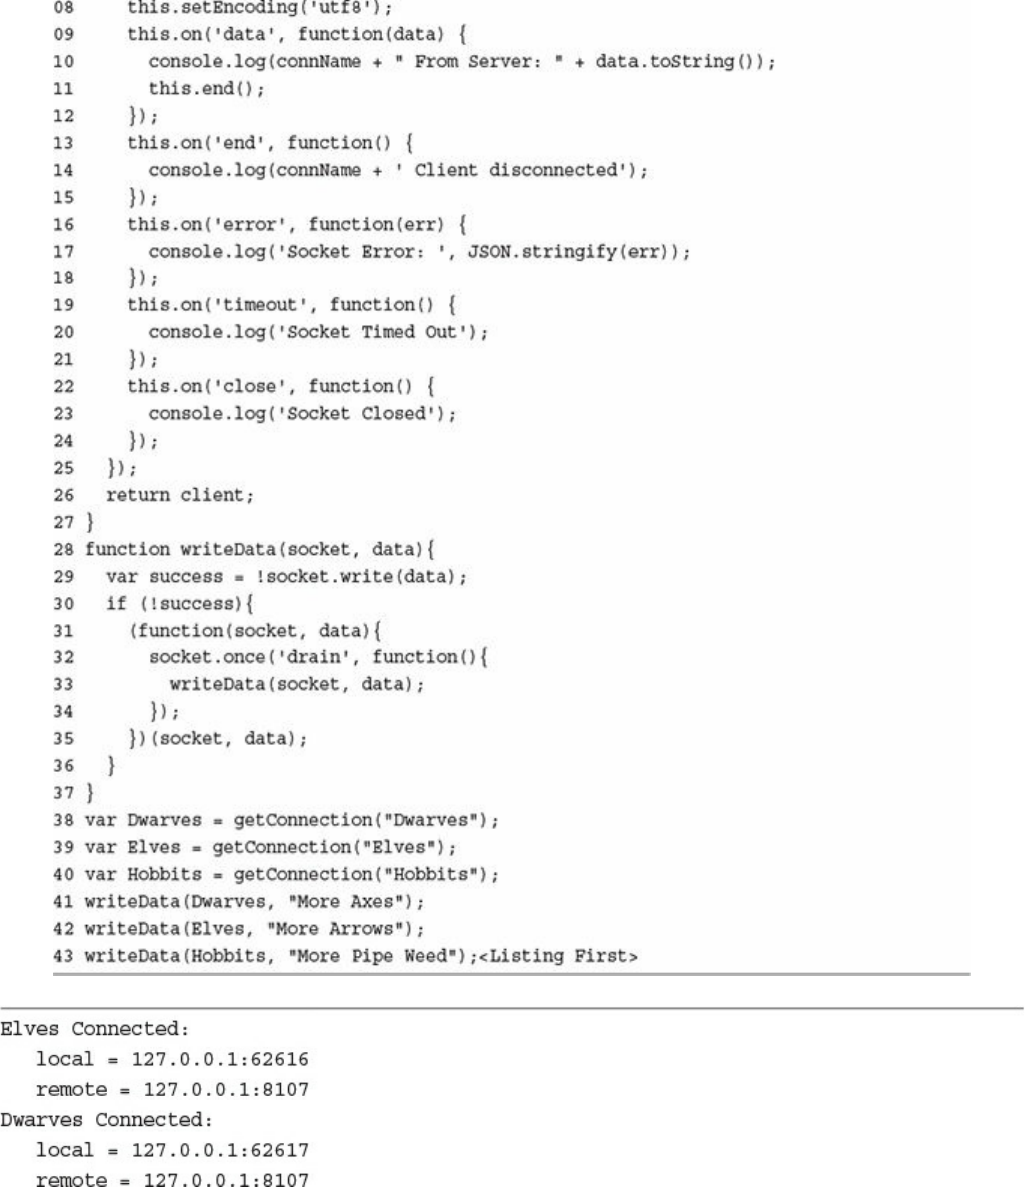
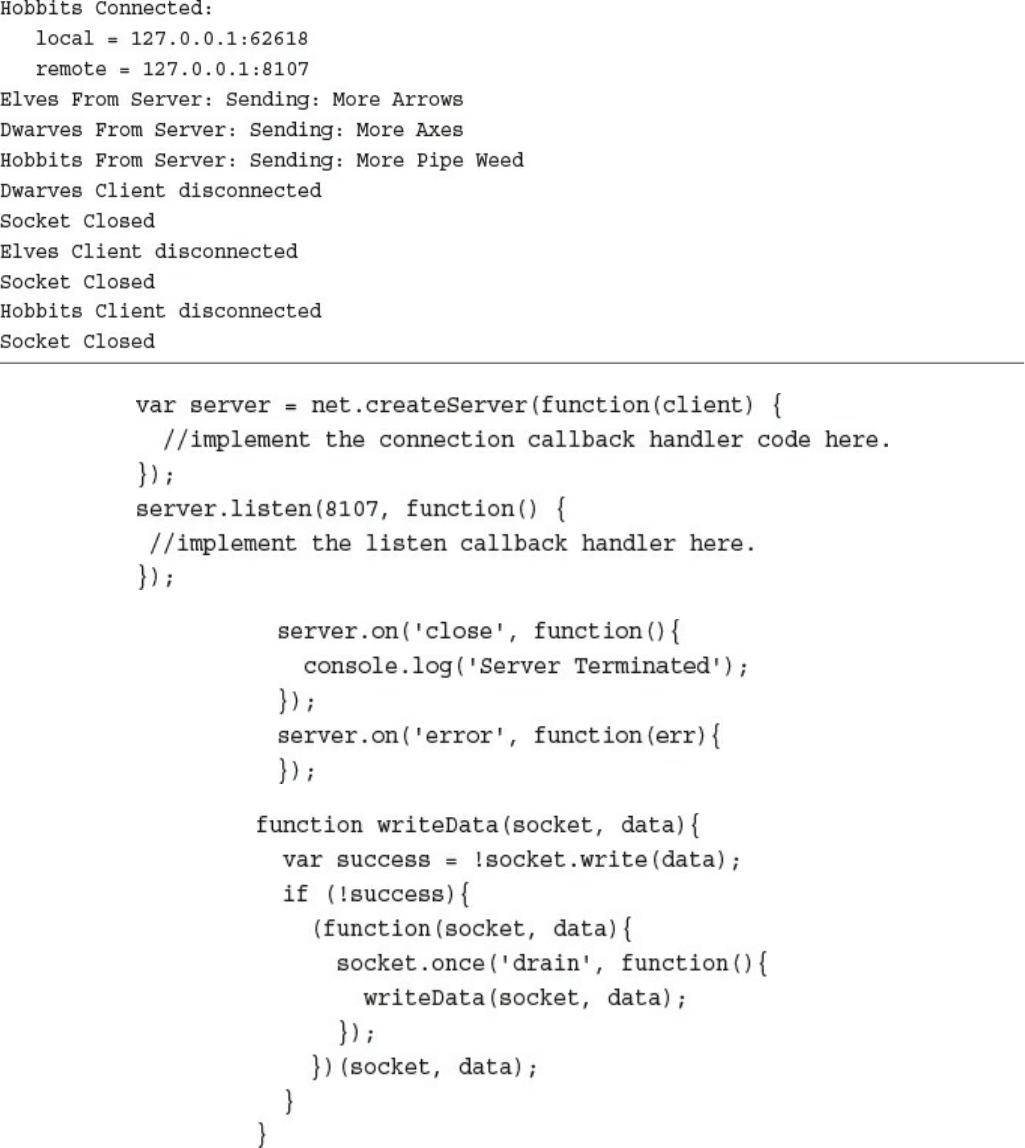
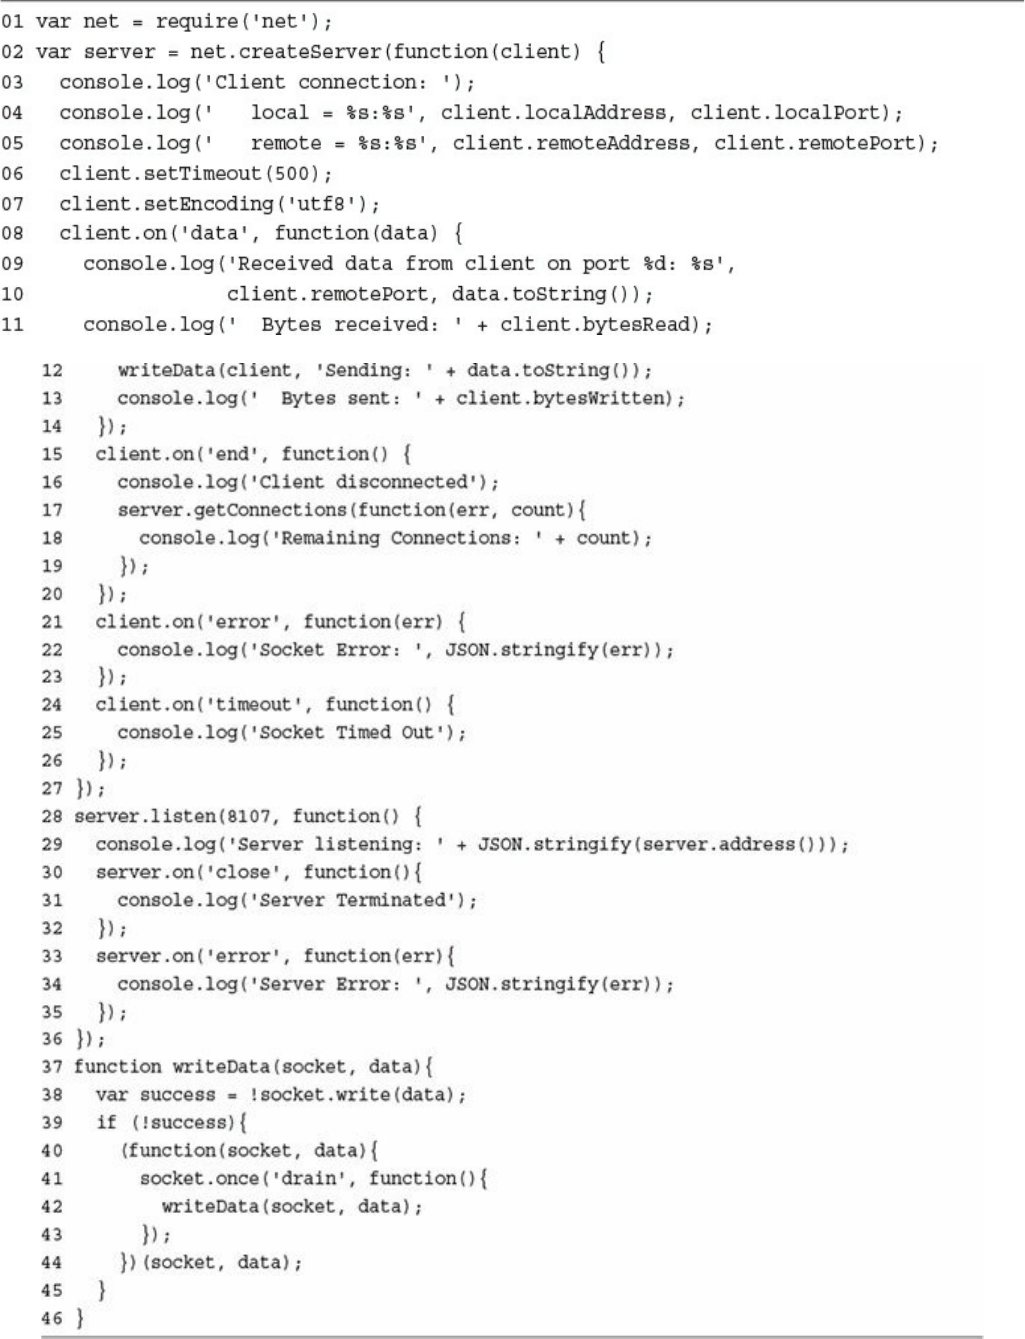
8 Implementing Socket Services in Node.js
Understanding Network Sockets
Understanding TPC Server and Socket Objects
The net.Socket Object
The net.Server Object
Implementing TCP Socket Servers and Clients
Implementing a TCP Socket Client
Implementing a TCP Socket Server
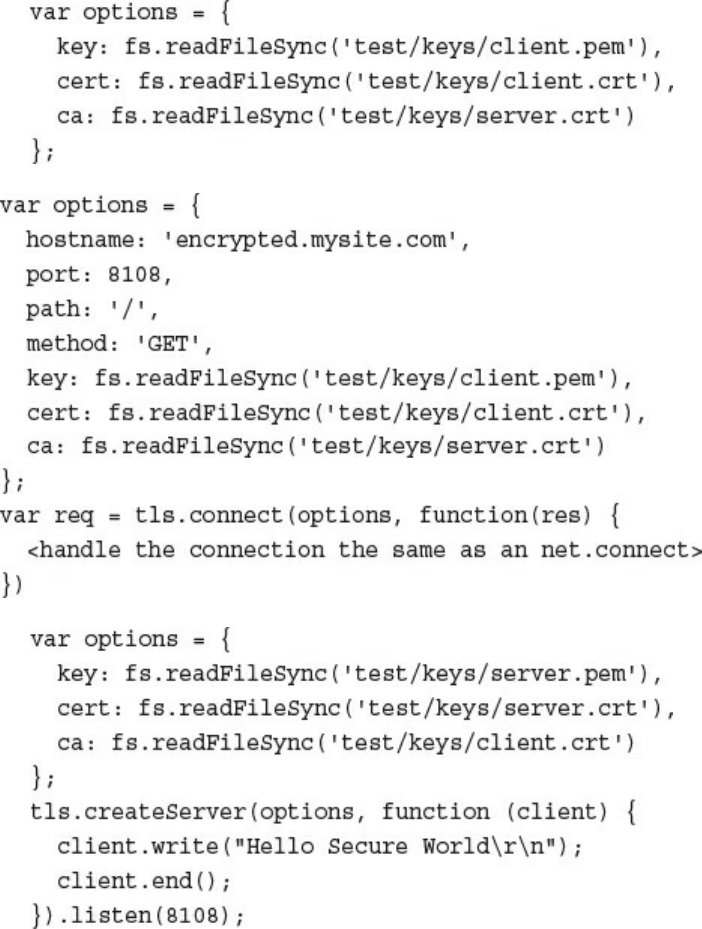
Implementing TLS Servers and Clients
Creating a TLS Socket Client
Creating a TLS Socket Server
Summary
Next
9 Scaling Applications Using Multiple Processors in Node.js
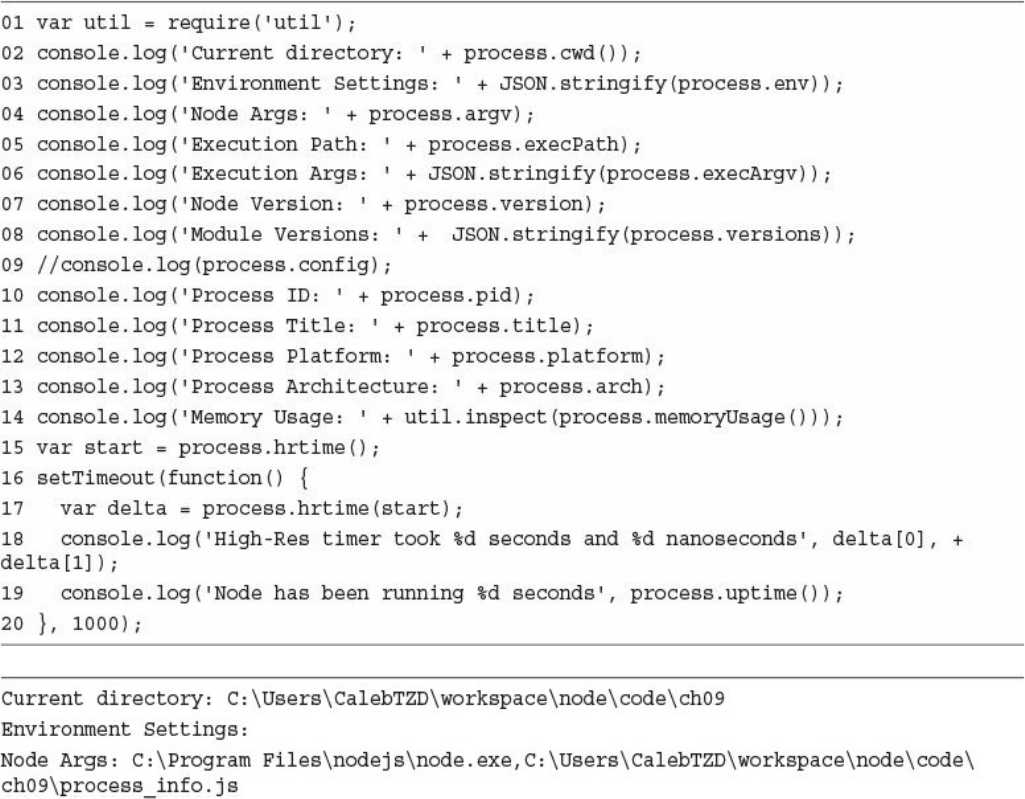
Understanding the Process Module
Understanding Process I/O Pipes
Understanding Process Signals
Controlling Process Execution with the process Module
Getting Information from the process Module
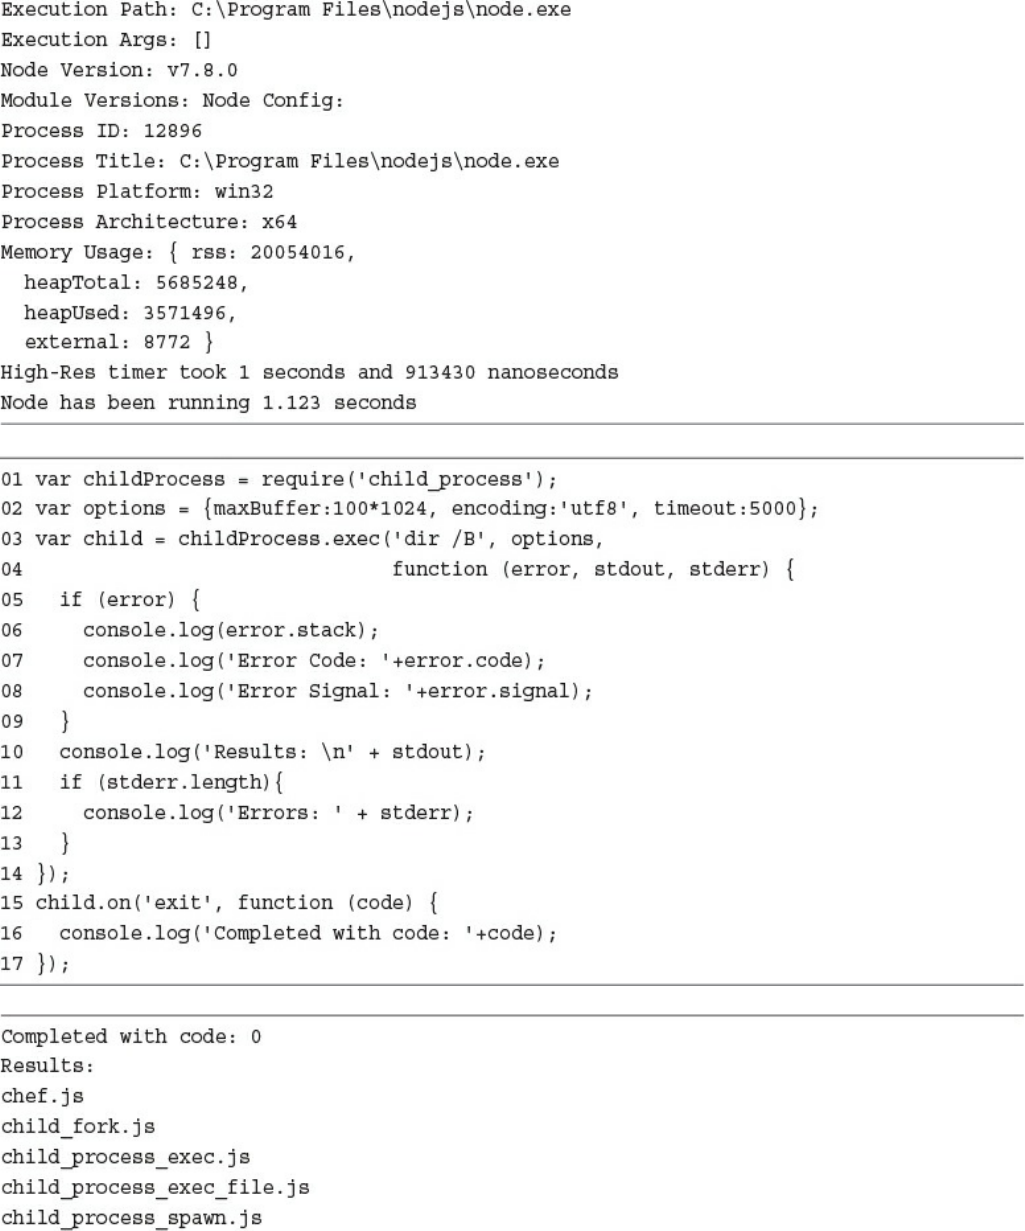
Implementing Child Processes
Understanding the ChildProcess Object
Executing a System Command on Another Process Using exec()
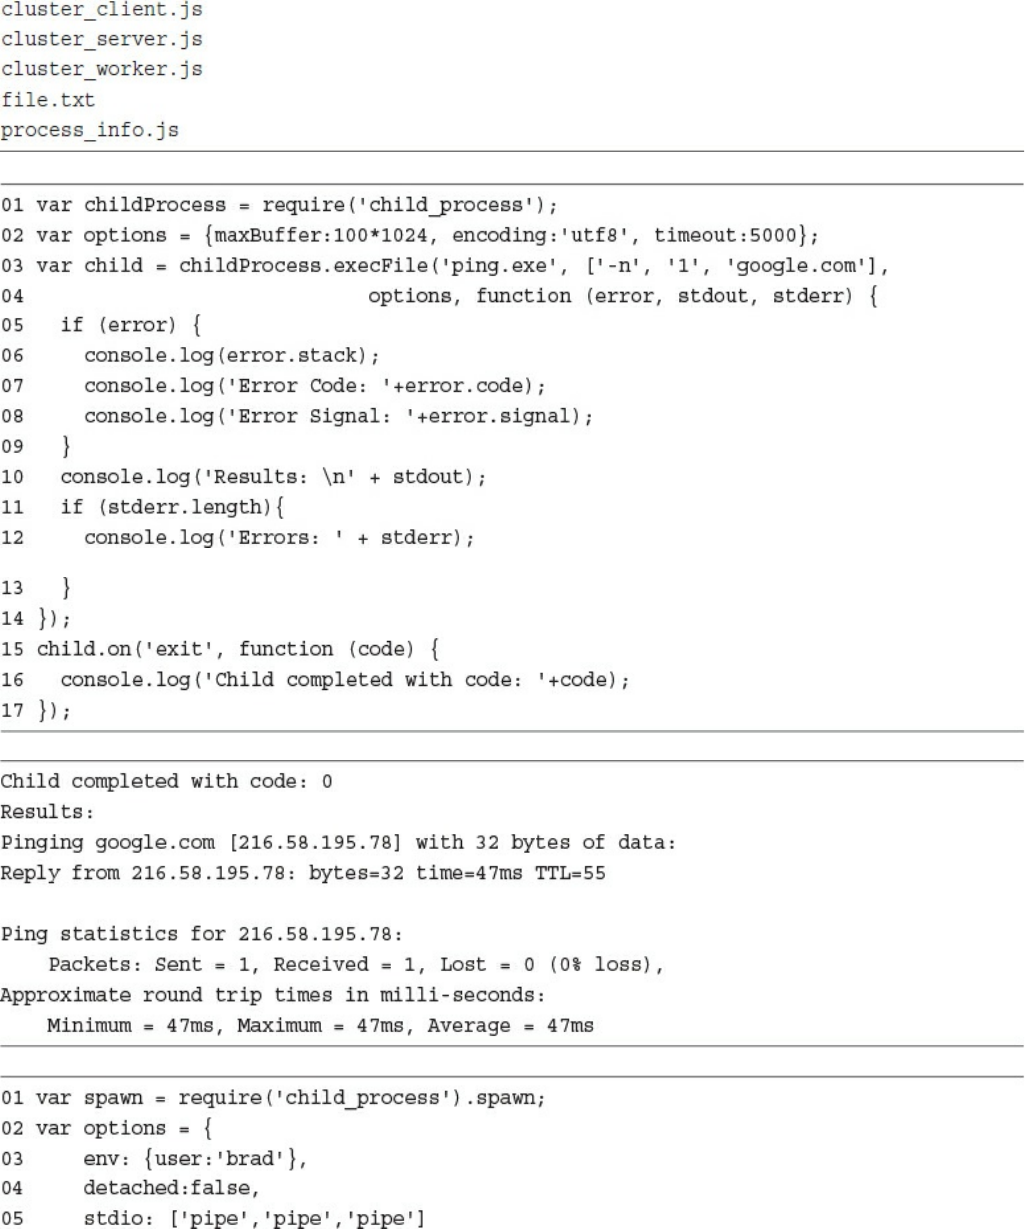
Executing an Executable File on Another Process Using execFile()
Spawning a Process in Another Node.js Instance Using spawn()
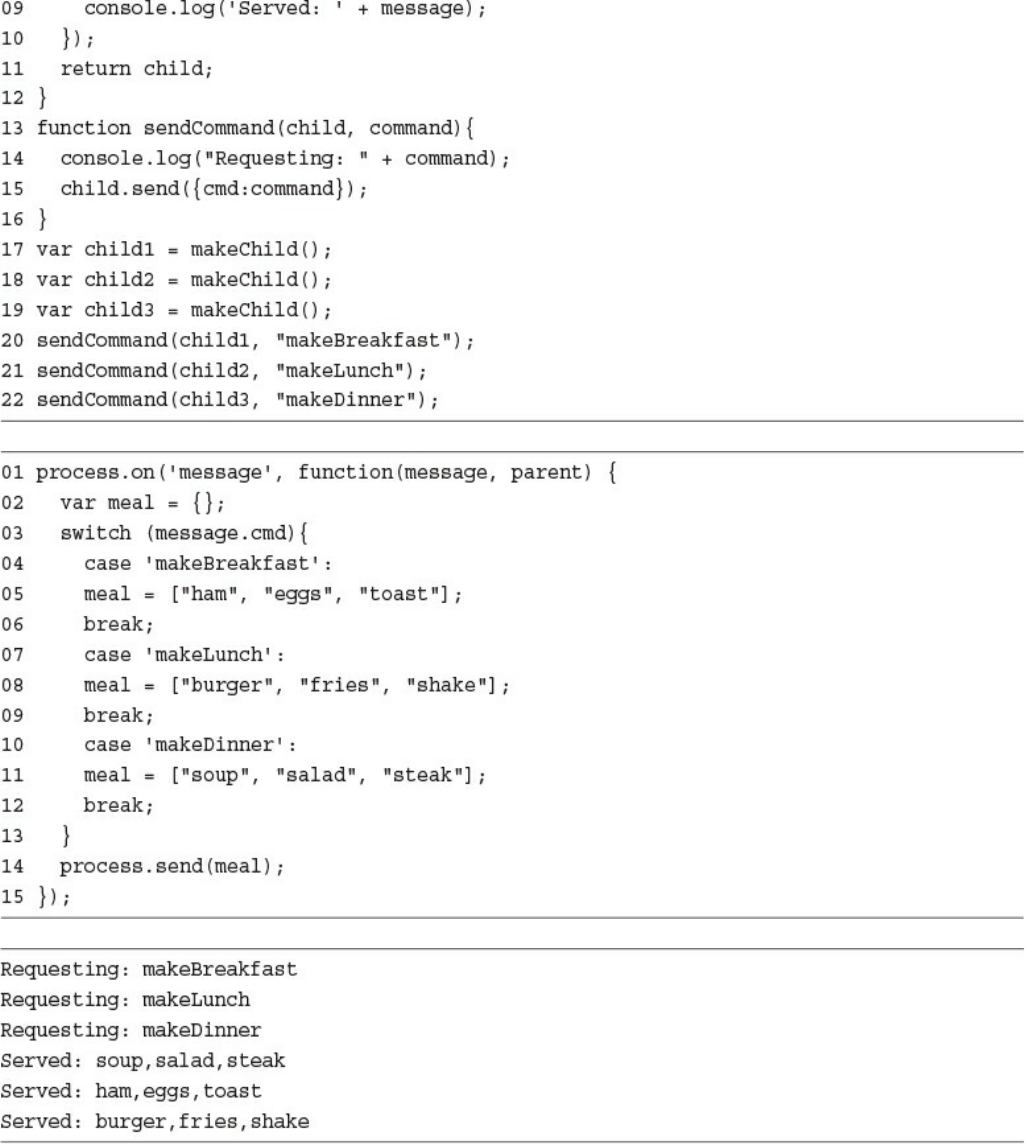
Implementing Child Forks
Implementing Process Clusters
Using the Cluster Module
Understanding the Worker Object
Implementing an HTTP Cluster
Summary
Next
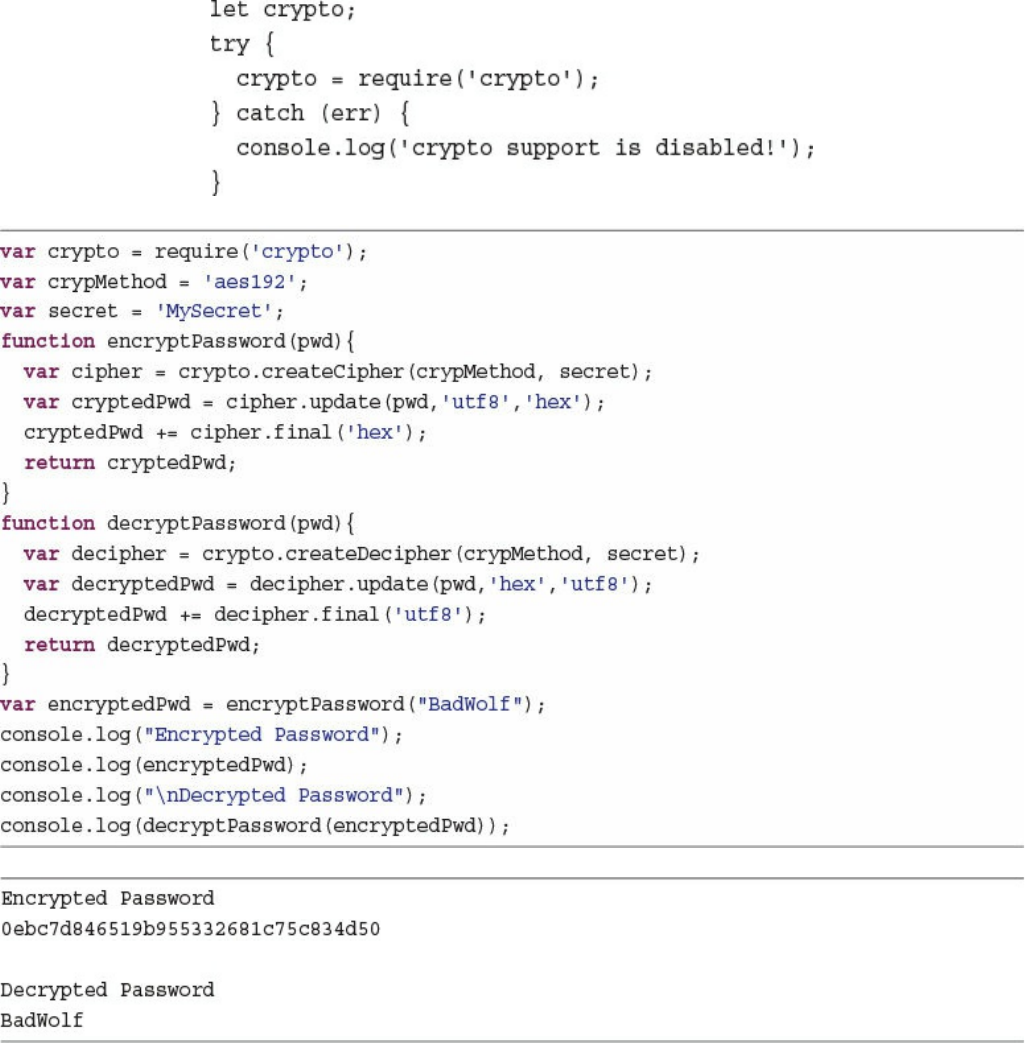
10 Using Additional Node.js Modules
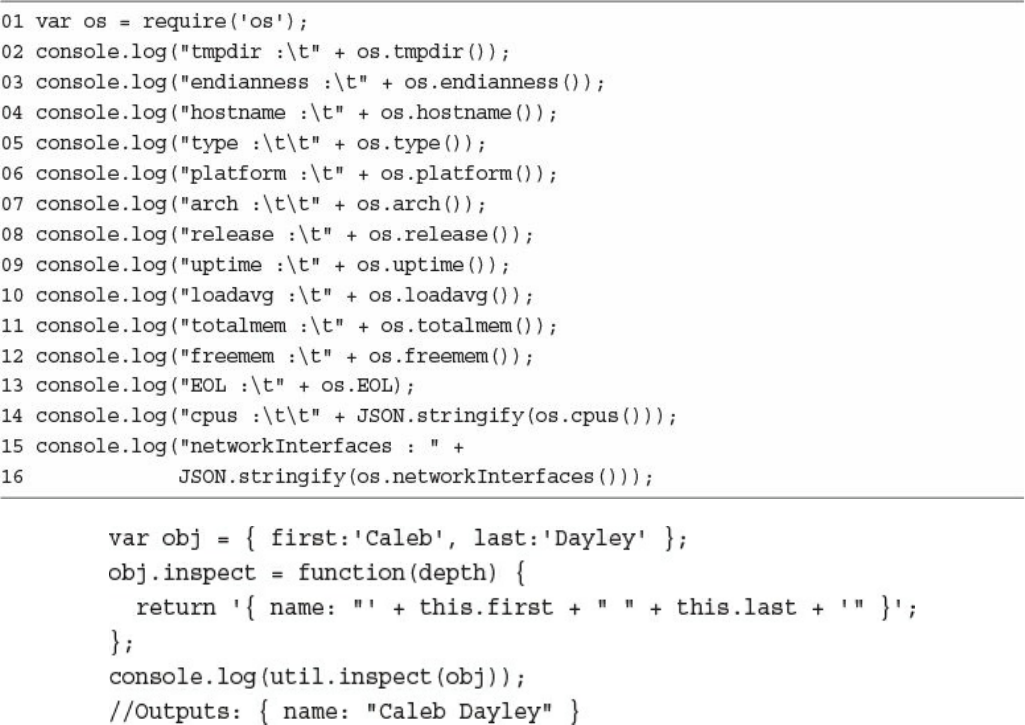
Using the os Module
Using the util Module
Formatting Strings
Checking Object Types
Converting JavaScript Objects to Strings
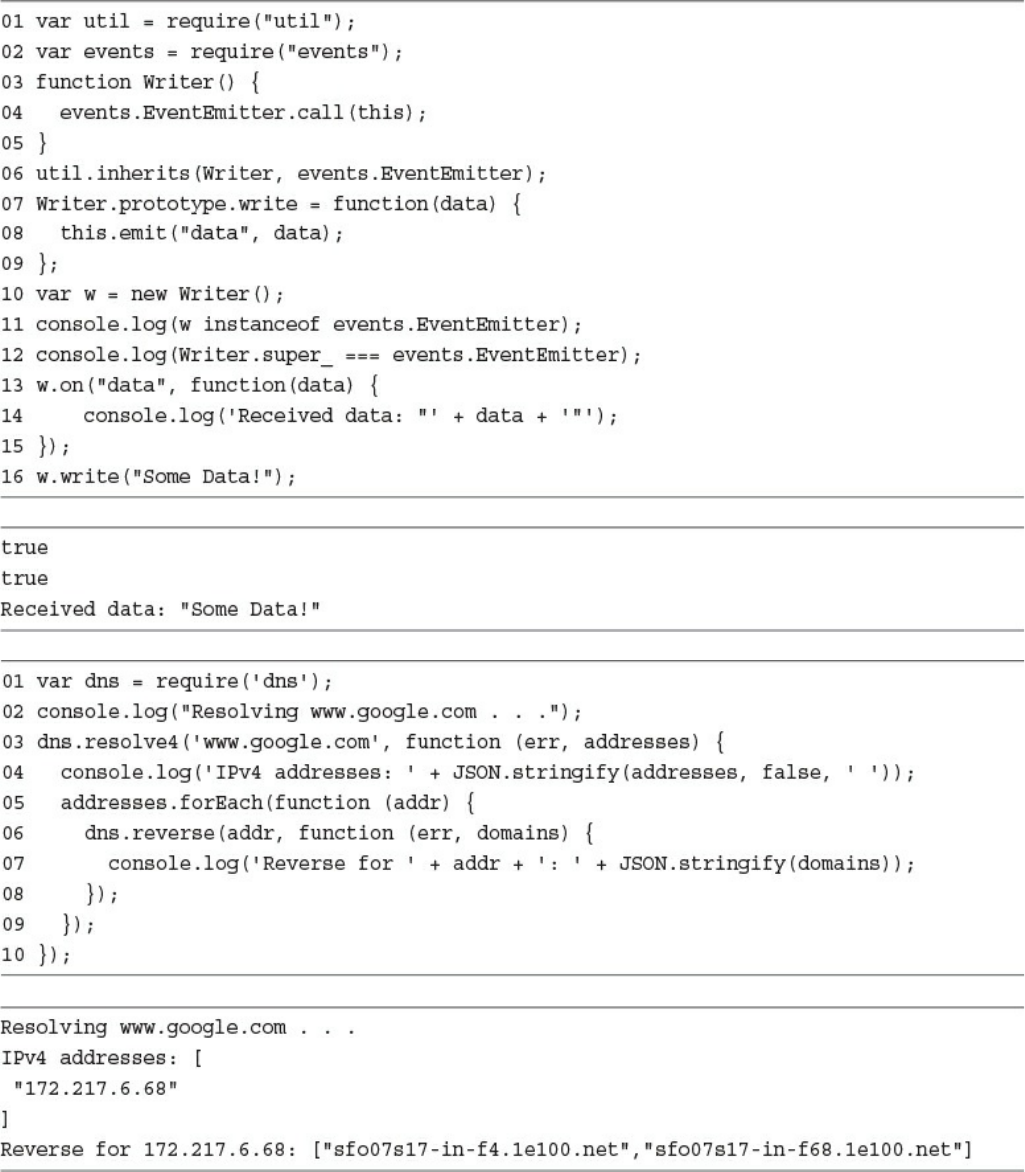
Inheriting Functionality from Other Objects
Using the dns Module
Using the crypto Module
Other Node Modules and Objects
Summary
Next
III: Learning MongoDB
11 Understanding NoSQL and MongoDB
Why NoSQL?
Understanding MongoDB
Understanding Collections
Understanding Documents
MongoDB Data Types
Planning Your Data Model
Normalizing Data with Document References
Denormalizing Data with Embedded Documents
Using Capped Collections
Understanding Atomic Write Operations
Considering Document Growth
Identifying Indexing, Sharding, and Replication Opportunities
Large Collections Versus Large Numbers of Collections
Deciding on Data Life Cycles
Considering Data Usability and Performance
Summary
Next
12 Getting Started with MongoDB
Building the MongoDB Environment
Installing MongoDB
Starting MongoDB
Stopping MongoDB
Accessing MongoDB from the Shell Client
Administering User Accounts
Listing Users
Creating User Accounts
Removing Users
Configuring Access Control
Creating a User Administrator Account
Turning on Authentication
Creating a Database Administrator Account
Administering Databases
Displaying a List of Databases
Changing the Current Database
Creating Databases
Deleting Databases
Copying Databases
Managing Collections
Displaying a List of Collections in a Database
Creating Collections
Deleting Collections
Finding Documents in a Collection
Adding Documents to a Collection
Deleting Documents in a Collection
Updating Documents in a Collection
Summary
Next
13 Getting Started with MongoDB and Node.js
Adding the MongoDB Driver to Node.js
Connecting to MongoDB from Node.js
Understanding the Write Concern
Connecting to MongoDB from Node.js Using the MongoClient Object
Understanding the Objects Used in the MongoDB Node.js Driver
Understanding the Db Object
Understanding the Admin Object
Understanding the Collection Object
Understanding the Cursor Object
Accessing and Manipulating Databases
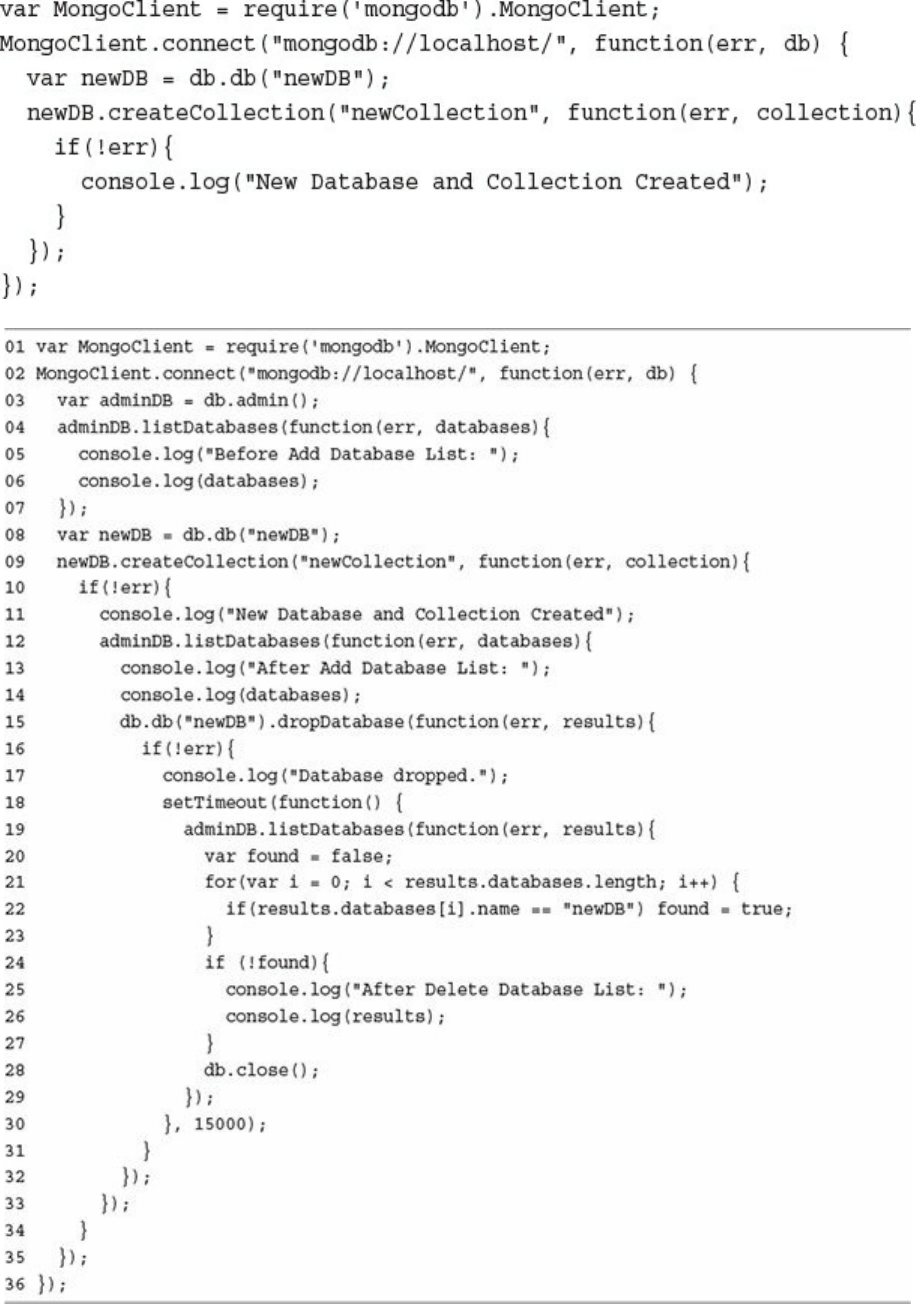
Listing Databases
Creating a Database
Deleting a Database
Creating, Listing, and Deleting Databases Example
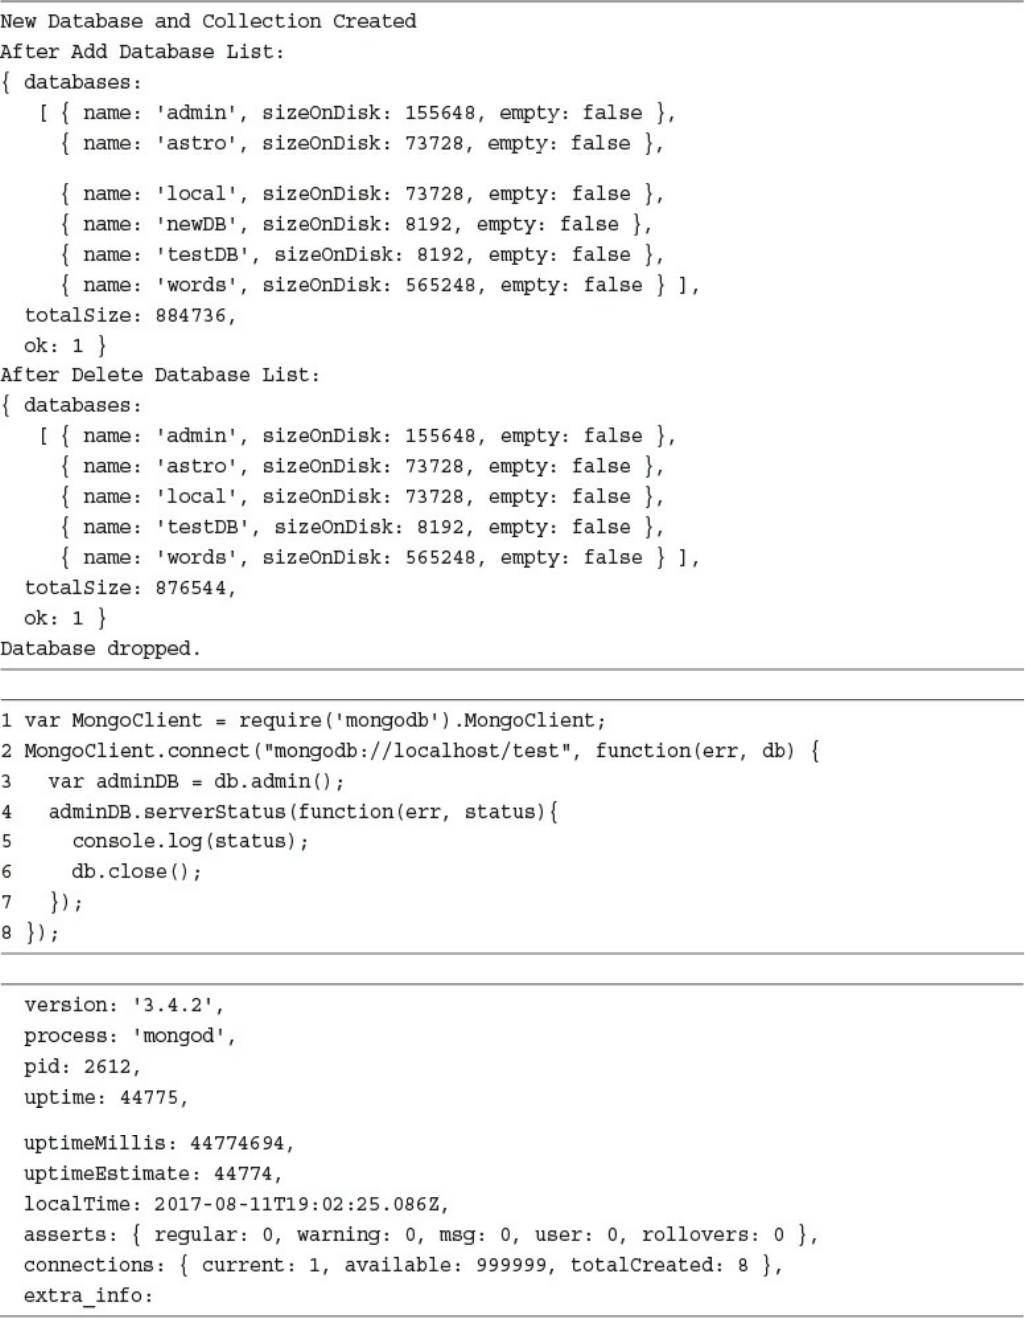
Getting the Status of the MongoDB Server
Accessing and Manipulating Collections
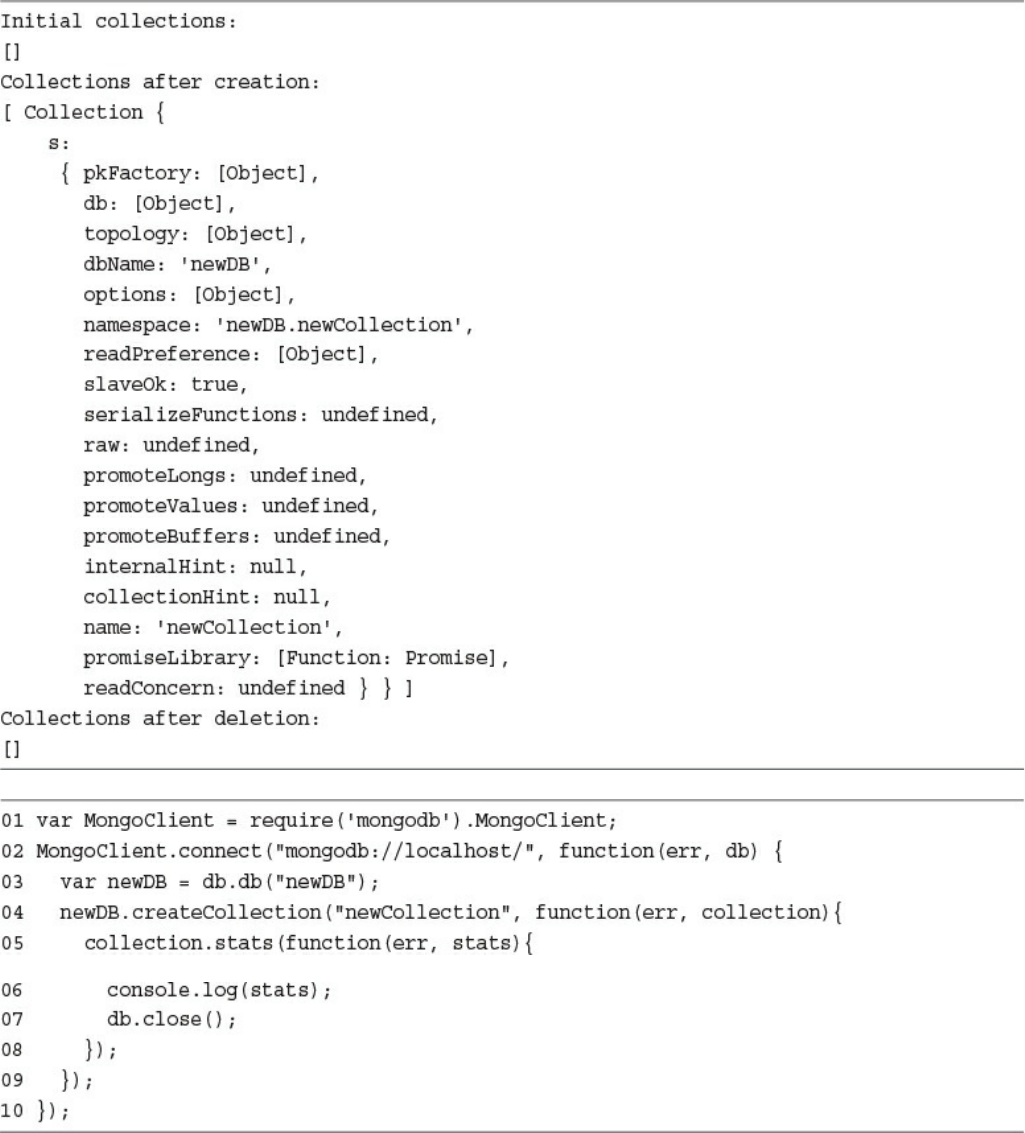
Listing Collections
Creating Collections
Deleting Collections
Collection Creation, Listing, and Deleting Example
Getting Collection Information
Summary
Next
14 Manipulating MongoDB Documents from Node.js
Understanding Database Change Options
Understanding Database Update Operators
Adding Documents to a Collection
Getting Documents from a Collection
Updating Documents in a Collection
Atomically Modifying Documents in a Collection
Saving Documents in a Collection
Upserting Documents in Collection
Deleting Documents from a Collection
Removing a Single Document from a Collection
Summary
Next
15 Accessing MongoDB from Node.js
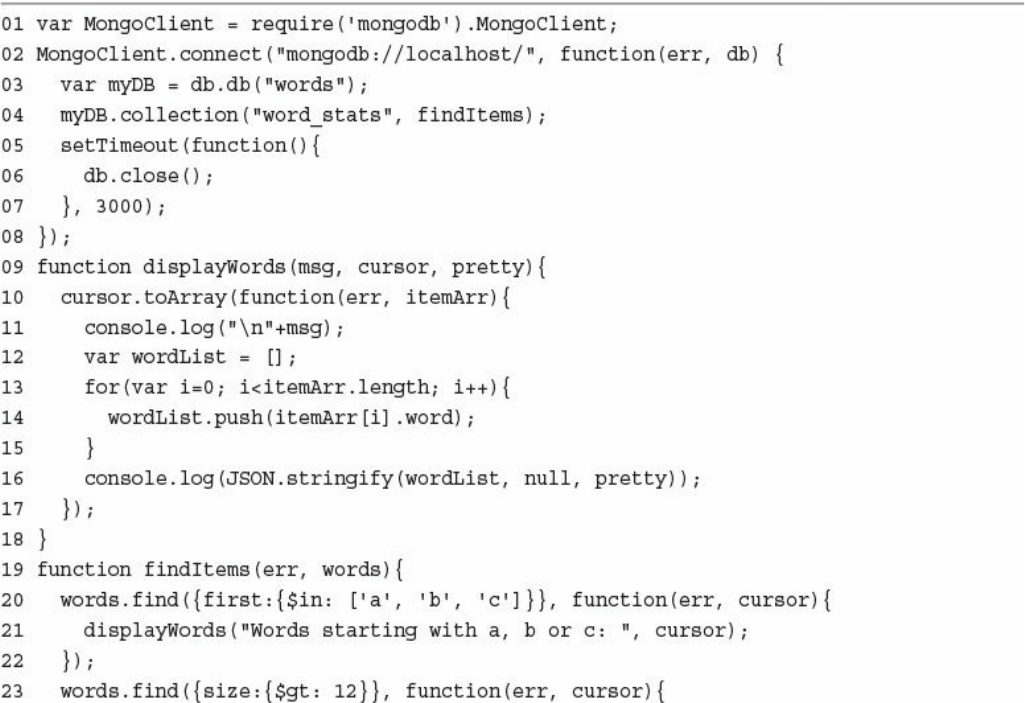
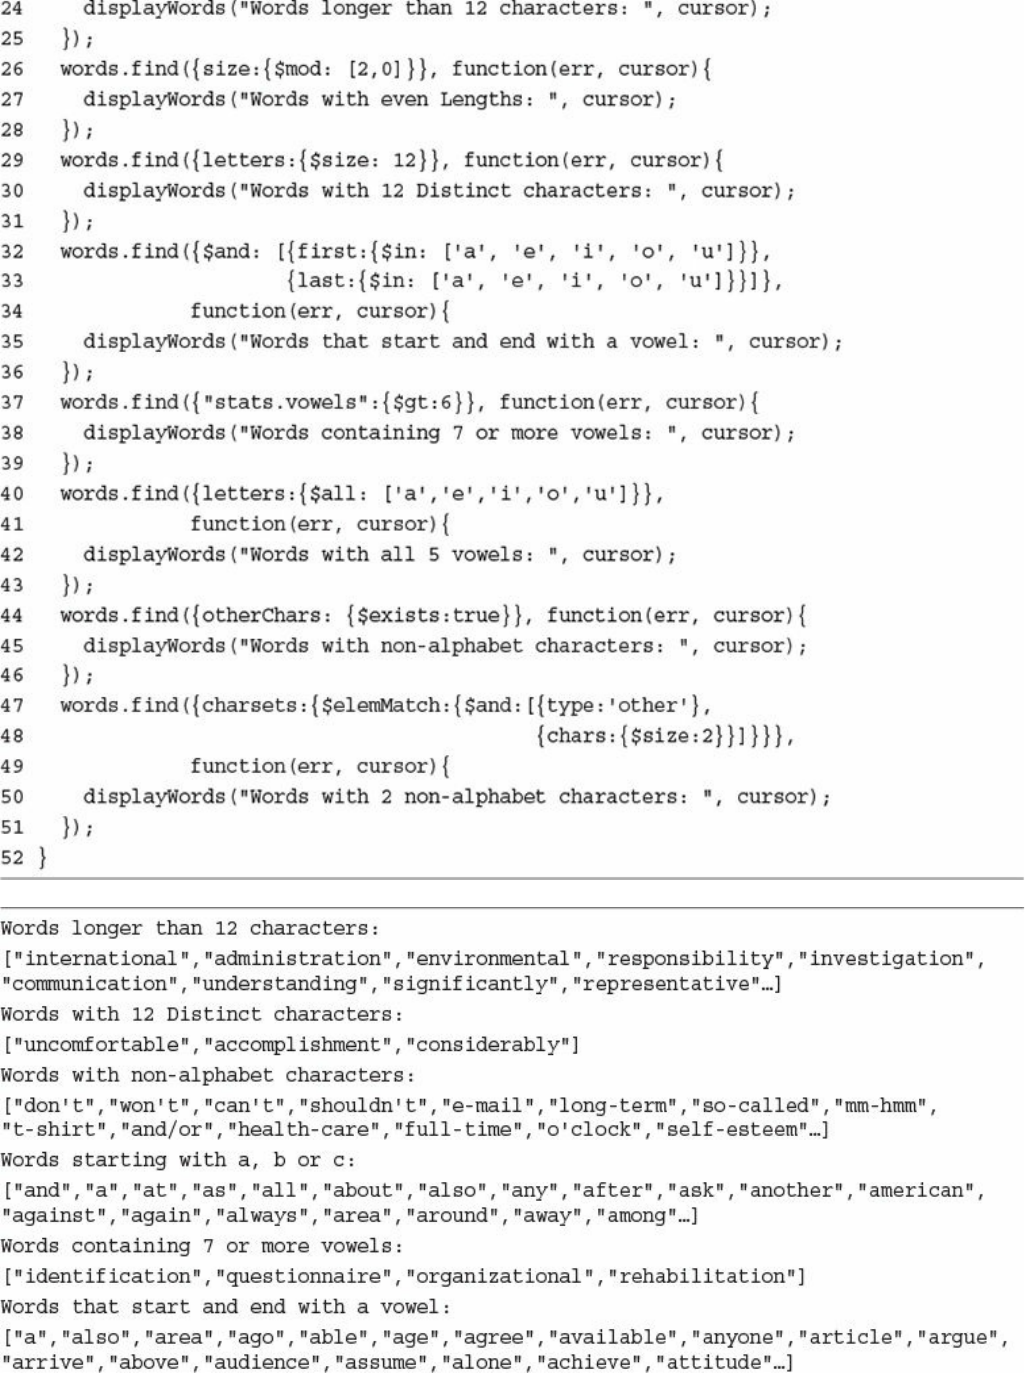
Introducing the Data Set
Understanding Query Objects
Understanding Query Options Objects
Finding Specific Sets of Documents
Counting Documents
Limiting Result Sets
Limiting Results by Size
Limiting Fields Returned in Objects
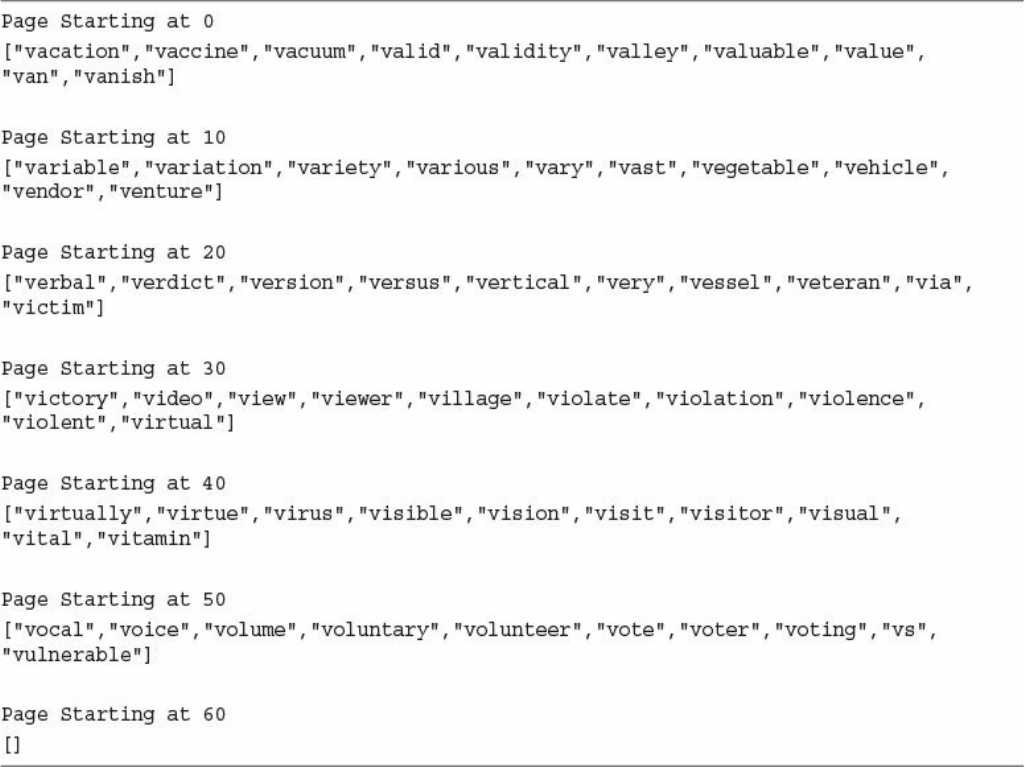
Paging Results
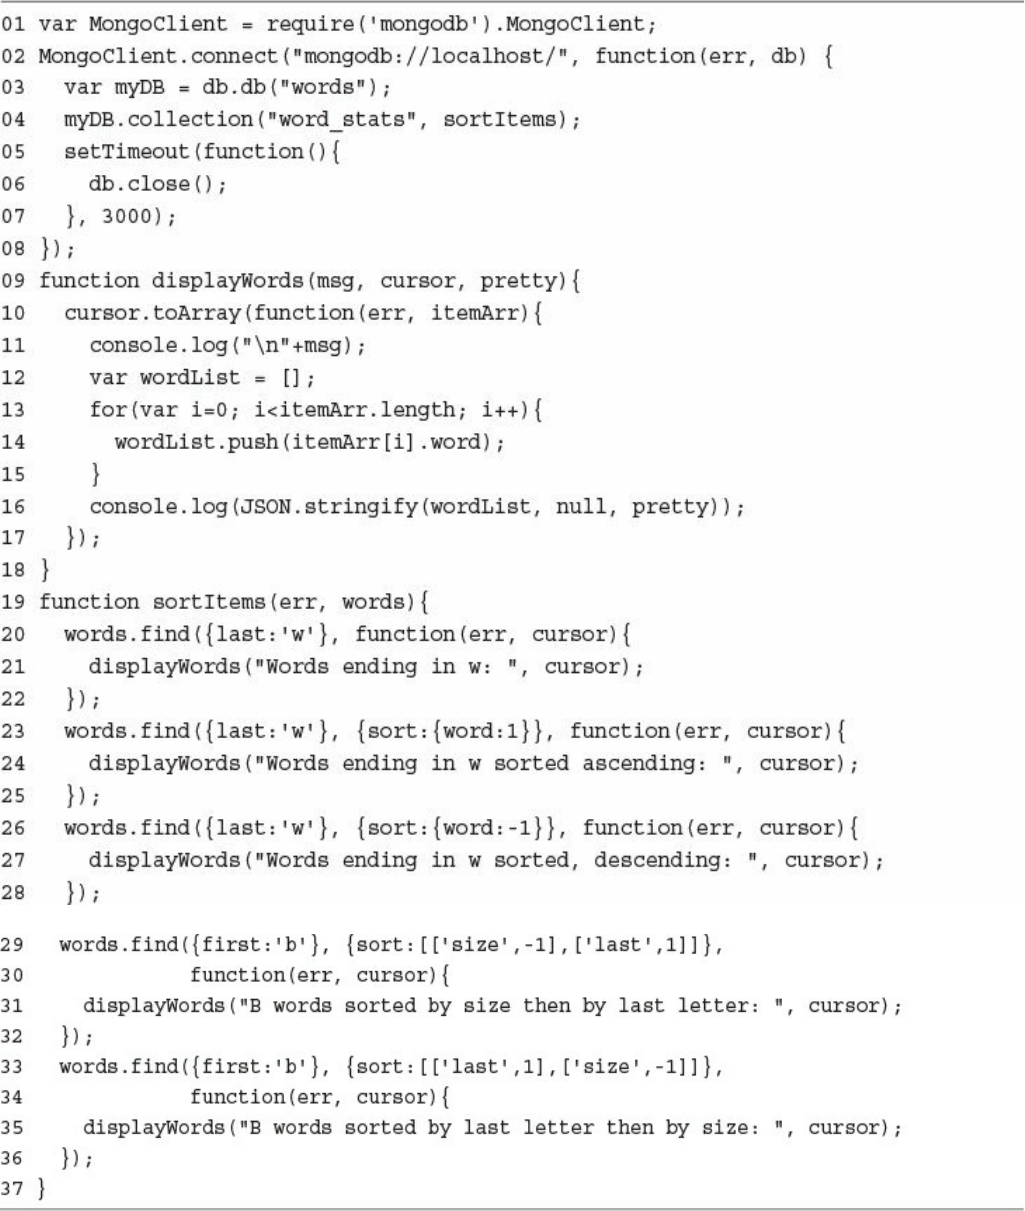
Sorting Result Sets
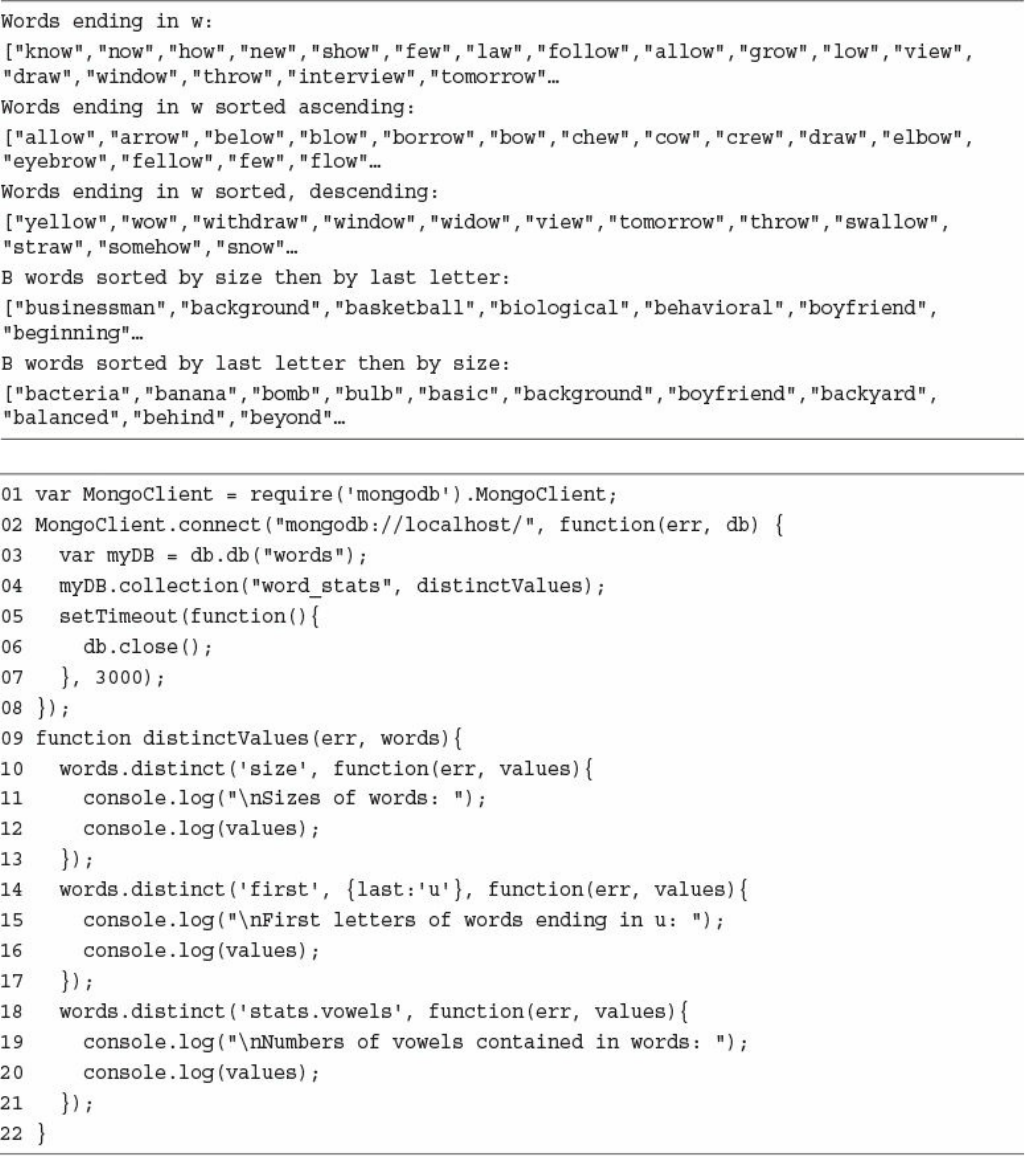
Finding Distinct Field Values
Grouping Results
Applying MapReduce by Aggregating Results
Understanding the aggregate() Method
Using Aggregation Framework Operators
Implementing Aggregation Expression Operators
Aggregation Examples
Summary
Next
16 Using Mongoose for Structured Schema and Validation
Understanding Mongoose
Additional Objects
Connecting to a MongoDB Database Using Mongoose
Defining a Schema
Understanding Paths
Creating a Schema Definition
Adding Indexes to a Schema
Implementing Unique Fields
Forcing Required Fields
Adding Methods to the Schema Model
Implementing the Schema on the Words Database
Compiling a Model
Understanding the Query Object
Setting the Query Database Operation
Setting the Query Database Operation Options
Setting the Query Operators
Understanding the Document Object
Finding Documents Using Mongoose
Adding Documents Using Mongoose
Updating Documents Using Mongoose
Saving Document Changes
Updating a Single Document
Updating Multiple Documents
Removing Documents Using Mongoose
Removing a Single Document
Removing Multiple Documents
Aggregating Documents Using Mongoose
Using the Validation Framework
Implementing Middleware Functions
Summary
Next
17 Advanced MongoDB Concepts
Adding Indexes
Using Capped Collections
Applying Replication
Replication Strategy
Deploying a Replica Set
Implementing Sharding
Sharding Server Types
Choosing a Shard Key
Selecting a Partitioning Method
Deploying a Sharded MongoDB Cluster
Repairing a MongoDB Database
Backing Up MongoDB
Summary
Next
IV: Using Express to Make Life Easier
18 Implementing Express in Node.js
Getting Started with Express
Configuring Express Settings
Starting the Express Server
Configuring Routes
Implementing Routes
Applying Parameters in Routes
Using Requests Objects
Using Response Objects
Setting Headers
Setting the Status
Sending Response
Sending JSON Responses
Sending Files
Sending a Download Response
Redirecting the Response
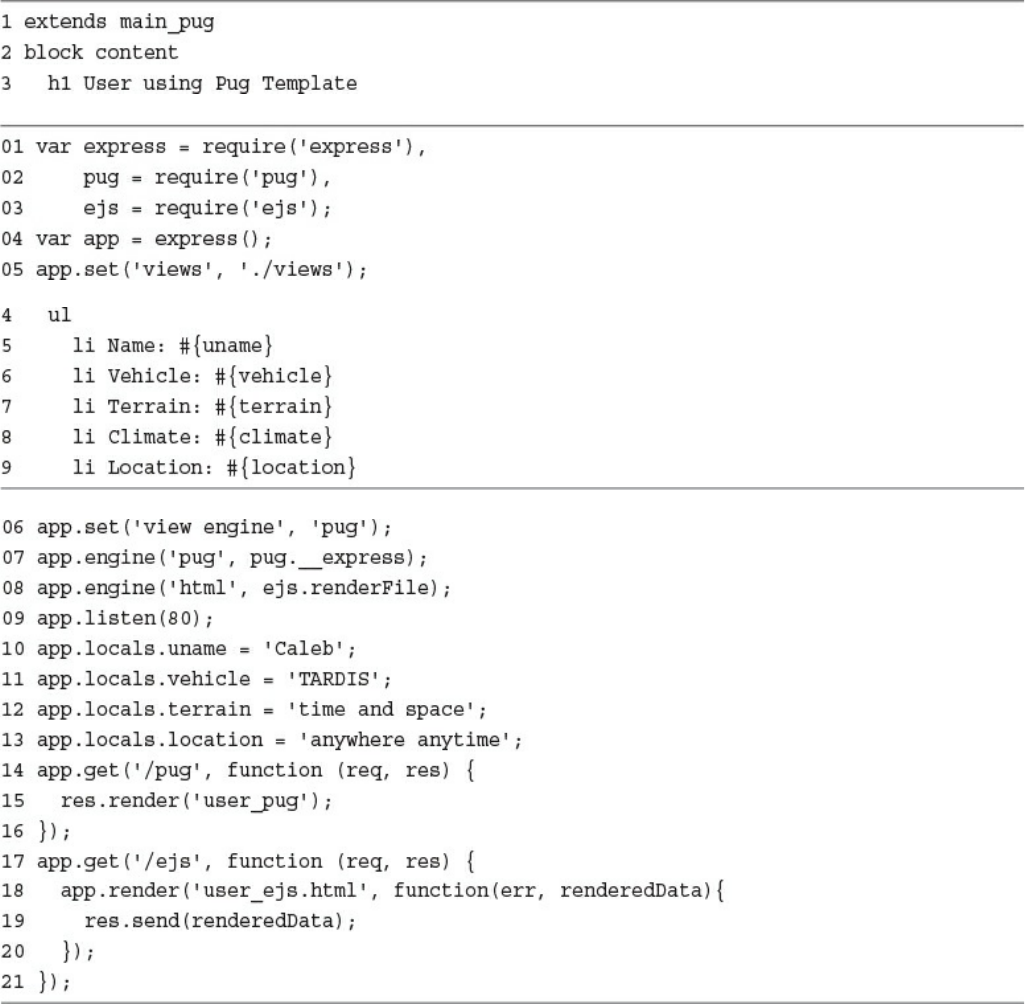
Implementing a Template Engine
Defining the Engine
Adding Locals
Creating Templates
Rendering Templates in a Response
Summary
Next
19 Implementing Express Middleware
Understanding Middleware
Assigning Middleware Globally to a Path
Assigning Middleware to a Single Route
Adding Multiple Middleware Functions
Using the query Middleware
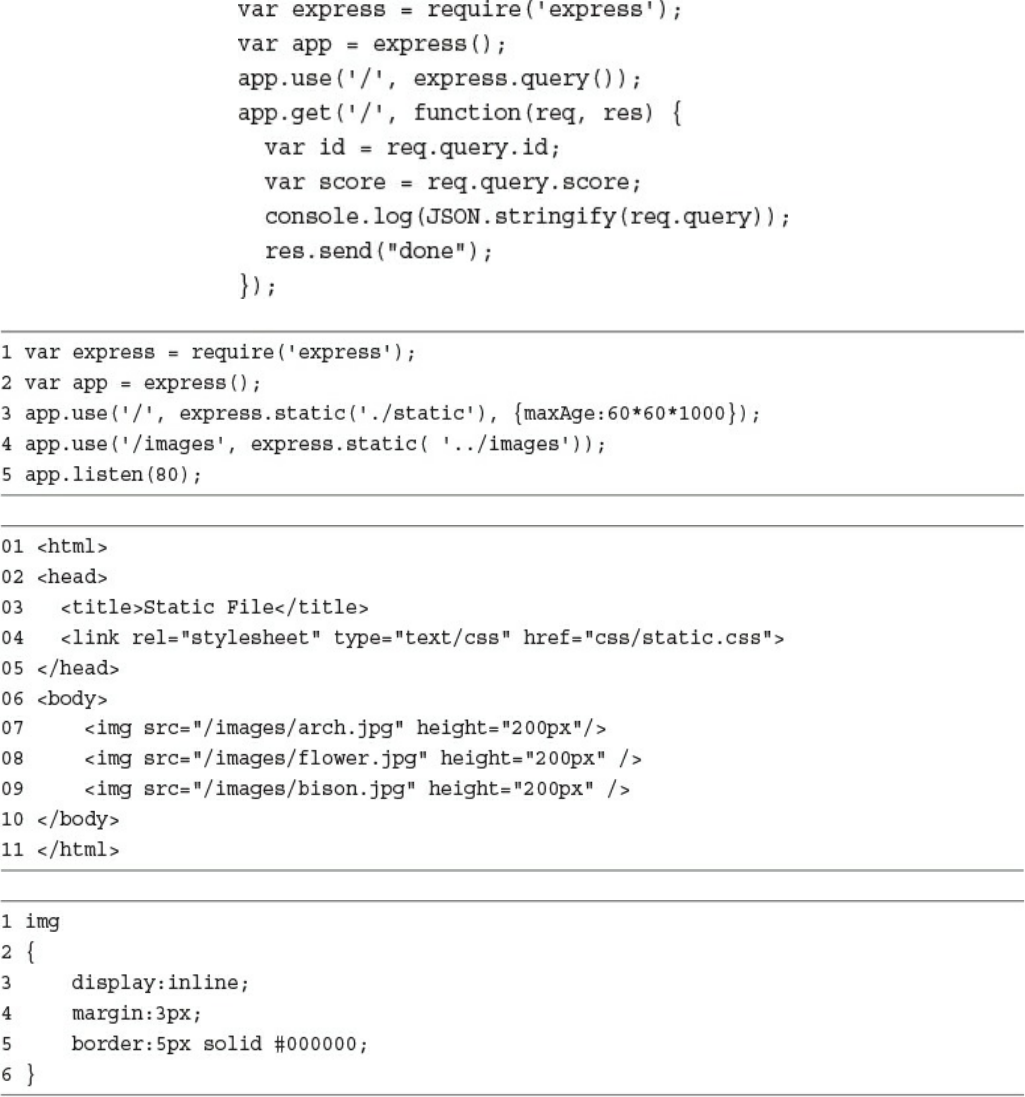
Serving Static Files
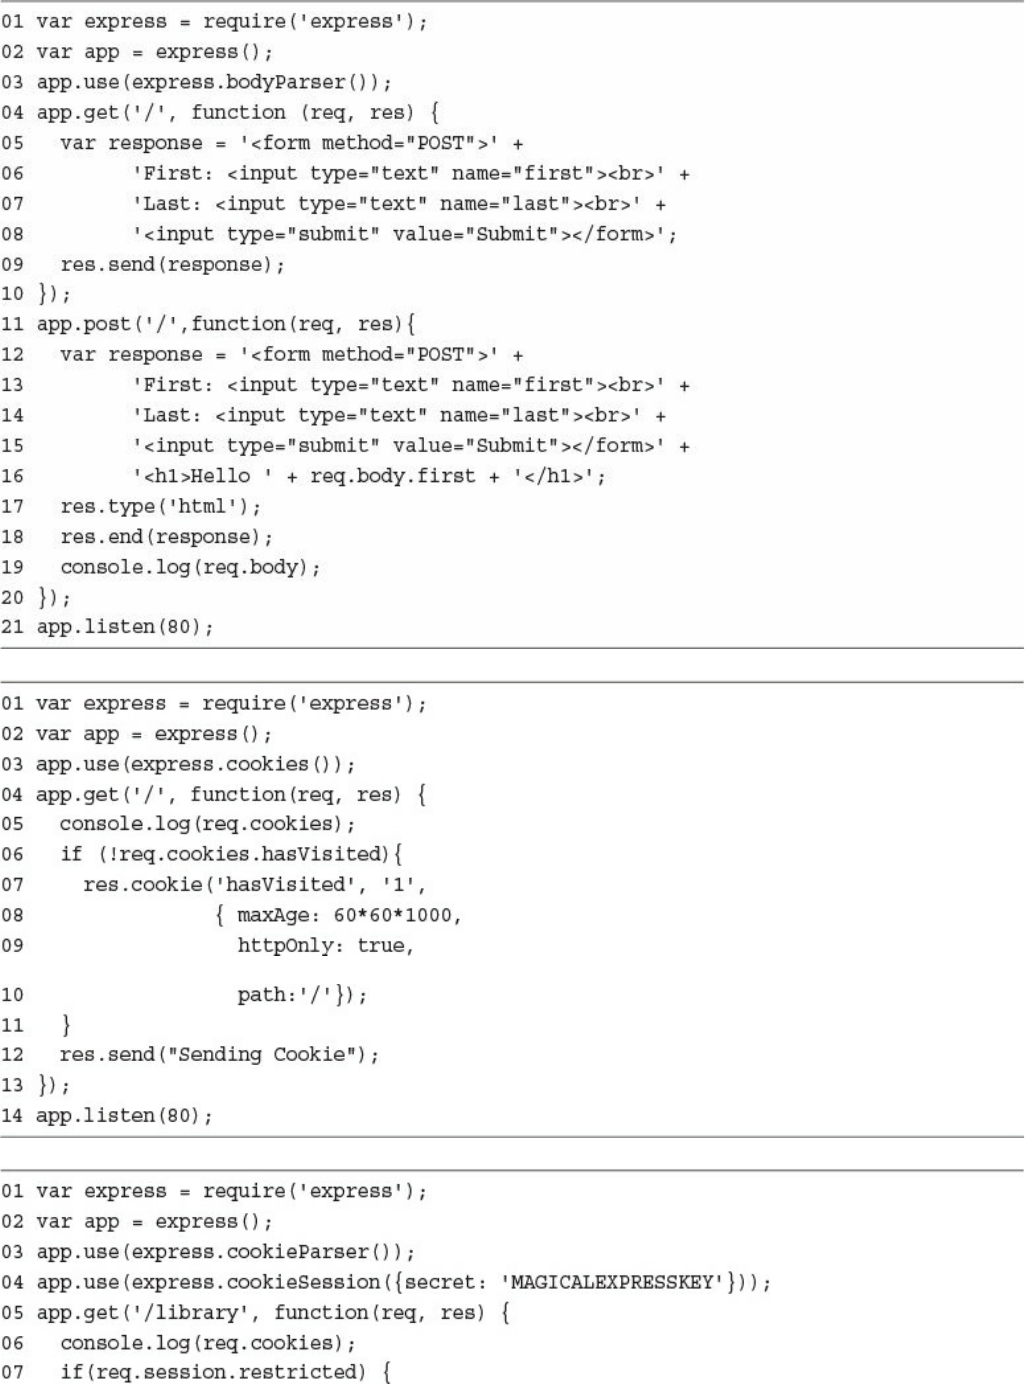
Handling POST Body Data
Sending and Receiving Cookies
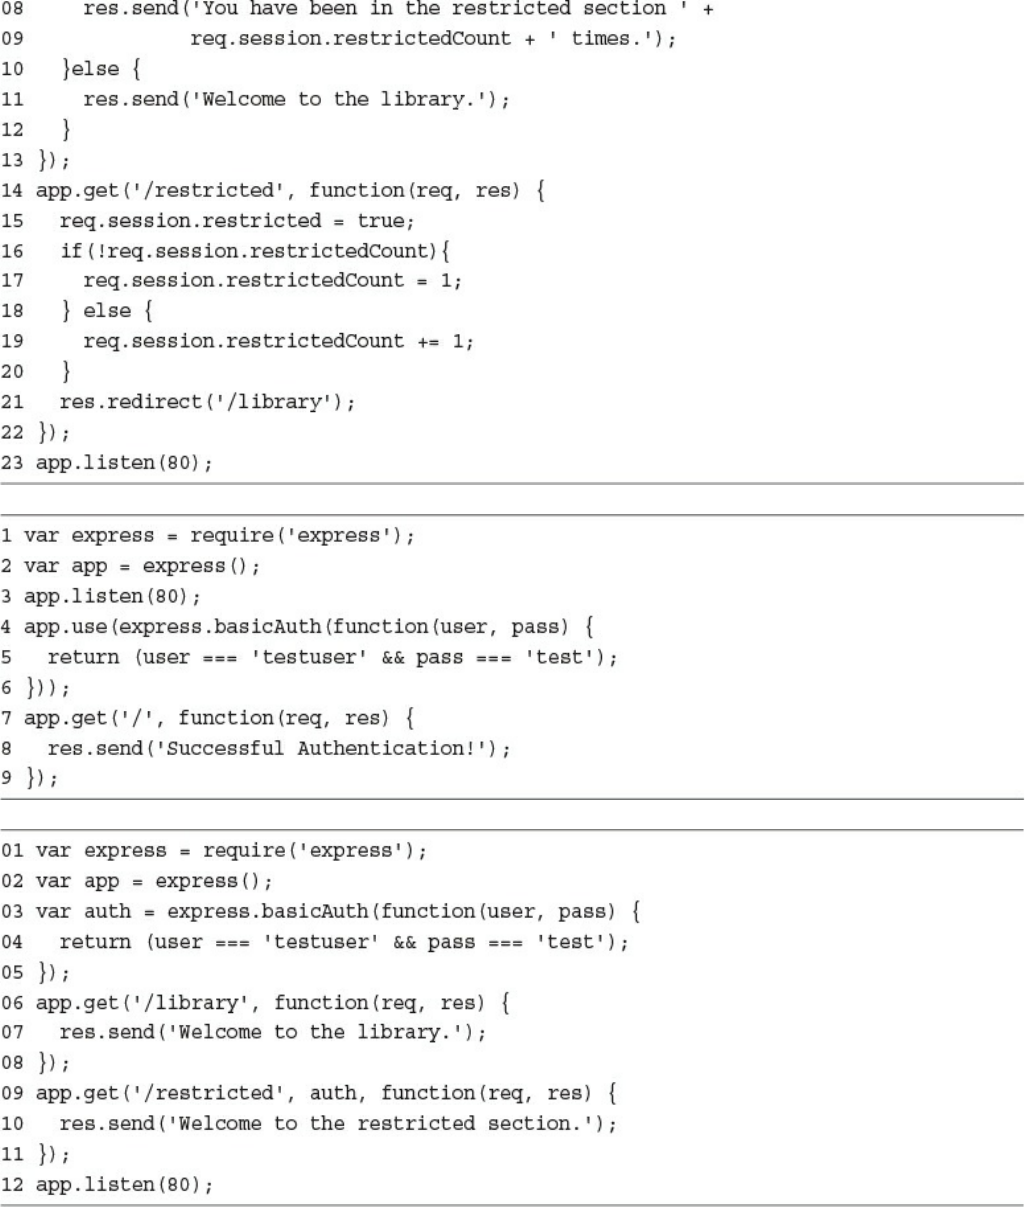
Implementing Sessions
Applying Basic HTTP Authentication
Implementing Session Authentication
Creating Custom Middleware
Summary
Next
V: Learning Angular
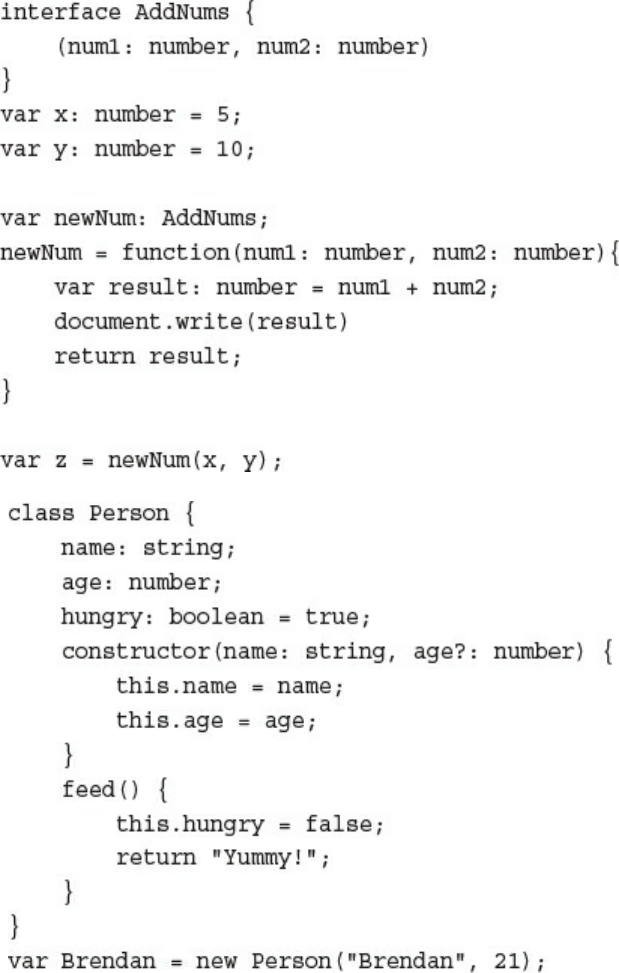
20 Jumping into TypeScript
Learning the Different Types
Understanding Interfaces
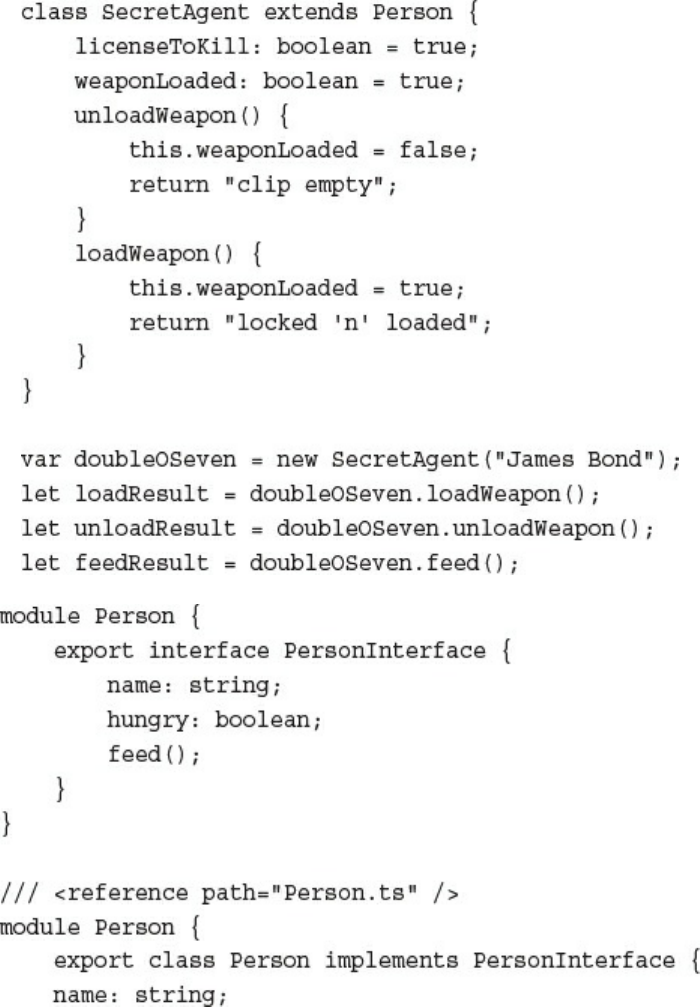
Implementing Classes
Class Inheritance
Implementing Modules
Understanding Functions
Summary
Next
21 Getting Started with Angular
Why Angular?
Understanding Angular
Modules
Directives
Data Binding
Dependency Injection
Services
Separation of Responsibilities
Adding Angular to Your Environment
Using the Angular CLI
Generating Content with the CLI
Creating a Basic Angular Application
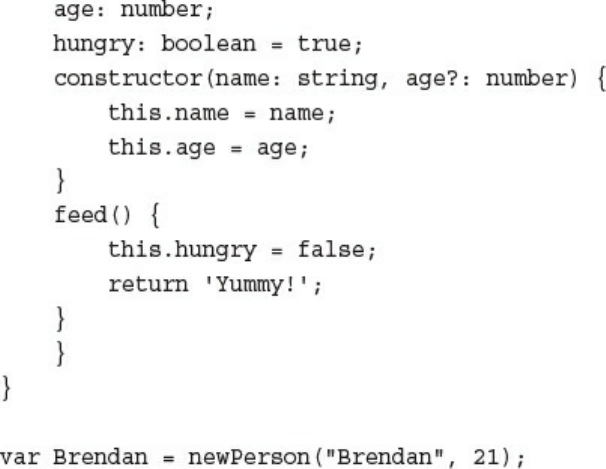
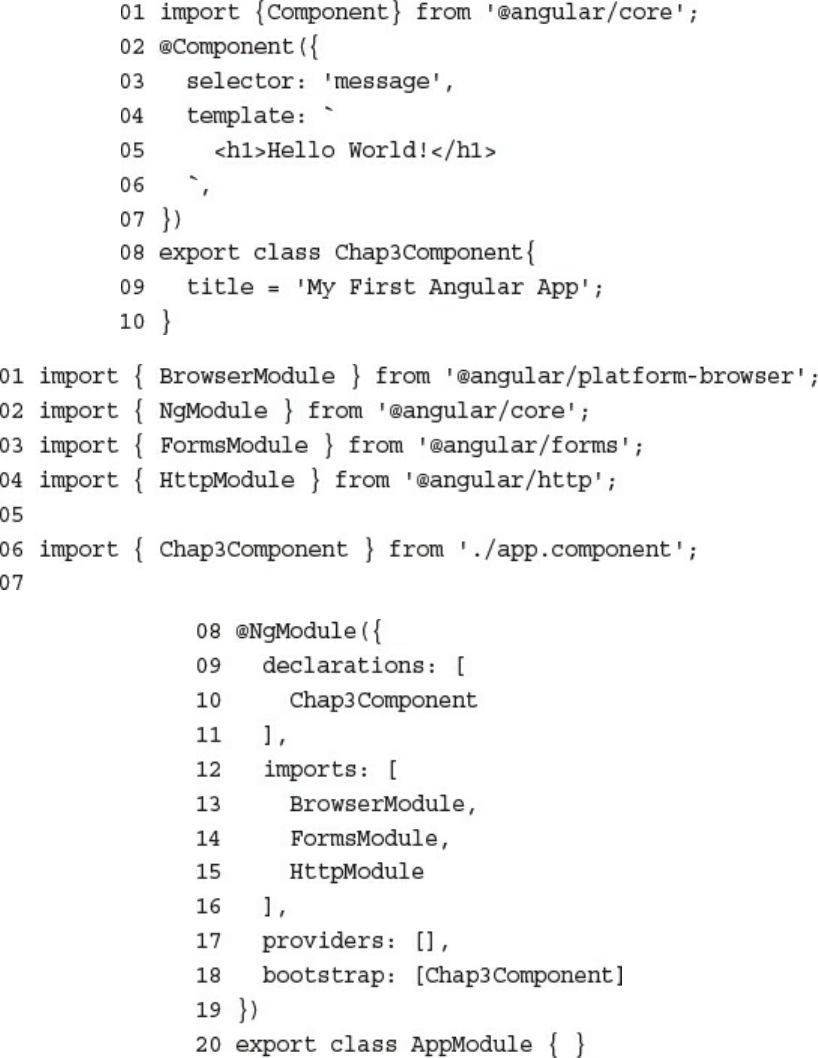
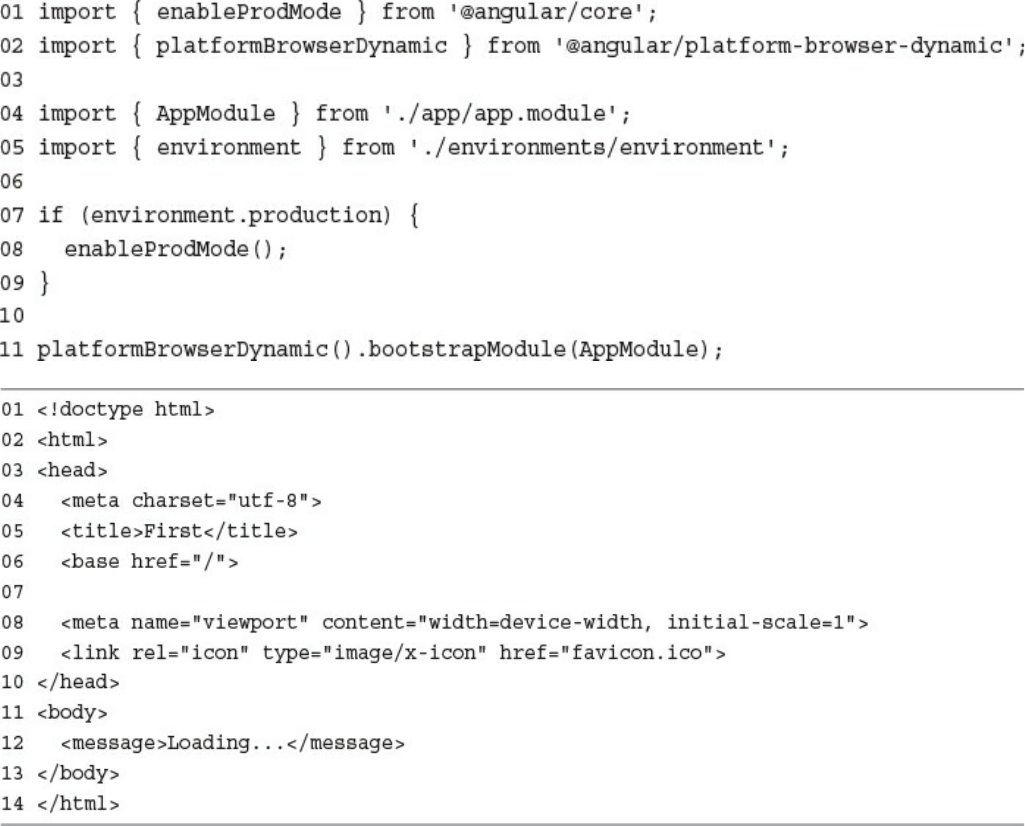
Creating Your First Angular App
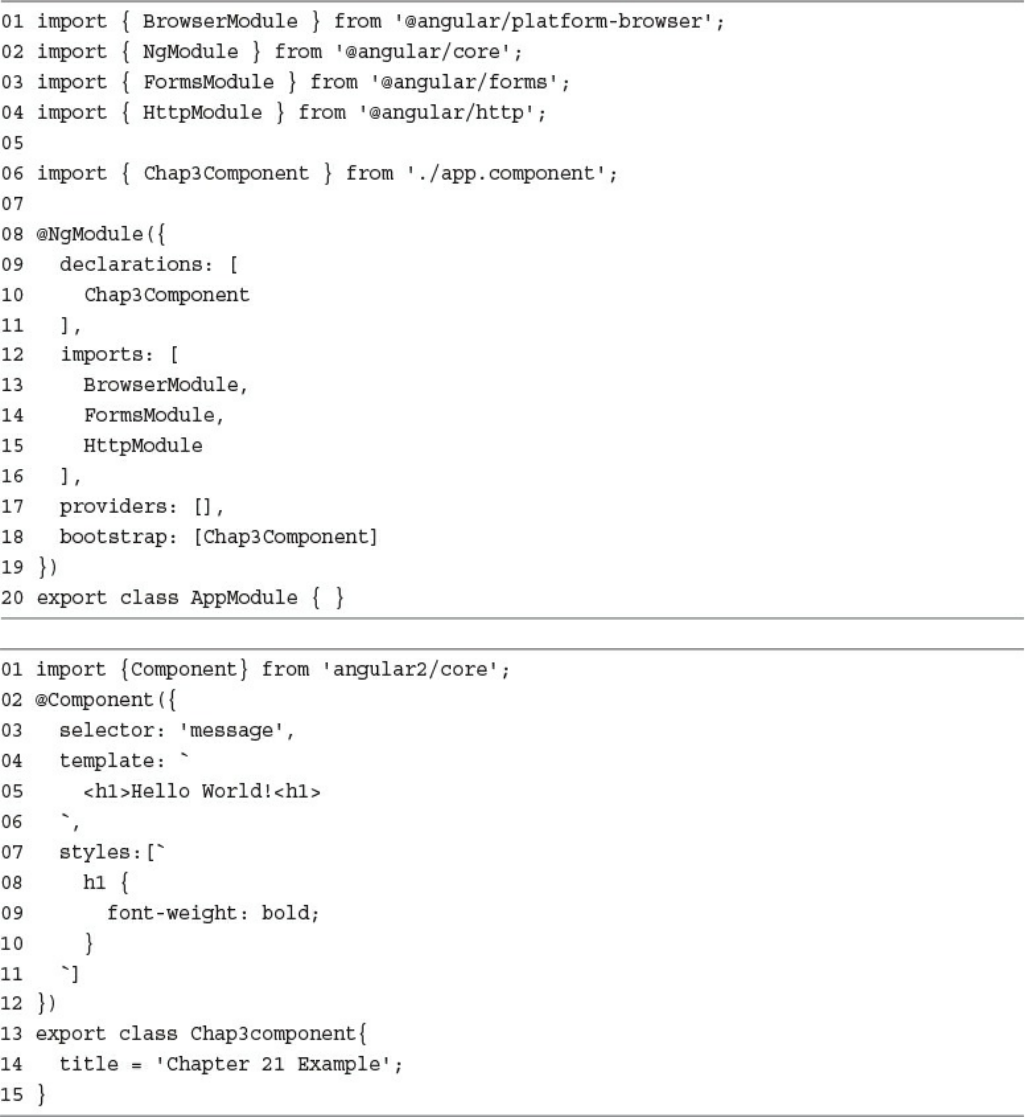
Understanding and Using NgModule
Creating the Angular Bootstrapper
Summary
Next
22 Angular Components
Component Configuration
Defining a Selector
Building a Template
Using Inline CSS and HTML in Angular Applications
Using Constructors
Using External Templates
Injecting Directives
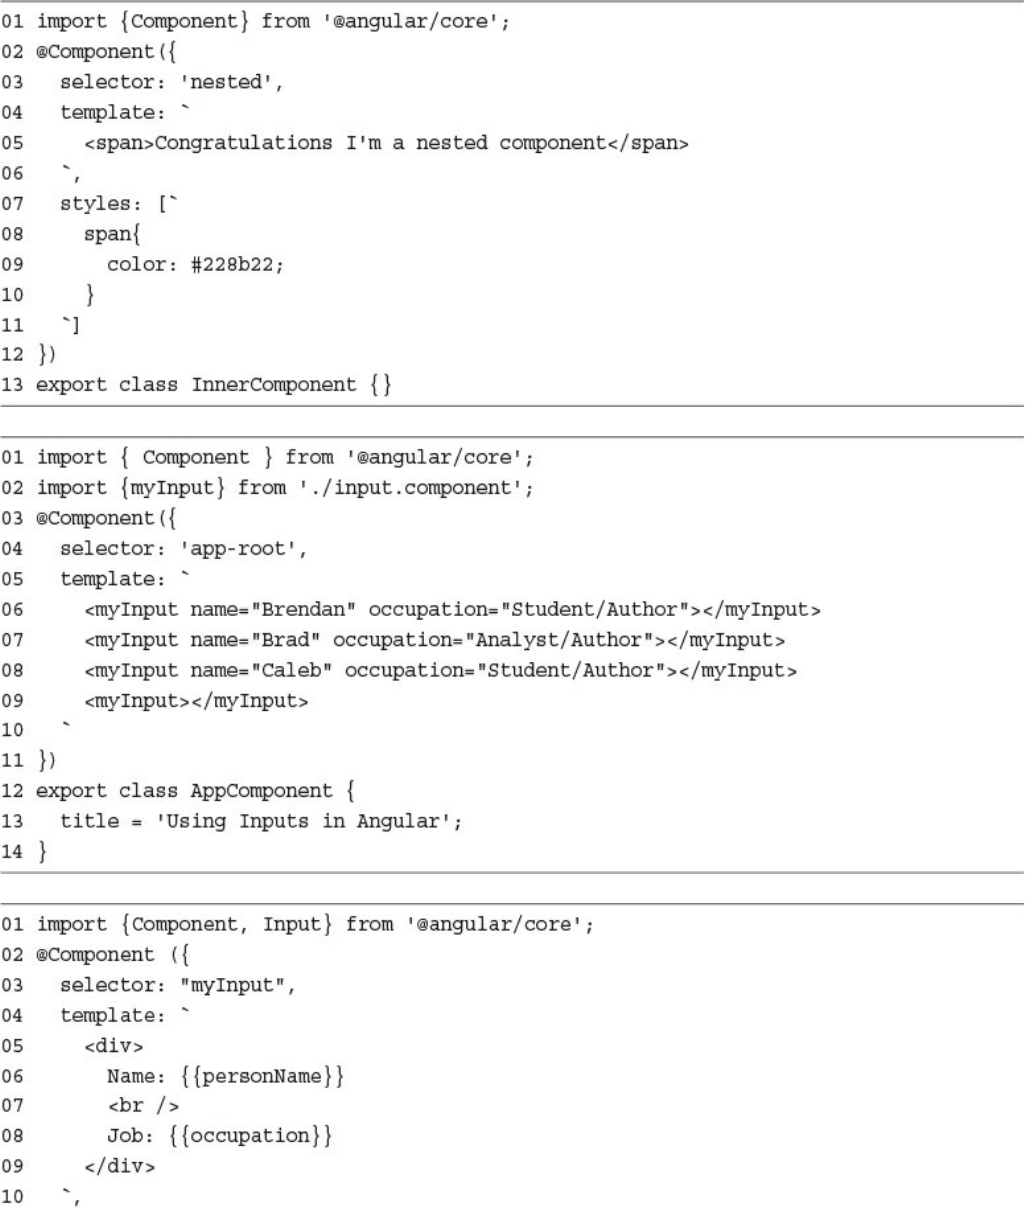
Building a Nested Component with Dependency Injection
Passing in Data with Dependency Injection
Creating an Angular Application that Uses Inputs
Summary
Next
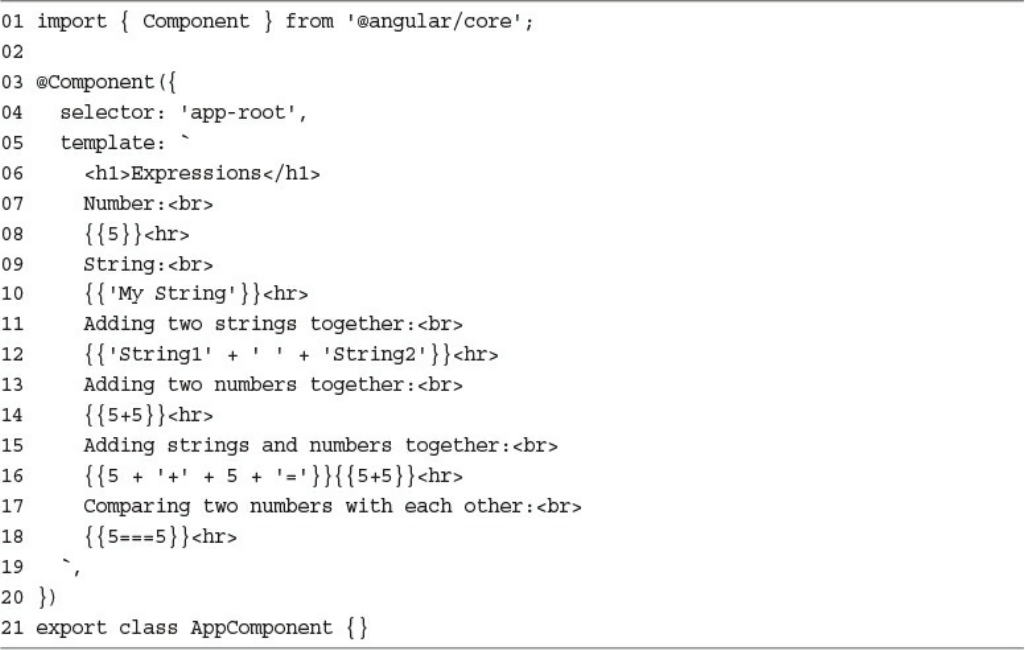
23 Expressions
Using Expressions
Using Basic Expressions
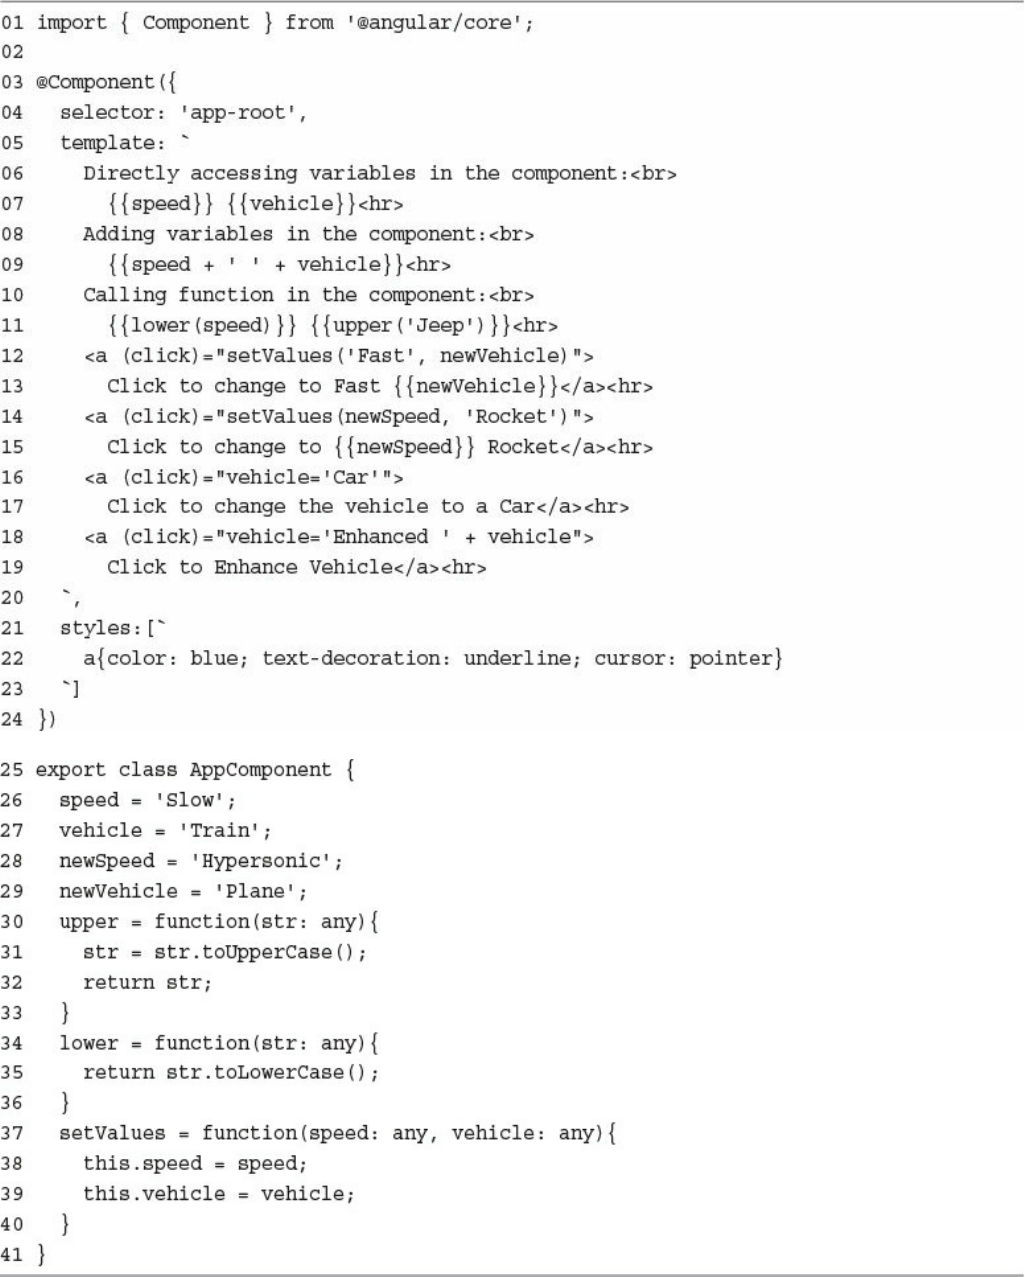
Interacting with the Component Class in Expressions
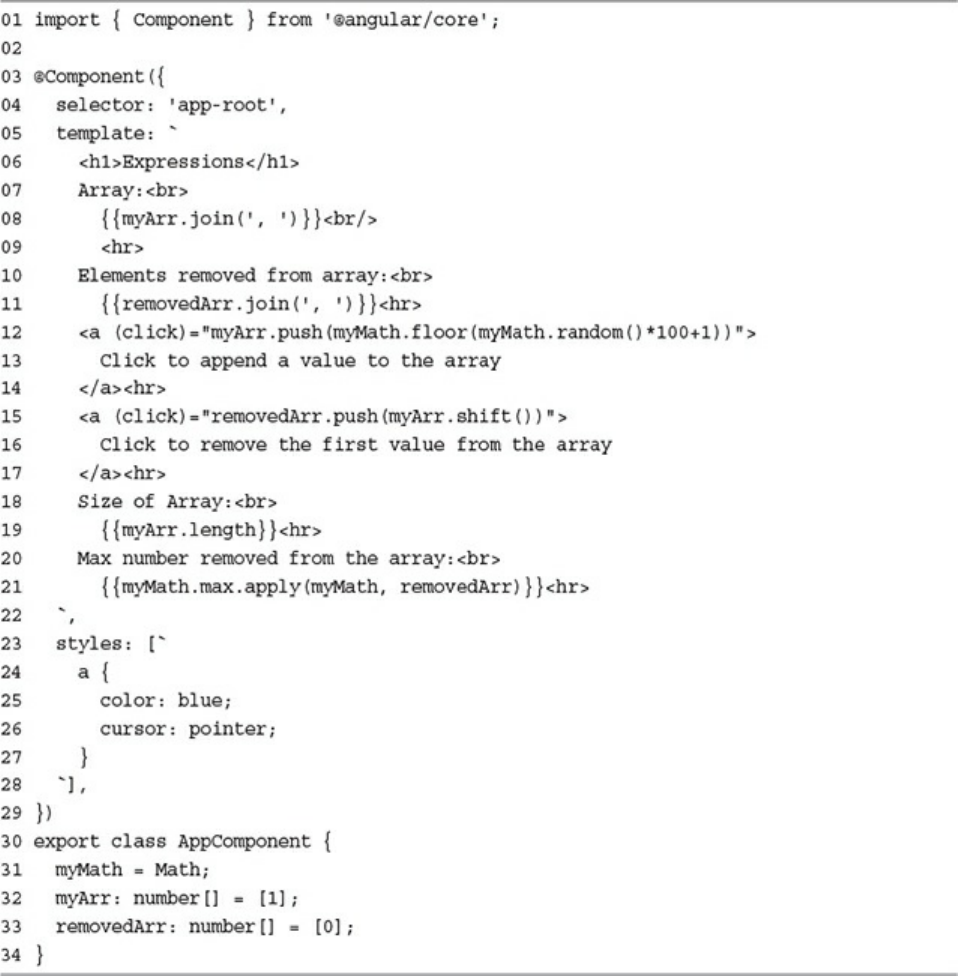
Using TypeScript in Angular Expressions
Using Pipes
Using Built-in Pipes
Building a Custom Pipe
Creating a Custom Pipe
Summary
Next
24 Data Binding
Understanding Data Binding
Interpolation
Property Binding
Attribute Binding
Class Binding
Style Binding
Event Binding
Two-Way Binding
Summary
Next
25 Built-in Directives
Understanding Directives
Using Built-in Directives
Components Directives
Structural Directives
Attribute Directives
Summary
Next
VI: Advanced Angular
26 Custom Directives
Creating a Custom Attribute Directive
Creating a Custom Directive with a Component
Summary
Next
27 Events and Change Detection
Using Browser Events
Emitting Custom Events
Emitting a Custom Event to the Parent Component Hierarchy
Handling Custom Events with a Listener
Implementing Custom Events in Nested Components
Deleting Data in a Parent Component from a Child Component
Using Observables
Creating an Observable Object
Watching for Data Changes with Observables
Summary
Next
28 Implementing Angular Services in Web Applications
Understanding Angular Services
Using the Built-in Services
Sending HTTP GET and PUT Requests with the http Service
Configuring the HTTP Request
Implementing the HTTP Response Callback Functions
Implementing a Simple JSON File and Using the http Service to Access It
Implementing a Simple Mock Server Using the http Service
Implementing a Simple Mock Server and Using the http Service to Update
Items on the Server
Changing Views with the router Service
Using routes in Angular
Implementing a Simple Router
Implementing a Router with a Navigation Bar
Implementing a Router with Parameters
Summary
Next
29 Creating Your Own Custom Angular Services
Integrating Custom Services into Angular Applications
Adding an Angular Service to an Application
Implementing a Simple Application that Uses a Constant Data Service
Implementing a Data Transform Service
Implementing a Variable Data Service
Implementing a Service that Returns a Promise
Implementing a Shared Service
Summary
Next
30 Having Fun with Angular
Implementing an Angular Application that Uses the Animation Service
Implementing an Angular Application that Zooms in on Images
Implementing an Angular Application that Enables Drag and Drop
Implementing a Star Rating Angular Component
Summary
About the Authors
Brad Dayley is a senior software engineer with more than 20 years of experience
developing enterprise applications and web interfaces. He has used JavaScript and
jQuery for years and is the author of Learning Angular, jQuery and JavaScript
Phrasebook and Sams Teach Yourself AngularJS, JavaScript, and jQuery All in One.
He has designed and implemented a wide array of applications and services, from
application servers to complex web applications.
Brendan Dayley is a web application developer who loves learning and
implementing the latest and greatest technologies. He is the co-author of Learning
Angular and Sams Teach Yourself AngularJS, JavaScript, and jQuery All in One. He
has written a number of web applications using JavaScript, TypeScript, and Angular,
and he is exploring the capabilities of new web and mobile technologies such as
augmented reality and how to use them for innovative solutions.
Caleb Dayley is a university student studying computer science. He tries to learn all
that he can and has taught himself much of what he knows about programming. He
has taught himself several languages, including JavaScript, C#, and, using the first
edition of this book, NodeJS, MongoDB and Angular. He is excited for what the
future holds, and the opportunities to help design and create the next generation of
innovative software that will continue to improve the way we live, work, and play.
Acknowledgments
I’d like to take this page to thank all those who made this title possible. First, I thank
my wonderful wife for the inspiration, love, and support she gives me. I’d never
make it far without you. I also want to thank my boys for the help they are when I
am writing. Thanks to Mark Taber for getting this title rolling in the right direction.
—Brad Dayley
I’d like to thank all those who helped make this book possible for me. First and
foremost, my wife, who pushes me to become greater and gives me all her love. Also
my father, who mentored me not just in writing and programming but in life. My
mother, who has always been there for me when I need her. And finally, Mark
Taber, who gave me the chance to be a part of this.
—Caleb Dayley

Accessing the Free Web Edition
Your purchase of this book in any format includes access to the corresponding Web
Edition, which provides several special online-only features:
The complete text of the book
Updates and corrections as they become available
The Web Edition can be viewed on all types of computers and mobile devices with
any modern web browser that supports HTML5.
To get access to the Web Edition of Node.js, MongoDB and Angular Web
Development all you need to do is register this book:
1. Go to www.informit.com/register
2. Sign in or create a new account.
3. Enter the ISBN: 9780134655536
4. Answer the questions as proof of purchase.
5. The Web Edition will appear under the Digital Purchases tab on your Account
page. Click the Launch link to access the product.

Introduction
Welcome to Node.js, MongoDB and Angular Web Development. This book is
designed to catapult you into the world of using JavaScript—from the server and
services to the browser client—in your web development projects. The book covers
the implementation and integration of Node.js, MongoDB, and Angular—some of
the most exciting and innovative technologies emerging in the world of web
development.
This introduction covers
Who should read this book
Why you should read this book
What you will be able to achieve using this book
What Node.js, MongoDB, and Angular are and why they are great technologies
How this book is organized
Where to find the code examples
Let’s get started.
Who Should Read This Book
This book is aimed at readers who already have an understanding of the basics of
HTML and have done some programming in a modern programming language.
Having an understanding of JavaScript will make this book easier to digest but is not
required because the book does cover the basics of JavaScript.
Why You Should Read This Book

This book will teach you how to create powerful, interactive websites and web
applications—from the webserver and services on the server to the browser-based
interactive web applications. The technologies covered here are all open source, and
you will be able to use JavaScript for both the server-side and browser-side
components.
Typical readers of this book want to master Node.js and MongoDB for the purpose
of building highly scalable and high-performing websites. Typical readers also want
to leverage the MVC/MVVM (Model-View-Controller/Model-View-View-Model)
approach of Angular to implement well-designed and structured webpages and web
applications. Overall, Node.js, MongoDB, and Angular provide an easy-to-
implement, fully integrated web development stack that allows you to implement
amazing web applications.
What You Will Learn from This Book
Reading this book will enable you to build real-world, dynamic websites and web
applications. Websites no longer consist of simple static content in HTML pages
with integrated images and formatted text. Instead, websites have become much
more dynamic, with a single page often serving as an entire site or application.
Using Angular technology allows you to build into your webpage logic that can
communicate back to the Node.js server and obtain necessary data from the
MongoDB database. The combination of Node.js, MongoDB, and Angular allows
you to implement interactive, dynamic webpages. The following are just a few of the
things that you will learn while reading this book:
How to implement a highly scalable and dynamic webserver, using Node.js and
Express
How to build server-side web services in JavaScript
How to implement a MongoDB data store for you web applications
How to access and interact with MongoDB from Node.js JavaScript code
How to define static and dynamic web routes and implement server-side scripts
to support them
How to define your own custom Angular components that extend the HTML
language
How to implement client-side services that can interact with the Node.js

webserver
How to build dynamic browser views that provide rich user interaction
How to add nested components to your webpages
How to implement Angular routing to manage navigation between client
application views
What Is Node.js?
Node.js, sometimes referred to as just Node, is a development framework that is
based on Google’s V8 JavaScript engine. You write Node.js code in JavaScript, and
then V8 compiles it into machine code to be executed. You can write most—or
maybe even all—of your server-side code in Node.js, including the webserver and
the server-side scripts and any supporting web application functionality. The fact that
the webserver and the supporting web application scripts are running together in the
same server-side application allows for much tighter integration between the
webserver and the scripts.
The following are just a few reasons Node.js is a great framework:
JavaScript end-to-end: One of the biggest advantages of Node.js is that it
allows you to write both server- and client-side scripts in JavaScript. There have
always been difficulties in deciding whether to put logic in client-side scripts or
server-side scripts. With Node.js you can take JavaScript written on the client
and easily adapt it for the server, and vice versa. An added plus is that client
developers and server developers are speaking the same language.
Event-driven scalability: Node.js applies a unique logic to handling web
requests. Rather than having multiple threads waiting to process web requests,
with Node.js they are processed on the same thread, using a basic event model.
This allows Node.js webservers to scale in ways that traditional webservers
can’t.
Extensibility: Node.js has a great following and an active development
community. People are providing new modules to extend Node.js functionality
all the time. Also, it is simple to install and include new modules in Node.js;
you can extend a Node.js project to include new functionality in minutes.
Fast implementation: Setting up Node.js and developing in it are super easy.
In only a few minutes you can install Node.js and have a working webserver.

What Is MongoDB?
MongoDB is an agile and scalable NoSQL database. The name Mongo comes from
the word “humongous,” emphasizing the scalability and performance MongoDB
provides. MongoDB provides great website backend storage for high-traffic websites
that need to store data such as user comments, blogs, or other items because it is
quickly scalable and easy to implement.
The following are some of the reasons that MongoDB really fits well in the Node.js
stack:
Document orientation: Because MongoDB is document-oriented, data is
stored in the database in a format that is very close to what you deal with in
both server-side and client-side scripts. This eliminates the need to transfer data
from rows to objects and back.
High performance: MongoDB is one of the highest-performing databases
available. Especially today, with more and more people interacting with
websites, it is important to have a backend that can support heavy traffic.
High availability: MongoDB’s replication model makes it easy to maintain
scalability while keeping high performance.
High scalability: MongoDB’s structure makes it easy to scale horizontally by
sharing the data across multiple servers.
No SQL injection: MongoDB is not susceptible to SQL injection (that is,
putting SQL statements in web forms or other input from the browser and
thereby compromising database security). This is the case because objects are
stored as objects, not using SQL strings.
What Is Angular?
Angular is a client-side JavaScript framework developed by Google. The theory
behind Angular is to provide a framework that makes it easy to implement well-
designed and structured webpages and applications, using an MVC/MVVM
framework.
Angular provides functionality to handle user input in the browser, manipulate data
on the client side, and control how elements are displayed in the browser view. Here
are some of the benefits Angular provides:

Data binding: Angular has a clean method for binding data to HTML elements,
using its powerful scope mechanism.
Extensibility: The Angular architecture allows you to easily extend almost
every aspect of the language to provide your own custom implementations.
Clean: Angular forces you to write clean, logical code.
Reusable code: The combination of extensibility and clean code makes it easy
to write reusable code in Angular. In fact, the language often forces you to do
so when creating custom services.
Support: Google is investing a lot into this project, which gives it an advantage
over similar initiatives that have failed.
Compatibility: Angular is based on JavaScript and has a close relationship with
the JavaScript standard. This makes it easier to begin integrating Angular into
your environment and reuse pieces of your existing code within the structure of
the Angular framework.
How This Book Is Organized
This book is divided into six main parts:
Part I, “Getting Started,” provides an overview of the interaction between
Node.js, MongoDB, and Angular and how these three products form a complete
web development stack. Chapter 2 is a JavaScript primer that provides the
basics of the JavaScript language that you need when implementing Node.js and
Angular code.
Part II, “Learning Node.js,” covers the Node.js language platform, from
installation to implementation of Node.js modules. This part gives you the basic
framework you need to implement your own custom Node.js modules as well as
the webserver and server-side scripts.
Part III, “Learning MongoDB,” covers the MongoDB database, from
installation to integration with Node.js applications. This part discusses how to
plan your data model to fit your application needs and how to access and
interact with MongoDB from your Node.js applications.
Part IV, “Using Express to Make Life Easier,” discusses the Express module for
Node.js and how to leverage it as the webserver for your application. You learn
how to set up dynamic and static routes to data as well as how to implement
security, caching, and other webserver basics.

Part V, “Learning Angular,” covers the Angular framework architecture and
how to integrate it into your Node.js stack. This part covers creating custom
HTML components and client-side services that can be leveraged in the
browser.
Part VI, “Advanced Angular,” covers more advanced Angular development,
such as building custom directives and custom services. You also learn about
using Angular’s built-in HTTP and routing services. This section finishes with
some additional rich UI examples, such as building drag-and-drop components
and implementing animations.
Getting the Code Examples
Throughout this book, you will find code examples in listings. The title for each
listing includes a filename for the source code. The source code is available for
download at the book’s website.
A Final Word
We hope you enjoy learning about Node.js, MongoDB, and Angular as much as we
have. They are great, innovative technologies that are fun to use. Soon, you’ll be able
to join the many other web developers who use the Node.js-to-Angular web stack to
build interactive websites and web applications. Enjoy the book!
Part I: Getting Started
1
Introducing the Node.js-to-Angular
Stack
To get you off on the right foot, this chapter focuses on the fundamental components
of the web development framework and then describes the components of the
Node.js-to-Angular stack that will be the basis for the rest of the book. The first
section discusses various aspects of the general website/web application
development framework from users to backend services. The purpose of first
covering the web development framework components is to get you in the mindset to
more easily understand how the components of the Node.js-to-Angular stack relate
to the pieces of the general framework. This should help you better see the benefits
of using the Node.js-to-Angular stack components over the more traditional
technologies.
Understanding the Basic Web Development
Framework
To get you in the right mindset to understand the benefits of utilizing Node.js,
MongoDB, and Angular as your web framework, this section provides an overview
of the basic components of most websites. If you are familiar with the full web
framework, this section will be old hat, but if you understand only the server side or
client side of the web framework, this section gives you a more complete picture.
The main components of any given web framework are the user, browser, webserver,
and backend services. Although websites vary greatly on appearance and behavior,
all have these basic components in one form or another.
This section is not intended to be in-depth, comprehensive, or technically exact, but
rather a high level perspective of the parts involved in a functional website. The
components are described in a top-down manner from user down to backend
services. Then in the next section we discuss the Node.js-to-Angular stack from the
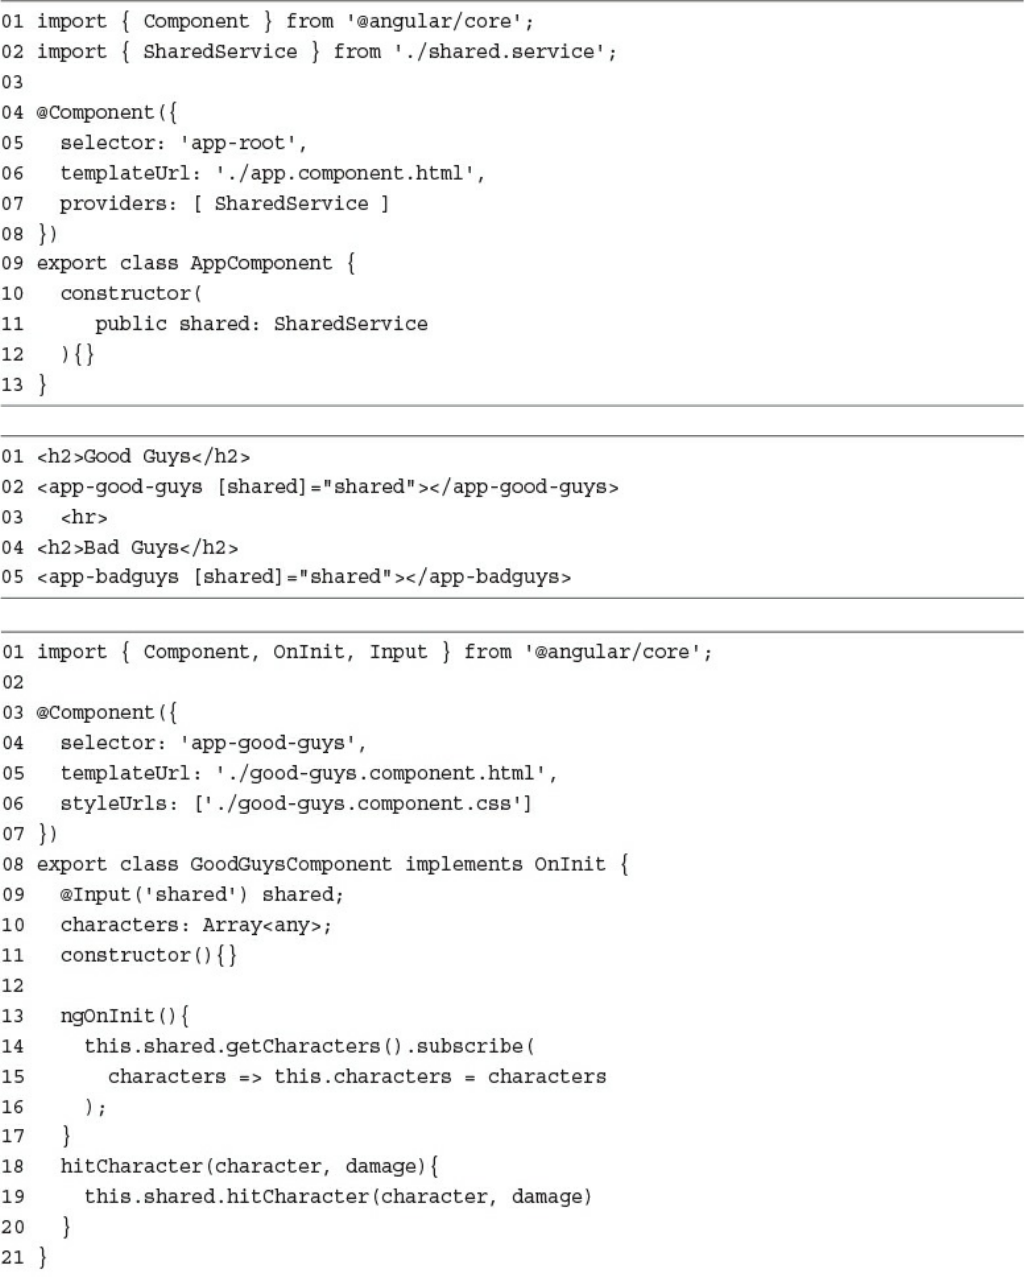
bottom up, and you can get a picture of where each piece fits and why. Figure 1.1
provides a basic diagram to make it easier to visualize the components in a
website/web application.
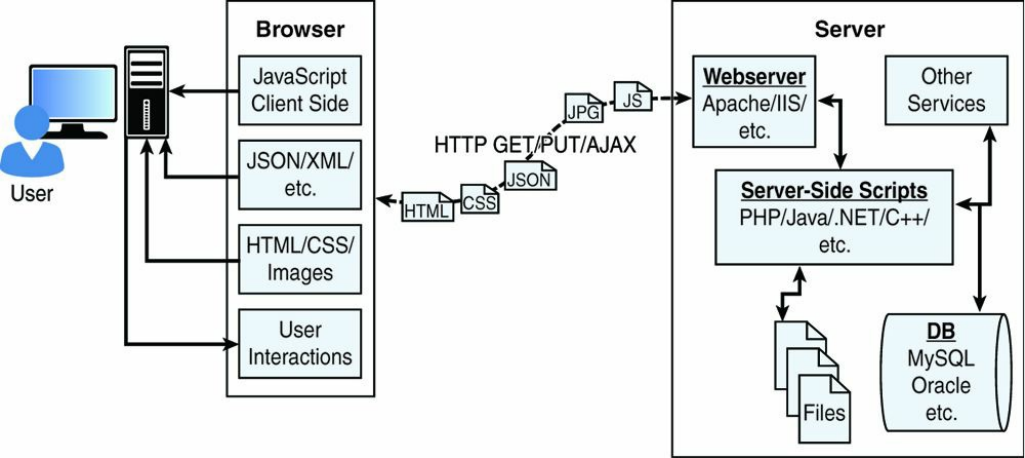
Figure 1.1 Diagram showing the components of a basic website/web application
User
Users are a fundamental part of all websites; they are, after all, the reason websites
exist in the first place. User expectations define the requirements for developing a
good website, and these expectations have changed a lot over the years. Users used
to accept the slow, cumbersome experience of the “world-wide-wait,” but no longer.
They expect websites to behave closer to applications installed on their computers
and mobile devices.
The user role in a web framework is to sit on the visual output and interaction input
of webpages. That is, users view the results of the web framework processing and
then provide interactions using mouse clicks, keyboard input, and swipes and taps on
mobile devices.
Browser
The browser plays three roles in the web framework. First, it provides
communication to and from the webserver. Second, it interprets the data from the
server and renders it into the view that the user actually sees. Finally, the browser
handles user interaction through the keyboard, mouse, touchscreen, or other input
device and takes the appropriate action.

Browser to Webserver Communication
Browser-to-webserver communication consists of a series of requests using the
HTTP and HTTPS protocols. Hypertext Transfer Protocol (HTTP) defines
communication between the browser and the webserver. HTTP defines what types of
requests can be made as well as the format of those requests and the HTTP response.
HTTPS adds an additional security layer, SSL/TLS, to ensure secure connections by
requiring the webserver to provide a certificate to the browser. The user then can
determine whether to accept the certificate before allowing the connection.
The browser makes three main types of requests to the server:
GET: The GET request is typically used to retrieve data from the server, such
as .html files, images, or JSON data.
POST: POST requests are used when sending data to the server, such as adding
an item to a shopping cart or submitting a web form.
AJAX: Asynchronous JavaScript and XML (AJAX) is actually just a GET or
POST request done directly by JavaScript running in the browser. Despite the
name, an AJAX request can receive XML, JSON, or raw data in the response.
Rendering the Browser View
The screen that the user actually views and interacts with is often made up of several
different pieces of data retrieved from the webserver. The browser reads data from
the initial URL and then renders the HTML document to build a Document Object
Model (DOM). The DOM is a tree structure object with the HTML document as the
root. The structure of the tree basically matches the structure of the HTML
document. For example, the document will have html as a child, and html will
have head and body as children, and body may have div, p, or other elements as
children, like this:
document
+ html
+ head
+ body
+ div
+ p
The browser interprets each DOM element and renders it to the user’s screen to build

the webpage view.
The browser often ends up getting various types of data from multiple webserver
requests to build the webpage. The following are the most common types of data the
browser uses to render the final user view as well as define the webpage behavior.
HTML files: These provide the fundamental structure of the DOM.
CSS files: These define how each of the elements on the page is to be styled;
for example, font, color, borders, and spacing.
Client-side scripts: These are typically JavaScript files. They can provide
added functionality to the webpage, manipulate the DOM to change the look of
the webpage, and provide any necessary logic required to display the page and
provide functionality.
Media files: Image, video, and sound files are rendered as part of the webpage.
Data: Any data, such as XML, JSON, or raw text, can be provided by the
webserver as a response to an AJAX request. Rather than sending a request
back to the server to rebuild the webpage, new data can be retrieved via AJAX
and inserted into the webpage via JavaScript.
HTTP headers: The HTTP protocol defines a set of headers that can be used
by the browser and client-side scripts to define the behavior of the webpage. For
example, cookies are contained in the HTTP headers. The HTTP headers also
define the type of data in the request as well as the type of data expected to be
returned back to the browser.
User Interaction
The user interacts with the browser via input devices such as mice, keyboards, and
touchscreens. The browser has an elaborate event system that captures these user
input events and then takes the appropriate action. Actions vary from displaying a
popup menu to loading a new document from the server to executing client-side
JavaScript.
Webserver
The webserver’s main focus is handling requests from browsers. As described
earlier, the browser may request a document, post data, or perform an AJAX request
to get a data. The webserver uses the HTTP headers as well as the URL to determine
what action to take. This is where things get different depending on the webserver,
configuration, and technologies used.
Most out-of-the-box webservers, such as Apache and IIS, are made to serve static
files such as .html, .css, and media files. To handle POST requests that modify server
data and AJAX requests to interact with backend services, webservers need to be
extended with server-side scripts.
A server-side program is really anything that can be executed by the webserver to
perform the task the browser is requesting. These can be written in PHP, Python, C,
C++, C#, Java, … the list goes on and on. Webservers such as Apache and IIS
provide mechanisms to include server-side scripts and then wire them up to specific
URL locations requested by the browser.
This is where having a solid webserver framework can make a big difference. It
often takes quite a bit of configuration to enable various scripting languages and wire
up the server-side scripts so that the webserver can route the appropriate request to
the appropriate script.
The server-side scripts either generate the response directly by executing their code
or connect with other backend servers such as databases to obtain the necessary
information and then use that information to build and send the appropriate response.
Backend Services
Backend services are services that run behind the webserver and provide data used to
build responses to the browser. The most common type of backend service is a
database that stores information. When a request comes in from the browser that
requires information from the database or other backend service, the server-side
script connects to the database, retrieves the information, formats it, and then sends it
back to the browser. Conversely, when data comes in from a web request that needs
to be stored in the database, the server-side script connects to the database and
updates the data.
Understanding the Node.js-to-Angular Stack
Components
Now that you have the basic structure of the web framework fresh in your mind, it is
time to discuss the Node.js-to-Angular stack. The most common—and we believe
the best—version of this stack is the Node.js-to-Angular stack comprised of
MongoDB, Express, Angular, and Node.js.
In the Node.js-to-Angular stack, Node.js provides the fundamental platform for
development. The backend services and server-side scripts are all written in Node.js.
MongoDB provides the data store for the website but is accessed via a MongoDB
driver Node.js module. The webserver is defined by Express, which is also a Node.js
module.
The view in the browser is defined and controlled using the Angular framework.
Angular is an MVC framework where the model is made up of JSON or JavaScript
objects, the view is HTML/CSS, and the controller is made up of Angular
JavaScript.
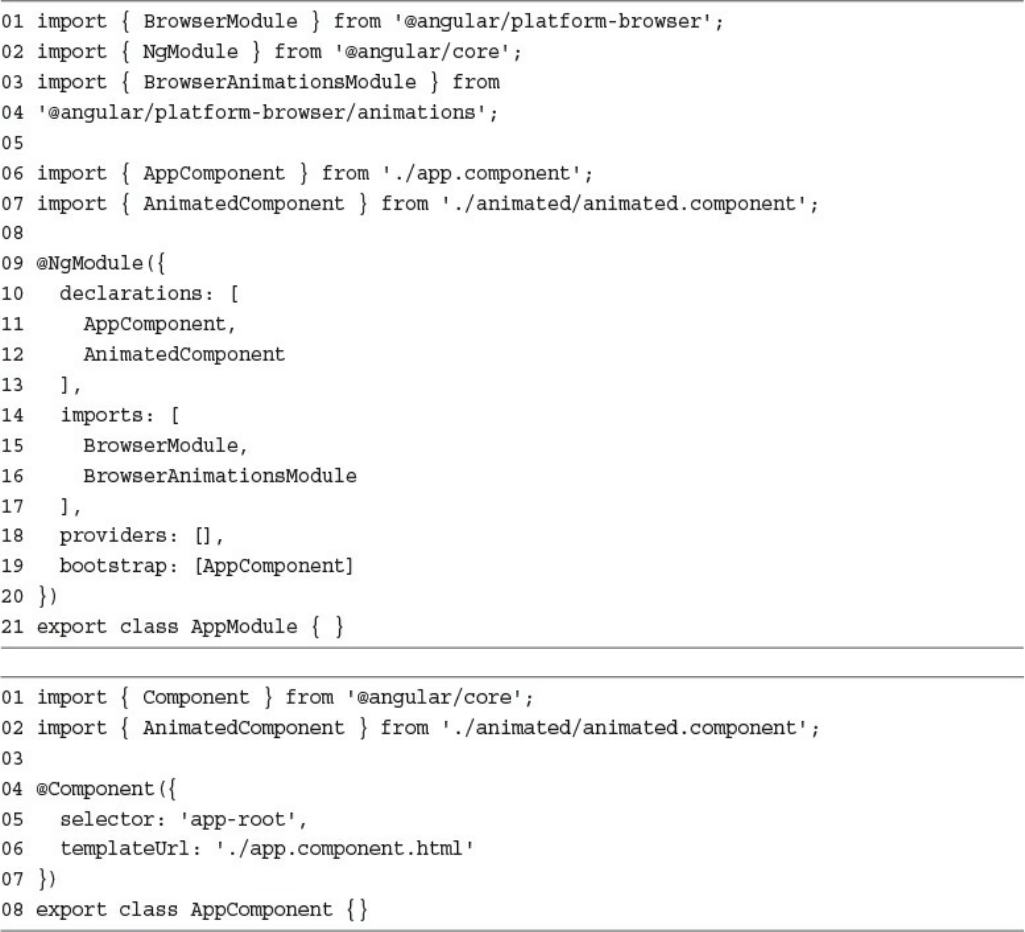
Figure 1.2 provides a basic diagram of how the Node.js-to-Angular stack fits into the
basic website/web application model. The following sections describe each of these
technologies and why they were chosen as part of the Node.js-to-Angular stack.
Later chapters in the book cover each of the technologies in much more detail.

Figure 1.2 Basic diagram showing where Node.js, Express, MongoDB, and Angular
fit in the web paradigm
Node.js
Node.js is a development framework based on Google’s V8 JavaScript engine.
Therefore, Node.js code is written in JavaScript and then compiled into machine
code by V8 to be executed.
Many of your backend services can be written in Node.js, as can the server-side
scripts and any supporting web application functionality. The nice thing about
Node.js is that it is all just JavaScript, so you can easily take functionality from a
client-side script and place it in a server-side script. Also, the webserver can run
directly within the Node.js platform as a Node.js module, so it makes it much easier
than, say, Apache at wiring up new services or server-side scripts.
The following are just a few reasons why Node.js is a great framework to start from:
JavaScript end-to-end: One of the biggest advantages to Node.js is that it
allows you to write both server- and client-side scripts in JavaScript. There have
always been difficulties in deciding where to put scripting logic. Too much on
the client side makes the client cumbersome and unwieldy, but too much on the
server side slows down web applications and puts a heavy burden on the

webserver. With Node.js you can take JavaScript written on the client and
easily adapt it for the server and vice versa. Also, your client developers and
server developers will be speaking the same language.
Event-driven scalability: Node.js applies a different logic to handling web
requests. Rather than having multiple threads waiting to process web requests,
they are processed on the same thread using a basic event model. This allows
Node.js webservers to scale in ways that traditional webservers never can. This
is discussed in more detail in later chapters.
Extensibility: Node.js has a great following and an active development
community. New modules to extend Node.js functionality are being developed
all the time. Also it is simple to install and include new modules in Node.js,
making it easy to extend a Node.js project to include new functionality in
minutes.
Time: Let’s face it, time is valuable. Node.js is super easy to set up and develop
in. In only a few minutes, you can install Node.js and have a working
webserver.
MongoDB
MongoDB is an agile and scalable NoSQL database. The name Mongo comes from
“humongous.” It is based on the NoSQL document store model, meaning that data is
stored in the database as a form of JSON objects rather than the traditional columns
and rows of a relational database.
MongoDB provides great website backend storage for high traffic websites that need
to store data such as user comments, blogs, or other items because it is fast, scalable,
and easy to implement. This book covers using the MongoDB driver library to
access MongoDB from Node.js.
Node.js supports a variety of DB access drivers, so the data store could just as easily
be MySQL or some other database. However, the following are some of the reasons
that MongoDB really fits in the Node.js stack well:
Document orientation: Because MongoDB is document-oriented, the data is
stored in the database in a format close to what you will be dealing with in both
server-side and client-side scripts. This eliminates the need to transfer data from
rows to objects and back.
High performance: MongoDB is one of the highest performing databases

available. Especially today when more and more people interact with websites,
it is important to have a backend that can support heavy traffic.
High availability: MongoDB’s replication model makes it easy to maintain
scalability while keeping high performance.
High scalability: MongoDB’s structure makes it easy to scale horizontally by
sharing the data across multiple servers.
No SQL injection: MongoDB is not susceptible to SQL injection (putting SQL
statements in web forms or other input from the browser that compromises the
DB security) because objects are stored as objects, not using SQL strings.
Express
The Express module acts as the webserver in the Node.js-to-Angular stack. The fact
that it is running in Node.js makes it easy to configure, implement, and control. The
Express module extends Node.js to provide several key components for handling
web requests. This allows you to implement a running webserver in Node.js with
only a few lines of code.
For example, the Express module provides the ability to easily set up destination
routes (URLs) for users to connect to. It also provides great functionality on working
with the HTTP request and response objects, including things like cookies and HTTP
headers.
The following is a partial list of the valuable features of Express:
Route management: Express makes it easy to define routes (URL endpoints)
that tie directly to Node.js script functionality on the server.
Error handling: Express provides built-in error handling for documents not
found and other errors.
Easy integration: An Express server can easily be implemented behind an
existing reverse proxy system such as Nginx or Varnish. This allows it to be
easily integrated into your existing secured system.
Cookies: Express provides easy cookie management.
Session and cache management: Express also enables session management
and cache management.
Angular

Angular is a client-side framework developed by Google. Angular provides all the
functionality needed to handle user input in the browser, manipulate data on the
client side, and control how elements are displayed in the browser view. It is written
using TypeScript. The entire theory behind Angular is to provide a framework that
makes it easy to implement web applications using the MVC framework.
Other JavaScript frameworks could be used with the Node.js platform, such as
Backbone, Ember, and Meteor. However, Angular has the best design, feature set,
and trajectory at this writing. Here are some of the benefits of Angular:
Data binding: Angular has a clean method to bind data to HTML elements
using its powerful scope mechanism.
Extensibility: The Angular architecture allows you to easily extend almost
every aspect of the language to provide your own custom implementations.
Clean: Angular forces you to write clean, logical code.
Reusable code: The combination of extensibility and clean code makes it easy
to write reusable code in Angular. In fact, the language often forces you to do
so when creating custom services.
Support: Google is investing a lot into this project, which gives it an advantage
over other similar initiatives.
Compatibility: Angular is based on TypeScript, which makes it easier to begin
integrating Angular into your environment and to reuse pieces of your existing
code within the structure of the Angular framework.
Summary
This chapter covered the basics of the web development framework. The chapter
discussed the interaction between the webserver and the browser as well as the
functionality required to make modern websites function.
The chapter also described the Node.js-to-Angular stack, comprising Node.js,
MongoDB, Express, and Angular. Node.js provides the platform for the framework,
MongoDB provides the backend data store, Express provides the webserver, and
Angular provides the client-side framework for modern web applications.
Next
The next chapter provides a primer on the JavaScript language. Since the entire
Node.js-to-Angular stack is based on JavaScript, you need to be familiar with the
language to follow the examples in the rest of the book.
2
JavaScript Primer
Each component that you will be working with in this book—Node.js, Express,
TypeScript, and Angular—is based on the JavaScript language. This makes it easy to
implement and reuse code at all levels of your web development stack.
The purpose of this chapter is to familiarize you with some of the language basics of
JavaScript, such as variables, functions, and objects. It is not intended as a full
language guide, but rather a synopsis of important syntax and idioms. If you are not
familiar with JavaScript, this chapter should give you enough information to help
you understand the examples throughout the rest of the book. If you already know
JavaScript well, you have the option of skipping this chapter or reviewing it as a
refresher.
Defining Variables
The first place to begin within JavaScript is defining variables. Variables are a means
to name data so that you can use that name to temporarily store and access data from
your JavaScript files. Variables can point to simple data types such as numbers or
strings, or they can point to more complex data types such as objects.
To define a variable in JavaScript you use the var keyword and then give the
variable a name, for example:
var myData;
You can also assign a value to the variable in the same line. For example, the
following line of code creates a variable myString and assigns it the value of
"Some Text":

var myString = "Some Text";
The following lines work as well:
var myString;
myString = "Some Text";
Once you have declared the variable, you can use the name to assign the variable a
value and access the value of the variable. For example, the following code stores a
string into the myString variable and then uses it when assigning the value to the
newString variable:
var myString = "Some Text";
var newString = myString + " Some More Text";
Your variable names should describe the data stored in them so that it is easy to use
them later in your program. The only rules for creating variable names is that they
must begin with a letter, $, or _, and they cannot contain spaces. Also remember that
variable names are case sensitive, so using myString is different from
MyString.
Understanding JavaScript Data Types
JavaScript uses data types to determine how to handle data assigned to a variable.
The variable type determines what operations you can perform on the variable, such
as looping or executing. The following list describes the most common types of
variables that you will work with throughout the book:
String: Stores character data as a string. The character data is specified by
either single or double quotes. All the data contained in the quotes will be
assigned to the string variable. For example:
var myString = 'Some Text'; var anotherString = 'Some More
Text';
Number: Stores the data as a numerical value. Numbers are useful in counting,
calculations, and comparisons. Some examples are
var myInteger = 1; var cost = 1.33;
Boolean: Stores a single bit that is either true or false. Booleans are often used
for flags. For example, you might set a variable to false at the beginning of

some code and then check it on completion so see whether the code execution
hit a certain spot. The following examples define a true and a false
variable.
var yes = true; var no = false;
Array: An indexed array is a series of separate distinct data items all stored
under a single variable name. Items in the array can be accessed by their zero-
based index using array[index]. The following example creates a simple
array and then accesses the first element, which is at index 0.
var arr = ["one", "two", "three"] var first = arr[0];
Object literal: JavaScript supports the ability to create and use object literals.
When you use an object literal you can access values and functions in the object
using the object.property syntax. The following example shows how to
create and access properties of an object literal:
Click here to view code image
var obj = {"name": "Brendan", "Hobbies":["Video Games", "camping"], "age",
"Unknown"};
var name = obj.name;
Null: At times you do not have a value to store in a variable either because it
hasn’t been created or you are no longer using it. At this time you can set a
variable to null. Using null is better than assigning the variable a value of 0
or empty string "" because those may be valid values for the variable.
Assigning the variable to null allows you to assign no value and check against
null inside your code.
var newVar = null;
Note
JavaScript is a typeless language. You do not need to specify in the script what
data type the variable is as the interpreter automatically figures out the correct
data type for the variable. Additionally, you can assign a variable of one type to a
value of a different type. For example, the following code defines a string variable
and then assigns it to an integer value type:
var id = "testID"; id = 1;

Using Operators
JavaScript operators allow you to alter the value of a variable. You are already
familiar with the = operator used to assign values to variables. JavaScript provides
several different operators that can be grouped into two types: arithmetic and
assignment.
Arithmetic Operators
Arithmetic operators are used to perform operations between variables and direct
values. Table 2.1 shows a list of the arithmetic operations along with the results that
get applied.
Table 2.1 JavaScript’s arithmetic operators, with results based on y=4 initially
Operator Description Example Resulting x
+Addition x=y+5
x=y+"5"
x="Four"+y+"4"
9
"45"
"Four44"
-Subtraction x=y-2 2
++ Increment x=y++
x=++y
4
5
-- Decrement x=y--
x=--y
4
3
*Multiplication x=y*4 16
/Division x=10/y 2.5
%Modulus (remainder of Division) x=y%3 1
Note
The + operator can also be used to add strings or strings and numbers together.

This allows you to quickly concatenate strings as well as add numerical data to
output strings. Table 2.1 shows that when adding a numerical value and a string
value the numerical value is converted to a string and then the two strings are
concatenated.
Assignment Operators
Assignment operators are used to assign a value to a variable. In addition to the =
operator, several different forms allow you to manipulate the data as you assign the
value. Table 2.2 shows a list of the assignment operations along with the results that
get applied.
Table 2.2 JavaScript’s assignment operators, with results based on x=10
initially
Operator Example Equivalent Arithmetic Operators Resulting x
= x=5 x=5 5
+= x+=5 x=x+5 15
-= x-=5 x=x-5 5
*= x*=5 x=x*5 50
/= x/=5 x=x/5 2
%= x%=5 x=x%5 0
Applying Comparison and Conditional Operators
Using conditionals is a way to apply logic to your applications so that certain code
will be executed only under the correct conditions. This is done by applying
comparison logic to variable values. The following sections describe the
comparisons available in JavaScript and how to apply them in conditional
statements.
Comparison Operators
A comparison operator evaluates two pieces of data and returns true if the
evaluation is correct or false if the evaluation is not correct. Comparison operators
compare the value on the left of the operator against the value on the right.

The simplest way to help you understand JavaScript comparison syntax is to provide
a list with some examples. Table 2.3 shows a list of the comparison operators along
with some examples.
Table 2.3 JavaScript’s comparison operators, with results based on x=10
initially
Operator Description Example Result
== Is equal to (value only) x==8
x==10
false
true
=== Both value and type are equal x===10
x==="10"
true
false
!= Is not equal x!=5 true
!== Both value and type are not equal x!=="10"
x!==10
true
false
>Is greater than x>5 true
>= Is greater than or equal to x>=10 true
<Is less than x<5 false
<= Is less than or equal to x<=10 true
You can chain multiple comparisons together using logical operators and standard
parentheses. Table 2.4 shows a list of the logical operators and how to use them to
chain comparisons together:
Table 2.4 JavaScript’s comparison operators, with results based on x=10 and
y=5 initially
Operator Description Example Result
&& And (x==10 && y==5)
(x==10 && y>x)
true
false
|| Or (x>=10 || y>x) true

(x<10 || y>x) false
!Not !(x==y)
!(x>y)
true
false
Mix (x>=10 && y<x || x==y)
((x<y || x>=10) && y>=5)
(!(x==y) && y>=10)
true
true
false
Using if Statements
An if statement allows you to separate code execution based on the evaluation of a
comparison. In the following lines of code the conditional operators are in (), and
the code to execute if the conditional evaluates to true is in {}:
if(x==5){
do_something();
}
In addition to only executing code within the if statement block, you can specify an
else block that gets executed only if the condition is false. For example:
Click here to view code image
if(x==5){
do_something();
} else {
do_something_else();
}
You can also chain if statements together. To do this add a conditional statement
along with an else statement, for example:
Click here to view code image
if(x<5){
do_something();
} else if(x<10) {
do_something_else();

} else {
do_nothing();
}
Implementing switch Statements
Another type of conditional logic is the switch statement. The switch statement
allows you to evaluate an expression once and then, based on the value, execute one
of many different sections of code.
The syntax for the switch statement is
Click here to view code image
switch(expression){
case value1:
<code to execute>
break
case value2:
<code to execute>
break;
default:
<code to execute if not value1 or value2>
}
So here is what is happening. The switch statement evaluates the expression
entirely and gets a value. The value may be a string, number, Boolean, or even an
object. The switch expression is then compared to each value specified by the
case statement. If the value matches, then the code in the case statement is
executed. If no values match, then the default code is executed.
Note
Typically each case statement includes a break command at the end to signal a
break out of the switch statement. If no break is found, then code execution
continues with the next case statement.
Implementing Looping
Looping is a means to execute the same segment of code multiple times. This is
useful when you need to perform the same tasks on an array or set of objects.
JavaScript provides functionality to perform for and while loops. The followings
sections describe how to implement loops in your JavaScript.
while Loops
The most basic type of looping in JavaScript is the while loop. A while loop tests
an expression and continues to execute the code contained in its {} brackets until the
expression evaluates to false.
For example, the following while loop executes until the value of i is equal to 5:
var i = 1;
while (i<5){
console.log("Iteration " + i + "<br>");
i++;
}
The resulting output to the console is
Iteration 1
Iteration 2
Iteration 3
Iteration 4
do/while Loops
Another type of while loop is the do/while loop. This is useful if you always
want to execute the code in the loop at least once and the expression cannot be tested
until the code has executed at least once.
For example, the following do/while loop executes until the value of day is equal
to Wednesday:
Click here to view code image
var days = ["Monday", "Tuesday", "Wednesday", "Thursday", "Friday"];
var i=0;
do{
var day=days[i++];
console.log("It's " + day + "<br>");
} while (day != "Wednesday");

The resulting output to the console is
It's Monday
It's Tuesday
It's Wednesday
for Loops
The JavaScript for loop allows you to execute code a specific number of times by
using a for statement that combines three statements into a single block of
execution using the following syntax:
for (assignment; condition; update;){
code to be executed;
}
The for statement uses those three statements as follows when executing the loop:
assignment: Executed before the loop begins and not again. This is used to
initialize variables that will be used in the loop as conditionals.
condition: Expression evaluated before each iteration of the loop. If the
expression evaluates to true the loop is executed; otherwise, the for loop
execution ends.
update: Executed each iteration after the code in the loop has executed. This is
typically used to increment a counter that is used in statement 2.
The following example illustrates not only a basic for loop but also the ability to
nest one loop inside another:
Click here to view code image
for (var x=1; x<=3; x++){
for (var y=1; y<=3; y++){
console.log(x + " X " + y + " = " + (x*y) + "<br>");
}
}
The resulting output to the web console is
Click here to view code image
1 X 1 = 1
1 X 2 = 2
1 X 3 = 3
2 X 1 = 2
2 X 2 = 4
2 X 3 = 6
3 X 1 = 3
3 X 2 = 6
3 X 3 = 9
for/in Loops
Another type of for loop is the for/in loop. The for/in loop executes on any
data type that can be iterated on. For the most part, you use the for/in loop on
arrays and objects. The following example illustrates the syntax and behavior of the
for/in loop on a simple array:
Click here to view code image
var days = ["Monday", "Tuesday", "Wednesday", "Thursday", "Friday"];
for (var idx in days){
console.log("It's " + days[idx] + "<br>");
}
Notice that the variable idx is adjusted each iteration through the loop from the
beginning array index to the last. The resulting output is It's Monday It's Tuesday It's
Wednesday It's Thursday It's Friday
Interrupting Loops
When working with loops there are times that you need to interrupt the execution of
code inside the code itself without waiting for the next iteration. There are two
different ways to do this: using the break and continue keywords.
The break keyword stops execution of the for or while loop completely. The
continue keyword, on the other hand, stops execution of the code inside the loop
and continues on with the next iteration. Consider the following examples:
Using a break if the day is Wednesday:
Click here to view code image
var days = ["Monday", "Tuesday", "Wednesday", "Thursday", "Friday"];
for (var idx in days){
if (days[idx] == "Wednesday")
break;
console.log("It's " + days[idx] + "<br>");
}
Once the value is Wednesday, loop execution stops completely:
It's Monday
It's Tuesday
Using a continue if the day is Wednesday:
Click here to view code image
var days = ["Monday", "Tuesday", "Wednesday", "Thursday", "Friday"];
for (var idx in days){
if (days[idx] == "Wednesday")
continue;
console.log("It's " + days[idx] + "<br>");
}
Notice that the write is not executed for Wednesday because of the continue
statement; however, the loop execution did complete:
It's Monday
It's Tuesday
It's Thursday
It's Friday
Creating Functions
One of the most important parts of JavaScript is making code that is reusable by
other code. To do this you organize your code into functions that perform specific
tasks. A function is a series of code statements combined together in a single block
and given a name. The code in the block can then be executed by referencing that
name.
Defining Functions
Functions are defined using the function keyword followed by a name that
describes the use of the function, a list of zero or more arguments in (), and a block
of one or more code statements in {}. For example, the following is a function
definition that writes "Hello World" to the console.
function myFunction(){
console.log("Hello World");
}
To execute the code in myFunction(), all you need to do is add the following line
to the main JavaScript or inside another function.
myFunction();
Passing Variables to Functions
Frequently you need to pass specific values to functions that they will use when
executing their code. Values are passed in comma-delimited form to the function.
The function definition needs a list of variable names in () that match the number
being passed in. For example, the following function accepts two arguments, a name
and city, and uses them to build the output string:
Click here to view code image
function greeting(name, city){
console.log("Hello " + name);
console.log(". How is the weather in " + city);
}
To call the greeting() function, you need to pass in a name value and a city
value. The value can be a direct value or a previously defined variable. To illustrate
this, the following code executes the greeting() function with a name variable
and a direct string for the city:
var name = "Brad";
greeting(name, "Florence");
Returning Values from Functions
Often, functions need to return a value to the calling code. Adding a return
keyword followed by a variable or value returns that value from the function. For
example, the following code calls a function to format a string, assigns the value
returned from the function to a variable, and then writes the value to the console:
Click here to view code image
function formatGreeting(name, city){
var retStr = "";
retStr += "Hello <b>" + name +"<b>,<br>);
retStr += "Welcome to " + city + "!";
return retStr;
}
var greeting = formatGreeting("Brad", "Rome");
console.log(greeting);
You can include more than one return statement in the function. When the
function encounters a return statement, code execution of the function is stopped
immediately. If the return statement contains a value to return, then that value is
returned. The following example shows a function that tests the input and returns
immediately if it is zero.
Click here to view code image
function myFunc(value){
if (value == 0)
return value;
<code_to_execute_if_value_nonzero>
return value;
}
Using Anonymous Functions
So far all the examples you have seen are of named functions. JavaScript also
provides the ability to create anonymous functions. In a functional language like
JavaScript, anonymous functions can be used as parameters to functions, properties
of an object, or to return values from a function. These functions have the advantage
of being defined directly in the parameter sets when calling other functions. Thus,
you do not need a formal definition.
For example, the following code defines a function, doCalc(), that accepts three
parameters. The first two should be numbers, and the third is a function that will be
called and pass the two numbers as arguments:
function doCalc(num1, num2, calcFunction){
return calcFunction(num1, num2);
}
You could define a function and then pass the function name without parameters to
doCalc(), for example:
function addFunc(n1, n2){
return n1 + n2;
}
doCalc(5, 10, addFunc);
However, you also have the option to use an anonymous function directly in the call
to doCalc(), as shown in the following two statements:
Click here to view code image
console.log( doCalc(5, 10, function(n1, n2){ return n1 + n2; }) );
console.log( doCalc(5, 10, function(n1, n2){ return n1 * n2; }) );
As you can see, the advantage of using anonymous functions is that you do not need
a formal definition because it will not be used anywhere else in your code. This
makes JavaScript code more concise and readable.
Understanding Variable Scope
Once you start adding conditions, functions, and loops to your JavaScript
applications, you need to understand variable scoping. Variable scope is simply “the
value of a specific variable name at the current line of code being executed.”
JavaScript allows you to define both a global and a local version of the variable. The
global version is defined in the main JavaScript, and local versions are defined inside
functions. When you define a local version in a function, a new variable is created in
memory. Within that function you reference the local version. Outside that function,
you reference the global version.
To understand variable scoping better, consider the following code:
Click here to view code image
var myVar = 1;
function writeIt(){
var myVar = 2;
console.log("Variable = " + myVar);
writeMore();
}
function writeMore(){
console.log("Variable = " + myVar);
}
writeIt();
The global variable myVar is defined on line 1; then on line 3 a local version is
defined within the writeIt() function. Line 4 writes "Variable = 2" to the
console. Then in line 5, writeMore() is called. Since no local version of myVar
is defined in writeMore(), the value of the global myVar is written in line 8.
Using JavaScript Objects
JavaScript has several built-in objects such as Number, Array, String, Date, and
Math. Each of these built-in objects has member properties and methods. In addition
to the JavaScript objects, Node.js, MongoDB, Express, and Angular add their own
built-in objects as well.
JavaScript provides a nice object-oriented programming structure for you to create
your own custom objects. Using objects rather than just a collection of functions is
key to writing clean, efficient, reusable JavaScript code.
Using Object Syntax
To use objects in JavaScript effectively, you need to have an understanding of their
structure and syntax. An object is really just a container to group multiple values
and, in some instances, functions together. The values of an object are called
properties, and functions are called methods.
To use a JavaScript object, you must first create an instance of the object. Object
instances are created using the new keyword with the object constructor name. For
example, to create a number object, you use the following line of code to create an
instance of the built-in Number object in JavaScript:
var x = new Number ("5");
Object syntax is straightforward: You use the object name, followed by a dot, and
then the property or method name. For example, the following lines of code get and
set the name property of an object named myObj:
var s = myObj.name;
myObj.name = "New Name";
You can also get and set object methods of an object in the same manner. For
example, the following lines of code call the getName() method and then change
the method function on an object named myObj:
var name = myObj.getName();
myObj.getName = function() { return this.name; };
You can also create objects and assign variables and functions directly using {}
syntax. For example, the following code defines a new object and assigns values and
a method function:
Click here to view code image
var obj = {
name: "My Object",
value: 7,
getValue: function() { return this.value; }
};
You can also access members of a JavaScript object using the
object[propertyName] syntax. This is useful when you are using dynamic
property names or if the property name must include characters not supported by
JavaScript. The following examples access the "User Name" and "Other
Name" properties of an object named myObj:
Click here to view code image
var propName = "User Name";
var val1 = myObj[propName];
var val2 = myObj["Other Name"];
Creating Custom-Defined Objects
As you have seen so far, using the built-in JavaScript objects has several advantages.
As you begin to write code that uses more and more data, you will find yourself
wanting to build your own custom objects with specific properties and methods.
JavaScript objects can be defined in a couple different ways. The simplest way is the
on-the-fly method: You create a generic object and then add properties to it as
needed.
For example, to create a user object and assign a first and last name as well as define
a function to return the name, you could use the following code:
Click here to view code image
var user = new Object();
user.first="Brendan";
user.last="Dayley";
user.getName = function() { return this.first + " " + this.last; }
You could also accomplish the same thing through direct assignment using the
following syntax where the object is enclosed in {} and the properties are defined
using property:value syntax:
Click here to view code image
var user = {
first: Brendan,
last: 'Dayley',
getName: function() { return this.first + " " + this.last; }};
These first two options work well for simple objects that you do not need to reuse
later. A better method for reusable objects is to actually enclose the object inside its
own function block. This has the advantage of allowing you to keep all the code
pertaining to the object local to the object itself. For example:
Click here to view code image
function User(first, last){
this.first = first;
this.last = last;
this.getName = function( ) { return this.first + " " + this.last; }};
var user = new User("Brendan", "Dayley");
The end result of these methods is essentially the same: You have an object with
properties that that can be referenced using dot syntax as shown here:
console.log(user.getName());
Using a Prototyping Object Pattern
An even more advanced method of creating objects is using a prototyping pattern.
The prototyping pattern is implemented by defining the functions inside the
prototype attribute of the object instead of the object itself. The advantage of
prototyping is that the functions defined in the prototype are created only once when
the JavaScript is loaded, instead of each time a new object is created.
The following example shows the code necessary to implement the prototyping
pattern. Notice that the object UserP is defined and then the UserP.prototype

is set to include the getFullName() function. You can include as many functions
in the prototype as you want. Each time a new object is created, those functions will
be available.
Click here to view code image
function UserP(first, last){
this.first = first;
this.last = last;
}
UserP.prototype = {
getFullName: function(){
return this.first + " " + this.last;
}
};
Manipulating Strings
The String object is by far the most commonly used object in JavaScript.
JavaScript automatically creates a String object for you any time you define a
variable that has a string data type. For example:
var myStr = "Teach Yourself jQuery & JavaScript in 24 Hours";
When creating a string, several special characters cannot be directly added to the
string. For these characters, JavaScript provides a set of escape codes described in
Table 2.5.
Table 2.5 String object escape codes
Escape Description Example Output String
\' Single quote
mark
"couldn\'t be" couldn't be
\" Double quote
mark
"I \"think\" I
\"am\""
I "think" I
"am"
\\ Backslash "one\\two\\three" one\two\three
\n New line "I am\nI said" I am
I said

\r Carriage return "to be\ror not" to be
or not
\t Tab "one\ttwo\tthree" one two three
\b Backspace "correctoin\b\b\bion" correction
\f Form feed "Title A\fTitle B" Title A then
Title B
To determine the length of the string, you can use the length property of the
String object, for example:
var numOfChars = myStr.length;
The String object has several functions that allow you to access and manipulate
the string in various ways. The methods for string manipulation are described in
Table 2.6.
Table 2.6 Methods to manipulate String objects
Method Description
charAt(index) Returns the character at the specified index.
charCodeAt(index) Returns the unicode value of the character
at the specified index.
concat(str1, str2, ...) Joins two or more strings, and returns a copy
of the joined strings.
fromCharCode() Converts unicode values to actual
characters.
indexOf(subString) Returns the position of the first occurrence of
a specified subString value. Returns -1 if
the substring is not found.
lastIndexOf(subString) Returns the position of the last occurrence of
a specified subString value. Returns -1 if
the substring is not found.
match(regex) Searches the string and returns all matches to
the regular expression.
replace(subString/regex, Searches the string for a match of the

replacementString) subString or regular expression, and
replaces the matched substring with a new
substring.
search(regex) Searches the string based on the regular
expression and returns the position of the first
match.
slice(start, end) Returns a new string that has the portion of
the string between the start and end
positions removed.
split(sep, limit) Splits a string into an array of substrings
based on a separator character or regular
expression. The optional limit argument
defines the maximum number of splits to
make starting from the beginning.
substr(start,length) Extracts the characters from a string,
beginning at a specified start position, and
through the specified length of characters.
substring(from, to) Returns a substring of characters between the
from and to index.
toLowerCase() Converts the string to lowercase.
toUpperCase() Converts a string to uppercase.
valueOf() Returns the primitive string value.
To get you started on using the functionality provided in the String object, the
following sections describe some of the common tasks that can be done using
String object methods.
Combining Strings
Multiple strings can be combined either by using a + operation or by using the
concat() function on the first string. For example, in the following code
sentence1 and sentence2 will be the same:
Click here to view code image
var word1 = "Today ";
var word2 = "is ";
var word3 = "tomorrow\'s";
var word4 = "yesterday.";
var sentence1 = word1 + word2 + word3 + word4;
var sentence2 = word1.concat(word2, word3, word4);
Searching a String for a Substring
To tell whether a string is a substring of another, you can use the indexOf()
method. For example, the following code writes the string to the console only if it
contains the word “think”:
Click here to view code image
var myStr = "I think, therefore I am.";
if (myStr.indexOf("think") != -1){
console.log (myStr);
}
Replacing a Word in a String
Another common String object task is replacing one substring with another. To
replace a word or phrase in a string, use the replace() method. The following
code replaces the text "<username>" with the value of the variable username:
var username = "Brendan";
var output = "<username> please enter your password: ";
output.replace("<username>", username);
Splitting a String into an Array
A common task with strings is to split them into arrays using a separator character.
For example, the following code splits a time string into an array of its basic parts
using the split() method on the ":" separator:
Click here to view code image
var t = "12:10:36";
var tArr = t.split(":");
var hour = t[0];
var minute = t[1];
var second = t[2];
Working with Arrays
The Array object provides a means of storing and handling a set of other objects.
Arrays can store numbers, strings, or other JavaScript objects. There are a few
different methods to create JavaScript arrays. For example, the following statements
create three identical versions of the same array:
Click here to view code image
var arr = ["one", "two", "three"];
var arr2 = new Array();
arr2[0] = "one";
arr2[1] = "two";
arr2[2] = "three";
var arr3 = new Array();
arr3.push("one");
arr3.push("two");
arr3.push("three");
The first method defines arr and sets the contents in a single statement using [].
The second method creates the arr2 object and then adds items to it using direct
index assignment. The third method creates the arr3 object and then uses the best
option for extending arrays, which is to use the push() method to push items onto
the array.
To get the number of elements in the array, you can use the length property of the
Array object, for example:
var numOfItems = arr.length;
Arrays are zero-based indexed, meaning that the first item is at index 0 and so on.
For example, in the following code the value of the variable first will be
Monday, and the value of variable last will be Friday:
Click here to view code image
var week = ["Monday", "Tuesday", "Wednesday", "Thursday", "Friday"];
var first = w [0];
var last = week[week.length-1];
The Array object has several built-in functions that allow you to access and
manipulate the array in various ways. Table 2.7 describes the methods attached to
the Array object that allows you to manipulate the array contents.

Table 2.7 Methods to manipulate Array objects
Method Description
concat(arr1, arr2,
...)
Returns a joined copy of the arrays that are passed as
arguments.
indexOf(value) Returns the first index of the value in the array or -1
if the item is not found.
join(separator) Joins all elements of an array separated by the
separator into a single string. If no separator is
specified, then a comma is used.
lastIndexOf(value) Returns the last index of the value in the array or -1
if the value is not found.
pop() Removes the last element from the array and returns
that element.
push(item1, item2,
...)
Adds one or more new elements to the end of an array
and returns the new length.
reverse() Reverses the order of all elements in the array.
shift() Removes the first element of an array and returns that
element.
slice(start, end) Returns the elements between the start and end
indexes.
sort(sortFunction) Sorts the elements of the array. The sortFunction
is optional.
splice(index,
count, item1,
item2...)
At the index specified, count number items are
removed, and then any optional items passed in as
arguments are inserted at index.
toString() Returns the string form of the array.
unshift() Adds new elements to the beginning of an array and
returns the new length.
valueOf() Returns the primitive value of an array object.
To get you started using the functionality provided in the Array object, the
following sections describe some of the common tasks that can be done using
Array object methods.

Combining Arrays
You can combine arrays the same way that you combine String objects, using +
statements or using the concat() method. In the following code, arr3 ends up
being the same as arr4:
Click here to view code image
var arr1 = [1,2,3];
var arr2 = ["three", "four", "five"]
var arr3 = arr1 + arr2;
var arr4 = arr1.concat(arr2);
Note
You can combine an array of numbers and an array of strings. Each item in the
array keeps its own object type. However, as you use the items in the array you
need to keep track of arrays that have more than one data type so that you do not
run into problems.
Iterating Through Arrays
You can iterate through an array using a for or a for/in loop. The following code
illustrates iterating through each item in the array using each method:
Click here to view code image
var week = ["Monday", "Tuesday", "Wednesday", "Thursday", "Friday"];
for (var i=0; i<week.length; i++){
console.log("<li>" + week[i] + "</li>");
}
for (dayIndex in week){
console.log("<li>" + week[dayIndex] + "</li>");
}
Converting an Array into a String
A useful feature of Array objects is the ability to combine the elements of a string
together to make a String object separated by a specific separator using the
join() method. For example, the following code results in the time components
being joined back together into the format 12:10:36:

var timeArr = [12,10,36];
var timeStr = timeArray.join(":");
Checking Whether an Array Contains an Item
Often you need to check to see whether an array contains a certain item. This can be
done by using the indexOf() method. If the item is not found in the list, a -1 is
returned. The following function writes a message to the console if an item is in the
week array:
Click here to view code image
function message(day){
var week = ["Monday", "Tuesday", "Wednesday", "Thursday", "Friday"];
if (week.indexOf(day) == -1){
console.log("Happy " + day);
}
}
Adding and Removing Items to Arrays
There are several methods to add and remove items from Array objects using the
various built-in methods. Table 2.8 shows you the various methods used in this
book.
Table 2.8 Array object methods used to add and remove elements from arrays
Statement Value of x Value of arr
var arr = [1,2,3,4,5]; undefined 1,2,3,4,5
var x = 0; 0 1,2,3,4,5
x = arr.unshift("zero"); 6 (length) zero,1,2,3,4,5
x = arr.push(6,7,8); 9 (length) zero,1,2,3,4,5,6,7,8
x = arr.shift(); zero 1,2,3,4,5,6,7,8
x = arr.pop(); 8 1,2,3,4,5,6,7
x=arr.splice(3,3,"four",
"five","six");
4,5,6 1,2,3,four,five,six,7
x = arr.splice(3,1); four 1,2,3,five,six,7
x = arr.splice(3); five,six,7 1,2,3
Adding Error Handling
An important part of JavaScript coding is adding error handling for instances where
there may be problems. By default, if a code exception occurs because of a problem
in your JavaScript, the script fails and does not finish loading. This is not usually the
desired behavior; in fact, it is often catastrophic. To prevent these types of problems,
wrap your code in a try/catch block.
try/catch Blocks
To prevent your code from totally bombing out, use try/catch blocks that can
handle problems inside your code. If JavaScript encounters an error when executing
code in a try block, it jumps down and executes the catch portion instead of
stopping the entire script. If no error occurs, then all of the try block is executed
and none of the catch block.
For example, the following try/catch block tries to assign variable x to a value of
an undefined variable named badVarNam.
Click here to view code image
try{
var x = badVarName;
} catch (err){
console.log(err.name + ': "' + err.message + '" occurred when assigning x.');
}
Notice that the catch statement accepts an err parameter, which is an error object.
The error object provides the message property that provides a description of the
error. The error object also provides a name property, which is the name of the error
type that was thrown.
The preceding code results in an exception and writes the following message:
ReferenceError: "badVarName is not defined occurred when assigning x."
Throw Your Own Errors
You can also throw your own errors using a throw statement. The following code
illustrates how to add throw statements to a function to throw an error even if a
script error does not occur. The function sqrRoot() accepts a single argument x.
It then tests x to verify that it is a positive number and returns a string with the
square root of x. If x is not a positive number, then the appropriate error is thrown
and the catch block returns the error:
Click here to view code image
function sqrRoot(x) {
try {
if(x=="") throw {message:"Can't Square Root Nothing"};
if(isNaN(x)) throw {message:"Can't Square Root Strings"};
if(x<0) throw {message:"Sorry No Imagination"};
return "sqrt("+x+") = " + Math.sqrt(x);
} catch(err){
return err.message;
}
}
function writeIt(){
console.log(sqrRoot("four"));
console.log(sqrRoot(""));
console.log(sqrRoot("4"));
console.log(sqrRoot("-4"));
}
writeIt();
The following is the console output showing the different errors that are thrown
based on input to the sqrRoot() function:
Can't Square Root Strings
Can't Square Root Nothing
sqrt(4) = 2
Sorry No Imagination
Using finally
Another valuable tool in exception handling is the finally keyword. A finally
keyword can be added to the end of a try/catch block. After the try/catch
blocks are executed, the finally keyword is always executed. It doesn’t matter if
an error occurs and is caught or if the try block is fully executed.
The following is an example of using a finally block inside a webpage:
Click here to view code image
function testTryCatch(value){
try {
if (value < 0){
throw "too small";
} else if (value > 10){
throw "too big";
}
your_code_here
catch (err) {
console.log("The number was " + err.message);
} finally {
console.log("This is always written.");
}
}
Summary
Understanding JavaScript is critical to working in the Node.js, MongoDB, Express,
and Angular environments. This chapter discussed enough of the basic JavaScript
language syntax for you to grasp the concepts in the rest of the book. The chapter
discussed creating objects and functions, as well as working with strings and arrays.
You also learned how to apply error handling to your scripts, which is critical in the
Node.js environment.
Next
In the next chapter, you jump right into the basics of setting up a Node.js project.
You also learn a few of the language idioms and a see simple practical example.
Part II: Learning Node.js
3
Getting Started with Node.js
This chapter introduces you to the Node.js environment. Node.js is a
website/application framework designed with high scalability in mind. It was
designed to take advantage of the existing JavaScript technology in the browser and
flow those same concepts all the way down through the webserver into the backend
services. Node.js is a great technology that is easy to implement and yet extremely
scalable.
Node.js is a modular platform, meaning that much of the functionality is provided by
external modules rather than being built in to the platform. The Node.js culture is
active in creating and publishing modules for almost every imaginable need.
Therefore, much of this chapter focuses on understanding and using the Node.js tools
to build, publish, and use your own Node.js modules in applications.
Understanding Node.js
Node.js was developed in 2009 by Ryan Dahl as an answer to the frustration caused
by concurrency issues, especially when dealing with web services. Google had just
come out with the V8 JavaScript engine for the Chrome web browser, which was
highly optimized for web traffic. Dahl created Node.js on top of V8 as a server-side
environment that matched the client-side environment in the browser.
The result is an extremely scalable server-side environment that allows developers to
more easily bridge the gap between client and server. The fact that Node.js is written
in JavaScript allows developers to easily navigate back and forth between client and
server code and even reuse code between the two environments.
Node.js has a great ecosystem with new extensions being written all the time. The

Node.js environment is clean and easy to install, configure, and deploy. Literally in
only an hour or two you can have a Node.js webserver up and running.
Who Uses Node.js?
Node.js quickly gained popularity among a wide variety of companies. These
companies use Node.js first and foremost for scalability but also for ease of
maintenance and faster development. The following are just a few of the companies
using the Node.js technology:
Yahoo!
LinkedIn
eBay
New York Times
Dow Jones
Microsoft
What Is Node.js Used For?
Node.js can be used for a wide variety of purposes. Because it is based on V8 and
has highly optimized code to handle HTTP traffic, the most common use is as a
webserver. However, Node.js can also be used for a variety of other web services
such as:
Web services APIs such as REST
Real-time multiplayer games
Backend web services such as cross-domain, server-side requests
Web-based applications
Multiclient communication such as IM
What Does Node.js Come With?
Node.js comes with many built-in modules available right out of the box. This book
covers many but not all of these modules:

Assertion testing: Allows you to test functionality within your code.
Buffer: Enables interaction with TCP streams and file system operations. (See
Chapter 5, “Handling Data I/O in Node.js.”)
C/C++ add-ons: Allows for C or C++ code to be used just like any other
Node.js module.
Child processes: Allows you to create child processes. (See Chapter 9,
“Scaling Applications Using Multiple Processors in Node.js.”)
Cluster: Enables the use of multicore systems. (See Chapter 9.)
Command line options: Gives you Node.js commands to use from a terminal.
Console: Gives the user a debugging console.
Crypto: Allows for the creation of custom encryption. (See Chapter 10, “Using
Additional Node.js Modules.”)
Debugger: Allows debugging of a Node.js file.
DNS: Allows connections to DNS servers. (See Chapter 10.)
Errors: Allows for the handling of errors.
Events: Enables the handling of asynchronous events. (See Chapter 4, “Using
Events, Listeners, Timers, and Callbacks in Node.js.”)
File system: Allows for file I/O with both synchronous and asynchronous
methods. (See Chapter 6, “Accessing the File System from Node.js.”)
Globals: Makes frequently used modules available without having to include
them first. (See Chapter 10.)
HTTP: Enables support for many HTTP features. (See Chapter 7,
“Implementing HTTP Services in Node.js.”)
HTTPS: Enables HTTP over the TLS/SSL. (See Chapter 7.)
Modules: Provides the module loading system for Node.js. (See Chapter 3.)
Net: Allows the creation of servers and clients. (See Chapter 8, “Implementing
Socket Services in Node.js.”)
OS: Allows access to the operating system that Node.js is running on. (See
Chapter 10.)
Path: Enables access to file and directory paths. (See Chapter 6.)
Process: Provides information and allows control over the current Node.js
process. (See Chapter 9.)
Query strings: Allows for parsing and formatting URL queries. (See Chapter
7.)

Readline: Enables an interface to read from a data stream. (See Chapter 5.)
REPL: Allows developers to create a command shell.
Stream: Provides an API to build objects with the stream interface. (See
Chapter 5.)
String decoder: Provides an API to decode buffer objects into strings. (See
Chapter 5.)
Timers: Allows for scheduling functions to be called in the future. (See Chapter
4.)
TLS/SSL: Implements TLS and SSL protocols. (See Chapter 8.)
URL: Enables URL resolution and parsing. (See Chapter 7.)
Utilities: Provides support for various apps and modules.
V8: Exposes APIs for the Node.js version of V8. (See Chapter 10.)
VM: Allows for a V8 virtual machine to run and compile code.
ZLIB: Enables compression using Gzip and Deflate/Inflate. (See Chapter 5.)
Installing Node.js
To easily install Node.js, download an installer from the Node.js website at
http://nodejs.org. The Node.js installer installs the necessary files on your PC to get
Node.js up and running. No additional configuration is necessary to start creating
Node.js applications.
Looking at the Node.js Install Location
If you look at the install location, you will see a couple of executable files and a
node_modules folder. The node executable file starts the Node.js JavaScript
VM. The following list describes the executables in the Node.js install location that
you need to get started:
node: This file starts a Node.js JavaScript VM. If you pass in a JavaScript file
location, Node.js executes that script. If no target JavaScript file is specified,
then a script prompt is shown that allows you to execute JavaScript code
directly from the console.
npm: This command is used to manage the Node.js packages discussed in the

next section.
node_modules: This folder contains the installed Node.js packages. These
packages act as libraries that extend the capabilities of Node.js.
Verify Node.js Executables
Take a minute and verify that Node.js is installed and working before moving on. To
do so, open a console prompt and execute the following command to bring up a
Node.js VM:
node
Next, at the Node.js prompt execute the following to write "Hello World" to the
screen.
>console.log("Hello World");
You should see "Hello World" output to the console screen. Now exit the
console using Ctrl+C in Windows or Cmd+C on a Mac.
Next, verify that the npm command is working by executing the following command
in the OS console prompt:
npm version
You should see output similar to the following:
Click here to view code image
{ npm: '3.10.5',
ares: '1.10.1-DEV',
http_parser: '2.7.0',
icu: '57.1',
modules: '48',
node: '6.5.0',
openssl: '1.0.2h',
uv: '1.9.1',
v8: '5.1.281.81',
zlib: '1.2.8'}
Selecting a Node.js IDE
If you are planning on using an Integrated Development Environment (IDE) for your
Node.js projects, you should take a minute and configure that now as well. Most
developers are particular about the IDE that they like to use, and there will likely be
a way to configure at least for JavaScript if not Node.js directly. For example,
Eclipse has some great Node.js plugins, and the WebStorm IDE by IntelliJ has some
good features for Node.js built in. If you are unsure of where to start, we use Visual
Studio Code for the built-in TypeScript functionality required later in this book.
That said, you can use any editor you want to generate your Node.js web
applications. In reality, all you need is a decent text editor. Almost all the code you
will generate will be .js, .json, .html, and .css. So pick the editor in which you feel
the most comfortable writing those types of files.
Working with Node Packages
One of the most powerful features of the Node.js framework is the ability to easily
extend it with additional Node Packaged Modules (NPMs) using the Node Package
Manager (NPM). That’s right, in the Node.js world, NPM stands for two things. This
book refers to the Node Packaged Modules as modules to make it easier to follow.
What Are Node Packaged Modules?
A Node Packaged Module is a packaged library that can easily be shared, reused,
and installed in different projects. Many different modules are available for a variety
of purposes. For example, the Mongoose module provides an ODM (Operational
Data Model) for MongoDB, Express extends Node’s HTTP capabilities, and so on.
Node.js modules are created by various third-party organizations to provide the
needed features that Node.js lacks out of the box. This community of contributors is
active in adding and updating modules.
Node Packaged Modules include a package.json file that defines the packages.
The package.json file includes informational metadata, such as the name,
version author, and contributors, as well as control metadata, such as dependencies
and other requirements that the Node Package Manager uses when performing
actions such as installation and publishing.
Understanding the Node Package Registry
The Node modules have a managed location called the Node Package Registry
where packages are registered. This allows you to publish your own packages in a
location where others can use them as well as download packages that others have
created.
The Node Package Registry is located at https://npmjs.com. From this location you
can view the newest and most popular modules as well as search for specific
packages, as shown in Figure 3.1.

Figure 3.1 The official Node Package Modules website
Using the Node Package Manager
The Node Package Manager you have already seen is a command-line utility. It
allows you to find, install, remove, publish, and do everything else related to Node
Package Modules. The Node Package Manager provides the link between the Node
Package Registry and your development environment.
The simplest way to really explain the Node Package Manager is to list some of the
command-line options and what they do. You use many of these options in the rest
of this chapter and throughout the book. Table 3.1 lists the Node Package Manager
commands.
Table 3.1 npm command-line options (with express as the package, where
appropriate)
Option Description Example
search Finds module packages in the repository npm search
express

install Installs a package either using a
package.json file, from the repository,
or a local location
npm install
npm install
express
npm install
express@0.1.1
npm install
../tModule.tgz
install –
g
Installs a package globally npm install
express -g
remove Removes a module npm remove
express
pack Packages the module defined by the
package.json file into a .tgz file
npm pack
view Displays module details npm view
express
publish Publishes the module defined by a
package.json file to the registry
npm publish
unpublish Unpublishes a module you have published npm unpublish
myModule
owner Allows you to add, remove, and list owners
of a package in the repository
npm add
bdayley
myModule
npm rm bdayley
myModule
npm ls
myModule
Searching for Node Package Modules
You can also search for modules in the Node Package Registry directly from the

Figure 3.2 Searching for Node.js modules from the command prompt
Installing Node Packaged Modules
To use a Node module in your applications, it must first be installed where Node can
find it. To install a Node module, use the npm install <module_name>
command. This downloads the Node module to your development environment and
places it into the node_modules folder where the install command is run. For
example, the following command installs the express module:
npm install express
The output of the npm install command displays the dependency hierarchy
installed with the module. For example, the following code block shows part of the
output from installing the express module.
Click here to view code image
C:\express\example
`-- express@4.14.0
+-- accepts@1.3.3
| +-- mime-types@2.1.11
| | `-- mime-db@1.23.0
| `-- negotiator@0.6.1
+-- array-flatten@1.1.1
+-- content-disposition@0.5.1
+-- content-type@1.0.2
+-- cookie@0.3.1
+-- cookie-signature@1.0.6
+-- debug@2.2.0
| `-- ms@0.7.1 ...
The dependency hierarchy is listed; some of the methods Express requires are
cookie-signature, range-parser, debug, fresh, cookie, and send
modules. Each of these was downloaded during the install. Notice that the version of
each dependency module is listed.
Node.js has to be able to handle dependency conflicts. For example, the express
module requires cookie 0.3.1, but another module may require cookie
0.3.0. To handle this situation, a separate copy for the cookie module is placed in
each module’s folder under another node_modules folder.
To illustrate how modules are stored in a hierarchy, consider the following example
of how express looks on disk. Notice that the cookie and send modules are
located under the express module hierarchy, and that since the send module
requires mime it is located under the send hierarchy:
Click here to view code image
./
./node_modules
./node_modules/express
./node_modules/express/node_modules/cookie
./node_modules/express/node_modules/send
./node_modules/express/node_modules/send/node_modules/mime
Using package.json
All Node modules must include a package.json file in their root directory. The
package.json file is a simple JSON text file that defines the module including
dependencies. The package.json file can contain a number of different
directives to tell the Node Package Manager how to handle the module.

The following is an example of a package.json file with a name, version,
description, and dependencies:
Click here to view code image
{
"name": "my_module",
"version": "0.1.0",
"description": "a simple node.js module",
"dependencies" : {
"express" : "latest"
}
}
The only required directives in the package.json file are name and version.
The rest depend on what you want to include. Table 3.2 describes the most common
directives:
Table 3.2 Directives used in the package.json file
Directive Description Example
name Unique name of package. "name": "camelot"
preferGlobal Indicates this module
prefers to be installed
globally.
"preferGlobal": true
version Version of the module. "version": 0.0.1
author Author of the project. "author":
"arthur@???.com"
description Textual description of
module.
"description": "a silly
place"
contributors Additional contributors to
the module. "contributors": [
{ "name": "gwen",
"email": "gwen@???.com"}]
bin Binary to be installed
globally with project. "bin: {
"excalibur":
"./bin/excalibur"}
scripts Specifies parameters that
execute console apps "scripts" {
"start": "node ./bin/

when launching node. excalibur",
"test": "echo testing"}
main Specifies the main entry
point for the app. This can
be a binary or a .js file.
"main":
"./bin/excalibur"
repository Specifies the repository
type and location of the
package.
"repository": {
"type": "git",
"location":
"http://???.com/c.git"}
keywords Specifies keywords that
show up in the npm
search.
"keywords": [
"swallow", "unladen" ]
dependencies Modules and versions this
module depends on. You
can use the * and x
wildcards.
"dependencies": {
"express": "latest",
"connect": "2.x.x,
"cookies": "*" }
engines Version of node this
package works with. "engines": {
"node": ">=6.5"}
A great way to use package.json files is to automatically download and install
the dependencies for your Node.js app. All you need to do is create a
package.json file in the root of your project code and add the necessary
dependencies to it. For example, the following package.json requires the
express module as a dependency.
Click here to view code image
{
"name": "my_module",
"version": "0.1.0",
"dependencies" : {
"express" : "latest"
}
}
Then you run the following command from root of your package, and the express
module is automatically installed.
npm install
Notice that no module is specified in the npm install. That is because npm
looks for a package.json file by default. Later, as you need additional modules,
all you need to do is add those to the dependencies directive and then run npm
install again.
Creating a Node.js Application
Now you have enough information to jump into a Node.js project and get your feet
wet. In this section, you create your own Node Packaged Module and then use that
module as a library in a Node.js application.
The code in this exercise is kept to a minimum so that you can see exactly how to
create a package, publish it, and then use it again.
Creating a Node.js Packaged Module
To create a Node.js Packaged Module you need to create the functionality in
JavaScript, define the package using a package.json file, and then either publish
it to the registry or package it for local use.
The following steps take you through the process of building a Node.js Packaged
Module using an example called censorify. The censorify module accepts
text and then replaces certain words with asterisks:
1. Create a project folder named .../censorify. This is the root of the
package.
2. Inside that folder, create a file named censortext.js.
3. Add the code from Listing 3.1 to censortext.js. Most of the code is just
basic JavaScript; however, note that lines 18–20 export the functions
censor(), addCensoredWord(), and getCensoredWords(). The
exports.censor is required for Node.js applications using this module to
have access to the censor() function as well as the other two.
Listing 3.1 censortext.js: Implementing a simple censor function and
exporting it for other modules using the package

Click here to view code image
01 var censoredWords = ["sad", "bad", "mad"];
02 var customCensoredWords = [];
03 function censor(inStr) {
04 for (idx in censoredWords) {
05 inStr = inStr.replace(censoredWords[idx], "****");
06 }
07 for (idx in customCensoredWords) {
08 inStr = inStr.replace(customCensoredWords[idx], "****");
09 }
10 return inStr;
11 }
12 function addCensoredWord(word){
13 customCensoredWords.push(word);
14 }
15 function getCensoredWords(){
16 return censoredWords.concat(customCensoredWords);
17 }
18 exports.censor = censor;
19 exports.addCensoredWord = addCensoredWord;
20 exports.getCensoredWords = getCensoredWords;
4. Once the module code is completed, you need to create a package.json
file that is used to generate the Node.js Packaged Module. Create a
package.json file in the .../censorify folder. Then add contents
similar to Listing 3.2. Specifically, you need to add the name, version, and
main directives as a minimum. The main directive needs to be the name of
the main JavaScript module that will be loaded, in this case censortext.
Note that the .js is not required, Node.js automatically searches for the .js
extension.
Listing 3.2 package.json: Defining the Node.js module
Click here to view code image
01 {
02 "author": "Brendan Dayley",
03 "name": "censorify",
04 "version": "0.1.1",
05 "description": "Censors words out of text",
06 "main": "censortext",
07 "dependencies": {},
08 "engines": {
09 "node": "*"
10 }

11 }
5. Create a file named README.md in the .../censorify folder. You can
put whatever read me instructions you want in this file.
6. Navigate to the .../censorify folder in a console window and run the
npm pack command to build a local package module.
7. The npm pack command creates a censorify-0.1.1.tgz file in the
.../censorify folder. This is your first Node.js Packaged Module.
Publishing a Node.js Packaged Module to the NPM Registry
In the previous section you created a local Node.js Packaged Module using the npm
pack command. You can also publish that same module to the NPM repository at
http://npmjs.com/.
When modules are published to the NPM registry, they are accessible to everyone
using the NPM manager utility discussed earlier. This allows you to distribute your
modules and applications to others more easily.
The following steps describe the process of publishing the module to the NPM
registry. These steps assume that you have completed steps 1 through 5 from the
previous section:
1. Create a public repository to contain the code for the module. Then push the
contents of the .../censorify folder up to that location. The following is
an example of a Github repository URL:
https://github.com/username/projectname/directoryName/ch03/censorify
2. Create an account at https://npmjs.org/signup.
3. Use the npm adduser command from a console prompt to add the user you
created to the environment.
4. Type in the username, password, and email that you used to create the account
in step 2.
5. Modify the package.json file to include the new repository information
and any keywords that you want made available in the registry search as shown
in lines 7–14 in Listing 3.3.

Listing 3.3 package.json: Defining the Node.js module that includes the
repository and keywords information
Click here to view code image
01 {
02 "author": "Brad Dayley",
03 "name": "censorify",
04 "version": "0.1.1",
05 "description": "Censors words out of text",
06 "main": "censortext",
07 "repository": {
08 "type": "git",
09 //"url": "Enter your github url"
10 },
11 "keywords": [
12 "censor",
13 "words"
14 ],
15 "dependencies": {},
16 "engines": {
17 "node": "*"
18 }
19 }
6. Publish the module using the following command from the .../censor
folder in the console:
npm publish
Once the package has been published you can search for it on the NPM registry and
use the npm install command to install it into your environment.
To remove a package from the registry make sure that you have added a user with
rights to the module to the environment using npm adduser and then execute the
following command:
npm unpublish <project name>
For example, the following command unpublishes the censorify module:
npm unpublish censorify
In some instances you cannot unpublish the module without using the --force
option. This option forces the removal and deletion of the module from the registry.
For example:
npm unpublish censorify --force
Using a Node.js Packaged Module in a Node.js Application
In the previous sections you learned how to create and publish a Node.js module.
This section provides an example of actually using a Node.js module inside your
Node.js applications. Node.js makes this simple: All you need to do is install the
NPM into your application structure and then use the require() method to load
the module.
The require() method accepts either an installed module name or a path to a .js
file located on the file system. For example:
require("censorify")
require("./lib/utils.js")
The .js filename extension is optional. If it is omitted, Node.js searches for it.
The following steps take you through that process so you can see how easy it is:
1. Create a project folder named .../readwords.
2. From a console prompt inside the .../readwords folder, use the following
command to install the censorify module from the censorify-
0.1.1.tgz package you created earlier:
npm install .../censorify/censorify-0.1.1.tgz
3. Or if you have published the censorify module, you can use the standard
command to download and install it from the NPM registry:
npm install censorify
4. Verify that a folder named node_modules is created along with a subfolder
named censorify.
5. Create a file named .../readwords/readwords.js.
6. Add the contents shown in Listing 3.4 to the readwords.js file. Notice
that a require() call loads the censorify module and assigns it to the
variable censor. Then the censor variable can be used to invoke the
getCensoredWords(), addCensoredWords(), and censor()
functions from the censorify module.

Listing 3.4 readwords.js: Loading the censorify module when displaying
text
Click here to view code image
1 var censor = require("censorify");
2 console.log(censor.getCensoredWords());
3 console.log(censor.censor("Some very sad, bad and mad text."));
4 censor.addCensoredWord("gloomy");
5 console.log(censor.getCensoredWords());
6 console.log(censor.censor("A very gloomy day."));
7. Run the readwords.js application using the node readwords.js
command and view the output shown in the following code block. Notice that
the censored words are replaced with **** and that the new censored word
gloomy is added to the censorify module instance censor.
Click here to view code image
C:\nodeCode\ch03\readwords>node readwords
[ 'sad', 'bad', 'mad' ]
Some very *****, ***** and ***** text.
[ 'sad', 'bad', 'mad', 'gloomy' ]
A very *** day.
Writing Data to the Console
One of the most useful modules in Node.js during the development process is the
console module. This module provides a lot of functionality when writing debug
and information statements to the console. The console module allows you to
control output to the console, implement time delta output, and write tracebacks and
assertions to the console. This section covers using the console module because
you need to know it for subsequent chapters in the book.
Because the console module is so widely used, you do not need to load it into
your modules using a require() statement. You simply call the console function
using console.<function> (<parameters>). Table 3.3 lists the functions
available in the console module.
Table 3.3 Member functions of the console module
Function Description

log([data],[...]) Writes data output to the console. The data variable
can be a string or an object that can be resolved to a
string. Additional parameters can also be sent. For
example:
console.log("There are %d items", 5);
>>There are 5 items
info([data],[...]) Same as console.log.
error([data],
[...])
Same as console.log; however, the output is also
sent to stderr.
warn([data],[...]) Same as console.error.
dir(obj) Writes out a string representation of a JavaScript
object to the console. For example:
console.dir({name:"Brad", role:"Author"});
>> { name: 'Brad', role: 'Author' }
time(label) Assigns a current timestamp with ms precision to the
string label.
timeEnd(label) Creates a delta between the current time and the
timestamp assigned to label and outputs the results.
For example:
console.time("FileWrite");
f.write(data); //takes about 500ms
console.timeEnd("FileWrite");
>> FileWrite: 500ms
trace(label) Writes out a stack trace of the current position in code
to stderr. For example:
module.trace("traceMark");
>>Trace: traceMark
at Object.<anonymous> (C:\test.js:24:9)
at Module._compile (module.js:456:26)
at Object.Module._ext.js (module.js:474:10)
at Module.load (module.js:356:32)
at Function.Module._load (module.js:312:12)
at Function.Module.runMain(module.js:497:10)
at startup (node.js:119:16)
at node.js:901:3

assert(expression,
[message])
Writes the message and stack trace to the console if
expression evaluates to false.
Summary
This chapter focused on getting you up to speed on the Node.js environment. Node.js
Packaged Modules provide the functionality that Node.js does not inherently come
with. You can download these modules from the NPM registry, or you can even
create and publish your own. The package.json file provides the configuration
and definition for every Node.js module.
The examples in this chapter covered creating, publishing, and installing your own
Node.js Packaged Modules. You learned how to use the NPM to package a local
module as well as publish one to the NPM registry. You then learned how to install
the Node.js modules and use them in your own Node.js applications.
Next
The next chapter covers the event-driven nature of Node.js. You see how events
work in the Node.js environment and learn how to control, manipulate, and use them
in your applications.
4
Using Events, Listeners, Timers, and
Callbacks in Node.js
Node.js provides scalability and performance through its powerful event-driven
model. This chapter focuses on understanding the model and how it differs from
traditional threading models used by most webservers. Understanding the event
model is critical because it may force you to change the design thinking for your
applications. However, the changes will be well worth the improvement in speed that
you get using Node.js.
This chapter also covers the different methods you use to add work to the Node.js
event queue. You can add work using event listeners or timers, or you can schedule
work directly. You also learn how to implement events in your own custom modules
and objects.
Understanding the Node.js Event Model
Node.js applications are run in a single-threaded event-driven model. Although
Node.js implements a thread pool in the background to do work, the application
itself doesn’t have any concept of multiple threads. “Wait, what about performance
and scale?” you might ask. At first it may seem counterintuitive, but once you
understand the logic behind the Node.js event model it all makes perfect sense.
Comparing Event Callbacks and Threaded Models
In the traditional threaded web model, a request comes in to the webserver and is
assigned to an available thread. Then the handling of work for that request continues
on that thread until the request is complete and a response is sent.
Figure 4.1 illustrates the threaded model processing two requests, GetFile and
GetData. The GetFile request first opens the file, reads the contents, and then
sends the data back in a response. All this occurs in order on the same thread. The
GetData request connects to the DB, queries the necessary data, and then sends the
data in the response.
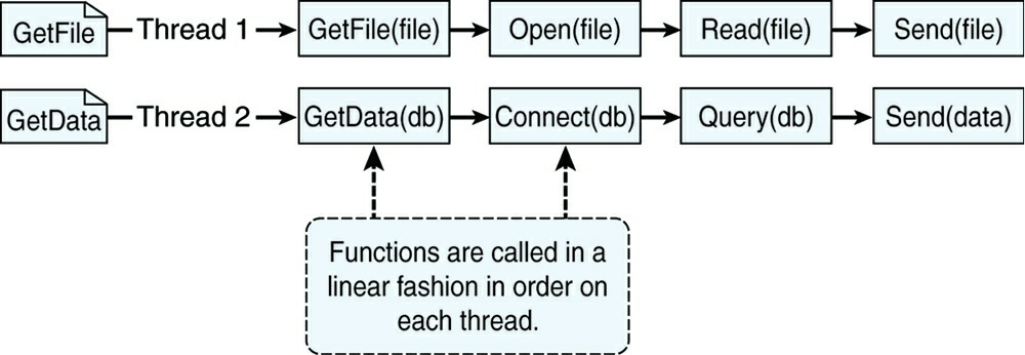
Figure 4.1 Processing two requests on individual threads using the threaded model
The Node.js event model does things differently. Instead of executing all the work
for each request on individual threads, work is added to an event queue and then
picked up by a single thread running an event loop. The event loop grabs the top
item in the event queue, executes it, and then grabs the next item. When executing
code that is no longer live or has blocking I/O, instead of calling the function
directly, the function is added to the event queue along with a callback that is
executed after the function completes. When all events on the Node.js event queue
have been executed, the Node application terminates.
Figure 4.2 illustrates the way Node.js handles the GetFile and GetData requests.
The GetFile and GetData requests are added to the event queue. Node.js first
picks up the GetFile request, executes it, and then completes by adding the
Open() callback function to the event queue. Next, it picks up the GetData
request, executes it, and completes by adding the Connect() callback function to
the event queue. This continues until there are no callback functions to be executed.
Notice in Figure 4.2 that the events for each thread do not necessarily follow a direct
interleaved order. For example, the Connect request takes longer to complete than
the Read request, so Send(file) is called before Query(db).

Figure 4.2 Processing two requests on a single event-driven thread using the Node.js
event model
Blocking I/O in Node.js
The Node.js event model of using the event callbacks is great until you run into the
problem of functions that block waiting for I/O. Blocking I/O stops the execution of
the current thread and waits for a response before continuing. Some examples of
blocking I/O are
Reading a file
Querying a database
Socket request
Accessing a remote service
The reason Node.js uses event callbacks is not to have to wait for blocking I/O.
Therefore, any requests that perform blocking I/O are performed on a different
thread in the background. Node.js implements a thread pool in the background.
When an event that requires blocking I/O is retrieved from the event queue, Node.js
retrieves a thread from the thread pool and executes the function there instead of on
the main event loop thread. This prevents the blocking I/O from holding up the rest
of the events in the event queue.
The function executed on the blocking thread can still add events back to the event
queue to be processed. For example, a database query call is typically passed a
callback function that parses the results and may schedule additional work on the
event queue before sending a response.
Figure 4.3 illustrates the full Node.js event model including the event queue, event
loop, and the thread pool. Notice that the event loop either executes the function on
the event loop thread itself or, for blocking I/O, it executes the function on a separate
thread.
The Conversation Example
To help you understand how events work in Node.js versus traditional threaded
webservers, consider the example of having different conversations with a large
group of people at a party. You are acting the part of the webserver, and the
conversations represent the work necessary to process different types of web
requests. Your conversations are broken up into several segments with different
individuals. You end up talking to one person and then another. Then you go back to
the first person and then to a third person, back to the second, and so on.
This example has many similarities to webserver processing. Some conversations
end quickly, like a simple request for a piece of data in memory. Others are broken
up into several segments as you go back and forth between individuals, similar to a
more complex server-side conversation. Still others have long breaks when you are
waiting for the other person to respond, similar to blocking I/O requests to the file
system, database, or remote service.
Using the traditional webserver threading model in the conversation example sounds
great at first because each thread acts like you. The threads/clones can talk back and
forth with each person, and it almost seems as though you can have multiple
conversations simultaneously. There are two problems with this model.
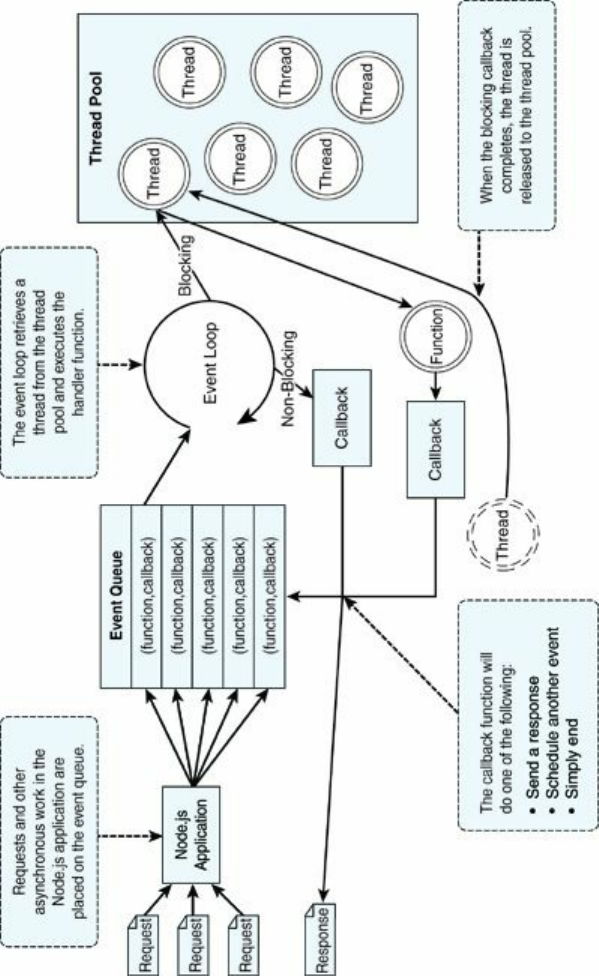
Figure 4.3 In the Node.js event model, work is added as a function with callback to
the event queue, and then picked up on the event loop thread. The function is then
executed on the event loop thread in the case of non-blocking, or on a separate thread
in the case of blocking
First, you are limited by the number of clones. What if you only have five clones?
To talk with a sixth person, one clone must completely finish its conversation. The
second problem is the limited number of CPUs (or “brains”) that the threads
(“clones”) must share. This means that clones sharing the same brain have to stop
talking/listening while other clones are using the brain. You can see that there really

isn’t a benefit to having clones when they freeze while the other clones are using the
brain.
The Node.js event model acts more like real life when compared to the conversation
example. First, Node.js applications run on a single thread, which means there is
only one of you, no clones. Each time a person asks you a question, you respond as
soon as you can. Your interactions are completely event driven, and you move
naturally from one person to the next. Therefore, you can have as many
conversations going on at the same time as you want by bouncing between
individuals. Second, your brain is always focused on the person you are talking to
since you aren’t sharing it with clones.
So how does Node.js handle blocking I/O requests? That is where the background
thread pool comes into play. Node.js hands blocking requests over to a thread in the
thread pool so that it has minimal impact on the application processing events. Think
about when someone asks you a question that you have to think about. You can still
interact with others at the party while trying to process that question in the back of
your mind. That processing may impact how fast you interact with others, but you
are still able to communicate with several people while processing the longer-lived
thought.
Adding Work to the Event Queue
As you create your Node.js applications, keep in mind the event model described in
the previous section and apply it to the way you design your code. To leverage the
scalability and performance of the event model, make sure that you break work up
into chunks that can be performed as a series of callbacks.
Once you have designed your code correctly, you can then use the event model to
schedule work on the event queue. In Node.js applications, work is scheduled on the
event queue by passing a callback function using one of these methods:
Make a call to one of the blocking I/O library calls such as writing to a file or
connecting to a database.
Add a built-in event listener to a built-in event such as an http.request or
server.connection.
Create your own event emitters and add custom listeners to them.
Use the process.nextTick option to schedule work to be picked up on the

next cycle of the event loop.
Use timers to schedule work to be done after a particular amount of time or at
periodic intervals.
The following sections discuss implementing timers, nextTick, and custom
events. They give you an idea of how the event mechanism works. The blocking I/O
calls and built-in events are covered in subsequent chapters.
Implementing Timers
A useful feature of Node.js and JavaScript is the ability to delay execution of code
for a period of time. This can be useful for cleanup or refresh work that you do not
want to always be running. There are three types of timers you can implement in
Node.js: timeout, interval, and immediate. The following sections describe each of
these timers and how to implement them in your code.
Delaying Work with Timeouts
Timeout timers are used to delay work for a specific amount of time. When that time
expires, the callback function is executed and the timer goes away. Use timeouts for
work that only needs to be performed once.
Timeout timers are created using the setTimeout(callback,
delayMilliSeconds, [args]) method built into Node.js. When you call
setTimeout(), the callback function is executed after delayMilliSeconds
expires. For example, the following executes myFunc() after 1 second:
setTimeout(myFunc, 1000);
The setTimeout() function returns a timer object ID. You can pass this ID to
clearTimeout(timeoutId) at any time before the delayMilliSeconds
expires to cancel the timeout function. For example:
myTimeout = setTimeout(myFunc, 100000);
…
clearTimeout(myTimeout);
Listing 4.1 implements a series of simple timeouts that call the
simpleTimeout() function, which outputs the number of milliseconds since the

timeout was scheduled. Notice that it doesn’t matter which order setTimeout()
is called; the results, shown in Listing 4.1 Output, are in the order that the delay
expires.
Listing 4.1 simple_timer.js: Implementing a series of timeouts at various
intervals
Click here to view code image
01 function simpleTimeout(consoleTimer){
02 console.timeEnd(consoleTimer);
03 }
04 console.time("twoSecond");
05 setTimeout(simpleTimeout, 2000, "twoSecond");
06 console.time("oneSecond");
07 setTimeout(simpleTimeout, 1000, "oneSecond");
08 console.time("fiveSecond");
09 setTimeout(simpleTimeout, 5000, "fiveSecond");
10 console.time("50MilliSecond");
11 setTimeout(simpleTimeout, 50, "50MilliSecond");<Listing First>
Listing 4.1 Output simple_timer.js: Timeout functions executed at
different delay amounts
Click here to view code image
C:\books\node\ch04> node simple_timer.js
50MilliSecond: 50.489ms
oneSecond: 1000.688ms
twoSecond: 2000.665ms
fiveSecond: 5000.186ms
Performing Periodic Work with Intervals
Interval timers are used to perform work on a regular delayed interval. When the
delay time expires, the callback function is executed and is then rescheduled for the
delay interval again. Use intervals for work that needs to be performed on a regular
basis.
Interval timers are created using the setInterval(callback,
delayMilliSeconds, [args]) method built into Node.js. When you call
setInterval(), the callback function is executed every interval after
delayMilliSeconds has expired. For example, the following executes

myFunc() every second:
setInterval(myFunc, 1000);
The setInterval() function returns a timer object ID. You can pass this ID to
clearInterval(intervalId) at any time before the
delayMilliSeconds expires to cancel the timeout function. For example:
myInterval = setInterval(myFunc, 100000);
…
clearInterval(myInterval);
Listing 4.2 implements a series of simple interval callbacks that update the values of
the variables x, y, and z at different intervals. Notice that the values of x, y, and z
are changed differently because the interval amounts are different, with x
incrementing twice as fast as y, which increments twice as fast as z, as shown in
Listing 4.2 Output.
Listing 4.2 simple_interval.js: Implementing a series of update callbacks
at various intervals
Click here to view code image
01 var x=0, y=0, z=0;
02 function displayValues(){
03 console.log("X=%d; Y=%d; Z=%d", x, y, z);
04 }
05 function updateX(){
06 x += 1;
07 }
08 function updateY(){
09 y += 1;
10 }
11 function updateZ(){
12 z += 1;
13 displayValues();
14 }
15 setInterval(updateX, 500);
16 setInterval(updateY, 1000);
17 setInterval(updateZ, 2000);
Listing 4.2 Output simple_interval.js: Interval functions executed at
different delay amounts
Click here to view code image

C:\books\node\ch04> node simple_interval.js
x=3; y=1; z=1
x=7; y=3; z=2
x=11; y=5; z=3
x=15; y=7; z=4
x=19; y=9; z=5
x=23; y=11; z=6
Performing Immediate Work with an Immediate Timer
Immediate timers are used to perform work on a function as soon as the I/O event
callbacks are executed, but before any timeout or interval events are executed. This
allows you to schedule work to be done after the current events in the event queue
are completed. Use immediate timers to yield long-running execution segments to
other callbacks to prevent starving the I/O events.
Immediate timers are created using the setImmediate(callback,[args])
method built into Node.js. When you call setImmediate(), the callback function
is placed on the event queue and popped off once for each iteration through the event
queue loop after I/O events have a chance to be called. For example, the following
schedules myFunc() to execute on the next cycle through the event queue:
setImmediate(myFunc(), 1000);
The setImmediate() function returns a timer object ID. You can pass this ID to
clearImmediate(immediateId) at any time before it is picked up off the
event queue. For example:
myImmediate = setImmediate(myFunc);
…
clearImmediate(myImmediate);
Dereferencing Timers from the Event Loop
Often you do not want timer event callbacks to continue to be scheduled when they
are the only events left in the event queue. Node.js provides a useful utility to handle
this case. The unref() function available in the object returned by
setInterval and setTimeout allows you to notify the event loop to not
continue when these are the only events on the queue.

For example, the following dereferences the myInterval interval timer:
myInterval = setInterval(myFunc);
myInterval.unref();
If for some reason you later do not want the program to terminate if the interval
function is the only event left on the queue, you can use the ref() function to re-
reference it:
myInterval.ref();
Warning
When using unref() with setTimout timers, a separate timer is used to wake
up the event loop. Creating a lot of these can cause an adverse performance
impact on your code, so use them sparingly.
Using nextTick to Schedule Work
A useful method of scheduling work on the event queue is the
process.nextTick(callback) function. This function schedules work to be
run on the next cycle of the event loop. Unlike the setImmediate() method,
nextTick() executes before the I/O events are fired. This can result in starvation
of the I/O events, so Node.js limits the number of nextTick() events that can be
executed each cycle through the event queue by the value of
process.maxTickDepth, which defaults to 1000.
Listing 4.3 illustrates the order of events when using a blocking I/O call, timers, and
nextTick(). Notice that the blocking call fs.stat() is executed first, then two
setImmediate() calls, and then two nextTick() calls. Listing 4.3 Output
shows that both nextTick() calls are executed before any of the others. Then the
first setImmediate() call is executed followed by the fs.stat(), and then on
the next iteration through the loop, the second setImmediate() call is executed.
Listing 4.3 nexttick.js: Implementing a series of blocking fs calls,
immediate timers, and nextTick() calls to show the order in which they get
executed
Click here to view code image
01 var fs = require("fs");

02 fs.stat("nexttick.js", function(){
03 console.log("nexttick.js Exists");
04 });
05 setImmediate(function(){
06 console.log("Immediate Timer 1 Executed");
07 });
08 setImmediate(function(){
09 console.log("Immediate Timer 2 Executed");
10 });
11 process.nextTick(function(){
12 console.log("Next Tick 1 Executed");
13 });
14 process.nextTick(function(){
15 console.log("Next Tick 2 Executed");
16 });
Listing 4.3 Output nexttick.js: Executing the nextTick() calls first
Click here to view code image
c:\books\node\ch04>node nexttick.js
Next Tick 1 Executed
Next Tick 2 Executed
Immediate Timer 1 Executed
Immediate Timer 2 Executed
nexttick.js Exists
Implementing Event Emitters and Listeners
In the following chapters you get a chance to implement many of the events built in
to the various Node.js modules. This section focuses on creating your own custom
events as well as implementing listener callbacks that get implemented when an
event is emitted.
Adding Custom Events to Your JavaScript Objects
Events are emitted using an EventEmitter object. This object is included in the
events module. The emit(eventName, [args]) function triggers the
eventName event and includes any arguments provided. The following code
snippet shows how to implement a simple event emitter:
var events = require('events');
var emitter = new events.EventEmitter();

emitter.emit("simpleEvent");
Occasionally you want to add events directly to your JavaScript objects. To do that
you need to inherit the EventEmitter functionality in your object by calling
events.EventEmitter.call(this) in your object instantiation as well as
adding the events.EventEmitter. prototype to your object’s prototyping.
For example:
Function MyObj(){
Events.EventEmitter.call(this);
}
MyObj.prototype.__proto__ = events.EventEmitter.prototype;
You then can emit events directly from instances of your object. For example:
var myObj = new MyObj();
myObj.emit("someEvent");
Adding Event Listeners to Objects
Once you have an instance of an object that can emit events, you can add listeners
for the events that you care about. Listeners are added to an EventEmitter object
using one of the following functions:
.addListener(eventName, callback): Attaches the callback
function to the object’s listeners. Every time the eventName event is
triggered, the callback function is placed in the event queue to be executed.
.on(eventName, callback): Same as .addListener().
.once(eventName, callback): Only the first time the eventName
event is triggered, the callback function is placed in the event queue to be
executed.
For example, to add a listener to an instance of the MyObject EventEmitter
class defined in the previous section you would use the following:
function myCallback(){
…
}
var myObject = new MyObj();
myObject.on("someEvent", myCallback);

Removing Listeners from Objects
Listeners are useful and vital parts of Node.js programming. However, they do cause
overhead, and you should use them only when necessary. Node.js provides server
helper functions on the EventEmitter object that allow you to manage the
listeners that are included. These include
.listeners(eventName): Returns an array of listener functions attached
to the eventName event.
.setMaxListeners(n): Triggers a warning if more than n listeners are
added to an EventEmitter object. The default is 10.
.removeListener(eventName, callback): Removes the
callback function from the eventName event of the EventEmitter
object.
Implementing Event Listeners and Event Emitters
Listing 4.4 demonstrates the process of implementing listeners and custom event
emitters in Node.js. The Account object is extended to inherit from the
EventEmitter class and provides two methods to deposit and withdraw that both
emit the balanceChanged event. Then in lines 15–31, three callback functions
are implemented that are attached to the Account object instance
balanceChanged event and display various forms of data.
Notice that the checkGoal(acc, goal) callback is implemented a bit
differently than the others. This was done to illustrate how to pass variables into an
event listener function when the event is triggered. The results of executing the code
are shown in Listing 4.4 Output.
Listing 4.4 emitter_listener.js: Creating a custom EventEmitter
object and implementing three listeners that are triggered when the
balancedChanged event is triggered
Click here to view code image
01 var events = require('events');
02 function Account() {
03 this.balance = 0;
04 events.EventEmitter.call(this);
05 this.deposit = function(amount){

06 this.balance += amount;
07 this.emit('balanceChanged');
08 };
09 this.withdraw = function(amount){
10 this.balance -= amount;
11 this.emit('balanceChanged');
12 };
13 }
14 Account.prototype.__proto__ = events.EventEmitter.prototype;
15 function displayBalance(){
16 console.log("Account balance: $%d", this.balance);
17 }
18 function checkOverdraw(){
19 if (this.balance < 0){
20 console.log("Account overdrawn!!!");
21 }
22 }
23 function checkGoal(acc, goal){
24 if (acc.balance > goal){
25 console.log("Goal Achieved!!!");
26 }
27 }
28 var account = new Account();
29 account.on("balanceChanged", displayBalance);
30 account.on("balanceChanged", checkOverdraw);
31 account.on("balanceChanged", function(){
32 checkGoal(this, 1000);
33 });
34 account.deposit(220);
35 account.deposit(320);
36 account.deposit(600);
37 account.withdraw(1200);
Listing 4.4 Output emitter_listener.js: The account statements output
by the listener callback functions
Click here to view code image
C:\books\node\ch04>node emmiter_listener.js
Account balance: $220
Account balance: $540
Account balance: $1140
Goal Achieved!!!
Account balance: $-60
Account overdrawn!!!

Implementing Callbacks
As you have seen in previous sections, the Node.js event-driven model relies heavily
on callback functions. Callback functions can be a bit difficult to understand at first,
especially if you want to depart from implementing a basic anonymous function.
This section deals with three specific implementations of callbacks: passing
parameters to a callback function, handling callback function parameters inside a
loop, and nesting callbacks.
Passing Additional Parameters to Callbacks
Most callbacks have automatic parameters passed to them, such as an error or result
buffer. A common question when working with callbacks is how to pass additional
parameters to them from the calling function. You do this by implementing the
parameter in an anonymous function and then call the actual callback with
parameters from the anonymous function.
Listing 4.5 illustrates implementing callback parameters. There are two sawCar
event handlers. Note that the sawCar event only emits the make parameter. Notice
that the emitter.emit() function also can accept additional parameters; in this
case, make is added as shown in line 5. The first event handler on line 16
implements the logCar(make) callback handler. To add a color for
logColorCar(), an anonymous function is used in the event handler defined in
lines 17–21. A randomly selected color is passed to the call
logColorCar(make, color). You can see the output in Listing 4.5 Output.
Listing 4.5 callback_parameter.js: Creating an anonymous function to
add additional parameters not emitted by the event
Click here to view code image
01 var events = require('events');
02 function CarShow() {
03 events.EventEmitter.call(this);
04 this.seeCar = function(make){
05 this.emit('sawCar', make);
06 };
07 }
08 CarShow.prototype.__proto__ = events.EventEmitter.prototype;
09 var show = new CarShow();
10 function logCar(make){

11 console.log("Saw a " + make);
12 }
13 function logColorCar(make, color){
14 console.log("Saw a %s %s", color, make);
15 }
16 show.on("sawCar", logCar);
17 show.on("sawCar", function(make){
18 var colors = ['red', 'blue', 'black'];
19 var color = colors[Math.floor(Math.random()*3)];
20 logColorCar(make, color);
21 });
22 show.seeCar("Ferrari");
23 show.seeCar("Porsche");
24 show.seeCar("Bugatti");
25 show.seeCar("Lamborghini");
26 show.seeCar("Aston Martin");
Listing 4.5 Output callback_parameter.js: The results of adding a
color parameter to the callback
Click here to view code image
C:\books\node\ch04>node callback_parameter.js
Saw a Ferrari
Saw a blue Ferrari
Saw a Porsche
Saw a black Porsche
Saw a Bugatti
Saw a red Bugatti
Saw a Lamborghini
Saw a black Lamborghini
Saw a Aston Martin
Saw a black Aston Martin
Implementing Closure in Callbacks
An interesting problem that asynchronous callbacks have is that of closure. Closure
is a JavaScript term that indicates that variables are bound to a function’s scope and
not the parent function’s scope. When you execute an asynchronous callback, the
parent function’s scope may have changed; for example, when iterating through a list
and altering values in each iteration.
If your callback needs access to variables in the parent function’s scope, then you
need to provide closure so that those values are available when the callback is pulled

off the event queue. A basic way of doing that is by encapsulating the asynchronous
call inside a function block and passing in the variables that are needed.
Listing 4.6 implements a wrapper function that provides closure to the logCar()
asynchronous function. Notice that the loop in lines 7–12 implements a basic
callback. However, Listing 4.6 Output shows that the car name is always the last
item read because the value of message changes each time through the loop.
The loop in lines 13–20 implements a wrapper function that is passed message as
the msg parameter and that msg value sticks with the callback. Thus the closure
shown in Output 4.6 displays the correct message. To make the callback truly
asynchronous, the process.nextTick() method is used to schedule the
callback.
Listing 4.6 callback_closure.js: Creating a wrapper function to provide
closure for variables needed in the asynchronous callback
Click here to view code image
01 function logCar(logMsg, callback){
02 process.nextTick(function() {
03 callback(logMsg);
04 });
05 }
06 var cars = ["Ferrari", "Porsche", "Bugatti"];
07 for (var idx in cars){
08 var message = "Saw a " + cars[idx];
09 logCar(message, function(){
10 console.log("Normal Callback: " + message);
11 });
12 }
13 for (var idx in cars){
14 var message = "Saw a " + cars[idx];
15 (function(msg){
16 logCar(msg, function(){
17 console.log("Closure Callback: " + msg);
18 });
19 })(message);
20 }
Listing 4.6 Output callback_closure.js: Adding a closure wrapper
function allows the asynchronous callback to access necessary variables
Click here to view code image

C:\books\node\ch04>node callback_closure.js
Normal Callback: Saw a Bugatti
Normal Callback: Saw a Bugatti
Normal Callback: Saw a Bugatti
Closure Callback: Saw a Ferrari
Closure Callback: Saw a Porsche
Closure Callback: Saw a Bugatti
Chaining Callbacks
With asynchronous functions you are not guaranteed the order that they will run if
two are placed on the event queue. The best way to resolve that is to implement
callback chaining by having the callback from the asynchronous function call the
function again until there is no more work to do. That way the asynchronous
function is never on the event queue more than once.
Listing 4.7 implements a basic example of callback chaining. A list of items is
passed into the function logCars(), the asynchronous function logCar() is
called, and then the logCars() function is used as the callback when logCar()
completes. Thus only one version of logCar() is on the event queue at the same
time. The output of iterating through the list is shown in Listing 4.7 Output.
Listing 4.7 callback_chain.js: Implementing a callback chain where the
callback from an anonymous function calls back into the initial function to
iterate through a list
Click here to view code image
01 function logCar(car, callback){
02 console.log("Saw a %s", car);
03 if(cars.length){
04 process.nextTick(function(){
05 callback();
06 });
07 }
08 }
09 function logCars(cars){
10 var car = cars.pop();
11 logCar(car, function(){
12 logCars(cars);
13 });
14 }
15 var cars = ["Ferrari", "Porsche", "Bugatti",

16 "Lamborghini", "Aston Martin"];
17 logCars(cars);
Listing 4.7 Output callback_chain.js: Using an asynchronous callback
chain to iterate through a list
Click here to view code image
C:\books\node\ch04>node callback_chain.js
Saw a Aston Martin
Saw a Lamborghini
Saw a Bugatti
Saw a Porsche
Saw a Ferrari
Summary
The event-driven model that Node.js uses provides scalability and performance. You
learned the difference between the event-driven model and the traditional threaded
model for webservers. You learned that events can be added to the event queue when
blocking I/O is called. And you learned that listeners can be triggered by events or
timers or called directly using the nextTick() method.
This chapter discussed the three types of timer events: timeout, interval, and
immediate. Each of these can be used to delay the execution of work for a period of
time. You also saw how to implement your own custom event emitters and add
listener functions to them.
Next
In the next chapter you see how to manage data I/O using streams and buffers. You
also learn about Node.js functionality that allows you to manipulate JSON, string,
and compressed forms of data.

5
Handling Data I/O in Node.js
Most active web applications and services have a lot of data flowing through them.
That data comes in the form of text, JSON strings, binary buffers, and data streams.
For that reason, Node.js has many mechanisms built in to support handling the data
I/O from system to system. It is important to understand the mechanisms that
Node.js provides to implement effective and efficient web applications and services.
This chapter focuses on manipulating JSON data, managing binary data buffers,
implementing readable and writable streams, and compressing and decompressing
data. You learn how to leverage the Node.js functionality to work with different I/O
requirements.
Working with JSON
One of the most common data types that you work with when implementing Node.js
web applications and services is JSON (JavaScript Object Notation). JSON is a
lightweight method to convert JavaScript objects into a string form and then back
again. This provides an easy method when you need to serialize data objects when
passing them from client to server, process to process, stream to stream, or when
storing them in a database.
There are several reasons to use JSON to serialize your JavaScript objects over XML
including the following:
JSON is much more efficient and takes up fewer characters.
Serializing/deserializing JSON is faster than XML because it’s simpler syntax.
JSON is easier to read from a developer’s perspective because it is similar to
JavaScript syntax.
The only reasons you might want to use XML over JSON are for complex objects or
if you have XML/XSLT transforms already in place.
Converting JSON to JavaScript Objects
A JSON string represents the JavaScript object in string form. The string syntax is
similar to code, making it easy to understand. You can use the
JSON.parse(string) method to convert a string that is properly formatted with
JSON into a JavaScript object.
For example, the following code snippet defines accountStr as a formatted JSON
string and converts it to a JavaScript object using JSON.parse(). Then member
properties can be accessed via dot notation:
Click here to view code image
var accountStr = '{"name":"Jedi", "members":["Yoda","Obi Wan"], \
"number":34512, "location": "A galaxy far, far away"}';
var accountObj = JSON.parse(accountStr);
console.log(accountObj.name);
console.log(accountObj.members);
The preceding code outputs the following:
Jedi
[ 'Yoda', 'Obi Wan' ]
Converting JavaScript Objects to JSON
Node also allows you to convert a JavaScript object into a properly formatted JSON
string. Thus the string form can be stored in a file or database, sent across an HTTP
connection, or written to a stream/buffer. Use the JSON.stringify(text)
method to parse JSON text and generate a JavaScript object:
For example, the following code defines a JavaScript object that includes string,
numeric, and array properties. Using JSON.stringify(), it is all converted to a
JSON string:
Click here to view code image
var accountObj = {
name: "Baggins",

number: 10645,
members: ["Frodo, Bilbo"],
location: "Shire"
};
var accountStr = JSON.stringify(accountObj);
console.log(accountStr);
The preceding code outputs the following:
{"name":"Baggins","number":10645,"members":["Frodo, Bilbo"],"location":"Shire"}
Using the Buffer Module to Buffer Data
While JavaScript is Unicode friendly, it is not good at managing binary data.
However, binary data is useful when implementing some web applications and
services. For example:
Transferring compressed files
Generating dynamic images
Sending serialized binary data
Understanding Buffered Data
Buffered data is made up of a series of octets in big endian or little endian format.
That means they take up considerably less space than textual data. Therefore,
Node.js provides the Buffer module that gives you the functionality to create,
read, write, and manipulate binary data in a buffer structure. The Buffer module is
global, so you do not need to use the require() statement to access it.
Buffered data is stored in a structure similar to that of an array but is stored outside
the normal V8 heap in raw memory allocations. Therefore a Buffer cannot be
resized.
When converting buffers to and from strings, you need to specify the explicit
encoding method to be used. Table 5.1 lists the various encoding methods supported.
Table 5.1 Methods of encoding between strings and binary buffers
Method Description

utf8 Multi-byte encoded Unicode characters used as the standard in most
documents and webpages.
utf16le Little endian encoded Unicode characters of 2 or 4 bytes.
ucs2 Same as utf16le.
base64 Base64 string encoding.
Hex Encode each byte as two hexadecimal characters.
Big Endian and Little Endian
Binary data in buffers is stored as a series of octets or a sequence of eight 0s and
1s that can be a hexadecimal value of 0x00 to 0xFF. It can be read as a single byte
or as a word containing multiple bytes. Endian defines the ordering of significant
bits when defining the word. Big endian stores the least significant word first, and
little endian stores the least significant word last. For example, the words 0x0A
0x0B 0x0C 0x0D would be stored in the buffer as [0x0A, 0x0B, 0x0C,
0x0D] in big endian but as [0x0D, 0x0C, 0x0B, 0x0A] in little endian.
Creating Buffers
Buffer objects are actually raw memory allocations; therefore, their size must be
determined when they are created. The three methods for creating Buffer objects
using the new keyword are
new Buffer(sizeInBytes)
new Buffer(octetArray)
new Buffer(string, [encoding])
For example, the following lines of code define buffers using a byte size, octet
buffer, and a UTF8 string:
var buf256 = new Buffer(256);
var bufOctets = new Buffer([0x6f, 0x63, 0x74, 0x65, 0x74, 0x73]);
var bufUTF8 = new Buffer("Some UTF8 Text \u00b6 \u30c6 \u20ac", 'utf8');
Writing to Buffers
You cannot extend the size of a Buffer object after it has been created, but you can
write data to any location in the buffer. Table 5.2 describes the three methods you

can use when writing to buffers.
Table 5.2 Methods of writing from Buffer objects
Method Description
buffer.write(string,
[offset], [length],
[encoding])
Writes length number of bytes from the string
starting at the offset index inside the buffer
using encoding.
buffer[offset] =
value
Replaces the data at index offset with the value
specified.
buffer.fill(value,
[offset], [end])
Writes the value to every byte in the buffer starting
at the offset index and ending with the end
index.
writeInt8(value,
offset, [noAssert])
writeInt16LE(value,
offset, [noAssert])
writeInt16BE(value,
offset, [noAssert])
…
There is a wide range of methods for Buffer objects
to write integers, unsigned integers, doubles, and
floats of various sizes using little endian or big
endian. value specifies the value to write,
offset specifies the index to write to, and
noAssert specifies whether to skip validation of
the value and offset. noAssert should be
left at the default false unless you are absolutely
certain of correctness.
To illustrate writing to buffers better, Listing 5.1 defines a buffer, fills it with zeros,
writes some text at the beginning using the write() method at line 4, and then
adds some additional text using a write that alters part of the existing buffer using
write(string, offset, length) at line 6. Then in line 8 it adds a + to the
end by directly setting the value of an index, as shown in Listing 5.1 Output. Notice
that the buf256.write("more text", 9, 9) statement writes to the middle
of the buffer and buf256[18] = 43 changes a single byte.
Listing 5.1 buffer_write.js: Various ways to write to a Buffer object
Click here to view code image
1 buf256 = new Buffer(256);
2 buf256.fill(0);
3 buf256.write("add some text");
4 console.log(buf256.toString());

5 buf256.write("more text", 9, 9);
6 console.log(buf256.toString());
7 buf256[18] = 43;
8 console.log(buf256.toString());
Listing 5.1 Output buffer_write.js: Writing data from a Buffer object
Click here to view code image
C:\books\node\ch05>node buffer_write.js
add some text
add some more text
add some more text+
Reading from Buffers
There are several methods for reading from buffers. The simplest is to use the
toString() method to convert all or part of a buffer to a string. However, you
can also access specific indexes in the buffer directly or by using read(). Also
Node.js provides a StringDecoder object that has a write(buffer) method
that decodes and writes buffered data using the specified encoding. Table 5.3
describes these methods for reading Buffer objects.
Table 5.3 Methods of reading from Buffer objects
Method Description
buffer.toString([encoding],
[start], [end])
Returns a string containing the decoded
characters specified by encoding from the
start index to the end index of the
buffer. If start or end is not specified,
then toString() uses the beginning or
end of the buffer.
stringDecoder.write(buffer) Returns a decoded string version of the
buffer.
buffer[offset] Returns the octet value in the buffer at
the specified offset.
readInt8(offset,
[noAssert])
readInt16LE(offset,
There is a wide range of methods for
Buffer objects to read integers,
unsigned integers, doubles, and floats of
various sizes using little endian or big

[noAssert])
readInt16BE(offset,
[noAssert])
…
endian. These functions accept the offset
to read from an optional noAssert
Boolean value that specifies whether to
skip validation of the offset. noAssert
should be left at the default false
unless you are absolutely certain of
correctness.
To illustrate reading from buffers, Listing 5.2 defines a buffer with UTF8 encoded
characters, and then uses toString() without parameters to read all the buffer,
and then with the encoding, start, and end parameters to read part of the
buffer. Then in lines 4 and 5 it creates a StringDecoder with UTF8 encoding
and uses it to write the contents of the buffer out to the console. Next, a direct access
method is used to get the value of the octet at index 18. Listing 5.2 Output shows the
output of the code.
Listing 5.2 buffer_read.js: Various ways to read from a Buffer object
Click here to view code image
1 bufUTF8 = new Buffer("Some UTF8 Text \u00b6 \u30c6 \u20ac", 'utf8');
2 console.log(bufUTF8.toString());
3 console.log(bufUTF8.toString('utf8', 5, 9));
4 var StringDecoder = require('string_decoder').StringDecoder;
5 var decoder = new StringDecoder('utf8');
6 console.log(decoder.write(bufUTF8));
Listing 5.2 Output buffer_read.js: Reading data from a Buffer object
Click here to view code image
C:\books\node\ch05>node buffer_read.js
Some UTF8 Text ¶ テ €
UTF8
Some UTF8 Text ¶ テ €
e3
e3838620
Determining Buffer Length
A common task when dealing with buffers is determining the length, especially
when you create a buffer dynamically from a string. The length of a buffer can be

determined by calling .length on the Buffer object. To determine the byte
length that a string takes up in a buffer you cannot use the .length property.
Instead you need to use Buffer.byteLength(string, [encoding]).
Note that there is a difference between the string length and byte length of a buffer.
To illustrate this consider the followings statements:
Click here to view code image
"UTF8 text \u00b6".length;
//evaluates to 11
Buffer.byteLength("UTF8 text \u00b6", 'utf8');
//evaluates to 12
Buffer("UTF8 text \u00b6").length;
//evaluates to 12
Notice that the same string evaluates to 11 characters, but because it contains a
double-byte character the byteLength is 12. Also note that Buffer("UTF8
text \u00b6").length evaluates to 12 also. That is because .length on a
buffer returns the byte length.
Copying Buffers
An important part of working with buffers is the ability to copy data from one buffer
into another buffer. Node.js provides the copy(targetBuffer,
[targetStart], [sourceStart], [sourceIndex]) method on
Buffer objects. The targetBuffer parameter is another Buffer object, and
targetStart, sourceStart, and sourceEnd are indexes inside the source
and target buffers.
Note
To copy string data from one buffer to the next, make sure that both buffers use
the same encoding or you may get unexpected results when decoding the resulting
buffer.
You can also copy data from one buffer to the other by indexing them directly, for
example:
sourceBuffer[index] = destinationBuffer[index]
Listing 5.3 illustrates three examples of copying data from one buffer to another. The
first method in lines 4–8 copies the full buffer. The next method in lines 10–14

copies only the middle 5 bytes of a buffer. The third example iterates through the
source buffer and only copies every other byte in the buffer. The results are shown in
Listing 5.3 Output.
Listing 5.3 buffer_copy.js: Various ways to copy data from one Buffer
object to another
Click here to view code image
01 var alphabet = new Buffer('abcdefghijklmnopqrstuvwxyz');
02 console.log(alphabet.toString());
03 // copy full buffer
04 var blank = new Buffer(26);
05 blank.fill();
06 console.log("Blank: " + blank.toString());
07 alphabet.copy(blank);
08 console.log("Blank: " + blank.toString());
09 // copy part of buffer
10 var dashes = new Buffer(26);
11 dashes.fill('-');
12 console.log("Dashes: " + dashes.toString());
13 alphabet.copy(dashes, 10, 10, 15);
14 console.log("Dashes: " + dashes.toString());
15 // copy to and from direct indexes of buffers
16 var dots = new Buffer('-------------------------');
17 dots.fill('.');
18 console.log("dots: " + dots.toString());
19 for (var i=0; i < dots.length; i++){
20 if (i % 2) { dots[i] = alphabet[i]; }
21 }
22 console.log("dots: " + dots.toString());
Listing 5.3 Output buffer_copy.js: Copying data from one Buffer
object to another
Click here to view code image
C:\books\node\ch05>node buffer_copy.js
abcdefghijklmnopqrstuvwxyz
Blank:
Blank: abcdefghijklmnopqrstuvwxyz
Dashes: --------------------------
Dashes: ----------klmno-----------
dots: .........................
dots: .b.d.f.h.j.l.n.p.r.t.v.x.

Slicing Buffers
Another important aspect of working with buffers is the ability to divide them into
slices. A slice is a section of a buffer between a starting index and an ending index.
Slicing a buffer allows you to manipulate a specific chunk.
Slices are created using the slice([start], [end]) method, which returns a
Buffer object that points to start index of the original buffer and has a length of
end – start. Keep in mind that a slice is different from a copy. If you edit a copy,
the original does not change. However, if you edit a slice, the original does change.
Listing 5.4 illustrates using slices. Note that when the slice is altered in lines 5 and 6,
it also alters the original buffer, as shown in Listing 5.4 Output.
Listing 5.4 buffer_slice.js: Creating and manipulating slices of a Buffer
object
Click here to view code image
1 var numbers = new Buffer("123456789");
2 console.log(numbers.toString());
3 var slice = numbers.slice(3, 6);
4 console.log(slice.toString());
5 slice[0] = '#'.charCodeAt(0);
6 slice[slice.length-1] = '#'.charCodeAt(0);
7 console.log(slice.toString());
8 console.log(numbers.toString());
Listing 5.4 Output buffer_slice.js: Slicing and modifying a Buffer
object
Click here to view code image
C:\books\node\ch05>node buffer_slice.js
123456789
456
#5#
123#5#789
Concatenating Buffers
You can also concatenate two or more Buffer objects together to form a new
buffer. The concat(list, [totalLength]) method accepts an array of

Buffer objects as the first parameter, and totalLength defines the maximum
bytes in the buffer as an optional second argument. The Buffer objects are
concatenated in the order they appear in the list, and a new Buffer object is
returned containing the contents of the original buffers up to totalLength bytes.
If you do not provide a totalLength parameter, concat() figures it out for
you. However, it has to iterate through the list, so providing a totalLength value
is faster.
Listing 5.5 concatenates a base Buffer with one buffer and then another, as shown
in Listing 5.5 Output.
Listing 5.5 buffer_concat.js: Concatenating Buffer objects
Click here to view code image
1 var af = new Buffer("African Swallow?");
2 var eu = new Buffer("European Swallow?");
3 var question = new Buffer("Air Speed Velocity of an ");
4 console.log(Buffer.concat([question, af]).toString());
5 console.log(Buffer.concat([question, eu]).toString());
Listing 5.5 Output buffer_concat.js: Concatenating Buffer objects
Click here to view code image
C:\books\node\ch05>node buffer_concat.js
Air Speed Velocity of an African Swallow?
Air Speed Velocity of an European Swallow?
Using the Stream Module to Stream Data
An important module in Node.js is the stream module. Data streams are memory
structures that are readable, writable, or both. Streams are used all over in Node.js,
for example, when accessing files or reading data from HTTP requests and in several
other areas. This section covers using the Stream module to create streams as well
as read and write data from them.
The purpose of streams is to provide a common mechanism to transfer data from one
location to another. They also expose events, such as when data is available to be
read, when an error occurs, and so on. You can then register listeners to handle the

data when it becomes available in a stream or is ready to be written to.
Some common uses for streams are HTTP data and files. You can open a file as a
readable stream or access the data from an HTTP request as a readable stream and
read bytes out as needed. Additionally, you can create your own custom streams. The
following sections describe the process of creating and using readable, writable,
duplex, and transform streams.
Readable Streams
Readable streams provide a mechanism to easily read data coming into your
application from another source. Some common examples of readable streams are
HTTP responses on the client
HTTP requests on the server
fs read streams
zlib streams
crypto streams
TCP sockets
Child processes stdout and stderr
process.stdin
Readable streams provide the read([size]) method to read data where size
specifies the number of bytes to read from the stream. read() can return a
String, Buffer or null. Readable streams also expose the following events:
readable: Emitted when a chunk of data can be read from the stream.
data: Similar to readable except that when data event handlers are
attached, the stream is turned into flowing mode, and the data handler is
called continuously until all data has been drained.
end: Emitted by the stream when data will no longer be provided.
close: Emitted when the underlying resource, such as a file, has been closed.
error: Emitted when an error occurs receiving data.
Readable stream objects also provide a number of functions that allow you to read
and manipulate them. Table 5.4 lists the methods available on a Readable stream

object.
Table 5.4 Methods available on Readable stream objects
Method Description
read([size]) Reads data from the stream. The data can be a
String, Buffer, or null, meaning there is no
more data left. If a size argument is read, then
the data is limited to that number of bytes.
setEncoding(encoding) Sets the encoding to use when returning String
in the read() request.
pause() This pauses data events from being emitted by the
object.
resume() The resumes data events being emitted by the
object.
pipe(destination,
[options])
This pipes the output of this stream into a
Writable stream object specified by
destination. options in a JavaScript
object. For example, {end:true} ends the
Writable destination when the Readable
ends.
unpipe([destination]) Disconnects this object from the Writable
destination.
To implement your own custom Readable stream object, you need to first inherit
the functionality for Readable streams. The simplest way to do that is to use the
util module’s inherits() method:
var util = require('util');
util.inherits(MyReadableStream, stream.Readable);
Then you create an instance of the object call:
stream.Readable.call(this, opt);
You also need to implement a _read() method that calls push() to output the
data from the Readable object. The push() call should push either a String,
Buffer, or null.

Listing 5.6 illustrates the basics of implementing and reading from a Readable
stream. Notice that the Answers() class inherits from Readable and then
implements the Answers.prototye._read() function to handle pushing data
out. Also notice that on line 18, a direct read() call reads the first item from the
stream and then the rest of the items are read by the data event handler defined on
lines 19–21. Listing 5.6 Output shows the result.
Listing 5.6 stream_read.js: Implementing a Readable stream object
Click here to view code image
01 var stream = require('stream');
02 var util = require('util');
03 util.inherits(Answers, stream.Readable);
04 function Answers(opt) {
05 stream.Readable.call(this, opt);
06 this.quotes = ["yes", "no", "maybe"];
07 this._index = 0;
08 }
09 Answers.prototype._read = function() {
10 if (this._index > this.quotes.length){
11 this.push(null);
12 } else {
13 this.push(this.quotes[this._index]);
14 this._index += 1;
15 }
16 };
17 var r = new Answers();
18 console.log("Direct read: " + r.read().toString());
19 r.on('data', function(data){
20 console.log("Callback read: " + data.toString());
21 });
22 r.on('end', function(data){
23 console.log("No more answers.");
24 });
Listing 5.6 Output stream_read.js: Implementing a custom Readable
object
Click here to view code image
C:\books\node\ch05>node stream_read.js
Direct read: yes
Callback read: no
Callback read: maybe
No more answers.

Writable Streams
Writable streams are designed to provide a mechanism to write data into a form
that can easily be consumed in another area of code. Some common examples of
Writable streams are
HTTP requests on the client
HTTP responses on the server
fs write streams
zlib streams
crypto streams
TCP sockets
Child process stdin
process.stdout, process.stderr
Writable streams provide the write(chunk, [encoding],
[callback]) method to write data into the stream, where chunk contains the
data to write, encoding specifies the string encoding if necessary, and callback
specifies a callback function to execute when the data has been fully flushed. The
write() function returns true if the data was written successfully. Writable
streams also expose the following events:
drain: After a write() call returns false, the drain event is emitted to
notify listeners when it is okay to begin writing more data.
finish: Emitted when end() is called on the Writable object; all data is
flushed and no more data will be accepted.
pipe: Emitted when the pipe() method is called on a Readable stream to
add this Writable as a destination.
unpipe: Emitted when the unpipe() method is called on a Readable
stream to remove this Writable as a destination.
Writable stream objects also provide a number of methods that allow you to write
and manipulate them. Table 5.5 lists the methods available on a Writable stream
object.
Table 5.5 Methods available on Writable stream objects

Method Description
write(chunk,
[encoding],
[callback])
Writes the data chunk to the stream object’s data location. The
data can be a String or Buffer. If encoding is specified,
then it is used to encode string data. If callback is specified,
then it is called after the data has been flushed.
end([chunk],
[encoding],
[callback])
Same as write(), except it puts the Writable into a state
where it no longer accepts data and sends the finish event.
To implement your own custom Writable stream object, you need to first inherit
the functionality for Writable streams. The simplest way to do that is to use the
util module’s inherits() method:
var util = require('util');
util.inherits(MyWritableStream, stream.Writable);
Then you create an instance of the object call:
stream. Writable.call(this, opt);
You also need to implement a _write(data, encoding, callback)
method that stores the data for the Writable object. Listing 5.7 illustrates the
basics of implementing and writing to a Writable stream. Listing 5.7 Output
shows the result.
Listing 5.7 stream_write.js: Implementing a Writable stream object
Click here to view code image
01 var stream = require('stream');
02 var util = require('util');
03 util.inherits(Writer, stream.Writable);
04 function Writer(opt) {
05 stream.Writable.call(this, opt);
06 this.data = new Array();
07 }
08 Writer.prototype._write = function(data, encoding, callback) {
09 this.data.push(data.toString('utf8'));
10 console.log("Adding: " + data);
11 callback();
12 };
13 var w = new Writer();
14 for (var i=1; i<=5; i++){

15 w.write("Item" + i, 'utf8');
16 }
17 w.end("ItemLast");
18 console.log(w.data);
Listing 5.7 Output stream_ write.js: Implementing a custom Writable
object
Click here to view code image
C:\books\node\ch05>node stream_write.js
Adding: Item1
Adding: Item2
Adding: Item3
Adding: Item4
Adding: Item5
Adding: ItemLast
[ 'Item1', 'Item2', 'Item3', 'Item4', 'Item5', 'ItemLast' ]
Duplex Streams
A Duplex stream combines Readable and Writable functionality. A good
example of a duplex stream is a TCP socket connection. You can read and write
from the socket connection once it has been created.
To implement your own custom Duplex stream object, you need to first inherit the
functionality for Duplex streams. The simplest way to do that is to use the util
module’s inherits() method:
var util = require('util');
util.inherits(MyDuplexStream, stream.Duplex);
Then you create an instance of the object call:
stream. Duplex.call(this, opt);
The opt parameter when creating a Duplex stream accepts an object with the
property allowHalfOpen set to true or false. If this option is true, then the
readable side stays open even after the writable side has ended and vice versa. If this
option is set to false, ending the writable side also ends the readable side and vice
versa.

When you implement a Duplex stream, you need to implement both a
_read(size) and a _write(data, encoding, callback) method when
prototyping your Duplex class.
Listing 5.8 illustrates the basics of implementing writing to and reading from a
Duplex stream. The example is basic but shows the main concepts. The
Duplexer() class inherits from the Duplex stream and implements a
rudimentary _write() function that stores data in an array in the object. The
_read() function uses shift() to get the first item in the array and then ends by
pushing null if it is equal to "stop", pushes it if there is a value, or sets a timeout
timer to call back to the _read() function if there is no value.
In Listing 5.8 Output, notice that the first two writes "I think, " and
"therefore" are read together. This is because both were pushed to the
Readable before the data event was triggered.
Listing 5.8 stream_duplex.js: Implementing a Duplex stream object
Click here to view code image
01 var stream = require('stream');
02 var util = require('util');
03 util.inherits(Duplexer, stream.Duplex);
04 function Duplexer(opt) {
05 stream.Duplex.call(this, opt);
06 this.data = [];
07 }
08 Duplexer.prototype._read = function readItem(size) {
09 var chunk = this.data.shift();
10 if (chunk == "stop"){
11 this.push(null);
12 } else {
13 if(chunk){
14 this.push(chunk);
15 } else {
16 setTimeout(readItem.bind(this), 500, size);
17 }
18 }
19 };
20 Duplexer.prototype._write = function(data, encoding, callback) {
21 this.data.push(data);
22 callback();
23 };
24 var d = new Duplexer();
25 d.on('data', function(chunk){

26 console.log('read: ', chunk.toString());
27 });
28 d.on('end', function(){
29 console.log('Message Complete');
30 });
31 d.write("I think, ");
32 d.write("therefore ");
33 d.write("I am.");
34 d.write("Rene Descartes");
35 d.write("stop");
Listing 5.8 Output stream_ duplex.js: Implementing a custom Duplex
object
Click here to view code image
C:\books\node\ch05>node stream_duplex.js
read: I think,
read: therefore
read: I am.
read: Rene Descartes
Message Complete
Transform Streams
Another type of stream is the Transform stream. A Transform stream extends
the Duplex stream but modifies the data between the Writable stream and the
Readable stream. This can be useful when you need to modify data from one
system to another. Some examples of Transform streams are
zlib streams
crypto streams
A major difference between the Duplex and the Transform streams is that for
Transforms you do not need to implement the _read() and _write()
prototype methods. These are provided as pass-through functions. Instead, you
implement the _transform(chunk, encoding, callback) and
_flush(callback) methods. The _transform() method should accept the
data from write() requests, modify it, and then push() out the modified data.
Listing 5.9 illustrates the basics of implementing a Transform stream. The stream
accepts JSON strings, converts them to objects, and then emits a custom event

named object that sends the object to any listeners. The _transform()
function also modifies the object to include a handled property and then sends a
string form on. Notice that lines 18–21 implement the object event handler
function that displays certain attributes. In Listing 5.9 Output, notice that the JSON
strings now include the handled property.
Listing 5.9 stream_transform.js: Implementing a Transform stream
object
Click here to view code image
01 var stream = require("stream");
02 var util = require("util");
03 util.inherits(JSONObjectStream, stream.Transform);
04 function JSONObjectStream (opt) {
05 stream.Transform.call(this, opt);
06 };
07 JSONObjectStream.prototype._transform = function (data, encoding, callback) {
08 object = data ? JSON.parse(data.toString()) : "";
09 this.emit("object", object);
10 object.handled = true;
11 this.push(JSON.stringify(object));
12 callback();
13 };
14 JSONObjectStream.prototype._flush = function(cb) {
15 cb();
16 };
17 var tc = new JSONObjectStream();
18 tc.on("object", function(object){
19 console.log("Name: %s", object.name);
20 console.log("Color: %s", object.color);
21 });
22 tc.on("data", function(data){
23 console.log("Data: %s", data.toString());
24 });
25 tc.write('{"name":"Carolinus", "color": "Green"}');
26 tc.write('{"name":"Solarius", "color": "Blue"}');
27 tc.write('{"name":"Lo Tae Zhao", "color": "Gold"}');
28 tc.write('{"name":"Ommadon", "color": "Red"}');
Listing 5.9 Output stream_transform.js: Implementing a custom
Transform object
Click here to view code image
C:\books\node\ch05>node stream_transform.js
Name: Carolinus

Color: Green
Data: {"name":"Carolinus","color":"Green","handled":true}
Name: Solarius
Color: Blue
Data: {"name":"Solarius","color":"Blue","handled":true}
Name: Lo Tae Zhao
Color: Gold
Data: {"name":"Lo Tae Zhao","color":"Gold","handled":true}
Name: Ommadon
Color: Red
Data: {"name":"Ommadon","color":"Red","handled":true}
Piping Readable Streams to Writable Streams
One of the coolest things you can do with stream objects is to chain Readable
streams to Writable streams using the pipe(writableStream,
[options]) function. This does exactly what the name implies. The output from
the Readable stream is directly input into the Writable stream. The options
parameter accepts an object with the end property set to true or false. When
end is true, the Writable stream ends when the Readable stream ends. This
is the default behavior. For example:
readStream.pipe(writeStream, {end:true});
You can also break the pipe programmatically using the
unpipe(destinationStream) option. Listing 5.10 implements a Readable
stream and a Writable stream and then uses the pipe() function to chain them
together. To show you the basic process, the data input from the _write() method
is output to the console in Listing 5.10 Output.
Listing 5.10 stream_piped.js: Piping a Readable stream into a
Writable stream
Click here to view code image
01 var stream = require('stream');
02 var util = require('util');
03 util.inherits(Reader, stream.Readable);
04 util.inherits(Writer, stream.Writable);
05 function Reader(opt) {
06 stream.Readable.call(this, opt);
07 this._index = 1;
08 }

09 Reader.prototype._read = function(size) {
10 var i = this._index++;
11 if (i > 10){
12 this.push(null);
13 } else {
14 this.push("Item " + i.toString());
15 }
16 };
17 function Writer(opt) {
18 stream.Writable.call(this, opt);
19 this._index = 1;
20 }
21 Writer.prototype._write = function(data, encoding, callback) {
22 console.log(data.toString());
23 callback();
24 };
25 var r = new Reader();
26 var w = new Writer();
27 r.pipe(w);
Listing 5.10 Output stream_ piped.js: Implementing stream piping
Click here to view code image
C:\books\node\ch05>node stream_piped.js
Item 1
Item 2
Item 3
Item 4
Item 5
Item 6
Item 7
Item 8
Item 9
Item 10
Compressing and Decompressing Data with
Zlib
When working with large systems or moving large amounts of data around, it is
helpful to be able to compress and decompress the data. Node.js provides an
excellent library in the Zlib module that allows you to easily and efficiently
compress and decompress data in buffers.

Keep in mind that compressing data takes CPU cycles. So you should be certain of
the benefits of compressing the data before incurring the
compression/decompression cost. The compression methods supported by Zlib are
gzip/gunzip: Standard gzip compression
deflate/inflate: Standard deflate compression algorithm based on Huffman
coding
deflateRaw/inflateRaw: Deflate compression algorithm on a raw buffer
Compressing and Decompressing Buffers
The Zlib module provides several helper functions that make it easy to compress
and decompress data buffers. These all use the same basic format of
function(buffer, callback), where function is the compression/decompression
method, buffer is the buffer to be compressed/decompressed, and callback is the
callback function executed after the compression/decompression occurs.
The simplest way to illustrate buffer compression/decompression is to show you
some examples. Listing 5.11 provides several compression/decompression examples,
and the size result of each example is shown in Listing 5.11 Output.
Click here to view code image
Listing 5.11 zlib_buffers.js: Compressing/decompressing buffers using
the Zlib module
01 var zlib = require("zlib");
02 var input = '...............text...............';
03 zlib.deflate(input, function(err, buffer) {
04 if (!err) {
05 console.log("deflate (%s): ", buffer.length, buffer.toString('base64'));
06 zlib.inflate(buffer, function(err, buffer) {
07 if (!err) {
08 console.log("inflate (%s): ", buffer.length, buffer.toString());
09 }
10 });
11 zlib.unzip(buffer, function(err, buffer) {
12 if (!err) {
13 console.log("unzip deflate (%s): ", buffer.length, buffer.toString());
14 }
15 });
16 }

17 });
18
19 zlib.deflateRaw(input, function(err, buffer) {
20 if (!err) {
21 console.log("deflateRaw (%s): ", buffer.length, buffer.toString('base64'));
22 zlib.inflateRaw(buffer, function(err, buffer) {
23 if (!err) {
24 console.log("inflateRaw (%s): ", buffer.length, buffer.toString());
25 }
26 });
27 }
28 });
29
30 zlib.gzip(input, function(err, buffer) {
31 if (!err) {
32 console.log("gzip (%s): ", buffer.length, buffer.toString('base64'));
33 zlib.gunzip(buffer, function(err, buffer) {
34 if (!err) {
35 console.log("gunzip (%s): ", buffer.length, buffer.toString());
36 }
37 });
38 zlib.unzip(buffer, function(err, buffer) {
39 if (!err) {
40 console.log("unzip gzip (%s): ", buffer.length, buffer.toString());
41 }
42 });
43 }
44 });
Listing 5.11 Output zilb_ buffers.js: Compressing/decompressing
buffers
Click here to view code image
C:\books\node\ch05>node zlib_buffers.js
deflate (18): eJzT00MBJakVJagiegB9Zgcq
deflateRaw (12): 09NDASWpFSWoInoA
gzip (30): H4sIAAAAAAAAC9PTQwElqRUlqCJ6AIq+x+AiAAAA
inflate (34): ...............text...............
unzip deflate (34): ...............text...............
inflateRaw (34): ...............text...............
gunzip (34): ...............text...............
unzip gzip (34): ...............text...............
Compressing/Decompressing Streams

Compressing/decompressing streams using Zlib is slightly different from
compressing/decompressing buffers. Instead, you use the pipe() function to pipe
the data from one stream through the compression/decompression object into another
stream. This can apply to compressing any Readable streams into Writable
streams.
A good example of doing this is compressing the contents of a file using
fs.ReadStream and fs.WriteStream. Listing 5.12 shows an example of
compressing the contents of a file using a zlib.Gzip() object and then
decompressing back using a zlib.Gunzip() object.
Listing 5.12 zlib_file.js: Compressing/decompressing a file stream using
the Zlib module
Click here to view code image
01 var zlib = require("zlib");
02 var gzip = zlib.createGzip();
03 var fs = require('fs');
04 var inFile = fs.createReadStream('zlib_file.js');
05 var outFile = fs.createWriteStream('zlib_file.gz');
06 inFile.pipe(gzip).pipe(outFile);
07 gzip.flush();
08 outFile.close();
09 var gunzip = zlib.createGunzip();
10 var inFile = fs.createReadStream('zlib_file.gz');
11 var outFile = fs.createWriteStream('zlib_file.unzipped');
12 inFile.pipe(gunzip).pipe(outFile);
Summary
At the heart of most intense web applications and services is a lot of data streaming
from one system to another. In this chapter, you learned how to use functionality
built into Node.js to work with JSON data, manipulate binary buffer data, and utilize
data streams. You also learned about compressing buffered data as well as running
data streams through compression/decompression.
Next
In the next chapter, you see how to interact with the file system from Node.js. You
get a chance to read/write files, create directories, and read file system information.
6
Accessing the File System from Node.js
Interacting with the file system in Node.js is important especially if you need to
manage dynamic files to support a web application or service. Node.js provides a
good interface for interacting with the file system in the fs module. This module
provides the standard file access APIs that are available in most languages to open,
read, write, and interact with files.
This chapter provides you with the fundamentals necessary to access the file system
from Node.js applications. You should come away with the ability to create, read,
and modify files as well as navigate the directory structure. You also learn how to
access file and folder information as well as delete, truncate, and rename files and
folders.
For all the file system calls discussed in this chapter, you need to have loaded the fs
module, for example:
var fs = require('fs');
Synchronous Versus Asynchronous File System
Calls
The fs module provided in Node.js makes almost all functionality available in two
forms: asynchronous and synchronous. For example, there is the asynchronous form
write() and the synchronous form writeSync(). It is important to understand
the difference when you are implementing your code.
Synchronous file system calls block until the call completes and then control is
released back to the thread. This has advantages but can also cause severe

performance issues in Node.js if synchronous calls block the main event thread or
too many of the background thread pool threads. Therefore, synchronous file system
calls should be limited in use when possible.
Asynchronous calls are placed on the event queue to be run later. This allows the
calls to fit into the Node.js event model; however, this can be tricky when executing
your code because the calling thread continues to run before the asynchronous call
gets picked up by the event loop.
For the most part, the underlying functionality of both synchronous and
asynchronous file system calls is exactly the same. They both accept the same
parameters with the exception that all asynchronous calls require an extra parameter
at the end, which is a callback function to execute when the file system call
completes.
The following list describes the important differences between synchronous and
asynchronous file system calls in Node.js:
Asynchronous calls require a callback function as an extra parameter. The
callback function is executed when the file system request completes, and
typically contains an error as its first parameter.
Exceptions are automatically handled by asynchronous calls, and an error object
is passed as the first parameter if an exception occurs. Exceptions in
synchronous calls must be handled by your own try/catch blocks of code.
Synchronous calls are run immediately, and execution does not return to the
current thread until they are complete. Asynchronous calls are placed on the
event queue, and execution returns to the running thread code, but the actual
call will not execute until picked up by the event loop.
Opening and Closing Files
Node provides synchronous and asynchronous methods for opening files. Once a file
is opened, you can read data from it or write data to it depending on the flags used to
open the file. To open files in a Node.js app, use one of the following statements for
asynchronous or synchronous:
fs.open(path, flags, [mode], callback)
fs.openSync(path, flags, [mode])

The path parameter specifies a standard path string for your file system. The
flags parameter specifies what mode to open the file in—read, write, append, and
so on—as described in Table 6.1. The optional mode parameter sets the file access
mode and defaults to 0666, which is readable and writable.
Table 6.1 Flags that define how files are opened
Mode Description
rOpen file for reading. An exception occurs if the file does not exist.
r+ Open file for reading and writing. An exception occurs if the file does not
exist.
rs Open file for reading in synchronous mode. This is not the same as forcing
fs.openSync(). When used, the OS bypasses the local file system
cache. Useful on NFS mounts because it lets you skip the potentially stale
local cache. You should only use this flag if necessary because it can have a
negative impact on performance.
rs+ Same as rs except the file is open file for reading and writing.
wOpen file for writing. The file is created if it does not exist or truncated if it
does exist.
wx Same as w but fails if the path exists.
w+ Open file for reading and writing. The file is created if it does not exist or
truncated if it exists.
wx+ Same as w+ but fails if path exists.
aOpen file for appending. The file is created if it does not exist.
ax Same as a but fails if the path exists.
a+ Open file for reading and appending. The file is created if it does not exist.
ax+ Same as a+ but fails if the path exists.
Once a file has been opened, you need to close it to force flushing changes to disk
and release the OS lock. Closing a file is done using one of the following methods
and passing the file handle to it. In the case of the asynchronous close() call, you
also need to specify a callback function:
fs.close(fd, callback)
fs.closeSync(fd)
The following shows an example of opening and closing a file in asynchronous
mode. Notice that a callback function is specified that receives an err and an fd
parameter. The fd parameter is the file descriptor that you can use to read or write to
the file:
fs.open("myFile", 'w', function(err, fd){
if (!err){
fs.close(fd);
}
});
The following shows an example of opening and closing a file in synchronous mode.
Notice that a there is no callback function and that the file descriptor used to read
and write to the file is returned directly from fs.openSync():
var fd = fs.openSync("myFile", 'w');
fs.closeSync(fd);
Writing Files
The fs module provides four different ways to write data to files. You can write
data to a file in a single call, write chunks using synchronous writes, write chunks
using asynchronous writes, or stream writes through a Writable stream. Each of
these methods accepts either a String or a Buffer object as input. The following
sections describe how to use these methods.
Simple File Write
The simplest method for writing data to a file is to use one of the writeFile()
methods. These methods write the full contents of a String or Buffer to a file.
The following shows the syntax for the writeFile() methods:
fs.writeFile(path, data, [options], callback)
fs.writeFileSync(path, data, [options])
The path parameter specifies the path to the file. The path can be relative or
absolute. The data parameter specifies the String or Buffer object to be
written to the file. The optional options parameter is an object that can contain
encoding, mode, and flag properties that define the string encoding as well as
the mode and flags used when opening the file. The asynchronous method also

requires a callback that is called when the file write has been completed.
Listing 6.1 implements a simple asynchronous fileWrite() request to store a
JSON string of a config object in a file. Listing 6.1 Output shows the output of the
code.
Listing 6.1 file_write.js: Writing a JSON string to a file
Click here to view code image
01 var fs = require('fs');
02 var config = {
03 maxFiles: 20,
04 maxConnections: 15,
05 rootPath: "/webroot"
06 };
07 var configTxt = JSON.stringify(config);
08 var options = {encoding:'utf8', flag:'w'};
09 fs.writeFile('config.txt', configTxt, options, function(err){
10 if (err){
11 console.log("Config Write Failed.");
12 } else {
13 console.log("Config Saved.");
14 }
15 });
Listing 6.1 Output file_write.js: Writing a configuration file
Click here to view code image
C:\books\node\ch06\writing>node file_write.js
Config Saved.
Synchronous File Writing
The synchronous method of file writing writes the data to the file before returning
execution to the running thread. This provides the advantage of allowing you to write
multiple times in the same section of code, but this can be a disadvantage if the file
writes hold up other threads as discussed earlier.
To write to a file synchronously, first open it using openSync() to get a file
descriptor and then use fs.writeSync() to write data to the file. The following
shows the syntax for fs.writeSync():

fs.writeSync(fd, data, offset, length, position)
The fd parameter is the file descriptor returned by openSync(). The data
parameter specifies the String or Buffer object to be written to the file. The
offset parameter specifies the index in the input data to begin reading from; if
you want to begin at the current index in the String or Buffer, this value should
be null. The length specifies the number of bytes to write; specifying null
writes until the end of the data buffer. The position argument specifies the
position in the file to begin writing at; specifying null for this value uses the
current file position.
Listing 6.2 illustrates implementing basic synchronous writing to store a series of
string data in a file. Listing 6.2 Output shows the result.
Listing 6.2 file_write_sync.js: Performing synchronous writes to a file
Click here to view code image
1 var fs = require('fs');
2 var veggieTray = ['carrots', 'celery', 'olives'];
3 fd = fs.openSync('veggie.txt', 'w');
4 while (veggieTray.length){
5 veggie = veggieTray.pop() + " ";
6 var bytes = fs.writeSync(fd, veggie, null, null);
7 console.log("Wrote %s %dbytes", veggie, bytes);
8 }
9 fs.closeSync(fd);
Listing 6.2 Output file_write_sync.js: Writing synchronously to a file
Click here to view code image
C:\books\node\ch06\writing>node file_write_sync.js
Wrote olives 7bytes
Wrote celery 7bytes
Wrote carrots 8bytes
Asynchronous File Writing
The asynchronous method of file writing puts the write request on the event queue
and then returns control back to the calling code. The actual write does not take place
until the event loop picks up the write request and executes it. You need to be careful
when performing multiple asynchronous write requests on the same file, since you

cannot guarantee what order they will be executed unless you wait for the first write
callback before executing the next. Typically the simplest way to do this is to nest
writes inside the callback from the previous write. Listing 6.3 illustrates that process.
To write to a file asynchronously, first open it using open() and then after the
callback from the open request has executed, use fs.write() to write data to the
file. The following shows the syntax for fs.write():
fs.writeSync(fd, data, offset, length, position, callback)
The fd parameter is the file descriptor returned by openSync(). The data
parameter specifies the String or Buffer object to be written to the file. The
offset parameter specifies the index in the input data to begin reading data; if you
want to begin at the current index in the String or Buffer, this value should be
null. The length specifies the number of bytes to write; specifying null writes
until the end of the buffer. The position argument specifies the position in the file
to begin writing at; specifying null for this value uses the current file position.
The callback argument must be a function that can accept two parameters,
error and bytes, where error is an error that occurred during the write and
bytes specifies the number of bytes written.
Listing 6.3 illustrates implementing basic asynchronous writing to store a series of
string data in a file. Notice that the callback specified in lines 18–20 in the open()
callback calls the writeFruit() function and passes the file descriptor. Also
notice that the write() callback specified in lines 6–13 also calls
writeFruit() and passes the file descriptor. This ensures that the asynchronous
write completes before executing another. Listing 6.3 Output shows the output of the
code.
Listing 6.3 file_write_async.js: Performing asynchronous writes to a file
Click here to view code image
01 var fs = require('fs');
02 var fruitBowl = ['apple', 'orange', 'banana', 'grapes'];
03 function writeFruit(fd){
04 if (fruitBowl.length){
05 var fruit = fruitBowl.pop() + " ";
06 fs.write(fd, fruit, null, null, function(err, bytes){
07 if (err){
08 console.log("File Write Failed.");
09 } else {

10 console.log("Wrote: %s %dbytes", fruit, bytes);
11 writeFruit(fd);
12 }
13 });
14 } else {
15 fs.close(fd);
16 }
17 }
18 fs.open('fruit.txt', 'w', function(err, fd){
19 writeFruit(fd);
20 });
Listing 6.3 Output file_write_async.js: Writing asynchronously to a file
Click here to view code image
C:\books\node\ch06\writing>node file_write_async.js
Wrote: grapes 7bytes
Wrote: banana 7bytes
Wrote: orange 7bytes
Wrote: apple 6bytes
Streaming File Writing
One of the best methods to use when writing large amounts of data to a file is the
streaming method. This method opens the file as a Writable stream. As discussed
in Chapter 5, “Handling Data I/O in Node.js,” Writable streams can easily be
implemented and linked to Readable streams using the pipe() method, which
makes it easy to write data from a Readable stream source such as an HTTP
request.
To stream data to a file asynchronously, you first need to create a Writable stream
object using the following syntax:
fs.createWriteStream(path, [options])
The path parameter specifies the path to the file and can be relative or absolute.
The optional options parameter is an object that can contain encoding, mode,
and flag properties that define the string encoding as well as the mode and flags
used when opening the file.
Once you have opened the Writable file stream, you can write to it using the

standard stream write(buffer) methods. When you are finished writing, call the
end() method to close the stream.
Listing 6.4 illustrates implementing a basic Writable file stream. Notice that when
the code is finished writing, the end() method is executed on line 13, which
triggers the close event. Listing 6.4 Output shows the output of the code.
Listing 6.4 file_write_stream.js: Implementing a Writable stream to
allow streaming writes to a file
Click here to view code image
01 var fs = require('fs');
02 var grains = ['wheat', 'rice', 'oats'];
03 var options = { encoding: 'utf8', flag: 'w' };
04 var fileWriteStream = fs.createWriteStream("grains.txt", options);
05 fileWriteStream.on("close", function(){
06 console.log("File Closed.");
07 });
08 while (grains.length){
09 var data = grains.pop() + " ";
10 fileWriteStream.write(data);
11 console.log("Wrote: %s", data);
12 }
13 fileWriteStream.end();
Listing 6.4 Output file_write_stream.js: Implementing streaming writes
to a file
Click here to view code image
C:\books\node\ch06\writing>node file_write_stream.js
Wrote: oats
Wrote: rice
Wrote: wheat
File Closed.
Reading Files
The fs module also provides four different ways to read data from files. You can
read data in one large chunk, read chunks of data using synchronous writes, read
chunks of data using asynchronous writes, or stream reads through a Readable
stream. Each of these methods is effective. Which one you should use depends on

the particular needs of your application. The following sections describe how to use
and implement these methods.
Simple File Read
The simplest method for reading data to a file is to use one of the readFile()
methods. These methods read the full contents of a file into a data buffer. The
following shows the syntax for the readFile() methods:
fs.readFile(path, [options], callback)
fs.readFileSync(path, [options])
The path parameter specifies the path to the file and can be relative or absolute.
The optional options parameter is an object that can contain encoding, mode,
and flag properties that define the string encoding as well as the mode and flags
used when opening the file. The asynchronous method also requires a callback
that is called when the file read has been completed.
Listing 6.5 illustrates implementing a simple asynchronous readFile() request to
read a JSON string from a configuration file and then use it to create a config
object. Listing 6.5 Output shows the output of the code.
Listing 6.5 file_read.js: Reading a JSON string file to an object
Click here to view code image
01 var fs = require('fs');
02 var options = {encoding:'utf8', flag:'r'};
03 fs.readFile('config.txt', options, function(err, data){
04 if (err){
05 console.log("Failed to open Config File.");
06 } else {
07 console.log("Config Loaded.");
08 var config = JSON.parse(data);
09 console.log("Max Files: " + config.maxFiles);
10 console.log("Max Connections: " + config.maxConnections);
11 console.log("Root Path: " + config.rootPath);
12 }
13 });
Listing 6.5 Output file_read.js: Reading a configuration file to an object
Click here to view code image

C:\books\node\ch06\reading>node file_read.js
Config Loaded.
Max Files: 20
Max Connections: 15
Root Path: /webroot
Synchronous File Reading
The synchronous method of file reading reads the data from the file before returning
execution to the running thread. This provides the advantage of allowing you to read
multiple times in the same section of code, but this can be a disadvantage if the file
reads hold up other threads as discussed earlier.
To read to a file synchronously, first open it using openSync() to get a file
descriptor and then use readSync() to read data from the file. The following
shows the syntax for readSync():
fs.readSync(fd, buffer, offset, length, position)
The fd parameter is the file descriptor returned by openSync(). The buffer
parameter specifies the Buffer object that data will be read into from the file. The
offset parameter specifies the index in the buffer to begin writing data; if you
want to begin at the current index in the Buffer this value should be null. The
length specifies the number of bytes to read; specifying null writes until the end
of the buffer. The position argument specifies the position in the file to begin
reading from; specifying null for this value uses the current file position.
Listing 6.6 illustrates implementing basic synchronous reading to read a chunk of
string data from a file. Listing 6.6 Output shows the output of the code.
Listing 6.6 file_read_sync.js: Performing synchronous reads from a file
Click here to view code image
01 var fs = require('fs');
02 fd = fs.openSync('veggie.txt', 'r');
03 var veggies = "";
04 do {
05 var buf = new Buffer(5);
06 buf.fill();
07 var bytes = fs.readSync(fd, buf, null, 5);
08 console.log("read %dbytes", bytes);

09 veggies += buf.toString();
10 } while (bytes > 0);
11 fs.closeSync(fd);
12 console.log("Veg g (to get output shown) ies: " + veggies);
Listing 6.6 Output file_read_sync.js: Reading synchronously from a file
Click here to view code image
C:\books\node\ch06\reading>node file_read_sync.js
read 5bytes
read 5bytes
read 5bytes
read 5bytes
read 2bytes
read 0bytes
Veggies: olives celery carrots
Asynchronous File Reading
The asynchronous method of file reading puts the read request on the event queue
and then returns control back to the calling code. The actual read does not take place
until the event loop picks up the read request and executes it. You need to be careful
when performing multiple asynchronous read requests on the same file, since you
cannot guarantee what order they will be executed unless you wait for the first read
callback to execute before executing the next read. Typically the simplest way to do
this is to nest reads inside the callback from the previous read. Listing 6.7 illustrates
that process.
To read from a file asynchronously, first open it using open() and then after the
callback from the open request has executed, use read() to read data from the file.
The following shows the syntax for read():
fs.read(fd, buffer, offset, length, position, callback)
The fd parameter is the file descriptor returned by openSync(). The buffer
parameter specifies the Buffer object that data will be read into from the file. The
offset parameter specifies the index in the buffer to begin reading data; if you
want to begin at the current index in the Buffer, this value should be null. The
length specifies the number of bytes to read; specifying null reads until the end
of the buffer. The position argument specifies the position in the file to begin
reading from; specifying null for this value uses the current file position.

The callback argument must be a function that can accept three parameters:
error, bytes, and buffer. The error parameter is an error that occurred
during the read, bytes specifies the number of bytes read, and buffer is the
buffer with data populated from the read request.
Listing 6.7 illustrates implementing basic asynchronous reading to read chunks of
data from a file. Notice that the callback specified in lines 16–18 in the open()
callback calls the readFruit() function and passes the file descriptor. Also
notice that the read() callback specified in lines 5–13 also calls readFruit()
and passes the file descriptor. This ensures that the asynchronous read completes
before executing another. Listing 6.7 Output shows the output of the code.
Listing 6.7 file_read_async.js: Performing asynchronous reads from a
file
Click here to view code image
01 var fs = require('fs');
02 function readFruit(fd, fruits){
03 var buf = new Buffer(5);
04 buf.fill();
05 fs.read(fd, buf, 0, 5, null, function(err, bytes, data){
06 if ( bytes > 0) {
07 console.log("read %dbytes", bytes);
08 fruits += data;
09 readFruit(fd, fruits);
10 } else {
11 fs.close(fd);
12 console.log ("Fruits: %s", fruits);
13 }
14 });
15 }
16 fs.open('fruit.txt', 'r', function(err, fd){
17 readFruit(fd, "");
18 });
Listing 6.7 Output file_read_async.js: Reading asynchronously from a
file
Click here to view code image
C:\books\node\ch06\reading>node file_read_async.js
read 5bytes
read 5bytes
read 5bytes

read 5bytes
read 5bytes
read 2bytes
Fruits: grapes banana orange apple
Streaming File Reading
One of the best methods to use when reading large amounts of data from a file is the
streaming method. This method opens the file as a Readable stream. As discussed
in Chapter 5, Readable streams can easily be implemented and linked to
Writable streams using the pipe() method. This makes it easy to read data from
a file and inject it into a Writable stream source such as an HTTP response.
To stream data from a file asynchronously, you first need to create a Readable
stream object using the following syntax:
fs.createReadStream(path, [options])
The path parameter specifies the path to the file. The path can be relative or
absolute. The optional options parameter is an object that can contain
encoding, mode, and flag properties that define the string encoding as well as
the mode and flags used when opening the file.
Once you have opened the Readable file stream, you can easily read from it using
the readable event with read() requests or by implementing a data event
handler as shown in Listing 6.8.
Listing 6.8 illustrates implementing a basic Readable file stream. Notice that lines
4–7 implement a data event handler that continuously reads data from the stream.
Listing 6.8 Output shows the output of the code.
Listing 6.8 file_read_stream.js: Implementing a Readable stream to
allow streaming reads from a file
Click here to view code image
01 var fs = require('fs');
02 var options = { encoding: 'utf8', flag: 'r' };
03 var fileReadStream = fs.createReadStream("grains.txt", options);
04 fileReadStream.on('data', function(chunk) {
05 console.log('Grains: %s', chunk);
06 console.log('Read %d bytes of data.', chunk.length);

07 });
08 fileReadStream.on("close", function(){
09 console.log("File Closed.");
10 });
Listing 6.8 Output file_read_stream.js: Implementing streaming reads
from a file
Click here to view code image
C:\books\node\ch06\reading>node file_read_stream.js
Grains: oats rice wheat
Read 16 bytes of data.
File Closed.
Other File System Tasks
In addition to reading and writing files, the fs module also provides functionality
for interacting with the file system—for example, listing files in a directory, looking
at file information, and much more. The following sections cover the most common
file system tasks that you may need to implement when creating Node.js
applications.
Verifying Path Existence
Before doing any kind of read/write operation on a file or directory, you might want
to verify whether the path exists. This can easily be done using one of the following
methods:
fs.exists(path, callback)
fs.existsSync(path)
The fs.existsSync(path) returns true or false based on the path
existence. Just as with any other asynchronous file system call, if you use
fs.exists(), you need to implement a callback that is executed when the call
completes. The callback is passed a Boolean value of true or false
depending on whether the path exists. For example, the following code verifies the
existence of a file named filesystem.js in the current path and displays the
results:

fs.exists('filesystem.js', function (exists) {
console.log(exists ? "Path Exists" : "Path Does Not Exist");
});
Getting File Info
Another common task is to get basic information about file system objects such as
file size, the mode, modify time, whether the entry is a file or folder, and so on. This
information can be obtained using one of the following calls:
fs.stats(path, callback)
fs.statsSync(path)
The fs.statsSync() method returns a Stats object, whereas the
fs.stats() method is executed and the Stats object is passed to the callback
function as the second parameter. The first parameter is error if an error occurs.
Table 6.2 lists some of the most commonly used attributes and methods attached to
the Stats object.
Table 6.2 Attributes and methods of Stats objects for file system entries
Attribute/Method Description
isFile() Returns true if the entry is a file
isDirectory() Returns true if the entry is a directory
isSocket() Returns true if the entry is a socket
dev Specifies the device ID on which the file is located
mode Specifies the access mode of the file
size Specifies the number of bytes in the file
blksize Specifies the block size used to store the file in bytes
blocks Specifies the number of blocks the file is taking on disk
atime Specifies the time the file was last accessed
mtime Specifies the time the file was last modified
ctime Specifies the time the file was created
Listing 6.9 illustrates the use of the fs.stats() call by making the call and then
outputting the results of the object as a JSON string as well as using the isFile(),

isDirector(), and isSocket() calls, as shown in Listing 6.9 Output.
Listing 6.9 file_stats.js: Implementing an fs.stats() call to retrieve
information about a file
Click here to view code image
01 var fs = require('fs');
02 fs.stat('file_stats.js', function (err, stats) {
03 if (!err){
04 console.log('stats: ' + JSON.stringify(stats, null, ' '));
05 console.log(stats.isFile() ? "Is a File" : "Is not a File");
06 console.log(stats.isDirectory() ? "Is a Folder" : "Is not a Folder");
07 console.log(stats.isSocket() ? "Is a Socket" : "Is not a Socket");
08 stats.isDirectory();
09 stats.isBlockDevice();
10 stats.isCharacterDevice();
11 //stats.isSymbolicLink(); //only lstat
12 stats.isFIFO();
13 stats.isSocket();
14 }
15 });
Listing 6.9 Output file_stats.js: Displaying information about a file
Click here to view code image
C:\books\node\ch06>node file_stats.js
stats: {
"dev": 818973644,
"mode": 33206,
"nlink": 1,
"uid": 0,
"gid": 0,
"rdev": 0,
"ino": 1970324837052284,
"size": 535,
"atime": "2016-09-14T18:03:26.572Z",
"mtime": "2013-11-26T21:51:51.148Z",
"ctime": "2014-12-18T17:30:43.340Z",
"birthtime": "2016-09-14T18:03:26.572Z"
}
Is a File
Is not a Folder
Is not a Socket

Listing Files
Another common task when working with the file system is listing files and folders
in a directory. For example, you might want to determine whether the files and
folders need to be cleaned up, you might need to dynamically operate on the
directory structure, and so on.
To access the files in the file system, use one of the following commands to read a
list of entries:
fs.readdir(path, callback)
fs.readdirSync(path)
If readdirSync() is called, an array of strings representing the entry names in
the specified path is returned. In the case of readdir(), the list is passed as the
second parameter to the callback function and an error, if there is one, is passed
as the first.
To illustrate the use of readdir(), Listing 6.10 implements a nested callback
chain to walk the directory structure and output the entries. Notice that the callback
function implements a wrapper to provide closure for the fullPath variable, and
that the WalkDirs() function loops by being called by the asynchronous callback
function, as shown in Listing 6.10 Output.
Listing 6.10 file_readdir.js: Implementing a callback chain to walk down
and output the contents of a directory structure
Click here to view code image
01 var fs = require('fs');
02 var Path = require('path');
03 function WalkDirs(dirPath){
04 console.log(dirPath);
05 fs.readdir(dirPath, function(err, entries){
06 for (var idx in entries){
07 var fullPath = Path.join(dirPath, entries[idx]);
08 (function(fullPath){
09 fs.stat(fullPath, function (err, stats){
10 if (stats.isFile()){
11 console.log(fullPath);
12 } else if (stats.isDirectory()){
13 WalkDirs(fullPath);
14 }
15 });

16 })(fullPath);
17 }
18 });
19 }
20 WalkDirs("../ch06");
Listing 6.10 Output file_readdir.js: Iteratively walking the directory
structure using chained asynchronous callbacks
Click here to view code image
C:\books\node\ch06>node file_readdir.js
../ch06
..\ch06\file_readdir.js
..\ch06\filesystem.js
..\ch06\data
..\ch06\file_stats.js
..\ch06\file_folders.js
..\ch06\renamed
..\ch06\reading
..\ch06\writing
..\ch06\data\config.txt
..\ch06\data\folderA
..\ch06\data\grains.txt
..\ch06\data\fruit.txt
..\ch06\reading\file_read.js
..\ch06\data\veggie.txt
..\ch06\data\log.txt
..\ch06\data\output.txt
..\ch06\writing\file_write.js
..\ch06\reading\file_read_async.js
..\ch06\reading\file_read_sync.js
..\ch06\reading\file_read_stream.js
..\ch06\writing\file_write_async.js
..\ch06\writing\file_write_stream.js
..\ch06\writing\file_write_sync.js
..\ch06\data\folderA\folderC
..\ch06\data\folderA\folderB
..\ch06\data\folderA\folderB\folderD
..\ch06\data\folderA\folderC\folderE
Deleting Files
Another common task when working with files is deleting them to clean up data or
make more room on the file system. To delete a file from Node.js, use one of the
following commands:
fs.unlink(path, callback)
fs.unlinkSync(path)
The unlinkSync(path) returns true or false based on whether the delete is
successful. The asynchronous unlink() call passes back an error value to the
callback function if an error is encountered when deleting the file.
The following code snippet illustrates the process of deleting a file named new.txt
using the unlink() asynchronous fs call:
fs.unlink("new.txt", function(err){
console.log(err ? "File Delete Failed" : "File Deleted");
});
Truncating Files
Truncating a file means reducing the size of the file by setting the end to a smaller
value than the current size. You might want to truncate a file that grows continuously
but does not contain critical data, such as a temporary log. To truncate a file, use one
the following fs calls and pass in the number of bytes you want the file to contain
when the truncation completes:
fs.truncate(path, len, callback)
fs.truncateSync(path, len)
The truncateSync(path) returns true or false based on whether the file is
successfully truncated. The asynchronous truncate() call passes an error value
to the callback function if an error is encountered when truncating the file.
The following code snippet illustrates the process of truncating a file named
log.txt to zero bytes.
fs.truncate("new.txt", function(err){
console.log(err ? "File Truncate Failed" : "File Truncated");
});
Making and Removing Directories
At times you may need to implement a directory structure for files being stored by
your Node.js application. The fs module provides the functionality to add and
remove directories as necessary.
To add a directory from Node.js, use one of the following fs calls. The path can be
absolute or relative. The optional mode parameter allows you to specify the access
mode for the new directory.
fs.mkdir(path, [mode], callback)
fs.mkdirSync(path, [mode])
The mkdirSync(path) returns true or false based on whether the directory
is successfully created. The asynchronous mkdir() call passes an error value to the
callback function if an error is encountered when creating the directory.
Keep in mind that when using the asynchronous method, you need to wait for the
callback for the creation of the directory before creating a subdirectory. The
following code snippet shows how to chain the creation of a subdirectory structure
together:
Click here to view code image
fs.mkdir("./data/folderA", function(err){
fs.mkdir("./data/folderA/folderB", function(err){
fs.mkdir("./data/folderA/folderB/folderD", function(err){
});
});
fs.mkdir("./data/folderA/folderC", function(err){
fs.mkdir("./data/folderA/folderC/folderE", function(err){
});
});
});
To delete a directory from Node.js, use one of the following fs calls. The path can
be absolute or relative.
fs.rmdir(path, callback)
fs.rmdirSync(path)
The rmdirSync(path) returns true or false based on whether the directory
is successfully deleted. The asynchronous rmdir() call passes an error value to the
callback function if an error is encountered when deleting the directory.
Just as with the mkdir() calls, keep in mind that when using the asynchronous
method, you need to wait for the callback of the deletion of the directory before
deleting the parent directory. The following code snippet shows how to chain the
deletion of a subdirectory structure together:
Click here to view code image
fs.rmdir("./data/folderA/folderB/folderC", function(err){
fs.rmdir("./data/folderA/folderB", function(err){
fs.rmdir("./data/folderD", function(err){
});
});
fs.rmdir("./data/folderA/folderC", function(err){
fs.rmdir("./data/folderE", function(err){
});
});
});
Renaming Files and Directories
You might also need to rename files and folders in your Node.js application to make
room for new data, archive old data, or apply changes made by a user. Renaming
files and folders uses the fs calls shown here:
fs.rename(oldPath, newPath, callback)
fs.renameSync(oldPath, newPath)
The oldPath specifies the existing file or directory path, and the newPath
specifies the new name. The renameSync(path) returns true or false based
on whether the file or directory is successfully renamed. The asynchronous
rename() call passes an error value to the callback function if an error is
encountered when renaming the file or directory.
The following code snippet illustrates implementing fs calls to rename a file named
old.txt to new.txt and a directory named testDir to renamedDir:
Click here to view code image
fs.rename("old.txt", "new.txt", function(err){
console.log(err ? "Rename Failed" : "File Renamed");
});
fs.rename("testDir", "renamedDir", function(err){
console.log(err ? "Rename Failed" : "Folder Renamed");
});
Watching for File Changes
Although not entirely stable, the fs module provides a useful tool to watch a file and
execute a callback function when the file changes. This can be useful if you want to
trigger events to occur when a file is modified, but do not want to continually poll
from your application directly. This does incur some overhead in the underlying OS,
so you should use watches sparingly.
To implement a watch on a file, use the following command passing the path to the
file you want to watch. You can also pass in options, which is an object that
contains persistent and interval properties. The persistent property is
true if you want the process to continue to run as long as files are being watched.
The interval property specifies the time in milliseconds that you want the file to
be polled for changes:
fs.watchFile(path, [options], callback)
When a file change occurs, the callback function is executed and passes a current
and previous Stats object.
The following code example monitors a file named log.txt at an interval of every
5 seconds and uses the Stats object to output the current and previous times the
file was modified:
Click here to view code image
fs.watchFile("log.txt", {persistent:true, interval:5000}, function (curr, prev) {
console.log("log.txt modified at: " + curr.mtime);
console.log("Previous modification was: " + prev.mtime);
});
Summary
Node.js provides the fs module that allows you to interact with the file system. The
fs module allows you to create, read, and modify files. You can also use the fs
module to navigate the directory structure, look at information about files and
folders, and change the directory structure by deleting and renaming files and
folders.
Next
The next chapter focuses on using the http module to implement basic webservers.
You see how to parse query strings and also how to implement a basic webserver in
Node.js.
7
Implementing HTTP Services in
Node.js
One of the most important aspects of Node.js is the ability to quickly implement
HTTP and HTTPS servers and services. Node.js provides the http and https
modules out of the box, and they provide the basic framework to do most everything
you need from an HTTP and HTTPS standpoint. In fact, it is not difficult to
implement a full webserver using just the http module.
That said, you will likely use a different module, such as express, to implement a
full-on webserver. This is because the http module is pretty low level. It doesn’t
provide calls to handle routing, cookies, caching, and so on. When you get to the
Express chapters later in this book, you will see the advantages it provides.
What you will more likely be using the http module for is implementing backend
web services for your applications to use. That is where the http module becomes
an invaluable tool in your arsenal. You can create basic HTTP servers that provide
an interface for communications behind your firewall and then basic HTTP clients
that interact with those services.
Therefore, this chapter focuses on understanding the objects that come into play
when implementing clients and servers using the http module. The examples in
this chapter are basic so that they are easy to consume and expand on.
Processing URLs
The Uniform Resource Locator (URL) acts as an address label for the HTTP server
to handle requests from the client. It provides all the information needed to get the
request to the correct server on a specific port and access the proper data.
The URL can be broken down into several different components, each providing a
basic piece of information for the webserver on how to route and handle the HTTP
request from the client. Figure 7.1 illustrates the basic structure of a URL and the
components that may be included. Not all these components are included in every
HTTP request. For example, most requests do not include the auth component, and
many do not include a query string or hash location.

Figure 7.1 Basic components that can be included in a URL
Understanding the URL Object
HTTP requests from the client include the URL string with the information shown in
Figure 7.1. To use the URL information more effectively, Node.js provides the url
module that provides functionality to convert the URL string into a URL object.
To create a URL object from the URL string, pass the URL string as the first
parameter to the following method:
url.parse(urlStr, [parseQueryString], [slashesDenoteHost])
The url.parse() method takes the URL string as the first parameter. The
parseQueryString parameter is a Boolean that when true also parses the
query string portion of the URL into an object literal. The default is false. The
slashesDenoteHost is also a Boolean that when true parses a URL with the
format of //host/path to {host: 'host', pathname: '/path'}
instead of {pathname: '//host/path'}. The default is false.
You can also convert a URL object into a string form using the following
url.parse() method. Table 7.1 lists the attributes of the URL objects created by
url.parse():
url.format(urlObj)
The following shows an example of parsing a URL string into an object and then
converting it back into a string:
Click here to view code image
var url = require('url');
var urlStr = 'http://user:pass@host.com:80/resource/path?query=string#hash

var urlObj = url.parse(urlStr, true, false);
urlString = url.format(urlObj);
Table 7.1 Properties of the URL object
Property Description
href This is the full URL string that was originally parsed.
protocol The request protocol lowercased.
host The full host portion of the URL including port information
lowercased.
auth The authentication information portion of a URL.
hostname The hostname portion of the host lowercased.
port The port number portion of the host.
pathname The path portion of the URL including the initial slash if present.
search The query string portion of the URL including the leading question
mark.
path The full path including the pathname and search.
query This is either the parameter portion of the query string or a parsed
object containing the query string parameters and values if the
parseQueryString is set to true.
hash The hash portion of the URL including the pound sign (#).
Resolving the URL Components
Another useful feature of the url module is the ability to resolve URL components
in the same manner as a browser would. This allows you to manipulate the URL
strings on the server side to make adjustments in the URL. For example, you might
want to change the URL location before processing the request because a resource
has moved or changed parameters.
To resolve a URL to a new location use the following syntax:
url.resolve(from, to)
The from parameter specifies the original base URL string. The to parameter
specifies the new location where you want the URL to resolve. The following code
illustrates an example of resolving a URL to a new location.
Click here to view code image
var url = require('url');
var originalUrl = 'http://user:pass@host.com:80/resource/path?query=string#hash
var newResource = '/another/path?querynew';
console.log(url.resolve(originalUrl, newResource));
The output of the previous code snippet is shown below. Notice that only the
resource path and beyond are altered in the resolved URL location:
http://user:pass@host.com:80/another/path?querynew
Processing Query Strings and Form Parameters
HTTP requests often include query strings in the URL or parameter data in the body
for form submissions. The query string can be obtained from the URL object defined
in the previous section. The parameter data sent by a form request can be read out of
the body of the client request, as described later in this chapter.
The query string and form parameters are just basic key-value pairs. To actually
consume these values in your Node.js webserver you need to convert the string into a
JavaScript object using the parse() method from the querystring module:
querystring.parse(str, [sep], [eq], [options])
The str parameter is the query or parameter string. The sep parameter allows you
to specify the separator character used. The default separator character is &. The eq
parameter allows you to specify the assignment character to use when parsing. The
default is =. The options parameter is an object with the property maxKeys that
allows you to limit the number of keys the resulting object can contain. The default
is 1000. If you specify 0, there is no limit.
The following shows an example of using parse() to parse a query string:
Click here to view code image
var qstring = require('querystring');
var params = qstring.parse("name=Brad&color=red&color=blue");
The params object created would be:
{name: 'Brad', color: ['red', 'blue']}
You can also go back the other direction and convert an object to a query string
using the stringify() function shown here:
querystring.stringify(obj, [sep], [eq])
Understanding Request, Response, and Server
Objects
To use the http module in Node.js applications, you first need to understand the
request and response objects. They provide the information and much of the
functionality that comes into and out of the HTTP clients and servers. Once you see
the makeup of these objects—including properties, events, and methods they provide
—it will be simple to implement your own HTTP servers and clients.
The following sections cover the purpose and behavior of the ClientRequest,
ServerResponse, IncomingMessage, and Server objects. The most
important events, properties, and methods that each provides also are covered.
The http.ClientRequest Object
The ClientRequest object is created internally when you call
http.request() when building the HTTP client. This object represents the
request while it is in progress to the server. You use the ClientRequest object to
initiate, monitor, and handle the response from the server.
The ClientRequest implements a Writable stream, so it provides all the
functionality of a Writable stream object. For example, you can use the
write() method to write to it as well as pipe a Readable stream into it.
To implement a ClientRequest object, you use a call to http.request()
using the following syntax:
http.request(options, callback)
The options parameter is an object whose properties define how to open and send
the client HTTP request to the server. Table 7.2 lists the properties that you can
specify. The callback parameter is a callback function that is called after the

request is sent to the server and handles the response back from the server. The only
parameter to the callback is an IncomingMessage object that will be the response
from the server.
The following code shows the basics of implementing the ClientRequest object:
Click here to view code image
var http = require('http');
var options = {
hostname: 'www.myserver.com',
path: '/',
port: '8080',
method: 'POST'
};
var req = http.request(options, function(response){
var str = ''
response.on('data', function (chunk) {
str += chunk;
});
response.on('end', function () {
console.log(str);
});
});
req.end();
Table 7.2 Options that can be specified when creating a ClientRequest
Property Description
host The domain name or IP address of the server to issue the request to.
Defaults to localhost.
hostname Same as host but preferred over host to support url.parse()
port Port of remote server. Defaults to 80.
localAddress Local interface to bind for network connections.
socketPath Unix Domain Socket (use one of host:port or socketPath
method A string specifying the HTTP request method. For example, GET
POST, CONNECT, OPTIONS, etc. Defaults to GET.
path A string specifying the requested resource path. Defaults to /. This
should also include the query string if any. For example:
/book.html?chapter=12
headers An object containing request headers. For example:

{ 'content-length': '750', 'content-type': 'text/plain' }
auth Basic authentication in the form of user:password used to
compute an Authorization header.
agent Defines the Agent behavior. When an Agent is used, request
defaults to Connection:keep-alive. Possible values are:
undefined (default): Uses global Agent.
Agent object: Uses specific Agent object.
false: Disables Agent behavior.
The ClientRequest object provides several events that enable you to handle the
various states the request may experience. For example, you can add a listener that is
called when the response event is triggered by the server’s response. Table 7.3
lists the events available on ClientResponse objects.
Table 7.3 Events available on ClientRequest objects
Property Description
response Emitted when a response to this request is received from the server.
The callback handler receives back an IncomingMessage object
as the only parameter.
socket Emitted after a socket is assigned to this request.
connect Emitted every time a server responds to a request that was initiated
with a CONNECT method. If this event is not handled by the client,
then the connection will be closed.
upgrade Emitted when the server responds to a request that includes an Update
request in the headers.
continue Emitted when the server sends a 100 Continue HTTP response
instructing the client to send the request body.
In addition to events, the ClientRequest object also provides several methods
that can be used to write data to the request, abort the request, or end the request.
Table 7.4 lists the methods available on the ClientRequest object.

Table 7.4 Methods available on ClientRequest objects
Method Description
write(chunk,
[encoding])
Writes a chunk, Buffer or String object, of body
data into the request. This allows you to stream data
into the Writable stream of the
ClientRequest object. If you stream the body
data, you should include the {'Transfer-
Encoding', 'chunked'} header option when
you create the request. The encoding parameter
defaults to utf8.
end([data],
[encoding])
Writes the optional data out to the request body and
then flushes the Writable stream and terminates
the request.
abort() Aborts the current request.
setTimeout(timeout,
[callback])
Sets the socket timeout for the request.
setNoDelay
([noDelay])
Disables the Nagle algorithm, which buffers data
before sending it. The noDelay argument is a
Boolean that is true for immediate writes and
false for buffered writes.
setSocketKeepAlive
([enable],
[initialDelay])
Enables and disables the keep-alive functionality
on the client request. The enable parameter
defaults to false, which is disabled. The
initialDelay parameter specifies the delay
between the last data packet and the first keep-
alive request.
The http.ServerResponse Object
The ServerResponse object is created by the HTTP server internally when a
request event is received. It is passed to the request event handler as the
second argument. You use the ServerRequest object to formulate and send a
response to the client.
The ServerResponse implements a Writable stream, so it provides all the

functionality of a Writable stream object. For example, you can use the
write() method to write to it as well as pipe a Readable stream into it to write
data back to the client.
When handling the client request, you use the properties, events, and methods of the
ServerResponse object to build and send headers, write data, and send the
response. Table 7.5 lists the event and properties available on the
ServerResponse object. Table 7.6 lists the methods available on the
ServerResponse object.
Table 7.5 Events available on ServerResponse objects
Property Description
close Emitted when the connection to the client is closed prior to
sending the response.end() to finish and flush the response.
headersSent A Boolean that is true if headers have been sent; otherwise,
false. This is read only.
sendDate A Boolean that, when set to true, the Date header is
automatically generated and sent as part of the response.
statusCode Allows you to specify the response status code without having to
explicitly write the headers. For example:
response.statusCode = 500;
Table 7.6 Methods available on ServerResponse objects
Method Description
writeContinue() Sends an HTTP/1.1 100 Continue message
to the client requesting that the body data be sent.
writeHead(statusCode,
[reasonPhrase],
[headers])
Writes a response header to the request. The
statusCode parameter is the three-digit HTTP
response status code, for example, 200, 401,
500. The optional reasonPhrase is a string
denoting the reason for the statusCode. The
headers are the response headers object, for
example:
response.writeHead(200, 'Success', {
'Content-Length': body.length,

'Content-Type': 'text/plain' });
setTimeout(msecs,
callback)
Sets the socket timeout for the client connection in
milliseconds along with a callback function to
be executed if the timeout occurs.
setHeader(name,
value)
Sets the value of a specific header where name is
the HTTP header name and value is the header
value.
getHeader(name) Gets the value of an HTTP header that has been
set in the response.
removeHeader(name) Removes an HTTP header that has been set in the
response.
write(chunk,
[encoding])
Writes a chunk, Buffer or String object, of
data out to the response Writable stream. This
only writes data to the body portion of the
response. The default encoding is utf8. This
returns true if the data is written successfully or
false if the data is written to user memory. If it
returns false, then a drain event is emitted by
the Writable stream when the buffer is free
again.
addTrailers(headers) Adds HTTP trailing headers to the end of the
response.
end([data],
[encoding])
Writes the optional data out to the response body
and then flushes the Writable stream and
finalizes the response.
The http.IncomingMessage Object
The IncomingMessage object is created either by the HTTP server or the HTTP
client. On the server side, the client request is represented by an
IncomingMessage object, and on the client side the server response is
represented by an IncomingMessage object. The IncomingMessage object
can be used for both because the functionality is basically the same.
The IncomingMessage implements a Readable stream, allowing you to read

the client request or server response as a streaming source. This means that the
readable and data events can be listened to and used to read data from the
stream.
In addition to the functionality provided by the Readable class, the
IncomingMessage object also provides the properties, events, and methods listed
in Table 7.7. These allow you to access information from the client request or server
response.
Table 7.7 Events, properties, and methods available on IncomingMessage
objects
Method/Event/Property Description
close Emitted when the underlying socket is closed.
httpVersion Specifies the version of HTTP used to build the client
request/response.
headers This is an object containing the headers sent with the
request/response.
trailers This is an object containing any trailer headers sent with
the request/response.
method Specifies the method for the request/response. For
example: GET, POST, CONNECT.
url The URL string sent to the server. This is the string that
can be passed to url.parse(). This attribute is only
valid in the HTTP server handling the client request.
statusCode Specifies the three-digit status code from the server.
This attribute is only valid on the HTTP client when
handling a server response.
socket This is a handle to the net.Socket object used to
communicate with the client/server.
setTimeout(msecs,
callback)
Sets the socket timeout for the connection in
milliseconds along with a callback function to be
executed if the timeout occurs.
The http.Server Object

The Node.js HTTP Server object provides the fundamental framework to
implement HTTP servers. It provides an underlying socket that listens on a port and
handles receiving requests and then sends responses out to client connections. While
the server is listening, the Node.js application will not end.
The Server object implements EventEmitter and emits the events listed in
Table 7.8. As you implement an HTTP server, you need to handle at least some or all
of these events. For example, at a minimum you need an event handler to handle the
request event that is triggered when a client request is received.
Table 7.8 Events that can be triggered by Server objects
Event Description
request Triggered each time the server receives a client request. The
callback should accept two parameters. The first is an
IncomingMessage object representing the client request,
and the second is a ServerResponse object you use to
formulate and send the response. For example:
function callback (request, response){}
connection Triggered when a new TCP stream is established. The
callback receives the socket as the only parameter. For
example:
function callback (socket){}
close Triggered when the server is closed. The callback receives no
parameters.
checkContinue Triggered when a request that includes the Expect: 100-
continue header is received. There is a default event
handler that responds with an HTTP/1.1 100 Continue
even if you do not handle this event. For example:
function callback (request, response){}
connect Emitted when an HTTP CONNECT request is received. The
callback receives the request, socket, and head, which is a
Buffer containing the first packet of the tunneling stream. For
example:
function callback (request, socket, head){}

upgrade Emitted when the client requests an HTTP upgrade. If this
event is not handled clients sending an upgrade request will
have their connections closed. The callback receives the
request, socket, and head, which is a Buffer containing the
first packet of the tunneling stream. For example:
function callback (request, socket, head){}
clientError Emitted when the client connection socket emits an error. The
callback receives an error as the first parameter and the socket
as the second. For example:
function callback (error, socket){}
To start the HTTP server, you need to first create a Server object using the
createServer() method shown below. This method returns the Server object.
The optional requestListener parameter is a callback that is executed when the
request event is triggered. The callback should accept two parameters. The first is an
IncomingMessage object representing the client request, and the second is a
ServerResponse object you use to formulate and send the response:
http.createServer([requestListener])
Once you have created the Server object, you can begin listening on it by calling
the listen() method on the Server object:
listen(port, [hostname], [backlog], [callback])
The first method listen(port, [hostname], [backlog],
[callback]) is the one that you will most likely use. The following list describes
each of the parameters:
port: Specifies the port to listen on.
hostname: Specifies when the hostname will accept connections, and if
omitted, the server will accept connections directed to any IPv4 address
(INADDR_ANY).
backlog: Specifies the maximum number of pending connections that are
allowed to be queued. This defaults to 511.
callback: Specifies the callback handler to execute once the server has begun
listening on the specified port.
The following code shows an example of starting an HTTP server and listening on
port 8080. Notice the request callback handler:
Click here to view code image
var http = require('http');
http.createServer(function (req, res) {
<<handle the request and response here>>
}).listen(8080);
Two other methods can be used to listen for connections through the file system. The
first accepts a path to a file to listen on, and the second accepts an already open file
descriptor handle:
listen(path, [callback])
listen(handle, [callback])
To stop the HTTP server from listening once it has started, use the following
close() method:
close([callback]).
Implementing HTTP Clients and Servers in
Node.js
Now that you understand the ClientRequest, ServerResponse, and
IncomingMessage objects, you are ready to implement some Node.js HTTP
clients and servers. This section guides you through the process of implementing
basic HTTP clients and servers in Node.js. To do this, a client and server are
implemented in each section to show you how the two interact.
The examples in the following sections are basic to make it easy for you to grasp the
concepts of starting the client/server and then handling the different requests and
responses. There is no error handling, protection against attacks, or much of the other
functionality built in. However, the examples provide a good variety of the basic
flow and structure required to handle general HTTP requests using the http
module.

Serving Static Files
The most basic type of HTTP server is one that serves static files. To serve static
files from Node.js, you need to first start the HTTP server and listen on a port. Then
in the request handler, you open the file locally using the fs module and write the
file contents to the response.
Listing 7.1 shows the basic implementation of a static file server. Notice that line 5
creates the server using createServer() and also defines the request event
handler shown in lines 6–15. Also notice that the server is listening on port 8080 by
calling listen() on the Server object.
Inside the request event handler on line 6, the url.parse() method is used to
parse the url so that we can use the pathname attribute when specifying the path
for the file in line 7. The static file is opened and read using fs.readFile(), and
in the readFile() callback the contents of the file are written to the response
object using res.end(data) on line 14.
Listing 7.1 http_server_static.js: Implementing a basic static file
webserver
Click here to view code image
01 var fs = require('fs');
02 var http = require('http');
03 var url = require('url');
04 var ROOT_DIR = "html/";
05 http.createServer(function (req, res) {
06 var urlObj = url.parse(req.url, true, false);
07 fs.readFile(ROOT_DIR + urlObj.pathname, function (err,data) {
08 if (err) {
09 res.writeHead(404);
10 res.end(JSON.stringify(err));
11 return;
12 }
13 res.writeHead(200);
14 res.end(data);
15 });
16 }).listen(8080);
Listing 7.2 shows a basic implementation of an HTTP client that sends a get request
to the server to retrieve the file contents. Notice that the options for the request are
set in lines 2–6, and then the client request is initiated in lines 16–18 passing the

options.
When the request completes, the callback function uses the on('data') handler
to read the contents of the response from the server and then the on('end')
handler to log the file contents to a file. Figure 7.2 and Listing 7.2 Output show the
output of the HTTP client as well as accessing the static file from a web browser.
Listing 7.2 http_client_static.js: Basic web client retrieving static files
Click here to view code image
01 var http = require('http');
02 var options = {
03 hostname: 'localhost',
04 port: '8080',
05 path: '/hello.html'
06 };
07 function handleResponse(response) {
08 var serverData = '';
09 response.on('data', function (chunk) {
10 serverData += chunk;
11 });
12 response.on('end', function () {
13 console.log(serverData);
14 });
15 }
16 http.request(options, function(response){
17 handleResponse(response);
18 }).end();
Listing 7.2 Output Implementing a basic static file webserver
Click here to view code image
C:\books\node\ch07>node http_server_static.js
<html>
<head>
<title>Static Example</title>
</head>
<body>
<h1>Hello from a Static File</h1>
</body>
</html>

Figure 7.2 Implementing a basic static file web server
Implementing Dynamic GET Servers
More often than not you will use Node.js webservers to serve dynamic content rather
than static content. This content may be dynamic HTML files or snippets, JSON
data, or a number of other data types. To serve a GET request dynamically, you need
to implement code in the request handler that dynamically populates the data you
want to send back to the client, writes it out to the response, and then calls end() to
finalize the response and flush the Writable stream.
Listing 7.3 shows the basic implementation of a dynamic web service. In this case,
the web service simply responds with a dynamically generated HTTP file. The
example is designed to show the process of sending the headers, building the
response, and then sending the data in a series of write() requests.
Notice that line 6 creates the server using createServer(), and line 15 begins
listening on port 8080 using listen(). Inside the request event handler defined
in lines 7–15, the Content-Type header is set and then the headers are sent with a

response code of 200. In reality you would have already done a lot of processing to
prepare the data. But in this case, the data is just the messages array defined in
lines 2–5.
Notice that in lines 11–13 the loop iterates through the messages and calls write()
each time to stream the response to the client. Then in line 14 the response is
completed by calling end().
Listing 7.3 http_server_get.js: Implementing a basic GET webserver
Click here to view code image
01 var http = require('http');
02 var messages = [
03 'Hello World',
04 'From a basic Node.js server',
05 'Take Luck'];
06 http.createServer(function (req, res) {
07 res.setHeader("Content-Type", "text/html");
08 res.writeHead(200);
09 res.write('<html><head><title>Simple HTTP Server</title></head>');
10 res.write('<body>');
11 for (var idx in messages){
12 res.write('\n<h1>' + messages[idx] + '</h1>');
13 }
14 res.end('\n</body></html>');
15 }).listen(8080);
Listing 7.4 shows a basic implementation of an HTTP client that reads the response
from the server in Listing 7.3. This is similar to the example in Listing 7.2; however,
note that no path was specified since the service doesn’t really require one. For more
complex services, you would implement query strings or complex path routes to
handle a variety of calls.
Note that on line 11 the statusCode from the response is logged to the console.
Also on line12 the headers from the response are also logged. Then on line 13 the
full response from the server is logged. Figure 7.3 and Listing 7.4 Output show the
output of the HTTP client as well as accessing the dynamic get server from a web
browser.
Listing 7.4 http_client_get.js: Basic web client that makes a GET request
to the server in Listing 7.3
Click here to view code image

01 var options = {
02 hostname: 'localhost',
03 port: '8080',
04 };
05 function handleResponse(response) {
06 var serverData = '';
07 response.on('data', function (chunk) {
08 serverData += chunk;
09 });
10 response.on('end', function() {
11 console.log("Response Status:", response.statusCode);
12 console.log("Response Headers:", response.headers);
13 console.log(serverData);
14 });
15 }
16 http.request(options, function(response){
17 handleResponse(response);
18 }).end
Listing 7.4 Output Implementing a basic HTTP GET service
Click here to view code image
C:\books\node\ch07>node http_server_get.js
Response Status: 200
Response Headers: { 'content-type': 'text/html',
date: 'Mon, 26 Sep 2016 17:10:33 GMT',
connection: 'close',
'transfer-encoding': 'chunked' }
<html><head><title>Simple HTTP Server</title></head><body>
<h1>Hello World</h1>
<h1>From a basic Node.js server</h1>
<h1>Take Luck</h1>
</body></html>
Figure 7.3 Output of a basic HTTP GET server
Implementing POST Servers
Implementing a POST service is similar to implementing a GET server. In fact, you
may end up implementing them together in the same code for the sake of
convenience. POST services are handy if you need to send data to the server to be
updated, as for form submissions. To serve a POST request, you need to implement
code in the request handler that reads the contents of the post body out and processes
it.
Once you have processed the data, you dynamically populate the data you want to
send back to the client, write it out to the response, and then call end() to finalize
the response and flush the Writable stream. Just as with a dynamic GET server,
the output of a POST request may be a webpage, HTTP snippet, JSON data, or some
other data.
Listing 7.5 shows the basic implementation of a dynamic web service handling
POST requests. In this case, the web service accepts a JSON string from the client

representing an object that has name and occupation properties. The code in lines 4–
6 read the data from the request stream, and then in the event handler in lines 7–14,
the data is converted to an object and used to build a new object with message and
question properties. Then in line 14 the new object is stringified and sent back
to the client in the end() call.
Listing 7.5 http_server_post.js: Implementing a basic HTTP server that
handles HTTP POST requests
Click here to view code image
01 var http = require('http');
02 var options = {
03 host: '127.0.0.1',
04 path: '/',
05 port: '8080',
06 method: 'POST'
07 };
08 function readJSONResponse(response) {
09 var responseData = '';
10 response.on('data', function (chunk) {
11 responseData += chunk;
12 });
13 response.on('end', function () {
14 var dataObj = JSON.parse(responseData);
15 console.log("Raw Response: " +responseData);
16 console.log("Message: " + dataObj.message);
17 console.log("Question: " + dataObj.question);
18 });
19 }
20 var req = http.request(options, readJSONResponse);
21 req.write('{"name":"Bilbo", "occupation":"Burgler"}');
22 req.end();
Listing 7.6 shows a basic implementation of an HTTP client that sends JSON data to
the server as part of a POST request. The request is started in line 20. Then in line 21
a JSON string is written to the request stream, and line 22 finishes the request with
end().
Once the server sends the response back, the on('data') handler in lines 10–12
reads the JSON response. Then the on('end') handler in lines 13–18 parses the
response into a JSON object and outputs the raw response, message, and question.
Output 7.6 shows the output of the HTTP POST client.

Listing 7.6 http_client_post.js: Basic HTTP client that sends JSON data
to the server using POST and handles the JSON response
Click here to view code image
01 var http = require('http');
02 var options = {
03 host: '127.0.0.1',
04 path: '/',
05 port: '8080',
06 method: 'POST'
07 };
08 function readJSONResponse (response) {
09 var responseData = '';
10 response.on('data', function (chunk) {
11 responseData += chunk;
12 });
13 response.on('end', function () {
14 var dataObj = JSON.parse(responseData);
15 console.log("Raw Response: " +responseData);
16 console.log("Message: " + dataObj.message);
17 console.log("Question: " + dataObj.question);
18 });
19 }
20 var req = http.request(options, readJSONResponse);
21 req.write('{"name":"Bilbo", "occupation":"Burgler"}');
22 req.end();
Listing 7.6 Output Implementing an HTTP POST server serving JSON data
Click here to view code image
C:\books\node\ch07>node http_server_post.js
Raw Response: {"message":"Hello Bilbo","question":"Are you a good Burgler?"}
Message: Hello Bilbo
Question: Are you a good Burgler?
Interacting with External Sources
A common use of the HTTP services in Node.js is to access external systems to get
data to fulfill client requests. A variety of external systems provide data that can be
used in various ways. In this example, the code connects to the openweathermap.org
API to retrieve weather information about a city. To keep the example simple, the
output from openweathermap.org is pushed to the browser in a raw format. In reality,
you would likely massage the pieces of data needed into your own pages, widgets, or

data responses.
Listing 7.7 shows the implementation of the web service that accepts both GET and
POST requests. For the GET request, a simple webpage with a form is returned that
allows the user to post a city name. Then in the POST request the city name is
accessed, and the Node.js web client starts up and connects remotely to
openweathermap.org to retrieve weather information for that city. Then that info is
returned to the server along with the original web form.
The big difference between this example and the previous examples is that the
webserver also implements a local web client to connect to the external service and
get data used to formulate the response. The webserver is implemented in lines 35–
49. Notice that if the method is POST, we read the form data from the request stream
and use querystring.parse() to get the city name and call into the
getWeather() function.
The getWeather() function in lines 27–33 implements the client request to
openweathermap.org. Then the parseWeather() request handler in lines 17–25
reads the response from openweathermap.org and passes that data to the
sendResponse() function defined in lines 4–16 that formulates the response and
sends it back to the client. Figure 7.4 shows the implementation of the external
service in a web browser.
Note
You must go to http://openweathermap.org/ to create an account and get an API
key to use the following application.
Listing 7.7 http_server_external: Implementing an HTTP web service
that connects remotely to an external source for weather data
Click here to view code image
01 var http = require('http');
02 var url = require('url');
03 var qstring = require('querystring');
04 var APIKEY = ""//place your own api key within the quotes;
05 function sendResponse(weatherData, res){
06 var page = '<html><head><title>External Example</title></head>' +
07 '<body>' +
08 '<form method="post">' +
09 'City: <input name="city"><br>' +
10 '<input type="submit" value="Get Weather">' +

11 '</form>';
12 if(weatherData){
13 page += '<h1>Weather Info</h1><p>' + weatherData +'</p>';
14 }
15 page += '</body></html>';
16 res.end(page);
17 }
18 function parseWeather(weatherResponse, res) {
19 var weatherData = '';
20 weatherResponse.on('data', function (chunk) {
21 weatherData += chunk;
22 });
23 weatherResponse.on('end', function () {
24 sendResponse(weatherData, res);
25 });
26 }
27 function getWeather(city, res){
28 city = city.replace(' ', '-');
29 console.log(city);
30 var options = {
31 host: 'api.openweathermap.org',
32 path: '/data/2.5/weather?q=' + city + '&APPID=' + APIKEY
33 };
34 http.request(options, function(weatherResponse){
35 parseWeather(weatherResponse, res);
36 }).end();
37 }
38 http.createServer(function (req, res) {
39 console.log(req.method);
40 if (req.method == "POST"){
41 var reqData = '';
42 req.on('data', function (chunk) {
43 reqData += chunk;
44 });
45 req.on('end', function() {
46 var postParams = qstring.parse(reqData);
47 getWeather(postParams.city, res);
48 });
49 } else {
50 sendResponse(null, res);
51 }
52 }).listen(8080);

Figure 7.4 Implementing an external web service that connects to a remote source for
weather data
Implementing HTTPS Servers and Clients
Hypertext Transfer Protocol Secure (HTTPS) is a communications protocol that
provides secure communication between HTTP clients and servers. HTTPS is really
just HTTP running on top of the SSL/TLS protocol, which is where it gets its
security capabilities. HTTP provides security in two main ways. First, it uses long-
term public and secret keys to exchange a short-term session key so that data can be
encrypted between client and server. Second, it provides authentication so that you
can ensure that the webserver you are connecting to is the one you actually think it
is, thus preventing man-in-the-middle attacks where requests are rerouted through a
third party.
The following sections discuss implementing HTTP servers and clients in your
Node.js environment using the https module. Before getting started using HTTPS,
you need to generate a private key and a public certificate. There are several ways to
do this, depending on your platform. One of the simplest methods is to use the
OpenSSL library for your platform.
To generate the private key, first execute the following OpenSSL command:
openssl genrsa -out server.pem 2048
Next, use the following command to create a certificate signing request file:

openssl req -new -key server.pem -out server.csr
Note
When creating the certificate signing request file, you will be asked several
questions. When prompted for the Common Name, you should put in the domain
name of the server you want to connect to. Otherwise, the certificate will not
work. Also you can put in additional domain names and IP addresses in the
Subject Alternative Names field.
Then to create a self-signed certificate that you can use for your own purpose or for
testing, use the following command:
openssl x509 -req -days 365 -in server.csr -signkey server.pem -out server.crt
Note
The self-signed certificate is fine for testing purposes or internal use. However, if
you are implementing an external web service that needs to be protected on the
Internet, you may want to get a certificate signed by a certificate authority. If you
want to create a certificate that is signed by a third-party certificate authority, you
need to take additional steps.
Creating an HTTPS Client
Creating an HTTPS client is almost exactly like the process of creating an HTTP
client discussed earlier in this chapter. The only difference is that there are additional
options, shown in Table 7.9, that allow you to specify the security options for the
client. The most important options you really need to worry about are key, cert,
and agent.
The key option specifies the private key used for SSL. The cert value specifies
the x509 public key to use. The global agent does not support options needed by
HTTPS, so you need to disable the agent by setting the agent to null, as shown
here:
var options = {
key: fs.readFileSync('test/keys/client.pem'),
cert: fs.readFileSync('test/keys/client.crt),
agent: false
};

You can also create your own custom Agent object that specifies the agent options
used for the request:
options.agent = new https.Agent (options);
Once you have defined the options with the cert, key, and agent settings, you
can call the https.request(options, [responseCallback]), and it
will work exactly the same as the http.request() call. The only difference is
that the data between the client and server is encrypted.
Click here to view code image
var options = {
hostname: 'encrypted.mysite.com',
port: 443,
path: '/',
method: 'GET',
key: fs.readFileSync('test/keys/client.pem'),
cert: fs.readFileSync('test/keys/client.crt),
agent: false
};
var req = https.request(options, function(res)) {
<handle the response the same as an http.request>
}
Table 7.9 Additional options for https.request() and
https.createServer()
Event Description
pfx A string or Buffer object containing the private key,
certificate, and CA certs of the server in PFX or
PKCS12 format.
key A string or Buffer object containing the private key
to use for SSL.
passphrase A string containing the passphrase for the private key
or pfx.
cert A string or Buffer object containing the public x509
certificate to use.
ca An Array of strings or Buffers of trusted
certificates in PEM format to check the remote host
against.
ciphers A string describing the ciphers to use or exclude.

rejectUnauthorized A Boolean that, when true, the server certificate is
verified against the list of supplied CAs. An error
event is emitted if verification fails. Verification
happens at the connection level, before the HTTP
request is sent. Defaults to true. Only for
https.request() options.
crl Either a string or list of strings of PEM encoded CRLs
(Certificate Revocation List) only for
https.createServer().
secureProtocol The SSL method to use. For example,
SSLv3_method to force SSL version 3.
Creating an HTTPS Server
Creating an HTTPS server is almost exactly like the process of creating an HTTP
server discussed earlier in this chapter. The only difference is that there are
additional options parameters that you must pass into
https.createServer(). The options, listed previously in Table 7.9, allow you
to specify the security options for the server. The most important options you really
need to worry about are key and cert.
The key option specifies the private key used for SSL. The cert value specifies
the x509 public key to use. The following shows an example of creating an HTTPS
server in Node.js:
Click here to view code image
var options = {
key: fs.readFileSync('test/keys/server.pem'),
cert: fs.readFileSync('test/keys/server.crt')
};
https.createServer(options, function (req, res) {
res.writeHead(200);
res.end("Hello Secure World\n");
}).listen(8080);
Once the HTTPS server has been created, the request/response handling works the
same way as for the HTTP servers described earlier in this chapter.
Summary
An important aspect of Node.js is the ability to quickly implement HTTP and
HTTPS servers and services. The http and https modules provide everything
you need to implement webserver basics. For your full webserver, you should use a
more extended library, such as Express. However, the http and https modules
work well for some basic web services and are simple to implement.
The examples in this chapter covered the HTTP basics to give you a good start on
implementing your own services. You also saw how the url and querystring
modules are used to parse URLs and query strings into objects and back.
Next
In the next chapter, you go a little deeper as the net module is discussed. You learn
how to implement your own socket services using TCP clients and servers.
8
Implementing Socket Services in
Node.js
An important part of backend services is the ability to communicate with each other
over sockets. Sockets allow one process to communicate with another process
through an IP address and port. This can be useful when implementing interprocess
communication (IPC) for two different processes running on the same server or
accessing a service running on a completely different server. Node.js provides the
net module that allows you to create both socket servers and clients that can
connect to socket servers. For secure connections, Node.js provides the tls module
that allows you to implement secure TLS socket servers and clients.
Understanding Network Sockets
Network sockets are endpoints of communication that flow across a computer
network. Sockets live below the HTTP layer and provide the actual point-to-point
communication between servers. Virtually all Internet communication is based on
Internet sockets that flow data between two points on the Internet.
A socket works using a socket address, which is a combination of an IP address and
port. There are two types of points in a socket connection: a server that listens for
connections and a client that opens a connection to the server. Both the server and
the client require a unique IP address and port combination.
The Node.js net module sockets communicate by sending raw data using the
Transmission Control Protocol (TCP). This protocol is responsible for packaging the
data and guaranteeing that it is sent from point to point successfully. Node.js sockets
implement the Duplex stream, which allows you to read and write streamed data
between the server and client.
Sockets are the underlying structure for the http module. If you do not need the
functionality for handling web requests like GET and POST and you just need to
stream data from point to point, then using sockets gives you a lighter weight
solution and a bit more control.
Sockets are also handy when communicating with other processes running on the
same computer. Processes cannot share memory directly, so if you want to access the
data in one process from another process, you can open up the same socket in each
process and read and write data between the two processes.
Understanding TPC Server and Socket
Objects
To use the net module in Node.js applications, you first need to understand the TCP
Server and Socket objects. These objects provide all the framework for starting
a TCP server to handle requests and implementing TCP socket clients to make
requests to the socket servers. Once you understand the events, properties, methods,
and behavior of these objects, it will be simple to implement your own TCP socket
servers and clients.
The following sections cover the purpose and behavior of the net.Socket and
net.Server objects. The most important events, properties, and methods that
each provides are also covered.
The net.Socket Object
Socket objects are created on both the socket server and the socket client and allow
data to be written and read back and forth between them. The Socket object
implements a Duplex stream, so it provides all the functionality that Writable
and Readable streams provide. For example, you can use the write()method to
stream writes of data to the server or client and a data event handler to stream data
from the server or client.
On the socket client, the Socket object is created internally when you call
net.connect() or net.createConnection(). This object is intended to

represent the socket connection to the server. You use the Socket object to monitor
the connection, send data to the server, and handle the response back from the server.
There is no explicit client object in the Node.js net module because the Socket
object acts as the full client allowing you to send/receive data and terminate the
connection.
On the socket server, the Socket object is created when a client connects to the
server and is passed to the connection event handler. This object is intended to
represent the socket connection to the client. On the server, you use the Socket
object to monitor the client connection as well as send and receive data to and from
the client.
To create a Socket object, you use one of the following methods. All the calls
return a Socket object. The only difference is the first parameters that they accept.
The final parameter for all of them is a callback function that is executed when a
connection is opened to the server. Notice that for each method there is a
net.connect() and a net.createConnection() form. These work
exactly the same way:
Click here to view code image
net.connect(options, [connectionListener])
net.createConnection(options, [connectionListener])
net.connect(port, [host], [connectListener])
net.createConnection(port, [host], [connectListener])
net.connect(path, [connectListener])
net.createConnection(path, [connectListener])
The first method to create a Socket object is to pass an options parameter,
which is an object that contains properties that define the socket connection. Table
8.1 lists the properties that can be specified when creating the Socket object. The
second method accepts port and host values, described in Table 8.1, as direct
parameters. The third option accepts a path parameter that specifies a file system
location that is a Unix socket to use when creating the Socket object.
Table 8.1 Options that can be specified when creating a Socket
Property Description
port Port number the client should connect to. This option is
required.
host Domain name or IP address of the server that the client should

connect to. Defaults to localhost.
localAddress Local IP address the client should bind to for network
connections.
localPort The local port that it binds to for network connections.
family Version of IP stack. (default: 4)
lookup Custom lookup. (default: dns.lookup)
Once the Socket object is created, it provides several events that are emitted during
the life cycle of the connection to the server. For example, the connect event is
triggered when the socket connects, the data event is emitted when there is data in
the Readable stream ready to be read, and the close event is emitted when
connection to the server is closed. As you implement your socket server, you can
register callbacks to be executed when these events are emitted to handle opening
and closing the socket, reading and writing data, and so on. Table 8.2 lists the events
that can be triggered on the Socket object.
Table 8.2 Events that can be triggered on Socket objects
Event Description
connect Emitted when a connection is successfully established with the server.
The callback function does not accept any parameters.
data Emitted when data is received on the socket. If no data event handler is
attached, then data can be lost. The callback function must accept a
parameter, which is a Buffer object containing the chunk of data
that was read from the socket. For example:
function(chunk){}
end Emitted when the server terminates the connection by sending a FIN.
The callback function does not accept any parameters.
timeout Emitted when the connection to the server times out due to inactivity.
drain Emitted when the write buffer becomes empty. You can use this event
to throttle back the data stream being written to the socket. The
callback function does not accept any parameters.
error Emitted when an error occurs on the socket connection. The callback
function should accept the error as the only argument. For example:
function(error){}

close Emitted when the socket has fully closed, either because it was closed
by an end() or because an error occurred. The callback function does
not accept any parameters.
The Socket object also includes several methods that allow you to do things like
read from and write to the socket as well as pause or end data flow. Many of these
are inherited from the Duplex stream objects and should be familiar to you. Table
8.3 lists the methods available on the Socket object.
Table 8.3 Methods that can be called on Socket Objects
Method Description
setEncoding([encoding]) When this function is called, data returned from the socket’s
streams is an encoded String instead of a Buffer
Sets the default encoding that should be used when writing
data to and reading data from the streams. Using this option
handles multi-byte characters that might otherwise be
mangled when converting the Buffer to a string using
buf.toString(encoding). If you want to read the data
as strings, always use this method.
write(data, [encoding],
[callback])
Writes a data Buffer or String to the Writable
of the socket using the encoding if specified. The callback
function is executed as soon as the data is written.
end([data], [encoding]) Writes a data Buffer or String to the Writable
of the socket and then flushes the stream and closes the
connection.
destroy() This forces the socket connection to shut down. You should
only need to use this in the case of failures.
pause() Pauses a Readable stream of the socket from emitting
data events. This allows you to throttle back the upload of
data to the stream.
resume() Resumes data event emitting on the Readable
the socket.
setTimeout(timeout,
[callback])
Specifies a timeout in milliseconds that the server will wait
before emitting a timeout event when the socket is
inactive. The callback function will be triggered as a
once event listener. If you want the connection to be

terminated on timeout, you should do it manually in the
callback function.
setNoDelay([noDelay]) Disables/enables the Nagle algorithm that buffers data before
sending it. Setting this to false disables data buffering.
setKeepAlive([enable],
[initialDelay])
Enables/disables the keep-alive functionality on the
connection. The optional initialDelay parameter
specifies the amount in milliseconds that the socket is idle
before sending the first keep-alive packet.
address() Returns the bound address, the address family name, and the
port of the socket as reported by the operating system. The
return value is an object that contains the port, family, and
address properties. For example:
{ port: 8107, family: 'IPv4', address: '127.0.0.1' }
unref() Calling this method allows the Node.js application to
terminate if this socket is the only event on the event queue.
ref() References this socket so that if this socket is the only thing
on the event queue, the Node.js application will not terminate.
The Socket object also provides several properties that you can access to get
information about the object. For example, the address and port the socket is
communicating on, the amount of data being written, and the buffer size. Table 8.4
lists the properties available on the Socket object.
Table 8.4 Properties that can be accessed on Socket Objects
Method Description
bufferSize Returns the number of bytes currently buffered waiting to be
written to the socket’s stream
remoteAddress IP address of the remote server that the socket is connected to
remotePort Port of the remote server that the socket is connected to
remoteFamily IP of the remote family the socket is connected to
localAddress Local IP address the remote client is using for the socket
connection
localPort Local port the remote client is using for the socket connection
bytesRead Number of bytes read by the socket

bytesWritten Number of bytes written by the socket
To illustrate flowing data across a Socket object, the following code shows the
basics of implementing the Socket object on a client. Notice that the
net.connect() method is called using an options object containing a port
and a host attribute. The connect callback function logs a message and then
writes some data out to the server. To handle data coming back from the server, the
on.data() event handler is implemented. To handle the closure of the socket, the
on('end') event handler is implemented:
Click here to view code image
var net = require('net');
var client = net.connect({port: 8107, host:'localhost'}, function() {
console.log('Client connected');
client.write('Some Data\r\n');
});
client.on('data', function(data) {
console.log(data.toString());
client.end();
});
client.on('end', function() {
console.log('Client disconnected');
});
The net.Server Object
The net.Server object is used to create a TCP socket server and begin listening
for connections to which you will be able to read and write data. The Server object
is created internally when you call net.createServer(). This object represents
the socket server and handles listening for connections and then sending and
receiving data on those connections to the server.
When the server receives a connection, the Server creates a Socket object and
passes it to any connection event handlers that are listening. Because the Socket
object implements a Duplex stream, you can use the write()method to stream
writes of data back to the client and a data event handler to stream data from the
client.
To create a Server object, you use the net.createServer() method shown
here:

net.createServer([options], [connectionListener])
The options parameter is an object that specifies options to use when creating the
socket Server object. Table 8.5 lists the properties of the options object. The
second parameter is the connection event callback function, which is executed
when a connection is received. This connectionListener callback function is
passed to the Socket object for the connecting client.
Table 8.5 Options that can be specified when creating a net.Server
Property Description
allowHalfOpen A Boolean; when true, the socket won’t automatically send
a FIN packet when the other end of the socket sends a FIN
packet, thus allowing half of the Duplex stream to remain
open. Defaults to false.
pauseOnConnect A Boolean; when true, each socket for each connection is
paused, and no data will be read from its handle. This allows
processes to pass connections between them without reading
any data. Defaults to false.
Once the Server object is created, it provides several events that are triggered
during the life cycle of the server. For example, the connection event is triggered
when a socket client connects, and the close event is triggered when the server
shuts down. As you implement your socket server, you can register callbacks to be
executed when these events are triggered to handle connections, errors, and
shutdown. Table 8.6 lists the events that can be triggered on the Socket object.
Table 8.6 Events that can be triggered on Socket objects
Event Description
listening Emitted when the server begins listening on a port by calling the
listen() method. The callback function does not accept any
parameters.
connection Emitted when a connection is received from a socket client. The
callback function must accept a parameter that is a Socket object
representing the connection to the connecting client. For example:
function(client){}
close Emitted when the server closes either normally or on error. This

event is emitted until all client connections have ended.
error Emitted when an error occurs. The close event also is triggered
on errors.
The Server object also includes several methods that allow you to do things like
read from and write to the socket as well as pause or end data flow. Many of these
are inherited from the Duplex stream objects and should be familiar to you. Table
8.7 lists the methods available on the Socket object.
Table 8.7 Methods that can be called on Socket objects
Method Description
listen(port, [host],
[backlog], [callback])
Opens up a port on the server and begins listening for
connections. port specifies the listening port. If you specify
0 for the port, a random port number is selected.
IP address to listen on. If it is omitted, the server accepts
connections directed to any IPv4 address. backlog
the maximum number of pending connections the server will
allow. The default is 511.
The callback function is called when the server has opened
the port and begins listening.
listen(path, [callback]) Same as the preceding method except that a Unix socket
server is started to listen for connections on the file
path specified.
listen(handle,
[callback])
Same as the preceding method except that a handle to a
Server or Socket object has an underlying _
member that points to a file descriptor handle on the
assumes that the file descriptor points to a socket file that has
been bound to a port already.
getConnections(callback) Returns the number of connections currently connected to the
server. The callback is executed when the number of
connections is calculated and accepts an error
and a count parameter. For example:
function(error, count)
close([callback]) Stops the server from accepting new connections. Current

connections are allowed to remain until they complete. The
server does not truly stop until all current connections have
been closed.
address() Returns the bound address, the address family name, and the
port of the socket as reported by the operating system. The
return value is an object that contains the port, family, and
address properties. For example:
{ port: 8107, family: 'IPv4', address: '127.0.0.1' }
unref() Calling this method allows the Node.js application to
terminate if this server is the only event on the event queue.
ref() References this socket so that if this server is the only thing
on the event queue the Node.js application will not terminate.
The Server object also provides the maxConnections attribute, which allows
you to set the maximum number of connections that the server will accept before
rejecting them. If a process has been forked to a child for processing using
child_process.fork(), you should not use this option.
The following code shows the basics of implementing the Server object. Notice
that the net.createServer() method is called and implements a callback that
accepts the client Socket object. To handle data coming back from the client, the
on.data() event handler is implemented. To handle the closure of the socket, the
on('end') event handler is implemented. To begin listening for connections, the
listen() method is called on port 8107:
Click here to view code image
var net = require('net');
var server = net.createServer(function(client) {
console.log(Client connected');
client.on('data', function(data) {
console.log('Client sent ' + data.toString());
});
client.on('end', function() {
console.log('Client disconnected');
});
client.write('Hello');
});
server.listen(8107, function() {
console.log('Server listening for connections');
});
Implementing TCP Socket Servers and Clients
Now that you understand the net.Server and net.Socket objects, you are
ready to implement some Node.js TCP clients and servers. This section guides you
through the process of implementing basic TCP clients and servers in Node.js.
The examples in the following sections are basic to make it easy for you to grasp the
concepts of starting the TCP server listening on a port, and then implementing clients
that can connect. The examples are designed to help you see the interactions and
event handling that need to be implemented.
Implementing a TCP Socket Client
At the most basic level, implementing a TCP socket client involves the process of
creating a Socket object that connects to the server, writing data to the server, and
then handling the data that comes back. Additionally, you should build the socket so
that it can also handle errors, the buffer being full, and timeouts. This section
discusses each of the steps to implement a socket client using the Socket object.
Listing 8.1 presents the full code for the following discussion.
The first step is to create the socket client by calling net.connect() as shown
below. Pass in the port and host that you want to connect to as well and
implement a callback function to handle the connect event:
net.connect({port: 8107, host:'localhost'}, function() {
//handle connection
});
Then inside the callback you should set up the connection behavior. For example,
you may want to add a timeout or set the encoding as shown here:
this.setTimeout(500);
this.setEncoding('utf8');
You also need to add handlers for the data, end, error, timeout, and close
events that you want to handle. For example, to handle the data event so that you
can read data coming back from the server, you might add the following handler
once the connection has been established:
this.on('data', function(data) {
console.log("Read from server: " + data.toString());

//process the data
this.end();
});
To write data to the server, you implement a write() command. If you are writing
a lot of data to the server and the write fails, then you may also want to implement a
drain event handler that begins writing again when the buffer is empty. The
following shows an example of implementing a drain handler because of a write
failure. Notice that a closure is used to preserve the values of the socket and
data variables once the function has ended.
Click here to view code image
function writeData(socket, data){
var success = !socket.write(data);
if (!success){
(function(socket, data){
socket.once('drain', function(){
writeData(socket, data);
});
})(socket, data);
}
}
Listing 8.1 shows the full implementation of a basic TCP socket client. All the client
does is send a bit of data to the server and receive a bit of data back; however, the
example could easily be expanded to support more complex data handling across the
socket. Notice that three separate sockets are opened to the server and are
communicating at the same time. Notice that each client created gets a different
random port number, as shown in Listing 8.1 Output.
Listing 8.1 socket_client.js: Implementing basic TCP socket clients
Click here to view code image
01 var net = require('net');
02 function getConnection(connName){
03 var client = net.connect({port: 8107, host:'localhost'}, function() {
04 console.log(connName + ' Connected: ');
05 console.log(' local = %s:%s', this.localAddress, this.localPort);
06 console.log(' remote = %s:%s', this.remoteAddress, this.remotePort);
07 this.setTimeout(500);
08 this.setEncoding('utf8');
09 this.on('data', function(data) {
10 console.log(connName + " From Server: " + data.toString());
11 this.end();

12 });
13 this.on('end', function() {
14 console.log(connName + ' Client disconnected');
15 });
16 this.on('error', function(err) {
17 console.log('Socket Error: ', JSON.stringify(err));
18 });
19 this.on('timeout', function() {
20 console.log('Socket Timed Out');
21 });
22 this.on('close', function() {
23 console.log('Socket Closed');
24 });
25 });
26 return client;
27 }
28 function writeData(socket, data){
29 var success = !socket.write(data);
30 if (!success){
31 (function(socket, data){
32 socket.once('drain', function(){
33 writeData(socket, data);
34 });
35 })(socket, data);
36 }
37 }
38 var Dwarves = getConnection("Dwarves");
39 var Elves = getConnection("Elves");
40 var Hobbits = getConnection("Hobbits");
41 writeData(Dwarves, "More Axes");
42 writeData(Elves, "More Arrows");
43 writeData(Hobbits, "More Pipe Weed");<Listing First>
Listing 8.1 Output socket_client.js: Implementing basic TCP socket
clients
Click here to view code image
Elves Connected:
local = 127.0.0.1:62616
remote = 127.0.0.1:8107
Dwarves Connected:
local = 127.0.0.1:62617
remote = 127.0.0.1:8107
Hobbits Connected:
local = 127.0.0.1:62618
remote = 127.0.0.1:8107
Elves From Server: Sending: More Arrows

Dwarves From Server: Sending: More Axes
Hobbits From Server: Sending: More Pipe Weed
Dwarves Client disconnected
Socket Closed
Elves Client disconnected
Socket Closed
Hobbits Client disconnected
Socket Closed
Implementing a TCP Socket Server
At the most basic level, implementing a TCP server client involves the process of
creating a Server object, listening on a port, and then handling incoming
connections, including reading and writing data to and from the connections.
Additionally, the socket server should handle the close and error events on the
Server object as well as the events that occur in the incoming client connection
Socket object. This section discusses each of the steps to implement a socket
server using the Server object. Listing 8.2 presents the full code for the following
discussion.
The first step is to create the socket server by calling net.createServer() as
shown below. You also need to provide a connection callback handler and then call
listen() to begin listening on the port:
Click here to view code image
var server = net.createServer(function(client) {
//implement the connection callback handler code here.
});
server.listen(8107, function() {
//implement the listen callback handler here.
});
Inside the listen callback handler, you should also add handlers to support the
close and error events on the Server object. These may just be log statements,
or you may also want to add additional code that is executed when these events
occur. The follow shows the basic examples:
Click here to view code image
server.on('close', function(){
console.log('Server Terminated');
});
server.on('error', function(err){
});
Inside the connection event callback, you need to set up the connection behavior.
For example, you might want to add a timeout or set the encoding as shown here:
this.setTimeout(500);
this.setEncoding('utf8');
You also need to add handlers for the data, end, error, timeout, and close
events that you want to handle on the client connection. For example, to handle the
data event so that you can read data coming from the client, you might add the
following handler once the connection is established:
this.on('data', function(data) {
console.log("Received from client: " + data.toString());
//process the data
});
To write data to the server, you implement a write() command somewhere in
your code. If you are writing a lot of data to the client, then you may also want to
implement a drain event handler that begins writing again when the buffer is
empty. This can help if the write() returns a failure because the buffer is full, or if
you want to throttle back writing to the socket. The following shows an example of
implementing a drain handler because of a write failure. Notice that a closure is used
to preserve the values of the socket and data variables once the function has ended:
Click here to view code image
function writeData(socket, data){
var success = !socket.write(data);
if (!success){
(function(socket, data){
socket.once('drain', function(){
writeData(socket, data);
});
})(socket, data);
}
}
The code in Listing 8.2 shows the full implementation of a basic TCP socket server.
The socket server accepts connections on port 8107, reads the data in, and then
writes a string back to the client. Although the implementation is basic, it illustrates
handling the events as well as reading and writing data in the client connection.

Listing 8.2 socket_server.js: Implementing a basic TCP socket server
Click here to view code image
01 var net = require('net');
02 var server = net.createServer(function(client) {
03 console.log('Client connection: ');
04 console.log(' local = %s:%s', client.localAddress, client.localPort);
05 console.log(' remote = %s:%s', client.remoteAddress, client.remotePort);
06 client.setTimeout(500);
07 client.setEncoding('utf8');
08 client.on('data', function(data) {
09 console.log('Received data from client on port %d: %s',
10 client.remotePort, data.toString());
11 console.log(' Bytes received: ' + client.bytesRead);
12 writeData(client, 'Sending: ' + data.toString());
13 console.log(' Bytes sent: ' + client.bytesWritten);
14 });
15 client.on('end', function() {
16 console.log('Client disconnected');
17 server.getConnections(function(err, count){
18 console.log('Remaining Connections: ' + count);
19 });
20 });
21 client.on('error', function(err) {
22 console.log('Socket Error: ', JSON.stringify(err));
23 });
24 client.on('timeout', function() {
25 console.log('Socket Timed Out');
26 });
27 });
28 server.listen(8107, function() {
29 console.log('Server listening: ' + JSON.stringify(server.address()));
30 server.on('close', function(){
31 console.log('Server Terminated');
32 });
33 server.on('error', function(err){
34 console.log('Server Error: ', JSON.stringify(err));
35 });
36 });
37 function writeData(socket, data){
38 var success = !socket.write(data);
39 if (!success){
40 (function(socket, data){
41 socket.once('drain', function(){
42 writeData(socket, data);
43 });
44 })(socket, data);
45 }

46 }
Implementing TLS Servers and Clients
Transport Layer Security/Secure Socket Layer (TLS/SSL) is a cryptographic
protocol designed to provide secure communications on the Internet. They use X.509
certificates along with session keys to verify whether the socket server you are
communicating with is the one that you want to communicate with. TLS provides
security in two main ways. First, it uses long-term public and secret keys to
exchange a short-term session key so that data can be encrypted between client and
server. Second, it provides authentication so that you can ensure that the webserver
you are connecting to is the one you actually think it is, thus preventing man-in-the-
middle attacks where requests are rerouted through a third party.
The following sections discuss implementing TLS socket servers and clients in your
Node.js environment using the tls module. Before getting started using TLS, you
need to generate a private key and public certificate for both your clients and your
server. There are several ways to do this depending on your platform. One of the
simplest methods is to use the OpenSSL library for your platform.
To generate the private key, first execute the following OpenSSL command:
openssl genrsa -out server.pem 2048
Next, use the following command to create a certificate signing request file:
openssl req -new -key server.pem -out server.csr
Note
When creating the certificate signing request file, you are asked several questions.
When prompted for the Common Name, you should put in the domain name of
the server you want to connect to. Otherwise, the certificate will not work. Also
you can put in additional domain names and IP addresses in the Subject
Alternative Names field.
Then to create a self-signed certificate that you can use for your own purpose or
testing, use the following command:
openssl x509 -req -days 365 -in server.csr -signkey server.pem -out server.crt

Note
The self-signed certificate is fine for testing purposes or internal use. However, if
you are implementing an external web service that needs to be protected on the
Internet, you may want to get a certificate signed by a certificate authority. If you
want to create a certificate that is signed by a third-party certificate authority, you
need to take additional steps.
Creating a TLS Socket Client
Creating a TLS client is almost exactly like the process of creating a socket client
discussed earlier in this chapter. The only difference is that there are additional
options, shown in Table 8.8, that allow you to specify the security options for the
client. The most important options you need to worry about are key, cert, and ca.
The key option specifies the private key used for SSL. The cert value specifies
the x509 public key to use. If you are using a self-signed certificate, you need to
point the ca property at the certificate for the server:
Click here to view code image
var options = {
key: fs.readFileSync('test/keys/client.pem'),
cert: fs.readFileSync('test/keys/client.crt'),
ca: fs.readFileSync('test/keys/server.crt')
};
Once you have defined the options with the cert, key, and ca settings, then you
can call the tls.connect(options, [responseCallback]), and it will
work exactly the same as the net.connect() call. The only difference is that the
data between the client and server is encrypted.
Click here to view code image
var options = {
hostname: 'encrypted.mysite.com',
port: 8108,
path: '/',
method: 'GET',
key: fs.readFileSync('test/keys/client.pem'),
cert: fs.readFileSync('test/keys/client.crt'),
ca: fs.readFileSync('test/keys/server.crt')
};
var req = tls.connect(options, function(res) {

<handle the connection the same as an net.connect>
})
Table 8.8 Additional options for tls.connect()
Event Description
pfx A string or Buffer object containing the private key,
certificate, and CA certs of the server in PFX or
PKCS12 format.
key A string or Buffer object containing the private key
to use for SSL.
passphrase A string containing the passphrase for the private key
or pfx.
cert A string or Buffer object containing the public x509
certificate to use.
ca An array of strings or buffers of trusted certificates in
PEM format to check the remote host against.
rejectUnauthorized A Boolean; when true, the server certificate is verified
against the list of supplied CAs. An error event is
emitted if verification fails. Verification happens at the
connection level, before the HTTP request is sent.
Defaults to true.
servername Specifies the server name for the Server Name
Indication SNI TLS extension.
secureProtocol Specifies the SSL method to use. For example,
SSLv3_method will force SSL version 3.
Creating a TLS Socket Server
Creating a TLS socket server is almost exactly like the process of creating a socket
server discussed earlier in this chapter. The only differences are that there are
additional options parameters that you must pass into
https.createServer(), and there are some additional events that can be
triggered on the tls.Server object. The options, listed in Table 8.9, allow you to
specify the security options for the server. Table 8.10 lists the additional events for
the TLS socket server. The most important options you need to worry about are key,
cert, and ca.

The key option specifies the private key used for SSL. The cert value specifies
the x509 public key to use. If you are using a self-signed certificate, you need to
point the ca property at the certificate for the client.
Table 8.9 Additional options for tls.createServer()
Event Description
pfx A string or Buffer object containing the private key,
certificate, and CA certs of the server in PFX or
PKCS12 format.
key A string or Buffer object containing the private key
to use for SSL.
passphrase A string containing the passphrase for the private key
or pfx.
cert A string or Buffer object containing the public x509
certificate to use.
ca An array of strings or buffers of trusted certificates in
PEM format to check the remote host against.
crl Either a string or list of strings of PEM encoded CRLs
(Certificate Revocation Lists).
ciphers A string describing the ciphers to use or exclude.
Using this in conjunction with the
honorCipherOrder is a good way to prevent
BEAST attacks.
handshakeTimeout Specifies the number of milliseconds to wait before
aborting the connection if the SSL/TLS handshake
does not finish. If the timeout is hit, a clientError
is emitted on the tls.Server.
honorCipherOrder A Boolean; when true, the server honors the server’s
preferences over the client’s when choosing a cipher.
requestCert When true, the server requests a certificate from
clients that connect and attempt to verify that
certificate. Default is false.
rejectUnauthorized When true, the server rejects any connection that is
not authorized by the list of supplied CAs. This option
only has an effect if requestCert is true. Default

is false.
NPNProtocols An Array or Buffer of possible NPN protocols.
Protocols should be ordered by their priority.
SNICallback A function that is called if the client supports the SNI
TLS extension. The server name is the only argument
passed to the callback.
sessionIdContext A string containing an opaque identifier for session
resumption. If requestCert is true, the default is
an MD5 hash value generated from the command line.
Otherwise, the default is not provided.
secureProtocol Specifies the SSL method to use. For example,
SSLv3_method will force SSL version 3.
The following shows an example of creating a TLS socket server in Node.js:
Click here to view code image
var options = {
key: fs.readFileSync('test/keys/server.pem'),
cert: fs.readFileSync('test/keys/server.crt'),
ca: fs.readFileSync('test/keys/client.crt')
};
tls.createServer(options, function (client) {
client.write("Hello Secure World\r\n");
client.end();
}).listen(8108);
Once the TLS socket server has been created, the request/response handling works
basically the same way that the TCP socket servers described earlier in this chapter
work. The server can accept connections and read and write data back to the client.
Table 8.10 Additional events on TLS Server objects
Event Description
secureConnection Emitted when a new secure connection has been
successfully established. The callback accepts a single
instance of a tls.CleartextStream streaming
object that can be written to and read from. For example:
function (clearStream)

clientError Emitted when a client connection emits an error. The
parameters to the callback are the error and a
tls.SecurePair object. For example:
function (error, securePair)
newSession Emitted when a new TLS session is created. The callback
is passed the sessionId and sessionData
parameters containing the session information. For
example:
function (sessionId, sessionData)
resumeSession Emitted when the client tries to resume a previous TLS
session. You can store the session in an external storage
so that you can look it up when receiving this event. The
callback handler receives two parameters. The first is a
sessionId, and the second is a callback to be
executed if the session cannot be established. For
example:
function (sessionId, callback)
Summary
Sockets are useful when implementing backend services in a Node.js application.
They allow a service on one system to communicate with a service on another
system through an IP address and port. They also provide the ability to implement an
IPC between two different processes running on the same server. The net module
allows you to create Server objects that act as socket servers and Socket objects
that act as socket clients. Since the Socket object extends Duplex streams, you
can read and write data from both the server and the client. For secure connections,
Node.js provides the tls module that allows you to implement secure TLS socket
servers and clients.
Next
In the next chapter, you learn how to implement multiprocessing in a Node.js
environment. This allows you to farm work out to other processes on the system to
take advantage of multiprocessor servers.
9
Scaling Applications Using Multiple
Processors in Node.js
In Chapter 4, “Using Events, Listeners, Timers, and Callbacks in Node.js,” you
learned that Node.js applications run on a single thread rather than multiple threads.
Using the single thread for application processing makes Node.js processes more
efficient and faster. But most servers have multiple processors, and you can scale
your Node.js applications by taking advantage of them. Node.js allows you to fork
work from the main application to separate processes that can then be processed in
parallel with each other and the main application.
To facilitate using multiple processes Node.js provides three specific modules. The
process module provides access to the running processes. The child_process
module provides the ability to create child processes and communicate with them.
The cluster module implements clustered servers that share the same port, thus
allowing multiple requests to be handled simultaneously.
Understanding the Process Module
The process module is a global object that can be accessed from your Node.js
applications without the need to use a require(). This object gives you access to
the running processes as well as information about the underlying hardware
architecture.
Understanding Process I/O Pipes
The process module provides access to the standard I/O pipes for the process

stdin, stdout, and stderr. stdin is the standard input pipe for the process,
which is typically the console. You can read input from the console using the
following code:
process.stdin.on('data', function(data){
console.log("Console Input: " + data);
});
When you type in data to the console and press Enter, the data is written back out.
For example:
some data
Console Input: some data
The stdout and stderr attributes of the process module are Writable
streams that can be treated accordingly.
Understanding Process Signals
A great feature of the process module is that it allows you to register listeners to
handle signals sent to the process from the OS. This is helpful when you need to
perform certain actions, such as clean up before a process is stopped or terminated.
Table 9.1 lists the process events that you can add listeners for.
To register for a process signal, simply use the on(event, callback) method.
For example, to register an event handler for the SIGBREAK event, you would use
the following code:
process.on('SIGBREAK', function(){
console.log("Got a SIGBREAK");
});
Table 9.1 Events that can be sent to Node.js processes
Event Description
SIGUSR1 Emitted when the Node.js debugger is started. You can add a listener;
however, you cannot stop the debugger from starting.
SIGPIPE Emitted when the process tries to write to a pipe without a process
connected on the other end.
SIGHUP Emitted on Windows when the console window is closed, and on
other platforms under various similar conditions. Note: Windows

terminates Node.js about 10 seconds after sending this event.
SIGTERM Emitted when a request is made to terminate the process. This is not
supported on Windows.
SIGINT Emitted when a Break is sent to the process. For example, when
Ctrl+C is pressed.
SIGBREAK Emitted on Windows when Ctrl+Break is pressed.
SIGWINCH Emitted when the console has been resized. On Windows, this is
emitted only when you write to the console, when the cursor is being
moved, or when a readable TTY is used in raw mode.
SIGKILL Emitted on a process kill. Cannot have a listener installed.
SIGSTOP Emitted on a process stop. Cannot have a listener installed.
Controlling Process Execution with the process Module
The process module also gives you some control over the execution of processes,
specifically, the ability to stop the current process, kill another process, or schedule
work to run on the event queue. These methods are attached directly to the
process module. For example, to exit the current Node.js process, you would use:
process.exit(0)
Table 9.2 lists the available process control methods on the process module.
Table 9.2 Methods that can be called on the process module to affect process
execution
Method Description
abort() Causes the current Node.js application to emit an
abort event, exit, and generate a memory core.
exit([code]) Causes the current Node.js application to exit and
return the specified code.
kill(pid,
[signal])
Causes the OS to send a kill signal to the process with
the specified pid. The default signal is SIGTERM,
but you can specify another.
nextTick(callback) Schedules the callback function on the Node.js
application’s queue.

Getting Information from the process Module
The process module provides a wealth of information about the running process
and the system architecture. This information can be useful when implementing your
applications. For example, the process.pid property gives you the process ID
that can then be used by your application.
Table 9.3 lists the properties and methods that you can access from the process
module and describes what they return.
Table 9.3 Methods that can be called on the process module to gather
information
Method Description
version Specifies the version of Node.js.
versions Provides an object containing the required modules and version for this Node.js application.
config Contains the configuration options used to compile the current node executable.
argv Contains the command arguments used to start the Node.js application. The first element is the node, and the second element
is the path to the main JavaScript file.
execPath Specifies the absolute path where Node.js was started from.
execArgv Specifies the node-specific command-line options used to start the application.
chdir(directory) Changes the current working directory for the application. This can be useful if you provide a configuration file that is
loaded after the application has started.
cwd() Returns the current working directory for the process.
env Contains the key/value pairs specified in the environment for the process.
pid Specifies the current process’s ID.
title Specifies the title of the currently running process.
arch Specifies the processor architecture the process is running on (for example,
platform Specifies the OS platform (for example, linux, win32, or
memoryUsage() Describes the current memory usage of the Node.js process. You need to use the
object. For example:
console.log(util.inspect(process.memoryUsage()));{ rss: 13946880, heapTotal: 4083456, heapUsed: 2190800 }
maxTickDepth Specifies the maximum number of events schedule by nextTick()
from being processed. You should adjust this value as necessary to keep your I/O processes from being starved.

uptime() Contains the number of seconds the Node.js processor has been
hrtime() Returns a high-resolution time in a tuple array [seconds,
implement a granular timing mechanism.
getgid() On POSIX platforms, returns the numerical group ID for this process.
setgid(id) On POSIX platforms, sets the numerical group ID for this process.
getuid() On POSIX platforms, returns the numerical or string user ID for this process.
setuid(id) On POSIX platforms, sets the numerical or string user ID for this process.
getgroups() On POSIX platforms, returns an array of group IDs.
setgroups(groups) On POSIX platforms, sets the supplementary group IDs. Your Node.js application needs root privileges to call this method.
initgroups(user,
extra_group)
On POSIX platforms, initializes the group access list with the information from
needs root privileges to call this method.
To help you understand accessing information using the process module, Listing
9.1 makes a series of calls and outputs the results to the console, as shown in Listing
9.1 Output.
Listing 9.1 process_info.js: Accessing information about the process and
system using the process module
Click here to view code image
01 var util = require('util');
02 console.log('Current directory: ' + process.cwd());
03 console.log('Environment Settings: ' + JSON.stringify(process.env));
04 console.log('Node Args: ' + process.argv);
05 console.log('Execution Path: ' + process.execPath);
06 console.log('Execution Args: ' + JSON.stringify(process.execArgv));
07 console.log('Node Version: ' + process.version);
08 console.log('Module Versions: ' + JSON.stringify(process.versions));
09 //console.log(process.config);
10 console.log('Process ID: ' + process.pid);
11 console.log('Process Title: ' + process.title);
12 console.log('Process Platform: ' + process.platform);
13 console.log('Process Architecture: ' + process.arch);
14 console.log('Memory Usage: ' + util.inspect(process.memoryUsage()));
15 var start = process.hrtime();
16 setTimeout(function() {
17 var delta = process.hrtime(start);
18 console.log('High-Res timer took %d seconds and %d nanoseconds', delta[0], + delta[1]);
19 console.log('Node has been running %d seconds', process.uptime());
20 }, 1000);

Listing 9.1 Output Accessing information about the process and system using
the process module
Click here to view code image
Current directory: C:\Users\CalebTZD\workspace\node\code\ch09
Environment Settings:
Node Args: C:\Program Files\nodejs\node.exe,C:\Users\CalebTZD\workspace\node\code\ch09\process_info.js
Execution Path: C:\Program Files\nodejs\node.exe
Execution Args: []
Node Version: v7.8.0
Module Versions: Node Config:
Process ID: 12896
Process Title: C:\Program Files\nodejs\node.exe
Process Platform: win32
Process Architecture: x64
Memory Usage: { rss: 20054016,
heapTotal: 5685248,
heapUsed: 3571496,
external: 8772 }
High-Res timer took 1 seconds and 913430 nanoseconds
Node has been running 1.123 seconds
Implementing Child Processes
To take advantage of multiple processors in a server with your Node.js applications,
you need to farm work off to child processes. Node.js provides the
child_process module that allows you to spawn, fork, and execute work on
other processes. The following sections discuss the process of executing tasks on
other processes.
Keep in mind that child processes do not have direct access to the global memory in
each other or the parent process. Therefore, you need to design your applications to
run in parallel.
Understanding the ChildProcess Object
The child_process module provides a new class called ChildProcess that
acts as a representation of the child processes that can be accessed from the parent.
This allows you to control, end, and send messages to the child processes from the
parent process that started them.

The process module is a ChildProcess object as well. This means that when
you access process from the parent module, it is the parent ChildProcess
object, but when you access process from the child process, it is the
ChildProcess object.
The purpose of this section is to familiarize you with the ChildProcess object so
that in subsequent sections you can actually implement multiprocess Node.js
applications. The best way to do that is to learn about the events, attributes, and
methods of the ChildProcess object.
Table 9.4 lists the events that can be emitted on the ChildProcess object. You
implement handlers for the events to handle when the child process terminates or
sends messages back to the parent.
Table 9.4 Events that can be emitted on ChildProcess objects
Event Description
message Emitted when a ChildProcess object calls the send() method
to send data. Listeners on this event implement a callback that
can then read the data sent. For example:
child.on('send': function(message){console.log(message});
error Emitted when an error occurs in the worker. The handler receives
an error object as the only parameter.
exit Emitted when a worker process ends. The handler receives two
arguments, code and signal, that specify the exit code and the
signal passed to kill the process if it was killed by the parent.
close Emitted when all the stdio streams of a worker process have
terminated. Different from exit because multiple processes might
share the same stdio streams.
disconnect Emitted when disconnect() is called on a worker.
Table 9.5 lists the methods that can be called on the child process. These methods
allow you to terminate, disconnect, or send messages to the child process. For
example, the following code can be called from the parent process to send an object
to the child process:
child.send({cmd: 'command data'});

Table 9.5 Methods that can be called on ChildProcess objects
Method Description
kill([signal]) Causes the OS to send a kill signal to the child process. The
default signal is SIGTERM, but you can specify another. See
Table 9.1 for a list of signal strings.
send(message,
[sendHandle])
Sends a message to the handle. The message can be a string
or an object. The optional sendHandle parameter allows
you to send a TCP Server or Socket object to the client.
This allows the client process to share the same port and
address.
disconnect() Closes the IPC channel between the parent and child and sets
the connected flag to false in both the parent and child
processes.
Table 9.6 lists the properties that you can access on a ChildProcess object.
Table 9.6 Properties that can be accessed on ChildProcess objects
Property Description
stdin An input Writable stream.
stdout A standard output Readable stream.
stderr A standard output Readable stream for errors.
pid An ID of the process.
connected A Boolean that is set to false after disconnect() is called.
When this is false, you can no longer send() messages to the
child.
Executing a System Command on Another Process Using
exec()
The simplest method of adding work to another process from a Node.js process is to
execute a system command in a subshell using the exec() function. The exec()
function can execute just about anything that can be executed from a console
prompt; for example, a binary executable, shell script, Python script, or batch file.

When executed, the exec() function creates a system subshell and then executes a
command string in that shell just as if you had executed it from a console prompt.
This has the advantage of being able to leverage the capabilities of a console shell,
such as accessing environment variables on the command line.
The syntax for the exec() function call is shown below. The execFile()
function call returns a ChildProcess object:
child_process.exec(command, [options], callback)
The command parameter is a string that specifies the command to execute in the
subshell. The options parameter is an object that specifies settings to use when
executing the command, such as the current working directory. Table 9.7 lists the
options that can be specified by the exec() command.
The callback parameter is a function that accepts three parameters: error,
stdout, and stderr. The error parameter is passed an error object if an error is
encountered when executing the command. stdout and stderr are Buffer
objects that contain the output from executing the command.
Table 9.7 Options that can be set when using the exec() and execFile()
Functions
Property Description
cwd Specifies the current working directory for the child process to
execute within.
env Object whose property:value pairs are used as environment
key/value pairs.
encoding Specifies the encoding to use for the output buffers when storing
output from the command.
maxBuffer Specifies the size of the output buffers for stdout and stderr.
The default value is 200*1024.
timeout Specifies the number of milliseconds for the parent process to wait
before killing the child process if it has not completed. The default
is 0, which means there is no timeout.
killSignal Specifies the kill signal to use when terminating the child process.
The default is SIGTERM.

The code in Listing 9.2 illustrates an example of executing a system command using
the exec() function. Listing 9.2 Output shows the result.
Listing 9.2 child_exec.js: Executing a system command in another process
Click here to view code image
01 var childProcess = require('child_process');
02 var options = {maxBuffer:100*1024, encoding:'utf8', timeout:5000};
03 var child = childProcess.exec('dir /B', options,
04 function (error, stdout, stderr) {
05 if (error) {
06 console.log(error.stack);
07 console.log('Error Code: '+error.code);
08 console.log('Error Signal: '+error.signal);
09 }
10 console.log('Results: \n' + stdout);
11 if (stderr.length){
12 console.log('Errors: ' + stderr);
13 }
14 });
15 child.on('exit', function (code) {
16 console.log('Completed with code: '+code);
17 });
Listing 9.2 Output child_exec.js: Executing a system command in another
process
Click here to view code image
Completed with code: 0
Results:
chef.js
child_fork.js
child_process_exec.js
child_process_exec_file.js
child_process_spawn.js
cluster_client.js
cluster_server.js
cluster_worker.js
file.txt
process_info.js
Executing an Executable File on Another Process Using
execFile()

Another simple method of adding work to another process from a Node.js process is
to execute an executable file on another process using the execFile() function.
This is similar to using exec() except that no subshell is used. This makes
execFile() lighter weight, but it also means that the command to execute must
be a binary executable. Shell scripts on Linux and batch files on Windows do not
work with the execFile() function.
The syntax for the execFile() function call is shown below. The execFile()
function returns a ChildProcess object:
child_process.execFile(file, args, options, callback)
The file parameter is a string that specifies the path to the executable file that will
be executed. The args parameter is an array that specifies command-line arguments
to be passed to the executable. The options parameter is an object that specifies
settings to use when executing the command, such as the current working directory.
Table 9.7 lists the options that can be specified by the execFile() command.
The callback parameter is a function that accepts three parameters: error,
stdout, and stderr. The error parameter is passed an error object if an error is
encountered when executing the command. stdout and stderr are Buffer
objects that contain the output from executing the command.
Listing 9.3 illustrates executing a system command using the execFile()
function. Listing 9.3 Output shows the output.
Listing 9.3 child_process_exec_file.js: Executing an executable file in
another process
Click here to view code image
01 var childProcess = require('child_process');
02 var options = {maxBuffer:100*1024, encoding:'utf8', timeout:5000};
03 var child = childProcess.execFile('ping.exe', ['-n', '1', 'google.com'],
04 options, function (error, stdout, stderr) {
05 if (error) {
06 console.log(error.stack);
07 console.log('Error Code: '+error.code);
08 console.log('Error Signal: '+error.signal);
09 }
10 console.log('Results: \n' + stdout);
11 if (stderr.length){
12 console.log('Errors: ' + stderr);

13 }
14 });
15 child.on('exit', function (code) {
16 console.log('Child completed with code: '+code);
17 });
Listing 9.3 Output child_process_exec_file.js: Executing an
executable file in another process
Click here to view code image
Child completed with code: 0
Results:
Pinging google.com [216.58.195.78] with 32 bytes of data:
Reply from 216.58.195.78: bytes=32 time=47ms TTL=55
Ping statistics for 216.58.195.78:
Packets: Sent = 1, Received = 1, Lost = 0 (0% loss),
Approximate round trip times in milli-seconds:
Minimum = 47ms, Maximum = 47ms, Average = 47ms
Spawning a Process in Another Node.js Instance Using
spawn()
A more complex method of adding work to another process from a Node.js process
is to spawn another process; link the stdio, stdout, and stderr pipes between
them; and then execute a file on the new process using the spawn() function. That
makes spawning a bit heavier than exec() but provides some great benefits.
The major differences between spawn() and exec()/execFile() are that the
stdin for the spawned process can be configured and the stdout and stderr
are Readable streams in the parent process. This means that exec() and
execFile() must complete before reading the buffer outputs. However, you can
read output data from a spawn() process as soon as it is written.
The syntax for the spawn() function call is shown below. The spawn() function
returns a ChildProcess object:
child_process.spawn(command, [args], [options])
The command parameter is a string that specifies the command to be executed. The
args parameter is an array that specifies command-line arguments to be passed to

the executable command. The options parameter is an object that specifies
settings to use when executing the command, such as the current working directory.
Table 9.8 lists the options that can be specified by the spawn() command.
The callback parameter is a function that accepts three parameters: error,
stdout, and stderr. The error parameter is passed an error object if an error is
encountered when executing the command. The stdout and stderr are defined
by the stdio option settings; by default they are Readable stream objects.
Table 9.8 Properties of the options parameter that can be set when using the
spawn() function
Property Description
cwd A string representing the current working directory of the child
process.
env An object whose property:value pairs are used as environment
key/value pairs.
detached A Boolean; when true, this child process is made the leader of a
new process group enabling the process to continue even when the
parent exits. You should also use child.unref() so that the
parent process does not wait for the child process before exiting.
uid Specifies the user identity of the process for POSIX processes.
gid Specifies the group identity of the process for POSIX processes.
stdio An array that defines the child process stdio configuration
([stdin, stdout, stderr]). By default, Node.js opens file
descriptors [0, 1, 2] for [stdin, stdout, stderr]. The
strings define the configuration of each input and output stream. For
example:
['ipc', 'ipc', 'ipc']
The following list describes each of the options that can be used:
'pipe': Creates a pipe between the child and parent process. The
parent can access the pipe using ChildProcess.stdio[fd]
where fd is the file descriptors [0, 1, 2] for [stdin,
stdout, stderr].
'ipc': Creates an IPC channel for passing messages/file descriptors

between the parent and child using the send() method described
earlier.
'ignore': Does not set up a file descriptor in the child.
Stream object: Specifies a Readable or Writeable stream
object defined in the parent to use. The Stream object’s underlying
file descriptor is duplicated in the child and thus data can be streamed
from child to parent and vice versa.
File Descriptor Integer: Specifies the integer value of a file
descriptor to use.
null, undefined: Uses the defaults of [0, 1, 2] for the
[stdin, stdout, stderr] values.
Listing 9.4 illustrates executing a system command using the spawn() function.
Listing 9.4 Output shows the output.
Listing 9.4 child_process_spawn_file.js: Spawning a command in
another process
Click here to view code image
01 var spawn = require('child_process').spawn;
02 var options = {
03 env: {user:'brad'},
04 detached:false,
05 stdio: ['pipe','pipe','pipe']
06 };
07 var child = spawn('netstat', ['-e']);
08 child.stdout.on('data', function(data) {
09 console.log(data.toString());
10 });
11 child.stderr.on('data', function(data) {
12 console.log(data.toString());
13 });
14 child.on('exit', function(code) {
15 console.log('Child exited with code', code);
16 });
Listing 9.4 Output child_process_spawn_file.js: Spawning a

command in another process
Click here to view code image
Interface Statistics
Received Sent
Bytes 893521612 951835252
Unicast packets 780762 5253654
Non-unicast packets 94176 31358
Child exited with code 0
Discards 0 0
Errors 0 0
Unknown protocols 0
Implementing Child Forks
Node.js also provides a specialized form of process spawning called a fork, which is
designed to execute Node.js module code inside another V8 instance running on a
separate processor. This has the advantage of allowing you to run multiple services
in parallel. However, it also takes time to spin up a new instance of V8, and each
instance takes about 10MB of memory. Therefore, you should design your forked
processes to be longer lived, and not require many of them. Remember that you
don’t get a performance benefit for creating more processes than you have CPUs in
the system.
Unlike spawn, you cannot configure the stdio for the child process; instead it is
expected that you use the send() mechanism in the ChildProcess object to
communicate between the parent and child processes.
The syntax for the fork() function call is shown below. The fork() function
returns a ChildProcess object:
child_process.fork(modulePath, [args], [options])
The modulePath parameter is a string that specifies the path to the JavaScript file
that is launched by the new Node.js instance. The args parameter is an array that
specifies command-line arguments to be passed to the node command. The
options parameter is an object that specifies settings to use when executing the
command, such as the current working directory. Table 9.9 lists the options that can
be specified by the fork() command.

The callback parameter is a function that accepts three parameters: error,
stdout, and stderr. The error parameter is passed an error object if an error is
encountered when executing the command. The stdout and stderr are
Readable stream objects.
Table 9.9 Properties of the options parameter that can be set when using the
fork() function
Property Description
cwd A string representing the current working directory of the child
process.
env An object whose property:value pairs are used as environment
key/value pairs.
encoding Specifies the encoding to use when writing data to the output streams
and across the send() IPC mechanism.
execPath Specifies the executable to use to create the spawned Node.js process.
This allows you to use different versions of Node.js for different
processes, although that is not recommended in case the process
functionality is different.
silent A Boolean; when true, the stdout and stderror in the forked
process are not associated with the parent process. The default is
false.
Listing 9.5 and Listing 9.6 illustrate examples of forking work off to another Node.js
instance running in a separate process. Listing 9.5 uses fork() to create three child
processes running the code from Listing 9.6. The parent process then uses the
ChildProcess objects to send commands to the child processes. Listing 9.6
implements the process.on('message') callback to receive messages from
the parent, and the process.send() method to send the response back to the
parent process, thus implementing the IPC mechanism between the two.
The output is shown in Listing 9.6 Output.
Listing 9.5 child_fork.js: A parent process creating three child processes
and sending commands to each, executing in parallel
Click here to view code image
01 var child_process = require('child_process');
02 var options = {

03 env:{user:'Brad'},
04 encoding:'utf8'
05 };
06 function makeChild(){
07 var child = child_process.fork('chef.js', [], options);
08 child.on('message', function(message) {
09 console.log('Served: ' + message);
10 });
11 return child;
12 }
13 function sendCommand(child, command){
14 console.log("Requesting: " + command);
15 child.send({cmd:command});
16 }
17 var child1 = makeChild();
18 var child2 = makeChild();
19 var child3 = makeChild();
20 sendCommand(child1, "makeBreakfast");
21 sendCommand(child2, "makeLunch");
22 sendCommand(child3, "makeDinner");
Listing 9.6 chef.js: A child process handling message events and sending
data back to the parent process
Click here to view code image
01 process.on('message', function(message, parent) {
02 var meal = {};
03 switch (message.cmd){
04 case 'makeBreakfast':
05 meal = ["ham", "eggs", "toast"];
06 break;
07 case 'makeLunch':
08 meal = ["burger", "fries", "shake"];
09 break;
10 case 'makeDinner':
11 meal = ["soup", "salad", "steak"];
12 break;
13 }
14 process.send(meal);
15 });
Listing 9.5 Output chef.js: A child process handling message events and
sending data back to the parent process
Click here to view code image

Requesting: makeBreakfast
Requesting: makeLunch
Requesting: makeDinner
Served: soup,salad,steak
Served: ham,eggs,toast
Served: burger,fries,shake
Implementing Process Clusters
One of the coolest things you can do with Node.js is create a cluster of Node.js
instances running in parallel in separate processes on the same machine. You can do
that using the techniques you learned about the in the previous section by forking
processes and then using the send(message, serverHandle) IPC
mechanism to communicate send messages and pass the underlying TCP server
handles between them. However, because that is such a common task, Node.js has
provided the cluster module that does all that for you automatically.
Using the Cluster Module
The cluster module provides the functionality necessary to easily implement a
cluster of TCP or HTTP servers running in different processes on the same machine
but still using the same underlying socket, thus handling requests on the same IP
address and port combination. The cluster module is simple to implement and
provides several events, methods, and properties that can be used to initiate and
monitor a cluster of Node.js servers.
Table 9.10 lists the events that can be emitted in a cluster application.
Table 9.10 Events that can be emitted by the cluster module
Event Description
fork Emitted when a new worker has been forked. The callback
function receives a Worker object as the only argument. For
example:
function (worker)
online Emitted when the new worker sends back a message indicating

that it has started. The callback function receives a Worker
object as the only argument. For example:
function (worker)
listening Emitted when the worker calls listen() to begin listening on
the shared port. The callback handler receives the worker
object as well as an address object indicating the port the
worker is listening on. For example:
function (worker, address)
disconnect Emitted after the IPC channel has been disconnected, such as the
server calling worker.disconnect(). The callback
function receives a Worker object as the only argument. For
example:
function (worker)
exit Emitted when the Worker object has disconnected. The
callback handler receives the worker, exit code, and
signal used. For example:
function (worker, code, signal)
setup Emitted the first time the setupMaster() is called.
Table 9.11 lists the methods and properties available in the cluster module,
allowing you to get information such as whether this node is a worker or the master
as well as configuring and implementing the forked processes.
Table 9.11 Methods and properties of the cluster module
Property Description
settings Contains the exec, args, and silent
property values used to set up the cluster.
isMaster Is true if the current process is the cluster
master; otherwise, it is false.
isWorker Is true if the current process is a worker;
otherwise, it is false.

setupMaster([settings]) Accepts an optional settings object that
contains exec, args, and silent
properties. The exec property points to the
worker JavaScript file. The args property is
an array of parameters to pass, and silent
disconnects the IPC mechanism from the
worker thread.
disconnect([callback]) Disconnects the IPC mechanism from the
workers and closes the handles. The
callback function is executed when the
disconnect finishes.
worker References the current Worker object in
worker processes. This is not defined in the
master process.
workers Contains the Worker object, which you can
reference by ID from the master process. For
example:
cluster.workers[workerId]
Understanding the Worker Object
When a worker process is forked, a new Worker object is created in both the master
and worker processes. In the worker process, the object is used to represent the
current worker and interact with cluster events that are occurring. In the master
process, the Worker object is used to represent child worker processes so that your
master application can send messages to them, receive events on their state changes,
and even kill them.
Table 9.12 lists the events that Worker objects can emit.
Table 9.12 Events that can be emitted by Worker objects
Event Description
message Emitted when the worker receives a new message. The
callback function is passed the message as the only
parameter.

disconnect Emitted after the IPC channel has been disconnected on this
worker.
exit Emitted when this Worker object has disconnected.
error Emitted when an error has occurred on this worker.
Table 9.13 lists the methods and properties available in the Worker object, allowing
you to get information such as whether this node is a worker or the master as well as
configuring and implementing the forked processes.
Table 9.13 Methods and properties of the Worker module
Property Description
id Represents the unique ID of this worker.
process Specifies the ChildProcess object this worker is running
on.
suicide Is set to true when kill() or disconnect() is called
on this worker. You can use this flag to determine whether
you should break out of loops to try and go down gracefully.
send(message,
[sendHandle])
Sends a message to the master process.
kill([signal]) Kills the current worker process by disconnecting the IPC
channel and then exiting. Sets the suicide flag to true.
disconnect() When called in the worker, closes all servers, waits for the
close event, and then disconnects the IPC channel. When
called from the master, sends an internal message to the
worker causing it to disconnect itself. Sets the suicide
flag.
Implementing an HTTP Cluster
The best way to illustrate the value of the cluster module is to show a basic
implementation of Node.js HTTP servers. Listing 9.7 implements a basic cluster of
HTTP servers. Lines 4–13 register listeners for the fork, listening, and exit
events on cluster workers. Then in line 14 setupMaster() is called and the
worker executable cluster_worker.js is specified. Next, lines 15–19 create
the workers by calling cluster.fork(). Finally, in lines 20–24 the code iterates

through the workers and registers an on('message') event handler for each one.
Listing 9.8 implements the worker HTTP servers. Notice that the http server sends
back a response to the client and then also sends a message to the cluster master on
line 7.
Listing 9.9 implements a simple HTTP client that sends a series of requests to test
the servers created in Listing 9.8. The output of the servers is shown in Listing 9.7
and 9.8 Output, and the output of the clients is shown in Listing 9.9 Output. Notice
that Listing 9.9 Output shows that the requests are being handled by different
processes on the server.
Listing 9.7 cluster_server.js: A master process creating up to four
worker processes
Click here to view code image
01 var cluster = require('cluster');
02 var http = require('http');
03 if (cluster.isMaster) {
04 cluster.on('fork', function(worker) {
05 console.log("Worker " + worker.id + " created");
06 });
07 cluster.on('listening', function(worker, address) {
08 console.log("Worker " + worker.id +" is listening on " +
09 address.address + ":" + address.port);
10 });
11 cluster.on('exit', function(worker, code, signal) {
12 console.log("Worker " + worker.id + " Exited");
13 });
14 cluster.setupMaster({exec:'cluster_worker.js'});
15 var numCPUs = require('os').cpus().length;
16 for (var i = 0; i < numCPUs; i++) {
17 if (i>=4) break;
18 cluster.fork();
19 }
20 Object.keys(cluster.workers).forEach(function(id) {
21 cluster.workers[id].on('message', function(message){
22 console.log(message);
23 });
24 });
25 }
Listing 9.8 cluster_worker.js: A worker process implementing an HTTP
server

Click here to view code image
01 var cluster = require('cluster');
02 var http = require('http');
03 if (cluster.isWorker) {
04 http.Server(function(req, res) {
05 res.writeHead(200);
06 res.end("Process " + process.pid + " says hello");
07 process.send("Process " + process.pid + " handled request");
08 }).listen(8080, function(){
09 console.log("Child Server Running on Process: " + process.pid);
10 });
11 };
Listing 9.9 cluster_client.js: An HTTP client sending a series of
requests to test the server
Click here to view code image
01 var http = require('http');
02 var options = { port: '8080' };
03 function sendRequest(){
04 http.request(options, function(response){
05 var serverData = '';
06 response.on('data', function (chunk) {
07 serverData += chunk;
08 });
09 response.on('end', function () {
10 console.log(serverData);
11 });
12 }).end();
13 }
14 for (var i=0; i<5; i++){
15 console.log("Sending Request");
16 sendRequest();
17 }
Listing 9.7 and 9.8 Output cluster_server.js: A master process creating
up to four worker processes
Click here to view code image
Worker 1 created
Worker 2 created
Worker 3 created
Worker 4 created
Child Server Running on Process: 9012
Worker 1 is listening on null:8080

Child Server Running on Process: 1264
Worker 2 is listening on null:8080
Child Server Running on Process: 5488
Worker 4 is listening on null:8080
Child Server Running on Process: 7384
Worker 3 is listening on null:8080
Process 1264 handled request
Process 7384 handled request
Process 5488 handled request
Process 7384 handled request
Process 5488 handled request
Listing 9.9 Output cluster_client.js: An HTTP client sending a series of
requests to test the server
Click here to view code image
Sending Request
Sending Request
Sending Request
Sending Request
Sending Request
Process 10108 says hello
Process 12584 says hello
Process 13180 says hello
Process 10108 says hello
Process 12584 says hello
Summary
To make the most out of Node.js performance on servers with multiple processors,
you need to be able to farm work off to the other processes. The process module
allows you to interact with the system process, the child_process module
allows you to actually execute code on a separate process, and the cluster module
allows you to create a cluster of HTTP or TCP servers.
The child_process module provides the exec(), execFile(), spawn(),
and fork() functions, which are used to start work on separate processes. The
ChildProcess and Worker objects provide a mechanism to communicate
between the parent and child processes.
Next
In the next chapter, you are introduced to some other modules that Node.js provides
for convenience. For example, the os module provides tools to interact with the OS,
and the util module provides useful functionality.

10
Using Additional Node.js Modules
This chapter exposes you to some additional built-in capabilities of Node.js. The os
module provides operating system functionality that can be useful when
implementing your applications. The util module provides various functionality,
such as string formatting. The dns module provides the ability to perform DNS
lookups and reverse lookups from a Node.js application.
The following sections describe these modules and how to use them in your Node.js
applications. Some of the methods will already be familiar to you because you have
seen them in previous chapters.
Using the os Module
The os module provides a useful set of functions that allow you to get information
from the operating system (OS). For example, when accessing data from a stream
that comes from the OS, you can use the os.endianness() function to
determine whether the OS is big endian or little endian so that you can use the
correct read and write methods.
Table 10.1 lists the methods provided by the os module and describes how they are
used.
Table 10.1 Methods that can be called on the os module
Event Description
tmpdir() Returns a string path to the default temp directory for
the OS. Useful if you need to store files temporarily
and then remove them later.

endianness() Returns BE or LE for big endian or little endian,
depending on the architecture of the machine.
hostname() Returns the hostname defined for the machine. This
is useful when implementing network services that
require a hostname.
type() Returns the OS type as a string.
platform() Returns the platform as a string; for example,
win32, linux, or freeBSD.
arch() Returns the platform architecture; for example, x86
or x64.
release() Returns the OS version release.
uptime() Returns a timestamp in seconds of how long the OS
has been running.
loadavg() On UNIX-based systems, returns an array of values
containing the system load value for [1, 5, 15]
minutes.
totalmem() Returns an integer specifying the system memory in
bytes.
freemem() Returns an integer specifying the free system
memory in bytes.
cpus() Returns an array of objects that describes the model,
speed, and times. This array contains the amount
of time the CPU has spent in user, nice, sys,
idle, and irq.
networkInterfaces() Returns an array of objects describing the address
and family of addresses bound on each network
interface in your system.
EOL Contains the appropriate End Of Line characters for
the operating system; for example, \n or \r\n. This
can be useful to make your application cross-
platform compatible when processing string data.
To help you visualize using the os module, Listing 10.1 calls each of the os module
calls, and the output is shown in Listing 10.1 Output.

Listing 10.1 os_info.js: Calling methods on the os module
Click here to view code image
01 var os = require('os');
02 console.log("tmpdir :\t" + os.tmpdir());
03 console.log("endianness :\t" + os.endianness());
04 console.log("hostname :\t" + os.hostname());
05 console.log("type :\t\t" + os.type());
06 console.log("platform :\t" + os.platform());
07 console.log("arch :\t\t" + os.arch());
08 console.log("release :\t" + os.release());
09 console.log("uptime :\t" + os.uptime());
10 console.log("loadavg :\t" + os.loadavg());
11 console.log("totalmem :\t" + os.totalmem());
12 console.log("freemem :\t" + os.freemem());
13 console.log("EOL :\t" + os.EOL);
14 console.log("cpus :\t\t" + JSON.stringify(os.cpus()));
15 console.log("networkInterfaces : " +
16 JSON.stringify(os.networkInterfaces()));
Listing 10.1 Output Calling methods on the os module
tmpdir : C:\Users\CalebTZD\AppData\Local\Temp
endianness : LE
hostname : DESKTOP-3I5OR8I
type : Windows_NT
platform : win32
arch : x64
release : 10.0.14393
uptime : 1473719.6450068
loadavg : 0,0,0
totalmem : 12768796672
freemem : 8033443840
EOL :
cpus :
Using the util Module
The util module is a catch-all module that provides functions for formatting
strings, converting objects to strings, checking object types, performing synchronous
writes to output streams, and some object inheritance enhancements.

The following sections cover most of the functionality in the util module. They
also explain ways to use the util module in your Node.js applications.
Formatting Strings
When handling string data, it is important to be able to format the strings quickly.
Node.js provides a rudimentary string formatting method in the util module that
handles many string formatting needs. The util.format() function accepts a
formatter string as the first argument and returns a formatted string. The following
shows the syntax for the format() method, where format is the formatter string
and then [...] represents the following arguments:
util.format(format[...args])
The format argument is a string that can contain zero or more placeholders. Each
placeholder begins with a % character and is replaced with the converted string value
from its corresponding argument. The first formatter placeholder represents the
second argument and so on. The following is a list of supported placeholders:
%s: Specifies a string
%d: Specifies a number (can be integer or float)
%i: Specifies an integer
%f: Specifies a floating point value
%j: Specifies a JSON stringifyable object
%: If left empty afterward, does not act as a placeholder
The following is a list of things to keep in mind when using format():
When there are not as many arguments as placeholders, the placeholder is not
replaced. For example:
util.format('%s = %s', 'Item1'); // 'Item1:%s'
When there are more arguments than placeholders, the extra arguments are
converted to strings and concatenated with a space delimiter.
util.format('%s = %s', 'Item1', 'Item2', 'Item3'); //
'Item1 = Item2 Item3'
If the first argument is not a format string, then util.format()converts
each argument to a string, concatenates them together using a space delimiter,

and then returns the concatenated string. For example:
util.format(1, 2, 3); // '1 2 3'
Checking Object Types
It is often useful to determine whether an object you have received back from a
command is of a certain type. To do this, you can use the isinstanceof operator,
which compares the object types and returns true or false. For example:
([1,2,3] isinstanceof Array) //true
Converting JavaScript Objects to Strings
Often, especially when debugging, you need to convert a JavaScript object to a string
representation. The util.inspect() method allows you to inspect an object and
then return a string representation of the object.
The following shows the syntax for the inspect() method:
util.inspect(object, [options])
The object parameter is the JavaScript object you want to convert to a string. The
options method allows you to control certain aspects of the formatting process.
options can contain the following properties:
showHidden: When set to true, the non-enumerable properties of the object
are also converted to the string. Defaults to false.
depth: Limits the number of levels deep the inspect process traverses while
formatting properties that are also objects. This can prevent infinite loops and
also prevent instances where complex objects cost a lot of CPU cycles. Defaults
to 2; if it is null, it can recurse forever.
colors: When set to true, the output is styled with ANSI color codes.
Defaults to false.
customInspect: When set to false, any custom inspect() functions
defined on the objects being inspected are not called. Defaults to true.
You can attach your own inspect() function to the object, thus controlling the
output. The following code creates an object with first and last properties, but

inspect outputs only a name property:
Click here to view code image
var obj = { first:'Caleb', last:'Dayley' };
obj.inspect = function(depth) {
return '{ name: "' + this.first + " " + this.last + '" }';
};
console.log(util.inspect(obj));
//Outputs: { name: "Caleb Dayley" }
Inheriting Functionality from Other Objects
The util module provides the util.inherits() method to allow you to create
objects that inherit the prototype methods from another. When you create the
new object, the prototype methods are automatically used. You have already
seen this in a few examples in the book; for example, when implementing your own
custom Readable and Writable streams.
The following shows the format of the util.inherits() method:
util.inherits(constructor, superConstructor)
The prototype of constructor is set to the prototype of superConstructor
and executed when a new object is created. You can access the
superConstructor from your custom object constructor using the
constructor.super_ property.
Listing 10.2 illustrates using inherits() to inherit the
events.EventEmitter object constructor to create a Writable stream.
Notice on line 11 the object is an instance of events.EventEmitter. Also
notice on line 12 the Writer.super_ value is eventsEmitter. The results are
shown in Listing 10.2 Output.
Listing 10.2 util_inherit.js: Using inherits() to inherit the prototypes
from events.EventEmitter
Click here to view code image
01 var util = require("util");
02 var events = require("events");
03 function Writer() {
04 events.EventEmitter.call(this);

05 }
06 util.inherits(Writer, events.EventEmitter);
07 Writer.prototype.write = function(data) {
08 this.emit("data", data);
09 };
10 var w = new Writer();
11 console.log(w instanceof events.EventEmitter);
12 console.log(Writer.super_ === events.EventEmitter);
13 w.on("data", function(data) {
14 console.log('Received data: "' + data + '"');
15 });
16 w.write("Some Data!");
Listing 10.2 Output util_inherit.js: Using inherits() to inherit the
prototypes from events.EventEmitter
Click here to view code image
true
true
Received data: "Some Data!"
Using the dns Module
If your Node.js application needs to resolve DNS domain names, look up domains,
or do reverse lookups, then the dns module is helpful. A DNS lookup contacts the
domain name server and requests records about a specific domain name. A reverse
lookup contacts the domain name server and requests the DNS name associated with
an IP address. The dns module provides functionality for most of the lookups that
you may need to perform. Table 10.2 lists the lookup calls and their syntax, and
describes how they are used.
Table 10.2 Methods that can be called on the dns Module
Event Description
lookup(domain,
[family], callback)
Resolves the domain. The family attribute can
be 4, 6, or null, where 4 resolves into the first
found A (IPv4) record, 6 resolves into the first
round AAAA (IPv6) record, and null resolves
both. The default is null. The callback
function receives an error as the first argument

and an array of IP addresses as the second. For
example:
function (error, addresses)
resolve(domain,
[rrtype], callback)
Resolves the domain into an array of record types
specified by rrtype. rrtype can be
A: IPV4 addresses, the default
AAAA: IPV6 addresses
MX: Mail eXchange records
TXT: Text records
SRV: SRV records
PTR: Reverse IP lookups
NS: Name Server records
CNAME: Canonical Name records
The callback function receives an error as the
first argument and an array of IP addresses as
the second. For example:
function (error, addresses)
resolve4(domain,
callback)
Same as dns.resolve() except only for A
records.
resolve6(domain,
callback)
Same as dns.resolve() except only for AAAA
records.
resolveMx(domain,
callback)
Same as dns.resolve() except only for MX
records.
resolveTxt(domain,
callback)
Same as dns.resolve() except only for TXT
records.
resolveSrv(domain,
callback)
Same as dns.resolve() except only for SRV
records.
resolveNs(domain,
callback)
Same as dns.resolve() except only for NS
records.
resolveCname(domain,
callback)
Same as dns.resolve() except only for CNAME
records.

reverse(ip,
callback)
Does a reverse lookup on the ip address. The
callback function receives an error object if
one occurs and an array of domains if the lookup
is successful. For example:
function (error, domains)
Listing 10.3 illustrates performing lookups and reverse lookups. In line 3,
resolve4() is used to look up the IPv4 addresses, and then in lines 5–8,
reverse() is called on those same addresses and the reverse lookup performed.
Listing 10.3 Output shows the result.
Listing 10.3 dns_lookup.js: Performing lookups and then reverse lookups
on domains and IP addresses
Click here to view code image
01 var dns = require('dns');
02 console.log("Resolving www.google.com . . .");
03 dns.resolve4('www.google.com', function (err, addresses) {
04 console.log('IPv4 addresses: ' + JSON.stringify(addresses, false, ' '));
05 addresses.forEach(function (addr) {
06 dns.reverse(addr, function (err, domains) {
07 console.log('Reverse for ' + addr + ': ' + JSON.stringify(domains));
08 });
09 });
10 });
Listing 10.3 Output dns_lookup.js: Performing lookups and then reverse
lookups on domains and IP addresses
Click here to view code image
Resolving www.google.com . . .
IPv4 addresses: [
"172.217.6.68"
]
Reverse for 172.217.6.68: ["sfo07s17-in-f4.1e100.net","sfo07s17-in-f68.1e100.net"]
Using the crypto Module

The crypto module is interesting and fun to play around with. As the name
suggests, it creates cryptographic information, or in other words, creates secure
communication using secret code. To use crypto, you must make sure that it is
loaded into your Node project. Although cool, this module isn’t necessary, and a
Node application can be built without including support for crypto. The easiest
way to do ensure crypto is loaded is to use a simple try catch (err); for
example:
Click here to view code image
let crypto;
try {
crypto = require('crypto');
} catch (err) {
console.log('crypto support is disabled!');
}
The crypto module includes several classes that provide functionality to encrypt
and decrypt data and streams. Table 10.3 lists all the different classes that the
crypto module provides.
Table 10.3 Classes that can be used in the crypto module
Class Description
certificate Used for working with SPKAC (a certificate signing
request mechanism) and primarily used to handle output of
HTML5.
cipher Used to encrypt data in either a stream that is both readable
and writable, or using the cipher.update and
cipher.final methods.
decipher The opposite of cipher. Used to decrypt data using either
a readable and writable stream or the
decipher.update and deciper.final methods.
diffieHellman Used to create key exchanges for Diffie-Hellman (a
specific method for exchanging cryptographic keys).
eCDH
(Elliptical
Curve Diffie-
Hellman)
Used to create key exchanges for ECDH (same as Diffie-
Hellman, but the two parties use an elliptical curve public-
private key pair).
hash Used to create hash digests of data using a readable and

writable stream or hash.update and hash.digest.
hmac Used to create Hmac digests of data using a readable and
writable stream or Hmac.update and Hmac.digest.
sign Used to generate signatures.
verify Used in tandem with sign to verify the signatures.
The most common use for the crypto module is to use the Cipher and
Decipher classes to create encrypted data that can be stored and decrypted later;
for example, passwords. Initially, passwords are entered as text, but it would be
foolish to actually store them as text. Instead, passwords are encrypted using an
encryption algorithm such as the ('aes192') method. This allows you to store
data encrypted so if it is accessed without decrypting, your password is protected
from prying minds. Listing 10.4 shows an example of encrypting and decrypting a
password string. The output follows in Listing 10.4 Output.
Listing 10.4 encrypt_password.js: Using cipher and decipher to
encrypt and then decrypt data
Click here to view code image
var crypto = require('crypto');
var crypMethod = 'aes192';
var secret = 'MySecret';
function encryptPassword(pwd){
var cipher = crypto.createCipher(crypMethod, secret);
var cryptedPwd = cipher.update(pwd,'utf8','hex');
cryptedPwd += cipher.final('hex');
return cryptedPwd;
}
function decryptPassword(pwd){
var decipher = crypto.createDecipher(crypMethod, secret);
var decryptedPwd = decipher.update(pwd,'hex','utf8');
decryptedPwd += decipher.final('utf8');
return decryptedPwd;
}
var encryptedPwd = encryptPassword("BadWolf");
console.log("Encrypted Password");
console.log(encryptedPwd);
console.log("\nDecrypted Password");
console.log(decryptPassword(encryptedPwd));
Listing 10.4 Output Using cipher and decipher to encrypt and then decrypt
data
Click here to view code image
Encrypted Password
0ebc7d846519b955332681c75c834d50
Decrypted Password
BadWolf
Other Node Modules and Objects
This section lists some other Node modules and objects that would be beneficial for
you to know about:
Global: Object available throughout all the modules. Globals range anywhere
from _dirname, which gives you the name of the directory, to the Process
object.
V8: Module used to expose APIs, specifically for the version of V8 that is built
in to the Node binary.
Debugger: Module used to debug your Node application. To use, simply start
Node with the debug argument, like so: $ node debug myscript.js.
Assertion testing: Module that provides a basic set of assertion tests used to
test invariants.
C/C++ add-ons: Objects that allow you to dynamically link shared objects
written in C or C++. They provide an interface that both JavaScript in Node and
C/C++ libraries can use, allowing them to work as a regular Node.js
applications.
REPL (Read Event Print Loop): Accepts individual lines of input, evaluates
them using a user-defined function, and then outputs the results.
Summary
The os module allows you to get information about the system, including the
operating system type and version, the platform architecture, and programming
helps, such as the amount of free memory, temp folder location, and EOL characters.
The util module is the catch-all library for Node that has methods for synchronous
output, string formatting, and type checking. The dns module performs DNS
lookups and reverse lookups from a Node.js application. The crypto module
encrypts and decrypts data to secure private data.
Next
In the next chapter, you jump into the world of MongoDB. You learn the MongoDB
basics and how to implement it in the Node.js world.
Part III: Learning MongoDB
11
Understanding NoSQL and MongoDB
At the core of most large-scale web applications and services is a high-performance
data storage solution. The backend data store is responsible for storing everything
from user account information to shopping cart items to blog and comment data.
Good web applications must store and retrieve data with accuracy, speed, and
reliability. Therefore, the data storage mechanism you choose must perform at a
level that satisfies user demand.
Several different data storage solutions are available to store and retrieve data needed
by your web applications. The three most common are direct file system storage in
files, relational databases, and NoSQL databases. The data store chosen for this book
is MongoDB, which is a NoSQL database.
The following sections describe MongoDB and discuss the design considerations
you need to review before deciding how to implement the structure of data and
configuration of the database. The sections cover the questions to ask yourself, and
then cover the mechanisms built into MongoDB to satisfy the demands of the
answers to those questions.
Why NoSQL?
The concept of NoSQL (Not Only SQL) consists of technologies that provide
storage and retrieval without the tightly constrained models of traditional SQL
relational databases. The motivation behind NoSQL is mainly simplified designs,
horizontal scaling, and finer control of the availability of data.
NoSQL breaks away from the traditional structure of relational databases and allows
developers to implement models in ways that more closely fit the data flow needs of
their systems. This allows NoSQL databases to be implemented in ways that
traditional relational databases could never be structured.
There are several different NoSQL technologies, such as HBase’s column structure,
Redis’s key/value structure, and Neo4j’s graph structure. However, in this book
MongoDB and the document model were chosen because of great flexibility and
scalability when it comes to implementing backend storage for web applications and
services. Also MongoDB is one of the most popular and well supported NoSQL
databases currently available.
Understanding MongoDB
MongoDB is a NoSQL database based on a document model where data objects are
stored as separate documents inside a collection. The motivation of the MongoDB
language is to implement a data store that provides high performance, high
availability, and automatic scaling. MongoDB is simple to install and implement, as
you see in the upcoming chapters.
Understanding Collections
MongoDB groups data together through collections. A collection is simply a
grouping of documents that have the same or a similar purpose. A collection acts
similarly to a table in a traditional SQL database, with one major difference. In
MongoDB, a collection is not enforced by a strict schema; instead, documents in a
collection can have a slightly different structure from one another as needed. This
reduces the need to break items in a document into several different tables, which is
often done in SQL implementations.
Understanding Documents
A document is a representation of a single entity of data in the MongoDB database.
A collection is made up of one or more related objects. A major difference between
MongoDB and SQL is that documents are different from rows. Row data is flat,
meaning there is one column for each value in the row. However, in MongoDB,
documents can contain embedded subdocuments, thus providing a much closer
inherent data model to your applications.

In fact, the records in MongoDB that represent documents are stored as BSON,
which is a lightweight binary form of JSON, with field:value pairs
corresponding to JavaScript property:value pairs. These field:value pairs
define the values stored in the document. That means little translation is necessary to
convert MongoDB records back into the JavaScript object that you use in your
Node.js applications.
For example, a document in MongoDB may be structured similarly to the following
with name, version, languages, admin, and paths fields:
Click here to view code image
{
name: "New Project",
version: 1,
languages: ["JavaScript", "HTML", "CSS"],
admin: {name: "Brad", password: "****"},
paths: {temp: "/tmp", project: "/opt/project", html: "/opt/project/html"}
}
Notice that the document structure contains fields/properties that are strings,
integers, arrays, and objects, just like a JavaScript object. Table 11.1 lists the
different data types that field values can be set to in the BSON document.
The field names cannot contain null characters, . (dots), or $ (dollar signs). Also,
the _id field name is reserved for the Object ID. The _id field is a unique ID for
the system that is made up of the following parts:
A 4-byte value representing the seconds since the last epoch
A 3-byte machine identifier
A 2-byte process ID
A 3-byte counter, starting with a random value
The maximum size of a document in MongoDB is 16MB, which prevents queries
that result in an excessive amount of RAM being used or intensive hits to the file
system. Although you may never come close, you still need to keep the maximum
document size in mind when designing some complex data types that contain file
data.
MongoDB Data Types

The BSON data format provides several different types that are used when storing
the JavaScript objects to binary form. These types match the JavaScript type as
closely as possible. It is important to understand these types because you can actually
query MongoDB to find objects that have a specific property that has a value of a
certain type. For example, you can look for documents in a database whose
timestamp value is a String object or query for ones whose timestamp is a Date
object.
MongoDB assigns each of the data types an integer ID number from 1 to 255 that is
used when querying by type. Table 11.1 shows a list of the data types that MongoDB
supports along with the number MongoDB uses to identify them.
Table 11.1 MongoDB data types and corresponding ID number
Type Number
Double 1
String 2
Object 3
Array 4
Binary data 5
Object id 7
Boolean 8
Date 9
Null 10
Regular Expression 11
JavaScript 13
JavaScript (with scope) 15
32-bit integer 16
Timestamp 17
64-bit integer 18
Decimal126 19
Min key -1
Max key 127

Another thing to be aware of when working with different data types in MongoDB is
the order in which they are compared. When comparing values of different BSON
types, MongoDB uses the following comparison order from lowest to highest:
1. Min Key (internal type)
2. Null
3. Numbers (32-bit integer, 64-bit integer, Double)
4. String
5. Object
6. Array
7. Binary Data
8. Object ID
9. Boolean
10. Date, Timestamp
11. Regular Expression
12. Max Key (internal type)
Planning Your Data Model
Before you begin implementing a MongoDB database, you need to understand the
nature of the data being stored, how that data is going to get stored, and how it is
going to be accessed. Understanding these concepts allows you to make
determinations ahead of time and to structure the data and your application for
optimal performance.
Specifically, you should ask yourself the following questions:
What are the basic objects that my application will be using?
What is the relationship between the different object types: one-to-one, one-to-
many, or many-to-many?
How often will new objects be added to the database?
How often will objects be deleted from the database?

How often will objects be changed?
How often will objects be accessed?
How will objects be accessed: by ID, property values, comparisons, and so on?
How will groups of object types be accessed: by common ID, common property
value, and so on?
Once you have the answers to these questions, you are ready to consider the structure
of collections and documents inside the MongoDB. The following sections discuss
different methods of document, collection, and database modeling you can use in
MongoDB to optimize data storage and access.
Normalizing Data with Document References
Data normalization is the process of organizing documents and collections to
minimize redundancy and dependency. This is done by identifying object properties
that are subobjects and should be stored as a separate document in another collection
from the object’s document. Typically, this is used for objects that have a one-to-
many or many-to-many relationship with subobjects.
The advantage of normalizing data is that the database size will be smaller because
only a single copy of an object will exist in its own collection instead of being
duplicated on multiple objects in a single collection. Also, if you modify the
information in the subobject frequently, you only need to modify a single instance
rather than every record in the object’s collection that has that subobject.
A major disadvantage of normalizing data is that when looking up user objects that
require the normalized subobject, a separate lookup must occur to link the subobject.
This can result in a significant performance hit if you are accessing the user data
frequently.
An example of when it makes sense to normalize data is a system that contains users
that have a favorite store. Each User is an object with name, phone, and
favoriteStore properties. The favoriteStore property is also a subobject
that contains name, street, city, and zip properties.
However, thousands of users may have the same favorite store, so there is a high
one-to-many relationship. Therefore, it doesn’t make sense to store the
FavoriteStore object data in each User object because it would result in
thousands of duplications. Instead, the FavoriteStore object should include an
_id object property that can be referenced from documents in the user’s
FavoriteStore. The application can then use the reference ID
favoriteStore to link data from the Users collection to FavoriteStore
documents in the FavoriteStores collection.
Figure 11.1 illustrates the structure of the Users and FavoriteStores
collections just described.
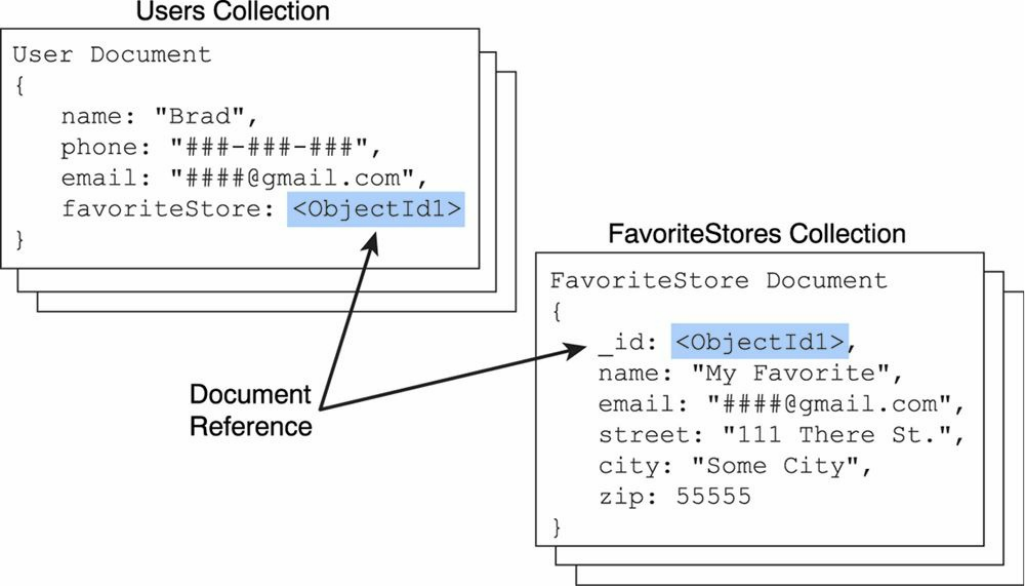
Figure 11.1 Defining normalized MongoDB documents by adding a reference to
documents in another collection
Denormalizing Data with Embedded Documents
Denormalizing data is the process of identifying subobjects of a main object that
should be embedded directly into the document of the main object. Typically this is
done on objects that have a mostly one-to-one relationship or are relatively small and
do not get updated frequently.
The major advantage of denormalized documents is that you can get the full object
back in a single lookup without the need to do additional lookups to combine
subobjects from other collections. This is a major performance enhancement. The
downside is that for subobjects with a one-to-many relationship you store a separate
copy in each document, which slows down insertion and also takes up additional
disk space.
An example of when it makes sense to normalize data is a system that contains users
with home and work contact information. The user is an object represented by a
User document with name, home, and work properties. The home and work
properties are subobjects that contain phone, street, city, and zip properties.
The home and work properties do not change often on the user. You may have
multiple users from the same home; however, there likely will not be many of them,
and the actual values inside the subobjects are not that big and will not change often.
Therefore, it makes sense to store the home contact information directly in the User
object.
The work property takes a bit more thinking. How many people are going to have
the same work contact information? If the answer is not many, then the work object
should be embedded with the User object. How often are you querying the User
and need the work contact information? If the answer is rarely, then you may want
to normalize work into its own collection. However, if the answer is frequently or
always, then you will likely want to embed work with the User object.
Figure 11.2 illustrates the structure of the Users with Home and work contact
information embedded as just described.
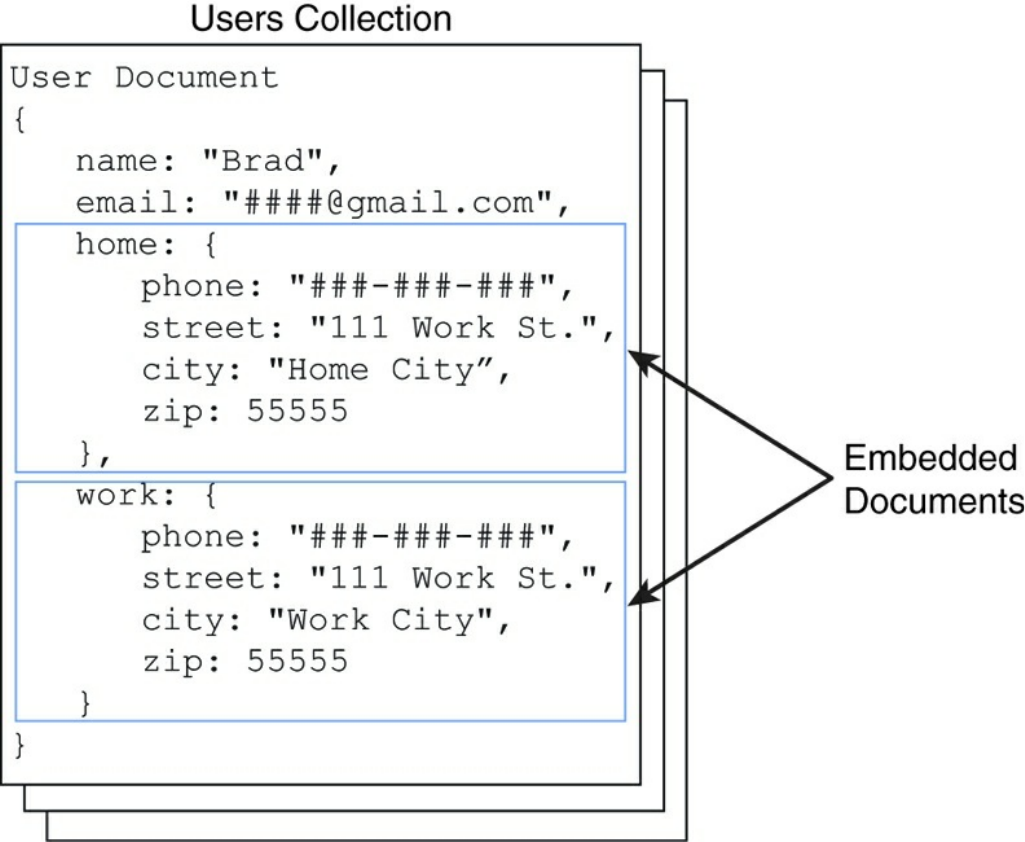
Figure 11.2 Defining denormalized MongoDB documents by implementing
embedded objects inside a document
Using Capped Collections
A great feature of MongoDB is the ability to create a capped collection, which is a
collection that has a fixed size. When a new document that exceeds the size of the
collection needs to be written to a collection, the oldest document in the collection is
deleted and the new document is inserted. Capped collections work great for objects
that have a high rate of insertion, retrieval, and deletion.
The following list contains the benefits of using capped collections:

Capped collections guarantee that the insertion order is preserved. Queries do
not need to use an index to return documents in the order they were stored, thus
eliminating indexing overhead.
Capped collections also guarantee that the insertion order is identical to the
order on disk by prohibiting updates that increase the document size. This
eliminates the overhead of relocating and managing the new location of
documents.
Capped collections automatically remove the oldest documents in the collection.
Therefore, you do not need to implement deletion in your application code.
Be careful using capped collections, though, as they have the following restrictions:
Documents cannot be updated to a larger size once they have been inserted into
the capped collection. You update them, but the data must be the same size or
smaller.
Documents cannot be deleted from a capped collection. That means that the
data takes up space on disk even if it is not being used. You can explicitly drop
the capped collection to effectively delete all entries, but you need to re-create it
to use it again.
A great use of capped collections is as a rolling log of transactions in your system.
You can always access the last X number of log entries without needing to explicitly
clean up the oldest.
Understanding Atomic Write Operations
Write operations are atomic at the document level in MongoDB, which means that
only one process can update a single document or a single collection at the same
time. This means that writing to documents that are denormalized is atomic.
However, writing to documents that are normalized requires separate write
operations to subobjects in other collections, and therefore the writes of the
normalized object may not be atomic as a whole.
Keep atomic writes in mind when designing your documents and collections to
ensure that the design fits the needs of the application. In other words, if you
absolutely must write all parts of an object as a whole in an atomic manner, then you
need to design the object in a denormalized fashion.

Considering Document Growth
When you update a document, consider what effect the new data will have on
document growth. MongoDB provides some padding in documents to allow for
typical growth during an update operation. However, if the update causes the
document to grow to an amount that exceeds the allocated space on disk, MongoDB
has to relocate that document to a new location on the disk, incurring a performance
hit on the system. Also, frequent document relocation can lead to disk fragmentation
issues—for example, if a document contains an array and you add enough elements
to the array.
One way to mitigate document growth is to use normalized objects for the properties
that may grow frequently. For example, instead of using an array to store items in a
Cart object, you could create a collection for CartItems and store new items that
get placed in the cart as new documents in the CartItems collection and then
reference the user’s Cart items within them.
Identifying Indexing, Sharding, and Replication
Opportunities
MongoDB provides several mechanisms to optimize performance, scaling, and
reliability. As you contemplate your database design, consider each of the following
options:
Indexing: Indexes improve performance for frequent queries by building a
lookup index that can be easily sorted. The _id property of a collection is
automatically indexed on since it is a common practice to look items up by ID.
However, you also need to consider what other ways users access data and
implement indexes that will enhance those lookup methods.
Sharding: Sharding is the process of slicing up large collections of data that
can be split between multiple MongoDB servers in a cluster. Each MongoDB
server is considered a shard. This provides the benefit of using multiple servers
to support a high number of requests to a large system, thus providing
horizontal scaling to your database. Look at the size of your data and the
amount of requests that will be accessing it to determine whether and how much
to shard your collections.
Replications: Replication is the process of duplicating data on multiple
MongoDB instances in a cluster. When considering the reliability aspect of your
database, you should implement replication to ensure that a backup copy of
critical data is always readily available.
Large Collections Versus Large Numbers of Collections
Another important thing to consider when designing your MongoDB documents and
collections is the number of collections that the design will result in. There isn’t a
significant performance hit for having a large number of collections; however, there
is a performance hit for having large numbers of items in the same collection.
Consider ways to break up your larger collections into more consumable chunks.
For example, say that you store a history of user transactions in the database for past
purchases. You recognize that for these completed purchases, you will never need to
look them up together for multiple users. You only need them available for the user
to look at his or her own history. If you have thousands of users who have a lot of
transactions, then it makes sense to store those histories in a separate collection for
each user.
Deciding on Data Life Cycles
One of the most commonly overlooked aspects of database design is that of the data
life cycle. Specifically, how long should documents exist in a specific collection?
Some collections have documents that should be indefinite, for example, active user
accounts. However, keep in mind that each document in the system incurs a
performance hit when querying a collection. You should define a TTL or time-to-
live value for documents in each of your collections.
There are several ways to implement a time-to-live mechanism in MongoDB. One
way is to implement code in your application to monitor and clean up old data.
Another way is to use the MongoDB TTL setting on a collection, which allows you
to define a profile where documents are automatically deleted after a certain number
of seconds or at a specific clock time. For collections where you only need the most
recent documents, you can implement a capped collection that automatically keeps
the size of the collection small.
Considering Data Usability and Performance
Two more important things to consider when designing a MongoDB database are
data use and how it will affect performance. The previous sections described
different methods for solving some complexities of data size and optimization. The
final things you should consider and even reconsider are data usability and
performance. Ultimately, these are the two most important aspects of any web
solution and, consequently, the storage behind it.
Data usability describes the ability for the database to satisfy the functionality of the
website. First, you must make sure that the data can be accessed so that the website
functions correctly. Users will not tolerate a website that simply does not do what
they want it to. This also includes the accuracy of the data.
Then you can consider performance. Your database must be able to deliver the data
at a reasonable rate. You can consult the previous sections when evaluating and
designing the performance factors for your database.
In some more complex circumstances, you may find it necessary to evaluate data
usability and then performance and then go back and evaluate usability again for a
few cycles until you get the balance correct. Also, keep in mind that in today’s
world, usability requirements can change at any time. Remembering that can
influence how you design your documents and collections so that they can become
more scalable in the future if necessary.
Summary
In this chapter you learned about MongoDB and design considerations for the
structure of data and configuration of a database. You learned about collections,
documents, and the types of data that can be stored in them. You also learned how to
plan your data model, what questions you need to answer, and the mechanisms built
in to MongoDB to satisfy the demands your database needs.
Next
In the next chapter, you install MongoDB. You also learn how to use the MongoDB
shell to set up user accounts and access collections and documents.
12
Getting Started with MongoDB
This chapter gets you up to speed with MongoDB. Whereas Chapter 11,
“Understanding NoSQL and MongoDB,” focused more on the theory side of
MongoDB, this chapter is all about practical application. You learn what it takes to
install MongoDB, start and stop the engine, and access the MongoDB shell. The
MongoDB shell allows you to administer the MongoDB server as well as perform
every necessary function on the databases. Using the MongoDB shell is a vital aspect
of the development process as well as database administration.
This chapter covers installing MongoDB and accessing the shell. The chapter
focuses on some basic administrative tasks such as setting up user accounts and
authentication. The chapter then wraps up by describing how to administer
databases, collections, and documents.
Building the MongoDB Environment
To get started with MongoDB, the first task is to install it on your development
system. Once installed on your development system, you can play around with the
functionality, learn the MongoDB shell, and prepare for Chapter 13, “Getting Started
with MongoDB and Node.js,” in which you begin integrating MongoDB into your
Node.js applications.
The following sections cover installation, starting and stopping the database engine,
and accessing the shell client. Once you can do those things you are ready to begin
using MongoDB in your environment.
Installing MongoDB

The first step in getting MongoDB implemented into your Node.js environment is
installing the MongoDB server. There is a version of MongoDB for each of the
major platforms, including Linux, Windows, Solaris, and OS X. There is also an
enterprise version available for the Red Hat, SuSE, Ubuntu, and Amazon Linux
distributions. The enterprise version of MongoDB is subscription-based and provides
enhanced security, management, and integration support.
For the purposes of this book and learning MongoDB, the standard edition of
MongoDB is perfect. Before continuing, go to the MongoDB website at
http://docs.mongodb.org/manual/installation/. Follow the links and instructions to
download and install MongoDB in your environment:
As part of the installation and setup process, perform the following steps:
1. Download and extract the MongoDB files.
2. Add the <mongo_install_location>/bin to your system path.
3. Create a data files directory: <mongo_data_location>/data/db.
4. Start MongoDB using the following command from the console prompt:
mongod –dbpath <mongo_data_location>/data/db
Starting MongoDB
Once you have installed MongoDB, you need to be able to start and stop the
database engine. The database engine starts by executing the mongod
(mongod.exe on Windows) executable in the
<mongo_install_location>/bin location. This executable starts MongoDB
and begins listening for database requests on the configured port.
The mongod executable accepts several different parameters that provide methods
of controlling its behavior. For example, you can configure the IP address and
port MongoDB listens on as well as logging and authentication. Table 12.1
provides a list of some of the most commonly used parameters.
Here is an example of starting MongoDB with a port and dbpath parameters:
mongod –port 28008 –dbpath <mongo_data_location>/data/db
Table 12.1 mongod command-line parameters

Parameter Description
--help, -h Returns basic help and usage text.
--version Returns the version of MongoDB.
--config
<filename>,
-f <filename>
Specifies a configuration file that contains runtime-
configurations.
--verbose, -v Increases the amount of internal reporting sent to the
console and written to the log file specified by --
logpath.
--quiet Reduces the amount of reporting sent to the console and log
file.
--port <port> Specifies a TCP port for mongod to listen for client
connections. Default: 27017.
--bind_ip <ip
address>
Specifies the IP address on which mongod will bind to and
listen for connections. Default: All Interfaces
--maxConns
<number>
Specifies the maximum number of simultaneous
connections that mongod will accept. Max: 20000
--logpath
<path>
Specifies a path for the log file. On restart, the log file is
overwritten unless you also specify --logappend.
--auth Enables database authentication for users connecting from
remote hosts.
--dbpath
<path>
Specifies a directory for the mongod instance to store its
data.
--
nohttpinterface
Disables the HTTP interface.
--nojournal Disables the durability journaling.
--noprealloc Disables the preallocation of data files, which shortens the
startup time but can cause significant performance penalties
during normal operations.
--repair Runs a repair routine on all databases.
Stopping MongoDB
Each platform has different methods of stopping the mongod executable once it has
started. However, one of the best methods is to stop it from the shell client because
that cleanly shuts down the current operations and forces the mongod to exit.
To stop the MongoDB database from the shell client, use the following commands to
switch to the admin database and then shut down the database engine:
use admin
db.shutdownServer()
Accessing MongoDB from the Shell Client
Once you have installed, configured, and started MongoDB, you can access it
through the MongoDB shell. The MongoDB shell is an interactive shell provided
with MongoDB that allows you to access, configure, and administer MongoDB
databases, users, and much more. You use the shell for everything from setting up
user accounts to creating databases to querying the contents of the database.
The following sections take you through some of the most common administration
tasks that you perform in the MongoDB shell. Specifically, you need to be able to
create user accounts, databases, and collections to follow the examples in the rest of
the book. Also you should be able to perform at least rudimentary queries on
documents to help you troubleshoot any problems with accessing data.
To start the MongoDB shell, first make sure that mongod is running, and then run
the mongod command, then execute the mongo command from the console prompt.
The shell should start up as shown in Figure 12.1.
Figure 12.1 Starting the MongoDB console shell
Once you have accessed the MongoDB shell, you can administer all aspects of
MongoDB. There are a couple of things to keep in mind when using MongoDB.
First is that it is based on JavaScript and most of its syntax is available. Second, the
shell provides direct access to the database and collections on the server so changes
you make directly impact the data on the server.
Understanding MongoDB Shell commands
The MongoDB shell provides several commands that can be executed from the shell
prompt. You need to be familiar with these commands as you will use them a lot.
The following list describes each command and its purpose:
help <option>: Displays syntax help for MongoDB shell commands. The
option argument allows you to specify an area where you want help.
use <database>: Changes the current database handle. Database
operations are processed on the current database handle.
db.help: Displays help options for the database methods.
show <option>: Shows a list based on the option argument. The value of
option can be:
dbs: Displays a list of databases.
collections: Displays a list of collections for the current database.
profile: Displays the five most recent system.profile entries taking

more than 1 millisecond.
databases: Displays a list of all available databases.
roles: Displays a list of all roles for the current database, both built-in and
user-defined.
users: Displays a list of all users for that database.
exit: Exits the database.
Understanding MongoDB Shell Methods
The MongoDB shell also provides a number of methods to perform administrative
functions. These methods can be called directly from the MongoDB shell or from a
script executed in the MongoDB shell.
There are many methods that you can use to perform various administrative
functions. Some of these are covered in later sections and chapters in this book. For
now, you need to be aware of the types of shell methods and how to access them.
The following list provides a few examples of shell methods:
load(script): Loads and runs a JavaScript file inside the shell. This is a
great way to script operations for the database.
UUID(string): Converts a 32-byte hex string into a BSON UUID.
db.auth(username, password): Authenticates you to the current
database.
There are a lot of different shell methods. Many of them are covered in subsequent
sections. For a full list of the native methods, check out
http://docs.mongodb.org/manual/reference/method/#native.
Understanding Command Parameters and Results
The MongoDB shell is an interactive JavaScript shell that is tightly coupled with the
MongoDB data structure. That means that much of the data interaction—from
parameters passed to methods to data being returned from methods—is standard
MongoDB documents, which are in most respects JavaScript objects. For example,
when creating a user you pass in a document similar to the following to define the
user:

Click here to view code image
db.createUser( { user: "testUser",
roles: [ "read" ],
otherDBRoles: { testDB2: [ "readWrite" ] } } )
And when listing the users for a database to the shell, the users are shown as a list of
documents similar to this:
Click here to view code image
> use admin
switched to db admin
> db.system.users.find()
{ "_id" : ObjectId("529e71927c798d1dd56a63d9"), "user" : "dbadmin", "pwd" :
"78384f4d73368bd2d3a3e1da926dd269", "roles"
: [ "readWriteAnyDatabase", "dbAdminAnyDatabase", "clusterAdmin" ] }
{ "_id" : ObjectId("52a098861db41f82f6e3d489"), "user" : "useradmin", "pwd" :
"0b4568ab22a52a6b494fd54e64fcee9f", "roles
" : [ "userAdminAnyDatabase" ] }
Scripting the MongoDB Shell
As you have seen, the commands, methods, and data structure of the MongoDB shell
are based on interactive JavaScript. A great method of administering MongoDB is
creating scripts that can be run multiple times, or be ready to run at specific times;
for example, as for an upgrade.
The script file can contain any number of MongoDB commands using JavaScript
syntax such as conditional statements and loops. There are two methods to run a
MongoDB shell script. The first is from the console command line using --eval.
The --eval parameter accepts a JavaScript string or a JavaScript file, launches the
MongoDB shell, and immediately executes the JavaScript.
For example, the following command starts the MongoDB shell, executes
db.getCollections() on the test database, and outputs the JSON string results
as shown in Figure 12.2:
mongo test --eval "printjson(db.getCollectionNames())"
Note
If you are using authentication, and you should, the script might need to

authenticate to perform the commands.

Figure 12.2 Executing a JavaScript file from the MongoDB console shell command
line
The second method is to execute a JavaScript from the MongoDB shell prompt using
the load(script_path) method. This method loads a JavaScript file and
immediately executes it. For example, the following shell command loads and
executes the db_update.js script file:
load("/tmp/db_update.js")
Administering User Accounts
Once you have MongoDB up and running, one of the first things you want to do is
add users to be able to access the database. MongoDB provides the ability to add,
remove, and configure users from the MongoDB shell. The following sections
discuss using the MongoDB shell to administer user accounts.
Listing Users
User accounts are stored in the db.system.users collection of each database. The
User object contains _id, user, pwd, roles, and sometimes otherDBRoles
fields. There are a couple of ways to get a list of user objects. The first is to change
to the database you want to list users on and then execute the show users
command. The following commands show changing to the admin database and
listing users, as shown in Figure 12.3:
use admin
show users
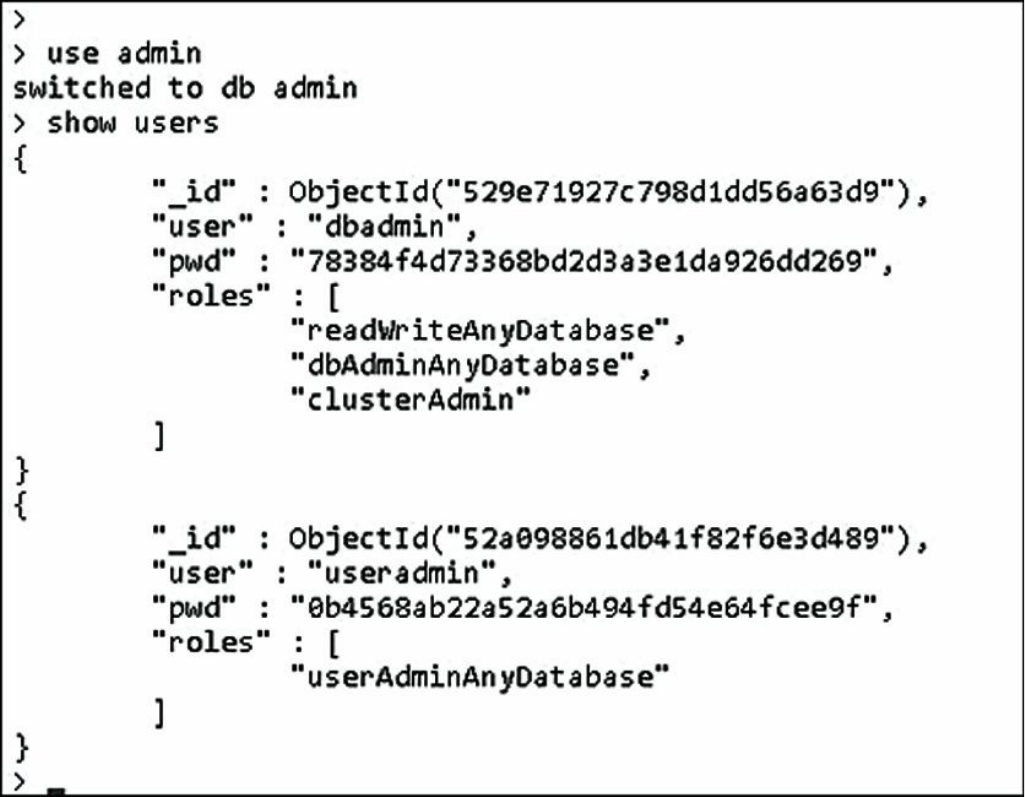
Figure 12.3 Listing users on the admin database
You can also use a query such as find on the db.system.users collection. The
difference is that db.system.users.find() returns a cursor object that you
can use to access the User documents. For example, the following code gets a
cursor for users in the admin database and returns the count of users:
use admin
cur = db.system.users.find()
cur.count()
Creating User Accounts
You can use the MongoDB shell to create user accounts that can administer, read,
and write to the databases. User accounts are added using the createUser()

method inside the MongoDB shell. The createUser() method accepts a
document object that allows you to specify the username, roles, and password that
apply to that user. Table 12.2 lists the fields that can be specified in the document
object.
Table 12.2 Fields used when creating users with the db.createUser()
method
Field Format Description
user string Specifies a unique username.
roles array Specifies an array of user roles. MongoDB provides a large
number of roles that can be assigned to a user. Table 12.3 lists
a few of the common roles.
pwd hash or
string
(Optional.) Specifies a user password. When creating the user,
this can be a hash or a string; however, it is stored in the
database as a hash.
MongoDB provides a number of different roles that can be assigned to a user
account. These roles give you the ability to implement intricate privileges and
restrictions on user accounts. Table 12.3 lists some of the more common roles that
can be assigned to users.
Table 12.3 Database roles that can be assigned to user accounts
Role Description
read Allows the user to read data from any
collection within the database.
readAnyDatabase Same as read except on the local and
config databases.
readWrite Provides all the functionality of read and
allows the user to write to any collection
within the database, including inserting,
removing, and updating documents as well
as creating, renaming, and dropping
collections.
readWriteAnyDatabase Same as readWrite except on the local
and config databases.
dbAdmin Allows the user to read from and write to

the database, as well as clean, modify,
compact, get statistics profile, and perform
validations.
dbAdminAnyDatabase Same as dbAdmin except for all databases.
clusterAdmin Allows the user to generally administer
MongoDB, including connections,
clustering, replication listing databases,
creating databases, and deleting databases.
userAdmin Allows the user to create and modify user
accounts on the database.
userAdminAnyDatabase Same as userAdmin except on the local
and config databases.
Note
The readAnyDatabase, readWriteAnyDatabase,
dbAdminAnyDatabase, and userAdminAnyDatabase roles can only be
applied to users in the admin database since they must apply to all databases.
To create a user you should switch to that database and then use the
createUser() method to create the user object. The following MongoDB shell
command illustrates creating a basic administrator user to the test database:
use test
db.createUser( { user: "testUser",
pwd: "test",
roles: [ "readWrite", "dbAdmin" ] } )
Now here’s a more complex example. The following commands add the same user
to the newDB database with only read rights and give them readWrite
privileges to the testDB2 database:
use newDB
db.createUser( { user: "testUser",
roles: [ "read" ],
otherDBRoles: { testDB2: [ "readWrite" ] } } )
Removing Users

Users can be removed from MongoDB using the removeUser(<username>)
method. You need to change to the database that the user is on first. For example, to
remove the testUser user from the testDB database, use the following
commands from the MongoDB shell:
use testDB
db.removeUser("testUser")
Configuring Access Control
One of the first administration tasks that you will want to perform in the MongoDB
shell is to add users to configure access control. MongoDB provides authentication
and authorization at a database level, meaning that users exist in the context of a
single database. For basic authentication purposes, MongoDB stores user credentials
inside a collection called system.users in each database.
Initially, the admin database does not have any users assigned to it. When no users
are defined in the admin database, MongoDB allows connections on the local host to
have full administrative access to the database. Therefore, your first step in setting
up a new MongoDB instance is to create User Administrator and Database
Administrator accounts. The User Administrator account provides the ability to
create user accounts in the admin and other databases. You also need to create a
Database Administrator account that you can use as a superuser to manage
databases, clustering, replication, and other aspects of MongoDB.
Note
The User Administrator and Database Administrator accounts are created in the
admin database. If you are using authentication for your MongoDB database, you
must authenticate to the admin database as one of those users to administer users
or databases. You should also create user accounts for each database for access
purposes as described in the previous section.
Creating a User Administrator Account
The first step in configuring access control is implementing a User Administrator
account. The User Administrator should only have rights to create users and not
manage the database or perform any other administration functions at all. This keeps
a clean separation between database administration and user account administration.
Creating a User Administrator account is done by executing the following two
commands in the MongoDB shell to access the admin database and then add a user
with userAdminAnyDatabase rights.
use admin
db.createUser( { user: "<username>",
pwd: "<password>",
roles: [ "userAdminAnyDatabase" ] } )
The User Administrator account should be created with
userAdminAnyDatabase as the only role. This gives the User Administrator the
ability to create new user accounts but not to manipulate the database beyond that.
For example, create a User Administrator account with the username useradmin
and a password of test as shown in Figure 12.4:
use admin
db.createUser( { user: "useradmin",
pwd: "test",
roles: [ "userAdminAnyDatabase" ] } )
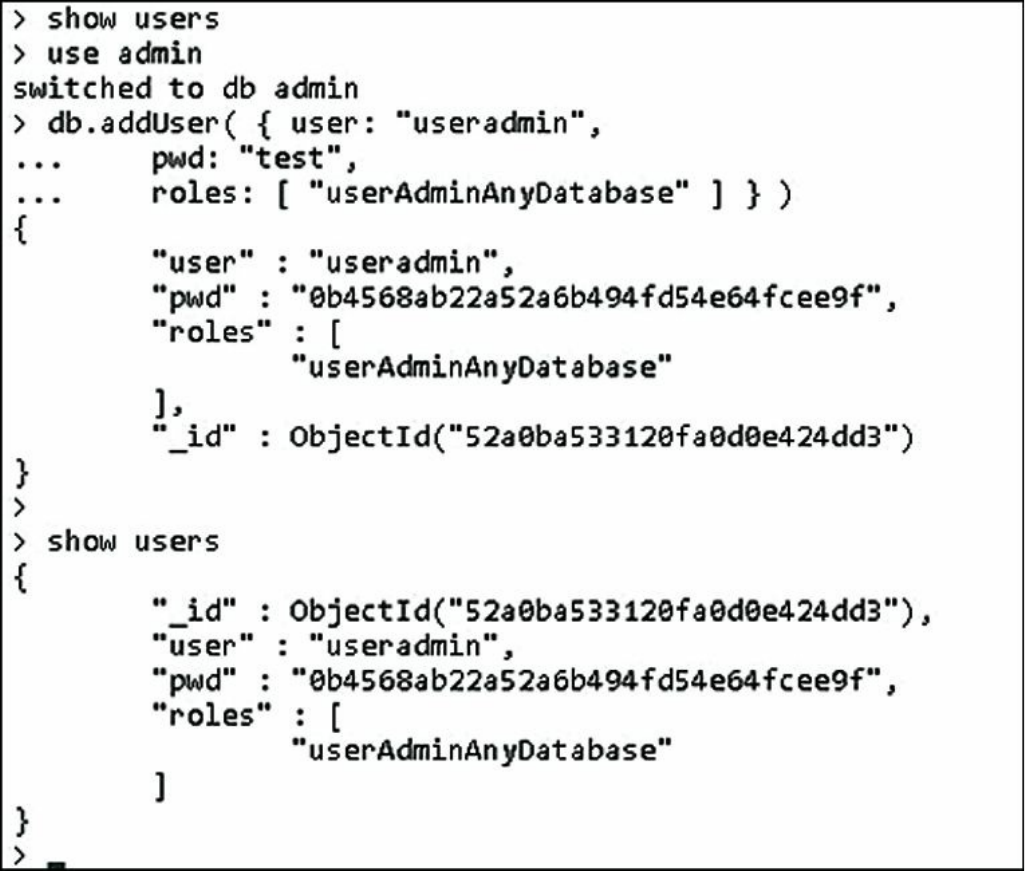
Figure 12.4 Creating the User Administrator account
Turning on Authentication
Once the User Administrator account has been created, restart the MongoDB
database using the --auth parameter. For example:
mongod –dbpath <mongo_data_location>/data/db --auth
Clients will now have to use a username and password to access the database. Also,
when you access MongoDB from the shell, you need to execute the following
commands to authenticate to the admin database so that you can add users with
rights to the database:
use admin
db.auth("useradmin", "test")
You can also authenticate to the admin database when starting the MongoDB shell
using the --username and --password options, for example:
mongo --username "useradmin" --password "test"
Creating a Database Administrator Account
Creating a Database Administrator account is done by executing the createuser
method in the MongoDB shell to access the admin database and then adding a user
with readWriteAnyDatabase, dbAdminAnyDatabase, and
clusterAdmin rights. This gives the user the ability to access all databases in the
system, create new databases, and manage MongoDB clusters and replicas. The
following example shows creating a Database Administrator named dbadmin:
use admin
db.createUser( { user: "dbadmin",
pwd: "test",
roles: [ "readWriteAnyDatabase", "dbAdminAnyDatabase", "clusterAdmin" ] } )
You can then use that user in the MongoDB shell to administer databases. Once you
have created the new administrator account, you can authenticate as that user using
the following commands:
use admin
db.auth("dbadmin", "test")
You can also authenticate to the admin database as the Database Administrator when
starting the MongoDB shell using the --username and --password options,
for example:
mongo --username "dbadmin" --password "test"
Administering Databases
When administering databases in the MongoDB shell, you need to use a user account
that has clusterAdmin privileges—for example, the Database Administrator
account described earlier in this chapter. Once you have a Database Administrator
account created, you can authenticate as that user and perform the tasks described in
the following sections.
Displaying a List of Databases
Often you may need to just see a list of databases that have been created, especially
if you have created a large number of databases or are not the only one administering
the system. To see a list of databases in the system, use the following show dbs
command, which displays a list of databases that have been created:
show dbs
Changing the Current Database
Database operations are performed using the handle db, which is built into
MongoDB. Many operations can only be applied on one database, and therefore to
perform operations on other databases, you need to change the db handle to point to
the new database.
To switch the current database, you can use the
db.getSiblingDB(database) method or the use <database> method.
For example, both of the following methods switch the current database handle to
testDB. Either one is acceptable and sets the value of db to the database specified.
You can then use db to manage the new current database:
db = db.getSiblingDB('testDB')
use testDB
Creating Databases
MongoDB doesn’t provide a command in the shell to explicitly create databases.
Instead you can simply use the use <new_database_name> to create a new
database handle. Keep in mind that the new database is not actually saved until you
add a collection to it. For example, the following commands create a new database
named newDB and then add a collection named newCollection to it:
use newDB
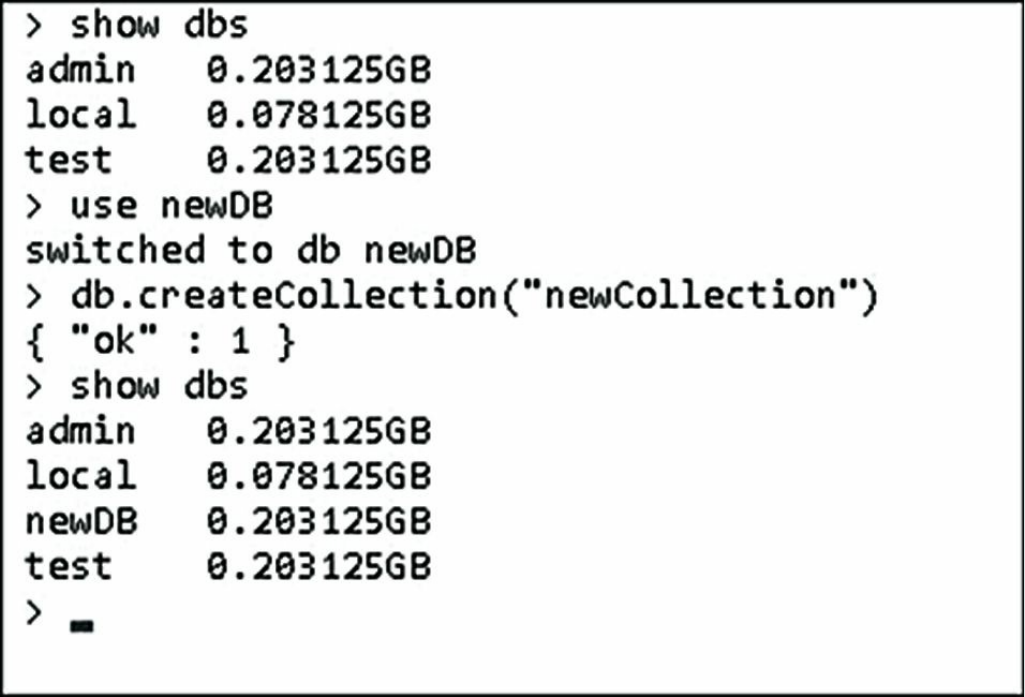
Figure 12.5 Creating a new database in the MongoDB console shell
Deleting Databases
Once a database has been created, it exists in MongoDB until it is deleted by the
administrator. Deleting a database is a common task on some systems. Especially
when databases are created to contain temporary data, it is sometimes easier to delete
databases when they become stale and simply create new ones as needed instead of
trying to clean up the entries in a database.
To delete a database from the MongoDB shell, use the dropDatabase() method.
For example, to delete the newDB database, use the following commands to change
to the newDB database and then delete it:
use newDB
db.dropDatabase()
Be aware that dropDatabase() removes the current database, but it does not
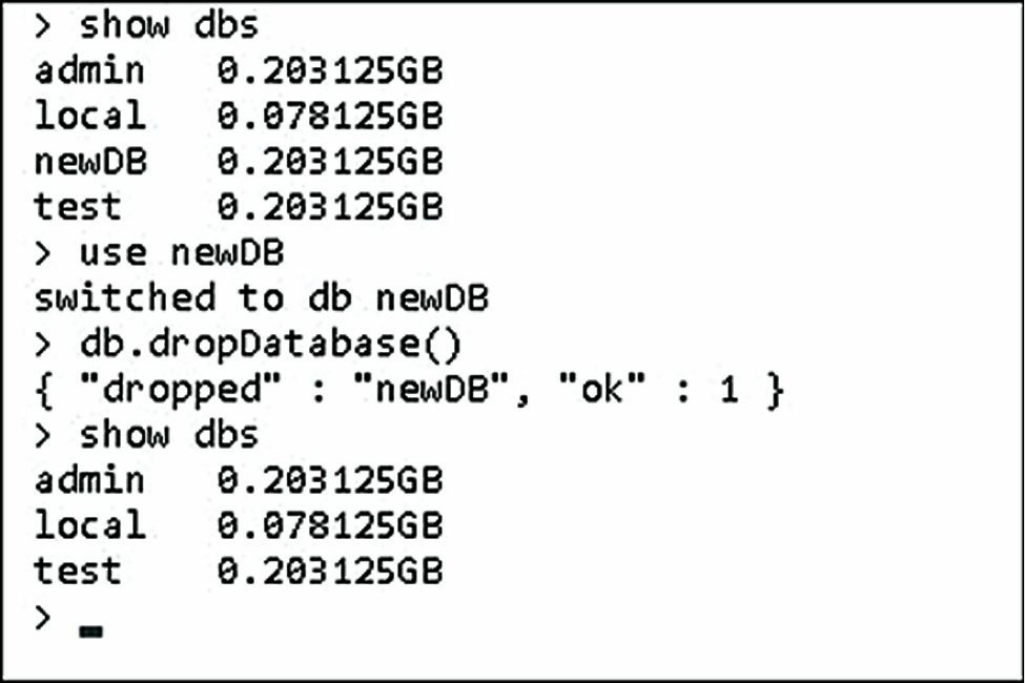
Figure 12.6 Deleting a database in the MongoDB console shell
Copying Databases
Another common task with databases is copying them. Copying a database creates
an exact duplicate of the database, only with a different name. You might want to
create a copy of a database for various reasons, such as to have a backup while you
perform heavy changes or to use as an archive.
To create a copy of a database, you switch to that database and then use
copyDatabase(origin, destination, [hostname]) to create a copy.
The origin parameter is a string specifying the name of the database to copy. The
destination parameter specifies the name of the database to create on this
MongoDB server. The optional hostname parameter specifies a hostname of the
origin database MongoDB server if you are copying a database from a different host.
For example:
db.copyDatabase('customers', 'customers_archive')

Managing Collections
As a database admin, you may also find yourself administering collections within a
database. MongoDB provides the functionality in the MongoDB shell to create,
view, and manipulate collections in a database. The following sections cover the
basics that you need to know to use the MongoDB shell to list collections, create
new ones, and access the documents contained within them.
Displaying a List of Collections in a Database
Often you may need to just see a list of collections contained in a database—for
example, to verify that a collection exists or to find the name of a collection that you
cannot remember. To see a list of collections in a database, you need to switch to that
database and then use show collections to get the list of collections contained
in the database. For example, the following commands list the collections in the test
database:
use test
show collections
Creating Collections
You must create a collection in MongoDB database before you can begin storing
documents. To create a collection, you need to call createCollection(name,
[options]) on the database handle. The name parameter is the name of the new
database. The optional options parameter is an object that can have the properties
listed in Table 12.4 that define the behavior of the collection.
Table 12.4 Options that can be specified when creating collections
Role Description
capped A Boolean; when true, the collection is a
capped collection that does not grow bigger
than the maximum size specified by the size
attribute. Default: false.
autoIndexID A Boolean; when true, an _id field is
automatically created for each document added
to the collection and an index on that field is

implemented. This should be false for
capped collections. Default: true.
size Specifies the size in bytes for the capped
collection. The oldest document is removed to
make room for new documents.
max Specifies the maximum number of documents
allowed in a capped collection. The oldest
document is removed to make room for new
documents.
validator Allows users to specify validation rules or
expressions for the collection.
validationLevel Determines the strictness MongoDB applies to
the validation rules on documents during
updates.
validationAction Determines whether an invalid document is
errored or warned but still can be inserted.
indexOptionDefaults Allows users to specify a default index
configuration when a collection is created.
For example, the following lines of code create a new collection called
newCollection in the testDB database as shown in Figure 12.7:
db.createCollection("newCollection")
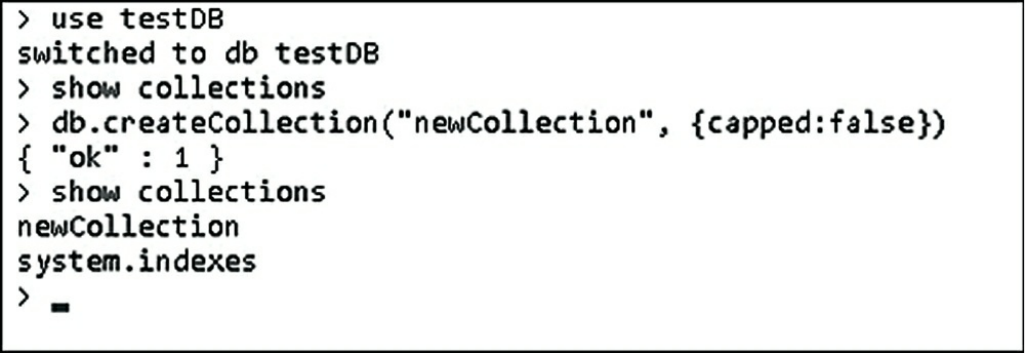
Figure 12.7 Creating a new collection in the MongoDB console shell
Deleting Collections
Occasionally you also want to remove old collections when they are no longer
needed. Removing old collections frees up disk space and eliminates any overhead
such as indexing associated with the collection.
To delete a collection in the MongoDB shell, you need to switch to the correct
database, get the collection object, and then call the drop() function on that object.
For example, the following code deletes the newCollection collection from the
testDB database as shown in Figure 12.8:
use testDB
show collections
coll = db.getCollection("newCollection")
coll.drop()
show collections
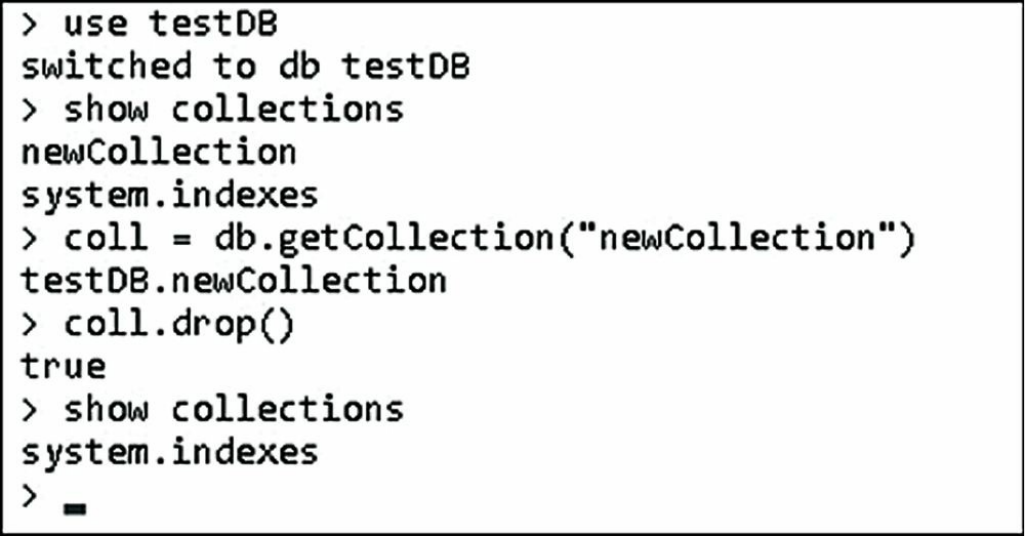
Figure 12.8 Deleting a collection in the MongoDB console shell
Finding Documents in a Collection
Most of the time you use a library such as the native MongoDB driver or Mongoose
to access documents in a collection. However, sometimes you might need to look at
documents inside the MongoDB shell.
The MongoDB shell provides full querying functionality to find documents in
collections using the find(query) method on the collection object. The optional
query parameter specifies a query document with fields and values to match
documents against in the collection. The documents that match the query are
removed from the collection. Using the find() method with no query parameter
returns all documents in the collection.
For example, the following lines of code first query every item in the collection and
then retrieve the documents whose speed field is equal to 120mph. The results are
shown in Figure 12.9.
use testDB
coll = db.getCollection("newCollection")
coll.find()
coll.find({speed:"120mph"})

Figure 12.9 Finding documents in a collection
Adding Documents to a Collection
Typically, insertion of documents in a collection should be done through your
Node.js application. However, at times you may need to manually insert a document
from an administrative point of view to preload a database, to fix a database, or for
testing purposes.
To add documents to a collection, you need to get the collection object and then call
the insert(document) or save(document) method on that object. The
document parameter is a well-formatted JavaScript object that is converted to
BSON and stored in the collection. As an example, the following commands create
three new objects inside a collection as shown in Figure 12.10:
Click here to view code image
use testDB
coll = db.getCollection("newCollection")
coll.find()
coll.insert({ vehicle: "plane", speed: "480mph" })
coll.insert({ vehicle: "car", speed: "120mph" })
coll.insert({ vehicle: "train", speed: "120mph" })
coll.find()
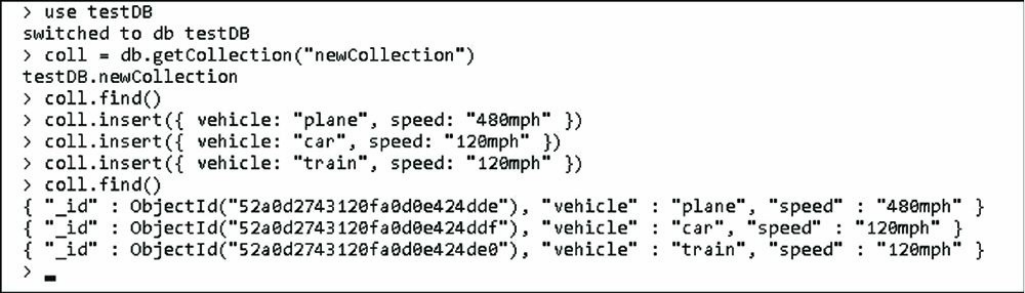
Figure 12.10 Creating documents in a collection
Deleting Documents in a Collection
Deletion of documents in a collection also is typically done through your Node.js
application. However, at times you may need to manually remove a document from
an administrative point of view to fix a database or for testing purposes.
To remove documents from a collection, you need to get the collection object and
then call the remove(query) method on that object. The optional query
parameter specifies a query document with fields and values to match documents
against in the collection. The documents that match the query are removed from the
collection. Using the remove() method with no query parameter removes all
documents in the collection. As an example, the following commands first remove
documents where the vehicle is plane and then all documents from the collection, as
shown in Figure 12.11:
use testDB
coll = db.getCollection("newCollection")
coll.find()
coll.remove({vehicle: "plane"})
coll.find()
coll.remove()
coll.find()
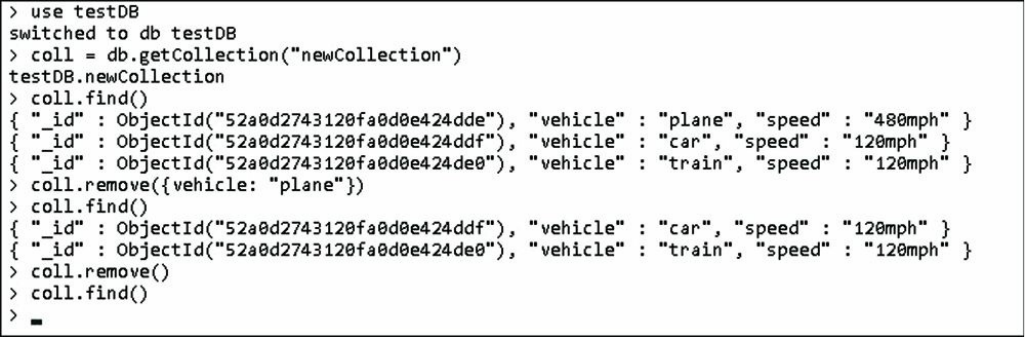
Figure 12.11 Deleting documents from a collection
Updating Documents in a Collection
Updates of documents in a collection should also be done through your Node.js
application. However, at times you may need to manually update a document from
an administrative point of view to fix a database or for testing purposes.
To update documents in a collection, you need to get the collection. Then you can
use a couple of different methods: The save(object) method saves changes that
you have made to an object, and the update(query, update, options)
method queries for documents in the collection and then updates them as they are
found.
When using the update() method, the query parameter specifies a query
document with fields and values to match documents against in the collection. The
update parameter is an object that specifies the update operator to use when
making the update. For example, $inc increments the value of the field, $set sets
the value of the field, $push pushes an item onto an array, and so on. For example,
the following update object increments one field, sets another, and then renames a
third:
{ $inc: {count: 1}, $set: {name: "New Name"}, $rename: {"nickname": "alias"} }
The options parameter of update() is an object that has two properties
—multi and upsert—that are both Boolean values. If upsert is true, a new
document is created if none are found. If multi is true, all documents that match
the query are updated; otherwise, only the first document is updated.
For example, the following commands update documents with a speed of 120mph
by setting the speed to 150 and adding a new field called updated. Also the
save() method is used to save changes to the plane document. The console
output is shown in Figure 12.12:
Click here to view code image
use testDB
coll = db.getCollection("newCollection")
coll.find()
coll.update({ speed: "120mph" },
{ $set: { speed: "150mph" , updated: true } },
{ upsert: false, multi: true })
coll.save({ "_id" : ObjectId("52a0caf33120fa0d0e424ddb"),
"vehicle" : "plane", "speed" : "500mph" })
coll.find()
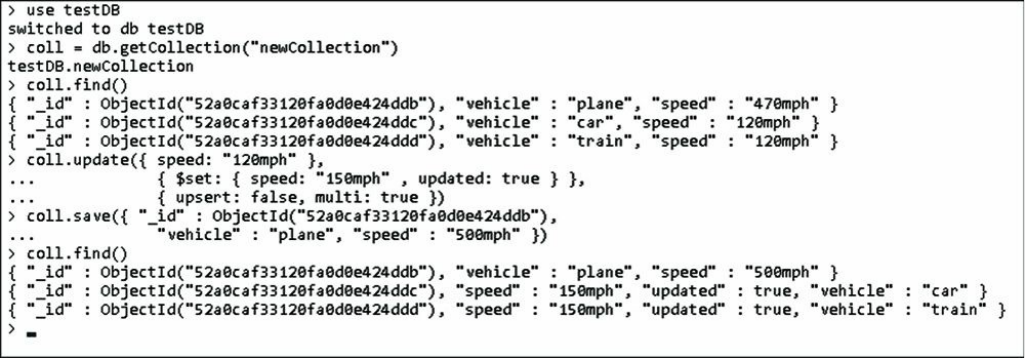
Figure 12.12 Updating documents from a collection
Summary
From a development perspective, most of the interaction that you have with
MongoDB is from a library, such as the native MongoDB driver for Node.js.
However, before you can begin implementing MongoDB in your applications, you
need to install the MongoDB server and configure it to run. You should also create
administrative and database accounts and then turn on authentication to ensure
security even in your development environment.
This chapter discussed the process of installing MongoDB and accessing the
MongoDB shell. You learned how to interact with the shell to create user accounts,
databases, collections, and documents.
Next
In the next chapter, you implement MongoDB in your Node.js applications using the
native MongoDB driver for the Node.js module. You learn how to include the
mongodb module in your applications and connect to MongoDB to perform
database operations.
13
Getting Started with MongoDB and
Node.js
You can use several modules to access MongoDB from your Node.js applications.
The MongoDB group adopted the MongoDB Node.js driver as the standard method.
This driver provides all the functionality and is similar to the native commands
available in the MongoDB shell client.
This chapter focuses on getting you started accessing MongoDB from your Node.js
applications. You learn how to install the MongoDB Node.js driver and use it to
connect to the MongoDB databases. Several sections also cover the processes of
creating, accessing, and manipulating databases and collections from your Node.js
applications.
Adding the MongoDB Driver to Node.js
The first step in implementing MongoDB access from your Node.js applications is to
add the MongoDB driver to your application project. The MongoDB Node.js driver
is the officially supported native Node.js driver for MongoDB. It has by far the best
implementation and is sponsored by MongoDB.
This book cannot cover all the details about the driver. For additional information,
go to http://mongodb.github.io/node-mongodb-native/ to read the documentation for
the MongoDB Node.js driver. The documentation is reasonably organized although a
bit rough around the edges.
Thanks to the Node.js modular framework, adding the MongoDB Node.js driver to
your project is a simple npm command. From your project root directory, execute the
following command using a console prompt:
npm install mongodb
A node_modules directory is created if it is not already there, and the mongodb
driver module is installed under it. Once that is done, your Node.js application files
can use the require('mongodb') command to access the mongodb module
functionality.
Connecting to MongoDB from Node.js
Once you have installed the mongodb module using the npm command, you can
begin accessing MongoDB from your Node.js applications by opening up a
connection to the MongoDB server. The connection acts as your interface to create,
update, and access data in the MongoDB database.
Accessing MongoDB is best done through the MongoClient class in the
mongodb module. This class provides two main methods to create connections to
MongoDB. One is to create an instance of the MongoClient object and then use
that object to create and manage the MongoDB connection. The other method uses a
connection string to connect. Either of these options works well.
Understanding the Write Concern
Before connecting to and updating data on a MongoDB server, you need to decide
what level of write concern you want to implement on your connection. Write
concern describes the guarantee that the MongoDB connection provides when
reporting on the success of a write operation. The strength of the write concern
determines the level of guarantee.
A stronger write concern tells MongoDB to wait until the write has successfully been
written to disk completely before responding back, whereas a weaker write concern
may only wait until MongoDB has successfully scheduled the change to be written
before responding back. The downside of stronger write concerns is speed. The
stronger a write concern, the longer MongoDB waits to respond to the client
connection, thus making write requests slower.
From a MongoDB driver connection perspective, the write concern can be set to one

of the levels listed in Table 13.1. This level is set on the server connection and
applies to all connections to the server. If a write error is detected, then an error is
returned in the callback function of the write request.
Table 13.1 Write concern levels for MongoDB connections
Level Description
-1 Ignores network errors.
0No write acknowledgement is required.
1Write acknowledgement is requested.
2Write acknowledgement is requested across primary and one
secondary server in the replica set.
majority Write acknowledgement is requested across a majority of servers in
the replica set.
Connecting to MongoDB from Node.js Using the
MongoClient Object
Using a MongoClient object to connect to MongoDB involves creating an
instance of the client, opening a connection to the database, authenticating to the
database if necessary, and then handling logout and closure as needed.
To connect to MongoDB via a MongoClient object, first create an instance of the
MongoClient object using the following syntax:
var client = new MongoClient();
After you have created the MongoClient, you still need to open a connection to
the MongoDB server database using the connect(url, options,
callback) method. The url is composed of several components listed in Table
13.2. The following syntax is used for these options:
mongodb://[username:password@]host[:port][/[database][?options]]
For example, to connect to a MongoDB database named MyDB on a host named
MyDBServer on port 8088, you would use the following URL:
client.connect('mongodb://MyDBServer:8088/MyDB');

Table 13.2 MongoClient connection url components
Option Description
mongodb:// Specifies that this string is using a MongoDB connection format.
username (Optional) Specifies the user name to use when authenticating.
password (Optional) Specifies the password to use when authenticating.
host Specifies the host name or address of the MongoDB server. You can specify
multiple host:port combinations to connect to multiple MongoDB servers
by separating them by a comma. For example:
mongodb://host1:270017,host2:27017,host3:27017/testDB
port Specifies the port to use when connecting to the MongoDB server. Default is
27017.
database Specifies the database name to connect to. Default is admin.
options Specifies the key/value pairs of options to use when connecting. These
same options can be specified in the dbOpt and serverOpt parameters.
In addition to the connection url information, you can also provide an options
object that specifies how the MongoClient object creates and manages the
connection to MongoDB. This options object is the second parameter to the
connect() method.
For example, the following code shows connecting to MongoDB with a reconnect
interval of 500 and a connection timeout of 1000 milliseconds:
client.connect ('mongodb://MyDBServer:8088/MyDB',
{ connectTimeoutMS: 1000,
reconnectInterval: 500 },
function(err, db){ . . . });
Table 13.3 lists the most important settings in the options object that you can set
when defining the MongoClient object. The callback method is called back
with an error as the first parameter if the connection fails or with a
MongoClient object as the second parameter if the connection is successful.
Table 13.3 Options used to create the server object for the MongoClient
Option Description
readPreference Specifies which read preference to use when reading
objects from a replica set. Setting the read preference

allows you to optimize read operations. For example,
read only from secondary servers to free up primary.
ReadPreference.PRIMARY
ReadPreference.PRIMARY_PREFERRED
ReadPreference.SECONDARY
ReadPreference.SECONDARY_PREFERRED
ReadPreference.NEAREST
ssl A Boolean that, when true, specifies that the
connection uses SSL. The mongod also needs to be
configured with SSL. If you are using ssl, you can
also specify the sslCA, sslCert, sslKey, and
sslPass options to set the SSL certificate authority,
certificate, key, and password.
poolSize Specifies the number of connections to use in the
connection pool for the server. Default is 5, meaning
there can be up to five connections to the database
shared by the MongoClient.
ReconnectInterval Specifies the amount of time in milliseconds that the
server waits between retries.
auto_reconnect A Boolean that, when true, specifies whether the
client will try to re-create the connection when an error
is encountered.
readConcern Sets the read concern for the collection.
WSets the write concern. (See Table 13.1.)
wTimeOut Sets the timeout value of the write concern.
reconnectTries Sets the number of times the server attempts to
reconnect.
nodelay A Boolean that specifies a no-delay socket.
keepAlive Specifies the keepalive amount for the socket.
connectionTimeOut Specifies the amount of time in milliseconds for the
connection to wait before timing out.
socketTimeOut Specifies the amount of time in milliseconds for a
socket send to wait before timing out.

The callback function accepts an error as the first parameter, and a Db object
instance as the second parameter. If an error occurs, the Db object instance will be
null; otherwise, you can use it to access the database because the connection will
already be created and authenticated.
While in the callback function, you can access the MongoDB database using the Db
object passed in as the second parameter. When you are finished with the
connection, call close() on the Db object to close the connection.
Listing 13.1 shows an example of using the connection url method. The connection
is specified on line 4. Notice that the callback function is passed a Db object that
is already authenticated, so no authentication is necessary.
Listing 13.1 db_connect_url.js: Connecting to MongoDB using a
connection url
Click here to view code image
01 var MongoClient = require('mongodb').MongoClient,
02 Server = require('mongodb').Server;
03 var client = new MongoClient();
04 client.connect('mongodb://dbadmin:test@localhost:27017/testDB',
05 { poolSize: 5, reconnectInterval: 500 },
06 function(err, db) {
07 if (err){
08 console.log("Connection Failed Via Client Object.");
09 } else {
10 console.log("Connected Via Client Object . . .");
11 db.logout(function(err, result) {
12 if(!err){
13 console.log("Logged out Via Client Object . . .");
14 }
15 db.close();
16 console.log("Connection closed . . .");
17 });
18 }
Listing 13.1 Output db_connect_url.js: Connecting to MongoDB using a
connection url
Click here to view code image
Connected Via Client Object ...
Logged out Via Client Object ...
Connection closed ...

Alternatively, you can create the connection and use the db object to authenticate
using the username and password parameters. This allows you to connect to
MongoDB without including all parameters in the url. In Listing 13.2, this is
shown on line 4, where we connect to the database without the username,
password, and database specified in the url. Then on line 10 we connect to
the testDB database, and on line 13 we authenticate using the username and
password.
Listing 13.2 db_connect_object.js: Authenticating using the db object
Click here to view code image
01 var MongoClient = require('mongodb').MongoClient,
02 Server = require('mongodb').Server;
03 var client = new MongoClient();
04 client.connect('mongodb://localhost:27017'),
05 { poolSize: 5, reconnectInterval: 500, },
06 function(err, db) {
07 if (err){
08 console.log("Connection Failed Via Client Object.");
09 } else {
10 var db = db.db("testDB");
11 } if (db){
12 console.log("Connected Via Client Object . . .");
13 db.authenticate("dbadmin", "test", function(err, results){
14 if (err){
15 console.log("Authentication failed . . .");
16 db.close();
17 console.log("Connection closed . . .");
18 } else {
19 console.log("Authenticated Via Client Object . . .");
20 db.logout(function(err, result) {
21 if(!err){
22 console.log("Logged out Via Client Object . . .");
23 }
24 db.close();
25 console.log("Connection closed . . .");
26 });
27 }
28 });
29 }
30 }
Listing 13.2 Output db_connect_object.js: Authenticating using the db
object

Click here to view code image
Connected Via Client Object . . .
Authenticated Via Client Object . . .
Logged out Via Client Object . . .
Connection closed . . .
Understanding the Objects Used in the
MongoDB Node.js Driver
The MongoDB Node.js driver works heavily from structured objects to interact with
the database. You have already seen how the MongoClient object provides
interactions to connect to the database. Other objects represent interactions with the
database, collection, administrative functions, and cursors.
The following sections discuss each of these objects and provide the fundamentals
that you need to use to implement database functionality in your Node.js
applications. You get more exposure to these objects and methods in the next few
chapters as well.
Understanding the Db Object
The Db object inside the MongoDB driver provides access to databases. It acts as a
representation of the database allowing you to do things like connect, add users, and
access collections. You use Db objects heavily to gain and maintain access to
databases that you are interacting with in MongoDB.
A Db object is typically created when you connect to the database as described in the
previous section. Table 13.4 lists the methods that can be called once you have a Db
object.
Table 13.4 Methods on the Db object
Method Description
open(callback) Connects to the database. The callback
function is executed once the connection has
been made. The first parameter to the
callback is an error if one occurs, and the

second is the Db object. For example:
function(error, db){}
db(dbName) Creates a new instance of the Db object. The
connections sockets are shared with the original.
close([forceClose],
callback)
Closes the connection to the database. The
forceClose parameter is a Boolean that,
when true, forces closure of the sockets. The
callback function is executed when the
database is closed and accepts an error object
and a results object:
function(error, results){}
admin() Returns an instance of an Admin object for
MongoDB. (See Table 13.5.)
collectionInfo
([name], callback)
Retrieves a Cursor object that points to
collection information for the database. If name
is specified, then only that collection is returned
in the cursor. The callback function accepts
error and cursor parameters.
function(err, cursor){}
collectionNames
(callback)
Returns a list of the collection names for this
database. The callback function accepts an
error and names parameters, where names is
an array of collection names:
function(err, names){}
collection(name,
[options], callback)
Retrieves information about a collection and
creates an instance of a Collection object.
The options parameter is an object that has
properties that define the access to the collection.
The callback function accepts an error and
Collection object as parameters:
function(err, collection){}

collections(callback) Retrieves information about all collections in
this database and creates an instance of a
Collection object for each of them. The
callback function accepts an error and
collections as parameters, where
collections is an array of Collection
objects:
function(err, collections){}
logout(callback) Logs the user out from the database. The
callback accepts an error object and a
results object:
function(error, results){}
authenticate(username,
password, callback)
Authenticates as a user to this database. You can
use this to switch between users while accessing
the database. The callback function accepts
an error object and a results object:
function(error, results){}
addUser(username,
password, callback)
Adds a user to this database. The currently
authenticated user needs user administration
rights to add the user. The callback function
accepts an error object and a results
object:
function(error, results){}
removeUser(username,
callback)
Removes a user from the database. The callback
function accepts an error object and a
results object:
function(error, results){}
createCollection
(collectionName,
callback )
Creates a new collection in the database. The
callback function accepts an error object
and a results object:
function(error, results){}

dropCollection
(collectionName,
callback )
Deletes the collection specified by collection
name from the database. The callback
function accepts an error object and a
results object:
function(error, results){}
renameCollection
(oldName, newName,
callback)
Renames a collection in the database. The
callback function accepts an error
object and a results object:
function(error, results){}
dropDatabase(dbName,
callback)
Deletes this database from MongoDB. The
callback function accepts an error
object and a results object:
function(error, results){}
Understanding the Admin Object
The Admin object is used to perform certain administrative functions on a
MongoDB database. The Admin object represents a connection specifically to the
admin database and provides functionality not included in the Db object.
The Admin object can be created using the admin() method on an instance of the
Db object or by passing a Db object into the constructor. For example, both of the
following work fine:
var adminDb = db.admin()
var adminDb = new Admin(db)
Table 13.5 lists the important administration methods that can be called from an
Admin object. These methods allow you to perform tasks such as ping the
MongoDB server, add and remove users from the admin database, and list databases.
Table 13.5 Methods on the Admin object
Method Description
serverStatus(callback) Retrieves status information from the MongoDB

server. The callback function accepts an
error object and a status object:
function(error, status){}
ping(callback) Pings the MongoDB server. This is useful since
you can use your Node.js apps to monitor the
server connection to MongoDB. The callback
function accepts an error object and a
results object:
function(error, results){}
listDatabases
(callback)
Retrieves a list of databases from the server. The
callback function accepts an error object and a
results object:
function(error, results){}
authenticate(username,
password, callback)
Same as for Db in Table 13.4 except for the
admin database.
logout(callback) Same as for Db in Table 13.4 except for the
admin database.
addUser(username,
password, [options],
callback)
Same as for Db in Table 13.4 except for the
admin database.
removeUser(username,
callback)
Same as for Db in Table 13.4 except for the
admin database.
Understanding the Collection Object
The Collection object represents a collection in the MongoDB database. You
use the collection object to access items in the collection, add documents, query
documents, and much more.
A Collection object can be created using the collection() method on an
instance of the Db object or by passing a Db object and collection name into the
constructor. The collection should already be created on the MongoDB server
previously or using the createCollection() method on the Db object. For

example, both of the following work fine:
var collection = db.collection()
var collection = new Collection(db, "myCollection")
db.createCollection("newCollection", function(err, collection){ }
Table 13.6 lists the basic methods that can be called from a Collection object.
These methods allow you to add and modify documents in the collection, find
documents, and delete the collection.
Table 13.6 Basic methods on the Collection object
Method Description
insert(docs,
[callback])
Inserts one or more documents into the collection.
The docs parameter is an object describing the
documents. The callback function must be
included when using a write concern. The
callback function accepts an error object and
a results object:
function(error, results){}
remove([query],
[options],
[callback])
Deletes documents from the collection. The query
is an object used to identify the documents to
remove. If no query is supplied, all documents are
deleted. If a query object is supplied, the
documents that match the query are deleted. The
options allow you to specify the write concern
using w, wtimeout, upsert, and options
when modifying documents. The callback
function must be included when using a write
concern. The callback function accepts an
error object and a results object:
function(error, results){}
rename(newName,
callback)
Renames the collection to newName. The
callback function accepts an error object and
a results object:
function(error, results){}

save([doc],
[options],
[callback])
Saves the document specified in the doc parameter
to the database. This is useful if you are making ad-
hoc changes to objects and then needing to save
them, but is not as efficient as update() or
findAndModify. The options allow you to
specify the write concern using w, wtimeout,
upsert, and new options when modifying
documents. The callback function must be
included when using a write concern. The
callback function accepts an error object and
a results object:
function(error, results){}
update(query,
update, [options],
[callback])
Updates the documents that match the query in
the database with the information specified in the
document parameter. The options allow you to
specify the write concern using w, wtimeout,
upsert, and new options when modifying
documents. The callback function must be
included when using a write concern. The
callback function accepts an error object and
a results object:
function(error, results){}
find(query,
[options], callback)
Creates a Cursor object that points to a set of
documents that match the query. The options
parameter is an object that allows you to specify the
limit, sort, and many more options when building
the cursor on the server side. The callback
function accepts an error as the first parameter
and the Cursor object as the second:
function(error, cursor){}
findOne(query,
[options], callback)
Same as find() except that only the first
document found is included in the Cursor.
findAndModify(query,
sort, update,
Performs modifications on documents that match
the query parameter. The sort parameter

[options], callback) determines which objects are modified first. The
doc parameter specifies the changes to make on the
documents. The options allow you to specify the
write concern using w, wtimeout, upsert, and
new options when modifying documents. The
callback function accepts an error object and
a results object:
function(error, results){}
findAndRemove(query,
sort, [options],
callback)
Removes documents that match the query
parameter. The sort parameter determines which
objects are modified first. The options allow you
to specify the write concern using w, wtimeout,
upsert, and new options when deleting
documents. The callback function accepts an
error object and a results object:
function(error, results){}
distinct(key,
[query], callback)
Creates a list of distinct values for a specific
document key in the collection. If a query is
specified, only those documents that match the
query are included. The callback function
accepts error and values parameters, where
values is an array of distinct values for the
specified key:
function(error, values){}
count([query],
callback)
Counts the number of documents in a collection. If
a query parameter is used, only documents that
match the query are included. The callback
function accepts an error object and a count
parameter, where count is the number of matching
documents:
function(error, count){}
drop(callback) Drops the current collection. The callback
function accepts an error object and a results

object:
function(error, results){}
stats(callback) Retrieves the stats for the collection. The stats
include the count of items, size on disk,
average object size, and much more. The
callback function accepts an error object and
a stats object:
function(error, stats){}
Understanding the Cursor Object
When you perform certain operations on MongoDB using the MongoDB Node.js
driver, the results come back as a Cursor object. The Cursor object acts as a
pointer that can be iterated on to access a set of objects in the database. For example,
when you use find(), the actual documents are not returned in the callback
function but a Cursor object instead. You can then use the Cursor object to read
the items in the results.
Because the Cursor object can be iterated on, an index to the current location is
kept internally. That way you can read items one at a time. Keep in mind that some
operations only affect the current item in the Cursor and increment the index.
Other operations affect all items at the current index forward.
To give you an overview, Table 13.7 lists the basic methods that can be called on the
Cursor object. These methods allow you to add and modify documents in the
collection, find documents, and delete the collection.
Table 13.7 Basic methods on the Cursor Object
Method Description
each(callback) Iterates on each item in the Cursor from the
current cursor index and calls the callback each
time. This allows you to perform the callback
function on each item represented by the cursor.
The callback function accepts an error object
and the item object:

function(err, item){}
toArray(callback) Iterates through the items in the Cursor from the
current index forward and returns an array of
objects to the callback function. The callback
function accepts an error object and the items
array:
function(err, items){}
nextObject(callback) Returns the next object in the Cursor to the
callback function and increments the index. The
callback function accepts an error object and the
item object:
function(err, item){}
rewind() Resets the Cursor to the initial state. This is
useful if you encounter an error and need to reset
the cursor and begin processing again.
count(callback) Determines the number of items represented by the
cursor. The callback function accepts an error
object and the count value:
function(err, count){}
sort(keyOrList,
direction, callback)
Sorts the items represented by the Cursor. The
keyOrList parameter is a String or Array of
field keys that specifies the field(s) to sort on. The
direction parameter is a number, where 1 is
ascending and -1 is descending. The callback
function accepts an error as the first parameter
and the sortedCursor object as the second:
function(err, sortedCursor){}
close(callback) Closes the Cursor, which frees up memory on the
client and on the MongoDB server.
isClosed() Returns true if the Cursor has been closed;
otherwise, returns false.
Accessing and Manipulating Databases
A great feature of the MongoDB Node.js driver is that it provides the ability to
create and manage databases from your Node.js applications. For most installations,
you design and implement your databases once and then do not touch them again.
However, sometimes it is handy to be able to dynamically create and delete
databases.
Listing Databases
To list the databases in your system, you use the listDatabases() method on
an Admin object. That means that you need to create an instance of an Admin
object first. The list of databases is returned as the second parameter to the callback
function and is a simple array of database objects.
The following code shows an example of creating an Admin object and then using it
to get a list of the databases on the MongoDB server:
Click here to view code image
MongoClient.connect("mongodb://localhost/admin", function(err, db) {
var adminDB = db.admin();
adminDB.listDatabases(function(err, databases){
console.log("Before Add Database List: ");
console.log(databases);
});
});
Creating a Database
Just as with the MongoDB shell, there is no explicit method for creation of
databases. Databases are created automatically whenever a collection or document is
added to them. Therefore, to create a new database all you need to do is to use the
db() method on the Db object provided by the MongoClient connection to
create a new Db object instance. Then call createCollection() on the new Db
object instance to create the database.
The following code shows an example of creating a new database named newDB
after connecting to the server:
Click here to view code image
var MongoClient = require('mongodb').MongoClient;
MongoClient.connect("mongodb://localhost/", function(err, db) {
var newDB = db.db("newDB");
newDB.createCollection("newCollection", function(err, collection){
if(!err){
console.log("New Database and Collection Created");
}
});
});
Deleting a Database
To delete a database from MongoDB, you need to get a Db object instance that
points to that database. Then call the dropDatabase() method on that object. It
may take a while for MongoDB to finalize the deletion. If you need to verify that the
deletion occurred, you can use a timeout to wait for the database delete to occur. For
example:
newDB.dropDatabase(function(err, results){
<handle database delete here>
});
Creating, Listing, and Deleting Databases Example
To help solidify your understanding of database operations, Listing 13.3 illustrates
the full process of creating, listing, and deleting databases. A connection is made to
the MongoDB server, and then in lines 4–7 a listing of the current databases is
shown. Then in lines 8 and 9, a new database is created by calling
createCollection(). Inside the createCollection() callback handler,
the databases are listed again to verify creation.
In lines 15–32 the database is deleted using dropDatabase(). Notice that inside
the dropDatabase() callback a setTimeout() timer is implemented to wait
for a number of seconds before checking the list of databases to verify that the
database was deleted.
Listing 13.3 db_create_list_delete.js: Creating, listing, and deleting
databases using the MongoDB Node.js driver
Click here to view code image

01 var MongoClient = require('mongodb').MongoClient;
02 MongoClient.connect("mongodb://localhost/", function(err, db) {
03 var adminDB = db.admin();
04 adminDB.listDatabases(function(err, databases){
05 console.log("Before Add Database List: ");
06 console.log(databases);
07 });
08 var newDB = db.db("newDB");
09 newDB.createCollection("newCollection", function(err, collection){
10 if(!err){
11 console.log("New Database and Collection Created");
12 adminDB.listDatabases(function(err, databases){
13 console.log("After Add Database List: ");
14 console.log(databases);
15 db.db("newDB").dropDatabase(function(err, results){
16 if(!err){
17 console.log("Database dropped.");
18 setTimeout(function() {
19 adminDB.listDatabases(function(err, results){
20 var found = false;
21 for(var i = 0; i < results.databases.length; i++) {
22 if(results.databases[i].name == "newDB") found = true;
23 }
24 if (!found){
25 console.log("After Delete Database List: ");
26 console.log(results);
27 }
28 db.close();
29 });
30 }, 15000);
31 }
32 });
33 });
34 }
35 });
36 });
Listing 13.3 Output db_create_list_delete.js: Creating, listing, and
deleting databases using the MongoDB Node.js driver
Click here to view code image
New Database and Collection Created
After Add Database List:
{ databases:
[ { name: 'admin', sizeOnDisk: 155648, empty: false },
{ name: 'astro', sizeOnDisk: 73728, empty: false },

{ name: 'local', sizeOnDisk: 73728, empty: false },
{ name: 'newDB', sizeOnDisk: 8192, empty: false },
{ name: 'testDB', sizeOnDisk: 8192, empty: false },
{ name: 'words', sizeOnDisk: 565248, empty: false } ],
totalSize: 884736,
ok: 1 }
After Delete Database List:
{ databases:
[ { name: 'admin', sizeOnDisk: 155648, empty: false },
{ name: 'astro', sizeOnDisk: 73728, empty: false },
{ name: 'local', sizeOnDisk: 73728, empty: false },
{ name: 'testDB', sizeOnDisk: 8192, empty: false },
{ name: 'words', sizeOnDisk: 565248, empty: false } ],
totalSize: 876544,
ok: 1 }
Database dropped.
Getting the Status of the MongoDB Server
Another great feature of the Admin object is the ability to get status information
about the MongoDB server. This information includes the host name, version,
uptime, open cursors, and much more. You can use this information to determine
the health and status of the MongoDB server and then make adjustments in your
code to handle problem situations.
To display the status of the MongoDB server, you use the serverStatus()
method on the Admin object. Listing 13.4 illustrates creating the Admin object and
then calling serverStatus() and displaying the results.
Listing 13.4 db_status.js: Retrieving and displaying the MongoDB server
status
Click here to view code image
1 var MongoClient = require('mongodb').MongoClient;
2 MongoClient.connect("mongodb://localhost/test", function(err, db) {
3 var adminDB = db.admin();
4 adminDB.serverStatus(function(err, status){
5 console.log(status);
6 db.close();
7 });
8 });

Listing 13.4 Output db_status.js: Retrieving and displaying the
MongoDB server status
Click here to view code image
version: '3.4.2',
process: 'mongod',
pid: 2612,
uptime: 44775,
uptimeMillis: 44774694,
uptimeEstimate: 44774,
localTime: 2017-08-11T19:02:25.086Z,
asserts: { regular: 0, warning: 0, msg: 0, user: 0, rollovers: 0 },
connections: { current: 1, available: 999999, totalCreated: 8 },
extra_info:
Accessing and Manipulating Collections
A common task for heavily used Node.js installations is the dynamic manipulation of
collections. For example, some larger installations give each large customer a
separate collection, so as customers sign on or leave, the collections need to be added
and deleted. The MongoDB Node.js driver provides easy-to-use methods on the Db
and Collection objects that allow you to manipulate the collections on a
database.
Listing Collections
To list the collections in a database, you need to start with a Db object that points to
the database you want to use. Then you call the collections() method on the
Db object. For example:
var newDB = db.db("newDB");
newDB.collections(function(err, collections){})
The collections() method returns an array of objects that contains the names
of the collections, for example:
[ { name: 'newDB.system.indexes' },
{ name: 'newDB.newCollection',
options: { create: 'newCollection' } } ]
The resulting value of the collectionList parameter would be an array of
Collection objects.
Creating Collections
You have already seen the process of creating a collection. You simply use the
createCollection() method on the Db object. For example:
var newDB = db.db("newDB");
newDB.createCollection("newCollection", function(err, collection){ })
The value of the collection parameter of the callback is a Collection object.
You can then use this object to perform tasks such as manipulate the collection or
add documents.
Deleting Collections
You can delete a collection in two ways: First, you can call
dropCollection(name) on the Db object, and second, you can call the
drop() method on the collection object, which is sometimes more convenient; for
instance, when you are iterating through a list of Collection objects.
The following shows both methods:
var myDB = db.db("myDB ");
myDB.dropCollection("collectionA", function(err, results){ })
myDB.collection("collectionB", function(err, collB){
collB.drop();
})
Collection Creation, Listing, and Deleting Example
To illustrate the process of creating, listing, and deleting collections, Listing 13.5
makes a series of chained callbacks that list the collections, create a new collection,
and then delete it. The code is basic and easy to follow.
Listing 13.5 collection_create_list_delete.js: Creating,
retrieving, and deleting collections on a MongoDB database
Click here to view code image

01 var MongoClient = require('mongodb').MongoClient;
02 MongoClient.connect("mongodb://localhost/", function(err, db) {
03 var newDB = db.db("newDB");
04 newDB.collections(function(err, collectionNames){
05 console.log("Initial collections: ");
06 console.log(collectionNames);
07 newDB.createCollection("newCollection", function(err, collection){
08 newDB.collections(function(err, collectionNames){
09 console.log("Collections after creation: ");
10 console.log(collectionNames);
11 newDB.dropCollection("newCollection", function(err, results){
12 newDB.collections(function(err, collectionNames){
13 console.log("Collections after deletion: ");
14 console.log(collectionNames);
15 db.close();
16 });
17 });
18 });
19 });
20 });
21 });
Listing 13.5 Output collection_create_list_delete.js: Creating,
retrieving, and deleting collections on a MongoDB database
Click here to view code image
Initial collections:
[]
Collections after creation:
[ Collection {
s:
{ pkFactory: [Object],
db: [Object],
topology: [Object],
dbName: 'newDB',
options: [Object],
namespace: 'newDB.newCollection',
readPreference: [Object],
slaveOk: true,
serializeFunctions: undefined,
raw: undefined,
promoteLongs: undefined,
promoteValues: undefined,
promoteBuffers: undefined,
internalHint: null,
collectionHint: null,

name: 'newCollection',
promiseLibrary: [Function: Promise],
readConcern: undefined } } ]
Collections after deletion:
[]
Getting Collection Information
Another useful feature of the Collection object is the ability to get the statistics
for a particular collection. The statistics can give you an idea of how big the
collection is, both in number of documents as well as size on disk. You may want to
add code that periodically checks the statistics of your collections to determine
whether they need to be cleaned up.
Listing 13.6 shows how to access the statistics for a collection by calling the
stats() method on the Collection object.
Listing 13.6 collection_stat.js: Retrieving and displaying the stats for
a collection
Click here to view code image
01 var MongoClient = require('mongodb').MongoClient;
02 MongoClient.connect("mongodb://localhost/", function(err, db) {
03 var newDB = db.db("newDB");
04 newDB.createCollection("newCollection", function(err, collection){
05 collection.stats(function(err, stats){
06 console.log(stats);
07 db.close();
08 });
09 });
10 });
Listing 13.6 Output collection_stat.js: Retrieving and displaying the
stats for a collection
Click here to view code image
{ ns: 'newDB.newCollection',
size: 0,
count: 0,
storageSize: 4096,
capped: false,
wiredTiger:

{ metadata: { formatVersion: 1 },
creationString:
type: 'file',
uri: 'statistics:table:collection-4-8106062778677821448',
Summary
The MongoDB Node.js driver is the officially supported native method for accessing
MongoDB from Node.js applications. It is simple to install and easy to incorporate
into your Node.js applications. In this chapter you see the various methods and
options to connect to a MongoDB database using the MongoClient class. You
also got to see and work with the Db, Admin, Collection, and Cursor classes.
The examples in this chapter took you through creating, viewing, and deleting
databases dynamically from your Node.js applications. You also learned how to
create, access, and delete collections.
Next
In the next chapter, you work with MongoDB documents. You learn the methods to
insert documents into a collection and how to access them. You also learn how to
manipulate and delete documents using several different methods.

14
Manipulating MongoDB Documents
from Node.js
In Chapter 13, “Getting Started with MongoDB and Node.js,” you learned the
fundamentals of using the MongoDB Node.js driver to manage and manipulate
databases and collections. This chapter expands on those concepts to include
manipulation of documents within collections. The MongoDB Node.js driver
provides a lot of functionality in the Collection class, described in Chapter 13,
that allows you to insert, access, modify, and remove documents from collections.
This chapter is broken down into sections that describe the basic document
management tasks that you perform on collections, including inserts and deletes.
This chapter introduces you to the options that control the behavior of write requests
to the database. You also learn about the update structure that MongoDB uses to
update documents rather than the long, complex query strings you may have seen in
SQL.
Understanding Database Change Options
Several methods discussed in this chapter modify the MongoDB database. When you
make changes to the database, the MongoDB Node.js driver needs to know how to
handle the connection during the change process. For that reason, each method that
changes the database allows you to pass in an optional options parameter that can
specify some or all of the properties defined in Table 14.1.
Table 14.1 Options that can be specified in the options parameter of
database changing requests to define behavior
Option Description

wSpecifies the write concern level for database
connections. See Table 13.1 for the available
values.
wtimeout Specifies the amount of time in milliseconds to
wait for the write concern to finish. This value is
added to the normal connection timeout value.
fsync A Boolean that, when true, indicates that write
requests wait for fsync to finish before returning.
journal A Boolean that, when true, indicates that write
requests wait for the journal sync to complete
before returning.
serializeFunctions A Boolean that, when true, indicates that
functions attached to objects will be serialized
when stored in the document.
forceServerObjectId A Boolean that, when true, indicates that any
object ID (_id) value set by the client is
overridden by the server during insert.
checkKeys A Boolean that, when true, causes the document
keys to be checked when being inserted into the
database. The default is true. (Warning: Setting
this to false can open MongoDB up for injection
attacks.)
upsert A Boolean that, when true, specifies that if no
documents match the update request, a new
document is created.
multi A Boolean that, when true, specifies that if
multiple documents match the query in an update
request, all documents are updated. When false,
only the first document found is updated.
new A Boolean that, when true, specifies that the
newly modified object is returned by the
findAndModify() method instead of the pre-
modified version. The default is false.

Understanding Database Update Operators
When performing updates on objects in MongoDB, you need to specify exactly what
fields need to be changed and how they need to be changed. Unlike SQL where you
create long query strings that define the update, MongoDB allows you to implement
an update object with operators that define exactly how to change the data in the
documents.
You can include as many operators in the update object as you need. The format of
the update object is shown here:
{
<operator>: {<field_operation>, <field_operation>, . . .},
<operator>: {<field_operation>, <field_operation>, . . .}
. . .
}
For example, consider the following object:
{
name: "myName",
countA: 0,
countB: 0,
days: ["Monday", "Wednesday"],
scores: [ {id:"test1", score:94}, {id:"test2", score:85}, {id:"test3", score:97}]
}
If you want to increment the countA field by 5, increment countB by 1, set name
to “New Name”, add Friday to the days array, and sort the scores array by the
score field, you would use the following update object:
{
$inc:{countA:5, countB:1},
$set:{name:"New Name"},
$push{days:"Friday},
$sort:{score:1}
}
Table 14.2 lists the operators that can be used in the update object when updating
documents.
Table 14.2 Operators that can be specified in the update object when
performing update operations

Operator Description
$inc Increments the value of the field by the specified amount.
Operation format: field:inc_value
$rename Renames a field.
Operation format: field:new_name
$setOnInsert Sets the value of a field when a new document is created in the
update operation.
Operation format: field:value
$set Sets the value of a field in an existing document.
Operation format: field:new_value
$unset Removes the specified field from an existing document.
Operation format: field:""
$Acts as a placeholder to update the first element that matches
the query condition in an update.
$addToSet Adds elements to an existing array only if they do not already
exist in the set.
Operation format: array_field:new_value
$pop Removes the first or last item of an array. If the pop_value is
-1, the first element is removed. If the pop_value is 1, the
last element is removed.
Operation format: array_field:pop_value
$pullAll Removes multiple values from an array. The values are passed
in as an array to the field name.
Operation format: array_field:[value1, value2,

...]
$pull Removes items from an array that match a query statement. The
query statement is a basic query object with field names and
values to match.
Operation format: array_field:[<query>]
$push Adds an item to an array.
Simple array format: array_field:new_value
Object array format: array_field:{field:value}
$each Modifies the $push and $addToSet operators to append
multiple items for array updates.
Operation format: array_field:{$each:[value1,
...]}
$slice Modifies the $push operator to limit the size of updated
arrays.
$sort Modifies the $push operator to reorder documents stored in an
array.
Operation format: array_field:{$slice:<num>}
$bit Performs bitwise AND and OR updates of integer values.
Operation format:
integer_field:{and:<integer>}
integer_field:{or:<integer>}
Adding Documents to a Collection
Another common task when interacting with MongoDB databases is inserting

documents into collections. To insert a document, you first create a JavaScript object
that represents the document that you want to store. You create a JavaScript object
because the BSON format that MongoDB uses is based on JavaScript notation.
Once you have a JavaScript version of your new document, you can store it in the
MongoDB database using the insert() method on an instance of the
Collection object connected to the database. The following shows the syntax for
the insert() method:
insert(docs, [options], callback)
The docs parameter can be a single document object or an array of document
objects. The options parameter specifies the database change options described
previously in Table 14.1. The callback function is required if you are
implementing a write concern in the options. The first parameter of the
callback function is an error, and the second parameter is an array of the
documents inserted into the collection.
Listing 14.1 illustrates a basic example of inserting documents. Lines 2–9 show a
function that accepts the Collection object and an object to insert. The
insert() method is called, and the resulting array of inserted objects (one at time
in this case) is displayed on the console. Lines 10–13 open up the connection to the
MongoDB server, clear out the nebulae collection, and then re-create it to provide
a clean slate. Then lines 14–19 call addObject() for a series of JavaScript objects
describing nebulae.
Listing 14.1 doc_insert.js: Inserting documents into a collection
Click here to view code image
01 var MongoClient = require('mongodb').MongoClient;
02 function addObject(collection, object){
03 collection.insert(object, function(err, result){
04 if(!err){
05 console.log("Inserted : ");
06 console.log(result);
07 }
08 });
09 }
10 MongoClient.connect("mongodb://localhost/", function(err, db) {
11 var myDB = db.db("astro");
12 myDB.dropCollection("nebulae");
13 myDB.createCollection("nebulae", function(err, nebulae){

14 addObject(nebulae, {ngc:"NGC 7293", name:"Helix",
15 type:"planetary",location:"Aquila"});
16 addObject(nebulae, {ngc:"NGC 6543", name:"Cat's Eye",
17 type:"planetary",location:"Draco"});
18 addObject(nebulae, {ngc:"NGC 1952", name: "Crab",
19 type:"supernova",location:"Taurus"});
20 });
21 });
Listing 14.1 Output doc_insert.js: Inserting documents into a collection
Click here to view code image
Inserted :
{ result: { ok: 1, n: 1 },
ops:
[ { ngc: 'NGC 7293',
name: 'Helix',
type: 'planetary',
location: 'Aquila',
_id: 598e04b98e397c0f8464bb99 } ],
insertedCount: 1,
insertedIds: [ 598e04b98e397c0f8464bb99 ] }
Inserted :
{ result: { ok: 1, n: 1 },
ops:
[ { ngc: 'NGC 6543',
name: 'Cat\'s Eye',
type: 'planetary',
location: 'Draco',
_id: 598e04b98e397c0f8464bb9a } ],
insertedCount: 1,
insertedIds: [ 598e04b98e397c0f8464bb9a ] }
Inserted :
{ result: { ok: 1, n: 1 },
ops:
[ { ngc: 'NGC 1952',
name: 'Crab',
type: 'supernova',
location: 'Taurus',
_id: 598e04b98e397c0f8464bb9b } ],
insertedCount: 1,
insertedIds: [ 598e04b98e397c0f8464bb9b ] }
Getting Documents from a Collection
A common task that you perform on data stored in a MongoDB is retrieving one or
more documents. For example, consider product information for products on a
commercial website. The information is stored once but retrieved many times.
The retrieval of data sounds simple; however, it can become complex as you filter,
sort, limit, and aggregate the results. In fact, Chapter 15, “Accessing MongoDB from
Node.js,” is entirely devoted to the complexities of retrieving data.
This section introduces you to the simple basics of the find() and findOne()
methods of the Collection object to make it easier to understand the code
examples in this chapter. The syntax for find() and findOne() are shown here:
find(query, [options], callback)
findOne(query, [options], callback)
Both find() and findOne() accept a query object as the first parameter. The
query object contains properties that are matched against fields in the documents.
Documents that match the query are included in the list. The options parameter
is an object that specifies everything else about the search for documents, such as the
limit, sort, and what to return.
The callback function is where find() and findOne() differ. The find()
method returns a Cursor object that can be iterated on to retrieve documents,
whereas the findOne() method returns a single object.
Listing 14.2 illustrates the basic use of handling the results of find() and
findOne(). The code in lines 5–10 implements find(). Notice that the result is
a Cursor object. To display the results, the toArray() method is called, which
iterates through the Cursor object and builds a basic JavaScript array of objects.
This allows you to operate on the documents as you would a normal set of JavaScript
objects.
Lines 11–18 also use the find() method; however, the each() method is used to
iterate through the Cursor object one document at a time. For each iteration, a
single document is retrieved from MongoDB and passed in as the second parameter
to the callback function.
Lines 19–22 implement the findOne() method. Notice the simple query on the
type field. The callback function receives the object and outputs it to the screen.

Listing 14.2 doc_find.js: Finding documents in a MongoDB collection
Click here to view code image
01 var MongoClient = require('mongodb').MongoClient;
02 MongoClient.connect("mongodb://localhost/", function(err, db) {
03 var myDB = db.db("astro");
04 myDB.collection("nebulae", function(err, nebulae){
05 nebulae.find(function(err, items){
06 items.toArray(function(err, itemArr){
07 console.log("Document Array: ");
08 console.log(itemArr);
09 });
10 });
11 nebulae.find(function(err, items){
12 items.each(function(err, item){
13 if(item){
14 console.log("Singular Document: ");
15 console.log(item);
16 }
17 });
18 });
19 nebulae.findOne({type:'planetary'}, function(err, item){
20 console.log("Found One: ");
21 console.log(item);
22 });
23 });
24 });
Listing 14.2 Output doc_find.js: Finding documents in a MongoDB
collection
Click here to view code image
Document Array:
[ { _id: 598e04b98e397c0f8464bb99,
ngc: 'NGC 7293',
name: 'Helix',
type: 'planetary',
location: 'Aquila' },
{ _id: 598e04b98e397c0f8464bb9b,
ngc: 'NGC 1952',
name: 'Crab',
type: 'supernova',
location: 'Taurus' },
{ _id: 598e04b98e397c0f8464bb9a,
ngc: 'NGC 6543',
name: 'Cat\'s Eye',

type: 'planetary',
location: 'Draco' } ]
Singular Document:
{ _id: 598e04b98e397c0f8464bb99,
ngc: 'NGC 7293',
name: 'Helix',
type: 'planetary',
location: 'Aquila' }
Singular Document:
{ _id: 598e04b98e397c0f8464bb9b,
ngc: 'NGC 1952',
name: 'Crab',
type: 'supernova',
location: 'Taurus' }
Singular Document:
{ _id: 598e04b98e397c0f8464bb9a,
ngc: 'NGC 6543',
name: 'Cat\'s Eye',
type: 'planetary',
location: 'Draco' }
Found One:
{ _id: 598e04b98e397c0f8464bb99,
ngc: 'NGC 7293',
name: 'Helix',
type: 'planetary',
location: 'Aquila' }
Updating Documents in a Collection
Once objects have been inserted into a collection you often need to update them
from time to time as the data changes. The MongoDB Node.js driver provides
several methods for updating documents. The most commonly used is the
update() method, which is versatile and easy to implement. The following shows
the syntax for the update() method:
update(query, update, [options], [callback])
The query parameter is a document used to identify which document(s) you want
to change. The request matches the properties and values in the query with the fields
and values of the object, and only those matching the query are updated. The
update parameter is an object that specifies the changes to make to the documents
that match the query. Table 14.2 lists the operators that can be used.

The options parameter specifies the database change options described previously
in Table 14.1. The callback function is required if you are implementing a write
concern in the options. The first parameter of the callback function is an
error, and the second parameter is an array of the documents inserted into the
collection.
When updating multiple documents with the update() call, you can isolate writes
to protect the documents from other writes using the $isolate:1 property in the
query. This doesn’t provide an all or nothing atomic write; it simply inhibits other
write processes from updating the same objects you are writing to. For example:
update({type:"Planetary", $isolated:1}, {updated:true}, {multi:true})
Listing 14.3 illustrates updating multiple objects using the update() method.
Lines 9–19 implement the update() method and callback to change the type
planetary to Planetary and add a new field named updated. Notice that the
$set operator is used to set values. Also notice that upsert is false so that new
documents will not be created, multi is true so that multiple documents will get
updated, and w is 1 so that the request will wait for the write operation before
returning.
Listing 14.3 doc_update.js: Updating multiple documents in the database
Click here to view code image
01 var MongoClient = require('mongodb').MongoClient;
02 MongoClient.connect("mongodb://localhost/", function(err, db) {
03 var myDB = db.db("astro");
04 myDB.collection("nebulae", function(err, nebulae){
05 nebulae.find({type:"planetary"}, function(err, items){
06 items.toArray(function(err, itemArr){
07 console.log("Before Update: ");
08 console.log(itemArr);
09 nebulae.update({type:"planetary", $isolated:1},
10 {$set:{type:"Planetary", updated:true}},
11 {upsert:false, multi:true, w:1},
12 function(err, results){
13 nebulae.find({type:"Planetary"}, function(err, items){
14 items.toArray(function(err, itemArr){
15 console.log("After Update: ");
16 console.log(itemArr);
17 db.close();
18 });
19 });

20 });
21 });
22 });
23 });
24 });
Listing 14.3 Output doc_update.js: Updating multiple documents in the
database
Click here to view code image
Before Update:
[ { _id: 598e04b98e397c0f8464bb99,
ngc: 'NGC 7293',
name: 'Helix',
type: 'planetary',
location: 'Aquila' },
{ _id: 598e04b98e397c0f8464bb9a,
ngc: 'NGC 6543',
name: 'Cat\'s Eye',
type: 'planetary',
location: 'Draco' } ]
After Update:
[ { _id: 598e04b98e397c0f8464bb99,
ngc: 'NGC 7293',
name: 'Helix',
type: 'Planetary',
location: 'Aquila',
updated: true },
{ _id: 598e04b98e397c0f8464bb9a,
ngc: 'NGC 6543',
name: 'Cat\'s Eye',
type: 'Planetary',
location: 'Draco',
updated: true } ]
Atomically Modifying Documents in a
Collection
The Collection object provides the findAndModify() function that performs
an atomic write on a single document in the collection. This is useful if you need to
ensure that no other processes can write to your document at the same time. The
following shows the syntax for the findAndModify() method:

findAndModify(query, sort, update, [options], callback)
The query parameter is a document used to identify which document you want to
modify. The request matches the properties and values in the query with the fields
and values of the object, and only those matching the query are modified.
The sort parameter is an array of [field, sort_order] pairs that specify
which fields to sort on when finding the item to modify. The sort_order value is
1 for ascending, -1 for descending. The update parameter is an object that
specifies the changes to make to the documents that match the query. Table 14.2 lists
the operators that can be used.
The options parameter specifies the database change options described previously
in Table 14.1.The callback function is required if you are implementing a write
concern in the options. The first parameter of the callback function is an error,
and the second parameter is the object being modified. If new is set to true in
the options, then the newly modified object is returned. If new is set to false,
the pre-modified object is returned. Getting back the pre-modified object can be
useful if you need to verify changes or store the original somewhere else.
Listing 14.4 illustrates performing an atomic write on a single object in the
MongoDB database. Lines 9–15 implement the findAndModify() operation.
Notice that the sort value is [['name', 1]], which means sort on name in
ascending order. Also notice that w is 1 to enable the write concern, and new is set
to true so that the modified object is returned in the callback function and
displayed on the console.
Listing 14.4 doc_modify.js: Atomically modifying a document using
findAndModify()
Click here to view code image
01 var MongoClient = require('mongodb').MongoClient;
02 MongoClient.connect("mongodb://localhost/", function(err, db) {
03 var myDB = db.db("astro");
04 myDB.collection("nebulae", function(err, nebulae){
05 nebulae.find({type:"supernova"}, function(err, items){
06 items.toArray(function(err, itemArr){
07 console.log("Before Modify: ");
08 console.log(itemArr);
09 nebulae.findAndModify({type:"supernova"}, [['name', 1]],
10 {$set: {type:"Super Nova", "updated":true}},
11 {w:1, new:true}, function(err, doc){

12 console.log("After Modify: ");
13 console.log(doc);
14 db.close();
15 });
16 });
17 });
18 });
19 });
Listing 14.4 Output doc_modify.js: Atomically modifying a document using
findAndModify()
Click here to view code image
Before Modify:
[ { _id: 598e04b98e397c0f8464bb9b,
ngc: 'NGC 1952',
name: 'Crab',
type: 'supernova',
location: 'Taurus' } ]
After Modify:
{ lastErrorObject: { updatedExisting: true, n: 1 },
value:
{ _id: 598e04b98e397c0f8464bb9b,
ngc: 'NGC 1952',
name: 'Crab',
type: 'Super Nova',
location: 'Taurus',
updated: true },
ok: 1 }
Saving Documents in a Collection
The save() method on Collection objects is interesting. It can be used to insert
or update a document in the database. The save() method is not as efficient as
insert() or update() but can be easier to implement in some circumstances.
For example, when you are making ad-hoc changes to objects already retrieved from
MongoDB, you can use save() without having to implement the query and
update objects of the update() method.
The following shows the syntax of the save() method:
save(doc, [options], [callback])

The doc parameter is the document object you want to save to the collection. The
options parameter specifies the database change options described previously in
Table 14.1. The callback function is required if you are implementing a write
concern in the options. The first parameter of the callback function is an error,
and the second parameter is the object that was just saved to the collection.
Typically when using save(), the document object either is a completely new
JavaScript object that you want to add to the collection, or it is an object you have
already gotten back from the collection, made changes to, and now you want to save
those changes back to the database.
Listing 14.5 illustrates retrieving an object from the database, modifying it, and
saving it back to the database using the save() method. The save() method and
callback are implemented in lines 9–15. Notice that the save() method is much
simpler to use than the update() and findAndModify() methods. Also notice
that the savedItem is returned to the callback function and displayed on the
console.
Listing 14.5 doc_save.js: Updating and saving an existing document using
save()
Click here to view code image
01 var MongoClient = require('mongodb').MongoClient;
02 MongoClient.connect("mongodb://localhost/", function(err, db) {
03 var myDB = db.db("astro");
04 myDB.collection("nebulae", function(err, nebulae){
05 nebulae.findOne({type:"supernova"}, function(err, item){
06 console.log("Before Save: ");
07 console.log(item);
08 item.info = "Some New Info";
09 nebulae.save(item, {w:1}, function(err, results){
10 nebulae.findOne({_id:item._id}, function(err, savedItem){
11 console.log("After Save: ");
12 console.log(savedItem);
13 db.close();
14 });
15 });
16 });
17 });
18 });
Listing 14.5 Output doc_save.js: Updating and saving an existing document

using save()
Click here to view code image
Before Save:
{ _id: 598e06c4efe25f1c0cf4932e,
ngc: 'NGC 1952',
name: 'Crab',
type: 'supernova',
location: 'Taurus' }
After Save:
{ _id: 598e06c4efe25f1c0cf4932e,
ngc: 'NGC 1952',
name: 'Crab',
type: 'supernova',
location: 'Taurus',
info: 'Some New Info' }
Upserting Documents in Collection
Another type of update that you can perform on documents is the upsert, which is
the combination of updating the object if it exists or inserting it if it does not. Normal
updates do not automatically insert objects because they incur a cost to determine
whether the object exists. If you know that an object does exist, a normal
update() is much more efficient, as is an insert() if you know the document
does not already exist.
To implement an upsert, all you need to do is include the upsert:true option
in the update() method’s options object. This tells the request to try to update
the object if it exists; otherwise, the object specified will be inserted.
Listing 14.6 illustrates using upsert with the update() method. The update()
in lines 9–12 creates the object because it does not exist. Then in line 18 the _id
value of the inserted document is retrieved and used in the query of the update()
in lines 19–22 to ensure an existing document will be found and updated. Notice that
initially there are no documents matching the descriptor, and then after the first
update the document is inserted and then modified after the second update.
Listing 14.6 doc_upsert.js: Using upsert to insert new documents or
update existing ones
Click here to view code image

01 var MongoClient = require('mongodb').MongoClient;
02 MongoClient.connect("mongodb://localhost/", function(err, db) {
03 var myDB = db.db("astro");
04 myDB.collection("nebulae", function(err, nebulae){
05 nebulae.find({type:"diffuse"}, function(err, items){
06 items.toArray(function(err, itemArr){
07 console.log("Before Upsert: ");
08 console.log(itemArr);
09 nebulae.update({type:"diffuse"},
10 {$set: {ngc:"NGC 3372", name:"Carina",
11 type:"diffuse",location:"Carina"}},
12 {upsert:true, w:1,forceServerObjectId:false},
13 function(err, results){
14 nebulae.find({type:"diffuse"}, function(err, items){
15 items.toArray(function(err, itemArr){
16 console.log("After Upsert 1: ");
17 console.log(itemArr);
18 var itemID = itemArr[0]._id;
19 nebulae.update({_id:itemID},
20 {$set: {ngc:"NGC 3372", name:"Carina",
21 type:"Diffuse",location:"Carina"}},
22 {upsert:true, w:1}, function(err, results){
23 nebulae.findOne({_id:itemID}, function(err, item){
24 console.log("After Upsert 2: ");
25 console.log(item);
26 db.close();
27 });
28 });
29 });
30 });
31 });
32 });
33 });
34 });
35 });
Listing 14.6 Output doc_upsert.js: Using upsert to insert new documents
or update existing ones
Click here to view code image
Before Upsert:
[]
After Upsert 1:
[ { _id: 598e070aac7bf01c2a209601,
type: 'diffuse',
ngc: 'NGC 3372',
name: 'Carina',

location: 'Carina' } ]
After Upsert 2:
{ _id: 598e070aac7bf01c2a209601,
type: 'Diffuse',
ngc: 'NGC 3372',
name: 'Carina',
location: 'Carina' }
Deleting Documents from a Collection
At times, you need to delete documents from your MongoDB collection to keep
space consumption down, improve performance, and keep things clean. The
remove() method on Collection objects makes it simple to delete documents
from a collection. The syntax for the remove() method is shown here:
remove([query], [options], [callback])
The query parameter is a document used to identify which document(s) you want
to delete. The request matches the properties and values in the query with the fields
and values of the object, and only those matching the query are deleted. If no query
is provided, all the documents in the collection are deleted.
The options parameter specifies the database change options described previously
in Table 14.1. The callback function is required if you are implementing a write
concern in the options. The first parameter of the callback function is an error,
and the second parameter is a count of the documents deleted.
Listing 14.7 illustrates using the remove() method to delete objects from the
collection. The remove() and callback implemented in lines 9–18 query the
collection for documents that have type planetary and delete them from the
collection. Notice that the results parameter of the callback is the count of
documents deleted. Listing 14.7 Output shows the output of Listing 14.7 with the
before delete and after delete documents in the collection.
Listing 14.7 doc_delete.js: Deleting documents from a collection
Click here to view code image
01 var MongoClient = require('mongodb').MongoClient;
02 MongoClient.connect("mongodb://localhost/", function(err, db) {
03 var myDB = db.db("astro");

04 myDB.collection("nebulae", function(err, nebulae){
05 nebulae.find(function(err, items){
06 items.toArray(function(err, itemArr){
07 console.log("Before Delete: ");
08 console.log(itemArr);
09 nebulae.remove({type:"planetary"}, function(err, results){
10 console.log("Deleted " + results + " documents.");
11 nebulae.find(function(err, items){
12 items.toArray(function(err, itemArr){
13 console.log("After Delete: ");
14 console.log(itemArr);
15 db.close();
16 });
17 });
18 });
19 });
20 });
21 });
22 });
Listing 14.7 Output doc_delete.js: Deleting documents from a collection
Click here to view code image
Before Delete:
[ { _id: 598e06c4efe25f1c0cf4932c,
ngc: 'NGC 7293',
name: 'Helix',
type: 'planetary',
location: 'Aquila' },
{ _id: 598e06c4efe25f1c0cf4932d,
ngc: 'NGC 6543',
name: 'Cat\'s Eye',
type: 'planetary',
location: 'Draco' },
{ _id: 598e06c4efe25f1c0cf4932e,
ngc: 'NGC 1952',
name: 'Crab',
type: 'supernova',
location: 'Taurus',
info: 'Some New Info' },
{ _id: 598e070aac7bf01c2a209601,
type: 'Diffuse',
ngc: 'NGC 3372',
name: 'Carina',
location: 'Carina' } ]
Delete:
{"n":0,"ok":1}

After Delete:
[ { _id: 598e06c4efe25f1c0cf4932c,
ngc: 'NGC 7293',
name: 'Helix',
type: 'planetary',
location: 'Aquila' },
{ _id: 598e06c4efe25f1c0cf4932d,
ngc: 'NGC 6543',
name: 'Cat\'s Eye',
type: 'planetary',
location: 'Draco' },
{ _id: 598e06c4efe25f1c0cf4932e,
ngc: 'NGC 1952',
name: 'Crab',
type: 'supernova',
location: 'Taurus',
info: 'Some New Info' },
{ _id: 598e070aac7bf01c2a209601,
type: 'Diffuse',
ngc: 'NGC 3372',
name: 'Carina',
location: 'Carina' } ]
Removing a Single Document from a Collection
You can also delete documents from the database using the findAndRemove()
method. This is similar to the findAndModify() method in its syntax and
application. The following shows the syntax for the findAndRemove() method:
findAndRemove(query, sort, [options], callback)
The query parameter is a document used to identify which document you want to
remove. The request matches the properties and values in the query with the fields
and values of the object, and only those matching the query are removed.
The sort parameter is an array of [field, sort_order] pairs that specify
which fields to sort on when finding the item to remove. The sort_order is a
value of 1 for ascending and -1 for descending. The options parameter specifies
the database change options described previously in Table 14.1. The first parameter
of the callback function is an error, and the second parameter is the results
of the document deletion.

Listing 14.8 illustrates deleting a document using the findAndRemove() method.
The findAndRemove() and callback are implemented in lines 9–18. The items of
type planetary are searched on. The sort order [['name', 1]] specifies to
sort the items by name in ascending order. Listing 14.8 Output shows that the
Cat's Eye entry was deleted and not the Helix because of the sort order.
Listing 14.8 doc_delete_one.js: Deleting single documents using
findAndRemove()
Click here to view code image
01 var MongoClient = require('mongodb').MongoClient;
02 MongoClient.connect("mongodb://localhost/", function(err, db) {
03 var myDB = db.db("astro");
04 myDB.collection("nebulae", function(err, nebulae){
05 nebulae.find(function(err, items){
06 items.toArray(function(err, itemArr){
07 console.log("Before Delete: ");
08 console.log(itemArr);
09 nebulae.findAndRemove({type:"planetary"}, [['name', 1]],
10 {w:1}, function(err, results){
11 console.log("Deleted " + results + " documents.");
12 nebulae.find(function(err, items){
13 items.toArray(function(err, itemArr){
14 console.log("After Delete: ");
15 console.log(itemArr);
16 db.close();
17 });
18 });
19 });
20 });
21 });
22 });
23 });
Listing 14.8 Output doc_delete_one.js: Deleting single documents using
findAndRemove()
Click here to view code image
Before Delete:
[ { _id: 598e06c4efe25f1c0cf4932c,
ngc: 'NGC 7293',
name: 'Helix',
type: 'planetary',
location: 'Aquila' },
{ _id: 598e06c4efe25f1c0cf4932d,

ngc: 'NGC 6543',
name: 'Cat\'s Eye',
type: 'planetary',
location: 'Draco' },
{ _id: 598e06c4efe25f1c0cf4932e,
ngc: 'NGC 1952',
name: 'Crab',
type: 'supernova',
location: 'Taurus',
info: 'Some New Info' },
{ _id: 598e070aac7bf01c2a209601,
type: 'Diffuse',
ngc: 'NGC 3372',
name: 'Carina',
location: 'Carina' } ]
Deleted [object Object] documents.
After Delete:
[ { _id: 598e06c4efe25f1c0cf4932c,
ngc: 'NGC 7293',
name: 'Helix',
type: 'planetary',
location: 'Aquila' },
{ _id: 598e06c4efe25f1c0cf4932e,
ngc: 'NGC 1952',
name: 'Crab',
type: 'supernova',
location: 'Taurus',
info: 'Some New Info' },
{ _id: 598e070aac7bf01c2a209601,
type: 'Diffuse',
ngc: 'NGC 3372',
name: 'Carina',
location: 'Carina' } ]
Summary
The MongoDB Node.js driver provides several methods to insert, access, modify,
and remove documents from collections. insert(), save(), and even
update() with upsert can be used to insert documents into the database. The
update(), save(), and findAndModify() methods can be used to update
existing documents. The remove() and findAndRemove() methods can be
used to delete documents.
The methods used to update documents in the database include options that allow
you to define the write concern, journaling, and other settings that control the
behavior of the write request and response. Also the update structure that MongoDB
uses to update documents is much easier to implement and maintain than the long,
complex query strings you may have seen in SQL.
Next
Chapter 15 expands on the concept of finding objects in the database. This chapter
introduced you to find() and findOne(), but Chapter 15 includes more
complex examples of how to filter, sort, and limit the results returned when finding
objects in a collection.
15
Accessing MongoDB from Node.js
In Chapter 14, “Manipulating MongoDB Documents from Node.js,” you learned
how to create and manipulate documents and got a brief glimpse into finding them
using the find() method. This chapter takes a deeper look at accessing documents
in a MongoDB collection using the MongoDB Node.js driver module.
There is much more to accessing documents than just returning everything in a
collection. This chapter covers using the query object to limit which documents are
returned as well as methods to limit the fields and number of documents in the query
results. You also see how to count the number of documents that match query
criteria without actually retrieving them from the server. This chapter also covers
some advanced aggregation techniques to group the results and even generate a new
fully aggregated set of documents.
Introducing the Data Set
For the purpose of introducing you to the various methods of accessing data, all the
data used for examples in this chapter comes from the same data set. The data set is a
collection that contains various information about 5,000 words. This provides a large
enough data set to implement the necessary examples.
The structure of objects in this data set is as follows and should be fairly intuitive
(which is why it was selected). This document structure gives us fields that are
strings, integers, arrays, subdocuments, and arrays of subdocuments:
Click here to view code image
{
word: <word>,
first: <first_letter>,
last: <last_letter>,
size: <character_count>,
letters: [<array_of_characters_in_word_no_repeats>],
stats: {
vowels:<vowel_count>, consonants:<consonant_count>},
charsets: [
{
"type": <consonants_vowels_other>,
"chars": [<array_of_characters_of_type_in_word>]},
. . .
],
}
Understanding Query Objects
Throughout this chapter the various methods of data all use a query object of some
sort to define which documents to retrieve from a MongoDB collection. The query
object is just a standard JavaScript object with special property names that are
understood by the MongoDB Node.js driver. These property names match closely
the native queries that you can perform inside the MongoDB client, which makes it
nice to be able to transfer back and forth.
The properties of the query object are called operators because they operate on the
data to determine whether a document should be included in the result set. These
operators are used to match the values of fields in the document against specific
criteria.
For example, to find all documents with a count value greater than 10 and name
value equal to test, the query object would be
{count:{$gt:10}, name:'test'}
The operator $gt specifies documents with a count field larger than 10. The
standard colon syntax of name:'test' is also an operator that specifies that the
name field must equal test. Notice that the query object has multiple operators.
You can include several different operators in the same query.
When specifying field names in a query object, you can use dot notation to specify
subdocument fields. For example, consider the following object format:
{

name:"test",
stats: { height:74, eyes:'blue' }
}
You can query users that have blue eyes using the following query object:
{stats.eyes:'blue'}
Table 15.1 lists the more commonly used operators.
Table 15.1 query object operators that define the result set returned by
MongoDB requests
Operator Description
$eq Matches documents with fields that have a value equal to the
value specified.
$gt Matches values that are greater than the value specified in the
query. For example: {size:{$gt:5}}
$gte Matches values that are equal to or greater than the value
specified in the query. For example: {size:{$gte:5}}
$in Matches any of the values that exist in an array specified in the
query. For example: {name:{$in:['item1',
'item2']}}
$lt Matches values that are less than the value specified in the
query. For example: {size:{$lt:5}}
$lte Matches values that are less than or equal to the value specified
in the query. For example: {size:{$lte:5}}
$ne Matches all values that are not equal to the value specified in the
query. For example: {name:{$ne:"badName"}}
$nin Matches values that do not exist in an array specified to the
query. For example: {name:{$nin:['item1',
'item2']}}
$or Joins query clauses with a logical OR; returns all documents that
match the conditions of either clause. For example:
{$or:[{size:{$lt:5}}, {size:{$gt:10}}]}
$and Joins query clauses with a logical AND; returns all documents

that match the conditions of both clauses. For example:
{$and:[{size:{$gt:5}}, {size:{$lt:10}}]}
$not Inverts the effect of a query expression and returns documents
that do not match the query expression. For example: {$not:
{size:{$lt:5}}}
$nor Joins query clauses with a logical NOR; returns all documents
that fail to match both clauses. For example: {$nor:{size:
{$lt:5}},{name:"myName"}}
$exists Matches documents that have the specified field. For example:
{specialField:{$exists:true}}
$type Selects documents if a field is of the specified BSON type
number. Table 11.1 lists the different BSON type numbers. For
example:
{specialField: {$type:<BSONtype>}}
$mod Performs a modulo operation on the value of a field and selects
documents with a specified result. The value for the modulo
operation is specified as an array with the first number being the
number to divide by and the second being the remainder. For
example: {number:{$mod:[2,0]}}
$regex Selects documents where values match a specified regular
expression. For example: {myString:
{$regex:'some.*exp'}}
$all Matches arrays that contain all elements specified in the query.
For example: {myArr:{$all:
['one','two','three']}}
$elemMatch Selects documents if an element in the array of subdocuments
has fields that match all the specified $elemMatch conditions.
For example: {myArr:{$elemMatch:{value:
{$gt:5},size:{$lt:3}}}}
$size Selects documents if the array field is a specified size. For
example: {myArr:{$size:5}}

Understanding Query Options Objects
In addition to the query object, most of the methods of retrieving documents using
the MongoDB Node.js driver also include an options object. The options
object allows you to define the behavior of the request when retrieving documents.
These options allow you to limit the result set, sort items while creating the result
set, and much more.
Table 15.2 lists the options that can be set on methods that retrieve documents from
the MongoDB server. Not all of these methods are available on every request. For
example, when counting items that match the query it doesn’t make sense to specify
a limit on the result.
Table 15.2 Options that can be specified in the options object when querying
documents
Option Description
limit Specifies the maximum number of documents to return.
sort Specifies the sort order of documents as an array of
[field, <sort_order>] elements where sort
order is 1 for ascending and -1 for descending. For
example:
sort:[['name':1],['value':-1]]
fields Specifies an object whose fields match fields that should
be included or excluded from the returned documents. A
value of 1 means include, a value of 0 means exclude.
You can only include or exclude, not both. For example:
fields:{name:1,value:1}
skip Specifies the number of documents from the query
results to skip before returning a document. Typically
used when paginating result sets.
hint Forces the query to use specific indexes when building
the result set. For example: hint:{'_id':1}
explain Returns an explanation of what will happen when
performing the query on the server instead of actually
running the query. This is essential when trying to

debug/optimize complex queries.
snapshot {Boolean, default:false}; specifies whether to use a
snapshot query.
timeout A Boolean; when true, the cursor is allowed to timeout.
maxScan Specifies the maximum number of documents to scan
when performing a query before returning. This is useful
if you have a collection that has millions of objects and
you don’t want queries to run on forever.
comment Specifies a string that is printed out in the MongoDB
logs. This can help when troubleshooting because you
can identify queries more easily.
readPreference Specifies whether you want to read from a primary or
secondary replica or just the nearest MongoDB server in
the replica set to perform the query.
numberOfRetries Specifies the number of timeout retries to perform on the
query before failing. The default is 5.
partial A Boolean that, when true, indicates the cursor will
return partial results when querying against data shared
between sharded systems.
Finding Specific Sets of Documents
You were introduced to the find() method of the Collection object in Chapter
14. This method returns a Cursor object to the callback function providing access
to the documents. If no query is specified, all documents are returned, which is rarely
the case. Instead, you need a subset of documents that match a set of criteria.
To limit the resulting documents included in the find() method, you apply a
query object that limits the documents returned in the Cursor. Listing 15.1
illustrates using query objects in a find statement.
Listing 15.1 performs a bunch of different queries against the word collection
described earlier in this chapter. You should already recognize all the connection
code as well as the code used in displayWords() to iterate through the cursor
and display only the word names in the documents.
In line 20, the following query is used to find words starting with a, b, or c:
{first:{$in: ['a', 'b', 'c']}}
In line 23, the following query is used to find words longer than 12 letters:
{size:{$gt: 12}}
In line 26, the following query is used to find words with an even number of letters:
{size:{$mod: [2,0]}}
In line 29, the following query is used to find words with exactly 12 letters:
{letters:{$size: 12}}
In lines 32 and 33, the following query is used to find words that both begin and end
with a vowel:
{$and: [{first:{$in: ['a', 'e', 'i', 'o', 'u']}},
{last:{$in: ['a', 'e', 'i', 'o', 'u']}}]}
In line 37, the following query is used to find words that contain more than 6 vowels:
{"stats.vowels":{$gt:6}}
In line 40, the following query is used to find words that contain all of the vowels:
{letters:{$all: ['a','e','i','o','u']}}
In line 44, the following query is used to find words with non-alphabet characters:
{otherChars: {$exists:true}}
In line 47, a bit more challenging query is used. The $elemMatch operator is used
to match the charsets subdocuments. The $and operator forces the type field
to equal other and the chars array field to be exactly 2:
{charsets:{$elemMatch:{$and:[{type:'other'},{chars:{$size:2}}]}}}
Listing 15.1 doc_query.js: Finding a specific set of documents in a
MongoDB collection
Click here to view code image

01 var MongoClient = require('mongodb').MongoClient;
02 MongoClient.connect("mongodb://localhost/", function(err, db) {
03 var myDB = db.db("words");
04 myDB.collection("word_stats", findItems);
05 setTimeout(function(){
06 db.close();
07 }, 3000);
08 });
09 function displayWords(msg, cursor, pretty){
10 cursor.toArray(function(err, itemArr){
11 console.log("\n"+msg);
12 var wordList = [];
13 for(var i=0; i<itemArr.length; i++){
14 wordList.push(itemArr[i].word);
15 }
16 console.log(JSON.stringify(wordList, null, pretty));
17 });
18 }
19 function findItems(err, words){
20 words.find({first:{$in: ['a', 'b', 'c']}}, function(err, cursor){
21 displayWords("Words starting with a, b or c: ", cursor);
22 });
23 words.find({size:{$gt: 12}}, function(err, cursor){
24 displayWords("Words longer than 12 characters: ", cursor);
25 });
26 words.find({size:{$mod: [2,0]}}, function(err, cursor){
27 displayWords("Words with even Lengths: ", cursor);
28 });
29 words.find({letters:{$size: 12}}, function(err, cursor){
30 displayWords("Words with 12 Distinct characters: ", cursor);
31 });
32 words.find({$and: [{first:{$in: ['a', 'e', 'i', 'o', 'u']}},
33 {last:{$in: ['a', 'e', 'i', 'o', 'u']}}]},
34 function(err, cursor){
35 displayWords("Words that start and end with a vowel: ", cursor);
36 });
37 words.find({"stats.vowels":{$gt:6}}, function(err, cursor){
38 displayWords("Words containing 7 or more vowels: ", cursor);
39 });
40 words.find({letters:{$all: ['a','e','i','o','u']}},
41 function(err, cursor){
42 displayWords("Words with all 5 vowels: ", cursor);
43 });
44 words.find({otherChars: {$exists:true}}, function(err, cursor){
45 displayWords("Words with non-alphabet characters: ", cursor);
46 });
47 words.find({charsets:{$elemMatch:{$and:[{type:'other'},
48 {chars:{$size:2}}]}}},

49 function(err, cursor){
50 displayWords("Words with 2 non-alphabet characters: ", cursor);
51 });
52 }
Listing 15.1 Output doc_query.js: Finding a specific set of documents in a
MongoDB collection
Click here to view code image
Words longer than 12 characters:
["international","administration","environmental","responsibility","investigation",
"communication","understanding","significantly","representative"…]
Words with 12 Distinct characters:
["uncomfortable","accomplishment","considerably"]
Words with non-alphabet characters:
["don't","won't","can't","shouldn't","e-mail","long-term","so-called","mm-hmm",
"t-shirt","and/or","health-care","full-time","o'clock","self-esteem"…]
Words starting with a, b or c:
["and","a","at","as","all","about","also","any","after","ask","another","american",
"against","again","always","area","around","away","among"…]
Words containing 7 or more vowels:
["identification","questionnaire","organizational","rehabilitation"]
Words that start and end with a vowel:
["a","also","area","ago","able","age","agree","available","anyone","article","argue",
"arrive","above","audience","assume","alone","achieve","attitude"…]
Words with all 5 vowels:
["education","educational","regulation","evaluation","reputation","communicate",
"dialogue","questionnaire","simultaneously","equation","automobile"…]
Words with 2 non-alphabet characters:
["two-third's","middle-class'"]
Words with even Lengths:
["be","of","in","to","have","it","that","he","with","on","do","this","they","at","we",
"from","by","or","as","what","go","if","my","make","know","will","up"…]
Counting Documents
When accessing document sets in MongoDB, you may want to only get a count first
before deciding to retrieve a set of documents. There are several reasons to count
specific document sets. Performing a count is much less intensive on the MongoDB
side because when retrieving documents using the find() and other methods,
temporary objects such as cursors must be created and maintained by the server.
Also, when performing operations on the resulting set of documents from a

find(), you should be aware of how many documents you are going to be dealing
with, especially in larger environments. Sometimes all you want is a count. For
example, if you need to know how many users are configured in your application,
you could just count the number of documents in the users collection.
The count() method on the Collection object allows you to get a simple count
of documents that match the query object criteria. The count() method is
formatted exactly the same way as the find() method, as shown below, and
performs the query and options parameters in exactly the same manner.
count([query], [options], callback)
If no query is specified, the count() returns a count of all the documents in the
database. The callback function should accept an error as the first argument
and the count as an integer as the second.
Listing 15.2 illustrates using the count() method with the same queries performed
with find() in Listing 15.1. The output in Listing 15.2 Output shows that instead
of a Cursor a simple integer is returned and displayed.
Listing 15.2 doc_count.js: Counting specific sets of documents in a
MongoDB collection
Click here to view code image
01 var MongoClient = require('mongodb').MongoClient;
02 MongoClient.connect("mongodb://localhost/", function(err, db) {
03 var myDB = db.db("words");
04 myDB.collection("word_stats", countItems);
05 setTimeout(function(){
06 db.close();
07 }, 3000);
08 });
09 function countItems(err, words){
10 words.count({first:{$in: ['a', 'b', 'c']}}, function(err, count){
11 console.log("Words starting with a, b or c: " + count);
12 });
13 words.count({size:{$gt: 12}}, function(err, count){
14 console.log("Words longer than 12 characters: " + count);
15 });
16 words.count({size:{$mod: [2,0]}}, function(err, count){
17 console.log("Words with even Lengths: " + count);
18 });
19 words.count({letters:{$size: 12}}, function(err, count){
20 console.log("Words with 12 Distinct characters: " + count);

21 });
22 words.count({$and: [{first:{$in: ['a', 'e', 'i', 'o', 'u']}},
23 {last:{$in: ['a', 'e', 'i', 'o', 'u']}}]},
24 function(err, count){
25 console.log("Words that start and end with a vowel: " + count);
26 });
27 words.count({"stats.vowels":{$gt:6}}, function(err, count){
28 console.log("Words containing 7 or more vowels: " + count);
29 });
30 words.count({letters:{$all: ['a','e','i','o','u']}},
31 function(err, count){
32 console.log("Words with all 5 vowels: " + count);
33 });
34 words.count({otherChars: {$exists:true}}, function(err, count){
35 console.log("Words with non-alphabet characters: " + count);
36 });
37 words.count({charsets:{$elemMatch:{$and:[{type:'other'},
38 {chars:{$size:2}}]}}},
39 function(err, count){
40 console.log("Words with 2 non-alphabet characters: " + count);
41 });
42 }
Listing 15.2 Output doc_count.js: Counting specific sets of documents in a
MongoDB collection
Click here to view code image
Words starting with a, b or c: 964
Words longer than 12 characters: 64
Words that start and end with a vowel: 227
Words with even Lengths: 2233
Words with 12 Distinct characters: 3
Words containing 7 or more vowels: 4
Words with non-alphabet characters: 24
Words with all 5 vowels: 16
Words with 2 non-alphabet characters: 2
Limiting Result Sets
When finding complex documents on larger systems, you often want to limit what is
being returned to reduce the impact on the network, including the memory on both
the server and client. You can limit the result sets that match a specific query in three
ways: You can simply only accept a limited number of documents, you can limit the

fields returned, or you can page the results and get them in chunks.
Limiting Results by Size
The simplest method to limit the amount of data returned in a find() or other
query request is to use the limit option in the options parameter when
performing the request. The limit parameter, shown below, allows only a fixed
number of items to be returned with the Cursor object. This can save you from
accidentally retrieving more objects than your application can handle:
limit:<maximum_documents_to_return>
Listing 15.3 illustrates limiting the results of a find() request by using the
limit:5 option in the options object. The output in Listing 15.3 Output shows
that when limit is used only five words are retrieved.
Listing 15.3 doc_limit.js: Limiting the specific set of documents in a
MongoDB collection
Click here to view code image
01 var MongoClient = require('mongodb').MongoClient;
02 MongoClient.connect("mongodb://localhost/", function(err, db) {
03 var myDB = db.db("words");
04 myDB.collection("word_stats", limitFind);
05 setTimeout(function(){
06 db.close();
07 }, 3000);
08 });
09 function displayWords(msg, cursor, pretty){
10 cursor.toArray(function(err, itemArr){
11 console.log("\n"+msg);
12 var wordList = [];
13 for(var i=0; i<itemArr.length; i++){
14 wordList.push(itemArr[i].word);
15 }
16 console.log(JSON.stringify(wordList, null, pretty));
17 });
18 }
19 function limitFind(err, words){
20 words.count({first:'p'}, function(err, count){
21 console.log("Count of words starting with p : " + count);
22 });
23 words.find({first:'p'}, function(err, cursor){

24 displayWords("Words starting with p : ", cursor);
25 });
26 words.find({first:'p'}, {limit:5}, function(err, cursor){
27 displayWords("Limiting words starting with p : ", cursor);
28 });
29 }
Listing 15.3 Output doc_limit.js: Limiting the specific set of documents in
a MongoDB collection
Click here to view code image
Count of words starting with p : 353
Limiting words starting with p :
["people","put","problem","part","place"]
Words starting with p :
["people","put","problem","part","place","program","play","point","provide","power",
"political","pay"…]
Limiting Fields Returned in Objects
Another effective method of limiting the resulting data when retrieving documents is
to limit which fields are returned. Documents may have many different fields that are
useful in some circumstance but not in others. You should consider which fields
should be included when retrieving documents from the MongoDB server and only
request the ones necessary.
To limit the fields returned from the server, use the fields option of the options
object. The fields option enables you to either include or exclude fields by setting
the value of the document field to 0 for exclude or 1 for include. You cannot mix
includes and excludes in the same expression.
For example, to exclude the fields stats, value, and comments when returning
a document, you would use the following fields option:
{fields:{stats:0, value:0, comments:0}}
Often it is easier to just include a few fields; for example, if you want to include only
the name and value fields of documents, you would use
{fields:{name:1, value:1}}

Listing 15.4 illustrates using the fields option to reduce the amount of data
returned from the server by excluding fields or specifying fields to include.
Listing 15.4 doc_fields.js: Limiting the fields returned with a set of
documents
Click here to view code image
01 var MongoClient = require('mongodb').MongoClient;
02 MongoClient.connect("mongodb://localhost/", function(err, db) {
03 var myDB = db.db("words");
04 myDB.collection("word_stats", limitFields);
05 setTimeout(function(){
06 db.close();
07 }, 3000);
08 });
09 function limitFields(err, words){
10 words.findOne({word:'the'}, {fields:{charsets:0}},
11 function(err, item){
12 console.log("Excluding fields object: ");
13 console.log(JSON.stringify(item, null, 2));
14 });
15 words.findOne({word:'the'}, {fields:{word:1,size:1,stats:1}},
16 function(err, item){
17 console.log("Including fields object: ");
18 console.log(JSON.stringify(item, null, 2));
19 });
20 }
Listing 15.4 Output doc_fields.js: Limiting the fields returned with a set
of documents
Click here to view code image
Excluding fields object:
{
"_id": "58f04c8c6ec5050becd012c5",
"word": "the",
"first": "t",
"last": "e",
"size": 3,
"letters": [
"t",
"h",
"e"
],
"stats": {

"vowels": 1,
"consonants": 2
}
}
Including fields object:
{
"_id": "58f04c8c6ec5050becd012c5",
"word": "the",
"size": 3,
"stats": {
"vowels": 1,
"consonants": 2
}
}
Paging Results
Paging is a common method of reducing the number of documents returned. Paging
involves specifying a number of documents to skip in the matching set as well as a
limit on the documents returned. Then the skip value is incremented each time by the
number returned the previous time.
To implement paging on a set of documents, you need to implement the limit and
skip options on the options object. The skip option specifies a number of
documents to skip before returning documents. By moving the skip value each
time, you get another set of documents you can effectively page through in the data
set. Also, always include a sort option when paging data to ensure the order is
always the same. For example, the following statements find documents 1–10, then
11–20, and 21–30:
collection.find({},{sort:[['_id':1]], skip:0, limit:10},
function(err, cursor){});
collection.find({},{sort:[['_id':1]], skip:10, limit:10}, function(err, cursor){});
collection.find({},{sort:[['_id':1]], skip:20, limit:10}, function(err, cursor){});
Listing 15.5 illustrates using limit and skip to page through a specific set of
documents. Each time a new find() request is implemented, which more closely
mimics what would happen when handling paging requests from a webpage. Listing
15.5 Output shows the output of Listing 15.5. Notice that words are retrieved 10 at a
time.

Warning
If the data on the system changes in such a way that it affects the results of the
query, the skip may miss some items or include items again in a subsequent paged
request.
Listing 15.5 doc_paging.js: Paging results from a specific set of documents
in a MongoDB collection
Click here to view code image
01 var util = require('util');
02 var MongoClient = require('mongodb').MongoClient;
03 MongoClient.connect("mongodb://localhost/", function(err, db) {
04 var myDB = db.db("words");
05 myDB.collection("word_stats", function(err, collection){
06 pagedResults(err, collection, 0, 10);
07 });
08 });
09 function displayWords(msg, cursor, pretty){
10 cursor.toArray(function(err, itemArr){
11 console.log("\n"+msg);
12 var wordList = [];
13 for(var i=0; i<itemArr.length; i++){
14 wordList.push(itemArr[i].word);
15 }
16 console.log(JSON.stringify(wordList, null, pretty));
17 });
18 }
19 function pagedResults(err, words, startIndex, pageSize){
20 words.find({first:'v'},
21 {limit:pageSize, skip:startIndex, sort:[['word',1]]},
22 function(err, cursor){
23 cursor.count(true, function(err, cursorCount){
24 displayWords("Page Starting at " + startIndex, cursor);
25 if (cursorCount === pageSize){
26 pagedResults(err, words, startIndex+pageSize, pageSize);
27 } else {
28 cursor.db.close();
29 }
30 });
31 });
32 }
Listing 15.5 Output doc_paging.js: Paging results from a specific set of
documents in a MongoDB collection

Click here to view code image
Page Starting at 0
["vacation","vaccine","vacuum","valid","validity","valley","valuable","value",
"van","vanish"]
Page Starting at 10
["variable","variation","variety","various","vary","vast","vegetable","vehicle",
"vendor","venture"]
Page Starting at 20
["verbal","verdict","version","versus","vertical","very","vessel","veteran","via",
"victim"]
Page Starting at 30
["victory","video","view","viewer","village","violate","violation","violence",
"violent","virtual"]
Page Starting at 40
["virtually","virtue","virus","visible","vision","visit","visitor","visual",
"vital","vitamin"]
Page Starting at 50
["vocal","voice","volume","voluntary","volunteer","vote","voter","voting","vs",
"vulnerable"]
Page Starting at 60
[]
Sorting Result Sets
An important aspect of retrieving documents from a MongoDB database is the
ability to get it in a sorted format. This is especially helpful if you are only retrieving
a certain number, such as the top 10, or if you are paging the requests. The
options object provides the sort option that allows you to specify the sort order
and direction of one or more fields in the document.
The sort option is specified using an array of [field,<sort_order>] pairs,
where sort_order is 1 for ascending and -1 for descending. For example, to sort
on the name field descending first and then the value field ascending you would
use the following:
sort:[['value':-1]['name':1]]

Listing 15.6 illustrates using the sort option to find and sort lists of words in
different ways. Notice that in line 29 the words are sorted by size first and then by
last letter, whereas in line 33 they are sorted by last letter first and then by size. The
two different sort orders result in different lists of words returned.
Listing 15.6 doc_sort.js: Sorting results of a find() request for a set of
documents in a MongoDB collection
Click here to view code image
01 var MongoClient = require('mongodb').MongoClient;
02 MongoClient.connect("mongodb://localhost/", function(err, db) {
03 var myDB = db.db("words");
04 myDB.collection("word_stats", sortItems);
05 setTimeout(function(){
06 db.close();
07 }, 3000);
08 });
09 function displayWords(msg, cursor, pretty){
10 cursor.toArray(function(err, itemArr){
11 console.log("\n"+msg);
12 var wordList = [];
13 for(var i=0; i<itemArr.length; i++){
14 wordList.push(itemArr[i].word);
15 }
16 console.log(JSON.stringify(wordList, null, pretty));
17 });
18 }
19 function sortItems(err, words){
20 words.find({last:'w'}, function(err, cursor){
21 displayWords("Words ending in w: ", cursor);
22 });
23 words.find({last:'w'}, {sort:{word:1}}, function(err, cursor){
24 displayWords("Words ending in w sorted ascending: ", cursor);
25 });
26 words.find({last:'w'}, {sort:{word:-1}}, function(err, cursor){
27 displayWords("Words ending in w sorted, descending: ", cursor);
28 });
29 words.find({first:'b'}, {sort:[['size',-1],['last',1]]},
30 function(err, cursor){
31 displayWords("B words sorted by size then by last letter: ", cursor);
32 });
33 words.find({first:'b'}, {sort:[['last',1],['size',-1]]},
34 function(err, cursor){
35 displayWords("B words sorted by last letter then by size: ", cursor);
36 });
37 }

Listing 15.6 Output doc_sort.js: Sorting results of a find() request for a
set of documents in a MongoDB collection
Click here to view code image
Words ending in w:
["know","now","how","new","show","few","law","follow","allow","grow","low","view",
"draw","window","throw","interview","tomorrow"…
Words ending in w sorted ascending:
["allow","arrow","below","blow","borrow","bow","chew","cow","crew","draw","elbow",
"eyebrow","fellow","few","flow"…
Words ending in w sorted, descending:
["yellow","wow","withdraw","window","widow","view","tomorrow","throw","swallow",
"straw","somehow","snow"…
B words sorted by size then by last letter:
["businessman","background","basketball","biological","behavioral","boyfriend",
"beginning"…
B words sorted by last letter then by size:
["bacteria","banana","bomb","bulb","basic","background","boyfriend","backyard",
"balanced","behind","beyond"…
Finding Distinct Field Values
A useful query against a MongoDB collection is to get a list of the distinct values for
a single field in a set of documents. Distinct means that even though there are
thousands of documents, you only want to know the unique values that exist.
The distinct() method on Collection objects allows you to find a list of
distinct values for a specific field. The syntax for the distinct() method is
shown below:
distinct(key,[query],[options],callback)
The key parameter is the string value of the field name you want to get values for.
You can specify subdocuments using the dot syntax such as stats.count. The
query parameter is an object with standard query options defined in Table 15.1.
The options parameter is an options object that allows you to define the
readPreference option defined in Table 15.2. The callback function should
accept an error as the first parameter, and the results parameter, which is an
array of distinct values for the field specified in the key parameter, as the second.
Listing 15.7 illustrates finding the distinct values in the words collection. Notice that

a query in line 14 limits the words to those starting with u. In line 18, to access the
stats.vowels field, the dot syntax is used.
Listing 15.7 doc_distinct.js: Finding distinct field values in a specific set
of documents in a MongoDB collection
Click here to view code image
01 var MongoClient = require('mongodb').MongoClient;
02 MongoClient.connect("mongodb://localhost/", function(err, db) {
03 var myDB = db.db("words");
04 myDB.collection("word_stats", distinctValues);
05 setTimeout(function(){
06 db.close();
07 }, 3000);
08 });
09 function distinctValues(err, words){
10 words.distinct('size', function(err, values){
11 console.log("\nSizes of words: ");
12 console.log(values);
13 });
14 words.distinct('first', {last:'u'}, function(err, values){
15 console.log("\nFirst letters of words ending in u: ");
16 console.log(values);
17 });
18 words.distinct('stats.vowels', function(err, values){
19 console.log("\nNumbers of vowels contained in words: ");
20 console.log(values);
21 });
22 }
Listing 15.7 Output doc_distinct.js: Finding distinct field values in a
specific set of documents in a MongoDB collection
Click here to view code image
Sizes of words:
[ 3, 2, 1, 4, 5, 9, 6, 7, 8, 10, 11, 12, 13, 14 ]
First letters of words ending in u:
[ 'y', 'm', 'b' ]
Numbers of vowels contained in words:
[ 1, 2, 0, 3, 4, 5, 6, 7 ]

Grouping Results
When performing operations on large data sets, it is often useful to group the results
based on the distinct values of one or more fields in a document. This could be done
in code after retrieving the documents; however, it is much more efficient to have
MongoDB do it for you as part of a single request that is already iterating through
the documents.
To group the results of a query together, you can use the group() method on the
Collection object. The group request first collects all the documents that match a
query, and then adds a group object to an array based on distinct values of a set of
keys, performs operations on the group objects, and returns the array of group
objects. The syntax for the group() method is shown below:
group(keys, query, initial, reduce, finalize, command, [options], callback)
The parameters of the group() method are described in the following list:
keys: This can be an object, array, or function expressing the keys to group by.
The simplest method is to specify the key(s) in an object such as
{field1:true, field2:true} or an array such as
['first', 'last'].
query: Query object that defines which documents to be included in the initial
set. See Table 15.1 for a list of query options.
initial: Specifies an initial group object to use when aggregating data while
grouping. An initial object is created for each distinct set of keys. The most
common use is a counter that tracks a count of items that match the keys. For
example:
{"count":0}
reduce: This is a function(obj, prev) with two parameters, obj and
prev. This function is executed on each document that matches the query. The
obj parameter is the current document, and the prev parameter is the object
created by the initial parameter. You can then use the obj object to update
the prev object with new values such as counts or sums. For example, to
increment the count value you would use:
function(obj, prev) { prev.count++; }

finalize: This is a function(obj) that accepts one parameter, obj,
which is the final object resulting from the initial parameter and updated as
prev in the reduce function. This function is called on the resulting object
for each distinct key before returning the array in the response.
command: A Boolean that, when true, specifies the command will run using
the internal group command instead of eval(). The default is true.
options: This object allows you to define the readPreference option.
callback: This accepts an error as the first parameter and an array of the
results objects as the second.
Listing 15.8 illustrates implementing grouping of words based on various key sets.
Lines 10–18 implement a basic grouping of words by first and last letter. The query
in line 11 limits the words to those beginning with o and ending with a vowel. The
initial object for each has a count property only, which is updated for each matching
document in the function on line 13.
Lines 19–28 add the concept of summing the total vowels in the documents while
grouping them together by incrementing the prev.totalVowels with the
obj.stats.vowels value in line 23. Then lines 29–40 show the use of a finalize
function that adds a new obj.total property to the group objects that is a sum of
the obj.vowels and obj.consonants properties of the object.
Listing 15.8 doc_group.js: Grouping a set of documents by specific fields in
a MongoDB collection
Click here to view code image
01 var MongoClient = require('mongodb').MongoClient;
02 MongoClient.connect("mongodb://localhost/", function(err, db) {
03 var myDB = db.db("words");
04 myDB.collection("word_stats", groupItems);
05 setTimeout(function(){
06 db.close();
07 }, 3000);
08 });
09 function groupItems(err, words){
10 words.group(['first','last'],
11 {first:'o',last:{$in:['a','e','i','o','u']}},
12 {"count":0},
13 function (obj, prev) { prev.count++; }, true,
14 function(err, results){
15 console.log("\n'O' words grouped by first and last" +

16 " letter that end with a vowel: ");
17 console.log(results);
18 });
19 words.group(['first'],
20 {size:{$gt:13}},
21 {"count":0, "totalVowels":0},
22 function (obj, prev) {
23 prev.count++; prev.totalVowels += obj.stats.vowels;
24 }, {}, true,
25 function(err, results){
26 console.log("\nWords grouped by first letter larger than 13: ");
27 console.log(results);
28 });
29 words.group(['first'],{}, {"count":0, "vowels":0, "consonants":0},
30 function (obj, prev) {
31 prev.count++;
32 prev.vowels += obj.stats.vowels;
33 prev.consonants += obj.stats.consonants;
34 },function(obj){
35 obj.total = obj.vowels + obj.consonants;
36 }, true,
37 function(err, results){
38 console.log("\nWords grouped by first letter with totals: ");
39 console.log(results);
40 });
41 }
Listing 15.8 Output doc_group.js: Grouping a set of documents by specific
fields in a MongoDB collection
Click here to view code image
'O' words grouped by first and last letter that end with a vowel:
[ { first: 'o', last: 'e', count: 21 },
{ first: 'o', last: 'o', count: 1 },
{ first: 'o', last: 'a', count: 1 } ]
Words grouped by first letter larger than 13:
[ { first: 'a', count: 4, totalVowels: 22 },
{ first: 'r', count: 5, totalVowels: 30 },
{ first: 'c', count: 2, totalVowels: 11 },
{ first: 't', count: 2, totalVowels: 10 },
{ first: 'i', count: 4, totalVowels: 24 },
{ first: 'd', count: 2, totalVowels: 11 },
{ first: 's', count: 1, totalVowels: 6 },
{ first: 'o', count: 1, totalVowels: 7 } ]
Words grouped by first letter with totals:
[ { first: 't',
count: 250,
vowels: 545,
consonants: 1017,
total: 1562 },
{ first: 'b',
count: 218,
vowels: 417,
consonants: 769,
total: 1186 },
{ first: 'a',
count: 295,
vowels: 913,
consonants: 1194,
total: 2107 },
{ first: 'o',
count: 118,
vowels: 356,
consonants: 435,
total: 791 },
{ first: 'i',
count: 189,
vowels: 655,
consonants: 902,
total: 1557 },
{ first: 'h',
count: 139,
vowels: 289,
consonants: 511,
total: 800 },
{ first: 'f',
count: 203,
vowels: 439,
consonants: 774,
total: 1213 },
{ first: 'y', count: 16, vowels: 31, consonants: 50, total: 81 },
{ first: 'w',
count: 132,
vowels: 255,
consonants: 480,
total: 735 },
{ first: 'd',
count: 257,
vowels: 675,
consonants: 1102,
total: 1777 },
{ first: 'c',
count: 451,

vowels: 1237,
consonants: 2108,
total: 3345 },
{ first: 's',
count: 509,
vowels: 1109,
consonants: 2129,
total: 3238 },
{ first: 'n', count: 82, vowels: 205, consonants: 314, total: 519 },
{ first: 'g',
count: 112,
vowels: 236,
consonants: 414,
total: 650 },
{ first: 'm',
count: 200,
vowels: 488,
consonants: 778,
total: 1266 },
{ first: 'k', count: 21, vowels: 33, consonants: 70, total: 103 },
{ first: 'u', count: 58, vowels: 173, consonants: 233, total: 406 },
{ first: 'p',
count: 353,
vowels: 902,
consonants: 1575,
total: 2477 },
{ first: 'j', count: 33, vowels: 72, consonants: 114, total: 186 },
{ first: 'l',
count: 142,
vowels: 307,
consonants: 503,
total: 810 },
{ first: 'v', count: 60, vowels: 163, consonants: 218, total: 381 },
{ first: 'e',
count: 239,
vowels: 788,
consonants: 1009,
total: 1797 },
{ first: 'r',
count: 254,
vowels: 716,
consonants: 1011,
total: 1727 },
{ first: 'q', count: 16, vowels: 50, consonants: 59, total: 109 },
{ first: 'z', count: 1, vowels: 2, consonants: 2, total: 4 } ]
Applying MapReduce by Aggregating Results
One benefit of MongoDB is the ability to MapReduce the results of database queries
into a completely different structure than the original collections. MapReduce is the
process of mapping the values on a DB lookup into a completely different form and
then reducing it to make it more consumable.
MongoDB has a MapReduce framework but has also added a framework that
simplifies the process of piping one MapReduce operation into another in a series to
produce some extraordinary results with the data. Aggregation is the concept of
applying a series of operations to documents on the MongoDB server as they are
being compiled into a result set. This is much more efficient than retrieving them and
processing them in your Node.js application because the MongoDB server can
operate on chunks of data locally.
Understanding the aggregate() Method
The Collection object provides the aggregate() method to perform
aggregation operations on data. The syntax for the aggregate() method is shown
below:
aggregate(operators, [options], callback)
The operators parameter is an array of aggregation operators, shown in Table
15.3, that allow you to define what aggregation operation to perform on the data. The
options parameter is an object that allows you to set the readPreference
property that defines where to read the data from. The callback parameter should
be a function that accepts an error as the first parameter and a results array as
the second. The results array is the fully aggregated object set returned by the
aggregation.
Using Aggregation Framework Operators
The aggregation framework provided by MongoDB is powerful in that it allows you
to pipe the results of one aggregation operator into another multiple times. To
illustrate this, look at the following data set:
{o_id:"A", value:50, type:"X"}

{o_id:"A", value:75, type:"X"}
{o_id:"B", value:80, type:"X"}
{o_id:"C", value:45, type:"Y"}
The following aggregation operator set would pipeline the results of the $match
into the $group operator and then return the grouped set in the results parameter of
the callback function. Notice that when referencing the values of fields in documents
that the field name is prefixed by a dollar sign, for example $o_id and $value.
This syntax tells the aggregate framework to treat it as a field value instead of a
string.
aggregate([{$match:{type:"X"}},
{$group:{set_id:"$o_id", total: {$sum: "$value"}}},
function(err, results){}]);
After the $match operator completes, the documents that would be applied to
$group would be:
{o_id:"A", value:50, type:"X"}
{o_id:"A", value:75, type:"X"}
{o_id:"B", value:80, type:"X"}
Then after the $group operator is applied, a new array of objects is sent to the
callback function with set_id and total fields as shown below:
{set_id:"A", total:"125"}
{set_id:"B", total:"80"}
Table 15.3 defines the types of aggregation commands that you can include in the
operators parameter to the aggregate() method:
Table 15.3 Aggregation operators that can be used in the aggregate()
method
Operator Description
$project Reshapes the documents by renaming, adding, or removing
fields. You can also recompute values and add
subdocuments. For example, the following includes title
and excludes name:
{$project{title:1, name:0}}
The following is an example of renaming name to title:

{$project{title:"$name"}}
The following is an example of adding a new field total and
computing its value from price and tax fields:
{$project{total:{$add:["$price", "$tax"]}}}
$match Filters the document set using the query operators defined in
Table 15.1. For example:
{$match:{value:{$gt:50}}}
$limit Restricts the number of documents that can be passed to the
next pipe in the aggregation. For example:
{$limit:5}
$skip Specifies a number of documents to skip before processing
the next pipe in the aggregation. For example:
{$skip:10}
$unwind Specifies an array field that splits, with a separate document
created for each value. For example:
{$unwind:"$myArr"}
$group Groups the documents together into a new set of documents
for the next level in the pipe. The fields of the new object
must be defined in the $group object. You can also apply
group expression operators, listed in Table 15.4, to the
multiple documents in the group. For example, to sum the
value field:
{$group:{set_id:"$o_id", total: {$sum: "$value"}}}
$sort Sorts the documents before passing them on to the next pipe
in the aggregation. The sort specifies an object with field:
<sort_order> properties where <sort_order> is 1
for ascending and -1 for descending. For example:
{$sort: {name:1, age:-1}}
$collStatus Returns a collection’s or view’s statistics.

$redact Restricts each document in the stream based on stored values
in the documents. Can implement field level redaction. Every
one input document outputs one or zero documents.
$sample Selects a specific number of random documents from its
input.
$geoNear Returns an ordered stream of documents based on proximity
to a geospatial point. An additional distance field and a
location identifier field can be included in the output
documents.
$lookup Used to perform an equality match between a field in the
input documents with field documents in a joined collection.
$out Writes the resulting documents of the aggregation pipeline to
a collection. The $out stage must be used in the last stage of
the pipeline.
$indexStats Returns statistics of the use of each index for the collection.
$facet Processes multiple aggregation pipelines in a single stage on
the same input documents. Allows the creation of
multifaceted aggregations that can characterize data across
multiple dimensions or facets in a single stage.
$bucket Categorizes incoming documents into groups called buckets,
based on certain expressions and bucket boundaries.
$bucketAuto Categorizes incoming documents into a specific number of
groups called buckets, based on certain expressions. The
bucket boundaries are automatically determined to try and
evenly distribute documents into the specified number of
buckets.
$sortByCount Sorts incoming documents by the value of a specified
expression and then determines the number of documents in
each specific group.
$addFields Adds new fields to documents.
$replaceRoot Replaces a document with a specified embedded document,
replacing all fields in the input document.
$count Returns a count of all documents at this point of the
aggregation pipeline.
$graphLookup Searches a collection and adds a new array field on each

output document that contains the traversal results of the
search for that document.
Implementing Aggregation Expression Operators
When you implement the aggregation operators, you are building a new document
that will be passed to the next level in the aggregation pipeline. The MongoDB
aggregation framework provides a number of expression operators that help when
computing values for new fields or for comparison of existing fields in the
documents.
When operating on a $group aggregation pipe, multiple documents match the
defined fields in the new documents created. MongoDB provides a set of operators
that you can apply to those documents and use to compute values for fields in the
new group document based on values of fields in the original set of documents.
Table 15.4 lists the $group expression operators.
Table 15.4 Aggregation $group expression operators
Operator Description
$addToSet Returns an array of all the unique values for the selected field
among all the documents in that group. For example:
colors: {$addToSet: "$color"}
$first Returns the first value for a field in a group of documents. For
example:
firstValue:{$first: "$value"}
$last Returns the last value for a field in a group of documents. For
example:
lastValue:{$last: "$value"}
$max Returns the highest value for a field in a group of documents. For
example:
maxValue:{$max: "$value"}
$min Returns the lowest value for a field in a group of documents. For

example:
minValue:{$min: "$value"}
$avg Returns an average of all the values for a field in a group of
documents. For example:
avgValue:{$avg: "$value"}
$push Returns an array of all values for the selected field among all the
documents in that group of documents. For example:
username:{$push: "$username"}
$sum Returns the sum of all the values for a field in a group of documents.
For example:
total:{$sum: "$value"}
Several string and arithmetic operators also can be applied when computing new
field values. Table 15.5 lists some of the more common operators that you can apply
when computing new field values in the aggregation operators:
Table 15.5 String and arithmetic operators used in aggregation expressions
Operator Description
$add Computes the sum of an array of numbers. For example:
valuePlus5:{$add:["$value", 5]}
$divide Takes two numbers and divides the first number by the second.
For example:
valueDividedBy5:{$divide:["$value", 5]}
$mod Takes two numbers and calculates the modulo of the first number
divided by the second. For example:
valueMod5:{$mod:["$value", 5]}
$multiply Computes the product of an array of numbers. For example:
valueTimes5:{$multiply:["$value", 5]}

$subtract Takes two numbers and subtracts the second number from the
first. For example:
valueMinus5:{$minus:["$value", 5]}
$concat Concatenates two strings. For example:
title:{$concat:["$title", " ", "$name"]}
$strcasecmp Compares two strings and returns an integer that reflects the
comparison. For example:
isTest:{$strcasecmp:["$value", "test"]}
$substr Takes a string and returns a portion of that string. For example:
hasTest:{$substr:["$value", "test"]}
$toLower Converts a string to lowercase. For example:
titleLower:{$toLower:"$title"}
$toUpper Converts a string to uppercase. For example:
titleUpper:{$toUpper:"$title"}
Aggregation Examples
Listing 15.9 illustrates three examples of implementing aggregation against the
words collection.
The first example, in lines10–20, implements a $match to get words beginning in
vowels and then a $group to calculate the largest and smallest sizes. The results are
then sorted using $sort and displayed in Listing 15.9 Output.
The second example, in lines 21–27, uses $match to limit the words to size 4. Then
$limit is used to only process five documents in the $project operator. The
third example, in lines 28–34, uses a $group to get the average size of the words
and set the _id value to the word. Then the words are sorted in descending order by
average and displayed in Listing 15.9 Output.

Listing 15.9 doc_aggregate.js: Grouping a set of documents by specific
fields in a MongoDB collection
Click here to view code image
01 var MongoClient = require('mongodb').MongoClient;
02 MongoClient.connect("mongodb://localhost/", function(err, db) {
03 var myDB = db.db("words");
04 myDB.collection("word_stats", aggregateItems);
05 setTimeout(function(){
06 db.close();
07 }, 3000);
08 });
09 function aggregateItems(err, words){
10 words.aggregate([{$match: {first:{$in:['a','e','i','o','u']}}},
11 {$group: {_id:"$first",
12 largest:{$max:"$size"},
13 smallest:{$min:"$size"},
14 total:{$sum:1}}},
15 {$sort: {_id:1}}],
16 function(err, results){
17 console.log("Largest and smallest word sizes for " +
18 "words beginning with a vowel: ");
19 console.log(results);
20 });
21 words.aggregate([{$match: {size:4}},
22 {$limit: 5},
23 {$project: {_id:"$word", stats:1}}],
24 function(err, results){
25 console.log("Stats for 5 four letter words: ");
26 console.log(results);
27 });
28 words.aggregate([{$group: {_id:"$first", average:{$avg:"$size"}}},
29 {$sort: {average:-1}},
30 {$limit: 5}],
31 function(err, results){
32 console.log("Letters with largest average word size: ");
33 console.log(results);
34 });
35 }
Listing 15.9 Output doc_aggregate.js: Grouping a set of documents by
specific fields in a MongoDB collection
Click here to view code image
Stats for 5 four letter words:
[ { stats: { vowels: 2, consonants: 2 }, _id: 'have' },

{ stats: { vowels: 1, consonants: 3 }, _id: 'that' },
{ stats: { vowels: 1, consonants: 3 }, _id: 'with' },
{ stats: { vowels: 1, consonants: 3 }, _id: 'this' },
{ stats: { vowels: 1, consonants: 3 }, _id: 'they' } ]
Largest and smallest word sizes for words beginning with a vowel:
[ { _id: 'a', largest: 14, smallest: 1, total: 295 },
{ _id: 'e', largest: 13, smallest: 3, total: 239 },
{ _id: 'i', largest: 14, smallest: 1, total: 189 },
{ _id: 'o', largest: 14, smallest: 2, total: 118 },
{ _id: 'u', largest: 13, smallest: 2, total: 58 } ]
Letters with largest average word size:
[ { _id: 'i', average: 8.238095238095237 },
{ _id: 'e', average: 7.523012552301255 },
{ _id: 'c', average: 7.419068736141907 },
{ _id: 'a', average: 7.145762711864407 },
{ _id: 'p', average: 7.01699716713881 } ]
Summary
In this chapter you looked at the query and options objects used by
Collection methods to access documents in the database. The query object
allows you to limit which documents are considered for operations. The options
object allows you to control the interaction of the requests to limit the number of
documents returned, which document to start on, and what fields should be returned.
The distinct(), group(), and aggregate() methods allow you to group
documents based on field values. The MongoDB aggregation framework is a
powerful feature that allows you to process documents on the server before returning
them to the client. The aggregation framework allows you to pipe documents from
one aggregation operation to the next, each time mapping and reducing to a more
defined set of data.
Next
In the next chapter, you use the mongoose module to implement an Object
Document Model (ODM), which provides a more structured approach to data
modeling from Node.js.

16
Using Mongoose for Structured Schema
and Validation
Now that you understand the native driver, it won’t be hard to make the jump to
using Mongoose. Mongoose is an Object Document Model (ODM) library that
provides additional functionality to the MongoDB Node.js native driver. For the
most part, it is used as a way to apply a structured schema to a MongoDB collection.
This provides the benefits of validation and type casting.
Mongoose also attempts to simplify some of the complexities of making database
calls by implementing builder objects that allow you to pipe additional commands
into find, update, save, remove, aggregate, and other database operations. This can
make it easier to implement your code.
This chapter discusses the Mongoose module and how to use it to implement a
structured schema and validation on your collections. You are introduced to new
objects and a new way of implementing MongoDB in your Node.js applications.
Mongoose doesn’t replace the MongoDB Node.js native driver; instead, it enhances
it with additional functionality.
Understanding Mongoose
Mongoose is an Object Document Model (ODM) library that wraps around the
MongoDB Node.js driver. The main purpose is to provide a schema-based solution
to model data stored in the MongoDB database.
The chief benefits of using Mongoose are:
You can create a schema structure for your documents.

Objects/documents in the model can be validated.
Application data can be typecast into the object model.
Business logic hooks can be applied using middleware.
Mongoose is in some ways easier to use than the MongoDB Node.js native
driver.
However, there are some downsides to using Mongoose as well. Those drawbacks
are:
You are required to provide a schema, which isn’t always the best option when
MongoDB doesn’t require it.
It doesn’t perform certain operations, such as storing data, as well as the native
driver does.
Additional Objects
Mongoose sits on top of the MongoDB Node.js native driver and extends the
functionality in a couple of different ways. It adds some new objects—Schema,
Model, and Document—that provide the functionality necessary to implement the
ODM and validation.
The Schema object defines the structured schema for documents in a collection. It
allows you to define the fields and types to include, uniqueness, indexes, and
validation. The Model object acts as a representation of all documents in the
collection. The Document object acts as a representation of the individual
document in a collection.
Mongoose also wraps the standard functionality used for implementing query and
aggregation parameters into new objects, Query and Aggregate, which allow
you to apply the parameters of database operations in a series of method calls before
finally executing them. This can make it simpler to implement code as well as reuse
instances of those object to perform multiple database operations.
Connecting to a MongoDB Database Using
Mongoose

Connecting to the MongoDB database using Mongoose is similar to using the
connection string method discussed in Chapter 13, “Getting Started with MongoDB
and Node.js.” It uses the same connection string format and options syntax shown
below:
connect(uri, options, [callback])
The connect() method is exported at the root level of the mongoose module.
For example, the following code connects to the words database on the
localhost:
var mongoose = require('mongoose');
mongoose.connect('mongodb://localhost/words');
The connection can be closed using the disconnect() method of the mongoose
module, for example:
mongoose.disconnect();
Once created, the underlying Connection object can be accessed in the
connection attribute of the mongoose module. The Connection object
provides access to the connection, underlying Db object, and Model object that
represents the collection. This gives you access to all the Db object functionality
described in Chapter 13. For example, to list the collections on the database you
could use the following code:
mongoose.connection.db.collectionNames(function(err, names){
console.log(names);
});
The Connection object emits the open event that can be used to wait for the
connection to open before trying to access the database. To illustrate the basic life
cycle of a MongoDB connection via Mongoose, Listing 16.1 imports the mongoose
module, connects to the MongoDB database, waits for the open event, and then
displays the collections in the database and disconnects.
Listing 16.1 mongoose_connect.js: Connecting to a MongoDB database by
using Mongoose
Click here to view code image
1 var mongoose = require('mongoose');
2 mongoose.connect('mongodb://localhost/words');

3 mongoose.connection.on('open', function(){
4 console.log(mongoose.connection.collection);
5 mongoose.connection.db.collectionNames(function(err, names){
6 console.log(names);
7 mongoose.disconnect();
8 });
9 });
Listing 16.1 Output mongoose_connect.js: Connecting to a MongoDB
database by using Mongoose
Click here to view code image
[Function]
[ Collection {
s:
{ pkFactory: [Object],
db: [Object],
topology: [Object],
dbName: 'words',
options: [Object],
namespace: 'words.word_stats',
readPreference: null,
slaveOk: false,
serializeFunctions: undefined,
raw: undefined,
promoteLongs: undefined,
promoteValues: undefined,
promoteBuffers: undefined,
internalHint: null,
collectionHint: null,
name: 'word_stats',
promiseLibrary: [Function: Promise],
readConcern: undefined } } ]
Defining a Schema
A fundamental requirement of using Mongoose is to implement a schema. The
schema defines the fields and field types for documents in a collection. This can be
useful if your data is structured in a way that supports a schema because you can
validate and typecast objects to match the requirements of the schema.
For each field in the schema, you need to define a specific value type. The value
types supported are:

String
Number
Boolean or Bool
Array
Buffer
Date
ObjectId or Oid
Mixed
A schema must be defined for each different document type that you plan to use.
Also, you should only store one document type in each collection.
Understanding Paths
Mongoose uses the term path to define access paths to fields in the main document
as well as subdocuments. For example, if a document has a field named name,
which is a subdocument with title, first, and last properties, the following
are all paths:
name
name.title
name.first
name.last
Creating a Schema Definition
To define a schema for a model, you need to create a new instance of a Schema
object. The Schema object definition accepts an object describing the schema
as the first parameter and an options object as the second parameter:
new Schema(definition, options)
The options object defines the interaction with the collection on the MongoDB
server. The most commonly used options that can be specified are shown in Table
16.1.
Table 16.1 Options that can be specified when defining a Schema object

Option Description
autoIndex A Boolean that, when true, indicates that the autoindex
feature for the collection is turned off. The default is true.
bufferCommands A Boolean that, when true, indicates that commands that
cannot be completed due to connection issues are buffered.
The default is true.
capped Specifies the maximum number of documents supported in a
capped collection.
collection Specifies the collection name to use for this Schema model.
Mongoose automatically connects to this collection when
compiling the schema model.
id A Boolean that, when true, indicates that the documents in
the model will have an id getter that corresponds to the _id
value of the object. The default is true.
_id A Boolean that, when true, indicates that Mongoose
automatically assigns an _id field to your documents. The
default is true.
read Specifies the replica read preferences. Value can be
primary, primaryPreferred, secondary,
secondaryPreferred, or nearest.
safe A Boolean; when true, Mongoose applies a write concern
to requests that update the database. The default is true.
strict A Boolean that, when true, indicates that attributes passed
in the object that do not appear in the defined schema are not
saved to the database. The default is true.
For example, to create a schema for a collection called students, with a name
field that is a String type, an average field that is a Number type, and a
scores field that is an Array of Number types, you use:
Click here to view code image
var schema = new Schema({
name: String,
average: Number,
scores: [Number]
}, {collection:'students'});
Adding Indexes to a Schema
You might want to assign indexes to specific field that you frequently use to find
documents. You can apply indexes to a schema object when defining the schema or
using the index(fields) command. For example, both of the following
commands add an index to the name field in ascending order:
Click here to view code image
var schema = new Schema({
name: {type: String, index: 1}
});
//or
var schema = new Schema({name: String});
schema.index({name:1});
You can get a list of indexed fields on a schema object using the indexes()
method. For example:
schema.indexes()
Implementing Unique Fields
You can also specify that the value of a field must be unique in the collection,
meaning no other documents can have the same value for that field. This is done by
adding the unique property to the Schema object definition. For example, to add
an index and make the name field unique in the collection, you use:
var schema = new Schema({
name: {type: String, index: 1, unique: true}
});
Forcing Required Fields
You can also specify that a field must be included when creating a new instance of a
Document object for the model. By default, if you do not specify a field when
creating a Document instance, the object is created without one. For fields that
must exist in your model, add the required property when defining the Schema. For
example, to add an index, ensure uniqueness, and force including the name field in
the collection, you use:
var schema = new Schema({
name: {type: String, index: 1, unique: true, required: true}
});
You can get a list of required fields on a schema object using the
requiredPaths() method. For example:
schema.requiredPaths()
Adding Methods to the Schema Model
Mongoose schemas enables you to add methods to the Schema object that are
automatically available on document objects in the model. This allows you to call the
methods using the Document object.
Methods are added to the Schema object by assigning a function to the
Schema.methods property. The function is just a standard JavaScript function
assigned to the Document object. The Document object can be accessed using the
this keyword. For example, the following assigns a function named fullName to
a model that returns a combination of the first and last name.
Click here to view code image
var schema = new Schema({
first: String,
last: String
});
schema.methods.fullName = function(){
return this.first + " " + this.last;
};
Implementing the Schema on the Words Database
Listing 16.2 implements a schema on the word_stats collection defined in
Chapter 15, “Accessing MongoDB from Node.js.” This schema is used in other
examples in this chapter, so it is exported in the final line of code. Notice that the
word and first fields have an index assigned to them and that the word field is
both unique and required.
For the stats subdocument the document is defined as normal but with types
specified in lines 9–11. Also notice that for the charsets field, which is an array

of subdocuments, the syntax defines an array and defines the single subdocument
type for the model. In lines 13–15 a startsWith() method is implemented that is
available on Document objects in the model. Listing 16.2 Output shows the
required paths and indexes.
Listing 16.2 word_schema.js: Defining the schema for the word_stats
collection
Click here to view code image
01 var mongoose = require('mongoose');
02 var Schema = mongoose.Schema;
03 var wordSchema = new Schema({
04 word: {type: String, index: 1, required:true, unique: true},
05 first: {type: String, index: 1},
06 last: String,
07 size: Number,
08 letters: [String],
09 stats: {
10 vowels:Number, consonants:Number},
11 charsets: [Schema.Types.Mixed]
12 }, {collection: 'word_stats'});
13 wordSchema.methods.startsWith = function(letter){
14 return this.first === letter;
15 };
16 exports.wordSchema = wordSchema;
17 console.log("Required Paths: ");
18 console.log(wordSchema.requiredPaths());
19 console.log("Indexes: ");
20 console.log(wordSchema.indexes());
Listing 16.2 Output word_schema.js: Defining the schema for the
word_stats collection
Click here to view code image
Required Paths:
[ ‘word’ ]
Indexes:
[ [ { word: 1 }, { background: true } ],
[ { first: 1 }, {background: true } ] ]
Compiling a Model
Once you have defined the Schema object for your model, you need to compile it
into a Model object. When Mongoose compiles the model, it uses the connection to
the MongoDB established by mongoose.connect() and ensures that the
collection is created and has the appropriate indexes, as well as required and unique
settings when applying changes.
The compiled Model object acts in much the same way as the Collection object
defined in Chapter 13. It provides the functionality to access, update, and remove
objects in the model and subsequently in the MongoDB collection.
To compile the model, you use the model() method in the mongoose module.
The model() method uses the following syntax:
model(name, [schema], [collection], [skipInit])
The name parameter is a string that can be used to find the model later using
model(name). The schema parameter is the Schema object discussed in the
previous section. The collection parameter is the name of the collection to
connect to if one is not specified in the Schema object. The skipInit option is a
Boolean that defaults to false. When true, the initialization process is skipped
and a simple Model object with no connection to the database is created.
The following shows an example of compiling the model for the Schema object
defined in Listing 16.2:
var Words = mongoose.model('Words', wordSchema);
You can then access the compiled Model object at any time using the following:
mongoose.model('Words')
Understanding the Query Object
Once you have the Schema object compiled into a Model object, you are
completely ready to begin accessing, adding, updating, and deleting documents in
the model, which makes the changes to the underlying MongoDB database.
However, before you jump in, you need to understand the nature of the Query
object provided with Mongoose.
Many of the methods in the Model object match those in the Collection object
defined in Chapter 13. For example, there are find(), remove(), update(),
count(), distinct(), and aggregate() methods. The parameters for these
methods are for the most part exactly the same as for the Collection object with
a major difference: the callback parameter.
Using the Mongoose Model object, you can either pass in the callback function
or omit it from the parameters of the method. If the callback function is passed
in, the methods behave as you would expect them to. The request is made to
MongoDB, and the results returned in the callback function.
However, if you do not pass in a callback function, the actual MongoDB request
is not sent. Instead, a Query object is returned that allows you to add additional
functionality to the request before executing it. Then, when you are ready to execute
the database call, you use the exec(callback) method on the Query object.
The simplest way to explain this is to look at an example of a find() request;
using the same syntax as in the native driver is perfectly acceptable in Mongoose:
model.find({value:{$gt:5}},{sort:{[['value',-1]]}, fields:{name:1, title:1, value:1}},
function(err, results){});
However, using Mongoose, all the query options can also be defined separately
using the following code:
var query = model.find({});
query.where('value').lt(5);
query.sort('-value');
query.select('name title value');
query.exec(function(err, results){});
The model.find() call returns a Query object instead of performing the
find() because no callback is specified. Notice that the query properties and
options properties are broken out in subsequent method calls on the query
object. Then, once the query object is fully built, the exec() method is called and
the callback function is passed into that.
You can also string the query object methods together, for example:
model.find({}).where('value').lt(5).sort('-value').select('name title value')
.exec(function(err, results){});

When exec() is called, the Mongoose library builds the necessary query and
options parameters and then makes the native call to MongoDB. The results are
returned in the callback function.
Setting the Query Database Operation
Each Query object must have a database operation associated with it. The database
operation determines what action to take when connecting to the database, from
finding documents to storing them. There are two ways to assign a database
operation to a query object. One way is to call the operation from the Model object
and not specify a callback. The query object returned has that operation assigned to
it. For example:
var query = model.find();
Once you already have a Query object, you can change the operation that is applied
by calling the method on the Query object. For example, the following code creates
a Query object with the count() operation and then switches to a find()
operation:
var query = model.count();
query.where('value').lt(5);
query.exec(function(){});
query.find();
query.exec(function(){});
This allows you to dynamically reuse the same Query object to perform multiple
database operations. Table 16.2 lists the operation methods that you can call on the
Query object. This is also the list of methods on a compiled Model object that can
return a Query object by omitting the callback function. Keep in mind that if
you pass in a callback function to any of these methods, the operation is executed
and the callback called when finished.
Table 16.2 Methods available on the Query and Model objects to set the
database operation
Method Description
create(objects,
[callback])
Inserts the objects specified in the
objects parameter to the MongoDB
database. The objects parameter can be a
single JavaScript object or an array of

JavaScript objects. A Document object
instance for the model is created for each
object. The callback function receives an
error object as the first parameter and the
saved documents as additional objects.
For example:
function(err, doc1, doc2, doc3, …)
count([query],
[callback])
Sets the operation to count. When the
callback is executed, the results returned
are the number of items matching the
Query.
distinct([query],
[field], [callback])
Sets the operation to distinct, which
limits the results to an array of the distinct
values of the field specified when the
callback is executed.
find([query], [options],
[callback])
Sets the operation to a find, which returns
an array of the Document objects that
match the Query.
findOne([query],
[options], [callback])
Sets the operation to a findOne, which
returns the first Document object that
matches the Query.
findOneAndRemove([query],
[options], [callback])
Sets the operation to a findAndRemove,
which deletes the first document in the
collection that matches the Query.
findOneAndUpdate([query],
[update], [options],
[callback])
Sets the operation to a findAndUpdate,
which updates the first document in the
collection that matches the Query. The
update operation is specified in the update
parameter. See Table 14.2 for the update
operators that can be used.
remove([query],
[options], [callback])
Sets the operation to a remove, which
deletes all the documents in the collection
that match the Query.
update([query], [update],
[options], [callback])
Sets the operation to update, which
updates all documents in the collection that

match the Query. The update operation is
specified in the update parameter. See
Table 14.2 for the update operators that can
be used.
aggregate(operators,
[callback])
Applies one or more aggregate
operators to the collection. The
callback function accepts an error as
the first parameter and an array of
JavaScript objects representing the
aggregated results as the second parameter.
Setting the Query Database Operation Options
The Query object also has methods that allow you to set the options such as
limit, skip, and select that define how the request is processed on the server.
These can be set in the options parameter of the methods listed in Table 16.2 or
by calling the methods on the Query object listed in Table 16.3.
Table 16.3 Methods available on the Query and Model objects to set the
database operation options
Method Description
setOptions(options) Sets the options used to interact with MongoDB
when performing the database request. See Table
15.2 for a description of the options that can be set.
limit(number) Sets the maximum number of documents to
include in the results.
select(fields) Specifies the fields that should be included in each
document of the result set. The fields parameter
can be either a space-separated string or an object.
When using the string method, adding a + to the
beginning of the field name forces inclusion even
if the field doesn’t exist in the document, and
adding a - excludes the field. For example:
select('name +title -value');
select({name:1, title:1, value:0);

sort(fields) Specifies the fields to sort on in string form or
object form. For example:
sort('name -value');
sort({name:1, value:-1})
skip(number) Specifies the number of documents to skip at the
beginning of the result set.
read(preference) Enables you to set the read preference to
primary, primaryPreferred, secondary,
secondaryPreferred, or nearest.
snapshot(Boolean) Sets the query to a snapshot query when true.
safe(Boolean) When set to true, the database request uses a
write concern for update operations.
hint(hints) Specifies the indexes to use or exclude when finding
documents. Use a value of 1 for include and -1 for
exclude. For example:
hint(name:1, title:-1);
comment(string) Adds the string to the MongoDB log with the
query. This is useful to identify queries in the log
files.
Setting the Query Operators
The Query object also allows you to set the operators and values used to find the
document that you want to apply the database operations to. These operators define
this like “field values greater than a certain amount.” The operators all work off a
path to the field. That path can be specified by the where() method, or included in
the operator method. If no operator method is specified, the last path passed to a
where() method is used.
For example, the gt() operator below compares against the value field:
query.where('value').gt(5)

However, in the following statement, the lt() operator compares against the score
field:
query.where('value').gt(5).lt('score', 10);
Table 16.4 lists the most common methods that can be applied to the Query object.
Table 16.4 Methods available on Query objects to define the query operators
Method Description
where(path,[value]) Sets the current field path for the operators. If a
value is also included, only documents where
that field equals the value are included. For
example:
where('name', "myName")
gt([path], value) Matches values that are greater than the value
specified in the query. For example:
gt('value', 5)gt(5)
gte([path], value) Matches fields that are equal to or greater than the
value specified in the query.
lt([path], value) Matches values that are less than the value
specified in the query.
lte([path], value) Matches fields that are less than or equal to the
value specified in the query.
ne([path], value) Matches all fields that are not equal to the
specified in the query.
in([path], array) Matches any of the values that exist in an
specified in the query. For example:
in('name', ['item1', 'item2'])
in(['item1', 'item2'])
nin([path], array) Matches values that do not exist in an
specified in the query.
or(conditions) Joins query clauses with a logical OR and returns
all documents that match the conditions

either clause. For example:
or([{size:{$lt:5}},{size:{$gt:10}}])
and(conditions) Joins query clauses with a logical AND and returns
all documents that match the conditions
both clauses. For example:
and([{size:{$lt:10}},{size:{$gt:5}}])
nor(conditions) Joins query clauses with a logical NOR and returns
all documents that fail to match both
conditions. For example:
nor([{size:{$lt:5}},{name:"myName"}])
exists([path], Boolean) Matches documents that have the specified field.
For example:
exists('name', true}
exists('title', false}
mod([path], value, remainder) Performs a modulo operation on the value of a
field and selects documents that have the matching
remainder. For example:
mod('size', 2,0)
regex([path], expression) Selects documents where values match a specified
regular expression. For example:
regex('myField', 'some.*exp')
all([path], array) Matches array fields that contain all elements
specified in the array parameter. For example:
all('myArr', ['one','two','three'])
elemMatch([path], criteria) Selects documents if an element in the array of
subdocuments has fields that match all the
specified $elemMatch criteria. The
criteria can be an object or a function. For
example:

elemMatch('item', {{value:5},size:{$lt:3}})
elemMatch('item', function(elem){
elem.where('value', 5);
elem.where('size').gt(3);
})
size([path], value) Selects documents if the array field is a specified
size. For example:
size('myArr', 5)
Understanding the Document Object
When you use the Model object to retrieve documents from the database, the
documents are presented in the callback function as Mongoose Document objects.
Document objects inherit from the Model class and represent the actual document
in the collection. The Document object allows you to interact with the document
from the perspective of your schema model by providing a number of methods and
extra properties that support validation and modifications.
Table 16.5 lists the most useful methods and properties on the Document object.
Table 16.5 Methods and properties available on document objects
Method/Property Description
equals(doc) Returns true if this Document object matches the
document specified by the doc parameter.
id Contains the _id value of the document.
get(path, [type]) Returns the value of the specified path. The type
parameter allows you to typecast the type of value to
return.
set(path, value,
[type])
Sets the value of the field at the specified path. The
type parameter allows you to typecast the type of
value to set.
update(update,
[options],
[callback])
Updates the document in the MongoDB database. The
update parameter specifies the update operators to
apply to the document. See Table 14.2 for the update
operators that can be used.

save([callback]) Saves changes that have been made to the Document
object to the MongoDB database. The callback
function accepts an error object as the only
parameter.
remove([callback]) Removes the Document object from the MongoDB
database. The callback function accepts an error
object as the only parameter.
isNew A Boolean that, if true, indicates this is a new object
to the model that has not been stored in MongoDB.
isInit(path) Returns true if the field at this path has been
initialized.
isSelected(path) Returns true if the field at this path was selected in
the result set returned from MongoDB.
isModified(path) Returns true if the field at this path has been
modified but not yet saved to MongoDB.
markModified(path) Marks the path as being modified so that it will be
saved/updated to MongoDB.
modifiedPaths() Returns an array of paths in the object that have been
modified.
toJSON() Returns a JSON string representation of the
Document object.
toObject() Returns a normal JavaScript object without the extra
properties and methods of the Document object.
toString() Returns a string representation of the Document
object.
validate(callback) Performs a validation on the Document. The
callback function accepts only an error
parameter.
invalidate(path,
msg, value)
Marks the path as invalid causing the validation to
fail. The msg and value parameters specify the error
message and value.
errors Contains a list of errors in the document.
schema Links to the Schema object that defines the
Document object’s model.

Finding Documents Using Mongoose
Finding documents using the mongoose module is similar in some ways to using
the MongoDB Node.js native driver and yet different in other ways. The concepts of
logic operators, limit, skip, and distinct are all the same. However, there are two big
differences.
The first major difference is that when using Mongoose, the statements used to build
the request can be piped together and reused because of the Query object discussed
earlier in this chapter. This allows Mongoose code to be much more dynamic and
flexible when defining what documents to return and how to return them.
For example, all three of the following queries are identical, just built in different
ways:
Click here to view code image
var query1 = model.find({name:'test'}, {limit:10, skip:5, fields:{name:1,value:1}});
var query2 = model.find().where('name','test').limit(10).skip(5).
select({name:1,value:1});
var query3 = model.find().
query3.where('name','test')
query3.limit(10).skip(5);
query3.select({name:1,value:1});
A good rule to follow when building your query object using Mongoose is to only
add things as you need them in your code.
The second major difference is that MongoDB operations such as find() and
findOne() return Document objects instead of JavaScript objects. Specifically,
find() returns an array of Document objects instead of a Cursor object, and
findOne() returns a single Document object. The Document objects allow you
to perform the operations listed in Table 16.5.
Listing 16.3 illustrates several examples of implementing the Mongoose way of
retrieving objects from the database. Lines 9–14 count the number of words that
begin and end with a vowel. Then in line 15 the same query object is changed to a
find() operation, and a limit() and sort() are added before executing it in
line 16.

Lines 22–32 use mod() to find words with an even length and greater than six
characters. Also the output is limited to ten documents, and each document returns
only the word and size fields.
Listing 16.3 mongoose_find.js: Finding documents in a collection by using
Mongoose
Click here to view code image
01 var mongoose = require('mongoose');
02 var db = mongoose.connect('mongodb://localhost/words');
03 var wordSchema = require('./word_schema.js').wordSchema;
04 var Words = mongoose.model('Words', wordSchema);
05 setTimeout(function(){
06 mongoose.disconnect();
07 }, 3000);
08 mongoose.connection.once('open', function(){
09 var query = Words.count().where('first').in(['a', 'e', 'i', 'o', 'u']);
10 query.where('last').in(['a', 'e', 'i', 'o', 'u']);
11 query.exec(function(err, count){
12 console.log("\nThere are " + count +
13 " words that start and end with a vowel");
14 });
15 query.find().limit(5).sort({size:-1});
16 query.exec(function(err, docs){
17 console.log("\nLongest 5 words that start and end with a vowel: ");
18 for (var i in docs){
19 console.log(docs[i].word);
20 }
21 });
22 query = Words.find();
23 query.mod('size',2,0);
24 query.where('size').gt(6);
25 query.limit(10);
26 query.select({word:1, size:1});
27 query.exec(function(err, docs){
28 console.log("\nWords with even lengths and longer than 5 letters: ");
29 for (var i in docs){
30 console.log(JSON.stringify(docs[i]));
31 }
32 });
33 });
Listing 16.3 Output mongoose_find.js: Finding documents in a collection
by using Mongoose
Click here to view code image

There are 5 words that start and end with a vowel
Words with even lengths and longer than 5 letters:
{"_id":"598e0ebd0850b51290642f8e","word":"american","size":8}
{"_id":"598e0ebd0850b51290642f9e","word":"question","size":8}
{"_id":"598e0ebd0850b51290642fa1","word":"government","size":10}
{"_id":"598e0ebd0850b51290642fbe","word":"national","size":8}
{"_id":"598e0ebd0850b51290642fcc","word":"business","size":8}
{"_id":"598e0ebd0850b51290642ff9","word":"continue","size":8}
{"_id":"598e0ebd0850b51290643012","word":"understand","size":10}
{"_id":"598e0ebd0850b51290643015","word":"together","size":8}
{"_id":"598e0ebd0850b5129064301a","word":"anything","size":8}
{"_id":"598e0ebd0850b51290643037","word":"research","size":8}
Longest 5 words that start and end with a vowel:
administrative
infrastructure
intelligence
independence
architecture
Adding Documents Using Mongoose
Documents can be added to the MongoDB library using either the create()
method on the Model object or the save() method on a newly created Document
object. The create() method accepts an array of JavaScript objects and creates a
Document instance for each JavaScript object, which applies validation and a
middleware framework to them. Then the Document objects are saved to the
database.
The syntax of the create() method is shown below:
create(objects, [callback])
The callback function of the create method receives an error for the first
parameter if it occurs and then additional parameters, one for each document. Lines
27–32 of Listing 16.4 illustrate using the create() method and handling the saved
documents coming back. Notice that the create() method is called on the Model
object Words and that the arguments are iterated on to display the created
documents, as shown in Listing 16.4 Output.

The save() method is called on a Document object that has already been created.
It can be called even if the document has not yet been created in the MongoDB
database, in which case the new document is inserted. The syntax for the save()
method is
save([callback])
Listing 16.4 also illustrates the save() method of adding documents to a collection
using Mongoose. Notice that a new Document instance is created in lines 6–11 and
that the save() method is called on that document instance.
Listing 16.4 mongoose_create.js: Creating new documents in a collection
by using Mongoose
Click here to view code image
01 var mongoose = require('mongoose');
02 var db = mongoose.connect('mongodb://localhost/words');
03 var wordSchema = require('./word_schema.js').wordSchema;
04 var Words = mongoose.model('Words', wordSchema);
05 mongoose.connection.once('open', function(){
06 var newWord1 = new Words({
07 word:'gratifaction',
08 first:'g', last:'n', size:12,
09 letters: ['g','r','a','t','i','f','c','o','n'],
10 stats: {vowels:5, consonants:7}
11 });
12 console.log("Is Document New? " + newWord1.isNew);
13 newWord1.save(function(err, doc){
14 console.log("\nSaved document: " + doc);
15 });
16 var newWord2 = { word:'googled',
17 first:'g', last:'d', size:7,
18 letters: ['g','o','l','e','d'],
19 stats: {vowels:3, consonants:4}
20 };
21 var newWord3 = {
22 word:'selfie',
23 first:'s', last:'e', size:6,
24 letters: ['s','e','l','f','i'],
25 stats: {vowels:3, consonants:3}
26 };
27 Words.create([newWord2, newWord3], function(err){
28 for(var i=1; i<arguments.length; i++){
29 console.log("\nCreated document: " + arguments[i]);
30 }

31 mongoose.disconnect();
32 });
33 });
Listing 16.4 Output mongoose_create.js: Creating new documents in a
collection by using Mongoose
Click here to view code image
Is Document New? True
Saved document: { __v: 0,
word: 'gratifaction',
first: 'g',
last: 'n',
size: 12,
_id: 598e10192e335a163443ec13,
charsets: [],
stats: { vowels: 5, consonants: 7 },
letters: [ 'g', 'r', 'a', 't', 'i', 'f', 'c', 'o', 'n' ] }
Created document: { __v: 0,
word: 'googled',
first: 'g',
last: 'd',
size: 7,
_id: 598e10192e335a163443ec14,
charsets: [],
stats: { vowels: 3, consonants: 4 },
letters: [ 'g', 'o', 'l', 'e', 'd' ] },{ __v: 0,
word: 'selfie',
first: 's',
last: 'e',
size: 6,
_id: 598e10192e335a163443ec15,
charsets: [],
stats: { vowels: 3, consonants: 3 },
letters: [ 's', 'e', 'l', 'f', 'i' ] }
Updating Documents Using Mongoose
There are several methods for updating documents when using Mongoose. Which
one you use depends on the nature of your application. One method is simply to call
the save() function described in the previous section. The save() method can be
called on objects already created in the database.

The other way is to use the update() method on either the Document object for
a single update or on the Model object to update multiple documents in the model.
The advantages of the update() method are that it can be applied to multiple
objects and provides better performance. The following sections describe these
methods.
Saving Document Changes
You have already seen how to use the save() method to add a new document to
the database. You can also use it to update an existing object. Often the save()
method is the most convenient to use when working with MongoDB because you
already have an instance of the Document object.
The save() method detects whether the object is new, determines which fields
have changed, and then builds a database request that updates those fields in the
database. Listing 16.5 illustrates implementing a save() request. The word book
is retrieved from the database, and the first letter is capitalized, changing the word
and first fields.
Notice that doc.isNew in line 8 reports that the document is not new. Also, in line
14 the modified fields are reported to the console using
doc.modifiedFields(). These are the fields that are updated.
Listing 16.5 mongoose_save.js: Saving documents in a collection by using
Mongoose
Click here to view code image
01 var mongoose = require('mongoose');
02 var db = mongoose.connect('mongodb://localhost/words');
03 var wordSchema = require('./word_schema.js').wordSchema;
04 var Words = mongoose.model('Words', wordSchema);
05 mongoose.connection.once('open', function(){
06 var query = Words.findOne().where('word', 'book');
07 query.exec(function(err, doc){
08 console.log("Is Document New? " + doc.isNew);
09 console.log("\nBefore Save: ");
10 console.log(doc.toJSON());
11 doc.set('word','Book');
12 doc.set('first','B');
13 console.log("\nModified Fields: ");
14 console.log(doc.modifiedPaths());
15 doc.save(function(err){

16 Words.findOne({word:'Book'}, function(err, doc){
17 console.log("\nAfter Save: ");
18 console.log(doc.toJSON());
19 mongoose.disconnect();
20 });
21 });
22 });
23 });
Listing 16.5 Output mongoose_save.js: Saving documents in a collection by
using Mongoose
Click here to view code image
Is Document New? false
Before Save:
{ _id: 598e0ebd0850b51290642fc7,
word: 'book',
first: 'b',
last: 'k',
size: 4,
charsets:
[ { chars: [Object], type: 'consonants' },
{ chars: [Object], type: 'vowels' } ],
stats: { vowels: 2, consonants: 2 },
letters: [ 'b', 'o', 'k' ] }
Modified Fields:
[ 'word', 'first' ]
After Save:
{ _id: 598e0ebd0850b51290642fc7,
word: 'Book',
first: 'B',
last: 'k',
size: 4,
charsets:
[ { chars: [Object], type: 'consonants' },
{ chars: [Object], type: 'vowels' } ],
stats: { vowels: 2, consonants: 2 },
letters: [ 'b', 'o', 'k' ] }
Updating a Single Document
The Document object also provides the Update() method that enables you to

update a single document using the update operators described in Table 14.2. The
syntax for the update() method on Document objects is shown below:
update(update, [options], [callback])
The update parameter is an object that defines the update operation to perform on
the document. The options parameter specifies the write preferences, and the
callback function accepts an error as the first argument and the number of
documents updated as the second.
Listing 16.6 shows an example of using the update() method to update the word
gratifaction to gratifactions by setting the word, size, and last
fields using a $set operator as well as pushing the letter s on the end of letters
using the $push operator.
Listing 16.6 mongoose_update_one.js: Updating a single document in a
collection by using Mongoose
Click here to view code image
01 var mongoose = require('mongoose');
02 var db = mongoose.connect('mongodb://localhost/words');
03 var wordSchema = require('./word_schema.js').wordSchema;
04 var Words = mongoose.model('Words', wordSchema);
05 mongoose.connection.once('open', function(){
06 var query = Words.findOne().where('word', 'gratifaction');
07 query.exec(function(err, doc){
08 console.log("Before Update: ");
09 console.log(doc.toString());
10 var query = doc.update({$set:{word:'gratifactions',
11 size:13, last:'s'},
12 $push:{letters:'s'}});
13 query.exec(function(err, results){
14 console.log("\n%d Documents updated", results);
15 Words.findOne({word:'gratifactions'}, function(err, doc){
16 console.log("\nAfter Update: ");
17 console.log(doc.toString());
18 mongoose.disconnect();
19 });
20 });
21 });
22 });
Listing 16.6 Output mongoose_update_one.js: Updating a single

document in a collection by using Mongoose
Click here to view code image
Before Update:
{ _id: 598e10192e335a163443ec13,
word: 'gratifaction',
first: 'g',
last: 'n',
size: 12,
__v: 0,
charsets: [],
stats: { vowels: 5, consonants: 7 },
letters: [ 'g', 'r', 'a', 't', 'i', 'f', 'c', 'o', 'n' ] }
NaN Documents updated
After Update:
{ _id: 598e10192e335a163443ec13,
word: 'gratifactions',
first: 'g',
last: 's',
size: 13,
__v: 0,
charsets: [],
stats: { vowels: 5, consonants: 7 },
letters: [ 'g', 'r', 'a', 't', 'i', 'f', 'c', 'o', 'n', 's' ] }
Updating Multiple Documents
The Model object also provides an Update() method that allows you to update
multiple documents in a collection using the update operators described in Table
14.2. The syntax for the update() method on Model objects is slightly different,
as shown below:
update(query, update, [options], [callback])
The query parameter defines the query used to identify which objects to update.
The update parameter is an object that defines the update operation to perform on
the document. The options parameter specifies the write preferences, and the
callback function accepts an error as the first argument and the number of
documents updated as the second.
A nice thing about updating at the Model level is that you can use the Query object

to define which objects should be updated. Listing 16.7 shows an example of using
the update() method to update the size field of words that match the regex
/grati.*/ to 0. Notice that an update object is defined in line 11; however,
multiple query options are piped onto the Query object before executing it in line
14. Then another find() request is made, this time using the regex /grat.*/ to
show that only those matching the update query actually change.
Listing 16.7 mongoose_update_many.js: Updating multiple documents in a
collection by using Mongoose
Click here to view code image
01 var mongoose = require('mongoose');
02 var db = mongoose.connect('mongodb://localhost/words');
03 var wordSchema = require('./word_schema.js').wordSchema;
04 var Words = mongoose.model('Words', wordSchema);
05 mongoose.connection.once('open', function(){
06 Words.find({word:/grati.*/}, function(err, docs){
07 console.log("Before update: ");
08 for (var i in docs){
09 console.log(docs[i].word + " : " + docs[i].size);
10 }
11 var query = Words.update({}, {$set: {size: 0}});
12 query.setOptions({multi: true});
13 query.where('word').regex(/grati.*/);
14 query.exec(function(err, results){
15 Words.find({word:/grat.*/}, function(err, docs){
16 console.log("\nAfter update: ");
17 for (var i in docs){
18 console.log(docs[i].word + " : " + docs[i].size);
19 }
20 mongoose.disconnect();
21 });
22 });
23 });
24 });
Listing 16.7 Output mongoose_update_many.js: Updating multiple
documents in a collection by using Mongoose
Click here to view code image
Before update:
gratifactions : 13
immigration : 11
integration : 11

migration : 9
After update:
grateful : 8
gratifactions : 0
immigration : 0
integrate : 9
integrated : 10
integration : 0
migration : 0
Removing Documents Using Mongoose
There are two main ways to remove objects from a collection using Mongoose. You
can use the remove() method on either the Document object for a single deletion
or on the Model object to delete multiple documents in the model. Deleting a single
object is often convenient if you already have a Document instance. However, it is
often much more efficient to delete multiple documents at the same time at the
Model level. The following sections describe these methods.
Removing a Single Document
The Document object provides the remove() method that allows you to delete a
single document from the model. The syntax for the remove() method on
Document objects is shown below. The callback function accepts an error as
the only argument if an error occurs or the deleted document as the second if the
delete is successful:
remove([callback])
Listing 16.8 shows an example of using the remove() method to remove the word
unhappy.
Listing 16.8 mongoose_remove_one.js: Deleting a document from a
collection by using Mongoose
Click here to view code image
01 var mongoose = require('mongoose');
02 var db = mongoose.connect('mongodb://localhost/words');

03 var wordSchema = require('./word_schema.js').wordSchema;
04 var Words = mongoose.model('Words', wordSchema);
05 mongoose.connection.once('open', function(){
06 var query = Words.findOne().where('word', 'unhappy');
07 query.exec(function(err, doc){
08 console.log("Before Delete: ");
09 console.log(doc);
10 doc.remove(function(err, deletedDoc){
11 Words.findOne({word:'unhappy'}, function(err, doc){
12 console.log("\nAfter Delete: ");
13 console.log(doc);
14 mongoose.disconnect();
15 });
16 });
17 });
18 });
Listing 16.8 Output mongoose_remove_one.js: Deleting a document from
a collection by using Mongoose
Click here to view code image
Before Delete:
{ _id: 598e0ebd0850b51290643f21,
word: 'unhappy',
first: 'u',
last: 'y',
size: 7,
charsets:
[ { chars: [Object], type: 'consonants' },
{ chars: [Object], type: 'vowels' } ],
stats: { vowels: 2, consonants: 5 },
letters: [ 'u', 'n', 'h', 'a', 'p', 'y' ] }
After Delete:
null
Removing Multiple Documents
The Model object also provides a remove() method that allows you to delete
multiple documents in a collection using a single call to the database. The syntax for
the remove() method on Model objects is slightly different, as shown below:
update(query, [options], [callback])

The query parameter defines the query used to identify which objects to delete.
The options parameter specifies the write preferences, and the callback
function accepts an error as the first argument and the number of documents
deleted as the second.
A nice thing about deleting at the Model level is that you delete multiple documents
in the same operation, saving the overhead of multiple requests. Also, you can use
the Query object to define which objects should be updated.
Listing 16.9 shows an example of using the remove() method to delete words that
match the regex /grati.*/ expression. Notice that multiple query options are
piped onto the Query object before executing it in line 13. The number of
documents removed is displayed, and then another find() request is made, this
time using the regex /grat.*/ to show that only those matching the remove
query actually are deleted.
Listing 16.9 mongoose_remove_many.js: Deleting multiple documents in a
collection by using Mongoose
Click here to view code image
01 var mongoose = require('mongoose');
02 var db = mongoose.connect('mongodb://localhost/words');
03 var wordSchema = require('./word_schema.js').wordSchema;
04 var Words = mongoose.model('Words', wordSchema);
05 mongoose.connection.once('open', function(){
06 Words.find({word:/grat.*/}, function(err, docs){
07 console.log("Before delete: ");
08 for (var i in docs){
09 console.log(docs[i].word);
10 }
11 var query = Words.remove();
12 query.where('word').regex(/grati.*/);
13 query.exec(function(err, results){
14 console.log("\n%d Documents Deleted.", results);
15 Words.find({word:/grat.*/}, function(err, docs){
16 console.log("\nAfter delete: ");
17 for (var i in docs){
18 console.log(docs[i].word);
19 }
20 mongoose.disconnect();
21 });
22 });
23 });
24 });

Listing 16.9 Output mongoose_remove_many.js: Deleting multiple
documents in a collection by using Mongoose
Click here to view code image
Before delete:
grateful
gratifactions
immigration
integrate
integrated
integration
migration
NaN Documents Deleted.
After delete:
grateful
integrate
integrated
Aggregating Documents Using Mongoose
The Model object provides an aggregate() method that allows you to
implement the MongoDB aggregation pipeline discussed in Chapter 15. If you
haven’t read the aggregation section in Chapter 15 yet, you should do so before
reading this section. Aggregation in Mongoose works similarly to the way it works
in the MongoDB Node.js native driver. In fact, you can use the exact same syntax if
you want. You also have the option of using the Mongoose Aggregate object to
build and then execute the aggregation pipeline.
The Aggregate object works similarly to the Query object in that if you pass in a
callback function, aggregate() is executed immediately. If not, an
Aggregate object is returned, and you can apply a pipeline method.
For example, the following calls the aggregate() method immediately:
model.aggregate([{$match:{value:15}}, {$group:{_id:"$name"}}],
function(err, results) {});
You can also pipeline aggregation operations using an instance of the Aggregate

object. For example:
Click here to view code image
var aggregate = model.aggregate();
aggregate.match({value:15});
aggregate.group({_id:"$name"});
aggregate.exec();
Table 16.6 describes the methods that can be called on the Aggregate object.
Table 16.6 Pipeline methods for the Aggregate object in Mongoose
Method Description
exec(callback) Executes the Aggregate object pipeline in the order they are added.
The callback function receives an error object as the first parameter
and an array of JavaScript objects as the second, representing the
aggregated results.
append(operations) Appends additional operations to the Aggregation
pipeline. You can apply multiple operations, for example:
append({match:{size:1}}, {$group{_id:"$title"}}, {$limit:2})
group(operators) Appends a group operation defined by the group operators
example:
group({_id:"$title", largest:{$max:"$size"}})
limit(number) Appends a limit operation that limits the aggregated results to a
specific number.
match(operators) Appends a match operation defined by the operators
example:
match({value:{$gt:7, $lt:14}, title:"new"})
project(operators) Appends a project operation defined by the operators
example:
project({_id:"$name", value:"$score", largest:{$max:"$size"}})
read(preference) Specifies the replica read preference use for aggregation. Value can
be primary, primaryPreferred, secondary,
secondaryPreferred, or nearest.

skip(number) Appends a skip operation that skips the first number documents when
applying the next operation in the aggregation pipeline.
sort(fields) Appends a sort operation to the aggregation pipeline. The
specified in an object where a value of 1 is include, and a value of
exclude. For example:
sort({name:1, value:-1})
unwind(arrFields) Appends an unwind operation to the aggregation pipeline, which
unwinds the arrFields by creating a new document in the aggregation
set for each value in the array. For example:
unwind("arrField1", "arrField2", "arrField3")
Listing 16.10 illustrates implementing aggregation in Mongoose using three
examples. The first example, in lines 9–19, implements aggregation in the native
driver way, but by using the Model object. The aggregated result set is the largest
and smallest word sizes for words beginning with a vowel.
The next example, in lines 20–27, implements aggregation by creating an
Aggregate object and appending operations to it using the match(),
append(), and limit() methods. The results are stats for the five four-letter
words.
The final example, in lines 28–35, uses the group(), sort(), and limit()
methods to build the aggregation pipeline that results in the top five letters with the
largest average word size.
Listing 16.10 mongoose_aggregate.js: Aggregating data from documents
in a collection by using Mongoose
Click here to view code image
01 var mongoose = require('mongoose');
02 var db = mongoose.connect('mongodb://localhost/words');
03 var wordSchema = require('./word_schema.js').wordSchema;
04 var Words = mongoose.model('Words', wordSchema);
05 setTimeout(function(){
06 mongoose.disconnect();
07 }, 3000);
08 mongoose.connection.once('open', function(){
09 Words.aggregate([{$match: {first:{$in:['a','e','i','o','u']}}},

10 {$group: {_id:"$first",
11 largest:{$max:"$size"},
12 smallest:{$min:"$size"},
13 total:{$sum:1}}},
14 {$sort: {_id:1}}],
15 function(err, results){
16 console.log("\nLargest and smallest word sizes for " +
17 "words beginning with a vowel: ");
18 console.log(results);
19 });
20 var aggregate = Words.aggregate();
21 aggregate.match({size:4});
22 aggregate.limit(5);
23 aggregate.append({$project: {_id:"$word", stats:1}});
24 aggregate.exec(function(err, results){
25 console.log("\nStats for 5 four letter words: ");
26 console.log(results);
27 });
28 var aggregate = Words.aggregate();
29 aggregate.group({_id:"$first", average:{$avg:"$size"}});
30 aggregate.sort('-average');
31 aggregate.limit(5);
32 aggregate.exec( function(err, results){
33 console.log("\nLetters with largest average word size: ");
34 console.log(results);
35 });
36 });
Listing 16.10 Output mongoose_aggregate.js: Aggregating data from
documents in a collection by using Mongoose
Click here to view code image
Stats for 5 four letter words:
[ { stats: { vowels: 2, consonants: 2 }, _id: 'have' },
{ stats: { vowels: 1, consonants: 3 }, _id: 'that' },
{ stats: { vowels: 1, consonants: 3 }, _id: 'with' },
{ stats: { vowels: 1, consonants: 3 }, _id: 'this' },
{ stats: { vowels: 1, consonants: 3 }, _id: 'they' } ]
Largest and smallest word sizes for words beginning with a vowel:
[ { _id: 'a', largest: 14, smallest: 1, total: 295 },
{ _id: 'e', largest: 13, smallest: 3, total: 239 },
{ _id: 'i', largest: 14, smallest: 1, total: 187 },
{ _id: 'o', largest: 14, smallest: 2, total: 118 },
{ _id: 'u', largest: 13, smallest: 2, total: 57 } ]
Letters with largest average word size:

[ { _id: 'i', average: 8.20855614973262 },
{ _id: 'e', average: 7.523012552301255 },
{ _id: 'c', average: 7.419068736141907 },
{ _id: 'a', average: 7.145762711864407 },
{ _id: 'p', average: 7.01699716713881 } ]
Using the Validation Framework
One of the most important aspects of the mongoose module is that of validation
against a defined model. Mongoose provides a built-in validation framework that
only requires you to define validation functions to perform on specific fields that
need to be validated. When you try to create a new instance of a Document, read a
Document from the database, or save a Document, the validation framework calls
your custom validation methods and returns an error if the validation fails.
The validation framework is actually simple to implement. You call the
validate() method on the specific path in the Model object that you want to
apply validation to and pass in a validation function. The validation
function should accept the value of the field and then use that value to return true
or false depending on whether the value is valid. The second parameter to the
validate() method is an error string that is applied to the error object if
validation fails. For example:
Words.schema.path('word').validate(function(value){
return value.length < 20;
}, "Word is Too Big");
The error object thrown by validation has the following fields:
error.errors.<field>.message: String defined when adding the
validate function
error.errors.<field>.type: Type of validation error
error.errors.<field>.path: Path in the object that failed validation
error.errors.<field>.value: Value that failed validation
error.name: Error type name
err.message: Error Message
Listing 16.11 shows a simple example of adding validation to the word model, where

a word of length 0 or greater than 20 is invalid. Notice that when the newWord is
saved in line 18, an error is passed to the save() function. The output in lines 12–
26 shows the various values of different parts of the error, as shown in Listing 16.11
Output. You can use these values to determine how to handle validation failures in
the code.
Listing 16.11 mongoose_validation.js: Implementing validation of
documents in the model by using Mongoose
Click here to view code image
01 var mongoose = require('mongoose');
02 var db = mongoose.connect('mongodb://localhost/words');
03 var wordSchema = require('./word_schema.js').wordSchema;
04 var Words = mongoose.model('Words', wordSchema);
05 Words.schema.path('word').validate(function(value){
06 return value.length < 0;
07 }, "Word is Too Small");
08 Words.schema.path('word').validate(function(value){
09 return value.length > 20;
10 }, "Word is Too Big");
11 mongoose.connection.once('open', function(){
12 var newWord = new Words({
13 word:'supercalifragilisticexpialidocious',
14 first:'s',
15 last:'s',
16 size:'supercalifragilisticexpialidocious'.length,
17 });
18 newWord.save(function (err) {
19 console.log(err.errors.word.message);
20 console.log(String(err.errors.word));
21 console.log(err.errors.word.type);
22 console.log(err.errors.word.path);
23 console.log(err.errors.word.value);
24 console.log(err.name);
25 console.log(err.message);
26 mongoose.disconnect();
27 });
28 });
Listing 16.11 Output mongoose_validation.js: Implementing validation
of documents in the model by using Mongoose
Click here to view code image
Word is Too Small
Word is Too Small

undefined
word
supercalifragilisticexpialidocious
ValidationError
Words validation failed
Implementing Middleware Functions
Mongoose provides a middleware framework where pre and post functions are
called before and after the init(), validate(), save(), and remove()
methods on a Document object. A middleware framework allows you to implement
functionality that should be applied before or after a specific step in the process. For
example, when creating word documents using the model defined earlier in this
chapter, you may want to automatically set the size to the length of the word field as
shown below in the following pre save() middleware function:
Click here to view code image
Words.schema.pre('save', function (next) {
console.log('%s is about to be saved', this.word);
console.log('Setting size to %d', this.word.length);
this.size = this.word.length;
next();
});
There are two types of middleware functions—the pre and the post functions—
and they are handled a bit differently. The pre functions receive a next parameter,
which is the next middleware function to execute. The pre functions can be called
asynchronously or synchronously. In the case of the asynchronous method, an
additional done parameter is passed to the pre function allowing you to notify the
asynchronous framework that you are finished. If you are applying operations that
should be done in order in the middleware, you use the synchronous method.
To apply the middleware synchronously, you simply call next() in the middleware
function. For example:
schema.pre('save', function(next){
next();
});
To apply the middleware asynchronously, add a true parameter to the pre()

method to denote asynchronous behavior and then call doAsync(done) inside the
middleware function. For example:
schema.pre('save', true, function(next, done){
next();
doAsync(done);
});
The post middleware functions are called after the init, validate, save, or
remove operation has been processed. This allows you to do any cleanup work
necessary when applying the operation. For example, the following implements a
simple post save method that logs that the object has been saved:
schema.post('save', function(doc){
console.log("Document Saved: " + doc.toString());
});
Listing 16.12 illustrates the process of implementing middleware for each stage of
the Document life cycle. Notice that the validate and save middleware
functions are executed when saving the document. The init middleware functions
are executed when retrieving the document from MongoDB using findOne(). The
remove middleware functions are executed when using remove() to delete the
document from MongoDB.
Also notice that the this keyword can be used in all the middleware functions
except pre init to access the Document object. In the case of pre init, we do
not have a document from the database yet to use.
Listing 16.12 mongoose_middleware.js: Applying a middleware
framework to a model by using Mongoose
Click here to view code image
01 var mongoose = require('mongoose');
02 var db = mongoose.connect('mongodb://localhost/words');
03 var wordSchema = require('./word_schema.js').wordSchema;
04 var Words = mongoose.model('Words', wordSchema);
05 Words.schema.pre('init', function (next) {
06 console.log('a new word is about to be initialized from the db');
07 next();
08 });
09 Words.schema.pre('validate', function (next) {
10 console.log('%s is about to be validated', this.word);
11 next();
12 });

13 Words.schema.pre('save', function (next) {
14 console.log('%s is about to be saved', this.word);
15 console.log('Setting size to %d', this.word.length);
16 this.size = this.word.length;
17 next();
18 });
19 Words.schema.pre('remove', function (next) {
20 console.log('%s is about to be removed', this.word);
21 next();
22 });
23 Words.schema.post('init', function (doc) {
24 console.log('%s has been initialized from the db', doc.word);
25 });
26 Words.schema.post('validate', function (doc) {
27 console.log('%s has been validated', doc.word);
28 });
29 Words.schema.post('save', function (doc) {
30 console.log('%s has been saved', doc.word);
31 });
32 Words.schema.post('remove', function (doc) {
33 console.log('%s has been removed', doc.word);
34 });
35 mongoose.connection.once('open', function(){
36 var newWord = new Words({
37 word:'newword',
38 first:'t',
39 last:'d',
40 size:'newword'.length,
41 });
42 console.log("\nSaving: ");
43 newWord.save(function (err){
44 console.log("\nFinding: ");
45 Words.findOne({word:'newword'}, function(err, doc){
46 console.log("\nRemoving: ");
47 newWord.remove(function(err){
48 mongoose.disconnect();
49 });
50 });
51 });
52 });
Listing 16.12 Output mongoose_middleware.js: Applying a middleware
framework to a model by using Mongoose
Click here to view code image
Saving:
newword is about to be validated

newword has been validated
newword is about to be saved
Setting size to 7
newword has been saved
Finding:
a new word is about to be initialized from the db
newword has been initialized from the db
Removing:
newword is about to be removed
newword has been removed
Summary
This chapter introduced you to Mongoose, which provides a structured schema to a
MongoDB collection that provides the benefits of validation and typecasting. You
learned about the new Schema, Model, Query, and Aggregation objects and
how to use them to implement an ODM. You also got a chance to use the sometimes
more friendly Mongoose methods to build a Query object before executing
database commands.
You were also introduced to the validation and middleware frameworks. The
validation framework allows you to validate specific fields in the model before
trying to save them to the database. The middleware framework allows you to
implement functionality that happens before and/or after each init, validate,
save, or remove operation.
Next
In the next chapter, you delve into some more advanced MongoDB topics, such as
indexes, replication, and sharding.

17
Advanced MongoDB Concepts
There is much more to MongoDB than can be fully covered in this book. This
chapter covers some additional fundamentals beyond the normal database create,
access, and delete operations. Designing and implementing indexes allows you to
improve database performance. Also, implementing replica sets and sharding
provide additional performance improvements and high availability.
Adding Indexes
MongoDB allows you to index fields in your collections that make it faster to find
documents. When an index is added in MongoDB, a special data structure is created
in the background that stores a small portion of a collection’s data and then
optimizes the structure of that data to make it faster to find specific documents.
For example, applying an _id index basically creates a sorted array of _id values.
Once the index has been created, the following benefits occur:
When looking up an object by _id, an optimized search can be performed on
the ordered index to find the object in question.
Say that you want objects back sorted by _id, and the sort has already been
performed on the index so it doesn’t need to be done again. MongoDB just
needs to read the documents in the order the _id appears in the index.
Say that you want documents 10–20 sorted by _id, the operation is just a
matter of slicing that chunk out of the index to get the _id values to look up
objects.
If all you need is a list of sorted _id values, MongoDB does not even need to
read the documents at all. It can just return the values directly from the index.

Keep in mind, however, that those benefits come at a cost. The following are some
of costs associated with indexes:
Indexes take up space on disk and in memory.
Indexes take up processing time when inserting and updating documents. That
means that database writes to collections with a large number of indexes can
suffer performance hits.
The larger the collection, the greater the cost in resources and performance.
Extremely large collections may make it impractical to apply some indexes.
Several different types of indexes can be applied to fields in a collection to support
various design requirements. Table 17.1 lists the different index types.
Table 17.1 Types of Indexes Supported by MongoDB
Option Description
Default
_id
All MongoDB collections have an index on the _id by default. If
applications do not specify a value for _id, the driver or the mongod
create an _id field with an ObjectID value. The _id index is
unique, and prevents clients from inserting two documents with the
same value for _id.
Single
field
The most basic type of index is one on a single field. This is similar to
the _id index but on any field that you need. The index can be sorted
in ascending or descending order. The values of the fields do not
necessarily need to be unique. For example:
{name: 1}
Compound Specifies an index on multiple fields. The index is sorted on the first
field value, then the second, and so on. You can also mix the sort
direction. For example, you can have one field sorting ascending and
another sorted descending.
{name: 1, value: -1}
Multikey If you add a field that stores an array of items, a separate index for
every element in the array also is created. This allows you to find
documents more quickly by values contained in the index. For
example, consider an array of objects named myObjs where each
object has a score field:

{myObjs.score: 1}
Geospatial MongoDB allows you to create a geospatial index based on 2d or
2sphere coordinates. This allows you to more effectively store and
retrieve data that has a reference to a geospatial location. For example:
{"locs":"2d"}
Text MongoDB also supports adding a text index that supports faster
lookup of string elements by words that are contained inside. The
index does not store words like the, a, and, etc. For example:
{comment: "text"}
Hashed When using hashed base sharding, MongoDB allows you to use a
hashed index, which only indexes hashed values that match those
stored in that particular server. This reduces the overhead of keeping
hashes around for items on other servers. For example:
{key: "hashed"}
Indexes can also have special properties that define how MongoDB handles the
index. These properties are
unique: This forces the index to only include a single instance of each field
value and thus MongoDB rejects adding a document that has a duplicate value
to one that is already in the index.
sparse: This ensures that the index only contains entries for documents that
have the indexed field. The index skips documents that do not have the indexed
field.
TTL: TTL or Time To Live indexes apply the concept of only allowing
documents to exist in the index for a certain amount of time—for example, log
entries or event data that should be cleaned up after a certain amount of time.
The index keeps track of insertion time and removes the earliest items after they
have expired.
The unique and sparse properties can be combined such that the index rejects
documents that have a duplicate value for the index field and rejects documents that
do not include the indexed field.
Indexes can be created from the MongoDB shell, MongoDB Node.js native client, or
Mongoose. To create an index from the MongoDB shell, you use the
ensureIndex(index, properties) method. For example:
db.myCollection.ensureIndex({name:1}, {background:true, unique:true, sparse: true})
The background option specifies whether the index created should take place in the
foreground of the shell or the background. Running in the foreground completes
faster but takes up more system resources, so it’s not a good idea on a production
system during peak times.
To create an index from the MongoDB Node.js native driver, you can call the
ensureIndex(collection, index, options, callback) method on
an instance of the Db object. For example:
Click here to view code image
var MongoClient = require('mongodb').MongoClient;
MongoClient.connect("mongodb://localhost/", function(err, db) {
db.ensureIndex('myCollection', {name: 1},
{background: true, unique: true, sparse: true},
function(err){
if(!err) console.log("Index Created");
});
});
To create an index using the Schema object in Mongoose, you set the index options
on the field in the schema for example:
var s = new Schema({ name: { type: String, index: true, unique: true, sparse: true});
You can also add the index to the Schema object later using the index() method,
for example:
s.schema.path.('some.path').index({unique: true, sparse: true});
Using Capped Collections
Capped collections are fixed-size collections that insert, retrieve, and delete
documents based on insertion order. This allows the capped collection to support
high throughput operations. Capped collections work similarly to circular buffers in
that once a collection fills its allocated space, it makes room for new documents by

overwriting the oldest documents in the collection.
Capped collections can also be limited based on a maximum number of documents.
This is useful in reducing the indexing overhead that can occur when storing large
numbers of documents in a collection.
Capped collections are useful for rotating event logs or caching data because you do
not need to worry about expending the overhead and effort of implementing code in
your application to clean up the collection.
To create a capped collection from the MongoDB shell, you use the
createCollection() method on the db object, specify the capped property,
and set the size in bites as well as the optional maximum number of documents. For
example:
db.createCollection("log", { capped : true, size : 5242880, max : 5000 } )
From the MongoDB Node.js native driver, you can also specify a capped collection
in the db.createCollection() method described in Chapter 13, “Getting
Started with MongoDB and Node.js.” For example:
db.createCollection("newCollection", { capped : true, size : 5242880, max : 5000 }
function(err, collection){ });
From Mongoose, you can define the collection as capped in the schema options. For
example:
var s = new Schema({ name:String, value:Number},
{ capped : true, size : 5242880, max : 5000});
Applying Replication
Replication is one of the most critical aspects of high-performance databases.
Replication is the process of defining multiple MongoDB servers that have the same
data. The MongoDB servers in the replica set will be one of three types, as illustrated
in Figure 17.1:
Primary: The primary server is the only server in a replica set that can be
written to and ensures the data integrity during write operations. A replica set
can only have one primary server.

Figure 17.1 Implementing a replica set in MongoDB
Secondary: Secondary servers contain a duplicate of the data on the primary
server. To ensure the data is accurate, the replica servers apply the operations
log, or oplog, from the primary server, ensuring that every write operation on
the primary server also happens on the secondary servers in the same order.
Clients can read from secondary servers but not write to them.
Arbiter: The arbiter server is kind of interesting. It does not contain a replica of
the data but can be used when electing a new primary if the primary server
experiences a problem. When the primary server fails, the failure is detected,
and other servers in the replica set elect a new primary using a heartbeat
protocol between the primary, secondary, and arbiter servers. Figure 17.2 shows
an example of the configuration using an arbiter server.
Replication provides two benefits: performance and high availability. Replica sets
provide better performance because although clients cannot write to secondary
servers they can read from them, which allows you to provide multiple read sources
for your applications.
Replica sets provide high availability because if the primary server happens to fail,
other servers that have a copy of the data can take over. The replica set uses a
heartbeat protocol to communicate between the servers and determine whether the
primary server has failed, at which point a new master is elected.
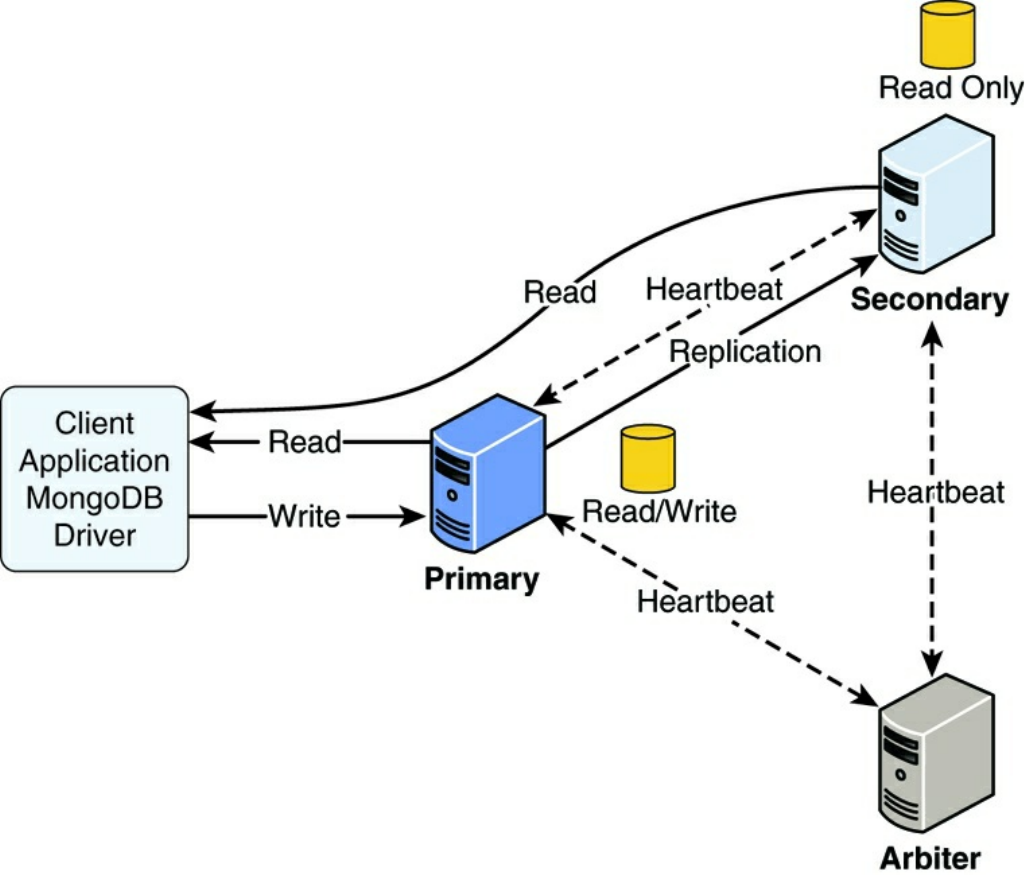
Figure 17.2 Implementing an arbiter server in a MongoDB replica set to ensure an
odd number of servers
You should have at least three servers in the replica set, and you should also try and
have an odd number. This makes it easier for the servers to elect a primary. This is
where arbiter servers come in handy. They require few resources but can save time
when electing a new primary. Figure 17.2 shows the replica set configuration with an
arbiter. Notice that the arbiter does not have a replica; it only participates in the
heartbeat protocol.
Replication Strategy
There are a few concepts to apply when you are determining how to deploy a
MongoDB replica set. The following sections discuss a few of the different things
you should consider before implementing a MongoDB replica set.
Number of Servers
The first question is how many servers should be included in the replica set. This
depends on the nature of data interaction from clients. If the data from clients is
mostly writes, you are not going to get a big benefit from a large number of servers.
However, if your data is mostly static and you have a high number of read requests,
more secondary servers will definitely make a difference.
Number of Replica Sets
Also consider the data. In some instances, it makes more sense to break up the data
into multiple replica sets, each containing a different segment of the data. This
allows you to fine-tune the servers in each set to meet the data and performance
needs. Only consider this if there is no correlation between the data, so clients
accessing the data would rarely need to connect to both replica sets at the same time.
Fault Tolerance
How important is the fault tolerance to your application? It will likely be a rare
occurrence for your primary server to go down. If it doesn’t really affect your
application too much and the data can easily be rebuilt, you may not need
replication. However, if you promise your customer Seven Nines availability, any
outage is bad, and an extended outage is unacceptable. In those cases, it makes sense
to add additional servers to the replica set to ensure availability.
Another thing to consider is placing one of the secondary servers in an alternative
data center to support instances when your entire data center fails. However, for the
sake of performance, you should keep the majority of secondary servers in your
primary data center.
If you are concerned about fault tolerance, you should also enable journaling as
described in Chapter 12, “Getting Started with MongoDB.” Enabling journaling
allows transactions to be replayed even if the power fails in your data center.
Deploying a Replica Set
Implementing a replica set is simple in MongoDB. The following steps take you
through the process of prepping and deploying the replica set.
1. First ensure that each member in the replica set is accessible to each other
using DNS or hostnames. Adding a virtual private network for the replica
servers to communicate on will enhance the performance of the system because
the replication process will not be affected by other traffic on the network. If
the servers are not behind a firewall so the data communications are safe, you
should also configure an auth and kwFile for the servers to communicate on
for security.
2. Configure the replSet value, which is a unique name for the replica set,
either in the mongodb.conf file or on your command line for each server in
the replica set, for example:
mongod --port 27017 --dbpath /srv/mongodb/db0 --
replSet rs0
3. Start the MongoDB client using the mongo command and execute the
following command on each server in the replica set to initiate the replica set
operations:
rs.initiate()
4. Use the MongoDB shell to connect to the MongoDB server that acts as the
primary and execute the following command for each secondary host:
rs.add(<secondary_host_name_or_dns>)
5. Use the following command to view the configuration on each server:
rs.conf()
6. Inside your application, define the read preference for reading data from the
replica set. The previous chapters already described how to do this by setting
the preference to primary, primaryPreferred, secondary,
secondaryPreferred, or nearest.
Implementing Sharding
A serious problem that many large-scale applications encounter is that the data
stored in the MongoDB is so enormous that it severely impacts performance. When a
single collection of data becomes too large, indexing can cause a severe performance
hit, the amount of data on disk can cause a system performance hit, and the number
of requests from clients can quickly overwhelm the server. The application gets
slower and slower at an accelerated rate when reading from and writing to the
database.
MongoDB solves this problem through sharding. Sharding is the process of storing
documents across multiple MongoDB servers running on different machines. This
allows the MongoDB database to scale horizontally. The more MongoDB servers
you add, the larger the number of documents that can be supported by your
application. Figure 17.3 illustrates the concept of sharding. From the application’s
perspective there is a single collection; however, there are actually four MongoDB
shard servers, and each contains a portion of the documents in the collections.
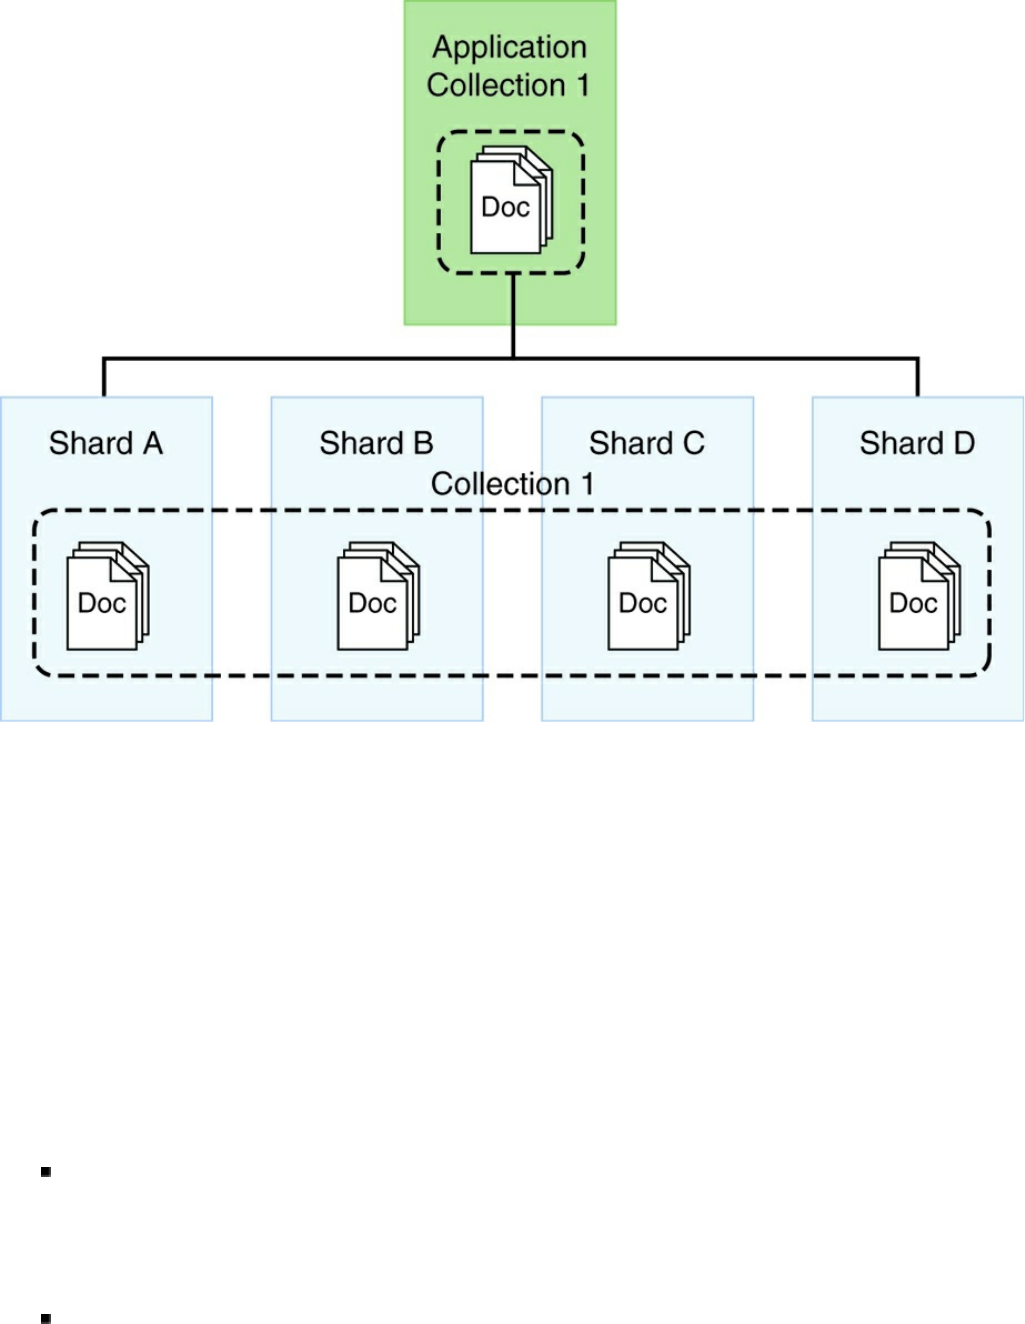
Figure 17.3 From the application’s perspective there is only a single collection to
access; however, the documents for that collection are split across multiple
MongoDB shard servers
Sharding Server Types
Three types of MongoDB servers are involved when sharding your data. These
servers each play a specific role to present a unified view to the applications. The
following list describes each of the server types, and the diagram in Figure 17.4
illustrates the interaction between the different types of sharding servers.
Shard: A shard actually stores the documents that make up the collection. The
shard can be an individual server; however, to provide high availability and data
consistency in production, consider using a replica set that provides primary and
secondary copies of the shard.
Query router: The query router runs an instance of mongos. The query router

provides the interface for client applications to interact with the collection and
obfuscates the fact that the data is in fact sharded. The query router processes
the request, sends targeted operations to the shards, and then combines the shard
responses into a single response to the client. A sharded cluster can contain
more than one query router, which is a good way to load balance large numbers
of client requests.
Config: Config servers store the metadata about the sharded cluster that
contains a mapping of the cluster’s data set to the shards. The query router uses
this metadata when targeting operations to specific shards. Production sharded
clusters should have exactly three config servers.
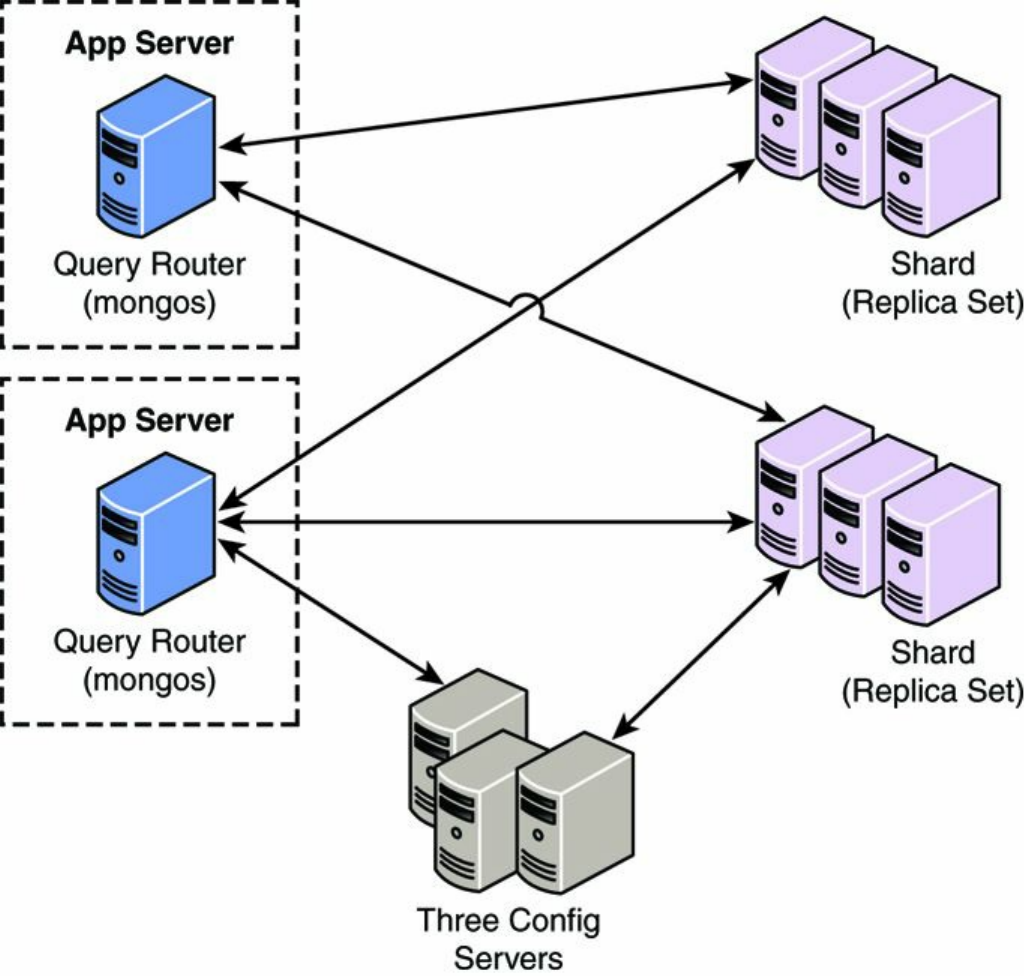
Figure 17.4 The router servers accept requests from the MongoDB clients and then
communicate with the individual shard servers to read or write data
Choosing a Shard Key
The first step in sharding a large collection is to decide on a shard key that is used to
determine which documents should be stored in which shard. The shard key is an
indexed field or an indexed compound field that must be included in every document
in the collection. MongoDB uses the value of the shard key to split the collection

between the shards in the cluster.
Selecting a good shard key can be critical to achieving the performance that you
need from MongoDB. A bad key can seriously impact the performance of the
system, whereas a good key can improve performance and ensure future scalability.
If a good key does not exist in your documents, you may want to consider adding a
field specifically to be a sharding key.
When selecting a shard key, keep in mind the following considerations:
Easily divided: The shard key needs to be easily divided into chunks.
Randomness: When using range-based sharding, random keys can ensure that
documents are more evenly distributed, so no one server is overloaded.
Compound keys: It is best to shard using a single field when possible;
however, if a good single field key doesn’t exist, you can still get better
performance from a good compound field than a bad single field key.
Cardinality: Cardinality defines the uniqueness of the values of the field. A
field has high cardinality if it is unique, for example, a Social Security number
among a million people. A field has low cardinality if it is generally not unique,
for example, eye color in a million people. Typically, fields that have high
cardinality provide much better options for sharding.
Query targeting: Take a minute and look at the queries necessary in your
applications. Queries perform better if the data can be collected from a single
shard in the cluster. If you can arrange for the shard key to match the most
common query parameters, you will get better performance as long as all
queries are not going to the same field value. Consider the example of arranging
documents based on the zip code of the user when all your queries are based on
looking up users by zip code. All the users for a given zip code exist on the
same shard server. If your queries are fairly distributed across zip codes, a zip
code key is a good idea. However, if most of your queries are on a few zip
codes, a zip code key is actually a bad idea.
To illustrate shard keys better consider the following keys:
{ "zipcode": 1}: This shard key distributes documents by the value of the
zipcode field. That means that all lookups based on a specific zipcode go
to a single shard server.
{ "zipcode": 1, "city": 1 }: This shard key first distributes
documents by the value of the zipcode field. If a number of documents have

the same value for zipcode, they can be split off to other shards based on the
city field value. That means you are no longer guaranteed that a query on a
single zipcode will hit only one shard. However, queries based on zipcode
and city will go to the same shard.
{ "_id": "hashed" }: This shard key distributes documents by a hash of
the value of the _id field. This ensures a more even distribution across all
shards in the cluster. However, it makes it impossible to target queries so that
they will hit only a single shard server.
Selecting a Partitioning Method
The next step in sharding a large collection is to decide how to partition the
documents based on the shard key. You can use two methods to distribute the
documents into different shards based on the shard key value. Which method you use
depends on the type of shard key you select:
Range-based sharding: Divides the data set into specific ranges based on the
value of the shard key. This method works well for shard keys that are numeric.
For example, if you have a collection of products and each product is given a
specific product ID from 1 to 1,000,000, you could shard the products in ranges
of 1–250,000; 250,001–500,000, and so on.
Hash-based sharding: Uses a hash function that computes a field value to
create chunks. The hash function ensures that shard keys that have a close value
end up in different shards to ensure a good distribution.
It is vital that you select a shard key and distribution method that distributes
documents as evenly as possible across the shards; otherwise, one server ends up
overloaded while another is relatively unused.
The advantage of range-based sharding is that it is often easy to define and
implement. Also if your queries are often range-based as well, it is more performant
than hash-based sharding. However, it is difficult to get an even distribution with
range-based sharding unless you have all the data up front and the shard key values
will not change going forward.
Hash-based sharding takes more understanding of the data but typically provides the
best overall approach to sharding because it ensures a much more evenly spaced
distribution.

The index used when enabling sharding on the collection determines which
partitioning method is used. If you have an index based on a value, MongoDB uses
range-based sharding. For example, the following implements a range-based shard
on the zip and name fields of the document:
db.myDB.myCollection.ensureIndex({"zip": 1, "name":1})
To shard using the hash-based method, you need to define the index using the hash
method, for example:
db.myDB.myCollection.ensureIndex({"name":"hash"})
Deploying a Sharded MongoDB Cluster
The process of deploying a sharded MongoDB cluster involves several steps to set
the different types of servers and then configuring the databases and collections. To
deploy a sharded MongoDB cluster, you need to
1. Create the config server database instances.
2. Start query router servers.
3. Add shards to the cluster.
4. Enable sharding on a database.
5. Enable sharding on a collection.
The following sections describe each of these steps in more detail.
Warning
All members of a sharded cluster must be able to connect to all other members of
a sharded cluster, including all shards and all config servers. Make sure that the
network and security systems, including all interfaces and firewalls, allow these
connections.
Creating the Config Server Database Instances
The config server processes are simply mongod instances that store the cluster’s
metadata instead of the collections. Each config server stores a complete copy of the
cluster’s metadata. In production deployments, you must deploy exactly three config

server instances, each running on different servers to ensure high availability and
data integrity.
To implement the config servers, perform the following steps on each:
1. Create a data directory to store the config database.
2. Start the config server instances passing the path to the data directory created
in step 1, and also include the --configsvr option to denote that this is a
config server. For example:
mongod --configsvr --dbpath <path> --port <port>
3. Once the mongod instance starts up, the config server is ready.
Note
The default port for config servers is 27019.
Starting Query Router Servers (mongos)
The query router (mongos) servers do not require database directories because the
configuration is stored on the config servers and the data is stored on the shard
server. The mongos servers are lightweight, and therefore it is acceptable to have a
mongos instance on the same system that runs your application server.
You can create multiple instances of the mongos servers to route requests to the
sharded cluster. However, these instances shouldn’t be running on the same system
to ensure high availability.
To start an instance of the mongos server, you need to pass in the --configdb
parameter with a list of the DNS names/hostnames of the config servers you want to
use for the cluster. For example:
mongos --configdb c1.test.net:27019,c2.test.net:27019,c3.test.net:27019
By default, a mongos instance runs on port 27017. However, you can also
configure a different port address using the --port <port> command line
option.
Tip

To avoid downtime, give each config server a logical DNS name (unrelated to the
server’s physical or virtual hostname). Without logical DNS names, moving or
renaming a config server requires shutting down every mongod and mongos
instance in the sharded cluster.
Adding Shards to the Cluster
The shard servers in a cluster are just standard MongoDB servers. They can be a
standalone server or a replica set. To add the MongoDB servers as shards in the
cluster, all you need to do is access the mongos server from the MongoDB shell and
use the sh.addShard() command.
The syntax for the sh.addShard() command is:
sh.addShard(<replica_set_or_server_address>)
For example, to add a replica set named rs1 on a server named mgo1.test.net
as a shard in the cluster server, execute the following command from the MongoDB
shell on the mongos server:
sh.addShard( "rs1/mgo1.test.net:27017" )
For example, to add a server named mgo1.test.net as a shard in the cluster
server, execute the following command from the MongoDB shell on the mongos
server:
sh.addShard( "mgo1.test.net:27017" )
Once you have added all the shards to the replica set, the cluster will be
communicating and sharding the data, although for predefined data it takes some
time for the chunks to be fully distributed.
Enabling Sharding on a Database
Prior to sharding a collection you need to enable the database it resides in to handle
sharding. Enabling sharding doesn’t automatically redistribute the data, but instead
just assigns a primary shard for the database and makes other configuration
adjustments that make it possible to enable the collections for sharding.
To enable the database for sharding, you need to connect to a mongos instance
using the MongoDB shell and issue the sh.enableSharding(database)
command. For example, to enable a database named bigWords you would use:
sh.enableSharding("bigWords");
Enabling Sharding on a Collection
Once the database has been enabled for sharding, you are ready to enable sharding at
the collection level. You do not need to enable sharding for all collections in the
database, just the one that it makes sense on.
Use the following steps to enable sharding on a collection:
1. Determine which field(s) will be used for the shard key as described above.
2. Create a unique index on the key field(s) using ensureIndex() described
earlier in this chapter.
db.myDB.myCollection.ensureIndex( { _id : "hashed" }
)
3. Enable sharding on the collection using
sh.shardCollection(<database>. <collection>,
shard_key). The shard_key is the pattern used to create the index. For
example:
sh.shardCollection("myDB.myCollection", { "_id":
"hashed" } )
Set Up Shard Tag Ranges
Once you have enabled sharding on a collection, you might want to add tags to target
specific ranges of the shard key values. A really good example of this is where the
collection is sharded by zip codes. To improve performance, tags can be added for
specific city codes, such as NYC and SFO, and the zip code ranges for those cities
specified. This ensures that documents for a specific city are stored on a single shard
in the cluster, which can improve performance for queries based on multiple zip
codes for the same city.
To set up shard tags, you simply need to add the tag to the shard using the
sh.addShardTag(shard_server, tag_name) command from a mongos
instance. For example:
sh.addShardTag("shard0001", "NYC")
sh.addShardTag("shard0002", "SFO")
Then to specify range for a tag, in this case the zip code ranges for each city tag, you
use the sh.addTagRange(collection_path, startValue,
endValue, tag_name) command from the mongos instance. For example:
sh.addTagRange("records.users", { zipcode: "10001" }, { zipcode: "10281" }, "NYC")
sh.addTagRange("records.users", { zipcode: "11201" }, { zipcode: "11240" }, "NYC")
sh.addTagRange("records.users", { zipcode: "94102" }, { zipcode: "94135" }, "SFO")
Notice that multiple ranges are added for NYC. This allows you to specify multiple
ranges within the same tag that is assigned to a single shard.
If you need to remove a shard tag later, you can do so using the
sh.removeShardTag(shard_server, tag_name) method. For example:
sh.removeShardTag("shard0002", "SFO")
Repairing a MongoDB Database
There are a couple of reasons to run a repair on the MongoDB database—for
example, if the system crashes, or there is a data integrity problem manifested in the
application, or even just to reclaim some unused disk space.
You can initiate a repair of a MongoDB database from the MongoDB shell or from
the mongod command line. To execute a repair from the command line, use --
repair and --repairpath <repair_path> syntax. The <repair_path>
specifies the location to store temporary repair files. For example:
mongod --repair --repairpath /tmp/mongdb/data
To execute a repair from the MongoDB client, use the
db.repairDatabase(options) command, for example:
db.repairDatabase({ repairDatabase: 1,
preserveClonedFilesOnFailure: <boolean>,
backupOriginalFiles: <boolean> })

When a repair is initiated, all collections in the database are compacted, which
reduces the size on disk. Also any invalid records in the database are deleted.
Therefore, it may be better to restore from backup rather than run a repair.
The time it takes to run the repair depends on the size of the data. A repair impacts
the performance on the systems and should be run during off peak hours.
Warning
If you are trying to repair a member of a replica set and you have access to an
intact copy of your data on another replica, you should restore from that intact
copy because repairDatabase will delete the corrupt data and it will be lost.
Backing Up MongoDB
The best backup strategy for MongoDB is to implement high availability using a
replica set. This ensures that the data is as up-to-date as possible and ensures that it is
always available. However, also consider the following if your data is critical and
cannot be replaced:
What if the data center fails? In this case you can back up the data
periodically and store it off-site, or you can add a replica somewhere off-site.
What if something happens to corrupt the actual application data that gets
replicated? This is always a concern. In this instance, the only option is to have
a backup from a previous point.
If you decide that you need to implement periodic backups of data, also consider the
impact that backups will have on the system and decide on a strategy. For example:
Production impact: Backups are often intensive and need to be performed at a
time when they have the least impact on your environment.
Requirements: If you plan on implementing something like a block-level
snapshot to back up the database, you need to make sure the system
infrastructure supports it.
Sharding: If you are sharding the data, all shards must be consistent. You
cannot back up one without backing up all. Also you must stop the writes to the
cluster to generate the point-in-time backup.
Relevant data: You can also reduce the impact that backups have on your
system by only backing up data that is critical to your system. For example, if a
database will never change, it only needs to be backed up once, or if data in a
database can easily be regenerated but is very large, it may be worth accepting
the cost of regeneration rather than frequent backups.
There are two main approaches to backing up MongoDB. The first is to perform a
binary dump of the data using the mongodump command. The binary data can be
stored off-site for later use. For example, to dump the database for a replica set
named rset1 on host mg1.test.net and on a standalone system named
mg2.test.net to a folder called /opt/backup/current, use the following
command:
mongodump --host rset1/mg1.test.net:27018,mg2.test.net --out /opt/backup/current
The second method for backing up MongoDB databases is to use a file system
snapshot. The snapshots are quick to complete; however, they are also much larger.
You need to have journaling enabled, and the system has to support the block-level
backups. If you are interested in implementing a snapshot method for backups, check
out the guide at the following location:
http://docs.mongodb.org/manual/tutorial/back-up-databases-with-filesystem-
snapshots/.
Summary
This chapter finished off the MongoDB introduction by adding some more advanced
concepts. You learned how to define different types of indexes to improve the speed
for queries. You learned how to deploy a MongoDB replica set to ensure high
availability and improve read performance. The replica set has read/write master and
read-only replicas.
You were introduced to the concept of partitioning data in large collections into
shards that exist on separate partitions to allow your implementation to scale
horizontally. You also looked at different backup strategies and options to protect the
most critical data in your MongoDB databases.
Next
In the next chapter you get back to the Node.js world with the express module.
The express module allows you to more easily implement a webserver running on
Node.js by supporting routes and other functionality.
Part IV: Using Express to Make Life
Easier
18
Implementing Express in Node.js
Express is a lightweight module that wraps the functionality of the Node.js http
module in a simple to use interface. Express also extends the functionality of the
http module to make it easy for you to handle server routes, responses, cookies,
and statuses of HTTP requests. This chapter gets you started implementing Express
as the webserver for your Node.js applications. You learn how to configure the
Express server, design routes, and use the Request and Response objects to send
and receive HTTP requests. You also get a look at how to implement template
engines in Express.
Getting Started with Express
It is simple to start using Express in your Node.js projects. All you need to do is add
the express module using the following command from the root of your project:
npm install express
You can also add express to your package.json module to ensure that express is
installed when you deploy your application.
Once you have installed express, you need to create an instance of the express
class to act as the HTTP server for your Node.js application. The following lines of
code import the express module and create an instance of express that you can
use:
var express = require('express');
var app = express();

Configuring Express Settings
Express provides several application settings that control the behavior of the Express
server. These settings define the environment as well as how Express handles JSON
parsing, routing, and views. Table 18.1 lists the different settings that can be defined
on an express object.
The express object provides the set(setting, value) and
enable(setting) and disable(setting) methods to set the value of the
application settings. For example, the following lines of code enable the trust
proxy setting and set the view engine to pug:
app.enable('trust proxy');
app.disable('strict routing');
app.set('view engine', 'pug');
To get the value of a setting, you can use the get(setting),
enabled(setting), and disabled(setting) methods. For example:
app.enabled('trust proxy'); \\true
app.disabled('strict routing'); \\true
app.get('view engine'); \\pug
Table 18.1 Express application settings
Setting Description
env Defines the environment mode string, such as development,
testing, and production. The default is the value of
process.env.NODE_ENV.
trust
proxy
Enables/disables reverse proxy support. The default is disabled.
jsonp
callback
name
Defines the default callback name of JSONP requests. The default
is ?callback=.
json
replacer
Defines the JSON replacer callback function. The default is null.
json
spaces
Specifies the number of spaces to use when formatting JSON
response. The default is 2 in development, 0 in production.
case Enables/disables case sensitivity. For example, /home is not the

sensitive
routing
same as /Home. The default is disabled.
strict
routing
Enables/disables strict routing. For example, /home is not the
same as /home/. The default is disabled.
view
cache
Enables/disables view template compilation caching, which keeps
the cached version of a compiled template. The default is enabled.
view
engine
Specifies the default template engine extension that is used when
rendering templates if a file extension is omitted from the view.
views Specifies the path for the template engine to look for view
templates. The default is ./views.
Starting the Express Server
To begin implementing Express as the HTTP server for your Node.js application,
you need to create an instance and begin listening on a port. The following three
lines of code start a rudimentary Express server listening on port 8080:
var express = require('express');
var app = express();
app.listen(8080);
The app.listen(port) call binds the underlying HTTP connection to the port
and begins listening on it. The underlying HTTP connection is the same connection
produced using the listen() method on a Server object created using the http
library discussed earlier in this book.
In fact, the value returned by express() is actually a callback function that maps
to the callback function that is passed into the http.createServer() and
https.createServer() methods.
To illustrate this, Listing 18.1 illustrates implementing a basic HTTP and HTTPS
server using Node.js. Notice that the app variable returned from express() is
passed into the createServer() methods. Also, notice that an options object
is defined to set the host, key, and cert used to create the HTTPS server. Lines
13–15 implement a simple get route that handles the / path.
Listing 18.1 express_http_https.js: Implementing HTTP and HTTPS
servers using Express

Click here to view code image
01 var express = require('express');
02 var https = require('https');
03 var http = require('http');
04 var fs = require('fs');
05 var app = express();
06 var options = {
07 host: '127.0.0.1',
08 key: fs.readFileSync('ssl/server.key'),
09 cert: fs.readFileSync('ssl/server.crt')
10 };
11 http.createServer(app).listen(80);
12 https.createServer(options, app).listen(443);
13 app.get('/', function(req, res){
14 res.send('Hello from Express');
15 });
Configuring Routes
The previous section discussed how to start the Express HTTP server. However,
before the server can begin accepting requests, you need to define routes. A route is
simply a definition that describes how to handle the path portion of the URI in the
HTTP request to the Express server.
Implementing Routes
There are two parts when defining the route. First is the HTTP request method
(typically GET or POST). Each of these methods often needs to be handled
completely differently. Second, is the path specified in the URL—for example, / for
the root of the website, /login for the login page, and /cart to display a
shopping cart.
The express module provides a series of functions that allow you to implement
routes for the Express server. These functions all use the following syntax:
app.<method>(path, [callback . . .], callback)
The <method> portion of the syntax actually refers to the HTTP request method,
such as GET or POST. For example:
app.get(path, [middleware, ...], callback)
app.post(path, [middleware, ...], callback)
The path refers to the path portion of the URL that you want to be handled by the
callback function. The middleware parameters are 0 or more middleware
functions that are applied before executing the callback function. The
callback function is the request handler that handles the request and sends the
response back to the client. The callback function accepts a Request object as
the first parameter and a Response object as the second.
For example, the following code implements some basic GET and POST routes:
Click here to view code image
app.get('/', function(req, res){
res.send("Server Root");
});
app.get('/login', function(req, res){
res.send("Login Page");
});
app.post('/save', function(req, res){
res.send("Save Page");
});
When the Express server receives an HTTP request, it looks for a route that has been
defined for the appropriate HTTP method and path. If one is found, a Request and
Response object is created to manage the request and is passed into the callback
function(s) for the route.
Express also provides the app.all() method that works exactly the same as the
app.post() and app.get() methods. The only difference is that the callback
function for app.all() is called on every request for the specified path regardless
of HTTP method. Also, the app.all() method can accept the * character as a
wildcard in the path. This is a great feature for implementing request logging or
other special functionality to handle requests. For example:
Click here to view code image
app.all('*', function(req, res){
// global handler for all paths
});
app.all('/user/*', function(req, res){
// global handler for /user path
});

Applying Parameters in Routes
As you begin implementing routes, you will quickly see that for complex systems
the number of routes can get out of hand. To reduce the number of routes, you can
implement parameters within the URL. Parameters allow you to use the same route
for similar requests by providing unique values for different requests that define how
your application handles the request and builds the response.
For example, you would never have a separate route for every user or product in
your system. Instead you would pass in a user ID or product ID as a parameter to one
route, and the server code would use that ID to determine which user or product to
use. There are four main methods for implementing parameters in a route:
Query string: Uses the standard ?key=value&key=value... HTTP query
string after the path in the URL. This is the most common method for
implementing parameters, but the URLs can become long and convoluted.
POST params: When implementing a web form or other POST request, you
can pass parameters in the body of the request.
regex: Defines a regular expression as the path portion of the route. Express
uses the regex to parse the path of the URL and store matching expressions as
an array of parameters.
Defined parameter: Defines a parameter by name using :<param_name> in
the path portion of the route. Express automatically assigns that parameter a
name when parsing the path.
The following sections discuss these methods with the exception of POST params,
which is covered in the next chapter.
Applying Route Parameters Using Query Strings
The simplest method to add parameters to a route is to pass them using the normal
HTTP query string format of ?key=value&key=value... Then you can use
the url.parse() method discussed earlier in the book to parse the url attribute
of the Request object to get the parameters.
The following code implements a basic GET route to /find?author=
<author>&title=<title> that accepts author and title parameters. To
actually get the value of author and title, the url.parse() method is used to build
a query object:
Click here to view code image
app.get('/find', function(req, res){
var url_parts = url.parse(req.url, true);
var query = url_parts.query;
res.send('Finding Book: Author: ' + query.author +
' Title: ' + query.title);
});
For example, consider the following URL:
/find?author=Brad&title=Node
The res.send() method returns:
Finding Book: Author: Brad Title: Node
Applying Route Parameters Using Regex
One way to implement parameters in routes is to use a regex expression to match
patterns. This allows you to implement patterns that do not follow a standard /
formatting for the path.
The following code implements a regex parser to generate route parameters for GET
requests at the URL /book/<chapter>:<page> path. Notice that the values of
the parameters are not named; instead, req.params is an array of matching items
in the URL path.
app.get(/^\/book\/(\w+)\:(\w+)?$/, function(req, res){
res.send('Get Book: Chapter: ' + req.params[0] +
' Page: ' + req.params[1]);
});
For example, consider the following URL:
/book/12:15
The res.send() method returns
Get Book: Chapter: 12 Page: 15
Applying Route Parameters Using Defined Parameters
If your data is more structured, a defined parameter is a better method to use than
regex. Using a defined parameter allows you to define your parameters by name
within the route path. You define parameters in the path of the route using :
<param_name>. When using defined parameters, req.param is a function
instead of an array, where calling req.param(param_name) returns the value
of the parameter.
The following code implements a basic :userid parameter expecting a URL with
a /user/<user_id> format:
app.get('/user/:userid', function (req, res) {
res.send("Get User: " + req.param("userid"));
});
For example, consider the following URL:
/user/4983
The res.send() method returns
Get User: 4983
Applying Callback Functions for Defined Parameters
A major advantage of using defined parameters is that you can specify callback
functions that are executed if the defined parameter is found in a URL. When parsing
the URL, if Express finds a parameter that has a callback registered, it calls the
parameter’s callback function before calling the route handler. You can register more
than one callback function for a route.
To register a callback function, you use the app.param() method. The
app.param() method accepts the defined parameter as the first argument, and
then a callback function that receives the Request, Response, next, and
value parameters.
app.param(param, function(req, res, next, value){} );
The Request and Response objects are the same as are passed to the route
callback. The next parameter is a callback function for the next

app.param() callback registered, if any. You must call next() somewhere in
your callback function or the callback chain will be broken. The value
parameter is the value of the parameter parsed from the URL path.
For example, the following code logs every request received that has the userid
parameter specified in the route. Notice that next() is called before leaving the
callback function:
app.param('userid', function(req, res, next, value){
console.log("Request with userid: " + value);
next();
});
To see how the preceding code works, consider the following URL:
/user/4983
The userid of 4983 is parsed from the URL and the consol.log() statement
displays
Request with userid: 4983
Applying Route Parameters Example
To clarify the example, Listing 18.2 implements query strings, regex, and defined
parameters to Express routes. The POST method is covered in the next chapter.
Lines 8–16 implement the query string method. Lines 17–23 implement the regex
method. Lines 24–33 implement a defined parameter along with a callback function
that is executed whenever the userid parameter is specified in the request
parameters. Figure 18.1 shows the console output from the code in Listing 18.2.
Listing 18.2 express_routes.js: Implementing route parameters in
Express
Click here to view code image
01 var express = require('express');
02 var url = require('url');
03 var app = express();
04 app.listen(80);
05 app.get('/', function (req, res) {
06 res.send("Get Index");
07 });

08 app.get('/find', function(req, res){
09 var url_parts = url.parse(req.url, true);
10 var query = url_parts.query;
11 var response = 'Finding Book: Author: ' + query.author +
12 ' Title: ' + query.title;
13 console.log('\nQuery URL: ' + req.originalUrl);
14 console.log(response);
15 res.send(response);
16 });
17 app.get(/^\/book\/(\w+)\:(\w+)?$/, function(req, res){
18 var response = 'Get Book: Chapter: ' + req.params[0] +
19 ' Page: ' + req.params[1];
20 console.log('\nRegex URL: ' + req.originalUrl);
21 console.log(response);
22 res.send(response);
23 });
24 app.get('/user/:userid', function (req, res) {
25 var response = 'Get User: ' + req.param('userid');
26 console.log('\nParam URL: ' + req.originalUrl);
27 console.log(response);
28 res.send(response);
29 });
30 app.param('userid', function(req, res, next, value){
31 console.log("\nRequest received with userid: " + value);
32 next();
33 });
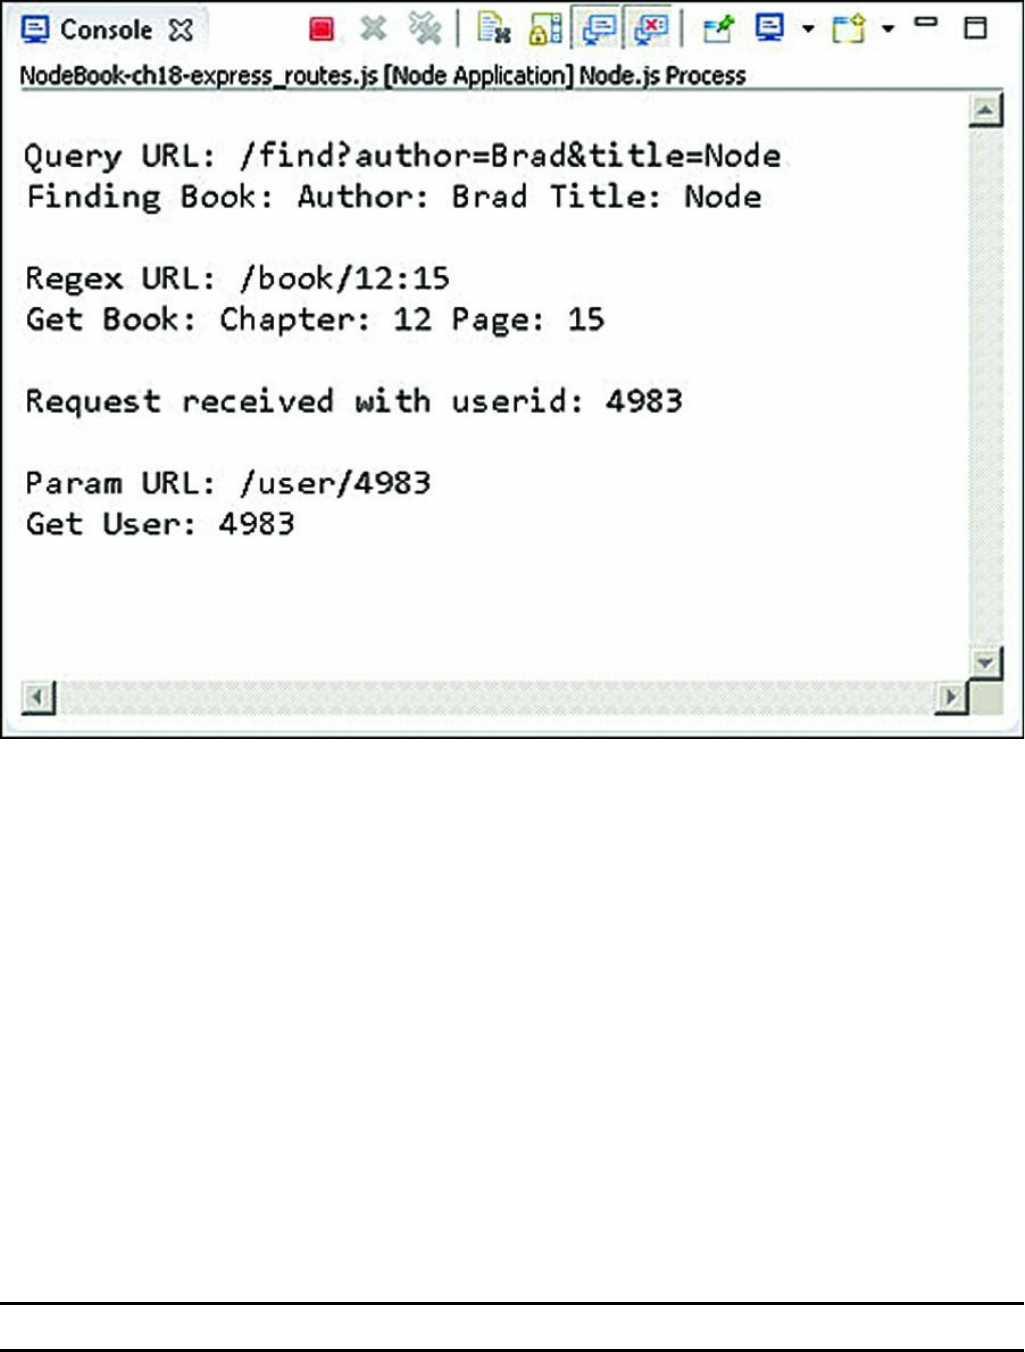
Figure 18.1 Implementing route parameters using query strings, regex, and defined
parameters
Using Requests Objects
The route handlers are passed a Request object as the first parameter. The
Request object provides the data and metadata about the request, including the
URL, headers, query string, and much more. This allows you to handle the request
appropriately in your code.
Table 18.2 lists some of the more commonly used properties available in the
Request object.
Table 18.2 Properties and methods of the HTTP Request object
Setting Description

originalUrl The original URL string of the request.
protocol The protocol string, for example, http or
https.
ip IP address of the request.
path Path portion of the request URL.
hostname Hostname of the request.
method HTTP method. GET, POST, etc.
query Query string portion of the request URL.
fresh A Boolean that is true when last-modified
matches the current.
stale A Boolean that is false when last-modified
matches.
secure A Boolean that is true when a TLS
connection is established.
acceptsCharset(charset) Returns true if the character set specified by
charset is supported.
get(header) Returns the value of the header.
Listing 18.3 illustrates accessing the various parts of the Request object. The
output in Figure 18.2 shows the actual values associated with a GET request.
Listing 18.3 express_request.js: Accessing properties of the Request
object in Express
Click here to view code image
01 var express = require('express');
02 var app = express();
03 app.listen(80);
04 app.get('/user/:userid', function (req, res) {
05 console.log("URL:\t " + req.originalUrl);
06 console.log("Protocol: " + req.protocol);
07 console.log("IP:\t " + req.ip);
08 console.log("Path:\t " + req.path);
09 console.log("Host:\t " + req.host);
10 console.log("Method:\t " + req.method);
11 console.log("Query:\t " + JSON.stringify(req.query));
12 console.log("Fresh:\t " + req.fresh);
13 console.log("Stale:\t " + req.stale);

14 console.log("Secure:\t " + req.secure);
15 console.log("UTF8:\t " + req.acceptsCharset('utf8'));
16 console.log("Connection: " + req.get('connection'));
17 console.log("Headers: " + JSON.stringify(req.headers,null,2));
18 res.send("User Request");
19 });

Figure 18.2 Accessing properties of the Request object
Using Response Objects
The Response object passed to the route handler provides the necessary
functionality to build and send a proper HTTP response. The following sections
discuss using the Response object to set headers, set the status, and send data back
to the client.

Setting Headers
An important part of formulating a proper HTTP response is to set the headers. For
example, setting the Content-Type header determines how the browser handles
the response. The Response object provides several helper methods to get and set
the header values that are sent with the HTTP response.
The most commonly used methods are get(header) and set(header,
value), which gets and sets any header value. For example, the following code
first gets the Content-Type header and then sets it:
var oldType = res.get('Content-Type');
res.set('Content-Type', 'text/plain');
Table 18.3 describes the helper methods to get and set header values.
Table 18.3 Methods to get and set header values on the Response object
Setting Description
get(header) Returns the value of the header specified.
set(header, value) Sets the value of the header.
set(headerObj) Accepts an object that contains multiple
'header':'value' properties. Each of the
headers in the headerObj is set in the
Response object.
location(path) Sets the location header to the path specified.
The path can be a URL path such as /login, a
full URL such as http://server.net/, a
relative path such as ../users, or a browser
action such as back.
type(type_string) Sets the Content-Type header based on the
type_string parameter. The type_string
parameter can be a normal content type such as
application/json, a partial type such as
png, or it can be a file extension such as
.html.
attachment([filepath]) Sets the Content-Disposition header to
attachment, and if a filepath is specified the

Content-Type header is set based on the file
extension.
Setting the Status
You also need to set the HTTP status for the response if it is something other than
200. It is important to send the correct status response so that the browser or other
applications can handle the HTTP response correctly. To set the status response, use
the status(number) method where the number parameter is the HTTP response
status defined in the HTTP spec.
For example, the following lines set different statuses:
res.status(200); // OK
res.status(300); // Redirection
res.status(400); // Bad Request
res.status(401); // Unauthorized
res.status(403); // Forbidden
res.status(500); // Server Error
Sending Response
You already saw the send() method in action when sending simple responses in
some earlier examples in this chapter. The send() method can use one of the
following formats, where status is the HTTP status code and body is a String or
Buffer object:
res.send(status, [body])
res.send([body])
If you specify a Buffer object, the Content-Type is automatically set to
application/octet-stream unless you explicitly set it to something else.
For example:
res.set('Content-Type', 'text/html');
res.send(new Buffer('<html><body>HTML String</body></html>'));
The send() method can really handle all the responses necessary as long as you set
the appropriate headers and status for the response. Once the send() method
completes, it sets the value of the res.finished and res.headerSent
properties. You can use these to verify the response was sent as well as how much

data was transferred. The following shows an example value of the
res.headerSent property:
HTTP/1.1 200 OK
X-Powered-By: Express
Content-Type: text/html
Content-Length: 92
Date: Tue, 17 Dec 2013 18:52:23 GMT
Connection: keep-alive
Listing 18.4 illustrates some of the basics of setting the status and headers, and
sending a response. Notice that in lines 18–21 the route for /error sets the status
to 400 before sending the response. Figure 18.3 shows the res.headerSent data
in the console output on the Express server.
Listing 18.4 express_send.js: Sending status, headers, and response data
using the Response object
Click here to view code image
01 var express = require('express');
02 var url = require('url');
03 var app = express();
04 app.listen(80);
05 app.get('/', function (req, res) {
06 var response = '<html><head><title>Simple Send</title></head>' +
07 '<body><h1>Hello from Express</h1></body></html>';
08 res.status(200);
09 res.set({
10 'Content-Type': 'text/html',
11 'Content-Length': response.length
12 });
13 res.send(response);
14 console.log('Response Finished? ' + res.finished);
15 console.log('\nHeaders Sent: ');
16 console.log(res.headerSent);
17 });
18 app.get('/error', function (req, res) {
19 res.status(400);
20 res.send("This is a bad request.");
21 });
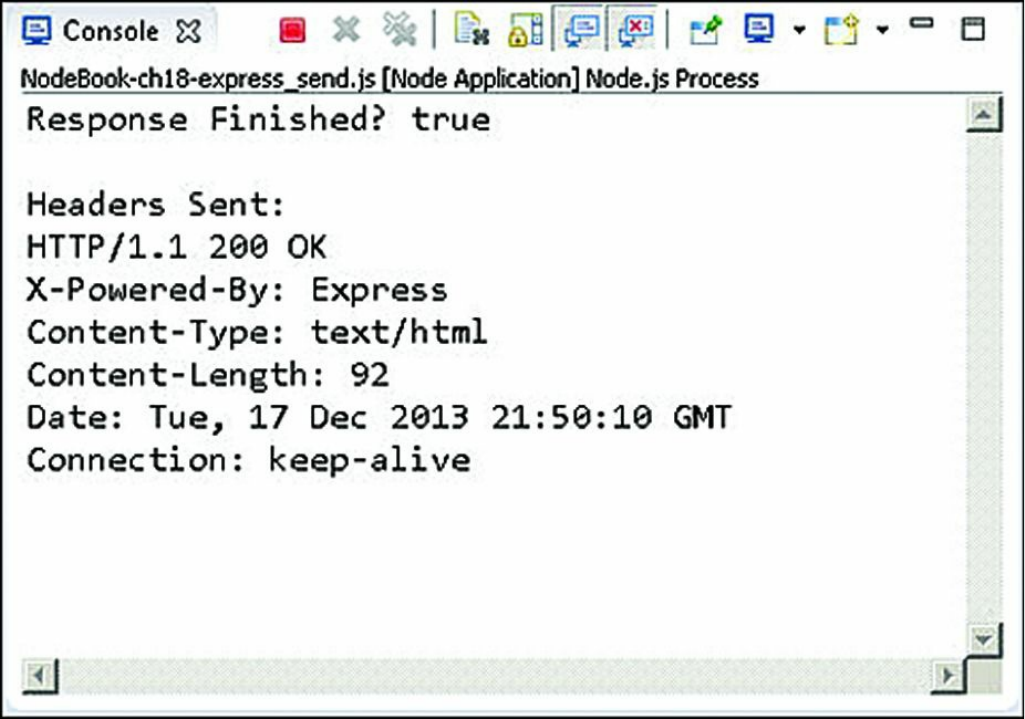
Figure 18.3 The res.headerSent output after a response has been sent
Sending JSON Responses
A growing trend has been to use JSON data to transfer information from the server
to the client and then having the client dynamically populate the HTML elements on
the page, rather than the server building HTML documents or parts of HTML
documents and sending the HTML to the client. Express facilitates sending JSON by
providing the json() and jsonp() methods on the Response object. These
methods use a similar syntax as send() except that the body is a JSON stringifiable
JavaScript object:
res.json(status, [object])
res.json([body])
res.jsonp(status, [object])
res.jsonp([object])

The JavaScript object is converted to a JSON string and sent back to the client. In the
case of jsonp(), the URL of the request object includes a ?callback=
<method> parameter and then the JSON string is wrapped in a function with the
method name that can be called from the browser client to support the JSONP
design.
Listing 18.5 implements both json() and jsonp() to illustrate sending JSON
data back to the server. Notice that in line 6 the json spaces application setting
is set to 4, and in line 7 a basic JavaScript object is passed into the json() call. On
line 12 an error code is set in the response, and the response object is a JSON object.
In lines 14–19 the jsonp() method is implemented. Notice that the jsonp
callback name is set to cb in line 15. That means that instead of passing ?
callback=<function> in the URL, the client needs to pass ?cb=
<function> in the URL. Figure 18.4 shows the output to the browser for each of
these calls.
Listing 18.5 express_json.js: Sending JSON and JSONP data in the
response from Express
Click here to view code image
01 var express = require('express');
02 var url = require('url');
03 var app = express();
04 app.listen(80);
05 app.get('/json', function (req, res) {
06 app.set('json spaces', 4);
07 res.json({name:"Smithsonian", built:'1846', items:'137M',
08 centers: ['art', 'astrophysics', 'natural history',
09 'planetary', 'biology', 'space', 'zoo']});
10 });
11 app.get('/error', function (req, res) {
12 res.json(500, {status:false, message:"Internal Server Error"});
13 });
14 app.get('/jsonp', function (req, res) {
15 app.set('jsonp callback name', 'cb');
16 res.jsonp({name:"Smithsonian", built:'1846', items:'137M',
17 centers: ['art', 'astrophysics', 'natural history',
18 'planetary', 'biology', 'space', 'zoo']});
19 });
Sending Files

A great helper method in Express is the sendfile(filepath) method on the
Response object. The sendfile() method does everything that needs to be
done to send files to the client in a single function call. Specifically, the
sendfile() method does the following:
Sets the Content-Type header to the type based on file extension
Sets other appropriate headers such as Content-Length
Sets the status of the response
Sends the contents of the file to the client using the connection inside the
Response object
The sendfile() method uses the following syntax:
res.sendfile(path, [options], [callback])
The path should point to the file that you want to send to the client. The options
parameter is an object that contains a maxAge property that defines the maximum
age for the content and a root property that is a root path to support relative paths
in the path parameter. The callback function is called when the file transfer is
complete and should accept an error object as the only parameter.
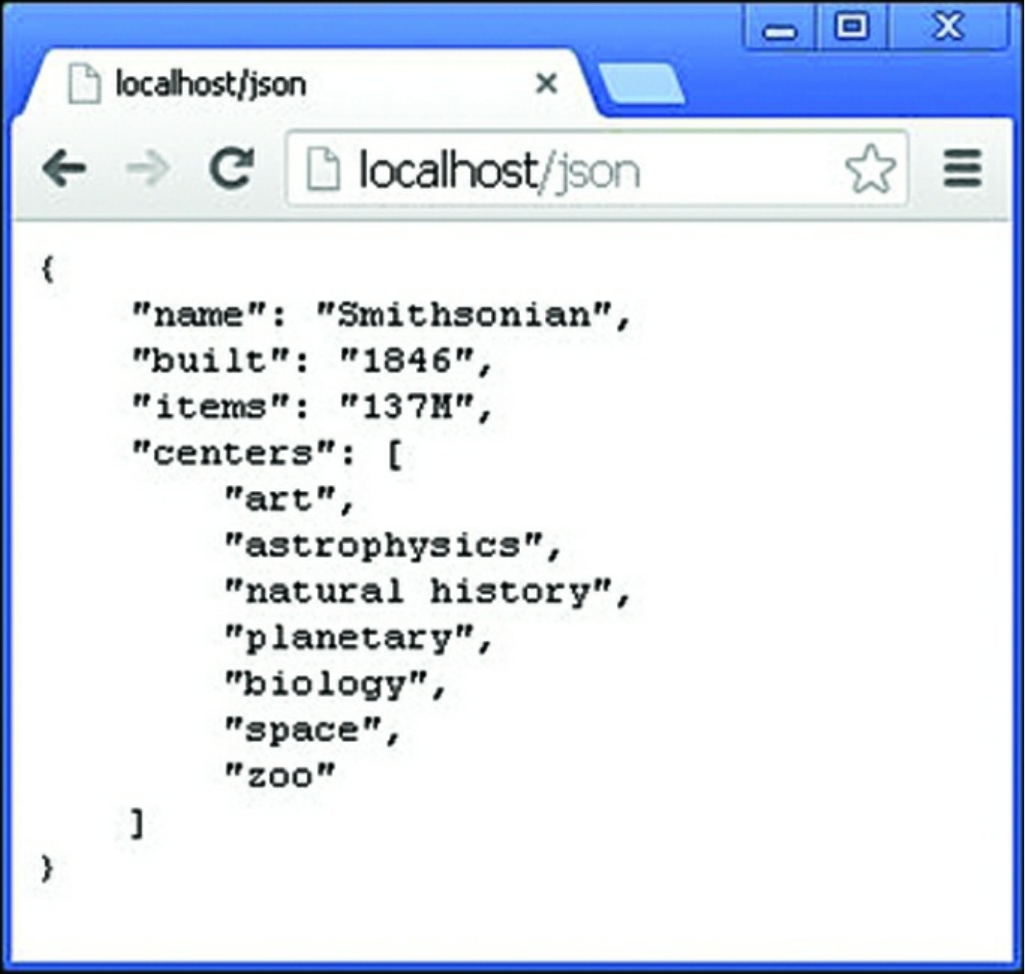

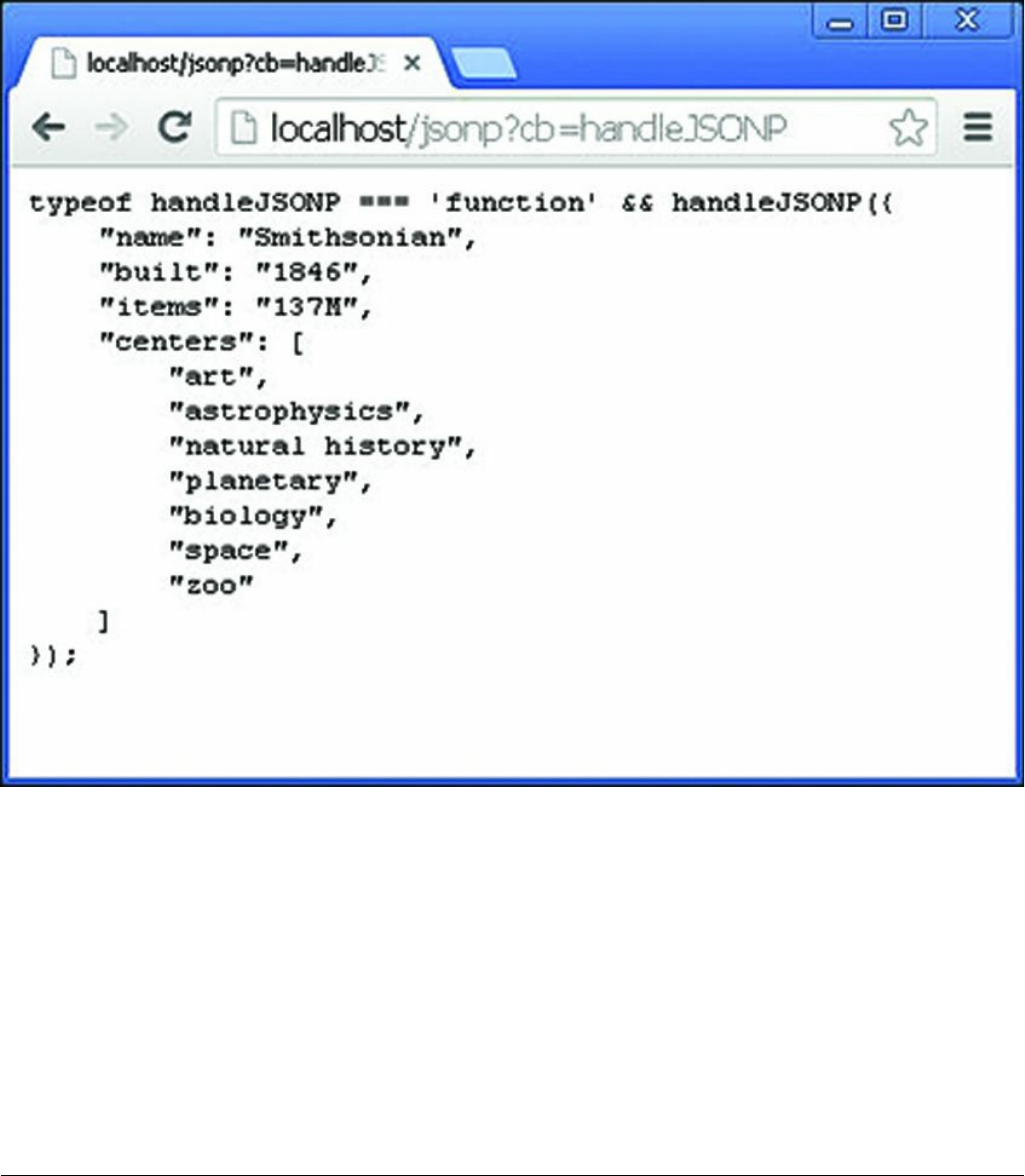
Figure 18.4 Sending JSON and JSONP data to the browser
Listing 18.6 illustrates how easy it is to send the contents of a file using the
sendfile() command. Notice that a root path is specified in line 8, so only the
filename is required in line 6. Also notice that the callback function has code to
handle the error. Figure 18.5 shows the image displayed in the browser.
Listing 18.6 express_send_file.js: Sending files in an HTTP request
from Express
Click here to view code image
01 var express = require('express');
02 var url = require('url');
03 var app = express();
04 app.listen(80);
05 app.get('/image', function (req, res) {

06 res.sendfile('arch.jpg',
07 { maxAge: 1,//24*60*60*1000,
08 root: './views/'},
09 function(err){
10 if (err){
11 console.log("Error");
12 } else {
13 console.log("Success");
14 }
15 });
16 });

Figure 18.5 Image file sent in an HTTP response to the client
Sending a Download Response
Express also includes a res.download() method that works similarly to the
res.sendfile() method with only a few differences. The res.download()
method sends the file in the HTTP response as an attachment, which means the
Content-Disposition header will be set. The res.download() method
uses the following syntax:

res.download(path, [filename], [callback])
The path points to the file to send to the client. The filename parameter can
specify a different filename that should be sent in the Content-Disposition
header. The callback function is executed once the file download has completed.
Redirecting the Response
A common need when implementing a webserver is the ability to redirect a request
from the client to a different location on the same server or on a completely different
server. The res.redirect(path) method handles redirection of the request to a
new location.
Listing 18.7 illustrates the various redirection addressing that you can use. In line 6 a
redirect is done to a completely new domain address. In line 9 a redirect is made to a
different path on the same server, and in line 15 a redirect is made to a relative path
on the same server.
Listing 18.7 express_redirect.js: Redirecting requests on an Express
server
Click here to view code image
01 var express = require('express');
02 var url = require('url');
03 var app = express();
04 app.listen(80);
05 app.get('/google', function (req, res) {
06 res.redirect('http://google.com');
07 });
08 app.get('/first', function (req, res) {
09 res.redirect('/second');
10 });
11 app.get('/second', function (req, res) {
12 res.send("Response from Second");
13 });
14 app.get('/level/A', function (req, res) {
15 res.redirect("../B");
16 });
17 app.get('/level/B', function (req, res) {
18 res.send("Response from Level B");
19 });

Implementing a Template Engine
A growing trend in the industry is to use a template engine to generate HTML using
a template file and application data rather than trying to build HTML files from
scratch or use static files. The template engines use the template object to build
HTML based on values provided by the application. Template engines provide two
benefits:
Simplicity: Templates try to make it easy to generate the HTML either by a
shorthand notation or by allowing JavaScript to be embedded in the HTML
document directly.
Speed: Template engines optimize the process of building the HTML
documents. Many compile a template and store the compiled version in a cache
that makes it faster to generate the HTML response.
The following sections discuss implementing template engines in Express. Several
template engines are available for use in Express, and in this section, you learn about
Pug (formerly Jade) and Embedded JavaScript (EJS). These two work in different
ways and together give you an idea of what is available. Pug uses a shorthand
notation of HTML in the template, so the template files do not look anything like
HTML. The advantage is that the template files are small and easy to follow. The
disadvantage is that you need to learn yet another language.
EJS, on the other hand, uses special notation to embed JavaScript in normal HTML
documents. This makes it much easier to transition from normal HTML. The
downside is that the HTML documents are even more complex than the originals and
not as tidy as Pug templates.
To run the example for this section, you need to install both the Pug and EJS
modules in your application using the following commands:
npm install Pug
npm install EJS
Defining the Engine
The first step in implementing a template engine is to define a default template
engine for the Express application. This is done by setting the view engine
setting on the express() application object. You also need to set the views
setting to the location where your template files are stored. For example, the
following sets the ./views directory as the root for template documents and pug
as the view engine:
var app = express();
app.set('views', './views');
app.set('view engine', 'pug');
Then you need to register the template engines for the template extensions that you
want them to handle using the app.engine(ext, callback) method. The
ext parameter is the file extension used for the template files, and the callback is
a function that supports Express’s rendering functionality.
Many engines provide the callback functionality in an __express function. For
example:
app.engine('pug', require('pug').__express)
The __express functionality often only works on the default extension name. In
that case, you can use a different function. For example, EJS provides the
renderFile function for that purpose. You can use the following to register EJS
for ejs extensions:
app.engine('ejs', require('ejs').__express)
However, if you want to register EJS for HTML extensions, you use
app.engine('html', require('ejs').renderFile)
Once the extension is registered, the engine callback function is be called to render
any templates with that extension. If you choose a different engine besides Pug or
EJS, you need to figure out how they expect to register with Express.
Adding Locals
When rendering a template, you often want to include dynamic data—for example,
to render a user page for user data just read from the database. In this case you can
generate a locals object that contains properties that map to variable names
defined in the templates. The express() app object provides the app.locals
property to store local variables.

To assign a local template variable directly, you can use dot syntax. For example, the
following code defines the local variables title and version:
app.locals.title = 'My App';
app.locals.version = 10;
Creating Templates
You also need to create template files. When creating template files, keep in mind
these considerations:
Reusability: Try to make your templates reusable in other parts of your
application and in other applications. Most template engines cache the
templates to speed up performance. The more templates you have requires more
caching time. Try to organize your templates so that they can be used for
multiple purposes. For example, if you have several tables of a data displayed in
your app, only make a single template for all of them that can not only
dynamically add the data, but can also set column headers, titles, and such.
Size: As template sizes grow, they tend to become more and more unwieldy.
Try to keep your templates compartmentalized to the type of data they are
presenting. For example, a page that has a menu bar, form, and table could be
split into three separate templates.
Hierarchy: Most websites and applications are built on some sort of hierarchy.
For example, the <head> section as well as a banner and menu may be the
same throughout the site. Use a separate template for components that show up
in multiple locations, and just include those subtemplates when building your
final page.
Listing 18.8 shows a basic EJS template that applies a set of local variables in a list
to display user information. The EJS code is basic and only uses the <%=
variable %> to pull values from the Express local variables.
Listing 18.8 user_ejs.html: Simple EJS template for displaying a user
Click here to view code image
01 <!DOCTYPE html>
02 <html lang="en">
03 <head>
04 <title>EJS Template</title>
05 </head>

06 <body>
07 <h1>User using EJS Template</h1>
08 <ul>
09 <li>Name: <%= uname %></li>
10 <li>Vehicle: <%= vehicle %></li>
11 <li>Terrain: <%= terrain %></li>
12 <li>Climate: <%= climate %></li>
13 <li>Location: <%= location %></li>
14 </ul>
15 </body>
16 </html>
Listing 18.9 and Listing 18.10 show using Pug to implement a main template and
then consume it in a subtemplate. The main template in Listing 18.9 is basic, only
implementing the doctype, html, head, and title elements. It also defines the
block content element defined in Listing 18.10.
Notice that line 1 in Listing 18.10 extends main_pug to include those elements first
and then adds the h1, ul, and li elements, which get values from the local
variables.
Listing 18.9 main_pug.pug: Simple Pug template that defines the main
webpage
Click here to view code image
1 doctype 5
2 html(lang="en")
3 head
4 title="Pug Template"
5 body
6 block content
Listing 18.10 user_pug.pug: Simple Pug template that includes the
main_pug.pug template and adds elements for displaying a user
Click here to view code image
1 extends main_pug
2 block content
3 h1 User using Pug Template
4 ul
5 li Name: #{uname}
6 li Vehicle: #{vehicle}
7 li Terrain: #{terrain}
8 li Climate: #{climate}

9 li Location: #{location}
Rendering Templates in a Response
Once you have the template engine defined and configured and have created your
templates, you can send a rendered template using the Express app object or using
the Response object. To render a template in the Express app you use the
app.render() method:
app.render(view, [locals], callback)
The view parameter specifies the view filename in the views directory. If no
extension is included on the file, the default extensions such as .pug and .ejs are
tried. The locals parameter allows you to pass in a locals object if one has not
been defined in app.locals already. The callback function is executed after
the template has been rendered and accepts an error object for the first parameter
and the string form of the rendered template as the second.
To render a template directly into the response, you can also use the
res.render() function, which works exactly the same as app.render(),
except that no callback is needed. The rendered results automatically are sent in the
response.
The app.render() and res.render() methods both work well. If you do not
need to do anything with the data before sending it, the res.render() method
saves the extra code to call res.send() to send the data.
Listing 18.11 puts all the template rendering concepts together in a couple of basic
examples. Lines 5–8 set up the views directory and view engine and register
pug and ejs. Then in lines 10–13 user information is defined in app.locals.
Lines 14–16 handle the /pug route, which directly renders the user_pug.pug
template from Listing 18.10 with the defined locals in the client response.
Lines 17–21 handle the /ejs route by first calling app.render() to render the
users_ejs.html template defined in Listing 18.8 into a string,
renderedData. Then that data is sent using the res.send() command. Figure
18.6 shows the rendered webpages from both functions.

Listing 18.11 express_templates.js: Implementing Pug and EJS
templates in Express
Click here to view code image
01 var express = require('express'),
02 pug = require('pug'),
03 ejs = require('ejs');
04 var app = express();
05 app.set('views', './views');
06 app.set('view engine', 'pug');
07 app.engine('pug', pug.__express);
08 app.engine('html', ejs.renderFile);
09 app.listen(80);
10 app.locals.uname = 'Caleb';
11 app.locals.vehicle = 'TARDIS';
12 app.locals.terrain = 'time and space';
13 app.locals.location = 'anywhere anytime';
14 app.get('/pug', function (req, res) {
15 res.render('user_pug');
16 });
17 app.get('/ejs', function (req, res) {
18 app.render('user_ejs.html', function(err, renderedData){
19 res.send(renderedData);
20 });
21 });
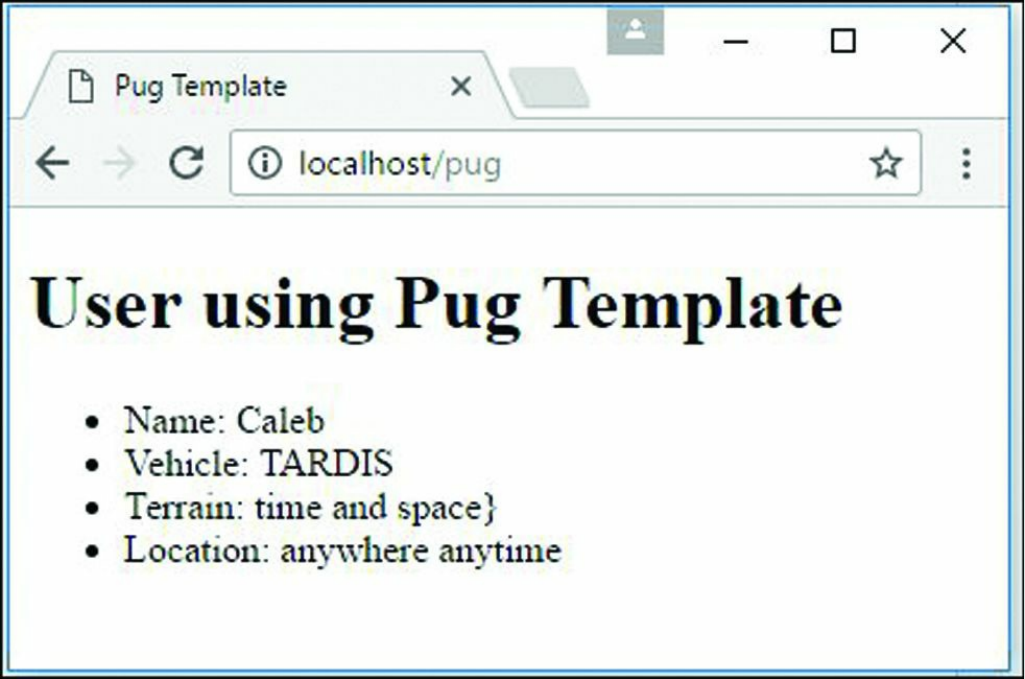
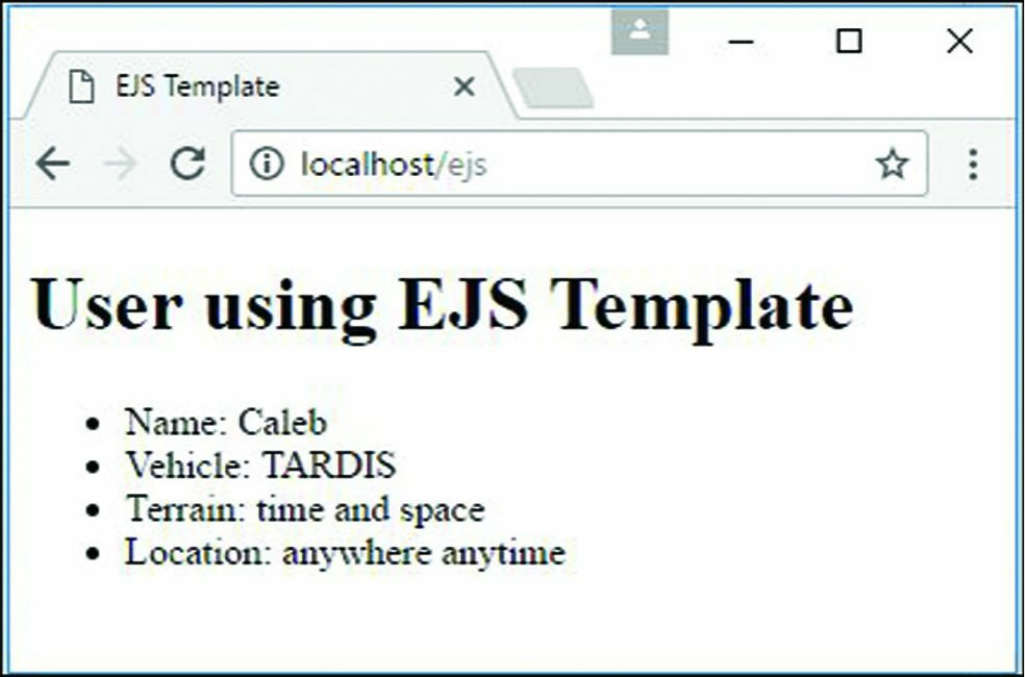
Figure 18.6 Webpages generated by rendering Pug and EJS templates
Summary
This chapter focused on the basics of getting Express installed, configured, and
running for your Node.js applications. You learned how to configure routes to handle
HTTP requests and how to use the Request object to get information about the
request. You also learned how to configure the headers and status for the response
and then send HTML strings, files, and rendered templates.
Next
In the next chapter, you implement some of the middleware that Express provides to
extend functionality. Middleware allows you to handle cookies, sessions, and
authentication as well as control the cache.
19
Implementing Express Middleware
Much of the functionality that Express brings to the table is through middleware
functions that get executed between the point when the request is received by
Node.js and the time that the response is sent. Express uses the connect module to
provide a middleware framework that allows you to easily insert middleware
functionality on a global or path level or for a single route.
The middleware provided with Express allows you to quickly support serving static
files, implement cookies, support sessions, process POST data, and much more. You
can even create your own custom middleware functions that can be used to
preprocess the requests and provide your own functionality.
This chapter focuses on the basics of implementing Express middleware. It also
provides some examples of using middleware to handle POST requests, serve static
files, and implement sessions, cookies, and authentication.
Understanding Middleware
Express provides a simple but effective middleware framework that allows you to
provide additional functionality between the point when a request is received and
when you actually handle the request and send the response. Middleware allows you
to apply authentication, cookies, and sessions and otherwise manipulate the request
before it is passed to the handler.
Express is built on top of the connect NPM module, which provides the
underlying middleware support. The following list describes some of the built-in
middleware components that come with Express. Additional Express middleware
components are available as NPMs if you query the NPM repository, and you can

also create your own custom middleware:
logger: Implements a formatted request logger to track requests to the server
static: Allows the Express server to stream static file get requests
favicon: Provides functionality to support sending the favicon to the browser
basicAuth: Provides support for basic HTTP authentication
cookieParser: Allows you to read cookies from the request and set cookies
in the response
cookieSession: Provides cookie-based session support
session: Provides a fairly robust session implementation
bodyParser: Parses the body data of POST requests into the req.body
property
query: Converts the query string to a JavaScript object and stores it as
req.query
compress: Provides Gzip compress support for large responses to the client
csrf: Provides cross-site request forgery protection
Middleware can be applied either globally to all routes under a specific path or to
specific routes. The following sections describe each of these methods.
Assigning Middleware Globally to a Path
To assign middleware to all routes, you can implement the use() method on the
Express application object. The use() method uses the following syntax:
use([path], middleware)
The path variable is optional and defaults to /, which mean all paths. The
middleware is a function that has the following syntax, where req is the
Request object, res is the Response object, and next is the next middleware
function to execute:
function(req, res, next)
Each of the built-in middleware components has a constructor that returns the
appropriate middleware function. For example, to apply the logger middleware to
all paths with default parameters, you use the following statements:
var express = require('express');
var app = express();
app.use('/', express.logger());
Assigning Middleware to a Single Route
You can also apply logger to a single route by passing it after the path
parameter. For example, in the following code, requests to the /loggedRoute are
logged; however, requests to the /otherRoute are not logged.
app.get('/loggedRoute', express.logger(), function(req, res) {
res.send('This request was logged.');
});
app.get('/otherRoute', function(req, res) {
res.send('This request was not logged.');
});
Adding Multiple Middleware Functions
You can assign as many middleware functions globally and to routes as you want.
For example, the following code assigns the query, logger, and bodyParser
middleware modules:
app.use('/', express.logger()).
use('/', express.query()).
use('/', express.bodyParser());
Keep in mind that the order you assign the functions is the order that they will be
applied during a request. Some middleware functions need to be added before others.
Using the query Middleware
One of the most useful and simple middleware components is the query
middleware. The query middleware converts the query string in the URL into a
JavaScript object and stores it as the query property on the Request object.
The following code shows the basics of implementing the query middleware. The
query string for the request looks like ?id=10,score=95. Notice that
JSON.stringify can be called on req.query because it is a JavaScript object.

Click here to view code image
var express = require('express');
var app = express();
app.use('/', express.query());
app.get('/', function(req, res) {
var id = req.query.id;
var score = req.query.score;
console.log(JSON.stringify(req.query));
res.send("done");
});
Serving Static Files
A commonly used Express middleware is the static middleware, which allows
you to serve static files directly from disk to the client. You can use static
middleware to support things like JavaScript files, CSS files, image files, and HTML
documents that do not change. The static module is easy to implement and uses
the following syntax:
express.static(path, [options])
The path is the root path to where the static files are referenced from in the
requests. The options parameter allows you to set the following properties:
maxAge: Sets the browser cache maxAge in milliseconds. The default is 0.
hidden: A Boolean that, when true, indicates that transfer of hidden files is
enabled. The default is false.
redirect: A Boolean that, when true, indicates that if the request path is a
directory, the request is redirected to the path with a trailing /. The default is
true.
index: Specifies the default filename for the root path. The default is
index.html.
Listings 19.1 through 19.3 show the Express code, HTML, and CSS that illustrate
implementing the static middleware to support serving a static HTML, CSS, and
image file. Notice that two static paths are implemented: one for the route / that
maps to a subdirectory named static and the second for route /images that
maps to a peer directory named images. Figure 19.1 shows the statically served
HTML document in a web browser.

Listing 19.1 express_static.js: Express code that implements two static
routes
Click here to view code image
1 var express = require('express');
2 var app = express();
3 app.use('/', express.static('./static'), {maxAge:60*60*1000});
4 app.use('/images', express.static( '../images'));
5 app.listen(80);
Listing 19.2 ./static/index.html: Static HTML file that requests the CSS
and image files from the server
Click here to view code image
01 <html>
02 <head>
03 <title>Static File</title>
04 <link rel="stylesheet" type="text/css" href="css/static.css">
05 </head>
06 <body>
07 <img src="/images/arch.jpg" height="200px"/>
08 <img src="/images/flower.jpg" height="200px" />
09 <img src="/images/bison.jpg" height="200px" />
10 </body>
11 </html>
Listing 19.3 ./static/css/static.css: CSS file that formats the images
Click here to view code image
1 img
2 {
3 display:inline;
4 margin:3px;
5 border:5px solid #000000;
6 }

Figure 19.1 HTML, CSS, and image files served statically to a browser
Handling POST Body Data
Another common use for Express middleware is to handle body data inside a POST
request. The data inside a request body can be in various formats such as POST
parameter strings, JSON strings, or raw data. Express provides the bodyParser
middleware that attempts to parse the data in the body of requests and properly

format them as the req.body property of the Request object.
For example, if POST parameters or JSON data is received they are converted to a
JavaScript object and stored as the req.body property of the Request object.
Listing 19.4 illustrates using the bodyParser middleware to support reading form
data posted to the server.
Lines 4–9 handle the GET request and respond with a basic form. It is not well
formatted HTML; however, it is adequate to illustrate the use of the bodyParser
middleware.
Lines 11–20 implement a POST request handler. Notice that in line 16, the first
name entered in the form field is accessed using req.body.first to help build
the hello message in the response. That really is it. You can handle any kind of form
data in the body in this manner. Figure 19.2 shows the web form usage in the
browser.
Listing 19.4 express_post.js: Handling POST parameters in the request
body using the bodyParser middleware
Click here to view code image
01 var express = require('express');
02 var app = express();
03 app.use(express.bodyParser());
04 app.get('/', function (req, res) {
05 var response = '<form method="POST">' +
06 'First: <input type="text" name="first"><br>' +
07 'Last: <input type="text" name="last"><br>' +
08 '<input type="submit" value="Submit"></form>';
09 res.send(response);
10 });
11 app.post('/',function(req, res){
12 var response = '<form method="POST">' +
13 'First: <input type="text" name="first"><br>' +
14 'Last: <input type="text" name="last"><br>' +
15 '<input type="submit" value="Submit"></form>' +
16 '<h1>Hello ' + req.body.first + '</h1>';
17 res.type('html');
18 res.end(response);
19 console.log(req.body);
20 });
21 app.listen(80);

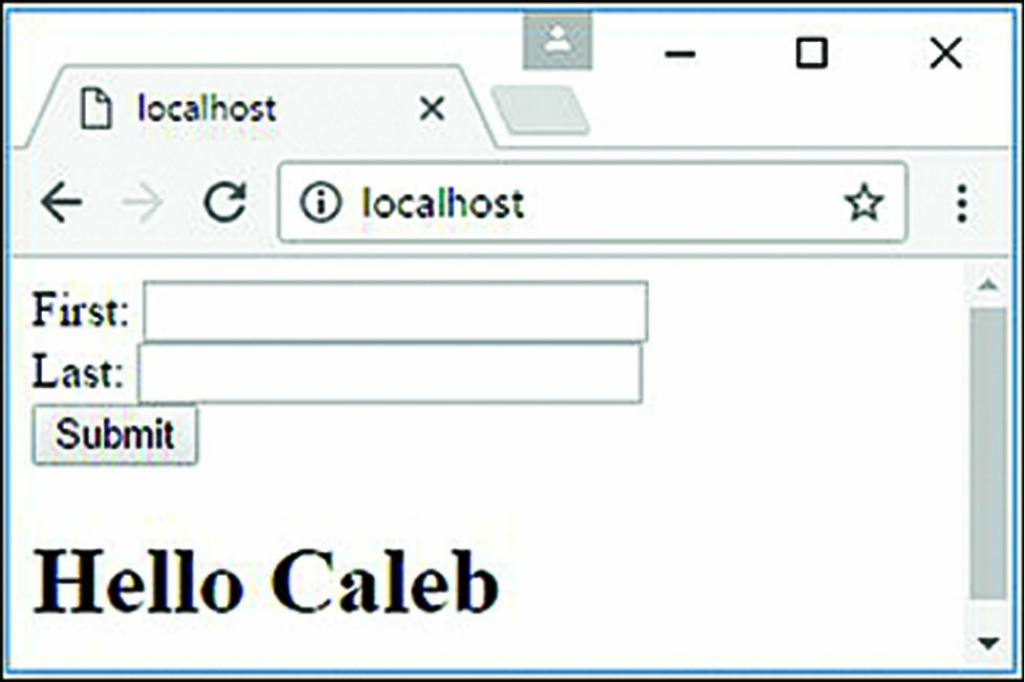
Figure 19.2 Handling POST parameters in the request body using the bodyParser
middleware
Sending and Receiving Cookies
The cookieParser middleware provided in Express makes handling cookies
simple. The cookieParser middleware parses the cookies from the request and
stores them in the req.cookies property as a JavaScript object. The
cookieParser middleware uses the following syntax:
express.cookieParser([secret])
The optional secret string parameter prevents cookie tampering by internally
signing the cookies using the secret string.
To set a cookie in a response, you can use the res.cookie() method shown
below:

res.cookie(name, value, [options])
A cookie with the name and value specified is added to the response. The
options property allows you to set the following properties for the cookie:
maxAge: Specifies the amount of time in milliseconds for the cookie to live
before it expires.
httpOnly: A Boolean that, when true, indicates that this cookie should only
be accessed by the server and by not client-side JavaScript.
signed: A Boolean that, when true, indicates that the cookie will be signed
and you need to access it using the req.signedCookie object instead of the
req.cookie object.
path: Specifies the path that the cookie applies to.
For example, the following sets a hasVisited cookie:
res.cookie('hasVisited', '1',
{ maxAge: 60*60*1000,
httpOnly: true,
path:'/'});
Cookies can be removed from the client using the res.clearCookie() method.
For example:
res.clearCookie('hasVisited');
Listing 19.5 illustrates a simple implementation of getting a cookie named
req.cookies.hasVisited from the request, and if it hasn’t been set, setting it.
Listing 19.5 express_cookies.js: Sending and receiving cookies using
Express
Click here to view code image
01 var express = require('express');
02 var app = express();
03 app.use(express.cookies());
04 app.get('/', function(req, res) {
05 console.log(req.cookies);
06 if (!req.cookies.hasVisited){
07 res.cookie('hasVisited', '1',
08 { maxAge: 60*60*1000,
09 httpOnly: true,

10 path:'/'});
11 }
12 res.send("Sending Cookie");
13 });
14 app.listen(80);
Implementing Sessions
You can also use Express middleware to provide session support for your
applications. For complex session management, you may want to implement it
yourself; however, for basic session support, the cookieSession middleware
works relatively well.
The cookieSession middleware utilizes the cookieParser middleware
underneath, so you need to add cookieParser prior to adding
cookieSession. The following shows the syntax for adding the
cookieSession middleware:
res.cookie([options])
The options property allows you to set the following properties for the cookie:
key: Name of the cookie that identifies the session.
secret: String used to sign the session cookie to prevent cookie tampering.
cookie: An object that defines the cookie settings, including maxAge, path,
httpOnly, and signed. The default is { path:'/',
httpOnly:true, maxAge:null }
proxy: A Boolean that, when true, causes Express to trust the reverse proxy
when setting secure cookies via x-forwarded-proto.
When cookieSession is implemented, the session is stored as an object in
req.session. Any changes you make to req.session flow across multiple
requests from the same browser.
Listing 19.6 shows an example of implementing a basic cookieSession session.
Notice that cookieParser is added first in line 3 and then cookieSession is
added in line 4 with a secret string. There are two routes in the example. When
/restricted route is accessed, the restrictedCount value is incremented in

the session and the response is redirected to /library. Then in library, if the
restrictedCount is not undefined, the value is displayed; otherwise, a
welcome message is displayed. Figure 19.3 shows the different outputs in the web
browser.
Listing 19.6 express_session.js: Implementing a basic cookie session
using Express
Click here to view code image
01 var express = require('express');
02 var app = express();
03 app.use(express.cookieParser());
04 app.use(express.cookieSession({secret: 'MAGICALEXPRESSKEY'}));
05 app.get('/library', function(req, res) {
06 console.log(req.cookies);
07 if(req.session.restricted) {
08 res.send('You have been in the restricted section ' +
09 req.session.restrictedCount + ' times.');
10 }else {
11 res.send('Welcome to the library.');
12 }
13 });
14 app.get('/restricted', function(req, res) {
15 req.session.restricted = true;
16 if(!req.session.restrictedCount){
17 req.session.restrictedCount = 1;
18 } else {
19 req.session.restrictedCount += 1;
20 }
21 res.redirect('/library');
22 });
23 app.listen(80);
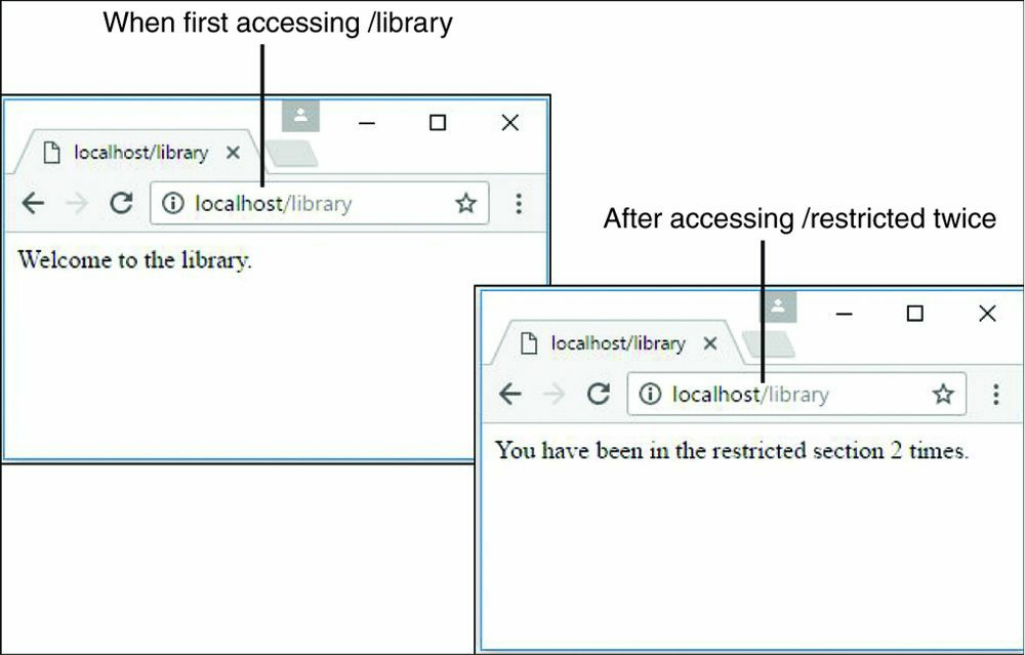
Figure 19.3 Using basic session handling to track improper access to a route
Applying Basic HTTP Authentication
Express middleware also is commonly used to apply basic HTTP authentication.
HTTP authentication uses the Authorization header to send the encoded
username and password from the browser to the server. If no authorization
information is stored in the browser for the URL, the browser launches a basic login
dialog box to allow the user to enter the username and password. Basic HTTP
authentication works well for basic sites that require a minimal authentication
method, and is easy to implement.
The basicAuth middleware function in Express provides the support to handle
basic HTTP authentication. The basicAuth middleware uses the following syntax:
express.basicAuth(function(user, pass){})
The function passed to basicAuth accepts the user and password and then

returns true if they are correct or false if they are not. For example:
app.use(express.basicAuth(function(user, password) {
return (user === 'testuser' && pass === 'test');
}));
Typically, you store the user and password in the database and inside the
authentication function retrieve the user object to validate against.
Listing 19.7 and Listing 19.8 illustrate how easy it is to implement the basicAuth
middleware. Listing 19.7 implements a global authentication, and Listing 19.8
implements authentication against a single route. Figure 19.4 shows the browser
requesting authentication and then the authenticated webpage.
Listing 19.7 express_auth.js: Implementing basic HTTP authentication
globally for the site
Click here to view code image
1 var express = require('express');
2 var app = express();
3 app.listen(80);
4 app.use(express.basicAuth(function(user, pass) {
5 return (user === 'testuser' && pass === 'test');
6 }));
7 app.get('/', function(req, res) {
8 res.send('Successful Authentication!');
9 });
Listing 19.8 express_auth_one.js: Implementing basic HTTP
authentication for a single route
Click here to view code image
01 var express = require('express');
02 var app = express();
03 var auth = express.basicAuth(function(user, pass) {
04 return (user === 'testuser' && pass === 'test');
05 });
06 app.get('/library', function(req, res) {
07 res.send('Welcome to the library.');
08 });
09 app.get('/restricted', auth, function(req, res) {
10 res.send('Welcome to the restricted section.');
11 });
12 app.listen(80);

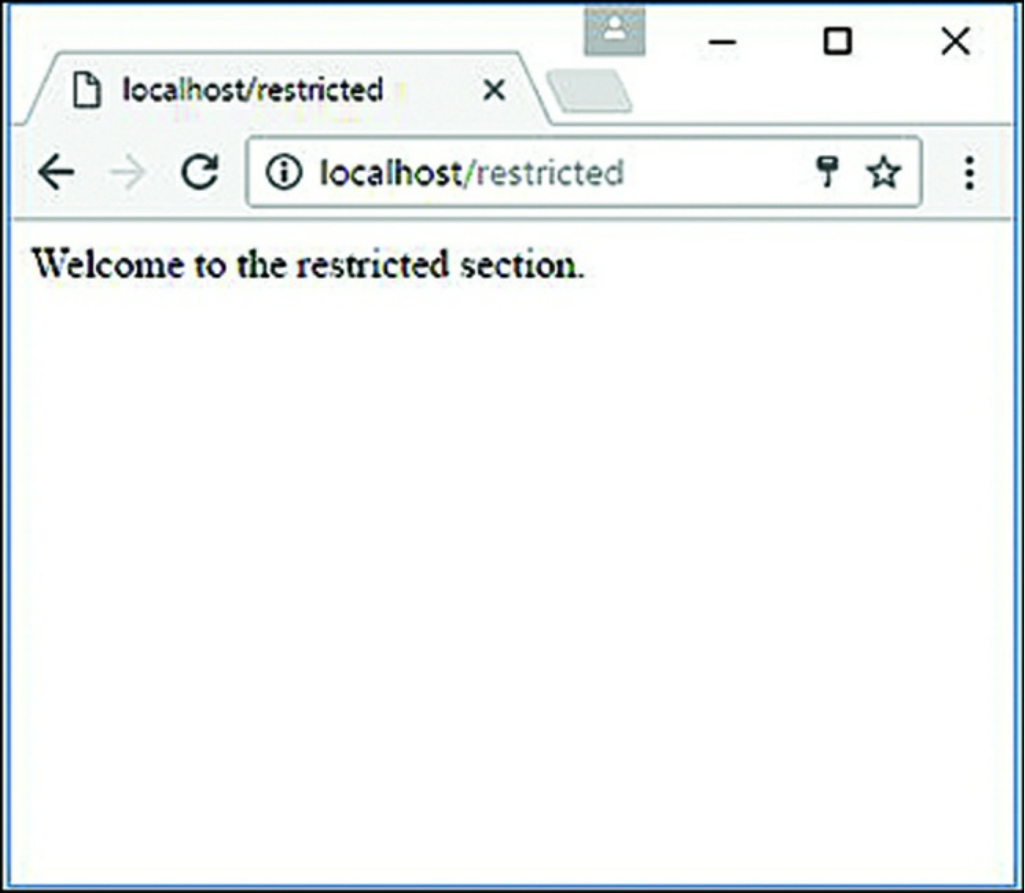
Figure 19.4 Using basic HTTP authentication
Implementing Session Authentication
A major downside to basic HTTP authentication is that the login sticks around as
long as the credentials are stored and is not really all that secure. A much better route
is to implement your own authentication and store the authentication in a session that
you can expire whenever you want.
The session middleware inside Express works well for implementing session
authentication. The session middleware attaches a Session object

req.session to the Request object that provides the session functionality.
Table 19.1 describes the methods that can be called on the res.session object.
Table 19.1 Methods on the res.session object to manage sessions
Option Description
regenerate([callback]) Removes the req.session object and
creates a new one enabling you to reset the
session
destroy([callback]) Removes the req.session object
save([callback]) Saves the session data
touch([callback]) Resets the maxAge count for the session cookie
cookie Specifies the cookie object linking the session to
the browser
Listing 19.9 illustrates implementing session authentication using the crypto
module to generate secure passwords. The example is rudimentary to keep it small
enough for the book; however, it contains the basic functionality so you can see how
to implement session authentication.
The passwords are encrypted using the hasPW() function in lines 3–6. Notice that
the bodyParser, cookieParser, and session middleware are used. Lines 41
and 42 simulate getting a user object from the database and comparing the stored
password hash with the password hash from the request body. The session is
created in lines 45–49. Notice that the regenerate() function is used to
regenerate a new session and that the callback function passed to
regenerate() sets the session.user and session.success properties of
the session. If the authentication fails, only the session.error property is set for
the session.
The /login get route in lines 26–38 displays a rudimentary login to get credentials.
If session.error is set, it is also displayed on the login page. The
/restricted route in lines 11–20 checks the session to see whether it has a valid
user, and if so displays a success message; otherwise, the session.error is set
and the response is redirected to /login.
The /logout route in lines 21–25 calls destroy() on the session to remove
the authentication. You could also have other code destroy the session based on a

timeout, amount of requests, and so on. Figure 19.5 shows the browser screens
forcing a login and then displaying success.
Listing 19.9 express_auth_session.js: Implementing session
authentication in Express
Click here to view code image
01 var express = require('express');
02 var crypto = require('crypto');
03 function hashPW(pwd){
04 return crypto.createHash('sha256').update(pwd).
05 digest('base64').toString();
06 }
07 var app = express();
08 app.use(express.bodyParser());
09 app.use(express.cookieParser('MAGICString'));
10 app.use(express.session());
11 app.get('/restricted', function(req, res){
12 if (req.session.user) {
13 res.send('<h2>'+ req.session.success + '</h2>' +
14 '<p>You have Entered the restricted section<p><br>' +
15 ' <a href="/logout">logout</a>');
16 } else {
17 req.session.error = 'Access denied!';
18 res.redirect('/login');
19 }
20 });
21 app.get('/logout', function(req, res){
22 req.session.destroy(function(){
23 res.redirect('/login');
24 });
25 });
26 app.get('/login', function(req, res){
27 var response = '<form method="POST">' +
28 'Username: <input type="text" name="username"><br>' +
29 'Password: <input type="password" name="password"><br>' +
30 '<input type="submit" value="Submit"></form>';
31 if(req.session.user){
32 res.redirect('/restricted');
33 }else if(req.session.error){
34 response +='<h2>' + req.session.error + '<h2>';
35 }
36 res.type('html');
37 res.send(response);
38 });
39 app.post('/login', function(req, res){
40 //user should be a lookup of req.body.username in database

41 var user = {name:req.body.username, password:hashPW("myPass")};
42 if (user.password === hashPW(req.body.password.toString())) {
43 req.session.regenerate(function(){
44 req.session.user = user;
45 req.session.success = 'Authenticated as ' + user.name;
46 res.redirect('/restricted');
47 });
48 } else {
49 req.session.regenerate(function(){
50 req.session.error = 'Authentication failed.';
51 res.redirect('/restricted');
52 });
53 res.redirect('/login');
54 }
55 });
56 app.listen(80);
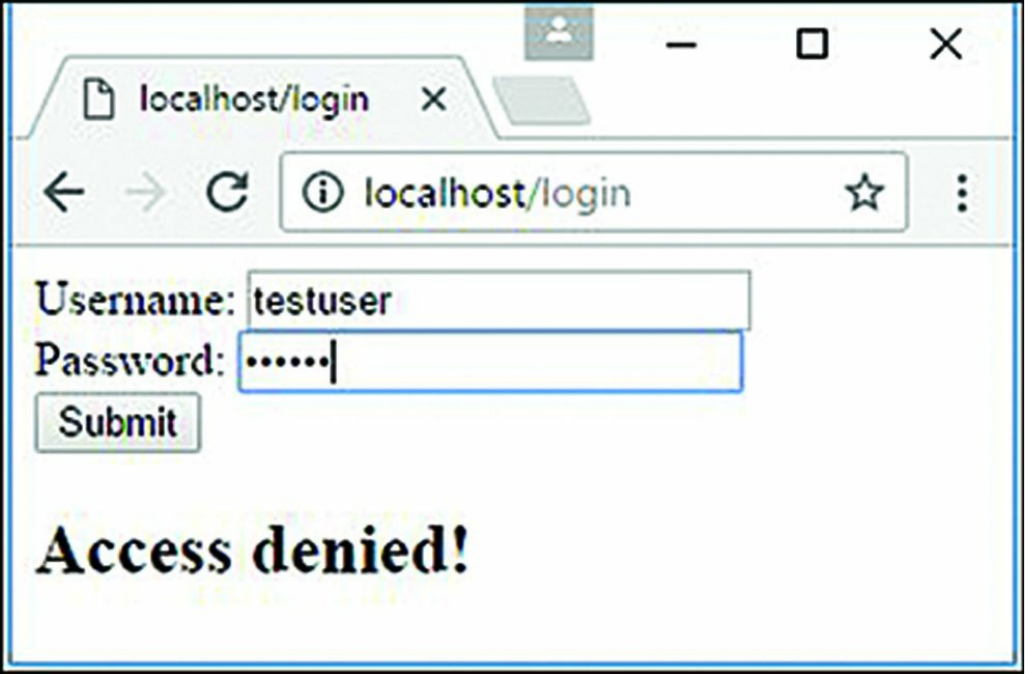
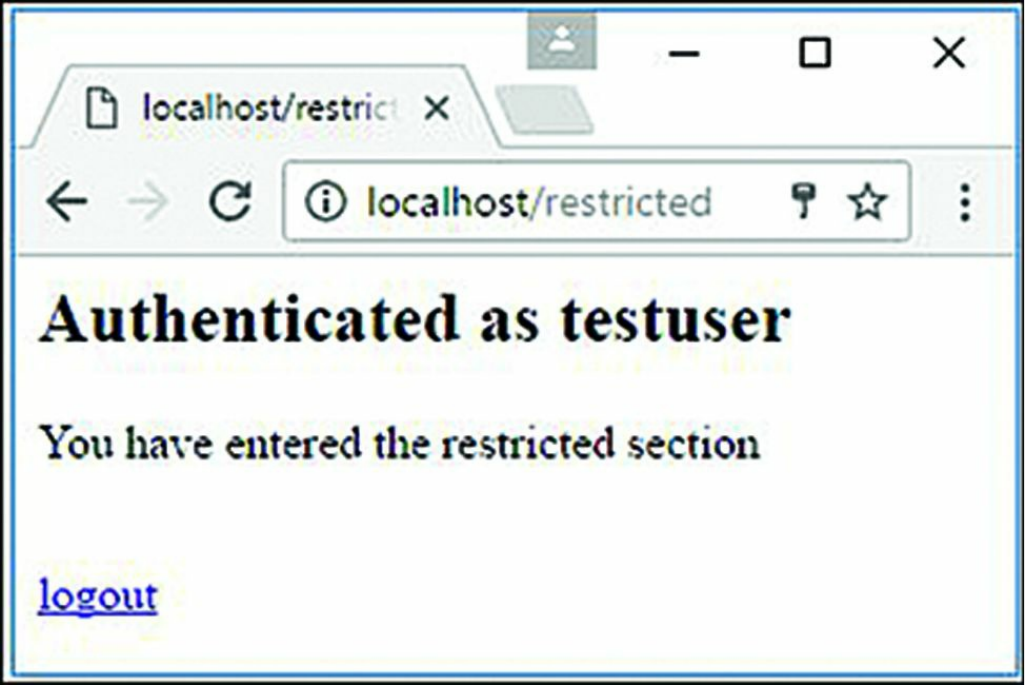
Figure 19.5 Implementing session authentication in Node.js using Express session
middleware
Creating Custom Middleware
A great feature of Express middleware is the ability to create your own. All you need
to do is provide a function that accepts the Request object as the first parameter,
the Response object as the second parameter, and a next parameter as the third.
The next parameter is a function passed by the middleware framework that points
to the next middleware function to execute, so you must call next() prior to
exiting your custom function or the handler will never be called.
To illustrate how easy it is to implement your own custom middleware functionality
in Express, Listing 19.10 implements a middleware function named
queryRemover() that strips the query string off the URL prior to sending it on to
the handler.

Notice that queryRemover() accepts a the Request and Response objects as
the first two parameters and the next parameter as the third. The next() callback
function is executed prior to leaving the middleware function as required. Figure
19.6 displays the console output showing that the query string portion of the URL
has been removed.
Listing 19.10 express_middleware.js: Implementing custom middleware
to remove the query string from the Request object
Click here to view code image
01 var express = require('express');
02 var app = express();
03 function queryRemover(req, res, next){
04 console.log("\nBefore URL: ");
05 console.log(req.url);
06 req.url = req.url.split('?')[0];
07 console.log("\nAfter URL: ");
08 console.log(req.url);
09 next();
10 };
11 app.use(queryRemover);
12 app.get('/no/query', function(req, res) {
13 res.send("test");
14 });
15 app.listen(80);
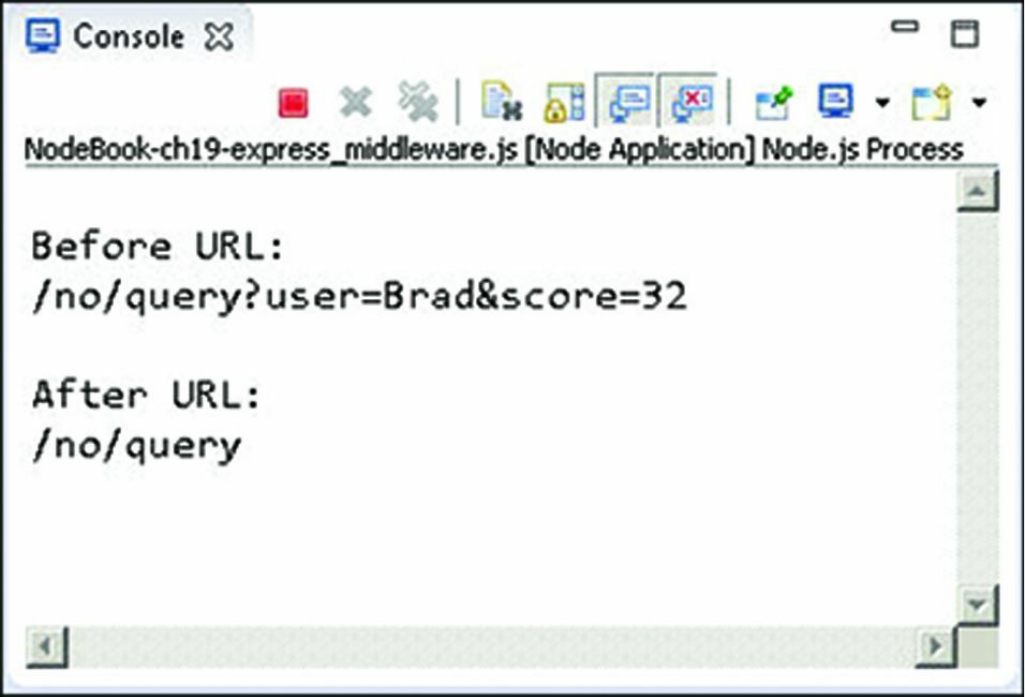
Figure 19.6 Implementing custom middleware to remove the query string from the
Request object
Summary
This chapter introduced you to the world of Express middleware and how to
implement middleware in your code. The parseBody middleware allows you to
parse POST parameters or JSON data in the body of the request. The static
middleware allows you to set routes to serve static files such as JavaScript, CSS, and
images. The cookieParser, cookieSession, and session middleware
allow you to implement cookies and sessions.
You also learned how to use the middleware framework to implement basic HTTP
authentication and more advanced session authentication. A great advantage of
Express middleware is that it is simple to implement your own middleware
functionality.
Next
In the next chapter, you jump into the world of Angular and get an overview of the
TypeScript language to prepare to build Angular components. You learn where
Angular fits in the Node.js stack and how to begin implementing it in your projects.
Part V: Learning Angular

20
Jumping into TypeScript
Angular is built on TypeScript, so it is important that you have an understanding of it
in order to use Angular. This chapter will help you understand the fundamentals of
TypeScript.
This chapter will familiarize you with the additions TypeScript gives to JavaScript.
If you are familiar with C# and object-oriented programming, TypeScript will seem
more familiar than JavaScript. This chapter will also familiarize you with the basics
of programming in TypeScript; it discusses types, interfaces, classes, modules,
functions, and generics. It is not intended to be a full language guide; rather, it is a
primer on the language to help prepare you for using Angular.
Learning the Different Types
Like JavaScript, TypeScript uses data types to handle data, but there are some
differences in syntax. TypeScript also adds in an extra type enumeration. The
following list goes over the types and variables and their syntax for TypeScript:
String: This data type stores character data as a string. The character data is
specified by either single or double quotation marks. All the data contained in
the quotes will be assigned to the string variable. Consider these examples:
var myString: string = 'Some Text';
var anotherString: string = "Some More Text";
Number: This data type stores data as a numeric value. Numbers are useful in
counting, calculations, and comparisons. Here are some examples:
var myInteger: number = 1;
var cost: number = 1.33;

Boolean: This data type stores a single bit that is either true or false.
Booleans are often used for flags. For example, you might set a variable to
false at the beginning of some code and then check it on completion to see if
the code execution hit a certain spot. The following examples define true and
false variables:
var yes: boolean = true;
var no: boolean = false;
Array: An indexed array is a series of separate distinct data items, all stored
under a single variable name. Items in the array can be accessed by their zero-
based index, using array[index]. The following are two examples of
creating a simple array and then accessing the first element, which is at index 0:
var arr:string[] = ["one", "two", "three"];
var firstInArr = arr[0];
var arr2:Array<number> = ["a", "second", "array"];
var firstInArr2 = arr[0];
Null: Sometimes you do not have a value to store in a variable, either because it
hasn’t been created or you are no longer using it. At such a time, you can set a
variable to null. Using null is better than assigning a value of 0 or an empty
string ("") because those may be valid values for the variable. By assigning
null to a variable, you can assign no value and check against null inside
your code, like this:
var newVar = null;
Any: In TypeScript you may not always know what type of variable you will be
getting or using. In such a case, you can assign the variable type as any to
allow any other type to be assigned to a variable. The following is an example
of assigning multiple types to the same variable:
Var anyType: any = "String Assigned";
Var anyType = 404;
Var anyType = True;
Void: You use void when you don’t want a variable to have any type at all. In
TypeScript, using void prohibits you from assigning or returning a value. In
most cases you use void when declaring a function you don’t want to have a
return value. The following example is a function of type void:
function empty(): void { document.write("code goes

here"); }
Enum: TypeScript lets us use enum, which allows you to give names to
enumerated values. The following is the syntax to declare enum:
Enum People {Bob, John, Alex}
Also, to reference the values in enum, you use this syntax:
var x = People.Bob
or this:
var y = People[0]
By using this syntax, you set var x equal to the number 0 and var y equal
to the string Bob.
Understanding Interfaces
Interfaces are a fundamental part of TypeScript. They allow you to have a set
structure for an application. They are powerful tools that allow you to set structures
for objects, functions, arrays, and classes. You can think of interfaces as defining
standards you want your interface subsets to follow.
To define an interface in TypeScript, you use the keyword interface followed by
the structure you want your objects to follow, like this:
interface Person {
hairColor: string;
age: number;
}
You can also add optional items to interfaces to allow some flexibility within a
program. You do this by using the syntax attribute?: Boolean;, as shown in
the following examples:
interface Person {
hairColor: string;
age: number;
alive?: Boolean;
}
You can define an interface for functions in TypeScript. This helps ensure that
functions take in specific types of parameters. The following example sets var z
equal to variables x + y, using an instance of the interface AddNums:
Click here to view code image
interface AddNums {
(num1: number, num2: number)
}
var x: number = 5;
var y: number = 10;
var newNum: AddNums;
newNum = function(num1: number, num2: number){
var result: number = num1 + num2;
document.write(result)
return result;
}
var z = newNum(x, y);
Interfaces also allow you to define how you would like
arrays to look. You give arrays the index type to define the
types allowed for an object’s index. You then give the return type for the index. Here
is an example:
interface Stringy {
[index: number]: string;
}
var coolArray: Stringy;
coolArray = ["Apples", "Bananas"];
Finally, interfaces allow you to define class
structures. As with a function interface, this allows
you to set required variables and methods within each
class. It’s important to note that this only describes
the public portion of a class and not a private section.
(We talk more about classes in the next section.) In
this example, the interface has a property called name and
a method called feed:
interface PersonInterface {
name: string;
feed();
}
Implementing Classes
JavaScript is a language that is based on prototype inheritance. Thanks to
ECMAScript 6 (ES6) and TypeScript, you can use class-based programming. You
can describe the objects you put into a program by using the base attributes to
describe classes.
To define a class in TypeScript, you use the syntax class ClassName{ code
goes here }. The following example defines a simple class that defines a
Person object with a feed function:
Click here to view code image
class Person {
name: string;
age: number;
hungry: boolean = true;
constructor(name: string, age?: number) {
this.name = name;
this.age = age;
}
feed() {
this.hungry = false;
return "Yummy!";
}
}
var Brendan = new Person("Brendan", 21);
Notice that the last line uses the new keyword to call into the constructor and initiate
a new instance of the class with the name Brendan. This uses the constructor
method from the class, which pulls in "Brendan" and 21 as its parameters to
build a person named Brendan.
Say that you have a method feed as part of your class that you would like to be able
to use. Here is how you use it:
Brendan.feed()
Class Inheritance
Classes are subject to inheritance, and you can pass functionality to other classes by
using methods and attributes. This example shows how you can make an extension
of Person called SecretAgent and give it extra properties that Person doesn’t
have:
Click here to view code image
class SecretAgent extends Person {
licenseToKill: boolean = true;
weaponLoaded: boolean = true;
unloadWeapon() {
this.weaponLoaded = false;
return "clip empty";
}
loadWeapon() {
this.weaponLoaded = true;
return "locked 'n' loaded";
}
}
var doubleOSeven = new SecretAgent("James Bond");
let loadResult = doubleOSeven.loadWeapon();
let unloadResult = doubleOSeven.unloadWeapon();
let feedResult = doubleOSeven.feed();
So now you have a class SecretAgent that extends the Person class. This
means you can still invoke the original feed method on the Person class, but it
gives you some extra attributes and methods on the SecretAgent class.
Implementing Modules
Modules in TypeScript allow you to organize your code over multiple files. This
helps keep your files shorter and more maintainable. Modules are able to do this by
allowing you to import the functionality you need from within the module you are
working on. You can do this if you export the class you need functionality from.
The following example splits the Person class into two separate modules:
Click here to view code image
module Person {
export interface PersonInterface {
name: string;
hungry: boolean;
feed();
}
}
/// <reference path="Person.ts" />
module Person {
export class Person implements PersonInterface {
name: string;
age: number;
hungry: boolean = true;
constructor(name: string, age?: number) {
this.name = name;
this.age = age;
}
feed() {
this.hungry = false;
return 'Yummy!';
}
}
}
var Brendan = newPerson("Brendan", 21);
In this example, the root module has the interface for Person. The submodule starts
by using /// <reference path="Person.ts" /> to point to the root
module so it can have access to the PersonInterface interface. The example
then proceeds to build the Person class in the submodule.
Understanding Functions
Functions in TypeScript are similar to functions in JavaScript, but they have added
capabilities. TypeScript functions enable you to give types to the parameters and
even to what will be returned by a function. While giving a function a type is
optional, it’s very helpful when you want to make sure that your functions don’t give
you back something you don’t want.
TypeScript allows you to give a function a return type, much in the same way you
give return types to variables. You first declare the function name and parameters,
and then you can define the type of the function. Also remember that you can assign
types to the parameters as well. Check out the following example:
function hello(x: string, y: string): string{
Return x + ' ' + y;
}
Like interfaces, TypeScript functions give you the power to create optional
parameters. This is helpful when you know that parameters may be circumstantial.
It’s important to know that optional parameters need to come after the required ones,
or an error will be thrown. The following example shows a function
soldierOfGondor which takes in a required variable name, and an optional
variable prefWeapon:
function soldierOfGondor(name: string, prefWeapon?: string){
Return "Welcome " + name + " to the Gondor infantry."
}
With TypeScript functions, you can create default parameters. A default parameter is
optional, but if it isn’t given, it has a default value instead of nothing. You create a
default parameter by setting one of the parameters equal to the desired default value:
function soldierOfGondor(name: string, prefWeapon = "Sword"){
return "hello " + name + " you can pick up your " + prefWeapon + " at the armory.";
}
Summary
Understanding TypeScript is critical to being able to use Angular to its full potential.
This chapter goes over enough of the fundamental TypeScript properties and
methods to get you through the rest of the book. You’ve learned how TypeScript
uses its different types and how to write and use interfaces, classes, modules, and
functions.
Next
In the next chapter you will learn about Angular and get an overview of its design
and intention. Then you will learn how to create your own Angular application step-
by-step, preparing you to jump into future chapters.
21
Getting Started with Angular
Angular is a perfect client-side framework for most web applications because it
provides a very clean and structured approach. With a clean, structured front end,
you will find that it is much easier to implement clean, well-structured server-side
logic.
This chapter introduces you to Angular as well as the major components involved in
an Angular application. It is critical that you understand these components before
you try to implement an Angular application because the framework is different from
more traditional JavaScript web application programming.
After you get a good grasp of the components of an Angular application, you’ll learn
how to construct a basic Angular application, step by step. This should prepare you
to jump into the following chapters, which provide much more detail on
implementing Angular.
Why Angular?
JavaScript is a powerful programming language that allows developers to use a web
browser as a full application platform. Angular provides a great framework that
makes it faster and easier to create client-side JavaScript applications. Developers
use Angular because it provides a lot of the structure of web applications—such as
data binding, dependency injection, and HTTP communications—that teams would
otherwise need to develop themselves.
Understanding Angular

Angular is a JavaScript framework, which means it provides a number of APIs and
structure that helps you quickly and easily create complex client-side code. Angular
does a great job at providing not only features but also a basic framework and
programming model to create client applications. The following sections describe the
most important aspects of the Angular framework and how they contribute to make
Angular a great JavaScript framework.
Modules
In general, Angular apps use a modular design. While not required, modules are
highly recommended because they allow you to separate your code into separate
files. This helps you keep your code files short and manageable while still allowing
you to access the functionality from each one.
Unlike how you use modules with TypeScript, with Angular you import external
modules at the top of a file and export the functionality you need at the bottom. You
do this by using the key terms import and export, with the following syntax:
Import {Component} from 'angular2/core';
Export class App{}
Directives
Directives are JavaScript classes with metadata that defines the structure and
behavior. Directives provide the majority of UI functionality for Angular
applications. There are three major types of directives:
Components: A component directive is a directive that incorporates an HTML
template with JavaScript functionality to create a self-contained UI element that
can be added to an Angular application as a custom HTML element.
Components are likely to be the directives you use the most in Angular.
Structural: You use structural directives when you need to manipulate the
DOM. Structural directives allow you to create and destroy elements and
components from a view.
Attribute: An attribute directive changes the appearance and behavior of HTML
elements by using HTML attributes.
Data Binding
One of the best features of Angular is the built-in data binding—the process of
linking data from a component with what is displayed in a web page. Angular
provides a very clean interface to link model data to elements in a web page.
When data is changed on a web page, the model is updated, and when data is
changed in the model, the web page is automatically updated. This way, the model is
always the only source for data represented to the user, and the view is just a
projection of the model.
Dependency Injection
Dependency injection is a process in which a component defines dependencies on
other components. When the code is initialized, the dependent component is made
available for access within the component. Angular applications make heavy use of
dependency injection.
A common use for dependency injection is consuming services. For example, if you
are defining a component that requires access to a web server via HTTP requests,
you can inject the HTTP services into the component, and the functionality is
available in the component code. In addition, one Angular component consumes the
functionality of another via dependency.
Services
Services are the major workhorses in the Angular environment. Services are
singleton classes that provide functionality for a web app. For example, a common
task of web applications is to perform AJAX requests to a web server. Angular
provides an HTTP service that houses all the functionality to access a web server.
The service functionality is completely independent of context or state, so it can be
easily consumed from the components of an application. Angular provides a lot of
built-in service components for basic uses, such as HTTP requests, logging, parsing,
and animation. You can also create your own services and reuse them throughout
your code.
Separation of Responsibilities

An extremely important part of designing Angular applications is the separation of
responsibilities. The whole reason you choose a structured framework is to ensure
that code is well implemented, easy to follow, maintainable, and testable. Angular
provides a very structured framework to work from, but you still need to ensure that
you implement Angular in the appropriate manner.
The following are a few rules to follow when implementing Angular:
The view acts as the official presentation structure for the application. Indicate
any presentation logic as directives in the HTML template of the view.
If you need to perform any DOM manipulation, do it in a built-in or custom
directive JavaScript code—and nowhere else.
Implement any reusable tasks as services and add them to your modules by
using dependency injection.
Ensure that the metadata reflects the current state of the model and is the single
source for data consumed by the view.
Define controllers within the module namespace and not globally to ensure that
your application can be packaged easily and avoid overwhelming the global
namespace.
Adding Angular to Your Environment
To get started with Angular, you need to set up a few things first to get it ready to
use. Here’s what you need:
Angular libraries to make Angular applications
A web server to serve the files to the browser
A transpiler to convert your TypeScript code back to JavaScript
A watcher so that the transpiler knows when there has been a file change
An editor in which to write your code
Note
We recommend that you use Visual Studio Code (https://code.visualstudio.com/);
it has good TypeScript and Angular support built in, and is a lightweight editor
with many available extensions.

Fortunately, the Angular team has done most of the work for you here. All you need
to do is go to the Angular QuickStart website, which walks you through the process.
The following Angular QuickStart website takes you through the basics of Angular:
https://angular.io/docs/ts/latest/quickstart.html. This website explains the basics of
Angular’s command-line interface (CLI): https://angular.io/docs/ts/latest/cli-
quickstart.html.
Note
We recommend that you use the CLI while learning Angular. The CLI generates
all the bootstrap and configuration files for you. It also includes a lightweight
server for testing your code.
Using the Angular CLI
Angular provides a powerful CLI that makes building out Angular applications a
much more streamlined process. By using the CLI, you will quickly be able to
generate new Angular applications, components, directives, pipes, and services. The
following sections go over some of the most important tools available through the
CLI.
Generating Content with the CLI
One of the most common purposes of the CLI is to generate content for applications.
It automates the process of creating and bootstrapping a new Angular application,
letting you get straight to the meat of the application.
From the command line, run the command ng new [application name] to
create a new Angular application. If you navigate to that newly created application,
you have access to many other useful commands. Table 21.1 lists some of the most
important commands that the CLI has to offer.
Table 21.1 Angular CLI Command Options
Command Alias Purpose
ng new Creates a new Angular application
ng serve Builds and runs the angular
application for testing

ng eject Makes the webpack config files
available to be edited
ng generate
component [name]
ng g c
[name]
Creates a new component
ng generate
directive [name]
ng g d
[name]
Creates a new directive
ng generate module
[name]
ng g m
[name]
Creates a module
ng generate pipe
[name]
ng g p
[name]
Creates a pipe
ng generate service
[name]
ng g s
[name]
Creates a service
ng generate enum
[name]
ng g e
[name]
Creates an enumeration
ng generate guard
[name]
ng g g
[name]
Creates a guard
ng generate
interface [name]
ng g i
[name]
Creates an interface
While an in-depth guide of everything the CLI has to offer is beyond the scope of
this book, it is worth learning how to use.
Creating a Basic Angular Application
Now that you understand the basics of the Angular CLI, you are ready to get started
implementing Angular code. This section walks you through a very basic Angular
application that implements an Angular component with an inline template, an inline
stylesheet, and the Component class.
For this example, it is expected that you have started working through the Angular
QuickStart guide and understand the basics of the CLI. The first thing to do is to
create a directory where you can place your projects.
When you have your directory set up, the next step is to generate your first Angular
application. Run the following command to create the application for this example:
ng new first
Next, run the following command to launch a server that will render the application:
ng serve
The following sections describe the important steps in implementing the Angular
application and the code involved in each step. Each of these steps is described in
much more detail in later chapters, so don't get bogged down in them here. What is
important at this point is that you understand the process of implementing the
HTML, component, class, and bootstrap and generally how they interact with each
other.
Figure 21.1 shows the web application you are going to create. It shows a simple
message that has been printed out by an Angular component.

Figure 21.1 Implementing a basic Angular web application that uses a component to
load an HTML template to the view
Creating Your First Angular App
Now that you’ve seen how Angular works, let’s get into a practical example. This
example doesn’t change much that was generated by the CLI, but it will familiarize
you with the different pieces of an Angular application.
To get started, navigate to the file src/app/app.component.ts in your
application directory. It looks like this:
Click here to view code image
01 import {Component} from '@angular/core';
02 @Component({
03 selector: 'message',
04 template: `
05 <h1>Hello World!</h1>
06 `,

07 })
08 export class Chap3Component{
09 title = 'My First Angular App';
10 }
Notice that line l imports the component module. Then the component decorator is
defined and given a selector and a template. The selector is the name given to the
component, and the template is the HTML that the component will generate. For this
example, change the template and selector to match the ones on lines 3–6 and change
the title variable as shown on line 9.
After the decorator is defined, lines 8–10 create the export class to make your
component available to the rest of the application as well as define variables and
functions that are made available to the component template.
Understanding and Using NgModule
Now that you’ve created your component, you need some way to tell the rest of your
app about it. You do this by importing NgModule from Angular. NgModule is an
Angular decorator that allows you to place all your imports, declarations, and
bootstrap files for a particular module in a single location. This makes bootstrapping
all the files in large applications very easy. NgModule has several metadata options
that allow different things to be imported, exported, and bootstrapped:
providers: This is an array of injectable objects that are available in the
injector of the current module.
declarations: This is an array of directives, pipes, and/or components that
belong in the current module.
imports: This is an array of directives, pipes, and/or components that will be
available to other templates within the current module.
exports: This is an array of directives, pipes, and/or modules that can be used
within any component that imports the current module.
entryComponents: This is an array of components that will be compiled
and will have a component factory created when the current module is defined.
bootstrap: This is an array of components that will be bootstrapped when
the current module is bootstrapped.
schemas: This is an array of elements and properties that aren’t directives or
components.

id: This is a simple string that acts as a unique ID to identify this module.
As is often the case, it’s easiest to learn this by doing, so let’s get started using
NgModule. Navigate to the file named app.module.ts in your app folder. It
looks like this:
Click here to view code image
01 import { BrowserModule } from '@angular/platform-browser';
02 import { NgModule } from '@angular/core';
03 import { FormsModule } from '@angular/forms';
04 import { HttpModule } from '@angular/http';
05
06 import { Chap3Component } from './app.component';
07
08 @NgModule({
09 declarations: [
10 Chap3Component
11 ],
12 imports: [
13 BrowserModule,
14 FormsModule,
15 HttpModule
16 ],
17 providers: [],
18 bootstrap: [Chap3Component]
19 })
20 export class AppModule { }
First, you import NgModule, BrowserModule, and any custom components,
directives, services, and so on that your app has. Second, you configure the
@NgModule object to bootstrap everything together. Notice that when the
component is imported, the bootstrap property has the component’s export class
name. Finally, you export the class named AppModule.
Creating the Angular Bootstrapper
Now that you’ve looked at your component and module, you need some way to tell
the rest of your app about it. You do this by importing the bootstrapper through
platformBrowserDynamic from Angular.
Navigate to the file named main.ts in your app folder, which looks like this:
Click here to view code image
01 import { enableProdMode } from '@angular/core';
02 import { platformBrowserDynamic } from '@angular/platform-browser-dynamic';
03
04 import { AppModule } from './app/app.module';
05 import { environment } from './environments/environment';
06
07 if (environment.production) {
08 enableProdMode();
09 }
10
11 platformBrowserDynamic().bootstrapModule(AppModule);
The imports are enableProdMode, platformBrowserDynamic,
AppModule, and environment. enableProdMode uses Angular’s
optimizations for a production application. platformBrowserDynamic is used
to bootstrap the application together, using the application module AppModule, as
shown in the following code:
platformBrowserDynamic().bootstrapModule(AppModule);
The environment variable determines the state of the application—whether it should
be deployed in development mode or production mode.
platform is then assigned the result from the function
platformBrowserDynamic. platform has the method
bootstrapModule(), which consumes the module. Notice that when you import
and bootstrap a component, the name you use is the same as the component’s export
class.
Now open the command prompt, navigate to your root directory, and run the
command ng serve. This command compiles your code and opens a browser
window. You may need to point your browser to the local host and port. The
command lets you know the URL to navigate your browser to, as shown in the
following example:
** NG Live Development Server is running on http://localhost:4200 **
Listing 21.1 shows the html index file that loads the application. Line 12 shows
where the message component gets applied.
Listing 21.2 shows the Angular module that bootstraps the component. Lines 1–4
show the Angular modules BrowserModule, NgModule, FormsModule, and
HttpModule each getting imported. Line 6 shows the Angular component

Chap3Component getting imported. Lines 9–11 show the component being
declared. Lines 12–16 show the imports array which makes the imported modules
available to the application. Line 18 bootstraps the main component of the
application.
Note
This application doesn’t need the FormsModule or the HttpModule to run.
However, they are included to help show the syntax of importing extra modules
into the application.
Listing 21.3 shows the Angular component which has the selector message. This
component displays the message Hello World! in the browser.
Listing 21.1 first.html: A Simple Angular Template That Loads the First
Component
Click here to view code image
01 <!doctype html>
02 <html>
03 <head>
04 <meta charset="utf-8">
05 <title>First</title>
06 <base href="/">
07
08 <meta name="viewport" content="width=device-width, initial-scale=1">
09 <link rel="icon" type="image/x-icon" href="favicon.ico">
10 </head>
11 <body>
12 <message>Loading...</message>
13 </body>
14 </html>
Listing 21.2 app.module.ts: An Angular Module that bootstraps the
application
Click here to view code image
01 import { BrowserModule } from '@angular/platform-browser';
02 import { NgModule } from '@angular/core';
03 import { FormsModule } from '@angular/forms';
04 import { HttpModule } from '@angular/http';
05
06 import { Chap3Component } from './app.component';
07

08 @NgModule({
09 declarations: [
10 Chap3Component
11 ],
12 imports: [
13 BrowserModule,
14 FormsModule,
15 HttpModule
16 ],
17 providers: [],
18 bootstrap: [Chap3Component]
19 })
20 export class AppModule { }
Listing 21.3 first.component.ts: An Angular Component
Click here to view code image
01 import {Component} from 'angular2/core';
02 @Component({
03 selector: 'message',
04 template: `
05 <h1>Hello World!<h1>
06 `,
07 styles:[`
08 h1 {
09 font-weight: bold;
10 }
11 `]
12 })
13 export class Chap3component{
14 title = 'Chapter 21 Example';
15 }
Listings 21.4 and 21.5 show the compiled JavaScript code from the TypeScript files
in Listings 21.2 and 21.3.
Note
This is the only time we show you the compiled JavaScript files in this book
because these are generated automatically for you when the application is
compiled and run—and to help keep the book more readable.
Listing 21.4 app.module.js: The JavaScript Version of the Angular Module
that bootstraps the application

Click here to view code image
01 "use strict";
02 var __decorate = (this && this.__decorate) ||
03 function (decorators, target, key, desc) {
04 var c = arguments.length, r = c < 3 ? target :
05 desc === null ? desc = Object.getOwnPropertyDescriptor(target, key) : desc, d;
06 if (typeof Reflect === "object" && typeof Reflect.decorate === "function")
07 r = Reflect.decorate(decorators, target, key, desc);
08 else for (var i = decorators.length - 1; i >= 0; i--)
09 if (d = decorators[i]) r = (c < 3 ? d(r) : c > 3 ? d(target, key, r)
10 : d(target, key)) || r;
11 return c > 3 && r && Object.defineProperty(target, key, r), r;
12 };
13 exports.__esModule = true;
14 var platform_browser_1 = require("@angular/platform-browser");
15 var core_1 = require("@angular/core");
16 var forms_1 = require("@angular/forms");
17 var http_1 = require("@angular/http");
18 var app_component_1 = require("./app.component");
19 var AppModule = (function () {
20 function AppModule() {
21 }
22 AppModule = __decorate([
23 core_1.NgModule({
24 declarations: [
25 app_component_1.Chap3Component
26 ],
27 imports: [
28 platform_browser_1.BrowserModule,
29 forms_1.FormsModule,
30 http_1.HttpModule
31 ],
32 providers: [],
33 bootstrap: [app_component_1.Chap3Component]
34 })
35 ], AppModule);
36 return AppModule;
37 }());
38 exports.AppModule = AppModule;
Listing 21.5 first.component.js: The JavaScript Version of the Angular
Component File
Click here to view code image
01 "use strict";
02 var __decorate = (this && this.__decorate)

03 || function (decorators, target, key, desc) {
04 var c = arguments.length, r = c < 3
05 ? target : desc === null
06 ? desc = Object.getOwnPropertyDescriptor(target, key) : desc, d;
07 if (typeof Reflect === "object" && typeof Reflect.decorate === "function")
08 r = Reflect.decorate(decorators, target, key, desc);
09 else for (var i = decorators.length - 1; i >= 0; i--)
10 if (d = decorators[i]) r = (c < 3 ? d(r) : c > 3
11 ? d(target, key, r) : d(target, key)) || r;
12 return c > 3 && r && Object.defineProperty(target, key, r), r;
13 };
14 exports.__esModule = true;
15 var core_1 = require("@angular/core");
16 var Chap3Component = (function () {
17 function Chap3Component() {
18 this.title = 'Chapter 21 Example';
19 }
20 Chap3Component = __decorate([
21 core_1.Component({
22 selector: 'message',
23 template: "\n <h1>Hello World!<h1>\n "
24 })
25 ], Chap3Component);
26 return Chap3Component;
27 }());
28 exports.Chap3Component = Chap3Component;
Summary
The Angular framework provides a very structured method for creating websites and
web applications. Angular structures a web application using a very clean,
componentized approach. Angular uses data binding to ensure that there is only one
source of data. It also takes advantage of templates with directives that extend
HTML capabilities, enabling you to implement totally customized HTML
components.
This chapter looks at the different components in an Angular application and how
they interact with each other. At the end of this chapter, a detailed example of how to
implement a basic Angular application, including a component, a module, and a
bootstrapper is seen.
Next
In the next chapter, you will learn about Angular components. You will learn how to
build a template using HTML and CSS. You will then go over how you can build
your own components.
22
Angular Components
Angular components are the building blocks you use to create Angular applications.
Angular components allow you to build self-contained UI elements for an
application. Components allow you to control how your application looks and
functions through TypeScript code and an HTML template. This chapter discusses
how to create Angular components using a TypeScript class that defines the look and
behavior of UI elements.
Component Configuration
An Angular component consists of two main parts: the definition in the decorator
section and the class section, which defines the logic. The decorator section is used
to configure the component, including things like the selector name and HTML
template. The class section enables you to give the component its logic, data, and
event handlers, as well as export it to be used in other TypeScript files.
With these two sections you can create a basic component. The following example
shows what a component might look like:
Click here to view code image
Import {Component} from '@angular/core';
@Component({
selector: 'my-app',
template: '<p>My Component</p>'
})
Export class AppComponent{
Title = 'Chapter 1 Example';
}
To create a component, you import Component from Angular and apply it to a

TypeScript class that you can then use to control the look and functionality of the
component. Within the @Component decorator are several component
configuration options you need to understand. The following list includes some of
the most important options available:
selector: This option allows you to define the HTML tag name used to add
the component to the application via HTML.
template: This option allows you to add inline HTML to define the look of
the component. This is for when there won’t be very much code to add, and it’s
helpful for when you don’t want extra files.
templateUrl: This option allows you to import an external template file
rather than inline HTML. This is helpful for separating a large amount of
HTML code out of a component to help with maintainability.
styles: This option allows you to add inline CSS to your component. Use it
when only minor style changes are needed.
stylesUrls: This option allows you to import an array of external CSS
stylesheet(s). You should use this rather than styles when importing external
CSS files.
viewProviders: This is an array of dependency injection providers. It
allows you to import and use Angular services that provide application
functionality such as HTTP communications.
Defining a Selector
In a component, a selector tells Angular where to apply the component in HTML.
You apply Angular to a component to HTML by giving it a selector and then using
the selector name as a tag name in your HTML file. This makes the functionality of
the Angular component available in HTML. The following is an example of a
selector:
@Component({
selector: 'angular-rules'
})
You can then add the selector to HTML files by using the
following syntax:
<angular-rules></angular-rules>

Note
It’s important to note that when defining a selector name, there can’t be any white
spaces. For example, you can’t name a selector angular rules, but you can
name it angular-rules or angular_rules.
Building a Template
You use a template to define how an Angular component should look. Templates are
written in HTML, but they allow you to include Angular magic to do some pretty
cool things. Angular allows for both inline templates and external template files.
You can add a template to the Angular @component decorator. For a single-line
template, you can use either single or double quotes to wrap it. For a multiple-line
template, you use backquotes (`); you generally find the backquote key in the upper
left of your keyboard, on the same key as the tilde symbol (~). Using the backquote
is very important as it will break your code if it’s not correct. Here is an example of a
single-line template compared to a multiple-line template:
Click here to view code image
@Component({
selector: 'my-app',
template: '<h1>Hello World!</h1>'
})
@Component({
selector: 'my-app',
template: `
<h1>Hello World!</h1>
`
})
Note
For the template and styles configuration options, you need to use the backquote
(`), generally located on the same key as the tilde symbol (~).
The same principles you use for templates also apply to CSS. You use the keyword
styles to tell a component about inline styling. The only major difference is that
styles takes in an object of strings instead of just one string. The following example

shows some inline styling:
Click here to view code image
@Component ({
selector: 'my-app',
template: '<p>hello world</p>',
styles: [`
P {
color: yellow;
font-size: 25px;
}
`]
})
Note
You need to use the backquote key for a multiple-line stylesheet.
Using Inline CSS and HTML in Angular Applications
You’ve learned how to implement HTML and CSS in an Angular component. This
section builds an example based on that knowledge.
In this exercise you will see how Angular components use and include external
templates and stylesheets. The purpose of this exercise is to illustrate how this use of
templates allows for more readable and manageable code.
The code in Listing 22.1 is the Angular component. Line 1 imports the component
necessary to define the component. Lines 3 through 18 define the component. The
component has a very simple template, as shown in lines 5 through 7, and some CSS
styling in lines 8 through 13 to go with it.
Figure 22.1 shows the finished Angular component rendered.
Listing 22.1 intro.ts: A Simple Angular Template and Styling to Display a
<span> Element
Click here to view code image
01 import { Component } from '@angular/core';
02
03 @Component({
04 selector: 'app-root',

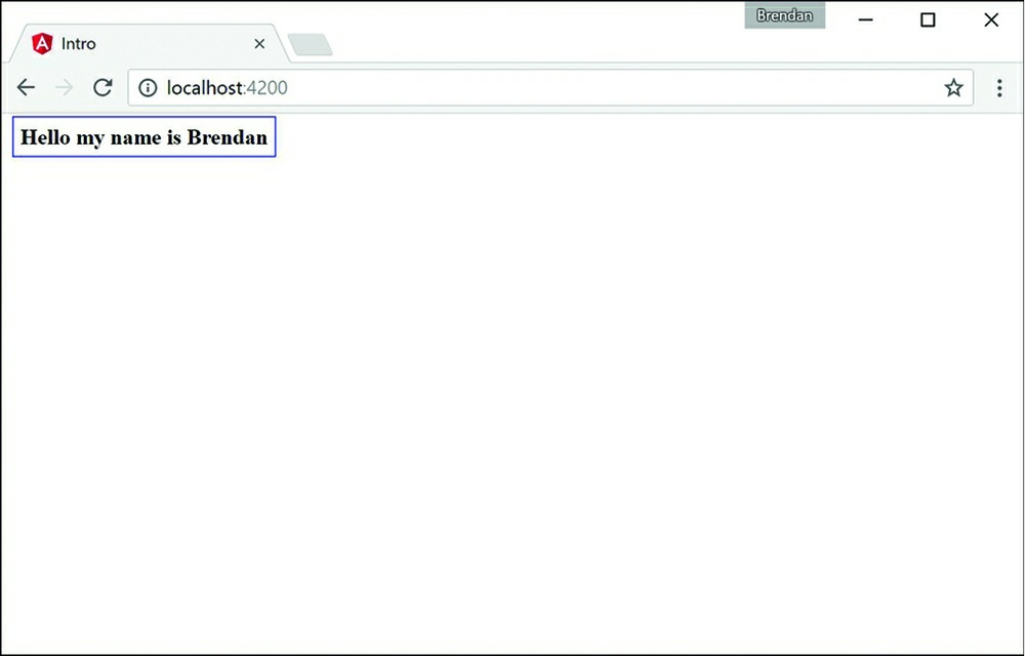
Figure 22.1 Implementing a basic Angular web application that loads an HTML
template and styles to the view
Using Constructors
When you use Angular, you often need to have default values and an initial setup for
your component variables. Angular uses constructors to give its components default
values. This section goes over how to create and implement them.
Constructors go in the Component class. Their purpose is to set default values and
initial configuration of variables for that class so that when those variables are used
within the component, they are never uninitialized. The following is an example of
constructor syntax:
export class constructor {
name: string;
constructor(){
this.name = "Brendan";
{

}
Now that you’ve learned what a constructor is and what it looks like, let’s get into an
example that uses one. This simple exercise uses a constructor to define the current
date at the time the component is created.
Listing 22.2 shows an Angular component with a selector named simple-
constructor and a simple template. Note the {{today}} on line 6 is a form of
data binding, which is discussed in more detail in Chapter 24, “Data Binding.” For
now, you should focus on how the constructor works.
Figure 22.2 shows the rendered Angular component.
Listing 22.2 constructor.component.ts: A Simple Component that
Displays the Date
Click here to view code image
01 import {Component} from '@angular/core';
02
03 @Component({
04 selector: 'simple-constructor',
05 template: `
06 <p>Hello today is {{today}}!</p>
07 `,
08 })
09 export class UsingAConstructor {
10 today: Date;
11 constructor() {
12 this.today = new Date();
13 }
14 }

Figure 22.2 Implementing a basic Angular web application that uses a constructor to
define default variables
Using External Templates
Another way to incorporate templates and stylesheets into Angular components is
through a separate file. Using this method is handy because it helps you separate
what the files do. It also makes the component easier to read. Under your
@Component decorator, you place the keyword templateUrl followed by the
path from the root of the application to your template HTML file. Here is an
example.
@Component ({
selector: 'my-app',
templateUrl: "./view.example.html"
})
You use the keyword styleUrls to tell the component about external stylesheets.
The difference with the external stylesheets is that you pass in an array of one or

more stylesheets. The following example shows how to import external stylesheets:
@Component ({
selector: 'my-app',
templateUrl: "./view.example.html"
styleUrls: ["./styles1.css", "./styles2.css"]
})
Note
The styleUrls configuration option takes in an array of comma-separated
strings.
Earlier in this chapter, in the “Building a Template” section, you learned how to
implement external HTML and CSS files into an Angular component. The example
in this section builds on that knowledge and walks you through an Angular
application that incorporates external HTML and CSS files.
Listing 22.3 shows an Angular component with the selector named external, and
templateUrl and styleUrls, which link the external files you need for this
application.
Listing 22.4 shows an external template named externalTemplate.html. The
component uses this file to render the view on the browser.
Listing 22.5 shows an external stylesheet named external.css. The component
applies this file to the component template file.
Figure 22.3 shows the finished Angular component rendered.
Listing 22.3 external.component.ts: An Angular Component with
External File Dependencies
Click here to view code image
01 import { Component } from '@angular/core';
02
03 @Component({
04 selector: 'app-root',
05 templateUrl: './app.component.html',
06 styleUrls: ['./app.component.css']
07 })
08 export class AppComponent {
09 title = 'Chapter 22 Using External templates and styles';
10 }

Listing 22.4 externalTemplate.html: An HTML Template File for the
Component to Pull In and Use
Click here to view code image
01 <h1>Congratulations</h1>
02 <p>
03 You've successfully loaded an external html file.
04 <span>
05 If I'm red then You managed to get the styles in there as well
06 </span>
07 </p>
Listing 22.5 external.css: A CSS Stylesheet for the Component to Apply to
Its Template
Click here to view code image
01 span{
02 color: red;
03 border: 2px solid red;
04 }
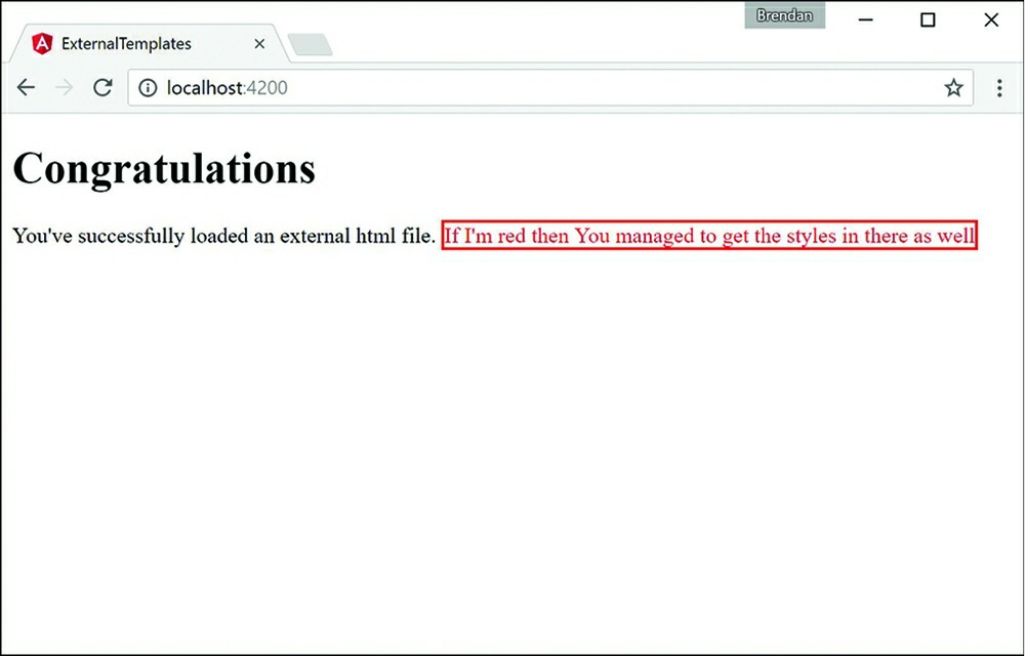
Figure 22.3 Implementing a basic Angular web application that loads an external
HTML template and stylesheet to the view
Injecting Directives
Dependency injection can be a difficult concept to fully grasp. However, it is a very
important part of Angular, and when you understand the basics, the Angular
implementation becomes quite clear. Dependency injection is a well-known design
pattern in many server-side languages, but had not been used extensively in a
JavaScript framework until Angular came along.
The idea of Angular dependency injection is to define and dynamically inject a
dependency object into another object, which makes available all the functionality
provided by the dependency object. Angular provides dependency injection through
the use of providers and an injector service.
In Angular, to use dependency injection on another directive or component, you
need to add the directive’s or component’s class name to the declarations

metadata in the @NgModule decorator within the module for the application, which
takes in an array of directives imported into your application. The following is the
syntax of the declarations array.
...
declarations: [ OuterComponent, InnerComponent ],
...
Building a Nested Component with Dependency Injection
You’ve learned what dependency injection is and how to use it for components and
directives. This section shows you how to use what you’ve learned to create a nested
component. This section walks you through an Angular application that incorporates
a component that has a second component within it.
Listing 22.6 shows the outer.component.ts file, which loads an external
template and stylesheet.
Listing 22.7 shows the outer.html template file that the
outer.component.ts file loads. Notice that the HTML tag nested is a
custom HTML tag that you use to load the inner component. You do this exactly the
same way you load the outer component in the main HTML file.
Listing 22.8 shows the outer.css file that gives the outer component and its child
components default styles. These styles are inherited by the inner component.
Listing 22.9 shows the inner.component.ts file. This is the inner component
that the outer component has injected. Notice that the selector for this component,
which was used to load this directive within the outer component, is nested.
Figure 22.4 shows the completed application in the browser window.
Listing 22.6 outer.component.ts: The Outer Component for the
Application
Click here to view code image
01 import { Component } from '@angular/core';
02
03 @Component({
04 selector: 'app-root',
05 templateUrl: './app.component.html',

06 styleUrls: ['./app.component.css']
07 })
08 export class AppComponent {
09 title = 'Nested Example';
10 }
Listing 22.7 outer.html: An HTML Template for the Component to Apply
the View
Click here to view code image
01 <div>
02 <h1>the below text is a nested component</h1>
03 <nested></nested>
04 </div>
Listing 22.8 outer.css: A CSS Stylesheet for the Outer Component to Apply
to Its Template
Click here to view code image
01 div {
02 color: red;
03 border: 3px ridge red;
04 padding: 20px;
05 }
06 nested {
07 font-size: 2em;
08 font-weight: bolder;
09 border: 3px solid blue;
10 }
Listing 22.9 inner.component.ts: The Nested Component
Click here to view code image
01 import {Component} from '@angular/core';
02 @Component({
03 selector: 'nested',
04 template: `
05 <span>Congratulations I'm a nested component</span>
06 `,
07 styles: [`
08 span{
09 color: #228b22;
10 }
11 `]

12 })
13 export class InnerComponent {}

Figure 22.4 Displaying nested components
Passing in Data with Dependency Injection
Dependency injection is a powerful tool that allows you
to build a reusable directive to be used within any
application that imports that directive. Sometimes data
needs to be passed through the application to the
directive that’s being injected. This is made possible
through Angular inputs.
In Angular, to input data to another directive or component, you need to import the
Input decorator from @angular/core. The following code shows the syntax:
import {Component, Input} from '@angular/core';
When the Input decorator has been imported, you can begin to define what data
you would like to have input into the directive. Start by defining @input(), which
takes in a string as a parameter. The HTML uses that string to pass in the data to the

imported directive. Do this by using the following syntax:
@Input('name') personName: string;
Creating an Angular Application that Uses Inputs
Now that you have learned how to use inputs with dependency injection, it’s time to
get started on an example. This section walks through an Angular application that
passes data to a directive from another directive.
Listing 22.10 shows the person.component.ts file, which is the entry point for
the application that will pass data into the input.component.ts file.
Listing 22.11 shows the input.component.ts file. It is the component that will
take in and handle the inputs from an external directive.
Figure 22.5 shows the completed application in the browser window.
Listing 22.10 person.component.ts: A Component that Imports
input.component and Passes Data to It through the Selector
Click here to view code image
01 import { Component } from '@angular/core';
02 import {myInput} from './input.component';
03 @Component({
04 selector: 'app-root',
05 template: `
06 <myInput name="Brendan" occupation="Student/Author"></myInput>
07 <myInput name="Brad" occupation="Analyst/Author"></myInput>
08 <myInput name="Caleb" occupation="Student/Author"></myInput>
09 <myInput></myInput>
10 `
11 })
12 export class AppComponent {
13 title = 'Using Inputs in Angular';
14 }
Listing 22.11 input.component.ts: A Component that Takes Data through
Its Selector to Modify What Is Displayed via HTML
Click here to view code image
01 import {Component, Input} from '@angular/core';

02 @Component ({
03 selector: "myInput",
04 template: `
05 <div>
06 Name: {{personName}}
07 <br />
08 Job: {{occupation}}
09 </div>
10 `,
11 styles: [`
12 div {
13 margin: 10px;
14 padding: 15px;
15 border: 3px solid grey;
16 }
17 `]
18 })
19 export class myInputs {
20 @Input('name') personName: string;
21 @Input('occupation') occupation: string;
22 constructor() {
23 this.personName = "John Doe";
24 this.occupation = "Anonymity"
25 }
26 }

Figure 22.5 Displaying information passed down through inputs
Summary
Angular components are the main building blocks of Angular applications. This
chapter shows how to build a component, from the decorator to the class. It shows
different ways of including templates and stylesheets. It also shows how to use
dependency injection to incorporate external directives or components within each
other.
Next
In the next chapter you will learn about expressions, and how Angular evaluates
them and adds them dynamically to a webpage. Then you will learn about pipes and
how they are used. You will then learn how to build your very own custom pipe.
23
Expressions
A great feature of Angular is the capability to add JavaScript-like expressions inside
an HTML template. Angular evaluates expressions and then can dynamically add the
results to a web page. Expressions are linked to a component, and you can have an
expression that utilizes values in the component, and its value can change as the
model changes.
Using Expressions
Using expressions is the simplest way to represent data from a component in an
Angular view. Expressions are encapsulated blocks of code inside brackets, like this:
{{expression}}
The Angular compiler compiles an expression into HTML elements so that the
results of the expression are displayed. For example, look at the following
expressions:
{{1+5}}
{{'One' + 'Two'}}
Based on these expressions, the web page displays the following values:
6
OneTwo
Expressions are bound to the data model, which provides two huge benefits. First,
you can use the property names and functions that are defined in the component
inside your expressions. Second, because the expressions are bound to the
component, when data in the component changes, so do the expressions. For

example, say that a component contains the following values:
name: string='Brad';
score: number=95;
You can directly reference the name and score values in the template expressions,
as shown here:
Name: {{name}}
Score: {{score}}
Adjusted: {{score+5}}
Angular expressions are similar to TypeScript/JavaScript expressions in several
ways, but they differ in these ways:
Attribute evaluation: Property names are evaluated against the component
model instead of against the global JavaScript namespace.
More forgiving: Expressions do not throw exceptions when they encounter
undefined or null variable types; instead, they treat them as having no value.
No flow control: Expressions do not allow the following:
Assignments (for example, =, +=, -=)
The new operator
Conditionals
Loops
Increment and decrement operators (++ and --)
Also, you cannot throw an error inside an expression
Angular evaluates as expressions the strings used to define the values of directives.
This means you can include expression-type syntax within a definition. For example,
when you set the value of the ng-click directive in the template, you specify an
expression. Inside that expression, you can reference a component variable and use
other expression syntax, as shown here:
<span ng-click="myFunction()"></span>
<span ng-click="myFunction(var, 'stringParameter')"></span>
<span ng-click="myFunction(5*var)"></span>
Because the Angular template expressions have access to the component, you can
also make changes to the component inside the Angular expression. For example,
this (click) directive changes the value of msg inside the component model:

<span (click)="msg='clicked'"></span>
The following sections take you through some examples of using the expression
capability in Angular.
Using Basic Expressions
In this section, you get a chance to see how Angular expressions handle rendering of
strings and numbers. This example illustrates how Angular evaluates expressions
that contain strings and numbers as well as basic mathematical operators.
Listing 23.1 shows an Angular component. This component has a template that
contains several types of expressions wrapped in double curly brackets ({{}}).
Some of the expressions are just numbers or strings, some include the + operation to
combine strings and/or numbers, and one applies a === operator to compare two
numbers.
Figure 23.1 shows the rendered web page. Note that numbers and strings are
rendered directly to the final view. Adding strings and numbers together enables you
to build text strings that are rendered to the view. Also note that using a comparison
operator renders the word true or false to the view.
Listing 23.1 basicExpressions.component.ts: Basic Strings and
Numbers with Simple Math Operations in an Angular Template
Click here to view code image
01 import { Component } from '@angular/core';
02
03 @Component({
04 selector: 'app-root',
05 template: `
06 <h1>Expressions</h1>
07 Number:<br>
08 {{5}}<hr>
09 String:<br>
10 {{'My String'}}<hr>
11 Adding two strings together:<br>
12 {{'String1' + ' ' + 'String2'}}<hr>
13 Adding two numbers together:<br>
14 {{5+5}}<hr>
15 Adding strings and numbers together:<br>
16 {{5 + '+' + 5 + '='}}{{5+5}}<hr>
17 Comparing two numbers with each other:<br>

18 {{5===5}}<hr>
19 `,
20 })
21 export class AppComponent {}
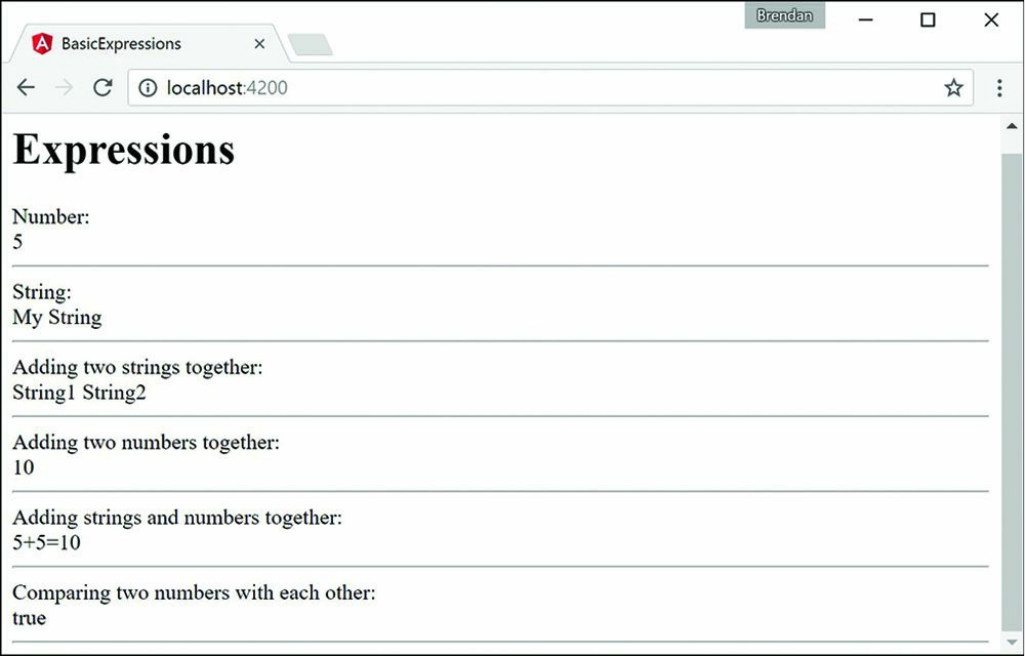
Figure 23.1 Using Angular expressions that contain strings, numbers, and basic math
operations
Interacting with the Component Class in Expressions
Now that you have seen some basic Angular expressions, let's take a look at how to
interact with the Component class inside Angular expressions. In the previous
example, all the input for the expressions came from explicit strings or numbers.
This section illustrates the true power of Angular expressions that come from
interacting with the model.
Listing 23.2 shows an Angular component file that applies Angular expressions that
use values from the Component class to render text to the screen as well as act as
parameters to functions. Note that the variable names in the Component class can
be used directly in the expressions. For example, the expression in line 9 creates a
string based on the values of the speed and vehicle variables.
Figure 23.2 shows the rendered web page, based on the expressions. Note that when

the links of the page are clicked, the resulting function calls adjust the Component
class variables, which change how the previously discussed expressions are
rendered.
Listing 23.2 classExpressions.component.ts: An Angular Application
that Uses Expressions to Interact with Data from the Component Class
Click here to view code image
01 import { Component } from '@angular/core';
02
03 @Component({
04 selector: 'app-root',
05 template: `
06 Directly accessing variables in the component:<br>
07 {{speed}} {{vehicle}}<hr>
08 Adding variables in the component:<br>
09 {{speed + ' ' + vehicle}}<hr>
10 Calling function in the component:<br>
11 {{lower(speed)}} {{upper('Jeep')}}<hr>
12 <a (click)="setValues('Fast', newVehicle)">
13 Click to change to Fast {{newVehicle}}</a><hr>
14 <a (click)="setValues(newSpeed, 'Rocket')">
15 Click to change to {{newSpeed}} Rocket</a><hr>
16 <a (click)="vehicle='Car'">
17 Click to change the vehicle to a Car</a><hr>
18 <a (click)="vehicle='Enhanced ' + vehicle">
19 Click to Enhance Vehicle</a><hr>
20 `,
21 styles:[`
22 a{color: blue; text-decoration: underline; cursor: pointer}
23 `]
24 })
25 export class AppComponent {
26 speed = 'Slow';
27 vehicle = 'Train';
28 newSpeed = 'Hypersonic';
29 newVehicle = 'Plane';
30 upper = function(str: any){
31 str = str.toUpperCase();
32 return str;
33 }
34 lower = function(str: any){
35 return str.toLowerCase();
36 }
37 setValues = function(speed: any, vehicle: any){
38 this.speed = speed;
39 this.vehicle = vehicle;

40 }
41 }
Using TypeScript in Angular Expressions
This section takes a look at some additional TypeScript interactions within the
Component class. As described previously, much of the TypeScript functionality is
supported in Angular expressions. To illustrate this better, this example shows some
array manipulation and uses the TypeScript Math object within expressions.
Listing 23.3 implements an Angular component that uses Angular expressions that
take advantage of push() and shift()to display the arrays, show the array
length, and manipulate the array elements. Note that with Math added to the
Component class, you are able to use TypeScript Math operations directly in the
expressions in lines 12 and 21.
Figure 23.3 shows the Angular web page rendered. Notice that as the links are
clicked, the arrays are adjusted and the expressions are reevaluated.

Figure 23.2 Using Angular expressions to represent and use Component class data
in the Angular view
Listing 23.3 typescriptExpressions.component.ts: An Angular
Component that Uses Expressions Containing Arrays and Math
Click here to view code image
01 import { Component } from '@angular/core';
02
03 @Component({

04 selector: 'app-root',
05 template: `
06 <h1>Expressions</h1>
07 Array:<br>
08 {{myArr.join(', ')}}<br/>
09 <hr>
10 Elements removed from array:<br>
11 {{removedArr.join(', ')}}<hr>
12 <a (click)="myArr.push(myMath.floor(myMath.random()*100+1))">
13 Click to append a value to the array
14 </a><hr>
15 <a (click)="removedArr.push(myArr.shift())">
16 Click to remove the first value from the array
17 </a><hr>
18 Size of Array:<br>
19 {{myArr.length}}<hr>
20 Max number removed from the array:<br>
21 {{myMath.max.apply(myMath, removedArr)}}<hr>
22 `,
23 styles: [`
24 a {
25 color: blue;
26 cursor: pointer;
27 }
28 `],
29 })
30 export class AppComponent {
31 myMath = Math;
32 myArr: number[] = [1];
33 removedArr: number[] = [0];
34 }
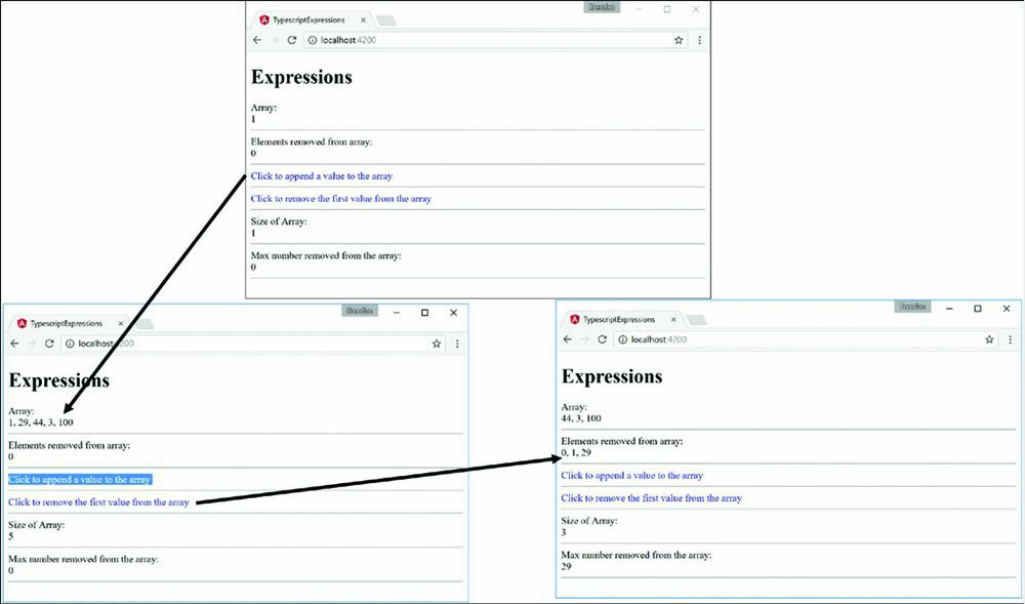
Figure 23.3 Using Angular expressions that apply TypeScript array and Math
operations to interact with scope data
Using Pipes
A great feature of Angular is the capability to implement pipes. A pipe is a type of
operator that hooks into the expression parser and modifies the results of the
expression for display in a view—for example, to format time or currency values.
You implement pipes inside expressions, using the following syntax:
{{ expression | pipe}}
If you chain multiple pipes together, they are executed in the order in which you
specify them:
{{ expression | pipe | pipe }}
Some filters allow you to provide input in the form of function parameters. You add
these parameters by using the following syntax:

{{ expression | pipe:parameter1:parameter2 }}
Angular provides several types of pipes that enable you to easily format strings,
objects, and arrays in component templates. Table 23.1 lists the built-in pipes
provided with Angular.
Table 23.1 Pipes That Modify Expressions in Angular Component Templates
Filter Description
currency[
:currencyCode?[
:symbolDisplay?[
:digits?]]]
Formats a number as currency, based on the
currencyCode value provided. If no
currencyCode value is provided, the default code for
the locale is used. Here is an example:
{{123.46 | currency:"USD" }}
json Formats a TypeScript object into a JSON string. Here is
an example:
{{ {'name':'Brad'} | json }}
slice:start:end Limits the data represented in the expression by the
indexed amount. If the expression is a string, it is
limited in the number of characters. If the result of the
expression is an array, it is limited in the number of
elements. Consider these examples:
{{ "Fuzzy Wuzzy" | slice:1:9 }}
{{ ['a','b','c','d'] | slice:0:2 }}
lowercase Outputs the result of the expression as lowercase.
uppercase Outputs the result of the expression as uppercase.
number[:pre.post-
postEnd]
Formats the number as text. If a pre parameter is
specified, the number of whole numbers is limited to
that size. If post-postEnd is specified, the number
of decimal places displayed is limited to that range or
size. Consider these examples:
{{ 123.4567 | number:1.2-3 }}
{{ 123.4567 | number:1.3 }}

date[:format]Formats a TypeScript date object, a timestamp, or an
ISO 8601 date string, using the format parameter.
Here is an example:
{{1389323623006 | date:'yyyy-MM-dd
HH:mm:ss Z'}}
The format parameter uses the following date
formatting characters:
yyyy: Four-digit year
yy: Two-digit year
MMMM: Month in year, January through
December
MMM: Month in year, Jan through Dec
MM: Month in year, padded, 01 through 12
M: Month in year, 1 through 12
dd: Day in month, padded, 01 through 31
d: Day in month, 1 through 31
EEEE: Day in week, Sunday through Saturday
EEE: Day in Week, Sun through Sat
HH: Hour in day, padded, 00 through 23
H: Hour in day, 0 through 23
hh or jj: Hour in a.m./p.m., padded, 01 through
12
h or j: Hour in a.m./p.m., 1 through 12
mm: Minute in hour, padded, 00 through 59
m: Minute in hour, 0 through 59
ss: Second in minute, padded, 00 through 59
s: Second in minute, 0 through 59
.sss or ,sss: Millisecond in second, padded,
000–999
a: a.m./p.m. marker

Z: Four-digit time zone offset, -1200 through
+1200
The format string for date can also be one of the
following predefined names:
medium: Same as 'yMMMdHms'
short: same as 'yMdhm'
fullDate: same as 'yMMMMEEEEd'
longDate: same as 'yMMMMd'
mediumDate: same as 'yMMMd'
shortDate: same as 'yMd'
mediumTime: same as 'hms'
shortTime: same as 'hm'
The format shown here is en_US, but the format always
matches the locale of the Angular application.
async Waits for a promise and returns the most recent value
received. It then updates the view.
Using Built-in Pipes
This section shows how the built-in Angular pipes handle the transformation of data
in Angular expressions. The purpose of this example is to show how pipes transform
the data provided.
Listing 23.4 shows the Angular component with a template that contains several
examples of built-in pipes wrapped in {{}} brackets. The Component class
contains data for some of the pipes to use.
Figure 23.4 shows the rendered application with the transformed data.
Listing 23.4 builtInPipes.component.ts: An Angular Component That
Contains an Example of Built-in Pipes
Click here to view code image

01 import { Component } from '@angular/core';
02
03 @Component({
04 selector: 'app-root',
05 template: `
06 Uppercase: {{"Brendan" | uppercase }}<br>
07 Lowercase: {{"HELLO WORLD" | lowercase}}<br>
08 Date: {{ today | date:'yMMMMEEEEhmsz'}}<br>
09 Date: {{today | date:'mediumDate'}}<br>
10 Date: {{today | date: 'shortTime'}}<br>
11 Number: {{3.1415927 | number:'2.1-5'}}<br>
12 Number: {{28 | number:'2.3'}}<br>
13 Currency: {{125.257 | currency:'USD':true: '1.2-2'}}<br>
14 Currency: {{2158.925 | currency}}<br>
15 Json: {{jsonObject | json}}<br>
16 PercentPipe: {{.8888 | percent: '2.2'}}<br>
17 SlicePipe: {{"hello world" | slice:0:8}}<br>
18 SlicePipe: {{days | slice:1:6}}<br>
19 legen... {{wait | async}} {{dairy | async}}
20 `
21 })
22 export class AppComponent {
23 today = Date.now();
24 jsonObject = [{title: "mytitle"}, {title: "Programmer"}];
25 days=['Sunday', 'Monday', 'Tuesday', 'Wednesday',
26 'Thursday', 'Friday', 'Saturday'];
27 wait = new Promise<string>((res, err) => {
28 setTimeout(function () {
29 res('wait for it...');
30 },1000);
31 });
32 dairy = new Promise<string>((res, err) => {
33 setTimeout(function() {
34 res('dairy');
35 },2000)
36 })
37 }
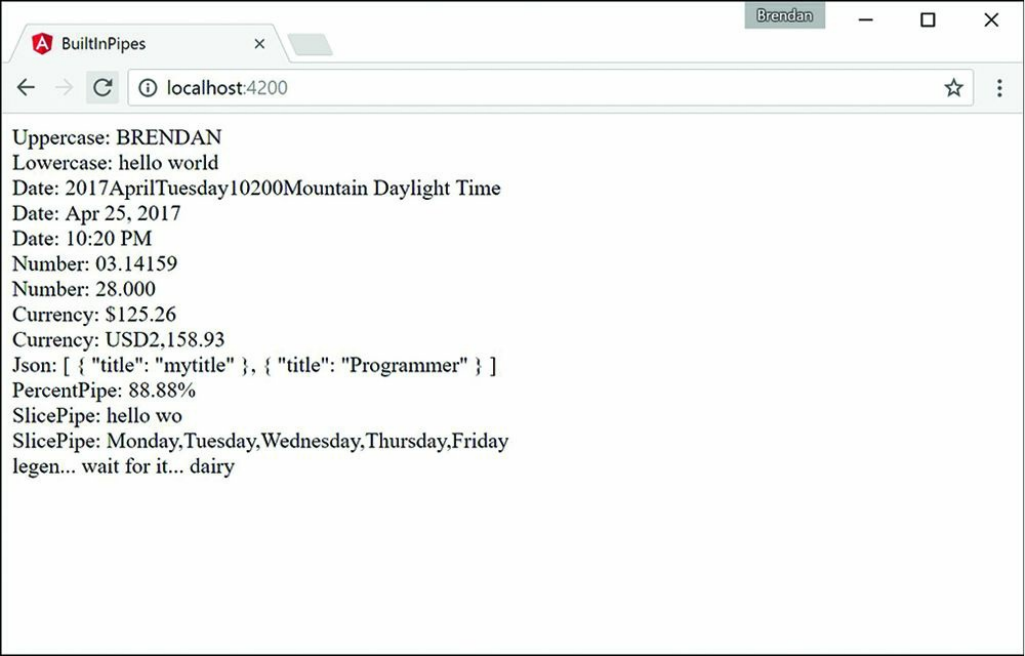
Figure 23.4 Using Angular pipes that transform data within expressions
Building a Custom Pipe
Angular enables you to create your own custom pipes and then use them within
expressions and services as if they were built-in pipes. Angular provides the @pipe
decorator to create a pipe and register it with the dependency injector server.
The @pipe decorator takes in metadata, just as an Angular component does. The
metadata options are name and pure. The name metadata works like the selector
of a component: It tells Angular where you want to use the pipe. The pure metadata
tells the pipe how to handle change detection. A pure pipe updates when there is a
change to the input value or an object reference. An impure pipe can update
whenever there is an event, such as a keystroke, mouse click, or mouse movement.
The following example demonstrates a sample pipe and its syntax:
@Pipe({
name: 'example',

Pure: true
})
The pipe class works much the same as the Component class, in that it is where
the logic of the pipe resides. However, the logic needs to be within a Transform
method, which tells the pipe how to transform whatever is to the left of the pipe
symbol (|). Review the following example:
Export class customPipe{
Transform(parameter1:string, parameter2:number) : string {
myStr = "logic goes in here";
return myStr;
}
}
Creating a Custom Pipe
This section shows how to build a custom pipe that filters out select words from a
string. The purpose of this example is to show you how to create and apply a custom
pipe that can transform data.
Listing 23.5 shows an Angular pipe with the name metadata censor. The export
class contains the Transform method, which replaces certain words with a
different string and then returns the transformed string.
Listing 23.6 shows an Angular component which contains template that uses the
custom pipe, as well as the pipe metadata to import the pipe. Notice that on line 6,
there is the expression that you use to implement the pipe. The pipe takes in a string
as an argument and replaces the word with it.
Figure 23.5 shows the rendered application, using the custom pipe.
Listing 23.5 custom.pipe.ts: An Angular Pipe That Replaces Certain
Words in a String
Click here to view code image
01 import {Pipe} from '@angular/core';
02
03 @Pipe({name: 'censor'})
04 export class censorPipe{
05 transform(input:string, replacement:string) : string {
06 var cWords = ["bad", "rotten", "terrible"];

07 var out = input;
08 for(var i=0; i<cWords.length; i++){
09 out = out.replace(cWords[i], replacement);
10 }
11 return out
12 }
13 }
Listing 23.6 customPipes.component.ts: An Angular Component That
Imports and Uses a Custom Pipe
Click here to view code image
01 import { Component } from '@angular/core';
02
03 @Component({
04 selector: 'app-root',
05 template: `
06 {{phrase | censor:"*****"}}
07 `
08 })
09 export class AppComponent {
10 phrase:string="This bad phrase is rotten ";
11 }
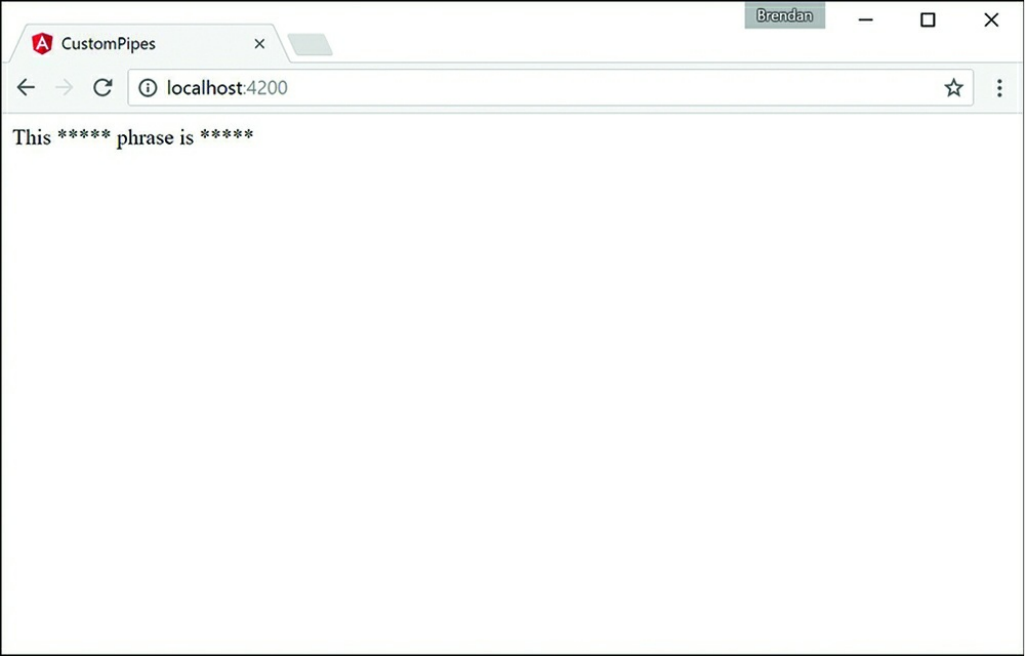
Figure 23.5 Using a custom Angular pipe that transforms data in an expression
Summary
Angular comes with powerful built-in expressions and pipes and provides the option
to create custom pipes. This chapter discusses the available built-in expressions and
pipes and how to implement them. It also discusses how to build and implement a
custom pipe. Expressions are bits of TypeScript code contained within {{}}, and
pipes are able to manipulate those expressions. Expressions have access to
information within the Component class and can render class variables to the view.
Next
In the next chapter you will learn about databinding. You will learn about how it
links data together and expand on the many different types of databinding.

24
Data Binding
One of the best features of Angular is the built-in data binding. Data binding is the
process of linking data from a component with what is displayed in a web page.
When data in the component changes, the UI rendered to the user is automatically
updated. Angular provides a very clean interface to link the model data to elements
in a web page.
Understanding Data Binding
Data binding means linking data in an application with the UI element that is
rendered to the user. When data is changed in the model, the web page is
automatically updated. This way, the model is always the only source for data
represented to the user, and the view is just a projection of the model. The glue that
puts the view and the model together is data binding.
There are many ways in Angular to use data binding to make an application look and
act in different ways. The following is a list of the types of data binding available
with Angular that are discussed in this chapter:
Interpolation: You can use double curly braces ({{}}) to get values directly
from the Component class.
Property binding: You can use this type of binding to set the property of an
HTML element.
Event binding: You can use this type of binding to handle user inputs.
Attribute binding: This type of binding allows the setting of attributes to an
HTML element.
Class binding: You can use this type of binding to set CSS class names to the

element.
Style binding: You can use this type of binding to create inline CSS styles for
the element.
Two-way binding with ngModel: You can use this type of binding with data
entry forms to receive and display data.
Interpolation
Interpolation involves using the {{}} double curly braces to evaluate a template
expression. This can be in a hard-coded form, or it can reference a property of the
Component class.
The syntax for interpolation should look familiar from Chapter 23, “Expressions.”
However, you can also use interpolation to give an HTML tag property a value (for
example, the img tag). Here is an example of the syntax to do this:
<img src="{{imgUrl}}"/>
Now let’s look at an example that shows some cool things you can do with
interpolation binding.
Listing 24.1 shows an Angular component. This component has a template that
contains types of interpolation and expressions wrapped in {{}} brackets. The
Component class gives values to be used within the {{}} brackets. (Be sure to
change the imageSrc variable to the appropriate image name.)
Figure 24.1 shows the rendered web page. As you can see, interpolation can use
strings from the Component class to populate the template.
Listing 24.1 interpolation.component.ts: Interpolation with Strings
and a Function
Click here to view code image
01 import { Component } from '@angular/core';
02
03 @Component({
04 selector: 'app-root',
05 template: `
06 {{str1 + ' ' + name}}
07 <br>

08 <img src="{{imageSrc}}" />
09 <br>
10 <p>{{str2 + getLikes(likes)}}</p>
11 `,
12 styles: [`
13 img{
14 width: 300px;
15 height: auto;
16 }
17 p{
18 font-size: 35px;
19 color: darkBlue;
20 }
21 `]
22 })
23 export class AppComponent {
24 str1: string = "Hello my name is"
25 name: string = "Brendan"
26 str2: string = "I like to"
27 likes: string[] = ['hike', "rappel", "Jeep"]
28 getLikes = function(arr: any){
29 var arrString = arr.join(", ");
30 return " " + arrString
31 }
32 imageSrc: string = "../assets/images/angelsLanding.jpg"
33 }

Figure 24.1 Using interpolation to combine strings, define an imageSrc URL, and
run a function
Property Binding
You use property binding when you need to set the property of an HTML element.
You do this by defining the value you want within the Component class. Then you
bind that value to the component template, using the following syntax:
<img [src]="myValue">
Note
In many cases, it is possible to use interpolation to achieve the same results you
get with property binding.
Now let’s take a look at an example of property binding. Listing 24.2 shows an
Angular component. This component has a template that contains types of property
binding. It also makes a comparison between property binding and interpolation.

Figure 24.2 shows the rendered web page. As you can see, interpolation can use
strings from the Component class to populate the template.
Listing 24.2 property.component.ts: Property Binding with Logic and the
Application of a Class Name
Click here to view code image
01 import { Component } from '@angular/core';
02
03 @Component({
04 selector: 'app-root',
05 template: `
06 <img [src]="myPic"/>
07 <br>
08 <button [disabled]="isEnabled">Click me</button><hr>
09 <button disabled="{!isEnabled}">Click me</button><br>
10 <p [ngClass]="className">This is cool stuff</p>
11 `,
12 styles: [`
13 img {
14 height: 100px;
15 width auto;
16 }
17 .myClass {
18 color: red;
19 font-size: 24px;
20 }
21 `]
22 })
23 export class AppComponent {
24 myPic: string = "../assets/images/sunset.JPG";
25 isEnabled: boolean = false;
26 className: string = "myClass";
27 }

Figure 24.2 Using property binding to define an imageSrc URL, set a button to
disabled mode, and assign a class name
Attribute Binding
Attribute binding is similar to property binding but is tied to the HTML attribute
rather than the DOM property. You are not likely to use attribute binding very often,
but it is important to know what it is and how to use it. You will generally only use
attribute binding on attributes that do not have a corresponding DOM property (for
example, aria, svg, and table span attributes). You define an attribute binding
by using the following syntax:
<div [attr.aria-label] = "labelName"></div>
Note
Because attribute binding and property binding function almost the same way, we
do not present an example for attribute binding in this book.

Class Binding
You use class binding to bind CSS style tags to HTML elements. It assigns the class
based on the result of an expression being true or false. If the result is true, the
class gets assigned. The following is an example of the syntax:
<div [class.nameHere] = "true"></div>
<div [class.anotherName] = "false"></div>
Now let’s take a look at an example of class binding. Listing 24.3 shows an Angular
component that has a template. This template contains types of class binding that
show how to apply a class name using two different methods.
Figure 24.3 shows the rendered web page. As you can see, the class names take
effect and allow the CSS styles to change the HTML.
Listing 24.3 class.component.ts: Property Binding with Logic and the
Application of a Class Name
Click here to view code image
01 import { Component } from '@angular/core';
02
03 @Component({
04 selector: 'app-root',
05 template: `
06 <div [class]="myCustomClass"></div>
07 <span [class.redText]="isTrue">Hello my blue friend</span>
08 `,
09 styles: [`
10 .blueBox {
11 height: 150px;
12 width: 150px;
13 background-color: blue;
14 }
15 .redText{
16 color: red;
17 font-size: 24px;
18 }
19 `]
20 })
21 export class AppComponent {
22 myCustomClass: string = 'blueBox';
23 isTrue = true;
24 }

Figure 24.3 An Angular application that applies class binding to add custom classes
to HTML elements
Style Binding
You use style binding to assign inline styles to an HTML element. Style binding
works by defining the CSS style property in the brackets, with the assignment
expression in the quotation marks. The syntax looks almost the same as for class
binding but with style instead of class as the prefix:
<p [style.styleProperty] = "assignment"></p>
<div [style.backgroundColor] = "'green'"></div>
Now let’s take a look at an example of style binding. Listing 24.4 shows an Angular
component that has a template. This template contains types of style binding that
show how to apply custom inline styles to an application.
Figure 24.4 shows the rendered web page. As you can see, the styles take effect, and
the CSS styles change the HTML accordingly.

Listing 24.4 style.component.ts: Style Binding to Change the Appearance
of the HTML
Click here to view code image
01 import { Component } from '@angular/core';
02
03 @Component({
04 selector: 'app-root',
05 template: `
06 <span [style.border]="myBorder">Hey there</span>
07 <div [style.color]="twoColors ? 'blue' : 'forestgreen'">
08 what color am I
09 </div>
10 <button (click)="changeColor()">click me</button>
11 `
12 })
13 export class AppComponent {
14 twoColors: boolean = true;
15 changeColor = function(){
16 this.twoColors = !this.twoColors;
17 }
18 myBorder = "1px solid black";
19 }

Figure 24.4 The rendered web page with custom styles applied via a button that runs
a function to adjust the value of the twoColors variable
Event Binding
You use event binding to handle user inputs such as clicking, keystrokes, and mouse
movements. Angular event binding is similar to HTML event attributes; the major
difference is that the prefix “on” is removed from the binding, and instead the event
is surrounded by parentheses (()). For example, onkeyup in HTML looks like
(keyup) in Angular.
A common purpose for event binding is to run functions from the component. The
following is the syntax for click event binding:
<button (click)="myFunction()">button</button>
Let’s look at an example of event binding. Listing 24.5 shows an Angular
component. This component has event binding that calls a function to change the
image URL once clicked.

Figure 24.5 shows the rendered web page. You can see both the initial web page and
the results of clicking the button to trigger the event.
Listing 24.5 event.component.ts: Event Binding to Change the Image
URL That Displays on the Web Page
Click here to view code image
01 import { Component } from '@angular/core';
02
03 @Component({
04 selector: 'app-root',
05 template: `
06 <div (mousemove)="move($event)">
07 <img [src]="imageUrl"
08 (mouseenter)="mouseGoesIn()"
09 (mouseleave)="mouseLeft()"
10 (dblclick)="changeImg()" /><br>
11 double click the picture to change it<br>
12 The Mouse has {{mouse}}<hr>
13 <button (click)="changeImg()">Change Picture</button><hr>
14 <input (keyup)="onKeyup($event)"
15 (keydown)="onKeydown($event)"
16 (keypress)="keypress($event)"
17 (blur)="underTheScope($event)"
18 (focus)="underTheScope($event)">
19 {{view}}
20 <p>On key up: {{upValues}}</p>
21 <p>on key down: {{downValues}}</p>
22 <p>on key press: {{keypressValue}}</p>
23 <p (mousemove)="move($event)">
24 x coordinates: {{x}}
25 <br> y coordinates: {{y}}
26 </p>
27 </div>
28 `,
29 styles: [`
30 img {
31 width: auto;
32 height: 300px;
33 }
34 `]
35 })
36 export class AppComponent {
37 counter = 0;
38 mouse: string;
39 upValues: string = '';
40 downValues: string = '';
41 keypressValue: string = "";
42 x: string = "";
43 y: string = '';
44 view: string = '';
45
46 mouseGoesIn = function(){
47 this.mouse = "entered";
48 };
49 mouseLeft = function(){
50 this.mouse = "left";
51 }
52 imageArray: string[] = [
53 "../assets/images/flower.jpg",
54 "../assets/images/lake.jpg", //extensions are case sensitive
55 "../assets/images/bison.jpg",
56 ]
57 imageUrl: string = this.imageArray[this.counter];
58 changeImg = function(){
59 if(this.counter < this.imageArray.length - 1){
60 this.counter++;
61 }else{
62 this.counter = 0;
63 }
64 this.imageUrl=this.imageArray[this.counter];
65 }
66 onKeyup(event:any){
67 this.upValues = event.key;
68 //this.upValues += event.target.value + ' | ';
69 }
70 onKeydown(event:any){
71 this.downValues = event.key;
72 //this.downValues += event.target.value + " | ";
73 }
74 keypress(event:any){
75 this.keypressValue = event.key;
76 //this.keypressValue += event.target.value + " | ";
77 }
78 move(event:any){
79 this.x = event.clientX;
80 this.y = event.clientY;
81 }
82 underTheScope(event:any){
83 if(event.type == "focus"){
84 this.view = "the text box is focused";
85 }
86 else if(event.type == "blur"){
87 this.view = "the input box is blurred";
88 }

89 console.log(event);
90 }
91 }
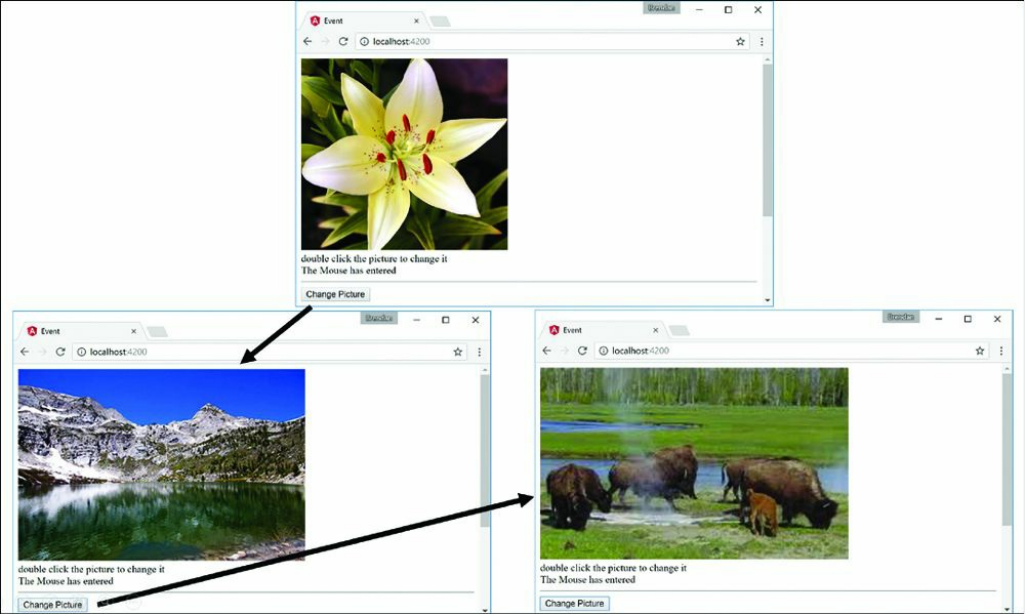
Figure 24.5 The initial result when the web page is loaded and the result from the
event being triggered
Two-Way Binding
Two-way binding allows for data to be easily displayed and updated simultaneously.
This makes it easy to reflect any changes the user makes to the DOM. Angular does
this by using ngModel to watch for changes and then update the value. This is the
syntax:
<input [(ngModel)] = "myValue">
Now let’s take a look at an example of two-way binding. Listing 24.6 shows an
Angular component that has a template. This template shows different ways to
accomplish two-way data binding.
Figure 24.6 shows the rendered web page. It shows that the styles take effect and the
CSS styles change the HTML accordingly.
Listing 24.6 twoWay.component.ts: Different Methods to Implement Two-

Way Data Binding
Click here to view code image
01 import { Component } from '@angular/core';
02 @Component({
03 selector: 'app-root',
04 template: `
05 <input [(ngModel)]="text"><br>
06 <input bindon-ngModel="text"><br>
07 <input [value]="text" (input)="text=$event.target.value">
08 <h1>{{text}}</h1>
09 `
10 })
11 export class AppComponent {
12 text: string = "some text here";
13 }

Figure 24.6 An Angular application that shows multiple ways to accomplish two-
way data binding. The variable and the view are updated every time there is a change
to the input field
Summary
Angular allows for powerful and very useful types of data binding. As you have seen
in this chapter, you can bind data in the application model to the UI elements that are
rendered to the user. This chapter goes over the available types of data binding and
how to implement them. Data binding allows for data to be both displayed to the user
and updated by the user in a simple and efficient manner.
Next
The next chapter talks about built in directives. You will learn about what they are,
as well as how to implement them in your Angular templates.
25
Built-in Directives
One of the most powerful features Angular provides is directives. Directives extend
the behavior of HTML, enabling you to create custom HTML elements, attributes,
and classes with functionality specific to an application. Angular provides many
built-in directives, which provide the capability to interact with form elements, bind
data in a component to the view, and interact with browser events.
This chapter discusses the built-in directives and how to implement them in Angular
templates. You will learn how to apply these directives in your Angular templates
and support them in back-end controllers to quickly turn a rendered view into an
interactive application.
Understanding Directives
Directives are a combination of Angular template markup and supporting TypeScript
code. Angular directive markups can be HTML attributes, element names, or CSS
classes. The TypeScript directive code defines the template data and behavior of the
HTML elements.
The Angular compiler traverses the template DOM and compiles all directives. Then
it links the directives by combining a directive with a scope to produce a new live
view. The live view contains the DOM elements and functionality defined in the
directive.
Using Built-in Directives
Much of the Angular functionality that you need to implement in HTML elements is

provided through built-in directives. These directives provide a wide variety of
support for Angular applications. The following sections describe most of the
Angular directives, which fall into three categories:
Component: A directive with a template
Structural: A directive that manipulates elements in the DOM
Attribute: A directive that manipulates the appearance and behavior of a DOM
element
The following sections describe these three types of directives. You do not need to
understand all the directives right away. The following sections provide tables for
reference. In addition, the following sections and chapters provide sample code for
using many of these directives.
Components Directives
Angular components are a form of structural directive that utilize a template. A
component creates a selector that is used as an HTML tag to dynamically add
HTML, CSS, and Angular logic to the DOM. Components are at the heart of
Angular.
Structural Directives
Several directives dynamically update, create, and remove elements from the DOM.
These directives create the layout, look, and feel of an application. Table 25.1 lists
these directives and describes the behavior and usage of each.
Table 25.1 Structural Directives
Directive Description
ngFor This directive is used to create a copy of a template for each item
within an iterable object. Here is an example:
<div *ngFor="let person of people"></div>
ngIf When this directive is present in an element, that element is
added to the DOM if the value returns true. If the value returns
false, then that element is removed from the DOM, preventing

that element from using resources. Here is an example:
<div *ngIf="person"></div>
ngSwitch This directive displays a template based on the value passed in it.
As with ngIf, if the value does not match the case, the element
is not created. Here is an example:
<div [ngSwitch]="timeOfDay">
<span [ngSwitchCase]="'morning'">Morning</span>
<span [ngSwitchCase]="'afternoon'">Afternoon</span>
<span [ngSwitchDefault]="'daytime'">Evening</span>
The ngSwitch directive relies on two other directives to work:
ngSwitchCase and ngSwitchDefault. These directives
are be explained below.
ngSwitchCase This directive evaluates the value it has stored against the value
passed into ngSwitch and determines whether the HTML
template it is attached to should be created.
ngSwitchDefault This directive creates the HTML template if all the above
ngSwitchCase expressions evaluate to false. This ensures
that some HTML is generated no matter what.
The directives in Table 25.1 are used in a variety of different ways in various parts of
the code. They allow for dynamic manipulation of the DOM, based on what data is
passed to them. Structural directives dynamically manipulate the DOM by using
expressions or values. Two of the most common structural directives are ngIf and
ngSwitch.
ngIf displays a section of HTML if a value or an expression returns true. ngIf
uses the * symbol to let Angular know it’s there. The following is an example of the
syntax for ngIf:
<div *ngIf="myFunction(val)" >...</div>
<div *ngIf="myValue" >{{myValue}}</div>
Note
ngFor is another example of a directive that uses the * symbol as a prefix to let
Angular know it’s there.

ngSwitch uses ngSwitchCase, which displays a section of HTML if a value or
an expression returns true. ngSwitch is surrounded by [] as a form of one-way
data binding to pass the data to each ngSwitchCase for evaluation. The following
is an example of the syntax for ngSwitch:
<div [ngSwitch]="time">
<span *ngSwitchCase="'night'">It's night time </span>
<span *ngSwitchDefault>It's day time </span>
Listing 25.1 shows an Angular component which has a template that contains built-
in structural directives. The ngIf directive dynamically adds and removes HTML
from the DOM. ngSwitch does the same thing as ngIf, but it allows for more
options, along with a default option if all the cases return false.
Lines 6 and 7 in Listing 25.1 use ngIf to determine whether the HTML should be
displayed.
Line 10 shows the extended form of ngFor to dynamically add HTML based on the
amount of data passed to it. (This example simply shows another method of using
the ngFor directive, but the rest of the book will use the shorter form *ngFor.)
Line 15 uses the shorthand form of the ngFor directive to display data. This method
is used throughout the rest of this book.
Lines 20 through 26 use ngSwitchCase to determine which piece of HTML
should be displayed.
Figure 25.1 shows the rendered web page. As you can see, interpolation can use
strings from the Component class to populate the template.
Click here to view code image
Listing 25.1 structural.component.ts: Structural Built-in Functions
01 import { Component } from '@angular/core';
02
03 @Component({
04 selector: 'app-root',
05 template: `
06 <div *ngIf="condition">condition met</div>
07 <div *ngIf="!condition">condition not met</div>
08 <button (click)="changeCondition()">Change Condition</button>
09 <hr>

10 <template ngFor let-person [ngForOf]="people">
11 <div>name: {{person}}</div>
12 </template>
13 <hr>
14 <h3>Monsters and where they live</h3>
15 <ul *ngFor="let monster of monsters">
16 {{monster.name}}:
17 {{monster.location}}
18 </ul>
19 <hr>
20 <div [ngSwitch]="time">
21 <span *ngSwitchCase="'night'">It's night time
22 <button (click)="changeDay()">change to day</button>
23 </span>
24 <span *ngSwitchDefault>It's day time
25 <button (click)="changeNight()">change to night</button></span>
26 </div>
27 `
28 })
29 export class AppComponent {
30 condition: boolean = true;
31 changeCondition = function(){
32 this.condition = !this.condition;
33 }
34 changeDay = function(){
35 this.time = 'day';
36 }
37 changeNight = function(){
38 this.time = 'night'
39 }
40 people: string[] = [
41 "Andrew", "Dillon", "Philipe", "Susan"
42 ]
43 monsters = [
44 { name: "Nessie",
45 location: "Loch Ness, Scotland" },
46 { name: "Bigfoot",
47 location: "Pacific Northwest, USA" },
48 { name: "Godzilla",
49 location: "Tokyo, sometimes New York" }
50 ]
51 time: string = 'night';
52 }

Figure 25.1 Using built-in structural directives
Attribute Directives
Angular attribute directives modify how HTML elements look and behave. They are
injected straight into the HTML and dynamically modify how the user interacts with
an HTML segment. Attribute directives are so named because they often look like
normal HTML attributes. An example of an attribute directive that you’ve been
using throughout the book is ngModel, which modifies an element by changing the
display value.
Table 25.2 lists the attribute directives and describes the behavior and usage of each.
Table 25.2 Attribute Directives
Directive Description
ngModel This directive watches a variable for changes and then updates display values
based on those changes. Consider these examples:

<input [(ngModel)]="text"><br>
<h1>{{text}}</h1>
ngForm This directive creates a form group and allows it to track the values and
validation within that form group. By using ngSubmit, you can pass the
form data as an object to the submission event. Here is an example:
<form #formName="ngForm" (ngSubmit)="onSubmit(formName)"> </form>
ngStyle This directive updates the styles of an HTML element.
The directives in Table 25.2 are used in a variety of different ways in various parts of
the code. They allow for manipulation of an application’s behavior. The following
example shows how to use some of the built-in attribute directives to build a form
that submits data to a simulated database.
Listing 25.2 shows an Angular component. Lines 9 through 14 set the default values
for the variables used throughout the application. Lines 15 through 17 define the
enabler method, which sets the Boolean isDisabled to the opposite value of what
it was. Lines 18 through 30 define the addClass method, which pushes a value
from the event target to the selectedClass array.
Listing 25.3 shows an Angular template file that uses ngModel, ngClass,
ngStyle, and ngForm to modify the look and behavior of the HTML template.
Lines 7 through 12 create an HTML selection element that assigns a color to the
color variable on the attribute component. Lines 14 through 18 create an HTML
selection element that uses the change event to invoke the addClass method and
pass in the event object. Lines 16 through 21 display the output of the component
variables, using the ngClass and ngStyle directives to dynamically modify the
look of the elements.
The code in Listing 25.4 is the CSS for the component that sets up the styles for the
application.
Figure 25.2 shows the rendered web page. It shows that interpolation can use strings
from the Component class to populate the template.
Listing 25.2 attribute.component.ts: A Component That Builds and
Manages an Angular Form
Click here to view code image

01 import { Component } from '@angular/core';
02
03 @Component({
04 selector: 'app-root',
05 templateUrl: './attribute.component.html',
06 styleUrls: ['./attribute.component.css']
07 })
08 export class AppComponent {
09 colors: string[] = ["red", "blue", "green", "yellow"];
10 name: string;
11 color: string = 'color';
12 isDisabled: boolean = true;
13 classes:string[] = ['bold', 'italic', 'highlight'];
14 selectedClass:string[] = [];
15 enabler(){
16 this.isDisabled = !this.isDisabled;
17 }
18 addClass(event: any){
19 this.selectedClass = [];
20 var values = event.target.options;
21 var opt: any;
22
23 for (var i=0, iLen = values.length; i<iLen; i++){
24 opt = values[i];
25
26 if (opt.selected){
27 this.selectedClass.push(opt.text);
28 }
29 }
30 }
31 }
Listing 25.3 attribute.component.html: An Angular Template for the
Attribute Component
Click here to view code image
01 <form>
02 <span>name: </span>
03 <input name="name" [(ngModel)]="name">
04 <br>
05 <span>color:</span>
06 <input type="checkbox" (click)="enabler()">
07 <select #optionColor [(ngModel)]="color" name="color"
08 [disabled]="isDisabled">
09 <option *ngFor="let color of colors" [value]="color">
10 {{color}}

11 </option>
12 </select><hr>
13 <span>Change Class</span><br>
14 <select #classOption multiple name="styles" (change)="addClass($event)">
15 <option *ngFor="let class of classes" [value]="class" >
16 {{class}}
17 </option>
18 </select><br>
19 <span>
20 press and hold control/command
21 <br>
22 to select multiple options
23 </span>
24 </form>
25 <hr>
26 <span>Name: {{name}}</span><br>
27 <span [ngClass]="selectedClass"
28 [ngStyle]="{'color': optionColor.value}">
29 color: {{optionColor.value}}
30 </span><br>
Listing 25.4 attribute.component.css: A CSS File That Styles the
Application
Click here to view code image
01 .bold {
02 font-weight: bold;
03 }
04 .italic {
05 font-style: italic;
06 }
07 .highlight {
08 background-color: lightblue;
09 }
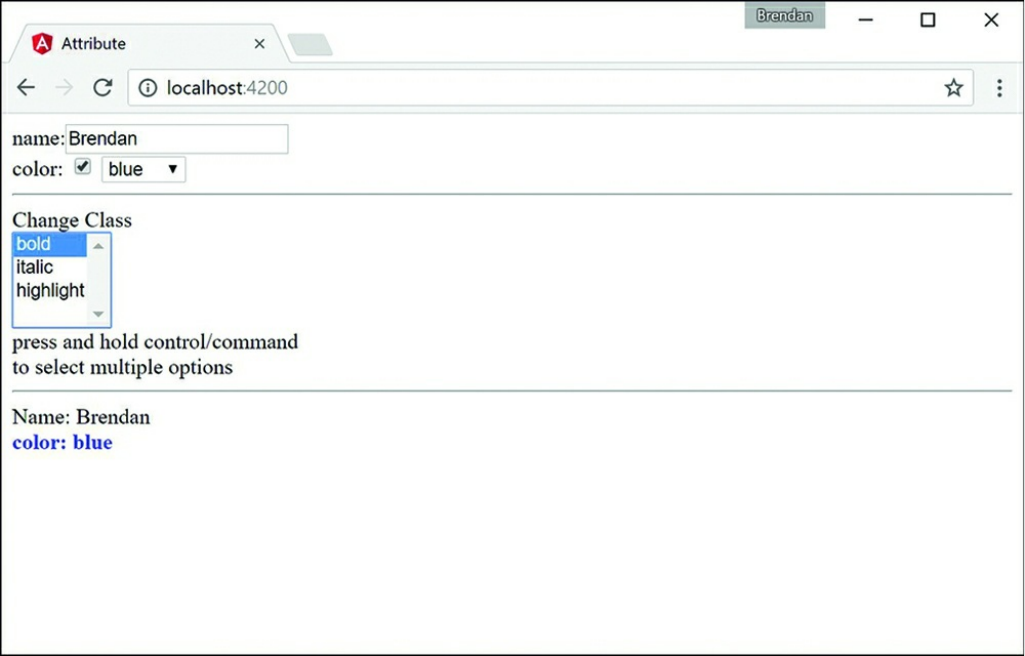
Figure 25.2 An Angular application that shows multiple ways to apply attribute
directives to modify the behavior of the DOM
Summary
Angular offers many built-in directives that provide functionality to manipulate the
look, feel, and behavior of an application, without requiring you to write large
amounts of code. This chapter goes over some of the available built-in directives and
provides examples of how to utilize Angular’s built-in directives.
Next
In this chapter you learned about built-in directives. In the next Chapter you will
learn about custom directives and how to make your own directives that you can
implement in Angular.
Part VI: Advanced Angular
26
Custom Directives
As with many other features of Angular, you can extend functionality by creating
your own custom directives. Custom directives allow you to extend the functionality
of HTML by implementing the behavior of elements yourself. If you have code that
needs to manipulate the DOM, it should be done inside a custom directive.
You implement a custom directive by calling the @directive class, much the
same way you define a component. The @directive class metadata should
include the selector of the directive to be used in the HTML. The Directive
export class is where the logic for the directive will reside. For example, the
following is a basic definition for a directive:
import { Directive } from '@angular/core';
@Directive({
selector: '[myDirective]'
})
export class myDirective { }
Creating a Custom Attribute Directive
You can define a limitless number of types of custom directives, which makes
Angular incredibly extensible. Custom directives are the most complex portion of
Angular to explain. The best way to get you started is to show you an example of
custom directives to give you a feel for how they can be implemented and interact
with each other.
This section shows how to implement a custom attribute directive. The zoom
directive created in this example is designed to add custom functionality to whatever
image it is applied to. With this directive applied, you can scroll over an image with

the mouse wheel to make the element grow or shrink in size.
Listing 26.1 shows the zoom component, which displays a list of images. These
images have the zoom directive applied to them, allowing the mouse scroll event to
increase or decrease the size of each image.
Listing 26.2 shows the zoom directive. This directive has the selector zoom. This
directive imports Directive, ElementRef, HostListener, Input, and
Renderer from @angular/core to provide the functionality this directive
needs.
Lines 10 through 12 of Listing 26.2 watch for the mouse cursor to enter the element,
and when it does, it applies a border to the element with the border() function to
let the user know the directive is active.
Lines 14 through 16 remove the border when the cursor leaves the element to tell the
user the directive is no longer active.
Lines 17 through 26 listen for the mouse wheel to be activated. Depending on which
direction the wheel is scrolled, the element’s size is adjusted with the
changeSize() function.
Lines 27 through 31 define the border() function. This function takes in three
parameters and then applies those parameters to style the host element.
Lines 32 through 36 define the changeSize() function, which changes the size of
the host element.
Listing 26.3 shows the HTML file for zoom.component.ts. It creates a row of
images and applies the zoom directive to those images.
Listing 26.4 shows the styles for zoom.component.ts. It sets the height of the
images to 200px initially so they aren’t rendered huge if they have a high resolution.
The web page that results from Listings 26.1–26.4 is shown in Figure 26.1.
Listing 26.1 zoom.component.ts: A Structural Directive
Click here to view code image
01 import { Component } from '@angular/core';
02

03 @Component({
04 selector: 'app-root',
05 templateUrl: './app.component.html',
06 styleUrls: ['./app.component.css']
07 })
08 export class AppComponent {
09 images: string[] = [
10 '../assets/images/jump.jpg',
11 '../assets/images/flower2.jpg',
12 '../assets/images/cliff.jpg'
13 ]
14 }
Listing 26.2 zoom.directive.ts: A Custom Attribute Directive
Click here to view code image
01 import { Directive, ElementRef, HostListener, Input, Renderer }
02 from '@angular/core';
03 @Directive({
04 selector: '[zoom]'
05 })
06
07 export class ZoomDirective {
08 constructor(private el: ElementRef, private renderer: Renderer) { }
09
10 @HostListener('mouseenter') onMouseEnter() {
11 this.border('lime', 'solid', '5px');
12 }
13
14 @HostListener('mouseleave') onMouseLeave() {
15 this.border();
16 }
17 @HostListener('wheel', ['$event']) onWheel(event: any) {
18 event.preventDefault();
19 if(event.deltaY > 0){
20 this.changeSize(-25);
21 }
22 if(event.deltaY < 0){
23 this.changeSize(25);
24 }
25 }
26 private border(
27 color: string = null,
28 type: string = null,
29 width: string = null
30 ){
31 this.renderer.setElementStyle(

32 this.el.nativeElement, 'border-color', color);
33 this.renderer.setElementStyle(
34 this.el.nativeElement, 'border-style', type);
35 this.renderer.setElementStyle(
36 this.el.nativeElement, 'border-width', width);
37 }
38 private changeSize(sizechange: any){
39 let height: any = this.el.nativeElement.offsetHeight;
40 let newHeight: any = height + sizechange;
41 this.renderer.setElementStyle(
42 this.el.nativeElement, 'height', newHeight + 'px');
43 }
44 }
Listing 26.3 app.component.html: An HTML File That Uses the Zoom
Directive
Click here to view code image
01 <h1>
02 Attribute Directive
03 </h1>
04 <span *ngFor="let image of images">
05 <img zoom src="{{image}}" />
06 </span>
Listing 26.4 app.component.css: A CSS File that Sets the Image Height
Click here to view code image
01 img {
02 height: 200px;
03 }

Figure 26.1 Applying a custom attribute directive
Creating a Custom Directive with a Component
Angular components are also a type of directive. What distinguishes a component
from a directive is that components use an HTML template to generate a view. But
because a component underneath is just a directive, it can be applied to HTML
elements to add custom functionality in some really cool ways.
Angular offers a built-in directive called ng-content. This directive allows
Angular to take existing HTML from between two element tags that use a directive
and use that HTML within the components template. The syntax of ng-content is
as follows:
<ng-content></ng-content>
The example in this section shows how to use a component as a custom directive to
change how the element looks with a containing template.

This example implements a custom directive container that is designed to add a
surrounding “container” HTML template to the element it is being applied to. This
directive has two inputs title and description that can be used to give the host
element a description and title.
Listing 26.5 shows the root component, which displays various HTML elements.
These elements have the container directive applied, which adds a header with an
optional title, a footer with an optional description, and borders to each element.
Listing 26.5 app.component.ts: The Root Component
Click here to view code image
01 import { Component } from '@angular/core';
02
03 @Component({
04 selector: 'app-root',
05 templateUrl: './app.component.html',
06 styleUrls: ['./app.component.css'],
07 })
08 export class AppComponent {
09
10 images: any = [
11 {
12 src: "../assets/images/angelsLanding.jpg",
13 title: "Angels Landing",
14 description: "A natural wonder in Zion National Park Utah, USA"
15 },
16 {
17 src: "../assets/images/pyramid.JPG",
18 title: "Tikal",
19 description: "Mayan Ruins, Tikal Guatemala"
20 },
21 {
22 src: "../assets/images/sunset.JPG"
23 },
24 ]
25 }
Listing 26.6 shows the HTML for the root component. The code creates several
elements of different types, such as image, div, and p, and applies the container
directive to them.
Listing 26.6 app.component.html: HTML for the Root Component
Click here to view code image

01 <span *ngFor="let image of images" container title="{{image.title}}"
02 description="{{image.description}}">
03 <img src="{{image.src}}" />
04 </span>
05 <span container>
06 <p>Lorem ipsum dolor sit amet, consectetur adipiscing elit,
07 sed do eiusmod tempor incididunt ut labore </p>
08 </span>
09 <span container>
10 <div class="diver">
11 </div>
12 </span>
Listing 26.7 shows the CSS for the root component. It sets a max image height to
keep the size of the image smaller. It also sets some default styling for the class
diver so that it is visible to the user.
Listing 26.7 app.component.css: CSS for the Root Component
Click here to view code image
01 img{ height: 300px; }
02 p{ color: red }
03 .diver{
04 background-color: forestgreen;
05 height: 300px;
06 width: 300px;
07 }
Listing 26.8 shows the container directive. This directive has the selector
container and the inputs title and description. This directive imports
Directive, Input, and Output from @angular/core to provide the
functionality this directive needs.
Listing 26.8 container.component.ts: A Component that Defines the
Container
Click here to view code image
01 import { Component, Input, Output } from '@angular/core';
02
03 @Component({
04 selector: '[container]',
05 templateUrl: './container.component.html',
06 styleUrls: ['./container.component.css']

07 })
08 export class ContainerComponent {
09 @Input() title: string;
10 @Input() description: string;
11 }
Listing 26.9 shows the HTML for the container directive. Lines 2 through 4 create
the title bar for the container. Lines 5 through 7 apply the content attribute directive.
ng-content acts as a placeholder and will be replaced with the template from the
container component shown in Listing 26.8. Lines 8 through 10 create the
description bar for the container component.
Listing 26.9 container.component.html: HTML for the Container
Component
Click here to view code image
01 <div class="sticky">
02 <div class="title" >
03 {{ title }}
04 </div>
05 <div class="content">
06 <ng-content></ng-content>
07 </div>
08 <div class="description">
09 {{ description }}
10 </div>
11 </div>
Listing 26.10 shows the CSS for the container component. This file sets the CSS to
give the container component borders, a title bar, and a description bar.
Listing 26.10 container.component.css: CSS for the Container
Component
Click here to view code image
01 .title {
02 color: white;
03 background-color: dimgrey;
04 padding: 10px;
05 }
06 .content {
07 text-align: center;
08 margin: 0px;
09 }

10 .description {
11 color: red;
12 background-color: lightgray;
13 margin-top: -4px;
14 padding: 10px;
15 }
16 .sticky {
17 display: inline-block;
18 padding: 0px;
19 margin: 15px;
20 border-left: dimgrey 3px solid;
21 border-right: dimgrey 3px solid;
22 }
The web page that results from Listings 26.5 through 26.10 is shown in Figure 26.2.

Figure 26.2 Custom component directive
Summary
Angular directives extend the behavior of HTML. Directives can be applied to
Angular templates as HTML elements, attributes, and classes. The functionality of
directives is defined in the @directive class. Angular provides several built-in
directives that interact with form elements, bind data, and interact with browser
events. For example, ngModel binds the value of a form element directly to the
component. When the component value changes, so does the value displayed by the
element and vice versa.
One of the most powerful features of Angular is the ability to create your own
custom directives. Implementing a custom directive in code is simple, using the
@directive class. However, directives can also be very complex because of the
myriad ways they can be implemented.
Next
In the next chapter you will learn how to use events and observables to handle
change detection in your Angular components. You will also learn how to create,
emit, and handle your own custom events.

27
Events and Change Detection
Angular has powerful browser events that extend HTML events by using Angular
data binding to handle responses. Some of the built-in Angular events are discussed
in Chapter 24, “Data Binding,” in the section “Event Binding.” This chapter goes
over built-in events, custom events, and event handling with an Angular application.
Using Browser Events
Using the built-in events in Angular works like data binding. By wrapping an event
name in (), you let Angular know what event you’re binding to. The event is
followed by a statement that can be used to manipulate the data. The following is an
example of the syntax for a built-in event:
<input type="text" (change)="myEventHandler($event)" />
Table 27.1 lists some of the HTML events, along with their Angular counterparts
and short descriptions.
Table 27.1 HTML Events with Angular Syntax and a Description of the Event
HTML Event Angular
Syntax
Description
onclick (click) Event that is fired when the
HTML element is clicked on
onchange (change) Event that is fired when the
value of the HTML element is
changed
onfocus (focus) Event that is fired when the

HTML element is selected
onsubmit (submit) Event that is fired when the
form is submitted
onkeyup,
onkeydown,
onkeypress
(keyup),
(keydown),
(keypress)
Events that are fired
intermittently when the
keyboard keys are pressed
onmouseover (mouseover) Event that is fired when the
cursor moves over an HTML
element
Some of these events should be familiar to you as they have been used in previous
chapters. Notice that the Angular syntax uses one-way data binding, which involves
using () around each event to pass information about the event to the component.
Emitting Custom Events
A great feature of components is the capability to emit events within the component
hierarchy. Events enable you to send notifications to different levels in the
application to indicate that the events have occurred. An event can be anything you
choose, such as a value changed or a threshold reached. This is extremely useful in
many situations, such as for letting child components know that a value has changed
in a parent component or vice versa.
Emitting a Custom Event to the Parent Component
Hierarchy
To emit an event from a component, you use the EventEmitter class. This class
has the emit() method, which sends an event upward through the parent
component hierarchy. Any ancestor components that have registered for the event
are notified. The emit() method uses the following syntax, where name is the
event name and args is zero or more arguments to pass to the event handler
functions:
@Output() name: EventEmitter<any> = new EventEmitter();

myFunction(){
this.name.emit(args);
}
Handling Custom Events with a Listener
To handle an event that is emitted, you use syntax similar to that used for the built-in
events Angular has to offer. The event handler method uses the following syntax,
where name is the name of the event to listen for, and event is the value passed by
EventEmitter:
<div (name)="handlerMethod(event)">
Implementing Custom Events in Nested Components
Listings 27.1, 27.2, and 27.3 illustrate the use of EventEmitter, Output, emit,
and an event handler to send and handle events up the component hierarchy.
Listing 27.1 shows a custom event component that uses a custom event from a child
component to pass data to a variable in the parent. Lines 9 through 11 implement a
custom event handler, which takes in an event and applies it to the variable text.
In Listing 27.2, line 1 implements a custom event named myCustomEvent, which
passes the event to the component method eventHandler. The eventHandler
method takes in the emitted value and assigns the value to the variable text, which
is outputted on line 3.
In Listing 27.3, line 1 imports Output and EventEmitter from
@angular/core to be used within the component. Line 15 uses Output and
EventEmitter to create the custom event myCustomEvent. Lines 19 and 24
both emit the event and pass the variable message to the parent component.
Figure 27.1 shows the rendered web page.
Listing 27.1 customevent.component.ts: A Main Component with an
Event Handler
Click here to view code image
01 import { Component } from '@angular/core';
02

03 @Component({
04 selector: 'app-root',
05 templateUrl: 'customevent.component.html'
06 })
07 export class AppComponent {
08 text: string = '';
09 eventHandler(event: any){
10 this.text = event;
11 }
12
13 }
Listing 27.2 customevent.component.html: HTML That Implements a
Custom Event
Click here to view code image
01 <child (myCustomEvent)="eventHandler($event)"></child>
02 <hr *ngIf="text">
03 {{text}}
Listing 27.3 child.component.ts: A Child Component That Emits an
Event
Click here to view code image
01 import { Component, Output, EventEmitter } from '@angular/core';
02
03 @Component({
04 selector: 'child',
05 template: `
06 <button (click)="clicked()" (mouseleave)="mouseleave()">
07 Click Me
08 </button>
09 `,
10 styleUrls: ['child.component.css']
11 })
12 export class ChildComponent {
13 private message = "";
14
15 @Output() myCustomEvent: EventEmitter<any> = new EventEmitter();
16
17 clicked() {
18 this.message = "You've made a custom event";
19 this.myCustomEvent.emit(this.message);
20 }
21

22 mouseleave(){
23 this.message = "";
24 this.myCustomEvent.emit(this.message);
25 }
26 }
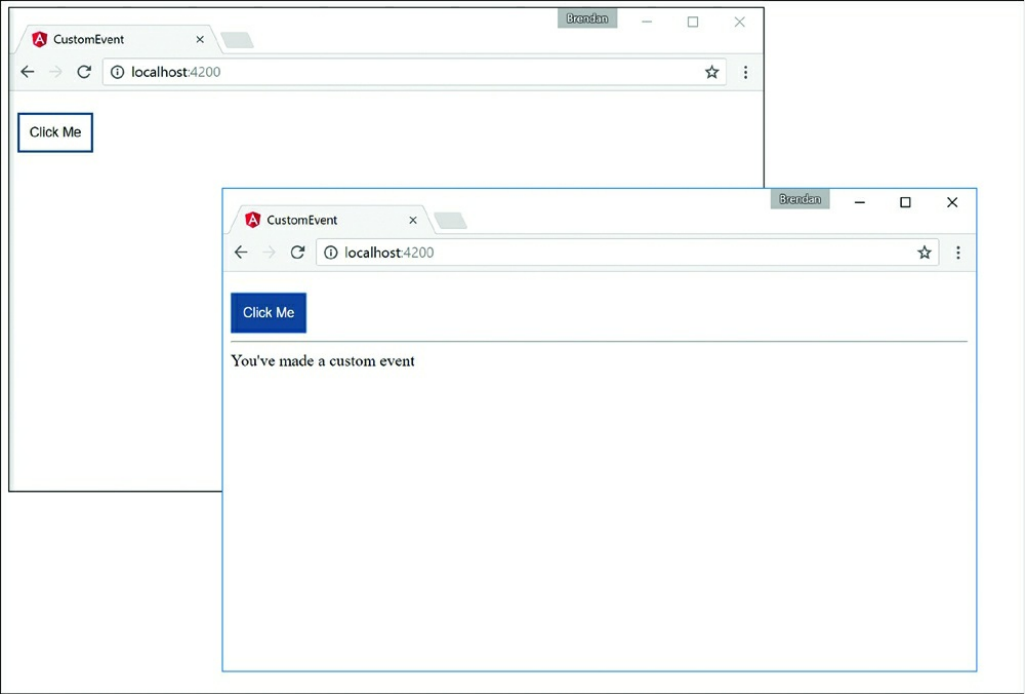
Figure 27.1 Creating a custom event
Deleting Data in a Parent Component from a Child
Component
Listings 27.4 through 27.9 illustrate the use of EventEmitter, input, Output,
emit, and an event handler to send and handle events up the component hierarchy.
Listing 27.4 shows a component that creates a list of characters that can be
manipulated via custom events. The selectCharacter() function on line 21 is
an event handler that changes the character value, which can then be passed
down to the details component.
In Listing 27.5, line 9 implements a custom event called CharacterDeleted,
which invokes the deleteChar() method that takes in the event. Lines 24
through 30 of Listing 27.5 implement a handler for the CharacterDeleted
event, which removes the character name from the names property. In line 14 of

Listing 27.7, the child component emits this event via the emit() method.
In Listing 27.7, line 10 creates the character input, which takes data in from the
parent. Line 11 creates the CharacterDeleted EventEmitter, which is used
on line 14 to pass the character data back up to the parent to be handled.
In Listing 27.8, line 8 invokes the deleteChar() method which then activates the
EventEmitter on line 41 to send the character data back to the parent
component.
Figure 27.2 shows the rendered web page.
Listing 27.4 character.component.ts: A Main Component, Which Passes
Data Down to a Nested Component
Click here to view code image
01 import { Component } from '@angular/core';
02
03 @Component({
04 selector: 'app-root',
05 templateUrl: './app.component.html',
06 styleUrls: ['./app.component.css']
07 })
08 export class AppComponent {
09 character = null;
10
11 characters = [{name: 'Frodo', weapon: 'Sting',
12 race: 'Hobbit'},
13 {name: 'Aragorn', weapon: 'Sword',
14 race: 'Man'},
15 {name:'Legolas', weapon: 'Bow',
16 race: 'Elf'},
17 {name: 'Gimli', weapon: 'Axe',
18 race: 'Dwarf'}
19 ]
20
21 selectCharacter(character){
22 this.character = character;
23 }
24 deleteChar(event){
25 var index = this.characters.indexOf(event);
26 if(index > -1) {
27 this.characters.splice(index, 1);
28 }
29 this.character = null;

30 }
31
32 }
Listing 27.5 character.component.html: HTML That Implements a
Custom Event
Click here to view code image
01 <h2>Custom Events in Nested Components</h2>
02 <div *ngFor="let character of characters">
03 <div class="char" (click)="selectCharacter(character)">
04 {{character.name}}
05 </div>
06 </div>
07 <app-character
08 [character]="character"
09 (CharacterDeleted)="deleteChar($event)">
10 </app-character>
Listing 27.6 character.component.css: Styles for the Character
Component
Click here to view code image
01 .char{
02 padding: 5px;
03 border: 2px solid forestgreen;
04 margin: 5px;
05 border-radius: 10px;
06 cursor: pointer;
07 }
08 .char:hover{
09 background-color: lightgrey;
10 }
11 body{
12 text-align: center;
13 }
Listing 27.7 details.component.ts: A Details Component That Emits a
Delete Event
Click here to view code image
01 import { Component, Output, Input, EventEmitter } from '@angular/core';
02
03 @Component({

04 selector: 'app-character',
05 templateUrl: './characters.component.html',
06 styleUrls: ['./characters.component.css']
07 })
08 export class CharacterComponent {
09
10 @Input('character') character: any;
11 @Output() CharacterDeleted = new EventEmitter<any>();
12
13 deleteChar(){
14 this.CharacterDeleted.emit(this.character);
15 }
16
17 }
Listing 27.8 details.component.html: HTML that Triggers a Delete
Event
Click here to view code image
01 <div>
02 <div *ngIf="character">
03 <h2>Character Details</h2>
04 <div class="cInfo">
05 <b>Name: </b>{{character.name}}<br>
06 <b>Race: </b>{{character.race}}<br>
07 <b>Weapon: </b>{{character.weapon}}<br>
08 <button (click)="deleteChar()">Delete</button>
09 </div>
10 </div>
11 </div>
Listing 27.9 details.component.css: Styles for the Details Component
Click here to view code image
01 div{
02 display: block;
03 }
04 .cInfo{
05 border: 1px solid blue;
06 text-align: center;
07 padding: 10px;
08 border-radius: 10px;
09 }
10 h2{
11 text-align: center;
12 }

13 button{
14 cursor: pointer;
15 }
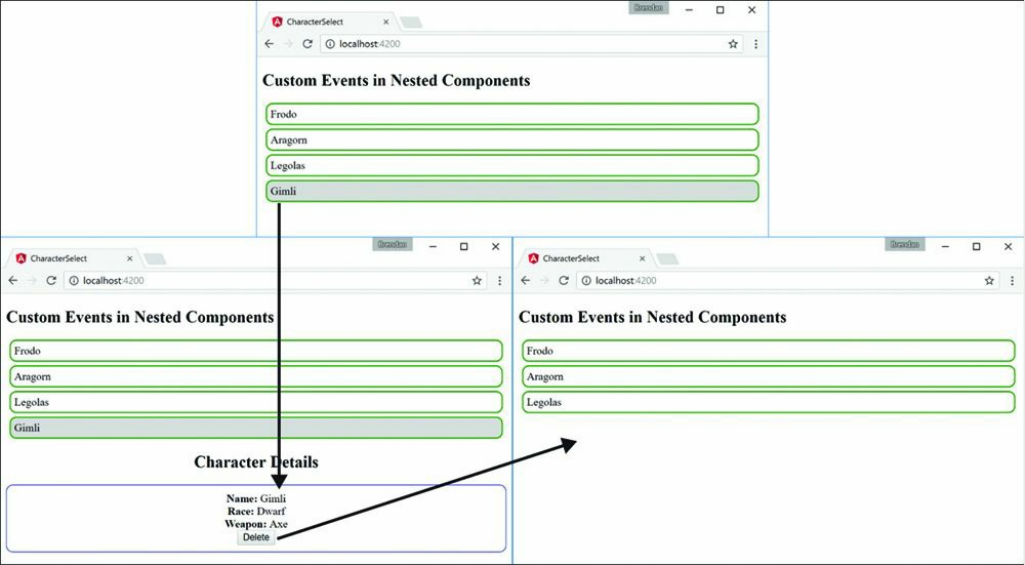
Figure 27.2 Using events to send and delete data
Using Observables
Observables offer components a way to observe data that changes asynchronously,
such as data coming from a server or from user input. Basically, observables allow
you to watch values for changes over time. Unlike a JavaScript promise, which
returns a single value, an observable is capable of returning an array of values. This
array of values doesn’t have to be received all at once, either, which makes
observables that much more powerful.
Creating an Observable Object
You import Observable from rxjs/observable to be used within a
component. Once it is imported, you can create an observable object by using the
following syntax, where name is the observable name:
private name: Observable<Array<number>>;
Once the observable object is created, it is available to be subscribed to and to make
the observable data available to the rest of the component. This is done in two parts:
implementing the observable and using the subscribe method. This following is a
basic example of an observable:
Click here to view code image
01 private name: Observable<Array<number>>;
02 ngOnInit(){
03 this.name = new Observable(observer => {
04 observer.next("my observable")
05 observer.complete();
06 }
07 Let subscribe = this.name.subscribe(
08 data => { console.log(data) },
09 Error => { errorHandler(Error) },
10 () => { final() }
11 );
12 subscribe.unsubscribe();
13 }
Lines 3 through 6 instantiate the observable name as observer, making it
available to be subscribed to. Line 4 uses the method next on observer, which
passes data to the observable. Line 5 uses the method complete on observer to
close the connection of the observable.
The subscription to the observable occurs in lines 7 through 11. This subscription
has three callback functions. The first is called when data is successfully received by
the subscription. The second is the error handler, which is called when the
subscription fails. The third is the final one, which runs code when the subscription
completes, whether the subscription succeeds or fails.
On line 8, data is passed to the console.log function when the subscription
successfully receives the data. Line 9 calls the function errorHandler. Line 10
invokes final().
Watching for Data Changes with Observables
Listings 27.10 and 27.11 illustrate the use of Observable to watch for changes of
data. The example in this section uses observables to watch for data changes and
then makes that data available to be displayed on the DOM.
Listing 27.10 shows the component for the application. This component creates two
Observable objects, pass and run. These observables have a function that goes

and gets a random number between 0 and 30 and gives each number to one of the
two teams randomly until the combined total of both teams equals 1,000 or greater.
In Listing 27.10, lines 11 and 12 declare the observables pass and run. These
Observable objects are both initialized and subscribed to within the ngOnInit
function, which runs when the component is initialized.
The observable pass is initialized on lines 18 through 20, and run is initialized on
lines 27 through 28. Once they are initialized, pass and run both use the function
playLoop on lines 43 through 52. playLoop creates and sends an object that
contains a random number between 0 and 1 to determine the team and a random
number between 0 and 29 for yards. Each observable then interprets the team and
applies the yards to either the team’s pass yards or running yards.
Lines 57 through 59 create a random number generator that the rest of the
application uses to create the random numbers for the timeout functions, teams, and
yards.
Listing 27.11 shows the HTML for this example. This listing has three main parts.
Lines 3 through 5 show data for an imaginary team’s distance, in yards. Lines 8
through 10 show the same for a second team. Line 11 shows the combination of both
teams’ distances.
Figure 27.3 shows the rendered web page.
Listing 27.10 observable.component.ts: Observables for Detecting Data
Changes
Click here to view code image
01 import { Component, OnInit } from '@angular/core';
02 import { Observable } from 'rxjs/observable';
03 import { Subscription } from 'rxjs/Subscription';
04 @Component({
05 selector: 'app-root',
06 templateUrl: "./observable.component.html",
07 styleUrls: ['./app.component.css']
08 })
09 export class AppComponent implements OnInit {
10 combinedTotal:number = 0;
11 private pass: Observable<any>;
12 private run: Observable<any>;
13 teams = [];
14 ngOnInit(){

15 this.teams.push({passing:0, running:0, total:0});
16 this.teams.push({passing:0, running:0, total:0});
17 //Passing
18 this.pass = new Observable(observer => {
19 this.playLoop(observer);
20 });
21 this.pass.subscribe(
22 data => {
23 this.teams[data.team].passing += data.yards;
24 this.addTotal(data.team, data.yards);
25 });
26 //Running
27 this.run = new Observable(observer => {
28 this.playLoop(observer);
29 });
30 this.run.subscribe(
31 data => {
32 this.teams[data.team].running += data.yards;
33 this.addTotal(data.team, data.yards);
34 });
35 //Combined
36 this.pass.subscribe(
37 data => { this.combinedTotal += data.yards;
38 });
39 this.run.subscribe(
40 data => { this.combinedTotal += data.yards;
41 });
42 }
43 playLoop(observer){
44 var time = this.getRandom(500, 2000);
45 setTimeout(() => {
46 observer.next(
47 { team: this.getRandom(0,2),
48 yards: this.getRandom(0,30)});
49 if(this.combinedTotal < 1000){
50 this.playLoop(observer);
51 }
52 }, time);
53 }
54 addTotal(team, yards){
55 this.teams[team].total += yards;
56 }
57 getRandom(min, max) {
58 return Math.floor(Math.random() * (max - min)) + min;
59 }
60 }

Listing 27.11 observable.component.html: A Template File for the
Component
Click here to view code image
01 <div>
02 Team 1 Yards:<br>
03 Passing: {{teams[0].passing}}<br>
04 Running: {{teams[0].running}}<br>
05 Total: {{teams[0].total}}<br>
06 <hr>
07 Team 2 Yards:<br>
08 Passing: {{teams[1].passing}}<br>
09 Running: {{teams[1].running}}<br>
10 Total: {{teams[1].total}}<hr>
11 Combined Total: {{combinedTotal}}
12 </div>
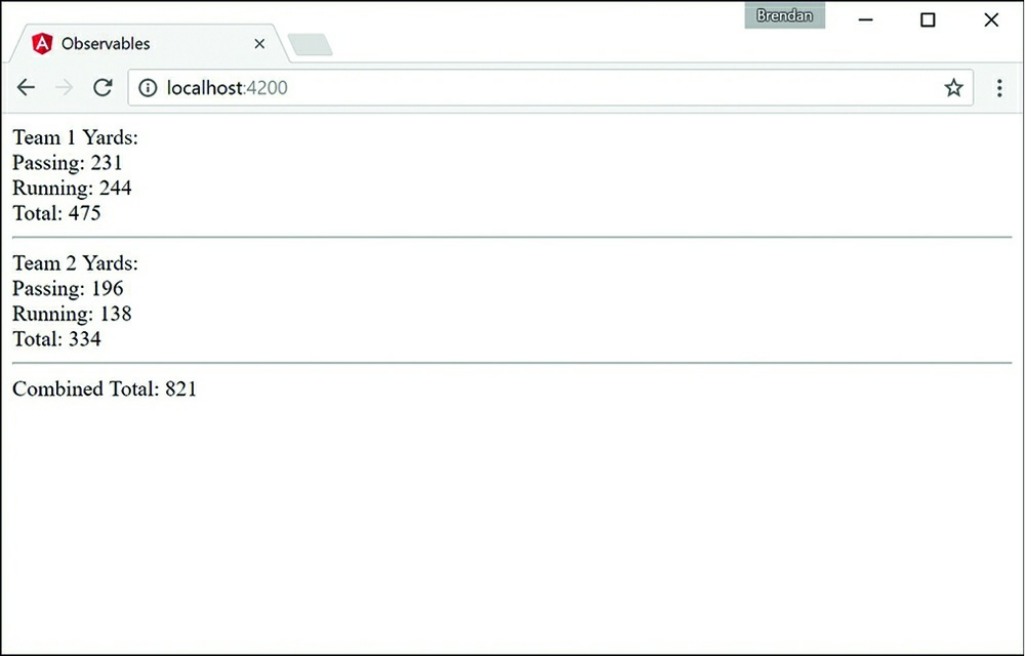
Figure 27.3 Using observables to watch for data changes over time
Summary
The capability to manage events is one of the most critical components in most
Angular applications. You can use events in Angular applications to provide user
interaction with elements as well as components of the application that communicate
with each other so they know when to perform certain tasks.
Components are organized into hierarchies, and the root component is defined at the
application level. In this chapter, you have learned how to emit events from within a
component and then implement handlers that listen for those events and get executed
when they are triggered. You have also learned about observables and how to
implement them for asynchronous watching of values.
Next
The next chapter will introduce you to built-in Angular services. You will get a
chance to see and implement some of the built-in services such as Http for
communicating with back-end services and Router for managing routing in multi-
view applications.
28
Implementing Angular Services in Web
Applications
One of the most fundamental components of Angular functionality is services.
Services provide task-based functionality to applications. You can think of a service
as a chunk of reusable code that performs one or more related tasks. Angular
provides several built-in services and also allows you to create your own customized
services.
This chapter introduces built-in Angular services. You will get a chance to see and
implement some of the built-in services, such as http for web server
communication, router for managing and changing the state of an application, and
animate to provide animation capabilities.
Understanding Angular Services
The purpose of a service is to provide a concise bit of code that performs specific
tasks. A service does something as simple as providing a value definition or as
complex as providing full HTTP communication to a web server.
A service provides a container for reusable functionality that is readily available to
Angular applications. Services are defined and registered with the dependency
injection mechanism in Angular. This allows you to inject services into modules,
components, and other services.
Using the Built-in Services
Angular provides several built-in services that are included in the Angular module,
using dependency injection. Once included within a module, services can be used
throughout an application.
Table 28.1 describes some of the most common built-in services to give you an idea
of what is available. The following sections cover the http and router services in
more detail.
Table 28.1 Common Services That Are Built in to Angular
Service Description
animate Provides animation hooks to link into both CSS- and JavaScript-based
animations
http Provides a simple-to-use functionality to send HTTP requests to the
web server or other service
router Provides navigation between views and between sections within views
forms Provides a service that allows for dynamic and reactive forms with
simple form validation
Sending HTTP GET and PUT Requests with the
http Service
The http service enables you to directly interact with the web server from your
Angular code. The http service uses the browser's XMLHttpRequest object
underneath but from the context of the Angular framework.
There are two ways to use the http service. The simplest is to use one of the
following built-in shortcut methods that correspond to standard HTTP requests:
delete(url, [options])
get(url, [options])
head(url, [options])
post(url, data, [options])
put(url, data, [options])
patch(url, data, [options])

In these methods, the url parameter is the URL of the web request. The optional
options parameter is a JavaScript object that specifies the options to use when
implementing the request. Table 28.2 lists some the properties you can set in the
options parameter.
Table 28.2 Properties that Can Be Defined in the config Parameter for http
Service Requests
Property Description
method An HTTP method, such as GET or POST.
url The URL of the resource that is being requested.
params Parameters to be sent. This can be a string in the following
format:
?key1=value1&key2=value2&...
Or it can be an object, in which case it is turned into a
JSON string.
body Data to be sent as the request message body.
headers Headers to send with the request. You can specify an object
containing the header names to be sent as properties. If a
property in the object has a null value, the header is not
sent.
withCredentials A Boolean that, when true, indicates that the
withCredentials flag on the XHR object is set.
responseType The type of response to expect, such as JSON or text.
Configuring the HTTP Request
You can specify a request, a URL, and data by sending the options parameter
directly to the http(options) method. For example, the following are exactly
the same:
http.get('/myUrl');
http({method: 'GET', url:'/myUrl'});
Implementing the HTTP Response Callback Functions

When you call a request method by using the http object, you get back an
Observable object, which allows the data sent or received to/from the server to be
continuously observed. Observables have many operators that use the RxJS library to
allow for the transformation and use of the data. The following are some useful
methods:
map: Applies a function to each value in the observable sequence. This allows
you to dynamically transform the output of the observable stream into custom
data formats.
toPromise: Converts the observable into a Promise object, which has
access to the methods available on a promise. Promise objects provide syntax to
handle asynchronous operations.
catch: Specifies a function to gracefully handle errors in the observable
sequence.
debounce: Specifies an interval at which the observable stream will emit
values. Only the value of the observable at the interval is emitted; interim
values are not emitted.
The following is a simple example of a GET request that returns an observable with
syntax to add operators:
get(): Observable<any>{
http.get(url)
.map(response => response.JSON())
.catch(err => Rx.Observable.of('the error was: ${err}'));
}
Implementing a Simple JSON File and Using the http
Service to Access It
The code in Listings 28.1 through 28.5 implements a simple mock web server in the
form of a JSON file and the Angular application that accesses it. Figure 28.1 shows
the output. The web server contains a simple JSON object with a list of users. The
web application allows a user to view the list of users. The example is very
rudimentary to ensure that the code is easy to follow; it incorporates a GET request
as well as an error-handling example.
Listing 28.1 shows the JSON file that contains the JSON object. This file can be
accessed using an HTTP GET request, which allows http to grab the JSON object

and return it to the Angular application as an observable.
Listing 28.1 dummyDB.JSON: A JSON Object that Contains Data for Users
Click here to view code image
01 [
02 {
03 "userId": 1,
04 "userName": "brendan",
05 "userEmail": "fake@email.com"
06 },
07 {
08 "userId": 2,
09 "userName": "brad",
10 "userEmail": "email@notreal.com"
11 },
12 {
13 "userId": 3,
14 "userName": "caleb",
15 "userEmail": "dummy@email.com"
16 },
17 {
18 "userId": 4,
19 "userName": "john",
20 "userEmail": "ridiculous@email.com"
21 },
22 {
23 "userId": 5,
24 "userName": "doe",
25 "userEmail": "some@email.com"
26 }
27 ]
Listing 28.2 implements the Angular component. http is imported on line 3, and
rxjs is imported on line 5. (Note that you may need to install rxjs via npm.) rxjs
allows toPromise() to be called on the observable object. Notice that the
constructor() method instantiates http on line 15. Line 16 shows an HTTP
GET request, which has the path to the dummyDB.JSON file passed in as url. The
toPromise() method is called to convert the observable response from the
http.get() method into a promise object. Once the promise completes,
.then() is called, which takes in the promise object data and applies it to the
array users so it can be displayed in the application. If an error occurs, catch is
called, which passes the error response object to a callback function to be used.

Listing 28.2 http.component.ts: A Component that Implements the HTTP
Service for a GET Request
Click here to view code image
01 import { Component } from '@angular/core';
02 import { Observable } from 'rxjs/Observable';
03 import { Http } from '@angular/http';
04
05 import 'rxjs/Rx';
06
07 @Component({
08 selector: 'app-root',
09 templateUrl: './app.component.html',
10 styleUrls: ['./app.component.CSS']
11 })
12 export class AppComponent {
13 users = [];
14
15 constructor(private http: Http){
16 http.get('../assets/dummyDB.JSON')
17 .toPromise()
18 .then((data) => {
19 this.users = data.JSON()
20 })
21 .catch((err) =>{
22 console.log(err);
23 })
24 }
25 }
Listing 28.3 implements an Angular module that imports HttpModule to allow the
http service to be used throughout the application. HttpModule is imported from
@angular/http on line 4 and then added to the imports array on line 15.
Listing 28.3 app.module.ts: An Angular Module that Imports
HttpModule for Use in the Application
Click here to view code image
01 import { BrowserModule } from '@angular/platform-browser';
02 import { NgModule } from '@angular/core';
03 import { FormsModule } from '@angular/forms';
04 import { HttpModule } from '@angular/http';
05
06 import { AppComponent } from './app.component';
07

08 @NgModule({
09 declarations: [
10 AppComponent
11 ],
12 imports: [
13 BrowserModule,
14 FormsModule,
15 HttpModule
16 ],
17 providers: [],
18 bootstrap: [AppComponent]
19 })
20 export class AppModule { }
Listing 28.4 implements an Angular template that uses ngFor to create a list of
users to be displayed in the application.
Listing 28.4 http.component.html: An Angular Template that Displays a
List of Users Received from the Database
Click here to view code image
01 <h1>
02 Users
03 </h1>
04 <div class="user" *ngFor="let user of users">
05 <div><span>Id:</span> {{user.userId}}</div>
06 <div><span>Username:</span> {{user.userName}}</div>
07 <div><span>Email:</span> {{user.userEmail}}</div>
08 </div>
Listing 28.5 is a CSS file that styles the application so that each user is
distinguishable from the rest and easy to see.
Listing 28.5 http.component.CSS: A CSS File that Adds Styles to the
Application
Click here to view code image
01 span{
02 width: 75px;
03 text-align: right;
04 font-weight: bold;
05 display: inline-block;
06 }
07 .user{

08 border: 2px ridge blue;
09 margin: 10px 0px;
10 padding: 5px;
11 }


the Angular application that accesses it. Figure 28.2 shows the output. The web
server returns a simple JSON object with a list of users. The web application uses
HTTP GET, create, and delete requests to allow the user to view, add to, and
remove from the list of users.
Note
To create the mock service, you need to run the following command from the
console:
npm install Angular-in-memory-web-api
This service is intended for development purposes only and shouldn’t ever be
used in a production application.
Listing 28.6 is the mock data service that returns the JSON object. This file will be
accessed using HTTP requests, which will allow http to modify the database. Line
1 imports InMemoryDbService, which allows Angular to use this as a database
where data can be stored while the session is active. The database is created and
made useable on line 3, using the createDb() method, which returns the users as
a JSON object.
Listing 28.6 data.service.ts: An Angular Mock Service that Returns a
JSON Object Called Users
Click here to view code image
01 import { InMemoryDbService } from 'angular-in-memory-web-api';
02 export class InMemoryDataService implements InMemoryDbService {
03 createDb() {
04 const users = [
05 {
06 "id": 1,
07 "userName": "brendan",
08 "email": "fake@email.com"
09 },
10 {
11 "id": 2,
12 "userName": "brad",
13 "email": "email@notreal.com"
14 },
15 {
16 "id": 3,
17 "userName": "caleb",

18 "email": "dummy@email.com"
19 }
20 ]
21 return {users};
22 }
23 }
Listing 28.7 implements the Angular component. UserService, which is
imported on line 7, contains all the HTTP functions that this application will be
using. UserService is added to the component providers on line 13, making it
available to the component. On line 19, UserService is implemented as a
variable in the constructor.
Lines 21 through 37 define the deleteUser() function, which takes in a user
object. On lines 32 and 33, the deleteUser() function on the UserService is
called and passes in the user ID to let the database know which user to delete. The
function has a callback in the .then() method that calls this.getUsers() to
refresh the current list of users.
Lines 39 through 52 define the createUser() function. This function takes two
parameters, username and email. It assigns those parameters to a user object
on lines 41 through 44. Lines 48 through 51 call the createUser() method on
the UserService and pass in the user object. Once the response is received, the
createUser() method pushes the response into the users array, which is
reflected immediately in the DOM.
Listing 28.7 createDelete.component.ts: An Angular Component that
Gets and Modifies a List of Users with the http Service
Click here to view code image
01 import { Component, OnInit } from '@angular/core';
02 import { Observable } from 'rxjs/Observable';
03 import { Http } from '@angular/http';
04
05 import 'rxjs/Rx';
06
07 import { UserService } from './user.service';
08
09 @Component({
10 selector: 'app-root',
11 templateUrl: './app.component.html',
12 styleUrls: ['./app.component.CSS'],
13 providers: [UserService]

14 })
15 export class AppComponent implements OnInit {
16 users = [];
17 selectedUser;
18
19 constructor(private UserService: UserService){ }
20
21 ngOnInit(){
22 this.getUsers()
23 }
24
25 getUsers(): void {
26 this.UserService
27 .getUsers()
28 .then(users => this.users = users)
29 }
30
31 deleteUser(user){
32 this.UserService
33 .deleteUser(user.id)
34 .then(() => {
35 this.getUsers();
36 });
37 }
38
39 createUser(userName, email){
40 this.selectedUser = null;
41 let user = {
42 'userName': userName.trim(),
43 'email': email.trim()
44 };
45 if (!user.userName || !user.email){
46 return;
47 }
48 this.UserService.createUser(user)
49 .then(res => {
50 this.users.push(res);
51 })
52 }
53 }
Listing 28.8 implements the Angular service UserService, which handles all the
HTTP requests for the application. Lines 16 through 21 define the deleteUser()
method, which takes in the parameter id. An HTTP delete request is then created
using id to go to the server and delete the user with the matching ID. Lines 22
through 31 define the createUser() method, which takes in a user object. A

post request passes the user to the server as a JSON string, which is then added to
the server.
Listing 28.8 user.service.ts: An Angular Service that Uses http to Send
and Get Data from a Server
Click here to view code image
01 import { Injectable } from '@angular/core';
02 import { Http } from '@angular/http';
03 import 'rxjs/add/operator/toPromise';
04
05 @Injectable()
06 export class UserService {
07 url = 'api/users'
08 constructor(private http: Http) { }
09
10 getUsers(): Promise<any[]> {
11 return this.http.get(this.url)
12 .toPromise()
13 .then(response => response.JSON().data)
14 .catch(this.handleError)
15 }
16 deleteUser(id: number): Promise<void>{
17 return this.http.delete(`${this.url}/${id}`)
18 .toPromise()
19 .then(() => null)
20 .catch(this.handleError);
21 }
22 createUser(user): Promise<any>{
23 return this.http
24 .post(this.url, JSON.stringify({
25 userName: user.userName,
26 email: user.email
27 }))
28 .toPromise()
29 .then(res => res.JSON().data)
30 .catch(this.handleError)
31 }
32
33 private handleError(error: any): Promise<any> {
34 console.error('An error occurred', error);
35 return Promise.reject(error.message || error);
36 }
37
38 }

Listing 28.9 implements an Angular template that utilizes ngFor to create a list of
users to be displayed within the application.
Listing 28.9 createDelete.component.html: An Angular Template that
Displays a List of Users Received from the Database with Options to Create and
Delete Users
Click here to view code image
01 <div>
02 <label>user name:</label> <input #userName />
03 <label>user email:</label> <input #userEmail />
04 <button (click)="createUser(userName.value, userEmail.value);
05 userName.value=''; userEmail.value=''">
06 Add
07 </button>
08 </div>
09
10 <h1>
11 Users
12 </h1>
13 <div class="userCard" *ngFor="let user of users">
14 <div><span>Id:</span> {{user.id}}</div>
15 <div><span>Username:</span> {{user.userName}}</div>
16 <div><span>Email:</span> {{user.email}}</div>
17 <button class="delete"
18 (click)="deleteUser(user); $event.stopPropagation()">x</button>
19 </div>
Listing 28.10 is a CSS file that styles the application so that each user is
distinguishable from the rest and easy to see.
Listing 28.10 createDelete.component.CSS: A CSS Stylesheet that Styles
the Application
Click here to view code image
01 span{
02 width: 75px;
03 text-align: right;
04 font-weight: bold;
05 display: inline-block;
06 }
07 .userCard{
08 border: 2px ridge blue;
09 margin: 10px 0px;
10 padding: 5px;

11 }
12 .selected{
13 background-color: steelblue;
14 color: white;
15 }
Listing 28.11 implements an Angular module that imports the mock data service.
Line 5 imports InMemoryWebApiModule from angular-in-memory-web-
api, which helps wire the mock database into the application. Line 8 imports
InMemoryDataService from Listing 28.6. Line 18 shows
InMemoryWebApiModule using its forRoot method on the
InMemoryDataService, fully making the database service available to be used
by the HTTP requests.
Listing 28.11 app.module.ts: An Angular Module that Imports
InMemoryWebApiModule to Be Used with the Application
Click here to view code image
01 import { BrowserModule } from '@angular/platform-browser';
02 import { NgModule } from '@angular/core';
03 import { FormsModule } from '@angular/forms';
04 import { HttpModule } from '@angular/http';
05 import { InMemoryWebApiModule } from 'angular-in-memory-web-api';
06
07 import { AppComponent } from './app.component';
08 import { InMemoryDataService } from './data.service'
09
10 @NgModule({
11 declarations: [
12 AppComponent
13 ],
14 imports: [
15 BrowserModule,
16 FormsModule,
17 HttpModule,
18 InMemoryWebApiModule.forRoot(InMemoryDataService)
19 ],
20 providers: [],
21 bootstrap: [AppComponent]
22 })
23 export class AppModule { }
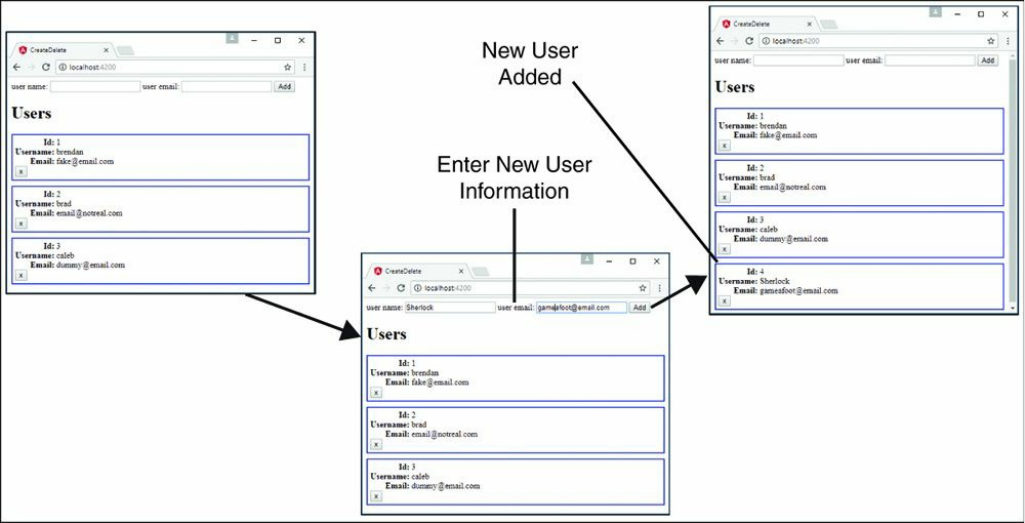
Figure 28.2 Implementing a simple mock server to create and delete items from a
database
Implementing a Simple Mock Server and Using the http
Service to Update Items on the Server
The code in Listings 28.12 through 28.16 implements the same mock web server
from the previous example as well as the Angular application that accesses it. Figure
28.3 shows the output. The web application allows a user to view and edit the list of
users, using HTTP get and put requests.
Listing 28.12 is the mock data service that returns the JSON object. This file will be
accessed using HTTP requests, which will allow http to modify the database. Line
1 imports InMemoryDbService, which allows Angular to use this as a database
where data can be stored while the session is active. The database is created and
made usable on line 3, using the createDb() method, which returns the users as a
JSON object.
Listing 28.12 data.service.ts: An Angular Mock Service that Returns a
JSON Object Called Users
Click here to view code image

01 import { InMemoryDbService } from 'angular-in-memory-web-api';
02 export class InMemoryDataService implements InMemoryDbService {
03 createDb() {
04 const users = [
05 {
06 "id": 1,
07 "userName": "brendan",
08 "email": "fake@email.com"
09 },
10 {
11 "id": 2,
12 "userName": "brad",
13 "email": "email@notreal.com"
14 },
15 {
16 "id": 3,
17 "userName": "caleb",
18 "email": "dummy@email.com"
19 }
20 ]
21 return {users};
22 }
23 }
Listing 28.13 implements an Angular component that gets a list of users to be
displayed in the template. This component also allows for the updating of users.
Lines 7 and 13 import UserService and provide it to the component. In line 19,
UserService is turned into a usable variable also named UserService. Lines
21 through 23 show the ngOnInit method, which calls the getUsers method
when the component finishes loading. Lines 25 through 29 show the getUsers
method, which calls the getUsers method on UserService and assigns the
result to the variable users. Lines 31 through 33 show the selectUser method,
which takes a parameter named user. This method assigns user to the variable
selectedUser. Lines 35 through 39 show the updateUser method, which
takes a parameter named user. The updateUser method sets the variable
selectedUser to null and then invokes the updateUser method on
userService, passing in user as a parameter. When the updateUser method
completes, the getUsers method is called to refresh the list of users that is
displayed.
Listing 28.13 update.component.ts: An Angular Component that Uses
http to Update Data in the Server

Click here to view code image
01 import { Component, OnInit } from '@angular/core';
02 import { Observable } from 'rxjs/Observable';
03 import { Http } from '@angular/http';
04
05 import 'rxjs/Rx';
06
07 import { UserService } from './user.service';
08
09 @Component({
10 selector: 'app-root',
11 templateUrl: './app.component.html',
12 styleUrls: ['./app.component.CSS'],
13 providers: [UserService]
14 })
15 export class AppComponent implements OnInit {
16 users = [];
17 selectedUser;
18
19 constructor(private UserService: UserService){ }
20
21 ngOnInit(){
22 this.getUsers()
23 }
24
25 getUsers(): void {
26 this.UserService
27 .getUsers()
28 .then(users => this.users = users)
29 }
30
31 selectUser(user){
32 this.selectedUser = user;
33 }
34
35 updateUser(user){
36 this.selectedUser = null;
37 this.UserService.updateUser(user)
38 .then(() => this.getUsers());
39 }
40 }
Listing 28.14 implements the Angular service UserService, which handles all the
HTTP requests for the application. Lines 16 through 24 define the updateUser
method, which takes in the parameter user. A URL is then generated to specify
which user will be updated. An HTTP put request is made on line 20, taking in the

generated URL and the user object, which is passed into the json.stringify
method. The updateUser method then sends a response object on success or
moves to the error handler on fail.
Listing 28.14 user.service.ts: An Angular Service that Gets Users and
Updates a User
Click here to view code image
01 import { Injectable } from '@angular/core';
02 import { Http } from '@angular/http';
03 import 'rxjs/add/operator/toPromise';
04
05 @Injectable()
06 export class UserService {
07 url = 'api/users'
08 constructor(private http: Http) { }
09
10 getUsers(): Promise<any[]> {
11 return this.http.get(this.url)
12 .toPromise()
13 .then(response => response.JSON().data)
14 .catch(this.handleError)
15 }
16 updateUser(user): Promise<void>{
17 console.log(user);
18 const url = `${this.url}/${user.id}`;
19 return this.http
20 .put(url, JSON.stringify(user))
21 .toPromise()
22 .then(() => user)
23 .catch(this.handleError)
24 }
25
26 private handleError(error: any): Promise<any> {
27 console.error('An error occurred', error);
28 return Promise.reject(error.message || error);
29 }
30
31 }
Listing 28.15 implements an Angular template that uses ngFor to create a list of
users to be displayed within the application. These users are each selectable. When
one is selected, the information is shown in an editable form field that allows the
user to be edited and saved. Lines 20 through 24 show the button that can be clicked
to invoke the updateUser method and pass in an object with that user’s updated

information.
Listing 28.15 update.component.html: An Angular Template that Displays
a List of Users and Can Be Updated
Click here to view code image
01 <h1>
02 Users
03 </h1>
04 <div class="userCard" *ngFor="let user of users"
05 (click)="selectUser(user)"
06 [class.selected]="user === selectedUser">
07 <div><span>Id:</span> {{user.id}}</div>
08 <div><span>Username:</span> {{user.userName}}</div>
09 <div><span>Email:</span> {{user.email}}</div>
10 </div>
11
12 <div *ngIf="selectedUser">
13 <label>user name:</label>
14 <input #updateName [ngModel]="selectedUser.userName"/>
15
16 <label>user email:</label>
17 <input #updateEmail [ngModel]="selectedUser.email" />
18
19
20 <button (click)="updateUser(
21 {'id': selectedUser.id,
22 'userName': updateName.value,
23 'email': updateEmail.value});
24 ">
25 Save
26 </button>
27 </div>
Listing 28.16 is a CSS file that styles the application so that each user is
distinguishable from the rest and easy to see. It provides some logic to help the user
know that each user can be clicked on.
Listing 28.16 update.component.CSS: A CSS File that Styles the
Application
Click here to view code image
01 span{
02 width: 75px;
03 text-align: right;

04 font-weight: bold;
05 display: inline-block;
06 }
07 .userCard{
08 border: 2px ridge blue;
09 margin: 10px 0px;
10 padding: 5px;
11 cursor: pointer;
12 }
13 .userCard:hover{
14 background-color: lightblue;
15 }
16 .selected{
17 background-color: steelblue;
18 color: white;
19 }
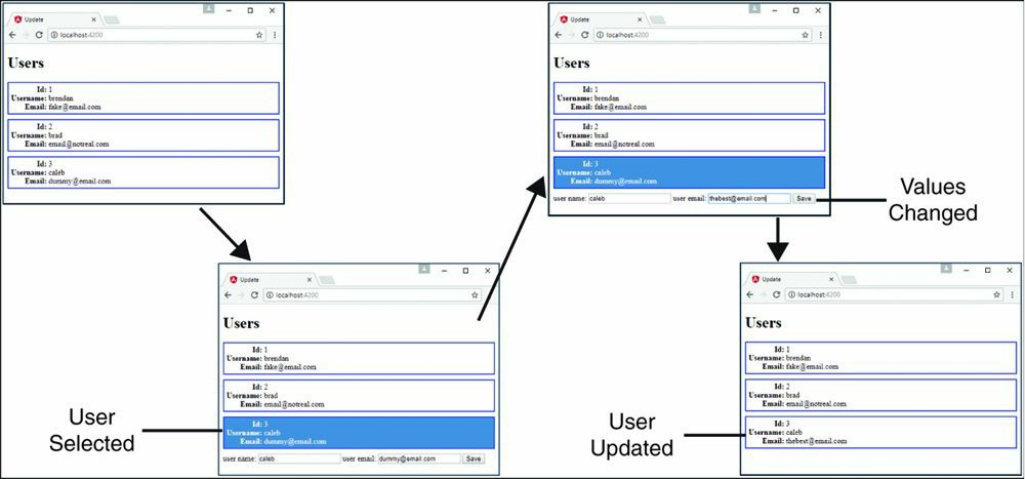
Figure 28.3 Implementing a simple mock server to update items in a database
Changing Views with the router Service
The router service enables you to change views on the web application so that you
can route back and forth between components. This can be done as a full-page view
change or can change smaller segments of a single-page application. The router
service is in an external Angular module called RouterModule and needs to be
included in the applications module to be used throughout the application.
To set up an app for routing, you need to import the Routes and Router modules
from @angular/router. To help keep the application simple to maintain,
router should get its own module that can be imported into the main application
module.
Defining routes for an application is as simple as making an array of objects, with
each object defining a specific route. The two required options for each of these
routes are path and component. The path option specifies the tree to follow to
reach the component. The component option defines which component will be
loaded into the view. The following examples show the syntax for defining a
Routes array:
Click here to view code image

Const routes: Routes = [
{
Path: '',
Component: myComponent
},
{
Path: 'route',
Component: myComponent
},
{
Path: 'routeWithParams/:param1/:param2',
Component: myComponent
}
]
Many more parameters can be added to the route object. Table 28.3 shows a list of
some of them.
Table 28.3 Properties that Can Be Defined in the config Parameter for
route Service Object
Property Description
path Shows where in the router tree this route belongs
component Defines which component will be loaded once
routed
redirectTo Redirects to the defined path instead of the current
route
outlet Specifies the name used for the RouterOutlet
that renders the route
canActivate Protects the route by preventing activation when
false
canActivateChild Protects the child routes by preventing activation
when false
canDeactivate Specifies whether the route can be deactivated
canLoad Allows you to protect specific modules from
being loaded in the route
Data Allows for data to be passed into the component
Resolve Specifies a resolver that pre-fetches data for the
route before activation

Children Allows for a nested routes array that contains
route objects (Each of these objects has the same
options described in this table.)
loadChildren Allows for lazy loading of child routes
runGuardsAndResolvers Defines when the guards and resolvers are run
Once the routes array is defined, it needs to be implemented into the router so that
the router service knows it exists and knows how to use it. This is done by using
the forRoot method on RouterModule. The result of this is included in the
routing module’s imports array. The syntax for this looks as follows:
imports: [RouterModule.forRoot(routes)]
Using routes in Angular
To use routes in Angular, the routing module needs to be included within the
main app module and included within the imports—the same as for built-in Angular
modules. Once it is included within the application module, the defined routes
become available throughout the application.
To be able to use router within a component, Router and ActivatedRoute
need to be imported from @angular/router. Once they are imported, they need
to be implemented via the constructor. The following code shows the syntax:
Constructor(
private route: ActivatedRoute,
private router: Router
){}
There are two ways to navigate between routes. The first way is from HTML
directly, using the Angular directive routerLink, which has the following syntax:
<a routerLink="/myRoute">
The second way to navigate between routes is from the component class, using the
following syntax:
myFunction(){
this.router.navigate(['myRoute'])
}

When the router is all wired up and ready to be used, the last step is to make sure the
routes get displayed on the application. You do this by using the Angular HTML tag
router-outlet. It is important to note that the component that uses router-
outlet will be outside the router, and anything besides router-outlet will
always display, no matter what route is currently being shown. You can implement
router-outlet by using the following syntax:
<router-outlet></router-outlet>
Implementing a Simple Router
Listings 28.17 through 28.23 implement a simple router that allows the user to
navigate between two components. Figure 28.4 shows the output. This router is
navigated using the Angular routerLink directive within the HTML, allowing it
to change between the views.
Listing 28.17 shows the application module, which is the main module for the
application. App.module imports the Router module from Listing 28.17. On line
6, this file loads AppRoutingModule, which is added to the imports array on
line 21.
Listing 28.17 app.module.ts: An Angular Module that Imports the Router
Module File
Click here to view code image
01 import { BrowserModule } from '@angular/platform-browser';
02 import { NgModule } from '@angular/core';
03 import { FormsModule } from '@angular/forms';
04 import { HttpModule } from '@angular/http';
05
06 import { AppRoutingModule } from './app-routing.module';
07 import { AppComponent } from './app.component';
08 import { Route2Component } from './route2/route2.component';
09 import { HomeComponent } from './home/home.component';
10
11 @NgModule({
12 declarations: [
13 AppComponent,
14 Route2Component,
15 HomeComponent
16 ],
17 imports: [

18 BrowserModule,
19 FormsModule,
20 HttpModule,
21 AppRoutingModule
22 ],
23 providers: [],
24 bootstrap: [AppComponent]
25 })
26 export class AppModule { }
Listing 28.18 shows the Router module, which defines the routes for the
application. The Router module imports Routes and RouterModule to enable
routing within the application. The Router module also imports any components
that will be used as routes. Lines 5 through 14 define the routes array, which
contains the route definitions for the application. Lines 6 through 9 define the home
route that the application will default to because the path is set to an empty string.
The home route uses HomeComponent as the component that controls the view.
Lines 10 through 13 define a second route object that will be displayed when the
path is set to route2. This route uses Route2Component.
Listing 28.18 app-routing.module.ts: An Angular Module that Defines
the routes for This Application
Click here to view code image
01 import { NgModule } from '@angular/core';
02 import { Routes, RouterModule } from '@angular/router';
03 import { Route2Component } from './route2/route2.component';
04 import { HomeComponent } from './home/home.component';
05 const routes: Routes = [
06 {
07 path: '',
08 component: HomeComponent
09 },
10 {
11 path: 'route2',
12 component: Route2Component
13 }
14 ];
15
16 @NgModule({
17 imports: [RouterModule.forRoot(routes)],
18 exports: [RouterModule]
19 })
20 export class AppRoutingModule { }

Listing 28.19 shows the root component for the application. This component has a
simple template that outputs router-outlet for router to display its routes.
Listing 28.19 app.component.ts: An Angular Component that Defines the
Router Outlet
Click here to view code image
01 import { Component } from '@angular/core';
02
03 @Component({
04 selector: 'app-root',
05 template: '<router-outlet></router-outlet>'
06 })
07 export class AppComponent {}
Listing 28.20 shows the home component template file. This file displays a message
that lets the user know that the route is working, followed by a link that uses
routerLink to navigate the user to a separate view.
Listing 28.20 home.component.html: An HTML File that Is the Default
Displayed Route
Click here to view code image
01 <p>
02 Home Route works!
03 </p>
04 <a routerLink="/route2">Route 2</a>
Listing 28.21 shows the home component file. This file is as barebones as a
component gets. Its main purpose is to load the template file and make it available to
the router.
Listing 28.21 home.component.ts: An Angular Component that Includes a
Template with a Route
Click here to view code image
01 import { Component} from '@angular/core';
02
03 @Component({
04 selector: 'app-home',
05 templateUrl: './home.component.html',
06 styleUrls: ['./home.component.CSS']
07 })

08 export class HomeComponent{}
Listing 28.22 shows the route2 component template file. This file displays a
message that lets the user know the route is working, followed by a link that uses
routerLink to navigate the user to a separate view.
Listing 28.22 route2.component.html: A CSS File that Styles the
Application
Click here to view code image
01 <p>
02 route 2 works!
03 </p>
04 <a routerLink="/">Route 1</a>
Listing 28.23 shows the barebones route2 component file. Its main purpose is to
load the template file and make it available to the router.
Listing 28.23 route2.component.ts: An Angular Component that Includes
a Template with a Route
Click here to view code image
01 import { Component } from '@angular/core';
02
03 @Component({
04 selector: 'app-route2',
05 templateUrl: './route2.component.html'
06 })
07 export class Route2Component {}

Figure 28.4 Implementing the http service to allow Angular components to interact
with a web server
Implementing a Router with a Navigation Bar
The code in Listings 28.24 through 28.35 implements a router with a nav bar that
allows the user to navigate between views that are nested. Figure 28.5 shows the
output. This router is navigated using the Angular routerLink directive within
the HTML, allowing it to change between the views.
Listing 28.24 shows the Router module, which defines the routes for the
application. The Router module imports any components that will be used as
routes. There isn’t a home route for this example. If the route is empty, the router
redirects to page1, as shown in lines 22 through 25. In addition, if an invalid route
is typed into the URL, the router again redirects to page1, as shown in lines 27
through 30.
Listing 28.24 app-routing.module.ts: An Angular Module that Defines
the Routes for the Application

Click here to view code image
01 import { NgModule } from '@angular/core';
02 import { Routes, RouterModule } from '@angular/router';
03 import { Page1Component } from './page1/page1.component';
04 import { Page2Component } from './page2/page2.component';
05 import { Page3Component } from './page3/page3.component';
06 import { Page4Component } from './page4/page4.component';
07 import { NavComponent } from './nav/nav.component';
08 const routes: Routes = [
09 {
10 path: 'page1',
11 component: Page1Component
12 },
13 {
14 path: 'page2',
15 component: Page2Component
16 },
17 {
18 path: 'page3',
19 component: Page3Component
20 },
21 {
22 path: '',
23 redirectTo: '/page1',
24 pathMatch: 'full'
25 },
26 {
27 path: '**',
28 redirectTo: '/page1',
29 pathMatch: 'full'
30 }
31 ];
32
33 @NgModule({
34 imports: [RouterModule.forRoot(routes)],
35 exports: [RouterModule]
36 })
37 export class AppRoutingModule { }
Listing 28.25 shows the nav component, which controls the nav bar and links to the
views within the page. Lines 9 through 19 show an array of available pages which
the nav bar can use to create buttons with links for navigation.
Listing 28.25 nav.component.ts: An Angular Component that Creates a
Persisting Nav Bar That Navigates Between Views

Click here to view code image
01 import { Component, OnInit } from '@angular/core';
02
03 @Component({
04 selector: 'app-nav',
05 templateUrl: './nav.component.html',
06 styleUrls: ['./nav.component.CSS']
07 })
08 export class NavComponent{
09 pages = [
10 { 'url': 'page1',
11 'text': 'page 1'
12 },
13 { 'url': 'page2',
14 'text': 'page 2'
15 },
16 { 'url': 'page3',
17 'text': 'page 3'
18 }
19 ]
20 }
Listing 28.26 shows the nav component template file. It creates a list of buttons that
allow for navigation between the named routes.
Listing 28.26 nav.component.html: An Angular Template that Creates the
View for the Nav Bar
Click here to view code image
01 <span class="container" *ngFor="let page of pages">
02 <a routerLink="/{{page.url}}">{{page.text}}</a>
03 </span>
Listing 28.27 shows the nav component CSS file. This file styles the nav bar buttons
so they make sense. Lines 9 through 12 cause the color of the buttons and text to
change when the user hovers the mouse over a button.
Listing 28.27 nav.component.CSS: A CSS File that Styles the Navigation
Buttons for the Application
Click here to view code image
01 a{
02 padding: 5px 10px;
03 border: 1px solid darkblue;

04 background-color: steelblue;
05 color: white;
06 text-decoration: none;
07 border-radius: 3px;
08 }
09 a:hover{
10 color: black;
11 background-color: lightgrey;
12 }
Listing 28.28 shows the root component file app.component.ts, which serves
as the entry to the application and loads the routed views and the nav component.
Listing 28.28 app.comonent.ts: An Angular Component that Acts as the
Root Component for the Application
Click here to view code image
01 import { Component } from '@angular/core';
02
03 @Component({
04 selector: 'app-root',
05 templateUrl: './app.component.html',
06 styleUrls: ['./app.component.CSS']
07 })
08 export class AppComponent { }
Listing 28.29 shows the root component template file, which loads the nav
component followed by the router outlet, which is where the views are loaded for the
application.
Listing 28.29 app.component.html: An Angular Template that Loads the
Nav Component Followed by the Router Outlet
Click here to view code image
01 <div><app-nav></app-nav></div>
02 <div><router-outlet></router-outlet></div>
Listing 28.30 shows the root component CSS file, which provides some spacing for
the nav bar so it is displayed nicely.
Listing 28.30 app.component.CSS: An Angular Module that Imports the
Router Module File

Click here to view code image
01 div{
02 margin: 15px 0px;
03 }
Listing 28.31 shows the page1 component. This component loads a template that
will be used as one of the views for this application. Line 5 loads an image to be
displayed on the view.
Listing 28.31 page1.component.ts: An Angular Module that Imports the
Router Module File
Click here to view code image
01 import { Component } from '@angular/core';
02
03 @Component({
04 selector: 'app-page1',
05 template: '<img src="../assets/images/lake.jpg" />'
06 })
07 export class Page1Component {}
Listing 28.32 shows the page2 component. This component loads a template that
will be used as one of the views for this application.
Listing 28.32 page2.component.ts: An Angular Module that Imports the
Router Module File
Click here to view code image
01 import { Component } from '@angular/core';
02
03 @Component({
04 selector: 'app-page2',
05 templateUrl: './page2.component.html'
06 })
07 export class Page2Component { }
Listing 28.33 shows the page2 template file, which contains some dummy text that
will be loaded into the view.
Listing 28.33 page2.component.html: An Angular Template that Creates
the View for Page 2

Click here to view code image
01 <p>
02 Lorem ipsum dolor sit amet, consectetur adipiscing elit. Nam efficitur
03 tristique ornare. Interdum et malesuada fames ac ante ipsum primis in
04 faucibus. Proin id nulla vitae arcu laoreet consequat. Donec quis
05 convallis felis. Mauris ultricies consectetur lectus, a hendrerit leo
06 feugiat sit amet. Aliquam nec velit nibh. Nam interdum turpis ac dui
07 congue maximus. Integer fringilla ante vitae arcu molestie finibus. Morbi
08 eget ex pellentesque, convallis orci venenatis, vehicula nunc.
09 </p>
Listing 28.34 shows the page3 component. This component loads a template that
will be used as one of the views for this application.
Listing 28.34 page3.component.ts: An Angular Module that Imports the
Router Module File
Click here to view code image
01 import { Component } from '@angular/core';
02
03 @Component({
04 selector: 'app-page3',
05 templateUrl: './page3.component.html'
06 })
07 export class Page3Component {}
Listing 28.35 shows the page3 template file, which creates a text area box to be
displayed on the view.
Listing 28.35 page3.component.html: An Angular Template that Creates
the View for Page 3
Click here to view code image
01 <textarea rows="4" cols="50" placeHolder="Some Text Here">
02 </textarea>
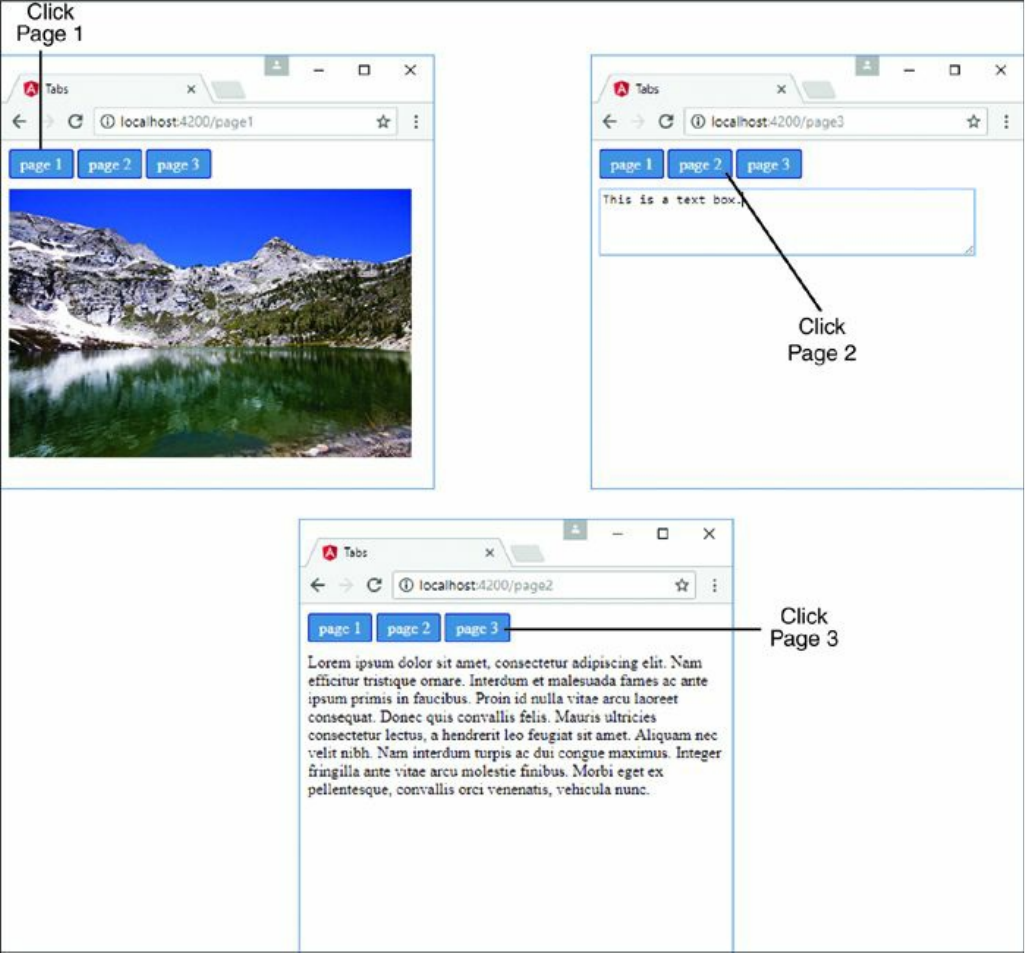
Figure 28.5 Implementing the http service to allow Angular components to interact
with a web server
Implementing a Router with Parameters
Listings 28.36 through 28.40 implement a router with a route that takes in a
parameter that allows for data to be transferred to that view through the url
parameter. Figure 28.6 shows the output.

Listing 28.36 shows the Router module, which defines the routes for the
application. The Router module imports any components that will be used as
routes. Line 14 defines the path to page 2, which takes in the parameter
this.text.
Listing 28.36 app-routing.module.ts: An Angular Template that Assigns
Router Parameters
Click here to view code image
01 import { Component } from '@angular/core';
02 import { Router, ActivatedRoute, Params } from '@angular/router';
03
04 @Component({
05 selector: 'app-page1',
06 templateUrl: './page1.component.html'
07 })
08 export class Page1Component {
09 text='';
10 constructor(
11 private route: ActivatedRoute,
12 private router: Router,
13 ){ }
14 gotoPage2(){
15 this.router.navigate(
16 ['/page2', this.text],
17 {
18 relativeTo: this.route,
19 skipLocationChange: true
20 }
21 );
22 }
23 }
Listing 28.37 shows the root component app.component.ts. This file has a
template that declares router-outlet to display the views from the router.
Listing 28.37 app.component.ts: An Angular Component that Acts as the
Entry Point to the Application
Click here to view code image
01 import { Component } from '@angular/core';
02
03 @Component({
04 selector: 'app-root',

05 template: '<router-outlet></router-outlet>'
06 })
07 export class AppComponent { }
Listing 28.38 shows the page1 component. This component imports Router and
ActivatedRoute from @angular/router to allow this component to access
the router and read or assign parameters to RouterState. Lines 10 through 13
define the constructor, which on lines 11 and 12 implements ActivatedRoute
and Router as private variables route and router. Lines 14 through 22 define
the function gotoPage2(), which navigates to page2, passing in a parameter.
Line 16 navigates to page2, passing in this.text as the parameter. Lines 18 and
19 allow the application to change views without changing the URL in the browser.
Listing 28.38 page1.component.ts: An Angular Component that Navigates
to Page 2 with Parameters
Click here to view code image
01 import { Component } from '@angular/core';
02 import { Router, ActivatedRoute } from '@angular/router';
03
04 @Component({
05 selector: 'app-page1',
06 templateUrl: './page1.component.html'
07 })
08 export class Page1Component {
09 text='';
10 constructor(
11 private route: ActivatedRoute,
12 private router: Router,
13 ){ }
14 gotoPage2(){
15 this.router.navigate(
16 ['/page2', this.text],
17 {
18 relativeTo: this.route,
19 skipLocationChange: true
20 }
21 );
22 }
23 }
Listing 28.39 shows the page1 template file. Line 4 shows a text area that is bound
to the variable text that is passed as a parameter when routed to page 2. Line 5

creates a button that invokes the gotoPage2 function, changing the view. This
button is available only when the variable text has a non-empty value.
Listing 28.39 page1.component.html: An HTML Template that Provides
an Input Field to Give a Value to Router Parameters
Click here to view code image
01 <span>
02 Enter Text to Pass As Params:
03 </span>
04 <input type=text [(ngModel)]="text" />
05 <button [disabled]="!text" (click)="gotoPage2()">Page 2</button>
Listing 28.40 shows the page2 component. This component imports Router and
ActivatedRoute from @angular/router to allow this component to access
the router and parameters that were set when the route was loaded. Lines 15 and 16
create a subscription to the params observable and assign the value to the variable
text to be displayed in the view.
Listing 28.40 page2.component.ts: An Angular Component that Displays
Router Parameters on the View
Click here to view code image
01 import { Component, OnInit } from '@angular/core';
02 import { Router, ActivatedRoute } from '@angular/router';
03
04 @Component({
05 selector: 'app-page2',
06 templateUrl: './page2.component.html'
07 })
08 export class Page2Component implements OnInit {
09 text;
10 constructor(
11 private route: ActivatedRoute,
12 private router: Router
13 ) { }
14 ngOnInit() {
15 this.route.params
16 .subscribe(text => this.text = text.params);
17 }
18
19 goBack(){
20 this.router.navigate(['/page1']);
21 }

22 }
Listing 28.41 shows the page2 template file. Line 2 displays the variable text,
which gets its value from the route params. Line 3 creates a button that can be
clicked to navigate back to page 1.
Listing 28.41 page2.component.html: Parameters Passed from the Router
Click here to view code image
01 <h3>Params From Page 1</h3>
02 <p>{{text}}</p>
03 <button (click)="goBack()" >back</button>
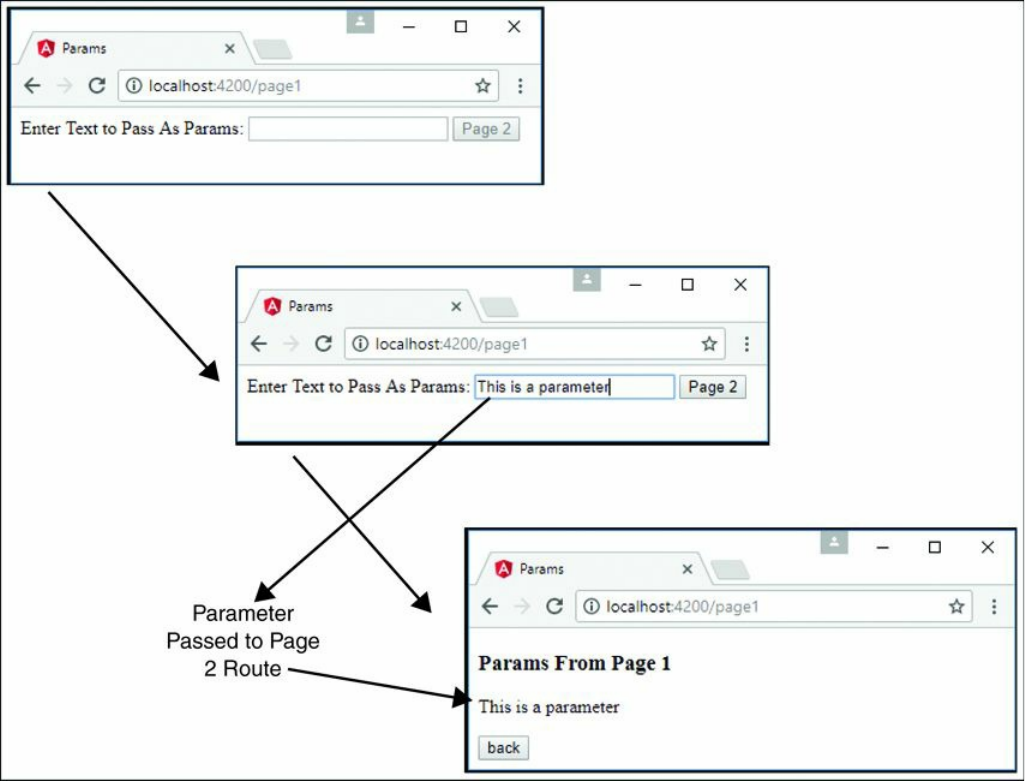
Figure 28.6 Implementing the http service to allow Angular components to interact
with a web server
Summary
Angular services are objects that contain functionality you can inject into other
Angular components. Angular’s built-in services provide a lot of prebuilt
functionality needed for your client code. For example, the http service allows you
to easily integrate web server communication into your Angular applications, and the
router service allows you to manage navigation between views.
Next
The next chapter introduces you to Angular custom services. While there is a lot of
built-in functionality in Angular, the chapter shows you how you can create your
own services for more control over your applications.

29
Creating Your Own Custom Angular
Services
Angular provides a lot of functionality in its built-in services, but it also allows you
to implement your own custom services to provide specific functionality. You should
implement a custom service any time you need to provide task-based functionality to
an application.
When implementing custom services, you need to think about each service as being
a chunk of reusable code that performs one or more related tasks. Then you can
design and group them together into libraries that can easily be consumed by several
different Angular applications.
This chapter introduces Angular custom services. It provides several examples of
custom Angular services to provide you with a clearer understanding of how to
design and build your own.
Integrating Custom Services into Angular
Applications
As you begin implementing Angular services for your applications, you will find that
some will be very simple and others will be very complex. The complexity of the
service typically reflects the complexity of the underlying data and the functionality
it provides. The purpose of this section is to provide you with some basic examples
of different types of custom services to illustrate how they can be implemented and
used. Table 29.1 lists some uses for services.
Table 29.1 Use Cases for Custom Services

Service Description
Mock service Provides dummy data that can be used to test HTTP-based
services while the back end is unavailable
Constant data Returns data variables that need to remain constant, such as
the mathematical value of pi
Variable data Returns data variables that can be changed, with the
changed value being saved to the service for other services
to use
HTTP
connection to
the back end
Should be used within a custom service to create an
interface with the back-end data
Data
transformations
Takes in a form of data to be transformed, runs the
transformation, and returns the transformed value (for
example, a square service that takes in a number and
returns the square)
Shared service Any type of service that can be used by multiple
components at once while the data is automatically updated
for all components any time it changes
Adding an Angular Service to an Application
This section goes over how to create and implement a custom service in an
application. When you create services, they have to be made injectable in order to be
used throughout the application. The following example shows the syntax for
creating an injectable service:
import { Injectable } from '@angular/core';
@Injectable()
export class CustomService { }
Once you’ve created an injectable service, it needs to be imported and provided to
any Angular component that needs access to it. The following is the syntax for
importing a custom service, along with the custom service being injected via the
providers array in the component decorator metadata:
Click here to view code image
import { CustomService } from './path_to_service';

@Component({
selector: 'app-root',
template: '',
providers: [ CustomService ]
})
The final step in making a custom service usable is to create an instance of that
service to be used throughout the component. You do this in the constructor of the
component, as shown in the following example:
constructor(
private myService: CustomService
){}
When these steps are complete, the custom service and any of its methods are made
available to the component through the instance myService.
The following sections provide examples that illustrate various ways of
implementing custom services.
Implementing a Simple Application that Uses a
Constant Data Service
This example shows how to build a constant data service. The purpose of this
example is to create a simple service that returns a constant data variable.
Listing 29.1 shows the pi service, which returns the value of pi. Lines 1 and 3
import and implement Injectable to make the service available to be used
externally. Line 4 creates the PiService class, which holds the definition for the
service. Lines 5 through 7 define the getPi method, which returns the value of pi.
Listing 29.1 pi.service.ts: Creating a Service that Returns the Value of Pi
Click here to view code image
01 import { Injectable } from '@angular/core';
02
03 @Injectable()
04 export class PiService {
05 getPi(){
06 return Math.PI;

07 }
08 }
Listing 29.2 implements an Angular component that imports and implements
PiService. Lines 2 and 7 show PiService being imported and then provided
to make it available to use throughout the component. Line 12 shows PiService
being instantiated as the variable PiService. Lines 14 through 16 show the
ngOnInit method, which calls the getPi method from PiService and assigns
it to the variable pi.
Listing 29.2 app.component.ts: An Angular Component that Gets the
Value of Pi from PiService
Click here to view code image
01 import { Component, OnInit } from '@angular/core';
02 import { PiService } from './pi.service';
03
04 @Component({
05 selector: 'app-root',
06 templateUrl: './app.component.html',
07 providers: [ PiService ]
08 })
09 export class AppComponent implements OnInit {
10 pi: number;
11 constructor(
12 private PiService: PiService
13 ){}
14 ngOnInit(){
15 this.pi = this.PiService.getPi();
16 }
17 }
Listing 29.3 shows an Angular template that displays the value of pi to five places.
Listing 29.3 app.component.html: An Angular Template That Displays the
Value of Pi to Five Places
Click here to view code image
01 <h1>
02 Welcome. this app returns the value of pi
03 </h1>
04 <p> the value of pi is: {{pi | number:'1.1-5'}}</p>

Figure 29.1 An HTML page that shows the Angular component displaying the value
of pi obtained from a constant service
Implementing a Data Transform Service
This example shows how to build a simple data transform service that takes in data
variables, calculates the area of a shape, and returns the area for the shape.
Listing 29.4 shows a custom service named AreaCalcService, which has
several methods named after various shapes. Each of these methods takes in
variables that are then used to generate the areas of the shapes they are named after.
Lines 1 and 3 import and implement Injectable to make the service available to
be used externally.
Listing 29.4 area-calc.service.ts: An Angular Service with Methods
that Calculate the Areas of Shapes
Click here to view code image
01 import { Injectable } from '@angular/core';
02
03 @Injectable()
04 export class AreaCalcService {
05 circle(radius:number): number {
06 return Math.PI * radius * radius;
07 }
08 square(base:number): number {
09 return base * base;
10 }

11 rectangle(base:number, height): number {
12 return base * height;
13 }
14 triangle(base:number, height): number {
15 return (base*height)/2;
16 }
17 trapezoid(base1:number,
18 base2:number,
19 height:number): number {
20 return ((base1+base2)/2)*height;
21 }
22 }
Listing 29.5 shows an Angular component that gets areas of shapes from
AreaCalcService, based on the values received from the user. Lines 2 and 8
import AreaCalcService and add it to the providers to make it available to the
component. Line 21 creates an instance of AreaCalcService as areaCalc to
be used with the component methods.
Lines 23 through 25 define the doCircle method, which implements the circle
method on areaCalc to get the area of a circle.
Lines 26 through 28 define the doSquare method, which implements the square
method on areaCalc to get the area of a square.
Lines 29 through 31 define the doRectangle method, which implements the
rectangle method on areaCalc to get the area of a rectangle.
Lines 32 through 34 define the doTriangle method, which implements the
triangle method on areaCalc to get the area of a triangle.
Lines 35 through 39 define the doTrapezoid method, which implements the
trapezoid method on areaCalc to get the area of a trapezoid.
Listing 29.5 app.component.ts: An Angular Component that Gets Areas of
Shapes from AreaCalcService Based on Values Received from the User
Click here to view code image
01 import { Component } from '@angular/core';
02 import { AreaCalcService } from './area-calc.service';
03
04 @Component({
05 selector: 'app-root',

06 templateUrl: './app.component.html',
07 styleUrls: ['./app.component.css'],
08 providers: [ AreaCalcService ]
09 })
10 export class AppComponent {
11 circleRadius: number = 0;
12 squareBase: number = 0;
13 rectangleBase: number = 0;
14 rectangleHeight: number = 0;
15 triangleBase: number = 0;
16 triangleHeight: number = 0;
17 trapezoidBase1: number = 0;
18 trapezoidBase2: number = 0;
19 trapezoidHeight: number = 0;
20
21 constructor(private areaCalc: AreaCalcService){ }
22
23 doCircle(){
24 return this.areaCalc.circle(this.circleRadius);
25 }
26 doSquare(){
27 return this.areaCalc.square(this.squareBase);
28 }
29 doRectangle(){
30 return this.areaCalc.rectangle(this.rectangleBase, this.rectangleHeight);
31 }
32 doTriangle(){
33 return this.areaCalc.triangle(this.triangleBase, this.triangleHeight);
34 }
35 doTrapezoid(){
36 return this.areaCalc.trapezoid(this.trapezoidBase1,
37 this.trapezoidBase2,
38 this.trapezoidHeight);
39 }
40 }
Listing 29.6 shows an Angular template file that creates form fields to input data
required to calculate the areas of various shapes. When the data is input, the area is
immediately calculated and displayed to the user.
Listing 29.6 app.component.html: An Angular Template that Provides a
User Interface to Create Form Fields to Receive the Areas of Shapes
Click here to view code image
01 <label>Circle Radius:</label>
02 <input type="text" [(ngModel)]="circleRadius"/>

03 <span>Area: {{this.doCircle()}}</span>
04 <hr>
05
06 <label>Square Side:</label>
07 <input type="text" [(ngModel)]="squareBase" />
08 <span>Area: {{this.doSquare()}}</span>
09 <hr>
10
11 <label>Rectangle Base:</label>
12 <input type="text" [(ngModel)]="rectangleBase" /> <br>
13 <label>Rectangle Height:</label>
14 <input type="text" [(ngModel)]="rectangleHeight" />
15 <span>Area: {{this.doRectangle()}}</span>
16 <hr>
17
18 <label>Triangle Base:</label>
19 <input type="text"
20 [(ngModel)]="triangleBase" /> <br>
21 <label>Triangle Height:</label>
22 <input type="text" [(ngModel)]="triangleHeight" />
23 <span>Area: {{this.doTriangle()}}</span>
24 <hr>
25
26 <label>Trapezoid Base1:</label>
27 <input type="text" [(ngModel)]="trapezoidBase1" /><br>
28 <label>Trapezoid Base2:</label>
29 <input type="text" [(ngModel)]="trapezoidBase2" /><br>
30 <label>Trapezoid Height:</label>
31 <input type="text" [(ngModel)]="trapezoidHeight" />
32 <span>Area: {{this.doTrapezoid()}}</span>
Listing 29.7 shows a CSS file that styles the application, separating the individual
forms for each shape.
Listing 29.7 app.component.html: A CSS File that Styles the Application
Click here to view code image
01 label{
02 color: blue;
03 font: bold 20px times new roman;
04 width: 200px;
05 display: inline-block;
06 text-align: right;
07 }
08 input{
09 width: 40px;

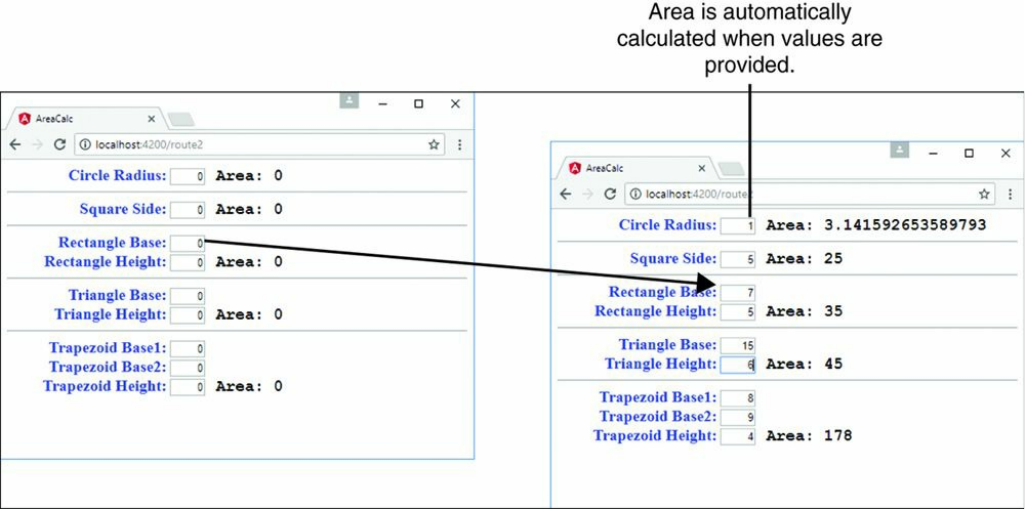
Figure 29.2 An Angular application that uses a custom service to automatically
calculate the areas of different shapes
Implementing a Variable Data Service
This example shows how to build a variable data service that creates an image
changer that at random times randomly selects an image from a list and sends it to
the component to be displayed.
Listing 29.8 shows a custom service named RandomImageService that selects
an image URL from a list and emits that URL at a random interval. Line 2 shows
Observable being imported from rxjs/observable. Lines 33 through 37
show the constructor that initializes the observable imageChange and calls the
method changeLoop, passing in the observer object. Lines 38 through 51
define the changeLoop method, which takes in the observable response object
observer. A setTimeout function is called with a random time before it
completes. Then a random image is selected from the images array. The image
URL, title, and width are then emitted, and changeLoop recursively calls itself.
Lines 52 through 54 define the getRandom function, which takes in two
parameters, min and max, and gets a random number between those values.

Listing 29.8 random-image.service.ts: An Angular Service that Returns
an Observable that Contains a Random Image
Click here to view code image
01 import { Injectable, OnInit } from '@angular/core';
02 import { Observable } from 'rxjs/observable';
03
04 @Injectable()
05 export class RandomImageService {
06 imageChange: Observable<any>;
07 private images = [
08 {
09 url: '../../assets/images/arch.jpg',
10 title: "Delicate Arch"
11 },
12 {
13 url: '../../assets/images/lake.jpg',
14 title: "Silver Lake"
15 },
16 {
17 url: '../../assets/images/cliff.jpg',
18 title: "Desert Cliff"
19 },
20 {
21 url: '../../assets/images/bison.jpg',
22 title: "Bison"
23 },
24 {
25 url: '../../assets/images/flower.jpg',
26 title: "Flower"
27 },
28 {
29 url: '../../assets/images/volcano.jpg',
30 title: "Volcano"
31 },
32 ];
33 constructor() {
34 this.imageChange = new Observable(observer => {
35 this.changeLoop(observer);
36 });
37 }
38 changeLoop(observer){
39 setTimeout(() => {
40 let imgIndex = this.getRandom(0,6);
41 let image = this.images[imgIndex];
42 observer.next(
43 {
44 url: image.url,

45 title: image.title,
46 width: this.getRandom(200,400)
47 }
48 );
49 this.changeLoop(observer);
50 }, this.getRandom(100,1000));
51 }
52 getRandom(min, max) {
53 return Math.floor(Math.random() * (max - min)) + min;
54 }
55 getRandomImage(): Observable<any> {
56 return this.imageChange;
57 }
58 }
Listing 29.9 shows an Angular component that gets a random image from
RandomImageService, displays it in the main view, and adds it into the
imageHistory array. Lines 4 and 10 show RandomImageService being
imported and provided to the component. Line 18 instantiates the
RandomImageService as the variable randomImages. Lines 20 through 24
create a default initial imageInfo object to hold a place until data can be received
from RandomImageService. Lines 27 through 34 show the ngOnInit method,
which calls the getRandomImage method on the randomImages service
instance and assigns it to the observable randomImage. imageInfo is then
assigned the value of anything emitted from the observable. imageHistory also
adds the value of anything emitted from the observable.
Listing 29.9 app.component.ts: An Angular Component that Gets a
Random Image from RandomImageService and Displays That Image
Click here to view code image
01 import { Component, OnInit } from '@angular/core';
02 import { Observable } from 'rxjs/observable';
03 import { Subscription } from 'rxjs/Subscription';
04 import { RandomImageService } from './random-image.service';
05
06 @Component({
07 selector: 'app-root',
08 templateUrl: './app.component.html',
09 styleUrls: ['./app.component.css'],
10 providers: [ RandomImageService ]
11 })
12 export class AppComponent {
13 title = 'app';

14 randomImage: Observable<any>;
15 imageInfo: any;
16 imageHistory: any[];
17 constructor(
18 private randomImages: RandomImageService
19 ){
20 this.imageInfo = {
21 url: '',
22 title: 'Loading . . .',
23 width: 400
24 };
25 this.imageHistory = [];
26 }
27 ngOnInit(){
28 this.randomImage = this.randomImages.getRandomImage();
29 this.randomImage.subscribe(
30 imageData => {
31 this.imageInfo = imageData;
32 this.imageHistory.push(imageData);
33 });
34 }
35 }
Listing 29.10 shows an Angular template that displays a random image in the main
view. ngFor is used to display each image within the image history array.
Listing 29.10 app.component.html: An Angular Template that Displays
Images Emitted from RandomImageService
Click here to view code image
01 <div>
02 <img src="{{imageInfo.url}}"
03 width="{{imageInfo.width}}">
04 <p>{{imageInfo.title}}</p>
05 </div>
06 <hr>
07 <h3>Random Image History</h3>
08 <span *ngFor = "let image of imageHistory">
09 <img src="{{image.url}}" height="50px">
10 </span>
Listing 29.11 shows a CSS file that styles the application with a border for the main
image and text.
Listing 29.11 app.component.css: A CSS File that Styles the Application

Separating the Main View from the Smaller Pictures
Click here to view code image
01 div {
02 position: inline-block;
03 width: fit-content;
04 border: 3px solid black;
05 }
06 p {
07 font: bold 25px 'Times New Roman';
08 padding: 5px;
09 text-align: center;
10 }
Figure 29.3 shows the running example. The main image URL and size are randomly
changed by the service. A rolling history of the randomly displayed images is shown
at the bottom.
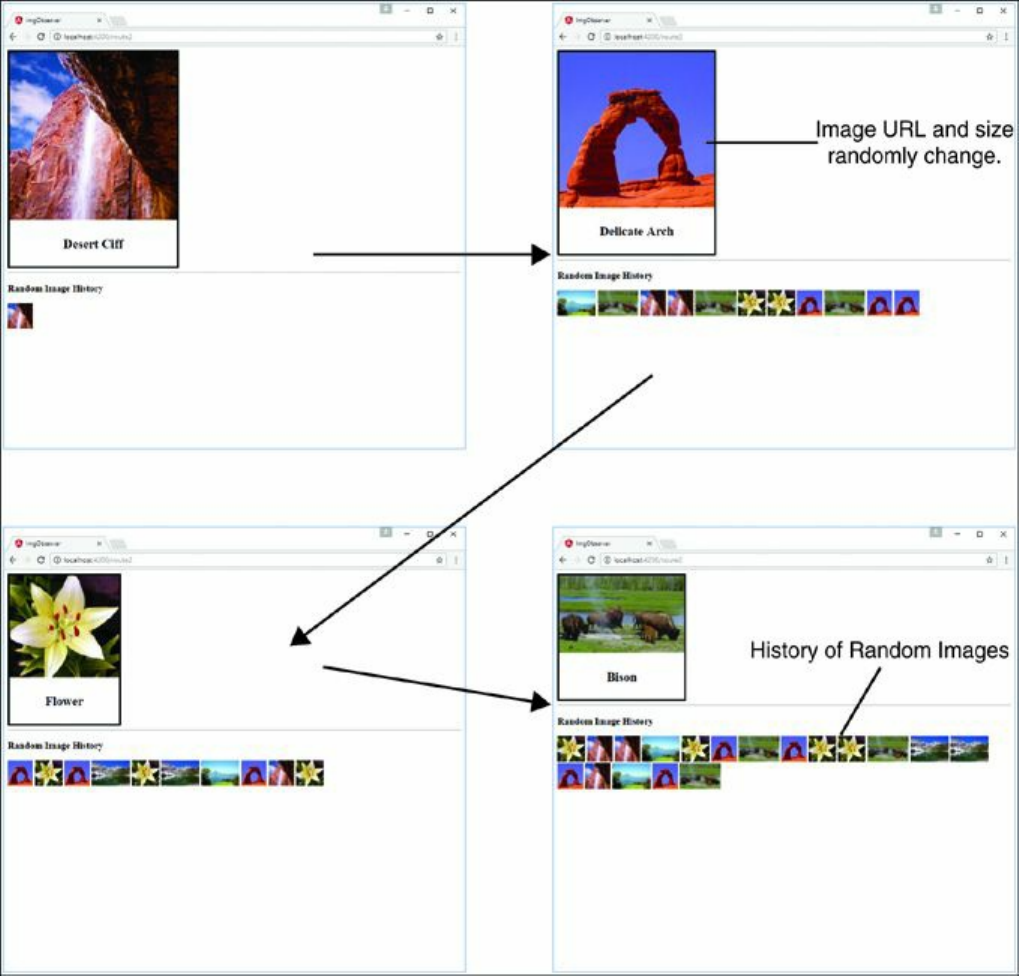
Figure 29.3 Implementing a variable data service that updates a component with
random changes to image size and URL
Implementing a Service that Returns a Promise
This example shows how to build a service that creates and returns a promise.
Listing 29.12 shows a custom service named PromiseService, which creates an

asynchronous timer that alerts the user after a particular number of seconds. Lines 6
through 13 define the method createTimedAlert, which takes in the parameter
seconds and returns a promise. Lines 8 through 10 create a resolve function,
which runs only after the promise completes. This function creates an alert that tells
the user how long it took to run the alert.
Listing 29.12 promise.service.ts: An Angular Service that Provides a
Timer-Based Alert
Click here to view code image
01 Import { Injectable } from '@angular/core';
02
03 @Injectable()
04 export class PromiseService {
05
06 createTimedAlert(seconds: number): Promise<any>{
07 return new Promise((resolve, reject) =>{
08 resolve(setTimeout(function(){
09 alert('this alert took ' + seconds + ' seconds to load');
10 }, (seconds * 1000))
11 );
12 })
13 }
Listing 29.13 shows an Angular component that uses PromiseService to create
an asynchronous request that can be resolved at a later time. Lines 2 and 7 show
PromiseService being imported and then added to the providers array so it
is available to the component. Line 12 creates an instance of PromiseService
called alert. Lines 15 through 17 define the createAlert method, which
invokes the createTimedAlert method on alert and passes in the seconds
variable.
Listing 29.13 app.component.ts: An Angular Component that Uses the
PromiseService Service
Click here to view code image
01 import { Component } from '@angular/core';
02 import { PromiseService } from './promise.service';
03
04 @Component({
05 selector: 'app-root',
06 templateUrl: './app.component.html',
07 providers: [PromiseService]

08 })
09 export class AppComponent {
10 seconds: number = 0;
11 constructor(
12 private alert: PromiseService
13 ){}
14
15 createAlert(){
16 this.alert.createTimedAlert(this.seconds);
17 }
18 }
Listing 29.14 shows an Angular template that has an input the user can use to type
the amount of time in seconds. The template has a button that invokes the function
createAlert.
Listing 29.14 app.component.htm: A Template that Displays a Button to
Start the Asynchronous Alert Request
Click here to view code image
01 <h3>set the time in seconds to create an alert</h3>
02 <input [(ngModel)]="seconds">
03 <button (click)="createAlert()">go</button>
Figure 29.4 shows the asynchronous alert being displayed by the service after the
time has elapsed.
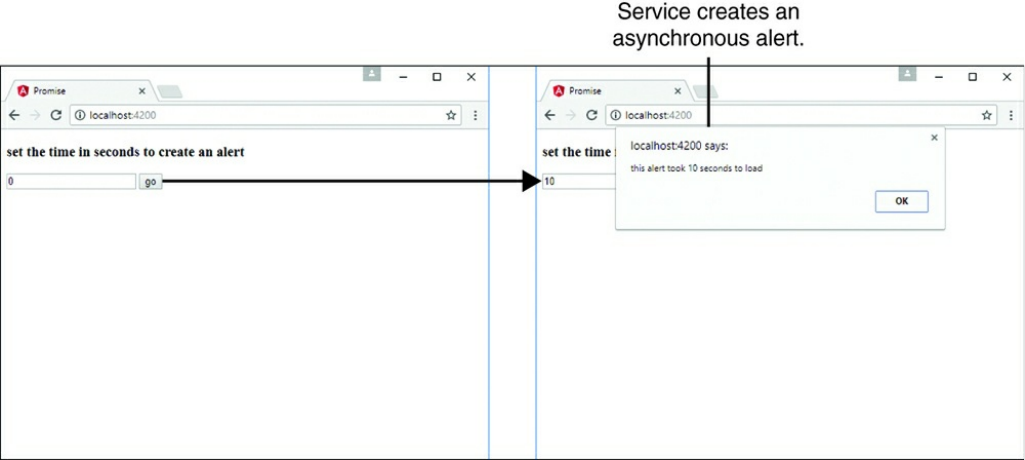
Figure 29.4 Using an Angular service to provide asynchronous alerts
Implementing a Shared Service
This example shows how to build a service that is shared between two components.
There will only be one instance of this service, which means that when one
component changes the data, the other component will see that data change as well.
Listing 29.15 shows a custom service named SharedService, which creates an
observable of an array of characters. This observable is editable, which makes it
useful for reducing characters’ health. When the values are changed, the observable
emits that change to all components that are subscribed to the observable.
Lines15 through 52 define the characters array, which contains the values
name, race, alignment, and health. Lines 55 through 60 define the
constructor method, which creates the observable charObservable. The
observer object is saved to the service variable observer. Then the observer emits
the characters array. Lines 62 through 64 define the getCharacters method,
which returns the charObservable.
Lines 66 through 79 define the hitCharacter method, which takes two
parameters: character and damage. The method then searches for the index of
character within the characters array. If the character exists in the array, the

method subtracts damage from that character’s health. Then if the health is less than
or equal to 0, the method removes the character from the array. Finally, the
method emits the updated characters array.
Listing 29.15 shared.service.ts: An Angular Service that Will Be Shared
Between Components
Click here to view code image
01 import { Injectable } from '@angular/core';
02
03 import { Observable } from 'rxjs/Observable';
04 import 'rxjs';
05
06 export class character {
07 name: string;
08 race: string;
09 alignment: string;
10 health: number;
11 }
12
13 @Injectable()
14 export class SharedService{
15 characters: character[] = [
16 {
17 name: 'Aragon',
18 race: 'human',
19 alignment: 'good',
20 health: 100
21 },
22 {
23 name: 'Legolas',
24 race: 'elf',
25 alignment: 'good',
26 health: 100
27 },
28 {
29 name: 'Gimli',
30 race: 'Dwarf',
31 alignment: 'good',
32 health: 100
33 },
34 {
35 name: 'Witch King',
36 race: 'Wraith',
37 alignment: 'bad',
38 health: 100
39 },

40 {
41 name: 'Lurtz',
42 race: 'Uruk-hai',
43 alignment: 'bad',
44 health: 100
45 },
46 {
47 name: 'Sarumon',
48 race: 'Wizard',
49 alignment: 'bad',
50 health: 100
51 },
52 ];
53 charObservable: Observable<character[]>;
54 observer;
55 constructor(){
56 this.charObservable = new Observable(observer => {
57 this.observer = observer;
58 this.observer.next(this.characters);
59 })
60 }
61
62 getCharacters(): Observable<character[]>{
63 return this.charObservable;
64 }
65
66 hitCharacter(character, damage){
67
68 var index = this.characters.indexOf(character, 0);
69 if(index > -1){
70 this.characters[index].health -= damage;
71 if(this.characters[index].health <= 0){
72 this.characters.splice(index, 1);
73 }
74 }
75 this.observer.next(this.characters);
76 }
77 }
Listing 29.16 shows an Angular component that creates a single instance of
SharedService that can be passed down to child components. Because each
child receives the same instance of the service, all child components that inject the
SharedService and subscribe to its observable will be updated anytime the data
changes. Lines 2 and 7 import and provide SharedService for use within the
component. Line 11 assigns SharedService to the variable shared to be used
within the HTML.

Listing 29.16 app.component.ts: An Angular Component that Distributes
SharedService
Click here to view code image
01 import { Component } from '@angular/core';
02 import { SharedService } from './shared.service';
03
04 @Component({
05 selector: 'app-root',
06 templateUrl: './app.component.html',
07 providers: [ SharedService ]
08 })
09 export class AppComponent {
10 constructor(
11 public shared: SharedService
12 ){}
13 }
Listing 29.17 shows an Angular template that displays two sections: one for good
guys and one for bad guys. Line 2 shows the Good Guys component, which takes
in an input shared and is passed the shared observable from app.component
to good-guys.component. Line 5 shows the Bad Guys component, which
takes in an input shared and is passed the shared observable from
app.component to badguys.component.
Listing 29.17 app.component.html: An Angular Template File that
Distributes SharedService to Two Components
Click here to view code image
01 <h2>Good Guys</h2>
02 <app-good-guys [shared]="shared"></app-good-guys>
03 <hr>
04 <h2>Bad Guys</h2>
05 <app-badguys [shared]="shared"></app-badguys>
Listing 29.18 shows the Angular component good-guys.component. Line 9
shows the input shared that gets the SharedService observable from
app.component. Lines 14 through 16 show getCharacters being subscribed
to on the shared service; this sets the variable characters to the emitted value
from the observable returned from the method. Lines 18 through 20 define the
hitCharacter method, which takes two parameters: character and damage.
This method calls the hitCharacter method on the shared service and passes in

character and damage as parameters.
Listing 29.18 good-guys.component.ts: An Angular Component that
Watches and Displays a Shared Observable
Click here to view code image
01 import { Component, OnInit, Input } from '@angular/core';
02
03 @Component({
04 selector: 'app-good-guys',
05 templateUrl: './good-guys.component.html',
06 styleUrls: ['./good-guys.component.css']
07 })
08 export class GoodGuysComponent implements OnInit {
09 @Input('shared') shared;
10 characters: Array<any>;
11 constructor(){}
12
13 ngOnInit(){
14 this.shared.getCharacters().subscribe(
15 characters => this.characters = characters
16 );
17 }
18 hitCharacter(character, damage){
19 this.shared.hitCharacter(character, damage)
20 }
21 }
Listing 29.19 shows an Angular template that displays a list of characters. Lines 3
through 5 display the character’s name, race, and health. Lines 6 through 8 show that
characters with the alignment 'bad' have a button that invokes the
hitCharacter method which takes in the character object and the number
25 as parameters.
Listing 29.19 good-guys.component.html: An Angular Template that
Displays a List of Characters
Click here to view code image
01 <div *ngFor="let character of characters">
02 <div class="character">
03 <b>Name:</b> {{character.name}}<br>
04 <b>Race:</b> {{character.race}}<br>
05 <b>Health:</b> {{character.health}}
06 <span *ngIf="character.alignment == 'bad'">

07 <button (click)="hitCharacter(character, 25)">hit</button>
08 </span>
09 </div>
10 </div>
Listing 29.20 shows a CSS file that adds borders to each character to help distinguish
the characters as separate entities.
Listing 29.20 good-guys.component.css: A CSS File that Visually
Separates Characters into Their Own Cards
Click here to view code image
01 b{
02 font-weight: bold;
03 }
04 div {
05 display: inline-block;
06 margin: 10px;
07 padding: 5px;
08 }
09 .character {
10 border: 2px solid steelblue;
11 }
Listing 29.21 shows the Angular component badguys.component. Line 10
shows the input shared that gets the SharedService observable from
app.component. Lines 15 through 17 show getCharacters being subscribed
to on the shared service; this sets the variable characters to the emitted value
from the observable returned from the method. Lines 19 through 21 define the
hitCharacter method, which takes two parameters: character and damage.
This method calls the hitCharacter method on the shared service to pass in
character and damage as parameters.
Listing 29.21 badguys.component.ts: An Angular Component that
Watches and Displays a Shared Observable
Click here to view code image
01 import { Component, OnInit, Input } from '@angular/core';
02
03 @Component({
04 selector: 'app-badguys',
05 templateUrl: './badguys.component.html',
06 styleUrls: ['./badguys.component.css']

07 })
08
09 export class BadguysComponent implements OnInit {
10 @Input('shared') shared;
11 characters: Array<any>;
12 constructor(){ }
13
14 ngOnInit(){
15 this.shared.getCharacters().subscribe(
16 characters => this.characters = characters
17 );
18 }
19 hitCharacter(character, damage){
20 this.shared.hitCharacter(character, damage);
21 }
22 }
Listing 29.22 shows an Angular template that displays a list of characters. Lines 3
through 5 display the character’s name, race, and health. Lines 6 through 8 show that
characters with the alignment 'good' also have a button that invokes the
hitCharacter method which takes in the character object and 25 as
parameters.
Listing 29.22 badguys.component.html: An Angular Template that
Displays a List of Characters
Click here to view code image
01 <div *ngFor="let character of characters">
02 <div class="character">
03 <b>Name:</b> {{character.name}}<br>
04 <b>Race:</b> {{character.race}}<br>
05 <b>Health:</b> {{character.health}}
06 <span *ngIf="character.alignment == 'good'">
07 <button (click)="hitCharacter(character, 25)">hit</button>
08 </span>
09 </div>
10 </div>
Listing 29.23 shows a CSS file that adds borders to each character to help distinguish
the characters as separate entities.
Listing 29.23 badguys.component.css: A CSS File that Visually Separates
Characters into Their Own Cards

Click here to view code image
01 b{
02 font-weight: bold;
03 }
04 div {
05 display: inline-block;
06 margin: 10px;
07 padding: 5px;
08 }
09 .character {
10 border: 2px solid steelblue;
11 }
Figure 29.5 shows the application that connects a Good Guys component with a
Bad Guys component. Clicking the hit button updates the shared service, which is
observed by both components.
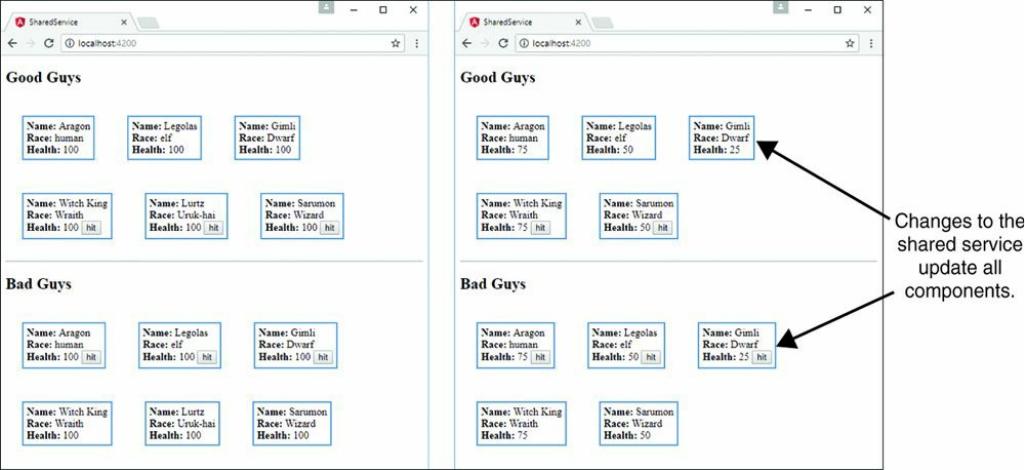
Figure 29.5 Using a shared Angular service to update multiple components
Summary
Angular custom services provide functionality that can be injected into other
Angular services and components. Services allow you to organize your code into
functional modules that can be used to create libraries of functionality available to
Angular applications.
This chapter focuses on tools that enable you to implement your own custom
Angular services for providing task-based functionality to applications. This chapter
provides examples of implementing each of various types of custom Angular
services.
Next
The next chapter focuses on expanding what you have learned so far with additional
examples. It will take everything you have learned so far and show you how to use it
to create fun and useful Angular components.

30
Having Fun with Angular
Angular provides a lot of functionality and is a well-featured framework. The
previous chapters in this book have given you everything you need to understand
what Angular has to offer. This chapter is a bit different from the previous ones. It
provides some additional examples that expand on what you have learned so far. The
examples in this chapter take bits and pieces from all the previous chapters and show
you how to build fun and useful applications that demonstrate more of what Angular
is capable of.
Implementing an Angular Application that Uses
the Animation Service
Listings 30.1 through 30.6 show how to create an Angular application that uses the
animation service to animate images. An image fades in and grows to the correct size
when the mouse hovers over the image title. When the mouse leaves, the image
shrinks and fades out of view.
The folder structure for this example is as follows:
./app.module.ts: App module that imports animations (see Listing 30.1)
./app.component.ts: Angular root component for the application (see
Listing 30.2)
./app.component.html: Angular template file for app.component
(see Listing 30.3)
./animated: Animated component folder
./animated/animated.component.ts: Angular component that

handles animations (see Listing 30.4)
./animated/animated.component.html: Angular template for the
animated component (see Listing 30.5)
./animated/animated.component.css: CSS file for the animated
component (see Listing 30.6)
Listing 30.1 shows the application module. For the application to use the animation
service, BrowserAnimationsModule needs to be loaded. Lines 3 and 16 show
BrowserAnimationsModule being imported from @angular/platform-
browser/animations and then added to the imports array to make
animations available to the application.
Listing 30.1 app.module.ts: An Angular Module that Includes
BrowserAnimationsModule
Click here to view code image
01 import { BrowserModule } from '@angular/platform-browser';
02 import { NgModule } from '@angular/core';
03 import { BrowserAnimationsModule } from
04 '@angular/platform-browser/animations';
05
06 import { AppComponent } from './app.component';
07 import { AnimatedComponent } from './animated/animated.component';
08
09 @NgModule({
10 declarations: [
11 AppComponent,
12 AnimatedComponent
13 ],
14 imports: [
15 BrowserModule,
16 BrowserAnimationsModule
17 ],
18 providers: [],
19 bootstrap: [AppComponent]
20 })
21 export class AppModule { }
Listing 30.2 shows an Angular component that acts as the root of the application.
This component loads a template file that uses the animated component.
Listing 30.2 app.component.ts: An Angular Component that Acts as the

Root to the Application
Click here to view code image
01 import { Component } from '@angular/core';
02 import { AnimatedComponent } from './animated/animated.component';
03
04 @Component({
05 selector: 'app-root',
06 templateUrl: './app.component.html'
07 })
08 export class AppComponent {}
Listing 30.3 shows an Angular template that loads the animated component four
times and passes in an image URL to the input src. It also adds a title to the input
title.
Listing 30.3 app.component.html: An Angular Template that Uses the
animated Component
Click here to view code image
01 <animated title="Arch"
02 src="../../assets/images/arch.jpg">
03 </animated>
04 <animated title="Volcano"
05 src="../../assets/images/volcano.jpg">
06 </animated>
07 <animated title="Flower"
08 src="../../assets/images/flower.jpg">
09 </animated>
10 <animated title="Sunset"
11 src="../../assets/images/jump.jpg">
12 </animated>
Listing 30.4 shows an Angular animated component which handles the animation
of an image that is passed in via an input. Lines 1 through 3 import animate,
keyframes, state, style, transition, and trigger from
@angular/core to make animations for this application possible.
Lines 9 through 36 define the animations metadata for the component. Lines 10
through 23 show the trigger for the animation called fadeState, which when
activated calls two states, inactive and active, and two transitions,
inactive => active (which creates a 500 ms ease-in animation) and
active => inactive (which creates a 500 ms ease-out animation).

Lines 24 through 34 show the trigger bounceState, which contains the transition
void => *. This transition creates an animation that causes the menu items to
bounce down and up when the application is first loaded. Lines 45 through 47 define
the enter method, which sets the variable state to active. Lines 48 and 49
define the leave method, which sets the variable state to inactive.
Listing 30.4 animated.component.ts: An Angular Component that Uses
the Animation Service
Click here to view code image
01 import { Component, OnInit, Input,
02 animate, keyframes, state,
03 style, transition, trigger } from '@angular/core';
04
05 @Component({
06 selector: 'animated',
07 templateUrl: './animated.component.html',
08 styleUrls: ['./animated.component.css'],
09 animations: [
10 trigger('fadeState', [
11 state('inactive', style({
12 transform: 'scale(.5) translateY(-50%)',
13 opacity: 0
14 })),
15 state('active', style({
16 transform: 'scale(1) translateY(0)',
17 opacity: 1
18 })),
19 transition('inactive => active',
20 animate('500ms ease-in')),
21 transition('active => inactive',
22 animate('500ms ease-out'))
23 ]),
24 trigger('bounceState', [
25 transition('void => *', [
26 animate(600, keyframes([
27 style({ opacity: 0,
28 transform: 'translateY(-50px)' }),
29 style({ opacity: .5,
30 transform: 'translateY(50px)' }),
31 style({ opacity: 1,
32 transform: 'translateY(0)' }),
33 ]))
34 ])
35 ])
36 ]

37 })
38 export class AnimatedComponent implements OnInit {
39 @Input ("src") src: string;
40 @Input ("title") title: string;
41 state: string = 'inactive';
42 constructor() { }
43 ngOnInit() {
44 }
45 enter(){
46 this.state = 'active';
47 }
48 leave(){
49 this.state = 'inactive';
50 }
51 }
Listing 30.5 shows an Angular template that displays a title and an image. Line 1
shows the Angular animation @bounceState being used; it is passed in the
variable state from the component to determine what animation sequence should
be used. Lines 7 and 8 show @fadeState being implemented; it also has state
passed in to determine the animation sequence.
Listing 30.5 animated.Component.html: An Angular Template That
Displays Image Titles with Images That Are Animated
Click here to view code image
01 <div [@bounceState]='state'>
02 <p
03 (mouseenter)="enter()"
04 (mouseleave)="leave()">
05 {{title}}
06 </p>
07 <img src="{{src}}"
08 [@fadeState]='state' />
09 </div>
Listing 30.6 shows a CSS file that styles the titles for the images and sets the
dimensions for the images.
Listing 30.6 animated.component.css: A CSS File That Styles the
animated Component
Click here to view code image
01 div {

02 display: inline-block;
03 padding: 0px;
04 margin: 0px;
05 }
06 p {
07 font: bold 16px/30px Times New Roman;
08 color: #226bd8;
09 border: 1px solid lightblue;
10 background: linear-gradient(white, lightblue, skyblue);
11 text-align: center;
12 padding: 0px;
13 margin: 0px;
14 vertical-align: top;
15 }
16 img {
17 width: 150px;
18 vertical-align: top;
19 }
Figure 30.1 shows how the images animate in size and opacity when you click on the
image name.

Figure 30.1 Using Angular’s built-in animation service to animate images
Implementing an Angular Application that
Zooms in on Images
Listings 30.7 through 30.11 show you how to create an Angular application that
displays images that can be zoomed in on (via browser events) when they are
clicked.
The folder structure for this example is as follows:
./app/app.component.ts: Root component for the application (see
Listing 30.7)
./app/app.component.html: Angular template for the root component
(see Listing 30.8)
./app/zoomit: Folder containing the zoomit component
./app/zoomit/zoomit.component.ts: Angular component called
zoomit (see Listing 30.9)
./app/zoomit/zoomit.component.html: Angular template for the
zoomit component (see Listing 30.10)
./app/zoomit/zoomit.component.html: CSS file for the zoomit
component (see Listing 30.11)

./assets/images: Folder where the image files for the example will be
kept
Listing 30.7 shows an Angular component that acts as the root of the application.
This component loads a template file that uses the zoomit component.
Listing 30.7 app.component.ts: An Angular Component That Acts as the
Root to the Application
Click here to view code image
01 import { Component } from '@angular/core';
02 import { ZoomitComponent } from './zoomit/zoomit.component';
03
04 @Component({
05 selector: 'app-root',
06 templateUrl: './app.component.html'
07 })
08 export class AppComponent {}
Listing 30.8 shows an Angular template that creates three zoomit components by
passing in the image URL as the attribute zsrc.
Listing 30.8 app.component.html: An Angular Template That Implements
the Component zoomit
Click here to view code image
01 <hr>
02 <zoomit zsrc="../../assets/images/volcano.jpg"></zoomit>
03 <hr>
04 <zoomit zsrc="../../assets/images/flower2.jpg"></zoomit>
05 <hr>
06 <zoomit zsrc="../../assets/images/arch.jpg"></zoomit>
07 <hr>
Listing 30.9 shows the Angular zoomit component, which handles zooming in on a
section of an image by using browser events. Lines 13 through 16 define the
ngOnInit method, which generates a URL to get an image based on the name of
the image passed into the component via the zsrc input. ngOnInit then sets a
default position. Lines 18 through 23 define the imageClick event, which takes in
a parameter event. Then it gets the element from the event object and uses that to
set new x and y coordinates as the basis for the zoom of the image.

Listing 30.9 zoomit.component.ts: An Angular Component That Uses
Browser Events to Zoom In on Part of an Image
Click here to view code image
01 import { Component, OnInit, Input } from '@angular/core';
02
03 @Component({
04 selector: 'zoomit',
05 templateUrl: './zoomit.component.html',
06 styleUrls: ['./zoomit.component.css']
07 })
08 export class ZoomitComponent implements OnInit {
09 @Input ("zsrc") zsrc: string;
10 public pos: string;
11 public zUrl: string;
12
13 ngOnInit() {
14 this.zUrl = 'url("' + this.zsrc + '")';
15 this.pos = "50% 50%";
16 }
17
18 imageClick(event: any){
19 let element = event.target;
20 let posX = Math.ceil(event.offsetX/element.width * 100);
21 let posY = Math.ceil(event.offsetY/element.height * 100);
22 this.pos = posX +"% " + posY + "%";
23 }
24 }
Listing 30.10 shows an Angular template that displays an image and a zoomed-in
portion of the image next to it, using the coordinates generated from the
imageClick function.
Listing 30.10 zoomit.component.html: An Angular Template That
Displays an Image as Well as a Zoomed-In Portion of That Image
Click here to view code image
01 <img src="{{zsrc}}" (click)="imageClick($event)"/>
02 <div class="zoombox"
03 [style.background-image]="zUrl"
04 [style.background-position]="pos">
05 </div>
Listing 30.11 shows a CSS file that styles the application by adding a border to the

zoomed-in image. It also sets width and height to 100px.
Listing 30.11 zoomit.component.css: A CSS File That Styles the
Application
Click here to view code image
01 img {
02 width: 200px;
03 }
04 .zoombox {
05 display: inline-block;
06 border: 3px ridge black;
07 width: 100px;
08 height: 100px;
09 background-repeat: no-repeat;
10 }
Figure 30.2 shows how the custom component displays a zoomed-in portion of the
image. When you click on the image, the position of the zoom is changed.

Figure 30.2 Implementing a custom Angular component that zooms in on a portion
of an image
Implementing an Angular Application that
Enables Drag and Drop
Listings 30.12 through 30.20 show how to create an Angular application that
displays images that can have descriptive tags dragged and dropped onto them.

The folder structure for this example is as follows:
./app/app.component.ts: Root component for the application (see
Listing 30.12)
./app/app.component.html: Angular template for the root
component (see Listing 30.13)
./app/app.component.css: CSS file for app.component (see
Listing 30.14)
./app/drop-item: Folder containing the drop-item component
./app/drop-item/drop-item.component.ts: Angular component
called drop-item (see Listing 30.15)
./app/drop-item/drop-item.component.html: Angular template
for the drop-item component (see Listing 30.16)
./app/drop-item/drop-item.component.css: CSS file for the
drop-item component (see Listing 30.17)
./app/drag-item: Folder containing the drag-item component
./app/drag-item/drag-item.component.ts: Angular component
that allows the dragging of an element (see Listing 30.18)
./app/drag-item/drag-item.component.html: Angular template
for the drag-item component (see Listing 30.19)
./app/drag-item/drag-item.component.css: CSS file for the
drag-item component (see Listing 30.20)
./assets/images: Folder where the image files for the example will be
kept
Listing 30.12 shows an Angular component that implements the drag-item and
drop-item components to apply tags to images. Lines 12 through 24 define the
constructor, which initializes a list of tags available to be dragged onto an image.
Listing 30.12 app.component.ts: An Angular Component That Acts as the
Root to the Application
Click here to view code image
01 import { Component } from '@angular/core';
02 import { DragItemComponent} from './drag-item/drag-item.component';
03 import { DropItemComponent} from './drop-item/drop-item.component';
04

05 @Component({
06 selector: 'app-root',
07 templateUrl: './app.component.html',
08 styleUrls: ['./app.component.css']
09 })
10 export class AppComponent {
11 tagList: string[];
12 constructor() {
13 this.tagList = [
14 'Nature',
15 'Landscape',
16 'Flora',
17 'Sunset',
18 'Desert',
19 'Beauty',
20 'Inspiring',
21 'Summer',
22 'Fun'
23 ]
24 }
25 ngOnInit() {
26 }
27 }
Listing 30.13 shows an Angular template that implements the drag-item and
drop-item components, which allow tags to be dragged and dropped onto images.
Listing 30.13 app.component.html: An Angular Template That Implements
the drag-item and drop-item Components
Click here to view code image
01 <h1>Tagging Images</h1>
02 <hr>
03 <div class="tagBox">
04 <span *ngFor="let tagText of tagList">
05 <drag-item [tag]="tagText"></drag-item>
06 </span>
07 </div>
08 <hr>
09
10 <drop-item
11 [imgsrc]="'../../assets/images/arch.jpg'">
12 </drop-item>
13 <drop-item
14 [imgsrc]="'../../assets/images/lake.jpg'">
15 </drop-item>

16 <drop-item
17 [imgsrc]="'../../assets/images/jump.jpg'">
18 </drop-item>
19 <drop-item
20 [imgsrc]="'../../assets/images/flower.jpg'">
21 </drop-item>
22 <drop-item
23 [imgsrc]="'../../assets/images/volcano.jpg'">
24 </drop-item>
Listing 30.14 shows a CSS file that styles the application to give direct styles to the
drop-item custom HTML tag.
Listing 30.14 app.component.css: A CSS File That Styles the Application
Click here to view code image
01 .tagBox {
02 width: 320px;
03 padding: 5px;
04 }
05 drop-item{
06 display: inline-block;
07 vertical-align: top;
08 margin-bottom: 5px;
09 }
Listing 30.15 shows the Angular component drop-item, which uses browser
events to allow an element to be dropped onto the component element. Lines 11
through 13 define the constructor that initializes the tags variable as an empty
array.
Lines 16 through 18 define the allowDrop method, which takes an event object
as a parameter. The preventDefault method is invoked on the event object.
Lines 19 through 25 define the onDrop method, which takes in an event object as
a parameter. preventDefault is called on the event object. Then the variable
data is assigned tagData from the event to allow Angular to add that data to the
tags array and to the list on the image.
Listing 30.15 drop.component.ts: An Angular Component That Allows for
an Item to Be Dropped on the Element
Click here to view code image

01 import { Component, OnInit, Input } from '@angular/core';
02
03 @Component({
04 selector: 'drop-item',
05 templateUrl: './drop-item.component.html',
06 styleUrls: ['./drop-item.component.css']
07 })
08 export class DropItemComponent implements OnInit {
09 @Input() imgsrc: string;
10 tags: string[];
11 constructor() {
12 this.tags = [];
13 }
14 ngOnInit() {
15 }
16 allowDrop(event) {
17 event.preventDefault();
18 }
19 onDrop(event) {
20 event.preventDefault();
21 let data = JSON.parse(event.dataTransfer.getData('tagData'));
22 if (!this.tags.includes(data.tag)){
23 this.tags.push(data.tag);
24 }
25 }
26 }
Listing 30.16 shows an Angular template that displays an image and any tags
assigned to that image.
Listing 30.16 drop.component.html: An Angular Template That Displays
an Image and Any Image Tags Dropped onto That Image
Click here to view code image
01 <div class="taggedImage"
02 (dragover)="allowDrop($event)"
03 (drop)="onDrop($event)">
04 <img src="{{imgsrc}}" />
05 <span class="imageTag"
06 *ngFor="let tag of tags">
07 {{tag}}
08 </span>
09 </div>
Listing 30.17 shows a CSS file that styles the application by adding custom styles to

the tags attached to the image.
Listing 30.17 drop.component.css: A CSS File That Styles the Application
Click here to view code image
01 img{
02 width: 100px;
03 }
04 .taggedImage{
05 display: inline-block;
06 width: 100px;
07 background: #000000;
08 }
09 .imageTag {
10 display: inline-block;
11 width: 100px;
12 font: 16px/18px Georgia, serif;
13 text-align: center;
14 color: white;
15 background: linear-gradient(#888888, #000000);
16 }
Listing 30.18 shows the Angular component drag-item, which uses browser
events to allow elements to be dragged. Lines 14 through 17 define the onDrag
method, which takes an event object as a parameter. This method adds data to the
dataTransfer item on the event object to allow the tag data to be transferred
when the element is dropped.
Listing 30.18 drag.component.ts: An Angular Component That Allows an
Element to Be Dragged
Click here to view code image
01 import { Component, OnInit, Input } from '@angular/core';
02
03 @Component({
04 selector: 'drag-item',
05 templateUrl: './drag-item.component.html',
06 styleUrls: ['./drag-item.component.css']
07 })
08 export class DragItemComponent implements OnInit {
09 @Input() tag: string;
10 constructor() {
11 }
12 ngOnInit() {
13 }

14 onDrag(event) {
15 event.dataTransfer.setData('tagData',
16 JSON.stringify({tag: this.tag}));
17 }
18 }
Listing 30.19 shows an Angular template that displays a draggable tag.
Listing 30.19 drag.component.html: An Angular Template That Displays
an Image Tag
Click here to view code image
01 <div class="tagItem"
02 (dragstart)="onDrag($event)"
03 draggable="true">
04 {{tag}}
05 </div>
Listing 30.20 shows a CSS file that styles the application by adding custom styles to
the tags.
Listing 30.20 drag.component.css: A CSS File That Styles the Application
Click here to view code image
01 .tagItem {
02 display: inline-block;
03 width: 100px;
04 font: 16px/18px Georgia, serif;
05 text-align: center;
06 background: linear-gradient(#FFFFFF, #888888);
07 }
Figure 30.3 shows how the drag-item and drop-item components work in a
browser: When you drag a tag onto an image, the tag is added to the list below.

Figure 30.3 Implementing drag and drop using Angular components
Implementing a Star Rating Angular
Component
Listings 30.21–30.29 show how to create an Angular application that creates a star
rating system so a user can give ratings to items attached to the component (images
in this case).
The folder structure for this example is as follows:
./app/app.module.ts: Root component for the application (see Listing
30.21)
./app/mockbackend.service.ts: Angular template for the root
component (see Listing 30.22)
./app/app.module.ts: CSS file for app.component (see Listing
30.23)
./app/app.component.ts: Root component for the application (see
Listing 30.24)
./app/app.component.html: Angular template for the root
component (see Listing 30.25)
./app/app.component.css: CSS file for app.component (see

Listing 30.26)
./app/rated-item: Folder containing the rated-item component.
./app/rated-item/rated-item.component.ts: Angular
component that lets the user rate items (see Listing 30.27)
./app/rated-item/rated-item.component.html: Angular
template for the rated-item component (see Listing 30.28)
./app/rated-item/rated-item.component.css: CSS file for the
rated-item component (see Listing 30.29)
Listing 30.21 shows the application module. This module uses
InMemoryWebApiModule, which allows for the creation of a mock database.
Line 18 shows the implementation of InMemoryWebApiModule.
Listing 30.21 app.module.ts: An Angular Module That Implements
InMemoryWebApiModule
Click here to view code image
01 import { BrowserModule } from '@angular/platform-browser';
02 import { NgModule } from '@angular/core';
03 import { HttpModule } from '@angular/http';
04 import { InMemoryWebApiModule } from 'angular-in-memory-web-api';
05
06 import { AppComponent } from './app.component';
07 import { RatedItemComponent } from './rated-item/rated-item.component';
08 import { MockbackendService } from './mockbackend.service';
09
10 @NgModule({
11 declarations: [
12 AppComponent,
13 RatedItemComponent
14 ],
15 imports: [
16 BrowserModule,
17 HttpModule,
18 InMemoryWebApiModule.forRoot(MockbackendService)
19 ],
20 providers: [],
21 bootstrap: [AppComponent]
22 })
23 export class AppModule { }
Listing 30.22 shows an Angular service that acts as a mock database for the

application. Lines 4 through 29 create an array of items that can be retrieved and
updated via HTTP requests.
Listing 30.22 mockbackend.service.ts: An Angular Mock Back-end
Service
Click here to view code image
01 import { InMemoryDbService } from 'angular-in-memory-web-api';
02 export class MockbackendService implements InMemoryDbService{
03 createDb() {
04 const items = [
05 {
06 id: 1,
07 title: "Waterfall",
08 url: "../../assets/images/cliff.jpg",
09 rating: 4
10 },
11 {
12 id: 2,
13 title: "Flower",
14 url: "../../assets/images/flower.jpg",
15 rating: 5
16 },
17 {
18 id: 3,
19 title: "Pyramid",
20 url: "../../assets/images/pyramid.jpg",
21 rating: 3
22 },
23 {
24 id: 4,
25 title: "Lake",
26 url: "../../assets/images/lake.jpg",
27 rating: 5
28 }
29 ]
30 return {items};
31 }
32 }
Listing 30.23 shows an Angular service that uses HTTP to retrieve and update the
items in the mock database. Lines 6 through 11 define the RatedItem interface
with strictly typed variable names. Lines 19 through 24 define the constructor that
creates an instance of http and a new observable called itemObservable.

Once a response is received from the observable, the getItems method is called.
Lines 27 and 28 define the getObservable method, which returns
itemObservable. Lines 30 through 38 define the getItems method, which
uses an HTTP get to retrieve the items list from the mock database; it then assigns
the items variable to the response and emits that response to the observer.
Lines 39 through 47 define the updateRating method, which takes two
parameters: item and newRating. It assigns the item rating newRating and
uses an HTTP put request to update the item in the database.
Listing 30.23 ratings.service.ts: An Angular Service That Uses HTTP to
Retrieve a List of Items with Ratings
Click here to view code image
01 import { Injectable, OnInit } from '@angular/core';
02 import { Http } from '@angular/http';
03 import { Observable } from 'rxjs/observable';
04 import 'rxjs/add/operator/toPromise';
05
06 export class RatedItem {
07 id: number;
08 url: string;
09 title: string;
10 rating: number;
11 }
12
13 @Injectable()
14 export class RatingsService {
15 url = 'api/items';
16 items: RatedItem[];
17 public itemObservable: Observable<any>;
18 observer;
19 constructor(private http: Http) {
20 this.itemObservable = new Observable(observer => {
21 this.observer = observer;
22 this.getItems();
23 })
24 }
25 ngOnInit(){
26 }
27 getObservable(){
28 return this.itemObservable;
29 }
30 getItems(){
31 this.http.get(this.url)

32 .toPromise()
33 .then( response => {
34 this.items = response.json().data;
35 this.observer.next(this.items);
36 })
37 .catch(this.handleError);
38 }
39 updateRating(item, newRating){
40 item.rating = newRating;
41 const url = `${this.url}/${item.id}`;
42 this.http
43 .put(url, JSON.stringify(item))
44 .toPromise()
45 .then(() => this.getItems())
46 .catch(this.handleError)
47 }
48 private handleError(error: any): Promise<any> {
49 console.error('An error occurred', error);
50 return Promise.reject(error.message || error);
51 }
52 }
Listing 30.24 shows an Angular component that handles getting the items from
RatingsService. Lines 21 through 27 define ngOnInit, which invokes the
getObservable method on RatingsService to assign the items observable
to itemsObservable. The items variable is then assigned the response
received from itemsObservable.
Listing 30.24 app.component.ts: An Angular Component That Acts as the
Root to the Application
Click here to view code image
01 import { Component } from '@angular/core';
02 import { RatedItemComponent } from './rated-item/rated-item.component';
03 import { Observable } from 'rxjs/observable';
04 import { RatingsService } from './ratings.service';
05
06 @Component({
07 selector: 'app-root',
08 templateUrl: './app.component.html',
09 styleUrls: ['./app.component.css'],
10 providers: [ RatingsService ]
11 })
12 export class AppComponent {
13 title = 'app';

14 itemsObservable: Observable<any>;
15 items: any[];
16 constructor(
17 public ratingsService: RatingsService
18 ){
19 this.items = [];
20 }
21 ngOnInit(){
22 this.itemsObservable = this.ratingsService.getObservable();
23 this.itemsObservable.subscribe(
24 itemList => {
25 this.items = itemList;
26 });
27 }
28 }
Listing 30.25 shows an Angular template that implements the rated-item
component to display a list of rated items. rated-item takes two inputs: item
and RatingsService.
Listing 30.25 app.component.html: An Angular Template That Creates a
List of Rated Items, Using the Component rated-item
Click here to view code image
01 <h1> Rated Images </h1>
02 <hr>
03 <div class="item"
04 *ngFor="let item of items">
05 <rated-item
06 [item]="item"
07 [ratingsService]="ratingsService">
08 </rated-item>
09 </div>
Listing 30.26 shows a CSS file that styles the item class on
app.component.html.
Listing 30.26 app.component.css: A CSS File That Styles the Application
Click here to view code image
01 .item{
02 border: .5px solid black;
03 display: inline-block;
04 width: 175px;

05 text-align: center;
06 }
Listing 30.27 shows an Angular component that displays a rated item. Lines 13
through 15 define the constructor method, which initializes the starArray
value.
Lines 18 through 20 define the setRating method, which takes the parameter
rating. The method invokes the updateRating method on the ratings
service and takes the parameters item and rating, which the ratings service uses
to update the rating of the item.
Lines 21 through 27 define the getStarClass method, which takes the parameter
rating. This method is used to assign the class of each star to accurately represent
the rating of the item.
Listing 30.27 rated-item.component.ts: An Angular Component That
Displays an Image as Well as a Rating for the Image
Click here to view code image
01 import { Component, OnInit, Input } from '@angular/core';
02 import { RatingsService } from '../ratings.service';
03
04 @Component({
05 selector: 'rated-item',
06 templateUrl: './rated-item.component.html',
07 styleUrls: ['./rated-item.component.css']
08 })
09 export class RatedItemComponent implements OnInit {
10 @Input ("item") item: any;
11 @Input ("ratingsService") ratingsService: RatingsService;
12 starArray: number[];
13 constructor() {
14 this.starArray = [1,2,3,4,5];
15 }
16 ngOnInit() {
17 }
18 setRating(rating){
19 this.ratingsService.updateRating(this.item, rating);
20 }
21 getStarClass(rating){
22 if(rating <= this.item.rating){
23 return "star";
24 } else {

25 return "empty";
26 }
27 }
28 }
Listing 30.28 shows an Angular template that displays a title, an image, and a rating.
Lines 8 through 12 create the stars, which are used to visualize the rating. When a
user clicks on a new rating, the overall rating is adjusted, using the setRating
method. The getStarClass method determines whether the stars are filled in or
blank.
Listing 30.28 rated-item.component.html: An Angular Template That
Displays a Title and an Image as Well as a Rating for the Image
Click here to view code image
01 <p class="title">
02 {{item.title}}
03 </p>
04 <img src="{{item.url}}" />
05 <p>
06 Rating: {{item.rating}}
07 </p>
08 <span *ngFor="let rating of starArray"
09 (click)="setRating(rating)"
10 [ngClass]="getStarClass(rating)">
11
12 </span>
Listing 30.29 shows a CSS file that styles the application by setting the dimensions
of the rated item and adding stars to give that item a visualized rating.
Listing 30.29 rated-item.component.css: A CSS File That Styles the
Application
Click here to view code image
01 * {
02 margin: 5px;
03 }
04 img {
05 height: 100px;
06 }
07 .title{
08 font: bold 20px/24px Verdana;
09 }

10 span {
11 float: left;
12 width: 20px;
13 background-repeat: no-repeat;
14 cursor: pointer;
15 }
16 .star{
17 background-image: url("../../assets/images/star.png");
18 }
19 .empty {
20 background-image: url("../../assets/images/empty.png");
21 }
Figure 30.4 shows the star rating component in the browser. Clicking on a star
changes the rating in the mock back-end service, which updates the UI component.
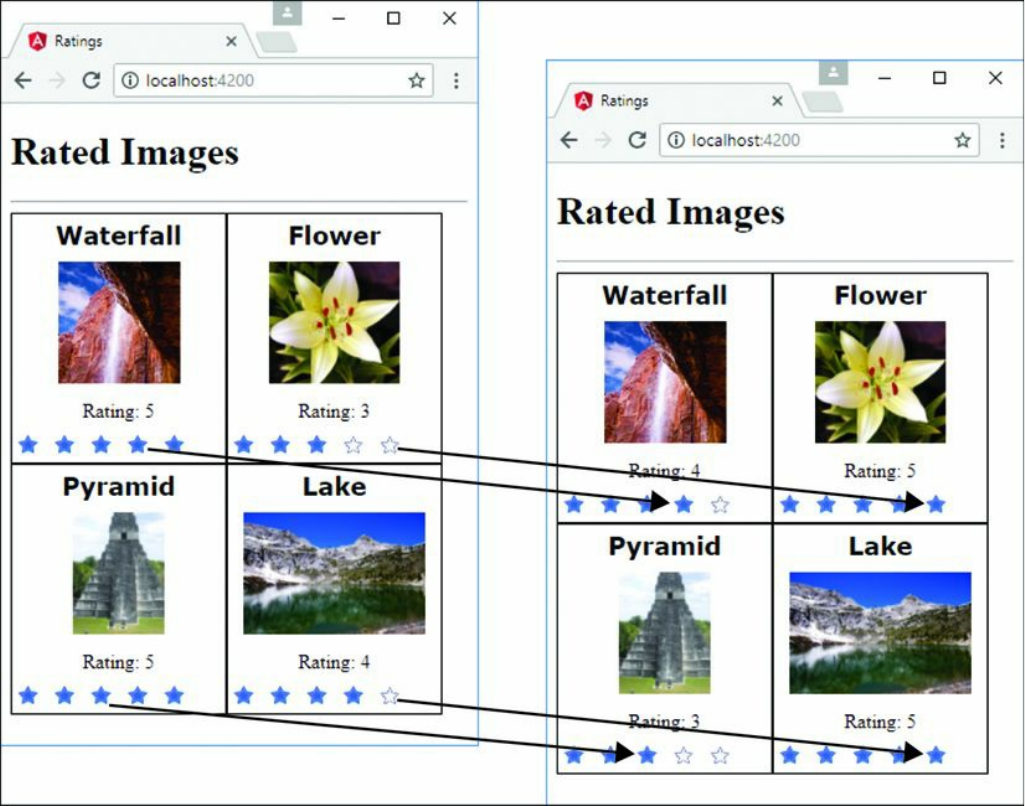
Figure 30.4 Using Angular components and services to implement star ratings on
images with a mock back end
Summary
In this chapter, you got a chance to see how to extend what you have learned in the
rest of the book to build some cool Angular components. You have seen how to
implement animations, create a star rating component, and implement drag-and-drop
capability. These are just some of the many ways to use Angular in real-world web
applications. If you are interested in learning more about Angular, https://angular.io
is a great resource.

Index
Symbols
+ (addition) operator, 17
&& (and) operator, 19
= assignment operator, 18
+= assignment operator, 18
-= assignment operator, 18
/= assignment operator, 18
*= assignment operator, 18
%= assignment operator, 18
` (backquotes), 404–405
{ } (curly braces), 20, 24, 415, 416, 429
/ (division) operator, 18
$ (dollar sign), 243
== (equal) operator, 19
=== (equal) operator, 19
\' escape code, 29
\" escape code, 29
\\ escape code, 29
> (greater than) operator, 19
>= (greater than or equal to) operator, 19
++ (increment) operator, 18
< (less than) operator, 19
<= (less than or equal to) operator, 19
% (modulus) operator, 18
* (multiplication) operator, 18
! (not) operator, 19
!= (not equal) operator, 19

!== (not equal) operator, 19
|| (or) operator, 19
( ) (parentheses), 20, 24, 436, 457
| (pipe symbol), 426
- (subtraction) operator, 18
~ (tilde), 404–405
A
abort() method, 120, 161
acceptsCharset property (Request object), 351
accessing MongoDB
access control, 209
authentication, 210–211
Database Administrator accounts, 211
User Administrator accounts, 209–210
from shell client, 203–204
command parameters, 205
shell commands, 204
shell methods, 205
shell scripts, 205–206
accounts (MongoDB)
Database Administrator accounts, 211
user accounts
creating, 206–207
listing, 206–207
removing, 209
roles, 208
User Administrator accounts, 209–210
ActivatedRoute, importing, 488
$add operator, 286
addCensoredWords() function, 52
addClass() method, 446
$addFields operator, 285
addition (+) operator, 17
addListener() function, 65
AddNums interface, 385
address() method, 143, 146
addShard() method, 339
addShardTag() method, 340
addTagRange() method, 340
$addToSet operator, 243, 286
addTrailers() method, 122
addUser() method, 228, 229
admin() method, 227, 229
Admin object, 229
aggregate() method, 283, 301, 317
aggregating results, 282–289
aggregate() method, 283
aggregation examples, 287–289
aggregation expression operators, 285–287
aggregation framework operators, 283–285
aggregation expression operators, 285–287
aggregation framework operators, 283–285
AJAX (Asynchronous JavaScript and XML) requests, 9
alerts, asynchronous, 516
all() method, 304, 346
$all operator, 264
allowDrop() method, 536
allowHalfOpen option, 86, 145
and() method, 303
and (&&) operator, 19
$and operator, 263
Angular. See also Node.js-to-Angular stack
adding to environment, 393–394
advantages of, 4, 13–14, 391
applications, creating, 395–396, 398–402
Angular bootstrapper, 399–402
animation application, 525–529
component modules, importing, 396–397
drag-and-drop application, 533–539
NgModule, 397–398
star rating application, 539–546
zoom application, 530–533
bootstrapper, 398–402
app.module.js, 401
app.module.ts, 400
first.component.js, 402
first.component.ts, 400
first.html listing, 399
browser events, 457–458
built-in directives, 441–442
attribute directives, 392, 445–448
components directives, 392, 442
structural directives, 392, 442–445
change detection, 465–468
CLI (command-line interface), 394–395
components, 396–397, 539–546
Angular bootstrapper components, 398–402
animation application components, 526–529
collections, 204
configuration, 403–404
constructors, 407
custom component directives, 452–456
deleting data in, 461–464
dependency injection, 392–393, 410–414
drag-and-drop application components, 534–538
emitting custom events from, 458
image zoom application components, 530–532
importing, 396–397
inline CSS and HTML in, 405–406
integrating custom services into, 503–504
nested components, 458–460
NgModule, 397–398
selectors, 404
separation of responsibilities, 393
star rating application components, 539–546
templates, 404–405, 408–410
custom directives, 449
custom attribute directives, 449–452
custom component directives, 452–456
custom events, 458
deleting data with, 461–464
emitting from components, 458
handling with listeners, 458
implementing in nested components, 458–460
data binding, 429
attribute binding, 433
class binding, 433–434
definition of, 392
event binding, 436–439
interpolation, 430–431
property binding, 431–433
style binding, 435–436
two-way binding, 439–440
definition of, 4
dependency injection, 392–393
event binding, 436–439
expressions, 415–416
basic expressions, 416–417
built-in pipes, 422–426
Component class interaction, 418–419
custom pipes, 426–428
pipe implementation, 422
TypeScript in, 419–422
modules, 392
observables
creating, 464–465
definition of, 464
detecting data changes with, 465–468
separation of responsibilities, 393
services
animate, 470
animation service, application using, 525–529
area-calc.service.ts, 506–510
constant data service, 505–506
definition of, 393
forms, 470
http, 470–486
integrating into applications, 503–504
mock back-end service, 540–541
purpose of, 469
ratings service, 541–542
router, 470, 487–501
service that returns a promise, 515–516
shared service, 516–523
use cases for, 503–504
UserService, 483–484
variable data service, 510–514
TypeScript, 383
in Angular expressions, 419–422
classes, 386
data types, 383–384
directives, 462–463
functions, 388–389
inheritance, 387
interfaces, 385–386
modules, 387–388
Angular QuickStart website, 394
animate service, 470
animated component
animated.component.css, 529
animated.component.html, 529
animated.component.ts, 527–528
animation application
animated.component.css, 529
animated.component.html, 529
animated.component.ts, 527–528
app.component.html, 526–527
app.component.ts, 526
app.module.ts, 525–526
folder structure, 525
anonymous functions, 25–26
any data type, 384
app.component.css listing
AreaCalcService, 509
custom directive with component, 454
drag-and-drop application, 535–536
RandomImageService, 513–514
router with navigation bar, 495
star rating application, 544
app.component.html listing
animation application, 526–527
AreaCalcService, 508–509
custom directive with component, 453–454
drag-and-drop application, 535
image zoom application, 531
PiService, 506
PromiseService, 516
RandomImageService, 513
router with navigation bar, 494
SharedService, 519
star rating application, 543–544
zoom directive, 451–452
app.component.ts listing
animation application, 526
AreaCalcService, 507–508
custom directive with component, 453
drag-and-drop application, 534–535
image zoom application, 530–531
PiService, 505
PromiseService, 515–516
RandomImageService, 512–513
router with navigation bar, 494
router with parameters, 498
SharedService, 519
simple router application, 490
star rating application, 543
append() method, 318
applications (Angular), 395–396, 398–402. See also components (Angular)
Angular bootstrapper
app.module.js, 401
app.module.ts, 400
first.component.js, 402
first.component.ts, 400
first.html, 399
animation application
animated.component.css, 529
animated.component.html, 529
animated.component.ts, 527–528
app.component.html, 526–527
app.component.ts, 526
app.module.ts, 525–526
folder structure, 525
component modules, importing, 396–397
drag-and-drop application
app.component.css, 535–536
app.component.html, 535
app.component.ts, 534–535
drag.component.css, 538
drag.component.html, 538
drag.component.ts, 538
drop.component.css, 537
drop.component.html, 537
drop.component.ts, 536
folder structure, 533–534
NgModule, 397–398
star rating application
app.component.css, 544
app.component.html, 543–544
app.component.ts, 543
app.module.ts, 540
folder structure, 539
mockbackend.service.ts, 540–541
rated-item.component.css, 545–546
rated-item.component.html, 545
rated-item.component.ts, 544–545
ratings.service.ts, 541–542
zoom application
app.component.html, 531
app.component.ts, 530–531
folder structure, 530
zoomit.component.css, 532
zoomit.component.html, 532
zoomit.component.ts, 531–532
applications (Node.js), censorify module
censortext.js, 49
creating, 49–50
loading into Node.js applications, 52–53
package.json, 50, 51
publishing to NPM Registry, 50–51
readwords.js, 52
app.module.js listing, 401
app.module.ts listing
Angular bootstrapper, 400
animation application, 525–526
simple mock server implementation, 473–474, 480
simple router implementation, 488–489
star rating application, 540
AppRoutingModule, importing, 488
app-routing.module.ts listing
router with navigation bar, 492–493
router with parameters, 498
simple router implementation, 489–490
arbiter servers, 331
arch() method, 162, 182
AreaCalcService, 506–510
app.component.css, 509
app.component.html, 508–509
app.component.ts, 507–508
area-calc.service.ts, 506–507
area-calc.service.ts listing, 506–507
argv method, 162
arithmetic operators, 17–18
Array object, 32–33
adding items to, 34–35
combining, 33–34
converting into strings, 34
iterating through, 34
manipulating, 32–33
methods, 32–33
removing items from, 34–35
searching, 34
arrays, 16
JavaScript
adding items to, 34–35
combining, 33–34
converting into strings, 34
iterating through, 34
manipulating, 32–33
methods, 32–33
removing items from, 34–35
searching, 34
Routes, defining, 486–487
TypeScript, 384
assert() function, 54
assertion testing module, 40, 190
assigning Express middleware
globally to path, 368
to single route, 368
assignment operators, 18
async pipe, 424
asynchronous alerts, 516
asynchronous file reading, 104–105
asynchronous file system calls, 95
asynchronous file writing, 99–101
Asynchronous JavaScript and XML (AJAX), 9
atomic write operations, 198
atomically modifying documents, 250–251
attachment() method, 353
attribute binding, 433
attribute directives, 392, 445–448

attribute.component.css, 448
attribute.component.html, 447
attribute.component.ts, 446–447
custom attribute directives, 449–452
definition of, 441
ngForm, 445
ngModel, 445
ngStyle, 445
attribute.component.css listing, 448
attribute.component.html listing, 447
attribute.component.ts listing, 446–447
--auth parameter (mongod command), 203
auth property (URL object), 116
authenticate() method, 228, 229
authentication
HTTP, 375–377
MongoDB, 210–211
session, 377–380
author directive, 47
auto_reconnect option (server object), 224
autoIndex option (Schema object), 295
autoIndexID option (collections), 214
$avg operator, 286
B
\b (backspace) escape code, 30
backend services, 10
backing up MongoDB, 341–342
backquotes (`), 404–405
backspace escape code, 30
Bad Guys component
badguys.component.css, 522
badguys.component.html, 522
badguys.component.ts, 521
base64 encoding, 75
basicAuth middleware, 368, 375–377
basicExpressions.component.ts listing, 417
big endian, 75
bin directives, 47
--bind parameter (mongod command), 203
binding. See data binding
$bit operator, 244
blocking I/O, 57–58
bodyParser middleware, 368, 371–372
Boolean data type
JavaScript, 16
TypeScript, 383
bootstrap metadata option (NgModule), 397
bootstrapper (Angular), 398–402
app.module.js, 401
app.module.ts, 400
first.component.js, 402
first.component.ts, 400
first.html listing, 399
border() function, 450
brackets ({ }), 415, 416
break statement, 23–24
browser events, 457–458
browser view, rendering, 9–10
BrowserAnimationsModule, loading, 526
browsers, 8
browser events, 457–458
browser view, rendering, 9–10
browser-to-webserver communication, 8–9
user interaction, 10
browser-to-webserver communication, 8–9
BSON, 192
$bucket operator, 285
$bucketAuto operator, 285
buffer module. See buffers
buffer_concat.js listing, 81
buffer_copy.js listing, 79
buffer_read.js listing, 78
buffer_slice.js listing, 80
buffer_write.js listing, 77
bufferCommands option (Schema object), 295
buffers, 74–75
compressing/decompressing, 91–92
concatenating, 81
copying, 79–80
creating, 75–76
determining length of, 78
encoding methods, 75
reading from, 77–78
slicing, 80
writing to, 76–77
bufferSize property (Socket object), 143
building templates, 404–405
built-in directives, 441–442
attribute directives, 392, 445–448
attribute.component.css, 448
attribute.component.html, 447
attribute.component.ts, 446–447
definition of, 441
ngForm, 445
ngModel, 445
ngStyle, 445
components directives, 392, 441, 442
structural directives, 392, 442–445
definition of, 441
ngFor, 442, 474, 479, 484, 513
ngIf, 442–443
ngSwitch, 442–443
ngSwitchCase, 442, 443
ngSwitchDefault, 442
structural.component.ts, 443–444
built-in events, 457–458
built-in pipes
builtInPipes.component.ts, 425

table of, 422–424
built-in services
animate, 470
forms, 470
http, 470
GET requests, sending, 470–471
JSON file implementation and access, 472–475
PUT requests, sending, 470–471
request configuration, 471
response callback functions, 471
simple mock server implementation, 475–481
simple mock server updates, 481–486
router, 470
ActivatedRoute, importing, 488
route navigation, 488
route object parameters, 487
Router, importing, 488
router with navigation bar, 492–497
router with parameters, 497–501
Routes array, 486–487
routing module, including, 488
simple router implementation, 488–491
builtInPipes.component.ts listing, 425
byteLength() method, 78
bytesRead property (Socket object), 144
bytesWritten property (Socket object), 144
C
ca option
htp.createServer(), 136
https.request(), 136
tls.connect(), 154
tls.createServer(), 155
callback functions, 67
applying for defined parameters, 348–349
chaining, 70
implementing closure in, 68–69
passing parameters to, 67–68
callback_chain.js listing, 70
callback_closure.js listing, 69
callback_parameter.js listing, 67–68
canActivate property (route object), 487
canActivateChild property (route object), 487
canDeactivate property (route object), 487
canLoad property (route object), 487
capped collections, 197–198, 330
capped option
collections, 214
Schema object, 295
carriage return escape code, 29
Cascading Style Sheets. See CSS (Cascading Style Sheets)
case sensitive routing setting (Express), 344
catch() method, 471
catch statement, 35–36
C/C++ add-ons, 40, 190
censor() function, 52
censorify module
censortext.js, 49
creating, 49–50
loading into Node.js applications, 52–53
package.json, 50, 51
publishing to NPM Registry, 50–51
readwords.js, 52
censortext.js listing, 49
cert option
htp.createServer(), 136
https.request(), 136
tls.connect(), 154
certificate class, 188
chaining callback functions, 70
change detection, 465–468
(change) event, 457
changeLoop() method, 510
changeSize() function, 450
character.component.css listing, 462
character.component.html listing, 462
character.component.ts listing, 461–462
charAt() method, 30
charCodeAt() method, 30
charObservable, 517
chdir() method, 162
checkContinue event, 124
checkGoal() function, 66
checkKeys option, 242
child components, deleting parent data from, 461–464
child forks, 171–173
child processes, 159–160
child forks, 171–173
ChildProcess object, 164–166
executable files, executing on another process, 168–169
processes, spawning, 169–171
system command, executing on another process, 166–168
child_exec.js listing, 167–168
child_fork.js listing, 172–173
child_process module, 40, 159–160
child forks, 171–173
ChildProcess object, 164–166
executable files, executing on another process, 168–169
processes, spawning, 169–171
system command, executing on another process, 166–168
child_process_exec_file.js listing, 168–169
child_process_spawn_file.js listing, 170–171
ChildProcess object, 164–166
Children property (route object), 487
cipher class, 188
ciphers option
htp.createServer(), 136
https.request(), 136
tls.createServer(), 155
class binding, 433–434
class.component.ts listing, 434
classes. See also services (Angular)
binding, 433–434
certificate, 188
cipher, 188
Component, 418–419
decipher, 188
defining, 386
diffieHellman, 188
@directive, 449
eCDH, 188
EventEmitter, 458
export classes
Directive, 449
ZoomDirective, 451
hash, 189
hmac, 189
inheritance, 387
MongoClient, 222
pipe, 426
SecretAgent, 387
sign, 189
verify, 189
classExpressions.component.ts listing, 418–419
clearCookie() method, 373
clearImmediate() function, 62
clearInterval() function, 61
clearTimeout() function, 60
CLI (command-line interface), 394–395. See also commands
(click) event, 457
clientError event, 124, 156
ClientRequest object, 118–121
clients
HTTPS clients, 135–136
TCP socket clients, 147–150
TLS socket clients, 153–154
client-side scripts, 9
close event, 82, 121, 123, 124, 142, 145, 165
close() method, 97, 125, 146, 227, 233
closeSync() method, 97
closing files, 96–97
closure in callback functions, 68–69
cluster module, 40, 174
events, 174
HTTP clusters, 176–179
methods, 175
properties, 175
Worker object, 175–176
cluster_server.js listing, 177–179
clusterAdmin role (MongoDB), 208
clusters
cluster module, 40, 174
events, 174
HTTP clusters, 176–179
methods, 175
properties, 175
Worker object, 175–176
sharded MongoDB clusters, 338
adding shards to cluster, 339
config server database instances, 338
query router servers, 338–339
code listings. See listings
collection() method, 228, 230
Collection object, 229–232. See also collections (MongoDB)
collection option (Schema object), 295
collection_create_list_delete.js listing, 238–239
collection_stat.js listing, 239–240
collectionInfo() method, 227
collectionNames() method, 227
collections (MongoDB)
capped collections, 197–198, 330
Collection object, 229–232
collection_create_list_delete.js application example, 238–239
creating, 214–215, 237
definition of, 192
deleting, 215–216, 238
displaying list of, 214
documents
adding, 217, 244–246, 307–309
aggregating with Mongoose, 317–320
atomically modifying, 250–251
counting, 268–269
Document object, 304–305
finding, 216, 265–268, 305–307
removing, 217–218, 255–258, 314–317
retrieving, 246–248
saving, 252–253, 310–311
updating, 218–219, 248–250, 309–314
upserting, 253–254
listing, 237
number of, 199
sharding on, 340
statistics for, 239–240
collections command, 204
collections() method, 228, 237
$collStatus operator, 284
combining
arrays, 33–34
strings, 31
command-line interface, 394–395. See also commands
command-line options module, 40
commands. See also directives
databases, 204
db.help, 204
dbs, 204
executing in another process, 166–168
exit, 204
help, 204
mongod, 202–203
mongodump, 342
ng eject, 395
ng generate component, 395
ng generate directive, 395
ng generate enum, 395
ng generate guard, 395
ng generate interface, 395
ng generate module, 395
ng generate pipe, 395
ng generate service, 395
ng new, 395
ng serve, 395
npm, 42, 44–45
npm adduser, 50
npm install, 46, 51
npm pack, 50
npm search, 45
npm install, 475
profile, 204
roles, 204
show, 204
use, 204
users, 204
comment() method, 302
comment option (options object), 265
communication, browser-to-webserver, 8–9
comparison operators, 19–20
compatibility of Angular, 14
compiling models, 298
Component class, 418–419
component directives, 441
component property (route object), 487
components (Angular), 396–397, 539–546. See also services (Angular)
Angular bootstrapper, 398–402
animation application, 526–527
animated.component.css, 529
animated.Component.html, 529
animated.component.ts, 527–528
app.component.ts, 526
app.module.ts, 525–526
folder structure, 525
collections, 204
configuration, 403–404
constructors, 407
custom component directives, 452–456
container component, 454
CSS for container component, 455
CSS for root component, 454
HTML for container component, 455
HTML for root component, 453–454
root component, 453
deleting data in, 461–464
dependency injection
building nested components with, 410–412
definition of, 392–393, 410
passing data with, 412–413
sample application with inputs, 413–414
drag-and-drop application
app.component.css, 535–536
app.component.html, 535
app.component.ts, 534–535
drag.component.css, 538
drag.component.html, 538
drag.component.ts, 538
drop.component.css, 537
drop.component.html, 537
drop.component.ts, 536
folder structure, 533–534
emitting custom events from, 458
image zoom application
app.component.html, 531
app.component.ts, 530–531
folder structure, 530
zoomit.component.css, 532
zoomit.component.html, 532
zoomit.component.ts, 531–532
importing, 396–397
inline CSS and HTML in, 405–406
integrating custom services into, 503–504
nested components, 458–460
NgModule, 397–398
selectors, defining, 404
separation of responsibilities, 393
star rating application
app.component.css, 544
app.component.html, 543–544
app.component.ts, 543
app.module.ts, 540
folder structure, 539
mockbackend.service.ts, 540–541
rated-item.component.css, 545–546
rated-item.component.html, 545
rated-item.component.ts, 544–545
ratings.service.ts, 541–542
templates
building, 404–405
external templates, 408–410
components directives, 392, 442
compound indexes, 328
compress middleware, 368
compressing
buffers, 91–92
streams, 92–93
concat() method, 30, 31, 33–34, 81
$concat operator, 287
concatenating buffers, 81
conditionals
if statements, 20
switch statements, 20–21
config method, 161
--config parameter (mongod command), 202
config servers, creating, 338
configuration
components, 403–404
selectors, 404
templates, 404–405
Express, 343–344
HTTP requests, 471
MongoDB authentication, 210–211
query database operation, 299–302
connect event, 120, 124, 141
connect() method, 56, 140, 147, 154, 223, 292
connected property (ChildProcess object), 166
connecting to MongoDB
MongoClient class, 222
MongoClient object, 223–226
Mongoose, 292–294
write concern, 222
connection event, 124, 145
Connection object, 292–293
connectionTimeOut option (server object), 224
console, writing data to, 53–54
console module, 40, 53–54
constant data service, 505–506
app.component.html, 506
app.component.ts, 505
pi.service.ts, 505
constructor.component.ts listing, 407
constructors, 407
container component, 454
CSS for, 455
HTML for, 455
container directive
container.component.css, 455
container.component.html, 455
container.component.ts, 454
content, generating with CLI (command-line interface), 394–395
continue event, 120
continue statement, 23–24
contributors directive, 47
converting
arrays to strings, 34
JavaScript objects to JSON, 74
JSON to JavaScript objects, 74
objects to strings, 184–185
cookie() method, 373, 378
cookieParser middleware, 368, 373–374
cookies
cookie sessions, 374–375
sending/receiving, 373–374
cookieSession middleware, 368, 374–375
copy() method, 79
copyDatabase() method, 213
copying
buffers, 79–80
databases, 213
count() method, 231, 233, 268–269, 300
$count operator, 285
counting documents, 268–269
cpus() method, 182
create() method, 300, 307
createAlert() method, 515
createCollection() method, 214, 228, 234, 237, 330
createConnection() method, 140
createDb() method, 481
createDelete.component.CSS listing, 479–480
createDelete.component.html listing, 479
createDelete.component.ts listing, 477–478
createReadStream() method, 105–106
createServer() method, 124, 126, 128, 136, 150, 154–156, 345
createTimedAlert() method, 515
createUser() method, 207, 208, 476, 478
createWriteStream() method, 101–102
crl option
htp.createServer(), 136
https.request(), 136
tls.createServer(), 155
crypto module, 41, 188–190
csrf middleware, 368
CSS (Cascading Style Sheets)
files, 9
inline CSS in Angular applications, 405–406
listings
app.component.css, 454, 495, 513–514, 535–536, 544
attribute.component.css, 448
character.component.css, 462
container.component.css, 455
details.component.css, 463
drag.component.css, 538
drop.component.css, 537
external.css, 409
http.component.CSS, 474–475
outer.css, 411
rated-item.component.css, 545–546
./static/css/static.css, 370
update.component.CSS, 485–486
zoomit.component.css, 532
curly braces ({ }), 20, 24, 429
currency pipe, 423
current database, changing, 211–212
Cursor object, 232–233
custom Angular services, 503
constant data service, 505–506
app.component.html, 506
app.component.ts, 505
pi.service.ts, 505
data transform service, 506–510
app.component.css, 509
app.component.html, 508–509
app.component.ts, 507–508
area-calc.service.ts, 506–507
integrating into applications, 503–504
mock back-end service, 540–541
ratings service, 541–542
service that returns a promise, 515–516
shared service, 516–523
app.component.html, 519
app.component.ts, 519
badguys.component.css, 522
badguys.component.html, 522
badguys.component.ts, 521
good-guys.component.css, 521
good-guys.component.html, 520
good-guys.component.ts, 520
shared.service.ts, 517–518
use cases for, 503–504
variable data service, 510–514
app.component.css, 513–514
app.component.html, 513
app.component.ts, 512–513
random-image.service.ts, 511–512
custom directives, 449
custom attribute directives, 449–452
custom component directives, 452–456
container component, 454
CSS for container component, 455
CSS for root component, 454
HTML for container component, 455
HTML for root component, 453–454
root component, 453
custom events, 64–65, 457
deleting data with, 461–464
emitting from components, 458
handling with listeners, 458
implementing in nested components, 458–460
custom middleware, 380–381
custom pipes, 426–428
custom-defined objects, 28
customevent.component.html listing, 459–460
customevent.component.ts listing, 459

customPipes.component.ts listing, 427
custom.pipe.ts listing, 427
cwd() method, 162
cwd property
exec() and execFile() methods, 166
fork() function, 172
spawn() function, 170
D
Dahl, Ryan, 39
data binding, 429
attribute binding, 433
class binding, 433–434
definition of, 392
event binding, 436–439
interpolation, 430–431
property binding, 431–433
style binding, 435–436
two-way binding, 439–440
data changes, detecting with observables, 465–468
data denormalization, 196–197
data event, 82, 141
data I/O
buffers, 74–75
compressing/decompressing, 91–92
concatenating, 81
copying, 79–80
creating, 75–76
determining length of, 78
encoding methods, 75
reading from, 77–78
slicing, 80
writing to, 76–77
JSON (JavaScript Object Notation), 73
converting JavaScript objects to, 74
converting to JavaScript objects, 74
streams, 81
compressing/decompressing, 92–93
Duplex streams, 86–88
piping, 89–90
Readable streams, 82–84, 89–90
Transform streams, 88–89
Writable streams, 84–86, 89–90
data life cycles, 199
data model, planning, 194–195
data normalization, 195–196
data passing with dependency injection, 412–413
Data property (route object), 487
data transform service, 506–510
app.component.css, 509
app.component.html, 508–509
app.component.ts, 507–508
area-calc.service.ts, 506–507
data types
JavaScript, 16–17
MongoDB, 193–194
TypeScript, 383–384
data usability, 200
Database Administrator accounts, 211
databases (MongoDB). See also collections (MongoDB)
changing current, 211–212
connecting to using Mongoose, 292–294
copying, 213
creating, 212, 234
database change options, 241–242
db_create_list_delete.js sample application, 234–236
deleting, 212–213, 234
displaying list of, 211
implementing schemas on, 295–296
listing, 233
query database operation
options, 301–302
setting, 299–301
repairing, 341
update operators, 242–244
databases command, 204
data.service.ts listing, 476, 481–482
date pipe, 423
db() method, 227
Db object, 227–228
db_connect_object.js listing, 226
db_connect_url.js listing, 225
db_create_list_delete.js listing, 234–236
db_status.js listing, 236–237
dbAdmin role (MongoDB), 208
dbAdminAnyDatabase role (MongoDB), 208
db.auth() method, 205
db.help command, 204
--dbpath parameter (mongod command), 203
dbs command, 204
debounce() method, 471
debugger module, 41
decipher class, 188
declarations metadata, 397, 410
decompressing
buffers, 91–92
streams, 92–93
decorators
@NgModule, 397–398, 410
@pipe, 426
defined parameters, applying route parameters with, 348
deflate() method, 91
deflateRaw() method, 91
delaying work
interval timers, 61–62
timeout timers, 60–61
delete() method, 470
deleteChar() method, 461
deleteUser() method, 476, 478
deleting data, 461–464
array items, 34–35
collections, 215–216, 238
databases, 212–213
directories, 111–112
documents, 217–218
findAndRemove() method, 257–258
with Mongoose, 314–317
remove() method, 217–218, 255–256
event listeners, 65
files, 110
MongoDB user accounts, 209
denormalizing data, 196–197
dependencies directive, 48
dependency injection
building nested components with, 410–412
definition of, 392–393, 410
passing data with, 412–413
sample application with inputs, 413–414
deploying
replica sets, 333–334
sharded MongoDB clusters, 338
adding shards to cluster, 339
config server database instances, 338
query router servers, 338–339
dereferencing timers, 63
description directive, 47
destroy() method, 142, 378
detached property (spawn() function), 170
details.component.css listing, 463
details.component.html listing, 463
details.component.ts listing, 462–463
detecting data changes, 465–468
diffieHellman class, 188
dir() function, 53
@directive class, 449
Directive class, 449
directives. See also commands
author, 47
bin, 47
built-in directives, 441–442
attribute directives, 392, 445–448
components directives, 392, 442
structural directives, 392, 442–445
contributors, 47
custom directives, 449
custom attribute directives, 449–452
custom component directives, 452–456
definition of, 441
dependencies, 48
description, 47
engines, 48
keywords, 48
main, 47
name, 47
preferGlobal, 47
repository, 48
scripts, 47
version, 47
directories
creating, 111–112
deleting, 111–112
node_modules, 221
renaming, 112
disable() method, 344
disabled() method, 344
disconnect event, 165, 174, 176
disconnect() method, 165, 175, 176, 292
distinct field values, finding, 276–277
distinct() method, 231, 276–277, 300
$divide operator, 286
division (/) operator, 18
dns module, 41, 186–188
dns_lookup.js listing, 187–188
doc_aggregate.js listing, 288
doc_count.js listing, 268–269
doc_delete_one.js listing, 257–258
doc_delete.js listing, 255–256
doc_distinct.js listing, 277
doc_fields.js listing, 271–272
doc_find.js listing, 247–248
doc_group.js listing, 279–280
doc_insert.js listing, 245–246
doc_limit.js listing, 270–271
doc_modify.js listing, 251
doc_paging.js listing, 273–274
doc_query.js listing, 266–268
doc_save.js listing, 252–253
doc_sort.js listing, 275–276
doc_update.js listing, 249–250
doc_upsert.js listing, 253–254
doCalc() function, 26
doCircle() method, 507
Document object, 292, 304–305
Document Object Model. See DOM (Document Object Model)
documents (MongoDB)
adding
insert() method, 217, 244–246
with Mongoose, 307–309
aggregating with Mongoose, 317–320
atomically modifying, 250–251
counting, 268–269
data denormalization, 196–197
data normalization, 195–196
embedded documents, 196–197
finding
find() method, 216
with Mongoose, 305–307
sets of documents, 265–268
getting from collections, 246–248
growth of, 198
Mongoose Document object, 304–305
paths, 294
references, 195–196
removing
findAndRemove() method, 257–258
with Mongoose, 314–317
remove() method, 217–218, 255–256
saving
with Mongoose, 310–311
save() method, 252–253
structure of, 192–193
TTY (time-to-live), 199
updating
findAndRemove() method, 218–219
with Mongoose, 311–314
update() method, 248–250
upserting, 253–254
dollar sign, 243
DOM (Document Object Model), 9
doRectangle() method, 507
doSquare() method, 507
doTrapezoid() method, 507
doTriangle() method, 507
double curly braces ({{}}), 429
do/while loops, 22
download responses, sending, 359
downloading MongoDB, 202
drag-and-drop application
app.component.css, 535–536
app.component.html, 535
app.component.ts, 534–535
drag.component.css, 538
drag.component.html, 538
drag.component.ts, 538
drop.component.css, 537
drop.component.html, 537
drop.component.ts, 536

folder structure, 533–534
drag-item component
app.component.css, 535–536
app.component.html, 535
app.component.ts, 534–535
drag.component.css, 538
drag.component.html, 538
drag.component.ts, 538
drain event, 84, 142
driver. See MongoDB Node.js driver
drop() method, 215, 232
dropCollection() method, 228, 238
dropDatabase() method, 213, 228, 234
drop-item component
app.component.css, 535–536
app.component.html, 535
app.component.ts, 534–535
drop.component.css, 537
drop.component.html, 537
drop.component.ts, 536
dropping. See deleting data
dummyDB.JSON listing, 472
Duplex streams, 86–88
dynamic GET servers, 127–129
E
each() method, 232
$each operator, 244
eCDH class, 188
EJS template
creating, 361–363
implementing, 363–364
elements of arrays, adding/removing, 34–35
$elemMatch, 266
elemMatch() method, 304
$elemMatch operator, 264
embedded documents, 196–197
emit() method, 64, 458
emitter_listener.js listing, 66–67
emitting custom events, 458
enable() method, 344
enabled() method, 344
enableSharding() method, 339–340
encoding methods, 75
encoding property
exec() method, 167
execFile() method, 167
fork() function, 172
encrypt_password.js listing, 189
end event, 82, 141
end() method, 85, 120, 122, 127, 142
endian, 75
endianness() method, 181
engine() method, 360
engines, template, 360
defining, 360–361
locals, adding, 361
rendered templates, sending, 363–364
template creation, 361–363
engines directive, 48
ensureIndex() method, 329
entryComponents metadata option (NgModule), 397
enum data type, 384
env method, 162
env property
exec() and execFile() methods, 166
fork() function, 172
spawn() function, 170
env setting (Express), 344
environment, adding Angular to, 393–394
$eq operator, 263
equal sign (=), 18
equality operators, 19
equals() method, 304
error event, 82, 142, 145, 165, 176
error() function, 53
error handling, 35
finally keyword, 36–37
throwing errors, 36
try/catch blocks, 35–36
errors module, 41
errors property (Document object), 305
escape codes, 29–30
event binding, 436–439
event listeners
adding to objects, 65
implementing, 65–67
removing from objects, 65
event queue, scheduling work on, 59–60
event.component.ts listing, 436–438
EventEmitter object, 64–65, 458
eventHandler() method, 459
events, 55–56
binding, 436–439
blocking I/O, 57–58
browser events, 457–458
callbacks, 67
chaining, 70
implementing closure in, 68–69
passing parameters to, 67–68
ClientRequest object, 120
cluster module, 174
conversation metaphor, 57–59
custom events, 64–65, 458
deleting data with, 461–464
emitting from components, 458
handling with listeners, 458
implementing in nested components, 458–460
event callbacks, 55–56
event listeners
adding to objects, 65
implementing, 65–67
removing from objects, 65
event queue, scheduling work on, 59–60
IncomingMessage object, 123
process signals, 160
Readable streams, 82
Server object, 124, 145
ServerResponse object, 121
Socket object, 141–142
threaded models, 55–56
Worker object, 176
Writable streams, 84
events module, 41. See also events
exec() method, 166–168, 318
execArgv method, 162
execFile() method, 168–169
execPath method, 162
execPath property (fork() function), 172
executable files, executing on another process, 168–169
executables
mongod.exe, 202
Node.js executables, verifying, 42–43
executing
executable files on another process, 168–169
processes, 161
system commands on another process, 166–168
exist event, 165
exists() method, 106–107, 303
$exists operator, 263
existsSync() method, 106–107
exit command, 204
exit event, 174, 176
exit() method, 161
explain option (options object), 264
export classes
Directive, 449
ZoomDirective, 451
export keyword, 392
exporting modules, 392
exports metadata option (NgModule), 397
Express, 13, 343
configuring, 343–344
installing, 343
middleware, 367–368
assigning globally to path, 368
assigning to single route, 368
basicAuth, 368, 375–377
bodyParser, 368, 371–372
compress, 368
cookieParser, 368, 373–374
cookieSession, 368, 374–375
csrf, 368
custom, 380–381
favicon, 367
functions, 369
logger, 367
query, 368, 369
session, 368, 377–380
static, 367, 369–371
Request objects, 350–352
Response objects, 352
download responses, 359
files in, 356–358
headers, 352–353
JSON responses, 355–357
redirection, 359
rendered templates in, 363–364
sending, 353–355
status, 353
routes
applying parameters in, 347–350
definition of, 345
implementing, 346
server, starting, 345
template engines, 360
defining, 360–361
locals, adding, 361
rendered templates, sending, 363–364
template creation, 361–363
express_auth_one.js listing, 376
express_auth_session.js listing, 378–379
express_auth.js listing, 376
express_cookies.js listing, 373–374
express_http_https.js listing, 345
express_json.js listing, 356
express_middleware.js listing, 381
express_post.js listing, 372
express_redirect.js listing, 359
express_request.js listing, 351
express_routes.js listing, 349–350
express_send_file.js listing, 358
express_send.js listing, 354
express_session.js listing, 374–375
express_static.js listing, 370
express_templates.js listing, 363–364
expressions, 415–416
basic expressions, 416–417
Component class interaction, 418–419
pipes
built-in pipes, 422–426
custom pipes, 426–428
definition of, 422
TypeScript in, 419–422
extensibility
of Angular, 14
of Node.js, 3, 12
external sources, interacting with, 132–134
external templates, 408–410
external.component.ts listing, 409

external.css listing, 409
externalTemplate.html listing, 409
F
\f (form feed) escape code, 30
--f parameter (mongod command), 202
$facet operator, 285
@fadeState, 527–529
favicon middleware, 367
feed() function, 386
fields
distinct field values, finding, 276–277
limiting results by, 271–272
naming conventions, 193
required fields, forcing, 296
unique fields, 296
fields option (options object), 264
file system, 41, 95
asynchronous file system calls, 95
directories
creating, 111–112
deleting, 111–112
renaming, 112
files
deleting, 110
listing, 108–110
opening/closing, 96–97
reading, 102–106
renaming, 112
returning statistics about, 107–108
truncating, 110–111
verifying path of, 106–107
watching for file changes, 112–113
writing, 97–102
synchronous file system calls, 95
file_read_async.js listing, 105
file_read_stream.js listing, 106
file_read_sync.js listing, 103–104
file_readdir.js listing, 109–110
file_read.js listing, 102–103
file_stats.js listing, 108
file_write_async.js listing, 100–101
file_write_stream.js listing, 101
file_write_sync.js listing, 99
file_write.js listing, 98
files. See also listings
deleting, 110
executing in another process, 168–169
listing, 108–110
node, 42
opening/closing, 96–97
package.json file, 47–48
reading
asynchronous file reading, 104–105
simple file read, 102–103
streamed file reading, 105–106
synchronous file reading, 103–104
renaming, 112
returning statistics about, 107–108
sending in responses, 356–358
static files, serving, 125–127, 369–371
truncating, 110–111
verifying path of, 106–107
watching for file changes, 112–113
writing
asynchronous file writing, 99–101
simple file write, 98
streaming file writing, 101–102
synchronous file writing, 98–99
fill() method, 76
finally keyword, 36–37
find() method, 216, 231, 246–248, 265–268, 299, 300, 306
findAndModify() method, 231, 250–251
findAndRemove() method, 231, 257, 300
findOne() method, 231, 246–248, 300, 305
findOneAndUpdate() method, 301
finish event, 84
$first operator, 286
first.component.js listing, 402
first.component.ts listing, 400
first.html listing, 399
flush() method, 88
(focus) event, 457
folders, node_modules, 42
forceServerObjectId option, 242
forcing required fields, 296
for/in loops, 23
fork event, 174
fork() method, 171–173
forks, 171–173
for loops, 22–23
form feed escape code, 30
form parameters, processing, 117–118
format() method, 183–184
formatGreeting() function, 25
formatting strings, 183–184
forms service, 470
frameworks. See Angular; Node.js
freemem() method, 182
fresh property (Request object), 351
fromCharCode() method, 30
fs module. See file system
fsync option, 242
functions, 24. See also individual functions (for example, doCalc() function)
anonymous functions, 25–26
callback functions, 67
applying for defined parameters, 348–349
chaining, 70
implementing closure in, 68–69

passing parameters to, 67–68
defining, 24
passing variables to, 24–25
returning values from, 25
TypeScript functions, 388–389
G
generating content with CLI (command-line interface), 394–395
$geoNear operator, 285
geospatial indexes, 328
get() method, 304, 344, 352, 470
GET requests
definition of, 9
dynamic GET servers, 127–129
response callback functions, 471
sending, 470–471
GET servers, 127–129
getCensoredWords() function, 52
getCharacters() method, 517
getConnections() method, 146
GetData requests, 55–56
GetFile requests, 55–56
getgid() method, 162
getgroups() method, 163
getHeader() method, 122
getItems() method, 541
getObservable() method, 541, 543
getPi() method, 505
getRandom() function, 510
getRandomImage() method, 512
getSiblingDB() method, 212
getStarClass() method, 544–545
getuid() method, 162
getUsers() method, 476, 482
getWeather() function, 132

gid property (spawn() function), 170
global module, 41, 190
Good Guys component
good-guys.component.css, 521
good-guys.component.html, 520
good-guys.component.ts, 520
gotoPage2() function, 498–499
$graphLookup operator, 285
greater than (>) operator, 19
greater than or equal to (>=) operator, 19
greeting() function, 25
group() method, 277–282, 318
$group operator, 284
grouping results, 277–282
growth of MongoDB documents, 198
gt() method, 303
$gt operator, 263
gte() method, 303
$gte operator, 263
gunzip() method, 91
gzip() method, 91
H
handshakeTimeout option (tls.createServer), 155
hash class, 189
hash property (URL object), 117
hash-based sharding, 337
hashed indexes, 329
head() method, 470
headers, 10, 352–353
headers property (IncomingMessage object), 123
headersSent event, 121
help command, 204
--help parameter (mongod command), 202
Hex encoding, 75
high availability, 3, 13
hint() method, 302
hint option (options object), 264
hitCharacter() method, 517–520
hmac class, 189
home.component.html listing, 490
home.component.ts listing, 490
honorCipherOrder option (tls.createServer), 155
host property
ClientRequest object, 119
URL object, 116
hostname() method, 181
hostname property
ClientRequest object, 119
Request object, 351
URL object, 116
href property (URL object), 116
hrtime() method, 162
HTML (Hypertext Markup Language)
events, Angular syntax for, 457–458
files, 9
inline HTML in Angular applications, 405–406
listings
animated.Component.html, 529
app.component.html. See app.component.html listing
app.module.ts, 480
attribute.component.html, 447
badguys.component.html, 522
character.component.html, 462
container.component.html, 455
createDelete.component.html, 479
customevent.component.html, 459–460
details.component.html, 463
drag.component.html, 538
drop.component.html, 537
externalTemplate.html, 409
first.html, 399
good-guys.component.html, 520
home.component.html, 490
http.component.html, 474
observable.component.html, 467
outer.html, 411
page1.component.html, 499
page2.component.html, 496, 500
page3.component.html, 496
rated-item.component.html, 545
route2.component.html, 491
update.component.html, 484–485
user_ejs.html, 362
zoomit.component.html, 532
router-outlet tag, 488
HTTP (Hypertext Transfer Protocol), 8, 115. See also http service
authentication, 375–377
clusters, 176–179
headers, 10
HTTPS, 8, 134–135
certificate signing request files, 135
HTTPS clients, 135–136
HTTPS servers, 137
private keys, 135
query string and form parameter processing, 117–118
requests, 9
ClientRequest object, 118–121
methods, 350–352
POST, 371–372
properties, 350–352
responses, 352
download responses, 359
files in, 356–358
headers, 352–353
IncomingMessage object, 122–123
JSON responses, 355–357
redirecting, 359
rendered templates in, 363–364
sending, 353–355
ServerResponse object, 121–122
status, 353
servers
dynamic GET servers, 127–129
external sources, interacting with, 132–134
POST servers, 130–131
Server object, 123–125
static files, serving, 125–127
URLs (Uniform Resource Locators)
resolving, 117
structure of, 115–116
URL object, 116–117
http module. See HTTP (Hypertext Transfer Protocol)
http service, 470
GET requests, sending, 470–471
JSON file implementation and access, 472–475
app.module.ts, 473–474
dummyDB.JSON, 472
http.component.CSS, 474–475
http.component.html, 474
http.component.ts, 473
PUT requests, sending, 470–471
request configuration, 471
response callback functions, 471
simple mock server implementation, 475–481
app.module.ts, 480
createDelete.component.CSS, 479–480
createDelete.component.html, 479
createDelete.component.ts, 477–478
creating, 475
data.service.ts, 476
user.service.ts, 478–479
simple mock server updates, 481–486
data.service.ts, 481–482
update.component.CSS, 485–486
update.component.html, 484–485

update.component.ts, 482–483
user.service.ts, 483–484
http_client_get.js listing, 128
http_client_post.js listing, 131
http_client_static.js listing, 126–127
http_server_external listing, 132–133
http_server_get.js listing, 128
http_server_post.js listing, 130
http_server_static.js listing, 126
http.component.CSS listing, 474–475
http.component.html listing, 474
http.component.ts listing, 473
HttpModule, importing, 473–474
https module, 41, 134–135
certificate signing request files, 135
HTTPS clients, 135–136
HTTPS servers, 137
private keys, 135
httpVersion property (IncomingMessage object), 123
Hypertext Markup Language. See HTML (Hypertext Markup Language)
Hypertext Transfer Protocol. See HTTP (Hypertext Transfer Protocol)
I
_id indexes, 327–328
id metadata option (NgModule), 397
id property
Document object, 304
Schema object, 295
Worker object, 176
IDE (Integrated Development Environment), 43
if statements, 20
imageClick() function, 532
images
animation application
animated.component.css, 529
animated.Component.html, 529
animated.component.ts, 527–528
app.component.html, 526–527
app.component.ts, 526
app.module.ts, 525–526
drag-and-drop application
app.component.css, 535–536
app.component.html, 535
app.component.ts, 534–535
drag.component.css, 538
drag.component.html, 538
drag.component.ts, 538
drop.component.css, 537
drop.component.html, 537
drop.component.ts, 536
folder structure, 533–534
image zoom application
app.component.html, 531
app.component.ts, 530–531
folder structure, 530
zoomit.component.css, 532
zoomit.component.html, 532
zoomit.component.ts, 531–532
immediate timers, 62
import keyword, 392
importing
modules, 392
ActivatedRoute, 488
AppRoutingModule, 488
Component, 396–397
HttpModule, 473–474
InMemoryDbService, 476, 481
InMemoryWebApiModule, 480–481
NgModule, 397–398
Router, 488, 492
Observable object, 510–512
imports metadata option (NgModule), 397
$inc operator, 243
IncomingMessage object, 122–123
increment (++) operator, 18
index() method, 295–296
indexed arrays, 384
indexes, 198–199
adding to schemas, 295–296
creating, 327–330
indexes() method, 296
indexOf() method, 30, 31, 33, 34
indexOptionsDefaults option (collections), 215
$indexStats operator, 285
inflate() method, 91
inflateRaw() method, 91
info() function, 53
inheritance, 387
inherits() method, 83, 185–186
initgroups() method, 163
inline CSS and HTML, 405–406
InMemoryDbService, importing, 476, 481
InMemoryWebApiModule
implementing, 540
importing, 480–481
in() method, 303
inner.component.ts listing, 412
$in operator, 263
Input decorator, 412
input.component.ts listing, 413–414
insert() method, 217, 230, 244–246
inspect() method, 184–185
installing
Express, 343
MongoDB, 201–202
Node.js, 42
NPMs (Node Packaged Modules), 46
Integrated Development Environment (IDE), 43
interface keyword, 385

interfaces
Person, 385
PersonInterface, 386
RatedItem, 541
Stringy, 385
TypeScript, 385–386
interpolation, 430–431
interpolation.component.ts listing, 430–431
interrupting loops, 23–24
interval timers, 61–62
intro.ts listing, 406
invalidate() method, 305
I/O
blocking, 57–58
pipes, 159–160
ip property (Request object), 351
isClosed() method, 233
isInit() method, 305
isinstanceof operator, 184
isMaster property (cluster module), 175
isModified() method, 305
isNew property (Document object), 305
isSelected() method, 305
isWorker property (cluster module), 175
iterating through arrays, 34
J
JavaScript, 15. See also listings
arrays
adding items to, 34–35
combining, 33–34
converting into strings, 34
iterating through, 34
manipulating, 32–33
methods, 32–33
removing items from, 34–35
searching, 34
conditionals
if statements, 20
switch statements, 20–21
data types, 16–17
error handling, 35
finally keyword, 36–37
throwing errors, 36
try/catch blocks, 35–36
functions, 24. See also individual functions (for example, doCalc() function)
anonymous functions, 25–26
callback functions, 67–70, 348–349
defining, 24
passing variables to, 24–25
returning values from, 25
JSON (JavaScript Object Notation), 73
converting JavaScript objects to, 74
converting to JavaScript objects, 74
keywords
export, 392
finally, 36–37
import, 392
new, 27
styles, 405
styleUrls, 408
templateUrl, 408
var, 15–16
loops, 21
do/while, 22
for, 22–23
for/in, 23
interrupting, 23–24
while, 21
methods, 27. See also individual methods (for example, write() method)
objects, 27
Array, 32–33
converting JSON to, 74
converting to JSON, 74
custom events, 64–65
custom-defined objects, 28
prototyping object patterns, 29
String, 29–31
syntax, 27–28
operators, 17
arithmetic operators, 17–18
assignment operators, 18
comparison operators, 19–20
isinstanceof, 184
statements
break, 23–24
catch, 35–36
continue, 23–24
if, 20
return, 25
switch, 20–21
throw, 36
try, 35–36
strings
combining, 31
converting arrays into, 34
manipulating, 29–31
replacing words in, 31
searching, 31
splitting, 32
string-related methods, 30–31
variables
defining, 15–16
passing to functions, 24–25
scope, 26–27
JavaScript Object Notation. See JSON (JavaScript Object Notation)
join() method, 33, 34
journal option, 242
JSON (JavaScript Object Notation), 73

converting JavaScript objects to, 74
converting to JavaScript objects, 74
file implementation and access, 472–475
app.module.ts, 473–474
dummyDB.JSON, 472
http.component.CSS, 474–475
http.component.html, 474
http.component.ts, 473
responses, sending, 355–357
json pipe, 423
jsonp callback name setting (Express), 344
jsonp replacer setting (Express), 344
jsonp spaces setting (Express), 344
K
keepAlive option (server object), 224
key option
htp.createServer(), 135–136
https.request(), 135–136
tls.connect(), 154
tls.createServer(), 155
(keydown) event, 458
(keypress) event, 458
keys
private keys, generating, 135
shard keys, 336–337
x509 public key, 135, 137
(keyup) event, 458
keywords. See also statements
export, 392
import, 392
new, 27
styles, 405
styleUrls, 408
templateUrl, 408

this, 323
var, 15–16
keywords directive, 48
kill() method, 161, 165, 176
killSignal property (exec() method), 167
L
$last operator, 286
lastIndexOf() method, 30, 33
leave() method, 527
length of buffers, determining, 78
less than (<) operator, 19
less than or equal to (<=) operator, 19
limit() method, 301, 318
$limit operator, 284
limit option (options object), 264
limiting result sets, 270
by fields, 271–272
paging results, 273–274
by size, 270–271
listDatabases() method, 229, 233
listdb_connect_url.js, 225
listen() method, 124, 146, 345
listeners, 458
adding to objects, 65
implementing, 65–67
removing from objects, 65
listeners() function, 65
listening event, 145, 174
listing
collections, 214, 237
databases, 211, 233
files, 108–110
MongoDB server status, 236–237
MongoDB user accounts, 206–207
listings
animated.component.css, 529
animated.Component.html, 529
animated.component.ts, 527–528
app.component.css
AreaCalcService, 509
custom directive with component, 454
drag-and-drop application, 535–536
RandomImageService, 513–514
router with navigation bar, 495
star rating application, 544
app.component.html
animation application, 526–527
AreaCalcService, 508–509
custom directive with component, 453–454
drag-and-drop application, 535
image zoom application, 531
PiService, 506
PromiseService, 516
RandomImageService, 513
router with navigation bar, 494
SharedService, 519
star rating application, 543–544
zoom directive, 451–452
app.component.ts
animation application, 526
AreaCalcService, 507–508
custom directive with component, 453
drag-and-drop application, 534–535
image zoom application, 530–531
PiService, 505
PromiseService, 515–516
RandomImageService, 512–513
router with navigation bar, 494
router with parameters, 498
SharedService, 519
simple router application, 490
star rating application, 543
app.module.js, 401
app.module.ts
Angular bootstrapper, 400
animation application, 525–526
simple mock server implementation, 473–474, 480
simple router implementation, 488–489
star rating application, 540
app-routing.module.ts
router with navigation bar, 492–493
router with parameters, 498
simple router implementation, 489–490
area-calc.service.ts, 506–507
attribute.component.css, 448
attribute.component.html, 447
attribute.component.ts, 446–447
badguys.component.css, 522
badguys.component.html, 522
badguys.component.ts, 521
basicExpressions.component.ts, 417
buffer_concat.js, 81
buffer_copy.js, 79
buffer_read.js, 78
buffer_slice.js, 80
buffer_write.js, 77
builtInPipes.component.ts, 425
callback_chain.js, 70
callback_closure.js, 69
callback_parameter.js, 67–68
censortext.js, 49
character.component.css, 462
character.component.html, 462
character.component.ts, 461–462
child_exec.js, 167–168
child_fork.js, 172–173
child_process_exec_file.js, 168–169
child_process_spawn_file.js, 170–171
class.component.ts, 434
classExpressions.component.ts, 418–419
cluster_server.js, 177–179
collection_create_list_delete.js, 238–239
collection_stat.js, 239–240
constructor.component.ts, 407
container.component.css, 455
container.component.html, 455
container.component.ts, 454
createDelete.component.CSS, 479–480
createDelete.component.html, 479
createDelete.component.ts, 477–478
customevent.component.html, 459–460
customevent.component.ts, 459
customPipes.component.ts, 427
custom.pipe.ts, 427
data.service.ts, 476, 481–482
db_connect_object.js, 226
db_create_list_delete.js, 234–236
db_status.js, 236–237
details.component.css, 463
details.component.html, 463
details.component.ts, 462–463
dns_lookup.js, 187–188
doc_aggregate.js, 288
doc_count.js, 268–269
doc_delete_one.js, 257–258
doc_delete.js, 255–256
doc_distinct.js, 277
doc_fields.js, 271–272
doc_find.js, 247–248
doc_group.js, 279–280
doc_insert.js, 245–246
doc_limit.js, 270–271
doc_modify.js, 251
doc_paging.js, 273–274
doc_query.js, 266–268
doc_save.js, 252–253
doc_sort.js, 275–276
doc_update.js, 249–250
doc_upsert.js, 253–254
drag.component.css, 538
drag.component.html, 538
drag.component.ts, 538
drop.component.css, 537
drop.component.html, 537
drop.component.ts, 536
dummyDB.JSON, 472
emitter_listener.js, 66–67
encrypt_password.js, 189
event.component.ts, 436–438
express_auth_one.js, 376
express_auth_session.js, 378–379
express_auth.js, 376
express_cookies.js, 373–374
express_http_https.js, 345
express_json.js, 356
express_middleware.js, 381
express_post.js, 372
express_redirect.js, 359
express_request.js, 351
express_routes.js, 349–350
express_send_file.js, 358
express_send.js, 354
express_session.js, 374–375
express_static.js, 370
express_templates.js, 363–364
external.component.ts, 409
external.css, 409
externalTemplate.html, 409
file_read_async.js, 105
file_read_stream.js, 106
file_read_sync.js, 103–104
file_readdir.js, 109–110
file_read.js, 102–103
file_stats.js, 108
file_write_async.js, 100–101
file_write_stream.js, 101
file_write_sync.js, 99
file_write.js, 98
first.component.js, 402
first.component.ts, 400
first.html, 399
good-guys.component.css, 521
good-guys.component.html, 520
good-guys.component.ts, 520
home.component.html, 490
home.component.ts, 490
http_client_get.js, 128
http_client_post.js, 131
http_client_static.js, 126–127
http_server_external, 132–133
http_server_get.js, 128
http_server_post.js, 130
http_server_static.js, 126
http.component.CSS, 474–475
http.component.html, 474
http.component.ts, 473
inner.component.ts, 412
input.component.ts, 413–414
interpolation.component.ts, 430–431
intro.ts, 406
main_pug.pug, 362–363
mockbackend.service.ts, 540–541
mongoose_aggregate.js, 319
mongoose_connect.js, 293
mongoose_create.js, 308–309
mongoose_find.js, 306–307
mongoose_middleware.js, 323–324
mongoose_remove_many.js, 316
mongoose_remove_one.js, 315
mongoose_save.js, 310
mongoose_update_many.js, 313–314
mongoose_update_one.js, 312
mongoose_validation.js, 321
nav.component.CSS, 494
nav.component.html, 493
nav.component.ts, 493
nexttick.js, 63–64
observable.component.html, 467
observable.component.ts, 466–467
os_info.js, 182–183
outer.component.ts, 411
outer.css, 411
outer.html, 411
package.json, 50, 51
page1.component.html, 499
page1.component.ts
router with navigation bar, 495
router with parameters, 499
page2.component.html
router with navigation bar, 496
router with parameters, 500
page2.component.ts
router with navigation bar, 495
router with parameters, 500
page3.component.html, 496
page3.component.ts, 496
person.component.ts, 413
pi.service.ts, 505
process_info.js, 163–164
promise.service.ts, 515
property.component.ts, 432
random-image.service.ts, 511–512
rated-item.component.css, 545–546
rated-item.component.html, 545
rated-item.component.ts, 544–545
ratings.service.ts, 541–542
readwords.js, 52
route2.component.html, 491
route2.component.ts, 491
shared.service.ts, 517–518
simple_interval.js, 61–62
simple_timer.js, 60–61
socket_client.js, 148–149
socket_server.js, 151–152
./static/css/static.css, 370
stream_duplex.js, 87
stream_piped.js, 90
stream_read.js, 83–84
stream_transform.js, 88–89
stream_write.js, 85
structural.component.ts, 443–444
style.component.ts, 435
twoWay.component.ts, 439–440
typescriptExpressions.component.ts, 421
update.component.CSS, 485–486
update.component.html, 484–485
update.component.ts, 482–483
user_ejs.html, 362
user.service.ts, 478–479, 483–484
util_inherit.js, 185–186
word_schema.js, 297
zlib_buffers.js, 91–92
zlib_file.js, 93
zoom.component.ts, 450–452
zoom.directive.ts, 450–451
zoomit.component.css, 532
zoomit.component.html, 532
zoomit.component.ts, 531–532
little endian, 75
load() method, 205, 206
loadavg() method, 182
loadChildren property (route object), 487
local template variables, adding, 361

localAddress property
ClientRequest object, 119
Socket object, 143
localPort property (Socket object), 144
location() method, 353
log() function, 53
logCar() function, 67–70
logColorCar() function, 67
logger middleware, 367
logout() method, 228, 229
--logpath parameter (mongod command), 203
lookup() method, 186
$lookup operator, 285
loops, 21
do/while, 22
for, 22–23
for/in, 23
interrupting, 23–24
while, 21
lowercase pipe, 423
lt() method, 303
$lt operator, 263
$lte operator, 263
M
main directive, 47
main_pug.pug listing, 362–363
manipulating
arrays, 32–33
strings, 29–31
map() method, 471
MapReduce, 282. See also aggregating results
markModified() method, 305
match() method, 30, 318
$match operator, 283, 284
$max operator, 286
max option (collections), 214
maxBuffer property (exec() method), 167
--maxConns parameter (mongod command), 203
maxScan option (options object), 265
maxTickDepth() method, 162
media files, 9
memoryUsage() method, 162
message event, 165, 176
method property
ClientRequest object, 119
IncomingMessage object, 123
Request object, 351
methods. See also individual methods (for example, write() method)
adding to schemas, 295–296
definition of, 27
methods property (Schema object), 296
middleware (Express), 367–368
assigning globally to path, 368
assigning to single route, 368
basicAuth, 368, 375–377
bodyParser, 368, 371–372
compress, 368
cookieParser, 368, 373–374
cookieSession, 368, 374–375
csrf, 368
custom, 380–381
favicon, 367
functions, 369
logger, 367
Mongoose middleware functions, 322–324
query, 368, 369
session, 368, 377–380
static, 367, 369–371
middleware functions (Mongoose), 322–324
$min operator, 286
mkdir() method, 111
mkdirSync() method, 111
mock back-end service, 540–541
mock web servers
simple JSON file implementation, 472–475
app.module.ts, 473–474
dummyDB.JSON, 472
http.component.CSS, 474–475
http.component.html, 474
http.component.ts, 473
simple mock server implementation, 475–481
app.module.ts, 480
createDelete.component.CSS, 479–480
createDelete.component.html, 479
createDelete.component.ts, 477–478
creating, 475
data.service.ts, 476
user.service.ts, 478–479
simple mock server updates, 481–486
data.service.ts, 481–482
update.component.CSS, 485–486
update.component.html, 484–485
update.component.ts, 482–483
user.service.ts, 483–484
mockbackend.service.ts listing, 540–541
mod() method, 303
$mod operator, 263, 287
model() method, 298
Model object, 292, 298
models, compiling, 298
modifiedFields() method, 310
modifiedPaths() method, 305
modules (Angular), 392
importing
AppRoutingModule, 488
BrowserAnimationsModule, 526
Component, 396–397
HttpModule, 473–474
InMemoryDbService, 476, 481
InMemoryWebApiModule, 480–481
NgModule, 397–398
Router, 492
routing module, 488
TypeScript, 387–388
modules (Node.js)
assertion testing, 190
buffer. See buffers
C/C++ add-ons, 190
child_process, 159–160
child forks, 171–173
ChildProcess object, 164–166
executable files, executing on another process, 168–169
processes, spawning, 169–171
system command, executing on another process, 166–168
cluster, 174
events, 174
HTTP clusters, 176–179
methods, 175
properties, 175
Worker object, 175–176
console, 53–54
creating, 49–50
crypto, 188–190
definition of, 43
dns, 186–188
events. See events
express. See Express
fs. See file system
global, 190
http. See HTTP (Hypertext Transfer Protocol)
https, 134–135
certificate signing request files, 135
HTTPS clients, 135–136
HTTPS servers, 137
private keys, 135
installing, 46
loading into Node.js applications, 52–53
mongodb. See MongoDB Node.js driver
mongoose. See Mongoose
net, 41. See also socket services
Server object, 144–147
Socket objects, 140–144
Node Package Manager, 44–45
Node Package Registry, 43–44
publishing modules to, 50–51
viewing, 43–44
os, 181–183
overview of, 40–41
package.json file, 47–48
process, 159
process execution, 161
process I/O pipes, 159–160
process signals, 160
returning information from, 161–164
publishing to NPM Registry, 50–51
REPL (Read Event Print Loop), 190
searching for, 45
stream. See streams
tls, 139–140, 152–153
TLS socket clients, 153–154
TLS socket servers, 154–156
util, 183–186
format() method, 183–184
inherits() method, 185–186
inspect() method, 184–185
isinstanceof operator, 184
V8, 190
Zlib, 91
compressing/decompressing buffers, 91–92
compressing/decompressing streams, 92–93
modules module, 41
modulus (%) operator, 18
MongoClient object, 222, 223–226
mongod command, 202–203
MongoDB, 192. See also MongoDB Node.js driver; Node.js-to-Angular stack
access control, 209
authentication, 210–211
Database Administrator accounts, 211
User Administrator accounts, 209–210
access from shell client, 203–204
command parameters, 205
shell commands, 204
shell methods, 205
shell scripts, 205–206
advantages of, 3, 12–13
atomic write operations, 198
backing up, 341–342
collections
accessing statistics for, 239–240
adding documents to, 217, 244–246, 307–309
atomically modifying documents in, 250–251
capped collections, 197–198, 330
collection_create_list_delete.js application example, 238–239
creating, 214–215, 237
definition of, 192
deleting, 215–216, 238
deleting documents in, 217–218, 255–256
displaying list of, 214
enabling sharding on, 340
finding documents in, 216, 305–307
getting documents from, 246–248
listing, 237
number of, 199
removing documents from, 314–317
removing single document from, 257–258
saving documents in, 252–253, 310–311
updating documents in, 218–219, 248–250, 309–310
upserting documents in, 253–254
connecting to
MongoClient object, 222, 223–226
Mongoose, 292–294
write concern, 222
data life cycles, 199
data model, planning, 194–195
data types, 193–194
data usability and performance, 200
databases
changing current, 211–212
connecting to using Mongoose, 292–294
copying, 213
creating, 212, 234
database change options, 241–242
db_create_list_delete.js sample application, 234–236
deleting, 212–213, 234
displaying list of, 211
listing, 233
repairing, 341
update operators, 242–244
definition of, 3, 12
distinct field values, finding, 276–277
documents
adding, 217, 244–246, 307–309
aggregating with Mongoose, 317–320
atomically modifying, 250–251
counting, 268–269
data denormalization, 196–197
data normalization, 195–196
embedded documents, 196–197
finding, 216, 265–268, 305–307
getting from collections, 246–248
growth of, 198
paths, 294
references, 195–196
removing, 217–218, 255–256, 257–258, 314–317
saving, 252–253, 310–311
structure of, 192–193
TTY (time-to-live), 199
updating, 218–219, 248–250, 309–314
upserting, 253–254
downloading, 202
indexing, 198–199, 327–330
installing, 201–202
MapReduce, 282
middleware functions, 322–324
Mongoose, 291–292
adding documents with, 307–309
aggregating documents with, 317–320
Document object, 304–305
finding documents with, 305–307
middleware functions, 322–324
models, compiling, 298
objects, 292
Query object, 298–305
removing multiple documents with, 315–317
removing single documents with, 314–315
schemas, 294–298
updating multiple documents with, 313–314
updating single documents with, 311–313
validation framework, 320–322
objects
Admin, 229
Collection, 229–232
Cursor, 232–233
Db, 227–228
MongoClient, 222, 223–226
options, 264–265
query, 262–264
replication, 199
applying, 330–332
replica sets, 333–334
strategy, 332–333
result sets, 270
aggregating, 282–289
grouping results, 277–282
limiting by size, 270–271
limiting fields returned in, 271–272
paging results, 273–274
sorting, 275–276
server status, displaying, 236–237
sharding, 199
definition of, 334
enabling on collections, 340
enabling on databases, 339–340
hash-based sharding, 337
partitioning methods, 337
range-based sharding, 337
shard keys, 336–337
shard tag ranges, 340–341
sharded MongoDB clusters, 338–339
sharding server types, 335
starting, 202–203
stopping, 203
user accounts
creating, 206–207
listing, 206–207
removing, 209
roles, 208
mongodb module. See MongoDB Node.js driver
MongoDB Node.js driver. See also Mongoose
adding to project, 221
collections
accessing statistics for, 239–240
collection_create_list_delete.js application example, 238–239
creating, 237
deleting, 238
listing, 237
database change options, 241–242
database update operators, 242–244
databases
creating, 234
db_create_list_delete.js sample application, 234–236
deleting, 234
listing, 233
distinct field values, finding, 276–277
documents
adding to collections, 244–246
atomically modifying, 250–251
counting, 268–269
deleting, 255–258
finding specific sets of, 265–268
getting from collections, 246–248
saving in collections, 252–253
updating in collections, 248–250
upserting, 253–254
objects
Admin, 229
Collection, 229–232
Cursor, 232–233
Db, 227–228
query objects, 262–265
result sets, 270
aggregating, 282–289
grouping results, 277–282
limiting by size, 270–271
limiting fields returned in, 271–272
paging results, 273–274
sorting, 275–276
mongod.exe, 202
mongodump command, 342
Mongoose, 291–292
connecting to MongoDB with, 292–294
Document object, 304–305
documents
adding, 307–309
aggregating, 317–320
finding, 305–307
removing multiple, 315–317
removing single, 314–315
saving, 310–311
updating multiple, 313–314
updating single, 311–313
models, compiling, 298
objects, 292
Query object, 298–299
operators, 302–304
query database operation, 299–302
schemas
defining, 294–295
implementing on database, 295–296
indexes, 295–296
methods, 295–296
paths, 294
required fields, forcing, 296
unique fields, 296
value types, 294–298
validation framework, 320–322
mongoose_aggregate.js listing, 319
mongoose_connect.js listing, 293
mongoose_create.js listing, 308–309
mongoose_find.js listing, 306–307
mongoose_middleware.js listing, 323–324
mongoose_remove_many.js listing, 316
mongoose_remove_one.js listing, 315
mongoose_save.js listing, 310
mongoose_update_many.js listing, 313–314
mongoose_update_one.js listing, 312
mongoose_validation.js listing, 321
(mouseover) event, 458
multi option, 242
multikey indexes, 328
multiple documents
removing with Mongoose, 315–317
updating with Mongoose, 313–314
multiplication (*) operator, 18

$multiply operator, 287
myCustomEvent, 459
N
\n (new line) escape code, 29
name directive, 47
naming conventions, 193, 404
nav.component.CSS listing, 494
nav.component.html listing, 493
nav.component.ts listing, 493
navigating routes, 488
navigation bar, router with, 492–497
app.component.CSS, 495
app.component.html, 494
app.component.ts, 494
app-routing.module.ts, 492–493
nav.component.CSS, 494
nav.component.html, 493
nav.component.ts, 493
page1.component.ts, 495
page2.component.html, 496
page2.component.ts, 495
page3.component.html, 496
page3.component.ts, 496
ne() method, 303
$ne operator, 263
nested components
building with dependency injection, 410–412
custom events in, 458–460
net module, 41. See also socket services
Server object, 144–147
Socket objects
creating, 140–141
data flow across, 144
events, 141–142
methods, 142–143
properties, 143–144
networkInterfaces() method, 182
new keyword, 27
new line escape code, 29
new option, 242
newSession event, 156
nextObject() method, 232
nextTick() function, 63–64, 161
nexttick.js listing, 63–64
ng eject command, 395
ng generate component command, 395
ng generate directive command, 395
ng generate enum command, 395
ng generate guard command, 395
ng generate interface command, 395
ng generate module command, 395
ng generate pipe command, 395
ng generate service command, 395
ng new command, 395
ng serve command, 395
ng-content directive, 452
ngFor directive, 442, 474, 479, 484, 513
ngForm directive, 445
ngIf directive, 442–443
ngModel directive, 445
NgModule, 397–398, 410
ngOnInit() method, 465, 482, 505, 531, 543
ngStyle directive, 445
ngSwitch directive, 442–443
ngSwitchCase directive, 442, 443
ngSwitchDefault directive, 442
nin() method, 303
$nin operator, 263
node file, 42
Node Package Manager. See NPM (Node Package Manager)
Node Package Registry
publishing modules to, 50–51
viewing, 43–44
Node Packaged Modules. See NPMs (Node Packaged Modules)
node_modules directory, 221
node_modules folder, 42
Node.js. See also modules (Node.js); MongoDB Node.js driver
advantages of, 2–3, 11–12
buffers, 74–75
compressing/decompressing, 91–92
concatenating, 81
copying, 79–80
creating, 75–76
determining length of, 78
encoding methods, 75
reading from, 77–78
slicing, 80
writing to, 76–77
child processes, 164
child forks, 171–173
ChildProcess object, 164–166
executable files, executing on another process, 168–169
processes, spawning, 169–171
system command, executing on another process, 166–168
companies using, 40
connecting to MongoDB from
MongoClient object, 223–226
write concern, 222
definition of, 2, 11, 39
development of, 39
directories
creating, 111–112
deleting, 111–112
renaming, 112
events, 55–56
blocking I/O, 57–58
callbacks, 67–70
conversation metaphor, 57–59
custom events, 64–65
event callbacks, 55–56
event listeners, 65–67
event queue, scheduling work on, 59–60
threaded models, 55–56
executables, verifying, 42–43
files
asynchronous file system calls, 95
deleting, 110
listing, 108–110
opening/closing, 96–97
reading, 102–106
renaming, 112
returning statistics about, 107–108
synchronous file system calls, 95
truncating, 110–111
verifying path of, 106–107
watching for file changes, 112–113
writing, 97–102
HTTP services, 115
ClientRequest object, 118–121
dynamic GET servers, 127–129
external sources, interacting with, 132–134
IncomingMessage object, 122–123
POST servers, 130–131
query string and form parameter processing, 117–118
Server object, 123–125
ServerResponse object, 121–122
static files, serving, 125–127
URLs (Uniform Resource Locators), 115–117
HTTPS services, 134–135
certificate signing request files, 135
HTTPS clients, 135–136
HTTPS servers, 137
private keys, 135
IDE (Integrated Development Environment), 43
install location, 42
installing, 42
JSON (JavaScript Object Notation), 73
converting JavaScript objects to, 74
converting to JavaScript objects, 74
manipulating documents from. See documents (MongoDB)
MongoClient object, 222
nextTick() function, 63–64
objects
checking type of, 184
converting to strings, 184–185
EventEmitter, 64–65
Stats, 107
process clusters, 174
events, 174
HTTP clusters, 176–179
methods, 175
properties, 175
Worker object, 175–176
processes, 159
executable files, executing on another process, 168–169
process execution, 161
process I/O pipes, 159–160
process signals, 160
returning information about, 161–164
spawning, 169–171
system command, executing on another process, 166–168
socket services, 139–140
net.Server object, 144–147
net.Socket object, 140–144
TCP socket clients, 147–150
TCP socket servers, 150–152
TLS socket clients, 153–154
TLS socket servers, 154–156
TLS/SSL, 152–153
streams, 81
compressing/decompressing, 92–93
Duplex streams, 86–88
piping, 89–90
Readable streams, 82–84, 89–90
Transform streams, 88–89
Writable streams, 84–86, 89–90
strings
converting objects to, 184–185
formatting, 183–184
timers, 60
dereferencing, 63
immediate timers, 62
interval timers, 61–62
timeout timers, 60–61
use cases for, 40
Zlib, 91
compressing/decompressing buffers, 91–92
compressing/decompressing streams, 92–93
Node.js modules. See modules (Node.js)
Node.js-to-Angular stack, 7
components of, 11–14
web development framework
backend services, 10
browsers, 8–10
diagram of, 7–8
users, 8
webservers, 10
nodelay option (server object), 224
--nohttpinterface parameter (mongod command), 203
--nojournal parameter (mongod command), 203
--noprealloc parameter (mongod command), 203
nor() method, 303
$nor operator, 263
normalizing data, 195–196
NoSQL, 191–192. See also MongoDB
not (!) operator, 19
not equal (!=) operator, 19
$not operator, 263
NPM (Node Package Manager), 44–45

npm command, 42, 44–45
npm adduser, 50
npm install, 46, 51
npm pack, 50
npm search, 45
npm install command, 475
NPMs (Node Packaged Modules). See modules (Node.js)
NPNProtocols option (tls.createServer), 155
null data type
JavaScript, 17
TypeScript, 384
number data type
JavaScript, 16
TypeScript, 383
number of MongoDB collections, 199
number pipe, 423
numberOfRetries option (options object), 265
O
Object Document Model (ODM). See Mongoose
object literals, 17
objects, 27
Admin, 229
Array, 32–33
adding items to, 34–35
combining, 33–34
converting into strings, 34
iterating through, 34
manipulating, 32–33
methods, 32–33
removing items from, 34–35
searching, 34
checking type of, 184
ChildProcess object, 164–166
ClientRequest, 118–121
Collection. See collections (MongoDB)
Connection, 292–293
converting JSON to, 74
converting to JSON, 74
converting to strings, 184–185
Cursor, 232–233
custom events, 64–65
custom-defined objects, 28
Db, 227–228
Document, 292, 304–305
event listeners
adding, 65
implementing, 65–67
removing, 65
EventEmitter, 64–65
IncomingMessage, 122–123
inheriting from, 185–186
Model, 292, 298
MongoClient, 222, 223–226
Observable
creating, 464–465
detecting data changes with, 465–468
importing, 510–512
options, 264–265, 275–276
properties, 27
prototyping object patterns, 29
Query, 262–264, 298–299
operators, 302–304
query database operation, 299–302
Request, 350–352
Response, 352
download responses, 359
files in, 356–358
headers, 352–353
JSON responses, 355–357
redirection, 359
rendered templates in, 363–364
sending, 353–355
status, 353
route, 487
Schema, 292, 294–295
Server, 123–125, 144–147
ServerResponse, 121–122
Socket
creating, 140–141
data flow across, 144
events, 141–142
methods, 142–143
properties, 143–144
Stats, 107
String, 29–31
combining, 31
converting arrays into, 34
escape codes, 29–30
manipulating, 29–31
methods, 30–31
replacing words in, 31
searching, 31
splitting, 32
syntax, 27–28
URL, 116–117
Worker, 175–176
Observable object
creating, 464–465
detecting data changes with, 465–468
importing, 510–512
observable.component.html listing, 467
observable.component.ts listing, 466–467
observables
definition of, 464
Observable object
creating, 464–465
detecting data changes with, 465–468
importing, 510–512
ODM (Object Document Model). See Mongoose
once() function, 65
onDrop() method, 536
on() function, 65, 126, 160
online event, 174
open() method, 56, 96–97, 227
opening files, 96–97
openSync() method, 96–97
operators
JavaScript, 17
arithmetic operators, 17–18
assignment operators, 18
comparison operators, 19–20
isinstanceof, 184
MongoDB
$add, 286
$addFields, 285
$addToSet, 243, 286
$all, 264
$and, 263
$avg, 286
$bit, 244
$bucket, 285
$bucketAuto, 285
$collStatus, 284
$concat, 287
$count, 285
$divide, 286
$each, 244
$elemMatch, 264, 266
$eq, 263
$exists, 263
$facet, 285
$first, 286
$geoNear, 285
$graphLookup, 285
$group, 284
$gt, 263
$gte, 263
$inc, 243, 263
$indexStats, 285
$last, 286
$limit, 284
$lookup, 285
$lt, 263
$lte, 263
$match, 283, 284
$max, 286
$min, 286
$mod, 263, 287
$multiply, 287
$ne, 263
$nin, 263
$nor, 263
$not, 263
$or, 263
$out, 285
$pop, 243
$project, 284
$pull, 244
$pullAll, 243
$push, 244, 286
$redact, 284
$regex, 264
$rename, 243
$replaceRoot, 285
$sample, 285
$set, 243
$setOnInsert, 243
$size, 264
$skip, 284
$slice, 244
$sort, 244, 284
$sortByCount, 285

$strcasecmp, 287
$substr, 287
$subtract, 287
$sum, 286
$toLower, 287
$toUpper, 287
$type, 263
$unset, 243
$unwind, 284
options object, 264–265, 275–276
or() method, 303
or (||) operator, 19
$or operator, 263
originalUrl property (Request object), 351
os module, 41, 181–183
os_info.js listing, 182–183
$out operator, 285
outer.component.ts listing, 411
outer.css listing, 411
outer.html listing, 411
outlet property (route object), 487
P
package.json file, 47–48, 50, 51
packages. See modules (Node.js)
page1.component.html listing, 499
page1.component.ts listing
router with navigation bar, 495
router with parameters, 499
page2.component.html listing
router with navigation bar, 496
router with parameters, 500
page2.component.ts listing
router with navigation bar, 495
router with parameters, 500
page3.component.html listing, 496
page3.component.ts listing, 496
paging results, 273–274
param() method, 349
parameters
MongoDB shell commands, 205
passing to callback functions, 67–68
route parameters, applying, 347
callback functions, 348–349
with defined parameters, 348
express_routes.js example, 349–350
with query strings, 347–348
with regex, 348
router with parameters, 497–501
app.component.ts, 498
app-routing.module.ts, 498
page1.component.html, 499
page1.component.ts, 499
page2.component.html, 500
page2.component.ts, 500
parent components, deleting data in, 461–464
parentheses ( ), 20, 24, 436, 457
parse() method, 74, 116, 117–118, 347
parseWeather() function, 132
parsing query strings, 117–118
partial option (options object), 265
partitioning methods, 337
passing data
with dependency injection, 412–413
parameters to functions, 67–68
variables to functions, 24–25
passphrase option
htp.createServer(), 136
https.request(), 136
tls.connect(), 154
tls.createServer(), 155
patch() method, 470
path module, 41
path property
ClientRequest object, 119
Request object, 351
route object, 487
URL object, 117
pathname property (URL object), 117
paths
assigning Express middleware to, 368
document paths, 294
verifying, 106–107
pause() method, 82, 142
pauseOnConnect option, 145
performance, MongoDB, 200
periodic work, scheduling
with immediate timers, 62
with interval timers, 61–62
Person interface, 385
person.component.ts listing, 413
PersonInterface, 386
pfx option
htp.createServer(), 136
https.request(), 136
tls.connect(), 154
tls.createServer(), 155
pid method, 162
pid property (ChildProcess object), 166
ping() method, 229
pipe class, 426
@pipe decorator, 426
pipe event, 84
pipe() method, 83, 89–90
pipe symbol (|), 426
pipes
built-in pipes
builtInPipes.component.ts, 425
table of, 422–424
custom pipes, 426–428
definition of, 422
piping Readable streams to Writable streams, 89–90
process I/O pipes, 159–160
PiService, 505–506
app.component.html, 506
app.component.ts, 505
pi.service.ts, 505
pi.service.ts listing, 505
platform() method, 162, 182
playLoop() function, 465
poolSize option (server object), 224
pop() method, 33
$pop operator, 243
--port parameter (mongod command), 202
port property
ClientRequest object, 119
URL object, 116
post() method, 470
post middleware functions, 322–324
POST requests
body data, handling, 371–372
definition of, 9
POST servers, 130–131
pre middleware functions, 322–324
preferGlobal directive, 47
preventDefault() method, 536
primary servers, 330
private keys, 135
process module, 41, 159
process execution, 161
process I/O pipes, 159–160
process signals, 160
returning information from, 161–164
process property (Worker object), 176
process signals, 160
process_info.js listing, 163–164
processes, 159
child processes, 159–160
ChildProcess object, 164–166
executable files, executing on another process, 168–169
processes, spawning, 169–173
system command, executing on another process, 166–168
process clusters, 174
events, 174
HTTP clusters, 176–179
methods, 175
properties, 175
Worker object, 175–176
process execution, 161
process I/O pipes, 159–160
process signals, 160
returning information about, 161–164
profile command, 204
project() method, 318
$project operator, 284
PromiseService, 515–516
promise.service.ts listing, 515
properties
binding, 431–433
ClientRequest object, 119
cluster module, 175
definition of, 27
Document object, 304–305
IncomingMessage object, 123
net.Socket object, 143–144
Request object, 351
URL object, 116–117
Worker object, 176
property binding, 431–433
property.component.ts listing, 432
protocol property
Request object, 351
URL object, 116

prototyping object patterns, 29
providers metadata option (NgModule), 397
publishing modules, 50–51
$pull operator, 244
$pullAll operator, 243
push() method, 33
$push operator, 244, 286
put() method, 470
PUT requests
response callback functions, 471
sending, 470–471
Q
queries
MongoDB query object, 262–264
Mongoose Query object, 298–299
operators, 302–304
query database operation, 299–302
options objects, 264–265
query strings, 41
applying route parameters with, 347–348
processing, 117–118
result sets, 270
aggregating, 282–289
grouping results, 277–282
limiting by size, 270–271
limiting fields returned in, 271–272
paging results, 273–274
sorting, 275–276
query middleware, 368, 369
query object (MongoDB), 262–264
Query object (Mongoose), 298–299
operators, 302–304
query database operation
options, 301–302

setting, 299–302
query property
Request object, 351
URL object, 117
query router servers, 335, 338–339
query strings, 41
applying route parameters with, 347–348
processing, 117–118
queryRemover() function, 380
--quiet parameter (mongod command), 202
R
\r (carriage return) escape code, 29
RandomImageService, 510–514
app.component.css, 513–514
app.component.html, 513
app.component.ts, 512–513
random-image.service.ts, 511–512
random-image.service.ts listing, 511–512
range-based sharding, 337
rated-item component, 543–544
rated-item.component.css, 545–546
rated-item.component.html, 545
rated-item.component.ts, 544–545
RatedItem interface, 541
ratings.service.ts listing, 541–542
Read Event Print Loop (REPL) module, 41, 190
read() method, 82, 104–105, 302, 318
read option (Schema object), 295
read role (MongoDB), 208
readable event, 82
Readable streams, 82–84, 89–90
readAnyDatabase role (MongoDB), 208
readConcern option (server object), 224
readdir() method, 109
readdirSync() method, 109
readFile() method, 102–103
reading files
asynchronous file reading, 104–105
simple file read, 102–103
streamed file reading, 105–106
synchronous file reading, 103–104
readInt8() method, 77
readInt16BE() method, 77
readInt16LE() method, 77
readline module, 41
readPreference option
options object, 265
server object, 224
readSync() method, 103–104
readwords.js listing, 52
readWrite role (MongoDB), 208
readWriteAnyDatabase role (MongoDB), 208
receiving cookies, 373–374
ReconnectInterval option (server object), 224
reconnectTries option (server object), 224
$redact operator, 284
redirect() method, 359
redirecting responses, 359
redirectTo property (route object), 487
ref() method, 63, 143, 146
references, MongoDB documents, 195–196
regenerate() method, 378
regex, applying route parameters with, 348
regex() method, 303
$regex operator, 264
Registry, Node Package Registry
publishing modules to, 50–51
viewing, 43–44
rejectUnauthorized option
htp.createServer(), 136
https.request(), 136
tls.connect(), 154
tls.createServer(), 155
release() method, 182
remoteAddress property (Socket object), 143
remoteFamily property (Socket object), 143
remotePort property (Socket object), 143
remove() method, 217, 230, 255, 301, 305, 314–316
removeHeader() method, 122
removeListener() function, 65
removeShardTag() method, 341
removeUser() method, 209, 228, 229
removing data. See deleting data
rename() method, 112, 230
$rename operator, 243
renameCollection() method, 228
renameSync() method, 112
renaming files/directories, 112
render() method, 363–364
rendered templates, sending, 363–364
rendering browser view, 9–10
--repair parameter (mongod command), 203
repairDatabase() method, 341
repairing databases, 341
REPL (Read Event Print Loop) module, 41, 190
replace() method, 30, 31
$replaceRoot operator, 285
replacing words in strings, 31
replica sets, deploying, 333–334
replication
applying, 330–332
replica sets, 333–334
strategy, 332–333
replications, 199
repository directive, 48
request event, 124
request() method, 118, 136
Request objects, 350–352
requestCert option (tls.createServer), 155
requests, 9
ClientRequest object, 118–121
configuration, 471
GET requests, 470–471
GetData, 55–56
GetFile, 55–56
POST, 371–372
PUT requests, 470–471
request event, 124
Request objects, 350–352
response callback functions, 471
require() method, 52
required fields, forcing, 296
requiredPaths() method, 296
resolve() method, 117, 186, 515
Resolve property (route object), 487
resolve4() method, 187
resolve6() method, 187
resolveCname() method, 187
resolveMx() method, 187
resolveNs() method, 187
resolveSrv() method, 187
resolveTxt() method, 187
resolving URLs (Uniform Resource Locators), 117
response callback functions (HTTP), 471
response event, 120
Response objects, 352
download responses, 359
headers, 352–353
JSON responses, 355–357
redirection, 359
sending, 353–355
sending files in, 356–358
sending rendered templates in, 363–364
status, 353
responses
IncomingMessage object, 122–123
response event, 120
Response objects, 352
download responses, 359
headers, 352–353
JSON responses, 355–357
redirection, 359
sending, 353–355
sending files in, 356–358
sending rendered templates in, 363–364
status, 353
ServerResponse object, 121–122
responsibilities, separation of, 393
result sets, 270
aggregating, 282–289
aggregate() method, 283
aggregation examples, 287–289
aggregation expression operators, 285–287
aggregation framework operators, 283–285
grouping results, 277–282
limiting by size, 270–271
limiting fields returned in, 271–272
paging results, 273–274
sorting, 275–276
resume() method, 82, 142
resumeSession event, 156
return statement, 25
return values, 25
reusable code, 14, 361
reverse() method, 33, 187
rewind() method, 233
rmdir() method, 111
rmdirSync() method, 111
roles (MongoDB), 208
roles command, 204
root component (custom directive), 453
CSS for, 454
HTML for, 453–454
route object, 487
route2.component.html listing, 491
route2.component.ts listing, 491
Router, importing, 488
Router module, importing, 492
router service, 470
ActivatedRoute, importing, 488
route navigation, 488
route object parameters, 487
Router, importing, 488
router with navigation bar, 492–497
app.component.CSS, 495
app.component.html, 494
app.component.ts, 494
app-routing.module.ts, 492–493
nav.component.CSS, 494
nav.component.html, 493
nav.component.ts, 493
page1.component.ts, 495
page2.component.html, 496
page2.component.ts, 495
page3.component.html, 496
page3.component.ts, 496
router with parameters, 497–501
app.component.ts, 498
app-routing.module.ts, 498
page1.component.html, 499
page1.component.ts, 499
page2.component.html, 500
page2.component.ts, 500
Routes array, defining, 486–487
routing module, including, 488
simple router implementation, 488–491
app.component.ts, 490
app.module.ts, 488–489
app-routing.module.ts, 489–490

home.component.html, 490
home.component.ts, 490
route2.component.html, 491
route2.component.ts, 491
router-outlet tag, 488
routes
applying parameters in, 347
callback functions, 348–349
with defined parameters, 348
express_routes.js example, 349–350
with query strings, 347–348
with regex, 348
assigning Express middleware to, 368
definition of, 345
implementing, 346
Routes array, defining, 486–487
routing module, including, 488
runGaurdsAndResolvers property (route object), 487
S
safe() method, 302
safe option (Schema object), 295
$sample operator, 285
save() method, 217, 218–219, 230, 252–253, 305, 308, 310, 378
saving documents, 252–253, 310–311
scalability
of MongoDB, 3, 13
of Node.js, 3, 12
scheduling work
nextTick() function, 63–64
timers, 60
dereferencing, 63
immediate timers, 62
interval timers, 61–62
timeout timers, 60–61
Schema object, 292, 294–295
schema property (Document object), 305
schemas
defining, 294–295
implementing on database, 295–296
indexes, adding, 295–296
methods, adding, 295–296
paths, 294
required fields, forcing, 296
Schema object, 292, 294–295
unique fields, 296
value types, 294–298
schemas metadata option (NgModule), 397
scope of variables, 26–27
scripts, 205–206. See also listings
scripts directive, 47
search() method, 30
search property (URL object), 117
searching
arrays, 34
collections, 216
documents, 216, 265–268
field values, 276–277
for NPMs (Node Packaged Modules), 45
strings, 31
secondary servers, 331
SecretAgent class, 387
secure property (Request object), 351
secureConnection event, 156
secureProtocol option
htp.createServer(), 136
https.request(), 136
tls.connect(), 154
tls.createServer(), 155
select() method, 301
selectCharacter() function, 461
selector option (components), 403
selectors, 404
selectUser() method, 482
send() method, 165, 176, 353–355
sendData event, 121
sendfile() method, 356–358
sending
cookies, 373–374
rendered templates, 363–364
requests, 470–471
responses
download responses, 359
JSON responses, 355–357
redirection, 359
send() method, 353–355
separation of responsibilities, 393
serializeFunctions option, 242
Server object, 123–125, 144–147
server status, displaying, 236–237
servername option (tls.connect), 154
ServerResponse object, 121–122
servers. See also mock web servers
arbiter, 331
config servers, 335, 338
Express server, starting, 345
HTTP (Hypertext Transfer Protocol)
dynamic GET servers, 127–129
external sources, interacting with, 132–134
POST servers, 130–131
Server object, 123–125
static files, serving, 125–127
HTTPS, 137
MongoDB server status, displaying, 236–237
primary servers, 330
query router servers, 335, 338–339
secondary servers, 331
shard servers, 335
TCP socket servers, 150–152
TLS socket servers, 154–156
server-side programs, 10
serverStatus() method, 229
services (Angular)
animate, 470
animation service, application using
animated.component.css, 529
animated.component.html, 529
animated.component.ts, 527–528
app.component.html, 526–527
app.component.ts, 526
app.module.ts, 525–526
folder structure, 525
constant data service, 505–506
app.component.html, 506
app.component.ts, 505
pi.service.ts, 505
data transform service, 506–510
app.component.css, 509
app.component.html, 508–509
app.component.ts, 507–508
area-calc.service.ts, 506–507
definition of, 393
forms, 470
http, 470
GET requests, sending, 470–471
JSON file implementation and access, 472–475
PUT requests, sending, 470–471
request configuration, 471
response callback functions, 471
simple mock server implementation, 475–481
simple mock server updates, 481–486
integrating into applications, 503–504
mock back-end service, 540–541
purpose of, 469
ratings service, 541–542
router, 470
ActivatedRoute, importing, 488
route navigation, 488
route object parameters, 487
Router, importing, 488
router with navigation bar, 492–497
router with parameters, 497–501
Routes array, 486–487
routing module, including, 488
simple router implementation, 488–491
service that returns a promise, 515–516
shared service, 516–523
app.component.html, 519
app.component.ts, 519
badguys.component.css, 522
badguys.component.html, 522
badguys.component.ts, 521
good-guys.component.css, 521
good-guys.component.html, 520
good-guys.component.ts, 520
shared.service.ts, 517–518
use cases for, 503–504
UserService, 483–484
variable data service, 510–514
app.component.css, 513–514
app.component.html, 513
app.component.ts, 512–513
random-image.service.ts, 511–512
session middleware, 368, 377–380
sessionIdContext option (tls.createServer), 155
sessions
implementing, 374–375
session authentication, 377–380
session middleware, 368
set() method, 304, 344, 352
$set operator, 243
setEncoding() method, 82, 142
setgid() method, 162
setgroups() method, 163
setHeader() method, 122
setImmediate() function, 62
setInterval() function, 61–62
setKeepAlive() method, 143
setMaxListeners() function, 65
setNoDelay() method, 121, 143
$setOnInsert operator, 243
setOptions() method, 301
setRating() method, 544
sets of documents, finding, 265–268
setSocketKeepAlive() method, 121
setTimeout() function, 60–61, 120, 122, 123, 143, 510
settings property (cluster module), 175
setuid() method, 162
setup event, 174
setupMaster() method, 175
shard keys, 336–337
shard tag ranges, 340–341
sharding, 199
definition of, 334
enabling on collections, 340
enabling on databases, 339–340
hash-based sharding, 337
partitioning methods, 337
range-based sharding, 337
shard keys, 336–337
shard tag ranges, 340–341
sharded MongoDB clusters, 338
adding shards to cluster, 339
config server database instances, 338
query router servers, 338–339
sharding server types, 335
shared service, 516–523
app.component.html, 519
app.component.ts, 519
badguys.component.css, 522
badguys.component.html, 522
badguys.component.ts, 521
good-guys.component.css, 521
good-guys.component.html, 520
good-guys.component.ts, 520
shared.service.ts, 517–518
SharedService. See shared service
shared.service.ts listing, 517–518
shell clients, accessing MongoDB from, 203–204
command parameters, 205
shell commands, 204
shell methods, 205
shell scripts, 205–206
shift() method, 33
show command, 204
SIGBREAK event, 160
SIGHUP event, 160
SIGINT event, 160
SIGKILL event, 160
sign class, 189
signals, process, 160
SIGPIPE event, 160
SIGSTOP event, 160
SIGTERM event, 160
SIGUSR1 event, 160
SIGWINCH event, 160
silent property (fork() function), 172
simple_interval.js listing, 61–62
simple_timer.js listing, 60–61
single documents
removing with Mongoose, 314–315
updating with Mongoose, 311–313
single field indexes, 328
size, limiting results by, 270–271
size() method, 304
$size operator, 264
size option (collections), 214
skip() method, 302, 318
$skip operator, 284
skip option (options object), 264
slice() method, 30, 33, 80
$slice operator, 244
slice:start:end pipe, 423
slicing buffers, 80
snapshot() method, 302
snapshot option (options object), 265
SNICallback option (tls.createServer), 155
socket event, 120
Socket objects
creating, 140–141
data flow across, 144
events, 141–142
methods, 142–143
properties, 143–144
socket property (IncomingMessage object), 123
socket services, 139–140
net.Server object, 144–147
net.Socket object
creating, 140–141
data flow across, 144
events, 141–142
methods, 142–143
properties, 143–144
TCP socket clients, 147–150
TCP socket servers, 150–152
TLS socket clients, 153–154
TLS socket servers, 154–156
socket_client.js listing, 148–149
socket_server.js listing, 151–152
socketPath property (ClientRequest object), 119
socketTimeOut option (server object), 224
soldierOfGondor() function, 388
sort() method, 33, 233, 302, 318
$sort operator, 244, 284
sort option (options object), 264, 275–276
$sortByCount operator, 285
sorting result sets, 275–276
spare property (indexes), 329
spawn() method, 169–171
spawning processes, 169–171
splice() method, 33
split() method, 30, 32
splitting strings, 32
SQL injection, 13
ssl option (server object), 224
stale property (Request object), 351
star rating application
app.component.css, 544
app.component.html, 543–544
app.component.ts, 543
app.module.ts, 540
folder structure, 539
mockbackend.service.ts, 540–541
rated-item.component.css, 545–546
rated-item.component.html, 545
rated-item.component.ts, 544–545
ratings.service.ts, 541–542
starting
Express server, 345
MongoDB, 202–203
query router servers, 338–339
statements. See also keywords
break, 23–24
catch, 35–36
continue, 23–24
finally, 36–37
if, 20
return, 25
switch, 20–21
throw, 36
try, 35–36
static files, serving, 125–127, 369–371
static middleware, 367, 369–371
./static/css/static.css listing, 370
statistics, accessing
collection statistics, 239–240
file statistics, 107–108
stats() method, 107–108, 232
Stats object, 107
statsSync() method, 107
status of Response objects, 353
statusCode event, 121, 123
stderr, 159, 166
stdin, 159, 166
stdio property (spawn() function), 170
stdout, 159, 166
stopping MongoDB, 203
strategy, replication, 332–333
$strcasecmp operator, 287
stream module. See streams
stream_duplex.js listing, 87
stream_piped.js listing, 90
stream_read.js listing, 83–84
stream_transform.js listing, 88–89
stream_write.js listing, 85
streams, 81
compressing/decompressing, 92–93
Duplex streams, 86–88
piping, 89–90
Readable streams, 82–84, 89–90
streamed file reading, 105–106
streamed file writing, 101–102
Transform streams, 88–89
Writable streams, 84–86, 89–90
strict option (Schema object), 295
strict routing setting (Express), 344
string decoder module, 41
String object, 29–31
combining, 31
converting arrays into, 34
escape codes, 29–30
manipulating, 29–31
methods, 30–31
replacing words in, 31
searching, 31
splitting, 32
stringify() method, 74, 118
strings, 16
converting objects to, 184–185
formatting, 183–184
JavaScript
combining, 31
converting arrays into, 34
escape codes, 29–30
manipulating, 29–31
methods, 30–31
replacing words in, 31
searching, 31
splitting, 32
query strings, 41
applying route parameters with, 347–348
processing, 117–118
TypeScript, 383
Stringy interface, 385
structural directives, 392, 442–445
definition of, 441
ngFor, 442
ngIf, 442–443
ngSwitch, 442–443
ngSwitchCase, 442, 443
ngSwitchDefault, 442
structural.component.ts, 443–444
structural.component.ts listing, 443–444
style binding, 435–436
style.component.ts listing, 435

styles keyword, 405
styles option (components), 404
stylesUrls option (components), 404
styleUrls keyword, 408
(submit) event, 457
subscribe() method, 464
substr() method, 31
$substr operator, 287
substrings, searching for, 31
$subtract operator, 287
subtraction (-) operator, 18
suicide property (Worker object), 176
$sum operator, 286
switch statements, 20–21
synchronous file reading, 103–104
synchronous file system calls, 95
synchronous file writing, 98–99
system command, executing on another process, 166–168
T
\t (tab) escape code, 30
tab escape code, 30
tags, router-outlet, 488
TCP (Transmission Control Protocol)
socket clients, 147–150
socket servers, 150–152
template engines, 360
defining, 360–361
locals, adding, 361
rendered templates, sending, 363–364
template creation, 361–363
template option (components), 404
templates
building, 404–405
creating, 361–363
external templates, 408–410
template engines, 360
defining, 360–361
locals, adding, 361
rendered templates, sending, 363–364
template creation, 361–363
templateUrl keyword, 408
templateUrl option (components), 404
text indexes, 328
then() method, 472–473
this keyword, 323
threaded event models, 55–56
throw statement, 36
throwing errors, 36
tilde (~), 404–405
time() function, 53
timeEnd() function, 54
timeout event, 141
timeout property
exec() method, 167
options object, 265
timeout timers, 60–61
timers, 41, 60
dereferencing, 63
immediate timers, 62
interval timers, 61–62
timeout timers, 60–61
time-to-live (TTY) values
documents, 199
indexes, 329
title method, 162
tls module, 41, 139–140, 152–153. See also socket services
TLS socket clients, 153–154
TLS socket servers, 154–156
tmpdir() method, 181
toArray() method, 232
toJSON() method, 305
$toLower operator, 287
toLowerCase() method, 31
toObject() method, 305
toPromise() method, 471, 472–473
toString() method, 33, 77, 305
totalmem() method, 182
touch() method, 378
$toUpper operator, 287
toUpperCase() method, 31
trace() function, 54
trailers property (IncomingMessage object), 123
transform() method, 88
Transform streams, 88–89
Transmission Control Protocol. See TCP (Transmission Control Protocol)
truncate() method, 110–111
truncateSync() method, 110–111
truncating files, 110–111
trust proxy setting (Express), 344
try statement, 35–36
TTY (time-to-live) values
documents, 199
indexes, 329
two-way binding, 439–440
twoWay.component.ts listing, 439–440
type() method, 181, 353
$type operator, 263
types. See data types
TypeScript, 383. See also listings
in Angular expressions, 419–422
classes
defining, 386
inheritance, 387
data types, 383–384
directives, 462–463
functions, 388–389
interfaces, 385–386
modules, 387–388

typescriptExpressions.component.ts listing, 421
U
ucs2 encoding, 75
uid property (spawn() function), 170
Uniform Resource Locators. See URLs (Uniform Resource Locators)
unique fields, 296
unique property (indexes), 329
unlink() method, 110
unlinkSync() method, 110
unpipe event, 85
unpipe() method, 83, 89–90
unref() method, 63, 143, 146
$unset operator, 243
unshift() method, 33
unwind() method, 318
$unwind operator, 284
update() method, 218–219, 231, 248–250, 301, 304, 311, 313
update operators, 242–244
update.component.CSS listing, 485–486
update.component.html listing, 484–485
update.component.ts listing, 482–483
updateRating() method, 541–542
updateUser() method, 482, 483
updating
documents
findAndRemove() method, 218–219
with Mongoose, 309–314
update() method, 248–250
mock web server items, 481–486
data.service.ts, 481–482
update.component.CSS, 485–486
update.component.html, 484–485
update.component.ts, 482–483
user.service.ts, 483–484
upgrade event, 120, 124
uppercase pipe, 423
upsert option, 242
upserting documents, 253–254
uptime() method, 162, 182
URL object, 116–117
url property (IncomingMessage object), 123
URLs (Uniform Resource Locators), 41
resolving, 117
structure of, 115–116
URL object, 116–117
use command, 204
use() method, 368
user accounts (MongoDB)
creating, 206–207
listing, 206–207
removing, 209
roles, 208
User Administrator accounts, 209–210
user_ejs.html listing, 362
userAdmin role (MongoDB), 208
userAdminAnyDatabase role (MongoDB), 208
users, 8, 10
users command, 204
UserService, 483–484
user.service.ts listing, 478–479, 483–484
utf8 encoding, 75
utf16le encoding, 75
util module, 183
format() method, 183–184
inherits() method, 185–186
inspect() method, 184–185
isinstanceof operator, 184
util_inherit.js listing, 185–186
utilities module, 41
UUID() method, 205

V
V8 module, 41, 190
validate() method, 305, 320
validation framework (Mongoose), 320–322
validationAction option (collections), 215
validationLevel option (collections), 215
validator option (collections), 214
valueOf() method, 31, 33
var keyword, 15–16
variable data service, 510–514
app.component.css, 513–514
app.component.html, 513
app.component.ts, 512–513
random-image.service.ts, 511–512
variables
defining, 15–16
local template variables, 361
passing to functions, 24–25
scope, 26–27
--verbose parameter (mongod command), 202
verify class, 189
verifying
file path, 106–107
Node.js executables, 42–43
version directive, 47
version method, 161
--version parameter (mongod command), 202
versions method, 161
view cache setting (Express), 344
view engine setting (Express), 344
viewProviders option (components), 404
views (browser), rendering, 9–10
views setting (Express), 344
Visual Studio Code, 394
VM module, 41
void data type, 384

W
w option, 224, 241
warn() function, 53
watchFile() method, 112–113
watching for file changes, 112–113
web applications. See components (Angular); services (Angular)
web browsers. See browsers
web development framework
backend services, 10
browsers, 8
browser view, rendering, 9–10
browser-to-webserver communication, 8–9
user interaction, 10
diagram of, 7–8
users, 8
webservers, 10
web servers. See mock web servers
webservers, 10
where() method, 302
while loops, 21
word_schema.js listing, 297
words, replacing in strings, 31
work, scheduling
adding to event queue, 59–60
nextTick() function, 63–64
timers, 60
dereferencing, 63
immediate timers, 62
interval timers, 61–62
timeout timers, 60–61
Worker object, 175–176
worker property (cluster module), 175
workers property (cluster module), 175
Writable streams, 84–86, 89–90
write concern, 222
write() method, 76, 84–85, 118, 120, 122, 128, 142, 151

write operations, 198
writeContinue() method, 122
writeFile() method, 98
writeInt8() method, 76
writeInt16BE() method, 76
writeInt16LE() method, 76
writeSync() method, 98–101
writing
to console, 53–54
files
asynchronous file writing, 99–101
simple file write, 98
streaming file writing, 101–102
synchronous file writing, 98–99
wtimeout option, 241
wTimeOut option (server object), 224
X-Y-Z
x509 public key, 135, 137
Zlib module, 41, 91
compressing/decompressing buffers, 91–92
compressing/decompressing streams, 92–93
zlib_buffers.js listing, 91–92
zlib_file.js listing, 93
zoom application
app.component.html, 531
app.component.ts, 530–531
folder structure, 530
zoomit.component.css, 532
zoomit.component.html, 532
zoomit.component.ts, 531–532
zoom directive, 449–452
ZoomDirective export class, 451
zoom.directive.ts listing, 450–451
zoomit component