CR3HTO HTB Io En
User Manual: CR3HTO-HTB
Open the PDF directly: View PDF ![]() .
.
Page Count: 21
IGFC-CR3H-HTB-0314
2
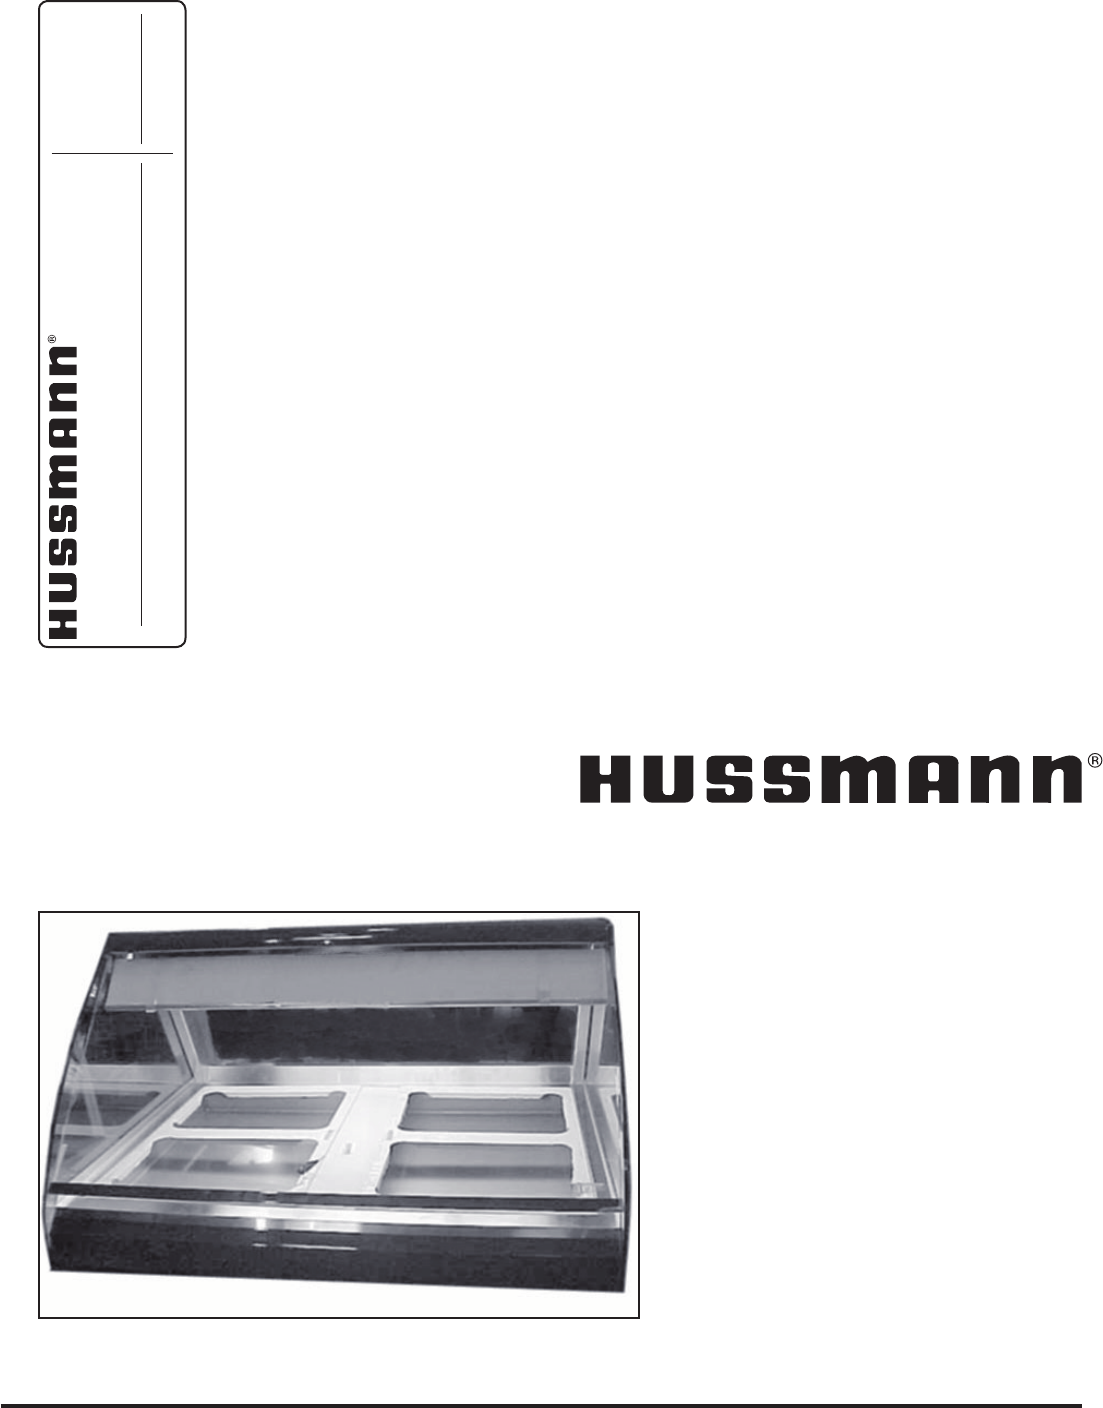
CR3HTO-HTB
HOT COUNTER-TOP SERVICE CASE
P/N IGFC-CR3H-HTB-0314
INSTALLATION & OPERATION GUIDE
/CHINO
CR3HTO-HTB
HOT TOP W/ SELF SERVICE HEAT OR REFRIG.
REV. 0314
Installation
& Operation
Manual

IGFC-CR3H-HTB-0314
2
/CHINO
A publication of HUSSMANN® Chino
13770 Ramona Avenue • Chino, California 91710
(909) 628-8942 FAX
(909) 590-4910
(800) 395-9229
Keep this booklet with the case at all times for future reference.
General Instructions
Table of Contents
General Instructions.....................................................2
Case Drawings ..............................................................3
NSF Installation Note ...................................................3
Installation .....................................................................4
Location ..................................................................................... 4
Uncrating the Stand ................................................................... 4
Exterior Loading ......................................................................... 4
Glass Adjustment ....................................................................... 4
Leveling ..................................................................................... 4
Installation .................................................................................. 4
Electrical........................................................................4
Wiring Color Code ..................................................................... 4
Electrical Circuit Identication .................................................... 4
Electrical Service Receptacles (When Applicable) .................... 4
Field Wiring and Serial Plate Amperage .................................... 5
Ballast Location ......................................................................... 5
Maintenance ..................................................................5
Cleaning ..................................................................................... 5
Antistatic Coatings ..................................................................... 5
Cleaning Glass and Mirrors ....................................................... 5
Glass .......................................................................................... 6
Lift-up Glass Maintenance ......................................................... 6
Periodic Inspection and Maintenance ........................................ 6
Replacing Fluorescent Lamps ................................................... 7
Tips and Troubleshooting .......................................................... 7
Stainless Steel Cleaning and Care ............................................ 7
User Information ...........................................................8
Food Handling and Hot Food Equipment .................................. 8
Important Operation Tips: .......................................................... 8
Case Startup .................................................................9
Controls ..................................................................................... 9
Temperature Adjustment ............................................................ 9
Timer Operation ......................................................................... 9
Electrical Wiring Diagrams ........................................10
Wiring Diagrams ......................................................... 11
Appendices .................................................................19
Appendix A. – Temperature Guidelines ................................... 19
Appendix B. – Application ........................................................ 19
Appendix C. – Field Recommendations .................................. 19
Appendix D. – Recommendations to user ............................... 19
This Booklet Contains Information on:
CR3HTO-HTB: Hot Countertop Service Case available in
3, 4, and 5 foot lengths.
Shipping Damage
All equipment should be thoroughly examined for shipping
damage before and during unloading.
This equipment has been carefully inspected at our factory
and the carrier has assumed responsibility for safe arrival.
If damaged, either apparent or concealed, claim must be
made to the carrier.
Apparent Loss or Damage
If there is an obvious loss or damage, it must be noted on
the freight bill or express receipt and signed by the carrier’s
agent; otherwise, carrier may refuse claim. The carrier will
supply necessary claim forms.
Concealed Loss or Damage
When loss or damage is not apparent until after equipment
is uncrated, a claim for concealed damage is made. Make
request in writing to carrier for inspection within 15 days,
and retain all packaging. The carrier will supply inspection
report and required claim forms.
Shortages
Check your shipment for any possible shortages of
material. If a shortage should exist and is found to be the
responsibility of Hussmann Chino, notify Hussmann Chino.
If such a shortage involves the carrier, notify the carrier
immediately, and request an inspection. Hussmann Chino
will acknowledge shortages within ten days from receipt
of equipment.
Hussmann Chino Product Control
The serial number and shipping date of all equipment
has been recorded in Hussmann’s les for warranty and
replacement part purposes. All correspondence pertaining
to warranty or parts ordering must include the serial number
of each piece of equipment involved, in order to provide
the customer with the correct parts.
This equipment is to be installed
to comply with the applicable
NEC, Federal, State , and Local
Plumbing and Construction
Code having jurisdiction.
AT TENTION
INSTALLER
Rev. 0314
3
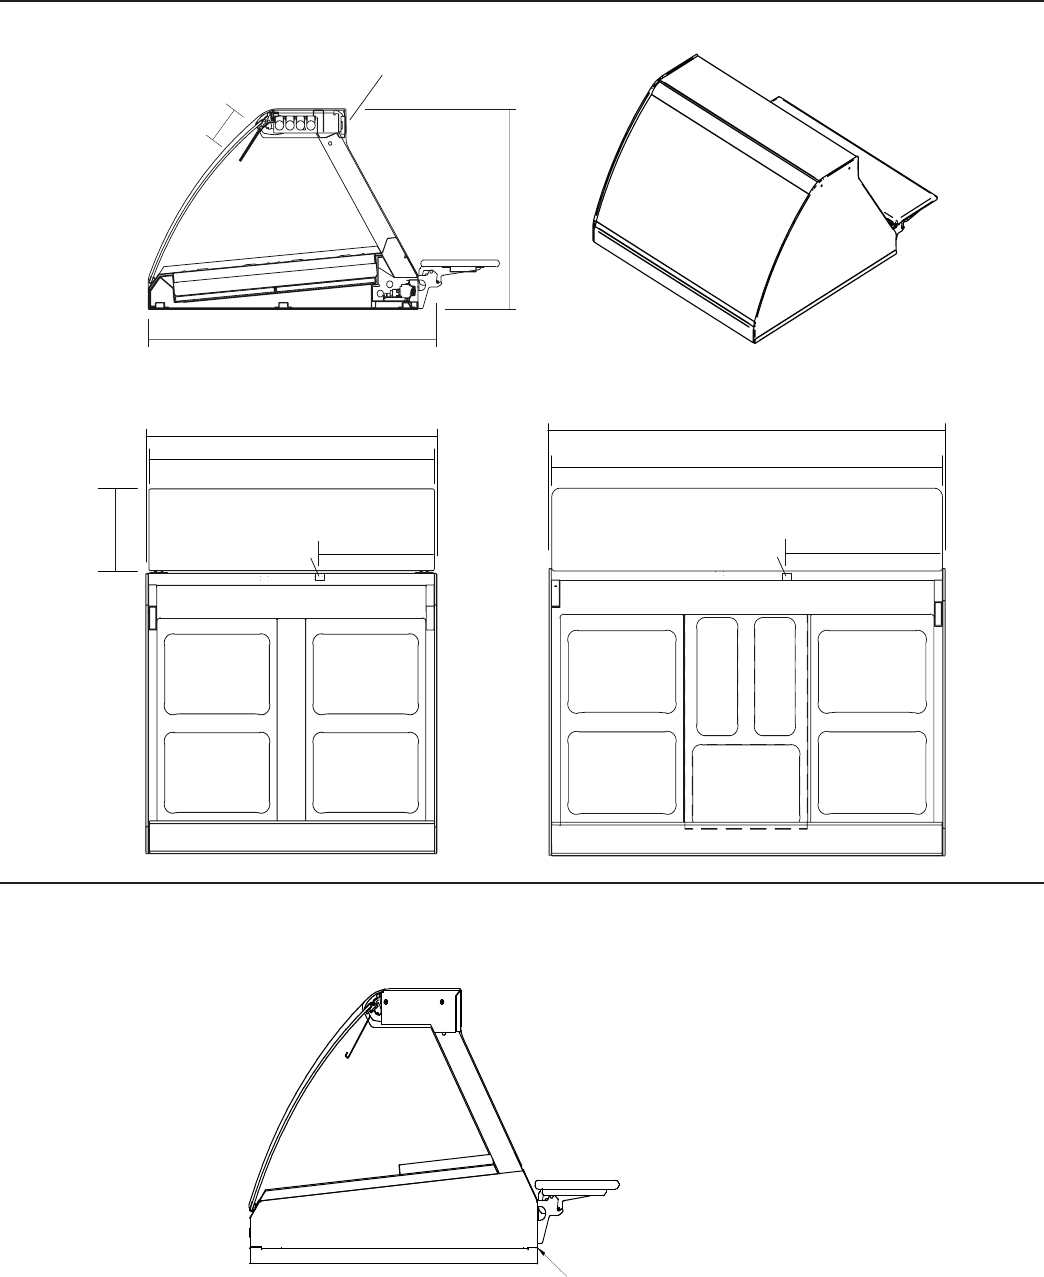
Case Drawings
34 1/4"
4
1
/
4
"
21
3
/
4
"
Timers
6' Electrical electrical cord
36
3
/
4
"
36"
9
1
/
2
"
14
1
/
2
"
48
3
/
4
"
48"
20
1
/
4
"
6' Electrical electrical cord
PER NSF INSTALLATION REQUIREMENT
SEAL AROUND CASE TO BASE PERIMETER
WITH NS
F APPROVED SEALANT
NSF Installation Note
IGFC-CR3H-HTB-0314
4
Location
The refrigerated merchandisers have been designed for
use only in air conditioned stores where temperature and
humidity are maintained at or below 75°F and 55% relative
humidity. DO NOT allow air conditioning, electric fans, open
doors or windows (etc.) to create air currents around the
merchandiser, as this will impair its correct operation.
Product temperature should always be maintained at a
constant and proper temperature. This means that from the
time the product is received, through storage, preparation
and display, the temperature of the product must be
controlled to maximize life of the product.
Uncrating the Stand
Place the xture as close to its permanent position as
possible. Remove the top of the crate. Detach the walls from
each other and remove from the skid. Unbolt the case from
the skid. The xture can now be lifted off the crate skid. Lift
only at base of stand!
Exterior Loading
These models have not been structurally designed to
support excessive external loading. Do not walk on their
tops; This could cause serious personal injury and damage
to the xture.
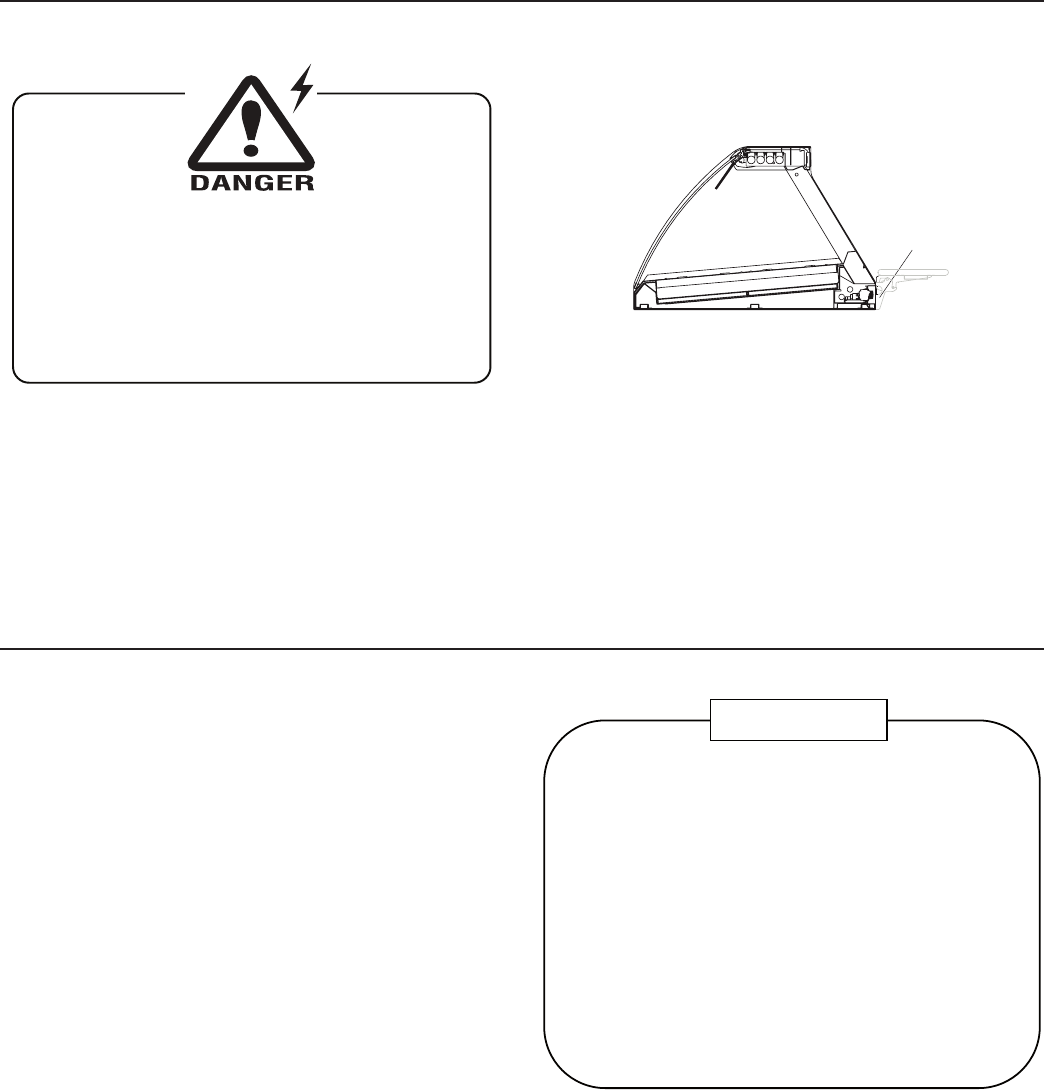
BEFORE SERVICING
ALWAYS DISCONNECT ELECTRICAL
POWER AT THE MAIN DISCONNECT
WHEN SERVICING OR REPLACING ANY
ELECTRICAL COMPONENT.
This includes (but not limited to) Fans, Heaters
Thermostats, and Lights.
Glass Adjustment
During shipment, the lubricant inside the cylinders may
have settled. This settling may cause excessive or uneven
tension on the glass - to the point of breakage. To avoid any
damage, please follow these three easy steps:
1. Slowly raise and lower each glass section 6 times to
a height of 6 inches.
2. Increase the height to 12 inches, and raise and lower
the glass 6 more times.
3. Finally raise the glass to its full extension, and lower.
These steps should release any settled lubricant within the
cylinders and prevent any stress on the front glass.
Leveling
IMPORTANT! IT IS IMPERATIVE THAT CASES AND
SUPPORTING COUNTERS BE LEVELED FROM
FRONT TO BACK AND SIDE TO SIDE PRIOR TO
JOINING. A LEVEL CASE IS NECESSARY TO INSURE
PROPER OPERATION, WATER DRAINAGE, AND
PLEXIGLASS ALIGNMENT.
NOTE: A. To avoid removing concrete ooring, begin lineup
leveling from the highest point of the store oor.
B. When wedges are involved in a lineup, set them rst.
Installation
All cases were tested at a level state before shipping.
When joining, use a carpenters level and shim enclosing
or supporting cabinet accordingly.
1. Make sure the cabinet you are installing the FC4H
CINNABON on is level.
2. Wire unit according to local codes.
Installation
Electrical
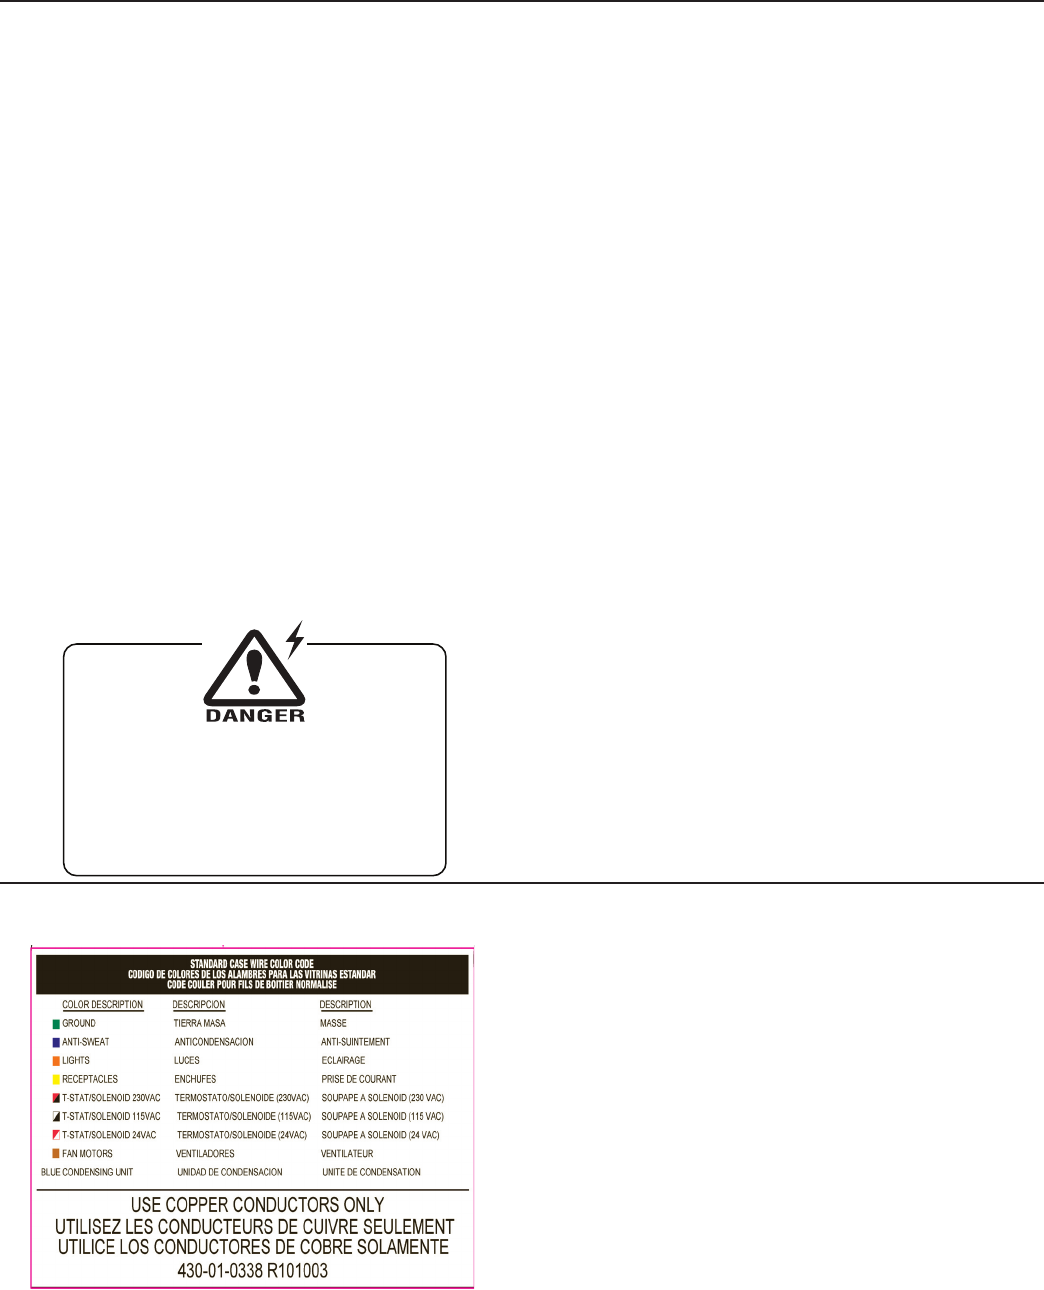
Wiring Color Code
CASE MUST BE GROUNDED
NOTE: Refer to label illustrated above that is afxed to case
to determine the actual conguration as checked in the
“TYPE INSTALLED” boxes.
Electrical Circuit Identication
Standard lighting for all models will be full length uorescent
lamps located within the case at the top.
The switch controlling the lights, the plug provided for
digital scale, and the thermometer are located at the rear
of the case mullion.
The receptacle that is provided on the exterior back of these
models is intended for computerized scales with a ve amp
maximum load, not for large motors or other high wattage
appliances. It should be wired to a dedicated circuit.
Electrical Service Receptacles (When Applicable)
The receptacles located on the exterior of the merchandiser
are intended for scales and lighted displays. They are not
intended nor suitable for large motors or other external
appliances.
Rev. 0314
5
BEFORE SERVICING
ALWAYS DISCONNECT ELECTRICAL
POWER AT THE MAIN DISCONNECT
WHEN SERVICING OR REPLACING ANY
ELECTRICAL COMPONENT.
This includes (but not limited to) Fans, Heaters
Thermostats, and Lights.
Field Wiring and Serial Plate Amperage
Field Wiring must be sized for component amperes printed
on the serial plate. Actual ampere draw may be less than
specied. Field wiring from the refrigeration control panel to
the merchandisers is required for refrigeration thermostats.
Case amperes are listed on the wiring diagram, but always
check the serial plate.
Ballast Location
Ballasts are located within the access panel that runs the
length of the rear of the case. Refer to diagram below.
Ballast
Maintenance
Plexiglass and Acrylic Care
Improper cleaning not only accelerates the cleaning cycle
but also degrades the quality of this surface. Normal daily
bufng motions can generate static cling attracting dust to
the surface. Incorrect cleaning agents or cleaning cloths
can cause micro scratching of the surface, causing the
plastic to haze over time.
Cleaning
Hussmann recommends using a clean damp chamois, or a
paper towel marketed as dust and abrasive free with 210®
Plastic Cleaner and Polish available by calling Sumner
Labs at 1-800-542-8656. Hard, rough cloths or paper towels
will scratch the acrylic and should not be used.
Antistatic Coatings
The 210® has proven to be very effective in not only
cleaning and polishing the Plexiglass surface, but also
providing anti-static and anti-fog capabilities. This product
also seals pores and provides a protective coating.
CLEANING PRECAUTIONS
When cleaning:
•Do not use high pressure water hoses
•Do not introduce water faster then waste outlet can drain
•NEVER INTRODUCE WATER ON SELF CONTAINED UNIT
WITH AN EVPORATOR PAN
•NEVER USE A CLEANING OR SANITIZING SOLUTION
THAT HAS AN OIL BASE (these will dissolve the butyl
sealants) or an AMMONA BASE (this will corrode the
copper components of the case)
•TO PRESERVE THE ATTRACTIVE FINISH:
•DO USE WATER AND A MILD DETERGENT FOR THE
EXTERIOR ONLY
•DO NOT USE A CHLORANITED CLAENER ON ANY
SURFACE
•DO NOT USE ABRASIVES OR STEEL WOOL SCOURING
PADS (these will mar the finish)
C
A
U
TI
O
N
Cleaning Glass and Mirrors
Only use a soft cloth and mild glass cleaner for cleaning
any glass or mirrored components. Be sure to rinse and/
or dry completely.
Never use hot water on cold glass surfaces! It may
shatter and cause serious injury! Allow glass surfaces
to warm.
Electrical (Cont'd)
IGFC-CR3H-HTB-0314
6
Maintenance (Cont'd)
Glass
The non-glare glass supplied in your case has a specialized
Anti-Reective coatings on the surface of the glass. These
coatings reduce the glare from lighting so that the products
in your display are more visible to your customers.
While the anti reective coatings are durable, they are
susceptible to scratching if abrasive materials or liquids are
used for cleaning. Once the glass surface is damaged, it is
IMPOSSIBLE to restore it to the original nish. The following
materials are recommended for routine cleaning:
Specialized cleaning cloths
• Scotch Brite @ High performance Cloth
manufactured by 3M and available in most grocery
stores. This cloth is washable and may be reused as
long as the cloth stays clean and free from solvents.
• Spontex® Microbre Cleaning Cloth - distributed
by Spontex® and available in most grocery stores
under the same name. This cloth is washable and
may be reused as long as the cloth stays clean and
free from solvents.
The cleaning cloths named above will usually remove dust,
grease, oil, and ngerprints without the need for cleaning
uids. A light spray of the cleaning uids listed above will
reduce the time required for cleaning. These materials have
been tested and proven to clean the non glare glass without
scratching or damaging the Antireective coating.
Cleaning solvents - for more difcult cleaning jobs, these
products are recommended for the cleaning of glass.
Care must be taken where they are used. The solvents
are tested for use on the outside of the glass. No solvent
should be applied directly to food product and food should
be protected from overspray unless they carry the
USDA-A1 ranking.
The food should be covered or the solution should be
sprayed on a cleaning cloth away from the case if it is to
be used inside the case with product present.
The following products will not damage the non-glare
coating on the glass:
• Windex®
• Glass-Plus®
• Exceed™ Multi Surface Glass Cleaner - from Kay
Chemical Company, Greensboro, NC
• Warm water
Under no circumstances should the following be used for
cleaning glass:
• Coarse paper towels
• Souring Pads or Powders
• Steel wool or steel ber materials
• Blades
• Acidic or highly Alkaline detergents
• Fluorine based detergents
Lift-up Glass Maintenance
At Installation and after replacement:
The top cylinders, which allow the raising and lowering of
the glass, have been carefully tested for proper tension.
However, during shipment, the lubricant inside may have
settled. This settling may cause excessive or uneven
tension on the glass - to the point of breakage.
Before opening the glass for the rst time and after installing
new cylinders, it is advisable to perform these three easy
steps before completely raising the front glass.
1. Slowly raise and lower each glass section 6 times,
to a height of 6”.
2. Increase the height to 12”, and raise and lower the
glass 6 more times.
3. Finally, raise the glass to it’s full extension. This
should release any settled lubricant in the cylinders,
and prevent any stress on the front glass.
After the case is brought to operating temperature the rst
time, recheck the Allen screws on the glass once the
case is in full operation and brought to temperature.
Temperature changes can affect the size and shape of the
materials involved, and can cause changes in the secure
t of the glass and the clamp.
Cylinders are a wear item.
They are designed:
• To support the glass when fully open
• to allow the glass to close slowly
Have your Service Contractor replace the
cylinders when required.
Glass is heavy and can cause bodily damage. Check
support cylinders for periodic maintenance
Periodic Inspection and Maintenance
Piston cylinders are a wear item. They are designed to
support the glass when fully open and to allow the glass
to close slowly. Glass is heavy and can cause bodily
damage.
Check support cylinders as a part of periodic maintenance.
Have your Service Contractor replace the cylinders if they
show signs of weakness or when otherwise indicated.

Rev. 0314
7
Maintenance (Cont'd)
Replacing Fluorescent Lamps
Fluorescent lamps are furnished with a shatterproof
protective coating. The same type of lamp with protective
coating must be used if replaced.
ENCAPSULITE
SHATTERPROOF COATING - SA 10645
Complies with FDA USDA
& OSHA Regulations
for replacement call:
1-800-395-9229
Turn switch off then on after replacing bulb
NSF
U
R
R
Tips and Troubleshooting
Before calling for service, check the following:
1. Check electrical power supply to the equipment for
connection.
2. Check xture loading. Overstocking case will affect
its proper operation.
3. If frost is collecting on xture and/or product, check
that no outside doors or windows are open allowing
moisture to enter store. These merchandisers were
designed for use in stores were temperature &
humidity does not exceed 75°F and 55% H.
Stainless Steel Cleaning and Care
There are three basic things, which can break down your
stainless steel’s passivity layer and allow corrosion.
1. Mechanical Abrasion
Mechanical Abrasion means those things that
will scratch the steels surface. Steel Pads, wire
Brushes, and Scrapers are prime examples.
2. Water
Water comes out of our tap in varying degrees of
hardness. Depending on what part of the country
you live in, you may have hard or soft water. Hard
water may leave spots. Also, when heated, hard
water leaves deposits behind that if left to sit, will
break down the passive layer and rust your stainless
steel. Other deposits from food preparation and
service must be properly removed.
3. Chlorides
Chlorides are found nearly everywhere. They
are in water, food and table salt. One of the worst
perpetrators of chlorides can come from household
and industrial cleaners.
Don’t Despair! Here are a few steps that can help prevent
stainless steel rust.
1. Use the Proper Tools
When cleaning your stainless steel products, take
care to use non-abrasive tools. Soft Clothes and
plastic scouring pads will NOT harm the steel’s
passive layer. Stainless steel pads can also be
used but the scrubbing motion must be in the same
direction of the manufacturer’s polishing marks.
2. Clean With the Polish Lines
Some stainless steels come with visible polishing
lines or “grain”. When visible lines are present, you
should ALWAYS scrub in a motion that is parallel to
them. When the grain cannot be seen, play it safe
and use a soft cloth or plastic scouring pad.
3. Use Alkaline, Alkaline Chlorinated or
Non-chloride Containing Cleaners
While many traditional cleaners are loaded
with chlorides, the industry is providing an ever
increasing choice of non-chloride cleaners. If you
are not sure of your cleaner’s chloride content
contact your cleaner supplier. If they tell you that
your present cleaner contains chlorides, ask for
an alternative. Also, avoid cleaners containing
quaternary salts as they also can attack stainless
steel & cause pitting and rusting.
4. Treat your Water
Though this is not always practical, softening hard
water can do much to reduce deposits. There
are certain lters that can be installed to remove
distasteful and corrosive elements. If you are not
sure of the proper water treatment, call a treatment
specialist.
5. Keep your Food Equipment Clean
Use alkaline or non-chlorinated cleaners at
recommended strength. Clean frequently to avoid
build-up of hard, stubborn stains. If you boil water
in your stainless steel equipment, remember the
single most likely cause of damage is chlorides in
the water. Heating cleaners that contain chlorides
has a similar effect.
6. RINSE, RINSE, RINSE
If chlorinated cleaners are used you must rinse,
rinse, rinse and wipe dry immediately. The sooner
you wipe off standing water, especially when sit
contains cleaning agents, the better. After wiping the
equipment down, allow it to air dry for the oxygen
helps maintain the stainless steel’s passivity lm.
7. Never Use Hydrochloric Acid (Muriatic Acid) on
Stainless Steel
8. Regularly Restore/Passivate Stainless Steel
IGFC-CR3H-HTB-0314
8
User Information
Food Handling and Hot Food Equipment
These hot tables are for short-term holding and display
of precooked hot foods. They are not intended to cool
or reheat food. The temperature of the food should be
approximately 160°F when rst put into the hot table.
These hot tables are best suited when used in a cafeteria
type application where the food is held and served rapidly,
within a few hours. Any attempt to use the hot table to display
large amounts of food for long periods of time will result in
dehydrated, overcooked and unsafe food. The quality of food
will progressively worsen as the length of time increases.
The deterioration of product quality is a function of time
and temperature. All products are affected even though in
a gravy or other liquid. They may appear to withstand the
temperature better than “dry” foods such as fried chicken
but this is not necessarily true. ALL foods will continue to be
affected by prolonged exposure to elevated temperatures.
The following guidelines are provided only as a general guide
for the use of this equipment. The local health agency for
your area can provide specic temperature requirements.
Critical attention must be given to the heat controls for
these hot tables. Both the upper and lower heat controls
must be adjusted to achieve proper food temperatures. Hot
foods should be held at a minimum temperature of at least
140°F (60°C) according to 1995 FDA Food Code. However,
increasing the temperature too high will also cause the
food to overcook, dry out, lose its avor, texture and color.
Food held for prolonged periods at high temperatures will
also lose some of their nutritional value.
Different foods will require different control settings. The type
of food, the quantities of food and length of time that it is to
remain in the hot table must be considered when establishing
control settings. Therefore, it must be the user’s responsibility
to establish the correct control settings to maintain the food
at the safest, tastiest and most saleable condition.
Food temperatures can be accurately determined only
through the use of food thermometers!
Important Operation Tips:
* Preheat case 30 minutes before loading product
using higher settings.
* Never place food directly into warmer. Always use
an inset and pan.
* Using thermometer, check product before loading
in case (135°F).
* Stir sauces often to keep foods uniformly heated
and prevent scorching.
* At start, set wells to “4”. After loading, recheck
temperature every 1/2 hour to see that unit is
operating properly. Adjust the thermostat (a higher
number for hotter and a lower number for cooler)
to maintain product temperature of 135°F+ (57°C.)
minimum. Be sure to test product temperature
with a thermometer frequently for good product
maintenance.
* Food must always be placed into a display pan over
the well, never directly into the well.
* Food should not be stacked above the top of the
pan. Food above the top of the pan will dry out
rapidly.
* If practical, the food should be covered during slack
sale periods to reduce dehydration.
* At end of the day, remove product and let case cool.
Then clean with soap and water (use oven cleaner
on the difcult spots). Polish and clean glass with a
good glass cleaner.
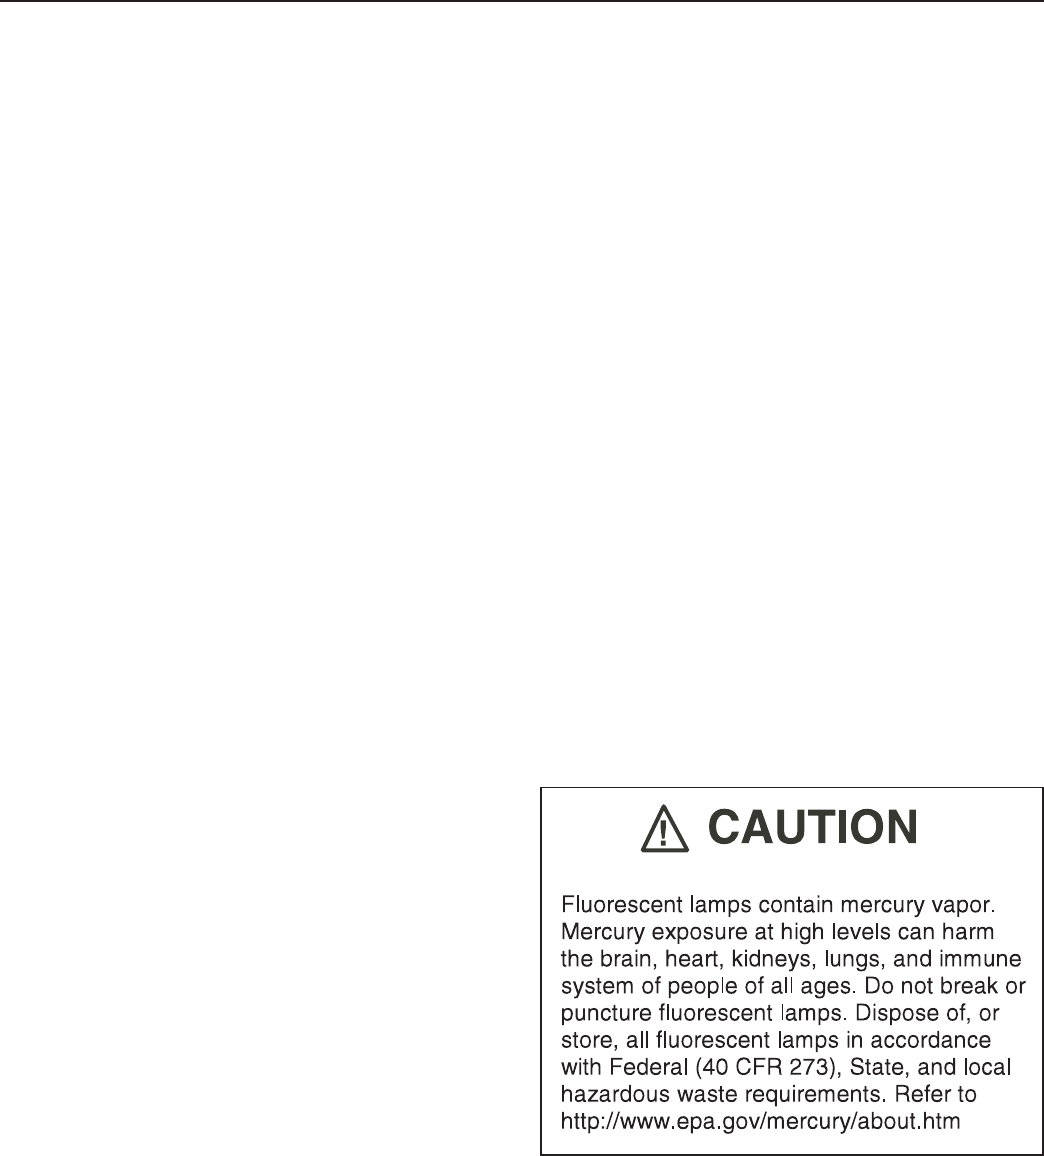
Fluorescent Lamp Disposal: The United States
Environmental Protection Agency has information
regarding environmentally-safe uorescent lamp
waste management programs.
On the Net: EPA Website:
http://www.epa.gov/osw/hazard/wastetypes/
universal/lamps/recycle.htm
Rev. 0314
9
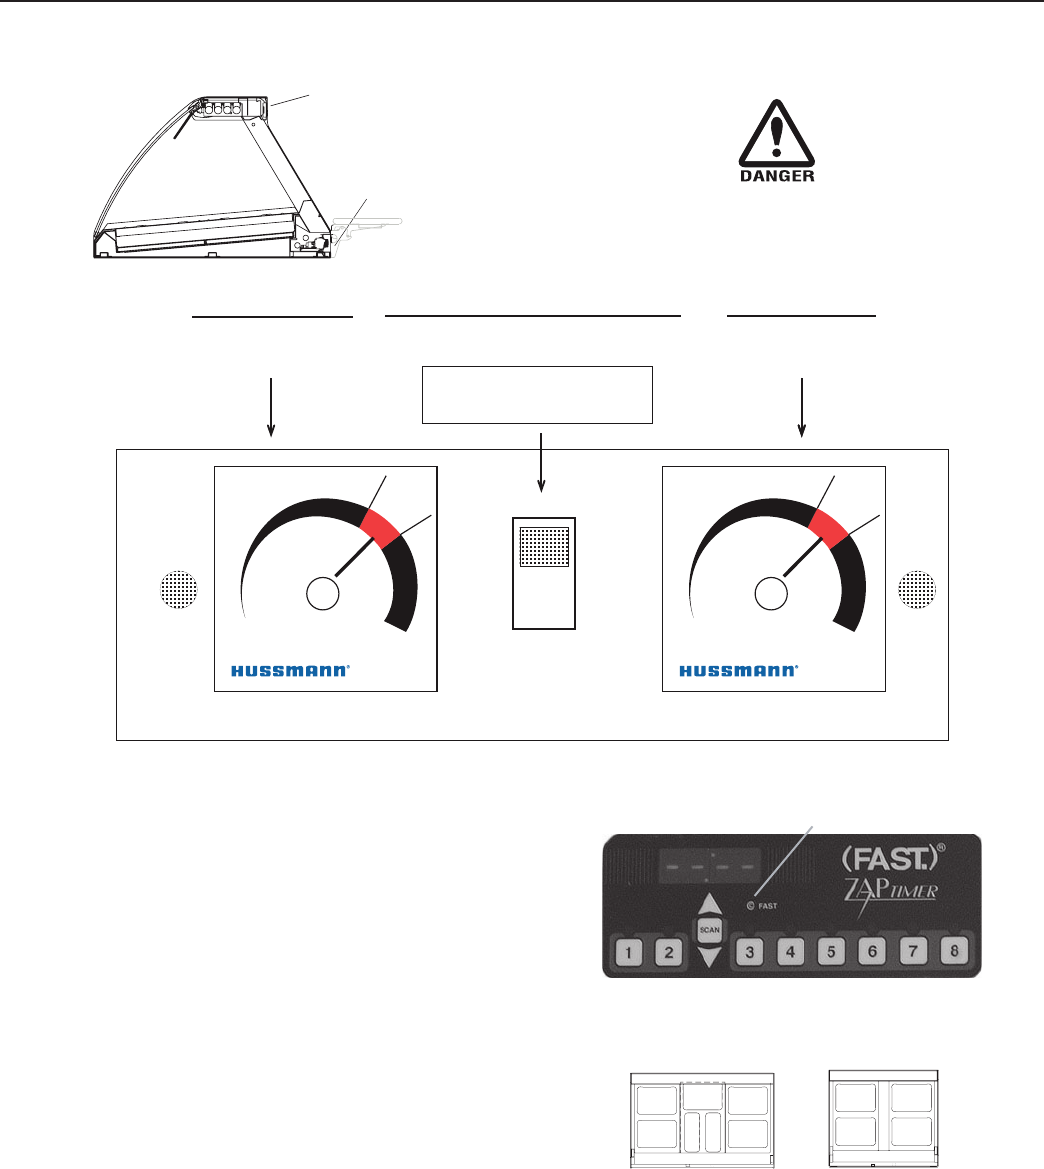
Case Startup
Controls
The controls are located at the rear of the case.
Control Panel
Locaton
Timer Panel
Locaton
Parts of the case exterior, shelves and
light bulbs become extremely hot when
in use.
USE EXTREME CAUTION!
FRONT GRIDDLE
INITIAL
SETTING
"4"
REAR GRIDDLE
INITIAL
SETTING
"4"
LIGHTS and GRIDDLE ON / OFF
TURN
SWITCHES
ON
Check to make sure all lights come on
at start-up.
If they do not contact your Service
Department
Control Panel on Rear of Case
Number of controls may vary.
POWER
ON / OFF
430-01-0365 9810
1
2
3
4
56
7
8
9
10
S
t
a
r
t
u
p
430-01-0365 9810
1
2
3
4
56
7
8
9
10
S
t
a
r
t
u
p
Temperature Adjustment
Allow case preheat for 45 minutes prior to loading.
NOTE: This equipment is not designed to heat-up or cook food.
Food should be slightly higher temperature than
desired holding temperature when put in display.
1. Measure PRODUCT temperature hourly by
inserting a food thermometer into the food. Proper
holding temperature is 135ºF.
2.
To change temperature, increase or decrease
Overhead Heat by one number at a time. Adjust
the griddle temperature as necessary. Measure
product temperature again in one hour. Re-adjust if
necessary.
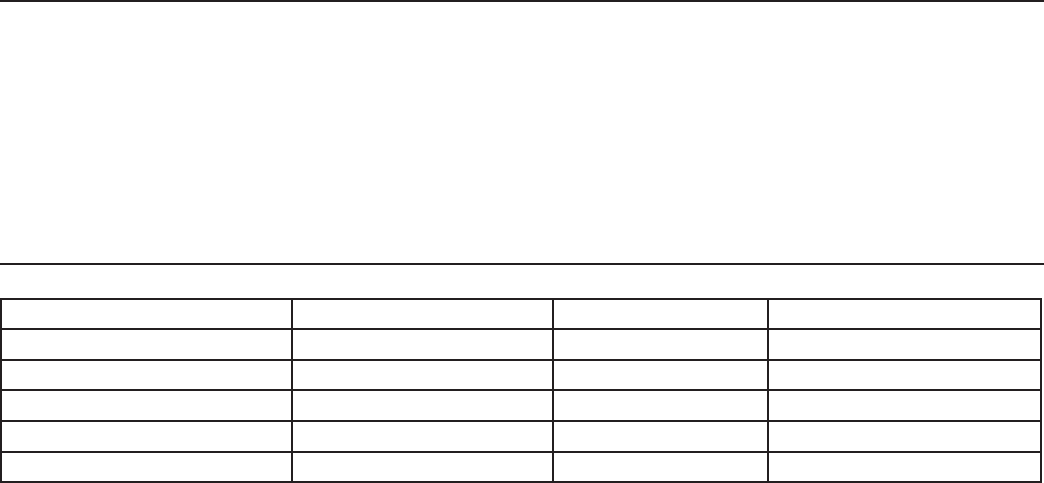
Timer Operation
Numbered product
keys above
correspond to
FC4H-Cinnabon
pans 1-7 below
(back of case)
1
2
6
7
3
5
41
2
3
4
Numbered product
keys above
correspond to
FC3H-Cinnabon
pans 1-4 below
(back of case)
©FAST key
NOTE: The colon will ash if the unit is in hours / minutes mode
and be on constant in minutes / seconds mode.
• To enter programming from ‘--:--’, press the
©(FAST.) key for three seconds. The display will
change to “PROG”.
IGFC-CR3H-HTB-0314
10
• To change a time, press the desired product / pan
number key. The display will change to the existing
set time. Press the up or down arrow keys to change
to the desired time. To change another key press
that product key and follow the same procedure.
• To exit programming mode, press the ©(FAST.) key
and the timer will return to the operating mode ‘--:--’.
Case Startup (Cont'd)
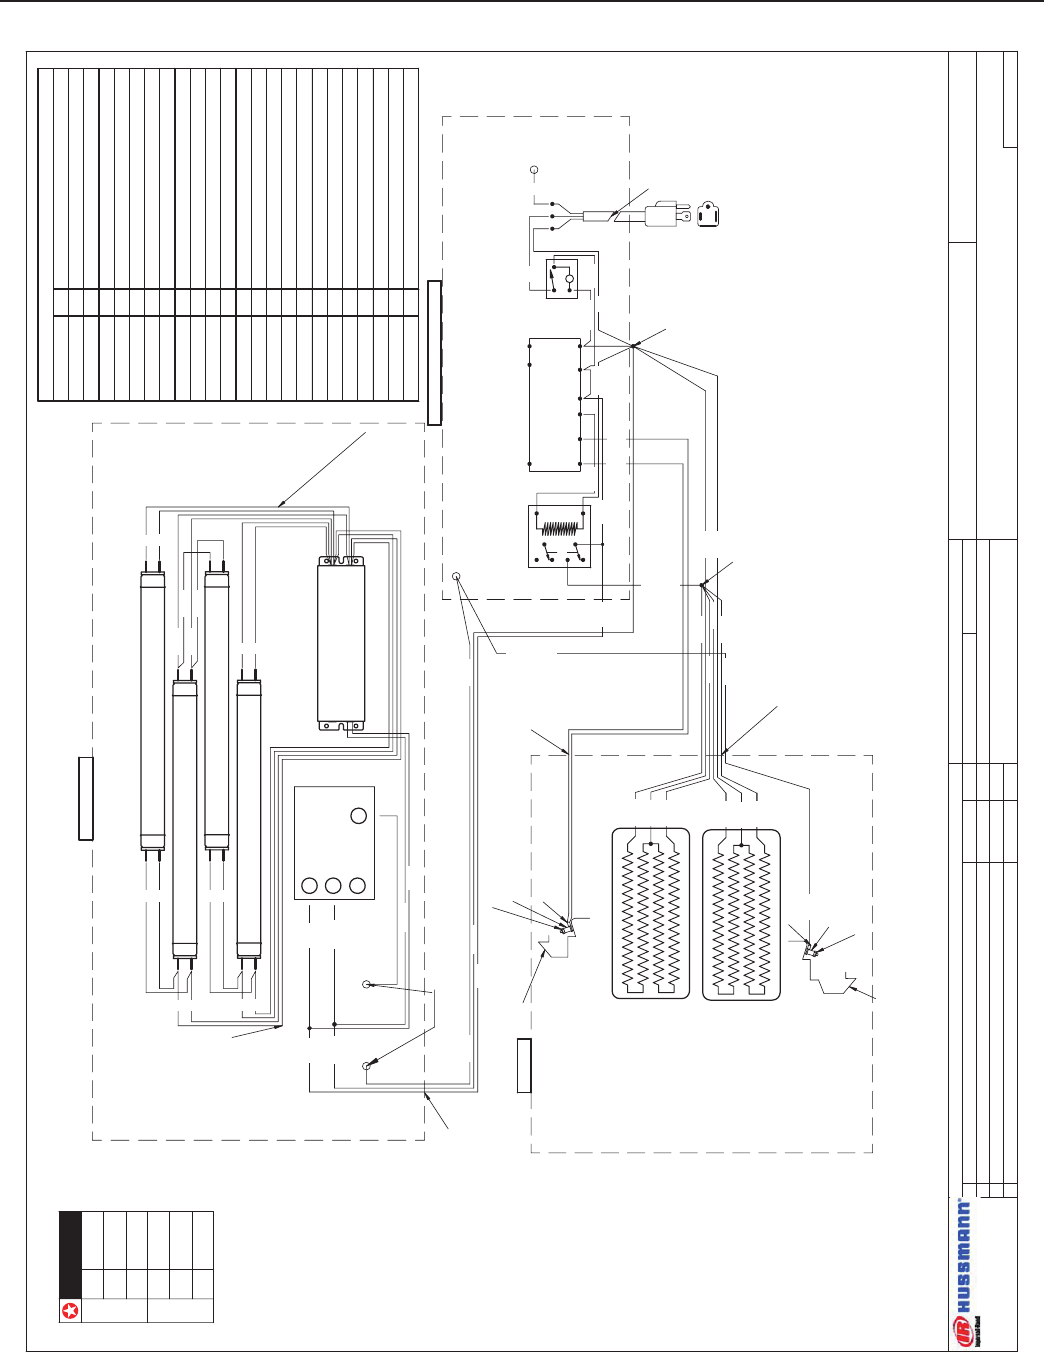
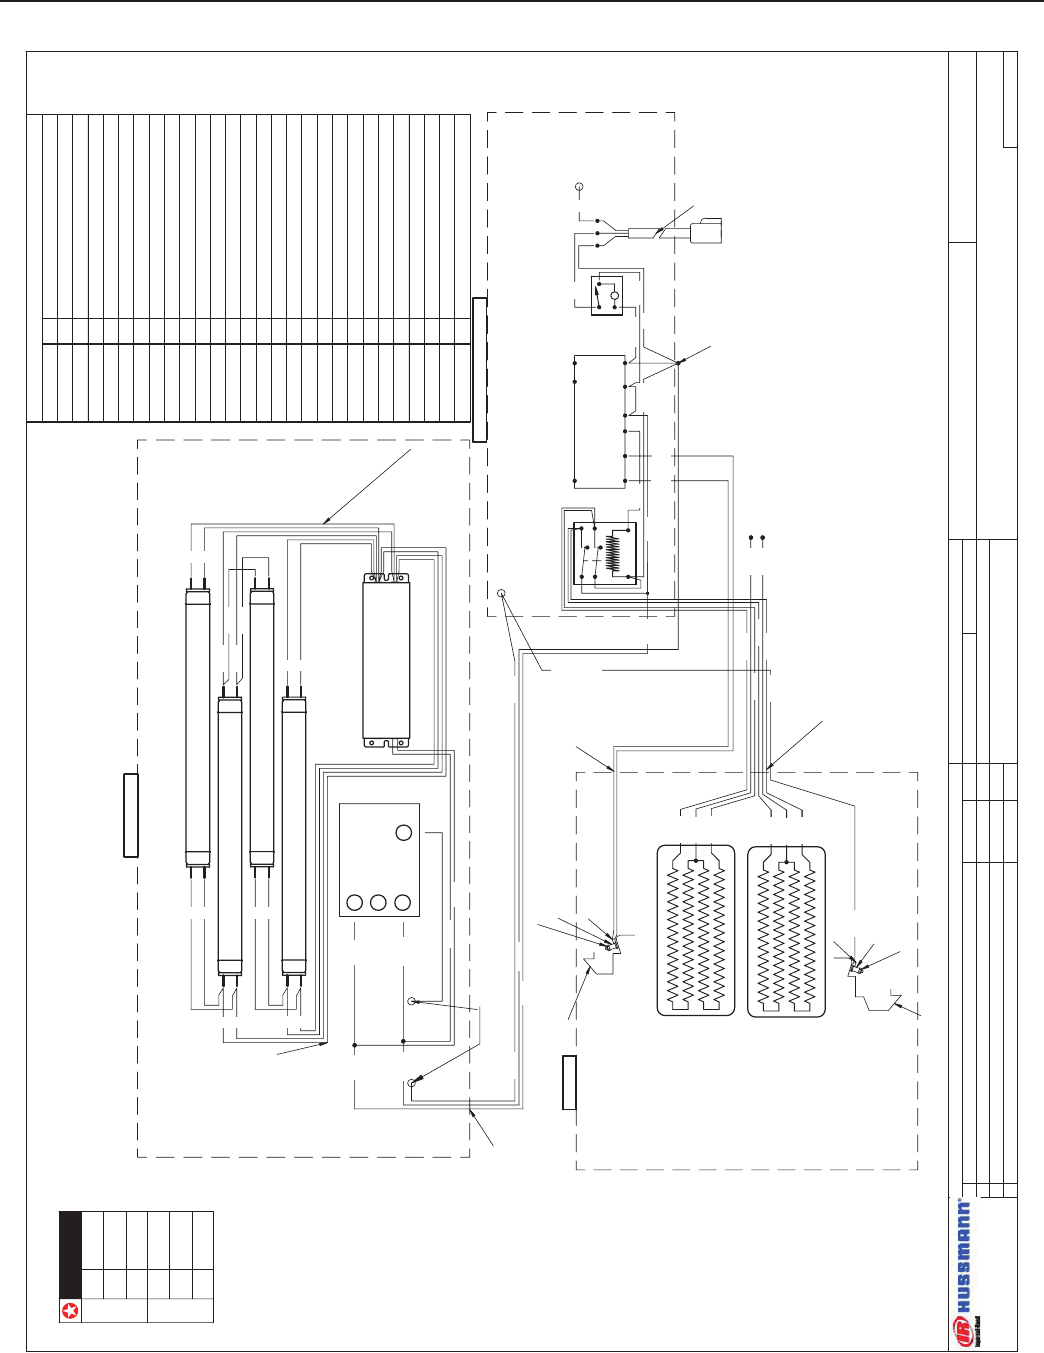
Electrical Wiring Diagrams
CR3HTO 115V 3' W5000312
HOT TOP SECTIONS ONLY! 115V 4' W5000313
Cinnabon HTB MOD2 115V 5' W8700002
208/240V 3' W8700003
208/240V 4' W8700004
208/240V 5' W8700005
• To cancel a product /pan cycle, press and hold that
product key.
• To view the remaining time on a product key, press
the SCAN key. Continue to press the SCAN key to
toggle through all active times.
For Service Call 1-800-243-9271
Rev. 0314
11
DATE:
PROJECT TITLE: DWG #:DRAWN BY:
PRODUCTION ORDER #: DRAWING TITLE:
DATE:
REVISIONS:
:YB DEKCEHC:NOITPIRCSED :# BY:
FILE LOCATION:
M Kimura
---
PAGE OF
HUSSMANN® CORPORATION
13770 RAMONA AVENUE
CHINO, CA.91710
(909) 590-4910 LIC.#: 644406
1
2
31 1
8/10/04
H:\WIRESCHEMATICS\NEW-WIRING
NON HAZ HOT CASE W5000312
CR3HTO-3-HTB MOD2 115V 60HZ
******
TEXT REVISION 11-11-04 JR
CORRECTED LAMP PART NUMBER 09/07/06 DQ
GRIDDLE HEATERS
THERMOFLEX™
(1) 313W @ 115 VAC
(1) 313W @ 230 VAC
225-01-6769T
LAMP SOCKET, VS-102590 E-27
(8) 125-01-3191
GRIDDLE HEATERS
THERMOFLEX™
(1) 313W @ 115 VAC
(1) 313W @ 230 VAC
225-01-6769T
F17T8-24" PN125-03-1071
125-01-0728
PCB ASSEMBLY TIMER
BALLAST 125-01-3273
MAGNETE
B432PUNVHP-A
F17T8-24" PN125-03-1071
F17T8-24" PN125-03-1071
F17T8-24" PN125-03-1071
2
1
34
POWER
RELAY MARS
90341
125-01-1343
NEUTRAL
GROUND
RED
RED
BLU/WHT
BLU
BLU
BLU/WHT
BLU/WHT
BLU/WHT
RED
YEL
YEL
GRN GROUND LUG
300-03-1262
TOP SECTION
USE 2 BUSHINGS
125-01-0539
USE 2 BUSHINGS
125-01-0539
B
USHING
125-01-0539
TY-RAP .25 MOUNT
QTY 6
00001296
SHINKO FCL-13A-R/M
225-01-4229
+B -
A B + - + -
EVENT
OUTPUT
VOLTAGE
POWER:
~ 115 VAC - 1Ø - 3W
125-01-0991
SWITCH
125-01-0311
L
STRAIN RELIEF
125-01-0063
BUSHING
125-01-0539
BUSHING
125-01-0539
SPACER
125-01-0734
SENSOR
225-01-4228
LOCK NUT
FRONT OF CASE
SPACER
125-01-0734
LUG BLUE
LOCK NUT
REAR OF CASE
WIRE NUT RED
125-01-0025
WIRE NUT RED
125-01-0025
Y
E
L
R
E
D
YEL
YEL
BRN
BRN
BRN
BRN
RED 18ga
WHT 18ga
WHT 18ga
WHT 18ga
WHT 18ga
RED 18ga
WHT 18ga
WHT 18ga
WHT 18ga
WHT 18ga
RED 18ga
RED 18ga
W
H
T
/
B
L
K
1
4
g
a
BLK 14ga
BLK 14ga
BLK 14ga
BLK
BLK 14ga WHT 14ga WHT
W
H
T
1
4
g
a
WHT 14ga
GRN
GRN 14ga
BLK 14ga
BLK 14ga
BLK 18ga
BLK 14ga
WHT 14gaWHT 14ga
WHT 18ga
WHT 14ga GRN 14gaGRN 14ga
GRN 14ga
G
R
N
1
4
g
a
BOTTOM ELECTRIC BOX
GRIDDLE
NOTE: CASE MUST
BE GROUNDED
LOADING
115 V
L1
L2
L3
L1
L2
L3
6.7
0.0
0.0
0.0
0.0
PN Qty Description
125-01-3273 1 BLST B432PUNVHP-A
125-01-0539 8 BUSHING HEYCO #2053 1/2"
125-01-0728 1 PCB 4 BUTTON ASS 216-70068-01
125-01-0729 1 PCB 4 BUTTON ASSY ADD ON
125-01-0731 1 OVERLAY 8 BUTTON ZAP TIMER
125-01-0734 9 FAST TIMER 1/4"L MTG.SPACER
125-01-0733 4 FAST TIMER 3/8"L MTG.SPACER
125-01-3191 8 (S)SCKT FLR T8/T12 VS-109346
00001296 9 TIES,TY38M,7-7/8",ZIP PUSH MT
300-03-1262 2 SCREW HEX 8/32X1/2" GRN
125-01-0736 1 FAST TIMER INSTRUC. STICKER
125-01-0311 1 (S)SWTCH TIPETE SGL POLE 3XC59
225-01-4228 1 SENSOR #6 X 60" LEAD #Q7105
225-01-4229 1 T-STAT ELECTRONIC HOT SHINKO
125-03-1071 4 (S)LMP FLR F17/T8/SPX30 24"
225-01-6799T 2 HTR FLEX-SLCN 30"X11"W/TRAY
125-01-0063 1 FITTING HEYCO #1184 SR 6W-1
125-01-1343 1 RELAY MARS 90341 - DPDT 115V
125-01-0025 1 WIRE NUT RED 452
125-01-0462A 11 PANDUIT DNFR 14-250FI BLU FLAG
125-01-0475 5 TERMNL 14-10-RC BLU EYE
300-03-0250 2 SCREW MAC F/H PHIL 8-32X1/2"
300-03-1318 2 WASHER STAR 10
Parts List
Wiring Diagrams
IGFC-CR3H-HTB-0314
12
DATE:
PROJECT TITLE: DWG #:DRAWN BY:
PRODUCTION ORDER #: DRAWING TITLE:
DATE:
REVISIONS:
:YB DEKCEHC:NOITPIRCSED :# BY:
FILE LOCATION:
RTwohy
---
PAGE OF
HUSSMANN® CORPORATION
13770 RAMONA AVENUE
CHINO, CA.91710
(909) 590-4910 LIC.#: 644406
1
2
31 1
5/28/04
H:\WIRESCHEMATICS\NEW-WIRING
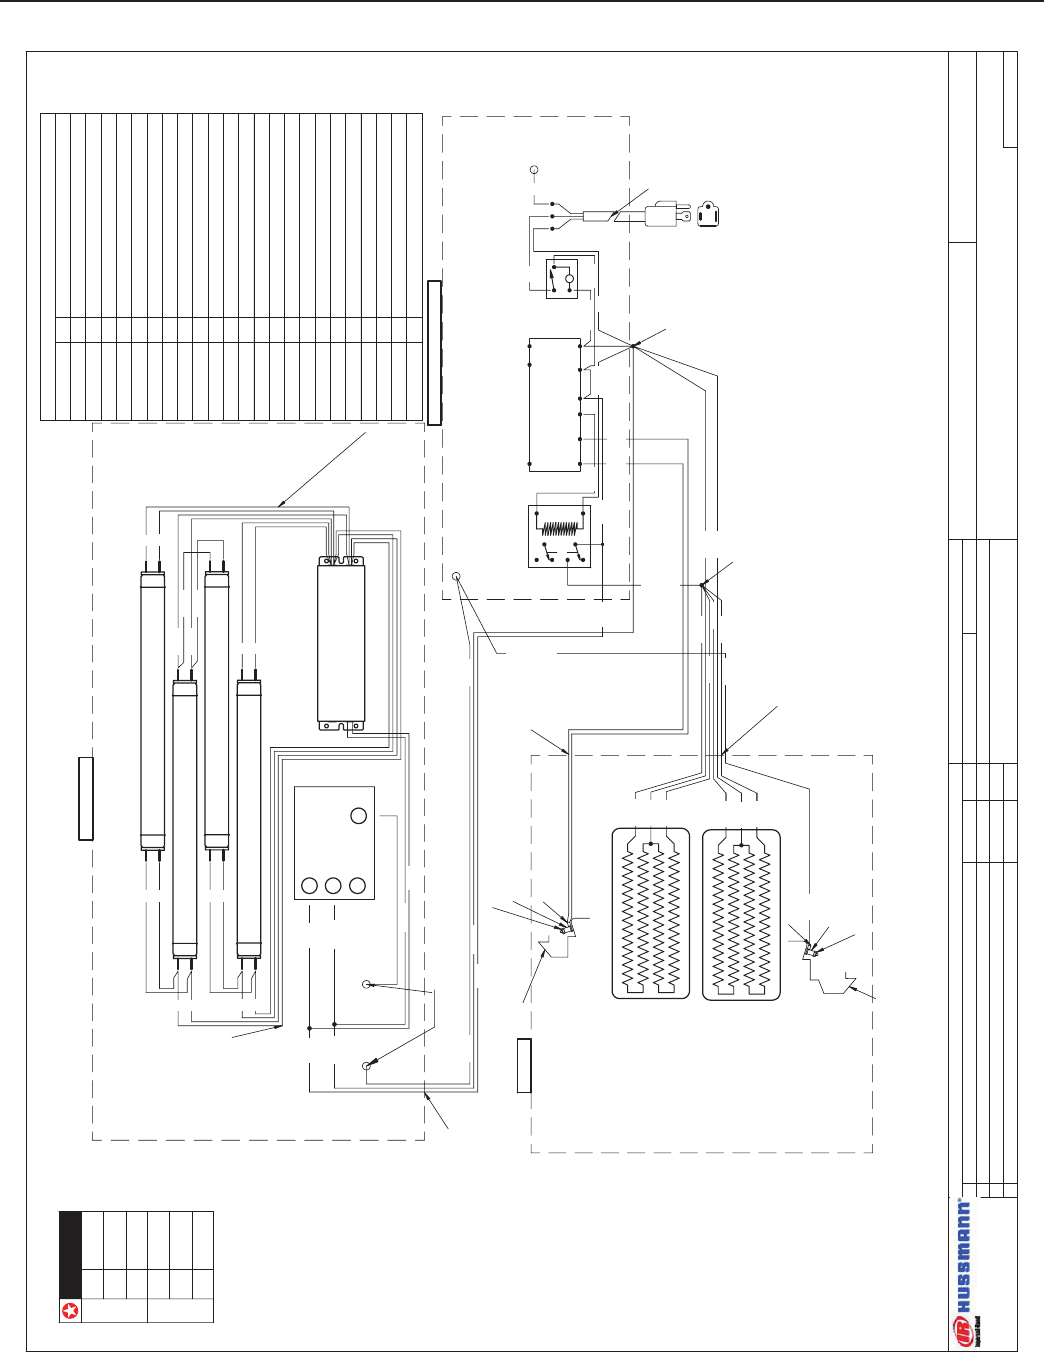
NON HAZ HOT CASE W5000313
CR3HTO-4-HTB MOD2 115V 60HZ
******
TEXT REVISION 11-11-04 JR
GRIDDLE HEATERS
THERMOFLEX™
(1) 400W @ 115 VAC
(1) 400W @ 230 VAC
225-01-6799T
LAMP SOCKET, VS-102590 E-27
(8) 125-01-3191
GRIDDLE HEATERS
THERMOFLEX™
(1) 400W @ 115 VAC
(1) 400W @ 230 VAC
225-01-6799T
F25T8-36" PN125-03-1072
125-01-0728
PCB ASSEMBLY TIMER
BALLAST 125-01-3273
MAGNETE
B432PUNVHP-A
F25T8-36" PN125-03-1072
F25T8-36" PN125-03-1072
F25T8-36" PN125-03-1072
2
1
34
POWER
RELAY MARS
90341
125-01-1343
NEUTRAL
GROUND
RED
RED
BLU/WHT
BLU
BLU
BLU/WHT
BLU/WHT
BLU/WHT
RED
YEL
YEL
GRN GROUND LUG
300-03-1262
TOP SECTION
USE 2 BUSHINGS
125-01-0539
USE 2 BUSHINGS
125-01-0539
B
USHING
125-01-0539
TY-RAP .25 MOUNT
QTY 6
00001296
SHINKO FCL-13A-R/M
225-01-4229
+B -
A B + - + -
EVENT
OUTPUT
VOLTAGE
POWER:
~ 115 VAC - 1Ø - 3W
125-01-0991
SWITCH
125-01-0311
L
STRAIN RELIEF
125-01-0063
BUSHING
125-01-0539
BUSHING
125-01-0539
SPACER
125-01-0734
SENSOR
225-01-4228
LOCK NUT
FRONT OF CASE
SPACER
125-01-0734
LUG BLUE
LOCK NUT
REAR OF CASE
WIRE NUT RED
125-01-0025
WIRE NUT RED
125-01-0025
Y
E
L
R
E
D
YEL
YEL
BRN
BRN
BRN
BRN
RED 18ga
WHT 18ga
WHT 18ga
WHT 18ga
WHT 18ga
RED 18ga
WHT 18ga
WHT 18ga
WHT 18ga
WHT 18ga
RED 18ga
RED 18ga
W
H
T
/
B
L
K
1
4
g
a
BLK 14ga
BLK 14ga
BLK 14ga
BLK
BLK 14ga WHT 14ga WHT
W
H
T
1
4
g
a
WHT 14ga
GRN
GRN 14ga
BLK 14ga
BLK 14ga
BLK 18ga
BLK 14ga
WHT 14gaWHT 14ga
WHT 18ga
WHT 14ga GRN 14gaGRN 14ga
GRN 14ga
G
R
N
1
4
g
a
BOTTOM ELECTRIC BOX
GRIDDLE
NOTE: CASE MUST
BE GROUNDED
LOADING
115 V
L1
L2
L3
L1
L2
L3
8.2
0.0
0.0
0.0
0.0
0.0
PN Qty Description
125-01-3273 1 BLST B432PUNVHP-A
125-01-0539 8 BUSHING HEYCO #2053 1/2"
125-01-0728 1 PCB 4 BUTTON ASS 216-70068-01
125-01-0729 1 PCB 4 BUTTON ASSY ADD ON
125-01-0731 1 OVERLAY 8 BUTTON ZAP TIMER
125-01-0734 9 FAST TIMER 1/4"L MTG.SPACER
125-01-0733 4 FAST TIMER 3/8"L MTG.SPACER
125-01-3191 8 (S)SCKT FLR T8/T12 VS-109346
00001296 9 TIES,TY38M,7-7/8",ZIP PUSH MT
300-03-1262 2 SCREW HEX 8/32X1/2" GRN
125-01-0736 1 FAST TIMER INSTRUC. STICKER
125-01-0311 1 (S)SWTCH TIPETE SGL POLE 3XC59
225-01-4228 1 SENSOR #6 X 60" LEAD #Q7105
225-01-4229 1 T-STAT ELECTRONIC HOT SHINKO
125-03-1072 4 (S)LMP FLR F25/T8/SPX30 36"
225-01-6799T 2 HTR FLEX-SLCN 42"X11"W/TRAY
125-01-0063 1 FITTING HEYCO #1184 SR 6W-1
125-01-1343 1 RELAY MARS 90341 - DPDT 115V
125-01-0025 1 WIRE NUT RED 452
125-01-0462A 11 PANDUIT DNFR 14-250FI BLU FLAG
125-01-0475 5 TERMNL 14-10-RC BLU EYE
300-03-0250 2 SCREW MAC F/H PHIL 8-32X1/2"
300-03-1318 2 WASHER STAR 10
Parts List
Wiring Diagrams (Cont'd)

Rev. 0314
13
DATE:
PROJECT TITLE: DWG #:DRAWN BY:
PRODUCTION ORDER #: DRAWING TITLE:
DATE:
REVISIONS:
:YB DEKCEHC:NOITPIRCSED :# BY:
FILE LOCATION:
MKimura
---
PAGE OF
HUSSMANN® CORPORATION
13770 RAMONA AVENUE
CHINO, CA.91710
(909) 590-4910 LIC.#: 644406
1
2
31 1
8/10/04
H:\WIRESCHEMATICS\NEW-WIRING
CINNABON HOT CASE W8700002
CR3HTO-5-HTB MOD2 115V 60HZ
******
TEXT REVISION 11-11-04 JR
GRIDDLE HEATERS
THERMOFLEX™
(1) 600W @ 115 VAC
(1) 600W @ 230 VAC
225-01-6690T
LAMP SOCKET, VS-102590 E-27
(8) 125-01-3191
GRIDDLE HEATERS
THERMOFLEX™
(1) 600W @ 115 VAC
(1) 600W @ 230 VAC
225-01-6690T
F25T8-36" PN125-03-1072
125-01-0728
PCB ASSEMBLY TIMER
BALLAST 125-01-3273
MAGNETE
B432PUNVHP-A
F25T8-36" PN125-03-1072
F25T8-36" PN125-03-1072
F25T8-36" PN125-03-1072
2
1
34
POWER
RELAY MARS
90341
125-01-1343
NEUTRAL
GROUND
RED
RED
BLU/WHT
BLU
BLU
BLU/WHT
BLU/WHT
BLU/WHT
RED
YEL
YEL
GRN GROUND LUG
300-03-1262
TOP SECTION
USE 2 BUSHINGS
125-01-0539
USE 2 BUSHINGS
125-01-0539
B
USHING
125-01-0539
TY-RAP .25 MOUNT
QTY 6
00001296
SHINKO FCL-13A-R/M
225-01-4229
+B -
A B + - + -
EVENT
OUTPUT
VOLTAGE
POWER:
~ 115 VAC - 1Ø - 3W
125-01-0991
SWITCH
125-01-0311
L
STRAIN RELIEF
125-01-0063
BUSHING
125-01-0539
BUSHING
125-01-0539
SPACER
125-01-0734
SENSOR
225-01-4228
LOCK NUT
FRONT OF CASE
SPACER
125-01-0734
LUG BLUE
LOCK NUT
REAR OF CASE
WIRE NUT RED
125-01-0025
WIRE NUT RED
125-01-0025
Y
E
L
R
E
D
YEL
YEL
BRN
BRN
BRN
BRN
RED 18ga
WHT 18ga
WHT 18ga
WHT 18ga
WHT 18ga
RED 18ga
WHT 18ga
WHT 18ga
WHT 18ga
WHT 18ga
RED 18ga
RED 18ga
W
H
T
/
B
L
K
1
4
g
a
BLK 14ga
BLK 14ga
BLK 14ga
BLK
BLK 14ga WHT 14ga WHT
W
H
T
1
4
g
a
WHT 14ga
GRN
GRN 14ga
BLK 14ga
BLK 14ga
BLK 18ga
BLK 14ga
WHT 14gaWHT 14ga
WHT 18ga
WHT 14ga GRN 14gaGRN 14ga
GRN 14ga
G
R
N
1
4
g
a
BOTTOM ELECTRIC BOX
GRIDDLE
NOTE: CASE MUST
BE GROUNDED
LOADING
115 V
L1
L2
L3
L1
L2
L3
11.7
0.0
0.0
0.0
0.0
0.0
PN Qty Description
125-01-3273 1 BLST B432PUNVHP-A
125-01-0539 8 BUSHING HEYCO #2053 1/2"
125-01-0728 1 PCB 4 BUTTON ASS 216-70068-01
125-01-0729 1 PCB 4 BUTTON ASSY ADD ON
125-01-0731 1 OVERLAY 8 BUTTON ZAP TIMER
125-01-0734 9 FAST TIMER 1/4"L MTG.SPACER
125-01-0733 4 FAST TIMER 3/8"L MTG.SPACER
125-01-3191 8 (S)SCKT FLR T8/T12 VS-109346
00001296 9 TIES,TY38M,7-7/8",ZIP PUSH MT
300-03-1262 2 SCREW HEX 8/32X1/2" GRN
125-01-0736 1 FAST TIMER INSTRUC. STICKER
125-01-0311 1 (S)SWTCH TIPETE SGL POLE 3XC59
225-01-4228 1 SENSOR #6 X 60" LEAD #Q7105
225-01-4229 1 T-STAT ELECTRONIC HOT SHINKO
125-03-1072 4 (S)LMP FLR F25/T8/SPX30 36"
225-01-6690T 2 HTR FLEX-SLCN 57"X11"W/TRAY
125-01-0063 1 FITTING HEYCO #1184 SR 6W-1
125-01-1343 1 RELAY MARS 90341 - DPDT 115V
125-01-0025 1 WIRE NUT RED 452
125-01-0462A 11 PANDUIT DNFR 14-250FI BLU FLAG
125-01-0475 5 TERMNL 14-10-RC BLU EYE
300-03-0250 2 SCREW MAC F/H PHIL 8-32X1/2"
300-03-1318 2 WASHER STAR 10
Parts List
Wiring Diagrams (Cont'd)
IGFC-CR3H-HTB-0314
14
DATE:
PROJECT TITLE: DWG #:DRAWN BY:
PRODUCTION ORDER #: DRAWING TITLE:
DATE:
REVISIONS:
:YB DEKCEHC:NOITPIRCSED :# BY:
FILE LOCATION:
D.QUAN
---
PAGE OF
HUSSMANN® CORPORATION
13770 RAMONA AVENUE
CHINO, CA.91710
(909) 590-4910 LIC.#: 644406
1
2
31 1
3/10/05
T:\WIRESCHEMATICS\NEW-WIRING
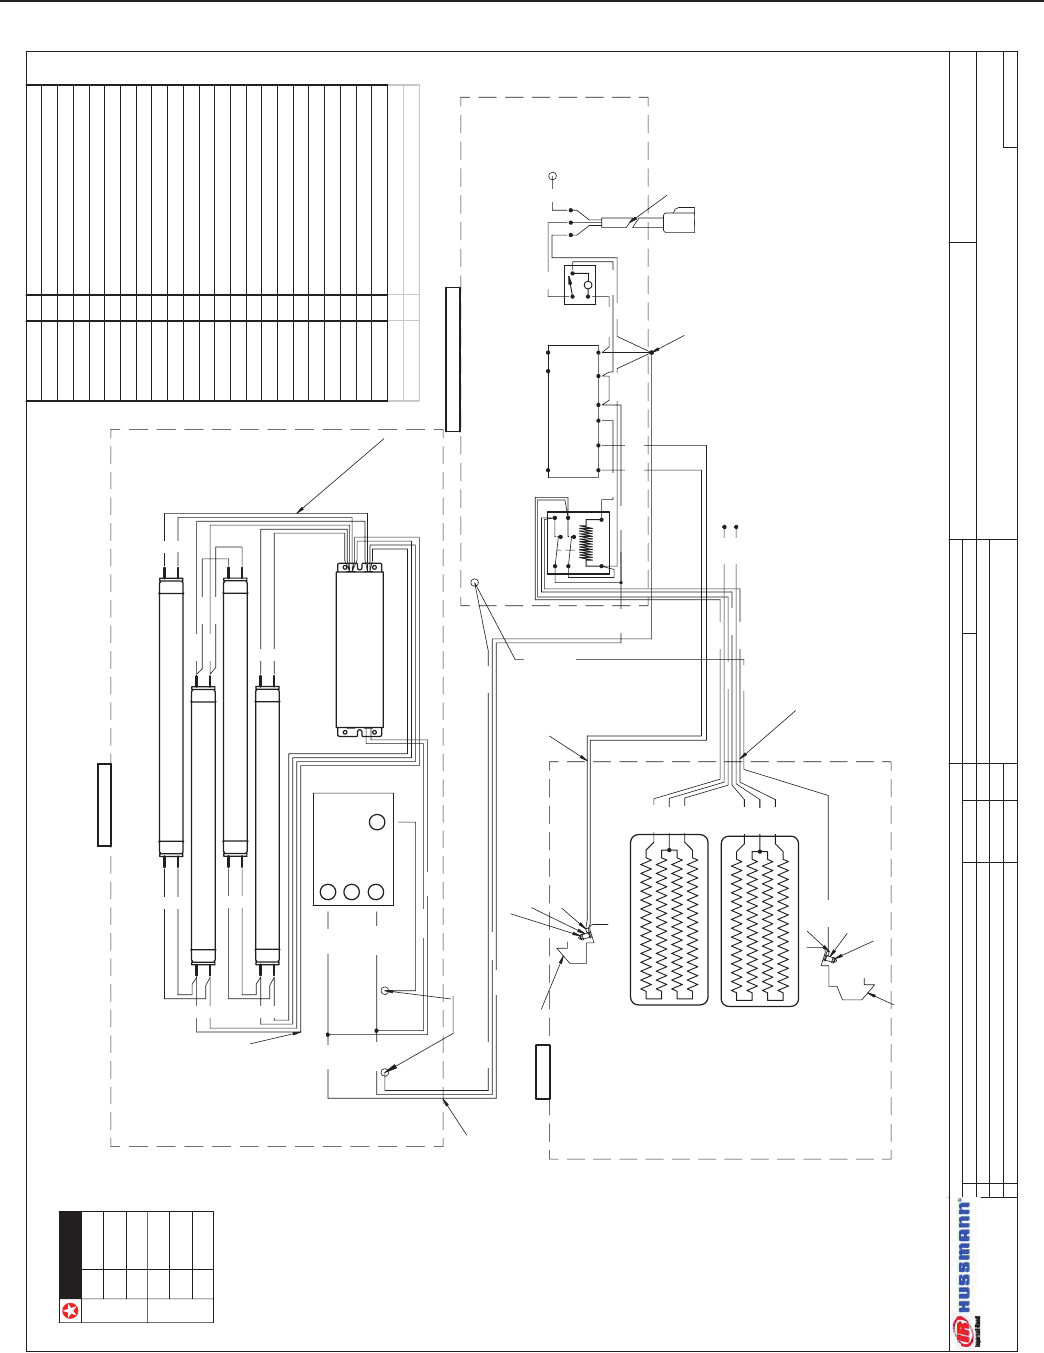
CINNABON HOT CASE W8700003
CR3HTO-3-HTB MOD2 208/240V 50/60HZ
******
GRIDDLE HEATERS
THERMOFLEX™
(1) 400W @ 115 VAC
(1) 400W @ 230 VAC
225-01-6799T
LAMP SOCKET, VS-102590 E-27
(8) 125-01-3191
GRIDDLE HEATERS
THERMOFLEX™
(1) 400W @ 115 VAC
(1) 400W @ 230 VAC
225-01-6799T
125-01-0728
PCB ASSEMBLY TIMER
BALLAST 125-01-3273
MAGNETE
B432PUNVHP-A
2
1
34
POWER
RELAY MARS
90341
125-01-1342
NEUTRAL
GROUND
RED
RED
BLU/WHT
BLU
BLU
BLU/WHT
BLU/WHT
BLU/WHT
RED
YEL
YEL
GRN GROUND LUG
300-03-1262
TOP SECTION
USE 2 BUSHINGS
125-01-0539
USE 2 BUSHINGS
125-01-0539
BUSHING
125-01-0539
TY-RAP .25 MOUNT
QTY 6
00001296
SHINKO FCL-13A-R/M
225-01-4229
+B -
A B + - + -
EVENT
OUTPUT
VOLTAGE
POWER:
~ 208-240 VAC - 1Ø - 3W
SWITCH
125-01-0311
L
STRAIN RELIEF
125-01-0063
BUSHING
125-01-0539
BUSHING
125-01-0539
SPACER
125-01-0734
SENSOR
225-01-4228
LOCK NUT
FRONT OF CASE
SPACER
125-01-0734
LUG BLUE
LOCK NUT
REAR OF CASE
WIRE NUT RED
125-01-0025
Y
E
L
R
E
D
YEL
YEL
BRN
BRN
BRN
BRN
RED 18ga
WHT 18ga
WHT 18ga
WHT 18ga
WHT 18ga
RED 18ga
WHT 18ga
WHT 18ga
WHT 18ga
WHT 18ga
RED 18ga
RED 18ga
BLK 14ga
BLK 14ga
BLK 14ga
BLK
BLK 14ga RED 14ga RED
R
E
D
1
4
g
a
RED 14ga
GRN
GRN 14ga
BLK 14ga
BLK 14ga
BLK 18ga
BLK 14ga
RED 14ga
RED 14ga
WHT 18ga
RED 14ga GRN 14gaGRN 14ga
GRN 14ga
G
R
N
1
4
g
a
BOTTOM ELECTRIC BOX
GRIDDLE 12
3
45
6
F17T8-24" PN125-01-1071
F17T8-24" PN125-01-1071
F17T8-24" PN125-01-1071
F17T8-24" PN125-01-1071
NOTE: CASE MUST
BE GROUNDED
LOADING
240 V
L1
L2
L3
L1
L2
L3
4.4
4.4
0.0
0.0
0.0
125-01-3273 1 BLST B432PUNVHP-A
125-01-0539 8 BUSHING HEYCO #2053 1/2"
125-01-0728 1 PCB 4 BUTTON ASS 216-70068-01
125-01-0729 1 PCB 4 BUTTON ASSY ADD ON
125-01-0731 1 OVERLAY 8 BUTTON ZAP TIMER
125-01-0734 9 FAST TIMER 1/4"L MTG.SPACER
125-01-0733 4 FAST TIMER 3/8"L MTG.SPACER
125-01-3191 8 (S)SCKT FLR T8/T12 VS-109346
00001296 9 TIES,TY38M,7-7/8",ZIP PUSH MT
300-03-1262 2 SCREW HEX 8/32X1/2" GRN
125-01-0736 1 FAST TIMER INSTRUC. STICKER
125-01-0311 1 (S)SWTCH TIPETE SGL POLE 3XC59
225-01-4228 1 SENSOR #6 X 60" LEAD #Q7105
225-01-4229 1 T-STAT ELECTRONIC HOT SHINKO
125-03-1071 4 (S)LMP FLR F17/T8/SPX30 24"
225-01-6799T 2 HTR FLEX-SLCN 30"X11"W/TRAY
125-01-0063 1 FITTING HEYCO #1184 SR 6W-1
125-01-1342 1 RELAY MARS 90342 - DPDT 230V
125-01-0025 1 WIRE NUT RED 452
125-01-0462A 11 PANDUIT DNFR 14-250FI BLU FLAG
125-01-0475 5 TERMNL 14-10-RC BLU EYE
300-03-0250 2 SCREW MAC F/H PHIL 8-32X1/2"
300-03-1318 2 WASHER STAR 10
Wiring Diagrams (Cont'd)
Rev. 0314
15
DATE:
PROJECT TITLE: DWG #:DRAWN BY:
PRODUCTION ORDER #: DRAWING TITLE:
DATE:
REVISIONS:
:YB DEKCEHC:NOITPIRCSED :# BY:
FILE LOCATION:
RTwohy
---
PAGE OF
HUSSMANN® CORPORATION
13770 RAMONA AVENUE
CHINO, CA.91710
(909) 590-4910 LIC.#: 644406
1
2
31 1
10/11/04
H:\WIRESCHEMATICS\NEW-WIRING
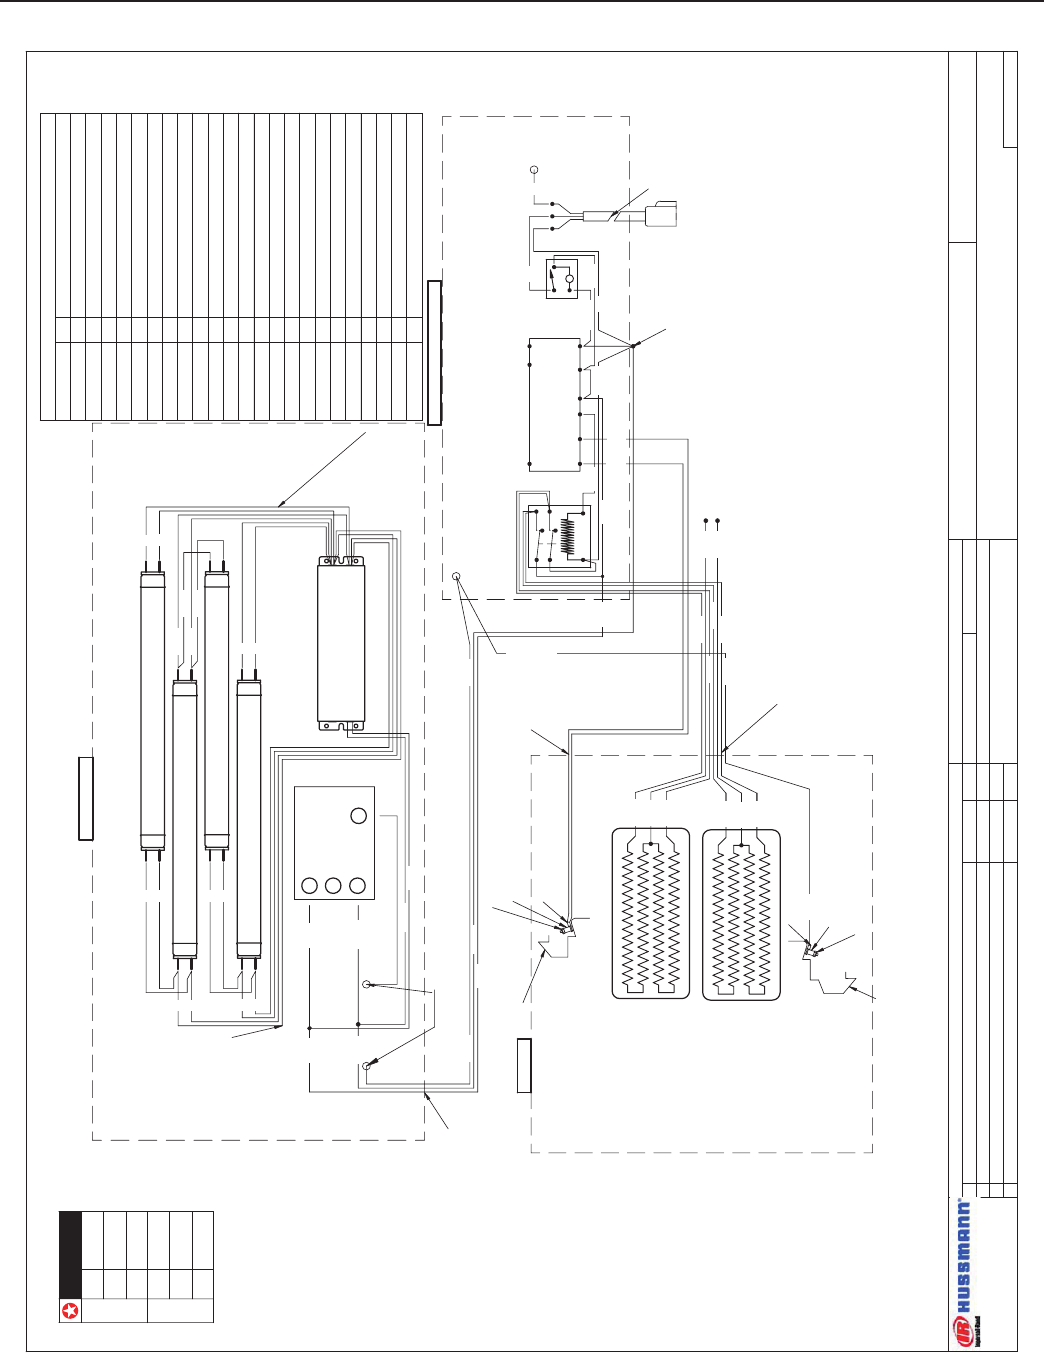
CINNABON HOT CASE W8700004
CR3HTO-4-HTB MOD2 220-240V 50/60HZ
******
TEXT REVISION 11-11-04 JR
GRIDDLE HEATERS
THERMOFLEX™
(1) 400W @ 115 VAC
(1) 400W @ 230 VAC
225-01-6799T
LAMP SOCKET, VS-102590 E-27
(8) 125-01-3191
GRIDDLE HEATERS
THERMOFLEX™
(1) 400W @ 115 VAC
(1) 400W @ 230 VAC
225-01-6799T
F25T8-36" PN125-03-1072
125-01-0728
PCB ASSEMBLY TIMER
BALLAST 125-01-3273
MAGNETE
B432PUNVHP-A
F25T8-36" PN125-03-1072
F25T8-36" PN125-03-1072
F25T8-36" PN125-03-1072
2
1
34
POWER
RELAY MARS
90341
125-01-1342
NEUTRAL
GROUND
RED
RED
BLU/WHT
BLU
BLU
BLU/WHT
BLU/WHT
BLU/WHT
RED
YEL
YEL
GRN GROUND LUG
300-03-1262
TOP SECTION
USE 2 BUSHINGS
125-01-0539
USE 2 BUSHINGS
125-01-0539
BUSHING
125-01-0539
TY-RAP .25 MOUNT
QTY 6
00001296
SHINKO FCL-13A-R/M
225-01-4229
+B -
A B + - + -
EVENT
OUTPUT
VOLTAGE
POWER:
~ 208-240 VAC - 1Ø - 3W
SWITCH
125-01-0311
L
STRAIN RELIEF
125-01-0063
BUSHING
125-01-0539
BUSHING
125-01-0539
SPACER
125-01-0734
SENSOR
225-01-4228
LOCK NUT
FRONT OF CASE
SPACER
125-01-0734
LUG BLUE
LOCK NUT
REAR OF CASE
WIRE NUT RED
125-01-0025
Y
E
L
R
E
D
YEL
YEL
BRN
BRN
BRN
BRN
RED 18ga
WHT 18ga
WHT 18ga
WHT 18ga
WHT 18ga
RED 18ga
WHT 18ga
WHT 18ga
WHT 18ga
WHT 18ga
RED 18ga
RED 18ga
BLK 14ga
BLK 14ga
BLK 14ga
BLK
BLK 14ga RED 14ga RED
R
E
D
1
4
g
a
RED 14ga
GRN
GRN 14ga
BLK 14ga
BLK 14ga
BLK 18ga
BLK 14ga
RED 14gaRED 14ga
WHT 18ga
RED 14ga GRN 14gaGRN 14ga
GRN 14ga
G
R
N
1
4
g
a
BOTTOM ELECTRIC BOX
GRIDDLE 12
3
45
6
NOTE: CASE MUST
BE GROUNDED
LOADING
220 V
L1
L2
L3
L1
L2
L3
4.1
4.1
PN Qty Description
125-01-3273 1 BLST B432PUNVHP-A
125-01-0539 8 BUSHING HEYCO #2053 1/2"
125-01-0728 1 PCB 4 BUTTON ASS 216-70068-01
125-01-0729 1 PCB 4 BUTTON ASSY ADD ON
125-01-0731 1 OVERLAY 8 BUTTON ZAP TIMER
125-01-0734 9 FAST TIMER 1/4"L MTG.SPACER
125-01-0733 4 FAST TIMER 3/8"L MTG.SPACER
125-01-3191 8 (S)SCKT FLR T8/T12 VS-109346
00001296 9 TIES,TY38M,7-7/8",ZIP PUSH MT
300-03-1262 2 SCREW HEX 8/32X1/2" GRN
125-01-0736 1 FAST TIMER INSTRUC. STICKER
125-01-0311 1 (S)SWTCH TIPETE SGL POLE 3XC59
225-01-4228 1 SENSOR #6 X 60" LEAD #Q7105
225-01-4229 1 T-STAT ELECTRONIC HOT SHINKO
125-03-1072 4 (S)LMP FLR F25/T8/SPX30 36"
225-01-6799T 2 HTR FLEX-SLCN 42"X11"W/TRAY
125-01-0063 1 FITTING HEYCO #1184 SR 6W-1
125-01-1342 1 RELAY MARS 90341 - DPDT 230V
125-01-0025 1 WIRE NUT RED 452
125-01-0462A 11 PANDUIT DNFR 14-250FI BLU FLAG
125-01-0475 5 TERMNL 14-10-RC BLU EYE
300-03-0250 2 SCREW MAC F/H PHIL 8-32X1/2"
300-03-1318 2 WASHER STAR 10
Parts List
Wiring Diagrams (Cont'd)

IGFC-CR3H-HTB-0314
16
GRIDDLE HEATERS
THERMOFLEX™
(1) 400W @ 115 VAC
(1) 400W @ 230 VAC
225-01-6799T
GRIDDLE HEATERS
THERMOFLEX™
(1) 400W @ 115 VAC
(1) 400W @ 230 VAC
225-01-6799T
2
2
5
-
0
1
-
4
2
2
8
SPACER
125-01-0734
LUG BLUE
LOCK NUT
REAR OF CASE
RED 18ga
WHT 18ga
WHT 18ga
WHT 18ga
WHT 18ga
RED 18ga
GRN 14ga
Wiring Diagrams (Cont'd)
Rev. 0314
17
DATE:
PROJECT TITLE: DWG #:DRAWN BY:
PRODUCTION ORDER #: DRAWING TITLE:
DATE:
REVISIONS:
:YB DEKCEHC:NOITPIRCSED :# BY:
FILE LOCATION:
D.QUAN
---
PAGE OF
HUSSMANN® CORPORATION
13770 RAMONA AVENUE
CHINO, CA.91710
(909) 590-4910 LIC.#: 644406
1
2
31 1
3/10/05
T:\WIRESCHEMATICS\NEW-WIRING
CINNABON HOT CASE W8700005
CR3HTO-5-HTB MOD2 208-240V 50/60HZ
******
GRIDDLE HEATERS
THERMOFLEX™
(1) 600W @ 115 VAC
(1) 600W @ 230 VAC
225-01-6690T
LAMP SOCKET, VS-102590 E-27
(8) 125-01-3191
GRIDDLE HEATERS
THERMOFLEX™
(1) 600W @ 115 VAC
(1) 600W @ 230 VAC
225-01-6690T
F25T8-36" PN125-03-1072
125-01-0728
PCB ASSEMBLY TIMER
BALLAST 125-01-3273
MAGNETE
B432PUNVHP-A
F25T8-36" PN125-03-1072
F25T8-36" PN125-03-1072
F25T8-36" PN125-03-1072
2
1
34
POWER
RELAY MARS
90341
125-01-1342
NEUTRAL
GROUND
RED
RED
BLU/WHT
BLU
BLU
BLU/WHT
BLU/WHT
BLU/WHT
RED
YEL
YEL
GRN GROUND LUG
300-03-1262
TOP SECTION
USE 2 BUSHINGS
125-01-0539
USE 2 BUSHINGS
125-01-0539
BUSHING
125-01-0539
TY-RAP .25 MOUNT
QTY 6
00001296
SHINKO FCL-13A-R/M
225-01-4229
+B -
A B + - + -
EVENT
OUTPUT
VOLTAGE
POWER:
~ 208-240 VAC - 1Ø - 3W
SWITCH
125-01-0311
L
STRAIN RELIEF
125-01-0063
BUSHING
125-01-0539
BUSHING
125-01-0539
SPACER
125-01-0734
SENSOR
225-01-4228
LOCK NUT
FRONT OF CASE
SPACER
125-01-0734
LUG BLUE
LOCK NUT
REAR OF CASE
WIRE NUT RED
125-01-0025
Y
E
L
R
E
D
YEL
YEL
BRN
BRN
BRN
BRN
RED 18ga
WHT 18ga
WHT 18ga
WHT 18ga
WHT 18ga
RED 18ga
WHT 18ga
WHT 18ga
WHT 18ga
WHT 18ga
RED 18ga
RED 18ga
BLK 14ga
BLK 14ga
BLK 14ga
BLK
BLK 14ga RED 14ga RED
R
E
D
1
4
g
a
RED 14ga
GRN
GRN 14ga
BLK 14ga
BLK 14ga
BLK 18ga
BLK 14ga
RED 14gaRED 14ga
WHT 18ga
RED 14ga GRN 14ga
GRN 14ga
GRN 14ga
G
R
N
1
4
g
a
BOTTOM ELECTRIC BOX
GRIDDLE 12
3
45
6
NOTE: CASE MUST
BE GROUNDED
LOADING
240 V
L1
L2
L3
L1
L2
L3
6.4
6.4
PN Qty Description
125-01-3273 1 BLST B432PUNVHP-A
125-01-0539 8 BUSHING HEYCO #2053 1/2"
125-01-0728 1 PCB 4 BUTTON ASS 216-70068-01
125-01-0729 1 PCB 4 BUTTON ASSY ADD ON
125-01-0731 1 OVERLAY 8 BUTTON ZAP TIMER
125-01-0734 9 FAST TIMER 1/4"L MTG.SPACER
125-01-0733 4 FAST TIMER 3/8"L MTG.SPACER
125-01-3191 8 (S)SCKT FLR T8/T12 VS-109346
00001296 9 TIES,TY38M,7-7/8",ZIP PUSH MT
300-03-1262 2 SCREW HEX 8/32X1/2" GRN
125-01-0736 1 FAST TIMER INSTRUC. STICKER
125-01-0311 1 (S)SWTCH TIPETE SGL POLE 3XC59
225-01-4228 1 SENSOR #6 X 60" LEAD #Q7105
225-01-4229 1 T-STAT ELECTRONIC HOT SHINKO
125-03-1072 4 (S)LMP FLR F25/T8/SPX30 36"
225-01-6690T 2 HTR FLEX-SLCN 42"X11"W/TRAY
125-01-0063 1 FITTING HEYCO #1184 SR 6W-1
125-01-1342 1 RELAY MARS 90342 - DPDT 230V
125-01-0025 1 WIRE NUT RED 452
125-01-0462A 11 PANDUIT DNFR 14-250FI BLU FLAG
125-01-0475 5 TERMNL 14-10-RC BLU EYE
300-03-0250 2 SCREW MAC F/H PHIL 8-32X1/2"
300-03-1318 2 WASHER STAR 10
Parts List
Wiring Diagrams (Cont'd)

IGFC-CR3H-HTB-0314
18
GRIDDLE HEATERS
THERMOFLEX™
(1) 400W @ 115 VAC
(1) 400W @ 230 VAC
225-01-6799T
GRIDDLE HEATERS
THERMOFLEX™
(1) 400W @ 115 VAC
(1) 400W @ 230 VAC
225-01-6799T
2
2
5
-
0
1
-
4
2
2
8
SPACER
125-01-0734
LUG BLUE
LOCK NUT
REAR OF CASE
RED 18ga
WHT 18ga
WHT 18ga
WHT 18ga
WHT 18ga
RED 18ga
GRN 14ga
Wiring Diagrams (Cont'd)

Rev. 0314
19
Appendices
Appendix A. – Temperature Guidelines
1.0 Hot cases are tested to maintain all hot food at 140°
- 150°F. These cases are not designed to heat up
or cook food. It is the user’s responsibility to stock
the hot food cases immediately after the cooking of
the food with a pulp temperature of at least 150° to
160°F.
Appendix B. – Application
Recommendations
1.0 The installer should perform a complete start-up
evaluation prior to the loading of food into the hot
food case, which includes such items as:
a) Initial temperature performance, Griddles and
Hot Wells.
b) Observation of outside inuences such as drafts,
radiant heating from the ceiling and from lamps.
Such inuence should be properly corrected or
compensated for.
c) Complete start-up procedures should include:
1. Heat / display lamps are lighting
2. Indicator lamps on control panel(s) are
working
3. Auto-ll is functioning properly (Service
cases)
4. Hot Griddles are functioning.
Appendix C. – Field Recommendations
1.0 The most consistent indicator of display hot case
performance is temperature of the product itself.
NOTE: Public Health will use the temperature of the product
in determining if the hot case will be allowed to display
potentially hazardous food. For the purpose of this
evaluation, product temperature above the FDA Food
Code 1993 temperature for potentially hazardous food
will be the rst indication that an evaluation should be
performed. It is expected that all hot cases will keep
food at the FDA Food Code 1993 temperature to prevent
the sale of potentially hazardous food.
1.1 The following recommendations are made for the
purpose of arriving at easily taken and understood
data which, coupled with other observations, may
be used to determined whether a display refrigerator
is working as intended:
a)
INSTRUMENT – A stainless steel stem-type
thermometer is recommended and it should have
a dial a minimum of 1 inch internal diameter. A
test thermometer scaled only in Celsius or dually
scaled in Celsius and Fahrenheit shall be accurate
to 1°C (1.8°F). Temperature measuring devices
that are scaled only in Fahrenheit shall be accurate
to 2°F. The thermometer should be checked for
proper calibration. (It should read 32°F when the
stem is immersed in an ice water bath).
b) LOCATION – The thermometer must be inserted
into the food itself to acquire proper food pulp
temperature.
c) READING – The thermometer reading should be
made only after it has been allowed to stabilize,
i.e., maintain a constant reading.
Loading Product: Cases should be allowed to
heat up for one hour before product is loaded.
Temperature adjustments: Allow 4 hours after
adjustment has been made before testing pulp
temperature of product.
d) OTHER OBSERVATIONS – Other observations
should be made which may indicate operating
problems, such as unsatisfactory product, feel/
appearance.
Appendix D. – Recommendations to user
1.0 Hussmann should provide instructions and
recommendations for proper periodic cleaning. The
user will be responsible for such cleaning, including
the cleaning of equipment within the compartment
and the hot area(s). Cleaning practices, particularly
with respect to proper refrigerator unloading and
warm-up, must be in accordance with applicable
recommendations.
1. Allow the case to preheat for one hour prior to
loading.
2. Hot foods should enter the case directly after
cooking or no lower than 150° - 160°F. The Hot
Cases are not designed to heat up or cook food.
3. Self Service - be sure to display product in single
layer in direct contact with heating surface and/or
wire rack.
4. All griddle type units are designed to maintain
temperatures above the FDA guideline of 140°F.
This is product temperature, not air or griddle
temperature. Due to the open design of these
units, they must be loaded with product for proper
operation. When units are empty, they experience
rapid rise of heated air from air outside the case.
This action gives empty units a false, lower than
desired, temperature reading. Loading the case
traps the air at the griddle, raising temperatures
to the 165°F to 185°F range, keeping product
well above the FDA guidelines. Remember, these
units must be loaded with product to maintain
safe product temperature.
5. Check the food pulp temperature frequently with
a thermometer to make sure it is at the proper
holding temperature. Hot foods should be at
140°F. The thermometer must be inserted into the
food itself for the proper temperature.
6. Do not display more food than will be sold within a
4 hour period.
7. When restocking, bring older food to the front,
and stock fresher food on top.
8. Clean spills as soon as they happen.

IGFC-CR3H-HTB-0314
20
9. Fingerprints and food splatter will drastically
shorten bulb life. Clean splatter off the bulbs
immediately with a soft cloth. When handling
bulbs, wear cotton gloves or use a cotton rag /
towel.
10. When “freshening” foods such as macaroni
and cheese with added water, heat the water in
a clean container until it is 10° to 20°F above the
desired holding temperature of the food. This
will keep the food at a safe serving temperature.
Depending on the amount of water, the
temperature can drop 10° to 20°F in as little as
ve minutes.
11. When transferring hot foods in the heated
merchandiser to clean pans, preheat the clean
pan. Transferring hot foods to room temperature
pans can cause the temperature of the food to
drop 20°F or more thus causing food to be at an
unsafe serving temperature.
Appendices (Cont'd)
For further technical information, please log on to http://www.hussmann.com/products/cr3to-htb.htm
12. Clean spills as they happen simply by wiping
with a cloth. Be sure to use a dry cloth on very hot
surfaces to prevent steam burns.
13. Turn the equipment off and allow to cool before
cleaning.
14. To remove “baked-on” splatter from Stainless
Steel, the following may be used
Grade F Italian Pumice Scour or rub with a
damp cloth
Liquid NuSteel Scour with a small
amount of a dry cloth
Paste NuSteel
Household Cleaners Rub with a damp cloth
Coopers Stainless Steel Cleaner
Allen Stainless Steel Polish

Rev. 0314
21
The MODEL NAME and SERIAL NUMBER is required in order to
provide you with the correct parts and information for your particular
unit.
They can be found on a small metal plate on the unit.
Please note them below for future reference.
MODEL:
SERIAL NUMBER:
/Chino
Additional copies of this publication may be obtained by contacting:
Hussmann® Chino
13770 Ramona Avenue • Chino, California 91710
(909) 628-8942 FAX
(909) 590-4910
(800) 395-9229
Service Record
Last service date: By:
_______________ __________________________________________________________________________________________________
_______________ __________________________________________________________________________________________________
_______________ __________________________________________________________________________________________________
_______________ __________________________________________________________________________________________________
_______________ __________________________________________________________________________________________________
_______________ __________________________________________________________________________________________________
_______________ __________________________________________________________________________________________________
IGFC-CR3H-HTB-0409
