C Support For My RIO User Guide
User Manual:
Open the PDF directly: View PDF ![]() .
.
Page Count: 10

C Support for myRIO 3.0
User Guide
C Support for myRIO provides tools for you to program the myRIO by using non-
LabVIEW programming languages, such as the C programming language.
C Support for myRIO includes the following components:
• C Support—Contains header files, source files, and binary files for using the NI
FPGA interface and NI-VISA interface on the myRIO target.
• Examples—Contains example projects that invoke the C support to use the resources
on the myRIO target.
• Template—Contains a blank project configured with the required myRIO settings.
The template provides a starting point for using the C support.
System Requirements
• One of the following operating systems:
− Windows 8.0/8.1 (32-bit and 64-bit)
− Windows 7 (32-bit and 64-bit)
− Windows Vista (32-bit and 64-bit)
− Windows XP Service Pack 3 Professional
− Windows Server 2012 R2 (64-bit)
− Windows Server 2008 R2 (64-bit)
− Windows Server 2003 R2 (32-bit)
• LabVIEW 2015 myRIO Toolkit—Provides drivers and software for setting up the
myRIO target.
• Java—Required for C/C++ Development Tools for NI Linux Real-Time 2014,
Eclipse Edition.
• C/C++ Development Tools for NI Linux Real-Time 2014, Eclipse Edition—Provides
the integrated development environment (IDE) and compilation tools.
Installation Instructions
You must perform the following tasks before developing a myRIO application:
• Setting up the software environment
• Configuring the myRIO target
• Importing C Support for myRIO to Eclipse
• Installing an FPGA bitfile on the myRIO target

Setting up the Software Environment
1. Install the LabVIEW 2015 myRIO Toolkit. Visit ni.com/info and enter the Info
Code myRIOToolkit2015 to download and install the myRIO Toolkit.
2. Install Java. Visit the Java website http://www.java.com/getjava to download Java.
3. Install the C/C++ Development Tools for NI Linux Real-Time 2014, Eclipse Edition.
Visit ni.com/info and enter the Info Code Eclipse2014 to download and install
Eclipse.
4. Download the C Support for myRIO 3.0. Visit ni.com/info and enter the Info
Code myriocsupport2015 to download the C Support for myRIO.
5. Add the compiler path to the system environment variables.
a. In the Windows Control Panel, select System and Security»System»Advanced
system settings to display the System Properties dialog box.
b. Click Environment Variables to display the Environment Variables dialog
box.
c. Select PATH in the User variables group box and click Edit. If PATH does not
exist, click New to create one.
d. Append the compiler path to Variable value. Delimit paths with semicolons.
(Windows 32-bit): C:\Program Files\National
Instruments\Eclipse\14.0\arm\sysroots\i686-nilrtsdk-
mingw32\usr\bin\armv7a-vfp-neon-nilrt-linux-gnueabi
(Windows 64-bit): C:\Program Files (x86)\National
Instruments\Eclipse\14.0\arm\sysroots\i686-nilrtsdk-
mingw32\usr\bin\armv7a-vfp-neon-nilrt-linux-gnueabi
Note The compiler paths are customized for the 2014 version of Eclipse. If you
use other versions of Eclipse, update the value to use the cross-compilers
directory of Eclipse.
e. Click OK to close the dialog box and save changes.
2 | ni.com | C Support for myRIO 3.0 User Guide

Configuring the myRIO Target
Complete the following steps to install software on the myRIO target by using the Getting
Started with myRIO wizard:
1. Connect the myRIO to the host computer using a USB cable. The myRIO USB
Monitor appears after the USB driver is installed.
2. Note down the IP address of the myRIO target.
3. Click Launch the Getting Started Wizard and go through the wizard to install
or upgrade all required software on the myRIO target and test the myRIO
onboard devices.
After you install the software on the myRIO target, complete the following steps to enable
Secure Shell (SSH) on the myRIO target by using the NI Web-based Configuration &
Monitoring application:
1. On the host computer, open a Web browser and enter the following URL to
launch NI Web-based Configuration & Monitoring: http://<IP address>/,
where <IP address> is the IP address of your myRIO target.
2. In the Startup Settings section, enable the Enable Secure Shell Server (sshd)
checkbox.
3. Click Save at the top of the page.
4. Click Restart on the upper right corner of the page to restart the myRIO target.
Importing C Support for myRIO to Eclipse
Complete the following steps to import C Support for myRIO to Eclipse:
1. Launch Eclipse, specify a workspace, and click OK to display the C/C++
perspective.
2. Select File»Import to display the Import dialog box.
3. Select General»Existing Projects into Workspace and click Next to display
the Import Projects page.
4. Select Select archive file, click Browse and select the C Support for myRIO 3.0
that you download.
5. Ensure that all items are checked and click Finish to import C Support for
myRIO to Eclipse.
Note Projects that already exist in the workspace directory appear grayed out.
Rename or delete the existing projects from the disk before you import them
again.
Installing an FPGA Bitfile on the myRIO Target
After importing C Support for myRIO to Eclipse, establish a connection to install the
FPGA bitfile on the myRIO target.
Complete the following steps to establish a connection to the myRIO target:
C Support for myRIO 3.0 User Guide | © National Instruments | 3
1. In Eclipse, select Window»Open Perspective»Other to display the Open
Perspective dialog box.
2. Select Remote Systems Explorer and click OK to display the Remote Systems
Explorer perspective.
3. Click the Remote Systems Explorer icon to display the Remote Systems
pane.
4. Click the Define a connection to remote system icon to display the New
Connection dialog box.
5. Select General»Linux and click Next.
6. Enter the IP address of your myRIO target in the Host name textbox and click
Next to display the Files page.
7. Enable the ssh.files checkbox and click Next to display the Processes page.
8. Enable the processes.shell.linux checkbox and click Next to display the Shells
page.
9. Enable the ssh.shells checkbox and click Next to display the Ssh Terminals
page.
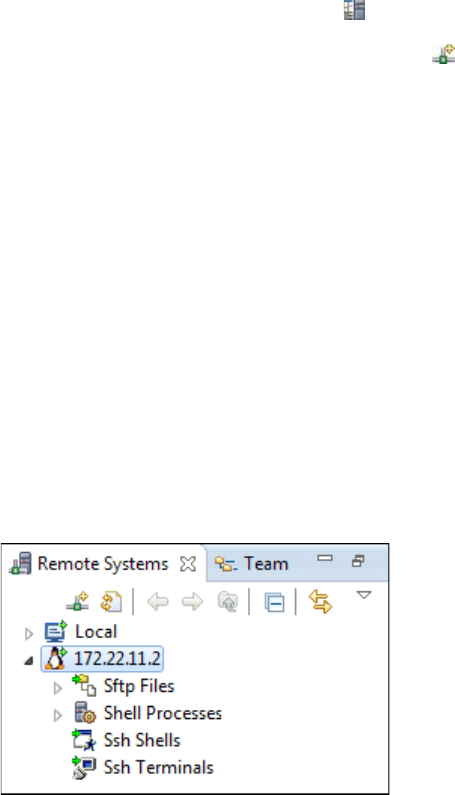
10. Click Finish. Your new remote system now appears in the Remote Systems
pane.
Complete the following steps to connect to the myRIO target:
1. In the Remote Systems pane, right-click the target and select Connect from the
shortcut menu to display the Enter Password dialog box.
2. Enter the user ID and password for the myRIO and click OK. By default, the
user ID is admin and there is no password.
3. Click OK in the Info dialog box.
4. If the Keyboard Interactive authentication dialog box appears, enter the same
authentication as step 2 and click OK. A green arrow appears on the target icon
when the myRIO is connected.
Complete the following steps to install the FPGA bitfile on the myRIO target:
1. In the Remote Systems pane, right-click Sftp Files»Root and select
New»Folder to display the New Folder dialog box.
2. Enter /var/local/natinst/bitfiles in the New folder name textbox
and click Finish. Ignore the error if the folder already exists.
4 | ni.com | C Support for myRIO 3.0 User Guide

3. Right-click Sftp Files»Root»/»var»local»natinst»bitfiles and select Export
From Project from the shortcut menu to display the Export dialog box.
4. Click C Support for myRIO»source to display the files in C Support for
myRIO.
5. Select an FPGA bitfile. If your hardware is myRIO-1900, select
NiFpga_MyRio1900Fpga30.lvbitx. If your hardware is myRIO-1950, select
NiFpga_MyRio1950Fpga30.lvbitx.
6. Click Finish. Verify that the FPGA file that you select appears in the
bitfiles folder.
Using C Support for myRIO with Eclipse for
NI Linux Real-Time
C Support for myRIO includes examples and a template project. You can use the
examples, whose names start with myRIO Example, to build and deploy an example
project to the myRIO. Refer to the Examples Overview section of this document for more
information about examples. You can use the template project, myRIO Template, to
build and deploy your own application.
This section introduces how to build and deploy an example project and a template project
and how to create a new project.
Building and Deploying an Example Project
Complete the following steps to build and deploy an example project:
1. Launch Eclipse in the C/C++ perspective. If Eclipse is not in the C/C++
perspective, select Window»Open Perspective»Other to display the Open
Perspective dialog box, select C/C++ (default), and click OK.
2. In the Project Explorer pane, right-click an example and select Build Project
from the shortcut menu to build the example.
3. Right-click the example and select Run As»Run Configurations to display the
Run Configurations dialog box.
4. Expand C/C++ Remote Application and select the example to run.
5. Click Search Project to display the Program Selection dialog box.
6. Select the example in the Binaries section and click OK.
7. Click Apply and click Run. The example starts to run on the myRIO target.
You can find the result in the Console pane.
8. In the Project Explorer pane, right-click the example and select Debug
As»Debug Configurations to display the Debug Configurations dialog box.
9. Expand C/C++ Remote Application and select the example to debug.
10. Click Search Project to display the Program Selection dialog box.
11. Select the example in the Binaries section and click OK.
12. Click Apply and click Debug. The example runs on the myRIO target with a
debugger. You can find the debug tools on the toolbar of Eclipse.
C Support for myRIO 3.0 User Guide | © National Instruments | 5

Note The default configuration of the project builds the debug mode for debugging.
You can switch to the release mode by right-clicking the project and selecting
Build Configurations»Set Active»2 Release from the shortcut menu.
Building and Deploying Your First Project
Complete the following steps to build and deploy your first project by using the template
project:
1. Launch Eclipse in the C/C++ perspective. If Eclipse is not in the C/C++
perspective, select Window»Open Perspective»Other to display the Open
Perspective dialog box, select C/C++ (default), and click OK.
2. In the Project Explorer pane, right-click myRIO Template and select Rename
from the shortcut menu to display the Rename Resource dialog box.
3. Specify a new name for your project and click OK.
Note You must specify a new name for your project. Otherwise, you cannot
import the myRIO Template project again.
4. Right-click your project and select New»File to add your source files to the
project. You can also reuse the source files in example projects by copying and
pasting the source files into your project.
5. Right-click the project and select Build Project from the shortcut menu to build
the project.
6. Right-click the project and select Run As»Run Configurations to display the
Run Configurations dialog box.
7. Expand C/C++ Remote Application and select myRIO Template.
8. In the Name textbox, enter the new name that you specified in step 3.
9. Click Search Project to display the Program Selection dialog box.
10. Select your project in the Binaries section and click OK.
11. Click Apply and click Run. The project starts to run on the myRIO target. You
can find the result in the Console pane.
12. Right-click the project and select Debug As»Debug Configurations to display
the Debug Configurations dialog box.
13. Expand C/C++ Remote Application and select your project.
14. Click Search Project to display the Program Selection dialog box.
15. Select your project in the Binaries section and click OK.
16. Click Apply and click Run. The project starts to run on the myRIO target with a
debugger. You can find the debug tools on the toolbar of Eclipse.
Note The default configuration of the project builds the debug mode for
debugging. You can switch to the release mode by right-clicking the project and
selecting Build Configurations»Set Active»2 Release from the shortcut menu.
6 | ni.com | C Support for myRIO 3.0 User Guide

Creating a New Project
C Support for myRIO also includes a template project archive that you can use to create
new projects for the myRIO. The template project archive is included when you import C
Support for myRIO. Complete the following steps to create a new project:
1. Launch Eclipse in the C/C++ perspective. If Eclipse is not in the C/C++
perspective, select Window»Open Perspective»Other to display the Open
Perspective dialog box, select C/C++ (default), and click OK.
2. Select File»Import to display the Import dialog box.
3. Select General»Existing Projects into Workspace and click Next to display
the Import Projects page.
4. Select Select archive file, navigate to <workspace>\C Support for
myRIO\template project, where <workspace> is the workspace
directory that you specify in Eclipse, and select the myRIO Template
v3.0.zip file. The myRIO Template now appears in the Projects list.
5. Click Finish.
Note Projects that already exist in the workspace directory appear grayed out.
Rename or delete the existing projects from the disk before you import them again.
Complete the Building and Deploying Your First Project section of this document to use
this template project with the myRIO.
Examples Overview
NI provides the following examples for using the myRIO. Refer to the main.c file in
each example for more information.
Accelerometer
Demonstrates using the onboard accelerometer. This example reads the acceleration
values in the three directions and prints the values to the console.
AIIRQ
Demonstrates using the analog input interrupt request (IRQ). This example registers an
IRQ on analog input AI0 on connector A and creates a new thread that waits for the
interrupt to occur.
AIO
Demonstrates using the analog input and output (AIO). This example reads initial values
of two analog input channels from connector A and writes the sum of the read values on
connector B. This example also prints the values to the console.
ButtonIRQ
Demonstrates using the button interrupt request. This example registers an IRQ on the
user button of the myRIO and creates a new thread that waits for the interrupt to occur.
C Support for myRIO 3.0 User Guide | © National Instruments | 7
DIIRQ
Demonstrates using the digital input interrupt request. This example registers an IRQ on
digital input DI0 on connector A and creates a new thread that waits for the interrupt to
occur.
DIO
Demonstrates using the digital input and output (DIO). This example reads initial values
of two digital input channels from connector A and writes the Boolean AND of the read
values on connector B. This example also prints the values to the console.
Encoder
Demonstrates using the encoder. This example reads a step and direction signal from the
encoder on connector B and prints the values to the console.
I2C
Demonstrates using the I²C. This example reads the temperature from a connected
TMP102 digital temperature sensor and writes the response to the console.
PWM
Demonstrates using pulse-width modulation (PWM). This example generates a PWM
signal from PWM 0 on connector A.
SPI
Demonstrates using the serial peripheral interface bus (SPI). This example writes a
message to the SPI bus and then prints any returned bytes to the console.
TimerIRQ
Demonstrates using the timer interrupt request. This example registers an IRQ on software
timer and creates a new thread that waits for the interrupt to occur.
UART
Demonstrates using the universal asynchronous receiver/transmitter (UART). This
example writes a character to the UART bus and then prints any returned character to the
console.
8 | ni.com | C Support for myRIO 3.0 User Guide
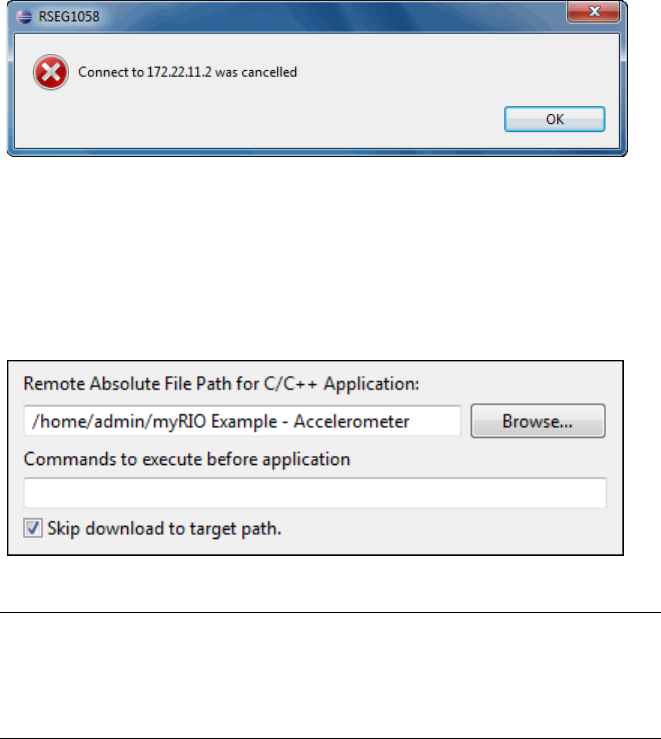
Known Issues
Connection Cancelled
You might find that the connection to the myRIO target sometimes cancels when you start
to run or debug your project in Eclipse.
The connection in Eclipse is not stable when you download your application to the myRIO
target. Click OK to dismiss the message. The connection reestablishes next time you
download your application. You also can manually reestablish the connection in the
Remote System Explorer perspective.
A way to minimize the problem is to enable the Skip download to target path checkbox
in the Run Configurations or Debug Configurations dialog box. However, you must
then manually transfer the built executable to the myRIO using SFTP.
Using the myRIO Target with LabVIEW
To use the myRIO target with LabVIEW, you must install LabVIEW and the LabVIEW
Real-Time Module and then reinstall the myRIO Toolkit. Refer to the readme of each
product for specific system requirements and supported operating systems.
Related Information
myRIO Shipping Personality Reference—Contains information about the FPGA bitfiles
included with C Support for myRIO.
C Support for myRIO 3.0 User Guide | © National Instruments | 9
Refer to the NI Trademarks and Logo Guidelines at ni.com/trademarks for more information on National
Instruments trademarks. Other product and company names mentioned herein are trademarks or trade names of their
respective companies. For patents covering National Instruments products/technology, refer to the appropriate
location: Help»Patents in your software, the patents.txt file on your media, or the National Instruments Patent
Notice at ni.com/patents. You can find information about end-user license agreements (EULAs) and third-party
legal notices in the readme file for your NI product. Refer to the Export Compliance Information at
ni.com/legal/export-compliance for the National Instruments global trade compliance policy and how to
obtain relevant HTS codes, ECCNs, and other import/export data. NI MAKES NO EXPRESS OR IMPLIED WARRANTIES
AS TO THE ACCURACY OF THE INFORMATION CONTAINED HEREIN AND SHALL NOT BE LIABLE FOR ANY ERRORS.
U.S. Government Customers: The data contained in this manual was developed at private expense and is subject to the
applicable limited rights and restricted data rights as set forth in FAR 52.227-14, DFAR 252.227-7014, and DFAR
252.227-7015.
© 2013-2015 National Instruments. All rights reserved.
