CryptoServer LAN Manual For System Administrators Crypto Server Systemadministrators
User Manual:
Open the PDF directly: View PDF ![]() .
.
Page Count: 142 [warning: Documents this large are best viewed by clicking the View PDF Link!]
- 1 Introduction
- 2 The CryptoServer LAN - Overview
- 3 Bringing the CryptoServer LAN into Operation
- 4 Administering the CryptoServer LAN
- 4.1 Connecting the PIN pad
- 4.2 Setting up the PIN Pad on the CryptoServer LAN
- 4.3 Generating New Keys for the SSH Daemon
- 4.4 Setting up DHCP
- 4.5 Enabling SNMP and SNMP Traps
- 4.6 Exporting/Importing the File csxlan.conf
- 4.7 Specifying the Keyboard Layout
- 4.8 Displaying the Date and Time on the CryptoServer LAN
- 4.9 Setting the Date and Time on the CryptoServer LAN Manually
- 4.10 Transferring the Time from the CryptoServer to the CryptoServer LAN
- 4.11 Viewing CryptoServer LAN Information
- 4.12 Enabling the Trace Level
- 4.13 Exporting the Trace Files
- 4.14 Displaying the Network Configuration
- 4.15 Checking Reachability in the Network (ping)
- 4.16 Performing a Self-Test
- 4.17 Selecting a Boot Partition
- 4.18 Updating the Operating System
- 4.19 Resetting the Configuration of the CryptoServer LAN
- 4.20 Rebooting the CryptoServer LAN
- 4.21 Switching off the CryptoServer LAN
- 5 Administering the CryptoServer
- 5.1 Displaying the CryptoServer Status
- 5.2 Resetting an Alarm
- 5.3 Displaying the Battery Status
- 5.4 Displaying Files in the CryptoServer
- 5.5 Listing Current Firmware Modules
- 5.6 Displaying Users
- 5.7 Displaying the Boot Log
- 5.8 Displaying the Audit Log
- 5.9 Exporting the Audit Log
- 5.10 Configuring the Audit Log
- 5.11 Displaying the Date and Time on the CryptoServer
- 5.12 Displaying Memory Information
- 5.13 Displaying Driver Information
- 5.14 Loading Files onto the CryptoServer
- 5.15 Deleting Files in the CryptoServer
- 5.16 Transferring the Tme from the CryptoServer LAN to the CryptoServer
- 5.17 Restarting the CryptoServer
- 5.18 Changing the ADMIN Authentication Key
- 5.19 Loading the Firmware Encryption Key into the CryptoServer
- 5.20 Changing to Maintenance Mode
- 5.21 Clear Command
- 5.22 Performing Clear to Factory Settings
- 5.23 Performing MBK Management on the CryptoServer LAN
- 5.23.1 Using the PIN Pad to Import an MBK
- 5.23.2 Importing an MBK (DES) from a Smartcard
- 5.23.3 Importing an MBK (AES) from a Smartcard
- 5.23.4 Generating an MBK (AES) on a Smartcard
- 5.23.5 Displaying MBK Key Information on the Smartcard
- 5.23.6 Copying an MBK from One Smartcard to Another
- 5.23.7 Changing the PIN for the MBK Smartcard
- 5.23.8 Using the PIN Pad to Import an MBK and Save it to a Smartcard
- 5.23.9 Generating an AES Key and Saving It to a Smartcard
- 6 Setting up NTP
- 7 Configuring NTP
- 8 Advanced Administration on the CryptoServer LAN
- 9 Contact Address for Support Queries
- Appendix A SNMP Objects and SNMP Traps
CryptoServer LAN
CSLANOS Version 3.3 and 4.x
Manual for System Administrators

Imprint
Copyright 2017
Utimaco IS GmbH
Germanusstr. 4
D-52080 Aachen
Germany
Phone
+49 (0)241 / 1696-200
Fax
+49 (0)241 / 1696-199
Internet
http://hsm.utimaco.com
E-mail
hsm@utimaco.com
Document Version
1.5.1
Date
2017-02-10
Status
Final
Document No.
M010-0002-en
All Rights reserved
No part of this documentation may be reproduced in any form (printing, photocopy or
according to any other process) without the written approval of Utimaco IS GmbH or be
processed, reproduced or distributed using electronic systems.
Utimaco IS GmbH reserves the right to modify or amend the documentation at any time
without prior notice. Utimaco IS GmbH assumes no liability for typographical errors and
damages incurred due to them.
All trademarks and registered trademarks are the property of their respective owners.

Table of Contents
Page 3 of 142
Table of Contents
1 Introduction ................................................................................................................................ 7
1.1 About this Manual ...................................................................................................................... 7
1.1.1 Target Audience for this Manual .......................................................................................... 7
1.1.2 Contents of this Manual ....................................................................................................... 7
1.1.3 Document Conventions ........................................................................................................ 8
1.2 Other Manuals ............................................................................................................................ 9
2 The CryptoServer LAN - Overview .............................................................................................. 11
2.1 Administration .......................................................................................................................... 12
2.2 Transferring Files to or from the CryptoServer LAN ................................................................. 12
2.3 Authenticating commands ....................................................................................................... 13
2.4 CryptoServer LAN System Users .............................................................................................. 14
2.5 Boot Partitions in the CryptoServer LAN .................................................................................. 14
2.6 The Simple Network Management Protocol ............................................................................. 15
2.7 The Internet Protocol Version 6 (IPv6) ..................................................................................... 15
3 Bringing the CryptoServer LAN into Operation ........................................................................... 17
3.1 Menu Options on the Front Panel of CryptoServer LAN ........................................................... 17
3.2 Switching on the CryptoServer LAN ......................................................................................... 18
3.3 Changing the Password for the Users root and cslagent ......................................................... 19
3.3.1 Changing the Default Password via a Terminal .................................................................. 19
3.3.2 Changing the Default Password via an SSH Connection .................................................... 20
3.4 Entering the IP Address of the CryptoServer LAN .................................................................... 21
3.5 Entering the IP Address of the Default Gateway ...................................................................... 22
3.6 Enabling the SSH Daemon ........................................................................................................ 23
4 Administering the CryptoServer LAN ......................................................................................... 25
4.1 Connecting the PIN pad ............................................................................................................ 25
4.2 Setting up the PIN Pad on the CryptoServer LAN .................................................................... 28
4.3 Generating New Keys for the SSH Daemon .............................................................................. 28
4.4 Setting up DHCP ....................................................................................................................... 29
4.5 Enabling SNMP and SNMP Traps ............................................................................................. 30
4.5.1 Configuration Options for SNMP Traps .............................................................................. 33
4.5.2 Specifying other IP Addresses for SNMP Traps Receivers ................................................ 40
4.6 Exporting/Importing the File csxlan.conf ................................................................................. 41
4.7 Specifying the Keyboard Layout .............................................................................................. 43
4.8 Displaying the Date and Time on the CryptoServer LAN .......................................................... 44
4.9 Setting the Date and Time on the CryptoServer LAN Manually ................................................ 44
4.10 Transferring the Time from the CryptoServer to the CryptoServer LAN .................................. 45

Table of Contents
Page 4 of 142
4.11 Viewing CryptoServer LAN Information ................................................................................... 45
4.11.1 Displaying CryptoServer LAN Information.......................................................................... 45
4.11.2 Displaying CryptoServer LAN Driver Information ............................................................... 46
4.11.3 Displaying a List of the Clients ........................................................................................... 46
4.12 Enabling the Trace Level .......................................................................................................... 47
4.13 Exporting the Trace Files .......................................................................................................... 47
4.14 Displaying the Network Configuration ..................................................................................... 48
4.15 Checking Reachability in the Network (ping) ........................................................................... 49
4.16 Performing a Self-Test ............................................................................................................. 50
4.17 Selecting a Boot Partition ........................................................................................................ 51
4.18 Updating the Operating System ............................................................................................... 51
4.18.1 Performing a Local Update ................................................................................................. 53
4.18.2 Performing a Remote Update ............................................................................................. 55
4.19 Resetting the Configuration of the CryptoServer LAN ............................................................. 56
4.20 Rebooting the CryptoServer LAN ............................................................................................. 57
4.21 Switching off the CryptoServer LAN ......................................................................................... 58
5 Administering the CryptoServer ................................................................................................. 59
5.1 Displaying the CryptoServer Status ......................................................................................... 59
5.2 Resetting an Alarm ................................................................................................................... 61
5.3 Displaying the Battery Status ................................................................................................... 62
5.4 Displaying Files in the CryptoServer ........................................................................................ 62
5.5 Listing Current Firmware Modules ........................................................................................... 63
5.6 Displaying Users ....................................................................................................................... 64
5.7 Displaying the Boot Log ........................................................................................................... 65
5.8 Displaying the Audit Log .......................................................................................................... 66
5.9 Exporting the Audit Log ............................................................................................................ 67
5.10 Configuring the Audit Log ........................................................................................................ 68
5.11 Displaying the Date and Time on the CryptoServer .................................................................. 71
5.12 Displaying Memory Information ............................................................................................... 71
5.13 Displaying Driver Information ................................................................................................... 72
5.14 Loading Files onto the CryptoServer ........................................................................................ 72
5.15 Deleting Files in the CryptoServer ............................................................................................ 74
5.16 Transferring the Tme from the CryptoServer LAN to the CryptoServer ................................... 75
5.17 Restarting the CryptoServer ..................................................................................................... 75
5.18 Changing the ADMIN Authentication Key ................................................................................. 76
5.19 Loading the Firmware Encryption Key into the CryptoServer .................................................. 78
5.20 Changing to Maintenance Mode ............................................................................................... 80
5.21 Clear Command ........................................................................................................................ 81

Table of Contents
Page 5 of 142
5.22 Performing Clear to Factory Settings ....................................................................................... 82
5.23 Performing MBK Management on the CryptoServer LAN ........................................................ 86
5.23.1 Using the PIN Pad to Import an MBK ................................................................................. 88
5.23.2 Importing an MBK (DES) from a Smartcard ....................................................................... 88
5.23.3 Importing an MBK (AES) from a Smartcard ....................................................................... 88
5.23.4 Generating an MBK (AES) on a Smartcard ......................................................................... 89
5.23.5 Displaying MBK Key Information on the Smartcard ........................................................... 89
5.23.6 Copying an MBK from One Smartcard to Another .............................................................. 90
5.23.7 Changing the PIN for the MBK Smartcard .......................................................................... 90
5.23.8 Using the PIN Pad to Import an MBK and Save it to a Smartcard ...................................... 90
5.23.9 Generating an AES Key and Saving It to a Smartcard ........................................................ 91
6 Setting up NTP .......................................................................................................................... 93
6.1 Activating the SSH Daemon ..................................................................................................... 94
6.2 Entering the NTP Server's IP Address ...................................................................................... 95
6.3 Creating an NTP Manager ........................................................................................................ 96
6.4 Running & Configuring NTP on the CryptoServer..................................................................... 97
6.5 Running the NTP Daemon ........................................................................................................ 98
6.6 Synchronizing the CryptoServer LAN's Time with the Time of the CryptoServer plug-in card 98
6.6.1 Connecting the PIN Pad ..................................................................................................... 98
6.6.2 Activating the PIN Pad ....................................................................................................... 99
6.6.3 Transferring the Time of the CryptoServer LAN to the CryptoServer ................................. 99
6.7 Running the NTP Client ......................................................................................................... 100
7 Configuring NTP ..................................................................................................................... 101
7.1 Changing the Default Values for Time Synchronization on the CryptoServer LAN ................ 101
7.2 Viewing NTP Log Entries ........................................................................................................ 102
7.3 Changing the Time Zone for the CryptoServer LAN ............................................................... 102
8 Advanced Administration on the CryptoServer LAN ................................................................ 104
8.1 Configuring the Transfer Speed for Ethernet ......................................................................... 104
8.2 The Configuration File csxlan.conf ......................................................................................... 106
8.3 Restricting the Network Access on the CryptoServer LAN .................................................... 109
8.4 Setting up Remote Logging .................................................................................................... 112
8.4.1 Configuring the File ulogd.conf ........................................................................................ 112
8.4.2 Configuring the File syslog.conf ....................................................................................... 115
8.4.3 Configuring the Remote Syslog Daemon.......................................................................... 116
8.5 Adjusting the Menu Structure for the Menu Options ............................................................. 116
8.6 Setting up Static Routing ....................................................................................................... 118
9 Contact Address for Support Queries ..................................................................................... 120
Appendix A SNMP Objects and SNMP Traps ............................................................................... 121

Table of Contents
Page 6 of 142
A.1 SNMP Objects ......................................................................................................................... 121
A.2 SNMP Traps ............................................................................................................................ 135

Introduction
Page 7 of 142
1 Introduction
Thank you for purchasing our CryptoServer LAN security system. We hope you are satisfied
with our product. Please do not hesitate to contact us if you have any questions or
comments.
Third party (Open Source) software is used in the CryptoServer LAN.
You will find the license conditions for this software in the document
CryptoServerLAN_<version>_Licenses.pdf corresponding to your CryptoServer LAN
version on the delivered SecurityServer product CD in the folder
Documentation\Administration Guides\Licenses.
1.1 About this Manual
This manual describes how to configure the CryptoServer LAN, either via the menu options on
the front panel of the device, via SSH access, or directly using a keyboard and monitor
connected to the device.
1.1.1 Target Audience for this Manual
This manual is primarily designed to be used by administrators who are responsible for the
CryptoServer LAN.
1.1.2 Contents of this Manual
Chapter 2 provides an overview about the CryptoServer LAN and its administration.
Chapter 3 describes all the necessary configuration steps for bringing the CryptoServer LAN
into operation
Chapter 4 shows how you can locally administer the CryptoServer LAN by using the menu
options on its front panel.
Chapter 5 shows how you can locally administrate the CryptoServer (all series), installed into
the CryptoServer LAN, by using the menu options which are available on the front panel of the
CryptoServer LAN.
Chapter 6 is a short overview of the steps required to enable NTP to be used with a
CryptoServer LAN.
Chapter 7 describes a few more options that you can use to configure NTP on the
CryptoServer LAN.
Chapter 8 describes advanced administration functions for the CryptoServer LAN. None of the
administration tasks detailed in this chapter can be performed using the menu options on the
CryptoServer LAN.
Introduction
Page 8 of 142
Chapter 9 provides the manufacturer's contact data in case you have questions on
CryptoServer LAN or problems occurred while operating the CryptoServer LAN.
In this manual you'll find solution-oriented, highly practical scenarios that provide all the
information you require to set up and administer the CryptoServer LAN.
As not all the administration tasks for the CryptoServer plug-in card can be configured within
the CryptoServer LAN using the device's own menu options, we recommend you configure the
plug-in card remotely using the CryptoServer Administration Tool (CAT) or with the
CryptoServer command line tool (csadm).
The most important settings, for example for user management and for the cryptographic
interfaces, can only be made with the CryptoServer Administration Tool (CAT) or with the
CryptoServer command line tool (csadm).
1.1.3 Document Conventions
We use the following conventions in this manual:
Convention
Usage
Example
Bold
Items of the Graphical User Interface
(GUI), for example, menu options
Press the OK button on the front panel
of the CryptoServer LAN.
Monospaced
File names, folder and directory
names, commands, file outputs,
programming code samples
You will find the file example.conf in
the /exmp/demo/ directory.
Italic
References and important terms
See Chapter 3, "Example" in the
CryptoServer Manual for System
Administrators.
Table 1: Document conventions
We have used icons to highlight the most important notes and information.
Here you find important safety information that should be followed.
Here you find additional notes or supplementary information.

Introduction
Page 9 of 142
1.2 Other Manuals
The CryptoServer is supplied as a PCI-Express (PCIe) plug-in card in the following series:
■ CryptoServer CSe-Series
■ CryptoServer Se-Series
■ CryptoServer Se-Series Gen2
The CryptoServer LAN (appliance) is supplied in the following series:
■ CryptoServer LAN CSe-Series
■ CryptoServer LAN Se-Series
■ CryptoServer LAN Se-Series Gen2
We provide the following manuals on the product CD for the CryptoServer PCIe CSe-, Se-
Series, and Se-Series Gen2 plug-in cards and for the CryptoServer LAN (appliance) CSe-, Se-
Series and Se-Series Gen2:
Quick Start Guides
You will find these Manuals in the main folder of the SecurityServer product CD. They are
available only in English, do not cover all possible scenarios, and are intended as a
supplement to the product documentation provided on the SecurityServer product CD.
■ CryptoServer LAN - Quick Start Guide
If you are looking for step-by-step instructions on how to bring the CryptoServer LAN into
service, how to prepare a computer (Windows 7) for the CryptoServer administration and
how to start administrating your CryptoServer with the Java-based GUI CryptoServer
Administration Tool (CAT), read this document.
■ CryptoServer PCIe - Quick Start Guide
If you are looking for step-by-step instructions on how to bring the CryptoServer PCIe plug-
in card into service, how to install the CryptoServer driver on a computer with minimal
RHEL 7.0 installation and how to start administrating your CryptoServer with the
CryptoServer Command-line Administration Tool (csadm), read this document.
Manuals for System Administrators
You will find these manuals on the product CD in the following folder:
…Documentation\Administration Guides\
■ CryptoServer - Manual for System Administrators
If you need to administer a CryptoServer PCIe plug-in card or a CryptoServer LAN using
the CryptoServer Administration Tool (CAT), read this manual. Furthermore, this manual

Introduction
Page 10 of 142
provides a detailed description of the CryptoServer functions, required for the correct and
effective operation of the product.
■ CryptoServer LAN - Manual for System Administrators (this manual)
If you need to administer a CryptoServer LAN (appliance), read this manual. Since a
CryptoServer is integrated into the CryptoServer LAN, please read the CryptoServer -
Manual for System Administrators, as well.
■ CryptoServer LAN/CryptoServer - Troubleshooting
If problems occur while you are using a CryptoServer PCIe plug-in card or a CryptoServer
LAN (appliance), read this manual.
■ CryptoServer LAN/CryptoServer
PKCS#11 CryptoServer Administration Tool – Manual for System Administrators
If you need to administer the PKCS#11 R2 interface with the PKCS#11 CryptoServer
Administration Tool (P11CAT), read this manual.
■ CryptoServer LAN/CryptoServer
CryptoServer Command-line Administration Tool - csadm - Manual for System Administrators
If you need to administer a CryptoServer PCIe plug-in card or a CryptoServer LAN using
the CryptoServer Command-line Administration Tool (csadm), read this manual (only
English version available).
Operating Manuals
You will find these manuals on the product CD in the following folder:
…Documentation\Operating Manuals\. They contain all the necessary information for using
the hardware of the CryptoServer PCIe plug-in card respectively the CryptoServer LAN
(appliance).
The CryptoServer LAN - Overview
Page 11 of 142
2 The CryptoServer LAN - Overview
The CryptoServer LAN is a 19-inch appliance in which a CryptoServer PCIe plug-in card CSe-,
Se-Series or Se-Series Gen2 is installed. It can easily be installed in a 19-inch cabinet and
integrated in a network.
The CryptoServer LAN (appliance) is supplied in the following series:
■ CryptoServer LAN V4 CSe-Series, i.e., a CSe-Series CryptoServer PCIe plug-in card is
integrated in the CryptoServer LAN
■ CryptoServer LAN V4 Se-Series, i.e., a Se-Series CryptoServer PCIe plug-in card is
integrated in the CryptoServer LAN
■ CryptoServer LAN V4 Se-Series Gen2, i.e., a Se-Series Gen2 CryptoServer PCIe plug-in card
is integrated in the CryptoServer LAN.
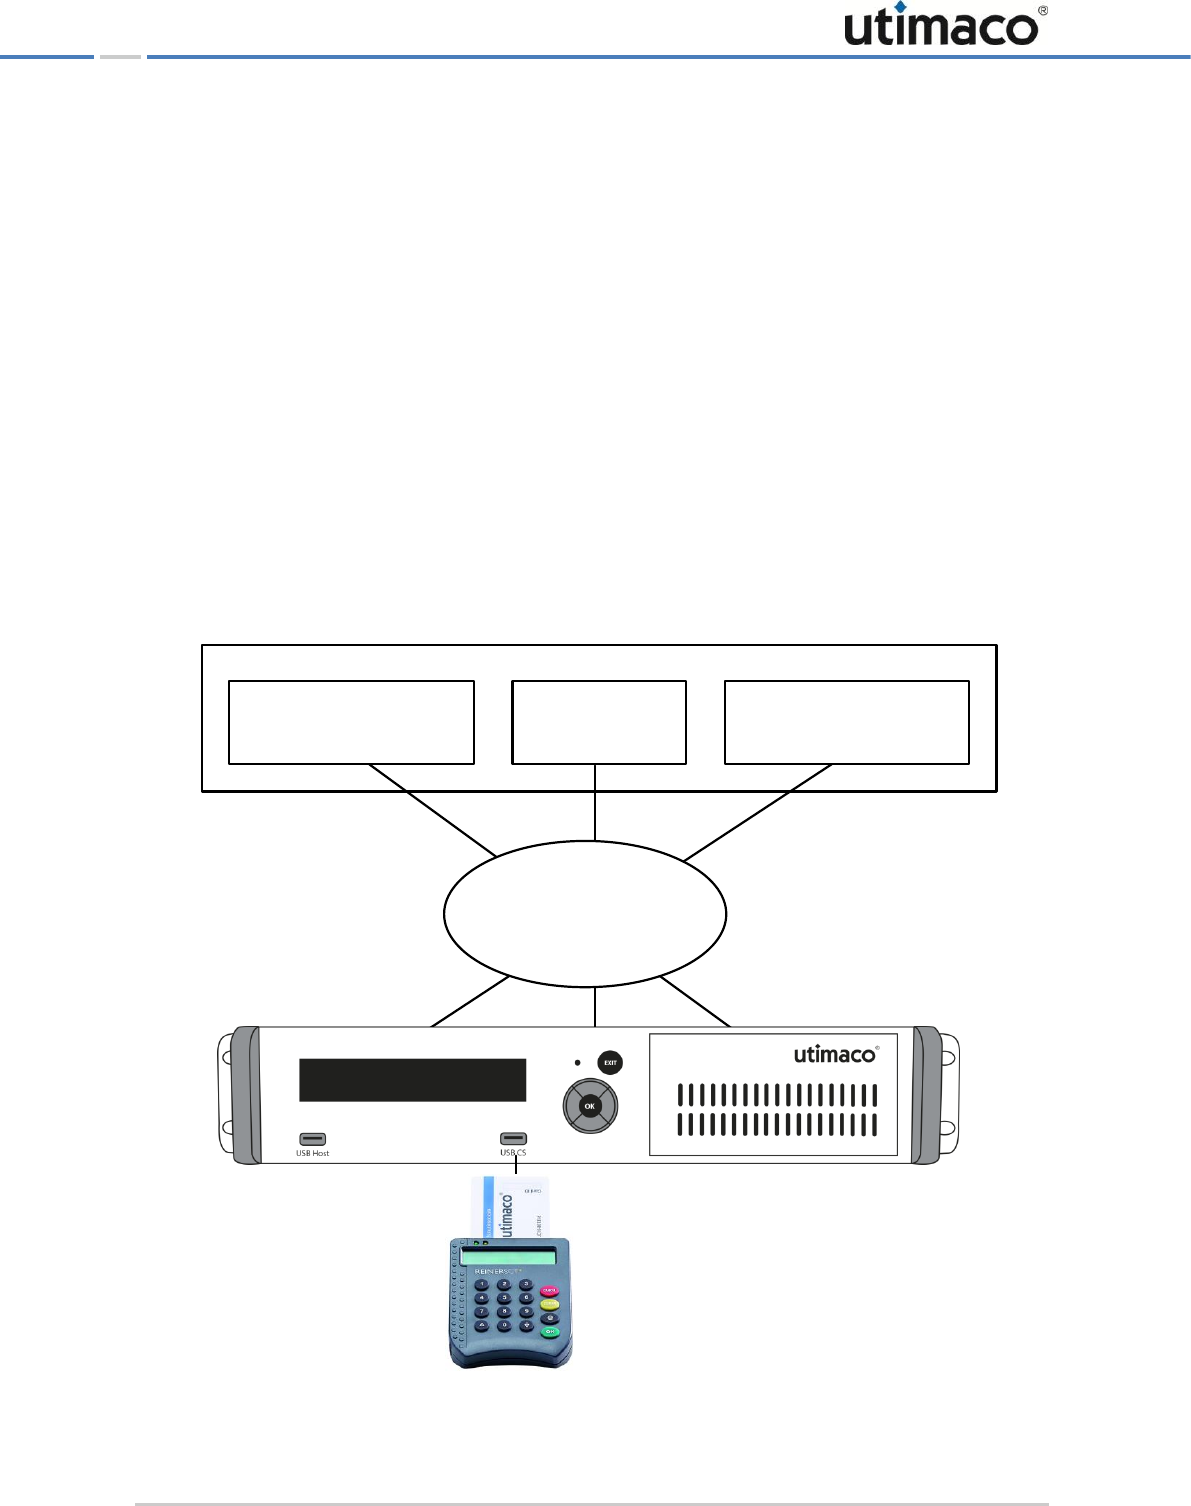
The environment in which a CryptoServer LAN can be implemented looks like this:
Figure 1: Example for a CryptoServer LAN implementation environment
REINER SCT
PIN pad with smartcard
csadm
(CryptoServer Command-line
Administration Tool)
Application
(CSP, PKCS#11, ...)
Customer Software
CAT
CryptoServer Administration Tool
(Java based)
TCP/IP Network
CryptoServer LAN V4
Host-PC

The CryptoServer LAN - Overview
Page 12 of 142
The CryptoServer LAN can be administered over a network from a host computer. You can
find the current and complete list of supported operating systems in the document
CS_PD_SecurityServer_SupportedPlatforms.pdf on the product CD in the folder
…\SecurityServer <version>\Documentation\Product Details.
2.1 Administration
When using the administration functions, you can choose between administering the
CryptoServer LAN or the CryptoServer plug-in card.
You can use the following methods to administer the CryptoServer LAN:
■ Local administration via the CryptoServer LAN menu options
On the front panel of the CryptoServer LAN you see a display with a number of control
buttons. Use this display and the control buttons to access the menu options.
■ Local administration by using a monitor and a keyboard that are directly connected to the
CryptoServer LAN.
■ Remote administration via an SSH connection (for example under Windows with PuTTY
and WinSCP)
■ Remote administration with the command line administration tool (csadm)
The csadm tool is a program that is installed on a host computer and can be called from a
command-line interface or from a script.
You can administer the CryptoServer plug-in card within the CryptoServer LAN as follows:
■ Remotely by using the CryptoServer Administration Tool (CAT) which is installed on a host
computer.
The CAT is a Java application that can only be used to administer the CryptoServer plug-in
card. It is provided by Utimaco on the SecurityServer product CD, and is installed per
default during the SecurityServer software installation (see Chapter 3, "Installing the
Software" in the CryptoServer Manual for System Administrators).
■ Remotely with the CryptoServer command-line Administration tool (csadm) installed on a
host computer.
■ Locally with the CryptoServer LAN menu options mentioned above.
To enable this, a PIN pad and ten smartcards are included in the CryptoServer LAN
deliverables. Chapter 4.1 explains in detail how to connect the PIN pad depending on your
CryptoServer LAN hardware version, PIN pad model and administration task to be performed.
2.2 Transferring Files to or from the CryptoServer LAN
You may sometimes need to transfer files to your CryptoServer LAN, for example to update
the CSLAN operating system (also referred to bellow as CSLANOS) in all or only a single
CryptoServer LAN partition as described in chapter 4.18 or to export files, for example trace
The CryptoServer LAN - Overview
Page 13 of 142
files, from the CryptoServer LAN so they can be used later on for error analysis as described in
chapter 4.13.
You can do this either by:
■ using a trustworthy USB flash drive which has been formatted with the FAT32 file system
The USB flash drive must be connected to a USB port of the CryptoServer LAN which has
no access to the integrated CryptoServer.
▣ If you are using a CryptoServer LAN V3, connect the USB flash drive to one of the USB
ports behind the front door of the CryptoServer LAN.
▣ If you are using a CryptoServer LAN V4, connect the USB flash drive to one of the two
USB Host ports on the front panel of the CryptoServer LAN.
The file (a firmware module, *.mtc or a firmware package, *.mpkg) you want to upload has to
be placed in the main directory of a USB flash drive, so that it is shown on the display of the
CryptoServer LAN and can be selected for upload.
CryptoServer LAN can access data from and write data on only a single trustworthy USB
flash drive connected to it. Although more than one USB flash drives can be simultaneously
connected to the CryptoServer LAN, the USB device that has been inserted as first gets
connected with the CryptoServer LAN. To establish a connection to another USB flash drive,
you should first disconnect the currently connected one and then plug the next USB flash
drive into the corresponding USB port of the CryptoServer LAN.
■ using an SSH client (for example with PuTTY and WinSCP under Windows).
The CryptoServer LAN has an integrated SSH server. This SSH server supports the SCP file
transfer protocol.
SCP offers significantly higher levels of security than FTP because the connection is
encrypted. This protocol also uses an SSH server key to provide extremely effective server
authentication. In addition, it can use either password (default setting) or SSH key
authentication to check the client.
Visit the following website to get an overview of the available SSH clients:
http://www.openssh.org
2.3 Authenticating commands
Some of the commands you trigger using the menu options on the CryptoServer LAN must
also be authenticated. This process is performed exclusively using the authentication key
The CryptoServer LAN - Overview
Page 14 of 142
stored on the delivered smartcards. When the CryptoServer LAN is supplied, the ADMIN.key is
already stored on the ten delivered smartcards.
If you have changed this authentication key in the CryptoServer, you must use the new
authentication key to authenticate the commands. This new authentication key must be
saved to a smartcard.
To do this, connect the supplied serial PIN pad to the CS COM serial port on the
CryptoServer LAN or resp. to the USB CS port of the CryptoServer LAN V4.
You cannot authenticate the commands by using any other keys or by entering a password
via the CryptoServer LAN menu options.
2.4 CryptoServer LAN System Users
The system user root, who has access to all administrative functions, is the only user existing
in the CryptoServer LAN operating system CSLANOS version 4.4.7 and previous. A second
user - the cslagent – is introduced with CSLANOS version 4.5.x. The cslagent user has no
privileges but is used to avoid direct SSH-login as root. He is able to do some monitoring, but
he is not privileged to execute any administrative functions.
2.5 Boot Partitions in the CryptoServer LAN
The CryptoServer LAN has three boot partitions:
■ factory
■ user1
■ user2
The boot partition user1 is started when the CryptoServer LAN is in its initial state. If you have
not used the menu options to select a different boot partition, the last boot partition selected
via the CryptoServer LAN menu options is the one that now boots automatically.
You can access the factory boot partition at any time if the user1 and user2 boot partitions
fail to boot.
These two boot partitions, user1 and user2, give you the option of booting the CryptoServer
LAN with two different configurations. You can also reset any user settings in boot partitions
user1 and user2.
■ factory
This boot partition corresponds to the state in which the CryptoServer LAN is supplied.
You cannot make any permanent configuration changes here. This initial configuration is

The CryptoServer LAN - Overview
Page 15 of 142
created again after every restart. From this boot partition you can update the CSLAN
operating system on one of the other two boot partitions, user1 or user2.
■ user1
This boot partition is where you launch the CryptoServer LAN in the state in which it is
supplied. You can also make permanent changes to its configuration here. From this boot
partition you can update the CSLAN operating system on boot partition user2. If you then
boot the user2 boot partition, the configuration of boot partition user1 is transferred to
boot partition user2.
■ user2
You can make permanent configuration changes in this boot partition. From this boot
partition you can update the CSLAN operating system on boot partition user1. If you then
boot the user1 boot partition, the configuration is transferred from boot partition user2 to
boot partition user1.
For step-by-step instructions on how to update the operating system of the CryptoServer
LAN, please read chapter 4.18.
2.6 The Simple Network Management Protocol
The Simple Network Management Protocol (SNMP) is a network protocol developed by the
Internet Engineering Task Force (IETF) to provide a way of monitoring network devices from a
central management station.
What are known as agents (programs) are used for monitoring. They run directly on the
devices that are to be monitored. These programs can record the status of a device, make
settings, and trigger actions. SNMP enables these programs to communicate with a central
management station over a network.
However, the SNMP protocol does not define which values are supplied by a network device.
These values (Managed Objects) are described in a Management Information Base (MIB). An
MIB is a description file which lists the individual values.
Versions SNMPv1 and SNMPv2 of CryptoServer LAN support the SNMP protocol. In the
CryptoServer LAN, SNMP is disabled by default.
2.7 The Internet Protocol Version 6 (IPv6)
It is possible to assign an IPv4 and an IPv6 address for every network connection of the
CryptoServer LAN.
The CryptoServer LAN - Overview
Page 16 of 142
From CSLANOS version 4.2.0 onwards the Internet Protocols IPv4 and IPv6 are supported.
Previous CSLANOS versions support only IPv4.
Bringing the CryptoServer LAN into Operation
Page 17 of 142
3 Bringing the CryptoServer LAN into Operation
This chapter describes all the configuration steps you must perform to bring the CryptoServer
LAN into operation.
The accompanying operating guidelines tell you how to integrate CryptoServer LAN into a
network and which connections the device has for that purpose. You should also take note of
the network connection, either eth0 or eth1, to which you have connected the network cable
to the CryptoServer LAN.
Refer to the accompanying operating manuals for details of the network connections to the
device.
The following sections describe how you can bring the CryptoServer LAN into operation by
using the menu options on the front panel of the CryptoServer LAN.
3.1 Menu Options on the Front Panel of CryptoServer LAN
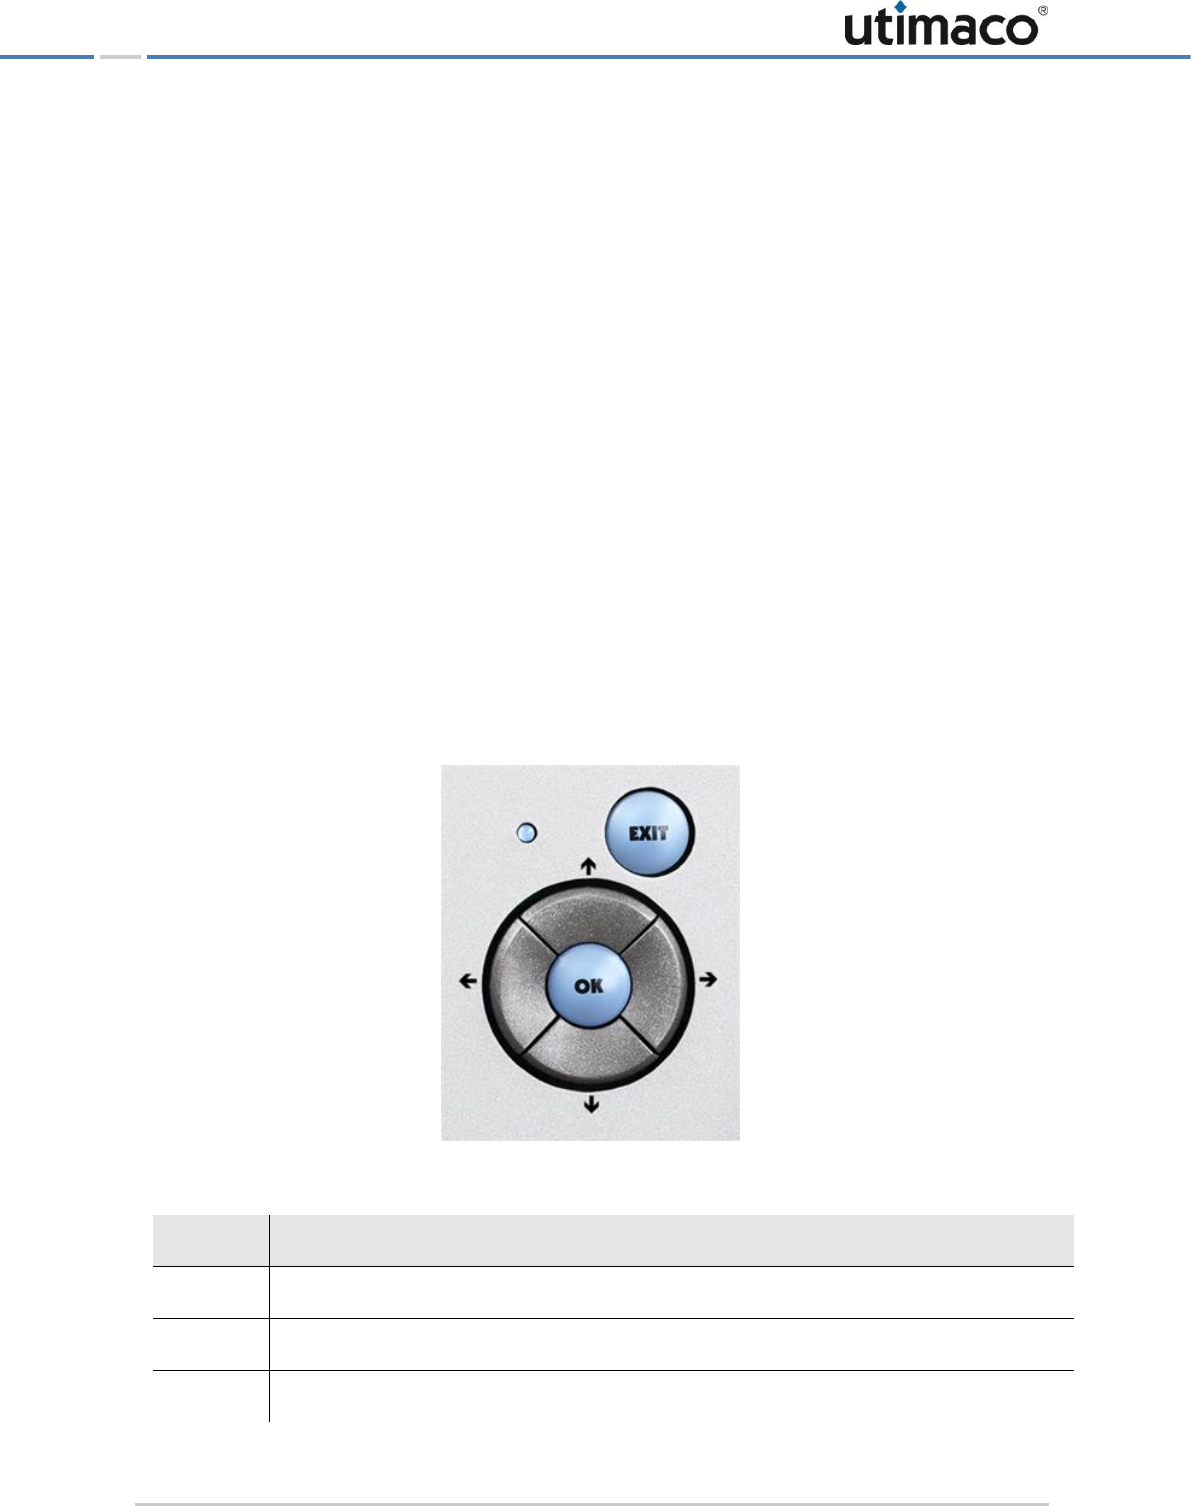
For administrating the CryptoServer LAN a display (4 x 40 characters) and six buttons are
available on the front panel of the CryptoServer LAN. You can use the buttons to access the
CryptoServer LAN menu options which are then shown on the display.
Figure 2: Menu control buttons of CryptoServer LAN
Button
Function
EXIT
Quit the currently displayed menu level or menu item
OK
Select the menu level or confirm the menu item
Move up in the menu control

Bringing the CryptoServer LAN into Operation
Page 18 of 142
Button
Function
Move to the right in the menu control
Move down in the menu control
Move to the left in the menu control
Table 2: Menu control buttons of CryptoServer LAN and their function
The last item in the menu is saved automatically. When you press a button, you automatically
access the most recently selected menu item. If you press the EXIT button to quit the most
recently selected menu item, the last item in the menu will not be saved.
3.2 Switching on the CryptoServer LAN
1. When you have connected the CryptoServer LAN to a power supply and switched the main
switch for the power supply on the rear of the device from 0 to 1, open the front door on
the right-hand front panel.
2. Press the rocker switch with the white dot, to the right of the reset switch, to switch the
device on.
If the CryptoServer LAN has been brought into operation correctly, the display should look like
this for example:
Figure 3: Display view of CryptoServer LAN - example
■ If you have a CryptoServer LAN with a Se-Series CryptoServer plug-in card, the first line of
the display says CryptoServer Se.
■ If you have purchased a CryptoServer LAN with a CSe-Series CryptoServer plug-in card,
the first line of the display says CryptoServer Se-Series Gen2.
■ If you have purchased a CryptoServer LAN with a CSe-Series CryptoServer plug-in card,
the first line of the display says CryptoServer CSe.
The values displayed in the figure above for Temp., Trans./min., Clients and Load are only
example values.
CryptoServer CSe
Mode: Operational OK Temp.: 31,3 °C
Trans./min.: 0 Clients: 2
Load: 0 %

Bringing the CryptoServer LAN into Operation
Page 19 of 142
The most important thing at this point is that the CryptoServer is running in Operational Mode
after it has been booted and is therefore ready for use.
3.3 Changing the Password for the Users root and cslagent
As the manufacturer, Utimaco, has already set the password for accessing the operating
system CSLANOS as the root user (for all CSLANOS versions) and the user cslagent (only
for CSLANOS version 4.5.x and higher), we strongly recommend you to change this password
as soon as possible.
User = root, cslagent
Password = utimaco
3.3.1 Changing the Default Password via a Terminal
To change the password for the root or cslagent user by using a terminal directly connected
to the CryptoServer LAN, proceed as follows:
1. Check the version of the installed CSLANOS.
a) On the front panel of the CryptoServer LAN, press the OK button.
b) Press the OK button to open the CSLAN Administration menu item.
c) Use the button to select Show CSLAN Info and press the OK button to open the
menu item.
d) Press the OK button to select Show Version and press the OK button to open the menu
item.
The installed version of the CSLANOS is displayed as the entry CSLAN.
2. Connect a keyboard and a monitor to the CryptoServer LAN.
3. Logon to the CryptoServer LAN.
CSLANOS all versions:
a) Enter root as the CryptoServer login and confirm by pressing the Enter key.
b) As the Password, enter utimaco and confirm by pressing the Enter key.
CSLANOS 4.5.x and higher:
a) Enter cslagent as the CryptoServer login and confirm by pressing the Enter key.
b) As the Password, enter utimaco and confirm by pressing the Enter key.
4. To enable you to change the password for the root or cslagent user, enter passwd and
press the Enter key.
5. Follow the instructions on the monitor.
Bringing the CryptoServer LAN into Operation
Page 20 of 142
The default system configuration of CSLANOS version 4.5.x and higher prohibits remote
login for the
root
user via SSH connection.
To enable SSH-login for the user
root
, you should edit the configuration file for the SSH
daemon
/etc/ssh/sshd_config
to change the default setting
PermitRootLogin
no
to
PermitRootLogin yes
. Afterwards, the SSH daemon has to be restarted for the
setting to become effective (
/etc/init.d/sshd restart
).
3.3.2 Changing the Default Password via an SSH Connection
If you want to change the password for the root user (all CSLANOS versions) or the
cslagent user (CSLANOS version 4.5.x and higher) remotely via an SSH connection from your
admin PC, follow the steps described below.
Prerequisites:
■ Check the version of the installed CSLANOS by using the menu buttons on the front panel
of CryptoServer LAN as described in chapter 3.3.1, step 1. Alternatively, you can use the
csadm command CSLGetVersion (csadm Dev=<device> CSLGetVersion).
If you are using a CryptoServer LAN with CSLANOS version 4.5.x and higher, please keep in
mind that the default system configuration of that CSLANOS version prohibits remote login
for the
root
user via SSH connection.
■ You have enabled the SSH daemon as described in chapter 3.6.
The data required for SSH access is as follows:
Host name = <Name or IP address of the CryptoServer LAN>
Port number = 22
User name = <root or cslagent>
Password = utimaco
CSLANOS version 4.4.7 and lower
1. Open a secure shell (for example, PuTTY for Windows or SSH on a Linux machine).
2. As the CryptoServer login, enter root and confirm by pressing the Enter key.
3. As the Password, enter utimaco and confirm by pressing the Enter key.
4. To enable you to change the password for the root user, enter passwd and press the
Enter key.
Bringing the CryptoServer LAN into Operation
Page 21 of 142
5. Follow the instructions on the monitor.
CSLANOS version 4.5.x and higher
1. Open a secure shell (for example, PuTTY for Windows or SSH on a Linux machine).
2. As the CryptoServer login, enter cslagent and confirm by pressing the Enter key.
3. As the Password, enter utimaco and confirm by pressing the Enter key.
4. To enable you to change the password for the root user, enter passwd and press the
Enter key.
5. Follow the instructions on the monitor.
6. Type su -l to login as the root user.
7. As the Password, enter utimaco and confirm by pressing the Enter key.
8. To enable you to change the password for the root user, enter passwd and press the
Enter key.
9. Follow the instructions on the monitor.
3.4 Entering the IP Address of the CryptoServer LAN
You must assign an IP address to the CryptoServer LAN to ensure it can be accessed over the
network. You must use the menu options on the CryptoServer LAN to input this IP address.
From CSLANOS version 4.2.0 onwards the Internet Protocols IPv4 and IPv6 are supported.
Previous CSLANOS versions support only IPv4.
1. On the front panel of the CryptoServer LAN, press the OK button.
The arrow on the far left-hand side of the display shows you which submenu you can
select with the OK button.
2. Press the OK button to open the CSLAN Administration menu item.
3. Press the OK button to open the Configuration menu item.
4. Press the OK button to open the Network menu item.
5. Press the OK button to open the IP Address menu item.
6. Press the OK button to open the IPv4 Address menu item or use the button to select the
IPv6 Address and then press OK to open this menu item.
7. Press the OK button to open the network interface: eth0 menu item or use the button to
select network interface: eth1 and then press OK to open the menu item you require.
Bringing the CryptoServer LAN into Operation
Page 22 of 142
▣ If you select IPv4 Address the IP Address: menu item opens.
▣ If you select IPv6 Address the IPv6 Address and bit mask: menu item opens.
The cursor under a number shows that you can change that number with the and
buttons. Press the button to move the cursor to the next number. Press the button
to move the cursor back to the previous symbol.
If you want to assign an IPv6 address you can use the and buttons to select the
letters from a to f, a colon and a slash.
If you have selected the symbol █ by using the and buttons you can use the
button to insert a zero at this point or you can use the button to delete the current
symbol.
If the curser is positioned on the right below the last symbol, you can use the button to
insert a zero at this point. If you press the button several times, the zero entry will be
repeated.
8. Use the menu options to assign an IPv4 or an IPv6 address for the network connection
you require and press the OK button.
If you have assigned an invalid IPv6 address a special note will be shown.
9. In this case, please enter the IPv6 address again.
10. If you have assigned a valid IP address, please respond to the prompt that follows with
Yes, by pressing the button to insert the asterisk in the brackets []Yes and confirm by
pressing the OK button.
The system displays a message confirming that you have successfully entered the IP
address.
3.5 Entering the IP Address of the Default Gateway
From CSLANOS version 4.2.0 onwards the Internet Protocols IPv4 and IPv6 are supported.
Previous CSLANOS versions support only IPv4.
1. On the front panel of the CryptoServer LAN, press the OK button.
The arrow on the far left-hand side of the display shows you which submenu you can
select with the OK button.
2. Press the OK button to open the CSLAN Administration menu item.
3. Press the OK button to open the Configuration menu item.
4. Press the OK button to open the Network menu item.

Bringing the CryptoServer LAN into Operation
Page 23 of 142
5. Use the button to select Default Gateway and press the OK button to open the menu
item.
6. Select Default Gateway IPv4 to open the IPv4 Gateway Address: menu item.
7. Select Default Gateway IPv6 to open the IPv6 Gateway Address: menu item.
The cursor under a number shows that you can change that number with the and
buttons. Press the button to move the cursor to the next number. Press the button
to move the cursor back to the previous symbol.
If you want to assign an IPv6 address you can use the and buttons to select the
letters from a to f, a colon and a slash.
If you have selected the symbol █ by using the and buttons you can use the
button to insert a zero at this point or you can use the button to delete the current
symbol.
If the curser is positioned on the right below the last symbol, you can use the button to
insert a zero at this point. If you press the button several times, the zero entry will be
repeated.
8. Use the menu options to assign an IPv4 or an IPv6 address for the network connection
you require and press the OK button.
9. If you have assigned an invalid IPv6 address a special note will be shown.
10. In this case, please enter the IPv6 address again.
11. If you have assigned a valid IP address, please respond to the prompt that follows with
Yes, by pressing the button to insert the asterisk in the brackets []Yes and confirm by
pressing the OK button.
The system displays a message confirming that you have successfully entered the IP address
of the default gateway.
3.6 Enabling the SSH Daemon
The SSH daemon creates a secure, authenticated and encrypted connection between two
computers over an insecure network.
The default setting in the CryptoServer LAN is for the SSH daemon to be disabled.
To enable the SSH daemon:
1. Press the OK button on the front panel of the CryptoServer LAN.
The arrow on the far left-hand side of the display shows you which submenu you can
select with the OK button.
2. Press the OK button to open the CSLAN Administration menu item.
3. Press the OK button to open the Configuration menu item.
Bringing the CryptoServer LAN into Operation
Page 24 of 142
4. Use the button to select Services and press the OK button to open the menu item.
5. Press the OK button to open the SSH Daemon menu item.
6. Press the OK button to open the Configuration menu item.
7. If the display shows Configuration of SSH Daemon, use the button to move the asterisk
into the square brackets []Enable and confirm by pressing OK.
You then see the IP area, including the subnet mask (after the slash) for which SSH access to
your CryptoServer LAN is permitted.
If you have already assigned an IP address for your CryptoServer LAN, the subnet mask of
that IP address is displayed here.
The cursor under a number shows that you can change that number with the and
buttons. Use the button to move the cursor to the next number.
8. Then press the / and buttons to set the IP area for which SSH access is to be
permitted and then press OK.
This setting also comes into effect for the /etc/hosts.allow file. You find further
information about how to restrict the SSH access to the CryptoServer LAN in chapter 8.3 of
this manual.
If you are using a CSLANOS version 4.5.x or higher, use the
cslagent
system user account
to login to the CSLANOS for the first time via an SSH connection. By default, the SSH-login
for the user
root
is disabled until you enable it in the configuration file for the SSH daemon
/etc/ssh/sshd_config
with the setting
PermitRootLogin yes
. Afterwards, the
SSH daemon has to be restarted for the setting to become effective (
/etc/init.d/sshd
restart
).
Administering the CryptoServer LAN
Page 25 of 142
4 Administering the CryptoServer LAN
In the next few sections we describe how you can administer the CryptoServer LAN by using
the menu options on the front panel of the CryptoServer LAN.
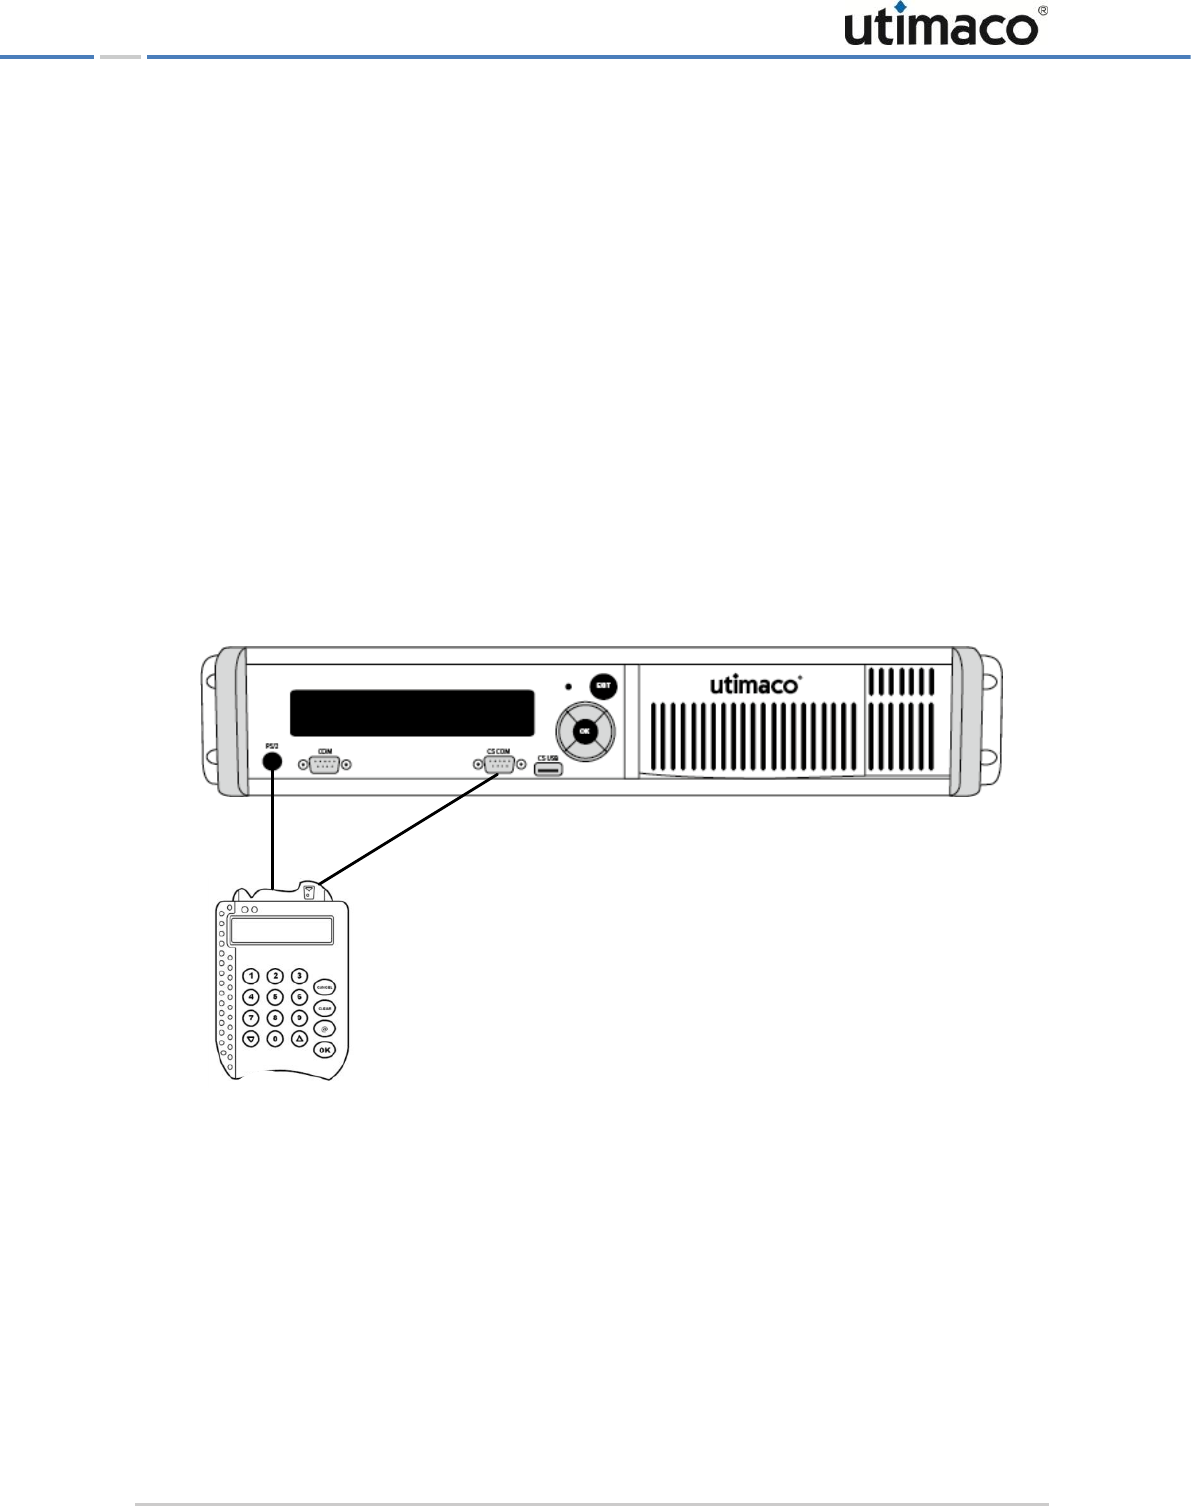
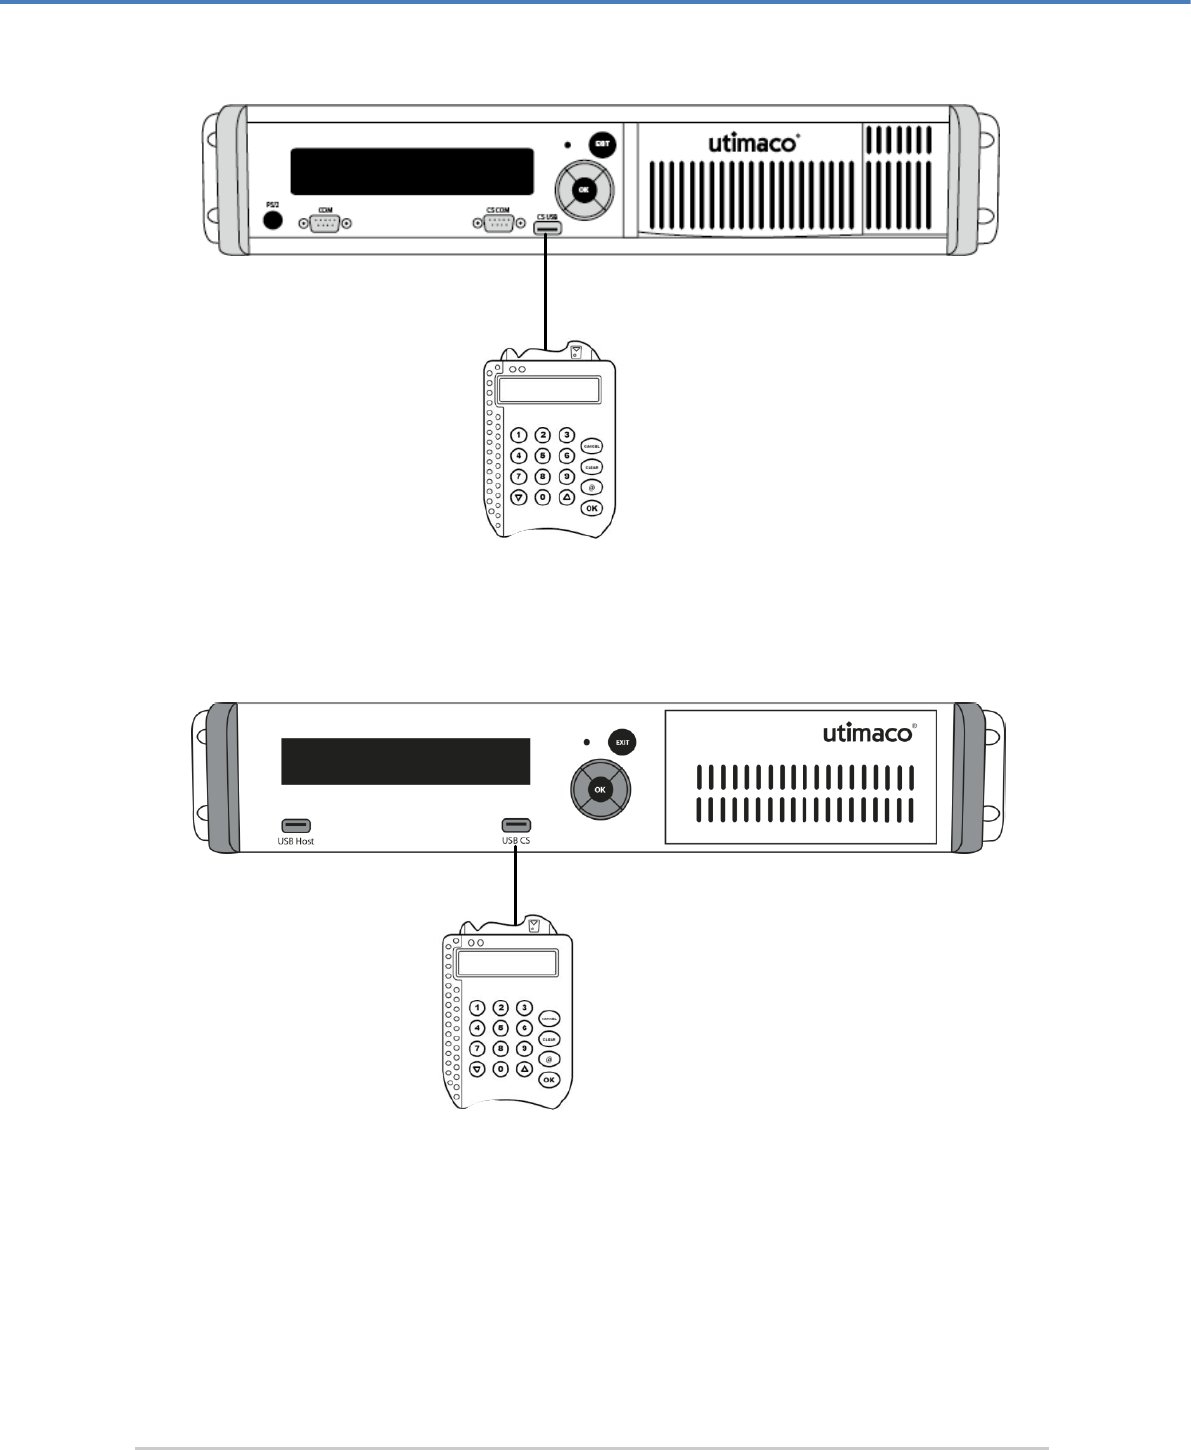
4.1 Connecting the PIN pad
If you want to perform MBK management locally by using the CryptoServer LAN's menu
options or if you want to use an RSA smartcard for authentication, you must connect the PIN
pad directly to the integrated CryptoServer plug-in card, i. e. you must connect the PIN pad to
the CS COM serial port or to the CS USB port on the front panel of the CryptoServer LAN. The
CS COM and USB CS ports are directly connected to the integrated CryptoServer plug-in card.
When you connect your serial PIN pad to the CS COM port of the CryptoServer LAN, you have
to use also the PS/2 port on the front panel of the CryptoServer LAN to provide the power for
the PIN pad.
Figure 4: Connecting the PIN pad directly to the integrated CryptoServer plug-in card (via serial port)
You have to connect the USB PIN pad for local MBK management to the CS USB (USB CS for
CryptoServer LAN V4) port on the CryptoServer LAN or to the USB port on the CryptoServer
plug-in card.
REINER SCT
PIN pad
CryptoServer LAN
Administering the CryptoServer LAN
Page 26 of 142
Figure 5: Connecting the PIN pad directly to the integrated CryptoServer plug-in card (via USB port)
Figure 6: Connecting the PIN pad directly to the integrated CryptoServer plug-in card (via USB port)
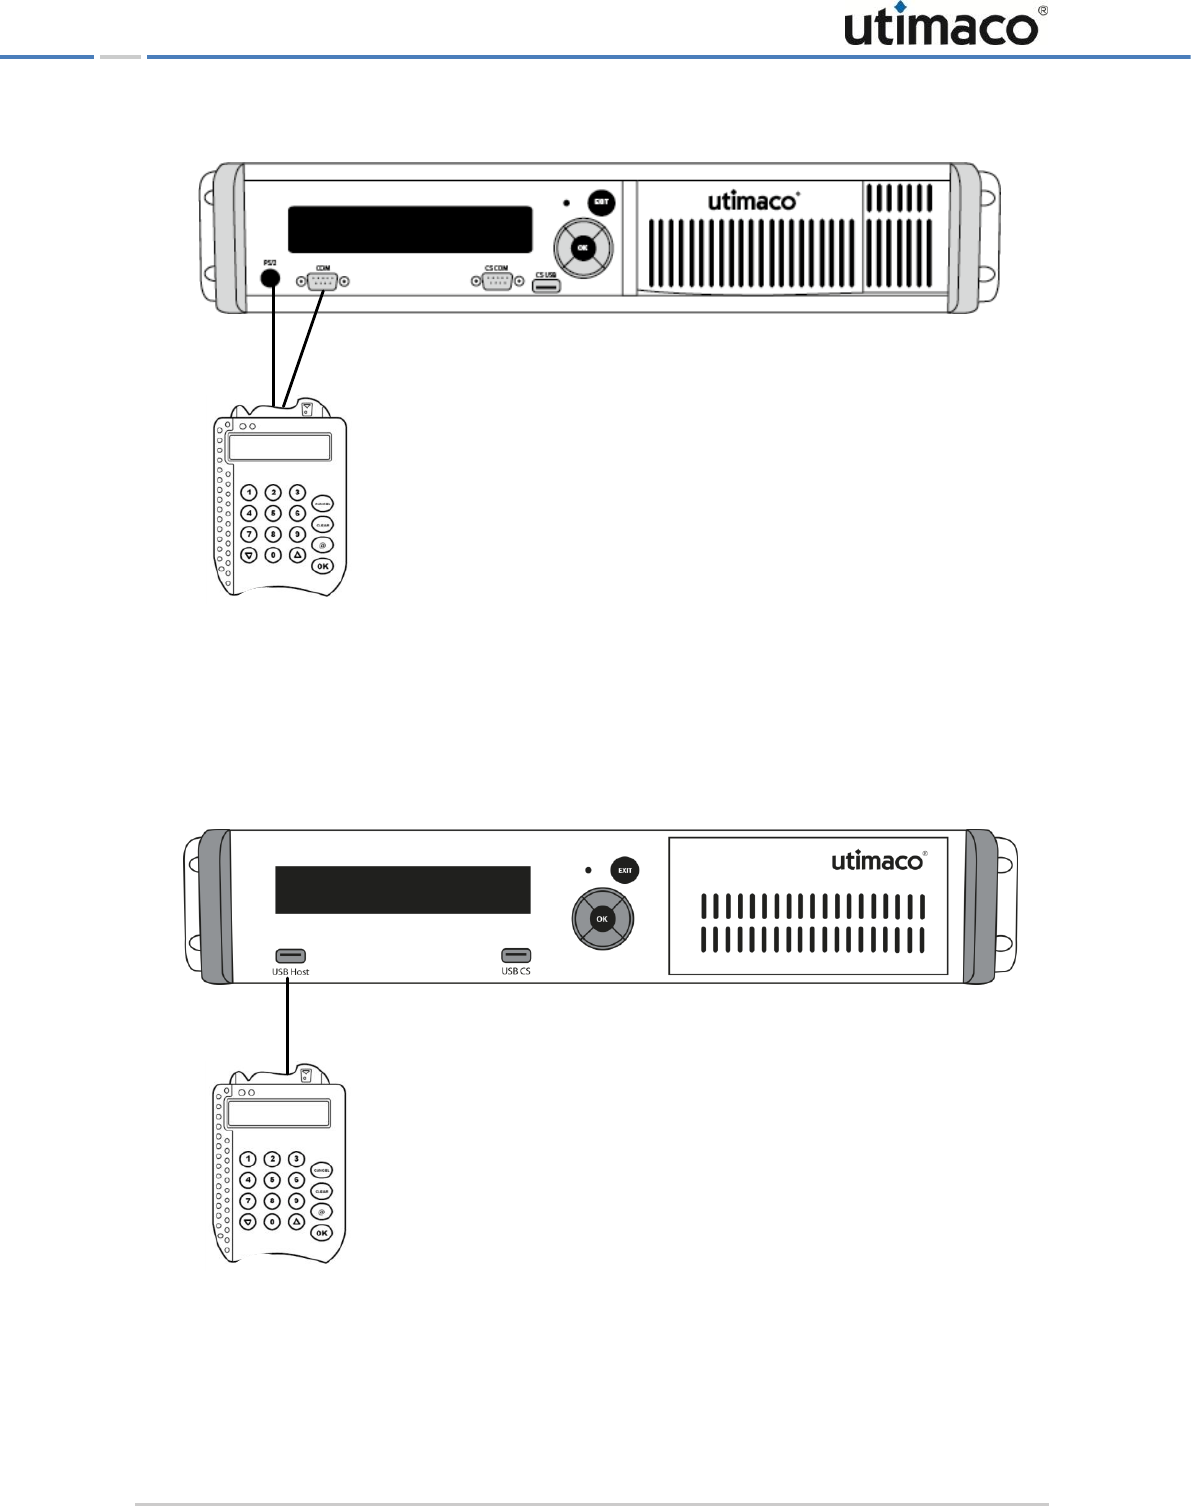
For all other administration tasks, the serial PIN pad must be connected to the CryptoServer
LAN's COM serial port and to the PS/2 port to provide it with power. The USB PIN pad has to
be connected to the USB Host port, depending on the CryptoServer LAN hardware you are
using.
REINER SCT
PIN pad
CryptoServer LAN
REINER SCT
PIN pad
CryptoServer LAN V4
Administering the CryptoServer LAN
Page 27 of 142
Figure 7: Connecting the PIN pad to the CryptoServer LAN (via serial port)
When you connect your PIN pad to the COM port of the CryptoServer LAN, you have to use
also the PS/2 port to provide the power for the PIN pad.
Figure 8: Connecting the PIN pad to the CryptoServer LAN (via USB port)
REINER SCT
PIN pad
CryptoServer LAN
REINER SCT
PIN pad
CryptoServer LAN V4

Administering the CryptoServer LAN
Page 28 of 142
If you do not want to connect the PIN pad to the COM serial port, you can use any of the
several USB ports on the CryptoServer LAN. Suitable cable adapters for connecting to the
serial ports or to the USB port are supplied along with the CryptoServer LAN.
4.2 Setting up the PIN Pad on the CryptoServer LAN
Before the REINERSCT PIN pad supplied with the CryptoServer LAN can be identified, you
must use the menu options to either enable or select it.
This is how you find or enable this PIN pad.
1. On the front panel of the CryptoServer LAN, press the OK button.
The arrow on the far left-hand side of the display shows you which submenu you can
select with the OK button.
2. Press the OK button to open the CSLAN Administration menu item.
3. Press the OK button to open the Configuration menu item.
4. Use the button to select Host and press the OK button to open the menu item.
5. Press the OK button to open the Card Reader&PIN Pad menu item.
6. As you want to change the PIN pad, press the OK button. This opens a list of PIN pads.
7. Use the button to select the REINERSCT(COM) or REINERSCT(USB), depending on
where you have connected the PIN pad, and press the OK button to confirm.
8. To confirm the selection, which is now displayed, press OK again.
4.3 Generating New Keys for the SSH Daemon
The CryptoServer LAN already holds a key pair for the SSH daemon. However, if you do not
want to use these keys, you can also generate new keys for allowing SSH access to the
CryptoServer LAN.
For security reasons, we recommend you change the keys that enable SSH access to the
CryptoServer LAN.
1. On the front panel of the CryptoServer LAN, press the OK button.
The arrow on the far left-hand side of the display shows you which submenu you can
select with the OK button.
2. Press the OK button to open the CSLAN Administration menu item.
3. Press the OK button to open the Configuration menu item.
4. Use the button to select Services and press the OK button to open the menu item.
5. Press the OK button to open the SSH Daemon menu item.
6. Use the button to select Generate new Keys and press the OK button to open the menu
item.
Administering the CryptoServer LAN
Page 29 of 142
7. Respond to the prompt that you now see on the display Do you really want to generate
new SSH keys? by pressing the button to insert the asterisk in the brackets []Yes and
confirm by pressing the OK button.
The keys that have now been generated appear on the display.
8. Press the OK or EXIT button, to close the menu.
4.4 Setting up DHCP
The Dynamic Host Configuration Protocol (DHCP) enables a computer to automatically
access an IP address and therefore to be integrated in an existing network.
This means that the computer (here the CryptoServer LAN) is automatically assigned an IP
address and the IP address of the default gateway by the DHCP server.
From CSLANOS version 4.2.0 onwards the Internet Protocols IPv4 and IPv6 are supported.
Previous CSLANOS versions support only IPv4.
You must use the CryptoServer LAN's menu options to enable DHCP.
1. On the front panel of the CryptoServer LAN, press the OK button.
The arrow on the far left-hand side of the display shows you which submenu you can
select with the OK button.
2. Press the OK button to open the CSLAN Administration menu item.
3. Press the OK button to open the Configuration menu item.
4. Then press OK to open the Network menu item.
5. Press the button to select DHCP and then press OK to open the menu item.
6. Press the OK button to open the Network menu item.
7. Use the button to select DHCP and then press the OK button to open this menu item.
If you want to enable that the IPv4 addresses for the CryptoServer LAN and for the default
gateway are provided by a DHCP server:
c) Press the OK button to select DHCP.
The Configuration of DHCP? menu item appears.
d) To enable DHCP, use the or the button to insert the asterisk in the []Enable
brackets and press the OK button to confirm this.
If you want to enable that the IPv6 addresses for the CryptoServer LAN and for the
standard gateway are provided by a DHCP server:

Administering the CryptoServer LAN
Page 30 of 142
a) Use the button to select DHCPv6 and press the OK button to select this menu item.
b) Press the OK button to open the network interface: eth0 menu item or use the
button to select network interface: eth1 and then press OK to open this menu item.
The Configuration of DHCPv6? menu item appears. Here you can select Disabled,
Enabled and Stateless by using the buttons and .
□ To enable DHCPv6, use the or the button to insert the asterisk in the
[]Enable brackets and press the OK button to confirm this.
To enable Stateless DHCPv6, use the or the button to insert the asterisk in
the []Stateless brackets and press the OK button to confirm this.
Stateless stands for the stateless address autoconfiguration, where a host (here the
CryptoServer LAN) can establish automatically a functioning network connection.
The host communicates with the responsible routers in his network segment in
order to get the required configuration (IP address). A router provides the IP
address of the default gateway to the CryptoServer LAN.
The system displays a message confirming that you have successfully configured DHCP.
4.5 Enabling SNMP and SNMP Traps
You can enable SNMP (Simple Network Management Protocol) by using the menu options of
the CryptoServer LAN. Additionally, you can decide whether to enable sending messages
(SNMP traps) about monitored events, like for example, error messages, too high or too low
temperature of the CryptoServer, alarm status and other.
You can only enable SNMP Traps if you first enable SNMP.
To enable SNMP, follow these steps:
1. Press the OK button on the front panel of the CryptoServer LAN.
The arrow on the far left of the display shows you which submenu you can select with
the OK button.
2. Press the OK button to open the CSLAN Administration menu option.
3. Then press the OK button to open the Configuration menu option.
4. Use the key to select Services and then press OK to open the menu option.
5. Use the key to select SNMP and then press OK to open the menu option.
Administering the CryptoServer LAN
Page 31 of 142
6. Press the key to insert an asterisk in the []Enable brackets and press OK to confirm
this. You see now the prompt Send SNMP Traps to Sink on the display.
7. If you only want to enable SNMP, and not SNMP traps, leave the asterisk in []Disable and
press OK to confirm the setting.
The display then shows you that you have successfully configured SNMP.
8. If you also want to enable SNMP traps, use the key to insert an asterisk in the
[]Enable brackets for the Send SNMP Traps to Sink prompt and then press OK.
You see now the Send SNMP Traps prompt on the display.
9. Enter here the IP address of the device the SNMP traps are to be sent to.
From CSLANOS version 4.2.0 onwards the Internet Protocols IPv4 and IPv6 are supported.
Previous CSLANOS versions support only IPv4.
The cursor under a number shows that you can change that number with the and
buttons. Press the button to move the cursor to the next number. Press the button
to move the cursor back to the previous symbol.
If you want to assign an IPv6 address you can use the and buttons to select the
letters from a to f, a colon and a slash.
If you have selected the symbol █ by using the and buttons you can use the
button to insert a zero at this point or you can use the button to delete the current
symbol.
If the curser is positioned on the right below the last symbol, you can use the button to
insert a zero at this point. If you press the button several times, the zero entry will be
repeated.
10. Use the menu options to assign an IPv4 or an IPv6 address for the network connection
you require and press the OK button.
The display then shows you that you have successfully configured SNMP.
So that the CryptoServer sends the SNMP traps, a specific configuration file must be edited.
You will find this file in the /etc/snmp/ directory. Depending on your CSLANOS version, the
configuration file might be differently named, as noted in the following table:

Administering the CryptoServer LAN
Page 32 of 142
CSLANOS Version
Configuration File
Necessary Settings
≤ 3.2.0
cslan3_mib.conf
The parameter enabled for all traps
in section [AllTraps] must be
activated, i.e., enabled = 1.
IMPORTANT: Do not change the file
name for SNMP to be able to use it.
≤ 3.3.0
cslan_mib.conf.sample
The parameter enabled for all traps
in section [AllTraps] must be
activated, i.e., enabled = 1.
The file cslan_mib.conf.sample
must be renamed to
cslan3_mib.conf
4.1.0 ≤ CSLANOS ≥ 4.2.4
cslan_mib.conf.sample
The parameter enabled for all traps
in section [AllTraps] must be
activated, i.e., enabled = 1.
The file cslan_mib.conf.sample
must be renamed to
cslan_mib.conf.
≥ 4.4.2
cslan_mib.conf
The parameter enabled for all traps
in section [AllTraps] must be
activated, i.e., enabled = 1.
IMPORTANT: Do not change the file
name for SNMP to be able to use it.
Table 3: Naming and availability of configuration file for the SNMP Traps
Restart the CryptoServer LAN so the changes in the configuration file
cslan3_mib.conf
or
cslan_mib.conf
take effect.
Specifics to be observed:
■ If you have purchased, for example, a CryptoServer LAN version 3.2.0, edited the
cslan3_mib.conf file, and performed an update from version 3.2.0 to, for example,
version 3.3.0, you will find in the /etc/snmp/ directory the cslan3_mib.conf file, edited
by you, and the cslan_mib.conf.sample file, after the update. In this case, take over your
settings from the file clan3_mib.conf into the file cslan_mib.conf.sample, remove the

Administering the CryptoServer LAN
Page 33 of 142
clan3_mib.conf file and rename the file Datei cslan_mib.conf.sample to
clan3_mib.conf.
■ If you have purchased, for example, a CryptoServer LAN version 3.2.0, not edited the
cslan3_mib.conf file, and performed an update from version 3.2.0 to, for example,
version 3.3.0, you will find, after the update, in the /etc/snmp/ directory the
cslan_mib.conf.sample file. Rename this configuration file to cslan3_mib.conf and
configure the required settings.
■ If you have purchased, for example, a CryptoServer LAN version 3.3.5, have edited the
cslan_mib.conf.sample file, and renamed it to cslan3_mib.conf, and then you have
performed an update from version 3.3.5 to, for example, version 4.1.0, you will find in the
/etc/snmp/ directory the cslan_mib.conf.sample file and the cslan3_mib.conf file. In
this case, take over your settings from the cslan3_mib.conf file into the
cslan_mib.conf.sample file, remove the cslan3_mib.conf file and rename the
cslan_mib.conf.sample file to cslan_mib.conf.
■ If you have purchased, for example, a CryptoServer LAN version 3.3.5, not edited the
cslan_mib.conf.sample file, and have performed an update from version 3.3.5 to, for
example, version 4.1.0, you will find in the /etc/snmp/ directory the
cslan_mib.conf.sample file. Rename this file to cslan_mib.conf and configure the
required settings.
■ If you have purchased, for example, a CryptoServer LAN version 4.4.3, have edited the
cslan_mib.conf file, and have performed an update from version 4.4.3 to, for example,
version 4.4.7, you will find in the /etc/snmp/ directory the cslan_mib.conf configuration
file. It remained unchanged, and you can configure further settings, if necessary.
■ You will find explanations of all the other setting options you can configure in this file in
the next section.
4.5.1 Configuration Options for SNMP Traps
The cslan3_mib.conf file (in CSLANOS version 3.x.x) and cslan_mib.conf (in CSLANOS
version 4.x.x), stored in the /etc/snmp/ drectory, is the configuration file for the supported
SNMP traps. You can configure the SNMP traps in this file.
The configuration options for each individual CryptoServer trap are described in the following
table:

Administering the CryptoServer LAN
Page 34 of 142
SNMP Trap name
Parameter/Description
[StateDevice]
device - IP address of the CryptoServer to be monitored.
Default: device = 127.0.0.1 (localhost)
connect_timeout - timeout on connection establishment in
milliseconds.
Default: connect_timeout = 3000
read_timeout - timeout on command execution between sending data
and receiving the answer in milliseconds.
Default: read_timeout = 60000
[AllTraps]
enabled - This is where you specify whether SNMP traps are to be sent
or not.
Possible values: 0 (AllTraps disabled, no traps are sent) or
1 (AllTraps enabled, specified traps will be sent).
Default: enabled = 0.
Use the sections listed below in this table to enable (enabled = 1) or
disable (enable = 0) a specific trap.
IMPORTANT: A specific SNMP trap from the list below is enabled only if
for [AllTraps] enabled = 1 and for [<specific>Trap(s)]
enabled = 1.
frequency - Interval at which the Callback function for traps is called,
in seconds.
Default: frequency = 60 (every 60 seconds)
[ErrorTrap]
enabled - This is where you specify whether or not error messages are
to be displayed.
Possible values: 0 (ErrorTrap disabled) or 1 (ErrorTrap enabled).
Default: enabled = 1
If for [AllTraps] enabled = 1 and the default setting for
ErrorTrap is used then error messages are enabled.
[ModeChangeTrap]
enabled - This is where you enable or disable messages about a change
of mode.
Possible values: 0 (ModeChangeTrap disabled) or 1 (ModeChangeTrap
enabled).
Default: enabled = 1
If for [AllTraps] enabled = 1 and the default setting for
ModeChangeTrap is used then messages about a change of mode are
enabled.

Administering the CryptoServer LAN
Page 35 of 142
SNMP Trap name
Parameter/Description
[AlarmTraps]
enabled - This is where you enable or disable messages about alarms.
Possible values: 0 (AlarmTraps disabled) or 1 (AlarmTraps enabled).
Default: enabled = 1
If for [AllTraps] enabled = 1 and the default setting for
AlarmTraps is used then messages about alarms are enabled.
[HighTempTraps]
enabled - This is where you enable or disable messages about the
temperature being too high.
Possible values: 0 (HighTempTraps disabled) or 1 (HighTempTraps
enabled).
Default: enabled = 1
If for [AllTraps] enabled = 1 and the default setting for
HighTempTraps is used, then messages about the temperature being
too high are enabled.
You can also configure the following parameter:
threshold - CryptoServer high temperature threshold value
Valid range:
threshold: [-30, 100] and > [LowTempTraps] threshold
Default: threshold = 50
delta – a value in °C for repeating the message
Possible values: delta >= 0
Default: delta = 0
Setting delta = 0 results in a single trap being sent when the threshold
is exceeded and a single trap being sent when the temperature falls back
to or under the threshold.
Example 1: threshold = 50, delta = 0
A single notifyCsTemperatureHigh trap is sent when the
temperature rises to > 50°C.
A single notifyCsTemperatureHighBack trap be sent when the
temperature falls back to <= 50°C.
Example 2: threshold = 50, delta = 5
The notifyCsTemperatureHigh trap is sent when the temperature
rises to > 50°C, > 55°C, > 60°C, etc.
The notifyCsTemperatureHighBack trap will be sent when the
temperature falls back to <= 55°C, <= 50°C, <= 45°C.

Administering the CryptoServer LAN
Page 36 of 142
SNMP Trap name
Parameter/Description
[LowTempTraps]
enabled - This is where you enable or disable messages about the
temperature being too low.
Possible values: 0 (LowTempTraps disabled) or
1 (LowTempTraps enabled).
Default: enabled = 1
If for [AllTraps] enabled = 1 and the default setting for
LowTempTraps is used, then messages about the temperature being
too low are enabled.
You can also configure the following parameter:
threshold - CryptoServer low temperature threshold value
Valid range:
threshold: [-30, 100] and > [HighTempTraps] threshold
Default: threshold = 10
delta – a value in °C for repeating the message
Possible values: delta >= 0
Default: delta = 0
Setting delta = 0 results in a single trap being sent when the
temperature falls under the threshold and a single trap being sent
when the temperature rises back to or above the threshold.
Example 1: threshold = 10, delta = 0
A single notifyCsTemperatureLow trap is sent when the temperature
falls to < 10°C.
A single notifyCsTemperatureLowBack trap is sent when the
temperature rises back to >= 10°C.
Example 2: threshold = 10, delta = 5
The notifyCsTemperatureLow trap is sent when the temperature
falls to < 10°C, < 5°C, < 0°C, etc.
The notifyCsTemperatureLowBack trap is sent when the
temperature rises back to >= 5°C, >= 10°C, >= 15°C.

Administering the CryptoServer LAN
Page 37 of 142
SNMP Trap name
Parameter/Description
[BatteryTraps]
enabled - This is where you enable or disable messages about the
battery status of the CryptoServer and CryptoServer LAN to be sent.
Possible values: 0 (BatteryTraps disabled) or 1 (BatteryTraps
enabled).
Default: enabled = 1
If for [AllTraps] enabled = 1 and the default setting for
BatteryTraps is used, then messages about the battery status of the
CryptoServer and CryptoServer LAN are enabled.
If the BatteryTraps are enabled a BatteryTrap is generated and
sent every time the status of the CryptoServer or CryptoServer LAN
battery has changed (from OK to LOW, UNKNOWN or ABSENCE). A single
trap is generated and displayed in this case (for example, "CryptoServer
LAN battery low" or "CryptoServer battery low").
[LoadTraps]
enabled - This is where you enable or disable messages about the load
on the CryptoServer LAN.
Possible values: 0 (LoadTraps disabled) or 1 (LoadTraps enabled).
Default: enabled = 0
If for [AllTraps] enabled = 1, and for [LoadTraps] enabled =
1 then messages about the load on the CryptoServer LAN are enabled.
You can also configure the following parameters:
threshold – a threshold value for the load
Valid range: threshold = [0, 100]
Default: threshold = 75
delta – a value in % for repeating the message.
Valid range: delta = [0, 100]
Default: delta = 0
Setting delta = 0 will result in a single trap being sent when the
threshold is exceeded and a single trap being sent when the load falls
back to or under the threshold.
Example 1: threshold = 75, delta = 0:
A single notifyCslLoadHigh trap is sent when the load rises to
> 75%.
A single notifyCslLoadHighBack trap is sent when the load falls
back to <= 75%.
Example 2: threshold = 75, delta = 10:

Administering the CryptoServer LAN
Page 38 of 142
SNMP Trap name
Parameter/Description
The notifyCslLoadHigh trap is sent when the load rises to > 75%, >
85%, > 95% etc.
The notifyCslLoadHighBack trap is sent when the load falls back to
<= 85%, <= 75%, <= 65%.
[ClientsTraps]
enabled - This is where you enable or disable messages about the
usage of the CryptoServer LAN connections.
Possible values: 0 (ClientsTraps disabled) or 1 (ClientsTraps
enabled).
Default: enabled = 1
If for [AllTraps] enabled = 1 and the default setting for
ClientsTraps is used, then messages about the usage of the
CryptoServer LAN connections are enabled.
You can also configure the following parameters:
threshold – a threshold value for the client connection load
Valid range: threshold = [0, 100]
Default: threshold = 75
delta - a value in % for repeating the message.
Valid range: delta = [0, 100]
Default: delta = 0
The client connection load is relative to the maximal number of client
connections specified in the configuration file csxlan.conf. When the
system is supplied, the maximum number of connections set in the
csxlan.conf file is 256. You can only change this setting in this file.
Setting delta = 0 results in a single trap being sent when the threshold
is exceeded and a single trap being sent when the number of clients falls
back to or under the threshold.
Example 1: threshold = 75, delta = 0:
A single notifyCslClientsHigh trap is sent when the client
connection load rises to > 75%.
A single notifyCslClientsHighBack trap is sent when the client
connection load falls back to <= 75%.
Example 2: threshold = 75, delta = 10:
The notifyCslClientsHigh trap is sent when the client connection
load rises to > 75%, > 85%, > 95%, etc.
The notifyCslClientsHighBack trap is sent when the client
connection load falls back to <= 85%, <= 75%, <= 65%.

Administering the CryptoServer LAN
Page 39 of 142
SNMP Trap name
Parameter/Description
[BootTrap]
enabled - This is where you enable or disable messages about the boot
process.
Possible values: 0 (BootTrap disabled) or 1 (BootTrap enabled).
Default: enabled = 1
If for [AllTraps] enabled = 1 and the default setting for BootTrap
is used then messages about the boot process are enabled.
[ShutdownTrap]
enabled - This is where you enable or disable messages about the
shutdown process.
Possible values: 0 (ShutdownTrap disabled) or 1 (ShutdownTrap
enabled).
Default: enabled = 1
If for [AllTraps] enabled = 1 and the default setting for
ShutdownTrap is used then messages about the shutdown process are
enabled.
Table 4: Configuration parameter for SNMP Traps
The following SNMP traps are only available from CryptoServer LAN V4 onwards which has
two power supplies.
SNMP Trap name
Parameter/Description
[FanSpeedTraps]
enabled - Here you can enable or disable messages about
the speed (rotations per minute - rpm) of the cooler fan.
Possible values: 0 (FanSpeedTraps disabled) or
1 (FanSpeedTraps enabled).
Default: enabled = 1
If for [AllTraps] enabled = 1 and the default setting for
FanSpeedTraps is used, then messages about the speed of
the cooler fan are enabled.
You can also configure the following parameters:
threshold – a threshold value for the fan speed
Valid range: threshold >= 0
Default: threshold = 600

Administering the CryptoServer LAN
Page 40 of 142
SNMP Trap name
Parameter/Description
delta - a value in % for repeating the message.
Valid range: delta >= 0
Default: delta = 200
Setting delta = 0 results in a single trap being sent when
the fan speed falls under the threshold and a single trap being
sent when the fan speed rises back to or above the threshold.
Example 1: threshold = 600, delta = 0:
A single notifyCslFanSpeedLow trap is sent when the fan
speed falls to < 600 rpm.
A single notifyCslFanSpeedLowBack trap is sent when
the fan speed rises back to >= 600 rpm.
Example 2: threshold = 600, delta = 200
The notifyCslFanSpeedLow trap is sent when the fan
speed falls to < 600 rpm, < 400 rpm, < 200 rpm, etc.
The notifyCslFanSpeedLowBack trap is sent when the
fan speed rises back to >= 400 rpm,
>= 600 rmp, >= 800 rmp.
[PowerSupplyFailureTrap]
enabled - Here you can enable or disable messages to be
send if one of the two power supplies fails or is switched off.
Possible values: 0 (PowerSupplyFailureTraps disabled)
or 1 (PowerSupplyFailureTraps enabled).
Default: enabled = 1
If for [AllTraps] enabled = 1 and the default setting for
PowerSupplyFailureTrap is used then messages about
the failure of one of the two power supplies or one of the two
power supplies being switched off are enabled.
Table 5: Configuration parameter for SNMP Traps on CryptoServer LAN V4 only
4.5.2 Specifying other IP Addresses for SNMP Traps Receivers
In the CryptoServer LAN menu options you can only input one IP address to which the SNMP
traps are to be sent. However, if you want to send the SNMP traps to more than one IP
address, you must edit the snmpd.conf file.
This file is stored here: /etc/snmp/snmpd.conf.
Perform the following steps to specify more than one IP address for receiving SNMP traps:
1. Open the snmpd.conf file.
You see for example the following entry right at the end of it:
Administering the CryptoServer LAN
Page 41 of 142
trapcommunity CryptoServer
trap2sink 10.17.2.1
After trap2sink you then see the IP address you have specified by using the menu
options of the CryptoServer LAN as the address to which the SNMP traps are to be sent.
2. Enter the IP addresses you require by using the following format:
trapcommunity CryptoServer
trap2sink 10.17.2.1
trap2sink 10.17.4.3
trap2sink 10.17.3.2
trap2sink 3ffe:9001:f20::101
From CSLANOS version 4.2.0 onwards the Internet Protocols IPv4 and IPv6 are supported.
Previous CSLANOS versions support only IPv4.
3. Save the snmpd.conf file after you have finished editing it.
4. Restart the CryptoServer LAN for any changes you made in this file to come into effect.
If you use the CryptoServer LAN display to modify the SNMP settings, this will afterwards
overwrite all the changes made in the file. This means that all other IP addresses will be
overwritten by the IP address set using the display.
4.6 Exporting/Importing the File csxlan.conf
If you want to export the csxlan.conf file, which contains the configuration details for the
csxlan daemon, from the CryptoServer LAN, so you can process it and then import it back into
the CryptoServer LAN, you must work through the following steps:
■ Export
1. On the front panel of the CryptoServer LAN, press the OK button.
The arrow on the far left-hand side of the display shows you which submenu you can
select with the OK button.
2. Press the OK button to open the CSLAN Administration menu item.
3. Press the OK button to open the Configuration menu item.
4. Use the button to select Host and press the OK button to open the menu item.

Administering the CryptoServer LAN
Page 42 of 142
5. Use the button to select Export csxlan.conf and press the OK button to open the menu
item.
6. Connect a USB flash drive to the CryptoServer LAN.
▣ If you are using a CryptoServer LAN V3, connect the USB flash drive to one of the USB
ports behind the front door of the CryptoServer LAN.
▣ If you are using a CryptoServer LAN V4, connect the USB flash drive to one of the two
USB Host ports on the front panel of the CryptoServer LAN.
CryptoServer LAN can write data on only a single trustworthy USB flash drive connected to
it. Although more than one USB flash drives can be simultaneously plugged in to the
CryptoServer LAN, the USB device that has been inserted as first gets connected with the
CryptoServer LAN. To establish a connection to another USB flash drive, you should first
disconnect the currently connected one and then plug the next USB flash drive into the
corresponding USB port of the CryptoServer LAN.
7. Press any button. The successful export of the csxlan.conf file is confirmed on the
display.
The csxlan.conf is stored by default in the main directory on the USB flash drive.
8. Press any button to get back to the CryptoServer LAN menu.
Import
1. On the front panel of the CryptoServer LAN, press the OK button.
The arrow on the far left-hand side of the display shows you which submenu you can
select with the OK button.
2. Press the OK button to open the CSLAN Administration menu item.
3. Press the OK button to open the Configuration menu item.
4. Use the button to select Host and press the OK button to open the menu item.
5. Use the button to select Import csxlan.conf and then press the OK button to open the
menu item.
6. Connect a USB flash drive to your CryptoServer LAN.

Administering the CryptoServer LAN
Page 43 of 142
▣ If you are using a CryptoServer LAN V3, connect the USB flash drive to one of the USB
ports behind the front door of the CryptoServer LAN.
▣ If you are using a CryptoServer LAN V4, connect the USB flash drive to one of the two
USB Host ports on the front panel of the CryptoServer LAN.
7. Press any button. The successful import of the csxlan.conf file is confirmed on the
display.
8. Restart the CryptoServer LAN so you can use the csxlan.conf file you have just
imported.
a) Press the EXIT button to get back to the main menu.
b) Press the OK button to open the CSLAN Administration menu item.
c) Use the button to select Reboot and press the OK button to open the menu item.
d) When the display shows Confirm Reboot, press the button to insert the asterisk in
the brackets []Yes and confirm by pressing the OK button.
This reboots the CryptoServer LAN.
4.7 Specifying the Keyboard Layout
If you want to use a keyboard and a monitor to configure the CryptoServer LAN, you can
specify the layout (language) of the keyboard you are going to connect. To change the
keyboard layout, follow these steps:
1. On the front panel of the CryptoServer LAN, press the OK button.
The arrow on the far left-hand side of the display shows you which submenu you can
select with the OK button.
2. Press the OK button to open the CSLAN Administration menu item.
3. Press the OK button to open the Configuration menu item.
4. Use the button to select Host and press the OK button to open the menu item.
5. Use the button to select Keyboard Layout and press the OK button to open the menu
item.
This opens a list of different countries.
6. Use the button to select the country you require and then press OK to confirm.
7. When the display shows set (Country) as keyboard layout, use the button to move the
asterisk into the square brackets []Yes and confirm by pressing OK.
The system displays a message confirming that you have successfully configured the
keyboard layout.

Administering the CryptoServer LAN
Page 44 of 142
4.8 Displaying the Date and Time on the CryptoServer LAN
You can use the Get Host (System) Time function to display the current date and the current
time on the CryptoServer LAN's display.
You do not require authentication to display the current time of the CryptoServer LAN. Use Get
Host (System) Time via the CryptoServer LAN's menu options.
1. On the front panel of the CryptoServer LAN, press the OK button.
The arrow on the far left-hand side of the display shows you which submenu you can
select with the OK button.
2. Press the OK button to open the CSLAN Administration menu item.
3. Press the OK button to open the Configuration menu item.
4. Use the button to select Host and press the OK button to open the menu item.
5. Use the button to select Date&Time and press the OK button to open the menu item.
6. Press the OK button to open the Get Host (System) Time menu item.
On the display of the CryptoServer LAN you now see the following:
UTC: shows the current international UTC (Universal Time Coordinated) global time on the
CryptoServer LAN.
Local Time: shows the local time in the time zone set for the CryptoServer LAN.
4.9 Setting the Date and Time on the CryptoServer LAN Manually
You can use the function Set Host Time Manually to set the date and the UTC time on the
CryptoServer LAN.
1. On the front panel of the CryptoServer LAN, press the OK button.
The arrow on the far left-hand side of the display shows you which submenu you can
select with the OK button.
2. Press the OK button to open the CSLAN Administration menu item.
3. Press the OK button to open the Configuration menu item.
4. Use the button to select Host and press the OK button to open the menu item.
5. Use the button to select Date&Time and press the OK button to open the menu item.
6. Use the button to select Set Host Time Manually and press the OK button to open the
menu item.
You then see this information in the CryptoServer LAN's display:
Current time: displays the current date and current time on the CryptoServer LAN.
Change to: shows the date and time to which you want to change.

Administering the CryptoServer LAN
Page 45 of 142
The cursor under a number shows that you can change that number with the and
buttons. Press the button to move the cursor to the next number.
7. Then press the / and buttons to set the new date and time (Change to) and then
press OK.
4.10 Transferring the Time from the CryptoServer to the CryptoServer
LAN
You can use the Set Host Time to CryptoServer Time function to transfer the time on the
CryptoServer to the CryptoServer LAN and so synchronize the two times with each other.
1. On the front panel of the CryptoServer LAN, press the OK button.
The arrow on the far left-hand side of the display shows you which submenu you can
select with the OK button.
2. Press the OK button to open the CSLAN Administration menu item.
3. Press the OK button to open the Configuration menu item.
4. Use the button to select Host and press the OK button to open the menu item.
5. Use the button to select Date&Time and press the OK button to open the menu item.
6. Use the button to select Set Host Time to CryptoServer Time and press the OK button
to open the menu item.
You then see this information in the CryptoServer LAN's display:
CS: displays the current date and current time on the CryptoServer.
Host: displays the current date and current time on the CryptoServer LAN. To the right of
this you see any difference between the time on the CryptoServer LAN (host) and on the
CryptoServer.
7. When you see the prompt Set Host Time to CS Time?, respond by using the button to
insert the asterisk in the brackets []Yes and confirm by pressing the OK button.
4.11 Viewing CryptoServer LAN Information
You can show various, different information on the CryptoServer LAN display. This includes
the version of the CryptoServer LAN software, CryptoServer driver information, and a client list
that displays all the TCP connections.
4.11.1 Displaying CryptoServer LAN Information
1. On the front panel of the CryptoServer LAN, press the OK button.
The arrow on the far left-hand side of the display shows you which submenu you can
select with the OK button.

Administering the CryptoServer LAN
Page 46 of 142
2. Press the OK button to open the CSLAN Administration menu item.
3. Use the button to select Show CSLAN Info and press the OK button to open the menu
item.
4. Press the OK button to select Show Version and press the OK button to open the menu
item.
▣ You can now see which software version is being used on the CryptoServer LAN.
▣ The serial number of the CryptoServer LAN is displayed.
▣ The version of the dsp_admin program being used here is displayed.
4.11.2 Displaying CryptoServer LAN Driver Information
If your CryptoServer suddenly stops reacting to any commands, you can display the driver
information. Please have this information to hand if you then need to contact our support
team.
This information includes, among other things, details about the CryptoServer plug-in card
driver which can only be interpreted by the manufacturer (Utimaco IS GmbH).
1. On the front panel of the CryptoServer LAN, press the OK button.
The arrow on the far left-hand side of the display shows you which submenu you can
select with the OK button.
2. Press the OK button to open the CSLAN Administration menu item.
3. Use the button to select Show CSLAN Info and press the OK button to open the menu
item.
4. Use the button to select Show Driver Info and press the OK button to open the menu
item.
4.11.3 Displaying a List of the Clients
To display a list of the clients who are linked to the CryptoServer LAN over the network, follow
these steps:
1. On the front panel of the CryptoServer LAN, press the OK button.
The arrow on the far left-hand side of the display shows you which submenu you can
select with the OK button.
2. Press the OK button to open the CSLAN Administration menu item.
3. Use the button to select Show CSLAN Info and press the OK button to open the menu
item.
4. Use the button to select List Clients and press the OK button to open the menu item.

Administering the CryptoServer LAN
Page 47 of 142
You now see a list of the clients along with the relevant protocol, IP address and port.
4.12 Enabling the Trace Level
You can use the menu options on the CryptoServer LAN to enable additional trace levels that
can be used for analysis/diagnosis at a later point in time. As enabling the trace level
produces huge quantities of data, it is only suitable for short-term analyses. After you restart
the CryptoServer LAN, the system resets to the default setting from the csxlan.conf file.
You can enable three trace levels:
■ Info
All the connection data and all the functions that are triggered on the CryptoServer LAN
are recorded in this trace level.
■ Verbose:
The particular status of the CryptoServer LAN is recorded in this trace level.
■ Packet Data:
The contents of the packets sent to and from the CryptoServer LAN are recorded in this
trace level.
To enable one of these trace levels, follow these steps:
1. On the front panel of the CryptoServer LAN, press the OK button.
The arrow on the far left-hand side of the display shows you which submenu you can
select with the OK button.
2. Press the OK button to open the CSLAN Administration menu item.
3. Use the button to select Diagnostic and press the OK button to open the menu item.
4. Press the OK button to open the Trace Level menu item.
a) Use the and buttons to select the trace level.
b) Press the OK button to enable a trace level. You then see an asterisk [] within the
square brackets.
5. After your selection, press the button to place the cursor next to Accept and press OK to
confirm.
4.13 Exporting the Trace Files
You can export trace files to a USB flash drive so they can be used later on for error analysis.
To do this, you actually export a csxlog.gz file. This csxlog.gz file is compressed and also
includes the trace level you previously enabled.
To export the trace file:
Administering the CryptoServer LAN
Page 48 of 142
1. On the front panel of the CryptoServer LAN, press the OK button.
The arrow on the far left-hand side of the display shows you which submenu you can
select with the OK button.
2. Press the OK button to open the CSLAN Administration menu item.
3. Use the button to select Diagnostic and press the OK button to open the menu item.
4. Use the button to select Export Trace File, then press the OK button to open the menu
item and follow the instructions on the display.
a) Connect a USB flash drive to the CryptoServer LAN.
□ If you are using a CryptoServer LAN V3, connect the USB flash drive to one of the
USB ports behind the front door of the CryptoServer LAN.
□ If you are using a CryptoServer LAN V4, connect the USB flash drive to one of the
two USB Host ports on the front panel of the CryptoServer LAN.
CryptoServer LAN can write data on only a single trustworthy USB flash drive connected to
it. Although more than one USB flash drives can be simultaneously plugged in to the
CryptoServer LAN, the USB device that has been inserted as first gets connected with the
CryptoServer LAN. To establish a connection to another USB flash drive, you should first
disconnect the currently connected one and then plug the next USB flash drive into the
corresponding USB port of the CryptoServer LAN.
b) Press any button. The successful trace file export is confirmed on the display.
The csxlog.gz is stored by default in the main directory on the USB flash drive.
c) Press any button to get back to the CryptoServer LAN menu.
4.14 Displaying the Network Configuration
You can use the ifconfig menu item (CSLANOS version 3.3) or the ip addr show menu item
(CSLANOS version 4.2 and higher) to view the status for each active interface.
The names of the menu items correspond to the Linux commands called by dsp_admin when
you select these menu items on the display of the CryptoServer.
To call the ifconfig or the ip addr show menu item on the display, follow these steps:
Administering the CryptoServer LAN
Page 49 of 142
1. On the front panel of the CryptoServer LAN, press the OK button.
The arrow on the far left-hand side of the display shows you which submenu you can
select with the OK button.
2. Press the OK button to open the CSLAN Administration menu item.
3. Use the button to select Diagnostic and press the OK button to open the menu item.
4. Use the button to select ifconfig or ip addr show and press OK to open the menu item.
5. Press the OK button to open the network interface: eth0 menu item or use the button to
select network interface: eth1 and then press OK to open this menu item to display the
information you require.
Use the , , and buttons to scroll through the text.
4.15 Checking Reachability in the Network (ping)
You can send Internet Control Message Protocol (ICMP) messages (pings) from the
CryptoServer LAN to check whether the CryptoServer LAN can contact other computers over
the network.
To send a ping from the CryptoServer LAN:
1. On the front panel of the CryptoServer LAN, press the OK button.
The arrow on the far left-hand side of the display shows you which submenu you can
select with the OK button.
2. Press the OK button to open the CSLAN Administration menu item.
3. Use the button to select Diagnostic and press the OK button to open the menu item.
4. Use the button to select ping or pingv6 and press the OK button to open the menu item.
5. Under IP or IPv6 ping Address you can input the IP address of the computer to which you
want to send the ping.
From CSLANOS version 4.2.0 onwards the Internet Protocols IPv4 and IPv6 are supported.
Previous CSLANOS versions support only IPv4.
The cursor under a number shows that you can change that number with the and
buttons. Press the button to move the cursor to the next number. Press the button
to move the cursor back to the previous symbol.
If you want to assign an IPv6 address you can use the and buttons to select the
letters from a to f, a colon and a slash.

Administering the CryptoServer LAN
Page 50 of 142
If you have selected the symbol █ by using the and buttons you can use the
button to insert a zero at this point or you can use the button to delete the current
symbol.
If the curser is positioned on the right below the last symbol, you can use the button to
insert a zero at this point. If you press the button several times, the zero entry will be
repeated.
6. Use the menu options to assign an IPv4 or an IPv6 address for the network connection
you require and press the OK button.
The result of the ping appears on the display. Use the , , and buttons to scroll
through the text.
4.16 Performing a Self-Test
The CryptoServer LAN can perform a self-test which tests the following points:
For the CryptoServer LAN
■ Is its means of accessing the network (Ethernet adapter) working correctly?
■ The network
▣ Can the default gateway be accessed?
▣ Can any of the workstations in the local network be accessed?
For the CryptoServer
■ Has the CryptoServer driver been loaded?
■ Has the csxlan daemon been started and is it working correctly?
■ Can the PCIe interface be accessed directly?
■ Are all the configured ports accessible?
To perform a self-test on the CryptoServer LAN, do the following:
1. On the front panel of the CryptoServer LAN, press the OK button.
The arrow on the far left-hand side of the display shows you which submenu you can
select with the OK button.
2. Press the OK button to open the CSLAN Administration menu item.
3. Use the button to select Diagnostic and press the OK button to open the menu item.
4. Use the button to select Selftest and press the OK button to open the menu item.
The self-test starts. After a short time, the result is shown on the display.
Administering the CryptoServer LAN
Page 51 of 142
4.17 Selecting a Boot Partition
This section describes how to use the menu options to select the CryptoServer LAN's boot
partition.
1. On the front panel of the CryptoServer LAN, press the OK button.
The arrow on the far left-hand side of the display shows you which submenu you can
select with the OK button.
2. Press the OK button to open the CSLAN Administration menu item.
3. Use the button to select Update&Maintenance and press the OK button to open the
menu item.
4. Press the OK button to open the Set Boot Partition menu item.
5. Use the and buttons to move the asterisk to the boot partition you want to use after
a restart and confirm your selection by pressing OK.
6. Reboot the CryptoServer LAN so you can start using the selected boot partition.
a) Use the button to select Reboot and press the OK button to open the menu item.
b) Press the button to insert the asterisk in the brackets []Yes and confirm by
pressing the OK button.
This restarts the CryptoServer LAN, and then boots the boot partition you have just
selected.
4.18 Updating the Operating System
Utimaco IS GmbH supplies updates for the operating system of the CryptoServer LAN
(CSLAN) in the compressed archive file cslan-x.y.z.tar.gz (x.y.z. is the version number of
the update). The files provided in the update contain the entire CryptoServer LAN operating
system. cslan-x.y.z.tar.gz can be imported into the CryptoServer LAN from a USB flash
drive directly connected to the CryptoServer LAN (local update, chapter 4.18.1) or remotely via
SSH connection (remote update, chapter 4.18.2). After the import cslan-x.y.z.tar.gz is
automatically unpacked and saved in the CryptoServer LAN.
A CSLAN update can only be performed from one boot partition to one of the others.
For further details about the boot partitions of the CryptoServer LAN please read chapter 2.5.
All configuration files are retained after an update and are not replaced or overwritten by new
versions.
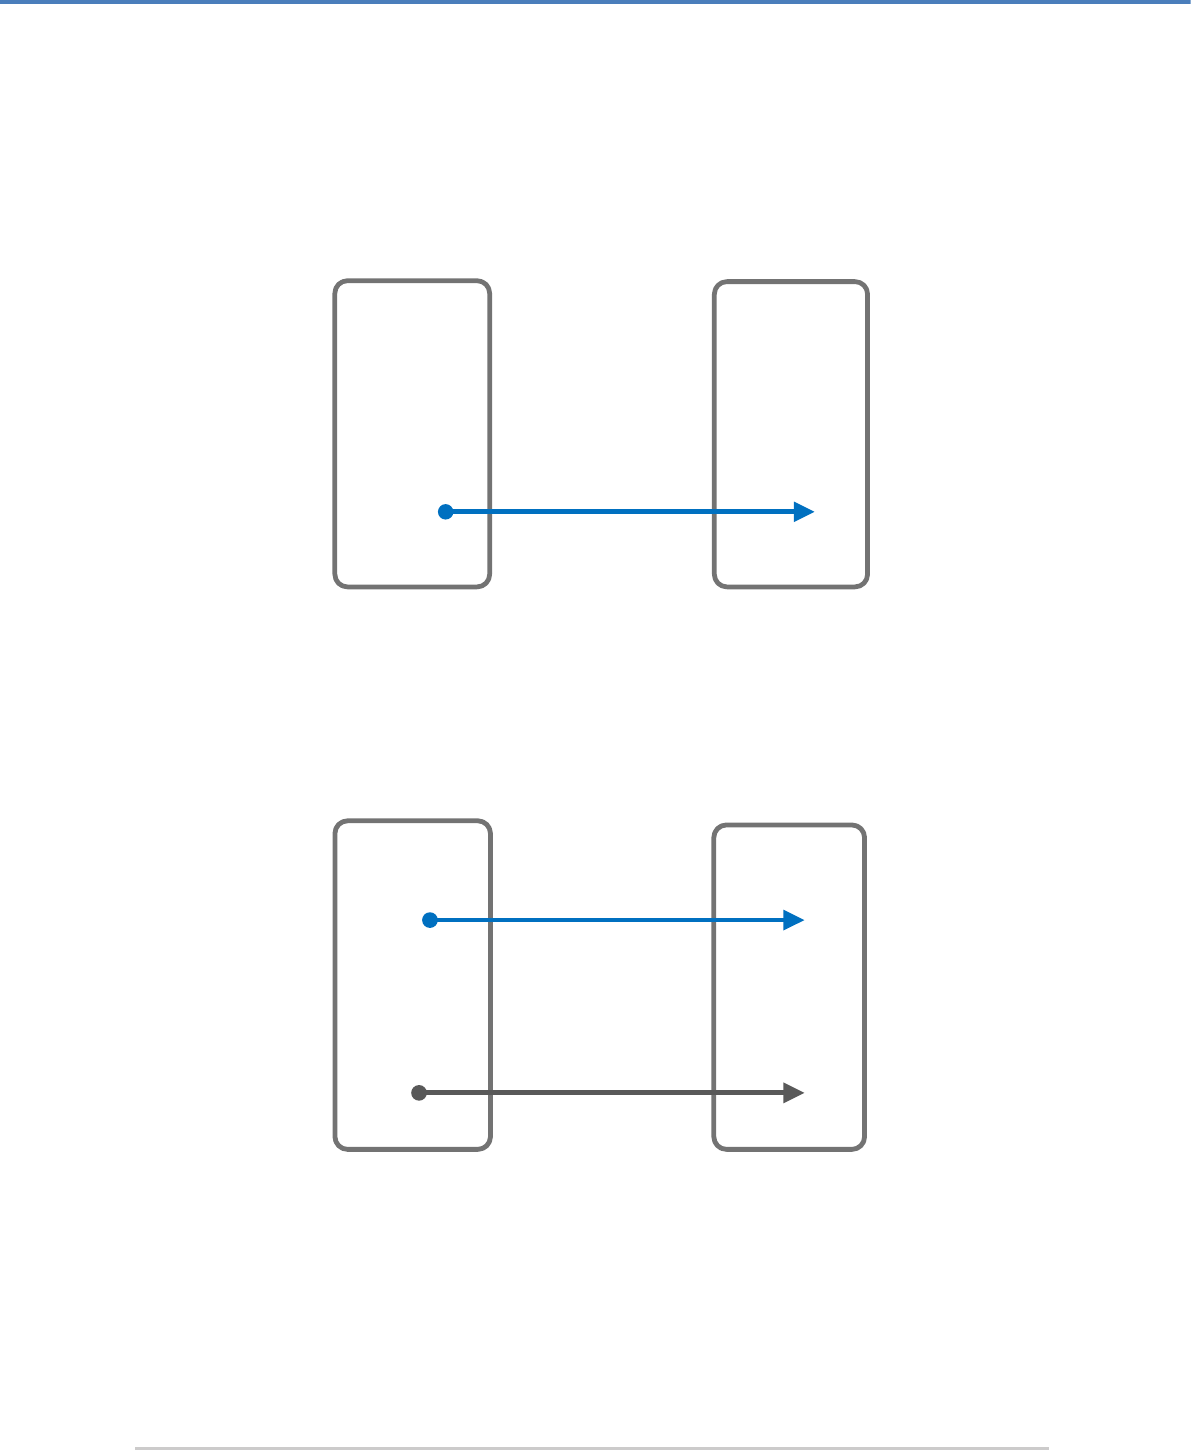
Administering the CryptoServer LAN
Page 52 of 142
■ If you have currently booted the factory boot partition, you must select the boot partition
into which you want to import the update: user1 or user2. As you cannot make permanent
user settings in the factory boot partition, you cannot simply transfer the configuration
settings in this case. In this situation, you can only import an update for the operating
system (see the following Figure 9).
Figure 9: Updating the operating system CSLANOS in user1 or user2 from the factory boot partition
■ If you have currently booted the user1 boot partition, the update is imported to the user2
boot partition. Your individual configuration settings are then transferred from the user1
boot partition to the user2 boot partition (see the following Figure 10).
Figure 10: Updating the operating system CSLANOS in boot partition user2
■ If you have currently booted the user2 boot partition, the update is imported to the user1
boot partition. Your individual configuration settings are then transferred from the user2
boot partition to the user1 boot partition (see the following Figure 11).
CSLANOS
version
4.4.6
user1/user2
CSLANOS
version
4.4.3
factory
CSLANOS update
version 4.4.6
CSLANOS
version
4.4.6
user2
CSLANOS
version
4.4.3
user1
Configuration
version 4.4.3
CSLANOS update
version 4.4.6
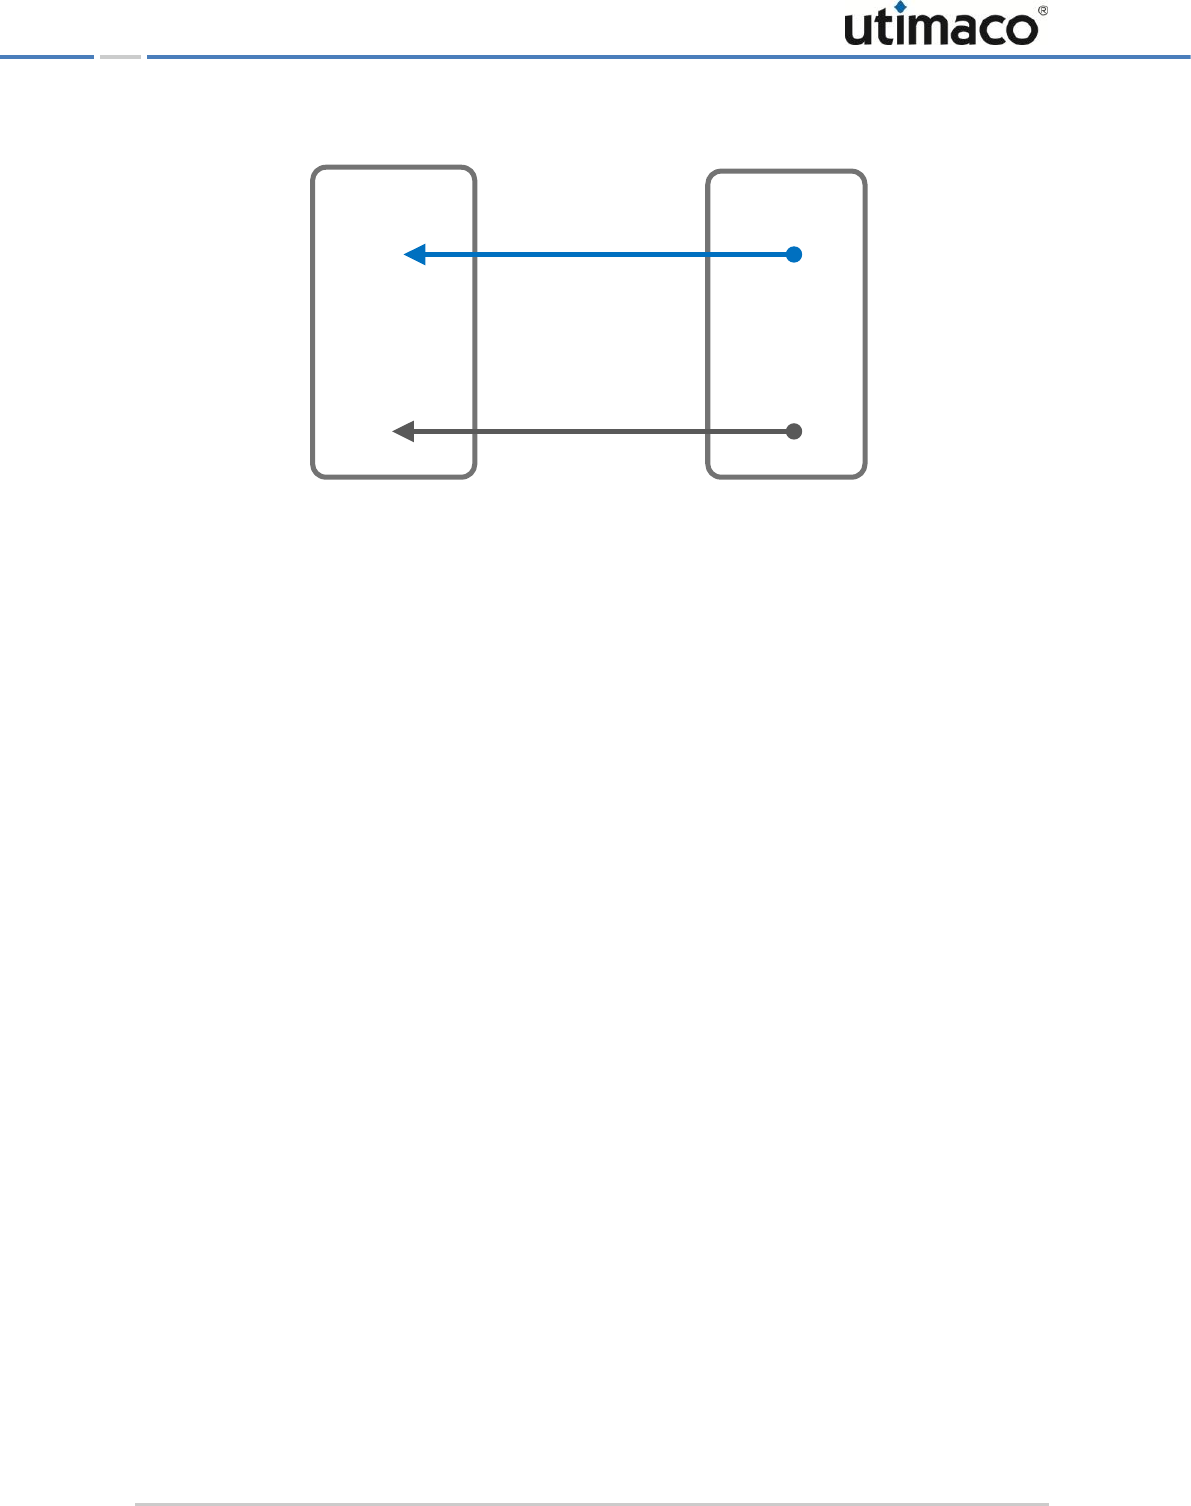
Administering the CryptoServer LAN
Page 53 of 142
Figure 11: Updating the operating system CSLANOS in boot partition user1
4.18.1 Performing a Local Update
Prerequisites:
■ You must already have copied the new version of cslan-x.y.z.tar.gz to the main
directory of a trustworthy USB flash drive.
■ You have booted the appropriate boot partition of the CryptoServer LAN:
▣ If you want to update the boot partition user1, you must have booted the boot partition
user2.
▣ If you want to update the boot partition user2, you must have booted the boot partition
user1.
▣ If you have booted factory, you can choose to update either boot partition user1 or
boot partition user2.
This is how you update the operating system for the CryptoServer LAN:
1. On the front panel of the CryptoServer LAN, press the OK button.
The arrow on the far left-hand side of the display shows you which submenu you can
select with the OK button.
2. Press the OK button to open the CSLAN Administration menu item.
3. Use the button to select Update&Maintenance and press the OK button to open the
menu item.
4. Use the button to select Update and press the OK button to open the menu item. Follow
the instructions on the display of the CryptoServer LAN.
a) Connect a USB flash drive to your CryptoServer LAN.
CSLANOS
version
4.4.3
user2
CSLANOS
version
4.4.6
user1 CSLANOS update
version 4.4.6
Configuration
version 4.4.3
Administering the CryptoServer LAN
Page 54 of 142
□ If you are using a CryptoServer LAN V3, connect the USB flash drive to one of the
USB ports behind the front door of the CryptoServer LAN.
□ If you are using a CryptoServer LAN V4, connect the USB flash drive to one of the
two USB Host ports on the front panel of the CryptoServer LAN.
The cslan-x.y.z.tar.gz file you want to upload has to be placed in the main directory of a
trustworthy USB flash drive, so that it is shown on the display of the CryptoServer LAN and
can be selected for upload.
CryptoServer LAN can access data from and write data on only a single trustworthy USB
flash drive connected to it. Although more than one USB flash drives can be simultaneously
connected to the CryptoServer LAN, the USB device that has been inserted as first gets
connected with the CryptoServer LAN. To establish a connection to another USB flash drive,
you should first disconnect the currently connected one and then plug the next USB flash
drive into the corresponding USB port of the CryptoServer LAN.
b) Press the OK button. Now you should see the files available in the main directory of the
connected USB flash drive.
c) Use the and buttons to select the required cslan-x.y.z.tar.gz file.
d) Press the OK button. The successful update of the operating system of the
CryptoServer LAN is confirmed on the display.
e) Press any button to get back to the CryptoServer LAN menu.
5. Select the boot partition to which you imported the update.
a) Use the button to select Set Boot Partition and press the OK button to open the
menu item.
b) Use the and buttons to move the asterisk to the boot partition you want to use
after a restart and confirm your selection by pressing OK.
□ If the asterisk is currently set for the boot partition user1, the currently used boot
partition is user1. The operating system update has been performed in boot
partition user2. So you have to select boot partition user2.
□ If the asterisk is currently set for the boot partition user2, the currently used boot
partition is user2. The operating system update has been performed in boot
partition user1. So you have to select boot partition user1.
c) Press the EXIT button to get back to the main menu.
6. Reboot the CryptoServer LAN so you can start using the selected boot partition.
Administering the CryptoServer LAN
Page 55 of 142
a) Press the OK button to open the CSLAN Administration menu item.
b) Use the button to select Reboot and press the OK button to open the menu item.
c) Press the button to insert the asterisk in the brackets []Yes and confirm by
pressing the OK button.
This restarts the CryptoServer LAN, and then boots the boot partition you have just
selected.
7. Reboot the CryptoServer LAN so the operating system update comes into effect, and the
change of boot partition is applied.
4.18.2 Performing a Remote Update
If you do not have a direct/local access to the CryptoServer LAN, you can also update the
operating system of the CryptoServer LAN remotely using an SSH client (for example with
PuTTY and WinSCP under Windows) from a host computer in the same network.
If you are using a CSLANOS version 4.5.x or higher, please keep in mind that by default the
SSH-login for the user
root
is disabled until you enable it in the configuration file for the
SSH daemon
/etc/ssh/sshd_config
with the setting
PermitRootLogin yes
.
Afterwards, the SSH daemon has to be restarted for the setting to become effective
(
/etc/init.d/sshd restart
).
Prerequisites:
■ You have the new cslan-x.y.z.tar.gz at hand (product CD or boot stick).
■ You have activated the SSH daemon locally by using the control menu buttons of the
CryptoServer LAN as described in chapter 3.6.
■ You have booted the appropriate boot partition of the CryptoServer LAN locally as
explained in chapter 4.17 or remote by using SSH access and command line setBoot.sh
<boot partition> and rebooting the CryptoServer LAN afterwards with reboot:
▣ If you want to update the boot partition user1, you must have booted the boot partition
user2.
▣ If you want to update the boot partition user2, you must have booted the boot partition
user1.
▣ If you have booted factory, you can choose to update either boot partition user1 or
boot partition user2.
To update the operating system of the CryptoServer LAN remotely, proceed as follows:

Administering the CryptoServer LAN
Page 56 of 142
1. Copy the cslan-x.y.z.tar.gz by using an SCP client (for example, WinSCP for
Windows) to the CryptoServer LAN root directory.
2. Open a secure shell (for example, PuTTY for Windows or SSH for Linux) and logon to the
CryptoServer LAN as the root user.
3. Call the script update.sh in the same directory where you have previously copied the
cslan-x.y.z.tar.gz file:
update.sh cslan-x.y.z.tar.gz [partition]
The partition entry – user1 or user2 - is only required if the currently booted partition is
factory.
Example:
update.sh cslan-x.y.z.tar.gz
4. Set the boot partition you have just updated to be started after reboot:
setBoot.sh <boot partition>
5. Reboot the CryptoServer LAN:
reboot
6. Check that the updated boot partition has been started by executing the script
getBoot.sh: 2 = user2 and 1 = user1
7. Execute csadm [Dev=<device>] CSLGetVersion to check that the CSLAN required
version has been installed.
4.19 Resetting the Configuration of the CryptoServer LAN
Resetting the configuration of the CryptoServer LAN means you reset the entire configuration
in a particular boot partition. This process deletes all the settings you have made in this boot
partition.
Prerequisites
■ Before you reset the CryptoServer LAN configuration in a particular boot partition you may
need to select the boot partition you require as described in chapter 4.17.
■ Connect a monitor and a keyboard to the CryptoServer LAN to get physical access to it.
To reset the configuration of the CryptoServer LAN in a specific boot partition, follow these
steps:
1. On the front panel of the CryptoServer LAN, press the OK button.
The arrow on the far left-hand side of the display shows you which submenu you can
select with the OK button.
2. Press the OK button to open the CSLAN Administration menu item.
Administering the CryptoServer LAN
Page 57 of 142
3. Use the button to select Update&Maintenance and press the OK button to open the
menu item.
4. Use the button to select Revert CSLAN Configuration and press the OK button to open
the menu item.
5. Respond to the prompt Really revert file system changes? by pressing the button to
insert the asterisk in the brackets []Yes and then press OK to confirm.
6. Reboot the CryptoServer LAN as described in chapter 4.20 to reset the configuration.
After that the CryptoServer LAN has the default configuration as provided on delivery by
the manufacturer Utimaco.
7. Change the default password for the root user.
Make sure that you have booted the same boot partition as the one you have previously
reverted to default configuration.
At the end of the boot process you see the login prompt on the display of the monitor.
a) Enter root as the CryptoServer login and confirm by pressing the Enter key.
b) As the Password, enter utimaco and confirm by pressing the Enter key.
c) Type the passwd command and press the Enter key.
d) Follow the instructions on the display of the monitor to change the current password.
8. If you are using a CSLANOS version 4.5.x or higher, change also the default password for
the cslagent user in the same way as previously done for the root user.
You don't need to reboot the CryptoServer LAN.
9. Configure the currently used boot partition of the CryptoServer LAN again to meet your
specific requirements.
4.20 Rebooting the CryptoServer LAN
Some of the settings you make on the CryptoServer LAN will require you to reboot the device
before the changes come into effect.

Administering the CryptoServer LAN
Page 58 of 142
This is how you reboot the CryptoServer:
1. On the front panel of the CryptoServer LAN, press the OK button.
The arrow on the far left-hand side of the display shows you which submenu you can
select with the OK button.
2. Press the OK button to open the CSLAN Administration menu item.
3. Use the button to select Reboot and press the OK button to open the menu item.
4. If Confirm Reboot is shown on the display, use the button to insert the asterisk in the
brackets []Yes and confirm by pressing the OK button.
After a few seconds, this reboots the CryptoServer LAN.
4.21 Switching off the CryptoServer LAN
When you want to switch off the CryptoServer LAN, we recommend you first shut down the
operating system in the correct way.
To shut down the CryptoServer LAN:
1. On the front panel of the CryptoServer LAN, press the OK button.
The arrow on the far left-hand side of the display shows you which submenu you can
select with the OK button.
2. Press the OK button to open the CSLAN Administration menu item.
3. Use the button to select Shutdown and press the OK button to open the menu item.
4. If Confirm Shutdown is shown on the display, use the button to insert the asterisk in
the brackets []Yes and confirm by pressing the OK button.
The CryptoServer LAN then shuts down after a few seconds.

Administering the CryptoServer
Page 59 of 142
5 Administering the CryptoServer
You can use the menu options on the CryptoServer LAN to administer the CryptoServer
installed within the CryptoServer LAN. This chapter describes the range of administration
options available to you here.
5.1 Displaying the CryptoServer Status
If you want to see the CryptoServer's status, follow these steps:
1. Press the OK button you see on the front panel on the CryptoServer LAN.
The arrow on the far left of the display shows you which submenu you can select with
the OK button.
2. Use the button to select CryptoServer Administration and press the OK button to open
the menu item.
3. Press the OK button to open the Show CryptoServer Info menu item.
4. Press the OK button to open the Get State menu item.
You then see, for example, the following information in the CryptoServer LAN's display:
mode = Operational Mode
state = INITIALIZED (0x00100004)
temp = 31.6 [C°]
alarm = OFF
bl_ver = 4.00.3.0
hw_ver = 4.00.3.0
uid = d8000008 c2cafe01
adm1=53653530 20202020 43533430 30303039
CSe100 CS507903
adm2=494e5445 524e0000 32303039 30390000
SecurityServer
adm3=496e6974 5f646576 5f707276 00000000
INSTALLED
The following table explains what the serial numbers and the codings mean, their format and
their appearance.
Status
information
Meaning and coding
mode
Shows the current mode (Operational/Maintenance)
state
Shows the current status (INITIALIZED/DEFECT)
temp
Shows the current temperature (in Celsius)
alarm
Shows the current alarm status

Administering the CryptoServer
Page 60 of 142
Status
information
Meaning and coding
bl_ver
Shows the current Bootloader version
hw_ver
Version of the hardware for the CryptoServer CSe-Series and CryptoServer Se-
Series Gen2.
Not available for CryptoServer CS- and Se-Series
uid
UID is an 8-byte binary data field.
The UID is a Universal Identification which uniquely identifies every
CryptoServer plug-in card. It is stored in a hardware component and loaded to
the plug-in card during programming.
The UID is displayed when the status information is extracted. It is not stored
on the CryptoServer.
adm1
adm1 is a readable character string, with a length of 16 characters.
The first 8 characters of adm1 contain a short form of the CryptoServer's
model type, filled with blank spaces
CS10, CSe10, Se10, Se12, CS50, CSe100, Se50, Se52,Se400, Se500, Se1000
or Se1500.
The second 8 characters represent the serial number of the CryptoServer's
plug-in card. This serial number is assigned by Utimaco IS GmbH during
manufacture and then loaded into the CryptoServer. The serial number starts
with the letters CS, followed by a 6-digit number.
The character string adm1 is displayed when you select the status
information. The 8-character serial number CSxxxxxx is also stored on the
CryptoServer plug-in card.
adm2
adm2 is a readable 16-character string.
The contents of the adm2 character string are also assigned by Utimaco IS
GmbH and loaded onto the CryptoServer during production. Whilst the
CryptoServer is being manufactured, the name of the firmware module
package loaded for the customer is also recorded here, according to which
CryptoServer model series is being produced. For a CryptoServer Se-Series,
the value SecurityServer is recorded here.
The character string adm2 is displayed when you select the status
information. It is not stored on the CryptoServer.
Administering the CryptoServer
Page 61 of 142
Status
information
Meaning and coding
adm3
adm3 is a readable 16-character string.
During production, a default value is recorded here, according to which
CryptoServer model is being manufactured.
For a CryptoServer Se-, CSe-Series and Se-Series Gen2, the value INSTALLED
is recorded here.
For a CryptoServer CS-Series, the value Init-dev-1-prv is recorded here.
Table 6: CryptoServer status information fields
5.2 Resetting an Alarm
Every CryptoServer alarm must be reset by an administrator. This ensures that the alarm is
noticed and investigated properly.
Before you reset an alarm you should find out why it was triggered in the first place. If the
alarm is a temporary alarm triggered, for example, because the mains power supply is too low,
or because the internal temperature is either too high or too low, you must resolve the cause
of the alarm before resetting it.
If you do not resolve the cause, the CryptoServer will return to Maintenance Mode after you
restart it. The CryptoServer will only enter Operational Mode after a restart if you have removed
the cause for the alarm.
The Reset Alarm command must be authenticated. To do so the current authentication key
is required, and this must be saved on a smartcard.
1. On the front panel of the CryptoServer LAN, press the OK button.
The arrow on the far left of the display shows you which submenu you can select with
the OK button.
2. Use the button to select CryptoServer Administration and press the OK button to open
the menu item.
3. Use the button to select Recovery Procedures and press the OK button to open the
menu item.
4. Use the button to select Reset Alarm and press the OK button to open the menu item.
5. Then follow the instructions on the PIN pad and authenticate this command.

Administering the CryptoServer
Page 62 of 142
The system displays the successfully performed action on the display of the CryptoServer
LAN.
5.3 Displaying the Battery Status
1. On the front panel of the CryptoServer LAN, press the OK button.
The arrow on the far left-hand side of the display shows you which submenu you can
select with the OK button.
2. Use the button to select CryptoServer Administration and press the OK button to open
the menu item.
3. Press the OK button to open the Show CryptoServer Info menu item.
4. Use the button to select Battery State and press the OK button to open the menu item.
The CryptoServer LAN's display then shows you the status and power (in Volts) of the
carrier battery and the external battery. The carrier battery is connected directly to the
CryptoServer plug-in card. The external battery is installed in the CryptoServer LAN. Both
batteries supply power to the CryptoServer in the CryptoServer LAN.
If the system could not find out the battery status, because the CryptoServer register is
currently being accessed by another process, then you should try to find out the battery
state again after waiting a few minutes.
The battery power level shown on the display of the CryptoServer LAN is not updated very
frequently. Therefore, after replacing the External Battery we recommend you to wait for at
least three minutes before checking the battery state.
5.4 Displaying Files in the CryptoServer
You can use the menu options on the CryptoServer LAN to display the files held in the
CryptoServer.
1. On the front panel of the CryptoServer LAN, press the OK button.
The arrow on the far left-hand side of the display shows you which submenu you can
select with the OK button.
2. Use the button to select CryptoServer Administration and press the OK button to open
the menu item.
3. Press the OK button to open the Show CryptoServer Info menu item.
4. Use the button to select List Files and press the OK button to open the menu item.

Administering the CryptoServer
Page 63 of 142
You can select the following files using the button and OK so you can display them:
▣ Files in FLASH
This displays all the files that are present in the CryptoServer's flash memory (RAM).
You can display all the firmware modules (*.msc), databases (*.db) and log files
(*.log) that have been loaded, as well as the license file (*.slf).
▣ System files in SYS
This displays all the system files that are present in the flash memory. These include
all the firmware modules (*.sys), the Bootloader configuration file (bl.cfg) and a
system log (sys.log).
The following keys are also displayed in this directory:
□ mdlsig.key, the key used to sign the firmware modules.
□ init.key, the authentication key for CryptoServer administration tasks.
□ prod.key, the key used when the CryptoServer was manufactured.
▣ Files in NVRAM
The NVRAM is non-volatile memory which is not deleted if an alarm is triggered.
5.5 Listing Current Firmware Modules
You can use the menu options on the CryptoServer LAN to display a list of currently active
firmware modules which the CryptoServer could start when it boots up.
1. On the front panel of the CryptoServer LAN, press the OK button.
The arrow on the far left-hand side of the display shows you which submenu you can
select with the OK button.
2. Use the button to select CryptoServer Administration and press the OK button to open
the menu item.
3. Press the OK button to select Show CryptoServer Info.
4. Use the button to select List Active Firmware Modules and press the OK button to open
the menu item.
The following information is displayed from left to right:
▣ Firmware module ID
▣ Name of the firmware module
▣ Firmware module version
▣ Status of the firmware module
Example:

Administering the CryptoServer
Page 64 of 142
0
SMOS
3.3.4.1
OK
A
HCE
2.2.1.0
inactive
E
BCM
1.0.2.0
inactive
68
CXI
2.1.9.0
OK
81
VDES
1.0.9.1
OK
82
PP
1.2.5.0
OK
83
CMDS
3.4.0.0
OK
84
VRSA
1.3.0.6
OK
85
SC
1.2.0.2
OK
86
UTIL
3.0.2.0
OK
87
ADM
3.0.16.0
OK
88
DB
1.3.1.1
OK
89
HASH
1.0.9.0
OK
8b
AES
1.3.5.1
OK
8d
DSA
1.2.3.0
OK
8e
LNA
1.2.0.2
OK
8f
ECA
1.1.7.3
OK
91
ASN1
1.0.3.4
OK
96
MBK
2.2.4.4
OK
9a
NTP
1.2.0.6
OK
9c
ECDSA
1.1.8.4
OK
5.6 Displaying Users
You can use the menu options on the CryptoServer LAN to display all the users that have been
created on the CryptoServer.
1. On the front panel of the CryptoServer LAN, press the OK button.
The arrow on the far left-hand side of the display shows you which submenu you can
select with the OK button.
2. Use the button to select CryptoServer Administration and press the OK button to open
the menu item.
3. Press the OK button to open the Show CryptoServer Info menu item.
4. Use the button to select List Users and press the OK button to open the menu item.
The following information is displayed from left to right:
▣ Under Name you see the user's name.
▣ Under Permission you see the user's permissions.
▣ Under Mechanism you see the authentication procedure for the user.

Administering the CryptoServer
Page 65 of 142
▣ Under Flags you see whether a static login (allow_login) is permitted or not
permitted (no_login) for a particular user and whether a secure messaging
connection with authentication (sma) or without authentication (sm) is permitted for
them.
5.7 Displaying the Boot Log
A boot log is generated every time the CryptoServer is restarted. If problems occur during the
boot process, you can use the boot log for error analysis purposes.
The boot log is completely overwritten every time the CryptoServer is rebooted.
The boot log contains the following entries:
■ The version number of the loaded operating system (SMOS).
■ The version number of the sensoring system's internal firmware. The version number is
only displayed for Se-Series devices.
■ CPU speed: 1000 MHz. This shows the processor speed (only for Se-Series
CryptoServers).
■ If a license file has been loaded, its name is displayed here.
■ Depending on which license file has been loaded, after CMDS: you can see whether the
transactions per second (TPS) are limited, or whether there are no limits specified for TPS
(no TPS limit).
■ The No Hardware Crypto Engine installed display tells you that no Crypto accelerator chip
has been installed in the Se-Series CryptoServer. If a Crypto accelerator chip is present,
you see the message Hardware Crypto Engine detected.
■ If the initialization was successful, you see the configuration settings for the Pseudo
Random Number Generator and the Real Random Number Generator.
■ A short description (for example, MBK for Master Backup Key) and a unique identification
code (0x96) are displayed for all the firmware modules started by the operating system.
The boot log also records whether or not it was possible to start the firmware module
successfully (and specifies the reason) and whether it is therefore either ready, or not
ready, for use.
To display the boot log on the display of the CryptoServer LAN:
1. On the front panel of the CryptoServer LAN, press the OK button.
The arrow on the far left-hand side of the display shows you which submenu you can
select with the OK button.
2. Use the button to select CryptoServer Administration and press the OK button to open
the menu item.
3. Press the OK button to open the Show CryptoServer Info menu item.
Administering the CryptoServer
Page 66 of 142
4. Use the button to select Show Boot Log and press the OK button to open the menu
item.
5.8 Displaying the Audit Log
The audit log is where all the events and actions involving security issues that occur, or are
performed, whilst the CryptoServer is running are recorded. It creates a log entry if the
following occur:
■ The sensory triggers an alarm.
■ The permitted upper limit for the CryptoServer's internal temperature is exceeded and the
CryptoServer therefore goes into sleep mode (power down mode).
■ An alarm is reset.
■ The CryptoServer is completely deleted.
■ Date/time in the CryptoServer's real-time clock is reset.
■ Firmware modules or packets are loaded, deleted or replaced.
■ Users are created, changed or deleted or their properties are changed.
■ The audit log is deleted.
■ A few other more rarely used commands are performed.
Every entry in the audit log has this structure:
DD.MM.YY hh:mm:ss [user] event data [return code]
The individual fields in this type of entry have the following meaning:
Field
Meaning
DD.MM.YY
Date on which the event occurred in day.month.year format. The date is
taken from the CryptoServer's internal real-time clock.
hh:mm:ss
Time at which the event occurred in hour:minute:second format. The time is
taken from the CryptoServer's internal real-time clock.
[user]
ID of the user who performed the action. However, if an external event
occurs, i.e. alarm or restart, the user ID is not present.
event
Description of the event in a readable format.
data
Additional information about the event in a readable format.

Administering the CryptoServer
Page 67 of 142
Field
Meaning
[return code]
Return value of the function that has been performed. Return code 0 means
that the function was performed successfully. A return code that is not 0
corresponds to the returned error number.
Table 7: Description of Audit Log entries
The square brackets […] displayed for user and return code in the previous table do not
mean that these fields are optional. In each case, the relevant user ID or return code is
effectively enclosed in square brackets.
If you want to display the audit log, follow these steps:
1. Press the OK button on the front panel of the CryptoServer LAN.
The arrow on the far left of the display shows you which submenu you can select with
the OK button.
2. Press the key to select CryptoServer Administration and then press the OK button to
open the menu option.
3. Press the key to select Audit Log and then press the OK button to open the menu
option.
4. Then press OK to enable Show Audit Log.
5.9 Exporting the Audit Log
To export the audit log, proceed as follows:
1. Press the OK button on the front panel of the CryptoServer LAN.
The arrow on the far left of the display shows you which submenu you can select with
the OK button.
2. Press the key to select CryptoServer Administration and then press the OK button to
open the menu option.
3. Press the key to select the Audit Log menu option and then press the OK button to open
the menu option.
4. Press the key to select Export Audit Log and then press the OK button to open the
menu option. Follow the instructions on the display.
a) Connect a USB flash drive to your CryptoServer integrated in the CryptoServer LAN.
□ If you are using a CryptoServer LAN V3, connect the USB flash drive to one of the
USB ports behind the front door of the CryptoServer LAN.
□ If you are using a CryptoServer LAN V4, connect the USB flash drive to one of the
two USB Host ports on the front panel of the CryptoServer LAN.
Administering the CryptoServer
Page 68 of 142
CryptoServer LAN can write data on only a single trustworthy USB flash drive connected to
it. Although more than one USB flash drives can be simultaneously plugged in to the
CryptoServer LAN, the USB device that has been connected as first gets connected with the
CryptoServer LAN. To establish a connection to another USB flash drive, you should first
disconnect the currently connected one and then plug the next USB flash drive into the
corresponding USB port of the CryptoServer LAN.
b) Press any button. A file with the name audit.log is then copied to the main directory
of the USB flash drive. The successful export of the audit log is confirmed on the
display.
c) Press any button to get back to the CryptoServer LAN menu.
5.10 Configuring the Audit Log
To configure the audit log, follow these steps:
1. Press the OK button on the front panel of the CryptoServer LAN.
The arrow on the far left of the display shows you which submenu you can select with
the OK button.
2. Press the key to select CryptoServer Administration and then press the OK button to
open the menu option.
3. Press the key to select the Audit Log menu option and then press the OK button to open
the menu option.
4. Press the key to select Audit Log Configuration and then click the OK button to open the
menu option. Here you can configure the following settings:
▣ Number of logfiles:
This is where you define the number of audit log files. The number 3 (default setting)
means that three audit log files will be created in the CryptoServer. You can create at
least 2, and a maximum of 10, audit log files.
If you have enabled the Audit Log Configuration menu option, you will see an arrow
to the left of Number of logfiles.
To change the Number of logfiles follow these steps:
a) Press the key to move the cursor under the number 3.
Then use the and keys to change the setting. You can input values from 2
to 10 here.
Administering the CryptoServer
Page 69 of 142
b) Press OK after you have input the values you require and then confirm the
dialog on the display with Yes by pressing the key to insert an asterisk in the
[]Yes brackets. Then press the OK button to confirm this.
□ Rotate logfiles:
This is where you define how the audit log files are to be handled when they are full.
If you enable Rotate logfiles: (yes) this means that the next audit log file is used once
the previous audit log file is full. When all the audit log files are full, the first audit log file
will be overwritten.
If you do not enable Rotate logfiles: (no) no audit log file will be overwritten when all the
audit log files are full.
If all audit log files are full, and you have selected Rotate logfiles: no all CryptoServer
commands generating a log file entry will be blocked.
In this case, you must delete all audit log files, in order to be able to administer the
CryptoServer again.
For that purpose, you have to log onto the CryptoServer with authentication status
20000000 or 02000000.
If you have enabled the Audit Log Configuration menu option, you will see an arrow
to the left of Number of logfiles:.
To change the setting Rotate logfiles follow these steps:
a) Press the key to select the Rotate logfiles: menu option.
b) Press the key to move the cursor to yes.
Then use the and keys to change the setting from yes to no.
c) Press OK after you have input the values you require and then confirm the
dialog on the display with Yes by pressing to insert an asterisk in the []Yes
brackets and then press OK to confirm this.
□ Max filesize:
This is where you specify the size of each audit log file in bytes. The default setting is
200000 bytes for each audit log file. You must specify at least 4000 bytes.
If you have enabled the Audit Log Configuration menu option, you will see an arrow
to the left of Number of logfiles:.
To change the setting for Max filesize follow these steps:
a) Press the key to select the Max filesize: menu option.

Administering the CryptoServer
Page 70 of 142
b) Press the key to move the cursor to the first number 200000.
Then use the and keys to change this number. You can input values from 0
to 2 here.
c) Then press the key to move the cursor to the other numbers.
d) Use the and keys to change all the other numbers. You can input values
from 0 to 9 here.
e) Press OK after you have input the values you require and then confirm the
dialog on the display with Yes by pressing to insert an asterisk in the []Yes
brackets. Then press the OK button to confirm this.
□ Events:
This is where you can display which events are enabled (asterisk on the left) and will be
recorded in the audit log files. The additional information (default) displayed to the right
of the event means the default setting for this event is to be enabled.
The next table explains the meanings of the individual selection options.
Event
Default
Meaning
1
Firmware management
yes
Load, delete and replace firmware modules.
2
User management
yes
Create and delete users, backup and restore
the user database.
3
Date/Time
management
yes
Set date and time.
4
Startup messages
yes
All the relevant CryptoServer messages from
the start phase.
5
Audit log
management
yes
The entire audit log files configuration.
6
MBK management
yes
The entire MBK management (remote and
local).
7
Key management
no
Key management for the cryptographic
interfaces (for example CXI).
8
Successful login
no
All successful logons to the CryptoServer.
9
Failed login
yes
All unsuccessful logons to the CryptoServer.
10
Backup/Restore
yes
Backup and restore of CryptoServer databases.
If a large number of entries are present in the

Administering the CryptoServer
Page 71 of 142
Event
Default
Meaning
CryptoServer databases, this may cause the
individual audit log files to overrun.
11 -24
Future use
no
25- 31
Customer definition
no
Table 8: Audit log selection options and their meaning
If you have enabled the Audit Log Configuration menu option, you will see an arrow
to the left of Number of logfiles:.
If you want to change the default settings for the audit log files, follow these steps:
a) Press the key to select the Events: menu option and then press .
b) Use the and keys to access all the events.
c) Use the key to enable or disable individual events.
d) Once you have finished editing, press the OK button and confirm the dialog on
the display with Yes, by pressing the key to insert the asterisk in the []Yes
brackets. Then press the OK button.
5.11 Displaying the Date and Time on the CryptoServer
To display the CryptoServer's date and time on the CryptoServer LAN display:
1. On the front panel of the CryptoServer LAN, press the OK button.
The arrow on the far left-hand side of the display shows you which submenu you can
select with the OK button.
2. Use the button to select CryptoServer Administration and press the OK button to open
the menu item.
3. Press the OK button to open the Show CryptoServer Info menu item.
4. Use the button to select Get Time and press the OK button to open the menu item.
You now see the UTC time and local time on the CryptoServer.
5.12 Displaying Memory Information
If you want to display how much memory the CryptoServer is using, follow these steps:
1. On the front panel of the CryptoServer LAN, press the OK button.
The arrow on the far left-hand side of the display shows you which submenu you can
select with the OK button.
2. Use the button to select CryptoServer Administration and press the OK button to open
the menu item.

Administering the CryptoServer
Page 72 of 142
3. Press the OK button to open the Show CryptoServer Info menu item.
4. Use the button to select Show Memory Info and press the OK button to open the menu
item.
You now see the following information for the CryptoServer's FLASH memory and NVRAM:
▣ Total in Bytes
▣ Used (amount of memory being used) in bytes
▣ Free (memory that is not being used) in bytes
▣ Available (memory that is available for use) in bytes
5.13 Displaying Driver Information
If your CryptoServer LAN suddenly stops reacting to any commands, you can display the
driver information. Please have this information to hand if you then need to contact our
support team
This information includes, among other things, details about the CryptoServer plug-in card
driver, which can only be interpreted by the manufacturer.
1. On the front panel of the CryptoServer LAN, press the OK button.
The arrow on the far left-hand side of the display shows you which submenu you can
select with the OK button.
2. Use the button to select CryptoServer Administration and press the OK button to open
the menu item.
3. Press the button to open the Show CryptoServer Info menu item.
4. Use the button to select Show Driver Info and press the OK button to open the menu
item.
5.14 Loading Files onto the CryptoServer
You can use the menu options on the CryptoServer LAN to upload files to the CryptoServer.
However, you can only upload files to the CryptoServer's RAM (FLASH).
You can only upload license files and firmware modules to the CryptoServer's RAM via the
CryptoServer LAN's menu options.
You must authenticate the command before you can start uploading firmware modules or
license files to the CryptoServer. To do so, you require the current authentication key, and this
must be saved on a smartcard.
The accompanying PIN pad must therefore have been prepared, using the CryptoServer LAN
menu options, and connected to the CryptoServer LAN (COM and PS2 port in case a
CryptoServer LAN V3 is used or USB Host port, in case a CryptoServer LAN V4 is used).
Administering the CryptoServer
Page 73 of 142
If you want to upload a new license file to the CryptoServer, you must first delete the old
license file. The CryptoServer can only ever hold one license file at a time.
If you want to upload a firmware module to the CryptoServer, you must ensure that this file
has the correct file extension (.mtc). If you want to upload a firmware package, the file must
have .mpkg as its file extension.
If the file you want to upload (for example a firmware module) is already present in the
CryptoServer, and has the same name, the current file will be replaced by the new one.
The file (a firmware module, *.mtc or a firmware package, *.mpkg) you want to upload has to
be placed in the main directory of a USB flash drive, so that it is shown on the display of the
CryptoServer LAN and can be selected for upload.
CryptoServer LAN can access data only from a single trustworthy USB flash drive connected
to it. Although more than one USB flash drives can be simultaneously plugged in to the
CryptoServer LAN, the USB device that has been inserted as first gets connected with the
CryptoServer LAN. To establish a connection to another USB device, you should first
disconnect the currently connected one and then plug the next USB flash drive into the
corresponding USB port of the CryptoServer LAN.
1. On the front panel of the CryptoServer LAN, press the OK button.
The arrow on the far left-hand side of the display shows you which submenu you can
select with the OK button.
2. Use the button to select CryptoServer Administration and press the OK button to open
the menu item.
3. Use the button to select Administration&File Management and press the OK button to
open the menu item.
4. Press the OK button to open the Load File(s) menu item. Follow the instructions on the
display.
a) Connect the USB flash drive, from which you want to upload the file to the
CryptoServer, to a USB port of the CryptoServer LAN.
□ If you are using a CryptoServer LAN V3, connect the USB flash drive to one of the
USB ports behind the front door on the front panel of the CryptoServer LAN.

Administering the CryptoServer
Page 74 of 142
□ If you are using a CryptoServer LAN V4, connect the USB flash drive to the USB
Host port below the display on the front panel of the CryptoServer LAN or to the
USB Host port behind the front door on the front panel of the CryptoServer LAN.
b) Press the OK button.
On the display, you can now see which files (not directories and subdirectories) are
present in the main directory on the USB flash drive.
5. Use the button to select the relevant file and confirm your selection by pressing . The
file is then marked with an asterisk () on the left.
6. Press the OK button and then follow the instructions on display of the PIN pad.
If the file loads successfully, it appears on the CryptoServer LAN's display.
5.15 Deleting Files in the CryptoServer
You can only use the menu options on the CryptoServer LAN to delete the following files from
the CryptoServer:
■ License files with the .slf file extension
■ Firmware modules with the .msc file extension
The files you can delete here are deleted from the CryptoServer's RAM (FLASH).
You must authenticate the command before you can delete files from the CryptoServer. To do
so, you require the current authentication key, and this must be saved on a smartcard.
1. On the front panel of the CryptoServer LAN, press the OK button.
The arrow on the far left-hand side of the display shows you which submenu you can
select with the OK button.
2. Use the button to select CryptoServer Administration and press the OK button to open
the menu item.
3. Use the button to select Administration&File Management and press the OK button to
open the menu item.
4. Use the button to select Delete File(s) and press the OK button to open the menu item.
You now see a list of files.
5. Use the button to select the file you want to delete and confirm your selection by
pressing . The file is then marked with an asterisk () on the left.
6. Press the OK button and then follow the instructions on the PIN pad.
The CryptoServer LAN's display then shows whether you have deleted the file successfully.

Administering the CryptoServer
Page 75 of 142
5.16 Transferring the Tme from the CryptoServer LAN to the CryptoServer
You can use the Set CS Time to System Time (Host) function to transfer the time on the
CryptoServer LAN to the CryptoServer and so synchronize the two times with each other.
You must authenticate the command before you can perform the Set CS Time to System Time
(Host) using the menu options on the CryptoServer LAN. To do so, you require the current
authentication key, and this must be saved on a smartcard.
1. On the front panel of the CryptoServer LAN, press the OK button.
The arrow on the far left-hand side of the display shows you which submenu you can
select with the OK button.
2. Use the button to select CryptoServer Administration and press the OK button to open
the menu item.
3. Use the button to select Administration&File Management and press the OK button to
open the menu item.
4. Use the button to select Set CS Time to System Time (Host) and press the OK button to
open the menu item.
You then see this information in the CryptoServer LAN's display:
CS: displays the current date and current time on the CryptoServer.
Host: displays the current date and current time on the CryptoServer LAN.
To the right of this you see any difference between the time on the CryptoServer LAN
(host) and on the CryptoServer.
5. When you see the prompt Set CS Time to System Time (Host)? respond by using the
button to insert the asterisk in the brackets []Yes and confirm by pressing the OK button.
6. Follow the instructions on the PIN pad and authenticate this command.
The CryptoServer LAN's display then shows you if the action was performed successfully.
5.17 Restarting the CryptoServer
Some of the settings you make on the CryptoServer will require you to reboot the device
before the changes come into effect.
1. On the front panel of the CryptoServer LAN, press the OK button.
The arrow on the far left-hand side of the display shows you which submenu you can
select with the OK button.
2. Use the button to select CryptoServer Administration and press the OK button to open
the menu item.
3. Use the button to select Administration&File Management and press the OK button to
open the menu item.
Administering the CryptoServer
Page 76 of 142
4. Use the button to select Restart CryptoServer and press the OK button to open the
menu item.
The system displays the successfully performed action on the display of the CryptoServer
LAN.
Alternatively, you can use the following method to restart the CryptoServer.
1. On the front panel of the CryptoServer LAN, press the OK button.
The arrow on the far left-hand side of the display shows you which submenu you can
select with the OK button.
2. Use the button to select CryptoServer Administration and press the OK button to open
the menu item.
3. Use the button to select Recovery Procedures and press the OK button to open the
menu item.
4. Press the OK button to open the Restart CryptoServer menu item.
The system displays the successfully performed action on the display of the
CryptoServer LAN.
5.18 Changing the ADMIN Authentication Key
With this function you can assign a new RSA authentication key to the default user ADMIN.
It is only available for CryptoServer LAN V4 with CSLANOS version 4.4.6 and higher.
Before delivery Utimaco creates the default ADMIN user on every CryptoServer as the default
administrator. The authentication token of the user ADMIN is shipped by Utimaco as clear text
keyfile (ADMIN.key) on the SecurityServer product CD
(…\Software\All_Supported_Operating_Systems\Administration\key) and is initially
stored on every smartcard that is delivered by Utimaco IS GmbH (with default PIN 123456).
For security reasons you should replace the authentication token of the user ADMIN with a
self-generated RSA key as described in this chapter. Alternatively, you can create other users
with sufficient permissions on the CryptoServer, and then delete the user ADMIN (for details
see the CryptoServer Manual for System Administrators and the CryptoServer Command-line
Administration Tool – (csadm) Manual for System Administrators).
Prerequisites:
Before you can change the authentication key of the default user ADMIN by using the menu
options on the front panel of the CryptoServer LAN there are some preparation steps required.
Administering the CryptoServer
Page 77 of 142
■ The USB PIN pad delivered by Utimaco is connected to the USB Host port on the front
panel of the CryptoServer LAN V4 and is configured on the CryptoServer LAN as described
in Chapter 4.2, "Setting up the PIN Pad on the CryptoServer LAN".
If you are using a CryptoServer LAN V4 which has a COM serial port below the display on the
front panel, you'll have to connect the PIN pad to a USB port behind the front door on the
front panel of the CryptoServer LAN.
■ You have generated a new authentication key (RSA) and have stored it on one of the
smartcards delivered by Utimaco. You can do that by using either the csadm tool (see the
CryptoServer Command-line Administration Tool – (csadm) Manual for System Administrators,
commands GenKey and SaveKey) or CAT (see the CryptoServer Manual for System
Administrators).
■ Two smartcards delivered by Utimaco are available:
▣ One containing the default authentication key ADMIN.key for the default user ADMIN
▣ One where the new RSA authentication key is stored on.
■ The CryptoServer in the CryptoServer LAN is in Operational Mode, i. e. on the display of the
CryptoServer LAN you see Mode: Operational.
1. Press the OK button on the front panel of the CryptoServer LAN.
The arrow on the far left-hand side of the display shows you which submenu you can
select with the OK button.
2. Use the button to select the CryptoServer Administration menu item, and press OK to
open the menu item.
3. Use the button to select Administration&File Management and press the OK button to
open the menu item.
4. Use the button to select Change ADMIN authentication Key and press the OK button to
open the menu item.
You should see on the CryptoServer LAN display:
Changing key for ADMIN key: RSA
See PINPad display
5. Follow the instructions on the display of the PIN pad:
a) Insert the smartcard where the default key ADMIN.key is stored on into the PIN pad.
b) Press the OK button on the PIN pad.
c) Enter the smartcard PIN (default 123456) and press the OK button on the PIN pad.
Administering the CryptoServer
Page 78 of 142
d) Remove the smartcard and press OK on the PIN pad.
e) Insert the smartcard where the new authentication key is stored on into the PIN pad.
f) Press the OK button on the PIN pad.
The successful change of the authentication key for the user ADMIN is confirmed on the
display of the CryptoServer LAN.
5.19 Loading the Firmware Encryption Key into the CryptoServer
This function is only available for CryptoServer LAN V4 with CLAN version 4.4.6 and higher.
Utimaco customers can develop their own CryptoServer firmware modules corresponding to
their individual needs and providing customer specific functions. These firmware modules
have to be signed with a customer-individual key Alternative Module Signature Key. The public
part of this key has to be loaded into the CryptoServer before the firmware modules can be
loaded into the CryptoServer.
Optionally, the self-developed firmware modules can be encrypted with the public part of a
customer-specific Firmware Encryption Key (RSA key). In this case the private part of this key
has to be loaded into the CryptoServer. This chapter describes how to load the private part of
a previously generated Firmware Encryption Key into the CryptoServer by using the menu
options on the front panel of the CryptoServer LAN.
Prerequisites:
Before you can start loading the Firmware Decryption Key into the CryptoServer by using the
menu options on the front panel of the CryptoServer LAN there are some preparation steps
required.
■ The USB PIN pad delivered by Utimaco is connected to the USB Host port on the front
panel of the CryptoServer LAN V4 and is configured on the CryptoServer LAN as described
in Chapter 4.2, "Setting up the PIN Pad on the CryptoServer LAN".
If you are using a CryptoServer LAN V4 which has a COM serial port below the display on the
front panel, you'll have to connect the PIN pad to a USB port behind the front door on the
front panel of the CryptoServer LAN.

Administering the CryptoServer
Page 79 of 142
■ The CryptoServer in the CryptoServer LAN is in Operational Mode, i. e. on the display of the
CryptoServer LAN you see Mode: Operational.
■ You have created your firmware module, for example, exmp.out which you have signed
with your self-generated Alternative Module Signature Key (for example, FWSignKey.key,
2048 bits RSA key) and encrypted with your self-generated Firmware Encryption Key (for
example, FWEncKey.key, 2048 bits RSA key). Please find details about how to sign
and encrypt self-developed firmware modules in the manual CryptoServer Command-line
Administration Tool – (csadm) Manual for System Administrators.
■ You have loaded the Alternative Module Signature Key into the CryptoServer, for example, by
using the csadm command LoadAltMdlSigKey (see the CryptoServer Command-line
Administration Tool – (csadm) Manual for System Administrators).
■ You have copied the private part of the Firmware Encryption Key on two smartcards, for
example, by using the csadm command BackupKey (see the CryptoServer Command-line
Administration Tool – (csadm) Manual for System Administrators).
■ Three smartcards delivered by Utimaco are at hand:
▣ one where the authentication key for the default user ADMIN is stored on,
▣ two smartcards where the private part of your Firmware Encryption Key split in two
shares is stored on.
1. Press the OK button on the front panel of the CryptoServer LAN.
The arrow on the far left-hand side of the display shows you which submenu you can
select with the OK button.
2. Use the button to select the CryptoServer Administration menu item, and press OK to
open the menu item.
3. Use the button to select Administration&File Management and press the OK button to
open the menu item.
4. Use the button to select Load Firmware Decryption Key and press the OK button to
open the menu item.
You should see on the CryptoServer LAN display:
Insert FwDecKey card & confirm
5. Insert the smartcard where the first key share of the Firmware Encryption Key is stored on
into the PIN pad.
6. Press the OK button on the PIN pad.
7. Enter the PIN of the smartcard (default 123456) and press OK on the PIN pad.

Administering the CryptoServer
Page 80 of 142
8. Insert the smartcard where the second key share of the Firmware Encryption Key is stored
on into the PIN pad.
9. Press the OK button on the PIN pad.
10. Enter the PIN of the second smartcard and press OK on the PIN pad.
You should see on the CryptoServer LAN display:
Insert Smartcard & press OK/Cancel
11. Insert the smartcard where the new authentication key for the default user ADMIN is
stored on into the PIN pad.
12. Press the OK button on the PIN pad.
13. Enter the PIN of the smartcard and press OK on the PIN pad.
The display of the CryptoServer LAN shows you that you have successfully loaded the
Firmware Encryption Key into the CryptoServer.
You can now load your self-developed firmware module into the CryptoServer by using the
csadm command LoadFile (see CryptoServer Command-line Administration Tool – (csadm)
Manual for System Administrators).
5.20 Changing to Maintenance Mode
The CryptoServer usually runs in Operational Mode and uses the firmware modules stored in
its RAM (FLASH). In addition to the system firmware modules, the RAM holds all the firmware
modules required for the cryptographic interfaces and a number of other firmware modules.
However, if your CryptoServer is not running correctly in Operational Mode, you have the option
of using the CryptoServer LAN's menu options to switch the CryptoServer to Maintenance
Mode.
In Maintenance Mode the CryptoServer only uses the system firmware modules that are
present in its system directory (sys). The CryptoServer's functionality is also restricted in
Maintenance Mode. Cryptographic interfaces cannot access the CryptoServer when it is
running in this mode.
1. On the front panel of the CryptoServer LAN, press the OK button.
The arrow on the far left-hand side of the display shows you which submenu you can
select with the OK button.
2. Use the button to select CryptoServer Administration and press the OK button to open
the menu item.
3. Use the button to select Recovery Procedures and press the OK button to open the
menu item.
4. Use the button to select Reset to Maintenance Mode and press the OK button to open
the menu item.

Administering the CryptoServer
Page 81 of 142
The system displays the successfully performed action on the display of the
CryptoServer LAN.
5.21 Clear Command
You can use the Clear command to delete any sensitive data and firmware modules from the
CryptoServer by hand. The following actions are triggered after you enter this command:
■ All the firmware modules are deleted from the flash directory.
Only the system firmware modules required for base administration remain on the
CryptoServer.
■ All the users who have to log onto the CryptoServer with an HMAC, SHA-1 or Clear
password are deleted.
■ A new individual device key is generated for the CryptoServer.
This automatically makes any other keys (including the MBK) and sensitive data stored on
the CryptoServer unusable, because they can no longer be decrypted, as the "old"
individual device key has been replaced.
However, users who log on to the CryptoServer with RSA signatures, RSA Smartcard or
ECDSA are not deleted.
Once you have performed the Clear command, the CryptoServer is no longer in Operational
Mode and returns automatically to Maintenance Mode after a restart.
The CryptoServer does not return to Operational Mode until the SecurityServer package's
firmware modules are reloaded.
You should only perform a Clear command if you want to set up or reinstall the CryptoServer
again.
You must authenticate the command before you can perform the Clear function using the
menu options on the CryptoServer LAN. To do so, you require the current authentication key,
and this must be saved on a smartcard.
1. On the front panel of the CryptoServer LAN, press the OK button.
The arrow on the far left-hand side of the display shows you which submenu you can
select with the OK button.
2. Use the button to select CryptoServer Administration and press the OK button to open
the menu item.
3. Use the button to select Recovery Procedures and press the OK button to open the
menu item.
4. Use the button to select Clear (Firmware and Data) and press the OK button to open the
menu item.
5. Follow the instructions on the PIN pad and authenticate this command.
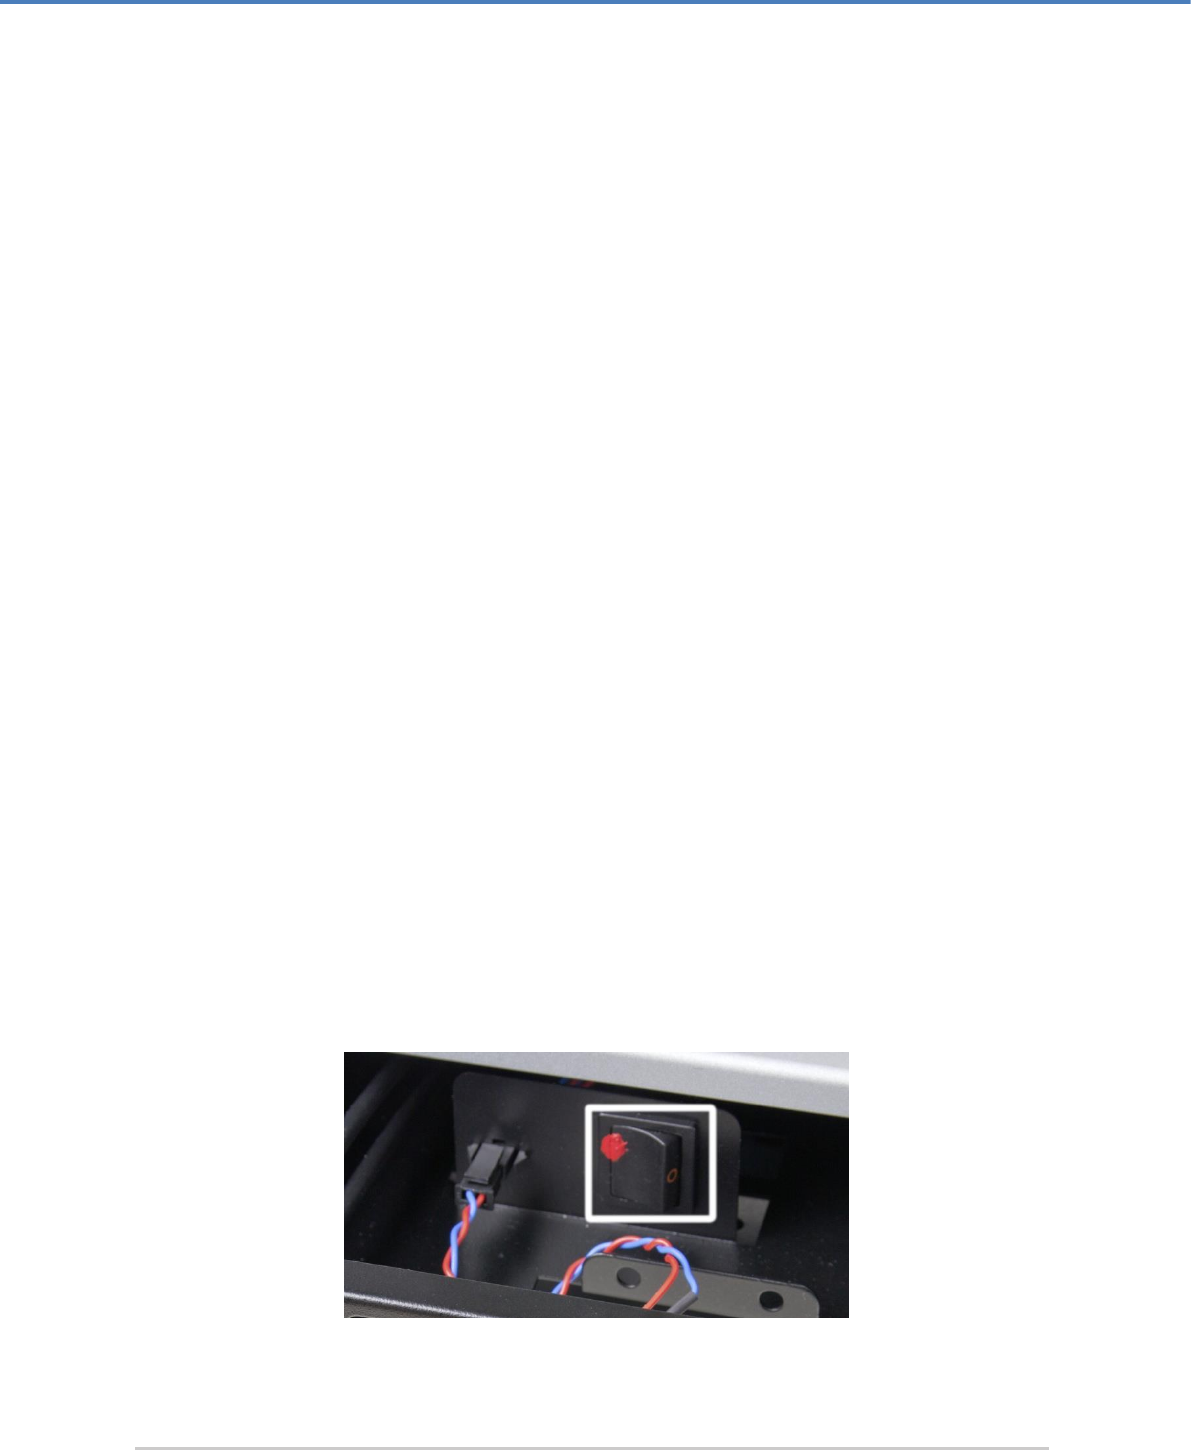
Administering the CryptoServer
Page 82 of 142
The system displays the successfully performed action on the display of the CryptoServer
LAN.
5.22 Performing Clear to Factory Settings
When you perform the Clear to Factory Settings command, you return the CryptoServer
to the state it was in when it was supplied.
■ This command deletes the firmware modules from the flash directory.
Only the system firmware modules required for base administration remain on the
CryptoServer.
■ All the users in the CryptoServer user database are deleted.
■ ADMIN, the default administrator, is set up again and can log onto the CryptoServer again
using the original authentication key ADMIN.key.
■ A new individual device key is generated for the CryptoServer.
This automatically makes any other keys (including the MBK) and sensitive data stored on
the CryptoServer unusable, because they can no longer be decrypted, as the "old"
individual device key has been replaced.
Before you can carry out the Clear to Factory Settings command, you must first
perform an External Erase on the CryptoServer LAN.
The External Erase command triggers an alarm in the CryptoServer which allows you to
execute the Clear to Factory Settings command whilst the alarm is enabled.
Performing an External Erase on a CryptoServer LAN V3
To perform an External Erase on the CryptoServer LAN V3, follow the following steps:
1. Open the front door on the front panel of the CryptoServer LAN and pull out the battery
compartment.
In the battery compartment, behind the battery, you see a rocker switch with a red seal
(see figure below).
Figure 12: Rocker switch for performing External Erase on a CryptoServer LAN V3
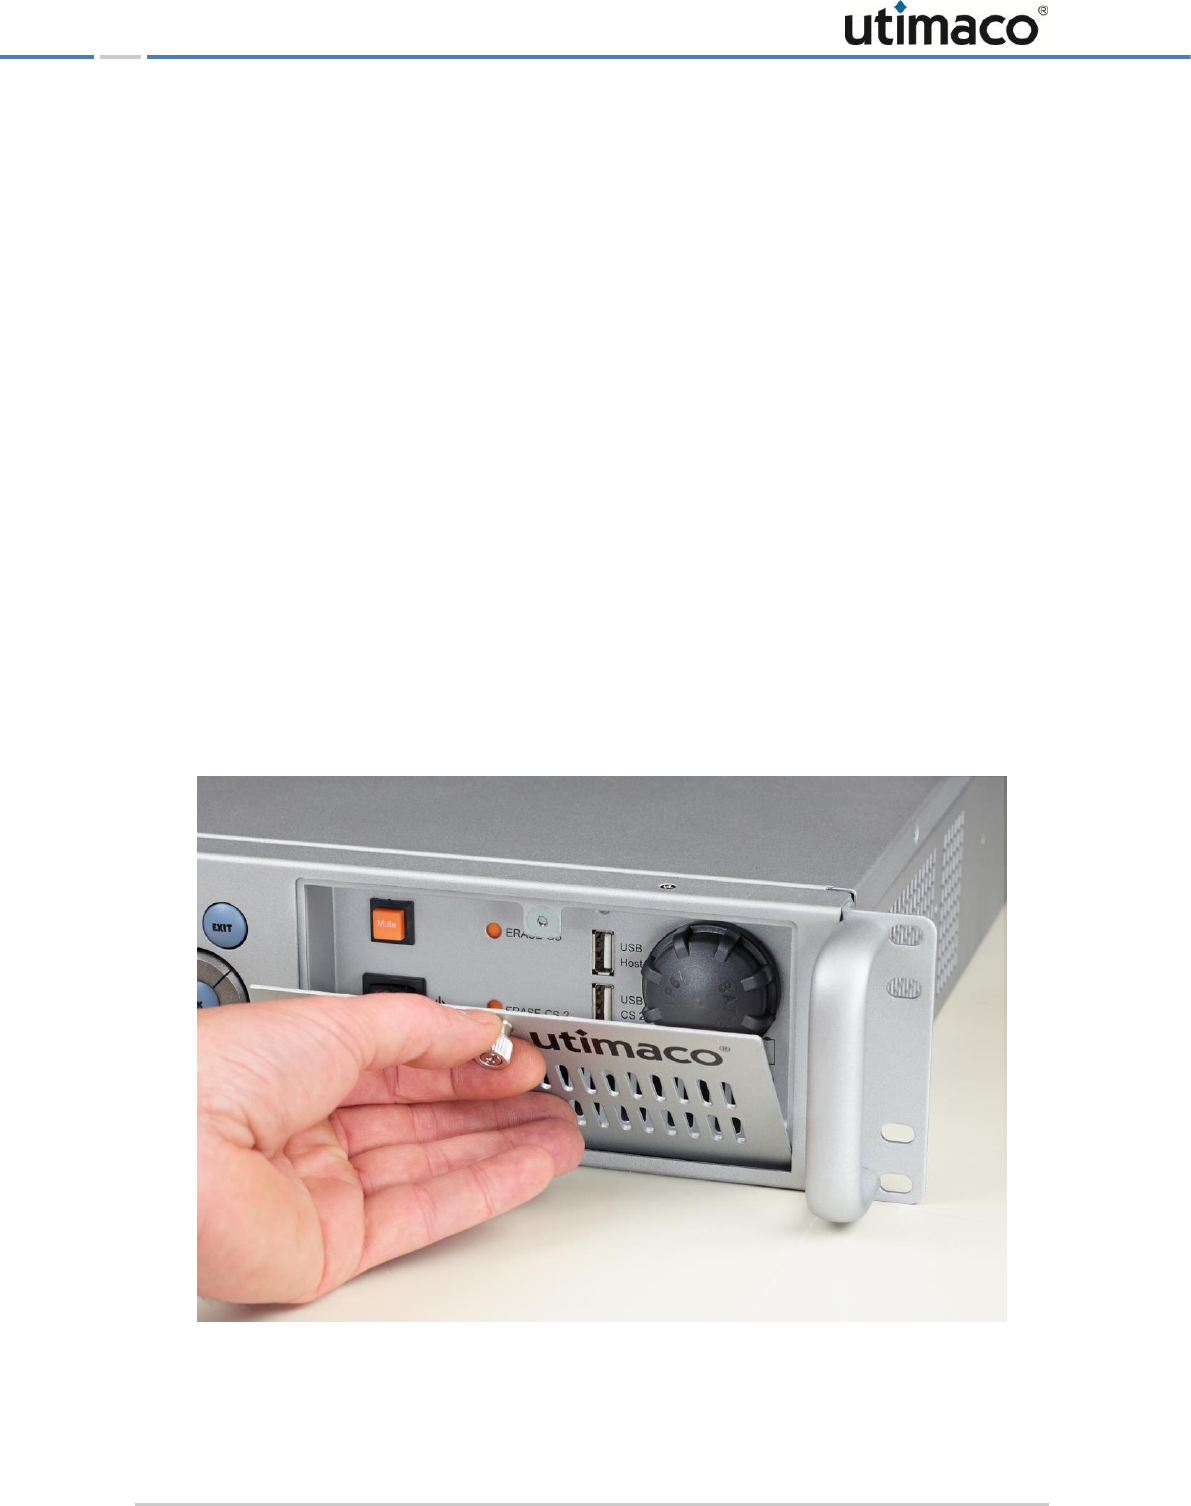
Administering the CryptoServer
Page 83 of 142
2. Press this switch once. An External Erase has been performed on the CryptoServer. An
Alarm has been triggered.
3. Put the battery compartment back in place and close the front door of the CryptoServer
LAN.
4. Reboot the CryptoServer LAN by performing the following steps:
a) On the front panel of the CryptoServer LAN, press the OK button.
The arrow on the far left-hand of the display shows you which submenu you can
select with the OK button.
b) Press the OK button to open the CSLAN Administration menu item.
c) Use the button to select Reboot and press the OK button to open the menu item.
d) If Confirm Reboot is shown on the display, use the button to insert the asterisk in
the brackets []Yes and confirm by pressing the OK button.
After a few seconds, this reboots the CryptoServer LAN.
Performing an External Erase on a CryptoServer LAN V4
To perform an External Erase on the CryptoServer LAN V4, follow the following steps:
1. Turn the knurled screw counterclockwise to open the front door of the CryptoServer LAN.
Figure 13: Opening the front door of the CryptoServer LAN V4
2. If you want, you can remove the front door from the bracket.
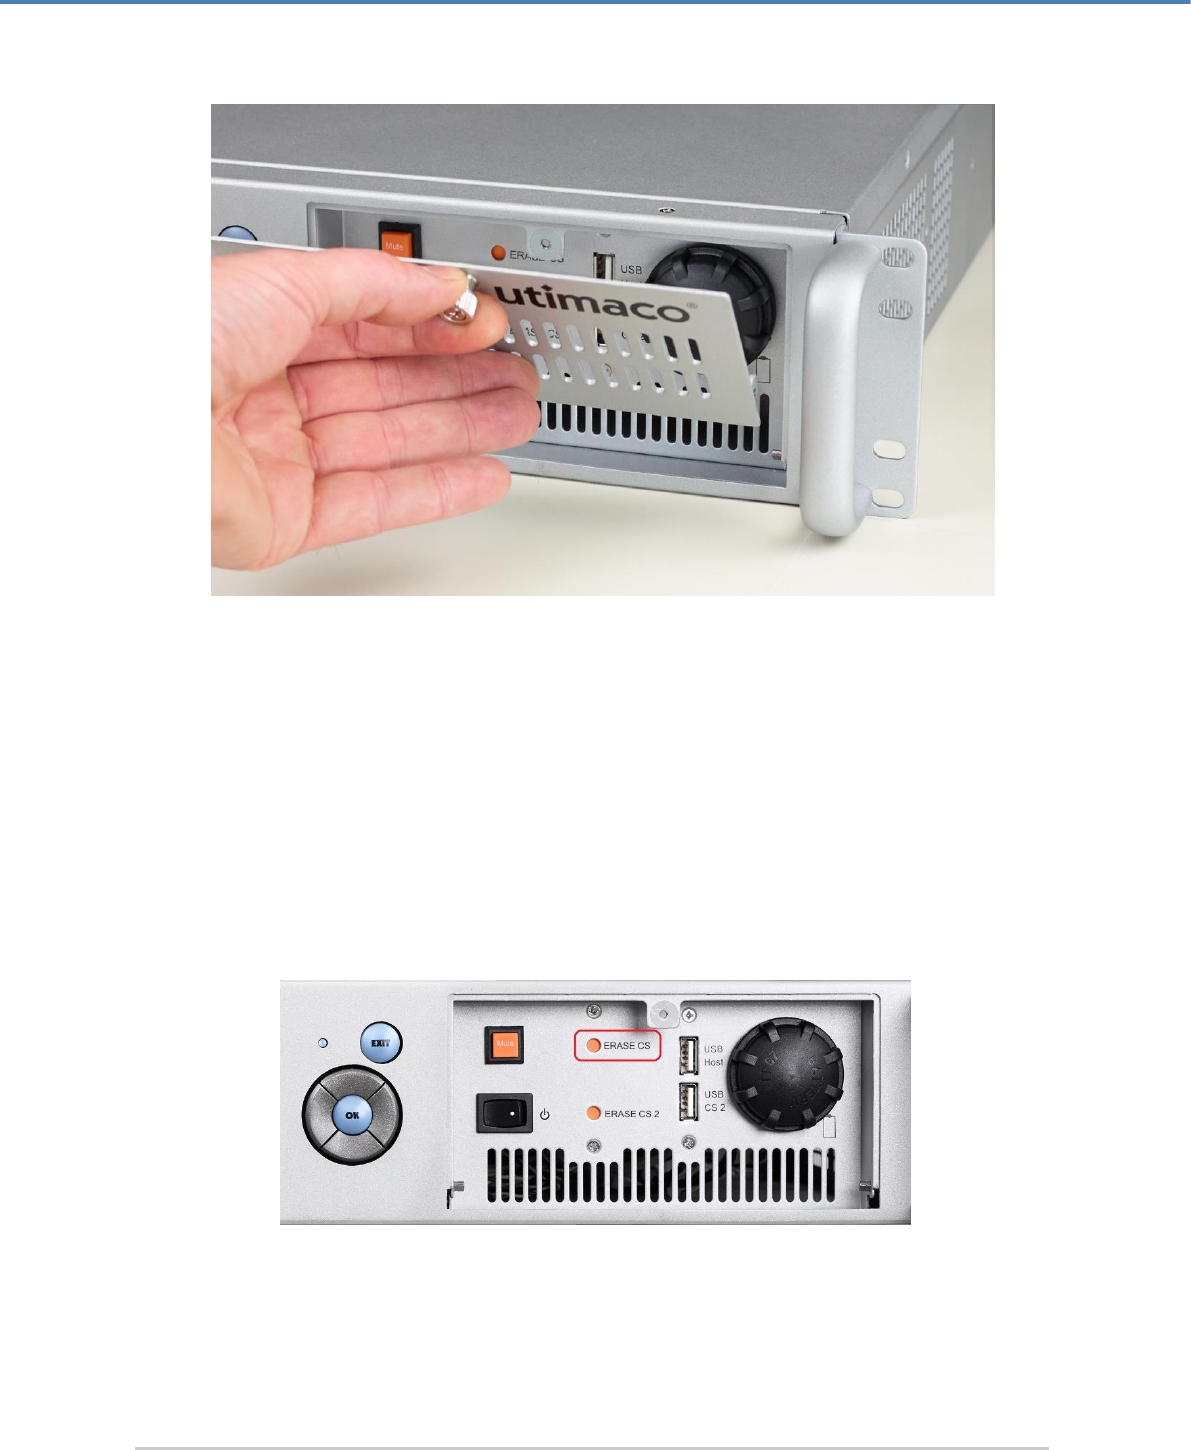
Administering the CryptoServer
Page 84 of 142
Figure 14: Removing the front door of the CryptoServer LAN V4
3. Push the corresponding ERASE pushbutton by using an appropriate screwdriver.
If a CryptoServer plug-in card CSe- or Se-Series has been installed in the CryptoServer
LAN, pushing the ERASE push-button is only effective if the CryptoServer LAN has been
switched on.
If pushing the ERASE push-button should be applied to a CryptoServer plug-in card Se-
Series Gen2 in the CryptoServer LAN, it is not necessary that the CryptoServer LAN has
been switched on.
Figure 15: ERASE pushbutton for performing External Erase on a CryptoServer LAN V4
▣ If there is a single CryptoServer plug-in card integrated in the CryptoServer LAN, only
the ERASE CS pushbutton is connected.
Administering the CryptoServer
Page 85 of 142
▣ If there are two CryptoServer plug-in cards integrated in the CryptoServer LAN, you
have to know exactly which plug-in card is connected to which ERASE pushbutton.
An External Erase has been performed on the CryptoServer, and an Alarm has been
triggered.
Regardless of whether you have performed an External Erase (pressing the ERASE push-
button) or not, the following applies:
If you remove the CryptoServer PCIe plug-in card from the CryptoServer LAN and remove
any battery from this plug-in card, the sensitive data on this plug-in card is deleted
automatically in any case after a maximum of 30 minutes.
4. Close the front door of the CryptoServer LAN.
5. Restart the CryptoServer LAN using the menu control buttons.
Triggering the Clear to Factory Settings command
To perform a Clear to Factory Settings on the CryptoServer LAN follow these steps:
1. On the front panel of the CryptoServer LAN, press the OK button.
The arrow on the far left-hand side of the display shows you which submenu you can
select with the OK button.
2. Use the button to select CryptoServer Administration and press the OK button to open
the menu item.
3. Use the button to select Recovery Procedures and press the OK button to open the
menu item.
4. Use the button to select Clear to Factory Settings and press the OK button to open the
menu item.
■ Resetting the alarm
Finally, you must reset the alarm that was triggered by the External Erase.
You must authenticate the command before you can perform the Reset Alarm function using
the menu options on the CryptoServer LAN. To do so, you require the current authentication
key, and this must be saved on a smartcard.
1. On the front panel of the CryptoServer LAN, press the OK button.
The arrow on the far left-hand side of the display shows you which submenu you can
select with the OK button.
2. Use the button to select CryptoServer Administration and press the OK button to open
the menu item.

Administering the CryptoServer
Page 86 of 142
3. Use the button to select Recovery Procedures and press the OK button to open the
menu item.
4. Use the button to select Reset Alarm and press the OK button to open the menu item.
5. Follow the instructions on the PIN pad and authenticate this command.
5.23 Performing MBK Management on the CryptoServer LAN
The CryptoServer provides secure storage for secret data and keys. This includes, for
example, the keys used by the PKCS#11, CSP/CNG, JCE and other interfaces. As any
perceived attack will cause the CryptoServer to permanently delete all the sensitive data and
keys stored on it, we strongly recommend you backup this data or the keys so they can be
reimported (restored) once the alarm has been resolved. To ensure this backup copy of the
sensitive data or keys can be stored securely, even outside of the CryptoServer, it is encrypted
with the MBK.
The function of an MBK is therefore to protect the backup copy of secret data or keys that are
normally stored on the CryptoServer from unauthorized access, even when they have to be
stored elsewhere. However, secret data stored on the CryptoServer is encrypted with the
individual device key and not with the MBK.
As an alarm will also cause the MBK to be permanently deleted, we also recommend you
store a backup copy of this key in a different location (not on the CryptoServer).
If you generate the MBK using the menu options on the CryptoServer LAN, you can only store
it on a smartcard.
You must connect the PIN pad directly to one of the CryptoServer's serial ports so that the
MBK can be managed locally on the CryptoServer.
■ You can connect your PIN pad REINER SCT cyberJack eCom Serial to the CS COM serial
port on the front panel of the CryptoServer LAN V3. In this case you should also use the
PS/2 port on the front panel of the CryptoServer LAN V3 to provide the power for the PIN
pad. If your PIN pad is REINER SCT cyberJack eCom USB, connect it to the USB port CS
USB on the front panel of the CryptoServer LAN V3.

Administering the CryptoServer
Page 87 of 142
Figure 16: Connecting the PIN pad to the CryptoServer LAN V3 for performing MBK management
■ If you have a CryptoServer LAN V4, you can connect the PIN pad to the USB port USB CS
on the front panel of the CryptoServer LAN V4.
Figure 17: Connecting the PIN pad to the CryptoServer LAN V4 for performing MBK management
Alternatively, you can also connect the PIN pad for local MBK management on all
CryptoServer LAN versions to the USB port on the CryptoServer plug-in card.
REINER SCT
PIN pad
CryptoServer LAN
REINER SCT
PIN pad
CryptoServer LAN V4

Administering the CryptoServer
Page 88 of 142
5.23.1 Using the PIN Pad to Import an MBK
If your MBK is in plain (unencrypted) text (in hexadecimal numbers = numbers 0 to 9 and
letters A to F), you can use the Import MBK from PIN pad function to enter it and import it into
the CryptoServer.
You must therefore use the PIN pad to enter a total of 32 hexadecimal numbers (16 bytes) for
each (XOR) half of the MBK. You can only import one 16-byte DES key (32 hexadecimal
numbers) via the PIN pad. The MBK must not be split into more than 2 parts, to ensure it can
be imported into the CryptoServer via the PIN pad.
1. On the front panel of the CryptoServer LAN, press the OK button.
The arrow on the far left-hand side of the display shows you which submenu you can
select with the OK button.
2. Use the button to select PIN Pad applications and press the OK button to open the
menu item.
3. Press the OK button to open the Import MBK from PIN pad menu item and follow the
instructions on the PIN pad.
Please note the following:
If you want to enter a letter, you must first press the button (on the bottom left) every
time before you input the letter. Buttons 1 to 6 represent letters A to F.
For example, to input the letter A, you must press the button and then 1 on the PIN pad.
5.23.2 Importing an MBK (DES) from a Smartcard
You use the Import DES MBK from Smartcard function to import a DES key (16 bytes) from a
smartcard to the CryptoServer.
1. On the front panel of the CryptoServer LAN, press the OK button.
The arrow on the far left-hand side of the display shows you which submenu you can
select with the OK button.
2. Use the button to select PIN-Pad Applications and press the OK button to open the
menu item.
3. Use the button to open the Import DES MBK from Smartcard menu item.
4. Press the OK button and follow the instructions on the PIN pad.
5.23.3 Importing an MBK (AES) from a Smartcard
You use the Import AES MBK from Smartcard function to import an AES key (32 bytes) from a
smartcard to the CryptoServer.

Administering the CryptoServer
Page 89 of 142
1. On the front panel of the CryptoServer LAN, press the OK button.
The arrow on the far left-hand side of the display shows you which submenu you can
select with the OK button.
2. Use the button to select PIN-Pad Applications and press the OK button to open the
menu item.
3. Use the button to open the Import AES MBK from Smartcard menu item.
4. Press the OK button and follow the instructions on the PIN pad.
5.23.4 Generating an MBK (AES) on a Smartcard
Use the Generate AES MBK on smartcard function to generate an MBK (AES key with 32 bytes)
in the secure environment provided by the CryptoServer, and then store this MBK on a
smartcard. This function saves the MBK to the smartcard but not to the CryptoServer. As the
MBK is automatically split into two parts, you will need two smartcards to perform this
function. The two individual parts of the MBK are then stored on separate cards.
1. On the front panel of the CryptoServer LAN, press the OK button.
The arrow on the far left-hand side of the display shows you which submenu you can
select with the OK button.
2. Use the button to select PIN-Pad Applications and press the OK button to open the
menu item.
3. Use the button to open the Generate AES MBK on Smartcard menu item.
4. Press the OK button and follow the instructions on the PIN pad.
5.23.5 Displaying MBK Key Information on the Smartcard
Use the List MBKs on Smartcard function to display information about an MBK key that is
stored on a smartcard.
1. On the front panel of the CryptoServer LAN, press the OK button.
The arrow on the far left-hand side of the display shows you which submenu you can
select with the OK button.
2. Use the button to select PIN Pad Applications and press the OK button to open the
menu item.
3. Use the button to open the List MBKs on Smartcard menu item.
4. Press the OK button and follow the instructions on the PIN pad.

Administering the CryptoServer
Page 90 of 142
5.23.6 Copying an MBK from One Smartcard to Another
You use the Copy MBK Smartcard function to copy the MBK key stored on one smartcard to a
different smartcard, to create a backup of the MBK on a smartcard.
As a complete MBK is made up of at least two parts and is therefore stored on two
smartcards, you must perform this action twice to copy an entire MBK to different smartcards
or to create a backup of the MBK on a smartcard.
1. On the front panel of the CryptoServer LAN, press the OK button.
The arrow on the far left-hand side of the display shows you which submenu you can
select with the OK button.
2. Use the button to select PIN Pad Applications and press the OK button to open the
menu item.
3. Use the button to open the Copy MBK Smartcard menu item.
4. Press the OK button and follow the instructions on the PIN pad.
5. Repeat the process with the second smartcard, on which the second part of the MBK is
stored.
5.23.7 Changing the PIN for the MBK Smartcard
Use the Change MBK Smartcard PIN function to change the PIN for the smartcard on which an
MBK key is stored.
1. On the front panel of the CryptoServer LAN, press the OK button.
The arrow on the far left-hand side of the display shows you which submenu you can
select with the OK button.
2. Use the button to select PIN Pad Applications and press the OK button to open the
menu item.
3. Use the button to open the Change MBK Smartcard PIN menu item.
4. Press the OK button and follow the instructions on the PIN pad.
5.23.8 Using the PIN Pad to Import an MBK and Save it to a Smartcard
Use the Import MBK from PIN-Pad & write it to SC function to import a plain text MBK into the
CryptoServer, using the PIN pad, and then to store it on a smartcard.
You must use the PIN pad to enter a total of 32 hexadecimal numbers (16 bytes) for each
(XOR) half of the MBK. You can only import one 16-byte DES key (32 hexadecimal numbers)
via the PIN pad and then save it to a smartcard. The MBK must not be split into more than 2
parts, to ensure it can be imported into the CryptoServer via the PIN pad and then saved to a
smartcard.
Administering the CryptoServer
Page 91 of 142
1. On the front panel of the CryptoServer LAN, press the OK button.
The arrow on the far left-hand side of the display shows you which submenu you can
select with the OK button.
2. Use the button to select PIN Pad Applications and press the OK button to open the
menu item.
3. Use the button to open the Import MBK from PIN-Pad & write it to SC menu item.
4. Press the OK button and follow the instructions on the PIN pad.
Please note the following points:
If you want to enter a letter, you must first press the button (on the bottom left) every
time before you input the letter. Buttons 1 to 6 represent letters A to F.
For example, to input the letter A, you must press the button and then 1 on the PIN pad.
5.23.9 Generating an AES Key and Saving It to a Smartcard
Use the Generate AES Key Shares & Store on SC function to generate an AES key (with 32 bytes)
in the secure environment provided by the CryptoServer and then save it to several
smartcards.
When the MBK is saved to a smartcard or to a key file it is always split up into several parts.
Splitting the MBK into several parts, known as key shares, is one of the CryptoServer's
important security functions because it enables the responsibility for the MBK to be given to
more than one person.
Before you generate an MBK, you must take the following decisions:
■ How many parts should the MBK be split into?
This is specified as n (shares).
■ What is the minimum number of parts that still allow the MBK to be used?
This is given as m (shares).
Here, n (shares) is the number of people to which the key is to be distributed and m (shares) is
the minimum number of people required to use the key.
You should ensure that you have the corresponding number of smartcards available.
The examples below illustrate the relationship between n (shares) and m (shares)
and show which combinations are sensible:
Key Shares
Number
Meaning
n (shares)
4
The MBK has been split in four parts.
Administering the CryptoServer
Page 92 of 142
Key Shares
Number
Meaning
m (shares)
2
Two people must be present to use the MBK.
Table 9: Example for an MBK split into four shares
Key Shares
Number
Meaning
n (shares)
2
The MBK has been split in two parts.
m (shares)
2
Two people must be present before the MBK can be used. This
corresponds to the familiar principle of requiring approval from a
second person.
Table 10: Example for an MBK split into two shares
To generate an MBK (AES) and save it on a smartcard by using the menu control buttons of
the CryptoServer LAN follow these steps:
1. On the front panel of the CryptoServer LAN, press the OK button.
The arrow on the far left-hand side of the display shows you which submenu you can
select with the OK button.
2. Use the button to select PIN-Pad Applications and press the OK button to open the
menu item.
3. Use the button to select Generate AES Key Shares & store on SC.
4. Press the OK button and follow the instructions on the PIN pad.
Setting up NTP
Page 93 of 142
6 Setting up NTP
The Network Time Protocol (NTP) is a standard for synchronizing clocks in computer systems
via packet-based communication networks.
If you do not want to use the menu control buttons of CryptoServer LAN to set up NTP but
prefer to do this remotely using another computer within the same network, you have to first
activate the SSH daemon on the CryptoServer LAN and define the netmask for remote SSH
access. For details see chapter 6.1, "Activating the SSH Daemon".
The following is a short overview of the steps required to enable NTP to be used with a
CryptoServer LAN. Read the following sections for detailed descriptions of these steps.
1. Enter the NTP server's IP address in the ntp.conf file on the CryptoServer LAN as
described in Section 6.2, "Entering the NTP Server's IP Address".
2. Create a user for the NTP administration by using the CryptoServer Administration Tool
(CAT) as described in Section 6.3, "Creating an NTP Manager". The CAT provides the
appropriate role-based user profile (NTP Manager one-person rule) and NTP Manager two-
person rule (for secondary confirmation).
3. Activate NTP on the CryptoServer by using CAT as described in Section 6.4, "Running &
Configuring NTP on the CryptoServer".
4. Run the NTP daemon by using the menu options on the front panel of the CryptoServer
LAN as described in Section 6.5, "Running the NTP Daemon".
5. Synchronize the time of the CryptoServer LAN with the time of the CryptoServer plug-in
card integrated into the CryptoServer LAN as described in Section 6.6, "Synchronizing the
CryptoServer LAN's Time with the Time of the CryptoServer".
6. Run the NTP client by using the menu options on the front panel of the CryptoServer LAN
as described in Section 6.7, "Running the NTP Client".
.
Ensure you perform the individual configuration steps in exactly the sequence described.
An NTP daemon and an NTP client are installed on the CryptoServer LAN. They are used to
synchronize the time on the CryptoServer with the CryptoServer LAN, with the help of NTP.
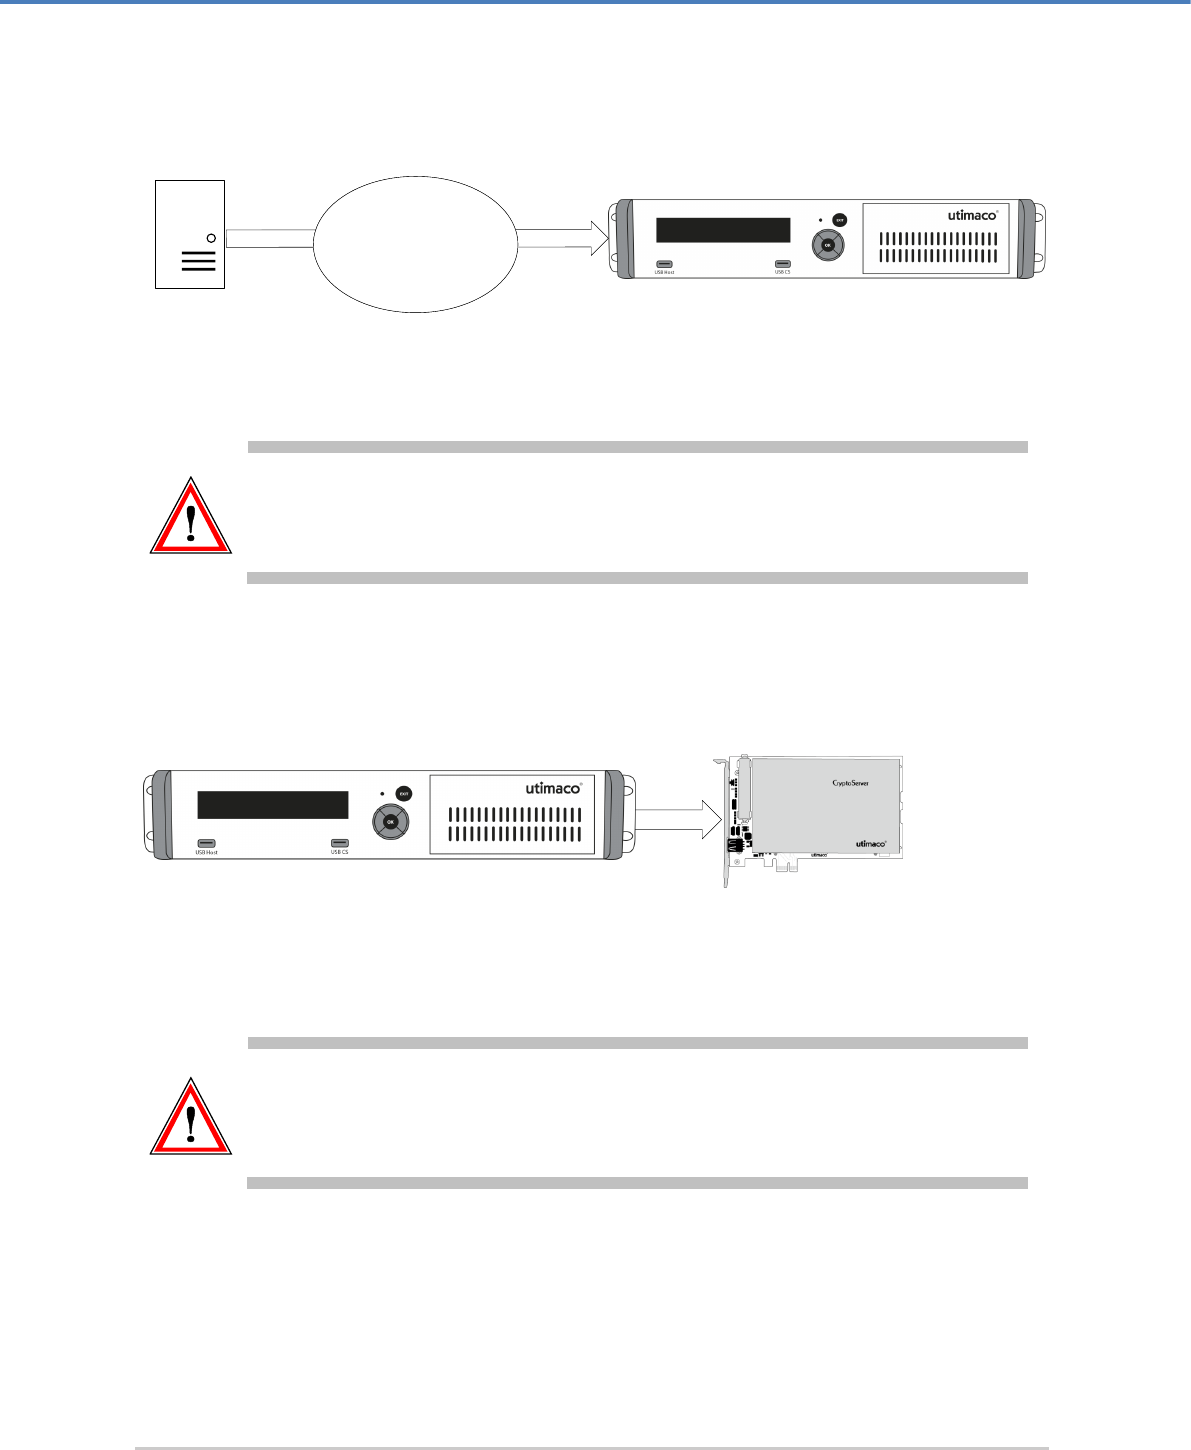
Setting up NTP
Page 94 of 142
When you run the NTP daemon, the time is transferred from an NTP server to the
CryptoServer LAN.
Figure 18: Transferring the time from an NTP server to the CryptoServer LAN
A too big time difference (≥ 1000 s) between the clock of the CryptoServer LAN and the one
in the NTP server causes an error message. In such case, the clock on the CryptoServer will
not be set.
When you run the NTP client, the time is transferred from the CryptoServer LAN to the
CryptoServer.
Figure 19: CryptoServer LAN transfers the time to the integrated CryptoServer plug-in card
A time difference between the internal clocks on the CryptoServer LAN and the CryptoServer
which is greater than the maximum time shift permitted for the clock on the CryptoServer,
per day (see chapter 6.4), leads to an error. In such case, the clock on the CryptoServer is not
set.
6.1 Activating the SSH Daemon
The SSH daemon creates a secure, authenticated and encrypted connection between two
computers over an unsecured network.
CryptoServer LAN V4
NTP server
Internet
CryptoServer LAN V4 CryptoServer PCIe plug-in card CSe-Series

Setting up NTP
Page 95 of 142
CryptoServer LAN supports only Version 2 of the SSH protocol. Previous versions of the SSH
protocol are not supported. The default settings do not permit remote SSH access to the
CryptoServer LAN. To set up remote SSH access set up, follow these steps:
1. Press the OK button on the front panel of the CryptoServer LAN. The arrow you see on
the far left of the display shows you which submenu you can select by pressing the OK
key.
2. Use the OK key to select CSLAN Administration.
3. Press OK again to select Configuration.
4. Then press the key to select Services and confirm this by pressing OK.
5. Press OK to select SSH Daemon.
6. After this, press OK again to select Configuration.
The prompt Configuration of SSH Daemon then appears on the monitor. To respond, use
the key to move the asterisk into the brackets []Enable and then press OK.
You can then specify the netmask for SSH access.
The cursor appears on the far left, under the first number. Then use the und keys to
set the numbers. Press the key to move the cursor to the next number.
7. Use the / and keys to set the netmask for SSH access and then press OK.
▣ In a CSLANOS version 4.4.7 and lower now the system user root can access the
CryptoServer LAN via an SSH connection.
▣ In a CSLANOS version 4.5.x or higher, now only the cslagent system user can
remotely login to the CSLANOS via an SSH connection. By default, the SSH-login for
the user root is disabled. Optionally, you can enable it in the configuration file for the
SSH daemon /etc/ssh/sshd_config by replacing the default setting
PermitRootLogin no with the setting PermitRootLogin yes. Afterwards, the SSH
daemon has to be restarted for the setting to become effective (/etc/init.d/sshd
restart).
6.2 Entering the NTP Server's IP Address
Before you run the NTP daemon and the NTP client you must first enter the NTP server's IP
address in the ntp.conf configuration file.
From CSLANOS version 4.2.0 onwards the Internet Protocols IPv4 and IPv6 are supported.
Previous CSLANOS versions support only IPv4.
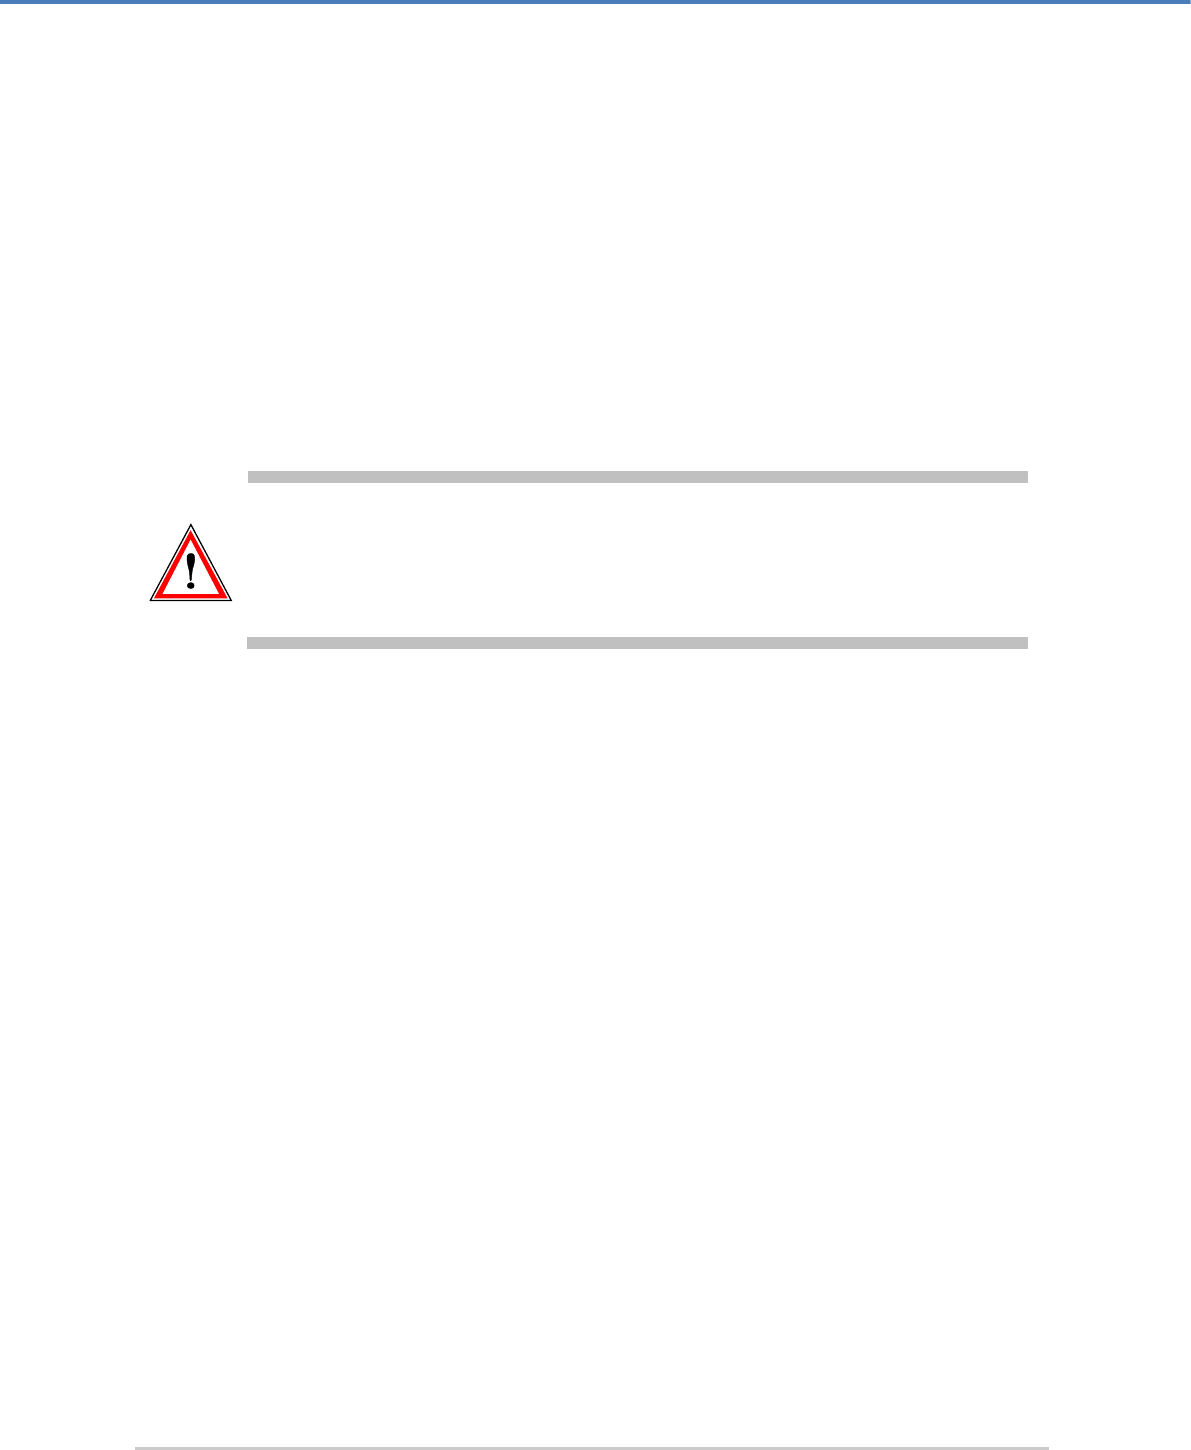
Setting up NTP
Page 96 of 142
Here we describe how you use WinSCP for Windows operating systems to modify the
ntp.conf file.
1. Start your SCP client (for example, WinSCP).
2. Logon to your CryptoServer LAN via SSH, for example, with the following access data:
Host name = <computer name/IP address of the CryptoServer LAN>
Port number = 22
User name = root
Password = utimaco
If you are using a CSLANOS version 4.5.x or higher, please keep in mind that by default the
SSH-login for the user
root
is disabled until you enable it in the configuration file for the
SSH daemon
/etc/ssh/sshd_config
with the setting
PermitRootLogin yes
.
Afterwards, the SSH daemon has to be restarted for the setting to become effective
(
/etc/init.d/sshd restart
).
3. Double-click the ntp.conf configuration file in the /etc directory to open it.
4. Enter the correct IP address for the internal NTP server next to the entry server.
5. Save and close the ntp.conf file.
6. Shut down your SCP client.
6.3 Creating an NTP Manager
Use CAT to set up one or two users for NTP administration (NTP Manager). CAT provides the
appropriate role-based user profiles NTP Manager one-person rule and NTP Manager two-
person rule.
1. Start CAT on your administration computer.
2. Click the Login/Logoff button in the toolbar and then logon to the CryptoServer as NTP
administrator/user with at least the authentication status 20000000.
3. Click Close to close the Logon/Logoff User dialog box.
4. Click the Manage User button in the toolbar.
5. In the User Management dialog box, click the Add User button.
6. In the Name of New User field, enter a unique name for the NTP Manager.

Setting up NTP
Page 97 of 142
7. Under User Profile, select the NTP Manager one person rule option if you only want to set
up one NTP user. If you want to set up secondary confirmation, select NTP Manager two-
person rule.
8. Under Authentication Mechanism, select the required authentication mechanism.
9. Enter an attribute if you wish to do so.
10. Click OK to finish working in the Add User dialog box.
If you want to set up the two-person rule for NTP users, you must now use the procedure
described above to set up another NTP user (NTP Manager two-person rule).
6.4 Running & Configuring NTP on the CryptoServer
1. Start CAT on your administrator computer.
2. Click the Login/Logoff button in the toolbar and logon to the CryptoServer as the NTP
administrator/user, with at least the authentication status 00200000.
3. Click Close to close the Login/Logoff User dialog box.
4. Click on Manage in the menu bar and select the NTP Settings… submenu option.
The Network Time Protocol (NTP) Configuration dialog box opens.
5. Select the option Enabled.
6. Optionally you can change the default values for the following settings:
▣ Max. time to set per day (msec); default value 30000 ms
Here you can specify the number of milliseconds by which the internal clock of the
CryptoServer can be shifted for one day.
The default setting is 30000 milliseconds (30 seconds). You can set a minimum of 0
milliseconds (not recommended) and a maximum of 4,294,967,295 milliseconds.
▣ Max. time to set per operation (msec); default value 3000 ms
Here you can specify the number of milliseconds by which the internal clock of the
CryptoServer's can be shifted per operation (time synchronization).
The default setting is 3000 milliseconds (3 seconds). You can set a minimum of 0
milliseconds (not recommended) and a maximum of 4,294,967,295 milliseconds.
7. Click Apply to transfer the values you have entered to the CryptoServer.
8. Finish entering your data in this dialog box by clicking on OK. The dialog box Network
Time Protocol (NTP) Configuration closes.
Setting up NTP
Page 98 of 142
6.5 Running the NTP Daemon
1. Press the OK button on the front panel of the CryptoServer LAN.
The arrow on the far left of the display shows you which submenu you can select with
the OK button.
2. Press the OK button to select CSLAN Administration.
3. Press the OK button to select Configuration.
4. Press the button to select Services and confirm by pressing OK.
5. Press the button to select NTP Daemon and confirm by pressing OK.
6. Press the button to move the asterisk into the square brackets []Enable and confirm
by pressing OK.
7. You see a system message that you have performed the configuration successfully.
Confirm by pressing OK.
6.6 Synchronizing the CryptoServer LAN's Time with the Time of the
CryptoServer plug-in card
It is important to synchronize the time between the CryptoServer LAN and the CryptoServer
plug-in card integrated into the CryptoServer LAN after the time between the NTP server and
the CryptoServer LAN is synchronized. Otherwise, a time difference between the internal
clocks on the CryptoServer LAN and the CryptoServer that is greater than the maximum time
shift permitted for the clock on the CryptoServer, per day (see chapter 6.4, "Running &
Configuring NTP on the CryptoServer"), causes an error, and the clock of the CryptoServer will
not be set.
6.6.1 Connecting the PIN Pad
The PIN pad must be connected directly to the CryptoServer LAN.
1. Connect the PIN pad to the CryptoServer LAN.
□ If you have a CryptoServer LAN V3, connect the PIN pad to the COM serial port on
the front panel of the CryptoServer LAN V3. Use the PS/2 port on the front panel of
the CryptoServer LAN3 to provide the power for the PIN pad.

Setting up NTP
Page 99 of 142
□ If you have a CryptoServer LAN V4, connect the PIN pad to the USB Host port on
the front panel of the CryptoServer LAN V4.
6.6.2 Activating the PIN Pad
After you have connected the PIN pad, use the menu options on the CryptoServer LAN to
specify which PIN pad you have connected.
1. Press the OK button on the front panel of the CryptoServer LAN.
The arrow on the far left of the display shows you which submenu you can select with
the OK button.
2. Press the OK button to select CSLAN Administration.
3. Press the OK button to select Configuration.
4. Press the button to select Host and confirm by pressing OK.
5. Press the OK button to select Card Reader&PIN Pad.
To select a different PIN pad, click the OK button.
6. Select the appropriate menu item depending on that to which serial interface of
CryptoServer LAN you have connected the PIN pad:
▣ If you have a CyptoServer LAN V3 use the OK button to select the menu item
REINERSCT (COM).
▣ If you have a CyptoServer LAN V4 use the button to select the menu item
REINERSCT (USB).
7. Press OK to confirm.
You then see a system message.
8. Press OK to confirm it.
6.6.3 Transferring the Time of the CryptoServer LAN to the CryptoServer
Before you can run the Set CS Time to System Time (Host) function from the CryptoServer
LAN's menu options you must authenticate the command using the authentication key
ADMIN.key supplied on the delivered smartcards.
If you have changed this authentication key in the CryptoServer, then you must use the new
authentication key to authenticate the commands. Please note that this new key must be
saved on a smart card.

Setting up NTP
Page 100 of 142
The PIN pad (which is supplied) must be connected directly to the CryptoServer LAN: to the
COM interface and to the PS/2 port (to provide the power for the PIN pad) on the front panel
of the CryptoServer LAN V3, or to the USB Host port on the front panel of the CryptoServer
LAN V4.
1. Press the OK button on the front panel of the CryptoServer LAN.
The arrow on the far left of the display shows you which submenu you can select with
the OK button.
2. Press the button to select the CryptoServer Administration menu item and confirm by
pressing OK.
3. Press the button to select the Administration&File Management menu item and confirm
by pressing OK.
4. Press the button to select the Set CS Time to System Time (Host) menu item and
confirm by pressing OK.
The prompt Set CS Time to System Time (Host) then appears on the display.
5. Use the key to move the asterisk into the brackets []Yes and then press OK.
6. Follow the instructions on the PIN pad and authenticate this command.
You then see a system message on the display of the CryptoServer LAN.
7. Press OK to confirm it.
6.7 Running the NTP Client
1. Press the OK button on the front panel of the CryptoServer LAN.
The arrow on the far left of the display shows you which submenu you can select with
the OK button.
2. Press the OK button to select CSLAN Administration.
3. Press the OK button to select Configuration.
4. Press the button to select Services and confirm by pressing OK.
5. Press the button to select NTP Client and confirm by pressing OK.
6. Press the button to move the asterisk into the square brackets []Enable and confirm
by pressing OK.
You see a system message that you have performed the configuration successfully.
7. Press OK to confirm.

Configuring NTP
Page 101 of 142
7 Configuring NTP
This section describes a few more options you can use to configure NTP on the CryptoServer
LAN.
7.1 Changing the Default Values for Time Synchronization on the
CryptoServer LAN
The following settings are used for time synchronization:
■ LoopTime
defines how often (in seconds) the time is to be corrected
Default setting: LoopTime = 3600 (once per hour)
You can set a maximum of 2,147,483,647 seconds.
■ Deviation
defines for which time variation between CryptoServer and CryptoServer LAN (in
milliseconds) the time is to be corrected
Default setting: Deviation = 500 (for a time variation greater than 0.5 seconds)
You can set a maximum of 2,147,483,647 milliseconds.
You can redefine these default values in the csxlan.conf configuration file.
Here we describe how you use WinSCP for Windows operating systems to modify the
csxlan.conf file.
1. Start your SCP client (for example, WinSCP).
2. Logon to your CryptoServer LAN via SSH, for example by using the following access data:
Host name = <computer name/IP address of the CryptoServer LAN>
Port number = 22
User name = root
Password = utimaco
If you are using a CSLANOS version 4.5.x or higher, please keep in mind that by default the
SSH-login for the user
root
is disabled until you enable it in the configuration file for the
SSH daemon
/etc/ssh/sshd_config
with the setting
PermitRootLogin yes
.
Afterwards, the SSH daemon has to be restarted for the setting to become effective
(
/etc/init.d/sshd restart
).

Configuring NTP
Page 102 of 142
3. Open the /etc directory in it.
Here you will find the csxlan.conf configuration file (/etc/csxlan.conf).
4. Double-click the csxlan.conf file to open it.
In our example the time synchronization (LoopTime) should be performed every 7200
Seconds (two hours), and for any time variation (Deviation) of more than 1000
milliseconds (1 second).
To do so you should adjust the following entries in the [NTPClient] section of the
csxlan.conf configuration file:
[NTPClient]
Deviation = 1000
LoopTime = 7200
5. Save and close the csxlan.conf configuration file.
6. Shut down your SCP client.
7. Restart the CryptoServer LAN by using the menu options to make the changes in the
csxlan.conf configuration file effective.
a) On the front panel of the CryptoServer LAN, press the OK button.
The arrow on the far left of the display shows you which submenu you can select
with the OK button.
b) Using the OK button, select CSLAN Administration.
c) Using the button, select Reboot and confirm by pressing OK.
d) Press the button to move the asterisk into the square brackets []Yes and confirm
by pressing OK.
7.2 Viewing NTP Log Entries
All log entries or error messages relating to the NTP daemon and the NTP client to stand are
stored in the syslog file, and you can view them there. We describe how you use WinSCP for
Windows to modify the syslog file.
1. Start your SCP client (for example, WinSCP).
2. Select the /var/log folder and double click the syslog file to open it.
3. Look for these entries: ntpclient and ntpd.
4. Close the syslog file and shut down your SCP client.
7.3 Changing the Time Zone for the CryptoServer LAN
Use the menu options to display the UTC and local time on the CryptoServer LAN. You will find
the time display here:
Configuring NTP
Page 103 of 142
1. On the front panel of the CryptoServer LAN, press the OK button.
The arrow on the far left of the display shows you which submenu you can select with
the OK button.
2. Press the OK button, select CSLAN Administration.
3. Press the OK button to select the Configuration menu item and confirm by pressing OK.
4. Press the button to select the Host menu item and confirm by pressing OK.
5. Press the button to select the Date&Time menu item and confirm by pressing OK.
6. Press the OK button to select the Get Host (System) Time menu item and confirm by
pressing OK.
The upper part shows the UTC, whereas the lower part displays the local time on the
CryptoServer LAN.
You can change the local time displayed here by selecting a different time zone.
You can either connect a monitor and a keyboard to the CryptoServer LAN or administrate
it remotely via a SSH network connection (for example, using a secure shell (PuTTY for
Windows or SSH for Linux)).
If you are using a CSLANOS version 4.5.x or higher, please keep in mind that by default the
SSH-login for the user
root
is disabled until you enable it in the configuration file for the
SSH daemon
/etc/ssh/sshd_config
with the setting
PermitRootLogin yes
.
Afterwards, the SSH daemon has to be restarted for the setting to become effective
(
/etc/init.d/sshd restart
).
The data required for SSH access is listed in the following table.
Host name = <computer name/IP address of the CryptoServer LAN>
Port number = 22
User name = root
Password = utimaco
7. Enter root as the user name and then press the Enter key.
8. Enter utimaco as the password and press the Enter key again.
9. Finally, enter the tzconfig command and confirm this by pressing the Enter key.
10. Follow the instructions on the monitor.
The changed time zone comes into effect immediately and also appears immediately as the
Local Time on the display.
Advanced Administration on the CryptoServer LAN
Page 104 of 142
8 Advanced Administration on the CryptoServer LAN
This chapter describes advanced administration functions for the CryptoServer LAN. None of
the administration tasks detailed in this chapter can be performed using the menu options on
the CryptoServer LAN.
Instead, you must use one of the two following methods to perform advanced administration
tasks:
■ You can connect a monitor and a keyboard to the CryptoServer LAN.
If you do this, you must be familiar with the functions of the standard UNIX vi editor.
■ You can also perform extended administration tasks on the CryptoServer LAN remotely by
using an SSH client (for example with PuTTY and WinSCP under Windows) from a host
computer. You must also be familiar with the functions of the standard UNIX vi editor if
you want to access the CryptoServer LAN from a Windows-based host computer using
PuTTY.
You must logon as the root user for extended administration tasks and with the password
utimaco if the device is in its initial state.
If you have changed the password for the
root
user, you must input the current password.
If you are using a CSLANOS version 4.5.x or higher, please keep in mind that by default the
SSH-login for the user
root
is disabled until you enable it in the configuration file for the
SSH daemon
/etc/ssh/sshd_config
with the setting
PermitRootLogin yes
.
Afterwards, the SSH daemon has to be restarted for the setting to become effective
(
/etc/init.d/sshd restart
).
If you want to edit files on the CryptoServer LAN with WinSCP from a Windows-based host
computer, please be aware that a file processed in Notepad cannot be interpreted on a
Linux-based computer/server.
8.1 Configuring the Transfer Speed for Ethernet
The parameters used to link two Ethernet interfaces are usually negotiated automatically.
Advanced Administration on the CryptoServer LAN
Page 105 of 142
From CSLANOS version 4.2.0 onwards the Internet Protocols IPv4 and IPv6 are supported.
Previous CSLANOS versions support only IPv4.
However, if you cannot use auto negotiation in your network, you can also configure the
network using the following parameters:
Parameter
Description
Speed
Possible values: [10, 100, 1000]
Sets the network interface speed in MBit/s.
Duplex
Possible values: half or full
Sets the network interface duplex mode.
Autoneg
Possible values: on or off
Sets auto negotiation for the network interface.
Table 11: Configuration parameter for network usage
You will find the networking file in which the network interface can be configured without
auto negotiation here on the CryptoServer LAN:
/etc/sysconfig/networking
The example below shows a part of the networking configuration file for the Ethernet eth0
connection and a possible configuration for the network interface.
# Begin /etc/sysconfig/networking
NETCONFIG="_0"
NET_DEV_0=eth0
DHCP_0=no
IP_ADDR_0=10.16.0.82
NETWORK_0=10.16.0.0
NETMASK_0=255.255.192.0
BRDCAST_0=10.16.63.255
ETHTOOL_0=“speed 100 duplex half autoneg off“
GATEWAY=10.16.0.2
# End /etc/sysconfig/networking
As you can see from the networking file shown above, you can also modify a range of other
configuration parameters, such as IP address, netmask or default gateway.
Advanced Administration on the CryptoServer LAN
Page 106 of 142
You must ensure that you have set autoneg for auto negotiation to off so your configuration
can be used.
8.2 The Configuration File csxlan.conf
The csxlan.conf file is the configuration file for CSXLAN. This is where you configure the
majority of the settings for the CryptoServer LAN.
You will find this file here: /etc/csxlan.conf
This configuration file is split into these sections [Global], [CryptoServer], [Listener]
and [DisplayAdmin]. Each area includes an assignment of variable tasks.
A simple assignment of a value to a parameter looks like this:
VARIABLE = VALUE
A list of assignments of several values to one parameter looks like this:
VARIABLE = {
value1
value2
…
}
The variables for the individual areas are described in the tables below:
Variables for the [Global] section
Variables
Description
Debug
The debug level is a combination of the following bits.
■ 0x00 - for no debug
■ 0x10 - transaction time
■ 0x20 - show packet data
■ 0x40 - really verbose
■ 0x80 - informational
Watchdog
Enables the Hardware watchdog if a positive value was entered. The
default value for this variable is for the Watchdog to be enabled.
MaxConnections
Number of connections that can be performed simultaneously by the
csxlan daemon. Default setting is 256 connections.
Advanced Administration on the CryptoServer LAN
Page 107 of 142
Variables
Description
AuthReset
Shows whether the Reset, ResetToBL and Restart csadm commands
must be authenticated.
No authentication is necessary if the commands were input using the
menu options on the CryptoServer LAN.
Example:
AuthReset = 0 (no authentication)
AuthReset = 1 (authentication required)
HostsAllow
Shows whether an incoming connection query to the CryptoServer LAN
from the Hosts.Allow file must be checked.
Example:
HostsAllow = 0 (no check)
HostsAllow = 1 (checking of hosts.allow)
DenyLock
Disables the LOCK command used for maintenance tasks on the
CryptoServer. If the DenyLock variable is not present, the LOCK command
is permitted.
Example:
DenyLock = 0 (LOCK command is permitted)
DenyLock = 1 (LOCK command is not permitted)
Table 12: Variables in the [Global] section of csxlan.conf
Variables for the [CryptoServer] section
Variables
Description
Label
Unique ID for the CryptoServer plug-in card in the CryptoServer LAN.
Device
File name of the devices file assigned to the CryptoServer plug-in card in the
CryptoServer LAN (for example /dev/cs2a).
Timeout
Time in milliseconds to define when the CryptoServer device driver rejects a
command because the CryptoServer does not respond. The default value is
60000 milliseconds.
Table 13: Variables in the [CryptoServer] section of csxlan.conf

Advanced Administration on the CryptoServer LAN
Page 108 of 142
Variables for the [Listener] section
Variables
Description
Address
The local interface address to which the socket was assigned. If this is
missing, the server socket is assigned for all local interfaces.
Port
Number of the port used to handle csxlan daemon connections. Unless
otherwise specified, port 288 is used here.
Protocol
This is where you specify whether the TCP or UDP protocol is to be used.
Unless otherwise specified, the TCP protocol is used.
Multicast
This is where you specify whether multicast (multiple connections) is to be
used.
Multicast = 0 means that multicast is disabled.
Multicast = 1 means that multicast is enabled.
Multicast can only be used together with the UDP protocol.
Keepalive
Enables or disables TCP keepalive data packets that search for interrupted
connections.
Keepalive = 0 means that TCP keepalive data packets are disabled
Keepalive = 1 means TCP keepalive data packets are enabled.
Linger
For TCP connections, this is where you input the time in seconds during
which a connection to the socket is to be kept open before the socket is
closed by mutual agreement. If you input a value greater than 0, the socket is
closed by mutual agreement and an additional TCP packet is exchanged.
Priority
Allocates a priority to every query to the ports.
Possible values are 1 (highest) and 100 (lowest) priority.
Route_to
This mandatory option assigns the [Listener] to a specific CryptoServer.
The data you input here is the same as you input in the [CryptoServer]
area as the Label.
Table 14: Variables in the [Listener] section of csxlan.conf
Variables for the [DisplayAdmin] section
Variables
Description
Device
This is where you input a name which is also to be used under Address in the
[Listener] area. The name is made up of the protocol, address and port
(protocol:port@address). Examples: TCP:288@localhost,
TCP:localhost, 288@localhost, localhost
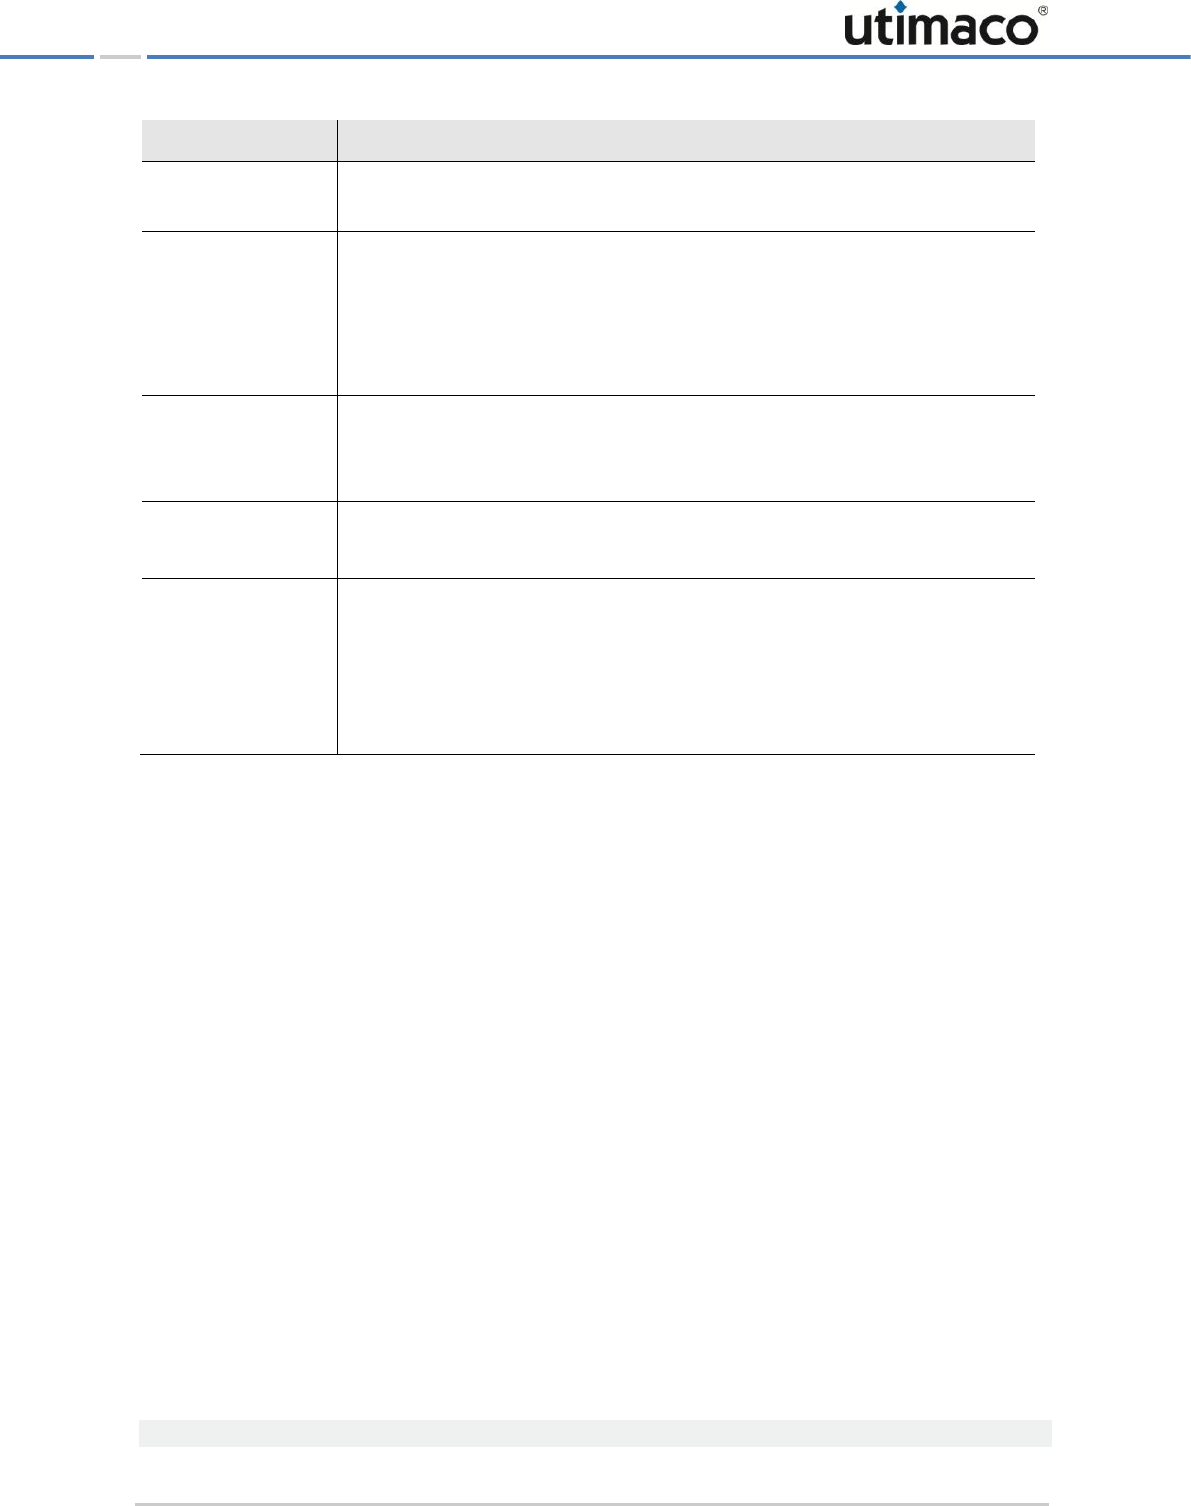
Advanced Administration on the CryptoServer LAN
Page 109 of 142
Variables
Description
This name is used for communications between the menu options on the
CryptoServer LAN and the CryptoServer plug-in card.
PinPad
Specifies which PIN pad is connected: The name has this format:
:smartcard-id:pinpadid:serial-port / USB
Input the character string like this:
:cs2:cp8:/dev/ttyS1
Timeout
This is where you input a time in milliseconds from the last time a button
was pressed that the device must wait before closing a menu item. The
default setting is 60000 milliseconds.
CS2_Timeout
Here, input a time in milliseconds after which the last command performed
on the CryptoServer is to be interrupted. The default setting is 10 minutes.
Logo
Character string displayed in the first line of the CryptoServer LAN's menu
options display.
When the device is supplied, this value is not set. It shows which
CryptoServer plug-in card has been installed. You therefore see CryptoServer
CS or CryptoServer Se or CryptoServer CSe at this point.
Table 15: Variables in the [DisplayAdmin] section of csxlan.conf
You can insert commented lines at any point in the csxlan.conf file. Commented lines start
with the character # and run to the end of the line.
8.3 Restricting the Network Access on the CryptoServer LAN
When the CryptoServer LAN is supplied, no services, such as SSH, etc., are enabled on it.
If you want to restrict the network access to the CryptoServer LAN, and only want to permit a
specific number of hosts to connect to the CryptoServer LAN, you shall edit the configuration
files hosts.allow, hosts.deny and csxlan.conf.
You will find these configuration files in the etc folder.
■ hosts.allow
In the configuration file …\etc\hosts.allow you can define the hosts that are generally
permitted to access the CryptoServer LAN over SSH or/and a TCP network (LAN, WLAN,
WAN).
You can enable the SSH access by using the menu options on the CryptoServer LAN (see
Chapter 3.6, "Enabling the SSH Daemon" for a detailed description on how to do that). After
you have done this, the hosts.allow configuration file looks, for example, like this:
# Begin /etc/hosts.allow
Advanced Administration on the CryptoServer LAN
Page 110 of 142
sshd: 10.17.0.0/255.255.192.0
# End /etc/hosts.allow
■ hosts.deny
In the configuration file …\etc\hosts.deny you can specify the hosts that are generally
not allowed to get network access to the CryptoServer LAN.
The configuration file hosts.deny contains the following default settings:
# Begin /etc/hosts.deny
ALL: ALL
# End /etc/hosts.deny
That means, that all requesting hosts are denied by default. Only hosts or domains listed
in the hosts.allow file are granted access to the CryptoServer LAN.
The file hosts.allow is always evaluated at first. If the IP address of the requesting host
could not be found there, the CSXLAN daemon searches the file …\etc\hosts.deny for it. In
case the IP address is found there, the requesting host gets an access denied response.
However, if the IP address could not be found there too, the requesting host is granted access
to the CryptoServer LAN.
You shall use the following syntax format for every service you input in the
hosts.allow resp. hosts.deny configuration file:
Service: IP address/netmask
If you only want to allow SSH or/and TCP access for one particular host, you must modify the
IP address and the netmask accordingly.
From CSLANOS version 4.2.0 onwards the Internet Protocols IPv4 and IPv6 are supported.
Previous CSLANOS versions support only IPv4.

Advanced Administration on the CryptoServer LAN
Page 111 of 142
Make sure that the CryptoServer LAN configuration file …\etc\csxlan.conf contains the entry
HostsAllow = 1 in the [Global] section. Otherwise, the settings in the hosts.allow and resp.
hosts.deny file will not be considered by the CryptoServer LAN.
If you want to restrict the number of SSH and TCP connections to the CryptoServer LAN, edit
the hosts.allow, hosts.deny and csxlan.conf files as follows:
1. Open the file hosts.allow in the /etc/ directory with your SCP client.
2. Enter the IP addresses of the hosts to be permitted to access the CryptoServer LAN.
Here are exemplary lines in the hosts.allow file illustrating how you would allow only a
single host 10.17.1.1 to access the CryptoServer LAN via SSH and TCP.
sshd: 10.17.1.1
csxlan: 10.17.1.1
The following example shows how you would allow a range of hosts 10.17.1.0 to
10.17.1.255 to access the CryptoServer LAN via SSH and TCP.
sshd: 10.17.1.0/255.255.255.0
csxlan: 10.17.1.0/255.255.255.0
The key words
sshd
(for SSH daemon) and
csxlan
(for CSXLAN Daemon) are mandatory.
3. Open the hosts.deny file in the /etc/ directory with your SCP client.
4. Enter the IP addresses of the hosts which shall be rejected access to the CryptoServer
LAN.
Here are exemplary lines in the hosts.deny file illustrating how you would reject a specific
host 10.247.1.3 from getting access to the CryptoServer LAN via SSH and TCP.
sshd: 10.247.1.3
csxlan: 10.247.1.3
The following example shows how you can reject a range of hosts, 10.247.1.0 to
10.247.1.255, from getting access to the CryptoServer LAN via SSH and TCP.
sshd: 10.247.1.0/255.255.255.0
csxlan: 10.247.1.0/255.255.255.0
5. Open the csxlan.conf file in the /etc/ directory with your SCP client.
6. Add the entry HostsAllow in the [Global] section of the csxlan.conf file so that the
defined restrictions are considered by the CryptoServer LAN:
Advanced Administration on the CryptoServer LAN
Page 112 of 142
HostsAllow = 1
7. Reboot the CryptoServer LAN for the changes in the csxlan.conf file to be applied.
It is also possible to grant all hosts in all networks with SSH access to the CryptoServer LAN
by using the following setting in the hosts.allow file.
sshd: ALL
For security reasons we strictly advise against enabling unrestricted SSH access to the
CryptoServer LAN.
8.4 Setting up Remote Logging
The CryptoServer LAN supports remote logging. This means it passes syslog messages on to
a remote syslog which records the syslog messages in log files.
Syslog is a standard system for collecting log messages, which can also be used to transfer
log messages within an IP computer network and therefore also to remotely monitor
computer systems. If all syslog messages are sent to a central syslog server, you can then
use syslog to monitor and check several computers from one location.
If you are already using remote logging via syslog in your computer network, you can easily
integrate the CryptoServer LAN into this system.
In the CryptoServer LAN, the csxlan daemon uses the ulogd (Utimaco Log Daemon) as its
logging daemon. To ensure the ulogd can transfer the log messages it receives from the
csxlan daemon to the syslogd (syslog daemon), you must edit the ulogd accordingly.
After this, you must also edit the syslogd so it can transfer the log messages to a remote
syslog. Finally, you must edit the remote syslog to ensure it can receive and handle log
messages correctly.
The chain along which log messages are passed looks like this:
csxlan ulogd syslog remote syslog
8.4.1 Configuring the File ulogd.conf
You must add a [syslog] entry to the ulogd.conf file in the [Global] section, before the first
entry for [logfile]. In this case, you must specify the Priority and the Input.
■ Priority is made up of the value used for Level plus the value used for Facilities.
Priority = Level + Facilities
The level specifies which type of log messages should be entered in the log.

Advanced Administration on the CryptoServer LAN
Page 113 of 142
The following entries are good ones to use for the level:
LOG_ERR 3 /* error conditions */
LOG_WARNING 4 /* warning conditions */
LOG_NOTICE 5 /* normal but significant condition */
LOG_INFO 6 /* informational */
LOG_DEBUG 7 /* debug-level messages */
■ Facilities identifies where, or to which syslog channel the data is to be logged.
The following entries are available for facilities:
LOG_LOCAL0 128 /* reserved for local use */
LOG_LOCAL1 136 /* reserved for local use */
LOG_LOCAL2 144 /* reserved for local use */
LOG_LOCAL3 152 /* reserved for local use */
LOG_LOCAL4 160 /* reserved for local use */
LOG_LOCAL5 168 /* reserved for local use */
LOG_LOCAL6 176 /* reserved for local use */
LOG_LOCAL7 184 /* reserved for local use */
Example 1:
If you want to store LOG_ERR level (value 3) on the LOG_LOCAL0 syslog channel (value 128),
you get the value 131 (3 + 128 = 131) for the Priority.
In this example, the additional entry in the ulogd.conf file must therefore look like this:
[Syslog]
Priority = 131
Input = csxlan.*
Example 2:
If you want to store the LOG_WARNING level (value 4) on the LOG_LOCAL2 syslog channel (value
144), you get the value 148 (4 + 144 = 148) for the Priority.
In this example, the additional entry in the ulogd.conf file must therefore look like this:
[Syslog]
Priority = 148
Input = csxlan.*
This is how you edit the ulogd.conf file with WinSCP and with PuTTY for Windows.
The data required for SSH access is as follows:
Host address = <Name or IP address of the CryptoServer LAN>
Port number = 22
User name = root
Password = utimco

Advanced Administration on the CryptoServer LAN
Page 114 of 142
If you are using a CSLANOS version 4.5.x or higher, please keep in mind that by default the
SSH-login for the user
root
is disabled until you enable it in the configuration file for the
SSH daemon
/ /etc/ssh/sshd_config
with the setting
PermitRootLogin yes
.
Afterwards, the SSH daemon has to be restarted for the setting to become effective
(
/etc/init.d/sshd restart
).
1. Start your SCP client (for example, WinSCP).
1. Double click the ulogd.conf configuration file in the /etc directory to open it.
2. Insert the entry for [syslog] between the entries for [Global] and the first entry for
[Logfile].
The ulogd.conf file should therefore look like this after you have input the entry for
[syslog]:
[Global]
PID_file = /var/run/ulogd.pid
Socket = /dev/ulog
SerialFile = /var/run/ulogd.seq
[Syslog]
Priority = xxx
Input = csxlan.*
[Logfile]
...
In this example, we have used the placeholder xxx for Priority = Level +
Facilities.
3. As described above, insert the entry for [syslog] and enter the value you require as the
Priority.
4. Do not change the value for Input that has been given here.
5. Save these changes and then close the ulogd.conf file.
6. Close your SCP client.
7. If the ulogd.conf file has been changed, you must restart the ulogd (Utimaco log
daemon).
a) Start your SSH client (for example, PuTTY for Windows).
b) Enter the user name root and confirm by pressing the Enter key.
c) As the Password, enter utimaco and confirm by pressing the Enter key.
d) Enter the /etc/init.d/ulogd restart command and confirm by pressing the Enter
key.

Advanced Administration on the CryptoServer LAN
Page 115 of 142
e) Close your SSH client.
8.4.2 Configuring the File syslog.conf
To ensure the log messages collected by the CryptoServer LAN's syslog daemon are also
transferred to a remote syslog daemon, you must edit the syslog.conf file. This is how you
edit the syslog.conf file with WinSCP and with PuTTY for Windows.
The data required for SSH access is as follows:
Host name = <Name or IP address of the CryptoServer LAN>
Port number = 22
User name = root
Password = utimaco
If you are using a CSLANOS version 4.5.x or higher, please keep in mind that by default the
SSH-login for the user
root
is disabled until you enable it in the configuration file for the
SSH daemon
/etc/ssh/sshd_config
with the setting
PermitRootLogin yes
.
Afterwards, the SSH daemon has to be restarted for the setting to become effective
(
/etc/init.d/sshd restart
).
1. Start your SCP client (for example, WinSCP).
2. Double click the syslog.conf configuration file in the /etc directory to open it.
3. Add the following line in the syslog.conf file:
localx.* @hostname
In this example, we have used x as a placeholder after local. Replace this placeholder x
with the number of the syslog channel you specified as the Facilities for the Priority
when you configured the ulogd.conf file. If, for Priority, you selected LOG_LOCAL5 as
Facilities, you must also enter local5.* in the syslog.conf file.
As the hostname, then input the host name of the remote syslog daemon to which the log
messages are to be sent.
4. Save the changes and close the syslog.conf file.
5. Close your SCP client.
6. If you have changed the syslog.conf file, you must restart the syslog daemon.
a) Start your SSH client (for example, PuTTY for Windows or SSH for Linux).
b) Enter the user name root and confirm by pressing the Enter key.
c) As the Password, enter utimaco and confirm by pressing the Enter key.

Advanced Administration on the CryptoServer LAN
Page 116 of 142
d) Enter the /etc/init.d/syslogd restart command and confirm by pressing the
Enter key.
e) Close your SSH client.
You will find all the other information you need about how to configure syslogd in the
Linux/UNIX manual, page SYSLOG(8).
8.4.3 Configuring the Remote Syslog Daemon
To ensure the remote logging server can accept the log messages, you must use the "-r"
option to restart the syslog daemon.
Under Debian you must change the last line to SYSLOGD= "-r" in the /etc/default/syslogd
file.
After this, restart the remote syslog daemon.
8.5 Adjusting the Menu Structure for the Menu Options
The dsp_admin3_menu.conf configuration file contains the menu structure that appears in
the CryptoServer LAN display along with the texts displayed there. You can configure this file
to adjust both the menu structure and its texts to your specific requirements. You find the
configuration file here: /etc/dsp_admin3_menu.conf
Before you make any changes to the configuration file
dsp_admin3_menu.conf
, and
therefore also change the menu structure, we strongly recommend you save a copy of the
configuration file on your host PC so you can access the original file if you need to.
The individual levels in the menu structure are illustrated here using an extract from the
dsp_admin3_menu.conf file as an example.
CSLAN Administration
.Configuration
..Network
...IP Address
....01,IPv4 Address
....91,IPv6 Address
...Default Gateway
....02,Default Gateway IPv4
....92,Default Gateway IPv6
CSLAN Administration is the top level of the menu structure here and is shown without
leading points, justified to the left.
Configuration, with one preceding point, is a submenu item of CSLAN Administration.
Network with two preceding points, is a submenu item of Configuration.
Advanced Administration on the CryptoServer LAN
Page 117 of 142
IP Address, with three preceding points, is a submenu item of Network.
The individual levels in the menu structure are structured according to the number of points
that appear before the text.
The number 01 before IPv4 Address shows that this menu item is fixed to a particular
function. The number 01 represents the input of the IPv4 address on the CryptoServer LAN.
The numbers linked to specific functions must be separated from the text that stands after
them by a comma.
You also have the option of translating the texts of individual menu items into different
languages and therefore tailoring the entire menu structure to your own specific
requirements.
You will see how the individual numbers are linked to their associated functions by referring to
the dsp_admin3_menu.conf file.
After you have modified the menu structure, you can either restart the CryptoServer LAN or
the
dsp_admin3
.
To restart the CryptoServer LAN perform the following steps:
If you are using a CSLANOS version 4.5.x or higher, please keep in mind that by default the
SSH-login for the user
root
is disabled until you enable it in the configuration file for the
SSH daemon
/etc/ssh/sshd_config
with the setting
PermitRootLogin yes
.
Afterwards, the SSH daemon has to be restarted for the setting to become effective
(
/etc/init.d/sshd restart
).
1. Start your SSH client (for example, PuTTY for Windows or SSH for Linux).
2. Enter the user name root and confirm by pressing the Enter key.
Advanced Administration on the CryptoServer LAN
Page 118 of 142
3. As the Password, enter utimaco and confirm by pressing the Enter key.
4. Enter the /etc/init.d/cs2 restart command and confirm by pressing the Enter key.
5. Close your SSH client.
All the submenu items for
86,PIN Pad applications
are made available directly by
the CryptoServer plug-in card and are therefore not described in this configuration file..
8.6 Setting up Static Routing
In this chapter we will show you how to set up static routing on the CryptoServer LAN's eth0
and eth1 Ethernet connections.
To enable static routing to be set up, you must configure an IP address and a default gateway
address for the CryptoServer LAN.
From CSLANOS version 4.2.0 onwards the Internet Protocols IPv4 and IPv6 are supported.
Previous CSLANOS versions support only IPv4.
In the example below we use this default gateway address for eth0:
192.168.0.1
ffde::1
For eth1 we use this gateway address:
172.16.1.255
Static routing is to be set up for the following networks:
■ for eth0 10.10.10.0/24 (IPv4)
■ for eth0 ffde::effe (IPv6)
■ for eth1 10.101.0.0/16
To set up the static routing on the CryptoServer LAN by using a display and a keyboard
connected to the CryptoServer LAN, proceed as follows:
1. Logon to the CryptoServer LAN as root with the corresponding password.
2. Create the route.conf configuration file by using the UNIX vi editor:
vi /etc/route.conf
Advanced Administration on the CryptoServer LAN
Page 119 of 142
The /etc/route.conf configuration file is not available per default in the CryptoServer LAN,
and must be created manually.
3. Configure the desired static routes in the configuration file /etc/route.conf by adding
the following data for every route in a separate line, and in the given order:
<Network address> <Default Gateway address> <Netmask> <Device address>
To set up the corresponding static route the network init-script /etc/init.d/network
reads each line in the /etc/route.conf.
Example (route.conf)
#net gateway mask dev
10.10.10.0 192.168.0.1 24 eth0
10.101.0.0 172.16.1.255 16 eth1
ffde::effe ffde::1 64 eth0
The lines starting with the # character are considered to be comments.
4. Restart the networking init-script /etc/init.d/network to bring the configured static
routing into use.
/etc/init.d/network restart

Contact Address for Support Queries
Page 120 of 142
9 Contact Address for Support Queries
Please feel free to contact us if an error occurs while operating the CryptoServer LAN, or if you
have any further questions on CryptoServer LAN.
Utimaco IS GmbH
Germanusstr. 4
52080 Aachen
Germany
You can reach us from Monday to Friday 09.00 a.m. to 05.00 p.m., apart from public holidays
and other customs days, under the following phone/fax number and e-mail address:
Phone: +49 (0) 241 1696-153
Fax: +49 (0) 241 1696-58153
e-mail: support-cs@utimaco.com
If you need to send the CryptoServer LAN back to the manufacturer, we request that you first
send us an e-mail containing a short description of the problem and the Diagnostic
Information as a txt file, to this email address:
rma-cs@utimaco.com
To save the Diagnostic Information in a txt file on your computer please proceed as described
in the manual CryptoServer – Manual for System Administrators.

SNMP Objects and SNMP Traps
Page 121 of 142
Appendix A SNMP Objects and SNMP Traps
In the following tables you can see which OIDs and Traps CryptoServer LAN can output, and
what information they can provide you with. They are defined in the UTIMACO-CSLAN-MIB.txt
and configured in the cslan3_mib.conf file (for CSLANOS version 3.x.x) or the
cslan_mib.conf (for CSLANOS version 4.x.x).
A.1 SNMP Objects
CryptoServer LAN Objects:
Object name
cslVersion
Description
CryptoServer LAN version
Type
String
OID (Name)
1.3.6.1.4.1.3159.1.1.1.0
(UTIMACO-CSLAN-MIB::cslVersion)
Example
snmpget -v 2c -c CryptoServer -Oqv 111.166.1.200 UTIMACO-CSLAN-
MIB::cslVersion.0
snmpget -v 2c -c CryptoServer -Oqv 111.166.1.200 1.3.6.1.4.1.3159.1.1.1.0
Example output
CSLAN 4.4.6
Object name
cslSerialNumber
Description
CryptoServer LAN serial number
Type
String
OID (Name)
1.3.6.1.4.1.3159.1.1.2.0
(UTIMACO-CSLAN-MIB::cslSerialNumber)
Example
snmpget -v 2c -c CryptoServer -Oqv 111.166.1.200 UTIMACO-CSLAN-
MIB::cslSerialNumber.0
snmpget -v 2c -c CryptoServer -Oqv 111.166.1.200 1.3.6.1.4.1.3159.1.1.2.0
Example output
MD2000609

SNMP Objects and SNMP Traps
Page 122 of 142
Object name
cslBatteryState
Description
CryptoServer LAN battery state (OK, LOW or ABSENCE)
Type
String
OID (Name)
1.3.6.1.4.1.3159.1.1.3.0
(UTIMACO-CSLAN-MIB::cslBatteryState)
Example
snmpget -v 2c -c CryptoServer -Oqv 111.166.1.200 UTIMACO-CSLAN-
MIB::cslBatteryState.0
snmpget -v 2c -c CryptoServer -Oqv 111.166.1.200 1.3.6.1.4.1.3159.1.1.3.0
Example output
OK
Object name
cslDateTime
Description
CryptoServer LAN date and time (YYYYMMDD hhmmss, UTC)
Type
String
OID (Name)
1.3.6.1.4.1.3159.1.1.4.0
(UTIMACO-CSLAN-MIB::cslDateTime)
Example
snmpget -v 2c -c CryptoServer -Oqv 111.166.1.200 UTIMACO-CSLAN-
MIB::cslDateTime.0
snmpget -v 2c -c CryptoServer -Oqv 111.166.1.200 1.3.6.1.4.1.3159.1.1.4.0
Example output
20150605 092900
Object name
cslLoad
Description
CryptoServer LAN load average in %
Type
Integer
OID (Name)
1.3.6.1.4.1.3159.1.1.5.0
(UTIMACO-CSLAN-MIB::cslLoad)
Example
snmpget -v 2c -c CryptoServer -Oqv 111.166.1.200 UTIMACO-CSLAN-
MIB::cslLoad.0
snmpget -v 2c -c CryptoServer -Oqv 111.166.1.200 1.3.6.1.4.1.3159.1.1.5.0
Example output
0
SNMP Objects and SNMP Traps
Page 123 of 142
Object name
cslClients
Description
CryptoServer LAN number of client connections
Type
Integer
OID (Name)
1.3.6.1.4.1.3159.1.1.6.0
(UTIMACO-CSLAN-MIB::cslClients)
Example
snmpget -v 2c -c CryptoServer -Oqv 111.166.1.200 UTIMACO-CSLAN-
MIB::cslClients.0
snmpget -v 2c -c CryptoServer -Oqv 111.166.1.200 1.3.6.1.4.1.3159.1.1.6.0
Example output
1
Object name
cslClientsLoad
Description
CryptoServer LAN client connection load in % (0…100)
Type
Integer
OID (Name)
1.3.6.1.4.1.3159.1.1.7.0
(UTIMACO-CSLAN-MIB::cslClientsLoad)
Example
snmpget -v 2c -c CryptoServer -Oqv 111.166.1.200 UTIMACO-CSLAN-
MIB::cslClientsLoad.0
snmpget -v 2c -c CryptoServer -Oqv 111.166.1.200 1.3.6.1.4.1.3159.1.1.7.0
Example output
0

SNMP Objects and SNMP Traps
Page 124 of 142
CryptoServer Table:
Object name
csTable
Description
The table holding information about all CryptoServer within the CryptoServer LAN
Type
Table
OID (Name)
1.3.6.1.4.1.3159.1.2
(UTIMACO-CSLAN-MIB::csTable)
Example
snmptable -v 2c -c CryptoServer -Cw 70 111.166.1.200 UTIMACO-CSLAN-
MIB::csTable
snmptable -v 2c -c CryptoServer -Cw 70 111.166.1.200 1.3.6.1.4.1.3159.1.2
Example
output
SNMP table: UTIMACO-CSLAN-MIB::csTable
csIndex
csDevice
csMode
csState
csTemperature
1
288@localhost
OPERATIONAL
INITIALIZED
41
SNMP table: UTIMACO-CSLAN3-MIB::csTable, part 2
csTemperatureAsString
csAlarm
csVersion
csSerialNumber
csBatteryState
41.3
0
3.00.3.0
CS411957
OK
SNMP table: UTIMACO-CSLAN-MIB::csTable, part 3
csDateTime
csModuleState
20150605 093858
OK
Object name
csIndex.x
Description
CryptoServer x device index for identification
Type
Integer (1…4)
OID (Name)
1.3.6.1.4.1.3159.1.2.1.1.x
(UTIMACO-CSLAN-MIB::csIndex.x)
Example
(CryptoServer 1)
snmpget -v 2c -c CryptoServer -Oqv 111.166.1.200 UTIMACO-CSLAN-
MIB::csIndex.1
snmpget -v 2c -c CryptoServer -Oqv 111.166.1.200 1.3.6.1.4.1.3159.1.2.1.1.1
Example output
1

SNMP Objects and SNMP Traps
Page 125 of 142
Object name
csDevice.x
Description
CryptoServer x device in the CryptoServer LAN
Type
String
OID (Name)
1.3.6.1.4.1.3159.1.2.1.2.x
(UTIMACO-CSLAN-MIB::csDevice.x)
Example
(CryptoServer 1)
snmpget -v 2c -c CryptoServer -Oqv 111.166.1.200 UTIMACO-CSLAN-
MIB::csDevice.1
snmpget -v 2c -c CryptoServer -Oqv 111.166.1.200 1.3.6.1.4.1.3159.1.2.1.2.1
Example output
288@localhost
Object name
csDevice
Description
All CryptoServer devices in the CryptoServer LAN
Type
List
OID (Name)
1.3.6.1.4.1.3159.1.2.1.2
(UTIMACO-CSLAN-MIB::csDevice)
Example
snmpwalk -v 2c -c CryptoServer -Os 111.166.1.200 UTIMACO-CSLAN-
MIB::csDevice
snmpwalk -v 2c -c CryptoServer -Os 111.166.1.200 1.3.6.1.4.1.3159.1.2.1.2
Example output
csDevice.1 = STRING: 288@localhost
csDevice.2 = STRING: 288@localhost
Object name
csMode.x
Description
Mode of CryptoServer x in the CryptoServer LAN (BOOTLOADER,
OPERATIONAL, MAINTENANCE, ALARM or POWERDOWN)
Type
String
OID (Name)
1.3.6.1.4.1.3159.1.2.1.3.x
(UTIMACO-CSLAN-MIB::csMode.x)
Example
(CryptoServer 1)
snmpget -v 2c -c CryptoServer -Oqv 111.166.1.200 UTIMACO-CSLAN-
MIB::csMode.1
snmpget -v 2c -c CryptoServer -Oqv 111.166.1.200 1.3.6.1.4.1.3159.1.2.1.3.1

SNMP Objects and SNMP Traps
Page 126 of 142
Example output
OPERATIONAL
Object name
csMode
Description
Mode of all CryptoServer devices integrated in the CryptoServer LAN
(BOOTLOADER, OPERATIONAL, MAINTENANCE, ALARM or POWERDOWN)
Type
List
OID (Name)
1.3.6.1.4.1.3159.1.2.1.3
(UTIMACO-CSLAN-MIB::csMode)
Example
snmpwalk -v 2c -c CryptoServer -Os 111.166.1.200 UTIMACO-CSLAN-
MIB::csMode
snmpwalk -v 2c -c CryptoServer -Os 111.166.1.200 1.3.6.1.4.1.3159.1.2.1.3
Example output
csMode.1 = STRING: OPERATIONAL
csMode.2 = STRING: OPERATIONAL
Object name
csState.x
Description
State of CryptoServer x device integrated in the CryptoServer LAN
(BLANK, DEFECT, MANUFACTURED, PRODUCED, INITIALIZED, OPERATIONAL,
MAX or UNKNOWN)
Type
String
OID (Name)
1.3.6.1.4.1.3159.1.2.1.4.x
(UTIMACO-CSLAN-MIB::csState.x)
Example
(CryptoServer 1)
snmpget -v 2c -c CryptoServer -Oqv 111.166.1.200 UTIMACO-CSLAN-
MIB::csState.1
snmpget -v 2c -c CryptoServer -Oqv 111.166.1.200 1.3.6.1.4.1.3159.1.2.1.4.1
Example output
INITIALIZED
Object name
csState
Description
State of all CryptoServer devices integrated in the CryptoServer LAN
Type
List
SNMP Objects and SNMP Traps
Page 127 of 142
OID (Name)
1.3.6.1.4.1.3159.1.2.1.4
(UTIMACO-CSLAN-MIB::csState)
Example
snmpwalk -v 2c -c CryptoServer -Os 111.166.1.200 UTIMACO-CSLAN-
MIB::csState
snmpwalk -v 2c -c CryptoServer -Os 111.166.1.200 1.3.6.1.4.1.3159.1.2.1.4
Example output
csState.1 = STRING: INITIALIZED
csState.2 = STRING: INITIALIZED
Object name
csTemperature.x
Description
Temperature of CryptoServer x in °C
Type
Integer
OID (Name)
1.3.6.1.4.1.3159.1.2.1.5.x
(UTIMACO-CSLAN-MIB::csTemperature.x)
Example
(CryptoServer 1)
snmpget -v 2c -c CryptoServer -Oqv 111.166.1.200 UTIMACO-CSLAN-
MIB::csTemperature.1
snmpget -v 2c -c CryptoServer -Oqv 111.166.1.200 1.3.6.1.4.1.3159.1.2.1.5.1
Example output
41
Object name
csTemperature
Description
Temperature in °C of all CryptoServer devices integrated in the CryptoServer
LAN
Type
List
OID (Name)
1.3.6.1.4.1.3159.1.2.1.5
(UTIMACO-CSLAN-MIB::csTemperature)
Example
snmpwalk -v 2c -c CryptoServer -Os 111.166.1.200 UTIMACO-CSLAN-
MIB::csTemperature
snmpwalk -v 2c -c CryptoServer -Os 111.166.1.200 1.3.6.1.4.1.3159.1.2.1.5
Example output
csTemperature.1 = INTEGER: 41
csTemperature.2 = INTEGER: 40

SNMP Objects and SNMP Traps
Page 128 of 142
Object name
csTemperatureAsString.x
Description
Temperature (in °C as string with 1 decimal place) of a CryptoServer x device
integrated in the CryptoServer LAN
Type
String
OID (Name)
1.3.6.1.4.1.3159.1.2.1.6.x
(UTIMACO-CSLAN-MIB::csTemperatureAsString.x)
Example
(CryptoServer 1)
snmpget -v 2c -c CryptoServer -Oqv 111.166.1.200 UTIMACO-CSLAN-
MIB::csTemperatureAsString.1
snmpget -v 2c -c CryptoServer -Oqv 111.166.1.200 1.3.6.1.4.1.3159.1.2.1.6.1
Example output
41.3
Object name
csTemperatureAsString
Description
Temperature (in °C as string with 1 decimal place) of all CryptoServer devices
integrated in the CryptoServer LAN
Type
List
OID (Name)
1.3.6.1.4.1.3159.1.2.1.6
(UTIMACO-CSLAN-MIB::csTemperatureAsString)
Example
snmpwalk -v 2c -c CryptoServer -Os 111.166.1.200 UTIMACO-CSLAN-
MIB::csTemperatureAsString
snmpwalk -v 2c -c CryptoServer -Os 111.166.1.200 1.3.6.1.4.1.3159.1.2.1.6
Example output
csTemperatureAsString.1 = STRING: 41.1
csTemperatureAsString.1 = STRING: 40.5
Object name
csAlarm.x
Description
Alarm register of CryptoServer x device integrated in CryptoServer LAN (0 =
alarm OFF, 1 = alarm ON)
Type
Integer
OID (Name)
1.3.6.1.4.1.3159.1.2.1.7.x
(UTIMACO-CSLAN-MIB::csAlarm.x)
SNMP Objects and SNMP Traps
Page 129 of 142
Example
(CryptoServer 1)
snmpget -v 2c -c CryptoServer -Oqv 111.166.1.200 UTIMACO-CSLAN-
MIB::csAlarm.1
snmpget -v 2c -c CryptoServer -Oqv 111.166.1.200 1.3.6.1.4.1.3159.1.2.1.7.1
Example output
0
Object name
csAlarm
Description
Alarm register of all CryptoServer devices integrated in the CryptoServer LAN
(0 = alarm OFF, 1 = alarm ON)
Type
List
OID (Name)
1.3.6.1.4.1.3159.1.2.1.7
(UTIMACO-CSLAN-MIB::csAlarm)
Example
snmpwalk -v 2c -c CryptoServer -Os 111.166.1.200 UTIMACO-CSLAN-
MIB::csAlarm
snmpwalk -v 2c -c CryptoServer -Os 111.166.1.200 1.3.6.1.4.1.3159.1.2.1.7
Example output
csAlarm.1 = INTEGER: 0
csAlarm.1 = INTEGER: 1
Object name
csVersion.x
Description
Bootloader version of CryptoServer x device in the CryptoServer LAN
Type
String
OID (Name)
1.3.6.1.4.1.3159.1.2.1.8.x
(UTIMACO-CSLAN-MIB::csVersion.x)
Example
(CryptoServer 1)
snmpget -v 2c -c CryptoServer -Oqv 111.166.1.200 UTIMACO-CSLAN-
MIB::csVersion.1
snmpget -v 2c -c CryptoServer -Oqv 111.166.1.200 1.3.6.1.4.1.3159.1.2.1.8.1
Example output
3.00.3.0
Object name
csVersion
Description
Bootloader version of all CryptoServers
Type
List

SNMP Objects and SNMP Traps
Page 130 of 142
OID (Name)
1.3.6.1.4.1.3159.1.2.1.8
(UTIMACO-CSLAN-MIB::csVersion)
Example
snmpwalk -v 2c -c CryptoServer -Os 111.166.1.200 UTIMACO-CSLAN-
MIB::csVersion
snmpwalk -v 2c -c CryptoServer -Os 111.166.1.200 1.3.6.1.4.1.3159.1.2.1.8
Example output
csVersion.1 = STRING: 3.00.3.0
csVersion.1 = STRING: 3.00.2.0
Object name
csSerialNumber.x
Description
Serial number of CryptoServer x (CSxxxxxx)
Type
String
OID (Name)
1.3.6.1.4.1.3159.1.2.1.9.x
(UTIMACO-CSLAN-MIB::csSerialNumber.x)
Example
(CryptoServer 1)
snmpget -v 2c -c CryptoServer -Oqv 111.166.1.200 UTIMACO-CSLAN-
MIB::csSerialNumber.1
snmpget -v 2c -c CryptoServer -Oqv 111.166.1.200 1.3.6.1.4.1.3159.1.2.1.9.1
Example output
CS411957
Object name
csSerialNumber
Description
Serial number of all CryptoServer devices integrated in the CryptoServer LAN
Type
List
OID (Name)
1.3.6.1.4.1.3159.1.2.1.9
(UTIMACO-CSLAN-MIB::csSerialNumber)
Example
snmpwalk -v 2c -c CryptoServer -Os 111.166.1.200 UTIMACO-CSLAN-
MIB::csSerialNumber
snmpwalk -v 2c -c CryptoServer -Os 111.166.1.200 1.3.6.1.4.1.3159.1.2.1.9
Example output
csSerialNumber.1 = STRING: CS411957
csSerialNumber.2 = STRING: CS888022
Object name
csBatteryState.x
SNMP Objects and SNMP Traps
Page 131 of 142
Description
Battery state of the CryptoServer x device (OK, LOW or ABSENCE)
Type
String
OID (Name)
1.3.6.1.4.1.3159.1.2.1.10.x
(UTIMACO-CSLAN-MIB::csBatteryState.x)
Example
(CryptoServer 1)
snmpget -v 2c -c CryptoServer -Oqv 111.166.1.200 UTIMACO-CSLAN-
MIB::csBatteryState.1
snmpget -v 2c -c CryptoServer -Oqv 111.166.1.200 1.3.6.1.4.1.3159.1.2.1.10.1
Example output
OK
Object name
csBatteryState
Description
Battery state of all (1…4) CryptoServer integrated in the CryptoServer LAN
Type
List
OID (Name)
1.3.6.1.4.1.3159.1.2.1.10
(UTIMACO-CSLAN-MIB::csBatteryState)
Example
snmpwalk -v 2c -c CryptoServer -Os 111.166.1.200 UTIMACO-CSLAN-
MIB::csBatteryState
snmpwalk -v 2c -c CryptoServer -Os 111.166.1.200 1.3.6.1.4.1.3159.1.2.1.10
Example output
csBatteryState.1 = STRING: OK
csBatteryState.2 = STRING: OK
Object name
csDateTime.x
Description
Date and time of CryptoServer x device integrated in the CryptoServer LAN
(YYYYMMDD hhmmss, UTC)
Type
String
OID (Name)
1.3.6.1.4.1.3159.1.2.1.11.x
(UTIMACO-CSLAN-MIB::csDateTime.x)
Example
(CryptoServer 1)
snmpget -v 2c -c CryptoServer -Oqv 111.166.1.200 UTIMACO-CSLAN-
MIB::csDateTime.1
snmpget -v 2c -c CryptoServer -Oqv 111.166.1.200 1.3.6.1.4.1.3159.1.2.1.11.1
Example output
20150605 111321

SNMP Objects and SNMP Traps
Page 132 of 142
Object name
csDateTime
Description
Date and time of all CryptoServer in the CryptoServer LAN
Type
List
OID (Name)
1.3.6.1.4.1.3159.1.2.1.11
(UTIMACO-CSLAN-MIB::csDateTime)
Example
snmpwalk -v 2c -c CryptoServer -Os 111.166.1.200 UTIMACO-CSLAN-
MIB::csDateTime
snmpwalk -v 2c -c CryptoServer -Os 111.166.1.200 1.3.6.1.4.1.3159.1.2.1.11
Example output
csDateTime.1 = STRING: 20150605 111321
csDateTime.2 = STRING: 20150605 111325
Object name
csModuleState.x
Description
Module initialization state of CryptoServer x device integrated in the
CryptoServer LAN (OK or Failed if at least one module failed to initialize)
Type
String
OID (Name)
1.3.6.1.4.1.3159.1.2.1.12.x
(UTIMACO-CSLAN-MIB::csModuleState.x)
Example
(CryptoServer 1)
snmpget -v 2c -c CryptoServer -Oqv 111.166.1.200 UTIMACO-CSLAN-
MIB::csModuleState.1
snmpget -v 2c -c CryptoServer -Oqv 111.166.1.200 1.3.6.1.4.1.3159.1.2.1.12.1
Example output
OK
Object name
csModuleState
Description
Module initialization state of all (1…4) CryptoServer devices integrated in the
CryptoServer LAN
Type
List
OID (Name)
1.3.6.1.4.1.3159.1.2.1.12
(UTIMACO-CSLAN-MIB::csModuleState)
SNMP Objects and SNMP Traps
Page 133 of 142
Example
snmpwalk -v 2c -c CryptoServer -Os 111.166.1.200 UTIMACO-CSLAN-
MIB::csModuleState
snmpwalk -v 2c -c CryptoServer -Os 111.166.1.200 1.3.6.1.4.1.3159.1.2.1.12
Example output
csModuleState.1 = STRING: OK
csModuleState.2 = STRING: OK
The OIDs listed below are only available from CSLANOS version 4.1.0 onwards. This version
is only available when combined with the CryptoServer LAN, which has two power supplies.
Object name
cslFanTable
Description
CryptoServer LAN fan table (information about all CryptoServer LAN fans)
Type
Table
OID (Name)
1.3.6.1.4.1.3159.1.1.8
(UTIMACO-CSLAN-MIB::cslFanTable)
Example
snmptable -v 2c -c CryptoServer -Cw 70 111.166.1.200 UTIMACO-CSLAN-
MIB::cslFanTable
snmptable -v 2c -c CryptoServer -Cw 70 111.166.1.200 1.3.6.1.4.1.3159.1.1.8
Example output
SNMP table: UTIMACO-CSLAN-MIB::cslFanTable
cslFanIndex
cslFanSpeed
1
3600
2
3650
3
3700
Object name
cslFanSpeed.x
Description
Fan speed of CryptoServer LAN fan x in rpm
Type
Integer
OID (Name)
1.3.6.1.4.1.3159.1.1.8.1.2.x
(UTIMACO-CSLAN-MIB::cslFanSpeed.x)

SNMP Objects and SNMP Traps
Page 134 of 142
Example (fan 1)
snmpget -v 2c -c CryptoServer -Oqv 111.166.1.200 UTIMACO-CSLAN-
MIB::cslFanSpeed.1
snmpget -v 2c -c CryptoServer -Oqv 111.166.1.200 1.3.6.1.4.1.3159.1.1.8.1.2.1
Example output
3600
Object name
cslFanSpeed
Description
Fan speed of all CryptoServer LAN fans in rpm
Type
List
OID (Name)
1.3.6.1.4.1.3159.1.1.8.1.2
(UTIMACO-CSLAN-MIB::cslFanSpeed)
Example
snmpwalk -v 2c -c CryptoServer -Os 111.166.1.200 UTIMACO-CSLAN-
MIB::cslFanSpeed
snmpwalk -v 2c -c CryptoServer -Os 111.166.1.200 1.3.6.1.4.1.3159.1.1.8.1.2
Example output
cslFanSpeed.1 = INTEGER: 3600
cslFanSpeed.2 = INTEGER: 3650
cslFanSpeed.3 = INTEGER: 3700
Object name
cslPowerSupply
Description
CryptoServer LAN status of the redundant power supply units (OK or Failed)
Type
String
OID (Name)
1.3.6.1.4.1.3159.1.1.9.0
(UTIMACO-CSLAN-MIB::cslPowerSupply)
Example
snmpget -v 2c -c CryptoServer -Oqv 111.166.1.200 UTIMACO-CSLAN-
MIB::cslPowerSupply.0
snmpget -v 2c -c CryptoServer -Oqv 111.166.1.200 1.3.6.1.4.1.3159.1.1.9.0
Example output
OK
Object name
cslCPUTemperature
Description
CryptoServer LAN CPU temperature in °C
Type
Integer

SNMP Objects and SNMP Traps
Page 135 of 142
OID (Name)
1.3.6.1.4.1.3159.1.1.10.0
(UTIMACO-CSLAN-MIB::cslCPUTemperature)
Example
snmpget -v 2c -c CryptoServer -Oqv 111.166.1.200 UTIMACO-CSLAN-
MIB::cslCPUTemperature
snmpget -v 2c -c CryptoServer -Oqv 111.166.1.200 1.3.6.1.4.1.3159.1.1.10.0
Example output
35
Object name
cslCPUTemperatureAsString
Description
CryptoServer LAN CPU temperature in °C as String with 1 decimal place
Type
String
OID (Name)
1.3.6.1.4.1.3159.1.1.11.0
(UTIMACO-CSLAN-MIB::cslCPUTemperatureAsString)
Example
snmpget -v 2c -c CryptoServer -Oqv 111.166.1.200 UTIMACO-CSLAN-
MIB::cslCPUTemperatureAsString
snmpget -v 2c -c CryptoServer -Oqv 111.166.1.200 1.3.6.1.4.1.3159.1.1.11.0
Example output
35.5
A.2 SNMP Traps
Error Trap:
Trap name
notifyError
Description
Error notification
OID (Name)
1.3.6.1.4.1.3159.1.3.0.1
(UTIMACO-CSLAN-MIB::notifyError)
Variables
Error code (Integer)
Mode Change Trap:
Trap name
notifyCsModeChange
Description
CryptoServer mode change notification
OID (Name)
1.3.6.1.4.1.3159.1.3.0.2
(UTIMACO-CSLAN-MIB::notifyCsModeChange)

SNMP Objects and SNMP Traps
Page 136 of 142
Variables
CryptoServer device (String)
Old mode (String)
New mode (String)
Alarm Traps:
Trap name
notifyCsAlarmTemperatureLow
Description
CryptoServer alarm notification that the temperature is too low
OID (Name)
1.3.6.1.4.1.3159.1.3.0.3
(UTIMACO-CSLAN-MIB::notifyCsAlarmTemperatureLow)
Variables
CryptoServer device (String)
Trap name
notifyCsAlarmTemperatureHigh
Description
CryptoServer alarm notification that the temperature is too high
OID (Name)
1.3.6.1.4.1.3159.1.3.0.4
(UTIMACO-CSLAN-MIB::notifyCsAlarmTemperatureHigh)
Variables
CryptoServer device (String)
Trap name
notifyCsAlarmInnerFoil
Description
CryptoServer alarm notification that the inner foil is broken
OID (Name)
1.3.6.1.4.1.3159.1.3.0.5
(UTIMACO-CSLAN-MIB::notifyCsAlarmInnerFoil)
Variables
CryptoServer device (String)
Trap name
notifyCsAlarmOuterFoil
Description
CryptoServer alarm notification that the outer foil is broken
OID (Name)
1.3.6.1.4.1.3159.1.3.0.6
(UTIMACO-CSLAN-MIB::notifyCsAlarmOuterFoil)
Variables
CryptoServer device (String)
SNMP Objects and SNMP Traps
Page 137 of 142
Trap name
notifyCsAlarmPowerFailed
Description
CryptoServer alarm notification of power failure
OID (Name)
1.3.6.1.4.1.3159.1.3.0.7
(UTIMACO-CSLAN-MIB::notifyCsAlarmPowerFailed)
Variables
CryptoServer device (String)
Trap name
notifyCsAlarmPowerLow
Description
CryptoServer alarm notification that the power is too low
OID (Name)
1.3.6.1.4.1.3159.1.3.0.8
(UTIMACO-CSLAN-MIB::notifyCsAlarmPowerLow)
Variables
CryptoServer device (String)
Trap name
notifyCsAlarmPowerHigh
Description
CryptoServer alarm notification that the power is too high
OID (Name)
1.3.6.1.4.1.3159.1.3.0.9
(UTIMACO-CSLAN-MIB::notifyCsAlarmPowerHigh)
Variables
CryptoServer device (String)
Trap name
notifyCsAlarmInvalidMasterKey
Description
CryptoServer alarm notification that the Master Key is invalid
OID (Name)
1.3.6.1.4.1.3159.1.3.0.10
(UTIMACO-CSLAN-MIB::notifyCsAlarmInvalidMasterKey)
Variables
CryptoServer device (String)
Trap name
notifyCsAlarmExternalErase
Description
CryptoServer alarm notification that an External Erase has been performed
OID (Name)
1.3.6.1.4.1.3159.1.3.0.11
(UTIMACO-CSLAN-MIB::notifyCsAlarmExternalErase)

SNMP Objects and SNMP Traps
Page 138 of 142
Variables
CryptoServer device (String)
High Temperature Traps:
Trap name
notifyCsTemperatureHigh
Description
CryptoServer notification that the temperature has risen above the threshold
OID (Name)
1.3.6.1.4.1.3159.1.3.0.12
(UTIMACO-CSLAN-MIB::notifyCsTemperatureHigh)
Variables
CryptoServer device (String)
Temperature (Integer)
Temperature with 1 decimal (String)
Trap name
notifyCsTemperatureHighBack
Description
CryptoServer notification that the temperature has fallen back to or below the
threshold
OID (Name)
1.3.6.1.4.1.3159.1.3.0.13
(UTIMACO-CSLAN-MIB::notifyCsTemperatureHighBack)
Variables
CryptoServer device (String)
Temperature (Integer)
Temperature with 1 decimal (String)
Low Temperature Traps:
Trap name
notifyCsTemperatureLow
Description
CryptoServer notification that the temperature has fallen below the threshold
OID (Name)
1.3.6.1.4.1.3159.1.3.0.14
(UTIMACO-CSLAN-MIB::notifyCsTemperatureLow)
Variables
CryptoServer device (String)
Temperature (Integer)
Temperature with 1 decimal (String)
Trap name
notifyCsTemperatureLowBack
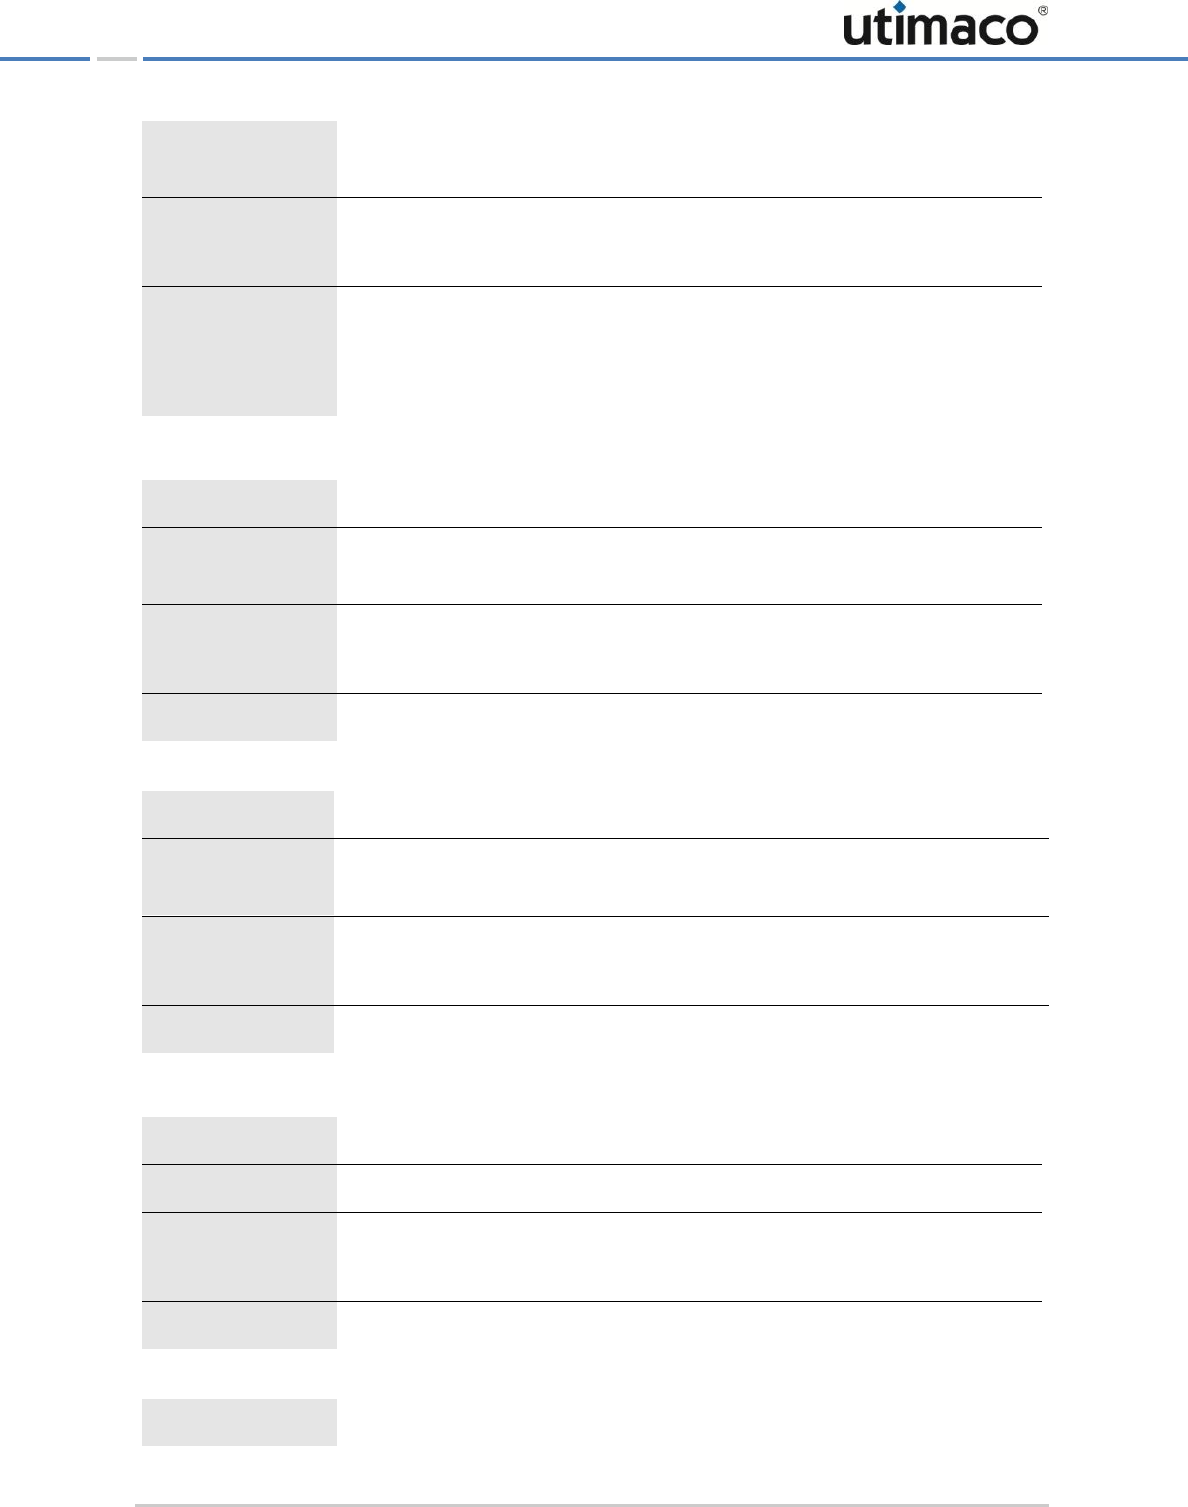
SNMP Objects and SNMP Traps
Page 139 of 142
Description
CryptoServer notification that the temperature has risen back to or above the
threshold
OID (Name)
1.3.6.1.4.1.3159.1.3.0.15
(UTIMACO-CSLAN-MIB::notifyCsTemperatureLowBack)
Variables
CryptoServer device (String)
Temperature (Integer)
Temperature with 1 decimal (String)
Battery Traps:
Trap name
notifyCsBatteryLow
Description
CryptoServer notification that the CryptoServer onboard battery level is too
low
OID (Name)
1.3.6.1.4.1.3159.1.3.0.16
(UTIMACO-CSLAN-MIB::notifyCsBatteryLow)
Variables
CryptoServer device (String)
Trap name
notifyCslBatteryLow
Description
CryptoServer LAN notification that the CryptoServer LAN backup battery level
is too low
OID (Name)
1.3.6.1.4.1.3159.1.3.0.17
(UTIMACO-CSLAN-MIB::notifyCslBatteryLow)
Variables
-
Load Traps:
Trap name
notifyCslLoadHigh
Description
CryptoServer LAN notification that the load has risen above the threshold
OID (Name)
1.3.6.1.4.1.3159.1.3.0.18
(UTIMACO-CSLAN-MIB::notifyCslLoadHigh)
Variables
CryptoServer LAN load in % (Integer)
Trap name
notifyCslLoadHighBack

SNMP Objects and SNMP Traps
Page 140 of 142
Description
CryptoServer LAN notification that the load has fallen back to or below the
threshold
OID (Name)
1.3.6.1.4.1.3159.1.3.0.19
(UTIMACO-CSLAN-MIB::notifyCslLoadHighBack)
Variables
CryptoServer LAN load in % (Integer)
Clients Traps:
Trap name
notifyCslClientsHigh
Description
CryptoServer LAN notification that the client connection load has risen above
the threshold
OID (Name)
1.3.6.1.4.1.3159.1.3.0.20
(UTIMACO-CSLAN-MIB::notifyCslClientsHigh)
Variables
Client connection load in % (Integer)
Trap name
notifyCslClientsHighBack
Description
CryptoServer LAN notification that the client connection load has fallen back to
or below the threshold
OID (Name)
1.3.6.1.4.1.3159.1.3.0.21
(UTIMACO-CSLAN-MIB::notifyCslClientsHighBack)
Variables
Client connection load in % (Integer)
Boot Trap:
Trap name
notifyCslBoot
Description
CryptoServer LAN notification that the CryptoServer LAN has booted
OID (Name)
1.3.6.1.4.1.3159.1.3.0.22
(UTIMACO-CSLAN-MIB::notifyCslBoot)
Variables
-
Shutdown Trap:
Trap name
notifyCslShutDown
Description
CryptoServer LAN notification that the CryptoServer LAN is shutting down
SNMP Objects and SNMP Traps
Page 141 of 142
OID (Name)
1.3.6.1.4.1.3159.1.3.0.23
(UTIMACO-CSLAN-MIB::notifyCslShutDown)
Variables
-
The Traps listed below are only available from CSLANOS version 4.1.0 onwards. This version
is only available when combined with the CryptoServer LAN, which has 2 power supplies.
Low Fan Speed Traps:
Trap name
notifyCslFanSpeedLow
Description
CryptoServer LAN notification that the CryptoServer LAN fan speed has fallen
below the threshold
OID (Name)
1.3.6.1.4.1.3159.1.3.0.24
(UTIMACO-CSLAN-MIB::notifyCslFanSpeedLow)
Variables
Fan index (Integer)
Fan speed in rpm (Integer)
Trap name
notifyCslFanSpeedLowBack
Description
CryptoServer LAN notification that the CryptoServer LAN fan speed has risen
back to or above the threshold
OID (Name)
1.3.6.1.4.1.3159.1.3.0.25
(UTIMACO-CSLAN-MIB::notifyCslFanSpeedLowBack)
Variables
Fan index (Integer)
Fan speed in rpm (Integer)
Power Supply Trap:
Trap name
notifyCslPowerSupplyFailure
Description
CryptoServer LAN notification that the CryptoServer LAN redundant power
supply has failed
OID (Name)
1.3.6.1.4.1.3159.1.3.0.26

SNMP Objects and SNMP Traps
Page 142 of 142
(UTIMACO-CSLAN-MIB::notifyCslPowerSupplyFailure)
Variables
-
