DDUGKY User Manual
User Manual:
Open the PDF directly: View PDF ![]() .
.
Page Count: 160 [warning: Documents this large are best viewed by clicking the View PDF Link!]
- DEEN DAYAL UPADHYAYA GRAMEEN KAUSHALYA YOJANA (DDU-GKY)
- User Manual
- Amendment Log
- Table of Content
- List of Figures
- List of Table
- 1 Introduction
- 2 Brief Overview
- 3 Minimum System Requirements
- 4 General Operating Instructions
- 5. Specific Operating Instructions
- 5.1 Authorized User Login
- 5.1.1 STATE DETAIL
- General Description
- Prerequisites
- Screen Shot
- Fields Description
- What happens when the form is submitted
- Messages
- 5.1.2 PROJECT DETAIL
- General Description
- Prerequisites
- Screen Shot
- Fields Description
- What happens when the form is submitted
- Messages
- 5.1.3 STATE FINANCIAL DETAIL
- General Description
- Prerequisites
- Screen Shot
- Fields Description
- What happens when the form is submitted
- Messages
- 5.1.4 HR TEAM
- General Description
- Prerequisites
- Screen Shot
- Fields Description
- What happens when the form is submitted
- Messages
- 5.1.5 STATE ACTION PLAN DETAILS
- General Description
- Prerequisites
- Screen Shot
- Fields Description
- What happens when the form is submitted
- Messages
- 5.1.6 Role Master
- General Description
- Prerequisites
- Screen Shot
- Fields Description
- What happens when the form is submitted
- Messages
- 5.1.7 Form Module Master
- General Description
- Prerequisites
- Screen Shot
- Fields Description
- What happens when the form is submitted
- Messages
- 5.1.8 User Master
- General Description
- Prerequisites
- Screen Shot
- Fields Description
- What happens when the form is submitted
- Messages
- 5.1.9 Assign Module
- General Description
- Prerequisites
- Screen Shot
- Fields Description
- What happens when the form is submitted
- Messages
- 5.1.10 Assign Project Mapping
- General Description
- Prerequisites
- Screen Shot
- What happens when the form is submitted
- Messages
- 5.1.11 Project Sanction Details
- General Description
- Prerequisites
- Screen Shot
- Fields Description
- What happens when the form is submitted
- Messages
- 5.1.12 Trade Target
- General Description
- Prerequisites
- Screen Shot
- Fields Description
- What happens when the form is submitted
- Messages
- 5.1.13 District Target
- General Description
- Prerequisites
- Screen Shot
- Fields Description
- What happens when the form is submitted
- Messages
- 5.1.14 PPWS (Entry Form)
- General Description
- Prerequisites
- Screen Shot
- Fields Description
- What happens when the form is submitted
- Messages
- 5.1.15 Batch Creation
- General Description
- Prerequisites
- Screen Shot
- Fields Description
- What happens when the form is submitted
- Messages
- 5.1.16 Batch Completion
- General Description
- Prerequisites
- Screen Shot
- Fields Description
- What happens when the form is submitted
- Messages
- 5.1.17 Training Centre Setup
- General Description
- Prerequisites
- Screen Shot
- Fields Description
- What happens when the form is submitted
- Messages
- 5.1.18 Tc Setup Due Diligence (Training Center Due Diligence)
- General Description
- Prerequisites
- Screen Shot
- Fields Description
- What happens when the form is submitted
- Messages
- 5.1.19 Tc Setup Trade
- General Description
- Prerequisites
- Screen Shot
- Fields Description
- What happens when the form is submitted
- Messages
- 5.1.20 Ppws achievement (Placed)
- General Description
- Prerequisites
- Screen Shot
- Fields Description
- What happens when the form is submitted
- Messages
- 5.1.21 MONITORING (Inspection)
- General Description
- Prerequisites
- Screen Shot
- Fields Description
- What happens when the form is submitted
- Messages
- 5.1.22 MONITORING (Installment)
- General Description
- Prerequisites
- Screen Shot
- Fields Description
- What happens when the form is submitted
- Messages
- 5.1.23 MONITORING (Project Alerts)
- General Description
- Prerequisites
- Screen Shot
- Fields Description
- What happens when the form is submitted
- Messages
- 5.1.24 MONITORING (Project Penalties)
- General Description
- Prerequisites
- Screen Shot
- Fields Description
- What happens when the form is submitted
- Messages
- 5.1.25 MONITORING (Candidate Statistics)
- General Description
- Prerequisites
- Screen Shot
- Fields Description
- What happens when the form is submitted
- Messages
- 5.1.26 MASTER DATA MODULES (State Master)
- General Description
- Prerequisites
- Screen Shot
- Fields Description
- What happens when the form is submitted
- Messages
- 5.1.27 MASTER DATA MODULES (Special Area Master)
- General Description
- Prerequisites
- Screen Shot
- Fields Description
- What happens when the form is submitted
- Messages
- 5.1.28 MASTER DATA MODULES (District Master)
- General Description
- Prerequisites
- Screen Shot
- Fields Description
- What happens when the form is submitted
- Messages
- 5.1.29 MASTER DATA MODULES (Designation Master)
- General Description
- Prerequisites
- Screen Shot
- Fields Description
- What happens when the form is submitted
- Messages
- 5.1.30 MASTER DATA MODULES (CTSA Master)
- General Description
- Prerequisites
- Screen Shot
- Fields Description
- What happens when the form is submitted
- Messages
- 5.1.31 MASTER DATA MODULES (TSA Master)
- General Description
- Prerequisites
- Screen Shot
- Fields Description
- What happens when the form is submitted
- Messages
- 5.1.32 MASTER DATA MODULES (Appraisal Agency Master)
- General Description
- Prerequisites
- Screen Shot
- Fields Description
- What happens when the form is submitted
- Messages
- 5.1.33 MASTER DATA MODULES (Assessment Body Master)
- General Description
- Prerequisites
- Screen Shot
- Fields Description
- What happens when the form is submitted
- Messages
- 5.1.34 MASTER DATA MODULES (Sanction Post Master)
- General Description
- Prerequisites
- Screen Shot
- Fields Description
- What happens when the form is submitted
- Messages
- 5.1.35 MASTER DATA MODULES (Certifying Agency Master)
- General Description
- Prerequisites
- Screen Shot
- Fields Description
- What happens when the form is submitted
- Messages
- 5.1.36 MASTER DATA MODULES (Project Type Master)
- General Description
- Prerequisites
- Screen Shot
- Fields Description
- What happens when the form is submitted
- Messages
- 5.1.37 MASTER DATA MODULES (Sector Master)
- General Description
- Prerequisites
- Screen Shot
- Fields Description
- What happens when the form is submitted
- Messages
- 5.1.38 MASTER DATA MODULES (Trade Master)
- General Description
- Prerequisites
- Screen Shot
- Fields Description
- What happens when the form is submitted
- Messages
- 5.1.39 MASTER DATA MODULES (Parliamentary Constituency Master)
- General Description
- Prerequisites
- Screen Shot
- Fields Description
- What happens when the form is submitted
- Messages
- 5.1.40 MASTER DATA MODULES (Assembly Constituency Master)
- General Description
- Prerequisites
- Screen Shot
- Fields Description
- What happens when the form is submitted
- Messages
- 5.1 Authorized User Login

NATIONAL INFORMATICS CENTRE DDU-GKY USER MANUAL VERSION 1.1
NIC-DDUGKY - USER MANUAL 1.0 PAGE 1 OF 160 RELEASE DATE: 20-04-2017
DEEN DAYAL UPADHYAYA
GRAMEEN KAUSHALYA
YOJANA (DDU-GKY)
(http://ddugky.gov.in/mprmis/)
User Manual
_____________________________________________________________________________
(NIC-DDUGKY-USER MANUAL V 1.0)
_____________________________________________________________________________
National Informatics Centre
Department of Information Technology
Ministry of Communications & Information Technology
Government of India
No part of this document shall be reproduced without prior
permission of Director General, National Informatics Centre

NATIONAL INFORMATICS CENTRE DDU-GKY USER MANUAL VERSION 1.1
NIC-DDUGKY - USER MANUAL 1.0 PAGE 2 OF 160 RELEASE DATE: 20-04-2017
Amendment Log
Version no.
Date
Change number
Brief Description
Section Change
1.0
20/04/2017
NIL
Draft
NIL
1.1
28/04/2017

NATIONAL INFORMATICS CENTRE DDU-GKY USER MANUAL VERSION 1.1
NIC-DDUGKY - USER MANUAL 1.0 PAGE 3 OF 160 RELEASE DATE: 20-04-2017
Table of Content
DEEN DAYAL UPADHYAYA GRAMEEN KAUSHALYA YOJANA (DDU-GKY) ............................................... 1
USER MANUAL ...................................................................................................................................... 1
AMENDMENT LOG ................................................................................................................................ 2
TABLE OF CONTENT .............................................................................................................................. 3
LIST OF FIGURES.................................................................................................................................. 10
LIST OF TABLE ..................................................................................................................................... 13
1 INTRODUCTION ............................................................................................................................... 17
BACKGROUND .............................................................................................................................................. 17
AUDIENCE ................................................................................................................................................... 17
PURPOSE OF THIS DOCUMENT ......................................................................................................................... 18
DOCUMENT ORGANIZATION ........................................................................................................................... 18
CONVENTIONS ............................................................................................................................................. 18
REFERENCES ................................................................................................................................................ 19
DEFINITIONS/GLOSSARY ................................................................................................................................ 19
2 BRIEF OVERVIEW ............................................................................................................................. 23
FEATURES.................................................................................................................................................... 23
STAKE HOLDERS & USERS .............................................................................................................................. 23
LIST OF USERS BASED ON ACCESS PRIVILEGE ....................................................................................................... 24
3 MINIMUM SYSTEM REQUIREMENTS ............................................................................................... 28
4 GENERAL OPERATING INSTRUCTIONS ............................................................................................. 29
GETTING STARTED ........................................................................................................................................ 29
HOME PAGE ................................................................................................................................................ 29
HOW TO LOG-IN ........................................................................................................................................... 29
User Log-in Error Message .................................................................................................................. 30
Problem Reporting .............................................................................................................................. 33
5. SPECIFIC OPERATING INSTRUCTIONS .............................................................................................. 35
5.1 AUTHORIZED USER LOGIN ........................................................................................................................ 36
5.1.1 STATE DETAIL ............................................................................................................................. 36
General Description ............................................................................................................................ 36
Prerequisites ....................................................................................................................................... 36
Screen Shot ......................................................................................................................................... 36
Fields Description ................................................................................................................................ 37
What happens when the form is submitted ....................................................................................... 39
Messages............................................................................................................................................. 39
5.1.2 PROJECT DETAIL ......................................................................................................................... 40
General Description ............................................................................................................................ 40
Prerequisites ....................................................................................................................................... 40
Screen Shot ......................................................................................................................................... 40
Fields Description ................................................................................................................................ 42

NATIONAL INFORMATICS CENTRE DDU-GKY USER MANUAL VERSION 1.1
NIC-DDUGKY - USER MANUAL 1.0 PAGE 4 OF 160 RELEASE DATE: 20-04-2017
What happens when the form is submitted ....................................................................................... 47
Messages............................................................................................................................................. 47
5.1.3 STATE FINANCIAL DETAIL ........................................................................................................... 48
General Description ............................................................................................................................ 48
Prerequisites ....................................................................................................................................... 48
Screen Shot ......................................................................................................................................... 48
Fields Description ................................................................................................................................ 49
What happens when the form is submitted ....................................................................................... 52
Messages............................................................................................................................................. 52
5.1.4 HR TEAM .................................................................................................................................... 53
General Description ............................................................................................................................ 53
Prerequisites ....................................................................................................................................... 53
Screen Shot ......................................................................................................................................... 53
Fields Description ................................................................................................................................ 55
What happens when the form is submitted ....................................................................................... 58
Messages............................................................................................................................................. 58
5.1.5 STATE ACTION PLAN DETAILS..................................................................................................... 59
General Description ............................................................................................................................ 60
Prerequisites ....................................................................................................................................... 60
Screen Shot ......................................................................................................................................... 60
Fields Description ................................................................................................................................ 60
What happens when the form is submitted ....................................................................................... 65
Messages............................................................................................................................................. 65
5.1.6 Role Master ................................................................................................................................ 66
General Description ............................................................................................................................ 66
Prerequisites ....................................................................................................................................... 66
Screen Shot ......................................................................................................................................... 66
Fields Description ................................................................................................................................ 66
What happens when the form is submitted ....................................................................................... 68
Messages............................................................................................................................................. 68
5.1.7 Form Module Master ................................................................................................................. 68
General Description ............................................................................................................................ 68
Prerequisites ....................................................................................................................................... 69
Screen Shot ......................................................................................................................................... 69
Fields Description ................................................................................................................................ 70
What happens when the form is submitted ....................................................................................... 71
Messages............................................................................................................................................. 71
5.1.8 User Master ............................................................................................................................... 73
General Description ............................................................................................................................ 73
Prerequisites ....................................................................................................................................... 73
Screen Shot ......................................................................................................................................... 73
Fields Description ................................................................................................................................ 74
What happens when the form is submitted ....................................................................................... 76
Messages............................................................................................................................................. 76
5.1.9 Assign Module ............................................................................................................................ 77
General Description ............................................................................................................................ 77
Prerequisites ....................................................................................................................................... 77
Screen Shot ......................................................................................................................................... 77
Fields Description ................................................................................................................................ 78
What happens when the form is submitted ....................................................................................... 81
Messages............................................................................................................................................. 81
5.1.10 Assign Project Mapping............................................................................................................ 82
General Description ............................................................................................................................ 82

NATIONAL INFORMATICS CENTRE DDU-GKY USER MANUAL VERSION 1.1
NIC-DDUGKY - USER MANUAL 1.0 PAGE 5 OF 160 RELEASE DATE: 20-04-2017
Prerequisites ....................................................................................................................................... 82
Screen Shot ......................................................................................................................................... 82
What happens when the form is submitted ....................................................................................... 82
Messages............................................................................................................................................. 83
5.1.11 Project Sanction Details ........................................................................................................... 83
General Description ............................................................................................................................ 83
Prerequisites ....................................................................................................................................... 83
Screen Shot ......................................................................................................................................... 83
Fields Description ................................................................................................................................ 84
What happens when the form is submitted ....................................................................................... 89
Messages............................................................................................................................................. 89
5.1.12 Trade Target ............................................................................................................................. 89
General Description ............................................................................................................................ 90
Prerequisites ....................................................................................................................................... 90
Screen Shot ......................................................................................................................................... 90
Fields Description ................................................................................................................................ 90
What happens when the form is submitted ....................................................................................... 92
Messages............................................................................................................................................. 92
5.1.13 District Target........................................................................................................................... 92
General Description ............................................................................................................................ 92
Prerequisites ....................................................................................................................................... 92
Screen Shot ......................................................................................................................................... 92
Fields Description ................................................................................................................................ 93
What happens when the form is submitted ....................................................................................... 94
Messages............................................................................................................................................. 94
5.1.14 PPWS (Entry Form) ................................................................................................................... 94
General Description ............................................................................................................................ 94
Prerequisites ....................................................................................................................................... 95
Screen Shot ......................................................................................................................................... 95
Fields Description ................................................................................................................................ 95
What happens when the form is submitted ....................................................................................... 96
Messages............................................................................................................................................. 96
5.1.15 Batch Creation ......................................................................................................................... 96
General Description ............................................................................................................................ 97
Prerequisites ....................................................................................................................................... 97
Screen Shot ......................................................................................................................................... 97
Fields Description ................................................................................................................................ 97
What happens when the form is submitted ..................................................................................... 100
Messages........................................................................................................................................... 100
5.1.16 Batch Completion................................................................................................................... 100
General Description .......................................................................................................................... 100
Prerequisites ..................................................................................................................................... 101
Screen Shot ....................................................................................................................................... 101
Fields Description .............................................................................................................................. 101
What happens when the form is submitted ..................................................................................... 104
Messages........................................................................................................................................... 104
5.1.17 Training Centre Setup ............................................................................................................ 104
General Description .......................................................................................................................... 105
Prerequisites ..................................................................................................................................... 105
Screen Shot ....................................................................................................................................... 105
Fields Description .............................................................................................................................. 105
What happens when the form is submitted ..................................................................................... 108
Messages........................................................................................................................................... 108

NATIONAL INFORMATICS CENTRE DDU-GKY USER MANUAL VERSION 1.1
NIC-DDUGKY - USER MANUAL 1.0 PAGE 6 OF 160 RELEASE DATE: 20-04-2017
5.1.18 Tc Setup Due Diligence (Training Center Due Diligence) ....................................................... 108
General Description .......................................................................................................................... 108
Prerequisites ..................................................................................................................................... 109
Screen Shot ....................................................................................................................................... 109
Fields Description .............................................................................................................................. 109
What happens when the form is submitted ..................................................................................... 111
Messages........................................................................................................................................... 111
5.1.19 Tc Setup Trade ....................................................................................................................... 111
General Description .......................................................................................................................... 111
Prerequisites ..................................................................................................................................... 112
Screen Shot ....................................................................................................................................... 112
Fields Description .............................................................................................................................. 112
What happens when the form is submitted ..................................................................................... 113
Messages........................................................................................................................................... 113
5.1.20 Ppws achievement (Placed) ................................................................................................... 114
General Description .......................................................................................................................... 114
Prerequisites ..................................................................................................................................... 114
Screen Shot ....................................................................................................................................... 114
Fields Description .............................................................................................................................. 114
What happens when the form is submitted ..................................................................................... 115
Messages........................................................................................................................................... 116
5.1.21 MONITORING (Inspection) ..................................................................................................... 116
General Description .......................................................................................................................... 116
Prerequisites ..................................................................................................................................... 116
Screen Shot ....................................................................................................................................... 116
Fields Description .............................................................................................................................. 116
What happens when the form is submitted ..................................................................................... 118
Messages........................................................................................................................................... 118
5.1.22 MONITORING (Installment) ................................................................................................... 119
General Description .......................................................................................................................... 119
Prerequisites ..................................................................................................................................... 119
Screen Shot ....................................................................................................................................... 119
Fields Description .............................................................................................................................. 119
What happens when the form is submitted ..................................................................................... 120
Messages........................................................................................................................................... 121
5.1.23 MONITORING (Project Alerts) ................................................................................................ 121
General Description .......................................................................................................................... 121
Prerequisites ..................................................................................................................................... 121
Screen Shot ....................................................................................................................................... 121
Fields Description .............................................................................................................................. 122
What happens when the form is submitted ..................................................................................... 124
Messages........................................................................................................................................... 124
5.1.24 MONITORING (Project Penalties) ........................................................................................... 124
General Description .......................................................................................................................... 124
Prerequisites ..................................................................................................................................... 124
Screen Shot ....................................................................................................................................... 124
Fields Description .............................................................................................................................. 125
What happens when the form is submitted ..................................................................................... 127
Messages........................................................................................................................................... 127
5.1.25 MONITORING (Candidate Statistics) ...................................................................................... 127
General Description .......................................................................................................................... 127
Prerequisites ..................................................................................................................................... 127
Screen Shot ....................................................................................................................................... 128

NATIONAL INFORMATICS CENTRE DDU-GKY USER MANUAL VERSION 1.1
NIC-DDUGKY - USER MANUAL 1.0 PAGE 7 OF 160 RELEASE DATE: 20-04-2017
Fields Description .............................................................................................................................. 128
What happens when the form is submitted ..................................................................................... 130
Messages........................................................................................................................................... 130
5.1.26 MASTER DATA MODULES (State Master)............................................................................... 131
General Description .......................................................................................................................... 131
Prerequisites ..................................................................................................................................... 131
Screen Shot ....................................................................................................................................... 131
Fields Description .............................................................................................................................. 132
What happens when the form is submitted ..................................................................................... 134
Messages........................................................................................................................................... 134
5.1.27 MASTER DATA MODULES (Special Area Master) ................................................................... 135
General Description .......................................................................................................................... 135
Prerequisites ..................................................................................................................................... 135
Screen Shot ....................................................................................................................................... 135
Fields Description .............................................................................................................................. 135
What happens when the form is submitted ..................................................................................... 136
Messages........................................................................................................................................... 136
5.1.28 MASTER DATA MODULES (District Master) ........................................................................... 136
General Description .......................................................................................................................... 136
Prerequisites ..................................................................................................................................... 137
Screen Shot ....................................................................................................................................... 137
Fields Description .............................................................................................................................. 137
What happens when the form is submitted ..................................................................................... 138
Messages........................................................................................................................................... 138
5.1.29 MASTER DATA MODULES (Designation Master) .................................................................... 139
General Description .......................................................................................................................... 139
Prerequisites ..................................................................................................................................... 139
Screen Shot ....................................................................................................................................... 139
Fields Description .............................................................................................................................. 139
What happens when the form is submitted ..................................................................................... 140
Messages........................................................................................................................................... 140
5.1.30 MASTER DATA MODULES (CTSA Master) ............................................................................... 141
General Description .......................................................................................................................... 141
Prerequisites ..................................................................................................................................... 141
Screen Shot ....................................................................................................................................... 141
Fields Description .............................................................................................................................. 141
What happens when the form is submitted ..................................................................................... 142
Messages........................................................................................................................................... 142
5.1.31 MASTER DATA MODULES (TSA Master) ................................................................................. 142
General Description .......................................................................................................................... 142
Prerequisites ..................................................................................................................................... 142
Screen Shot ....................................................................................................................................... 142
Fields Description .............................................................................................................................. 143
What happens when the form is submitted ..................................................................................... 143
Messages........................................................................................................................................... 143
5.1.32 MASTER DATA MODULES (Appraisal Agency Master) ........................................................... 144
General Description .......................................................................................................................... 144
Prerequisites ..................................................................................................................................... 144
Screen Shot ....................................................................................................................................... 144
Fields Description .............................................................................................................................. 144
What happens when the form is submitted ..................................................................................... 145
Messages........................................................................................................................................... 145
5.1.33 MASTER DATA MODULES (Assessment Body Master) ........................................................... 146

NATIONAL INFORMATICS CENTRE DDU-GKY USER MANUAL VERSION 1.1
NIC-DDUGKY - USER MANUAL 1.0 PAGE 8 OF 160 RELEASE DATE: 20-04-2017
General Description .......................................................................................................................... 146
Prerequisites ..................................................................................................................................... 146
Screen Shot ....................................................................................................................................... 146
Fields Description .............................................................................................................................. 146
What happens when the form is submitted ..................................................................................... 147
Messages........................................................................................................................................... 147
5.1.34 MASTER DATA MODULES (Sanction Post Master) ................................................................. 148
General Description .......................................................................................................................... 148
Prerequisites ..................................................................................................................................... 148
Screen Shot ....................................................................................................................................... 148
Fields Description .............................................................................................................................. 148
What happens when the form is submitted ..................................................................................... 149
Messages........................................................................................................................................... 149
5.1.35 MASTER DATA MODULES (Certifying Agency Master) ........................................................... 150
General Description .......................................................................................................................... 150
Prerequisites ..................................................................................................................................... 150
Screen Shot ....................................................................................................................................... 150
Fields Description .............................................................................................................................. 150
What happens when the form is submitted ..................................................................................... 151
Messages........................................................................................................................................... 151
5.1.36 MASTER DATA MODULES (Project Type Master) ................................................................... 151
General Description .......................................................................................................................... 151
Prerequisites ..................................................................................................................................... 152
Screen Shot ....................................................................................................................................... 152
Fields Description .............................................................................................................................. 152
What happens when the form is submitted ..................................................................................... 153
Messages........................................................................................................................................... 153
5.1.37 MASTER DATA MODULES (Sector Master) ............................................................................. 153
General Description .......................................................................................................................... 153
Prerequisites ..................................................................................................................................... 153
Screen Shot ....................................................................................................................................... 153
Fields Description .............................................................................................................................. 153
What happens when the form is submitted ..................................................................................... 154
Messages........................................................................................................................................... 154
5.1.38 MASTER DATA MODULES (Trade Master) .............................................................................. 154
General Description .......................................................................................................................... 154
Prerequisites ..................................................................................................................................... 154
Screen Shot ....................................................................................................................................... 154
Fields Description .............................................................................................................................. 155
What happens when the form is submitted ..................................................................................... 156
Messages........................................................................................................................................... 156
5.1.39 MASTER DATA MODULES (Parliamentary Constituency Master) .......................................... 156
General Description .......................................................................................................................... 156
Prerequisites ..................................................................................................................................... 156
Screen Shot ....................................................................................................................................... 156
Fields Description .............................................................................................................................. 157
What happens when the form is submitted ..................................................................................... 158
Messages........................................................................................................................................... 158
5.1.40 MASTER DATA MODULES (Assembly Constituency Master) .................................................. 158
General Description .......................................................................................................................... 158
Prerequisites ..................................................................................................................................... 158
Screen Shot ....................................................................................................................................... 158
Fields Description .............................................................................................................................. 158

NATIONAL INFORMATICS CENTRE DDU-GKY USER MANUAL VERSION 1.1
NIC-DDUGKY - USER MANUAL 1.0 PAGE 9 OF 160 RELEASE DATE: 20-04-2017
What happens when the form is submitted ..................................................................................... 159
Messages........................................................................................................................................... 159

NATIONAL INFORMATICS CENTRE DDU-GKY USER MANUAL VERSION 1.1
NIC-DDUGKY - USER MANUAL 1.0 PAGE 10 OF 160 RELEASE DATE: 20-04-2017
List of Figures
Figure 1: Home Page .................................................................................................................... 29
Figure 2 : User Log-in Screen ....................................................................................................... 30
Figure 3 : User Log-in Error Message ........................................................................................... 31
Figure 4 : User Log-in Error Message ....................................................................................... 31
Figure 5 : User Log-in Error Message ....................................................................................... 32
Figure 6 : User Log-in Error Message ....................................................................................... 32
Figure 7 : Problem Reporting ..................................................................................................... 33
Figure 8 : Problem Reporting ..................................................................................................... 34
Figure 9 : SRLM Admin Dashboard ........................................................................................... 36
Figure 10 : SRLM Admin> STATE DETAIL ................................................................................ 36
Figure 9 : STATE DETAIL> Messages ....................................................................................... 40
Figure 12 : PROJECT DETAIL .................................................................................................... 41
Figure 13 : PROJECT DETAIL (Add New) ................................................................................. 41
Figure 14 : PROJECT DETAIL (Update) ..................................................................................... 42
Figure 13 : PROJECT DETAIL> Messages ................................................................................ 47
Figure 14 : PROJECT DETAIL> Messages ................................................................................ 48
Figure 17 : STATE FINANCIAL DETAIL ..................................................................................... 49
Figure 18 : STATE FINANCIAL DETAIL> Messages ................................................................. 53
Figure 19 : HR Team .................................................................................................................... 54
Figure 20 : HR Team (Add New) ................................................................................................. 54
Figure 19 : HR Team (Update) .................................................................................................... 55
Figure 22 : HR TEAM > Messages .............................................................................................. 59
Figure 23 : HR TEAM > Messages .............................................................................................. 59
Figure 24 : STATE ACTION PLAN DETAILS ............................................................................. 60
Figure 23 : STATE ACTION PLAN DETAIL> Messages ........................................................... 65
Figure 26 : Role Master ............................................................................................................... 66

NATIONAL INFORMATICS CENTRE DDU-GKY USER MANUAL VERSION 1.1
NIC-DDUGKY - USER MANUAL 1.1 PAGE 11 OF 160 RELEASE DATE: 30-04-2017
Figure 27 : Role Master> Messages ........................................................................................... 68
Figure 28 : Form Module Master ................................................................................................ 69
Figure 29 : Form Module Master ................................................................................................ 69
Figure 30 : Form Module Master> Messages ............................................................................ 72
Figure 31 : Form Module Master> Messages ............................................................................ 72
Figure 32 : User Master ............................................................................................................... 73
Figure 33 : User Master> Messages .......................................................................................... 77
Figure 34 : Assign Module .......................................................................................................... 78
Figure 36 : Assign Module> Messages ..................................................................................... 81
Figure 37 : Assign Project Mapping .......................................................................................... 82
Figure 38 : Project Sanction Details .......................................................................................... 83
Figure 39 : Project Sanction Details (Add New) ....................................................................... 84
Figure 40 : Project Sanction Details> Messages ...................................................................... 89
Figure 41 : Trade Target .............................................................................................................. 90
Figure 42 : Trade Target .............................................................................................................. 90
Figure 42 : District Target ........................................................................................................... 93
Figure 43 : District Target ........................................................................................................... 93
Figure 44 : District Target (Add Row) ........................................................................................ 93
Figure 45 : PPWS> Entry Form .................................................................................................. 95
Figure 46 : Batch Creation .......................................................................................................... 97
Figure 47 : Batch Creation (Add New) ....................................................................................... 97
Figure 48 : Batch Completion ................................................................................................... 101
Figure 49 : Training Center Details .......................................................................................... 105
Figure 50 : Training Center Details (Add New) ....................................................................... 105
Figure 51 : Training Center Due Diligence .............................................................................. 109
Figure 52 : Training Center Due Diligence (Add New) ........................................................... 109
Figure 53 : TC Setup Trade ....................................................................................................... 112
Figure 54 : TC Setup Trade (Add Row) .................................................................................... 112

NATIONAL INFORMATICS CENTRE DDU-GKY USER MANUAL VERSION 1.1
NIC-DDUGKY - USER MANUAL 1.1 PAGE 12 OF 160 RELEASE DATE: 30-04-2017
Figure 51 : Ppws achievement (Placed) .................................................................................. 114
Figure 56 : Inspection ............................................................................................................... 116
Figure 57 : Inspection .................................................................................................................. 116
Figure 54 : Installment .............................................................................................................. 119
Figure 59 : Project Alerts .......................................................................................................... 121
Figure 55 : Project Alerts .......................................................................................................... 122
Figure 56 : Project Penalties .................................................................................................... 125
Figure 57 : Project Penalties .................................................................................................... 125
Figure 63 : Candidate Statistics ............................................................................................... 128
Figure 59 : Candidate Statistics> Messages........................................................................... 131
Figure 60 : State Master ............................................................................................................ 132
Figure 61 : State Master> Messages ........................................................................................ 134
Figure 62 : Special Area Master ............................................................................................... 135
Figure 63 : Special Area Master> Messages ........................................................................... 136
Figure 64 : District Master ........................................................................................................ 137
Figure 65 : District Master> Messages .................................................................................... 138
Figure 66 : Designation Master ................................................................................................ 139
Figure 67 : Designation Master> Messages ............................................................................ 140
Figure 68 : CTSA Master ........................................................................................................... 141
Figure 69 : CTSA Master> Messages ....................................................................................... 142
Figure 70 : TSA Master .............................................................................................................. 143
Figure 71 : TSA Master> Messages ......................................................................................... 144
Figure 72 : Appraisal Agency Master ...................................................................................... 144
Figure 73 : Appraisal Agency Master> Messages .................................................................. 145
Figure 74 : Assessment Body Master ..................................................................................... 146
Figure 75 : Assessment Body Master> Messages ................................................................. 147
Figure 76 : Sanction Post Master ............................................................................................. 148
Figure 77 : Sanction Post Master> Messages ........................................................................ 149

NATIONAL INFORMATICS CENTRE DDU-GKY USER MANUAL VERSION 1.1
NIC-DDUGKY - USER MANUAL 1.1 PAGE 13 OF 160 RELEASE DATE: 30-04-2017
Figure 78 : Certifying Agency Master ...................................................................................... 150
Figure 79 : Certifying Agency Master> Messages ................................................................. 151
Figure 80 : Project Type Master ............................................................................................... 152
Figure 81 : Sector Master .......................................................................................................... 153
Figure 82 : Trade Master ........................................................................................................... 155
Figure 81 : Parliamentary Constituency Master ..................................................................... 157
Figure 89 : Assembly Constituency Master ............................................................................ 158
List of Table

NATIONAL INFORMATICS CENTRE DDU-GKY USER MANUAL VERSION 1.1
NIC-DDUGKY - USER MANUAL 1.1 PAGE 14 OF 160 RELEASE DATE: 30-04-2017
Table 1 : Log-in Error Message ............................................................................................................ 33
Table 2 : STATE DETAILS Form Fields Description ............................................................................ 38
Table 3 : STATE DETAIL> Messages .................................................................................................. 40
Table 2 : PROJECT SETUP> PROJECT DETAIL Form Fields Description ........................................ 45
Table 5 : PROJECT DETAIL> Messages ............................................................................................. 48
Table 6 : STATE FINANCIAL DETAIL Form Fields Description ........................................................... 51
Table 7 : STATE FINANCIAL DETAIL> Messages ............................................................................ 53
Table 8 : HR Team Form Fields Description ......................................................................................... 57
Table 9 : HR Team> Messages ............................................................................................................ 59
Table 10 : STATE ACTION PLAN DETAILS Form Fields Description ................................................. 63
Table 11 : STATE ACTION PLAN DETAIL> Messages ..................................................................... 65
Table 12 : Role Master Form Fields Description................................................................................... 67
Table 13 : Role Master> Messages .................................................................................................... 68
Table 14 : Form Module Master Form Fields Description .................................................................... 71
Table 15 : Form Module Master> Messages ..................................................................................... 73
Table 16 : User Master Form Fields Description .................................................................................. 75
Table 17 : User Master> Messages.................................................................................................... 77
Table 16 : Assign Module Form Fields Description .............................................................................. 80
Table 19 : Assign Form Modules> Messages .................................................................................. 82
Table 20 : Project Sanction Details Form Fields Description ................................................................ 88
Table 21 : Project Sanction Details> Messages ............................................................................... 89
Table 24 : Trade Target Form Fields Description ................................................................................. 92
Table 25 : Trade Target Form Fields Description ................................................................................. 94
Table 24 : PPWS> Entry Form Fields Description ................................................................................ 96
Table 25 : Batch Creation Form Fields Description ............................................................................ 100
Table 26 : Batch Creation Form Fields Description ............................................................................ 104
Table 26 : Training Center Setup Form Fields Description ................................................................. 108
Table 28 : Training Center Due Diligence Form Fields Description.................................................... 111
Table 28 : TC Setup Trade Form Fields Description .......................................................................... 113
Table 30 : Ppws achievement (Placed) Form Fields Description ....................................................... 115

NATIONAL INFORMATICS CENTRE DDU-GKY USER MANUAL VERSION 1.1
NIC-DDUGKY - USER MANUAL 1.1 PAGE 15 OF 160 RELEASE DATE: 30-04-2017
Table 33 : Inspection Form Fields Description .................................................................................... 118
Table 34 : Inspection> Messages ....................................................................................................... 119
Table 33 : Installment Form Fields Description ................................................................................... 120
Table 36 : Installment> Messages ...................................................................................................... 121
Table 35 : Project Alerts Form Fields Description .............................................................................. 123
Table 38 : Project Alerts> Messages .................................................................................................. 124
Table 37 : Project Penalties Form Fields Description ......................................................................... 126
Table 38 : Project Penalties> Messages ......................................................................................... 127
Table 39 : Candidate Statistics Form Fields Description .................................................................... 130
Table 40 : Candidate Statistics> Messages .................................................................................... 131
Table 41 : State Master Form Fields Description................................................................................ 133
Table 42 : State Master > Messages ................................................................................................ 135
Table 43 : Special Area Master Form Fields Description ................................................................... 135
Table 44 : Special Area Master > Messages ................................................................................... 136
Table 45 : District Master Form Fields Description ............................................................................. 138
Table 46 : District Master > Messages ............................................................................................ 139
Table 47 : Designation Master Form Fields Description ..................................................................... 140
Table 48 : Designation Master > Messages .................................................................................... 140
Table 49 : CTSA Master Form Fields Description .............................................................................. 141
Table 50 : CTSA Master > Messages ............................................................................................... 142
Table 51 : TSA Master Form Fields Description ................................................................................. 143
Table 50 : TSA Master > Messages ................................................................................................. 144
Table 53 : Appraisal Agency Master Form Fields Description ............................................................ 145
Table 54 : Appraisal Agency Master > Messages .......................................................................... 146
Table 55 : Assessment Body Master Form Fields Description ........................................................... 147
Table 56 : Assessment Body Master > Messages ......................................................................... 148
Table 57 : Sanction Post Master Form Fields Description .................................................................. 149
Table 58 : Sanction Post Master > Messages ................................................................................ 150
Table 59 : Sanction Post Master Form Fields Description .................................................................. 151
Table 60 : Certifying Agency Master > Messages .......................................................................... 151

NATIONAL INFORMATICS CENTRE DDU-GKY USER MANUAL VERSION 1.1
NIC-DDUGKY - USER MANUAL 1.1 PAGE 16 OF 160 RELEASE DATE: 30-04-2017
Table 61 : Project Type Master Form Fields Description .................................................................... 152
Table 62 : Sector Master Form Fields Description ............................................................................. 154
Table 63 : Trade Master Form Fields Description .............................................................................. 156
Table 62 : Parliamentary Constituency Master Form Fields Description ............................................ 157
Table 65 : Assembly Constituency Master Form Fields Description .................................................. 159

NATIONAL INFORMATICS CENTRE DDU-GKY USER MANUAL VERSION 1.1
NIC-DDUGKY - USER MANUAL 1.1 PAGE 17 OF 160 RELEASE DATE: 30-04-2017
1 Introduction
Background
Government of India has set up a target to provide skill training to 500 million of its youth by 2022.
Several Ministries have been assigned targets for skilling India’s youth to contribute to the
Government’s vision for making India the skill capital of the world.
Ministry of Rural Development (MoRD) has initiated the Deen Dayal Upadhyaya Grameen Kaushalya
Yojana (DDU-GKY) as a skill training and placement program for youth aged between 15 to 35 years
living in rural areas. The program emphasizes on sustainable employment through the prominence
and incentives given to post-placement tracking, retention and career progression.
For administrative authorities and Project Implementation Agencies (PIAs) involved in training and
placement under DDU-GKY, there were no end-to-end, workflow-based system to facilitate online
management of training and placement. To fulfill it, this portal has been developed for DDU-GKY.
It will help MoRD, SRLM administrative authorities and organizations involved in managing the
training and placement needs/demands of the rural youth. Such detailed need capturing of training
and placement can lead to sizing the demand and preparation of training and placement plan.
The portal acts as a single platform for MoRD, other Administrative authorities and Training Agencies
to manage co-funding and implementation support to DDU-GKY in States.
SRLM Admin can plan for providing skill training to youth living in rural areas. This portal helps them
to identify the focus areas related to SC/ST, minorities and women. They can set separate targets for
special groups such as PWD, victims of trafficking, manual scavengers, trans-genders, rehabilitated
bonded labor and other vulnerable groups.
Project Implementation Agency (PIA) can share information on training venue, infrastructure, special
areas, faculty, resource material availability etc. with MoRD and SRLM authorities with the help of this
portal.
Audience
The audience of this document includes the various stakeholders involved in the DDU-GKY at various
levels of government which include:
MoRD, Govt. of India running the DDU-GKY
State Rural Livelihood Mission (SRLM) authorities
District level Authorities
Project Approval Committee
Project Implementation Agencies (PIAs) involved in the implementation of DDU-GKY

NATIONAL INFORMATICS CENTRE DDU-GKY USER MANUAL VERSION 1.1
NIC-DDUGKY - USER MANUAL 1.1 PAGE 18 OF 160 RELEASE DATE: 30-04-2017
Purpose of this document
This document attempts to describe the operational aspects of DDUGKY with a view to assist all
those who will be using DDUGKY application. The document provides step-wise instructions for
handling various aspects of the software with visual screens for easy and better understanding. It also
describes the error messages encountered while working with the software with appropriate remedial
actions required to be taken by the user.
Document Organization
The document is divided in five chapters.
Chapter 1: Introduction– This Chapter provides an Introduction to the document describing the
background, intended audience, purpose of the document, conventions adopted in the document,
references and contact address for reporting the problems encountered (if any) while using the
software or related with this document.
Chapter 2: Brief Overview– This Chapter gives an overview of the software with a broad list of
features offered by it.
Chapter 3: Minimum System Requirements– This chapter provides information about the minimum
system requirements.
Chapter 4: General/Common Operating Instructions– This chapter provides the general operating
instructions that are common across the package.
Chapter 5: Specific Operating Instructions– This Chapter provides specific operating instructions
for each of the features offered by the software. The feature description includes a general description
of the feature, screen description wherever applicable, step-wise instructions for carrying out the
operation, what happens after the operation is successfully executed, what more can be done from
the current screen and a list of messages that the user might encounter while carrying out the
operation.
Conventions
The document follows the font settings for Chapter Heading, Sub-Headings at various levels and text
as indicated below:
Chapter Heading– Style h1, Arial Black 16 pt
Sub-Heading Level 1– Style H2, Arial Black 14 pt
Sub-Heading Level 2– Arial Black, 12 pt

NATIONAL INFORMATICS CENTRE DDU-GKY USER MANUAL VERSION 1.1
NIC-DDUGKY - USER MANUAL 1.1 PAGE 19 OF 160 RELEASE DATE: 30-04-2017
Sub-Heading Level 3– Arial, 10 pt, Bold
Body Text– Arial, 10 pt
The labels related to text fields, buttons, icons etc. have been indicated in bold in the document text.
References
1. User Manual Template (NIC-TPL-004 version 1.1) prescribed as per NIC Quality Standards.
Definitions/Glossary
This section gives a glossary of terms used in the rest of the document.
Term
Description
AP
Action Plan (The equivalent of this for Non-AP states in
Year Programme)
APL
Above Poverty Line
BPL
Below Poverty Line
CAG
Controller and Auditor General
CAPART
Council for Advancement of People’s Action and Rural
Technology
CBOs
Community Based Organizations
COO
Chief Operating Officer
CRP
Community Resource Person
CSOs
Community Social Organizations
CTSA
Central Technical Support Agency
DONER
Development of North Eastern Region
DRDA
District Rural Development Authority
DSS
Decision Support System
DDU-GKY
Pandit Deen Dayal Upadhyaya Grameen Kaushalya
Yojana
EC
Empowered Committee

NATIONAL INFORMATICS CENTRE DDU-GKY USER MANUAL VERSION 1.1
NIC-DDUGKY - USER MANUAL 1.1 PAGE 20 OF 160 RELEASE DATE: 30-04-2017
ERP
Enterprise Resource Planning
FMS
Financial Management System
GOI
Government of India
GP
Gram Panchayat
IAP
Integrated Action Plan
IAY
Indira Awas Yojana
ICDS
Integrated Child Development Scheme
ICT
Information Communication Technology
IEC
Information Education Commission
IFD
Integrated Finance Division
IRDP
Integrated Rural Development Programme
IT
Information Technology
ITI
Industrial Training Institute
LWE
Left Wing Extremist
LQAS
Lot Quality Assurance Sampling
MES
Modular Employable Skills
MGNREGA
Mahatma Gandhi National Rural Employment Guarantee
Act
MIS
Management Information System
MoRD
Ministry of Rural Development
MOU
Memorandum of Understanding
MSP
Multi State Project
MSME
Micro Small and Medium Enterprises
NABARD
National Bank of Agriculture and Rural Development
NABCONS
NABARD Consultancy Services

NATIONAL INFORMATICS CENTRE DDU-GKY USER MANUAL VERSION 1.1
NIC-DDUGKY - USER MANUAL 1.1 PAGE 21 OF 160 RELEASE DATE: 30-04-2017
NAG
National Advisory Group
NCVT
National Council for Vocational Training
NIRD
National Institute of Rural Development
NIOS
National Institute of Open Schooling
NMMU
National Mission Management Unit
NRHM
National Rural Health Mission
NRLM
National Rural Livelihood Mission
NSDC
National Skill Development Corporation
NSDA
National Skill Development Agency
NSDM
National Skill Development Mission
NSAP
National Social Assistance Programme
OJT
On Job Training
PAC
Project Approval Committee
PFMS
Public Financial Management System
PIAs
Project Implementation Agencies
PIP
Participatory Identification of Poor
PRI
Panchayati Raj Institutions
PWD
Persons with Disability
RD
Rural Development
RL
Rural Livelihood
SRLM
State Rural Livelihood Mission
SC/ST
Scheduled Castes/Scheduled Tribes
SGSY
Swarnajayanti Gram Swarojgar Yojana
SHG
Self Help Group
SPIP
State Perspective and Implementation Plan

NATIONAL INFORMATICS CENTRE DDU-GKY USER MANUAL VERSION 1.1
NIC-DDUGKY - USER MANUAL 1.1 PAGE 22 OF 160 RELEASE DATE: 30-04-2017
SSP
Single State Project
TSA
Technical Support Agency
UC
Utilization Certificate
YP
Year Programme (This is the equivalent of AP for non-AP
States)

NATIONAL INFORMATICS CENTRE DDU-GKY USER MANUAL VERSION 1.1
NIC-DDUGKY - USER MANUAL 1.1 PAGE 23 OF 160 RELEASE DATE: 30-04-2017
2 Brief Overview
Features
Brief description of the features that will be offered by DDUGKY portal is given below:
1. Deen Dayal Upadhyaya Grameen Kaushalya Yojana – The user can access the portal by
entering the url http://www.ddugky.gov.in/mprmis/ in the address bar of the web browser.
2. A simple system- DDUGKY portal is a simple system.
3. Monitoring- MoRD and State Rural Livelihood Mission can monitor the progress.
4. Transparent Monitoring System- The names and other details of the beneficiaries will be
available at all levels and also in public domain.
5. Reports and Analysis- The data can be further analyzed and results can be used for further
improvement in the system.
Stake Holders & Users
Major Stake Holders of Deen Dayal Upadhyaya Grameen Kaushalya Yojana are:
Ministry of Rural Development
Central Technical Support Agency
State Rural Livelihood Mission
Technical Support Agency
Project Implementation Agency
Appraisal Agency
Assessment Body (Certifying Agency)
DDUGKY will have users at different levels. The hierarchy will be such that there will be:
1. Super User –
The Super User will have the permission to manage Master data and access control of the users.
2. MoRD User -
The users of Ministry of Rural Development will have the permission to view projects.
3. CTSA –
The users of Central Technical Support Agencies (CTSAs) will have permission to view all forms but
they cannot access the Master Data.
4. SRLM ADMIN –
NATIONAL INFORMATICS CENTRE DDU-GKY USER MANUAL VERSION 1.1
NIC-DDUGKY - USER MANUAL 1.1 PAGE 24 OF 160 RELEASE DATE: 30-04-2017
State Rural Livelihood Mission (SRLM) Admin can view all projects of own state. SRLM Admin can
view all forms but cannot edit forms except State Setup, State Sanction, State Financial, State HR
Team.
5. SRLM USER
SRLM Admin can create users at State and District levels. These users can access forms as per
the permission given by SRLM Admin.
6. PIA
Project Implementation Agency (PIA) users can access all the forms but will not be allowed to edit
State Setup, State Sanction, State Financial, State HR Team forms.
The list of forms along with the access privilege of user is given in the table below:
Privilege-- R* Read Only, RW* Read & Write
List of Users based on access privilege
S. No.
Module/Form
Name
MoRD
CTSA
CTSA
User
SRLM
Admin
SRLM
User
PIA
PIA User
1.
State Detail
R
R
R
RW
R
N/A
N/A
2.
Project Detail
R
R
R
RW
R
R
R
3.
State Financial
Detail
R
R
R
RW
R
N/A
N/A
4.
HR Team
R
R
R
RW
R
N/A
N/A
5.
State Action Plan
Details
R
R
R
RW
RW
R
R
6.
Role Master
RW
N/A
N/A
N/A
N/A
N/A
N/A
7.
Form Module
Master
RW
N/A
N/A
N/A
N/A
N/A
N/A
8.
User Master
RW
RW
RW
RW
RW
RW
RW
9.
Assign Module
RW
RW
RW
RW
RW
RW
RW
10.
Assign Project
Mapping
RW
RW
RW
RW
RW
RW
RW
NATIONAL INFORMATICS CENTRE DDU-GKY USER MANUAL VERSION 1.1
NIC-DDUGKY - USER MANUAL 1.1 PAGE 25 OF 160 RELEASE DATE: 30-04-2017
S. No.
Module/Form
Name
MoRD
CTSA
CTSA
User
SRLM
Admin
SRLM
User
PIA
PIA User
11.
Project Sanction
Details
R
R
R
RW
R
R
R
12.
Trade Target
R
R
R
R
R
RW
RW
13.
District Target
R
R
R
R
R
RW
RW
14.
PPWS
R
R
R
R
R
RW
RW
15.
Batch Creation
R
R
R
R
R
RW
RW
16.
Batch Completion
R
R
R
R
R
RW
RW
17.
Training Center
Setup
R
R
R
R
R
RW
RW
18.
Tc Setup Due
Diligence
R
RW
RW
RW
RW
R
R
19.
Tc Setup Trade
R
R
R
R
R
RW
RW
20.
Ppws achievement
(Placed)
R
R
R
R
R
RW
RW
21.
Monitoring
(Inspection)
R
RW
RW
RW
RW
RW
RW
22.
Monitoring
(Installment)
R
R
R
RW
RW
R
R
23.
Monitoring (Project
Alerts)
R
RW
RW
RW
RW
R
R
24.
Monitoring (Project
Penalties)
R
R
R
RW
RW
R
R
25.
Monitoring
(Candidate
Statistics)
R
R
R
R
R
RW
RW
26.
Master Data
Modules
RW
N/A
N/A
N/A
N/A
N/A
N/A
NATIONAL INFORMATICS CENTRE DDU-GKY USER MANUAL VERSION 1.1
NIC-DDUGKY - USER MANUAL 1.1 PAGE 26 OF 160 RELEASE DATE: 30-04-2017
S. No.
Module/Form
Name
MoRD
CTSA
CTSA
User
SRLM
Admin
SRLM
User
PIA
PIA User
(State Master)
27.
Master Data
Modules
(Special Area
Master)
RW
N/A
N/A
N/A
N/A
N/A
N/A
28.
Master Data
Modules
(District Master)
RW
N/A
N/A
N/A
N/A
N/A
N/A
29.
Master Data
Modules
(Designation
Master)
RW
N/A
N/A
N/A
N/A
N/A
N/A
30
Master Data
Modules
(CTSA Master)
RW
N/A
N/A
N/A
N/A
N/A
N/A
31
Master Data
Modules
(TSA Master)
RW
N/A
N/A
N/A
N/A
N/A
N/A
32
Master Data
Modules
(Appraisal Agency
Master)
RW
N/A
N/A
N/A
N/A
N/A
N/A
33
Master Data
Modules
(Assessment Body
Master)
RW
N/A
N/A
N/A
N/A
N/A
N/A

NATIONAL INFORMATICS CENTRE DDU-GKY USER MANUAL VERSION 1.1
NIC-DDUGKY - USER MANUAL 1.1 PAGE 27 OF 160 RELEASE DATE: 30-04-2017
S. No.
Module/Form
Name
MoRD
CTSA
CTSA
User
SRLM
Admin
SRLM
User
PIA
PIA User
34
Master Data
Modules
(Sanction Post
Master)
RW
N/A
N/A
N/A
N/A
N/A
N/A
35
Master Data
Modules
(Certifying Agency
Master)
RW
N/A
N/A
N/A
N/A
N/A
N/A
36
Master Data
Modules
(Project Type
Master)
RW
N/A
N/A
N/A
N/A
N/A
N/A
37
Master Data
Modules
(Sector Master)
RW
N/A
N/A
N/A
N/A
N/A
N/A
38
Master Data
Modules
(Trade Master)
RW
N/A
N/A
N/A
N/A
N/A
N/A
39
Master Data
Modules
(Constituency
Master)
RW
N/A
N/A
N/A
N/A
N/A
N/A

NATIONAL INFORMATICS CENTRE DDU-GKY USER MANUAL VERSION 1.1
NIC-DDUGKY - USER MANUAL 1.1 PAGE 28 OF 160 RELEASE DATE: 30-04-2017
3 Minimum System Requirements
DDUGKY is a web based application, the minimum system requirements for accessing the website
are:
1) Desktop or Laptop computer
2) Internet Connection
3) Web Browser
(i) Google Chrome
(ii) Mozilla Firefox

NATIONAL INFORMATICS CENTRE DDU-GKY USER MANUAL VERSION 1.1
NIC-DDUGKY - USER MANUAL 1.1 PAGE 29 OF 160 RELEASE DATE: 30-04-2017
4 General Operating Instructions
This section describes the details related to some of the common features which are applicable to all
roles. In particular, it describes the Home Page and the Log in form.
Getting Started
DDUGKY is a web based software application. To invoke the application, type the URL in the Address
Bar of the Browser Window. The Home Page will open as shown in Fig. 1.
Home Page
The Home Page of DDUGKY provides links to the following:
Home- Clicking this link will take you back to the home page from wherever you are.
Login- This option is provided on the upper right side of the Home page screen.
Figure 1: Home Page
How to Log-in
In order to use the privileges according to his/her profile, a User is required to first of all login to the
website using a valid User Id and Password.
When you click on the Log in link, a pop-up window with the following fields will appear (Fig. 2:
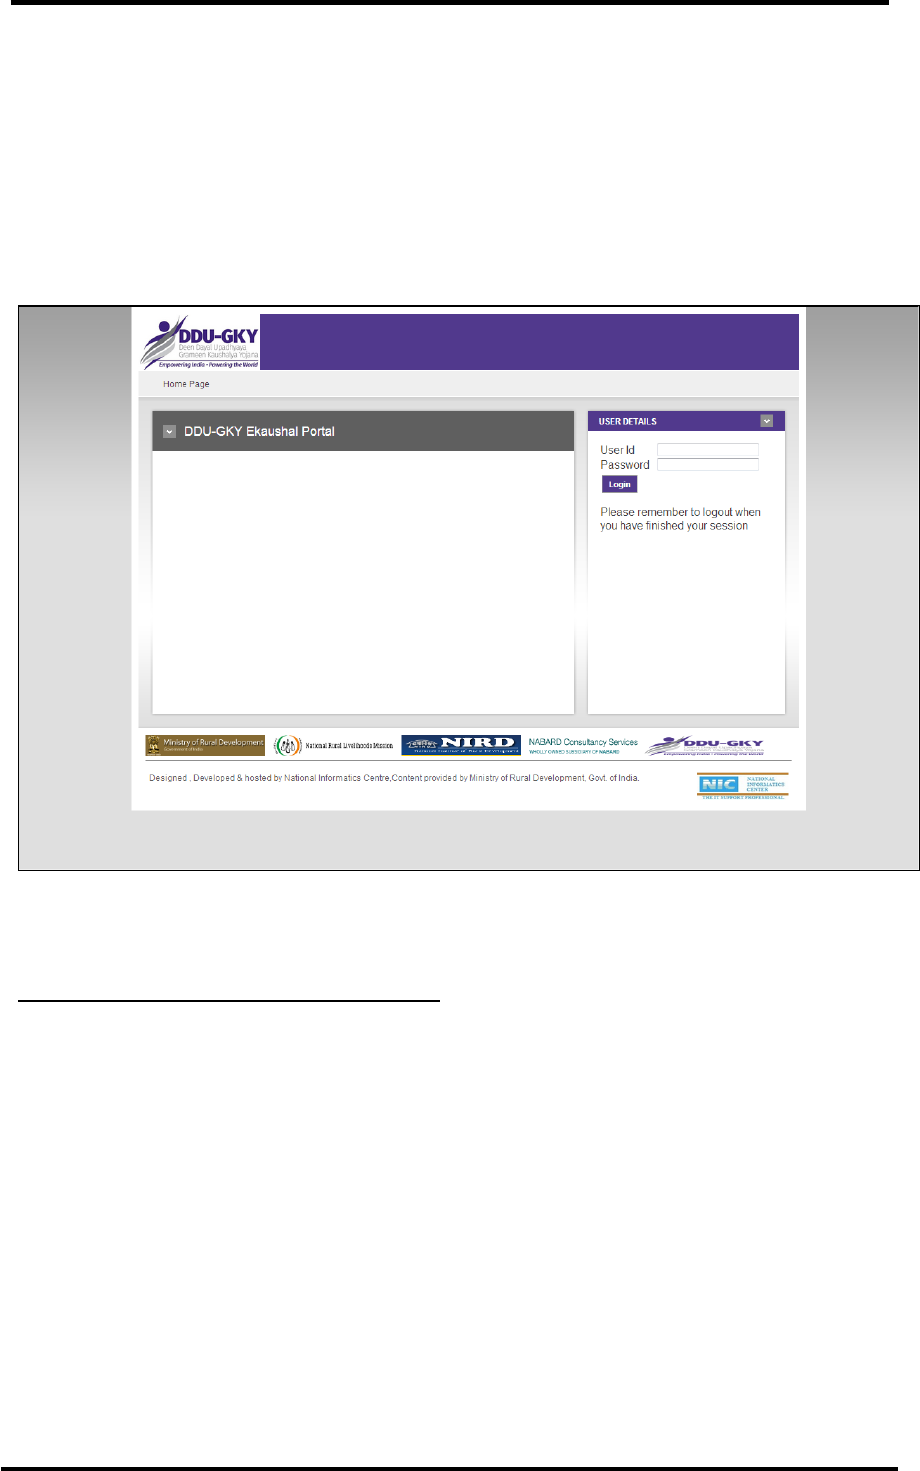
NATIONAL INFORMATICS CENTRE DDU-GKY USER MANUAL VERSION 1.1
NIC-DDUGKY - USER MANUAL 1.1 PAGE 30 OF 160 RELEASE DATE: 30-04-2017
Username– This field specifies the username of the user.
Password– This field specifies the password of the user.
Word Verification– This field is security code for verification of the user.
After filling all the fields in the Log-in form, click on the ‘Login’ button for submitting your credentials.
You will be logged-in after the successful submission of the form.
Figure 2 : User Log-in Screen
What happens when you Successfully Login
After you successfully login, various privileges as per the role assigned to you will be displayed and
you will be allowed to proceed further with the application. You will also get some links as given
below:
Help- This link can be used to get help on a topic related to DDUGKY.
Change Password- This link provides the option to change your password. Click on the option
Change Password and provide the required information about your account to change the old
password.
User Log-in Error Message
You may be prompted with the following messages if you fail to log-in:

NATIONAL INFORMATICS CENTRE DDU-GKY USER MANUAL VERSION 1.1
NIC-DDUGKY - USER MANUAL 1.1 PAGE 31 OF 160 RELEASE DATE: 30-04-2017
Figure 3 : User Log-in Error Message
Figure 4 : User Log-in Error Message
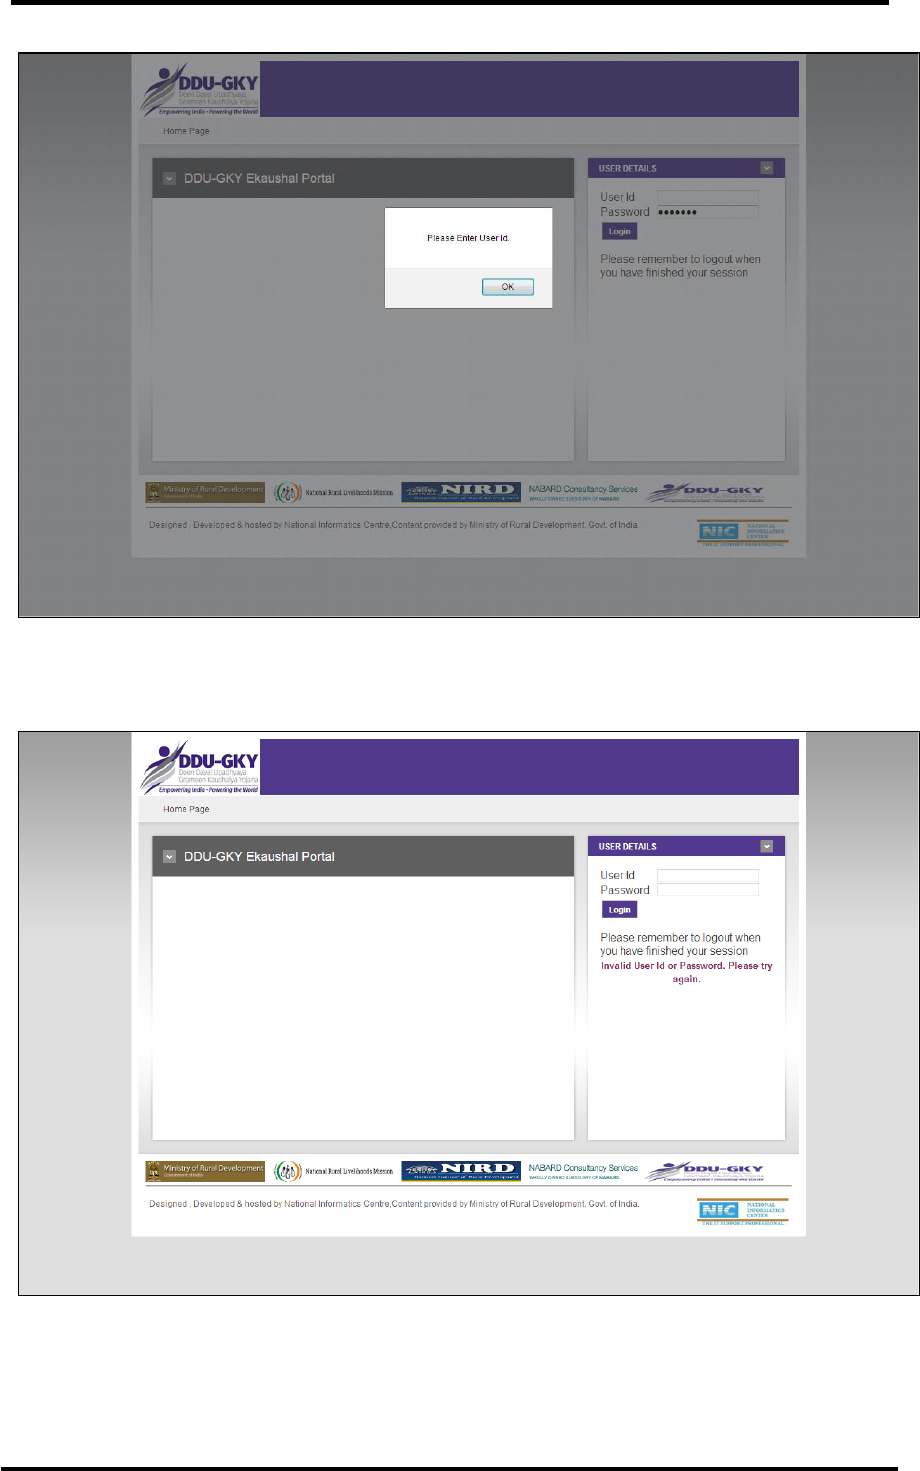
NATIONAL INFORMATICS CENTRE DDU-GKY USER MANUAL VERSION 1.1
NIC-DDUGKY - USER MANUAL 1.1 PAGE 32 OF 160 RELEASE DATE: 30-04-2017
Figure 5 : User Log-in Error Message
Figure 6 : User Log-in Error Message
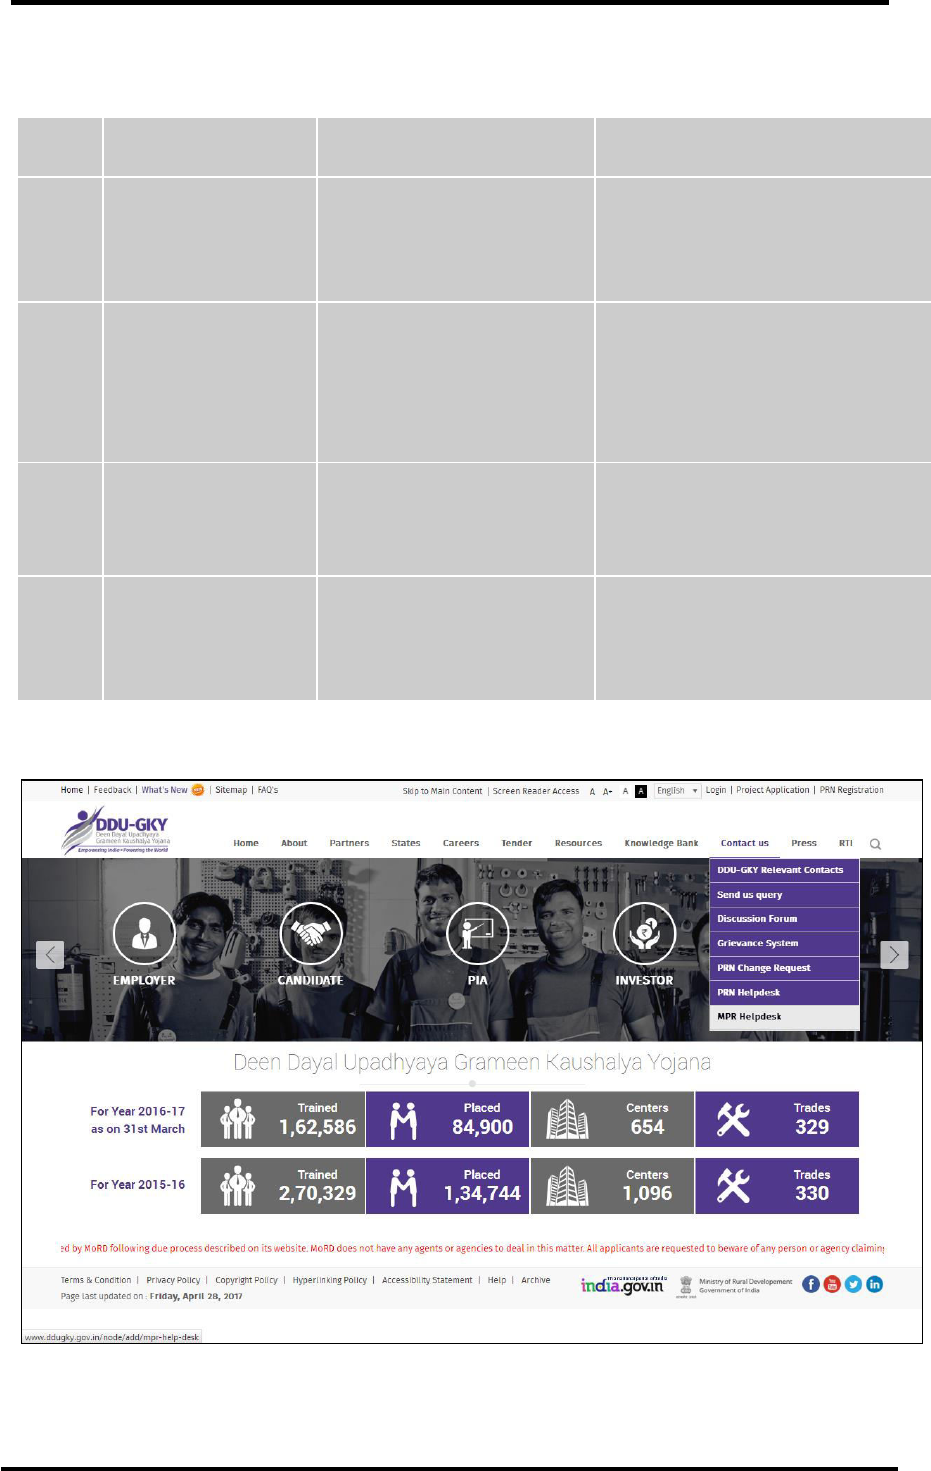
NATIONAL INFORMATICS CENTRE DDU-GKY USER MANUAL VERSION 1.1
NIC-DDUGKY - USER MANUAL 1.1 PAGE 33 OF 160 RELEASE DATE: 30-04-2017
Login Error Messages
S. No.
Message
Reason
Expected Action
1.
Please enter User Id
and Password
You have not entered User
Id and Password in the
given text boxes
You need to enter User Id and
Password in the given text boxes.
2.
Please enter
Password
You have entered the User
Id but not entered the
Password in the given text
box
You need to enter the Password in
the given text box.
3.
Please enter User Id
You have not entered the
User Id in the given text box
You need to enter the User Id in
the given text box.
4.
Invalid User Id or
Password. Please try
again
You have entered either the
wrong User Id or wrong
Password
You need to enter the correct User
Id and Password combination in
the given text boxes.
Table 1 : Log-in Error Message
Problem Reporting
Figure 7 : Problem Reporting
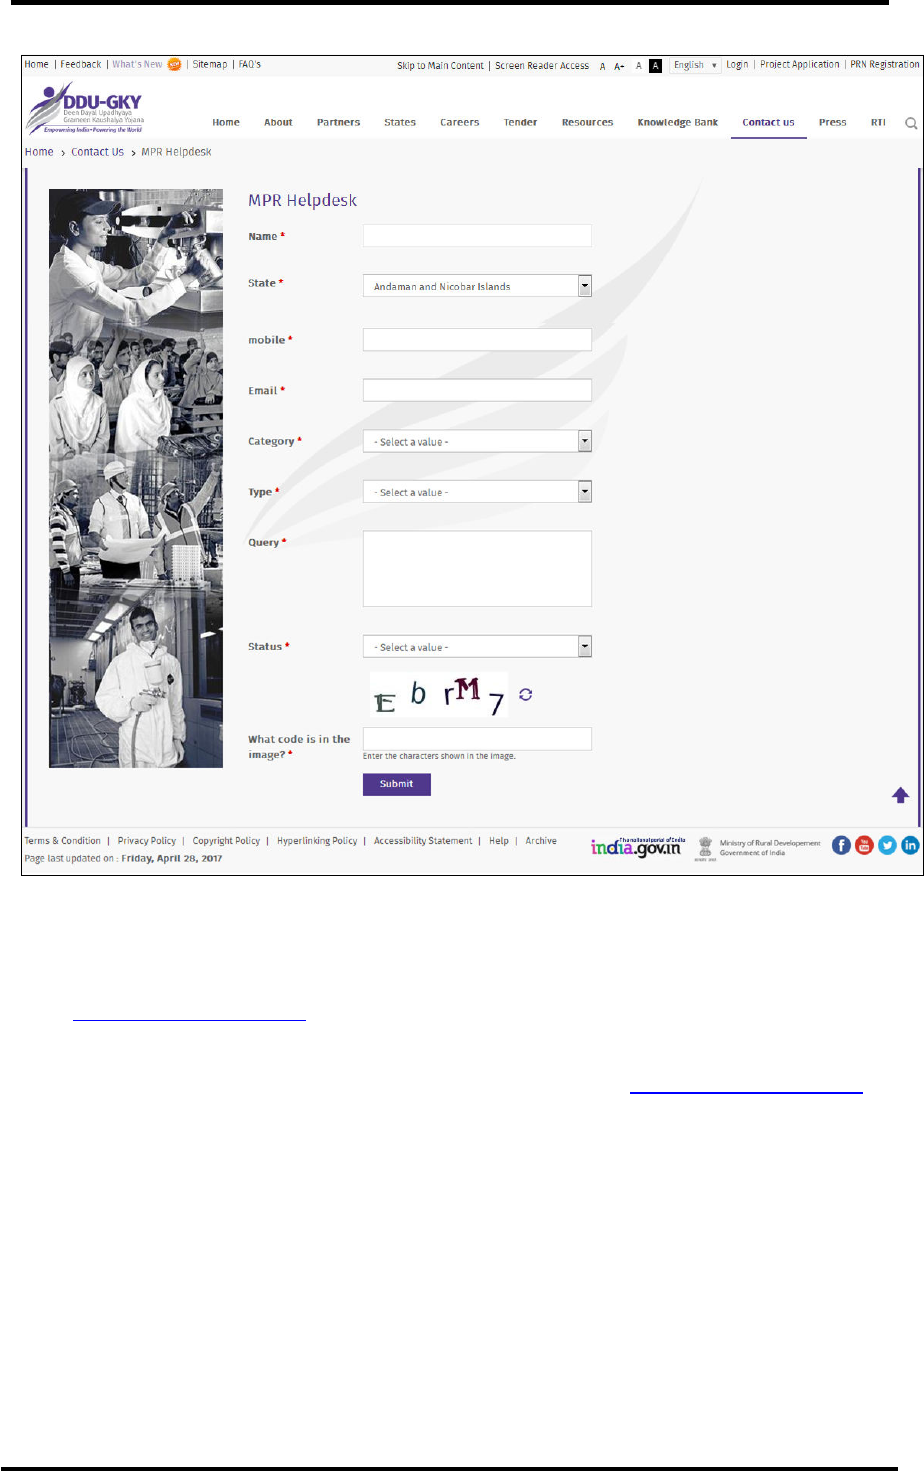
NATIONAL INFORMATICS CENTRE DDU-GKY USER MANUAL VERSION 1.1
NIC-DDUGKY - USER MANUAL 1.1 PAGE 34 OF 160 RELEASE DATE: 30-04-2017
Figure 8 : Problem Reporting
The user can report about any problem in accessing any of the form or issues related with the data
entry in forms of the software application. The link for reporting the errors has been provided on the
portal https://www.ddugky.gov.in :
To report any error, the user needs to follow the steps given below:
1. Access DDU-GKY portal on the Internet by entering the url https://www.ddugky.gov.in in the
address bar of the browser.
2. The Home Page of the DDU-GKY portal will appear on the screen.
3. The user needs to move the cursor to the tab Contact Us.
4. As the user will move the cursor on the tab, list of options provided under the tab will appear
in dropdown.
5. The user needs to move the cursor on “MPR Helpdesk” and click on it. After clicking on “MPR
Helpdesk”, a new form will open with the fields for reporting the error. The user can make
entries the form fields and submit the form. The fields marked with * are mandatory.

NATIONAL INFORMATICS CENTRE DDU-GKY USER MANUAL VERSION 1.1
NIC-DDUGKY - USER MANUAL 1.1 PAGE 35 OF 160 RELEASE DATE: 30-04-2017
5. Specific Operating Instructions
This section describes each role and the forms associated with each role in detail. The format for
the same is given below:
Role Name
General Description– A brief description about the role is given.
Form Name.
Pre-conditions- It provides a description of what the user should have done to be able to
successfully use the current form.
Screen Description– The screen associated with the form is described. Screen shot is
displayed here. All the fields and buttons in the form are described here. In particular, for each
field the following details are provided:
1. What the field means.
2. Whether it is mandatory or optional?
3. What should be the format or allowed values in the field?
4. Is any special logic/validation associated with the field which the end user must
know?
5. The meaning of various buttons in the form
Brief Description – Brief description of the form is given.
How to use the form – Here, the flow of the form is explained.
What happens when the form is submitted
Messages– Describes the messages which you are likely to face when working on the form,
the reason for the message and expected action from you.
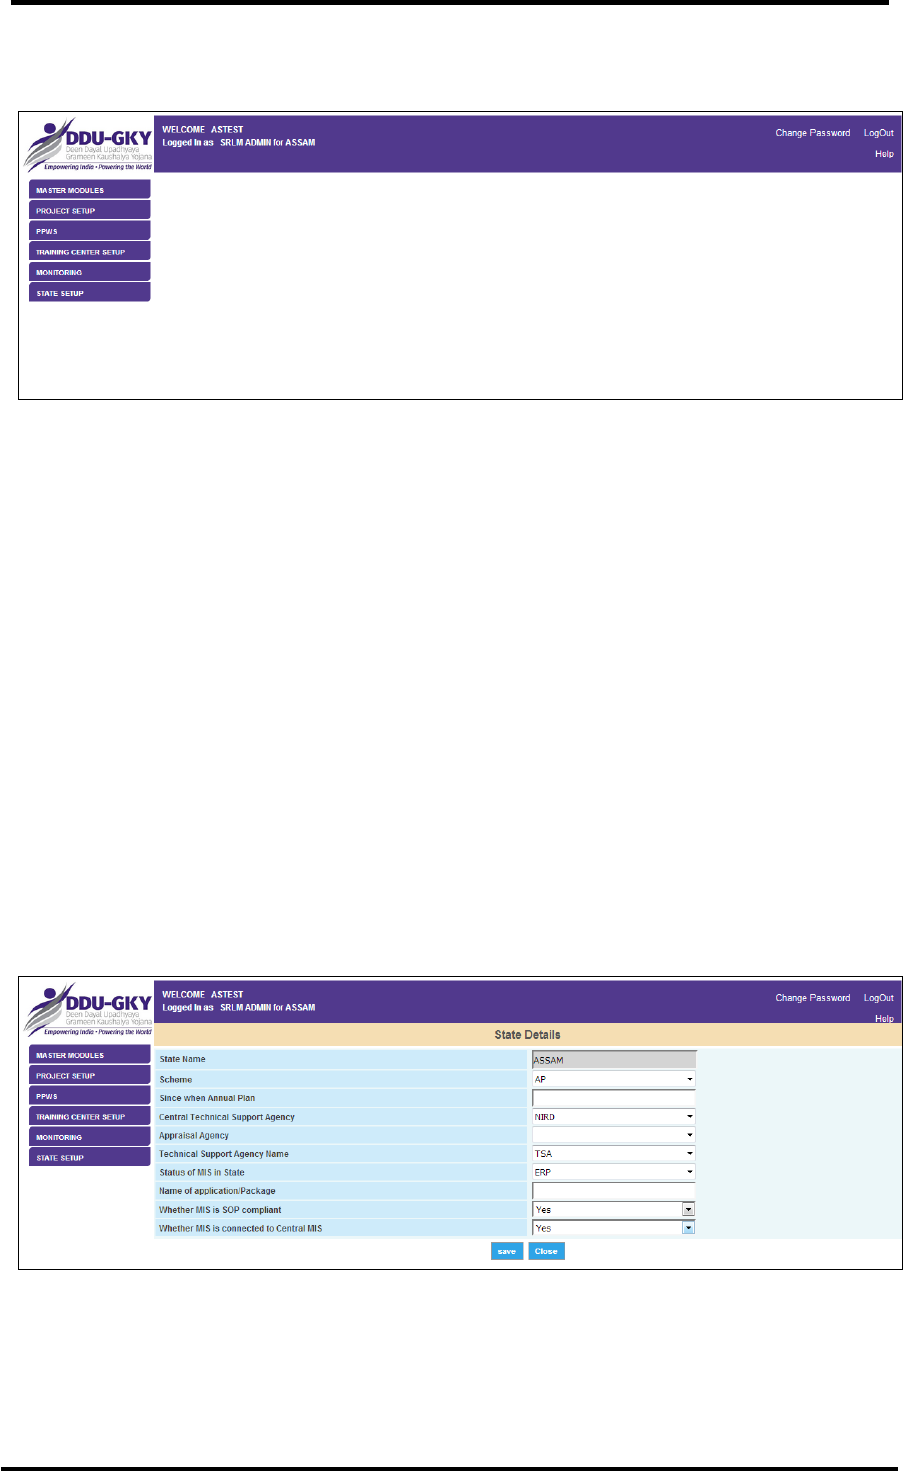
NATIONAL INFORMATICS CENTRE DDU-GKY USER MANUAL VERSION 1.1
NIC-DDUGKY - USER MANUAL 1.1 PAGE 36 OF 160 RELEASE DATE: 30-04-2017
5.1 Authorized User Login
Figure 9 : SRLM Admin Dashboard
An authorized user can login on DDUGKY portal by using valid user credentials, e.g. State Rural
Livelihood Mission (SRLM) Admin will act as a State level Administrator. SRLM Admin can view all
projects running in the state and edit the forms related to State Setup, State Sanction, Financial, HR
Team, Project Details. Except these forms, SRLM Admin can view all the other forms but cannot edit
them.
5.1.1 STATE DETAIL
General Description
The authorized user of DDUGKY can view State Target Details and based on the privilege the user
can edit the details of the form.
Prerequisites
The user should have access to DDUGKY portal on the Internet and hold a valid User id and
Password to act as an authorized user of DDUGKY.
Screen Shot
Figure 10 : SRLM Admin> STATE DETAIL

NATIONAL INFORMATICS CENTRE DDU-GKY USER MANUAL VERSION 1.1
NIC-DDUGKY - USER MANUAL 1.1 PAGE 37 OF 160 RELEASE DATE: 30-04-2017
Fields Description
S. No.
Field Name
Explanation
1.
State Name
Description- This field describes the name of the State for
which the user is authorized to access STATE DETAIL.
Validation- N/A
Mandatory/Optional- N/A
2.
Scheme
Description- This field describes the list of name of
Schemes running in the State. Click on the drop down list
box to open the list. The user can change the Scheme (if
required).
Validation- N/A
Mandatory/Optional- It’s an optional field.
3.
Since when Annual Plan
Description- The time since the State Target Details were
set will be displayed under this field. The user can make
changes (if required) and select any other time by using the
calendar control.
Validation- N/A
Mandatory/Optional- It’s a mandatory field.
4.
Central Technical
Support Agency
Description- The name of the Central Technical Support
Agency already assigned will be displayed under this field.
The user can make changes (if required) and select any
other Central Technical Support Agency from the drop down
list.
Validation- N/A
Mandatory/Optional- It’s a mandatory field.
5.
Appraisal Agency
Description- The name of the Appraisal Agency already
assigned will be displayed under this field. The user can
make changes (if required) and select any other Appraisal
Agency from the drop down list.
Validation- N/A

NATIONAL INFORMATICS CENTRE DDU-GKY USER MANUAL VERSION 1.1
NIC-DDUGKY - USER MANUAL 1.1 PAGE 38 OF 160 RELEASE DATE: 30-04-2017
S. No.
Field Name
Explanation
Mandatory/Optional- It’s a mandatory field.
6.
Technical Support
Agency Name
Description- The name of the Technical Support Agency
already assigned will be displayed under this field. The user
can make changes (if required) and select any other
Technical Support Agency from the drop down list.
Validation- N/A
Mandatory/Optional- It’s a mandatory field.
7.
Status of MIS in State
Description- The Status of MIS in the State will be
displayed under this field. The user can make changes (if
required) and select any other Status from the list.
Validation- N/A
Mandatory/Optional- It’s a mandatory field.
8.
Name of
application/Package
Description- The user can enter name of
application/package in the text box given under this field.
Validation- Only alphabetic characters can be entered.
Mandatory/Optional- It’s an optional field.
9.
Whether MIS is SOP
Compliant
Description- The user can select ‘Yes’ or ‘No’ from the drop
down box list as per the SOP compliance in the State.
Validation- N/A
Mandatory/Optional- It’s a mandatory field.
10.
Whether MIS is
connected to Central
MIS
Description- The user can select ‘Yes’ or ‘No’ from the drop
down box list as per the connection of MIS with Central/MIS.
Validation- N/A
Mandatory/Optional- It’s a mandatory field.
Table 2 : STATE DETAILS Form Fields Description
Form Flow
1. Login on DDUGKY portal by using the authorized user credentials.
2. Move the cursor on the Dashboard option STATE SETUP and click over it.

NATIONAL INFORMATICS CENTRE DDU-GKY USER MANUAL VERSION 1.1
NIC-DDUGKY - USER MANUAL 1.1 PAGE 39 OF 160 RELEASE DATE: 30-04-2017
3. As you will click on STATE SETUP, the list of forms associated with this option will get
displayed under it.
4. If you want to update STATE DETAIL, move the cursor on the link given for the form STATE
DETAIL and click over it. As you take this action, the form named as State Target Details will
open in editable mode.
5. State Name- The name of the State for which you are authorized to take action will be
displayed under this field.
6. Scheme- The name of the Scheme already assigned will be displayed under this field. You
can make changes (if required) and select any other scheme from the list.
7. Since when Annual Plan- The time since the State Target Details were set will be displayed
under this field. You can make changes (if required) and select any other time by using the
calendar control.
8. Central Technical Support Agency- The name of the Central Technical Support Agency
already assigned will be displayed under this field. You can make changes (if required) and
select any other Central Technical Support Agency from the list.
9. Appraisal Agency- The name of the Appraisal Agency already assigned will be displayed
under this field. You can make changes (if required) and select any other Appraisal Agency
from the list.
10. Technical Support Agency Name- The name of the Technical Support Agency already
assigned will be displayed under this field. You can make changes (if required) and select any
other Technical Support Agency from the list.
11. Status of MIS in State- The Status of MIS in the State will be displayed under this field. You
can make changes (if required) and select any other Status from the list.
12. Name of application/Package- You can enter name of application/package in the text box
given under this field.
13. Whether MIS is SOP Compliant- You can select ‘Yes’ or ‘No’ from the drop down box list as
per the SOP compliance in the State.
14. Whether MIS is connected to Central/MIS- You can select ‘Yes’ or ‘No’ from the drop down
box list as per the connection of MIS with Central/MIS.
What happens when the form is submitted
1. If you want to update the details of the form, click on the button ‘Update’ to save the details of
the form State Target Details.
2. If you don’t want to update the details of the form then click on the button ‘Close’.
Messages
While working with the form, you may encounter some messages. Some of these messages are
shown in the figure and expected actions for the removal of errors are given in the table below:

NATIONAL INFORMATICS CENTRE DDU-GKY USER MANUAL VERSION 1.1
NIC-DDUGKY - USER MANUAL 1.1 PAGE 40 OF 160 RELEASE DATE: 30-04-2017
Figure 11 : STATE DETAIL> Messages
S. No.
Message
Reason
Expected Action
1.
ARE YOU SURE
YOU WANT TO
UPDATE?
You have clicked on the
button ‘Update’.
You need to click on the button
‘OK’ if you are confirm about the
details of the form but if you still
want to take a review of the form
then click on the button ‘Cancel’.
Table 3 : STATE DETAIL> Messages
5.1.2 PROJECT DETAIL
General Description
Only authorized user can view and edit the details of a Project.
Prerequisites
The user should have access to DDUGKY portal on the Internet and hold a valid User id and
Password to act as a State Rural Livelihood Mission (SRLM) Admin for DDUGKY.
Screen Shot
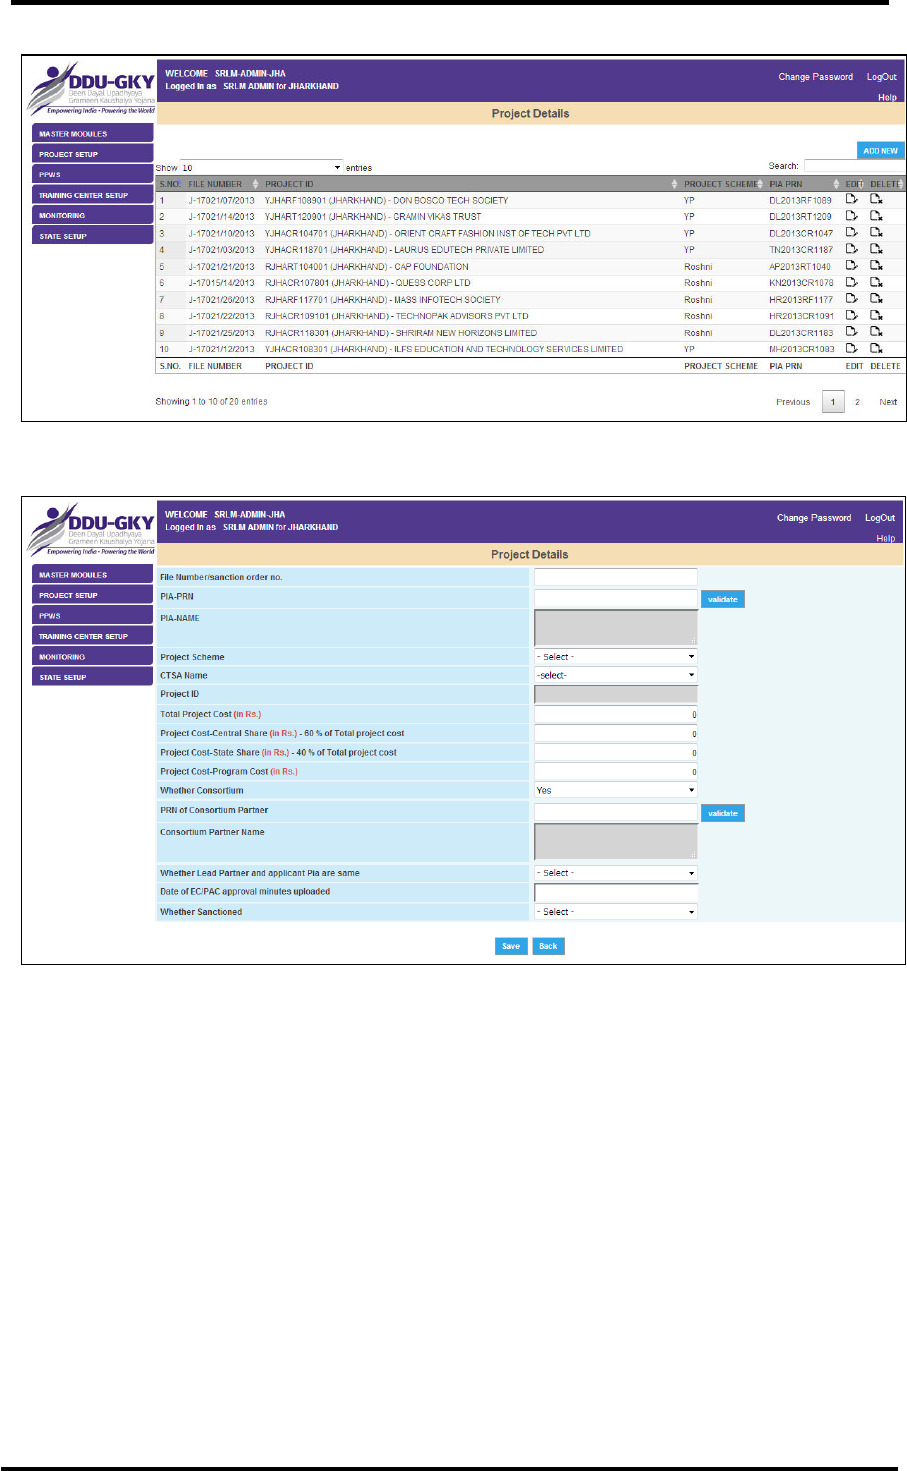
NATIONAL INFORMATICS CENTRE DDU-GKY USER MANUAL VERSION 1.1
NIC-DDUGKY - USER MANUAL 1.1 PAGE 41 OF 160 RELEASE DATE: 30-04-2017
Figure 12 : PROJECT DETAIL
Figure 13 : PROJECT DETAIL (Add New)

NATIONAL INFORMATICS CENTRE DDU-GKY USER MANUAL VERSION 1.1
NIC-DDUGKY - USER MANUAL 1.1 PAGE 42 OF 160 RELEASE DATE: 30-04-2017
Figure 14 : PROJECT DETAIL (Update)
Fields Description
S. No.
Field Name
Explanation
1.
Show entries
Description- This field describes the option to select the
appearance of number of entries on the form.
Validation- N/A
Mandatory/Optional- N/A
2.
Search
Description- This field describes the option to search an
entry in the table by entering keywords in the given text box.
To search a record, enter keywords related to the desired
record.
Validation- N/A
Mandatory/Optional- It’s an optional field.
3.
File Number/Sanction
Order No.
Description- The file number/sanction number for the
project will be entered under this field.
Validation- alphanumeric characters can be entered in this
field.
Mandatory/Optional- It’s a mandatory field.

NATIONAL INFORMATICS CENTRE DDU-GKY USER MANUAL VERSION 1.1
NIC-DDUGKY - USER MANUAL 1.1 PAGE 43 OF 160 RELEASE DATE: 30-04-2017
S. No.
Field Name
Explanation
4.
PIA-PRN
Description- The PRN of Project Implementation Agency
will be displayed under this field. You can change the value
of PIA-PRN as per the requirement. If you change the value
of PIA-PRN, click on the button ‘Validate’ for validating the
value entered in the text box.
Validation- N/A
Mandatory/Optional- It’s a mandatory field.
5.
PIA-NAME
Description- The name of the Project Implementation
Agency (PIA) will be displayed under this field. You can
change the name of the PIA.
Validation- N/A
Mandatory/Optional- It’s a mandatory field.
6.
Project Scheme
Description- The name of the scheme of the project will be
displayed under this field. You can change the scheme (if
required) and select any other scheme from the drop down
list given under the field Project Scheme.
Validation- N/A
Mandatory/Optional- It’s a mandatory field.
7.
CTSA Name
Description- The name of the CTSA related with the project
will be displayed under this field. You can change the CTSA
Name (if required) and select any other CTSA from the drop
down list given under the field CTSA Name.
Validation- N/A
Mandatory/Optional- It’s an optional field.
8.
Project ID
Description- The Project ID will be displayed under this
field. You cannot make any change in the Project ID.
Validation- N/A
Mandatory/Optional- It’s a mandatory field.
9.
Total Project Cost (in
Description- The total cost of the Project will be displayed

NATIONAL INFORMATICS CENTRE DDU-GKY USER MANUAL VERSION 1.1
NIC-DDUGKY - USER MANUAL 1.1 PAGE 44 OF 160 RELEASE DATE: 30-04-2017
S. No.
Field Name
Explanation
Rs.)
under this field. You can change the value of the Project cost
by entering the new value in the given text box.
Validation- N/A
Mandatory/Optional- It’s a mandatory field.
10.
Project Cost-Central
Share (in Rs.)-60% of
Total project cost
Description- The central share (60% of the total Project
cost will be displayed under this field. The value of this field
will change according to the change in Total project cost.
Validation- N/A
Mandatory/Optional- N/A
11.
Project Cost-State
Share (in Rs.)-40% of
Total project cost
Description- The State share (40% of the total Project cost
will be displayed under this field. The value of this field will
change according to the change in Total project cost.
Validation- N/A
Mandatory/Optional- N/A
12.
Project Cost-Program
Cost (in Rs.)
Description- The cost of programs run under the project will
be displayed under this field. You can change the value of
Program Cost.
Validation- Only numeric characters can be entered.
Mandatory/Optional- It’s a mandatory field.
13.
Project Cost-Welfare
Cost (in Rs.)
Description- The welfare cost under the project will be
displayed under this field. The value of this field will change
according to the change in Program cost.
Validation- N/A
Mandatory/Optional- N/A
14.
Whether Consortium
Description- Specify whether it is consortium or not by
selecting ‘Yes’ or ‘No’ from the drop down list.
Validation- N/A
Mandatory/Optional- N/A

NATIONAL INFORMATICS CENTRE DDU-GKY USER MANUAL VERSION 1.1
NIC-DDUGKY - USER MANUAL 1.1 PAGE 45 OF 160 RELEASE DATE: 30-04-2017
S. No.
Field Name
Explanation
15.
PRN of Consortium
Partner
Description-PRN of the Consortium Partner will be
displayed under this field. You need to click on the button
‘Validate’ for validation of PRN of Consortium Partner.
Validation- N/A
Mandatory/Optional- It’s a mandatory field.
16.
Consortium Partner
Name
Description- The name of the Consortium Partner will be
displayed under this field. You can change the value of this
field.
Validation- N/A
Mandatory/Optional- N/A
17.
Whether Lead Partner
and applicant Pia are
same
Description- SRLM Admin can specify whether Lead
Partner and applicant Pia are same or different. Select ‘Yes’
if they are same and select ‘No’ if they are different.
Validation- N/A
Mandatory/Optional- N/A
18.
Date of EC/PAC
approval minutes
uploaded
Description- The user can specify the date on which
EC/PAC approval minutes were uploaded by selecting the
date through calendar control.
Validation- N/A
Mandatory/Optional- N/A
19.
Whether Sanctioned
Description- The user can specify the sanction status by
selecting either ‘Yes’ or ‘No’ from the drop down box list
Validation- N/A
Mandatory/Optional- N/A
Table 4 : PROJECT SETUP> PROJECT DETAIL Form Fields Description
Form Flow
1. Login on DDUGKY portal by using the authorized user credentials.
2. Move the cursor on the Dashboard option STATE SETUP and click over it.

NATIONAL INFORMATICS CENTRE DDU-GKY USER MANUAL VERSION 1.1
NIC-DDUGKY - USER MANUAL 1.1 PAGE 46 OF 160 RELEASE DATE: 30-04-2017
3. As you will click on STATE SETUP, the list of forms associated with this option will get
displayed under it.
Add New/Update
1. If you want to update PROJECT DETAIL, move the cursor on the link given for the form
PROJECT DETAIL and click over it. As you take this action, the form named as Project
Details will open in as shown in the figure 10. The form contains some fields as described
below.
2. Show entries- This field describes the option to select the appearance of number of entries on
the form.
3. Search- This field describes the option to search an entry in the table by entering keywords in
the given text box. To search a record, enter keywords related to the desired record.
4. If you want to edit a record in the form Project Details, click on the button ‘edit’ provided in
front of that record in a row. As you click on the ‘Edit’ button, details related to the record
selected for editing will be displayed as shown in the figure 11.
5. SRLM Name- The name of the SRLM Admin of State will be displayed under this field.
6. File Number- The file number pre-allotted for the project will be displayed under this field.
7. PIA-PRN - The PRN of Project Implementation Agency will be displayed under this field. You
can change the value of PIA-PRN as per the requirement. If you change the value of PIA-
PRN, click on the button ‘Validate’ for validating the value entered in the text box.
8. PIA-NAME – The name of the Project Implementation Agency (PIA) will be displayed under
this field. You can change the name of the PIA (if required).
9. Project Scheme – The name of the scheme of the project will be displayed under this field.
You can change the scheme (if required) and select any other scheme from the drop down list
given under the field Project Scheme.
10. Project Type – The type of the project will be displayed under this field. You can change the
type (if required) and select any other type from the drop down list given under the field
Project Type.
11. Project ID - The Project ID will be displayed under this field. You cannot make any change in
the Project ID.
12. Total Project Cost (in Rs.) – The total cost of the Project will be displayed under this field. You
can change the value of the Project cost by entering the new value in the given text box (if
required).
13. Project Cost-Central Share (in Rs.)-75% of Total project cost – The central share (75% of the
total Project cost will be displayed under this field. The value of this field will change
according to the change in Total project cost.
14. Project Cost-State Share (in Rs.)-75% of Total project cost – The State share (25% of the
total Project cost will be displayed under this field. The value of this field will change
according to the change in Total project cost.
15. Project Cost-Program Cost (in Rs.)- The cost of programs run under the project will be
displayed under this field. You can change the value of Program Cost (if required).
16. Project Cost-Welfare Cost (in Rs.)- The welfare cost under the project will be displayed under
this field. The value of this field will change according to the change in Program cost.
17. Whether Consortium- You can specify whether it is consortium or not by selecting ‘Yes’ or
‘No’ from the drop down list.
18. PRN of Consortium Partner- PRN of the Consortium Partner will be displayed under this field.
You (SRLM Admin) need to click on the button ‘Validate’ for validation of PRN of Consortium
Partner.
19. Consortium Partner Name- The name of the Consortium Partner will be displayed under this
field. You can change the value of this field (if required).
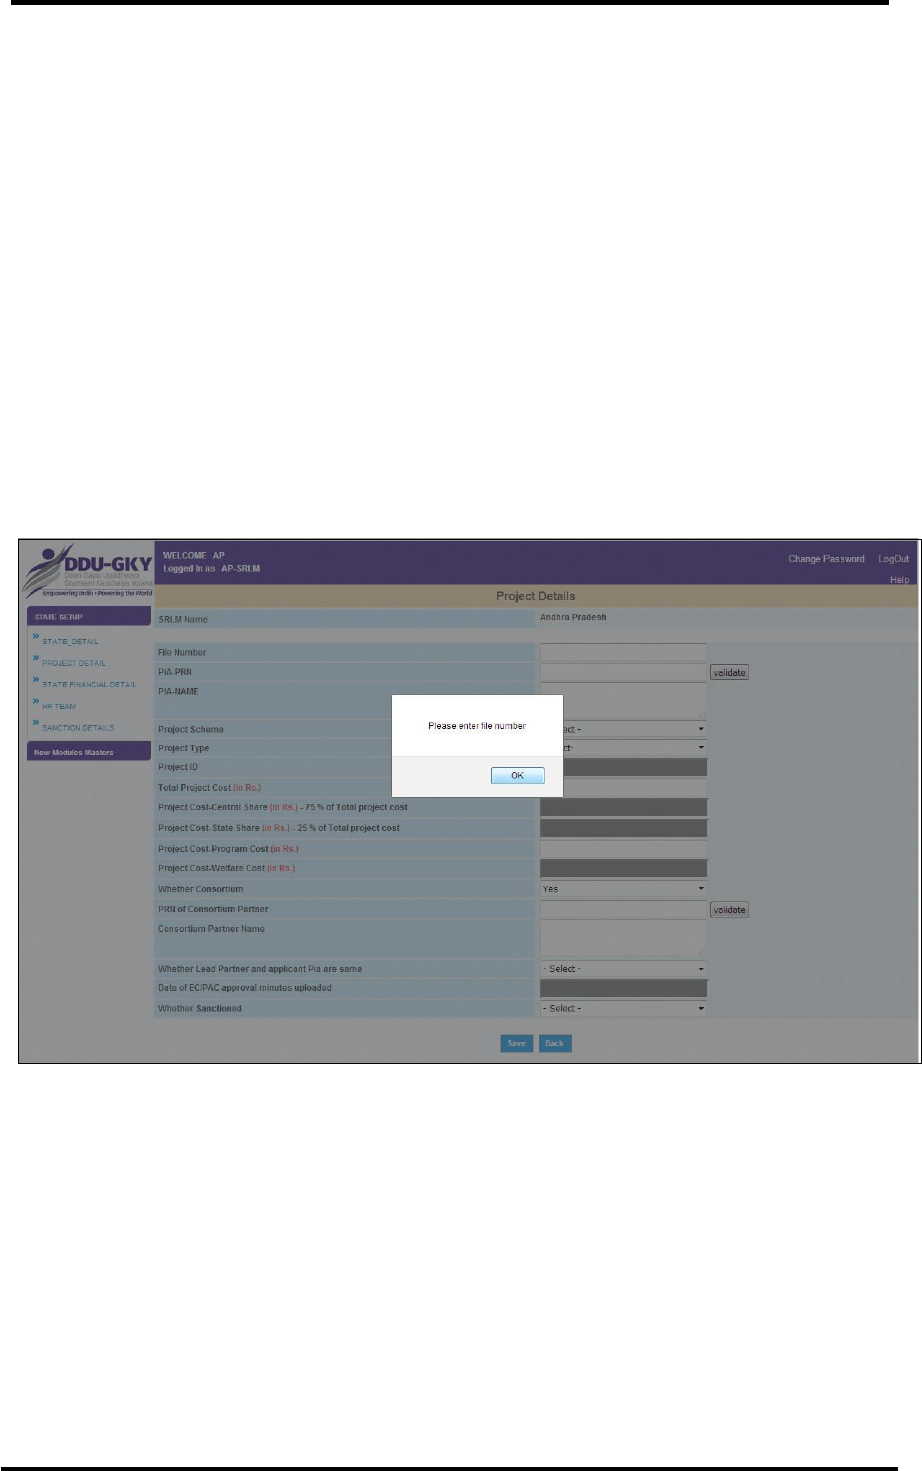
NATIONAL INFORMATICS CENTRE DDU-GKY USER MANUAL VERSION 1.1
NIC-DDUGKY - USER MANUAL 1.1 PAGE 47 OF 160 RELEASE DATE: 30-04-2017
20. Whether Lead Partner and applicant Pia are same- You can specify whether Lead Partner
and applicant Pia are same or different. Select ‘Yes’ if they are same and select ‘No’ if they
are different.
21. Date of EC/PAC approval minutes uploaded- You can specify the date on which EC/PAC
approval minutes were uploaded by selecting the date through calendar control.
22. Whether Sanctioned- You can specify the sanction status by selecting either ‘Yes’ or ‘No’
from the drop down box list.
What happens when the form is submitted
1. If you want to update the details of the form, click on the button ‘Update’ to save the details of
the form Project Details.
2. If you don’t want to update the details of the form then click on the button ‘Close’.
Messages
While working with the form, you may encounter some messages. Some of these messages are
shown in the figure and expected actions for the removal of errors are given in the table below:
Figure 15 : PROJECT DETAIL> Messages
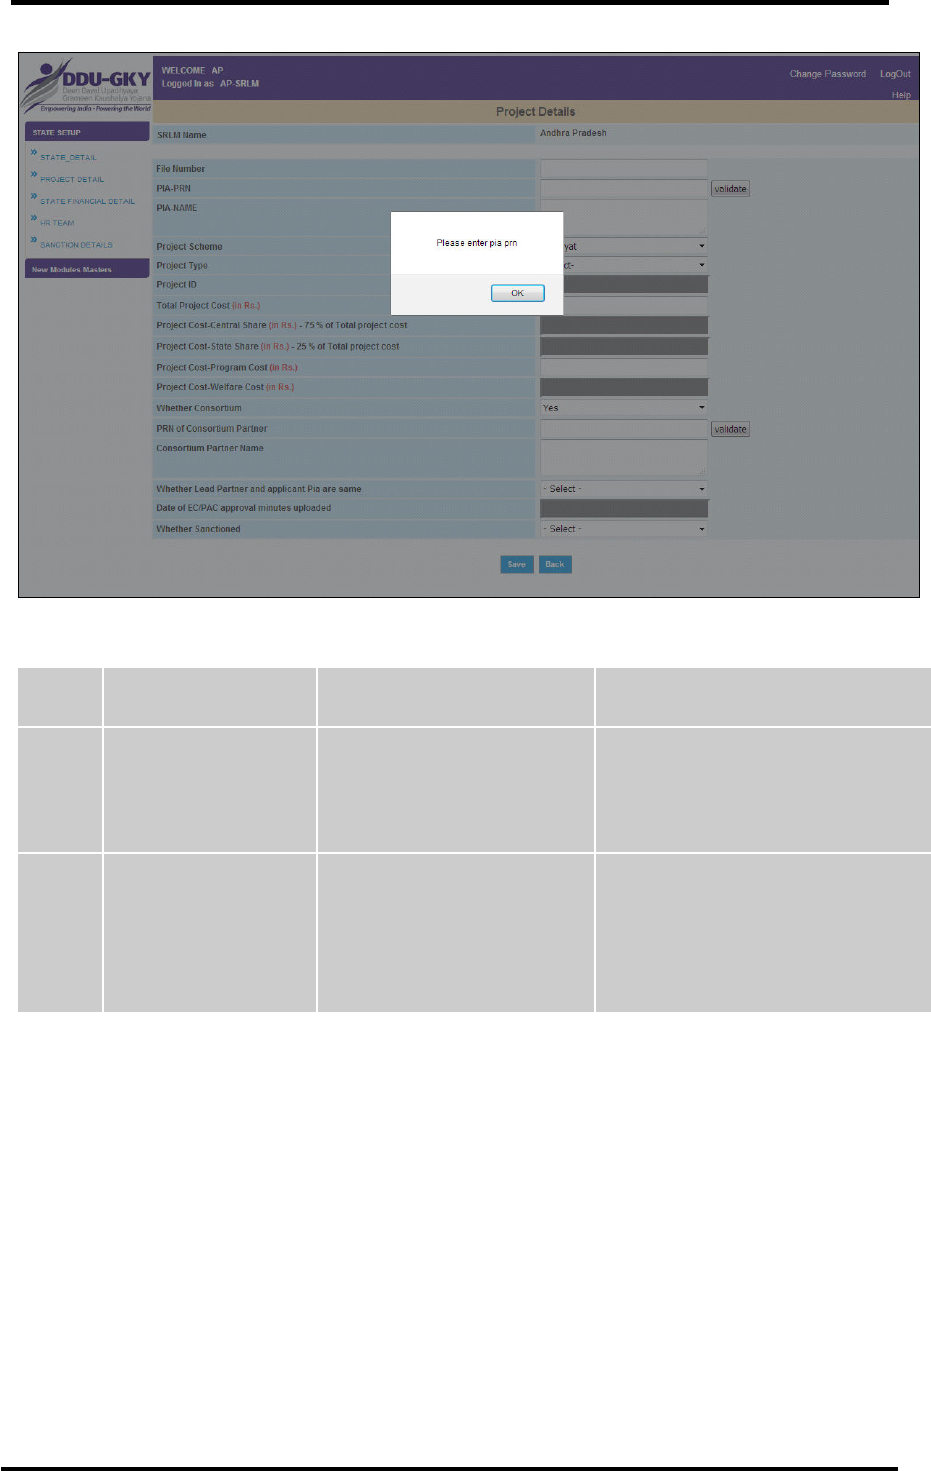
NATIONAL INFORMATICS CENTRE DDU-GKY USER MANUAL VERSION 1.1
NIC-DDUGKY - USER MANUAL 1.1 PAGE 48 OF 160 RELEASE DATE: 30-04-2017
Figure 16 : PROJECT DETAIL> Messages
S. No.
Message
Reason
Expected Action
1.
Please enter file
number
You have clicked on the
button ‘Save’ but not
entered file number.
You need to enter the file number
in the given text box and then click
on the button ‘Save’.
2.
Please enter pia prn
You have not entered pia
prn but clicked on the button
‘Save’ to save the details of
the form
You need to enter pia prn in the
given text box and then click on the
button ‘Save’.
Table 5 : PROJECT DETAIL> Messages
5.1.3 STATE FINANCIAL DETAIL
General Description
An authorized user can view and edit State Financial Details.
Prerequisites
The user should have access to DDUGKY portal on the Internet and hold a valid User id and
Password on DDUGKY.
Screen Shot

NATIONAL INFORMATICS CENTRE DDU-GKY USER MANUAL VERSION 1.1
NIC-DDUGKY - USER MANUAL 1.1 PAGE 49 OF 160 RELEASE DATE: 30-04-2017
Figure 17 : STATE FINANCIAL DETAIL
Fields Description
S. No.
Field Name
Explanation
1.
Project Cost
Program Cost
Description- This field describes the division of total
sanction amount for the program in terms of Central share,
State Share, Central Share released to State and Total
received by the user in terms of Central Share amount,
Central share released date, State Share amount, State
Share released date.
Validation- N/A
Mandatory/Optional- N/A
2.
Project Cost
Support Cost
Description- This field describes the division of total
sanction amount for the support in terms of Central share,
State Share, Central Share released to State and Total
received by the user in terms of Central Share amount,
Central share released date, State Share amount, State
Share released date.
Validation- N/A
Mandatory/Optional- It’s a mandatory field.
3.
Project Cost
CTSA
Description- This field describes the division of total
sanction amount for the CTSA in terms of Central share,
State Share, Central Share released to State and Total
received by the user in terms of Central Share amount,
Central share released date, State Share amount, State

NATIONAL INFORMATICS CENTRE DDU-GKY USER MANUAL VERSION 1.1
NIC-DDUGKY - USER MANUAL 1.1 PAGE 50 OF 160 RELEASE DATE: 30-04-2017
S. No.
Field Name
Explanation
Share released date.
Validation- N/A
Mandatory/Optional- It’s a mandatory field.
4.
Project Cost
Total
Description- This field describes the division of total
sanction amount for the project in terms of Central share,
State Share, Central Share released to State and Total
received by the user in terms of Central Share amount,
Central share released date, State Share amount, State
Share released date.
Validation- N/A
Mandatory/Optional- It’s a mandatory field.
5.
Other Cost
Admin Cost
Description- This field describes the division of total
sanction amount as Admin Cost in terms of Central share,
State Share, Central Share released to State and Total
received by the user in terms of Central Share amount,
Central share released date, State Share amount, State
Share released date.
Validation- N/A
Mandatory/Optional- It’s a mandatory field.
6.
Other Cost
Capacity Building
Description- This field describes the division of total
sanction amount for the Capacity building in terms of Central
share, State Share, Central Share released to State and
Total received by the user in terms of Central Share amount,
Central share released date, State Share amount, State
Share released date.
Validation- N/A
Mandatory/Optional- It’s a mandatory field.
7.
Other Cost
Total
Description- This field describes the division of total
sanction amount as Other Cost in terms of Central share,
State Share, Central Share released to State and Total
received by the user in terms of Central Share amount,

NATIONAL INFORMATICS CENTRE DDU-GKY USER MANUAL VERSION 1.1
NIC-DDUGKY - USER MANUAL 1.1 PAGE 51 OF 160 RELEASE DATE: 30-04-2017
S. No.
Field Name
Explanation
Central share released date, State Share amount, State
Share released date.
Validation- N/A
Mandatory/Optional- It’s a mandatory field.
8.
Total
Description- This field describes the division of total
sanction amount of Project Cost and Other Cost in terms of
Central share, State Share, Central Share released to State
and Total received by the user in terms of Central Share
amount, Central share released date, State Share amount,
State Share released date.
Validation- N/A
Mandatory/Optional- It’s a mandatory field.
Table 6 : STATE FINANCIAL DETAIL Form Fields Description
Form Flow
1. Login on DDUGKY portal by using the authorized user credentials.
2. Move the cursor on the Dashboard option STATE SETUP and click over it.
3. As you will click on STATE SETUP, the list of forms associated with this option will get
displayed under it.
4. If you want to update STATE FINANCIAL DETAIL, move the cursor on the link given for the
form STATE FINANCIAL DETAIL and click over it. As you take this action, the form named as
Project Details will open in as shown in the figure 15. The form contains some fields as
described below. You can make changes in values of these fields as per requirement.
5. Program Cost - This field describes the division of total sanction amount for the program in
terms of Central share, State Share, Central Share released to State and Total received by
SRLM Admin in terms of Central Share amount, Central share released date, State Share
amount, State Share released date. SRLM Admin can make changes as required
6. Support Cost - This field describes the division of total sanction amount for the support in
terms of Central share, State Share, Central Share released to State and Total received by
SRLM Admin in terms of Central Share amount, Central share released date, State Share
amount, State Share released date.
7. CTSA - This field describes the division of total sanction amount for the CTSA in terms of
Central share, State Share, Central Share released to State and Total received by SRLM
Admin in terms of Central Share amount, Central share released date, State Share amount,
State Share released date.
8. Total (Project Cost) - This field describes the division of total sanction amount for the project
in terms of Central share, State Share, Central Share released to State and Total received by

NATIONAL INFORMATICS CENTRE DDU-GKY USER MANUAL VERSION 1.1
NIC-DDUGKY - USER MANUAL 1.1 PAGE 52 OF 160 RELEASE DATE: 30-04-2017
SRLM Admin in terms of Central Share amount, Central share released date, State Share
amount, State Share released date.
9. Admin Cost - This field describes the division of total sanction amount as Admin Cost in terms
of Central share, State Share, Central Share released to State and Total received by SRLM
Admin in terms of Central Share amount, Central share released date, State Share amount,
State Share released date.
10. Capacity Building - This field describes the division of total sanction amount for the Capacity
building in terms of Central share, State Share, Central Share released to State and Total
received by SRLM Admin in terms of Central Share amount, Central share released date,
State Share amount, State Share released date.
11. Total (Other Cost) - This field describes the division of total sanction amount as Other Cost in
terms of Central share, State Share, Central Share released to State and Total received by
SRLM Admin in terms of Central Share amount, Central share released date, State Share
amount, State Share released date.
12. Total - This field describes the division of total sanction amount of Project Cost and Other
Cost in terms of Central share, State Share, Central Share released to State and Total
received by SRLM Admin in terms of Central Share amount, Central share released date,
State Share amount, State Share released date.
How to Know the Support Cost
The user can get the details of the support cost by using the following steps:
1. The user needs to enter the url https://www.ddugky.gov.in in the address bar of the browser.
2. After that, the user needs to move the cursor to the tab Resources> Meetings> EC
Meeting> EC Meeting Minutes 18.07.2016 (Download Minutes).
3. The user can download the Meeting Minutes of the date 18.07.2016 and know the support
cost of the project.
What happens when the form is submitted
1. If you want to update the details of the form, click on the button ‘Update’ to save the details of
the form STATE FINANCIAL.
2. If you don’t want to update the details of the form then click on the button ‘Close’.
Messages
While working with the form, you may encounter some messages. Some of these messages are
shown in the figure and expected actions for the removal of errors are given in the table below:
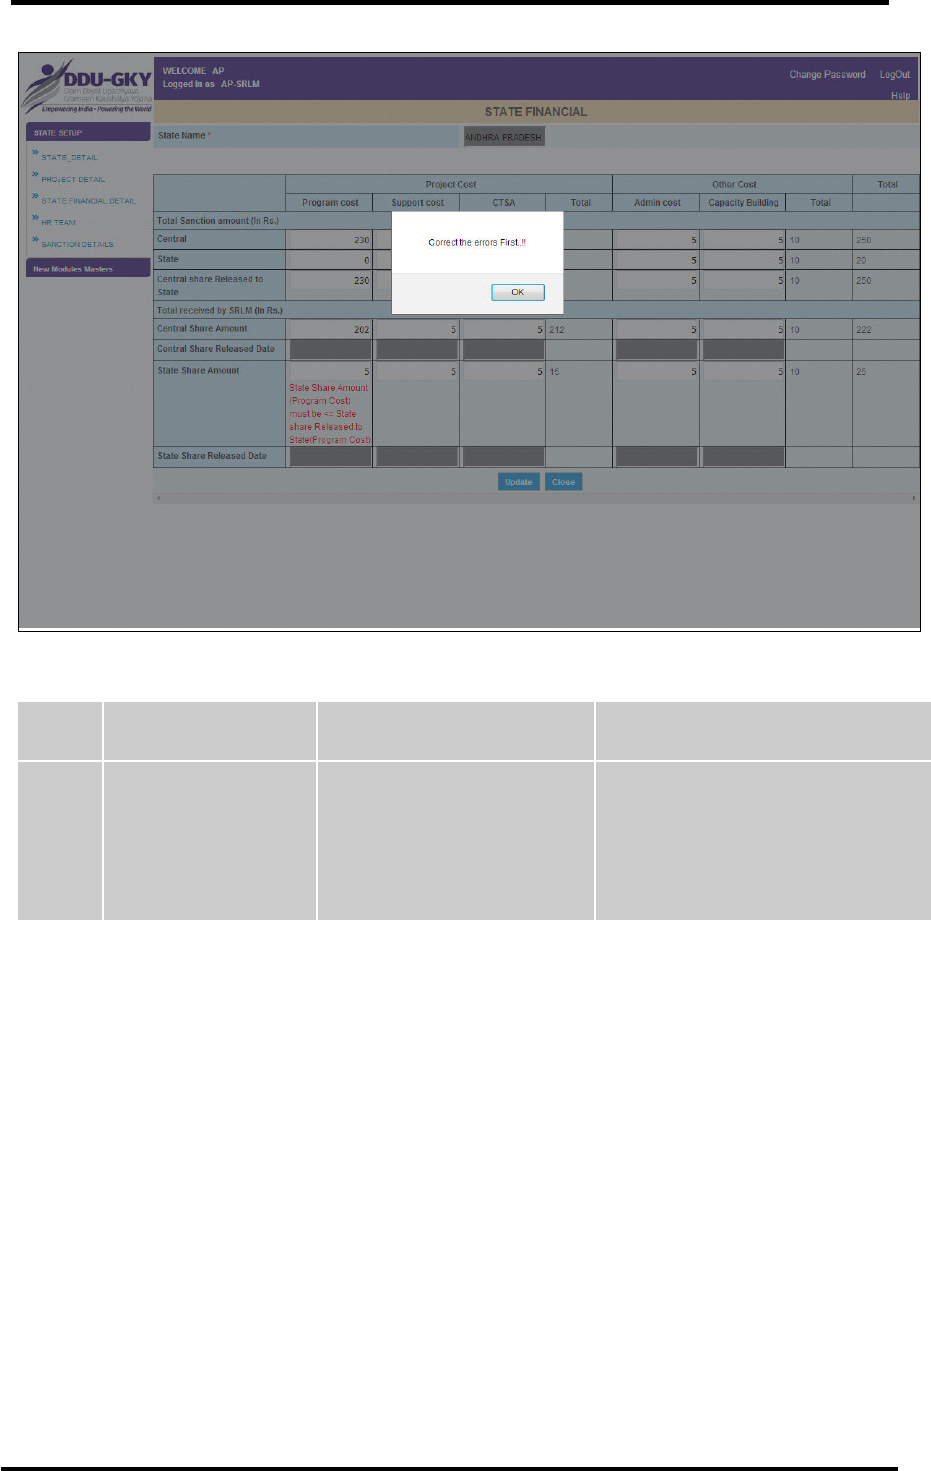
NATIONAL INFORMATICS CENTRE DDU-GKY USER MANUAL VERSION 1.1
NIC-DDUGKY - USER MANUAL 1.1 PAGE 53 OF 160 RELEASE DATE: 30-04-2017
Figure 18 : STATE FINANCIAL DETAIL> Messages
S. No.
Message
Reason
Expected Action
1.
Correct the error first
You have clicked on the
button ‘Update’ but not
entered values in all form
fields.
You need to enter correct values in
all the form fields.
Table 7 : STATE FINANCIAL DETAIL> Messages
5.1.4 HR TEAM
General Description
An authorized user can view, add new details and edit HR Team Details. SRLM Admin can manage
the HR Team.
Prerequisites
The user should have access to DDUGKY portal on the Internet and hold a valid User id and
Password for DDUGKY.
Screen Shot

NATIONAL INFORMATICS CENTRE DDU-GKY USER MANUAL VERSION 1.1
NIC-DDUGKY - USER MANUAL 1.1 PAGE 54 OF 160 RELEASE DATE: 30-04-2017
Figure 19 : HR Team
Figure 20 : HR Team (Add New)
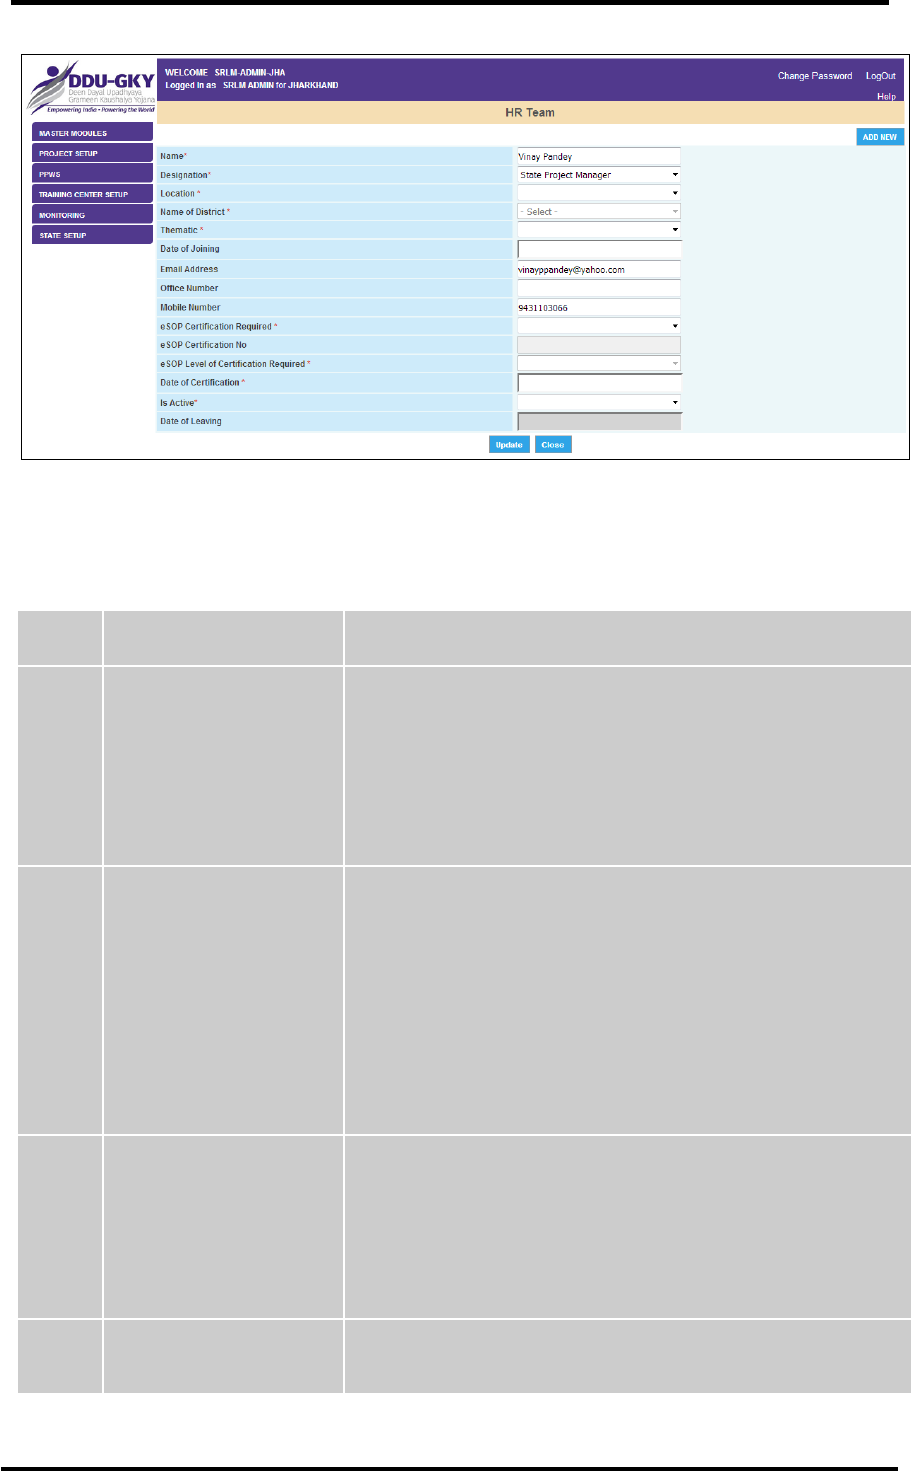
NATIONAL INFORMATICS CENTRE DDU-GKY USER MANUAL VERSION 1.1
NIC-DDUGKY - USER MANUAL 1.1 PAGE 55 OF 160 RELEASE DATE: 30-04-2017
Figure 21 : HR Team (Update)
Fields Description
S. No.
Field Name
Explanation
1.
Show entries
Description- This field describes the option to select the
appearance of number of entries on the form.
Validation- N/A
Mandatory/Optional- N/A
2.
Search
Description- This field describes the option to search an
entry in the table by entering keywords in the given text box.
To search a record, enter keywords related to the desired
record.
Validation- N/A
Mandatory/Optional- It’s an optional field.
3.
Designation
Description- The user will select a value from the drop down
list to specify the designation of the member of the HR Team.
Validation- N/A
Mandatory/Optional- It’s a mandatory field.
4.
Location
Description- The user will select a value from the drop down
list to specify the location of the member of the HR Team.
NATIONAL INFORMATICS CENTRE DDU-GKY USER MANUAL VERSION 1.1
NIC-DDUGKY - USER MANUAL 1.1 PAGE 56 OF 160 RELEASE DATE: 30-04-2017
S. No.
Field Name
Explanation
Validation- N/A
Mandatory/Optional- It’s a mandatory field.
5.
Name of District
Description- The user will select a value from the drop down
list to specify the district of the member of the HR Team
according to the selected location. If location is selected as
STATE HQ then name of district would not be required
Validation- N/A
Mandatory/Optional- It’s a mandatory field.
6.
Date of Joining
Description- The user will select a value through the
calendar control to specify the date of joining of member of
the HR Team.
Validation- N/A
Mandatory/Optional- It’s a mandatory field.
7.
Email Address
Description- The user will enter the email address of
member of the HR Team.
Validation- N/A
Mandatory/Optional- It’s an optional field.
8.
Office Number
Description- The user will enter the Office number of
member of the HR Team.
Validation- N/A
Mandatory/Optional- It’s a mandatory field.
9.
Mobile Number
Description- The user will enter the Office number of
member of the HR Team.
Validation- N/A
Mandatory/Optional- It’s a mandatory field.
10.
eSOP Certification
Required
Description- The user will select a value ‘Yes’ or ‘No’ from
the drop down list to specify whether eSOP Certification is
required for the member of the HR Team.
Validation- N/A

NATIONAL INFORMATICS CENTRE DDU-GKY USER MANUAL VERSION 1.1
NIC-DDUGKY - USER MANUAL 1.1 PAGE 57 OF 160 RELEASE DATE: 30-04-2017
S. No.
Field Name
Explanation
Mandatory/Optional- N/A
11.
eSOP Level of
Certification Required
Description- The user will select a value from the drop down
list to specify level of eSOP Certification is required for the
member of the HR Team.
Validation- N/A
Mandatory/Optional- N/A
12.
Date of Certification
Description- The user will enter the date of certification of
member of the HR Team.
Validation- Only numeric characters can be entered.
Mandatory/Optional- It’s a mandatory field.
13.
Is Active
Description- The user will select a value ‘Yes’ or ‘No’ from
the drop down list to specify whether member of HR Team is
Active or inactive.
Validation- N/A
Mandatory/Optional- N/A
14.
Date of Leaving
Description- The user will select a value through the
calendar control to specify the date of leaving of member of
the HR Team.
Validation- N/A
Mandatory/Optional- N/A
Table 8 : HR Team Form Fields Description
Form Flow
1. Login on DDUGKY portal by using the authorized user credentials.
2. Move the cursor on the Dashboard option STATE SETUP and click over it.
3. As you will click on STATE SETUP, the list of forms associated with this option will get
displayed under it.
Add New/Update
1. If you want to open the form HR Team, move the cursor on the link given for the form HR
TEAM and click over it. As you take this action, the form named as HR Team will open in as
shown in the figure 17. The form contains some fields as described below.

NATIONAL INFORMATICS CENTRE DDU-GKY USER MANUAL VERSION 1.1
NIC-DDUGKY - USER MANUAL 1.1 PAGE 58 OF 160 RELEASE DATE: 30-04-2017
2. Show entries- This field describes the option to select the appearance of number of entries on
the form.
3. Search- This field describes the option to search an entry in the table by entering keywords in
the given text box. To search a record, enter keywords related to the desired record.
4. If you want to add details related to HR Team, click on the button ‘ADD NEW’ to open a new
sheet of the form HR Team as shown in the figure 18.
5. Designation – The user will select a value from the drop down list to specify the designation of
the member of the HR Team.
6. Location - The user will select a value from the drop down list to specify the location of the
member of the HR Team.
7. Name of District – The user will select a value from the drop down list to specify the district of
the member of the HR Team according to the selected location. (Note: If location is selected
as STATE HQ then name of district would not be required)
8. Date of Joining – The user will select a value through the calendar control to specify the date
of joining of member of the HR Team.
9. Email Address – The user will enter the email address of member of the HR Team.
10. Office Number - The user will enter the Office number of member of the HR Team.
11. Mobile Number - The user will enter the Office number of member of the HR Team.
12. eSOP Certification Required - The user will select a value ‘Yes’ or ‘No’ from the drop down list
to specify whether eSOP Certification is required for the member of the HR Team.
13. eSOP Level of Certification Required - The user will select a value from the drop down list to
specify level of eSOP Certification is required for the member of the HR Team.
14. Date of Certification- The user will enter the date of certification of member of the HR Team.
15. Is Active - The user will select a value ‘Yes’ or ‘No’ from the drop down list to specify whether
member of HR Team is Active or inactive.
16. Date of Leaving – The user will select a value through the calendar control to specify the date
of leaving of member of the HR Team.
What happens when the form is submitted
1. If you want to update the details of the form, click on the button ‘Update’ to save the details of
the form HR Team.
2. If you don’t want to update the details of the form then click on the button ‘Close’.
Messages
While working with the form, you may encounter some messages. Some of these messages are
shown in the figure and expected actions for the removal of errors are given in the table below:
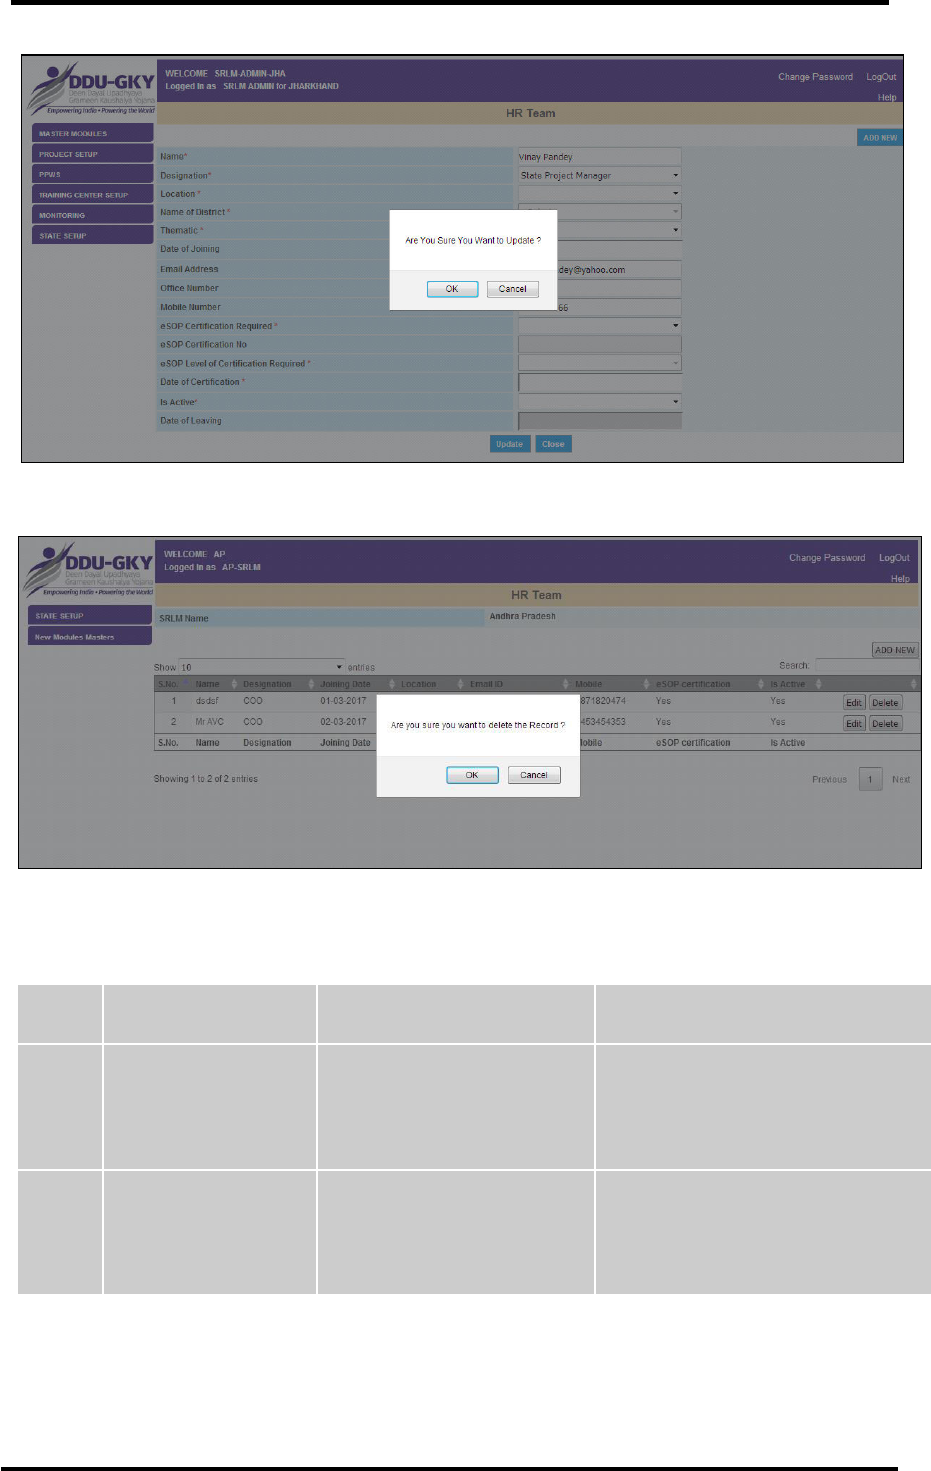
NATIONAL INFORMATICS CENTRE DDU-GKY USER MANUAL VERSION 1.1
NIC-DDUGKY - USER MANUAL 1.1 PAGE 59 OF 160 RELEASE DATE: 30-04-2017
Figure 22 : HR TEAM > Messages
Figure 23 : HR TEAM > Messages
S. No.
Message
Reason
Expected Action
1.
Are you sure you
want to Update?
You have clicked on the
‘Update’ button.
You need to make sure that you
have modified values of all the form
fields.
2.
Are you sure you
want to delete the
Record?
You have clicked on the
‘Delete’ button.
You need to make sure that you
don’t need the record which you
have selected to delete.
Table 9 : HR Team> Messages
5.1.5 STATE ACTION PLAN DETAILS

NATIONAL INFORMATICS CENTRE DDU-GKY USER MANUAL VERSION 1.1
NIC-DDUGKY - USER MANUAL 1.1 PAGE 60 OF 160 RELEASE DATE: 30-04-2017
General Description
An authorized user can view and edit State Action Plan Details. SRLM Admin can manage State
Action Plan Details.
Prerequisites
The user should have access to DDUGKY portal on the Internet and hold a valid User id and
Password to act for DDUGKY.
Screen Shot
Figure 24 : STATE ACTION PLAN DETAILS
Fields Description
S. No.
Field Name
Explanation
1.
Action Plan Start Year
Description- This field describes the Year when the action
plan starts.
Validation- N/A
Mandatory/Optional- It’s a mandatory field.
2.
Action Plan End Year
Description- This field describes the Year when the action
plan ends.
Validation- N/A
Mandatory/Optional- It’s a mandatory field.
3.
Sanctioned/ Allocated
Training Target
Description- This field describes the target sanctioned /
allocated for training.

NATIONAL INFORMATICS CENTRE DDU-GKY USER MANUAL VERSION 1.1
NIC-DDUGKY - USER MANUAL 1.1 PAGE 61 OF 160 RELEASE DATE: 30-04-2017
S. No.
Field Name
Explanation
Validation- alphanumeric characters can be entered.
Mandatory/Optional- It’s a mandatory field.
4.
Cost of Action Plan
Description- This field describes the amount sanctioned for
the Action plan in Rupee.
Validation- Only numbers can be entered.
Mandatory/Optional- It’s a mandatory field.
5.
Date of Approval
Description- This field describes the date on which the
project is approved.
Validation- N/A
Mandatory/Optional- It’s a mandatory field.
6.
Skill Gap Assessment
Description- This field describes the assessment done to
know the skill gap.
Validation- alphanumeric characters can be entered.
Mandatory/Optional- It’s a mandatory field
7.
Information, Education
and Communication
(IEC)
Description- This field describes the details about the
information, education and communication.
Validation- Numbers can be entered.
Mandatory/Optional- It’s a mandatory field
8.
Alumni Support
Description- This field describes the details related with
alumni support.
Validation- Numbers can be entered.
Mandatory/Optional- It’s a mandatory field
9.
Capacity Building
Description- This field describes the details related with
Capacity building.
Validation- Numbers can be entered.
Mandatory/Optional- It’s a mandatory field

NATIONAL INFORMATICS CENTRE DDU-GKY USER MANUAL VERSION 1.1
NIC-DDUGKY - USER MANUAL 1.1 PAGE 62 OF 160 RELEASE DATE: 30-04-2017
S. No.
Field Name
Explanation
10.
Monitoring and
Evaluation
Description- This field describes the details related with
monitoring and evaluation.
Validation- Numbers can be entered.
Mandatory/Optional- It’s a mandatory field
11.
Staff Block level and
below
Description- This field describes the details related with staff
of block level and below.
Validation- Numbers can be entered.
Mandatory/Optional- It’s a mandatory field
12.
Job Mela
Description- This field describes the details related with job
mela.
Validation- Numbers can be entered.
Mandatory/Optional- It’s a mandatory field
13.
Migration Support
Center
Description- This field describes the details related with
migration support center.
Validation- Numbers can be entered.
Mandatory/Optional- It’s a mandatory field
14.
Total Support Cost
Description- This field describes the details related with total
support cost.
Validation- Numbers can be entered.
Mandatory/Optional- It’s a mandatory field
15.
Whether register with
PFMS?
Description- This field describes the status of registration
with PFMS.
Validation- N/A
Mandatory/Optional- It’s a mandatory field
16.
Agency Code
Description- This field describes the code of the agency.
Validation- alphanumeric characters can be entered.

NATIONAL INFORMATICS CENTRE DDU-GKY USER MANUAL VERSION 1.1
NIC-DDUGKY - USER MANUAL 1.1 PAGE 63 OF 160 RELEASE DATE: 30-04-2017
S. No.
Field Name
Explanation
Mandatory/Optional- It’s a mandatory field
17.
Account Number
Description- This field describes the bank account number
of the agency.
Validation- alphanumeric characters can be entered.
Mandatory/Optional- It’s a mandatory field
18.
Bank Name
Description- This field describes the name of the bank in
which the agency has account.
Validation- Only alphabets can be entered.
Mandatory/Optional- It’s a mandatory field
19.
IFSC Code
Description- This field describes the IFSC Code of the bank
in which the agency has account.
Validation- alphanumeric characters can be entered.
Mandatory/Optional- It’s a mandatory field
Table 10 : STATE ACTION PLAN DETAILS Form Fields Description
Form Flow
1. Login on DDUGKY portal by using the authorized user credentials.
2. Move the cursor on the Dashboard option STATE SETUP and click over it.
3. As you will click on STATE SETUP, the list of forms associated with this option will get
displayed under it.
4. If you want to update STATE ACTION PLAN DETAILS, move the cursor on the link given for
the form STATE ACTION PLAN DETAILS and click over it. As you take this action, the form
named as STATE ACTION PLAN DETAILS will open in as shown in the figure 24. The form
contains some fields as described below. The user can make changes in values of these
fields as per requirement.

NATIONAL INFORMATICS CENTRE DDU-GKY USER MANUAL VERSION 1.1
NIC-DDUGKY - USER MANUAL 1.1 PAGE 64 OF 160 RELEASE DATE: 30-04-2017
5. Action Plan Start Year- This field describes the Year when the action plan starts. The user
can select the desired year from the drop down list.
6. Action Plan End Year - This field describes the Year when the action plan ends. The user can
select the desired year from the drop down list.
7. Sanctioned/ Allocated Training Target - This field describes the target sanctioned / allocated
for training. The user can enter the value in the given text box.
8. Cost of Action Plan -This field describes the amount sanctioned for the Action plan in Rupee.
The user can enter the value in the given text box.
9. Date of Approval - This field describes the date on which the project is approved. The user
can select the date through the calendar control.
10. Skill gap assessment - This field describes the assessment done to know the skill gap. The
user can enter the value in the given text box.
11. Information, Education and Communication (IEC) - This field describes the details about the
information, education and communication. The user can enter the value in the given text box.
12. Alumni Support - This field describes the details related with alumni support. The user can
enter the value in the given text box.
13. Capacity Building - This field describes the details related with Capacity building. The user
can enter the value in the given text box.
14. Monitoring and Evaluation -This field describes the details related with monitoring and
evaluation. The user can enter the value in the given text box.
15. Staff Block level and below - This field describes the details related with staff of block level
and below. The user can enter the value in the given text box.
16. Job Mela - This field describes the details related with job mela. The user can enter the value
in the given text box.
17. Migration Support Center - This field describes the details related with migration support
center. The user can enter the value in the given text box.
18. Total Support Cost - This field describes the details related with total support cost. The user
can enter the value in the given text box.
19. Whether register with PFMS? - This field describes the status of registration with PFMS.
20. Agency Code - This field describes the code of the agency. The user can enter the value in
the given text box.
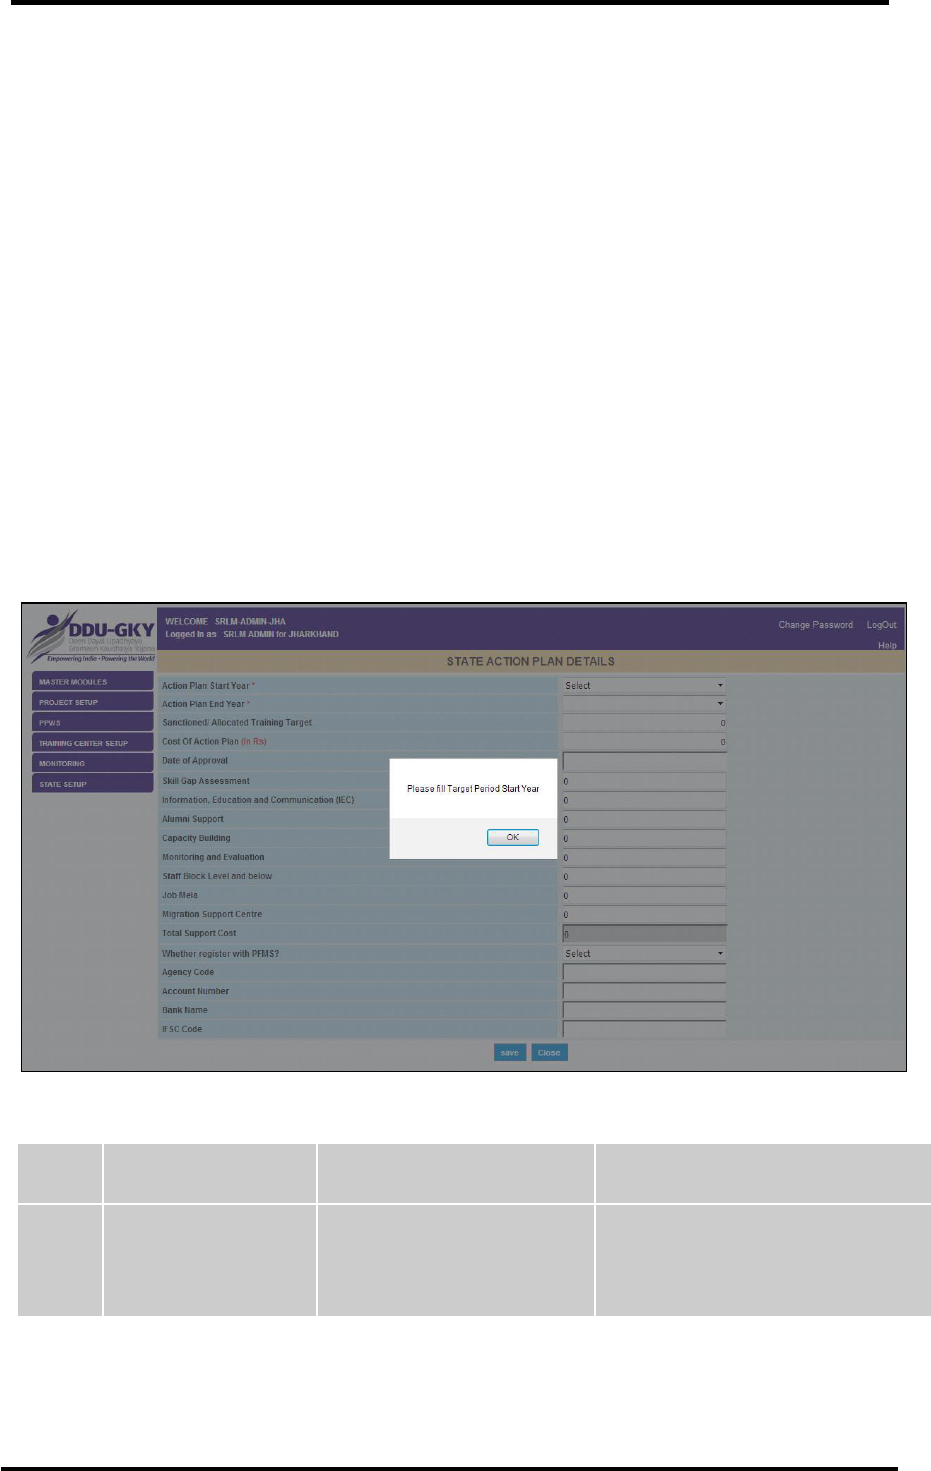
NATIONAL INFORMATICS CENTRE DDU-GKY USER MANUAL VERSION 1.1
NIC-DDUGKY - USER MANUAL 1.1 PAGE 65 OF 160 RELEASE DATE: 30-04-2017
21. Account Number - This field describes the bank account number of the agency. The user can
enter the value in the given text box.
22. Bank Name -This field describes the name of the bank in which the agency has account. The
user can enter the value in the given text box.
23. IFSC Code- This field describes the IFSC Code of the bank in which the agency has account.
The user can enter the value in the given text box.
What happens when the form is submitted
1. If you want to update the details of the form, click on the button ‘Save/Update’ to save/update
the details of the form STATE ACTION PLAN DETAILS.
2. If you don’t want to update the details of the form then click on the button ‘Close’.
Messages
While working with the form, you may encounter some messages. Some of these messages are
shown in the figure and expected actions for the removal of errors are given in the table below:
Figure 25 : STATE ACTION PLAN DETAIL> Messages
S. No.
Message
Reason
Expected Action
1.
Please fill target
period start year
The user has not filled the
target period start year
The user needs to fill the target
period start year.
Table 11 : STATE ACTION PLAN DETAIL> Messages
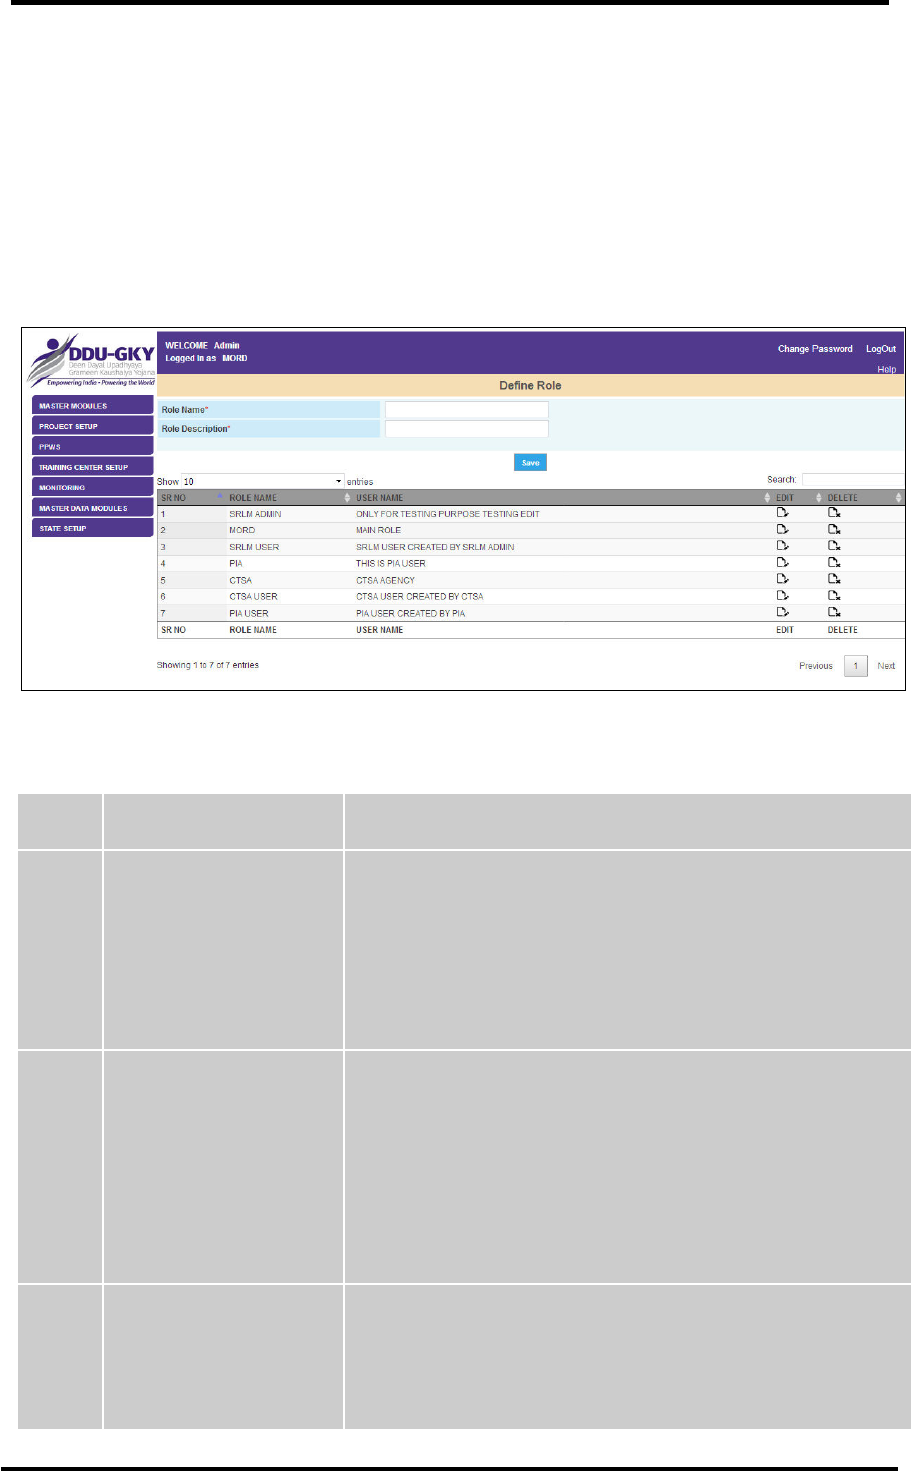
NATIONAL INFORMATICS CENTRE DDU-GKY USER MANUAL VERSION 1.1
NIC-DDUGKY - USER MANUAL 1.1 PAGE 66 OF 160 RELEASE DATE: 30-04-2017
5.1.6 Role Master
General Description
An authorized user can view and edit record in Role Master.
Prerequisites
The user should have access to DDUGKY portal on the Internet and hold a valid User id and
Password to act for DDUGKY.
Screen Shot
Figure 26 : Role Master
Fields Description
S. No.
Field Name
Explanation
1.
Role Name
Description- This field describes the name of the role of the
user which the user wants to add. Enter the name of the role
of the user in the given text box.
Validation- Only alphabetic characters can be entered.
Mandatory/Optional- It’s a mandatory field.
2.
Role Description
Description- This field describes the details of the actions
that the user will take. The details will appear in the table as
User Name.
Validation- Only alphabetic characters can be entered.
Mandatory/Optional- It’s a mandatory field.
3.
Show entries
Description- This field describes the option to select the
appearance of number of entries on a page.
Validation- N/A
NATIONAL INFORMATICS CENTRE DDU-GKY USER MANUAL VERSION 1.1
NIC-DDUGKY - USER MANUAL 1.1 PAGE 67 OF 160 RELEASE DATE: 30-04-2017
S. No.
Field Name
Explanation
Mandatory/Optional- It’s an optional field.
4.
Search
Description- This field describes the option to search a
particular record in the table by entering the keywords related
to the desired record.
Validation- N/A
Mandatory/Optional- It’s an optional field.
5.
Edit
Description- This field describes the option to open the form
in editable mode.
Validation- N/A
Mandatory/Optional- It’s an optional field.
6.
Delete
Description- This field describes the option to delete a
record in the form.
Validation- N/A
Mandatory/Optional- It’s an optional field.
Table 12 : Role Master Form Fields Description
Form Flow
1. Login on DDUGKY portal by using the authorized user credentials.
2. Move the cursor on the Dashboard option MASTER MODULES and click over it.
3. As you will click on MASTER MODULES, the list of forms associated with this option will get
displayed under it.
4. If you want to work on Role Master, move the cursor on the link given as Role Master and
click over it. As you take this action, the form named as Define Role will open in as shown in
the figure 26. The form contains some fields as described below. The user can make changes
in values of these fields as per requirement.
5. Role Name - This field describes the name of the role of the user which the user wants to
add. Enter the name of the role of the user in the given text box.

NATIONAL INFORMATICS CENTRE DDU-GKY USER MANUAL VERSION 1.1
NIC-DDUGKY - USER MANUAL 1.1 PAGE 68 OF 160 RELEASE DATE: 30-04-2017
6. Role Description - This field describes the details of the actions that the user will take. The
details will appear in the table as User Name.
7. Show entries- This field describes the option to select the appearance of number of entries on
a page.
8. Search- This field describes the option to search a particular record in the table by entering
the keywords related to the desired record.
9. Edit - This field describes the option to open the form in editable mode. The user can use this
option to open the form in editable mode and edit the desired record.
10. Delete - This field describes the option to delete a record in the form. The user can use this
option to delete a record in the form.
What happens when the form is submitted
1. If the user wants to save/update the details of the form, click on the button ‘Save/Update’ to
save the details of the form Define Role.
2. If user doesn’t want to update the details of the form, then click on the button ‘Close’.
Messages
While working with the form, a user may encounter some messages. Some of these messages are
shown in the figure and expected actions for the removal of errors are given in the table below:
Figure 27 : Role Master> Messages
S. No.
Message
Reason
Expected Action
1.
Are you sure you
want to delete?
You have clicked on the
button ‘Delete’.
You need to make sure that you
don’t need the record anymore.
Table 13 : Role Master> Messages
5.1.7 Form Module Master
General Description
An authorized user can view and edit record in Form Module Master.

NATIONAL INFORMATICS CENTRE DDU-GKY USER MANUAL VERSION 1.1
NIC-DDUGKY - USER MANUAL 1.1 PAGE 69 OF 160 RELEASE DATE: 30-04-2017
Prerequisites
The user should have access to DDUGKY portal on the Internet and hold a valid User id and
Password to act for DDUGKY.
Screen Shot
Figure 28 : Form Module Master
Figure 29 : Form Module Master

NATIONAL INFORMATICS CENTRE DDU-GKY USER MANUAL VERSION 1.1
NIC-DDUGKY - USER MANUAL 1.1 PAGE 70 OF 160 RELEASE DATE: 30-04-2017
Fields Description
S. No.
Field Name
Explanation
1.
Form Name
Description- This field describes the name of the Form which
SRLM Admin wants to add. Enter the name of the Form in
the given text box. The user can check the box given in front
of the field “Is Form a Master Module” to specify the Form as
a Master Module.
Validation- Only alphabetic characters can be entered.
Mandatory/Optional- It’s a mandatory field.
2.
Module Name
Description- T This field describes the name of the Form
which the user wants to add. Enter the name of the Form in
the given text box.
Validation- Only alphabetic characters can be entered.
Mandatory/Optional- It’s a mandatory field.
3.
Url.
Description- This field describes the url for accessing the
form.
Validation- N/A
Mandatory/Optional- N/A
4.
Order Number
Description- This field describes the Order Number of the
form.
Validation- N/A
Mandatory/Optional- It’s an optional field.
5.
Help
Description- This field describes the help information related
to the form.
Validation- N/A
Mandatory/Optional- It’s an optional field.
6.
Show entries
Description- This field describes the option to select the
appearance of number of entries on a page.
Validation- N/A
Mandatory/Optional- It’s an optional field.

NATIONAL INFORMATICS CENTRE DDU-GKY USER MANUAL VERSION 1.1
NIC-DDUGKY - USER MANUAL 1.1 PAGE 71 OF 160 RELEASE DATE: 30-04-2017
S. No.
Field Name
Explanation
7.
Search
Description- This field describes the option to search a
particular record in the table by entering the keywords related
to the desired record.
Validation- N/A
Mandatory/Optional- It’s an optional field.
Table 14 : Form Module Master Form Fields Description
Form Flow
1. Login on DDUGKY portal by using the authorized user credentials.
2. Move the cursor on the Dashboard option New Modules Masters and click over it.
3. As you will click on New Modules Masters, the list of forms associated with this option will get
displayed under it.
4. If you want to work on Role Master, move the cursor on the link given as Role Master and
click over it. As you take this action, the form named as Define Role will open in as shown in
the figure 28. The form contains some fields as described below. The user can make changes
in values of these fields as per requirement.
5. Form Name - This field describes the name of the Form which the user wants to add. Enter
the name of the Form in the given text box. (Note: SRLM Admin can check the box given in
front of the field “Is Form a Master Module” to specify the Form as a Master Module)
6. Module Name - This field describes the name of the Form which the user wants to add. Enter
the name of the Form in the given text box.
7. Url - This field describes the url for accessing the form.
8. Order Number - This field describes the Order Number of the form.
9. Help – This field describes the help information related to the form.
10. Show entries- This field describes the option to select the appearance of number of entries on
a page.
11. Search- This field describes the option to search a particular record in the table by entering
the keywords related to the desired record.
What happens when the form is submitted
1. If you want to save the details of the form, click on the button ‘Save’ to save the details of the
form ADD Modules.
2. If you want to clear the values of the form fields then click on the button ‘Clear’.
Messages
While working with the form, you may encounter some messages. Some of these messages are
shown in the figure and expected actions for the removal of errors are given in the table below:

NATIONAL INFORMATICS CENTRE DDU-GKY USER MANUAL VERSION 1.1
NIC-DDUGKY - USER MANUAL 1.1 PAGE 72 OF 160 RELEASE DATE: 30-04-2017
Figure 30 : Form Module Master> Messages
Figure 31 : Form Module Master> Messages

NATIONAL INFORMATICS CENTRE DDU-GKY USER MANUAL VERSION 1.1
NIC-DDUGKY - USER MANUAL 1.1 PAGE 73 OF 160 RELEASE DATE: 30-04-2017
S. No.
Message
Reason
Expected Action
1.
Do you really want to
update this form name
and description?
You have clicked on the
button ‘Save’ after opening
the form in editable mode.
You need to click on ‘OK’ button to
confirm the action but if you do not
want to update, click on the button
‘Cancel’.
2.
Are you sure you
want to delete?
You have clicked on the
button ‘Delete’.
You need to make sure that you
don’t need the record anymore.
Table 15 : Form Module Master> Messages
5.1.8 User Master
General Description
Any authorized user can view and edit record in User Master.
Prerequisites
The user should have access to DDUGKY portal on the Internet and hold a valid User id and
Password to act for DDUGKY.
Screen Shot
Figure 32 : User Master
NATIONAL INFORMATICS CENTRE DDU-GKY USER MANUAL VERSION 1.1
NIC-DDUGKY - USER MANUAL 1.1 PAGE 74 OF 160 RELEASE DATE: 30-04-2017
Fields Description
S. No.
Field Name
Explanation
1.
Login Id
Description- This field describes the Login Id which is to be
provided to the user by Admin. Enter the login id for the user
in the given text box.
Validation- Alpha numeric and special characters can be
entered.
Mandatory/Optional- It’s a mandatory field.
2.
Assign Role
Description- This field describes the role list which can be
assigned to the user. Only those values will appear in this
field which has been entered in Role Master.
Validation- N/A
Mandatory/Optional- It’s a mandatory field.
3.
User Name
Description- This field describes the name of the user.
Admin will enter the name of the user in the given text box.
Validation- Only alpha numeric characters can be entered.
Mandatory/Optional- It’s a mandatory field.
4.
Password
Description- This field describes the password assigned to
the user. Admin will enter the password in the given text box.
Validation- Password must contain at least one upper letter,
one lowercase letter, one numeral and one upper case letter.
Mandatory/Optional- It’s a mandatory field.
5.
Re-Enter Password
Description- This field describes the confirmation of
Password. Admin will re-enter the password assigned to the
user to confirm it.
Validation- N/A
Mandatory/Optional- It’s a mandatory field.
6.
User Status
Description- This field describes the Status of the user. The
authorized user with the privilege of changing the status of
the user can change the status.

NATIONAL INFORMATICS CENTRE DDU-GKY USER MANUAL VERSION 1.1
NIC-DDUGKY - USER MANUAL 1.1 PAGE 75 OF 160 RELEASE DATE: 30-04-2017
S. No.
Field Name
Explanation
Validation- N/A
Mandatory/Optional- It’s a mandatory field.
7.
Mobile/Telephone
Number
Description-This field describes the mobile/telephone
number of the user. Admin will enter the mobile/telephone
number of the user in the given text box.
Validation- Only numbers can be entered.
Mandatory/Optional- It’s an optional field.
7
Email Id
This field describes the email id of the user. Admin will enter
the email id of the user in the given text box.
Validation- The email should be in proper format
Mandatory/Optional- It’s an optional field.
8.
Show entries
Description- This field describes the option to select the
appearance of number of entries on a page.
Validation- N/A
Mandatory/Optional- It’s an optional field.
9.
Search
Description- This field describes the option to search a
particular record in the table by entering the keywords related
to the desired record.
Validation- Alpha numeric characters can be entered.
Mandatory/Optional- It’s an optional field.
Table 16 : User Master Form Fields Description
Form Flow
1. Login on DDUGKY portal by using the authorized user credentials.
2. Move the cursor on the Dashboard option New Modules Masters and click over it.
3. As you will click on MASTER MODULES, the list of forms associated with this option will get
displayed under it.
4. If you want to work on User Master, move the cursor on the link given as User Master and
click over it. As you take this action, the form named as Define Role will open in as shown in
the figure 32. The form contains some fields as described below. Admin can make changes in
values of these fields as per requirement.
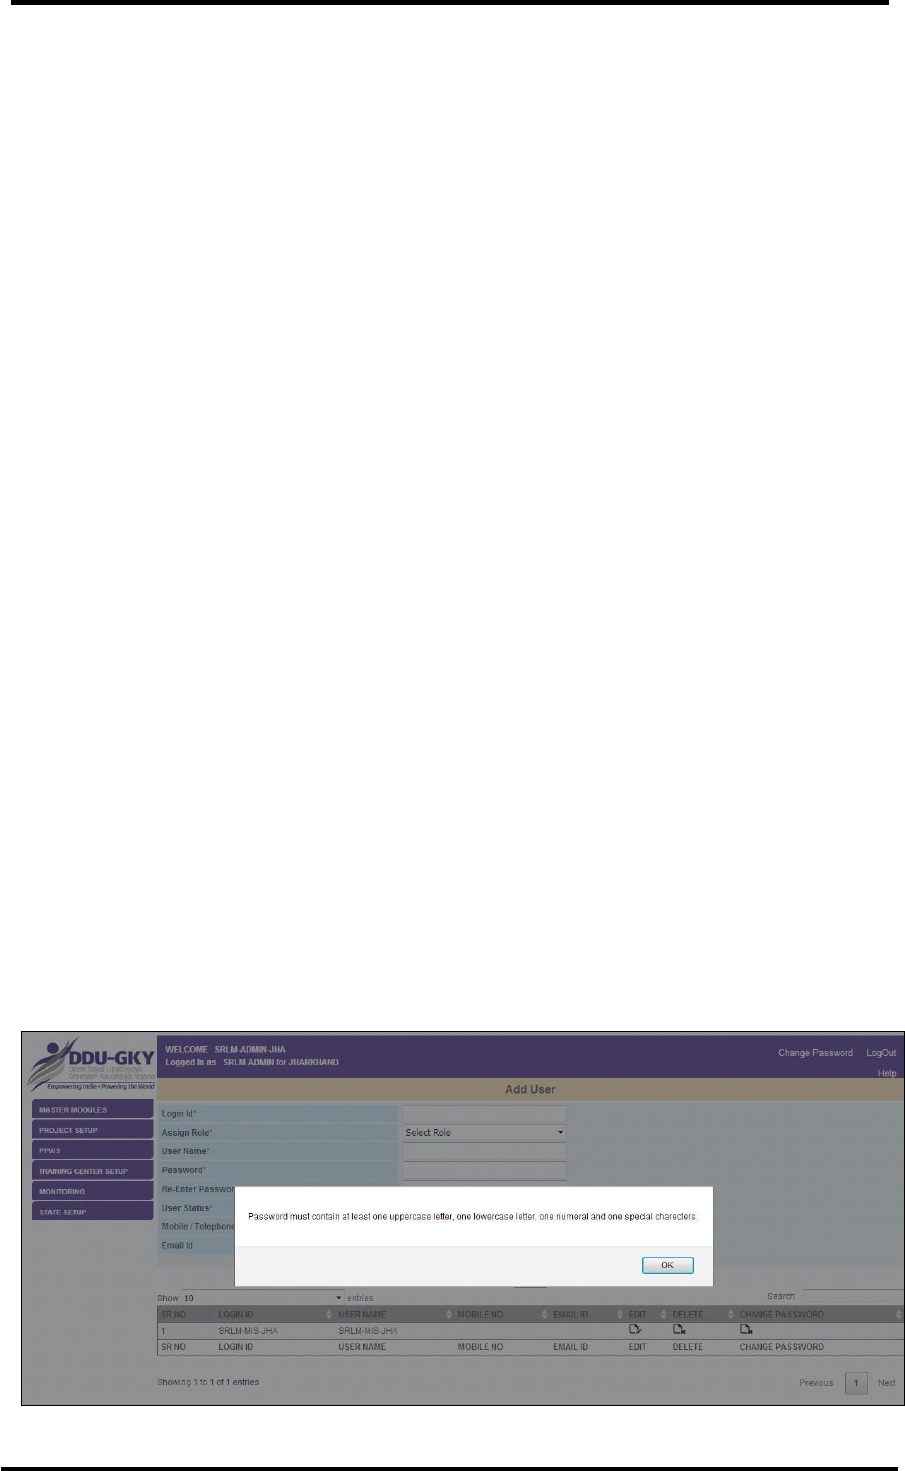
NATIONAL INFORMATICS CENTRE DDU-GKY USER MANUAL VERSION 1.1
NIC-DDUGKY - USER MANUAL 1.1 PAGE 76 OF 160 RELEASE DATE: 30-04-2017
5. Login Id - This field describes the Login Id which is to be provided to the user by Admin. Enter
the login id for the user in the given text box.
6. Assign Role - This field describes the role list which can be assigned to the user. (Note: Only
those values will appear in this field which has been entered in Role Master.
7. User Name - This field describes the name of the user. Admin will enter the name of the user
in the given text box.
8. Password - This field describes the password assigned to the user. Admin will enter the
password in the given text box. (Note: Password must contain at least one upper letter, one
lowercase letter, one numeral and one upper case letter).
9. Re-Enter Password – This field describes the confirmation of Password. Admin will re-enter
the password assigned to the user to confirm it.
10. User Status - This field describes the status of the user. Admin can change the status of the
user.
11. Mobile/Telephone Number- This field describes the mobile/telephone number of the user.
Admin will enter the mobile/telephone number of the user in the given text box.
12. Email Id- This field describes the email id of the user. Admin will enter the email id of the user
in the given text box.
13. Show entries – This field describes the option to specify the appearance of the number of
entries in the table on the form.
14. Search- This field describes the option to search a particular record in the table by entering
the keywords related to the desired record.
What happens when the form is submitted
1. If you want to save the details of the form, click on the button ‘Save’ to save the details of the
form Add User.
2. If you want to clear the values of the form fields then click on the button ‘Clear’.
Messages
While working with the form, you may encounter some messages. Some of these messages are
shown in the figure and expected actions for the removal of errors are given in the table below:

NATIONAL INFORMATICS CENTRE DDU-GKY USER MANUAL VERSION 1.1
NIC-DDUGKY - USER MANUAL 1.1 PAGE 77 OF 160 RELEASE DATE: 30-04-2017
Figure 33 : User Master> Messages
S. No.
Message
Reason
Expected Action
1.
Password must
contain at least one
upper letter, one
lowercase letter, one
numeral and one
upper case letter
The password chosen for the
user does not fulfill the defined
criteria.
You need to create the Password
which contains at least one upper
letter, one lowercase letter, one
numeral and one upper case letter
Table 17 : User Master> Messages
5.1.9 Assign Module
General Description
Any authorized user can assign modules to Users according to their role and login Id.
Prerequisites
The user should have access to DDUGKY portal on the Internet and hold a valid User id and
Password to act for DDUGKY.
Screen Shot
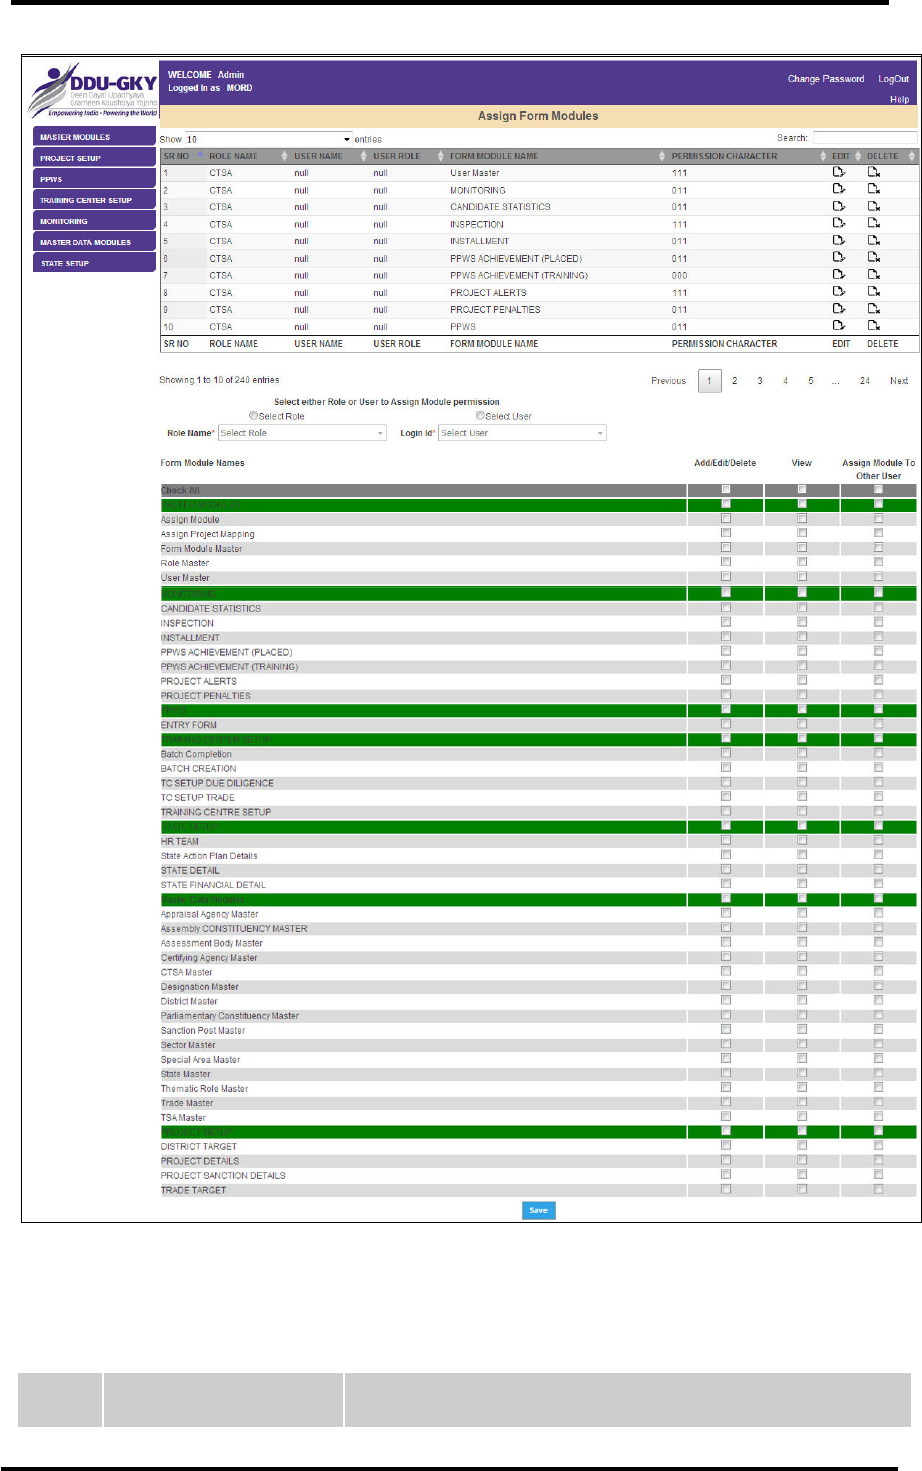
NATIONAL INFORMATICS CENTRE DDU-GKY USER MANUAL VERSION 1.1
NIC-DDUGKY - USER MANUAL 1.1 PAGE 78 OF 160 RELEASE DATE: 30-04-2017
Figure 34 : Assign Module
Fields Description
S. No.
Field Name
Explanation

NATIONAL INFORMATICS CENTRE DDU-GKY USER MANUAL VERSION 1.1
NIC-DDUGKY - USER MANUAL 1.1 PAGE 79 OF 160 RELEASE DATE: 30-04-2017
S. No.
Field Name
Explanation
1.
Select either Role or
User to Assign Module
permission
Description- This field describes the option to specify
whether the module permission is to be given on the basis of
Role or it has to be given on the basis of User. Select either
radio button ‘Select Role’ or ‘Select User’.
Validation- N/A
Mandatory/Optional- It’s a mandatory field.
2.
Role Name
Description- This field describes the name of the role name
of the user in the drop down list. Admin will select the name
of the role of the user.
Validation- N/A
Mandatory/Optional- It’s a mandatory field.
3.
Login Id
Description- This field describes the Login Id which has
been provided to the user. Admin will select the login id of the
user from the drop down list.
Validation- N/A
Mandatory/Optional- It’s a mandatory field.
4.
Form Module Names
Description- This field describes the list of Form Modules.
Validation- N/A
Mandatory/Optional- N/A
5.
Add/Edit/Delete
Description- This field describes the options
(Add/Edit/Delete) that can be provided to the Role/User by
checking the box given in front of the Form Module in a row.
Validation- N/A
Mandatory/Optional- It’s an optional field.
6.
View
Description- This field describes view option that can be
provided to the Role/User by checking the box given in front
of the Form Module in a row.
Validation- N/A
Mandatory/Optional- It’s an optional field.

NATIONAL INFORMATICS CENTRE DDU-GKY USER MANUAL VERSION 1.1
NIC-DDUGKY - USER MANUAL 1.1 PAGE 80 OF 160 RELEASE DATE: 30-04-2017
S. No.
Field Name
Explanation
7.
Assign Module to Other
User
Description- This field describes the option for assigning
module to other user that can be provided to the Role/User
by checking the box given in front of the Form Module in a
row.
Validation- N/A
Mandatory/Optional- It’s an optional field.
8.
Show entries
Description- This field describes the option to select the
appearance of number of entries on a page.
Validation- N/A
Mandatory/Optional- It’s an optional field.
9.
Search
Description- This field describes the option to search a
particular record in the table by entering the keywords related
to the desired record.
Validation- Alpha numeric characters can be entered.
Mandatory/Optional- It’s an optional field.
Table 18 : Assign Module Form Fields Description
Form Flow
1. Login on DDUGKY portal by using the authorized user credentials.
2. Move the cursor on the Dashboard option MASTER MODULES and click over it.
3. As you will click on MASTER MODULES, the list of forms associated with this option will get
displayed under it.
4. If you want to work on User Master, move the cursor on the link given as User Master and
click over it. As you take this action, the form named as Assign Form Modules will open in as
shown in the figure 34. The form contains some fields as described below. Admin can make
changes in values of these fields as per requirement.
5. Select either Role or User to Assign Module permission - This field describes the option to
specify whether the module permission is to be given on the basis of Role or it has to be
given on the basis of User. Select either radio button ‘Select Role’ or ‘Select User’.
6. Role Name - This field describes the name of the role name of the user in the drop down list.
Admin will select the name of the role of the user.
7. Login Id - This field describes the Login Id which has been provided to the user. Admin will
select the login id of the user from the drop down list.
8. Form Module Names - This field describes the list of Form Modules.
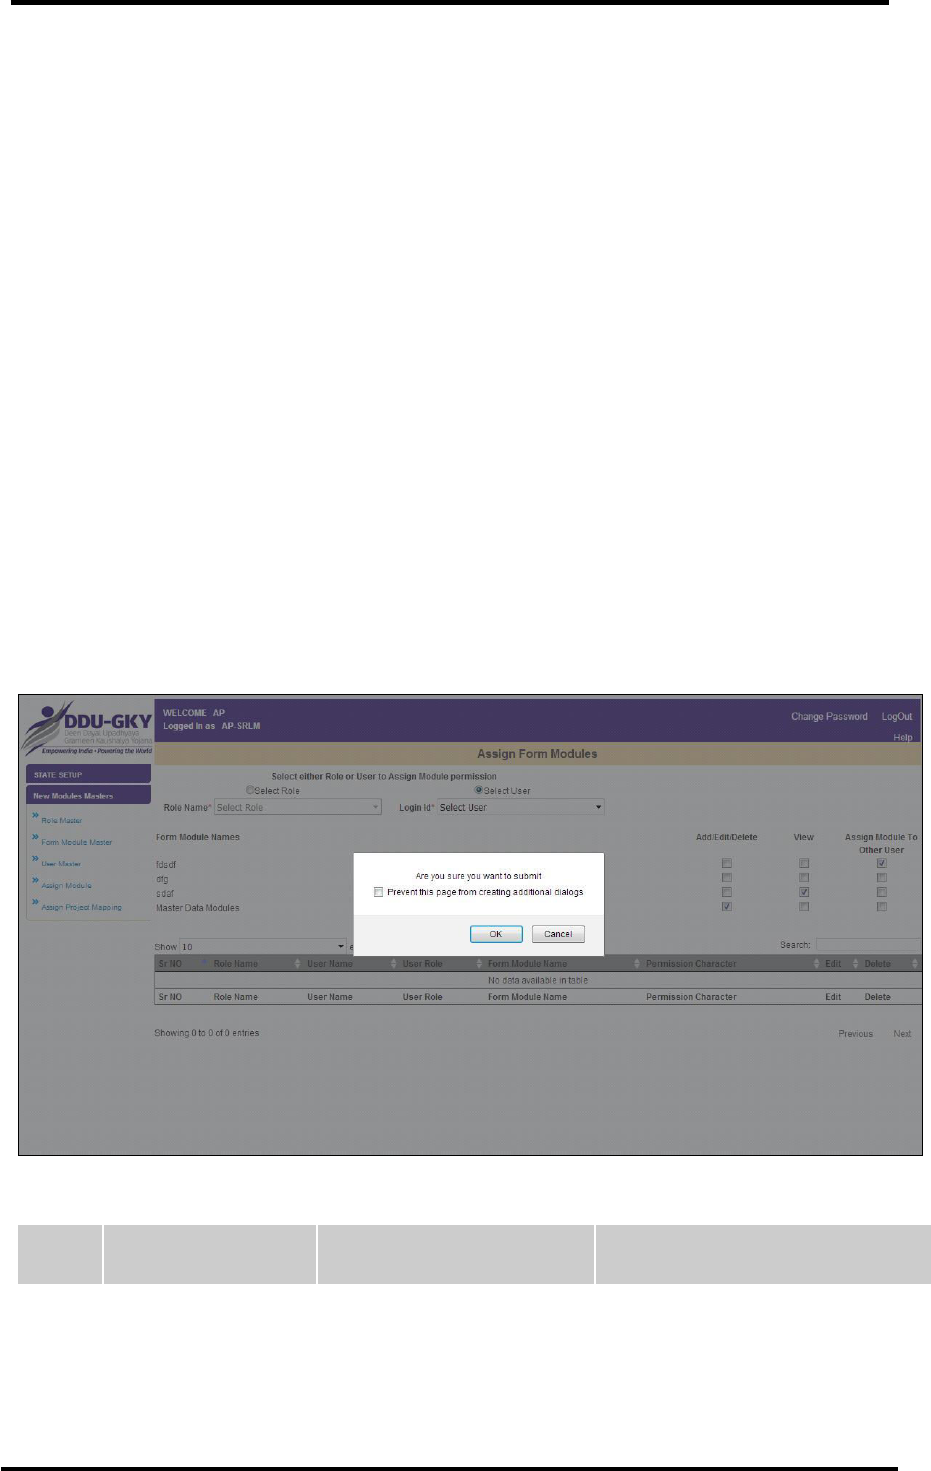
NATIONAL INFORMATICS CENTRE DDU-GKY USER MANUAL VERSION 1.1
NIC-DDUGKY - USER MANUAL 1.1 PAGE 81 OF 160 RELEASE DATE: 30-04-2017
9. Add/Edit/Delete - This field describes the options (Add/Edit/Delete) that can be provided to
the Role/User by checking the box given in front of the Form Module in a row.
10. View - This field describes view option that can be provided to the Role/User by checking the
box given in front of the Form Module in a row.
11. Assign Module to Other User - This field describes the option for assigning module to other
user that can be provided to the Role/User by checking the box given in front of the Form
Module in a row.
12. Show entries - This field describes the option to select the appearance of number of entries
on a page.
13. Search - This field describes the option to search a particular record in the table by entering
the keywords related to the desired record.
What happens when the form is submitted
1. If you want to save the details of the form, click on the button ‘Save’ to save the details of the
form Assign Form Modules.
2. If you want to clear the values of the form fields then click on the button ‘Clear’.
Messages
While working with the form, you may encounter some messages. Some of these messages are
shown in the figure and expected actions for the removal of errors are given in the table below:
Figure 35 : Assign Module> Messages
S. No.
Message
Reason
Expected Action
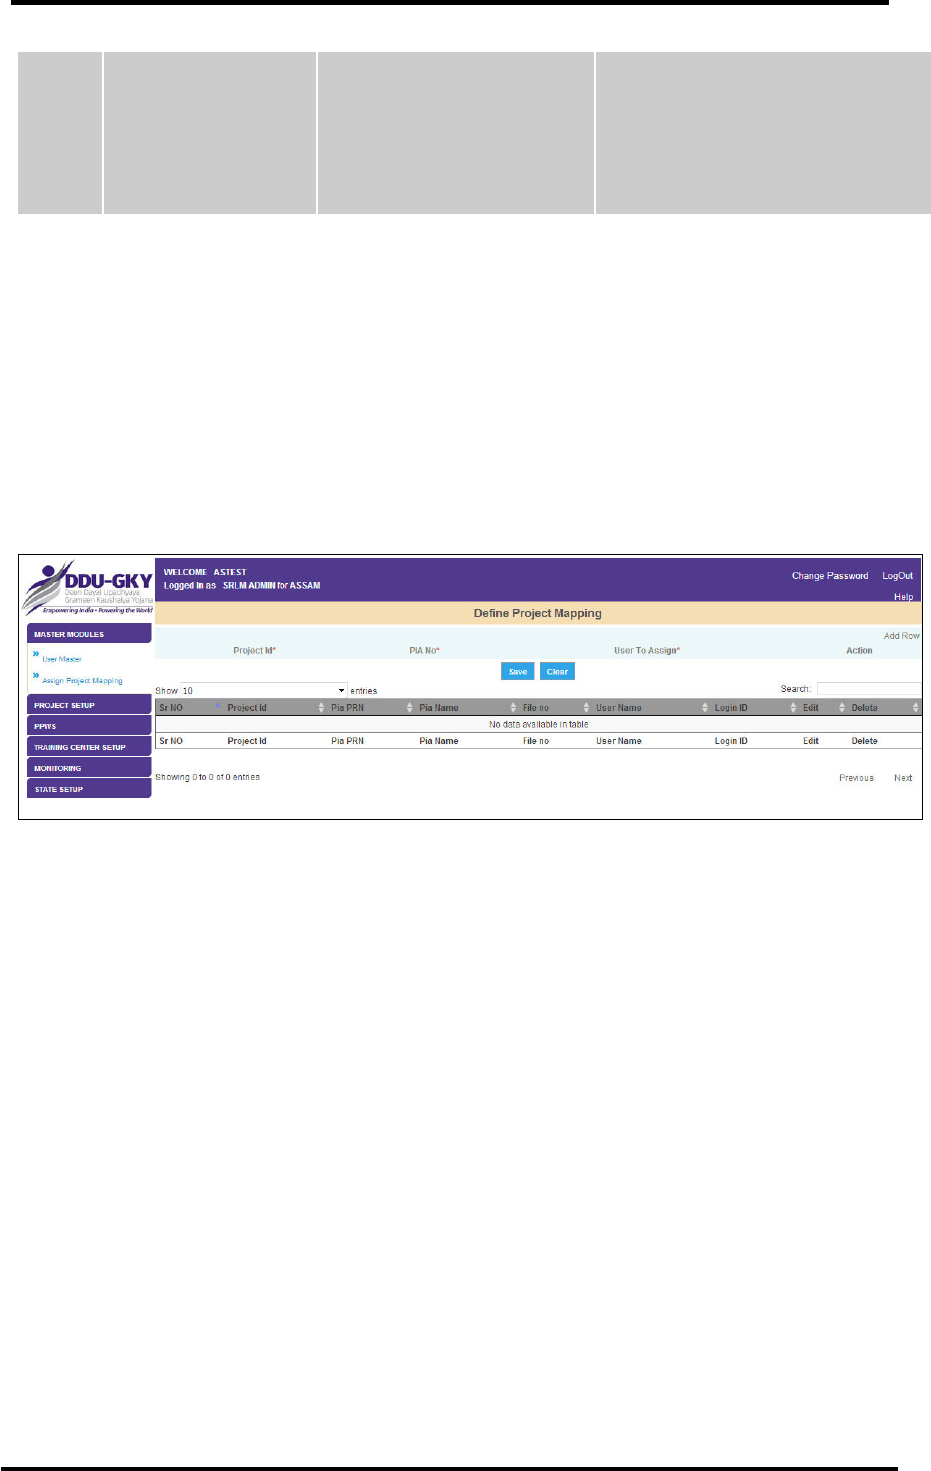
NATIONAL INFORMATICS CENTRE DDU-GKY USER MANUAL VERSION 1.1
NIC-DDUGKY - USER MANUAL 1.1 PAGE 82 OF 160 RELEASE DATE: 30-04-2017
1.
Are you sure you want
to submit
You have clicked on the
button ‘Save’
You need to confirm all aspects
before clicking ‘OK’ button. If you
don’t want to submit, click ‘Cancel’
button.
Table 19 : Assign Form Modules> Messages
5.1.10 Assign Project Mapping
General Description
An authorized user of Admin level can perform the action of project mapping with a subordinate user.
Prerequisites
The user should have access to DDUGKY portal on the Internet and hold a valid User id and
Password to act for DDUGKY.
Screen Shot
Figure 36 : Assign Project Mapping
Form Flow
1. Login on DDUGKY portal by using the authorized user credentials.
2. Move the cursor on the Dashboard option New Modules Masters and click over it.
3. As you will click on New Modules Masters, the list of forms associated with this option will get
displayed under it.
4. If you want to work on project mapping assignment, move the cursor on the link given as
Assign Project Mapping and click over it. As you take this action, the form named as Define
Project Mapping will open in as shown in the figure 37. The form contains some fields as
described below. Admin can make changes in values of these fields as per requirement.
What happens when the form is submitted
1. If you want to save the details of the form, click on the button ‘Save’ to save the details of the
form Assign Project Mapping.
2. If you want to clear the values of the form fields then click on the button ‘Clear’.
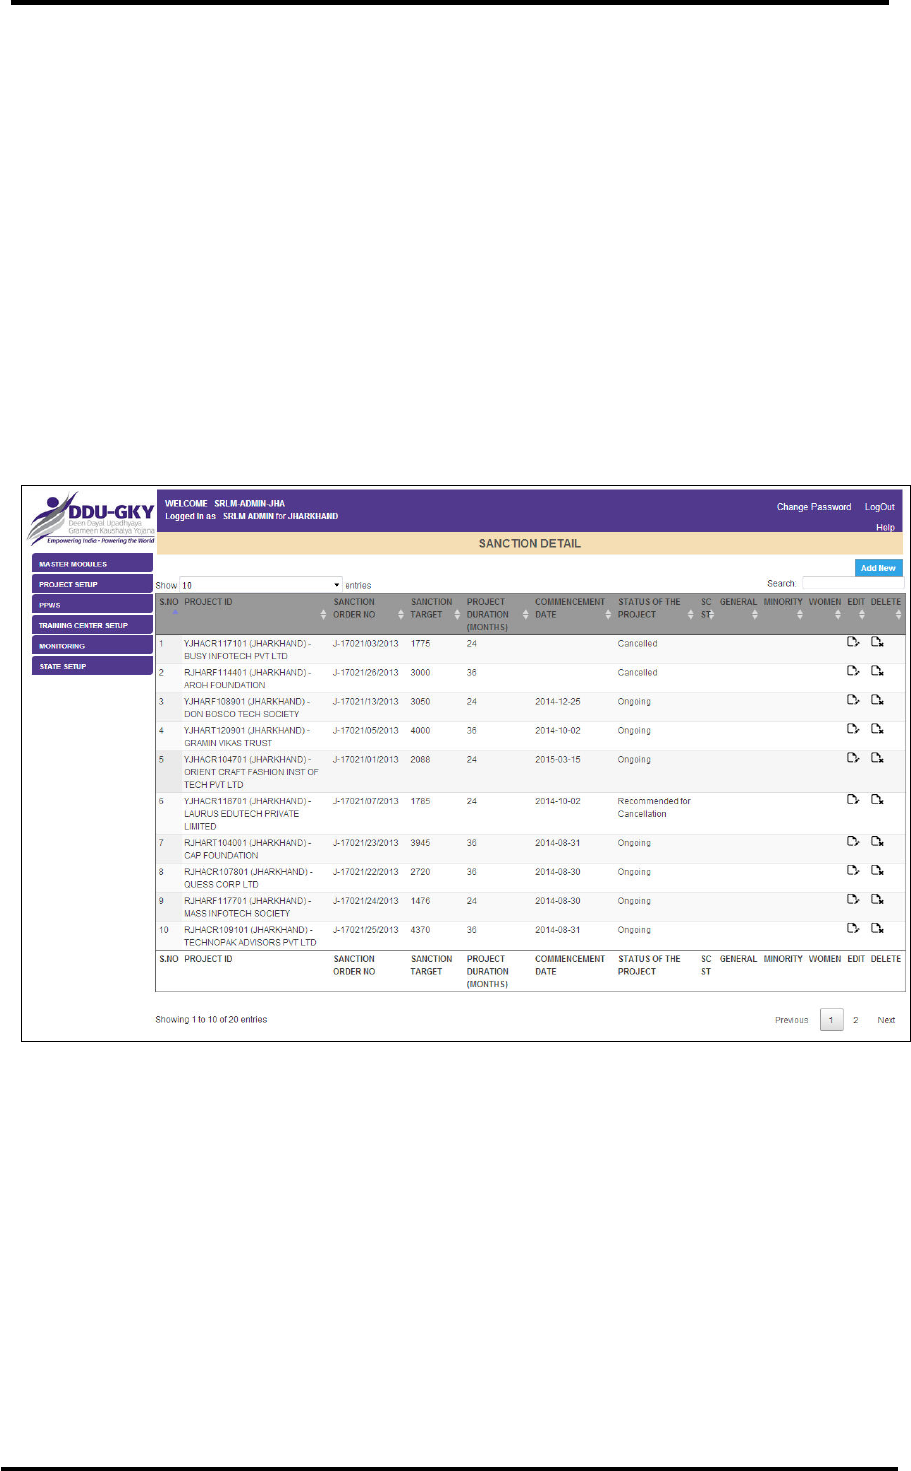
NATIONAL INFORMATICS CENTRE DDU-GKY USER MANUAL VERSION 1.1
NIC-DDUGKY - USER MANUAL 1.1 PAGE 83 OF 160 RELEASE DATE: 30-04-2017
Messages
N/A
5.1.11 Project Sanction Details
General Description
Any authorized user can take action on sanction of target for a project. This form will help a user in
managing different provisions related with Project Sanction.
Prerequisites
The user should have access to DDUGKY portal on the Internet and hold a valid User id and
Password to act for DDUGKY.
Screen Shot
Figure 37 : Project Sanction Details

NATIONAL INFORMATICS CENTRE DDU-GKY USER MANUAL VERSION 1.1
NIC-DDUGKY - USER MANUAL 1.1 PAGE 84 OF 160 RELEASE DATE: 30-04-2017
Figure 38 : Project Sanction Details (Add New)
Fields Description
S. No.
Field Name
Explanation
1.
Project ID
Description- This field describes identification number of the
Project
Validation- Alpha numeric characters can be entered.
Mandatory/Optional- It’s a mandatory field.
2.
State Name
Description- This field describes the name of the State.
Validation- N/A
Mandatory/Optional- It’s a mandatory field.
3.
Sanction Order No
Description- This field describes the sanction order number
of the project.
Validation- Alpha numeric characters can be entered.
Mandatory/Optional- It’s a mandatory field.

NATIONAL INFORMATICS CENTRE DDU-GKY USER MANUAL VERSION 1.1
NIC-DDUGKY - USER MANUAL 1.1 PAGE 85 OF 160 RELEASE DATE: 30-04-2017
S. No.
Field Name
Explanation
4.
Date of Sanction
Description- This field describes the date of sanction of the
project.
Validation- N/A
Mandatory/Optional- It’s a mandatory field.
5.
Residential Target
Description- This field describes the residential target which
has been sanctioned for the project.
Validation- N/A
Mandatory/Optional- It’s a mandatory field.
6.
Non-Residential Target
Description- This field describes the non residential target
which has been sanctioned for the project.
Validation- N/A
Mandatory/Optional- It’s a mandatory field.
7.
Sanction Target
Description- This field describes the target which has been
sanctioned for the project.
Validation- N/A
Mandatory/Optional- It’s a mandatory field.
8.
Project Duration
(months)
Description- This field describes the duration of the project
in months.
Validation- N/A
Mandatory/Optional- It’s a mandatory field.
9.
PCO Date
Description- This field describes the date of commencement
order of the project.
Validation- N/A
Mandatory/Optional- It’s a mandatory field.
10.
Commencement Date
Description- This field describes the date of commencement
of the project.
Validation- N/A

NATIONAL INFORMATICS CENTRE DDU-GKY USER MANUAL VERSION 1.1
NIC-DDUGKY - USER MANUAL 1.1 PAGE 86 OF 160 RELEASE DATE: 30-04-2017
S. No.
Field Name
Explanation
Mandatory/Optional- It’s a mandatory field.
11.
Project End Date
Description- This field describes the date of end of the
project.
Validation- N/A
Mandatory/Optional- It’s a mandatory field.
12.
Last Date of Training
Completion
Description- This field describes the last date of completion
of the training.
Validation- N/A
Mandatory/Optional- It’s a mandatory field.
13.
Last Date of Placement
Completion
Description- This field describes the last date of placement
completion.
Validation- N/A
Mandatory/Optional- It’s a mandatory field.
14.
Whether MoU Signed
Description- This field describes the status about Mou, i.e.
whether MoU is signed for the project or not.
Validation- N/A
Mandatory/Optional- It’s an optional field.
15.
MoU signed Date
Description- This field describes the date on which the MoU
was signed for the project.
Validation- N/A
Mandatory/Optional- It’s an optional field.
16.
Whether Project Work
Schedule (PWS)
approved
Description- This field describes the status of approval of
Project Work Schedule (PWS), i.e. whether PWS has been
approved or not.
Validation- N/A
Mandatory/Optional- It’s an optional field.

NATIONAL INFORMATICS CENTRE DDU-GKY USER MANUAL VERSION 1.1
NIC-DDUGKY - USER MANUAL 1.1 PAGE 87 OF 160 RELEASE DATE: 30-04-2017
S. No.
Field Name
Explanation
17.
PWS approval Date
Description- This field describes the date on which the PWS
was approved.
Validation- N/A
Mandatory/Optional- It’s an optional field.
18.
Whether Project
Execution Readiness
(PER) approved
Description- This field describes the status of approval of
Project Execution Readiness (PER), i.e. whether PER has
been approved or not.
Validation- N/A
Mandatory/Optional- It’s an optional field.
19.
Date of PER
Description- This field describes the date on which the PWS
was approved.
Validation- N/A
Mandatory/Optional- It’s an optional field.
20.
Status of the Project
Description- This field describes the status of the project,
i.e. whether the project has been commenced or yet to be
commenced.
Validation- N/A
Mandatory/Optional- It’s an optional field.
21.
Whether register with
PFMS
Description- This field describes the status of the
registration with PFMS.
Validation- N/A
Mandatory/Optional- It’s an optional field.
22.
Agency Code
Description- This field describes the code of the agency.
Validation- Alpha numeric characters can be entered.
Mandatory/Optional- It’s an optional field.
23.
Account Number
Description- This field describes the bank account number
of the agency.

NATIONAL INFORMATICS CENTRE DDU-GKY USER MANUAL VERSION 1.1
NIC-DDUGKY - USER MANUAL 1.1 PAGE 88 OF 160 RELEASE DATE: 30-04-2017
S. No.
Field Name
Explanation
Validation- Alpha numeric characters can be entered.
Mandatory/Optional- It’s an optional field.
24.
Bank Name
Description- This field describes the name of the bank in
which the agency has account.
Validation- Alpha numeric characters can be entered.
Mandatory/Optional- It’s an optional field.
25.
IFSC Code
Description- This field describes the IFSC Code of the bank
in which the agency has account.
Validation- Alpha numeric characters can be entered.
Mandatory/Optional- It’s an optional field.
16.
Remarks
Description- This field describes the option to enter the
remarks about the project. Any authorized user can enter the
remarks in the given text field.
Validation- Only alphabetic and numeric characters can be
entered.
Mandatory/Optional- It’s an optional field.
Table 20 : Project Sanction Details Form Fields Description
Form Flow
1. Login on DDUGKY portal by using the authorized user credentials.
2. Move the cursor on the Dashboard option PROJECT SETUP and click over it.
3. As you will click on PROJECT SETUP, the list of forms associated with this option will get
displayed under it.
4. If you want to work on project sanction, move the cursor on the link given as Project sanction
details and click over it. As you take this action, the form named as SANCTION DETAIL will
open in non editable form as shown in the figure 39. The user can view the details related to
project sanction.
5. Edit - To edit the details of a Project, the user has to click on the button ‘Edit’ provided in front
of that Project Id in a row. As the user will click on the button ‘Edit’, the form will open in
editable mode as shown in the figure.
6. The user can enter/select values for the fields Project ID, Sanction Order No., Date of
Sanction, residential target, non residential target, Sanction Target, Project Duration
(months), PCO date, commencement date, Project end date, last date of training completion,
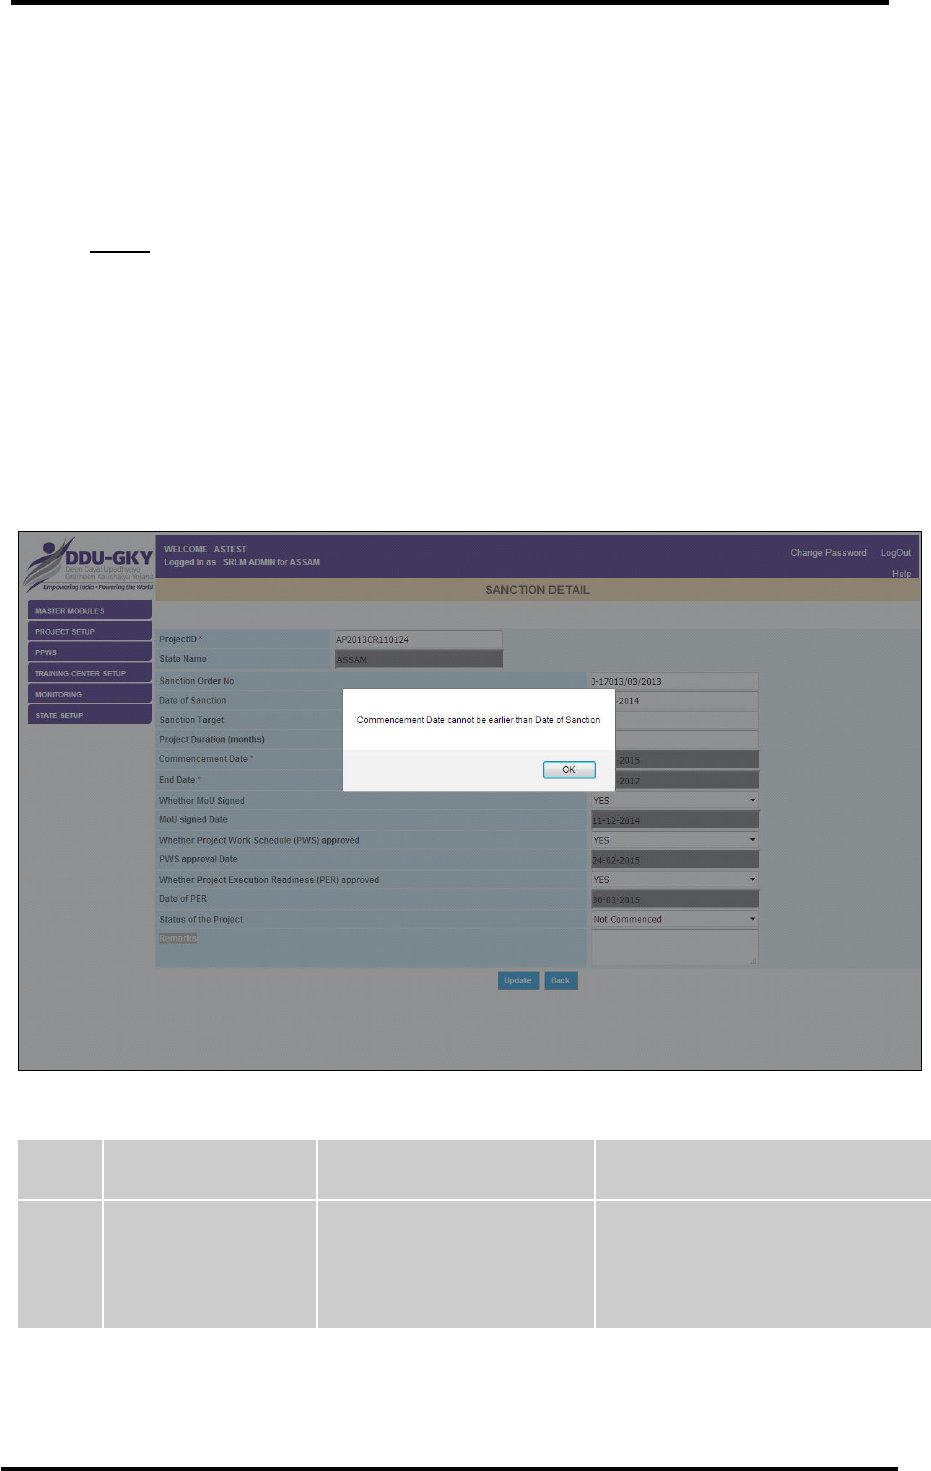
NATIONAL INFORMATICS CENTRE DDU-GKY USER MANUAL VERSION 1.1
NIC-DDUGKY - USER MANUAL 1.1 PAGE 89 OF 160 RELEASE DATE: 30-04-2017
last date of placement completion, Whether MoU Signed, Whether Project Work Schedule
(PWS) approved, PWS approval date, Whether Project Execution Readiness (PER)
approved, date of PER, Status of the Project, Whether register with PFMS, Agency Code,
Account Number, Bank Name, IFSC Code and Remarks.
7. After making the desired changes in the values of the form fields, the user needs to click on
the button ‘Update’ to save these changes.
8. Delete –The user can delete a record related to any Project by clicking on the button ‘Delete’
provided in front of Project ID in the row of the table.
What happens when the form is submitted
1. If you want to save the updated details of the form, click on the button ‘Update’ to save the
details of the form Project Sanction Details. The changes will be saved in the record.
2. If you click on the button ‘Delete’, the selected record will get removed.
Messages
While working with the form, the user may encounter some messages. Some of these messages are
shown in the figure and expected actions for the removal of errors are given in the table below:
Figure 39 : Project Sanction Details> Messages
S. No.
Message
Reason
Expected Action
1.
Commencement Date
cannot be earlier than
Date of Sanction
The User has selected
Commencement Date which
is earlier to Date of Sanction
The User requires to select
Commencement Date later to Date of
Sanction.
Table 21 : Project Sanction Details> Messages
5.1.12 Trade Target

NATIONAL INFORMATICS CENTRE DDU-GKY USER MANUAL VERSION 1.1
NIC-DDUGKY - USER MANUAL 1.1 PAGE 90 OF 160 RELEASE DATE: 30-04-2017
General Description
Any authorized user with required privilege can view and edit details of target for the trade.
Prerequisites
The user should have access to DDUGKY portal on the Internet and hold a valid User id and
Password to act for DDUGKY.
Screen Shot
Figure 40 : Trade Target
Figure 41 : Trade Target
Fields Description
S. No.
Field Name
Explanation
1.
Project ID
Description- This field describes identification number of the
Project. The user can select the Project ID from the drop
down list.
Validation- N/A
Mandatory/Optional- It’s a mandatory field.
2.
Training Target
Description- This field describes the target of the training.
Validation- N/A

NATIONAL INFORMATICS CENTRE DDU-GKY USER MANUAL VERSION 1.1
NIC-DDUGKY - USER MANUAL 1.1 PAGE 91 OF 160 RELEASE DATE: 30-04-2017
S. No.
Field Name
Explanation
Mandatory/Optional- N/A
3.
Sector
Description- This field describes the name of the sectors
related with the project.
Validation- N/A
Mandatory/Optional- It’s a mandatory field.
4.
Trade
Description- This field describes the name of the Trade
related with the sector.
Validation- N/A
Mandatory/Optional- It’s a mandatory field.
5.
Is Other Trade Included
Description- This field describes whether any other trade is
included in trade target.
Validation- N/A
Mandatory/Optional- It’s a mandatory field.
6.
Total Trade Duration (in
hours)
Description- This field describes the total duration of the
trade.
Validation- N/A
Mandatory/Optional- It’s a mandatory field.
7.
OJT (in hours)
Description- This field describes the OJT (on job training)
period in hours.
Validation- N/A
Mandatory/Optional- It’s an optional field.
8.
Training Target
Description- This field describes the target of the training.
Validation- N/A
Mandatory/Optional- It’s an optional field.
9.
Non Residential Full
Time
Description- This field describes the non residential full time
trade target.

NATIONAL INFORMATICS CENTRE DDU-GKY USER MANUAL VERSION 1.1
NIC-DDUGKY - USER MANUAL 1.1 PAGE 92 OF 160 RELEASE DATE: 30-04-2017
S. No.
Field Name
Explanation
Validation- N/A
Mandatory/Optional- It’s a mandatory field.
10.
Residential Full Time
Description- This field describes the residential full time
trade target.
Validation- N/A
Mandatory/Optional- It’s a mandatory field.
Table 22 : Trade Target Form Fields Description
Form Flow
1. Login on DDUGKY portal by using the authorized user credentials.
2. Move the cursor on the Dashboard option PROJECT SETUP and click over it.
3. As you will click on PROJECT SETUP, the list of forms associated with this option will get
displayed under it.
4. If you want to view Trade Target, move the cursor on the link given as Trade Target and click
over it. As you take this action, the form named as Trade Target will open in non editable form
as shown in the figure. To view and edit Trade Target of a project, the user needs to select
Project ID from the drop down list given under the field Project ID. As the user will select the
Project ID, details related to trade target of that project will appear in a tabular format as
shown in the figure. The user can view and edit the desired details.
5. The user can view the details of the trade target and modify it.
What happens when the form is submitted
The details entered in the form will be saved in the record.
Messages
N/A
5.1.13 District Target
General Description
Any authorized user with proper privilege can view and edit details of District target.
Prerequisites
The user should have access to DDUGKY portal on the Internet and hold a valid User id and
Password to act for DDUGKY.
Screen Shot
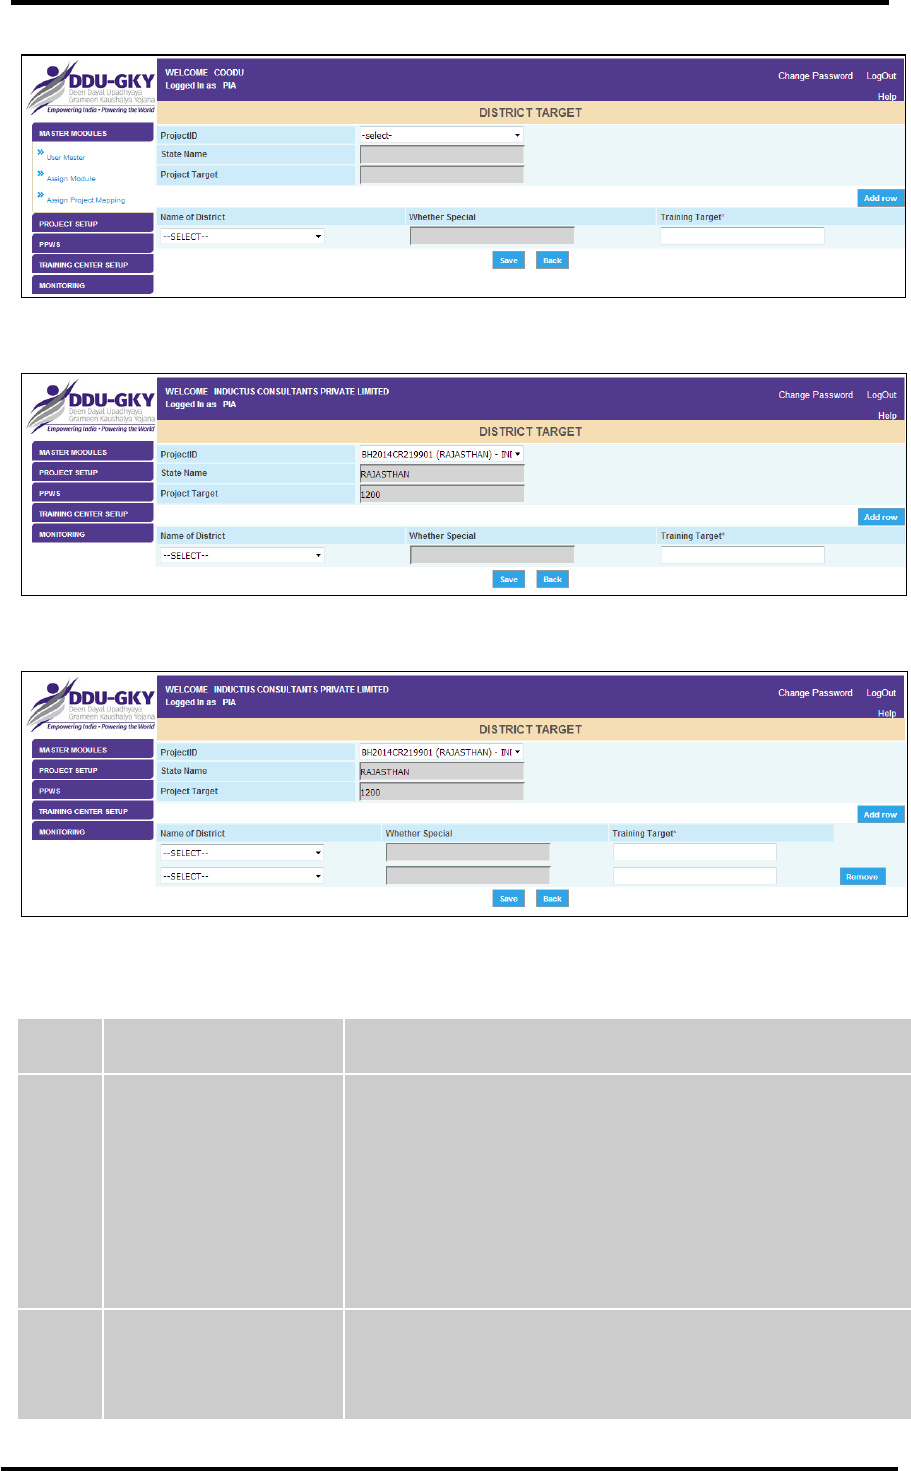
NATIONAL INFORMATICS CENTRE DDU-GKY USER MANUAL VERSION 1.1
NIC-DDUGKY - USER MANUAL 1.1 PAGE 93 OF 160 RELEASE DATE: 30-04-2017
Figure 42 : District Target
Figure 43 : District Target
Figure 44 : District Target (Add Row)
Fields Description
S. No.
Field Name
Explanation
1.
Project ID
Description- This field describes identification number of the
Project. The user can select the Project ID from the drop
down list.
Validation- N/A
Mandatory/Optional- It’s a mandatory field.
2.
Project Target
Description- This field describes the target of the project.
Validation- N/A

NATIONAL INFORMATICS CENTRE DDU-GKY USER MANUAL VERSION 1.1
NIC-DDUGKY - USER MANUAL 1.1 PAGE 94 OF 160 RELEASE DATE: 30-04-2017
S. No.
Field Name
Explanation
Mandatory/Optional- N/A
3.
Name of District
Description- This field describes the name of the district.
Validation- N/A
Mandatory/Optional- It’s a mandatory field.
4.
Whether Special
Description- This field describes the status of district training.
If district training is special then it will be displayed here.
Validation- N/A
Mandatory/Optional- It’s a mandatory field.
5.
Training Target
Description- This field describes the target of the training.
Validation- N/A
Mandatory/Optional- It’s a mandatory field.
Table 23 : Trade Target Form Fields Description
Form Flow
1. The user needs to login on DDUGKY portal by using the authorized user credentials.
2. The user needs to mMove the cursor on the Dashboard option PROJECT SETUP and click.
3. As user will click on PROJECT SETUP, the list of forms associated with this option will get
displayed under it.
4. If user wants to view/add row in Trade Target, move the cursor on the link given as District
Target and click over it. As you take this action, the form named as District Target will open in
non editable form as shown in the figure. To view District Target of a project, the user needs
to select Project ID from the drop down list given under the field Project ID. As the user will
select the Project ID, details related to district target of that project will appear in a tabular
format as shown in the figure.
5. The user can view the details of the district target and add/modify it.
What happens when the form is submitted
N/A
Messages
N/A
5.1.14 PPWS (Entry Form)
General Description
Any authorized user with proper privilege can view and edit details entered in Entry form for PPWS
Setup.
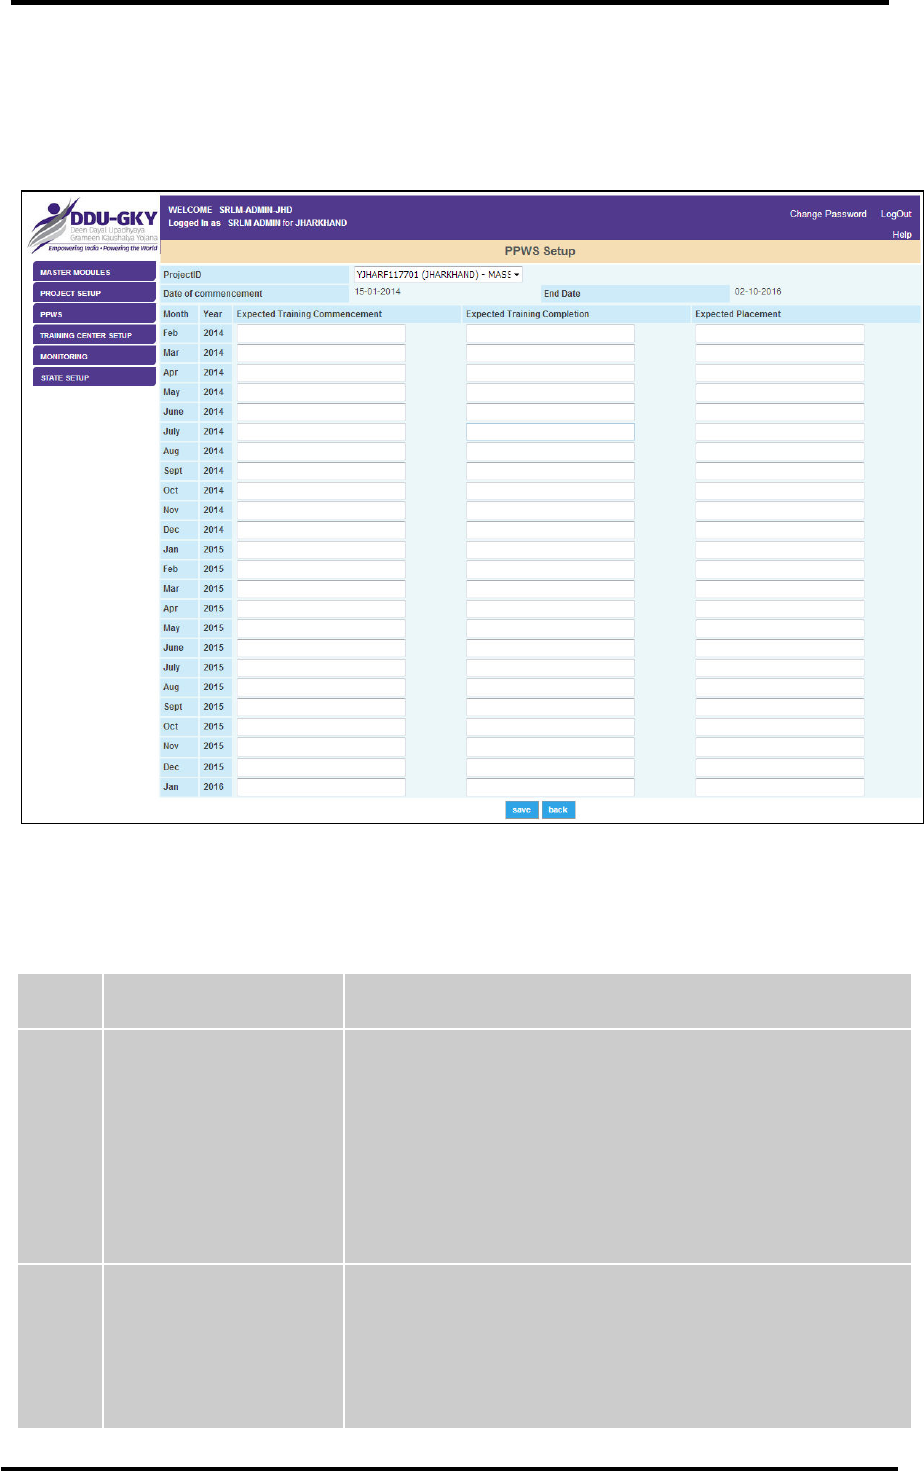
NATIONAL INFORMATICS CENTRE DDU-GKY USER MANUAL VERSION 1.1
NIC-DDUGKY - USER MANUAL 1.1 PAGE 95 OF 160 RELEASE DATE: 30-04-2017
Prerequisites
The user should have access to DDUGKY portal on the Internet and hold a valid User id and
Password to act for DDUGKY.
Screen Shot
Figure 45 : PPWS> Entry Form
Fields Description
S. No.
Field Name
Explanation
1.
Project ID
Description- This field describes identification number of the
Project. SRLM Admin can select the Project ID from the drop
down list.
Validation- N/A
Mandatory/Optional- It’s a mandatory field.
2.
Date of Commencement
Description- This field describes the target of the project.
Validation- N/A
Mandatory/Optional- N/A

NATIONAL INFORMATICS CENTRE DDU-GKY USER MANUAL VERSION 1.1
NIC-DDUGKY - USER MANUAL 1.1 PAGE 96 OF 160 RELEASE DATE: 30-04-2017
S. No.
Field Name
Explanation
3.
End Date
Description- This field describes the name of the district.
Validation- N/A
Mandatory/Optional- It’s a mandatory field.
4.
Expected Training
Commencement
Description- This field describes the date on which the
training is expected to commence.
Validation- N/A
Mandatory/Optional- It’s a mandatory field.
5.
Expected Training
Completion
Description- This field describes the date on which the
training is expected to complete.
Validation- N/A
Mandatory/Optional- It’s a mandatory field.
6.
Expected Placement
Description- This field describes the expected placement
date.
Validation- N/A
Mandatory/Optional- It’s a mandatory field.
Table 24 : PPWS> Entry Form Fields Description
Form Flow
1. The user needs to login on DDUGKY portal by using the authorized user credentials.
2. Move the cursor on the Dashboard option PPWS and click over it.
3. As user will click on PPWS, the list of forms associated with this option will get displayed
under it.
4. If user wants to view/update Entry Form, move the cursor on the link given as Entry Form and
click over it. As user takes this action, the form named as PPWS Setup will open in non
editable form as shown in the figure. To view details of Entry Form of PPWS Setup, the user
needs to select Project ID from the drop down list given under the field Project ID. As the user
will select the Project ID, details related to PPWS Setup will appear in a tabular format. The
user can enter the expected training commencement date, expected training completion date,
expected placement date as per the requirement.
5. The user can view the details of the form and modify it.
What happens when the form is submitted
The details entered in the form will be saved in the record.
Messages
N/A
5.1.15 Batch Creation
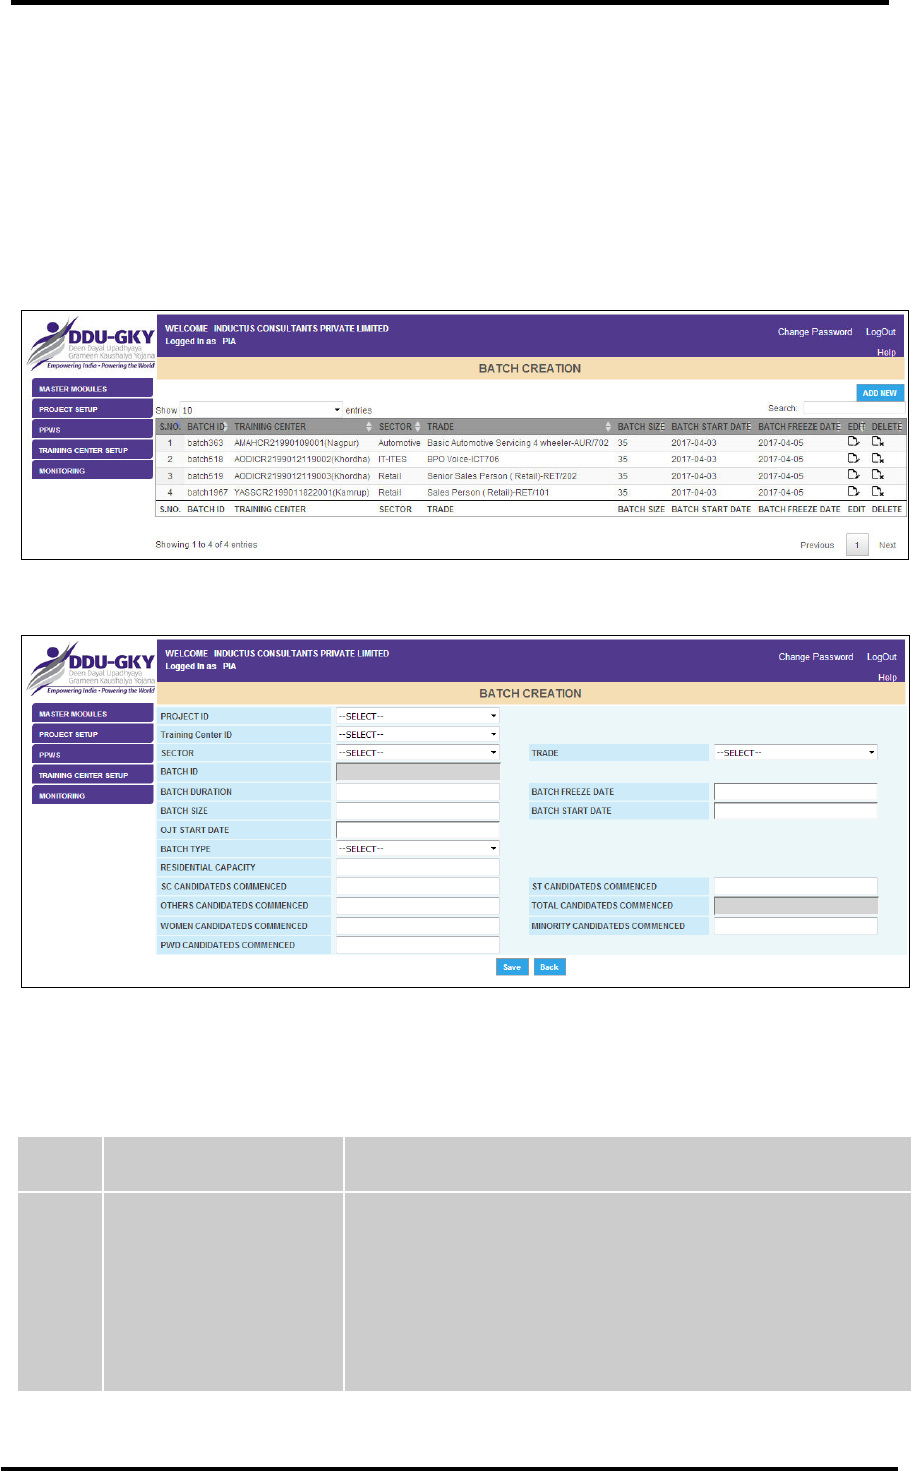
NATIONAL INFORMATICS CENTRE DDU-GKY USER MANUAL VERSION 1.1
NIC-DDUGKY - USER MANUAL 1.1 PAGE 97 OF 160 RELEASE DATE: 30-04-2017
General Description
Any authorized user with proper privilege can view and edit details entered in a training batch. PIA or
PIA user can create the batches.
Prerequisites
The user should have access to DDUGKY portal on the Internet and hold a valid User id and
Password to act for DDUGKY.
Screen Shot
Figure 46 : Batch Creation
Figure 47 : Batch Creation (Add New)
Fields Description
S. No.
Field Name
Explanation
1.
Project ID
Description- This field describes the identification number of
Project.
Validation- N/A
Mandatory/Optional- It’s a mandatory field.

NATIONAL INFORMATICS CENTRE DDU-GKY USER MANUAL VERSION 1.1
NIC-DDUGKY - USER MANUAL 1.1 PAGE 98 OF 160 RELEASE DATE: 30-04-2017
S. No.
Field Name
Explanation
2.
Training Center ID
Description- This field describes the identification number of
training center.
Validation- N/A
Mandatory/Optional- It’s a mandatory field.
3.
Sector
Description- This field describes the sector for which the
training batch has been created.
Validation- N/A
Mandatory/Optional- It’s a mandatory field.
4.
Trade
Description- This field describes the trade on which the
training has to be imparted.
Validation- N/A
Mandatory/Optional- It’s a mandatory field.
5.
Batch ID
Description- This field describes the identification number of
batch of the training.
Validation- N/A
Mandatory/Optional- It’s a mandatory field.
6.
Batch Duration
Description- This field describes the duration of batch of the
training.
Validation- N/A
Mandatory/Optional- It’s a mandatory field.
7.
Batch Freeze Date
Description- This field describes the date of freezing of
batch of the training.
Validation- N/A
Mandatory/Optional- It’s a mandatory field.
8.
Batch Size
Description- This field describes the size of the batch.
Validation- N/A

NATIONAL INFORMATICS CENTRE DDU-GKY USER MANUAL VERSION 1.1
NIC-DDUGKY - USER MANUAL 1.1 PAGE 99 OF 160 RELEASE DATE: 30-04-2017
S. No.
Field Name
Explanation
Mandatory/Optional- It’s a mandatory field.
9.
Batch Start Date
Description- This field describes the date on which the
training batch will start.
Validation- N/A
Mandatory/Optional- It’s a mandatory field.
10.
OJT Start Date
Description- This field describes the date on which the on
job training will start.
Validation- N/A
Mandatory/Optional- It’s a mandatory field.
11.
Batch Type
Description- This field describes the type of the batch.
Validation- N/A
Mandatory/Optional- It’s a mandatory field.
12.
Residential Capacity
Description- This field describes the residential capacity in
the batch.
Validation- N/A
Mandatory/Optional- It’s a mandatory field.
13.
SC Candidates
Commenced
Description- This field describes the number of SC
candidates who were commenced in the training.
Validation- N/A
Mandatory/Optional- It’s a mandatory field.
14.
ST Candidates
Commenced
Description- This field describes the number of ST
candidates who were commenced in the training.
Validation- N/A
Mandatory/Optional- It’s a mandatory field.
15.
Other Candidates
Commenced
Description- This field describes the number of other
candidates who were commenced in the training.
Validation- N/A
Mandatory/Optional- It’s a mandatory field.
16.
Total Candidates
Description- This field describes the number of Total

NATIONAL INFORMATICS CENTRE DDU-GKY USER MANUAL VERSION 1.1
NIC-DDUGKY - USER MANUAL 1.1 PAGE 100 OF 160 RELEASE DATE: 30-04-2017
S. No.
Field Name
Explanation
Commenced
candidates who were commenced in the training.
Validation- N/A
Mandatory/Optional- It’s a mandatory field.
17.
Women Candidates
Commenced
Description- This field describes the number of women
candidates who were commenced in the training.
Validation- N/A
Mandatory/Optional- It’s a mandatory field.
18.
Minority Candidates
Commenced
Description- This field describes the number of minority
candidates who were commenced in the training.
Validation- N/A
Mandatory/Optional- It’s a mandatory field.
19.
PWD Candidates
Commenced
Description- This field describes the number of PWD
candidates who were commenced in the training.
Validation- N/A
Mandatory/Optional- It’s a mandatory field.
Table 25 : Batch Creation Form Fields Description
Form Flow
1. The user needs to login on DDUGKY portal by using the authorized user credentials.
2. Move the cursor on the Dashboard option TRAINING CENTER SETUP and click over it.
3. As user will click on TRAINING CENTER SETUP, the list of forms associated with this option
will get displayed under it.
4. If user wants to view details of Batch Creation, move the cursor on the link given as Batch
Creation and click over it. As user takes this action, the form named as BATCH CREATION
will open in non editable form as shown in the figure. The user can view the details of the
Training Batch appeared on the screen in a tabular format.
5. The user can view the details of the form and modify it.
What happens when the form is submitted
The details entered/edited in the form will be saved in the record.
Messages
N/A
5.1.16 Batch Completion
General Description
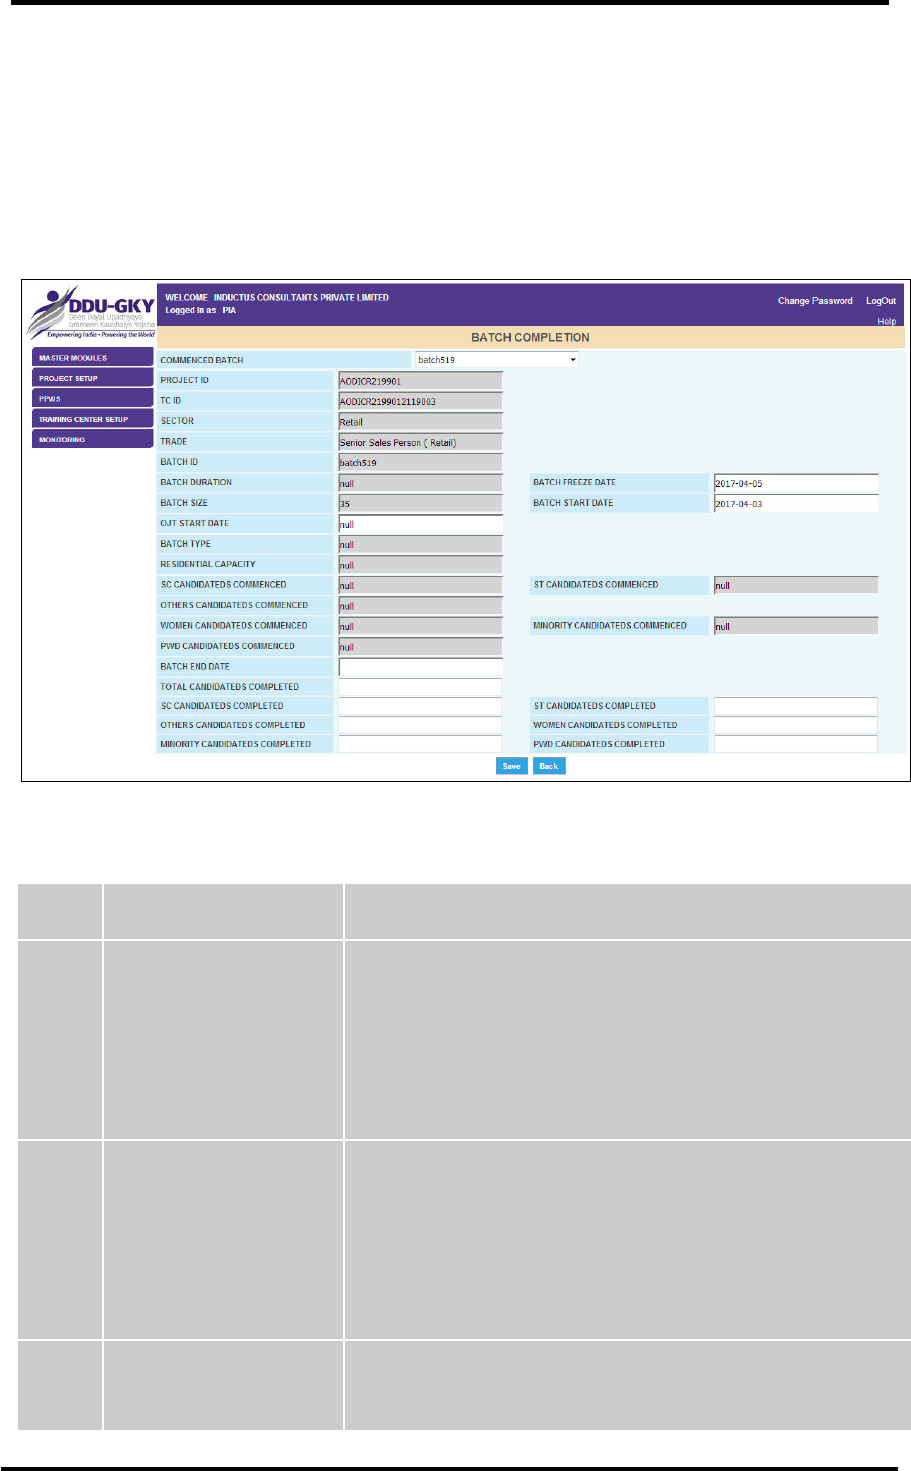
NATIONAL INFORMATICS CENTRE DDU-GKY USER MANUAL VERSION 1.1
NIC-DDUGKY - USER MANUAL 1.1 PAGE 101 OF 160 RELEASE DATE: 30-04-2017
Any authorized user with proper privilege can view and edit details entered in a training batch. PIA or
PIA user can manage the batches.
Prerequisites
The user should have access to DDUGKY portal on the Internet and hold a valid User id and
Password to act for DDUGKY.
Screen Shot
Figure 48 : Batch Completion
Fields Description
S. No.
Field Name
Explanation
1.
Commenced Batch
Description- This field describes the batch of the training
which has been commenced.
Validation- N/A
Mandatory/Optional- It’s a mandatory field.
2.
Project ID
Description- This field describes the identification number of
Project.
Validation- N/A
Mandatory/Optional- It’s a mandatory field.
3.
TC(Training Center) ID
Description- This field describes the identification number of
training center.
NATIONAL INFORMATICS CENTRE DDU-GKY USER MANUAL VERSION 1.1
NIC-DDUGKY - USER MANUAL 1.1 PAGE 102 OF 160 RELEASE DATE: 30-04-2017
S. No.
Field Name
Explanation
Validation- N/A
Mandatory/Optional- It’s a mandatory field.
4.
Sector
Description- This field describes the sector for which the
training batch has been created.
Validation- N/A
Mandatory/Optional- It’s a mandatory field.
5.
Trade
Description- This field describes the trade on which the
training has to be imparted.
Validation- N/A
Mandatory/Optional- It’s a mandatory field.
6.
Batch ID
Description- This field describes the identification number of
batch of the training.
Validation- N/A
Mandatory/Optional- It’s a mandatory field.
7.
Batch Duration
Description- This field describes the duration of batch of the
training.
Validation- N/A
Mandatory/Optional- It’s a mandatory field.
8.
Batch Freeze Date
Description- This field describes the date of freezing of
batch of the training.
Validation- N/A
Mandatory/Optional- It’s a mandatory field.
9.
Batch Size
Description- This field describes the size of the batch.
Validation- N/A
Mandatory/Optional- It’s a mandatory field.
10.
Batch Start Date
Description- This field describes the date on which the
training batch will start.

NATIONAL INFORMATICS CENTRE DDU-GKY USER MANUAL VERSION 1.1
NIC-DDUGKY - USER MANUAL 1.1 PAGE 103 OF 160 RELEASE DATE: 30-04-2017
S. No.
Field Name
Explanation
Validation- N/A
Mandatory/Optional- It’s a mandatory field.
11.
OJT Start Date
Description- This field describes the date on which the on
job training will start.
Validation- N/A
Mandatory/Optional- It’s a mandatory field.
12.
Batch Type
Description- This field describes the type of the batch.
Validation- N/A
Mandatory/Optional- It’s a mandatory field.
13.
Residential Capacity
Description- This field describes the residential capacity in
the batch.
Validation- N/A
Mandatory/Optional- It’s a mandatory field.
14.
SC Candidates
Commenced
Description- This field describes the number of SC
candidates who were commenced in the training.
Validation- N/A
Mandatory/Optional- It’s a mandatory field.
15.
ST Candidates
Commenced
Description- This field describes the number of ST
candidates who were commenced in the training.
Validation- N/A
Mandatory/Optional- It’s a mandatory field.
16.
Others Candidates
Commenced
Description- This field describes the number of other
candidates who were commenced in the training.
Validation- N/A
Mandatory/Optional- It’s a mandatory field.
17.
Women Candidates
Commenced
Description- This field describes the number of women
candidates who were commenced in the training.
Validation- N/A
Mandatory/Optional- It’s a mandatory field.

NATIONAL INFORMATICS CENTRE DDU-GKY USER MANUAL VERSION 1.1
NIC-DDUGKY - USER MANUAL 1.1 PAGE 104 OF 160 RELEASE DATE: 30-04-2017
S. No.
Field Name
Explanation
18.
Minority Candidates
Commenced
Description- This field describes the number of minority
candidates who were commenced in the training.
Validation- N/A
Mandatory/Optional- It’s a mandatory field.
19.
PWD Candidates
Commenced
Description- This field describes the number of PWD
candidates who were commenced in the training.
Validation- N/A
Mandatory/Optional- It’s a mandatory field.
20.
Batch End Date
Description- This field describes the end date of the batch of
the training.
Validation- N/A
Mandatory/Optional- It’s a mandatory field.
21.
Total Candidates
Completed
Description- This field describes the number of total
candidates who completed the training.
Validation- N/A
Mandatory/Optional- It’s a mandatory field.
Table 26 : Batch Creation Form Fields Description
Form Flow
1. The user needs to login on DDUGKY portal by using the authorized user credentials.
2. Move the cursor on the Dashboard option TRAINING CENTER SETUP and click over it.
3. As user will click on TRAINING CENTER SETUP, the list of forms associated with this option
will get displayed under it.
4. If user wants to view details of Batch Creation, move the cursor on the link given as Batch
Creation and click over it. As user takes this action, the form named as BATCH CREATION
will open in non editable form as shown in the figure. The user can view the details of the
Training Batch appeared on the screen in a tabular format.
5. The user can view the details of the form and modify it.
What happens when the form is submitted
The details entered/edited in the form will be saved in the record.
Messages
N/A
5.1.17 Training Centre Setup
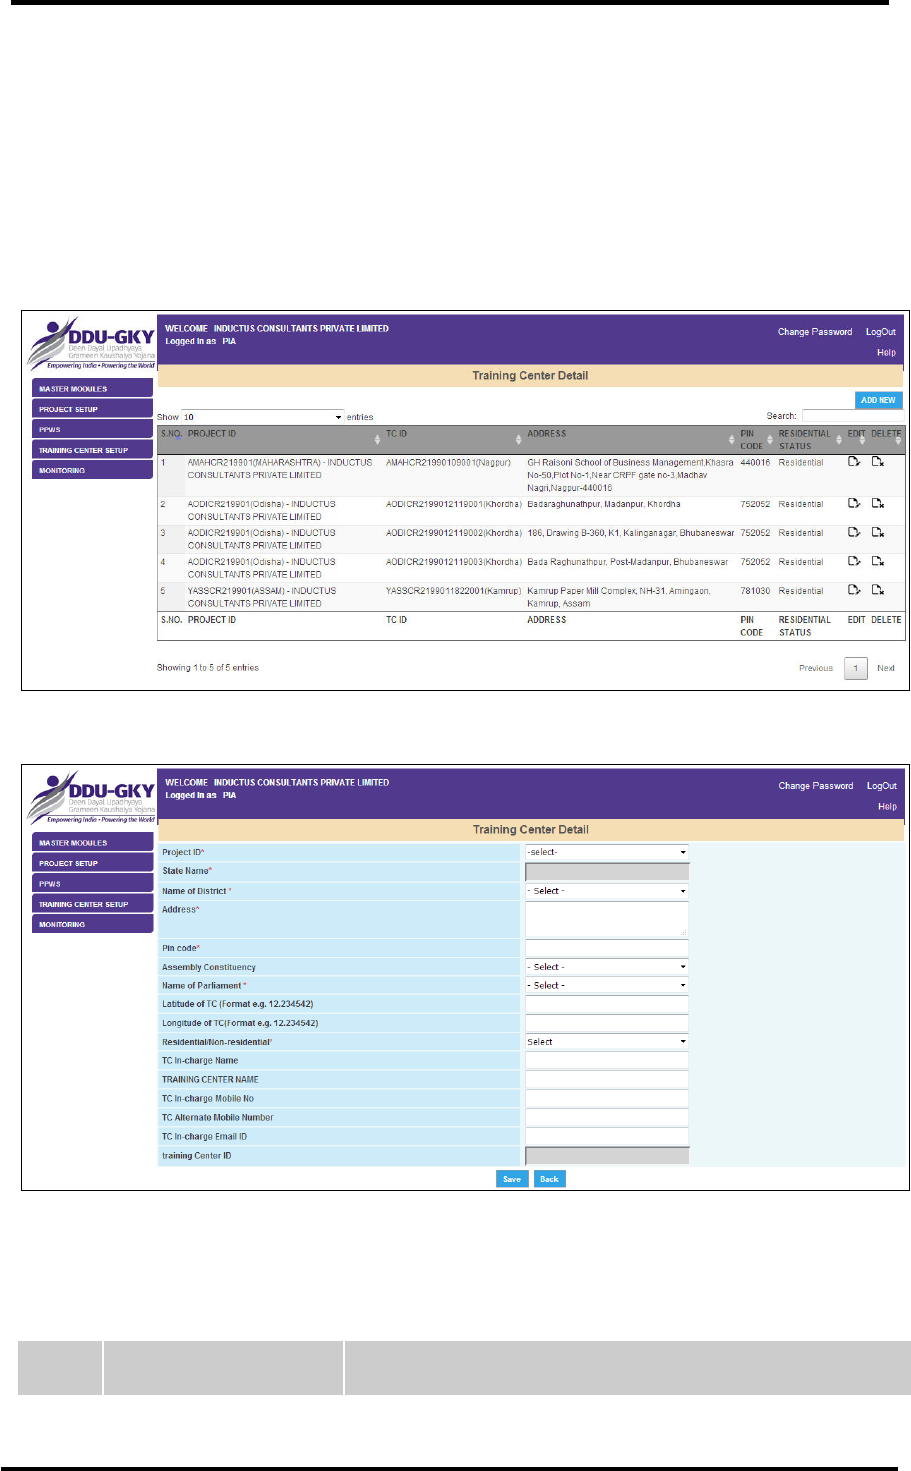
NATIONAL INFORMATICS CENTRE DDU-GKY USER MANUAL VERSION 1.1
NIC-DDUGKY - USER MANUAL 1.1 PAGE 105 OF 160 RELEASE DATE: 30-04-2017
General Description
Any authorized user with required privilege can view and edit the details of a training center. PIA can
manage the Training Center Setup.
Prerequisites
The user should have access to DDUGKY portal on the Internet and hold a valid User id and
Password to act for DDUGKY.
Screen Shot
Figure 49 : Training Center Details
Figure 50 : Training Center Details (Add New)
Fields Description
S. No.
Field Name
Explanation

NATIONAL INFORMATICS CENTRE DDU-GKY USER MANUAL VERSION 1.1
NIC-DDUGKY - USER MANUAL 1.1 PAGE 106 OF 160 RELEASE DATE: 30-04-2017
S. No.
Field Name
Explanation
1.
Project Id
Description- This field describes the identification number of
the project for which training center has been setup.
Validation- N/A
Mandatory/Optional- It’s a mandatory field.
2.
State Name
Description- This field describes the State where training
center has been setup.
Validation- N/A
Mandatory/Optional- It’s a mandatory field.
3.
Name of District
Description- This field describes the District of the State
where training center has been setup.
Validation- N/A
Mandatory/Optional- It’s a mandatory field.
4
Address
Description- This field describes the address where training
center has been setup.
Validation- N/A
Mandatory/Optional- It’s a mandatory field.
5
Pin Code
Description- This field describes the pin code of the address
where training center has been setup.
Validation- N/A
Mandatory/Optional- It’s a mandatory field.
6
Assembly Constituency
Description- This field describes the Assembly Constituency
where training center has been setup.
Validation- N/A
Mandatory/Optional- It’s a mandatory field.
7
Name of Parliament
Description- This field describes the Name of the Parliament
Constituency where training center has been setup.
NATIONAL INFORMATICS CENTRE DDU-GKY USER MANUAL VERSION 1.1
NIC-DDUGKY - USER MANUAL 1.1 PAGE 107 OF 160 RELEASE DATE: 30-04-2017
S. No.
Field Name
Explanation
Validation- N/A
Mandatory/Optional- It’s a mandatory field.
8
Latitude of TC
Description- This field describes the latitude of the address
where training center has been setup.
Validation- N/A
Mandatory/Optional- It’s a mandatory field.
9
Longitude of TC
Description- This field describes the longitude of the
address where training center has been setup.
Validation- N/A
Mandatory/Optional- It’s a mandatory field.
10
Residential/Non
Residential
Description- This field describes whether training center
setup is residential/non residential.
Validation- N/A
Mandatory/Optional- It’s a mandatory field.
11
TC in-charge Name
Description- This field describes the name of the in charge
of training center that has been setup.
Validation- N/A
Mandatory/Optional- It’s a mandatory field.
12
Training Center Name
Description- This field describes the name of the training
center that has been setup.
Validation- N/A
Mandatory/Optional- It’s a mandatory field.
13
TC In-Charge Mobile
No.
Description- This field describes the mobile number of the in
charge of training center.
Validation- N/A
Mandatory/Optional- It’s a mandatory field.

NATIONAL INFORMATICS CENTRE DDU-GKY USER MANUAL VERSION 1.1
NIC-DDUGKY - USER MANUAL 1.1 PAGE 108 OF 160 RELEASE DATE: 30-04-2017
S. No.
Field Name
Explanation
14
TC Alternate Mobile No.
Description- This field describes the alternate mobile
number of the in charge of training center.
Validation- N/A
Mandatory/Optional- It’s a mandatory field.
15
TC In-Charge Email Id
Description- This field describes the email id of the in
charge of training center.
Validation- N/A
Mandatory/Optional- It’s a mandatory field.
16
Training Center ID
Description- This field describes the identification number of
training center.
Validation- N/A
Mandatory/Optional- It’s a mandatory field.
Table 27 : Training Center Setup Form Fields Description
Form Flow
1. The user needs to login on DDUGKY portal by using the authorized user credentials.
2. Move the cursor on the Dashboard option TRAINING CENTER SETUP and click over it.
3. As user will click on TRAINING CENTER SETUP, the list of forms associated with this option
will get displayed under it.
4. If user wants to view details of Training Center, move the cursor on the link given as Training
Center Setup and click over it. As user takes this action, the form named as Training Center
Details will open in non editable form as shown in the figure. The user can view the details of
the Training Center appeared on the screen in a tabular format.
5. The user can view the details of the form and modify it.
What happens when the form is submitted
N/A
Messages
N/A
5.1.18 Tc Setup Due Diligence (Training Center Due Diligence)
General Description
Any authorized user with required privilege can view and edit the details about the work performed by
training centers. CTSA, SRLM Admin, SRLM User can manage Tc setup due diligence.
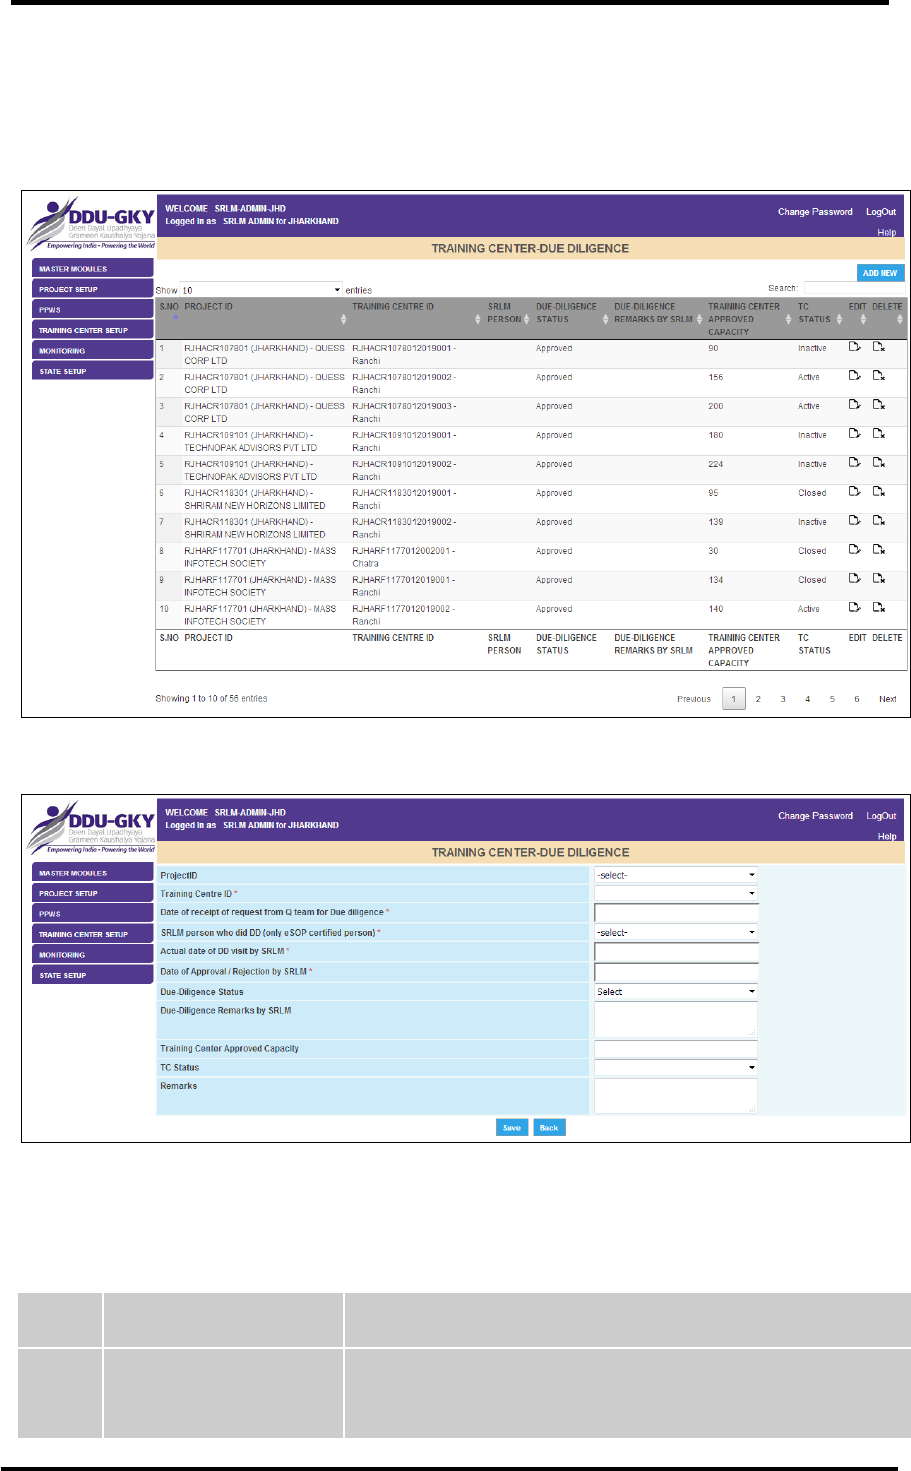
NATIONAL INFORMATICS CENTRE DDU-GKY USER MANUAL VERSION 1.1
NIC-DDUGKY - USER MANUAL 1.1 PAGE 109 OF 160 RELEASE DATE: 30-04-2017
Prerequisites
The user should have access to DDUGKY portal on the Internet and hold a valid User id and
Password to act for DDUGKY.
Screen Shot
Figure 51 : Training Center Due Diligence
Figure 52 : Training Center Due Diligence (Add New)
Fields Description
S. No.
Field Name
Explanation
1.
Project Id
Description- This field describes the identification number of
the project for which training center has to provide training.
NATIONAL INFORMATICS CENTRE DDU-GKY USER MANUAL VERSION 1.1
NIC-DDUGKY - USER MANUAL 1.1 PAGE 110 OF 160 RELEASE DATE: 30-04-2017
S. No.
Field Name
Explanation
Validation- N/A
Mandatory/Optional- It’s a mandatory field.
2.
Training Center ID
Description- This field describes the identification number of
the training center.
Validation- N/A
Mandatory/Optional- It’s a mandatory field.
3.
Date of receipt of
request from Q team for
Due diligence *
Description- This field describes the date on which Q Teams
request for due diligence has been received.
Validation- N/A
Mandatory/Optional- It’s a mandatory field.
4.
SRLM person who did
DD (only eSOP certified
person) *
Description- This field describes the SRLM person who did
due diligence.
Validation- N/A
Mandatory/Optional- It’s a mandatory field.
5.
Actual date of DD visit
by SRLM *
Description- This field describes the date on which SRLM
visited for Due Diligence.
Validation- N/A
Mandatory/Optional- It’s a mandatory field.
6.
Date of Approval /
Rejection by SRLM *
Description- This field describes the date of
approval/rejection by SRLM.
Validation- N/A
Mandatory/Optional- It’s a mandatory field.
7.
Due Diligence Status
Description- This field describes the status of the training
center about due diligence.
Validation- N/A
Mandatory/Optional- It’s a mandatory field.

NATIONAL INFORMATICS CENTRE DDU-GKY USER MANUAL VERSION 1.1
NIC-DDUGKY - USER MANUAL 1.1 PAGE 111 OF 160 RELEASE DATE: 30-04-2017
S. No.
Field Name
Explanation
8.
Due Diligence Remarks
by SRLM
Description- This field describes the remarks given by
SRLM Admin about due diligence of the training center.
Validation- N/A
Mandatory/Optional- It’s a mandatory field.
9.
Training Center
Approved Capacity
Description- This field describes the approved capacity of
the training center.
Validation- N/A
Mandatory/Optional- It’s a mandatory field.
10.
TC STATUS
Description- This field describes the status of the training
center.
Validation- N/A
Mandatory/Optional- It’s a mandatory field.
11.
Remarks
Description- This field describes the Remarks.
Validation- N/A
Mandatory/Optional- It’s a mandatory field.
Table 28 : Training Center Due Diligence Form Fields Description
Form Flow
1. The user needs to login on DDUGKY portal by using the authorized user credentials.
2. Move the cursor on the Dashboard option TRAINING CENTER SETUP and click over it.
3. As user will click on TRAINING CENTER SETUP, the list of forms associated with this option
will get displayed under it.
4. If user wants to view details of Due Diligence of Training Center, move the cursor on the link
given as TC Setup due diligence and click over it. As user takes this action, the form named
as TRAINING CENTER–DUE DILIGENCE will open in non editable form as shown in the
figure. The user can view the details of the due diligence of Training Center appeared on the
screen in a tabular format.
5. The user can view the details of the form and modify it.
What happens when the form is submitted
The details entered/edited in the form will be saved in the record.
Messages
N/A
5.1.19 Tc Setup Trade
General Description

NATIONAL INFORMATICS CENTRE DDU-GKY USER MANUAL VERSION 1.1
NIC-DDUGKY - USER MANUAL 1.1 PAGE 112 OF 160 RELEASE DATE: 30-04-2017
Any authorized user with required privilege can view and edit the details of trade targets of training
centers. PIA, PIA user can manage Tc setup trade.
Prerequisites
The user should have access to DDUGKY portal on the Internet and hold a valid User id and
Password to act for DDUGKY.
Screen Shot
Figure 53 : TC Setup Trade
Figure 54 : TC Setup Trade (Add Row)
Fields Description
S. No.
Field Name
Explanation
1.
Project Id
Description- This field describes the identification number of
the project for which training center has to provide training.
The user can select the Project Id from the drop down list.
Validation- N/A
Mandatory/Optional- It’s a mandatory field.
2.
Training Center ID
Description- This field describes the identification number of
the training center. The user can select the Training center Id
from the drop down list.

NATIONAL INFORMATICS CENTRE DDU-GKY USER MANUAL VERSION 1.1
NIC-DDUGKY - USER MANUAL 1.1 PAGE 113 OF 160 RELEASE DATE: 30-04-2017
S. No.
Field Name
Explanation
Validation- N/A
Mandatory/Optional- It’s a mandatory field.
3.
Training Center
Approved Target
Description- This field describes the approved target of the
training center.
Validation- N/A
Mandatory/Optional- N/A
4.
Sector
Description- This field describes the sector in which the
training is imparted.
Validation- N/A
Mandatory/Optional- N/A
5.
Trade Code & Name
Description- This field describes the trade Code and name
in which the training is imparted.
Validation- N/A
Mandatory/Optional- N/A
6.
Approved Trade Target
Description- This field describes the approved trade target
of the training center.
Validation- N/A
Mandatory/Optional- N/A
Table 29 : TC Setup Trade Form Fields Description
Form Flow
1. The user needs to login on DDUGKY portal by using the authorized user credentials.
2. Move the cursor on the Dashboard option TRAINING CENTER SETUP and click over it.
3. As user will click on TRAINING CENTER SETUP, the list of forms associated with this option
will get displayed under it.
4. If user wants to view details of trade setup of Training Center, move the cursor on the link
given as TC Setup Trade and click over it. As user takes this action, the form named as
Training Center-Trade Target will open in non editable form as shown in the figure. The user
can view the details of the trade setup of Training Center appeared on the screen in a tabular
format.
5. The user can view the details of the form and modify it.
What happens when the form is submitted
The details entered in the form will be saved in the record.
Messages
N/A

NATIONAL INFORMATICS CENTRE DDU-GKY USER MANUAL VERSION 1.1
NIC-DDUGKY - USER MANUAL 1.1 PAGE 114 OF 160 RELEASE DATE: 30-04-2017
5.1.20 Ppws achievement (Placed)
General Description
Any authorized user with required privilege can view and edit the details of project plan work schedule
(PPWS) achievement of placement.
Prerequisites
The user should have access to DDUGKY portal on the Internet and hold a valid User id and
Password to act for DDUGKY.
Screen Shot
Figure 55 : Ppws achievement (Placed)
Fields Description
S. No.
Field Name
Explanation
1.
Project ID
Description- This field describes the identification number of
the project (Project ID) for which placement after the training
has been given. Select the Project ID from the drop down list.
Validation- N/A
Mandatory/Optional- It’s a mandatory field.
2.
Training Center Id
Description- This field describes the identification number of
the training Center. Select the Training Id from the drop down
list.
Validation- N/A
Mandatory/Optional- It’s a mandatory field.
3
Batch ID
Description- This field describes the identification number of
the batch of the training.
Validation- N/A
Mandatory/Optional- It’s a mandatory field.
4
Appointed
Description- This field describes the candidates appointed
after the training.
Validation- N/A

NATIONAL INFORMATICS CENTRE DDU-GKY USER MANUAL VERSION 1.1
NIC-DDUGKY - USER MANUAL 1.1 PAGE 115 OF 160 RELEASE DATE: 30-04-2017
S. No.
Field Name
Explanation
Mandatory/Optional- It’s a mandatory field.
5
Candidate Placed
Description- This field describes the candidates placed after
the training.
Validation- N/A
Mandatory/Optional- It’s a mandatory field.
6
Candidate Assessed
Description- This field describes the candidates assessed
after the training.
Validation- N/A
Mandatory/Optional- It’s a mandatory field.
7
Candidate Certified
Description- This field describes the candidates certified
after the training.
Validation- N/A
Mandatory/Optional- It’s a mandatory field.
Table 30 : Ppws achievement (Placed) Form Fields Description
Form Flow
1. The user needs to login on DDUGKY portal as SRLM Admin by using the authorized user
credentials.
2. Move the cursor on the Dashboard option MONITORING and click over it.
3. As user will click on MONITORING, the list of forms associated with this option will get
displayed under it.
4. If user wants to view details of project plan work schedule (PPWS) achievement of Placement
after Training, move the cursor on the link given as Ppws achievement (Placed) and click over
it. As user takes this action, the form named as MONITORING-PPWS ACHIEVEMENT
(PLACED) will open in non editable form as shown in the figure. The user can view the details
of the trade setup of Ppws achievement of Placement after Training by following the steps
given below:
Step 1 – Select the year from the drop down list given under the field Year.
Step 2 – Select the month from the drop down list given under the field Month.
Step 3 – Select the identification number of the project (Project Id) from the drop down list given
under the field Project ID.
Step 4 – Select the identification number of the training (Training Id) from the drop down list given
under the field Training Id.
After selecting values for all the form fields, the figures related to project plan work schedule
(PPWS) achievement of placement after training will appear in a tabular format.
What happens when the form is submitted
The details entered in the form will be saved in the record.
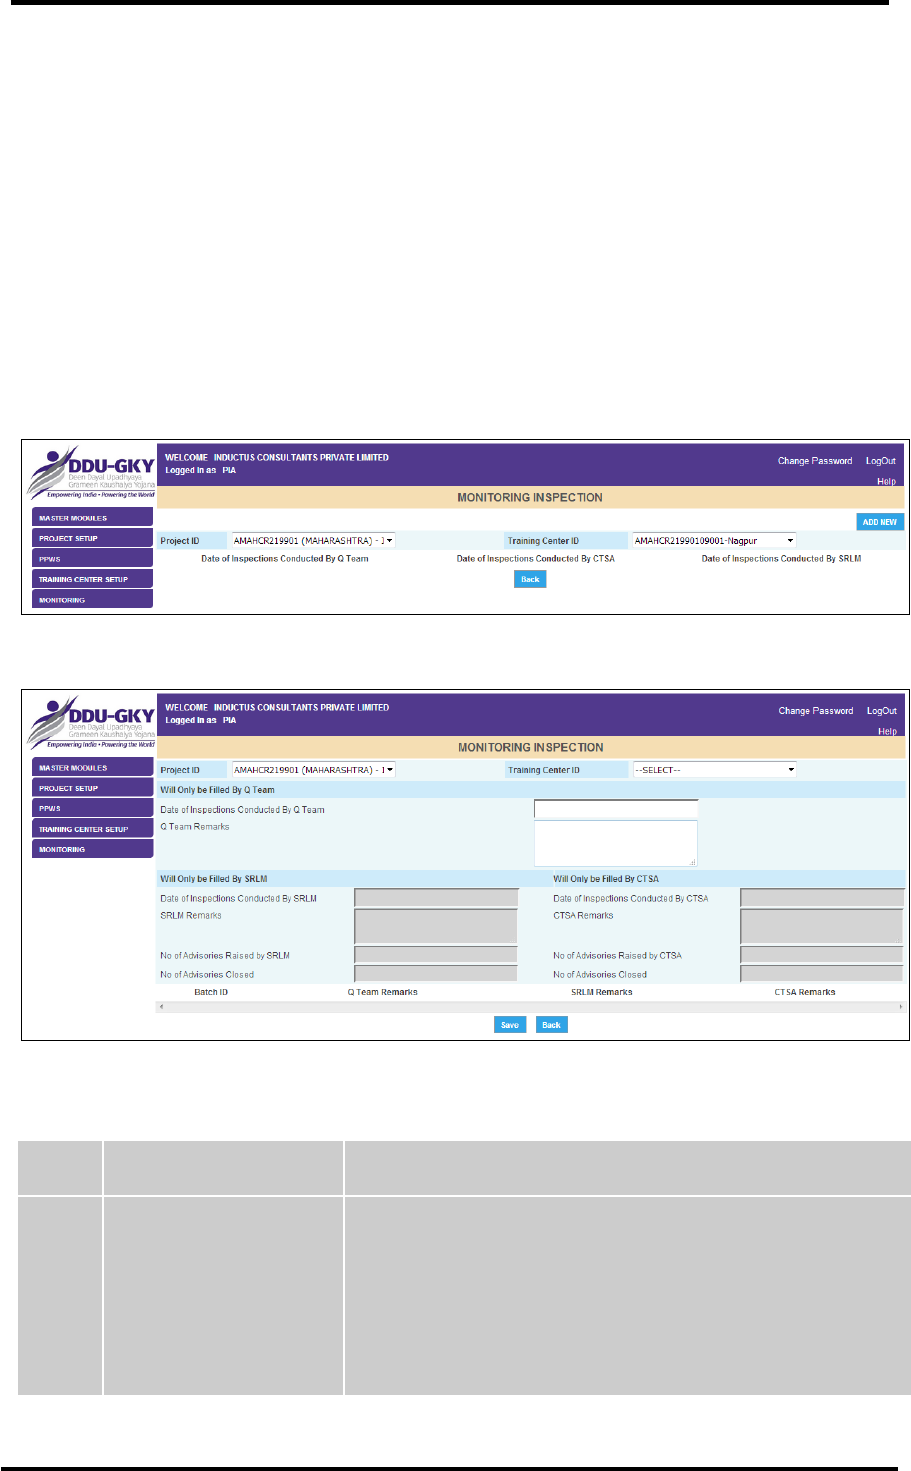
NATIONAL INFORMATICS CENTRE DDU-GKY USER MANUAL VERSION 1.1
NIC-DDUGKY - USER MANUAL 1.1 PAGE 116 OF 160 RELEASE DATE: 30-04-2017
Messages
N/A
5.1.21 MONITORING (Inspection)
General Description
Any authorized user with required privilege can view and edit details of inspection performed to
monitor the progress of the project.
Prerequisites
The user should have access to DDUGKY portal on the Internet and hold a valid User id and
Password to act as a State Rural Livelihood Mission (SRLM) Admin for DDUGKY.
Screen Shot
Figure 56 : Inspection
Figure 57 : Inspection
Fields Description
S. No.
Field Name
Explanation
1.
Project ID
Description- This field describes the identification number of
the project (Project ID) for which inspection was performed.
Select the Project ID from the drop down list.
Validation- N/A
Mandatory/Optional- It’s a mandatory field.
NATIONAL INFORMATICS CENTRE DDU-GKY USER MANUAL VERSION 1.1
NIC-DDUGKY - USER MANUAL 1.1 PAGE 117 OF 160 RELEASE DATE: 30-04-2017
S. No.
Field Name
Explanation
2.
Training Center Id
Description- This field describes the identification number of
the training center. Select the Training center Id from the
drop down list.
Validation- N/A
Mandatory/Optional- It’s a mandatory field.
3.
Date of Inspections
Conducted by Q Team
Description- This field describes the dates on which
inspections were conducted by Q Team.
Validation- N/A
Mandatory/Optional- N/A
4.
Q Team Remarks
Description- This field describes the remarks given by Q
Team.
Validation- N/A
Mandatory/Optional- N/A
5.
Date of Inspections
Conducted by SRLM
Description- This field describes the dates on which
inspections were conducted by SRLM.
Validation- N/A
Mandatory/Optional- N/A
6.
SRLM Remarks
Description- This field describes the remarks given by
SRLM.
Validation- N/A
Mandatory/Optional- N/A
7.
No. of Advisories raised
by SRLM
Description- This field describes the number of advisories
raised by SRLM.
Validation- N/A
Mandatory/Optional- N/A
8.
No. of Advisories Closed
Description- This field describes the number of advisories
closed.
Validation- N/A
Mandatory/Optional- N/A
9.
Date of Inspections
Conducted by CTSA
Description- This field describes the dates on which
inspections were conducted by CTSA.
Validation- N/A

NATIONAL INFORMATICS CENTRE DDU-GKY USER MANUAL VERSION 1.1
NIC-DDUGKY - USER MANUAL 1.1 PAGE 118 OF 160 RELEASE DATE: 30-04-2017
S. No.
Field Name
Explanation
Mandatory/Optional- N/A
10.
CTSA Remarks
Description- This field describes the remarks given by
CTSA.
Validation- N/A
Mandatory/Optional- N/A
11.
No. of Advisories raised
by CTSA
Description- This field describes the number of advisories
raised by CTSA.
Validation- N/A
Mandatory/Optional- N/A
12.
No. of Advisories Closed
Description- This field describes the number of advisories
closed by CTSA.
Validation- N/A
Mandatory/Optional- N/A
Table 31 : Inspection Form Fields Description
Form Flow
1. The user needs to login on DDUGKY portal by using the authorized user credentials.
2. Move the cursor on the Dashboard option MONITORING and click over it.
3. As user will click on MONITORING, the list of forms associated with this option will get
displayed under it.
4. If user wants to view or update details of Inspection, move the cursor on the link given as
Inspection and click over it. As user takes this action, the form named as MONITORING
INSPECTION will open in editable mode. The user needs to follow the steps given below.
5. Select the year from the drop down list given under the field “Year”.
6. Select the month from the drop down list given under the field “Month”.
7. Select the project Id from the drop down list given under the field “Project ID”.
8. Select the training center ID from the drop down list given under the field “Training Center ID”.
9. After selecting values for these form fields, data will get populated in the grid displayed in the
form.
10. The user can take action according to the permissions given to them.
What happens when the form is submitted
1. If user wants to update the details of the form, click on the button ‘Update’ to save the details
of the form.
2. If user doesn’t want to update the details of the form then click on the button ‘Close’.
Messages
While working with the form, you may encounter some messages. Expected actions for the removal of
errors are given in the table below:

NATIONAL INFORMATICS CENTRE DDU-GKY USER MANUAL VERSION 1.1
NIC-DDUGKY - USER MANUAL 1.1 PAGE 119 OF 160 RELEASE DATE: 30-04-2017
S. No.
Message
Reason
Expected Action
1.
ARE YOU SURE
YOU WANT TO
UPDATE?
You have clicked on the
button ‘Update’.
You need to click on the button
‘OK’ if you are confirm about the
details of the form but if you still
want to take a review of the form
then click on the button ‘Cancel’.
Table 32 : Inspection> Messages
5.1.22 MONITORING (Installment)
General Description
Any authorized user with required privilege can view and edit details of installments.
Prerequisites
The user should have access to DDUGKY portal on the Internet and hold a valid User id and
Password to act for DDUGKY.
Screen Shot
Figure 58 : Installment
Fields Description
S. No.
Field Name
Explanation
1.
Project ID
Description- This field describes the identification number of
the project (Project ID) for which installment has to be given.
Project ID will be displayed in the box.
Validation- N/A
Mandatory/Optional- N/A
2.
Amount Released
Description- This field describes the amount released for the

NATIONAL INFORMATICS CENTRE DDU-GKY USER MANUAL VERSION 1.1
NIC-DDUGKY - USER MANUAL 1.1 PAGE 120 OF 160 RELEASE DATE: 30-04-2017
S. No.
Field Name
Explanation
project.
Validation- Only numeric characters can be entered.
Mandatory/Optional- It’s a mandatory field.
3.
Date of Release
Description- The date of release of the installment will be
displayed under this field.
Validation- N/A
Mandatory/Optional- It’s a mandatory field.
4.
Utilization in %
Description- The percentage of utilization of the installment
will be displayed under this field.
Validation- N/A
Mandatory/Optional- It’s a mandatory field.
5.
Remarks (If any)
Description- This field describes the space provided in the
grid to enter the remarks.
Validation- N/A
Mandatory/Optional- It’s an optional field.
Table 33 : Installment Form Fields Description
Form Flow
1. The user needs to login on DDUGKY portal by using the authorized user credentials.
2. Move the cursor on the Dashboard option MONITORING and click over it.
3. As user will click on MONITORING, the list of forms associated with this option will get
displayed under it.
4. If user wants to view or update details of Installment, move the cursor on the link given as
Installment and click over it. As user takes this action, the form named as INSTALLMENT will
open in editable mode.
5. Project identification number (Project ID) will be displayed under the column field “Project ID”.
6. Enter the amount released for the project in the text box given under the field “Amount
Released”.
7. Select the date of release of installment from the calendar control given under the field “Date
of Release”.
8. Enter the remarks related to the installment in the text box given under the field “Remarks (If
any)”.
9. Click on the button ‘Save’ to save the details of the form.
What happens when the form is submitted
1. If user wants to save/update the details of the form, click on the button ‘Save’/‘Update’ to save
the details of the form.

NATIONAL INFORMATICS CENTRE DDU-GKY USER MANUAL VERSION 1.1
NIC-DDUGKY - USER MANUAL 1.1 PAGE 121 OF 160 RELEASE DATE: 30-04-2017
2. If user doesn’t want to save/update the details of the form then click on the button ‘Close’.
Messages
While working with the form, user may encounter some messages. Expected actions for the removal
of errors are given in the table below:
S. No.
Message
Reason
Expected Action
1.
ARE YOU SURE
YOU WANT TO
UPDATE?
You have clicked on the
button ‘Update’.
You need to click on the button
‘OK’ if you are confirm about the
details of the form but if you still
want to take a review of the form
then click on the button ‘Cancel’.
Table 34 : Installment> Messages
5.1.23 MONITORING (Project Alerts)
General Description
Any authorized user with required privilege can view and edit details related to Project Alerts.
Prerequisites
The user should have access to DDUGKY portal on the Internet and hold a valid User id and
Password to act for DDUGKY.
Screen Shot
Figure 59 : Project Alerts

NATIONAL INFORMATICS CENTRE DDU-GKY USER MANUAL VERSION 1.1
NIC-DDUGKY - USER MANUAL 1.1 PAGE 122 OF 160 RELEASE DATE: 30-04-2017
Figure 60 : Project Alerts
Fields Description
S. No.
Field Name
Explanation
1.
Project ID
Description- This field describes the identification number of
the project (Project ID). Project ID will be displayed in the
box.
Validation- N/A
Mandatory/Optional- N/A
2.
Type of Alert/SCN
Description- This field describes the Type of Alert/SCN.
Select the type from the drop down list.
Validation- N/A
Mandatory/Optional- It’s a mandatory field.
3.
Date of Issue of
Alert/SCN
Description- This field describes the date of issue of
Alert/SCN. Select the date from the calendar control.
Validation- N/A
Mandatory/Optional- It’s a mandatory field.
4.
Category of Reason
Description- This field describes the category of the reason.
Select from the drop down list.
Validation- N/A
Mandatory/Optional- It’s a mandatory field.
5.
Reason for Issuing
Alert/Show Cause
Description- This field describes the reason for issuing
alert/show cause. Enter the reason in the given text box.

NATIONAL INFORMATICS CENTRE DDU-GKY USER MANUAL VERSION 1.1
NIC-DDUGKY - USER MANUAL 1.1 PAGE 123 OF 160 RELEASE DATE: 30-04-2017
S. No.
Field Name
Explanation
Validation- Alphabets can be entered.
Mandatory/Optional- It’s an optional field.
6.
Issuing Agency
Description- This field describes the agency who has issues
Project Alert. Select from the drop down list.
Validation- N/A
Mandatory/Optional- It’s a mandatory field.
7.
Date of Reply from PIA
Description- This field describes the date of reply given by
PIA with respect to Alert/SCN. Select the date from the
calendar control.
Validation- N/A
Mandatory/Optional- It’s a mandatory field.
8.
Reply from PIA
Description- This field describes the reply given by PIA with
respect to alert/show cause. Enter the reply in the given text
box.
Validation- Alphabets can be entered.
Mandatory/Optional- It’s an optional field.
9.
Status
Description- This field describes the status of the project
alert/show cause.
Validation- N/A
Mandatory/Optional- It’s a mandatory field.
10.
Date of Communication
of PIA
Description- This field describes the date of Communication
of PIA with respect to Alert/SCN. Select the date from the
calendar control.
Validation- N/A
Mandatory/Optional- It’s a mandatory field.
11.
Remarks
Description- This field describes the remarks of PIA with
respect to Alert/SCN.
Validation- N/A
Mandatory/Optional- It’s an optional field.
Table 35 : Project Alerts Form Fields Description
Form Flow
1. The user needs to login on DDUGKY portal by using the authorized user credentials.
2. Move the cursor on the Dashboard option MONITORING and click over it.

NATIONAL INFORMATICS CENTRE DDU-GKY USER MANUAL VERSION 1.1
NIC-DDUGKY - USER MANUAL 1.1 PAGE 124 OF 160 RELEASE DATE: 30-04-2017
3. As user will click on MONITORING, the list of forms associated with this option will get
displayed under it.
4. If user wants to view or update details of Project Alerts, move the cursor on the link given as
Project Alerts and click over it. As user takes this action, the form named as PROJECT
ALERTS will open.
5. The user can add a new project alert by using the button ‘Add New’. As the user will click on
the button ‘ADD NEW’, a blank form named as PROJECT ALERTS will open. The user
needs to enter the values in the form fields and then click on the button ‘Save’.
6. The user can edit an existing project alert by using the button ‘EDIT’. As the user will click on
the button ‘EDIT’, the form PROJECT ALERTS will open in editable mode with existing
values of all the form fields. The user can edit the values of all the form fields as per
requirement. After editing the values of the form fields, the user needs to click on the button
‘Update’ to update the details of the form.
7. The user can use the button ‘Back’ to move to the previous screen.
What happens when the form is submitted
If user wants to save/update the details of the form, click on the button ‘Save’/‘Update’ to save the
record.
Messages
While working with the form, user may encounter some messages. Expected actions for the removal
of errors are given in the table below:
S. No.
Message
Reason
Expected Action
1.
ARE YOU SURE
YOU WANT TO
UPDATE?
You have clicked on the
button ‘Update’.
You need to click on the button
‘OK’ if you are confirm about the
details of the form but if you still
want to take a review of the form
then click on the button ‘Cancel’.
Table 36 : Project Alerts> Messages
5.1.24 MONITORING (Project Penalties)
General Description
Any authorized user with required privilege can view and edit details related to Project Penalties.
Prerequisites
The user should have access to DDUGKY portal on the Internet and hold a valid User id and
Password to act for DDUGKY.
Screen Shot
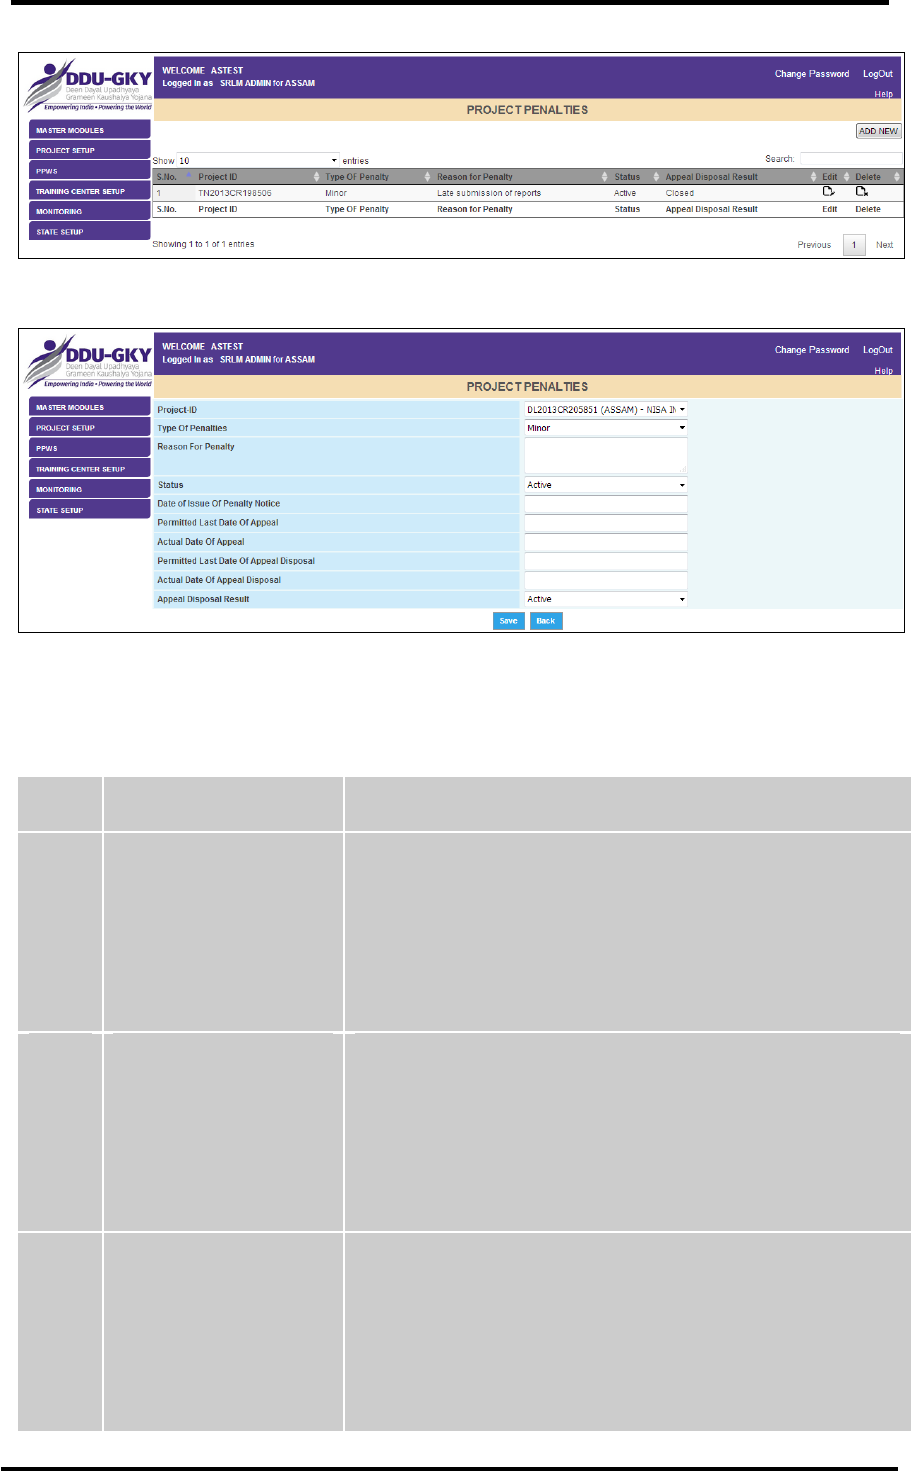
NATIONAL INFORMATICS CENTRE DDU-GKY USER MANUAL VERSION 1.1
NIC-DDUGKY - USER MANUAL 1.1 PAGE 125 OF 160 RELEASE DATE: 30-04-2017
Figure 61 : Project Penalties
Figure 62 : Project Penalties
Fields Description
S. No.
Field Name
Explanation
1.
Project ID
Description- This field describes the identification number of
the project (Project ID). Select Project ID from the drop down
list.
Validation- N/A
Mandatory/Optional- It’s a mandatory field.
2.
Type of Penalties
Description- This field describes the Types of Penalties.
Select the type of penalty from the drop down list.
Validation- N/A
Mandatory/Optional- It’s a mandatory field.
3.
Reason for Penalty
Description- This field describes the reason for which
penalty has been imposed. Enter the reason for penalty in
the given text box.
Validation- Only alphabets can be entered.
Mandatory/Optional- It’s a mandatory field.

NATIONAL INFORMATICS CENTRE DDU-GKY USER MANUAL VERSION 1.1
NIC-DDUGKY - USER MANUAL 1.1 PAGE 126 OF 160 RELEASE DATE: 30-04-2017
S. No.
Field Name
Explanation
4.
Status
Description- This field describes the status of the Penalty.
Select the status from the drop down list.
Validation- N/A
Mandatory/Optional- It’s a mandatory field.
5.
Date of Issue of Penalty
Notice
Description- This field describes the date on which penalty
notice was issued. Select the date from the calendar control.
Validation- N/A
Mandatory/Optional- It’s a mandatory field.
6.
Permitted Last Date of
Appeal
Description- This field describes the date till then one can
appeal against the penalty.
Validation- N/A
Mandatory/Optional- It’s a mandatory field.
7.
Actual Date of Appeal
Description- This field describes the actual date for making
an appeal against the Penalty. Select the date from the
calendar control.
Validation- N/A
Mandatory/Optional- It’s a mandatory field.
8.
Permitted Last Date of
Appeal Disposal
Description- This field describes the last date which has
been permitted for appeal disposal. Select the date from the
calendar control.
Validation- N/A
Mandatory/Optional- It’s a mandatory field.
9.
Actual Date of Appeal
Disposal
Description- This field describes the actual date which has
been permitted for appeal disposal. Select the date from the
calendar control.
Validation- N/A
Mandatory/Optional- It’s a mandatory field.
10.
Appeal Disposal Result
Description- This field describes the result of the appeal
disposal. Select the value from the drop down box list.
Validation- N/A
Mandatory/Optional- It’s a mandatory field.
Table 37 : Project Penalties Form Fields Description
Form Flow

NATIONAL INFORMATICS CENTRE DDU-GKY USER MANUAL VERSION 1.1
NIC-DDUGKY - USER MANUAL 1.1 PAGE 127 OF 160 RELEASE DATE: 30-04-2017
1. The user needs to login on DDUGKY portal by using the authorized user credentials.
2. Move the cursor on the Dashboard option MONITORING and click over it.
3. As user will click on MONITORING, the list of forms associated with this option will get
displayed under it.
4. If user wants to view or update details of Project Penalties, move the cursor on the link given
as Project Penalties and click over it. As user takes this action, the form named as PROJECT
PENALTIES will open.
5. The user can add a new project penalty by using the button ‘ADD NEW’. As the user will click
on the button ‘ADD NEW’, a blank form named as PROJECT PENALTIES will open. The
user needs to enter the values in the form fields and then click on the button ‘Save’.
6. The user can edit an existing project penalty by using the button ‘EDIT’. As the user will click
on the button ‘EDIT’, the form PROJECT PENALTIES will open in editable mode with existing
values of all the form fields. The user can edit the values of all the form fields as per
requirement. After editing the values of the form fields, the user needs to click on the button
‘Update’ to update the details of the form.
7. The user can use the button ‘Back’ to move to the previous screen.
What happens when the form is submitted
If user wants to save/update the details of the form, he/she needs to click on the button
‘Save’/‘Update’ to save the record.
Messages
While working with the form, user may encounter some messages. Expected actions for the removal
of errors are given in the table below:
S. No.
Message
Reason
Expected Action
1.
ARE YOU SURE
YOU WANT TO
UPDATE?
You have clicked on the
button ‘Update’.
You need to click on the button
‘OK’ if you are confirm about the
details of the form but if you still
want to take a review of the form
then click on the button ‘Cancel’.
Table 38 : Project Penalties> Messages
5.1.25 MONITORING (Candidate Statistics)
General Description
Any authorized user with required privilege can view and edit candidate statistics. PIA and PIA user
can manage Candidate Statistics.
Prerequisites
The user should have access to DDUGKY portal on the Internet and hold a valid User id and
Password to act for DDUGKY.
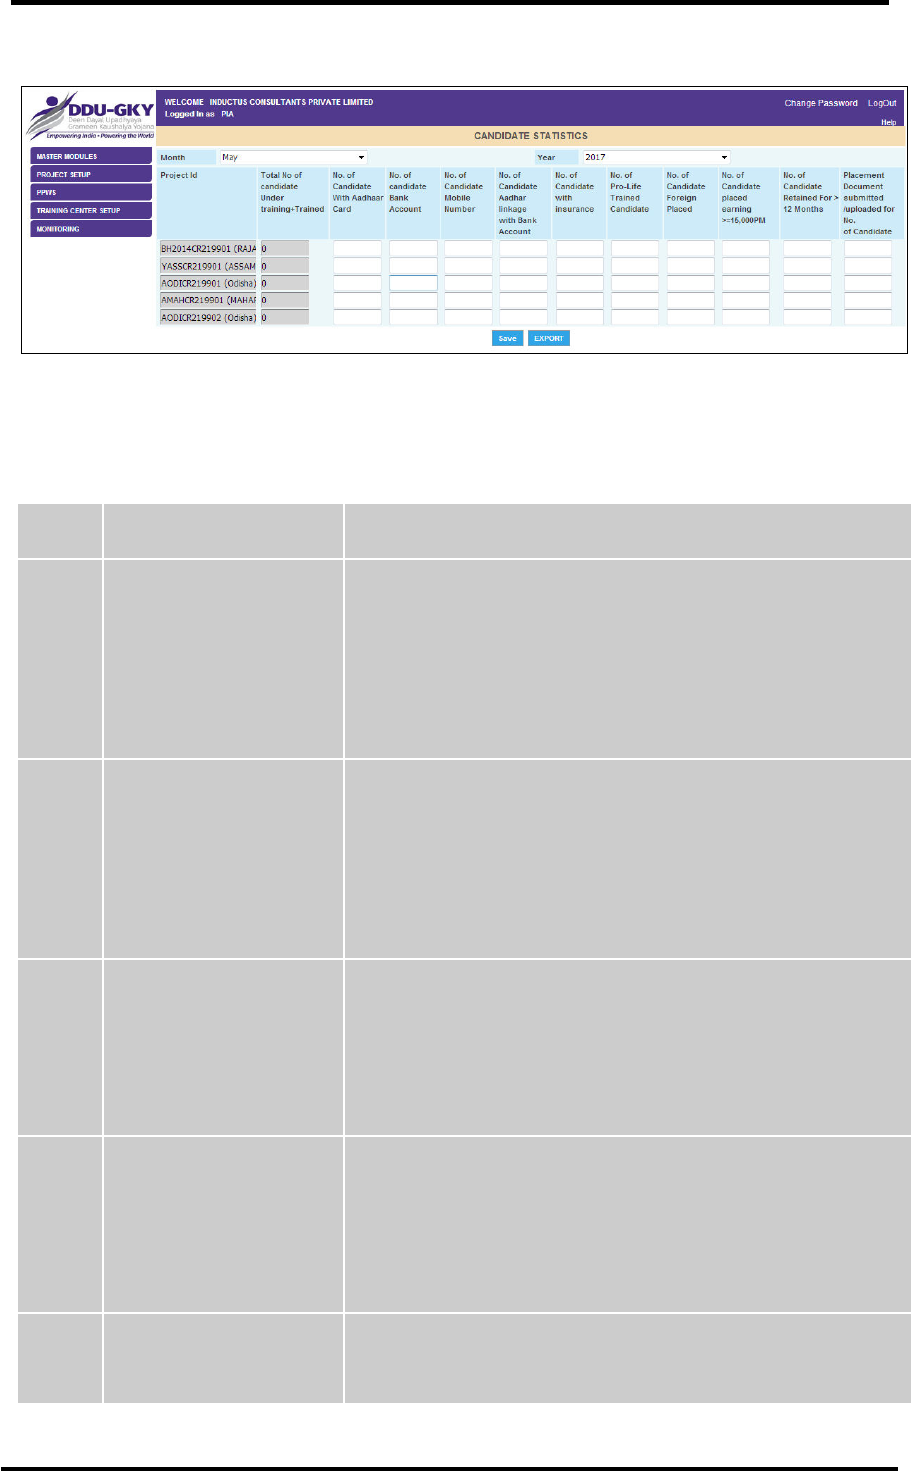
NATIONAL INFORMATICS CENTRE DDU-GKY USER MANUAL VERSION 1.1
NIC-DDUGKY - USER MANUAL 1.1 PAGE 128 OF 160 RELEASE DATE: 30-04-2017
Screen Shot
Figure 63 : Candidate Statistics
Fields Description
S. No.
Field Name
Explanation
1.
Month
Description- This field describes the month for which the
user wants to view the candidate statistics. Select the month
from the list of months.
Validation- N/A
Mandatory/Optional- It’s a mandatory field.
2.
Year
Description- This field describes the Year for which the user
wants to view the candidate statistics. Select the year from
the list of years.
Validation- N/A
Mandatory/Optional- It’s a mandatory field.
3.
Project ID
Description- This field describes the identification number of
the project (Project ID). Project ID will be displayed.
Validation- N/A
Mandatory/Optional- It’s a mandatory field.
4.
Total No. of Candidate
Under Training+Trained
Description- This field describes the total number of
candidates who underwent training or trained.
Validation- N/A
Mandatory/Optional- It’s a mandatory field.
5.
No. of Candidate with
Aadhaar Card
Description- This field describes the total number of
candidates who have Aadhaar Card. Enter the detail in the
given text box.

NATIONAL INFORMATICS CENTRE DDU-GKY USER MANUAL VERSION 1.1
NIC-DDUGKY - USER MANUAL 1.1 PAGE 129 OF 160 RELEASE DATE: 30-04-2017
S. No.
Field Name
Explanation
Validation- Only numeric characters can be entered.
Mandatory/Optional- It’s a mandatory field.
6.
No. of Candidate with
Bank Account
Description- This field describes the total number of
candidates who have Bank Account. Enter the detail in the
given text box.
Validation- Only numeric characters can be entered.
Mandatory/Optional- It’s a mandatory field.
7.
No. of Candidate with
Mobile Number
Description- This field describes the total number of
candidates who have Mobile Number. Enter the Mobile
Number in the given text box.
Validation- Only numeric characters can be entered.
Mandatory/Optional- It’s a mandatory field.
8
No. of Candidate
Aadhar linkage
with Bank Account
Description- This field describes the number of candidates
who have Aadhar linkage with Bank Account. Enter the detail
in the given text box.
Validation- Only numeric characters can be entered.
Mandatory/Optional- It’s a mandatory field.
9
No. of Candidate
with insurance
Description- This field describes the total number of
candidates who have Insurance. Enter the detail in the given
text box.
Validation- Only numeric characters can be entered.
Mandatory/Optional- It’s a mandatory field.
10
No. of Pro-Life
Trained Candidate
Description- This field describes the total number of
candidates who prolife trained. Enter the detail in the given
text box.
Validation- Only numeric characters can be entered.
Mandatory/Optional- It’s a mandatory field.
11
No. of Candidate
Foreign Placed
Description- This field describes the total number of
candidates who are placed in foreign countries. Enter the
detail in the given text box.
Validation- Only numeric characters can be entered.
Mandatory/Optional- It’s a mandatory field.
12
No. of Candidate
placed earning
>=15,000PM
Description- This field describes the total number of
candidates who are placed and earning more than 15
thousand. Enter the detail in the given text box.

NATIONAL INFORMATICS CENTRE DDU-GKY USER MANUAL VERSION 1.1
NIC-DDUGKY - USER MANUAL 1.1 PAGE 130 OF 160 RELEASE DATE: 30-04-2017
S. No.
Field Name
Explanation
Validation- Only numeric characters can be entered.
Mandatory/Optional- It’s a mandatory field.
13
No. of Candidate
Retained For > 12
Months
Description- This field describes the total number of
candidates who have been retained for more than 12
months. Enter the detail in the given text box.
Validation- Only numeric characters can be entered.
Mandatory/Optional- It’s a mandatory field.
14
Placement Document
submitted
/uploaded for No.
of Candidate
Description- This field describes the placement documents
submitted/uploaded for number of candidates. Enter the
detail in the given text box.
Validation- Only numeric characters can be entered.
Mandatory/Optional- It’s a mandatory field.
Table 39 : Candidate Statistics Form Fields Description
Form Flow
1. The user needs to login on DDUGKY portal by using the authorized user credentials.
2. Move the cursor on the Dashboard option MONITORING and click over it.
3. As user will click on MONITORING, the list of forms associated with this option will get
displayed under it.
4. If user wants to view or update details of Candidate Statistics, move the cursor on the link
given as Candidate Statistics and click over it. As user takes this action, the form named as
CANDIDATE STATISTICS will open.
5. The user can enter the values in the form fields and then click on the button ‘Save’.
6. The user can use the button ‘Back’ to move to the previous screen.
What happens when the form is submitted
If user wants to save/update the details of the form, click on the button ‘Save’/‘Update’ to save the
record.
Messages
While working with the form, user may encounter some messages. Expected actions for the removal
of errors are given in the table below:
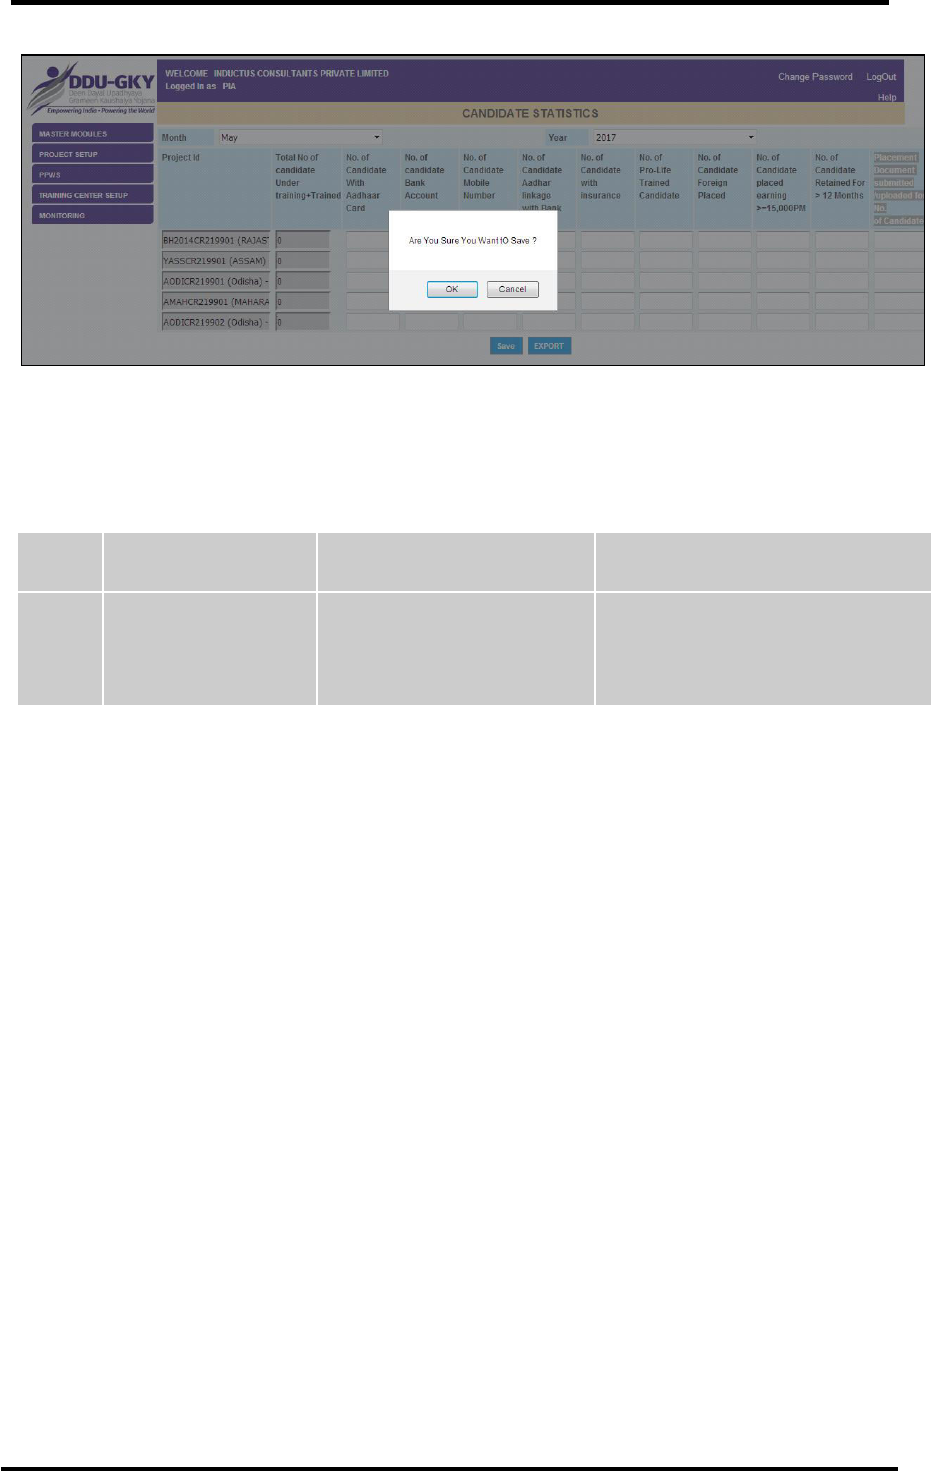
NATIONAL INFORMATICS CENTRE DDU-GKY USER MANUAL VERSION 1.1
NIC-DDUGKY - USER MANUAL 1.1 PAGE 131 OF 160 RELEASE DATE: 30-04-2017
Figure 64 : Candidate Statistics> Messages
S. No.
Message
Reason
Expected Action
1.
Are you sure you
want to save
The user has clicked on
‘Save’ button
Press ‘OK’ to save or cancel to
abort the process.
Table 40 : Candidate Statistics> Messages
5.1.26 MASTER DATA MODULES (State Master)
General Description
State Master Form can be used to enter the master data related with the State. Only an authorized
user can view and edit the master data related with the State.
Prerequisites
The user should have access to DDUGKY portal on the Internet and hold a valid User id and
Password to act for DDUGKY.
Screen Shot
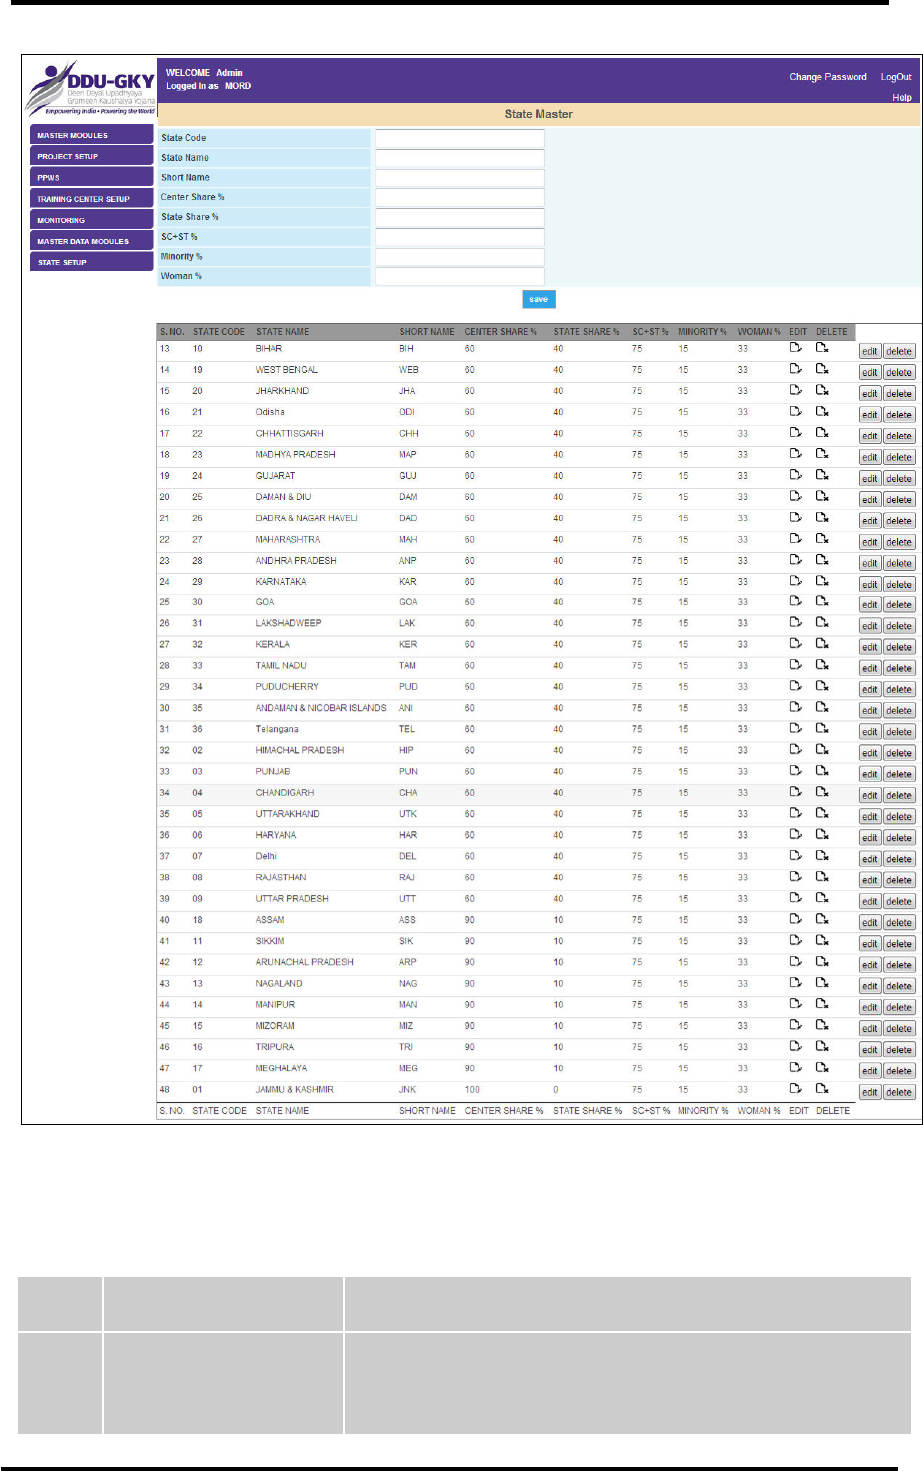
NATIONAL INFORMATICS CENTRE DDU-GKY USER MANUAL VERSION 1.1
NIC-DDUGKY - USER MANUAL 1.1 PAGE 132 OF 160 RELEASE DATE: 30-04-2017
Figure 65 : State Master
Fields Description
S. No.
Field Name
Explanation
1.
State Code
Description- The user can enter the state code.
Validation- Only numbers can be entered.

NATIONAL INFORMATICS CENTRE DDU-GKY USER MANUAL VERSION 1.1
NIC-DDUGKY - USER MANUAL 1.1 PAGE 133 OF 160 RELEASE DATE: 30-04-2017
S. No.
Field Name
Explanation
Mandatory/Optional- It’s a mandatory field.
2.
State Name
Description- The user can enter the State Name.
Validation- Only alphabets can be entered.
Mandatory/Optional- It’s a mandatory field.
3.
Short Name
Description- The user can enter the Short Name.
Validation- Only alphabets can be entered.
Mandatory/Optional- It’s a mandatory field.
4.
Center Share%
Description- The user can enter the Center Share in
percentage.
Validation- Only numbers can be entered.
Mandatory/Optional- It’s a mandatory field.
5.
State Share%
Description- The user can enter the State Share in
percentage.
Validation- Only numbers can be entered.
Mandatory/Optional- It’s a mandatory field.
6.
SC+ST%
Description- The user can enter the percentage on SC+ST.
Validation- Only numbers can be entered.
Mandatory/Optional- It’s a mandatory field.
7.
Minority%
Description- The user can enter the percentage of Minority.
Validation- Only numbers can be entered.
Mandatory/Optional- It’s a mandatory field.
8.
Woman%
Description- The user can enter the percentage of Woman.
Validation- Only numbers can be entered.
Mandatory/Optional- It’s a mandatory field.
Table 41 : State Master Form Fields Description
Form Flow
1. The user needs to login on DDUGKY portal by using the authorized user credentials.
2. Move the cursor on the Dashboard option MASTER DATA MODULES and click over it.
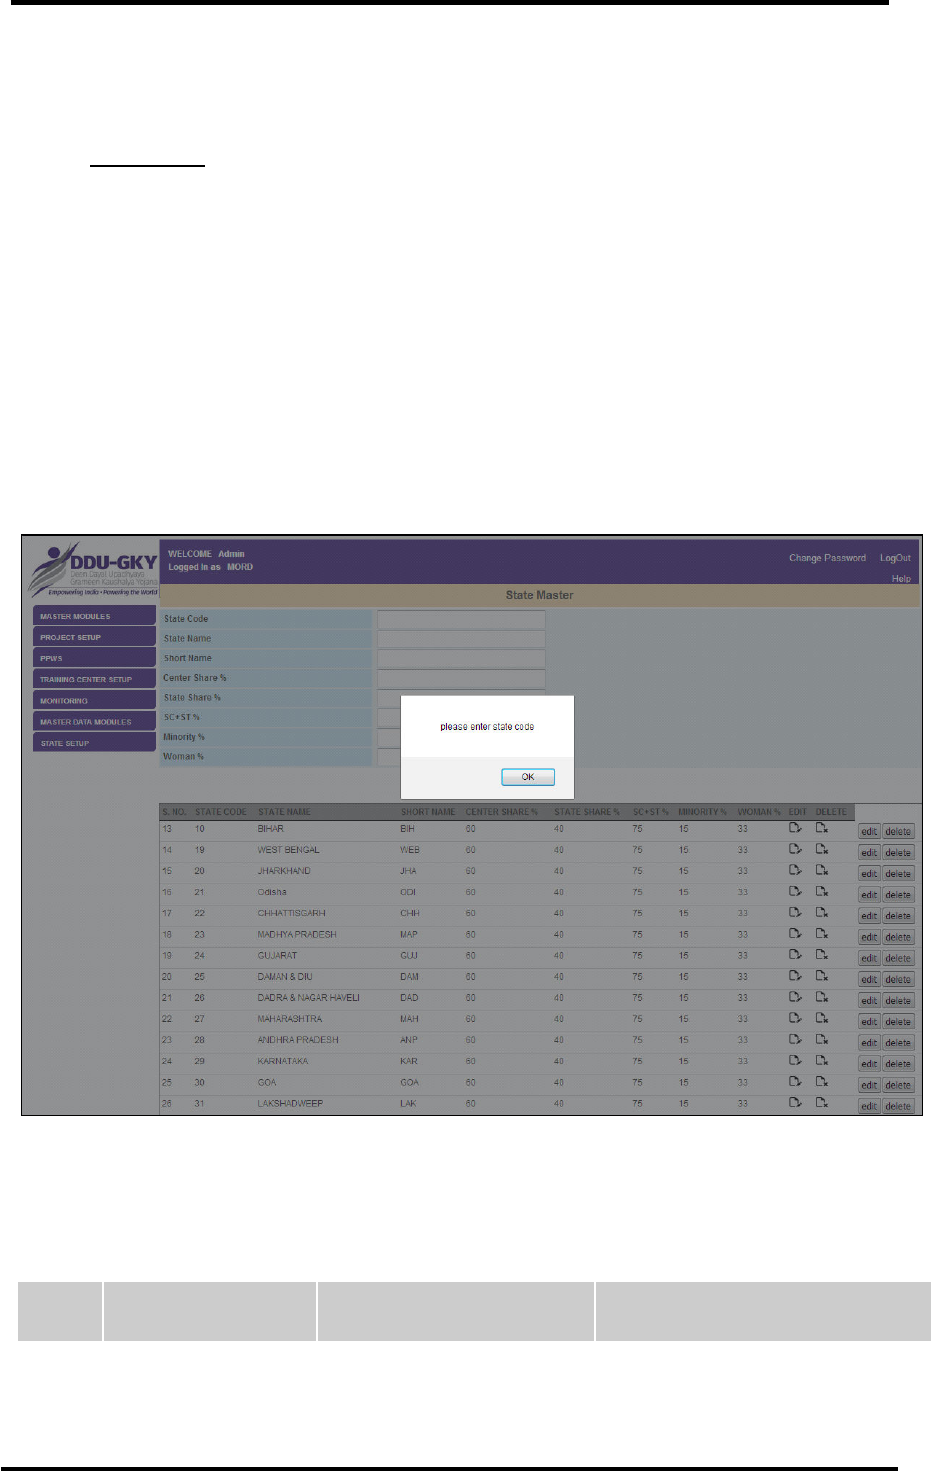
NATIONAL INFORMATICS CENTRE DDU-GKY USER MANUAL VERSION 1.1
NIC-DDUGKY - USER MANUAL 1.1 PAGE 134 OF 160 RELEASE DATE: 30-04-2017
3. As user will click on MASTER DATA MODULES, the list of forms associated with this option
will get displayed under it.
4. If user wants to view or update details of State Master, move the cursor on the link given as
State Master and click over it. As you take this action, the form named as State Master will
open.
5. The user can enter the values in the form fields and then click on the button ‘Save’.
What happens when the form is submitted
If user wants to save/update the details of the form, click on the button ‘Save’/‘Update’ to save the
record.
Messages
While working with the form, you may encounter some messages. Expected actions for the removal of
errors are given in the table below:
Figure 66 : State Master> Messages
S. No.
Message
Reason
Expected Action

NATIONAL INFORMATICS CENTRE DDU-GKY USER MANUAL VERSION 1.1
NIC-DDUGKY - USER MANUAL 1.1 PAGE 135 OF 160 RELEASE DATE: 30-04-2017
S. No.
Message
Reason
Expected Action
1.
Please enter State
Code
The user has not entered
the State Code
The user needs to enter the State
Code in the given text box.
Table 42 : State Master > Messages
5.1.27 MASTER DATA MODULES (Special Area Master)
General Description
Special Area Master link can be used to enter the special area master data related with the State.
Only an authorized user can view and edit the special area master data related with the State.
Prerequisites
The user should have access to DDUGKY portal on the Internet and hold a valid User id and
Password to act for DDUGKY.
Screen Shot
Figure 67 : Special Area Master
Fields Description
S. No.
Field Name
Explanation
1.
Special Area Code
Description- The user can enter the Special Area Code.
Validation- Only numbers can be entered.
Mandatory/Optional- It’s a mandatory field.
2.
Special Area Name
Description- The user can enter the Special Area Name.
Validation- Only alphabets can be entered.
Mandatory/Optional- It’s a mandatory field.
Table 43 : Special Area Master Form Fields Description
Form Flow
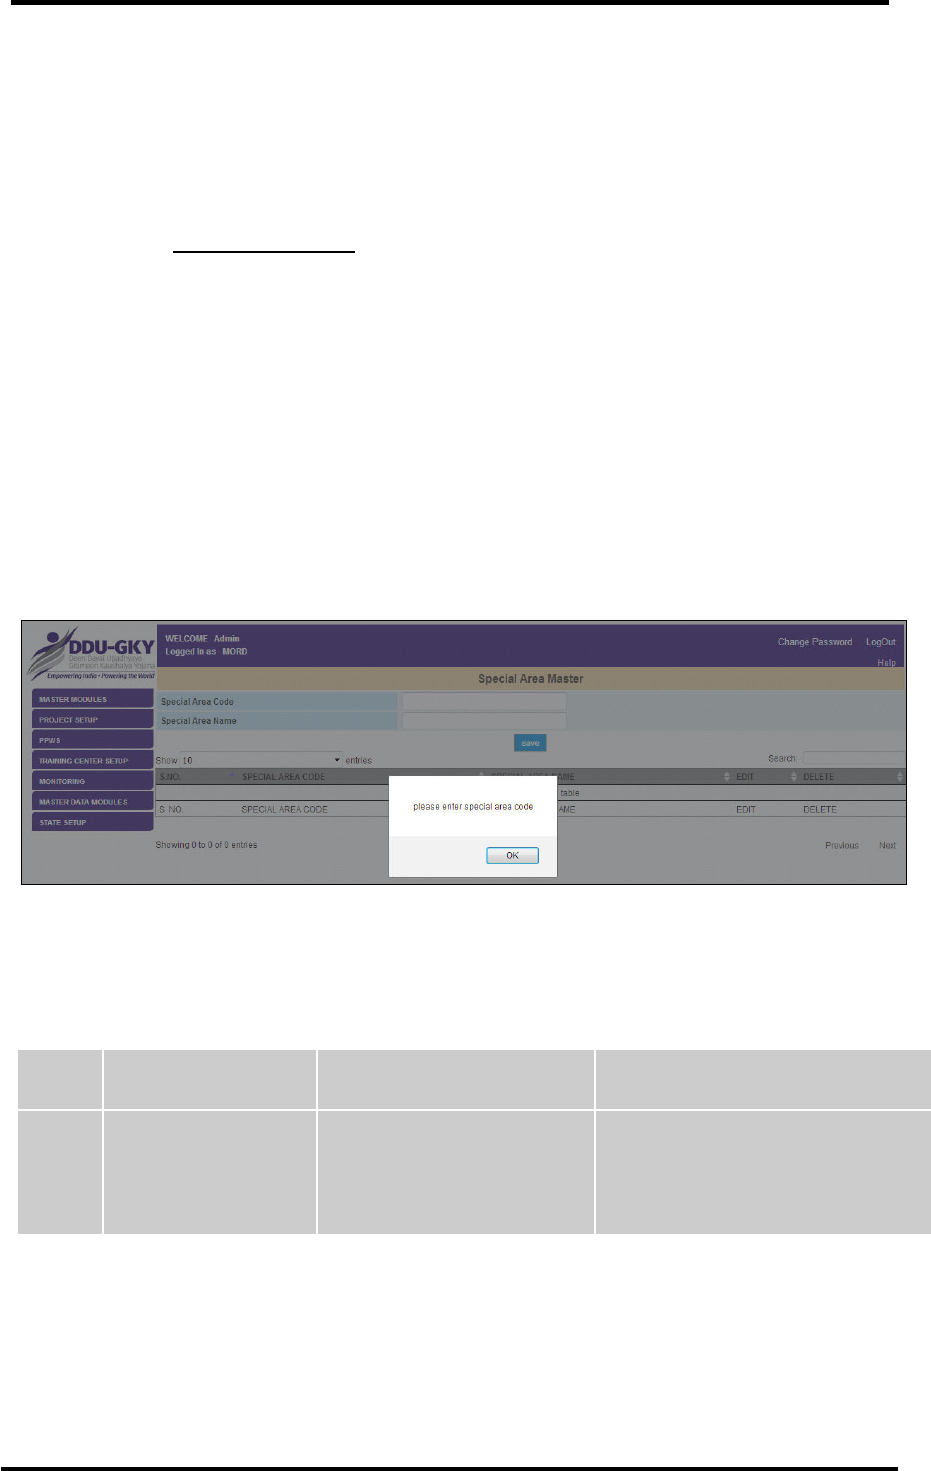
NATIONAL INFORMATICS CENTRE DDU-GKY USER MANUAL VERSION 1.1
NIC-DDUGKY - USER MANUAL 1.1 PAGE 136 OF 160 RELEASE DATE: 30-04-2017
1. The user needs to login on DDUGKY portal by using the authorized user credentials.
2. Move the cursor on the Dashboard option MASTER DATA MODULES and click over it.
3. As user will click on MASTER DATA MODULES, the list of forms associated with this option
will get displayed under it.
4. If user wants to view or update details of Special Area Master, move the cursor on the link
given as Special Area Master and click over it. As user takes this action, the form named as
Special Area Master will open.
5. The user can enter the desired values in the form fields and then click on the button ‘Save’.
What happens when the form is submitted
If user wants to save/update the details of the form, click on the button ‘Save’/‘Update’ to save the
record.
Messages
While working with the form, user may encounter some messages. Expected actions for the removal
of errors are given in the table below:
Figure 68 : Special Area Master> Messages
S. No.
Message
Reason
Expected Action
1.
Please enter Special
Area Code
The user has not entered
the Special Area Code
The user needs to enter the
Special Area Code in the given text
box.
Table 44 : Special Area Master > Messages
5.1.28 MASTER DATA MODULES (District Master)
General Description
District Master link can be used to enter the district master data for a State. Only an authorized user
can view and edit the district master data.
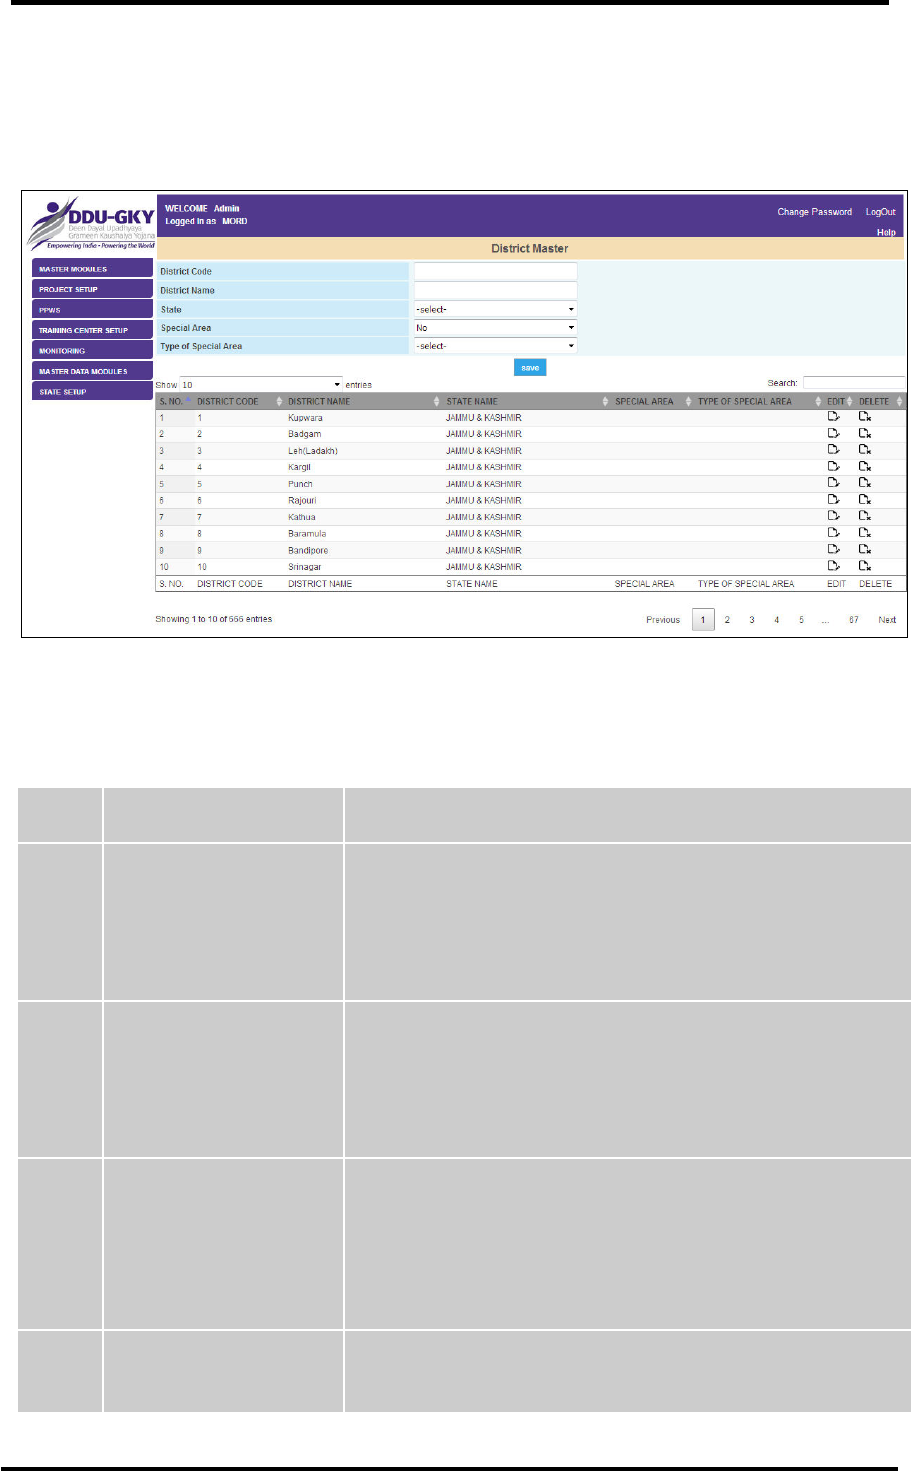
NATIONAL INFORMATICS CENTRE DDU-GKY USER MANUAL VERSION 1.1
NIC-DDUGKY - USER MANUAL 1.1 PAGE 137 OF 160 RELEASE DATE: 30-04-2017
Prerequisites
The user should have access to DDUGKY portal on the Internet and hold a valid User id and
Password to act for DDUGKY.
Screen Shot
Figure 69 : District Master
Fields Description
S. No.
Field Name
Explanation
1.
District Code
Description- The user can enter the District Code.
Validation- Only numbers can be entered.
Mandatory/Optional- It’s a mandatory field.
2.
District Name
Description- The user can enter the District Name.
Validation- Only alphabets can be entered.
Mandatory/Optional- It’s a mandatory field.
3.
State
Description- The user can select the State from the drop
down list.
Validation- N/A
Mandatory/Optional- It’s a mandatory field.
4.
Special Area
Description- The user can select the Special Area from the
drop down list.
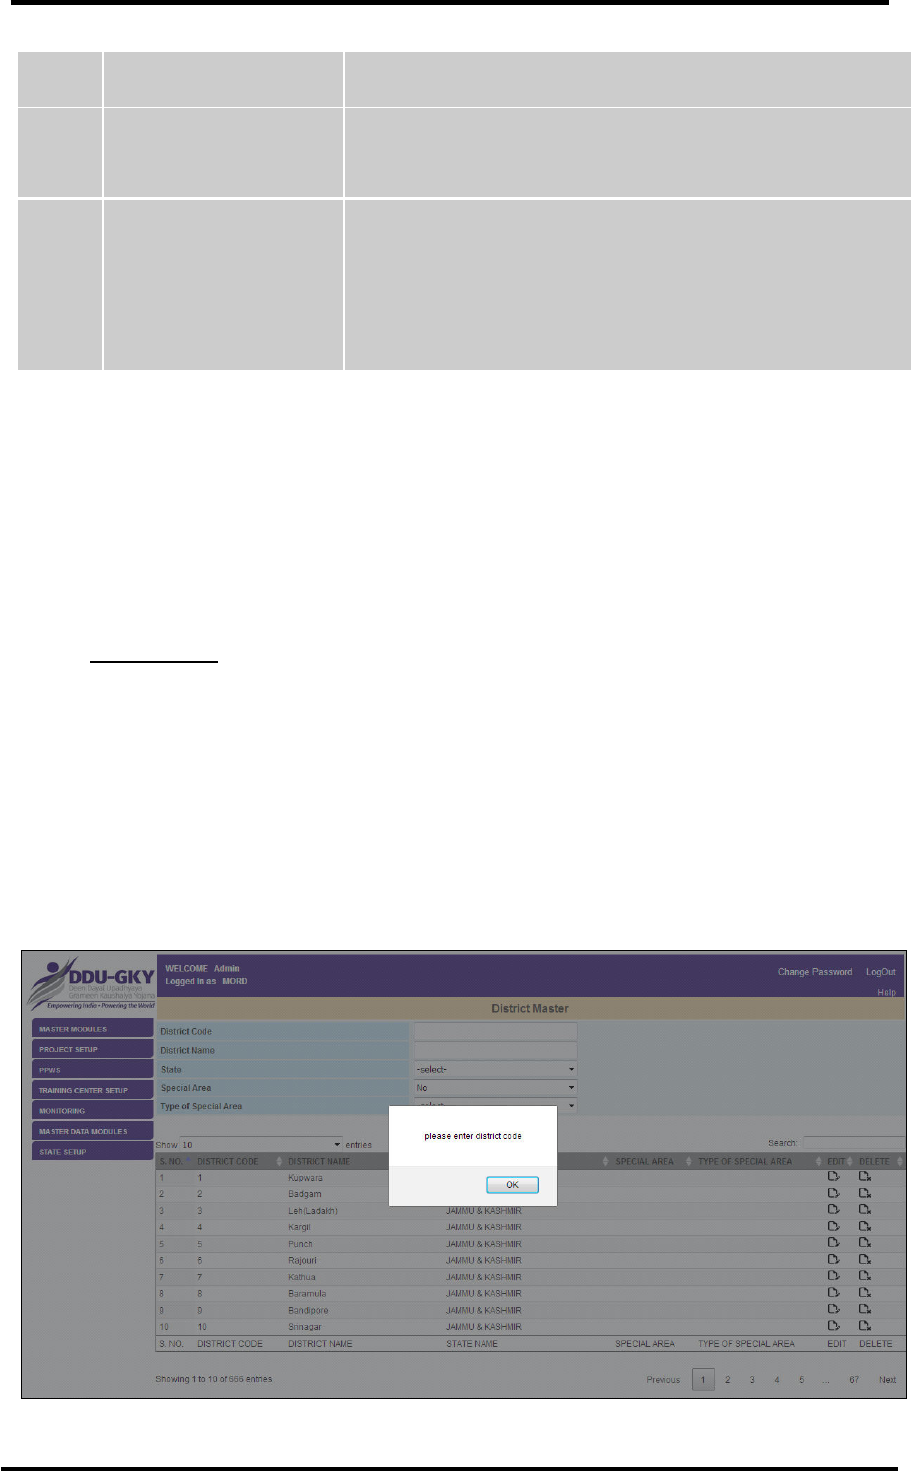
NATIONAL INFORMATICS CENTRE DDU-GKY USER MANUAL VERSION 1.1
NIC-DDUGKY - USER MANUAL 1.1 PAGE 138 OF 160 RELEASE DATE: 30-04-2017
S. No.
Field Name
Explanation
Validation- N/A
Mandatory/Optional- It’s a mandatory field.
5.
Type of Special Area
Description- The user can select the Type of Special Area
from the drop down list.
Validation- N/A
Mandatory/Optional- It’s a mandatory field.
Table 45 : District Master Form Fields Description
Form Flow
1. The user needs to login on DDUGKY portal by using the authorized user credentials.
2. Move the cursor on the Dashboard option MASTER DATA MODULES and click over it.
3. As user will click on MASTER DATA MODULES, the list of forms associated with this option
will get displayed under it.
4. If user wants to view or update details of District Master, move the cursor on the link given as
District Master and click over it. As user takes this action, the form named as District Master
will open.
5. The user can enter the desired values in the form fields and then click on the button ‘Save’.
What happens when the form is submitted
If user wants to save the details of the form, click on the button ‘Save’/‘Update’ to save the record.
Messages
While working with the form, user may encounter some messages. Expected actions for the removal
of errors are given in the table below:
Figure 70 : District Master> Messages
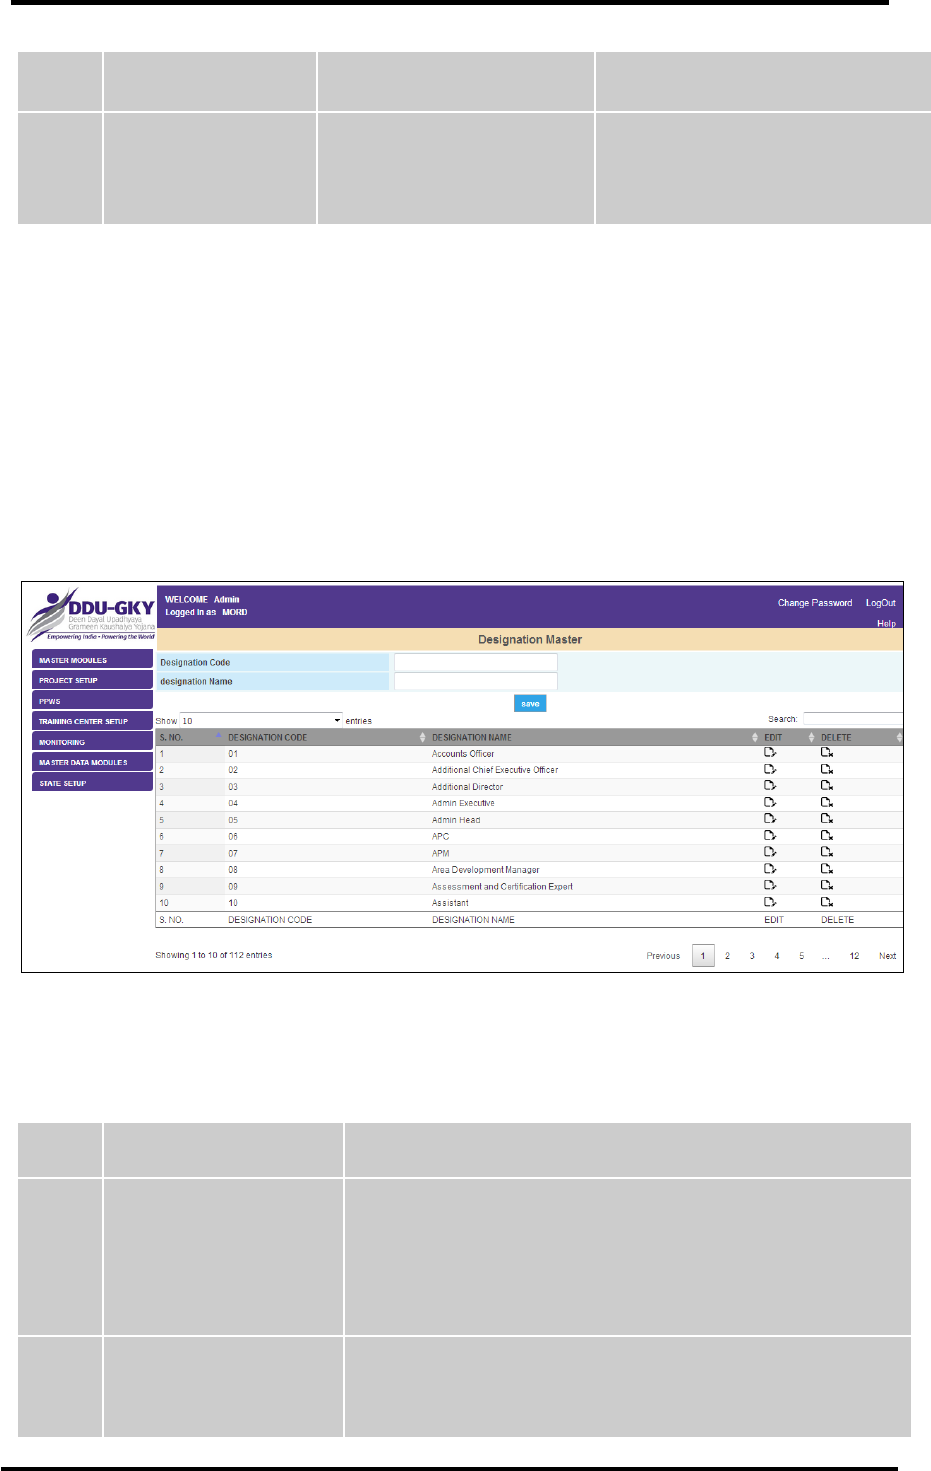
NATIONAL INFORMATICS CENTRE DDU-GKY USER MANUAL VERSION 1.1
NIC-DDUGKY - USER MANUAL 1.1 PAGE 139 OF 160 RELEASE DATE: 30-04-2017
S. No.
Message
Reason
Expected Action
1.
Please enter district
Code
The user has not entered
the district Code
The user needs to enter the district
Code in the given text box.
Table 46 : District Master > Messages
5.1.29 MASTER DATA MODULES (Designation Master)
General Description
Designation Master link can be used to enter the Designation master data for a State. Only an
authorized user can view and edit the Designation Master data.
Prerequisites
The user should have access to DDUGKY portal on the Internet and hold a valid User id and
Password to act for DDUGKY.
Screen Shot
Figure 71 : Designation Master
Fields Description
S. No.
Field Name
Explanation
1.
Designation Code
Description- The user can enter the Designation Code.
Validation- Only numbers can be entered.
Mandatory/Optional- It’s a mandatory field.
2.
Designation Name
Description- The user can enter the Designation Name.
Validation- Only alphabets can be entered.
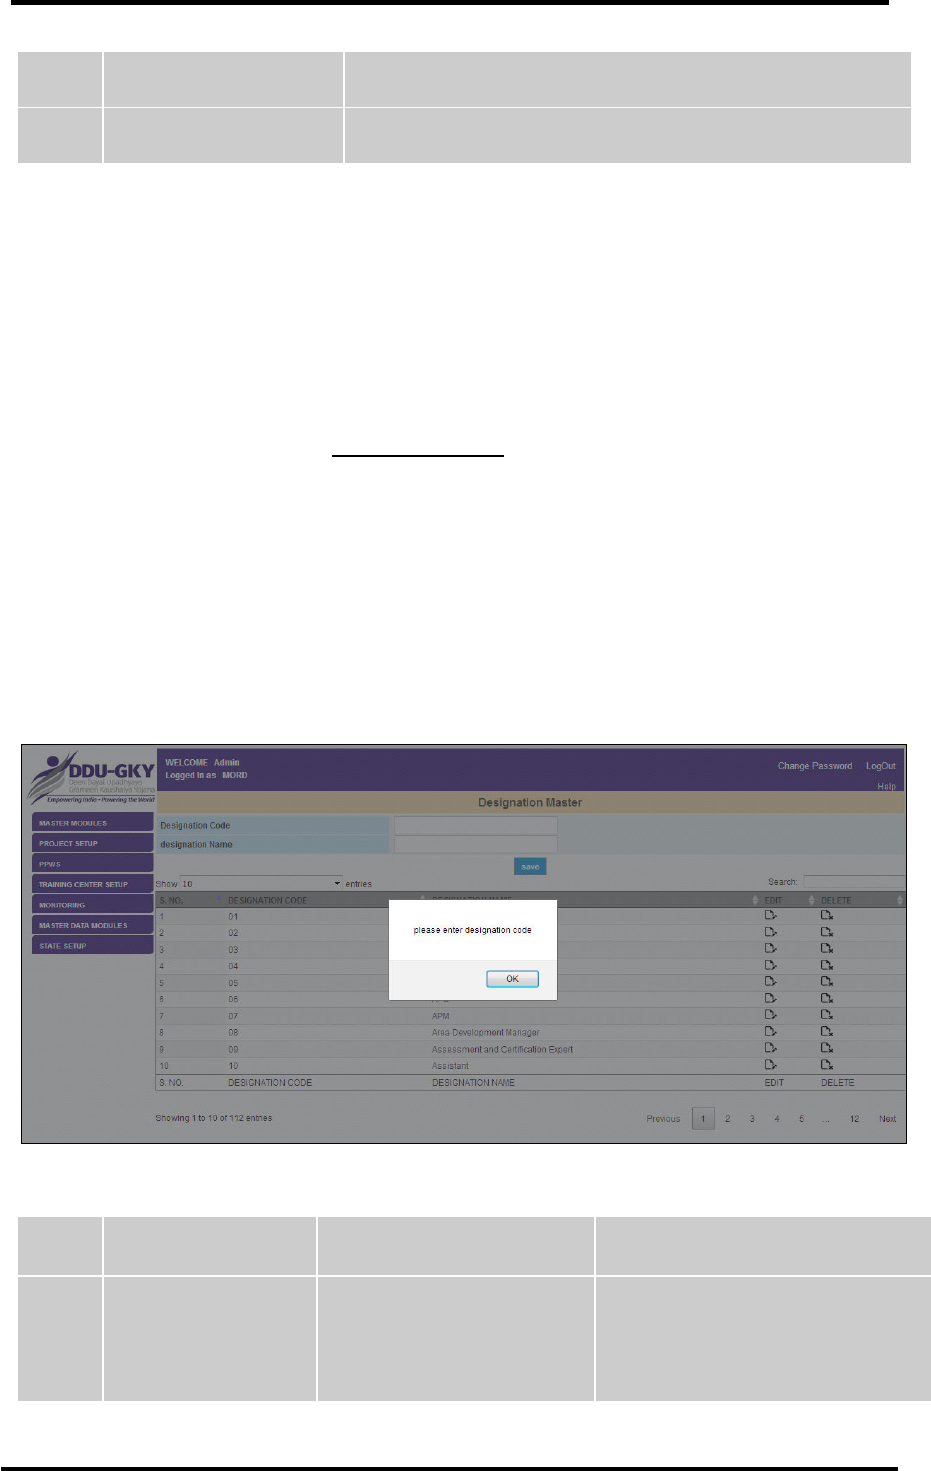
NATIONAL INFORMATICS CENTRE DDU-GKY USER MANUAL VERSION 1.1
NIC-DDUGKY - USER MANUAL 1.1 PAGE 140 OF 160 RELEASE DATE: 30-04-2017
S. No.
Field Name
Explanation
Mandatory/Optional- It’s a mandatory field.
Table 47 : Designation Master Form Fields Description
Form Flow
1. The user needs to Login on DDUGKY portal by using the authorized user credentials.
2. Move the cursor on the Dashboard option MASTER DATA MODULES and click over it.
3. As user will click on MASTER DATA MODULES, the list of forms associated with this option
will get displayed under it.
4. If user wants to view or update details of Designation Master, he/she needs to move the
cursor on the link given as Designation Master and click over it. As user takes this action, the
form named as Designation Master will open.
5. The user can enter the desired values in the form fields and then click on the button ‘Save’.
What happens when the form is submitted
If user wants to save the details of the form, click on the button ‘Save’/‘Update’ to save the record.
Messages
While working with the form, user may encounter some messages. Expected actions for the removal
of errors are given in the table below:
Figure 72 : Designation Master> Messages
S. No.
Message
Reason
Expected Action
1.
Please enter
Designation Code
The user has not entered
the Designation Code
The user needs to enter the
Designation Code in the given text
box.
Table 48 : Designation Master > Messages
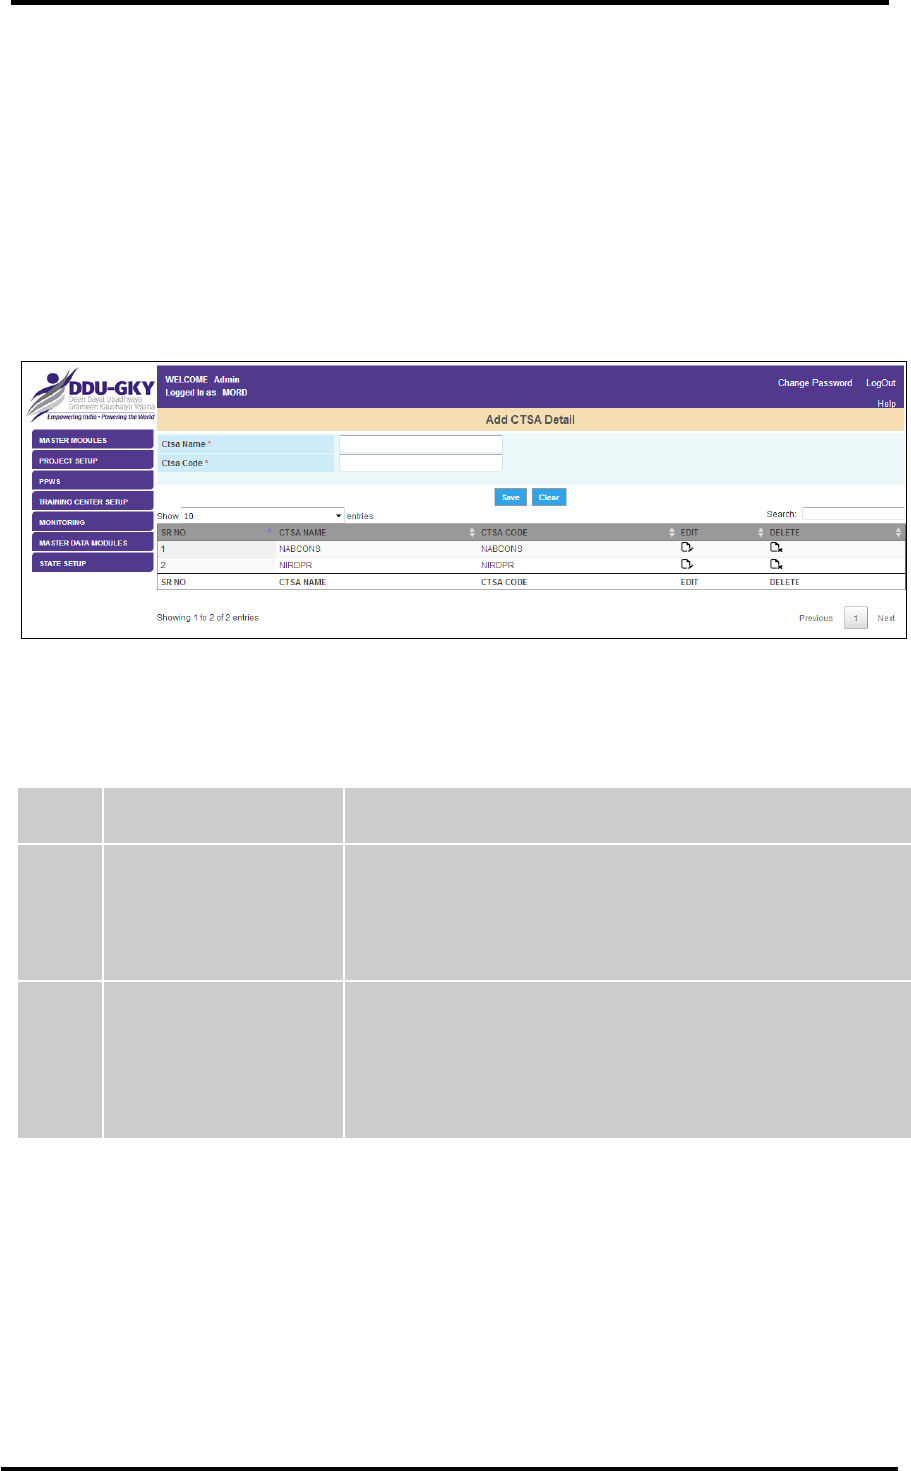
NATIONAL INFORMATICS CENTRE DDU-GKY USER MANUAL VERSION 1.1
NIC-DDUGKY - USER MANUAL 1.1 PAGE 141 OF 160 RELEASE DATE: 30-04-2017
5.1.30 MASTER DATA MODULES (CTSA Master)
General Description
CTSA Master link can be used to enter the CTSA master data for a State. Only an authorized user
can view and edit the CTSA Master data.
Prerequisites
The user should have access to DDUGKY portal on the Internet and hold a valid User id and
Password to act for DDUGKY.
Screen Shot
Figure 73 : CTSA Master
Fields Description
S. No.
Field Name
Explanation
1.
CTSA Name
Description- The user can enter the CTSA Name.
Validation- Only alphabets can be entered.
Mandatory/Optional- It’s a mandatory field.
2.
CTSA Code
Description- The user can enter the CTSA Code.
Validation- Only numbers can be entered.
Mandatory/Optional- It’s a mandatory field.
Table 49 : CTSA Master Form Fields Description
Form Flow
1. The user needs to login on DDUGKY portal by using the authorized user credentials.
2. Move the cursor on the Dashboard option MASTER DATA MODULES and click over it.
3. As user will click on MASTER DATA MODULES, the list of forms associated with this option
will get displayed under it.
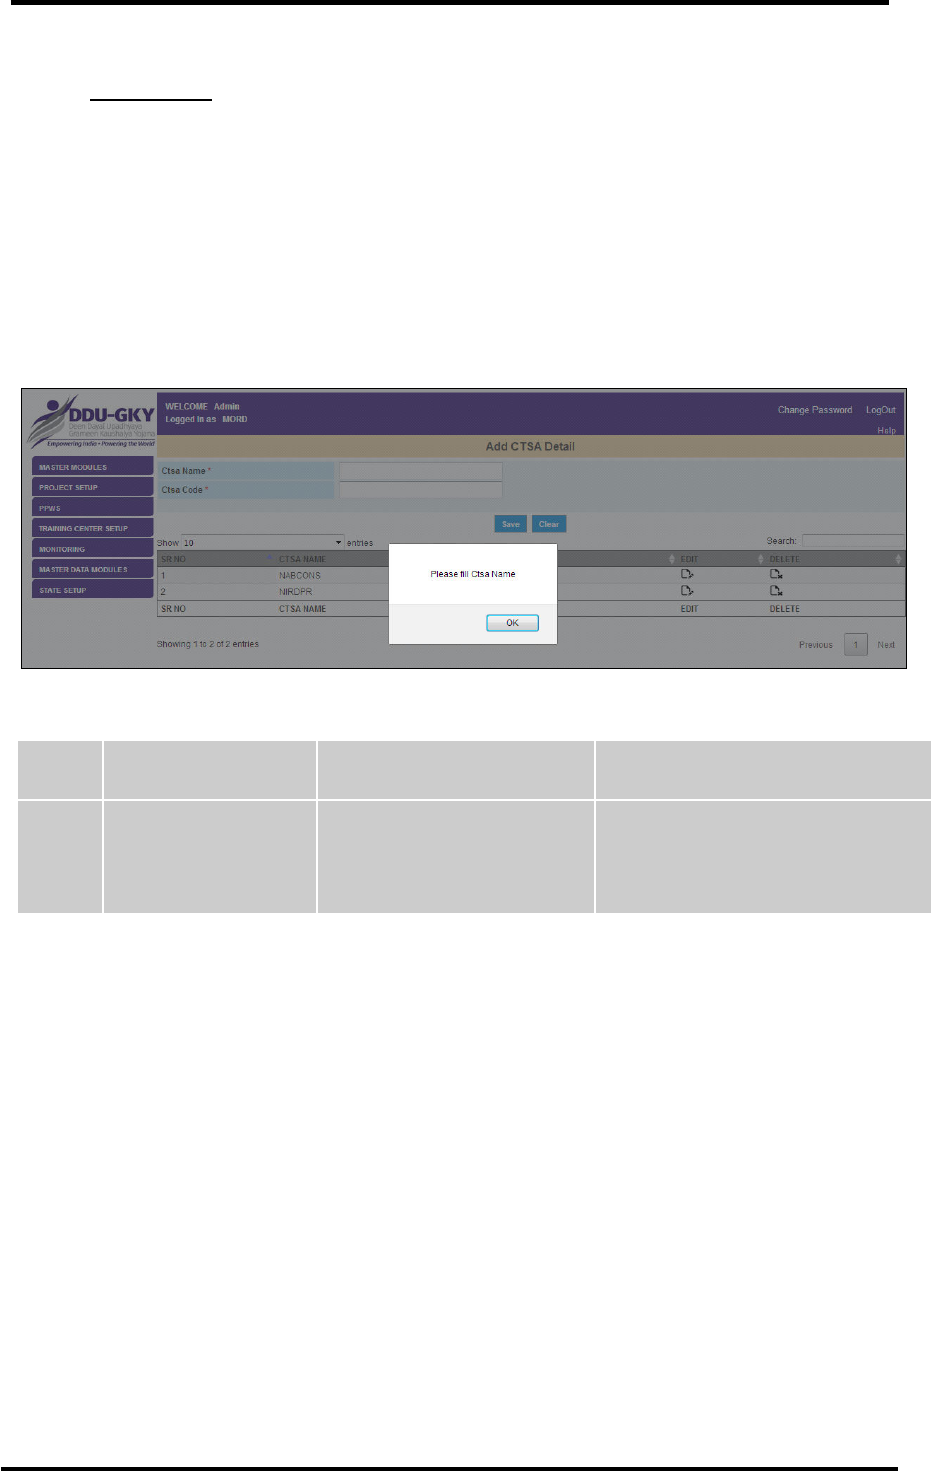
NATIONAL INFORMATICS CENTRE DDU-GKY USER MANUAL VERSION 1.1
NIC-DDUGKY - USER MANUAL 1.1 PAGE 142 OF 160 RELEASE DATE: 30-04-2017
4. If user wants to view or update details of CTSA Master, move the cursor on the link given as
CTSA Master and click over it. As user takes this action, the form named as CTSA Master
will open.
5. The user can enter the desired values in the form fields and then click on the button ‘Save’.
What happens when the form is submitted
If user wants to save the details of the form, click on the button ‘Save’/‘Update’ to save the record.
Messages
While working with the form, you may encounter some messages. Expected actions for the removal of
errors are given in the table below:
Figure 74 : CTSA Master> Messages
S. No.
Message
Reason
Expected Action
1.
Please fill Ctsa name
The user has not entered
the Ctsa name
The user needs to enter the Ctsa
name in the given text box.
Table 50 : CTSA Master > Messages
5.1.31 MASTER DATA MODULES (TSA Master)
General Description
CTSA Master link can be used to enter the TSA master data for a State. Only an authorized user can
view and edit the TSA Master data.
Prerequisites
The user should have access to DDUGKY portal on the Internet and hold a valid User id and
Password to act for DDUGKY.
Screen Shot
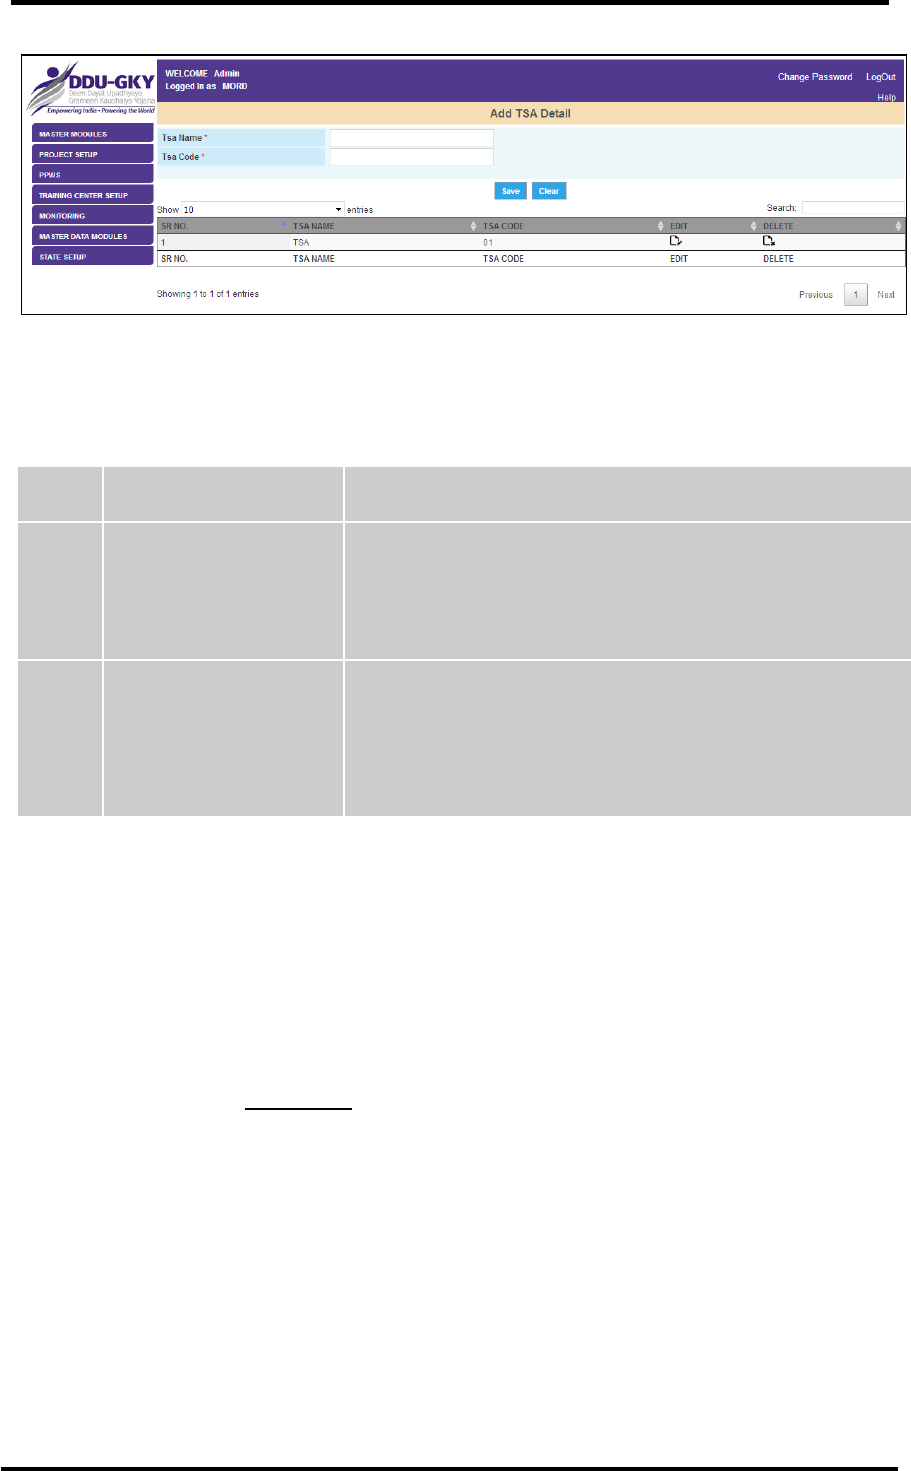
NATIONAL INFORMATICS CENTRE DDU-GKY USER MANUAL VERSION 1.1
NIC-DDUGKY - USER MANUAL 1.1 PAGE 143 OF 160 RELEASE DATE: 30-04-2017
Figure 75 : TSA Master
Fields Description
S. No.
Field Name
Explanation
1.
TSA Name
Description- The user can enter the TSA Name.
Validation- Only alphabets can be entered.
Mandatory/Optional- It’s a mandatory field.
2.
TSA Code
Description- The user can enter the TSA Code.
Validation- Only numbers can be entered.
Mandatory/Optional- It’s a mandatory field.
Table 51 : TSA Master Form Fields Description
Form Flow
1. The user needs to login on DDUGKY portal by using the authorized user credentials.
2. Move the cursor on the Dashboard option MASTER DATA MODULES and click over it.
3. As user will click on MASTER DATA MODULES, the list of forms associated with this option
will get displayed under it.
4. If user wants to view or update details of TSA Master, he/she needs to move the cursor on
the link given as TSA Master and click over it. As user takes this action, the form named as
TSA Master will open.
5. The user can enter the desired values in the form fields and then click on the button ‘Save’.
What happens when the form is submitted
If user wants to save the details of the form, click on the button ‘Save’/‘Update’ to save the record.
Messages
While working with the form, user may encounter some messages. Expected actions for the removal
of errors are given in the table below:
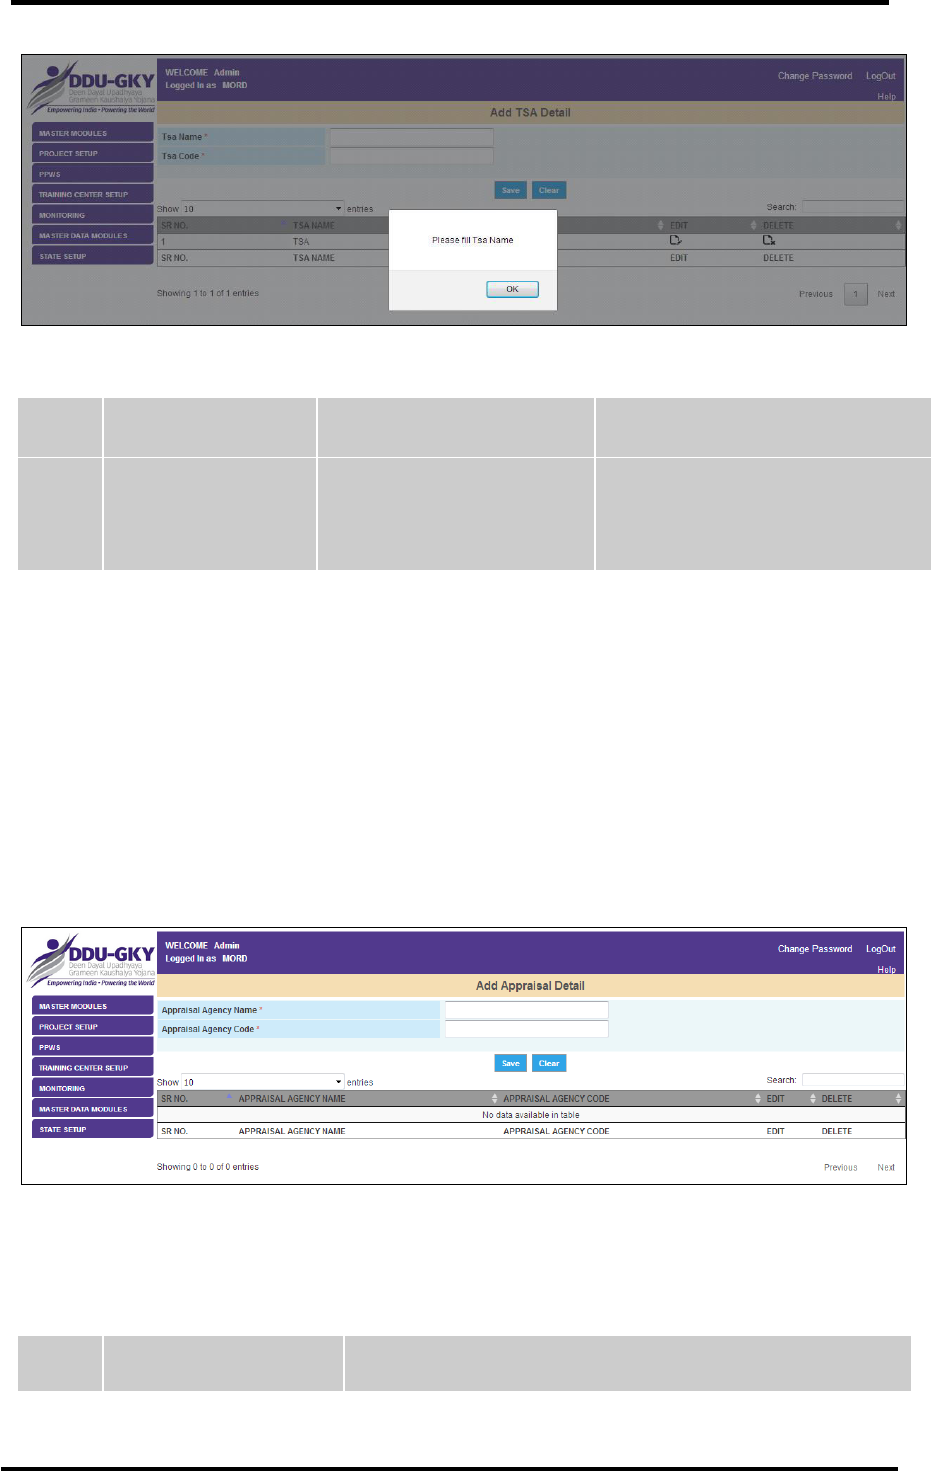
NATIONAL INFORMATICS CENTRE DDU-GKY USER MANUAL VERSION 1.1
NIC-DDUGKY - USER MANUAL 1.1 PAGE 144 OF 160 RELEASE DATE: 30-04-2017
Figure 76 : TSA Master> Messages
S. No.
Message
Reason
Expected Action
1.
Please fill Tsa name
The user has not entered
the Tsa name
The user needs to enter the Tsa
name in the given text box.
Table 52 : TSA Master > Messages
5.1.32 MASTER DATA MODULES (Appraisal Agency Master)
General Description
Appraisal Agency Master link can be used to enter the Appraisal Agency master data for a State. Only
an authorized user can view and edit the Appraisal Agency Master data.
Prerequisites
The user should have access to DDUGKY portal on the Internet and hold a valid User id and
Password to act for DDUGKY.
Screen Shot
Figure 77 : Appraisal Agency Master
Fields Description
S. No.
Field Name
Explanation
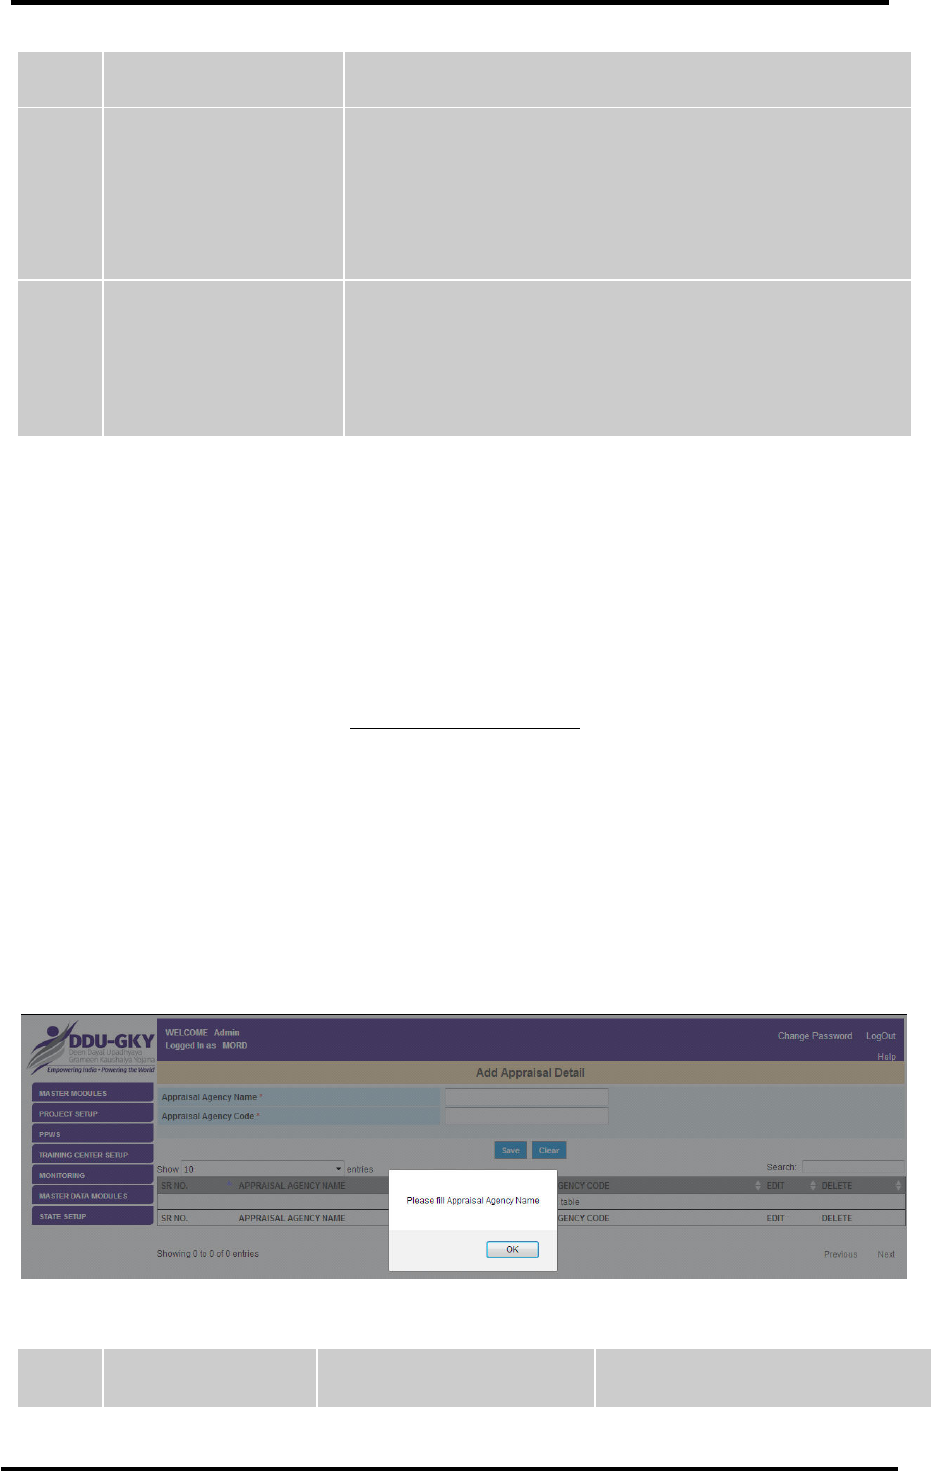
NATIONAL INFORMATICS CENTRE DDU-GKY USER MANUAL VERSION 1.1
NIC-DDUGKY - USER MANUAL 1.1 PAGE 145 OF 160 RELEASE DATE: 30-04-2017
S. No.
Field Name
Explanation
1.
Appraisal Agency Name
Description- The user can enter the Appraisal Agency
Name.
Validation- Only alphabets can be entered.
Mandatory/Optional- It’s a mandatory field.
2.
Appraisal Agency Code
Description- The user can enter the Appraisal Agency Code.
Validation- Only numbers can be entered.
Mandatory/Optional- It’s a mandatory field.
Table 53 : Appraisal Agency Master Form Fields Description
Form Flow
1. The user needs to login on DDUGKY portal by using the authorized user credentials.
2. Move the cursor on the Dashboard option MASTER DATA MODULES and click over it.
3. As user will click on MASTER DATA MODULES, the list of forms associated with this option
will get displayed under it.
4. If user wants to view or update details of Appraisal Agency Master, he/she needs to move the
cursor on the link given as Appraisal Agency Master and click over it. As user takes this
action, the form named as Appraisal Agency Master will open.
5. The user can enter the desired values in the form fields and then click on the button ‘Save’.
What happens when the form is submitted
If user wants to save the details of the form, click on the button ‘Save’/‘Update’ to save the record.
Messages
While working with the form, user may encounter some messages. Expected actions for the removal
of errors are given in the table below:
Figure 78 : Appraisal Agency Master> Messages
S. No.
Message
Reason
Expected Action

NATIONAL INFORMATICS CENTRE DDU-GKY USER MANUAL VERSION 1.1
NIC-DDUGKY - USER MANUAL 1.1 PAGE 146 OF 160 RELEASE DATE: 30-04-2017
S. No.
Message
Reason
Expected Action
1.
Please fill Appraisal
Agency name
The user has not entered
the Appraisal Agency name
The user needs to enter the
Appraisal Agency name in the
given text box.
Table 54 : Appraisal Agency Master > Messages
5.1.33 MASTER DATA MODULES (Assessment Body Master)
General Description
Assessment Body Master link can be used to enter the Assessment Body master data for a State.
Only an authorized user can view and edit the Assessment Body Master data.
Prerequisites
The user should have access to DDUGKY portal on the Internet and hold a valid User id and
Password to act for DDUGKY.
Screen Shot
Figure 79 : Assessment Body Master
Fields Description
S. No.
Field Name
Explanation
1.
Assessment Body Name
Description- The user can enter the Assessment Body
Name.
Validation- Only alphabets can be entered.
Mandatory/Optional- It’s a mandatory field.
2.
Assessment Body Code
Description- The user can enter the Assessment Body

NATIONAL INFORMATICS CENTRE DDU-GKY USER MANUAL VERSION 1.1
NIC-DDUGKY - USER MANUAL 1.1 PAGE 147 OF 160 RELEASE DATE: 30-04-2017
S. No.
Field Name
Explanation
Code.
Validation- Only numbers can be entered.
Mandatory/Optional- It’s a mandatory field.
Table 55 : Assessment Body Master Form Fields Description
Form Flow
1. The user needs to login on DDUGKY portal by using the authorized user credentials.
2. Move the cursor on the Dashboard option MASTER DATA MODULES and click over it.
3. As user will click on MASTER DATA MODULES, the list of forms associated with this option
will get displayed under it.
4. If user wants to view or update details of Assessment Body Master, he/she needs to move the
cursor on the link given as Assessment Body Master and click over it. As user takes this
action, the form named as Assessment Body Master will open.
5. The user can enter the desired values in the form fields and then click on the button ‘Save’.
What happens when the form is submitted
If user wants to save the details of the form, click on the button ‘Save’/‘Update’ to save the record.
Messages
While working with the form, user may encounter some messages. Expected actions for the removal
of errors are given in the table below:
Figure 80 : Assessment Body Master> Messages
S. No.
Message
Reason
Expected Action
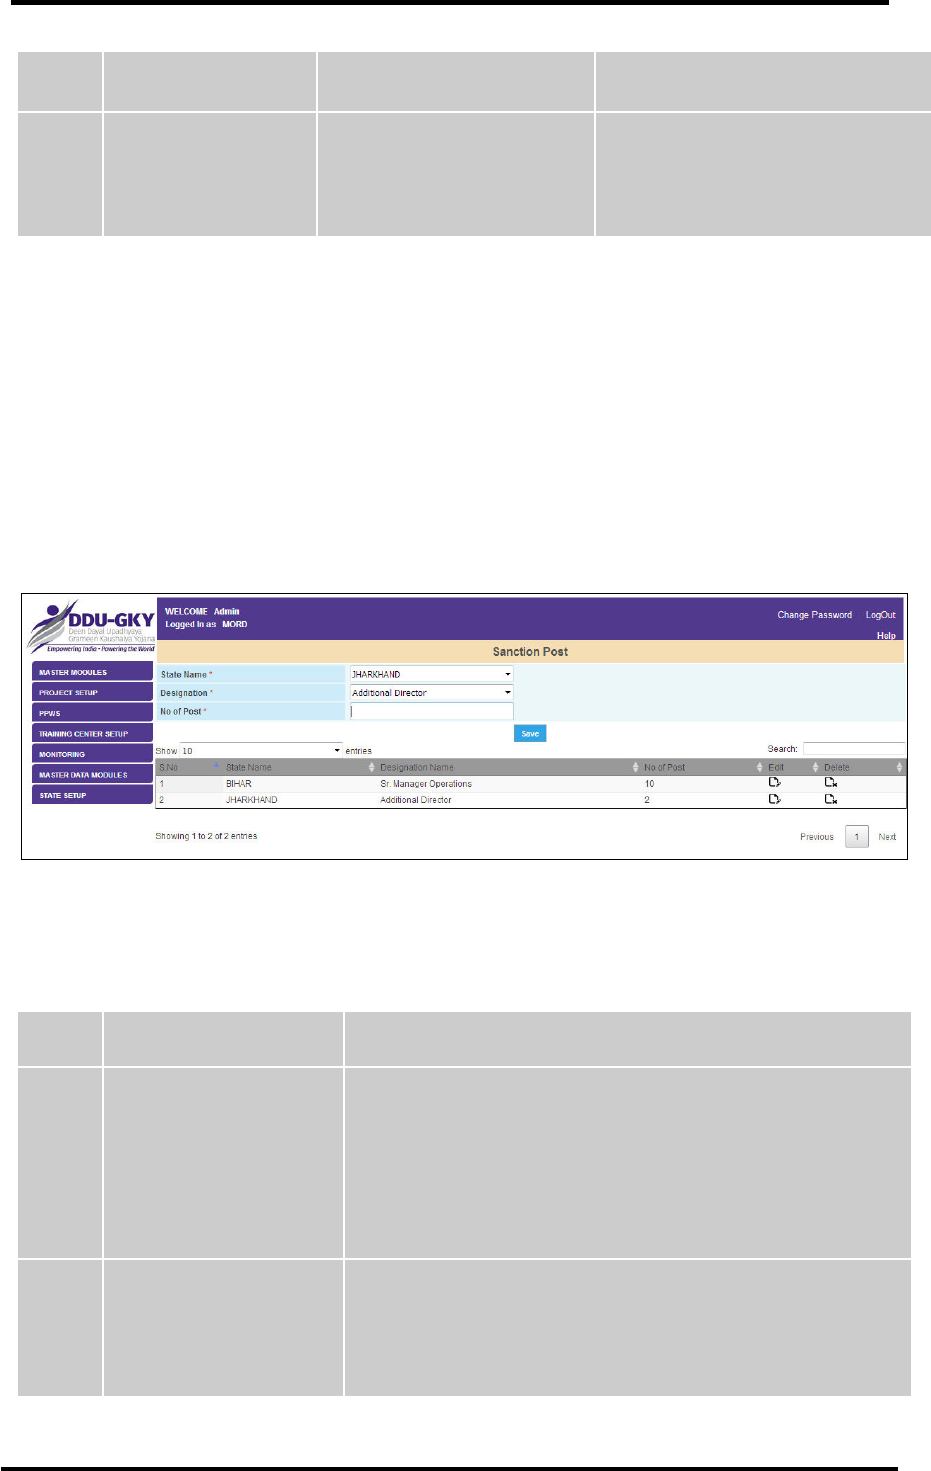
NATIONAL INFORMATICS CENTRE DDU-GKY USER MANUAL VERSION 1.1
NIC-DDUGKY - USER MANUAL 1.1 PAGE 148 OF 160 RELEASE DATE: 30-04-2017
S. No.
Message
Reason
Expected Action
1.
Please fill
Assessment Body
name
The user has not entered
the Assessment Body name
The user needs to enter the
Assessment Body name in the
given text box.
Table 56 : Assessment Body Master > Messages
5.1.34 MASTER DATA MODULES (Sanction Post Master)
General Description
Sanction Post Master link can be used to enter the Sanction Post master data for a State. Only an
authorized user can view and edit the Sanction Post Master data.
Prerequisites
The user should have access to DDUGKY portal on the Internet and hold a valid User id and
Password to act for DDUGKY.
Screen Shot
Figure 81 : Sanction Post Master
Fields Description
S. No.
Field Name
Explanation
1.
State Name
Description- The user can select the State Name from the
drop down list.
Validation- N/A
Mandatory/Optional- It’s a mandatory field.
2.
Designation
Description- The user can select the designation from the
drop down list.
Validation- N/A
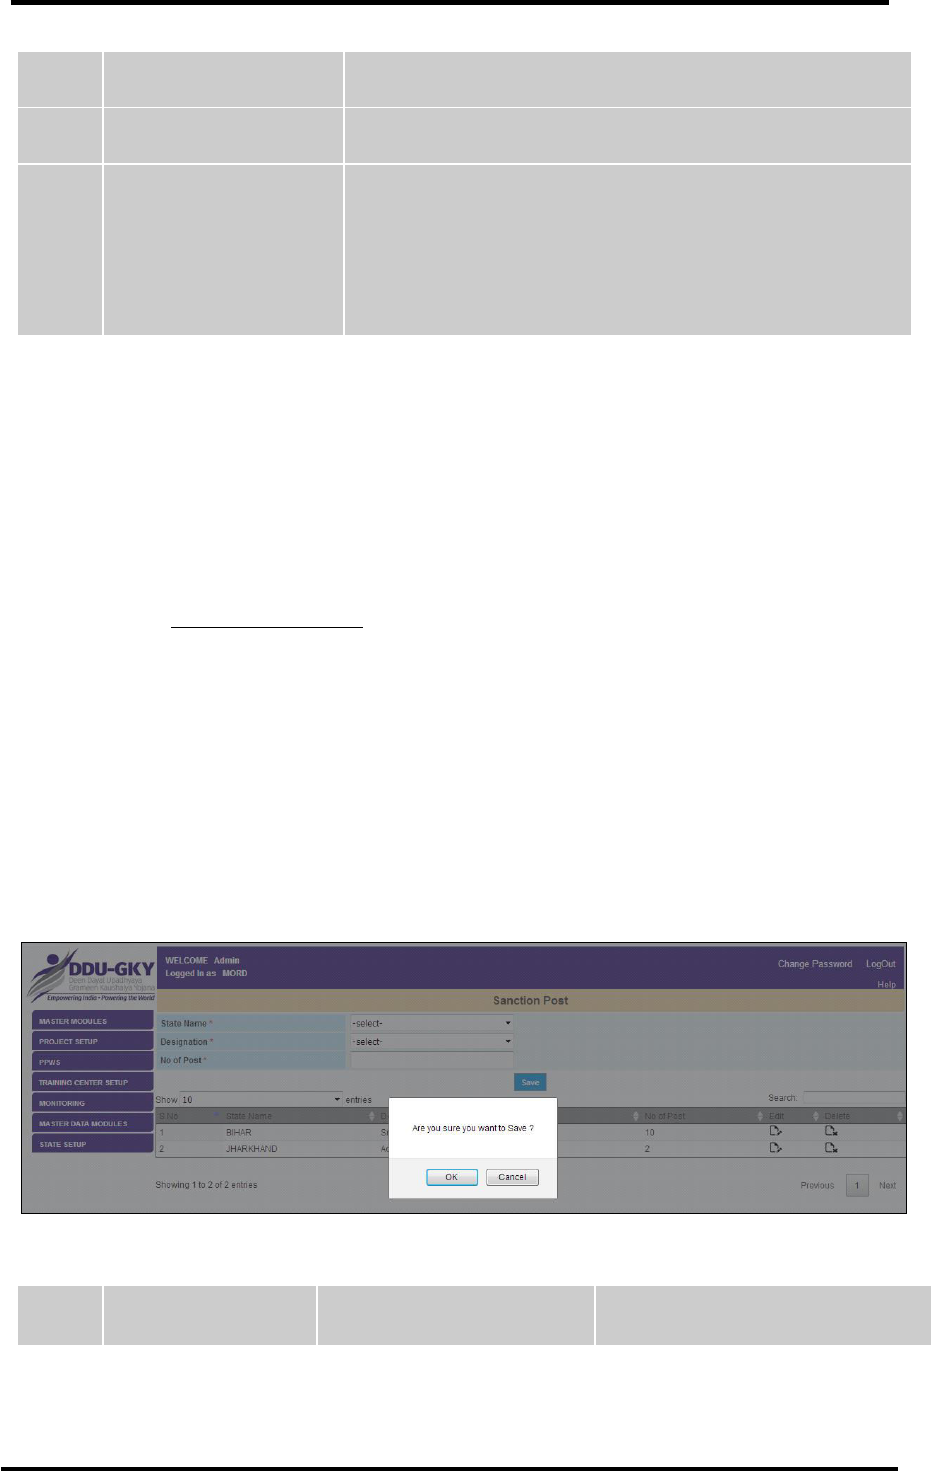
NATIONAL INFORMATICS CENTRE DDU-GKY USER MANUAL VERSION 1.1
NIC-DDUGKY - USER MANUAL 1.1 PAGE 149 OF 160 RELEASE DATE: 30-04-2017
S. No.
Field Name
Explanation
Mandatory/Optional- It’s a mandatory field.
3.
No. of Post
Description- The user can enter the number of post in the
given text box.
Validation- Only numbers can be entered.
Mandatory/Optional- It’s a mandatory field.
Table 57 : Sanction Post Master Form Fields Description
Form Flow
1. The user needs to login on DDUGKY portal by using the authorized user credentials.
2. Move the cursor on the Dashboard option MASTER DATA MODULES and click over it.
3. As user will click on MASTER DATA MODULES, the list of forms associated with this option
will get displayed under it.
4. If user wants to view or update details of Sanction Post Master, move the cursor on the link
given as Sanction Post Master and click over it. As user takes this action, the form named as
Sanction Post Master will open.
5. The user can enter the desired values in the form fields and then click on the button ‘Save’.
What happens when the form is submitted
If user wants to save the details of the form, he/she needs to click on the button ‘Save’/‘Update’ to
save the record.
Messages
While working with the form, user may encounter some messages. Expected actions for the removal
of errors are given in the table below:
Figure 82 : Sanction Post Master> Messages
S. No.
Message
Reason
Expected Action

NATIONAL INFORMATICS CENTRE DDU-GKY USER MANUAL VERSION 1.1
NIC-DDUGKY - USER MANUAL 1.1 PAGE 150 OF 160 RELEASE DATE: 30-04-2017
S. No.
Message
Reason
Expected Action
1.
Are you sure you
want to Save?
The user has selected the
values for all the fields and
clicked on the button ‘Save’
The user needs to click on the
button ‘OK’ to confirm or the user
can click on the button ‘Cancel’ to
abort the process.
Table 58 : Sanction Post Master > Messages
5.1.35 MASTER DATA MODULES (Certifying Agency Master)
General Description
Certifying Agency Master link can be used to enter the Certifying Agency master data for a State.
Only an authorized user can view and edit the Certifying Agency Master data.
Prerequisites
The user should have access to DDUGKY portal on the Internet and hold a valid User id and
Password to act for DDUGKY.
Screen Shot
Figure 83 : Certifying Agency Master
Fields Description
S. No.
Field Name
Explanation
1.
Certifying Agency Name
Description- The user can enter the Certifying Agency
Name in the given text box.
Validation- Only alphabets can be entered.
Mandatory/Optional- It’s a mandatory field.
2.
Certifying Agency Code
Description- The user can enter the Certifying Agency code
in the given text box.
Validation- Only numbers can be entered.
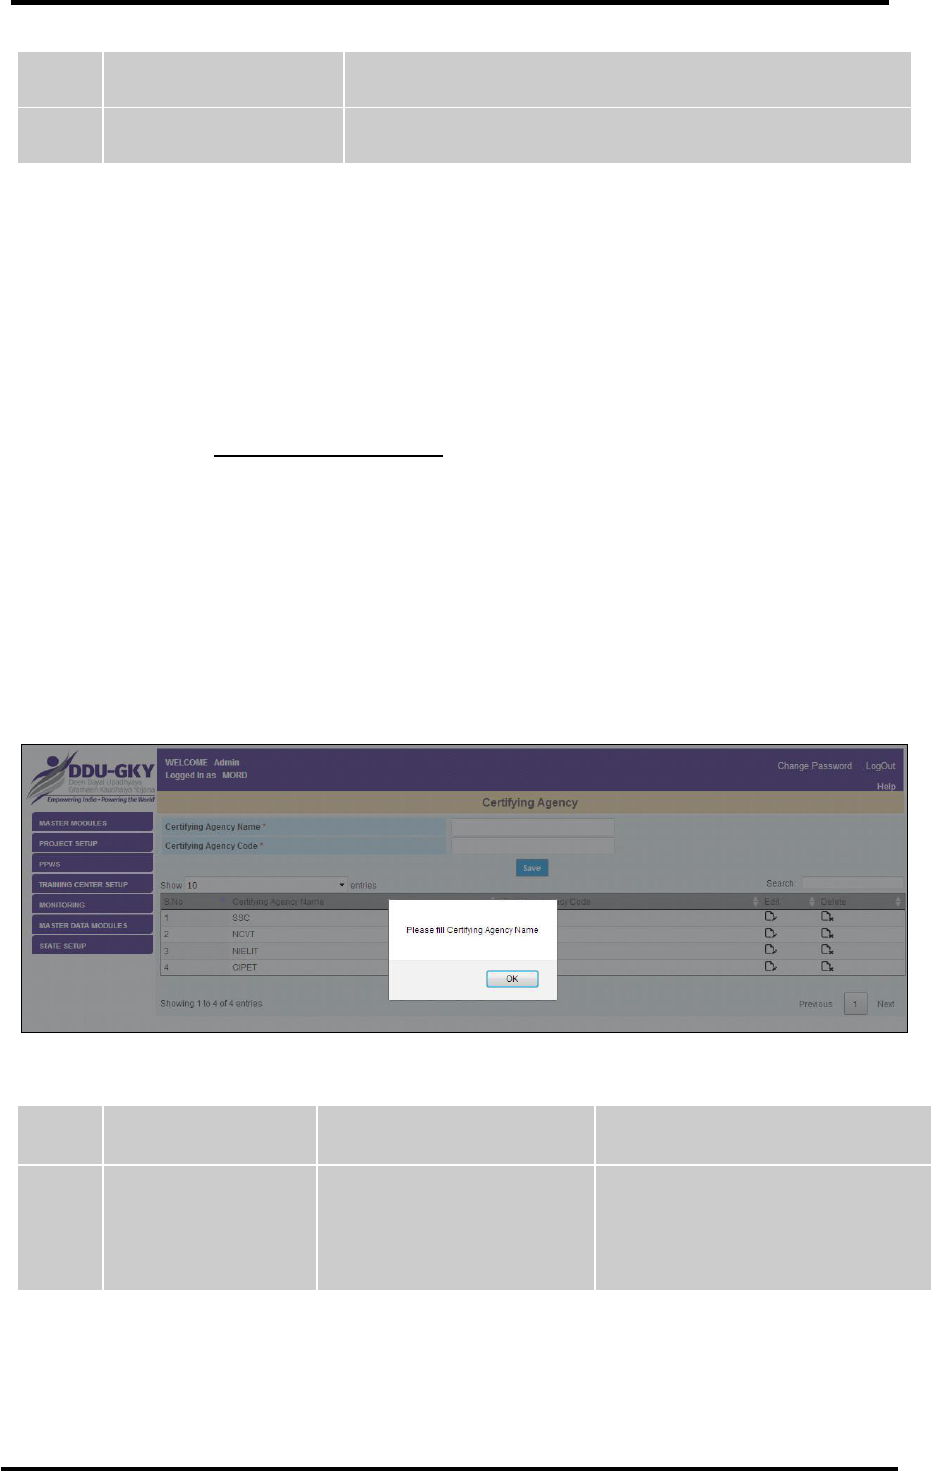
NATIONAL INFORMATICS CENTRE DDU-GKY USER MANUAL VERSION 1.1
NIC-DDUGKY - USER MANUAL 1.1 PAGE 151 OF 160 RELEASE DATE: 30-04-2017
S. No.
Field Name
Explanation
Mandatory/Optional- It’s a mandatory field.
Table 59 : Sanction Post Master Form Fields Description
Form Flow
1. The user needs to login on DDUGKY portal by using the authorized user credentials.
2. Move the cursor on the Dashboard option MASTER DATA MODULES and click over it.
3. As user will click on MASTER DATA MODULES, the list of forms associated with this option
will get displayed under it.
4. If user wants to view or update details of Certifying Agency Master, move the cursor on the
link given as Certifying Agency Master and click over it. As user take this action, the form
named as Certifying Agency Master will open.
5. The user can enter the desired values in the form fields and then click on the button ‘Save’.
What happens when the form is submitted
If user wants to save the details of the form, click on the button ‘Save’/‘Update’ to save the record.
Messages
While working with the form, user may encounter some messages. Expected actions for the removal
of errors are given in the table below:
Figure 84 : Certifying Agency Master> Messages
S. No.
Message
Reason
Expected Action
1.
Please fill Certifying
Agency Name
The user has not entered
the Certifying Agency name
in the given text box
The user needs to enter the
Certifying Agency Name in the
given text box.
Table 60 : Certifying Agency Master > Messages
5.1.36 MASTER DATA MODULES (Project Type Master)
General Description

NATIONAL INFORMATICS CENTRE DDU-GKY USER MANUAL VERSION 1.1
NIC-DDUGKY - USER MANUAL 1.1 PAGE 152 OF 160 RELEASE DATE: 30-04-2017
Project Type Master link can be used to enter the Project Type master data for a State. Only an
authorized user can view and edit the Project Type Master data.
Prerequisites
The user should have access to DDUGKY portal on the Internet and hold a valid User id and
Password to act for DDUGKY.
Screen Shot
Figure 85 : Project Type Master
Fields Description
S. No.
Field Name
Explanation
1.
Project Type Code
Description- The user can enter the Project Type Code in
the given text box.
Validation- Only numbers can be entered.
Mandatory/Optional- It’s a mandatory field.
2.
Project Type Name
Description- The user can enter the Project Type Name in
the given text box.
Validation- Only alphabets can be entered.
Mandatory/Optional- It’s a mandatory field.
Table 61 : Project Type Master Form Fields Description
Form Flow
1. The user needs to login on DDUGKY portal by using the authorized user credentials.
2. Move the cursor on the Dashboard option MASTER DATA MODULES and click over it.
3. As user will click on MASTER DATA MODULES, the list of forms associated with this option
will get displayed under it.
4. If user wants to view or update details of Project Type Master, move the cursor on the link
given as Project Type Master and click over it. As user takes this action, the form named as
Project Type Master will open.
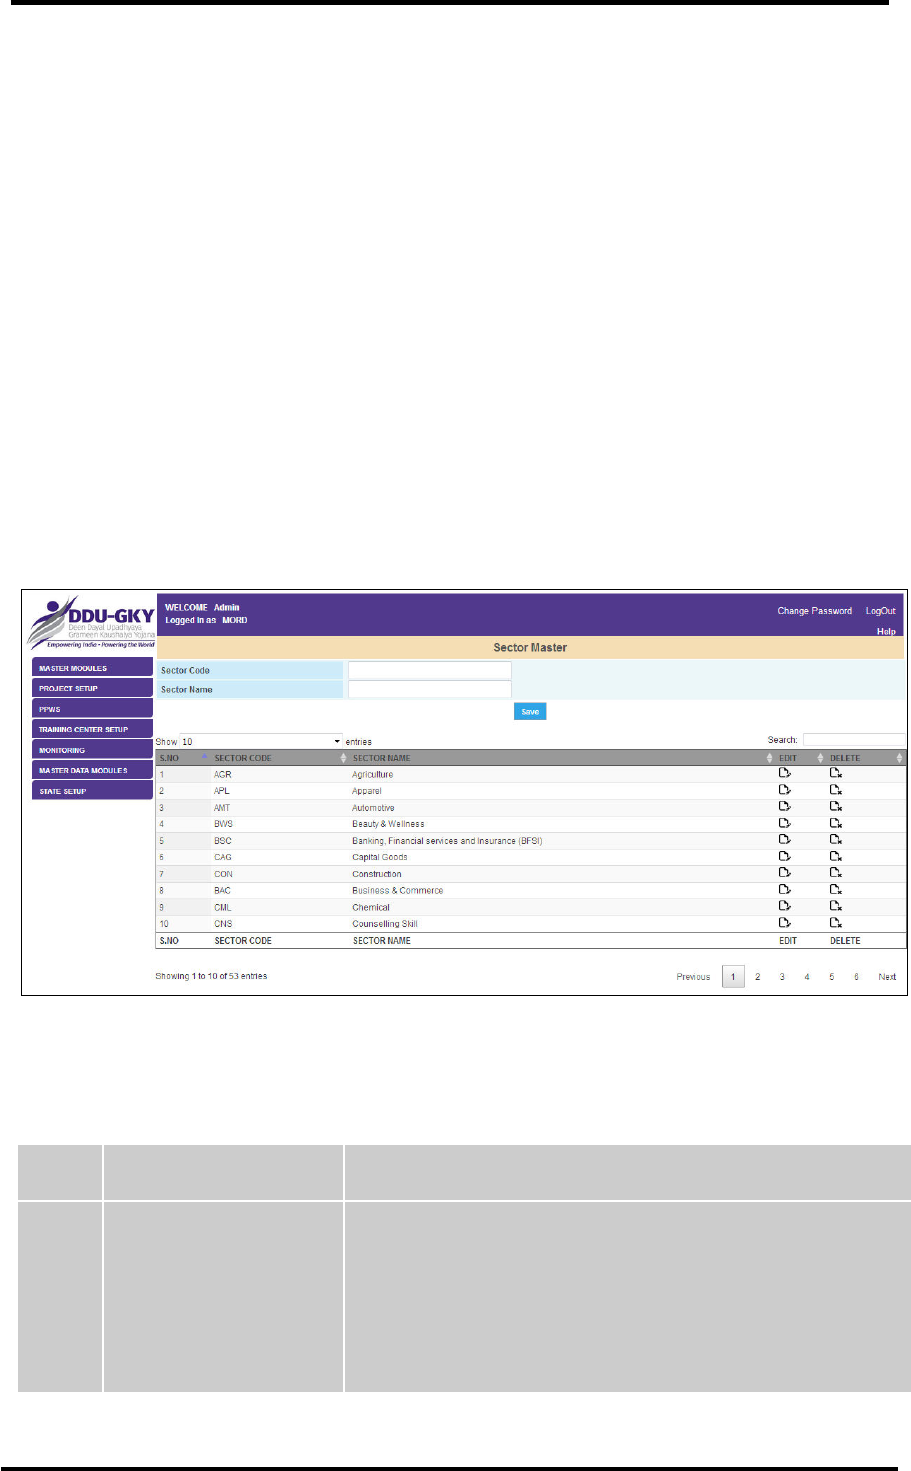
NATIONAL INFORMATICS CENTRE DDU-GKY USER MANUAL VERSION 1.1
NIC-DDUGKY - USER MANUAL 1.1 PAGE 153 OF 160 RELEASE DATE: 30-04-2017
5. The user can enter the desired values in the form fields and then click on the button ‘Save’.
What happens when the form is submitted
If user wants to save the details of the form, click on the button ‘Save’/‘Update’ to save the record.
Messages
N/A
5.1.37 MASTER DATA MODULES (Sector Master)
General Description
Sector Master link can be used to enter the Sector master data for a State. Only an authorized user
can view and edit the Sector Master data.
Prerequisites
The user should have access to DDUGKY portal on the Internet and hold a valid User id and
Password to act for DDUGKY.
Screen Shot
Figure 86 : Sector Master
Fields Description
S. No.
Field Name
Explanation
1.
Sector Code
Description- The user can enter the Sector code in the given
text box.
Validation- Only numbers can be entered.
Mandatory/Optional- It’s a mandatory field.

NATIONAL INFORMATICS CENTRE DDU-GKY USER MANUAL VERSION 1.1
NIC-DDUGKY - USER MANUAL 1.1 PAGE 154 OF 160 RELEASE DATE: 30-04-2017
S. No.
Field Name
Explanation
2.
Sector Name
Description- The user can enter the Sector Name in the
given text box.
Validation- Only alphabets can be entered.
Mandatory/Optional- It’s a mandatory field.
Table 62 : Sector Master Form Fields Description
Form Flow
1. The user needs to login on DDUGKY portal by using the authorized user credentials.
2. Move the cursor on the Dashboard option MASTER DATA MODULES and click over it.
3. As user will click on MASTER DATA MODULES, the list of forms associated with this option
will get displayed under it.
4. If user wants to view or update details of Sector Master, he/she needs to move the cursor on
the link given as Sector Master and click over it. As user takes this action, the form named as
Sector Master will open.
5. The user can enter the desired values in the form fields and then click on the button ‘Save’.
What happens when the form is submitted
If user wants to save the details of the form, click on the button ‘Save’/‘Update’ to save the record.
Messages
N/A
5.1.38 MASTER DATA MODULES (Trade Master)
General Description
Trade Master link can be used to enter the Trade master data for a State. Only an authorized user
can view and edit the Trade Master data.
Prerequisites
The user should have access to DDUGKY portal on the Internet and hold a valid User id and
Password to act for DDUGKY.
Screen Shot
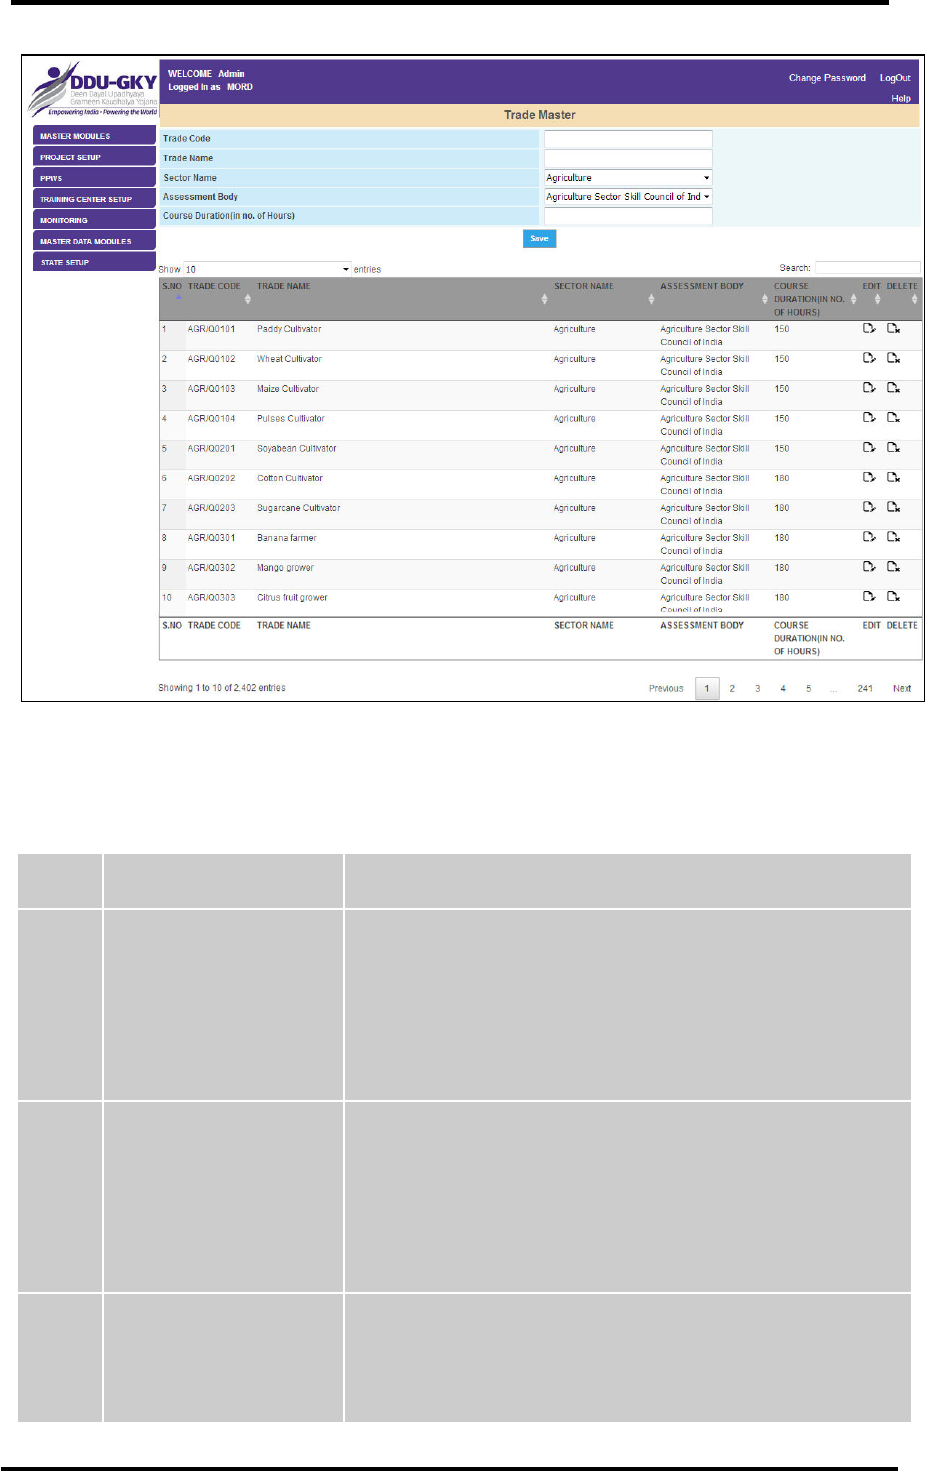
NATIONAL INFORMATICS CENTRE DDU-GKY USER MANUAL VERSION 1.1
NIC-DDUGKY - USER MANUAL 1.1 PAGE 155 OF 160 RELEASE DATE: 30-04-2017
Figure 87 : Trade Master
Fields Description
S. No.
Field Name
Explanation
1.
Trade Code
Description- The user can enter the Trade code in the given
text box.
Validation- Only numbers can be entered.
Mandatory/Optional- It’s a mandatory field.
2.
Trade Name
Description- The user can enter the Trade Name in the
given text box.
Validation- Only alphabets can be entered.
Mandatory/Optional- It’s a mandatory field.
3.
Sector Name
Description- The user can select the sector name from the
drop down list.
Validation- N/A

NATIONAL INFORMATICS CENTRE DDU-GKY USER MANUAL VERSION 1.1
NIC-DDUGKY - USER MANUAL 1.1 PAGE 156 OF 160 RELEASE DATE: 30-04-2017
S. No.
Field Name
Explanation
Mandatory/Optional- It’s a mandatory field.
4.
Assessment Body
Description- The user can select the Assessment Body from
the drop down list.
Validation- N/A
Mandatory/Optional- It’s a mandatory field.
5.
Course Duration (in no.
of Hours)
Description- The user can enter the course duration (in no.
of hours) in the given text box.
Validation- Only numbers can be entered.
Mandatory/Optional- It’s a mandatory field.
Table 63 : Trade Master Form Fields Description
Form Flow
1. The user needs to login on DDUGKY portal by using the authorized user credentials.
2. Move the cursor on the Dashboard option MASTER DATA MODULES and click over it.
3. As user will click on MASTER DATA MODULES, the list of forms associated with this option
will get displayed under it.
4. If user wants to view or update details of Trade Master, he/she needs to move the cursor on
the link given as Trade Master and click over it. As user takes this action, the form named as
Trade Master will open.
5. The user can enter the desired values in the form fields and then click on the button ‘Save’.
What happens when the form is submitted
If user wants to save the details of the form, click on the button ‘Save’/‘Update’ to save the record.
Messages
N/A
5.1.39 MASTER DATA MODULES (Parliamentary Constituency Master)
General Description
Parliamentary Constituency Master link can be used to enter the Parliamentary Constituency master
data for a State. Only an authorized user can view and edit the Parliamentary Constituency Master
data.
Prerequisites
The user should have access to DDUGKY portal on the Internet and hold a valid User id and
Password to act for DDUGKY.
Screen Shot

NATIONAL INFORMATICS CENTRE DDU-GKY USER MANUAL VERSION 1.1
NIC-DDUGKY - USER MANUAL 1.1 PAGE 157 OF 160 RELEASE DATE: 30-04-2017
Figure 88 : Parliamentary Constituency Master
Fields Description
S. No.
Field Name
Explanation
1.
Parliamentary
Constituency Name
Description- The user can enter the Parliamentary
Constituency Name in the given text box.
Validation- Only alphabets can be entered.
Mandatory/Optional- It’s a mandatory field.
2.
Parliamentary
Constituency Code
Description- The user can enter the Parliamentary
Constituency code in the given text box.
Validation- Only numbers can be entered.
Mandatory/Optional- It’s a mandatory field.
Table 64 : Parliamentary Constituency Master Form Fields Description
Form Flow
1. The user needs to Login on DDUGKY portal by using the authorized user credentials.
2. Move the cursor on the Dashboard option MASTER DATA MODULES and click over it.
3. As user will click on MASTER DATA MODULES, the list of forms associated with this option
will get displayed under it.
4. If user wants to view or update details of Parliamentary Constituency Master, he/she needs to
move the cursor on the link given as Parliamentary Constituency Master and click over it. As
user takes this action, the form named as Parliamentary Constituency Master will open.
5. The user can enter the desired values in the form fields and then click on the button ‘Save’.
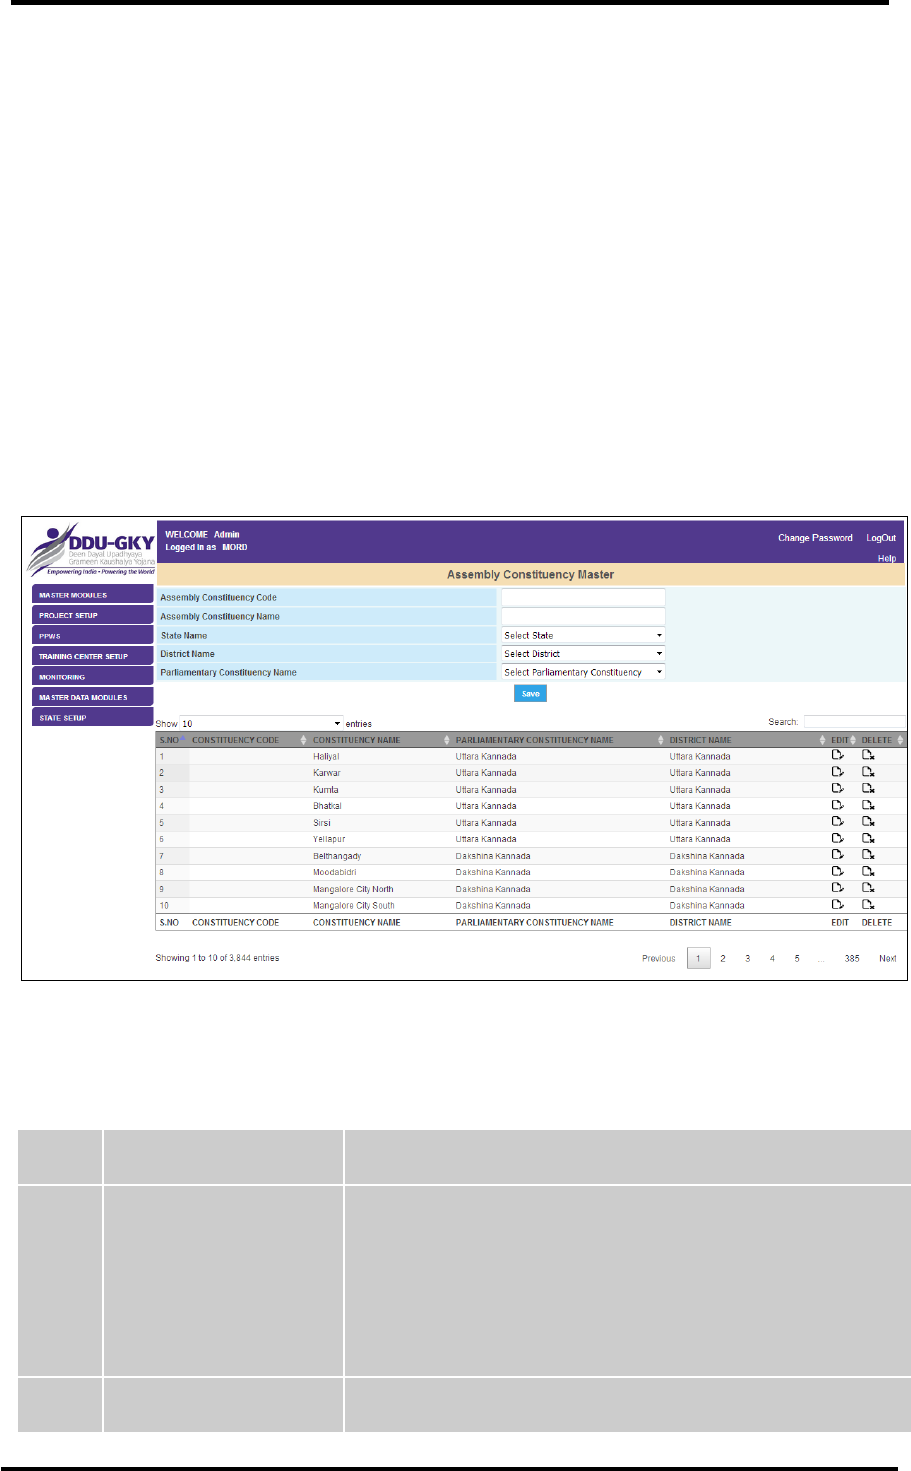
NATIONAL INFORMATICS CENTRE DDU-GKY USER MANUAL VERSION 1.1
NIC-DDUGKY - USER MANUAL 1.1 PAGE 158 OF 160 RELEASE DATE: 30-04-2017
What happens when the form is submitted
If user wants to save the details of the form, click on the button ‘Save’/‘Update’ to save the record.
Messages
N/A
5.1.40 MASTER DATA MODULES (Assembly Constituency Master)
General Description
Assembly Constituency Master link can be used to enter the Assembly Constituency master data for a
State. Only an authorized user can view and edit the Assembly Constituency Master data.
Prerequisites
The user should have access to DDUGKY portal on the Internet and hold a valid User id and
Password to act for DDUGKY.
Screen Shot
Figure 89 : Assembly Constituency Master
Fields Description
S. No.
Field Name
Explanation
1.
Assembly Constituency
Code
Description- The user can enter the Assembly Constituency
code in the given text box.
Validation- Only numbers can be entered.
Mandatory/Optional- It’s a mandatory field.
2.
Assembly Constituency
Description- The user can enter the Assembly Constituency

NATIONAL INFORMATICS CENTRE DDU-GKY USER MANUAL VERSION 1.1
NIC-DDUGKY - USER MANUAL 1.1 PAGE 159 OF 160 RELEASE DATE: 30-04-2017
S. No.
Field Name
Explanation
Name
Name in the given text box.
Validation- Only alphabets can be entered.
Mandatory/Optional- It’s a mandatory field.
3.
State Name
Description- This field describes the name of the State.
Validation- N/A
Mandatory/Optional- It’s a mandatory field.
4.
District Name
Description- This field describes the name of the district of
the State.
Validation- N/A
Mandatory/Optional- It’s a mandatory field.
5.
Parliamentary
Constituency Name
Description- The user can select the Parliamentary
Constituency Name in the given text box.
Validation- N/A
Mandatory/Optional- It’s a mandatory field.
Table 65 : Assembly Constituency Master Form Fields Description
Form Flow
1. The user needs to Login on DDUGKY portal by using the authorized user credentials.
2. Move the cursor on the Dashboard option MASTER DATA MODULES and click over it.
3. As user will click on MASTER DATA MODULES, the list of forms associated with this option
will get displayed under it.
4. If user wants to view or update details of Assembly Constituency Master, he/she needs to
move the cursor on the link given as Assembly Constituency Master and click over it. As user
takes this action, the form named as Assembly Constituency Master will open.
5. The user can enter the desired values in the form fields and then click on the button ‘Save’.
What happens when the form is submitted
If user wants to save the details of the form, click on the button ‘Save’/‘Update’ to save the record.
Messages
N/A

NATIONAL INFORMATICS CENTRE DDU-GKY USER MANUAL VERSION 1.1
NIC-DDUGKY - USER MANUAL 1.1 PAGE 160 OF 160 RELEASE DATE: 30-04-2017
