HPE Security ArcSight ESM Installation Guide Install 7.0
User Manual:
Open the PDF directly: View PDF ![]() .
.
Page Count: 115 [warning: Documents this large are best viewed by clicking the View PDF Link!]
- Chapter 1: What Is ESM With CORR-Engine Storage?
- Chapter 2: Installing on an Appliance
- Chapter 3: Installing Software ESM
- Securing Your ESM System
- Preparing to Install
- System Requirements
- Supported Platforms
- Download the Installation Package
- Prepare the System
- Keep these TCP Ports Open
- Install the Time Zone Package
- Add RemoveIPC=no to /etc/systemd/logind.conf - RHEL and CentOS 7.3 Only
- Set Directory Sizes
- Sizing Guidelines for CORR-Engine
- Export Language UTF File
- Distributed Correlation Cluster Planning
- Starting the Installer
- Chapter 4: Post-Installation Considerations
- Uninstalling ESM
- Uninstalling ESM - Distributed Correlation Mode
- Rerunning the Installer
- Rerunning the ESM Configuration Wizard
- Setting Up ESM Reports to Display in a Non-English Environment
- Improving the Performance of Your Server
- Configure Your Browser for TLS Protocols
- Setting Up SSL Client-Side Authentication Between Event Broker and ESM - Non-...
- Configure Integration with ServiceNow® IT Service Management (ITSM) - Optional
- Post-Installation Next Steps
- Chapter 5: Installing ArcSight Console
- Appendix A: Troubleshooting
- Location of Log Files for Components
- If You Encounter an Unsuccessful Installation
- Customizing the Manager
- Fatal Error when Running the First Boot Wizard - Appliance Installation
- Search Query Result Charts Do Not Display in Safari Browser
- Hostname Shown as IPv6 Address in Dashboard
- Internet Not Accessible From an IPv6 System
- Appendix B: Default Settings For Components
- Appendix C: Using PKCS
- PKCS#11
- PKCS#11 Token Support in ESM
- Setting Up to Use a PKCS#11 Provider
- Install the PKCS#11 Provider’s Software
- Map a User’s External ID to the Subject CN
- Obtain the CAC/90Meter’s Issuers’ Certificate
- Extract the Root CA Certificate From the CAC/90Meter Certificate
- Import the CAC/90Meter Root CA Certificate into the ArcSight Manager
- Select Authentication Option in ArcSight Console Setup
- Logging in to the ArcSight Console Using PKCS#11 Token
- Logging in to an ESM Web UI Using PKCS#11 Token
- Appendix D: Installing ESM in FIPS Mode
- What is FIPS?
- What is Suite B?
- Transport Layer Security (TLS) Configuration Concepts
- TLS Support
- Server Side Authentication
- Client Side Authentication
- Exporting the Manager’s Certificate to Clients
- Using PKCS#11 Token With a FIPS Mode Setup
- Installing ArcSight Console in FIPS Mode
- Connecting a Default Mode ArcSight Console to a FIPS 140-2 ArcSight Manager
- Connecting a FIPS ArcSight Console to FIPS Enabled ArcSight Managers
- Installing SmartConnectors in FIPS Mode
- Configure Event Broker Access - FIPS Mode (Server Authentication Only) (Optio...
- Configure ServiceNow® IT Service Management (ITSM) Access - FIPS Mode
- Setting Up SSL Client-Side Authentication Between Event Broker and ESM - FIPS...
- How Do I Know if My Installation is FIPS Enabled?
- Appendix E: Event Broker Best Practices
- Appendix F: Locales and Encodings
- Appendix G: Restore Appliance Factory Settings
- Send Documentation Feedback

HPE SecurityArcSightESM
Software Version: 7.0
ESM Installation Guide
April 20, 2018

Legal Notices
Warranty
The only warranties for Hewlett Packard Enterprise products and services are set forth in the express warranty statements
accompanying such products and services. Nothing herein should be construed as constituting an additional warranty.
Hewlett Packard Enterprise shall not be liable for technical or editorial errors or omissions contained herein.
The information contained herein is subject to change without notice.
The network information used in the examples in this document (including IP addresses and hostnames) is for illustration
purposes only.
HPE Security ArcSight products are highly flexible and function as you configure them. The accessibility, integrity, and
confidentiality of your data is your responsibility. Implement a comprehensive security strategy and follow good security
practices.
This document is confidential.
Restricted Rights Legend
Confidential computer software. Valid license from Hewlett Packard Enterprise required for possession, use or copying.
Consistent with FAR 12.211 and 12.212, Commercial Computer Software, Computer Software Documentation, and Technical
Data for Commercial Items are licensed to the U.S. Government under vendor's standard commercial license.
Copyright Notice
© Copyright 2018 Hewlett Packard Enterprise Development, LP
Follow this link to see a complete statement of copyrights and acknowledgements:
https://community.softwaregrp.com/t5/Discussions/Third-Party-Copyright-Notices-and-License-Terms/td-p/1589228
Support
Phone A list of phone numbers is available on the Technical Support
Page:
https://softwaresupport.softwaregrp.com/support-contact-information
Support Web Site https://softwaresupport.softwaregrp.com/
ArcSight Product Documentation https://community.softwaregrp.com/t5/ArcSight-Product-Documentation/ct-
p/productdocs
Contact Information
ESM Installation Guide
HPE ESM 7.0 Page 2 of 115

Contents
Chapter 1: What Is ESM With CORR-Engine Storage? 8
ESM Basic Components 8
ESM Components and Distributed Correlation 9
ESM Communication Overview 10
Choosing between FIPS Mode or Default Mode 10
FIPS Encryption Cipher Suites 11
Using PKCS#11 11
Effect on Communication When Components Fail 12
Directory Structure for ESM Installation 12
References to ARCSIGHT_HOME 12
Chapter 2: Installing on an Appliance 14
Starting the Appliance for the First Time 14
Starting the Appliance for the First Time - IPv4 14
Starting the Appliance for the First Time - IPv6 15
IPv6 Static Networking Setup 15
IPv6 Auto Config Networking Setup 16
Starting the Appliance for the First Time - Dual Stack 17
Using the Configuration Wizard - Appliance 17
Keep These TCP Ports Open 21
Enable Peering 22
Running ESM on an Encrypted Appliance 22
Configuring the Appliance for Out-of-Band Remote Access 23
Chapter 3: Installing Software ESM 24
Securing Your ESM System 24
Protecting ArcSight Manager 24
Built-In Security 26
Physical Security for the Hardware 26
Operating System Security 26
General Guidelines and Policies about Security 27
Preparing to Install 28
System Requirements 28
HPE ESM 7.0 Page 3 of 115

Supported Platforms 29
Download the Installation Package 30
Prepare the System 31
Keep these TCP Ports Open 31
Install the Time Zone Package 32
Add RemoveIPC=no to /etc/systemd/logind.conf - RHELand CentOS 7.3 Only 33
Set Directory Sizes 33
Sizing Guidelines for CORR-Engine 34
Export Language UTF File 35
Distributed Correlation Cluster Planning 36
Hierarchical Implementations and Cluster Planning 36
Cluster Requirements 36
Recommended Cluster Configurations 37
Starting the Installer 41
Running the Installation File 41
Starting the Configuration Wizard In Console Mode 42
Using the Configuration Wizard - ESM in Compact Mode 42
Using the Configuration Wizard - ESM in Distributed Correlation Mode 46
Persistor Node Installation 47
Add Nodes to a Cluster - Further Node Installation 52
Post Cluster Creation Configuration 53
Setting Up Key-Based Passwordless SSH - Distributed Correlation Mode Only 53
Handling a Time Zone Update Error 54
Chapter 4: Post-Installation Considerations 55
Uninstalling ESM 55
Uninstalling ESM - Distributed Correlation Mode 56
Rerunning the Installer 57
Rerunning the ESM Configuration Wizard 57
Setting Up ESM Reports to Display in a Non-English Environment 58
Setting Up Reports On the Manager 58
Setting Up Reports On the Console 58
Improving the Performance of Your Server 59
Configure Your Browser for TLS Protocols 60
Setting Up SSL Client-Side Authentication Between Event Broker and ESM - Non-FIPS Mode 60
Configure Integration with ServiceNow® IT Service Management (ITSM) - Optional 62
Post-Installation Next Steps 63
ESM Installation Guide
HPE ESM 7.0 Page 4 of 115

Chapter 5: Installing ArcSight Console 64
Console Supported Platforms 64
Required Libraries for RHEL and CentOS (64 Bit) 64
Installing the Console 65
Configuring the ArcSight Console 66
Importing the Console’s Certificate into the Browser 70
Character Set Encoding 70
Starting the ArcSight Console 71
Logging into the Console 72
Reconnecting to the ArcSight Manager 73
Reconfiguring the ArcSight Console 73
Uninstalling the ArcSight Console 73
Appendix A: Troubleshooting 75
Location of Log Files for Components 75
If You Encounter an Unsuccessful Installation 77
Customizing the Manager 78
Fatal Error when Running the First Boot Wizard - Appliance Installation 78
Search Query Result Charts Do Not Display in Safari Browser 79
Hostname Shown as IPv6 Address in Dashboard 79
Internet Not Accessible From an IPv6 System 79
Appendix B: Default Settings For Components 80
General Settings 80
CORR-Engine Settings 80
Manager Settings 80
Appendix C: Using PKCS 82
PKCS#11 82
PKCS#11 Token Support in ESM 82
Setting Up to Use a PKCS#11 Provider 83
Install the PKCS#11 Provider’s Software 83
Map a User’s External ID to the Subject CN 83
Obtain the CAC/90Meter’s Issuers’ Certificate 85
Extract the Root CA Certificate From the CAC/90Meter Certificate 87
ESM Installation Guide
HPE ESM 7.0 Page 5 of 115

Import the CAC/90Meter Root CA Certificate into the ArcSight Manager 88
Import into the ArcSight Manager’s Truststore 88
Select Authentication Option in ArcSight Console Setup 89
Logging in to the ArcSight Console Using PKCS#11 Token 90
Logging in to an ESMWeb UI Using PKCS#11 Token 90
Appendix D: Installing ESM in FIPS Mode 92
What is FIPS? 92
What is Suite B? 92
Transport Layer Security (TLS) Configuration Concepts 93
TLS Support 93
Server Side Authentication 94
Client Side Authentication 95
Exporting the Manager’s Certificate to Clients 95
Using PKCS#11 Token With a FIPS Mode Setup 96
Installing ArcSight Console in FIPS Mode 96
Connecting a Default Mode ArcSight Console to a FIPS 140-2 ArcSight Manager 98
Connecting a FIPS ArcSight Console to FIPS Enabled ArcSight Managers 98
Installing SmartConnectors in FIPS Mode 98
Configure Event Broker Access - FIPS Mode (Server Authentication Only) (Optional) 99
Configure ServiceNow® IT Service Management (ITSM) Access - FIPS Mode 101
Setting Up SSL Client-Side Authentication Between Event Broker and ESM - FIPS Mode 102
How Do I Know if My Installation is FIPS Enabled? 103
Appendix E: Event Broker Best Practices 104
Appendix F: Locales and Encodings 105
Locale and Encoding Terminology 105
Character Set 105
Code Point 105
Code Set 105
Encoding 105
Internationalization 105
Locale 106
Localization 106
ESM Installation Guide
HPE ESM 7.0 Page 6 of 115

Region Code 106
Unicode 106
UTF-8 106
Before You Install a Localized Version of ESM 106
ArcSight Console and Manager 107
ArcSight SmartConnectors 107
Setting the Encoding for Selected SmartConnectors 107
Localizing Date Formats 107
List of Possible Values 107
Key-Value Parsers for Localized Devices 113
Appendix G: Restore Appliance Factory Settings 114
Send Documentation Feedback 115
ESM Installation Guide
HPE ESM 7.0 Page 7 of 115
Chapter 1: What Is ESM With CORR-Engine
Storage?
ESM is a Security Information and Event Management (SIEM) solution that collects and analyzes
security data from different devices on your network and provides you a central, real-time view of the
security status of all devices of interest to you. ESM uses the Correlation Optimized Retention and
Retrieval Engine (CORR-Engine) storage, a proprietary framework that processes events, and performs
searches.
Terminology to Note:
ESMAppliance and ESM Express are different licensing models installed on an appliance.
Software ESM is ESM installed on your own hardware.
ESM Basic Components
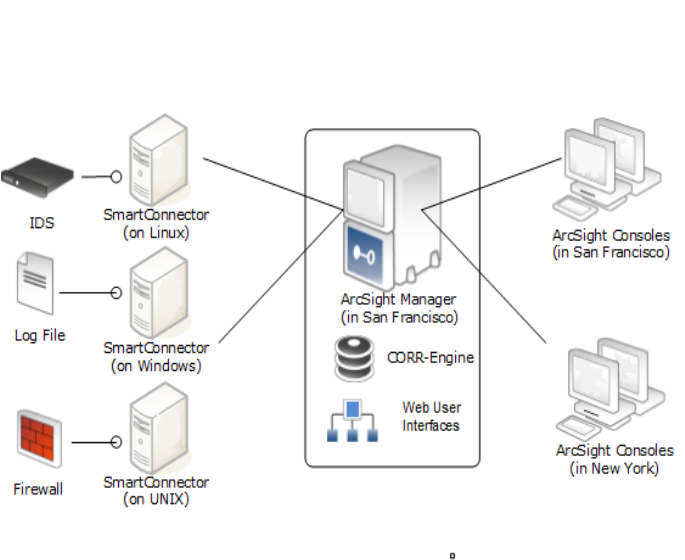
The ESM system comprises the following components:
lESMManager -- The Manager is a server that receives event data from Connectors and correlates,
reports, and stores them in the database. The Manager and CORR-Engine are integrated
components and get installed on the same machine.
lCORR-Engine -- The CORR-Engine (Correlation Optimized Retention and Retrieval Engine) is a long-
term data storage and retrieval engine that enables the product to receive events at high rates.
lArcSight Console -- The ArcSight Console enables you to perform administrative tasks, such as
tuning the ESM content, creating rules, and managing users. The ArcSight Console is installed
separately on client machines.
lArcSight Command Center -- The ArcSight Command Center is a web-based user interface that
enables you to perform many of the functions found in the ArcSight Console. It provides
dashboards, a variety of search types, reports, case management, notifications, channels, and
administrative functions for managing content, storage, archives, search filters, saved searches,
search configuration, log retrieval and license information.
lSmartConnectors -- SmartConnectors are software components that forward security events from a
wide variety of devices and security event sources to ESM. SmartConnectors are not bundled with
ESM and are installed separately.
Below is a diagram of how these components can be deployed in a network:
HPE ESM 7.0 Page 8 of 115
ESM Components and Distributed Correlation
Distributed correlation allows you to use distributed resources as services to run on one or several
systems (nodes) in a software cluster that you install, configure, and manage. A distributed correlation
deployment includes the persistor, repository, correlators, aggregators, message bus data, message bus
control, and distributed cache. Ideally, the correlators and aggregators in the cluster will keep up with
event flow on your system. As needed, you can add more correlators and aggregators through
configuration, as described in "Configuring and Managing a Distributed Correlation", in the
ESM
Administrator's Guide.
You must balance system resources as you add these components (CPU and memory). You will want to
be somewhat generous in your cluster planning, and add more correlators and aggregators than you
think you need. Distributed correlation is most effective if configured over multiple physical systems to
ensure the fault tolerance benefit of the distributed correlation cluster deployment is fully realized. The
fault tolerance aspect of the distributed correlation cluster, as described in "Distributed Correlation
Concepts" in ESM 101.
Distributed correlation has components that are used in the context of cluster nodes:
lPersistor: Persists to disk the information that needs to be retained, retrieved, or shared. There is a
single persistor in the distributed correlation cluster. The persistor consists of multiple entities,
including the Manager, Logger, and the CORR-Engine database, among others. When you configure
a distributed correlation cluster, the persistor is on the first node you configure during installation.
lCorrelators: Each correlator in the cluster is a single process; there can be multiple correlators on
each node in the cluster.
lAggregators: Each aggregator in the cluster is a single process; there can be multiple aggregators on
each node in the cluster.
ESM Installation Guide
Chapter 1: What Is ESM With CORR-Engine Storage?
HPE ESM 7.0 Page 9 of 115
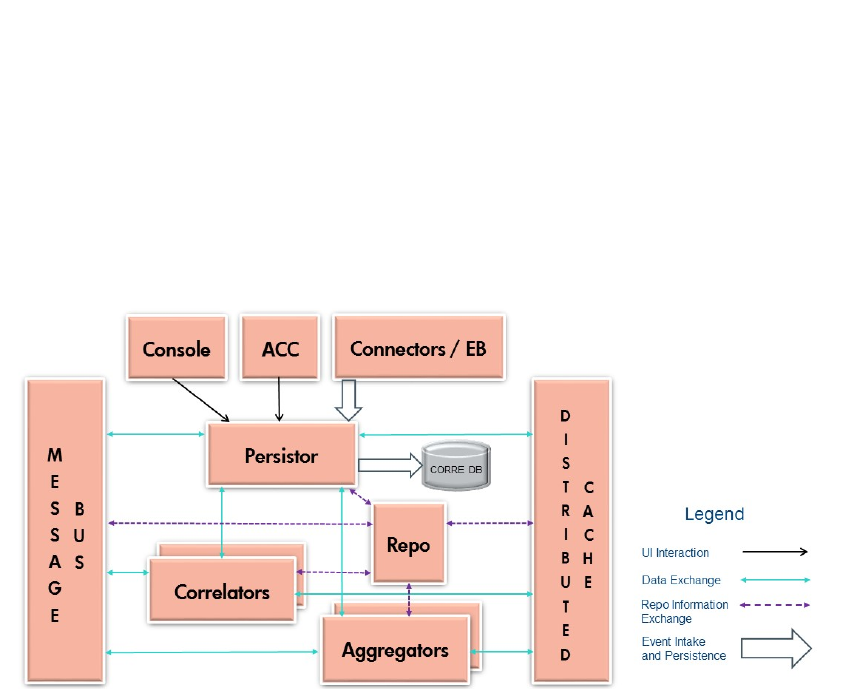
lMessage Bus Control and Message Bus Data:Handles the messaging among the cluster
components.
lRepository (Repo): Contains the state of each member of the cluster among all of the nodes.
lDistributed Cache: Manages the short-term storage of data needed for cluster operation.
Here is a conceptual view of the cluster services and their interactions with each other and ESM:
ESM Communication Overview
The ArcSight Console, Manager, and SmartConnectors communicate using HTTPS (HyperText
Transfer Protocol Secure). The HTTPS protocol provides for data encryption, data integrity
verification, and authentication for both server and client.
SSL works over TCP (Transport Control Protocol) connections. The default incoming TCP port on the
Manager is 8443.
The Manager never makes outgoing connections to the Console or SmartConnectors. The Manager
connects to the CORR-Engine through a loop-back interface using a propriety protocol.
Choosing between FIPS Mode or Default Mode
ESM supports the Federal Information Processing Standard (FIPS) 140-2 and Suite B. FIPS is a
standard published by the National Institute of Standards and Technology (NIST) and is used to
accredit cryptographic modules in software components. The US Federal government requires that all
IT products dealing with Sensitive, but Unclassified (SBU) information should meet FIPS140-2
standards.
Depending on your requirements, you can choose to install the ESM components in one of these
modes:
ESM Installation Guide
Chapter 1: What Is ESM With CORR-Engine Storage?
HPE ESM 7.0 Page 10 of 115

lDefault mode (standard cryptography)
lFIPS 140-2 mode
lFIPS with Suite B mode (128 bits or 192 bits)
FIPS Encryption Cipher Suites
A cipher suite is a set of authentication, encryption, and data integrity algorithms used for securely
exchanging data between an SSL server and a client. Depending on FIPS mode settings, some of the
following specific cipher suites are automatically enabled for ESM and its clients.
Note: SSL is not supported in any mode. TLS is supported for all modes. For TLS version support
see "TLS Support" on page93.
The following table outlines some of the basic differences between the three modes that ESM supports:
Mode Default Cipher Suites
Keystore/
Truststore
Default Mode lTLS_RSA_WITH_AES_128_CBC_SHA
lTLS_RSA_WITH_AES_128_GCM_SHA256
Keypair and Certificates stored in Keystore and
cacerts, and Truststore in JKS format
FIPS 140-2
Mode
lTLS_RSA_WITH_AES_128_CBC_SHA
lTLS_RSA_WITH_AES_128_GCM_SHA256
Keypair and Certificates stored in Keystore
FIPS with Suite
B Mode
lIn 192 bit mode, the following 192-bit cipher
suites are supported.
oTLS_ECDHE_ECDSA_WITH_AES_256_
CBC_SHA
oTLS_ECDHE_ECDSA_WITH_AES_256_
GCM_SHA384
lIn 128 bit mode, the following 128-bit cipher
suites are supported.
oTLS_ECDHE_ECDSA_WITH_AES_128_CBC_
SHA
oTLS_ECDHE_ECDSA_WITH_AES_128_
GCM_SHA256
Keypair and Certificates stored in Keystore
Using PKCS#11
ESM supports the use of a PKCS#11 token such as 90Meter or the Common Access Card (CAC) (which
is used for identity verification and access control) to log into the Console. PKCS#11 is Public-Key
Cryptography Standard (PKCS), published by RSA Laboratories which describes it as “a technology-
independent programming interface, called Cryptoki, for cryptographic devices such as smart cards and
PCMCIA cards.”
ESM Installation Guide
Chapter 1: What Is ESM With CORR-Engine Storage?
HPE ESM 7.0 Page 11 of 115

PKCS#11 authentication is not supported with Radius, LDAP, and Active Directory authentication
methods.
Effect on Communication When Components Fail
If any of the software components is unavailable, it can affect communication between other
components.
If the CORR-Engine is unavailable for any reason, the Manager stops accepting events and caches any
events that were not committed to the CORR-Engine. The SmartConnectors also start caching new
events they receive, so there is no event data loss. The Console is disconnected.
When the CORR-Engine is filled to capacity, as new events come in, the Manager starts deleting existing
events starting from the oldest event.
If the Manager is unavailable, the SmartConnectors start caching events to prevent event data loss. The
CORR-Engine is idle. The Console is disconnected.
If a SmartConnector fails, whether event data loss will occur or not depends on the SmartConnector
type. SmartConnectors that listen for events from devices such as the SNMP SmartConnectors will stop
accepting events. However, a SmartConnector that polls a device, such as the NT Collector
SmartConnector, may be able to collect events that were generated while the SmartConnector was
down, after the SmartConnector comes back up.
Directory Structure for ESM Installation
By default, ESM is installed in a directory tree under a single root directory. Other third-party software is
not necessarily installed under this directory, however. The path to this root directory is called
/opt/arcsight.
The directory structure below /opt/arcsight is also standardized across components and platforms.
The following table lists a few of the commonly used directories for the Manager.
Port Directory
ESM bin /opt/arcsight/manager/bin
Properties files /opt/arcsight/manager/config
Log files /opt/arcsight/var/logs
References to ARCSIGHT_HOME
<ARCSIGHT_HOME> in the paths represents:
ESM Installation Guide
Chapter 1: What Is ESM With CORR-Engine Storage?
HPE ESM 7.0 Page 12 of 115

l/opt/arcsight/manager for the ArcSight Manager
lWhatever path you specified when you installed the ArcSight Console
lWhatever path you specified when you installed an ArcSight SmartConnector.
ESM Installation Guide
Chapter 1: What Is ESM With CORR-Engine Storage?
HPE ESM 7.0 Page 13 of 115

Chapter 2: Installing on an Appliance
This section applies to users who have purchased ESM on an appliance. For instructions about how to
install ESM on your own hardware, go to "Installing Software ESM" on page24.
Read the Release Notes before you begin.
Note: The operating system image provided on a G9 appliance does not include X Window. Since
the X Window system is not present on ESM on an appliance, the installation and configuration of
ESM on an appliance is performed using the command line. No GUI wizard is available for
installation and configuration of ESM on an appliance.
There are no software preparations necessary on the appliance and no opportunity to make any
preparatory adjustments before the First Boot Wizard starts.
Starting the Appliance for the First Time
When you power on the appliance, the Operating System First Boot Wizard (FBW) starts automatically.
The FBW offers three choices of networking types:
lIPv4
lIPv6
lBoth IPv4 and IPv6 (dual stack)
Starting the Appliance for the First Time - IPv4
This is a command line interface. The FBW asks you to supply the following information, one entry at a
time (the FBW indicates which values are optional):
1. At appliance login, log in as user root, using the password arcsight.
2. Set a new password for user root.
3. Set a new password for user arcsight.
4. Set the appliance hostname.
5. Specify 1 for IPv4.
6. Specify the appliance IP address.
7. Specify the netmask.
8. Specify the default gateway.
9. Specify the primary DNS IPAddress.
ESM Installation Guide
Chapter 2: Installing on an Appliance
HPE ESM 7.0 Page 14 of 115

10. Specify the secondary DNSIP Address (optional).
11. Specify the DNSSearch Domains.
12. Specify the time zone. You can start to type and press Tab and the system will attempt to auto-fill
the time zone. For example you can type A, Tab and it fills in "America_". Press the Tab key twice for
a list of timezone entries that starts with "America_".
13. Enter the Date.
The date and time are optional. If you specify an NTP server, it overrides these date/time values. If
there is no NTPserver, these date/time values reset the appliance system clock and if you leave
them blank, the system clock determines the date time.
14. Enter the Time.
15. Specify the NTPservers. List one NTPserver per line. You can use IP addresses or host names.
Using an NTPserver is recommended.
When you are done, the FBW provides a list of what you have specified, for you to review. If you say No,
it starts over.
If you accept the specifications, type yand press Enter to end the installation session and automatically
start the Configuration Wizard.
License file: Once the IP address is defined you can log in to the appliance from the machine where you
downloaded the license file and copy it to the appliance. The Configuration Wizard segment, which is
next, asks you to specify the location of the license file on the appliance.
Starting the Appliance for the First Time - IPv6
For IPV6, you can specify Static or Auto Config Networking setups.
This is a command line interface. The FBW asks you to supply the following information, one entry at a
time (the FBW indicates which values are optional).
IPv6 Static Networking Setup
1. At appliance login, log in as user root, using the password arcsight.
2. Set a new password for user root.
3. Set a new password for user arcsight.
4. Set the appliance hostname.
5. Specify 2 for IPv6.
6. Specify 1 for a static IPv6 networking setup (in which you will provide the IP address).
7. Specify the appliance IP address.
8. Specify the default gateway.
9. Specify the primary DNS IPAddress.
ESM Installation Guide
Chapter 2: Installing on an Appliance
HPE ESM 7.0 Page 15 of 115

10. Specify the secondary DNSIP Address (optional).
11. Specify the DNSSearch Domains.
12. Specify the time zone. You can start to type and press Tab and the system will attempt to auto-fill
the time zone. For example you can type A, Tab and it fills in "America_". Press the Tab key twice for
a list of timezone entries that starts with "America_".
13. Enter the Date.
The date and time are optional. If you specify an NTP server, it overrides these date/time values. If
there is no NTPserver, these date/time values reset the appliance system clock and if you leave
them blank, the system clock determines the date time.
14. Enter the Time.
15. Specify the NTPservers. List one NTPserver per line. You can use IP addresses or host names.
Using an NTPserver is recommended.
When you are done, the FBW provides a list of what you have specified, for you to review. If you say No,
it starts over.
If you accept the specifications, type yand press Enter to end the installation session and automatically
start the Configuration Wizard.
IPv6 Auto Config Networking Setup
1. At appliance login, log in as user root, using the password arcsight.
2. Set a new password for user root.
3. Set a new password for user arcsight.
4. Set the appliance hostname.
5. Specify 2 for IPv6.
6. Specify 2 for an Auto Config IPv6 networking setup, which uses Stateless Address Auto
Configuration (SLAAC). Specify the primary DNS IP address and, optionally, the secondary DNS IP
address. The IP address and gateway address are automatically detected and assigned through the
DNS.
7. Specify the time zone. You can start to type and press Tab and the system will attempt to auto-fill
the time zone. For example you can type A, Tab and it fills in "America_". Press the Tab key twice for
a list of timezone entries that starts with "America_".
8. Enter the Date.
The date and time are optional. If you specify an NTP server, it overrides these date/time values. If
there is no NTPserver, these date/time values reset the appliance system clock and if you leave
them blank, the system clock determines the date time.
9. Enter the Time.
10. Specify the NTPservers. List one NTPserver per line. You can use IP addresses or host names.
Using an NTPserver is recommended.
ESM Installation Guide
Chapter 2: Installing on an Appliance
HPE ESM 7.0 Page 16 of 115

When you are done, the FBW provides a list of what you have specified, for you to review. If you say No,
it starts over.
If you accept the specifications, type yand press Enter to end the installation session and automatically
start the Configuration Wizard.
License file: Once the IP address is defined you can log in to the appliance from the machine where you
downloaded the license file and copy it to the appliance. The Configuration Wizard segment, which is
next, asks you to specify the location of the license file on the appliance.
Starting the Appliance for the First Time - Dual Stack
This is a command line interface. The FBW asks you to supply the following information, one entry at a
time (the FBW indicates which values are optional):
1. At appliance login, log in as user root, using the password arcsight.
2. Set a new password for user root.
3. Set a new password for user arcsight.
4. Set the appliance hostname.
5. Specify 3 for both IPv4 and IPv6.
6. Complete the choices for the IPv4 networking setup per the steps in "Starting the Appliance for the
First Time - IPv4" on page14.
7. Complete the choices for the IPv6 networking setup per the steps in "Starting the Appliance for the
First Time - IPv6" on page15.
When you are done, the FBW provides a list of what you have specified for both IPv4 and IPv6, for your
review. If you choose No, it starts over.
If you accept the specifications for both IPv4 and IPv6, type yand press Enter to end the installation
session and automatically start the Configuration Wizard.
License file: Once the IP address is defined you can log in to the appliance from the machine where you
downloaded the license file and copy it to the appliance. The Configuration Wizard segment, which is
next, asks you to specify the location of the license file on the appliance.
Using the Configuration Wizard - Appliance
When installing on an appliance, the configuration wizard starts automatically. (You do not need to
manually enter any command for that to happen.)
Note: Distributed correlation mode is not available on an appliance.
ESM Installation Guide
Chapter 2: Installing on an Appliance
HPE ESM 7.0 Page 17 of 115

Note: When you run the managersetup command on the appliance, you will receive these
messages: "Wizard could not connect to an X11 display. Please set the DISPLAY variable to start the
wizard in UI mode. Falling back to console mode." Ignore these messages.
1. Read the Welcome message. If the license file is accessible, type yes to continue.
2. Under Language Options, select the language for interface displays. Press Enter to continue.
3. Under Installation Mode, type 0to install ESM in Compact Mode. The other option, Distributed
Mode, is not available on an appliance.
4. Under CORR-Engine Password, press Enter to continue with obfuscated passwords or type no
and press Enter to allow them to show on screen.
5. Under CORR-Engine Password, set a password for the CORR-Engine and reenter it for the
Password confirmation. Press Enter. For information on password restrictions, see the
ESM
Administrator's Guide section “Managing Password Configuration” in the chapter “ Basic
Configuration.”
6. Under CORR-Engine Configuration, enter the CORR-Engine storage allocation information and
press Enter.
System Storage Size - the size of the storage space set aside to store resources
Event Storage Size - the size of the storage space set aside to store events
Online Event Archive Size - the maximum number of gigabytes of disk space for event archives.
This only applies to the online event archive.
Retention Period - the amount of time that you want to retain the events before they are purged
from the system
7. Under Notification Emails, specify the following email addresses:
Error Notification Recipient: Specify one email address for the email account to receive email
notifications if the Manager goes down or encounters some other problem. If you need to specify
more email addresses, the Manager Configuration Wizard allows that, as described in the "Running
the Manager Configuration Wizard" section of the ESM Administrator's Guide.
From email address: The email address used for the notifications sender.
If the values are correct, type yes and Enter to continue. Emails are sent when the system detects
the following occurrences:
lThe subsystem status is changed. The email shows the change and who did it.
lThe report has been successfully archived.
lThe account password has been reset.
lThe Archive report generation fails.
lThere is too many notifications received by a destination.
lThe event archive location has reached the cap space. It will ask you to free up some space by
moving the event archives to some other place.
ESM Installation Guide
Chapter 2: Installing on an Appliance
HPE ESM 7.0 Page 18 of 115

lThe user elects to email the ArcSight Console settings.
lThe user sends partition archival command.
lAn archive fails because there is not enough space.
lThe Connection to the database failed.
8. For the License File, enter the path and file name of the license file you downloaded and press
Enter.
9. Under Select the Product Mode, select whether you want to install in default mode or FIPS mode.
Press Enter to continue.
Caution:
lIf you choose to install the product in FIPS mode, be sure to install the Console in FIPS
mode too. Refer to "Installing ArcSight Console in FIPS Mode" on page96 for instructions
on installing the Console in FIPS mode.
lOnce you have configured the software in FIPS mode, you will not be able to convert it to
default mode without reinstalling it.
lConverting from default mode installation to FIPS-140-2 mode is supported. If you need to
do so at any time, refer to the Administrator’s Guide for instructions.
lBy default, ESM uses a self-signed certificate. If you would like to use a CA-signed
certificate, you will have to import the CA-signed certificate manually after the
configuration wizard completes successfully. Refer to the Administrator’s Guide for ESM for
details on using a CA-signed certificate.
10. If you selected FIPS mode, confirm your selection. if not, skip to the Manager Information step.
11. If you selected FIPS mode on the Select the Cipher Suite Options panel, select the cipher suite.
Suite B defines two security levels of 128 and 192 bits. The two security levels are based on the
Advanced Encryption Standard (AES) key size that is used instead of the overall security provided
by Suite B. At the 128-bit security level, the 128 bit AES key size is used. However, at the 192-bit
security level, a 256 bit AES key size is used. Although a larger key size means more security, it also
means computational cost in time and resource (CPU) consumption. In most scenarios, the 128-bit
key size is sufficient.
12. Under Manager Information, enter the Manager’s hostname, set the user ID and password for the
admin user, and press Enter.
Caution:
lThe Manager host name is the IP address (for IPv4 only), or fully-qualified domain name of
the machine where the Manager is installed. This name is what all clients (for example,
ArcSight Console) specify to connect to the Manager. Using a fully-qualified domain name
instead of an IP address is recommended for flexibility.
ESM Installation Guide
Chapter 2: Installing on an Appliance
HPE ESM 7.0 Page 19 of 115

lThe IP Version selection (IPv4 or IPv6) appears if you have a dual-stack machine, such as
an appliance. If you see this option, your selection has the following effects:
lIt controls what IP Address is used by third party software if a hostname is given. for
example, the e-mail server in Manager Setup.
lIt controls which IP Address is tried on the peering page if a hostname is specified.
lIt controls whether an IPv4 or IPv6 Address is chosen for the manager asset.
lThere might be more than one host name, and the default might not be the same as the one
returned by the hostname command. If you are using the High Availability Module, use the
Service hostname that is common to both servers (primary and secondary) as the Manager
IP, or hostname. Otherwise, pick one which you would expect to work, and would be
convenient for configuring connectors, consoles, and other clients. Note that it is always
best to use a fully qualified domain name.
lIf you do not want the hostname on your DNSserver, add a static host entry to the
/etc/hosts file to resolve the host name locally.
lThe Manager hostname is used to generate a self-signed certificate. The Common Name
(CN) in the certificate is the Manager host name that you specify in this screen.
lAlthough the Manager uses a self-signed certificate by default, you can switch to using a
CA-signed certificate if needed. You can do this after installation. Refer to the
ESM
Administrator’s Guide for instructions.
13. Select whether to set up connection to the Event Broker (if Event Broker is part of your
implementation of ESM). If you need to set up the Event Broker in FIPS mode, see "Configure
Event Broker Access - FIPS Mode (Server Authentication Only) (Optional)" on page99 .
If client authentication is enabled on the Event Broker, see either "Setting Up SSL Client-Side
Authentication Between Event Broker and ESM - Non-FIPS Mode" on page60 or "Setting Up SSL
Client-Side Authentication Between Event Broker and ESM - FIPS Mode" on page102.
Select Yes to set up the connection; select No to continue. If you select Yes, specify:
a. Host: Port(s): Enter the host and port information for the nodes in the Event Broker. Include
the host (hostname or IP address) and port information of all the nodes in a multiple node
environment not just the Master node. This is a comma-separated list, for example:
<host>:<port>,<host>:<port>. Note that Event Broker can only accept IPV4 connections from
ESM.
b. Topic to read from: Specify the topic in the Event Broker you want to read from. This will
determine the data source. See the chapter "Managing Event Broker Topics", in the Event
Broker Administrator's Guide.
c. Path to the Event Broker root cert: ESM communicates with the Event Broker through TLS.
To enable this, you must import the Event Broker's root certificate into ESM's client truststore.
Copy over the Event Broker root certificate from the Event Broker machine in this location:
/opt/arcsight/kubernetes/ssl/ca.crt to a local folder on the ESM machine. After you
ESM Installation Guide
Chapter 2: Installing on an Appliance
HPE ESM 7.0 Page 20 of 115

enter the path to the certificate, and click Next, the Event Broker's root certificate is imported
into ESM's client truststore and the connection to the Event Broker is validated. If there are any
issues, you will receive an error or warning message. If no message displays and you advance to
the next screen in the wizard, that indicates that the connection between the Event Broker and
ESM is successfully validated.
14. Select whether to set up ArcSight Investigate. Select Yes to enable the integration; select No to
continue. If you select Yes, specify the Search URL for the ArcSight Investigate deployment.
15. Select whether to integrate with the ServiceNow® IT Service Management (ITSM) application.
Select Yes to enable the integration; select No to continue. If you select Yes, specify the
mandatory ServiceNow URL and the optional ServiceNow Proxy URL .
16. Under Packages Panel press Enter to continue. Otherwise, select the optional packages that you
are licensed to use. In addition to these optional packages, there are default standard content
packages that are installed automatically on the ArcSight Manager. These default packages
provide essential system health and status operations, and you can use them immediately to
monitor and protect your network.
For more information about packages, see the ArcSight Administration and ArcSight System
Standard Content Guide.
17. Under About to Configure ESM.
Caution: Once you type yes and press Enter, the product is installed as specified.
18. When the configuration says Configuration Completed Successfully, type yes and then Enter to
exit.
19. Log in as user root and run the following script to set up and start the required services:
/opt/arcsight/manager/bin/setup_services.sh
20. After you have completed the installation, check the location and size of your storage volumes and
make any necessary changes. You can do this in the ArcSight Command Center. Refer to the
ArcSight Command Center User's Guide, the "Administration" chapter under "Storage and Archive”
section for details regarding your storage volumes.
You can rerun the wizard manually only if you exit it at any point before you reach the first
configuration screen called “About to Configure ESM v7.0”. See "Rerunning the ESM
Configuration Wizard" on page57 for details.
Keep These TCP Ports Open
On an appliance, these ports are already open.
Ports for external incoming connections:
8443/tcp
22/tcp (ssh)
ESM Installation Guide
Chapter 2: Installing on an Appliance
HPE ESM 7.0 Page 21 of 115

TCP ports used internally for inter-component communication:
1976, 28001, 2812, 3306, 5555, 6005, 6009, 7777, 7778, 7779, 7780, 8005, 8009, 8080, 8088, 8089,
8666, 8766, 8808, 8880, 8888, 8889, 9095, 9090, 9123, 9124, 9999,45450
Enable Peering
This topic is for appliance installation using an ESM license that includes peering.
By default appliances ship with port 9000 disabled. Peering requires this port. For peering to work on
an appliance, enable port 9000 using the following commands:
[root@rhel7 ~]# firewall-cmd --zone=public --add-port=9000/tcp --permanent
[root@rhel7 ~]# firewall-cmd --reload
Use this command to check that port 9000 is enabled:
[root@rhel7 ~]# iptables-save | grep 9000
You should get response similar to this:
-A IN_public_allow -p tcp -m tcp --dport 9000 -m conntrack --ctstate NEW -j
ACCEPT
Note that peering works between ESMManagers that use the same IP version. However, if an
ESMManager is on a dual-stack machine, refer to the ArcSight Command Center User's Guide for
details. See "Peers" in the section on "Administration Configuration."
Running ESM on an Encrypted Appliance
ESM can be run on encrypted hardware to help you to meet compliance regulations and privacy
challenges by securing your sensitive data at rest. This includes systems using the HighAvailability
Module; the HA functionality is exactly the same.
You can encrypt your G9 ESM Express appliance (such as B7600 or E7600) by using Secure
Encryption, available from the Server Management Software > Secure Encryption web page. For
instructions, refer to the Secure Encryption Installation and User Guide, available in PDFand CHM
formats through the Technical Support > Manuals link on that page.
G9 Appliances are encryption-capable. They come pre-installed with everything necessary for you to
encrypt them using Secure Encryption. You can encrypt your hardware before or after ESM is installed.
If HA is already installed, encrypt the secondary first, so you only have to failover once.
The length of time encryption takes depends on the amount of data on the server being encrypted. In
our testing, a Gen 9 appliance with 7.5 TBof stored data took about 72 hours to encrypt. You can
ESM Installation Guide
Chapter 2: Installing on an Appliance
HPE ESM 7.0 Page 22 of 115

continue using ESM while the encryption runs. You may notice some performance degradation after
encrypting your ESM appliance.
Caution:After encryption, you cannot restore your ESM to its previously unencrypted state.
Configuring the Appliance for Out-of-Band Remote
Access
Configure the appliance for out-of-band remote access so that Customer Support can access and
troubleshoot the appliance if it becomes unresponsive. All appliance models are equipped with the
Integrated Lights-Out (iLO) advanced remote management card. Visit
https://www.hpe.com/us/en/servers/integrated-lights-out-ilo.html for detailed information and
documentation.
ESM Installation Guide
Chapter 2: Installing on an Appliance
HPE ESM 7.0 Page 23 of 115

Chapter 3: Installing Software ESM
We recommend that you read the ESM Release Notes before you begin installing ESM.
If you are installing ESMExpress, which is on an appliance, go to "Installing on an Appliance" on page14.
If you are going to use the ESMHigh Availability Module with ESMand this is a new ESMinstallation,
install the HAModule first. Refer to the ESM
High Availability Module Guide for instructions. Note that
you must install ESM after HA has completed disk synchronization. Attempting to install ESM while HA
synchronization is in process can cause the ESM installation to fail.
ESM is sensitive to the operating system and version. To ensure proper operation, this installer only
allows installation on the specific operating systems and versions listed in the ArcSight ESM Support
Matrix, which is available for download on Protect 724.
Securing Your ESM System
Use the information in the following sections to protect your ArcSight components.
Protecting ArcSight Manager
Do not use demo SSL certificates in production. Make sure when switching that you remove the demo
CA from cacerts on all SmartConnectors and ArcSight Consoles.
Closely control access to files, using the principle of least privilege, which states that a user should be
given only those privileges that the user needs to complete his or her tasks. The following files are
particularly sensitive:
Note: <ARCSIGHT_HOME> is the root directory for a component. For example for the Manager
component, <ARCSIGHT_HOME> is: /opt/arcsight/manager.
l<ARCSIGHT_HOME>/config/jetty/keystore (to prevent the ArcSight Manager private key from
being stolen)
l<ARCSIGHT_HOME>/config/jetty/truststore (with SSL Client authentication only, to prevent
injection of new trusted CAs)
l<ARCSIGHT_HOME>/config/server.properties (has database passwords)
l<ARCSIGHT_HOME>/config/esm.properties (has cluster configuration properties and SSL
properties common to persistor, correlator, and aggregator services on the node) This properties file
is present on each node in a distributed correlation cluster.
l<ARCSIGHT_HOME>/config/jaas.config (with RADIUS or SecurID enabled only, has shared
HPE ESM 7.0 Page 24 of 115

node secret)
l<ARCSIGHT_HOME>/config/client.properties (with SSL Client authentication only, has
keystore passwords)
l<ARCSIGHT_HOME>/reports/sree.properties (to protect the report license)
l<ARCSIGHT_HOME>/reports/archive/* (to prevent archived reports from being stolen)
l<ARCSIGHT_HOME>/jre/lib/security/cacerts (to prevent injection of new trusted CAs)
l<ARCSIGHT_HOME>/lib/* (to prevent injection of malicious code)
l<ARCSIGHT_HOME>/rules/classes/* (to prevent code injection)
If you are installing ESM on your own hardware (as opposed to an appliance), use a host-based firewall.
On the ArcSight Manager, block everything except for the following ports. Make sure you restrict the
remote IP addresses that may connect to those that actually need to talk.
Port Flow Description
22/TCP Inbound SSH log in (Unix only)
53/UDP Inbound/Outbound DNS requests and responses
8443/TCP Inbound SmartConnectors and Consoles
25/TCP Outbound SMTP to mail server
110/TCP Outbound POP3 to mail server, if applicable
143/TCP Outbound IMAP to mail server, if applicable
1645/UDP Inbound/Outbound RADIUS, if applicable
1812/UDP Inbound/Outbound RADIUS, if applicable
389/TCP Outbound LDAP to LDAP server, if applicable
636/TCP Outbound LDAP over SSL to LDAP server, if applicable
Applies to IPv4 only:
As another layer of defense (or if no host-based firewall is available), you can restrict which connections
are accepted by the ArcSight Manager using the following properties in the server.properties file:
xmlrpc.accept.ips=
agents.accept.ips=
Each of these properties takes a list of IP addresses or subnet specifications, separated by commas or
spaces. Once specified, only connections originating from those addresses are accepted.
lThe xmlrpc.accept.ips property restricts access for ArcSight Consoles.
lThe agents.accept.ips property restricts access for SmartConnectors. For registration, the
SmartConnectors need to be in xmlrpc.accept.ips as well, so that they can be registered. (Being
"registered"does not mean you can then remove them.)
ESM Installation Guide
Chapter 3: Installing Software ESM
HPE ESM 7.0 Page 25 of 115

The format for specifying subnets is quite flexible, as shown in the following example:
xmlrpc.accept.ips=192.0.2.0 192.0.2.5
agents.accept.ips=10.*.*.*,192.0.0.0-192.0.255.255
Built-In Security
ESM user accounts have user types that control the functions which users can access in the ArcSight
Manager. The "Normal User" type has the most privileges. Where possible, use more restrictive types,
such as "Manager SmartConnector," "Management Tool," or "Archive Utility" for automated user
accounts. This is particularly important when user passwords must be stored in scripts for unattended
execution.
Apply the principle of least privilege when creating user accounts in ESM and when granting access to
resources or events. Users should not have more privileges than their tasks require.
By default, the minimum length for passwords is six characters and the maximum length is 20
characters. For information on password restrictions see the Administrator's Guide, chapter 2.
"Configuration," "Managing Password Configuration," "Password Character Sets."
Physical Security for the Hardware
In addition to establishing security policies for passwords, keystores, and other software facilities, it is
important to provide physical security for the hardware used by the ESM system. Physical hardware
includes computers running ArcSight Console, and SmartConnector software, as well as the network
which connects them.
Physical access to computers running ArcSight software must be restricted.
lUse the locking mechanisms provided by most rack-mount cases to prevent malicious/accidental
tampering with the machine
lUse locks on disk drive enclosures
lUse redundant power and uninterruptible power supplies (UPS)
lProtect the BIOS (x86 systems only) or firmware:
oDisable all CD-ROM drives for booting so that the system can only be booted from the hard disk
oDisable COM, parallel, and USB ports so that they cannot be used to extract data
oDisable power management
Operating System Security
lOn Linux, set up a boot loader password to prevent unauthorized people from booting into single
user mode (see the iLO or GRUB documentation for details).
lOn Linux, disable reboot by Ctrl-Alt-Del in /etc/inittab. Comment out the line that refers to
ESM Installation Guide
Chapter 3: Installing Software ESM
HPE ESM 7.0 Page 26 of 115

“ctrlaltdel.”
lSet up a screen saver that prompts for a password with a moderately short delay (such as five
minutes).
lDisable power management in the OS.
lWhen installing the OS, select packages individually. Only install what you know will be needed. You
can always install missing packages as you encounter them.
lRun automated update tools to obtain all security fixes. Use up2date on Red Hat Linux (may
require Red Hat Network subscription).
lUninstall (or at least turn off) all services that you do not need. In particular: finger, r-services, telnet,
ftp, httpd, linuxconf (on Linux), Remote Administration Services and IIS Services on Windows.
lOn Unix machines, disallow remote root logins (for OpenSSH, this can be done using the
PermitRootLogin no directive in /etc/ssh/sshd_config). This will force remote users to log in
as a non-root user and su to root, thus requiring knowledge of two passwords to gain root access to
the system. Restrict access to su, using a “wheel group” pluggable authentication module (PAM) so
that only one non-root user on the machine can su to root. Make that user different from the
arcsight user. That way, even if the root password is known and an attacker gains access through
ESM in some way, they won't be able to log in as root.
lRename the Administrator/root account to make brute force attacks more difficult to perform.
General Guidelines and Policies about Security
Educate system users about “social engineering” tricks used to discover user account information. No
employee of HPE will ever request a user’s password. When HPE representatives are on site, the
administrator of the system will be asked to enter the password and, if needed, to temporarily change
the password for the HPE team to work effectively.
Educate users to use secure means of communication (such as SSL to upload or PGP for e-mail) when
transferring configuration information or log files to HPE.
Set up a login banner stating the legal policies for use of the system and the consequences of misuse.
(Instructions for creating a login banner vary by platform.) ArcSight Consoles can also display a custom
login banner. See the ESM Administrator's Guide or Contact Customer Support for more information.
Choose secure passwords. (No password used in two places, seemingly random character sequences,
eight characters or longer, containing numbers and special (non-letter) characters). For information on
password restrictions see the Administrator's Guide, chapter 2. "Configuration," "Managing Password
Configuration."
Passwords are used in the following places—if any one is breached, the system is compromised:
lAll database accounts (arcsight)
lThe “arcsight” user and root user on the system that runs the ArcSight Manager
lAll users created in ESM
ESM Installation Guide
Chapter 3: Installing Software ESM
HPE ESM 7.0 Page 27 of 115

lThe SSL keystores
lThe boot loader (Linux)
lThe BIOS (x86 systems only)
lThe RADIUS node secret
lThe LDAP password for ArcSight Manager (with basic authentication only), where applicable
lThe Active Directory domain user password for ArcSight Manager, where applicable
Consider purchasing and using a PKI solution to enable SSL client authentication on Consoles and
SmartConnectors.
Consider purchasing and using a two-factor authentication solution such as RSA SecurID.
Make sure that all the servers with which ESM interacts (DNS, Mail, RADIUS, etc.) are hardened
equivalently.
Use a firewall and intrusion detection systems to secure the network that the ArcSight Manager CORR_
Engine use.
Preparing to Install
Before you run the Software ESM installation file, you must prepare your system.
System Requirements
The hardware requirements for ESM 7.0 are as follows:
Minimum Mid-Range High Performance
Processors 8 cores (16 preferred) 32 cores 40 cores
Memory 48 GB RAM (64 preferred) 192 GB RAM 512 GB RAM
Hard Disk Six 600 GB disks (1.5 TB)
(RAID 10)
10,000 RPM
20 1 TB disks (10 TB)
(RAID 10)
15,000 RPM
12 TB
(RAID 10)
Solid state
Caution: The "Minimum" values apply to systems running base system content at low EPS (typical
in lab environments). It should not be used for systems running high number of customer-created
resources, or for systems that need to handle high event rates. Use the "Mid Range" or "High
Performance" specifications for production environments that handle a sizable EPS load with
additional content and user activity.
ESM Installation Guide
Chapter 3: Installing Software ESM
HPE ESM 7.0 Page 28 of 115

Using Pattern Discovery or large numbers of Assets and Actors puts additional load on the system
that can reduce the search and event processing performance. For further assistance in sizing your
ESM installation, contact your Sales or Field Representative.
If you anticipate that you will have large lists, ensure that your system meets the Mid-Range
requirements or better.
Manager Hostname Resolution
Before ESM installation, make sure that the host machine's hostname is resolvable, otherwise, Manager
setup will not complete successfully. Use ping to verify the hostname, and fix any issues to avoid errors
during Manager setup.
Mapping 127.0.0.1 to localhost
Make sure that the IP address 127.0.0.1 is resolved to localhost in the /etc/hosts file, otherwise,
the ESM installation will fail. This applies to IPv4 and IPv6 systems.
Monitor Requirement
For displaying the ArcSight Command Center, use a monitor that has a width of at least 1450 pixels.
This is the minimum width needed to display all of the top-menu items without cutting any of them off.
This minimum width also applies on a larger monitor when reducing the size of the browser window.
Supported Platforms
ESM 7.0 is supported on 64-bit Red Hat Enterprise Linux and CentOS. See the ArcSight ESM Support
Matrix for the supported version numbers. Install them using at least the "Web Server" option with
added "Compatibility Libraries" and "Development Tools" at the time of installation. ESM is sensitive to
the operating system and version.
Note:
lTo install the product in GUImode, install the X Windows system package. X Window is entirely
optional. If you use it, use xorg-x11-server-utils-7.5-13.el6.x86_64 or a later version
for RHEL or CentOS. If you do not use X Window, you can install ESMin console mode.
lThe XFS and EXT4 file system formats are supported during installation.
lESM configures itself to the file system upon which it is first installed; you therefore cannot
change the file system type after installation, even during an upgrade.
lWhen you install RHEL or CentOS, the installation offers you certain options. Be sure to choose
the Web Server,Compatibility Libraries, and the Development Tools options.
ESM Installation Guide
Chapter 3: Installing Software ESM
HPE ESM 7.0 Page 29 of 115

Download the Installation Package
The ESM7.0 installation package is available for download from at
https://softwaresupport.softwaregrp.com/. Download the ArcSightESMSuite-7.0.0.xxxx.0.tar
file and copy it on to the system where you will be installing ESM. The xxxx in the file name stands for
the build number.
HPE provides a digital public key to enable you to verify that the signed software you received is indeed
from HPE and has not been manipulated in any way by a third party.
Visit the following site for information and instructions:
https://h20392.www2.hpe.com/portal/swdepot/displayProductInfo.do?productNumber=HPLinuxCod
eSigning
After you download the .tar file from the software download site, initiate license procurement by
following the instructions in the Electronic Delivery Receipt you receive in an email after placing the
order.
ESM Installation Guide
Chapter 3: Installing Software ESM
HPE ESM 7.0 Page 30 of 115

Prepare the System
1. Verify that the zip and unzip packages are installed on the server. These packages are required in
order for the installation to function properly.
For RHEL and CentOS 6.9:
lunzip-6.0-5.el6.x86_64
lzip-3.0-1.el6_7.1.x86_64
For RHEL and CentOS 7.3:
lzip-3.0-11.el7.x86_64
lunzip-6.0-16.el7.x86_64
2. Log in as user root.
3.
Run the following command to untar the file:
tar xvf ArcSightESMSuite-7.0.0.xxxx.0.tar
When you untar the ArcSightESMSuite-7.0.0.xxxx.0.tar file, It places the prepare_
system.sh script in a sub-directory called Tools in the location where you untarred the file.
4. Run prepare_system.sh
5. Change ownership of all the files and folders that were extracted from the tar file to be owned by
user arcsight.
6. Reboot the system.
7. Verify that it ran correctly. Log in as user root and run:
ulimit -a
Check for the following two lines:
open files 65536
max user processes 10240
Keep these TCP Ports Open
For Software ESM, before installation, open the following ports on your system, if not already open,
and ensure that no other process is using them.
Ports for external incoming connections:
8443/tcp
9000/tcp
694/udp (for HA)
7789/tcp (for HA)
22/tcp (ssh)
TCP ports used internally for inter-component communication:
ESM Installation Guide
Chapter 3: Installing Software ESM
HPE ESM 7.0 Page 31 of 115

1976, 28001, 2812, 3306, 5555, 6005, 6009, 7777, 7778, 7779, 7780, 8005, 8009, 8080, 8088, 8089,
8666, 8766, 8808, 8880, 8888, 8889, 9000, 9095, 9090, 9123, 9124, 9999, 45450
Some ports are used in a distributed correlation environment. The ports 3179, 3180, and 3181 are used
by the information repository. Also, there are port ranges reserved for use by cluster services. Ports in
these reserved ranges must not be used by other processes. See "Dynamic Ports in the Distributed
Correlation Environment" in the ESM Administrator's Guide for details on these reserved port ranges.
Install the Time Zone Package
ESM uses the time zone update package in order to automatically handle changes in time zone or
changes between standard and daylight savings time. During installation, ESM checks to see if the
appropriate operating system time zone package is installed. If it is not, you have the option of exiting
the installer to install the latest operating system timezone update or continuing the ESM installation
and skipping the timezone update for ESM components. We recommend installing the time zone
update package.
For RHEL 7.3 and CentOS 7.3 use tzdata-2017c-1.el7.noarch.rpm, or a later version of the rpm
package.
On RHELor CentOS 7.3
To install it on RHELor CentOS 7.3, as user root use the command:
rpm -Uvh <package>
Check the time zone setting with this command:
timedatectl
If the time zone is not set or is not the desired time zone, specify another time zone by using:
timedatectl set-timezone <time_zone>
for example:
timedatectl set-timezone America/Los_Angeles
On RHEL or CentOS 6.9
To install it on RHELor CentOS 6.9, as user root use the command:
rpm -Uvh <package>
Check to make sure that the /etc/localtime link is pointing to a valid time zone by running the
following command:
ls -altrh /etc/localtime
You should get a response similar to this (below), where <ZONE> is your time zone such as
America/Los_Angeles.
ESM Installation Guide
Chapter 3: Installing Software ESM
HPE ESM 7.0 Page 32 of 115

lrwxrwxrwx. 1 root root 39 Nov 27 08:28 /etc/localtime ->
/usr/share/zoneinfo/<ZONE>
Note:If the /etc/localtime link is not pointing to a valid time zone, the ESMinstallation stops. In this
case, you must manually set the link to a valid timezone.
If you do not install at this time...
If you complete the ESM installation without installing the required tzdata rpm package, you can still set
up the time zone update after completing the ESM installation. Use the following procedure after
ensuring that you have downloaded and installed the correct tzdata package and the link
/etc/localtime is set correctly. (Remember, this is for after the ESM installation is complete.):
1. As user arcsight, shut down all arcsight services. (This is important.) Run
/etc/init.d/arcsight_services stop all
2. As user arcsight, run the following command (this is one line):
/opt/arcsight/manager/bin/arcsight tzupdater /opt/arcsight /opt/arcs
ight/manager/lib/jre-tools/tzupdater
3. Start all arcsight services using this command.
/etc/init.d/arcsight_services start all
Add RemoveIPC=no to /etc/systemd/logind.conf - RHELand
CentOS 7.3 Only
If the preflight check fails, add or edit the value of the property RemoveIPC=no in the file
/etc/systemd/logind.conf.
To add the value:
1. As user root, edit the file /etc/systemd/logind.conf.
2. Search for RemoveIPC, and ensure there is only one instance of this property.
3. Edit the property if it exists (or add the property if it does not exist) to have the value no:
RemoveIPC=no
4. Run:
systemctl restart systemd-logind.service
Set Directory Sizes
Make sure that the partition in which your /tmp directory resides has at least 6 GB of space.
Make sure that the partition in which your /opt/arcsight directory resides has at least 100 GB of
space.
ESM Installation Guide
Chapter 3: Installing Software ESM
HPE ESM 7.0 Page 33 of 115

Sizing Guidelines for CORR-Engine
When installing ESM 7.0, the default CORR-Engine storage sizes are automatically calculated based on
your hardware according to the default values in the table below. These are the recommended sizing
guidelines. You can change any of the default storage sizes in the “CORR-Engine Configuration” panel
of the wizard, but when doing so, be sure that you take the minimum and maximum values into
consideration when changing storage sizes.
Note: Any events that are brought from an offline archive into the online archive count as part of
the total 12 TB (or license determined) storage limit. You do not want the online archives that you
bring back online to encompass the entire storage limit. Use discretion when bringing offline
archives online, and be sure to make them offline again when you are done working with them.
System Storage - non-event storage, for example, resources, trends, and lists
Event Storage - storage for events
Event Archive Size - archive of online events
Recommended Minimum Maximum
System
Storage
Size
The default is about one sixth of Usable Space, from at least 3 GB up to a
maximum of 1,500 GB. During installation, it is recommended that you
accept the default.
3 GB 1,500 GB
Event
Storage
Size
Specify about two thirds of the Usable Space shown during installation. 10 GB 12 TB
Event
Archive
Size
You may specify the remaining space after the System and Event storage
have been allocated.
1 GB Limit is
predicated on
your file system
size.
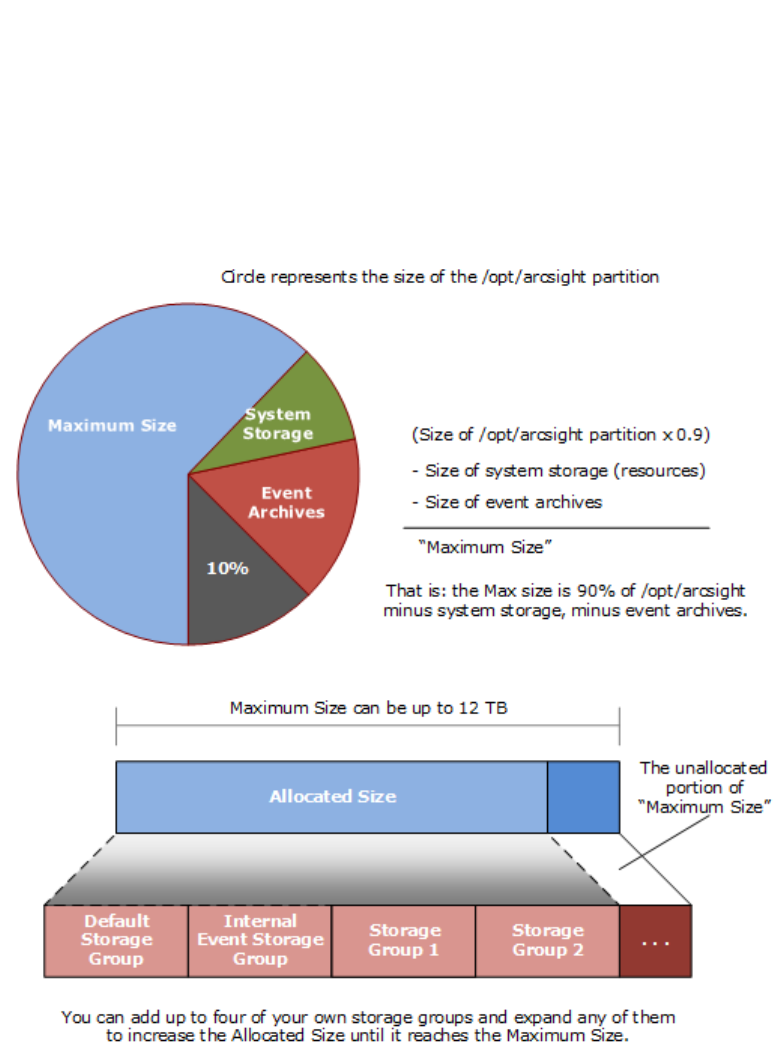
The system reserves 10 percent of the /opt/arcsight partition for its own use.
During installation, the system will show the size of the /opt/arcsight partition as Available Space,
and the size of that partition less 10 percent reserved space designated as Usable Space. The maximum
event storage volume size is calculated by the system using this formula:
Maximum Event Storage = /opt/arcsight partition x 0.9 - system storage -
event archives.
After installation, the allocated event storage space consists of a default storage group and an internal
storage group whose size is initially set by the installer. These storage groups do not fill the maximum
size of the event storage volume. You may expand the size of these storage groups or add up to four of
your own storage groups until the allocated size of the event storage reaches the maximum size of the
event storage volume. Use the ArcSight Command Center user interface to add or change the size of
storage groups.
ESM Installation Guide
Chapter 3: Installing Software ESM
HPE ESM 7.0 Page 34 of 115
In the ArcSight Command Center, select Administration > Storage and Archive to see and change
the storage allocations. Refer to the ArcSight Command Center User's Guide for details.
The following diagrams clarify the various terms used in the configuration wizard and in the ArcSight
Command Center user interface:
Export Language UTF File
Run the following command:
export LC_ALL=[language].UTF-8
...where [language] is one of these:
en_US (English)
zh_CN (Simplified Chinese)
zh_TW (Traditional Chinese)
ja_JP (Japanese)
fr_FR (French)
ESM Installation Guide
Chapter 3: Installing Software ESM
HPE ESM 7.0 Page 35 of 115

ko_KR (Korean)
ru_RU (Russian)
For example: export LC_ALL=en_US.UTF-8
Distributed Correlation Cluster Planning
Plan your cluster before you begin the installation described in "Using the Configuration Wizard - ESM
in Distributed Correlation Mode" on page46. A distributed correlation deployment includes the
persistor, information repository, correlators, aggregators, message bus data, message bus control, and
distributed cache. Ideally, the correlators and aggregators in the cluster will keep up with event flow on
your system.
You must balance system resources as you add these components (CPU and memory). You will want to
be somewhat generous in your cluster planning, and add more correlators and aggregators than you
think you need. Distributed correlation is most effective if configured over multiple physical systems to
ensure the fault tolerance benefit of the distributed correlation cluster deployment is fully realized. The
fault tolerance aspect of the distributed correlation cluster, as described in "Distributed Correlation
Concepts" in ESM 101.
Note: In the context of a distributed correlation implementation, ESMis the entire cluster. The
individual cluster nodes are part of the fuller implementation, and do not function independently.
The systems that are the cluster nodes should be dedicated to use in the cluster only, and not used
to run other applications. Keep this in mind when you plan your cluster.
Hierarchical Implementations and Cluster Planning
If you have been using a hierarchical implementation of ESM in order to get higher performance, then
you might consider implementing a distributed correlation cluster to increase your EPS. You can convert
your upgraded system to a cluster implementation, repurposing the systems that were part of your
hierarchical implementation, and adding more as needed. If you use a hierarchical implementation of
ESM to gain benefits other than higher performance, such as combining feeds from various
geographical areas, then a cluster implementation is not the favored solution for your situation.
Cluster Requirements
All nodes in a distributed correlation cluster must:
lHave the same operating system version
lBe in the same time zone
lIf FIPS, be in the same FIPS mode
lUse the same IP protocol (IPv4 or IPv6). Dual stack machines are supported, but all ESM IP
addresses on all nodes of a cluster must be either IPv4 or IPv6.
ESM Installation Guide
Chapter 3: Installing Software ESM
HPE ESM 7.0 Page 36 of 115

Note: We recommend 32 GB as the minimum heap memory size for the manager service on the
persistor node in a cluster if you expect heavy use (>30,000 EPS, large numbers of rules and data
monitors, and large active lists and session lists).
Recommended Cluster Configurations
Depending on your system resources, you can set multiple nodes on multiple machines. Below are
recommended cluster configurations.
Note concerning adding correlators and aggregators to your cluster: The number of
correlators and aggregators you configure in your cluster will depend on the settings in your ESM
implementation. For example, if you have complex filters and rule conditions, you might need more
correlators. If you have a large number of data monitors or use complex join rules, you might need
more aggregators. Lags shown in the Cluster View dashboard in the ArcSight Command Center can
indicate that you need to add more correlators or aggregators, depending on the type of lag shown
in the dashboard.
Small Configuration (Good)
The small configuration consists of three nodes on three systems, distributed as listed below and with
the following recommended resources:
Hardware Requirements
The persistor node hardware:
lat least 128 GB RAM
lat least 8 TB disk
lat least 16 cores
lat least 1 Gbit network
Other nodes hardware:
lat least 128 GB RAM
lat least 2 TB disk
lat least 16 cores
lat least 1 Gbit network
Software Requirements
lNode 1:
opersistor with a built-in distributed cache
Note:Adding standalone distributed cache instances can reduce persistor memory usage. You
might need to add at least two additional (standalone) distributed cache instances when
ESM Installation Guide
Chapter 3: Installing Software ESM
HPE ESM 7.0 Page 37 of 115

persistor memory usage is excessive. This means adding at least two instances of distributed
cache in addition to the built-in distributed cached that is included during installation.
oone message bus control
oone information repository
lNode 2:
oone correlator
Note: Two correlators are recommended if the number of cores is 24 or greater, and the
network is 10 Gbit or greater.
oone aggregator
oone message bus control
oone message bus data
oone information repository
lNode 3:
oone correlator
Note: Two correlators are recommended if the number of cores is 24 or greater, and the
network is 10 Gbit or greater.
oone aggregator
oone message bus control
oone message bus data
oone information repository
Medium Configuration (Better)
The medium configuration consists of four nodes on four systems, distributed as listed below and with
the following recommended resources:
Hardware Requirements
The persistor node hardware:
lat least 192 GB RAM
lat least 8 TB disk
lat least 24 cores
lat least 10 Gbit network
Other nodes hardware:
ESM Installation Guide
Chapter 3: Installing Software ESM
HPE ESM 7.0 Page 38 of 115

lat least 128 GB RAM
lat least 6 TB disk
lat least 24 cores
lat least 10 Gbit network
Software Requirements
lNode 1:
opersistor with a built-in distributed cache
oone information repository
lNode 2:
oone correlator
Note: Two correlators are recommended if the number of cores is 32 or greater.
oone aggregator
oone distributed cache
oone message bus control
oone message bus data
lNode 3:
otwo correlators
Note: Three correlators are recommended if the number of cores is 32 or greater.
oone message bus control
oone message bus data
oone information repository
lNode 4:
otwo aggregators
Note: One correlator and two aggregators are recommended if the number of cores is 32 or
greater.
oone distributed cache
oone message bus control
oone message bus data
oone information repository
ESM Installation Guide
Chapter 3: Installing Software ESM
HPE ESM 7.0 Page 39 of 115

Large Configuration (Best)
The large configuration consists of five (or more) nodes on five (or more) systems, distributed as listed
below and with the following recommended resources:
Hardware Requirements
The persistor node hardware:
lat least 256 GB RAM
lat least 8 TB disk
lat least 32 cores
lat least 10 Gbit network
Other nodes hardware:
lat least 256 GB RAM
lat least 8 TB disk
lat least 32 cores
lat least 10 Gbit network
Software Requirements
lNode 1:
opersistor with a built-in distributed cache
oone information repository
lNode 2:
otwo correlators
otwo aggregators
oone distributed cache
oone message bus control
oone message bus data
lNode 3:
otwo correlators
oone aggregator
oone message bus control
oone message bus data
oone information repository
lNode 4:
otwo correlators
oone aggregator
ESM Installation Guide
Chapter 3: Installing Software ESM
HPE ESM 7.0 Page 40 of 115

oone distributed cache
oone message bus control
oone message bus data
oone information repository
lNode 5+:
oone distributed cache
oone message bus data
otwo correlators
o1 aggregator
Starting the Installer
Start the installation while logged in as user arcsight.
If not already granted, give the ArcSightESMSuite.bin file the execute permission. To do so, enter:
chmod +x ArcSightESMSuite.bin
Run the installation file as follows:
./ArcSightESMSuite.bin -i console
(or ./ArcSightESMSuite.bin, for GUI mode, if you are using X Window.)
The installation begins.
Note:
lTo run in GUImode, X Window must be running. If it is not, the installer automatically runs in
Console mode. GUImode is entirely optional.
lTo run in Console mode, make sure X Windows is not running. GUI mode requests the same
information as console mode and is not documented separately.
lThe log files for this installation appear in the /home/arcsight directory.
The next topic picks up after the installer has started.
Running the Installation File
The following steps describe the ESMinstaller.
1. Read the Introduction message and press Enter.
2. On the License Agreement panel, press Enter to page through the agreement. In GUImode, the “I
accept the terms of the License Agreement” check box is disabled until you scroll to the bottom of
ESM Installation Guide
Chapter 3: Installing Software ESM
HPE ESM 7.0 Page 41 of 115

the agreement text. If you accept the License Agreement, type yand press Enter.
3. Read the Special Notice and press Enter.
4. Under Choose Link Folder, enter the number for the location where you would like the installer to
place the links for this installation and press Enter.
5. Review the Pre-Installation Summary. Press Enter to continue.
Under Installing a progress bar appears.
The Suite Installer installs each component.
lIn Console mode, after the components are installed it says Installation Complete. Press Enter to
exit the installer. Go to the next topic, "Starting the Configuration Wizard In Console Mode" below.
lIn GUImode, after the components are installed, the Configuration Wizard GUI opens automatically.
Go to "Using the Configuration Wizard - ESM in Compact Mode" below or "Using the Configuration
Wizard - ESM in Distributed Correlation Mode" on page46 for details on configuring ESM.
Note: In GUImode, if you get a dialog box reporting an error or problem and the action button
says Quit, use the Quit button. If you use the Xin the upper right corner of the dialog, the
process does not quit, but cannot complete successfully with the reported error.
Starting the Configuration Wizard In Console Mode
If you are installing software ESM in GUI mode or installing ESMExpress, the configuration wizard
starts automatically and you can skip this step during initial installation.
When installing software ESM in console mode (from the command line), the installation stops at this
point when the Suite Installer is done, but it does not automatically continue with the configuration
wizard. You start the configuration wizard manually by issuing the following command:
/opt/arcsight/manager/bin/arcsight firstbootsetup -boxster -soft -i console
Using the Configuration Wizard - ESM in Compact Mode
This section contains instructions to install ESM in compact mode. To install ESM in distributed
correlation mode (using a cluster implementation) see "Using the Configuration Wizard - ESM in
Distributed Correlation Mode" on page46.
For Software ESM in console mode, you start the configuration wizard manually using the following
command:
/opt/arcsight/manager/bin/arcsight firstbootsetup -boxster -soft -i console
1. Read the Welcome message. If the license file is accessible, type yes to continue.
2. Under Language Options, select the language for interface displays. Press Enter to continue.
3. Under Installation Mode, type 0to install ESMin Compact mode.
ESM Installation Guide
Chapter 3: Installing Software ESM
HPE ESM 7.0 Page 42 of 115

4. Under CORR-Engine Password, press Enter to continue with obfuscated passwords or type no
and Enter to allow them to show on screen.
5. Under CORR-Engine Password, set a password for the CORR-Engine and reenter it for the
Password confirmation. Press Enter. For information on password restrictions, see the
ESMAdministrator's Guide section “Managing Password Configuration” in the chapter
“Configuration.”
6. Under CORR-Engine Configuration, enter the CORR-Engine storage allocation information and
press Enter.
System Storage Size - the size of the storage space set aside to store resources
Event Storage Size - the size of the storage space set aside to store events
Online Event Archive Size - the maximum number of gigabytes of disk space for event archives.
This only applies to the online event archive.
Retention Period - the amount of time that you want to retain the events before they are purged
from the system
7. Under Notification Emails, specify the following email addresses:
Error Notification Recipient: Specify one email address for the email account to receive email
notifications if the Manager goes down or encounters some other problem. If you need to specify
more email addresses, the Manager Configuration Wizard allows that, as described in the "Running
the Manager Configuration Wizard" section of the ESM Administrator's Guide.
From email address: The email address used for the notifications sender.
If the values are correct, type yes and Enter to continue. Emails are sent when the system detects
the following occurrences:
lThe subsystem status is changed. The email shows the change and who did it.
lThe report has been successfully archived.
lThe account password has been reset.
lThe Archive report generation fails.
lThere is too many notifications received by a destination.
lThe event archive location has reached the cap space. It will ask you to free up some space by
moving the event archives to some other place.
lThe user elects to email the ArcSight Console settings.
lThe user sends partition archival command.
lAn archive fails because there is not enough space.
lThe Connection to the database failed.
8. For the License File, enter the path and file name of the license file you downloaded and press
Enter.
ESM Installation Guide
Chapter 3: Installing Software ESM
HPE ESM 7.0 Page 43 of 115

9. Under Select the Product Mode, select whether you want to install in default mode or FIPS mode.
Press Enter to continue.
Caution:
lIf you choose to install the product in FIPS mode, be sure to install the Console in FIPS
mode too. Refer to "Installing ArcSight Console in FIPS Mode" on page96 for instructions
on installing the Console in FIPS mode.
lOnce you have configured the software in FIPS mode, you will not be able to convert it to
default mode without reinstalling it.
lConverting from default mode installation to FIPS-140-2 mode is supported. If you need to
do so at any time, refer to the Administrator’s Guide for instructions.
lBy default, ESM uses a self-signed certificate. If you would like to use a CA-signed
certificate, you will have to import the CA-signed certificate manually after the
configuration wizard completes successfully. Refer to the Administrator’s Guide for ESM for
details on using a CA-signed certificate.
10. If you selected FIPS mode, confirm your selection. if not, skip to the Manager Information step.
11. If you selected FIPS mode on the Select the Cipher Suite Options panel. select the cipher suite.
Suite B defines two security levels of 128 and 192 bits. The two security levels are based on the
Advanced Encryption Standard (AES) key size that is used instead of the overall security provided
by Suite B. At the 128-bit security level, the 128 bit AES key size is used. However, at the 192-bit
security level, a 256 bit AES key size is used. Although a larger key size means more security, it also
means computational cost in time and resource (CPU) consumption. In most scenarios, the 128-bit
key size is sufficient.
12. Under Manager Information, enter the Manager’s hostname, set the user ID and password for the
admin user, and press Enter.
Caution:
lThe Manager host name is the IP address (for IPv4 only), or fully-qualified domain name of
the machine where the Manager is installed. This name is what all clients (for example,
ArcSight Console) specify to connect to the Manager. Using a fully-qualified domain name
instead of an IP address is recommended for flexibility.
lThe IP Version selection (IPv4 or IPv6) appears if you have a dual-stack machine, such as
an appliance. If you see this option, your selection has the following effects:
lIt controls what IP Address is used by third party software if a hostname is given. for
example, the e-mail server in Manager Setup.
lIt controls which IP Address is tried on the peering page if a hostname is specified.
lIt controls whether an IPv4 or IPv6 Address is chosen for the manager asset.
ESM Installation Guide
Chapter 3: Installing Software ESM
HPE ESM 7.0 Page 44 of 115

lThere might be more than one host name, and the default might not be the same as the one
returned by the hostname command. If you are using the High Availability Module, use the
Service hostname that is common to both servers (primary and secondary) as the Manager
IP, or hostname. Otherwise, pick one which you would expect to work, and would be
convenient for configuring connectors, consoles, and other clients. Note that it is always
best to use a fully qualified domain name.
lIf you do not want the hostname on your DNSserver, add a static host entry to the
/etc/hosts file to resolve the host name locally.
lThe Manager hostname is used to generate a self-signed certificate. The Common Name
(CN) in the certificate is the Manager host name that you specify in this screen.
lAlthough the Manager uses a self-signed certificate by default, you can switch to using a
CA-signed certificate if needed. You can do this after installation. Refer to the
ESM
Administrator’s Guide for instructions.
13. Select whether to set up connection to the Event Broker (if Event Broker is part of your
implementation of ESM). If you need to set up the Event Broker in FIPS mode, see "Configure
Event Broker Access - FIPS Mode (Server Authentication Only) (Optional)" on page99 .
If client authentication is enabled on the Event Broker, see either "Setting Up SSL Client-Side
Authentication Between Event Broker and ESM - Non-FIPS Mode" on page60 or "Setting Up SSL
Client-Side Authentication Between Event Broker and ESM - FIPS Mode" on page102.
Select Yes to set up the connection; select No to continue. If you select Yes, specify:
a. Host: Port(s): Enter the host and port information for the nodes in the Event Broker. Include
the host (hostname or IP address) and port information of all the nodes in a multiple node
environment not just the Master node. This is a comma-separated list, for example:
<host>:<port>,<host>:<port>. Note that Event Broker can only accept IPV4 connections from
ESM.
b. Topic to read from: Specify the topic in the Event Broker you want to read from. This will
determine the data source. See the chapter "Managing Event Broker Topics", in the Event
Broker Administrator's Guide.
c. Path to the Event Broker root cert: ESM communicates with the Event Broker through TLS.
To enable this, you must import the Event Broker's root certificate into ESM's client truststore.
Copy over the Event Broker root certificate from the Event Broker machine in this location:
/opt/arcsight/kubernetes/ssl/ca.crt to a local folder on the ESM machine. After you
enter the path to the certificate, and click Next, the Event Broker's root certificate is imported
into ESM's client truststore and the connection to the Event Broker is validated. If there are any
issues, you will receive an error or warning message. If no message displays and you advance to
the next screen in the wizard, that indicates that the connection between the Event Broker and
ESM is successfully validated.
14. Select whether to set up ArcSight Investigate. Select Yes to enable the integration; select No to
continue. If you select Yes, specify the Search URL for the ArcSight Investigate deployment.
ESM Installation Guide
Chapter 3: Installing Software ESM
HPE ESM 7.0 Page 45 of 115

15. Select whether to integrate with ServiceNow® IT Service Management (ITSM) application. Select
Yes to enable the integration; select No to continue. If you select Yes, specify the ServiceNow
URL and the optional ServiceNow Proxy URL.
16. Under Packages Panel press Enter to continue. Otherwise, select the optional packages that you
are licensed to use. In addition to these optional packages, there are default standard content
packages that are installed automatically on the ArcSight Manager. These default packages
provide essential system health and status operations, and you can use them immediately to
monitor and protect your network.
For more information about packages, see the ArcSight Administration and ArcSight System
Standard Content Guide.
17. Under About to Configure ESM.
Caution: Once you type yes and press Enter, the product is installed as specified.
18. When the configuration says Configuration Completed Successfully, type yes and then Enter to
exit.
19. Log in as user root and run the following script to set up and start the required services:
/opt/arcsight/manager/bin/setup_services.sh
20. After you have completed the installation, check the location and size of your storage volumes and
make any necessary changes. You can do this in the ArcSight Command Center. Refer to the
ArcSight Command Center User's Guide, the "Administration" chapter under "Storage and Archive”
section for details regarding your storage volumes.
You can rerun the wizard manually only if you exit it at any point before you reach the first
configuration screen called “About to Configure ESM v7.0”. See "Rerunning the ESM
Configuration Wizard" on page57 for details.
Using the Configuration Wizard - ESM in Distributed
Correlation Mode
This section contains instructions to install ESM in distributed correlation mode. To install ESM in
compact mode see "Using the Configuration Wizard - ESM in Compact Mode" on page42.
Distributed correlation allows you to use distributed resources as services to run on several systems
(nodes) in a software cluster that you install, configure, and manage. You must plan the cluster before
you begin installation in distributed correlation mode. See "Distributed Correlation Cluster Planning" on
page36 for details. This is an important task and you want to get as much of it right the first time as you
can. For details on cluster configuration and management post-installation, see "Configuring and
Managing a Distributed Correlation", in the ESM
Administrator's Guide.
When you install ESM in distributed correlation mode, you must first install the persistor node (which is
by default the first node installed); see "Persistor Node Installation" on the next page. After that, you
ESM Installation Guide
Chapter 3: Installing Software ESM
HPE ESM 7.0 Page 46 of 115

install the other cluster nodes as needed (see "Add Nodes to a Cluster - Further Node Installation" on
page52), and then perform post-cluster creation configuration tasks (see "Post Cluster Creation
Configuration " on page53).
Do not attempt simultaneous installations of cluster nodes. You must complete the installation of the
persistor node and then add each additional node separately, one at a time.
Note: Distributed correlation mode is not available on an appliance.
Persistor Node Installation
Note: If you have a High Availability (HA) implementation, note that HA is supported only on the
persistor node in the distributed correlation cluster. HA is not supported on any non-persistor node
in a distributed correlation cluster.
For Software ESM in console mode, you start the configuration wizard manually using the following
command:
/opt/arcsight/manager/bin/arcsight firstbootsetup -boxster -soft -i console
1. Read the Welcome message. If the license file is accessible, type yes to continue.
2. Under Language Options, select the language for interface displays. Press Enter to continue.
3. Under Installation Mode, type 1to install ESM in Distributed mode.
4. Under Cluster Setup:Are you starting a new cluster or adding to an existing one, type 0to
start a new cluster. Starting a new cluster creates the first node in a cluster. This node is the
persistor node and contains a built-in distributed cache and the information repository.
5. Under ESM server ports:Enter low and high values of ESM server ports, the default values
are:
lLowest ESM server port: 10000
lHighest ESM server port:10100
You must specify a range of available ports for your cluster. This range of ports is made available
for dynamic assignment to services (aggregator and correlator, message bus data and message bus
control, and distributed cache) as they are added to a cluster. The lowest value can be 1024 and the
highest value 32767. The difference between the lowest value and the highest value specified must
be at least 100.
6. Under Certificate Administrator Master Password, press Enter to continue with obfuscated
passwords or type no and Enter to allow them to show on screen.
7. Under Certificate Administrator Master Password, set a password for the certificate
administration and reenter it for the Password confirmation. Press Enter. For information on
password restrictions, see the ESM
Administrator's Guide section “Managing Password
Configuration”. Be sure to save this password in a safe place outside of ESM.
ESM Installation Guide
Chapter 3: Installing Software ESM
HPE ESM 7.0 Page 47 of 115

8. Under CORR-Engine Password, press Enter to continue with obfuscated passwords or type no
and Enter to allow them to show on screen.
9. Under CORR-Engine Password, set a password for the CORR-Engine and reenter it for the
Password confirmation. Press Enter. For information on password restrictions, see the
ESMAdministrator's Guide section “Managing Password Configuration” in the chapter
“Configuration.”
10. Under CORR-Engine Configuration, enter the CORR-Engine storage allocation information and
press Enter.
System Storage Size - the size of the storage space set aside to store resources
Event Storage Size - the size of the storage space set aside to store events
Online Event Archive Size - the maximum number of gigabytes of disk space for event archives.
This only applies to the online event archive.
Retention Period - the amount of time that you want to retain the events before they are purged
from the system
11. Under Notification Emails, specify the following email addresses:
Error Notification Recipient: Specify one email address for the email account to receive email
notifications if the Manager goes down or encounters some other problem. If you need to specify
more email addresses, the Manager Configuration Wizard allows that, as described in the "Running
the Manager Configuration Wizard" section of the ESM Administrator's Guide.
From email address: The email address used for the notifications sender.
If the values are correct, type yes and Enter to continue. Emails are sent when the system detects
the following occurrences:
lThe subsystem status is changed. The email shows the change and who did it.
lThe report has been successfully archived.
lThe account password has been reset.
lThe Archive report generation fails.
lThere is too many notifications received by a destination.
lThe event archive location has reached the cap space. It will ask you to free up some space by
moving the event archives to some other place.
lThe user elects to email the ArcSight Console settings.
lThe user sends partition archival command.
lAn archive fails because there is not enough space.
lThe Connection to the database failed.
12. For the License File, enter the path and file name of the license file you downloaded and press
Enter.
ESM Installation Guide
Chapter 3: Installing Software ESM
HPE ESM 7.0 Page 48 of 115

13. Under Select the Product Mode, select whether you want to install in default mode or FIPS mode.
Press Enter to continue.
Caution:
lIf you choose to install the product in FIPS mode, be sure to install the Console in FIPS
mode too. Refer to "Installing ArcSight Console in FIPS Mode" on page96 for instructions
on installing the Console in FIPS mode.
lOnce you have configured the software in FIPS mode, you will not be able to convert it to
default mode without reinstalling it.
lConverting from default mode installation to FIPS-140-2 mode is supported. If you need to
do so at any time, refer to the Administrator’s Guide for instructions.
lBy default, ESM uses a self-signed certificate. If you would like to use a CA-signed
certificate, you will have to import the CA-signed certificate manually after the
configuration wizard completes successfully. Refer to the Administrator’s Guide for ESM for
details on using a CA-signed certificate.
14. If you selected FIPS mode, confirm your selection. if not, skip to the Manager Information step.
15. If you selected FIPS mode on the Select the Cipher Suite Options panel. select the cipher suite.
Suite B defines two security levels of 128 and 192 bits. The two security levels are based on the
Advanced Encryption Standard (AES) key size that is used instead of the overall security provided
by Suite B. At the 128-bit security level, the 128 bit AES key size is used. However, at the 192-bit
security level, a 256 bit AES key size is used. Although a larger key size means more security, it also
means computational cost in time and resource (CPU) consumption. In most scenarios, the 128-bit
key size is sufficient.
16. Under Manager Information, enter the Manager’s hostname, set the user ID and password for the
admin user, and press Enter.
Caution:
lThe Manager host name is the IP address (for IPv4 only), or fully-qualified domain name of
the machine where the Manager is installed. This name is what all clients (for example,
ArcSight Console) specify to connect to the Manager. Using a fully-qualified domain name
instead of an IP address is recommended for flexibility.
lThe IP Version selection (IPv4 or IPv6) appears if you have a dual-stack machine, such as
an appliance. If you see this option, your selection has the following effects:
lIt controls what IP Address is used by third party software if a hostname is given. for
example, the e-mail server in Manager Setup.
lIt controls which IP Address is tried on the peering page if a hostname is specified.
lIt controls whether an IPv4 or IPv6 Address is chosen for the manager asset.
ESM Installation Guide
Chapter 3: Installing Software ESM
HPE ESM 7.0 Page 49 of 115

lThere might be more than one host name, and the default might not be the same as the one
returned by the hostname command. If you are using the High Availability Module, use the
Service hostname that is common to both servers (primary and secondary) as the Manager
IP, or hostname. Otherwise, pick one which you would expect to work, and would be
convenient for configuring connectors, consoles, and other clients. Note that it is always
best to use a fully qualified domain name.
lIf you do not want the hostname on your DNSserver, add a static host entry to the
/etc/hosts file to resolve the host name locally.
lThe Manager hostname is used to generate a self-signed certificate. The Common Name
(CN) in the certificate is the Manager host name that you specify in this screen.
lAlthough the Manager uses a self-signed certificate by default, you can switch to using a
CA-signed certificate if needed. You can do this after installation. Refer to the
ESM
Administrator’s Guide for instructions.
17. Select whether to set up connection to the Event Broker (if Event Broker is part of your
implementation of ESM). If you need to set up the Event Broker in FIPS mode, see "Configure
Event Broker Access - FIPS Mode (Server Authentication Only) (Optional)" on page99 .
If client authentication is enabled on the Event Broker, see either "Setting Up SSL Client-Side
Authentication Between Event Broker and ESM - Non-FIPS Mode" on page60 or "Setting Up SSL
Client-Side Authentication Between Event Broker and ESM - FIPS Mode" on page102.
Select Yes to set up the connection; select No to continue. If you select Yes, specify:
a. Host: Port(s): Enter the host and port information for the nodes in the Event Broker. Include
the host (hostname or IP address) and port information of all the nodes in a multiple node
environment not just the Master node. This is a comma-separated list, for example:
<host>:<port>,<host>:<port>. Note that Event Broker can only accept IPV4 connections from
ESM.
b. Topic to read from: Specify the topic in the Event Broker you want to read from. This will
determine the data source. See the chapter "Managing Event Broker Topics", in the Event
Broker Administrator's Guide.
c. Path to the Event Broker root cert: ESM communicates with the Event Broker through TLS.
To enable this, you must import the Event Broker's root certificate into ESM's client truststore.
Copy over the Event Broker root certificate from the Event Broker machine in this location:
/opt/arcsight/kubernetes/ssl/ca.crt to a local folder on the ESM machine. After you
enter the path to the certificate, and click Next, the Event Broker's root certificate is imported
into ESM's client truststore and the connection to the Event Broker is validated. If there are any
issues, you will receive an error or warning message. If no message displays and you advance to
the next screen in the wizard, that indicates that the connection between the Event Broker and
ESM is successfully validated.
18. Select whether to set up ArcSight Investigate. Select Yes to enable the integration; select No to
continue. If you select Yes, specify the Search URL for the ArcSight Investigate deployment.
ESM Installation Guide
Chapter 3: Installing Software ESM
HPE ESM 7.0 Page 50 of 115

19. Select whether to integrate with the ServiceNow® IT Service Management (ITSM) application.
Select Yes to enable the integration; select No to continue. If you select Yes, specify the
ServiceNow URL and the optional ServiceNow Proxy URL.
20. Under Packages Panel press Enter to continue. Otherwise, select the optional packages that you
are licensed to use. In addition to these optional packages, there are default standard content
packages that are installed automatically on the ArcSight Manager. These default packages
provide essential system health and status operations, and you can use them immediately to
monitor and protect your network.
For more information about packages, see the ArcSight Administration and ArcSight System
Standard Content Guide.
21. Under Select optional services to configure on this server select distributed correlation services
to implement:
l0: Distributed Cache - configures silently
l1: Correlation - allows you to add aggregators and correlators to the cluster on the node you
are installing. The wizard runs during ESMconfiguration.
22. Under About to Configure ESM.
Caution: Once you type yes and press Enter, the product is installed as specified.
23. If, in step 21, you chose to configure Correlation (aggregators and correlators to add to your
distributed correlation cluster), the ArcSight Correlation Configuration Wizard will run at this point.
See "Configuring Services in a Distributed Correlation Cluster" in the ESM Administrator's Guide for
details on running the wizard.
24. When the configuration says Configuration Completed Successfully, type yes and then Enter to
exit.
25. This step is required in order to set up the services.
Note: In the context of distributed correlation setup, setup_services performs setup only,
and does not start services. In this configuration, services must not be started until all cluster
configuration is complete.
Log in as user root and run the following script to set up the required services:
/opt/arcsight/manager/bin/setup_services.sh
To add cluster nodes, follow the steps in the section "Add Nodes to a Cluster - Further Node
Installation" on the next page.
When your cluster is complete, follow the steps in "Post Cluster Creation Configuration " on page53 to
complete your cluster.
Note:You can rerun the wizard manually only if you exit it at any point before you reach the first
configuration screen called “About to Configure ESM v7.0”. See "Rerunning the ESM Configuration
ESM Installation Guide
Chapter 3: Installing Software ESM
HPE ESM 7.0 Page 51 of 115

Wizard" on page57 for details.
Add Nodes to a Cluster - Further Node Installation
After you perform the steps shown in "Persistor Node Installation" on page47, you can add nodes to
the cluster. Follow these steps to add each additional node that you wish to add to the cluster.
1. First, follow the steps in "Running the Installation File" on page41
2. For Software ESM in console mode, you start the configuration wizard manually using the
following command:
/opt/arcsight/manager/bin/arcsight firstbootsetup -boxster -soft -i
console
You run the installer on all cluster nodes and then start the First Boot Wizard.
3. Under Language Options, select the language for interface displays. Press Enter to continue.
4. Under Installation Mode, type 1to install ESM in Distributed mode.
5. Under Cluster Setup:Are you starting a new cluster or adding to an existing one, type 1to
add to an existing cluster.
6. For Location of Persistor: Enter name or IP address of Persistor host, enter the host name or
IP address of the system on which you performed the steps for "Persistor Node Installation" on
page47. You must verify this host name or IP address.
Note: If your cluster (system) is in pure IPv6 mode, where only IPv6 addresses are available in the
interface, then you must enter the host name of the persistor system. Using the IP address of a
IPv6 system is not supported for cluster configuration.
7. Under Select services to configure on this server select distributed correlation services to
implement:
l0: Distributed Cache - configures silently
l1: Correlation - allows you to add aggregators and correlators to the cluster on the node you
are installing. The wizard runs during ESMconfiguration.
Select one or more options, separated by commas.
8. Under About to Configure ESM.
Caution: Once you type yes and press Enter, the product is installed as specified.
9. If, in step 6, you chose to configure Correlation (aggregators and correlators to add to your
distributed correlation cluster), the ArcSight Correlation Configuration Wizard will run at this point.
See "Configuring Services in a Distributed Correlation Cluster" in the ESM Administrator's Guide for
details on running the wizard.
10. When the configuration says Configuration Completed Successfully, type yes and then Enter to
exit.
11. This step is required in order to set up the services.
ESM Installation Guide
Chapter 3: Installing Software ESM
HPE ESM 7.0 Page 52 of 115

Note: In the context of distributed correlation setup, setup_services performs setup only,
and does not start services. In this configuration, services must not be started until all cluster
configuration is complete.
Log in as user root and run the following script to set up the required services:
/opt/arcsight/manager/bin/setup_services.sh
When you have completed your cluster and added all nodes, follow the steps in "Post Cluster Creation
Configuration " below to complete your cluster.
Post Cluster Creation Configuration
These steps must be performed on the persistor node in the cluster.
1. Setup passwordless SSH. This is required for the operation of message bus data and message
bus control instances in the distributed correlation cluster. See "Setting Up Key-Based
Passwordless SSH - Distributed Correlation Mode Only" below for details.
2. Approve certificates. The cluster nodes use certificates to enable the communication among the
nodes. Each time you add a node to a cluster, an entry for that node is created in the information
repository. To approve certificates, as user arcsight, run this command from the persistor node:
./arcsight certadmin -approveall
You are prompted for the cluster administration password that was provided during persistor node
installation.
3. Configure message bus data and message bus control instances. See "Configuring Services in
a Distributed Correlation Cluster" in the ESM Administrator's Guide for details on running the
ArcSight Message Bus Configuration Wizard.
4. Configure additional information repository instances. At this point in the cluster
configuration, you have one repository instance; most configurations would benefit from three
repository instances. See "Configuring Services in a Distributed Correlation Cluster" in the ESM
Administrator's Guide for details on running the ArcSight Repository Configuration Wizard.
5. Start services. This step is required to start the services. As user arcsight, run this command:
/etc/init.d/arcsight_services start all
6. Verify that all services are running:
/etc/init.d/arcsight_services statusByNode
Setting Up Key-Based Passwordless SSH - Distributed Correlation Mode
Only
The distributed correlation services cluster depends on key-based passwordless SSH to enable
communication among the cluster services. In the distributed correlation environment, passwordless
SSH must be implemented on the node in the cluster that contains the persistor.
ESM Installation Guide
Chapter 3: Installing Software ESM
HPE ESM 7.0 Page 53 of 115

The command arcsight_services uses passwordless SSH to allow starting and stopping of services
on remote nodes through commands originating on the persistor node. In this instance, passwordless
SSH works by generating a keypair on the persistor, and configuring the remote node to accept the
login based on a public key for the Persistor node. In the distributed correlation environment, ESM is
configured to allow the user arcsight on the persistor node to connect to a remote node as the user
arcsight . Only arcsight user to arcsight user passwordless SSH is supported, and only from the
persistor node to other cluster nodes.
Set Up Key-Based Passwordless SSH
After installing ESM on all nodes, use this command on the persistor node to setup passwordless
SSHwith cluster nodes:
/etc/init.d/arcsight_services sshSetup
If a node needs configuration, the command prompts you for the user arcsight password on the node,
so it can log in and complete the setup.
Verify Key-Based Passwordless SSH
On the persistor node, run the command /etc/init.d/arcsight_services checkSshSetup.
This command verifies whether the nodes in the cluster are configured with passwordless SSH.
Handling a Time Zone Update Error
There are two possible errors that can happen when the installer tries to update the time zone
information for the ESM components.
1. A timezone version 2017c or later rpm for your operating system is not installed.
2. The /etc/localtime link is pointing to invalid or non-existent timezone.
You can choose to continue with the installation even if the right timezone package is unavailable or
incorrectly setup. If you choose to do so, you can update timezone info for the ESM components after
the installation.
Use the following procedure after ensuring that you have downloaded and installed the correct
package and the link is set correctly.
1. As user arcsight, shut down all arcsight services. (This is important.) Run
/etc/init.d/arcsight_services stop all
2. As user arcsight, run the following command (this is one line):
/opt/arcsight/manager/bin/arcsight tzupdater /opt/arcsight /opt/arcs
ight/manager/lib/jre-tools/tzupdater
3. Start all arcsight services using this command.
/etc/init.d/arcsight_services start all
ESM Installation Guide
Chapter 3: Installing Software ESM
HPE ESM 7.0 Page 54 of 115
Chapter 4: Post-Installation Considerations
This section includes information about uninstalling ESM (if needed), rerunning the installation and
configuration wizard.
Uninstalling ESM
Use the following procedure to uninstall ESM.
1. Log in as user root.
2. Run the following command:
/opt/arcsight/manager/bin/remove_services.sh
3. Log in as user arcsight.
4. Shut down any arcsight processes that are still running.
To check for running arcsight processes, run:
ps -elf | grep "/opt/arcsight"
To shut down any arcsight processes that are running, run:
kill -9 <process_id_number>
5. Run the uninstaller program from either the directory where you have created the links while
installing the product or if you had opted not to create links, then run this from the
/opt/arcsight/suite/UninstallerData directory:
./Uninstall_ArcSight_ESM_Suite_7.0.0
Alternatively, you can run the following command from the /home/arcsight (or wherever you
installed the shortcut links) directory:
./Uninstall_ArcSight_ESM_Suite_7.0.0
6. Verify that the /tmp and /opt/arcsight directories contain no ESM-related files. If that is not
the case:
a. While logged in as user arcsight kill all arcsight processes.
b. Delete all remaining arcsight-related files/directories in /opt/arcsight/ and /tmp directory
manually.
c. Delete any links created during installation.
HPE ESM 7.0 Page 55 of 115

Uninstalling ESM - Distributed Correlation Mode
Uninstalling the cluster:
The steps direct you to always start with the persistor node. After the persistor node is uninstalled
successfully, you can continue uninstalling the remaining nodes in the cluster.
1. Log in as root on the persistor node in a cluster.
2. Run the following script to remove services:
/opt/arcsight/manager/bin/remove_services.sh
3. Log in as user arcsight.
4. Shut down any arcsight processes that are still running.
To check for running arcsight processes, run:
ps -elf | grep "/opt/arcsight"
To shut down any arcsight processes that are running, run:
kill -9 <process_id_number>
5. Run the uninstaller program from either the directory where you have created the links while
installing the product or if you had opted not to create links, then run this from the
/opt/arcsight/suite/UninstallerData directory:
./Uninstall_ArcSight_ESM_Suite_7.0.0
Alternatively, you can run the following command from the /home/arcsight (or wherever you
installed the shortcut links) directory:
./Uninstall_ArcSight_ESM_Suite_7.0.0
6. Verify that the /tmp and /opt/arcsight directories contain no ESM-related files. If that is not
the case:
a. While logged in as user arcsight kill all arcsight processes.
b. Delete all remaining arcsight-related files/directories in /opt/arcsight/ and /tmp directory
manually.
c. Delete any links created during installation.
7. After completing the uninstall in the persistor node, repeat the process on the remaining nodes in
the same cluster. On each remaining node, do not skip the step to run the remove_services.sh
script that removes all services on that configured node.
Note: If you are uninstalling on all nodes, be sure to first uninstall the persistor, and then run remove_
services.sh on the persistor to stop all services. If you are not uninstalling the persistor node, you
ESM Installation Guide
Chapter 4: Post-Installation Considerations
HPE ESM 7.0 Page 56 of 115

should first run the mbussetup utility to stop and delete message bus data and message bus control
instances from the cluster. Also, run other setup utilities to delete other services from the node. Only
then should you run remove_services.sh.
Rerunning the Installer
For software ESM, if the installation is interrupted and the process exits (for any reason) before you get
to "File Delivery Complete:"
1. Remove all install.dir.xxxx directories from the /tmp directory.
2. Remove all directories and files in the /opt/arcsight directory.
3. From wherever you saved it, rerun the installer, ./ArcSightESMSuite.bin.
Rerunning the ESM Configuration Wizard
You can rerun the wizard manually only if you exit it at any point before the actual configuration
begins.
1. To rerun the configuration wizard use the following command:
rm /opt/arcsight/manager/config/fbwizard*
2. To run the First Boot Wizard, run the following from the /opt/arcsight/manager/bin
directory while logged in as user arcsight:
In GUI mode (software ESM only)
./arcsight firstbootsetup -boxster -soft
In console mode
./arcsight firstbootsetup -boxster -soft -i console
For software ESM, Make sure that X-Window is not running when running the first boot wizard in
console mode.(X Window is not installed on the appliance.)
If you encounter a failure during the configuration stage, uninstall and reinstall ESM. On an
appliance, restore the appliance to it's factory settings and start over. See "Restore Appliance
Factory Settings" on page114.
Important: When you rerun the configuration wizard, you will see:
Do you want to run ESM in Compact or Distributed mode?
In this case, accept the default and keep moving through the wizard. You cannot change the ESM
mode in the wizard after the initial installation of ESM. If you want to change ESM from compact to
distributed mode, see the topic "Converting Compact Mode to Distributed Correlation Mode" in the
ESM Upgrade Guide and follow that conversion process. Note that conversion from distributed
correlation mode to compact mode is not supported.
ESM Installation Guide
Chapter 4: Post-Installation Considerations
HPE ESM 7.0 Page 57 of 115

Setting Up ESM Reports to Display in a Non-English
Environment
To enable international characters in string-based event fields to be retrieved by queries, you need to
store such characters correctly. Following the processes in this section allows ESM to correctly store and
recognize international characters.
Setting Up Reports On the Manager
This procedure is required only if you plan to output reports that use international characters in PDF
format. You will need to purchase the ARIALUNI.TTF font file.
1. On the Manager host, place the font file ARIALUNI.TTF in a folder. For example:
/usr/share/fonts/somefolder
2. Modify the ESM reports properties file, sree.properties, located in
/opt/arcsight/manager/reports/ directory by default.
Add the following line:
font.truetype.path=/usr/share/fonts/somefolder
Save the file.
3. Stop and start the Manager by running:
/etc/init.d/arcsight_services stop manager
/etc/init.d/arcsight_services start all
4. In the ArcSight Console, select the Arial Unicode MS font in all the report elements, including the
report template. This is described in the next topic.
Setting Up Reports On the Console
Set preferences in the Console and on the Console host machine.
1. Install the Arial Unicode MS font on the Console host operating system if not already present.
2. Edit the following script located in <ARCSIGHT_HOME>/current/bin/scripts directory by
default:
On Windows: Edit console.bat
On Linux: No edits required. The coding is set correctly.
Find the section ARCSIGHT_JVM_OPTIONS and append the following JVM option:
ESM Installation Guide
Chapter 4: Post-Installation Considerations
HPE ESM 7.0 Page 58 of 115

" -Dfile.encoding=UTF8"
3. In the ArcSight Console Preferences menu, set Arial Unicode MS as the default font:
Go to Edit > Preferences > Global Options > Font
On Windows: Select Arial Unicode MS from the drop-down
On Linux: Enter Arial Unicode MS
4. Set the font preferences for your reports, as described in, "Using Report Templates" in the ArcSight
Console User's Guide.
Improving the Performance of Your Server
For an appliance, you can ignore this topic because the appliance is already set up for top performance.
For software ESMon your own hardware, you can improve the server performance by tuning your BIOS
as follows:
lHyperThreading - Disable this. This setting exists on any Intel processor that supports
HyperThreading. Most recent server class processors have this. AMD processors do not have an
equivalent setting.
lIntel VT-d - Disable this. This setting is specific to Intel processors and is likely to be present on most
recent server class processors. AMD has an equivalent feature named AMD-Vi.
lPower Regulator - set to Static High Performance: This setting tells the CPU(s) to always run at
high speed, rather than slowing down to save power when the system senses that load has
decreased. Most modern CPUs have some equivalent setting.
lThermal Configuration - set to Increased cooling: This setting increases fan speed in the server to
help deal with the increased heat resulting from running the CPU(s) at high speed all the time.
lMinimum Processor Idle Power Package State - This setting tells the CPU not to use any of its C-
states (various states of power saving in the CPU). All CPUs have C-states, so most servers have a
setting like this.
lPower Profile - set this to Maximum Performance.
This setting changes the following:
oQPI link power management (link between physical CPU sockets) gets disabled
oPCIe support gets forced to Gen 2
oC-states get disabled as part of this profile
oThis setting also disables the lower speed settings on the CPU(s) so they run at high speed all the
time
ESM Installation Guide
Chapter 4: Post-Installation Considerations
HPE ESM 7.0 Page 59 of 115

Configure Your Browser for TLS Protocols
To connect a browser to a FIPS web server, the browser must be configured to support TLS. SSL
protocols are not supported. You must make the browser TLS compliant before using it for ArcSight
Console online help or to connect to the ArcSight Command Center.
Make sure that all SSL protocols are turned off and TLS protocols are turned on. For example, on
Microsoft Internet Explorer (IE):
1. Select Tools > Internet Options.
2. Select the Advanced tab.
3. Scroll down to the Security section.
4. Uncheck Use SSL 2.0 and Use SSL 3.0.
5. Check the TLSoptions. See "TLS Support" on page93 for details.
Other browsers (and other versions of IE) may have different menu items or options for doing this, so
refer to your browser documentation.
Setting Up SSL Client-Side Authentication Between
Event Broker and ESM - Non-FIPS Mode
Before setting up client-side authentication with Event Broker, you must import the Event Broker root
certificate into the ESM truststore to enable the SSL handshake between the Event Broker and ESM.
To import the Event Broker root certificate into an ESM machine:
Note:Before performing the steps below to import the root certificate into the ESM
truststore, check if the Event Broker root certificate has previously been imported into
ESM. If it is not, then perform these steps:
1. Log onto the Event Broker machine and copy the certificate from the following location:
/opt/arcsight/kubernetes/ssl/ca.crt
into a location on the ESM machine.
2. Use the arcsight keytool command to import the root CA certificate into the ESM's client
truststore:
/opt/arcsight/manager/bin/arcsight keytool -store clientcerts -importcert
-file <absolute path to certificate file> -alias <alias for the
certificate>
ESM Installation Guide
Chapter 4: Post-Installation Considerations
HPE ESM 7.0 Page 60 of 115

To enable client-side authentication between the Event Broker and ESM for non-FIPS
(default)mode:
IMPORTANT: All the steps in this procedure must be completed for client-side
authorization to work. Be sure to perform all steps.
1. Verify that Event Broker is functional, and has client authentication set up.
2. As user arcsight, stop the Manager:
/etc/init.d/arcsight_services stop manager
3. If /opt/arcsight/manager/config/client.properties does not exist, create it using an
editor of your choice.
4. Change the store password for the keystore, keystore.client, which has an empty password by
default. This empty password interferes with the certificate import you must perform.
Also, you must update the empty password of the generated key services-cn in the keystore to
be the same password as that of the keystore itself. To do so, run the following commands:
/opt/arcsight/manager/bin/arcsight keytool -store clientkeys -storepasswd
-storepass ""
Enter the new password when prompted.
/opt/arcsight/manager/bin/arcsight keytool -store clientkeys -keypasswd -
keypass "" -alias services-cn
Enter the new password to be same as the store password (entered above), when prompted.
5. Update the password in config/client.properties by running this command:
/opt/arcsight/manager/bin/arcsight changepassword -f
config/client.properties -p ssl.keystore.password
6. Generate the keypair and certificate signing request (.csr) file. When generating the keypair, enter
the fully qualified domain name of the manager host as the common name (CN) for the certificate.
Run these commands:
/opt/arcsight/manager/bin/arcsight keytool -store clientkeys -genkeypair –
dname "cn=<your host's fully qualified domain name>, ou=<your
organization>, o=<your company>, c=<your country>" -keyalg rsa -keysize
2048 –alias ebkey -startdate -1d -validity 366
/opt/arcsight/manager/bin/arcsight keytool -certreq -store clientkeys -
alias ebkey -file ebkey.csr
where ebkey.csr is the output file where the csr is stored.
7. Sign the .csr with the Event Broker root certificate. The Event Broker root certificate is on the Event
Broker machine under /opt/arcsight/kubernetes/ssl and is called ca.crt and the key is
called ca.key. For example, the following command can be run either on the Event Broker machine
or on a different machine with a functional openssl as long as you have the ca.crt and ca.key:
ESM Installation Guide
Chapter 4: Post-Installation Considerations
HPE ESM 7.0 Page 61 of 115

openssl x509 -req -CA <full path to ca.crt> -CAkey <full path to ca.key> -
in <full path to the esm csr> -out <full path and file name for storing
the generated cert> -days 3650 -CAcreateserial -sha256
For example:
openssl x509 -req -CA /tmp/ca.crt -CAkey /tmp/ca.key -in /tmp/ebkey.csr -
out /tmp/ebkey.crt -days 3650 -CAcreateserial -sha256
Note that all file locations must be specified with the full path.
8. On the ESM machine, import the signed certificate (the -out parameter in the above openssl
command) by running this command:
/opt/arcsight/manager/bin/arcsight keytool -store clientkeys -alias ebkey
-importcert -file <path to signed cert> -trustcacerts
For example:
/opt/arcsight/manager/bin/arcsight keytool -store clientkeys -alias ebkey
-importcert -file ebkey.crt -trustcacerts
9. To verify that the configuration is complete, and the connection to Event Broker can be made
successfully, run managersetup to verify that the configuration flows through with no errors.
10. Start the Manager and all services:
/etc/init.d/arcsight_services start all
Configure Integration with ServiceNow® IT Service
Management (ITSM) - Optional
You can optionally configure to integrate with the ServiceNow® IT Service Management (ITSM)
application after installation.
To configure ESM integrate with ServiceNow® IT Service Management (ITSM):
1. Log in as user arcsight, and stop the Manager services:
/etc/init.d/arcsight_services stop manager
2. As user arcsight , start the managersetup wizard by running the following command from the
/opt/arcsight/manager/bin directory:
./arcsight managersetup -i console
3. Advance through the wizard until you get to the ServiceNow® IT Service Management (ITSM)
panel.
4. Select whether to set up ServiceNow® IT Service Management (ITSM). Select Yes to enable the
integration; select No to continue. If you select Yes, specify the ServiceNow URL and the optional
ServiceNow Proxy URL.
ESM Installation Guide
Chapter 4: Post-Installation Considerations
HPE ESM 7.0 Page 62 of 115

5. Continue to advance through the wizard and complete the configuration. For details about
running the Manager Configuration Wizard (managersetup), see "Using the Configuration
Wizard" in the ESM Administrator's Guide .
6. When you have completed the configuration, restart the Manager and services by running the
following as user arcsight:
/etc/init.d/arcsight_services start all
Post-Installation Next Steps
lInstall ArcSight Console
Download the ArcSight Console and install it on a supported platform. Refer to the chapter on
installing the Console, for details on how to do this. For performance reasons, install the ArcSight
Console on a different machine than your ESM installation.
lAccess ArcSight Command Center
Refer to the ArcSight Command Center User’s Guide for more information on using the ArcSight
Command Center.
lContinue to Read the Release Notes
The release notes for this release are available on Protect724.
lDownload Use Cases
To get up and running quickly, Security Use Case packages are available for download at
https://marketplace.microfocus.com/arcsight. These packages provide essential security monitoring
for network systems (such as IDS/IPS, VPN, Firewall), and packages that monitor and analyze the
event stream for critical security concerns, such as anomalous traffic and suspicious outbound traffic.
lRemote Access to the Appliance
As an option, you can configure the appliance for out-of-band remote access so that Customer
Support can access and troubleshoot the appliance if it becomes unresponsive. All appliance models
are equipped with Integrated Lights-Out (iLO) Advanced remote management card. Visit
https://www.hpe.com/us/en/servers/integrated-lights-out-ilo.html for detailed information and
documentation.
ESM Installation Guide
Chapter 4: Post-Installation Considerations
HPE ESM 7.0 Page 63 of 115
Chapter 5: Installing ArcSight Console
The ArcSight Console provides a host-based interface (as opposed to the browser-based interface of
the ArcSight Command Center) to ESM. This chapter explains how to install and configure the ArcSight
Console in default mode. To install the Console in FIPS mode, see "Installing ArcSight Console in FIPS
Mode" on page96. Section "Choosing between FIPS Mode or Default Mode" on page10 lists the basic
differences between the modes.
Make sure the Manager is running before installing the ArcSight Console. Typically, ArcSight Console is
deployed on several perimeter machines located outside the firewall which protects the ArcSight
Manager.
Console Supported Platforms
Refer to the ArcSight ESM Support Matrix document available on the Protect724 site for the most
current information on supported platforms and browsers.
Required Libraries for RHEL and CentOS (64 Bit)
On the RHEL and CentOS 6.x and later 64-bit workstations, the Console requires the latest versions of
following libraries:
pam-1.1.1-10.el6.x86_64.rpm
pam-1.1.1-10.el6.i686.rpm
libXtst-1.0.99.2-3.el6.x86_64.rpm
libXtst-1.0.99.2-3.el6.i686.rpm
libXp-1.0.0-15.1.el6.x86_64.rpm
libXp-1.0.0-15.1.el6.i686.rpm
libXmu-1.0.5-1.el6.x86_64.rpm
libXmu-1.0.5-1.el6.i686.rpm
libXft-2.1.13-4.1.el6.x86_64.rpm
libXft-2.1.13-4.1.el6.i686.rpm
libXext-1.1-3.el6.x86_64.rpm
libXext-1.1-3.el6.i686.rpm
libXrender-0.9.7-2.el6.i686.rpm
gtk2-engines-2.18.4-5.el6.x86_64.rpm
gtk2-2.18.9-6.el6.x86_64.rpm
compat-libstdc++-33-3.2.3-69.el6.x86_64.rpm
compat-libstdc++-33-3.2.3-69.el6.i686.rpm
HPE ESM 7.0 Page 64 of 115

compat-db-4.6.21-15.el6.x86_64.rpm
compat-db-4.6.21-15.el6.i686.rpm
Installing the Console
The notes that follow include important considerations for Installing the ArcSight Console on different
operation systems.
Note: On Linux:
Do not attempt to install the Console as the root user on Linux machines. If you do, the installer
prompts you to change ownership of certain directories after the installation completes, so we
recommend you perform all of the following steps as a non-root user.
This issue does not apply to Windows machines.
Note: On Macintosh:
lKeep in mind that keytoolgui does not work on the Mac, so use keytool commands,
documented in the ESM Administrator's Guide, whenever you need to manage the keystore or
certificates.
lBefore you start the Console, make sure to set up a default printer to which to print. if you open
a channel, select some rows, right-click on them and select Print Selected Rows from the
resulting menu, the Console will crash if a default printer is not set up.
Make sure that ESM is installed before installing the ArcSight Console.
1. To install ArcSight Console, run the self-extracting archive file that is appropriate for your target
platform. Go to the directory where the ArcSight Console Installer is located. Note that nnnn
stands for the build number.
Platform Installation File
Linux ArcSight-7.0.0.nnnn.0-Console-Linux.bin
Windows ArcSight-7.0.0.nnnn.0-Console-Win.exe
Macintosh ArcSight-7.0.0.nnnn.0-Console-MacOSX.zip
The location of the installer's log files are shown below:
Platform Installation Log Files
Linux /home/<user>
Windows C:\Users\<user>
Macintosh /Users/<user>
2. Click Next in the Installation Process Check screen.
ESM Installation Guide
Chapter 5: Installing ArcSight Console
HPE ESM 7.0 Page 65 of 115

3. Read the introductory text in the Introduction panel and click Next.
4. On the License Agreement panel, the “I accept the terms of the License Agreement” check box is
disabled until you scroll to the bottom of the agreement text. After you have read the text, select
the “I accept the terms of the License Agreement” check box and click Next.
5. Read the text in the Special Notice panel and click Next.
6. On the Choose ArcSight installation directory panel, you can accept the default installation
directory, click Choose to navigate to an existing folder, or type in a path to where you want to
install the Console. If you specify a folder that does not exist, the folder is created for you.
Caution: Do not use spaces in install paths. This includes Linux, Macintosh, and Windows
systems. The Console installer does not display any error message, but the Console will not
start.
7. On the Choose Shortcut Folder panel, select where you would like to create a shortcut for the
Console and uninstall icons and click Next.
8. View the summary in the Pre-Installation Summary screen and click Install if you are satisfied
with the paths listed. If you want to make any changes, use the Previous button to do so.
You can view the installation progress in the progress bar.
Note: On Windows, when the installer is configuring the Console (the Please Wait panel), you
might see a message that the TZData update was not successful. If you get that message, click OK
and continue. The Console installs successfully. Usually, TZData is correctly updated regardless of
this message. To make sure check that the time stamp on the files in the <ARCSIGHT_
HOME>\Console70Feldspar\
2401_3\current\jre\lib\tzdb.dat.tzdata2017b\ directory matches the date and time
when you installed the Console. If the time stamp is old or the files are missing, uninstall then re-
install the Console.
Configuring the ArcSight Console
After the Console has been installed, you will need to configure it.
1. The wizard asks if you would like to transfer configuration options from an existing installation of
ArcSight Console. Choose No, I do not want to transfer the settings to create a new, clean
installation and click Next.
2. Select the mode in which you would like to configure the Console, Default or FIPS.
Select the same mode in which the Manager is installed.
If you select Run console in FIPS mode, you get a warning that once you switch to FIPS mode you
cannot revert to default mode and are asked if you want to continue.
(FIPS mode only) You will be prompted to select a cipher suite. The choices are:
ESM Installation Guide
Chapter 5: Installing ArcSight Console
HPE ESM 7.0 Page 66 of 115

lFIPS 140-2
lFIPSwith Suite B 128 bits
lFIPS with Suite B 192 bits.
Suite B defines two security levels of 128 and 192 bits. The two security levels are based on the
Advanced Encryption Standard (AES) key size that is used instead of the overall security provided
by Suite B. At the 128-bit security level, the 128 bit AES key size is used. However, at the 192-bit
security level, a 256 bit AES key size is used. Although a larger key size would mean more security, it
would also mean computational cost in terms of time and resource (CPU) consumption. In most
scenarios, the 128-bit key size is sufficient.
Click Next.
3. Enter the Manager host name or IP address of the Manager to which this Console will connect in
the Manager Host Name field.
Select the IP Version (IPv4 or IPv6) that the Manager is using. If, on a dual stack machine, ESM
must be contacted by hostname, and DNS or other naming services have both IPv4 addresses and
IPv6 addresses associated with this, the Preferred IP Protocol is used to communicate with ESM.
Caution: Do not change the Manager’s port number.
Click Next.
4. Select Use direct connection option and click Next. You can set up a proxy server and connect to
the Manager using that server if you cannot connect to the Manager directly.
If you select the Use proxy server option, you will be prompted to enter the proxy server
information Proxy Host Name and Proxy Host.
Enter the Proxy Host name and click Next.
5. The ArcSight Console configuration wizard prompts you to choose the type of client
authentication you want to use. The choices are:
lPassword Based Authentication
lPassword Based and SSL Client Based Authentication
lPassword Based or SSL Client Based Authentication
lSSL Client Only Authentication
Caution: In order to use PKCS#11 authentication, you must select the Password Based or
SSL Client Based Authentication method.
Note: Password Based and SSL Client Based Authentication option currently supports
only client keystore for SSL based authentication. Using PKCS#11 token as your SSL Client
Based authentication method within the Password Based and SSL Client Based
Authentication option is not currently supported.
ESM Installation Guide
Chapter 5: Installing ArcSight Console
HPE ESM 7.0 Page 67 of 115

If you select Password Based Authentication, you to log in with a user name and password.
If you select Password Based and SSL Client Based Authentication, you need a client certificate
to log in, in addition to your user name and password. Follow the procedure described in ESM
Administrator’s Guide to set up the client certificate.
If you selected Password Based or SSL Client Based Authentication or SSL Client Only
Authentication, you will be required to select your SSL client based authentication method. The
choices are:
lClient Key Store
lPKCS#11 Token
If you plan to use a PKCS#11 token, you should have the token’s software and hardware already set
up. If you have not set up the token yet, you can select Client Key Store and continue with the
installation. After you have finished installing the Console, you can refer to "Setting Up to Use a
PKCS#11 Provider " on page83 for instructions on how to set up the token.
If you select Client Key Store, you will see a message reminding you to set up the client certificate
after the installation completes:
Manual setup of the client certificate will be required.
Do you wish to proceed?
After completing the Configuration Wizard, follow the procedure described in ESM Administrator’s
Guide to set up the client certificate.
6. The ArcSight Console configuration wizard prompts you to specify the default web browser you
want to use to display reports, Knowledge Centered Support articles, and other web page content.
Specify the location of the executable for the web browser that you want to use to display the
Knowledge Centered Support articles and other web pages launched from the ArcSight Console.
Browse to and select the Browser Executable and click Next.
7. Select whether this installation of the Console will be used by a single user or multiple users.
You can choose from these options:
lThis is a single system user installation. (Recommended)
Select this option when:
lThere is only one system account on this machine that one or more Console users will use to
connect to the Console. For example, a system account, admin, is used by Console users Joe,
Jack, Jill, and Jane.
OR
lAll Console users who will use this machine to connect to the Console have their own user
accounts on this machine AND these users have write permission to the ArcSight Console’s
\current directory.
ESM Installation Guide
Chapter 5: Installing ArcSight Console
HPE ESM 7.0 Page 68 of 115

Advantage: Logs for all Console users are written to one central location in ArcSight
Console’s \current\logs directory. The user preferences files (denoted by username.ast)
for all Console users are located centrally in ArcSight Console’s \current.
Disadvantage: You cannot use this option if your security policy does not allow all Console
users to share a single system user account or all users to write to the ArcSight Console’s
\current directory.
lMultiple users will use this installation
Select this option when:
lAll Console users who will be using this machine to connect to the Console have their own
user accounts on this machine
AND
lThese users do not have write permission to the ArcSight Console’s \current\logs
directory
By selecting this option, each user’s log and preferences files are written to the user’s local
directory (for example, Document and Settings\username\.arcsight\console on
Windows) on this machine.
Advantage: You do not have to enable write permission for all Console users to the Console’s
\current directory.
Disadvantages: Logs are distributed. Therefore, to view logs for a specific time period, you will
have to access them from the local directory of the user who was connected at that time.
If you do not enable write permission for all the Console users to the Console’s \current
directory, they can only run the following commands (found in the Console’s \bin\scripts)
from the Console command-line interface:
lsendlogs
lconsole
lexceptions
lportinfo
lwebsearch
All other commands require write permission to the Console’s \current directory.
Note: The location from which the Console accesses user preference files and to which it writes
logs depends on the option you select above. Therefore, if you switch between these options
after the initial configuration, any customized user preferences may appear to be lost. For
example, your Console is currently configured with the “This is a single system user installation”
option on a Windows machine. Console user Joe’s customized preferences file is located in the
Console’s <ARCSIGHT_HOME>\current. Now, you run the consolesetup command and
change the setting to ‘Multiple system users will use this installation.’ Next time the user Joe
connects to the Console, the Console will access Joe’s preference file from Document and
ESM Installation Guide
Chapter 5: Installing ArcSight Console
HPE ESM 7.0 Page 69 of 115

Settings\joe\.arcsight\console, which will contain the default preferences.
8. You have completed configuring your ArcSight Console. Click Finish on the final panel to close the
configuration wizard.
9. Click Done in the next screen.
10. For best results, install the ArcSight Console on an operating system that is set to the same locale
as the Manager. During startup, the ArcSight Console and the Manager automatically detect and
use the locale from the operating system.
However, if you are installing the Console on a Linux machine, edit the file
/home/arcsight/.bash_profile by adding the line:
export LANG=[language].UTF-8
...where [language] is one of these:
en_US (English)
zh_CN (Simplified Chinese)
zh_TW (Traditional Chinese)
ja_JP (Japanese)
fr_FR (French)
ko_KR (Korean)
ru_RU (Russian)
Importing the Console’s Certificate into the Browser
The Console's online help is displayed in a browser. Follow these steps to view the online help if you are
using SSL Client Based Authentication mode:
1. Export the keypair from the Console. For more information, refer to the ESM Administrator’s Guide
in the "Export a Key Pair" topic.
2. Import the Console’s keypair into the browser.
You have installed the ArcSight Console successfully.
Character Set Encoding
Install the Console on a machine that uses the same character set encoding as the Manager.
If the character encodings do not match, then user IDs and passwords are restricted to using the
following characters:
a-z A-Z 0-9_@.#$%^&*+?<>{}|,()-[]
If the Console encoding does not match and a user ID contains other characters, that user should not
save any custom shortcut key (hot key) schema. The user ID is not properly encoded in the keymap .xml
ESM Installation Guide
Chapter 5: Installing ArcSight Console
HPE ESM 7.0 Page 70 of 115

file and that makes it impossible to establish the user’s shortcut schema during login. In that
circumstance, all logins fail on that Console.
If you must use a non-UTF-8 encoding, and you must have user IDs with other characters in them,
custom shortcut keys are not supported on any Console where these users would log in. In that
situation, add the following property to the console.properties file:
console.ui.enable.shortcut.schema.persist=false. This property prevents custom shortcut
key schema changes or additions.
If the Console encoding does not match and a password contains other characters, that user cannot
log in from that Console, as the password hash won’t match the one created on the Manager when the
password was created.
Starting the ArcSight Console
After installation and setup is complete, start ArcSight Console using the shortcuts installed or open a
command window on the Console’s bin directory and run:
On Windows:
arcsight console
On Unix:
./arcsight console
Depending on the client authentication method you selected when installing the Console, you will see
the following buttons on the login screen:
If you selected... You will see the following buttons...
Password Based Authentication Login
Cancel
Password Based and SSL Client Based
Authentication
Login
Cancel
ESM Installation Guide
Chapter 5: Installing ArcSight Console
HPE ESM 7.0 Page 71 of 115

If you selected... You will see the following buttons...
Password Based or SSL Client Based
Authentication
If you selected Client Keystore as your authentication method, you will see
lLogin (username and password)
lSSL Client Login
lCancel
If you selected PKCS#11 Token, you will see
lPKCS#11 Login
lLogin
lCancel
SSL Client Only Authentication If you selected Client Keystore as your authentication method, you will see
lThe user ID and Password fields are grayed out (disabled) because login
authentication is by client keystore.
lLogin
lCancel
If you selected PKCS#11 Token, you will see
lPKCS#11 Login (SSL client authentication)
lCancel
Note: Under certain circumstances, you might see a Login Failed message that, for the cacerts
folder, access is denied. Ensure that the arcsight user has write access to the cacerts file. If this does
not clear the problem, and you are on a Windows system, the cause may be due to file locks on the
cacerts file. These may be cleared by rebooting your computer.
Logging into the Console
Note: While logging into a Manager that has been configured to use Password Based or SSL Client
Based Authentication, if you try to log in using a certificate and the login fails, all subsequent
attempts to use the username/password login will also fail during the same session. To work around
this, restart the Console.
To start the Console, click Login. When you start the Console for the first time, after you click Login,
you will get a dialog asking you whether you want to trust the Manager’s certificate. The prompt will
show details specific to your settings. Click OK to trust the Manager’s certificate. The certificate will be
permanently stored in the Console’s truststore and you will not see the prompt again the next time you
log in.
ESM Installation Guide
Chapter 5: Installing ArcSight Console
HPE ESM 7.0 Page 72 of 115

Reconnecting to the ArcSight Manager
If the ArcSight Console loses the connection to the ArcSight Manager (for example, because the
Manager was restarted), a dialog box appears in the ArcSight Console stating that your connection to
the ArcSight Manager has been lost. Click Retry to re-establish a connection to the ArcSight Manager
or click Relogin.
Connections to the ArcSight Manager cannot be re-established while the ArcSight Manager is
restarting or if the Manager refuses the connection. In addition, you may see connection exceptions
during the Retry process while the connection is lost or ArcSight Manager is restarting.
Reconfiguring the ArcSight Console
You can reconfigure ArcSight Console at any time by running the following command within a
command window from the Console’s bin directory:
On Windows: arcsight consolesetup
On Linux: ./arcsight consolesetup
and follow the prompts.
Uninstalling the ArcSight Console
Before uninstalling the ArcSight Console, exit the current session.
To uninstall on Windows, run the Start > All Programs > ArcSight ESM 7.0 Console > Uninstall
ArcSight ESM Console 7.0 program. If a shortcut to the Console was not installed on the Start menu,
locate the Console’s UninstallerData folder and run:
Uninstall ArcSight ESM Console Installation.exe
To uninstall on Unix hosts, run the uninstaller program from either the directory where you created the
links while installing the product or if you had opted not to create links, then run this from the
/opt/arcsight/console/current/UninstallerData directory:
./"Uninstall ArcSight ESM Console Installation"
Alternatively, you can run one of the commands below from /home/arcsight (or wherever you
installed the shortcut links) directory.
./"Uninstall ArcSight_ESM_Console_7.0.0"
or
ESM Installation Guide
Chapter 5: Installing ArcSight Console
HPE ESM 7.0 Page 73 of 115

./Uninstall\ ArcSight_ESM_Console_7.0.0
Note: The UninstallerData directory contains a file .com.zerog.registry.xml with Read,
Write, and Execute permissions for all users. On Windows hosts, these permissions are required for
the uninstaller to work. However, on UNIX hosts, you can change the permissions to Read and
Write for everyone (that is, 666).
ESM Installation Guide
Chapter 5: Installing ArcSight Console
HPE ESM 7.0 Page 74 of 115

Appendix A: Troubleshooting
The following information may help solve problems that might occur when installing or using ESM. In
some cases, the solution can be found here or in other ESM documentation, but HPE Customer Support
is available if you need it.
If you intend to have HPE Customer Support guide you through a diagnostic process, please prepare to
provide specific symptoms and configuration information.
Location of Log Files for Components
The log files can be found in the following location:
Log file name location Description
First Boot Wizard Logs
fbwizard.log /opt/arcsight/var/logs/misc/default/ Contains detailed
troubleshooting information
logged during the steps in
"Using the Configuration
Wizard - ESM in Compact
Mode" on page42 or "Using
the Configuration Wizard -
ESM in Distributed
Correlation Mode" on
page46.
firstbootsetup.log /opt/arcsight/var/logs/misc Contains brief
troubleshooting information
about commands that ran
during the steps in "Using
the Configuration Wizard -
ESM in Compact Mode" on
page42 or "Using the
Configuration Wizard - ESM
in Distributed Correlation
Mode" on page46.
CORR-Engine Log Files
logger_server.log /opt/arcsight/logger/current/arcsight/logger/logs Contains troubleshooting
information about the CORR-
Engine
HPE ESM 7.0 Page 75 of 115

Log file name location Description
logger_
server.out.log
/opt/arcsight/logger/current/arcsight/logger/logs CORR-Engine stdout log file
arcsight_
logger.log
/opt/arcsight/logger/current/arcsight/logger/logs Logs for setting up the
CORR-Engine
logger_init_
driver.log
/opt/arcsight/logger/current/arcsight/logger/logs Logs for setting up the
CORR-Engine
logger_init.sh.log /opt/arcsight/logger/current/arcsight/logger/logs Logs for setting up the
CORR-Engine
logger_wizard.log /opt/arcsight/logger/current/arcsight/logger/logs Logs for setting up the
CORR-Engine
logger_
wizard.out.log
/opt/arcsight/logger/current/arcsight/logger/logs Logs for setting up the
CORR-Engine
Manager Log Files
server.log /opt/arcsight/var/logs/manager/default Contains troubleshooting
information about the
Manager
server.std.log /opt/arcsight/var/logs/manager/default Contains the stdout output of
the Manager
server.status.log /opt/arcsight/var/logs/manager/default Contains a dump of all the
MBeans, the memory status,
thread status, etc.
aggregator.std.log /opt/arcsight/var/logs/aggregator<service_id> Contains distributed
correlation aggregator output.
correlator.std.log /opt/arcsight/var/logs/correlator<service_id> Contains distributed
correlation correlator output.
dcache.log /opt/arcsight/var/logs/dcache<service_id> Contains distributed
correlation distributed cache
output.
dcache.std.log /opt/arcsight/var/logs/dcache<service_id> Contains distributed
correlation distributed cache
output.
repo.log /opt/arcsight/var/logs/repo<service_id> Contains distributed
correlation information
repository output.
repo.std.log /opt/arcsight/var/logs/repo<service_id> Contains distributed
correlation information
repository output.
zookeeper.log /opt/arcsight/var/logs/mbus/mbus_control<service_
id>
Contains message bus
ZooKeeper output.
ESM Installation Guide
Appendix A: Troubleshooting
HPE ESM 7.0 Page 76 of 115

Log file name location Description
zookeeper.std.log /opt/arcsight/var/logs/mbus/mbus_control<service_
id>
Contains message bus
ZooKeeper output.
mbus.log /opt/arcsight/var/logs/mbus Contains message bus output.
kafka.log /opt/arcsight/var/logs/mbus_data<service_id> Kafka output
kafka.std.log /opt/arcsight/var/logs/mbus_data<service_id> Garbage collection output
mbus-configure-
instances.log
/opt/arcsight/var/logs/mbus Contains message bus output.
mbus-configure-
instances.std.log
/opt/arcsight/var/logs/mbus Contains message bus output.
mbussetup.log /opt/arcsight/var/logs/mbus Contains message bus output.
Log file for services
arcsight_
services.log
/opt/arcsight/services/logs/ Contains information from
commands that manage
ArcSight service processes.
monit.log /opt/arcsight/services/monit/data/ Contains timing information
from startup and shutdown of
ArcSight service processes.
If You Encounter an Unsuccessful Installation
Here is what to do if you encounter an unsuccessful installation, or if your installation is corrupted.
For an appliance, restore the factory settings. See "Restore Appliance Factory Settings" on page114.
For software ESM, there are two possible cases.
Case 1 – If your installation became corrupted after running setup_services.sh, run the following
script as root user:
remove_services.sh
Then run the Recovery procedure below.
Case 2 –If your installation became corrupted before running setup_services.sh, run the recovery
procedure.
Recovery Procedure – Run this for either case 1 or case 2, above.
1. After exiting the install process, stop any ArcSight services that are currently running. As user root,
run the following command:
/opt/arcsight/manager/bin/remove_services.sh
ESM Installation Guide
Appendix A: Troubleshooting
HPE ESM 7.0 Page 77 of 115

2. Delete all ArcSight-related files/directories under /opt/arcsight and /tmp directory.
3. Delete any shortcuts created during installation (by default in the home directory of the arcsight
user).
4. For Software ESM, re-install the product.
Customizing the Manager
The First Boot Wizard allows you to configure the Manager and the CORR-Engine Storage. To
customize a component further, you can follow these instructions to start the setup program for the
component:
While logged in as user arcsight,
1. Stop the Manager if it is running:
/etc/init.d/arcsight_services stop manager
2. Run the following command from /opt/arcsight/manager/bin directory:
./arcsight managersetup
3. Follow the prompts on the wizard screens. See the Administrator’s Guide for information on any
specific screen.
4. Restart the Manager and services after the wizard completes by running:
/etc/init.d/arcsight_services start all
Fatal Error when Running the First Boot Wizard -
Appliance Installation
This section applies to the appliance installation only.
If you encounter a fatal error while running the First Boot Wizard, the wizard will display an error
message and then exit. Check the log files for the particular component for any error messages. The log
files are listed in the section "Location of Log Files for Components" on page75.
To resolve this issue, try the following steps:
1. Check the /opt/arcsight/var/logs/misc/fbwizard.log file to figure out where the error
occurred.
2. Check to make sure that all the required TCP ports mentioned in the section "Keep these TCP
Ports Open" on page31 are open.
3. If your error occurred before any component got configured, log in as user root and do the
following:
ESM Installation Guide
Appendix A: Troubleshooting
HPE ESM 7.0 Page 78 of 115

Clear out (delete) the contents of the /opt/arcsight directory.
Rerun the setup using the following commands:
cd
/home/arcsight/install.esm/ESMComponents/service/opt/arcsight/services/bin
/scripts
(All one line.)
./esm_setup.sh
If the above steps do not work, for example, if the setup has already started to configure the Manager
or if your installation is corrupted, then restore the factory settings. See "Restore Appliance Factory
Settings" on page114.
Search Query Result Charts Do Not Display in Safari
Browser
To enable query results to display as a chart in Safari, you must have the latest version of the Adobe
Flash Player Web Plug-In for MAC OS installed.
Hostname Shown as IPv6 Address in Dashboard
This can occur due to a mismatch between the system hostname, the network configuration, and your
environment's name resolution. Review your system's hosts file and DNS configuration, as well as the
addresses found in the DNS for the system hostname.
Internet Not Accessible From an IPv6 System
Depending on your system configuration and internet access, you might not be able to access the
internet from the links provided within the Console or the ArcSight Command Center if your system is
purely IPv6. To access the links, copy them to a system that is IPv4 only, or is dual stack.
ESM Installation Guide
Appendix A: Troubleshooting
HPE ESM 7.0 Page 79 of 115

Appendix B: Default Settings For Components
This appendix gives you the default settings for each software component in ESM.
You can always customize any component by running its setup program.
General Settings
Setting
default password for truststore changeit
default password for cacerts changeit
default password for keystore password
CORR-Engine Settings
The following are some of the default values that have been pre-configured in the CORR-Engine for
you:
Setting Default Value
Location of Logger /opt/arcsight/logger
Database user name arcsight
Database Port 3306
Manager Settings
Note: The Manager uses a self-signed certificate, which gets generated for you when you configure
the system using the First Boot Wizard. When you log into the Console for the very first time you
will be prompted to accept the Manager’s certificate. You can either click Yes in that dialog or
optionally import the Manager’s certificate manually at a later time.
HPE ESM 7.0 Page 80 of 115

The following are some of the default values that have been pre-configured in the Manager for you:
Setting Default Value
Location of Manager /opt/arcsight/manager
Manager host name Host name or IP address of ESM
Manager Port 8443
Manager Java Heap
Memory
16 GB
Authentication Type Password Based
Type of certificate
used
Self-signed certificate
Default password for
keystore
password
Default password for
cacerts
changeit
Default password for
truststore
changeit
E-mail Notification Internal SMTP server. If you want to use an External SMTP server,
1. Stop the Manager by running the following command (as user arcsight):
/etc/init.d/arcsight_services stop manager
2. Run the following command from the /opt/arcsight/manager/bin directory and
set up the external SMTP server when prompted:
./arcsight managersetup
3. Start the Manager and services by running (as user arcsight):
/etc/init.d/arcsight_services start all
Sensor Asset Auto
Creation
true
Packages/default
content installed
Default system content
ESM Installation Guide
Appendix B: Default Settings For Components
HPE ESM 7.0 Page 81 of 115
Appendix C: Using PKCS
Public-Key Cryptography Standard (PKCS) comprises standards used for reliable and secure public key
cryptography. Public Key Cryptography works by encrypting the data at the sender's end and
decrypting it at the receiver's end.
ESM supports the use of a PKCS#11 token such as the Common Access Card (CAC) or 90Meter for
identity verification and access control. It is used to log into the Manager from a user interface. PKCS#11
is Public-Key Cryptography Standard (PKCS), published by RSA Laboratories which describes it as “a
technology-independent programming interface, called Cryptoki, for cryptographic devices such as
smart cards and PCMCIA cards.”
You can use the PKCS#11 token to log in regardless of the mode in which ArcSight Console is running,
in FIPS 140-2 mode or default mode.
PKCS#11 authentication is not supported with Radius, LDAP and Active Directory authentication
methods.
PKCS#11
PKCS#11, one of the PKCS standards, is an API defining a generic interface to cryptographic tokens,
software tokens and hardware tokens such as hardware security modules and smartcards. A
cryptographic token is a security device that is used to authorize the use of the software or hardware,
such as the smartcard, Common Access Card (CAC), or 90Meter. The credentials of the authorized user
are stored on the hardware itself. ESM uses the PKCS#11 interface provided by the Network Security
Services (NSS) cryptographic module to communicate with it (the NSS cryptographic module). The use
of PKCS#11 is an example of client-side authentication.
PKCS#11 Token Support in ESM
ESM supports any PKCS#11 Token vendor that supports PKCS#11 2.0 or above. Make sure that the
vendor’s driver and the PKCS#11 driver DLL are installed on the machine on which you plan to use the
PKCS#11 token.
Before you use the PKCS#11 token, make sure that you have installed the provider software on the
ArcSight Console system with which you plan to use the PKCS#11 token. Refer to your PKCS#11 token
provider’s documentation on how to install and configure your cryptographic device.
You can use a PKCS#11 token regardless of the mode in which the ESM client is running (FIPS 140-2
mode or default mode). However, you must configure the ESMManager to use “Password or SSL
HPE ESM 7.0 Page 82 of 115

Authentication” when communicating with clients, which you set up by running the Manager
Configuration Wizard, as documented in the chapter by that name in the Administrator Guide.
To use a PKCS#11 token, make sure that the token’s CA’s root certificate and the certificate itself are
imported into the ArcSight Manager’s truststore. In the ArcSight Command Center, you can edit the
External ID to match the common name on the Admin tab.
Setting Up to Use a PKCS#11 Provider
Even though ESM supports authentication through any PKCS#11 token, this appendix covers how to
use the ActivClient’s Common Access Card (CAC) as an example. The steps to set up a CAC card are:
1. "Install the PKCS#11 Provider’s Software" below on each client machine. That includes the ArcSight
Console and every machine using a browser to access the ArcSight Command Center.
2. "Map a User’s External ID to the Subject CN" below
3. "Obtain the CAC/90Meter’s Issuers’ Certificate" on page85
4. "Extract the Root CA Certificate From the CAC/90Meter Certificate" on page87
5. "Import the CAC/90Meter Root CA Certificate into the ArcSight Manager" on page88
6. "Select Authentication Option in ArcSight Console Setup" on page89
Install the PKCS#11 Provider’s Software
Before you use the PKCS#11 token, make sure that you have installed its software on each client system.
That includes the ArcSight Console and any machine with a browser from which you intend to access a
web-based interface. Refer to your PKCS#11 provider’s documentation on how to install and configure
it.
Note: Install both the 32-bit version and the 64-bit version of the ActivClient software if you are on
a 64-bit system. You can do so by double-clicking on the setup.exe link instead of the .msi files
for the specific platform.
Install a proper PKCS#11 provider, such as 90Meter or ActivClient. Copying separate dlls might not be
enough. In some cases a library specified in arcsight consolesetup is just an entry point that needs
other provider modules.
For 90Meter, install SCM_1.2.27_64Bit_S.msi. This comes with the 32-bit library as part of your install,
which is required.
Map a User’s External ID to the Subject CN
The CAC/90Meter card contains three types of certificate, Signature, Encryption, and ID certificates.
The following instructions relate to identity certificate, which is used for SSL handshake during
ESM Installation Guide
Appendix C: Using PKCS
HPE ESM 7.0 Page 83 of 115

PKCS#11 login.
Map the Common Name (CN) on the PKCS#11 token to a User’s External ID on the ArcSight Manager.
The external user ID must be identical to the Common Name that appears in the PKCS#11 token’s ID
certificate (include any spaces and periods that appear in the Common name). For example
john.smith.9691998563.This allows the ArcSight Manager to know which user is represented by the
identity stored in the PKCS#11 token.
The following screen shots demonstrate how to find the CN and map it to the User's External ID for
ActivClient. It is just an example. For other PKCS#11 providers you would perform similar steps using
different UI specific to the provider. Refer to the provider's documentation for instructions.
1. Obtain the Subject CN from the CAC/90Meter card.
a. Insert the CAC/90Meter card into the reader if not already inserted.
b. Start the ActivClient Software by clicking Start > ActivIdentity > ActivClient > User Console.
c. Double-click My Certificates in the following screen:
d. Double click ID Certificate in the following screen:
e. Click on the Advanced tab and copy the contents in the Common name text box. You will have
ESM Installation Guide
Appendix C: Using PKCS
HPE ESM 7.0 Page 84 of 115
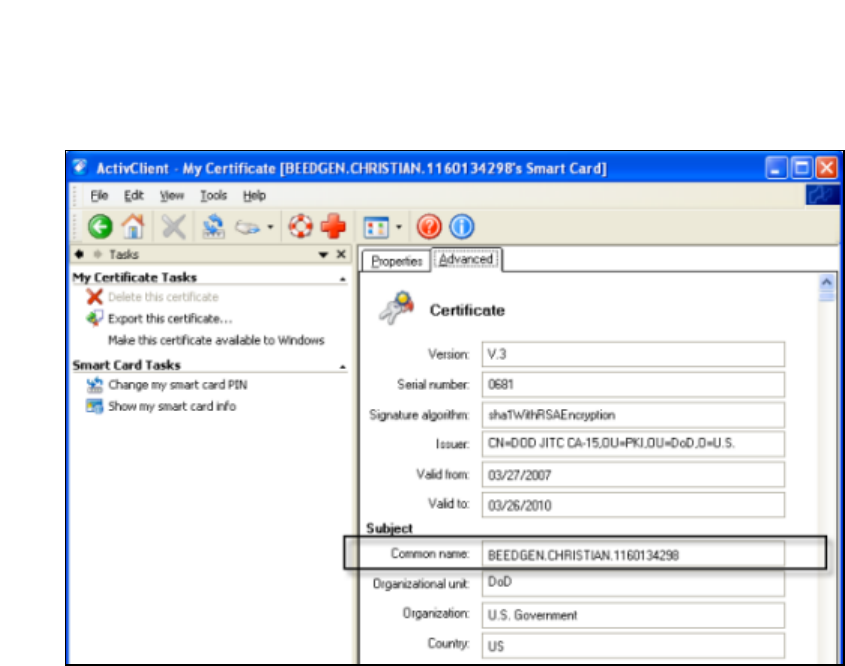
to copy it by hand on to a sheet of paper. Using the context menu to copy is not supported.
2. You can make the external ID match the CN in the ArcSight Console:
a. In the ArcSight Console, go to Resources > Users > [user group] and double-click the user
whose External ID you want to map to the CAC/90Meter card common name. This opens the
Inspect/Edit pane for that user.
b. Enter the CN you obtained in step 1 into the External User ID field and click Apply.
Obtain the CAC/90Meter’s Issuers’ Certificate
PKCS#11 Token authentication is based on SSL client-side authentication. In the case of the Common
Access Card, the key pair for the client (the CAC/90Meter device) is stored within the card itself. You
need to export the CAC/90Meter’s certificate from its keystore so that you can extract the root CA and
any intermediate certificates from this certificate.
If your certificate is issued by an intermediate CA, export not only the issuer (the intermediate root CA)
certificate, but also its top root CA certificate.
Option 1:
You can obtain the CAC/90Meter card’s certificate signer’s root CA certificate and any intermediate
signers’ certificates from the PKI administrator.
Option 2:
You can export the CAC/90Meter card’s certificate and any intermediate signers’ certificates from its
keystore and then extract the root CA certificate from this certificate.
The steps to extract the CAC/90Meter card’s certificate from the card are:
ESM Installation Guide
Appendix C: Using PKCS
HPE ESM 7.0 Page 85 of 115
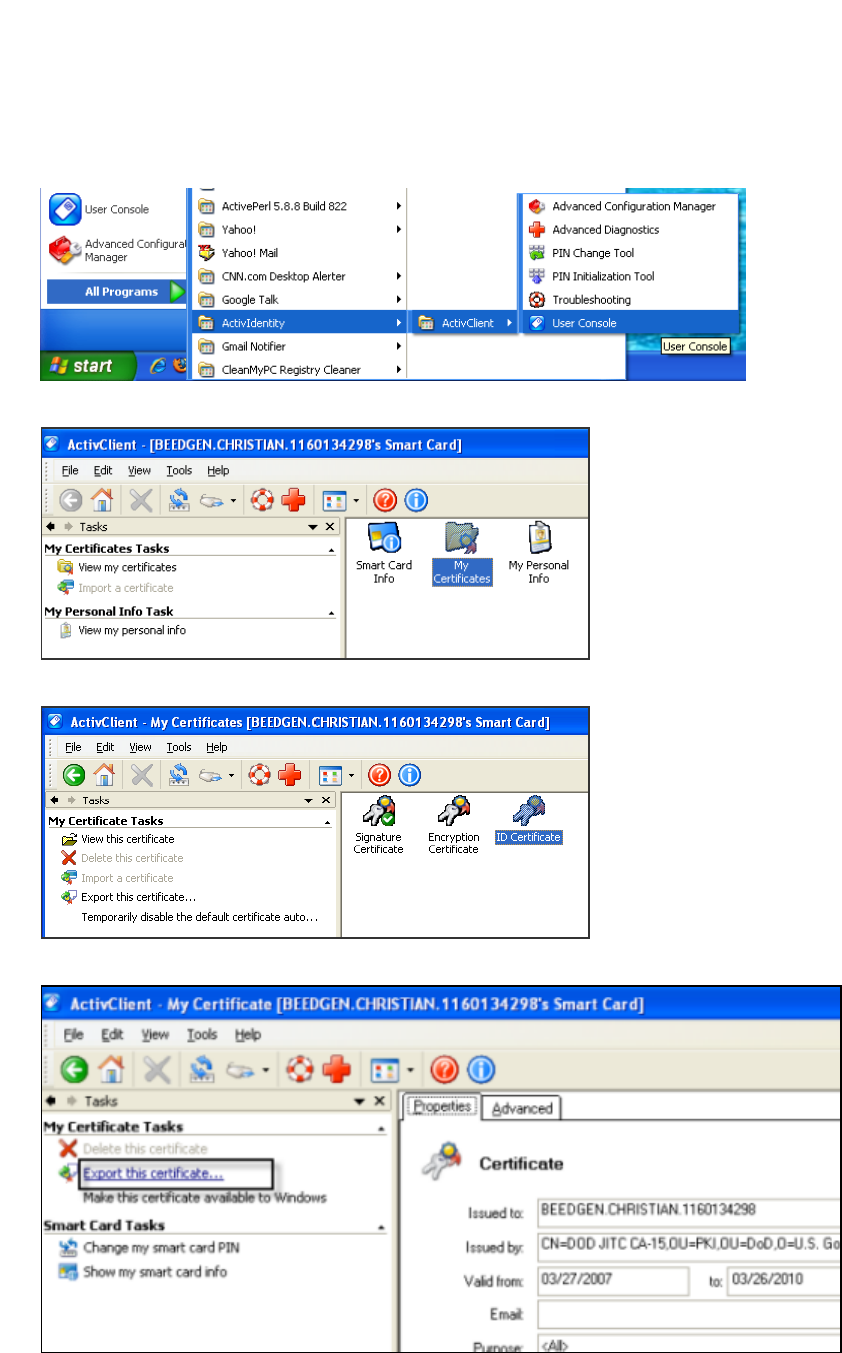
1. Insert the CAC/90Meter card into the reader if not already inserted.
2. Start the ActivClient Software by clicking Start->ActivIdentity->ActivClient->User Console.
3. Double-click My Certificates in the following screen:
4. Double click ID Certificate in the following screen:
5. Click Export this certificate... in the following screen:
6. Enter a name for the certificate in the File name box and navigate to a location on your machine
ESM Installation Guide
Appendix C: Using PKCS
HPE ESM 7.0 Page 86 of 115
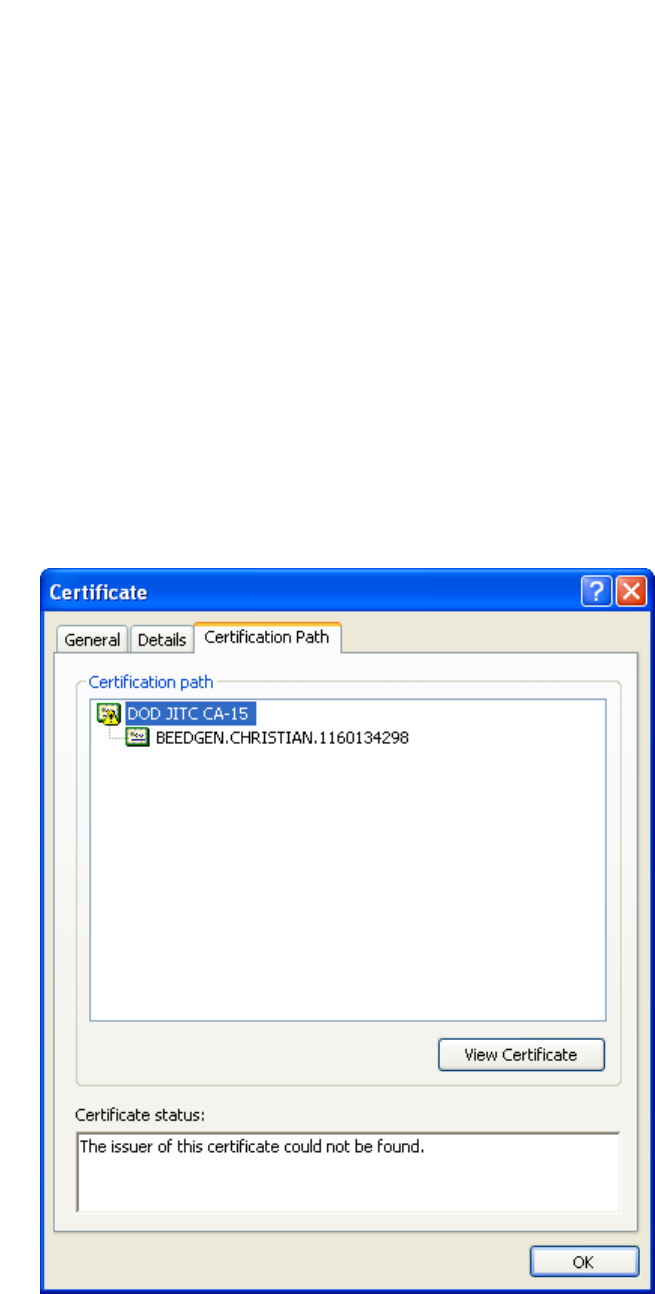
where you want to export it to and click Save.
7. When you see the success message, click OK.
8. Exit the ActivClient window.
Extract the Root CA Certificate From the CAC/90Meter
Certificate
The CAC/90Meter certificate signer’s CA root certificate and any intermediate signers’ certificate(s)
have to be imported into the ArcSight Manager’s keystore.
Extract all intermediate certificates too (if any exist) using the following steps:
1. Double-click the certificate that you exported. The Certificate interface opens.
2. Click the Certification Path tab and select the root certificate as shown in the example below:
3. Click View Certificate.
4. Click the Details tab and click Copy to File....
ESM Installation Guide
Appendix C: Using PKCS
HPE ESM 7.0 Page 87 of 115

5. The Certificate Export Wizard opens. Follow the prompts in the wizard screens and accept all the
defaults.
6. Enter a name for the CAC/90Meter root CA certificate file when prompted and continue with the
wizard by accepting all the defaults. The certificate is exported to the same location as the
CAC/90Meter certificate from which you extracted it.
7. Exit the Certificate dialog.
Import the CAC/90Meter Root CA Certificate into the
ArcSight Manager
Import into the ArcSight Manager’s Truststore
To import the certificate into the ArcSight Manager’s truststore:
1. If the ArcSight Manager is running, log in as user arcsight and use this command:
/etc/init.d/arcsight_services stop manager
ESM Installation Guide
Appendix C: Using PKCS
HPE ESM 7.0 Page 88 of 115

2. Import the PKCS#11 token signer’s CA root certificate by running:
cd <ARCSIGHT_HOME>
/opt/arcsight/manager/bin/arcsight keytool -store managercerts -importcert
-alias admin -file admin.cer
3. Restart the Manager and services while logged in as user arcsight :
/etc/init.d/arcsight_services start all
Select Authentication Option in ArcSight Console Setup
The authentication option on the ArcSight Console should match the authentication option that you
set on the ArcSight Manager. Run the ArcSight Console setup program and either confirm or change
the authentication on the ArcSight Console to match that of the ArcSight Manager. To do so:
1. Stop the ArcSight Console if it is running.
2. Run the ArcSight Console’s setup program from the ArcSight Console’s bin directory:
./arcsight consolesetup
3. Follow the prompts in the wizard screens by accepting all the defaults until you see the screen for
the authentication option. The choices are:
lPassword Based Authentication
lPassword Based and SSL Client Based Authentication
lPassword Based or SSL Client Based Authentication
lSSL Client Only Authentication
4. Select the option for Password or SSLClient Based Authentication. You should also have
chosen that option when you set up the ArcSight Manager.
5. Follow the prompts in the next few screens by accepting the defaults.
6. On the Select client keystore type screen select the PKCS#11 Token option.
7. Enter the path or browse to the PKCS#11 library when prompted.
If you are using a vendor other than ActivClient, this should point to the library location for that
installation.
If you are using ActivClient, by default the PKCS#11 library is located in:
On 32-bit Windows:
C:\Program Files\ActivIdentity\ActivClient\acpkcs211.dll
On 64-bit Windows:
C:\Program Files (x86)\ActivIdentity\ActivClient\acpkcs211.dll
(this is the 32-bit version of the ActivClient library)
Or, for ActivClient 7.1 and later:
ESM Installation Guide
Appendix C: Using PKCS
HPE ESM 7.0 Page 89 of 115

C:\Program Files (x86)\HID Global\ActivIdentity\ActivClient\acpkcs211.dll
For 90Meter, always use the 32-bit library:
C:\Program Files\90meter\CACPIVMD\pkcs11\x86\LitPKCS11.dll
8. Complete the setup program by accepting all the defaults.
9. Restart any running ArcSight Consoles.
Logging in to the ArcSight Console Using PKCS#11 Token
When you start the ArcSight Console, you will see a screen with a PKCS#11 login button.
You have the option to log in using one of the following methods:
lUsername and password combination (For this option, disconnect the CAC/90Meter card.)
lPKCS#11 Login
To log in using a PKCS#11 token, select the PKCS#11 Login option. On the ActivClient Login dialog,
enter the PIN number of your ActivClient card in the PIN text box.
Logging in to an ESMWeb UI Using PKCS#11 Token
Use a supported web browser to connect to the ArcSight Command Center.
1. Make sure that the PKCS#11 token is securely placed in its card reader.
2. Go to this web site: https://<hostname>:8443/.
Note for Firefox only: If you are using Firefox, be sure to configure Firefox to work with
ActivClient by loading the ActivClient module. For connections using a web browser you might
need to configure the browser for some PKCS#11 providers:
a. Open Tools > Options and go to the Advanced > Certificates tab.
b. In Security Devices -select Add a new module.
c. For "ActiveIdentity" specify 32-bit dll by pointing to
C:\Program Files (x86)\ActivIdentity\ActivClient\acpkcs211.dll
Or, for ActivClient 7.1 and later:
C:\Program Files (x86)\HID
Global\ActivIdentity\ActivClient\acpkcs211.dll
For 90Meter everything is configured automatically.
d. Use the Log In button to login to the module and enter the PIN when asked. Be sure to use the
Log Out button to prevent auto-authentication.
e. Restart Firefox and now you can log in to the ArcSight Command Center without any
credentials.
3. You will be requested to enter your PIN.
ESM Installation Guide
Appendix C: Using PKCS
HPE ESM 7.0 Page 90 of 115

If you see an exception, click Add exception, then generate and confirm the certificate key. When
you see the User Identification Request dialog. Click OK.
4. At the ArcSight CommandCenter login, do not enter any user ID or password. Leave them both
blank and click Login. User authentication is resolved after you enter the PKCS#11 PIN in the dialog
that appears next.
5. Enter your PIN in the Confirmation dialog. The dialog’s title and appearance varies, depending on
the PKCS#11 token configuration.
ESM Installation Guide
Appendix C: Using PKCS
HPE ESM 7.0 Page 91 of 115

Appendix D: Installing ESM in FIPS Mode
ESM supports the Federal Information Processing Standard 140-2 (FIPS 140-2) and Suite B. Once you
have configured an ESM system for a particular FIPS mode, you cannot reconfigure that system to
enable another FIPS mode. For example, a system configured to enable FIPS 140-2 cannot be
reconfigured to enable FIPS Suite B.
Note: When the Manager is installed in FIPS mode, all other components must also be installed in
FIPS mode.
If you are using FIPS mode, you cannot use the ArcSight Console on a Mac.
What is FIPS?
FIPS is a standard published by the National Institute of Standards and Technology (NIST) and is used
to accredit cryptographic modules in software components. A cryptographic module is either a piece of
hardware or a software or a combination of the two which is used to implement cryptographic logic. The
US Federal government requires that all IT products dealing with Sensitive, but Unclassified (SBU)
information should meet the FIPS 140-2 standard. For FIPS compliance, ESM uses Bouncy Castle Java
cryptography as the cryptographic module.
Note: To be FIPS 140-2 compliant, you need to have all components configured in the FIPS 140-2
mode. Even though an ArcSight Manager running in FIPS mode can accept connections from non-
FIPS mode components, if you opt for such a mixed configuration, you will not be considered FIPS
140-2 compliant. We recommend that you run all components in FIPS mode in order to be fully FIPS
140-2 compliant.
For FIPS compliance, ESM uses Bouncy Castle Java cryptography, which replaces Mozilla Network
Security Services (NSS). Bouncy Castle enables support of TLS 1.2 in FIPS mode as well as in Default
mode.
What is Suite B?
Suite B is a set of cryptographic algorithms put forth by the National Security Agency (NSA) as part of
the national cryptographic technology. While FIPS 140-2 supports sensitive but unclassified
information, FIPS with Suite B supports both unclassified information and most classified to top secret
information. In addition to AES, Suite B includes cryptographic algorithms for hashing, digital
signatures, and key exchange.
HPE ESM 7.0 Page 92 of 115

Note:
lNot all ESM versions support the FIPS with Suite B mode. Refer to the ESM HPE ArcSight ESM
Support Matrix available on the Protect724 website for supported platforms for FIPS with Suite
B mode.
lWhen the Manager is installed in FIPS with Suite B compliant mode, all components (ArcSight
Console, SmartConnectors, and Logger, if applicable) must be installed in FIPS with Suite B
compliant mode, and the browser used to access ESM must TLS enabled (SSL protocols are not
supported). See "Configure Your Browser for TLS Protocols" on page60 for details.
lBefore installing ESM in FIPS with Suite B mode, keep in mind that pre-v4.0 Loggers will not be
able to communicate with a FIPS-enabled ArcSight Manager.
For FIPS cipher suite information, see "Choosing between FIPS Mode or Default Mode" on page10.
Transport Layer Security (TLS) Configuration
Concepts
TLS configuration involves either server side authentication only or both server side and client side
authentication. Setting up client side authentication is optional.
For TLS version support information and configuring ESM in FIPS mode, see "TLS Support" below .
Since TLS is based on SSL 3.0, we recommend that you have a good understanding of how SSL works.
Read the section “Understanding SSL Authentication” in the ESM Administrator’s Guide for details on
how SSL works.
TLS requires the server to have a public/private key pair and a cryptographic certificate linking the
server's identity to the public key. The certificate should be signed by an entity that the client trusts. The
clients, in turn, should be configured to 'trust' this entity. If the server and clients are controlled by the
same authority then certificates can be created locally (self-signed certificates). Another secure
approach would be to get the certificate signed by an organization that clients are pre-configured to
trust. This involves dealing with one of the many commercial Certification Authorities (CAs).
Refer to the ESM Administrator’s Guide for information on upgrading an existing default mode
installation into FIPS mode.
TLS Support
The version of TLS you must implement depends on ESM/Logger peering, FIPS or non-FIPS
implementation, or use of standalone ESM configurations.
Note that:
ESM Installation Guide
Appendix D: Installing ESM in FIPS Mode
HPE ESM 7.0 Page 93 of 115

lFor compliance with the Payment Card Industry Data Security Standard (PCI DSS) 3.2, use TLS 1.2.
This requires ESM peers to also be running ESM 6.11.0 or later, and Logger peers to be running
Logger 6.4 or later
lIf you are running a standalone ESM implementation (no peering with other Managers or Logger),
use TLS 1.2 for FIPS or non-FIPS configurations.
lFor ESM releases prior to ESM 6.11.0 and ESM 7.0, instances of ESM/Logger that are peering must
use TLS 1.0 or TLS 1.1 . Note that use of TLS 1.0 means these systems are not PCI DSS 3.2 compliant.
lFor ESM releases prior to ESM 6.11.0 and ESM 7.0, instances of ESM/Logger that are standalone
(non-peering) must use TLS 1.1.
lAs of ESM 6.11.0, TLS 1.0, 1.1, and 1.2 are all supported for ESM in FIPS and default (non-FIPS)
modes. The SSL protocols are no longer supported.
Also, the following matrix clarifies TLS support for ESM 7.0 systems that are peering with ESM or
Logger:
Peering from ESM 7.0 to:
Non-FIPS FIPS
ESM 7.0 and ESM 6.11.0 TLS 1.2 TLS 1.2
ESM releases prior to ESM 6.11.0 TLS 1.0*, TLS 1.1 TLS 1.0*, TLS 1.1
Logger 6.4 TLS 1.2 TLS 1.2
Logger releases prior to Logger 6.4 TLS 1.0*, TLS 1.1, TLS 1.2 TLS 1.0* , TLS 1.1
*Note that the use of TLS 1.0 is does not comply with PCI DSS 3.2.
Server Side Authentication
The first step in an SSL handshake is when the server (ArcSight Manager) authenticates itself to the
ArcSight Console. This is called server side authentication.
To set up TLS configuration on your ArcSight Manager for server side authentication, you need:
lA key pair in your ArcSight Manager’s keystore.
lThe ArcSight Manager’s certificate, which incorporates the public key from the key pair located in the
ArcSight Manager’s keystore. By default, this is a self-signed certificate.
Next, you should export the ArcSight Manager’s certificate from its keystore and lastly import this
certificate into the keystore of the clients that will be connecting to this ArcSight Manager.
ESM Installation Guide
Appendix D: Installing ESM in FIPS Mode
HPE ESM 7.0 Page 94 of 115

Client Side Authentication
SSL 3.0 supports client side authentication, which you can optionally set up as an extra measure of
security. Client side authentication consists of the client authenticating itself to the server. In an SSL
handshake, client side authentication, if set up, takes place after the server (ArcSight Manager) has
authenticated itself to the client. At this point, the server requests the client to authenticate itself.
For the client to authenticate itself to the ArcSight Manager, you should have the following in the
client's keystore:
lA key pair.
lThe client’s certificate, which incorporates the client’s public key.
If you plan to use PKCS#11 token such as the Common Access Card, you will be required to import the
token’s certificate into the ArcSight Manager’s FIPS truststore as the token is a client to the ArcSight
Manager.
For detailed procedures on each of the steps mentioned above, refer to the section “Establising SSL
Client Authentication” in the ESM Administrator’s Guide.
Exporting the Manager’s Certificate to Clients
This topic does not apply to ArcSight Console, which automatically imports the certificate. You are
required to have this exported certificate available when installing clients that connect to this, such as
Connectors. When installing the certificate, you import it into the clients’ keystore. Importing the
ArcSight Manager’s certificate allows the clients to trust the ArcSight Manager.
To export the Manager’s certificate, run the following command from the ArcSight Manager’s
/opt/arcsight/manager/bin directory:
./arcsight keytool -exportcert -store managerkeys -alias mykey -file <path_
to_manager_certificate.cer>
Note: The -file specifies the absolute path to the location where you want the exported ArcSight
Manager’s certificate to be placed. If you do not specify the absolute path the file will be exported
to the /opt/arcsight/manager directory by default.
For example, to export the ArcSight Manager’s certificate to the/opt/arcsight/manager directory,
run:
./arcsight keytool -exportcert -store managerkeys -alias mykey -file
manager.cer
This will export the ManagerCert.cer file, the ArcSight Manager’s certificate, in the
/opt/arcsight/manager directory.
ESM Installation Guide
Appendix D: Installing ESM in FIPS Mode
HPE ESM 7.0 Page 95 of 115

Many utility functions for the Manager (for example, arcsight archive or arcsight
managerinventory) are clients for the Manager. In FIPS mode, the Manager certificate is not
automatically imported. In order to use the utilities, import the certificate by running:
./arcsight keytool -importcert -store clientcerts -alias <hostname> -file
<path_to_manager_certificate.cer>
Using PKCS#11 Token With a FIPS Mode Setup
To use a PKCS#11 Token, such as the ActivClient’s Common Access Card (CAC) or 90Meter, follow the
steps in "Setting Up to Use a PKCS#11 Provider " on page83.
Installing ArcSight Console in FIPS Mode
Note: If you would like to set up client-side authentication on the ArcSight Console, refer to the
Administrator’s Guide for detailed steps to do so.
If you are using FIPS mode, you cannot use the ArcSight Console on a Mac.
Typically, ArcSight Console is deployed on several perimeter machines located outside the firewall which
protects the ArcSight Manager.
Refer to the ESM Product Lifecycle document available on Protect724 for details on supported
platforms for the ArcSight Console.
This section tells you how to install the ArcSight Console in FIPS mode only. For details on installing the
ArcSight Console in default mode, refer to the “Installing ArcSight Console” chapter, earlier in this
guide.
In order for an ArcSight Console to communicate with a FIPS enabled ArcSight Manager, the ArcSight
Console must trust the ArcSight Manager. This trust is established by importing the ArcSight
Manager’s certificate into the ArcSight Console’s keystore. After you configure the ArcSight Console
for FIPS, it will automatically import the ArcSight Manager’s certificate the first time you start it. Note
that if there is a certificate resident in the keystore, no import will occur.
To install the ArcSight Console in FIPS mode:
1. Run the self-extracting archive file that is appropriate for your target platform.
2. Follow the prompts in the wizard screens. Refer to “Installing ArcSight Console” chapter for details
on each screen.
3. Select No, I do not want to transfer the settings in the following screen and click Next.
4. Next, you will see the following screen:
Select Run console in FIPS mode and click Next.
ESM Installation Guide
Appendix D: Installing ESM in FIPS Mode
HPE ESM 7.0 Page 96 of 115

5. You will be reminded that once you select the FIPS mode, you will not be able to revert to the
default mode. Click Yes.
6. You will be prompted to select a cipher suite. Select the type of FIPS the ArcSight Manager uses
and click Next.
7. Next you will be prompted for the ArcSight Manager’s hostname and port. The ArcSight Manager
hostname must be the same (short name, fully qualified domain name, or IP address) as the
Common Name (CN) you used when you created the ArcSight Manager key pair.
8. Follow the prompts in the next few wizard screens (refer to the “Installing ArcSight Console”
chapter, earlier in this guide for details on any screen) until you get to the screen where you have to
select the authentication option.
Select Password Based or SSL Client Based Authentication, which also must be the option that
you had set on the ArcSight Manager when installing it.
9. If you are using SSL client-based authentication and if you plan to use a PKCS#11 token with the
ArcSight Console, select PKCS#11 Token option in the following screen. If you are using different
authentication, you do not see this screen and you can skip this step.
Enter the path or browse to the PKCS#11 library.
By default, the PKCS#11 library is located in the following directory:
On 64-bit Windows:
C:\Program Files (x86)\ActivIdentity\ActivClient\acpkcs211.dll
Or, for ActivClient 7.1 and later, also on 64-bit Windows:
C:\Program Files (x86)\HID Global\ActivIdentity\ActivClient\acpkcs211.dll
These are both the 32-bit version of the ActivClient library.
If you do not plan to use a PKCS#11 token with the ArcSight Console, select Client Key Store, you
will see a message reminding you to set up the client certificate after the installation completes.
Alternatively, 90Meter is available at:
C:\Program Files\90meter\CACPIVMD\pkcs11\x86\litpkcs11.dll
After completing the Configuration Wizard, follow the procedure in the topic “Setting up Client-
Side Authentication,” in the “Configuration Changes Related to FIPS” appendix of the ESM
Administrator’s Guide.
10. Follow the prompts in the next few wizard screens to complete the ArcSight Console installation.
Refer to the “Installing ArcSight Console” chapter, earlier in this guide, for details on any screen.
When you start the ArcSight Console, you should see a message saying that the ArcSight Console is
being started in FIPS mode.
ESM Installation Guide
Appendix D: Installing ESM in FIPS Mode
HPE ESM 7.0 Page 97 of 115

Connecting a Default Mode ArcSight Console to a
FIPS 140-2 ArcSight Manager
You can connect a default mode Console to a FIPS 140-2 Manager with no additional configuration.
Note: You cannot connect a default mode ArcSight Console to an ArcSight Manager using FIPS
Suite B.
Connecting a FIPS ArcSight Console to FIPS Enabled
ArcSight Managers
This procedure should be automatic for multiple ArcSight Managers. Just make sure that each ArcSight
Manager certificate has a unique Common Name (CN) so that it’s CN does not conflict with the CN of
any existing certificate in the ArcSight Console’s keystore.
If you need to import an ArcSight Manager’s certificate into the ArcSight Console’s keystore manually,
refer to the ESM
Administrator’s Guide for details on the procedure.
Installing SmartConnectors in FIPS Mode
When the ArcSight Manager is installed in FIPS mode, the SmartConnectors must also be installed in
FIPS mode. When you run the SmartConnector installation, (see the SmartConnector documentation)
select Enable FIPSMode. Then continue until you see the screen that offers you the choice to
Continue or Exit. Select Exit and click Next. On the next screen, click Done. You have to import the
ArcSight Manager's certificate to allow the connector to trust the ArcSight Manager before adding a
new connector. See the SmartConnector documentation for the specific SmartConnector you are
installing for details. Also, for details on FIPS mode settings for SmartConnectors, see Configuring FIPS
and Non-FIPS Compliant Modes for ESM and SmartConnectors, available on Protect724 .
To import the Manager's certificate, run the following command from the connector's <ARCSIGHT_
HOME>/current/bin directory:
lFor Linux: cd <CONNECTOR_HOME>/current/jre/bin> and then run:
./keytool -J-Djava.security.egd=file:/dev/urandom -importcert -file
<certificate path> -keystore <CONNECTOR_
HOME>/current/user/agent/fips/bcfips_ks -storepass changeit -storetype
BCFKS -providername BCFIPS -providerclass
org.bouncycastle.jcajce.provider.BouncyCastleFipsProvider -providerpath
<CONNECTOR_HOME>/current/lib/agent/fips/bc-fips-1.0.0.jar -alias "myalias"
ESM Installation Guide
Appendix D: Installing ESM in FIPS Mode
HPE ESM 7.0 Page 98 of 115

lFor WIN 64-Bit: cd <CONNECTOR_HOME>\current\jre\bin> and then run:
keytool -importcert -file <CONNECTOR_HOME>\current\manager.cert -keystore
<CONNECTOR_HOME>\current\user\agent\fips\bcfips_ks -storepass changeit -
storetype BCFKS -providername BCFIPS -providerclass
org.bouncycastle.jcajce.provider.BouncyCastleFipsProvider -providerpath
<CONNECTOR_HOME>\current\lib\agent\fips\bc-fips-1.0.0.jar -alias "myalias"
Enter changeit for the password when prompted. That was the default password. If you changed it to
something else, enter that password.
Run <ARCSIGHT_HOME>/current/bin/runagentsetup -i console to resume your connector
setup. You can skip -i console to run this setup in GUImode, but this documentation explains the
procedure for running in console (command line) mode.
1. Select Add a Connector and press Enter.
2. Select the connector to configure and press Enter to continue.
3. For each of the parameters you are shown next, you can either change the value or accept the
default value. Continue until you get to the Type of Destination parameters.
4. Select ArcSight Manager (encrypted) as the type of destination and press Enter.
5. Under Destination Parameters, or each of the parameters you are shown next, you can either
change the value or accept the default value. When you get to them, enter the Manager Hostname
and login credentials.
6. For the FIPS Cipher Suites parameter, choose from:
lFIPS Default
lFIPS with Suite B 128 bits
lFIPS with Suite B 192 bits
Press Enter to continue.
7. Enter the connector details such as the name and location, which can be any values you want.
8. Decide whether to install the connector as a service or leave it as a standalone application and press
Enter to Continue.
9. Exit the connector configuration wizard.
For more information on installing SmartConnectors in FIPS mode see Installing FIPS-Compliant
SmartConnectors. It is used in conjunction with the individual device SmartConnector configuration
guides for your device.
Configure Event Broker Access - FIPS Mode (Server
Authentication Only) (Optional)
You can configure access to the Event Broker during the ESM installation but can perform specific
Event Broker configuration for FIPS mode only after the installation is complete. This configuration is
ESM Installation Guide
Appendix D: Installing ESM in FIPS Mode
HPE ESM 7.0 Page 99 of 115

required only if ESM and Event Broker are in FIPS mode. The only FIPS mode supported for integration
of ESM and Event Broker is FIPS 140-2.
To configure ESM access to the Event Broker in FIPS Mode:
1. Log in as user arcsight, and stop the Manager:
/etc/init.d/arcsight_services stop manager
2. Log onto the Event Broker machine and copy the certificate from the following location:
/opt/arcsight/kubernetes/ssl/ca.crt
into a location on the ESM machine.
3. Use the arcsight keytool command to import the root CA certificate into the ESM's client
truststore:
bin/arcsight keytool -store clientcerts -importcert -file <absolute path
to certificate file> -alias <alias for the certificate>
4. As user arcsight , start the managersetup wizard by running the following command from the
/opt/arcsight/manager/bin directory:
./arcsight managersetup -i console
For details about running the Manager Configuration Wizard (managersetup), see "Using the
Configuration Wizard" in the ESM Administrator's Guide.
5. Continue through the wizard until you encounter the Event Broker setup. Select Yes to set up the
connection, and specify:
a. Host: Port(s): Enter the host (hostname or IP address) and port information for the nodes in
the Event Broker. Include the host and port information of all the nodes in a multiple node
environment not just the Master node. This is a comma-separated list, for example:
<host>:<port>,<host>:<port>. Note that Event Broker can only accept IPV4 connections from
ESM.
b. Topic to read from: Specify the topic in the Event Broker you want to read from. This will
determine the data source. See the chapter "Managing Event Broker Topics", in the Event
Broker Administrator's Guide.
c. Path to the Event Broker root cert: Do not enter a value in this field. You have already
imported the certificate in step 3.
6. To verify that the configuration is complete, click Next and verify that the configuration flows
through with no errors.
7. Continue to advance through the wizard and complete the configuration.
8. When you have completed the configuration, restart the Manager and services by running the
following as user arcsight:
/etc/init.d/arcsight_services start all
9. To verify that the connection to the Event Broker is working, look for Event Broker service
is initialized in the server.std.log.
ESM Installation Guide
Appendix D: Installing ESM in FIPS Mode
HPE ESM 7.0 Page 100 of 115

Configure ServiceNow® IT Service Management
(ITSM) Access - FIPS Mode
You can configure access to the ServiceNow® IT Service Management (ITSM) application during the
ESM installation but can perform specific ServiceNow® IT Service Management (ITSM) configuration
for FIPS mode only after the installation is complete. This configuration is required only if both ESM
and ServiceNow® IT Service Management (ITSM) are in FIPS mode. All FIPS modes are supported with
ServiceNow® IT Service Management (ITSM).
To configure ESM access to ServiceNow® IT Service Management (ITSM) in FIPS Mode:
1. Log in as user arcsight, and stop the Manager:
/etc/init.d/arcsight_services stop manager
2. As user arcsight , start the managersetup wizard by running the following command from the
/opt/arcsight/manager/bin directory:
./arcsight managersetup -i console
For details about running the Manager Configuration Wizard (managersetup), see "Using the
Configuration Wizard" in the ESM Administrator's Guide
3. Continue through the wizard until you encounter the ServiceNow® IT Service Management (ITSM)
setup. Select Yes to enable the integration, and specify the ServiceNow URL and the optional
ServiceNow Proxy URL. To verify that the configuration is complete, click Next and verify that
the configuration flows through with no errors. Continue to advance through the wizard and
complete the configuration.
4. Download the ServiceNow® IT Service Management (ITSM) instance's certificate:
a. In your browser (which can be Chrome, Microsoft Internet Explorer, or Firefox), access the
ServiceNow® IT Service Management (ITSM) instance URL.
b. Once you are at the site, click a small padlock icon (or another equivalent icon, depending on
the browser used) to get certificate information for that site.
c. From View Certificate Detail, select the Export Certificate or Copy to File option. Be sure to
save to save the file with the .cer format (for Security Certificate).
5. Move the certificate (.cer file) to a safe location on the ESM machine, such as <ARCSIGHT_HOME>.
6. Use the arcsight keytool command to import the certificate into the ESM's truststore:
bin/arcsight keytool -store managercerts -importcert -alias servicenow -
file <absolute path to certificate file>
7. Restart the Manager and services by running the following as user arcsight:
/etc/init.d/arcsight_services start all
ESM Installation Guide
Appendix D: Installing ESM in FIPS Mode
HPE ESM 7.0 Page 101 of 115

Setting Up SSL Client-Side Authentication Between
Event Broker and ESM - FIPS Mode
Before setting up client-side authentication with Event Broker, you must import the Event Broker root
certificate into the ESM truststore to enable the SSL handshake between the Event Broker and ESM.
The only FIPS mode supported for integration of ESM and Event Broker is FIPS 140-2.
To import the Event Broker root certificate into an ESM machine:
Note:Before performing the steps below to import the root certificate into the ESM
truststore, check if the Event Broker root certificate has previously been imported into
ESM. If it is not, then perform these steps:
1. Log onto the Event Broker machine and copy the certificate from the following location:
/opt/arcsight/kubernetes/ssl/ca.crt
into a location on the ESM machine.
2. Use the arcsight keytool command to import the root CA certificate into the ESM's client
truststore:
/opt/arcsight/manager/bin/arcsight keytool -store clientcerts -importcert
-file <absolute path to certificate file> -alias <alias for the
certificate>
To enable client-side authentication between the Event Broker and ESM for FIPS mode:
IMPORTANT: All the steps in this procedure must be completed for client-side
authorization to work. Be sure to perform all steps.
1. Verify that Event Broker is functional, and has client authentication set up.
2. As user arcsight, stop the Manager:
/etc/init.d/arcsight_services stop manager
3. If /opt/arcsight/manager/config/client.properties does not exist, create it using an
editor of your choice.
4. Generate the keypair and certificate signing request (.csr) file. When generating the keypair, enter
the fully qualified domain name of the manager host as the common name (CN) for the certificate.
Run these commands:
/opt/arcsight/manager/bin/arcsight keytool -store clientkeys -genkeypair –
dname "cn=<your host's fully qualified domain name>, ou=<your
ESM Installation Guide
Appendix D: Installing ESM in FIPS Mode
HPE ESM 7.0 Page 102 of 115

organization>, o=<your company>, c=<your country>" -keyalg rsa -keysize
2048 –alias ebkey -startdate -1d -validity 366
/opt/arcsight/manager/bin/arcsight keytool -certreq -store clientkeys -
alias ebkey -file ebkey.csr
where ebkey.csr is the output file where the csr is stored.
5. Sign the .csr with the Event Broker root certificate. The Event Broker root certificate is on the Event
Broker machine under /opt/arcsight/kubernetes/ssl and is called ca.crt and the key is
called ca.key. For example, the following command can be run either on the Event Broker machine
or on a different machine with a functional openssl as long as you have the ca.crt and ca.key:
openssl x509 -req -CA <full path to ca.crt> -CAkey <full path to ca.key> -
in <full path to the esm csr> -out <full path and file name for storing
the generated cert> -days 3650 -CAcreateserial -sha256
For example:
openssl x509 -req -CA /tmp/ca.crt -CAkey /tmp/ca.key -in /tmp/ebkey.csr -
out /tmp/ebkey.crt -days 3650 -CAcreateserial -sha256
6. On the ESM machine, import the signed certificate (the -out parameter in the above openssl
command) by running this command:
/opt/arcsight/manager/bin/arcsight keytool -store clientkeys -alias ebkey
-importcert -file <path to signed cert>
-trustcacerts
For example:
/opt/arcsight/manager/bin/arcsight keytool -store clientkeys -alias ebkey
-importcert -file ebkey.crt -trustcacerts
7. To verify that the configuration is complete, and the connection to Event Broker can be made
successfully, run managersetup to verify that the configuration flows through with no errors.
8. Start the Manager and services:
/etc/init.d/arcsight_services start all
How Do I Know if My Installation is FIPS Enabled?
To verify whether your existing installation has been installed in FIPS mode or default mode, check the
fips.enabled property in the <ARCSIGHT_HOME>/config/esm.properties file on the Manager
and the <ARCSIGHT_HOME>/config/console.properties file for the ArcSight Console.
If FIPS mode is enabled, the property should be set to fips.enabled=true. If the component is
running in default mode, the property will be set to false.
Also, when the Console starts in FIPS mode, there is a message indicating that in console.log; when a
Manager starts in FIPS mode there is a message to that effect in server.std.log.
ESM Installation Guide
Appendix D: Installing ESM in FIPS Mode
HPE ESM 7.0 Page 103 of 115
Appendix E: Event Broker Best Practices
This appendix contains best practices information in reference to Event Broker working with ESM. For
specific information on configuration and property settings for the Event Broker, see the Event Broker
Administrator's Guide for details.
lCreate a separate topic on the Event Broker for connectors to write binary events to and for ESM to
consume from them. This topic should have a minimum of 5 partitions; ESM will automatically adjust
the number of consumers from ESM side to match the number of partitions. See the chapter
"Managing Event Broker Topics" in the Event Broker Administrator's Guide.
lDo not send both binary and CEF events to the same topic. Always use a dedicated topic on the
Event Broker for each type of event.
lConfigure the retention policy settings for time and space retention on the Event Broker after taking
into consideration the amount of data expected to be consumed by ESM. This is important to
consider because if the amount of data in a topic is more than ESM can consume before the Event
Broker retention policy activates, this could result in deletion of the portion of the topic that is as yet
unread by ESM. Refer to the Event Broker Administrator's Guide for information about configuring
retention policy on the Event Broker.
lCertificates used with Event Broker, both for TLS and Client Authentication, are read once during
ESM start up. To add or change certificates after ESM has started, make the changes and then restart
ESM.
lEither start Event Broker and configure ESM's binary topic before starting ESM, or do it soon after
starting ESM. When you start ESM after configuring it to use Event Broker, ESM will try to connect
every few minutes to the Event Broker until successful using the configuration and certificates that
were read at ESM start up. After four hours, ESM will assume Event Broker probably will not be
available in the near future, and ESM will only try to connect to it every two hours.
HPE ESM 7.0 Page 104 of 115
Appendix F: Locales and Encodings
ESM supports various languages: English, Japanese, Traditional Chinese, Simplified Chinese, French,
Russian, and Korean. Setting the Locale for any of these languages ensures that you get the
appropriate environment in terms of language settings, number format, date/time format, timezone
settings, and Daylight Saving Time setting for that country or language. This document describes the
updates to be taken into consideration when configuring ESM for a supported language.
Locale and Encoding Terminology
Character Set
A character set is a collection of characters that have been grouped together for a particular purpose.
An example of a character set is the English alphabet.
Code Point
Each character value within a code set is referred to as a code point.
Code Set
Each character in a character set is assigned a unique value. Collectively, these values are known as a
code set.
Encoding
Encoding specifies how each character's code point is stored in memory or disk files.
Internationalization
Internationalization is the process of designing an application so that it can be adapted to various
languages and regions without further engineering changes.
HPE ESM 7.0 Page 105 of 115

Locale
Locale refers to the region where you are running ArcSight ESM. A locale can include language, number
format, date-time format, and other settings.
Localization
Localization is the process of adding language specific files to an internationalized application so that
the application supports that language.
Region Code
Currently, the region code standard that is used is ISO 3166-2. Previous versions of ESM used the FIPS
10-4 region-code standard, which is no longer supported. As a result, there is a change in the way
region is represented in the geographical information for IP Addresses. For example, ESM 6.9.1 and
earlier would report 54 as the region code for the IP address 176.62.127.255. In later releases, it is
reported as OMS.
Unicode
Unicode is a universal character set that assigns a unique code point to characters from all major
languages of the world.
UTF-8
The version of Unicode supported by ESM.
Before You Install a Localized Version of ESM
Note: The ArcSight Manager and Console should be configured with the same locale.
By default, all communication between ArcSight components is done using UTF-8 character encoding.
Even though ESM supports only UTF-8 internally, if your Connector receives events in UTF-16, for
example, the events are still stored correctly since these events get converted to UTF-8 by the
Connector before they are passed on to the Manager.
ESM Installation Guide
Appendix F: Locales and Encodings
HPE ESM 7.0 Page 106 of 115

ArcSight Console and Manager
For best results, install the ArcSight Console on an operating system that is set to the same locale as the
Manager. During startup, the ArcSight Console and the Manager automatically detect and use the
locale from the operating system.
ArcSight SmartConnectors
If a device is configured to use a language-specific encoding (not Unicode), the Connector receiving
events from this device should be configured to use the same encoding as the device.
Setting the Encoding for Selected SmartConnectors
For some connectors you can set the encoding to a character set corresponding to your Locale. Check
the SmartConnector ConfigurationGuide for that connector for instructions on configuring encodings.
Such connectors support all character sets supported by Java.
Change the encoding to match the log files' encoding only if the log files use an encoding other
than the default.
Connectors that do not specifically support an encoding specification use the default encoding of the
operating system on which they reside.
Localizing Date Formats
If your connector receives logs that contain timestamps or date formats in a non-English language or
locale (for example, "mai 24, 2015 12:56:07.615" where "mai" is German for May), configure the
agent.parser.locale.name property in the agent.properties file. This file is located in the
<ARCSIGHT_HOME>/current/user/agent directory.
Set the agent.parser.locale.name property to the value that corresponds to the Connector's
locale. By default, this property is set to en_US. Refer to the table in "List of Possible Values" below for
possible values for this property.
List of Possible Values
agent.parser.locale.name Values
The table below lists the possible values for this property.
ESM Installation Guide
Appendix F: Locales and Encodings
HPE ESM 7.0 Page 107 of 115

Values Language Country Variant
ar Arabic
ar_AE Arabic United Arab
Emirates
ar_BH Arabic Bahrain
ar_DZ Arabic Algeria
ar_EG Arabic Egypt
ar_IQ Arabic Iraq
ar_JO Arabic Jordan
ar_KW Arabic Kuwait
ar_LB Arabic Lebanon
ar_LY Arabic Libya
ar_MA Arabic Morocco
ar_OM Arabic Oman
ar_QA Arabic Qatar
ar_SA Arabic Saudi Arabia
ar_SD Arabic Sudan
ar_SY Arabic Syria
ar_TN Arabic Tunisia
ar_YE Arabic Yemen
be Belarusian
be_BY Belarusian Belarus
bg Bulgarian
bg_BG Bulgarian Bulgaria
ca Catalan
ca_ES Catalan Spain
ESM Installation Guide
Appendix F: Locales and Encodings
HPE ESM 7.0 Page 108 of 115

Values Language Country Variant
cs Czech
cs_CZ Czech Czech Republic
da Danish
da_DK Danish Denmark
de German
de_AT German Austria
de_CH German Switzerland
de_DE German Germany
de_LU German Luxembourg
el Greek
el_GR Greek Greece
en English
en_AU English Australia
en_CA English Canada
en_GB English United Kingdom
en_IE English Ireland
en_IN English India
en_NZ English New Zealand
en_US English United States
en_ZA English South Africa
es Spanish
es_AR Spanish Argentina
es_BO Spanish Bolivia
es_CL Spanish Chile
es_CO Spanish Columbia
ESM Installation Guide
Appendix F: Locales and Encodings
HPE ESM 7.0 Page 109 of 115

Values Language Country Variant
es_CR Spanish Costa Rica
es_DO Spanish Dominican
Republic
es_EC Spanish Ecuador
es_ES Spanish Spain
es_GT Spanish Guatemala
es_HN Spanish Honduras
es_MX Spanish Mexico
es_NI Spanish Nicaragua
es_PA Spanish Panama
es_PE Spanish Peru
es_PR Spanish Puerto Rico
es_PY Spanish Paraguay
es_SV Spanish El Salvador
es_UY Spanish Uruguay
es_VE Spanish Venezuela
et Estonian
et_EE Estonian Estonia
fi Finnish
fi_FI Finnish Finland
fr French
fr_BE French Belgium
fr_CA French Canada
fr_CH French Switzerland
fr_FR French France
ESM Installation Guide
Appendix F: Locales and Encodings
HPE ESM 7.0 Page 110 of 115

Values Language Country Variant
fr_LU French Luxembourg
hi_IN Hindi India
hr Croatian
hr_HR Croatian Croatia
hu Hungarian
hu_HU Hungarian Hungary
is Icelandic
is_IS Icelandic Iceland
it Italian
it_CH Italian Switzerland
it_IT Italian Italy
iw Hebrew
iw_IL Hebrew Israel
ja Japanese
ja_JP Japanese Japan
ko Korean
ko_KR Korean Korea
lt Lithuanian
lt_LT Lithuanian Lithuania
lv Latvian
lv_LV Latvian Latvia
mk Macedonian
mk_MK Macedonian Macedonia
nl Dutch
nl_BE Dutch Belgium
ESM Installation Guide
Appendix F: Locales and Encodings
HPE ESM 7.0 Page 111 of 115

Values Language Country Variant
nl_NL Dutch Netherlands
no Norwegian
no_NO Norwegian Norway
no_NO_NY Norwegian Norway Nynorsk
pl Polish
pl_PL Polish Poland
pt Portuguese
pt_BR Portuguese Brazil
pt_PT Portuguese Portugal
ro Romanian
ro_RO Romanian Romania
ru Russian
ru_RU Russian Russia
sk Slovak
sk_SK Slovak Slovakia
sl Slovanian
sl_SI Slovanian Slovania
sq Albanian
sq_AL Albanian Albania
sv Swedish
sv_SE Swedish Sweden
th Thai
th_TH Thai Thailand
th_TH_TH Thai Thailand TH (Numbers have
Thai digits instead
of Arabic digits.)
ESM Installation Guide
Appendix F: Locales and Encodings
HPE ESM 7.0 Page 112 of 115

Values Language Country Variant
tr Turkish
tr_TR Turkish Turkey
uk Ukranian
uk_UA Ukranian Ukraine
vi Vietnamese
vi_VN Vietnamese Vietnam
zh Chinese
zh_CN Chinese China
zh_HK Chinese Hong Kong
zh_TW Chinese Taiwan
Key-Value Parsers for Localized Devices
Some localized devices not only send localized values but also localized keys in event messages. In such
a case, additional processing may be needed to translate the keys to English for the event messages to
be properly parsed. For example, assume that the content of a key-value parser is:
event.destinationUserName=User
...and the received event message is:
User=
...where is Korean for KIM.
In that case, the parser as it is works fine since double byte is supported already.
If the received event message is:
...where is Korean for User, then additional mapping is needed to translate to User.
If you encounter a need for a localized device, please contact Customer Support.
ESM Installation Guide
Appendix F: Locales and Encodings
HPE ESM 7.0 Page 113 of 115

Appendix G: Restore Appliance Factory
Settings
You can restore the appliance to its original factory settings using the built-in System Restore utility.
CAUTION: Factory reset irrevocably deletes all event and configuration data.
Use the following procedure to restore the appliance to its original, factory settings:
1. Attach a keyboard, monitor, and mouse directly to the appliance and open an operating system
console session.
2. Reboot the appliance.
3. After a few minutes, when the Linux boot menu appears, use the down arrow key to select System
Restore <build_num> from the menu that appears, then press Enter.
System Restore automatically detects and displays the archive image.
The image is named following this pattern:
YYYY-MM-DD_<model>_<build_num>.ari
where YYYY-MM-DD is the date, <model> is the appliance model, and <build_num> is the build
number of the image being restored. If you encounter any issues with the image, contact Customer
Support.
4. Press F10 (VERIFY) to check the archive for damage before performing the restore.
5. Press F1 (AUTOSELECT) to automatically map the source image.
6. Press F2 (RESTORE) to begin the restore process.
CAUTION: Do not interrupt or power-down the appliance during the restore process.
Interrupting the restore process may force the system into a state from which it cannot be
recovered.
7. When the restore process is completed, press F12 to reboot the appliance.
ESM Installation Guide
Appendix G: Restore Appliance Factory Settings
HPE ESM 7.0 Page 114 of 115
Send Documentation Feedback
If you have comments about this document, you can contact the documentation team by email. If an
email client is configured on this system, click the link above and an email window opens with the
following information in the subject line:
Feedback on ESM Installation Guide (ESM 7.0)
Just add your feedback to the email and click send.
If no email client is available, copy the information above to a new message in a web mail client, and send
your feedback to arc-doc@hpe.com.
We appreciate your feedback!
HPE ESM 7.0 Page 115 of 115
