Enable Te X User Guide
User Manual:
Open the PDF directly: View PDF ![]() .
.
Page Count: 11
EnableTeX User Guide
Andrew H. Norton
norton.ah@gmail.com
25 April 2019
Abstract
EnableTeX is a Mathematica package that turns a Mathematica notebook into a L
A
T
E
X editor.
T
E
X-enabled notebooks retain full notebook functionality, allowing L
A
T
E
X text to be interleaved with
any Mathematica computation. If desired, L
A
T
E
X source for equations can be automatically gener-
ated, with automatic equation alignment, punctuation, and line-breaking. Any required editing of
automatically generated L
A
T
E
X source can be done within the notebook. The generated source file is
human-readable standard L
A
T
E
X.
Contents
1 Introduction 2
2 Examples 3
3 Installation 3
3.1 Download and extract the EnableTeX software ....................... 3
3.2 Move the software to your applications directory ....................... 4
3.3 Copy the EnableTeX stylesheets to your StyleSheets directory ............... 4
3.4 Edit your init.m file ....................................... 5
4 Configuring a PDF viewer 5
4.1 Additional information ...................................... 5
5 Using EnableTeX 6
5.1 The new cell styles, TeX:name ................................. 6
5.2 Keyboard shortcuts via Mathematica [Esc]-aliases ...................... 7
5.3 Automatic L
A
T
E
X generation: Eqn[ label ] = expr ....................... 7
5.4 Greek characters in label ..................................... 8
5.5 Documentation .......................................... 8
5.5.1 List of functions ..................................... 8
5.6 Preamble files ........................................... 9
6 Miscellaneous 9
6.1 Notebook font size ........................................ 9
6.2 Hardware screen resolution ................................... 10
6.3 CodeFont for Input cells ..................................... 10
6.4 Line breaks in MiKTeX error messages ............................. 10
6.5 Importing a LaTeX document .................................. 11
1
1 Introduction
EnableTeX is a Mathematica package that enables L
A
T
E
X documents to be written in Mathematica
notebooks. This is nice to do for many reasons:
•Mathematica notebooks have sections, subsections, etc., that can be collapsed/expanded and are
easily rearranged by cut-and-paste. This makes writing L
A
T
E
X in a notebook convenient even for
non-mathematical documents.
•A PDF viewer can be synchronized with the document. As each fragment of L
A
T
E
X code is gen-
erated, whether it be typed by hand or automatically generated from Mathematica Output, it is
compiled by pdflatex. An external PDF viewer can display either the fragment or the updated
document. Any errors in written L
A
T
E
X are caught immediately.
•L
A
T
E
X code for equations can be generated without user intervention. While a paper is in its
draft state one can concentrate on writing and doing calculations, without having to typeset any
equations at all. In the final version of the paper, any automatically generated L
A
T
E
X that gives
poorly typeset results can be easily edited from within the same notebook.
•The hidden working and published results of a mathematical paper can be kept together in one
place. If the calculations are done entirely by Mathematica, then the results can be reproduced by
evaluating the same notebook that generates the PDF for the paper.
•L
A
T
E
X preambles can be copied, edited, and saved using any T
E
X-enabled notebook. Preambles
can load any package in your L
A
T
E
X installation, including journal style files.
•Any Mathematica notebook can easily generate a PDF document. Simply choose the headings,
comments, and Output cells that should be sent to the PDF. For headings and comments, change
the cell style: Title →TeX:Title, Text →TeX:Text, etc. For algebraic Output, add the command
//texit to the end of the corresponding Input command.
•More generally, EnableTeX includes methods for labeling, referencing, and manipulating equa-
tions. An assignment of the form
Eqn[ label ] = lefteqn == righteqn
will automatically generate L
A
T
E
X for the equation lefteqn == righteqn, and will allow \ref{label }
to be used to reference this equation in L
A
T
E
X. Equations that have Eqn[ label ] identifiers can
be manipulated in obvious ways using the EqnLabel package, which is included as part of the
EnableTeX download.
•The label argument in Eqn[ label ], and in any \ref{label }or \label{label }, can contain characters
from Mathematica’s Greek font. For L
A
T
E
X purists, all such extensions can be avoided by writing
their L
A
T
E
X in TeX:Pure cells rather than TeX:Text cells. In either case, the generated source file
is always standard L
A
T
E
X.
•The L
A
T
E
X that is generated for consecutive equations (with no intervening text in the PDF) is
automatically combined into an aligned L
A
T
E
X environment. Consecutive equations with the same
left side are formatted so that only the left side of the first equation is shown. Equations are
automatically punctuated in accordance with the surrounding document content.
•By default, EnableTeX uses the L
A
T
E
Xbreqn package to break long equations and expressions
over multiple lines. If breqn is incompatible with a L
A
T
E
X package that you need to use, then it
need not be loaded.
•If manual line breaking or other reformatting of equations is required then the generated L
A
T
E
X
can be easily edited. The function InsertTeX[eqn]will generate a TeX:Text cell that is pre-filled
with the L
A
T
E
X code for eqn, without any need for copy-and-paste.
•L
A
T
E
X source can be imported using InsertTeX[file]to generate a TeX:Text cell that is pre-filled
with the contents of file.
2

•The L
A
T
E
X source and PDF for the document, together with any other required files (graphics,
etc.) can be exported for journal submission using the Checkpoint[ ] function.
Using a T
E
X-enabled notebook does not restrict anything that can be done in either Mathematica or
L
A
T
E
X. It just means that both can be used at once in a nice editing environment, with a synchronised
PDF viewer, and with the option of automatic generation of L
A
T
E
X code for equations.
2 Examples
Example notebooks for EnableTeX, together with the PDF documents they generate, can be found in
the download directory
ahn/EnableTeX/Examples
This User Guide is also generated by a T
E
X-enabled notebook, and is included with the download,
ahn/EnableTeX/Guides/EnableTeX-UserGuide.nb
This too can be consulted as an example notebook.
Some of the example notebooks (e.g., HelloWorld.nb) contain significantly more information by way of
explanatory comments than the PDFs that they generate. So if you are wanting to try EnableTeX
then you should definitely read the notebooks. However:
The example notebooks will only display properly after installing an EnableTeX stylesheet.
To evaluate any of the example notebooks you will also need to install the EnableTeX software.
3 Installation
Installation of EnableTeX involves the following 3 steps (to be explained below):
•move the downloaded software into your Applications directory,
•copy the EnableTeX style files into your StyleSheets directory,
•add a line of code to your init.m file to update your Mathematica $Path variable.
To completely remove/uninstall EnableTeX, simply undo the above changes.
EnableTeX will run on Linux and Windows, and should also run on OS X/macOS. It was written using
Mathematica 11.3 on Linux. It has had minimal testing on Windows and (as yet) none on OS X. If you
encounter problems, please get in touch.
3.1 Download and extract the EnableTeX software
EnableTeX is available from the home page: https://ahnorton.github.io/EnableTeX/. To extract the
software from the downloaded file, one can use the following command (edit the date as appropriate for
your download),
unzip EnableTeX-2019-04-25.zip
The above will create a directory ./ahn that contains the Mathematica package EnableTeX, as well as
a number of stand-alone Mathematica packages, most of which EnableTeX depends on:1
1The exceptions are: PackageTemplate, which is included for use with About;ShortWindowTitles which does
nothing unless EnableTeX is running on Linux; and Backup which is recommended for routine use, but it is not actually
loaded by EnableTeX.
3

About Generate copyright/license notices for Mathematica packages.
Backup Automatic scheduled backups for Mathematica notebooks.
EditValue Edit string values and file contents in evaluatable notebook cells.
EqnLabel Encourage an equation-focused calculation style using labeled equations.
EnableTeX Write LaTeX documents in Mathematica notebooks (main package).
FileFunctions Utility functions for reading, writing, and viewing files (for PDFViewer).
PackageTemplate An empty package template, set up for use with About.
ShortWindowTitles Declutter Mathematica window titles on Linux desktops (especially KDE).
Timer Timers with stopwatch-like control (for triggering pdflatex compilation).
UsageTable Display usage documentation for a collection of Mathematica functions.
3.2 Move the software to your applications directory
The extracted directory ahn needs to be moved to your Mathematica applications directory. The correct
location can be determined by evaluating the Mathematica expression,
FileNameJoin[{$UserBaseDirectory, "Applications"}]
On Linux, this location is typically /home/<username>/.Mathematica/Applications, so one can do
mv ahn ~/.Mathematica/Applications
3.3 Copy the EnableTeX stylesheets to your StyleSheets directory
It is essential that an EnableTeX stylesheet be used for any T
E
X-enabled notebook.
Why? Because the stylesheets define several new cell styles (such as TeX:Text) for cells that
generate L
A
T
E
X code from their contents when the cell is evaluated. If a notebook that uses
the Default stylesheet is changed to use an EnableTeX stylesheet, then you will notice little
to no change in its appearance because the default cell styles are still defined. However, the
converse does not hold. Cells with style names of the form TeX: ... will not display correctly
with the Default stylesheet. Moreover, they will not generate L
A
T
E
X code until their cell
evaluation functions are defined, and that wont happen until EnableTeX is loaded (even if
an EnableTeX stylesheet is already in use).
The EnableTeX stylesheets are in the download directory ahn/EnableTeX/Source/StyleSheets and
have names of the form EnableTeX-version.nb. The stylesheets are installed by copying them to the
directory returned by the Mathematica expression
FileNameJoin[{$UserBaseDirectory, "SystemFiles", "FrontEnd", "StyleSheets"}]
On Linux, this is typically /home/<username>/.Mathematica/SystemFiles/FrontEnd/StyleSheets,
in which case,
cd ~/.Mathematica/Applications/ahn/EnableTeX/Source/StyleSheets
cp EnableTeX-*.nb ~/.Mathematica/SystemFiles/FrontEnd/StyleSheets
The stylesheet that is used for a notebook is selected from the menu: Format →Stylesheet. After
installing (or deleting) a stylesheet, this menu will be automatically updated when the notebook is next
opened.
B.T.W., it is perfectly OK to use an EnableTeX stylesheet on a notebook that is not T
E
X-enabled (one
that does not load EnableTeX). For example, you may prefer to have group-opener arrows on section
headers, whereas the Default stylesheet (for Mathematica 11.3) does not have them.
4
3.4 Edit your init.m file
The Mathematica command
Needs["EnableTeX`"]
will try to load EnableTeX by searching the directories listed in your $Path variable. This will include
your Applications directory, but its subdirectories are not searched. For later upgrade, the packages in
the download are best kept together in the directory Applications/ahn, so this directory needs to be
appended to your $Path. To do so, edit the file returned by the expression
FileNameJoin[{$UserBaseDirectory,"Kernel","init.m"}]
On Linux, this file is typically /home/<username>/.Mathematica/Kernel/init.m . Add the following
line to the end of your init.m,
AppendTo[$Path, FileNameJoin[{$UserBaseDirectory,"Applications","ahn"}]]
If you have a Linux system, then it is likely that EnableTeX is now ready for use. If your system is
Windows or Mac, then you may have to download and configure a suitable PDF viewer.
4 Configuring a PDF viewer
The PDF viewer that EnableTeX uses can be any viewer that will auto-reload when its .pdf file changes.
Only some PDF viewers will do this, so you may need to download one that does. The default viewers
are:
•Linux: okular for the KDE Desktop, evince for the GNOME Desktop,
•Windows: SumatraPDF from https://www.sumatrapdfreader.org/free-pdf-reader.html,
•OS X: Skim from https://skim-app.sourceforge.io/.
The above viewers for Linux and Windows auto-reload by default, so they require no configuring.
If running OS X, you will need to configure Skim to auto-reload. According to the Skim manual:
Choose Skim →Preferences, click Sync, and select “Check for file changes”.
There may also be a useful hidden option for Skim,
https://tex.stackexchange.com/questions/43057/macosx-pdf-viewer-automatic-reload-on-file-modification
To use a non-default PDF viewer, see Section 4.1.
4.1 Additional information
EnableTeX makes use of a function called PDFViewer provided by the FileFunctions package. To
learn more about the code the FileFunctions package can be loaded as a stand-alone package,
Needs["FileFunctions`"]
?FileFunctions`*
Click on the displayed function names to see their documentation. Also try these commands,
$PDFViewer
PDFViewer[]
PDFViewer["name.pdf"]
where “name.pdf” is a .pdf file you would like to view. The string variable $PDFViewer is the system
command that is used to start the PDF viewer. If you have a preferred (non-default) viewer then a value
for $PDFViewer can be set in your init.m file.
5

5 Using EnableTeX
To use EnableTeX in a notebook:
•Set the notebook Stylesheet using the main menu: Format →Stylesheet →EnableTeX-Courier-
11.3 (or similar).
•Load EnableTeX with Needs["EnableTeX`"]. The license notice that is output can be suppressed
by terminating this command with a semicolon (;).
•Create a L
A
T
E
X preamble for the document. To try out EnableTeX it suffices to evaluate
CopyPreamble[] (no argument) to copy the default preamble into the $TeXDirectory for your
document.
For starting a new document, you may find it convenient to start with a template notebook that includes
the above commands and some other useful content. For example, see file:
ahn/EnableTeX/Examples/NewDocument.nb
Depending on your desktop environment, it may be possible to add a “Create New” item for such a file
to the context menu of your file browser.
5.1 The new cell styles, TeX:name
Text that is typed into a cell with a style name of the form TeX:name is processed as L
A
T
E
X code and
“sent to the PDF” when the cell is evaluated.2Cells with style TeX:name can be inserted like any other
notebook cell. For example, when the cursor is a horizontal bar (at the end of your notebook, or between
cells) click the right mouse button and choose the menu item: Insert New Cell →TeX:name.
In practice, it is best if each paragraph of written L
A
T
E
X appears in its own TeX:Text cell, because then
any L
A
T
E
X errors that you make are caught as soon as the cell is evaluated. If there are L
A
T
E
X errors, then
a pop-up message window will show the relevant output from the attempted compilation by pdflatex.
TeX:Pure cells are similar to TeX:Text cells but they lack several conveniences that typing in a Math-
ematica notebook permits. Typing in a TeX:Pure cell is the same as typing in a plain text editor.
The contents of a TeX:Pure cell must be a complete fragment of valid L
A
T
E
X code and is processed by
pdflatex as is. On the other hand, the contents of a TeX:Text cell is allowed to (but need not) contain
Mathematica’s special characters (β,∂,⊗, etc.), so it might look very different to the same code in a
TeX:Pure cell, but that is where the difference ends. The required syntax is the same (after replacing
character βby string \beta, etc.).
In addition to the completely general TeX:Text and TeX:Pure cells, the EnableTeX stylesheet pro-
vides special cell styles TeX:Title, TeX:Section, TeX:Subsection, TeX:Subsubsection, and TeX:Verbatim.
When a cell in one of these styles is evaluated its contents are wrapped within a corresponding L
A
T
E
X
command before being processed. For example, typing abc into a TeX:Section cell and then evaluating
this cell results in \section{abc} being appended to the .tex file that is processed to generate the PDF.
The purpose of the special styles is not to save on key strokes (by typing abc rather than \section{abc}),
but to allow nice formatting of the notebook. In particular, the special styles (with the exception of
TeX:Verbatim) are based on the Default Mathematica stylesheet. Cells in these styles can therefore
double as headings in the notebook as well as headings in the PDF. Moreover, the EnableTeX stylesheet
specifies that heading cells have group opener arrows so that if cells are appropriately grouped then
sections, subsections, etc., can be easily collapsed and expanded. More about cell grouping can be found
in Examples/HelloWorld-fancy.nb.
2Mathematica cells are evaluated by typing Shift+Enter while the cursor is in the cell, or while the cell is selected.
Selections are indicated by highlighted cell brackets at the right edge of the notebook.
6
5.2 Keyboard shortcuts via Mathematica [Esc]-aliases
Mathematica notebooks provide [Esc]-aliases for Greek characters and mathematical symbols. When
typing in a TeX:name cell these aliases are defined as keyboard shortcuts for typing the equivalent L
A
T
E
X
command. For example, if one types [Esc]b[Esc] within a TeX:Pure cell then this character sequence
is replaced by \beta. In a TeX:Text cell, the same L
A
T
E
X command (\beta) will be generated, but it is
displayed in the cell as the character β.
The main difference between a TeX:Pure and a TeX:Text cell is how cell contents are able to display in
the notebook. Whereas in a TeX:Pure cell you might have an inline formula
$\tensor{X}{^\alpha_,_\beta} = \partial X^\alpha /\partial x^\beta$,
in a TeX:TeX cell the same formula could (but need not) be written as
$\tensor{X}{^α_,_β} = ∂X^α/∂x^β$,
where [Esc]a[Esc], [Esc]b[Esc] and [Esc]pd[Esc] are used to insert α,βand ∂. Both inputs generate
exactly the same L
A
T
E
X, and in either case one gets Xα
,β =∂Xα/∂xβin the PDF.
The other difference between TeX:Pure and TeX:Text is that quotes and double quotes are automatically
curly in TeX:Text, whereas in TeX:Pure they must be typed as proper L
A
T
E
X (e.g., two backticks for an
opening double quote).
The [Esc]-aliases for TeX:name header cells are defined as they are for TeX:Text. For TeX:Verbatim, no
[Esc]-aliases are defined.
5.3 Automatic L
A
T
E
X generation: Eqn[ label ] = expr
EqnLabel is a stand-alone Mathematica package that encourages an equation-focused calculation style
that closely resembles how calculations are done in mathematical publications. In Mathematica, an
equation is an expression (with head Equal) of the form lefteqn == righteqn. To easily manipulate such
expressions the EqnLabel package provides the Eqn[label ] function, which is little more than a container
for label together with a few simplification rules that make Eqn[label ] suitable as an equation identifier.
For example, if Eqn[a], Eqn[b] and Eqn[c] have been assigned expressions of the form
Eqn[label ] = lefteqn == righteqn
then evaluating the input Eqn[ans] = (Eqn[a] + 2Eqn[b])/Eqn[c] will assign the value
( LEqn[a] + 2LEqn[b] ) / LEqn[c] == ( REqn[a] + 2REqn[b] ) / REqn[c] ,
to Eqn[ans], where LEqn[label ] and REqn[label ] are the left and right sides of Eqn[label ].
The EqnLabel package includes various other functions for making substitutions and simplifications.
Documentation for the package is available via help["EqnLabel"]. With a little practice, one soon
finds that calculations that make use of an equation-focused style (rather than numerous assignments to
intermediate variables) are usually cleaner and often simpler.
EnableTeX makes use of the EqnLabel package as follows. Whenever an assignment Eqn[ label ] =
expr is detected as having been made, EnableTeX automatically generates L
A
T
E
X for the resulting expr.
Typically, expr is an equation, but it could be any expression or relation. Moreover, the label argument
in the assigned Eqn[ label ] is used to make a L
A
T
E
X label for expr. In other words, (\ref{label })
and \eqref{label }can be used to reference this equation in your L
A
T
E
X text. Returning to the above
example, one could say that (\ref{ans}) was obtained by adding 2 times (\ref{b}) to (\ref{a}) and
then dividing the result by (\ref{c}).
Automatic L
A
T
E
X generation can be suppressed by the //notex command,
Eqn[label ] = lefteqn == righteqn // notex .
Similarly, //nonumber can be used to suppress generation of an equation number.
7
5.4 Greek characters in label
In section 5.2 it was said that if Mathematica’s special characters (α,β,∂, etc.) are used in a TeX:Text
cell, then they generate the corresponding L
A
T
E
X code (\alpha,\beta,\partial, etc.). However, this
rule has one exception, which is made so that Mathematica’s Greek characters can be used in labels.
An assignment of the form Eqn[θ] = . . . , will automatically generate L
A
T
E
X for an equation that can
be referenced in a TeX:Text cell as \ref{θ}, where θis typed as [Esc]q[Esc]. This feature would not
work without some change to the generated code (since \ref{\theta} causes a compilation error). For
this reason, if the character θappears within \ref{},\eqref{}, or \label{}, then it is replaced by
the string [theta], not \theta as would normally be the case. Of course, the same applies for all of
Mathematica’s special characters.
It should be noted that using Greek characters in labels is not particularly convenient if one prefers to
use TeX:Pure cells. For example, to reference Eqn[αβγ] from text in a TeX:Pure cell, one would have
to type \ref{[alpha][beta][gamma]}.
5.5 Documentation
A table of all symbols in context EnableTeX` is returned by the command,
? EnableTeX`*
Clicking on a function’s name in the table will show the name::usage documentation for that function
(also available via ?name and Information[name]).
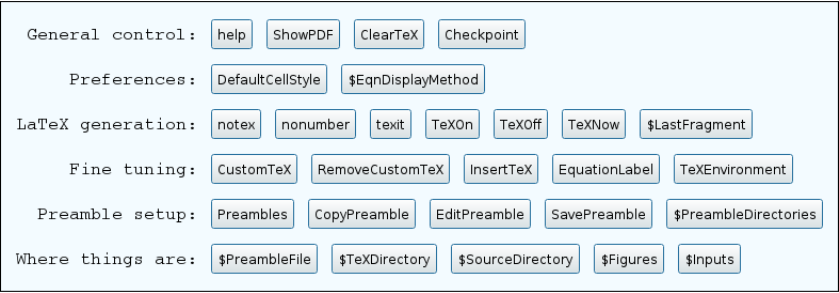
The UsageTable package provides a similar but more flexible alternative. UsageTable is automatically
loaded when EnableTeX is loaded. This package is used to define the command help["EnableTeX"]
which outputs the usage table shown in Figure 1. If EnableTeX was the last package loaded then this
table is also available via help[] (with no argument).
Figure 1: EnableTeX’s usage table, returned as the value of help["EnableTeX"]. Clicking on name
prints the name::usage documentation.
5.5.1 List of functions
For full descriptions of EnableTeX’s functions, see the documentation available via help[]. The
following list is only a brief overview of the available functions:
ShowPDF[ ] Open, re-open, or raise the PDF viewer window. With argument “body” or “fragment”,
set the PDF viewer mode.
DefaultCellStyle[style ] Set the cell style for any cells that are automatically created while typing.
The default for a Mathematica notebook is "Input", but a default of "TeX: Text" or "TeX: Pure"
can sometimes be more convenient. The value set applies only to the current notebook, and is
saved with the notebook.
8
ClearTeX[ ] Clear any previous L
A
T
E
X output. The PDF viewer will display an empty document.
Checkpoint[ ] Create a time-stamped checkpoint directory containing copies of all files required to
generate the document (e.g., for journal submission).
eqn // notex Suppress automatic generation of L
A
T
E
X for an eqn of the form Eqn[ label ] = left == right.
Typical use: in a final draft, directly followed by InsertTeX[eqn, label ], to replace the generated
L
A
T
E
X for eqn by hand-coded L
A
T
E
X.
eqn // nonumber Do not number the L
A
T
E
X equation that is automatically generated for an eqn of
the form Eqn[ label ] = left == right. In this case, label is used only to identify the Mathematica
expression Eqn[ label ], and can not (of course) be used in \ref{}.
expr // texit Send expression expr to the PDF. The preferred way is Eqn[ label ] = expr // nonumber,
especially if expr is an equation, because functionality of the EqnLabel package may then be used.
expr // texit[ label ] As above, but expr is numbered and can be referred to with \ref{label }.
TeXOn[ ] Restore EnableTeX to its normal state after TeXOff[].
TeXOff[ ] Disable all L
A
T
E
X generation and processing. Useful for “commenting out” large sections of
a document (with a closing TeXOn[]). Also useful for not having to specify //notex throughout a
long calculation that makes use of Eqn[ label ]identifiers but should not appear in the PDF.
TeXNow[ ] Compile the document using pdflatex and update the PDF. This is useful for forcing an
additional compilation when evaluating an entire notebook as one selection. It’s effect is otherwise
equivalent to evaluating an empty TeX:Text cell (but without adding a blank line to the .tex file).
InsertTeX[ x] Insert a TeX:Text cell that is pre-filled with the L
A
T
E
X code for expression x.
CustomTeX[ symbol,string ] Define a custom translation for Mathematica symbol to L
A
T
E
Xstring.
RemoveCustomTeX[ symol ] Remove any custom L
A
T
E
X for the Mathematica symbol.
Preambles[ ] Return a list of available preamble files.
CopyPreamble[ f] Copy a preamble file finto the document’s ./name_tex directory, for use as the
preamble for the document. If no argument fis given, copy EnableTeX’s default preamble.
EditPreamble[ f] Edit preamble file fin an editable cell (the edited cell contents are saved back to file
fby evaluating the cell). If no argument is given, edit the document’s preamble file.
SavePreamble[ f] Save the document’s preamble file to file f(for later re-use in other documents).
5.6 Preamble files
A preamble file contains the first part of the .tex source file for a LaTeX document, up to and in-
cluding the command \begin{document}. In order to save and re-use preamble files the variable
$PreambleDirectories will first need to be defined in the user’s init.m file.
The example notebooks (cf., section 2) can be run without setting a value for $PreambleDirectories
because they either use EnableTeX’s default preamble, or the example notebook defines its own pream-
ble using the function EditPreamble[]. For how to set a value for $PreambleDirectories, please read
the documentation available via help["EnableTeX"].
6 Miscellaneous
6.1 Notebook font size
If you are using a high resolution monitor then you may find that Mathematica’s default font sizes are
too small. Check the font screen resolution using
9
CurrentValue[ $FrontEnd, {FontProperties, "ScreenResolution"}]
The default setting of 72 gives fonts that are too small for my liking. You can find out your monitor
resolution by
SystemInformation["Devices", "ScreenInformation"]
For a 27 inch monitor at a resolution of 2560 ×1440, I find that a more suitable value for font screen
resolution is about 84. This can be set globally in the Option Inspector under Formatting Options →
Font Options →FontProperties →ScreenResolution, or more easily by
CurrentValue[ $FrontEnd, {FontProperties, "ScreenResolution"}] = 84
This command will save the value in ~/.Mathematica/FrontEnd/init.m. The advantages of this ap-
proach are that notebook magnification can be left at 100% (which is sometimes better for cursor
positioning in text), graphics are left at correct physical sizes on the screen, and all fonts scale the same,
including those in Mathematica’s help pages (which is not the case if you play with font sizes in notebook
style files because help pages have their own style).
To choose an appropriate value for font screen resolution one should proceed by viewing help pages at
100% magnification.
Further information can be found in the notebook
EnableTeX/Source/StyleSheets/ScreenResolutionAndFontSize.nb
6.2 Hardware screen resolution
It is worth noting that SreenResolution is also used in Mathematica to refer to hardware screen
resolution. This is determined by the monitor and graphics card and is returned by either of the
commands,
"Resolution" /. SystemInformation["Devices","ScreenInformation"]
CurrentValue["ScreenResolution"]
The returned value refers to the number pixels/inch that the monitor is displaying at. For the monitor
that was mentioned in section 6.1, the above two commands both returned 108 pixels/inch.
6.3 CodeFont for Input cells
The font for Input cells is specified by the CodeFont sub-option in StyleHints. It is returned by,
StyleHints /. Options[$FrontEnd]
Selection of the FontFamily for InputForm is implemented in the Core.nb stylesheet in the section
Format Type Styles →InputForm, using the cell option,
FontFamily -> Dynamic[CurrentValue[{StyleHints, "CodeFont"}]]
This overrides any direct setting for FontFamily as an option for an Input cell in a stylesheet. Therefore,
to change the font for Input cells using a stylesheet, one must set a value for the StyleHints cell option.
The EnableTeX-Default stylesheet(s) uses default Mathematica fonts for Input,Code, and Output cells.
The EnableTeX-Courier stylesheet(s) uses the StyleHints cell option to set “Courier” as the font for
Input,Code, and Output cells. To see the cell style definitions in a stylesheet, use Ctrl+Shift+Enter to
toggle visibility, or use the menu item Cell →Show Expression.
6.4 Line breaks in MiKTeX error messages
The message that EnableTeX displays if your L
A
T
E
X code has compilation errors is extracted from the
last part of the standard output from the pdflatex command, saved to file name_tex/stdout.txt,
10
where name.nb is your notebook.
The line length for MiKTeX standard output is unnecessarily short and makes reading some error mes-
sages difficult. Changing the value of max_print_line in file MiKTeX 2.9\miktex\config\texmfapp.ini
to about 250 fixes this problem. For further information,
https://tex.stackexchange.com/questions/52988/avoid-linebreaks-in-latex-console-log-output-or-increase-
columns-in-terminal
6.5 Importing a LaTeX document
A complete L
A
T
E
X document can be imported into an EnableTeX notebook as follows:
1. Read the file into a TeX:Text (or TeX:Pure) cell using InsertTeX[ file ].
2. Cut-and-paste the preamble, up to and including \begin{document}, into a cell generated by
EditPreamble[], then evaluate this cell to create the preamble file for the document.
3. Delete the \end{document} command, as this is automatically added by EnableTeX.
4. Divide the TeX:Text cell that contains the document body into multiple TeX:Text cells (e.g., for
section headings and section contents). Cells can be divided by typing Ctrl+Shift+D with the
cursor positioned at the desired division point. Cells can be merged by selecting them and then
typing Ctrl+Shift+M.
5. For the various section headings, change the cell style from TeX:Text to TeX:Section, etc. This
can done by right-clicking on the cell bracket and choosing Style from the menu.
To export a L
A
T
E
X file from EnableTeX, see the documentation for Checkpoint[].
11
