Getting Started With AppleWorks 6 Apple Works Book 2
User Manual: Getting Started With AppleWorks 6 Book 2
Open the PDF directly: View PDF ![]() .
.
Page Count: 66
- Getting Started
With AppleWorks 6
- Contents
- About This Manual
- Finding Answers and Instructions
- Getting to Know AppleWorks 6
- Examples and Ideas
Getting Started
With AppleWorks 6
Includes basics for new users
and project examples and ideas for all users
K
Apple Computer, Inc.
©
2000 Apple Computer, Inc. All rights reserved.
Under the copyright laws, this manual may not be copied, in whole or in part, without the written consent of Apple.
Your rights to the software are governed by the accompanying software license agreement.
The Apple logo is a trademark of Apple Computer, Inc., registered in the U.S. and other countries. Use of the
“keyboard” Apple logo (Option-Shift-K) for commercial purposes without prior written consent of Apple may
constitute trademark infringement and unfair competition in violation of federal and state laws.
Every effort has been made to ensure that the information in this manual is accurate. Apple is not responsible for
printing or clerical errors.
Apple Computer, Inc.
1 Infinite Loop
Cupertino, CA 95014-2084
408-996-1010
http://www.apple.com
Apple, the Apple logo, AppleWorks, ClarisWorks, Mac, and Macintosh are trademarks of Apple Computer, Inc.,
registered in the U.S. and other countries.
Balloon Help is a trademark of Apple Computer, Inc.
Windows is a registered trademark of Microsoft Corporation.
Other company and product names mentioned herein are trademarks of their respective companies. Mention of
third-party products is for informational purposes only and constitutes neither an endorsement nor a
recommendation. Apple assumes no responsibility with regard to the performance or use of these products.
Simultaneously published in the United States and Canada.
Digital imagery
®
copyright 1999 PhotoDisc, Inc.
Equation Editor in AppleWorks is a special version of MathType
™
by Design Science. If you frequently create
documents with equations, you may find MathType better suited to your needs. MathType is as easy to use as
Equation Editor and has many extra features to help you save time and create more complex mathematical formulas
in documents. For further information about upgrading Equation Editor to MathType, contact your software dealer
or Design Science directly.
Design Science, Inc.
4028 Broadway
Long Beach, CA 90803
Toll free: 800-827-0685
International: 310-433-0685
Fax: 310-433-6969
Email: mtinfo@mathtype.com
World Wide Web: http://www.mathtype.com/mathtype
LL0865.book Page 2 Thursday, November 18, 1999 5:37 PM

3
Contents
Preface
About This Manual 5
1 Finding Answers and Instructions 7
Where to Begin 7
Getting Instructions on Specific Tasks 8
Opening and Closing AppleWorks Help 8
Moving Around in AppleWorks Help 8
Identifying Items on the Screen 9
AppleWorks Resources on the Web 9
Product Support 10
2 Getting to Know AppleWorks 6 11
New Features in AppleWorks 6 11
Opening AppleWorks 12
Basics for New Users 12
Taking Advantage of Assistants and Templates 12
Introduction to the AppleWorks Windows 14
Starting a New Project From Scratch 18
Understanding and Choosing Document Types 18
Beyond the Basics 26
Integrating Different Kinds of Content in a Document (Frames) 26
Adding Tables to Your Documents 27
Controlling the Way Objects and Frames Interact With Text 27
Exchanging Documents Between Different Computers and Applications 31
Where to Go From Here 32
LL0865.book Page 3 Thursday, November 18, 1999 5:37 PM
4
Contents
3 Examples and Ideas 33
Agenda 34
Award Certificate 36
Banner 38
Brochure 40
Business Cards 42
Calendar 44
Event Tracker 46
Flash Cards (Interactive) 48
Greeting Card 50
Homework Sheet 52
Letterhead 54
Mailing Labels 56
Postcard 58
Poster 60
School Report 62
Slide Show 64
LL0865.book Page 4 Thursday, November 18, 1999 5:37 PM

5
PREFACE
About This Manual
This manual is for both new and experienced AppleWorks users. It assumes that you already
know how to perform basic tasks with your computer, such as using the mouse and saving
documents. (If necessary, refer to the documentation that came with your computer in order
to learn basic computer skills.)
Use this manual for a few different purposes:
m
Find out how to access detailed instructions and other useful resources.
See Chapter 1, “Finding Answers and Instructions.”
m
Familiarize yourself with basics to get you started quickly, and get a brief
summary of new features.
See Chapter 2, “Getting to Know AppleWorks 6.”
m
See examples, tips, and pointers to instructions on specific techniques.
See Chapter 3, “Examples and Ideas.” Each example tells you where to find instructions
for creating elements highlighted there.
If you are new to AppleWorks, Chapter 3 is a useful visual introduction and reference. If
you are an experienced user, use it for new ideas and to better familiarize yourself with
AppleWorks 6.
LL0865.book Page 5 Thursday, November 18, 1999 5:37 PM
LL0865.book Page 6 Thursday, November 18, 1999 5:37 PM

7
CHAPTER
1
1
Finding Answers and Instructions
Where to Begin
The AppleWorks suite of documentation is designed to get you going as quickly as possible,
whether you are a new or experienced AppleWorks user.
Experience level Do this
You’re new to
AppleWorks or want a
complete understanding
of AppleWorks 6
m
Review this chapter to learn about accessing step-by-step
instructions and other resources.
m
See Chapter 2, “Getting to Know AppleWorks 6,” to familiarize
yourself with the basic concepts that will get you started.
m
See Chapter 3, “Examples and Ideas,” for examples of what you can
do with AppleWorks, and to see where you can find out how to
create elements highlighted in the examples.
m
As necessary, refer to AppleWorks Help for help with specific
procedures.
You’ve used AppleWorks
before
m
Use this chapter to find out about onscreen help and resources on
the Web.
m
See Chapter 2, “Getting to Know AppleWorks 6,” to find out about
new features.
m
See Chapter 3, “Examples and Ideas,” to get new ideas or to learn
more about AppleWorks capabilities.
m
As necessary, refer to AppleWorks Help for shortcuts and help with
specific procedures.
LL0865.book Page 7 Thursday, November 18, 1999 5:37 PM
8
Chapter 1
Getting Instructions on Specific Tasks
Complete how-to instructions, shortcuts, and more details are available in AppleWorks Help.
The onscreen help provides these convenient features:
m
instant access through the Help menu or keyboard shortcuts
m
an index and (in Mac OS 8.5 or later) fully searchable content
m
quick access to related information via links
Opening and Closing AppleWorks Help
AppleWorks Help is available when AppleWorks is the active application.
To open the help system, choose AppleWorks Help from the Help menu. (Alternatively, you
can press the Help key on an extended keyboard.)
If a dialog box with a “?” button is on the screen, click the “?” button to get help using the
dialog box.
Note:
If you’re using a version of the Mac OS earlier than 8.5, AppleWorks Help opens in
your default Web browser. In Mac OS 8.5 and later, the help system appears in the Apple Help
Viewer.
Moving Around in AppleWorks Help
You move to new topics and pages in the onscreen help system by clicking links, which are
identified by underlined text.
Use these components to navigate through AppleWorks Help:
m
Table of contents:
The table of contents appears on the left side of the help window
when AppleWorks Help opens. When you click a topic, a list of subtopics appears on the
right side of the window. A link to the table of contents also appears at the bottom of
every help page.
m
Index:
The index contains an alphabetical list of topic links. A link to the index appears at
the bottom of every help page.
m
Search:
If you are using AppleWorks with Mac OS 8.5 or later, the Help Viewer searches
the entire help system for any text that you enter in the Search field.
m
Related topics:
A list of related topic links appears near the end of many help pages.
LL0865.book Page 8 Thursday, November 18, 1999 5:37 PM
Finding Answers and Instructions
9
Identifying Items on the Screen
You can get information by moving the pointer over items on the screen.
Identifying Names and Functions of Items on the Screen
If you are using the Mac OS, you can open Balloon Help to learn the names and functions of
items on the screen. To use Balloon Help:
1
Choose Show Balloons from the Help menu.
2
Move the pointer over the item you want to identify.
When you’re finished using Balloon Help, choose Hide Balloons from the Help menu.
Getting Information About Items in the Button Bar and Tools Window
AppleWorks includes “tooltips” about items in the Button Bar and items in the Tools window.
Move the pointer over an item and pause a moment to see the associated tooltip.
Note:
The tooltips feature is turned on by default. To turn it off and on, choose Preferences
from the Edit menu, then choose Button Bar from the submenu. Select or deselect the
“Show tooltips” checkbox.
AppleWorks Resources on the Web
If you have an Internet connection, you can access free supplemental AppleWorks material
such as
m
additional templates
m
additional clip art
m
news about AppleWorks
m
tips and tricks
To access the additional templates, tips and tricks, and news about AppleWorks:
1
If the Starting Points window is not open, choose Show Starting Points from the File menu.
2
Click the Web tab and select a resource.
To access additional clip art that Apple provides via the Internet:
1
Open the document to which you want to add clip art.
2
If the Clippings window is not open, choose Show Clippings from the File menu.
3
In the Search box, type a keyword describing the type of clip art you want, and click Search.
(Make sure the Search Web Content checkbox is checked.)
LL0865.book Page 9 Thursday, November 18, 1999 5:37 PM
10
Chapter 1
Product Support
Apple is dedicated to providing product support that meets your needs.
For information about product support, visit this Web site:
http://www.apple.com/support/
Or review the Apple Service and Support Guide included with your product.
The AppleWorks site may also be helpful:
http://www.apple.com/appleworks/
LL0865.book Page 10 Thursday, November 18, 1999 5:37 PM

11
CHAPTER
2
2
Getting to Know AppleWorks 6
Use AppleWorks for writing and outlining; creating tables, spreadsheets, and charts; creating
and managing databases; drawing and painting; and creating presentations. You can use it for
everyday personal tasks such as writing a letter or keeping an address list, and for more
complex tasks, such as publishing a newsletter.
Using AppleWorks for all your projects (instead of using a different program for each task)
conserves computer resources such as memory and disk space, makes it convenient to
integrate different types of content, and lets you switch between tasks without opening
several different programs.
New Features in AppleWorks 6
m
New presentation document environment for creating, organizing, and setting display
options for slide presentations
m
Useful, easily accessible Internet resources
m
New, easy table creation in any document type
m
Updated user interface, including windows that replace the libraries and the New
Document dialog box; a new Tools window that includes drawing, painting, and frame
tools; and a new window (“Accents”) that combines tools for setting colors and other
attributes (see “Floating Windows” on page 15)
m
Many more enhancements, including auto-save, improved mail merge, and improved
spreadsheet functionality
You can read more about the new features in AppleWorks Help:
1
Choose AppleWorks Help from the Help menu.
2
Click Introduction, then click “What’s new in AppleWorks 6.”
12
Chapter 2
Opening AppleWorks
To open AppleWorks:
m
Double-click the AppleWorks icon, located in the AppleWorks 6 folder. You can also open
AppleWorks by double-clicking the icon of any document created in AppleWorks.
Basics for New Users
If you are not familiar with AppleWorks, reviewing these essentials will help you get started
quickly.
Taking Advantage of Assistants and Templates
AppleWorks Assistants and templates give you a head start on your projects by doing a lot of
the work for you.
Assistants for Projects
Assistants ask you questions and then do the work based on your answers. There are
Assistants for
m
creating an address book database
m
creating business cards
m
creating a monthly calendar
m
creating award and diploma certificates
m
creating and printing envelopes
m
analyzing financial opportunities
After you create a document with an Assistant, you can edit and customize it as needed.
To use an Assistant:
1
If the Starting Points window is not open, choose Show Starting Points from the File menu.
2
Click the Assistants tab.
3
Select an Assistant and follow the instructions that appear.

Getting to Know AppleWorks 6
13
Assistants for Tasks Within Documents
There are a couple of Assistants for specific tasks within a document:
m
To create mailing labels in a database document,
choose New Label Layout from the
Layout menu.
m
To create citation footnotes in a word-processing document,
click the Insert Footnote
Assistant button in the Button Bar.
Templates
AppleWorks includes templates already set up with text, pictures, and other formatting
options. There are templates for home, business, and school needs.
You can personalize the templates, and you can also use them as a source of information
about available features and capabilities. Many of the templates include notes that provide
helpful instructions and tips.
To select a template:
1
If the Starting Points window is not open, choose Show Starting Points from the File menu.
2
Click the Templates tab.
3
Select a template.
For more information about using, customizing, and creating your own templates, see “Using
Templates” in the “Working Smarter” section of AppleWorks Help.
14
Chapter 2
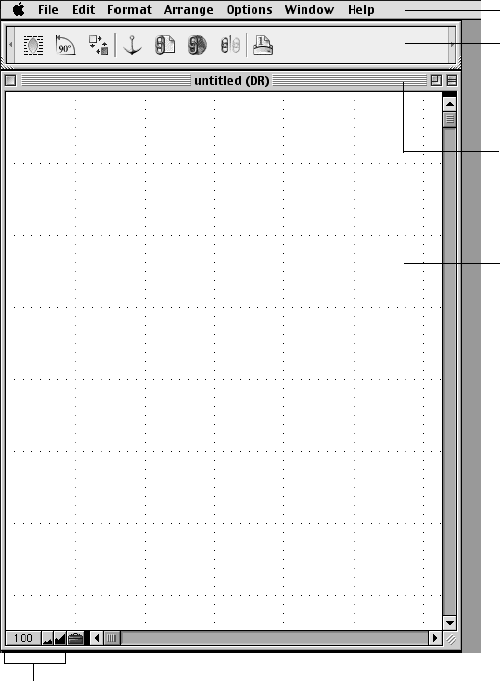
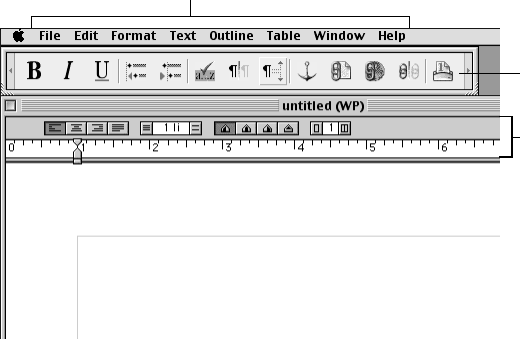
Introduction to the AppleWorks Windows
The picture shown below (a drawing document) highlights the basic features common to
all
AppleWorks document types.
Menu Bar
All features are available through the menu bar. The menus that appear depend on the type
of document you are working in, or the type of item or frame you have selected within the
document. For example, when you work on a drawing document or select a drawn object,
you see the Arrange menu.
Button Bar
The Button Bar gives you quick access to many features, as an alternative to using the menus.
The buttons that appear depend on the type of document or frame you are using.
Title bar
Document window
Button Bar
Zoom controls
Menu bar

Getting to Know AppleWorks 6
15
Title Bar
The title bar displays the title of the document, as well as an abbreviation that indicates the
document type:
m
WP (word processing)
m
SS (spreadsheet)
m
DB (database)
m
DR (drawing)
m
PT (painting)
m
PR (presentation)
Document Window
The document window is where you work on your document. Specific features of this
window vary, depending on the document type in which you are working. (See
“Understanding and Choosing Document Types” on page 18.)
Zoom Controls
The zoom controls allow you to enlarge (zoom in) or reduce (zoom out) your view of a
document.
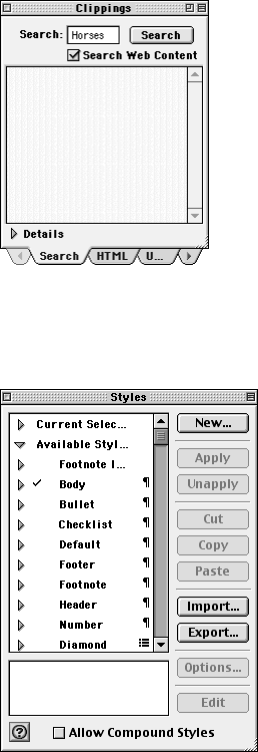
Floating Windows
In addition to the basic window elements listed previously, there are a number of small,
floating windows that provide convenient access to features.
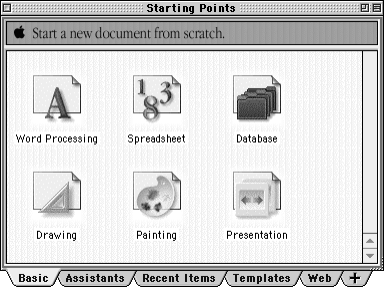
m
Starting Points
(replaces the New Document dialog box in earlier versions of AppleWorks
and ClarisWorks): Provides instant access to document types, Assistants, templates,
recently opened files, and Internet content. When a document is not open, Starting Points
appears. You can also open it from the File menu.
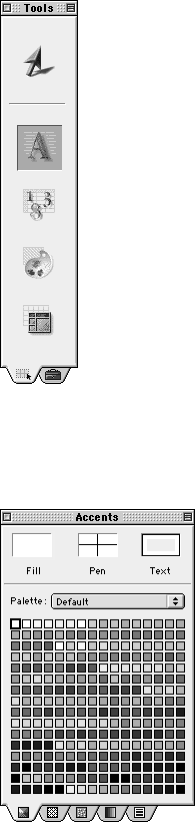
16
Chapter 2
m
Tools:
Contains one panel with frame tools and another with drawing and painting tools.
To create frames, you drag a frame tool to your document. To open the Tools window,
choose Show Tools from the Window menu.
m
Accents:
Contains tools for customizing graphics, lines, and text by using different colors,
patterns, styles, and more. To open Accents, choose Show Accents from the Window
menu.
Getting to Know AppleWorks 6
17
m
Clippings
(replaces the libraries in earlier versions of AppleWorks and ClarisWorks): Gives
you easy access to clip art included in AppleWorks 6, as well as items on the Internet. Use
Clippings to add and organize your own collections of media. The Clippings search
feature helps you find the items you want. To open Clippings, choose Show Clippings
from the File menu.
m
Styles:
Lets advanced users define and edit styles of text elements, such as headings and
lists. For example, you can select a few lines of text and use the Bullet style to make the
lines of text a bulleted list. To open Styles, choose Show Styles from the Format menu.
Some of these windows automatically appear in certain situations, and some are only
available in specific document types. You can position the floating windows anywhere on the
screen.
For details on moving and resizing floating windows, see “About the AppleWorks Interface” in
the “AppleWorks Basics” section of AppleWorks Help.
18
Chapter 2
Starting a New Project From Scratch
If you are not creating your project from an Assistant or template, you need to open a blank
document in order to start your project.
To open a blank document:
1
Open AppleWorks. (See “Opening AppleWorks” on page 12.)
2
In the Starting Points window, click the Basic tab, and select the type of document you want
to create. (The next section, “Understanding and Choosing Document Types,” helps you
decide which document type to choose.)
Understanding and Choosing Document Types
Because each document type has its own combination of features and menus, when you
create a document from scratch you need to choose the document type that’s best for your
project.
AppleWorks includes six different document types:
m
word processing
m
spreadsheet
m
database
m
drawing
m
painting
m
presentation
Regardless of the document type you work in, it’s easy to combine different kinds of content
within a single document. You can draw in any document type. You can also add “frames” of
different document types to a document. For example, you could add a spreadsheet frame to
a letter. For more information, see “Integrating Different Kinds of Content in a Document
(Frames)” on page 26.
Getting to Know AppleWorks 6
19
About Word-Processing Documents
Choose the word-processing document type to create projects that contain mostly text, such
as these:
m
letters
m
reports
m
stories
m
outlines
A blank word-processing document looks like this:
AppleWorks gives you flexibility in the way you present what you write. Using multiple
columns, for example, you can create professional-looking catalogs and reports. You can
write well-organized research papers by using AppleWorks to outline your ideas and to add
footnotes or endnotes that number and renumber automatically. You can format documents
in sections (like chapters in a book), each with its own header, footer, column configuration,
and page numbering. You can add tables, graphics, or spreadsheets without leaving the
document.
See these word-processing examples:
m
“Agenda” on page 34
m
“Award Certificate” on page 36
m
“Letterhead” on page 54
m
“School Report” on page 62
For complete instructions on word processing, see “Working With Text (Word Processing)” in
AppleWorks Help.
Buttons for common
word-processing tasks
Text ruler controls
Menus for word processing
20
Chapter 2
About Spreadsheet Documents
Choose the spreadsheet document type for tasks like these:
m
organizing numeric information
m
making calculations
m
developing and tracking budgets
m
adding visual aid to reports by creating a chart from a spreadsheet
A spreadsheet organizes text and numbers, and you can set it up to automatically perform
the calculations you need. You can add a headline or pictures, or convert the numbers into
charts to aid comprehension.
A blank spreadsheet document looks like this:
You need to understand the following basics about using the spreadsheet window:
m
Each column is labeled with a letter at the top. Each row is labeled with a number at the
left. The intersection of a row and column is called a
cell
. Each cell has a unique address,
which consists of the column letter and row number (for example, D3).
m
You enter or edit a cell’s contents by selecting the cell and typing in the
entry bar.
You can
enter or edit text, dates, numbers, or formulas.
m
The spreadsheet always has one active cell, which has a darker border. If the active cell
contains a value or is assigned a formula, the value or formula appears in the entry bar at
the top of the spreadsheet.
m
Formulas are not actual values like text or numbers. Rather, formulas are specific
instructions that AppleWorks follows to produce a value for a cell. The result of the
formula appears in the spreadsheet cell.
Menus for spreadsheets
Buttons for common
spreadsheet tasks
Entry bar
Getting to Know AppleWorks 6
21
See these spreadsheet examples:
m
“Flash Cards (Interactive)” on page 48 (spreadsheet frame)
m
“School Report” on page 62 (spreadsheet frame)
For complete instructions on working with spreadsheets, see “Working With Numbers
(Spreadsheet)” in AppleWorks Help.
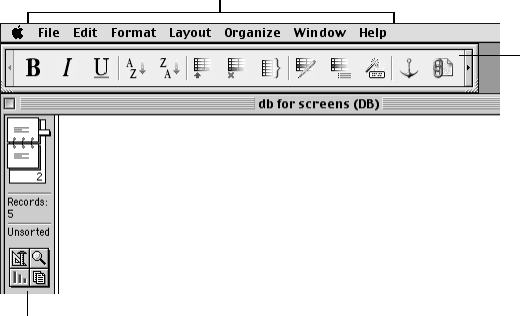
About Database Documents
Choose the database document type for managing and organizing collections of information.
You can create a database for projects like these:
m
address lists
m
forms
m
student or customer records
m
research notes
m
recipes
m
record of billable hours
A blank database document (in Browse mode) looks like this:
In a database document you can accumulate information, sort it, and print attractive reports.
You can also perform sophisticated searches to find specific data. By using different layouts
(views), you can organize and present the same data in many different ways. You can also
enhance the layout by adding pictures, patterned lines, or other objects to the database.
A popular use of databases is “mail merge,” which allows you to insert information from a
database into another document or frame. For example, you can merge an address database
with a letter to create personally addressed versions of the same letter.
Menus for databases
Buttons for common
database tasks
Side panel includes record book for navigating
through the database and pop-up menus for
managing layouts, searches, and more.
22
Chapter 2
See these database examples:
m
“Event Tracker” on page 46
m
“Mailing Labels” on page 56
m
“Postcard” on page 58 (uses mail merge feature)
For complete instructions on working with database documents, see “Organizing
Information (Databases)” in AppleWorks Help.
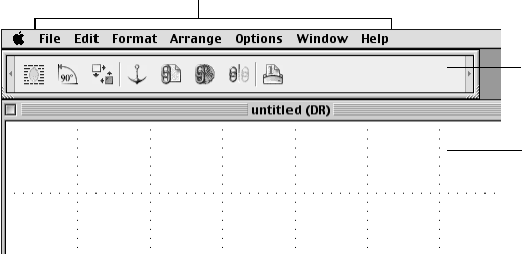
About Drawing Documents
Choose the drawing document type to create graphics that use shapes, lines, and curves, and
to design pages for projects with interrelated text and graphics, such as these:
m
maps
m
seating charts
m
brochures
m
flyers
m
newsletters
A blank drawing document looks like this:
In the drawing environment, you use the Tools and Accents windows to create and modify
objects (such as rectangles, circles, and lines). You can also add clip art, and text,
spreadsheet, and painting frames.
See also “Differences Between Painting and Drawing in AppleWorks” on page 24.
Note:
You can draw in any type of document, except for a database document in Browse,
List, or Find mode.
See these drawing examples:
m
“Banner” on page 38
m
“Brochure” on page 40
m
“Business Cards” on page 42
Menus for drawing
Buttons for common
drawing tasks
Graphics grid to use as
layout guide

Getting to Know AppleWorks 6
23
m
“Calendar” on page 44
m“Flash Cards (Interactive)” on page 48
m“Greeting Card” on page 50
m“Homework Sheet” on page 52
m“Postcard” on page 58
m“Poster” on page 60
For complete drawing instructions, see “Drawing and Working With Objects” in AppleWorks
Help.
About Painting Documents
Choose the painting document type for projects like these:
mfree-form designs
mlogos
martwork
A blank painting document looks like this:
The painting environment includes the drawing tools, plus a set of tools for special effects
like paintbrush strokes and spray paint. If you want to add a spreadsheet, text, or clip art, you
can do so without leaving the painting document.
See also the next section, “Differences Between Painting and Drawing in AppleWorks.”
Menus for painting
Buttons for common
painting tasks
24 Chapter 2
See these painting examples:
m“Agenda” on page 34 (painting frame)
m“Business Cards” on page 42 (painting frame)
m“Letterhead” on page 54 (painting frame)
For complete painting instructions, see “Painting and Working With Images” in AppleWorks
Help.
Differences Between Painting and Drawing in AppleWorks
Although they appear similar, the drawing and painting environments are different in the
following ways:
Drawing is better than painting when
myou want to rearrange layers of objects
myou want to draw shapes, lines, curves, and simple freehand objects
myou want to easily reselect and manipulate objects
myou do not need to use painting-only features, such as blending colors, tinting, and
lightening or darkening
Painting Drawing
Allows a “free-form” style of creation. You can
create any shape you want by moving the
pointer as you would move a paintbrush.
You can only create and work with the types of
lines or geometric shapes offered by the drawing
tools.
Similar to creating a painting on paper: when
you paint over something, you replace the
part you painted over with the new paint.
Similar to making a collage: every item you add
to the page is an object that you can arrange and
layer with other objects on the page.
For example, when one object in a drawing
overlaps another, the back object remains intact:
the back object can still be selected, moved, or
changed.
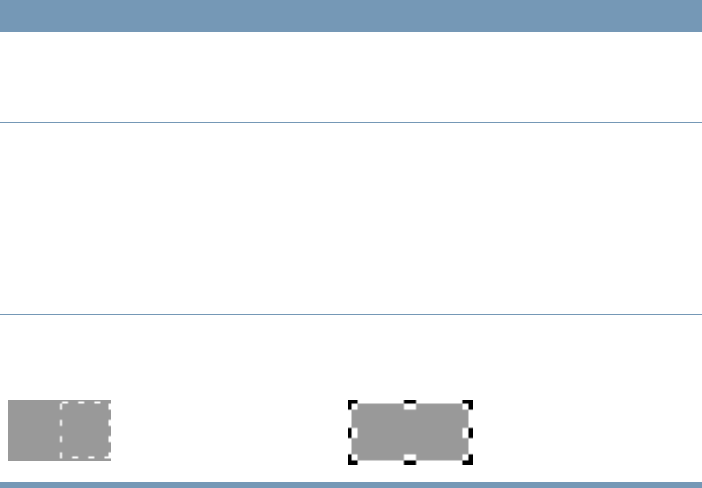
After you paint an item, you can select a
specific part of it (as shown in the example
below).
Once you draw an object, you can select the
entire object (as shown in the example below),
but you cannot select a specific part of it.

Getting to Know AppleWorks 6 25
Painting is better than drawing when
myou want to use the painting tools, such as the paintbrush and spray can, in addition to
the drawing tools
myou want to apply special effects to your images, such as blending colors, tinting, and
lightening or darkening
myou want to insert an image and use the painting tools and features to alter it
myou want to create freehand images that are more complex than simple shapes and lines
myou do not need to easily reselect and manipulate items
myou do not need to rearrange layers of items
About Presentation Documents
Choose the presentation document type to create slides to display with a computer or an
overhead projector.
A blank presentation document looks like this:
The presentation environment is new in AppleWorks 6. In a presentation document, you can
do everything you can do in a drawing document, and much more, including organizing
slides visually and drafting speaker’s notes. You can hide specific slides so you can use the
same presentation for different audiences, add special slide transitions such as the “fade out”
and “fade in” effect, and include movie or sound files.
Controls window
Use to add and organize
slides and master slides,
and to set slide show
options.
Menus for presentations
Buttons for common
presentation tasks
26 Chapter 2
See this presentation example:
m“Slide Show” on page 64
For complete instructions on working with presentation documents, see “Creating
Presentations” in AppleWorks Help.
Beyond the Basics
This section introduces you to some popular things you can do with AppleWorks: adding
tables to your documents, integrating different types of content in a document using frames,
determining the way items interact with text, and exchanging documents between different
computers and applications.
Integrating Different Kinds of Content in a Document (Frames)
There are a number of ways to include different kinds of content within your document,
depending on what you want to do. To create paintings, spreadsheets, sections of text, or
tables in a document of a different type, you start by selecting a frame tool and then dragging
in your document to create a frame. For example, to paint in a word-processing document,
you create a painting frame. The frame tools are in the Tools window.
How frames work in a document:
mWhen you select the frame, the drawing menus appear in the menu bar so you can
manipulate the frame. For example, you can use the Arrange commands to position the
frame on a page.
mWhen you enter a frame (by double-clicking it), the menus and tools change to those that
you need for working in that type of frame.
Frames are not the only way to integrate different kinds of content. See AppleWorks Help for
details on how to draw in any document type; insert images, documents, and other types of
files; use clip art (and more) from the Clippings window; and insert sounds and movies.
Many of the examples in this book use frames, including:
m“Brochure” on page 40 (includes text frames)
m“Business Cards” on page 42 (includes painting frames)
m“School Report” on page 62 (includes spreadsheet and table frames)
For details on creating and working with frames, see “Integrating Different Kinds of Content
in a Document (Frames)” in AppleWorks Help.
See also “Controlling the Way Objects and Frames Interact With Text” on page 27.

Getting to Know AppleWorks 6 27
Adding Tables to Your Documents
The tables feature is new in AppleWorks 6. You can add a table to any type of document.
To add a table:
1If the Tools window is not open, choose Show Tools from the Window menu.
2Select the table frame tool.
3Position the pointer where you want the table to appear, and drag diagonally to indicate the
size of the table.
4Enter the number of rows and columns in the dialog box.
You can enter, edit, and delete items in the table. You can drag to reposition rows and
columns and to resize the table. You can also change border and background styles.
Note: Because a table is a frame, you can choose how you want the table to interact with
text. See “Controlling the Way Objects and Frames Interact With Text,” next.
These examples use tables:
m“Homework Sheet” on page 52
m“School Report” on page 62
Controlling the Way Objects and Frames Interact With Text
There are three different ways you can position items, such as graphics and frames, in a
word-processing document or frame:
mplace the item inline with the text
mmake the item “float” so that it does not appear inline with the text
mmake the text wrap around the item
28 Chapter 2
Placing an Item Inline With Text
Like a word in a sentence, an inline item moves with the text flow as you edit your document.
The table below outlines how to place an item inline with text.
Object inline with text
Type of item Do this to place it inline with text
Object or frame (that is not
already inline) in the same
AppleWorks document
mCreate the object or frame and select it.
mChoose Cut from the Edit menu.
mClick to place the I-beam pointer where you want the item to
appear in the text, then choose Paste from the Edit menu.
File mSelect the text tool in the Tools window.
mClick to place the I-beam pointer where you want the file to
appear.
mChoose Insert from the File menu and select the file (or drag
it to your document).
Object or frame in another
document or application, or an
item from Clippings or Mac OS
Scrapbook
mCopy the item.
mDouble-click to place the I-beam pointer where you want the
item to appear (make sure nothing in the document is
selected), then choose Paste from the Edit menu.
Shortcut: Select the text tool and double-click to place the
pointer, then drag the item onto your document.
Getting to Know AppleWorks 6 29
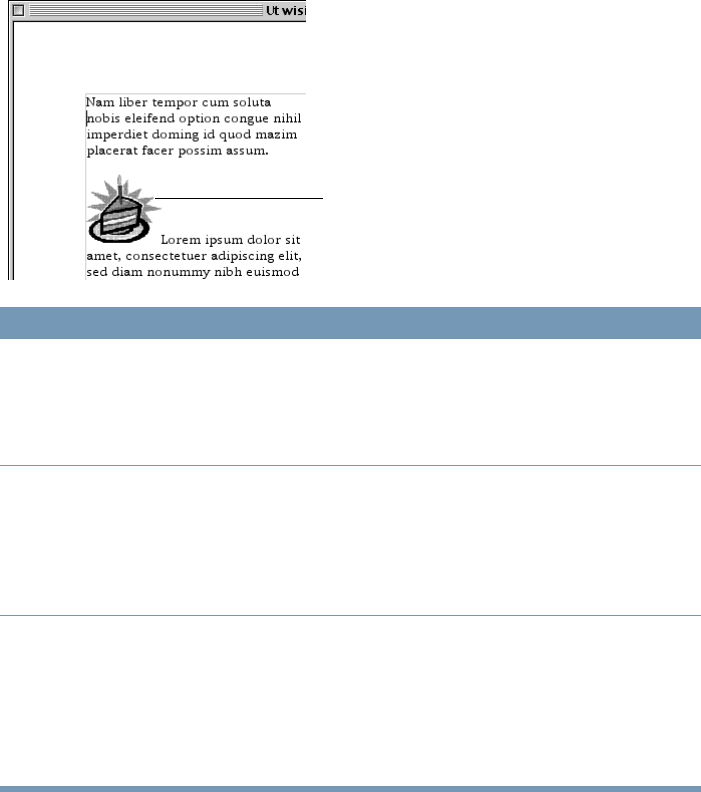
Making an Item “Float” Independently of Text
Unlike an inline item, a floating item does not flow with the text as you edit the document.
You can move a floating item, and you can place it behind text (to create an effect like the
background graphic in the “Agenda” on page 34). The table below outlines how to make an
item float independently of the text.
Note: A floating item does not move unless you move it.
Object floating over text
Type of item Do this to make it float independently of text
Object or frame in the same
AppleWorks document
mCreate the object or frame. (It floats over the text by
default.)
File mSelect the arrow in the Tools window.
mChoose Insert from the File menu and select the file.
Shortcut: Select the arrow, then drag the file to your document.
Object or frame in another
document or application, or an
item from Clippings or Mac OS
Scrapbook
mSelect the arrow in the Tools window.
mCopy and paste (or drag) the item into your document. Do
not click in your document before pasting.
30 Chapter 2
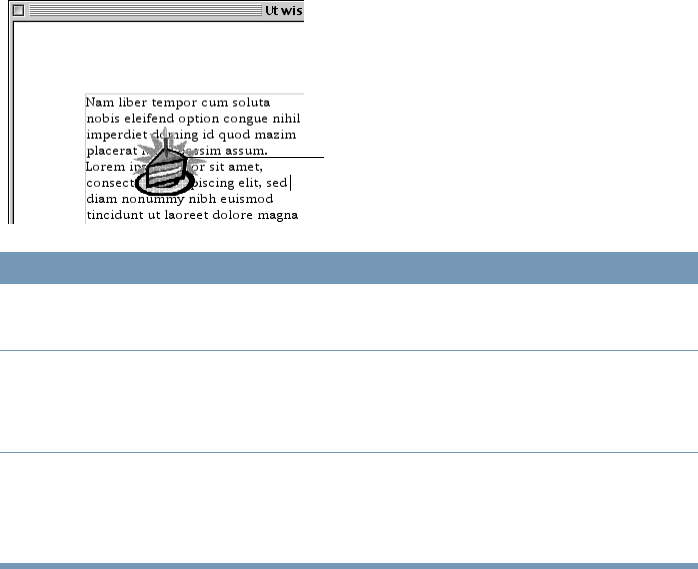
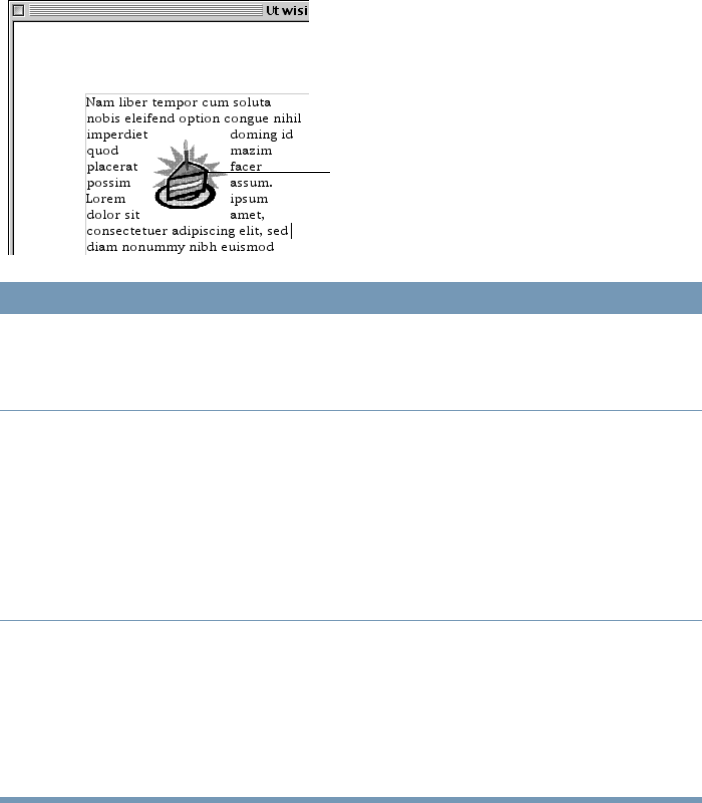
Making Text Wrap Around an Item
The table below outlines how to make text wrap around an item. You can choose Regular or
Irregular text wrap style. The Regular wrap is rectangular, regardless of the shape of the
object. The Irregular wrap fits the shape of the object.
To remove the text wrap effect, choose Text Wrap from the Options menu and select None.
Object with text
wrapping around it
Type of item Do this to make text wrap
Object or frame in the same
AppleWorks document
mCreate the object or frame and select it.
mChoose Text Wrap from the Options menu and choose a text
wrap style.
File mSelect the arrow in the Tools window.
mDo not click in the document.
mChoose Insert from the File menu and select the file (or drag
it to your document).
mSelect the object.
mChoose Text Wrap from the Options menu and choose a text
wrap style.
Object or frame in another
document or application, or
an item from Clippings or Mac
OS Scrapbook
mSelect the arrow in the Tools window.
mCopy and paste (or drag) the item into your document. Do
not click in your document before pasting.
mSelect the item.
mChoose Text Wrap from the Options menu and choose a text
wrap style.
Getting to Know AppleWorks 6 31
Exchanging Documents Between Different Computers and
Applications
Exchanging documents between different computers and applications is easy because
AppleWorks includes document translators that automate conversion from a variety of
formats (including the Windows and Macintosh versions of AppleWorks).
AppleWorks preserves as much as possible of the original document’s colors, layout, and
other formatting options.
Opening a Document From Another Application or Computer
To open a document from another application or computer:
1If the document is on another computer, copy it to your computer. (See “Methods for
Transferring a Document From One Computer to Another,” below.)
2Open the file as usual.
Note: If the file cannot be translated, try choosing a generic file format—for example, Text
for word-processing files, SYLK for spreadsheet files, DIF for database files, Picture or PNG
for drawing files, and JPEG or BMP for painting files. For more information, see “Opening a
Document” in the “AppleWorks Basics” section of AppleWorks Help.
Saving a Document so That It Can Be Opened in Another Application
To save a document so that it can be opened in another application:
1Choose Save As from the File menu and enter a name for the file.
Note: If you’re saving a document on a Macintosh for use on a Windows computer, add the
Windows extension “.CWK” (or “.CWS” for template files) to the end of the filename.
2From the Format pop-up menu, choose a format that is accepted by the other application.
For more information, see “Saving a Document” in the “AppleWorks Basics” section of
AppleWorks Help.
3Select a location for the document.
Methods for Transferring a Document From One Computer to Another
There are a few different ways to transfer documents between computers.
You can
msend the document as an attachment in an electronic mail message (Don’t compress the
file. Many file compression methods are not compatible between Mac OS and Windows.)
mcopy the document to a server on the same network, then copy the document from the
server to the other computer.

32 Chapter 2
mcopy the document onto a removable disk that both computers can read, and insert the
disk into the other computer. For transferring between Mac OS and Windows, it’s best to
use a Windows-formatted disk because your Macintosh can format and read a Windows
disk. (For more information, see the documentation that came with your computer.)
Where to Go From Here
Now you are ready to start working with AppleWorks. As you need them, detailed
instructions are available in AppleWorks Help (as described in “Getting Instructions on
Specific Tasks” on page 8).
To see examples of the kinds of things you can do with AppleWorks, and to be directed to
instructions for specific techniques and features, see Chapter 3, “Examples and Ideas,” next.
Important If given a conversion or copy method choice, choose “binary.”

33
CHAPTER
3
3Examples and Ideas
This chapter includes examples of many of the things you can do with AppleWorks. Each
example tells you where to find instructions for creating elements highlighted there.
Tip: All of these examples are also templates you can use and customize. To access them,
and many more, click the Templates tab in the Starting Points window.
The following examples are included in this section:
mAgenda (p. 34)
mAward Certificate (p. 36)
mBanner (p. 38)
mBrochure (p. 40)
mBusiness Cards (p. 42)
mCalendar (p. 44)
mEvent Tracker (p. 46)
mFlash Cards (Interactive) (p. 48)
mGreeting Card (p. 50)
mHomework Sheet (p. 52)
mLetterhead (p. 54)
mMailing Labels (p. 56)
mPostcard (p. 58)
mPoster (p. 60)
mSchool Report (p. 62)
mSlide Show (p. 64)
LL0865.book Page 33 Thursday, November 18, 1999 5:37 PM

34 Chapter 3
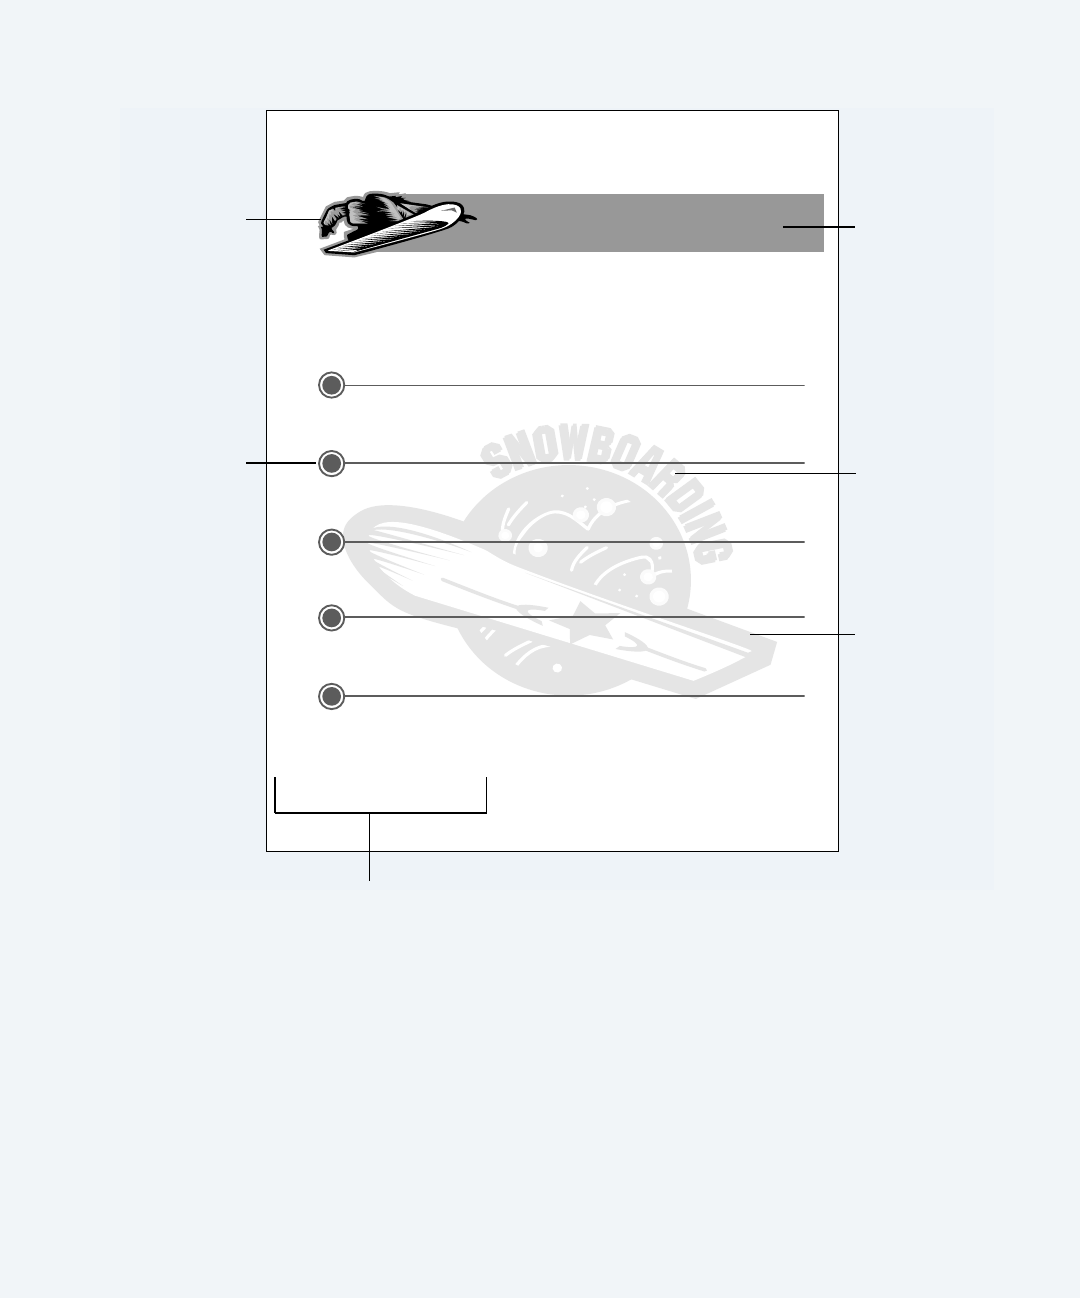
Agenda
The Agenda is a word-processing document.
Tips: A nice way to enhance a design is to use a tinted image as a background for text. When
you do this, choose white as the fill color and apply the Tint command several times in order
to make the image light enough for the text to be clear and easy to read.
Keep the major text elements aligned with each other (in this example they are aligned on
the left margin). This focuses the reader’s eye on content, which is especially important in
decorated documents.
To find out how to Choose AppleWorks Help
from the Help menu, then
draw objects click “Drawing and working with objects,” then “Drawing
objects”
adjust margins click “Working with text (word processing),” then
“Formatting word-processing documents,” then “Setting
document margins”
create a painting frame click “Integrating different kinds of content in a
document (frames),” then “Creating frames”
insert an image click “AppleWorks basics,” then “Inserting a file into a
document”
tint images click “Painting and working with images,” then “Changing
the appearance of painted images,” then “Tinting a
painted image”
manipulate the layering of objects click “Drawing and working with objects,” then
“Manipulating and positioning objects,” then “Moving
objects forward or backward”
LL0865.book Page 34 Thursday, November 18, 1999 5:37 PM
Examples and Ideas 35
Mr. Johnson
Room H17
Meeting February 2, 2000 3:00–5:00 p.m.
AGENDA
Safety First
Backcountry Preparations
Lorem ipsum dolor sit amet, consectetur adipiscing elit,
sed diam nonnumy eiusmod tempor incidunt labore et
dolore magna aliquam era.
Finding the Perfect Fit
Boots
Lorem ipsum dolor sit amet, consectetur adipiscing elit,
sed diam nonnumy eiusmod tempor incidunt labore et
dolore magna aliquam era.
Guest Speaker
Glissade Snowboard’s Greg Pronko
Lorem ipsum dolor sit amet, consectetur adipiscing elit,
sed diam nonnumy eiusmod tempor labore et dolore
magna aliquam era.
Tips and Tricks
Front Side Grabs
Lorem ipsum dolor sit amet, consectetur adipiscing elit,
sed diam nonnumy eiusmod tempor labore etor or labore
et dolore magna aliquam era.
Video
Mack Dawg’s Decade
Lorem ipsum dolor sit amet, consectetur adipiscing elit,
sed diam nonnumy eiusmod tempor labore etorelit, sed
diam nonnumy eiusmod tempor labore etor etorelit, sed
diam nonnumy eiusmod tempor labore etor
Bracker Jr. High Snowboarding Club
Bracker Jr. High Snowboarding Club
1
2
3
4
5
Floating image
inserted over
drawn banner
Faded background
created using
painting frame
with tinted image
Lines and circles
created with
drawing tools
Blair font
Tremor font
Custom margin
LL0865.book Page 35 Thursday, November 18, 1999 5:37 PM

36 Chapter 3
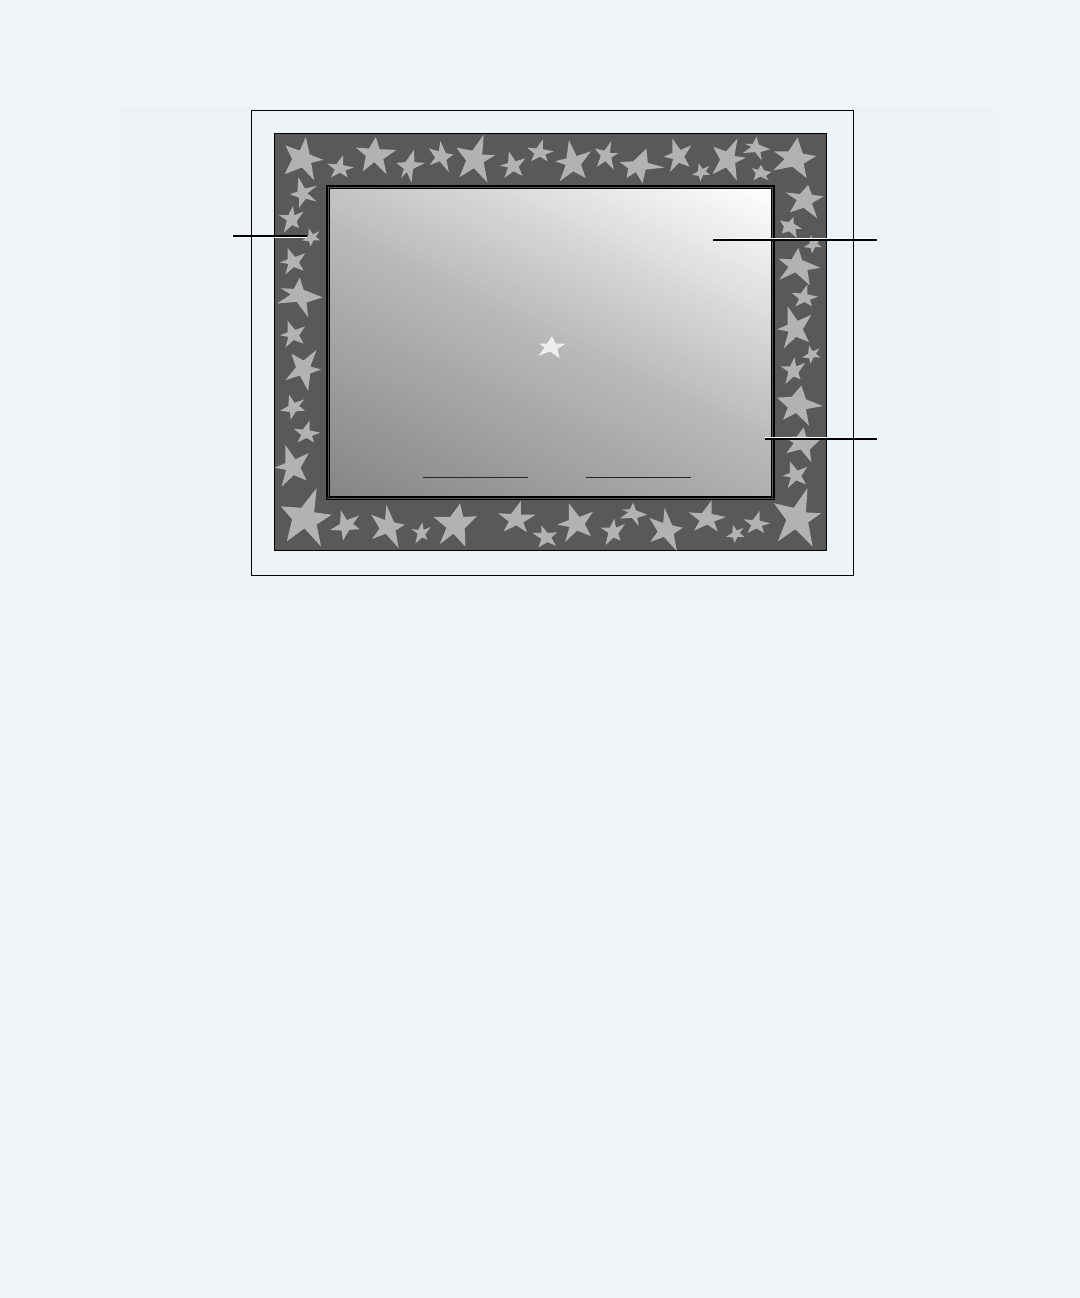
Award Certificate
The Award Certificate is a drawing document.
Tips: Because certificates usually contain primarily text, a key to designing them well is to
use two or three fonts and text sizes that contrast nicely with each other.
To create the type of drop-shadow lettering you see here, select the text and copy and paste
it. Then, move it behind and just slightly below the top layer of text. Use the Accents window
to make the shadow text a darker color.
You can quickly generate a variety of certificates by using the Certificate Assistant. (See
“Taking Advantage of Assistants and Templates” on page 12.)
To find out how to Choose AppleWorks Help
from the Help menu, then
create shapes with drawing tools click “Drawing and working with objects,” then “Drawing
objects”
choose colors, including gradients click “Drawing and working with objects,” then
“Changing colors and other attributes (Accents),” then
“Changing fill colors and other attributes”
LL0865.book Page 36 Thursday, November 18, 1999 5:37 PM
Examples and Ideas 37
Student of
the Month
Student of
the Month
School Name High School
October 1999
Student Name
Home Room Teacher Principal
Jokerman font
Gradient fill
used for
background
Shapes
created with
drawing tools
LL0865.book Page 37 Thursday, November 18, 1999 5:37 PM

38 Chapter 3
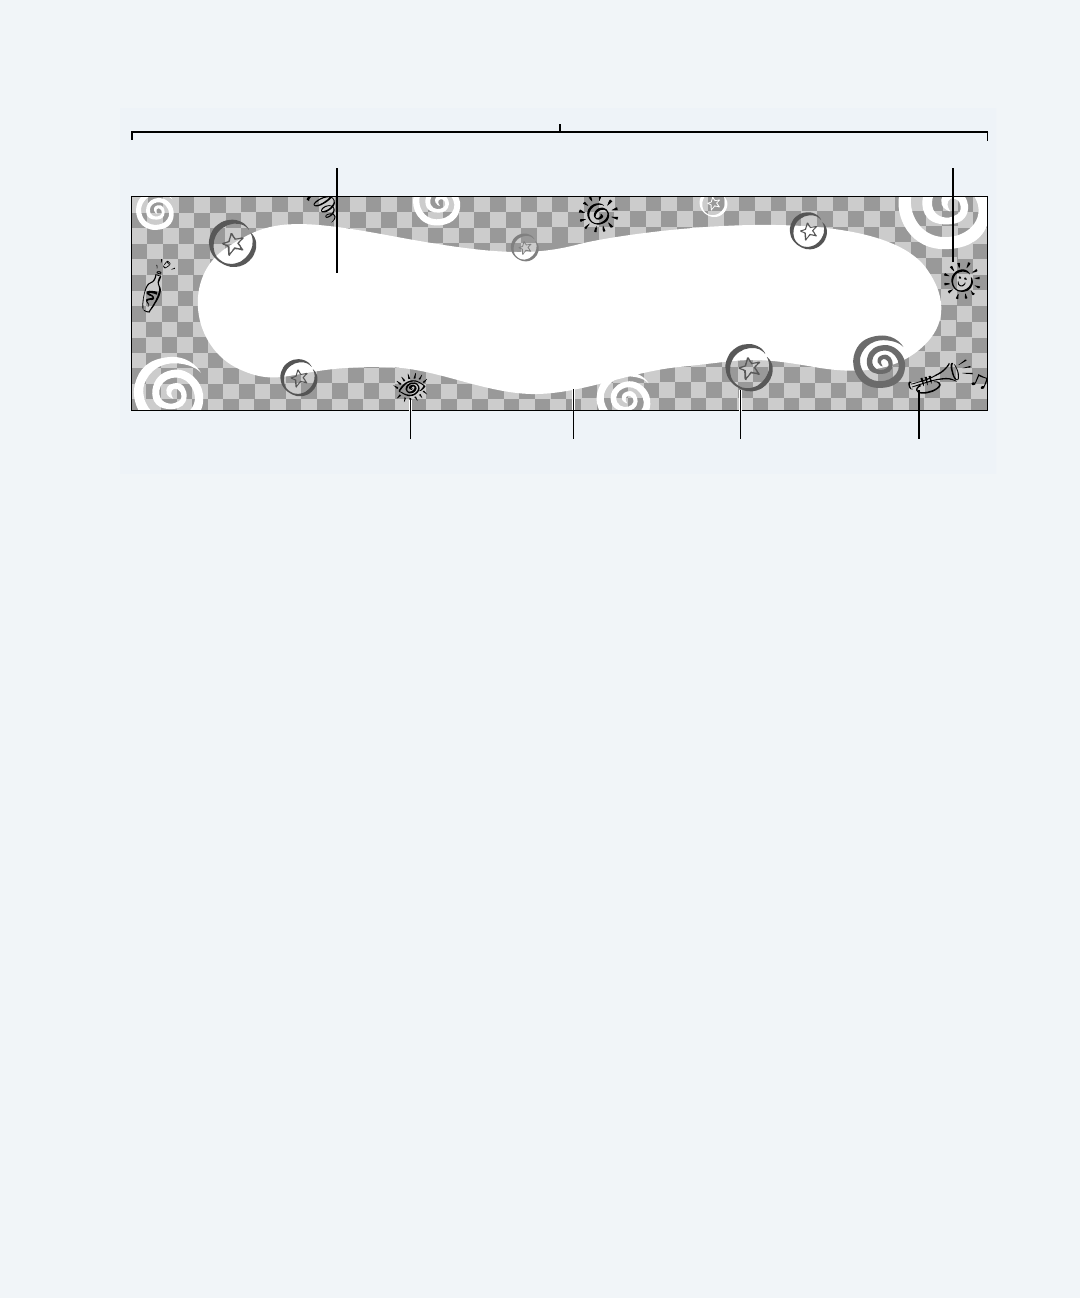
Banner
The Banner is a drawing document.
Tips: Before you start working, orient the page horizontally by choosing Page Setup from
the File menu and clicking the right icon next to “Orientation.”
To see the entire banner while working in the document, click the zoom-out control. (See
“Introduction to the AppleWorks Windows” on page 14.)
If your printer does not support printing banner-size documents, you can print the banner as
a series of pages and tape them together. As you design, you can avoid inconvenient page
breaks by turning on Page View so you can see where the page breaks occur. Choose Page
View from the Window menu.
To create text that is larger than the largest available size, type it and resize it in a painting
frame.
To find out how to Choose AppleWorks Help
from the Help menu, then
manipulate the layering of objects click “Drawing and working with objects,” then
“Manipulating and positioning objects,” then “Moving
objects forward or backward”
add pages across (horizontally) click “Drawing and working with objects,” then
“Formatting a drawing document,” then “Adding and
removing pages in a drawing document”
format text click “Working with text (word processing),” then
“Changing the appearance of text”
LL0865.book Page 38 Thursday, November 18, 1999 5:37 PM
Examples and Ideas 39
˝
ongratulations!!
C
Party font (Option-?)
Party font
(Option-R)
Party font
Party font
(Zero key)
Party font
(= key)
Document width extended by adding pages
Layered
objects
LL0865.book Page 39 Thursday, November 18, 1999 5:37 PM

40 Chapter 3
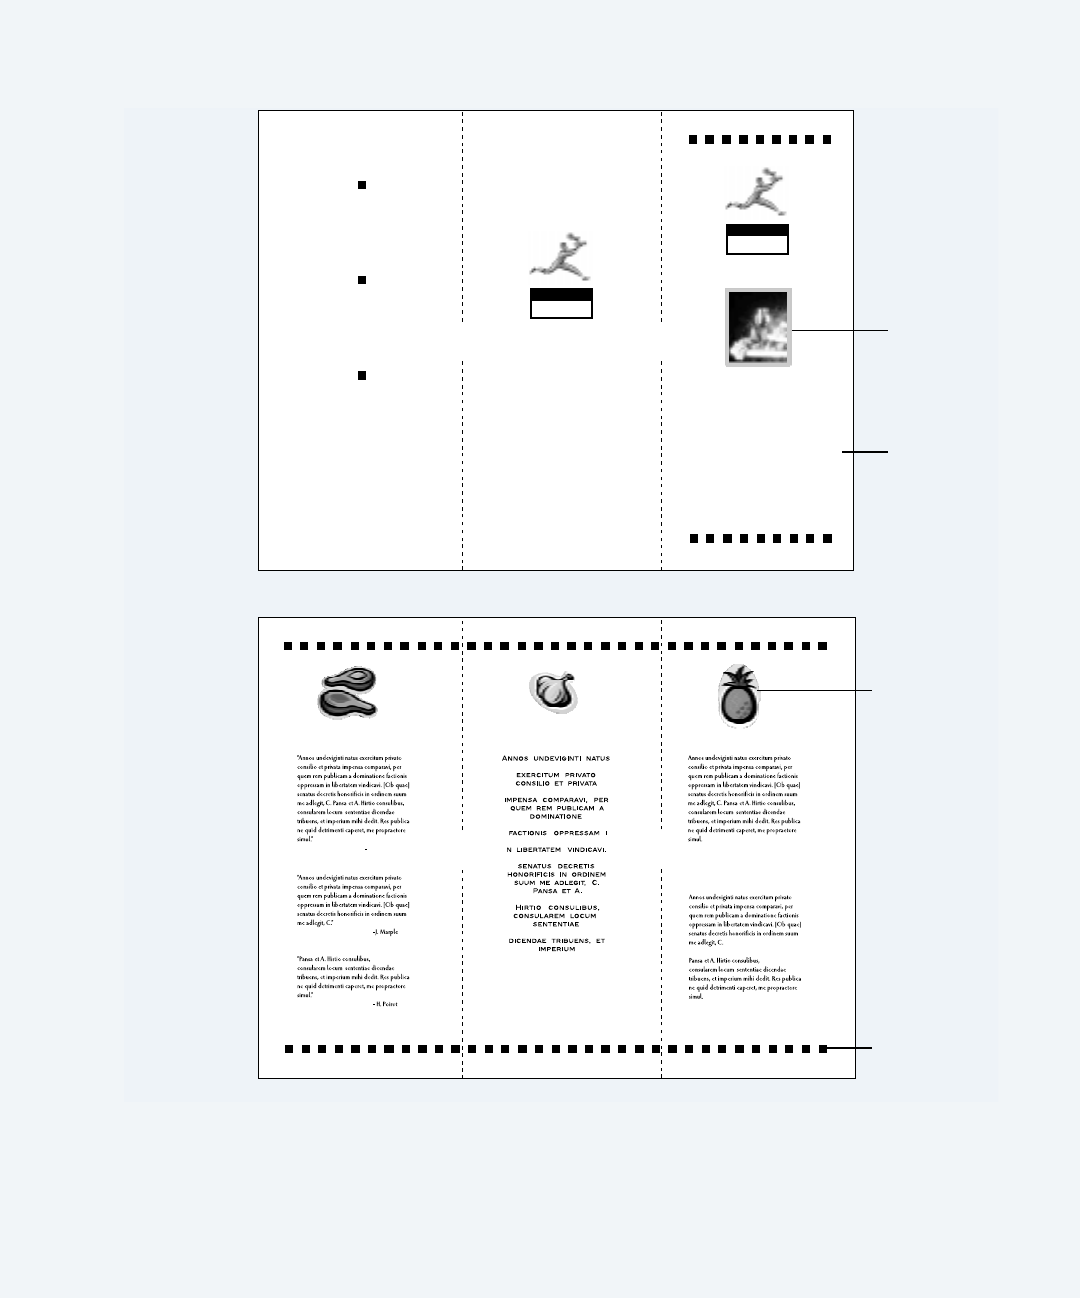
Brochure
The Brochure is a drawing document.
Tips: Before you start working, orient the page horizontally by choosing Page Setup from
the File menu and clicking the right icon next to “Orientation.”
To see the entire front or back of the brochure while working in the document, click the
zoom-out control. (See “Introduction to the AppleWorks Windows” on page 14.)
Repeated use of graphic elements (like the squares in this example) reinforces the style.
Repeated use of the logo can also be effective.
To find out how to Choose AppleWorks Help
from the Help menu, then
add pages click “Drawing and working with objects,” then
“Formatting a drawing document,” then “Adding and
removing pages in a drawing document”
draw shapes click “Drawing and working with objects,” then “Drawing
objects,” then “Drawing shapes”
manipulate the layering of objects click “Drawing and working with objects,” then
“Manipulating and positioning objects,” then “Moving
objects forward or backward”
add clip art click “Working smarter,” then “Using Clippings”
create text frames click “Integrating different kinds of content in a
document (frames),” then “Creating frames”
resize objects by scaling click “Drawing and working with objects,” then
“Manipulating and positioning objects,” then “Resizing
objects”
align objects click “Drawing and working with objects,” then
“Manipulating and positioning objects,” then “Aligning
objects”
LL0865.book Page 40 Thursday, November 18, 1999 5:37 PM
Examples and Ideas 41
Outside
SUPERB
CATERING
FOR ALL
OCCASIONS
1425 Sunshine Way
Anytown, USA 95595
tel: 555-555-2355
fax: 555-555-2345
FABULOUS
PRESENTATION
REASONABLE
PRICES
QUALITY
INGREDIENTS
BB
BB OO
OO BB
BB BB
BB YY
YY ’’
’’ SS
SS
c a t e r i n g
s e r v i c e
BB
BB OO
OO BB
BB BB
BB YY
YY ’’
’’ SS
SS
c a t e r i n g
s e r v i c e
CUSTOMER COMMENTS
T. Beresford
SAMPLE MENU
FABULOUS DESSERTS
QUALITY INGREDIENTS
Scaled clip art
Squares drawn,
copied, and
aligned to create
a border pattern
Inside
Fold
Fold
Inserted image
Text frame
Fold
Fold
LL0865.book Page 41 Thursday, November 18, 1999 5:37 PM

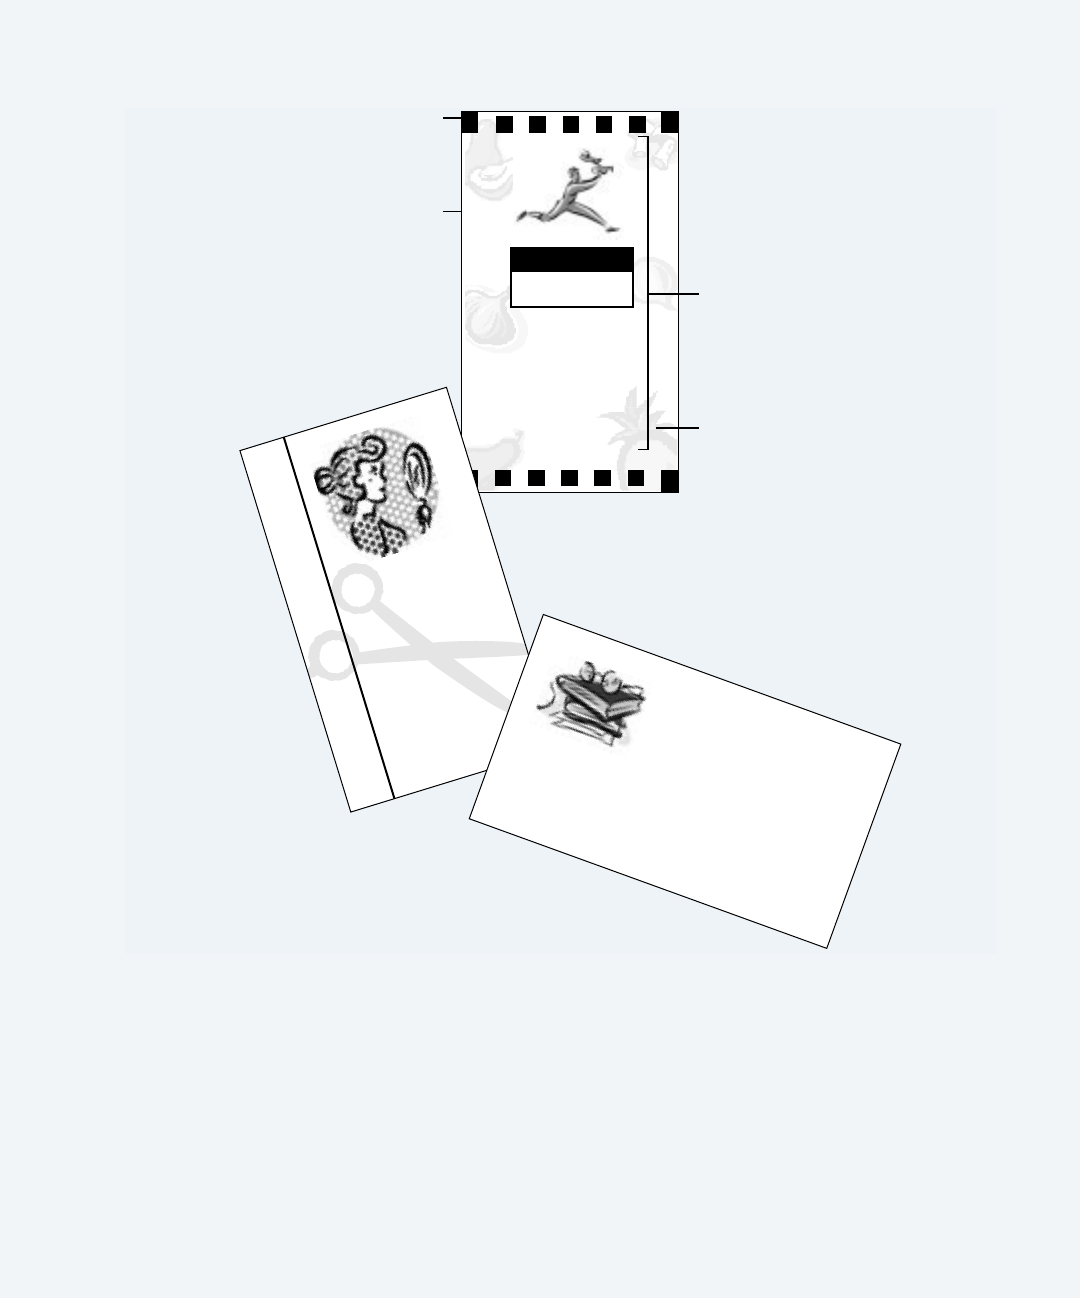
42 Chapter 3
Business Cards
The Business cards are drawing documents.
Tips: Color printing can make your business card more distinctive. But, if you find it too
expensive, a single nonblack color can create a more affordable yet attractive card. (Be sure
to choose an ink that is dark enough to be easy to read.)
When you use a tinted image as a background for text, choose white as the fill color and
apply the Tint command several times in order to make the image light enough for the text
to be clear and easy to read.
Use a master page to create border guides, then delete them before printing.
See “Letterhead” on page 54 and “Mailing Labels” on page 56 for examples of how the
business card text and graphic elements can be reused in different pieces.
To find out how to Choose AppleWorks Help
from the Help menu, then
create a master page click “Drawing and working with objects,” then “Creating
a common background or border for multiple pages”
draw shapes click “Drawing and working with objects,” then “Drawing
objects,” then “Drawing shapes”
align objects click “Drawing and working with objects,” then
“Manipulating and positioning objects,” then “Aligning
objects”
create a painting frame click “Integrating different kinds of content in a
document (frames),” then “Creating frames”
tint images click “Painting and working with images,” then “Changing
the appearance of painted images,” then “Tinting a
painted image”
move an object to the background click “Drawing and working with objects,” then
“Manipulating and positioning objects,” then “Moving
objects forward or backward”
LL0865.book Page 42 Thursday, November 18, 1999 5:37 PM
Examples and Ideas 43
Bobby LaPierre
Head Chef
1425 Sunshine Way
Anytown, USA 95595
tel: 555-555-2355
fax: 555- 555-2345
email: bobb
y
@net.com
BB
BB OO
OO BB
BB BB
BB YY
YY ’’
’’ SS
SS
c a t e r i n g
s e r v i c e
Background is a
painting frame that
contains scaled
and tinted clip art.
Edge trim created
by drawing squares
Master page
used for
border guides
Objects center
aligned
retro hair salon
Betsy Johnson
Hair Designer
1425 Sunshine Way
Anytown, USA 95595
tel: 555-555-2355
fax: 555-555-2345
Judy Smith
Judy Smith
Teacher
1425 Sunshine Way
Anytown, USA 95595
tel: 555-555-2355
fax: 555-555-2345
email: judys@internet.com
LL0865.book Page 43 Thursday, November 18, 1999 5:37 PM

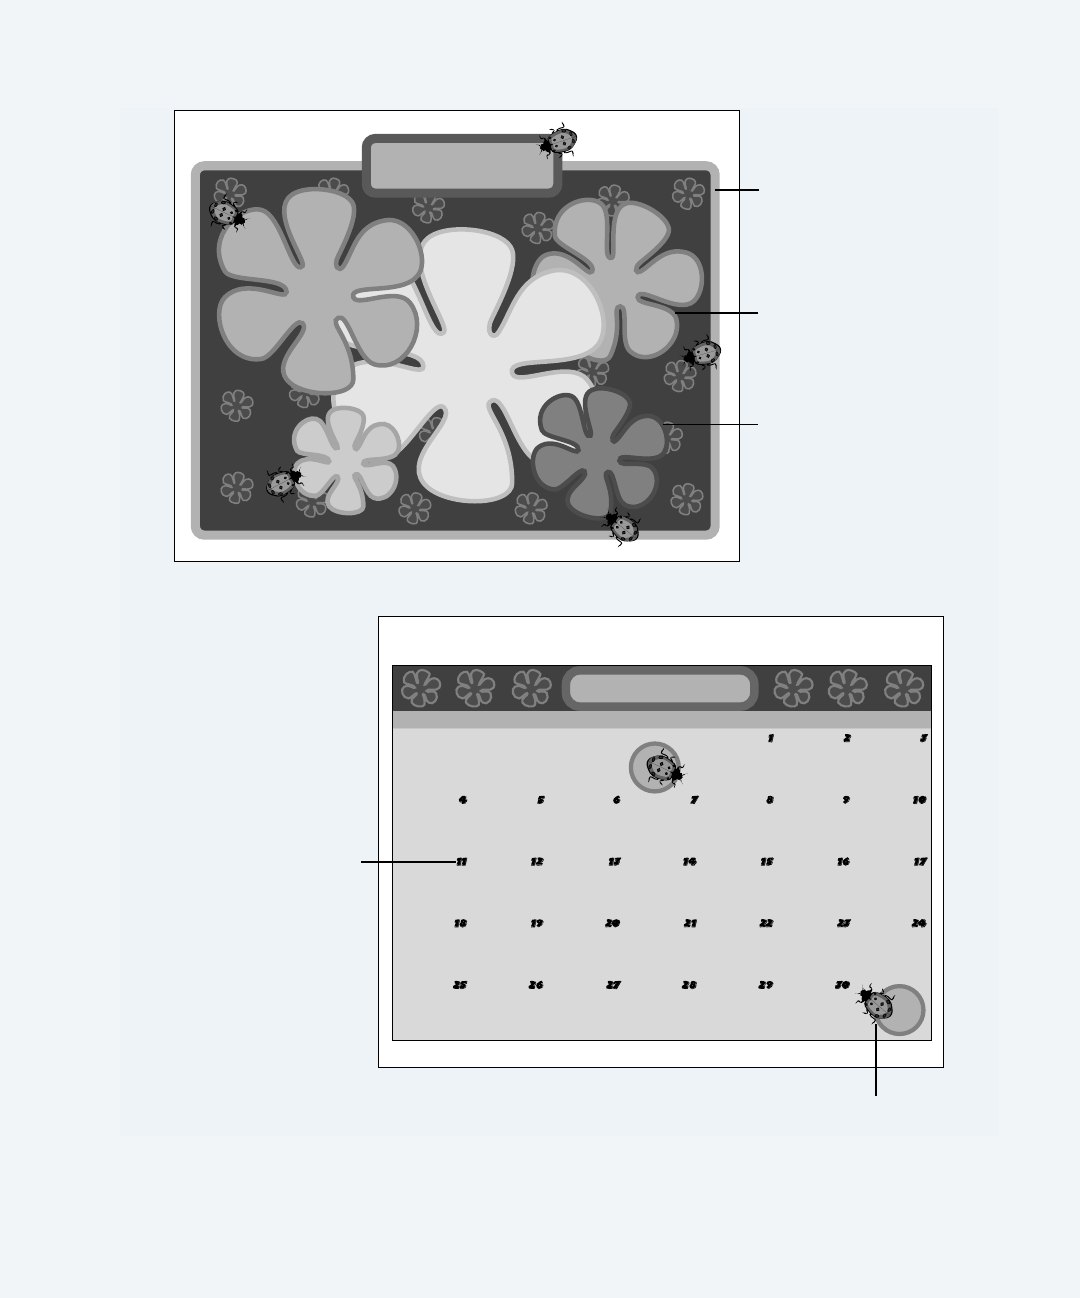
44 Chapter 3
Calendar
The Calendar is a drawing document.
Tip: To enliven a document, try placing some elements outside of the lines. For example,
use clip art that crosses the outer border.
You can quickly generate a variety of calendars by using the Calendar Assistant. (See “Taking
Advantage of Assistants and Templates” on page 12.)
To find out how to Choose AppleWorks Help
from the Help menu, then
draw shapes click “Drawing and working with objects,” then “Drawing
objects,” then “Drawing shapes”
use the Accents window to change
the colors of text and objects
click “Drawing and working with objects,” then
“Changing colors and other attributes (Accents)”
add clip art click “Working smarter,” then “Using Clippings”
use the Bezier tool to draw shapes
with precise curves
click “Drawing and working with objects,” then “Drawing
objects,” then “Drawing straight lines, arcs, and curves”
use the reshape feature click “Drawing and working with objects,” then
“Changing the appearance of objects,” then “Reshaping
objects and curves”
resize objects by scaling click “Drawing and working with objects,” then
“Manipulating and positioning objects,” then “Resizing
objects”
LL0865.book Page 44 Thursday, November 18, 1999 5:37 PM
Examples and Ideas 45
Bertram font
Clip art
APRIL
SUN MON TUE WED THU FRI SAT
APRIL
Flowers drawn with
Bezier tool and perfected
with reshape feature
Scaled objects
Basic shapes and colors
created with drawing tools
and Accents window
LL0865.book Page 45 Thursday, November 18, 1999 5:37 PM

46 Chapter 3
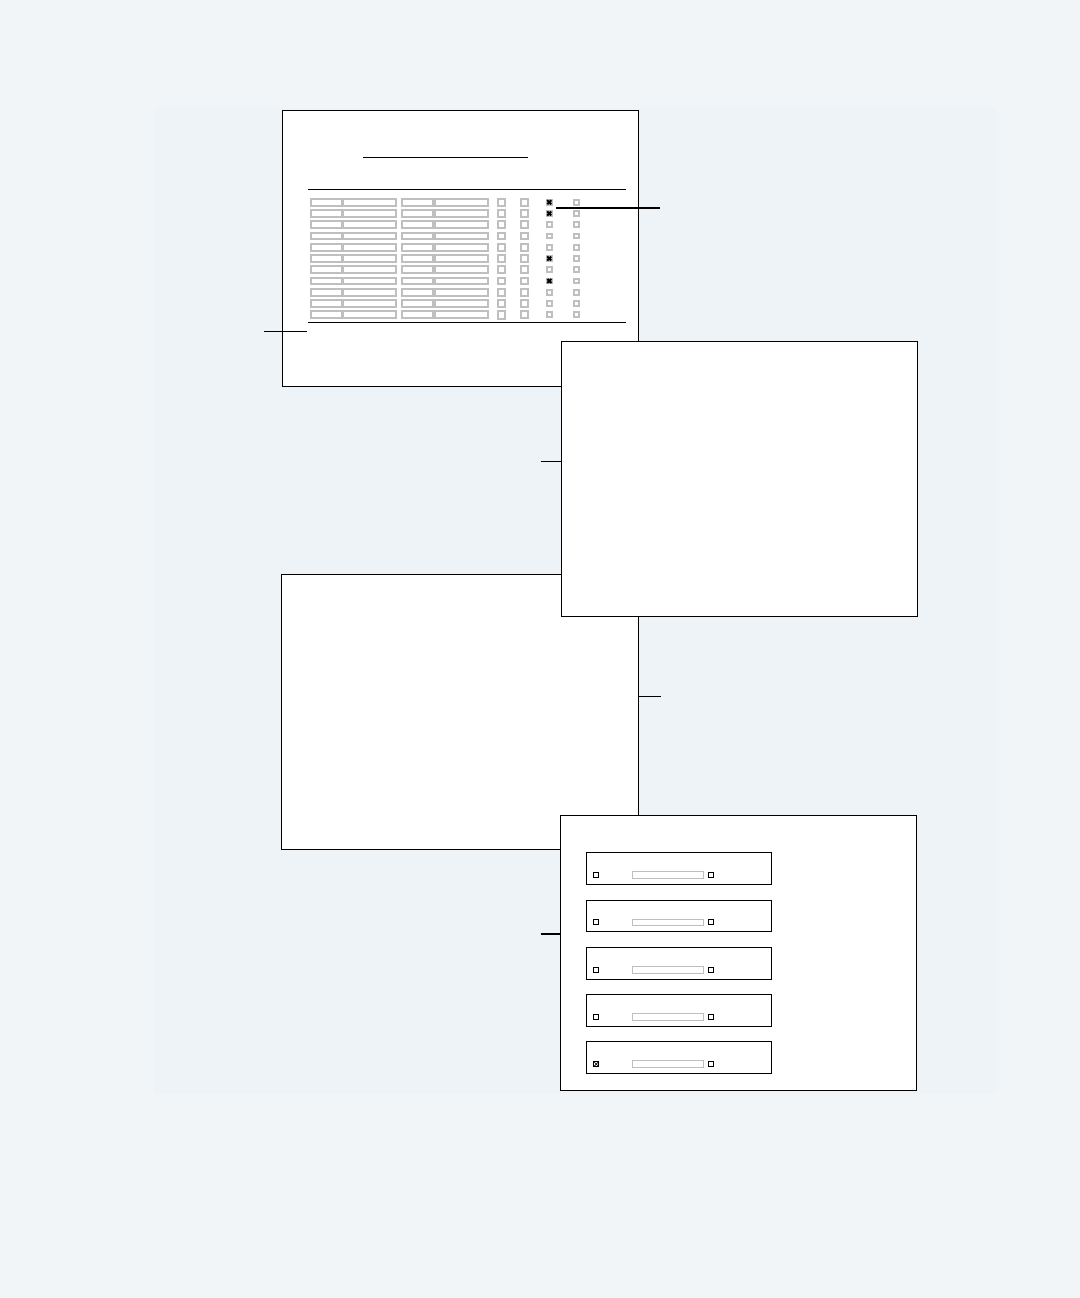
Event Tracker
The Event Tracker is a database document. Although it looks like four different documents,
it is actually four different layouts generated from one database. Each layout serves a different
purpose.
To find out how to Choose AppleWorks Help
from the Help menu, then
create and work with the different
database modes
click “Organizing information (databases),” then “About
databases”
create labels from a database
document
click “Organizing information (databases),” then
“Creating and printing labels”
design multiple database layouts for
different needs
click “Organizing information (databases),” then
“Creating and working with database layouts”
create layouts (“named reports”) with
customized searches and sorts
click “Organizing information (databases),” then
“Creating and working with database reports”
generate a summary of information in
a database
click “Organizing information (databases),” then
“Summarizing database data”
LL0865.book Page 46 Thursday, November 18, 1999 5:37 PM
Examples and Ideas 47
First Name Last Name Guest First Guest Last AttendedInvited Confirmed
RSVP
RDW
G U E S T L I S T
s
s
Alex Annis Pet e Bernsen 2
Sylvia Annis Dan Baker 2
Mark Applebaum Kari Applebaum 2
Bill Baker Alex Baker 2
Nancy DuArte Mark DuArte 2
Stephen Hall Melanie Hall 2
Shelia Horovitz Ken Horovitz 2
Laura O’Hare John O’Hare 22
Jolaine Phillips Trudy Olafsdottir 42
Kate Wormington Dan Johnson 2
David Marusich Sara Marusich
GuestsCurrently RSVP’d
6
Guests Invited
20
5 Guests Confirmed
S U M M A R Y
G U E S T L I S T
A
Al
A
P
Ber
&
Alex Annis & Pete Bernsen
Sl
A
D
Ba
&
S
y
lvia Annis & Dan Baker
M
A
K
Ap
&
Mark A
pp
lebaum & Kari A
pp
lebaum
B
Bill
Al
Ba
&
Bill Baker & Alex Baker
D
K
B
Da
&
Ken Dad
g
ar & Bett
y
Dad
g
ar
N
M
Du
&
Nanc
y
DuArte & Mark DuArte
H
Track attendance
in Browse mode
Alphabetical layout
created by using a
named report
Named sort
determines who
needs to be
thanked
Calculation
summary easy
to generate 1234 Ex-A
pp
le Wa
y
Anytown USA 95595
Alex Annis & Pete Bernsen
1234 i CEO Wa
y
Anytown USA 95595
Sylvia Annis & Dan Baker
1234 Hands
p
rin
g
Wa
y
Anytown USA 95595
Mark Applebaum & Kari Applebaum
1234 Develo
p
er Relations Wa
y
Anytown USA 95595
Bill Baker & Alex Baker
1234 Director Wa
y
Anytown USA 95595
Ken Dadgar & Betty Dadgar
1234 CFO Wa
y
Anytown USA 95595
Nancy DuArte & Mark DuArte
1235 Director Wa
y
Anytown USA 95595
Stephen Hall & Melanie Hall
1234 Product Mana
g
er Wa
y
Anytown USA 95595
Shelia Horovitz & Ken Horovitz
Used Label Assistant to
generate mailing labels
from database
G I F T L I S T
T
h
an
k
e
d
?Receive
d
Gi
f
t
Alex Annis & Pete Bernsen
T
h
an
k
e
d
?
Sylvia Annis & Dan Baker
T
h
an
k
e
d
?
Mark Applebaum & Kari Applebaum
T
h
an
k
e
d
?
Bill Baker & Alex Baker
T
h
an
k
e
d
?
Mone
y
Ken Dadgar & Betty Dadgar
Received Gift
Received Gift
Received Gift
Received Gift
LL0865.book Page 47 Thursday, November 18, 1999 5:37 PM

48 Chapter 3
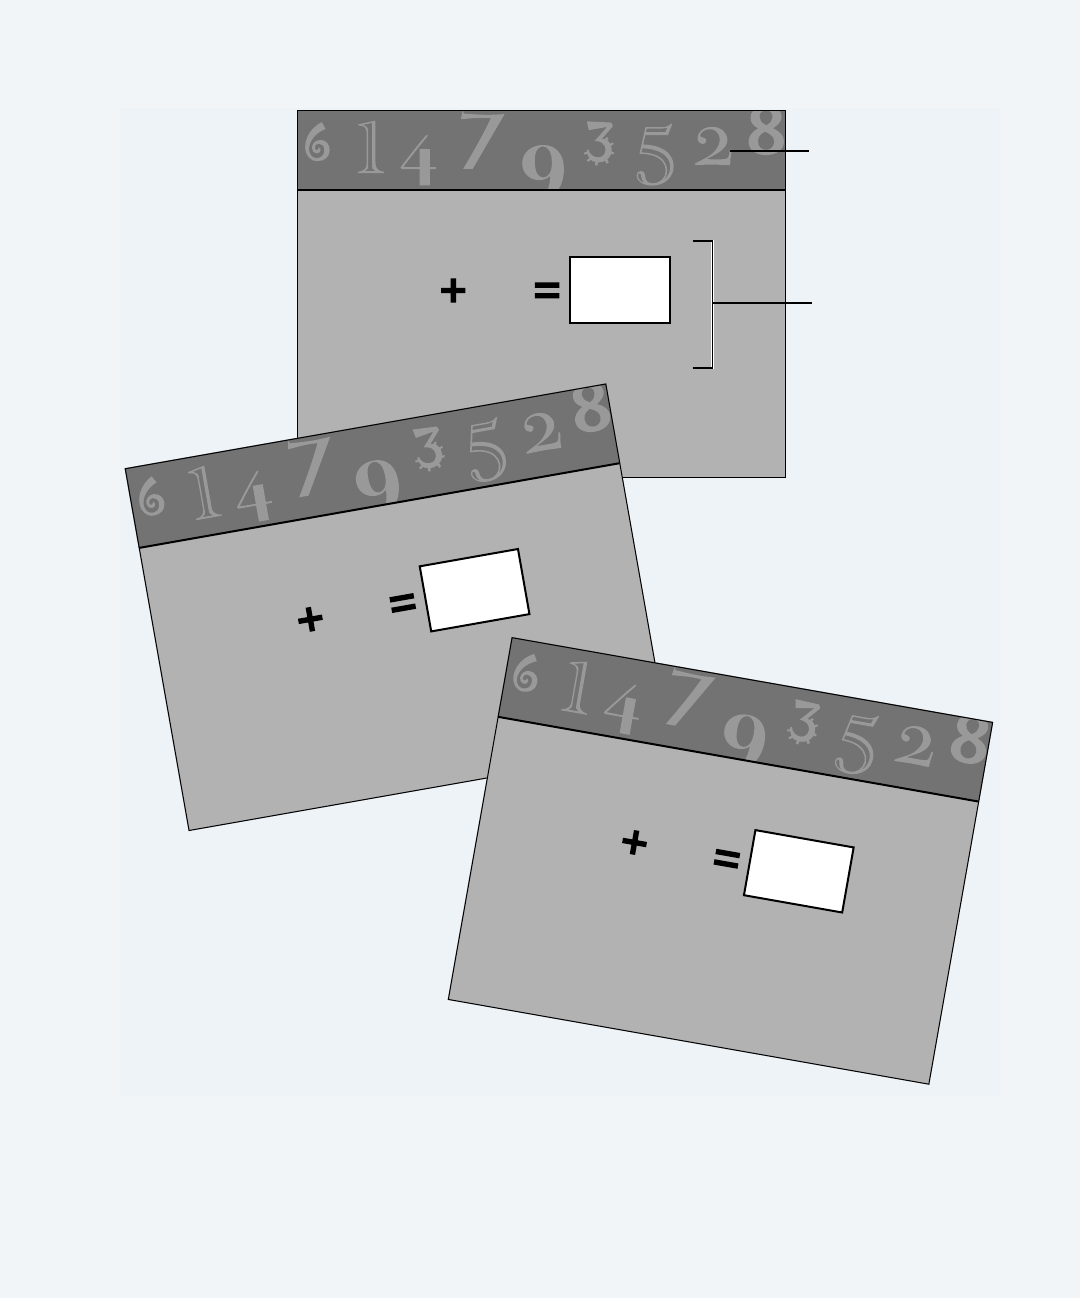
Flash Cards (Interactive)
The interactive Flash Cards are a drawing document with a spreadsheet frame. Kids type a
number and press the Enter key, and a message tells them whether or not the answer is
correct. When the answer is correct, users are prompted to choose the Calculate Now
command for another flash card.
To find out how to Choose AppleWorks Help
from the Help menu, then
add a spreadsheet frame click “Integrating different kinds of content in a
document (frames),” then “Creating frames”
work with spreadsheets click “Working with numbers (spreadsheets),” then
“About spreadsheets”
design spreadsheets to perform
calculations
click “Working with numbers (spreadsheets),” then
“Using formulas and functions in a spreadsheet”
LL0865.book Page 48 Thursday, November 18, 1999 5:37 PM
Examples and Ideas 49
ADDITION TO TEN
36
Click in the white box, type your answer, and press Enter.
Bertram font
Spreadsheet frame
containing a formula
that automatically
generates a response
when answers are
entered
ADDITION TO TEN
√ Correct! Choose 'Calculate Now' for more.
71 8
ADDITION TO TEN
Try again! Type a smaller number.
3610
LL0865.book Page 49 Thursday, November 18, 1999 5:37 PM

50 Chapter 3
Greeting Card
The Greeting Card is a drawing document.
Tip: Avery paper #3273 is a heavy stock that’s ideal for greeting cards, and it’s scored for
easy, clean folding. (Make sure your printer can use a heavier stock.)
To find out how to Choose AppleWorks Help
from the Help menu, then
draw objects click “Drawing and working with objects,” then “Drawing
objects”
resize objects click “Drawing and working with objects,” then
“Manipulating and positioning objects,” then “Resizing
objects”
create Bezier curves with the Bezier
tool
click “Drawing and working with objects,” then “Drawing
objects,” then “Drawing straight lines, arcs, and curves”
use colors and wallpapers from the
Accents window
click “Drawing and working with objects,” then
“Changing colors and other attributes (Accents)”
align objects click “Drawing and working with objects,” then
“Manipulating and positioning objects,” then “Aligning
objects”
manipulate the layering of objects click “Drawing and working with objects,” then
“Manipulating and positioning objects,” then “Moving
objects forward or backward”
choose text fonts and colors click “Working with text (word processing),” then
“Changing the appearance of text”
LL0865.book Page 50 Thursday, November 18, 1999 5:37 PM
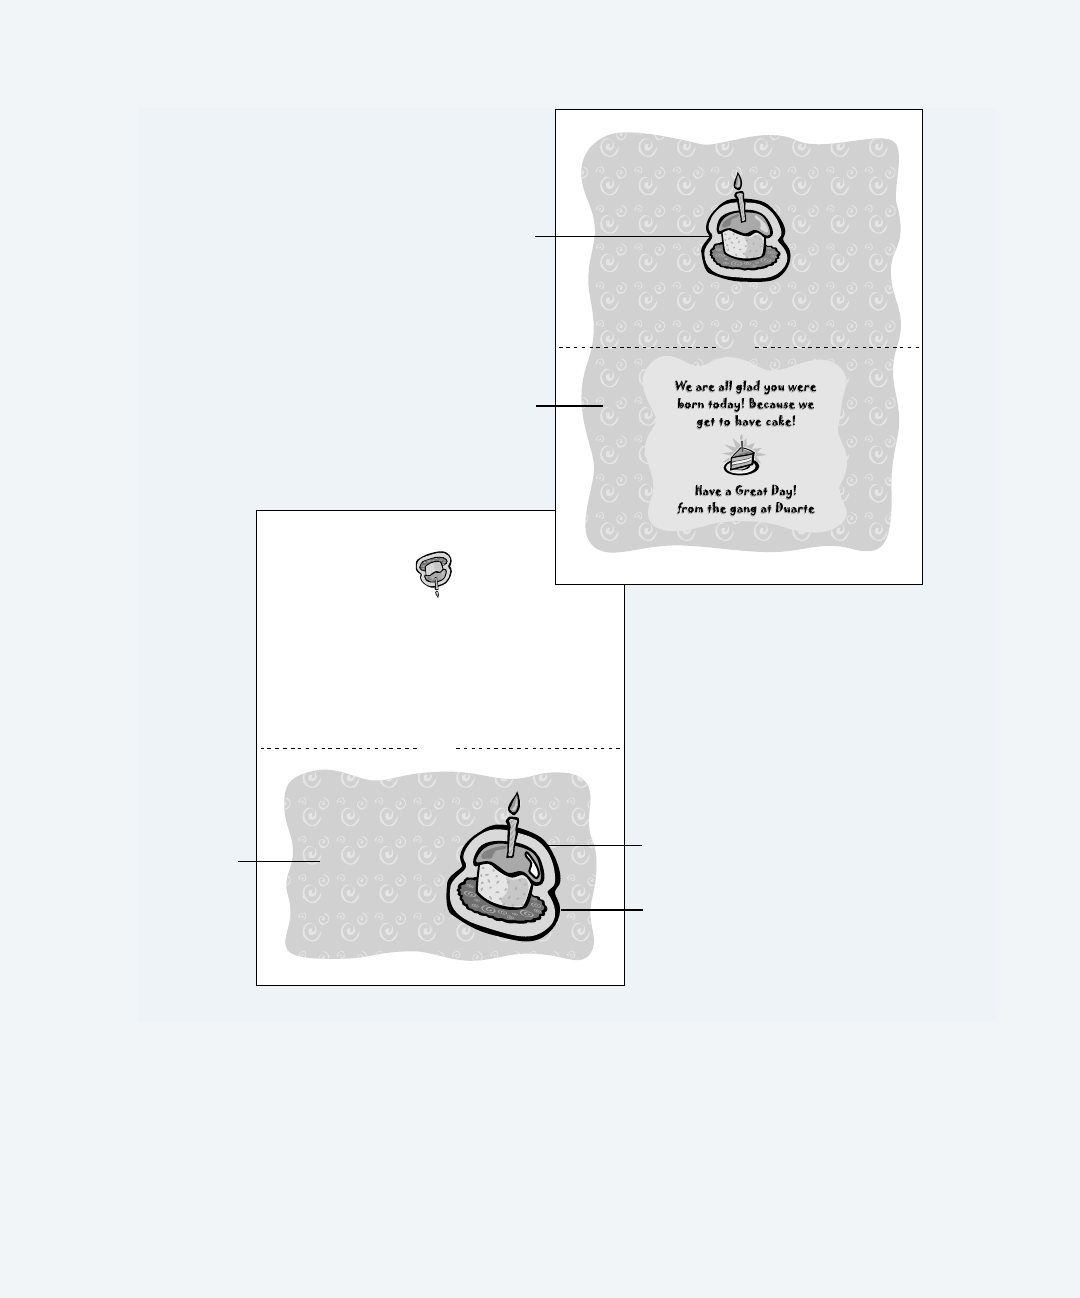
Examples and Ideas 51
Happy
Birthday,
Lindy!
Happy
Birthday,
Lindy!
Diandra’s Creations!
Jokerman
font
Resized object
Background pattern
created by choosing a
wallpaper from the
Accents window
Curved shapes created
with Bezier tool
Outside
Inside
Fold
Fold
Layered objects
LL0865.book Page 51 Thursday, November 18, 1999 5:37 PM

52 Chapter 3
Homework Sheet
The Homework Sheet is a drawing document.
Tips: Use the reshape feature repeatedly until you’re happy with the object. Draw
temporary lines to use as guides when creating a straight row of objects, then delete them
before printing.
To find out how to Choose AppleWorks Help
from the Help menu, then
use the drawing tools, including the
irregular polygon tool
click “Drawing and working with objects,” then “Drawing
objects,” then “Drawing shapes”
use the reshape feature click “Drawing and working with objects,” then
“Changing the appearance of objects,” then “Reshaping
objects and curves”
use the Bezier tool to draw shapes
with precise curves
click “Drawing and working with objects,” then “Drawing
objects,” then “Drawing straight lines, arcs, and curves”
add text frames click “Integrating different kinds of content in a
document (frames),” then “Creating frames”
add a table click “Creating tables”
LL0865.book Page 52 Thursday, November 18, 1999 5:37 PM
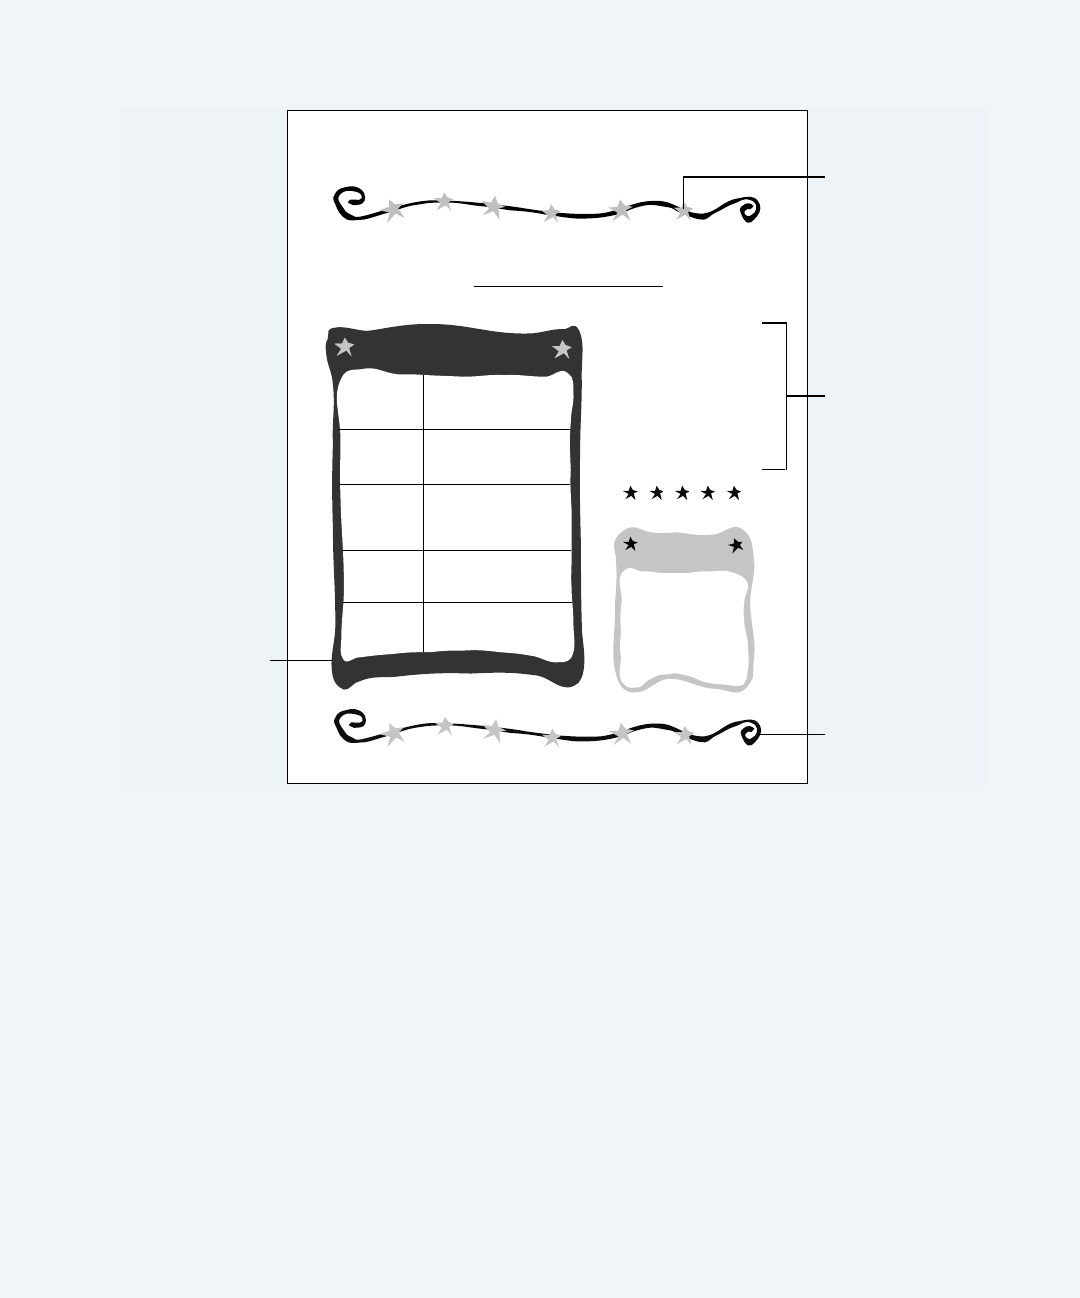
Examples and Ideas 53
Room 15, June 1-5
Name:
m
Monday
Assignments Class update
The year is almost over.
We will finish the year with
our nutrition unit in science,
social studies, and reading.
Don’t forget
6/16 Last day of school
6/29 Summer school begins
Challenge
Write the names
of four states that
begin with a “w.”
Find them on a
U.S. map.
hoework
Tuesday
Wednesday
Thursday
Friday
Read 20 minutes and record
Spelling: Reviews 13, 14
Math: Time p. 388, 293
Practice poem
Read 20 minutes and record
Spelling: Reviews 11, 12
Math: Time p. 327, 337
Practice poem
Read 20 minutes and record
Spelling: Reviews 9, 10
Reading: using I, Are, and
Am p. 316
Practice poem
Read 20 minutes and record
Spelling: Word #100
Math: Classifying by shape
Practice poem
Read 20 minutes and record
Spelling: Word #90
Reading: More verbs p. 51
Practice poem
Bezier curves
Table created with
table frame tool,
then decorated
with drawing tools
Text frame
Stars created with
irregular polygon tool
and reshape feature
LL0865.book Page 53 Thursday, November 18, 1999 5:37 PM

54 Chapter 3
Letterhead
The Letterhead is a word-processing document.
Tip: When you use a tinted image as a background for text, choose white as the fill color
and apply the Tint command several times in order to make the image light enough for the
text to be clear and easy to read.
To find out how to Choose AppleWorks Help
from the Help menu, then
draw shapes click “Drawing and working with objects,” then “Drawing
objects,” then “Drawing shapes”
add a painting or text frame click “Integrating different kinds of content in a
document (frames),” then “Creating frames”
add clip art click “Working smarter,” then “Using Clippings”
tint images click “Painting and working with images,” then “Changing
the appearance of painted images,” then “Tinting a
painted image”
resize objects click “Drawing and working with objects,” then
“Manipulating and positioning objects,” then “Resizing
objects”
push an object to the background of a
document
click “Drawing and working with objects,” then
“Manipulating and positioning objects,” then “Moving
objects forward or backward”
change line spacing click “Working with text (word processing),” then
“Formatting paragraphs,” then “Changing line and
paragraph spacing”
save a document as a custom
template
click “Working smarter,” then “Using templates,” then
“Creating your own templates”
LL0865.book Page 54 Thursday, November 18, 1999 5:37 PM
Examples and Ideas 55
Annos undeviginti natus exercitum privato consilio et privata
impensa comparavi, per quem rem publicam a dominatione
factionis oppressam in libertatem vindicavi. [Ob quae] senatus
decretis honorificis in ordinem suum me adlegit, C. Pansa et A.
Hirtio consulibus, consularem locum sententiae dicendae tribuens, et
imperium mihi dedit. Res publica ne quid detrimenti caperet, me
propraetore simul cum consulibus providere iussit. Populus autem
eodem anno me consulem, cum cos. uterque bello cecidisset, et
triumvirum rei publicae constituendae creavit.
Qui parentem meum trucidaverunt, eos in exilium expuli iudiciis
legitimis ultus eorum facinus, et postea bellum inferentis rei
publicae vici bis acie.
Bella terra et mari civilia externaque toto in orbe terrarum saepe
gessi, victorque omnibus veniam petentibus civibus peperci.
Externas gentes, quibus tuto ignosci potuit, conservare quam
excidere malui. Millia civium Romanorum sub sacramento meo
fuerunt circiter quingenta. Ex quibus deduxi in colonias aut remisi in
municipia sua stipendis emeritis millia aliquanto plura quam
trecenta, et iis omnibus agros adsignavi aut pecuniam pro praemiis
militiae dedi. Naves cepi sescentas praeter eas, si quae minores
quam triremes fuerunt.
Sincerely,
Judy Smith
Judy Smith
1425 Sunshine Way
Anytown, USA 95595
tel: 555-555-2355
fax: 555-555-2345
February 23, 2000
Mrs. Kathy Jones
2454 Mardell Way
Smithsville, TN 56784
Dear Mrs. Jones:
1425 Sunshine Way
Anytown, USA 95595
tel: 555-555-2355
fax: 555-555-2345
Annos undeviginti natus exercitum privato consilio et privata impensa comparavi, per
quem rem publicam a dominatione factionis oppressam in libertatem vindicavi. [Ob
quae] senatus decretis honorificis in ordinem suum me adlegit, C. Pansa et A. Hirtio
consulibus, consularem locum sententiae dicendae tribuens, et imperium mihi dedit. Res
publica ne quid detrimenti caperet, me propraetore simul cum consulibus providere iussit.
Populus autem eodem anno me consulem, cum cos. uterque bello cecidisset, et
triumvirum rei publicae
constituendae creavit.
Qui parentem meum trucidaverunt, eos in exilium expuli iudiciis legitimis ultus eorum
facinus, et postea bellum inferentis rei publicae vici bis acie.
Bella terra et mari civilia externaque toto in orbe terrarum saepe gessi, victorque
omnibus veniam petentibus civibus peperci. Externas gentes, quibus tuto ignosci potuit,
conservare quam excidere malui. Millia civium Romanorum sub sacramento meo fuerunt
circiter
quingenta. Ex quibus deduxi in colonias aut remisi in municipia sua stipendis emeritis
millia aliquanto plura quam trecenta, et iis omnibus agros adsignavi aut pecuniam pro
praemiis militiae dedi. Naves cepi sescentas praeter eas, si quae minores quam triremes
fuerunt.
Sincerely,
Bobby LaPierre
BB
BB OO
OO BB
BB BB
BB YY
YY ’’
’’ SS
SS
c a t e r i n g
s e r v i c e
February 23, 2000
Mrs. Kathy Jones
2454 Mardell Way
Smithsville, TN 56784
Dear Mrs. Jones:
1425 Sunshine Way Anytown, USA 95595 tel: 555-555-2355 fax: 515-555-2345
retro hair salon
Annos undeviginti natus exercitum privato consilio et privata impensa comparavi, per
quem rem publicam a dominatione factionis oppressam in libertatem vindicavi. [Ob
quae] senatus decretis honorificis in ordinem suum me adlegit, C. Pansa et A. Hirtio
consulibus, consularem locum sententiae dicendae tribuens, et imperium mihi dedit.
Res publica ne quid detrimenti caperet, me propraetore simul cum consulibus providere
iussit. Populus autem eodem anno me consulem, cum cos. uterque bello cecidisset, et
triumvirum rei publicae constituendae creavit.
Qui parentem meum trucidaverunt, eos in exilium expuli iudiciis legitimis ultus eorum
facinus, et postea bellum inferentis rei publicae vici bis acie.
Bella terra et mari civilia externaque toto in orbe terrarum saepe gessi, victorque
omnibus veniam petentibus civibus peperci. Externas gentes, quibus tuto ignosci potuit,
conservare quam excidere malui. Millia civium Romanorum sub sacramento meo
fuerunt circiter quingenta. Ex quibus deduxi in colonias aut remisi in municipia sua
stipendis emeritis millia aliquanto plura quam trecenta, et iis omnibus agros adsignavi
aut pecuniam pro praemiis militiae dedi. Naves cepi sescentas praeter eas, si quae
minores quam triremes fuerunt.
Sincerely,
Bobby LaPierre
February 23, 2000
Mrs. Kathy Jones
2454 Mardell Way
Smithsville, TN 56784
Dear Mrs. Jones:
Drawn objects combined
with text to create logo
Background created in
a painting frame using
tinted, resized clip art
Custom line spacing
Document saved as
a custom template
LL0865.book Page 55 Thursday, November 18, 1999 5:37 PM

56 Chapter 3
Mailing Labels
The Mailing Labels were created from a database document generated by the Mailing Label
Assistant.
Tip: To make sure labels print correctly, print a test page on regular paper before printing
on the label sheet.
To find out how to Choose AppleWorks Help
from the Help menu, then
copy objects click “Drawing and working with objects,” then
“Manipulating and positioning objects,” then “Copying or
duplicating objects”
resize objects by scaling click “Drawing and working with objects,” then
“Manipulating and positioning objects,” then “Resizing
objects”
create labels from a database
document
click “Organizing information (databases),” then
“Creating and printing labels”
LL0865.book Page 56 Thursday, November 18, 1999 5:37 PM
Examples and Ideas 57
retro hair salon
1425 Sunshine Way
Anytown, USA 95595
Judy Smith
1425 Sunshine Way
Anytown, USA 95595
BB
BB OO
OO BB
BB BB
BB YY
YY ’’
’’ SS
SS
c a t e r i n g
s e r v i c e
1425 Sunshine Way
Anytown, USA 95595
Tom Smith
2345 Mardo Way
An
y
town, USA 95595
Copied and scaled
logo elements
from letterhead
Avery mailing labels
easily created with
the Mailing Label Assistant
Addresses generated
from database
LL0865.book Page 57 Thursday, November 18, 1999 5:37 PM

58 Chapter 3
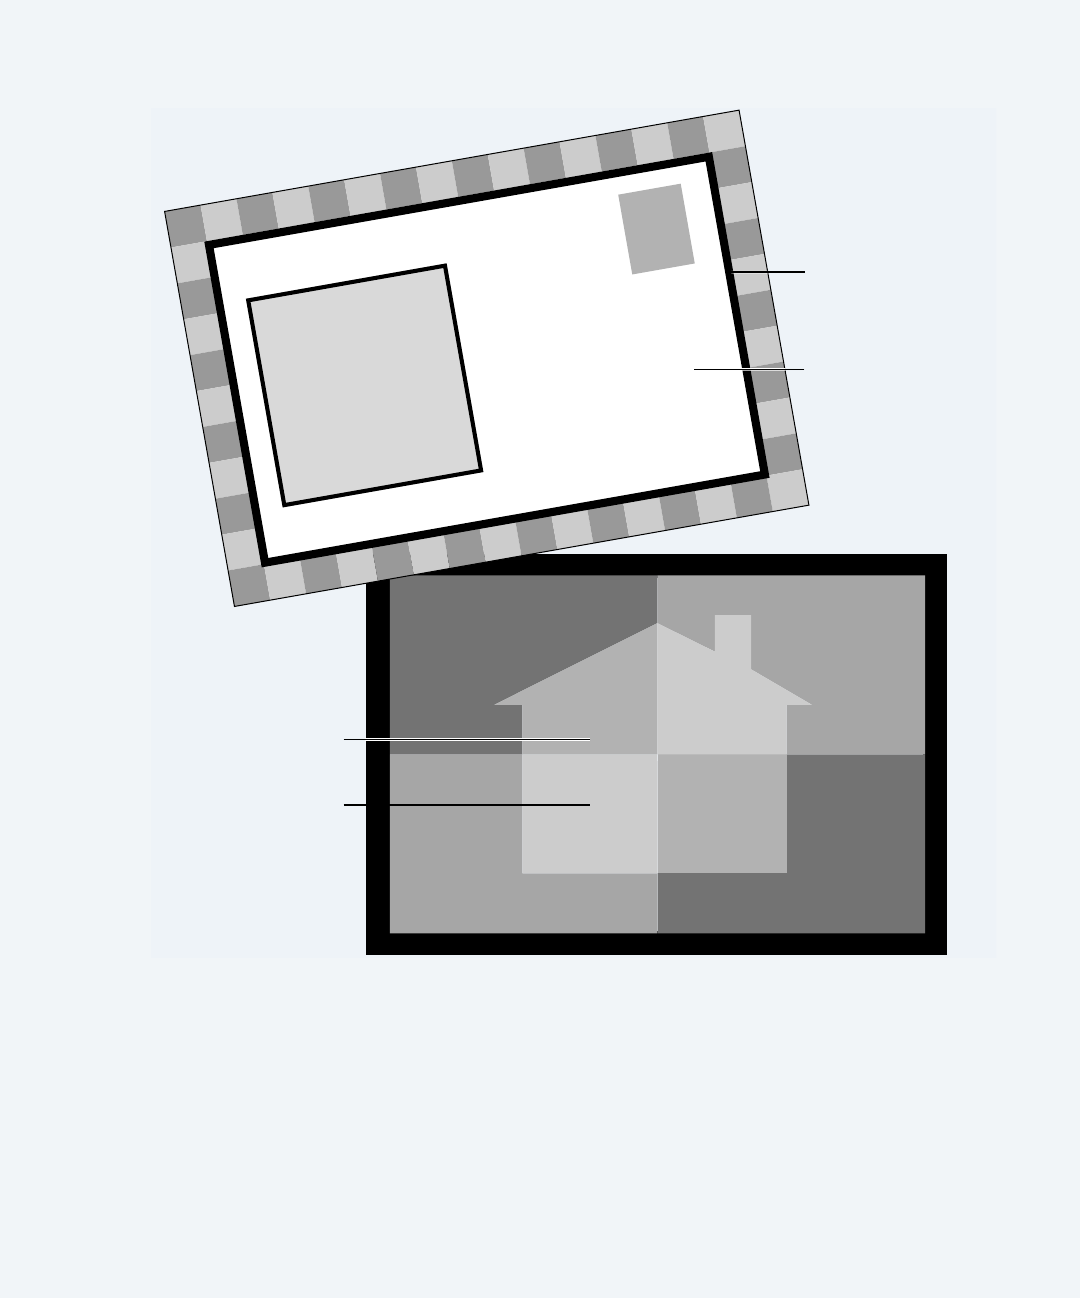
Postcard
The Postcard is a drawing document.
Tips: The Address List Assistant makes it easy to create your database of addresses. (For
information about accessing Assistants, see “Taking Advantage of Assistants and Templates”
on page 12.)
When you use a tinted image as a background for text, choose white as the fill color and
apply the Tint command several times in order to make the image light enough for the text
to be clear and easy to read.
To find out how to Choose AppleWorks Help
from the Help menu, then
draw shapes click “Drawing and working with objects,” then “Drawing
objects,” then “Drawing shapes”
add text or painting frames click “Integrating different kinds of content in a
document (frames),” then “Creating frames”
tint images click “Painting and working with images,” then “Changing
the appearance of painted images,” then “Tinting a
painted image”
manipulate the layering of objects click “Drawing and working with objects,” then
“Manipulating and positioning objects,” then “Moving
objects forward or backward”
use the mail merge feature to
automatically insert addresses from an
address database
click “Working with text (word processing),” then
“Merging data into another document (mail merge)”
LL0865.book Page 58 Thursday, November 18, 1999 5:37 PM
Examples and Ideas 59
with friends
We did it!
The Smiths
have moved!
Please stop by on
November 28th for
an evening of
celebration
and good times
and family.
Addresses automatically
inserted from the address
database using mail merge
Text frame using
Blair font
Layered drawn objects
Tinted painting
frame used for
transparent look
Write it
Down!
5603 Santa Domingo
Aptos, CA
94538
RSVP
408.555.4673
«Name»
«Street Address»
«City» «State»
«Zip Code»
LL0865.book Page 59 Thursday, November 18, 1999 5:37 PM

60 Chapter 3
Poster
The Poster is a drawing document.
Tip: If your printer does not support printing poster-size documents, you can print the
poster as a series of pages and tape them together. As you design, you can avoid
inconvenient page breaks by turning on Page View so you can see where the page breaks
occur. Choose Page View from the Window menu.
To find out how to Choose AppleWorks Help
from the Help menu, then
use the Bezier tool to draw shapes
with precise curves
click “Drawing and working with objects,” then “Drawing
objects,” then “Drawing straight lines, arcs, and curves”
add pages across and down
(horizontally and vertically)
click “Drawing and working with objects,” then
“Formatting a drawing document,” then “Adding and
removing pages in a drawing document”
add clip art click “Working smarter,” then “Using Clippings”
rotate text click “Drawing and working with objects,” then
“Manipulating and positioning objects,” then “Rotating
objects”
use the Accents window to change
the colors of text and objects, and to
adjust the line thickness of object
borders (outlines)
click “Drawing and working with objects,” then
“Changing colors and other attributes (Accents)”
LL0865.book Page 60 Thursday, November 18, 1999 5:37 PM
Examples and Ideas 61
B O O K
F A I R
S P R I N G 2 0 0 0
A P R I L 2 3
Neal Dow Elementary School
In the Sutter Gymnasium
Kids, Parents, and Teachers Welcome!
All Day From 8:30 A.M.–5:30 P. M .
Rerum gestarum divi Augusti, quibus orbem terrarum imperio populi Romani subiecit, et
impensarum quas in rem publicam populumque Romanum fecit, incisarum in duabus aheneis pilis,
quae sunt Romae positae, exemplar subiectum.
Rotated
(text) objects
Curved shapes
created with
Bezier
drawing tool
Clip art
Pages added to create poster size
Line
thickness of
circle outlines
increased
LL0865.book Page 61 Thursday, November 18, 1999 5:37 PM

62 Chapter 3
School Report
The School Report is a word-processing document.
Tips: To preserve the flow of the document, use text frames in the margin for any captions.
Add appeal to bars in the chart by using the Accents window to apply gradient fill coloring.
To find out how to Choose AppleWorks Help
from the Help menu, then
change paragraph indentation click “Working with text (word processing),” then
“Formatting paragraphs,” then “Changing paragraph
indentation”
add a spreadsheet frame click “Integrating different kinds of content in a
document (frames),” then “Creating frames”
work in a spreadsheet click “Working with numbers (spreadsheets)”
type an equation in a document click “Working with text (word processing),” then “Adding
special elements to a document,” then “Inserting specially
formatted equations”
add headers and footers click “AppleWorks basics,” then “Formatting documents,”
then “Adding document headers and footers”
create a chart from a spreadsheet click “Creating charts (graphs)”
use color in charts click “Creating charts (graphs),” then “Adding special
effects to charts,” then “Adding or adjusting color in
charts”
add a table click “Creating tables”
apply color to table cells click “Creating tables,” then “Changing table borders, cell
borders, and backgrounds,” then “Changing table
backgrounds”
LL0865.book Page 62 Thursday, November 18, 1999 5:37 PM
Examples and Ideas 63
Hank Shoukry
The Effects of Sunlight
on Chlorophyll
Production
Contents
1 Introduction
1 Sed diam nonummy nibh euismod tincidunt ut laboreet
3 Accumsan et iusto odio dignissim qui blandit praesent
luptatum zzril delenit augue
5 Quis nostrud exerci tation ullamcorper suscipit lobortis
nisl ut aliquip
7 Vel eum iriure dolor in hendrerit in vulputate velit esse
molestie consequat
10 Tincidunt ut laoreet dolore magna aliquam erat volutpat
11 Vel illium dolore eu feugiat nulla facilisis
14 Lupatum zzril delenit augue duis dolore te feugait nulla facilisi
Chart generated from
spreadsheet data, uses
colored background
and bars
Duis autem vel eum iriure dolor:
in hendrerit in vulputate velit
esse molestie consequat
Introduction
Ut wisi enim ad minim veniam, quis nostrud exerci tation
ullamcorper suscipit lobortis nisl ut aliquip ex ea commodo
consequat.
Sed diam nonummy nibh euismod tincidunt ut laboreet
In vulputate velit esse molestie consequat, vel illum dolore eu
feugiat nulla facilisis at vero eros et accumsan et iusto odio
dignissim qui blandit praesent luptatum zzril delenit augue duis
dolore te feugait nulla facilisi.
Duis autem vel eum iriure dolor in hendrerit in vulputate velit
esse molestie consequat, vel illum dolore eu feugiat nulla facilisis
at vero eros et accumsan et iusto odio dignissim qui blandit
praesent luptatum zzril delenit augue duis dolore te feugait nulla
facilisi:
β
=+4
3
xy()
1
Hank Shoukry
Nam liber Cum soluta Placerat facer
Tincidunt 15 20 12
Imperdiet 17 14 16
Consectetuer 25 11 11
Dignissim 13 19 15
Blandit 21 23 3
Euismod 32 78
Lobortis 912 28
purple
blue
green
yellow
33d
442a
32r
494d
Comparing Types of Item:
Ut wisi enim ad minim veniam, quis nostrud exerci tation ullamcorper
suscipit lobortis nisl ut aliquip ex.
Dignissim
N
J
S
Q
Consectetuer
Imperdiet
Tincidunt
Table 1:
Ut wisi enim ad minim veniam, quis
nostrud exerci tation ullamcorper
suscipit lobortis nisl ut aliquip ex
ea commodo consequat.
Nam liber tempor cum soluta nobis eleifend option congue nihil
imperdiet doming id quod mazim placerat facer possim assum.
Loremipsum dolor sit amet, consectetuer adipiscing elit, sed diam
nonummy nibh euismod tincidunt ut laoreet dolore magna aliquam
erat volutpat.
Ut wisi enim ad minim veniam, quis nostrud exerci tation
ullam corper suscipit lobortis nisl ut aliquip ex ea commodo
consequat. Duis autem vel eum iriure dolor in hendrerit in
vulputate velit esse molestie consequat, vel illum dolore eu
feugiat nulla facilisis at vero eros et accumsan et iusto odio
dignissim qui blandit praesent luptatum zzril delenit augue duis
dolore te feugait nulla facilisi.
Lorem ipsum dolor sit amet, consectetuer adipiscing elit, sed
diam nonummy nibh euismod tincidunt ut laoreet dolore magna
aliquam erat volutpat. Ut wisi enim ad minim veniam, quis
nostrud exerci tation ullamcorper suscipit lobortis nisl ut aliquip
2
Lorem ipsum dolor sit amet, consectetuer adipiscing elit,
sed diam nonummy nibh euismod tincidunt.
Ut laoreet dolore magna aliquam erat volutpat. Ut wisi enim
ad minim veniam
Quis nostrud exerci tation ullamcorper suscipit lobortis nisl
ut aliquip ex ea commodo consequat.
www.loremipsum.com
www.consectutuer.com
www.eratvoluptat.com
25
20
15
10
5
0
TinciduntImperdietConsectetuer
Nam liberCum soluta
Figure 1:
Ut wisi enim ad minim veniam, quis
nostrud exerci tation ullamcorper
suscipit lobortis nisl ut aliquip ex
ea commodo consequat.
Duis Autem vel Eum Iriure dolor
Duis auter vel eum iriure dolor in World Wide Web
Special
indentation
Page headers
Table
Spreadsheet
frame
Equation
feature
Page
footers
LL0865.book Page 63 Thursday, November 18, 1999 5:37 PM

64 Chapter 3
Slide Show
The Slide Show is a presentation document. You can display a presentation document as a
slide show on a computer, or you can print it on transparent paper and show the slides with
an overhead projector.
To find out how to Choose AppleWorks Help
from the Help menu, then
create and use master slides click “Creating presentations,” then “Using master slides”
create text frames click “Integrating different kinds of content in a
document (frames),” then “Creating frames”
insert images click “AppleWorks basics,” then “Inserting a file into a
document”
run and stop slide shows click “Creating presentations,” then “Running and
stopping slide shows”
LL0865.book Page 64 Thursday, November 18, 1999 5:37 PM
Examples and Ideas 65
Used three different master
slides for three different
slide layouts The Smith Family
25
TH
ANNUAL SMITH FAMILY HOEDOWN
120 YEARS OF T RADITION, LOVE AND LAUGHS April 1999
The Smith Family
120 YEARS OF T RADITION, LOVE AND LAUGHS
April 1999
Darren,
Amanda, Ginny,
Tom and Lola hit
the trail.
HOWDY PARTNER! SMITH FAMILY SADDLES UP!
The Smith Family
120 YEARS OF T RADITION, LOVE AND LAUGHS
April 1999
GETTING ORIENTED...
We couldn’t
be in better
hands—Julie
shows us
around the
camp.
Inserted image
Used text frames
on master slides for
consistent text placement
LL0865.book Page 65 Thursday, November 18, 1999 5:37 PM

www.apple.com
034-0865-A
Printed in U.S.A.
4-0865.AWGS_Cover 11/18/99 6:23 PM Page 1
