Is My1613
2017-08-30
: Is-My1613 is-my1613 images 708 p4dbimg
Open the PDF directly: View PDF  .
.
Page Count: 3
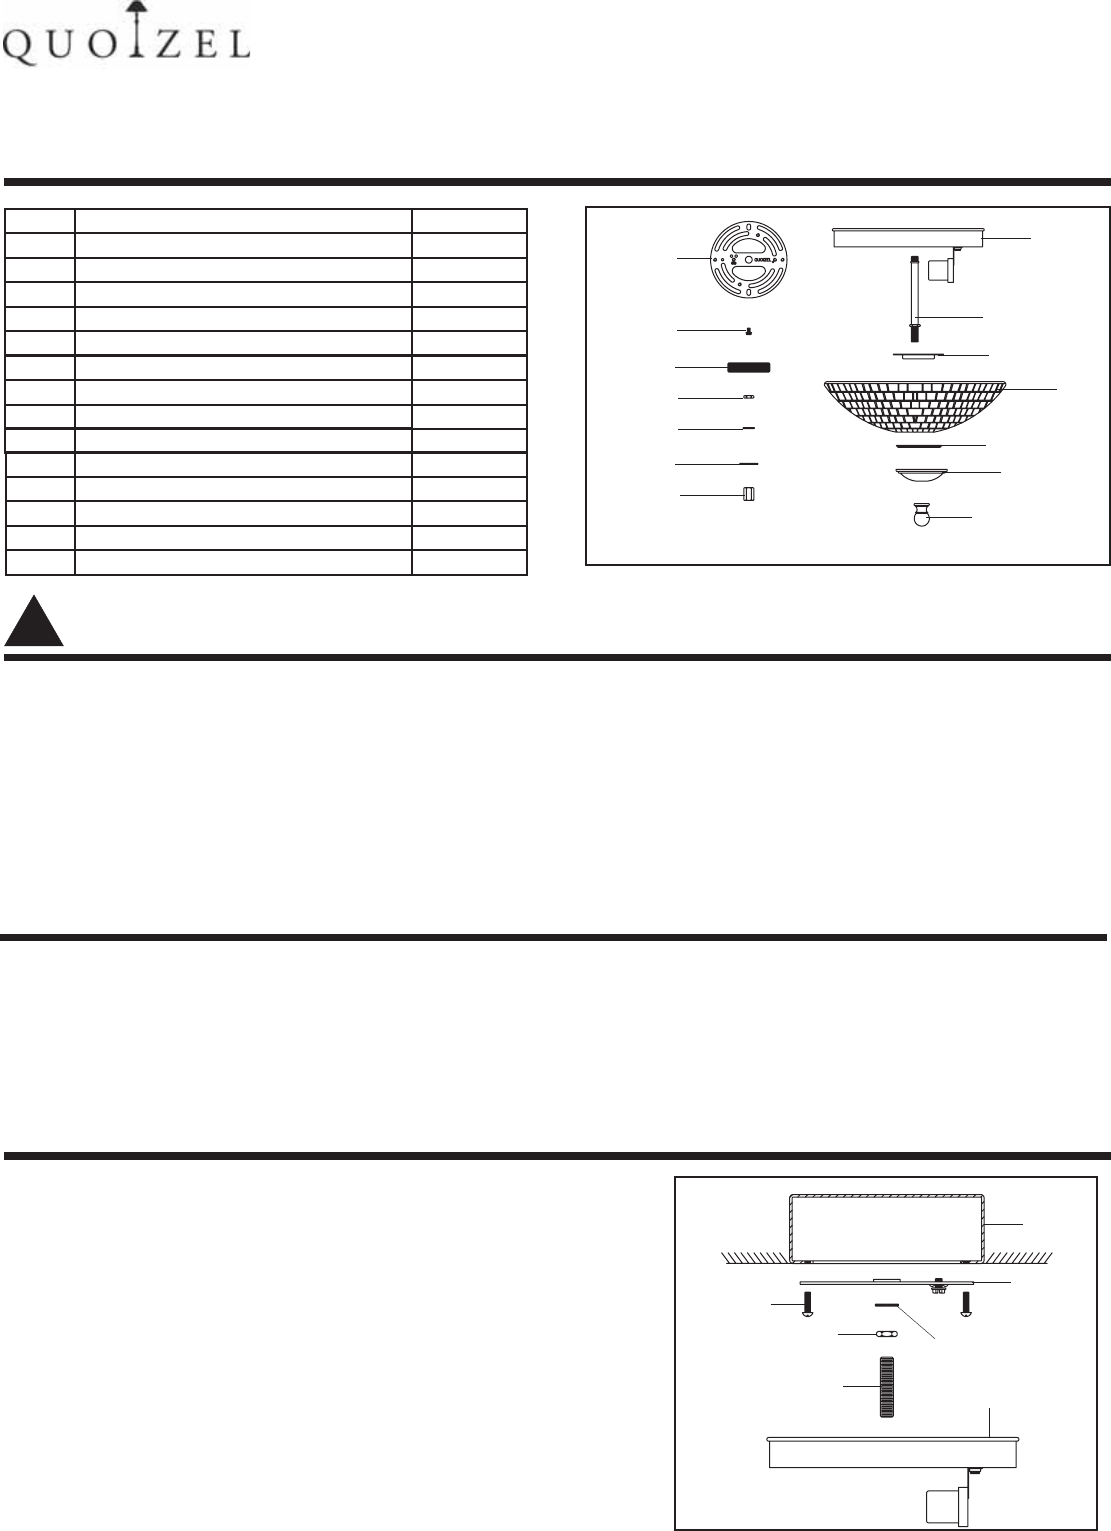
PACKAGE CONTENTS
Part
A
J
E
C
L
M
N
G
B
K
F
D
H
Description
Shade Stop
Shade
Crossbar
Green Ground Screw
Nipple
Hex Nut
Lock Washer
Flat Washer
Hex Coupling
Shade Holder
Cap
Finial
Ceiling Canopy
Quantity
1pc
1pc
3pcs
1pc
2pcs
1pc
1pc
1pc
1pc
1pc
1pc
1pc
1pc
WARNINGS AND CAUTIONS
!
PREPARATION
INSTRUCTION SHEET IS MY1613-
STYLE NUMBER MY1613ML:
ISSUED 04-2008
ASSEMBLY INSTRUCTIONS
1OF3
A
B
C
D
E
F
G
I
H
J
K
M
6 CORPORATE PARKWAY
GOOSE CREEK SC 29445
www quoizel com
,.
..
WARNING :
Before beginning the installation, turn off electricity at the circuit breaker box or the main fuse box by
switching off the circuit breaker or removing the fuse.
CAUTION :
These instructions are provided for your safety. It is very important that they are read completely before
the installation of your fixture.
We are strongly recommend that a professional electrician install the fixture.
Disconnect fixture from the power source before replacing the bulb(s), making sure the bulb(s) had
sufficient time to cool down. DO NOT subject the lamp to any shock while lit as shattering of lamp may
result.
●
●
●
●
●
●
●
●
Before beginning installation of product, make sure all parts are present. Compare parts with package
and diagram above. If any part is missing or damaged, do not attempt to assemble, install or operate the
product. Contact customer service for replacement part.
Estimated Assembly Time : 20 30 minutes
Tools Required for Assembly (not included) : Flathead Screwdriver Phillips Screwdriver, Pliers, Electrical
Tape, Wire Cutters, Safety Glasses & 3, 60 Watt, Type A 19 Medium Base Bulbs.
Helpful Tools (not included) : Wire Strippers.
-
,
-
STEP 1 :
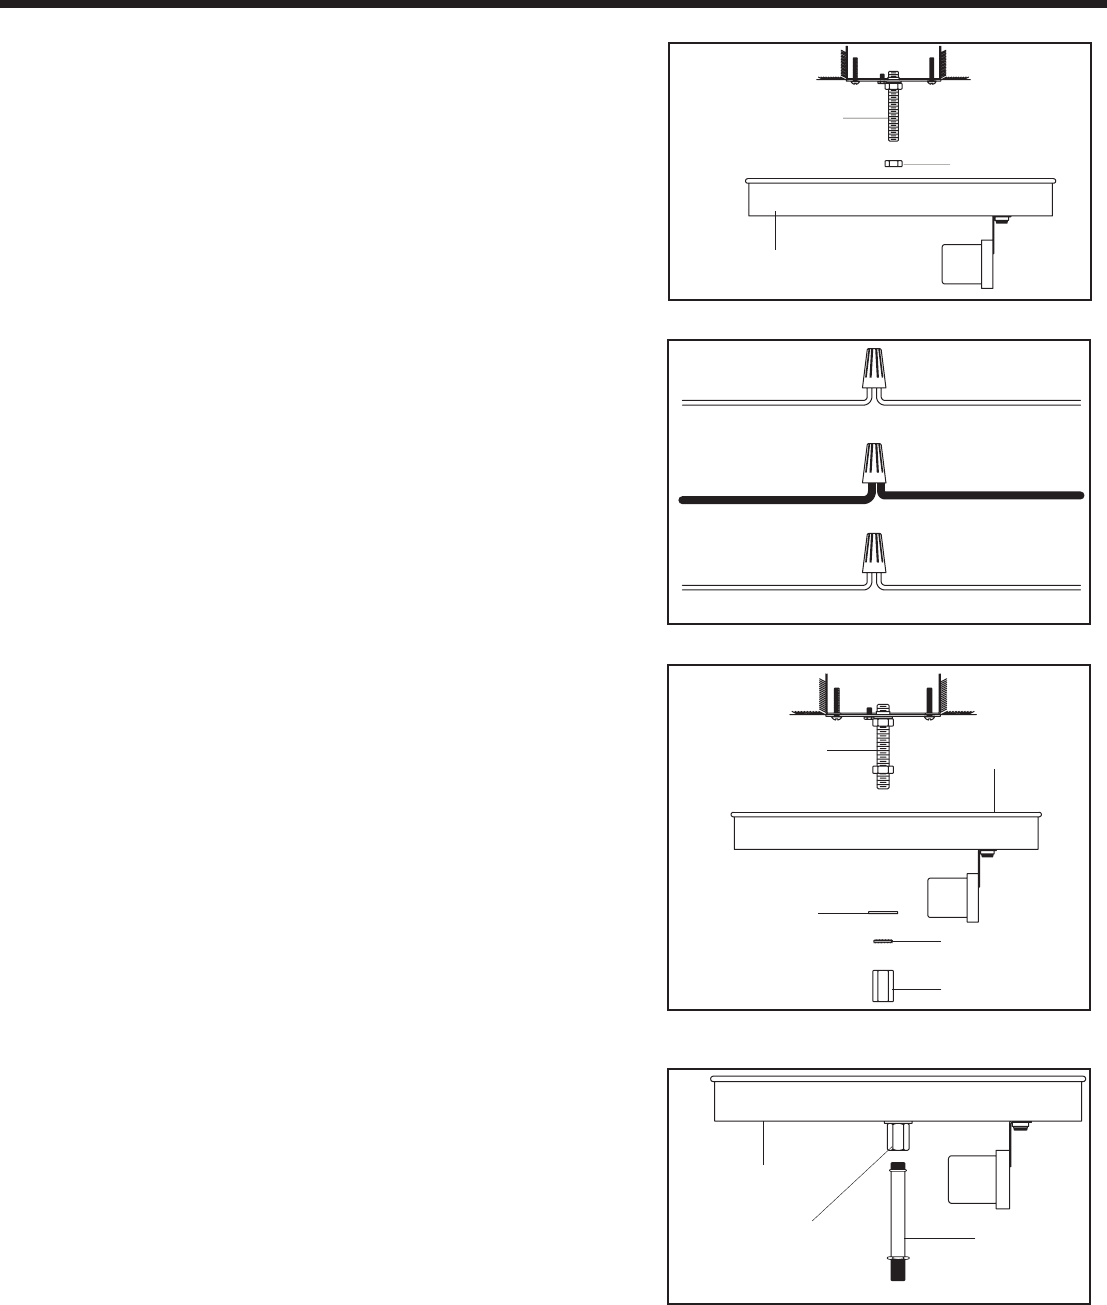
a Locate the Crossbar and attach it to the Outlet Box
using the Outlet Box Screws not supplied
b Locate the Nipple and thread one Hex Nut onto it about
half way. Slip a Lock Washer onto it and thread one
end of the Nipple into the center hole of the Crossbar
c Position the Ceiling Canopy over the outlet box,
passing the mounting hole in the center of the Ceiling
Canopy over the end of Nipple
d Adjust the Nipple so approx 3 8 inch of the Nipple is
protruding from the mounting hole. This adjustment may
take a few tries.
e When this length is achieved, remove the Ceiling
Canopy and tighten the Hex Nut up against the
underside of the Crossbar with pliers.
.
.
.
.
.
().
.
.
./"
Outlet
Box
Outlet Box
Screw
Hex Nut
Crossbar
Lock Washer
Nipple Ceiling Canopy
IStem 1pc L
N
ASSEMBLY INSTRUCTIONS
Nipple
Hex Nut
Ceiling Canopy
WHITE OR RIBBED
BLACK OR RED WIRE()
FROM HOUSE
GROUND WIRE GROUND WIRE
FROM HOUSE FROM FIXTURE
WHITE OR RIBBED
FROM FIXTURE
FROM HOUSE
FROM FIXTURE
BLACK SIDE
Nipple Ceiling Canopy
Flat Washer
Lock Washer
Hex Coupling
2OF3
Ceiling Canopy
Hex Coupling
Stem
STYLE NUMBER MY1613ML:
STEP 2 :
Thread another Hex Nut onto the other end of the
nipple. Thread this Hex Nut on just enough so the
inside surface of the pan rests against it.
You may have to trial fit the Ceiling Canopy one more
times to insure this distance also. This Hex Nut is
needed here to prevent you from crushing down the
center of the Ceiling Canopy
*
.
STEP 3 :
*()
.
.
.
()
.()
().
.
.
Use Wire Connectors not supplied to connect the
wires
aC
.
bC
or Ribbed .
cC
d
onnect the House Ground Wire to the Fixture Ground
Wire
onnect the House White Wire to the Fixture Supply Wire
White Side
onnect the House Black or Red Wire to the Fixture
Supply Wire Black Side
Wrap each connection with approved electrical tape and
carefully stuff all of the connected wires into the Outlet
Box
STEP 4 :
a Position the Ceiling Canopy to the ceiling by
b
.passing
the Nipple through the center hole
Slip on the Flat Washer and the Lock Washer and then
thread the Hex Coupling to the bottom end of the Nipple
Snug down assembly until the Ceiling Canopy is flush
against the ceiling
Be sure that there are no trapped or pinched wires
along the edge of the pan.
.
.
*
.
.
STEP 5 :
.
Thread the beaded end of the Stem into the Hex
Coupling and hand tighten until snug
STEP 6 :
/.
Install the correct wattage Bulbs referring to the fixture
markings and or labels for maximum wattage
Ceiling Canopy Stem
Hex Nut
Shade
Shade Holder
3OF3
ASSEMBLY INSTRUCTIONS
STYLE NUMBER MY1613ML:
Stem
Cap
Finial
STEP 7 :
,
.
.
.
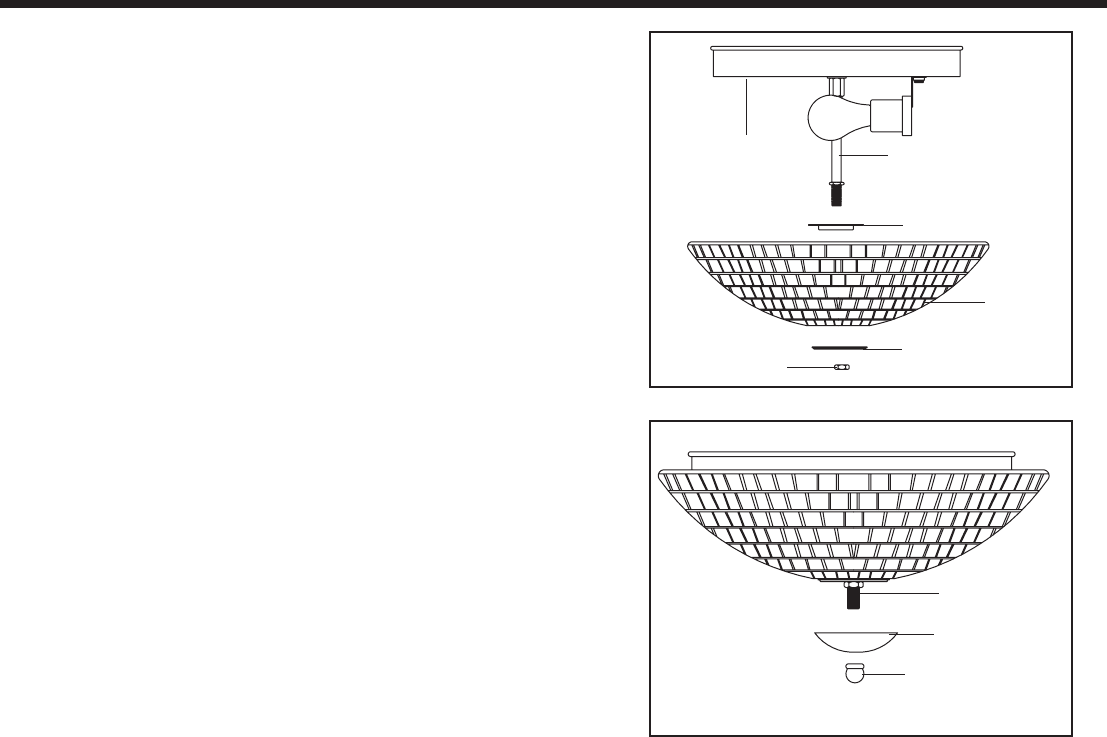
Place Shade Shade Stop and Shade Holder over the
end of the Stem as shown in the illustration Thread
the Hex Nut onto the end of the Stem to secure the
Shade Please tighten the Hex Nut gently in case
cracked the Shade
STEP 8 :
..
Place the Cap over the end of the Stem and secure
with the Finial Tighten until snug
.
.
.
Your installation is completed now Restore the power
to the installation point ON Retain this sheet for future
reference
Shade Stop
