LG Stylo 3 User Guide Plus Manual
LG-Stylus-3-Manual LG-Stylus-3-Manual
User Manual: LG-Stylo-3-Plus-Manual
Open the PDF directly: View PDF ![]() .
.
Page Count: 190 [warning: Documents this large are best viewed by clicking the View PDF Link!]
- Title
- Contents
- Getting Started
- Making Connections
- Phone Calls and Voicemail
- Contacts
- Messaging
- Internet and Social Networking
- Global Services
- Activate Sprint Worldwide Service on Your Account
- Your Phone’s SIM Card for International GSM Roaming
- Enable Global Roaming Mode
- Set the Communications Method for Global Use
- Select a Carrier
- Make and Receive Worldwide Calls
- Sprint International Voicemail Service
- International Data Roaming
- Contact Sprint for Assistance with International Service
- Connectivity
- Apps and Entertainment
- Camera and Video
- Productivity
- Entertainment and Activities
- Settings
- Getting Help
- Index
Available applications and services are subject to change at any time.
Sprint User Guide
A downloadable, printable guide to your LG Stylo 3 and its
features.

i
Table of Contents
GETTING STARTED 1
Introduction 2
Set Up Your Phone 3
PartsandFunctions 3
BatteryUse 4
InserttheBattery 5
RemovetheBattery 6
ChargetheBattery 7
NanoSIMCard 9
microSDCard 11
InsertmicroSDCard 12
UnmountandRemovethemicroSDCard 14
FormatmicroSDCard 15
TurnYourPhoneOnandOff 15
UsetheTouchscreen 17
ActivateYourPhone 20
CompletetheSetupScreens 21
Basic Operations 23
Basics 23
HomeScreen 23
PhoneSettingsMenu 24
PortraitandLandscapeScreenOrientation 24
CaptureScreenshots 25
Applications 25
PreinstalledApps 26
FingerprintRecognition 27
PrecautionsforFingerprintRecognition 27
RegisteringFingerprints 28
ManagingFingerprints 29
UnlockingtheScreenwithaFingerprint 29
Multi-taskingFeature 29
Multi-Window 29
Overviewscreen 30

ii
PhoneNumber 30
AirplaneMode 30
EnterText 31
TouchscreenKeyboards 31
QWERTYKeyboard 32
PhoneKeyboard 33
TipsforEditingText 33
GoogleAccount 36
CreateaGoogleAccount 36
CreateanExchangeAccount 37
SignintoYourGoogleAccount 38
FactoryResetProtection 38
GooglePlayStore 39
FindandInstallanApp 39
RequestaRefundforaPaidApp 40
UpdateanApp 40
UninstallanApp 41
GetHelpwithGooglePlay 41
LockandUnlockYourScreen 41
UnlockYourScreenUsingtheKnockCodeFeature 42
UpdateYourPhone 43
UpdateYourPhoneSoftware 43
UpdateYourProfile 45
UpdateYourPRL 46
Your Phone's Home Screen 47
HomeScreenBasics 47
HomeScreenLayout 47
ExtendedHomeScreens 48
StatusBarandNotificationPanel 48
StatusBar 48
NotificationPanel 50
CustomizetheHomeScreen 51
ChangetheWallpaper 51
AddWidgetstotheHomeScreen 52
AddFolderstotheHomeScreen 52
MAKING CONNECTIONS 53

iii
Phone Calls and Voicemail 54
PlaceandAnswerCalls 54
CallUsingthePhoneDialer 54
CallEmergencyNumbers 55
AnswerPhoneCalls 56
In-CallScreenLayoutandOperations 57
PlaceaCallfromContacts 58
CallfromCallLogs 59
Voicemail 59
VoicemailSetup 59
VisualVoicemailSetup 59
ReviewVisualVoicemail 61
ListentoMultipleVoicemailMessages 62
VisualVoicemailOptions 62
ConfigureVisualVoicemailSettings 62
OptionalCallingServices 64
Wi-FiCalling 64
CallerIDBlocking 65
CallWaiting 65
ConferenceCalling 65
CallForwarding 66
CallSettingsMenu 66
Contacts 70
AddaContact 70
ViewContacts 71
ContactsScreenLayout 72
EditaContact 73
DeleteaContact 73
ShareaContact 73
ImportContacts 74
BackUpContacts 74
Messaging 75
Messenger 75
SendaTextMessage 75
SendaMultimediaMessage(MMS) 75
SaveandResumeaDraftMessage 76

iv
NewMessagesNotification 77
ManageMessageConversations 77
TextandMMSOptions 79
Gmail 80
CreateandSendaGmailMessage 80
CheckReceivedGmailMessages 81
UseGmailLabels 81
ArchiveGmailThreads 82
MuteGmailThreads 82
DeleteGmailThreads 82
SearchGmailMessages 82
ReportSpam 83
AddAnotherGoogle(Gmail)Account 83
SwitchingbetweenGmailAccounts 83
GmailSettings 84
Internet and Social Networking 85
DataServicesGeneralInformation(4GLTEand3GNetworks) 85
4GLTE 85
DataConnectionStatusandIndicators 86
ChromeBrowser 86
UsetheBrowser 86
AddaBookmark 86
ViewBrowserHistory 87
OpenNewBrowserTabs 87
BrowserSettings 87
Facebook 88
InstalltheFacebookApponYourPhone 88
UseFacebook 88
Twitter 89
InstalltheTwitterApponYourPhone 89
TweetonTwitter 89
Duo 89
Global Services 90
ActivateSprintWorldwideServiceonYourAccount 90
YourPhone’sSIMCardforInternationalGSMRoaming 90
EnableGlobalRoamingMode 91

v
SettheCommunicationsMethodforGlobalUse 91
SelectaCarrier 91
MakeandReceiveWorldwideCalls 92
SprintInternationalVoicemailService 92
SetUpYourVoicemailAccessNumberforInternationalUse 93
AccessYourVoicemailInternationally 93
InternationalDataRoaming 94
AccessEmailandDataServicesInternationally 94
ContactSprintforAssistancewithInternationalService 95
Connectivity 97
TransferFilesBetweenYourPhoneandaComputer 97
Wi-Fi 98
TurnWi-FiOnandConnecttoaWirelessNetwork 98
ConfigureWi-FiSettings 99
DisconnectWi-Fi 99
Wi-FiDirect 99
Tethering 100
Hotspot 100
Bluetooth 101
BluetoothInformation 101
EnabletheBluetoothFeature 101
PairBluetoothDevices 102
ConnecttoaPairedBluetoothDevice 103
SendInformationUsingBluetooth 103
ReceiveInformationviaBluetooth 104
ContentSharing 104
PlayingContent 104
SendingorReceivingFiles 105
UsingNearbyDevices 105
APPS AND ENTERTAINMENT 106
Camera and Video 107
CameraOverview 107
TakePicturesandRecordVideos 108
TakePictures 109
RecordVideos 109
TakePanoramicPhotos 110

vi
ZoomInorOut 110
SwitchingbetweenCameras 110
SelfieShot 111
UsingthePower/LockButton 111
GestureShot 111
IntervalShot 112
GestureView 112
SaveasFlippedImage 112
ViewPicturesandVideosUsingGallery 113
EditPictures 114
SharePicturesandVideos 115
SendPicturesorVideosbyEmail 115
SendaPictureorVideobyMultimediaMessage 115
SendPicturesorVideosUsingBluetooth 116
SharePicturesorVideosviaAdditionalAppsorSocialMedia 116
ShareVideosonYouTube 117
CameraSettings 117
SwitchCameras 117
SetCameraFunctions 118
Productivity 119
GoogleCalendar 119
AddanEventtotheCalendar 119
AddRemindersintheCalendar 120
CreateaGoalintheCalendar 120
EditCalendarEvents,Reminders,orGoals 121
DeleteCalendarEvents,Reminders,orGoals 121
QuicklyHideorShowEvents 121
CalendarSettings 122
UsingtheStylusPen 122
NavigationApps 123
GoogleMaps 123
Scout 123
GoogleSearch 124
UseGoogleSearch 124
UseGoogleVoiceSearch 125
Calculator 126

vii
Clock 126
SetAlarms 126
AdditionalClockFeatures 127
Capture+ 128
QuickMemo+ 129
FileManager 129
VoiceRecorder 130
UninstalledApps 130
Entertainment and Activities 131
GooglePlayMusicApp 131
PlayMusicwithGooglePlay 131
GooglePlayMusicScreenLayout 132
CreatePlaylistsinGooglePlayMusic 132
SprintMusicPlus 133
BackUpYourDownloadedMusicFiles 135
YouTube 135
ViewYouTubeVideos 135
PostaVideotoYouTube 136
GetSupportfromSprintZone 136
NASCARMOBILE 137
SETTINGS 138
Networks Settings 139
BasicSettings 139
AirplaneMode 140
Wi-FiCalling 140
Wi-FiSettings 140
BluetoothSettings 140
MobileDataSettings 140
CallSettings 141
Share&Connect 141
Tethering 142
More 142
RoamingSettings 143
VirtualPrivateNetworks(VPN) 145
PrepareYourPhoneforVPNConnection 145
SetUpSecureCredentialStorage 145

viii
AddaVPNConnection 145
ConnecttoorDisconnectFromaVPN 146
Sound Settings 147
SoundProfile 147
Volume 148
Ringtone 148
RingtoneID 149
SoundwithVibration 149
VibrateType 149
DoNotDisturb 149
LockScreen 150
Apps 150
NotificationLED 150
More 150
Display Settings 152
HomeScreen 152
LockScreen 154
Theme 157
HomeTouchButtons 157
FontType 157
FontSize 157
BoldText 158
Brightness 158
ComfortView 158
Auto-RotateScreen 158
ScreenTimeout 159
More 159
General Settings 160
Language&Keyboard 161
Location 161
Accounts&Sync 162
Accessibility 162
ShortcutKeys 165
GoogleServices 165
Fingerprints&Security 165
Pen 166

ix
Date&Time 167
Storage 167
Battery&PowerSaving 167
Memory 168
SystemUpdates 168
Apps 168
Backup&Reset 169
AboutPhone 170
GETTING HELP 171
For Assistance 172
Troubleshooting 172
SprintAccountInformationandHelp 173
SprintAccountPasswords 173
ManageYourAccount 174
SprintSupportServices 175
Anti-TheftGuide 175
CopyrightInformation 176
INDEX 177

Getting Started 1
Getting Started
Thetopicsinthissectionwillintroduceyoutoyourphone,helpyougetsetupwithservice,provide
anoverviewofthephonescreen,andgetyoustartedwithbasicphoneoperations.

Getting Started Introduction 2
Introduction
Thefollowingtopicsdescribethebasicsofusingthisguideandyournewphone.
About the User Guide
ThankyouforpurchasingyournewLGStylo3.Thefollowingtopicsexplainhowbesttousethis
guidetogetthemostoutofyourphone.
Before Using Your Phone
ReadtheImportantInformationbookletthatwaspackagedwithyourphonethoroughlyforproper
usage.
Accessibleservicesmaybelimitedbysubscriptioncontractconditions.
Descriptions in the User Guide
Notethatmostdescriptionsinthisguidearebasedonyourphone'ssetupatthetimeofpurchase.
Unlessotherwisenoted,instructionsbeginfromthephone'shomescreen,whichisdisplayedby
tappingtheHome key .Someoperationdescriptionsmaybesimplified.
Screenshots and Key Labels
Screenshotsintheuserguidemayappeardifferentlyonyourphone.Keylabelsintheuserguideare
simplifiedfordescriptionpurposesanddifferfromyourphone'sdisplay.
Other Notations
Intheuserguide,thephonemaybereferredtoeitheras"phone,""device,"or"handset."A
microSD™ormicroSDXC™cardisreferredtoasan"SDCard"ora"memorycard."
Getting Started Set Up Your Phone 3
Set Up Your Phone
Thefollowingtopicsgiveyoualltheinformationyouneedtosetupyourphoneandwirelessservice
forthefirsttime.
Parts and Functions
Thesetopicsillustrateyourphone’sprimarypartsandkeyfunctions.
Note:Yourphone'sscreensandappslayoutsaresubjecttochange.Thisuserguideusessample
imagesonly.
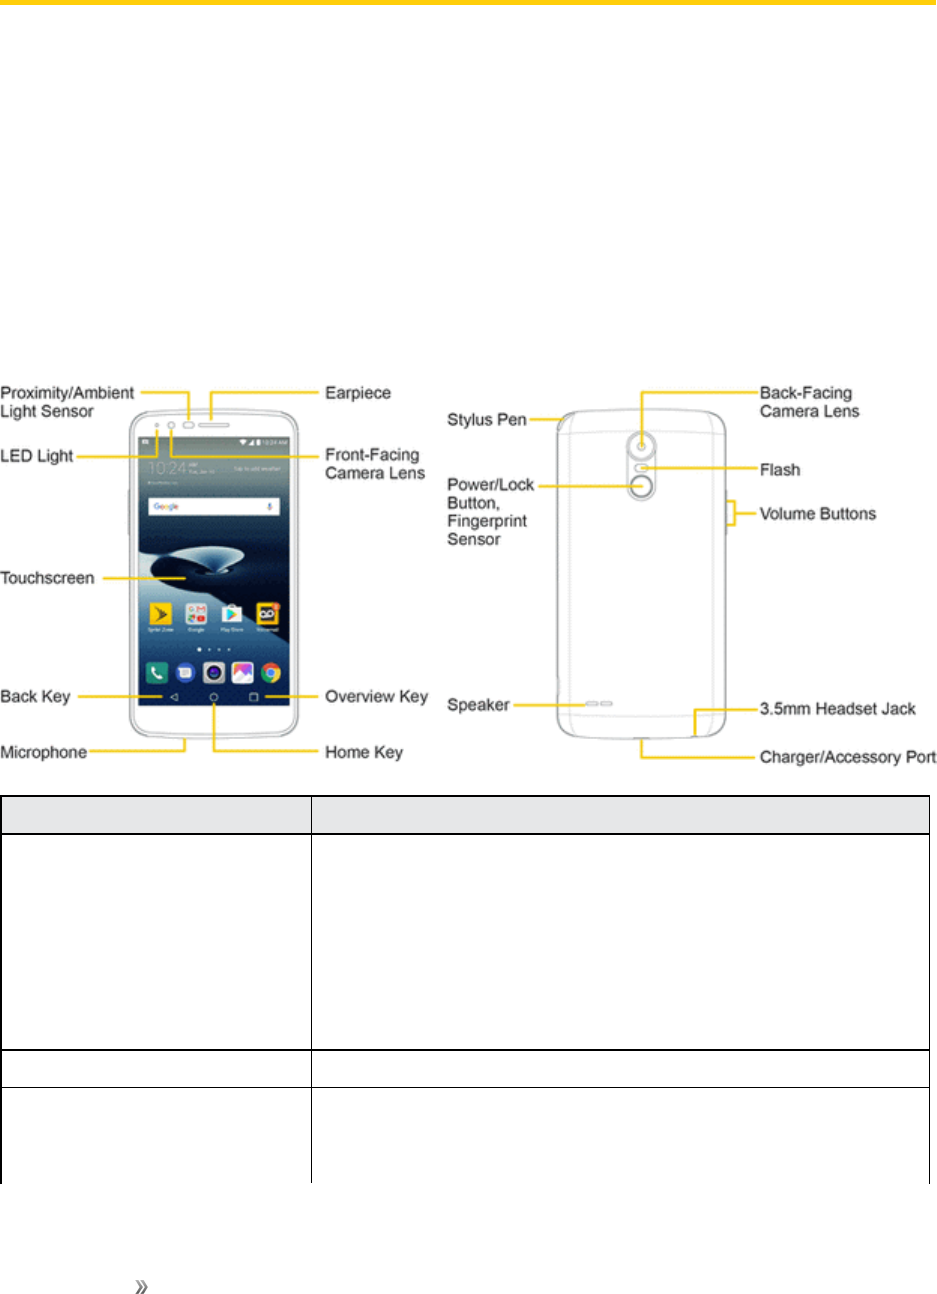
Phone Layout
Thefollowingillustrationoutlinesyourphone’sprimaryexternalfeaturesandbuttons.
Part Description
Proximity/Ambient Light
Sensor
Sensesproximitytowardsotherobjects(suchasyourhead)so
thattouchcommandsarenotaccidentallyactivatedduringacall.
Note:Pleasebecarefulnottocoverthesensorswitha
protectivefilm,pouch,oraprotectivecasenotauthorizedbyLG.
Theambientlightsensoranalyzestheambientlightintensity
whentheauto-brightnesscontrolmodeisturnedon.
LED Light Flashestoshowsomenotificationsaccordingtoyoursettings.
Touchscreen Displaysalltheinformationneededtooperateyourphone,such
astheapplications,callstatus,theContactslist,thedateand
time,andthesignalandbatterystrength.
Getting Started Set Up Your Phone 4
Part Description
Back Key Returnstothepreviousscreen.Italsoclosespop-updisplay
itemssuchasmenusanddialogboxes.
Microphone Transmitsyourvoiceforphonecallsorrecordsyourvoiceor
ambientsoundsforvoicerecordingsandvideos.
Home Key Returnstothehomescreen.Ifyou'realreadyviewingoneof
extensioncanvases,itopensthecentralhomescreen.Touch
andholdtoaccessGoogleNow.
OverviewKeyAllowsyoutoaccessrecently-usedapps.Whileusinganapp,
touchandholdtousetwoappsatthesametimewiththeMulti-
Windowfeature.
Front-Facing Camera Lens Allowsyoutotakepicturesandvideosofyourself.Alsoletsyou
participateinvideochats.
Earpiece Letsyouhearthecallerandautomatedprompts.
Back-Facing Camera Lens Letsyoutakepicturesandrecordvideos.
Stylus Pen Youcanusethestyluspentoinputcommands.Supportedapps
willallowyoutowriteordrawwiththestyluspen.
Power/Lock Button with
Fingerprint Sensor
Locksthescreen.Pressandholdtoopenthephoneoptions
menuforthefollowingoptions:Poweroff,Poweroffandrestart,
andTurnon/offAirplanemode.
Turnonthefingerprintrecognitionfeaturetosimplifytheprocess
ofunlockingthescreen.SeeFingerprintRecognitionfordetails.
Placeyourfingeronthebuttontotakeselfiesusingthefront
camera.Double-tap,thenholdtotakeascreenshot.
Speaker Letsyouhearthedifferentringersandsounds.Thespeakeralso
letsyouhearthecaller’svoiceinspeakerphonemode.
Charger/Accessory Port AllowsyoutoconnectthephonechargeroranoptionalUSB
cable.
3.5mm Headset Jack Allowsyoutopluginaheadsetforconvenient,hands-free
conversations.
Volume Buttons Allowsyoutoadjusttheringerandmediavolumes,ortoadjust
thein-callvolumeduringacall.
Flash Helpsyoutakepicturesandvideoindimlighting.
CAUTION!Insertinganaccessoryintotheincorrectjackmaydamagethephone.
Battery Use
Thefollowingtopicsexplainhowtoinsertandremoveyourphone’sbattery.
Battery Cautions
Getting Started Set Up Your Phone 5
Storage:Avoidstoringorleavingbatterywithnochargeremaining.Savedinformationand
settingsmaybecomelostorchanged,orbatterymaybecomeunusable.Chargeonceeverysix
monthsbeforestoringorleavingunusedforalongperiod.
Bulges:Dependingonuse,bulgesmayappearnearendofbatterylife.Thisdoesnotaffect
safety.
Replacing Battery:Thebatteryisaconsumableitem.Itneedstobereplacedifoperatingtime
shortensnoticeably.Purchaseanewbattery.
Cleaning:Cleansoiledterminalsbetweenbatteryandphonewithaclean,drycottonswab.
Soiledterminalscanresultinapoorconnectionandpreventcharging,etc.
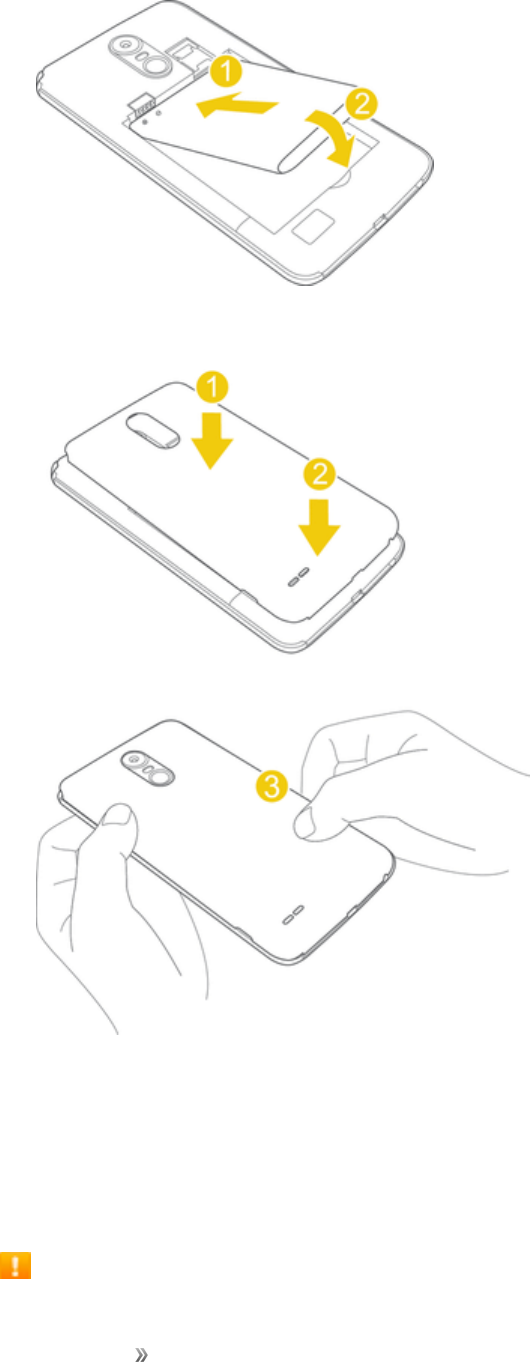
Insert the Battery
Followtheseinstructionstoinsertyourphone’sbatterysafelyandproperly.
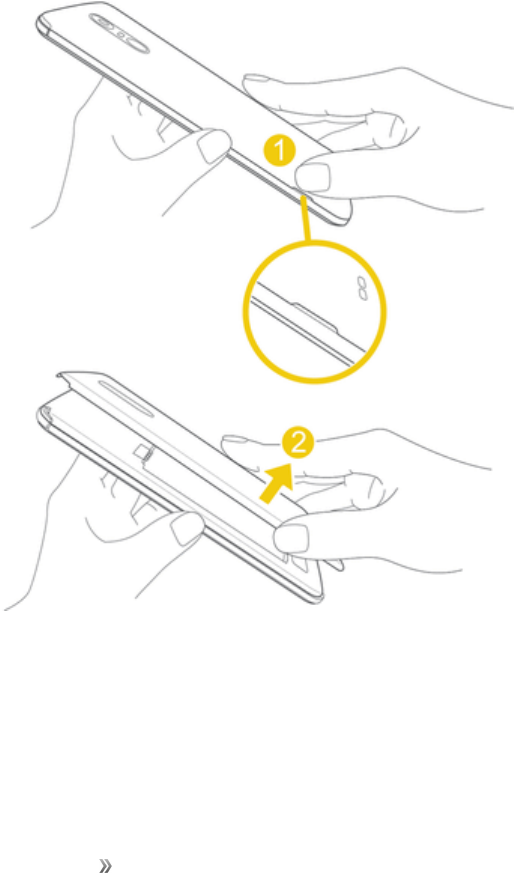
1. Removethebackcover.
lLiftgentlyinthedirectionshown.
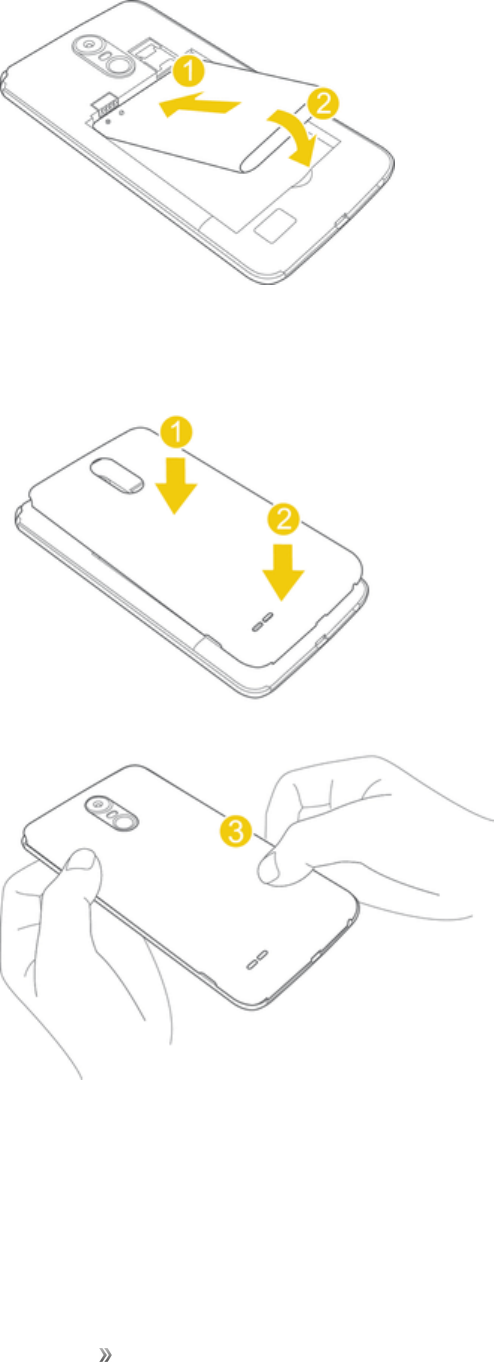
2. Insertthebattery.
Getting Started Set Up Your Phone 6
lAlignthecontactsofthebatterywiththecontactsinthephone.
3. Attachthebatterycover.
lMakesureallthetabsaresecureandtherearenogapsaroundthecover.
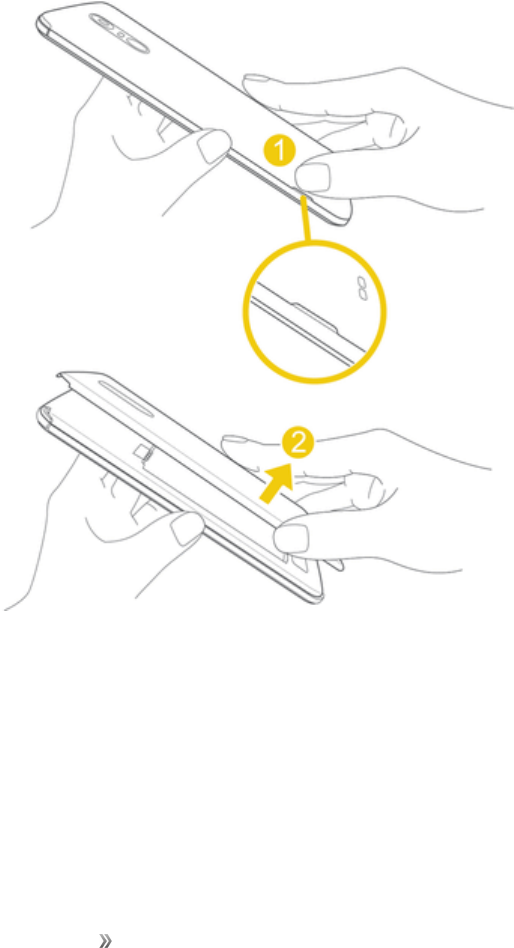
Remove the Battery
Followtheseinstructionstoremoveyourphone’sbattery.Alwayspowerthephoneoffbefore
removingthebattery.
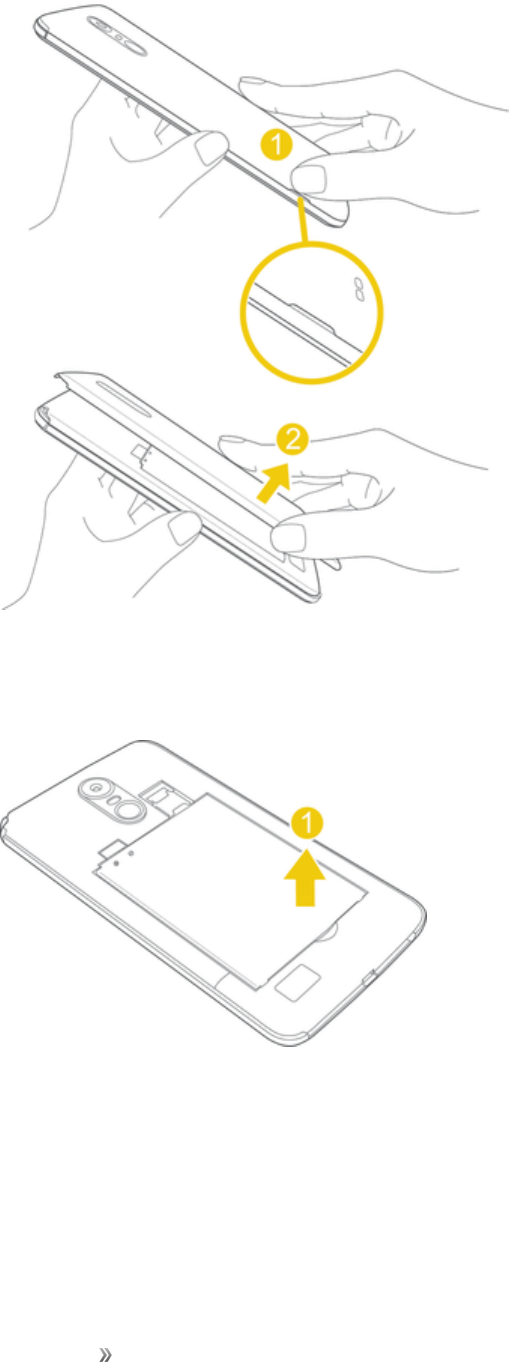
1. Removethebackcover.
Getting Started Set Up Your Phone 7
lLiftgentlyinthedirectionshown.
2. Removethebattery.
lLiftupwardgentlyasshown.
Charge the Battery
YourphoneisequippedwithaLi-Ionbattery.Itallowsyoutorechargeyourbatterybeforeitisfully
drained.Thebatteryprovidesupto25hoursofcontinuousdigitaltalktime.
Getting Started Set Up Your Phone 8
Youcanchargeyourphone’sbatteryusingeithertheincludedACadapterorviaaUSBconnection
withyourcomputer.
Charge Using the AC Adapter
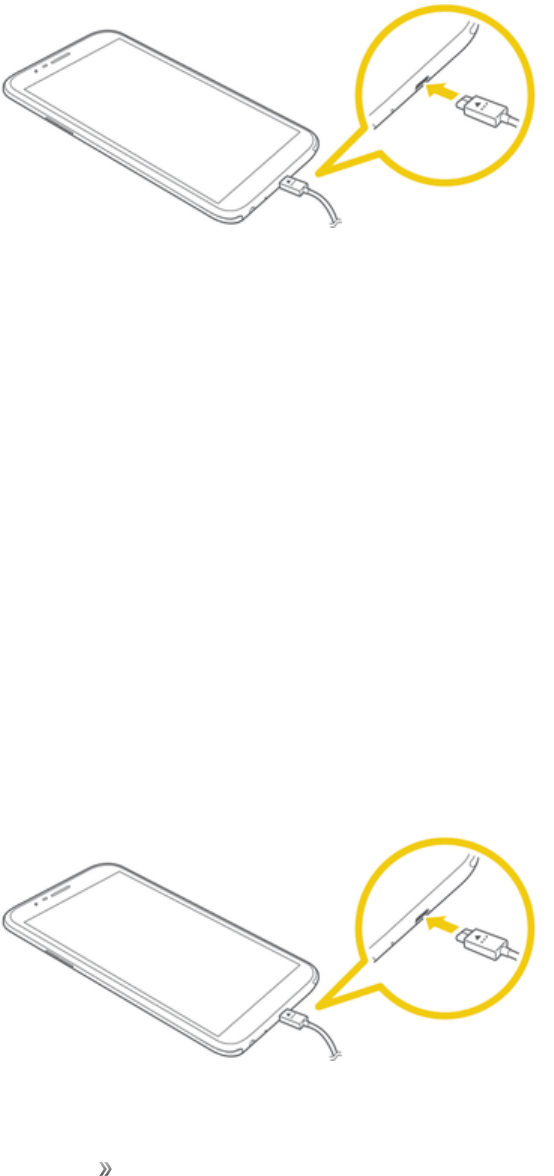
1. PlugtheUSBcableintothecharger/accessoryportatthebottomofyourphone.
2. PlugtheotherendoftheUSBcableintotheACadapter.
3. PlugtheACadapterintoanelectricaloutlet.
lTheindicatorlightilluminateswhenchargingstarts.Thelightgoesoffwhenthebatteryis
fullycharged.Fullychargingabatterymaytakeuptofourhours.
4. Aftercharging,disconnectthephonefromthecharger.
lUnplugtheACadapterfromtheoutlet,andremovetheUSBcablefromthephoneandthe
ACadapter.
Note:Alwaysunplugthechargerfromthewallsocketafterthephoneisfullychargedtosave
unnecessarypowerconsumptionofthecharger.
Charge Using a PC Connection
BeforeusingaPCconnectiontochargeyourphone,ensurethatthecomputeristurnedon.
Dependingonthetypeofconnection,yourphone’sbatterymaynotcharge.
1. InsertthesmallendoftheUSBcableintothecharger/accessoryportatthebottomofyour
phone.

Getting Started Set Up Your Phone 9
2. InsertthelargeendoftheUSBcableintoanexternalUSBportonyourcomputer.
3. Aftercharging,removetheUSBcablefromboththephoneandthecomputer.
Nano SIM Card
TheNanoSIMcardisanIC(IntegratedCircuit)cardcontainingphonenumberandothercustomer
information.
Handling the Nano SIM Card
KeepthefollowinginmindwhenhandlingaNanoSIMcard.
nCustomerisresponsibleforanydamagecausedbyinsertingNanoSIMcardinanother-brand
ICcardreader,etc.Sprintisnotresponsibleinsuchcase.
nAlwayskeeptheICchipclean.
nWipecleanwithadry,softcloth.
nAvoidapplyinglabels.MaydamagetheNanoSIMcard.
nSeeinstructionsincludedwiththeNanoSIMcardforhandling.
nTheNanoSIMcardisthepropertyofSprint.
nTheNanoSIMcardisreplaceable(atcost)incaseofloss/damage.
nReturntheNanoSIMcardtoSprintwhencancellingyoursubscription.
nReturnedNanoSIMcardsarerecycledforenvironmentalpurposes.
nNotethatNanoSIMcardspecificationsandperformancemaychangewithoutnotice.
nItisrecommendedthatyoukeepaseparatecopyofinformationthatisstoredontheNanoSIM
card.Sprintisnotresponsiblefordamagesfromstoredinformationthatislost.
nAlwaysfollowemergencyprocedurestosuspendserviceifyourNanoSIMcardorphone(Nano
SIMcardinserted)islost/stolen.Fordetails,contactCustomerService.
nAlwayspoweroffthephonebeforeinserting/removingaNanoSIMcard.
Insert Nano SIM Card
FollowtheseinstructionstoinsertaNanoSIMcard.Remembertopoweroffyourphonebefore
insertingaNanoSIMcard.
1. Removethebackcover.
Getting Started Set Up Your Phone 10
lLiftgentlyinthedirectionshown.
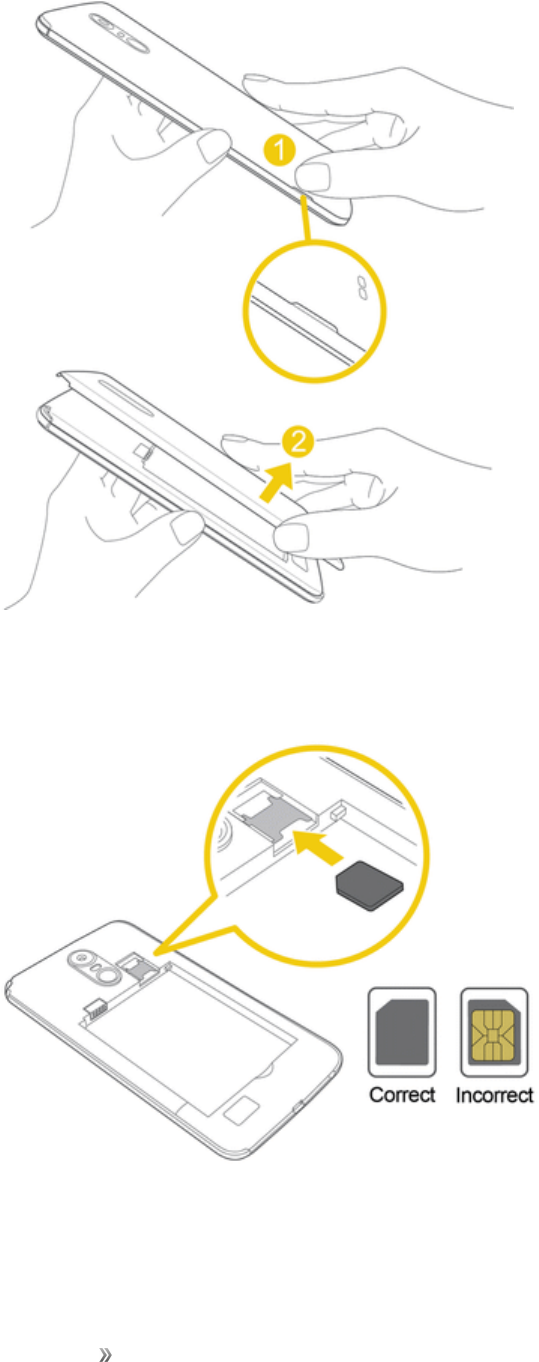
2. InserttheNanoSIMcard.
lInsertgentlywithgoldICchipfacingdownward.
3. Insertthebattery.
Getting Started Set Up Your Phone 11
4. Attachthebackcover.
lMakesureallthetabsaresecureandtherearenogapsaroundthecover.
microSD Card
YourphonesupportstheuseofanoptionalmicroSDcard(notincluded)toexpanditsstorage
capacity.Somecardsmaynotoperateproperlywithyourphone.
microSD card Cautions
Getting Started Set Up Your Phone 12
Data:InformationstoredonthemicroSDcardcanbecomelostorchangedaccidentlyorasa
resultofdamage.Itisrecommendedthatyoukeepaseparatecopyofimportantdata.Sprintis
notresponsiblefordamagesfromdatathatislostorchanged.
Reading/Writing Data:Neverpowerofforremovethebatterywhilereadingorwritingdata.
Handling microSD card:Use/storemicroSDcardsawayfromthereachofinfants.Maycause
chokingifswallowed.
Insert microSD Card
FollowthesestepstoinsertanoptionalmicroSDcard(notincluded).Makesuretopoweryour
phoneoffbeforeinsertingorremovingamicroSDcard.
1. Removethebackcover.
lLiftgentlyinthedirectionshown.
2. InsertthemicroSDcard.
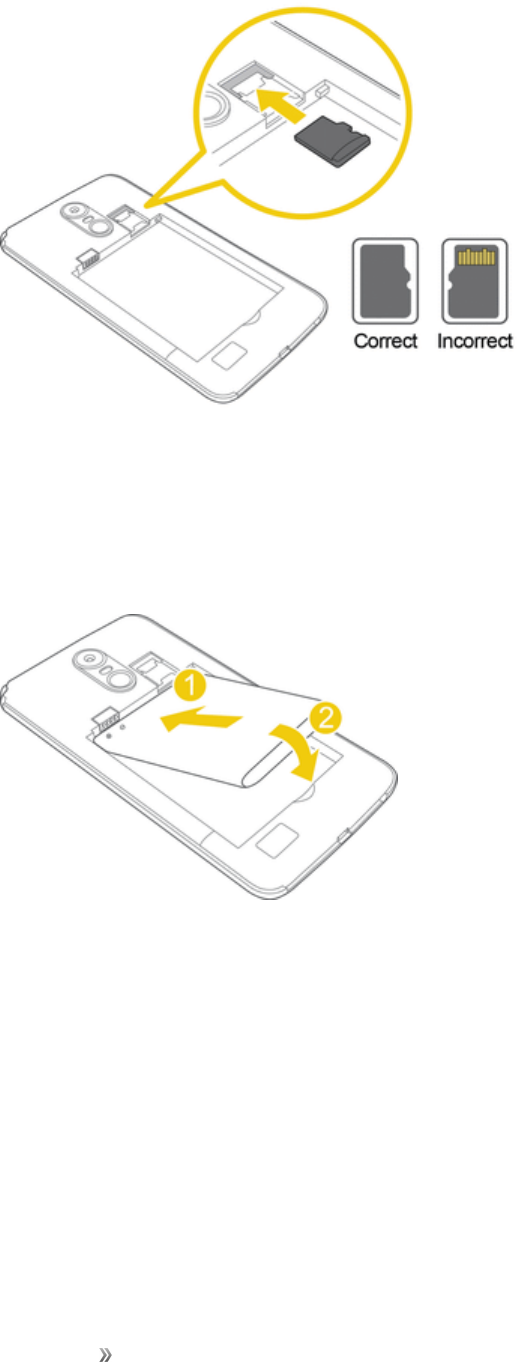
Getting Started Set Up Your Phone 13
lInsertthemicroSDcardallthewaygentlywithoutbendingandwiththeterminalsfacing
down.
lInsertonlymicroSDcards.
3. Insertthebattery.

Getting Started Set Up Your Phone 14
4. Attachthebackcover.
lMakesureallthetabsaresecureandtherearenogapsaroundthecover.
Unmount and Remove the microSD Card
FollowtheseinstructionstounmountandremoveamicroSDcard.AlwaysunmountthemicroSD
cardbeforeremovingitfromyourphone,andalwayspowerthephoneoffbeforeinsertingor
removingamicroSDcard.
1. Tap >Tools >Settings >Generaltab.
2. TapStorage.
3. Tap .
ThestatusoftheSD cardchangesfromEjectingtoEjected.Thecardisnowunmounted.
4. PressandholdthePower/Lock Button buttonandthentapPower Off>POWER OFFto
turnoffyourphone.
5. Removethebackcover.
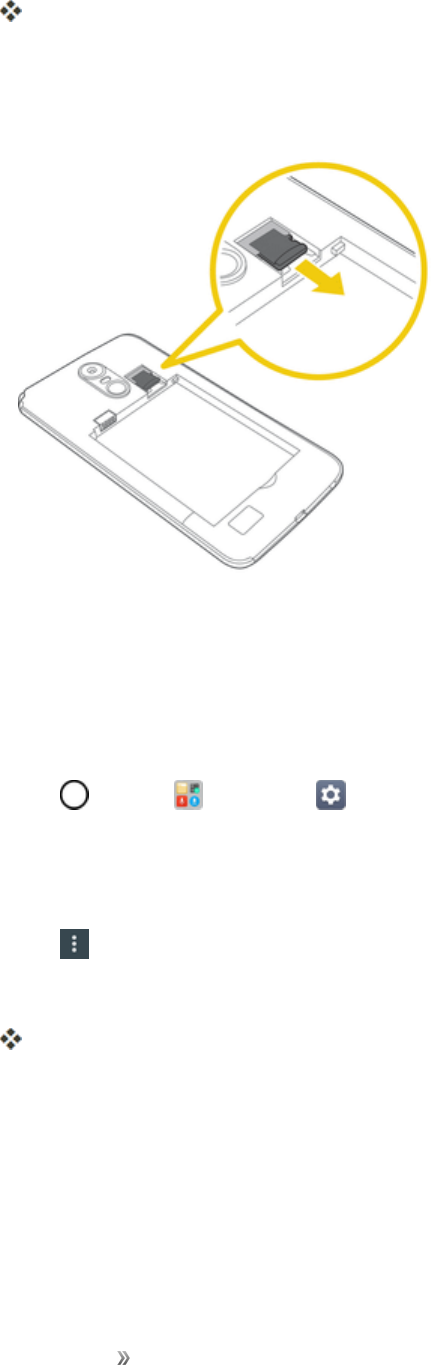
Getting Started Set Up Your Phone 15
Liftgentlyinthedirectionshown.
6. Removethebattery.
7. SlidethemicroSDcardoutoftheslottoremoveit.
8. Insertthebatteryandreplacethebackcover.(SeeInserttheBattery.)
Format microSD Card
WhenyouinsertanoptionalmicroSDcardforthefirsttime,itisrecommendedthatyouformatiton
yourphone.
1. Tap >Tools >Settings >Generaltab.
2. TapStorage.
3. TapSD card.
4. Tap >Storage settings.
5. TapFormat>FORMAT.
AlldataonthemicroSDcardiserased,andthecardisformattedforuseonyourphone.
Turn Your Phone On and Off
Theinstructionsbelowexplainhowtoturnyourphoneonandoff.

Getting Started Set Up Your Phone 16
Turn Your Phone On
nPressandholdthePower/LockButton.
Yourphonewillpoweron.Dependingonthesettings,youmayseethelockscreen.
lSeeLockandUnlockYourScreenandSelectScreenLockforinformationaboutusingthe
screenlock.
lThefirsttimeyouturnthephoneon,youwillseethesetupscreens.SeeCompletetheSetup
Screensfordetails.
lIfyourphoneisnotyetactivated,seeActivateYourPhoneformoreinformation.
Turn Your Phone Off
1. PressandholdthePower/LockButtontoopenthephoneoptionsmenu.
2. TapPower offtoturnthephoneoff.
3. TapPOWER OFFtoconfirm.
Yourphonewillpoweroff.
Yourscreenremainsblankwhileyourphoneisoff(unlessthebatteryischarging).
Tip:TheKnockONfeatureallowsyoutodouble-tapthescreentoeasilyturnitonoroff.
Getting Started Set Up Your Phone 17
Use the Touchscreen
Yourphone’stouchscreenletsyoucontrolactionsthroughavarietyoftouchgestures.
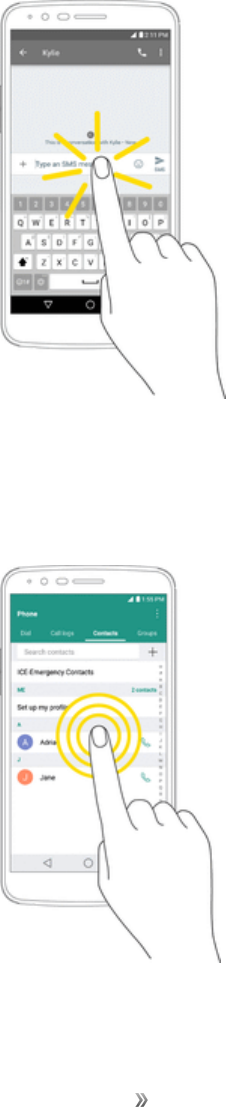
Tap
Whenyouwanttotypeusingtheonscreenkeyboard,selectitemsonscreensuchasapplicationand
settingsicons,orpressonscreenbuttonsbysimplytappingortouchingthemwithyourfinger.
Touch and Hold
Toopentheavailableoptionsforanitem(forexample,acontactorlinkinaWebpage),touchand
holdtheitem.
Getting Started Set Up Your Phone 18
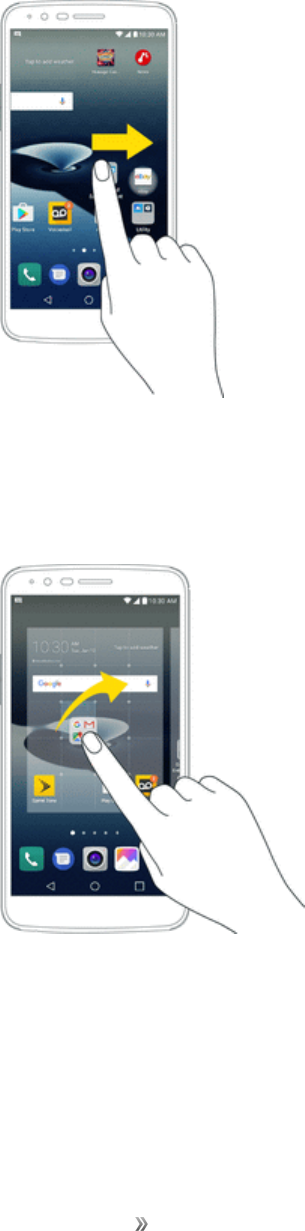
Swipe or Slide
Toswipeorslidemeanstoquicklydragyourfingerverticallyorhorizontallyacrossthescreen.
Drag
Todrag,touchandholdyourfingerwithsomepressurebeforeyoustarttomoveyourfinger.While
dragging,donotreleaseyourfingeruntilyouhavereachedthetargetposition.
Getting Started Set Up Your Phone 19
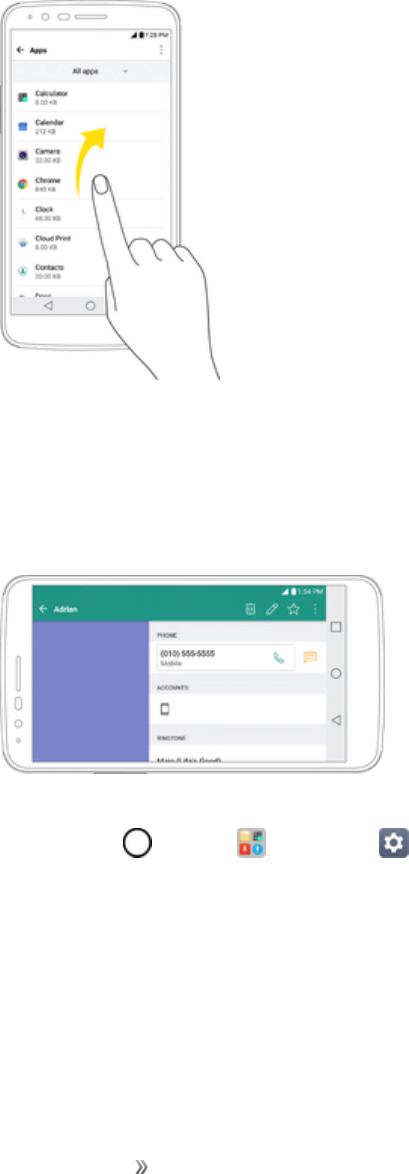
Flick
Flickingthescreenissimilartoswiping,exceptthatyouneedtoswipeyourfingerinlight,quick
strokes.Thisfingergestureisalwaysinaverticaldirection,suchaswhenflickingthecontactsor
messagelist.
Rotate
Formostscreens,youcanautomaticallychangethescreenorientationfromportraittolandscapeby
turningthephonesideways.Whenenteringtext,youcanturnthephonesidewaystobringupa
biggerkeyboard.
Note:TheAuto-rotateswitchneedstobeselectedforthescreenorientationtoautomatically
change.Tap >Tools >Settings >Displaytab>Auto-rotate screen.
Tip:YoucanalsoaccessthescreenrotationsettingfromtheNotificationsWindow.Dragthestatus
bardownandtapRotationtoselectordeselecttheoption.
Getting Started Set Up Your Phone 20
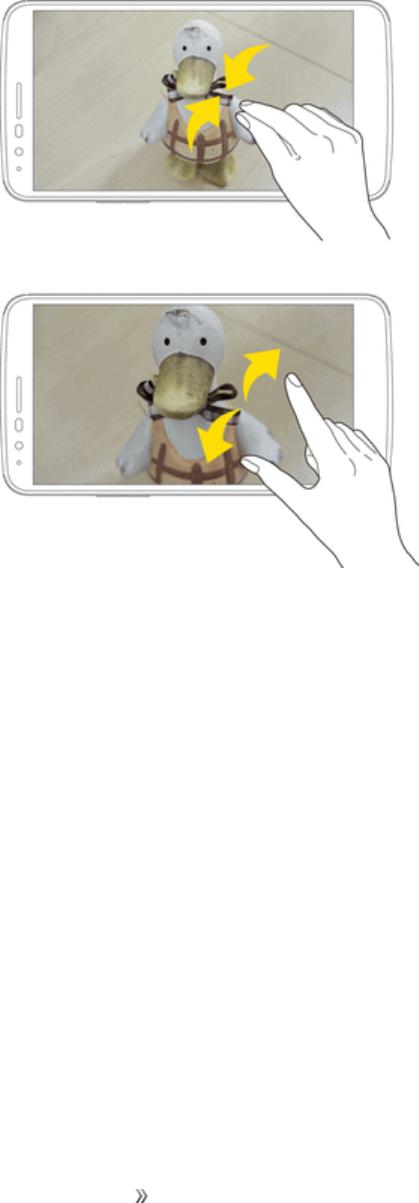
Pinch and Spread
“Pinch”thescreenusingyourthumbandforefingertozoomoutor“spread”thescreentozoomin
whenviewingapictureoraWebpage.(Movefingersinwardtozoomoutandoutwardtozoomin.)
Activate Your Phone
Followtheinstructionsbelowtoactivateyourphoneifithasnotalreadybeenactivated.Depending
onyouraccountorhowandwhereyoupurchasedyourphone,itmaybereadytouseoryoumay
needtoactivateitonyourSprintaccount.
nIfyoupurchasedyourphoneataSprintStore,itisprobablyactivatedandreadytouse.
nIfyoureceivedyourphoneinthemail,anditisforanewSprintaccountoranewlineofservice,it
willactivateautomaticallywhenyoufirstturniton.
nIfyou’reswappingphonesforanumberalreadyonyourSprintaccount,goto
sprint.com/activateandfollowtheinstructions.
Toconfirmactivation,makeaphonecall.Ifyourphoneisstillnotactivated,visitsprint.com/support
forassistance.IfyoudonothaveaccesstotheInternet,callSprintCustomerServiceat1-888-211-
4727fromanotherphone.

Getting Started Set Up Your Phone 21
Tip:DonotpressthePower/LockButtonwhilethephoneisbeingactivated.Pressingthe
Power/LockButtoncancelstheactivationprocess.
Note:Ifyouarehavinganydifficultywithactivation,visitsprint.com/support.
Complete the Setup Screens
Thesetupscreenshelpyousetupcertainfeaturesandpreferencesonyourphone.Onceyour
phonehasbeenturnedon,youwillseeanAccessibilitymessage.Youcanthencompletethesetup
process.
Note:Youmaybeabletocompletethesetupscreensbeforeyourphonehasbeenactivatedonyour
account.
1. Ontheconfigurationscreen,touchNEXTtogetstarted.
2. Followtheonscreeninstructionstocompleteeachsection.Foreachtopic,youwillhavethe
optiontoskipitandcontinuetothenextscreen.
lLanguage Selection-Selectadesiredlanguage.
lSet internet connection-Ifprompted,followthepromptstosignintoanavailableWi-Fi®
network.ForsecuredWi-Finetworks,youwillneedtoenterapassword.SeeWi-Fiformore
details.
lGoogle Account -SigninorsetupaGoogleAccount.
lName-Addyournametopersonalizesomeapps.
lAdd your fingerprint-Preventothersfromusingthisphonewithoutyourpermissionby
activatingdeviceprotectionfeatures.
lGoogle services-ReadalloftheinformationfortheavailableGoogleServicesand,ifyou
agree,tapNEXT.Otherwise,unchecktheoptionsandtapNEXT.
oHelp apps find your location-Helpsappsdeterminelocation.Thismeanssending
anonymouslocationtoGoogle,evenwhennoappsarerunning.TapLearn morefor
additionalinformation.
oImprove location accuracy-AllowsappsandservicestoscanforWi-Finetworks
evenwhenWi-Fiisoff.
oHelp improve your Android experience-Allowsyourdevicetosenddiagnosticand
usagedatatoGoogleautomatically.TapLearn moreforadditionalinformation.
lLegal documents -Readalloftheinformationaboutlegaldocuments.
oEULA (End-User License Agreement)-ReadtheEnd-UserLicenseAgreementand
taptheI agree checkboxifyouagreetotheterms.

Getting Started Set Up Your Phone 22
oLow power location estimation-ReadtheLowpowerlocationestimationinformation
andtaptheI agree checkboxifyouagreetotheterms.
3. TapDone.Yoursetupisnowcomplete.Followtheonscreeninstructionstolearnaboutbasic
touchmenunavigation,viewtutorials,orjustgetstarted.
Getting Started Basic Operations 23
Basic Operations
Thefollowingtopicsoutlinebasicfeaturesandoperationsofyourphone.
Basics
Thefollowingtopicsofferanoverviewofyourphone’sbasicoperations.
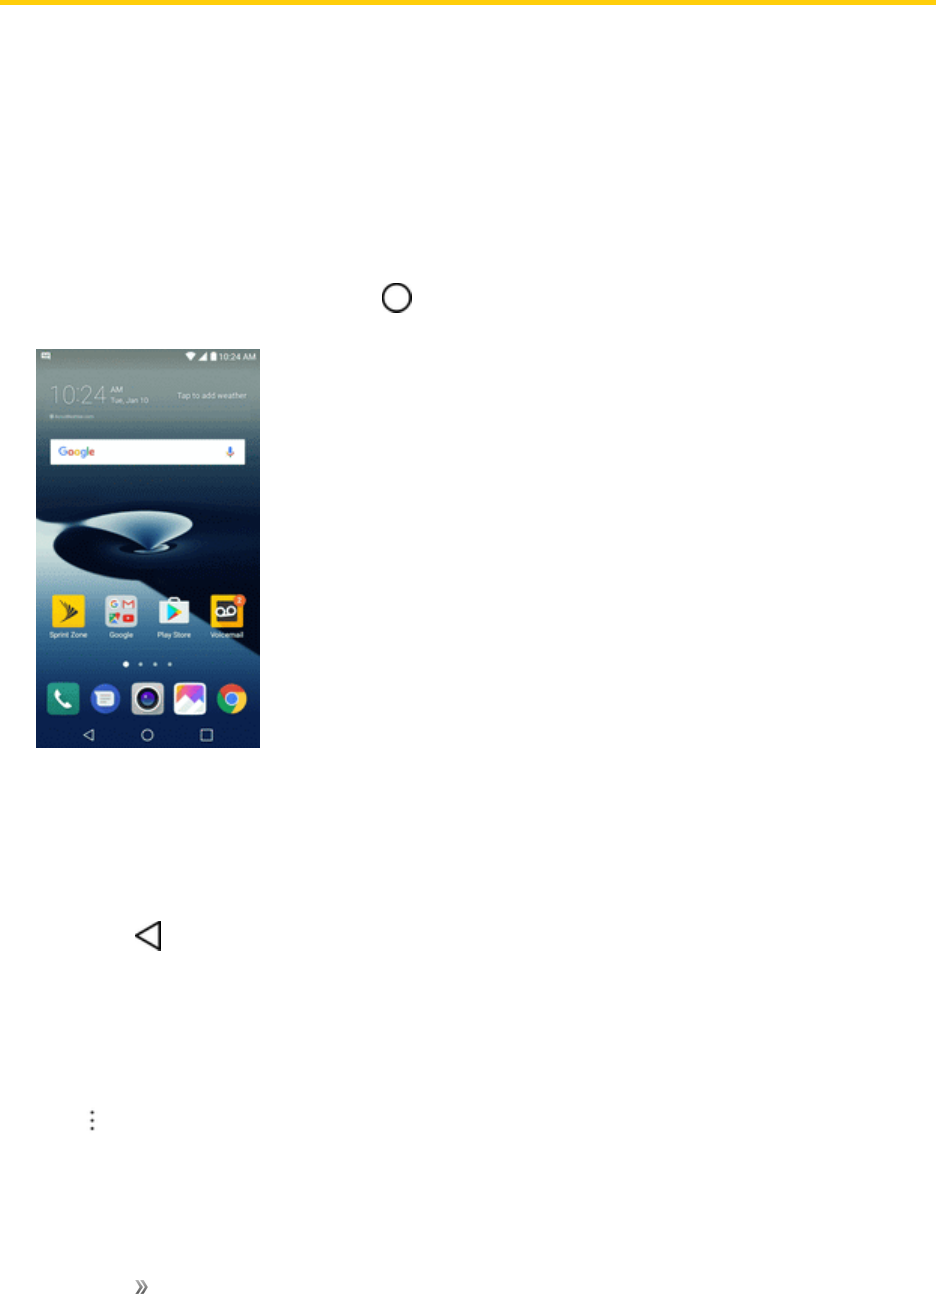
Home Screen
Mostofyourphone’soperationsoriginatefromthehomescreen.
nFromanyscreen,taptheHome key todisplaythehomescreen.
Forinformationaboutusingthehomescreen,seeHomeScreenBasics.
Select Options and Navigate Screens
Tapicons,onscreenkeys,andotheritemstoopenoractivatetheassignedfunction.
nTapBack toreturntothepreviousscreen.
Menu Operations
Youcandisplayoptionsmenususingthemenukey,anyapp-specificmenuicon,orbytappingand
holdingascreenarea,dependingonyourcurrentapp.
nTap toviewavailablesettingsandoptions.
Getting Started Basic Operations 24
Recent Applications
YoucandisplayalistofrecentlyusedapplicationsusingtheOverviewkey.
nTapOverview toviewalistofrecentlyusedapplications.
Phone Settings Menu
Youcancustomizeyourphone’ssettingsandoptionsthroughtheSettingsmenu.
nTap >Tools >Settings .
–or–
Dragthestatusbardownandtap >Settings .
Formoreinformation,seeSettings.
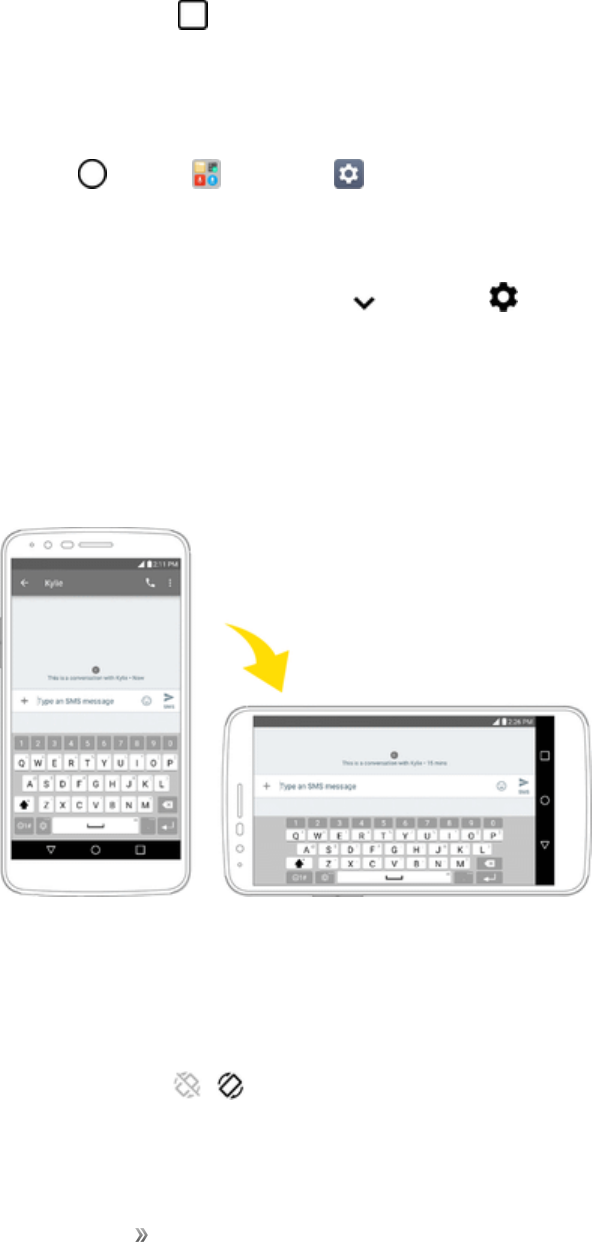
Portrait and Landscape Screen Orientation
Thedefaultorientationforyourphone’sscreenisportrait(vertical),butmanyappswillchangeto
landscapeorientation(widescreen)whenyourotatethephonesideways.
Note:Notallscreenswilladjustforlandscapeorientation.
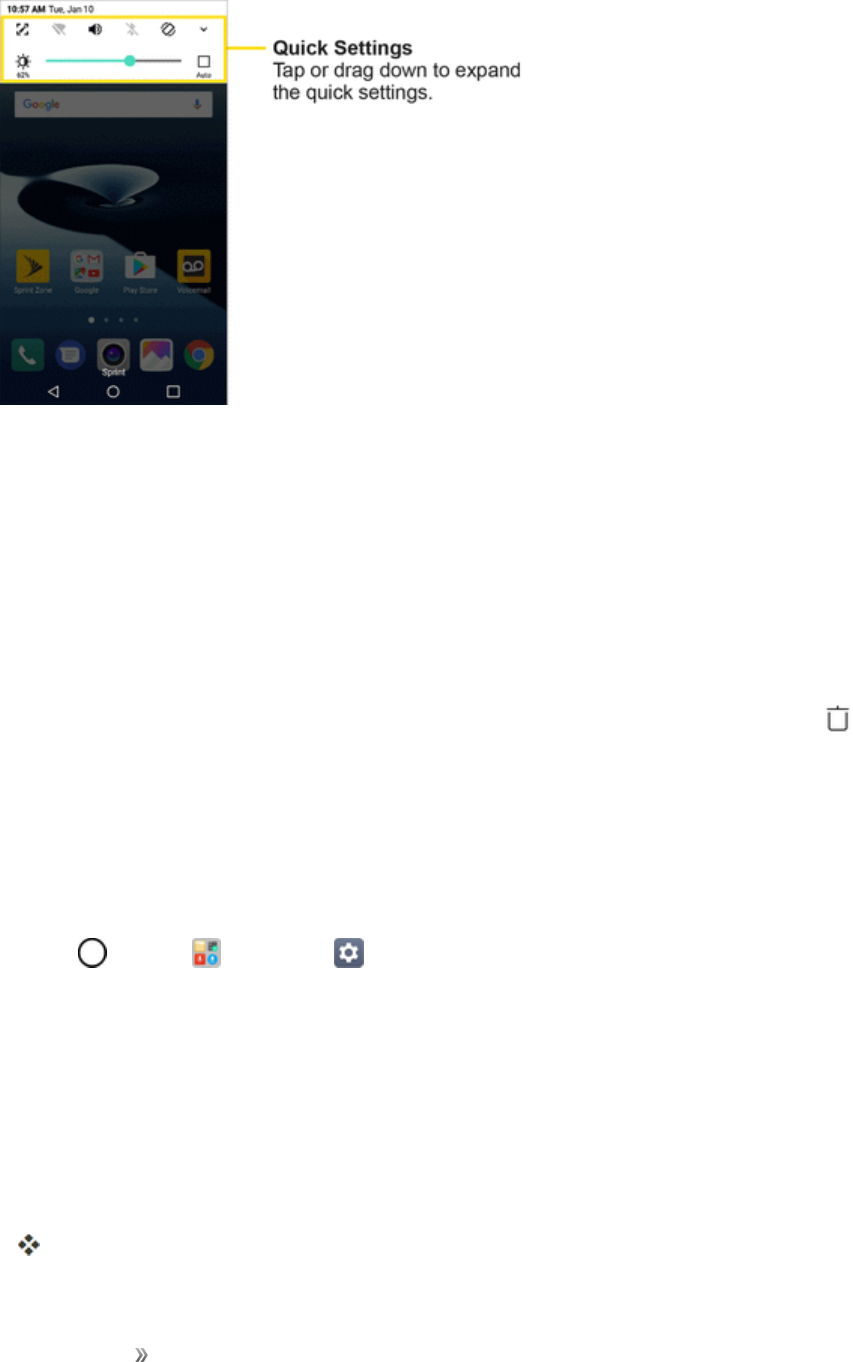
Turn Screen Rotation On or Off
1. Pulldownthestatusbartodisplaythequicksettingsmenu.
2. TapRotation / toturntheoptiononoroff.
lYoumayneedtoscrollleftorrighttoseetheScreenrotationoption.
Getting Started Basic Operations 25
Note:Youcanalsosettherotationoptionfromthemainsettingsmenu.Tap >Tools >
Settings >Displaytab>Auto-rotate screen.
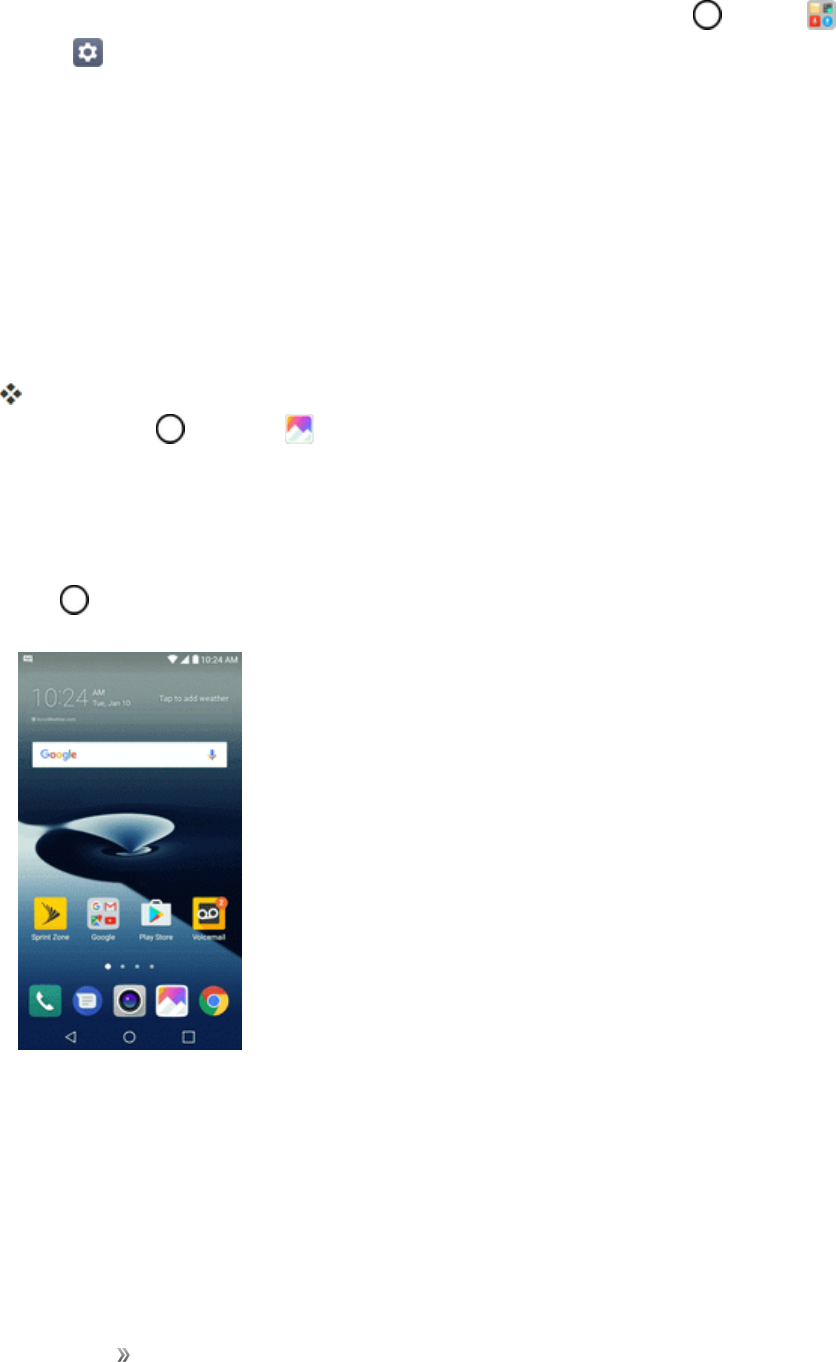
Capture Screenshots
Youcanuseyourphone’spowerandvolumebuttonstocapturescreenshots.
nPressandholdthePower/LockButtonandVolume DownButtonatthesametimeto
captureascreenshotofthecurrentscreen.
–or–
TapthePower/Lock Buttononce,thenimmediatelypressandholditafter.
ThecurrentscreenshotwillbecapturedandstoredintheScreenshotsalbuminthephone’s
Gallery.Tap >Gallery .
Applications
Allinstalledappscanbeaccessedandlaunchedfromthehomescreen.
1. Tap .
Getting Started Basic Operations 26
2. Tapanappicontolaunchthecorrespondingapplication.
Theapplicationopens.
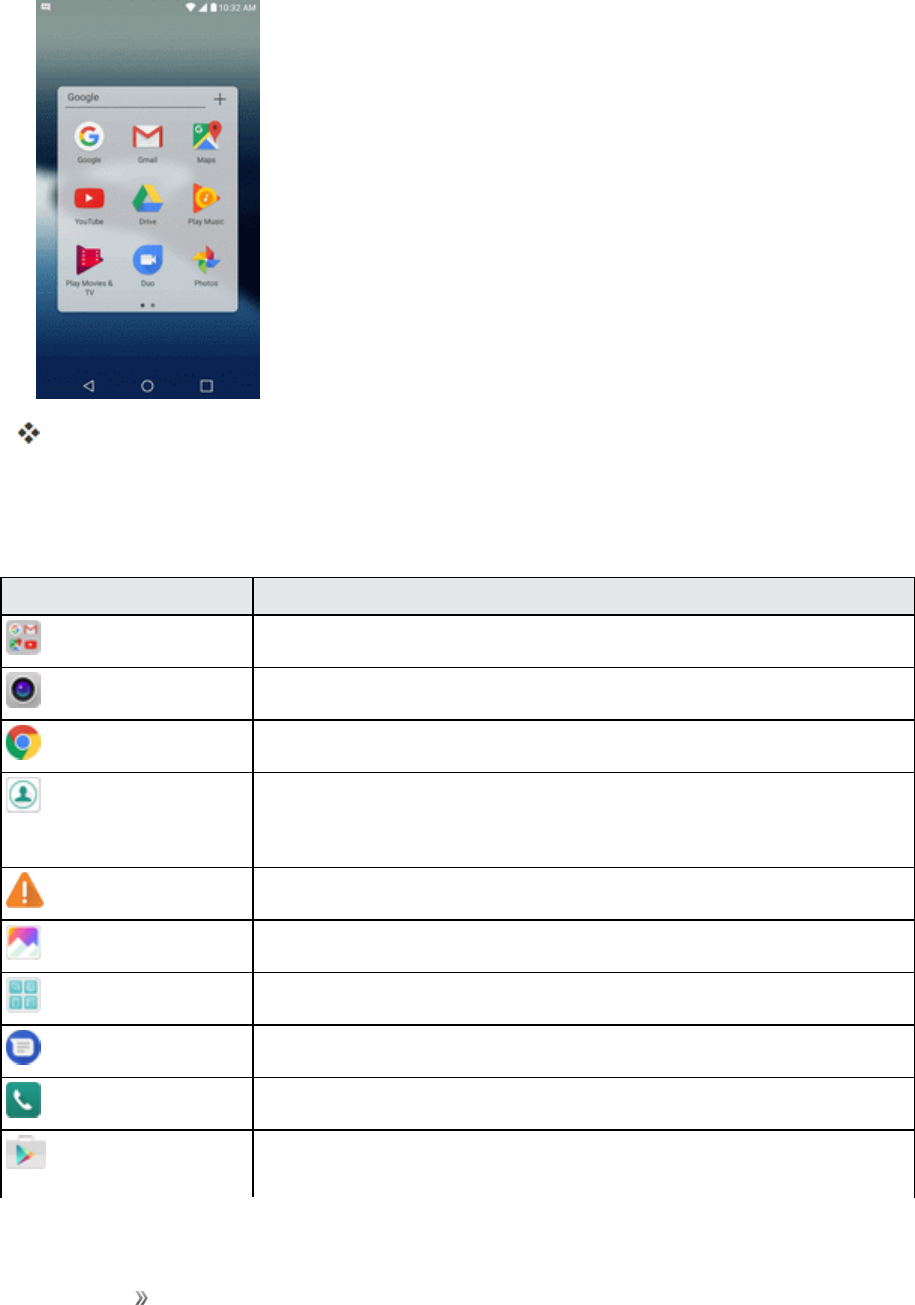
Preinstalled Apps
Thefollowingtableoutlinestheprimaryappsthathavebeenpreinstalledonyourphone.
App Function/Service
Google AccesstheGoogleapplications.
Camera Takepicturesandrecordvideosusingthefrontandrearcameras.
Chrome BrowsetheInternet.
Contacts DisplaystheContactsthatcanbesynchronizedwithyourphonefrom
eitheryourGoogleorOutlookaccount.Contactscanonlybesynched
toamanagedaccount.
Emergency Alert Providesaccesstoyouremergencymessagesanditssettings.
Gallery DisplaysaGalleryofcameraimagesandvideosavedonyourphone.
Management Accesspowerandstoragespacemanagementapps.
Messenger Providesaccesstoyourtextandmultimediamessages.
Phone Accessthedialpadtomakecalls.
Play Store Browse,searchfor,anddownloadapplicationsfromtheGooglePlay
Storeapp.
Getting Started Basic Operations 27
App Function/Service
QuickMemo+ Allowsyoutotakescreenshotsandwriteamemousingtheimages.
LG SmartWorld LaunchestheLGSmartWorldapp.
Sprint Fun &
Games
Allowsyoutoaccessthenewestappsandgames.
Sprint Zone AccessyourSprintaccount,getdeviceinformationandhelp,find
recommendedapps,andmore.
Tools AccesstheFileManager,Calculator,VoiceRecorder,Downloads
applications,andmore.
Voicemail UseVisualVoicemailforaquickandeasywaytoaccessyour
voicemail.Nowyoucanfindexactlythemessageyouarelookingfor
withouthavingtolistentoeveryvoicemailmessagefirst.
Fingerprint Recognition
Youmustregisteryourfingerprintonyourdevicefirstbeforeusingthefingerprintrecognition
function.
Youcanusethefingerprintrecognitionfunctioninthefollowingcases:
nTounlockthescreen
nToviewthelockedcontentintheGalleryorQuickMemo+.
nToconfirmapurchasebysigningintoanapporidentifyingyourselfwithyourfingerprint.
Note:Yourfingerprintcanbeusedbythedeviceforuseridentification.Verysimilarfingerprintsfrom
differentusersmayberecognizedbythefingerprintsensorasthesamefingerprint.Toenhancethe
devicesecurity,setthescreenlocktoapattern,PINorpassword.
Precautions for Fingerprint Recognition
Fingerprintrecognitionaccuracymaydecreaseduetoanumberofreasons.Tomaximizethe
recognitionaccuracy,checkthefollowingbeforeusingthedevice.
nThedevice’sPower/LockButtonhasafingerprintsensor.EnsurethatthePower/LockButtonis
notdamagedbyametallicobject,suchascoinorkey.
nWhenwater,dustorotherforeignsubstanceisonthePower/LockButtonoryourfinger,the
fingerprintregistrationorrecognitionmaynotwork.Cleananddryyourfingerbeforehavingthe
fingerprintrecognized.
nAfingerprintmaynotberecognizedproperlyifthesurfaceofyourfingerhasascarorisnot
smoothduetobeingsoakedinwater.
Getting Started Basic Operations 28
nIfyoubendyourfingerorusethefingertiponly,yourfingerprintmaynotberecognized.Make
surethatyourfingercoverstheentiresurfaceofthePower/LockButton.
nScanonlyonefingerforeachregistration.Scanningmorethanonefingermayaffectfingerprint
registrationandrecognition.
nThedevicemaygeneratestaticelectricityifthesurroundingairisdry.Ifthesurroundingairisdry,
avoidscanningfingerprints,ortouchametallicobjectsuchascoinorkeybeforescanning
fingerprintstoremovestaticelectricity.
Registering Fingerprints
Youcanregisterandsaveyourfingerprintonthedevicetousefingerprintidentification.
1. Tap >Tools >Settings >Generaltab>Fingerprints & security>Fingerprints.
Note:Thisfeatureisavailablewhenthesecuredlockisactivated.LockthedevicewithKnockCode,
Pattern,PINPasswordandmore.Ifthescreenlockisnotactive,configurethelockscreenby
followingtheon-screeninstructions.SeeSelectScreenLockfordetails.
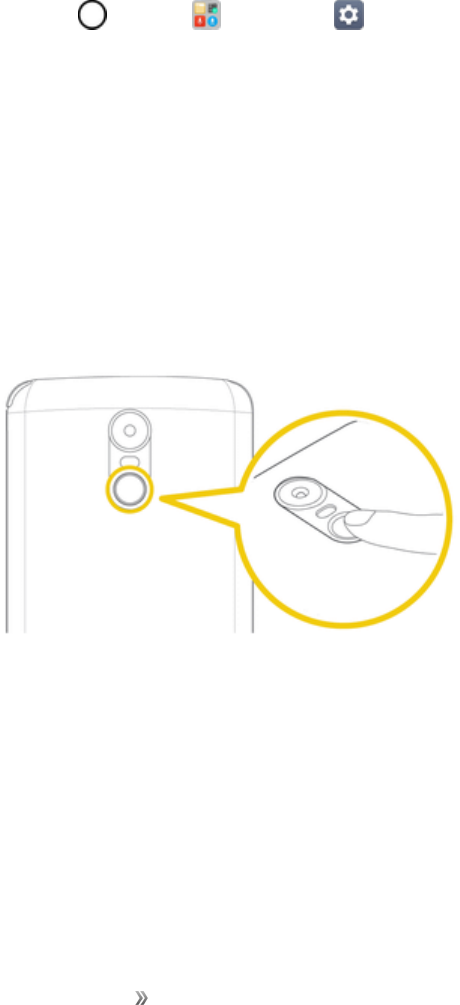
2. LocatethePower/LockButtononthebackofthedeviceandgentlyputyourfingeronitto
registerthefingerprint.
Note:GentlypressthePower/LockButtonsothatthesensorcanrecognizeyourfingerprint.Ifyou
pressthePower/LockButtonwithanexcessiveforce,thescreenlockfunctionmaystartorthe
screenmaybeturnedoff.Ensurethatyourfingertipcoverstheentiresurfaceofthesensorofthe
Power/LockButton.
3. Followtheon-screeninstructions.
lRepeatscanningthefingerprintbymovingyourfingerlittlebylittleuntilthefingerprint
registers.
4. Whenthefingerprintregistrationisdone,tapOK.
lTapADD MOREtoregisteranotherfingerprint.Ifyouregisteronlyonefingerprintandthe
correspondingfingerisnotinagoodcondition,thefingerprintrecognitionmaynotworkwell.
Getting Started Basic Operations 29
Asthepreventivemeasureagainstthiskindofsituation,registermultiplefingerprints.
Managing Fingerprints
Youcaneditordeleteregisteredfingerprints.
1. Tap >Tools >Settings >Generaltab>Fingerprints & security>Fingerprints.
2. Unlockaccordingtothespecifiedlockmethod.
3. Fromthefingerprintlist,tapafingerprinttorenameit.
lTodeleteit,tap .
Unlocking the Screen with a Fingerprint
Youcanunlockthescreenorviewthelockedcontentbyusingyourfingerprint.
Activatethedesiredfunction:
1. Tap >Tools >Settings >Generaltab>Fingerprints & security>Fingerprints.
2. Unlockaccordingtothespecifiedlockmethod.
3. Onthefingerprintsettingsscreen,activatethedesiredfunction:
lScreen lock:Unlockthescreenwithafingerprint.
lContent lock:Unlockcontentwithafingerprint.Todothis,makesurethatthecontentlock
isset.
Multi-tasking Feature
Youcanusetwoappsatthesametimebyseparatingthescreenintomultiplewindows.
Multi-Window
Whileusinganapp,touchandhold fromtheHometouchbuttons,thenselectanappfromthe
recently-usedappslist.
nYoucanusetwoappsatthesametime.
Getting Started Basic Operations 30
nTostoptheMulti-Windowfeature,touchandhold .
Note:TheMulti-Windowfeatureisnotsupportedbysomeapps,includingdownloadedapps.
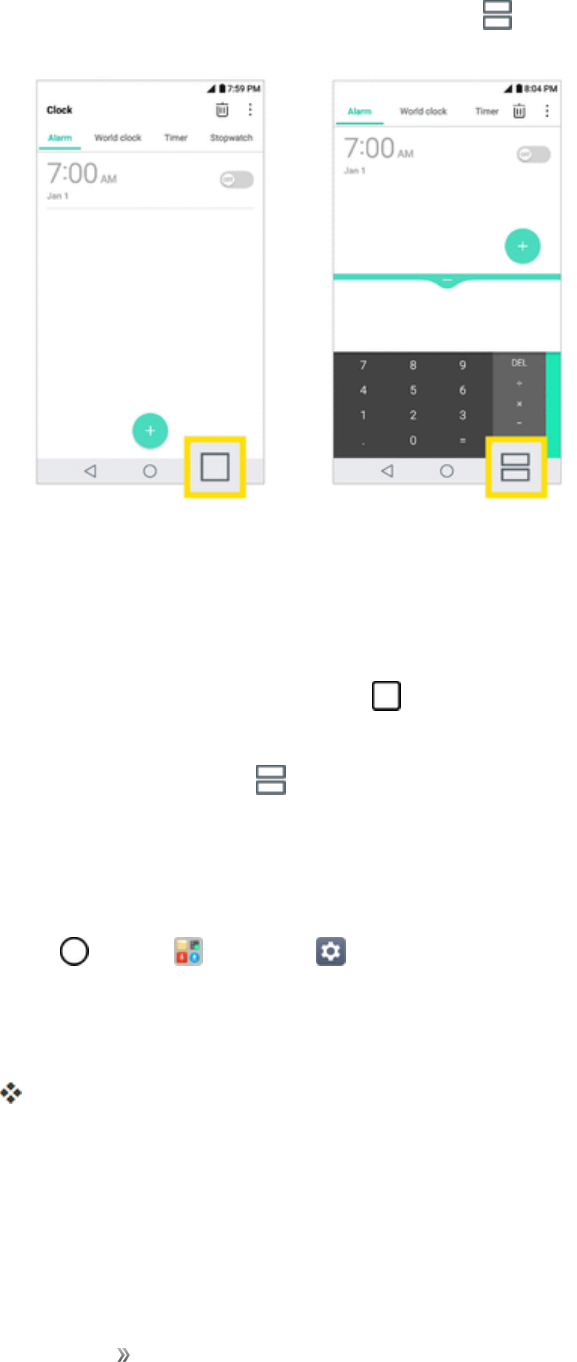
Overview screen
TheOverviewscreenprovidesapreviewofyourrecently-usedapps.
Toviewthelistofrecently-usedapps,tap ontheHometouchbuttons.
nTouchandholdanappanddragittothetopofthescreentostarttheappwiththeMulti-Window
feature.Youcanalsotap atthetopofeachapppreview.
Phone Number
Followtheinstructionsbelowtodisplayyourphone’swirelessphonenumber.
1. Tap >Tools >Settings >Generaltab.
2. TapAbout phone.
3. TapStatus.
YouwillseethenumberlistedunderMy phone number.
Airplane Mode
Airplanemodeturnsoffallfunctionsthatemitorreceivesignals,whileleavingyourphoneonsoyou
canuseappsthatdon’trequireasignalordata.

Getting Started Basic Operations 31
Toturnonairplanemode:
1. PressandholdthePower/Lock Buttontodisplaythephoneoptionsmenu.
2. TapTurn on Airplane mode>TURN ON.
Yourphoneisnowinairplanemode.Youwillseetheairplanemodeicon inthestatusbar.
Tip:Youcanalsoaccessairplanemodethroughthestatusbarmenu.Dragthestatusbardownand
tapAirplane mode >TURN ON.
Toturnoffairplanemode:
1. PressandholdthePower/Lock Buttontodisplaythephoneoptionsmenu.
2. TapTurn off Airplanemode.
Yourphone’swirelessconnectionfeaturesarenowrestored.
Tip:Youcanalsoturnoffairplanemodethroughthestatusbarmenu.Dragthestatusbardownand
tapAirplane mode .
Enter Text
YoucantypeonyourphoneusingoneoftheavailabletouchscreenkeyboardsorGooglevoice
typing.
Touchscreen Keyboards
Yourphoneoffersyouachoiceoftouchscreenkeyboardsforenteringtext.Thekeyboardappears
automaticallyonscreenwhenyoutapatextentryfield,andtheycanbeusedineitherportraitor
landscapemode.
Themethodsavailableinclude:
nGoogle voice typingallowstouseGooglevoicerecognitiontoconvertspeechtotext.
nLG KeyboardallowsyoutouseaLGkeyboardtoentertext.
Note:Keyboardlayoutsandoptionsmaychangedependingonwhereyou’reusingthem.For
example,ifyou’reenteringtexttodoaWebsearch,asearchiconmaybeavailableinsteadofan
enterkey.
Tochangethekeyboard:
1. Fromanyscreenwhereyoucanentertext,taptheinputfieldtorevealthekeyboard.
2. DragthestatusbardownandtapChange keyboard.
Getting Started Basic Operations 32
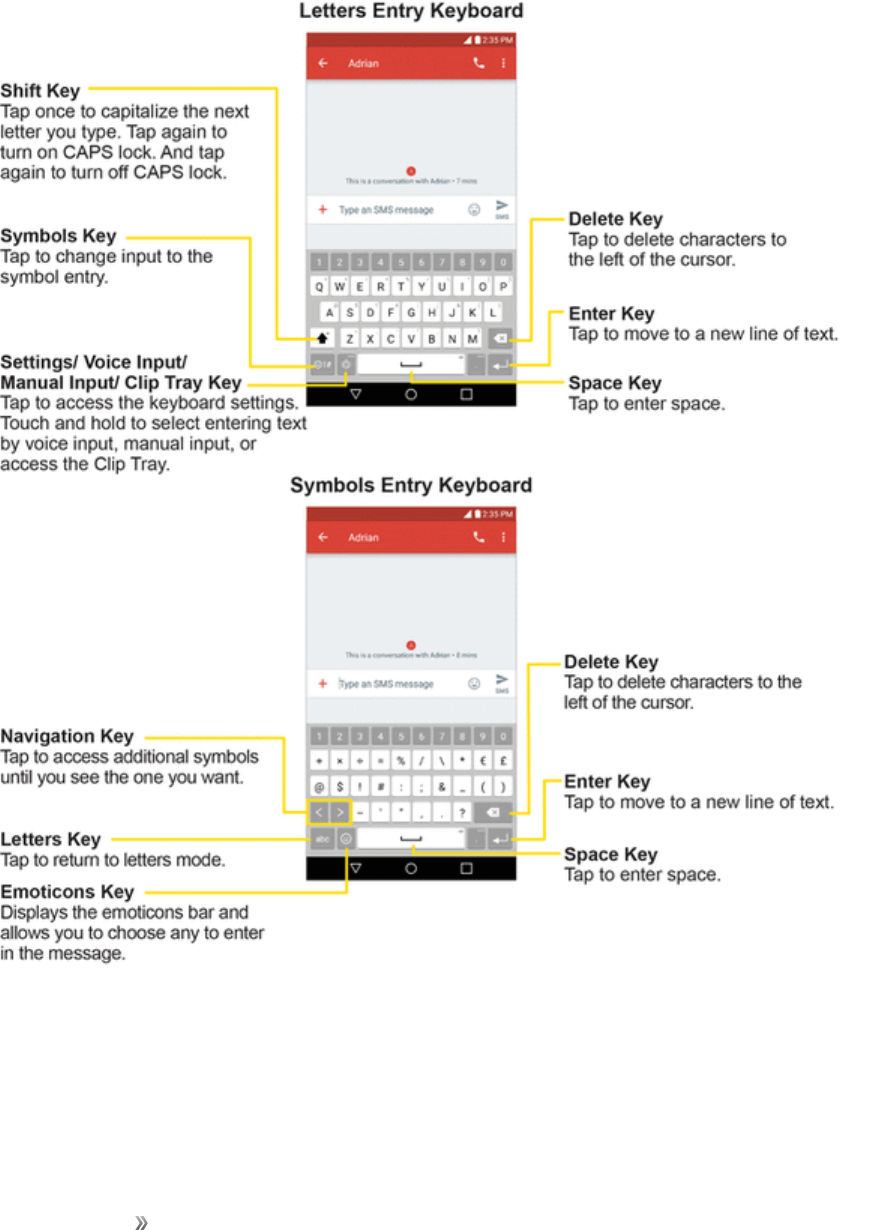
QWERTY Keyboard
Youcanentertextusingtheon-screenkeyboard.Theon-screenkeyboardappearsonthescreen
whenyoutapanavailabletextentryfield.
Getting Started Basic Operations 33
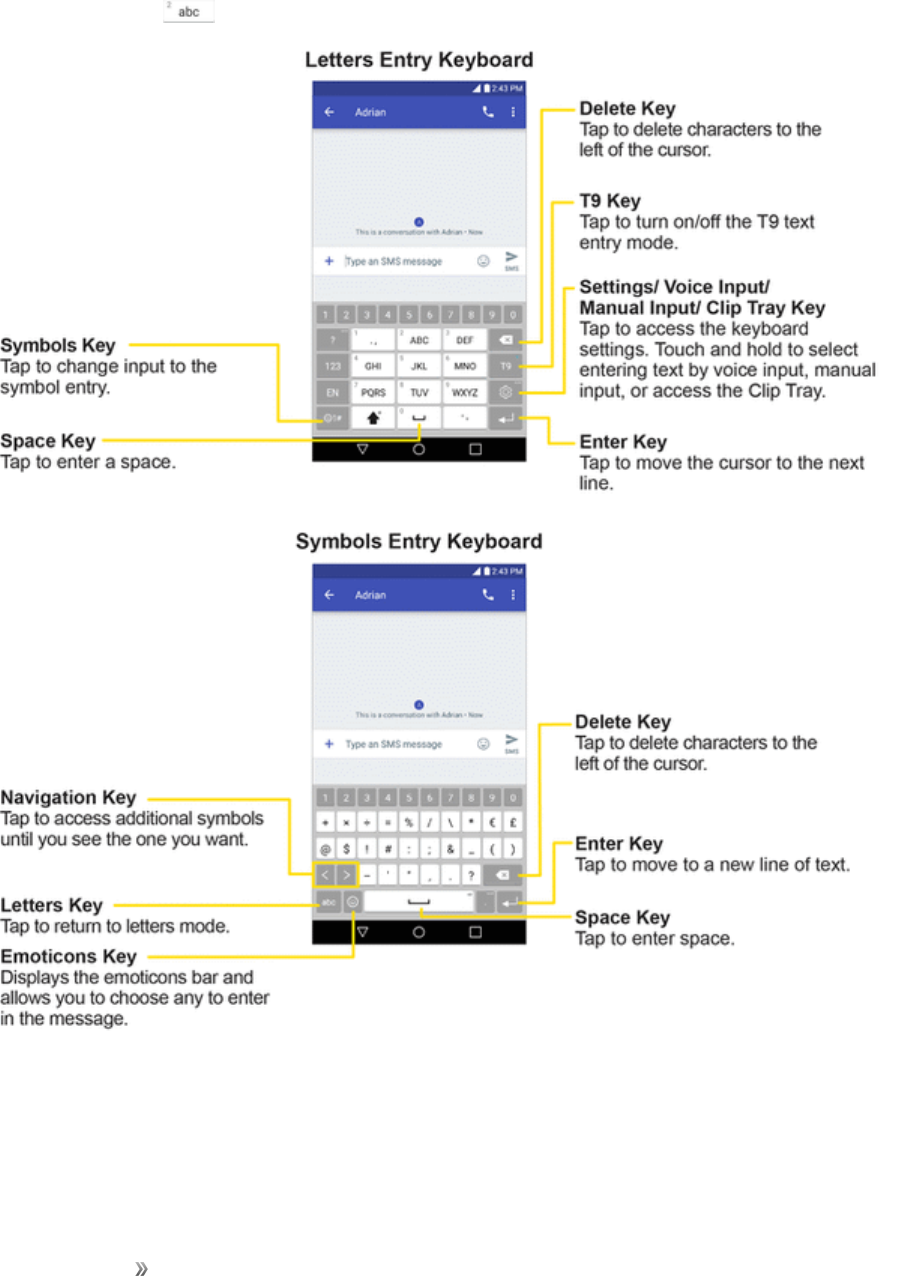
Phone Keyboard
WhenT9isoff,toentertext,tapthekeylabeledwiththedesiredletteruntilitappearsonthescreen.
Forexample,tap oncefor“a”,twicefor“b”,orthreetimesfor“c."
Tips for Editing Text
Yourphonegivesyoumanyoptionstomakeenteringtexteasier,includingcopying,cutting,and
pastingtext,usingvoice-to-textinput,customizingtheuserdictionary,usingpredictivetext,and
Getting Started Basic Operations 34
more.
Tocut/copyandpaste:
1. Touchandholdawordtohighlightit.
2. Dragthebluehighlightmarkerstohighlightthetextyouwant.
–or–
Toselectallthetext,tap >SELECT ALLinthecontextmenu.
lTocanceltheselection,simplytapunselectedtextoremptyarea.
3. TapCUTorCOPYinthecontextmenu.
4. Placethecursoronthelocationwhereyouwanttopastethetext.
5. TouchandholdthetextfieldandtapPASTE.Thetextthatyoupastedalsoremainsinthe
phone'smemory(temporarily),soyoucanpastethatsametextinanotherlocation.
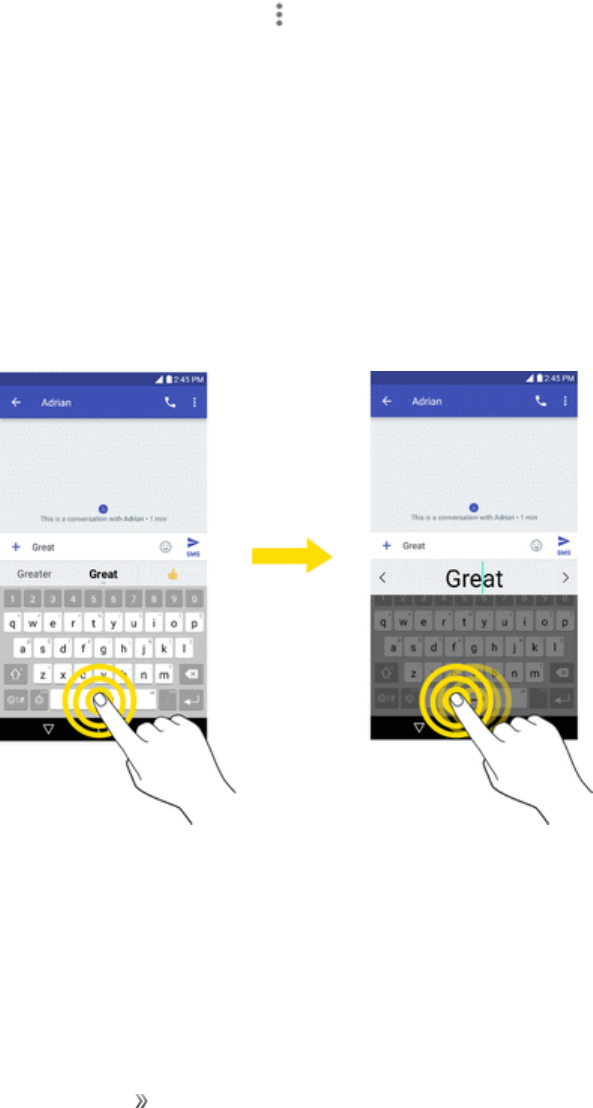
Move Cursor Using the Space Bar
Touchandholdthespace barandslideyourfingertotheleftorrighttomovethecursor.
Split Keyboard Using Gesture
Thesplitkeyboardfeatureallowsyoutousebothhandstotypewhileinlandscapeview.Eachhalfof
thekeyboardwithdrawstotheleftandrightofthescreen.Placeboththumbsonthekeyboardand
slidethemoutwardsinoppositedirections.
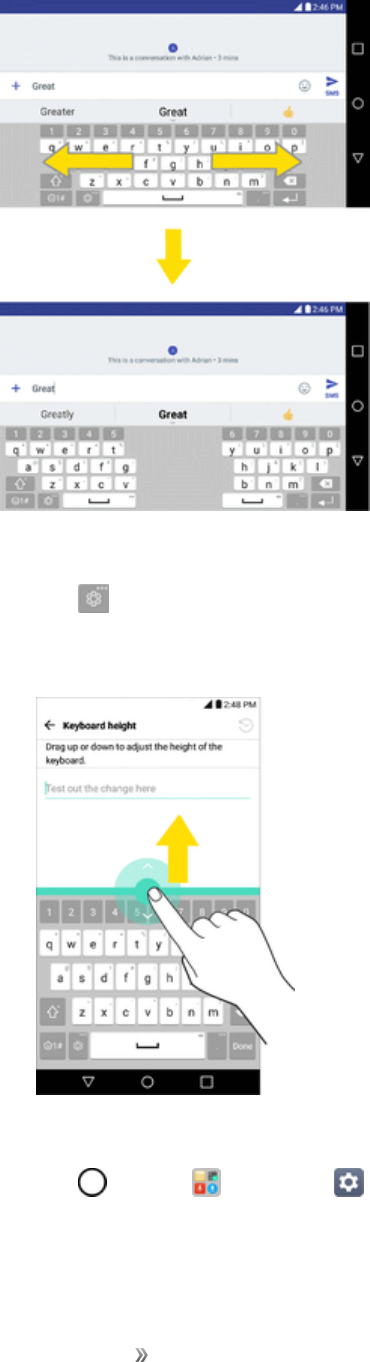
Getting Started Basic Operations 35
Tochangethekeyboardheight:
1. Tap >Keyboard height and layout>Keyboard height.
2. Dragthebluebartoadjustthekeyboardheight.
Tochangethebottomrowkeys:
1. Tap >Tools >Settings >Generaltab>Language & keyboard>LG Keyboard>
Keyboard height and layout>QWERTY keyboard layout.

Getting Started Basic Operations 36
2. Dragtoaddordeletekeysorchangetheorder.Tochangetoanothercharacteronthevisible
key,tapthekeyandchoosethedesiredcharacterthatyouwantdisplayed.
Note:Thisfunctiondoesnotsupportsomelanguages.
Google Account
YouwillneedaGoogleAccounttoaccessseveralphonefeaturessuchasGmail,GoogleMaps,
Duo,andtheGooglePlayapplications.BeforeyouareabletoaccessGoogleapplications,youmust
enteryouraccountinformation.Theseapplicationssyncbetweenyourphoneandyouronline
GoogleAccount.
Google Account Cautions
BesurenottoforgetyourGoogleAccountIDorpassword.
Create a Google Account
Youmustcreateand/orsignintoaGoogleAccounttouseGmail,Duo™,GoogleCalendar™,and
otherGoogleApps.SigningintoaGoogleAccountisalsonecessarytodownloadapplicationsfrom
theGooglePlayStoreapptosyncyourdata(ifapplicable)withtheGoogleservers,andtotake
advantageofanyotheravailableGoogleservicesonyourphone.
Ifyoudon’thaveaGoogleAccount,youwillbepromptedtocreateone.Ifyouhaveanenterprise
accountthroughyourcompanyorotherorganization,yourITdepartmentmayhavespecial
instructionsonhowtosignintothataccount.
Create a Google Account Online
1. Fromacomputer,orfromyourphone'sBrowser,navigatetowww.google.com.
2. Onthemainpage,taporclickSign in>Create an account.
3. Followtheon-screenpromptstocreateyourfreeaccount.
4. Logintoyourprovidedemailaddress,locatetheemailfromGoogle,andrespondtothenew
emailtobothconfirmandactivateyournewaccount.
Getting Started Basic Operations 37
Create a Google Account Using Your Phone
1. Tap >Tools >Settings >Generaltab>Accounts & sync > ADD ACCOUNT>
Google.
2. TapGoogleandthentapOr create a new account.
3. Followthepromptstosetupyouraccount.TapNEXTtoproceedbetweensteps,whichmay
include:
lEnteryourFirst nameandLast name.
lEnteradesiredUsername.
lEnterandreenterapassword.
lCreateasecurityquestionandanswer,enterasecondaryemailaddresstohelpyourecover
yourpasswordifyoueverloseit.
lOntheFinishaccountscreen,selectyourWebhistoryandadditionalGooglePlayoptions.
lEnterthelettersfromtheAuthenticatingscreen.
lAfteryourphoneconnectswiththeGoogleservers,selecttheitemsyouwouldliketosync
withyourphoneandthentapSync now.
4. TapFinishsetup.
YouaresignedintoyourGoogleAccount,andyourphonewillsynchronizetheselecteditems.
Note:WhensettingupanewGoogleAccount,eitheronyourphoneoronline,youwillbeprompted
toaddasecondaryemailaddress.EnterasecondGmailaddressoranyotheremailaddressfrom
whichyoucurrentlysendandreceiveemail.Thisaddressisusedtoauthenticateyouraccount
shouldyoueverencounterproblemsorforgetyourpassword.ItisstronglyencouragedforAndroid
userssoyoucanregainaccesstoGoogleservicesandpurchasesonyourphone.
Create an Exchange Account
IfyousynchronizeyourphonewithyourExchangeaccount,youcanread,manage,andsendemail
inthesameeasywayaswithaGmailAccount.
1. Tap >Tools >Settings >Generaltab>Accounts & sync>ADD ACCOUNT>
Exchange.
2. EntertheEMAIL ADDRESSandtapNEXT.
3. EnterthePASSWORDandthentapNEXT.
Getting Started Basic Operations 38
4. Followtheonscreenpromptstoconfigureoptionsfortheaccount.
5. EnteranaccountnameandadisplaynameandtapNEXTtocompletesetup.
Yourcorporateemailaccountissetupandyouwillbeginreceivingemailfortheaccount.
Sign into Your Google Account
IfyouhaveaGoogleAccountbuthavenotyetsignedinwithyourphone,followtheseinstructionsto
signintoyourGoogleAccount.
1. Tap >Tools >Settings >Generaltab>Accounts & sync > ADD ACCOUNT>
Google.
2. EnteraGoogleAccountandtapNEXT.
Note:IfyoudonotalreadyhaveaGoogleAccount,tapOr create a new accountandfollowthe
on-screenpromptstocreateyournewaccount.
3. EnteryourPasswordandtapNEXT.
4. Selectifyouwanttobackupyourphone'sapps,appdata,settings,andWi-Fipasswordsand
tapNEXT.
5. Checkmarktheentriesyouwanttosetuppaymentinfo(ifnecessary)andtapNEXT.
YourphonethencommunicateswiththeGoogleserverstoconfirmyourinformation.
Factory Reset Protection
WhenyousignintoaGoogleAccountonyourdevice,FactoryResetProtectionisturnedon.
FactoryResetProtection(FRP)preventsotherpeoplefromusingyourdeviceifitisresettofactory
settingswithoutyourpermission.Forexample,ifyourdeviceislostorstolenandafactorydatareset
isperformed,onlysomeonewithyourGoogleAccountusernameandpasswordcanusethedevice.
YouwillnotbeabletoaccessthedeviceafterafactorydataresetifyoudonothaveyourGoogle
Accountusernameandpassword.Formoreinformation,seeFactoryDataReset.
Caution:YoushouldremoveyourGoogleAccountbeforeshippingyourdevicetoLGoranyother
serviceproviderforserviceandbeforeresettingthedevicetofactorysettings.
Enable Factory Reset Protection
AddingaGoogleAccounttoyourdeviceautomaticallyturnsontheFactoryResetProtection(FRP)
securityfeature.NofurtheractionisnecessarytoturnonFRP.
Disable Factory Reset Protection
TodisableFRP,removeallGoogleAccountsfromthedevice.
Getting Started Basic Operations 39
1. Tap >Tools >Settings >Generaltab>Accounts & sync>Google.
2. TapaGoogle account.
3. Tap >Remove account>REMOVE.
Google Play Store
GooglePlay™istheplacetogotofindnewAndroidapps,books,movies,andmusicforyourphone.
Choosefromawidevarietyoffreeandpaidcontentrangingfromproductivityappsandgamesto
bestsellingbooksandblockbustermoviesandmusic.Whenyoufindwhatyouwant,youcaneasily
downloadandinstallitonyourphone.
ToaccesstheGooglePlaystoreapp,youmustfirstconnecttotheInternetusingyourphone’sWi-Fi
ormobiledataconnectionandsignintoyourGoogleAccount.SeeChromeBrowserandSigninto
YourGoogleAccountfordetails.
Installing Applications
ManydifferentkindsofapplicationscanbeinstalledonyourphonefromGooglePlay(provided
byGoogleInc.).Sprintisnotresponsibleinanywayforuser-installedapplications(quality,
reliability,legality,fitnessforapurpose,credibility,accuracy,etc.)orresultingmalfunctions
(viruses,etc.).
Important:Ourpoliciesoftendonotapplytothird-partyapplications.Third-partyapplicationsmay
accessyourpersonalinformationorrequireustodiscloseyourcustomerinformationtothethird-
partyapplicationprovider.Tofindouthowathird-partyapplicationwillcollect,access,use,or
discloseyourpersonalinformation,checktheapplicationprovider’spolicies,whichcanusuallybe
foundontheirwebsite.Ifyouaren’tcomfortablewiththethird-partyapplication’spolicies,don’tuse
theapplication.
Find and Install an App
WhenyouinstallappsfromGooglePlayappandusethemonyourphone,theymayrequireaccess
toyourpersonalinformation(suchasyourlocation,contactdata,andmore)oraccesstocertain
functionsorsettingsofyourphone.Downloadandinstallonlyappsthatyoutrust.
1. Tap >Play Store .
2. Browseforanapplication.Onceyouhavedecidedonone,tapittoviewitsdetails.
3. Readtheapplicationdescriptionsandcomments.
4. TapINSTALL (forfreeapplications)orthepricebutton(forpaidapplications).
Warning:Usecautionwithapplicationswhichrequestaccesstoanypersonaldata,functions,or
significantamountsofdatausagetimes.
Getting Started Basic Operations 40
5. ChecktheprogressofthecurrentdownloadbyopeningtheNotificationsPanel.
6. Youwillbenotifiedwhentheitemisdownloadedandinstalledonyourphone.
7. OnthePlayStorescreen,tap >My apps & games,taptheinstalledapplicationinthelist,
andthentapOPEN.
Purchasing Applications
Purchaseappsatyourownrisk.Sprintisnotresponsibleforanyharmtoyouorthirdparties
resultingfromtheuseofpurchasedapplications.
Request a Refund for a Paid App
Ifyouarenotsatisfiedwithanapp,youcanaskforarefundwithin15minutesofthepurchase.Your
creditcardisnotchargedandtheappisuninstalledfromyourphone.
Ifyouchangeyourmind,youcaninstalltheappagain,butyoucan’trequestarefundasecondtime.
1. Tap >Play Store .
2. Tap >My apps & games.
3. Taptheapptouninstallforarefund.
Thedetailsscreenfortheappopens.
4. TapRefund,andthentapYestoconfirm.
Yourappisuninstalledandthechargeiscanceled.
Update an App
Dependingonyoursettings,manyappswillupdateautomatically,oryoucanupdateappsdirectly
fromthePlayStoreapp.
Update an App Directly
1. Tap >Play Store .
2. Tap >My apps & games.
3. Taptheappyouwanttoupdate,andthentapUPDATE >CONTINUE.
Theappupdateisdownloadedandinstalled.

Getting Started Basic Operations 41
Set Automatic App Updates
1. Tap >Play Store .
2. Tap >Settings.
3. TapAuto-updateappsandselectanoption.
Theappissettoupdateautomaticallywheneveranupdatebecomesavailable(dependingon
yoursettings).
Note:Automaticupdatesareunavailableforsomeapps.
Uninstall an App
YoucanuninstallanyappthatyouhavedownloadedandinstalledfromGooglePlay.
1. Tap >Play Store .
2. Tap >My apps & games.
3. OntheInstalledscreen,taptheappyouwanttouninstall,andthentapUNINSTALL>OK.
Theappisuninstalledandremovedfromyourphone.
Get Help with Google Play
TheGooglePlaystoreappoffersanonlinehelpoptionifyouhavequestionsorwanttoknowmore
abouttheapp.
1. Tap >Play Store .
2. Tap >Help & feedback.
TheWebbrowserwilltakeyoutotheGooglePlayHelpWebpage,whereyouwillfind
comprehensive,categorizedinformationaboutGooglePlay.
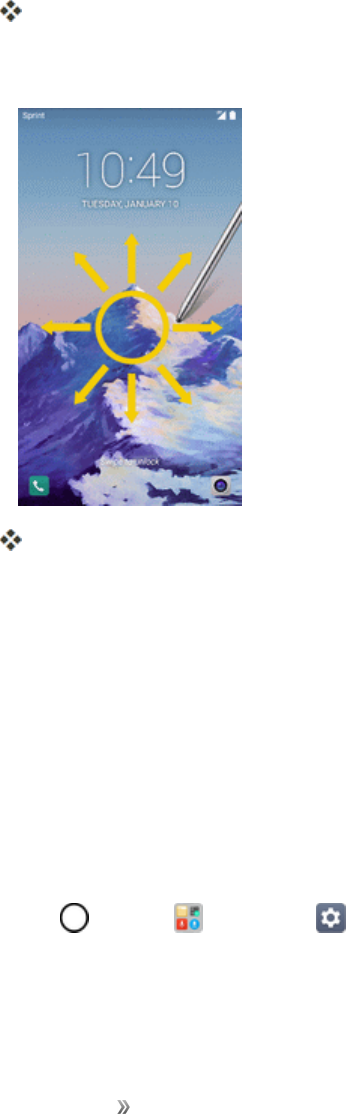
Lock and Unlock Your Screen
Yourphoneallowsyoutoquicklyturnthescreenoffwhennotinuseandtoturnitbackonandunlock
itwhenyouneedit.
Turn the Screen Off When Not in Use
nToquicklyturnthescreenoff,pressthePower/Lock Button.PressingthePower/Lock
Buttonagainorreceivinganincomingcallwillturnonyourphonescreenandshowthelock
screen.
Getting Started Basic Operations 42
Tosavebatterypower,thephoneautomaticallyturnsoffthescreenafteracertainperiodoftime
whenyouleaveitidle.Youwillstillbeabletoreceivemessagesandcallswhilethephone’sscreenis
off.
Note:Forinformationonhowtoadjustthetimebeforethescreenturnsoff,seeDisplaySettings.
Turn the Screen On and Unlock It
1. Toturnthescreenon,pressthePower/Lock Button.
Thelockscreenappears.
2. Swipeyourfingeracrossthescreentounlockit.
Thescreenisunlocked.
lIfyouhavesetupascreenlock,youwillbepromptedtodrawthepatternorenterthe
passwordorPIN.SeeSelectScreenLock.
Unlock Your Screen Using the Knock Code
Feature
TheKnockCodefeatureallowsyoutocreateyourownunlockcodeusingacombinationofknocks
(ortaps)onthescreen.
ToactivatetheKnockCodefeature:
1. Tap >Tools >Settings >Displaytab.
2. TapLock screen.
3. TapSelect screen lock>Knock Code.
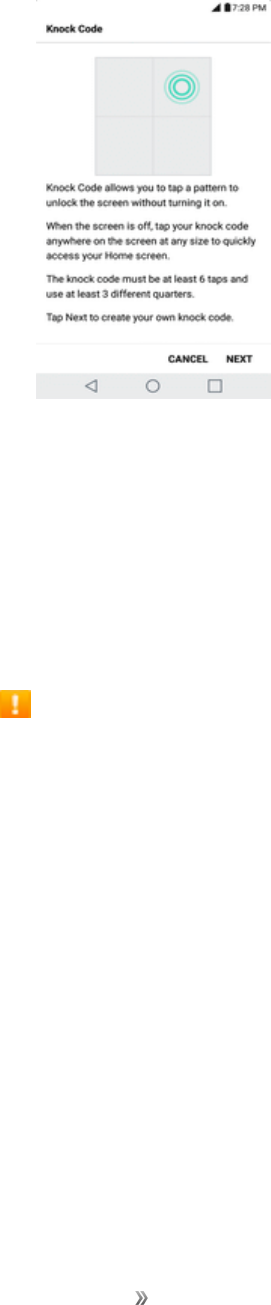
Getting Started Basic Operations 43
4. Usethe2x2gridtocreateasequenceofknocks(ortaps)tosetyourknockcode.
TounlockthephoneusingKnockCode:
nWhilethescreenisoff,tapthesamesequenceyouestablishedanywhereonthescreen.The
homescreenwillbeaccesseddirectly.
Update Your Phone
Fromtimetotime,updatesmaybecomeavailableforyourphone.Youcandownloadandapply
updatesthroughtheSettings>Generaltab>System updatesmenu.
Software Update Cautions
During update:Thephonecannotbeuseduntilthesoftwareupdateiscomplete.Itmaytake
timetoupdateyourphone’ssoftware.
Signal during update:Updateyourphonewheresignalreceptionisgood,anddonotchange
locationduringtheupdateprocess.Makesurethebatteryisadequatelychargedbefore
beginninganupdate.Aweaksignalorlowbatteryduringanupdatemaycausetheupdatetofail.
Anupdatefailuremaydisablethephone.
Other functions during update:Otherphonefunctionscannotbeusedduringasoftware
update.
Update Your Phone Software
Youcanupdateyourphone'ssoftwareusingtheSystemUpdateoption.
Getting Started Basic Operations 44
Before Updating Your Phone
Updatingyourphonemayresultinalossofsaveddatadependingontheconditionofyourphone
(malfunctioning,damaged,waterseepage,etc.).Youmustbackupallcriticalinformationbefore
updatingyourphonefirmware.
Back Up All Data Prior to Update
TobackupyourGmailinformation:
1. Tap >Tools >Settings >Generaltab>Accounts & sync.
2. TaptheAuto-sync dataoptiontoenablethefeature.
lIftheAuto-syncoptionison,email,CalendarandContactsautomaticallysynchronize
wheneverachangeismade.
lIftheAuto-syncoptionisoff,tapthesynciconwithintheaccountfieldtorevealtheaccount’s
synchronizationsettingsscreen.
3. Selectanaccountandthentap >Sync nowtosyncyourGoogleAccountinformation.
TobackupyourExchangeMailinformation:
1. Tap >Tools >Settings >Generaltab>Accounts & sync>Microsoft
Exchange.
2. Selectanaccountandthentap >SyncnowtosyncyourMicrosoftExchangeaccount
information.
lToggletheonscreenbuttonstomanuallysynchronizethedesiredparameters(Contactsor
Calendar).
TorestoreyourGoogleappsfollowingtheupdate:
1. Tap >Play Store .
2. Tap >My apps & games>ALLtab.
lScrollthroughthelistofpreviouslydownloadedGoogleappsandchoosethoseyouwishto
reinstall.Followtheonscreeninstructions.
Note:YourGoogleapppurchasesarereloadedremotelyandcanbere-installedaftertheupdateis
applied.
Asanaddedprecaution,topreserveanydataonyourmicroSDcard,pleaseunmountitfromyour
phonepriortostartingtheupdateprocess.Tap >Tools >Settings >Generaltab>
Storage> .
Getting Started Basic Operations 45
Update Your Phone’s Software
Onceyouhavebackedupallyourdata,usetheUpdatenowoptiontoupdateyourphone’ssoftware.
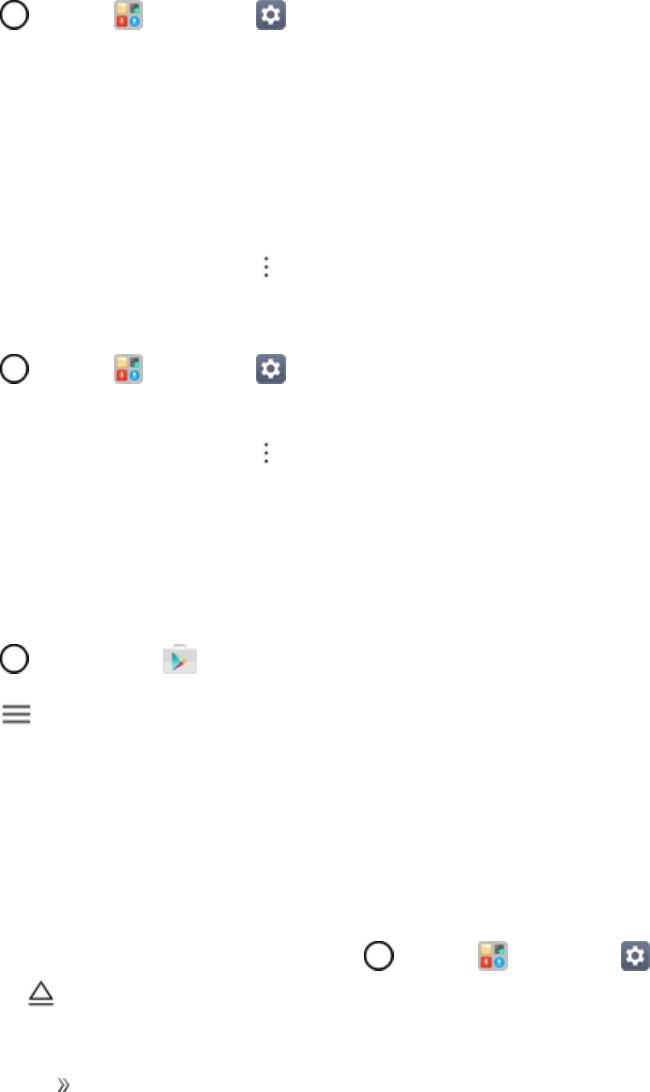
1. Tap >Tools >Settings >Generaltab>System updates.
2. TapUpdate LG software > CHECK FOR UPDATE.
Yourphoneautomaticallydownloadsandinstallsanyavailableupdates.Youmayberequired
topoweryourphoneoffandbackontocompletethesoftwareupgrade.
Alternatively,youcanaccesssystemupdatesthroughthenotificationpanel.
1. LocatetheSystem Update Availableicon innotifications.
2. Pulldownthestatusbar.
3. Tap toopentheSystemUpdatesscreen.
4. TapDownloadandfollowtheonscreeninstructions.
Thedownloadingicon appearswithinthestatusbartoindicatethephoneisdownloading
thenecessaryfiles.
5. TapRestartandinstalltocompletetheprocess.
Confirm Your Current Phone Software
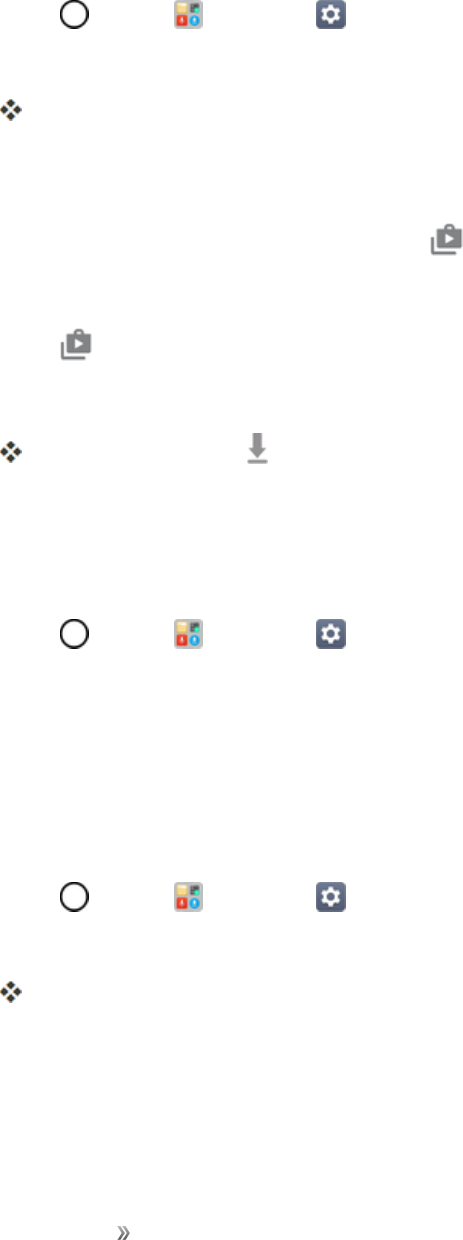
1. Tap >Tools >Settings >Generaltab>About phone.
2. TapSoftware info.
Update Your Profile
Thisoptionallowsyoutoautomaticallyupdateyouronlineuserprofileinformation.Ifyouchooseto
changeyourusernameandselectanewoneonline,youmustthenupdatetheusernameonyour
phone.
1. Tap >Tools >Settings >Generaltab>System updates>Update profile.
2. Followtheonscreeninstructions.
Thephonewilldownloadandinstalltheprofileupdateandyouwillseeaconfirmationwhen
complete.
Note:Ifyourdataservicesoraccountsyncingeverseemstogooutunexpectedly,usethisfeatureto
reconnectwiththenetwork.
Getting Started Basic Operations 46
Update Your PRL
ThisoptionallowsyoutodownloadandupdatethePRL(preferredroaminglist)automatically.
1. Tap >Tools >Settings >Generaltab>System updates>Update PRL.
2. Followtheonscreeninstructions.
ThephonewilldownloadandinstallthePRLupdateandyouwillseeaconfirmationwhen
complete.
Getting Started Your Phone's Home Screen 47
Your Phone's Home Screen
Thefollowingtopicsdescribehowtouseandcustomizeyourphone’shomescreen,understandthe
statusbar,andusethenotificationswindow.
Home Screen Basics
Thehomescreenisthestartingpointforyourphone’sapplications,functions,andmenus.Youcan
customizeyourhomescreenbyaddingapplicationicons,shortcuts,folders,widgets,andmore.
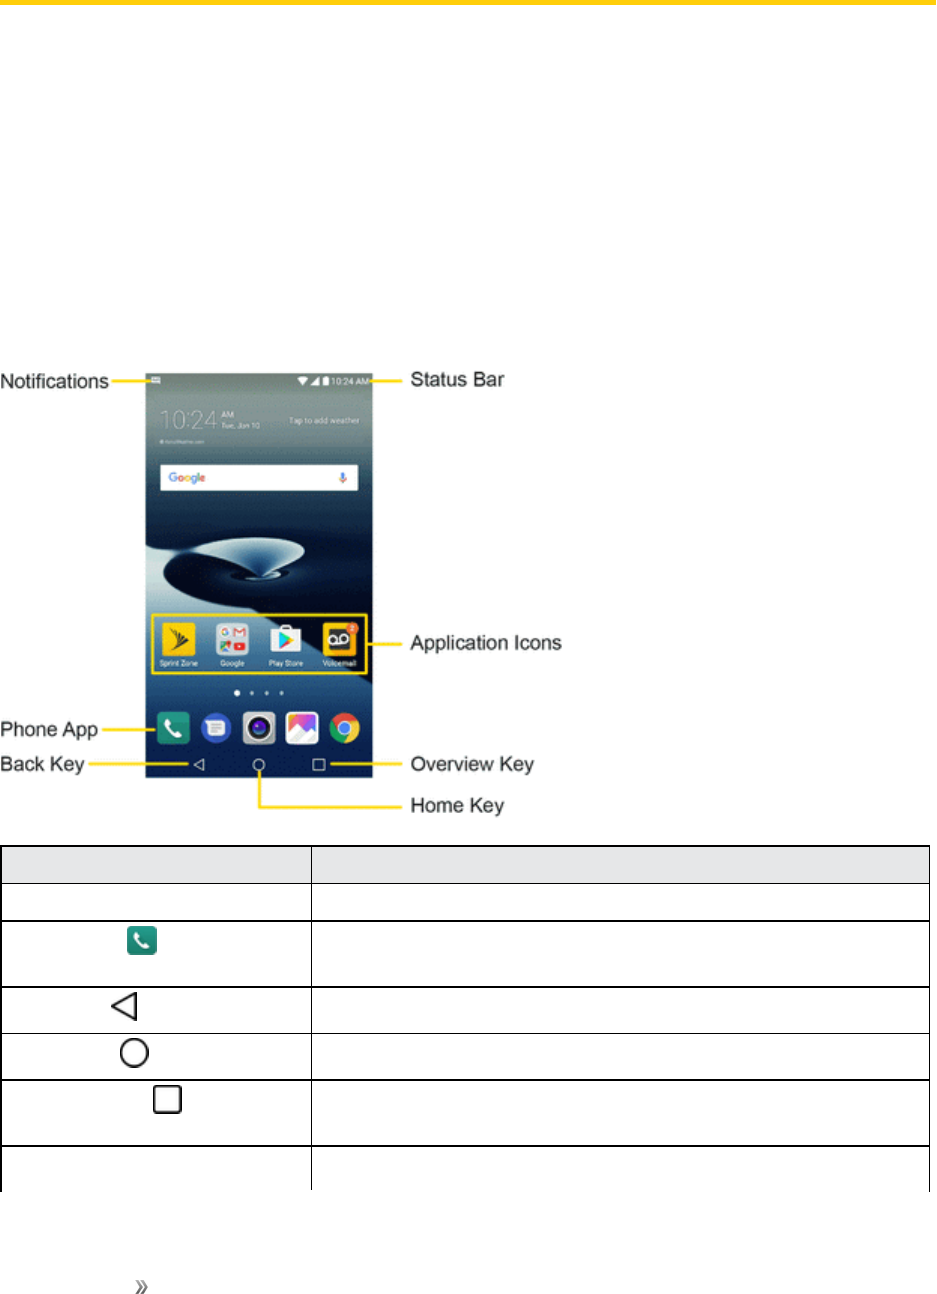
Home Screen Layout
Yourhomescreenextendsbeyondtheinitialscreen.Swipethescreenleftorrighttodisplay
additionalscreens.
Item Description
Notifications Displaysyourcurrentnotifications.
Phone AppTaptoopenthedialpad.Alsoprovidesadditionaltabstoaccess
Calllogs,Contacts,andGroups.
Back Key Taptoreturntothepreviousscreen.
Home Key Taptodisplaythemainhomescreen.
OverviewKey Taptoaccessalistofyourmostrecently-usedapps.Touchand
holdwhileusinganapptousetheMulti-windowfeature.
Application Icons Tapanicon(application,folder,etc.)toopenanduseit.

Getting Started Your Phone's Home Screen 48
Item Description
Status Bar Showsdevicestatusinformationincludingthetime,signal
strength,batterystatus,andnotificationicons.
Extended Home Screens
Inadditiontothemainhomescreen,yourphonefeaturesextendedhomescreensprovidemore
spaceforaddingicons,widgets,andmore.Swipeacrossthescreentomovefromthemainscreen
toanextendedscreen.Thesmallcirclesabovetheprimaryshortcutsletyouknowyourcurrent
screenposition.
nTaptheHome Key todisplaythemainhomescreen.
Togodirectlytoaparticularscreen:
nSwipeleftandrighttoaccessadditionalhomescreenpanels.
nTapthelocationdotsnearthebottomofthehomescreentomovetotheselectedpanel.
Status Bar and Notification Panel
Yourphone’sstatusandnotificationsareavailableataglanceatthetopofthescreen.
Status Bar
Thestatusbaratthetopofthehomescreenprovidesphoneandservicestatusinformationonthe
rightsideandnotificationalertsontheleft.Toviewthenotificationpaneloraccessthequicksettings
menu,pulldownthestatusbarfromthetopofthescreen.
Status Bar Layout
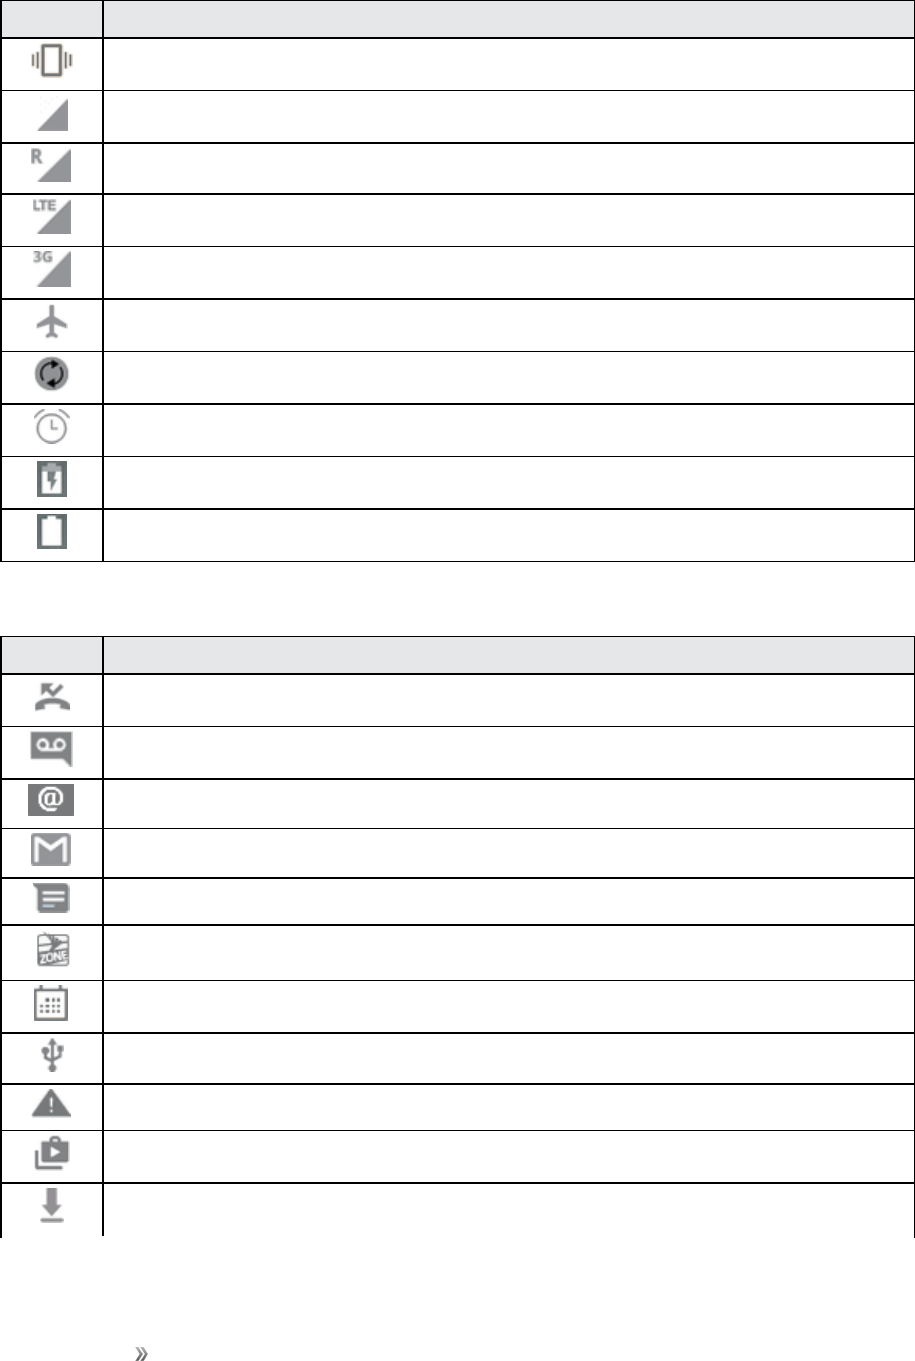
Main Status Icons
Icon Status
Bluetooth®active
GPSactive
Wi-Fiactive
Downloading
Getting Started Your Phone's Home Screen 49
Icon Status
Vibrate
Network(fullsignal)
Network(roaming)
4GLTEdataservice
3G(dataservice)
Airplanemode
Syncactive
Alarmset
Battery(charging)
Battery(fullcharge)
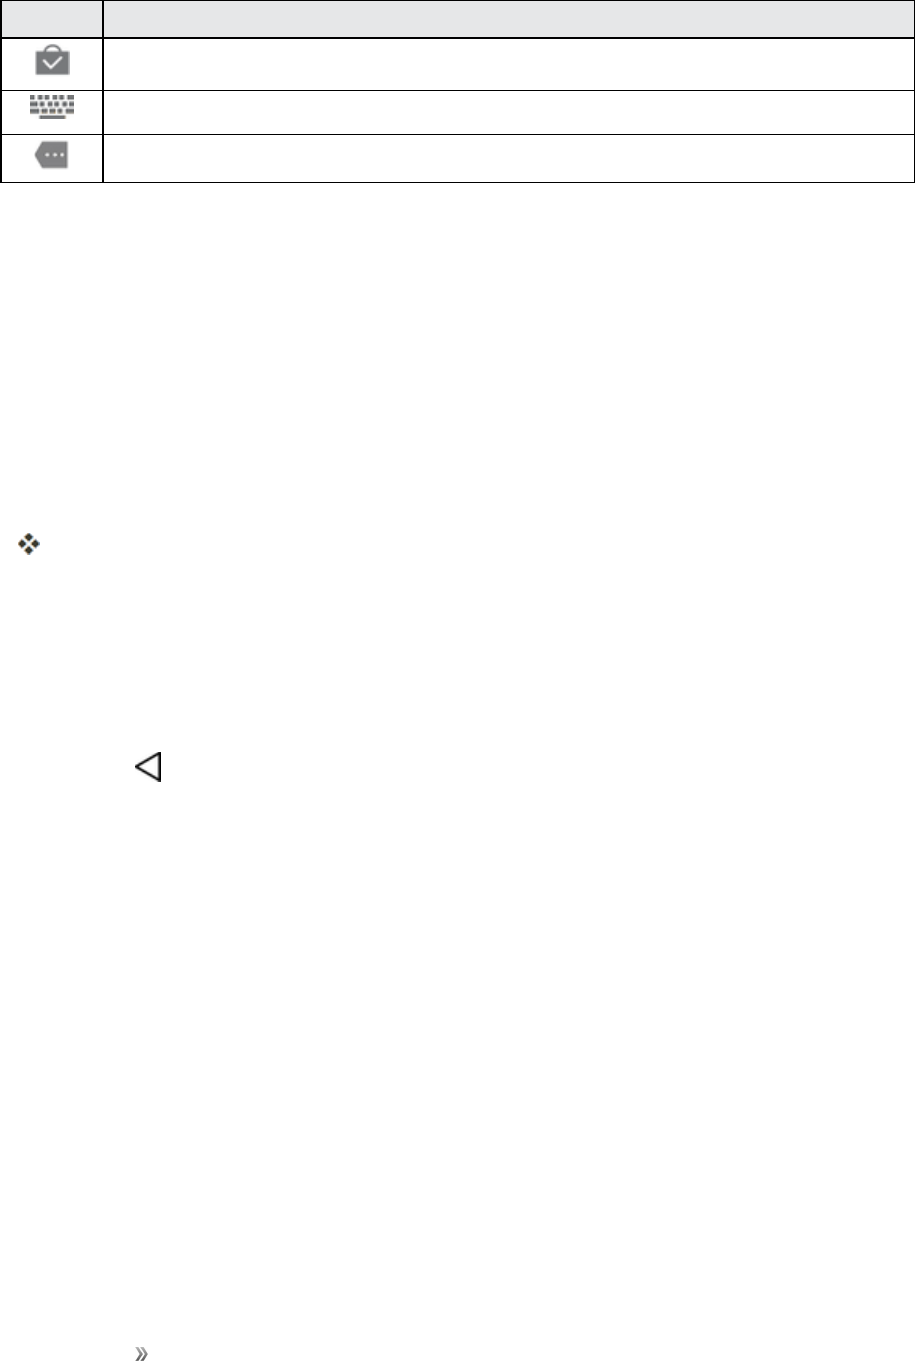
Main Notification Icons
Icon Notification
Missedcall
Newvoicemail
Newemail
NewGmail
NewtextorMMSmessage
NewSprintZonemessage
Event
USBconnection
Warning
Updateavailable
Updatedownloading
Getting Started Your Phone's Home Screen 50
Icon Notification
Updatesuccessful
Keyboardactive
Morenotificationsavailable(pulldowntoview)
Note:Additionalnotificationiconsmayappear.Allnotificationsmaybeaccessedthroughthe
notificationpanel.
Notification Panel
Yourphone’snotificationsappearattheleftsideofthestatusbar,andyoucanaccessthefull
notificationpanelbypullingdownthestatusbar.Fromthere,youcanchecknotifications,download
updates,openmessagingapps,usethequicksettingsmenu,andmore.
Open the Notification Panel
nPulldownthestatusbar.(Slideyourfingerdownfromthetopofthescreen.)
Thenotificationpanelopens.Tochecknotifications,tapaniteminthelist.
Close the Notification Panel
nSlidethenotificationpanelup.(Slideyourfingerupfromthebottomofthescreen.)
–or–
TapBack toclosethenotificationpanel.
Notification Panel Layout
Thenotificationpanelgivesyouaccessbothtonotificationsandthequicksettingsmenu.
Getting Started Your Phone's Home Screen 51
Customize the Home Screen
Learnhowtosetthewallpaperandadd,move,orremoveshortcuts,widgets,andfoldersfromthe
homescreen.
Operations for Rearranging the Home Screen
nMoving Widgets and Icons:Fromhome,touchandholdanitemandthendragittothedesired
location.
nDeleting Widgets:Fromhome,touchandholdanitemandthendragittoRemove .
nDisplaying the Home Screen Menu:Fromhome,touchandholdanemptyspacetodisplay
thehomescreenmenu.MenuoptionsincludeWallpapers,Widgets,andhomescreensettings.
Change the Wallpaper
Selectandassignyourphone’sbackgroundwallpaper.
1. Tap >Tools >Settings >Displaytab>Home screen/Lock screen>Wallpaper.
2. Tapanoptiontoselectthewallpaper.
lHome screentosetthebackgroundwallpaperforyourhomescreen.SelectfromGallery,
Wallpaper gallery,Sprint ID, Live wallpapers,and Photos.
lLock screentosetthewallpaperforyourphone’slockscreen.SelectfromWallpaper
galleryorGallery.
3. SelectawallpaperandtapOKorSET WALLPAPER.
Thewallpaperisset.

Getting Started Your Phone's Home Screen 52
Note:IfyouselectGallery,youwillneedtoselectanalbumandapicture.Onceselected,usethe
croptooltoresizeandpositiontheimageandthentapOK.
Note:IfyouselectLive Wallpapers,beforeyoutapSet wallpaper,youcantapSettingstoselect
customanimationsettings,etc.,forthelivewallpaper.
Add Widgets to the Home Screen
Youcanaddwidgetstoyourphone’shomescreen.Widgetsareself-containedappsthatdisplayon
ahomescreen.Unlikeashortcut,theWidgetworkslikeanonscreenapplication.Thereareallkinds
ofwidgets,includinglinkstoaspecificcontact,Internetbookmarks,Facebook®statuswindows,
Gmailandemailaccounts,andmanyothers.
1. Tap ,touchandholdanemptyspace,andthentapWidgets.
Thewidgetlistopens.
2. Touchandholdawidgeticon.
Theiconwilldisengageandyouwillseethumbnailsofyourhomescreens.
3. Dragtheicontoanemptylocationononeofthehomescreens.
Thewidgetisaddedtothehomescreen.
Add Folders to the Home Screen
Youcangrouphomescreenshortcutsintofoldersforconvenientaccess.
1. Tap ,touchandholdashortcutyouwanttoplaceinafolderanddragitoveranothericonyou
wanttoplaceinthefolder.Thenreleaseit.
Anewfolderiscreated.
2. Toaddmoreappshortcutstothefolder,touchandholdashortcutanddragitontopofthenew
folder.
Thenewshortcutisaddedtothefolder.
Change Folder Names
Onceyouhaveaddedfolders,youcanchangethenameeasilyfromthefolderdisplay.
1. Tap ,tapthefoldertoopenit,andthentapthefoldername.
2. TypeanewnameandthentapOK.

Making Connections 53
Making Connections
Thetopicsinthissectionwillcoveryourphone’sabilitytohelpyoumakeconnections,fromphone
callsandmaintainingcontacts,totextmessages,email,Internet,andinternationalservices.

Making Connections Phone Calls and Voicemail 54
Phone Calls and Voicemail
Thefollowingtopicsoutlinetheuseofyourdevice’sphoneapptoplaceandreceivecalls,use
voicemail,setupandmanagecontacts,andmore.
Place and Answer Calls
Thefollowingtopicsdescribehowtodirectlydialcalls,howtoanswerincomingcalls,andhowtouse
thein-callscreenoptions.
Adjust In-Call Volume
nAdjusting Call Volume:PresstheVolume Buttonsduringthecall.
Troubleshooting
Issue: Difficultyduringcall.
Solution 1:Itmaynotbepossibletomakeacallproperlyinanoisylocation.
Solution 2:WhencallingusingSpeaker,checkthecallvolume.Raisingthecallvolumemay
makecallingdifficult.
Issue: Soundpopsmomentarilyduringacall.
Solution:Areyouchanginglocationwhilecalling?Soundpopswhensignalisweakandthe
phoneswitchestoadifferentarea.
Emergency Call Cautions
EmergencycallsarerestrictedinAirplanemode.
Call Using the Phone Dialer
Themost"traditional"waytoplaceacallisbyusingthephone'sdialerscreen.
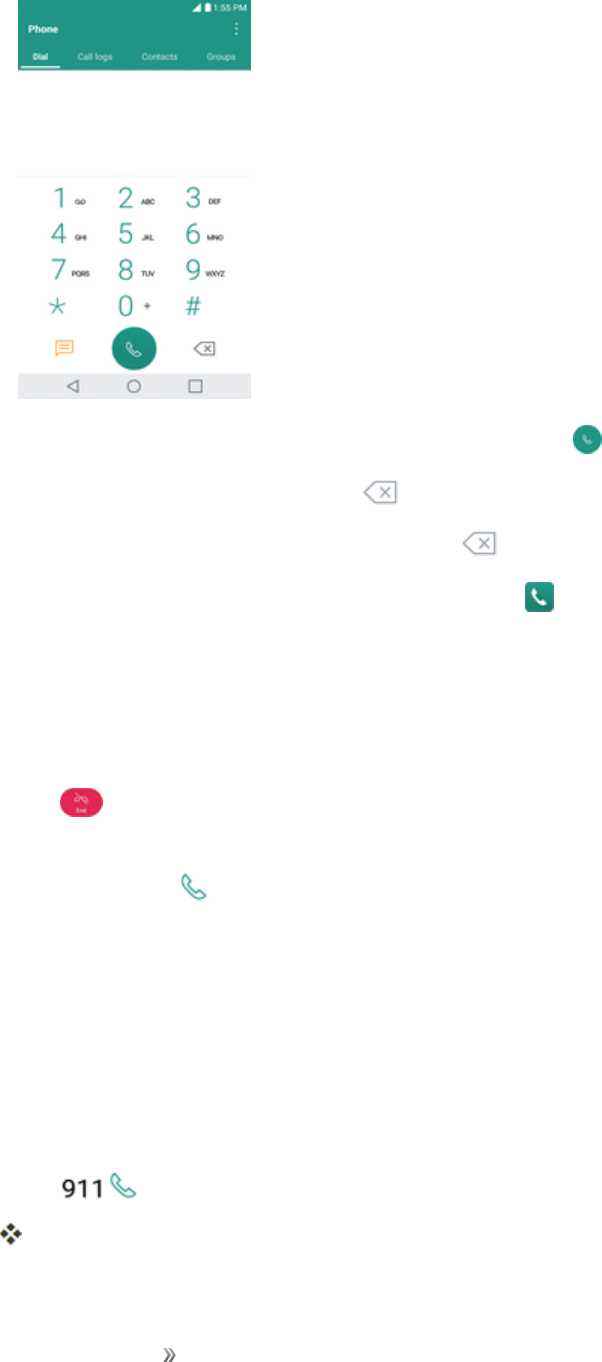
1. Tap >Phone >Dialtab.
Making Connections Phone Calls and Voicemail 55
2. Enteraphonenumberusingtheon-screendialpadandtap .
lIfyouenterawrongnumber,tap toerasedigitsonebyone.
lToerasetheentirenumber,touchandhold .
lYoucanopenotherapplicationsduringacall.The willappearinthestatusbarwhilethe
callisunderway.
lPresstheVolume Up/Down Buttonstoadjustthecallvolume.
lUsetheon-screenbuttonstoaddanothercall,putacallonhold,tousethespeakerphone,
andforotheroptions,asdescribedinIn-CallScreenLayoutandOperations.
3. Tap toendthecall.
Tip:Toredialyourlastoutgoingcall,followstep1toaccesstheDialer,taptheCall logstab,locate
thecallentryandtap .
YoucanalsomakecallsfromyourContactslistandfromtheCalllogs.
Call Emergency Numbers
Youcanplacecallsto9-1-1evenifthephone’sscreenislockedoryouraccountisrestricted.
Tocallthe9-1-1emergencynumberwhenthephone’sscreenislockedwithascreenlock:
1. Fromthelockscreen,tapEmergency call.
2. Tap .
Aslongasyouareinanareacoveredbywirelessservice,theemergencycallisplaced.
Making Connections Phone Calls and Voicemail 56
Tocallthe9-1-1emergencynumbernormallyorwhenyouraccountisrestricted:
1. Unlockthescreen.Formoreinformation,seeLockandUnlockYourScreen.
2. Tap >Phone >Dialtab.
3. Tap .
Aslongasyouareinanareacoveredbywirelessservice,theemergencycallisplaced.
Enhanced 9-1-1 (E 9-1-1) Information
ThisphonefeaturesanembeddedGlobalPositioningSystem(GPS)chipnecessaryforutilizingE9-
1-1emergencylocationserviceswhereavailable.
Whenyouplaceanemergency9-1-1call,theGPSfeatureofyourphoneseeksinformationto
calculateyourapproximatelocation.Dependingonseveralvariables,includingavailabilityand
accesstosatellitesignals,itmaytakeupto30secondsormoretodetermineandreportyour
approximatelocation.
Important:Alwaysreportyourlocationtothe9-1-1operatorwhenplacinganemergencycall.
Somedesignatedemergencycalltakers,knownasPublicSafetyAnsweringPoints(PSAPs),may
notbeequippedtoreceiveGPSlocationinformationfromyourphone.
Answer Phone Calls
Thefollowinginformationletsyouknowhowtoanswerincomingcalls,mutetheringeronincoming
calls,rejectincomingcalls,andmore.
Whenyoureceiveaphonecallfromacontact,theIncomingcallscreenappearsanddisplaysthe
callerIDicon,name,andphonenumberofthecallingparty.Whenyoureceiveaphonecallfrom
someonewhoisnotstoredinPeople,onlythedefaultcallerIDiconandphonenumberappearon
theIncomingcallscreen.
Note:Ifyourphoneisturnedoff,allcallsautomaticallygotovoicemail.
Answer an Incoming Call
1. Whenacallarrives,drag inanydirectiontoanswerit.
2. Toendthecall,tap .
Mute the Ringing Sound
Tomutetheringerwithoutrejectingthecall,youcandoanyofthefollowing:
nPresstheVolume Down Button.
nPlacethephonefacedownonalevelsurface.
Making Connections Phone Calls and Voicemail 57
Reject an Incoming Call
nWhenacallarrives,drag inanydirectiontorejectit.
Theringtoneorvibrationwillstopandcallwillbesentdirectlytovoicemail.
Reject a Call and Send a Text Message
Youcanrejectanincomingcallandautomaticallysendatextmessagetothecaller.
1. Whenacallarrives,slideDeclinewith messageupfromthebottomofthescreen.
Theringtoneorvibrationwillstopandyouwillseealistofpresettextmessages.
2. Taponeofthemessagestosendittothecaller.
Theselectedmessagewillbedeliveredtothecaller.
lYoucanedittherejectmessagesthroughtheCallsettingsmenu.Fromthephoneapp,tap
>Call settings>Call blocking & Decline with message >Decline with message
andeditorcreatetherejectmessages.
In-Call Screen Layout and Operations
Whileyou’reonacall,youwillseeanumberofonscreenoptions.Tapanoptiontoselectit.
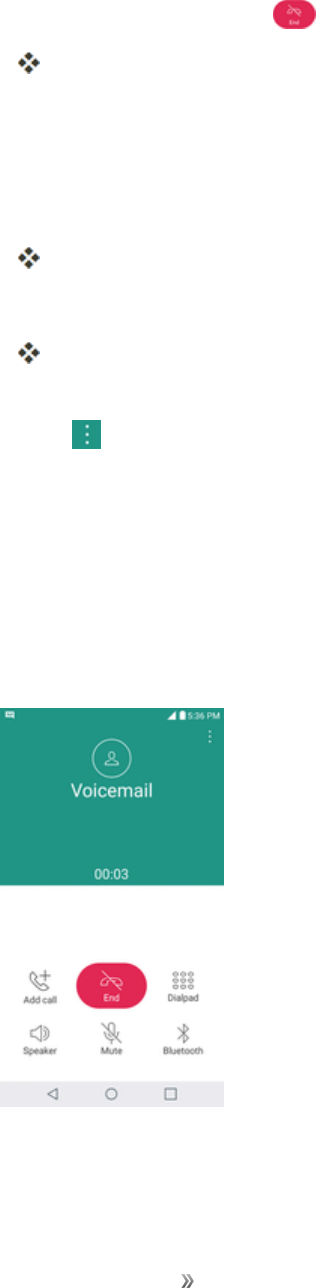
In-Call Screen Layout
Tapoptionstoactivatethemduringacall.
nAdd calltoinitiatea3-waycall.
nEndtoendthecurrentcall.

Making Connections Phone Calls and Voicemail 58
nDialpadtodisplaythedialpadtoenteradditionalnumbers,forexample,anextensionoraccess
code.
lForexample:Whenyoucallyourbank‘s800number,useyourdialpadtoenteryouraccount
numberandPIN.
nSpeakertoroutethephone’saudiothroughthespeaker(On)orthroughtheearpiece(Off).
lActivatethespeakertoroutethephone’saudiothroughthespeaker.(Youcanadjustthe
speakervolumeusingthevolumebuttons.)
lDeactivatethespeakertousethephone’searpiece.
Warning:Becauseofhighervolumelevels,donotplacethephonenearyourearduring
speakerphoneuse.
nMutetomutethemicrophoneduringanactivecall.Tapagaintounmutethemicrophone.
nBluetooth(OnlyavailablewhenaBluetoothheadsetisconnectedtoyourphone)toroutethe
phone’saudiothroughaconnectedBluetoothheadset(On)orthroughthespeaker(Off).
lWhenthecallisroutedtoaBluetoothheadset,thecurrentcallareashowstheBluetoothcall
icon( ).
Note:TheHeadsetbuttonisactivatedtoshowthecurrentcallisroutedtotheconnectedBluetooth
headset.
lToroutethecurrentcallbacktothephone,tapBluetoothtotemporarilyusethephone.Tap
itagaintoroutethecallbacktotheconnectedBluetoothheadset.
lWhenBluetoothortheBluetoothheadsetisturnedoff,thecallisroutedthrougheitherthe
earpieceorspeakerandshows( ).
nTap duringacalltodisplayalistofadditionalin-callfeatures:
lContacts:Displayyourcontactslist.
Place a Call from Contacts
YoucanplacephonecallsdirectlyfromentriesinyourContactslist.
1. Tap >Phone todisplaythephoneapp.
2. TaptheContactstabtodisplaytheContactslist.
3. Tapacontact.
4. Tap Call nexttothenumberyouwanttocall.
5. Toendthecall,tap .

Making Connections Phone Calls and Voicemail 59
Call from Call Logs
TheCalllogslistletsyouquicklyplacecallstorecentincoming,outgoing,ormissednumbers.
1. Tap >Phone todisplaythephoneapp.
2. TaptheCall logs tabtodisplaytheCalllogslist.
3. Tapanentrytodisplaythecalldetails.
4. TapCall toplaceacall.
5. Toendthecall,tap .
Voicemail
Thefollowingtopicsdescribehowtosetupanduseyourphone'svoicemailandvisualvoicemail
features.
Voicemail Setup
Youshouldsetupyourvoicemailandpersonalgreetingassoonasyourphoneisactivated.Always
useapasswordtoprotectagainstunauthorizedaccess.Yourphoneautomaticallytransfersall
unansweredcallstoyourvoicemail,evenifyourphoneisinuseorturnedoff.
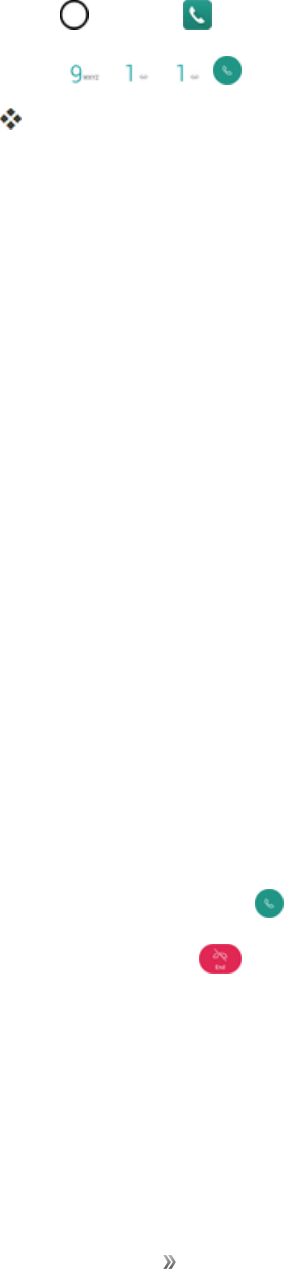
1. Tap >Phone >Dialtab.
2. Touchandhold todialyourvoicemailnumber.
3. Followthesystempromptsto:
lCreateyourpassword.
lRecordyournameannouncement.
lRecordyourgreeting.
Important:Voicemail passcode –Itisstronglyrecommendedthatyoucreateapasswordwhen
settingupyourvoicemailtoprotectagainstunauthorizedaccess.Withoutapassword,anyonewho
hasaccesstoyourphoneisabletoaccessyourvoicemailmessages.
Visual Voicemail Setup
ThistopicdescribestheVisualVoicemailfeatureofyourphone'sservice,aswellasthesteps
requiredtosetupVisualVoicemailonyourphone.
Making Connections Phone Calls and Voicemail 60
About Visual Voicemail
VisualVoicemailgivesyouaquickandeasywaytoaccessyourvoicemail.Nowyoucanfindexactly
themessageyouarelookingforwithouthavingtolistentoeveryvoicemailmessagefirst.This
featureperiodicallygoesouttoyourvoicemail,andgathersthecallerinformationfromallofthe
currentvoicemails.Itthenpopulatesalistwiththecallernameandnumber,alongwiththelengthof
timeandprioritylevelofthevoicemailmessage.
Set Up Visual Voicemail
SettingupVisualVoicemailfollowsmanyofthesameproceduresassettinguptraditionalvoicemail.
Youshouldsetupyourvoicemailandpersonalgreetingassoonasyourphoneisactivated.Your
phoneautomaticallytransfersallunansweredcallstoyourvoicemail,evenifyourphoneisinuseor
turnedoff.
Note:Tosetupyourtraditionalvoicemailbox,seeVoicemail.
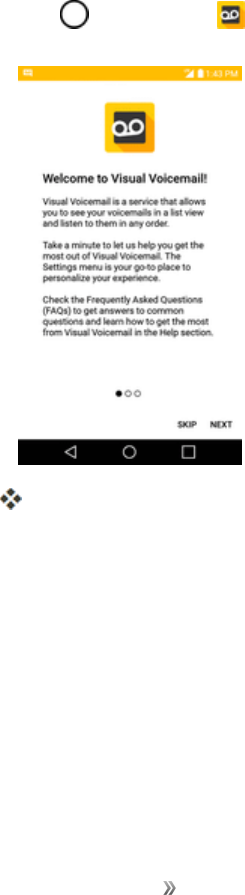
1. Tap >Voicemail .
You’llseeaWelcometoVisualVoicemailscreen.
2. Scrollthroughtheintroductionscreenstoviewabriefexplanationofvisualvoicemailservices.
Making Connections Phone Calls and Voicemail 61
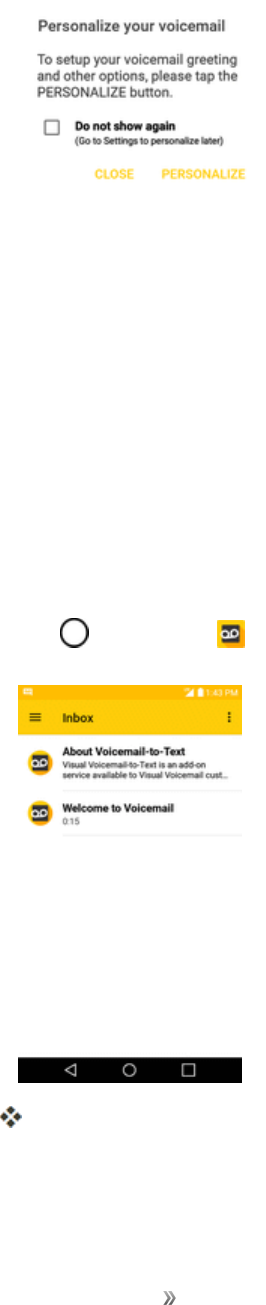
3. Attheendofthewelcomescreens,you'llcometoaPersonalizeyourvoicemailprompt.
4. TapPERSONALIZEandfollowthesystempromptsto:
lCreateapassword(partofstandardvoicemail).
lRecordyournameannouncement.
lRecordyourgreeting.
Important:Voicemail passcode –Itisstronglyrecommendedthatyoucreateapasswordwhen
settingupyourvoicemailtoprotectagainstunauthorizedaccess.Withoutapassword,anyonewho
hasaccesstoyourphoneisabletoaccessyourvoicemailmessages.
Review Visual Voicemail
VisualVoicemailletsyoueasilyaccessandselectwhichmessagesyouwanttoreview.
1. Tap >Voicemail .
Youwillseethevoicemailinbox.
2. Tapamessagetoreviewit.
Making Connections Phone Calls and Voicemail 62
Tip:Thereareseveraliconsatthebottomofthereviewscreenformaintenance,storage,
messaging,andotheroptions.Foranexplanationofallyouroptions,tapMenu >Help>Visual
Voicemail Menu.
Listen to Multiple Voicemail Messages
Whenyouaredonelisteningtoavoicemailmessageyoucaneasilyaccessothervoicemail
messageswithoutreturningtothemainvoicemailscreen.
1. Listentothecurrentvoicemailmessage.
2. Swipeyourfingerleftorrighttodisplaythenextorpreviousmessage.
Thenextorpreviousmessagewillbeginplayingautomatically.
Youcannavigatethroughvoicemailmessagesasfrequentlyasyou'dlike.Youcanevenmovetothe
nextorpreviousmessagebeforeyou'refinishedlisteningtothecurrentone.
Visual Voicemail Options
UsethefollowingoptionstoaccessandconfigureyourVisualVoicemailoptions.
1. Tap >Voicemail .
2. Fromthisinitialscreen,youcan:
lTap toviewthevoicemailmessagesinotherfolder:Inbox,Sent,Archive,andTrash.
lTap toaccessNew Voice SMS,New Avatar message,Search,Upgrade to
Premium,Store,Help,andSettings.
Configure Visual Voicemail Settings
TheVisualVoicemailsettingsmenuletsyouaccesssettingsfornotifications,pictures,greetings,
andmore.
1. Tap >Voicemail .
2. Tap >Settingsandselectfromthefollowing:
lAvatar
oDisable AvatartodisableAvatarcomposefeaturesandcontentstore.
oAvatar Facebookad signaturetoenableavataradvertisingsignaturewhenpostingon
Facebook.
oSMS deliverytoallowsendingSMSmessagetorecipientswhodonothaveAvatar
capability.

Making Connections Phone Calls and Voicemail 63
lDisplay
oThemestochoosethetypeofthemeusedfortheapplication.
oDisplay nametoenteranametoidentifyyourselftopeoplewhenreplyingorforwarding
messages.
lHelp/Infotoseethevisualvoicemailhelp.
lPreferences
oManage subscription tosubscribeandunsubscribefromthevisualvoicemailpremium
monthlysubscriptionservice.Thismaytakeaminute.
oAuto forward to emailtosendacopyofnewmessagestoanemailaddressofyour
choice.
oPersonalize voicemailtochangeyourvoicemailgreetingforincomingcallsandupdate
password.
oTranscription languagetochoosethetranscriptionlanguage(ifavailable).
oDelete messagestosetVisualVoicemailtopermanentlydeletemessagesfromthe
Trashfolderafteraspecificnumberofdays.
oMobile advertising preferencestomanageparticipationintheMobileAdvertising
Program,includingenablingbonusappfeatures.
oDisable adstocontrolwhetheradsaredisplayedinsideVoicemail.
oTranscriptionsdisplayedtotranscribeVoicemailsfromvoicetotext.
oEnable/DisableFree Trials tooptinoroutoffuturefreetrials.
oSMSdeliveryofvoicemessagetoallowvoicemessagedeliveryviaSMStorecipients
whodonotalwayshaveVoiceSMScapability.
lSound
oNotificationstodeterminehowyouarenotifiedofnewvoicemails.Setthenotification
soundandvibrateoption.
oSpeakerphonetoautomaticallyturnthespeakeronoroff.
lUpdatestosearchforanupgradetoyourVisualmessagesoftware.
lAbout Voicemailtoviewbuildinformationaboutthecurrentvisualvoicemailapplication.
Change Your Main Greeting via the Voicemail Menu
YourmaingreetingcanbechangeddirectlyviatheVisualVoicemailsystem.Thisdirectaccess
savesyoufromhavingtonavigatewithinthevoicemailmenu.
Making Connections Phone Calls and Voicemail 64
1. Tap >Voicemail .
2. Tap >Settings>Preferences>Personalize voicemail.
3. TapOKtoconnecttothevoicemailsystem.Followthepromptstochangeyourcurrentgreeting.
Edit the Display Name via the Voicemail Menu
FromyourVisualVoicemailmenu,youcanquicklychangethenameornumberattachedtoyour
voicemessages.
1. Tap >Voicemail .
2. Tap >Settings>Display>Display name.
3. Taptheexistingidentificationfieldandenteranewidentifyingnameornumber(usedtoidentify
youtorecipientsofyourvoicemessages).
4. TapOKtosaveyourinformation.
Optional Calling Services
Thefollowingtopicsoutlineadditionalvoice-relatedservicesavailablewithyourphone,includingcall
servicesandmore.
Wi-Fi Calling
Wi-FiCallingusesWi-Finetworkstohelpimprovevoiceanddatacoverage.Itsendsandreceives
callsoveraconnectedWi-Finetworkandmayofferbettercoverageinbuildingsandareasofpoor
cellularreception.
Set Up Wi-Fi Calling
1. Tap >Tools >Settings >Networkstab.
2. TapWi-Fi CallingandfollowtheonlinepromptstosetupWi-FiCalling.
Wi-FiCallingissetup.Youwillsee inthestatusbarwhenWi-FiCallingisactive,or if
Wi-FiCallingissetupbutyouarenotcurrentlyconnectedtoaWi-Finetwork.
Tip:FormoreinformationaboutWi-FiCalling,visitthisFAQlinkatsprint.com/support.
Enable or Disable Wi-Fi Calling
1. Tap >Tools >Settings >Networkstab>Wi-Fi Calling.
2. TapOn/OfftoturnWi-FiCallingonoroff.
Wi-FiCallingwillbeturnedoff,andtheWi-FiCallingiconwillnotappearinthestatusbar.

Making Connections Phone Calls and Voicemail 65
Tip:YoucanalsoturnWi-FiCallingonoroffthroughthequicksettingsmenu.Pulldownthestatus
bartodisplaythequicksettingsmenuandtapWi-Fi Calling toenableordisablethefeature.
Caller ID Blocking
CallerIDidentifiesacallerbeforeyouanswerthephonebydisplayingthenumberoftheincoming
call.Ifyoudonotwantyournumberdisplayedwhenyoumakeacall,followthesesteps.
1. Tap >Phone >Dialtab.
2. Tap .
3. Enteraphonenumber.
4. Tap .
Yourcallerinformationwillnotappearontherecipient’sphone.
Topermanentlyblockyournumber,callSprintCustomerService.
Call Waiting
Whenyou’reonacall,CallWaitingalertsyoutoincomingcallsbysoundingtwobeeps.Your
phone’sscreeninformsyouthatanothercalliscominginanddisplaysthecaller’sphonenumber(ifit
isavailable).
Torespondtoanincomingcallwhileyou’reonacall:
nSwipe inanydirection.(Thisputsthefirstcalleronholdandanswersthesecondcall.)
Toswitchbacktothefirstcaller:
nTapSwap calls.
Note:Forthosecallswhereyoudon’twanttobeinterrupted,youcantemporarilydisableCall
Waitingbypressing beforeplacingyourcall.CallWaitingisautomatically
reactivatedonceyouendthecall.
Conference Calling
Withconferencecalling,alsoknownas3-waycalling,youcantalktotwopeopleatthesametime.
Whenusingthisfeature,thenormalairtimerateswillbechargedforeachofthetwocalls.
1. Onthedialpadscreen,enteranumberandtap (orplaceacallfromLogorContacts).
2. Onceyouhaveestablishedtheconnection,tapAdd call,anddialthesecondnumber(orplace
thecallfromLogsorContacts).
Thisputsthefirstcalleronholdanddialsthesecondnumber.

Making Connections Phone Calls and Voicemail 66
3. Whenyou’reconnectedtothesecondparty,tapMerge calls.Yourconferencecallisnowin
session.
4. Toendthethree-waycall,tap .
Note:Ifoneofthepeopleyoucalledhangsupduringyourcall,youandtheremainingcallerstay
connected.Ifyouinitiatedthecallandarethefirsttohangup,allcallersaredisconnected.
Call Forwarding
CallForwardingletsyouforwardallyourincomingcallstoanotherphonenumber–evenwhenyour
phoneisturnedoff.YoucancontinuetomakecallsfromyourphonewhenyouhaveactivatedCall
Forwarding.
Note:Youarechargedahigherrateforcallsyouhaveforwarded.
ToactivateCallForwarding:
1. Tap >Phone >Dialtab.
2. Tap .
3. Entertheareacodeandphonenumbertowhichyouwantyourcallsforwarded.
4. Tap .
YouwillhearatonetoconfirmtheactivationofCallForwarding.Allcallstoyourwireless
numberwillbeforwardedtothedesignatedphonenumber.
TodeactivateCallForwarding:
1. Tap >Phone >Dialtab.
2. Tap .
3. Tap .
Youwillhearatonetoconfirmthedeactivation.
Call Settings Menu
Yourphone’sCallSettingsmenuletsyouconfigureyourvoicemailoptionsandanumberofother
settingsforthephoneapplication.
Call Settings Overview
UsetheCallSettingsmenutoadjustthefollowingsettings:

Making Connections Phone Calls and Voicemail 67
Setting Description
Decline with message
underCallblocking&Decline
withmessage
Youcansendoutatextmessagewhenyouwanttoignorean
incomingcallandrespondtothecallerwithatextinstead.Youcan
addoreditquickmessages.
Blocked numbersunder
Callblocking&Declinewith
message
Youcansetcallrejectionsandmanagetherejectlist.
Digit filterunderCall
blocking&Declinewith
message
Blockcallsbasedonthestartingorendingdigitsintheirnumber.
Private numbersunderCall
blocking&Declinewith
message
Youcansetcallrejectionsfromaprivatenumber.
End calls with the Power
keyunderAnswerandend
calls
YoucansetthephonetoendcallswiththePower/LockButton.
Auto answerunderAnswer
andendcalls
Allowsyoutosetthetimebeforeaconnectedhands-freedevice
automaticallyanswersanincomingcall.
Incoming voice call pop-up
underMore
Activatetodisplaytheincomingcallpop-upwhenusingan
application.
Vibrate when call ends
underMore
Activatetovibratewhenacallends.
Smart dialingunderMore ActivatetomakeacalltotheU.S.fromabroadwithoutenteringthe
nationalcode.Touchandhold ortapthecontact.
Silence incomingcalls
underMore>Gestures
Youcansetthephonetosilenceincomingcallsbyjustflippingthe
phone.
Save unknown numbers
underMore
Youcansetthephonetosavethephonenumbersnotsavedin
Contactsyet.
Proximity Sensorunder
More
Whenreceivingandmakingcalls,thissensorautomaticallyturns
thebacklightoffandlocksthetouchkeypadbysensingwhenthe
phoneisnearyourear.Thisextendsbatterylifeandpreventsthe
touchkeypadfromactivatingunintentionallyduringcalls.
Making Connections Phone Calls and Voicemail 68
Setting Description
TTY modeunderMore ATTY(alsoknownasaTDDorTextTelephone)isa
telecommunicationsphonethatallowspeoplewhoaredeaf,hardof
hearing,orwhohavespeechorlanguagedisabilities,to
communicatebytelephone.Yourphoneiscompatiblewithselect
TTYphones.PleasecheckwiththemanufacturerofyourTTY
phonetoensurethatitiscompatiblewithdigitalcellphones.Your
phoneandTTYphonewillconnectviaaspecialcablethatplugs
intoyourphone'sheadsetjack.Ifthiscablewasnotprovidedwith
yourTTYphone,contactyourTTYphonemanufacturerto
purchasetheconnectorcable.
Hearing aidsunderMore Taptoturnonhearingaidcompatibility.
Use the Call Settings Menu
1. Tap > Phone .
Thephoneappopens.
2. Tap >Call settings.
Thecallsettingsmenuappears.
3. Configureyouroptions.
lTapamenuitemtodisplayitsoptions.
lSelectyouroptionsandfollowthepromptstosetthem.
Yourcallsettingsoptionsareset.
TTY Mode
ATTY(teletypewriter,alsoknownasaTDDorTextTelephone)isatelecommunicationsdevicethat
allowspeoplewhoaredeaf,hardofhearing,orwhohavespeechorlanguagedisabilities,to
communicatebytelephone.
YourphoneiscompatiblewithselectTTYdevices.PleasecheckwiththemanufacturerofyourTTY
devicetoensurethatitsupportsdigitalwirelesstransmission.YourphoneandTTYdevicewill
connectusingaspecialcablethatplugsintoyourphone’sheadsetjack.Ifthiscablewasnot
providedwithyourTTYdevice,contactyourTTYdevicemanufacturertopurchasetheconnector
cable.
ToturnTTYModeonoroff:

Making Connections Phone Calls and Voicemail 69
1. Tap > Phone >Dialtab.
2. Tap > Call settings>More>TTY mode.
3. TapTTY Full,TTY HCO,orTTY VCOtoturnTTYmodeon.
–or–
TapTTY OfftoturnTTYmodeoff.
Yourphone’sTTYmodeisset.
Note:Whenenabled,TTYmodemayimpairtheaudioqualityofnon-TTYdevicesconnectedtothe
headsetjack.
Warning: 9-1-1 Emergency Calling –ItisrecommendedthatTTYusersmakeemergencycalls
byothermeans,includingTelecommunicationsRelayServices(TRS),analogcellular,andlandline
communications.WirelessTTYcallsto9-1-1maybecorruptedwhenreceivedbypublicsafety
answeringpoints(PSAPs),renderingsomecommunicationsunintelligible.Theproblem
encounteredappearsrelatedtoTTYequipmentorsoftwareusedbyPSAPs.Thismatterhasbeen
broughttotheattentionoftheFCC,andthewirelessindustryandthePSAPcommunityare
currentlyworkingtoresolvethis.
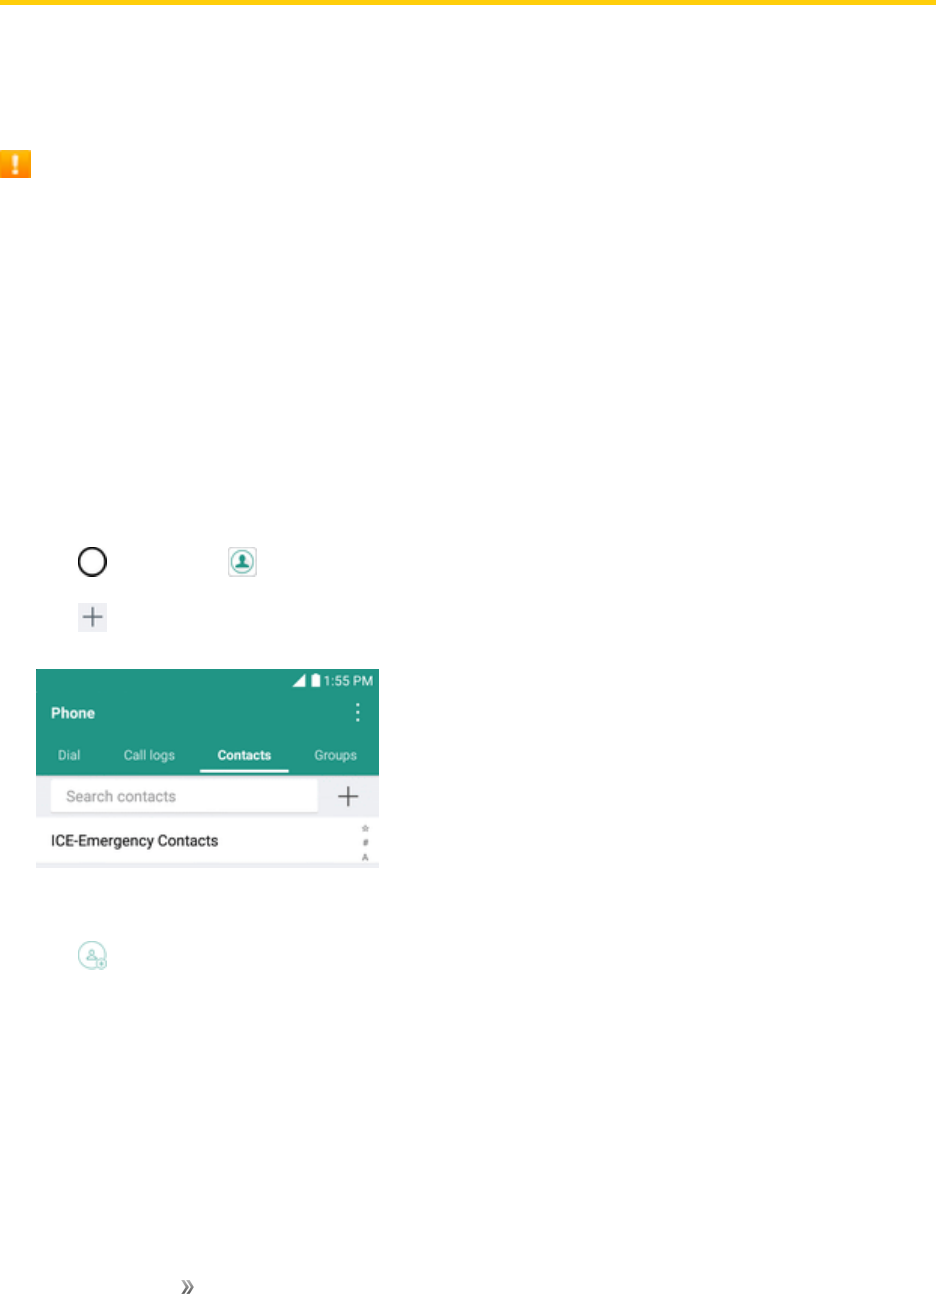
Making Connections Contacts 70
Contacts
TheContactsapplicationletsyoustoreandmanagecontactsfromavarietyofsources,including
contactsyouenterandsavedirectlyinyourphoneaswellascontactssynchronizedwithyour
GoogleAccount,yourPC,compatibleemailprograms(includingExchangeServer),andyour
friendsfromcompatiblesocialnetworkingapplications.
Contacts Cautions
InformationsavedinContactsmaybelostorchangedifthebatteryisremovedforalongperiod
orleftuncharged.Accidentormalfunctionmayalsocauselossorchangetoinformation.Itis
recommendedthatyoukeepaseparatecopyofcontactsandotherimportantinformation.Sprint
isnotresponsibleforanydamagesfromlostorchangedcontacts.
Add a Contact
YoucanaddcontactsonyourphoneandsynchronizethemwiththecontactsinyourGoogle
Account,MicrosoftExchangeaccount,orotheraccountsthatsupportsyncingcontacts.
TheContactsapplicationtriestojoinnewaddresseswithexistingcontactstocreateasingleentry.
Youcanalsomanagethatprocessmanually.
1. Tap >Contacts .
2. Tap toaddacontact.
3. Tapadestinationtype,Phone contactorGoogle(ifavailable).
4. Tap toselectapicturetodisplaynexttothenameinyourlistofcontactsandintheCallerID.
5. TaptheNamefieldandenteranameforyourcontact.
6. TapthePhonefieldandenteraphonenumber.
7. Enteranyadditionalinformationyoumaywanttosaveandwhenyou'refinishedtapSAVE.
Save a Phone Number
YoucansaveaphonenumbertoContactsdirectlyfromthephonekeypad.

Making Connections Contacts 71
1. Tap > Phone .
2. Enteraphonenumber.
3. Toaddthenumbertoanexistingcontact,tapUpdate contact.Toaddanewcontact,tap
Create contact.
lForanexistingcontact,tapthecontactnameandselectanumbertypeforthenewnumber.
lForanewcontact,enterthenameandanyadditionalinformation.
4. TapSAVE.
Thecontactisadded.
View Contacts
Viewacontact’sdetailsbydisplayingacontactentry.
1. Tap >Contacts .
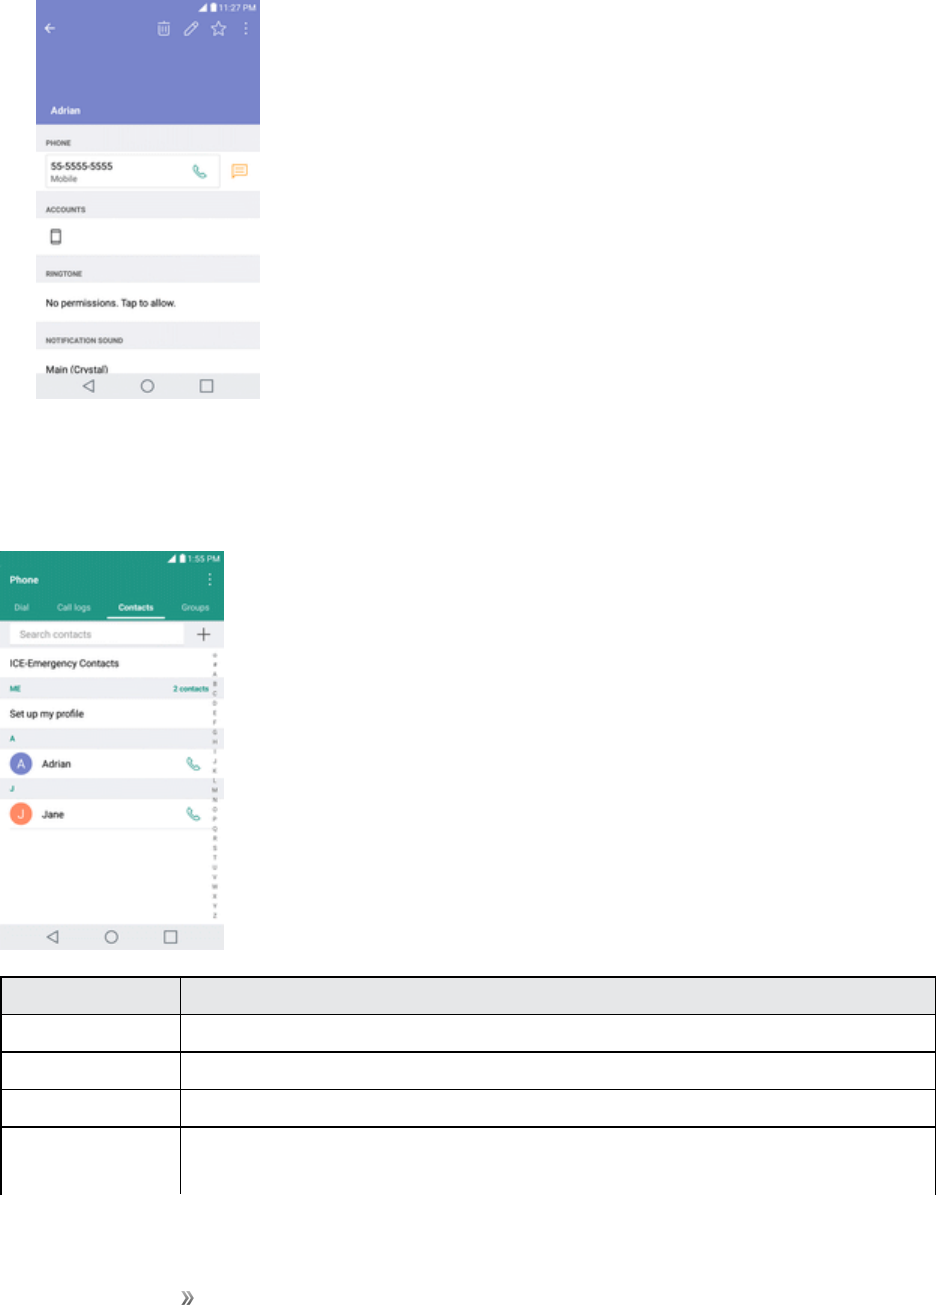
Making Connections Contacts 72
2. Tapacontacttoviewitsdetails.
Contacts Screen Layout
Thefollowingillustrationshow’syourContactsapplayoutanddescribesthevariousfeatures.
Item Description
Groups tab Showcontactgroups.
Contacts tab Showallcontacts.
Contact Taptoshowacontact’sdetails.
Image Taptoshowathumbnailofthecontactentry.Tapanicontoplaceacall,senda
message,etc.
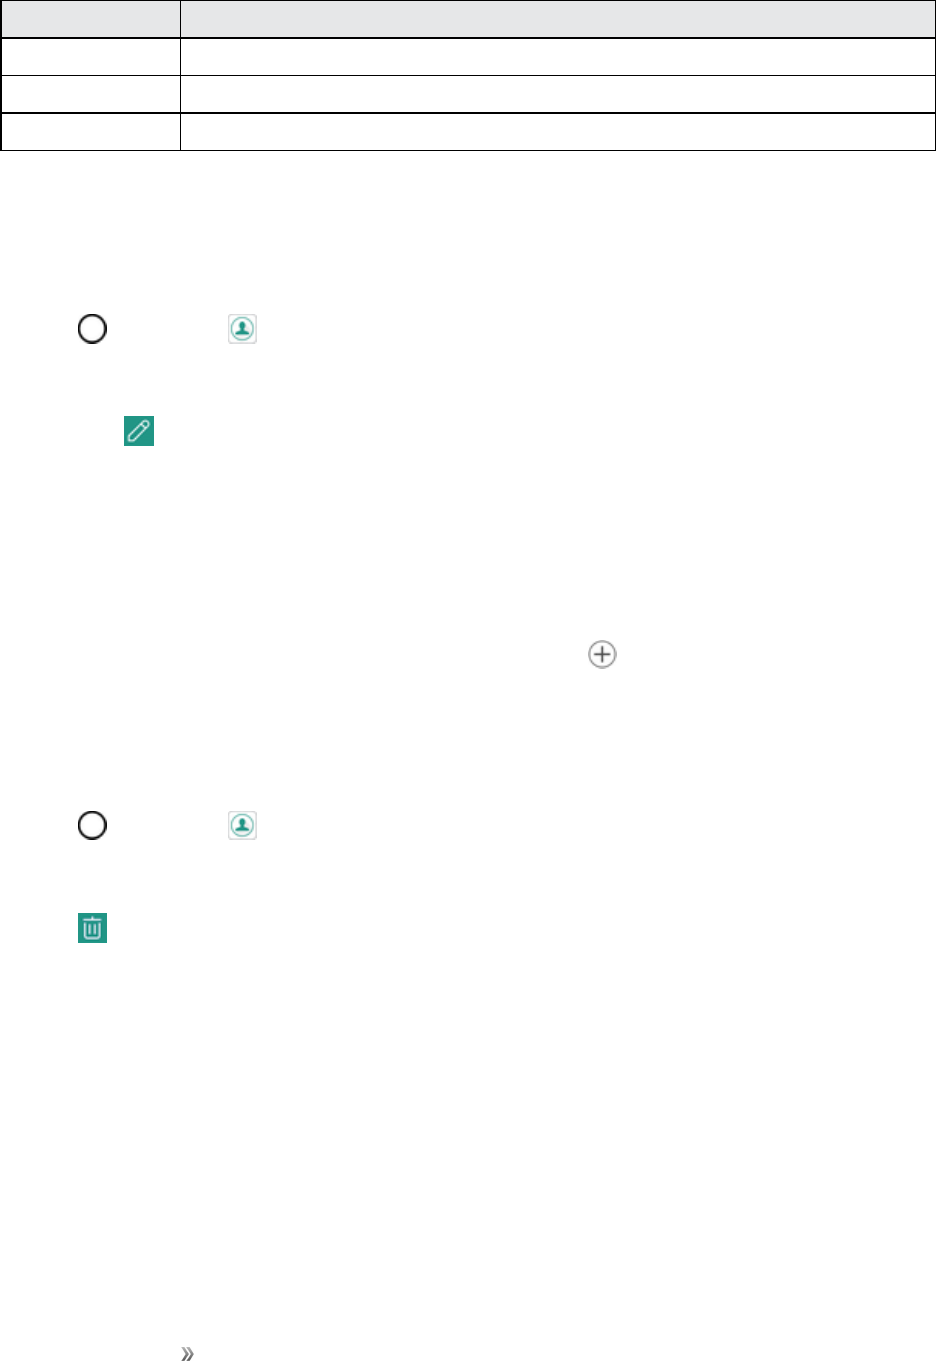
Making Connections Contacts 73
Item Description
Search Searchcontacts.
Index Browsecontactsbyletter.
Add new Addanewcontact.
Edit a Contact
Onceyou’veaddedacontact,youcanaddoreditanyoftheinformationintheentry,assignacaller
IDpicture,customizewithauniqueringtone,andmore.
1. Tap >Contacts .
2. Tapthecontacttoviewitsdetails.
3. TapEdit .
4. Tapanyfieldyouwanttochangeoradd.
5. Addoredittheinformation,andthentapSAVE.
Note:Toselectatype(label)foraphonenumber,emailaddress,orpostaladdress(suchasHome,
Work,etc.),tapthetypetotherightofthefield.
Note:Toaddmorephonenumbers,emailaddresses,etc.,tap ontherightsideoftheentryfield.
Delete a Contact
Youcandeleteacontactfromthecontactsdetailspage.
1. Tap >Contacts .
2. Tapacontacttoviewitsdetails.
3. Tap .
4. TapDELETE.
Tip:YoucanalsotouchandholdthecontactfromthecontactlistandthentapDeletecontact>
DELETE.
Share a Contact
YoucansharecontactswithothersbysendingasvCardfiles.

Making Connections Contacts 74
1. Tap >Contacts .
2. Tap >Share.
3. Tapthecontactsyouwanttoshare,thentapSHARE.
4. Choosethemethodforsending.
Import Contacts
YoucanimportcontactsfromyourinternalstoragedirectlytoyourContactsapplication.
1. CopythevCardfilestoyourphonefromyourcomputer.
2. Tap >Contacts .
3. Tap >Manage contacts>Import.
4. Selectwheretoimportfromandsaveto,thentapOK.
5. TapthefilesyouwishtoimportandtapIMPORTandIMPORTtoconfirm.
Back Up Contacts
Youcanbackupandexportallofthecontactsonyourphone,asvCardfiles.Youcanthencopythis
filetoacomputeroranotherphonethatiscompatiblewiththisformat,suchasanaddressbook
application.
1. Tap >Contacts .
2. Tap >Manage contacts>Back up.
3. SelectastoragelocationandthentapOK.
4. Tapthecontactsyouwanttoexport,thentapBACK UPandBACK UPtoconfirm.
5. EnterafilenameandtapOK.

Making Connections Messaging 75
Messaging
Withwirelessserviceandyourphone’smessagingcapabilities,youhavetheopportunitytoshare
informationthroughmanydifferentchannelsandaccounts,includingMessenger,Gmail(Google),
personalandcorporateemail.
Messenger
Youcansendandreceivetextmessages,photos,voicemessages,andvideousingMessenger.
Whenyoureceiveanewmessage,youwillbenotifiedbyyourphone.Messagingisavailableviathe
Messengerapplication.Theicon appearsstatusbarwhenanewmessageisreceived.
Send a Text Message
Quicklycomposeandsendtextmessages(SMS)onyourphone.
Note:Seeyourserviceplanforapplicablechargesfortextmessaging.
1. Tap >Messenger .
2. Tap .
3. TaptheTofieldandenteracontact'snames,phonenumbers,oremailaddressesthatyou'dlike
tomessage.Youcanalsopickfromyourtopcontactsoryourwholecontactlist.
4. Tap .
5. Tapthetextfieldandenteryourmessage.
lToenteraemoji,tap .Selectacategoryandmakeaselectionfromthelisttoinsertitinto
yourcurrentmessage.
6. Reviewyourmessageandtap .
Send a Multimedia Message (MMS)
Whenyouneedtoaddalittlemoretoatextmessage,youcansendamultimediamessage(MMS)
withthecontentssuchasimages,videos,etc.
Note:Seeyourserviceplanforapplicablechargesformultimediamessaging.
Compose Multimedia Messages
1. Tap >Messenger .
2. Tap .
Making Connections Messaging 76
3. TaptheTofieldandenteracontact'snames,phonenumbers,oremailaddressesthatyou'dlike
tomessage.Youcanalsopickfromyourtopcontactsoryourwholecontactlist.
4. Tap .
5. Tapthetextfieldandenteryourmessage.
6. Tap .
7. Selectamultimediaattachmenttype:
lSticker:Diversestickersareavailable.
lTake picture/Record video:Takeapictureorrecordavideotoinsertinyourmessage.
oTotakeapicture,tap .
oToseethecamerainfull-screenview,tap .
oTostartrecordingavideo,tap .
oTostoprecordingavideo,tap .
lGallery:OpenstheGalleryapplication.Tapapictureoravideotoattachtoyour
message.
lRecord audio:Touchandhold untilyoufinishrecording.
lLocation:Youcansendyourlocation.
Note:Toremoveorreplaceapictureoranaudioattachment,ontheComposescreen,tap next
totheattachment.
8. WhenyouarefinishedcreatingyournewMMSmessage,tap .
Save and Resume a Draft Message
Whilecomposingatextormultimediamessage,tap toautomaticallysaveyourmessageasa
draft.
Toresumecomposingthemessage:
1. Onthescreenwithallmessagethreads,tapthemessage.TheDraftlabelisshownifasaved
draftisavailable.
2. Whenyoufinisheditingthemessage,tap .

Making Connections Messaging 77
New Messages Notification
Dependingonyournotificationsettings,thephonewillplayaringtone,vibrate,ordisplaythe
messagebrieflyinthestatusbarwhenyoureceiveanewtextormultimediamessage.Tochange
thenotificationfornewtextandmultimediamessages,seeTextandMMSOptionsfordetails.
Anewmessageicon alsoappearsinthenotificationsareaofthestatusbartonotifyyouofanew
textormultimediamessage.TheMessagesapplicationicon(ifshownonthehomescreen)also
displaysthenumberofnewmessages .
nToopenthemessage,pulldownthestatusbartoopenthenotificationpanel.Tapthenew
messagetoopenandreadit.ForinformationonreadingandreplyingtomessagesseeManage
MessageConversations.
Manage Message Conversations
Textandmultimediamessagesthataresenttoandreceivedfromacontact(oranumber)are
groupedintoconversationsormessagethreadsintheMessengerscreen.Thisallowsyoutosee
exchangedmessages(similartoachatprogram)withacontactonthesamescreen.
Read a Text Message
nDooneofthefollowing:
lOntheMessengerscreen,tapthemessagethreadtoopenandreadit.
lIfyouhaveanewmessagenotification,dragthestatusbardowntoopentheNotifications
Window.Tapthenewmessagetoopenandreadit.
View a Multimedia Message (MMS)
1. Tap >Messenger .
2. OntheMessengerscreen,tapamessagethreadtoopenit.
3. Whileviewingamessage,taptheplayicon(onthevideooraudiofile)toplaybackthefileortap
theimagetoviewthepicture.
Tip:Thefileattachmentonthemultimediamessagecanbesavedtoyourphone'sinternalstorage.
Tosavetheattachment,touchandholdthefileandtap .
Note:WhenAuto-downloadMMSisdisabled,onlythemessageheaderisdownloaded.To
downloadtheentiremessage,taptheDownloadbuttoninthemessage.Fordetails,seeTextand
MMSOptions.

Making Connections Messaging 78
Reply to a Message
1. Tap >Messenger .
2. OntheMessengerscreen,tapamessagethreadtoopenit.
3. Whileviewingamessage,tapthetextfieldandtypeyourreplymessage.
4. Oncecompleted,tap .
ToreturntotheAllmessagesscreenfromatextmessagethread,tap .
Note:Toviewthedetailsofaparticularmessage,inthemessagethread,touchandholdthe
messagetoopentheoptionsmenu,andthentap .
Note:IfamessagecontainsalinktoaWebpage,tapthemessageandthentapthelinktoopenitin
theWebbrowser.
Note:Ifamessagecontainsaphonenumber,tapthemessageandthentapthephonenumberto
dialthenumberoraddittoyourcontacts.
Delete Conversations
1. Tap >Messenger .
2. OntheMessengerscreen,touchandholdamessagethreadtodisplay .
lToselectmultipleconversations,tapeachconversationtodelete. willbeshown.
3. Tap andthentapDELETEtoconfirm.
Tip:Youcanalsodeleteaconversationwhileyou'reviewingit.Whileviewingaconversation,tap
>Delete.
Delete a Single Message
1. Whileviewingaconversation,touchandholdthemessagethatyouwanttodelete.
2. Tap andthentapDELETEtoconfirm.
View Contact Information from a Message
Whenyouhavereceivedamessagefromsomeoneinyourstoredcontacts,youcantapthe
contact’sphotooriconinthemessagethreadtoopenamenuofoptions.Dependingonthestored
contactinformation,youcanviewthecontactdetails,placeaphonecall,sendanemailmessageto
thecontact,andmore.

Making Connections Messaging 79
Text and MMS Options
Themessagessettingsmenuletsyoucontroloptionsforyourtextandmultimediamessages
includingmessagelimits,sizesettings,andnotifications.
1. Tap >Messenger .
2. OntheMessengerscreen,tap >Settings.
3. Adjustthefollowingsettingsaccordingtoyourneeds:
lDefault SMS app:Tochangeyourdefaultmessengerapp.
lGet notifications:Selectwhethertogetnotificationsornotwhenanewmessagearrives.
lNotification sound:Allowsyoutoselectaringertosoundwhenanewmessageis
received.Tapthisoption,andthenselectaringtonethatisspecifictonewtextand
multimediamessages.Asamplewillbrieflybeplayeduponselection,thentapOKtosave
yournewsetting.
lHear outgoing message sounds:Selectwhethertohearsoundswhenyousenda
message.
lVibrate:Enablethisoptionifyouwantthephonetovibratewhenanewtextormultimedia
messageisreceived.
lAdvanced
oEnhanced features:Configuretheenhancedfeatures(availablewhenthemobile
networkallows).
oGroup messaging:SelectthegroupmessagingoptionbetweenSendanSMSreplyto
allrecipientsandgetindividualreplies(masstext)andSendanMMSreplytoall
recipients(groupMMS).
oAuto-download MMS:Enablethisoptiontoautomaticallyretrievetheentirecontentof
yourmultimediamessage.Whenenabled,themultimediamessageheader,message
body,andanyattachmentswillautomaticallydownloadtoyourphonewhenthe
messageisreceived.Ifyoudisablethisoption,onlythemultimediamessageheaderwill
beretrievedanddisplayed.
oAuto-download MMS when roaming:Disablethisoptionifyouonlydesirethe
multimediamessageheaderstodownloadwhileroaming.Enablethisoptionto
automaticallydownloadyourcompletemultimediamessagesevenwhileroaming.
oUse simple characters:Turnthisontochangespecialcharactersintextmessagesinto
simpleones.
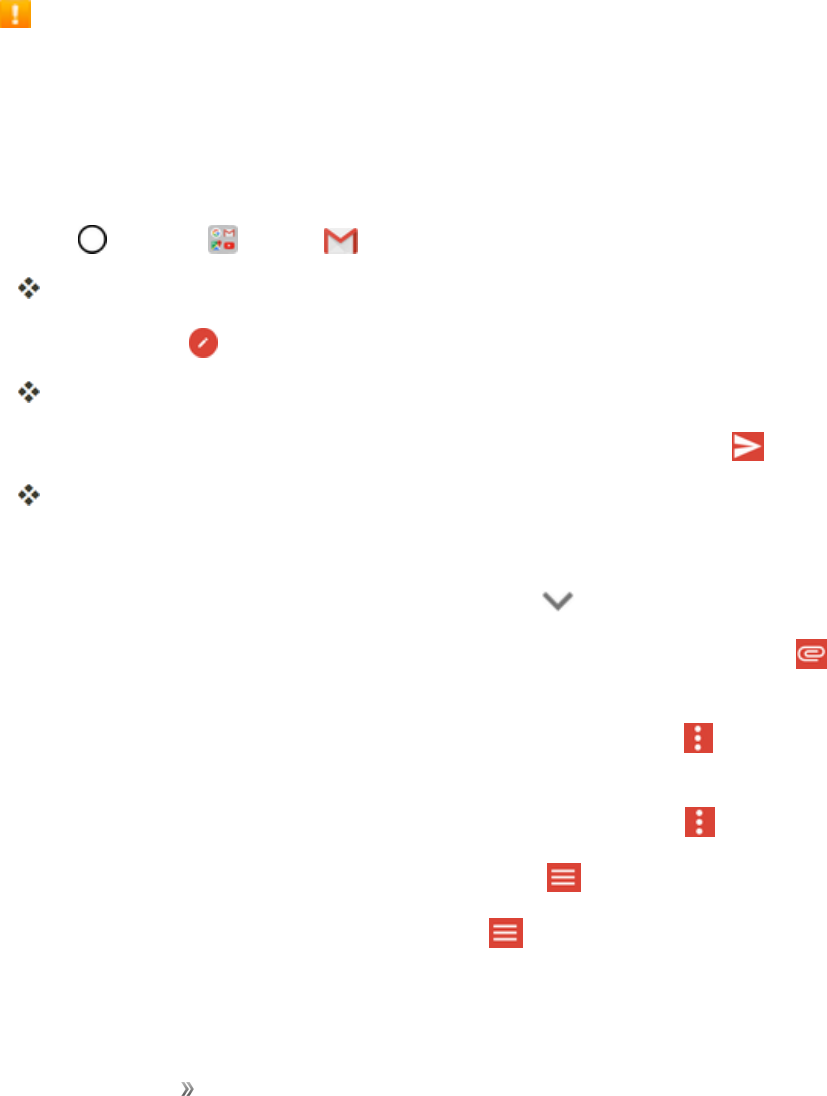
Making Connections Messaging 80
oSIM card messages:YoucanviewSIMcardmessages.
oPhone number:Tapthistochangethephonenumberyouusetosendmessages.
Gmail
UseGoogle’sGmailserviceandyourGoogleAccounttosend,receive,andmanageyourGmail
messages.BeforeusingGmail,youmustregisteraGoogle(Gmail)Accountonyourphone.See
GoogleAccountfordetails.
Gmail Cautions
GmailishandledasemailfromaPC.RestrictingemailfromPCsonyourphonepreventsyour
phonefromreceivingGmail.
Create and Send a Gmail Message
UseyourphonetocreateandsendGmailmessages.
1. Tap >Google >Gmail .
TheGmailinboxopens.
2. Intheinbox,tap .
TheGmailcompositionwindowopens.
3. Enterthemessagerecipient(s),subject,andmessage,andthentapSend .
TheGmailmessageissent.
Gmail Composition Options
nAdding Cc/Bcc:Inthemailcompositionwindow,tap andthenaddrecipients.
nAttaching Pictures or Videos:Inthemailcompositionwindow,tapAttach file .Locate
andthentapthepictureorvideoyouwanttoattach.
nSave as a Draft (Send Later):Whilecomposingyourmessage,tap >Save draft.The
messageissavedasadraftforlater.
nDelete Mail Being Composed:Inthemailcompositionwindow,tap >Discard.
Note:Toviewyourdraftemailmessages,intheinbox,tap >Drafts.
Note:Toviewyoursentmessages,intheinbox,tap >Sent.
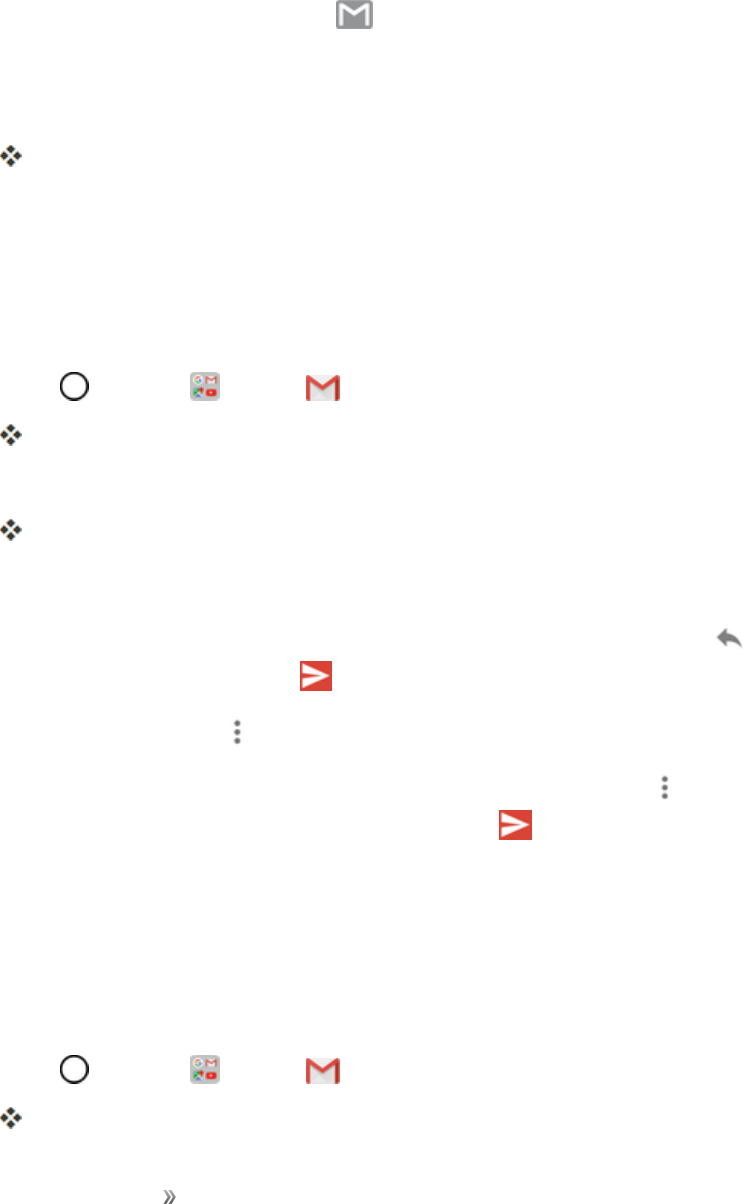
Making Connections Messaging 81
Check Received Gmail Messages
Yourphoneallowsyoutoaccess,read,andreplytoallyourGmailmessages.
Open Gmail Messages from Notifications
WhennewGmailarrives,youwillsee inthestatusbar.
1. Pulldownthestatusbartodisplaythenotificationpanel.
2. Tapthenewmessagefromthenotificationpanel.
ThenewGmailmessageopens.
lIfyouhavetwoormorenewGmailmessages,tappingthenotificationopenstheGmail
inbox.
Open Gmail Messages from the Inbox
YoucanalsoreadandreplytoallyourGmailmessagesfromtheGmailinbox.
1. Tap >Google >Gmail .
TheGmailinboxopens.
2. Tapthemessagethreadyouwanttoview.
Themessagethreadopens,withthenewestmessagedisplayed.
Options when Reviewing Gmail Messages
nReplying to Gmail Messages:WiththeGmailmessageopen,tapReply ,composeyour
replymessage,andtapSend .
lToreplytoall,tap >Reply all.
nForwarding Gmail Messages:WiththeGmailmessageopen,tap >Forward,entera
recipientandanadditionalmessage,andtapSend .
Use Gmail Labels
Gmailsavesallmailinonebox,butyoucanaddlabelsthatallowyoutosortyourGmailconversation
threads.Forexample,whenanewthreadstartswithareceivedmail,thelabel"Inbox"is
automaticallyaddedtothethread.Bythenaddingthelabel"travel,"allthreadswith"travel"are
showninalist.
1. Tap >Google >Gmail .
Theinboxopens.
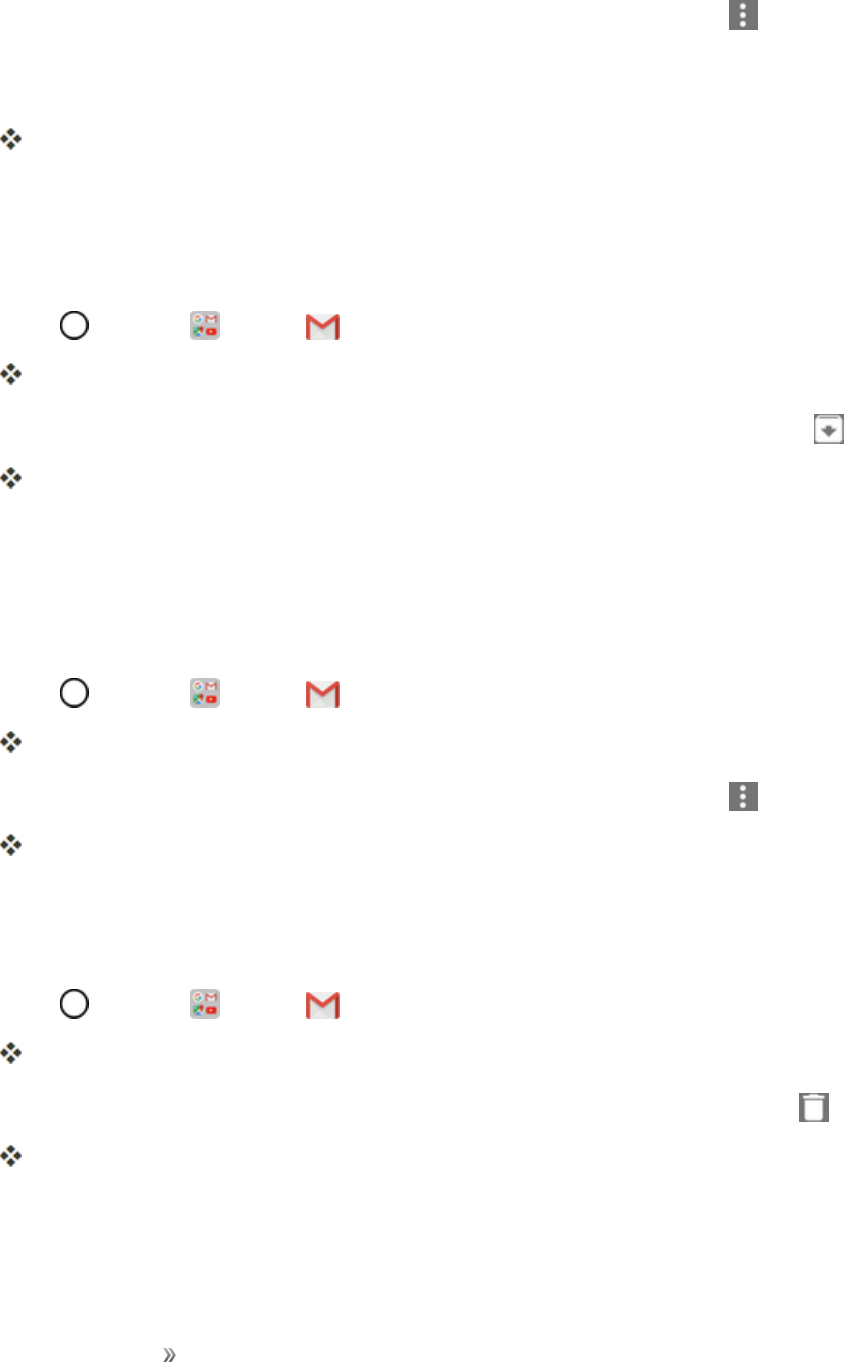
Making Connections Messaging 82
2. Touchandholdaconversationthreadtoaddacheckmarktoit,andthentap >Change
labels.
3. Tapalabelforthethread.
Thethreadisaddedtotheselectedlabel.
Archive Gmail Threads
RemovesentandreceivedGmailthreadssotheydonotappearintheinbox.Whenrepliesarrivefor
archivedthreads,theyappearintheinboxagain.
1. Tap >Google >Gmail .
Theinboxopens.
2. Touchandholdaconversationthreadtoaddacheckmarktoit,andthentapArchive .
Thethreadisnowarchived.
Mute Gmail Threads
Ifregisteredonamailinglist,therewillbethreadswithalways-continuingconversations.Forlong
threadsthatarenotimportant,mutethethreadsandtheywillnolongerappearintheinbox.When
mailarrivesthatincludesuser'saddressasarecipientorinCc,mailwillagainappearintheinbox.
1. Tap >Google >Gmail .
Theinboxopens.
2. Touchandholdaconversationthreadtoaddacheckmarktoit,andthentap >Mute.
Thethreadisnowhidden.
Delete Gmail Threads
IfyounolongerwishtokeepaGmailconversationthread,youcansimplydeleteitfromtheinbox.
1. Tap >Google >Gmail .
Theinboxopens.
2. Touchandholdaconversationthreadtoaddacheckmarktoit,andthentapDelete .
Thethreadisdeleted.
Search Gmail Messages
Ifyouneedtofindaspecificmessageormessagethread,youcansearchGmailfromtheinbox.
Making Connections Messaging 83
1. Tap >Google >Gmail .
Theinboxopens.
2. Tap .
3. Enteryoursearchtextandtap .
Thesearchresultsappear.Tapamessageorthreadfromthelisttodisplayit.
Report Spam
YoucanreportspamGmailmessagesfromyourphone’sGmailinbox.
1. Tap >Google >Gmail .
Theinboxopens.
2. Touchandholdaconversationthreadtoaddacheckmarktoit,andthentap >Report
spam.
TheselectedmessageisreportedasspamGmail.
Add Another Google (Gmail) Account
IfyouhavemultipleGmailaccountsyouwishtoviewonyourphone,youcanaddthemfromthe
Settings>Accounts& syncmenu.
1. Tap >Tools >Settings >Generaltab>Accounts& sync>ADD ACCOUNT.
2. TapGoogle,andthentapEnter your email.
3. EnteryourGmailusernameandpassword,andthentapNEXT.
4. AfteryourphoneconnectswiththeGoogleservers,selecttheitemsyouwouldliketosyncwith
yourphoneandthentapSync now.
5. TapFinish setup.
YouaresignedintoyourGoogleAccount,andyoucanaccessbothofyourGmailaccounts
fromtheGmailapp.
Note:YoucanalsosignupforanewGmailaccountfromtheSettingsmenu.Instep2above,tapOr
create a new accountandfollowtheprompts.
Switching between Gmail Accounts
IfyouhavemorethanoneGmailaccountsetup,youcanswitchbetweenthemintheGmailapp.
Making Connections Messaging 84
1. Tap >Google >Gmail .
Theinboxopens.
2. Tap .
3. Taptheaccountyouwanttoviewfromthelistatthetopofthemenu.
Theselectedaccountinboxisdisplayed.
Gmail Settings
YoucanaccesssettingsfortheGmailappandforyourindividualGmailaccountsfromtheGmail
Settingsmenu.
1. Tap >Google >Gmail .
ThePrimaryinboxopens.
2. Tap >Settings .
3. TapGeneral settingstoaccesssettingsforallaccounts,ortapanaccount nametoconfigure
settingsforaspecificGmailaccount.
lGeneral settings:Gmaildefaultaction,Conversationview,Swipeactions,Senderimage,
Replyall,Auto-fitmessages,Auto-advance,Confirmbeforedeleting,Confirmbefore
archiving,andConfirmbeforesending.
lAccount settings:Inboxtype,Inboxcategories,Notifications,Inboxsound&vibrate,
Signature,Vacationresponder,SyncGmail,Daysofmailtosync,Managelabels,Download
attachments,andImages.
Note:Availablesettingsaresubjecttochange.

Making Connections Internet and Social Networking 85
Internet and Social Networking
ThefollowingtopicsdescribehowtoconnecttoandusetheInternetonyourphone,andhowto
accesspopularsocialnetworkingsitessuchasFacebook,Twitter,andDuo.
Data Services General Information (4G LTE and
3G Networks)
Thefollowingtopicswillhelpyoulearnthebasicsofusingyourdataservices,includingmanaging
yourusername,launchingadataconnection,andnavigatingtheWebwithyourphone.
Important:Certaindataservicesrequestsmayrequireadditionaltimetoprocess.Whileyourphone
isloadingtherequestedservice,thetouchscreenorQWERTYkeyboardmayappearunresponsive
wheninfacttheyarefunctioningproperly.Allowthephonesometimetoprocessyourdatausage
request.
4G LTE
The4GenhancedLTEnetworkprovidesyourphonewithwirelessInternetaccessovergreater
distancesthanWi-Fianddeliversdatatransferratesofupto60Mbps.Toconnectyourphoneto4G,
youneedtobeinanareacoveredbythe4GenhancedLTEnetwork.
Formoreinformationabouttheavailabilityof4Ginyourlocation,visitsprint.com/coverage.
Note:Theavailabilityandrangeofthenetworkdependsonanumberoffactorsincludingyour
distancetothebasestation,infrastructure,andotherobjectsthroughwhichthesignalpasses.
Set Your Network Options
1. Tap >Tools >Settings >Networkstab>More>Mobile networks>Network
mode.
2. Selectthedesiredoption.
Bydefault,thephonewillscanforthebestavailableSprintnetworkandwillautomatically
connecttoit.
Whenyourphoneisconnectedvia4G,theLTEicon appearsinthestatusbar.
Note:The4Gnetworkisself-discoverable,whichmeansnoadditionalstepsarerequiredforyour
phonetoconnecttoit.
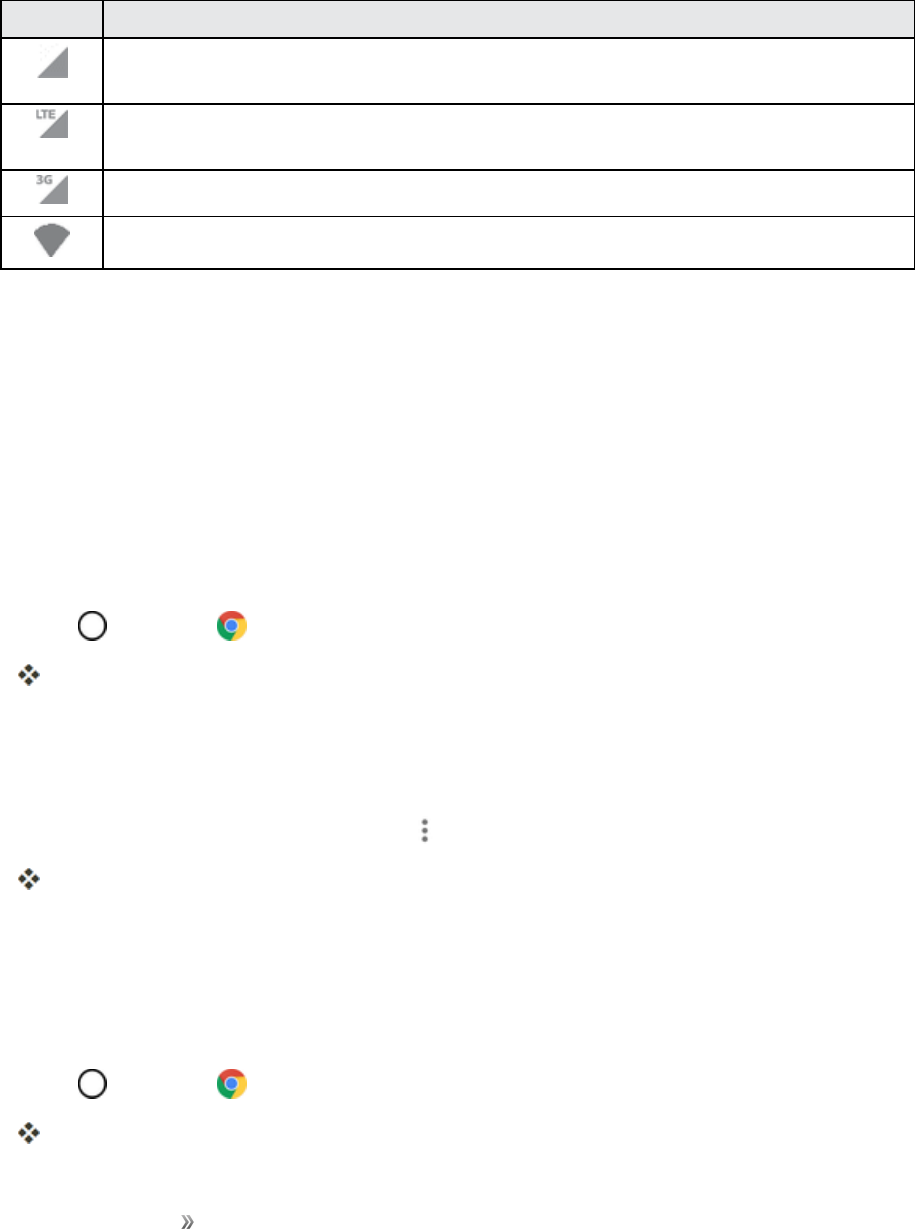
Making Connections Internet and Social Networking 86
Data Connection Status and Indicators
Yourphonedisplaysthecurrentstatusofyourdataconnectionthroughindicatorsatthetopofthe
screen.Thefollowingsymbolsareused:
Icon Status
Network (full signal):Thenumberofbarsindicatethestrengthofthesignal.More
barsmeanabettersignal.
Enhanced 4G LTE data service:Yourphoneisconnectedtothe4GenhancedLTE
network.
3G (data service):Yourphoneisconnectedtothe3Gnetwork.
Wi-Fi connection:YourphoneisconnectedtoaWi-Finetworkfordata.
Chrome Browser
TheChromemobileWebbrowsergivesyoufullaccesstobothmobileandtraditionalwebsiteson
thego,usingdataserviceorWi-Fidataconnections.
IfyouaresignedinwithaGoogleAccount,theChromebrowserwillimportallyourbookmarksand
otherWebpreferencesforuseonyourphone.
Use the Browser
Launchingthebrowserisaseasyastappinganicon.
1. Tap >Chrome .
Thebrowseropens.
2. Taptheaddressbaratthetopandentersearchwords(foraGooglesearch)oraWebaddress.
Chrome Support
nTofindhelpintheChromebrowser,tap >Help & feedback.
AWebpagewillopendisplayingGooglehelpforChrome.
Tip:Formoreinformationvisit:google.com/intl/en/chrome/browser/mobile/.
Add a Bookmark
Bookmarkfavoritesitesusingthebrowsermenuoptions.
1. Tap >Chrome .
Thebrowseropens.
Making Connections Internet and Social Networking 87
2. NavigatetotheWebpageyouwanttobookmark,andtap > .
TheWebpageisaddedtobookmarks.
Bookmark Options
nEditing Bookmarks:Fromthebrowser,tap >Bookmarks> >Edit>editthefavorite>
.
nDeleting Bookmarks:Fromthebrowser,tap >Bookmarks> >Delete.
View Browser History
Usethebrowsermenuoptionstoviewyourbrowsinghistory.
1. Tap >Chrome .
Thebrowseropens.
2. Tap > History.
Thebrowserhistorywindowopens.
3. TapanentrytoopentheWebpage.
Open New Browser Tabs
Usetabbedbrowsingtoswitchbetweenwebsitesquicklyandeasily.
1. Tap >Chrome .
Thebrowseropens.
2. Tap > New tab.
Anewtabappears.
Tip:Toswitchtabs,tap > Recent tabs.
Browser Settings
CustomizeyourexperiencewiththeInternetthroughthebrowsersettingsmenu.
1. Tap >Chrome .
Thebrowseropens.
2. Tap >Settingsandcustomizeyourbrowsersettings.

Making Connections Internet and Social Networking 88
Yourbrowsersettingsaresaved.
Facebook
Postupdates,readwhatyourfriendsareupto,uploadpicturesandcheck-ins,andmorewithon-
the-goFacebookaccess.
Install the Facebook App on Your Phone
BeforeyouuseFacebookonyourphone,youmustdownloadandinstalltheappfromtheGoogle
Playstoreapp.
1. Tap >Facebook .
2. TapINSTALL (or UPDATE).
Theappwillbedownloadedandinstalledonyourphone.
3. Whenthedownloadhascompleted,tapOPEN.
lTap >Facebook .
Sign in to Your Facebook Account from Account Settings
1. Tap >Tools >Settings >Generaltab>Accounts& sync>ADD ACCOUNT.
2. TapFacebook .
3. EnteryourEmailorPhoneandpasswordandtapLOG IN.
YourFacebookaccountisaddedtoyourphone.
Use Facebook
Onceyou’vedownloadedtheappandsignedin,youcanpostandreadupdates,uploadpictures,tag
locations,andmore,allfromyourphone.
1. Tap >Facebook .
TheFacebookapplaunches.
lIfthisisthefirsttimeyou’veusedFacebookonyourphone,enteryourEmailorPhoneand
passwordandtapLOG IN tosignintoanexistingaccount,ortapCREATE NEW
FACEBOOK ACCOUNT tosetupanewFacebookaccount.
2. TapWhat's on your mind? andtypeanupdate,tapPhoto/Video anduploadapictureor
videofromthegallery,tapCheck In toshareyourlocation,“Like”andcommentonfriends’
posts,andmore.
Making Connections Internet and Social Networking 89
Twitter
Tweet(postmessages)andviewotherpeople'stweetsonTwitter.Loginmayberequiredtouse
Twitter.FordetailsonTwitter,visittwitter.com.
Install the Twitter App on Your Phone
BeforeyoucanuseTwitteronyourphone,youhavetodownloadandinstalltheappfromGoogle
Play.
1. Tap >Play Store .
2. TaptheSearchiconandsearchfor"twitter."
3. TapTwitterfromtheresultslist.
4. TapINSTALL (orUPDATE).
Theappwillbedownloadedandinstalledonyourphone.
5. Whenthedownloadhascompleted,tapOPEN.
lTap >Twitter.
Tweet on Twitter
ReadTwitterfeeds,followyourfriends,andtweetyourownupdatesrightfromyourphone.
1. Tap >Twitter.
TheTwitterapplaunches.
lIfthisisthefirsttimeyou’veusedTwitteronyourphone,tapLog intosignintoanexisting
account,ortapSign up tosetupanewTwitteraccount.
2. Tap typeatweet,andtapTweet.
ThetweetissentandappearsonyourTwitterfeed.
Duo
Duoisaone-to-onesimplevideocallingappforeveryone,regardlessofOS(Android/iOS).
Open the Duo Application
nTap >Google >Duo .

Making Connections Global Services 90
Global Services
WithyourphoneandglobalroamingservicefromSprintWorldwideSMWirelessService,youcan
makephonecallsandusewirelessdataservicesaroundtheglobeoncompatibleCDMAand
GSM/UMTSnetworks.Foracountry-specifictravelguide,selectyourphoneanddestinationfrom
sprint.com/traveltips.
Activate Sprint Worldwide Service on Your
Account
Beforeusingyourphoneinglobalroamingmode,youmustactivateSprintWorldwideservice.
ToactivateSprintWorldwideservice:
nChatwithoremailaninternationalsupportrepbyvisitingsprint.com/swwsupport.
–or–
CallSprintWorldwideCustomersupportat1-888-226-7212.
Your Phone’s SIM Card for International GSM
Roaming
YourphonecomeswithapreinstalledSIM(SubscriberIdentityModule)cardtosupportroamingon
compatibleGSMnetworks.
Note:YourSIMcardshouldbepreinstalled.IfyouneedtoreinstallyourSIMcard,followthe
instructionsbelow.
Note:TheSIMcardincludedwithyourphonecontainsinformationspecifictoyourphoneand
shouldberetainedforuseonGSMnetworks.
Insert a SIM Card
FollowtheseinstructionstoinsertaSIMcard.Remembertopoweroffyourphonebeforeinsertinga
SIMcard.
1. Removethebackcover.(SeeInsertamicroSDCard.)
2. InserttheSIMcard.
lInsertgentlywithgoldICchipfacingdownward.
3. Replacethebackcover.
lFormoreinformation,seeNanoSIMCard.
Making Connections Global Services 91
Enable Global Roaming Mode
YourphoneisdesignedtoenterglobalroamingmodeautomaticallywhenyouactivateyourSprint
Worldwideservice,meaningthatitshouldautomaticallyconnecttoanappropriateCDMA/LTE
networkorGSM/UMTSnetworkwhenyoutravel.Youmaysetglobalroamingoptionsthroughthe
settingsmenu.
Youmayalsoneedtosetyournetworkmodeoptionsthroughthesettingsmenu.SeeSetthe
CommunicationsMethodforGlobalUse.
Tosetyourroamingoptionsmanually:
1. Tap >Tools >Settings >Networkstab>More>Mobile networks>Roaming.
2. TapUse roaming .
3. Selectthedesiredroamingoptionsforeachcategory.
Theselectedoptionsareset.
Set the Communications Method for Global Use
Selectacommunicationsmethodforanoverseascarrierasneeded.
1. Tap >Tools >Settings >Networkstab>More>Mobile networks.
2. TapNetwork mode>Automatic / LTE/CDMA / CDMA / GSM/UMTS.
Thecommunicationsmethodisset.
Note:Atthetimeofpurchase,yourphoneissettotheAutomaticmodebydefault.Thisallowsglobal
usageandnormallywillnotneedtobechanged.
Select a Carrier
Youcanselectaspecificlocalcarriertousewhentravelinginternationally.Atthetimeofpurchase,
yourphoneispresettoconnectautomaticallytoanappropriatecarrierinyourcurrentarea.
1. Tap >Tools >Settings >Networkstab>More>Mobile networks>4G settings
>Network operator.
2. Tapanavailablenetwork.
Theselectedcarrierisset.
lToautomaticallyselectanappropriatecarrier(default),tapChoose automatically.
lTosearchforallavailablenetworks,tapSearch networks.

Making Connections Global Services 92
Make and Receive Worldwide Calls
Whentravelingoninternationalnetworks,youcanplaceandanswercallsasyouwouldonthe
Sprintnetwork(seePlaceandAnswerCalls),althoughsomeadditionalinstructionsmaybe
requiredtoplaceacall.Somefeaturesandservicesarenotavailableinallcountries.Formore
informationonservicesthatareavailablewhileroaming,visitsprint.com/sww.
Make Calls Using Plus (+) Code Dialing
PlacingcallsfromonecountrytoanothercountryissimplewiththePlus(+)CodeDialingfeature.
Whenplacinginternationalcalls,youcanusePlusCodeDialingtoentertheappropriate
internationalaccesscodeforyourlocation(forexample,011forinternationalcallsplacedfromthe
UnitedStates).
Note:PlusCodeDialingisonlyavailablewhenroaminginternationallyonGSMnetworksandon
certainCDMAnetworksintheUnitedStates,Canada,andtheCaribbean.
Note:Internationalaccesscodesanddialinginformationareavailableonlineatsprint.com/sww.
TousePlusCodeDialingtoplaceaninternationalcall:
1. Tap >Phone >Dial tabtodisplaythephonescreen.
2. IfyouareontheGSMnetwork,touchandhold toinserta“+”onthephonedialscreen.
(The“+”symbolautomaticallyinsertstheinternationalaccesscodeforthecountryfromwhich
youarecalling.)
3. IfyouareontheCDMAnetworkoutsideCanadaortheCaribbean,entertheinternational
accesscodeforthecountryfromwhichyouarecalling.
4. Tap toinserttheUScountrycode,andthenentertheareacodeandnumber.
5. Tap toplacethecall.
Sprint International Voicemail Service
YourSprintvoicemailwillfollowyouasyoutravel.Allofyourunansweredcallswillbeforwardedto
yourSprintvoicemail.Youwillneedtobesureyourvoicemailboxisalreadysetupandthatyou
knowyourvoicemailpasscode.
Note:Sprintvoicemailmaynotbeavailableonallnetworks;checksprint.com/swwforservice
information.
International Voicemail Troubleshooting
ThereareafewtipstokeepinmindwhenusingSprintvoicemailwhiletraveling.

Making Connections Global Services 93
nSomecarriersmaynotsupportvoicemailindicators.Itmaybenecessarytocallyourvoicemailto
seeifyouhaveanynewmessages.
nIfyouhearthemessage“Pleaseenterthenumberofthesubscriberyouwishtocall,”enteryour
10-digitwirelessphonenumber.
Set Up Your Voicemail Access Number for International
Use
TosimplifyaccessingyourSprintvoicemailwhiletraveling,youcansetupyourvoicemailaccess
numberasaContactsentry.Thiswillmakeitfasterandeasiertoaccessyourmessageswhile
roaminginternationally.
1. Tap >Contacts .
2. Tap toaddacontact.
3. Typethecontactinformation(forexample,“MyVoicemail”).
4. Touchandhold andthentap (+1),yourareacode,andyourwirelessphonenumber.
5. TapSAVE.
Yourvoicemailaccessnumberissavedasacontact.
Access Your Voicemail Internationally
Youwillneedtocallyourvoicemailnumbertoaccessyourvoicemailwhileroaminginternationally.
New Message Indicators
Yourvoicemailmessageindicatorsmaybedisplayeddifferentlywhenroaminginternationally.
nA“MessageWaiting”indicatoriconoratextmessageisdisplayedwhenavoicemailmessageis
received.
nYoumaysee“MissedCall”onyourscreenpriortoreceivingamessagenotification.
nYoumustcallvoicemailinordertoretrievemessages.Followtheinstructionsontheprevious
pagetostoreyourvoicemailnumberforeasyaccess.
Retrieve Voicemail Messages
ThevoicemailretrievalprocesswhiletravelingisthesameasontheSprintNetwork;however,you
willberequiredtoenteryourvoicemailpasscode.
Toretrieveyourvoicemailmessages:

Making Connections Global Services 94
1. Tap >Contacts .
2. Tapthevoicemailentryandthentapthenumbertocallit.
Yourphonedialsyourvoicemailnumber.
3. Whenyourvoicemailanswers,tap ,enterthepasscode,andthentap toaccessyour
voicemail.
Yourvoicemailboxisaccessed.
International Data Roaming
SprintWorldwideWirelessServicecanalsokeepyouconnectedviaemailandWebbrowsingwhen
travelingincountriesinwhichSprintoffersdataservice.
DataservicesareavailableonbothCDMAandGSM/UMTSnetworks.Checksprint.com/traveltips
andsprint.com/swwtodeterminetheservicesavailablewhereyouaretraveling.
Note:PriortousingyourSprintWorldwideGSM/UMTSDataServices,youmustestablishand
utilizeyourCDMAdataservicesdomesticallyontheSprintNetwork.
Get Started With Sprint Worldwide Data Services
TouseSprintWorldwideDataServices,youwillneedtohavetheseservicesactivatedonyour
account.
nToactivate,callSprintWorldwideCustomerSupportat1-888-226-7212.Representativesare
available24hoursaday,7daysaweektoassistyou.
Access Email and Data Services Internationally
ToaccessyouremailandbrowsetheWebwhentraveling,youmayneedtomanuallyselectthe
carrierthatprovidesSprintserviceinyourlocation.Youcanfindalistofcarriersforeachcountry
whereGSMdataserviceisofferedatsprint.com/sww.Then,followtheinstructionsbelowtoselect
theappropriatecarriernetworkonyourphone.
Access International Data Services on GSM/UMTS Networks
ToselectaGSMdataservicecarrierforaspecificcountry:
1. Tap >Tools >Settings >Networkstab>More>Mobile networks.
2. TapNetworkmode>GSM/UMTS.
DataroamingonGSM/UMTSnetworksisset.

Making Connections Global Services 95
Access Email and Data Services Internationally on CDMA Networks
IfdataserviceisavailableonaninternationalCDMAnetwork,thenyouonlyneedtosetthephoneto
CDMA;youwillnotneedtoselectthespecificcarrier.Selectingaspecificcarrierisonlynecessary
forprovidersontheGSMnetwork.IfyourphonehasautomaticallyselectedaGSMnetworkwhile
traveling,thenyouwillneedtosetthephonetoCDMAtoaccessCDMAdataservices.(SeeEnable
GlobalRoamingMode.)Visitsprint.com/swwforalistofservicesavailableineachcountry.
Contact Sprint for Assistance with International
Service
IfyouexperienceanyissueswithvoiceordataserviceswhileoutsideoftheUnitedStates,Sprint
offerscustomersupport24hoursaday.Intheeventthatyoudoexperienceanissue,trythe
followingactions:
nFirsttrypoweringyourphoneoffandthenbackon;thiswillforceyourphonetoreregisterwith
thenetwork.
nTrymanuallyselectinganothernetwork.Informationforselectingnetworkscanbefoundinthe
phoneguide.
Ifneitheroftheseactionsresolvesyourissue,youwillneedtocontactcustomerservice(seebelow).
Whencallingtoreportanissue,thefollowinginformationwillbebeneficialintryingtoresolveyour
issueasquicklyaspossible:
nYourwirelessphonenumber.
nThecityandcountryyouaretravelingin.
nAnyerrormessagethatdisplaysonyourphoneorthatyouheardwhentryingtoplaceacall.
nIftheissueiswithdata,wereyouabletoplacevoicecalls?
nIftheissueiswithvoiceservice,wereyouabletoaccessdata?
Please call the numbers below if you need assistance:
WhileintheUnitedStates:Call1-888-226-7212.
WhiletravelingoutsidetheUnitedStates:
nInGSMmode:touchandhold andthendial1-817-698-4199.
nInCDMAmode:enterthecountrycodeandthendial1-817-698-4199.
Thereisnochargeforthiscallfromyourwirelessphone.

Making Connections Global Services 96
From a landline phone when outside the United States:
SprintWorldwideCustomerSupportcanbereachedfromalandlinephoneat1-817-698-4199.
Accessorconnectionfeesmayapply.Thetollfreenumbersbelowcanalsobeusedtocontact
SprintWorldwideCustomerSupportinthefollowingcountries:
Country From Landline Phone
Caribbean (Anguilla,
Barbados, Cayman Islands,
and Dominica)
1-888-226-7212
France 0800-903200
Germany 0800-180-0951
Italy 800-787-986
Mexico 001-877-294-9003
Trinidad and Tobago 1-800-201-7545
United Kingdom 0808-234-6616
Note:Thistollfreeserviceisavailableonordinarylandlinephonesandsomepublicpayphones.
Thisservicedoesnotcoveranyhotelaccesscharges.
Making Connections Connectivity 97
Connectivity
Thefollowingtopicsaddressyourphone’sconnectivityoptions,includingUSBfiletransferand
tethering,Wi-Fi,Bluetooth,IRconnectivity,andmore.
Transfer Files Between Your Phone and a
Computer
YoucanusethesuppliedUSBcabletoconnectyourphonedirectlytoyourcomputerandtransfer
music,pictures,andothercontentfiles.
Forexample,ifyouhaveamusicalbumstoredonyourcomputerthatyouwanttolistentoonyour
phonewithanyofthemusicapps,justattachyourphonetothecomputerandcopythefilestothe
musicfolder.
File Transfer Tips
nIfyouwanttosavedatatoamicroSDcardonyourphone,makesurethemicroSDcardis
installedandactive.SeemicroSDCard.
nAvoidremovingthebatteryormicroSDcardwhiletransferringdata.
nDataexchangemayusethemethodsoutlinedinthefollowingtable:
Method Description
File transfer TransferfilesbetweenyourphoneandPCsuchaspictures,videos,and
music.
Photo transfer TransferimagefilesbetweenyourphoneandPC.
Transfer Files Between the Phone and a Computer
1. ConnectyourphonetoyourcomputerusingthesuppliedUSB/chargingcable.
lInsertthelargerendofthecableintothecharger/accessoryportatthebottomofthephone.
lInserttheUSBendofthecableintoanavailableUSBportonyourcomputer.Youmayneed
toremovetheUSBcablefromthechargingadaptertoaccessit.
2. When appearsinthenotificationsarea,dragtheStatusbardowntodisplaytheNotifications
window.
3. YouwillseeeitherUSB PC connectionasFiletransferorPhototransfer.
Thefilesonyourphonecannowbeaccessedviayourcomputer.
lFormosttransfers,you'llwanttouseFile transfer.
Making Connections Connectivity 98
lTochangetheoption,tapitintheNotificationswindowtoopenthestoragesettings,and
thentapthedesiredoptionfromtheUSBPCconnectionwindow.
4. Onyourcomputer,navigatetothedetecteddevice(suchasthroughtheMyComputermenu)
andopenit.
5. Ifavailable,selectadrive(SD cardformicroSDcardorInternal storageforinternalphone
storage).
6. Selectafolder(forexample,Musicforsongsandalbums)andcopyfilestoitfromyour
computer.
7. Whenyouaredone,disconnectyourphonefromyourcomputer.
ThetransferredfilesarenowsavedtoyourphoneormicroSDcard.
Wi-Fi
Touseyourphone’sWi-Fi,youneedaccesstoawirelessaccesspointor“hotspot.”
TheavailabilityandrangeoftheWi-Fisignaldependsonanumberoffactors,including
infrastructureandotherobjectsthroughwhichthesignalpasses.
Turn Wi-Fi On and Connect to a Wireless Network
UsetheWireless&networkssettingmenutoenableyourphone’sWi-Firadioandconnecttoan
availableWi-Finetwork.
1. Tap >Tools >Settings >Networkstab.
2. TapWi-Fi.
3. TaptheWi-Fiswitch toturnWi-Fion.
Youwillseethenamesandsecuritysettingsofin-rangeWi-Finetworks.
lTodisableWi-Fi,taptheswitch again.
4. TapaWi-Finetworktoconnect,enterthepassword(ifit’snotanopennetwork),andthentap
CONNECT.
YourphoneisconnectedtotheWi-Finetwork.Youwillsee( )inthestatusbar.
lThepassword,forahouseholdwirelessLANrouter,issometimesfoundonastickeronthe
router(WEP,WPA,KEY,etc.).Contacttheroutermanufacturerforinformation.For
passwordforapublicwirelessLAN,checkwithuser'sserviceprovider.
lEnteringapasswordisnotrequiredifanaccesspointisnotsecurityprotected.
Making Connections Connectivity 99
Note:Thenexttimeyourphoneconnectstoapreviouslyaccessedsecuredwirelessnetwork,you
willnotbepromptedtoenterthepasswordagain,unlessyouresetyourphonetoitsfactorydefault
settingsoryouinstructthephonetoforgetthenetwork.
Note:Wi-Finetworksareself-discoverable,whichmeansnoadditionalstepsarerequiredforyour
phonetoconnecttoaWi-Finetwork.Itmaybenecessarytoprovideausernameandpasswordfor
certainclosedwirelessnetworks.
Configure Wi-Fi Settings
UsetheWi-FisettingsmenutomanuallysetyourWi-Ficonnectionoptions.
1. Tap >Tools >Settings >Networkstab.
2. TapWi-Fi.
3. TaptheWi-Fiswitch toturnWi-Fion.
Youwillseethenamesandsecuritysettingsofin-rangeWi-Finetworks.
lTodisableWi-Fi,taptheswitch again.
4. Tap >Advanced Wi-Fi.
5. ConfigureyourWi-Fisettings.
Disconnect Wi-Fi
YoumaywishtodisconnectfromaconnectedWi-FinetworkwithoutturningWi-Fioff.
1. Tap >Tools >Settings >Networkstab.
2. TapWi-Fi.
3. TapthenameoftheconnectedaccesspointandthentapFORGET.
lAfterdisconnectingfromanaccesspoint,youmayneedtore-enterthepasswordto
reconnect.
Wi-Fi Direct
UseWi-FiDirecttoconnectdirectlytootherWi-FiDirectdevicessimplyviaWi-Fi,withoutanaccess
pointortheInternet.
1. Tap >Tools >Settings >Networkstab.
2. TapWi-Fi.
3. TaptheWi-Fiswitch toturnWi-Fion.
Making Connections Connectivity 100
Youwillseethenamesandsecuritysettingsofin-rangeWi-Finetworks.
4. Tap >Advanced Wi-Fi>Wi-Fi Direct.
5. Tapadevicewithwhichtoconnect.
lIfconnectedviaWi-Fi,youwillseeaconfirmation.Followtheonscreeninstructions.
6. Accepttheconnectionontheotherdevice.
lIfaconnectionisnotacceptedafteracertainperiod,theconnectionrequestiscancelled.
lTostopaconnection,tapthedevice>OK.
Tethering
UseTetheringtoshareyourdevice’sInternetconnectionwithacomputerthatconnectstoyour
deviceviaUSBtethering,Wi-FihotspotorbyBluetooth.
1. Tap >Tools >Settings >Networks tab>Tethering.
2. Selectatetheringoption:USB tethering,Wi-Fi hotspotorBluetooth tethering.
lUSB tethering:AllowsotherdevicestoconnecttoyourphoneviaUSBcable.
lWi-Fi hotspot:AllowsotherdevicestoconnecttoyourphoneviaWi-Fi.
lBluetooth tethering:PairyourphonewiththeotherdeviceviaBluetooth.
Tip:Foradditionalsupportwithtethering,tapHelpfromthetetheringmenu.
Hotspot
Wi-FiHotspotallowsyoutoturnyourphoneintoaWi-Fihotspot.Whenthisfeatureisturnedon,you
canshareyourphone'smobiledataservicesviaWi-FiwithotherWi-Fienableddevices.Thefeature
worksbestwhenusedinconjunctionwith4Gdataservices(although3Gservicecanalsobeused).
Important:UseoftheHotspotfeaturerequiresanadditionalsubscription.Signontoyouraccount
atsprint.com/mysprintoraccessyouraccountviaSprintZone(Tap >Sprint Zone )tolearn
more.
Note:TurningonHotspotwilldisableyourphone'sconnectiontootherWi-Finetworks.
Set Up Wi-Fi Hotspot
1. Tap >Tools >Settings >Networkstab.
2. TapTethering>Wi-Fi hotspot.
Making Connections Connectivity 101
3. TaptheWi-Fi hotspotswitch toturnWi-Fihotspoton.
Wi-Fihotspotisenabled.
lTodisableWi-Fihotspot,taptheswitch again.
Note:Thebestwaytokeepusingthephoneasahotspotistohaveitconnectedtoapowersupply.
Important:Writedownthepasskey(password)forthiscommunication(shownonscreen).
Connect to Wi-Fi Hotspot
1. EnableWi-Fi(wireless)functionalityonyourtargetdevice(laptop,mediadevice,etc.).
2. ScanforWi-Finetworksfromthedeviceandselectyourphonehotspotfromthenetworklist.
3. Selectthisphoneandfollowyouronscreeninstructionstoenterthepasskey(providedonthe
Wi-FiHotspotpage).
4. LaunchyourWebbrowsertoconfirmyouhaveanInternetconnection.
Bluetooth
Bluetooth®isashort-rangecommunicationstechnologythatallowsyoutoconnectwirelesslytoa
numberofBluetoothdevices,suchasheadsetsandhands-freecarkits,andBluetooth-enabled
handhelds,computers,printers,andwirelessphones.TheBluetoothcommunicationrangeis
usuallyapproximately30feet.
Bluetooth Function Cautions
Informationmaynotappearcorrectlyonconnecteddevicesdependingonthetransferreddata.
Bluetooth Information
BluetoothisatechnologythatenableswirelessconnectionwithPCs,Bluetoothdeviceswithhands-
freefeatures,etc.
Function Description
Audio output Listentomusicwirelessly.
Hands-free calls Callhands-free,usingBluetooth-capablehands-freedevicesandheadsets.
Data exchange ExchangedatawithBluetoothdevices.
Enable the Bluetooth Feature
Usethesettingsmenutoenableordisableyourphone’sBluetoothcapabilities.
nWirelessconnectiontoallBluetoothfunctionsisnotguaranteedforthephone.
nThephonemaynotconnectproperlydependingontheotherdevice.
Making Connections Connectivity 102
nNoisemaybeexperiencedwithwirelesscallsandhands-freecallsdependingontheconditions.
ToenableBluetooth:
1. Tap >Tools >Settings >Networkstab.
2. TapBluetooth.
3. TaptheBluetoothswitch toturnBluetoothon.
lTodisableBluetooth,taptheswitch again.
Tip:YoucanalsoturnBluetoothonoroffwiththetogglemenuintheNotificationswindow.Dragthe
statusbardowntodisplaytheNotificationswindowandthentapBluetoothtoturnBluetoothonor
off.
Note:TurnoffBluetoothwhennotinusetoconservebatterypower,orinplaceswhereusinga
wirelessphoneisprohibited,suchasaboardanaircraftandinhospitals.
Pair Bluetooth Devices
SearchforandpairnearbyBluetoothdevices.RegisteredBluetoothdevicescanbeconnected
simply.
nEnabletheBluetoothfunctionontheBluetoothdevicesbeingpairedbeforehand.
TopairBluetoothdevices:
1. Tap >Tools >Settings >Networkstab.
2. TapBluetooth.
lNearbydevicesappearinthe“AVAILABLEDEVICES”list.
lIfatargetdeviceisnotdetected,tapSEARCHtosearchagain.
3. Tapadevicefromthe“AVAILABLEDEVICES”list,andfollowtheonscreeninstructionstopair
withthedevice.
lMethodstoacceptaBluetoothconnectiondifferdependingonthedevicesused.
Unpairing from a Paired Device
1. FromtheBluetoothsettingsmenu,tapSettings nexttothepaireddeviceyouwishtounpair.
2. TapUnpair.
Thedeviceisunpairedfromyourphone.Tomakeanotherconnectionwiththedevice,youwill
needtopairagain.
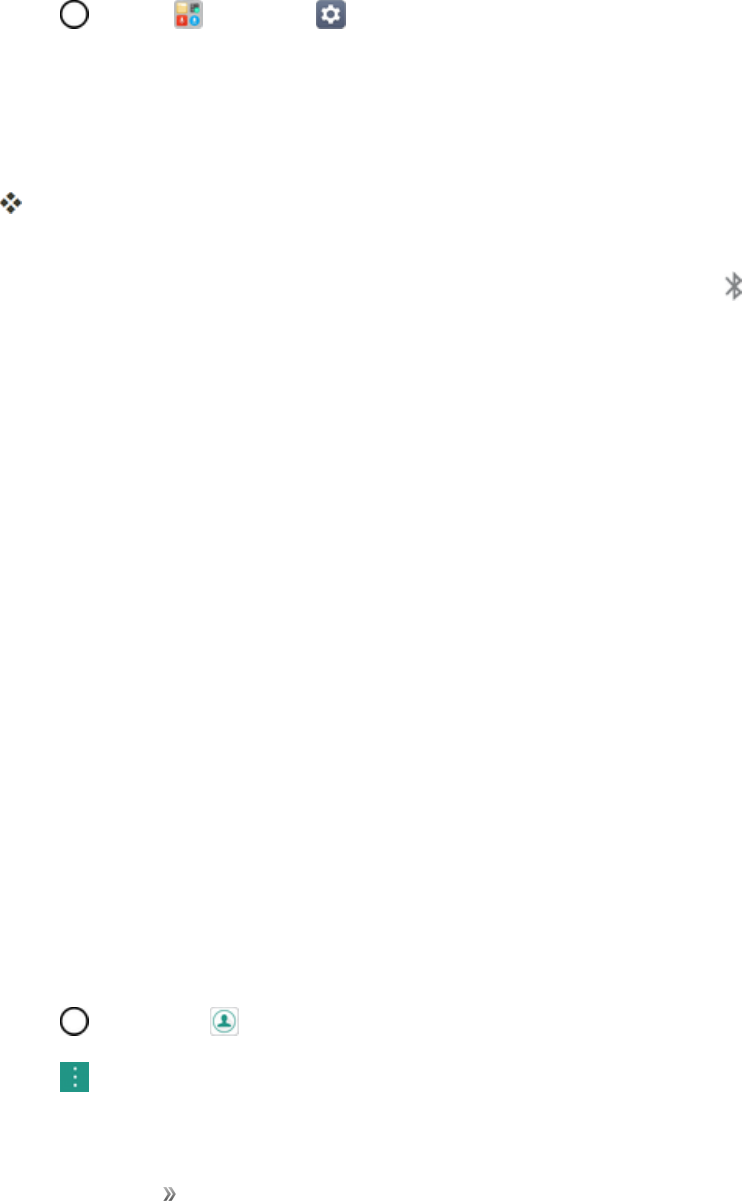
Making Connections Connectivity 103
Connect to a Paired Bluetooth Device
YoucanlistentomusicoveraBluetoothstereoheadset,orhavehands-freeconversationsusinga
compatibleBluetoothheadsetorcarkit.It’sthesameproceduretosetupstereoaudioandhands-
freedevices.
1. Tap >Tools >Settings >Networkstab.
2. TapBluetooth.
lPairedBluetoothdevicesappearinthe“PAIREDDEVICES”list.
3. Tapadevicefromthe“PAIREDDEVICES”list.
Yourphoneconnectstothepaireddevice.
Thepairingandconnectionstatusisdisplayedbelowthedevice’snameintheBluetoothdevices
section.Whenthedeviceisconnectedtoyourphone,theBluetoothpairedicon isdisplayedinthe
statusbar.Dependingonthetypeofdeviceyouhaveconnected,youcanthenstartusingthe
headsetorcarkittolistentomusicormakeandreceivephonecalls.
Note:DuetodifferentspecificationsandfeaturesofotherBluetooth-compatibledevices,display
andoperationsmaybedifferent,andfunctionssuchastransferorexchangemaynotbepossible
withallBluetooth-compatibledevices.
Send Information Using Bluetooth
YoucanuseBluetoothtotransferinformationbetweenyourphoneandanotherBluetooth-enabled
devicesuchasaphoneorcomputer.
Types of Data You Can Send via Bluetooth
Youcansendthefollowingtypesofinformation,dependingonthedeviceyouaresendingto:
nImagesandvideos
nCalendarevents
nContacts
nAudiofiles
Intheinstructionsbelow,Contactsdataisbeingusedasanexample.
Sending Contacts Data via Bluetooth
1. Tap >Contacts .
2. Tap >Share.

Making Connections Connectivity 104
3. Tapthecontact(s)youwanttosendandthentapSHARE>Bluetooth.
4. Tapapaireddevicetoreceivethedata.
Thecontactinformationissent.
lIfyouseeamessagetoconfirm,followtheonscreeninstructions.
Receive Information via Bluetooth
YourphoneiscapableofreceivingawidevarietyoffiletypeswithBluetooth,includingpictures,
musictracks,anddocumentssuchasPDFs.
1. WhenanotherdeviceattemptstosendafiletoyourphoneviaBluetooth,youwillseearequest
toacceptthefile.
2. TapACCEPT.
Thefileissenttoyourphone.
lWhenyourphonereceivesafile,youwillseeanotification.Toopenthefileimmediately,
dragthestatusbardowntodisplaytheNotificationswindow,andthentapthenotification.
lWhenyouopenareceivedfile,whathappensnextdependsonthefiletype:
oMediafilesanddocumentsareusuallyopeneddirectlyinacompatibleapplication.For
example,ifyouopenamusictrack,itstartsplayinginthedefaultmusicapplication.
oForavCalendarfile,selectthewhereyouwanttosavetheevent,andthentapSAVE
TO CALENDAR.ThevCalendarisaddedtoyourCalendarevents.
oForavCardcontactfile,iftherearemultiplevCardfilesonyourstoragecard,youcan
choosetoimportone,several,orallofthosecontactstoyourcontactslist.
Content Sharing
Shareyourdevice’sdatatootherdevicesviavariousmethods.
Playing Content
Youcanplayphotos,videosormusicsavedonthedevicefromaTV.
1. ConnecttheTVanddevicetothesameWi-Finetwork.
2. ExecuteafilefromtheGalleryandtapPlay onother device.
3. SelecttheTV.
Note:TouseChromecast,updateGooglePlaytothelatestversion.
Making Connections Connectivity 105
Sending or Receiving Files
YoucansendorreceivefilessavedonyourdevicetoanotherLGdeviceortablet.
nTap >Tools >Settings >Networkstab>Share & connect>File sharing>
SmartShare Beamandswipe toactivateit.
Note:Makesurethatyourdeviceisconnectedtothesamewirelessnetworkasthefiletransfer
targetdevice.
Note:MakesurethatFile sharingisturnedoninthenotificationpanelofboththedeviceandthe
targetdevice.
Sending Files to Another Device
1. Selectafileandtap >SmartShare Beam.Youcanalsosharemultiplefilesatonceby
tapping fromthefilelist,selectingthedesiredfiles,thentappingSHARE>SmartShare
Beam.
lWhenthesearchpermitconfirmationwindowappears,tapOK.
2. SelectadevicefromthelistofnearbydevicesthatsupportSmartShareBeam.
lThefileissenttothedevice.
Using Nearby Devices
Youcanplaymultimediafilessavedonaconnecteddevicefromyourdevice.
1. FromtheGallery,select >Nearby devices.
2. Selectadevicefromthedevicelist.
lIfthedesireddeviceisnotseenonthedevicelist,checkthatDLNAisturnedon,thentap
Search nearby devices.
3. Playcontentsavedontheselecteddevice.

Apps and Entertainment 106
Apps and Entertainment
Thetopicsinthissectionwillexplorethefeaturesthatmakeyourphonesomuchmorethanaphone,
fromthecameraandproductivityappstomusic,entertainment,andmore.
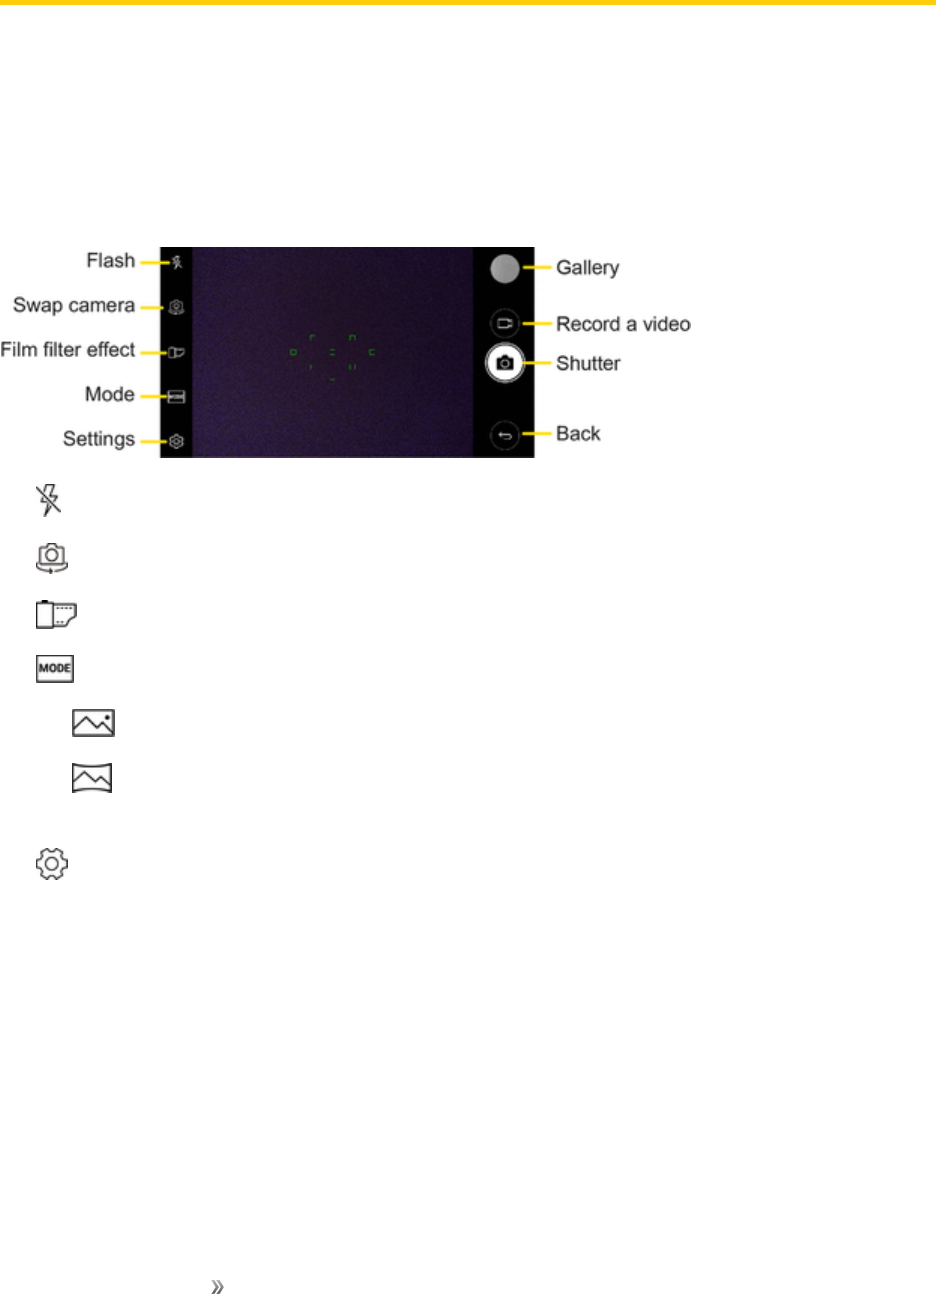
Apps and Entertainment Camera and Video 107
Camera and Video
Youcanusethecameraorcamcordertotakeandsharepicturesandvideos.Yourphonecomes
witha13megapixelcamerathatletsyoucapturesharppicturesandvideosanda5megapixelfront
camera.
Camera Overview
Thecamera'sviewfinderscreenletsyouviewyoursubjectandaccesscameracontrolsandoptions.
nFlashtoturntheflashOn, OfforsetittoAuto.
nSwap cameratoswapbetweentherearcameralensandthefrontcameralens.
nFilm filter effecttoadddiversefilmfiltereffect.
n Mode toselectthemodefrom:Auto,Panorama.
lAuto:Defaultsetting,automaticallyfocusesonasubject.
lPanorama:Createsawidephotoofapanoramicview.Holdthephonehorizontally,
presstheshutteroncetostartandslowlysweepthecameraacrossthescene.
nSettingstoadjustthefollowingcameraandvideosettings.
Note:Availableoptionsvarydependingontheselectedcamera(frontorrearcamera)andthe
selectedcameramode.
lPhoto size:Selectvaluesforaspectratioandsizefortakingphotos.
lVideo resolution:SelectbetweenFHDandHD.
lHDR:Obtainphotosorvideosinvividcolors,andgetcompensatedeffectsevenwhenthey
aretakenagainstthelight.Thesefunctionsareprovidedbythehighdynamicrange(HDR)
technologyequippedinthecameraofthedevice.
lTimer:Setthetimertoautomaticallytakephotosafteraspecifiedperiodoftime.

Apps and Entertainment Camera and Video 108
lCheese shutter:Takephotoswithvoicecommands.
lSteady recording:ActivatetheSteadyrecordingforastablevideoimage.
lTag locations:SavetheimagewithGPSlocationdata.
lGrid:Displayguidegridstosothatyoucantakephotosorrecordvideosbasedonthe
horizontalandverticalreferencelines.
lStorage:SelectifyouwanttostorethepicturesandvideosintheInternalstorageorSD
card.(Availablewhenthememorycardisinserted.)
lSimple view:Hideallmenusfromthecamerascreen.
lHelp:Providehelpinformationforeachcameramenu.
Additional Options on the Front Camera
nSelfie shot:Customizetheselfieshotsettings.
lGesture shot:TakeaphotousingtheGestureshotfeature.
lAuto shot:Takeaphotowhenthecameradetectsaface.
nGesture view:Checkyourselfieafteryoutakeitbybringingyourphonecloser.
nSave as flipped:Saveasflippedimagesaftertakingselfies.
Learn More About Your Phone's Camera
Foranoverviewofyourphone'scameraanditsfeatures,youcanaccessmoreinformationthrough
thephone'ssettingsmenu.
1. Tap >Camera .
Thecameraviewfinderappears.
2. Tap >Help,andscrollthroughthetopicstolearnmore.
Take Pictures and Record Videos
Youcantakehigh-resolutionpicturesusingyourphone’scamera.
Note:IfyouhaveanSDcardinstalled,picturesandvideoscanbestoredtotheSDcard.Ifnocardis
installed,picturesandvideosaresavedtoyourphone’smemory.
Capturing Pictures/Videos
nFile Format for Pictures:FileformatforpicturesisJPEG.
nFile Format for Videos:FileformatforvideosisMPEG4.

Apps and Entertainment Camera and Video 109
Camera Cautions
If the Lens Becomes Dirty:Fingerprints/smudgesonthelenspreventthecapturingofclear
stillimages/videos.Wipethelenswithasoftclothbeforehand.
Avoid Exposure to Direct Sunlight:Becarefulnottoexposethelenstodirectsunlightfor
longperiods.Itmaydiscolorthecolorfilterandaffectimagecolors.
Flash Warning
Donotshinetheflashclosetoyoureyes.Donotlookdirectlyattheflashwhenshiningit.Donot
shinetheflashatotherpeople'seyesasitmayaffecteyesight,etc.
Take Pictures
Youcantakehigh-resolutionpicturesusingyourphone’scamera.
1. Tap >Camera .
2. Frameyoursubjectonthescreen.
3. Tap .YourpicturewillbeautomaticallysavedtotheGallery.
Note:Whenthescreenisturnedofforlocked,startthecamerabypressingtheVolume Down (-)
keytwice.Tousethis,makesurethefeatureisturnedoninSettings.
Tap >Tools >Settings >Generaltab>Shortcut keysandturnontheOpen
Capture+/Camerafeature.
Record Videos
Recordhigh-qualityvideosusingyourphone’svideocamera.
1. Tap >Camera .
2. Frameyoursubjectonthescreen.
3. Tap tostartrecordingthevideo.
4. Thelengthoftherecordingisdisplayedonthescreen.
Note:Tap totakepictureswhilerecordingvideo.
5. Tap topauserecordingvideo.Youcanresumerecordingagaintapping .
6. Tap tostoprecording.YourvideowillbeautomaticallysavedtotheGallery.
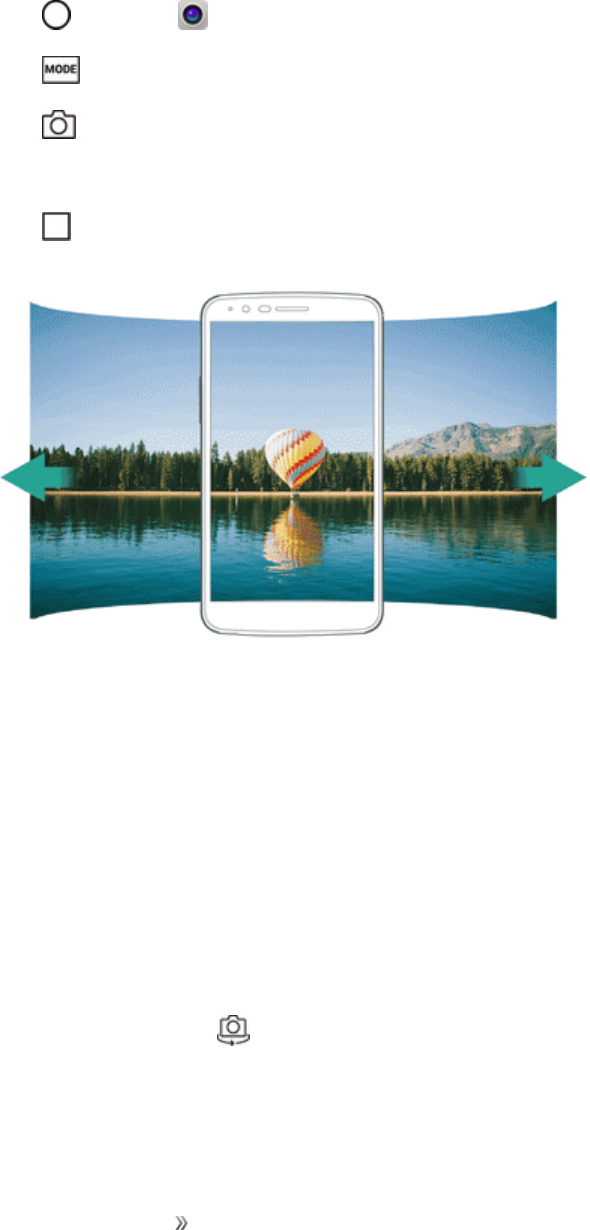
Apps and Entertainment Camera and Video 110
Take Panoramic Photos
Youcancreateapanoramicphotobymovingthecamerainonedirectiontophotographandstitch
continuousshotsofawideview.
1. Tap >Camera .
2. Tap >Panorama.
3. Tap andthenslowlymovethecamerainonedirection.
lMovethedevicebyfollowingthedirectionofthearrowintheguideline.
4. Tap tostopcapturingthepanoramic.
Zoom In or Out
Youcanusezoominoroutonthecamerascreenwhiletakingaphotoorrecordingavideo.
nOnthecamerascreen,pinchorspreadtwofingerstozoominorout,thenusethedisplayed+/-
slidebar.
Note:Thezoomfeatureisnotavailablewhenusingthefrontcamera.
Switching between Cameras
Youcanswitchbetweenthefrontandrearcamerastosuityourenvironment.
Onthecamerascreen,tap ordragthescreeninanydirectiontoswitchbetweenthefrontand
rearcameras.
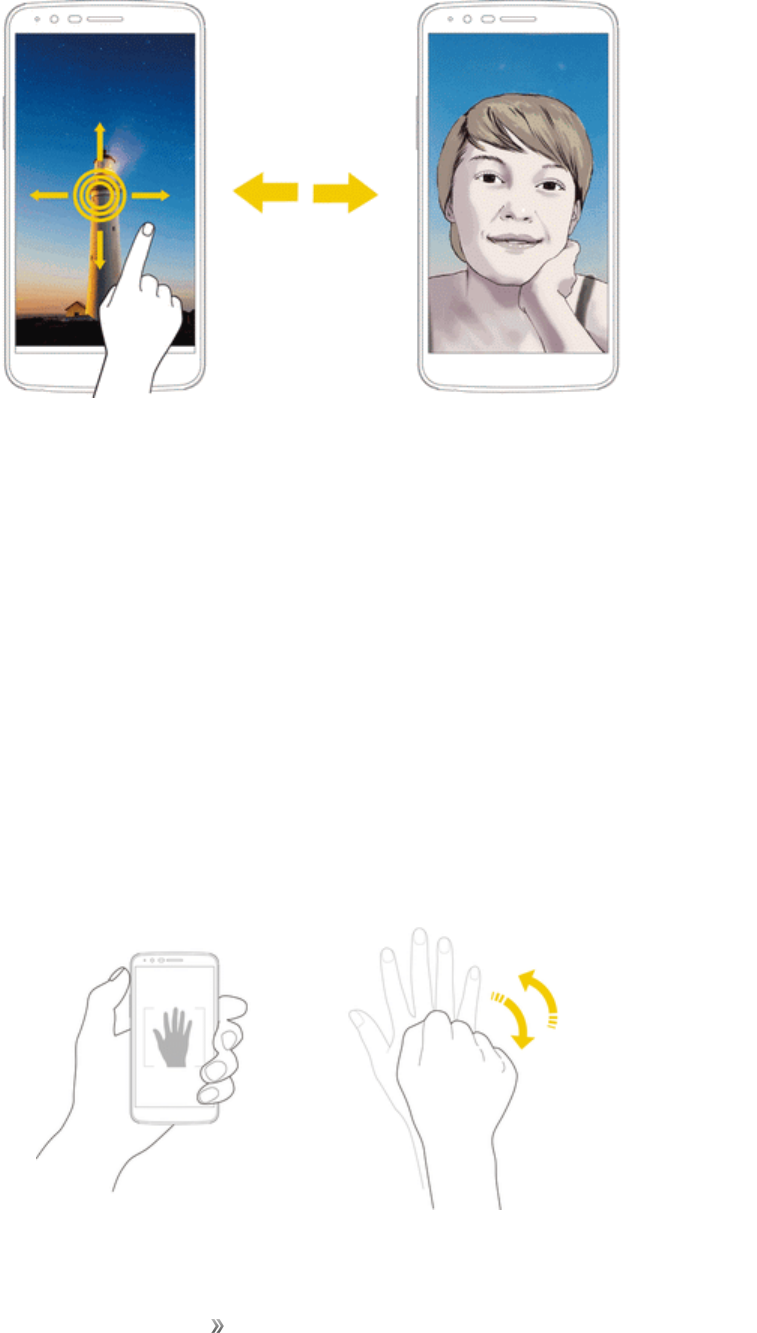
Apps and Entertainment Camera and Video 111
Note:Usethefrontcameratotakeselfies.SeeSelfieShotfordetails.
Selfie Shot
Youcanusethefrontcameratoviewyourfaceonthescreenandtakeselfies.
Using the Power/Lock Button
SimplyplaceyourfingeronthePower/LockButtonwhenthefrontcameraison.
Gesture Shot
Youcantakeselfiesbyusinggestures.
Showyourpalmtothefrontcameraandthenclenchyourfist.Youcanalsoclenchyourfistandthen
openittowardsthefrontcamera.
nInthreeseconds,aphotoistaken.
Note:Tousethisfunction,makesurethatGesture shotisselectedundercameraSettings.
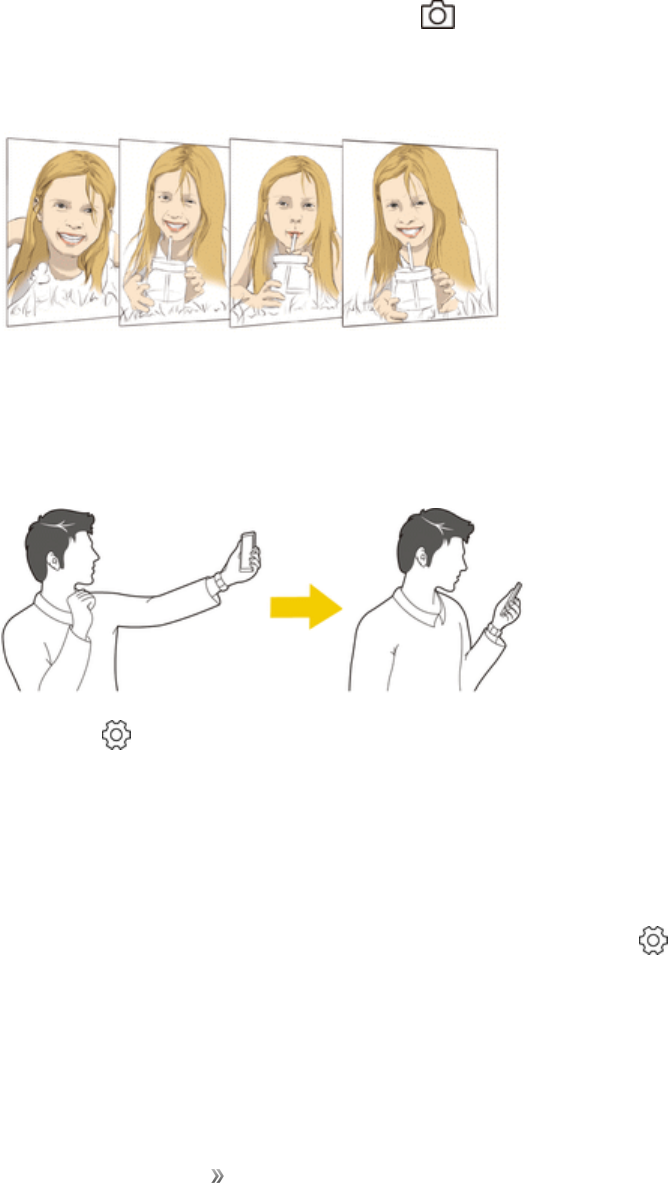
Apps and Entertainment Camera and Video 112
Note:Makesurethatyourpalmandfistarewithinthereferencelinesothatthecameracandetect
them.
Interval Shot
Youcantakeselfiesataninterval.
Whileusingthefrontcamera,touchandhold .Youcanalsoshowyourpalmtothecamera,then
clenchyourfisttwicequickly.
nFourphotosaretakenatabouttwosecondsintervalafteratimerdelayofthreeseconds.
Gesture View
Aftertakingaselfiewiththefrontcamera,youcanpreviewtheselfieimmediatelybyplacingthe
screenclosetoyourface.
Note:Tap >Gesture viewtoenabletheGestureviewfeature.
Note:Onlyonepreviewisavailableeachtimeaphotoistaken.
Note:Ifyourotatethedevicewhileinpreviewscreen,thescreenswitchestocameramode.
Save as Flipped Image
Beforetakingaphotoorrecordingavideowiththefrontcamera,tap >Save as flipped.The
imageisflippedhorizontally.

Apps and Entertainment Camera and Video 113
View Pictures and Videos Using Gallery
UsingtheGalleryapplication,youcanviewpicturesandwatchvideosthatyou’vetakenwithyour
phone’scamera,downloaded,orcopiedontoyourstoragecardorphonememory.
Forpicturesthatareonyourstoragecardorphonememory,youcandobasiceditingsuchas
rotatingandcropping.Youcanalsoeasilyassignapictureasyourcontactpictureorwallpaperand
sharepictureswithyourfriends.
View Pictures and Videos
Youcanaccessandviewallyourstoredpicturesandvideosfromyourphone’sGallery.
1. Tap >Gallery .
Thealbumlistopens.
2. Tapanalbum(suchasCamera).
Thelistofpicturesandvideosforthealbumopens.
lToselectanotheralbum,tapBack toreturntotheAlbumstab.
3. Tapanimagetoviewthepictureorvideo.
Thepictureopensorthevideobeginsplaying.
lTapapictureorvideotoviewitfullscreen.
lWhenviewingpicturesandvideos,youcantouchandholdanimagetoopenaselection
menuandchoosewhattodowiththepictureorvideo.
Pictures and Videos: Review Screen
Aftercapturingapictureorvideo,fromthecamerascreen,tapthethumbnailimageatthebottom
rightcornerofthescreentoseetheiteminthereviewscreen.Fromthere,youcanaccessoptions
suchassave,view,send,ordeletethepictureorvideo.
Pictures and Videos: Options while Viewing
nZoom In or Out on a Picture:Tapthescreentwiceorpinchthescreentozoominoroutona
picture.
nViewing Videos:Usetheonscreencontrolstoplay,pause,orstopthevideoplayback.
AfterselectinganalbumfromtheAlbumstab,youcanbrowsethroughthepicturesandvideosof
thatalbum.Tapapictureorvideotoviewitinfullscreen.Bydefault,thepicturesandvideosinan
albumaredisplayedingridview.
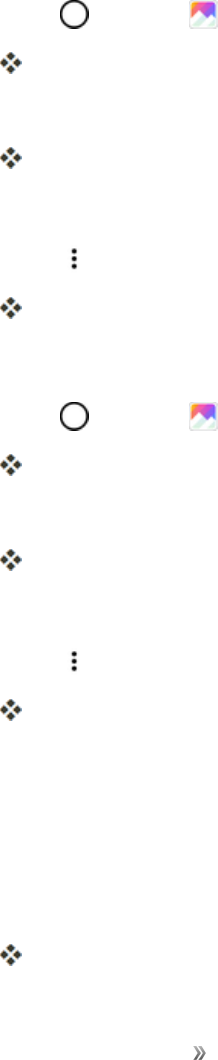
Apps and Entertainment Camera and Video 114
Note:Whenviewingpictures,youcantouchandholdonapictureorvideotoopenaselectionmenu
andchoosewhattodowiththepictureorvideo.
Edit Pictures
Whetheryou’rebrowsingpicturesinfilmstriporgridviewintheGalleryapplication,youcantouch
andholdonapicturetoopenaselectionmenuandchoosetodeletethepicture,rotateorcropit,and
more.
Rotate and Save a Picture
1. Tap >Gallery .
Thealbumlistopens.
2. Tapanalbum(suchasCamera).
Thelistofpicturesandvideosforthealbumopens.
3. Tapthepictureyouwanttorotate.
4. Tap >Rotate,thenselecteitherRotate leftorRotate right.
ThepictureisrotatedandsavedtothephoneorSDcard,dependingonyoursettings.
Crop a Picture
1. Tap >Gallery .
Thealbumlistopens.
2. Tapanalbum(suchasCamera).
Thelistofpicturesandvideosforthealbumopens.
3. Tapthepictureyouwanttocrop.
4. Tap >Crop.
Acropboxappearsonthepicture.
5. Toadjustthecropboxsize,touchandholdtheedgeofthebox.Whendirectionalarrowsappear,
dragyourfingerinwardtooroutwardtoresizethecropbox.
lTomovethecropboxtothepartofthepicturethatyouwanttocrop,dragthecropboxtothe
desiredsizeandposition.
6. TapOKtoapplythechangestothepicture.
Thecroppedpictureissavedinthealbumasacopy.Theoriginalpictureremainsunedited.
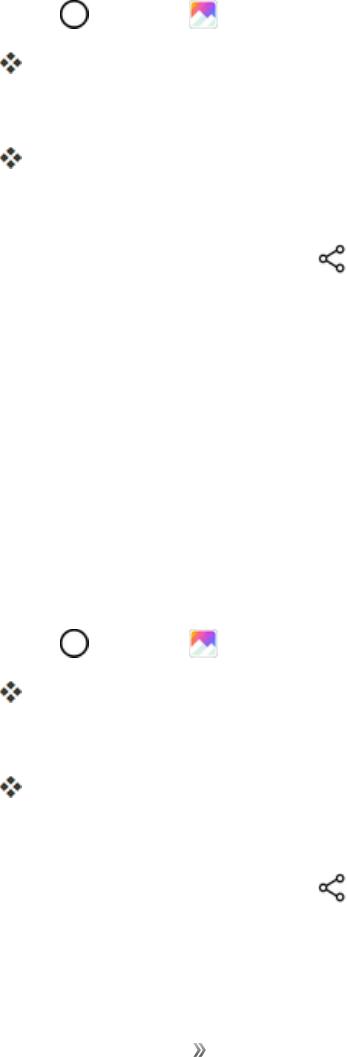
Apps and Entertainment Camera and Video 115
Share Pictures and Videos
TheGalleryapplicationletsyousendpicturesandvideosusingemailormultimediamessages.You
cansharepicturesonyoursocialnetworks(suchasFacebook,Flickr,andTwitter)andsharevideos
onYouTube.YoucanalsosendthemtoanotherphoneoryourcomputerusingBluetooth.
Send Pictures or Videos by Email
Youcansendseveralpictures,videos,orbothinanemailorGmailmessage.Theyareaddedasfile
attachmentsinyouremail.
1. Tap >Gallery .
Thealbumlistopens.
2. Tapanalbum(suchasCamera).
Thelistofpicturesandvideosforthealbumopens.
3. Tapthepictureorvideoyouwanttoshare.
lToselectmultipleitems,tap whileviewinganalbum.Thentapalltheitemsyouwantto
include.
4. TapSHAREandthenontheShareviamenu,tapGmail.
5. Followtheonscreenpromptstocompleteandsendthemessage.
FormoreinformationaboutusingGmail,seeCreateandSendaGmailMessage.
Send a Picture or Video by Multimedia Message
MultimediaMessaging(MMS)letsyousendpicturesandvideosusingyourphone’smessagingapp.
Althoughyoucansendseveralpicturesorvideosinamultimediamessage,itmaybebettertojust
sendoneatatime,especiallyifthefilesarelargeinsize.
1. Tap >Gallery .
Thealbumlistopens.
2. Tapanalbum(suchasCamera).
Thelistofpicturesandvideosforthealbumopens.
3. Tapthepictureorvideoyouwanttoshare.
lToselectmultipleitems,tap whileviewinganalbum.Thentapalltheitemsyouwantto
include.
Apps and Entertainment Camera and Video 116
4. TapSHAREandthenontheShareviamenu,tapMessaging.
5. Followtheonscreenpromptstocompleteandsendthemessage.
Formoreinformationaboutsendingmultimediamessages,seeSendaMultimediaMessage
(MMS).
Send Pictures or Videos Using Bluetooth
Youcanselectseveralpictures,videos,orbothandsendthemtosomeone’sphoneoryour
computerusingBluetooth.MakesurethatBluetoothison.
1. Tap >Gallery .
Thealbumlistopens.
2. Tapanalbum(suchasCamera).
Thelistofpicturesandvideosforthealbumopens.
3. Tapthepictureorvideoyouwanttoshare.
lToselectmultipleitems,tap whileviewinganalbum.Thentapalltheitemsyouwantto
include.
4. TapSHAREandthenontheShareviamenu,tapBluetooth.
5. Followtheonscreenpromptstocompleteandsendthefiles.
Formoreinformation,seeBluetooth.
Share Pictures or Videos via Additional Apps or Social
Media
FromGallery,youcanshareyourpicturesandvideosfromavarietyofappsandsocialmediasites,
suchasFacebook,Google+,Instagram,Flickr,andmore.Availableappswillvarydependingon
whatyouhaveinstalledonyourphone.
1. Tap >Gallery .
Thealbumlistopens.
2. Tapanalbum(suchasCamera).
Thelistofpicturesandvideosforthealbumopens.
3. Tapthepictureorvideoyouwanttoshare.

Apps and Entertainment Camera and Video 117
lToselectmultipleitems,tap whileviewinganalbum.Thentapalltheitemsyouwantto
include.
4. TapSHAREandthenontheShareviamenu,taptheappyouwanttouse.
5. Followthepromptstocompleteandpostorshareyourpicturesorvideos.
Theuploadiscompleted.
lForconfirmation,checkthestatusbarfortheuploadinformation.
Share Videos on YouTube
YoucanshareyourvideosbyuploadingthemtoYouTube™.Beforeyoudothis,youmustcreatea
YouTubeaccountandsignintothataccountonyourphone.
1. Tap >Gallery .
Thealbumlistopens.
2. Tapanalbum(suchasCamera).
Thelistofpicturesandvideosforthealbumopens.
3. Tapthevideoyouwanttoshare.
lToselectmultiplevideos,tap whileviewinganalbum.Thentapallthevideosyouwantto
include.
4. TapSHAREandthenontheShareviamenu,tapYouTube.
5. Enterthepromptedinformation,suchastitleanddescription,andselectaprivacyoption.
6. TapUpload .
Theuploadiscompleted.
Camera Settings
Youcanadjustyourcamera’ssettingsusingtheiconsonthemaincamerascreenandthefull
camerasettingsmenu.
Switch Cameras
Yourphoneletsyouusedifferenttypesofcamerasdependingonyoursettingsanddownloads.
1. Tap >Camera .
Thecameraviewfinderappears.

Apps and Entertainment Camera and Video 118
2. Tap .
Thecameraswitches.
Set Camera Functions
Youcanconfigureyourcamera’ssettingstofitanysituationandevent.
1. Tap >Camera .
Thecameraviewfinderappears.
2. Tap .
Thecamerasettingsmenuopens.
3. Selectyourdesiredsettings.
Thesettingsareapplied.
lItemsthatcanbesetdifferdependingonthecameratypeinuse.
Apps and Entertainment Productivity 119
Productivity
Thefollowingtopicsdetailmanyofyourphone’stoolsandfeaturessuchasthestyluspen,mapsand
navigation,calculator,clock,Capture+,QuickMemo+,andmore.
Google Calendar
UsetheCalendartocreateandmanageevents,meetings,andappointments.YourCalendarhelps
organizeyourtimeandremindsyouofimportantevents.Dependingonyoursynchronization
settings,yourphone’sCalendarstaysinsyncwithyourCalendarontheWeb,ExchangeActiveSync
calendar,GoogleCalendar,andOutlookcalendar.
InordertosyncwithyourGooglecalendar,youmustsignintoaGoogleaccountonyourphone.See
GoogleAccount.
Calendar Operations
nView Today’s Calendar:FromtheCalendar,tap .
nChange Calendar View:FromtheCalendar,tap >Day,3 Day,Week,orMonthto
changethecurrentview.
nView Next/Previous Month (Month View):FromtheCalendar,flickthescreenleftorright.
nView Next/Previous Week (Week View):FromtheCalendar,flickthescreenleftorright.
nView Next/Previous Day (Day/3 Day View):FromtheCalendar,flickthescreenleftorright.
nView the Next/Previous Time Period (Day/3 Day/Week View):FromtheCalendar,flickthe
screenupordown.
Add an Event to the Calendar
AddeventstoyourcalendardirectlyfromtheCalendarapplication.
1. Tap >Google >Calendar .
TheCalendarappopens.
2. Tap >Event .
Anevententryscreenopens.
3. Enteraneventtitle,startdate/time,enddate/time,etc.,andthentapSAVE.
lIfyouhavemorethanoneaccounttosyncwith,tapEventsandselectoneinwhichtoadd
yourevent.
Apps and Entertainment Productivity 120
Theeventisaddedtoyourcalendar.
Tip:Youcanalsocreateeventbyfindinganemptytimeonyourcalendar.Justswitchtoaviewwith
anhourgrid,likeDayview,andthendouble-tapanemptytime.
Add Reminders in the Calendar
YoucanaddremindersinGoogleCalendar.Reminderscarryovertothenextdayuntilyoumark
themasdone.Yourremindersareprivateandcan’tbesharedwithanyoneelse.
1. Tap >Google >Calendar .
TheCalendarappopens.
2. Tap >Reminder .
3. Typeyourreminder,orchooseasuggestionandtapDONE.
4. Chooseadate,time,andfrequency.
5. TapSAVE.
YouwillseethereminderintheGoogleCalendarapp.Whenyoumarkareminderasdone,it
willbecrossedoutintheGoogleCalendarapp,andwillstayonthedateyoumarkeditas
done.
Marking a Reminder as Done
1. Tap >Google >Calendar .
2. Tapthereminder.
3. TapMARK AS DONE.
Thereminderwillbecrossedoutonyourcalendar.
Create a Goal in the Calendar
Whenyoucreateagoal,youchoosehowmuchtimeyouwanttospendoniteachweek.Google
Calendarautomaticallyschedulestimetoworkonyourgoal.
1. Tap >Google >Calendar .
TheCalendarappopens.
2. Tap >Goal .
Anevententryscreenopens.
Apps and Entertainment Productivity 121
3. Chooseacategory,likeExerciseorBuild a skill.Tocreateacustomgoal,pickacategory,
thentapCustom.
4. Followthedirectionsonyourscreentosetupyourgoal.
5. Tap .
Goalswillbeautomaticallyaddedtoyourcalendar,startingwiththefirstoffourweeks.You
canadjustthetimeorlengthoftheseeventsatanytime.
Marking a Goal as Done
1. Tap >Google >Calendar .
2. Tapthegoal.
3. TapDid it.
Thegoalwillbecrossedoutonyourcalendar.
Edit Calendar Events, Reminders, or Goals
Youcanviewandeditevents,reminders,orgoals.
1. Tap >Google >Calendar .
2. Taptheevent(orreminderorgoal)youwanttoedit.
3. Tap .
4. Makechangestoyourevent,thentapSAVE.
Delete Calendar Events, Reminders, or Goals
Youcandeleteanevent,areminder,oragoalfromitsdetailspage.
1. Tap >Google >Calendar .
2. Taptheevent(orreminderorgoal)youwanttodelete.
3. Tap >Delete>OK.
Quickly Hide or Show Events
Youcaneasilyhideorshowcalendarsifyoudon’tneedtoseethemallthetime.
1. Tap >Google >Calendar .
2. Inthetopleft,tap .
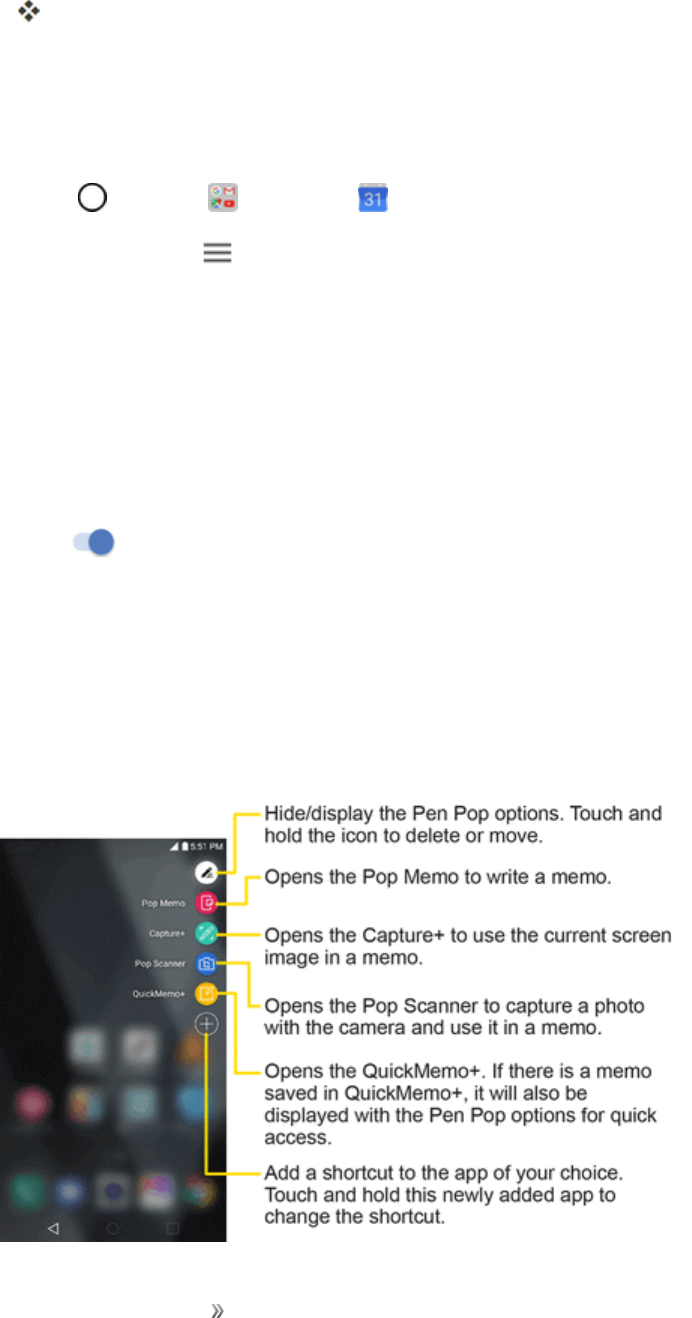
Apps and Entertainment Productivity 122
3. Tapeachitem(suchasEventsorHolidays)tohide.
Thecheckmarkchangestoanemptyboxoutline.Theitemwillbehiddenonthecalendar.
Calendar Settings
YoucanchangeyoursettingsforGoogleCalendar,includingyourdisplay,notifications,andtime
zone.
1. Tap >Google >Calendar .
2. Inthetopleft,tap >Settings.
3. TapGeneraltoaccessgeneralsettings,Events from GmailtoaddeventsfromGmail
messages,ortapeachcalendaritemtoconfigureit.
lGeneral:Startoftheweek,Usedevicetimezone,Timezone,Alternatecalendar,Show
weeknumber,Showdeclinedevents,Defaulteventduration,Notifyonthisdevice,Use
standardtone,Vibrate,andQuickresponses.
lEvents from Gmail:Whenyougetanemailabouteventlikeaflight,concert,orrestaurant
reservation,itwillbeaddedtoyourcalendarautomatically.Todeactivatethis,taptheswitch
.
lTapEvents,Reminders,BirthdaysorHolidaystocustomizeitssettings,suchascolor
codeornotifications.
Using the Stylus Pen
Youcancreateamemousingtherealpen-likestylus.WiththePenPopfeature,youcanquickly
accessMemoappswhenyoupullthestyluspenout.
Apps and Entertainment Productivity 123
Toconfigureoptionsforwhenthestyluspenisremovedfromitsslot,seePen.
Navigation Apps
Yourphoneoffersanumberoflocation-basednavigationprogramstohelpyoufigureoutwhereyou
areandgetyouwhereyou’regoing.
Enable Location Services on Your Phone
Beforeusinganylocation-basedservices,youmustenableyourphone’slocationfeature.For
informationaboutsettingyourphone’slocationoptions,seeLocation.
Google Maps
UsetheGoogleMapsapptodetermineyourlocation,finddirections,browselocalbusinessesand
attractions,rateandreviewplaces,andmore.
View Maps of Specified Places
UseGoogleMapstolocateandmapaspecificaddressordestination.
1. Tap >Google >Maps toviewvideosstoredinthestorage.
GoogleMapsopens.
lIfprompted,followtheonscreeninstructionstoaccepttermsofuse.
2. Tapthesearchbar.
3. Enteranaddress,city,facilityname,etc.,andthentapacandidateintheresultslistortapthe
Searchiconinthekeyboard.
Amapofthespecifiedlocationopens.
Scout
Scout™byTelenavisadailypersonalnavigatorthathelpsyougetwhereyou’regoing.Itletsyou
seeandhearturn-by-turndirectionsanditcanprovideimportant,personalizedinformationabout
trafficandalternateroutes.
Install the Scout App on Your Phone
BeforeyouuseScoutonyourphone,youmayneedtodownloadandinstalltheappfromtheGoogle
PlayStoreapp.
1. Tap >Play Store .
2. TaptheSearchiconandsearchfor"scout."
Apps and Entertainment Productivity 124
3. TapScout GPS Navigation & Meet Upfromtheresultslist.
4. TapINSTALL,andthentapACCEPT.
Theappwillbedownloadedandinstalledonyourphone.
5. Whenthedownloadhascompleted,tapOPEN.
lToopentheappfromthehomescreen,tap >Scout .
Use Scout as Your Personal Navigator
1. Tap >Scout .
TheScoutappwillopen.
lIfprompted,acceptthetermsofusebeforecontinuing.
2. Followtheon-screeninstructionstoaccess,launch,anduse.
Google Search
SearchinformationsavedonthephoneandinphoneapplicationsaswellasontheInternet.
Use Google Search
TypesearchtermsintheGoogleSearchbartofindinformationonyourphoneandaroundtheglobe.
1. Fromthehomescreen,taptheGooglesearchbarortap >Google >Google .
TheSearchwindowopens.
lIfconfirmationappears,followonscreeninstructions.
2. Typeyoursearchkeywordsandtap .
Searchresultsappear.
lTosearchbyvoice,tapinthesearchbarandspeakyoursearchterms.
Google Search Options
nChanging Search Information:Inthesearchwindow,tap >Settings>Phone search
andselectwheretosearch.
nUsing Google Now:GoogleNowautomaticallysearchesforinformationbasedonsearch
keywordsused,yourcurrentlocation,etc.,andpresentssearchresultsinthesearchscreen.
GoogleNowalsoinformsusersofscheduledevents.
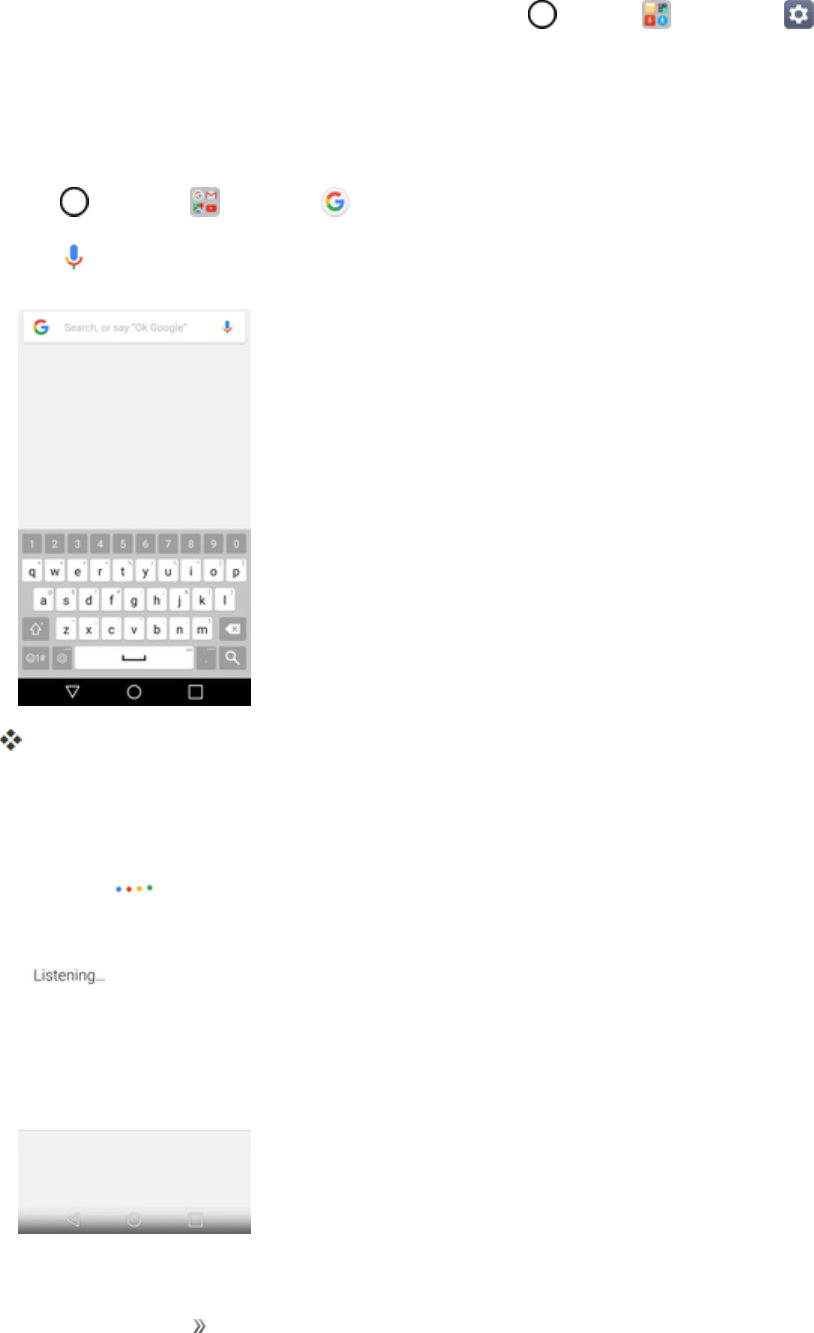
Apps and Entertainment Productivity 125
lTouseallofGoogleNow’sfunctions,ensurethatGoogleLocationReportingandLocation
Historyareturnedoninyourlocationsettings.Tap >Tools >Settings >General
tab>Location>Google Location Historyandselectyouroptions.
Use Google Voice Search
Useyourvoicetosearchinsteadoftyping,withGoogleVoiceSearch.
1. Tap >Google >Google .
2. Tap inthesearchbar.
TheVoiceSearchwindowopens.
3. Sayyoursearchterms.
Apps and Entertainment Productivity 126
Searchresultsappear.
Calculator
Yourphone’sconvenientbuilt-incalculatorletsyouperformbasicandadvancedmathematical
equations.
1. Tap >Tools >Calculator .
2. Usethekeypadtomakeacalculation.
lTousescientificcalculator,dragthegreencoloredslidebarlocatedontherightsideofthe
screentotheleft.
lTorestartacalculation,touchandholdtheDELbutton.
Clock
Yourphonehasaclockappthatletsyousetalarms,viewtimeintimezonesaroundtheworld,usea
stopwatch,setatimer,anduseyourphoneasadeskclock.
Checking the Time
Youcancheckthephoneanytimeonyourphone.Thecurrenttimedisplaysintheupperrightcorner
ofthestatusbar.Manywidgetsandlockscreensalsodisplaythetimeandprovideoptionsforhow
timeisdisplayed.
Set Alarms
Setmultiplealarmsusingyourphone’sClockapp.
1. Tap >Tools >Clock .
2. TapanexistingalarmtochangeitstimeandotherattributesortapAdd alarm toaddanew
one.
3. Setthetimeofthealarm.Youcanchangethetimebyscrollingup/downthehourandminuteand
AM/PMfieldortapthehourandminutesfieldstoenterthetimewiththekeyboard.
4. TapRepeattoselectthedayswhenyouwantthealarmtosound.(Ifyoudon'tsetarepeat,the
alarmwillonlysoundontheassignedday.)
5. TapAlarm soundtoselectaringtoneforthealarm.Theringtoneplaysbrieflywhenyouselect
it.
6. SlidethebuttonontheAlarm volumeslidertotherighttoincreasethealarmvolumeandtothe
lefttodecreaseit.
7. TapAlarm with vibrationtohavethephonevibrate,inadditiontoplayingtheringtone.
Apps and Entertainment Productivity 127
8. TapSnoozedurationtoopenadialogboxtosettheamountoftimetowaitbeforesoundingthe
alarmagainifitisnotdismissed.Youcansetthealarmtoringrepeatedlyfrom5minutesupto1
hour.
9. TapEnter memo texttoenteranameforthealarm.
10. TapPuzzle locktoenablethisoptionifdesired,whichrequiresyoutowakeupenoughtosolve
asimplepuzzletodismissthealarm.
11. Whenyou'refinished,tapSAVE.
Additional Clock Features
Yourphone’sclockappprovidesadditionalusefulfeaturesincludingworldclock,stopwatch,and
timerfunctions.Allfeaturesareavailablefromtheclockappdisplay.
nTap >Tools >Clock .
World Clock
Theworldclockletsyoukeeptrackofthecurrenttimeinmultiplecitiesaroundtheglobe.
1. Tap >Tools >Clock >World clocktab.
2. Tap toaddacity.
3. Enterthecitynameinthesearchfieldandtap onthekeyboard.
–or–
Scrollthroughthecitieslistandtapthecity.
4. Youcanaddasmanycitiesasyouwant.Repeatsteps2and3.
Timer
Thetimerprovidesacountdowntimer.
1. Tap >Tools >Clock >Timertab.
2. TaptheHour/Minute/Secondsectionstosetthetimer.
3. Tap tostart.
lTap toresetthetimerandstartover.
lTap toresumethetimerafterit'sstopped.
lTap topausethetimer.
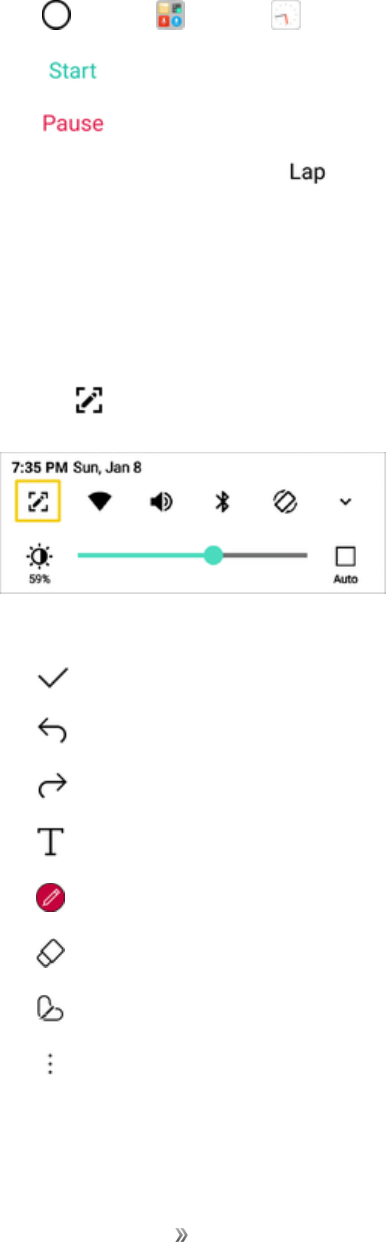
Apps and Entertainment Productivity 128
Stopwatch
Thestopwatchletsyoutimeeventsdowntothehundredthofasecond.
1. Tap >Tools >Clock >Stopwatchtab.
2. Tap tostartstopwatchtime.
3. Tap topausethestopwatch.
lWhilemeasuringtime,tap torecordlaptimes.
Capture+
TheCapture+featureallowsyoutocreatememosandcapturescreenshots.YoucanuseCapture+
toeasilyandefficientlycreatememosduringacall,withasavedpictureorfrommostphonescreens.
1. Whileviewingthescreenyouwanttocaptureandcreateamemoon,slidethestatusbardown
andtap .
2. Createamemousingthefollowingoptions:
l:Taptosavethecurrentmemo.
l:Taptoundothemostrecentaction.
l:Taptoredothemostrecentlyundoneaction.
l:Taptoaddtypedtexttothememo.
l:Taptoaddfreehandnotationstothememo.
l:Taptousetheeraseronthedrawingyou'veaddedtothememo.
l:Taptocropthememo.
l:Taptosharethememoorchangethebackgroundpaperstyle.
Note:PleaseuseafingertipwhileusingtheCapture+feature.Donotuseyourfingernail.
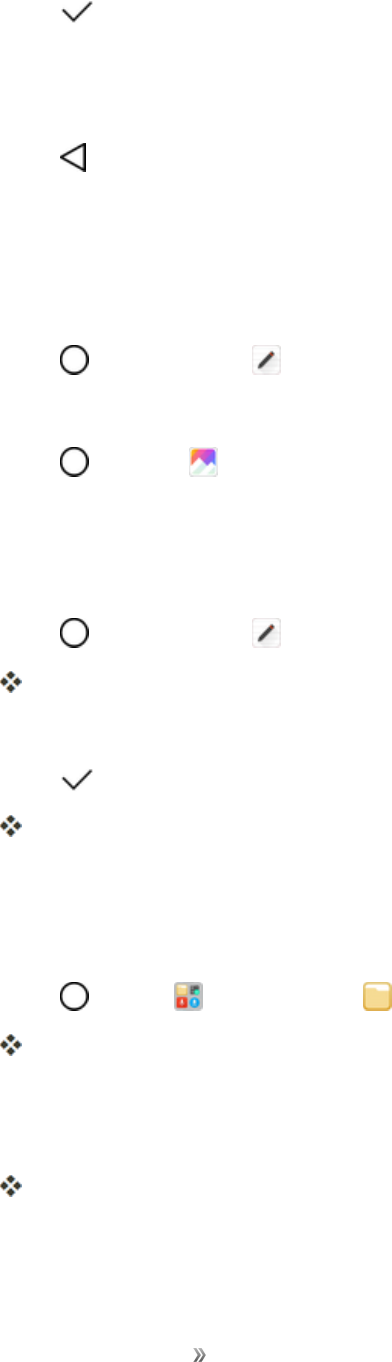
Apps and Entertainment Productivity 129
3. Tap tosavethecurrentmemo.
4. TapQuickMemo+orGallerytoselectwheretosavethenote.
DiscardthecurrentCapture+:
nTap untilyouexitCapture+.
View the Saved Memo
YourmemocanbesavedintheQuickMemo+applicationorintheGalleryapplication.
ToviewthememosavedinQuickMemo+:
nTap >QuickMemo+ andselectthememo.
ToviewthememosavedinyourGallery:
nTap >Gallery andselecttheCapture+album.
QuickMemo+
Useyourphone’sQuickMemo+apptosavetext,memos,lists,andmore.
1. Tap >QuickMemo+ .
Thememopadlistappears.
2. Tapandenteryourmemotitleandtext.
3. Tap .
Thememoissaved.
File Manager
Viewfilesstoredonyourphone.
1. Tap >Tools >File Manager .
FileManagerlaunches.
lFollowonscreeninstructionsforfirst-timeuseandpermissions.
2. Tapthefiletypeandthentapthefileyouwanttoopen.
Theappopensanddisplaysthefile.

Apps and Entertainment Productivity 130
Voice Recorder
Youcanrecordandsaveyourvoiceorothers’voicesfromimportantevents.Recordedvoicefiles
canbeplayedbackorshared.
1. Tap >Tools >Voice Recorder .
lTosavethelocationdetailsofarecording,tapLocation.
lToaddanevent,tapEventandaddaneventtothedateyouwant.
2. Tap .
lTopausetherecording,tap .
3. Tap toendtherecording.
lThefileissavedautomaticallyandtheRecorded filesscreenappears.
4. Tap toplaytherecordedvoice.
Note:Ifyoutap ,recordedvoicefilesappear.Youcanplayarecordedvoicefilefromthelist.
Uninstalled Apps
Youcanviewtheuninstalledappsonthehomescreen.Youcanalsoreinstallappswhichwere
uninstalledwithin24hoursfromnow.
1. Tap >Uninstalled apps .
2. Activatethedesiredfunction:
lReinstall:Reinstalltheselectedapp.
l:Removetheuninstalledappspermanentlyfromthedevice.
Note:Uninstalledappsareautomaticallyremovedfromthedevice24hoursafteritwasuninstalled.
Ifyouwanttoreinstalltheuninstalledapps,youmustdownloadthemagainfromtheappstore.
Note:Thisfeatureisactivatedonthedefaulthomescreenonly.Ifyouuninstallappswhileusingthe
EasyHomescreenorotherlauncher,theyareimmediatelyandpermanentlyremovedfromthe
device.
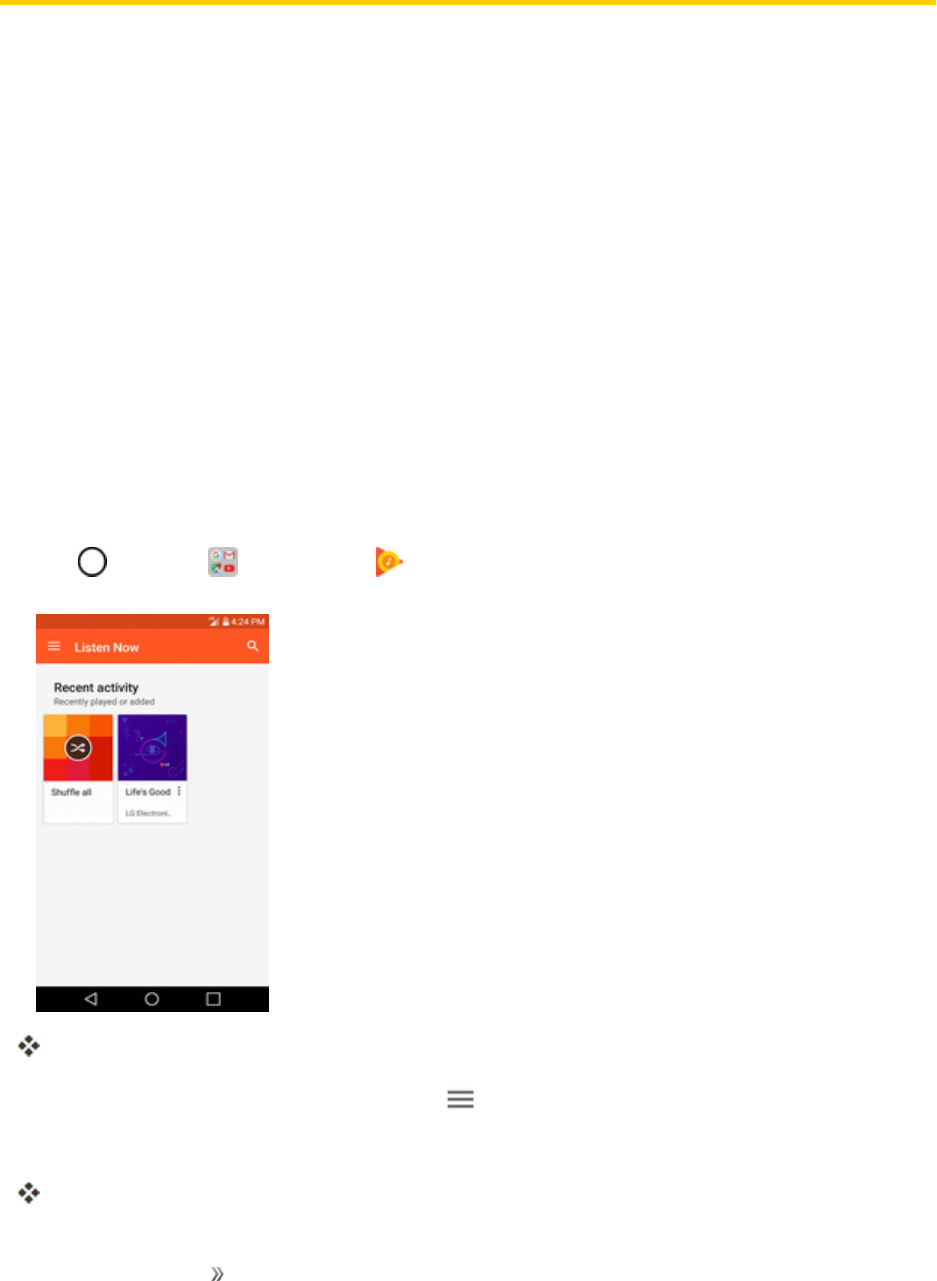
Apps and Entertainment Entertainment and
Activities
131
Entertainment and Activities
Thefollowingtopicsaddressyourphone’sentertainmentandactivitiesoptions.
Google Play Music App
TheGooglePlayMusicappletsyoubrowse,shop,andplaybacksongspurchasedfromGoogle
Playaswellassongsyouhaveloadedfromyourownmusiclibrary.Themusicyouchooseis
automaticallystoredinyourGooglePlayMusiclibraryandinstantlyreadytoplayviastreamingor
download.
FormoreinformationaboutGooglePlayMusic,visitplay.google.com/about/music.
Note:Forinformationaboutloadingmusicontoyourphone,seeTransferFilesBetweenYour
PhoneandaComputer.
Play Music with Google Play
UsetheGooglePlayMusicapptolistentoallyourmusiconyourphone.Compatiblemusicfile
formatsinclude:MP3(.mp3),AAC(.m4a,.aac),WMA(.wma),FLAC(.flac),Vorbis(.ogg),ALAC
(.m4a).
1. Tap >Google >Play Music .
ThePlayMusicappopenstotheListenNowscreen.
2. Toviewadditionalmusicoptions,tapMenu andselectanoption.
3. Tapanitemfromthecategorywindowandthentapasong.
Thesongbeginsplaying.
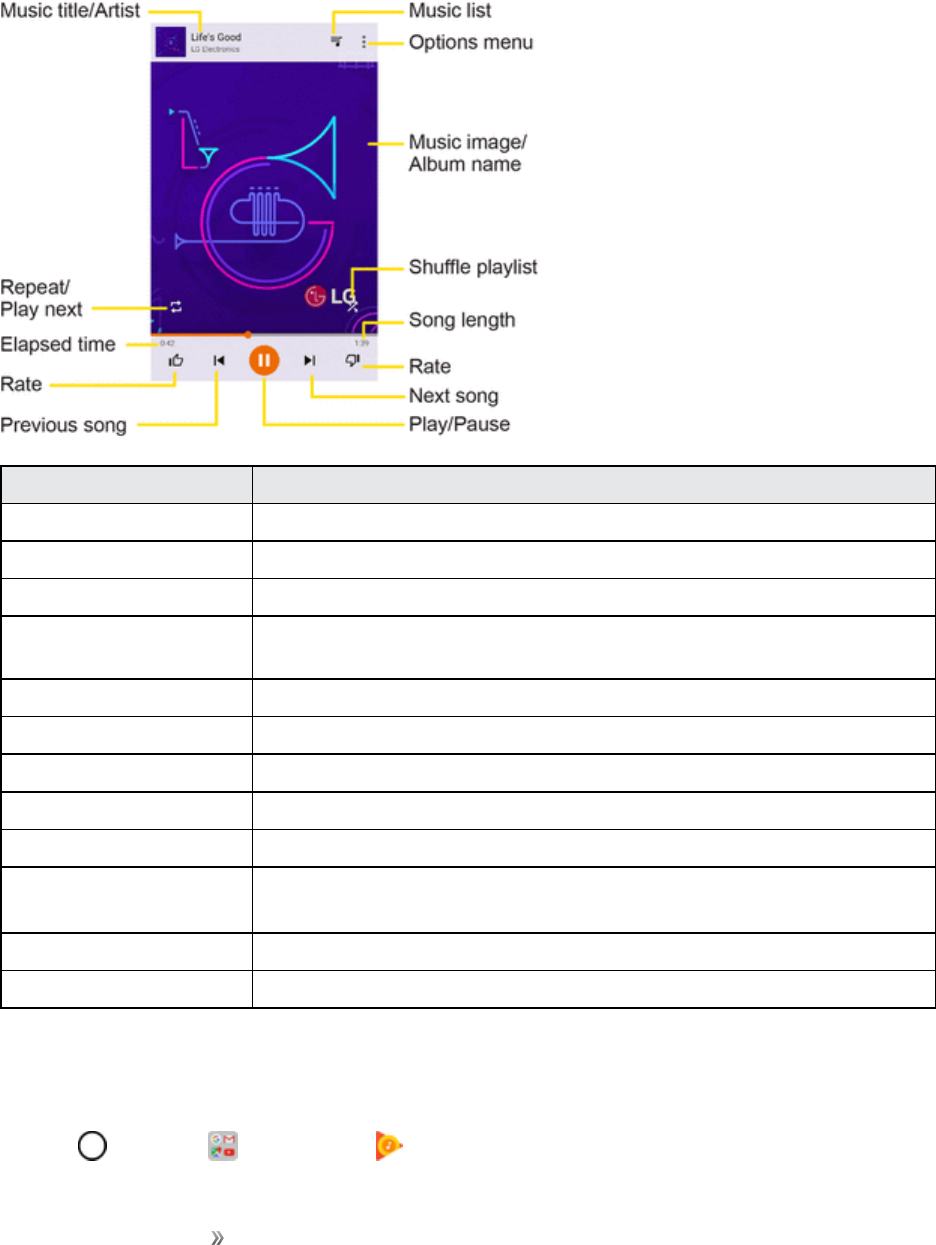
Apps and Entertainment Entertainment and
Activities
132
Google Play Music Screen Layout
ThefollowingdiagramoutlinesthemainfeaturesofthePlayMusicappplayerscreen.
Feature Description
Music title/Artist Displaysmusictitleandartist(ifavailable).
Repeat/Play next Repeatthecurrentsongorplaythenextsongqueued.
Elapsed time Amountoftimethesonghasbeenplaying.
Rate (thumbs
up/thumbs down)
Ratethecurrentsong.
Previous song Playtheprevioussong.
Play/Pause Playorpausethecurrentsong.
Next song Playthenextsong.
Song length Thelengthofthesong.
Shuffle playlist Shufflethecurrentplaylistorqueue.
Music image/Album
name
Displaymusicimagesandalbumnames(ifavailable).
Options menu Accesstheoptionsmenu.
Music list Viewthecurrentplaylistorqueue.
Create Playlists in Google Play Music
Organizemusicintoplayliststofiteveryoccasion.
1. Tap >Google >Play Music .
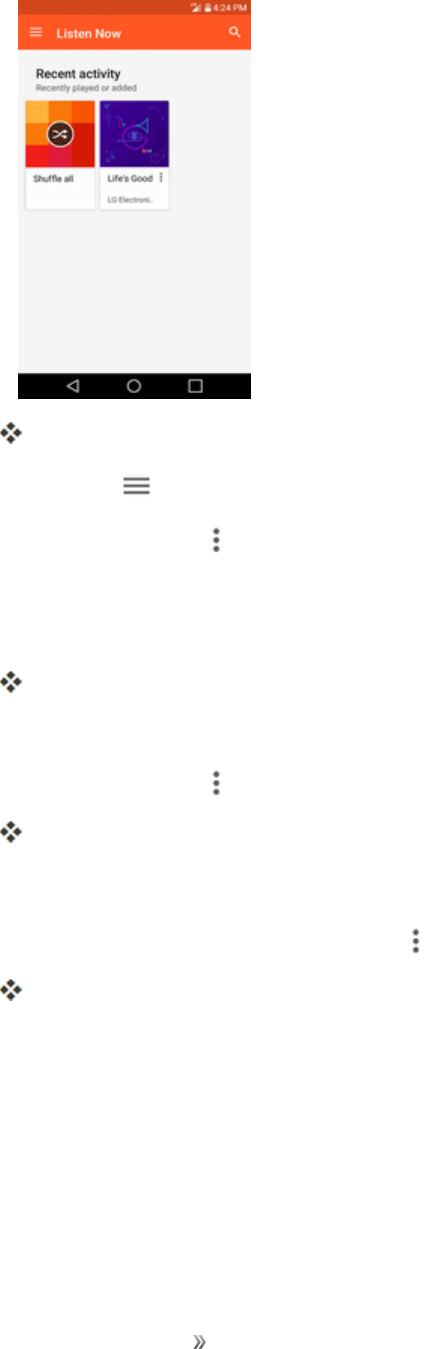
Apps and Entertainment Entertainment and
Activities
133
ThePlayMusicappopenstotheListenNowscreen.
2. TapMenu andtapMusic library>AlbumsorSongstab.
3. TapMore options nexttoanitemfromthecategorywindowandthentapAdd to playlist.
4. TapNEW PLAYLIST.
5. EnteranameandtapCREATE PLAYLIST.
Theplaylistiscreated.
6. ReturntothelibraryviewandselectALBUMSorSONGS.
7. TapMore options nexttoanitemandthentapAdd to playlist>[playlist name].
Thesongoralbumisaddedtotheplaylist.Repeattoaddmoreitemstotheplaylist.
Adding Currently Playing Music to a Playlist
nFromtheplayerview,tapMore options >Add to playlist>[playlist name].
Themusicisaddedtotheplaylist.
Sprint Music Plus
WithSprintMusicPlusandtheMusicStore,RingtoneStore,andRingbackToneStore,youcan
purchase,download,andplaymusic,ringtones,andringbacktonesforyourphone.

Apps and Entertainment Entertainment and
Activities
134
Install the Sprint Music Plus App on Your Phone
BeforeyouuseSprintMusicPlusonyourphone,youmustdownloadandinstalltheappfromthe
GooglePlaystoreapp.
1. Tap >Play Store .
2. TaptheSearchiconandsearchfor"sprintmusicplus."
3. TapSprint Music Plusfromtheresultslist.
4. TapINSTALL.
Theappwillbedownloadedandinstalledonyourphone.
5. Whenthedownloadhascompleted,tapOPEN.
lToopentheappfromthehomescreen,tap >Sprint Music Plus .
Access Sprint Music Plus
1. Tap >Sprint Music Plus .
Theappopens.
lThefirsttimeyouusetheapp,tapAccepttoagreetothePremiumServicesTermsofUse.
2. Tapastoreoptionfromthemainpage(Ringbacks Store,Music Store,orRingtones Store),
ortap >Music(underLibrary)toaccessyourmusic.
lTaptheonscreennavigationtoolstoskipaheadorrewind.Tap atanytimetosee
additionaloptions.
lFormoreinformation,tapMenu >Settings>About or Help.
Note:Ifyouhaveloadedmusicontoyourphonefromyourcomputer(seeTransferFilesBetween
YourPhoneandaComputer),youwillneedtosyncyourmusictolistentoitthroughSprintMusic
Plus.FromtheSprintMusicPlusapp,tap >Settings>Synchronize your music library.Once
synced,youwillseeyourmusicinthelibrary.
Purchase and Download Music from the Sprint Music Plus Store
FromtheSprintMusicPlusStore,youcanshopforsongstopurchaseanddownloadtoyourphone.
1. Tap >Sprint Music Plus >Music Store.
TheappwillopenanddisplaytheMusicStore.

Apps and Entertainment Entertainment and
Activities
135
2. Enterasongorartistinthesearchfieldorbrowsethroughoptionsinthetabsinthecenterofthe
screen.
3. Tapasongtoselectit.
Thesonginformationscreenisdisplayed.
4. Followtheonscreeninstructionstoprevieworpurchasethesong.Tap atanytimetodisplay
theSprintMusicPlusmenu.
Tip:Forringtonesorringbacktones,tapRingtone StoreorRingbackTone StorefromtheSprint
MusicPlusmainmenu.
Back Up Your Downloaded Music Files
Sprintrecommendsthatyoubackupyourdownloadedmusicfilestoyourcomputer.Althoughthe
downloadedfilescanonlybeplayedonyourphoneandonyouraccount,backingthemuptoyour
computerletsyouaccessthefilesincaseyourphoneismisplaced.
1. ConnectyourphonetoyourPCusingaUSBcable.
2. OpentheNotificationsPanelandtaptheUSBconnection.
3. SelectFile transferanduseyourcomputertonavigatetophone'sMusicfolder.
4. Selectandcopythemusicfilestoafolderonyourcomputer’sharddrive.
YouTube
ViewvideosuploadedtoYouTubeanduploadyourownvideostoyourYouTubeaccount.
View YouTube Videos
YoucanusetheYouTubeapptoviewvideosonYouTubeevenifyouaren’tsignedintoaYouTube
account.
1. Tap >Google >YouTube .
TheYouTubeapplaunches.
lIfyou’repromptedtoprovideconfirmationtousethesite,followtheonscreeninstructionsto
continue.
2. SearchthroughtheYouTubechannelsandtapavideoyouwanttosee.
Thevideoplaysonyourphonescreen.
lTapthescreentopauseorresumeplaywhilewatching.
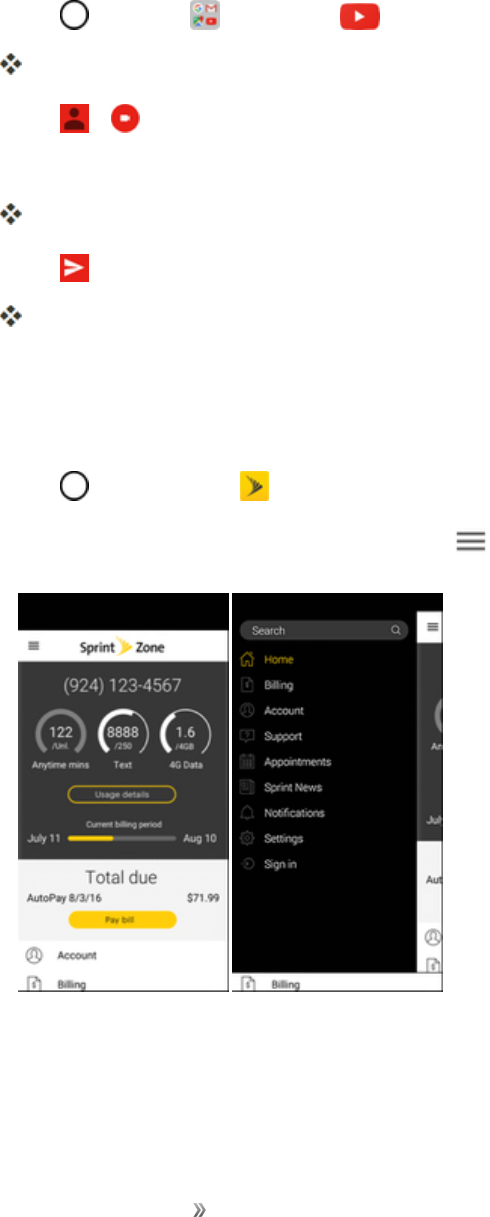
Apps and Entertainment Entertainment and
Activities
136
Post a Video to YouTube
YoucanpostvideostoyourYouTubeaccountfromyourphone.Beforeposting,youmustsetupa
YouTubeaccountandsignintoitonyourphone.
1. Tap >Google >YouTube .
TheYouTubeapplaunches.
2. Tap > .
3. Selectavideotoupload.
Enteratitle,description,andtags,andselectaprivacysetting.
4. Tap .
ThevideoisuploadedtoyourYouTubechannel.
Get Support from Sprint Zone
AccessyourSprintaccount,getphoneinformationandhelp,findrecommendedapps,andmore.
1. Tap >Sprint Zone .
2. TapanoptiononthemainscreenortapMenu andselectfromafulllistofoptions.
Note:SprintZonecategoriesandoptionsaresubjecttochange.Checkbackfrequentlyfornew
contentandupdates.

Apps and Entertainment Entertainment and
Activities
137
NASCAR MOBILE
NowyouhavetheabilitytogeteverybitofNASCARcoverage,news,andstatsrightonyourphone.
Install the NASCAR MOBILE App on Your Phone
BeforeyouusetheNASCARMOBILEapponyourphone,youmustdownloadandinstalltheapp
fromGooglePlay.
1. Tap >Play Store .
2. TaptheSearchiconandsearchfor"nascarmobile."
3. TapNASCAR MOBILEfromtheresultslist.
4. TapINSTALL,andthentapACCEPT.
Theappwillbedownloadedandinstalledonyourphone.
5. Whenthedownloadhascompleted,tapOPEN.
lToopentheappfromthehomescreen,tap >NASCAR .
Use the NASCAR MOBILE App
1. Tap >NASCAR .
TheNASCARMobileappopens.
2. Followthepromptstocustomizeyourappandbeginfollowingyourfavoriteracers.

Settings Networks Settings 139
Networks Settings
Thisgroupofsettingsletsyoucontrolyourphone'sWi-Fisettings,Bluetooth,Tethering,VPN,
Mobilenetworks,andmore.
Basic Settings
Yourphone’ssettingsmenuprovidesaccesstoallyourphonesettings,fromconnections,display,
andsounds,toaccounts,applications,andmore.
Access Settings
1. Tap >Tools >Settings .
Thesettingsmenuopens.
2. Selectcategoriesandthenselectyoursettingsoptions.
Tip:Youcanalsoaccesssettingsfromthenotificationpanel.Pulldownthestatusbarandtap
Settings .
Networks Settings Overview
Thenetworksettingsmenuallowsyoutoconfigurethefollowingoptions:
Category Description
Airplane mode Turnonoroffwirelessconnections.
Wi-Fi Calling SetupWi-FiCallingandenable/disableit.
Wi-Fi EnableandsetWi-Fioptions.
Bluetooth EnableBluetoothconnections.
Mobile data Checkyourphone’smobiledata.
Call Setvariouscallsettings.
Share & connect Sharedataandmediawithotherdevices.
Tethering Shareyourmobiledevice'sInternetconnection.
More Adjustadditionalnetworksettings.
Access Networks Settings
1. Tap >Tools >Settings .
2. TapNetworkstab.
3. Setyournetworksoptions.

Settings Networks Settings 140
Yournetworkssettingsaresavedandapplied.
Airplane Mode
AirplaneMode(flightmode)allowsyoutousemanyofyourphone’sfeatures,suchasgames,and
music,whenyouareinanairplaneorinanyotherareawheremakingorreceivingcallsordatais
prohibited.WhenyousetyourphonetoAirplaneMode,itcannotsendorreceiveanycallsoraccess
onlinedata.
Activate Airplane Mode
1. Tap >Tools >Settings >Networkstab.
2. TaptheAirplane modeswitch toturnthefunctionon.WhileinAirplaneMode,your
phone’sstatusbarwilldisplay .
Deactivate Airplane Mode
1. Tap >Tools >Settings >Networkstab.
2. TapAirplane modeswitch toturnthefunctionoff.
Wi-Fi Calling
YoucanmakeandreceivecallsoveraconnectedWi-Finetworktohelpimprovevoiceanddata
coverage.FordetailsonWi-FiCallingfeature,seeWi-FiCalling.
Wi-Fi Settings
YourphoneletsyoutakeadvantageofWi-Fihotspotsforhigh-speeddataaccessusingavailable
computernetworks.Fordetailsonyourphone‘sWi-Fifeaturesandsettings,seeConfigureWi-Fi
Settings.
Bluetooth Settings
Yourphone’sBluetoothcapabilitiesletyouusewirelessheadsets,sendandreceivepicturesand
files,andmore.Fordetailsonyourphone‘sBluetoothsettings,seeBluetooth.
Mobile Data Settings
Youcancheckthecurrentdatausage,settoenable/disablemobiledata,orsetthemobiledatalimit.

Settings Networks Settings 141
Turn Mobile Data On or Off
1. Tap >Tools >Settings >Networkstab>Mobile data.
2. TaptheMobile dataswitch toturniton.
–or–
TaptheMobile dataswitch toturnitoff.
Call Settings
Yourphone'sCallsettingsmenuletsyouconfigureoptions.Fordetailsonyourphone'sCall
settings,seeCallSettingsMenu.
Share & Connect
Yourphoneletsyouusethewirelesstechnologythatenablesdatatransmissionbetweendevices.
File Sharing
SendandreceivefileswithcomputersandLGdevices.
nTap >Tools >Settings >Networkstab>Share & connect>File sharing.
Media Server
SharemediacontentwithnearbyDLNA-compatibledevices.
1. Tap >Tools >Settings >Networkstab>Share & connect.
2. TapMedia server>Content sharingtoallownearbydevicestoaccessyourcontent.
LG AirDrive
ConnecttoyourPCtomanageyourphone.DownloadLGBridgefromtheLGElectronicswebsite
onyourPCbeforeuse.WhenyousignintothesameLGAccountonyourphoneandPC,youcan
usetheLGAirDrivefunction.
1. LogintothesameLGaccountonamobiledeviceandaPC.
2. Tap >Tools >Settings >Networkstab>Share & connect>LG AirDrive.
3. RuntheLGBridgeapplicationonyourPCandselectLG AirDrive.
Settings Networks Settings 142
Printing
ThePrintingmenuallowsyoutomanageyourGoogleCloudPrintsettingsandprintjobs.
nTap >Tools >Settings >Networkstab>Share&connect>Printing.
Tethering
Yourphone'sTetheringsettingsmenuletsyouconfiguretoshareyourphone'sInternetconnection
withotherdevices.FordetailsonyourTethering,seeTethering.
More
Thismenuallowsyoutopersonalizeadditionalwirelessfeaturesettings.
Mobile Networks
Thismenuallowsyoutoconfigurevariousmobilenetworksettings.
nTap >Tools >Settings >Networkstab>More>Mobile networks.
Mobile Data
Enableanddisabledataaccessoverthemobilenetwork.
1. Tap >Tools >Settings >Networkstab>More>Mobile networks.
2. TaptheMobile dataswitch .
4G Settings
Viewyour4GnetworkproviderandIPaddress.
1. Tap >Tools >Settings >Networks tab> More>Mobile networks.
2. Tapthe4G settingstocheckNetwork operatorandIP address.
Network Mode
Chooseyourpreferrednetworkmode.
1. Tap >Tools >Settings >Networks tab> More>Mobile networks>Network
mode.
2. Choosefromthefollowingoptions:
lTapAutomatictoturnontheAutomaticradioband.
lTapLTE/CDMAtoturnontheLTE/CDMAradioband.

Settings Networks Settings 143
lTapCDMAtoturnontheCDMAradioband.
lTapGSM/UMTStoturnontheGSM/UMTSradioband.
Access Point Names
ManageAPNinformation.
1. Tap >Tools >Settings >Networks tab> More.
2. TapMobile networks>Access point names.
Roaming Settings
Withyourphoneandglobalroamingservice,youcanmakephonecallsandusewirelessdata
servicesaroundtheglobeoncompatibleCDMAandGSM/UMTSnetworks.
Roaming Icon
Yourdisplayscreenalwaysletsyouknowwhenyou’reofftheNationwideSprintNetwork.
Anytimeyouareroaming,thephonedisplaystheroamingicon( ).
Roam on Other Digital Networks
Whenyou’reroamingondigitalnetworks,yourcallqualityandsecuritywillbesimilartothequality
youreceivewhenmakingcallsontheNationwideSprintNetwork.However,youmaynotbeableto
accesscertainfeatures,suchasdataservices,dependingontheavailablenetwork.
Note:Ifyou’reonacallwhenyouleavetheNationwideSprintNetwork,yourcallwillbedropped.If
yourcallisdroppedinanareawhereyouthinkSprintserviceisavailable,turnyourphoneoffandon
againtoreconnecttothenetwork.
Check for Voicemail Messages While Roaming
WhenyouareroamingofftheNationwideSprintNetwork,youmaynotreceiveanotificationofnew
voicemailmessagesonyourphone.Callerscanstillleavemessages,butyouwillneedto
periodicallycheckyourvoicemailfornewmessagesifyouareinaroamingserviceareaforan
extendedperiodoftime.
1. Dialyour10-digitwirelessphonenumber.
2. Whenyouhearyourvoicemailgreeting,tap .
3. Enteryourpasscodeatthepromptandfollowthevoiceprompts.
WhenyoureturntotheNationwideSprintNetwork,voicemailnotificationwillresumeasnormal.
Settings Networks Settings 144
Roaming Mode
Yourphoneallowsyoutocontrolyourroamingcapabilities.ByusingtheRoamingmenuoption,you
candeterminewhichsignalsyourphoneaccepts.
Choosefromtwodifferentsettingsonyourdual-bandphonetocontrolyourroamingexperience.
1. Tap >Tools >Settings >Networkstab>More>Mobile networks>Roaming.
2. TapUse roamingtoenableroamingonyourdevice.
3. TapeachDomesticroamingoptionandInternationalroamingoptiontoplaceacheckmarkand
connecttovoiceanddataservicewhileroaming.
Note:WithDataroamingoff,youcanstilltransmitdatawithaWi-Ficonnection.SeeConfigureWi-
FiSettings.
Roaming Alerts
Roamingalertsmakeiteasytomanageyourroamingbyprovidingawarningwhenyourdeviceis
roamingonanothercarrier'snetwork.
ToturnCallalertsonoroff:
1. Tap >Tools >Settings >Networkstab>More>Mobile networks>Roaming>
>Set roaming alerts.
2. Tapeachroamingalertoptiontoactivateordeactivatethisfunction.Whenactive,anextrakey
pressisrequiredfordialingwheninaroamingarea.
Note:Callalertsareturnedonbydefaultonyourphone.Voicedialingandspeeddialingarenot
availablewhenyouareroamingwithCallGuardenabled.
ToplaceroamingcallswithCallalertson:
1. Tap >Phone .
2. Enter1+areacode+theseven-digitnumberandtap .
ToanswerincomingroamingcallswithCallalertson:
1. Swipe inanydirection.Amessagewillbedisplayednotifyingyouthatroamingchargeswill
apply.
2. TapCALL.
Settings Networks Settings 145
Data Roam Guard
Dependingonserviceavailabilityandroamingagreements,yourphonemaybeabletoaccessdata
serviceswhileroamingoncertaindigitalsystems.Youcansetyourphonetoalertyouwhenyouare
roamingofftheNationwideSprintNetworkandtrytousedataservicessuchasmessaging.
Note:Dataroamingalertsarenotturnedonbydefaultonyourphone.
TosetyourDataroamingnotification:
1. Tap >Tools >Settings >Networkstab>More>Mobile networks>Roaming>
>Set roaming alerts.
2. TaptheDomestic data roaming,International data roamingbuttonsorbothtoactivatethe
function.
TousedataserviceswhenDataroamingalertsareactive:
nWhenapop-upnotificationappearsinformingyouthatdataroamchargesmayapply,tap
ConnectorAlways Connecttoconnect.
Virtual Private Networks (VPN)
Fromyourphone,youcanadd,setup,andmanagevirtualprivatenetworks(VPNs)thatallowyou
toconnectandaccessresourcesinsideasecuredlocalnetwork,suchasyourcorporatenetwork.
Prepare Your Phone for VPN Connection
DependingonthetypeofVPNyouareusingatwork,youmayberequiredtoenteryourlogin
credentialsorinstallsecuritycertificatesbeforeyoucanconnecttoyourcompany’slocalnetwork.
Youcangetthisinformationfromyournetworkadministrator.BeforeyoucaninitiateaVPN
connection,yourphonemustfirstestablishaWi-Fiordataconnection.
Set Up Secure Credential Storage
Ifyournetworkadministratorinstructsyoutodownloadandinstallsecuritycertificates,followthe
instructionsbelow.
1. Tap >Tools >Settings >Generaltab>Fingerprints & security.
2. TapCertificate management>Install from storagefordesiredcertificates.
Youcanthendownloadandinstallthecertificatesneededtoaccessyourlocalnetwork.Your
networkadministratorcantellyouhowtodothis.
Add a VPN Connection
UsetheWireless&networkssettingsmenutoaddaVPNconnectiontoyourphone.

Settings Networks Settings 146
1. Tap >Tools >Settings >Networkstab>More>VPN.
2. TapBasic VPN > Add Basic VPNor LG VPN >Add LG VPN.
Note:AscreenlockisrequiredtoconfigureaVPN.
3. Configurethesettingsaccordingtothesecuritydetailsyouhaveobtainedfromyournetwork
administrator.
4. Whenfinished,tapSAVE.
TheVPNisthenaddedtotheVPNssectionoftheVPNsettingsscreen.
Connect to or Disconnect From a VPN
OnceyouhavesetupaVPNconnection,usetheWirelessnetworkssettingsmenutoconnecttoor
disconnectfromtheVPN.
Connect to a VPN
1. Tap >Tools >Settings >Networkstab>More>VPN.
2. IntheVPNssection,taptheVPNthatyouwanttoconnectto.
3. Whenprompted,enteryourlogincredentials,andthentapCONNECT.Whenyouare
connected,theVPNconnectedicon appearsinthenotificationareaofthestatusbar.
4. OpentheWebbrowsertoaccessresourcessuchasintranetsitesonyourcorporatenetwork.
Disconnect From a VPN
1. DragthestatusbardowntoopentheNotificationpanel.
2. TaptheVPNconnection,andthentapDisconnect VPNtodisconnect.
Settings Sound Settings 147
Sound Settings
IntheSoundsettingsmenu,youcanconfigurecallandnotificationringtones,audiovolume,aswell
assomerelatedsettings.
Sound Settings Overview
Thesoundsettingsmenuallowsyoutoconfigurethefollowingoptions:
Category Description
Sound profile Setyourphone'ssoundprofile.
Volume Adjustyourphone'svolumesettingstosuityourneedsandyour
environment.
Ringtone Setringtonestoalertyouofincomingcalls.
Ringtone ID Setincomingcallswithringtonescomposedautomaticallyfromtheir
phonenumber.
Sound with vibration Setthephonetovibrateaccompanyingtheringtone.
Vibrate type Setavibratetype.
Do not disturb Setaschedulewhentopreventinterruptionsfromnotifications.
Lock screen Chooseifyouwanttoshoworhidenotificationsonthelockscreen.
Apps Preventappsfromdisplayingnotificationsorsetappstoshow
notificationswithpriority.
Notification LED Configurethenotificationflashoptions.
More Adjustadditionalsoundsettings.
Access Sound Settings
1. Tap >Tools >Settings .
2. TapSound tab.
3. Setyoursoundoptions.
Yoursoundsettingsaresavedandapplied.
Sound Profile
Setyourphone'ssoundprofile.
1. Tap >Tools >Settings >Soundtab.
2. TapSound profile.
Settings Sound Settings 148
3. Taponeofthethreeoptions:
lSound
lVibrateonly
lSilent
Volume
Adjustyourphone'svolumesettingstosuityourneedsandyourenvironment.
1. Tap >Tools >Settings >Soundtab.
2. TapVolume.
3. Adjusteachvolumelevel.
lRingtone:Changesthevolumeofyourcallringtones(ifapplicable).
lNotification sound:Allowsyoutosetthisvolumelevel.Thisisthevolumeoftheringtone
whenyoureceiveanotification.
lTouch feedback & system:Changesthevolumeforfeedbacktapsandsystem
notifications.
lMusic, video, games & other media:Changesthevolumeofyourmusic,videos,and
othermedia.
4. TapOK.
Tip:YoucanadjusttheringervolumeonthehomescreenorApplicationsscreen,oralmostany
screenbyusingtheVolumeButtonsonthebackofyourphone.InotherapplicationssuchasMusic,
YouTube,spokendirections,andotheraudio,theVolumeButtonscontrolthevolumeofthe
application.
Ringtone
Thephoneringtonesalertyouofincomingcalls.
Toselectaringtoneforvoicecalls:
1. Tap >Tools >Settings >Soundtab.
2. TapRingtone.
3. Taparingtonetoselectitandtohearit.Ifyouwanttosettheringtone,tapOK.Ifnot,select
anotherringtoneortapCANCEL.
Touseasongasaringtone:

Settings Sound Settings 149
1. Tap >Tools >Settings >Soundtab.
2. TapRingtone.
3. Tap andtapasong.
FordetailsaboutusingtheMusicPlayerapplication,seeGooglePlayMusicApp.
Ringtone ID
Allowsyoutosetincomingcallswithringtonescomposedautomaticallyfromtheirphonenumber.
1. Tap >Tools >Settings >Soundtab.
2. TapRingtone ID.
3. Toactivatethisfeature,taptheRingtone IDswitch .
4. TapCompose ringtonesfortoselectifyouwanttocreateringtonesforeveryone,your
contacts,oryourfavorites.
Sound with Vibration
Allowsyoutosetthephonetovibrateaccompanyingtheringtone.
1. Tap >Tools >Settings >Soundtab.
2. TaptheSound with vibrationswitchtoturnonthefeature.
Vibrate Type
Allowsyoutosetavibratetypeforincomingcalls,incomingmessagesandemail,alarms,and
calendarevents.
1. Tap >Tools >Settings >Soundtab.
2. TapVibrate type.
3. Seteachvibratetypetothedesiredoption.
4. TapOK.
Do Not Disturb
Allowsyoutosetaschedulewhentopreventinterruptionsfromnotifications.Youcansettoallow
certainfeaturestointerruptwhenPriorityonlyisset.

Settings Sound Settings 150
1. Tap >Tools >Settings >Soundtab.
2. TapDo not disturb.
3. Setthedesiredoptionsasneeded.
Lock Screen
Allowsyoutochooseifyouwanttoshoworhidenotificationsonthelockscreen.
1. Tap >Tools >Settings >Soundtab.
2. TapLock screen.
3. Tapthedesiredoption.
Apps
Allowsyoutopreventappsfromdisplayingnotificationsorsetappstoshownotificationswithpriority
whenDonotdisturbissettoPriorityonly.
1. Tap >Tools >Settings >Soundtab.
2. TapApps.
3. Tapthedesiredapps.
4. ChooseBlocktoshownonotificationsfromtheapporchoosePrioritytoshownotifications
withpriorityontopofothersandwhenDonotdisturbsettoPriorityonly.
Notification LED
Configurethenotificationflashoptions.
1. Tap >Tools >Settings >Soundtab.
2. TapNotification LED.
3. ToactivateLEDlightsfornotifications,taptheNotification LEDswitch .
4. Selectthenotificationtype(s)youwanttheLEDtoflashfor.
More
Thismenuallowsyoutoadjustadditionalsoundsettings.
Settings Sound Settings 151
Notification Sound
Whenyoureceiveanotificationsuchasthearrivalofnewmessages,calendarevents,oralarms,the
phonesoundsaringtone.
1. Tap >Tools >Settings >Sound tab.
2. TapMore>Notification sound.
3. Tapasoundtoselectitandtohearit.Ifyouwanttosetthesound,tapOK.Ifnot,selectanother
soundortapCANCEL.
Vibrate on Tap
VibratewhentappingtheHometouchbuttonsandduringotherUIinteractions.
1. Tap >Tools >Settings >Sound tab.
2. TapMore>Vibrate on tap.
3. Taptheswitchtoturnonthefeature.
Sound Effects
Thismenuletsyouselectwhetheryouheartoneswhentouchingnumbersonthedialpad,selecting
on-screenoptions,andmore.
1. Tap >Tools >Settings >Sound tab.
2. TapMore>Sound effects.
3. Taptheswitchnexttoadesiredoptiontoenableordisablethefeature.
Voice Notifications
Thismenuletsyouselectwhetherornotyouwantthephonetoreadouttheincomingcallandthe
messageeventautomatically.
1. Tap >Tools >Settings >Sound tab.
2. TapMore>Voicenotifications.
3. Tap toturnthefeatureonandsetthedesiredoptions.
Settings Display Settings 152
Display Settings
Adjustingyourphone'sdisplaysettingsnotonlyhelpsyouseewhatyouwant,itcanalsohelp
increasebatterylife.
Display Settings Overview
Thedisplaysettingsmenuallowsyoutoconfigurethefollowingoptions:
Category Description
Home screen Configureyourphone'shomescreensettings.
Lock screen Configureyourphone'slockscreensettings.
Theme Choosethedesiredtheme.
Home touch buttons Configureoptionsforyourhometouchbuttons.
Font type Choosethedesiredfonttype.
Font size Choosethedesiredfontsize.
Bold text Choosewhetherthephonedisplaysboldtext.
Brightness Adjustyourscreen’scontrast(brightness)tosuityoursurroundings.
Comport view Settoreducetheamountofbluelightonscreentoreduceeyestrain.
Auto-rotate screen Choosewhetherthephoneautomaticallyswitchestheorientationofthe
screenasyouturnitsidewaysorevenupsidedown.
Screen timeout Selecthowlongthedisplayscreenremainsbacklitafteryoutouchthe
screenorpressakeybeforethescreendarkens.
More Adjustadditionaldisplaysettings.
Access Display Settings
1. Tap >Tools >Settings .
2. TapDisplay tab.
3. Setyourdisplayoptions.
Yourdisplaysettingsaresavedandapplied.
Home Screen
Configureyourphone'shomescreensettings.
Select Home
ChoosethedesiredHometheme.
Settings Display Settings 153
1. Tap >Tools >Settings >Displaytab.
2. TapHome screen>Select Home.
3. TapHome(standardAndroidlayout),EasyHome(simplifiedversionforuserslessfamiliarwith
Androidnavigation),orHome & app drawer(providesseparatelayoutfortheHomescreen
andappslist).
Wallpaper
Choosethedesiredwallpaperforthehomescreen.
1. Tap >Tools >Settings >Displaytab.
2. TapHome screen>Wallpaper.
3. Choosealocationandselectthedesiredwallpaper.
4. TapOKoSET WALLPAPERtosetitasthewallpaper.
Screen Swipe Effect
Choosethedesiredtypeofeffecttodisplaywhenyouswipefromonehomescreencanvastothe
next.
1. Tap >Tools >Settings >Displaytab.
2. TapHome screen>Screen swipe effect.
3. TapthedesiredeffectandthentapOK.
Sort Apps By
Sortappsbynameordownloaddateordownloaddateonthehomescreen.
1. Tap >Tools >Settings >Displaytab.
2. TapHomescreen>Sort apps by.
3. Taptheoptionyouwanttosortappsby.
Grid
Setthelayoutofthehomescreen.
1. Tap >Tools >Settings >Displaytab.
2. TapHome screen>Grid.
3. TapthedesiredgridtypeandthentapOK.

Settings Display Settings 154
Hide Apps
Chooseifyouwanttoshoworhideappsonthehomescreen.
1. Tap >Tools >Settings >Displaytab.
2. TapHome screen>Hide apps.
3. Taptheapp(s)thatyouwanttohideandAPPLY.
Lock Screen
TheLockscreenmenuletsyouconfigurescreenlockoptions.
Select Screen Lock
Youcanincreaseyourphone'ssecuritybysettingupaknock-code,pattern,PIN,orPassword.
Whenthesefeaturesareenabled,drawthecorrectunlockpattern,enterthePIN,orenterthe
passwordonthescreentounlockandregainaccesstothephone.
1. Tap >Tools >Settings >Displaytab.
2. TapLock screen>Select screen lock.
3. Selectthedesiredscreenlockoptionfromthefollowingoptions:
lNone:Noscreenlockset.
lSwipe:Swipeanypartofthescreentounlockthescreen.
lKnock Code:TheKnockCodefeatureallowsyoutocreateyourownunlockcodeusinga
combinationofknocksonthescreen.Youcanaccessthehomescreendirectlywhenthe
screenisoffbytappingthesamesequenceonthescreen.Youcanalsoselectwhich
notificationstoshowonthelockscreen.
lPattern:Opensasetofscreensthatguideyouthroughdrawingascreenunlockpattern.
lPIN:EnteranumericPINtounlockscreen.
lPassword:Enterapasswordtounlockscreen.
lFingerprints:Useyourfingerprinttounlockthescreenorcontent.
Fromthenon,anytimeyouwishtoturnthephoneonorunlockthescreen,youmustdrawyour
unlockpatternorenterthePINorpasswordtounlockthescreen.
Note:YouhavefiveopportunitiestoenteryourunlockPattern,PINorPassword.Ifyou'veentered
wronginformationfivetimesinarow,youmustwait30secondsbeforeyoucanattemptagain.

Settings Display Settings 155
Note:WhenusingKnockCode,failingtoenterthecorrectsequence5timeswilldisplayanoutlined
gridboxtoallowyoupreciseentry.
Smart Lock
Allowsyoutosetwhentoautomaticallyunlockthephone.
1. Tap >Tools >Settings >Displaytab.
2. TapLock screen>Smart Lock.
Note:Ifyouusethisfunction,setascreenlockfirst.
Wallpaper
Selectthewallpapertodisplayforyourlockscreen.
1. Tap >Tools >Settings >Displaytab.
2. TapLock screen>Wallpaper.
3. Choosealocationandselectthedesiredwallpaper.
4. TapSET WALLPAPERtosetitasthewallpaper.
Clock
Selectthepositionoftheclockonthelockscreen.
1. Tap >Tools >Settings >Displaytab.
2. TapLock screen>Clock.
3. Selectthepositionoftheclockonthelockscreen.
Shortcuts
Allowsyoutochoosetheshortcutsavailableonthelockscreen.
1. Tap >Tools >Settings >Displaytab.
2. TapLock screen>Shortcuts.
3. Tapashortcutandselectthedesiredapp.Youcanalsoselect todeletetheshortcuts.
4. TapSAVE.
Screen Swipe Effect
Choosethedesiredscreenswipeeffectwhenyouswipethescreen.
Settings Display Settings 156
1. Tap >Tools >Settings >Displaytab.
2. TapLock screen>Screen swipe effect.
3. TapParticle,Soda,Basic circle,orVector circle.
Weather Animation
Showweatheranimationeffectonthelockscreen.
1. Tap >Tools >Settings >Displaytab.
2. TapLock screen.
3. TaptheWeather animationswitchtoshowaweatheranimationonthelockscreenwhenit
rainsorsnowsinyourcurrentlocation.
Contact Info for Lost Phone
Selectwhethertodisplaytheownerinformationonthelockscreenandcustomizetheowner
information.
1. Tap >Tools >Settings >Displaytab.
2. TapLock screen.
3. TapContact info for lost phone.
4. EnterthedesiredinformationinthefieldprovidedandtapSAVE.
Lock Timer
Choosetheamountoftimebeforethescreenautomaticallylocksafterthescreenhastimed-out.
1. Tap >Tools >Settings >Displaytab.
2. TapLock screen>Lock timer.
3. Tapthedesiredtime.
Power Key Instantly Locks
AllowsyoutoinstantlylockthescreenwhenyoupressthePower/LockButton.
1. Tap >Tools >Settings >Displaytab.
2. TapLock screen.
3. TapPowerkey instantly lockstoturnonthefeature.
Settings Display Settings 157
Theme
Choosethedesiredtheme.
1. Tap >Tools >Settings >Displaytab.
2. TapTheme.
Home Touch Buttons
Configureoptionsforyourhometouchbuttons.
Toselectthecombinationofyourhometouchbuttons:
1. Tap >Tools >Settings >Displaytab.
2. TapHome touch buttons>Button combination.
3. DragtheiconstorearrangetheHometouchbuttons.
Toselectthecolorofyourhometouchbuttons:
1. Tap >Tools >Settings >Displaytab.
2. TapHome touch buttons>Color.
3. Tapthedesiredcolorthemefromthelist.
Font Type
Choosethedesiredfonttype.
1. Tap >Tools >Settings >Displaytab.
2. TapFont type.
3. Tapadesiredfonttype.
Font Size
Choosethedesiredfontsize.
1. Tap >Tools >Settings >Displaytab.
2. TapFont size.
3. Tapadesiredfontsize.
Settings Display Settings 158
Bold Text
Choosewhetherthephonedisplaysboldtext.
1. Tap >Tools >Settings >Displaytab.
2. TaptheBold text switch tosettheboldtext.
Brightness
Adjustyourscreen’scontrast(brightness)tosuityoursurroundings.
1. Tap >Tools >Settings >Displaytab.
2. ScrolldowntoBrightnessandusetheslidertosetthebrightnesslevel.
Tip:Forthebestbatteryperformance,usethedimmerlevels.YoucanalsosetAutotoadjust
brightnessdependingonthesurroundinglighting.
Comfort View
Settoreducetheamountofbluelightonscreentoreduceeyestrain.
1. Tap >Tools >Settings >Displaytab.
2. TapComfortview.
3. Taptheswitchtousecomportviewandselectthebluelightfilter.
Auto-Rotate Screen
Choosewhetherthephoneautomaticallyswitchestheorientationofthescreenasyouturnit
sidewaysorevenupsidedown.
1. Tap >Tools >Settings >Displaytab.
2. TaptheAuto-rotate screen switch toautomaticallyrotatethescreen.
–or–
Todisabletheauto-rotatefeature,taptheAuto-rotate screen switch again.
Note:SomeapplicationsonyourphonedonotsupporttheAuto-rotatefeature.

Settings Display Settings 159
Screen Timeout
Selecthowlongthedisplayscreenremainsbacklitafteryoutouchthescreenorpressakeybefore
thescreendarkens.
1. Tap >Tools >Settings >Displaytab.
2. TapScreen timeout.
3. Select15 sec, 30 sec, 1 min, 2 min, 5 min, 10 min,15 min,orKeep screen turned on.
Note:Longbacklightsettingsreducethebattery’stalkandstandbytimes.Forthebestbattery
performance,usetheshortestconvenienttimeout.
More
TheMoresettingsmenuallowsyoutoadjustadditionaldisplaysettings.
Display Size
Settheitemsonthescreentoasizethatiseasyforyoutosee.Someitemsmaychangeposition.
KnockON
Turnonoroffthescreenbytappingthescreentwice.
Screen Saver
Screensaverwillbeonwhenthephoneissleepingwhiledockedand/orcharging.
Mini View
TurnonthismenutoshrinkthescreenforusewithonehandbyswipingleftorrightacrosstheHome
touchbuttons.
Motion Sensor Calibration
Improvetheaccuracyofthetiltandspeedofthesensor.

Settings General Settings 160
General Settings
Thefollowingtopicsdetailyourphone'sgeneralsettings,includingLanguage&keyboard,Location,
Accounts&sync,andmore.
General Settings Overview
YoucansetthefollowingoptionsintheGeneralsettingsmenu:
Category Description
Language & keyboard Setthelanguageandkeyboardtype.
Location Enablelocationservice.
Accounts & sync Manageandsyncyouraccounts.
Accessibility Configureanyaccessibilityplug-insyouhaveinstalledonyourphone.
Shortcut keys SelectwhethertoenableshortcutkeysfeatureusingthePower/Lock
ButtonandVolume Buttons.
Google services UseGoogleSettingstomanageyourGoogleappsandaccountsettings.
Fingerprints &
security
UsetheFingerprints&securitysettingstohelpsecureyourphoneandits
data.
Pen UsethePensettingstoconfigureoptionsforwhenthepenisremoved.
Date & time Setyourpreferencesforhowthedateandtimeisdisplayed.Youcan
alsoselectatimezone.
Storage MonitortheusedandavailableinternalmemoryandSDcard(if
available).Youcanalsomount/unmounttheSDcardanderaseits
contents.
Battery & power
saving
Showanybatteryinformationandconfigureoptions.
Memory Monitorthememoryusedonaverageandthememoryusedbyappsin
thedevice.
System updates Fromtimetotime,updatesmaybecomeavailableforyourphone.You
candownloadandapplyupdatesthroughtheSettingsmenu.
Apps Viewdetailsabouttheapplicationsinstalledonyourphone,managetheir
data,forcethemtostop,andsetwhetheryouwanttopermitinstallation
ofapplicationsthatyouobtainfromwebsitesandemail.
Backup & reset Back-upyourdata,automaticallyrestoredata,anderaseallthedataon
yourphone.
About phone Displaysinformationsuchasthenetwork,battery,hardware,and
software.

Settings General Settings 161
Access General Settings
1. Tap >Tools >Settings .
2. TapGeneral tab.
3. Setyourgeneraloptions.
Yourgeneralsettingsaresavedandapplied.
Language & Keyboard
Yourphone'sLanguage&keyboardsettingsletyouselectalanguageforthedevicesscreensand
menus,aswellasmanageapersonaluserdictionary.Thekeyboardsettingsletyouselecta
preferredinputmethod,controlkeyboardsettings,andmore.
Language
Youcanchoosetodisplayyourdevice'son-screenmenusinmultiplelanguages.
1. Tap >Tools >Settings >General tab>Language & keyboard>Language.
2. Selectalanguagefromthelist.
Keyboard & Input Methods
Showsthecurrentkeyboardtypeandtheavailableinputmethods.Taptheoptionstoconfigureeach
keyboard’ssettings.
Text-to-Speech Output
Taptosetthepreferredengineorgeneralsettingsfortext-to-speechoutput.
Pointer Speed
Adjustthepointerspeed.
Reverse Buttons
Reversethemousebuttonstousetheprimarybuttonontherightside.
Location
TheLocationsettingsmenuallowsyoutoenablelocationservice.Yourphonedeterminesyour
approximatelocationusingGPS,Wi-Fiandmobilenetworks.
Settings General Settings 162
nTap >Tools >Settings >Generaltab>Location.
lMode:SetthelocationmodeasHigh accuracy (GPS and networks), Battery saving
(Networks only),orDevice sensors only (GPS only).
lRECENT LOCATION REQUEST:Viewappsthatrecentlyrequestedlocationinformation.
lLow power location estimation:Estimatethedevicelocationbyusinglowpower
consumption.
lGoogle Location History:PermitGoogleservicestocollectyourlocationinformation.
Accounts & Sync
UsetheAccounts&syncsettingsmenutoadd,remove,andmanageyourGoogleandother
supportedaccounts.Youalsousethesesettingstocontrolhowandwhetherallapplicationssend,
receive,andsyncdataontheirownschedulesandwhetherallapplicationscansynchronizeuser
dataautomatically.Gmail,Calendar,andotherapplicationsmayalsohavetheirownsettingsto
controlhowtheysynchronizedata;seethesectionsonthoseapplicationsfordetails.
1. Tap >Tools >Settings >Generaltab.
2. TapAccounts & sync.
lTapADD ACCOUNTtoaddnewaccount.
lTapAuto-sync datatoautomaticallysyncyouraccountdata.
Accessibility
UsetheAccessibilitysettingstoconfigureanyaccessibilityplug-insyouhaveinstalledonyour
phone.
Note:Requiresadditionalplug-instobecomeselectable.
Vision
TheVisionsettingallowsyoutoconfigurethevisualoptions.
1. Tap >Tools >Settings >Generaltab>Accessibility>Vision.
2. Setthefollowingoptions:
lTalkBack:TaptheTalkBackswitch toturniton.TapSettingsatthebottomofthe
screentoadjusttheTalkBacksettings.WhenTalkBackisturnedon,thetouchscreen
settingsrequiretheusertofirsttapanitemtheywishtoselect,andthendoubletaptheitem
againinordertoaccessthisfeature.
lVoicenotifications:Useautomaticspokenalertsforincomingcallsandmessages.
Settings General Settings 163
lFont size:Taptosetthesizeofthetext.
lBold text:Taptosetboldtext.
lDisplay size:Settheitemsonthescreentoasizethatiseasyforyoutosee.Someitems
maychangeposition.
lTouch zoom:Zoominoroutbytripletappingthescreen.
lWindow zoom:Zoominoroutwithinawindowandinvertthecolor.
lLarge mouse pointer:Magnifythemousepointer.
lHigh contrast screen:Turnthebackgroundcolorintoblackforahighcontrastscreen.
lScreen color inversion:Taptoinvertthecolorsofthescreenandcontent.
lScreen coloradjustment:Setthecolorcontrastforbetterscreenviewing.
lGrayscale:Taptosetgrayscalescreen.
lEnd calls with the Power key:Tapsothatyoucanendvoicecallsbypressingthe
Power/LockButton.Whenthisoptionisenabled,pressingthePower/LockButtonduring
acalldoesnotlockthescreen.
Hearing
TheHearingsettingallowsyoutoconfigurehearingoptions.
1. Tap >Tools >Settings >Generaltab>Accessibility>Hearing.
2. Setyourpreferredoptions.
lCaptions:Customizecaptionsettingsforthosewithhearingimpairments.
lAll notificationLED:BlinktheLEDlightforallappnotificationsandkeepitonwhen
charging.
lFlash alerts:Theflashwillblinkforincomingcallsandnotifications.
lTurn off all sounds:Activatetoturnoffallsounds.
lAudio type:TaptochangethesoundtoMonoorStereo.
lSound balance:Tomanuallyadjustthesounddirection.
Motor & Cognition
TheMotor&cognitionsettingallowsyoutoconfigurephysicalandmotoroptions.
1. Tap >Tools >Settings >Generaltab>Accessibility>Motor & cognition.
2. Setyourpreferredoptions.

Settings General Settings 164
lTouch assistant:Provideatouchboardwitheasyuseforgeneralbuttonsorgesturesto
accessinshort.TaptheTouchassistanticon toaccessthePowerButton,Home
Button,Volume Down Button,VolumeUp Button,andtheNextbutton(Screen
capture, Accessibility,Pinch).
lTouch input:Entertextbytouchingandholdingthescreenormodifyitbysimplytouching
thescreen.
lPhysical keyboard:Customizethekeyboardsettings.
lAuto mouse click:Automaticallyclickthemousepointerincaseofnomovement.
lTouch and hold for calls:Answerordeclinecallsbytouchingandholdingthecallbutton
insteadofdraggingit.
lScreen timeout:Turnoffthescreenautomaticallywhenthedeviceisleftidleforaspecified
periodoftime.
lTouch control areas:Limitthetouchareasothatonlyaparticularportionofthescreencan
becontrolledbytouchinput.
General
TheGeneralsettingsallowsyoutoconfiguregeneralsystemoptions.
1. Tap >Tools >Settings >Generaltab>Accessibility.
2. Setyourpreferredoptions.
lAccessibility featuresshortcut:Setsquick,easyaccesstoselectedfeatureswhenyou
triple-taptheHome Key .
lPersistent notification:Taptheswitch toturniton.Alertssoundrepeatedlywhen
thereareunreadnotificationsforcertainapps.
lAuto-rotate screen:Taptoallowthedevicetorotatethescreendependingonthedevice
orientation(portraitorlandscape).
Services
TheServicessettingallowsyoutoconfiguretheserviceoption.
1. Tap >Tools >Settings >Generaltab>Accessibility.
2. TapSwitch Accesstocontrolyourdeviceusingconfigurablekeycombinations.
Settings General Settings 165
Shortcut Keys
ShortcutkeysprovidequickaccesstoappsusingthePower/Lock ButtonandVolume Buttons.If
youwanttodisableashortcutkeyfeature,taptheswitchtoturnon/off.
Power
YoucantakeselfiesorscreenshotsusingthefingerprintsensorinthePower/Lock Button.
1. Tap >Tools >Settings >Generaltab>Shortcut keys.
2. Tapeachswitchtoenable/disablethefeature.
lTake a selfie in Camera:Whenthefrontcameraison,placeyourfingeronthe
Power/Lock Button.
lTake a screenshot:Totakeascreenshot,tapthePower/Lock Buttononce,then
immediatelypressandholditafter.
Volume
YoucanquicklyopenCapture+orCamerabypressingtheVolume Buttonstwicewhenthe
screenisofforlocked.
1. Tap >Tools >Settings >Generaltab>Shortcut keys.
2. TapOpen Capture+/Cameraswitchtoenable/disablethefeature.
lCapture+:PresstheVolume Up Buttontwice.
lCamera:PresstheVolume Down Buttontwice.
Google Services
UseGoogleServicestomanageyourGoogleappsandaccountsettings.
nTap >Tools >Settings >Generaltab>Google services.
Fingerprints & Security
UsetheFingerprints&securitysettingstohelpsecureyourphoneanditsdata.
nTap >Tools >Settings >Generaltab>Fingerprints & security.
Fingerprints
Useyourfingerprinttounlockthescreenorcontent.

Settings General Settings 166
Content Lock
SelectlocktypestolockfilesintheQuickMemo+app.
Encrypt SD Card
EncryptSDcardstorageandkeepdataunavailableforotherdevices.
Secure Start-up
Whenyoupoweronyourdevice,youwillberequiredtoenteryourscreenlock.
Password Typing Visible
Enabletobrieflyshoweachcharacterofpasswordsasyouenterthemsothatyoucanseewhatyou
enter.
Phone Administrators
Allowsyoutoviewordeactivatedeviceadministrators.
Unknown Sources
Allowsinstallationofnon-PlayStoreapplications.
Credential Protection
Displaysthestoragetypeforcredentials.
Certificate Management
Allowsyoutomanagethecertificate.
Trust Agents
ViewordeactivateTrustagents.
Screen Pin
Thisfeatureallowsyoutolockyourdevicesothatthecurrentusercanonlyaccessthepinnedapp.
Thisisusefulforuserswithchildren.
Usage Access
AllowsyoutosetaccesstoAppusage.
Pen
UsethePensettingstoconfigureoptionsforwhenthestyluspenisremovedfromitsslot.
Settings General Settings 167
nTap >Tools >Settings >Generaltab>Pen.
Open When Pen is Removed
Allowsyoutoselectwhichfeaturewillautomaticallystartwhenthepenisremovedfromthedevice.
ChoosefromNone,PenPop,andPop Memo.
Pen Pop Shortcut
AllowsyoutodesignateanappyoucanaccessasashortcutfromthePenPopoptionsicons.
Screen-off Memo
Enablethisoptiontoallowyoutocreatenoteswhenthescreenisoffandyouremovethepen.
Pen Detection
Enablethisoptiontobenotifiedbysoundand/orvibrationwhenthepenisremovedorinserted.
Pen Keeper
Enablethisoptiontoberemindedtoreplacethepen.You'llreceiveanaudioand/orvisual
notificationwhenthedeviceismovedwiththescreenoffandthepenremoved.
Date & Time
Setyourpreferencesforhowthedateandtimeisdisplayed.Youcanalsoselectatimezone.
nTap >Tools >Settings >Generaltab>Date & time.
Storage
TheStoragemenuletsyoumonitortheusedandavailableinternalmemoryandSDcard(if
available).Youcanalsomount/unmounttheSDcardanderaseitscontents.
nTap >Tools >Settings >Generaltab>Storage.
Battery & Power Saving
TheBatterymenuletsyoushowanybatteryinformationandconfigureoptions.
1. Tap >Tools >Settings >Generaltab.
2. TapBattery&power saving.
Settings General Settings 168
lTapBattery usagetodisplaytheappsthatusethemostbatterypower.
lTapBattery percentage on status bartodisplaythebatterypercentageindicatoronthe
statusbar.
lTapBattery savertosettheBatterysaverfeatureonoroffandselectwhichfunctionsare
changedwhenthefeatureisactivated.
Memory
Youcanmonitorthememoryusedonaverageandthememoryusedbyappsinthedevice.
nTap >Tools >Settings >Generaltab>Memory.
System Updates
Fromtimetotime,updatesmaybecomeavailableforyourphone.Youcandownloadandapply
updatesthroughtheSettingsmenu.
nTap >Tools >Settings >Generaltab>System updates.
Apps
TheAppssettingsmenuletsyouviewdetailsabouttheapplicationsinstalledonyourphone,
managetheirdata,forcethemtostop,andsetwhetheryouwanttopermitinstallationofapplications
thatyouobtainfromwebsitesandemail.
Toviewdetailsaboutyourapplications:
1. Tap >Tools >Settings >Generaltab>Apps.
2. Tapthedesiredapptoviewitsinformation.
Toforceapplicationstostop:
1. Tap >Tools >Settings >Generaltab>Apps.
2. Findtheapplicationtoforcestopandtaptheapplication.
3. TapForce stop.
4. ReadthedisclaimerandtapOK.
Touninstalladownloadedapplication:
1. Tap >Tools >Settings >Generaltab>Apps.
2. Findtheapplicationyouwanttouninstallandtapit.

Settings General Settings 169
3. TapUninstall.
4. ReadthedisclaimerandtapOK.
Backup & Reset
Theprivacysettingsonyourdeviceallowyoutoback-upyourdata,automaticallyrestoredata,and
eraseallthedataonyourphone.
nTap >Tools >Settings >Generaltab>Backup & reset.
LG Backup
Backsupallinformationonthedeviceandrestoresitintheeventofdatalossorreplacement.
Back Up My Data
Allowsyoutobackupappdata,Wi-Fipasswords,andothersettingstoGoogleservers.
Backup Account
Allowsyoutochooseanaccounttobackupdata.
Automatic Restore
Whenreinstallinganapp,enablingthisoptionrestoresbackedupsettingsanddata.
Network Settings Reset
Resetallnetworksettings.
Factory Data Reset
Resettingthephonerestoresallthefactorydefaults,includingpersonaldatafromphonestorage,
informationaboutyourGoogleAccount,anyotheraccounts,yoursystemandapplicationsettings,
andanydownloadedapplications.Afterresettingthephone,thenexttimeyouturnonthephone,
you’repromptedtoreenterthesamekindofinformationaswhenyoufirststartedthephone.See
ActivateYourPhone.
1. Tap >Tools >Settings >Generaltab>Backup & reset.
2. Ifyouarecertainthatyouwouldliketorestoreallfactorysettings,tapFactory data reset.
3. TapRESET PHONE.
4. Enteryourunlocksequenceifyouhaveconfiguredone,thentapDelete allandRESETto
confirm.
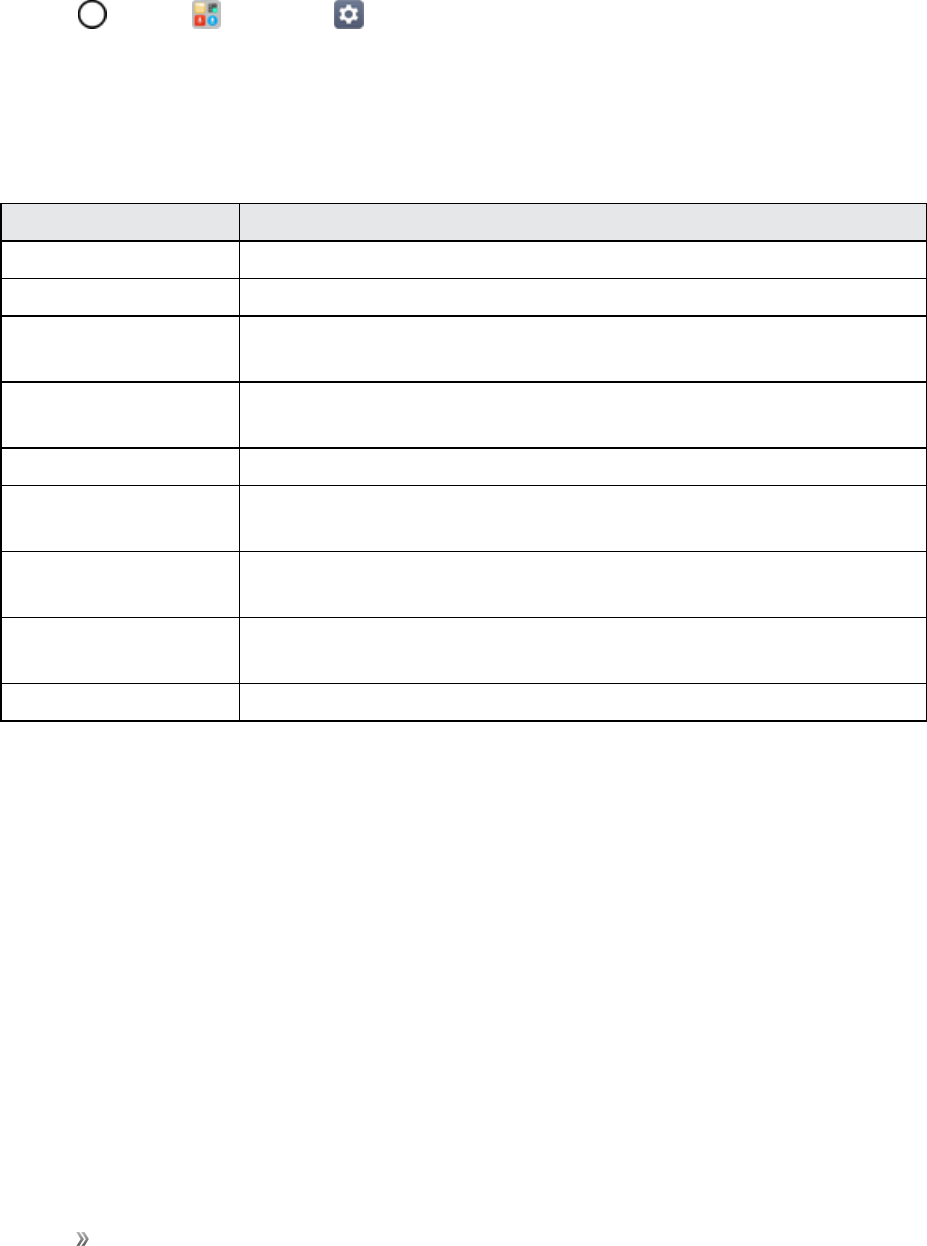
Settings General Settings 170
About Phone
TheAboutPhonemenudisplaysinformationsuchasthenetwork,battery,hardware,andsoftware.
1. Tap >Tools >Settings >Generaltab>About phone.
2. Tapthedesiredmenu.
About Phone Overview
ThefollowingAboutPhoneitemsmaybereviewedorset:
About Phone Item Description
Phone name Changethenameofyourdevice.
Update Center CheckupdatesforappsprovidedbyLGElectronics.
Network Checknetworkinformationsuchasthesignalpower,IPaddressand
etc.
Status Checkyourphone'sstatussuchasyourphonenumber,MEID/IMEIand
etc.
Battery Checkyourbatterystatus,levelandusage.
Hardware info Checkyourhardwareinformationsuchasthemodelnumber,hardware
versionandetc.
Software info CheckyoursoftwareinformationsuchastheAndroidversion,software
versionandetc.
Legal info ReviewvarioustypesofimportantlegalinformationforLGsoftware,
opensourcelicenses,Googleandetc.
Patent information Checkpatentinformationforthismodel.

Getting Help 171
Getting Help
ThetopicsinthissectionwillcoverphonespecificationsandhowtocontactSprintandmanageyour
wirelessservice.

Getting Help For Assistance 172
For Assistance
Thefollowingtopicsaddressareasofsupportforyourphone,includingtroubleshooting,account
information,andcustomerservicecontactinformation.
Troubleshooting
Checkthequestionsandanswersbelowfortroubleshootingsolutionsforcommonphoneissues.
Check Here First
Issue:Phonefreezes/operationisunstable.
Answer:Turnthephoneonagain.Ifyouareunabletoturnthephoneoff,removeandreplace
theBattery,andthenturnthephoneonagain.Datathatwasbeingeditediserasedafteryour
phoneispoweredonagain.
Issue:Operationisunstableafteranewapplicationwasinstalled.
Answer:Thenewlyinstalledapplicationmaybethecause.UninstalltheapplicationinSafe
mode.SeeUninstallanApp.ToturnthephoneoninSafemode:
lPressandholdthePower/Lock Button>touchandholdPower off,readthedisclaimer
forsafemode,andthentapTURN ON.
oAfterturningthephoneoninSafemode,"SafeMode"appearsatlowerleft.
oAfterrestartinginSafemode,yourphonecanbepoweredonasusual.
oBeforeturningthephoneoninSafemode,itisrecommendedthatyoubackupimportant
data.
oBypoweringthephoneoninSafemode,addedwidgetsmaybedeleted.
Issue:Cannotusephone,mail,orInternet.
Answer 1:Checkwhetheryouarewheresignalisweakoroutofservicearea.
Answer 2:Powerthephoneonagain.
Answer 3:IsthephoneinAirplanemode?TocheckthatAirplanemodeiscanceled:
1. Tap >Tools >Settings >Networkstab.
2. TapAirplane modeswitch toturnthefunctionoff.
Answer4:Isdatacommunicationdisabled?Tocheckthatdatacommunicationisenabled:
Getting Help For Assistance 173
1. Tap >Tools >Settings >Networkstab>Mobile data.
2. TaptheMobile dataswitch toturniton.
Answer5:Isadisabledaccesspointset?Toresettoinitialsettings:
1. Tap >Tools >Settings >Networks tab> More.
2. TapMobile networks>Access Point Names.
3. Tap >Reset to default.
Issue:Batterylevelgoesdownquickly.
Answer:Areyouwheresignalisweakorhavebeenoutofserviceareaforalongperiod?
CallingwheresignalisweakorbeingoutofserviceareausesalotofBattery.
Issue:Cannotinstallapplications.
Answer:ApplicationscannotbeinstalledwithonlyalittlefreespaceonthephoneorSDcard.
Tocheckfreespace,seeStorage.Applicationsnotsupportedbyyourphonecannotbeinstalled.
Issue:Cannotunlockscreen.
Answer:Powerthephoneonagain.Ifyouareunabletoturnthephoneoff,removeandreplace
theBattery,andthenpowerthephoneonagain.Datathatwasbeingeditediserasedafterthe
phoneispoweredonagain.
Sprint Account Information and Help
Findoutaboutaccountpasswordsandinformationaboutmanagingyouraccountandfindinghelp.
Sprint Account Passwords
Youwillneedtocreatepasswordstoprotectaccesstoyourpersonalaccountinformation,your
voicemailaccount,andyourdataservicesaccount.AsaSprintcustomer,youenjoyunlimited
accesstoallyourinformation.
Account User Name and Password
Ifyouaretheaccountowner,youwillcreateanaccountusernameandpasswordwhenyousignon
tosprint.com/mysprint.(ClickRegisterandfollowthepromptstogetstarted.)Ifyouarenotthe
accountowner(ifsomeoneelsereceivesthebillforyourSprintservice),youcangetasub-account
passwordatsprint.com/mysprint.
Getting Help For Assistance 174
Voicemail Passcode
You’llcreateyourvoicemailpasscodewhenyousetupyourvoicemail.SeeVoicemailSetupfor
moreinformationonyourvoicemailpasscode.
Data Services Password
WithyourSprintphone,youmayelecttosetupanoptionaldataservicespasswordtocontrolaccess
andauthorizepurchases.
Formoreinformation,ortochangeyourpasswords,signontosprint.com/mysprint.
Manage Your Account
ManageyourSprintaccountfromyourcomputer,yourSprintphone,oranyotherphone.
Online:sprint.com/mysprint
nAccessyouraccountinformation.
nCheckyourminutesused(dependingonyourSprintserviceplan).
nViewandpayyourbill.
nEnrollinSprintonlinebillingandautomaticpayment.
nPurchaseaccessories.
nShopforthelatestSprintphones.
nViewavailableSprintserviceplansandoptions.
nLearnmoreaboutdataservicesandotherproductslikegames,ringtones,screensavers,and
more.
From Your Sprint Phone
1. Tap >Phone >Dial tab.
2. Doanyofthefollowing:
lTap toaccessasummaryofyourSprintserviceplanorgetanswerstoother
questions.
lTap toaccessthe“PayMyBill”sectionofSprintZonetomakeapayment.
lTap tocheckminuteusageandaccountbalance.

Getting Help For Assistance 175
Sprint Support Services
Sprint411andSprintOperatorServicesletyoueasilyaccessinformationandcallingassistance
fromyourSprintphone.
Sprint 411
Sprint411givesyouaccesstoavarietyofservicesandinformation,includingresidential,business,
andgovernmentlistings;movielistingsorshowtimes;drivingdirections,restaurantreservations,and
majorlocaleventinformation.Youcangetuptothreepiecesofinformationpercall,andtheoperator
canautomaticallyconnectyourcallatnoadditionalcharge.
Thereisaper-callchargetouseSprint411,andyouwillbebilledforairtime.
nTap >Phone > Dial tab,andthentap .
Sprint Operator Services
SprintOperatorServicesprovidesassistancewhenyouplacecollectcallsorwhenyouplacecalls
billedtoalocaltelephonecallingcardorthirdparty.
nTap >Phone > Dial tab,andthentap .
Formoreinformationortoseethelatestinproductsandservices,visitusonlineat
sprint.com/mysprint.
Anti-Theft Guide
Youcansetupyourdevicetopreventotherpeoplefromusingitifit’sbeenresettofactorysettings
withoutyourpermission.Forexample,ifyourdeviceislost,stolen,orwiped,onlysomeonewithyour
GoogleAccountorscreenlockinformationcanusethedevice.
Allyouneedtomakesureyourdeviceisprotectedis:
nSet a screen lock:Ifyourdeviceislostorstolenbutyouhaveascreenlockset,thedevicecan’t
beerasedusingtheSettingsmenuunlessyourscreenisunlocked.
nAdd your Google Account on your device:IfyourdeviceiswipedbutyouhaveyourGoogle
Accountonit,thedevicecan’tfinishthesetupprocessuntilyourGoogleAccountinformationis
enteredagain.
Afteryourdeviceisprotected,you’llneedtoeitherunlockyourscreenorenteryourGoogleAccount
passwordifyouneedtodoafactoryreset.Thisensuresthatyouorsomeoneyoutrustisdoingthe
reset.
Note:DonotforgetyourGoogleAccountandpasswordyouhadaddedtoyourdevicepriorto
performingafactoryreset.Ifyoucan’tprovidetheaccountinformationduringthesetupprocess,you
won’tbeabletousethedeviceatallafterperformingthefactoryreset.

Getting Help For Assistance 176
Copyright Information
©2017Sprint.SprintandthelogoaretrademarksofSprint.Othermarksaretrademarksoftheir
respectiveowners.
LGandtheLGlogoareregisteredtrademarksofLGCorp.LGStylo3isatrademarkofLGCorp.Wi-
Fi®andtheWi-FilogoareregisteredtrademarksoftheWi-FiAlliance.Bluetooth®isaregistered
trademarkofBluetoothSIG,Inc.worldwide.GoogleisatrademarkofGoogleInc.microSD™isa
trademarkofSanDisk.Othertrademarksandtradenamesarethoseoftheirrespectiveowners.
Unlessotherwisespecifiedherein,allaccessoriesreferencedhereinaresoldseparately.All
features,functionality,andotherproductspecificationsaresubjecttochange.Screenshotsare
simulatedandsubjecttochange.
Note: Open Source Software
ToobtainthesourcecodeunderGPL,LGPL,MPL,andotheropensourcelicenses,thatis
containedinthisproduct,pleasevisithttp://opensource.lge.com.Inadditiontothesourcecode,all
referredlicenseterms,warrantydisclaimersandcopyrightnoticesareavailablefordownload.LG
ElectronicswillalsoprovideopensourcecodetoyouonCD-ROMforachargecoveringthecostof
performingsuchdistribution(suchasthecostofmedia,shipping,andhandling)uponemailrequest
toopensource@lge.com.Thisofferisvalidforthree(3)yearsfromthedateonwhichyoupurchased
theproduct.

Index 177
4
4GLTE85
A
AboutPhone170
AbouttheUserGuide2
AccessEmailandDataServices
Internationally94
AccessYourVoicemailInternationally93
Accessibility162
Accounts&Sync162
ActivateSprintWorldwideServiceonYour
Account90
ActivateYourPhone20
AddaBookmark86
AddaContact70
AddaVPNConnection145
AddanEventtotheCalendar119
AddAnotherGoogle(Gmail)Account83
AddFolderstotheHomeScreen52
AddRemindersintheCalendar120
AddWidgetstotheHomeScreen52
AdditionalClockFeatures127
AirplaneMode140
AnswerPhoneCalls56
Anti-TheftGuide175
Applications25
Apps150,168
ArchiveGmailThreads82
Auto-RotateScreen158
B
BackUpContacts74
BackUpYourDownloadedMusicFiles135
Backup&Reset169
BasicSettings139
Basics23
Battery&PowerSaving167
BatteryUse4
Bluetooth101
BluetoothInformation101
BluetoothSettings140
BoldText158
Brightness158
BrowserSettings87
C
Calculator126
CalendarSettings122
CallEmergencyNumbers55
CallForwarding66
CallfromCallLogs59
CallSettings141
CallSettingsMenu66
CallUsingthePhoneDialer54
CallWaiting65
CallerIDBlocking65
CameraOverview107
CameraSettings117
CaptureScreenshots25
Capture+128
ChangetheWallpaper51
ChargetheBattery7
CheckReceivedGmailMessages81
ChromeBrowser86
Clock126
ComfortView158
CompletetheSetupScreens21
ConferenceCalling65
ConfigureVisualVoicemailSettings62
ConfigureWi-FiSettings99
ConnecttoaPairedBluetoothDevice103
ConnecttoorDisconnectFromaVPN146
ContactSprintforAssistancewith
InternationalService95
ContactsScreenLayout72
ContentSharing104
CopyrightInformation176
CreateaGoalintheCalendar120
CreateaGoogleAccount36
CreateanExchangeAccount37
CreateandSendaGmailMessage80
CreatePlaylistsinGooglePlayMusic132
CustomizetheHomeScreen51
D
DataConnectionStatusandIndicators86
DataServicesGeneralInformation(4GLTE
and3GNetworks)85
Index
Index 178
Date&time167
DeleteaContact73
DeleteCalendarEvents,Reminders,or
Goals121
DeleteGmailThreads82
DisconnectWi-Fi99
DoNotDisturb149
Duo89
E
EditaContact73
EditCalendarEvents,Reminders,or
Goals121
EditPictures114
EnableGlobalRoamingMode91
EnabletheBluetoothFeature101
ExtendedHomeScreens48
F
Facebook88
FactoryResetProtection38
FileManager129
FindandInstallanApp39
FingerprintRecognition27
Fingerprints&Security165
FontSize157
FontType157
FormatmicroSDCard15
G
GestureShot111
GestureView112
GetHelpwithGooglePlay41
GetSupportfromSprintZone136
Gmail80
GmailSettings84
GoogleAccount36
GoogleCalendar119
GoogleMaps123
GooglePlayMusicApp131
GooglePlayMusicScreenLayout132
GooglePlayStore39
GoogleSearch124
GoogleServices165
H
HomeScreen23,152
HomeScreenBasics47
HomeScreenLayout47
HomeTouchButtons157
Hotspot100
I
ImportContacts74
In-CallScreenLayoutandOperations57
InsertmicroSDCard12
InserttheBattery5
InstalltheFacebookApponYourPhone88
InstalltheTwitterApponYourPhone89
InternationalDataRoaming94
IntervalShot112
L
Language&Keyboard161
ListentoMultipleVoicemailMessages62
Location161
LockandUnlockYourScreen41
LockScreen150,154
M
MakeandReceiveWorldwideCalls92
ManageMessageConversations77
ManageYourAccount174
ManagingFingerprints29
Memory168
Messenger75
microSDCard11
MobileDataSettings140
More142,150,159
Multi-taskingFeature29
Multi-Window29
MuteGmailThreads82
N
NanoSIMCard9
NASCARMOBILE137
NavigationApps123
NewMessagesNotification77
NotificationLED150
NotificationPanel50
O
OpenNewBrowserTabs87
OptionalCallingServices64
Index 179
Overviewscreen30
P
PairBluetoothDevices102
PartsandFunctions3
Pen166
PhoneSettingsMenu24
PlaceaCallfromContacts58
PlaceandAnswerCalls54
PlayMusicwithGooglePlay131
PlayingContent104
PortraitandLandscapeScreen
Orientation24
PostaVideotoYouTube136
PrecautionsforFingerprintRecognition27
PreinstalledApps26
PrepareYourPhoneforVPN
Connection145
Q
QuicklyHideorShowEvents121
QuickMemo+129
R
ReceiveInformationviaBluetooth104
RecordVideos109
RegisteringFingerprints28
RemovetheBattery6
ReportSpam83
RequestaRefundforaPaidApp40
ReviewVisualVoicemail61
Ringtone148
RingtoneID149
RoamingSettings143
S
SaveandResumeaDraftMessage76
SaveasFlippedImage112
Scout123
ScreenTimeout159
SearchGmailMessages82
SelectaCarrier91
SelfieShot111
SendaMultimediaMessage(MMS)75
SendaPictureorVideobyMultimedia
Message115
SendaTextMessage75
SendInformationUsingBluetooth103
SendPicturesorVideosbyEmail115
SendPicturesorVideosUsing
Bluetooth116
SendingorReceivingFiles105
SetAlarms126
SetCameraFunctions118
SettheCommunicationsMethodforGlobal
Use91
SetUpSecureCredentialStorage145
SetUpYourVoicemailAccessNumberfor
InternationalUse93
Share&Connect141
ShareaContact73
SharePicturesandVideos115
SharePicturesorVideosviaAdditionalApps
orSocialMedia116
ShareVideosonYouTube117
ShortcutKeys165
SignintoYourGoogleAccount38
SoundProfile147
SoundwithVibration149
SprintAccountInformationandHelp173
SprintAccountPasswords173
SprintInternationalVoicemailService92
SprintMusicPlus133
SprintSupportServices175
StatusBar48
StatusBarandNotificationPanel48
Storage167
SwitchCameras117
SwitchingbetweenCameras110
SwitchingbetweenGmailAccounts83
SystemUpdates168
T
TakePanoramicPhotos110
TakePictures109
TakePicturesandRecordVideos108
Tethering100,142
TextandMMSOptions79
Theme157
TipsforEditingText33
TransferFilesBetweenYourPhoneanda
Computer97
Troubleshooting172
TurnWi-FiOnandConnecttoaWireless
Network98
Index 180
TurnYourPhoneOnandOff15
TweetonTwitter89
Twitter89
U
UninstallanApp41
UninstalledApps130
UnlockYourScreenUsingtheKnockCode
Feature42
UnlockingtheScreenwithaFingerprint29
UnmountandRemovethemicroSD
Card14
UpdateanApp40
UpdateYourPhone43
UpdateYourPhoneSoftware43
UpdateYourPRL46
UpdateYourProfile45
UseFacebook88
UseGmailLabels81
UseGoogleSearch124
UseGoogleVoiceSearch125
UsetheBrowser86
UsetheTouchscreen17
UsingNearbyDevices105
UsingthePower/LockButton111
UsingtheStylusPen122
V
VibrateType149
ViewBrowserHistory87
ViewContacts71
ViewPicturesandVideosUsingGallery113
ViewYouTubeVideos135
VirtualPrivateNetworks(VPN)145
VisualVoicemailOptions62
VisualVoicemailSetup59
VoiceRecorder130
Voicemail59
VoicemailSetup59
Volume148
W
Wi-Fi98
Wi-FiCalling64,140
Wi-FiDirect99
Wi-FiSettings140
Y
YourPhone’sSIMCardforInternational
GSMRoaming90
YouTube135
Z
ZoomInorOut110
