Masternode Setup Guide Bitcoin Green BITG
Masternode%20Setup%20Guide%20-%20Bitcoin%20Green%20BITG
User Manual:
Open the PDF directly: View PDF ![]() .
.
Page Count: 1
Bitcoin'Green'(BITG)'Masternode'Setup'Guide:'
'
A'Bitcoin'Green'masternode'requires'2500'BITG'of'collateral'to'operate.'This'guide'will'show'
you'how'to'get'started'with'mining'Bitcoin'Green'through'masternode'proof-of-stake.'Start'out'
by'downloading'the'BITG'Wallet'from'___'and'running'bitcoingreen-qt.''
'
NOTE:&You&can&run&your&hot&wallet&on&a&different&computer&than&your&cold&wallets.&This&can&
increase&security&by&keeping&your&hot&wallet&(with&coins)&on&your&local&computer.&To&do&this,&
complete&steps&1-10&on&your&local&machine’s&wallet&(editing&masternode.conf),&and&then&do&the&
rest&on&your&VPS&wallet&(editing&bitcoingreen.conf).''
'
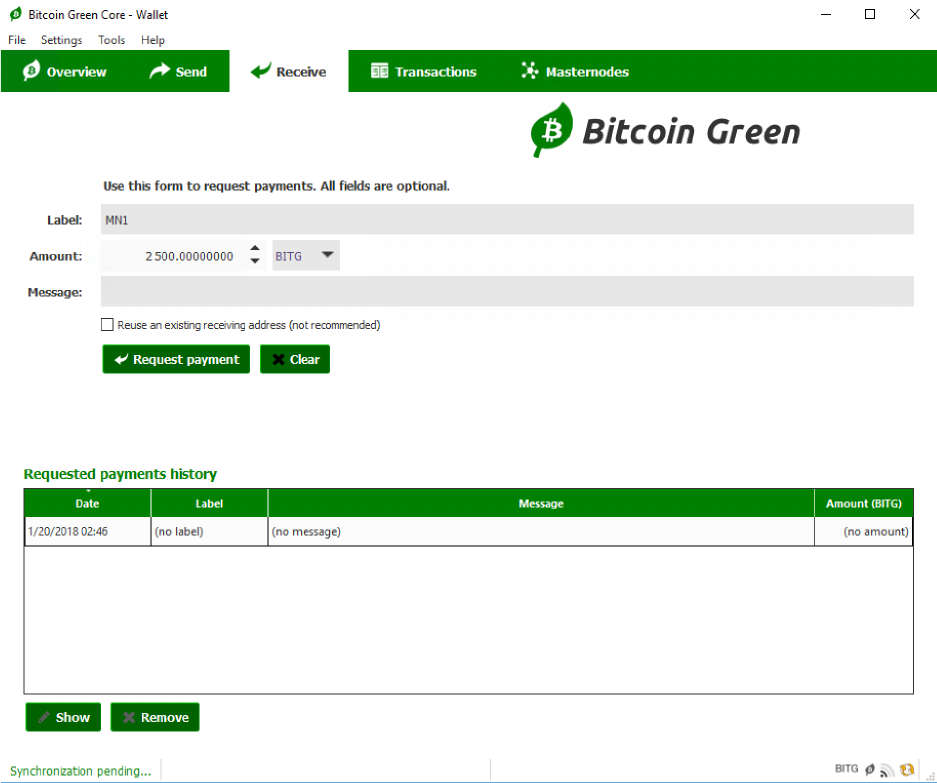
1. Click'the'Receive'tab'in'your'wallet.'Create'a'new'address'and'call'it'MN1'in'the'Label'
field.'Type'2500'in'the'Amount'field.'Click'request'payment'to'get'an'address.'
'
'
'
'
'
'
'
'
'
'
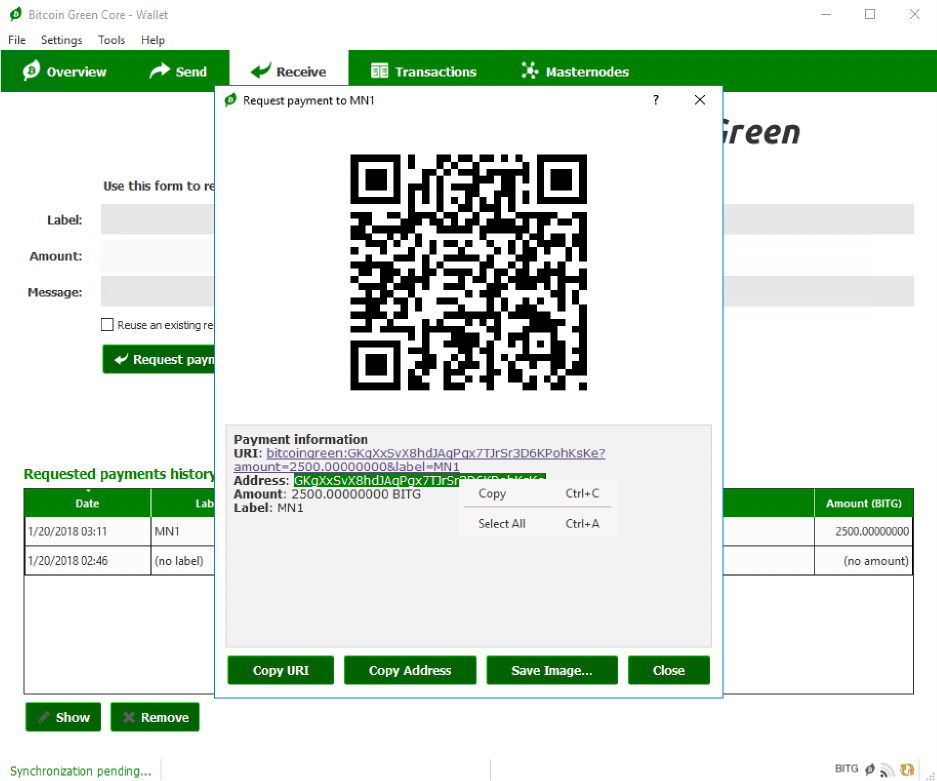
2. This'will'be'the'address'for'your'masternode'collateral.'Copy'the'Address'field.'
'
'
'
'
'
'
'
'
'
'
'
'
'
'
'
'
'
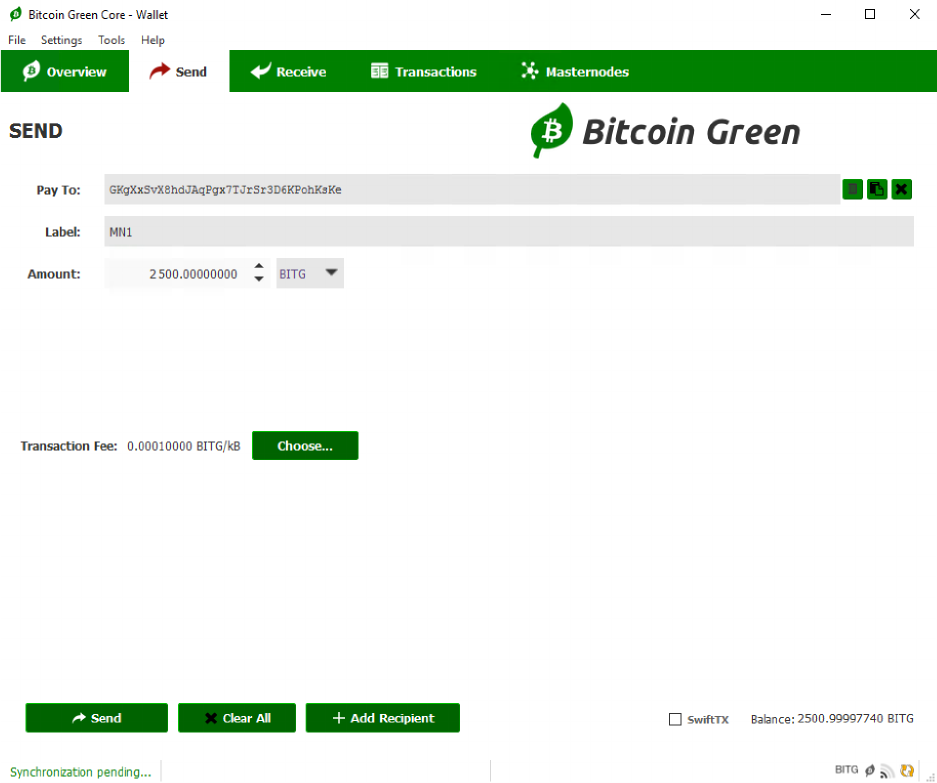
3. Next,'send'exactly'2500'BITG'to'this'address'from'the'Send'tab.'Click'send'to'send'the'
transaction'and'click'Yes'to'accept'the'fee.'
'
'
'
'
'
'
'
'
'
'
'
'
'
'
'
'
'
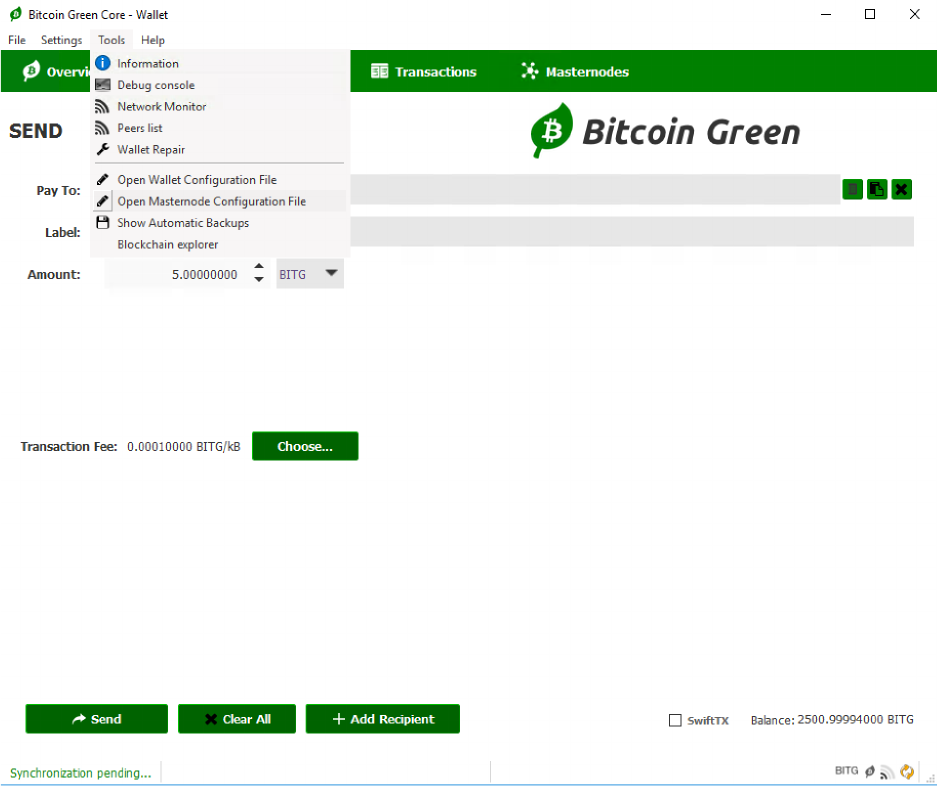
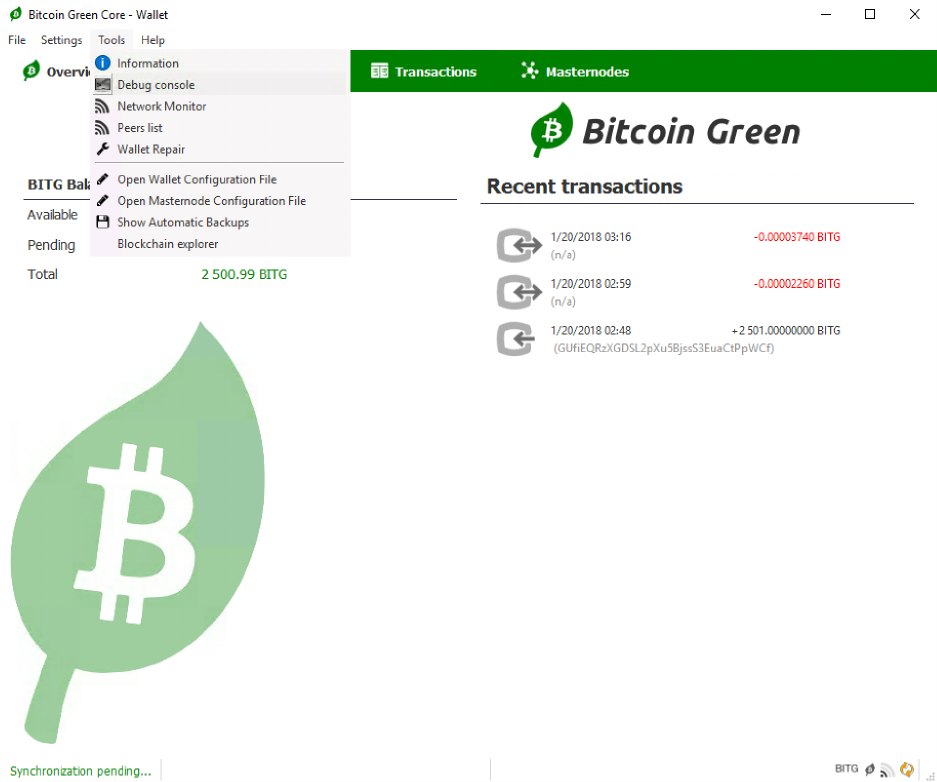
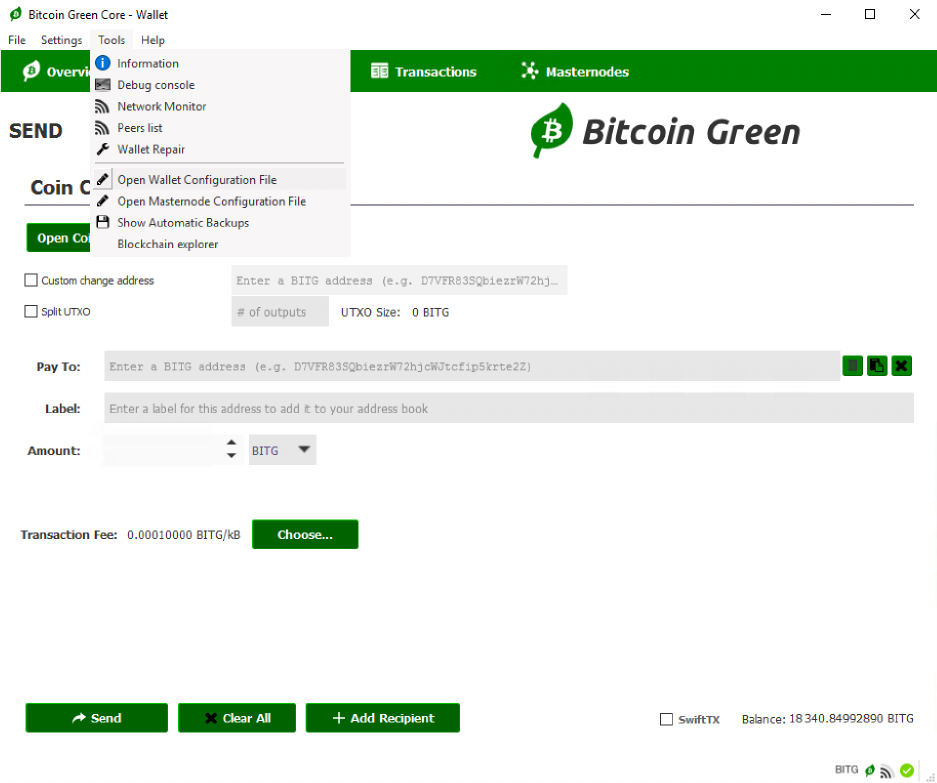
4. Time'to'edit'the'Masternode'Configuration'file.'Click'on'Tools'and'click'“Open'
Masternode'Configuration'File”.'This'should'open'in'your'text'editor'(Notepad).'
'
'
'
'
'
'
'
'
'
'
'
'
'
'
'
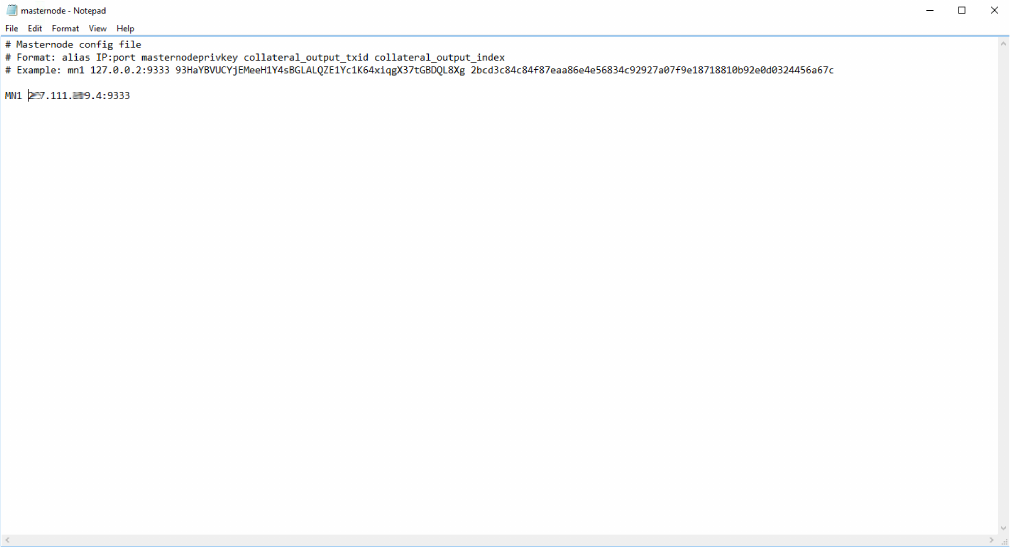
5. Now'we'need'to'add'1'line'of'code'to'the'Masternode'Configuration'file.'This'is'easy.'It'
just'takes'a'few'steps.'You'need'to'fill'out'the'following'code'format:''
'
alias%IP:port%masternodeprivkey%collateral_output_txid%collateral_output_index%%
%
Your'alias'is'your'masternode'name'(MN1).'Next,'you'need'your'VPS'or'host'computer'
IP'address.'If'you'use'ZapHosting,'this'can'be'found'on'your'user'dashboard.'The'port'
for'Bitcoin'Green'is'9333.'Your'config'file'should'now'look'like'this:'
'
'
'
'
'
'
'
'
'
'
'
'
'
'
'
'
'
'
6. Now'go'to'your'wallet,'click'Tools'and'click'the'Debug'Console.'
'
'
'
'
'
'
'
'
'
'
'
'
'
'
'
'
'
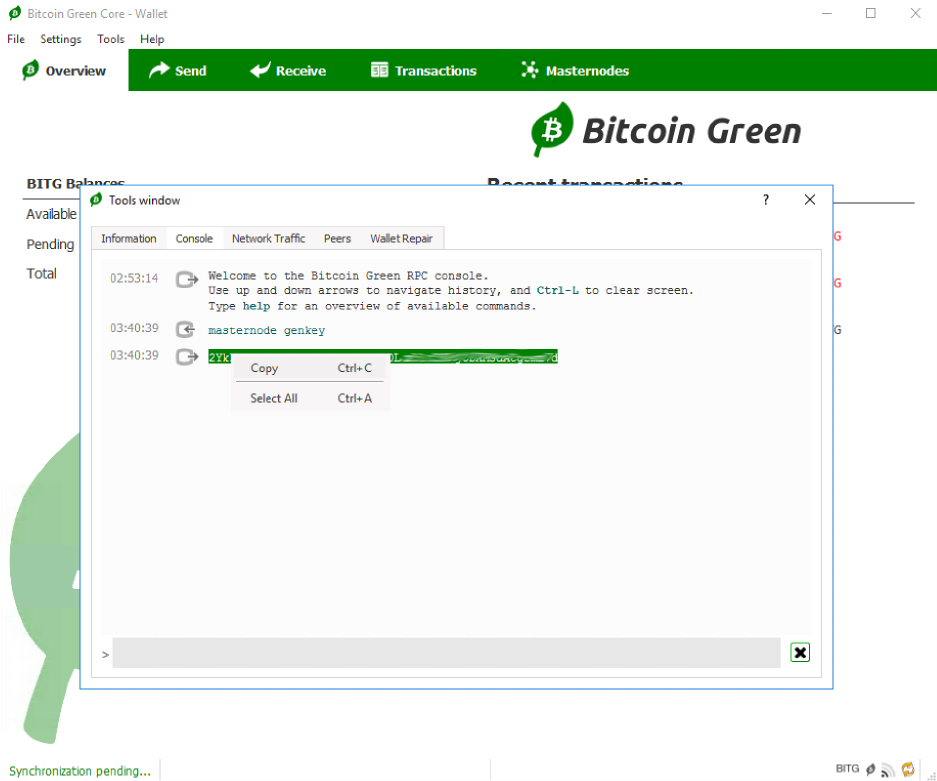
7. Type'“masternode'genkey”'and'press'Enter.'Copy'the'result.'
'
'
'
'
'
'
'
'
'
'
'
'
'
'
'
'
'
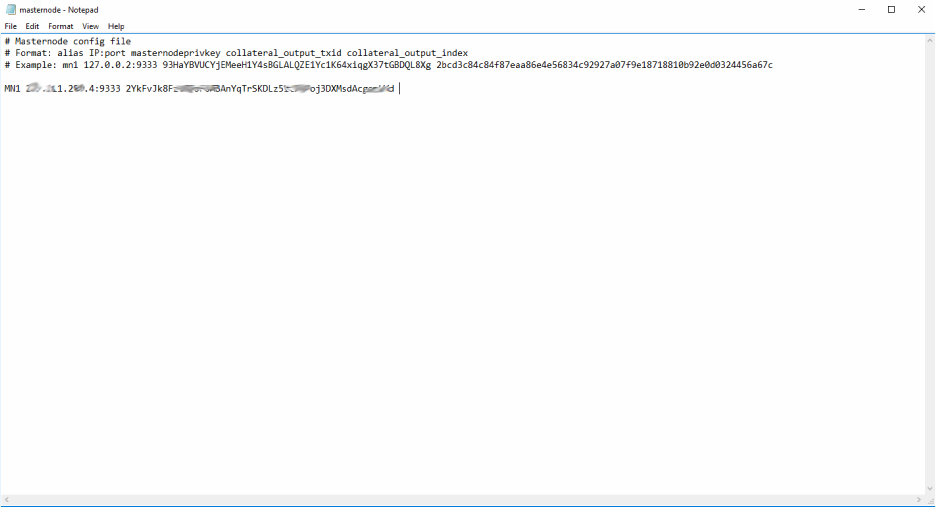
8. Paste'into'your'Masternode'config'file.'
'
'
'
'
'
'
'
'
'
'
'
'
'
'
'
'
'
'
'
'
'
'
'
'
'
'
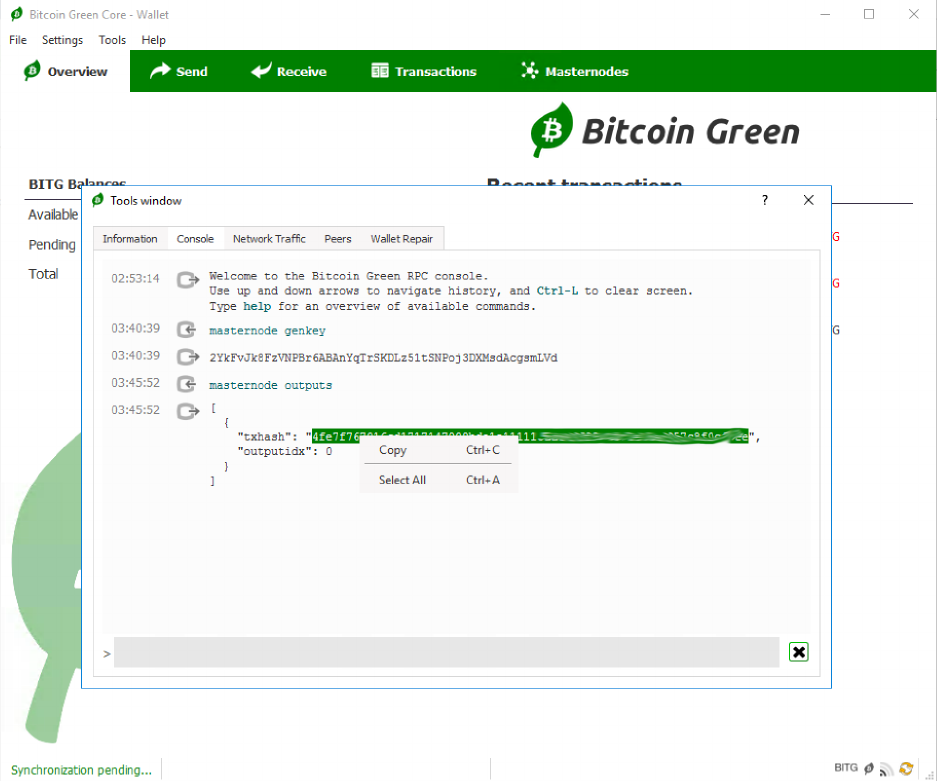
9. Go'back'to'the'debug'console'and'type'“masternode'outputs”'and'press'enter.'Copy'the'
txhash'and'note'the'outputidx.'
'
'
'
'
'
'
'
'
'
'
'
'
'
'
'
'
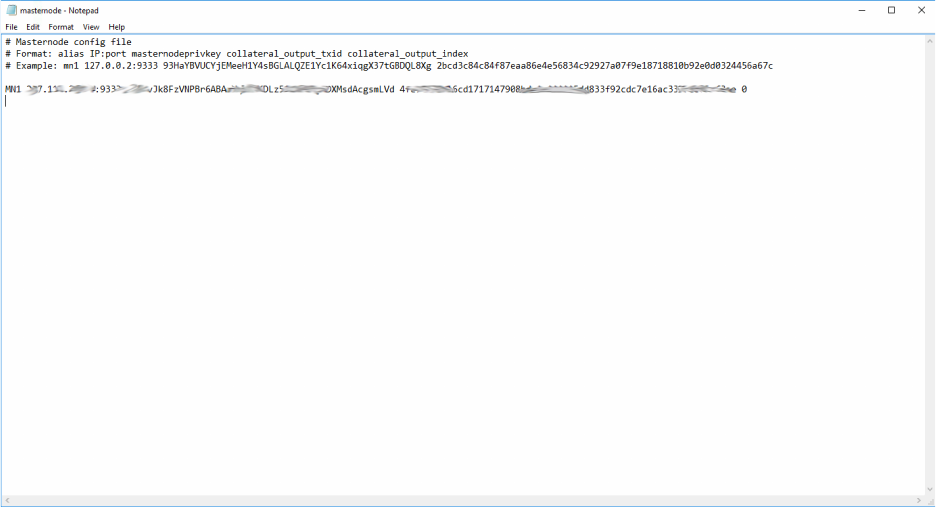
10. Paste'the'txhash'into'the'masternode'config'file.'Don’t'forget'the'outputidx.'Save'the'
masternode'config'file'and'then'close'the'wallet.'
'
'
'
'
'
'
'
'
'
'
'
'
'
'
'
'
'
'
'
'
'
'
'
'
11. Now'you'need'to'edit'the'wallet'config'file.'Open'the'Wallet'Configuration'File'from'the'
Tools'menu.'
'
'
'
'
'
'
'
'
'
'
'
'
'
'
'
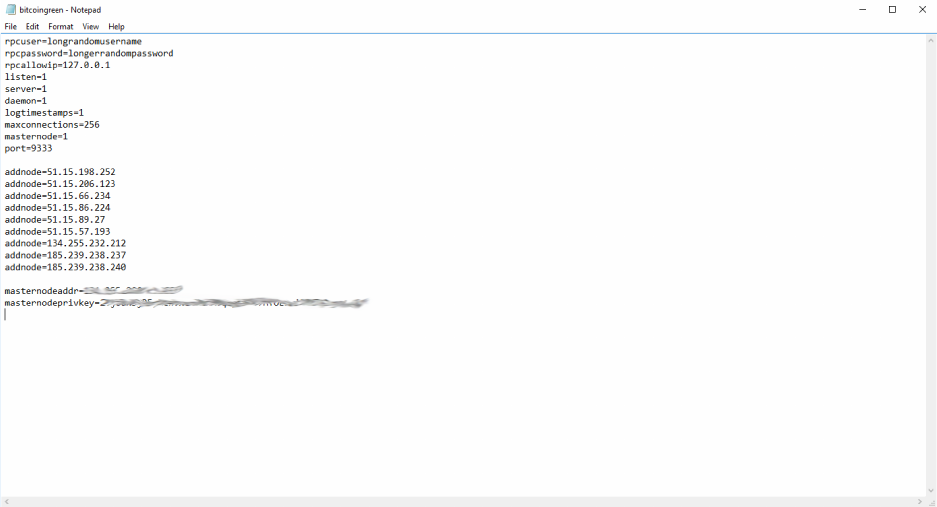
12. When'you'open'your'wallet'config,'it'should'be'blank.'Below'is'what'your'config'file'
needs'to'be.'Copy'paste'this'into'bitcoingreen.conf.''
'
rpcuser=longrandomusername'
rpcpassword=longerrandompassword'
rpcallowip=127.0.0.1'
listen=1'
server=1'
daemon=1'
logtimestamps=1'
maxconnections=256'
masternode=1'
port=9333'
'
addnode=51.15.198.252'
addnode=51.15.206.123'
addnode=51.15.66.234'
addnode=51.15.86.224'
addnode=51.15.89.27'
addnode=51.15.57.193'
addnode=134.255.232.212'
addnode=185.239.238.237'
addnode=185.239.238.240'
'
masternodeaddr=IP:port'
masternodeprivkey=masternodeprivkey%
%
Add'your'IP:Port'and'masternodeprivkey.'Also,'change'the'rpcuser'and'rpcpassword'to'
something'random.'Keep'everything'else'the'same,'then'Save:%
'
'
'
'
'
'
'
'
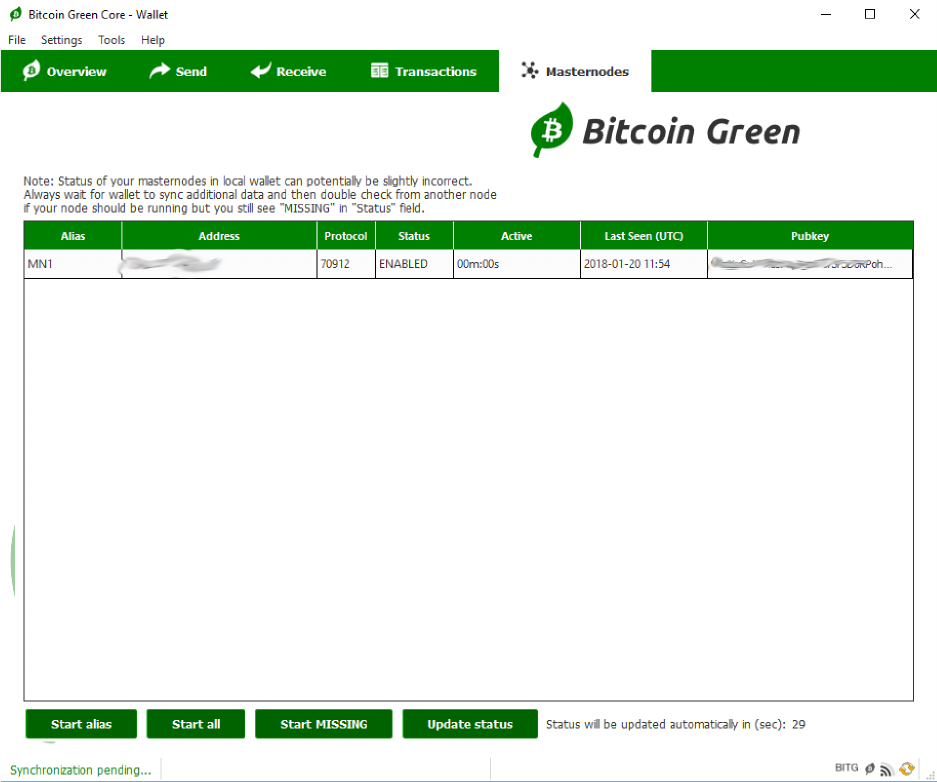
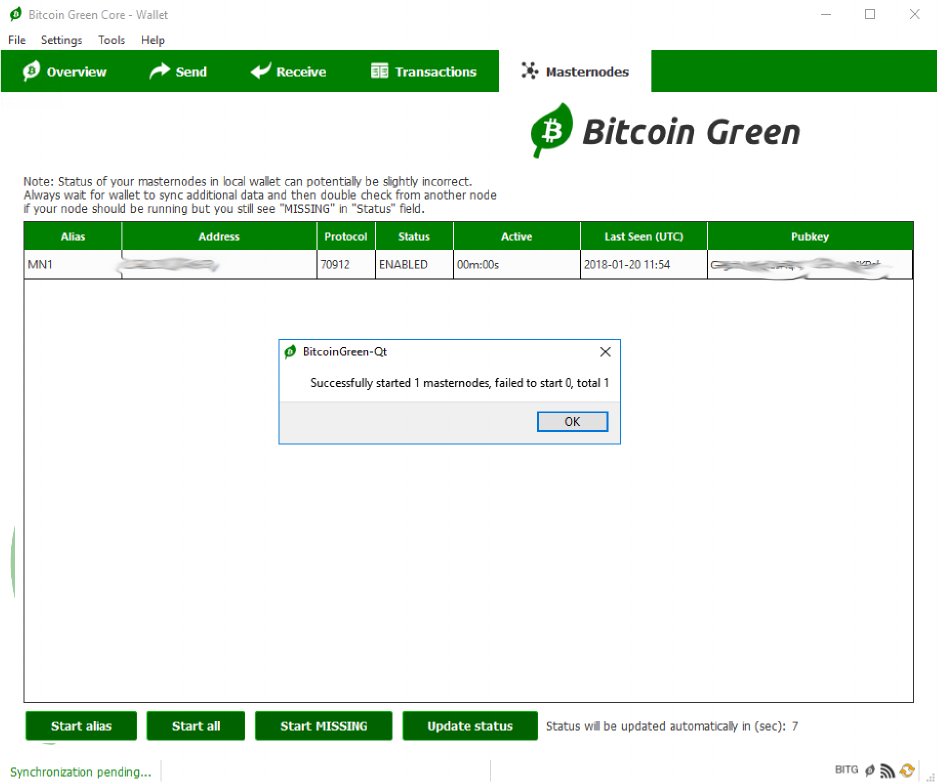
13. Restart'the'wallet.'Now'your'masternode'should'show'up'in'the'Masternodes'tab.'
'
'
'
'
'
'
'
'
'
'
'
'
'

'
'
'
'
'
14. Next'you'have'to'edit'your'firewall.'We'need'to'open'a'port'for'the'masternode.'Open'
Windows'Firewall'from'the'start'menu.'Click'“Advanced'Settings”.'
'
'
'
'
'
'
'
'
'
'
'
'
'
'
'
'
'
'
'
'
'
'
'
'
'
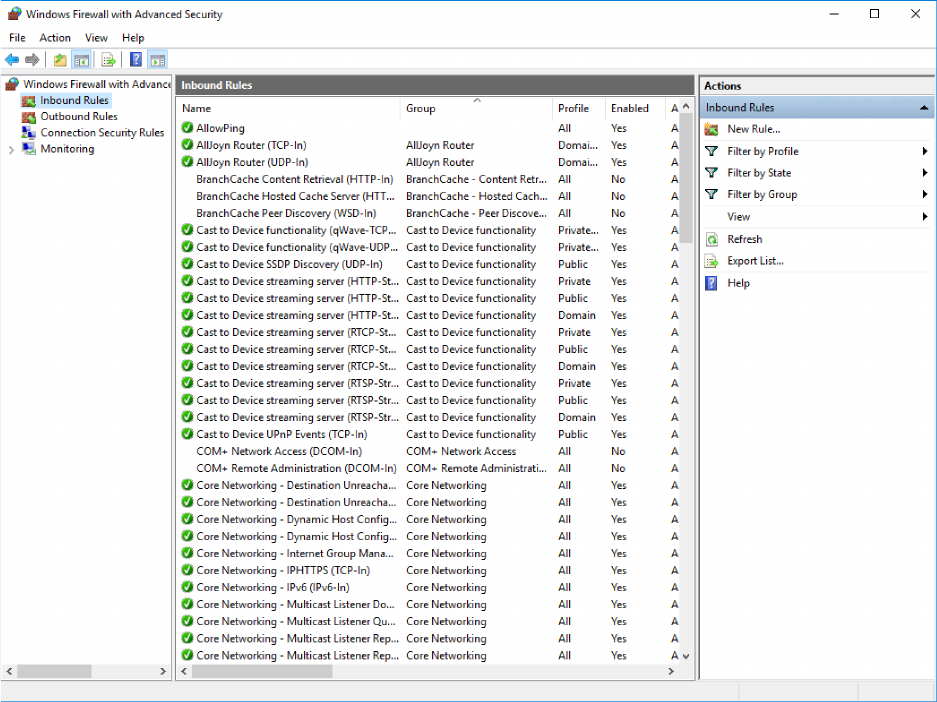
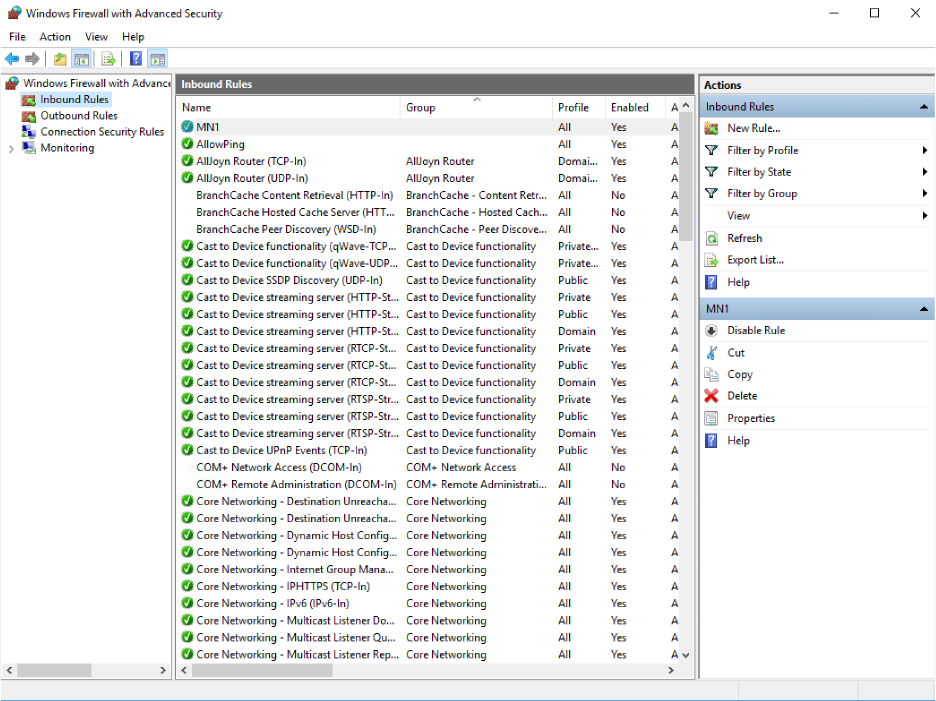
15. Clicking'“Advanced'Settings”'will'open'the'firewall'control'panel.'Click'“Inbound'Rules”.'
'
'
'
'
'
'
'
'
'
'
'
'
'
'
'
'
'
'
'
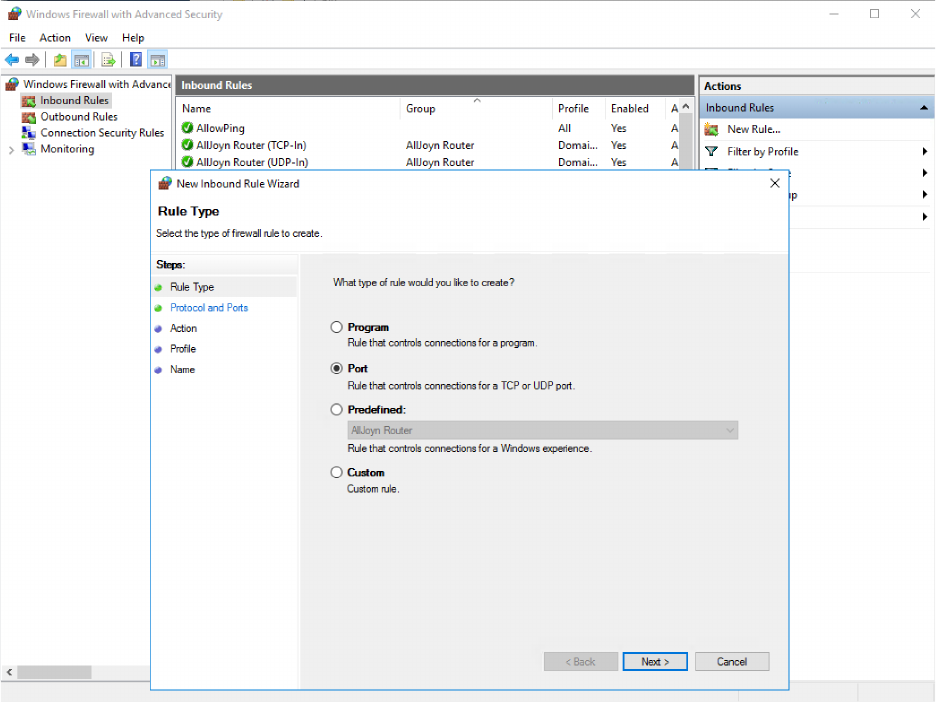
16. Click'“New'Rule”'on'the'upper'right'side'and'you'will'get'this'screen.'Select'Port.'
'
'
'
'
'
'
'
'
'
'
'
'
'
'
'
'
'
'
'
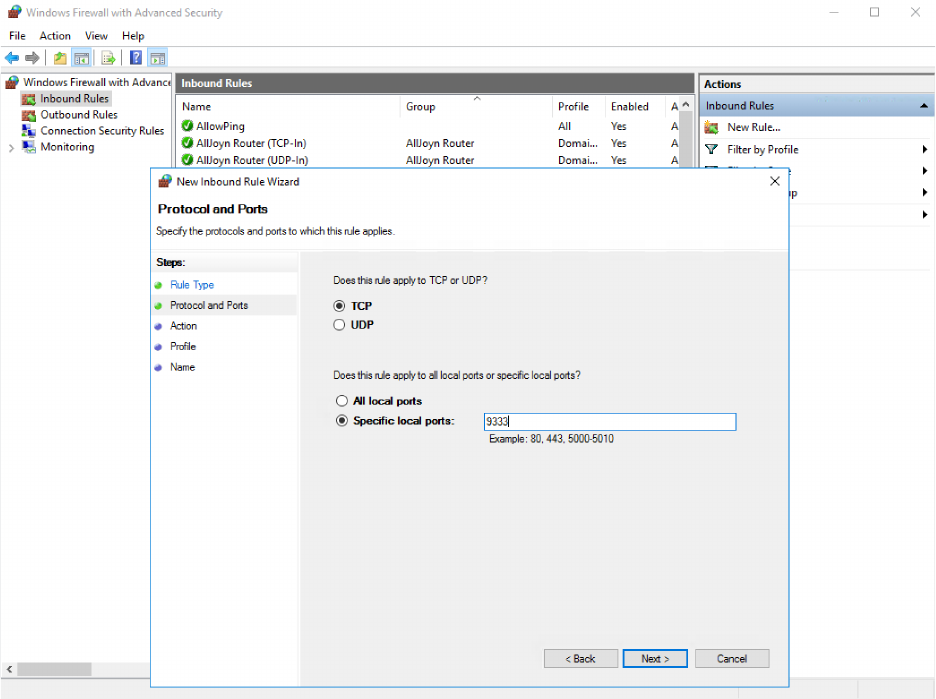
17. Choose'the'port'to'allow.'In'this'case'it'is'9333.'
'
'
'
'
'
'
'
'
'
'
'
'
'
'
'
'
'
'
'
'
18. Click'through,'allow'the'connection,'allow'it'in'all'places.'Give'it'a'name,'it'can'be'
anything'you'want.'When'you'are'done,'you'will'be'back'on'the'Windows'Firewall'
control'panel'and'you'will'see'your'new'rule.'You'can'now'close'the'firewall'control'
panel.'
'
'
'
'
'
'
'
'
'
'
'
'
'
'
'
'
'
19. Go'back'to'your'Masternodes'tab'and'click'Start'All.'Success!'Now'relax'and'wait'for'the'
stakes'to'come'in.'
'
'
'
'
'
'
'
'
'
'
'
'
'
'
ADDING'ADDITONAL'MASTERNODES:'
'
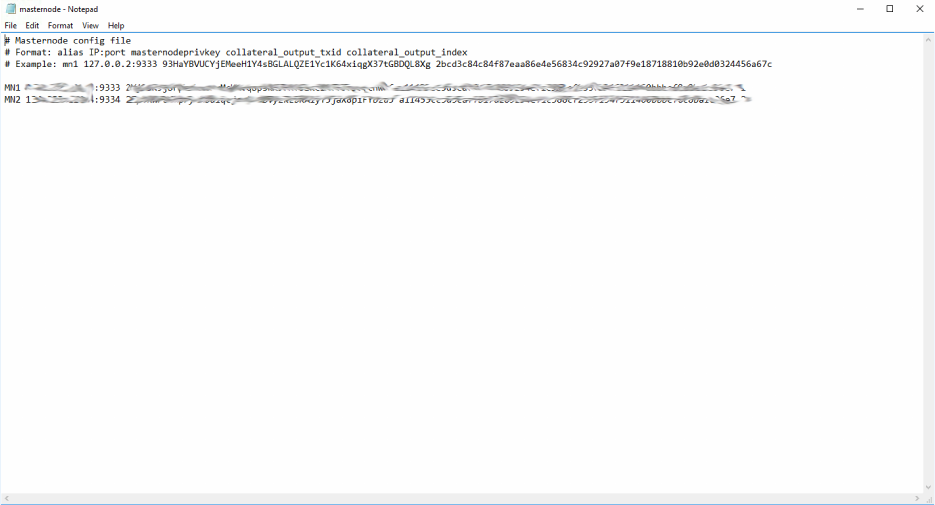
1. To'run'additional'masternodes,'start'by'completing'steps'1-10'with'the'alias'MN2'and'
the'port'9334.'This'means'add'a'new'line'to'the'masternode.conf.'Do'this'for'each'
masternode.'Here’s'what'it'looks'like'for'2'masternodes:'
'
'
'
For&each&additional&masternode&you&can&increment&the&port&by&1.&You&can&only&run&1&
masternode&per&port.&As&for&the&alias,&it&can&be&anything&you&want.&FYI&-&the&main&wallet&
that&holds&your&masternode.conf&file&and&all&your&coins&is&called&the&“hot&wallet”.&&
'
Next,&you’ll&have&to&open&an&instance&of&the&Bitcoin&Green&wallet&for&each&masternode.&
Each&masternode&requires&it’s&own&unique&instance&of&Bitcoin&Green.&Your&first&
masternode&is&already&running&in&the&hot&wallet&instance.&Opening&additional&instances&
will&allow&you&to&run&additional&nodes&on&the&same&machine.&These&instances&are&called&
“cold&wallets”.&They&don’t&need&to&hold&any&coins,&they&are&just&there&to&keep&the&port&
open&for&BITG.&In&fact,&the&only&thing&that&matters&in&the&cold&wallet&is&the&
bitcoingreen.conf&file.&First,&we’ll&need&to&give&the&Bitcoin&Green&client&a&new&blockchain&
database&to&access.&&
&
tl;dr&for&each&MN&we&need&to&run&an&empty&BITG&wallet&to&keep&the&right&port&open&
'
'
'
'
'
'
'
'
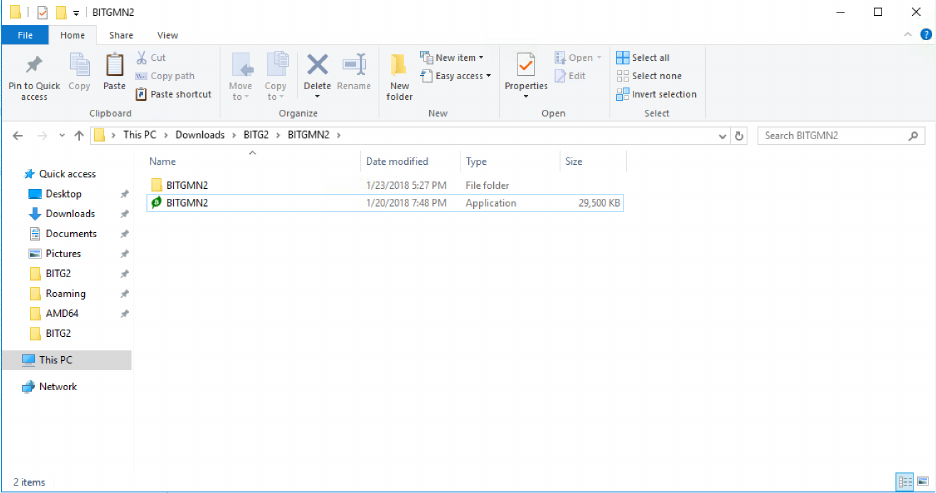
2. Create'a'new'folder.'It'can'be'anywhere'on'your'computer.'Copy'the'bitcoingreen-qt'file'
(from'your'Downloads'or'maybe'C:\Program'Files\BitcoinGreen)'and'paste'it'into'the'
new'folder.'Rename'the'qt'file'to'BITGMN2.'Then'create'another'folder'called'
BITGMN2.'Your'screen'should'look'like'this:'
'
'
'
'
'
'
'
'
'
'
'
'
'
'
'
'
'
'
'
'
'
'
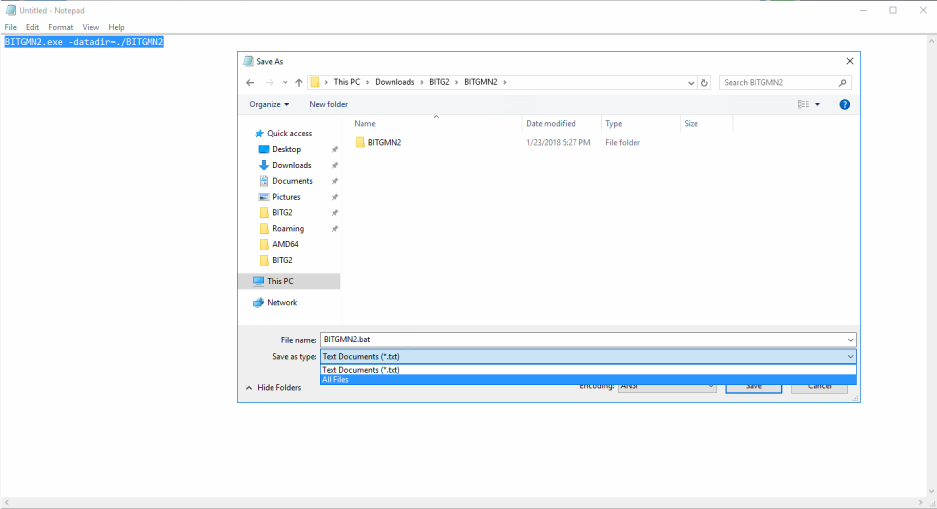
3. Now'open'a'new'file'on'Notepad.'Paste'the'following:''
'
BITGMN2.exe'-datadir=./BITGMN2'
'
Save'as'“BITGMN2.bat”'in'your'new'folder'and'make'sure'to'select'All'Files'file'type.'
This'creates'an'executable'batch'file.'
'
'
'
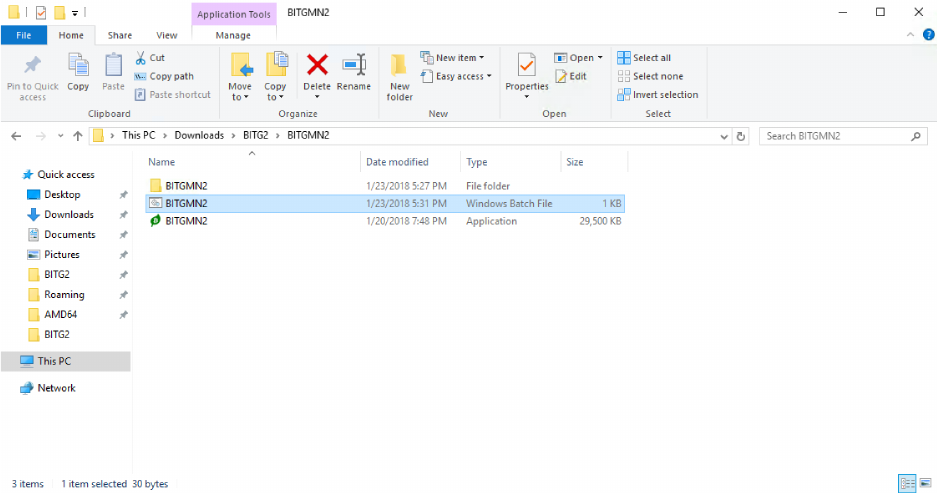
Final'Folder:'
'
'
'
4. Now'try'to'open'the'BITGMN2.bat'file'you'have'just'created'(Note:'you'must'open'the'
batch'(.bat)'file'to'use'BITGMN2'as'the'new'directory).''
'
If&your&main&wallet&is&open,&you&will&get&errors.&That’s&okay.&Even&though&you&got&errors,&
it&created&the&new&directory&that&you&will&edit.&Click&through&the&errors,&but&the&wallet&will&
not&open.&However,&open&the&BITGMN2&folder&you&just&created.&It&will&now&have&a&
bitcoingreen.conf&file&that&you&can&edit.&&
'

'
'
'
5. Edit'the'new'bitcoingreen.conf'file'with'the'config'from'step'12.'It'will'be'the'same'
except'you'will'need'to'put'the'new'port'and'masternode'key.'Don’t'forget'the'“port=”'
line.''
6. When'you'have'finished'editing'the'new'config,'press'Save.'
7. Make'sure'to'open'all'the'ports'you'are'using'in'your'firewall.'
8. Open'the'wallet'by'clicking'the'batch'file.'Once'your'cold'wallet'is'open'you'are'good'to'
go.'
9. Return'to'your'hot'wallet'and'click'start'all.'Your'nodes'should'succeed.'
10. When&your&nodes&status&still&says&ENABLED&after&130&minutes,&you&will&know&your&setup&
worked&successfully.&You&will¬&know&until&130&minutes&after&starting&the&node.&If&the&
node&says&missing&after&130&minutes&it&will&stop&mining&and&your&setup&failed.&&
11. To&save&sync&time,&you&can©&the&entire&blockchain&into&the&new&directory&(just&make&
sure&to&delete&the&wallet.dat&file&and&masternode.conf&–&and&do&it&AFTER&you&paste&them&
in.&Your&wallet&will&spawn&blank&ones&which&is&what&you&want)&
