Gaining Expertise With Azure AD B2C Microsoft Master Manual
User Manual:
Open the PDF directly: View PDF ![]() .
.
Page Count: 214 [warning: Documents this large are best viewed by clicking the View PDF Link!]
Microsoft
Identity
Version 1.5, July 2018
Gaining Expertise with
Azure AD B2C
A course for developers

1 © 2018 Microsoft Corporation Feedback? https://aka.ms/aad-b2c-course-feedback
Contents
About this course ............................................................................................................................................................ 4
Course Elements ......................................................................................................................................................... 5
Course Prerequisites .................................................................................................................................................. 5
Module 0: AAD B2C Environment Setup ................................................................................................................ 6
Introduction .................................................................................................................................................................. 6
Accounts, tenants, and subscriptions ................................................................................................................. 7
Create an Azure Tenant ............................................................................................................................................ 7
Create an Azure co-admin and test user ........................................................................................................... 8
Create a B2C tenant ................................................................................................................................................ 10
Link the B2C Tenant to the Azure Subscription ........................................................................................... 11
Enable the B2CAdmin account to manage the B2C Tenant .................................................................... 12
Make things easy to find ...................................................................................................................................... 13
Create a B2C Test user ........................................................................................................................................... 13
Important Concepts ................................................................................................................................................ 14
Module 1 – Using Built in Policies ......................................................................................................................... 15
Introduction ............................................................................................................................................................... 15
Create a Sign-up or Sign-In Policy .................................................................................................................... 16
Create a Password Reset Policy.......................................................................................................................... 19
Update the Password Reset Policy to include Multifactor Authentication ........................................ 21
Create a Profile Editing Policy ............................................................................................................................. 23
Register the Reply URL .......................................................................................................................................... 24
Review the Identity Token Using https://jwt.ms .......................................................................................... 28
Important Concepts ................................................................................................................................................ 31
Module 2 - Using Identity Providers with Azure AD B2C Built in Policies .............................................. 33
Introduction ............................................................................................................................................................... 33
See it in action .......................................................................................................................................................... 33
Setup Social Sign In ................................................................................................................................................ 34
Facebook Social Sign in Configuration Steps ............................................................................................... 36

2 © 2018 Microsoft Corporation Feedback? https://aka.ms/aad-b2c-course-feedback
Modify the SUSI Policy to Include Facebook ................................................................................................ 37
Test the Facebook SUSI Policy ............................................................................................................................ 38
Important Concepts ................................................................................................................................................ 39
Module 3: Application Integration for a .Net Web App ................................................................................ 40
Introduction ............................................................................................................................................................... 40
Register a Relying Party Application ................................................................................................................ 41
Download the Sample Application and Open it in Visual Studio ......................................................... 43
Edit the Application to Include SISU, Profile Edit and Password Reset Policies .............................. 44
Edit the Application to Add the Tenant ID..................................................................................................... 44
Edit the Application to Include the Client ID and Client Secret ............................................................. 45
Configure the Edit Profile and Reset Password Links ................................................................................ 45
Examine the OWIN Middleware Configuration ............................................................................................ 46
Publish the Sample Application ......................................................................................................................... 48
Test the Deployed Application ........................................................................................................................... 51
Important Concepts ................................................................................................................................................ 51
Module 4: UX Customization using Built-In Functionality ............................................................................ 55
Introduction ............................................................................................................................................................... 56
Customize the HTML Pages Displayed by B2C Policies ............................................................................ 56
Customize Email Messages sent by the B2C App ....................................................................................... 65
Add Localization to Support Spanish-Speaking Users .............................................................................. 67
Modify the Password Complexity of Policies ................................................................................................ 69
Important Concepts ................................................................................................................................................ 71
Module 5: Introduction to Custom Policies ....................................................................................................... 76
Introduction ............................................................................................................................................................... 77
Create a Custom Policy ......................................................................................................................................... 77
Update the Web Application to Reference the New Policies ................................................................. 88
est and Debug a Custom Policy by Using Application Insights ............................................................. 91
Modify the Starter Pack SUSI Policy ................................................................................................................. 94
Important Concepts ................................................................................................................................................ 96
What is IEF? ................................................................................................................................................................ 97
Module 6 – Custom Policies 2 – REST APIs ...................................................................................................... 105

3 © 2018 Microsoft Corporation Feedback? https://aka.ms/aad-b2c-course-feedback
Introduction.................................................................................................................................................................. 105
See it in action ........................................................................................................................................................ 105
Prerequisites ............................................................................................................................................................ 105
Step-by-Step Instructions ....................................................................................................................................... 106
Create a custom policy for REST API integration ...................................................................................... 106
Modify the Profile Edit Policy to Return the User Store Membership Date .................................... 122
Module 7—External IDPs, OIDC and SAML ...................................................................................................... 130
Introduction ............................................................................................................................................................. 130
Integrate an OIDC IDP and Map Claims ....................................................................................................... 131
Integrate a SAML IDP and Map Claims ......................................................................................................... 139
Module 8: Using the Azure AD Graph API and User Migration ............................................................... 147
Introduction.................................................................................................................................................................. 147
Use the Azure AD Graph API to Query, Add, Update, and Delete Users in AAD .......................... 148
Migrate Users to AAD .......................................................................................................................................... 161
Require Users to Change Password on First Sign-in ................................................................................ 170
Important Concepts .................................................................................................................................................. 186
The Azure AD Graph API and the Microsoft Graph API .......................................................................... 186
Graph Explorer ........................................................................................................................................................ 189
Planning User Migrations ................................................................................................................................... 196
Module 9 – Auditing and Reporting ................................................................................................................... 200
Introduction ............................................................................................................................................................. 200
Setup Application Insights ................................................................................................................................. 201
Use Audit logs to Export Application, Policy, and User Activity Data ................................................ 204
Download Data into an Insight/Analytics System ..................................................................................... 205
Auditing Admin and Security Events .............................................................................................................. 209
Accessing Audit Logs through the Azure AD Reporting API ................................................................ 210

4 © 2018 Microsoft Corporation Feedback? https://aka.ms/aad-b2c-course-feedback
About this course
Welcome to the Gaining Expertise with Azure AD B2C course for developers.
This self-paced course is designed to take you from initial awareness of Azure AD B2C to being
able to create complex user journeys for your customers and leveraging the insights of their
behavior with those journeys to determine how to deepen your organization’s relationship with
those customers.
Each module within the course builds on the previous, and at the end you will have a
working .Net web application that:
• Enables customers to log in with local, social, and enterprise accounts.
• Enables customers to edit their profiles and reset their own passwords with an MFA
experience.
• Has a fully customized UI.
• Requests users to accept terms and conditions.
At the end of the course, you will be able to:
• Create an Azure AD B2C tenant.
• Use built-in (UI-based) policies to
▪ Create sign up, sign in, profile edit, multi-factor authentication, and self-service
password reset journeys.
▪ Add many popular identity providers.
▪ Enable sign in with social accounts.
▪ Customize the User interface.
• Use custom policies built in XML to
o Create customized sign up, sign in, profile edit, multi-factor authentication, and
self-service password reset journeys.
o Enable sign in with social accounts
o Enable sign in with any OIDC or OAuth compliant identity provider.
o Enable REST API calls to eternal systems to validate user input.
o Migrate users from other Identity Providers to Azure AD B2C.
o CRUD users using Microsoft Graph.

5 © 2018 Microsoft Corporation Feedback? https://aka.ms/aad-b2c-course-feedback
Course Elements
In most course modules you will see the following elements:
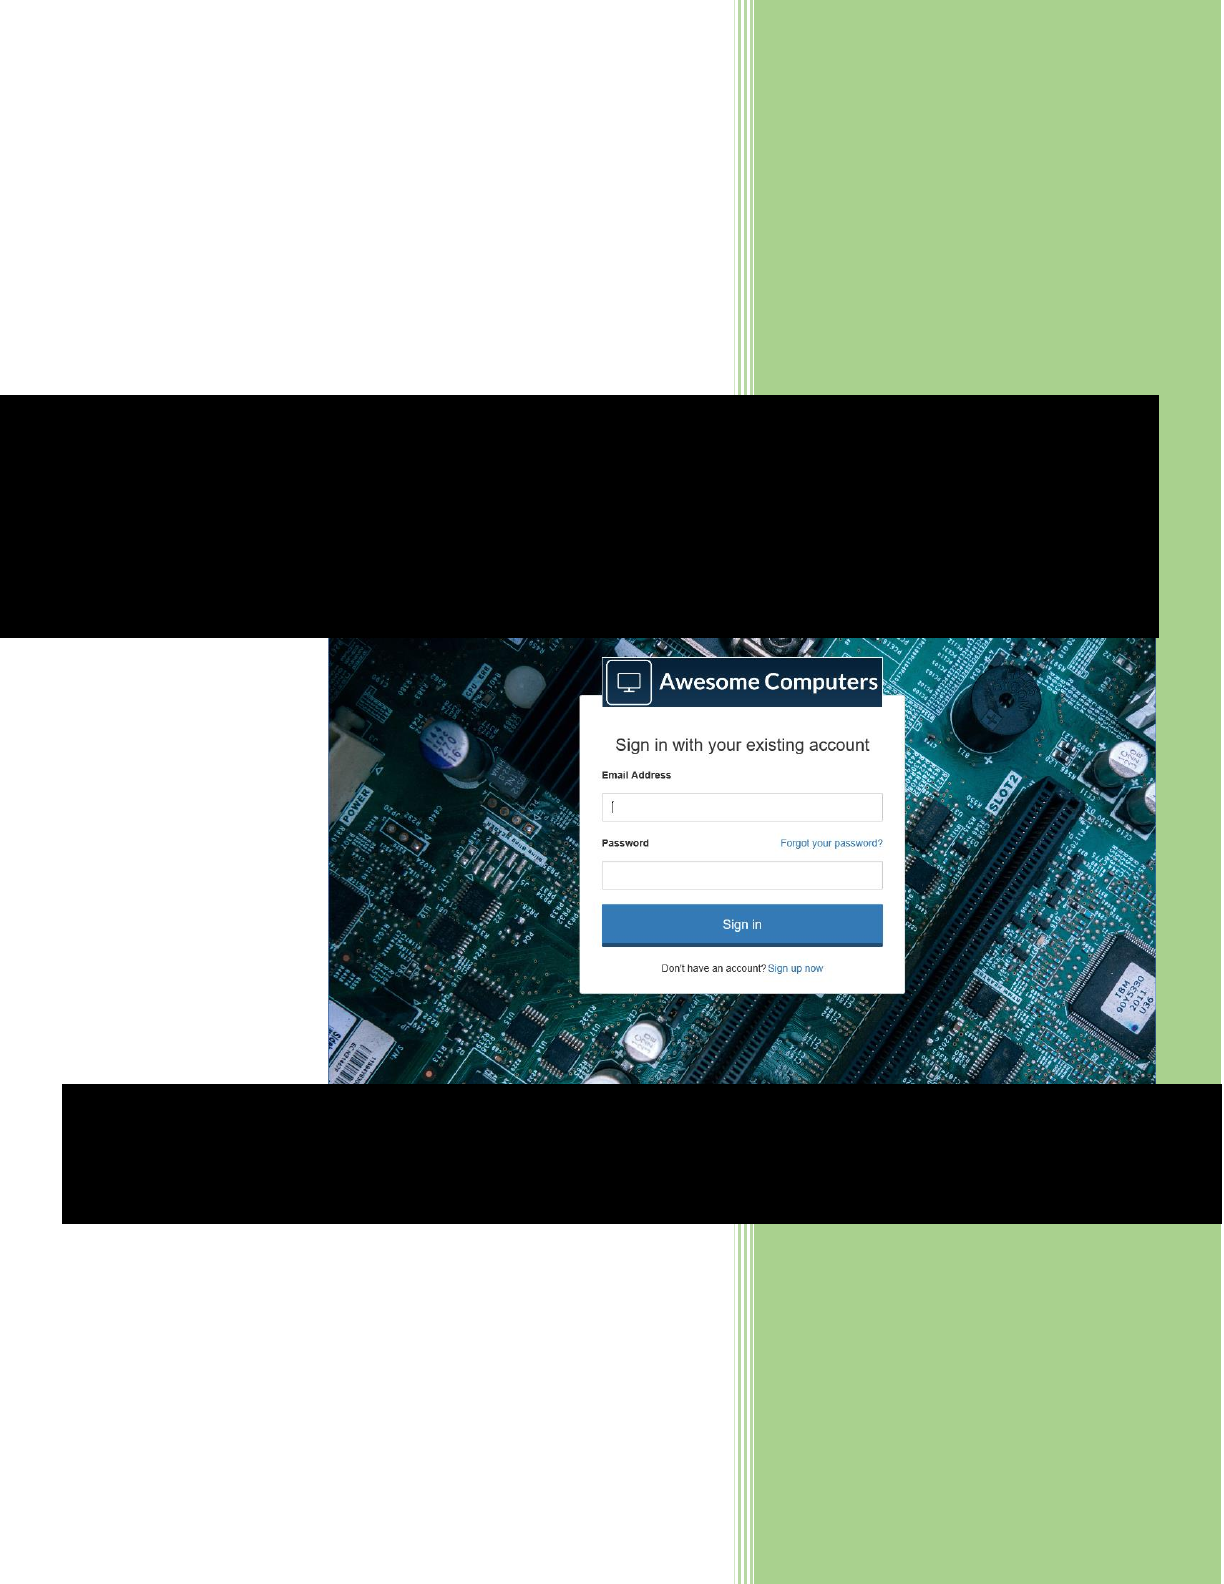
• See it in action. Before you complete most modules, you’ll go to the Awesome
Computers site to see the customer experience you’ll build in the module.
• Step-by-step directions. A click-through guide for completing each procedure. We
have included screen shots of virtually every step to guide you.
• Important Concepts. An explanation of some of the concepts important to the
procedures in the module, and what happens behind the scenes.
• Sample application, policies, and files. A downloadable version of the Awesome
Computers application that you will use throughout course, and other files you will need.
Please go to https://aka.ms/B2CCourse-SampleApp to download all necessary assets.
Course Prerequisites
To be successful in this course, you should be familiar with the following concepts:
• What is Azure Active Directory?
• What are authentication and authorization?
• What is federation?
• What is Single sign on?
• What are open authentication standards?
o OpenID Connect
o OAuth 2.0
• Understanding web site .CSS

6 © 2018 Microsoft Corporation Feedback? https://aka.ms/aad-b2c-course-feedback
Module 0: AAD B2C Environment Setup
Introduction
At the end of this module, you will be able to:
• Set up an Azure Tenant that supports Azure AD B2C
• Add a co-admin and a test user to the Azure tenant
• Enable the co-admin to manage the B2C tenant
• Set up an Azure AD B2C Tenant
• Create a test user in the B2C Tenant
• 8 Link the B2C Tenant to the Azure subscription
And you will have a deeper understanding of the following concepts:
• What Azure AD B2C is
• What tenants and subscriptions are
• When to use Azure AD B2C
This module should take you 30 minutes to complete.
7 © 2018 Microsoft Corporation Feedback? https://aka.ms/aad-b2c-course-feedback
Accounts, tenants, and subscriptions
In this module you will create an Azure account, which results in an Azure tenant. To create an
Azure Active Directory B2C tenant, your Azure tenant must have a subscription. Azure
subscriptions require a billing method and are pay-as-you go.
Nothing you do in this course should result in any billing to your Azure subscription. The
first 50,000 users in a B2C tenant are free. Be sure, at the end of the course, to follow the
directions for removing any test tenants and accounts from your subscription.
Create an Azure Tenant
If you already have an Azure account with a subscription, you may use that account to create
your B2C tenant for this course, in which case you can skip to you can skip to Create an Azure
co-admin and test user. If you have a free Azure tenant, you can choose to add a subscription to
it, and use that one.
Perform the following steps to create an Azure account, tenant, and subscription
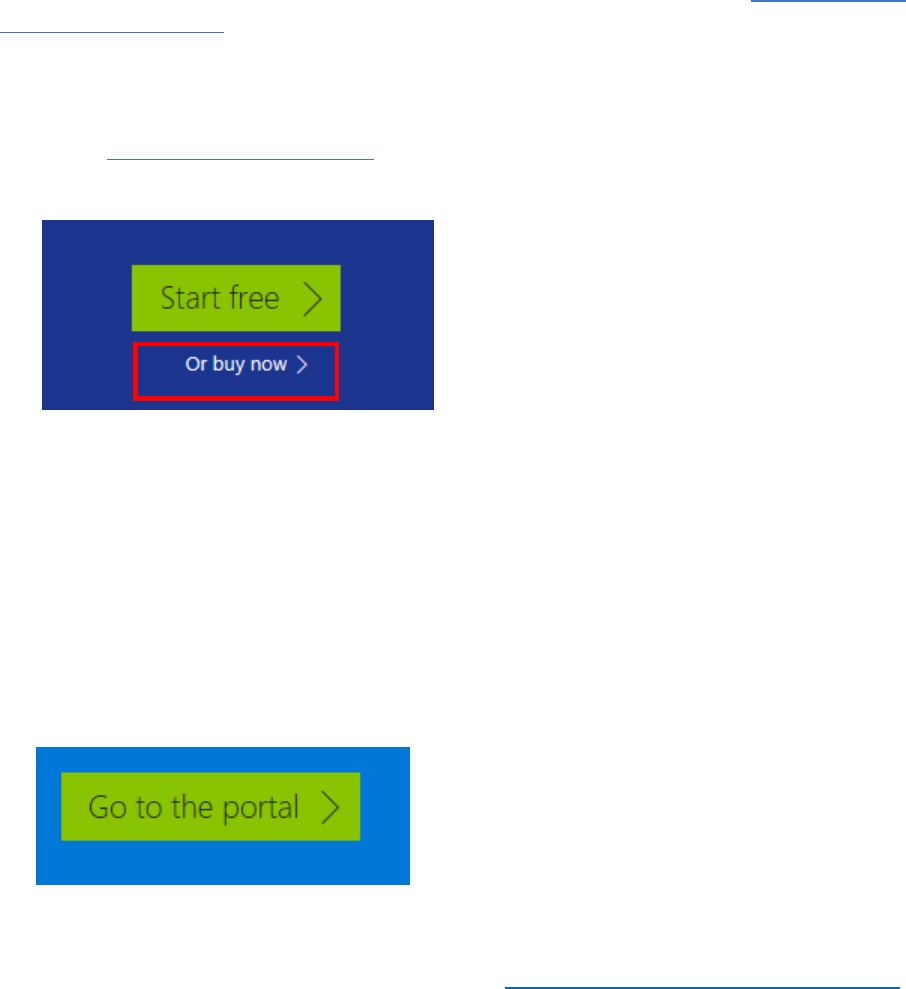
1) Access https://azure.microsoft.com, and select the green Start Free button.
2) On the resulting page, select the Or buy now link, and on the next page select Buy now.
3) Sign in with a Microsoft account, and select No at the Stay signed in? prompt.
you will be using an admin account you create in the next procedure.
4) On the Azure Pay-As-You-Go signup page, enter your contact information and select Next.
5) Verify your identity via phone, enter your payment information, then select Next.
6) Select No technical support, and then select Next.
7) Read the Agreement documents, and then select I agree…, and select Sign up.
8) Select answers to the questions if desired, and select Submit, then on the resultant page,
select Go to the portal.
8 © 2018 Microsoft Corporation Feedback? https://aka.ms/aad-b2c-course-feedback
Create an Azure co-admin and test user
In this procedure, you create an admin account to use throughout the course, and a test user to
use in later modules. It is always a good idea to have more than one administrator.
Perform the following steps to create your Azure users:
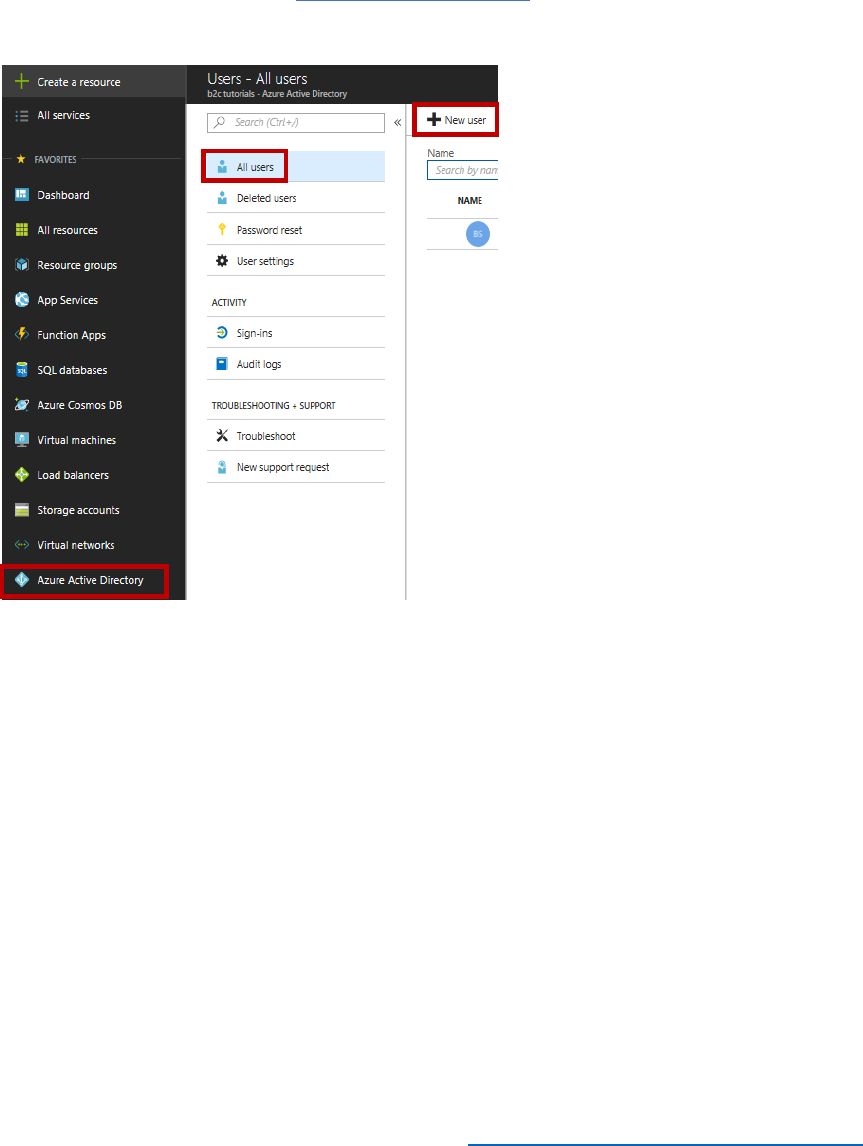
1) Log in to your Azure tenant at https://portal.azure.com
2) In the left navigation, select Azure Active Directory, select Users, then select + New user.
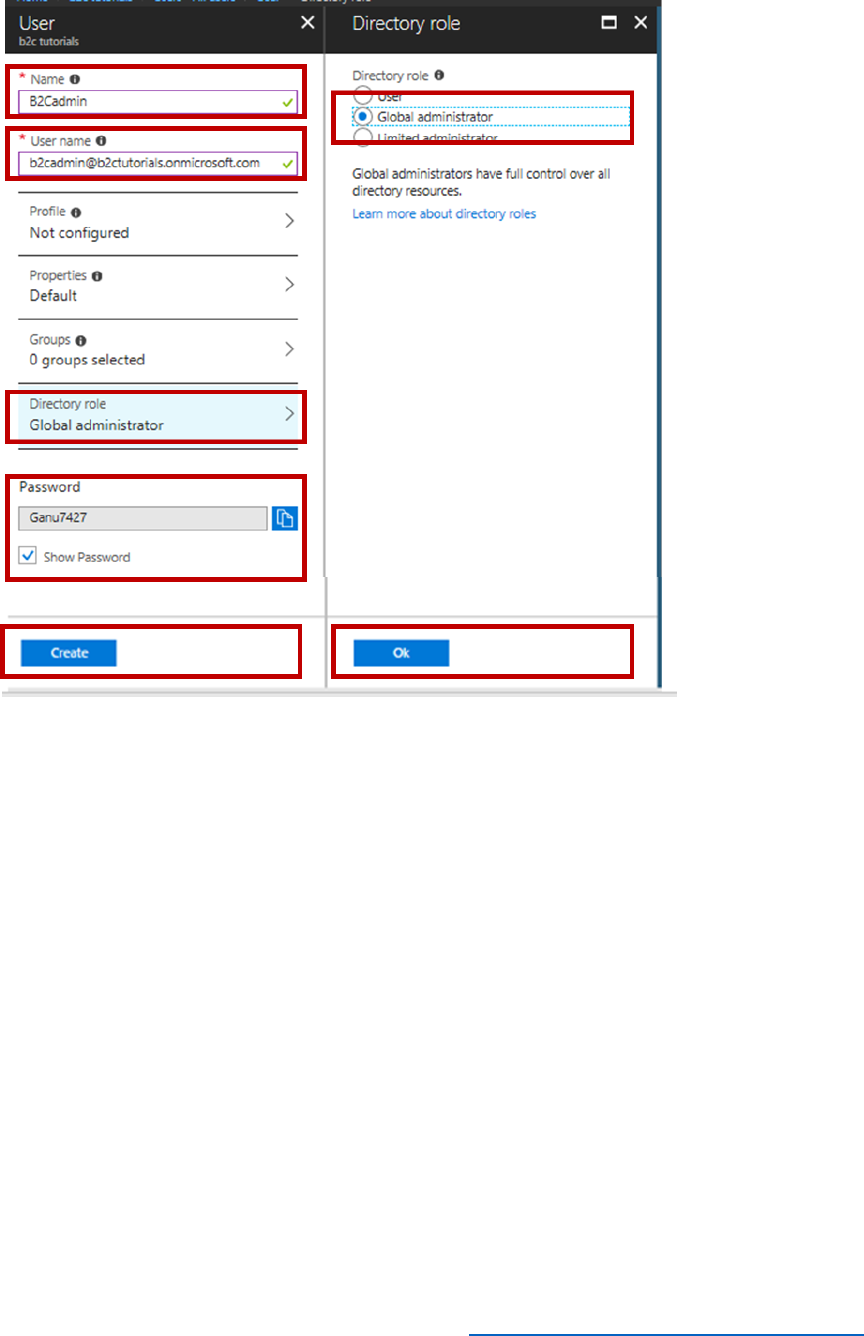
3) In the Name field, enter B2cadmin, and in the User name field, enter
b2cadmin@yourtenantname.onmicrosoft.com.
NOTE: if you have a custom domain name, your tenant will not have the .onmicrosoft
element in the name.
4) Select Directory role, select a role of Global Administrator and select OK.
NOTE: when you create a regular user, you will not need to select OK.
5) Select Show password, copy down the temporary password, and select Create.
9 © 2018 Microsoft Corporation Feedback? https://aka.ms/aad-b2c-course-feedback
6) Repeat steps 2-5 with the following values to create your test user.
a) Name: Testuser
b) User Name: Testuser@yourtenant.onmicrosoft.com
c) Directory role: User
Your administrator account and test user account now appear in your users list.
10 © 2018 Microsoft Corporation Feedback? https://aka.ms/aad-b2c-course-feedback
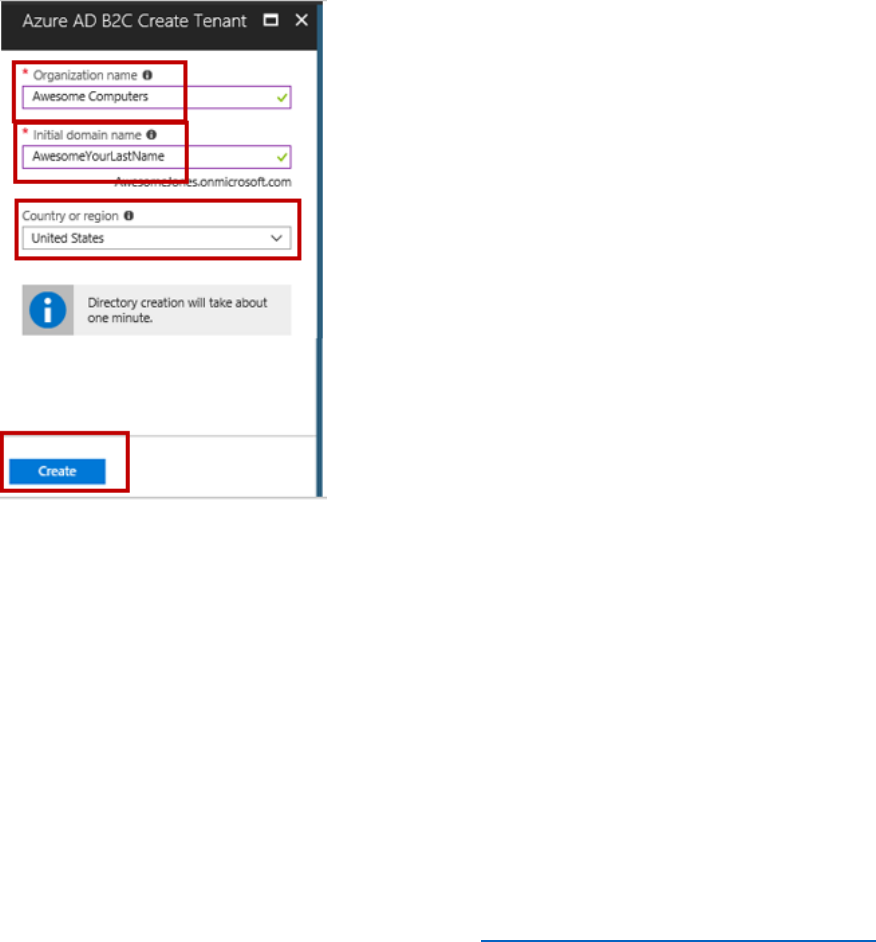
Create a B2C tenant
Perform the following steps to create a new B2C Tenant.
1) In the left navigation of the Azure portal, select Azure Active Directory, then select + Create
a resource at the top of the navigation.
2) In the search box, type B2C, and from the results choose Azure Active Directory B2C.
3) In the window that opens, select Create, then select Create a new Azure AD B2C Tenant.
4) In the Organization name, type Awesome Computers.
5) In the Initial domain name, type AwesomeYourLastName, for example AwesomeJones, and
then select Create.
If AwesomeYourLastName isn’t available, choose another name, such as AwesomeJones22.
The new directory will now be available in the drop down under your sign in name.
11 © 2018 Microsoft Corporation Feedback? https://aka.ms/aad-b2c-course-feedback
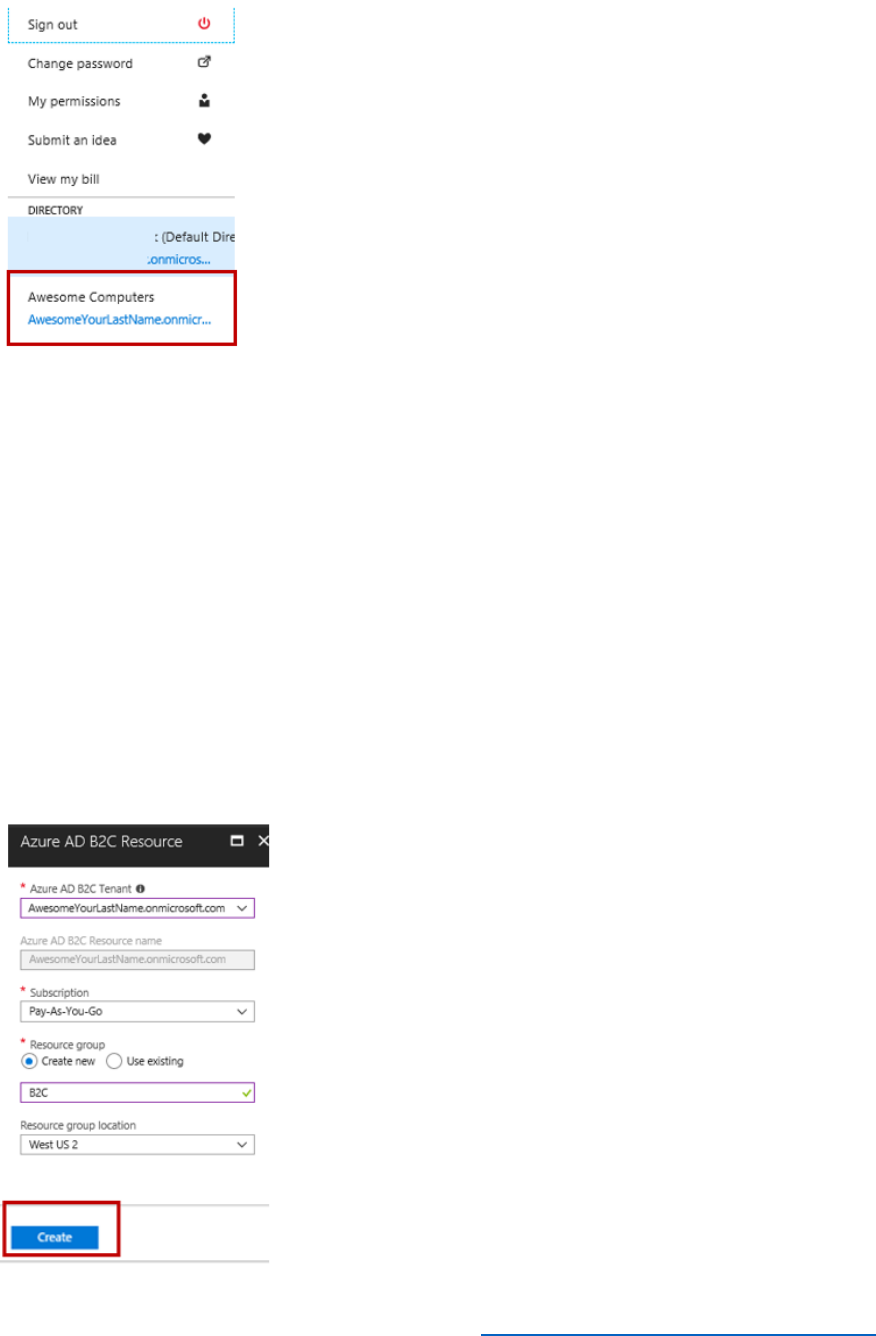
Link the B2C Tenant to the Azure Subscription
In this process, you connect your Azure AD B2C tenant to your Azure subscription.
Perform the following steps to make the connection.
1) In the left navigation of the Azure portal, select Azure Active Directory, then select + Create
a resource at the top of the navigation.
2) In the search box, type B2C, and from the results choose Azure Active Directory B2C.
3) In the window that opens, select Create, then select Link an existing Azure AD B2C Tenant
to my subscription.
4) In the Azure AD B2C Tenant drop down, select your AwesomeYourLastname tenant.
5) Choose an existing resource group or create a new one and select the resource group
location, select the Pin to dashboard check box, and then select Create.
12 © 2018 Microsoft Corporation Feedback? https://aka.ms/aad-b2c-course-feedback
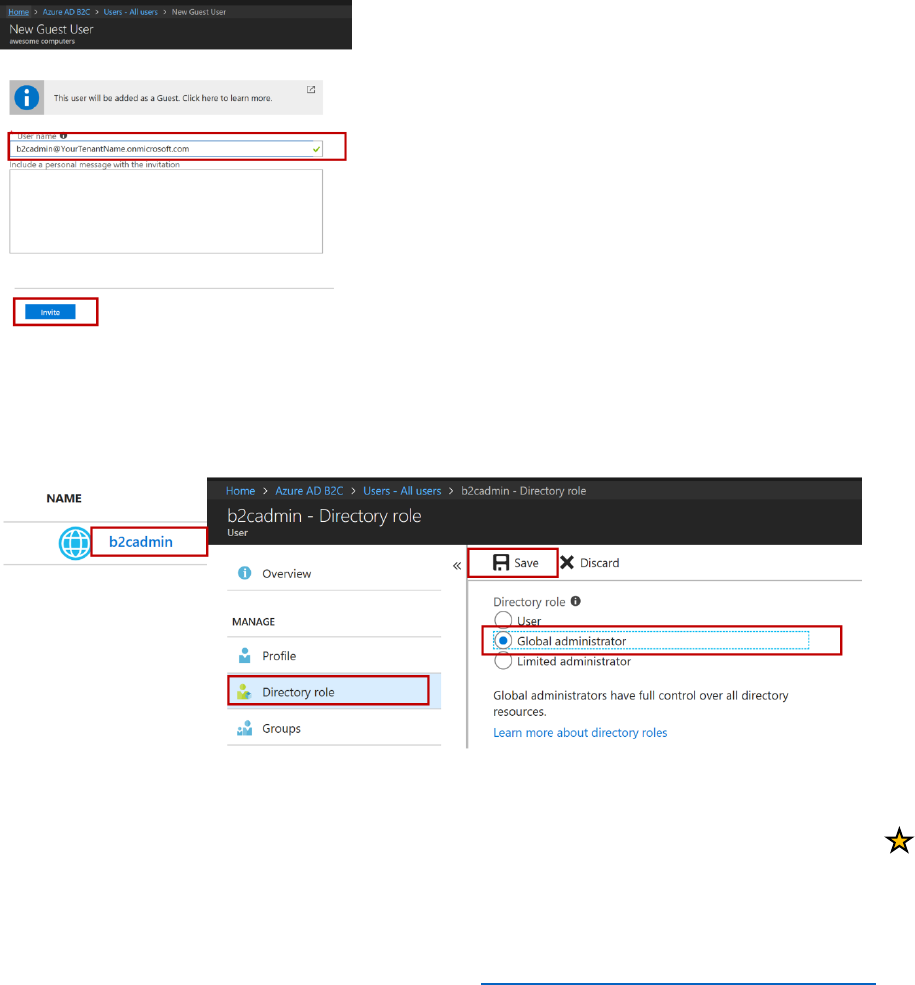
Enable the B2CAdmin account to manage the B2C Tenant
In this process, you will enable the B2CAdmin account to manage the B2C Tenant.
1) Ensure you are in your Azure Tenant.
2) From the dashboard, select your B2C Tenant, AwesomeYourLastName.
3) In the tenant navigation, select Users.
4) In the resultant window, Select + New guest user.
5) Type the B2CAdmin email B2CAdmin@YourTenantName.onmicrosoft.com, and select Invite.
On the All Users screen, the b2cadmin account will now show with a user type of Guest.
6) Select the link for the user name, and on the b2cadmin properties screen, select Directory
Role, choose a role of Global adminstrator, and select Save.
7) Sign out and sign in with the B2C admin account.
8) Select All Services, Search for B2C, and mark Azure AD B2C as a favorite by selecting the
For the rest of this course, use the B2CAdmin account.
13 © 2018 Microsoft Corporation Feedback? https://aka.ms/aad-b2c-course-feedback
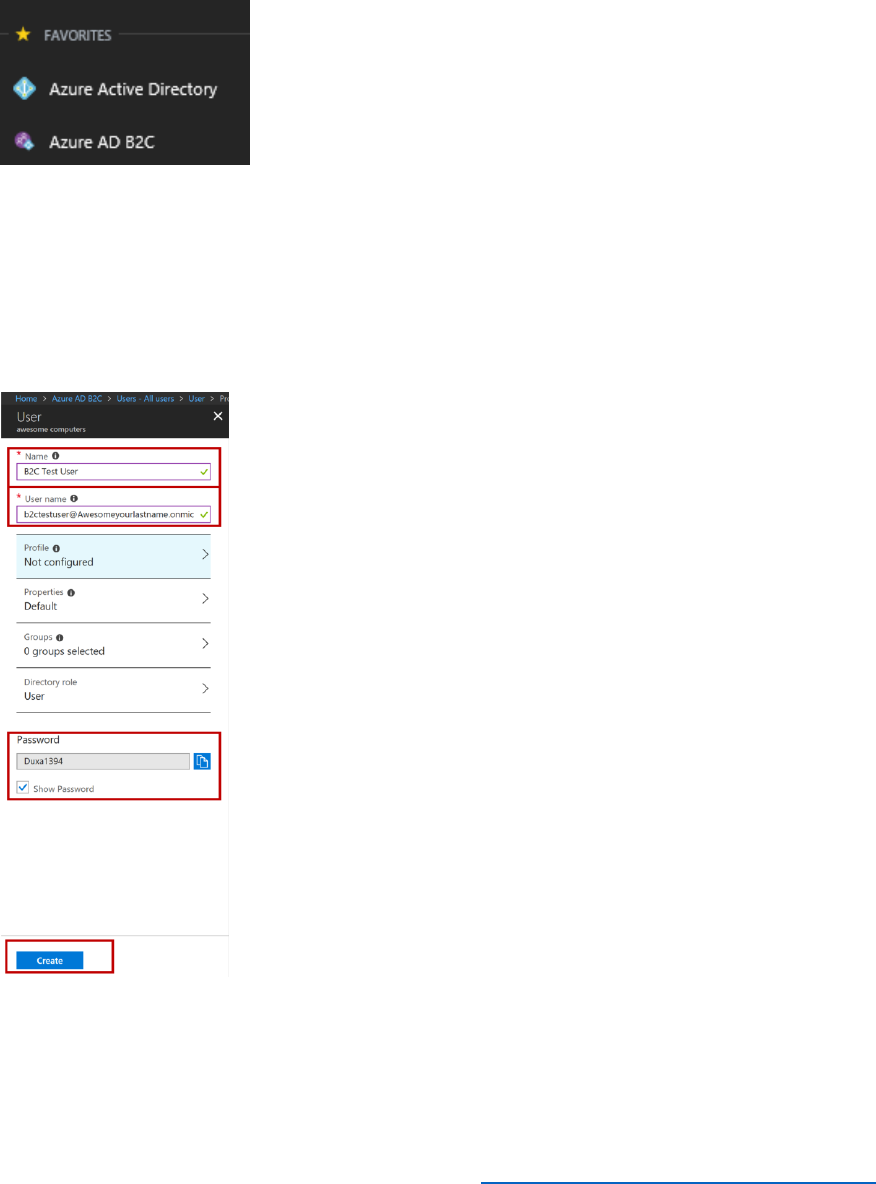
Make things easy to find
1) In your Azure portal, select All Services, search for B2C, then select the star next to it to add
it to your favorites. It will then appear in your left navigation.
2) Drag Azure AD and Azure AD B2C to the top of your favorites.
Create a B2C Test user
1) In the left navigation select Azure AD B2C, select Users, the select + New user.
2) In the Name field enter B2C Test User.
3) In the User name field, enter b2ctestuser@AwesomeYourlastname.onmicrosoft.com,
and then select the Show Password link, note the password, and select Create.
4)

14 © 2018 Microsoft Corporation Feedback? https://aka.ms/aad-b2c-course-feedback
Important Concepts
What is Azure AD B2C
Azure AD B2C is a customer identity management system that enables you to abstract the
authentication and authorization functions from your application. Azure AD B2C uses policies to
construct user journeys (or user flows) including sign up, sign in, and profile management.
Azure AD B2C interacts with identity providers, customers, other systems (such as CRM systems)
and a local directory to complete identity tasks.
The underlying platform that establishes multi-party trust and completes these steps is called
the Identity Experience Framework (IEF). This framework and a policy (also called a user journey
or a Trust Framework policy) explicitly defines the actors, the actions, the protocols, and the
sequence of steps to complete. You can find out more about Azure AD B2C here.
When to use Azure AD B2C
Azure AD B2C is best used when you want to sign up and sign in users for web apps, iOS apps,
android apps, single page apps, or desktop apps. It can enable the user journeys discussed
above and can interact with REST APIs to validate information with other systems, such as
validating an address with the postal service, or validating a governmental identity with a
government system.
If you are looking for identity services for enterprise accounts, you should investigate Azure
Active Directory. If you are looking for identity services for partners or suppliers to give them
access to enterprise resources, you should investigate Azure AD B2B collaboration. In B2B, you
invite users into your corporate directory. With Azure AD B2C, users remain external.
Accounts, Tenants, and Subscriptions
An Azure account is created when you sign up for Azure. Creating your Azure account creates
an Azure Tenant, which is accessed by logging in to https://portal.azure.com with the credentials
that you used to create your Azure account. This is the Azure Portal. Inside the portal, you
create and manage different types of user accounts and other resources.
An Azure subscription is a billing agreement you create in conjunction with your Azure
account. Azure subscriptions are usually pay-as-you-go, and you only incur charges for the
services that you use. To create an Azure AD B2C Tenant, your Azure account must have a
subscription.
An Azure AD B2C Tenant is a resource that you create within your Azure tenant.

15 © 2018 Microsoft Corporation Feedback? https://aka.ms/aad-b2c-course-feedback
Module 1 – Using Built in Policies
Introduction
This module introduces you to policies in Azure AD B2C that can be used with Identity Providers,
or IdPs, as part of the user journeys listed below. Policies save you time and effort within your
application so that you do not have to completely write code or create new pages for each user
journey. However, it is still possible to use the extensibility of Azure AD B2C to create custom
pages for each journey if at all desired.
At the end of this module, you will be able to:
• Create built-in policies for
o The sign up or sign-in journey.
o The password reset journey.
o The profile edit journey.
And you will have a deeper understanding of the following concepts:
• What policies are, and how applications use them.
• Claims and attributes and how they are used.
• How to view the contents of tokens.
• The pros and cons of using multi-factor authentication.
• Using policies to facilitate single-sign on among applications.
This module should take you 15 minutes to complete.
See it in action
Before you begin the module, you can experience the end user journeys that you are about to
build.
• Go to the Demo site and sign up.
• Enter your profile information
o Note: you must use both an email and a phone number to which you have
access.
• Edit your profile to add “-1” to your last name.
• Reset your password and experience the multi-factor authentication (MFA) experience.
16 © 2018 Microsoft Corporation Feedback? https://aka.ms/aad-b2c-course-feedback
Create a Sign-up or Sign-In Policy
A sign-up or sign-up policy provides a sign-in and a sign-up user experience with a single policy
configuration. Policies define the user experience and the attributes which are received when a
user signs into an application. The attributes are added as claims to the user token.
Perform the following steps to configure a Sign-up or Sign-in policy in the Azure AD B2C tenant.
1) Sign in to the Azure portal as the B2CAdmin account in your Azure tenant.
2) Select Azure AD B2C in the left navigation.
3) In the Azure AD B2C blade, under the Policies section, select Sign-up or sign-in-policies,
then select + Add.
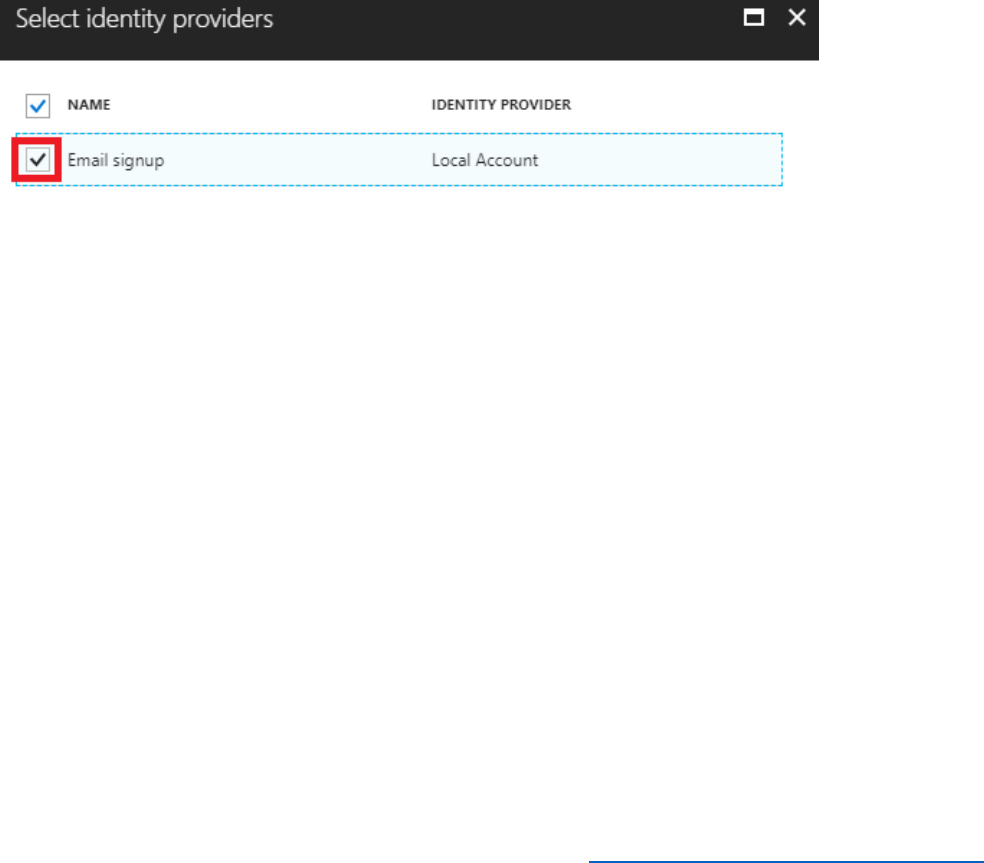
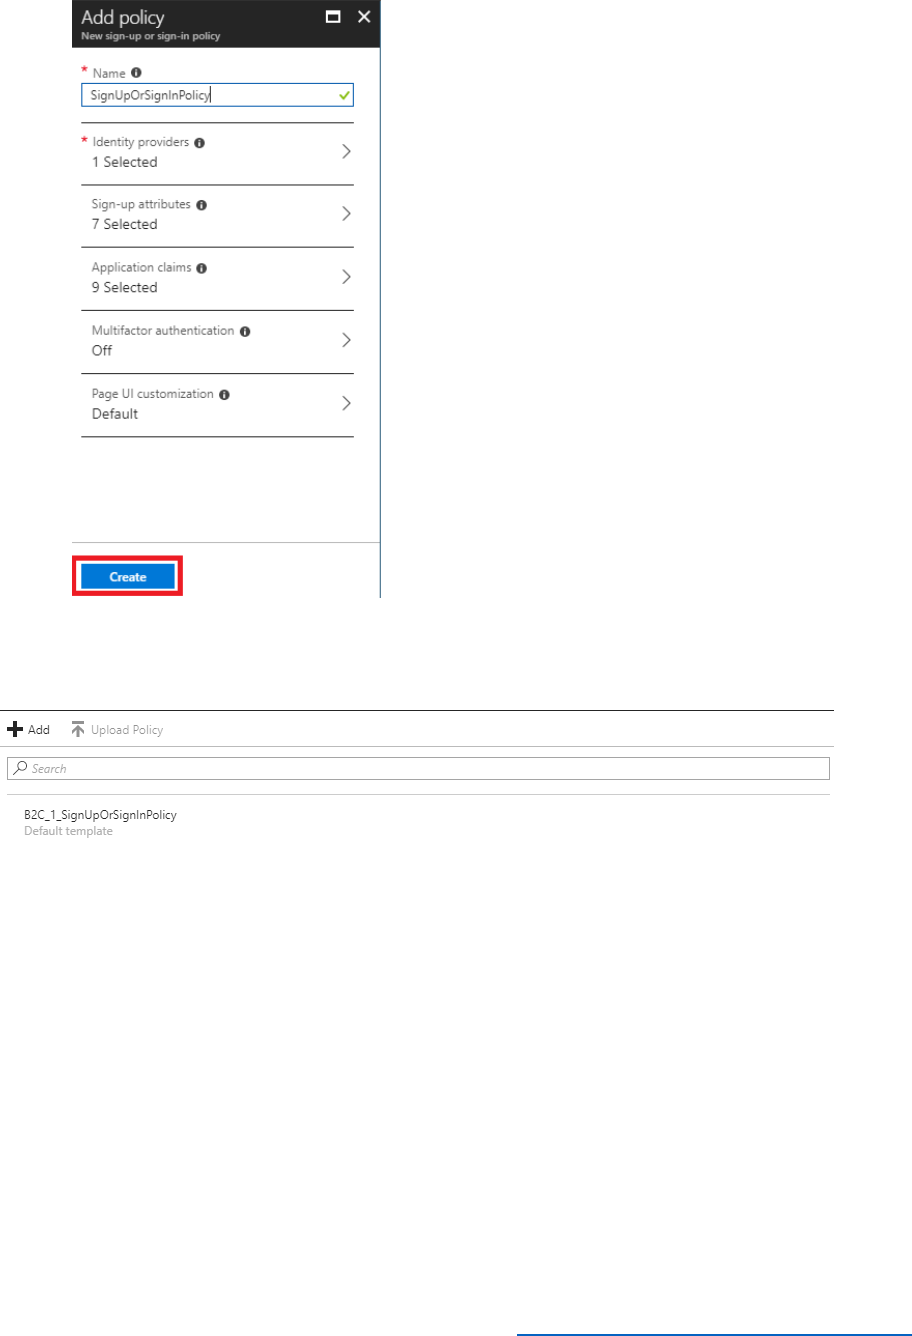
4) Name the policy SignUpOrSignInPolicy.
5) Select Identity Providers, then select the checkbox for Email signup.
This is for local accounts that are created within the Azure AD B2C tenant.
6) Select OK.
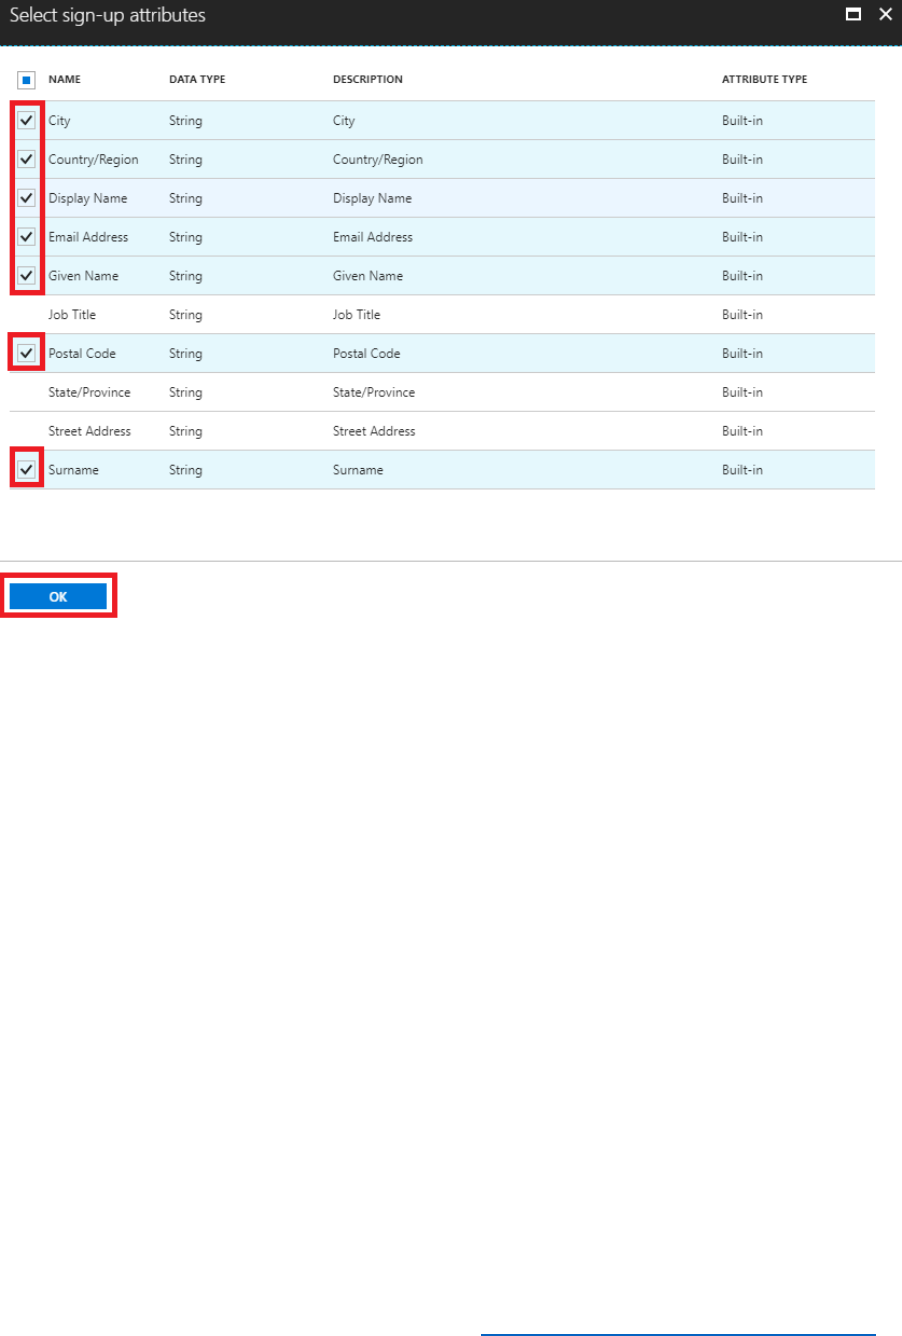
7) Select Sign-up attributes and then select the following attributes. The attributes are
collected as part of a sign-up process.
• City
• Country/Region
• Display Name
• Email Address
• Given Name
• Postal Code
• Surname
17 © 2018 Microsoft Corporation Feedback? https://aka.ms/aad-b2c-course-feedback
8) Select OK.
9) Select Application claims and then select the following application claims.
• City
• Country/Region
• Display Name
• Email Addresses
• Given Name
• Identity Provider
• Postal Code
• Surname
• User is new
• User's Object ID
10) Select OK to save the application claims.
11) Select Create to provision the Sign-up or Sign-In Policy.
19 © 2018 Microsoft Corporation Feedback? https://aka.ms/aad-b2c-course-feedback
Create a Password Reset Policy
You will now create a password reset policy, so that the application can handle password resets
for the local Azure AD B2C tenant user accounts.
Perform the following steps to create the password reset policy.
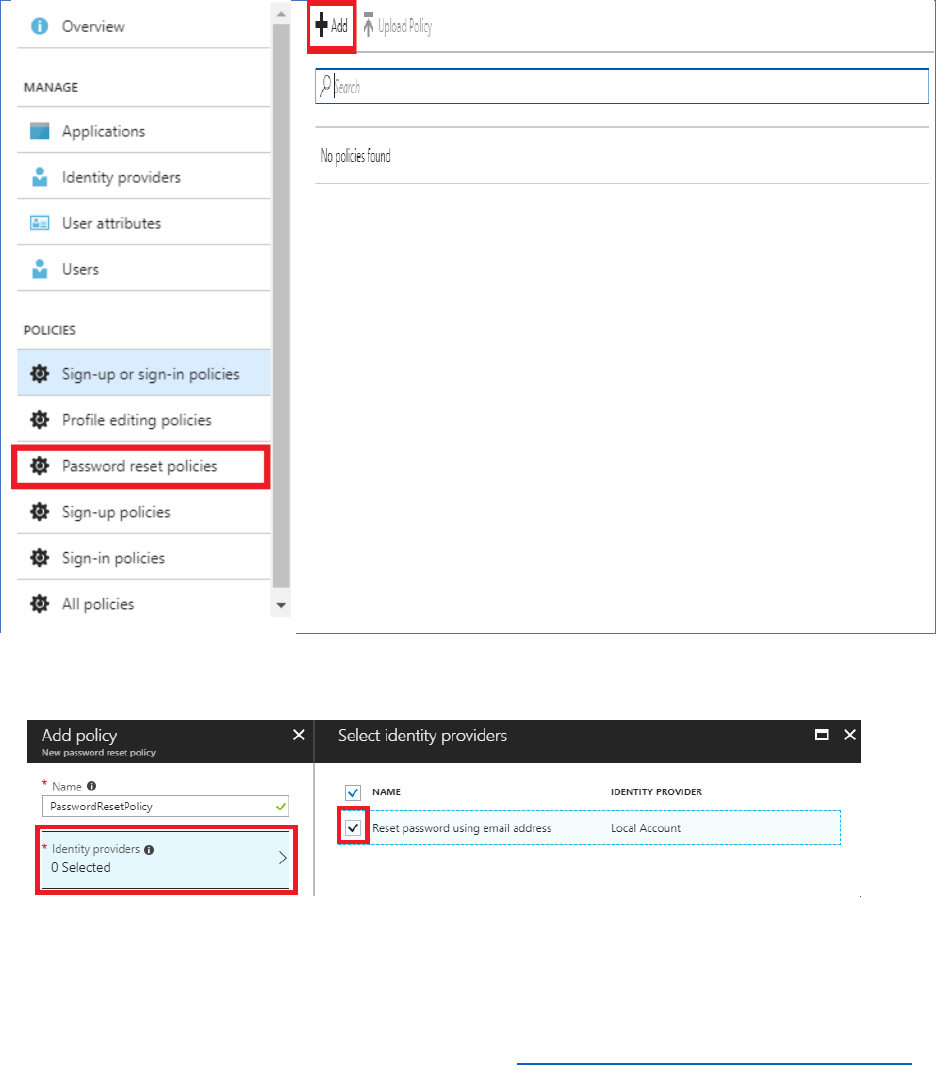
1) In the Azure AD B2C blade, under the Policies section, select Password reset policies, then
select +Add.
2) Name the policy PasswordResetPolicy.
3) Select Identity Providers, then select Reset password using email address.
4) Select OK.
20 © 2018 Microsoft Corporation Feedback? https://aka.ms/aad-b2c-course-feedback
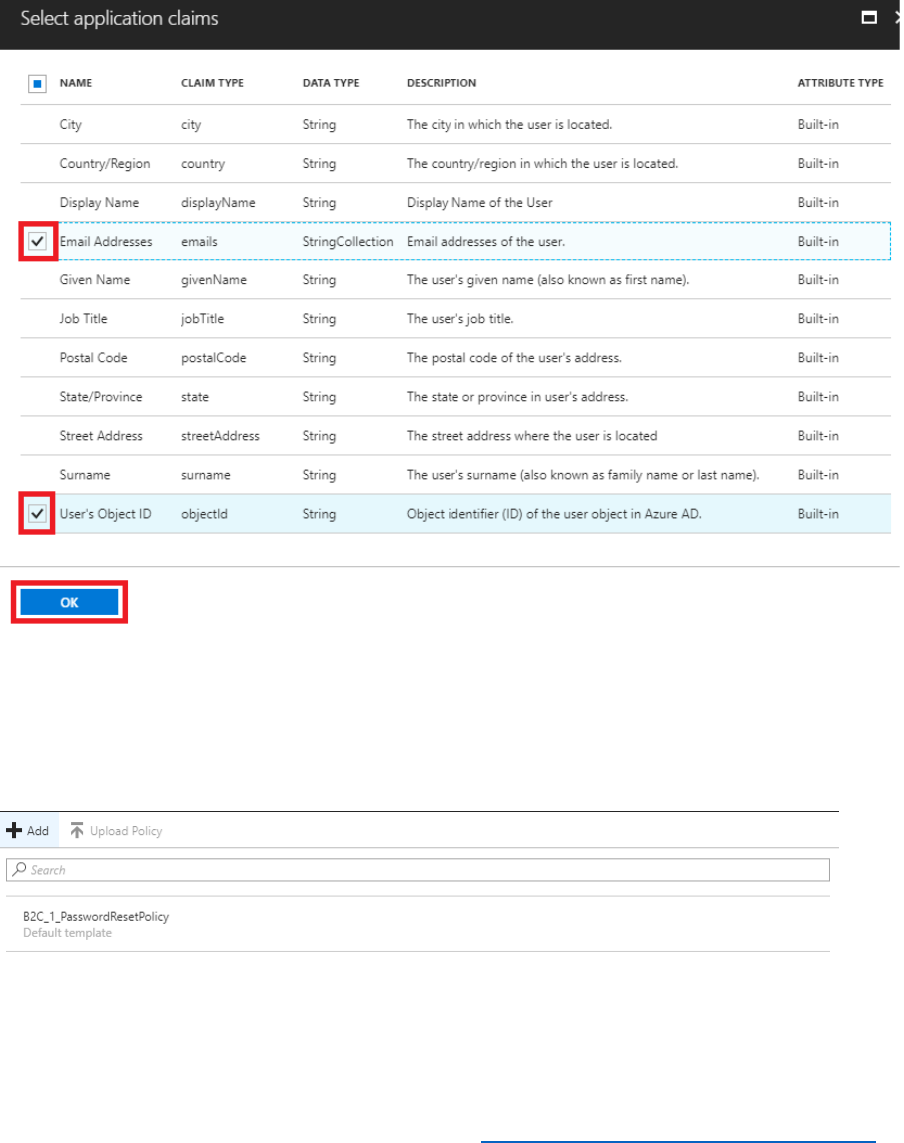
5) Select Application claims and then select the following claims. These will be returned to the
application after a successful password reset.
• Email Addresses
• User’s Object ID
6) Select OK.
7) Select Create to provision the password reset policy.
When the Policy has been created, the name will be prefixed with B2C_1_.
21 © 2018 Microsoft Corporation Feedback? https://aka.ms/aad-b2c-course-feedback
Update the Password Reset Policy to include Multifactor Authentication
Multifactor Authentication (MFA) can be enabled to secure Azure AD B2C identities.
Perform the following steps to enable MFA on a password reset policy.
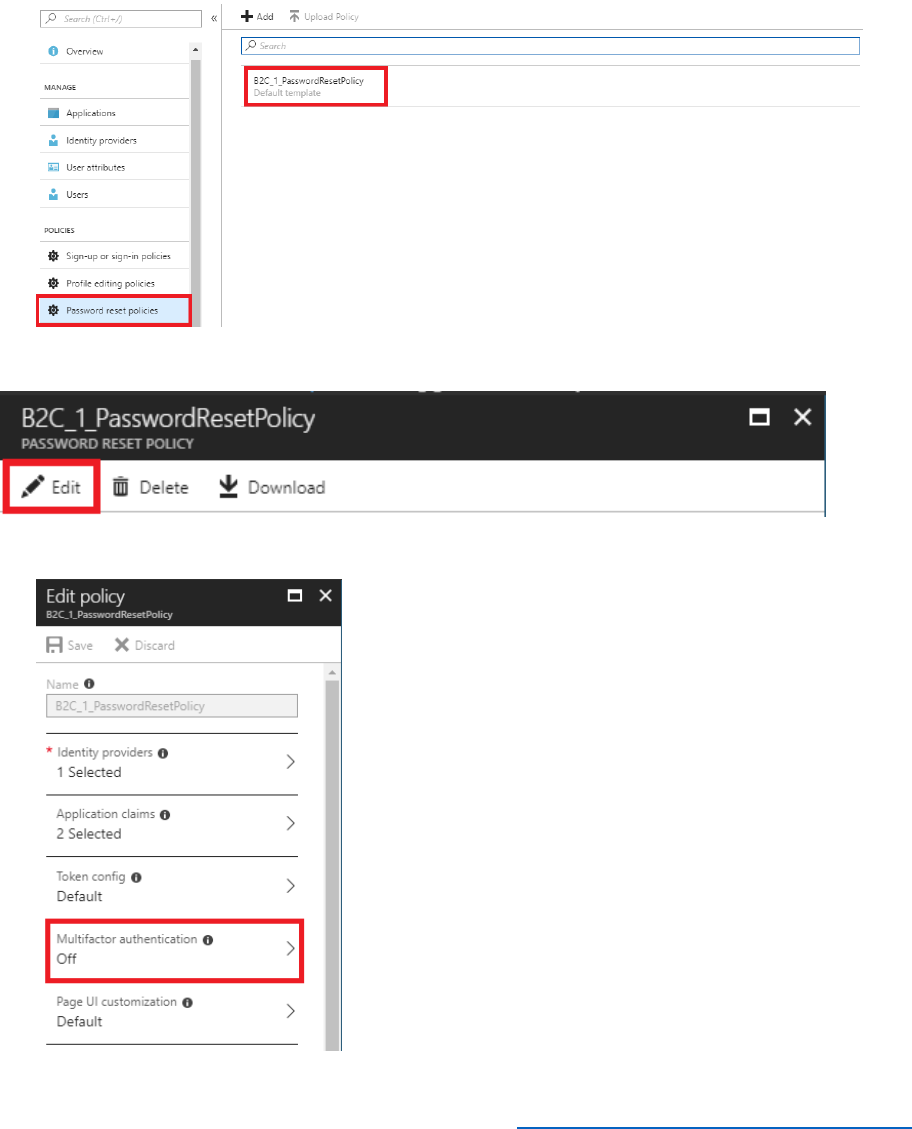
1) In the Azure AD B2C blade, under the Policies section, select Password reset policies and
then select the B2C_1_PasswordResetPolicy policy.
2) Select Edit.
3) Select Multifactor authentication.
22 © 2018 Microsoft Corporation Feedback? https://aka.ms/aad-b2c-course-feedback
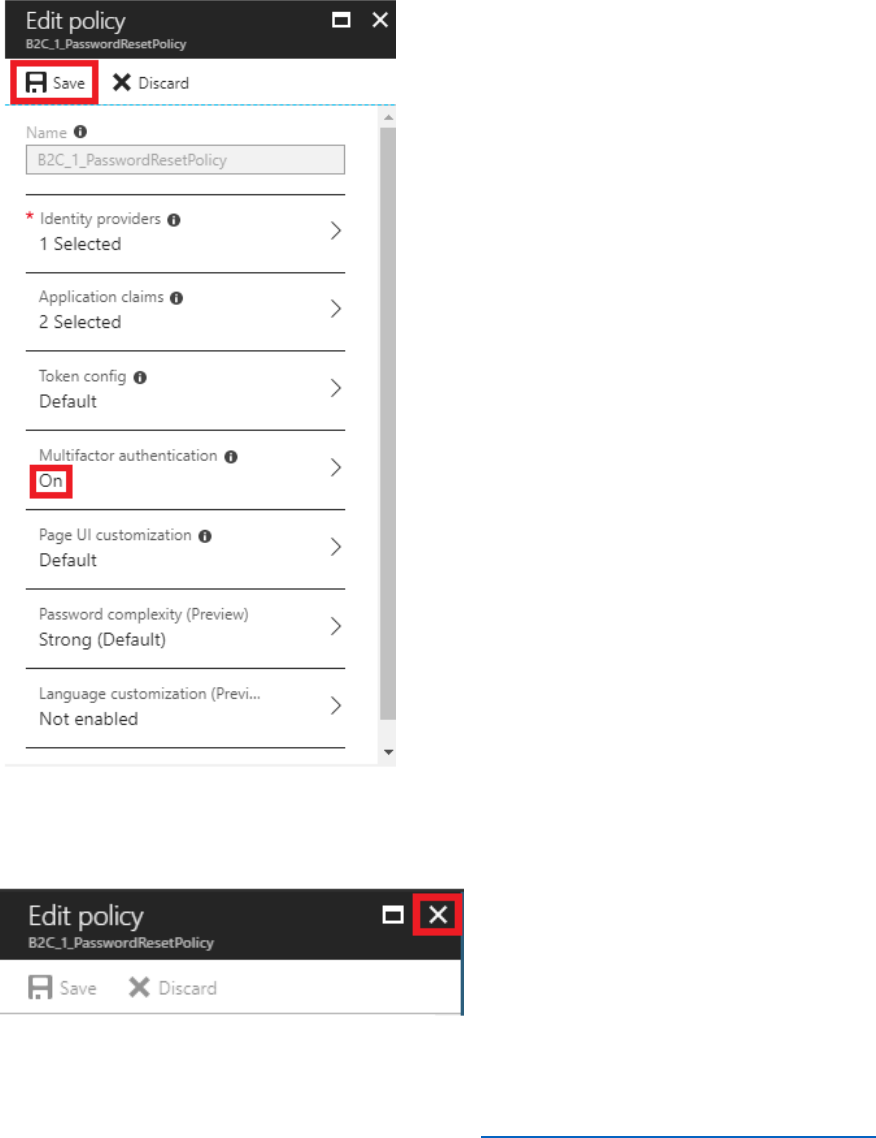
4) Toggle the State from Off to On and then select OK.
5) Select Save to save the change to the policy. Ensure that the Multifactor authentication
option displays On.
Multifactor authentication has been enabled on the password reset policy.
6) Close the Edit Policy blade, by selecting the X.
23 © 2018 Microsoft Corporation Feedback? https://aka.ms/aad-b2c-course-feedback
7) Close the B2C_1_PasswordResetPolicy blade, by selecting the X.
Create a Profile Editing Policy
Profile editing policies allow users to make changes to their profile.
Perform the following steps to enable a profile editing policy.
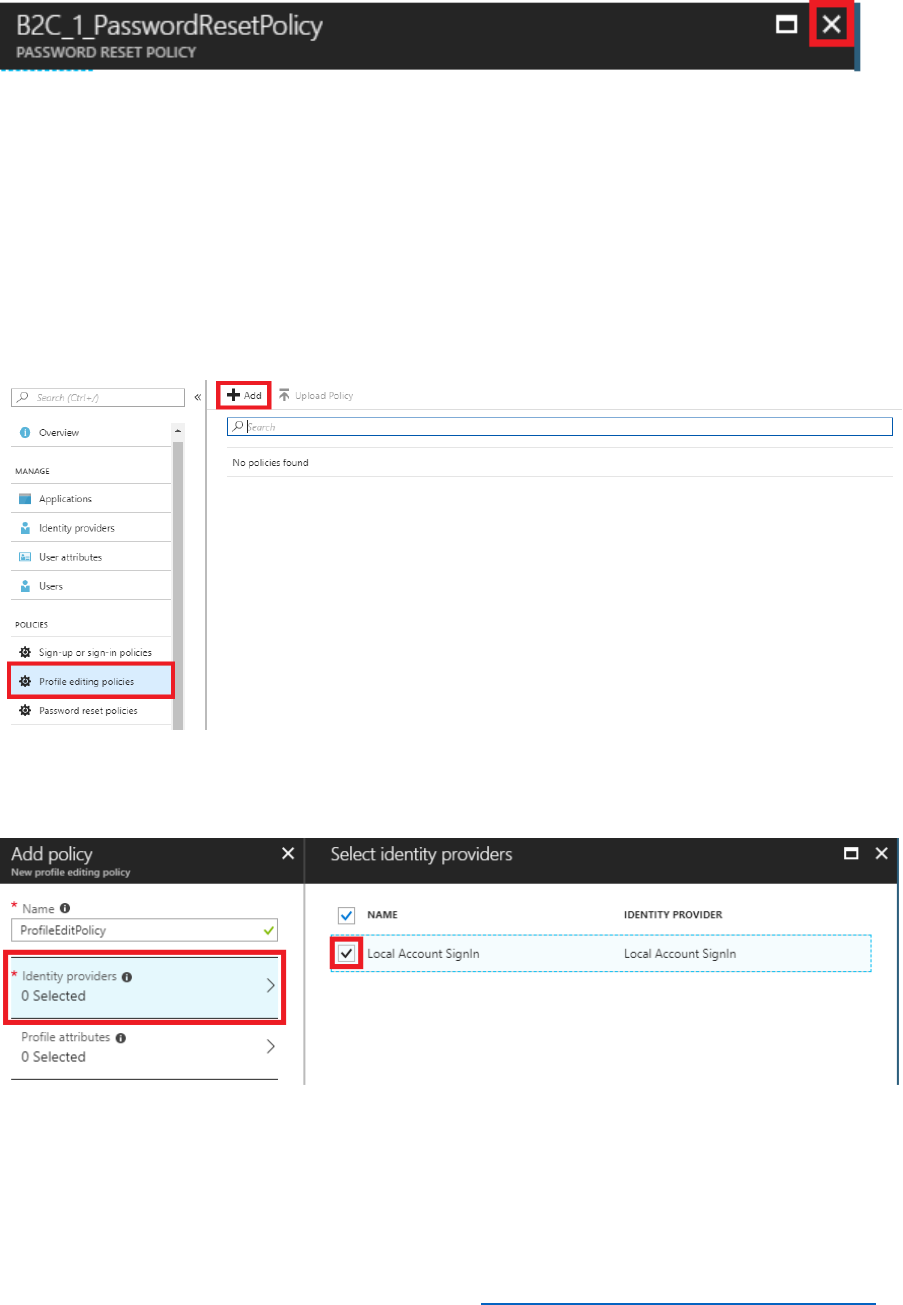
1) In the Azure AD B2C blade, under the Policies section, select Profile editing policies, then
select + Add.
2) Name the policy ProfileEditPolicy.
3) Select Identity providers, select Local Account SignIn and then select OK.
4) Select Profile attributes, select the attributes shown in the following image, and then select
OK.
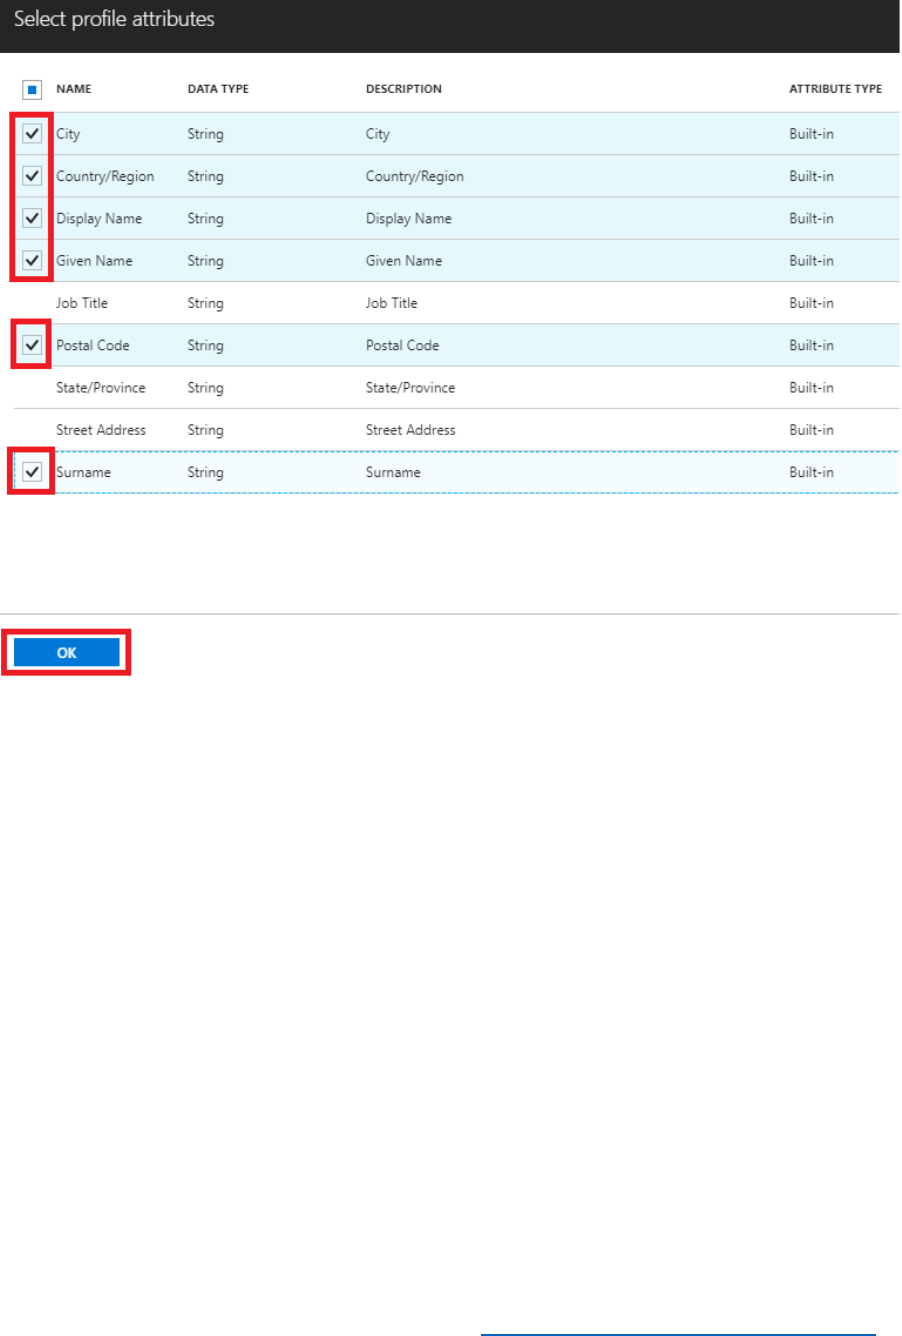
24 © 2018 Microsoft Corporation Feedback? https://aka.ms/aad-b2c-course-feedback
5) Select Application claims, select Email Addresses and User's Object ID, and then select
OK.
6) Select Create in the Add Policy blade.
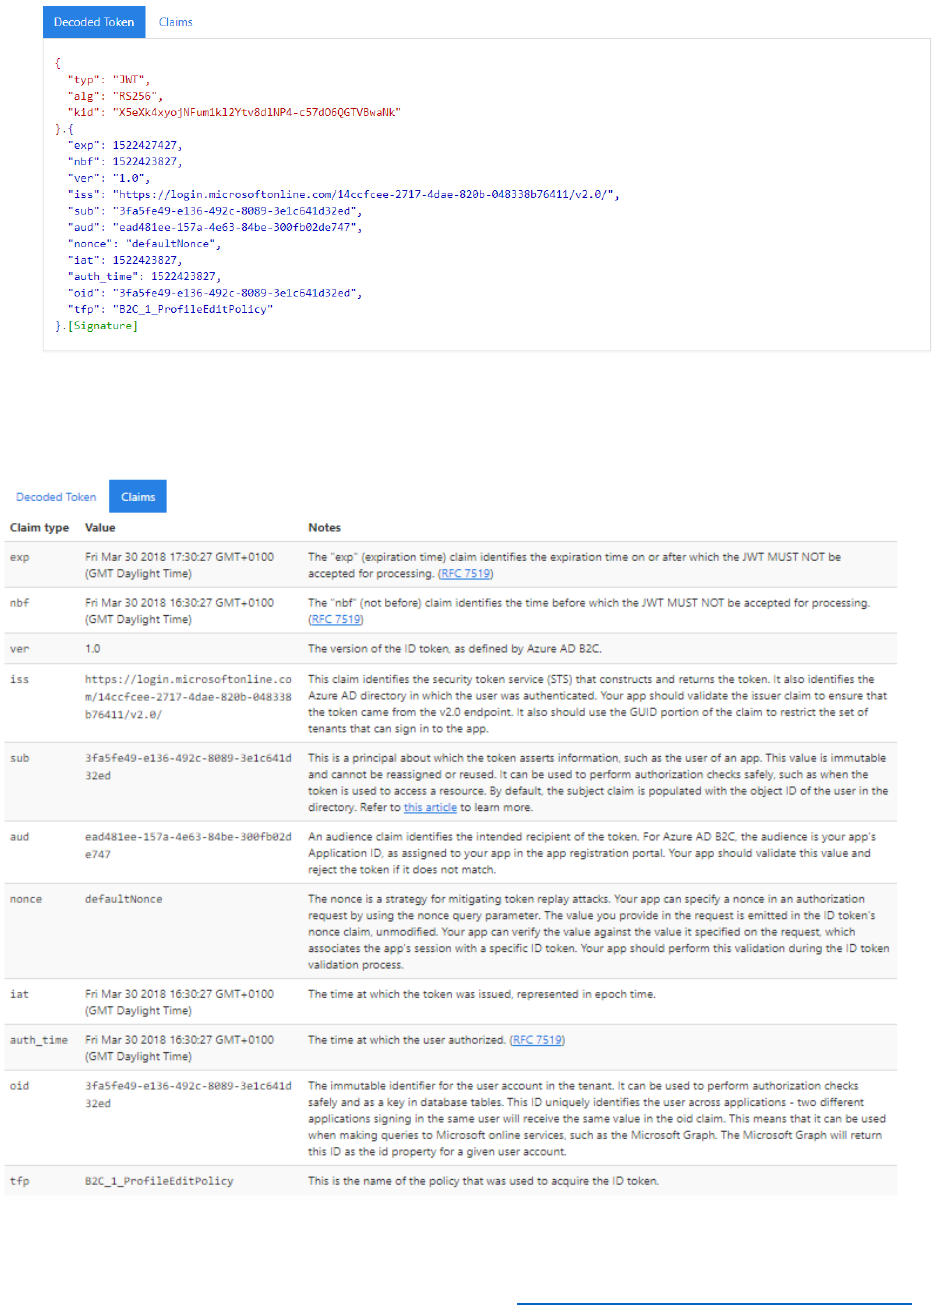
Register the Reply URL
You can examine the claims present in the identity tokens by using the https://jwt.ms website.
Jwt.ms provides the ability to decode id_tokens and show the claims present within the token.
To utilize jwt.ms, you can either paste in an id_token, or set the reply URL of the application to
https://jwt.ms.
Perform the following steps to update the application reply URL to https://jwt.ms.
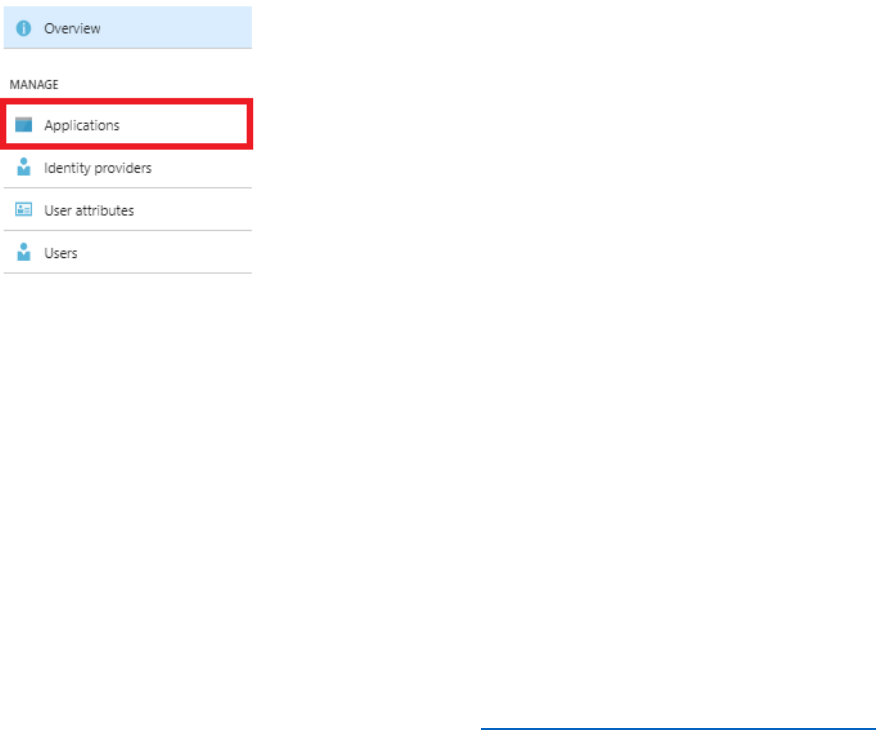
1) In the Azure AD B2C blade, under the Manage section select Applications.


28 © 2018 Microsoft Corporation Feedback? https://aka.ms/aad-b2c-course-feedback
Review the Identity Token Using https://jwt.ms
You can inspect identity tokens by using the page at https://jwt.ms. This site enables you to
review the token, and the decoded token and claims associated with the token that have been
issued by an IdP.
Perform the following steps to update the application reply URL to jwt.ms.
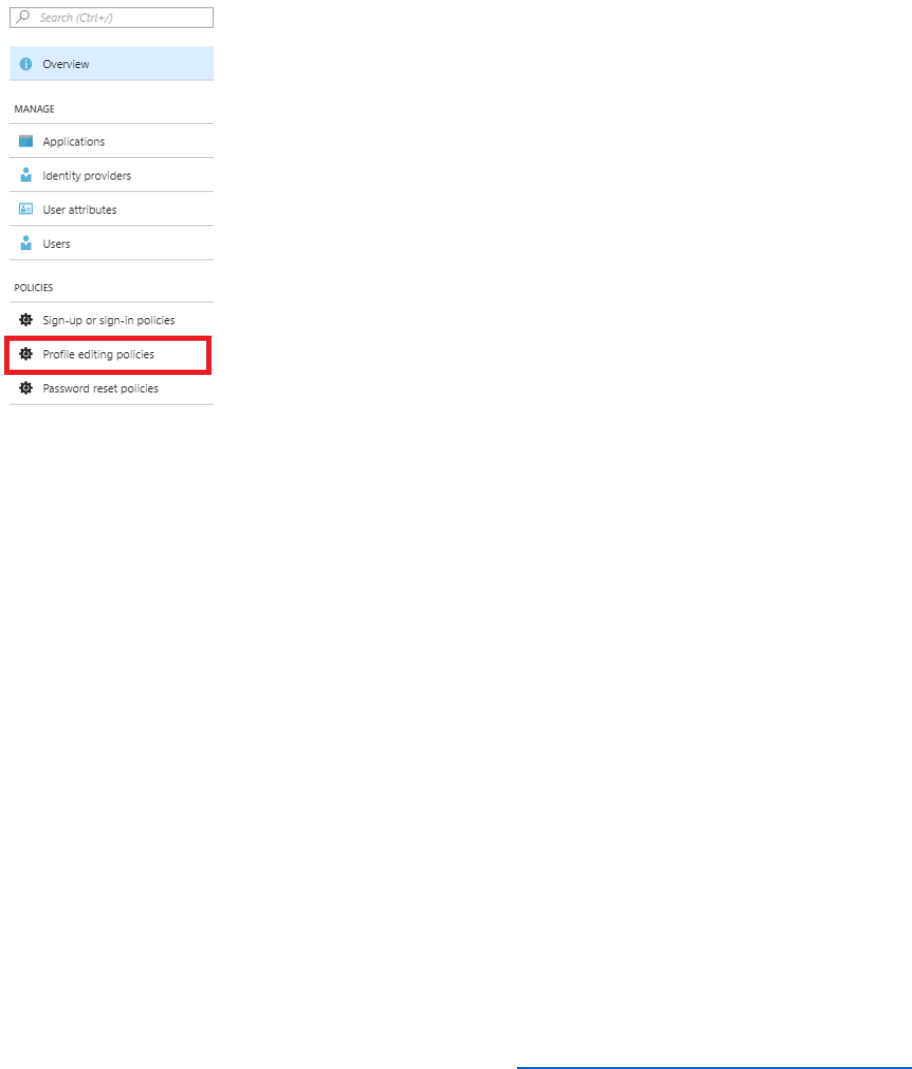
1) In the Azure AD B2C blade, under the Policies section, select Profile editing policies.
2) Select the B2C_1_ProfileEditPolicy which was created earlier.
3) In the profile editing policy blade select Run now. This will launch a browser with the
Run now endpoint URL.
4) Enter the credentials for the b2cTestUser@AwesomeYourLastname.onmicrosoft.com
that you created in the pre-module, and then select Sign in.
5) If this is the first time you have logged into the tenant with the test user account, you will
be asked to update your password. Enter the current password, new password and
confirm the new password, then select Sign in.
6) After successfully authenticating, you will need to complete the user profile fields as the
Sign-in and Sign-up policy enforces the capturing of profile information. Enter the details
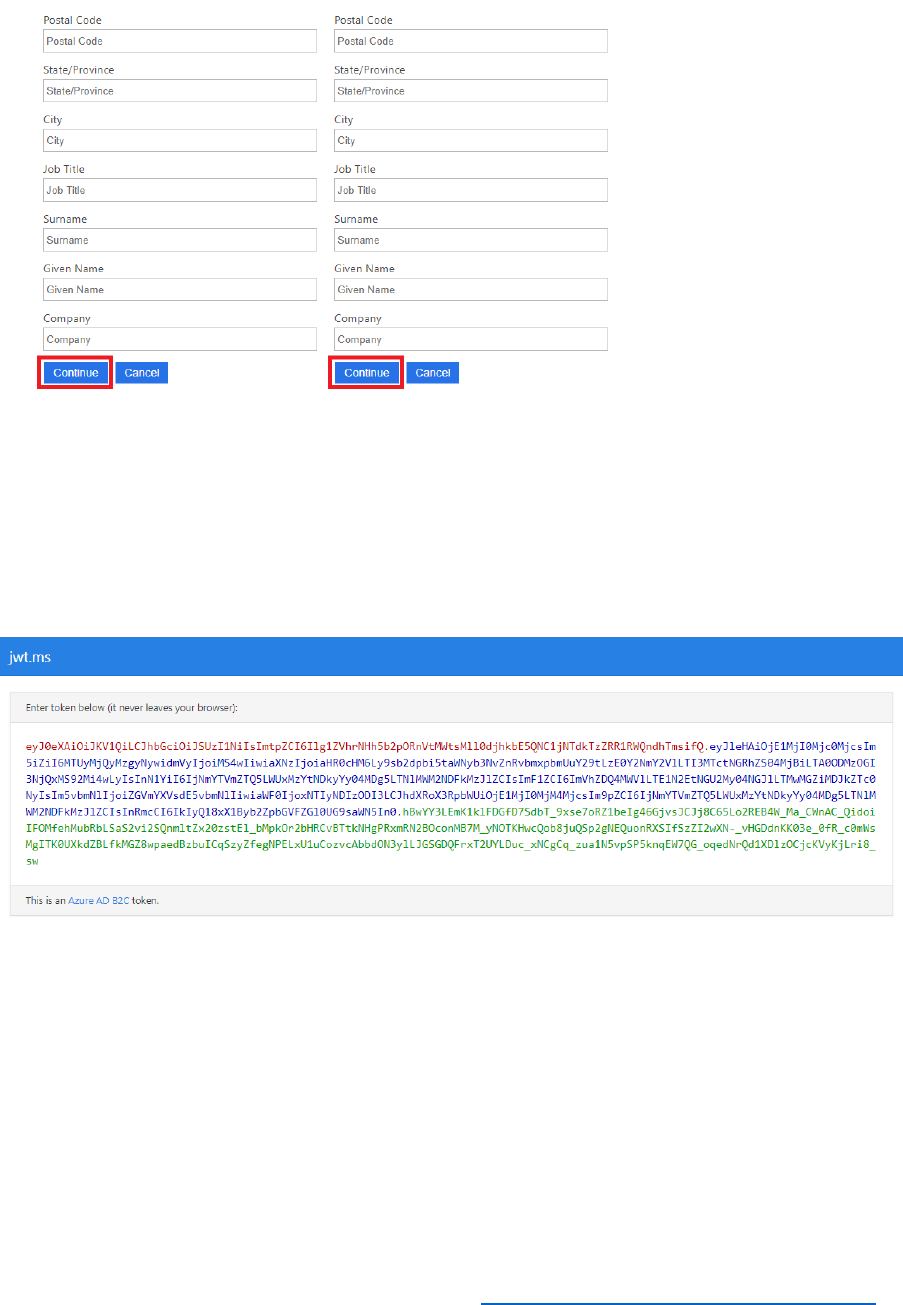
29 © 2018 Microsoft Corporation Feedback? https://aka.ms/aad-b2c-course-feedback
as desired for the user profile then select Continue.
7) After successfully authenticating, you will be re-directed to https://jwt.ms which is the
reply URL for the application. This is the URL where all tokens are returned, by the Azure
AD B2C OAuth 2.0 endpoint.
8) Inspect the decoded token and claims in https://jwt.ms.
Token

31 © 2018 Microsoft Corporation Feedback? https://aka.ms/aad-b2c-course-feedback
Important Concepts
Unique IDs for Applications
Each application registered in an Azure AD or Azure AD B2C tenant has a unique application ID
which is utilized as part of the trust mechanisms built into the Azure AD authentication libraries.
Applications contain unique IDs and secrets, which are used in applications to ensure that they
are authorized to request tokens from Azure AD tenants.
What are built in policies
Built in policies provide the user experience and are associated with IdPs and applications for
various user journeys. These include Sign up, Sign In, Password Resets and Profile Editing
policies. Policies can be applied to multiple IdPs and applications that are registered in Azure AD
B2C which makes the development effort faster, reducing the time you need to spend on coding
the user journeys.
Policies are important to ensure that the right user attributes are captured as part of the sign up
or sign in process and are flexible enough so that you can add custom attributes too. Policies
also allow you to control the look and feel of the user journeys and also enforce Multi Factor
Authentication.
How do policies work
Policies you define are associated with one or more IdPs. When your application leverages Azure
AD B2C, the policies will determine the behavior when a user authenticates to the IdP. When
the token from the IdP is validated by Azure AD B2C, ensuring the signature is trusted, Azure AD
B2C then uses a policy specified in the Azure AD B2C tenant for the specific IdP and application.
How applications use policies
Applications receive user id_tokens to make authorization decisions. Users attributes, which may
be collected during a sign up or sign in policy, are used as claims that are present in the
id_token. Applications can then utilize the claims in the id_token, to understand the user in more
detail e.g. a claim can be used to expose different UI elements based on a role associated with a
user’s claims, which are taken from attributes.
What are attributes and claims
Attributes are pieces of information which are tied to a user profile. You may want to collect
specific attributes as part of a sign up or sign in policy to ensure that you have collected the
necessary information for the application you are developing. Users will be presented with a
form, for each user journey, to ensure that the attributes are collected as part of the initial sign
up or sign in process.
Attributes of a user can be added to the user’s claims, which is essentially updating the user’s
id_token through the policies, when they are authenticated by Azure AD B2C which be utilized
across different applications.

32 © 2018 Microsoft Corporation Feedback? https://aka.ms/aad-b2c-course-feedback
Using policies for SSO across applications
Multiple applications within a tenant may use the same policies, which can result in Single Sign-
on (SSO) to all the applications to which the user has access. By default, the configuration is set
at the tenant level, which means that multiple applications can share the same user session. This
means that once the user is authenticated to an application, the user can access multiple
applications registered in the same Azure AD B2C tenant, without having to follow a user
journey or be re-directed for authentication credentials.
For further information, see Azure Active Directory B2C: Token, session and single sign-on configuration.
Pros and cons of using MFA
Multi-factor authentication (MFA) increases security, and also increases the friction a user
experiences in their journey by adding more steps. You should use it in situations where you feel
increased security is paramount. There is also a cost to using MFA. While minimal, if you plan to
scale to tens or hundreds of thousands of users, you should consider the impact of MFA
scenarios.

33 © 2018 Microsoft Corporation Feedback? https://aka.ms/aad-b2c-course-feedback
Module 2 - Using Identity Providers with Azure AD B2C Built in Policies
Introduction
This module introduces you to IdPs and provide you with the steps to federate with Facebook
using Azure AD B2C. You will learn how to add Facebook as an identity provider and set up
Facebook federation with an Azure AD B2C tenant.
At the end of this module, you will be able to:
• Register a Facebook developer account.
• Create a Facebook application.
• Create an Azure AD B2C Identity Provider.
And, you will have a deeper understanding of the following concepts:
• Identity Providers and federation
• Authentication protocols supported by Azure AD B2C
This module should take approximately 15 minutes to complete.
See it in action
Before you begin the module, you can experience the end user journeys that you are about to
build at https://aka.ms/b2ccourse-2.
34 © 2018 Microsoft Corporation Feedback? https://aka.ms/aad-b2c-course-feedback
Setup Social Sign In
Prerequisites
You must have an account in the Facebook for developers website, prior to implementing this
task. The following steps show how to setup an application in the Facebook for developers
website.
Setup the Facebook Application
1) Open a browser and navigate to https://developers.facebook.com/, enter your account
details, and select Login.
2) If you do not have a current Facebook for developers account, select Create New
Account then enter the details as requested.
3) Navigate to https://developers.facebook.com/, select My Apps, and then select Add a
New App.
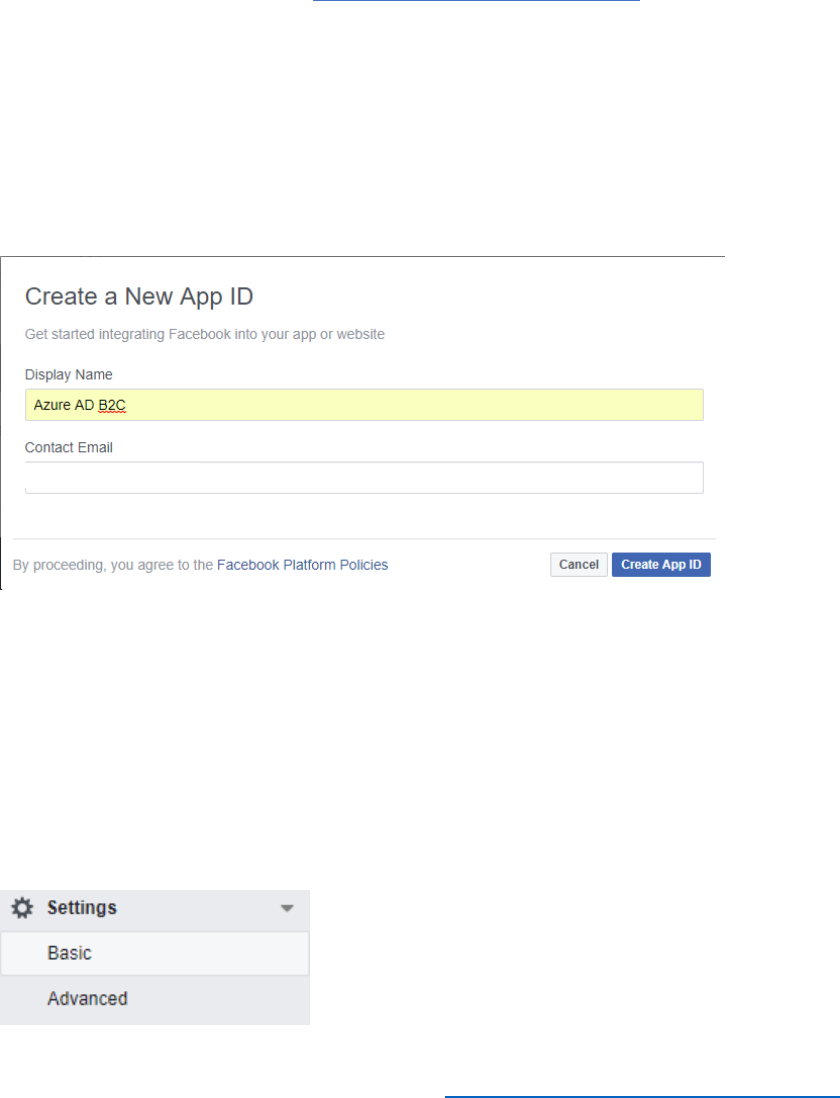
4) Enter the application Display Name and a Contact Email address.
5) Select Create App ID.
6) If you receive a Security Check message, enter the code on the screen in the box
provided and then select submit.
7) When you are shown the Add a Product page, note down the App ID as this will be
required for the configuration steps in the next set of tasks. Ensure that you handle this
information securely.
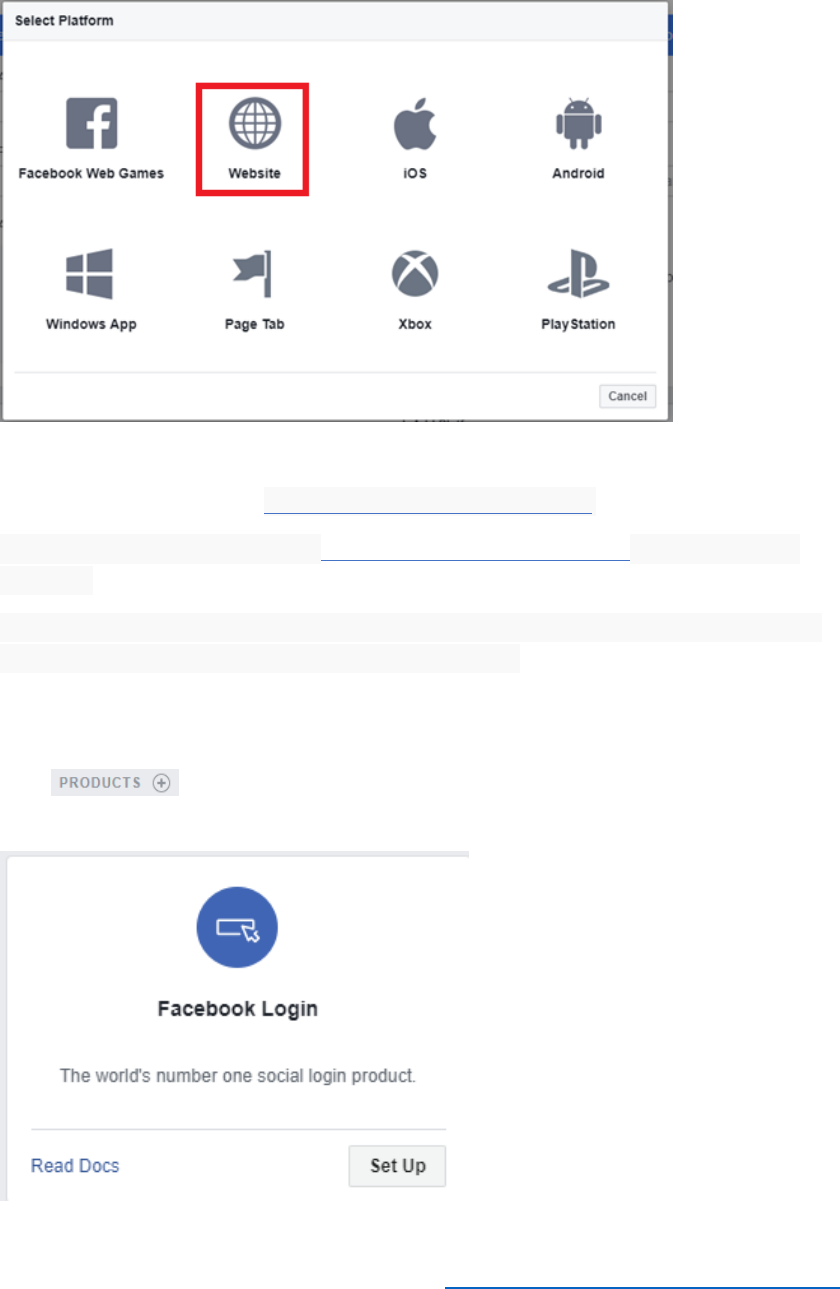
8) Click Settings in the left navigation pane and then click Basic.
35 © 2018 Microsoft Corporation Feedback? https://aka.ms/aad-b2c-course-feedback
9) Select + Add Platform and then select Website.
10) In the Site URL field, enter https://login.microsoftonline.com/.
11) In the Privacy Policy URL, enter https://privacy.microsoft.com, then select Save
Changes.
12) In the App Secret section of the page, Click Show to reveal the App Secret. You may
have to re-enter your password to complete this step.
13) Copy the App Secret when it is display on the page. Ensure that you handle this
information securely.
14) Click in the left-hand navigation pane, and then select Set Up, under the
Facebook Login section.

36 © 2018 Microsoft Corporation Feedback? https://aka.ms/aad-b2c-course-feedback
15) Under Facebook Login, in the left-hand navigation pane, select Settings.
16) In the Valid OAuth Redirect URIs field, enter
https://login.microsoftonline.com/te/AwesomeYourLastname.onmicrosoft.com/oauth2/au
thresp, and then select Save Changes.
17) Select App Review in the left-hand navigation pane, and then toggle the Make the App
Public option from No to Yes.
Facebook Social Sign in Configuration Steps
Follow the steps below to configure Social Sign In, by adding an Identity Provider (IdP) within
your Azure AD B2C tenant.
1) Log in to the Azure portal as B2CAdmin in your Azure tenant, and then switch to the
AwesomeYourLastname.onmicrosoft.com B2C tenant, where
AwesomeYourLastname is the name of your B2C tenant, and then select Save
Changes.
2) Go to your Azure tenant. Select All services, in the Filter box enter B2C, and then select
Azure AD B2C.
3) In the Azure AD B2C blade, under the Manage section, select Identity Providers.
4) Select +Add.
5) In the Add identity provider blade, in the Name field, enter Facebook, and then select
Identity provider type.
6) In the Select social identity provider blade, select Facebook, and then select OK.
7) In the Add identity provider blade, select Set up this identity provider.
8) In the Set up this social identity provider blade, enter the Client ID (the Facebook App
ID) and Secret that was configured in the Facebook for developers website, and then
select OK.
9) In the Add Identity Provider blade, select Create.
10) You will be re-directed back to the Azure AD B2C – Identity Providers blade. This blade
should now show the Facebook Social Identity Provider which you have just created.
11) Ensure that Local Accounts is set to Email.
37 © 2018 Microsoft Corporation Feedback? https://aka.ms/aad-b2c-course-feedback
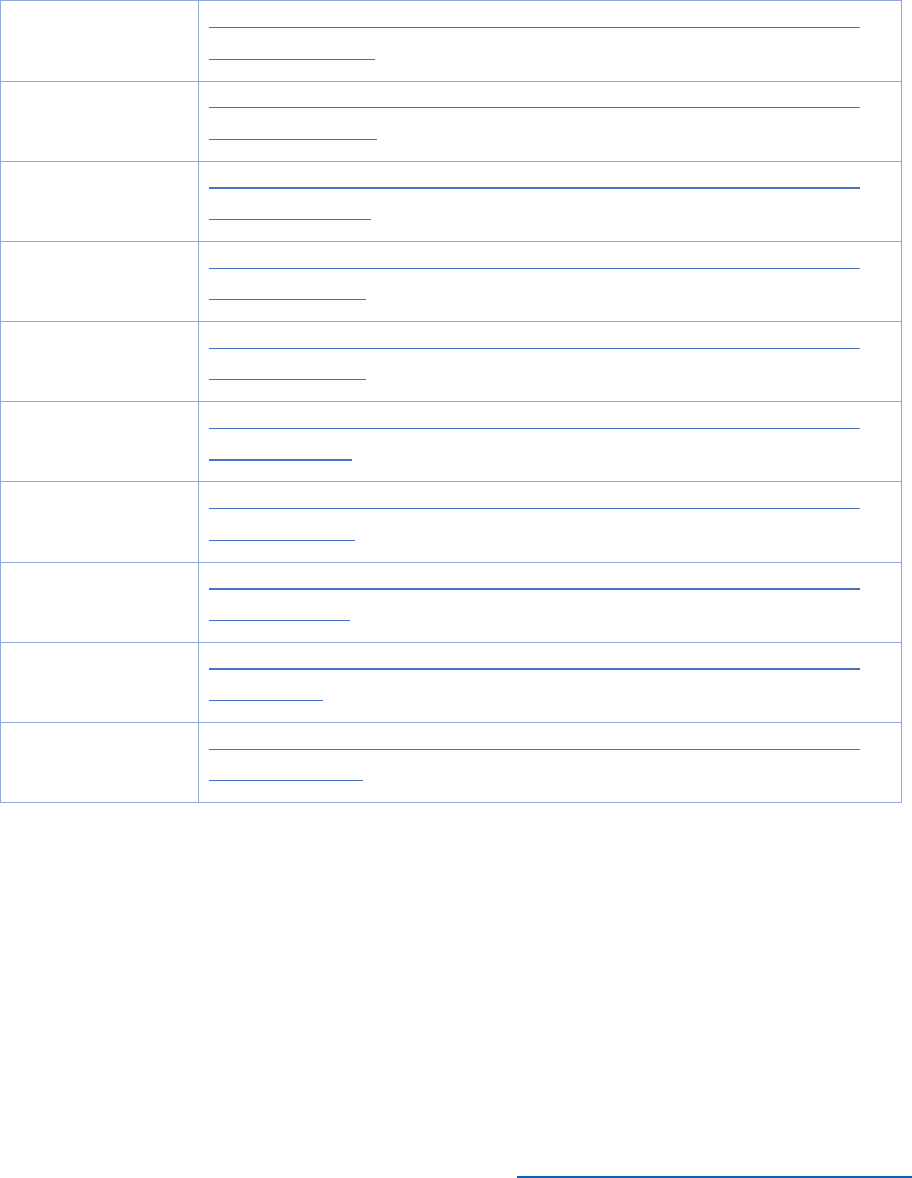
References
The following references are provided for detailed steps to integrate additional IdPs with Azure
AD B2C.
IdP
Reference
Microsoft
Accounts
Azure Active Directory B2C: Provide sign-up and sign-in to consumers with
Microsoft accounts
Facebook
Accounts
Azure Active Directory B2C: Provide sign-up and sign-in to consumers with
Facebook accounts
Google+
Accounts
Azure Active Directory B2C: Provide sign-up and sign-in to consumers with
Google+ accounts
Amazon Accounts
Azure Active Directory B2C: Provide sign-up and sign-in to consumers with
Amazon accounts
LinkedIn
Accounts
Azure Active Directory B2C: Provide sign-up and sign-in to consumers with
LinkedIn accounts
Twitter
Azure Active Directory B2C: Provide sign-up and sign-in to consumers with
Twitter accounts
GitHub
Azure Active Directory B2C: Provide sign-up and sign-in to consumers with
GitHub accounts
Weibo
Azure Active Directory B2C: Provide sign-up and sign-in to consumers with
Weibo accounts
QQ
Azure Active Directory B2C: Provide sign-up and sign-in to consumers with
QQ accounts
WeChat
Azure Active Directory B2C: Provide sign-up and sign-in to consumers with
WeChat accounts
Modify the SUSI Policy to Include Facebook
Azure AD B2C has an extensive policy framework which provides the consumer identity
experience and profile editing options. Azure AD B2C includes sign-up and sign-in policies that
can be used across registered applications. It is recommended that you use a sign-up or sign-in
policy.
Follow the steps below to add the Facebook IdPs to the policies.
1) In the Azure AD B2C blade, under the Policies section, select Sign-up or sign-in-
policies, and then select +Add.
38 © 2018 Microsoft Corporation Feedback? https://aka.ms/aad-b2c-course-feedback
2) In the Add policy blade, type ADandFacebookSignUporSignInPolicy in the Name field,
select Identity providers, select Facebook, and then select OK.
3) In the Add policy blade, select Sign-up attributes.
4) In the Sign-up attributes blade, select Display Name, Email Address, Given Name,
and Surname, and then select OK.
5) In the Add policy blade, select Application claims.
6) In the Select application claims blade, select Display Name, Email Address, Given
Name, Identity Provider, Surname, and User’s Object ID, and then select OK.
7) In the Add policy blade, leave Multi-Factor Authentication set to Off, and then select
Create.
Test the Facebook SUSI Policy
1) In the Azure AD B2C blade, under the Policies section, select Sign-up or sign-in
policies.
2) Select the B2C_1_ADandFacebookSignUporSignInPolicy.
3) Select Run now. The Facebook sign-in page should appear.
4) Log in using your Facebook account. The jwt.ms page should appear, displaying the
identity token and claims returned Facebook.

39 © 2018 Microsoft Corporation Feedback? https://aka.ms/aad-b2c-course-feedback
5) Click Claims, and verify that the Display Name (name), Email Address (emails), Given
Name (given_name), Identity Provider (idp), Surname (family_name), and User’s
Object ID (oid) are all listed.
Important Concepts
What are IdPs?
An Identity Provider’s primary purpose is to store information for user or system principals that
has its own mechanisms to provide authentication to a known subject. A subject can be referred
to as a user identity. A typical example of an identity provider is Azure AD; it encompasses user
identities, groups and various pieces of information for each object it stores. For example, Azure
AD provides authentication services to Office 365 and each Office 365 application relies on
Azure AD to provide a user identity token, using common authentication protocols.
Authentication occurs at the IdP and authorization occurs within an application.
What protocols does Azure AD B2C support?
A token that is signed by a trusted IdP is provided to Azure AD B2C, utilizing one of the
following authentication protocols which are supported by Azure AD B2C.
• OAuth 2.0
• Open ID Connect (OIDC)
• SAML 2.0
A user ID token or application token, also referred to as am App token, is provided by Azure AD
B2C to an application, which provides an authentication context for the user or application
respectively. Applications can utilize claims, based on the identity, present within the token e.g.
to make decisions on what the users role is within the application.

40 © 2018 Microsoft Corporation Feedback? https://aka.ms/aad-b2c-course-feedback
Module 3: Application Integration for a .Net Web App
Introduction
In this module, you will download the sample web application and configure it to utilize your
Azure AD B2C tenant and policies created in Module 1. You will then publish the application and
examine the claims associated with an id_token. The web application itself is very simple; all it
does is configure the OWIN middleware that implements the OAuth 2.0 authentication protocol
to integrate with your Azure AD B2C policies, and then display the resulting identity token when
the user has connected.
At the end of this module, you will have registered an application, edited the application to
incorporate policies, and edited the authorization token path.
And, you will have a deeper understanding of the following concepts:
1. How to register a relying party application
2. How to configure an application to utilize Azure AD B2C policies
3. Installing OWIN Middleware
4. Examine claims using jwt.ms
5. This module should take approximately 45 minutes to complete.
41 © 2018 Microsoft Corporation Feedback? https://aka.ms/aad-b2c-course-feedback
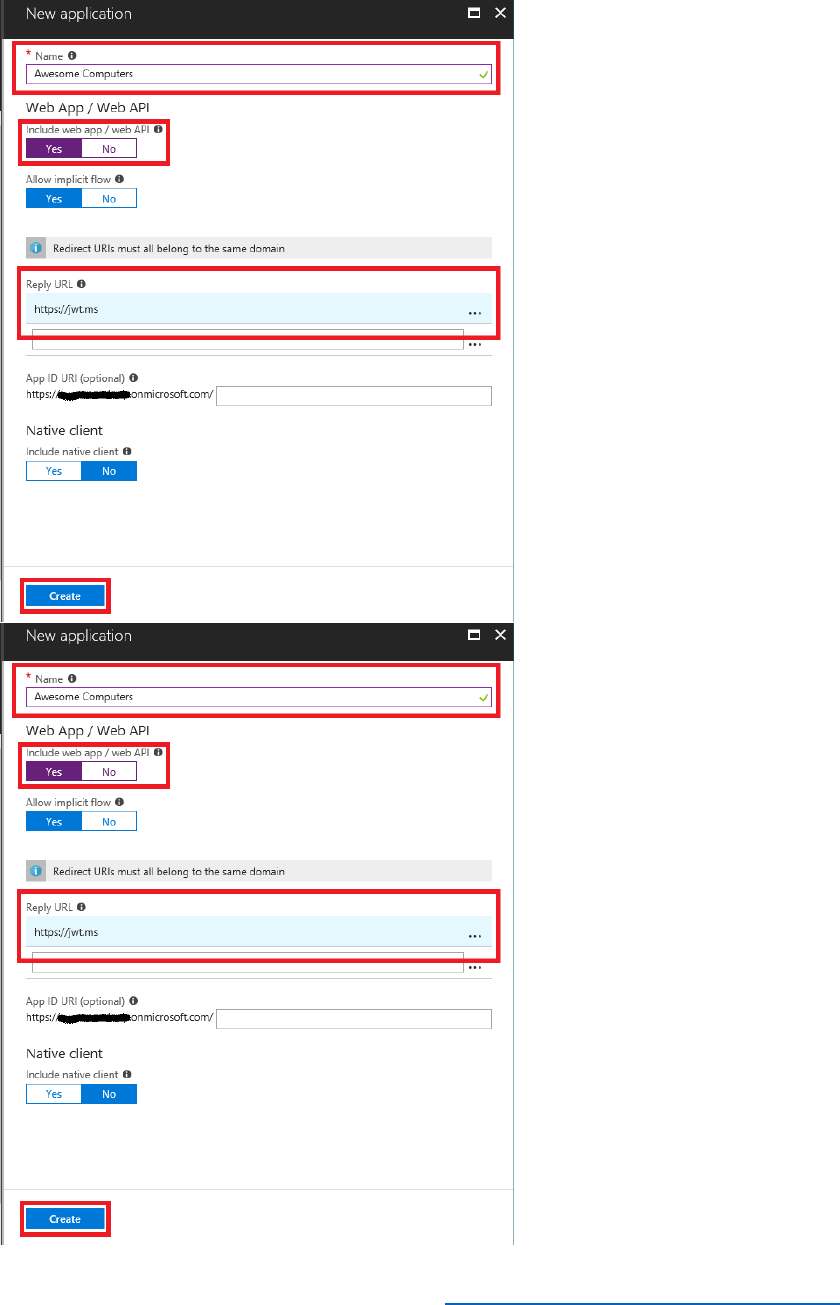
Register a Relying Party Application
A relying party application is required within the Azure AD B2C tenant so that it is authorized to
retrieve tokens from the Azure AD B2C tenant. The relying party application has several
important pieces of information that describe the application so that it can be integrated with
the Azure AD B2C tenant. The information that is required to register the relying party
application has been listed below.
• Name – the name of the application
• Application Type – Web app / API or a Native application
• Sign-on URL – A URL where users will sign into the application
Follow the steps below to configure a relying party application in the Azure AD B2C tenant.
1) Log in to the Azure portal as B2CAdmin.
2) Switch to the AwesomeYourLastname.onmicrosoft.com directory to access your B2C
tenant.
3) Select Azure AD B2C from your favorites.
4) In the Azure AD B2C blade, in the Manage section, select Applications.
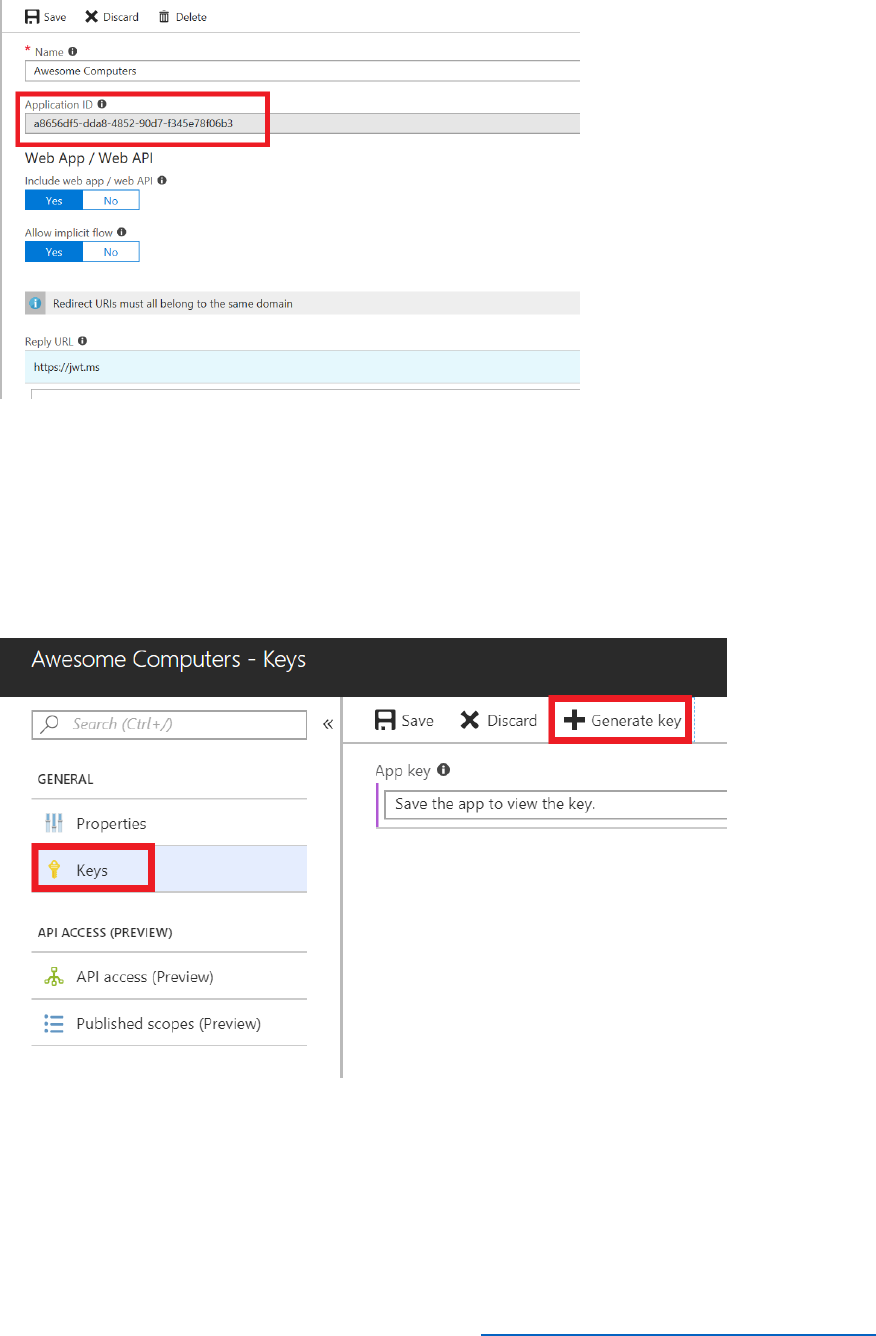
5) Select the Awesome Computers application.
6) Make a note of the Application ID. You will need this when you configure the sample web
application later.
42 © 2018 Microsoft Corporation Feedback? https://aka.ms/aad-b2c-course-feedback
7) Change the Reply URL to https://AwesomeYourLastname.azurewebsites.net. This is the
URL that you will to deploy the sample web application. Note that if you deploy the web
application to a different location, you must remember to update this URL for the
application.
8) You need to create an application secret to enable B2C to integrate with your web app.
Select Keys, and then select Generate Key.
9) Select Save and note down the App key value. You will reference this key later in the
web.config file for the sample application.
43 © 2018 Microsoft Corporation Feedback? https://aka.ms/aad-b2c-course-feedback
You must continue to manage the application in the Azure Portal, not with PowerShell. For
example, if you edit the application registered in an Azure B2C tenant using the Azure Portal,
subsequently managing the application with PowerShell is unsupported. For further
information, see Azure Active Directory B2C: Register your application, faulted apps section.
Download the Sample Application and Open it in Visual Studio
Follow the steps below to download the sample application to the local C:\B2Course-
SampleApp folder. This sample application will be used throughout the course.
1) Navigate to the following URL to download the sample application.
https://github.com/Azure-Samples/active-directory-b2c-training-course.
Note, download all the assets at this site as you will need them throughout the course.
2) If your browser shows a popup message to provide permissions to download the file, select
OK. If you opened the above URL in PDF, select Open.
3) Select the downloaded zip file in the browser to open the zip file contents.
4) Right-click the folder in the zip file and select Copy.
5) Navigate to the [C:\B2Course-SampleApp] folder, right-click in the explorer window and
then select Paste. The contents of the solution from the zip file will be copied into the folder.
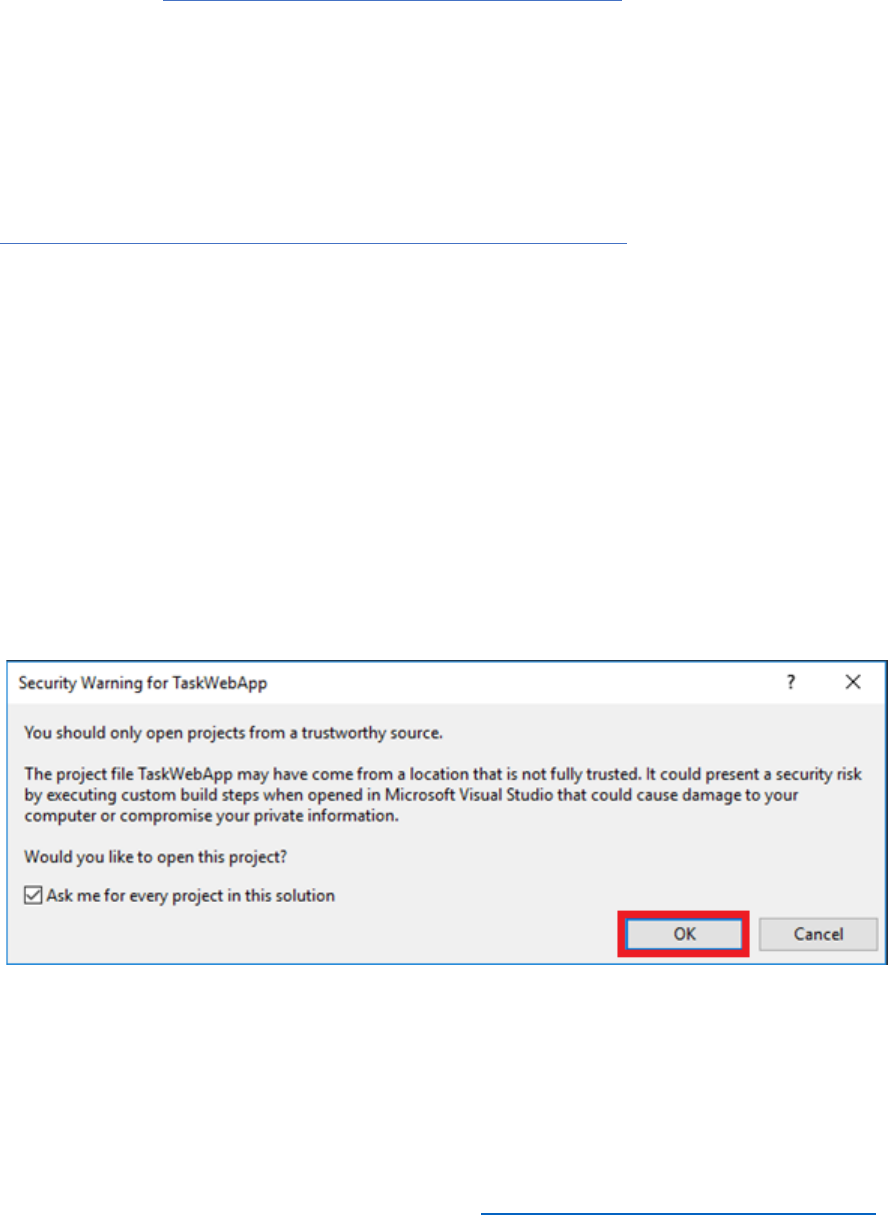
6) Start Visual Studio and open the B2C-WebAPI-DotNet.sln solution in the C:\B2Course-
SampleApp\MsftBuild2018.AwesomeComputers_Before folder.
7) Select OK to the security warning. A sample of the security warning is shown below.
I

44 © 2018 Microsoft Corporation Feedback? https://aka.ms/aad-b2c-course-feedback
Edit the Application to Include SISU, Profile Edit and Password Reset Policies
1. In Solution Explorer, in the AwesomeComputers project, select the Web.config file.
2. In the <appSettings> section of the file, replace the placeholders for the
SignInSignUpPolicyId, EditProfilePolicyId, and ResetPasswordPolicyId settings with
the names of the policies you created in module 1, as follows:
<configuration>
<appSettings>
...
<add key="ida:SignUpSignInPolicyId" value="B2C_1_SignUpOrSignInPolicy" />
<add key="ida:EditProfilePolicyId" value="B2C_1_ProfileEditPolicy" />
<add key="ida:ResetPasswordPolicyId" value="B2C_1_PasswordResetPolicy" />
</appSettings>
</configuration>
3. Replace the value of the RedirectUri setting with the URL that you specified when you
registered the application in the Azure portal,
https://AwesomeYourLastname.azurewebsites.net.
<configuration>
<appSettings>
...
<add key="ida: RedirectUri" value=" https://AwesomeYourLastname.azurewebsites.net" />
...
</appSettings>
</configuration>
4. Save the file.
Edit the Application to Add the Tenant ID
In the web.config file, update the app setting for the Tenant to reference the tenant ID for
your Azure AD B2C tenant. Replace AwesomeComputers with the name of your B2C tenant:
<configuration>
<appSettings>
<add key="ida:Tenant" value="AwesomeYourLastname.onmicrosoft.com" />
...
</appSettings>
</configuration>

45 © 2018 Microsoft Corporation Feedback? https://aka.ms/aad-b2c-course-feedback
Edit the Application to Include the Client ID and Client Secret
In the web.config file, update the app setting for the ClientId and specify the app id and app
secret that you generated earlier using the Azure portal.
<configuration>
<appSettings>
...
<add key="ida:ClientId" value="ApplicationId" />
<add key="ida:ClientSecret" value="ApplicationSecret"/>
...
</appSettings>
</configuration>
Note: The generated client secret may require escape characters to be correctly parsed in the
web.config (XML). Use an XML escape tool such as https://www.freeformatter.com/xml-
escape.html#ad-output to escape any special characters. In a production scenario, escape these
characters manually or generate your own secret using powershell.
Configure the Edit Profile and Reset Password Links
The web application includes links that enable the user to edit their profile and reset their
password. However, to keep the code straightforward, these links are hardcoded into the user
interface, and by default reference a version of the application running in the AADB2CTraining
domain. You should modify these links to reference your own web application.
1) In Solution Explorer, in the AwesomeComputers project, expand the Shared folder, expand
the Home folder, and then select the _LoginPartial.cshtml file.
2) In the _LoginPartial.cshtml file, modify the two <a> elements as follows. Replace
AwesomeYourLastname with the name of your Azure AD B2C tenant, and specify the value
that you added to the web.config file for the ClientID:
<ul class="nav navbar-nav navbar-right">
<li>
<a
href="https://login.microsoftonline.com/AwesomeYourLastname.onmicrosoft.com/oauth2/
v2.0/authorize?p=B2C_1_ProfileEditPolicy&client_id=ClientID&nonce=defaultNonce&redi
rect_uri=https%3A%2F%2FAwesomeYourLastname.azurewebsites.net&scope=openid&res
ponse_type=id_token">
Edit Profile
</a>

46 © 2018 Microsoft Corporation Feedback? https://aka.ms/aad-b2c-course-feedback
</li>
<li>
<a
href="https://login.microsoftonline.com/AwesomeYourLastname.onmicrosoft.com/oauth2/
v2.0/authorize?p=B2C_1_PasswordResetPolicy&client_id=ClientID&nonce=defaultNonce
&redirect_uri=https%3A%2F%2FAwesomeYourLastname.azurewebsites.net&scope=openid
&response_type=id_token">
Reset Password
</a>
</li>
</ul>
3) Save the file.
Examine the OWIN Middleware Configuration
4) In Solution Explorer, in the AwesomeComputers project, expand the App_Start folder, and
then select the Startup_Auth.cs file. This file contains the code that configures the OWIN
middleware when the web application starts running.
5) Examine the ConfigAuth method. This is the code that initializes the OWIN middleware:
public void ConfigureAuth(IAppBuilder app)
{
app.SetDefaultSignInAsAuthenticationType(CookieAuthenticationDefaults.AuthenticationTyp
e);
app.UseCookieAuthentication(new CookieAuthenticationOptions());
app.UseOpenIdConnectAuthentication(
new OpenIdConnectAuthenticationOptions
{
// Generate the metadata address using the tenant and policy information

47 © 2018 Microsoft Corporation Feedback? https://aka.ms/aad-b2c-course-feedback
MetadataAddress = String.Format(AadInstance, Tenant, DefaultPolicy),
// These are standard OpenID Connect parameters, with values pulled from
web.config
ClientId = ClientId,
RedirectUri = RedirectUri,
PostLogoutRedirectUri = RedirectUri,
// Specify the callbacks for each type of notifications
Notifications = new OpenIdConnectAuthenticationNotifications
{
RedirectToIdentityProvider = OnRedirectToIdentityProvider,
AuthorizationCodeReceived = OnAuthorizationCodeReceived,
AuthenticationFailed = OnAuthenticationFailed,
},
// Specify the claim type that specifies the Name property.
TokenValidationParameters = new TokenValidationParameters
{
NameClaimType = "name"
},
// Specify the scope by appending all of the scopes requested into one string
(separated by a blank space)
Scope = $"openid profile offline_access"
}
);
}

48 © 2018 Microsoft Corporation Feedback? https://aka.ms/aad-b2c-course-feedback
6) The remaining methods in the file, OnRedirectToIdentityProvider,
OnAuthenticationFailed, and OnAuthorizationCodeReceived are handlers that respond to
authentication and authorization events raised by the OWIN middleware. Note that the
OnAuthenticationFailed method also handles password resets.
Publish the Sample Application
Follow the steps below to publish the application to the Azure Web App.
7) In Solution Explorer, right-click the AwesomeComputers project, then select Publish.
8) Select Create new profile.
9) In the Pick a publish target dialog box, select App Service, select Create New, and then
select Publish.
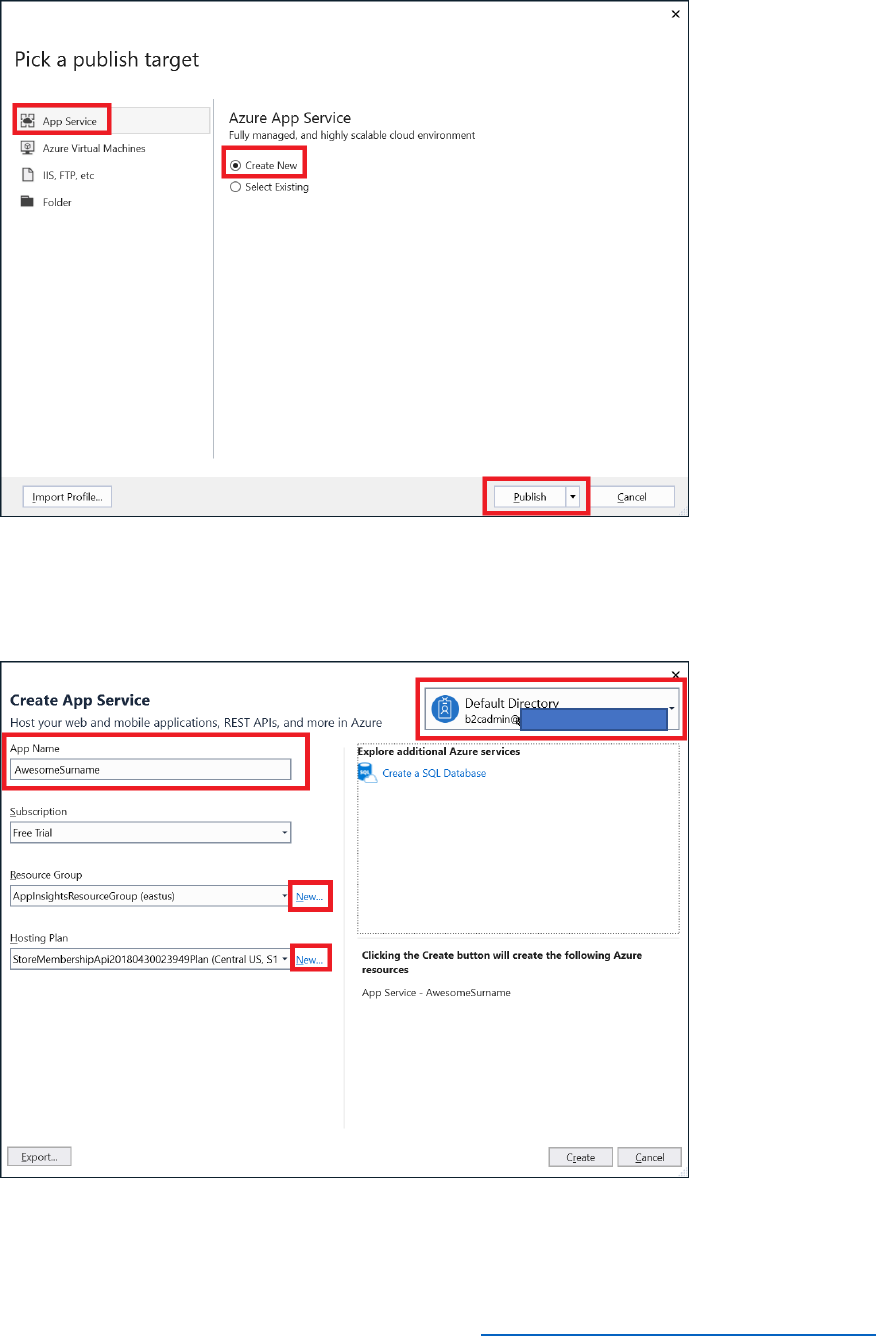
49 © 2018 Microsoft Corporation Feedback? https://aka.ms/aad-b2c-course-feedback
10) In the Create App Service dialog box, connect to your Azure tenant as the B2CAdmin
account, and specify the name of your app (AwesomeYourLastname).
11) Select New to create new resource group and name it AwesomeComputersApp.
12) Select New, next to the App Service Plan field.
50 © 2018 Microsoft Corporation Feedback? https://aka.ms/aad-b2c-course-feedback
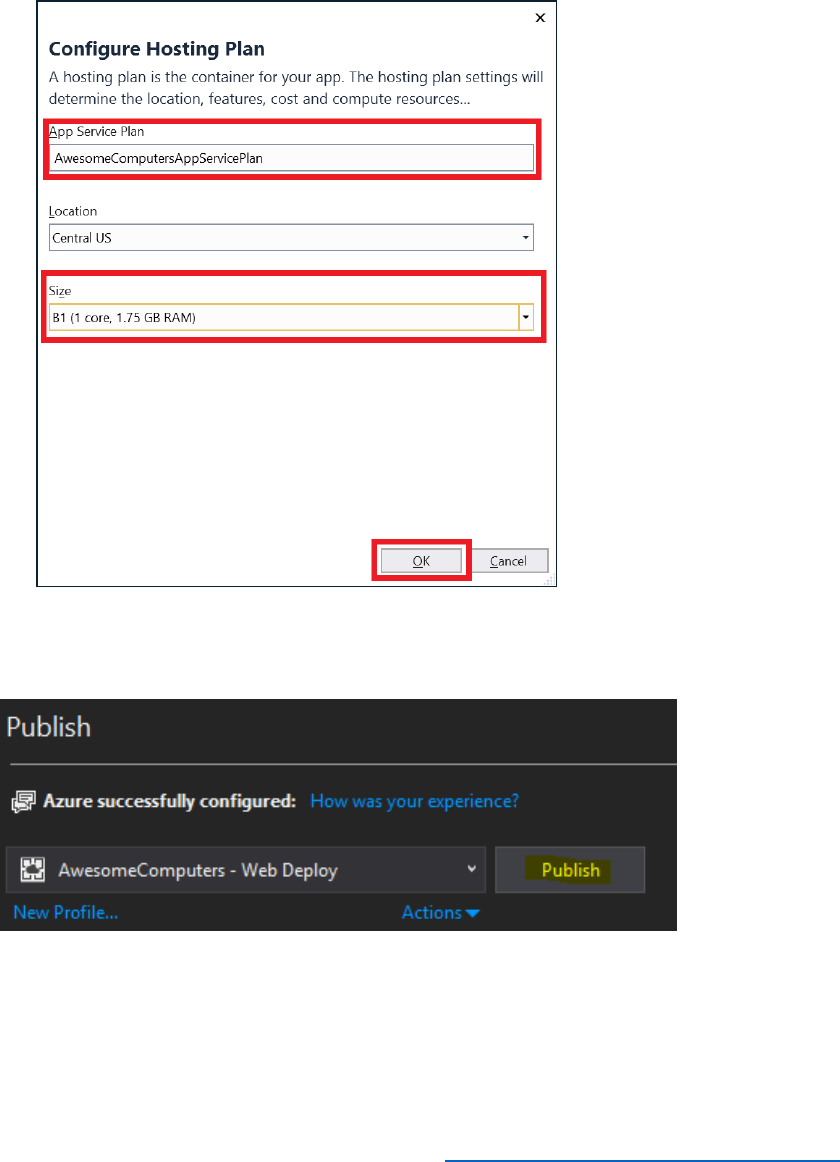
13) In the Configure Hosting Plan dialog box,
a. enter AwesomeComputersAppServicePlan for the App Service Plan Name.
b. Select your location.
c. Select B1 (1 core, 1.75 GB RAM) for the size, and then select OK.
14) In the Create App Service dialog box, select Create.
15) Publish the Application by selecting "Publish":
16) Wait while application is deployed.
17) Ensure the build has succeeded and the Web App was published successfully. You should
see messages similar to the following in the Output window of Visual Studio.
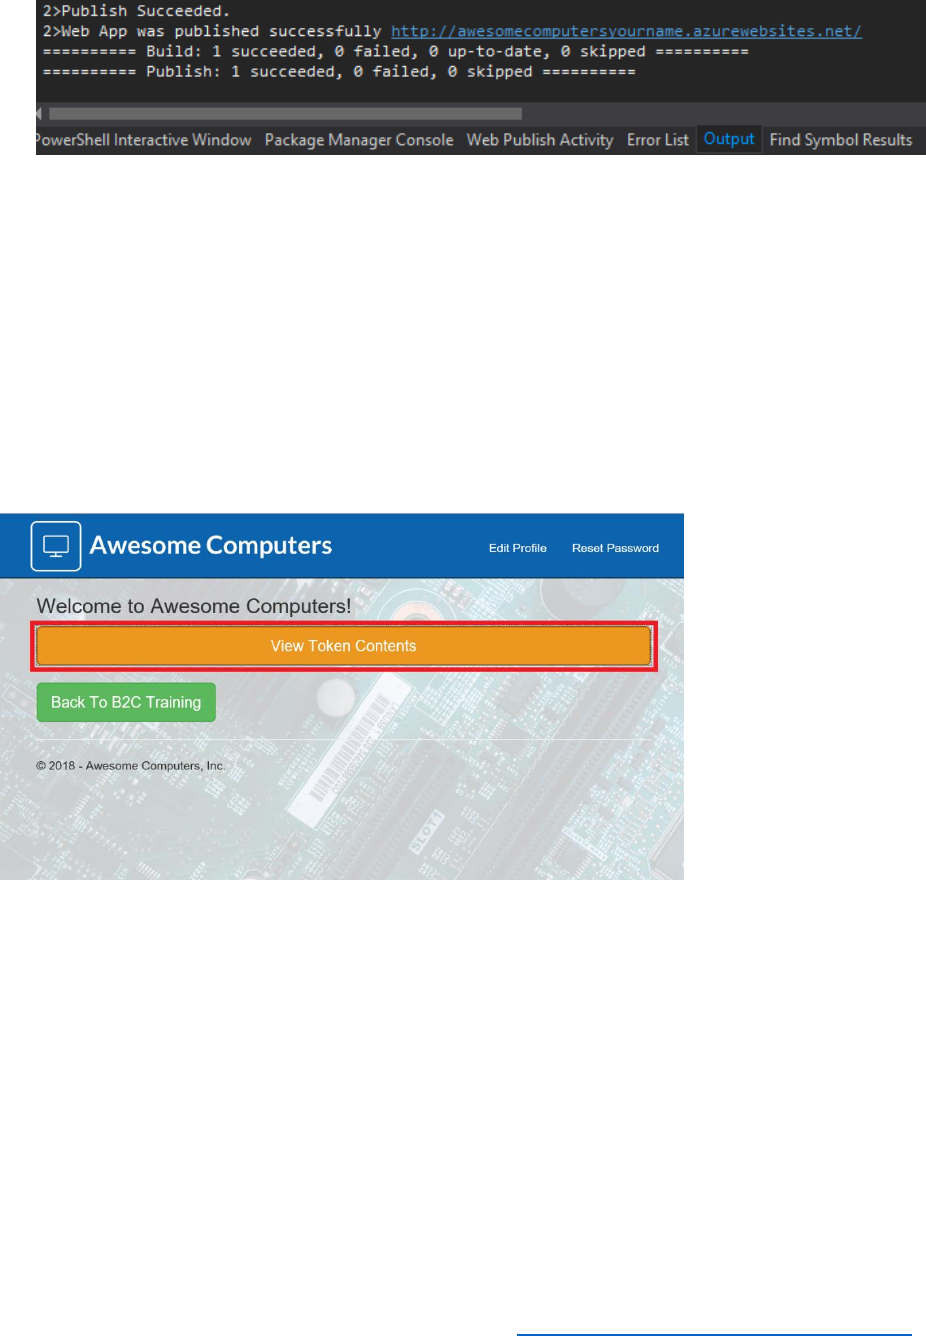
51 © 2018 Microsoft Corporation Feedback? https://aka.ms/aad-b2c-course-feedback
18) When the application has deployed, it will launch in the browser and display the sign-in
page. Do not sign in yet, just close the browser window.
Test the Deployed Application
1) In a web browser, navigate to your app web address,
https://AwesomeYourLastname.azurewebsites.net.
2) In the sign-in page, log in as TestUser@AwesomeYourLastname.onmicrosoft.com.
3) Verify that you are signed in successfully. You should see the following page.
5. Select View Token Contents. You will be presented with a page generated by using the web
site at https://jwt.ms which you used in Module 1 to display the identity token for the signed-
in user.
Note: If you select Back To B2C Training, you will be taken to the aadb2ctraining web site.
6. Select Claims, and view the claims passed to the web app by the SUSI policy.
Important Concepts
Authentication Flows for Web Apps
There are several common authentication flows for web apps and APIs. They are:

52 © 2018 Microsoft Corporation Feedback? https://aka.ms/aad-b2c-course-feedback
1) A user authenticating to a web application.
2) A user authenticating to a web API.
3) An application authenticating to a web API on behalf of a user using a confidential client.
4) A service authenticating to another service (service to service).
5) A mobile or native application authenticating to a web API.
For whichever scenario you need to develop, please see Azure Active Directory B2C: Types of
applications for further information.

53 © 2018 Microsoft Corporation Feedback? https://aka.ms/aad-b2c-course-feedback
Claims and Tokens Overview
The user id_token, which is issued by Azure AD B2C, contains claims that provide web apps and
APIs important information that can be used to make authorization decisions in applications
and/or surface different user interface elements or text specific to a user. The id_token is
essentially a security token that is signed by the Azure AD B2C tenant as part of the
authentication flow. Azure AD issues an id_token, the application utilizes the token with Open ID
Connect.
Bearer tokens are also security tokens that provide the bearer access to resources such as an
API. These are presented to a resource and the resource determines if the bearer token is
trusted and valid for use as part of a request. You must ensure that all tokens are transmitted
securely.
Access tokens and refresh tokens are also provided by Azure AD B2C, and have claims present
to authorize access to APIs. When an API receives an access token it must validate the access
token before authorizing the use of the access token. Refresh tokens are used to request a new
access token as the access token lifetime is limited and configurable within Azure AD B2C.
For further information, see Azure AD B2C: Token reference.
Incorporating Azure AD B2C into existing applications
To incorporate Azure AD B2C into existing applications you need to perform the following steps:
1) Ensure the application is registered in the Azure AD B2C tenant so that the application
can receive tokens, and ensure the reply url is set to the application authorization path.
2) Integrate Azure AD authentication, MSAL Libraries, and Open ID Connect middleware
into the application project.
3) Change the configuration files to include the following information:
a) Azure AD B2C tenant ID.
b) Application ID and secret
c) Azure AD B2C policy names which you intend to use in the application
d) Handle the Azure AD B2C notifications
e) Ensure that the application has the correct permissions to any resources i.e. Azure AD
B2C permissions to read directory data

54 © 2018 Microsoft Corporation Feedback? https://aka.ms/aad-b2c-course-feedback
Azure AD V1 vs V2 Endpoints
Azure AD provides a v1 and v2 endpoint which utilizes OAuth 2.0 to issue JSON Web Tokens. It
is important to understand the differences between both endpoints and the limitations. The v1
endpoints are commonly access using the Active Directory Authentication Library for work or
school accounts. The v2 endpoint is utilized using the Microsoft Authentication Library and
provides integration with Azure AD B2C and thus provides access to any IdP supported by Azure
AD B2C, which includes all the IdPs referenced in Module 1.
For further information, see What's different about the v2.0 endpoint?

55 © 2018 Microsoft Corporation Feedback? https://aka.ms/aad-b2c-course-feedback
Module 4: UX Customization using Built-In Functionality
At the end of this module, you will be able to:
• Customize the HTML pages displayed by B2C policies.
• Modify the style of email messages sent by B2C policies to match the corporate design.
• Localize the HTML content generated by B2C policies.
And, you will have a deeper understanding of the following concepts;
• Customized Azure AD domains.
• Built-in localization strings used by B2C policies.
This module should take approximately 40 minutes to complete.

56 © 2018 Microsoft Corporation Feedback? https://aka.ms/aad-b2c-course-feedback
Introduction
In this module, you will customize the user experience of the policies implemented by your
Azure AD B2C application to match the corporate look and feel of the Awesome Computers
organization. You will also add localization to the policies to support Spanish-speaking users,
and you will increase the password complexity requirements for users to make the application
more robust to attack.
See the end user experience you are about to build.
In the demonstration site, you will perform the following tasks:
• Login on the customized screen.
At the end of this module, you will be able to:
• Customize the HTML pages displayed by B2C policies. To achieve this, you will:
a. Create a storage account for holding customized content.
b. Create HTML content for the Profile Edit policy and the SUSI policy.
c. Upload the HTML content to blob storage
d. Update the SUSI and Profile Edit policies.
• Customize email messages sent by the B2C app.
• Add localization to support Spanish-speaking users.
• Modify the password complexity of policies.
Customize the HTML Pages Displayed by B2C Policies
You can customize the Azure AD B2C user interface to match the look and feel of your existing
applications and provide a seamless experience to users. Specifically, you can customize the
pages that appear in response to the SUSI, sign-up, sign-in, profile editing, and password reset
policies.
To customize the interface, you provide the HTML5 content in the form of HTML fragments and
CSS styling. The content includes placeholders where Azure AD B2C-specific content is
generated and inserted when the policies run. You save your HTML5 content to a convenient
and accessible location, and provide the URL of this content to your policies; different policies
can reference different HTML fragments. At run-time, the policy retrieves your content and
merges it with content that it generates for the placeholders. Note that the site that hosts your
content should expose an HTTPS endpoint with Cross-Origin Resource Sharing (CORS) enabled.
The GET and OPTIONS request methods must both allow CORS.
57 © 2018 Microsoft Corporation Feedback? https://aka.ms/aad-b2c-course-feedback
Follow these steps to create a custom HTML page, upload it to the cloud, and associate it with a
policy in the Azure AD B2C tenant.
Create a Storage Account for Holding Customized Content:
Note: This series of steps uses Azure Blob Storage to hold the HTML content, but you can
host this material anywhere that is accessible to Azure AD B2C. This includes publicly
accessible web servers, CDNs, AWS S3, and file servers. The prime requirements are that the
content is accessible through HTTPS and CORS has been enabled.
1) Log in to the Azure portal as the B2CAdmin account in your Azure tenant. Do not log
into the domain for the B2C tenant.
2) Select Create a resource, type Blob Storage in the search field, and then select Storage
account – blob, file, table, queue.
3) In the Storage account – blob, file, table, queue blade, select Create.
4) In the Create storage account blade, specify the following settings and then select
Create.
• Name: A unique name for the storage account. For example,
AwesomeYourlastnameUX
• Account kind: Blob storage
• Accept the default values for the remaining settings (create a new resource group
for the storage account if required)
5) When the storage account has been created, select All resources, and then select the
new storage account.
6) In the Services section of the blade, select Blobs.
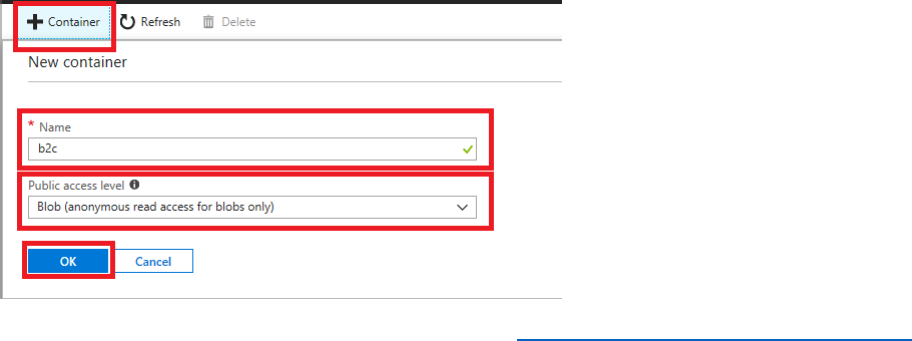
7) In the Blob service blade, select +Container.
8) Add a container with a convenient name, such as b2c, set the Public access level to
Blob, and then select OK.

58 © 2018 Microsoft Corporation Feedback? https://aka.ms/aad-b2c-course-feedback
9) Return to the blade for the storage account, and then select Access keys. Make a note of
the value of key1.
Create HTML Content for the Profile Edit Policy and the SUSI Policy
1) On your computer, create a new folder named PolicyUX under the B2Course-
SampleApp folder. Copy the subfolders named css, images, and fonts and their content
from the ui-customizations folder under the sample app to the PolicyUX folder.
2) Using Visual Studio, create a custom HTML5 page for the Profile Edit policy, as follows.
a. Replace the URLs highlighted in bold with the address of the blob storage
container you created earlier.
b. Name the file updateprofile.html, and save it in the PolicyUX folder you created
in the previous step.
<!DOCTYPE html>
<html>
<head>
<title>Update Profile</title>
<meta charset="utf-8" />
<meta http-equiv="X-UA-Compatible" content="IE=edge">
<meta name="viewport" content="width=device-width, initial-scale=1">
<!-- TODO: favicon -->
<link href="https://maxcdn.bootstrapcdn.com/bootstrap/3.3.5/css/bootstrap.min.css"
rel="stylesheet" type="text/css" />
<link
href="https://awesomeyoursurnameb2cux.blob.core.windows.net/b2c/css/global.css"
rel="stylesheet" type="text/css" />
</head>
<body>
<div class="container self_asserted_container">
<div class="row">
<div class="col-md-6 col-md-offset-3 col-sm-8 col-sm-offset-2">

59 © 2018 Microsoft Corporation Feedback? https://aka.ms/aad-b2c-course-feedback
<div class="panel panel-default">
<div class="panel-body">
<div class="image-center">
<img alt="Awesome Computers" class="login-logo"
src="https://AwesomeYourLastnameUX.blob.core.windows.net/b2c/images/logo
.png" />
</div>
<h3 class="text-center">Update your current profile</h3>
<div id="api" data-name="SelfAsserted">
</div>
</div>
</div>
</div>
</div>
</div>
</body>
</html>
The page references a style sheet and image files that provide a corporate look and feel that
matches the styling used by other applications published by Awesome Computers. You will
upload the CSS and image files to blob storage. Note that the URLs for these items reference
the container you created in the previous step.
The <div> highlighted in bold is the placeholder that will be replaced with content generated
by the policy at runtime. It is important to set the id attribute of this section to api. The content
generated by the policy uses a set of specific HTML class and id attributes. These attributes are
documented online at https://docs.microsoft.com/azure/active-directory-b2c/active-directory-b2c-
reference-ui-customization. The css file contains styles that modify the way in which elements in
this content are displayed.
3) Create another HTML page for customizing the SUSI user experience. Again, specify the
URLs for your blob storage account where highlighted. Save this page in the same folder,
and name it unified.html. Again, notice that this page includes a <div> named api.

60 © 2018 Microsoft Corporation Feedback? https://aka.ms/aad-b2c-course-feedback
<!DOCTYPE html>
<html>
<head>
<title>Sign in</title>
<meta charset="utf-8" />
<meta http-equiv="X-UA-Compatible" content="IE=edge">
<meta name="viewport" content="width=device-width, initial-scale=1">
<!-- TODO: favicon -->
<link href="https://maxcdn.bootstrapcdn.com/bootstrap/3.3.5/css/bootstrap.min.css"
rel="stylesheet" type="text/css" />
<link href="https://AwesomeYourLastnameUX.blob.core.windows.net/b2c/css/global.css"
rel="stylesheet" type="text/css" />
</head>
<body>
<div class="container unified_container">
<div class="row">
<div class="col-md-6 col-md-offset-3 col-sm-8 col-sm-offset-2">
<div class="panel panel-default">
<div class="panel-body">
<div class="image-center">
<img alt="Awesome Computers" class="login-logo"
src="https://AwesomeYourLastnameUX.blob.core.windows.net/b2c/images/logo.png" />
</div>
<h3 class="text-center">Sign in with your existing account</h3>
<div id="api" data-name="Unified">
</div>
</div>
</div>

61 © 2018 Microsoft Corporation Feedback? https://aka.ms/aad-b2c-course-feedback
</div>
</div>
</div>
</body>
</html>
Upload the HTML Content to Blob Storage
1) On your desktop computer, download the Azure Blob Storage helper tool from
https://github.com/azureadquickstarts/b2c-azureblobstorage-
client/raw/master/B2CAzureStorageClient.zip. Extract this archive into a convenient folder.
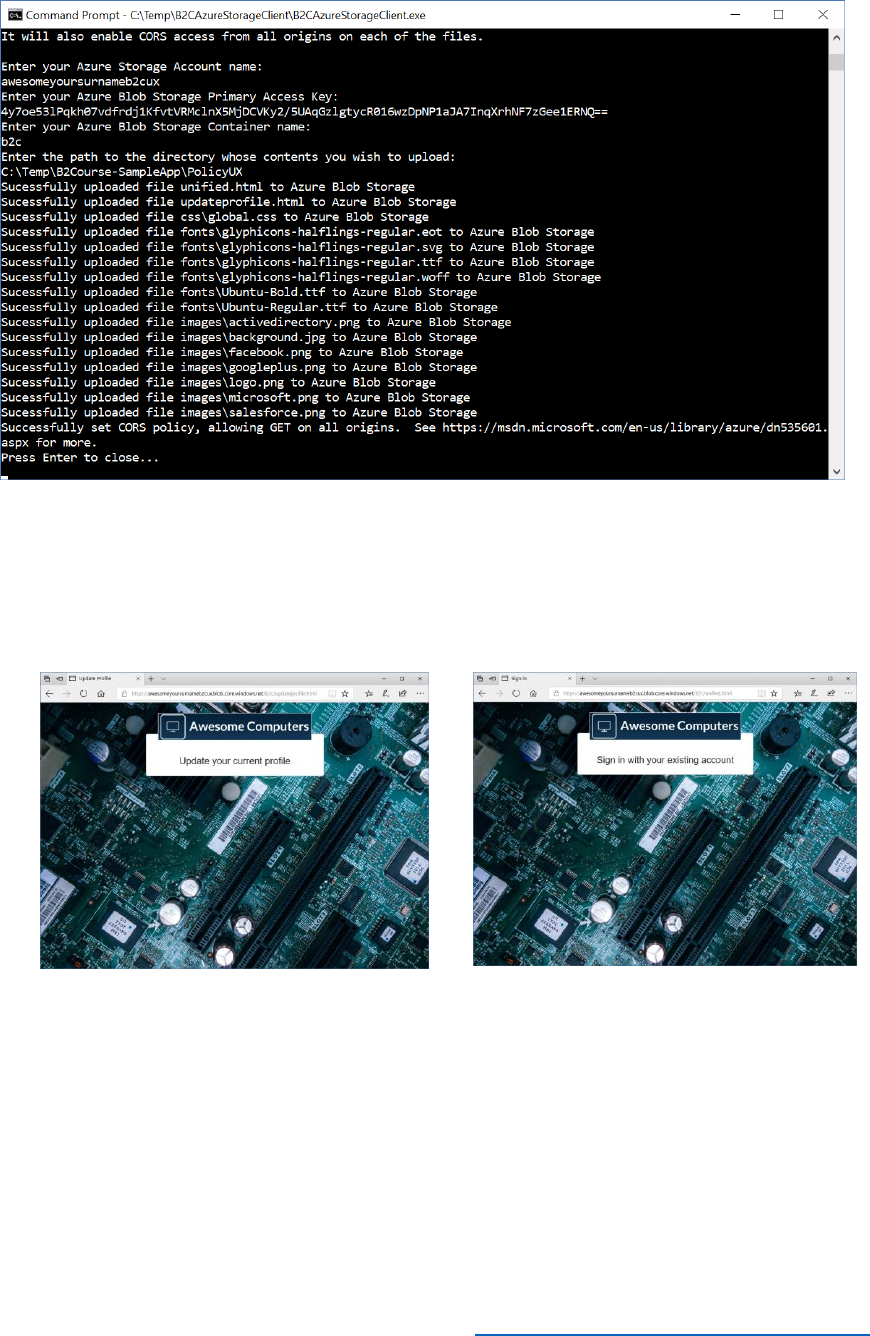
2) Run the B2CAzureStorageClient.exe utility extracted from the archive. You use this
utility to upload the HTML files and content that implement the customized user
interface. At the prompt, enter the following details:
a. The name of the storage account. For example, awesomecomputersb2cux.
b. The value of key1, the access key for the storage account, recorded earlier.
c. The name of the storage container you created earlier. For example, b2c.
d. The folder on your computer that contains the customized HTML pages,
including the subfolders holding the css and image files. For example, B2Course-
SampleApp\PolicyUX.
3) Verify that the pages were uploaded correctly, and that a message appears indicating
that the CORS policy has been set.
62 © 2018 Microsoft Corporation Feedback? https://aka.ms/aad-b2c-course-feedback
4) You can test the page by using a Web browser; navigate to the URL https://<storage
account name>.blob.core.windows.net/<container>/<page>.html, where <storage
account name> is the name of your storage account (awesomecomputersb2cux),
<container> is the name of the blob container (b2c), and page is the name of either of
the HTML files you uploaded (updateprofile.html or unified.html)
Update the SUSI and Profile Edit Policies
Once you have created and uploaded the HTML pages that define the user interface for a set of
policies, you can modify each policy to reference the appropriate page.
1) In the Azure portal, switch to the AwesomeYourLastname.onmicrosoft.com B2C tenant.
2) Select Azure AD BC from your favorites.
63 © 2018 Microsoft Corporation Feedback? https://aka.ms/aad-b2c-course-feedback
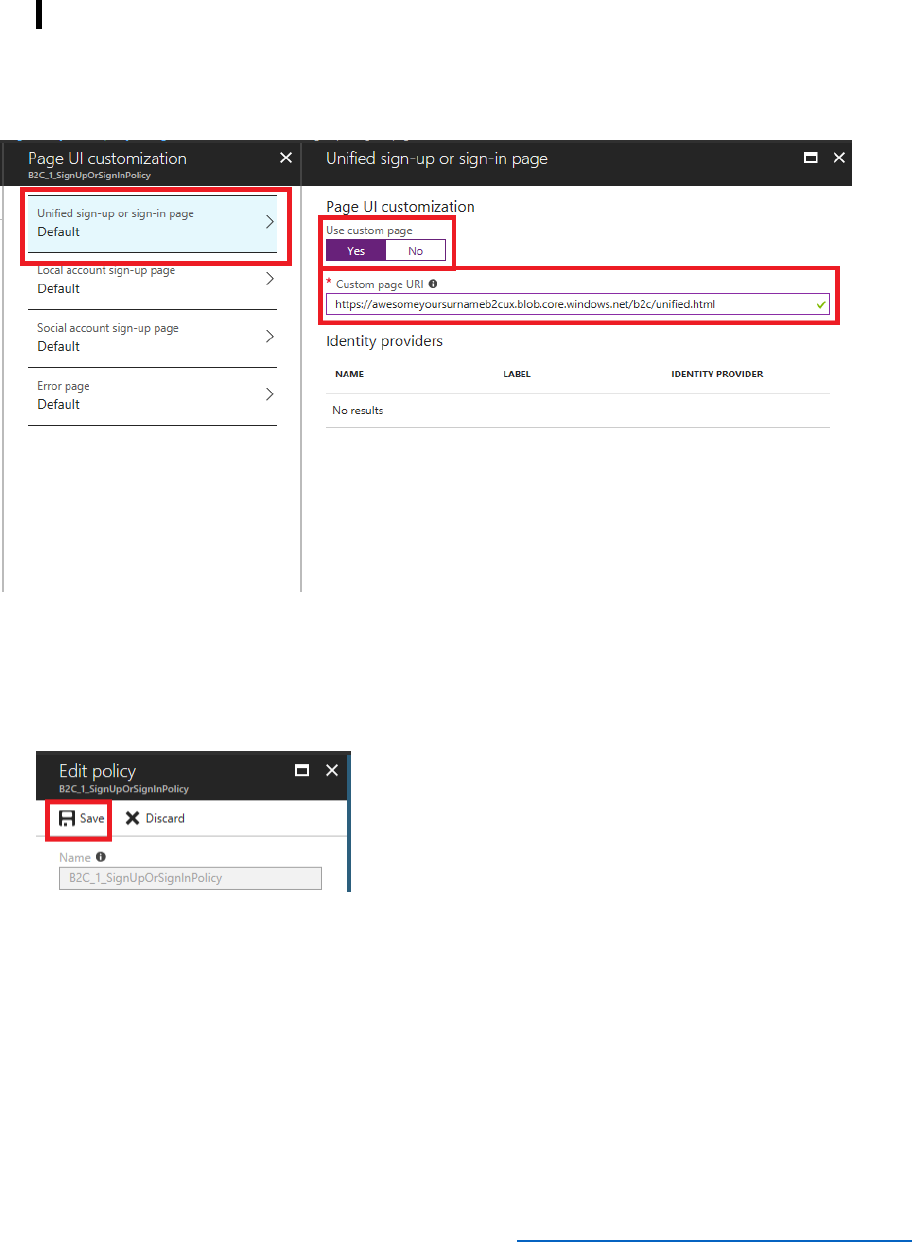
3) In the Policies section of the Azure AD B2C blade, select Sign-up or sign-in policies, and then
select B2C_1_SignUporSignInPolicy.In the SIGN-UP OR SIGN-IN POLICY blade, select Edit,
and then in the EDIT POLICY blade, select Page UI customization.
4) In the Page UI customization blade, select Unified sign-up or sign-in page. Set Use
custom page to Yes, and then enter the URI of the unified.html page you uploaded to blob
storage; https://<storage account
name>.blob.core.windows.net/<container>/unified.html
5) In the Unified sign-up or sign-in page blade, select OK.
6) In the Page UI customization blade, select OK.
7) In the Edit policy blade, select Save.
8) In the Policies section of the Azure AD B2C blade, select Profile editing policies, and then
select B2C_1_ProfileEditPolicy.
9) In the PROFILE EDITING POLICY blade, select Edit, and then in the EDIT POLICY blade, select
Page UI customization.
10) In the Page UI customization blade, select Profile Edit page. In the Profile Edit page blade,
set Use custom page to Yes, and then enter the URI of the profileedit.html page you
uploaded to blob storage: https://<storage account
name>.blob.core.windows.net/<container>/updateprofile.html
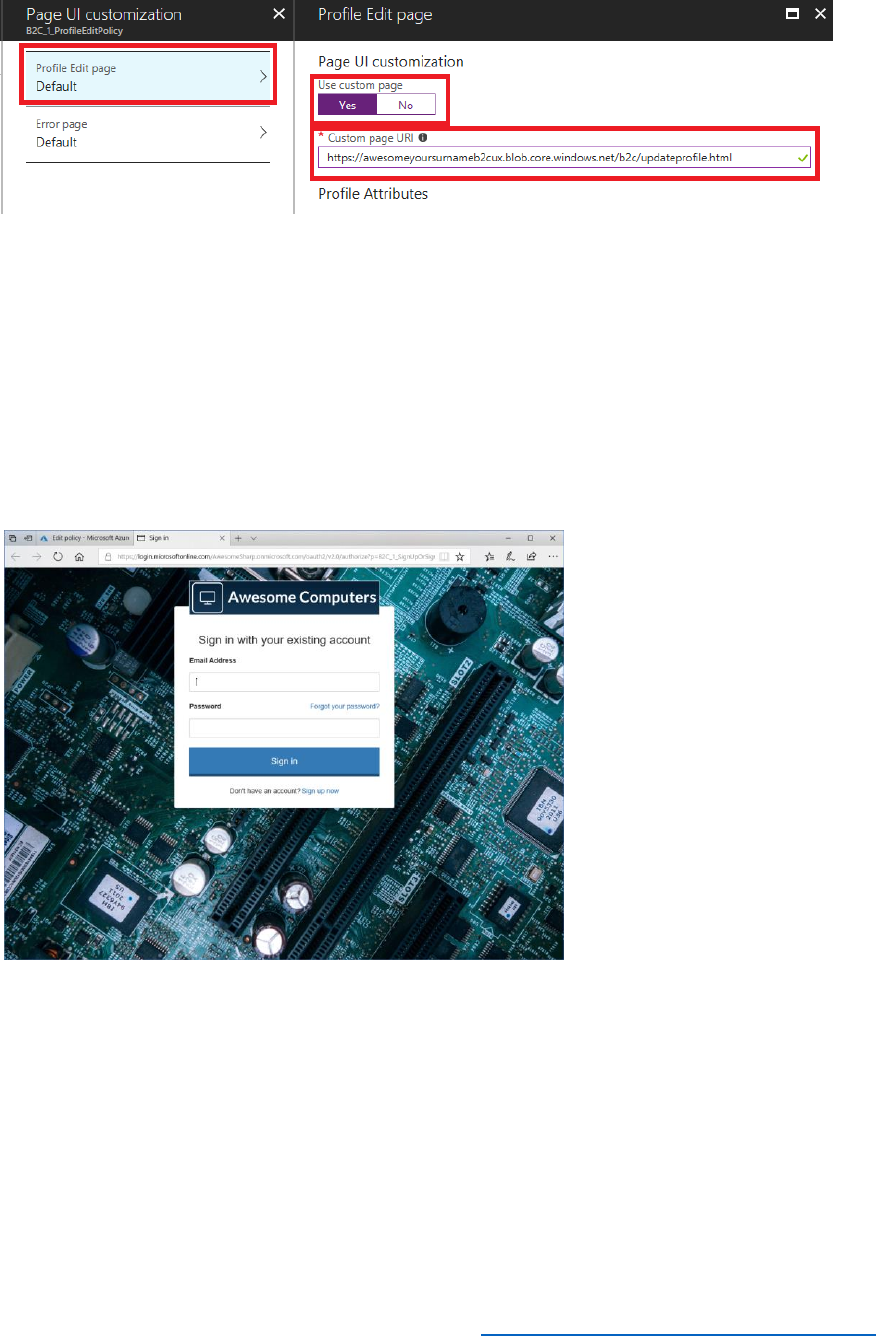
64 © 2018 Microsoft Corporation Feedback? https://aka.ms/aad-b2c-course-feedback
11) In the Profile Edit page blade, select OK.
12) In the Page UI customization blade, select OK.
13) In the Edit policy blade, select Save.
14) Return to the B2C_1_SignUpOrSignInPolicy, and in the B2C_1_SignUpOrSignInPolicy blade,
select Run now.
15) Verify that the sign-in page for the application appears. It should display the styling and
images specified by the unified.html page:
.
16) Sign in as TestUser@AwesomeYourLastname.onmicrosoft.com.
17) When the Awesome Computers page appears, select Edit Profile at the top of the page.
18) Verify that the customized version of the update profile page for the application appears:
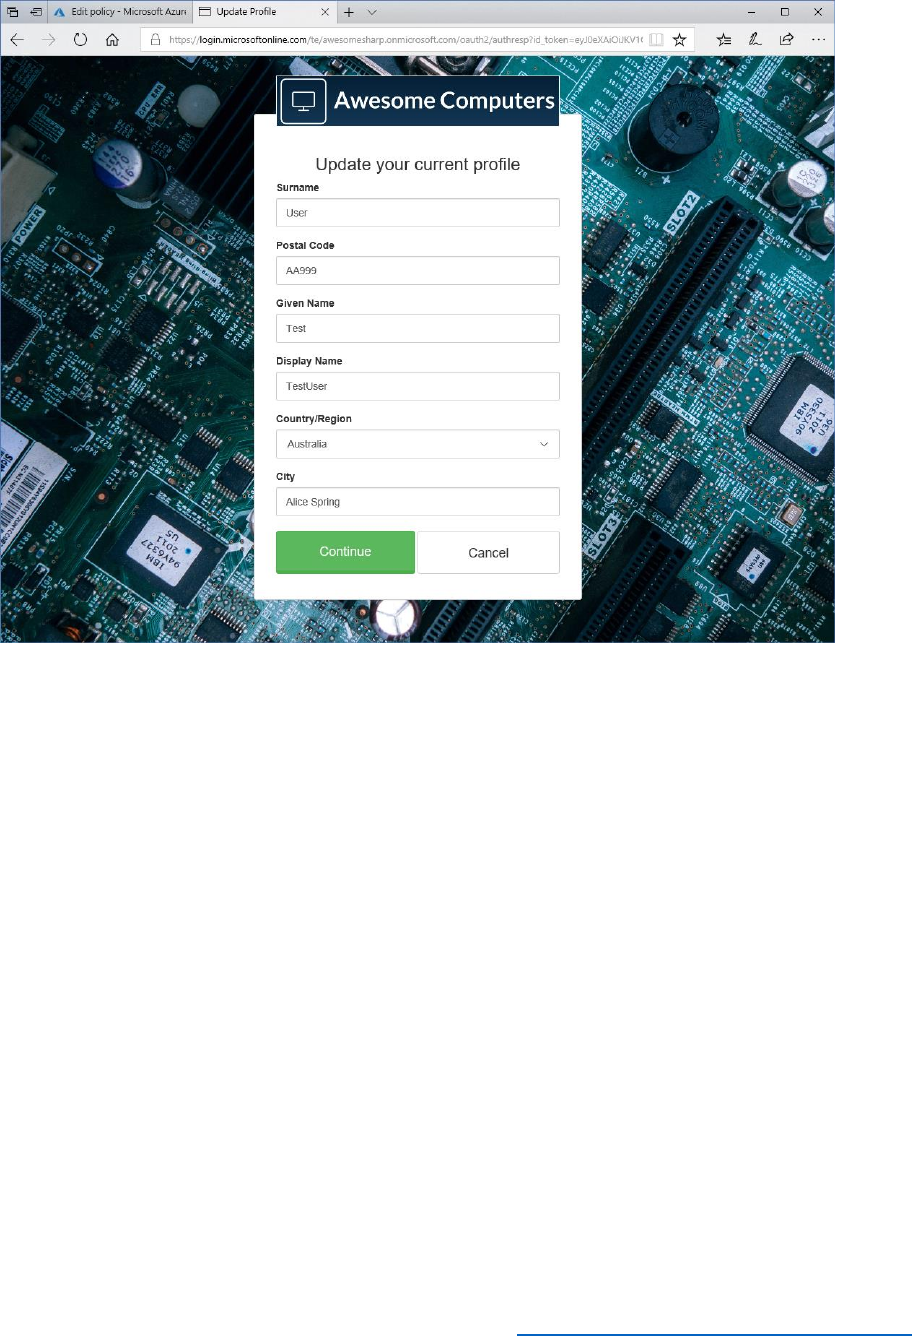
65 © 2018 Microsoft Corporation Feedback? https://aka.ms/aad-b2c-course-feedback
19) Close the update profile page and return to the Azure portal.
Customize Email Messages sent by the B2C App
When a user signs up or needs to reset their password, Azure AD B2C responds by sending
emails containing confirmation codes to the user's registered email address. These emails have a
default style, but you can use the Azure AD company branding feature to modify features such
as the logo displayed at the bottom of the email, the signature, and the background color of the
banner displayed at the top. The following steps show how to perform these tasks.
1) In the Azure portal, select Azure Active Directory.
2) Select Company branding, and then select Configure.
3) In the background image box, specify the name of the image file provided with the
sample application, B2CCourse-SampleApp\ui-
customizations\images\background_web.jpg.
4) In the Banner logo box, specify the name of the logo file provided with the sample
application, B2CCourse-SampleApp\ui-customizations\images\logo_small.jpg.
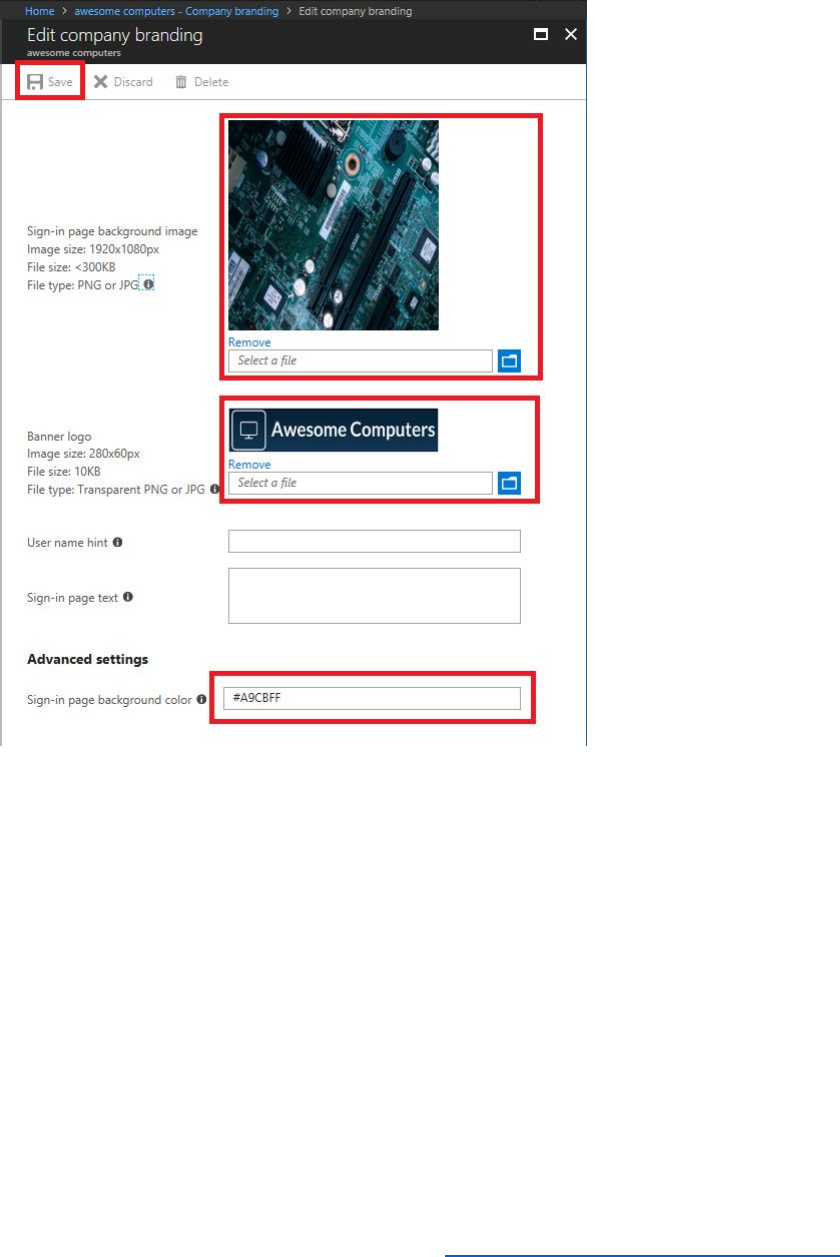
66 © 2018 Microsoft Corporation Feedback? https://aka.ms/aad-b2c-course-feedback
5) Set the background color to #A9CBFF, select Save, and then close the Edit company
branding blade.
6) In the Azure Active Directory blade, select Properties. In the Properties blade, in the
Name box enter Awesome Computers, and then select Save.
7) Select Azure AD BC from your favorites.
8) In the Policies section of the Azure AD B2C blade, select Password reset policies, and
then select B2C_1_PasswordResetPolicy.
9) In the PASSWORD RESET POLICY blade, select Run Now.
10) In the verification page, enter the email address associated with your account, and then
select Send verification code.
11) When you receive the verification email, note that it has been branded with the color,
logo, and domain name.
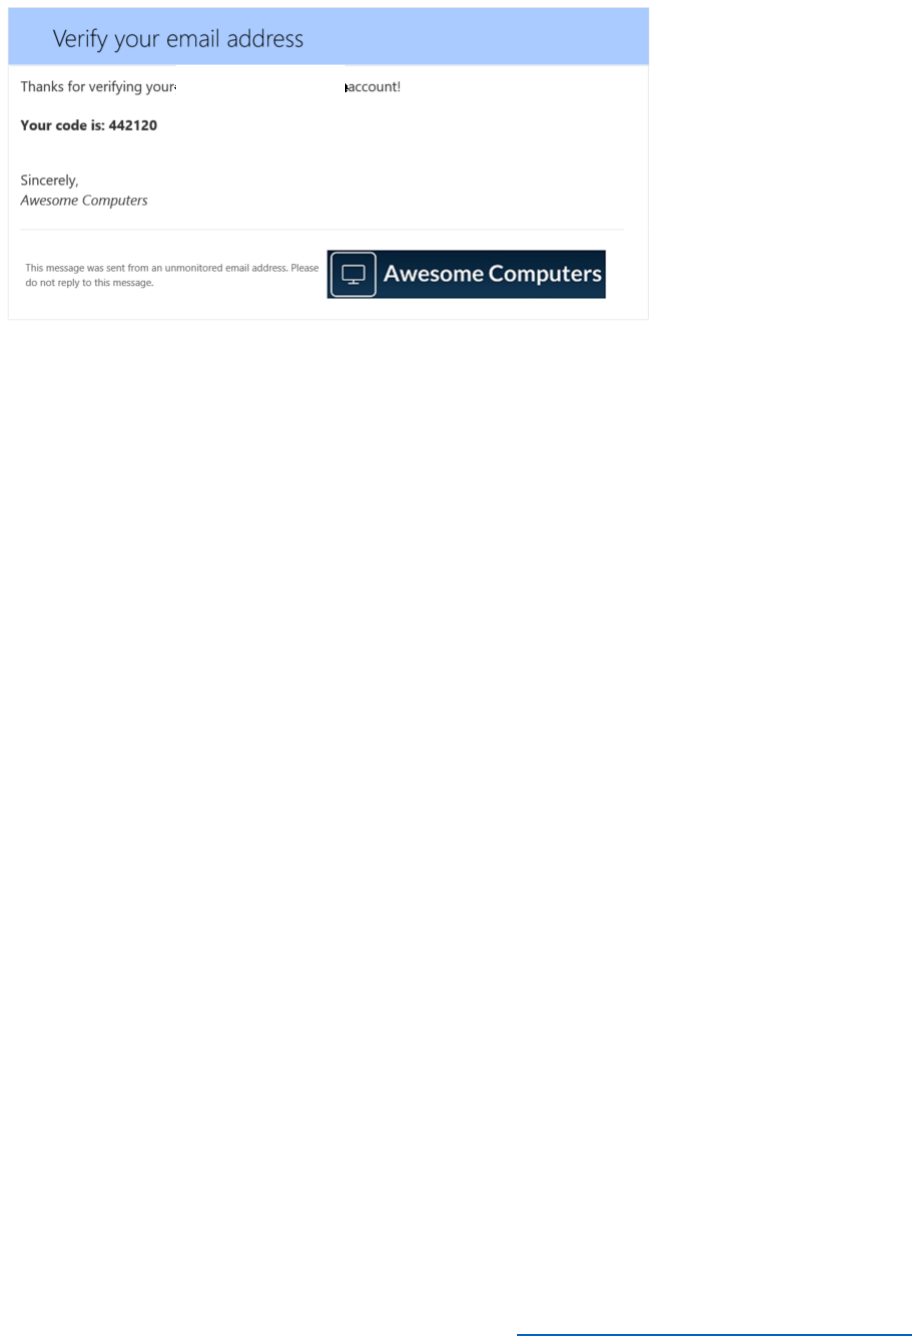
67 © 2018 Microsoft Corporation Feedback? https://aka.ms/aad-b2c-course-feedback
Add Localization to Support Spanish-Speaking Users
Localization enables Azure AD B2C to present the HTML pages displayed by your application
policies in the language most appropriate to the user and their location. The language to use is
passed as a parameter in the HTTP requests sent to Azure AD B2C.
Azure AD B2C provides automatic translation of the HTML content that it generates, depending
on the user's login locale, or the locale specified by the browser. You can also customize the way
in which translations are performed and provide your own translation strings.
Perform the following steps to enable translation of content generated for the SUSI page by
Azure AD B2C to Spanish. You should repeat this process for any other policies used by your
application.
1) In the Azure portal, select Azure AD B2C from your favorites.
2) In the Policies section of the Azure AD B2C blade, select Sign-up or sign-in policies,
and then select B2C_1_SignUporSignInPolicy.
3) In the SIGN-UP OR SIGN-IN POLICY blade, select Edit, and then in the EDIT POLICY
blade, select Language customization.
4) In the Language customization blade, select Enable language customization. In the
confirmation message box, select Yes.
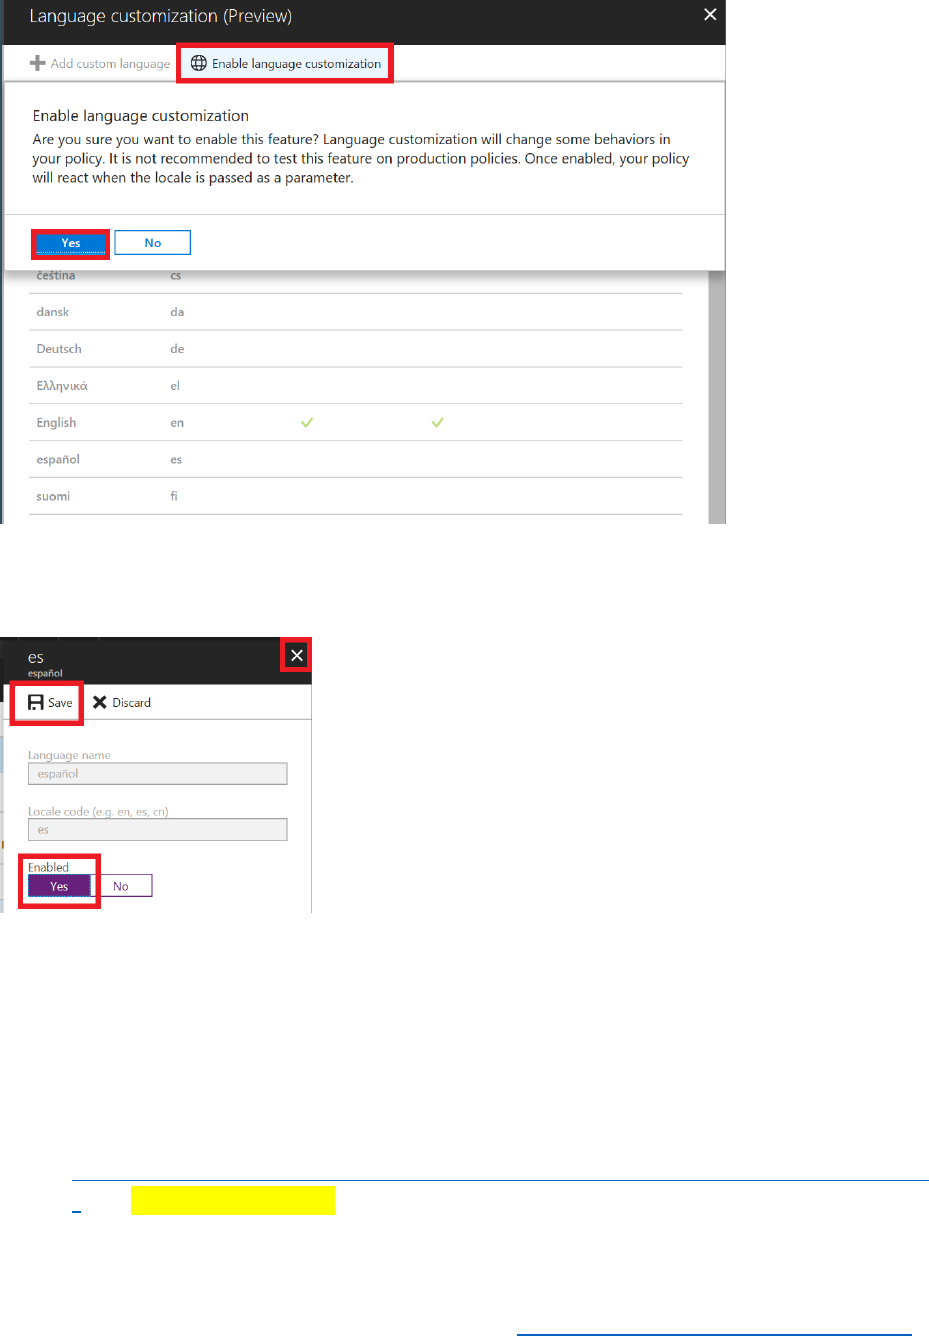
68 © 2018 Microsoft Corporation Feedback? https://aka.ms/aad-b2c-course-feedback
5) In the Language customization blade, select español.
6) In the es español blade, set Enabled to Yes, select Save, and then close the blade.
7) Close the Language customization blade.
8) In the SIGN-UP OR SIGN-IN POLICY blade, select Run now.
9) Verify that the English language version of the sign-in page appears.
10) Modify the URL in the browser, and append the string &ui_locales=es to the end of the
address:
https://login.microsoftonline.com/AwesomeYourLastname.onmicrosoft.com/oauth2/v2.0
/ […]=login&ui_locales=es
The ui_locales parameter indicates the locale that should be used to display a page. Azure B2C
determines the locale by examining the user's own configuration in the domain and includes the
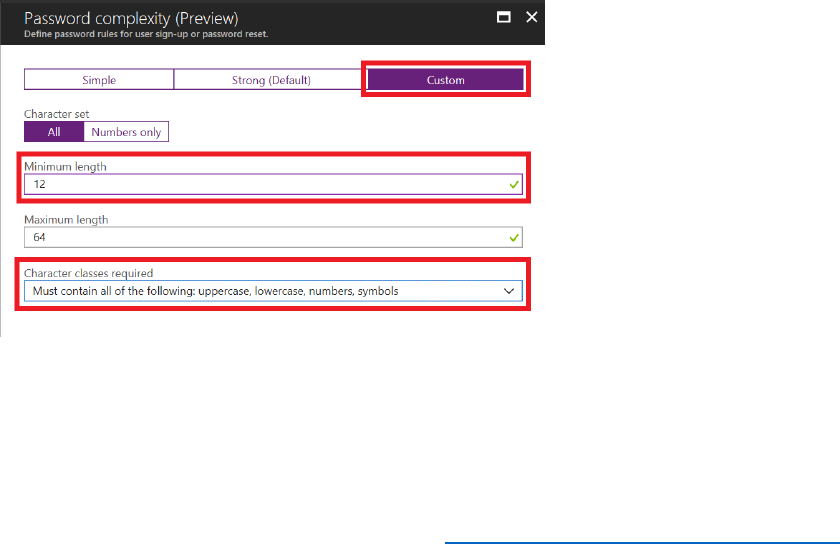
69 © 2018 Microsoft Corporation Feedback? https://aka.ms/aad-b2c-course-feedback
appropriate ui_locales parameter as a query string parameter. Some browsers (not Microsoft
Edge) also enable you to change the locale as a browser configuration setting.
11) Verify that the sign in page is presented in Spanish.
Modify the Password Complexity of Policies
Azure AD B2C is able to detect brute-force password attacks and dictionary password attacks,
and differentiate users attempting to recall or mistyping a password from hackers and botnets.
In the event of a suspected attack, Azure AD B2C will lock the affected account. Additionally, to
help prevent successful attacks, users should create passwords that are sufficiently complex. You
can use the following steps to configure password complexity, and enforce custom complexity
rules when users sign up or reset their passwords. Note that password strength applies to SUSI,
password reset, and sign-in policies, and that you must configure each of these policies
separately.
1) In the Azure portal, select Azure AD BC from your favoites.
2) In the Policies section of the Azure AD B2C blade, select Sign-up or sign-in policies,
and then select B2C_1_SignUporSignInPolicy.
3) In the SIGN-UP OR SIGN-IN POLICY blade, select Edit, and then in the EDIT POLICY
blade, select Password complexity.
4) In the Password complexity blade, select Custom. Set Minimum length to 12. Set
Character classes required to Must contain all of the following: uppercase,
lowercase, numbers, symbols, and then select OK.
5) In the SIGN-UP OR SIGN-IN POLICY blade, select Run now.
6) In the sign-in page, select Sign up now.
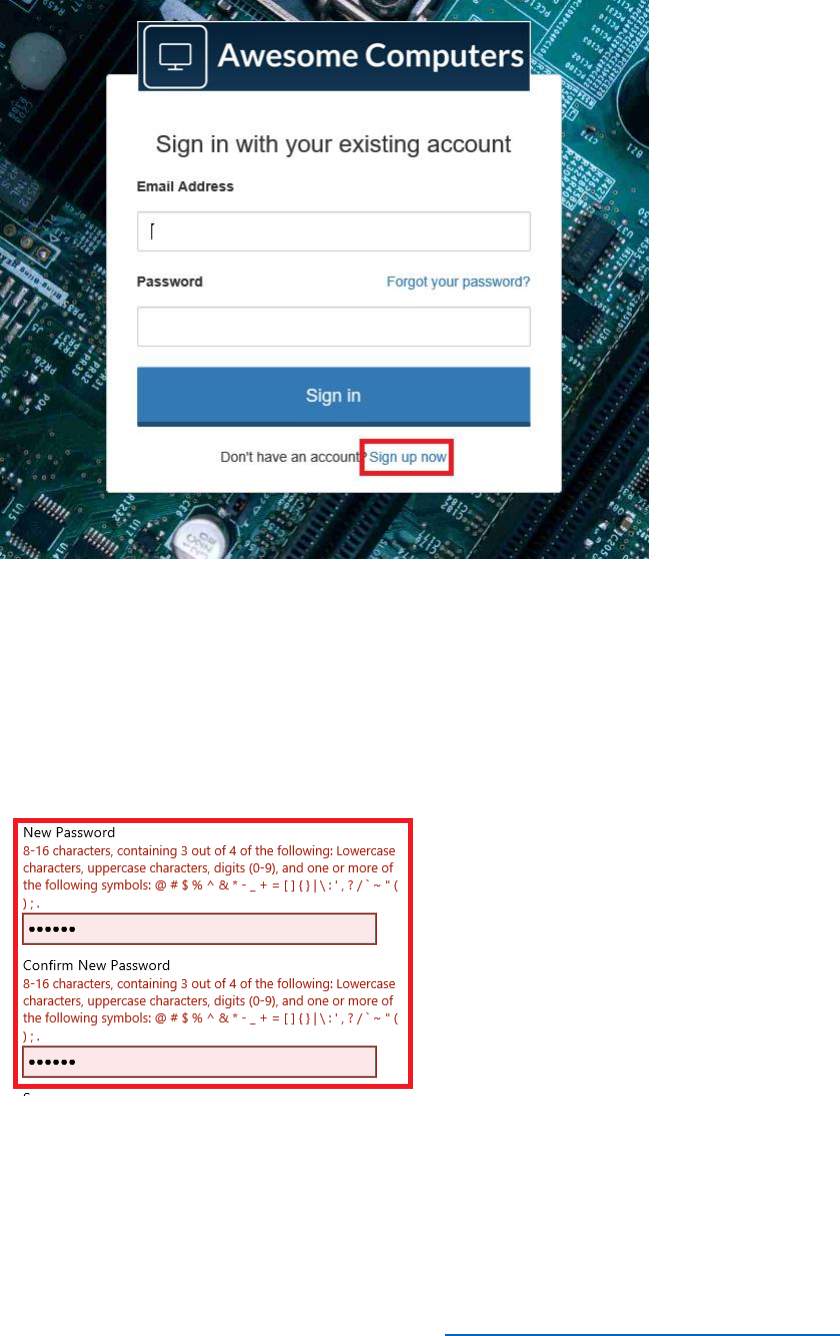
70 © 2018 Microsoft Corporation Feedback? https://aka.ms/aad-b2c-course-feedback
7) On the sign-up page, enter your email address and select Send verification code.
8) Wait for the verification email, and then enter the verification code and select Verify
code.
9) Enter a short password that does not meet the password complexity requirements in the
New Password and Confirm New Password boxes. Note that a message appears
indicating that the password is not complex enough.
10) Enter a password that matches the complexity requirements and verify that it is
accepted.

71 © 2018 Microsoft Corporation Feedback? https://aka.ms/aad-b2c-course-feedback
Important Concepts
Azure AD and Customized Domains
An Azure AD domain represents your organization on the Internet; it is the entry point through
which customers access your applications and services. An Azure AD domain handles many
aspects surrounding your applications, including the security, visibility, and look and feel of the
applications and services that your organization publishes.
You can customize many elements in an Azure AD domain. For example, you can:
• Add and delete users and groups, and assign permissions over your applications and
services to these users and groups. Identity and user management is a key aspect of
Azure AD that is utilized by B2C. See Quickstart: Add new users to Azure Active Directory for
details. You can also manage user profile information, such as adding a profile picture,
phone numbers, contact details, and other authentication information.
• You can implement self-service enrollment for users. This feature allows users to sign-up
to your services without requiring any administrative action (or cost) on your part. You
can enable self-service password reset (SSPR) for users who forget their sign-in
credentials. You can configure the methods available to perform this task, for example,
send a code to a specified email account, or verify the user's identity by asking questions
to which only the user should know the answer. The article Azure AD self-service password
reset for the IT professional describes how to perform these tasks.
• Associate an Azure domain with your own corporate DNS name. By default, each Azure
AD domain has a name in the form domainname.onmicrosoft.com. You can't remove or
change this name, but you can add your own custom DNS name, such as Contoso.com,
to the domain, and use this domain name to gain access to the domain. You can find
more information at Quickstart: Add a custom domain name to Azure Active Directory.
• Change the appearance of the sign-in page that Azure AD displays to match your
company's branding. You can change items such as the banner logo that appears on the
sign-in page, the text displayed, the background image and color, and other aspects.
These changes also apply to items such as emails sent by the domain by processes such
as password reset and confirmation. See Quickstart: Add company branding to your sign-in
page in Azure AD for additional information.
These features work in conjunction with the UX customization available through B2C
policies.
Built-in Localization Strings for B2C Policies, and Customization
The language customization feature of Azure AD B2C performs the automatic translation of text
generated as part of the HTML content for the various policies that you define. As noted on the
page Language customization in Azure Active Directory B2C:
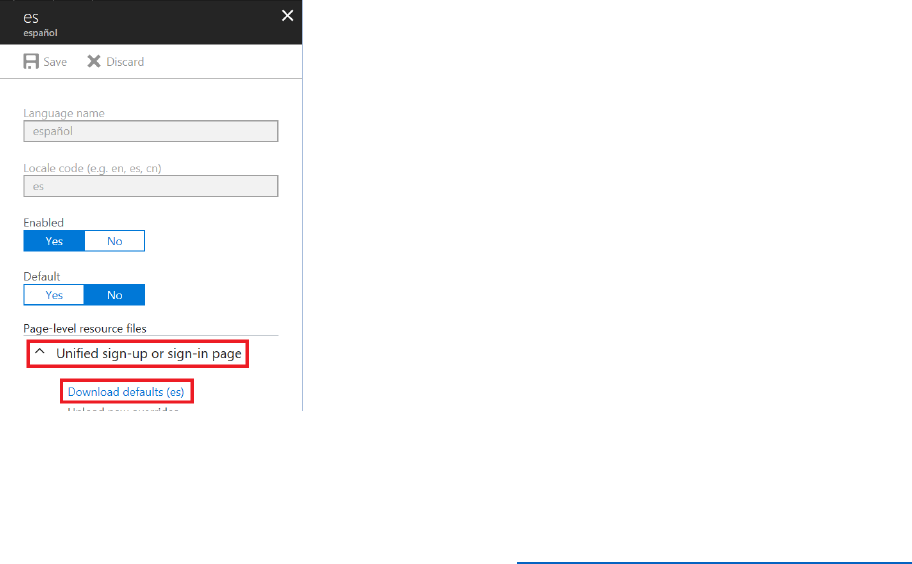
72 © 2018 Microsoft Corporation Feedback? https://aka.ms/aad-b2c-course-feedback
"Microsoft is committed to providing the most up-to-date translations for your use. Microsoft
continuously improves translations and keeps them in compliance for you. Microsoft will identify
bugs and changes in global terminology and make updates that will work seamlessly in your user
journey."
The translations are based on a predefined set of built-in strings displayed by the policies. You
can override the translations performed, and provide your own localized text, if the default
translations do not meet your requirements, or if you need to display different or additional
information.
Each phrase on each page displayed by the policies is associated with an identifier. You can
download the list of identifiers and the corresponding phrases from the Language
customization page of a policy to a local file. You can then edit this file to provide your own
translations for any phrases and upload this file to the policy. The following steps describe how
to override the Spanish language translation of phrases for the SUSI policy of the sample
application:
1) In the Policies section of the Azure AD B2C blade, select Sign-up or sign-in policies,
and then select B2C_1_ADandFacebookSignUporSignInPolicy.
2) In the SIGN-UP OR SIGN-IN POLICY blade, select Edit, and then in the EDIT POLICY
blade, select Language customization.
3) In the Language customization blade, select español.
4) In the es español blade, under Page-level resources, expand Unified sign-up or sign-
in page, and then select Download defaults (es).
5) Save the downloaded file in a convenient place, and open it using a text editor. The
contents will look similar to this (a large part of the file has been omitted, to save space):

73 © 2018 Microsoft Corporation Feedback? https://aka.ms/aad-b2c-course-feedback
{
"LocalizedStrings": [
{
"ElementType": "UxElement",
"ElementId": null,
"StringId": "email_pattern",
"Override": false,
"Value": "^[a-zA-Z0-9.!#$%&’*+/=?^_`{|}~-]+@[a-zA-Z0-9-]+(?:\\.[a-zA-Z0-9-]+)*$"
},
{
"ElementType": "UxElement",
"ElementId": null,
"StringId": "logonIdentifier_email",
"Override": false,
"Value": "Dirección de correo electrónico"
},
{
"ElementType": "UxElement",
"ElementId": null,
"StringId": "requiredField_email",
"Override": false,
"Value": "Escriba su correo electrónico"
},
{
"ElementType": "UxElement",
"ElementId": null,
"StringId": "logonIdentifier_username",

74 © 2018 Microsoft Corporation Feedback? https://aka.ms/aad-b2c-course-feedback
"Override": false,
"Value": "Nombre de usuario"
},
{
"ElementType": "UxElement",
"ElementId": null,
"StringId": "password",
"Override": false,
"Value": "Contraseña"
},
…
{
"ElementType": "ErrorMessage",
"ElementId": null,
"StringId": "AADRequestsThrottled",
"Override": false,
"Value": "Hay demasiadas solicitudes en este momento. Espere un momento y vuelva a
intentarlo."
}
]
}
6) To override the default translation of a phrase, set Override to true, and provide your
own custom translation string as the Value.
7) Save the file and return to the es español blade in the Azure portal.
8) Select Upload new overrides, and specify the file that you have just edited.
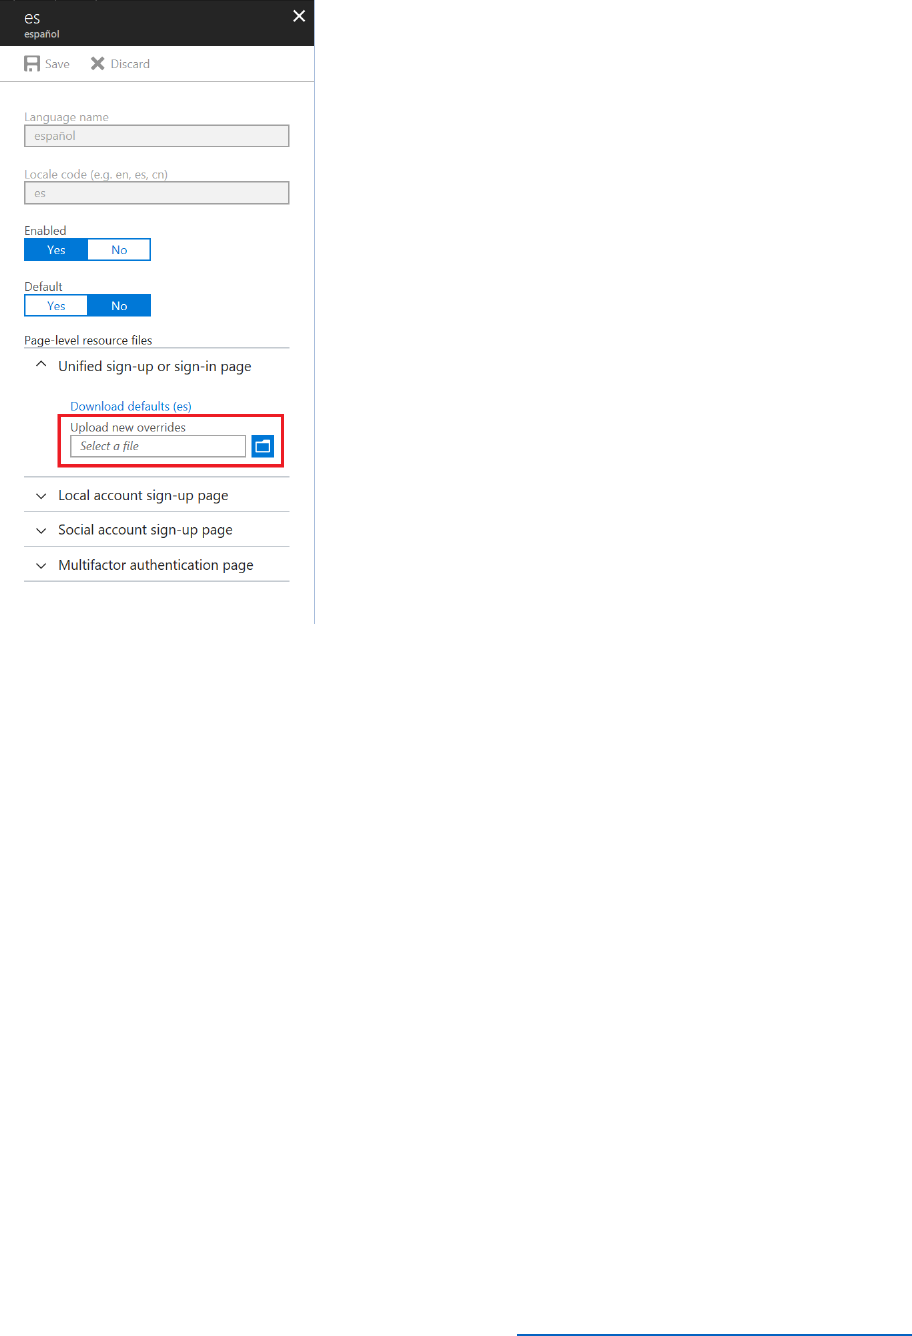

76 © 2018 Microsoft Corporation Feedback? https://aka.ms/aad-b2c-course-feedback
Module 5: Introduction to Custom Policies
At the end of this module, you will be able to:
• Create a custom policy.
• Test and debug a custom policy.
• Modify an existing custom B2C policy.
And, you will have a deeper understanding of the following concepts;
• When to use custom policies rather than built-in policies
• The Identity Experience Framework (IEF)
See it in action
See the end-user experience you are about to build.
In the demonstration site, access the Module 5 area and perform the following tasks:
• Sign up with your email and a password.
• Edit your profile to include a “1” at the end of your last name.
• Change your password and experience the Multi-factor Authentication process.
This module should take approximately 60 minutes to complete.
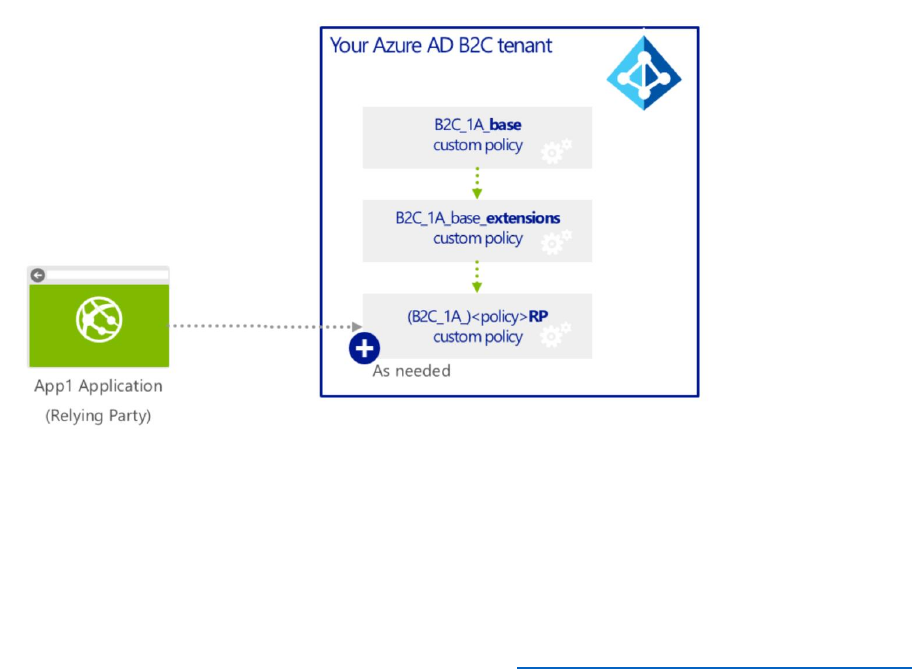
77 © 2018 Microsoft Corporation Feedback? https://aka.ms/aad-b2c-course-feedback
Introduction
Built-in policies provide a set of standard behaviors that are useful in the most common
situations in Azure AD B2C and are not customizable. If you need to implement some form of
non-standard or extended behavior, you can implement custom policies.
You describe the features implemented by a custom policy by using a set of XML files. These
files can define the claims schema, claims transformations, content definitions, claims
providers/technical profiles, and user journey orchestration steps, among other elements. You
can define a hierarchy of XML files to ease maintenance and provide consistency across policies.
The Microsoft recommended approach is to use three types of policy files:
1) A BASE file. This file contains the definitions that are shared all policies in your tenant.
tenants. Any changes to this file can affect all the policies that depend on it. We
recommend not changing this file unless absolutely necessary.
2) An EXTENSIONS file. This file specifies elements that override the base configuration for
a single tenant.
3) A Relying Party (RP) file. This is a single task-focused file that is invoked directly by the
application or service. There could be many RP files depending on RP requirement.
When an application calls the RP Policy file, the IEF in B2C will assemble the policy file by
adding all the elements from BASE, then from EXTENSIONS, and lastly from the RP policy file.
Create a Custom Policy
To create a custom policy, you require the following items:

78 © 2018 Microsoft Corporation Feedback? https://aka.ms/aad-b2c-course-feedback
• Signing and encryption keys
• AAD applications that enable users to sign up and sign in.
To create the custom policy, you can download the custom policy starter pack from GitHub and
use the items it contains as a starting point. The following steps perform these tasks.
Add Signing and Encryption Keys to the B2C Tenant for use by Custom Policies
1) Create a Facebook application following the process described in Module 2 Using
Identity Providers with Azure AD B2C Built in Policies. Make a note of the Facebook app
id and Facebook secret.
2) Log into the Azure portal as B2CAdmin in your Azure tenant.
3) Switch to the AwesomeYourLastname.onmicrosoft.com B2C tenant.
4) Select Azure AD BC from your favorites.
5) Select Identity Experience Framework.
6) Select Policy Keys to view the keys available in your tenant (there should be none).
7) Create a new key:
a) Select +Add.
b) For Options, select Generate.
c) For the Name, enter TokenSigningKeyContainer.
d) For the Key type, select RSA.
e) For Dates, keep the defaults.
f) For Key usage, select Signature.
g) Select Create to add the new key.
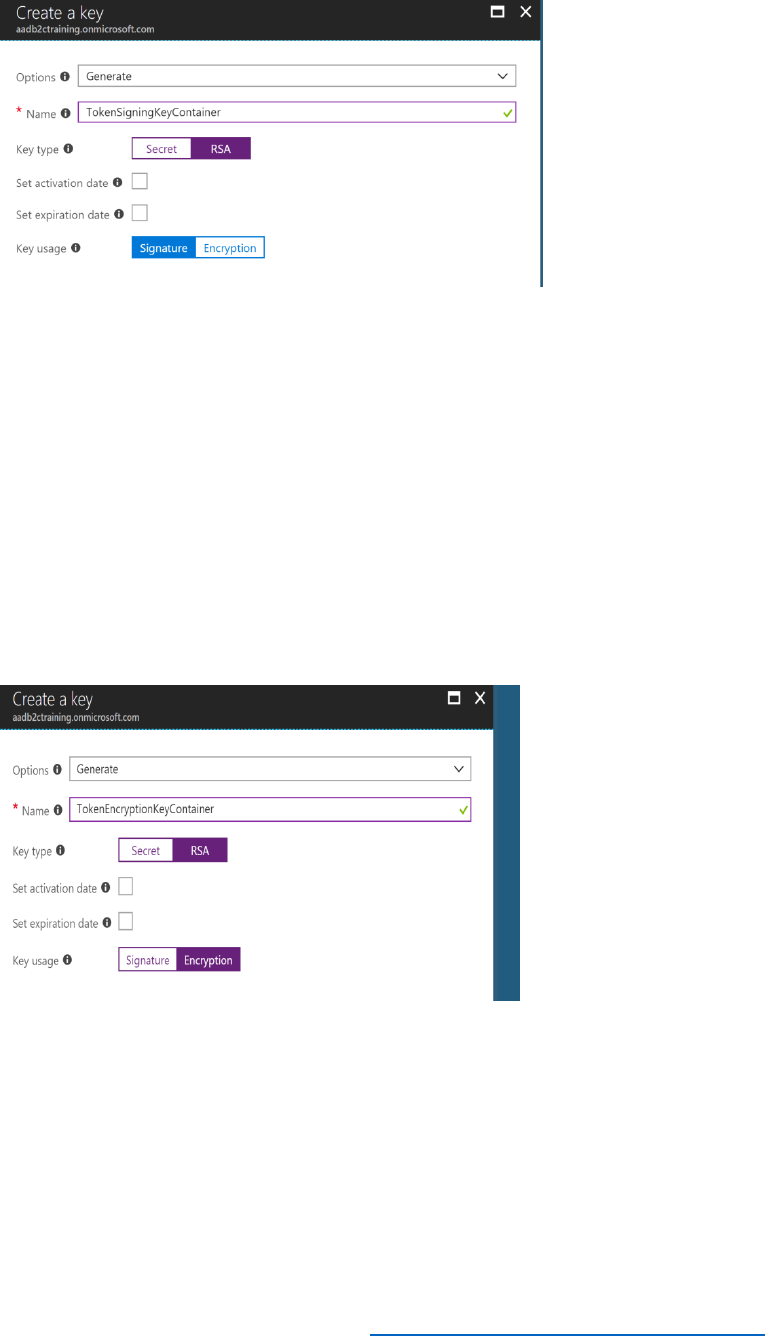
79 © 2018 Microsoft Corporation Feedback? https://aka.ms/aad-b2c-course-feedback
8) Create the TokenEncryptionKeyContainer:
a) Select +Add.
b) Select Generate.
c) For the Name, enter TokenEncryptionKeyContainer
d) For the Key type, select RSA.
e) For Dates, keep the defaults.
f) For Key usage, select Encryption.
g) Select Create.
9) Create a Facebook secret key:
a) Select +Add.
b) For Options, select Manual.
c) For the Name, specify FacebookSecret.
d) For the Secret, specify your Facebook secret.
e) For Key usage, select Signature.
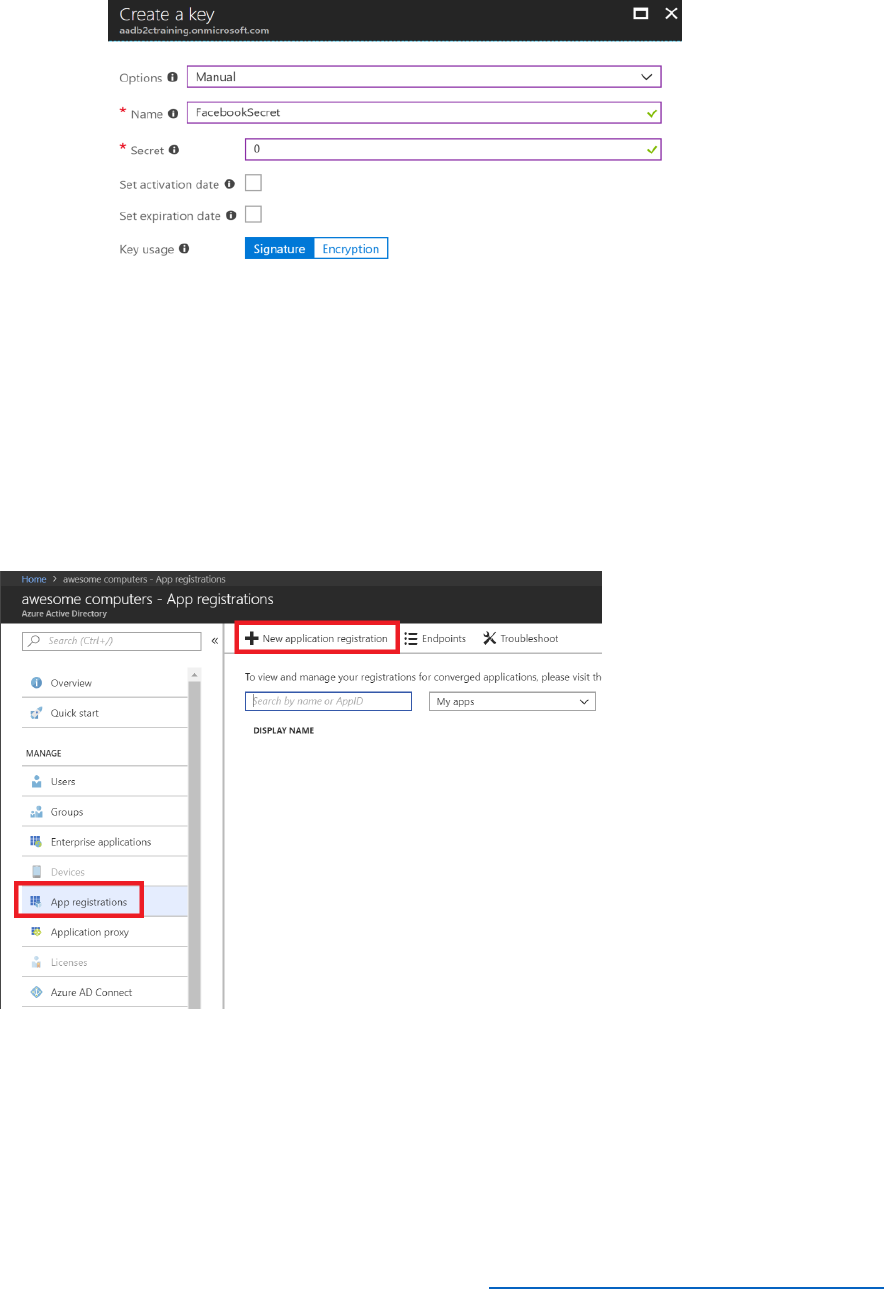
80 © 2018 Microsoft Corporation Feedback? https://aka.ms/aad-b2c-course-feedback
f) Select Create to create the key.
Register Identity Experience Framework applications
1) Create the IdentityExperienceFramework application (Web app)
a. Open the Azure Active Directory blade.
b. Select App registrations.
c. Select + New application registration.
d. Name the application IdentityExperienceFramework.
e. For the Application type, select Web App/API.
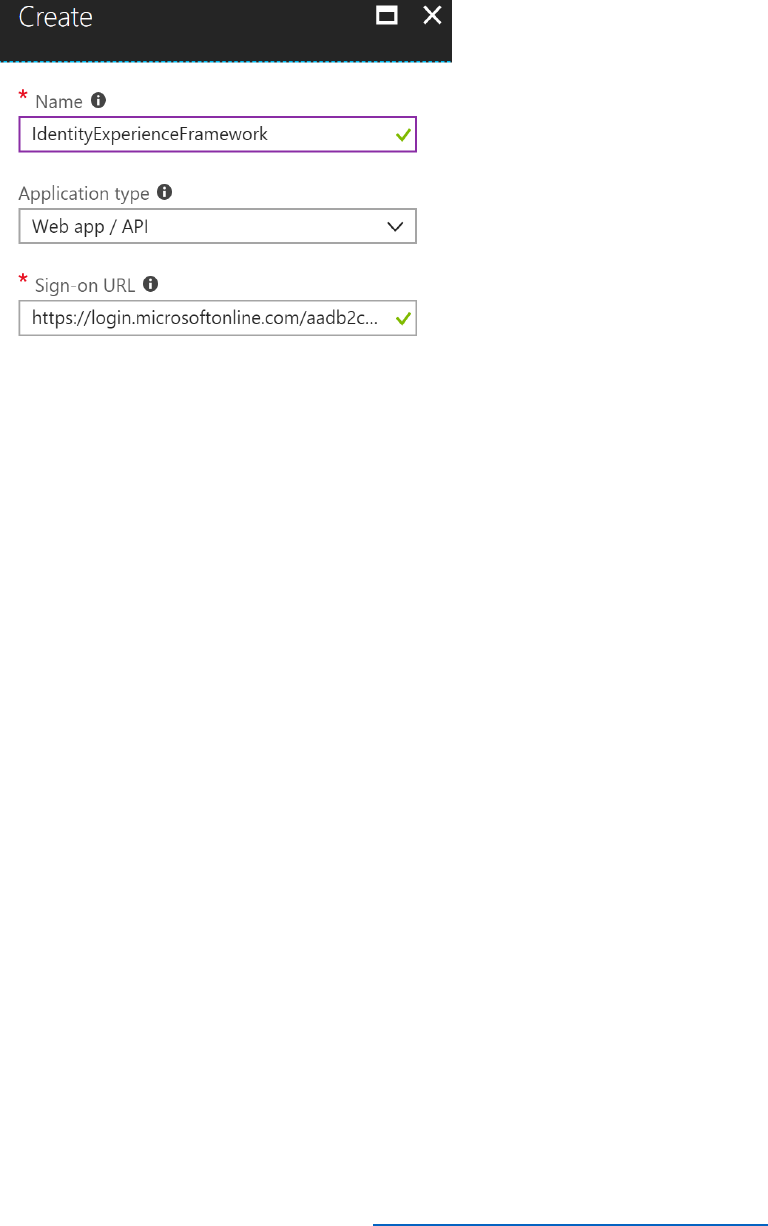
81 © 2018 Microsoft Corporation Feedback? https://aka.ms/aad-b2c-course-feedback
f. In Sign-on URL, enter
https://login.microsoftonline.com/AwesomeYourLastname.onmicrosoft.c
om, where AwesomeYourLastname is the name of your B2C tenant.
g. Select Create.
h. Record the application ID. You will need this later.
2) Create the ProxyIdentityExperienceFramework application (Native app).
a. Create a new application in Azure Active directory blade.
b. Name the application ProxyIdentityExperienceFramework.
c. Set application type to Native.
d. In Redirect Url, enter
https://login.microsoftonline.com/AwesomeYourLastname.onmicrosoft.c
om.
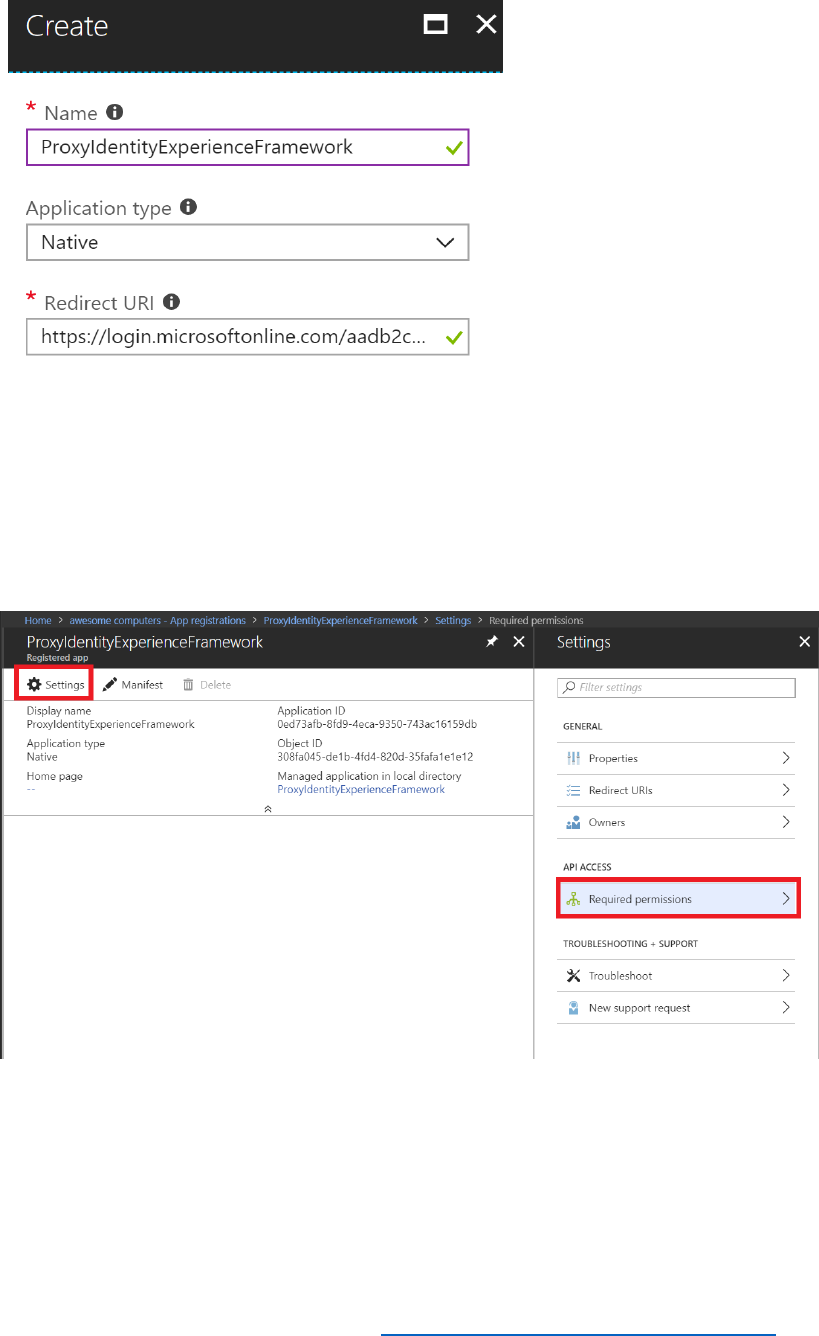
82 © 2018 Microsoft Corporation Feedback? https://aka.ms/aad-b2c-course-feedback
e. Select Create.
f. Record the application ID.
g. On the Application Details page select Settings.
h. Select Required permissions.
i. Select Add.
j. Select Select an API.
k. Search for IdentityExperienceFramework and select it.
l. Select Select permissions, and check Access IdentityExperienceFramework.
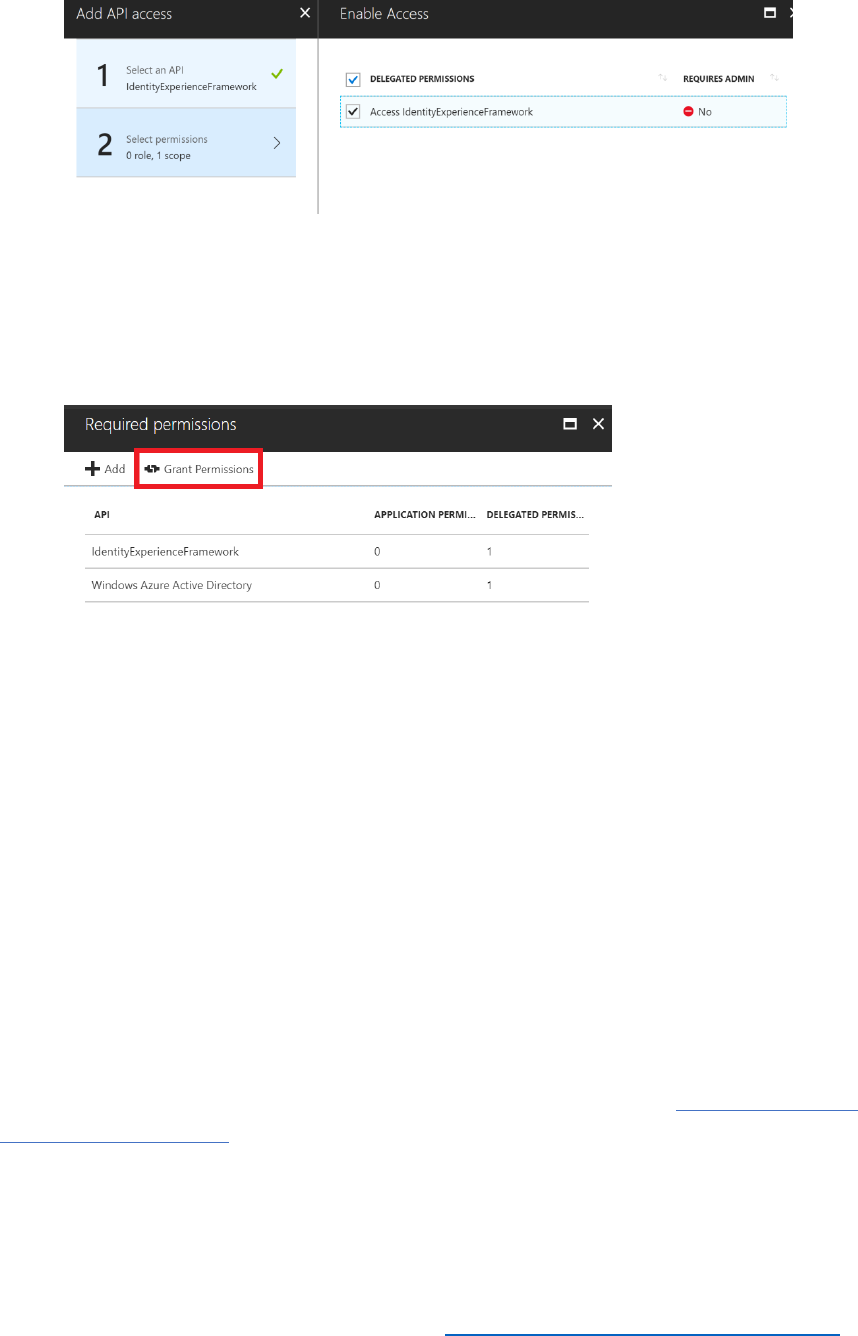
83 © 2018 Microsoft Corporation Feedback? https://aka.ms/aad-b2c-course-feedback
m. Select Select located at the bottom of the panel.
n. Select Done.
o. Select Grant Permissions, and then select Yes in the resulting dialog to
confirm the process.
Create the Custom Policies
Custom policies do not overwrite built in policies. To avoid possible confusion by having two
sets of policies defined for your B2C tenant, you will remove the built in policies you have added
in earlier modules as the functionality that they contain will be implemented (and extended) by
the custom policies.
1) In the Azure portal, move to the Azure AD B2C blade.
2) In the Policies section of the blade, select All policies.
3) Select the B2C_1_PasswordResetPolicy policy.
4) In the B2C_1_PasswordResetPolicy blade, select Delete, and then select Yes.
5) Repeat this process for the B2C_1_ProfileEditPolicy, B2C_1_SignUpOrSignInPolicy and
B2C_1_ADandFacebookSignUporSignInPolicy policies.
6) Using a web browser, download the custom policy starter packs from active-directory-b2c-
custom-policy-starterpack.
Each pack contains a list of XML policy files that include a Base file, an Extension File and
Replying Party files. You will use the SocialAndLocalAccounts pack for this tutorial.
7) Unzip the downloaded file to a convenient folder on your computer.

84 © 2018 Microsoft Corporation Feedback? https://aka.ms/aad-b2c-course-feedback
8) Move to the SocialAndLocalAccounts folder in the unzipped package.
9) Open the file TrustFrameworkBase.xml file using Visual Studio.
10) Modify the XML element TrustFrameworkPolicy at the top of the file, and replace
yourtenant with your B2C tenant name, AwesomeYourLastname. The resulting XML
element should look like this:
<TrustFrameworkPolicy
xmlns:xsi="http://www.w3.org/2001/XMLSchema-instance"
xmlns:xsd="http://www.w3.org/2001/XMLSchema"
xmlns="http://schemas.microsoft.com/online/cpim/schemas/2013/06"
PolicySchemaVersion="0.3.0.0"
TenantId="AwesomeYourLastname.onmicrosoft.com"
PolicyId="B2C_1A_TrustFrameworkBase"
PublicPolicyUri="http://AwesomeYourLastname.onmicrosoft.com/
B2C_1A_TrustFrameworkBase">
11) Save the file.
12) Open the file TrustFrameworkExtensions.xml in Visual Studio.
13) Find and replace yourtenant with the tenant name AwesomeYourLastname. There
should be three occurrences.
14) Find the element <TechnicalProfile Id="login-NonInteractive"> and replace both
instances of IdentityExperienceFrameworkAppId with the application id of the
IdentityExperienceFramework app that you created earlier.
15) Replace both instances of ProxyIdentityExperienceFrameworkAppId with the
application id you created earlier for ProxyIdentityExperienceFramework app. The
result should look similar to this (but with your own app ids):
<ClaimsProvider>
<DisplayName>Local Account SignIn</DisplayName>
<TechnicalProfiles>
<TechnicalProfile Id="login-NonInteractive">
<Metadata>
<Item Key="client_id">e4c7ce45-9291-49f0-a824-0decbb98601b</Item>
<Item Key="IdTokenAudience">3643843e-0931-43de-8ab7-
fc37d8f00d0b</Item>
</Metadata>
<InputClaims>
<InputClaim ClaimTypeReferenceId="client_id" DefaultValue="e4c7ce45-9291-
49f0-a824-0decbb98601b" />

85 © 2018 Microsoft Corporation Feedback? https://aka.ms/aad-b2c-course-feedback
<InputClaim ClaimTypeReferenceId="resource_id" PartnerClaimType="resource"
DefaultValue="3643843e-0931-43de-8ab7-fc37d8f00d0b" />
</InputClaims>
</TechnicalProfile>
</TechnicalProfiles>
</ClaimsProvider>
16) Save the file.
17) Edit the SignUpOrSignin.xml file and replace yourtenant with
AwesomeYourLastname (three occurrences).
18) After the closing </BasePolicy> tag but before the opening <RelyingParty> tag, add
the following <BuildingBlocks> XML element. Replace awesomeyoursurnameb2cux
with the name of the Azure storage account you created in Module 4 to hold the
custom unified.html fragment for the SUSI page. Replace b2c with the name of the
blob storage container you created.
<BuildingBlocks>
<ContentDefinitions>
<ContentDefinition Id="api.signuporsignin">
<LoadUri>https://AwesomeYourLastnameb2cux.blob.core.windows.net/b2c/unified.
html</LoadUri>
</ContentDefinition>
<ContentDefinition Id="api.localaccountsignup">
<LoadUri>https://AwesomeYourLastnameb2cux.blob.core.windows.net/b2c/unified.
html</LoadUri>
</ContentDefinition>
</ContentDefinitions>
</BuildingBlocks>
19) Save the file.
20) Edit ProfileEdit.xml and replace yourtenant with AwesomeYourLastname (three
occurrences).
21) After the closing </BasePolicy> tag but before the opening <RelyingParty> tag, add
the following <BuildingBlocks> XML element.
<BuildingBlocks>
<ContentDefinitions>
<ContentDefinition Id="api.selfasserted.profileupdate">

86 © 2018 Microsoft Corporation Feedback? https://aka.ms/aad-b2c-course-feedback
<LoadUri>https://AwesomeYourLastnameb2cux.blob.core.windows.net/b2c/update
profile.html</LoadUri>
</ContentDefinition>
</ContentDefinitions>
</BuildingBlocks>
22) Save the file.
23) Edit PasswordReset.xml and replace yourtenant with AwesomeYourLastname
(three occurrences).
24) After the closing </BasePolicy> tag but before the opening <RelyingParty> tag, add
the following <BuildingBlocks> XML element.
<BuildingBlocks>
<ContentDefinitions>
<ContentDefinition Id="api.localaccountpasswordreset">
<LoadUri>https://AwesomeYourLastnameb2cux.blob.core.windows.net/b2c/unified.
html</LoadUri>
</ContentDefinition>
</ContentDefinitions>
</BuildingBlocks>
25) Save the file.
26) Return to the Azure Portal. Open the Azure AD B2C blade and select Identity
Experience Framework.
27) Select Upload policy, and upload the policy files in the following order:
a. TrustFrameworkBase.xml
b. TrustFrameworkExtensions.xml
c. SignUpOrSignin.xml
d. ProfileEdit.xml
e. PasswordReset.xml
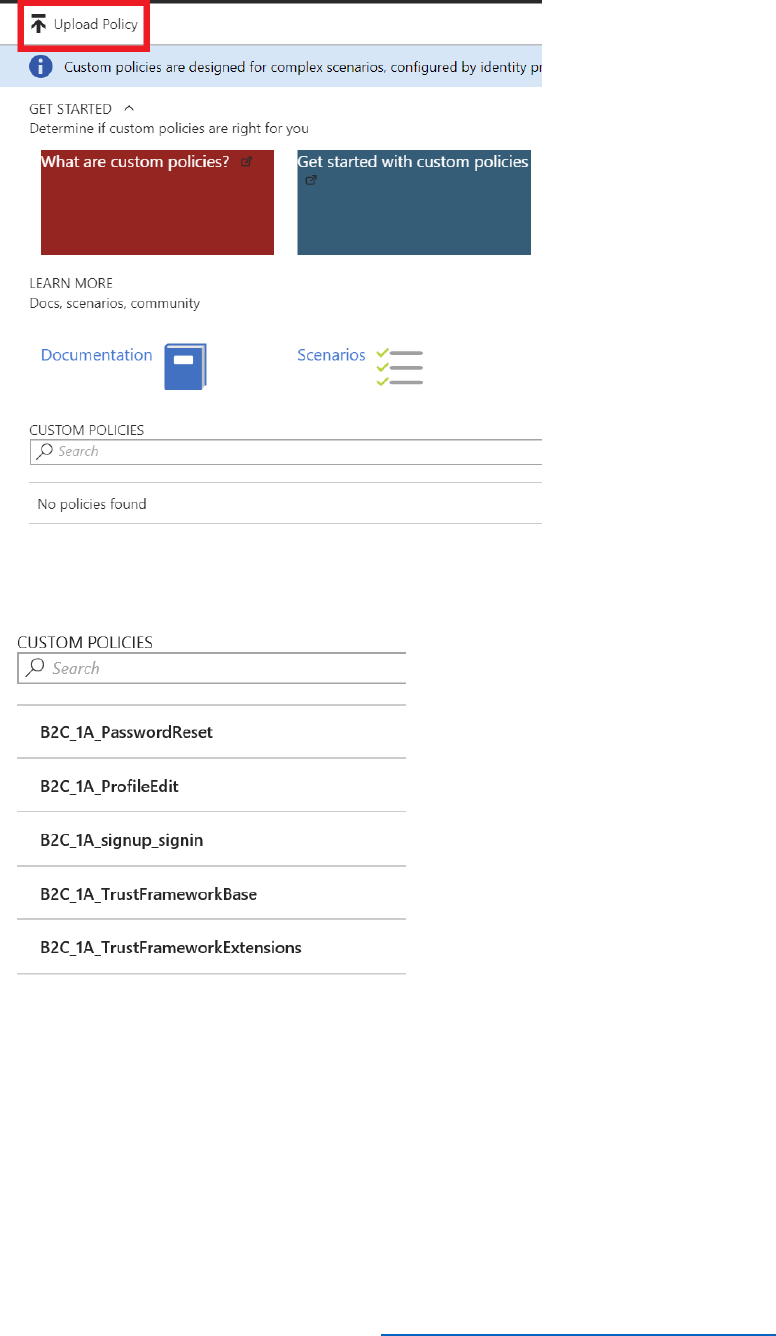
87 © 2018 Microsoft Corporation Feedback? https://aka.ms/aad-b2c-course-feedback
The list of uploaded files should look like this:
Add Facebook as an Identity Provider in the Custom Policy
1) Using Visual Studio, edit the TrustFrameworkExtensions.xml policy file, find the
element <Item Key="client_id">facebook_clientid</Item>. Replace
facebook_clientid with your Facebook app id.
2) Save the file, and then in the Azure portal, upload the policy file. Select Overwrite the
policy if it exists.
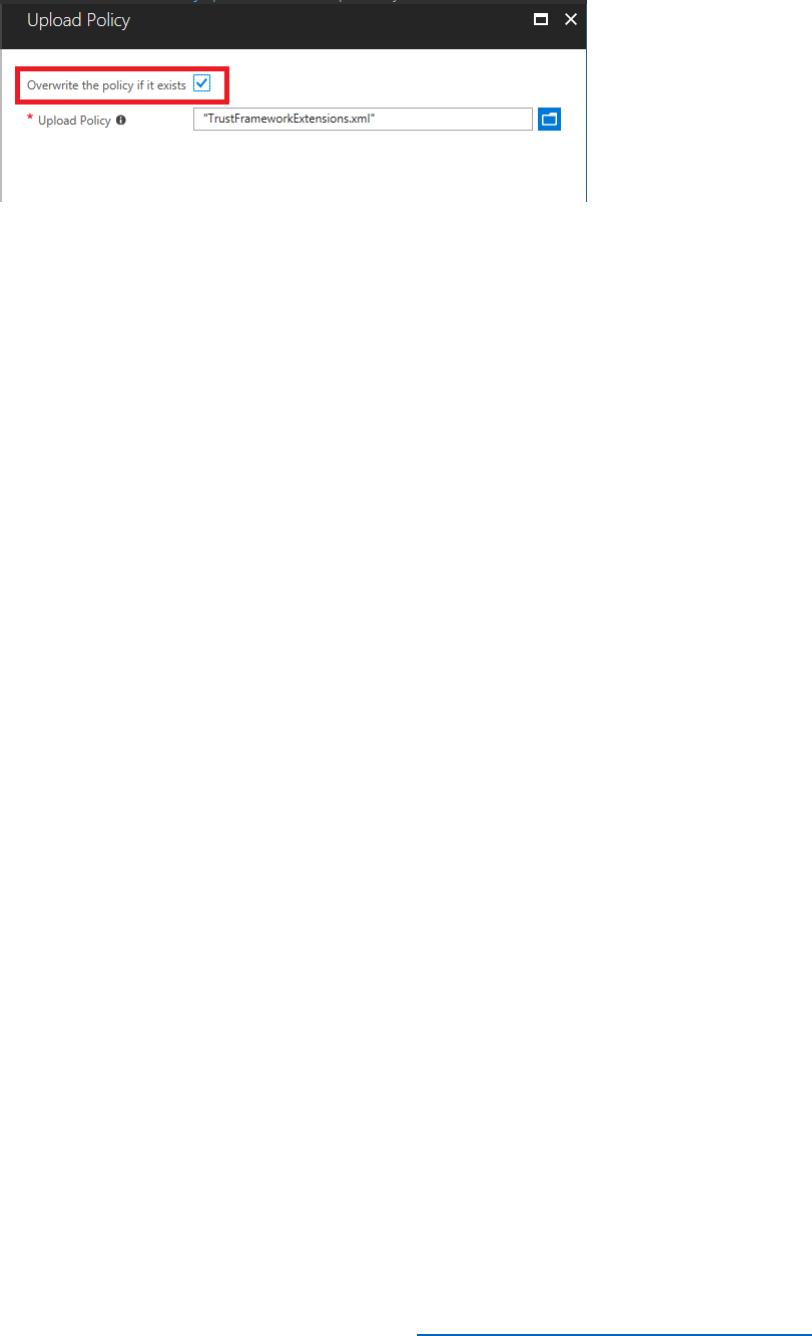
88 © 2018 Microsoft Corporation Feedback? https://aka.ms/aad-b2c-course-feedback
Update the Web Application to Reference the New Policies
1) Using Visual Studio, return to the B2C-WebAPI-DotNet.sln solution for the web
application you configured and published in Module 3.
2) In Solution Explorer, In the AwesomeComputers project, select the Web.config file.
3) In the <appSettings> section near the start of the file, change the values for the
policy references to specify the new custom policy files, as follows:
<appSettings>
...
<add key="ida:SignUpSignInPolicyId" value="B2C_1A_signup_signin" />
<add key="ida:EditProfilePolicyId" value="B2C_1A_ProfileEdit" />
<add key="ida:ResetPasswordPolicyId" value="B2C_1A_PasswordReset" />
</appSettings>
4) Save the file.
5) In Solution Explorer, in the AwesomeComputers project, expand the Shared folder,
expand the Home folder, and then select the _LoginPartial.cshtml file.
6) In the _LoginPartial.cshtml file, modify the two <a> elements as follows. Replace the
policy names as highlighted in bold:
<ul class="nav navbar-nav navbar-right">
<li>
<a
href="https://login.microsoftonline.com/AwesomeYourLastname.onmicrosoft.com/oauth2/v
2.0/authorize?p=B2C_1A_ProfileEdit&client_id=ClientID&nonce=defaultNonce&redirect_ur
i=https%3A%2F%2FAwesomeYourLastname.azurewebsites.net&scope=openid&response_ty
pe=id_token">
Edit Profile
</a>

89 © 2018 Microsoft Corporation Feedback? https://aka.ms/aad-b2c-course-feedback
</li>
<li>
<a
href="https://login.microsoftonline.com/AwesomeYourLastname.onmicrosoft.com/oauth2/v
2.0/authorize?p=B2C_1A_PasswordReset&client_id=ClientID&nonce=defaultNonce&redire
ct_uri=https%3A%2F%2FAwesomeYourLastname.azurewebsites.net&scope=openid&respon
se_type=id_token">
Reset Password
</a>
</li>
</ul>
7) Save the file.
8) In Solution Explorer, right-click the AwesomeComputers project, then select Publish.
9) On the Publish page, select Publish, and wait for the web application to be deployed.
When the sign-in page appears in the web browser, close the page (do not sign in).
10) Return to the Azure AD B2C blade in the Azure portal.
11) Under the Policies section, select All policies, and then select the
B2C_1A_signup_signin policy.
12) Select Run now. When the sign-in page appears, it should be correctly styled, and
include the option to sign in using Facebook.
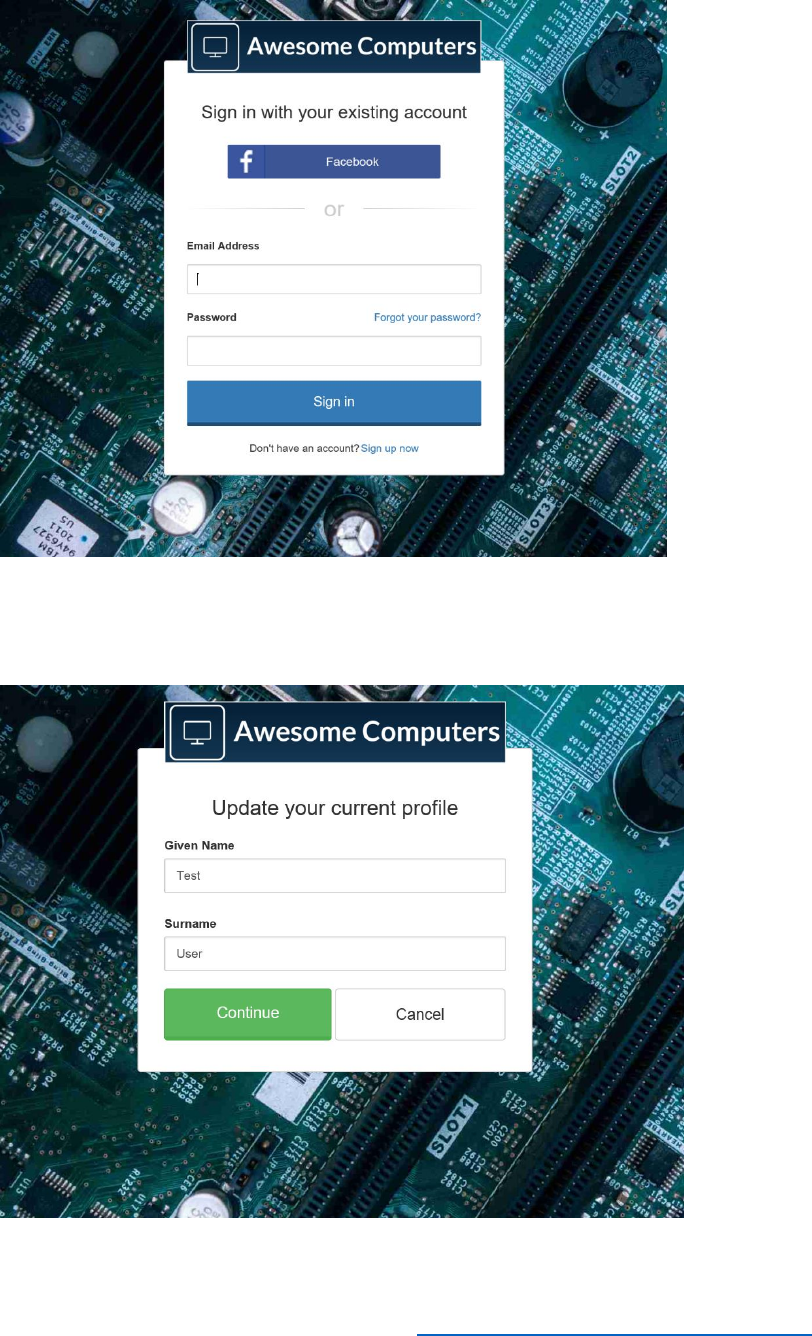
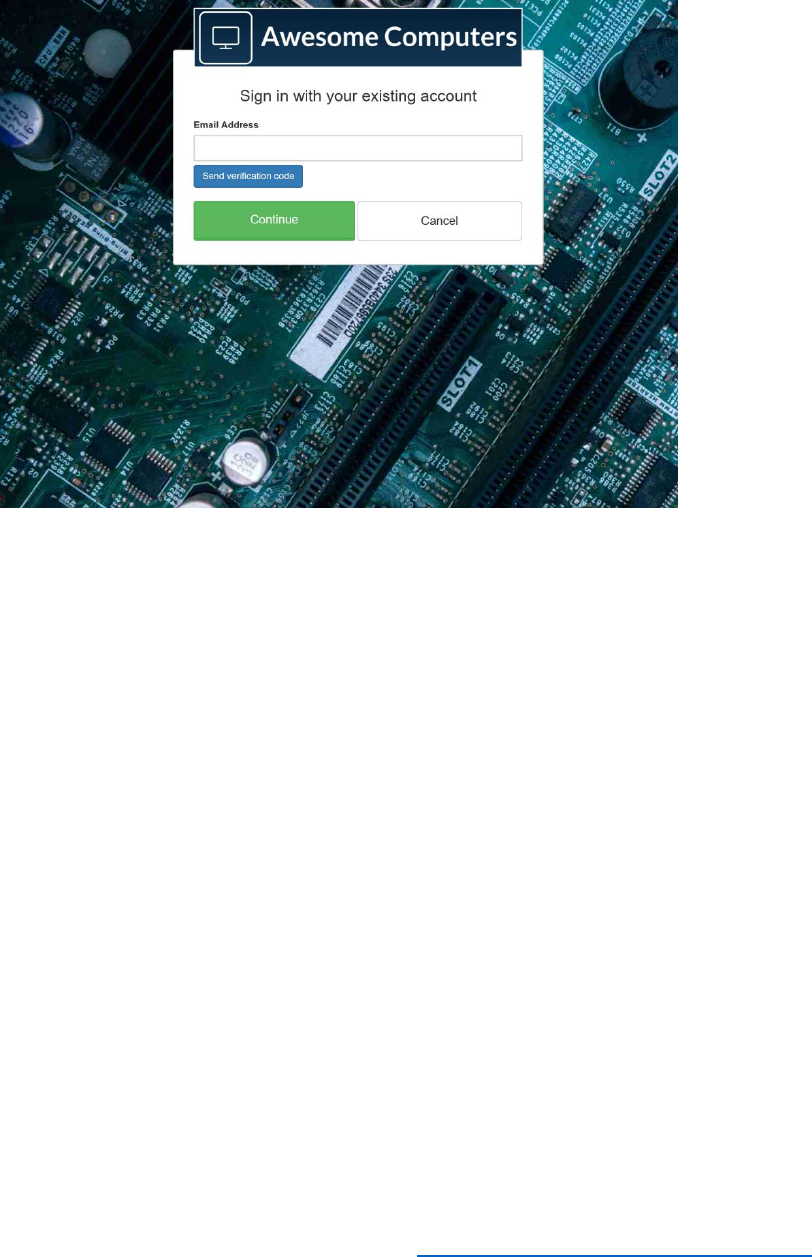
91 © 2018 Microsoft Corporation Feedback? https://aka.ms/aad-b2c-course-feedback
14) Select Continue. When the Awesome Computers page reappears, select Reset
Password. This page should have the same styling.
15) Close the web app.
est and Debug a Custom Policy by Using Application Insights
You can use the detailed log information provided by Application Insights to investigate any
issues that might occur with a custom policy. Use the following steps to configure IEF to send
events directly to Application Insights.
Create Application Insights Resource
1) In the Azure portal, switch to the Azure tenant (not the current B2C tenant).
2) Select + Create a resource.
3) In the search box, enter Application Insights, and then select Application Insights.
4) Select Create.
5) Specify the following settings, and then select Create.
• Name: DemoInsightsForCustomPolicies
• Application Type: ASP.NET web application
• Resource Group: Create new, AppInsightsResourceGroup
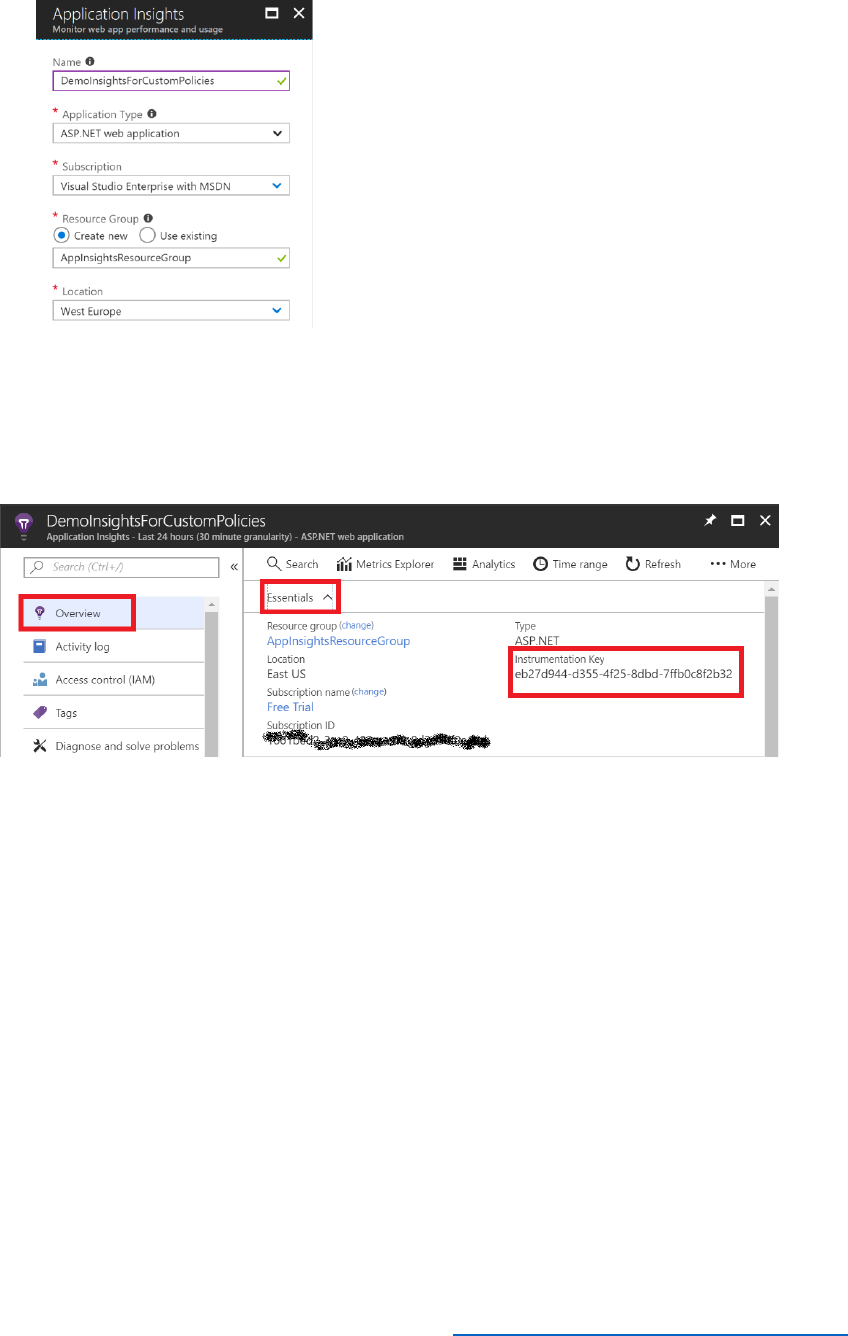
92 © 2018 Microsoft Corporation Feedback? https://aka.ms/aad-b2c-course-feedback
6) When the Application Insights resource has been created, select All resources, and
then select DemoInsightsForCustomPolicies.
7) Select Overview and then expand Essentials. Make a note of the Instrumentation
Key.
Update Relying Party (RP) Policies to Collect Logs
1) Using Visual Studio, open the SignUpOrSignIn.xml file.
2) Add the following attribute to the <TrustFrameworkPolicy> element.
DeploymentMode="Development"
UserJourneyRecorderEndpoint="urn:journeyrecorder:applicationinsights"
3) Under the <RelyingParty> element, add the following <UserJourneyBehaviours> node
immediately after <DefaultUserJourney ReferenceId="SignUpOrSignIn" /> element.
Replace the bold text with your application Insight Key.
<UserJourneyBehaviors>
<JourneyInsights
TelemetryEngine="ApplicationInsights"
InstrumentationKey="Your Application Insight Instrumentation Key"
DeveloperMode="true"

93 © 2018 Microsoft Corporation Feedback? https://aka.ms/aad-b2c-course-feedback
ClientEnabled="false"
ServerEnabled="true"
TelemetryVersion="1.0.0" />
</UserJourneyBehaviors>
Note the following points:
• DeveloperMode=true is good for development but constrained at high volumes
because it tells Application Insights to expedite the telemetry through the processing
pipeline.
• ClientEnabled="true" will send client-side scripts to Application Insights, for
tracking page view and client-side errors
• ServerEnabled="true" will send the existing UserJourneyRecorder JSON as a custom
event to Application Insights
4) Save the file.
5) Return to the Azure Portal and switch to your B2C tenant. Open the Azure AD B2C
Blade and select Identity Experience Framework.
6) Select Upload policy, and upload the SignUpOrSignIn.xml policy file. Select overwrite
the policy if it exists.
Check the logs in Application Insights
1) Select the B2C_1A_signup_signin policy.
2) Select Run now.
3) Attempt to sign in as ;
a. an invalid user (type a random email address). T
b. TestUser@AwesomeYourLastname.onmicrosoft.com but with the wrong
password.
c. TestUser@AwesomeYourLastname.onmicrosoft.com using the correct
password.
4) In the Azure portal, switch back to your Azure tenant, and open the
DemoInsightsForCustomPolicies Application Insights resource.
5) In the Details/Overview menu, select Analytics.
6) Open a new tab inside the Application Insights web application.
7) Use any of the following example queries to view log information.

94 © 2018 Microsoft Corporation Feedback? https://aka.ms/aad-b2c-course-feedback
• traces: See all of the logs generated by Azure AD B2C
• traces | where timestamp > ago(1d): See all of the logs generated by Azure AD
B2C for the last day
• traces | count: See how many events have been generated
• traces | render pie chart: Summarize the data as a pie chart
Note that you might have to wait for a few minutes before logs start appearing in Application
Insights.
If necessary, you can download the query results and export them to CSV files if you need to
perform a detailed analysis.
You can learn more about performing analytics with Application Insights here
Modify the Starter Pack SUSI Policy
You can use a custom policy to include additional sign-up/sign-in functionality. In this
procedure, you will see how to incorporate a journey step into the SUSI process that prompts
the user to accept the organization's terms and conditions, add a claim to the sign-up page, and
validate input using an external REST API.
1) Using Visual Studio, open the TrustFrameworkBase.xml file.
2) Inside the <ClaimsSchema> node, insert the following claim type.
<ClaimType Id="TnCs">
<DisplayName>Terms of Service Consent</DisplayName>
<DataType>string</DataType>
<UserHelpText>I agree to the Awesome Computers terms of
service.</UserHelpText>
<UserInputType>CheckboxMultiSelect</UserInputType>
<Restriction>
<Enumeration Text="I agree to the Awesome Computers terms of service."
Value="4/19/2018" SelectByDefault="false" />
</Restriction>
</ClaimType>
3) Find the element <TechnicalProfile Id="LocalAccountSignUpWithLogonEmail">, and
in the <OutputClaims> node, add the following element.
<OutputClaim ClaimTypeReferenceId="TnCs" Required="true" />
4) Save the file.
5) Return to the Azure Portal and switch to your B2C tenant. Open the Azure AD B2C
Blade and select Identity Experience Framework.
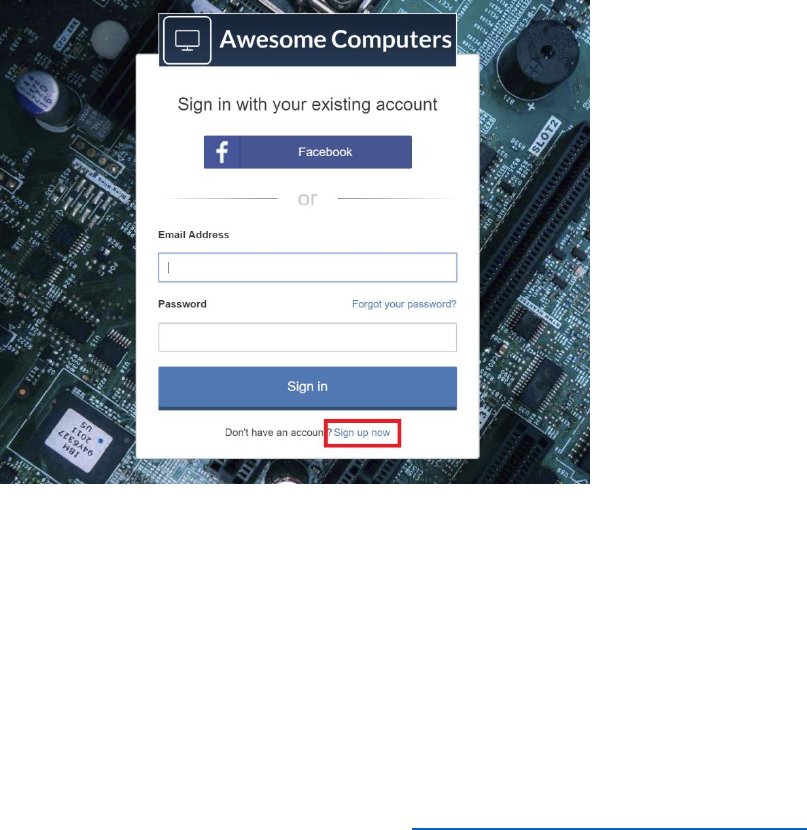
95 © 2018 Microsoft Corporation Feedback? https://aka.ms/aad-b2c-course-feedback
6) Select Upload policy and upload the TrustFrameworkBase.xml policy file. Select
overwrite the policy if it exists.
7) To add a claim to the sign up page, open the SignUpOrSignIn.xml file using Visual
Studio.
8) Find the element <TechnicalProfile Id="PolicyProfile">, and in the <OutputClaims>
node, add <OutputClaim ClaimTypeReferenceId="TnCs"/>.
9) Save the file.
10) In the Azure portal, upload the SignUpOrSignIn.xml policy file and overwrite the
existing policy.
11) Select the B2C_1A_signup_signin policy.
12) Select Run now.
13) In the sign-in page, select Sign-up now.
14) In the sign-up page, notice that the Terms of Service Consented checkbox appears.
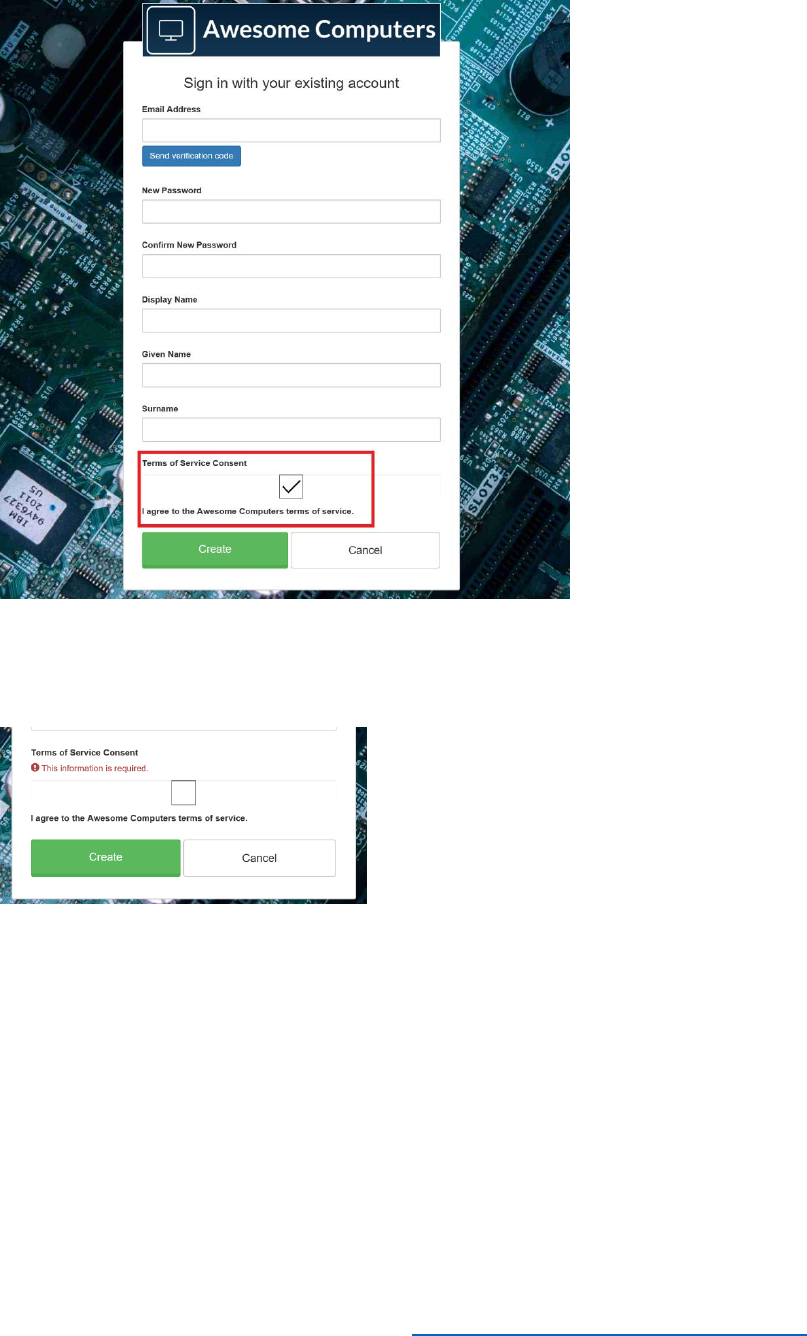
96 © 2018 Microsoft Corporation Feedback? https://aka.ms/aad-b2c-course-feedback
15) Attempt to create an account without checking Terms of Service Consent. This
should fail with the message This information is required. You should only be able
to proceed once you have checked the box.
16) Verify that you can create an account if you select the Terms of Service Consent
box.
Important Concepts
When to Use Built-in Versus Custom Policies
Built in policies implement the behavior most commonly required by tasks such as sign-in, sign-
up, password reset, and profile editing. . They also support scenarios such as authentication
through trusted parties, including Facebook, Google, and LinkedIn. If you have no special
identity requirements, using the built-in policies will get you up and running with the minimum
of fuss.

97 © 2018 Microsoft Corporation Feedback? https://aka.ms/aad-b2c-course-feedback
Custom policies are useful if you have special requirements, such as the use of non-standard
Identity providers. You can use custom policies to:
• Interact with providers that implement the OIDC, OAUTH, and SAML protocols.
• Include additional steps in the identity process, such as asking the user to confirm
acceptance of terms and conditions when they sign up to a service.
• Perform custom operations, such as transposing requests when RPs (relying parties) and
AtPs (attribute providers) do not support the same protocol.
Custom policies provide you with full control over identity behavior and experience. Azure AD
B2C custom policies enable you to author your own trust framework: For example, they control
how the identity information is exchanged between relying parties, IdPs (identity providers) and
AtPs. They include all the operational details including claim providers, metadata and technical
profiles, claims schema definitions, claims transformation functions, and user journeys necessary
to facilitate operational orchestration and automation.
You can define the behavior of custom policies through XML configuration files, and then apply
them to your B2C container by using the IEF.
What is IEF?
The Identity Experience Framework (IEF) is a fully configurable, policy driven, cloud based Azure
service that coordinates trust between various entities such as claim providers. It implements
standard protocol formats such as OAuth, SAML, WsFed, and OpenIdConnect as well as non-
standard formats, such as claims based on proprietary REST APIs. The IEF provides a user-
friendly step-by-step interface that simplifies many of the tasks involved when implementing
identity policies.
Using the IEF, you provide the following essential information.
• The legal, security, privacy and data protection policies to which participants must
conform.
• The contacts and process required to become an accredited user.
• The trusted identity/claims providers to use.
• The trusted relying parties and their requirements.
• The run time rules to enforce for exchanging identity information.
For built-in policies, you simply use the various wizards provided by the IEF blade in the Azure
portal. For more complex, custom requirements, you specify the details by using custom policy
files that you upload to IEF.
Using the IEF also minimizes the complexity of configuring identity federation. Federated
identity provides the end-user identity assurance. By delegating Identity to third parties, a single
user identity can be used with multiple relying parties. Identity assurance requires that the IdPs
and AtPs must adhere to specific security, privacy, and operational policies and practices. RPs

98 © 2018 Microsoft Corporation Feedback? https://aka.ms/aad-b2c-course-feedback
must build the trust relationships between IdPs and AtPs they choose to work with. The IEF
assists in this task, essentially reducing the process to two steps; establishing a trust relationship,
and performing a single metadata exchange.

99 © 2018 Microsoft Corporation Feedback? https://aka.ms/aad-b2c-course-feedback
Sample Custom Policy Files
TrustFrameworkExtensions.xml
<TrustFrameworkPolicy xmlns:xsi="http://www.w3.org/2001/XMLSchema-instance"
xmlns:xsd="http://www.w3.org/2001/XMLSchema"
xmlns="http://schemas.microsoft.com/online/cpim/schemas/2013/06"
PolicySchemaVersion="0.3.0.0" TenantId="aadb2ctraining.onmicrosoft.com"
PolicyId="B2C_1A_TrustFrameworkExtensions"
PublicPolicyUri="http://aadb2ctraining.onmicrosoft.com/B2C_1A_TrustFrameworkExtensions"
TenantObjectId="4ba38890-d941-471a-b8cd-e5df2769070c">
<BasePolicy>
<TenantId>aadb2ctraining.onmicrosoft.com</TenantId>
<PolicyId>B2C_1A_TrustFrameworkBase</PolicyId>
</BasePolicy>
<BuildingBlocks>
<!--
Custom claims for Azure Application Insights go here
-->
<ClaimsSchema>
<ClaimType Id="extension_TermsOfServiceConsented">
<DisplayName>Terms of Service Consented</DisplayName>
<DataType>string</DataType>
<UserHelpText>I am agreeing to the Awesome Computers terms of
service.</UserHelpText>
<UserInputType>CheckboxMultiSelect</UserInputType>
<Restriction>
<Enumeration Text="I am agreeing to the Awesome Computers terms of service."
Value="4/19/2018" SelectByDefault="false" />
</Restriction>
</ClaimType>
</ClaimsSchema>
</BuildingBlocks>
<!--
All Claim provider definitions go here. In this example, only FB and local account providers are
configured
-->
<ClaimsProviders>
<ClaimsProvider>
<DisplayName>Facebook</DisplayName>
<TechnicalProfiles>
<TechnicalProfile Id="Facebook-OAUTH">
<Metadata>

100 © 2018 Microsoft Corporation Feedback? https://aka.ms/aad-b2c-course-feedback
<Item Key="client_id">1567223293375050</Item>
<!-- FB app client Id -->
<Item Key="scope">email public_profile</Item>
<!-- What access required-->
<Item
Key="ClaimsEndpoint">https://graph.facebook.com/me?fields=id,first_name,last_name,name,e
mail</Item>
<!-- what user profile information will be needed by FB API endpoint-->
</Metadata>
</TechnicalProfile>
</TechnicalProfiles>
</ClaimsProvider>
<ClaimsProvider>
<DisplayName>Local Account SignIn</DisplayName>
<TechnicalProfiles>
<TechnicalProfile Id="login-NonInteractive">
<Metadata>
<!-- Apps we created in Azure Active Directory for B2C to work-->
<Item Key="client_id">c5f2f442-6750-448f-9855-92d8e1d496f1</Item>
<Item Key="IdTokenAudience">d210459f-f186-4b9a-ac63-a4b20645b0d3</Item>
</Metadata>
<InputClaims>
<InputClaim ClaimTypeReferenceId="client_id" DefaultValue="c5f2f442-6750-448f-
9855-92d8e1d496f1" />
<InputClaim ClaimTypeReferenceId="resource_id" PartnerClaimType="resource"
DefaultValue="d210459f-f186-4b9a-ac63-a4b20645b0d3" />
</InputClaims>
</TechnicalProfile>
</TechnicalProfiles>
</ClaimsProvider>
</ClaimsProviders>
<UserJourneys>
<!-- Signup Signin user journey where we define all Orchestra Steps needed to send back
claims to Azure Application Insights using the Technical profile references we defined earlier -->
<UserJourney Id="SignUpOrSignIn">
<OrchestrationSteps>
<OrchestrationStep Order="1" Type="CombinedSignInAndSignUp"
ContentDefinitionReferenceId="api.signuporsignin">
<ClaimsProviderSelections>
<ClaimsProviderSelection TargetClaimsExchangeId="FacebookExchange" />

101 © 2018 Microsoft Corporation Feedback? https://aka.ms/aad-b2c-course-feedback
<ClaimsProviderSelection
ValidationClaimsExchangeId="LocalAccountSigninEmailExchange" />
</ClaimsProviderSelections>
<ClaimsExchanges>
<ClaimsExchange Id="LocalAccountSigninEmailExchange"
TechnicalProfileReferenceId="SelfAsserted-LocalAccountSignin-Email" />
</ClaimsExchanges>
</OrchestrationStep>
<!-- Check if the user has selected to sign in using one of the social providers -->
<OrchestrationStep Order="2" Type="ClaimsExchange">
<Preconditions>
<Precondition Type="ClaimsExist" ExecuteActionsIf="true">
<Value>objectId</Value>
<Action>SkipThisOrchestrationStep</Action>
</Precondition>
</Preconditions>
<ClaimsExchanges>
<ClaimsExchange Id="FacebookExchange" TechnicalProfileReferenceId="Facebook-
OAUTH" />
<ClaimsExchange Id="SignUpWithLogonEmailExchange"
TechnicalProfileReferenceId="LocalAccountSignUpWithLogonEmail" />
</ClaimsExchanges>
</OrchestrationStep>
<!-- For social IDP authentication, attempt to find the user account in the directory. -->
<OrchestrationStep Order="3" Type="ClaimsExchange">
<Preconditions>
<Precondition Type="ClaimEquals" ExecuteActionsIf="true">
<Value>authenticationSource</Value>
<Value>localAccountAuthentication</Value>
<Action>SkipThisOrchestrationStep</Action>
</Precondition>
</Preconditions>
<ClaimsExchanges>
<ClaimsExchange Id="AADUserReadUsingAlternativeSecurityId"
TechnicalProfileReferenceId="AAD-UserReadUsingAlternativeSecurityId-NoError" />
</ClaimsExchanges>
</OrchestrationStep>
<!-- Show self-asserted page only if the directory does not have the user account already
(i.e. we do not have an objectId). This can only happen when authentication happened using a
social IDP. If a local account was created or authentication was done using ESTS in step 2, then a
user account must exist in the directory by this time. -->
<OrchestrationStep Order="4" Type="ClaimsExchange">
<Preconditions>
<Precondition Type="ClaimsExist" ExecuteActionsIf="true">

102 © 2018 Microsoft Corporation Feedback? https://aka.ms/aad-b2c-course-feedback
<Value>objectId</Value>
<Action>SkipThisOrchestrationStep</Action>
</Precondition>
</Preconditions>
<ClaimsExchanges>
<ClaimsExchange Id="SelfAsserted-Social" TechnicalProfileReferenceId="SelfAsserted-
Social" />
</ClaimsExchanges>
</OrchestrationStep>
<!-- This step reads any user attributes that we may not have received when
authenticating using ESTS so they can be sent in the token. -->
<OrchestrationStep Order="5" Type="ClaimsExchange">
<Preconditions>
<Precondition Type="ClaimEquals" ExecuteActionsIf="true">
<Value>authenticationSource</Value>
<Value>socialIdpAuthentication</Value>
<Action>SkipThisOrchestrationStep</Action>
</Precondition>
</Preconditions>
<ClaimsExchanges>
<ClaimsExchange Id="AADUserReadWithObjectId" TechnicalProfileReferenceId="AAD-
UserReadUsingObjectId" />
</ClaimsExchanges>
</OrchestrationStep>
<!-- The previous step (SelfAsserted-Social) could have been skipped if there were no
attributes to collect from the user. So, in that case, create the user in the directory if one does
not already exist (verified using objectId, which would be set from the last step if account was
created in the directory. -->
<OrchestrationStep Order="6" Type="ClaimsExchange">
<Preconditions>
<Precondition Type="ClaimsExist" ExecuteActionsIf="true">
<Value>objectId</Value>
<Action>SkipThisOrchestrationStep</Action>
</Precondition>
</Preconditions>
<ClaimsExchanges>
<ClaimsExchange Id="AADUserWrite" TechnicalProfileReferenceId="AAD-
UserWriteUsingAlternativeSecurityId" />
</ClaimsExchanges>
</OrchestrationStep>
<OrchestrationStep Order="7" Type="SendClaims"
CpimIssuerTechnicalProfileReferenceId="JwtIssuer" />
</OrchestrationSteps>
<ClientDefinition ReferenceId="DefaultWeb" />

103 © 2018 Microsoft Corporation Feedback? https://aka.ms/aad-b2c-course-feedback
</UserJourney>
</UserJourneys>
</TrustFrameworkPolicy>
SignUpOrSignin.xml
<TrustFrameworkPolicy
xmlns:xsi="http://www.w3.org/2001/XMLSchema-instance"
xmlns:xsd="http://www.w3.org/2001/XMLSchema"
xmlns="http://schemas.microsoft.com/online/cpim/schemas/2013/06"
PolicySchemaVersion="0.3.0.0" TenantId="aadb2ctraining.onmicrosoft.com"
TenantObjectId="4ba38890-d941-471a-b8cd-e5df2769070c"
PolicyId="B2C_1A_Module5SignupSignin"
PublicPolicyUri="http://aadb2ctraining.onmicrosoft.com/"
DeploymentMode="Development"
UserJourneyRecorderEndpoint="urn:journeyrecorder:applicationinsights">
<BasePolicy>
<TenantId>aadb2ctraining.onmicrosoft.com</TenantId>
<PolicyId>B2C_1A_TrustFrameworkExtensions</PolicyId>
</BasePolicy>
<RelyingParty>
<DefaultUserJourney ReferenceId="SignUpOrSignIn" />
<UserJourneyBehaviors>
<SingleSignOn Scope="Application" />
<SessionExpiryType>Rolling</SessionExpiryType>
<SessionExpiryInSeconds>86400</SessionExpiryInSeconds>
<JourneyInsights
TelemetryEngine="ApplicationInsights"
InstrumentationKey="XXXXXXXXXXXXXXXXX"
DeveloperMode="true"
ClientEnabled="false"
ServerEnabled="true" TelemetryVersion="1.0.0" />
</UserJourneyBehaviors>
<TechnicalProfile Id="PolicyProfile">
<DisplayName>PolicyProfile</DisplayName>
<Protocol Name="OpenIdConnect" />
<OutputClaims>
<OutputClaim ClaimTypeReferenceId="displayName" />
<OutputClaim ClaimTypeReferenceId="givenName" />
<OutputClaim ClaimTypeReferenceId="surname" />
<OutputClaim ClaimTypeReferenceId="email" />
<OutputClaim ClaimTypeReferenceId="objectId" PartnerClaimType="sub" />
<OutputClaim ClaimTypeReferenceId="identityProvider" />


105 © 2018 Microsoft Corporation Feedback? https://aka.ms/aad-b2c-course-feedback
Module 6 – Custom Policies 2 – REST APIs
Introduction
At the end of this module, you will be able to integrate your own REST APIs into custom policies,
to perform tasks such as validating input claims and sending back output claims. You will be
able to:
1. Create a custom policy for REST API integration
2. Modify the profile edit policy to consume data from an external API.
See it in action
See the end-user experience you are about to build.
In the demonstration site, access the Module 6 are and perform the following tasks:
1. Sign in with a previously created account.
2. When the Store membership Number field appears, enter a multiple of 5.
a. Only multiple of five will successfully validate against the API.
This module will take 60 minutes to complete.
The Azure AD B2C Identity Experience Framework (IEF) provides complete control for
configuring policies. It enables you to integrate identity providers with external REST full APIs
through user journeys. IEF sends and receives data in form of claims. You can configure a policy
to exchange claims and perform complex validation of identity information through a REST API
by adding orchestration steps inside the user journey.
By the end of this module, you will be able to create a user journey that interacts with a RESTful
service.
Prerequisites
Note that this module assumes that you have completed Module 5 and created the XML
files that define the custom policies used by the sample web application.

106 © 2018 Microsoft Corporation Feedback? https://aka.ms/aad-b2c-course-feedback
Step-by-Step Instructions
Create a custom policy for REST API integration
You will create a RESTful service that validates user input and sends an error message if the
input data is not valid. The data that the service validates is part of the identity information
provided when a user signs up to your application.
Create an API Application
1) Start Visual studio.
2) On the File menu, select New and then select Project.
3) In the New Project dialog box, expand Visual C#, select Web, and then select ASP.NET
Core Web Application.
4) Name the project StoreMembershipApi, and then select OK.
5) In the New ASP.NET Core Web Application dialog box, select Web Application
(Model View Controller), select No Authentication and then select OK.
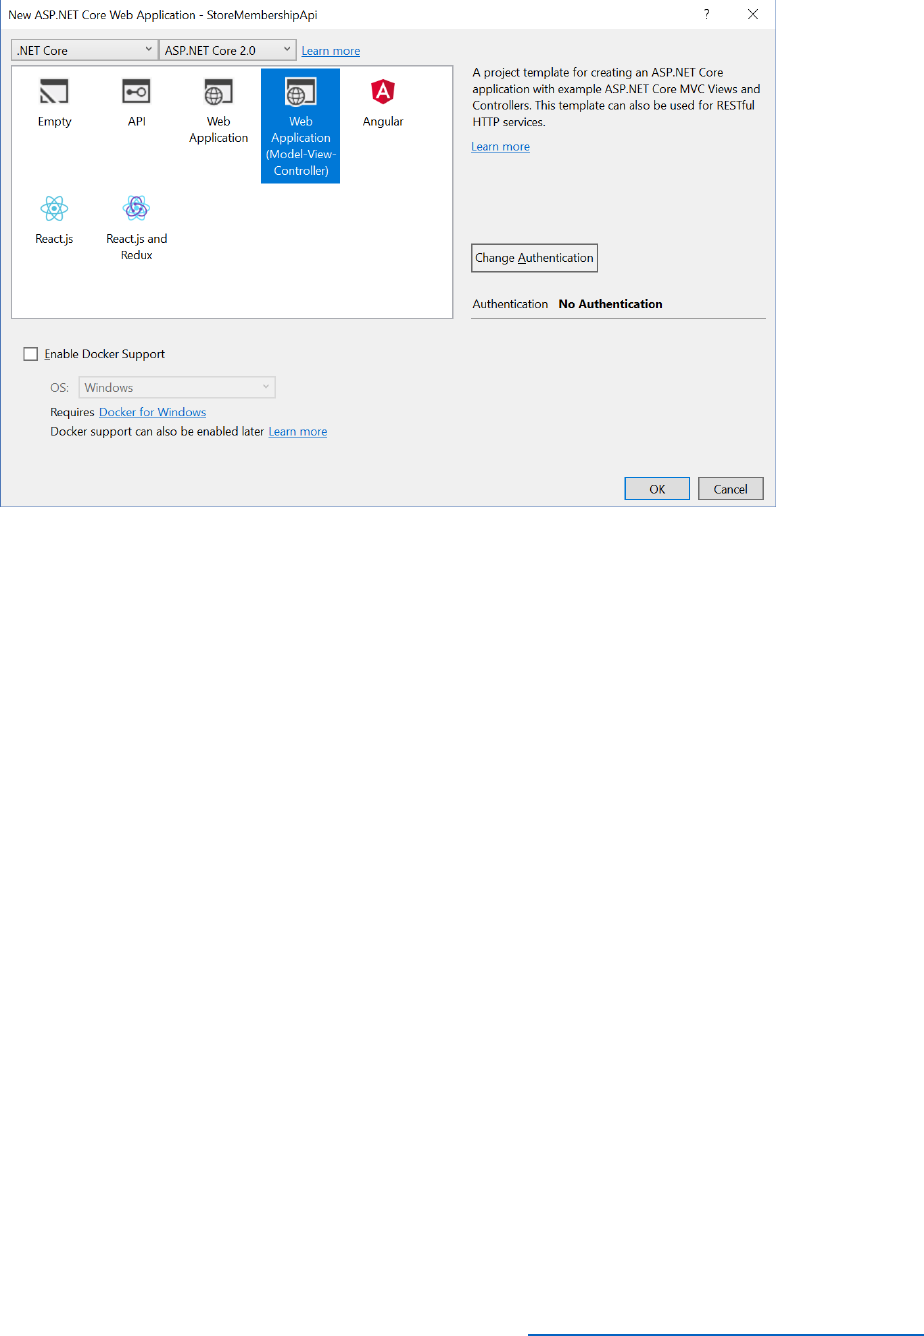
107 © 2018 Microsoft Corporation Feedback? https://aka.ms/aad-b2c-course-feedback
Add Data Models and the Controller to the API project
The user will provide a Store Membership Number at the time of registration of his account. The
RESTful service will validate this number, and if it is verified registration will be allowed to
proceed. If the number is invalid, the service will send back a validation failed error.
In this example, the validation is simple; the provided Store Membership Number must be an
integer that is divisible by 5.
1) In Solution Explorer, right-click Models, select Add, and the select Class.
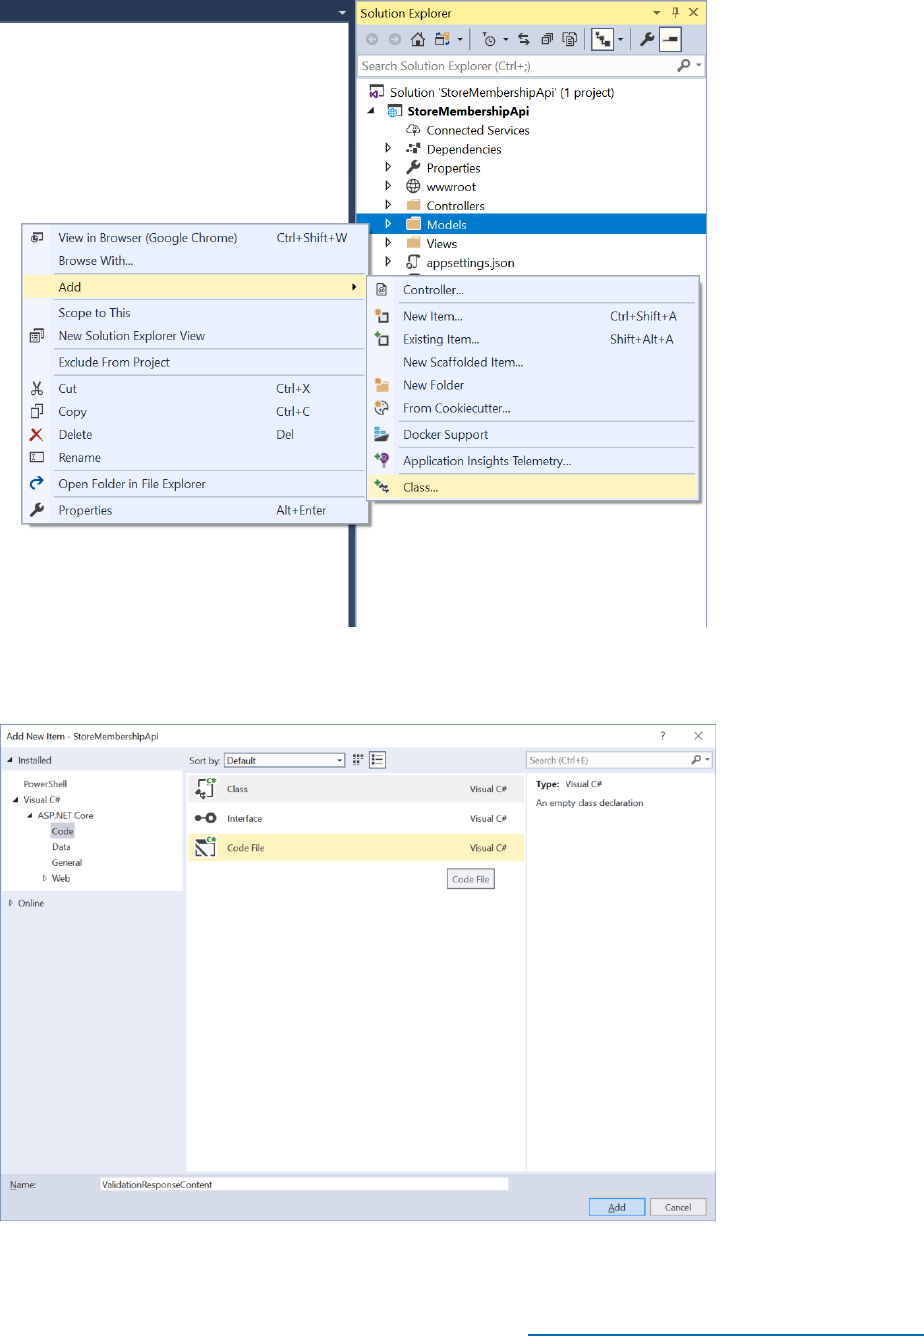

109 © 2018 Microsoft Corporation Feedback? https://aka.ms/aad-b2c-course-feedback
namespace StoreMembershipApi.Models
{
public class ValidationResponseContent : StoreResponseContent
{
public string StoreMembershipNumber { get; set; }
}
}
4) Using the same procedure, add another class to the Models folder, named
StoreResponseContent. Replace the code for the class with these statements:
using System.Net;
using System.Reflection;
namespace StoreMembershipApi.Models
{
public class StoreResponseContent
{
public string Version { get; set; }
public int Status { get; set; }
public string UserMessage { get; set; }
public StoreResponseContent()
{ }
public StoreResponseContent(string message, HttpStatusCode status)
{
this.UserMessage = message;
this.Status = (int)status;
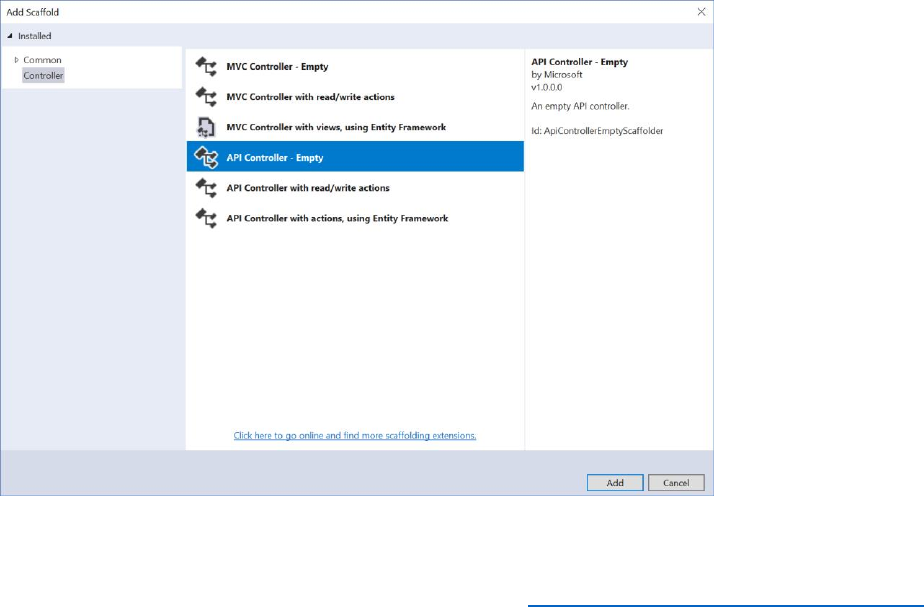
110 © 2018 Microsoft Corporation Feedback? https://aka.ms/aad-b2c-course-feedback
this.Version = Assembly.GetExecutingAssembly().GetName().Version.ToString();
}
}
}
5) Add a further class to the Models folder, named MembershipRequest. Replace the
code generated for this class with the following statements:
namespace StoreMembershipApi.Models
{
public class MembershipRequest
{
public int StoreMembershipNumber { get; set; }
}
}
6) In Solution Explorer, right-click the Controllers folder, select Add, and then select
Controller.
7) In the Add Scaffold dialog box, select API Controller -Empty, and then select Add.
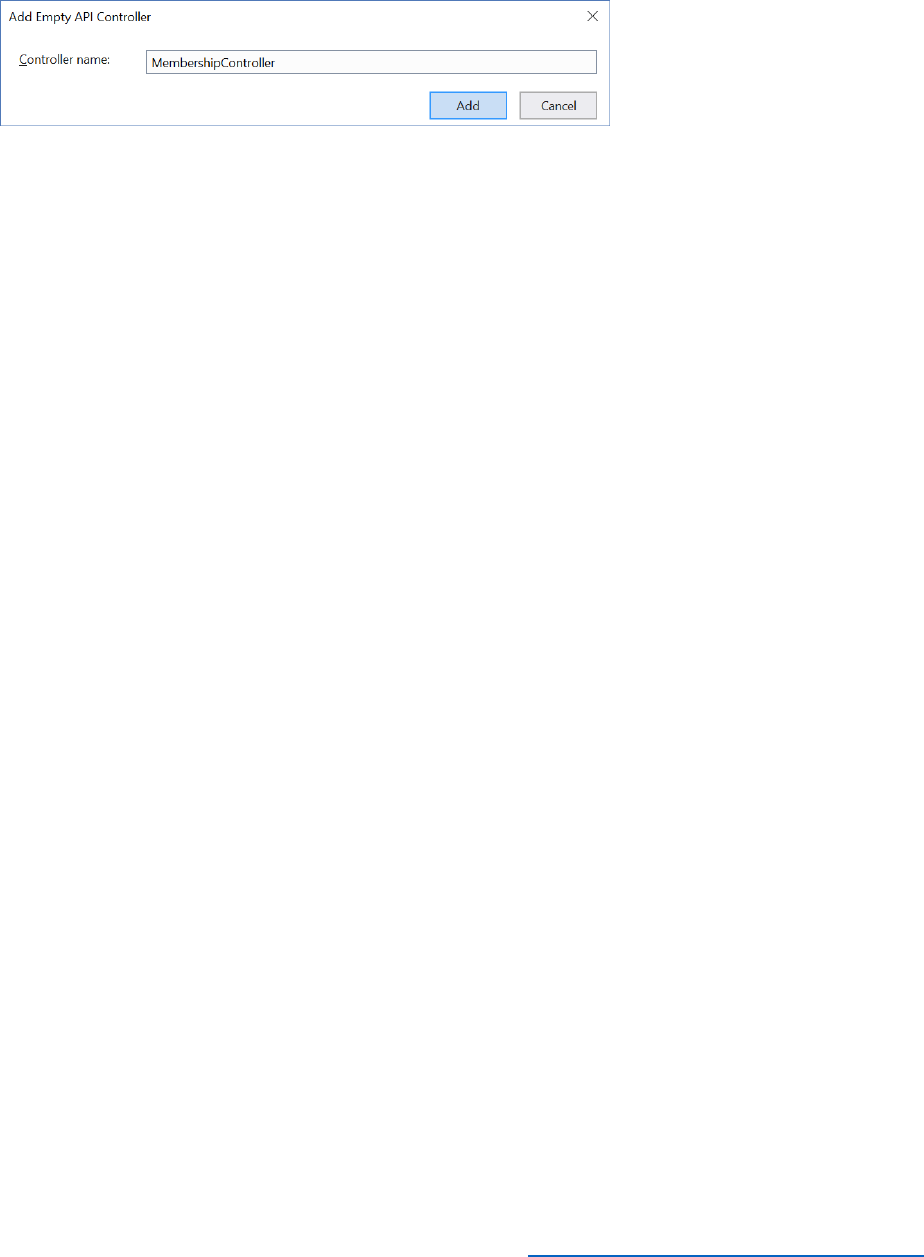
111 © 2018 Microsoft Corporation Feedback? https://aka.ms/aad-b2c-course-feedback
8) In the Add Controller dialog box, name the controller MembershipController, and then
select Add.
9) Replace the code generated for the controller with the following.
using System;
using System.Net;
using Microsoft.AspNetCore.Authorization;
using Microsoft.AspNetCore.Mvc;
using StoreMembershipApi.Models;
namespace StoreMembershipApi.Controllers
{
/// <summary>
/// This controller is responsible for responding to requests from our custom policies
/// to validate store membership numbers and retrieve customer membership dates.
/// </summary>
[Route("api/[controller]")]
public class MembershipController : Controller
{
/// <summary>
/// This method receives a storeMembershipnumber from the policy validation
step and returns a 409 Conflict
/// response if the store membership number is not valid (not a multiple of 5),
and a 200 Ok response on
/// successful validation of the store membership number.

112 © 2018 Microsoft Corporation Feedback? https://aka.ms/aad-b2c-course-feedback
/// </summary>
/// <param name="request">Passed from the policy validation step, contains a
storeMembershipNumber.</param>
/// <returns>HTTP 200 Ok on success. HTTP 409 Conflict if provided an invalid
store membership number.</returns>
[HttpPost("validate")]
public IActionResult ValidateMembershipNumber([FromBody]
MembershipRequest request)
{
if (!IsStoreMembershipNumberValid(request.StoreMembershipNumber))
{
return GenerateErrorMessageWithMessage("Store membership
number is not valid, it must be a multiple of 5!");
}
// Return the output claim(s)
return Ok(new ValidationResponseContent
{
StoreMembershipNumber =
request.StoreMembershipNumber.ToString()
});
}
/// <summary>
/// Constructs an HTTP 409 Conflict IActionResult to return back to the validation
or orchestration step.
/// This is used to communicate with the policy steps to communicate an error
state.

113 © 2018 Microsoft Corporation Feedback? https://aka.ms/aad-b2c-course-feedback
/// </summary>
/// <param name="message">The message to be passed back to the user to
explain why the request failed.</param>
/// <returns>An IActionResult representing an HTTP 409 Conflict with a custom
payload.</returns>
private IActionResult GenerateErrorMessageWithMessage(string message)
{
return StatusCode((int)HttpStatusCode.Conflict, new
StoreResponseContent
{
Version = "1.0.0",
Status = (int) HttpStatusCode.Conflict,
UserMessage = message
});
}
/// <summary>
/// Validates a provided store membership number by using the modulus
operator (see more <see href="https://docs.microsoft.com/en-us/dotnet/csharp/language-
reference/operators/remainder-operator">here</see>)
/// to determine if the provided store membership number is a multiple of 5. If it
is, we return true, if not, we return false.
/// </summary>
/// <param name="storeMembershipNumber">The store membership number
to be validated.</param>
/// <returns>True on successful validation, false if validation fails.</returns>
private bool IsStoreMembershipNumberValid(int storeMembershipNumber)
{

114 © 2018 Microsoft Corporation Feedback? https://aka.ms/aad-b2c-course-feedback
if (storeMembershipNumber % 5 != 0)
{
return false;
}
return true;
}
}
}
10) On the Build menu, select Rebuild Solution, and verify that the solution builds without
any errors.
Publish the Project as an Azure Website
1) In Solution Explorer, right-click the StoreMembershipApi project node, and then select
Publish.
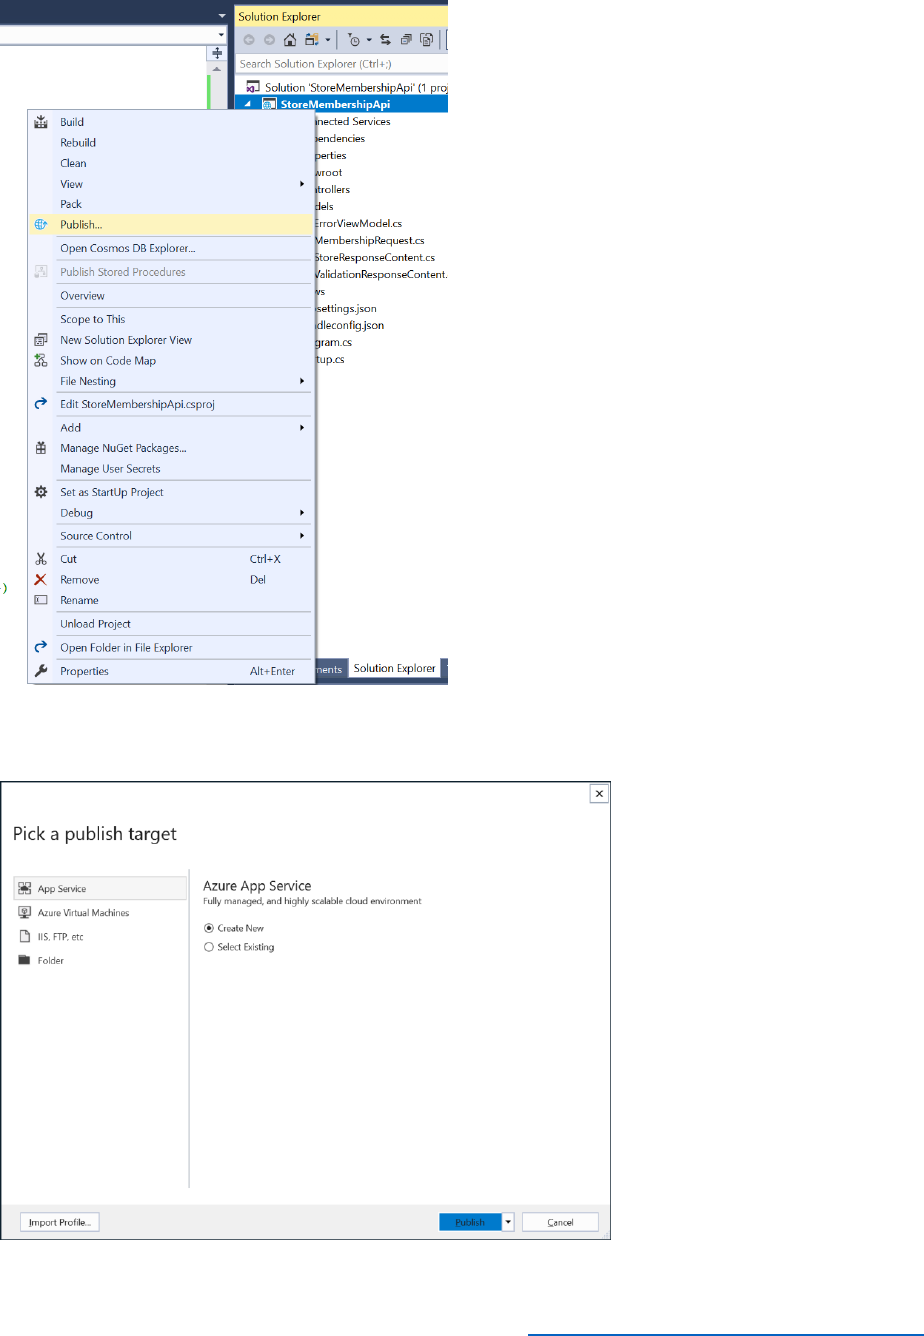
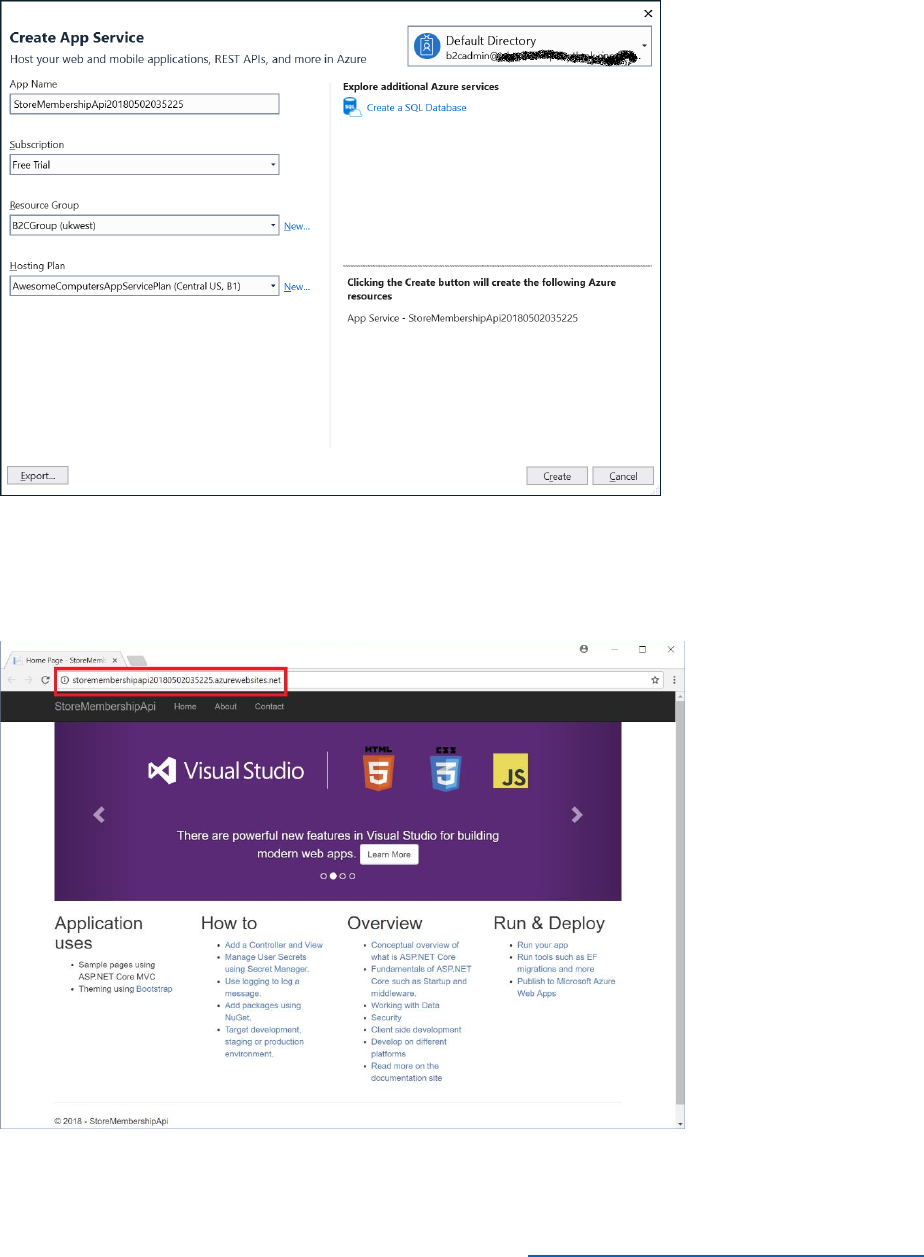
116 © 2018 Microsoft Corporation Feedback? https://aka.ms/aad-b2c-course-feedback
3) In the Create App Service dialog box, login to Azure as B2CAdmin in your Azure
domain, specify a unique App Name, select a resource group, and then select Create.
4) Wait while the service is published. The site will launch in the browser when publishing is
complete.
5) Record the URL of your service in the browser address bar.
Update Custom Policies

117 © 2018 Microsoft Corporation Feedback? https://aka.ms/aad-b2c-course-feedback
1) In Visual Studio and open the TrustFrameworkExtensions.xml policy file that you
created in Module 5.
2) In the <BuildingBlocks> node add the following <ClaimsSchema> element.
<ClaimsSchema>
<ClaimType Id="extension_storeMembershipNumber">
<DisplayName>Store Membership Number</DisplayName>
<DataType>string</DataType>
<UserHelpText>Your store membership number</UserHelpText>
<UserInputType>TextBox</UserInputType>
</ClaimType>
</ClaimsSchema>
3) In the <ClaimsProviders> node, add the following <ClaimsProvider> element. Replace
the address highlighted in bold with the URL of your REST web service.
<ClaimsProvider>
<DisplayName>REST APIs</DisplayName>
<TechnicalProfiles>
<TechnicalProfile Id="ValidateStoreMembershipNumber">
<DisplayName>Validate Store Membership Number</DisplayName>
<Protocol Name="Proprietary" Handler="Web.TPEngine.Providers.RestfulProvider,
Web.TPEngine, Version=1.0.0.0, Culture=neutral, PublicKeyToken=null" />
<Metadata>
<Item
Key="ServiceUrl">https://yourwebservice.azurewebsites.net/api/membership/validate</Item
>
<Item Key="AuthenticationType">None</Item>
<Item Key="SendClaimsIn">Body</Item>
</Metadata>
<InputClaims>
<InputClaim ClaimTypeReferenceId="extension_storeMembershipNumber"
PartnerClaimType="storeMembershipNumber" />
</InputClaims>
<UseTechnicalProfileForSessionManagement ReferenceId="SM-Noop" />
</TechnicalProfile>
<TechnicalProfile Id="LocalAccountSignUpWithLogonEmail">
<OutputClaims>
<OutputClaim ClaimTypeReferenceId="extension_storeMembershipNumber"
PartnerClaimType="storeMembershipNumber" />
</OutputClaims>
<ValidationTechnicalProfiles>
<ValidationTechnicalProfile ReferenceId="ValidateStoreMembershipNumber" />

118 © 2018 Microsoft Corporation Feedback? https://aka.ms/aad-b2c-course-feedback
</ValidationTechnicalProfiles>
</TechnicalProfile>
</TechnicalProfiles>
</ClaimsProvider>
4) Save the file.
5) Using the Identity Experience Framework in the Azure portal, upload the
TrustFrameworkExtensions.xml file, and overwrite the existing policy.
6) In Visual Studio, open the SignUpOrSignIn.xml file in your working directory.
7) Find the element <TechnicalProfile Id="PolicyProfile">, and in the <OutputClaims> node
add the following XML markup:
<OutputClaim ClaimTypeReferenceId="extension_storeMembershipNumber" />
8) Save the file.
9) Using the Identity Experience Framework in the Azure portal, upload the
SignUpOrSignIn.xml file, and overwrite the existing policy.
Test the Custom Policy
1) In the Azure portal, select Azure Active Directory, and then select Users.
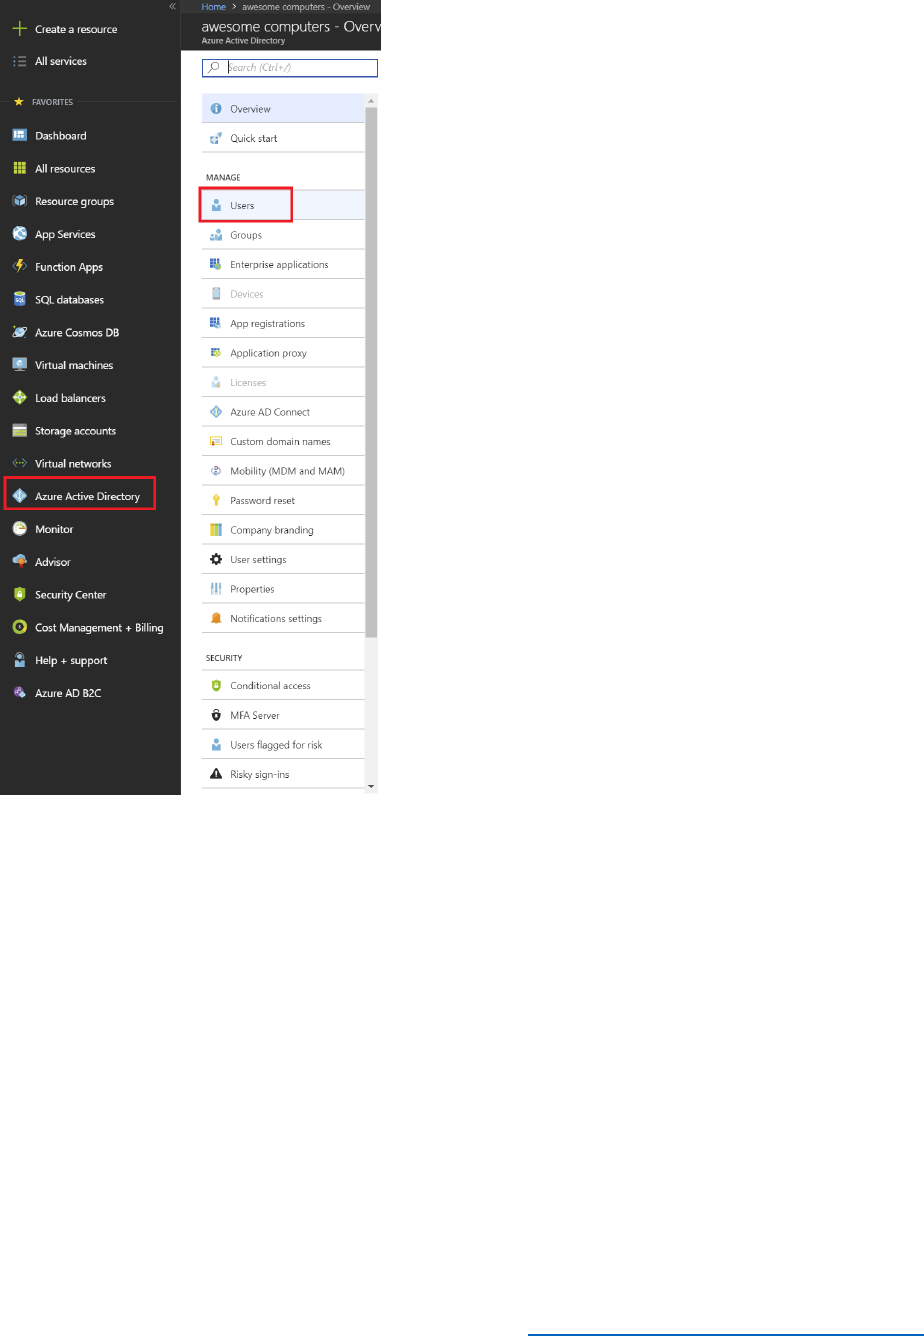
119 © 2018 Microsoft Corporation Feedback? https://aka.ms/aad-b2c-course-feedback
2) Select the user you created in module 5, and then select Delete user. Select Yes to
confirm the deletion.
Note: The purpose of these two steps was to enable you to reuse the same user account in the
following test.
3) In the Azure portal, return to the Azure AD B2C blade, and then select All policies.
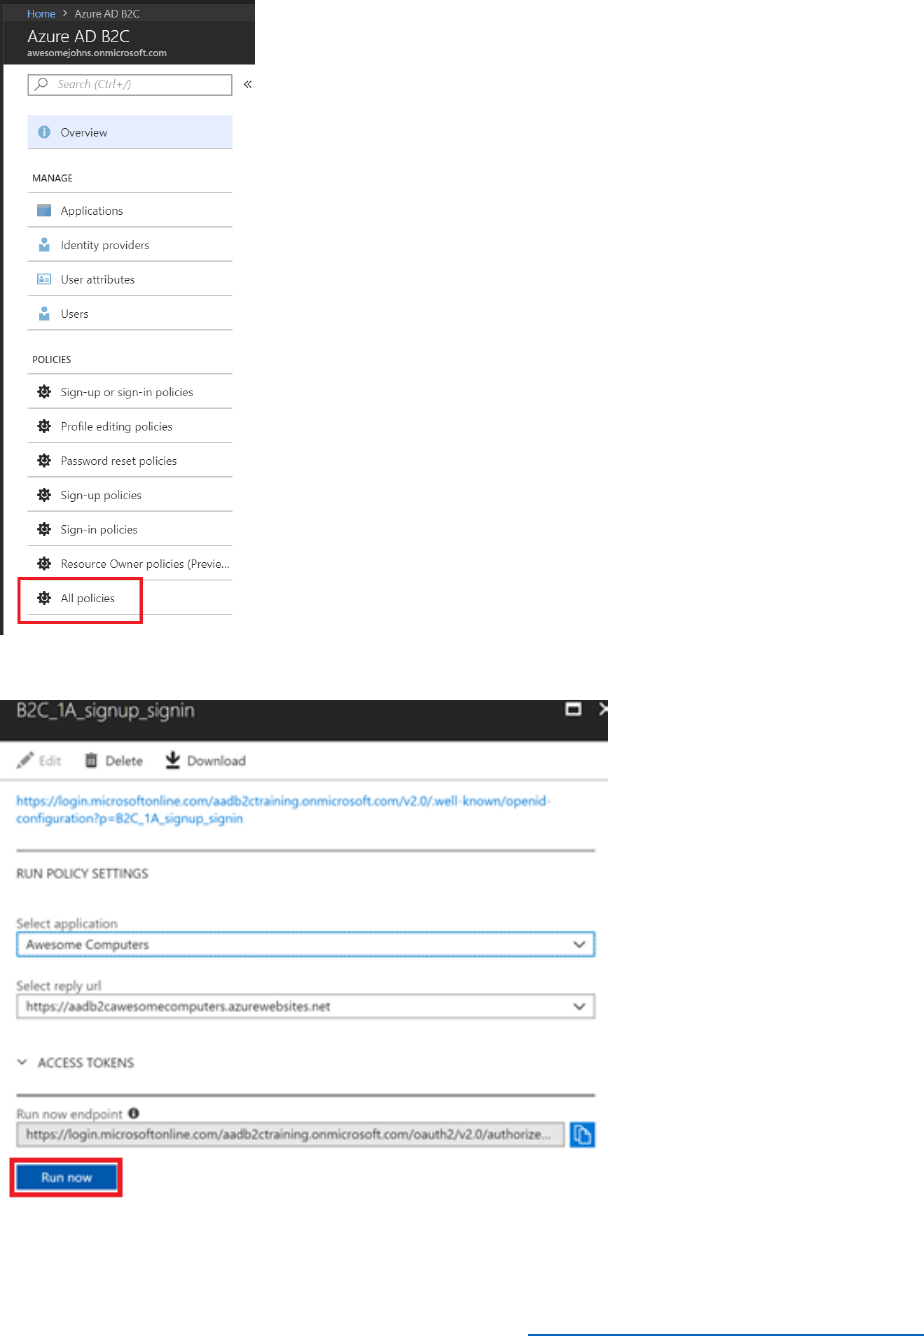
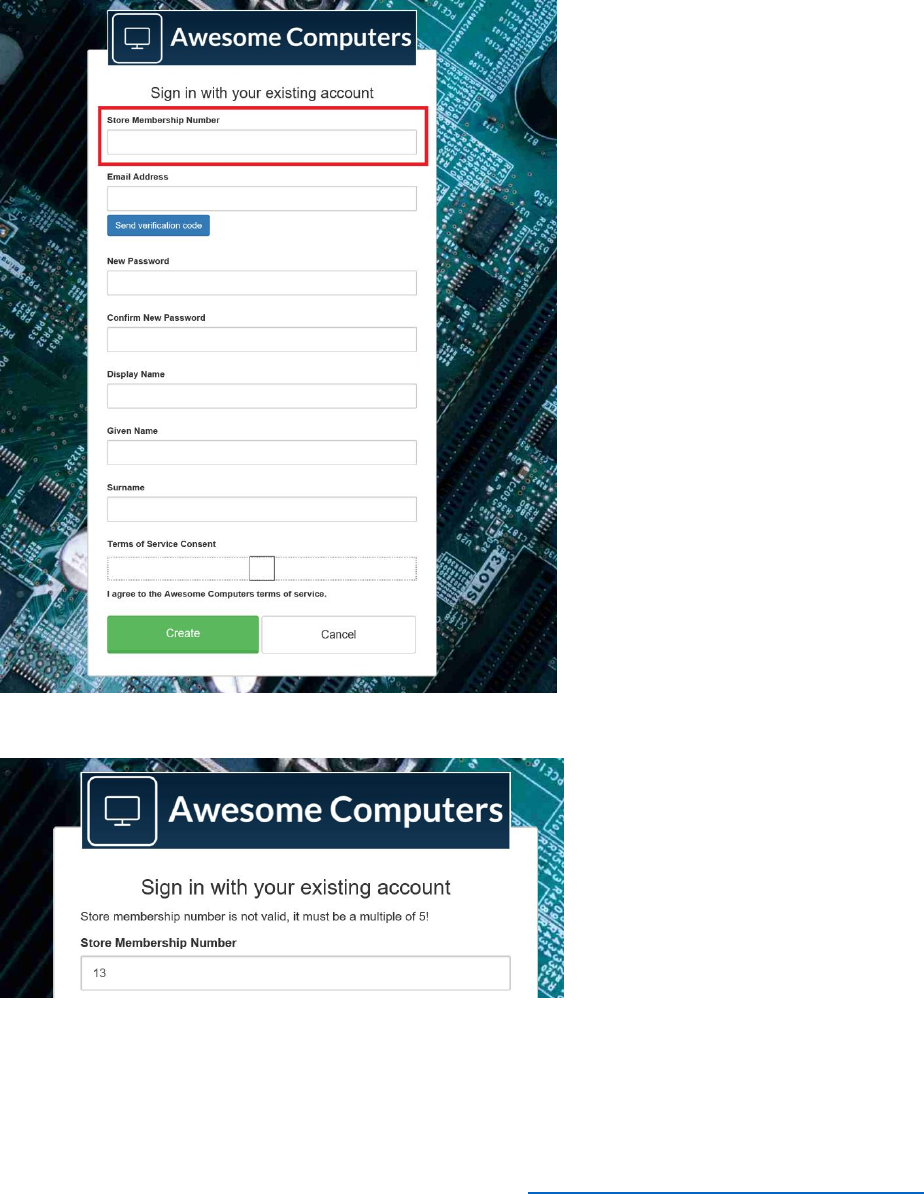
121 © 2018 Microsoft Corporation Feedback? https://aka.ms/aad-b2c-course-feedback
5) Select Run now.
6) On the sign in page, select Sign up now.
7) On the sign up page, verify that the prompt Store Membership Number appears.
8) Attempt to sign up with a store membership number that is not a multiple of 5.
9) Verify that if you specify a multiple of 5 for the store membership number then sign up is
successful. You can check this as follows:
a. When the Awesome Computers page appears, select View Token Contents.
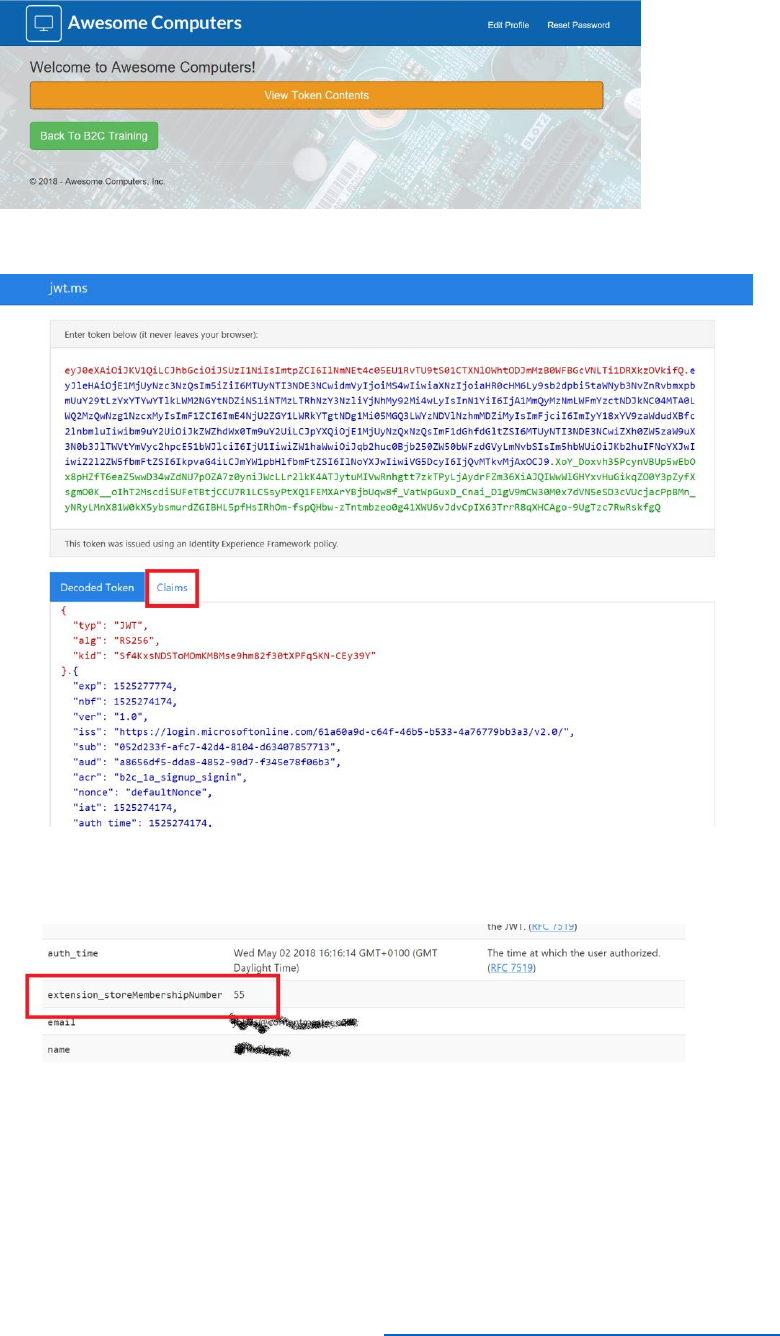
122 © 2018 Microsoft Corporation Feedback? https://aka.ms/aad-b2c-course-feedback
b. In the jwt.ms page, select the Claims tab.
c. Scroll through the list of claims, you should see a claim with type
extension_storeMembershipNumber that has the value that you specified.
Modify the Profile Edit Policy to Return the User Store Membership Date
In this task, you will add an additional step to the RESTful service. This step will read the input
user claims and return the Store Membership Date.
Modify the API Project
1) Return to the StoreMembershipApi project in Visual Studio.

123 © 2018 Microsoft Corporation Feedback? https://aka.ms/aad-b2c-course-feedback
2) In Solution Explorer, right-click Models, select Add, and then select Class.
3) In the Add New Item dialog box, select Visual C#, and then select Class. Specify the
name MembershipDateResponseContent and then select Add.
4) Replace the code in the MembershipDateResponseContent.cs file with the following
code:
namespace StoreMembershipApi.Models
{
public class MembershipDateResponseContent : StoreResponseContent
{
public string StoreMembershipDate { get; set; }
}
}
5) In Solution Explorer, expand the Controllers folder, and select the
MembershipController.cs file.
6) Add the following methods to the MembershipController class.
/// <summary>
/// This method receives a storeMembershipnumber from the policy orchestration step and
returns a 409 Conflict
/// response if the store membership number is not valid (not a multiple of 5), and a 200 Ok
response containing
/// the member's membership date if the store membership number is valid.
/// </summary>
/// <param name="request">Passed from the policy orchestration step, contains a
storeMembershipNumber.</param>
/// <returns>HTTP 200 Ok on success with an obtained membership date. HTTP 409 Conflict if
provided an invalid store membership number.</returns>
[HttpPost("membershipdate")]
public IActionResult GetMembershipDate([FromBody] MembershipRequest request)
{

124 © 2018 Microsoft Corporation Feedback? https://aka.ms/aad-b2c-course-feedback
if (!IsStoreMembershipNumberValid(request.StoreMembershipNumber))
{
return GenerateErrorMessageWithMessage("Store membership number is not valid, it must
be a multiple of 5!");
}
var membershipDate = ObtainStoreMembershipDate();
return Ok(new MembershipDateResponseContent
{
Version = "1.0.0",
Status = (int)HttpStatusCode.OK,
UserMessage = "Membership date located successfully.",
StoreMembershipDate = membershipDate.ToString("d")
});
}
/// <summary>
/// Generates a date within the last 90 days to return as the store membership number for a
member.
/// In a production application you'd likely contact a database here to get a real membership
date for a member.
/// </summary>
/// <returns>A DateTime representing the store membership date for a member.</returns>
private static DateTime ObtainStoreMembershipDate()
{
var random = new Random();
var daysOffOfToday = random.Next(0, 90);
var randomDate = DateTime.Now.AddDays(-daysOffOfToday);

125 © 2018 Microsoft Corporation Feedback? https://aka.ms/aad-b2c-course-feedback
return randomDate;
}
7) Save the file
8) On the Build menu, select Rebuild Solution. Verify that the solution compiles without
any errors.
9) In Solution Explorer, right-click the StoremembershipApi project, and then select
Publish.
10) In the Publish window, select Publish. Wait for the updated service to be deployed.
Update Custom Policies
1) Using Visual Studio, open the TrustFrameworkExtensions.xml policy file.
2) In the <BuildingBlocks> node, insert the following <ClaimType> to the collection in the
<ClaimsSchema> node.
<ClaimType Id="extension_storeMembershipDate">
<DisplayName>Store Membership Date</DisplayName>
<DataType>string</DataType>
<UserHelpText>Your store membership date</UserHelpText>
<UserInputType>TextBox</UserInputType>
</ClaimType>
3) In the <ClaimsProviders> node, find the <ClaimsProvider> node that contains the
<DisplayName>REST APIs</DisplayName> element. Add the following
<TechnicalProfile> node to this ClaimsProvider. Replace the address highlighted in bold
with the URL of your REST web service.
<!-- Obtain claim technical profile -->
<TechnicalProfile Id="ObtainStoreMembershipDate">
<DisplayName>Obtain Store Membership Date</DisplayName>
<Protocol Name="Proprietary" Handler="Web.TPEngine.Providers.RestfulProvider,
Web.TPEngine, Version=1.0.0.0, Culture=neutral, PublicKeyToken=null" />
<Metadata>
<Item Key="ServiceUrl">
https://yourwebservice.azurewebsites.net/api/membership/membershipdate</Item>
<Item Key="AuthenticationType">None</Item>
<Item Key="SendClaimsIn">Body</Item>
</Metadata>
<InputClaims>

126 © 2018 Microsoft Corporation Feedback? https://aka.ms/aad-b2c-course-feedback
<InputClaim ClaimTypeReferenceId="extension_storeMembershipNumber"
PartnerClaimType="storeMembershipNumber" />
</InputClaims>
<OutputClaims>
<OutputClaim ClaimTypeReferenceId="extension_storeMembershipDate"
PartnerClaimType="storeMembershipDate" />
</OutputClaims>
<UseTechnicalProfileForSessionManagement ReferenceId="SM-Noop" />
</TechnicalProfile>
4) Uncomment the <UserJourneys> node at the end of the file, and add the following
<UserJourney> element to this node.
<UserJourney Id="ProfileEditObtainApiClaim">
<OrchestrationSteps>
<OrchestrationStep Order="1" Type="ClaimsProviderSelection"
ContentDefinitionReferenceId="api.idpselections">
<ClaimsProviderSelections>
<ClaimsProviderSelection TargetClaimsExchangeId="LocalAccountSigninEmailExchange" />
</ClaimsProviderSelections>
</OrchestrationStep>
<OrchestrationStep Order="2" Type="ClaimsExchange">
<ClaimsExchanges>
<ClaimsExchange Id="LocalAccountSigninEmailExchange"
TechnicalProfileReferenceId="SelfAsserted-LocalAccountSignin-Email" />
</ClaimsExchanges>
</OrchestrationStep>
<OrchestrationStep Order="3" Type="ClaimsExchange">
<Preconditions>
<Precondition Type="ClaimEquals" ExecuteActionsIf="true">
<Value>authenticationSource</Value>
<Value>socialIdpAuthentication</Value>
<Action>SkipThisOrchestrationStep</Action>
</Precondition>
</Preconditions>
<ClaimsExchanges>
<ClaimsExchange Id="AADUserReadWithObjectId" TechnicalProfileReferenceId="AAD-
UserReadUsingObjectId" />
</ClaimsExchanges>
</OrchestrationStep>
<OrchestrationStep Order="4" Type="ClaimsExchange">
<ClaimsExchanges>

127 © 2018 Microsoft Corporation Feedback? https://aka.ms/aad-b2c-course-feedback
<ClaimsExchange Id="B2CUserProfileUpdateExchange"
TechnicalProfileReferenceId="SelfAsserted-ProfileUpdate" />
</ClaimsExchanges>
</OrchestrationStep>
<OrchestrationStep Order="5" Type="ClaimsExchange">
<ClaimsExchanges>
<ClaimsExchange Id="GetStoreMembershipDateData"
TechnicalProfileReferenceId="ObtainStoreMembershipDate" />
</ClaimsExchanges>
</OrchestrationStep>
<OrchestrationStep Order="6" Type="SendClaims"
CpimIssuerTechnicalProfileReferenceId="JwtIssuer" />
</OrchestrationSteps>
<ClientDefinition ReferenceId="DefaultWeb" />
</UserJourney>
5) Save the XML file.
6) Using the Identity Experience Framework in the Azure portal, upload the
TrustFrameworkExtensions.xml file, and overwrite the existing policy.
7) Using Visual Studio, open the ProfileEdit.xml file.
8) Under the <RelyingParty>, node replace the <DefaultUserJourney> node with the
following XML element.
<DefaultUserJourney ReferenceId="ProfileEditObtainApiClaim" />
9) Under the <TechnicalProfile Id="PolicyProfile">node, add the following XML markup
below the <OutputClaims> node.
<OutputClaim ClaimTypeReferenceId="extension_storeMembershipDate" />
10) Save the XML file.
11) Using the Identity Experience Framework in the Azure portal, upload the B2C_1A_
ProfileEdit.xml file, and overwrite the existing policy.
Test the Custom Policy
1) In the Azure portal, use the Azure Active Directory blade to delete the user you created
in the previous test.
2) Return to the Azure AD B2C blade, and then select All policies.
3) Select the B2C_1A_signup_signin policy, and then select Run now.
4) On the sign in page, select Sign up now.
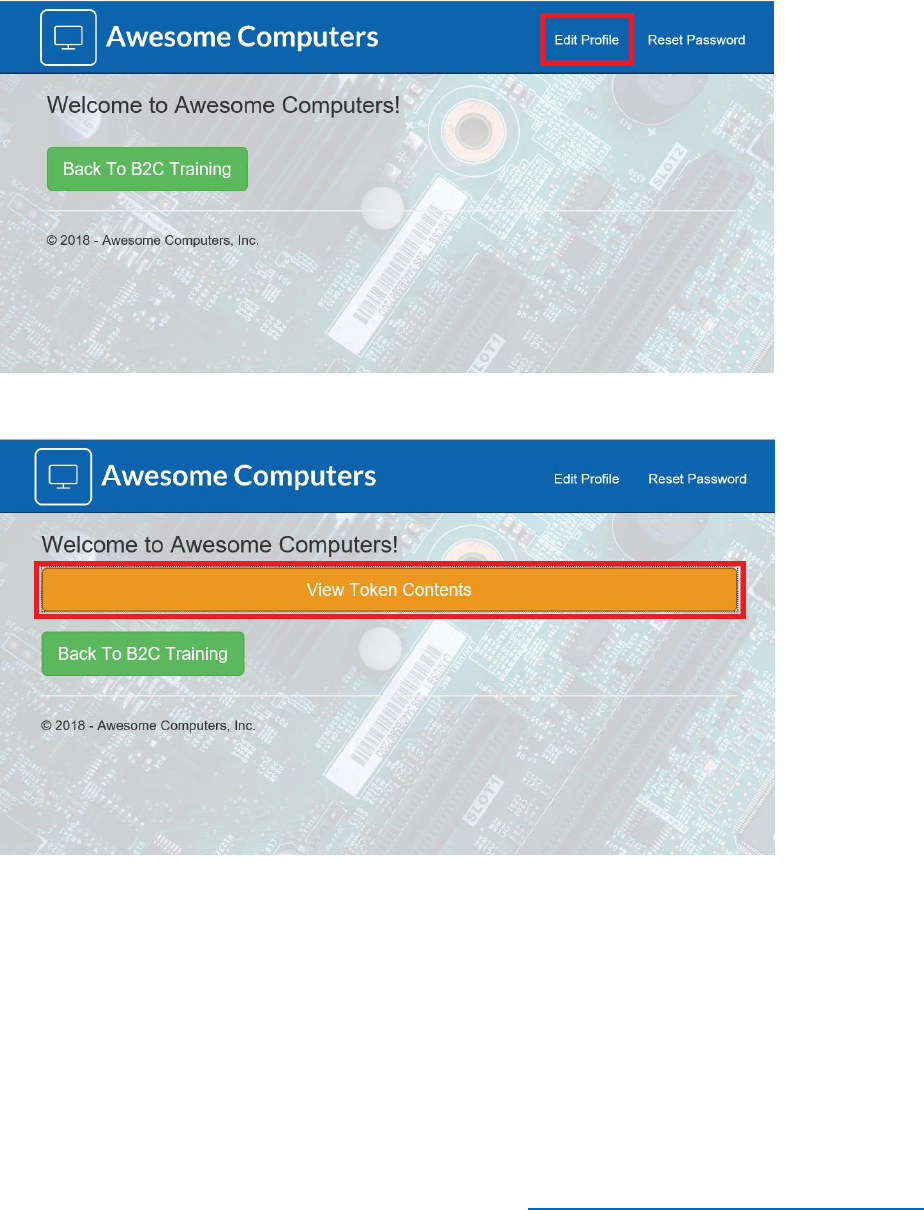
128 © 2018 Microsoft Corporation Feedback? https://aka.ms/aad-b2c-course-feedback
5) On the sign up page, sign up again, using the same account as before.
6) When sign up is complete, edit your profile by selecting Edit Profile in the demo web
app.
7) After updating your profile, select View Token Contents.
8) Select Claims. You should see the storeMembershipDate claim in the claims list sent
back from Azure AD B2C.
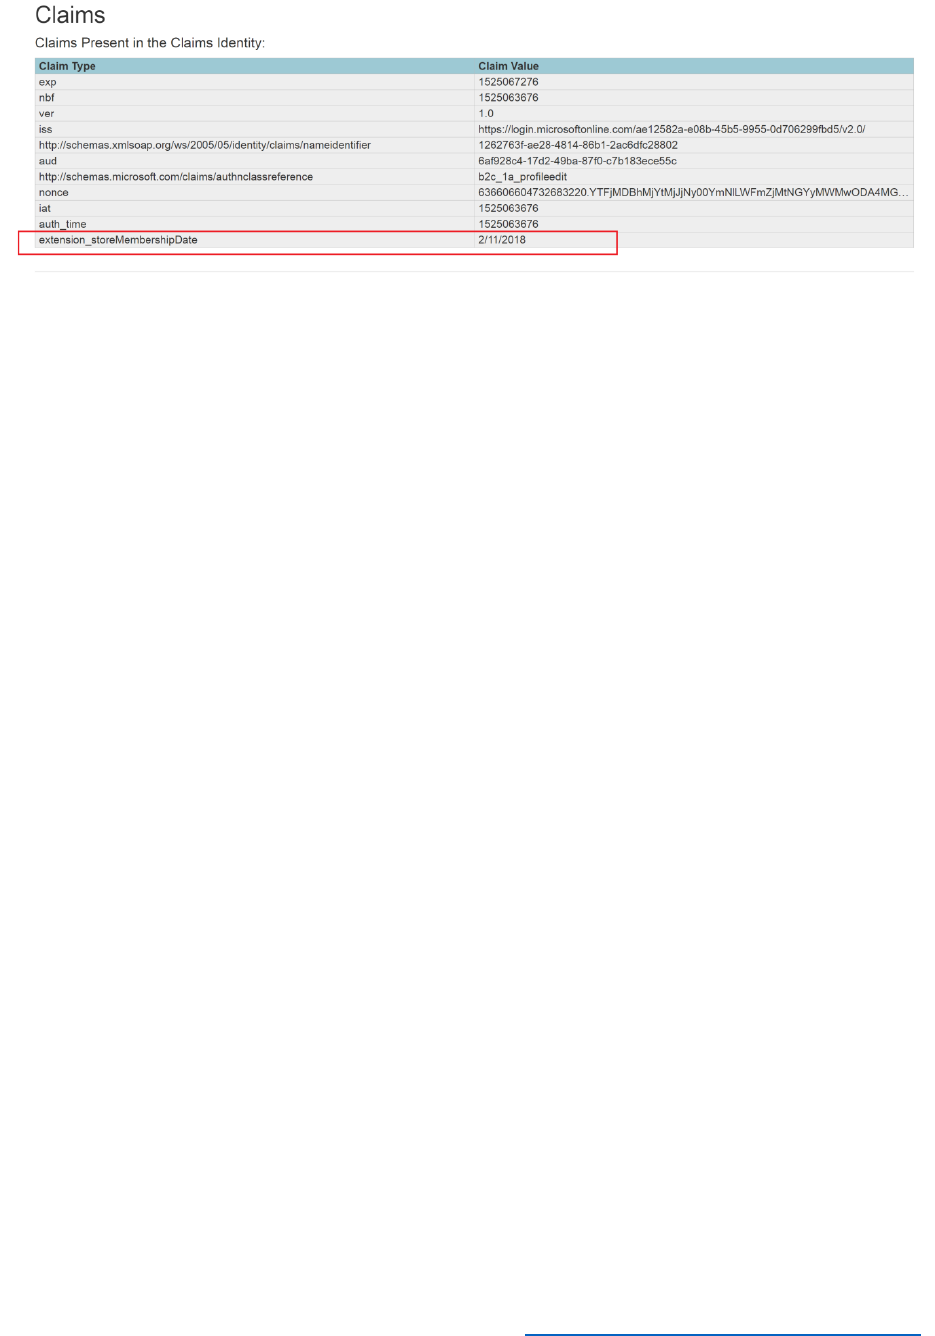

130 © 2018 Microsoft Corporation Feedback? https://aka.ms/aad-b2c-course-feedback
Module 7—External IDPs, OIDC and SAML
Introduction
At the end of this module, you will be able to:
• Add OIDC IDP (Google) in Azure AD B2C using Custom Policies
• Integrate a SAML IDP and map claims (Salesforce) using Custom Policies
This module should take approximately 75 minutes to complete.
User management and configuring authentication can be a time-consuming process. It can also
be error prone if the authentication and identity requirements are complex, leading to possible
issues with security. To reduce costs, it is sometimes worthwhile to consider using third party
identity providers to manage and authenticate users, although integration multiple IdPs into a
solution can also be a challenge. Using Azure AD B2C simplifies many of these tasks. This
module shows two examples for configuring popular third-party external IdPs.
Note that this module assumes that you have completed Module 6 and created the XML
files that define the custom policies used by the sample web application.
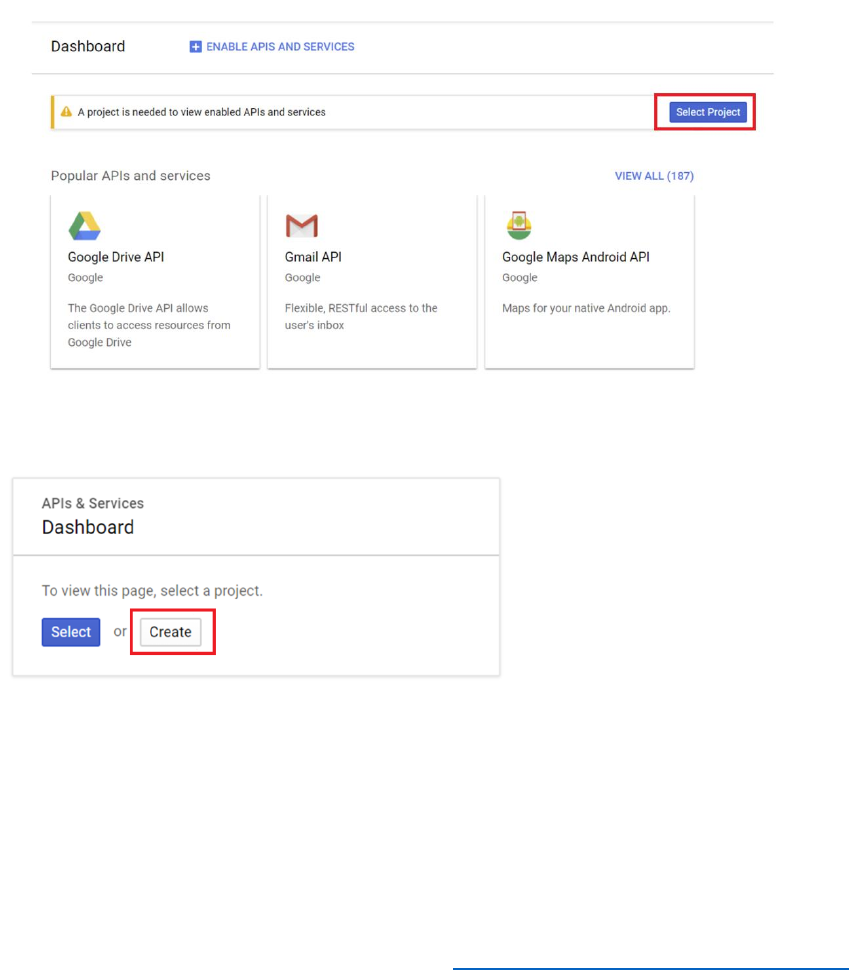
131 © 2018 Microsoft Corporation Feedback? https://aka.ms/aad-b2c-course-feedback
Integrate an OIDC IDP and Map Claims
As an example of using an OIDC IDP, the following procedure describes how to integrate
Google as an IDP in Azure Identity Framework Experience.
Create a Google+ Application
Note: This procedure is only necessary if you don't already have a Google app available. It
assumes that you have a Google+ account. If you need to create a Google+ account, click here.
1) Sign in to your Google+ account
2) Open the Google Developer Console
3) Select Select project.
4) Select Create.
5) Enter a project name of DemoB2CGooglePlus, and then click Create.
6) When the project has been created, select the DemoB2CGooglePlus project from
project menu.
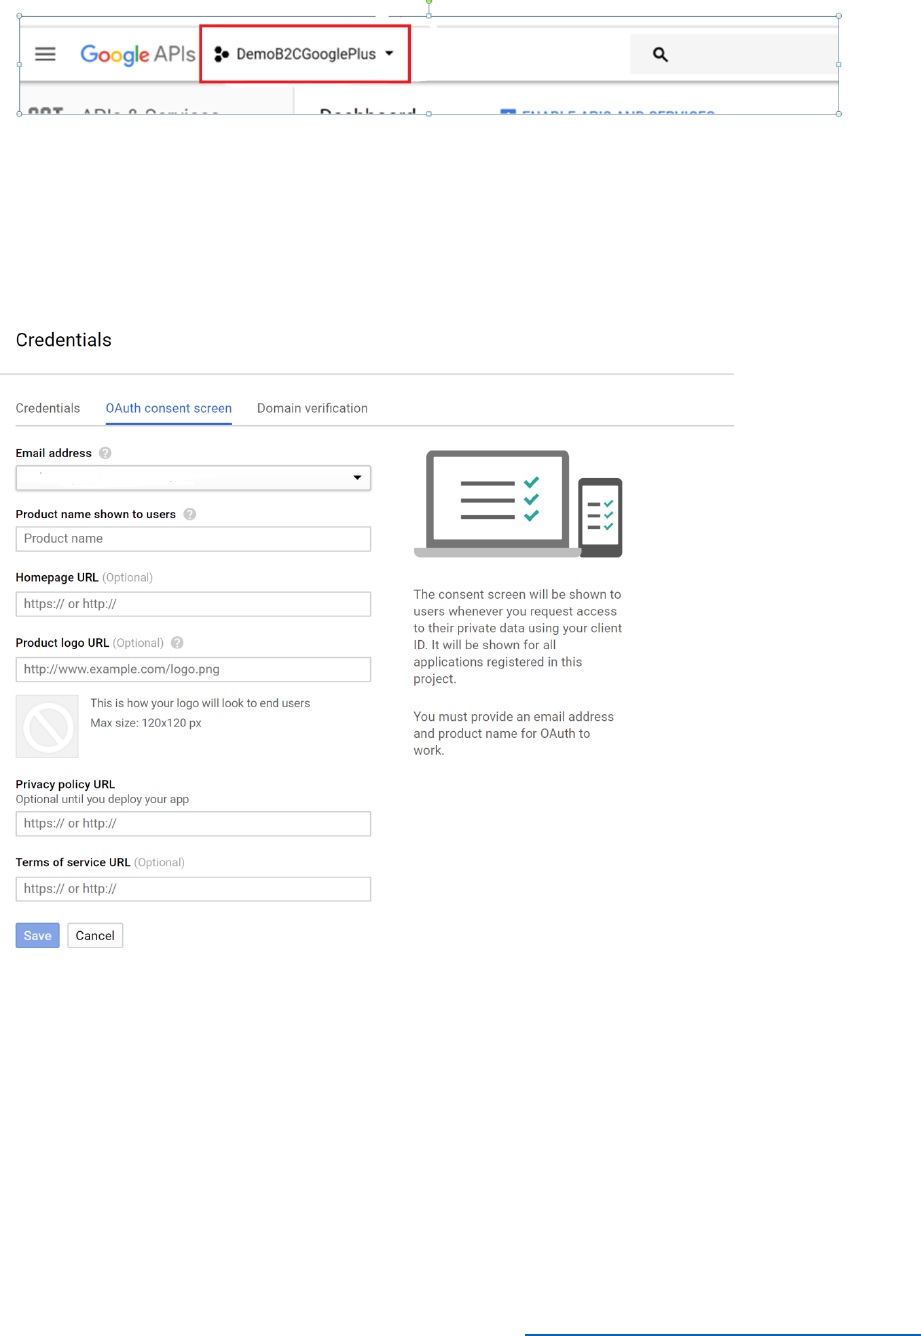
132 © 2018 Microsoft Corporation Feedback? https://aka.ms/aad-b2c-course-feedback
7) In the left-hand menu, select Credentials.
8) Select OAuth Consent Screen.
9) Provide your email address, enter a product name, and then select Save.
10) After the project has been saved, select Create Credentials, and then select OAuth
Client ID.
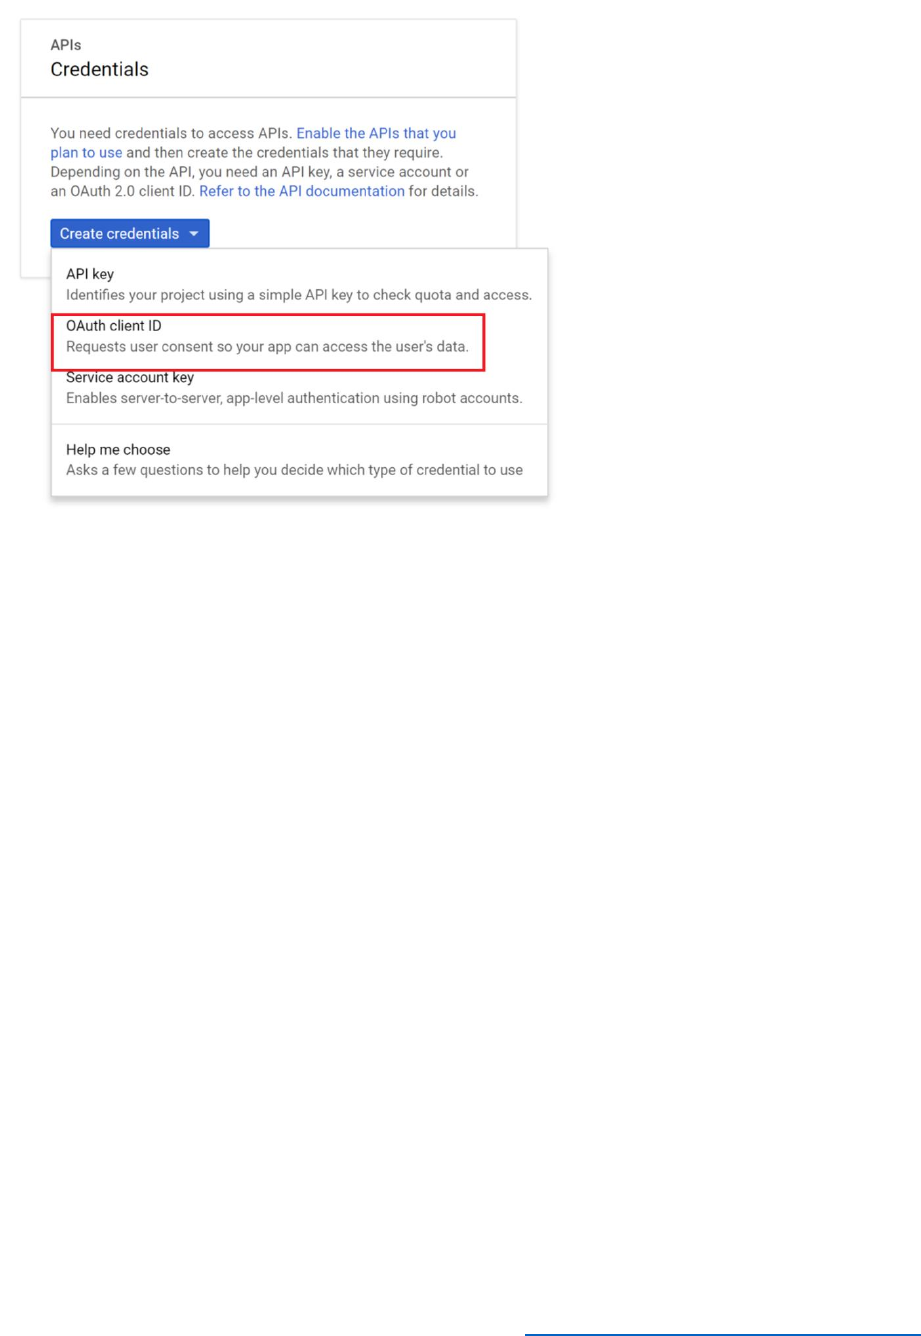
133 © 2018 Microsoft Corporation Feedback? https://aka.ms/aad-b2c-course-feedback
11) In the list of options, select Web Application.
12) Set the name to Azure Demo B2C Client, set the Authorised JavaScript Origins to
https://login.microsoftonline.com, enter
https://login.microsoftonline.com/te/AwesomeYourLastname.onmicrosoft.com/oa
uth2/authresp in the Authorized Redirect URIs field (where AwesomeYourLastname
is the name of your B2C tenant), and then select Create.
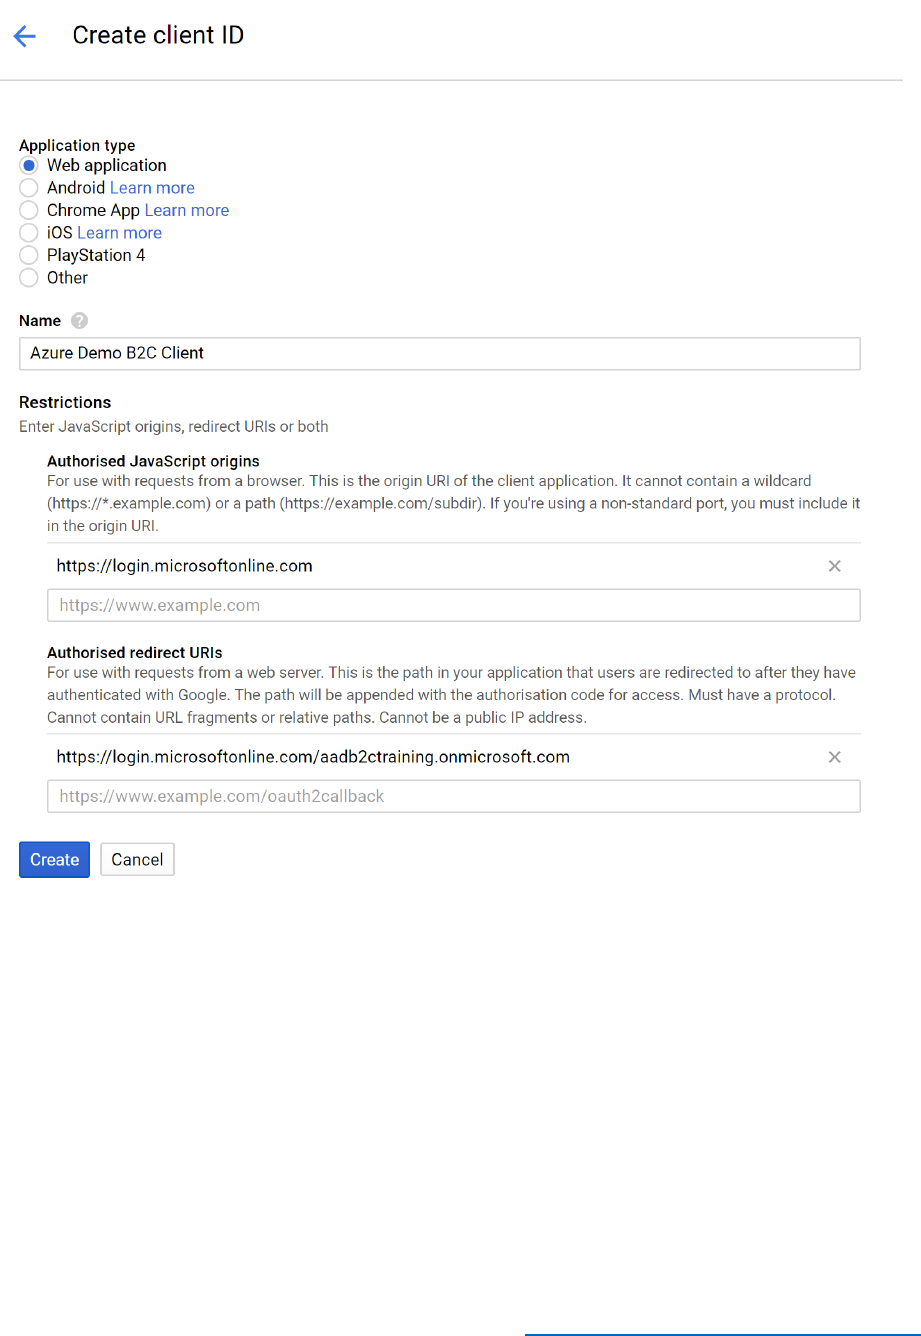
134 © 2018 Microsoft Corporation Feedback? https://aka.ms/aad-b2c-course-feedback
13) Record the client ID and client secret; you will need them later.
Setup Google+ Application Key and Secret in Azure AD B2C
1) Log in to the Azure portal as B2CAdmin in your Azure tenant, and then switch to the
AwesomeYourLastname.onmicrosoft.com B2C tenant.
2) Select All services, type Azure AD BC in the search field, and then select Azure AD B2C.
3) Select Identity Framework Experience.
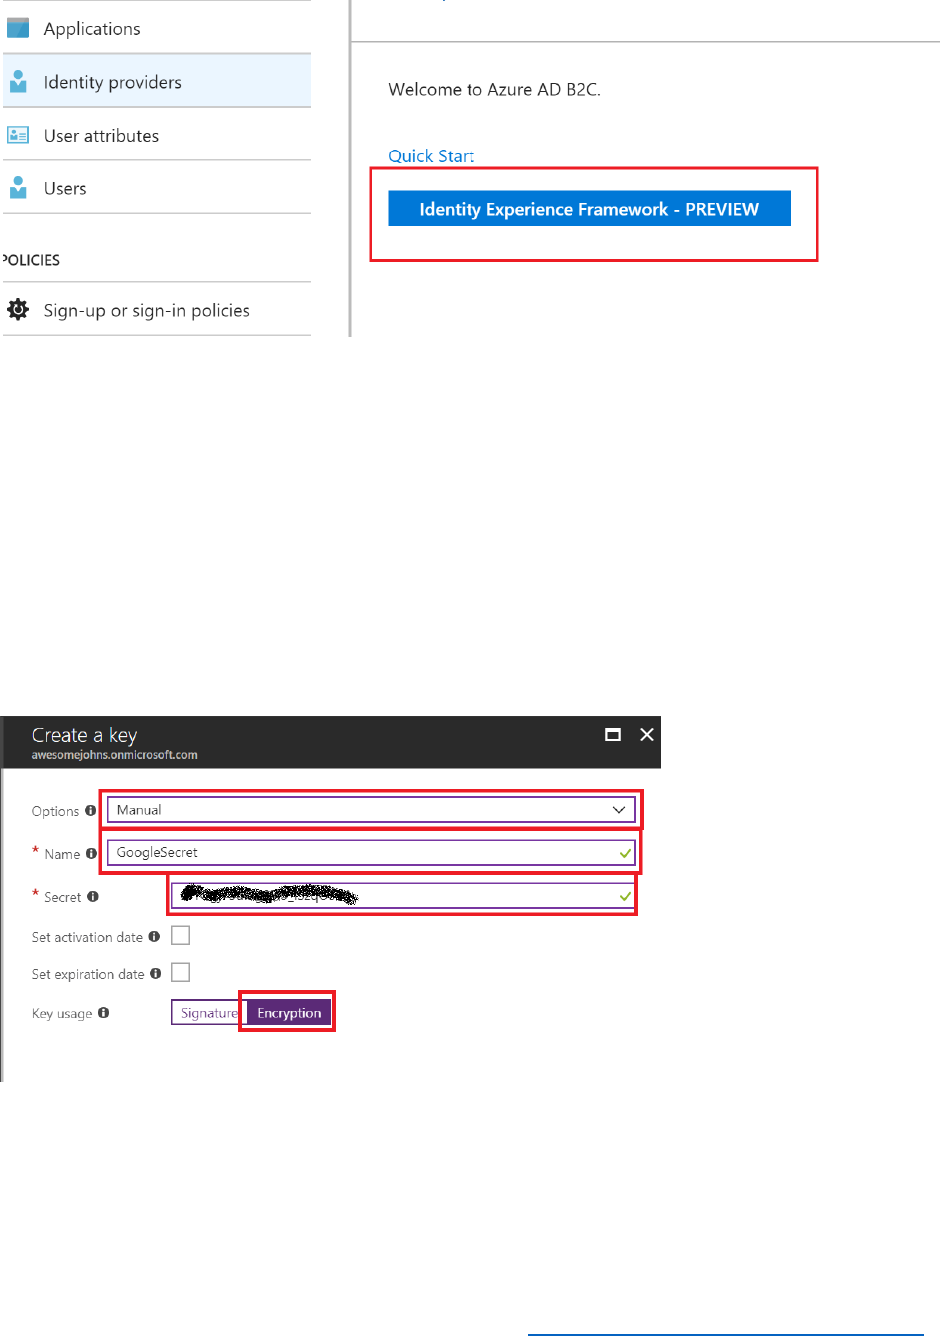
135 © 2018 Microsoft Corporation Feedback? https://aka.ms/aad-b2c-course-feedback
4) Select Policy Keys from left menu.
5) Select + Add.
6) For Options, select Manual.
7) In the Name field, enter GoogleSecret.
8) In the Secret field, enter the Google app secret key you recorded earlier.
9) Select Encryption.
10) Select Create.

136 © 2018 Microsoft Corporation Feedback? https://aka.ms/aad-b2c-course-feedback
Update Policy Files
1) Open the TrustFrameworkBase.xml policy file that you used in Modules 5 and 6 using
Visual Studio.
2) Add the following ClaimsProvider element to the list in the <ClaimsProviders> node.
Replace client_id with the client ID of your Google+ application.
<ClaimsProvider>
<Domain>google.com</Domain>
<DisplayName>Google</DisplayName>
<TechnicalProfiles>
<TechnicalProfile Id="Google-OAUTH">
<DisplayName>Google</DisplayName>
<Protocol Name="OAuth2" />
<Metadata>
<Item Key="ProviderName">google</Item>
<Item Key="authorization_endpoint">https://accounts.google.com/o/oauth2/auth</Item>
<Item Key="AccessTokenEndpoint">https://accounts.google.com/o/oauth2/token</Item>
<Item Key="ClaimsEndpoint">https://www.googleapis.com/oauth2/v1/userinfo</Item>
<Item Key="scope">email</Item>
<Item Key="HttpBinding">POST</Item>
<Item Key="UsePolicyInRedirectUri">0</Item>
<Item Key="client_id">Your Google+ application ID</Item>
</Metadata>
<CryptographicKeys>
<Key Id="client_secret" StorageReferenceId="B2C_1A_GoogleSecret" />
</CryptographicKeys>
<OutputClaims>
<OutputClaim ClaimTypeReferenceId="socialIdpUserId" PartnerClaimType="id" />
<OutputClaim ClaimTypeReferenceId="email" PartnerClaimType="email" />
<OutputClaim ClaimTypeReferenceId="givenName" PartnerClaimType="given_name" />
<OutputClaim ClaimTypeReferenceId="surname" PartnerClaimType="family_name" />
<OutputClaim ClaimTypeReferenceId="displayName" PartnerClaimType="name" />
<OutputClaim ClaimTypeReferenceId="identityProvider" DefaultValue="google.com" />
<OutputClaim ClaimTypeReferenceId="authenticationSource"
DefaultValue="socialIdpAuthentication" />
</OutputClaims>
<OutputClaimsTransformations>
<OutputClaimsTransformation ReferenceId="CreateRandomUPNUserName" />
<OutputClaimsTransformation ReferenceId="CreateUserPrincipalName" />
<OutputClaimsTransformation ReferenceId="CreateAlternativeSecurityId" />
<OutputClaimsTransformation
ReferenceId="CreateSubjectClaimFromAlternativeSecurityId" />
</OutputClaimsTransformations>

137 © 2018 Microsoft Corporation Feedback? https://aka.ms/aad-b2c-course-feedback
<UseTechnicalProfileForSessionManagement ReferenceId="SM-SocialLogin" />
<ErrorHandlers>
<ErrorHandler>
<ErrorResponseFormat>json</ErrorResponseFormat>
<ResponseMatch>$[?(@@.error == 'invalid_grant')]</ResponseMatch>
<Action>Reauthenticate</Action>
<!--In case of authorization code used error, we don't want the user to select his account
again.-->
<!--AdditionalRequestParameters
Key="prompt">select_account</AdditionalRequestParameters-->
</ErrorHandler>
</ErrorHandlers>
</TechnicalProfile>
</TechnicalProfiles>
</ClaimsProvider>
3) Save the file
4) Open the TrustFrameworkExtensions.xml policy file.
5) Find the <UserJourneys> element near the end of the file.
6) Copy the <UserJourney> element with attribute value Id="SignUpOrSignIn" from the
TrustFrameworkBase.xml file to the list of UserJourney elements in the
TrustFrameworkExtensions.xml file.
Note: Make sure that you copy the entire <UserJourney> element; it contains seven
orchestration steps.
7) Locate the <OrchestrationStep> element with attribute Order="1" value under this
element.
8) Replace the <ClaimsProviderSelections> element in this step with the following XML
markup.
<ClaimsProviderSelections>
<ClaimsProviderSelection TargetClaimsExchangeId="GoogleExchange" />
</ClaimsProviderSelections>
9) Locate the <OrchestrationStep> element with attribute Order="2" in the
<UserJourney> node and replace the <ClaimExchanges> node with this markup.
<ClaimsExchanges>
<ClaimsExchange Id="GoogleExchange" TechnicalProfileReferenceId="Google-OAUTH"
/>
</ClaimsExchanges>
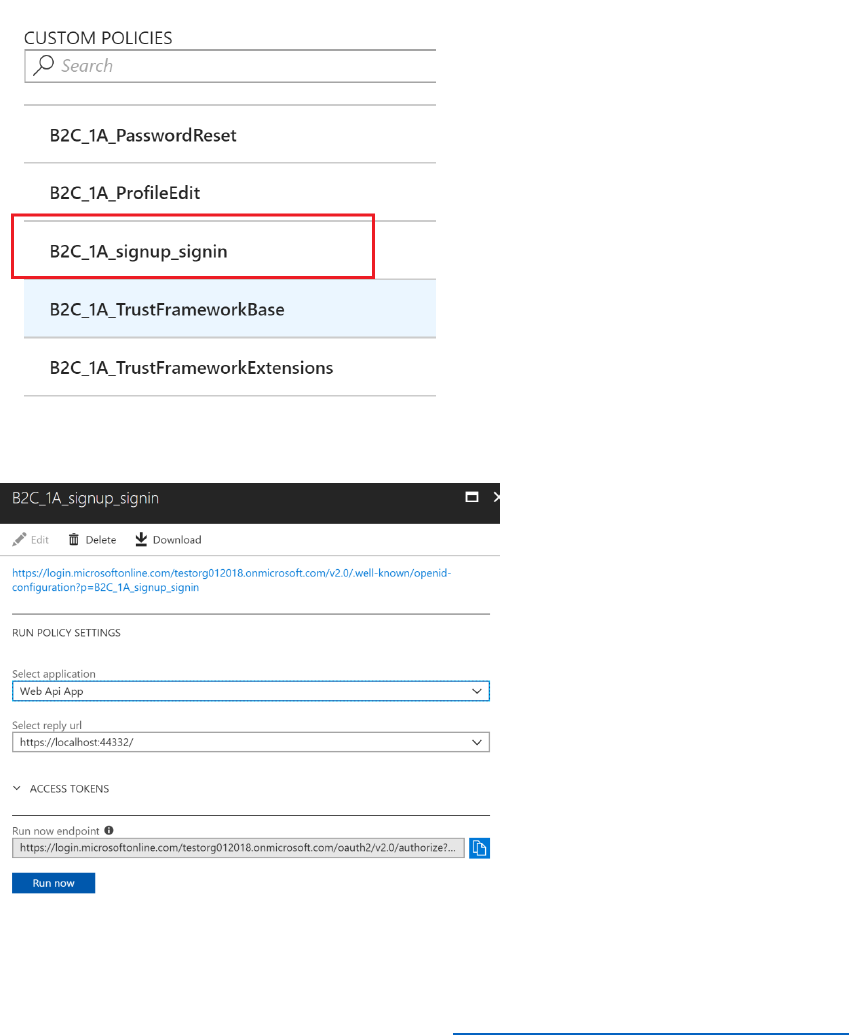
138 © 2018 Microsoft Corporation Feedback? https://aka.ms/aad-b2c-course-feedback
10) Save the file.
11) In the Azure portal, in the Azure AD B2C blade, select Identity Experience Framework.
12) Select Upload Policy, and upload the TrustFrameworkBase.xml policy file. Overwrite
the policy if it already exists.
13) Repeat the operation and upload TrustFrameworkExtensions.xml policy file.
14) When the files have been uploaded, click B2C_1A_signup_signin policy to see its detail
view.
15) Select Run now.
16) The sign-in page should include the option to sign in with Google.
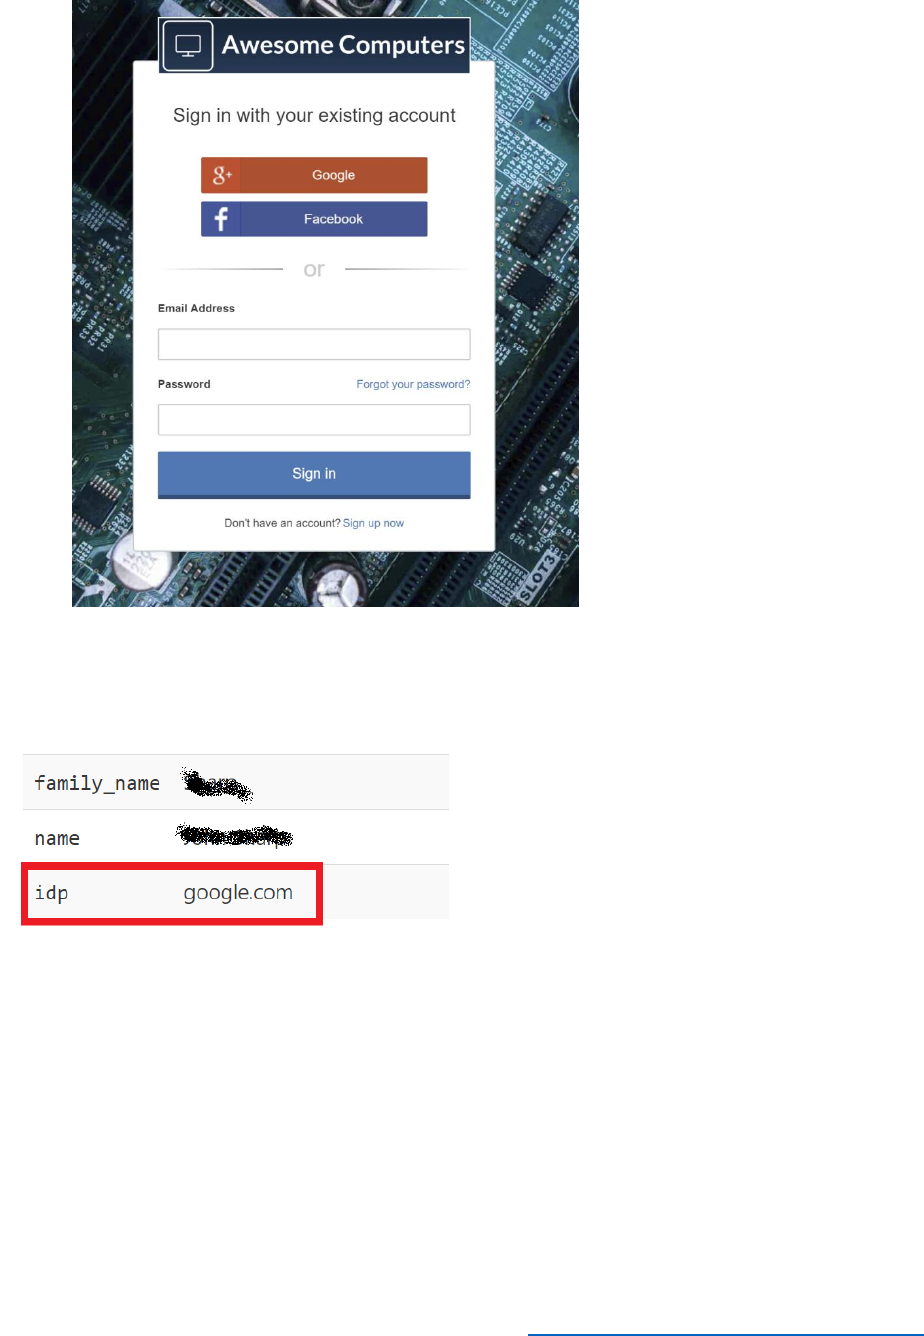
139 © 2018 Microsoft Corporation Feedback? https://aka.ms/aad-b2c-course-feedback
17) You should be able to sign in using your Google account.
18) After you have signed in, on the Awesome Computers page select View Token
Contents, and then select the Claims tab. The idp claim should be set to google.com.
Integrate a SAML IDP and Map Claims
This example shows how to integrate the Salesforce IDP as an example of a SAML identity
provider. If you don't have a Salesforce developer account you can Signup for a free Developer
Account, and then setup My Domain.
Setup the Identity Provider in Salesforce
1) Login to your Salesforce developer account.
2) In the left menu, under Settings, expand the Identity menu and then select Identity
Provider.
3) Select Enable Identity Provider (you may need to create a domain first).
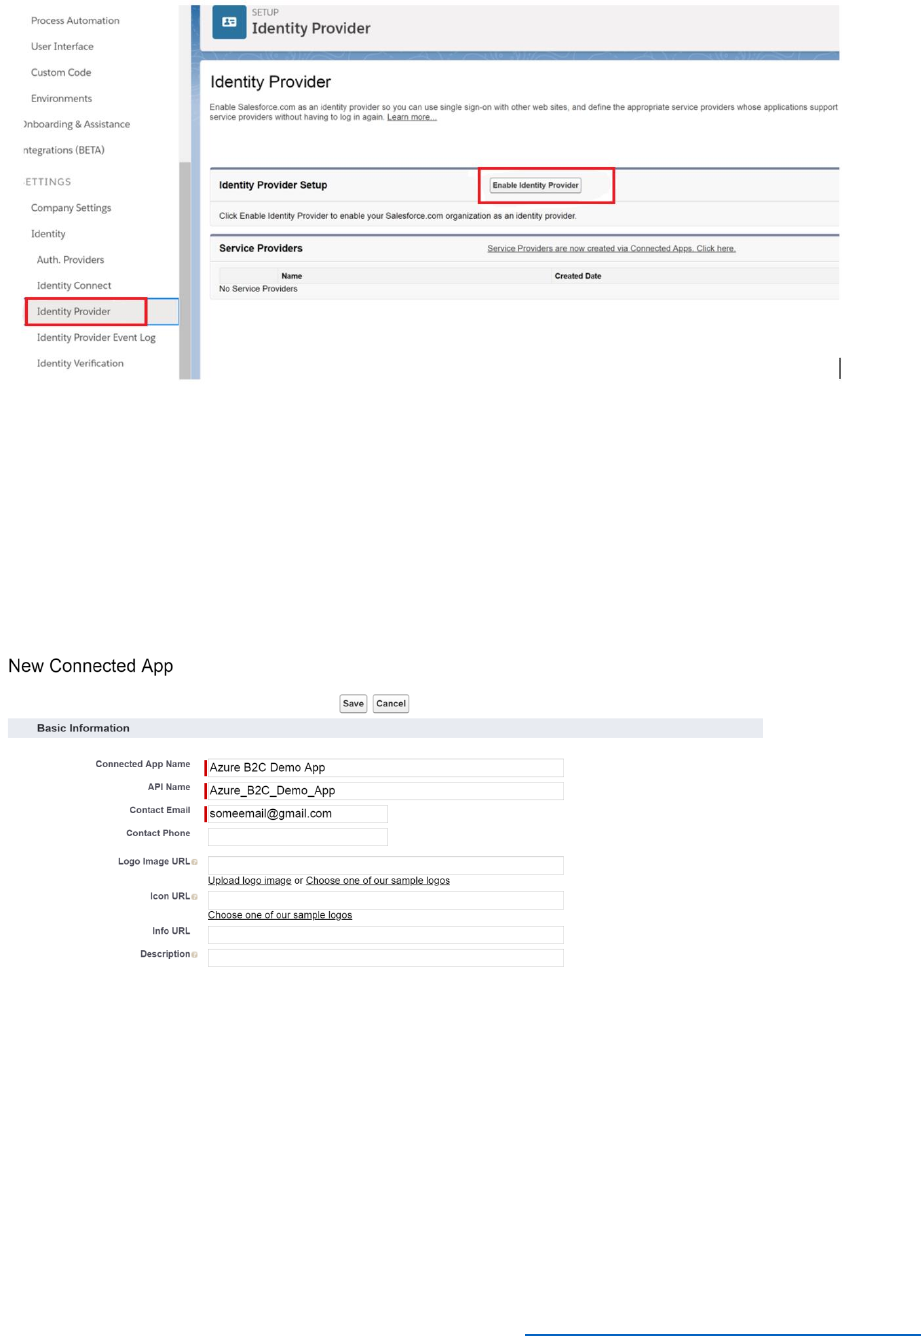
140 © 2018 Microsoft Corporation Feedback? https://aka.ms/aad-b2c-course-feedback
4) Select the default certificate from the list and then select Save.
Create a Salesforce App
1) On the Identity Provider page, select the Service Providers link.
2) Provide a connected app name, API name, and contact email as shown in the following
image:
3) In the Web App Settings section select Enable SAML.
4) In the Entity Id field, enter
https://login.microsoftonline.com/te/AwesomeYourLastname.onmicrosoft.com/B2
C_1A_TrustFrameworkBase.
5) In the ACS URL field, enter
https://login.microsoftonline.com/te/AwesomeYourLastname.onmicrosoft.com/B2
C_1A_TrustFrameworkBase/samlp/sso/assertionconsumer.
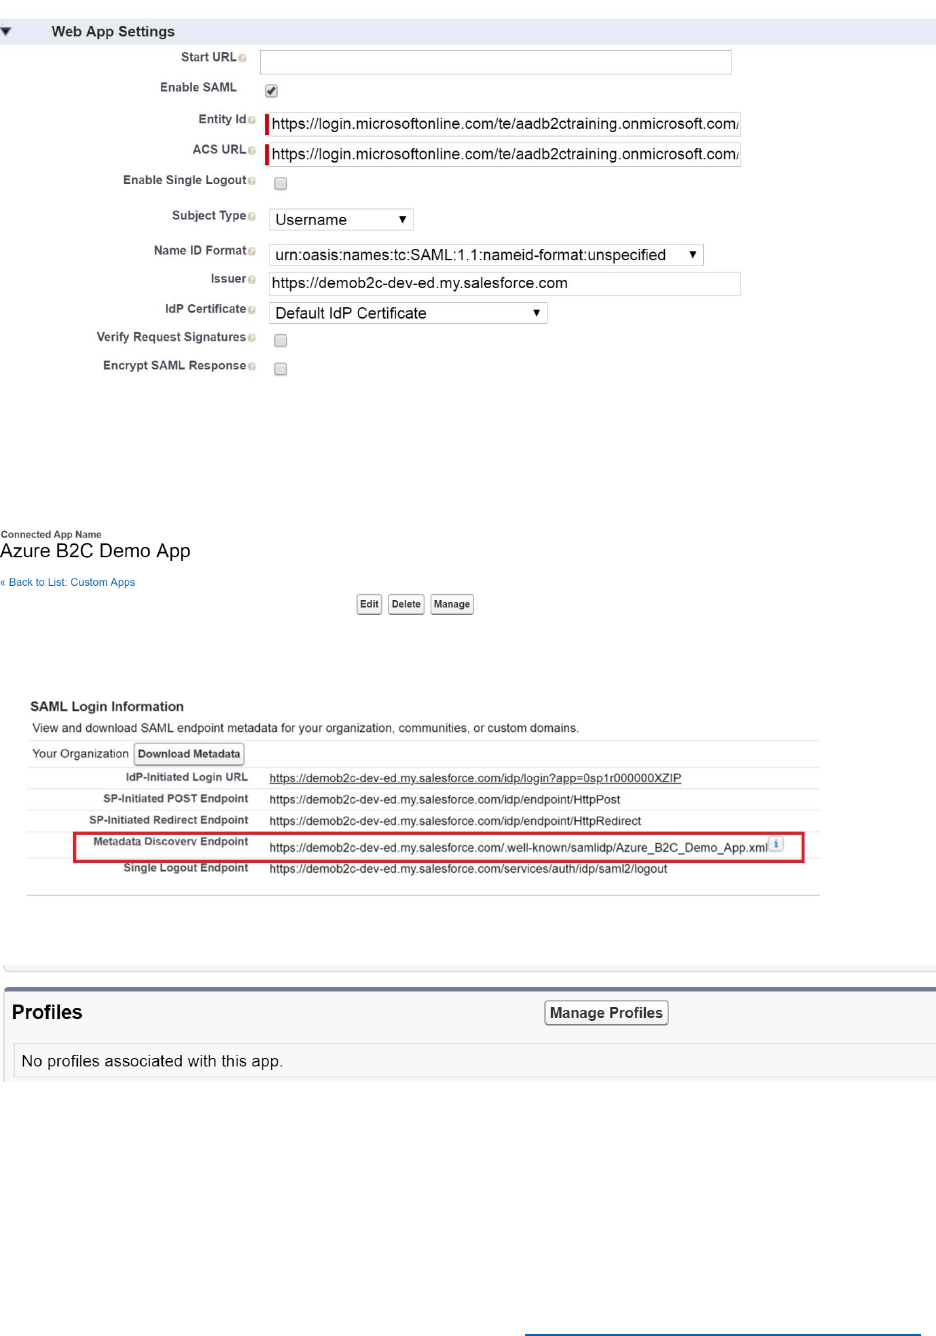
141 © 2018 Microsoft Corporation Feedback? https://aka.ms/aad-b2c-course-feedback
6) Leave the remaining fields at their default values, scroll down, and select Save.
7) On the overview page for the new app, select Manage.
8) In the Metadata section, record the value for Metadata Discovery Endpoint.
9) Scroll down to the Profiles section, and then select Manage Profile.
10) Select the profile or group you want to federate with Azure AD B2C. Select System
Administrator so that you can federate with your account.

142 © 2018 Microsoft Corporation Feedback? https://aka.ms/aad-b2c-course-feedback
Create a Signed Certificate for Azure AD B2C
1) Open Azure Power shell and run the following commands. Replace
AwesomeYourLastname with the name of your B2C tenant, and provide a password for
the certificate.
$tenantName = "AwesomeYourLastname.onmicrosoft.com"
$pwdText = "<YOUR PASSWORD HERE>"
$Cert = New-SelfSignedCertificate -CertStoreLocation Cert:\CurrentUser\My -DnsName
"SamlIdp.$tenantName" -Subject "B2C SAML Signing Cert" -HashAlgorithm SHA256 -
KeySpec Signature -KeyLength 2048
$pwd = ConvertTo-SecureString -String $pwdText -Force -AsPlainText
Export-PfxCertificate -Cert $Cert -FilePath .\B2CSigningCert.pfx -Password $pwd
Add a SAML Signing certificate to Azure AD B2C
1) In the Azure portal, go to the Azure AD B2C blade, and then select Identity Experience
Framework.
2) Select Policy Keys.
3) Select +Add.
4) In the Options list, select Upload.
5) Set the Name to SAMLSigningCert.
6) Upload the B2CSigningCert.pfx file you created in the in the previous procedure, and
provide the password that you specified when you created the certificate.
7) Select Create.
8) When the key has been created, record the key full name, including the B2C_1A prefix (it
should be something like B2C_1A_SAMLSigningCert if you specified the Subject of the
certificate exactly as shown previously).
Update Policy File
You register Salesforce as claim provider in your policy files as follows:
1) Using Visual Studio, open the TrustFrameworkExtensions.xml file.
2) Find the <ClaimsProviders> node and add the following ClaimsProvider to the list. In
the <Domain> element, replace SalesforceDomain with the name of the domain you
created for your Salesforce developer account. In the <PartnerEntity> element, replace

143 © 2018 Microsoft Corporation Feedback? https://aka.ms/aad-b2c-course-feedback
the text SalesForce App Endpoint Uri with the Salesforce Metadata Discovery Endpoint
that you recorded earlier.
<ClaimsProvider>
<!--Domain value must be unique -->
<Domain>SalesforceDomain</Domain>
<DisplayName>Salesforce</DisplayName>
<TechnicalProfiles>
<!-- Technical profile Id will be used to refere this profile in other parts of Policy-->
<TechnicalProfile Id="SalesforceProfile">
<!-- Sign in button text-->
<DisplayName>Salesforce</DisplayName>
<Description>Login with your Salesforce account</Description>
<!-- SalesForce use SAML 2.0 so make sure use SAML2 in the value -->
<Protocol Name="SAML2"/>
<Metadata>
<Item Key="RequestsSigned">false</Item>
<Item Key="WantsEncryptedAssertions">false</Item>
<Item Key="WantsSignedAssertions">false</Item>
<!-- Copy the endpoint url here from SalesForce app you have created in SalesForce
from metadata section of App overview-->
<Item Key="PartnerEntity">SalesForce App Endpoint Uri</Item>
</Metadata>
<CryptographicKeys>
<!--This is the key you have created in Azure AD B2C -> Identify Framework
Experience->Policy Keys section -->
<Key Id="SamlAssertionSigning" StorageReferenceId="B2C_1A_SAMLSigningCert"/>
<Key Id="SamlMessageSigning" StorageReferenceId="B2C_1A_SAMLSigningCert"/>
</CryptographicKeys>
<OutputClaims>
<OutputClaim ClaimTypeReferenceId="socialIdpUserId" PartnerClaimType="userId"/>
<OutputClaim ClaimTypeReferenceId="givenName" PartnerClaimType="given_name"/>
<OutputClaim ClaimTypeReferenceId="surname" PartnerClaimType="family_name"/>
<OutputClaim ClaimTypeReferenceId="email" PartnerClaimType="email"/>
<OutputClaim ClaimTypeReferenceId="displayName" PartnerClaimType="username"/>
<OutputClaim ClaimTypeReferenceId="authenticationSource"
DefaultValue="externalIdp"/>
<OutputClaim ClaimTypeReferenceId="identityProvider" DefaultValue="SAMLIdp" />
</OutputClaims>
<OutputClaimsTransformations>
<OutputClaimsTransformation ReferenceId="CreateRandomUPNUserName"/>
<OutputClaimsTransformation ReferenceId="CreateUserPrincipalName"/>
<OutputClaimsTransformation ReferenceId="CreateAlternativeSecurityId"/>

144 © 2018 Microsoft Corporation Feedback? https://aka.ms/aad-b2c-course-feedback
<OutputClaimsTransformation
ReferenceId="CreateSubjectClaimFromAlternativeSecurityId"/>
</OutputClaimsTransformations>
<UseTechnicalProfileForSessionManagement ReferenceId="SM-Noop"/>
</TechnicalProfile>
</TechnicalProfiles>
</ClaimsProvider>
3) In <UserJourneys> node, add a copy of the existing <UserJourney
Id="SignUpOrSignIn"> node and its contents that you created earlier in this module.
4) Change the ID of the new <UserJourney> element to SalesForceUserJourney.
5) Under this <UserJourney> node find the <OrchestrationStep> element with the attribute
Order="1", and replace the contents of the ClaimsProviders list in this node with the
following text.
<ClaimsProviderSelection TargetClaimsExchangeId="SalesForceExchange" />
6) Find the <OrchestrationStep> element with the attribute Order="2", and replace the
contents of the ClaimsExchanges list in this node with the following text.
<ClaimsExchange Id="SalesForceExchange" TechnicalProfileReferenceId="SalesforceProfile"
/>
7) Save the file.
8) In the Azure portal, in the Azure AD B2C blade, select Identity Experience Framework,
select Upload Policy, and upload the FrameworkExtensions.xml policy file. Overwrite
the existing policy.
Update the Relying Party File
11) Make a copy of SignUpOrSignIn.xml policy file from your working directory and
rename it as SalesForceSignUpOrSignIn.xml.
12) Open the SalesForceSignUpOrSignIn.xml file using Visual Studio.
13) In the </TrustFrameworkPolicy>element, change the PolicyId attribute to
SalesForceSignOrUpSignInPolicy
14) In the <RelyingParty> node, change the ReferenceId attribute of the
<DefaultUserJourney> element to SalesForceUserJourney.
15) Remove the <OutputClaim ClaimTypeReferenceId="TnCs"/> and <OutputClaim
ClaimTypeReferenceId="extension_storeMembershipNumber" /> elements from the list
of output claims in the PolicyProfile TechicalProfile element.
16) Save the file.
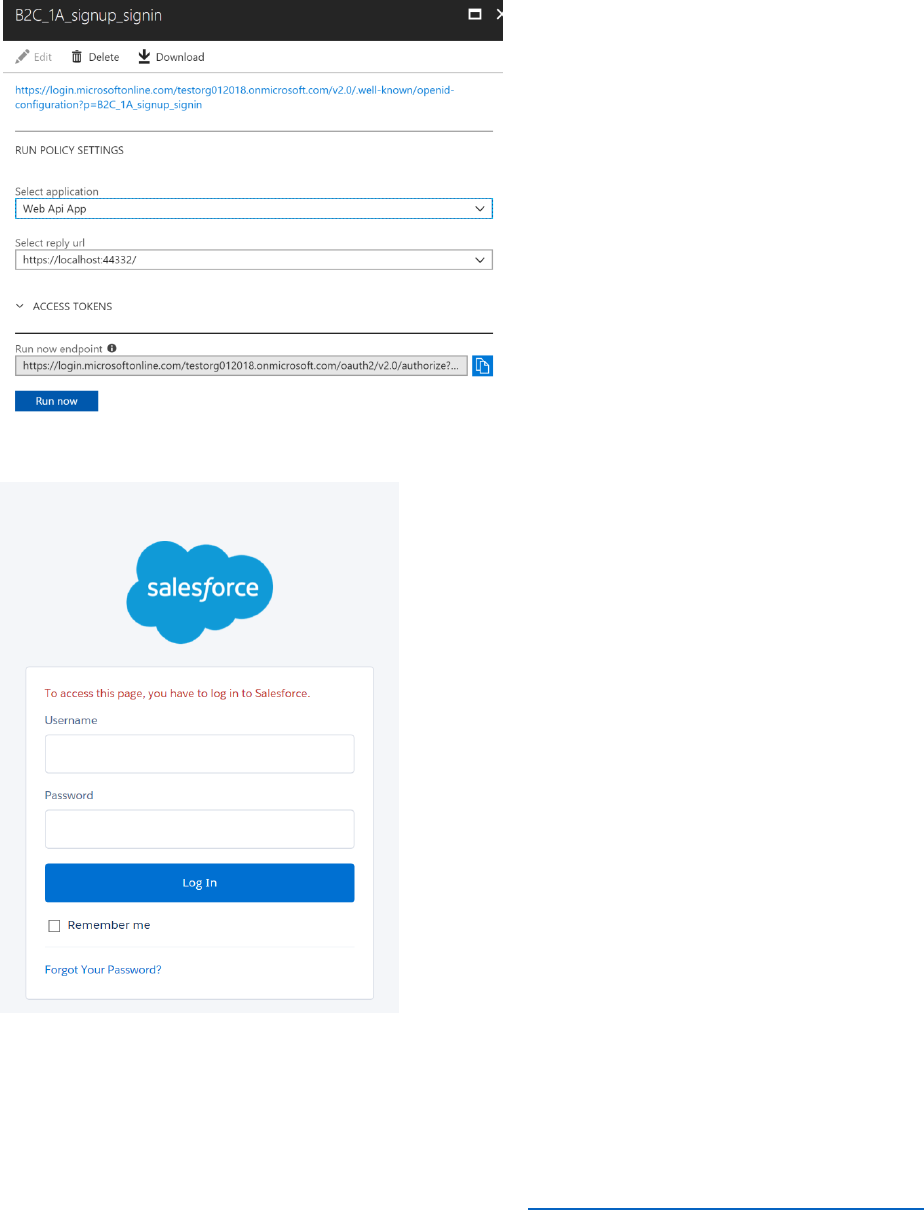
145 © 2018 Microsoft Corporation Feedback? https://aka.ms/aad-b2c-course-feedback
17) In the Azure portal, upload the SalesForceSignUpOrSignIn.xml policy file.
18) To test the policy, select the B2C_1A_SalesForceSignOrUpSignInPolicy policy, and then
select Run now.
19) The SalesForce sign-in page should appear.
20) Verify that you can log in with your SalesForce credentials.
21) After you have signed in, on the Awesome Computers page select View Token
Contents, and then select the Claims tab. The idp claim should be set to SAMLIdp.
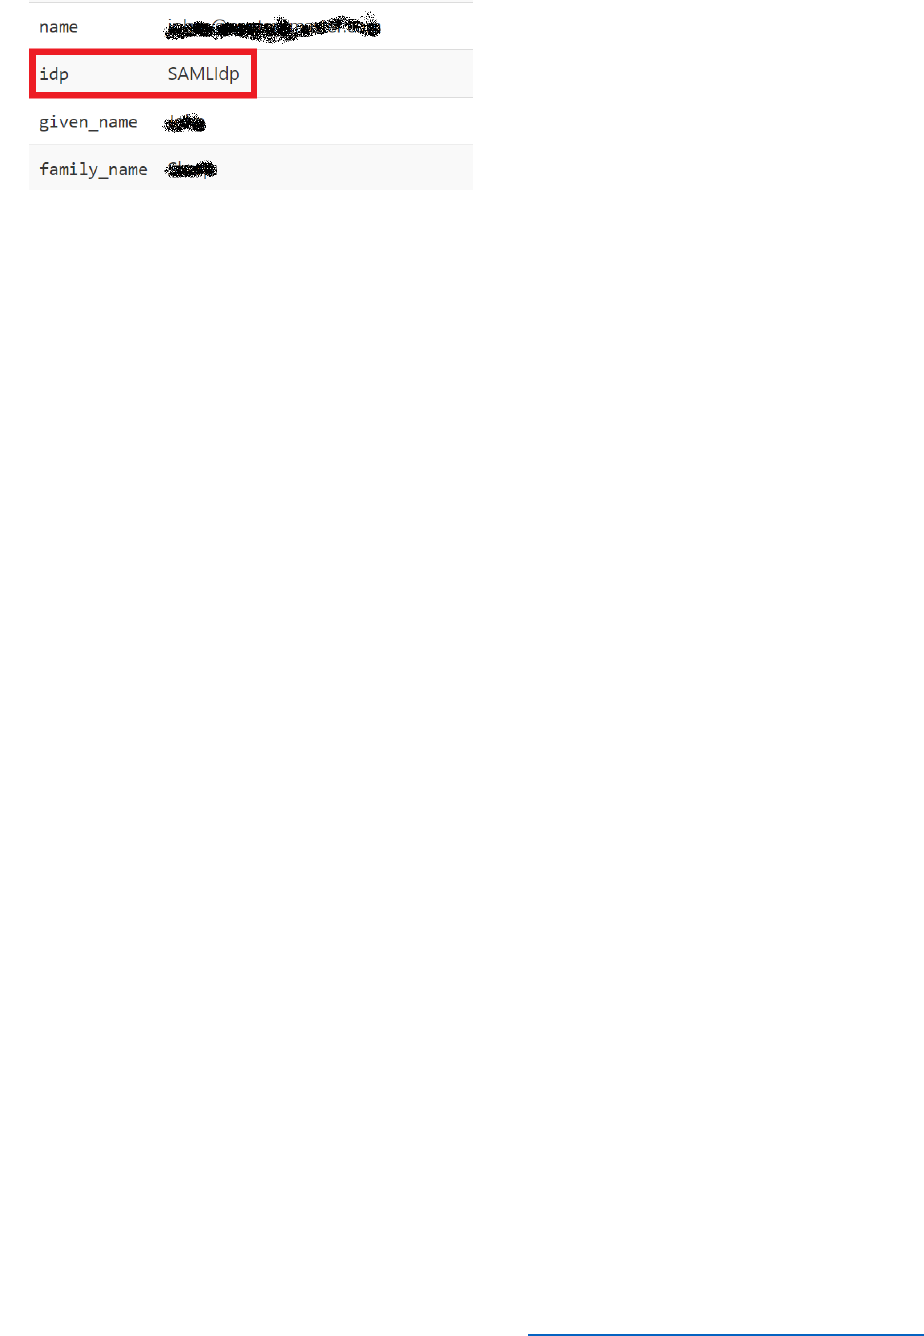

147 © 2018 Microsoft Corporation Feedback? https://aka.ms/aad-b2c-course-feedback
Module 8: Using the Azure AD Graph API and User Migration
At the end of this module, you will be able to:
• Use the Azure AD Graph API to query and modify objects in an AAD tenant.
• Migrate users to AAD by using the Azure AD Graph API
• Require users to change their passwords when they log in for the first time after being
migrated.
And, you will have a deeper understanding of the following concepts;
• The purposes of the Microsoft Graph API and the Azure AD Graph API, and when to use
each.
• Using Graph Explorer.
• Planning user migrations
This module should take approximately 60 minutes to complete.
Introduction
In an on-premises environment, users are frequently authenticated by using a local identity
provider, possibly also located on-premises. When you migrate an application to Azure, and
move users to a directory such as AAD, you will most likely change authentication to use an
identity provider provided by Azure. If your local directory contains many thousands of users,
migrating these users and changing their identity configuration is a non-trivial operation.
Typically, you would automate the tasks involved in this process. The Azure AD Graph API is
designed to help with these tasks. Using the Azure AD Graph API, you can query, create, update,
and delete identity and authentication information in AAD. The Azure AD Graph API is a REST
service, and you can perform individual operations by submitting the appropriate HTTP requests
to the API. Alternatively, you can write a custom application that uses the Azure AD Graph API to
implement tasks against an AAD domain.
Users might be identified by using a social networking identity provider rather than a local IDP,
and you can migrate these users also by using the Azure AD Graph API. Additionally, you can
amend the password policy of users once they have been migrated to enforce stronger
passwords, and you can configure Azure AD B2C to require users to change their password at
first sign-in after migration.

148 © 2018 Microsoft Corporation Feedback? https://aka.ms/aad-b2c-course-feedback
Use the Azure AD Graph API to Query, Add, Update, and Delete Users in AAD
The Azure AD Graph API provides access to a web service that enables you to manage tenants in
AAD. You can interact with the Azure Graph API from any environment that enables you to
compose and submit HTTP requests.
Use the Azure AD Graph API from PowerShell
You can perform operations using the Azure AD Graph API by submitting HTTP requests
through a tool such as PowerShell. This approach is useful for performing ad-hoc operations
against AAD. The following steps show this technique:
1) Open a PowerShell prompt.
2) Create the following PowerShell function:
function GetAuthToken
{
param
(
[Parameter(Mandatory=$true)]
$TenantName
)
$adal = "${env:ProgramFiles(x86)}\Microsoft
SDKs\Azure\PowerShell\ServiceManagement\Azure\Services\Microsoft.IdentityModel.Clients.Act
iveDirectory.dll"
$adalforms = "${env:ProgramFiles(x86)}\Microsoft
SDKs\Azure\PowerShell\ServiceManagement\Azure\Services\Microsoft.IdentityModel.Clients.Act
iveDirectory.WindowsForms.dll"
[System.Reflection.Assembly]::LoadFrom($adal) | Out-Null
[System.Reflection.Assembly]::LoadFrom($adalforms) | Out-Null
$clientId = "1950a258-227b-4e31-a9cf-717495945fc2"
$redirectUri = "urn:ietf:wg:oauth:2.0:oob"
$resourceAppIdURI = "https://graph.windows.net"
$authority = "https://login.windows.net/$TenantName"

149 © 2018 Microsoft Corporation Feedback? https://aka.ms/aad-b2c-course-feedback
$authContext = New-Object
"Microsoft.IdentityModel.Clients.ActiveDirectory.AuthenticationContext" -ArgumentList
$authority
$authResult = $authContext.AcquireToken($resourceAppIdURI, $clientId,$redirectUri, "Auto")
return $authResult
}
The GetAuthToken function prompts the user to log in to the AAD tenant specified by the
$TenantName parameter, and returns the authentication token if the login is successful.
3) Create a variable that references the name of your AAD tenant. Replace <tenantname>
with the name of your AAD tenant):
$tenant = "<tenantname>.onmicrosoft.com"
4) Run the GetAuthToken function and extract the authentication token from the result:
$token = GetAuthToken -TenantName $tenant
5) Construct an HTTP authorization header object that contains the bearer token in the
$token variable:
$authHeader = @{
'Content-Type'='application\json'
'Authorization'=$token.CreateAuthorizationHeader()
}
6) To retrieve the list of users from your tenant, run the following code:
$resource = "users/"
$uri = "https://graph.windows.net/$tenant/$($resource)?api-version=1.6"
$tenantInfo = (Invoke-RestMethod -Uri $uri –Headers $authHeader –Method Get –
Verbose).value
echo $tenantInfo
This code constructs the URI of the /users resource in your tenant, and then uses the Invoke-
RestMethod function to send a GET request to this URI. The request includes an authentication

150 © 2018 Microsoft Corporation Feedback? https://aka.ms/aad-b2c-course-feedback
header that contains the bearer token. The echo statement displays the results; these could be
lengthy if your tenant contains many users.
7) To retrieve a single user, set the $resource variable as follows (replace <username> with
the name of the user to fetch) and then run the query again:
$resource = "users/<username>@$tenant"
$uri = "https://graph.windows.net/$tenant/$($resource)?api-version=1.6"
Invoke-RestMethod -Uri $uri –Headers $authHeader –Method Get –Verbose
8) To create a new user, construct a JSON object that contains the attributes for the user:
$newuser = @{
"accountEnabled"=$true;
"userPrincipalName"="aabb@$tenant";
"displayName"="AAA BBB";
"passwordProfile"=@{
"password"="hsa98h(*&g"
"forceChangePasswordNextLogin"=$true
};
"mailNickname"="aabb"
} | ConvertTo-Json
9) Send an HTTP POST message to the users resource. Specify the JSON object as the
message body:
$resource = "users/"
$uri = "https://graph.windows.net/$tenant/$($resource)?api-version=1.6"
Invoke-RestMethod -Uri $uri –Headers $authHeader –Method Post -Body
$newuser -ContentType "application/json" –Verbose
10) To modify a user, for example, to disable the user's account, create a JSON object that
contains the details to be changed:
$changes = @{
"accountEnabled"=$false
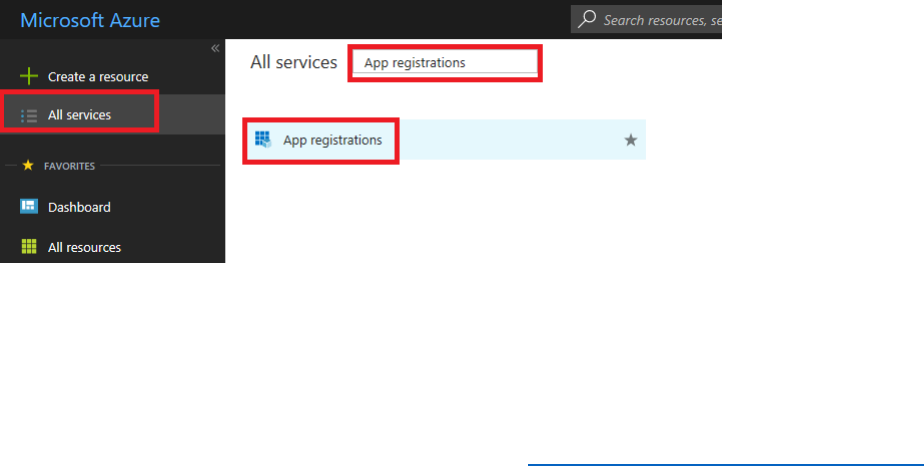
151 © 2018 Microsoft Corporation Feedback? https://aka.ms/aad-b2c-course-feedback
} | ConvertTo-Json
11) Send an HTTP PATCH message to the resource corresponding to the user account to
modify. Specify the JSON object as the message body:
$resource = "users/aaa@$tenant"
$uri = "https://graph.windows.net/$tenant/$($resource)?api-version=1.6"
Invoke-RestMethod -Uri $uri –Headers $authHeader –Method Patch -Body
$changes -ContentType "application/json" –Verbose
12) To remove a user, send an HTTP DELETE request to the users resource that corresponds
to that user:
$resource = "users/aaa@$tenant"
$uri = "https://graph.windows.net/$tenant/$($resource)?api-version=1.6"
Invoke-RestMethod -Uri $uri –Headers $authHeader –Method Delete –Verbose
Use the Azure AD Graph API from a Custom Application
If you are performing many tasks manually, such as migrating a large number of users, the
chances of making an error are high. A more considered approach is create your own .NET
application that automates the tasks required. The following steps configure and run a sample
application, to illustrate this process:
10) Log into the Azure portal as B2CAdmin@AwesomeYourLastname.onmicrosoft.com,
where AwesomeYourLastname is the name of your B2C tenant.
11) Select All services, type App registrations in the search field, and then select App
registrations.
12) Select + New application registration.
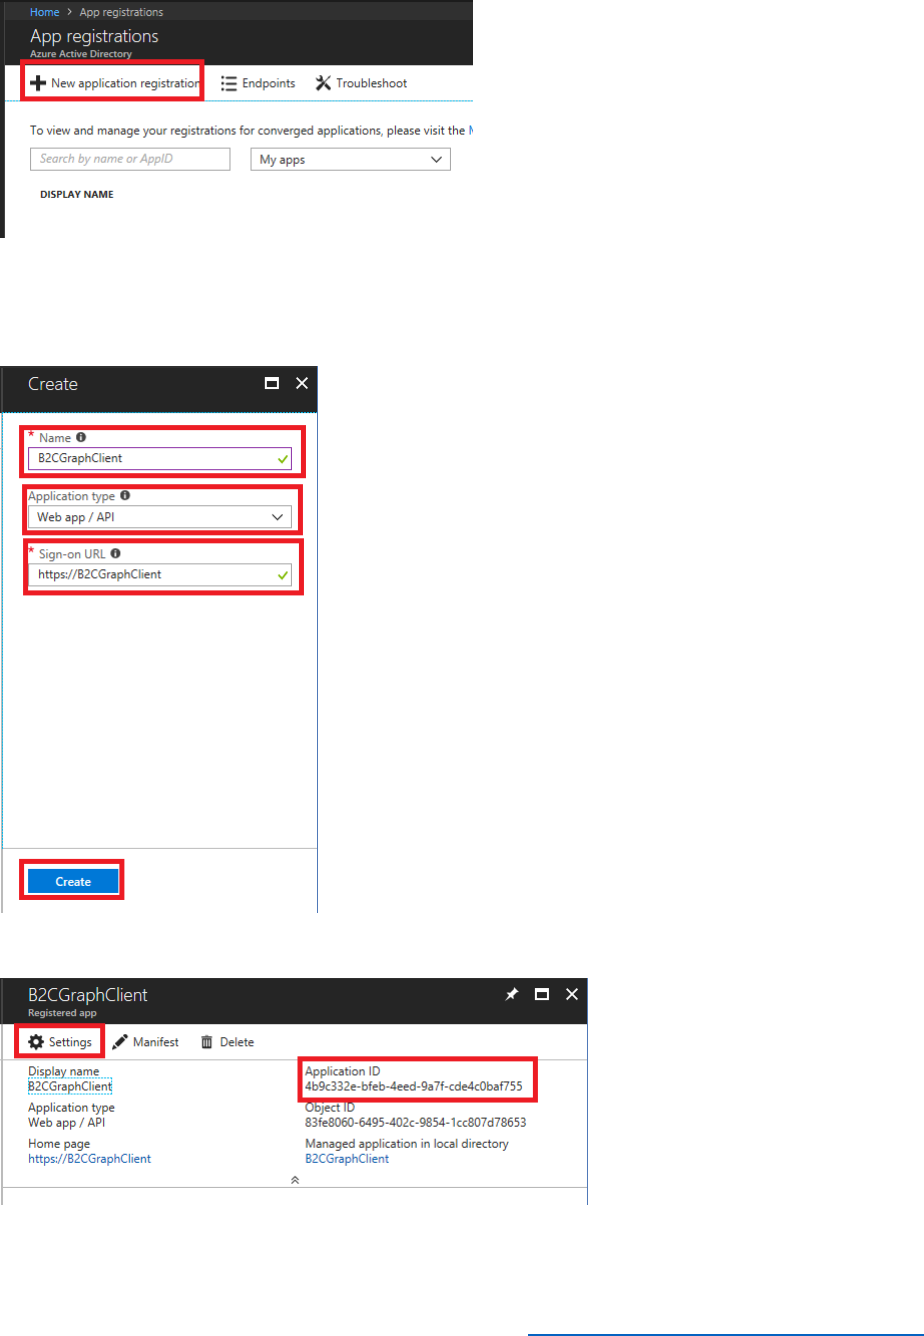
152 © 2018 Microsoft Corporation Feedback? https://aka.ms/aad-b2c-course-feedback
13) In the Name field enter B2CGraphClient, set the Application type to Web app/API, in
the Sign-on URL field enter https://B2CGraphClient (this can actually be anything as it is
just a placeholder), and then select Create.
14) Record the Application ID, and then select Settings.
15) Select Keys, and then create a new key named Secret that never expires. Select Save,
and make a note of the key value.
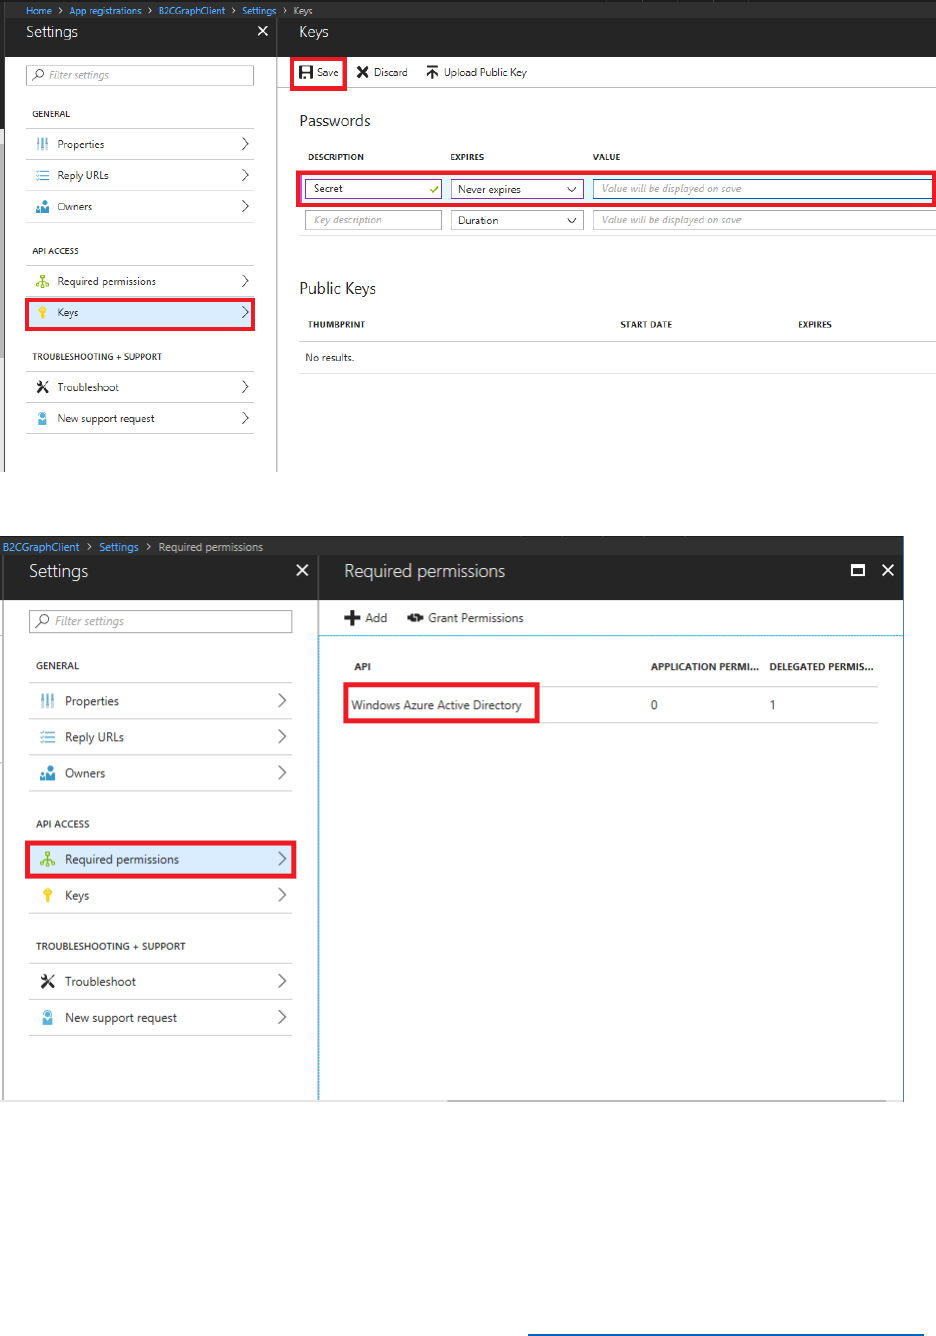
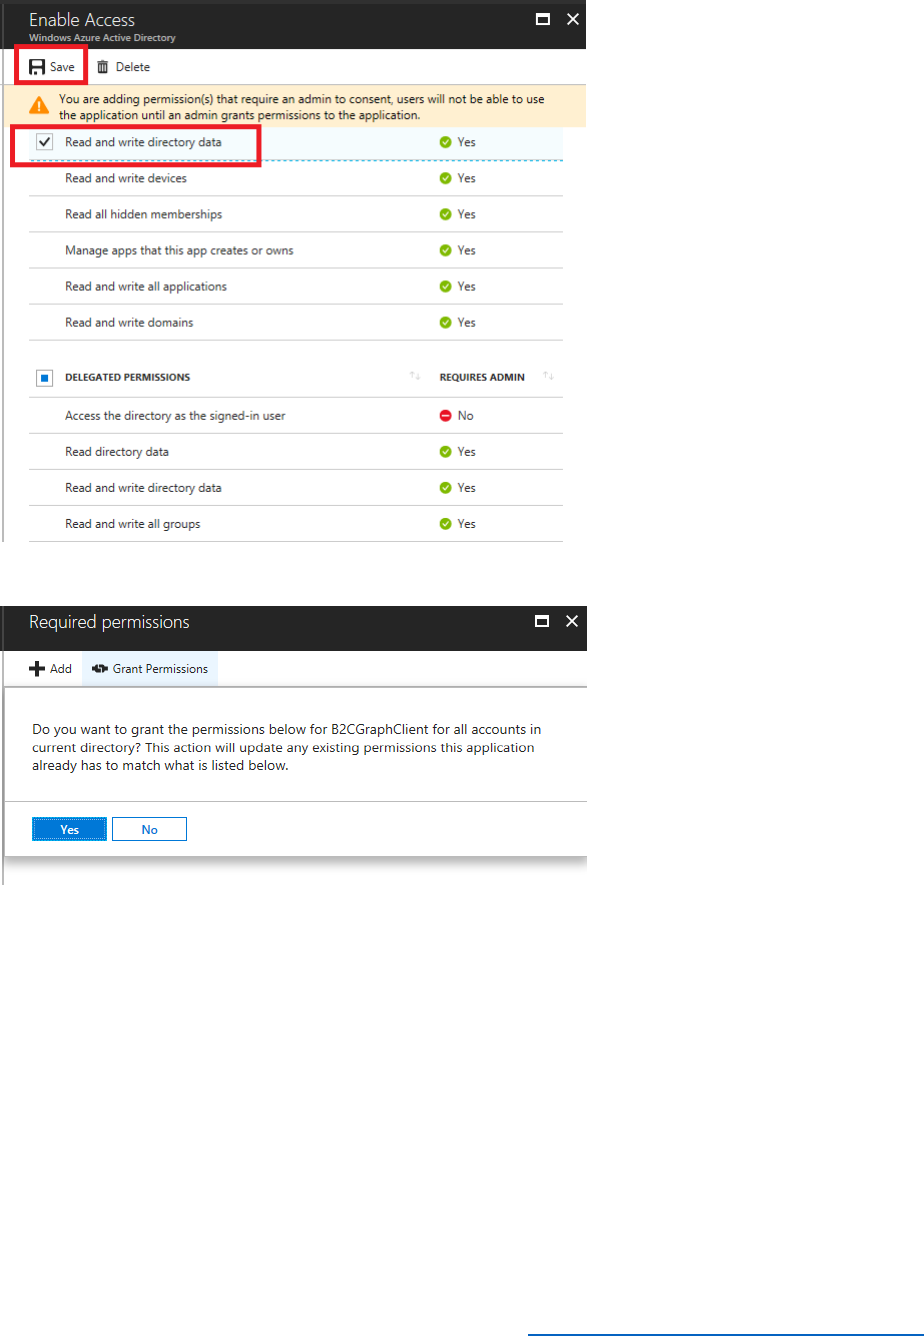
154 © 2018 Microsoft Corporation Feedback? https://aka.ms/aad-b2c-course-feedback
18) Select Grant Permissions, and then select Yes to confirm.
19) Download the sample application from B2C-GraphAPI-DotNet sample application. Unzip
it into the C:\B2C-GraphAPI-DotNet-master folder on your desktop computer.
20) Using Visual Studio, open the B2CGraphClient.sln solution file in the C:\B2C-GraphAPI-
DotNet-master\B2CGraphClient folder.
21) In Solution Explorer, select app.config
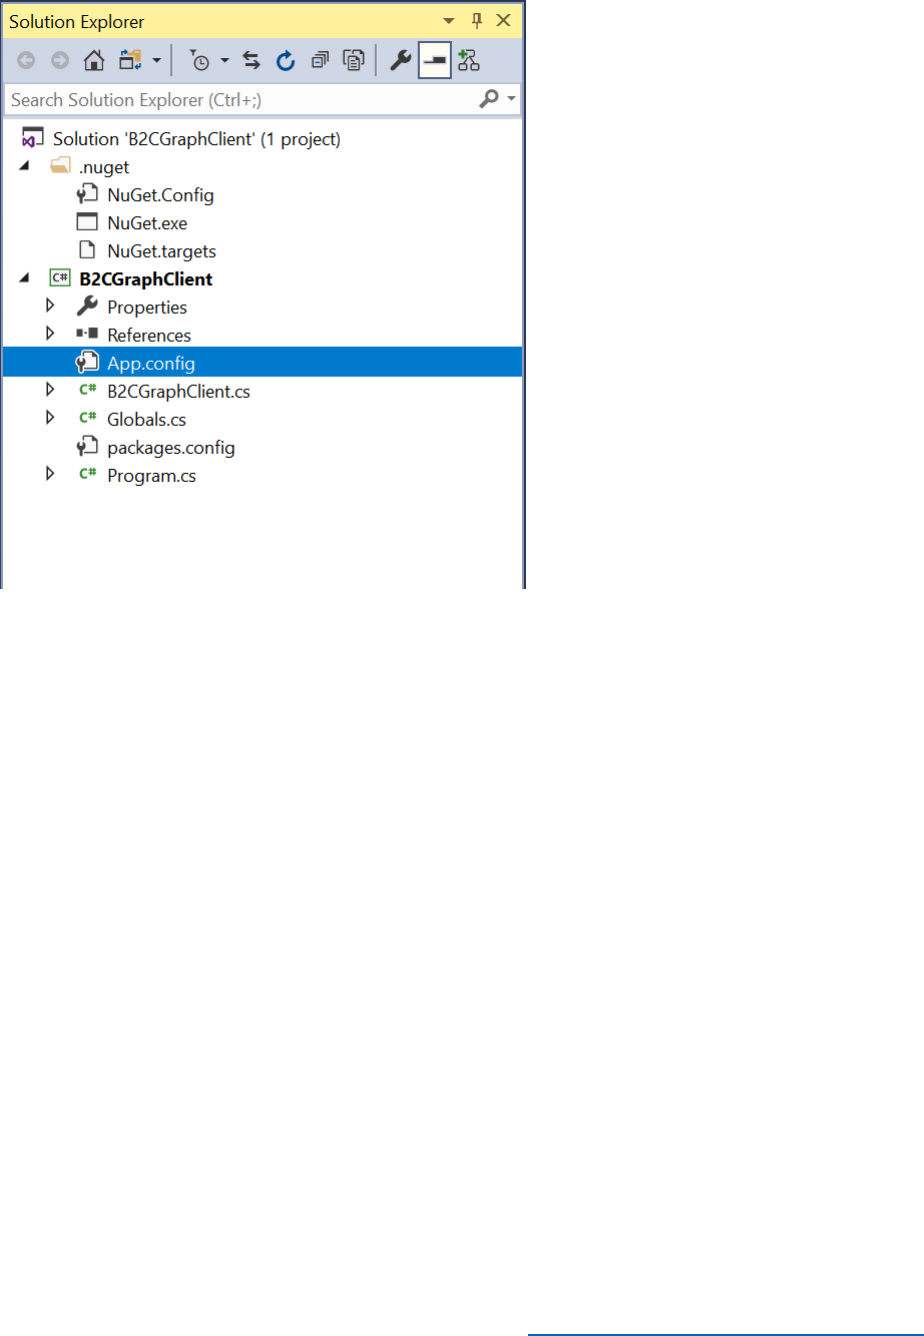
155 © 2018 Microsoft Corporation Feedback? https://aka.ms/aad-b2c-course-feedback
22) In the app.config file, modify the values in the appSettings section. Provide the name
of your tenant, the application ID, and the secret key for your application.
<appSettings>
<add key="b2c:Tenant" value="{Tenant Name}" />
<add key="b2c:ClientId" value="{ApplicationID }" />
<add key="b2c:ClientSecret" value="{Secret Key }" />
</appSettings>
23) On the Build menu, select Rebuild Solution.

156 © 2018 Microsoft Corporation Feedback? https://aka.ms/aad-b2c-course-feedback
24) In Solution Explorer, select B2CGraphClient.cs to examine the source code for the
application.
25) In the Code window, find the B2CGraphClient constructor. It looks like this:
public B2CGraphClient(string clientId, string clientSecret, string tenant)
{
// The client_id, client_secret, and tenant are pulled in from the App.config file

157 © 2018 Microsoft Corporation Feedback? https://aka.ms/aad-b2c-course-feedback
this.clientId = clientId;
this.clientSecret = clientSecret;
this.tenant = tenant;
// The AuthenticationContext is ADAL's primary class, in which you indicate the direcotry to
use.
this.authContext = new AuthenticationContext("https://login.microsoftonline.com/" + tenant);
// The ClientCredential is where you pass in your client_id and client_secret, which are
// provided to Azure AD in order to receive an access_token using the app's identity.
this.credential = new ClientCredential(clientId, clientSecret);
}
This code runs when the application starts up. It uses the values in the app.config file to connect
to your AAD tenant, and saves the authentication token that is returned. It is analogous to the
GetAuthToken function used in the PowerShell example.
26) Scroll to the end of the file and find the SendGraphRequest function:
public async Task<string> SendGraphGetRequest(string api, string query)
{
// First, use ADAL to acquire a token using the app's identity (the credential)
// The first parameter is the resource we want an access_token for; in this case, the Graph API.
AuthenticationResult result = authContext.AcquireToken("https://graph.windows.net",
credential);
// For B2C user managment, be sure to use the 1.6 Graph API version.
HttpClient http = new HttpClient();
string url = "https://graph.windows.net/" + tenant + api + "?" + Globals.aadGraphVersion;
if (!string.IsNullOrEmpty(query))
{

158 © 2018 Microsoft Corporation Feedback? https://aka.ms/aad-b2c-course-feedback
url += "&" + query;
}
Console.ForegroundColor = ConsoleColor.Cyan;
Console.WriteLine("GET " + url);
Console.WriteLine("Authorization: Bearer " + result.AccessToken.Substring(0, 80) + "...");
Console.WriteLine("");
// Append the access token for the Graph API to the Authorization header of the request,
using the Bearer scheme.
HttpRequestMessage request = new HttpRequestMessage(HttpMethod.Get, url);
request.Headers.Authorization = new AuthenticationHeaderValue("Bearer",
result.AccessToken);
HttpResponseMessage response = await http.SendAsync(request);
if (!response.IsSuccessStatusCode)
{
string error = await response.Content.ReadAsStringAsync();
object formatted = JsonConvert.DeserializeObject(error);
throw new WebException("Error Calling the Graph API: \n" +
JsonConvert.SerializeObject(formatted, Formatting.Indented));
}
Console.ForegroundColor = ConsoleColor.Green;
Console.WriteLine((int)response.StatusCode + ": " + response.ReasonPhrase);
Console.WriteLine("");
return await response.Content.ReadAsStringAsync();

159 © 2018 Microsoft Corporation Feedback? https://aka.ms/aad-b2c-course-feedback
}
The application uses this function to send HTTP GET requests to the Azure AD Graph API. The
api parameter to this function contains the resource to query (such as users or groups), and the
query parameter contains any OData options, such as $filter, $top, and so on. The function
constructs a URI referencing the data to fetch, adds the bearer token to the request, and then
submits it to the Azure AD Graph API endpoint. It captures the result and returns it as a string.
27) Find the SendPostRequest method:
private async Task<string> SendGraphPostRequest(string api, string json)
{
// NOTE: This client uses ADAL v2, not ADAL v4
AuthenticationResult result = authContext.AcquireToken(Globals.aadGraphResourceId,
credential);
HttpClient http = new HttpClient();
string url = Globals.aadGraphEndpoint + tenant + api + "?" + Globals.aadGraphVersion;
Console.ForegroundColor = ConsoleColor.Cyan;
Console.WriteLine("POST " + url);
Console.WriteLine("Authorization: Bearer " + result.AccessToken.Substring(0, 80) + "...");
Console.WriteLine("Content-Type: application/json");
Console.WriteLine("");
Console.WriteLine(json);
Console.WriteLine("");
HttpRequestMessage request = new HttpRequestMessage(HttpMethod.Post, url);
request.Headers.Authorization = new AuthenticationHeaderValue("Bearer",
result.AccessToken);
request.Content = new StringContent(json, Encoding.UTF8, "application/json");
HttpResponseMessage response = await http.SendAsync(request);
if (!response.IsSuccessStatusCode)

160 © 2018 Microsoft Corporation Feedback? https://aka.ms/aad-b2c-course-feedback
{
string error = await response.Content.ReadAsStringAsync();
object formatted = JsonConvert.DeserializeObject(error);
throw new WebException("Error Calling the Graph API: \n" +
JsonConvert.SerializeObject(formatted, Formatting.Indented));
}
Console.ForegroundColor = ConsoleColor.Green;
Console.WriteLine((int)response.StatusCode + ": " + response.ReasonPhrase);
Console.WriteLine("");
return await response.Content.ReadAsStringAsync();
}
This method sends HTTP POST requests to create new resources. The parameters are the URI
identifying the type of resource to create, and a string containing the JSON data that represents
the object.
28) Find and examine the SendGraphPatchRequest and SendGraphDeleteRequest
methods. These methods follow a similar pattern, constructing HTTP PATCH and HTTP
DELETE requests to modify and remove objects.
29) Open a command prompt window, and move to the C:\B2C-GraphAPI-DotNet-
master\B2CGraphClient\bin\Debug folder.
30) Type B2C Get-User. This command runs the sample application and sends an HTTP GET
request to the users resource. You should see a list of users from your tenant (in JSON
format)
31) Using Notepad, create a new file named NewUser.json, and add the following data to
this file:
{
"accountEnabled" : true,
"userPrincipalName" : "ddee@{tenant name}",
"displayName" : "DDD EEE",

161 © 2018 Microsoft Corporation Feedback? https://aka.ms/aad-b2c-course-feedback
"passwordProfile" : {
"password" : "hsa98h(*&g",
"forceChangePasswordNextLogin" : true
},
"mailNickname" : "ddee"
}
Replace {tenant name} in the userPrincipalName property with the name of your AAD tenant.
32) At the command prompt, type B2C Create-User NewUser.json. This command causes
the sample application to generate an HTTP POST request to the users resource and
create a new user.
Note that the B2C application also enables you to update and delete users, using the Update-
User and Delete-User options. However, for these commands you must specify the object ID of
the user to be modified or deleted. You can find this information by using the Get-User option.
Migrate Users to AAD
To migrate users from a local directory to AAD, you can use the Azure AD Graph API to retrieve
the details of local users and groups, and then recreate the same structures in AAD. However,
there are a number of issues that you should consider. The section Planning User Migrations in this
module summarizes the primary considerations, but arguably, the most important concerns
users' passwords. It may be possible to recreate users with their original passwords if you have
access to them, but if the passwords are encrypted this approach might not be possible (or even
desirable). Instead, you can opt to generate a random password and require users to reset their
password the first time they log in after the migration. The following steps illustrate this
approach.
Migrate Users Identified using an On-premises IDP to AAD
This procedure follows a two-stage approach:
• Retrieve the key information about users (sign in name, email, password, display name,
given name, and surname) from the on-premises directory and save this information as a
JSON array in a text file. You should not include domain-specific data such as object IDs,
although you can include the attributes that your organization utilizes, such as job title,
telephone number, and office location. You can perform this task by capturing the JSON
formatted output of the PowerShell commands shown in the previous exercise and
editing the results, or by following the principles used by the B2CGraphClient
application, and writing the data to a file rather than displaying it on the screen. If
necessary, an administrator can modify the resulting file and remove any records for
users that should not be migrated.

162 © 2018 Microsoft Corporation Feedback? https://aka.ms/aad-b2c-course-feedback
• Iterate through the records in the JSON text file and use the Azure AD Graph API to
create the corresponding users in AAD. Again, you can adapt the techniques used by the
B2CGraphClient application to achieve this.
The steps that follow assume that you have already retrieved the users to be migrated and
saved them to a pair of JSON files (one for users with known passwords, and another for users
whose passwords are undecipherable and so need to have random passwords generated).
Sample JSON files can be found in the Module 8 Json Files folder within the files you
downloaded for this course.
You will use another sample application that reads a JSON file and uploads the users found to
AAD. This application provides options to enable you to reuse the existing passwords for users
(if they are available). The application requires an application registration in Azure AAD B2C. To
save time, these steps reuse the B2CGraphClient created in the previous exercise.
Note that the following steps are primarily concerned with handling users with passwords that
can be migrated. The cases for users with indecipherable passwords, or that require users to
reset their password, are covered in the exercise Require Users to Change Password on First Sign-in,
later in this module.
1) Download the sample application from AADB2CUserMigration sample application. Unzip
it into the C:\AADB2C.UserMigration folder on your desktop computer.
2) Using Visual Studio, open the AADB2C.UserMigration.sln.sln solution file in the
C:\AADB2C.UserMigration folder.
3) In Solution Explorer, expand the AADB2C.UserMigration project, and then select
App.config.
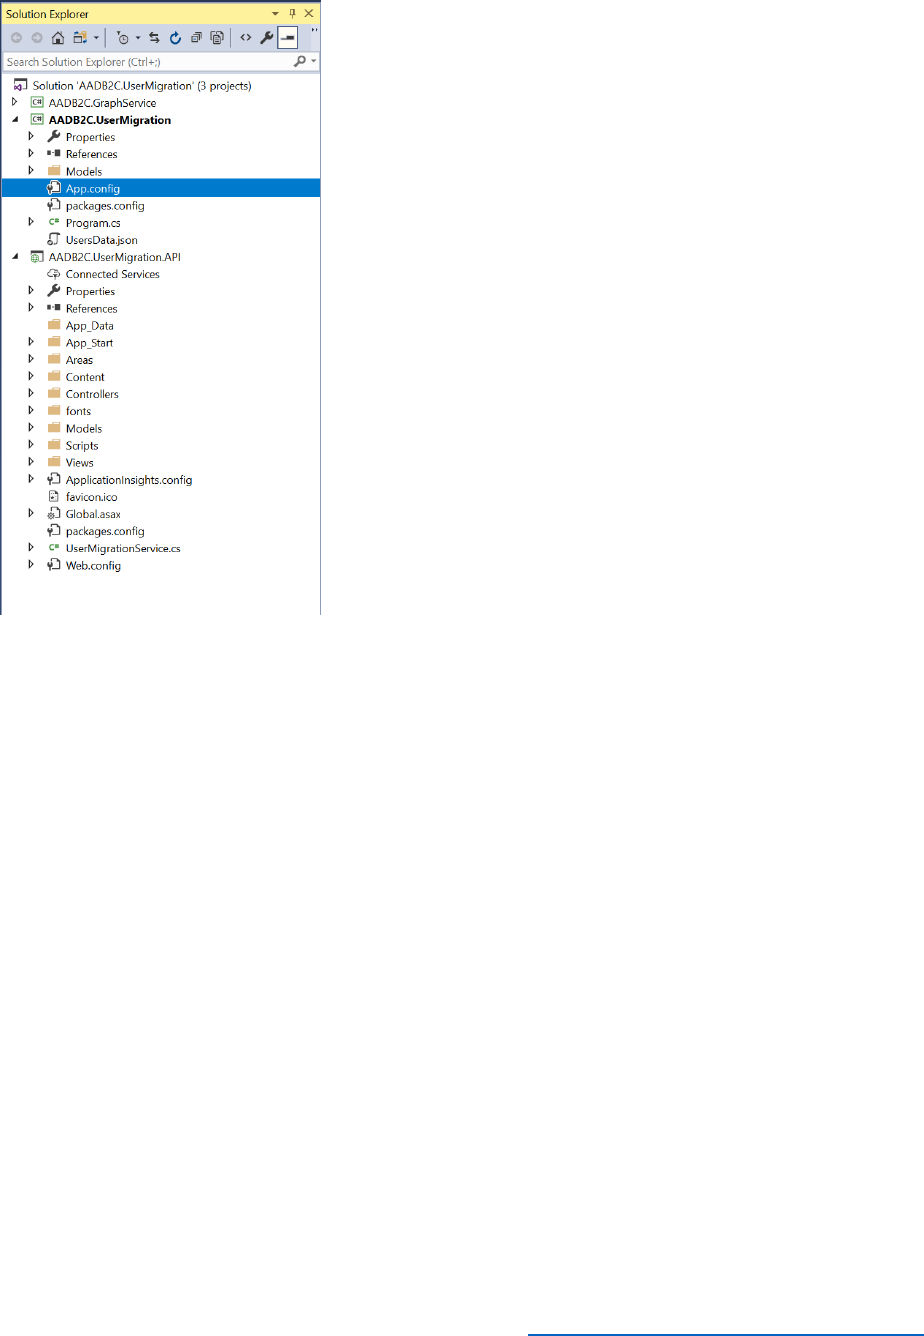
163 © 2018 Microsoft Corporation Feedback? https://aka.ms/aad-b2c-course-feedback
4) In the App.config file, modify the values in the appSettings section. Provide the name
of your tenant, the application ID, and the secret key for the application (reuse the
application ID and secret that you created for the B2CGraphClient application).
<appSettings>
<add key="b2c:Tenant" value="{Tenant Name}" />
<add key="b2c:ClientId" value="{ApplicationID }" />
<add key="b2c:ClientSecret" value="{Secret Key }" />
...
</appSettings>
5) On the Build menu, select Rebuild Solution.
6) In Solution Explorer, under the AADB2C.UserMigration project, select Program.cs.
The Main method in this file is the entry point for the application. The application
expects the user to provide a numeric option on the command line to specify which
operation to perform. If no option is specified, the code displays a menu indicating the
available choices (there are other selections available other than 1 and 2, but they are
not used by this exercise). If the user specifies option 1, the application invokes the

164 © 2018 Microsoft Corporation Feedback? https://aka.ms/aad-b2c-course-feedback
MigrateUsersWithPasswordAsync method. If the user invokes option 2, the application
runs the MigrateUsersWithRandomPasswordAsync method:
static void Main(string[] args)
{
if (args.Length <= 0)
{
Console.WriteLine("Please enter a command as the first argument.");
Console.WriteLine("\t1 : Migrate users with password");
Console.WriteLine("\t2 : Migrate users with random password");
Console.WriteLine("\t3 Email-address : Get user by email address");
Console.WriteLine("\t4 Display-name : Get user by display name");
Console.WriteLine("\t5 : User migration cleanup");
return;
}
try
{
switch (args[0])
{
case "1":
MigrateUsersWithPasswordAsync().Wait();
break;
case "2":
MigrateUsersWithRandomPasswordAsync().Wait();
break;
...

165 © 2018 Microsoft Corporation Feedback? https://aka.ms/aad-b2c-course-feedback
}
...
}
...
}
7) Scroll down and find the MigrateUsersWithPasswordAsync method. This method reads
the user data from a file (checking to make sure that the file exists first), and creates a
collection of user objects in a variable called users. The code then iterates through this
collection and calls the b2CGraphClient.CreateUser method to create each user. Note
that the users. GenerateRandomPassword variable is a Boolean indicating whether the
b2CGraphClient.CreateUser method should use the password specified as a parameter
to this method, or generate its own random password. This method sets the
GenerateRandomPassword variable to false. Note that the method
MigrateUsersWithRandomPasswordAsync, which runs when the users specifies option
2 when executing the program, sets this variable to true. The
b2cGraphClient.CreateUser method uses the Azure AD Graph API to create the user by
sending an HTTP POST request to the users resource for AAD, as described in the
previous exercise.
/// <summary>
/// Migrate users with their password
/// </summary>
/// <returns></returns>
static async Task MigrateUsersWithPasswordAsync()
{
string appDirectoryPath =
Path.GetDirectoryName(System.Reflection.Assembly.GetExecutingAssembly().Location);
string dataFilePath = Path.Combine(appDirectoryPath, Program.MigrationFile);
// Check file existence
if (!File.Exists(dataFilePath))
{

166 © 2018 Microsoft Corporation Feedback? https://aka.ms/aad-b2c-course-feedback
Console.ForegroundColor = ConsoleColor.Red;
Console.WriteLine($"File '{dataFilePath}' not found");
Console.ResetColor();
return;
}
// Read the data file and convert to object
UsersModel users = UsersModel.Parse(File.ReadAllText(dataFilePath));
// Create B2C graph client object
B2CGraphClient b2CGraphClient = new B2CGraphClient(Program.Tenant, Program.ClientId,
Program.ClientSecret);
foreach (var item in users.Users)
{
await b2CGraphClient.CreateUser(item.email,
item.password,
item.displayName,
item.firstName,
item.lastName,
users.GenerateRandomPassword);
}
Console.WriteLine("Users migrated successfully");
}
8) Using Windows Explorer, copy the UsersData.json file containing the sample user data
to the C:\AADB2C.UserMigration\AADB2C.UserMigration\bin\Debug folder.
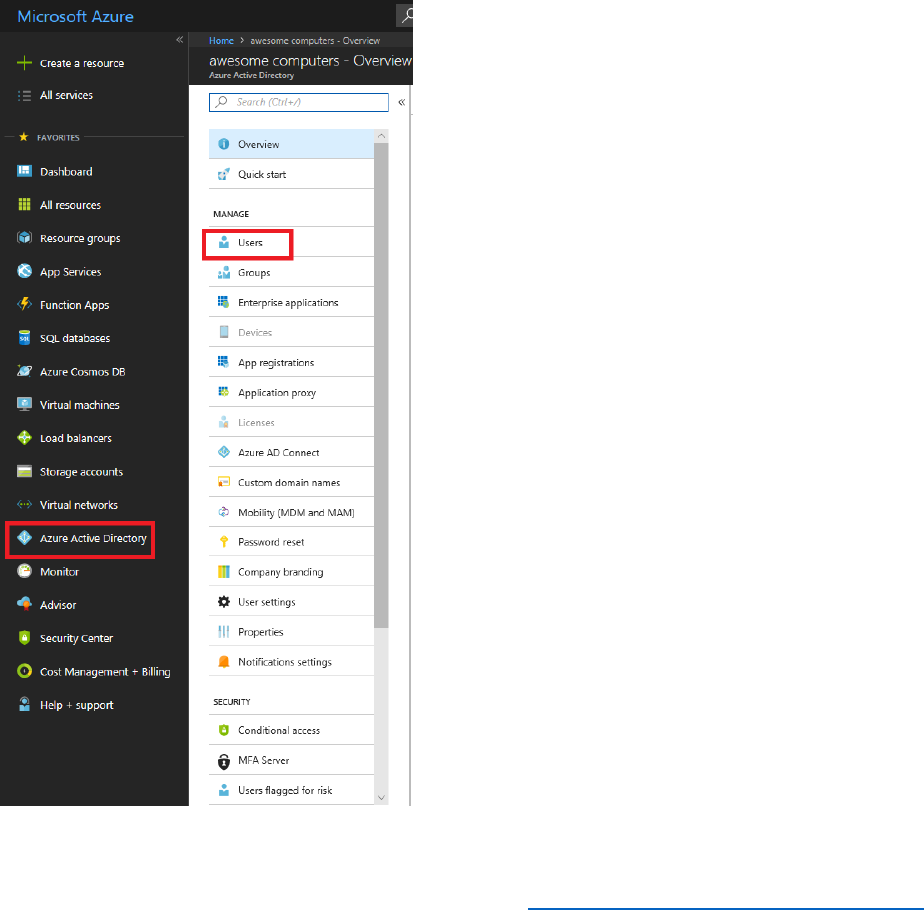
167 © 2018 Microsoft Corporation Feedback? https://aka.ms/aad-b2c-course-feedback
9) Using a text editor such as Notepad, open the UsersData.json file and examine its
contents. Notice that it includes users' passwords. Do not change anything. Close the file
when you are done.
10) Open a command prompt window and move to the
C:\AADB2C.UserMigration\AADB2C.UserMigration\bin\Debug folder
11) At the command prompt, type UserMigration 1. This command reads the records from
the UsersData.json file and creates the corresponding users in AAD. You should see
messages confirming each user as they are created.
12) In the Azure portal, make sure you are connected as
B2CAdmin@AwesomeYourLastname.onmicrosoft.com in the B2C tenant.
13) Select Azure Active Directory, and then select Users.
14) Verify that the new users appear in the list of users for your domain.

168 © 2018 Microsoft Corporation Feedback? https://aka.ms/aad-b2c-course-feedback
Migrate Users Identified using a Social Networking Account to AAD
If users are identified by using social networking accounts, the social networking IDP takes
responsibility for authenticating them; your directory does not contain any password data for
these accounts. To migrate users with these types of account, you must recreate the data
required by the social network IDP to identify these users. This information is usually held in the
userIdentites property of each user in AD, and is typically a combination of the name of the
issuer (such as Facebook) and an issuer user id (an encoded, unique value that identifies the user
to the social network IDP). For example:
"userIdentities": [{
"issuer": "Facebook.com",
"issuerUserId": "MTIzNDU2Nzg5MA=="
}
]
This procedure shows how to migrate these types of users to AAD. Note that the
AADB2C.UserMigration application does not currently support users with social identities, so
these steps focus on using PowerShell instead.
1) Using Windows Explorer, copy the UsersSocialData.json file containing the sample user
data to the C:\AADB2C.UserMigration folder.
2) Open the UsersSocialData.json file using Notepad. This file contains a list of users in
JSON formatted; this is how data is returned by using the Azure AD Graph API. Notice
that each user in this file has a userIdentities property that references Facebook as a
social identity provider. Do not change any data, and close Notepad when you have
finished browsing.
3) Open the Open a PowerShell prompt.
4) Create the following PowerShell function (this is the same function that you created in
the first set of exercises):
function GetAuthToken
{
param
(
[Parameter(Mandatory=$true)]
$TenantName
)

169 © 2018 Microsoft Corporation Feedback? https://aka.ms/aad-b2c-course-feedback
$adal = "${env:ProgramFiles(x86)}\Microsoft
SDKs\Azure\PowerShell\ServiceManagement\Azure\Services\Microsoft.IdentityModel.Clients.Act
iveDirectory.dll"
$adalforms = "${env:ProgramFiles(x86)}\Microsoft
SDKs\Azure\PowerShell\ServiceManagement\Azure\Services\Microsoft.IdentityModel.Clients.Act
iveDirectory.WindowsForms.dll"
[System.Reflection.Assembly]::LoadFrom($adal) | Out-Null
[System.Reflection.Assembly]::LoadFrom($adalforms) | Out-Null
$clientId = "1950a258-227b-4e31-a9cf-717495945fc2"
$redirectUri = "urn:ietf:wg:oauth:2.0:oob"
$resourceAppIdURI = "https://graph.windows.net"
$authority = "https://login.windows.net/$TenantName"
$authContext = New-Object
"Microsoft.IdentityModel.Clients.ActiveDirectory.AuthenticationContext" -ArgumentList
$authority
$authResult = $authContext.AcquireToken($resourceAppIdURI, $clientId,$redirectUri, "Auto")
return $authResult
}
The GetAuthToken function prompts the user to log in to the AAD tenant specified by the
$TenantName parameter, and returns the authentication token if the login is successful.
5) Create a variable that references the name of your AAD tenant (replace <tenantname>
with the name of your AAD tenant):
$tenant = "<tenantname>.onmicrosoft.com"
6) Run the GetAuthToken function and extract the authentication token from the result:
$token = GetAuthToken -TenantName $tenant
7) Construct an HTTP authorization header object that contains the bearer token in the
$token variable:
$authHeader = @{
'Content-Type'='application\json'

170 © 2018 Microsoft Corporation Feedback? https://aka.ms/aad-b2c-course-feedback
'Authorization'=$token.CreateAuthorizationHeader()
}
8) Type the following commands:
$jsonlist = Get-Content -Raw -Path C:\AADB2C.UserMigration\UsersSocialData.json |
ConvertFrom-Json
$userlist = $jsonlist | select -expand users
$resource = "users/"
$uri = "https://graph.windows.net/$tenant/$($resource)?api-version=1.6"
These statements read the user accounts from the JSON file and generate a list of user objects.
The $resource and $uri variables reference the URI in your tenant where the new users should
be stored.
9) Enter the following block of code:
foreach ($user in $userlist)
{
$newuser = $user | ConvertTo-Json
Invoke-RestMethod -Uri $uri –Headers $authHeader –Method Post -Body $newuser -
ContentType "application/json" –Verbose
echo Created $user.displayName
}
These statements iterate through the list of user objects, and send an HTTP POST request to
your AAD to create each user in turn.
10) In the Azure portal, make sure you are connected as
B2CAdmin@AwesomeYourLastname.onmicrosoft.com.
11) Select Azure Active Directory, and then select Users.
12) Verify that the new users appear in the list of users for your domain, and that each user is
identified as a facebook.com user.
Require Users to Change Password on First Sign-in
To handle users with passwords that cannot be migrated, you will need to generate a random
password, and then get users to reset their passwords when they log in. To achieve this you
have several strategies available, including:

171 © 2018 Microsoft Corporation Feedback? https://aka.ms/aad-b2c-course-feedback
• Directly emailing each user with the endpoint of the PasswordReset policy for
your domain:
• Setting the forceChangePasswordNextLogin attribute of the password profile
for the user to true:
{
"accountEnabled" : true,
"userPrincipalName" : "ddee@contoso.com",
"displayName" : "DDD EEE",
"passwordProfile" : {
"password" : "********",
"forceChangePasswordNextLogin" : true
},
"mailNickname" : "ddee"
}
In the situation where the passwords have been successfully migrated (the original passwords
are reused), it is still good practice to ask users to reset their passwords the next time they log
in. You can use either of the strategies just highlighted. However, the problem with the first
approach is that users might choose to ignore the email; there is no compulsion for them to
reset their password. The second approach enforces a password change, but from an
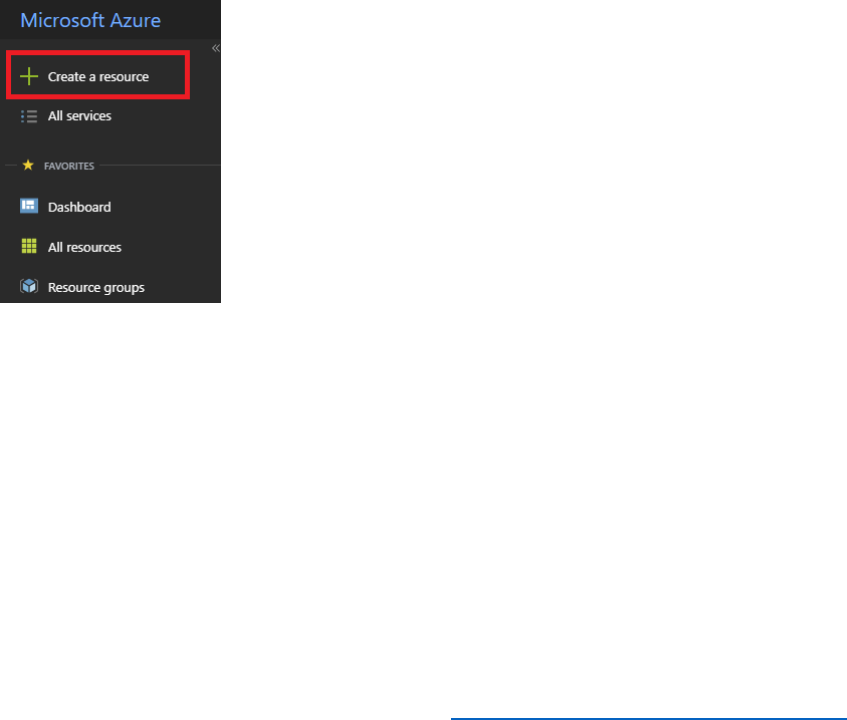
172 © 2018 Microsoft Corporation Feedback? https://aka.ms/aad-b2c-course-feedback
administrative perspective it is not easy to determine that users have actually logged in and
done so, so their accounts might still reference an old, unmodified password.
The AADB2C.UserMigration application adopts a third approach that enables you to quickly
check whether users have reset their passwords. As users are migrated, a record of each user is
also recorded in Azure table storage. A separate REST Web service, AADB2C.UserMigration.API,
implemented as part of the AADB2C.UserMigration solution reads the user records in table
storage. The next time the user logs in, a custom policy invokes the AADB2C.UserMigration.API
with the details of the user. If the user's record is found in table storage, the API returns the
error message "You must change password". Once the user has changed their password, the
policy calls the API again to remove the user's record from table storage. At any stage, an
administrator with the appropriate access rights can read the data from table storage to
determine which users are yet to reset their password.
The following procedure shows how to implement this approach.
1) In the Azure portal, make sure you are connected as
B2CAdmin.AwesomeYourLastname.onmicrosoft.com, and switch to your Azure
tenant (not the B2C tenant)
2) Select + Create a resource.
3) In the Search box, enter Storage account, and then select Storage account – blob,
table, file, queue.
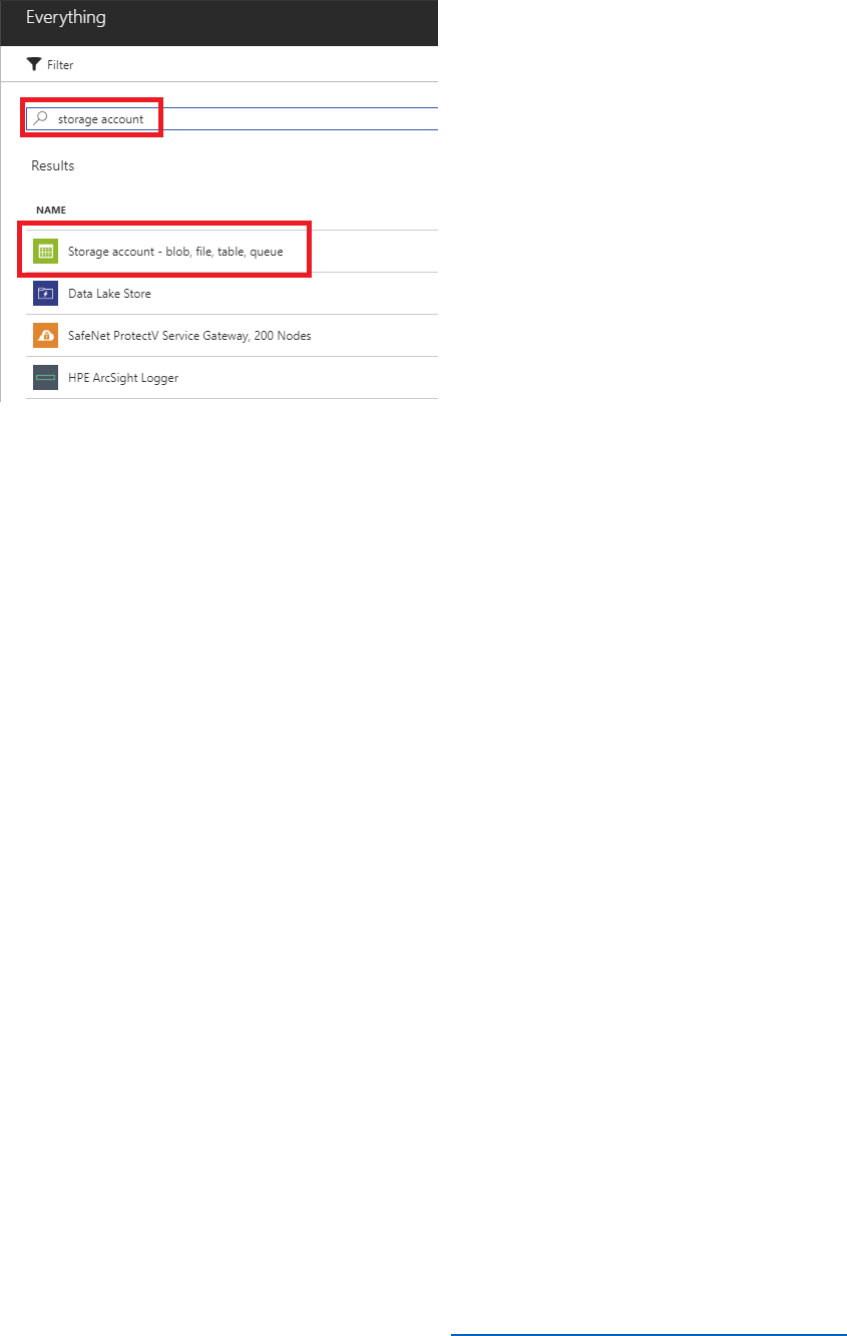
173 © 2018 Microsoft Corporation Feedback? https://aka.ms/aad-b2c-course-feedback
4) Select Create.
5) Enter a unique name for the storage account, leave the remaining options at their
defaults (create a new resource group if necessary), and then select Create.
6) When the storage account has been created, select All resources, select your new
storage account, and then select Access keys. Record the value for the Connection
string.
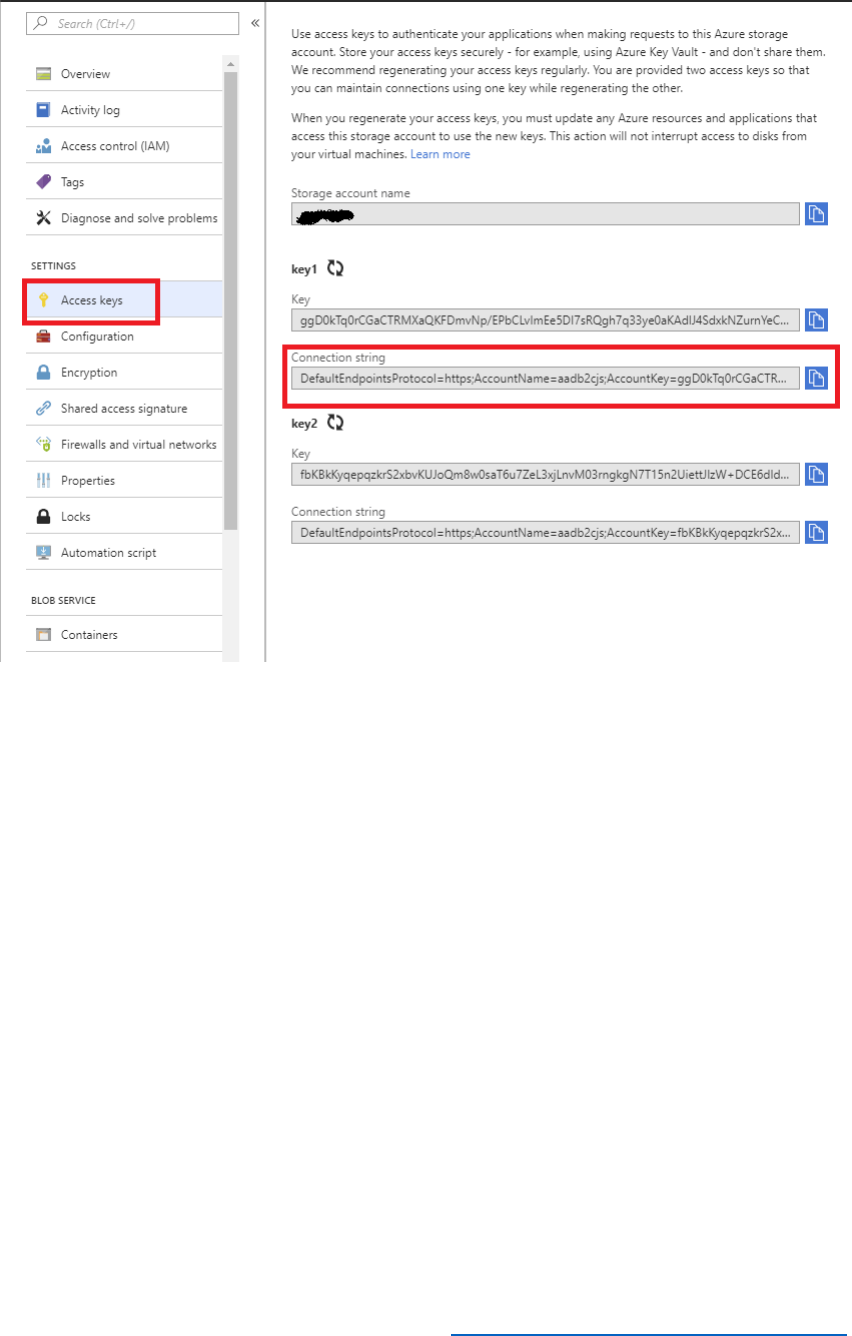
174 © 2018 Microsoft Corporation Feedback? https://aka.ms/aad-b2c-course-feedback
7) In Visual Studio, return to the AADB2C.UserMigration.sln solution file in the
C:\AADB2C.UserMigration folder.
8) In Solution Explorer, expand the AADB2C.UserMigration project, and then select
App.config.
9) In the App.config file, in the appSettings section, insert the table storage connection
string as the value for the BlobStorageConnectionString key.
<appSettings>
...
<add key="BlobStorageConnectionString"
value="DefaultEndpointsProtocol=https;AccountName=..." />
</appSettings>
10) In Solution Explorer, expand the AADB2C.UserMigration.API project, and then select
Web.config.
11) In the Web.config file, in the appSettings section, insert the same table storage
connection string as the value for the BlobStorageConnectionString key.
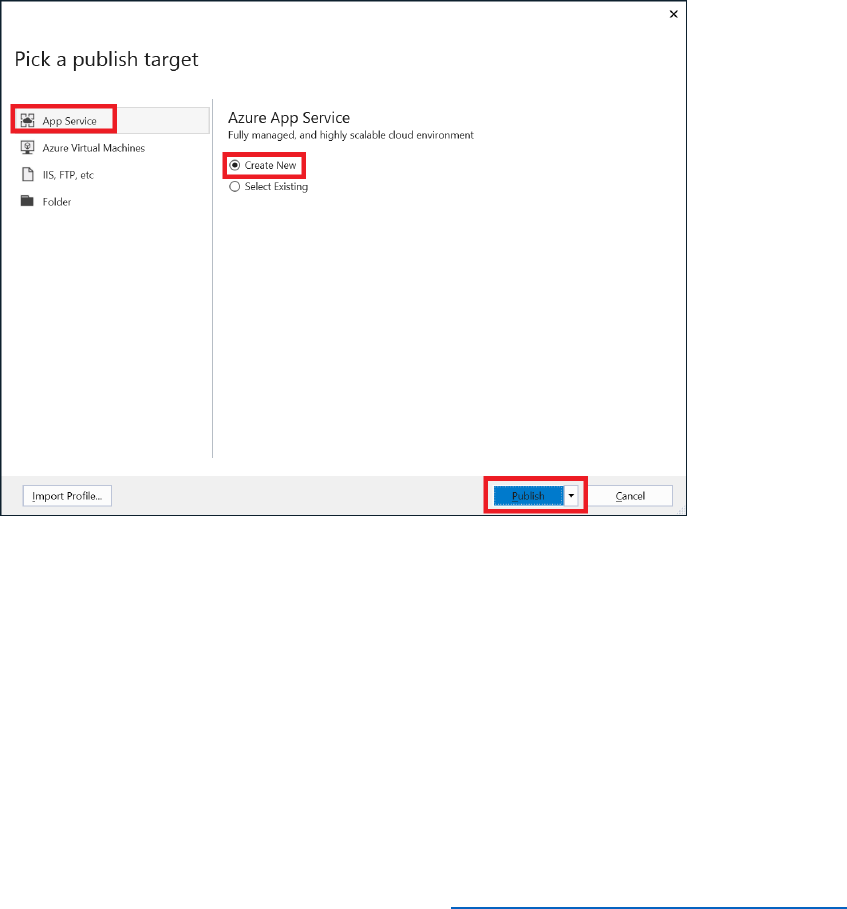
175 © 2018 Microsoft Corporation Feedback? https://aka.ms/aad-b2c-course-feedback
<appSettings>
...
<add key="BlobStorageConnectionString"
value="DefaultEndpointsProtocol=https;AccountName=..." />
</appSettings>
12) On the Build menu, select Rebuild Solution.
13) In Solution Explorer, right-click the AADB2C.UserMigration.API project, and then select
Publish.
14) In the Pick a publish target window, select App Service, select Create New, and then
select Publish.
15) In the Create App Service dialog box, log in as B2CAdmin in your Azure tenant (if
necessary, add the account to Visual Studio). Set the App Name to
AADB2CUserMigrationAPIAwesomeYourLastname where AwesomeYourLastname
is the name of your B2C tenant. Accept the default values for the remaining fields, and
then select Create.
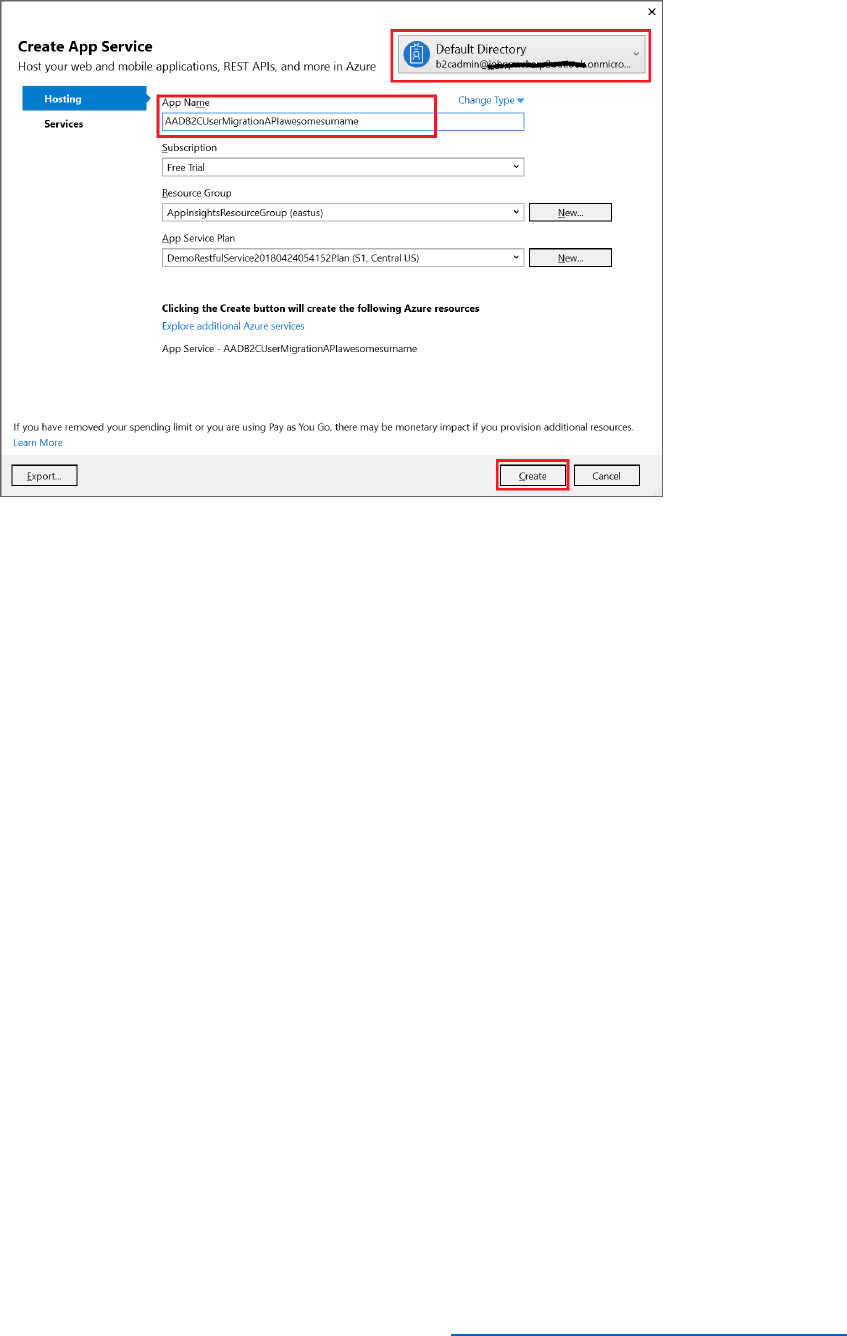
176 © 2018 Microsoft Corporation Feedback? https://aka.ms/aad-b2c-course-feedback
16) Wait while the web application is published. When deployment is complete, the web
app will start running and a browser window will open (The browser might display the
error message The resource cannot be found, but this is OK.)
17) Log in to the Azure portal as B2CAdmin@awsomesurname.onmicrosoft.com, where
AwesomeYourLastname is the name of your B2C tenant. Make sure you are connected
to your B2C tenant (not the Azure tenant).
18) Select All Services, type Azure AD B2C, and then select Azure AD B2C.
19) In the Azure AD B2C blade, select Identity Experience Framework.
20) Select Custom Policies, and then select the B2C_1A_TrustFrameworkExtensions policy
file.

177 © 2018 Microsoft Corporation Feedback? https://aka.ms/aad-b2c-course-feedback
21) Select Download, and save the file as TrustFrameworkExtensions.xml.
22) Open the TrustFrameworkExtensions.xml file using Visual Studio.
23) Add the following <ClaimsProvider> element to the list in the <ClaimsProviders> node.
Change your-app to AADB2CUserMigrationAPIAwesomeYourLastname (two
occurrences):
<ClaimsProvider>
<DisplayName>Password Reset APIs</DisplayName>
<TechnicalProfiles>
<TechnicalProfile Id="LocalAccountSignIn">
<DisplayName>Local account just in time migration</DisplayName>
<Protocol Name="Proprietary" Handler="Web.TPEngine.Providers.RestfulProvider,
Web.TPEngine, Version=1.0.0.0, Culture=neutral, PublicKeyToken=null" />
<Metadata>
<Item Key="ServiceUrl">https://your-
app.azurewebsites.net/api/PrePasswordReset/LocalAccountSignIn</Item>
<Item Key="AuthenticationType">None</Item>
<Item Key="SendClaimsIn">Body</Item>
</Metadata>
<InputClaims>
<InputClaim ClaimTypeReferenceId="signInName" PartnerClaimType="email" />
</InputClaims>
<UseTechnicalProfileForSessionManagement ReferenceId="SM-Noop" />
</TechnicalProfile>

178 © 2018 Microsoft Corporation Feedback? https://aka.ms/aad-b2c-course-feedback
<TechnicalProfile Id="LocalAccountPasswordReset">
<DisplayName>Local account just in time migration</DisplayName>
<Protocol Name="Proprietary" Handler="Web.TPEngine.Providers.RestfulProvider,
Web.TPEngine, Version=1.0.0.0, Culture=neutral, PublicKeyToken=null" />
<Metadata>
<Item Key="ServiceUrl">https://your-
app.azurewebsites.net/api/PrePasswordReset/PasswordUpdated</Item>
<Item Key="AuthenticationType">None</Item>
<Item Key="SendClaimsIn">Body</Item>
</Metadata>
<InputClaims>
<InputClaim ClaimTypeReferenceId="email" PartnerClaimType="email" />
</InputClaims>
<UseTechnicalProfileForSessionManagement ReferenceId="SM-Noop" />
</TechnicalProfile>
</TechnicalProfiles>
</ClaimsProvider>
24) Add the following <ClaimsProvider> element to the list, directly after the one that you
added in the previous step.
<ClaimsProvider>
<DisplayName>Local Account</DisplayName>
<TechnicalProfiles>
<!-- This technical profile uses a validation technical profile to authenticate the user. -
->
<TechnicalProfile Id="SelfAsserted-LocalAccountSignin-Email">
<ValidationTechnicalProfiles>
<ValidationTechnicalProfile ReferenceId="LocalAccountSignIn" />
</ValidationTechnicalProfiles>
</TechnicalProfile>
<TechnicalProfile Id="LocalAccountWritePasswordUsingObjectId">
<ValidationTechnicalProfiles>
<ValidationTechnicalProfile ReferenceId="LocalAccountPasswordReset" />
</ValidationTechnicalProfiles>
</TechnicalProfile>
</TechnicalProfiles>
</ClaimsProvider>
25) Save the file.
26) In the Azure portal, return to the list of policy files in the Identity Experience
Framework blade, and then select Upload Policy.
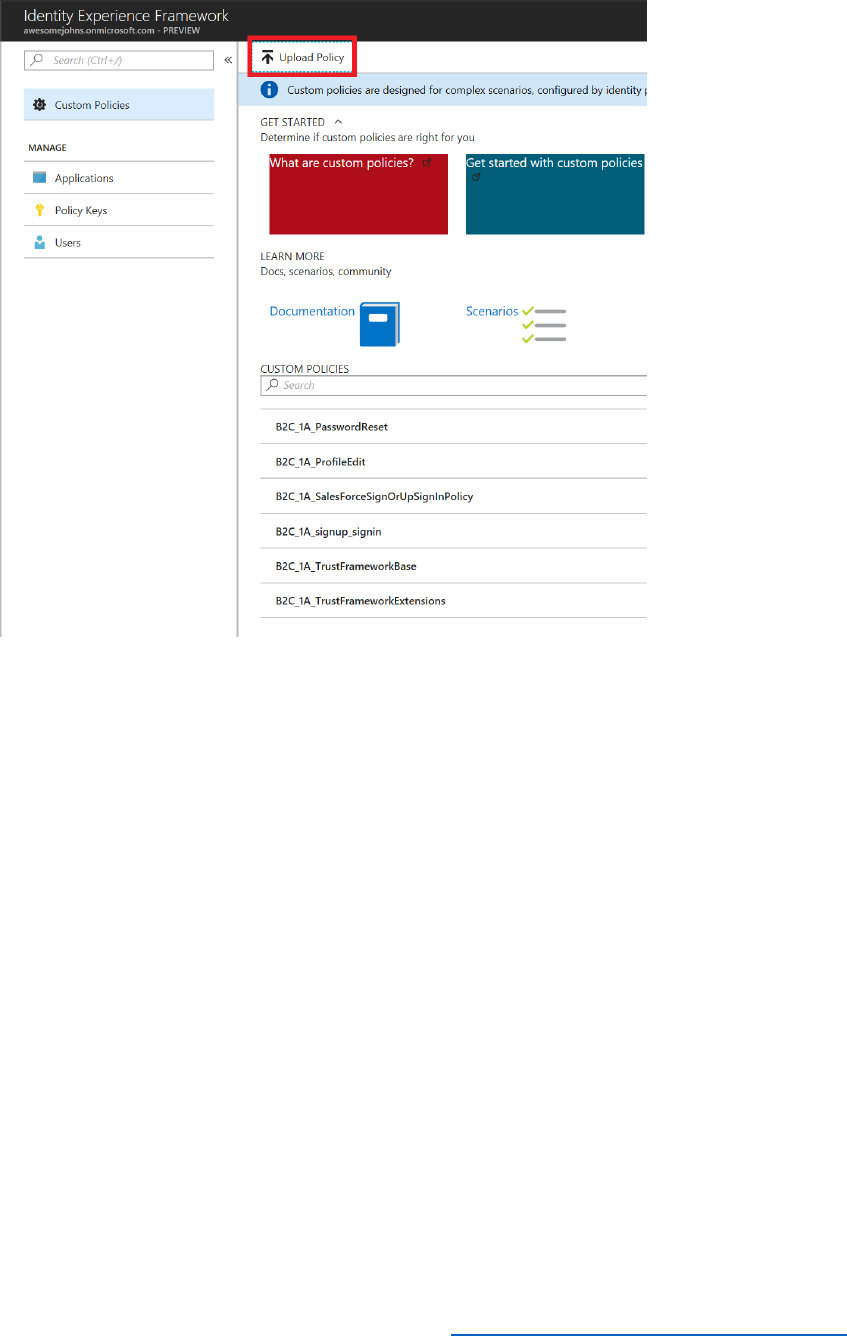
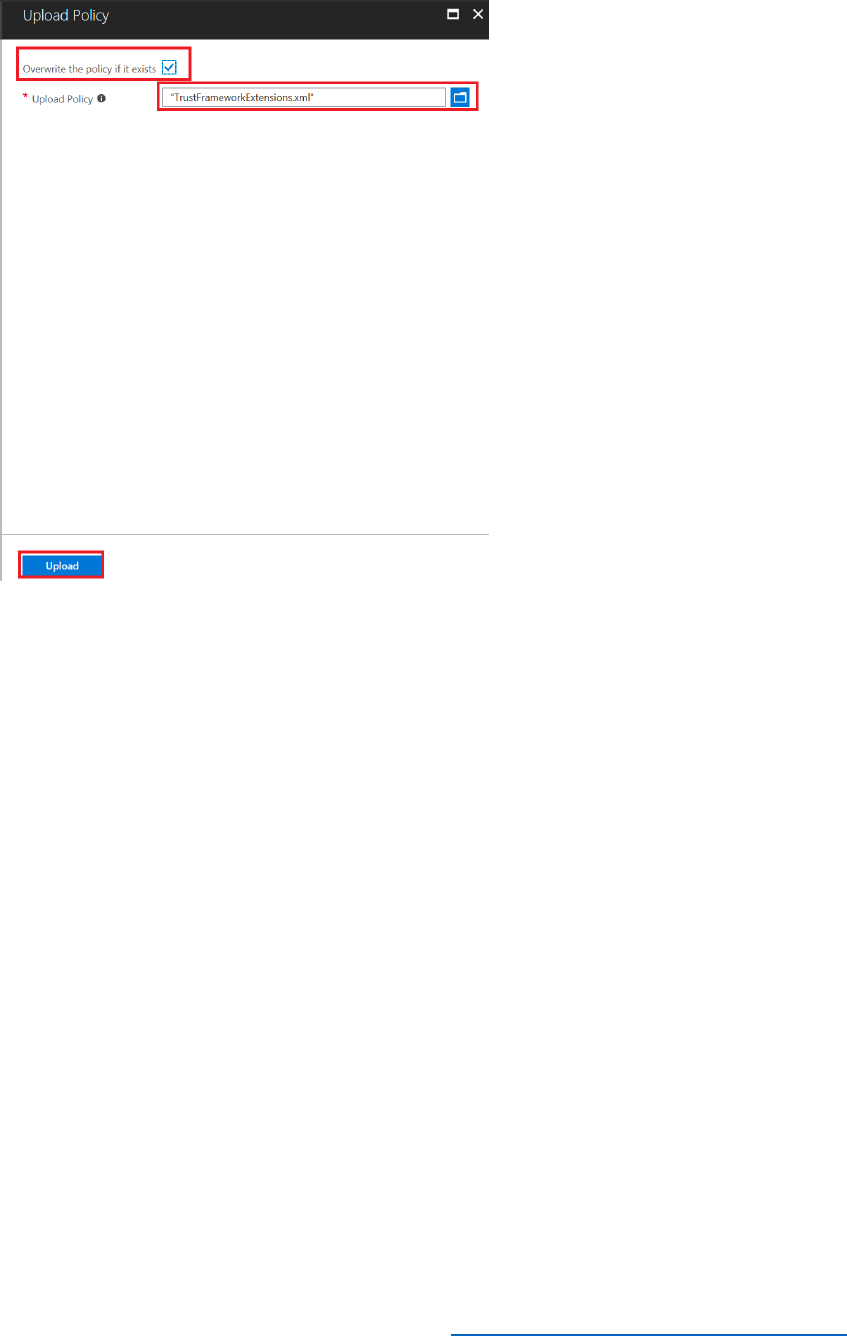
180 © 2018 Microsoft Corporation Feedback? https://aka.ms/aad-b2c-course-feedback
28) Using Windows Explorer, copy the UsersDataResetPasswords.json file containing the
sample user data to the
C:\AADB2C.UserMigration\AADB2C.UserMigration\bin\Debug folder. This file is
similar in format to the UsersData.json file except that it contains a different set of user
account information.
29) Open the UsersDataResetPasswords.json file using Notepad, and add a record for a
user with your own email address. Save the file.
Note: If you have already created a user in the B2C tenant with your email address, you
should remove it by using the Azure Active Directory blade in the Azure portal, as
described in Modules 6 and 7.
30) Using Visual Studio, in Solution Explorer, in the AADB2C.UserMigration project, select
App.config.
31) In the appSettings section of the file, modify the value is the MigrationFile key to refer
to the UsersDataResetPasswords.json file.
<appSettings>
...
<add key="MigrationFile" value="UsersDataNoPasswords.json" />
...

181 © 2018 Microsoft Corporation Feedback? https://aka.ms/aad-b2c-course-feedback
</appSettings>
32) In Solution Explorer, in the AADB2C.UserMigration project, select Program.cs.
33) Scroll down and find the MigrateUsersWithRandomPasswordAsync method.
static async Task MigrateUsersWithRandomPasswordAsync()
{
string appDirecotyPath =
Path.GetDirectoryName(System.Reflection.Assembly.GetExecutingAssembly().Location);
string dataFilePath = Path.Combine(appDirecotyPath, Program.MigrationFile);
// Check file existence
if (!File.Exists(dataFilePath))
{
Console.ForegroundColor = ConsoleColor.Red;
Console.WriteLine($"File '{dataFilePath}' not found");
Console.ResetColor();
return;
}
// Read the data file and convert to object
UsersModel users = UsersModel.Parse(File.ReadAllText(dataFilePath));
// Create B2C graph client object
B2CGraphClient b2CGraphClient = new B2CGraphClient(Program.Tenant,
Program.ClientId, Program.ClientSecret);
// Parse the connection string and return a reference to the storage account.
CloudStorageAccount storageAccount =
CloudStorageAccount.Parse(Program.BlobStorageConnectionString);

182 © 2018 Microsoft Corporation Feedback? https://aka.ms/aad-b2c-course-feedback
// Create the table client.
CloudTableClient tableClient = storageAccount.CreateCloudTableClient();
// Retrieve a reference to the table.
CloudTable table = tableClient.GetTableReference("users");
// Create the table if it doesn't exist.
table.CreateIfNotExists();
// Create the batch operation.
TableBatchOperation batchOperation = new TableBatchOperation();
foreach (var item in users.Users)
{
await b2CGraphClient.CreateUser(item.email,
item.password,
item.displayName,
item.firstName,
item.lastName,
users.GenerateRandomPassword);
// Create a new customer entity.
// Note: Azure Blob Table query is case sensitive, always set the email to lower case
TableEntity user = new TableEntity("B2CMigration", item.email.ToLower());
// Create the TableOperation object that inserts the customer entity.

183 © 2018 Microsoft Corporation Feedback? https://aka.ms/aad-b2c-course-feedback
TableOperation insertOperation = TableOperation.InsertOrReplace(user);
// Execute the insert operation.
table.Execute(insertOperation);
}
Console.WriteLine("Users migrated successfully");
}
This code uses the Azure Table API to create a new table, named users, in your storage
account. It then iterates through the user listed in the JSON file and called the
b2cGraphClient.CreateUser method to add each user to your AAD domain. If this
operation is successful, the method then adds a record of the user to the users table.
34) In the statement that calls the b2cGraphClient.CreateUser method, change the
users.GenerateRandomPassword parameter (highlighted) to false. For this example,
we want to preserve user's passwords, but force them to change in the next time they
log in.
await b2CGraphClient.CreateUser(item.email,
item.password,
item.displayName,
item.firstName,
item.lastName,
false);
35) On the Build menu, select Rebuild Solution.
36) Open a command prompt window and move to the
C:\AADB2C.UserMigration\AADB2C.UserMigration\bin\Debug folder
37) At the command prompt, type UserMigration 2 to migrate the users listed in the
UsersDataResetPasswords.json file. Remember that option 2 causes the program to run
the MigrateUsersWithRandomPasswordAsync that you have just amended.
You should see messages confirming each user as they are created.
38) In the Azure portal, select Azure Active Directory, and then select Users.
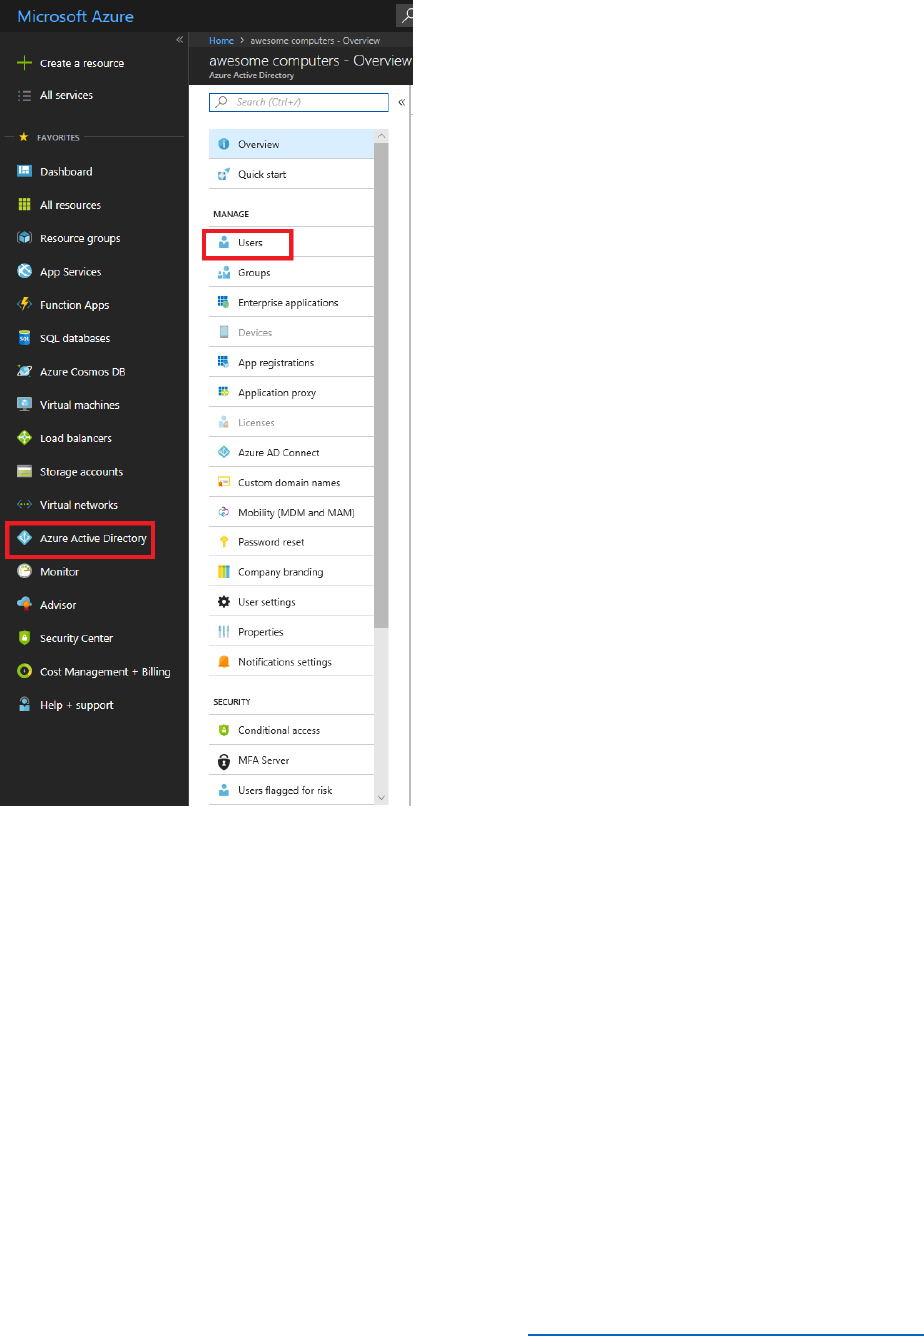
184 © 2018 Microsoft Corporation Feedback? https://aka.ms/aad-b2c-course-feedback
39) Verify that the new users appear in the list of users for your domain.
40) Select All services, enter Azure AD B2C, and then select Azure AD B2C.
41) In the Azure AD B2C blade, select Identity Experience Framework.
42) Select the B2C_1A_signup_signin policy.
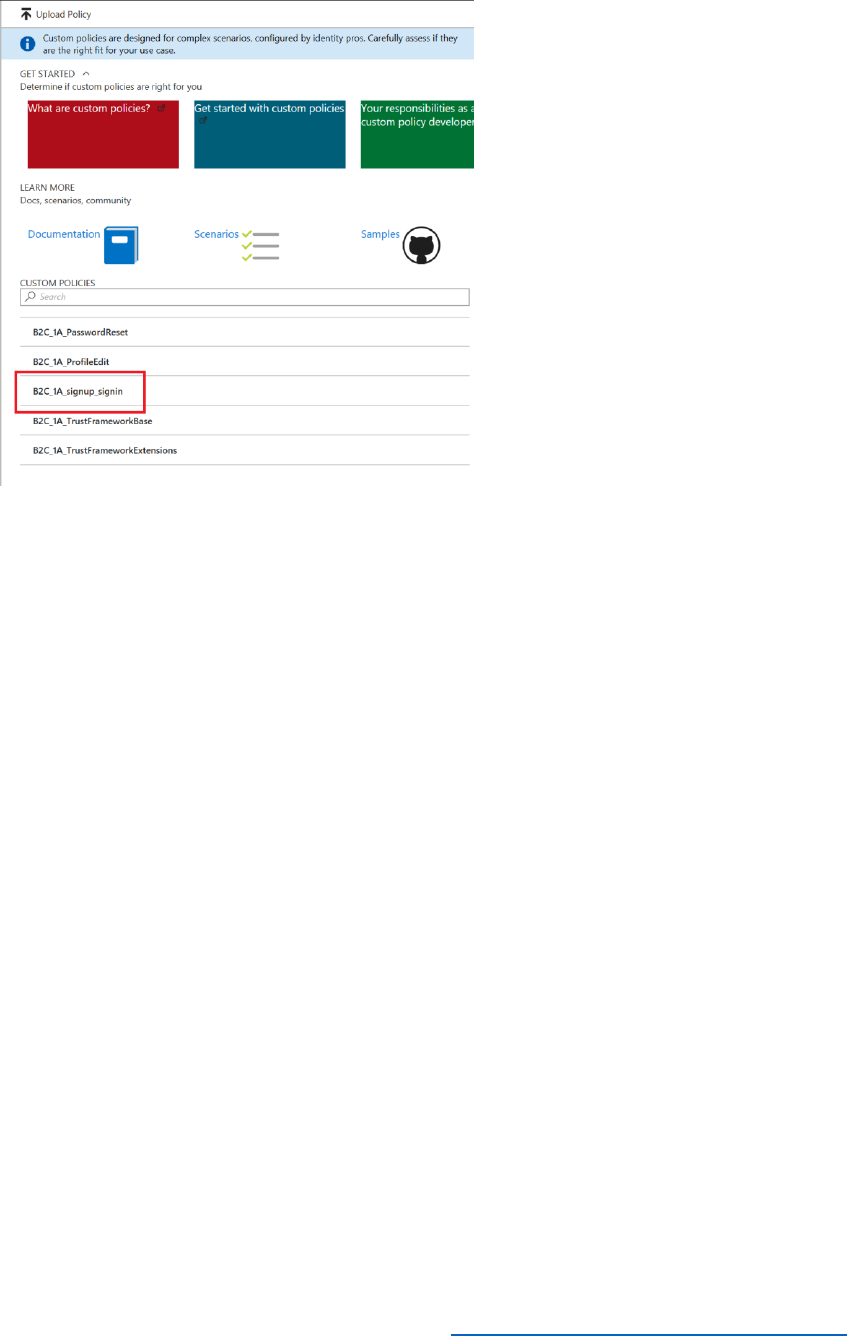
185 © 2018 Microsoft Corporation Feedback? https://aka.ms/aad-b2c-course-feedback
43) In the B2C_1A_signup_signin blade, select Run now.
44) Attempt to log in using your email address, as listed in the
UsersDataResetPasswords.json file. Provide the password specified in this file, and
then select Sign in. You should see the error message You need to change your
password. Please click on the 'Forgot your password?' link below.
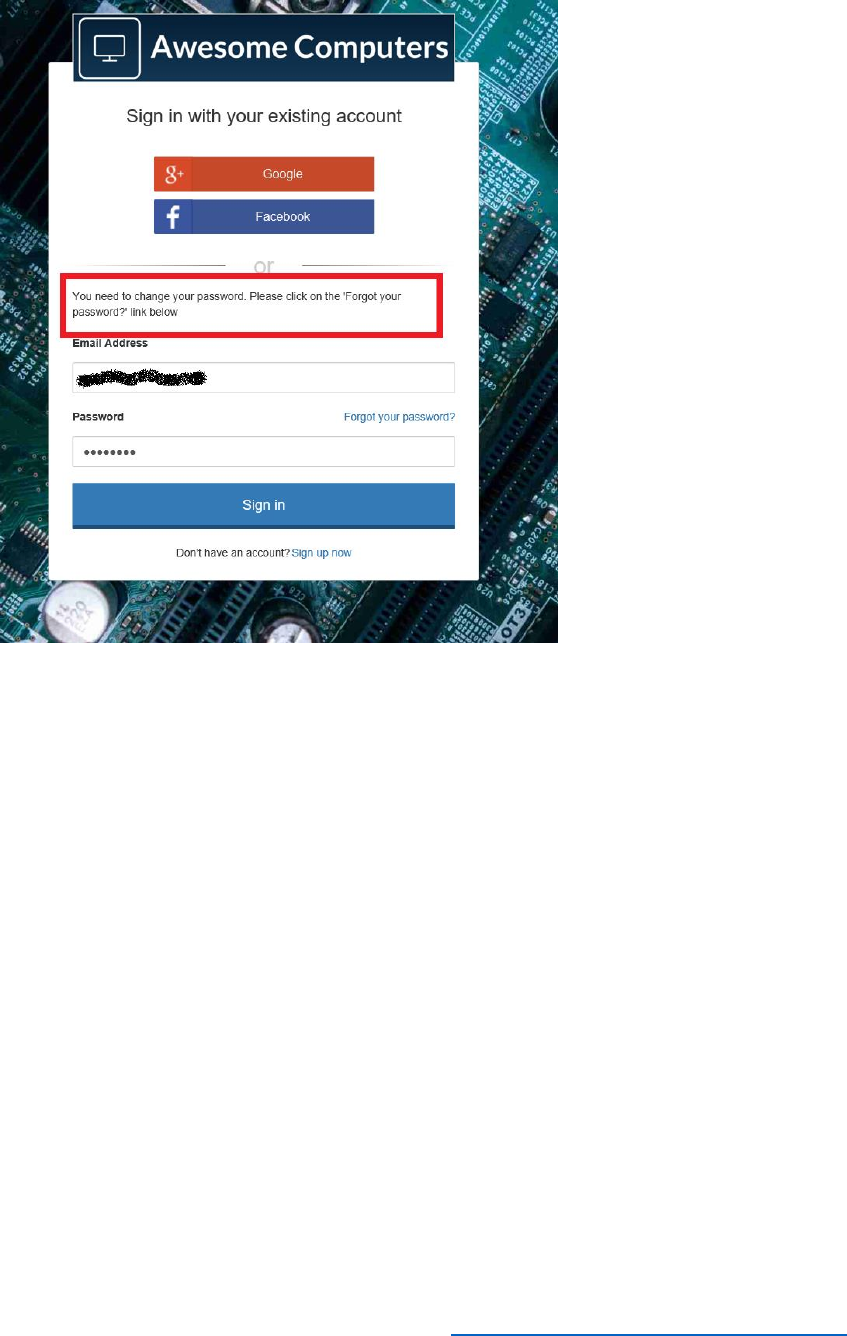
186 © 2018 Microsoft Corporation Feedback? https://aka.ms/aad-b2c-course-feedback
45) Close the sign-in page and return to the Azure portal (don't select Forgot your
password, as this will simply return to the sample app) displaying the list of policies.
46) Select the B2C_1A_PasswordReset policy, and then select Run now. Follow the process
to reset the password for your email address.
47) When you have reset your password, return to the Azure portal, select the
B2C_1A_signup_signin policy, and then select Run now.
48) Verify that you can now sign in using with your email address using your new password.
Important Concepts
The Azure AD Graph API and the Microsoft Graph API
Microsoft provides two APIs for managing information stored in Active Directory; the Azure AD
Graph API which was designed to operate over tenants hosted by using Azure Active Directory
(AAD), and the more recent Microsoft Graph API. The Microsoft Graph API unifies many of the
features available through the Azure Graph API with other services and Active Directory running
on-premises. This unification has resulted in significant overlap between the two APIs. The
purpose of this section is to summarize these APIs, and describe when you should use them.

187 © 2018 Microsoft Corporation Feedback? https://aka.ms/aad-b2c-course-feedback
The Azure AD Graph API
An AAD tenant can contain a large number of objects (users, groups, profiles, permissions, and
other items). While it might be feasible to perform some tasks manually, such as adding a new
user, implementing an operation that spans a large set of objects in the directory (such as
setting a permission for all users) is better performed programmatically. This approach can save
time and reduce inconsistencies and errors that might otherwise occur. This is the role of the
Azure AD Graph API.
The Azure AD Graph API is a service that provides a programmatic interface to AAD. With this
API, you can perform tasks such as:
• Retrieve, add, and delete users, and modify the properties of users and their permissions
and application licenses. You can maintain a hierarchy of users (users that have a direct
report to another user, for example) and assign managers.
• Manage groups. You can organize users into groups and query group membership. A
single user can belong to multiple groups, and you can assign permissions to a group (all
users in that group inherit these permissions). Groups can contain sub-groups.
• Implement token issuance and token lifetime policies over applications, service
principals, specific groups, or the entire organization.
• Manage directory roles. You can use directory roles to control the users and groups that
can perform sensitive operations in a directory.
• Create, delete, update, and query domains within a tenant.
Another key feature of the Azure AD Graph API is that it enables you to query the relationships
between groups of objects. Some of these relationships might involve a large set of objects, and
the relationships themselves could be complex.
You perform operations on a tenant through the Azure AD Graph API by submitting HTTP
requests to the API at https://graph.windows.net. All requests are authenticated, and you must
provide a valid access token in the request header. The article Authorize access to web applications
using OAuth 2.0 and Azure Active Directory describes how to do this.
The general form of a request is:
https://graph.windows.net/{tenant_id}/{resource_path}?{api_version}[odata_query_parameters]
Replace {tenant_id} with the name of your AAD tenant, and {resource_path} with the resource
that you are querying, modifying, adding, or deleting. Typically you should specify api-
version=1.6 for the version number. If a request requires additional parameters, you specify
them using OData operators, such as $filter, $orderby, $expand, $top, and $format For example,
to retrieve a list of users whose names start with "A" in your organization, you can send this
HTTP GET request:

188 © 2018 Microsoft Corporation Feedback? https://aka.ms/aad-b2c-course-feedback
https://graph.windows.net/myorganization/users?api-version=1.6&$filter=startswith(displayName,'A')
The result is an HTTP response message. The body contains a JSON array containing the
matching details. Note that you can use the aliases myorganization to refer to the tenant that
you are currently signed in to, and me to refer to the currently signed-in user.
To create a new user, you would submit a POST request like this:
https://graph.windows.net/myorganization/users?api-version=1.6
The request body must contain the details of the new user, for example:
{
"accountEnabled": true,
"displayName": "AAA BBB",
"mailNickname": "AaaBbb",
"passwordProfile": {
"password": "Test1234",
"forceChangePasswordNextLogin": false
},
"userPrincipalName": "AAA@mydomain.onmicrosoft.com"
}
You can find a full list of the HTTP requests that you can end to the Azure AD Graph API in the
Azure AD Graph API Reference.
You can invoke Azure AD Graph API requests directly from the PowerShell command line, and
you can use the Microsoft.IdentityModel.Clients.ActiveDirectory NuGet package in your own
applications to construct and send requests programmatically; the sample B2CGraphClient
application shows how to use this package in a C# application.
The Microsoft Graph API
The Microsoft Graph API enables you to build applications that connect users to their data. Like
the Azure Graph API, it uses the relationships and objects defined in Active Directory and AAD,
but can also operate over data held in Microsoft Office applications such as Excel. You can use
this API to build custom tools and utilities to help improve productivity. For example, you can
use the Microsoft Graph API to view and maintain the associations between users and items
such as their email, calendars, contacts, documents, devices, and other personal data sources.
The Microsoft Graph API facilitates building services that can automate tasks such as scheduling
meetings, notify interested users if a document changes, analyze usage patterns over
documents and data files, construct custom dashboards, and establish a user's organizational
context (which department they work in, who is their manager, and so on). See What can you do
with Microsoft Graph? for detailed examples.
You send requests to the Microsoft Graph API using queries of the form:

189 © 2018 Microsoft Corporation Feedback? https://aka.ms/aad-b2c-course-feedback
https://graph.microsoft.com/{version}/{resource}?query-parameters
Replace {version} with the version of the API you are using (specify v1.0 for the most recent
implementation), and {resource} with the object that you are referencing. As an example, this
query finds the last user to modify the file data.txt in the specified folder on the specified drive:
https://graph.microsoft.com/v1.0/me/drive/root/children/data.txt/lastModifiedByUser
Note that, as with the Azure AD Graph API, you must provide a valid access token in the security
header of the request – see Get access tokens to call Microsoft Graph for details.
When to Use Which Graph API
New development of the Azure AD Graph API has stopped, and Microsoft are focusing on the
Microsoft Graph API. In most cases, this means that while existing code that runs using the
Azure AD Graph API will still be supported, you should consider using the Microsoft Graph API
for new applications wherever possible. However, there are some situations where the
functionality of the Azure AD Graph API is not yet available in the Microsoft Graph API. One
example concerns Azure AD B2C. So, if you are working with B2C you should continue to use the
Azure AD Graph API.
Graph Explorer
Graph Explorer is a web application that provides a friendly user interface to the graph APIs.
There are actually two versions available; one based on the Azure AD Graph API and another
that uses the Microsoft Graph API. Both operate in a similar manner to send requests to your
tenant, and return results as an HTTP response. You provide your login credentials, and this
information is included in the security header of each request.
Using the Azure AD Graph Explorer
To use the Azure AD Graph Explorer, perform the following steps:
4) Using a web browser, navigate to https://graphexplorer.azurewebsites.net.
5) In the title bar, select Login.
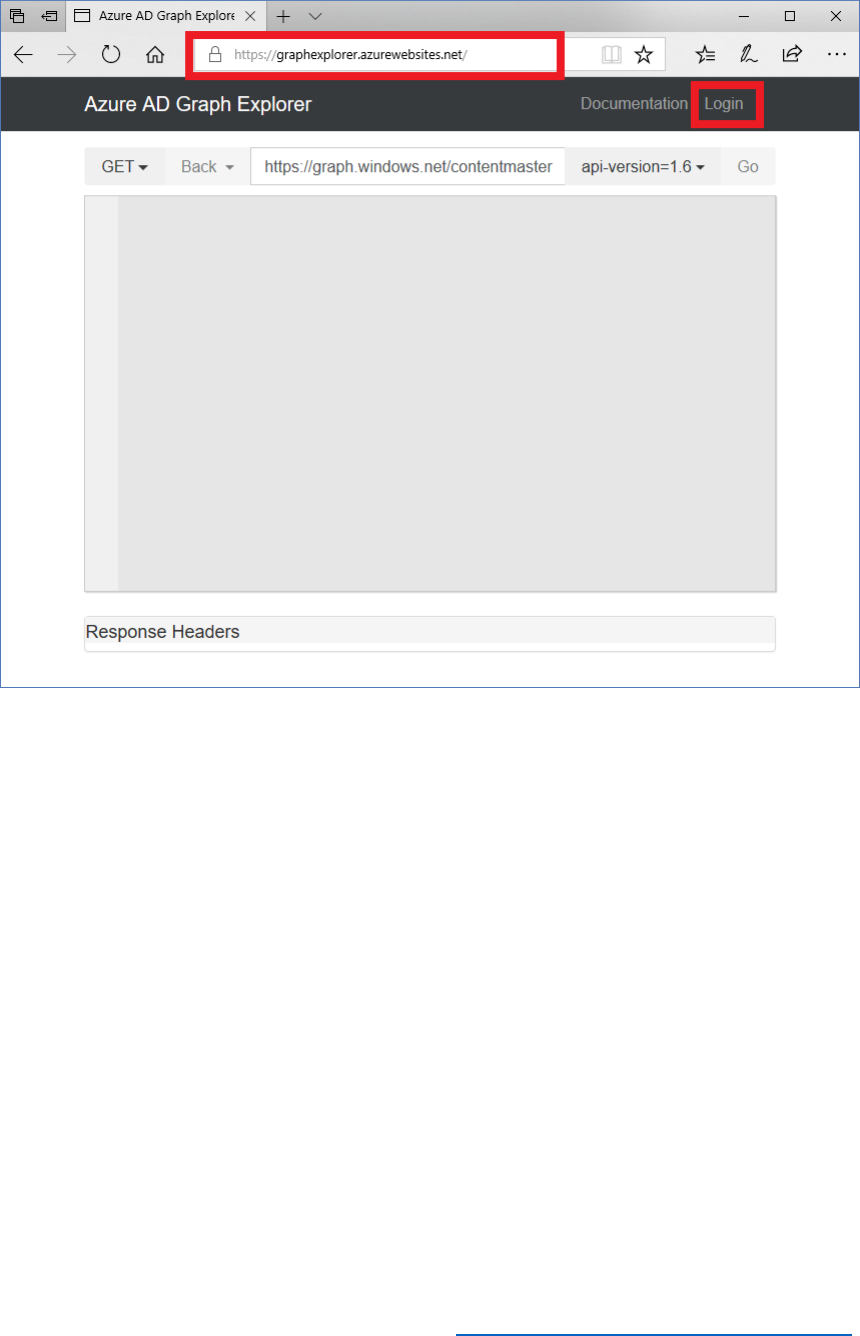
190 © 2018 Microsoft Corporation Feedback? https://aka.ms/aad-b2c-course-feedback
6) Provide the credentials of an account with administrative access to your AAD domain.
7) To run a query, select the GET verb, provide a URI that references the resources to find,
such as https://graph.windows.net/myorganization/users?$filter=startswith(displayName,'A') to
find all users whose name starts with the letter "A", select the API version to use, and
then select Go. The results will appear in the main body of the window:
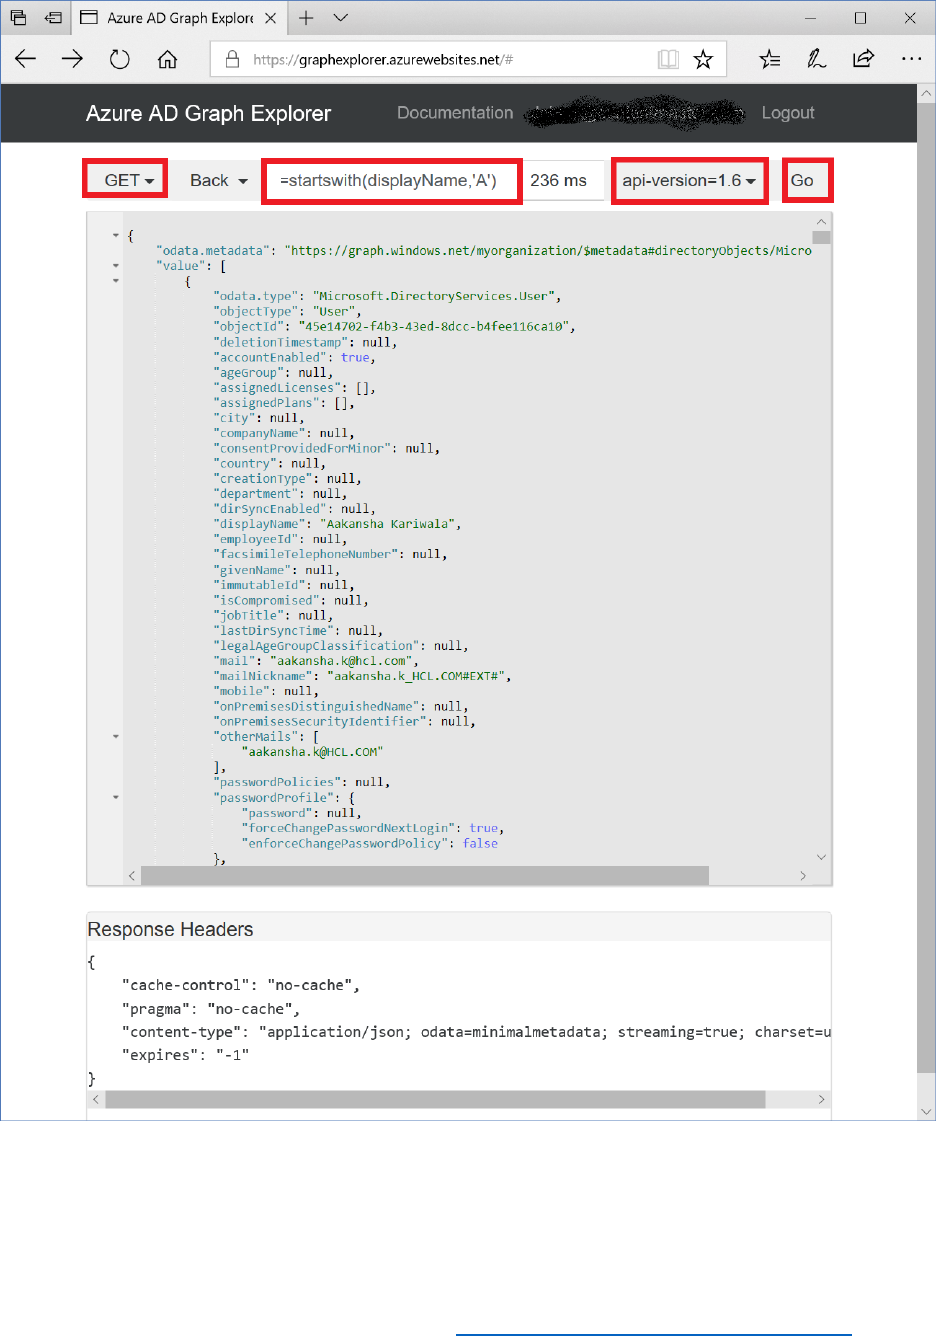
191 © 2018 Microsoft Corporation Feedback? https://aka.ms/aad-b2c-course-feedback
Note that you can expand the Response Headers pane to see the HTTP header
information included with the response.
8) To perform an operation such as adding a new user, select the POST verb, specify the
URI of the resource that you are adding, provide the details of the resource as the
message body, and then select Go. For example, to create a new user, specify a URI such
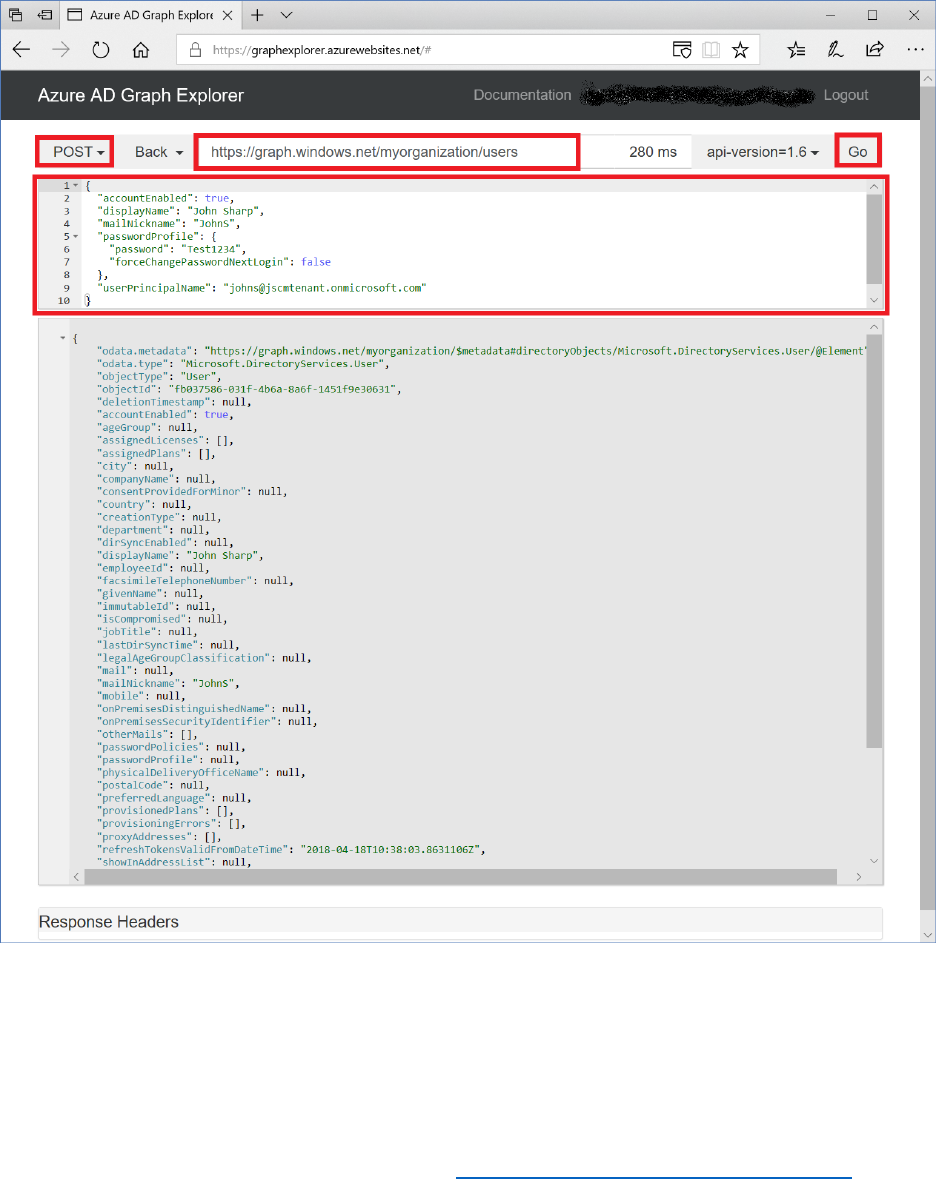
192 © 2018 Microsoft Corporation Feedback? https://aka.ms/aad-b2c-course-feedback
as https://graph.windows.net/myorganization/users, and enter the information for the new
user as the message body, in JSON format. You can find the details of the properties that
you can specify for the different types of objects that you can create in AAD by using the
Azure Graph API in the Azure AD Graph API Reference. If the operation is successful, the
response message shows the details of the object that was created:
Note that you must be logged in as an account that has administrative rights in the
domain to create, delete, and modify objects in AAD.
9) To modify an object, select the PATCH verb, provide the URI of the resource that you
wish to modify, and specify the new details for the resource as the message body. The
following example disables the account just created )
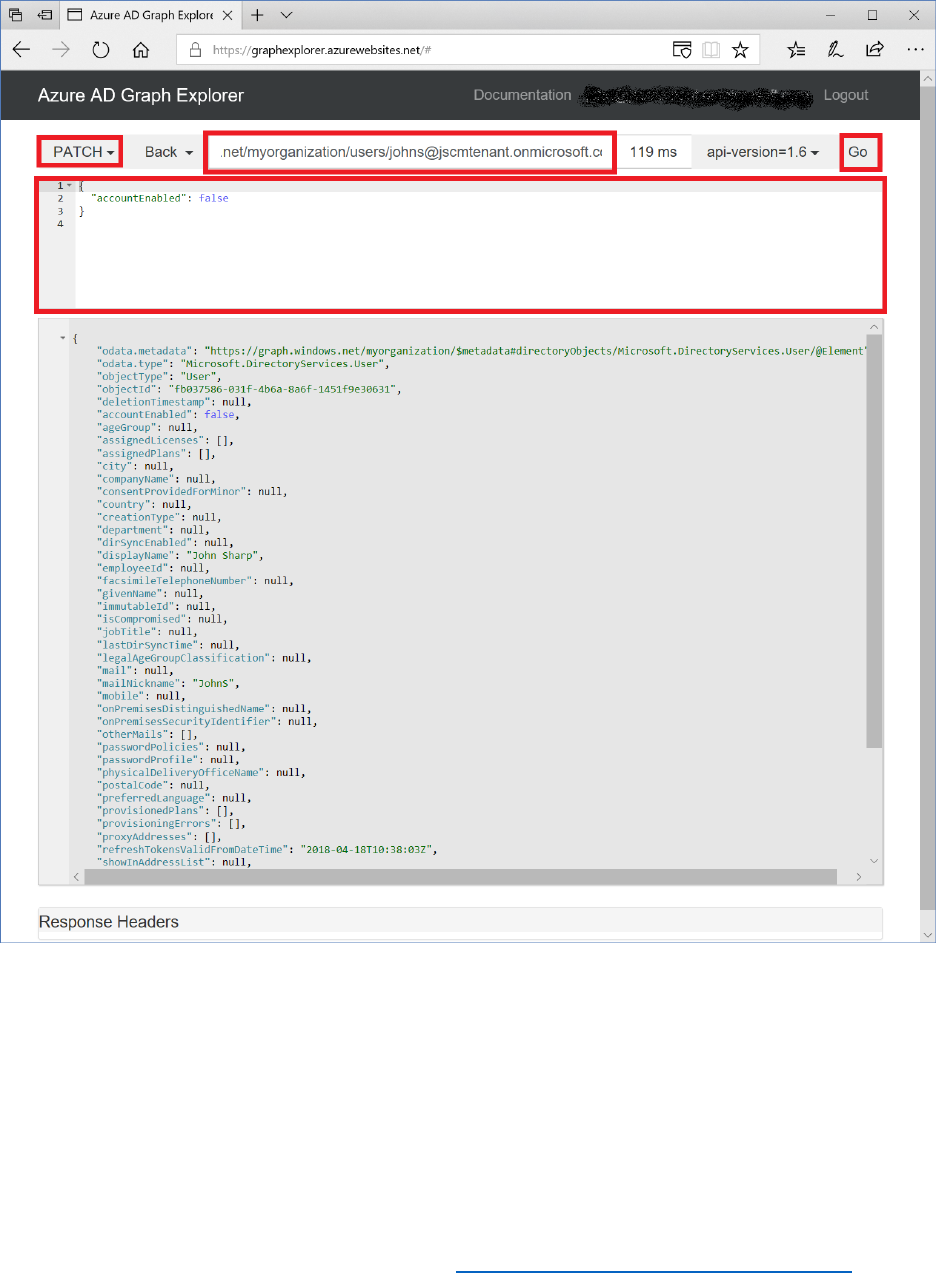
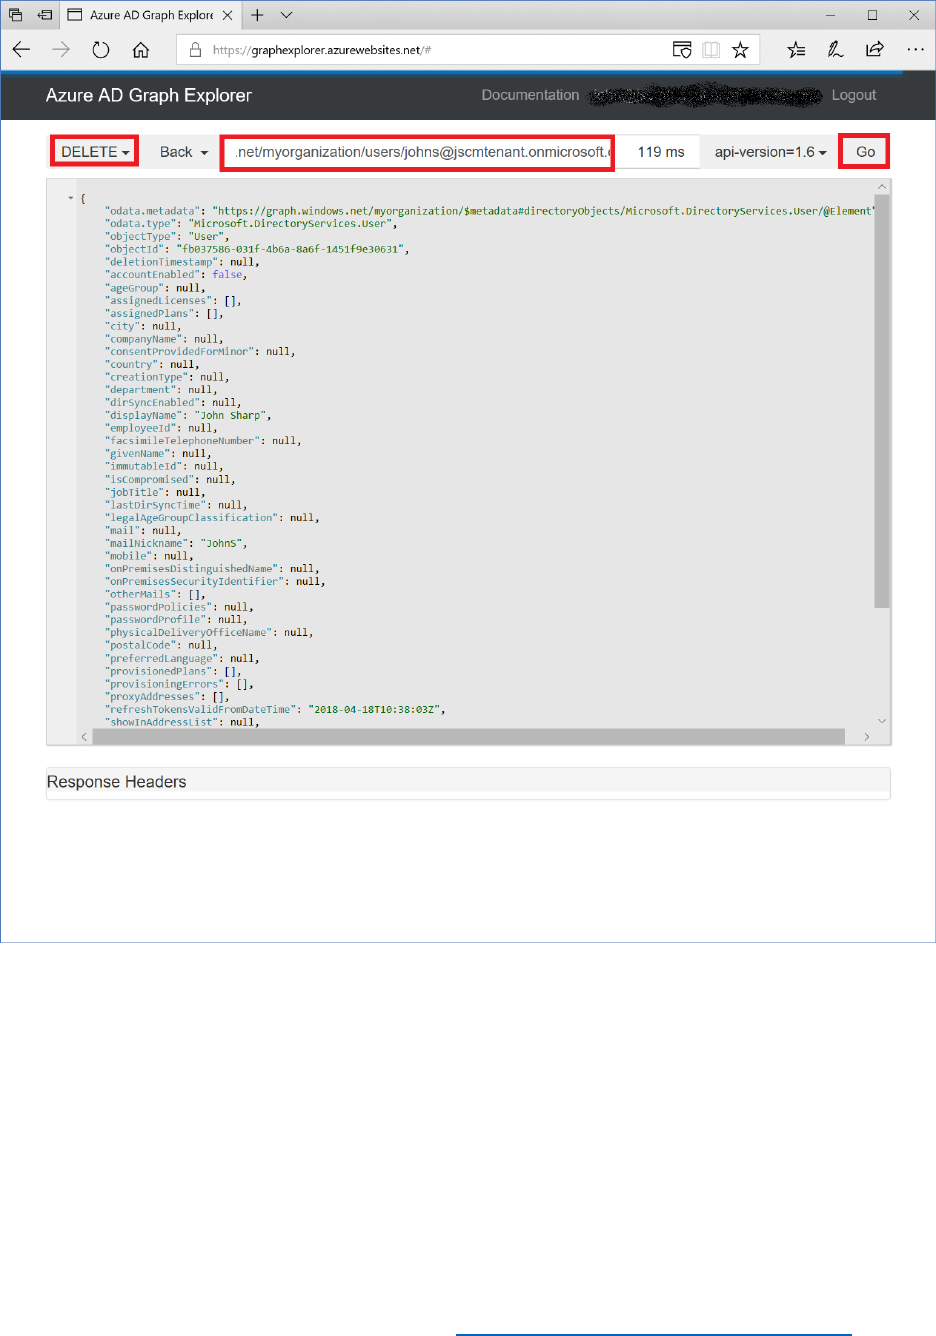
194 © 2018 Microsoft Corporation Feedback? https://aka.ms/aad-b2c-course-feedback
Using the Microsoft Graph Explorer
The Microsoft Graph Explorer is very similar to the Azure AD Graph Explorer. You connect to it
by using a browser and navigating to https://developer.microsoft.com/graph/graph-explorer. You
should sign in to the AAD domain using a valid domain account:
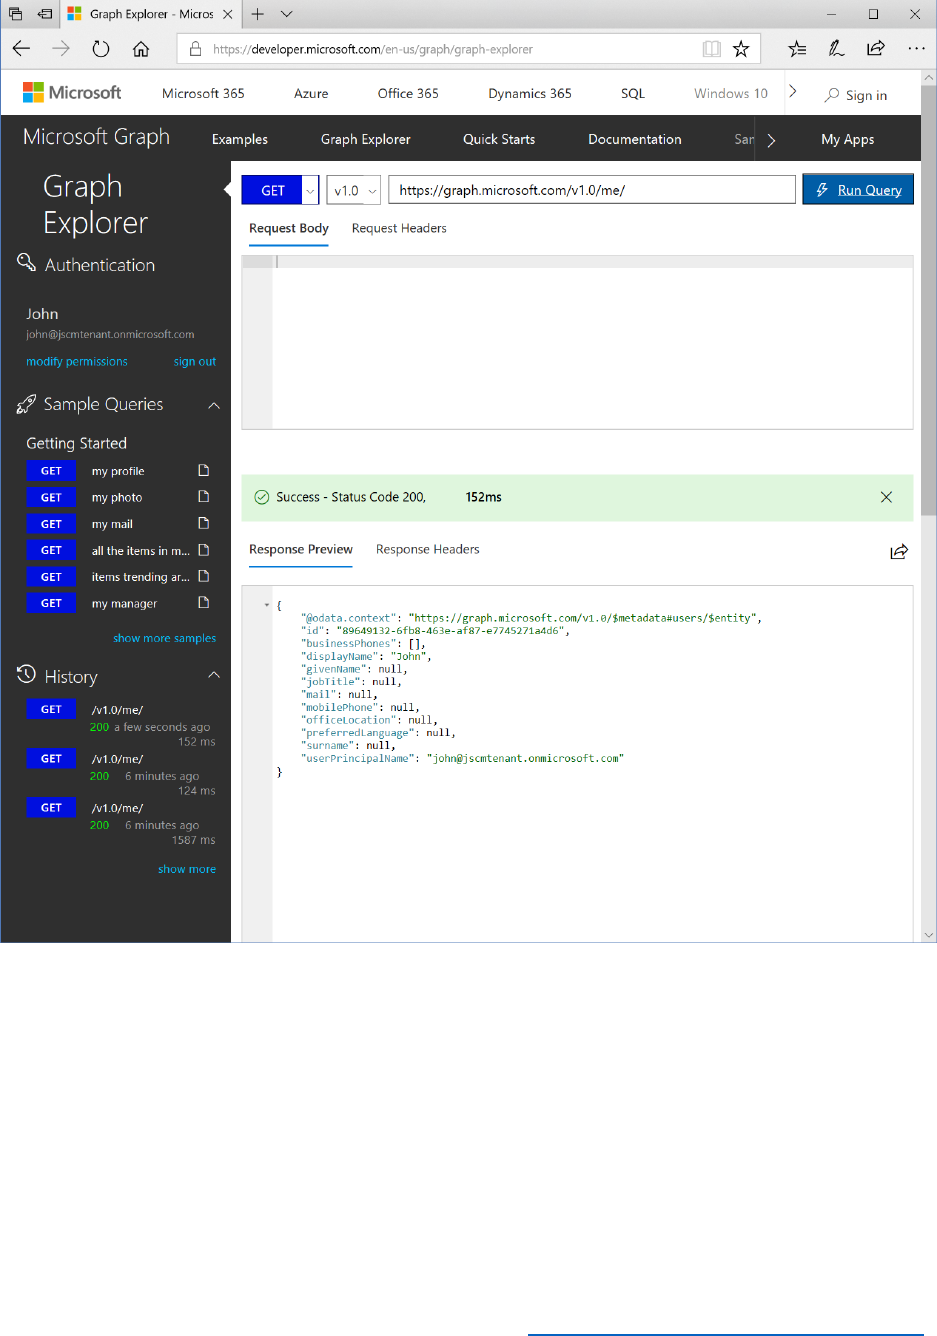
195 © 2018 Microsoft Corporation Feedback? https://aka.ms/aad-b2c-course-feedback
You run queries by selecting the GET verb and specifying the URI of the resource you want to
retrieve. You perform inserts, and updates by using the PUT, POST, and PATCH verbs and
providing the details of the new or amended item (POST creates a new resource, PATCH
modifies a resource, and PUT replaces an existing resource with a new one). You remove objects
by selecting the DELETE verb and specifying the URI of the resource to remove.
Microsoft Graph Explorer can potentially query and amend a lot of your own data (calendars,
email, contacts, and so on). By default, much of this data is inaccessible unless your explicitly
grant access over it. To do this, select modify permissions and then select the objects and
permissions that you want to enable:
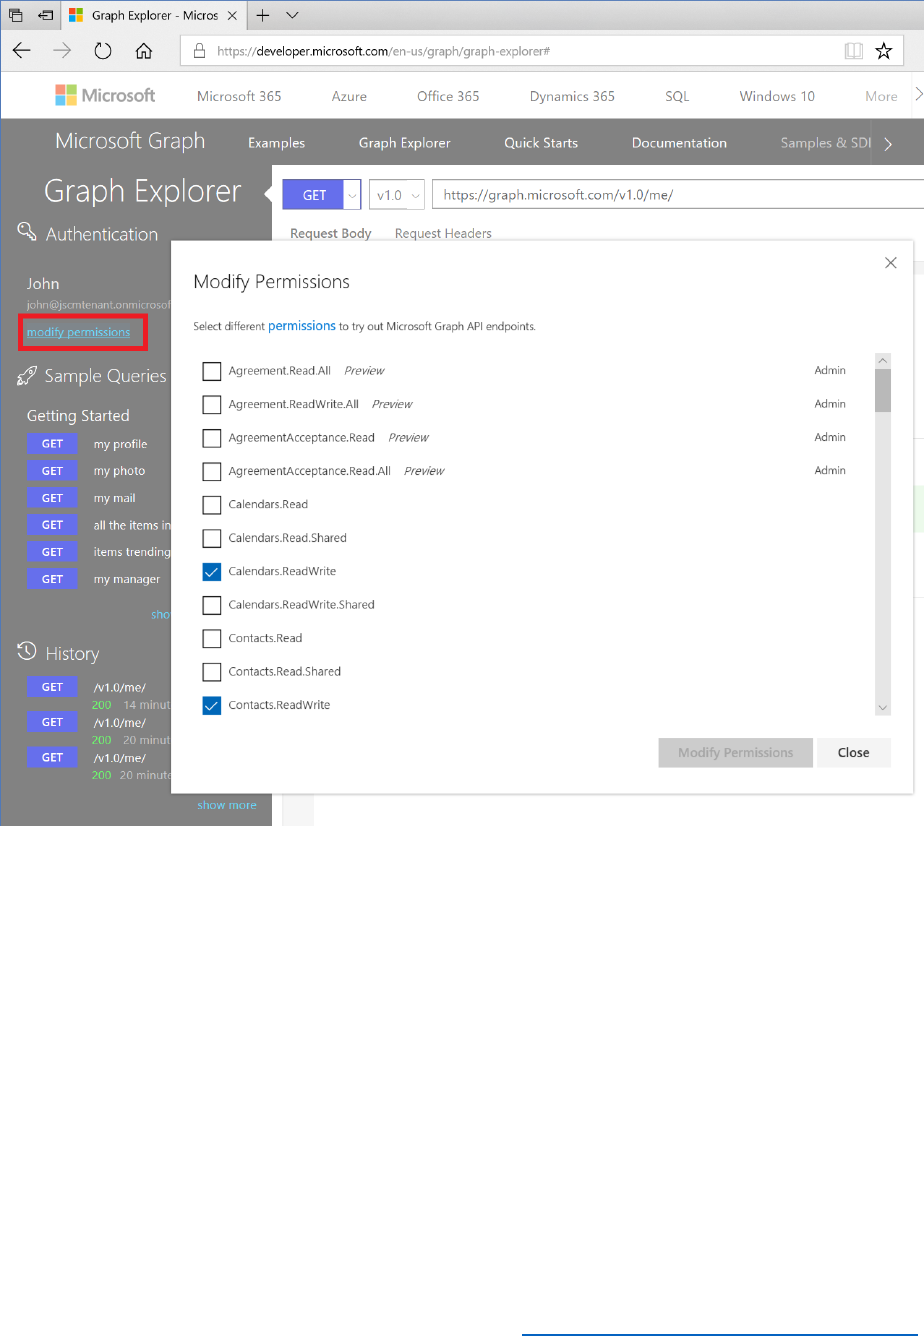
196 © 2018 Microsoft Corporation Feedback? https://aka.ms/aad-b2c-course-feedback
Planning User Migrations
A key part of a successful migration to Azure Active Directory is migrating your users to Azure.
This migration process needs to be carefully planned to ensure that you obtain the result that
you need, which is a clean directory service which contains all the relevant user information that
your apps need to function correctly.
Identity Types
When creating accounts in Azure Active Directory, those accounts will be one of two types:
• Local accounts
• Social accounts

197 © 2018 Microsoft Corporation Feedback? https://aka.ms/aad-b2c-course-feedback
In addition, you can have combined accounts, where users’ social accounts are linked to their
local accounts in one identity. With local accounts, users will sign-in, whereas with social
accounts, they will sign up to your B2C service.
Identifying Identity Use Cases
When carrying out this planning process, you must identify the use cases for which you want to
employ identity data within Azure Active Directory. You may have apps and resources that are
for your internal employees only, along with other apps that are for your customers. Employees
should log on to internal-only resources using their corporate credentials (sign-in), whereas
customers will use another credential source to connect to your service (sign-up), such as a free
cloud-based platform such as Outlook.com, Hotmail or Google, or a social media platform like
Facebook or LinkedIn. Your initial landing page would direct the user to the correct option (sign-
up or sign-in), depending on whether they are an employee or a customer.
You may have additional complications, such as the requirement to integrate federated
identities from, say, a partner organization, where partners may have access to more apps than
customers, but not the full range of internal resources that employees can open. For more
information on Azure AD federation, see the Azure AD federation compatibility list, at
https://docs.microsoft.com/en-us/azure/active-directory/connect/active-directory-aadconnect-federation-
compatibility.
Where your use cases dictate that you will have multiple identity sources to connect to Azure
Active Directory, then you will need to implement custom policies alongside Azure Active
Directory B2C and the Identity Experience Framework. For more information, see Azure Active
Directory B2C: Custom policies, at https://docs.microsoft.com/en-us/azure/active-directory-b2c/active-
directory-b2c-overview-custom.
Note: Custom policies are currently in public preview.
Access to External Applications
If you need to provide access to applications that are not in the Azure Active Directory
application gallery, then you can implement this functionality without writing code in Azure
Active Directory Premium. AAD Premium then brings the following additional capabilities:
• Self-service integration of any application that supports SAML 2.0 identity providers (SP-
initiated or IdP-initiated)
• Self-service integration of any web application that has an HTML-based sign-in page
using password-based SSO
• Self-service connection of applications that use the SCIM protocol for user provisioning
• Ability to add links to any application in the Office 365 app launcher or the Azure AD
access panel

198 © 2018 Microsoft Corporation Feedback? https://aka.ms/aad-b2c-course-feedback
Hence, you can enable users to connect to LOB SaaS apps that are currently not in the Azure AD
application gallery, along with any third-party apps that you control, either published from your
on-premises servers or running in the cloud.
For more information on configuring single sign-on in these cases, see Configuring single sign-
on to applications that are not in the Azure Active Directory application gallery, at
https://docs.microsoft.com/en-us/azure/active-directory/active-directory-saas-custom-apps.
Identifying the Source Identity Providers
From your use cases, you can now identify which identity providers will provide the source for
authenticating either employees, federated partners, or customers to Azure Active Directory.
With on-premises directory services, such as Active Directory, Oracle Directory Server, or 389
Directory Server, you will look to import the necessary user attributes into Azure Active
Directory.
Required attributes include the following values:
• accountEnabled – must be set to true for the account to be usable.
• displayName - The name to display in the address book for the user.
• passwordProfile - The password profile for the user (with social accounts, a password
must be specified, but its value is ignored)
• userPrincipalName - The user principal name, for example, someuser@contoso.com.
The user principal name must contain one of the verified domains for the tenant.
• mailNickname - The mail alias for the user. This value can be the same as
userPrincipalName.
• signInNames - One or more SignInName records that specify the sign-in names for the
user. Each sign-in name must be unique across the company/tenant. For social accounts
only, this property can be left empty.
• userIdentities - One or more UserIdentity records that specify the social account type
and the unique user identifier from the social identity provider.
• [optional] otherMails - For social account only, the user's email addresses
If you are intending using Azure Active Directory with Office 365 for your internal users, then
there are additional attributes that need to be synchronized. For more information, see Azure
AD Connect sync: Attributes synchronized to Azure Active Directory, at
https://docs.microsoft.com/en-us/azure/active-directory/connect/active-directory-aadconnectsync-
attributes-synchronized.

199 © 2018 Microsoft Corporation Feedback? https://aka.ms/aad-b2c-course-feedback
Cleaning up the Source Directory
Prior to any directory migration, you are highly recommended to carry out a clean-up of your
existing directory service, removing or merging old or duplicate user accounts and generally
ensuring that your current Idp is in the best possible shape prior to running the migration itself.
You are also recommend to run clean-up tools such as DCDIAG and NTDSUTIL METADATA
CLEANUP in Active Directory to test and verify the directory service.
When you have cleaned up the source directories, you then use the Graph API to carry the
migration itself.
Password Migration and Policies
When creating the new user accounts in Azure Active Directory, there is a difference in how
passwords are imported, depending on the level of access that you have to users’ passwords in
the source Idp.
• If you can access or decrypt the users’ passwords, then those passwords will migrate
across to Azure Active Directory.
• If you can’t import users’ passwords, for example, because they are hashed or stored in a
location you can’t access, then Azure Active Directory will create a random password for
each new user account and ask the user to change his or her password when they first
sign in.
Azure AD password policies will apply to any passwords imported into Azure AD B2C. Hence,
new passwords and any password resets will require strong passwords that comply with these
polices. To migrate accounts that have weaker passwords than those required by Azure AD, then
you can disable the strong password requirement by setting the passwordPolicies property to
DisableStrongPassword.

200 © 2018 Microsoft Corporation Feedback? https://aka.ms/aad-b2c-course-feedback
Module 9 – Auditing and Reporting
Introduction
This module introduces you to auditing and reporting in Azure AD B2C that can be used for
troubleshooting or reporting on activities within your application. Azure Application Insights will
be used to collect audit and diagnostic information from the web application to monitor events.
At the end of this module, you will be able to:
• Create and integrate Application Insights with Azure AD B2C.
• View audit events in the Portal.
• Download audit logs using the reporting API.
And you will have a deeper understanding of the following concepts:
• How to monitor user journeys.
• Security events.
• Azure Active Directory application permissions
• Utilizing the reporting API.
See it in action
Before you begin the module, you can experience the end user journeys that you are about to
build at https://aka.ms/b2ccourse-9.
And, you will have a deeper understanding of the following concepts;
• Integrating Application Insights with Azure B2C
• Downloading events from the Azure Portal
• Downloading events using the reporting API
This module should take approximately 20 minutes to complete.
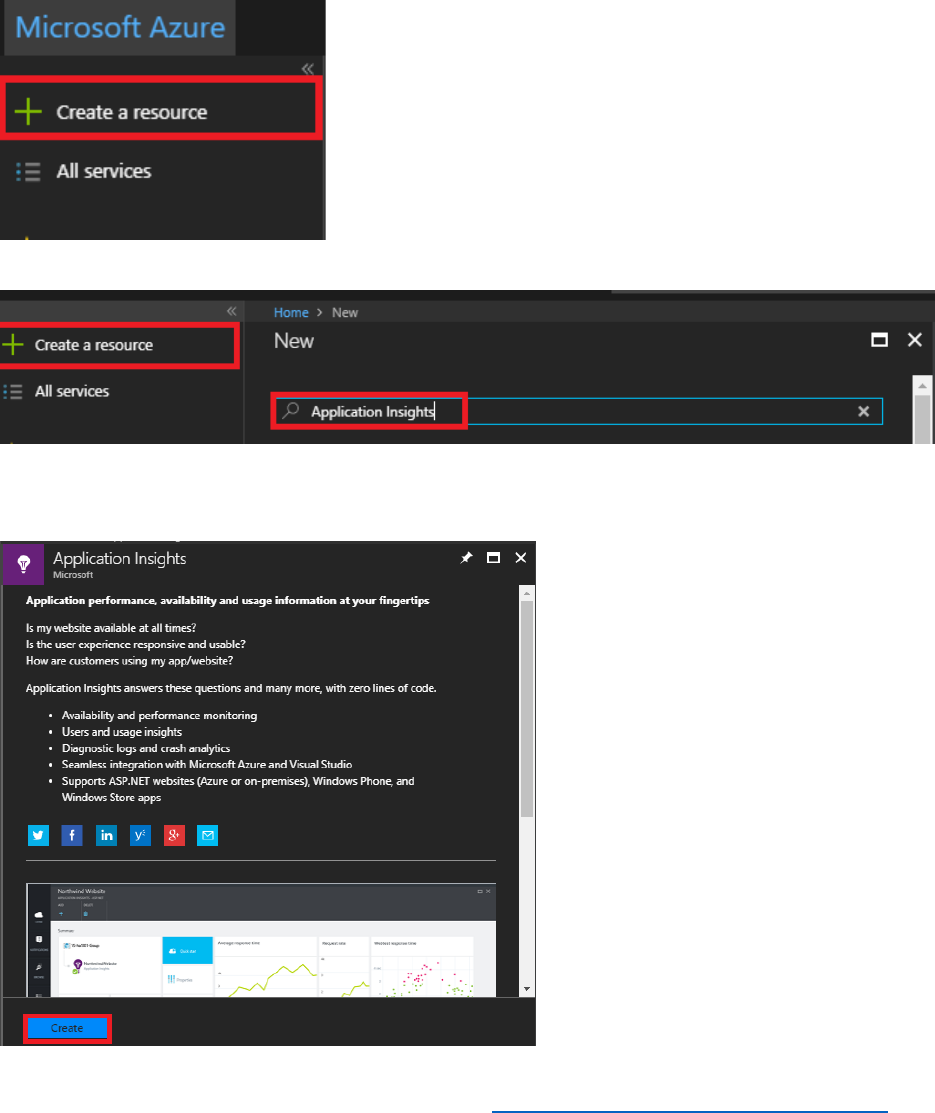
201 © 2018 Microsoft Corporation Feedback? https://aka.ms/aad-b2c-course-feedback
Setup Application Insights
First, you will need to create an application insights resource for the data to be sent from Azure
B2C custom policies. Follow the steps below to setup the application insights resource.
1) Log into the Azure portal as B2CAdmin@AwesomeYourLastname.onmicrosoft.com,
where AwesomeYourLastname is the name of your B2C tenant. Switch to the Azure tenant.
2) In the left navigation pane, select + Create a resource
3) In the search box type Application Insights, then press enter.
4) Select Application Insights.
5) In the Application Insights blade, select Create.
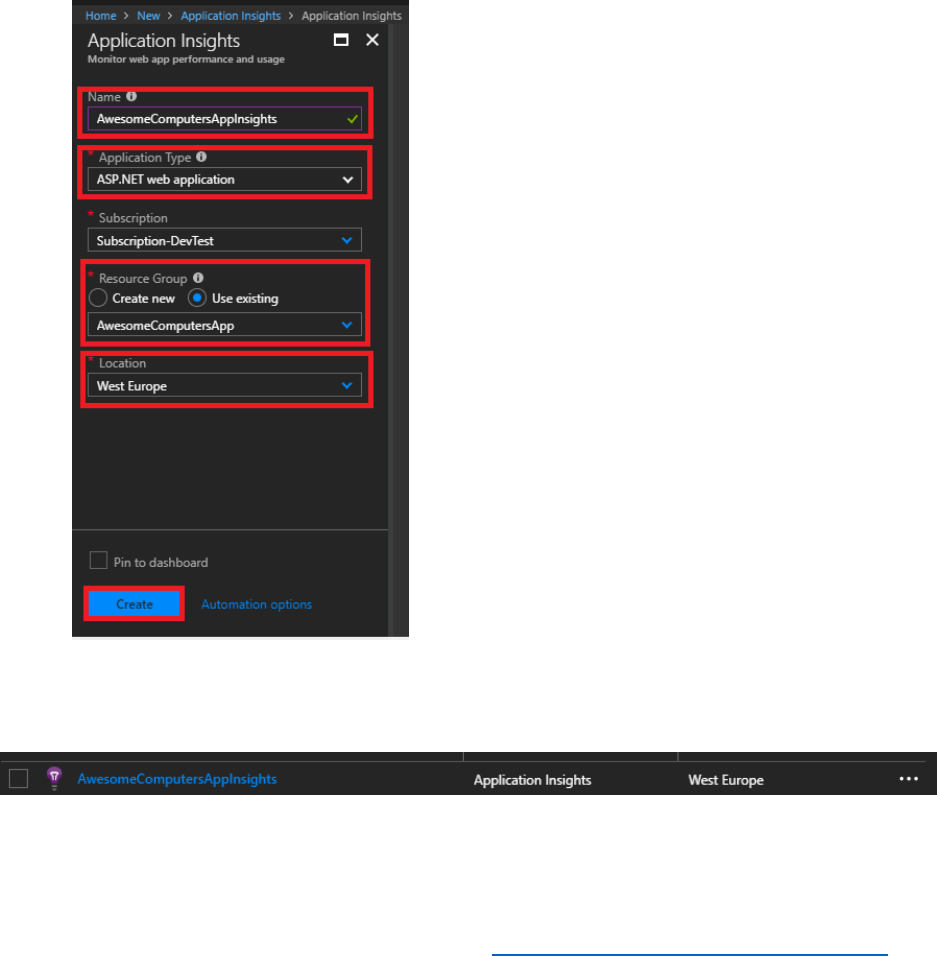
202 © 2018 Microsoft Corporation Feedback? https://aka.ms/aad-b2c-course-feedback
6) Set the following options in the Application Insights configuration blade, and then select
Create.
• Name: AwesomeComputersAppInsights.
• Application Type: ASP.Net web application.
• Subscription: Specify your current subscription.
• Resource Group: Either create new resource group or select an existing resource
group.
• Location: Select your closest location.
7) In the left navigation pane, select Resource Groups, and then select the resource group
selected in the previous step. You should see the Application Insights resource created in the
resource group.
8) Select the AwesomeComputerAppInsights resource.
9) Under the Configure section, select Properties.


204 © 2018 Microsoft Corporation Feedback? https://aka.ms/aad-b2c-course-feedback
Use Audit logs to Export Application, Policy, and User Activity Data
Follow the steps below to update the custom policies created in Modules 5 to 8.
1) Open the TrustFrameWorkExtensions.xml file using Visual Studio.
2) Under the <TrustPolicyFramework> element at the start of the file, add the following
attributes shown in bold text.
<TrustFrameworkPolicy
xmlns:xsi="http://www.w3.org/2001/XMLSchema-instance"
xmlns:xsd="http://www.w3.org/2001/XMLSchema"
xmlns="http://schemas.microsoft.com/online/cpim/schemas/2013/06"
PolicySchemaVersion="0.3.0.0"
TenantId="AwesomeYourLastname.onmicrosoft.com"
PolicyId="B2C_1A_TrustFrameworkExtensions"
PublicPolicyUri="http://AwesomeYourLastname.onmicrosoft.com/
B2C_1A_TrustFrameworkExtensions"
DeploymentMode="Development"
UserJourneyRecorderEndpoint="urn:journeyrecorder:applicationinsights">
3) Add the following <RelyingParty> node to the end of the file, before the closing
</TrustFrameworkPolicy> tag. Replace instrumentation-key with your AppInsights
instrumentation key.
<RelyingParty>
<UserJourneyBehaviors>
<JourneyInsights
TelemetryEngine="ApplicationInsights"
InstrumentationKey="instrumentation-key"
DeveloperMode="true"
ClientEnabled="false"
ServerEnabled="true"
TelemetryVersion="1.0.0" />
</UserJourneyBehaviors>
</RelyingParty>
Note: You must not set the DeveloperMode option to true in a production system.
4) Save the file.
5) Open the SignUpOrSignIn.xml file using Visual Studio.
6) In the <RelyingParty> node, remove the <UserJourneyBehaviors> element. This element
is now redundant.
7) Save the file.
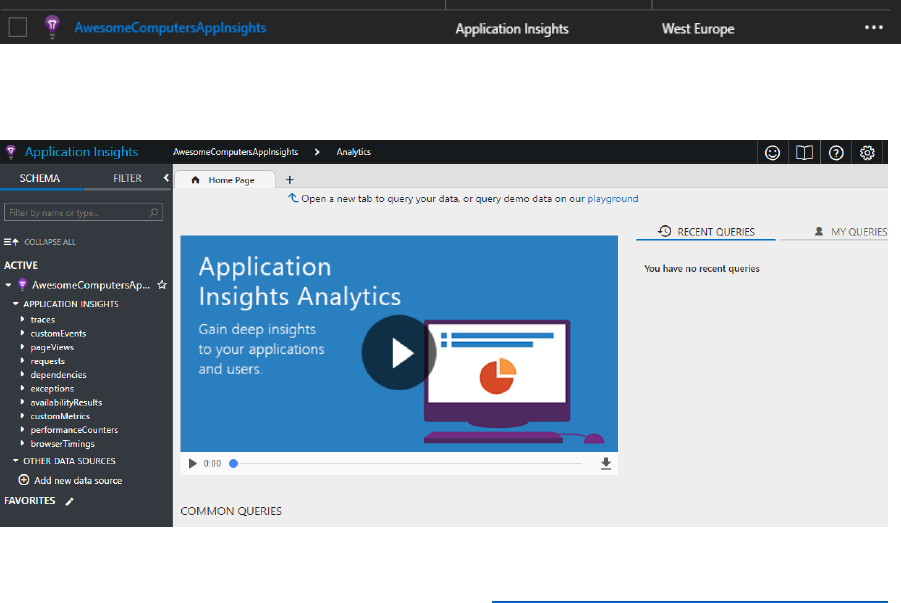
205 © 2018 Microsoft Corporation Feedback? https://aka.ms/aad-b2c-course-feedback
8) Return to the Azure portal, and switch to your B2C tenant.
9) In the Azure AD B2C blade, select Identity Experience Framework.
10) Select Upload Policy, and upload the TrustFrameWorkExtensions.xml file, overwriting the
existing policy.
11) Select Upload Policy again, and upload the SignUpOrSignIn.xml file, overwriting the
existing policy.
12) Select the B2C_1A_signup_signin policy, and then select Run now. This will generate some
data which will be recorded by Application Insights. Repeat this step several times, and
perform tasks such as changing your password or updating your profile using the sample
web application.
Note: There will be a delay of a few minutes while Application Insights gathers the data and you
can view reports; they are not real-time.
Download Data into an Insight/Analytics System
You can view the data sent from Azure AD B2C in the Application Insights resource directly.
Follow the steps below to view the data.
1) In the Azure portal, switch to the Azure tenant (not the B2C tenant).
2) Select Resource Groups, and then select the resource group that was used to create the
Application Insights resource. You should see the Application Insights resource created in
the resource group.
3) Select the AwesomeComputersAppInsights resource.
4) In the Overview blade, select Analytics. You should see the page below.
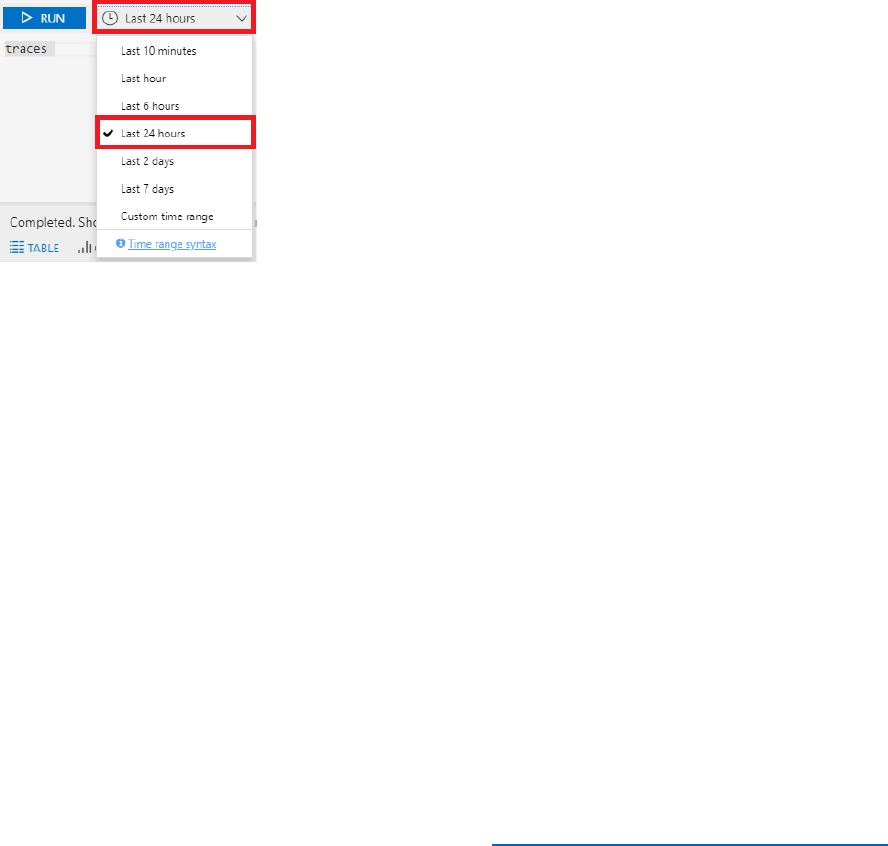
206 © 2018 Microsoft Corporation Feedback? https://aka.ms/aad-b2c-course-feedback
From here you can explore the metrics and trace information collected by Application
Insights for the custom policy which was uploaded with the telemetry key in the previous
step.
5) Select + next to the Home Page tab on the main page, this will open a new query page.
6) Examples of queries are listed below. Alternatively, you can select custom time ranges and
select Last 24 Hours, then select RUN.
Query
Description
traces
See all of the logs generated by Azure AD B2C
traces | where timestamp >
ago(1d)
See all of the logs generated by Azure AD B2C for the last
day
7) When the results are returned you can drill into them to examine the details. For example, if
you expand a record, and then expand customDimensions, you can see which user journey
triggered the event.
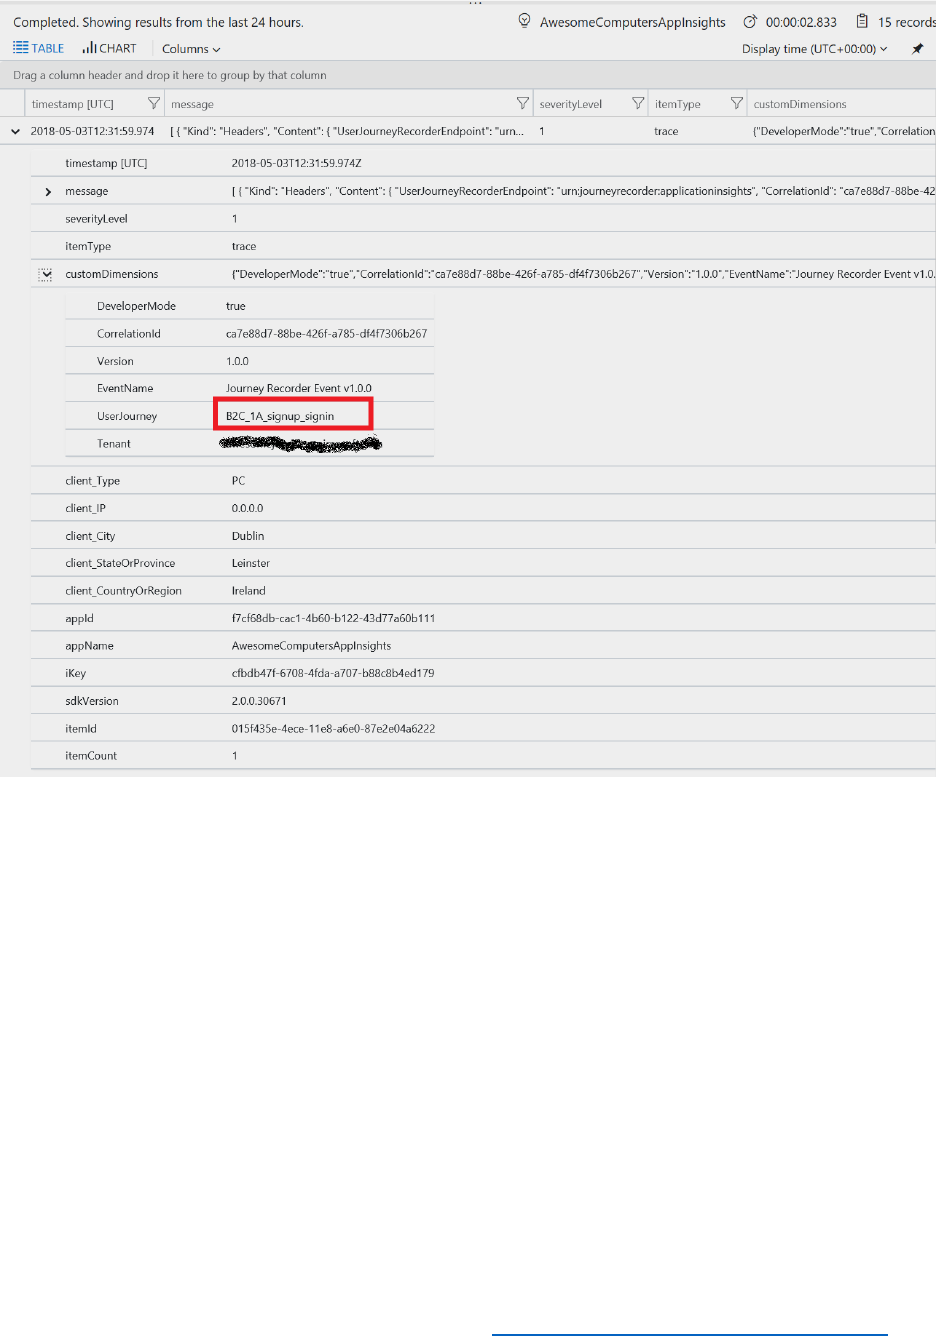
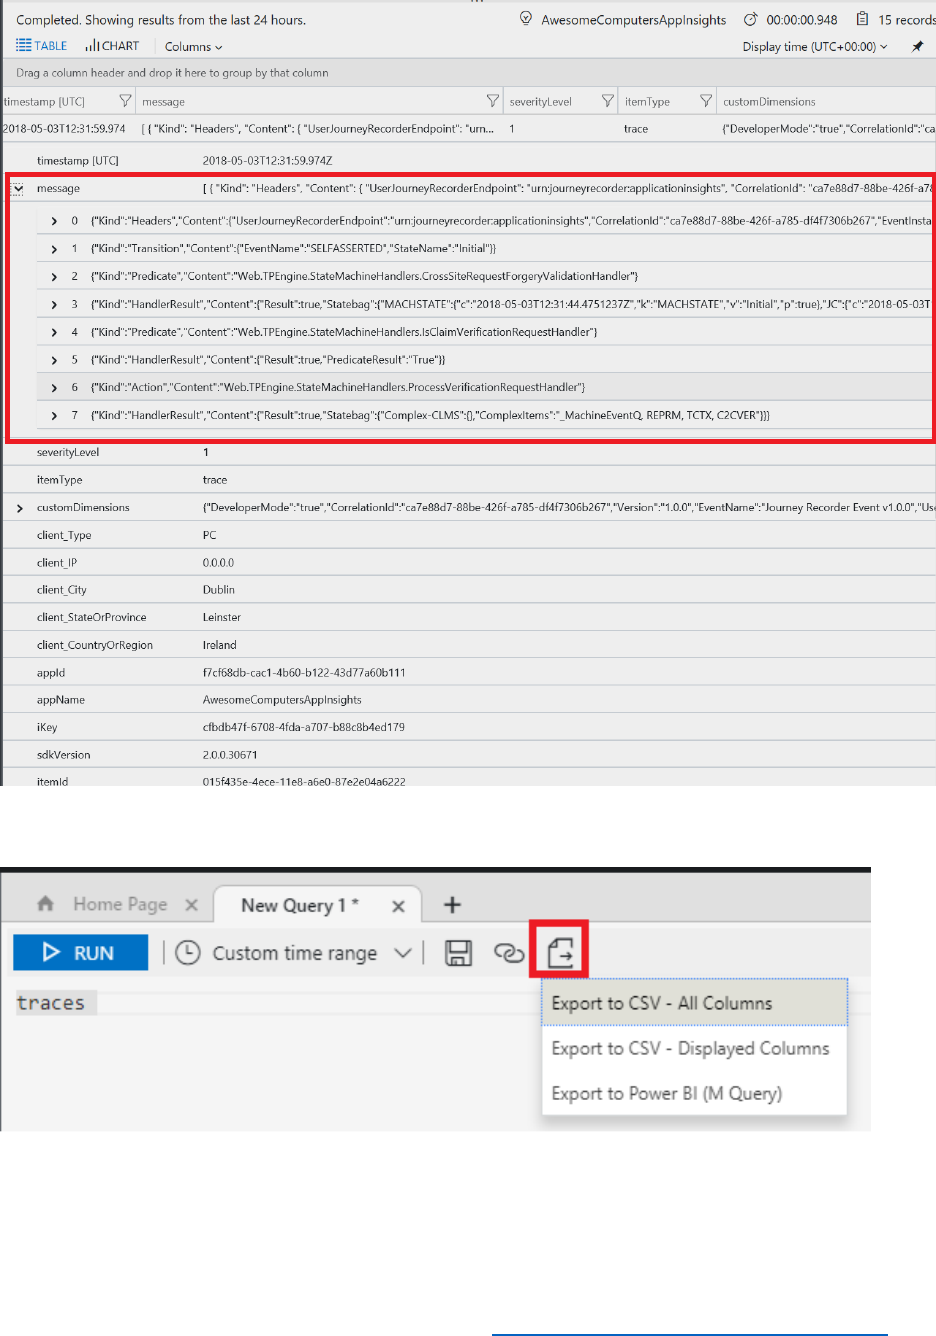
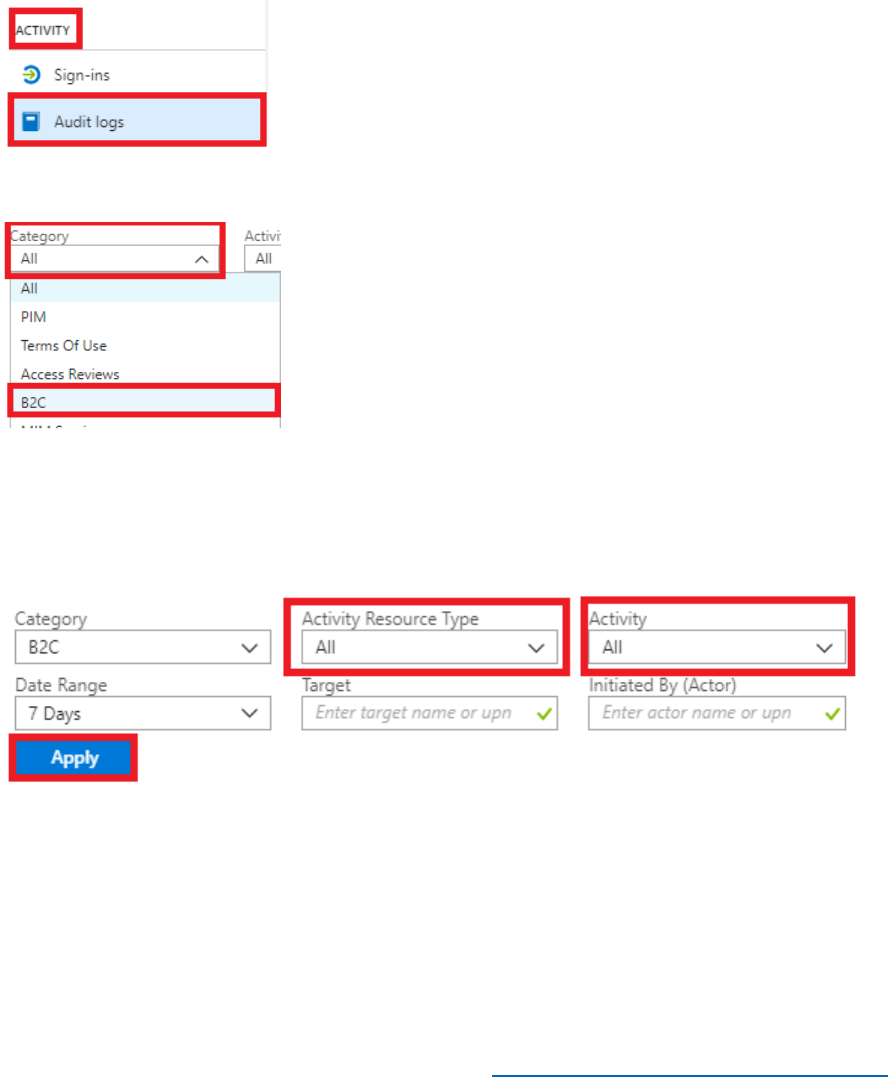
209 © 2018 Microsoft Corporation Feedback? https://aka.ms/aad-b2c-course-feedback
Auditing Admin and Security Events
You can view all auditing and security events by using the Azure Portal. Follow the steps below
to see the data for these events.
1) In the Azure Portal, switch to your B2C tenant.
2) In the left navigation pane, select Azure Active Directory.
3) In the Azure Active Directory blade, Under ACTIVITY, select Audit Logs.
4) To filter the results, select Category, select B2C, and then select Apply.
5) Using the filter on the blade, you can filter the results further to determine admin, IdP and
user related events. For example, to see authentication events, in the Activity Resource
Type list select Authentication, in the Activity list select Validate user authentication, and
then select Apply.
6) You will see a list of matching activities. You can select a record to display more information
about that activity.
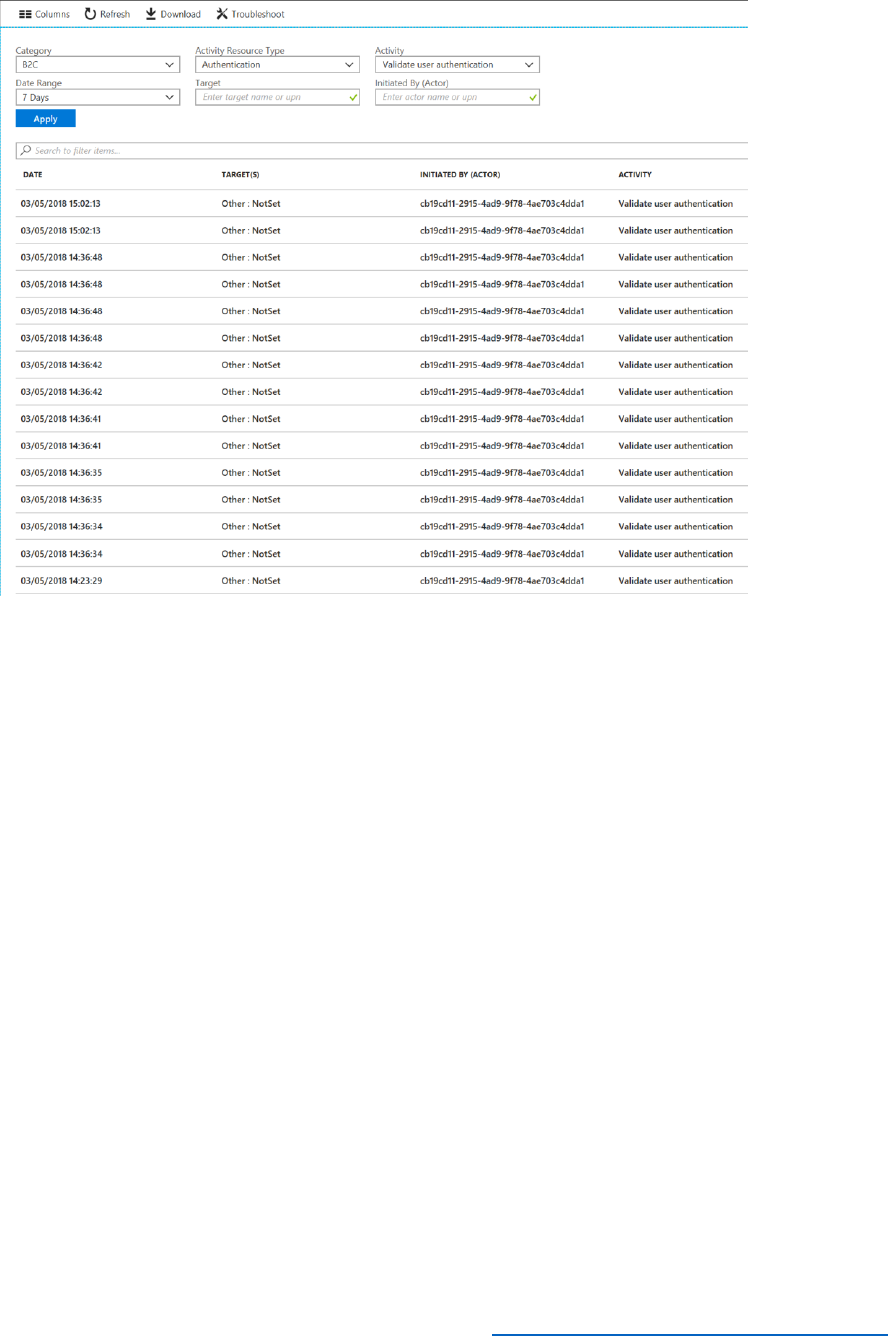
210 © 2018 Microsoft Corporation Feedback? https://aka.ms/aad-b2c-course-feedback
7) To download the data for the activities as a CSV file, select Download.
Accessing Audit Logs through the Azure AD Reporting API
You can download the activities using the Azure Reporting API. The Reporting API extends the
Graph API with a series of endpoints that generate summary usage data for your B2C tenant. For
auditing purposes, you send requests to the activities\audit endpoint, which returns audit data.
You can specify a filter to limit the data retrieved. For example, you can specify the type or status
of an activity, or limit the records to a specific date. See the Azure Active Directory audit API
reference for details.
The data is returned in JSON format, but you can apply transformations using PowerShell
functions such as ConvertFrom-Json and ConvertTo-Xml. You can also use PowerShell to save
the data to a file.
The example below provides details on how to access the B2C audit logs through the Reporting
API with PowerShell.
Create a Reporting Application in the B2C Tenant
1) In the Azure Portal, make sure that you are still connected to the B2C tenant.
2) In the left navigation pane, select Azure Active Directory.
3) Select App Registrations.
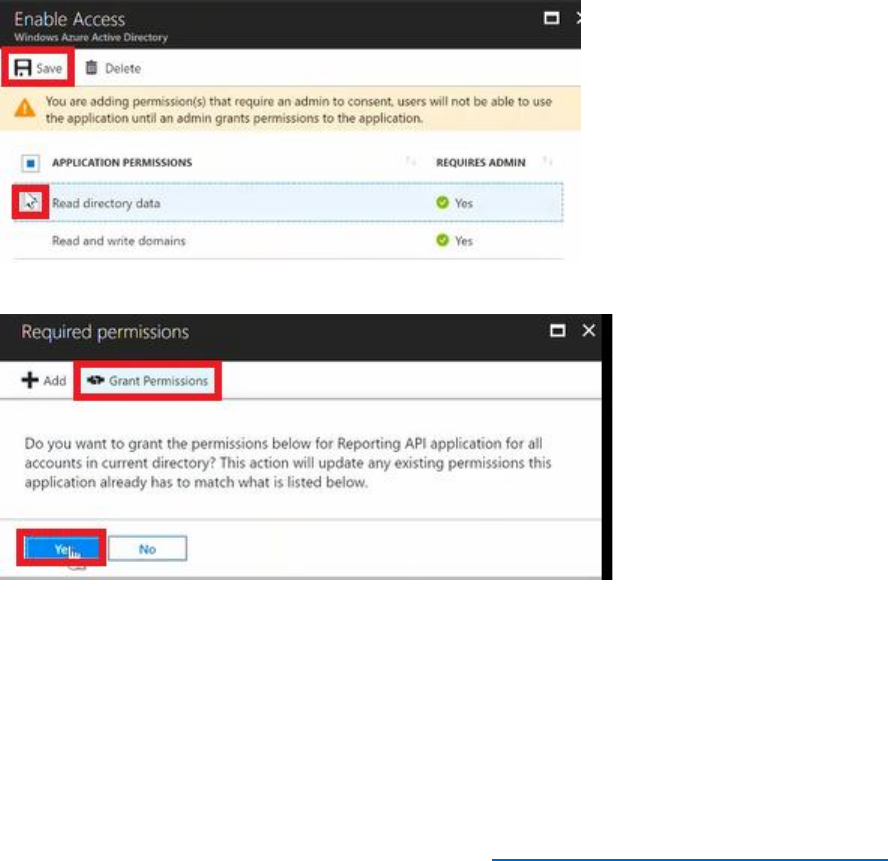
211 © 2018 Microsoft Corporation Feedback? https://aka.ms/aad-b2c-course-feedback
4) Select New application registration.
5) In the Name box, enter Reporting API application.
6) Select Web /API.
7) Specify the Sign-on URL as http://localhost.
8) Select Create.
9) After the application has been created note down the Application ID as this will be required
by the PowerShell script.
10) After the application has been created, select Settings, and then select Required
Permissions.
11) In the Required permissions blade, select Windows Azure Active Directory, select the
Read directory data permission, and then select Save.
12) In the Required Permissions blade, select Grant Permissions, and then select Yes.
13) In the Settings blade, select Keys.
14) Set the Description to ReportingKey, Expires to Never expires, and then select Save. Note
the value of the secret key as you will also require this later.
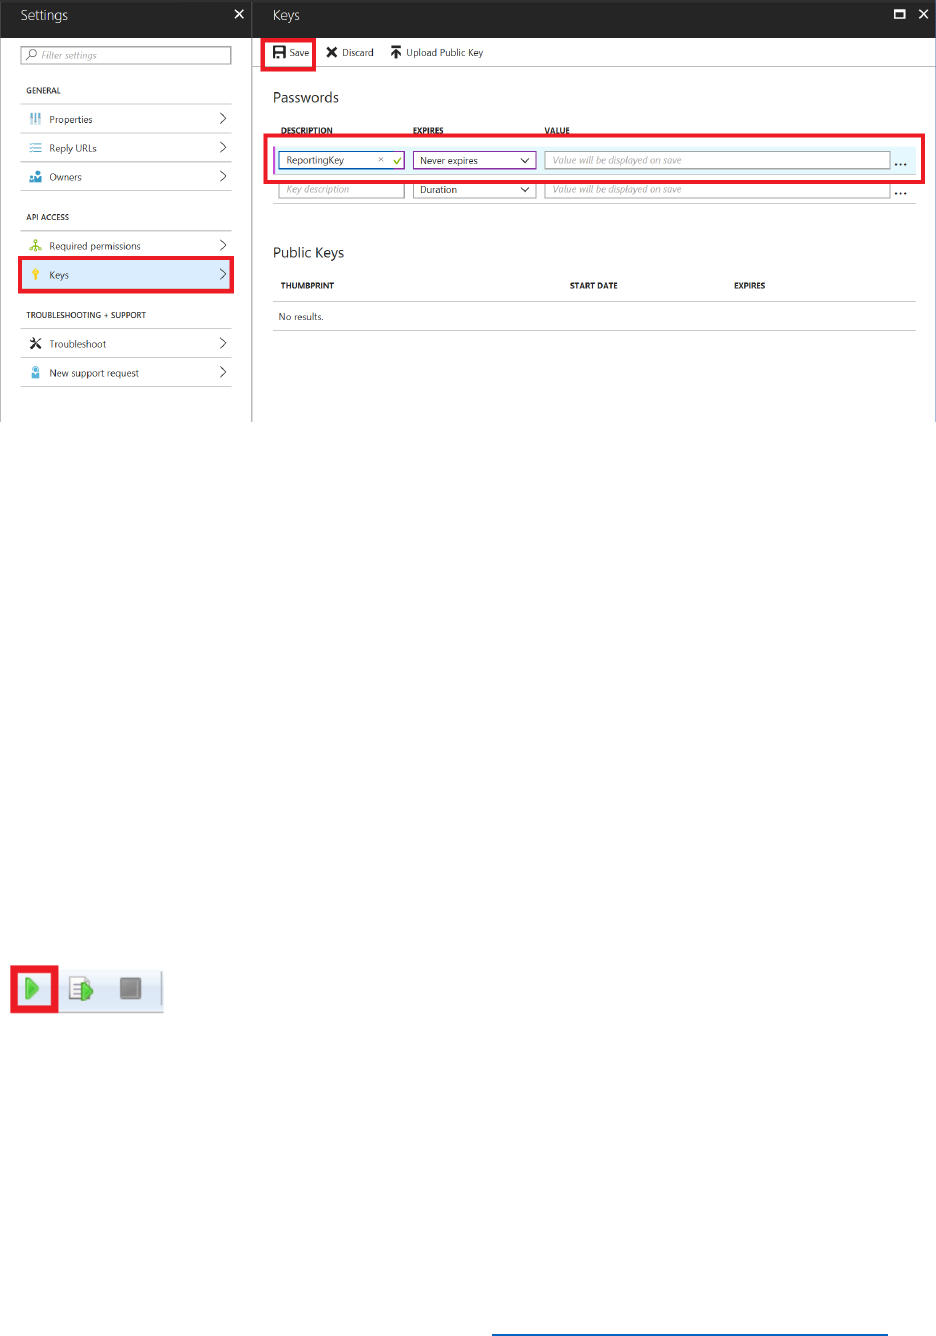
212 © 2018 Microsoft Corporation Feedback? https://aka.ms/aad-b2c-course-feedback
15) On your computer, start PowerShell ISE.
16) On the File menu select Open, move to the sample folder and, and the select the Audit
Logs API.ps1 PowerShell script. This script uses the Reporting API to perform a number of
queries and display the results. It generates reports that focus on billable activity in the B2C
tenant, such as the number of users, billable sign-in-based authentications, and multi-factor
authentications.
17) Set the $ClientID variable to the Application ID for the reporting application that was noted
down in the previous steps.
18) Set the $ClientSecret variable to the value of the secret key that you recorded earlier.
19) Set the $tenantdomain variable to the name of your B2C domain,
AwesomeYourLastname.onmicrosoft.com.
20) Save the PowerShell script.
21) On the Debug menu, select Run/Continue to execute the script.
22) The script retrieves the audit data for the last seven days. The results containing the audit
records are written to a series of JSON files, one for each day. You can use a text editor such
as Notepad to examine the contents of these files.

