IBM Netezza System Administrator’s Guide Administrator
User Manual:
Open the PDF directly: View PDF ![]() .
.
Page Count: 550 [warning: Documents this large are best viewed by clicking the View PDF Link!]
- Preface
- Administration Overview
- Installing the Netezza Client Software
- Using the Netezza Administration Interfaces
- Netezza CLI Overview
- SQL Command Overview
- NzAdmin Tool Overview
- Client Compatibility
- Starting the NzAdmin Tool
- Logging In to NzAdmin
- Connecting to the Netezza System
- Displaying System Components
- Interpreting the Color Status Indicators
- Main Menu Commands
- Using the NzAdmin Tool Hyperlinks
- Administration Commands
- Setting Automatic Refresh
- Controlling NzAdmin Session Termination
- Web Admin Overview
- Managing Netezza HA Systems
- Linux-HA and DRBD Overview
- Differences with the Previous Netezza HA Solution
- Linux-HA Administration
- Heartbeat Configuration
- CIB
- Important Information about Host 1 and Host 2
- Managing Failover Timers
- Netezza Cluster Management Scripts
- Identifying the Active and Standby Nodes
- Monitoring the Cluster and Resource Group Status
- nps Resource Group
- Failover Criteria
- Relocate to the Standby Node
- Safe Manual Control of the Hosts (And Heartbeat)
- Transition to Maintenance (Non-Heartbeat) Mode
- Transitioning from Maintenance to Clustering Mode
- Cluster Manager Events
- Logging and Messages
- DRBD Administration
- Administration Reference and Troubleshooting
- IP Address Requirements
- Forcing Heartbeat to Shutdown
- Shutting Down Heartbeat on Both Nodes without Causing Relocate
- Restarting Heartbeat after Maintenance Network Issues
- Resolving Configuration Problems
- Fixed a Problem, but crm_mon Still Shows Failed Items
- Output From crm_mon Does Not Show the nps Resource Group
- Linux Users and Groups Required for HA
- Checking for User Sessions and Activity
- Managing the Netezza Hardware
- Netezza Hardware Components
- Hardware Management Tasks
- Managing Data Slices
- Automatic Query and Load Continuation
- Power Procedures
- PDU and Circuit Breakers Overview
- Powering On the IBM Netezza 1000 and IBM PureData System for Analytics N1001
- Powering Off the IBM Netezza 1000 or IBM PureData System for Analytics N1001
- Powering on an IBM Netezza C1000 System
- Powering off an IBM Netezza C1000 System
- NEC InfoFrame DWH PDU and Circuit Breakers Overview
- Powering On the NEC InfoFrame DWH Appliance
- Powering Off an NEC InfoFrame DWH Appliance
- Managing the Netezza Server
- Software Revision Levels
- System States
- Managing the System State
- System Errors
- System Logs
- System Configuration
- Managing Event Rules
- Template Event Rules
- Managing Event Rules
- Copying a Template Event to Create an Event Rule
- Copying and Modifying a User-Defined Event Rule
- Generating an Event
- Deleting an Event Rule
- Disabling an Event Rule
- Adding an Event Rule
- Specifying the Event Match Criteria
- Specifying the Event Rule Attributes
- Specifying the Notification
- The sendMail.cfg File
- Aggregating Event E-mail Messages
- Creating a Custom Event Rule
- Template Event Reference
- Specifying System State Changes
- Hardware Service Requested
- Hardware Needs Attention
- Hardware Path Down
- Hardware Restarted
- Specifying Disk Space Threshold Notification
- Specifying Runaway Query Notification
- Monitoring the System State
- Monitoring for Disk Predictive Failure Errors
- Monitoring for ECC Errors
- Monitoring Regeneration Errors
- Monitoring Disk Errors
- Monitoring Hardware Temperature
- Monitoring System Temperature
- Query History Events
- Monitoring SPU Cores
- Monitoring Voltage Faults
- Monitoring Transaction Limits
- Switch Port Events
- Reachability and Availability Events
- Event Types Reference
- Displaying Alerts
- Establishing Security and Access Control
- Netezza Database Users and Groups
- Develop an Access Model
- Default Netezza Groups and Users
- Choosing a User Authentication Method
- Configuring Password Content Controls and Expiration
- Creating Netezza Database Users
- Altering Netezza Database Users
- Deleting Netezza Database Users
- Creating Netezza Database Groups
- Altering Netezza Database Groups
- Deleting Netezza Database Groups
- Security Model
- Logon Authentication
- Netezza Client Encryption and Security
- Setting User and Group Limits
- Logging Netezza SQL Information
- Group Public Views
- Netezza Database Users and Groups
- Managing User Content on the Netezza Appliance
- Creating Databases and User Tables
- Creating Distribution Keys
- Avoiding Data Skew
- Using Clustered Base Tables
- Updating Database Statistics
- Grooming Tables
- Managing Sessions
- Running Transactions
- Netezza Optimizer and Query Plans
- Viewing Query Status and History
- Backing Up and Restoring Databases
- General Information on Backup and Restore Methods
- Overview
- Database Completeness
- Portability
- Compression in Backups and Restores
- Multi-Stream Backup
- Special Columns
- Upgrade/Downgrade Concerns
- Compressed Unload and Reload
- Encryption Key Management in Backup and Restore
- Filesystem Connector for Backup and Recovery
- Third-Party Backup and Recovery Solutions Support
- Host Backup and Restore
- Using the nzbackup Command
- Using the nzrestore Command
- Using the Symantec NetBackup Connector
- Using the IBM Tivoli Storage Manager Connector
- About the Tivoli Backup Integration
- Configuring the Netezza Host
- Configuring the Tivoli Storage Manager Server
- Special Considerations for Large Databases
- Running nzbackup and nzrestore with the TSM Connector
- Host Backup and Restore to the TSM Server
- Backing up and Restoring Data Using the TSM Interfaces
- Troubleshooting
- Using the EMC NetWorker Connector
- NetWorker Troubleshooting
- General Information on Backup and Restore Methods
- Query History Collection and Reporting
- Query History Concepts
- Query History Loading Process
- Disabling History Collection
- Changing the Owner of a History Database
- Changing Query History Configuration Settings
- Displaying Query History Configuration Settings
- Dropping History Configurations
- Query History Event Notifications
- Managing History Configurations Using NzAdmin
- Query History Views and User Tables
- Query History and Audit History Views
- _v_querystatus
- _v_planstatus
- $v_hist_queries
- $v_hist_successful_queries and $v_hist_unsuccessful_queries
- $v_hist_incomplete_queries
- $v_hist_table_access_stats
- $v_hist_column_access_stats
- $v_hist_log_events
- $hist_version
- $hist_nps_$SCHEMA_VERSION
- $hist_log_entry_$SCHEMA_VERSION
- $hist_failed_authentication_$SCHEMA_VERSION
- $hist_session_prolog_$SCHEMA_VERSION
- $hist_session_epilog_$SCHEMA_VERSION
- $hist_query_prolog_$SCHEMA_VERSION
- $hist_query_epilog_$SCHEMA_VERSION
- $hist_query_overflow_$SCHEMA_VERSION
- $hist_service_$SCHEMA_VERSION
- $hist_state_change_$SCHEMA_VERSION
- $hist_table_access_$SCHEMA_VERSION
- $hist_column_access_$SCHEMA_VERSION
- $hist_plan_prolog_$SCHEMA_VERSION
- $hist_plan_epilog_$SCHEMA_VERSION
- History Table Helper Functions
- Managing Workloads on the Netezza Appliance
- Overview
- Managing Short Query Bias
- Managing GRA
- Resource Percentages and System Resources
- Assigning Users to Resource Groups
- Resource Groups Example
- GRA Allocations Example
- Resource Allocations for the Admin User
- Allocations for Multiple Jobs in the Same Group
- Priority and GRA Resource Sharing
- Guaranteed Resource Allocation Settings
- Tracking GRA Compliance
- Monitoring Resource Utilization and Compliance
- Managing PQE
- Managing the Gate Keeper
- Displaying Netezza Statistics
- Managing the MantraVM Service
- Mantra Information
- Starting and Stopping the MantraVM Service
- Managing the MantraVM Service
- Displaying the MantraVM Service Configuration
- Displaying the MantraVM Service Version
- Enabling the MantraVM Service
- Disabling the MantraVM Service
- Setting the MantraVM IP Address
- Reconfiguring the MantraVM IP Addresses
- Configuring the MantraVM Monitoring Interfaces
- Displaying the MantraVM Monitoring Interfaces
- Accessing the Mantra Web Interface
- Troubleshooting
- Netezza CLI
- Linux Host Administration Reference
- Netezza User and System Views
- System Configuration File Settings
- Notices and Trademarks
- Glossary of Database and System Terms
- Index

IBM Netezza 7.0 and Later
IBM Netezza System
Administrator’s Guide
Revised: October 9, 2012
20282-20 Rev. 1
iii
Contents
Preface
1 Administration Overview
Administrator’s Roles. . . . . . . . . . . . . . . . . . . . . . . . . . . . . . . . . . . . . . . . . . . . . . . 1-1
Administration Tasks . . . . . . . . . . . . . . . . . . . . . . . . . . . . . . . . . . . . . . . . . . . . . . . 1-1
Initial System Setup and Information . . . . . . . . . . . . . . . . . . . . . . . . . . . . . . . . . . . 1-2
Netezza Software Directories . . . . . . . . . . . . . . . . . . . . . . . . . . . . . . . . . . . . . . 1-3
Managing the External Network Connections . . . . . . . . . . . . . . . . . . . . . . . . . . . 1-5
Managing Domain Name Service (DNS) Updates . . . . . . . . . . . . . . . . . . . . . . . . 1-5
Setting up Remote Access . . . . . . . . . . . . . . . . . . . . . . . . . . . . . . . . . . . . . . . . 1-7
Administration Interfaces . . . . . . . . . . . . . . . . . . . . . . . . . . . . . . . . . . . . . . . . . . . . 1-7
Other Netezza Documentation. . . . . . . . . . . . . . . . . . . . . . . . . . . . . . . . . . . . . . . . . 1-8
2 Installing the Netezza Client Software
Client Software Packages . . . . . . . . . . . . . . . . . . . . . . . . . . . . . . . . . . . . . . . . . . . . 2-2
Installing the Netezza CLI Client on a Linux/UNIX System . . . . . . . . . . . . . . . . . . . . . 2-3
Installing on Linux/UNIX Clients . . . . . . . . . . . . . . . . . . . . . . . . . . . . . . . . . . . . 2-3
Setting the Path for Netezza CLI Client Commands. . . . . . . . . . . . . . . . . . . . . . . 2-5
Removing the CLI Clients from UNIX Systems . . . . . . . . . . . . . . . . . . . . . . . . . . 2-5
Installing the Netezza Tools on a Windows Client . . . . . . . . . . . . . . . . . . . . . . . . . . . 2-5
Installation Requirements. . . . . . . . . . . . . . . . . . . . . . . . . . . . . . . . . . . . . . . . . 2-5
Installing the Netezza Tools . . . . . . . . . . . . . . . . . . . . . . . . . . . . . . . . . . . . . . . 2-6
Environment Variables . . . . . . . . . . . . . . . . . . . . . . . . . . . . . . . . . . . . . . . . . . . 2-7
Removing the IBM Netezza Tools . . . . . . . . . . . . . . . . . . . . . . . . . . . . . . . . . . . 2-7
Installing the Web Admin Interface . . . . . . . . . . . . . . . . . . . . . . . . . . . . . . . . . . . . . 2-7
Installing the RPM and Shared Library Files. . . . . . . . . . . . . . . . . . . . . . . . . . . . 2-8
Installing the Web Admin Server and Application Files . . . . . . . . . . . . . . . . . . . . 2-8
Upgrading the Web Admin Interface . . . . . . . . . . . . . . . . . . . . . . . . . . . . . . . . 2-10
Removing the Web Admin Interface. . . . . . . . . . . . . . . . . . . . . . . . . . . . . . . . . 2-10
Contents of the WebAdmin Directory . . . . . . . . . . . . . . . . . . . . . . . . . . . . . . . . 2-10
Installing the Netezza SSL Site Certificate . . . . . . . . . . . . . . . . . . . . . . . . . . . . 2-11
Clients and Unicode Characters . . . . . . . . . . . . . . . . . . . . . . . . . . . . . . . . . . . . . . 2-11
Client Timeout Controls . . . . . . . . . . . . . . . . . . . . . . . . . . . . . . . . . . . . . . . . . . . . 2-12
Netezza Port Numbers . . . . . . . . . . . . . . . . . . . . . . . . . . . . . . . . . . . . . . . . . . . . . 2-13
Changing the Default Port Numbers . . . . . . . . . . . . . . . . . . . . . . . . . . . . . . . . 2-13
iv
Specifying Non-Default NPS Port Numbers for Clients . . . . . . . . . . . . . . . . . . . 2-14
Creating Encrypted Passwords . . . . . . . . . . . . . . . . . . . . . . . . . . . . . . . . . . . . . . . 2-15
Using Stored Passwords . . . . . . . . . . . . . . . . . . . . . . . . . . . . . . . . . . . . . . . . . . . . 2-16
3 Using the Netezza Administration Interfaces
Netezza CLI Overview . . . . . . . . . . . . . . . . . . . . . . . . . . . . . . . . . . . . . . . . . . . . . . 3-1
Summary of Commands . . . . . . . . . . . . . . . . . . . . . . . . . . . . . . . . . . . . . . . . . . 3-2
Command Locations . . . . . . . . . . . . . . . . . . . . . . . . . . . . . . . . . . . . . . . . . . . . 3-4
Netezza CLI Command Syntax . . . . . . . . . . . . . . . . . . . . . . . . . . . . . . . . . . . . . 3-5
Using the Netezza Commands . . . . . . . . . . . . . . . . . . . . . . . . . . . . . . . . . . . . . 3-6
Specifying Identifiers in Commands . . . . . . . . . . . . . . . . . . . . . . . . . . . . . . . . . 3-6
SQL Command Overview . . . . . . . . . . . . . . . . . . . . . . . . . . . . . . . . . . . . . . . . . . . . 3-7
nzsql Command . . . . . . . . . . . . . . . . . . . . . . . . . . . . . . . . . . . . . . . . . . . . . . . 3-7
NzAdmin Tool Overview . . . . . . . . . . . . . . . . . . . . . . . . . . . . . . . . . . . . . . . . . . . . 3-11
Client Compatibility . . . . . . . . . . . . . . . . . . . . . . . . . . . . . . . . . . . . . . . . . . . . 3-11
Starting the NzAdmin Tool . . . . . . . . . . . . . . . . . . . . . . . . . . . . . . . . . . . . . . . 3-12
Logging In to NzAdmin . . . . . . . . . . . . . . . . . . . . . . . . . . . . . . . . . . . . . . . . . 3-12
Connecting to the Netezza System . . . . . . . . . . . . . . . . . . . . . . . . . . . . . . . . . 3-13
Displaying System Components. . . . . . . . . . . . . . . . . . . . . . . . . . . . . . . . . . . . 3-14
Interpreting the Color Status Indicators . . . . . . . . . . . . . . . . . . . . . . . . . . . . . . 3-14
Main Menu Commands . . . . . . . . . . . . . . . . . . . . . . . . . . . . . . . . . . . . . . . . . 3-15
Using the NzAdmin Tool Hyperlinks . . . . . . . . . . . . . . . . . . . . . . . . . . . . . . . . 3-16
Administration Commands . . . . . . . . . . . . . . . . . . . . . . . . . . . . . . . . . . . . . . . 3-17
Setting Automatic Refresh . . . . . . . . . . . . . . . . . . . . . . . . . . . . . . . . . . . . . . . 3-17
Controlling NzAdmin Session Termination . . . . . . . . . . . . . . . . . . . . . . . . . . . . 3-19
Web Admin Overview . . . . . . . . . . . . . . . . . . . . . . . . . . . . . . . . . . . . . . . . . . . . . . 3-19
Using the Web Admin Application. . . . . . . . . . . . . . . . . . . . . . . . . . . . . . . . . . 3-20
Understanding the Web Admin Page Layout . . . . . . . . . . . . . . . . . . . . . . . . . . . 3-20
4 Managing Netezza HA Systems
Linux-HA and DRBD Overview . . . . . . . . . . . . . . . . . . . . . . . . . . . . . . . . . . . . . . . . 4-1
Differences with the Previous Netezza HA Solution . . . . . . . . . . . . . . . . . . . . . . . . . . 4-2
Linux-HA Administration . . . . . . . . . . . . . . . . . . . . . . . . . . . . . . . . . . . . . . . . . . . . 4-3
Heartbeat Configuration . . . . . . . . . . . . . . . . . . . . . . . . . . . . . . . . . . . . . . . . . . 4-3
CIB . . . . . . . . . . . . . . . . . . . . . . . . . . . . . . . . . . . . . . . . . . . . . . . . . . . . . . . . 4-3
Important Information about Host 1 and Host 2 . . . . . . . . . . . . . . . . . . . . . . . . . 4-3
Managing Failover Timers. . . . . . . . . . . . . . . . . . . . . . . . . . . . . . . . . . . . . . . . . 4-4
Netezza Cluster Management Scripts. . . . . . . . . . . . . . . . . . . . . . . . . . . . . . . . . 4-4
v
Identifying the Active and Standby Nodes . . . . . . . . . . . . . . . . . . . . . . . . . . . . . 4-5
Monitoring the Cluster and Resource Group Status . . . . . . . . . . . . . . . . . . . . . . . 4-6
nps Resource Group. . . . . . . . . . . . . . . . . . . . . . . . . . . . . . . . . . . . . . . . . . . . . 4-7
Failover Criteria . . . . . . . . . . . . . . . . . . . . . . . . . . . . . . . . . . . . . . . . . . . . . . . . 4-8
Relocate to the Standby Node. . . . . . . . . . . . . . . . . . . . . . . . . . . . . . . . . . . . . . 4-9
Safe Manual Control of the Hosts (And Heartbeat) . . . . . . . . . . . . . . . . . . . . . . . 4-9
Transition to Maintenance (Non-Heartbeat) Mode . . . . . . . . . . . . . . . . . . . . . . . 4-10
Transitioning from Maintenance to Clustering Mode . . . . . . . . . . . . . . . . . . . . . 4-11
Cluster Manager Events . . . . . . . . . . . . . . . . . . . . . . . . . . . . . . . . . . . . . . . . . 4-12
Logging and Messages . . . . . . . . . . . . . . . . . . . . . . . . . . . . . . . . . . . . . . . . . . 4-13
DRBD Administration. . . . . . . . . . . . . . . . . . . . . . . . . . . . . . . . . . . . . . . . . . . . . . 4-13
Monitoring DRBD Status . . . . . . . . . . . . . . . . . . . . . . . . . . . . . . . . . . . . . . . . 4-14
Sample DRBD Status Output . . . . . . . . . . . . . . . . . . . . . . . . . . . . . . . . . . . . . 4-15
Split-Brain . . . . . . . . . . . . . . . . . . . . . . . . . . . . . . . . . . . . . . . . . . . . . . . . . . 4-15
Administration Reference and Troubleshooting . . . . . . . . . . . . . . . . . . . . . . . . . . . . 4-16
IP Address Requirements . . . . . . . . . . . . . . . . . . . . . . . . . . . . . . . . . . . . . . . . 4-17
Forcing Heartbeat to Shutdown. . . . . . . . . . . . . . . . . . . . . . . . . . . . . . . . . . . . 4-17
Shutting Down Heartbeat on Both Nodes without Causing Relocate . . . . . . . . . . 4-17
Restarting Heartbeat after Maintenance Network Issues . . . . . . . . . . . . . . . . . . 4-17
Resolving Configuration Problems . . . . . . . . . . . . . . . . . . . . . . . . . . . . . . . . . . 4-18
Fixed a Problem, but crm_mon Still Shows Failed Items . . . . . . . . . . . . . . . . . . 4-18
Output From crm_mon Does Not Show the nps Resource Group . . . . . . . . . . . . . 4-18
Linux Users and Groups Required for HA . . . . . . . . . . . . . . . . . . . . . . . . . . . . . 4-19
Checking for User Sessions and Activity. . . . . . . . . . . . . . . . . . . . . . . . . . . . . . 4-19
5 Managing the Netezza Hardware
Netezza Hardware Components. . . . . . . . . . . . . . . . . . . . . . . . . . . . . . . . . . . . . . . . 5-1
Displaying Hardware Components . . . . . . . . . . . . . . . . . . . . . . . . . . . . . . . . . . . 5-3
Hardware Types. . . . . . . . . . . . . . . . . . . . . . . . . . . . . . . . . . . . . . . . . . . . . . . . 5-4
Hardware IDs . . . . . . . . . . . . . . . . . . . . . . . . . . . . . . . . . . . . . . . . . . . . . . . . . 5-5
Hardware Location. . . . . . . . . . . . . . . . . . . . . . . . . . . . . . . . . . . . . . . . . . . . . . 5-5
Hardware Roles . . . . . . . . . . . . . . . . . . . . . . . . . . . . . . . . . . . . . . . . . . . . . . . . 5-7
Hardware States . . . . . . . . . . . . . . . . . . . . . . . . . . . . . . . . . . . . . . . . . . . . . . . 5-8
Data Slices, Data Partitions, and Disks . . . . . . . . . . . . . . . . . . . . . . . . . . . . . . 5-10
IBM Netezza 100/1000 Storage Design. . . . . . . . . . . . . . . . . . . . . . . . . . . . . . 5-10
IBM Netezza C1000 Storage Design . . . . . . . . . . . . . . . . . . . . . . . . . . . . . . . . 5-11
System Resource Balance Recovery. . . . . . . . . . . . . . . . . . . . . . . . . . . . . . . . . 5-12
vi
Hardware Management Tasks . . . . . . . . . . . . . . . . . . . . . . . . . . . . . . . . . . . . . . . . 5-13
Callhome File . . . . . . . . . . . . . . . . . . . . . . . . . . . . . . . . . . . . . . . . . . . . . . . . 5-14
Displaying Hardware Issues . . . . . . . . . . . . . . . . . . . . . . . . . . . . . . . . . . . . . . 5-14
Managing Hosts. . . . . . . . . . . . . . . . . . . . . . . . . . . . . . . . . . . . . . . . . . . . . . . 5-14
Managing SPUs. . . . . . . . . . . . . . . . . . . . . . . . . . . . . . . . . . . . . . . . . . . . . . . 5-15
Managing Disks. . . . . . . . . . . . . . . . . . . . . . . . . . . . . . . . . . . . . . . . . . . . . . . 5-17
Managing Data Slices . . . . . . . . . . . . . . . . . . . . . . . . . . . . . . . . . . . . . . . . . . . . . 5-20
Displaying Data Slice Issues . . . . . . . . . . . . . . . . . . . . . . . . . . . . . . . . . . . . . . 5-20
Monitor Data Slice Status. . . . . . . . . . . . . . . . . . . . . . . . . . . . . . . . . . . . . . . . 5-20
Regenerate a Data Slice . . . . . . . . . . . . . . . . . . . . . . . . . . . . . . . . . . . . . . . . . 5-21
Rebalance Data Slices . . . . . . . . . . . . . . . . . . . . . . . . . . . . . . . . . . . . . . . . . . 5-23
Displaying the Active Path Topology . . . . . . . . . . . . . . . . . . . . . . . . . . . . . . . . 5-24
Handling Transactions during Failover and Regeneration . . . . . . . . . . . . . . . . . . 5-25
Automatic Query and Load Continuation . . . . . . . . . . . . . . . . . . . . . . . . . . . . . . . . 5-26
Power Procedures . . . . . . . . . . . . . . . . . . . . . . . . . . . . . . . . . . . . . . . . . . . . . . . . 5-27
PDU and Circuit Breakers Overview . . . . . . . . . . . . . . . . . . . . . . . . . . . . . . . . . 5-27
Powering On the IBM Netezza 1000 and IBM PureData System for Analytics N10015-
28
Powering Off the IBM Netezza 1000 or IBM PureData System for Analytics N1001. 5-
29
Powering on an IBM Netezza C1000 System . . . . . . . . . . . . . . . . . . . . . . . . . . 5-30
Powering off an IBM Netezza C1000 System . . . . . . . . . . . . . . . . . . . . . . . . . . 5-31
NEC InfoFrame DWH PDU and Circuit Breakers Overview . . . . . . . . . . . . . . . . . 5-32
Powering On the NEC InfoFrame DWH Appliance . . . . . . . . . . . . . . . . . . . . . . . 5-33
Powering Off an NEC InfoFrame DWH Appliance . . . . . . . . . . . . . . . . . . . . . . . 5-34
6 Managing the Netezza Server
Software Revision Levels . . . . . . . . . . . . . . . . . . . . . . . . . . . . . . . . . . . . . . . . . . . . 6-1
Displaying the Netezza Software Revision . . . . . . . . . . . . . . . . . . . . . . . . . . . . . 6-1
Displaying the Software Revision Levels. . . . . . . . . . . . . . . . . . . . . . . . . . . . . . . 6-2
System States . . . . . . . . . . . . . . . . . . . . . . . . . . . . . . . . . . . . . . . . . . . . . . . . . . . . 6-2
Displaying the Current System State . . . . . . . . . . . . . . . . . . . . . . . . . . . . . . . . . 6-3
System States Reference . . . . . . . . . . . . . . . . . . . . . . . . . . . . . . . . . . . . . . . . . 6-4
Waiting for a System State . . . . . . . . . . . . . . . . . . . . . . . . . . . . . . . . . . . . . . . . 6-5
Managing the System State . . . . . . . . . . . . . . . . . . . . . . . . . . . . . . . . . . . . . . . . . . 6-6
Start the System . . . . . . . . . . . . . . . . . . . . . . . . . . . . . . . . . . . . . . . . . . . . . . . 6-6
Stop the System . . . . . . . . . . . . . . . . . . . . . . . . . . . . . . . . . . . . . . . . . . . . . . . 6-7
Pause the System . . . . . . . . . . . . . . . . . . . . . . . . . . . . . . . . . . . . . . . . . . . . . . 6-7
vii
Resume the System . . . . . . . . . . . . . . . . . . . . . . . . . . . . . . . . . . . . . . . . . . . . . 6-7
Take the System Offline . . . . . . . . . . . . . . . . . . . . . . . . . . . . . . . . . . . . . . . . . . 6-8
Restart the System . . . . . . . . . . . . . . . . . . . . . . . . . . . . . . . . . . . . . . . . . . . . . 6-8
Overview of the Netezza System Processing . . . . . . . . . . . . . . . . . . . . . . . . . . . . 6-8
System States during Netezza Start-Up . . . . . . . . . . . . . . . . . . . . . . . . . . . . . . 6-10
System Errors . . . . . . . . . . . . . . . . . . . . . . . . . . . . . . . . . . . . . . . . . . . . . . . . . . . 6-11
System Logs . . . . . . . . . . . . . . . . . . . . . . . . . . . . . . . . . . . . . . . . . . . . . . . . . . . . 6-12
Backup and Restore Server. . . . . . . . . . . . . . . . . . . . . . . . . . . . . . . . . . . . . . . 6-12
Bootserver Manager . . . . . . . . . . . . . . . . . . . . . . . . . . . . . . . . . . . . . . . . . . . . 6-13
Client Manager . . . . . . . . . . . . . . . . . . . . . . . . . . . . . . . . . . . . . . . . . . . . . . . 6-13
Database Operating System . . . . . . . . . . . . . . . . . . . . . . . . . . . . . . . . . . . . . . 6-13
Event Manager . . . . . . . . . . . . . . . . . . . . . . . . . . . . . . . . . . . . . . . . . . . . . . . 6-14
Flow Communications Retransmit . . . . . . . . . . . . . . . . . . . . . . . . . . . . . . . . . . 6-15
Host Statistics Generator . . . . . . . . . . . . . . . . . . . . . . . . . . . . . . . . . . . . . . . . 6-15
Load Manager . . . . . . . . . . . . . . . . . . . . . . . . . . . . . . . . . . . . . . . . . . . . . . . . 6-15
Postgres . . . . . . . . . . . . . . . . . . . . . . . . . . . . . . . . . . . . . . . . . . . . . . . . . . . . 6-15
Session Manager . . . . . . . . . . . . . . . . . . . . . . . . . . . . . . . . . . . . . . . . . . . . . . 6-16
SPU Cores Manager . . . . . . . . . . . . . . . . . . . . . . . . . . . . . . . . . . . . . . . . . . . . 6-16
Startup Server . . . . . . . . . . . . . . . . . . . . . . . . . . . . . . . . . . . . . . . . . . . . . . . . 6-16
Statistics Server . . . . . . . . . . . . . . . . . . . . . . . . . . . . . . . . . . . . . . . . . . . . . . 6-17
System Manager . . . . . . . . . . . . . . . . . . . . . . . . . . . . . . . . . . . . . . . . . . . . . . 6-17
The nzDbosSpill File . . . . . . . . . . . . . . . . . . . . . . . . . . . . . . . . . . . . . . . . . . . 6-17
System Configuration. . . . . . . . . . . . . . . . . . . . . . . . . . . . . . . . . . . . . . . . . . . . . . 6-18
Display Configuration Information . . . . . . . . . . . . . . . . . . . . . . . . . . . . . . . . . . 6-18
Changing the System Registry. . . . . . . . . . . . . . . . . . . . . . . . . . . . . . . . . . . . . 6-19
7 Managing Event Rules
Template Event Rules . . . . . . . . . . . . . . . . . . . . . . . . . . . . . . . . . . . . . . . . . . . . . . 7-1
Managing Event Rules . . . . . . . . . . . . . . . . . . . . . . . . . . . . . . . . . . . . . . . . . . . . . . 7-6
Copying a Template Event to Create an Event Rule . . . . . . . . . . . . . . . . . . . . . . . 7-7
Copying and Modifying a User-Defined Event Rule . . . . . . . . . . . . . . . . . . . . . . . 7-7
Generating an Event . . . . . . . . . . . . . . . . . . . . . . . . . . . . . . . . . . . . . . . . . . . . 7-7
Deleting an Event Rule. . . . . . . . . . . . . . . . . . . . . . . . . . . . . . . . . . . . . . . . . . . 7-8
Disabling an Event Rule . . . . . . . . . . . . . . . . . . . . . . . . . . . . . . . . . . . . . . . . . . 7-8
Adding an Event Rule . . . . . . . . . . . . . . . . . . . . . . . . . . . . . . . . . . . . . . . . . . . 7-8
Specifying the Event Match Criteria. . . . . . . . . . . . . . . . . . . . . . . . . . . . . . . . . . 7-8
Specifying the Event Rule Attributes . . . . . . . . . . . . . . . . . . . . . . . . . . . . . . . . 7-12
viii
Specifying the Notification . . . . . . . . . . . . . . . . . . . . . . . . . . . . . . . . . . . . . . . 7-13
The sendMail.cfg File . . . . . . . . . . . . . . . . . . . . . . . . . . . . . . . . . . . . . . . . . . 7-13
Aggregating Event E-mail Messages. . . . . . . . . . . . . . . . . . . . . . . . . . . . . . . . . 7-16
Creating a Custom Event Rule. . . . . . . . . . . . . . . . . . . . . . . . . . . . . . . . . . . . . 7-18
Template Event Reference . . . . . . . . . . . . . . . . . . . . . . . . . . . . . . . . . . . . . . . . . . 7-19
Specifying System State Changes . . . . . . . . . . . . . . . . . . . . . . . . . . . . . . . . . . 7-19
Hardware Service Requested . . . . . . . . . . . . . . . . . . . . . . . . . . . . . . . . . . . . . 7-20
Hardware Needs Attention . . . . . . . . . . . . . . . . . . . . . . . . . . . . . . . . . . . . . . . 7-21
Hardware Path Down . . . . . . . . . . . . . . . . . . . . . . . . . . . . . . . . . . . . . . . . . . . 7-22
Hardware Restarted . . . . . . . . . . . . . . . . . . . . . . . . . . . . . . . . . . . . . . . . . . . . 7-24
Specifying Disk Space Threshold Notification. . . . . . . . . . . . . . . . . . . . . . . . . . 7-24
Specifying Runaway Query Notification . . . . . . . . . . . . . . . . . . . . . . . . . . . . . . 7-26
Monitoring the System State. . . . . . . . . . . . . . . . . . . . . . . . . . . . . . . . . . . . . . 7-27
Monitoring for Disk Predictive Failure Errors. . . . . . . . . . . . . . . . . . . . . . . . . . . 7-28
Monitoring for ECC Errors. . . . . . . . . . . . . . . . . . . . . . . . . . . . . . . . . . . . . . . . 7-29
Monitoring Regeneration Errors. . . . . . . . . . . . . . . . . . . . . . . . . . . . . . . . . . . . 7-29
Monitoring Disk Errors . . . . . . . . . . . . . . . . . . . . . . . . . . . . . . . . . . . . . . . . . . 7-30
Monitoring Hardware Temperature. . . . . . . . . . . . . . . . . . . . . . . . . . . . . . . . . . 7-32
Monitoring System Temperature . . . . . . . . . . . . . . . . . . . . . . . . . . . . . . . . . . . 7-33
Query History Events . . . . . . . . . . . . . . . . . . . . . . . . . . . . . . . . . . . . . . . . . . . 7-34
Monitoring SPU Cores . . . . . . . . . . . . . . . . . . . . . . . . . . . . . . . . . . . . . . . . . . 7-37
Monitoring Voltage Faults. . . . . . . . . . . . . . . . . . . . . . . . . . . . . . . . . . . . . . . . 7-37
Monitoring Transaction Limits. . . . . . . . . . . . . . . . . . . . . . . . . . . . . . . . . . . . . 7-38
Switch Port Events . . . . . . . . . . . . . . . . . . . . . . . . . . . . . . . . . . . . . . . . . . . . 7-39
Reachability and Availability Events . . . . . . . . . . . . . . . . . . . . . . . . . . . . . . . . 7-39
Event Types Reference. . . . . . . . . . . . . . . . . . . . . . . . . . . . . . . . . . . . . . . . . . . . . 7-40
Network Interface State Change Event. . . . . . . . . . . . . . . . . . . . . . . . . . . . . . . 7-40
Topology Imbalance Event . . . . . . . . . . . . . . . . . . . . . . . . . . . . . . . . . . . . . . . 7-40
S-Blade CPU Core Events. . . . . . . . . . . . . . . . . . . . . . . . . . . . . . . . . . . . . . . . 7-41
Displaying Alerts . . . . . . . . . . . . . . . . . . . . . . . . . . . . . . . . . . . . . . . . . . . . . . . . . 7-41
8 Establishing Security and Access Control
Netezza Database Users and Groups . . . . . . . . . . . . . . . . . . . . . . . . . . . . . . . . . . . . 8-1
Develop an Access Model . . . . . . . . . . . . . . . . . . . . . . . . . . . . . . . . . . . . . . . . . 8-2
Default Netezza Groups and Users . . . . . . . . . . . . . . . . . . . . . . . . . . . . . . . . . . 8-3
Choosing a User Authentication Method. . . . . . . . . . . . . . . . . . . . . . . . . . . . . . . 8-4
Configuring Password Content Controls and Expiration . . . . . . . . . . . . . . . . . . . . 8-4
ix
Creating Netezza Database Users . . . . . . . . . . . . . . . . . . . . . . . . . . . . . . . . . . . 8-6
Altering Netezza Database Users . . . . . . . . . . . . . . . . . . . . . . . . . . . . . . . . . . . . 8-7
Deleting Netezza Database Users . . . . . . . . . . . . . . . . . . . . . . . . . . . . . . . . . . . 8-7
Creating Netezza Database Groups . . . . . . . . . . . . . . . . . . . . . . . . . . . . . . . . . . 8-7
Altering Netezza Database Groups. . . . . . . . . . . . . . . . . . . . . . . . . . . . . . . . . . . 8-8
Deleting Netezza Database Groups . . . . . . . . . . . . . . . . . . . . . . . . . . . . . . . . . . 8-8
Security Model . . . . . . . . . . . . . . . . . . . . . . . . . . . . . . . . . . . . . . . . . . . . . . . . . . . 8-8
Administrator Privileges . . . . . . . . . . . . . . . . . . . . . . . . . . . . . . . . . . . . . . . . . . 8-8
Object Privileges on Objects . . . . . . . . . . . . . . . . . . . . . . . . . . . . . . . . . . . . . . 8-10
Object Privileges by Class. . . . . . . . . . . . . . . . . . . . . . . . . . . . . . . . . . . . . . . . 8-11
Scope of Object Privileges . . . . . . . . . . . . . . . . . . . . . . . . . . . . . . . . . . . . . . . 8-11
Revoking Privileges . . . . . . . . . . . . . . . . . . . . . . . . . . . . . . . . . . . . . . . . . . . . 8-13
Privileges by Object . . . . . . . . . . . . . . . . . . . . . . . . . . . . . . . . . . . . . . . . . . . . 8-13
Indirect Object Privileges . . . . . . . . . . . . . . . . . . . . . . . . . . . . . . . . . . . . . . . . 8-15
Always Available Functions. . . . . . . . . . . . . . . . . . . . . . . . . . . . . . . . . . . . . . . 8-16
Creating an Administrative User Group . . . . . . . . . . . . . . . . . . . . . . . . . . . . . . 8-16
Logon Authentication. . . . . . . . . . . . . . . . . . . . . . . . . . . . . . . . . . . . . . . . . . . . . . 8-17
Local Authentication . . . . . . . . . . . . . . . . . . . . . . . . . . . . . . . . . . . . . . . . . . . 8-17
LDAP Authentication . . . . . . . . . . . . . . . . . . . . . . . . . . . . . . . . . . . . . . . . . . . 8-17
Commands Related to Authentication Methods. . . . . . . . . . . . . . . . . . . . . . . . . 8-19
Passwords and Logons . . . . . . . . . . . . . . . . . . . . . . . . . . . . . . . . . . . . . . . . . . 8-20
Netezza Client Encryption and Security . . . . . . . . . . . . . . . . . . . . . . . . . . . . . . . . . 8-22
Configuring the SSL Certificate. . . . . . . . . . . . . . . . . . . . . . . . . . . . . . . . . . . . 8-22
Configuring the Netezza Host Authentication for Clients . . . . . . . . . . . . . . . . . . 8-23
Commands Related to Netezza Client Connection Methods . . . . . . . . . . . . . . . . 8-26
Setting User and Group Limits . . . . . . . . . . . . . . . . . . . . . . . . . . . . . . . . . . . . . . . 8-26
Specifying User Rowset Limits . . . . . . . . . . . . . . . . . . . . . . . . . . . . . . . . . . . . 8-27
Specifying Query Timeout Limits. . . . . . . . . . . . . . . . . . . . . . . . . . . . . . . . . . . 8-29
Specifying Session Timeout . . . . . . . . . . . . . . . . . . . . . . . . . . . . . . . . . . . . . . 8-29
Specifying Session Priority . . . . . . . . . . . . . . . . . . . . . . . . . . . . . . . . . . . . . . . 8-30
Logging Netezza SQL Information . . . . . . . . . . . . . . . . . . . . . . . . . . . . . . . . . . . . . 8-30
Logging Netezza SQL Information on the Server . . . . . . . . . . . . . . . . . . . . . . . . 8-30
Logging Netezza SQL Information on the Client . . . . . . . . . . . . . . . . . . . . . . . . 8-30
Group Public Views . . . . . . . . . . . . . . . . . . . . . . . . . . . . . . . . . . . . . . . . . . . . . . . 8-31
9 Managing User Content on the Netezza Appliance
Creating Databases and User Tables . . . . . . . . . . . . . . . . . . . . . . . . . . . . . . . . . . . . 9-1
Understanding Table Size and Storage Space. . . . . . . . . . . . . . . . . . . . . . . . . . . 9-2
x
Best Practices for Disk Space Usage in Tables . . . . . . . . . . . . . . . . . . . . . . . . . . 9-2
Database and Table Guidelines . . . . . . . . . . . . . . . . . . . . . . . . . . . . . . . . . . . . . 9-4
Accessing Rows in Tables. . . . . . . . . . . . . . . . . . . . . . . . . . . . . . . . . . . . . . . . . 9-4
Understanding Transaction IDs . . . . . . . . . . . . . . . . . . . . . . . . . . . . . . . . . . . . . 9-5
Creating Distribution Keys . . . . . . . . . . . . . . . . . . . . . . . . . . . . . . . . . . . . . . . . . . . 9-5
Selecting a Distribution Key . . . . . . . . . . . . . . . . . . . . . . . . . . . . . . . . . . . . . . . 9-6
Criteria for Selecting Distribution Keys . . . . . . . . . . . . . . . . . . . . . . . . . . . . . . . 9-6
Choosing a Distribution Key for a Subset Table. . . . . . . . . . . . . . . . . . . . . . . . . . 9-6
Distribution Keys and Collocated Joins . . . . . . . . . . . . . . . . . . . . . . . . . . . . . . . 9-7
Dynamic Redistribution or Broadcasts . . . . . . . . . . . . . . . . . . . . . . . . . . . . . . . . 9-7
Verifying Distribution . . . . . . . . . . . . . . . . . . . . . . . . . . . . . . . . . . . . . . . . . . . . 9-7
Avoiding Data Skew . . . . . . . . . . . . . . . . . . . . . . . . . . . . . . . . . . . . . . . . . . . . . . . . 9-8
Specifying Distribution Keys. . . . . . . . . . . . . . . . . . . . . . . . . . . . . . . . . . . . . . . 9-9
Viewing Data Skew . . . . . . . . . . . . . . . . . . . . . . . . . . . . . . . . . . . . . . . . . . . . . 9-9
Using Clustered Base Tables . . . . . . . . . . . . . . . . . . . . . . . . . . . . . . . . . . . . . . . . 9-11
Organizing Keys and Zone Maps . . . . . . . . . . . . . . . . . . . . . . . . . . . . . . . . . . . 9-12
Selecting Organizing Keys . . . . . . . . . . . . . . . . . . . . . . . . . . . . . . . . . . . . . . . 9-12
Reorganizing the Table Data . . . . . . . . . . . . . . . . . . . . . . . . . . . . . . . . . . . . . . 9-13
Copying Clustered Base Tables . . . . . . . . . . . . . . . . . . . . . . . . . . . . . . . . . . . . 9-14
Updating Database Statistics . . . . . . . . . . . . . . . . . . . . . . . . . . . . . . . . . . . . . . . . 9-14
Maintaining Table Statistics Automatically. . . . . . . . . . . . . . . . . . . . . . . . . . . . 9-15
Running the GENERATE STATISTICS Command . . . . . . . . . . . . . . . . . . . . . . . 9-16
Just in Time Statistics . . . . . . . . . . . . . . . . . . . . . . . . . . . . . . . . . . . . . . . . . . 9-16
Zone Maps . . . . . . . . . . . . . . . . . . . . . . . . . . . . . . . . . . . . . . . . . . . . . . . . . . 9-17
Grooming Tables . . . . . . . . . . . . . . . . . . . . . . . . . . . . . . . . . . . . . . . . . . . . . . . . . 9-18
GROOM and the nzreclaim Command . . . . . . . . . . . . . . . . . . . . . . . . . . . . . . . 9-19
Identifying Clustered Base Tables that Require Grooming . . . . . . . . . . . . . . . . . 9-19
About the Organization Percentage . . . . . . . . . . . . . . . . . . . . . . . . . . . . . . . . . 9-21
Groom and Backup Synchronization . . . . . . . . . . . . . . . . . . . . . . . . . . . . . . . . 9-21
Managing Sessions . . . . . . . . . . . . . . . . . . . . . . . . . . . . . . . . . . . . . . . . . . . . . . . 9-21
Using the nzsession Command . . . . . . . . . . . . . . . . . . . . . . . . . . . . . . . . . . . . 9-22
Running Transactions . . . . . . . . . . . . . . . . . . . . . . . . . . . . . . . . . . . . . . . . . . . . . 9-23
Transaction Control and Monitoring . . . . . . . . . . . . . . . . . . . . . . . . . . . . . . . . . 9-23
Transactions Per System . . . . . . . . . . . . . . . . . . . . . . . . . . . . . . . . . . . . . . . . 9-23
Transaction Concurrency and Isolation. . . . . . . . . . . . . . . . . . . . . . . . . . . . . . . 9-24
Concurrent Transaction Serialization and Queueing, Implicit Transactions. . . . . . 9-24
Concurrent Transaction Serialization and Queueing, Explicit Transactions. . . . . . 9-25
xi
Netezza Optimizer and Query Plans. . . . . . . . . . . . . . . . . . . . . . . . . . . . . . . . . . . . 9-26
Execution Plans. . . . . . . . . . . . . . . . . . . . . . . . . . . . . . . . . . . . . . . . . . . . . . . 9-26
Displaying Plan Types . . . . . . . . . . . . . . . . . . . . . . . . . . . . . . . . . . . . . . . . . . 9-27
Analyzing Query Performance . . . . . . . . . . . . . . . . . . . . . . . . . . . . . . . . . . . . . 9-28
Viewing Query Status and History . . . . . . . . . . . . . . . . . . . . . . . . . . . . . . . . . . . . . 9-28
10 Backing Up and Restoring Databases
General Information on Backup and Restore Methods . . . . . . . . . . . . . . . . . . . . . . . 10-1
Overview. . . . . . . . . . . . . . . . . . . . . . . . . . . . . . . . . . . . . . . . . . . . . . . . . . . . 10-3
Database Completeness . . . . . . . . . . . . . . . . . . . . . . . . . . . . . . . . . . . . . . . . . 10-3
Portability. . . . . . . . . . . . . . . . . . . . . . . . . . . . . . . . . . . . . . . . . . . . . . . . . . . 10-3
Compression in Backups and Restores. . . . . . . . . . . . . . . . . . . . . . . . . . . . . . . 10-4
Multi-Stream Backup . . . . . . . . . . . . . . . . . . . . . . . . . . . . . . . . . . . . . . . . . . . 10-4
Special Columns . . . . . . . . . . . . . . . . . . . . . . . . . . . . . . . . . . . . . . . . . . . . . . 10-5
Upgrade/Downgrade Concerns. . . . . . . . . . . . . . . . . . . . . . . . . . . . . . . . . . . . . 10-6
Compressed Unload and Reload . . . . . . . . . . . . . . . . . . . . . . . . . . . . . . . . . . . 10-6
Encryption Key Management in Backup and Restore. . . . . . . . . . . . . . . . . . . . . 10-6
Filesystem Connector for Backup and Recovery . . . . . . . . . . . . . . . . . . . . . . . . 10-7
Third-Party Backup and Recovery Solutions Support . . . . . . . . . . . . . . . . . . . . . 10-8
Host Backup and Restore . . . . . . . . . . . . . . . . . . . . . . . . . . . . . . . . . . . . . . . . . . . 10-8
Creating a Host Backup . . . . . . . . . . . . . . . . . . . . . . . . . . . . . . . . . . . . . . . . . 10-8
Restoring the Host Data Directory and Catalog . . . . . . . . . . . . . . . . . . . . . . . . . 10-9
Using the nzbackup Command . . . . . . . . . . . . . . . . . . . . . . . . . . . . . . . . . . . . . . 10-10
The nzbackup Command Syntax . . . . . . . . . . . . . . . . . . . . . . . . . . . . . . . . . . 10-11
Specifying Backup Privileges . . . . . . . . . . . . . . . . . . . . . . . . . . . . . . . . . . . . 10-14
nzbackup Examples . . . . . . . . . . . . . . . . . . . . . . . . . . . . . . . . . . . . . . . . . . . 10-15
Backup Archive Directory . . . . . . . . . . . . . . . . . . . . . . . . . . . . . . . . . . . . . . . 10-17
Incremental Backups . . . . . . . . . . . . . . . . . . . . . . . . . . . . . . . . . . . . . . . . . . 10-17
Backup History Report . . . . . . . . . . . . . . . . . . . . . . . . . . . . . . . . . . . . . . . . . 10-19
Backing Up and Restoring Users, Groups, and Permissions . . . . . . . . . . . . . . . 10-20
Using the nzrestore Command . . . . . . . . . . . . . . . . . . . . . . . . . . . . . . . . . . . . . . 10-22
The nzrestore Command Syntax . . . . . . . . . . . . . . . . . . . . . . . . . . . . . . . . . . 10-23
Specifying Restore Privileges . . . . . . . . . . . . . . . . . . . . . . . . . . . . . . . . . . . . 10-27
nzrestore Examples . . . . . . . . . . . . . . . . . . . . . . . . . . . . . . . . . . . . . . . . . . . 10-28
Maintaining Database Statistics . . . . . . . . . . . . . . . . . . . . . . . . . . . . . . . . . . 10-29
Restoring Tables . . . . . . . . . . . . . . . . . . . . . . . . . . . . . . . . . . . . . . . . . . . . . 10-29
Understanding Incremental Restoration . . . . . . . . . . . . . . . . . . . . . . . . . . . . . 10-31
xii
Using the Symantec NetBackup Connector . . . . . . . . . . . . . . . . . . . . . . . . . . . . . 10-33
Installing the Symantec NetBackup License. . . . . . . . . . . . . . . . . . . . . . . . . . 10-33
Configuring NetBackup for a Netezza Client . . . . . . . . . . . . . . . . . . . . . . . . . . 10-34
Integrating Symantec NetBackup to Netezza . . . . . . . . . . . . . . . . . . . . . . . . . 10-35
Procedures for Backing Up and Restoring Using Symantec NetBackup . . . . . . . 10-39
Using the IBM Tivoli Storage Manager Connector . . . . . . . . . . . . . . . . . . . . . . . . . 10-41
About the Tivoli Backup Integration. . . . . . . . . . . . . . . . . . . . . . . . . . . . . . . . 10-41
Configuring the Netezza Host . . . . . . . . . . . . . . . . . . . . . . . . . . . . . . . . . . . . 10-42
Configuring the Tivoli Storage Manager Server . . . . . . . . . . . . . . . . . . . . . . . . 10-46
Special Considerations for Large Databases . . . . . . . . . . . . . . . . . . . . . . . . . . 10-52
Running nzbackup and nzrestore with the TSM Connector . . . . . . . . . . . . . . . . 10-54
Host Backup and Restore to the TSM Server . . . . . . . . . . . . . . . . . . . . . . . . . 10-55
Backing up and Restoring Data Using the TSM Interfaces . . . . . . . . . . . . . . . . 10-56
Troubleshooting. . . . . . . . . . . . . . . . . . . . . . . . . . . . . . . . . . . . . . . . . . . . . . 10-57
Using the EMC NetWorker Connector . . . . . . . . . . . . . . . . . . . . . . . . . . . . . . . . . 10-59
Preparing your System for EMC NetWorker Integration . . . . . . . . . . . . . . . . . . 10-59
NetWorker Installation . . . . . . . . . . . . . . . . . . . . . . . . . . . . . . . . . . . . . . . . . 10-60
NetWorker Configuration . . . . . . . . . . . . . . . . . . . . . . . . . . . . . . . . . . . . . . . 10-60
NetWorker Troubleshooting. . . . . . . . . . . . . . . . . . . . . . . . . . . . . . . . . . . . . . 10-65
11 Query History Collection and Reporting
Query History Concepts . . . . . . . . . . . . . . . . . . . . . . . . . . . . . . . . . . . . . . . . . . . . 11-1
Query History and Audit History . . . . . . . . . . . . . . . . . . . . . . . . . . . . . . . . . . . 11-2
Planning Query History Monitoring Needs . . . . . . . . . . . . . . . . . . . . . . . . . . . . 11-2
Planning the History Database . . . . . . . . . . . . . . . . . . . . . . . . . . . . . . . . . . . . 11-3
Planning Query History Configurations . . . . . . . . . . . . . . . . . . . . . . . . . . . . . . . 11-5
Enabling History Collection. . . . . . . . . . . . . . . . . . . . . . . . . . . . . . . . . . . . . . . 11-6
Managing Access to the History Database . . . . . . . . . . . . . . . . . . . . . . . . . . . . 11-7
Query History Loading Process . . . . . . . . . . . . . . . . . . . . . . . . . . . . . . . . . . . . . . . 11-7
History Batch Directory Files . . . . . . . . . . . . . . . . . . . . . . . . . . . . . . . . . . . . . 11-9
Configuring the Loader Process. . . . . . . . . . . . . . . . . . . . . . . . . . . . . . . . . . . . 11-9
Query History Log Files . . . . . . . . . . . . . . . . . . . . . . . . . . . . . . . . . . . . . . . . 11-11
Disabling History Collection . . . . . . . . . . . . . . . . . . . . . . . . . . . . . . . . . . . . . . . . 11-11
Changing the Owner of a History Database . . . . . . . . . . . . . . . . . . . . . . . . . . . . . . 11-11
Changing Query History Configuration Settings . . . . . . . . . . . . . . . . . . . . . . . . . . . 11-12
Displaying Query History Configuration Settings . . . . . . . . . . . . . . . . . . . . . . . . . . 11-12
Dropping History Configurations . . . . . . . . . . . . . . . . . . . . . . . . . . . . . . . . . . . . . 11-13
Query History Event Notifications . . . . . . . . . . . . . . . . . . . . . . . . . . . . . . . . . . . . 11-14
xiii
Managing History Configurations Using NzAdmin . . . . . . . . . . . . . . . . . . . . . . . . . 11-14
Query History Views and User Tables . . . . . . . . . . . . . . . . . . . . . . . . . . . . . . . . . . 11-15
Query History and Audit History Views . . . . . . . . . . . . . . . . . . . . . . . . . . . . . . 11-15
_v_querystatus . . . . . . . . . . . . . . . . . . . . . . . . . . . . . . . . . . . . . . . . . . . . . . 11-16
_v_planstatus . . . . . . . . . . . . . . . . . . . . . . . . . . . . . . . . . . . . . . . . . . . . . . . 11-16
$v_hist_queries . . . . . . . . . . . . . . . . . . . . . . . . . . . . . . . . . . . . . . . . . . . . . . 11-18
$v_hist_successful_queries and $v_hist_unsuccessful_queries. . . . . . . . . . . . . 11-19
$v_hist_incomplete_queries . . . . . . . . . . . . . . . . . . . . . . . . . . . . . . . . . . . . . 11-19
$v_hist_table_access_stats. . . . . . . . . . . . . . . . . . . . . . . . . . . . . . . . . . . . . . 11-20
$v_hist_column_access_stats . . . . . . . . . . . . . . . . . . . . . . . . . . . . . . . . . . . . 11-20
$v_hist_log_events . . . . . . . . . . . . . . . . . . . . . . . . . . . . . . . . . . . . . . . . . . . 11-21
$hist_version. . . . . . . . . . . . . . . . . . . . . . . . . . . . . . . . . . . . . . . . . . . . . . . . 11-22
$hist_nps_$SCHEMA_VERSION . . . . . . . . . . . . . . . . . . . . . . . . . . . . . . . . . . 11-22
$hist_log_entry_$SCHEMA_VERSION . . . . . . . . . . . . . . . . . . . . . . . . . . . . . . 11-23
$hist_failed_authentication_$SCHEMA_VERSION . . . . . . . . . . . . . . . . . . . . . 11-23
$hist_session_prolog_$SCHEMA_VERSION . . . . . . . . . . . . . . . . . . . . . . . . . . 11-24
$hist_session_epilog_$SCHEMA_VERSION . . . . . . . . . . . . . . . . . . . . . . . . . . 11-26
$hist_query_prolog_$SCHEMA_VERSION . . . . . . . . . . . . . . . . . . . . . . . . . . . 11-27
$hist_query_epilog_$SCHEMA_VERSION . . . . . . . . . . . . . . . . . . . . . . . . . . . 11-28
$hist_query_overflow_$SCHEMA_VERSION . . . . . . . . . . . . . . . . . . . . . . . . . . 11-29
$hist_service_$SCHEMA_VERSION. . . . . . . . . . . . . . . . . . . . . . . . . . . . . . . . 11-30
$hist_state_change_$SCHEMA_VERSION . . . . . . . . . . . . . . . . . . . . . . . . . . . 11-31
$hist_table_access_$SCHEMA_VERSION . . . . . . . . . . . . . . . . . . . . . . . . . . . 11-32
$hist_column_access_$SCHEMA_VERSION. . . . . . . . . . . . . . . . . . . . . . . . . . 11-33
$hist_plan_prolog_$SCHEMA_VERSION . . . . . . . . . . . . . . . . . . . . . . . . . . . . 11-34
$hist_plan_epilog_$SCHEMA_VERSION . . . . . . . . . . . . . . . . . . . . . . . . . . . . 11-36
History Table Helper Functions . . . . . . . . . . . . . . . . . . . . . . . . . . . . . . . . . . . . . . 11-36
FORMAT_QUERY_STATUS () . . . . . . . . . . . . . . . . . . . . . . . . . . . . . . . . . . . . 11-37
FORMAT_PLAN_STATUS () . . . . . . . . . . . . . . . . . . . . . . . . . . . . . . . . . . . . . 11-37
FORMAT_TABLE_ACCESS() . . . . . . . . . . . . . . . . . . . . . . . . . . . . . . . . . . . . . 11-37
FORMAT_COLUMN_ACCESS() . . . . . . . . . . . . . . . . . . . . . . . . . . . . . . . . . . . 11-38
Example Usage . . . . . . . . . . . . . . . . . . . . . . . . . . . . . . . . . . . . . . . . . . . . . . 11-38
12 Managing Workloads on the Netezza Appliance
Overview. . . . . . . . . . . . . . . . . . . . . . . . . . . . . . . . . . . . . . . . . . . . . . . . . . . . . . . 12-1
Service Level Planning . . . . . . . . . . . . . . . . . . . . . . . . . . . . . . . . . . . . . . . . . . 12-1
WLM Feature Summary . . . . . . . . . . . . . . . . . . . . . . . . . . . . . . . . . . . . . . . . . 12-2
xiv
Resource Sharing Design . . . . . . . . . . . . . . . . . . . . . . . . . . . . . . . . . . . . . . . . 12-2
Concurrent Jobs . . . . . . . . . . . . . . . . . . . . . . . . . . . . . . . . . . . . . . . . . . . . . . 12-3
Managing Short Query Bias . . . . . . . . . . . . . . . . . . . . . . . . . . . . . . . . . . . . . . . . . 12-4
Managing GRA . . . . . . . . . . . . . . . . . . . . . . . . . . . . . . . . . . . . . . . . . . . . . . . . . . 12-6
Resource Percentages and System Resources. . . . . . . . . . . . . . . . . . . . . . . . . . 12-6
Assigning Users to Resource Groups . . . . . . . . . . . . . . . . . . . . . . . . . . . . . . . . 12-7
Resource Groups Example . . . . . . . . . . . . . . . . . . . . . . . . . . . . . . . . . . . . . . . 12-7
GRA Allocations Example . . . . . . . . . . . . . . . . . . . . . . . . . . . . . . . . . . . . . . . . 12-9
Resource Allocations for the Admin User . . . . . . . . . . . . . . . . . . . . . . . . . . . . 12-10
Allocations for Multiple Jobs in the Same Group. . . . . . . . . . . . . . . . . . . . . . . 12-11
Priority and GRA Resource Sharing . . . . . . . . . . . . . . . . . . . . . . . . . . . . . . . . 12-12
Guaranteed Resource Allocation Settings . . . . . . . . . . . . . . . . . . . . . . . . . . . . 12-13
Tracking GRA Compliance . . . . . . . . . . . . . . . . . . . . . . . . . . . . . . . . . . . . . . 12-14
Monitoring Resource Utilization and Compliance . . . . . . . . . . . . . . . . . . . . . . 12-15
Managing PQE . . . . . . . . . . . . . . . . . . . . . . . . . . . . . . . . . . . . . . . . . . . . . . . . . 12-19
Netezza Priority Levels . . . . . . . . . . . . . . . . . . . . . . . . . . . . . . . . . . . . . . . . . 12-20
Managing the Gate Keeper . . . . . . . . . . . . . . . . . . . . . . . . . . . . . . . . . . . . . . . . . 12-21
13 Displaying Netezza Statistics
Netezza Stats Tables . . . . . . . . . . . . . . . . . . . . . . . . . . . . . . . . . . . . . . . . . . . . . . 13-1
Database Table . . . . . . . . . . . . . . . . . . . . . . . . . . . . . . . . . . . . . . . . . . . . . . . 13-2
DBMS Group. . . . . . . . . . . . . . . . . . . . . . . . . . . . . . . . . . . . . . . . . . . . . . . . . 13-3
Host CPU Table. . . . . . . . . . . . . . . . . . . . . . . . . . . . . . . . . . . . . . . . . . . . . . . 13-3
Host File System Table . . . . . . . . . . . . . . . . . . . . . . . . . . . . . . . . . . . . . . . . . 13-4
Host Interface Table . . . . . . . . . . . . . . . . . . . . . . . . . . . . . . . . . . . . . . . . . . . 13-4
Host Management Channel Table . . . . . . . . . . . . . . . . . . . . . . . . . . . . . . . . . . 13-6
Host Network Table . . . . . . . . . . . . . . . . . . . . . . . . . . . . . . . . . . . . . . . . . . . . 13-7
Host Table . . . . . . . . . . . . . . . . . . . . . . . . . . . . . . . . . . . . . . . . . . . . . . . . . . 13-8
Hardware Management Channel Table . . . . . . . . . . . . . . . . . . . . . . . . . . . . . . . 13-9
Per Table Per Data Slice Table . . . . . . . . . . . . . . . . . . . . . . . . . . . . . . . . . . . 13-10
Query Table . . . . . . . . . . . . . . . . . . . . . . . . . . . . . . . . . . . . . . . . . . . . . . . . 13-10
Query History Table . . . . . . . . . . . . . . . . . . . . . . . . . . . . . . . . . . . . . . . . . . . 13-11
SPU Partition Table . . . . . . . . . . . . . . . . . . . . . . . . . . . . . . . . . . . . . . . . . . . 13-12
SPU Table . . . . . . . . . . . . . . . . . . . . . . . . . . . . . . . . . . . . . . . . . . . . . . . . . 13-13
System Group . . . . . . . . . . . . . . . . . . . . . . . . . . . . . . . . . . . . . . . . . . . . . . . 13-13
Table Table. . . . . . . . . . . . . . . . . . . . . . . . . . . . . . . . . . . . . . . . . . . . . . . . . 13-14
Displaying System Statistics. . . . . . . . . . . . . . . . . . . . . . . . . . . . . . . . . . . . . . . . 13-15
xv
The nzstats Command . . . . . . . . . . . . . . . . . . . . . . . . . . . . . . . . . . . . . . . . . 13-15
To display table types and fields . . . . . . . . . . . . . . . . . . . . . . . . . . . . . . . . . . 13-15
To display a specific table . . . . . . . . . . . . . . . . . . . . . . . . . . . . . . . . . . . . . . 13-15
14 Managing the MantraVM Service
Mantra Information . . . . . . . . . . . . . . . . . . . . . . . . . . . . . . . . . . . . . . . . . . . . . . . 14-1
MantraVM Hostname and IP Addresses . . . . . . . . . . . . . . . . . . . . . . . . . . . . . . 14-2
MantraVM and High Availability Systems . . . . . . . . . . . . . . . . . . . . . . . . . . . . . 14-2
MantraVM Users and Groups. . . . . . . . . . . . . . . . . . . . . . . . . . . . . . . . . . . . . . 14-2
MantraVM Log Files . . . . . . . . . . . . . . . . . . . . . . . . . . . . . . . . . . . . . . . . . . . . 14-2
Mantra Documentation. . . . . . . . . . . . . . . . . . . . . . . . . . . . . . . . . . . . . . . . . . 14-3
Starting and Stopping the MantraVM Service . . . . . . . . . . . . . . . . . . . . . . . . . . . . . 14-3
Starting the MantraVM Service . . . . . . . . . . . . . . . . . . . . . . . . . . . . . . . . . . . . 14-3
Stopping the MantraVM Service . . . . . . . . . . . . . . . . . . . . . . . . . . . . . . . . . . . 14-3
Displaying the Status of the MantraVM Service. . . . . . . . . . . . . . . . . . . . . . . . . 14-4
Managing the MantraVM Service . . . . . . . . . . . . . . . . . . . . . . . . . . . . . . . . . . . . . . 14-4
Displaying the MantraVM Service Configuration . . . . . . . . . . . . . . . . . . . . . . . . 14-4
Displaying the MantraVM Service Version. . . . . . . . . . . . . . . . . . . . . . . . . . . . . 14-5
Enabling the MantraVM Service . . . . . . . . . . . . . . . . . . . . . . . . . . . . . . . . . . . 14-5
Disabling the MantraVM Service . . . . . . . . . . . . . . . . . . . . . . . . . . . . . . . . . . . 14-5
Setting the MantraVM IP Address . . . . . . . . . . . . . . . . . . . . . . . . . . . . . . . . . . 14-6
Reconfiguring the MantraVM IP Addresses . . . . . . . . . . . . . . . . . . . . . . . . . . . . 14-6
Configuring the MantraVM Monitoring Interfaces . . . . . . . . . . . . . . . . . . . . . . . 14-7
Displaying the MantraVM Monitoring Interfaces . . . . . . . . . . . . . . . . . . . . . . . . 14-8
Accessing the Mantra Web Interface . . . . . . . . . . . . . . . . . . . . . . . . . . . . . . . . . . . 14-8
Troubleshooting. . . . . . . . . . . . . . . . . . . . . . . . . . . . . . . . . . . . . . . . . . . . . . . . . . 14-9
Double-Byte Character Support . . . . . . . . . . . . . . . . . . . . . . . . . . . . . . . . . . . . 14-9
Event Throttling. . . . . . . . . . . . . . . . . . . . . . . . . . . . . . . . . . . . . . . . . . . . . . . 14-9
/nz Partition is Full . . . . . . . . . . . . . . . . . . . . . . . . . . . . . . . . . . . . . . . . . . . . 14-9
Mantra Inactivity Timeout. . . . . . . . . . . . . . . . . . . . . . . . . . . . . . . . . . . . . . . 14-10
Appendix A: Netezza CLI
Summary of Command Line Commands. . . . . . . . . . . . . . . . . . . . . . . . . . . . . . . . . . A-1
Command Privileges . . . . . . . . . . . . . . . . . . . . . . . . . . . . . . . . . . . . . . . . . . . . A-4
Commands without Special Privileges . . . . . . . . . . . . . . . . . . . . . . . . . . . . . . . . A-6
Exit Codes . . . . . . . . . . . . . . . . . . . . . . . . . . . . . . . . . . . . . . . . . . . . . . . . . . . A-6
Netezza CLI Command Syntax . . . . . . . . . . . . . . . . . . . . . . . . . . . . . . . . . . . . . . . . A-6
nzbackup . . . . . . . . . . . . . . . . . . . . . . . . . . . . . . . . . . . . . . . . . . . . . . . . . . . . . . . A-7
xvi
nzcontents . . . . . . . . . . . . . . . . . . . . . . . . . . . . . . . . . . . . . . . . . . . . . . . . . . . . . . A-7
Syntax . . . . . . . . . . . . . . . . . . . . . . . . . . . . . . . . . . . . . . . . . . . . . . . . . . . . . . A-7
Description . . . . . . . . . . . . . . . . . . . . . . . . . . . . . . . . . . . . . . . . . . . . . . . . . . . A-7
Usage. . . . . . . . . . . . . . . . . . . . . . . . . . . . . . . . . . . . . . . . . . . . . . . . . . . . . . . A-7
nzconvert . . . . . . . . . . . . . . . . . . . . . . . . . . . . . . . . . . . . . . . . . . . . . . . . . . . . . . . A-8
Syntax . . . . . . . . . . . . . . . . . . . . . . . . . . . . . . . . . . . . . . . . . . . . . . . . . . . . . . A-8
Options . . . . . . . . . . . . . . . . . . . . . . . . . . . . . . . . . . . . . . . . . . . . . . . . . . . . . A-8
Description . . . . . . . . . . . . . . . . . . . . . . . . . . . . . . . . . . . . . . . . . . . . . . . . . . . A-8
nzds. . . . . . . . . . . . . . . . . . . . . . . . . . . . . . . . . . . . . . . . . . . . . . . . . . . . . . . . . . . A-8
Syntax . . . . . . . . . . . . . . . . . . . . . . . . . . . . . . . . . . . . . . . . . . . . . . . . . . . . . . A-8
Inputs . . . . . . . . . . . . . . . . . . . . . . . . . . . . . . . . . . . . . . . . . . . . . . . . . . . . . . A-9
Options . . . . . . . . . . . . . . . . . . . . . . . . . . . . . . . . . . . . . . . . . . . . . . . . . . . . A-11
Description . . . . . . . . . . . . . . . . . . . . . . . . . . . . . . . . . . . . . . . . . . . . . . . . . . A-11
Usage. . . . . . . . . . . . . . . . . . . . . . . . . . . . . . . . . . . . . . . . . . . . . . . . . . . . . . A-11
nzevent . . . . . . . . . . . . . . . . . . . . . . . . . . . . . . . . . . . . . . . . . . . . . . . . . . . . . . . A-12
Syntax . . . . . . . . . . . . . . . . . . . . . . . . . . . . . . . . . . . . . . . . . . . . . . . . . . . . . A-12
Inputs . . . . . . . . . . . . . . . . . . . . . . . . . . . . . . . . . . . . . . . . . . . . . . . . . . . . . A-12
Options . . . . . . . . . . . . . . . . . . . . . . . . . . . . . . . . . . . . . . . . . . . . . . . . . . . . A-13
Description . . . . . . . . . . . . . . . . . . . . . . . . . . . . . . . . . . . . . . . . . . . . . . . . . . A-16
Usage. . . . . . . . . . . . . . . . . . . . . . . . . . . . . . . . . . . . . . . . . . . . . . . . . . . . . . A-17
nzhistcleanupdb . . . . . . . . . . . . . . . . . . . . . . . . . . . . . . . . . . . . . . . . . . . . . . . . . A-17
Syntax . . . . . . . . . . . . . . . . . . . . . . . . . . . . . . . . . . . . . . . . . . . . . . . . . . . . . A-17
Inputs . . . . . . . . . . . . . . . . . . . . . . . . . . . . . . . . . . . . . . . . . . . . . . . . . . . . . A-18
Description . . . . . . . . . . . . . . . . . . . . . . . . . . . . . . . . . . . . . . . . . . . . . . . . . . A-18
Usage. . . . . . . . . . . . . . . . . . . . . . . . . . . . . . . . . . . . . . . . . . . . . . . . . . . . . . A-19
nzhistcreatedb . . . . . . . . . . . . . . . . . . . . . . . . . . . . . . . . . . . . . . . . . . . . . . . . . . A-20
Syntax . . . . . . . . . . . . . . . . . . . . . . . . . . . . . . . . . . . . . . . . . . . . . . . . . . . . . A-20
Inputs . . . . . . . . . . . . . . . . . . . . . . . . . . . . . . . . . . . . . . . . . . . . . . . . . . . . . A-20
Outputs . . . . . . . . . . . . . . . . . . . . . . . . . . . . . . . . . . . . . . . . . . . . . . . . . . . . A-21
Description . . . . . . . . . . . . . . . . . . . . . . . . . . . . . . . . . . . . . . . . . . . . . . . . . . A-22
Usage. . . . . . . . . . . . . . . . . . . . . . . . . . . . . . . . . . . . . . . . . . . . . . . . . . . . . . A-22
nzhostbackup . . . . . . . . . . . . . . . . . . . . . . . . . . . . . . . . . . . . . . . . . . . . . . . . . . . A-22
Syntax . . . . . . . . . . . . . . . . . . . . . . . . . . . . . . . . . . . . . . . . . . . . . . . . . . . . . A-23
Inputs . . . . . . . . . . . . . . . . . . . . . . . . . . . . . . . . . . . . . . . . . . . . . . . . . . . . . A-23
Description . . . . . . . . . . . . . . . . . . . . . . . . . . . . . . . . . . . . . . . . . . . . . . . . . . A-23
Usage. . . . . . . . . . . . . . . . . . . . . . . . . . . . . . . . . . . . . . . . . . . . . . . . . . . . . . A-24
nzhostrestore . . . . . . . . . . . . . . . . . . . . . . . . . . . . . . . . . . . . . . . . . . . . . . . . . . . A-24
xvii
Syntax . . . . . . . . . . . . . . . . . . . . . . . . . . . . . . . . . . . . . . . . . . . . . . . . . . . . . A-24
Inputs . . . . . . . . . . . . . . . . . . . . . . . . . . . . . . . . . . . . . . . . . . . . . . . . . . . . . A-25
Options. . . . . . . . . . . . . . . . . . . . . . . . . . . . . . . . . . . . . . . . . . . . . . . . . . . . . A-25
Description . . . . . . . . . . . . . . . . . . . . . . . . . . . . . . . . . . . . . . . . . . . . . . . . . . A-26
Usage. . . . . . . . . . . . . . . . . . . . . . . . . . . . . . . . . . . . . . . . . . . . . . . . . . . . . . A-26
nzhw . . . . . . . . . . . . . . . . . . . . . . . . . . . . . . . . . . . . . . . . . . . . . . . . . . . . . . . . . A-26
Syntax . . . . . . . . . . . . . . . . . . . . . . . . . . . . . . . . . . . . . . . . . . . . . . . . . . . . . A-27
Inputs . . . . . . . . . . . . . . . . . . . . . . . . . . . . . . . . . . . . . . . . . . . . . . . . . . . . . A-27
Options. . . . . . . . . . . . . . . . . . . . . . . . . . . . . . . . . . . . . . . . . . . . . . . . . . . . . A-30
Description . . . . . . . . . . . . . . . . . . . . . . . . . . . . . . . . . . . . . . . . . . . . . . . . . . A-30
Usage. . . . . . . . . . . . . . . . . . . . . . . . . . . . . . . . . . . . . . . . . . . . . . . . . . . . . . A-31
nzload . . . . . . . . . . . . . . . . . . . . . . . . . . . . . . . . . . . . . . . . . . . . . . . . . . . . . . . . A-33
nzpassword . . . . . . . . . . . . . . . . . . . . . . . . . . . . . . . . . . . . . . . . . . . . . . . . . . . . . A-33
Syntax . . . . . . . . . . . . . . . . . . . . . . . . . . . . . . . . . . . . . . . . . . . . . . . . . . . . . A-33
Inputs . . . . . . . . . . . . . . . . . . . . . . . . . . . . . . . . . . . . . . . . . . . . . . . . . . . . . A-33
Options. . . . . . . . . . . . . . . . . . . . . . . . . . . . . . . . . . . . . . . . . . . . . . . . . . . . . A-34
Description . . . . . . . . . . . . . . . . . . . . . . . . . . . . . . . . . . . . . . . . . . . . . . . . . . A-34
Usage. . . . . . . . . . . . . . . . . . . . . . . . . . . . . . . . . . . . . . . . . . . . . . . . . . . . . . A-35
nzreclaim . . . . . . . . . . . . . . . . . . . . . . . . . . . . . . . . . . . . . . . . . . . . . . . . . . . . . . A-35
Syntax . . . . . . . . . . . . . . . . . . . . . . . . . . . . . . . . . . . . . . . . . . . . . . . . . . . . . A-35
Inputs . . . . . . . . . . . . . . . . . . . . . . . . . . . . . . . . . . . . . . . . . . . . . . . . . . . . . A-36
Options. . . . . . . . . . . . . . . . . . . . . . . . . . . . . . . . . . . . . . . . . . . . . . . . . . . . . A-36
Description . . . . . . . . . . . . . . . . . . . . . . . . . . . . . . . . . . . . . . . . . . . . . . . . . . A-36
Usage. . . . . . . . . . . . . . . . . . . . . . . . . . . . . . . . . . . . . . . . . . . . . . . . . . . . . . A-37
nzrestore . . . . . . . . . . . . . . . . . . . . . . . . . . . . . . . . . . . . . . . . . . . . . . . . . . . . . . A-37
nzrev . . . . . . . . . . . . . . . . . . . . . . . . . . . . . . . . . . . . . . . . . . . . . . . . . . . . . . . . . A-37
Syntax . . . . . . . . . . . . . . . . . . . . . . . . . . . . . . . . . . . . . . . . . . . . . . . . . . . . . A-37
Inputs . . . . . . . . . . . . . . . . . . . . . . . . . . . . . . . . . . . . . . . . . . . . . . . . . . . . . A-38
Description . . . . . . . . . . . . . . . . . . . . . . . . . . . . . . . . . . . . . . . . . . . . . . . . . . A-38
Usage. . . . . . . . . . . . . . . . . . . . . . . . . . . . . . . . . . . . . . . . . . . . . . . . . . . . . . A-38
nzsession . . . . . . . . . . . . . . . . . . . . . . . . . . . . . . . . . . . . . . . . . . . . . . . . . . . . . . A-39
Syntax . . . . . . . . . . . . . . . . . . . . . . . . . . . . . . . . . . . . . . . . . . . . . . . . . . . . . A-39
Inputs . . . . . . . . . . . . . . . . . . . . . . . . . . . . . . . . . . . . . . . . . . . . . . . . . . . . . A-39
Options. . . . . . . . . . . . . . . . . . . . . . . . . . . . . . . . . . . . . . . . . . . . . . . . . . . . . A-40
Description . . . . . . . . . . . . . . . . . . . . . . . . . . . . . . . . . . . . . . . . . . . . . . . . . . A-41
Usage. . . . . . . . . . . . . . . . . . . . . . . . . . . . . . . . . . . . . . . . . . . . . . . . . . . . . . A-43
nzspupart . . . . . . . . . . . . . . . . . . . . . . . . . . . . . . . . . . . . . . . . . . . . . . . . . . . . . . A-43
xviii
Syntax . . . . . . . . . . . . . . . . . . . . . . . . . . . . . . . . . . . . . . . . . . . . . . . . . . . . . A-44
Inputs . . . . . . . . . . . . . . . . . . . . . . . . . . . . . . . . . . . . . . . . . . . . . . . . . . . . . A-44
Options . . . . . . . . . . . . . . . . . . . . . . . . . . . . . . . . . . . . . . . . . . . . . . . . . . . . A-44
Description . . . . . . . . . . . . . . . . . . . . . . . . . . . . . . . . . . . . . . . . . . . . . . . . . . A-46
Usage. . . . . . . . . . . . . . . . . . . . . . . . . . . . . . . . . . . . . . . . . . . . . . . . . . . . . . A-46
nzstart . . . . . . . . . . . . . . . . . . . . . . . . . . . . . . . . . . . . . . . . . . . . . . . . . . . . . . . . A-47
Syntax . . . . . . . . . . . . . . . . . . . . . . . . . . . . . . . . . . . . . . . . . . . . . . . . . . . . . A-47
Inputs . . . . . . . . . . . . . . . . . . . . . . . . . . . . . . . . . . . . . . . . . . . . . . . . . . . . . A-47
Description . . . . . . . . . . . . . . . . . . . . . . . . . . . . . . . . . . . . . . . . . . . . . . . . . . A-47
Usage. . . . . . . . . . . . . . . . . . . . . . . . . . . . . . . . . . . . . . . . . . . . . . . . . . . . . . A-48
nzstate . . . . . . . . . . . . . . . . . . . . . . . . . . . . . . . . . . . . . . . . . . . . . . . . . . . . . . . . A-48
Syntax . . . . . . . . . . . . . . . . . . . . . . . . . . . . . . . . . . . . . . . . . . . . . . . . . . . . . A-48
Inputs . . . . . . . . . . . . . . . . . . . . . . . . . . . . . . . . . . . . . . . . . . . . . . . . . . . . . A-49
Options . . . . . . . . . . . . . . . . . . . . . . . . . . . . . . . . . . . . . . . . . . . . . . . . . . . . A-49
Description . . . . . . . . . . . . . . . . . . . . . . . . . . . . . . . . . . . . . . . . . . . . . . . . . . A-50
Usage. . . . . . . . . . . . . . . . . . . . . . . . . . . . . . . . . . . . . . . . . . . . . . . . . . . . . . A-50
nzstats . . . . . . . . . . . . . . . . . . . . . . . . . . . . . . . . . . . . . . . . . . . . . . . . . . . . . . . . A-50
Syntax . . . . . . . . . . . . . . . . . . . . . . . . . . . . . . . . . . . . . . . . . . . . . . . . . . . . . A-50
Inputs . . . . . . . . . . . . . . . . . . . . . . . . . . . . . . . . . . . . . . . . . . . . . . . . . . . . . A-51
Options . . . . . . . . . . . . . . . . . . . . . . . . . . . . . . . . . . . . . . . . . . . . . . . . . . . . A-51
Description . . . . . . . . . . . . . . . . . . . . . . . . . . . . . . . . . . . . . . . . . . . . . . . . . . A-52
Usage. . . . . . . . . . . . . . . . . . . . . . . . . . . . . . . . . . . . . . . . . . . . . . . . . . . . . . A-53
nzstop . . . . . . . . . . . . . . . . . . . . . . . . . . . . . . . . . . . . . . . . . . . . . . . . . . . . . . . . A-53
Syntax Description. . . . . . . . . . . . . . . . . . . . . . . . . . . . . . . . . . . . . . . . . . . . . A-53
Inputs . . . . . . . . . . . . . . . . . . . . . . . . . . . . . . . . . . . . . . . . . . . . . . . . . . . . . A-54
Options . . . . . . . . . . . . . . . . . . . . . . . . . . . . . . . . . . . . . . . . . . . . . . . . . . . . A-54
Description . . . . . . . . . . . . . . . . . . . . . . . . . . . . . . . . . . . . . . . . . . . . . . . . . . A-54
Usage. . . . . . . . . . . . . . . . . . . . . . . . . . . . . . . . . . . . . . . . . . . . . . . . . . . . . . A-54
nzsystem . . . . . . . . . . . . . . . . . . . . . . . . . . . . . . . . . . . . . . . . . . . . . . . . . . . . . . A-55
Syntax . . . . . . . . . . . . . . . . . . . . . . . . . . . . . . . . . . . . . . . . . . . . . . . . . . . . . A-55
Inputs . . . . . . . . . . . . . . . . . . . . . . . . . . . . . . . . . . . . . . . . . . . . . . . . . . . . . A-55
Options . . . . . . . . . . . . . . . . . . . . . . . . . . . . . . . . . . . . . . . . . . . . . . . . . . . . A-56
Description . . . . . . . . . . . . . . . . . . . . . . . . . . . . . . . . . . . . . . . . . . . . . . . . . . A-56
Usage. . . . . . . . . . . . . . . . . . . . . . . . . . . . . . . . . . . . . . . . . . . . . . . . . . . . . . A-57
Customer Service Troubleshooting Commands . . . . . . . . . . . . . . . . . . . . . . . . . . . . A-58
nzconvertsyscase . . . . . . . . . . . . . . . . . . . . . . . . . . . . . . . . . . . . . . . . . . . . . . A-59
nzdumpschema . . . . . . . . . . . . . . . . . . . . . . . . . . . . . . . . . . . . . . . . . . . . . . . A-61
xix
nzinitsystem . . . . . . . . . . . . . . . . . . . . . . . . . . . . . . . . . . . . . . . . . . . . . . . . . A-62
nzlogmerge . . . . . . . . . . . . . . . . . . . . . . . . . . . . . . . . . . . . . . . . . . . . . . . . . . A-62
Appendix B: Linux Host Administration Reference
Managing Linux Accounts. . . . . . . . . . . . . . . . . . . . . . . . . . . . . . . . . . . . . . . . . . . . B-1
Setting Up Linux User Accounts . . . . . . . . . . . . . . . . . . . . . . . . . . . . . . . . . . . . B-1
Modifying Linux User Accounts. . . . . . . . . . . . . . . . . . . . . . . . . . . . . . . . . . . . . B-2
Deleting Linux User Accounts . . . . . . . . . . . . . . . . . . . . . . . . . . . . . . . . . . . . . . B-2
Changing Linux Account Passwords . . . . . . . . . . . . . . . . . . . . . . . . . . . . . . . . . . B-2
Managing Linux Groups . . . . . . . . . . . . . . . . . . . . . . . . . . . . . . . . . . . . . . . . . . . . . B-2
Adding Linux Groups . . . . . . . . . . . . . . . . . . . . . . . . . . . . . . . . . . . . . . . . . . . . B-2
Modifying Linux Groups . . . . . . . . . . . . . . . . . . . . . . . . . . . . . . . . . . . . . . . . . . B-3
Deleting Linux Groups . . . . . . . . . . . . . . . . . . . . . . . . . . . . . . . . . . . . . . . . . . . B-3
Managing the Linux Host System . . . . . . . . . . . . . . . . . . . . . . . . . . . . . . . . . . . . . . B-3
Hostname and IP Address Changes . . . . . . . . . . . . . . . . . . . . . . . . . . . . . . . . . . B-3
Rebooting the System . . . . . . . . . . . . . . . . . . . . . . . . . . . . . . . . . . . . . . . . . . . B-3
Reformatting the Host Disks . . . . . . . . . . . . . . . . . . . . . . . . . . . . . . . . . . . . . . . B-4
Fixing System Errors . . . . . . . . . . . . . . . . . . . . . . . . . . . . . . . . . . . . . . . . . . . . B-4
Viewing System Processes . . . . . . . . . . . . . . . . . . . . . . . . . . . . . . . . . . . . . . . . B-4
Stopping Errant Processes . . . . . . . . . . . . . . . . . . . . . . . . . . . . . . . . . . . . . . . . B-5
Changing the System Time . . . . . . . . . . . . . . . . . . . . . . . . . . . . . . . . . . . . . . . . B-5
Determining the Kernel Release Level . . . . . . . . . . . . . . . . . . . . . . . . . . . . . . . . B-6
System Administration . . . . . . . . . . . . . . . . . . . . . . . . . . . . . . . . . . . . . . . . . . . . . . B-6
Displaying Directories . . . . . . . . . . . . . . . . . . . . . . . . . . . . . . . . . . . . . . . . . . . B-6
Finding Files . . . . . . . . . . . . . . . . . . . . . . . . . . . . . . . . . . . . . . . . . . . . . . . . . . B-6
Displaying File Content . . . . . . . . . . . . . . . . . . . . . . . . . . . . . . . . . . . . . . . . . . B-6
Finding Netezza Hardware . . . . . . . . . . . . . . . . . . . . . . . . . . . . . . . . . . . . . . . . B-7
Timing Command Execution . . . . . . . . . . . . . . . . . . . . . . . . . . . . . . . . . . . . . . . B-7
Setting Default Command Line Editing . . . . . . . . . . . . . . . . . . . . . . . . . . . . . . . B-7
Miscellaneous Commands . . . . . . . . . . . . . . . . . . . . . . . . . . . . . . . . . . . . . . . . B-7
Appendix C: Netezza User and System Views
User Views . . . . . . . . . . . . . . . . . . . . . . . . . . . . . . . . . . . . . . . . . . . . . . . . . . . . . . C-1
System Views . . . . . . . . . . . . . . . . . . . . . . . . . . . . . . . . . . . . . . . . . . . . . . . . . . . . C-3
Appendix D: System Configuration File Settings
System Startup Configuration Options . . . . . . . . . . . . . . . . . . . . . . . . . . . . . . . . . . . D-1
System Manager Configuration Options . . . . . . . . . . . . . . . . . . . . . . . . . . . . . . . . . . D-3
Other Host Processes Configuration Options. . . . . . . . . . . . . . . . . . . . . . . . . . . . . . . D-6
xx
SPU Configuration Options. . . . . . . . . . . . . . . . . . . . . . . . . . . . . . . . . . . . . . . . . . D-10
Appendix E: Notices and Trademarks
Notices. . . . . . . . . . . . . . . . . . . . . . . . . . . . . . . . . . . . . . . . . . . . . . . . . . . . . . . . . E-1
Trademarks. . . . . . . . . . . . . . . . . . . . . . . . . . . . . . . . . . . . . . . . . . . . . . . . . . . . . . E-3
Electronic Emission Notices . . . . . . . . . . . . . . . . . . . . . . . . . . . . . . . . . . . . . . . . . . E-4
Regulatory and Compliance . . . . . . . . . . . . . . . . . . . . . . . . . . . . . . . . . . . . . . . . . . E-7
Glossary of Database and System Terms
Index
xxi
Tables
Table 2-1: Netezza Supported Platforms . . . . . . . . . . . . . . . . . . . . . . . . . . . . . 2-2
Table 2-2: Sample UNIX CD/DVD Mount Commands . . . . . . . . . . . . . . . . . . . . . 2-4
Table 2-3: Environment Variables . . . . . . . . . . . . . . . . . . . . . . . . . . . . . . . . . . 2-7
Table 2-4: Directory Structure. . . . . . . . . . . . . . . . . . . . . . . . . . . . . . . . . . . . 2-11
Table 2-5: Netezza Port Numbers for Database Access . . . . . . . . . . . . . . . . . . 2-13
Table 3-1: Command Line Summary . . . . . . . . . . . . . . . . . . . . . . . . . . . . . . . . 3-2
Table 3-2: CLI Command Locations. . . . . . . . . . . . . . . . . . . . . . . . . . . . . . . . . 3-4
Table 3-3: nzsql Command Options. . . . . . . . . . . . . . . . . . . . . . . . . . . . . . . . . 3-7
Table 3-4: nzsql Internal Slash Commands . . . . . . . . . . . . . . . . . . . . . . . . . . 3-10
Table 3-5: Color Indicators . . . . . . . . . . . . . . . . . . . . . . . . . . . . . . . . . . . . . . 3-15
Table 3-6: Main Menu Commands. . . . . . . . . . . . . . . . . . . . . . . . . . . . . . . . . 3-15
Table 3-7: Automatic Refresh . . . . . . . . . . . . . . . . . . . . . . . . . . . . . . . . . . . . 3-18
Table 4-1: HA Tasks and Commands (Old Design and New Design) . . . . . . . . . . 4-2
Table 4-2: Cluster Management Scripts . . . . . . . . . . . . . . . . . . . . . . . . . . . . . . 4-5
Table 4-3: HA IP Addresses . . . . . . . . . . . . . . . . . . . . . . . . . . . . . . . . . . . . . 4-17
Table 5-1: Key Netezza Hardware Components to Monitor . . . . . . . . . . . . . . . . . 5-1
Table 5-2: Hardware Description Types . . . . . . . . . . . . . . . . . . . . . . . . . . . . . . 5-4
Table 5-3: Hardware Roles . . . . . . . . . . . . . . . . . . . . . . . . . . . . . . . . . . . . . . . 5-7
Table 5-4: Hardware States . . . . . . . . . . . . . . . . . . . . . . . . . . . . . . . . . . . . . . 5-9
Table 5-5: Data Slice Status . . . . . . . . . . . . . . . . . . . . . . . . . . . . . . . . . . . . . 5-21
Table 5-6: System States and Transactions . . . . . . . . . . . . . . . . . . . . . . . . . . 5-25
Table 6-1: Netezza Software Revision Numbering . . . . . . . . . . . . . . . . . . . . . . . 6-2
Table 6-2: Common System States . . . . . . . . . . . . . . . . . . . . . . . . . . . . . . . . . 6-3
Table 6-3: System States Reference . . . . . . . . . . . . . . . . . . . . . . . . . . . . . . . . 6-4
Table 6-4: Netezza Processes . . . . . . . . . . . . . . . . . . . . . . . . . . . . . . . . . . . . . 6-8
Table 6-5: Error Categories . . . . . . . . . . . . . . . . . . . . . . . . . . . . . . . . . . . . . . 6-11
Table 7-1: Template Event Rules . . . . . . . . . . . . . . . . . . . . . . . . . . . . . . . . . . 7-2
Table 7-2: Netezza Template Event Rules . . . . . . . . . . . . . . . . . . . . . . . . . . . . 7-4
Table 7-3: Event Types. . . . . . . . . . . . . . . . . . . . . . . . . . . . . . . . . . . . . . . . . . 7-9
Table 7-4: Event Argument Expression Syntax . . . . . . . . . . . . . . . . . . . . . . . . 7-13
Table 7-5: Notification Substitution Tags. . . . . . . . . . . . . . . . . . . . . . . . . . . . 7-14
Table 7-6: Notification Syntax. . . . . . . . . . . . . . . . . . . . . . . . . . . . . . . . . . . . 7-15
Table 7-7: System State Changes . . . . . . . . . . . . . . . . . . . . . . . . . . . . . . . . . 7-19
xxii
Table 7-8: Hardware Service Requested Event Rule . . . . . . . . . . . . . . . . . . . . 7-20
Table 7-9: Hardware Needs Attention Event Rule . . . . . . . . . . . . . . . . . . . . . . 7-22
Table 7-10: Hardware Path Down Event Rule . . . . . . . . . . . . . . . . . . . . . . . . . . 7-23
Table 7-11: Hardware Restarted Event Rule. . . . . . . . . . . . . . . . . . . . . . . . . . . 7-24
Table 7-12: Disk Space Event Rules . . . . . . . . . . . . . . . . . . . . . . . . . . . . . . . . 7-25
Table 7-13: Threshold and States . . . . . . . . . . . . . . . . . . . . . . . . . . . . . . . . . . 7-26
Table 7-14: Runaway Query Event Rule . . . . . . . . . . . . . . . . . . . . . . . . . . . . . . 7-27
Table 7-15: SCSI Predictive Failure Event Rule . . . . . . . . . . . . . . . . . . . . . . . . 7-28
Table 7-16: ECC Error Event Rule . . . . . . . . . . . . . . . . . . . . . . . . . . . . . . . . . . 7-29
Table 7-17: Regen Fault Event Rule . . . . . . . . . . . . . . . . . . . . . . . . . . . . . . . . 7-30
Table 7-18: SCSI Disk Error Event Rule. . . . . . . . . . . . . . . . . . . . . . . . . . . . . . 7-31
Table 7-19: Thermal Fault Event Rule . . . . . . . . . . . . . . . . . . . . . . . . . . . . . . . 7-32
Table 7-20: Sys Heat Threshold Event Rule . . . . . . . . . . . . . . . . . . . . . . . . . . . 7-33
Table 7-21: histCaptureEvent Rule . . . . . . . . . . . . . . . . . . . . . . . . . . . . . . . . . 7-34
Table 7-22: histLoadEvent Rule . . . . . . . . . . . . . . . . . . . . . . . . . . . . . . . . . . . 7-35
Table 7-23: SPU Core Event Rule . . . . . . . . . . . . . . . . . . . . . . . . . . . . . . . . . . 7-37
Table 7-24: Voltage Fault Event Rule . . . . . . . . . . . . . . . . . . . . . . . . . . . . . . . 7-37
Table 7-25: Transaction Limit Event Rule . . . . . . . . . . . . . . . . . . . . . . . . . . . . 7-39
Table 8-1: Administrator Privileges . . . . . . . . . . . . . . . . . . . . . . . . . . . . . . . . . 8-9
Table 8-2: Object Privileges . . . . . . . . . . . . . . . . . . . . . . . . . . . . . . . . . . . . . 8-10
Table 8-3: Netezza SQL Commands for Displaying Privileges . . . . . . . . . . . . . . 8-13
Table 8-4: Privileges by Object . . . . . . . . . . . . . . . . . . . . . . . . . . . . . . . . . . . 8-14
Table 8-5: Indirect Object Privileges . . . . . . . . . . . . . . . . . . . . . . . . . . . . . . . 8-15
Table 8-6: Authentication-Related Commands . . . . . . . . . . . . . . . . . . . . . . . . 8-19
Table 8-7: Client Connection-Related Commands . . . . . . . . . . . . . . . . . . . . . . 8-26
Table 8-8: User and Group Settings. . . . . . . . . . . . . . . . . . . . . . . . . . . . . . . . 8-26
Table 8-9: Public Views . . . . . . . . . . . . . . . . . . . . . . . . . . . . . . . . . . . . . . . . 8-31
Table 8-10: System Views . . . . . . . . . . . . . . . . . . . . . . . . . . . . . . . . . . . . . . . 8-32
Table 9-1: Data Type Disk Usage . . . . . . . . . . . . . . . . . . . . . . . . . . . . . . . . . . 9-2
Table 9-2: Table Skew . . . . . . . . . . . . . . . . . . . . . . . . . . . . . . . . . . . . . . . . . 9-10
Table 9-3: Database Information . . . . . . . . . . . . . . . . . . . . . . . . . . . . . . . . . . 9-14
Table 9-4: Generate Statistics Syntax . . . . . . . . . . . . . . . . . . . . . . . . . . . . . . 9-15
Table 9-5: Automatic Statistics. . . . . . . . . . . . . . . . . . . . . . . . . . . . . . . . . . . 9-16
Table 9-6: cbts_needing_groom Input Options . . . . . . . . . . . . . . . . . . . . . . . . 9-20
Table 9-7: The 64th read/write Transaction Queueing . . . . . . . . . . . . . . . . . . . 9-25
Table 9-8: The _v_qrystat View . . . . . . . . . . . . . . . . . . . . . . . . . . . . . . . . . . . 9-29
Table 9-9: The _v_qryhist View . . . . . . . . . . . . . . . . . . . . . . . . . . . . . . . . . . . 9-29
xxiii
Table 10-1: Choosing a Backup and Restore Method. . . . . . . . . . . . . . . . . . . . . 10-2
Table 10-2: Backup/Restore Commands and Content . . . . . . . . . . . . . . . . . . . . 10-3
Table 10-3: Retaining Specials . . . . . . . . . . . . . . . . . . . . . . . . . . . . . . . . . . . . 10-5
Table 10-4: The nzbackup Command Options . . . . . . . . . . . . . . . . . . . . . . . . 10-11
Table 10-5: Environment Settings . . . . . . . . . . . . . . . . . . . . . . . . . . . . . . . . . 10-14
Table 10-6: Backup History Source . . . . . . . . . . . . . . . . . . . . . . . . . . . . . . . . 10-20
Table 10-7: Backup and Restore Behavior . . . . . . . . . . . . . . . . . . . . . . . . . . . 10-21
Table 10-8: The nzrestore Command Options . . . . . . . . . . . . . . . . . . . . . . . . . 10-23
Table 10-9: Environment Settings . . . . . . . . . . . . . . . . . . . . . . . . . . . . . . . . . 10-27
Table 10-10: Backup History Target . . . . . . . . . . . . . . . . . . . . . . . . . . . . . . . . 10-31
Table 10-11: Restore History Source . . . . . . . . . . . . . . . . . . . . . . . . . . . . . . . . 10-33
Table 10-12: NetBackup Policy Settings . . . . . . . . . . . . . . . . . . . . . . . . . . . . . 10-34
Table 11-1: History Loader Settings and Behavior. . . . . . . . . . . . . . . . . . . . . . . 11-9
Table 11-2: _v_querystatus. . . . . . . . . . . . . . . . . . . . . . . . . . . . . . . . . . . . . . 11-16
Table 11-3: _v_planstatus . . . . . . . . . . . . . . . . . . . . . . . . . . . . . . . . . . . . . . 11-16
Table 11-4: $v_hist_queries View . . . . . . . . . . . . . . . . . . . . . . . . . . . . . . . . . 11-18
Table 11-5: $v_hist_incomplete_queries View . . . . . . . . . . . . . . . . . . . . . . . . 11-19
Table 11-6: $v_hist_table_access_stats View . . . . . . . . . . . . . . . . . . . . . . . . . 11-20
Table 11-7: $v_hist_column_access_stats View . . . . . . . . . . . . . . . . . . . . . . . 11-20
Table 11-8: $v_hist_log_events View . . . . . . . . . . . . . . . . . . . . . . . . . . . . . . . 11-21
Table 11-9: $hist_version. . . . . . . . . . . . . . . . . . . . . . . . . . . . . . . . . . . . . . . 11-22
Table 11-10: $hist_nps_$SCHEMA_VERSION . . . . . . . . . . . . . . . . . . . . . . . . . 11-22
Table 11-11: $hist_log_entry_$SCHEMA_VERSION . . . . . . . . . . . . . . . . . . . . . 11-23
Table 11-12: $hist_failed_authentication_$SCHEMA_VERSION. . . . . . . . . . . . . 11-23
Table 11-13: $hist_session_prolog_$SCHEMA_VERSION . . . . . . . . . . . . . . . . . 11-24
Table 11-14: $hist_session_epilog_$SCHEMA_VERSION . . . . . . . . . . . . . . . . . 11-26
Table 11-15: $hist_query_prolog_$SCHEMA_VERSION. . . . . . . . . . . . . . . . . . . 11-27
Table 11-16: $hist_query_epilog_$SCHEMA_VERSION. . . . . . . . . . . . . . . . . . . 11-28
Table 11-17: $hist_query_overflow_$SCHEMA_VERSION . . . . . . . . . . . . . . . . . 11-29
Table 11-18: $hist_service_$SCHEMA_VERSION . . . . . . . . . . . . . . . . . . . . . . . 11-30
Table 11-19: $hist_state_change_$SCHEMA_VERSION . . . . . . . . . . . . . . . . . . 11-31
Table 11-20: $hist_table_access_$SCHEMA_VERSION. . . . . . . . . . . . . . . . . . . 11-32
Table 11-21: $hist_column_access_$SCHEMA_VERSION . . . . . . . . . . . . . . . . . 11-33
Table 11-22: $hist_plan_prolog_$SCHEMA_VERSION . . . . . . . . . . . . . . . . . . . 11-34
Table 11-23: $hist_plan_epilog_$SCHEMA_VERSION . . . . . . . . . . . . . . . . . . . 11-36
Table 12-1: Workload Management Feature Summary . . . . . . . . . . . . . . . . . . . . 12-2
Table 12-2: Short Query Bias Registry Settings. . . . . . . . . . . . . . . . . . . . . . . . . 12-5
xxiv
Table 12-3: Sample Resource Sharing Groups . . . . . . . . . . . . . . . . . . . . . . . . . 12-7
Table 12-4: Assigning Resources to Active RSGs . . . . . . . . . . . . . . . . . . . . . . . 12-9
Table 12-5: Guaranteed Resource Allocation Settings . . . . . . . . . . . . . . . . . . . 12-13
Table 12-6: GRA Compliance Registry Settings . . . . . . . . . . . . . . . . . . . . . . . 12-14
Table 12-7: GRA Report Settings . . . . . . . . . . . . . . . . . . . . . . . . . . . . . . . . . 12-16
Table 12-8: Netezza Priorities. . . . . . . . . . . . . . . . . . . . . . . . . . . . . . . . . . . . 12-20
Table 12-9: Gate Keeper Registry Settings. . . . . . . . . . . . . . . . . . . . . . . . . . . 12-22
Table 13-1: Netezza Groups and Tables. . . . . . . . . . . . . . . . . . . . . . . . . . . . . . 13-1
Table 13-2: Database Table . . . . . . . . . . . . . . . . . . . . . . . . . . . . . . . . . . . . . . 13-2
Table 13-3: DBMS Group . . . . . . . . . . . . . . . . . . . . . . . . . . . . . . . . . . . . . . . . 13-3
Table 13-4: Host CPU Table. . . . . . . . . . . . . . . . . . . . . . . . . . . . . . . . . . . . . . 13-3
Table 13-5: Host File System Table. . . . . . . . . . . . . . . . . . . . . . . . . . . . . . . . . 13-4
Table 13-6: Host Interfaces Table . . . . . . . . . . . . . . . . . . . . . . . . . . . . . . . . . . 13-4
Table 13-7: Host Management Channel Table . . . . . . . . . . . . . . . . . . . . . . . . . 13-6
Table 13-8: Host Network Table . . . . . . . . . . . . . . . . . . . . . . . . . . . . . . . . . . . 13-7
Table 13-9: Host Table . . . . . . . . . . . . . . . . . . . . . . . . . . . . . . . . . . . . . . . . . 13-8
Table 13-10: Hardware Management Channel Table . . . . . . . . . . . . . . . . . . . . . . 13-9
Table 13-11: Per Table Data Slice Table . . . . . . . . . . . . . . . . . . . . . . . . . . . . . 13-10
Table 13-12: Query Table . . . . . . . . . . . . . . . . . . . . . . . . . . . . . . . . . . . . . . . 13-10
Table 13-13: Query History Table . . . . . . . . . . . . . . . . . . . . . . . . . . . . . . . . . . 13-11
Table 13-14: SPU Partition Table . . . . . . . . . . . . . . . . . . . . . . . . . . . . . . . . . . 13-12
Table 13-15: SPU Table . . . . . . . . . . . . . . . . . . . . . . . . . . . . . . . . . . . . . . . . 13-13
Table 13-16: System Group . . . . . . . . . . . . . . . . . . . . . . . . . . . . . . . . . . . . . . 13-13
Table 13-17: Table Table . . . . . . . . . . . . . . . . . . . . . . . . . . . . . . . . . . . . . . . . 13-14
Table A-1: Command Line Summary . . . . . . . . . . . . . . . . . . . . . . . . . . . . . . . . A-1
Table A-2: Administrator Privileges . . . . . . . . . . . . . . . . . . . . . . . . . . . . . . . . . A-4
Table A-3: Object Privileges . . . . . . . . . . . . . . . . . . . . . . . . . . . . . . . . . . . . . . A-5
Table A-4: nzds Input Options. . . . . . . . . . . . . . . . . . . . . . . . . . . . . . . . . . . . . A-9
Table A-5: nzds Options . . . . . . . . . . . . . . . . . . . . . . . . . . . . . . . . . . . . . . . . A-11
Table A-6: nzevent Input Options . . . . . . . . . . . . . . . . . . . . . . . . . . . . . . . . . A-12
Table A-7: nzevent Options. . . . . . . . . . . . . . . . . . . . . . . . . . . . . . . . . . . . . . A-13
Table A-8: nzhistcleanupdb Input Options . . . . . . . . . . . . . . . . . . . . . . . . . . . A-18
Table A-9: nzhistcreatedb Input Options . . . . . . . . . . . . . . . . . . . . . . . . . . . . A-20
Table A-10: nzhistcreatedb Output Messages . . . . . . . . . . . . . . . . . . . . . . . . . . A-21
Table A-11: nzhostbackup Input Options . . . . . . . . . . . . . . . . . . . . . . . . . . . . . A-23
Table A-12: nzhostrestore Input Options . . . . . . . . . . . . . . . . . . . . . . . . . . . . . A-25
Table A-13: nzhostrestore Options. . . . . . . . . . . . . . . . . . . . . . . . . . . . . . . . . . A-25
xxv
Table A-14: nzhw Input Options . . . . . . . . . . . . . . . . . . . . . . . . . . . . . . . . . . . A-27
Table A-15: nzhw Options. . . . . . . . . . . . . . . . . . . . . . . . . . . . . . . . . . . . . . . . A-30
Table A-16: nzpassword Input Options. . . . . . . . . . . . . . . . . . . . . . . . . . . . . . . A-33
Table A-17: nzpassword Options . . . . . . . . . . . . . . . . . . . . . . . . . . . . . . . . . . . A-34
Table A-18: nzreclaim Input Options . . . . . . . . . . . . . . . . . . . . . . . . . . . . . . . . A-36
Table A-19: nzreclaim Options . . . . . . . . . . . . . . . . . . . . . . . . . . . . . . . . . . . . A-36
Table A-20: nzrev input Options . . . . . . . . . . . . . . . . . . . . . . . . . . . . . . . . . . . A-38
Table A-21: nzsession Input Options . . . . . . . . . . . . . . . . . . . . . . . . . . . . . . . . A-39
Table A-22: nzsession Options . . . . . . . . . . . . . . . . . . . . . . . . . . . . . . . . . . . . A-40
Table A-23: Session Information . . . . . . . . . . . . . . . . . . . . . . . . . . . . . . . . . . . A-42
Table A-24: nzspupart Inputs . . . . . . . . . . . . . . . . . . . . . . . . . . . . . . . . . . . . . A-44
Table A-25: nzspupart Options . . . . . . . . . . . . . . . . . . . . . . . . . . . . . . . . . . . . A-44
Table A-26: nzstart Inputs . . . . . . . . . . . . . . . . . . . . . . . . . . . . . . . . . . . . . . . A-47
Table A-27: nzstate Inputs . . . . . . . . . . . . . . . . . . . . . . . . . . . . . . . . . . . . . . . A-49
Table A-28: nzstate Options . . . . . . . . . . . . . . . . . . . . . . . . . . . . . . . . . . . . . . A-49
Table A-29: nzstats Inputs . . . . . . . . . . . . . . . . . . . . . . . . . . . . . . . . . . . . . . . A-51
Table A-30: nzstats Options . . . . . . . . . . . . . . . . . . . . . . . . . . . . . . . . . . . . . . A-51
Table A-31: nzstop Inputs . . . . . . . . . . . . . . . . . . . . . . . . . . . . . . . . . . . . . . . A-54
Table A-32: nzstop Options. . . . . . . . . . . . . . . . . . . . . . . . . . . . . . . . . . . . . . . A-54
Table A-33: nzsystem Inputs. . . . . . . . . . . . . . . . . . . . . . . . . . . . . . . . . . . . . . A-55
Table A-34: nzsystem Options. . . . . . . . . . . . . . . . . . . . . . . . . . . . . . . . . . . . . A-56
Table A-35: Diagnostic Commands . . . . . . . . . . . . . . . . . . . . . . . . . . . . . . . . . A-58
Table A-36: nzconvertsyscase Input Options. . . . . . . . . . . . . . . . . . . . . . . . . . . A-60
Table A-37: nzdumpschema Inputs . . . . . . . . . . . . . . . . . . . . . . . . . . . . . . . . . A-61
Table A-38: nzlogmerge Options . . . . . . . . . . . . . . . . . . . . . . . . . . . . . . . . . . . A-62
Table C-1: User Views . . . . . . . . . . . . . . . . . . . . . . . . . . . . . . . . . . . . . . . . . . C-1
Table C-2: System Views . . . . . . . . . . . . . . . . . . . . . . . . . . . . . . . . . . . . . . . . C-3
Table D-1: Startup Configuration Options . . . . . . . . . . . . . . . . . . . . . . . . . . . . . D-1
Table D-2: System Manager Configuration Options . . . . . . . . . . . . . . . . . . . . . . D-3
Table D-3: Host Processes . . . . . . . . . . . . . . . . . . . . . . . . . . . . . . . . . . . . . . . D-6
Table D-4: SPU Configuration Options . . . . . . . . . . . . . . . . . . . . . . . . . . . . . . D-10
xxvi
xxvii
Figures
Figure 3-1: Sample Run Command Window. . . . . . . . . . . . . . . . . . . . . . . . . . . 3-12
Figure 3-2: Login Dialog Box . . . . . . . . . . . . . . . . . . . . . . . . . . . . . . . . . . . . . 3-13
Figure 3-3: Netezza Revision Warning Window. . . . . . . . . . . . . . . . . . . . . . . . . 3-13
Figure 3-4: NzAdmin Main System Window . . . . . . . . . . . . . . . . . . . . . . . . . . . 3-14
Figure 3-5: NzAdmin Hyperlink Support . . . . . . . . . . . . . . . . . . . . . . . . . . . . . 3-17
Figure 3-6: Preferences Dialog Box. . . . . . . . . . . . . . . . . . . . . . . . . . . . . . . . . 3-18
Figure 3-7: Connection Error window . . . . . . . . . . . . . . . . . . . . . . . . . . . . . . . 3-19
Figure 3-8: Navigation Pane. . . . . . . . . . . . . . . . . . . . . . . . . . . . . . . . . . . . . . 3-21
Figure 3-9: Status Pane. . . . . . . . . . . . . . . . . . . . . . . . . . . . . . . . . . . . . . . . . 3-21
Figure 3-10: System Summary Page . . . . . . . . . . . . . . . . . . . . . . . . . . . . . . . . . 3-22
Figure 5-1: Sample nzhw show Output . . . . . . . . . . . . . . . . . . . . . . . . . . . . . . . 5-3
Figure 5-2: Sample nzhw show Output (IBM Netezza C1000 Systems) . . . . . . . . 5-4
Figure 5-3: IBM Netezza Full-Rack System Components and Locations . . . . . . . . 5-6
Figure 5-4: IBM Netezza C1000 System Components and Locations . . . . . . . . . . 5-7
Figure 5-5: SPUs, Disks, Data Slices, and Data Partitions. . . . . . . . . . . . . . . . . 5-11
Figure 5-6: Netezza C1000 SPU and Storage Representation . . . . . . . . . . . . . . 5-12
Figure 5-7: Balanced and Unbalanced Disk Topologies. . . . . . . . . . . . . . . . . . . 5-13
Figure 5-8: Netezza 1001-6 and N1001-005 and Larger PDUs and Circuit Breakers .
5-27
Figure 5-9: IBM Netezza 1000-3 and IBM PureData System for Analytics N1001-002
PDUs and Circuit Breakers5-28
Figure 5-10: NEC InfoFrame DWH ZA100 PDUs and Circuit Breakers . . . . . . . . . 5-33
Figure 7-1: Alerts Window . . . . . . . . . . . . . . . . . . . . . . . . . . . . . . . . . . . . . . . 7-42
Figure 9-1: Record Distribution Window . . . . . . . . . . . . . . . . . . . . . . . . . . . . . . 9-8
Figure 9-2: Table Skew Window . . . . . . . . . . . . . . . . . . . . . . . . . . . . . . . . . . . 9-11
Figure 9-3: Organizing Tables with CBTs. . . . . . . . . . . . . . . . . . . . . . . . . . . . . 9-11
Figure 10-1: Database Backups Timeline . . . . . . . . . . . . . . . . . . . . . . . . . . . . 10-18
Figure 11-1: Query History Staging and Loading Areas . . . . . . . . . . . . . . . . . . . . 11-8
Figure 12-1: SQB Queuing and Priority . . . . . . . . . . . . . . . . . . . . . . . . . . . . . . . 12-4
Figure 12-2: GRA Usage Sharing . . . . . . . . . . . . . . . . . . . . . . . . . . . . . . . . . . . 12-8
Figure 12-3: Impacts of the Admin User on GRA . . . . . . . . . . . . . . . . . . . . . . . 12-10
Figure 12-4: Multiple Jobs in a Group Share the Group’s Resources . . . . . . . . . 12-11
Figure 12-5: GRA and Priority . . . . . . . . . . . . . . . . . . . . . . . . . . . . . . . . . . . . 12-13
Figure 12-6: Resource Allocation Performance Window . . . . . . . . . . . . . . . . . . 12-17
xxviii
Figure 12-7: Resource Allocation Performance History Window . . . . . . . . . . . . . 12-18
Figure 12-8: Resource Allocation Performance Graph. . . . . . . . . . . . . . . . . . . . 12-19
Figure 12-9: Using PQE to Control Job Concurrency by Runtime and Priority . . . 12-21
Figure 12-10: Gate Keeper Default Normal Work Queue . . . . . . . . . . . . . . . . . . . 12-23
Figure 12-11: Gate Keeper Time-Based Normal Queues and Registry Settings . . . 12-24
Figure 14-1: Mantra and MantraVM Service . . . . . . . . . . . . . . . . . . . . . . . . . . . 14-1

xxix
Preface
The IBM® Netezza® data warehouse appliance is a high performance, integrated database
appliance that provides unparalleled performance, extensive scaling, high reliability, and
ease of use. The Netezza appliance uses a unique architecture that combines current
trends in processor, network, and software technologies to deliver a very high performance
system for large enterprise customers.
Audience for This Guide
The IBM Netezza System Administrator’s Guide is written for system administrators and
database administrators. In some customer environments, these roles could be the respon-
sibility of one person or several administrators.
To use this guide, you should be familiar with Netezza concepts and user interfaces, as
described in the IBM Netezza Getting Started Tips. You should be comfortable using com-
mand-line interfaces, Linux operating system utilities, windows-based administration
interfaces, and installing software on client systems to access the Netezza appliance.
Purpose of This Guide
The IBM Netezza System Administrator’s Guide describes the tasks, concepts, and inter-
faces for managing the Netezza appliance and databases. This guide describes tasks such
as the following:
Installing Netezza clients
Managing the Netezza appliance
Managing Netezza system processes
Managing users, groups, and access security
Managing the database and database objects
Backing up and restoring data
Symbols and Conventions
This guide uses the following typographical conventions:
Italics for emphasis on terms and user-defined values such as user input
Upper case for SQL commands; for example INSERT, DELETE
Bold for command line input; for example, nzsystem stop

xxx
If You Need Help
If you are having trouble using the Netezza appliance, you should:
1. Retry the action, carefully following the instructions given for that task in the
documentation.
2. Go to the IBM Support Portal at: http://www.ibm.com/support. Log in using your IBM
ID and password. You can search the Support Portal for solutions. To submit a support
request, click the Service Requests & PMRs tab.
3. If you have an active service contract maintenance agreement with IBM, you can con-
tact customer support teams via telephone. For individual countries, visit the Technical
Support section of the IBM Directory of worldwide contacts (http://www14.soft-
ware.ibm.com/webapp/set2/sas/f/handbook/contacts.html#phone).
Comments on the Documentation
We welcome any questions, comments, or suggestions that you have for the IBM Netezza
documentation. Please send us an e-mail message at netezza-doc@wwpdl.vnet.ibm.com
and include the following information:
The name and version of the manual that you are using
Any comments that you have about the manual
Your name, address, and phone number
We appreciate your comments on the documentation.

1-1
C H A P T E R 1
Administration Overview
What’s in this chapter
Administrator’s Roles
Administration Tasks
Initial System Setup and Information
Administration Interfaces
Other Netezza Documentation
This chapter provides an introduction and overview to the tasks involved in administering
an IBM® Netezza® data warehouse appliance.
Administrator’s Roles
Netezza administration tasks typically fall into two categories:
System administration — managing the hardware, configuration settings, system sta-
tus, access, disk space, usage, upgrades, and other tasks
Database administration — managing the user databases and their content, loading
data, backing up data, restoring data, controlling access to data and permissions
In some customer environments, one person could be both the system and database
administrator to perform the tasks when needed. In other environments, multiple people
may share these responsibilities, or they may own specific tasks or responsibilities. You can
develop the administrative model that works best for your environment.
In addition to the administrator roles, there are also database user roles. A database user is
someone who has access to one or more databases and has permission to run queries on
the data stored within those databases. In general, database users have access permissions
to one or more user databases, and they have permission to perform certain types of tasks
as well as to create or manage certain types of objects (tables, synonyms, and so forth)
within those databases.
Administration Tasks
The administration tasks generally fall into these categories:
Deploying and installing Netezza clients
Managing the Netezza appliance

1-2 20282-20 Rev.1
IBM Netezza System Administrator’s Guide
Managing system notifications and events
Managing Netezza users and groups
Database management
Loading data (described in the IBM Netezza Data Loading Guide)
Database backup and restore
Query history
Workload management
This guide describes these tasks and how to perform them using the various Netezza
administration UIs.
Initial System Setup and Information
A factory-configured and installed Netezza system includes the following components:
A Netezza data warehouse appliance with pre-installed Netezza software
A preconfigured Linux operating system (with Netezza modifications) on one or both
system hosts. Netezza high-availability (HA) models have two hosts, while non-HA
models have one host.
A virtual server environment to run the Mantra compliance application.
Several preconfigured Linux users and groups, which should not be modified or
deleted.
The nz user is the default Netezza system administrator account. The Linux user is
named nz with a default password of nz. The Netezza software runs as this user,
and you can access the system using a command shell or remote access software
as the nz user.
Netezza HA systems also require a Linux user (hacluster) and two Linux groups
(hacluster and haclient) which are added automatically to the host during the
Heartbeat RPM installation. For more information, see “Linux Users and Groups
Required for HA” on page 4-19.
The MantraVM service uses the mantravm user and mantravm group which are
automatically added to the host during the MantraVM installation. For more infor-
mation, see “MantraVM Users and Groups” on page 14-2.
A Netezza database user named admin (with a default password of password). The
admin user is the database super-user, and has full access to all system functions and
objects at all times. You cannot delete the admin user. You use the admin account to
start creating user databases and additional database user groups and accounts to
which you can assign appropriate permissions and access.
A preconfigured database group named public. All database users are automatically
placed in the group public and therefore inherit all of its privileges. The group public
has default access privileges to selected system views, such as lists of available data-
bases, tables, and views. You cannot delete the group public.
20282-20 Rev.1 1-3
Initial System Setup and Information
Netezza Support and Sales representatives will work with you to install and initially config-
ure the Netezza in your customer environment. Typically, the initial rollout consists of
installing the system in your data center, and then performing some configuration steps to
set the system’s hostname and IP address to connect the system to your network and make
it accessible to users. They will also work with you to perform initial studies of the system
usage and query performance, and may advocate other configuration settings or administra-
tion ideas to improve the performance of and access to the Netezza for your users.
Netezza Software Directories
The Netezza software is installed in several directories on the Netezza host as follows:
The /nz directory is the Netezza host software installation directory.
The /export/home/nz directory is a home directory for the nz user.
The Linux operating system boot directories.
The following sections describe these directories and their contents.
Host Software Directory
The Netezza host installation directory contains the following software directories and files.
/nz — The root of the Netezza software install tree. On a production host, the default
software installation directory is /nz. If you are a Linux user connected to the Netezza
host, include /nz/kit/bin and /nz/kit/bin/adm in your PATH.
/nz/data-> — A link to the current data directory.
/nz/kit-> — A link to the current kit of executables. The kit link points to the current
software revision in use.
/nz/data.<ver>/ — System catalog and other host-side database files.
/nz/kit.<rev>/ — The set of optimized executables and support files needed to run the
product. Note that the <rev> represents the revision of the software.
/nz/mantravm — The MantraVM service configuration files and executables.
/nz/tmp/ — Netezza temporary files.
/nzscratch — A location for Netezza internal files. This location is not mirrored. The
/nzscratch/tmp directory is the default temporary files directory, specified by the NZ_
TMP_DIR variable. It holds files created and used by the transaction manager and
other processes. The contents of NZ_TMP_DIR are deleted when the Netezza software
starts and when the Netezza system restarts. As a best practice, do not store large files
in /nzscratch or its subdirectories; if /nzscratch runs out of space, Netezza processes
could fail.
The data Directory The /nz/data directory contains the following subdirectories:
data.<ver>/base — Contains system tables, catalog information and subdirectories for
the databases. Each database you create has its own subdirectory whose name
matches the database’s object ID value. For example, base/1/ is the system database,
base/2/ is the master_db database, and base/nnn is an end-user database, where nnn
is the object ID of the database.
1-4 20282-20 Rev.1
IBM Netezza System Administrator’s Guide
data.<ver>/cache — Contains copies of compiled code that was dynamically generated
on the host, cross-compiled to run on the SPUs, then downloaded to the SPUs for exe-
cution. The copies are saved to eliminate extra steps and overhead when running
similar queries.
data.<ver>/config — Contains configuration files such as callHome.txt, sendMail.cfg,
and system.cfg files. The callHome.txt is the callhome attachment file; sendMail.cfg
contains the configuration parameters for the sendmail program; system.cfg is the sys-
tem’s configuration registry, which allows you to control and tune the system. Other
files may exist in this directory if the Netezza system uses options such as LDAP
authentication and other applications.
data.<ver>/plans — Contains copies of the most recent execution plans for reference.
The system stores the execution plan (for each query) in a separate file with a .pln
extension, and includes the following information:
The original SQL that was submitted.
The plan itself, describing how the various tables and columns are to be accessed,
when joins, sorts, and aggregations are performed, and so on.
If the system was able to reuse a cached (already compiled) version of the code.
The system also generates a separate C program (.cpp file) to process each snippet of
each plan. The system compares this code against files in /nz/data/cache to determine
whether the compilation step can be skipped.
The kit Directory The kit directory contains the following subdirectories:
kit.<rev>/ — Top level directory for the release <rev> (for example, kit.6.0).
kit.<rev>/bin/ — All user-level CLI programs.
kit.<rev>/bin/adm — Internal CLI programs.
kit.<rev>/log/<pgm name>/ — Component log files, one subdirectory per component —
containing a file per day of log information up to seven days. The information in the
logs includes when the process started, when the process exited or completed, and any
error conditions.
kit.<rev>/ sbin — Internal host and utility programs not intended to be run directly by
users. These programs are not specifically prefixed (for example, clientmgr).
kit.<rev>/share/ — Postgres-specific files.
kit.<rev>/sys/ — System configuration files, startup.cfg and some subdirectories (init,
include, strings).
kit.<rev>/sys/init/ — Files used for system initialization.
nz User’s Home Directory
The host software runs under a preconfigured Linux user named nz. The home directory for
the nz user is /export/home/nz. The default shell configuration file, in addition to standard
UNIX specifications, adds /nz/kit/bin to the PATH environment variable so that user nz can
automatically locate CLI commands.

20282-20 Rev.1 1-5
Initial System Setup and Information
Linux Boot Directories
To ensure that the system starts the Netezza software when it boots, Netezza places some
entries in the init.d directory — a standard system facility for starting applications. As a
best practice, never modify the Linux operating system boot directories or files unless you
are directed to by Netezza Support or documented Netezza procedures. Changes to these
files can impact the operation of the host.
Managing the External Network Connections
During the onsite installation of the Netezza system, Netezza installation engineers will
work with you to configure your system using the site survey information prepared for your
environment. The initial setup process includes steps to configure the external network
connections (that is, the hostname and IP address information) of your Netezza system.
If you need to change the hostname or IP address information, do not use the general Linux
procedures to change this information. Contact Netezza Support for assistance to ensure
that the changes are using Netezza’s procedures to ensure that the changes are propagated
to the high availability configuration and related services.
Managing Domain Name Service (DNS) Updates
The Netezza server uses a domain name service (DNS) server to provide name resolution to
devices such as S-Blades within the system. This allows SPUs to have a DNS name (such
as spu0103) as well as an IP address.
To change the DNS settings for your system, use the nzresolv service to manage the DNS
updates. The nzresolv service updates the resolv.conf information on the Netezza host; for
highly-available Netezza systems (such as the IBM Netezza 1000, C1000, or IBM Pure-
Data System for Analytics N1001 systems), the nzresolv service updates the information on
both hosts. (You can log in to either host to perform the DNS updates.) You must be able to
log in as the root user to update the resolv.conf information; any Linux user such as nz can
display the DNS information using the show option.
Note: Do not manually edit the /etc/resolv.conf* files, even as the root user. Use the nzre-
solv service to update the files and to ensure that the information is maintained correctly
on the host(s).
Displaying the DNS Information
To display the current DNS information for the system:
1. Log in to the active host as a Linux user such as nz.
2. Enter the following command:
[nz@nzhost1 ~]$ service nzresolv show
Sample output follows:
search yourcompany.com
nameserver 1.2.3.4
nameserver 1.2.5.6

1-6 20282-20 Rev.1
IBM Netezza System Administrator’s Guide
Changing DNS Information
You update the DNS information using the nzresolv service. You can change the DNS infor-
mation using a text editor, as well as read the DNS information from a file or enter it on the
command line. Any changes that you make take effect immediately (and on both hosts, for
HA systems). The DNS server uses the changes for the subsequent DNS lookup requests.
To change the DNS information:
1. Log in to either host as root.
2. Enter the following command:
[root@nzhost1 ~]# service nzresolv update
Note: If you use the service command to edit the DNS information, you must use vi as
the text editor tool, as shown in these examples. However, if you prefer to use a differ-
ent text editor, you can set the $EDITOR environment variable and use the /etc/init.d/
nzresolve update command to edit the files using your editor of choice.
3. A text editor opens with the system’s DNS information:
# !!! All lines starting '# !!!' will be removed.
# !!!
search yourcompany.com
nameserver 1.2.3.4
nameserver 1.2.5.6
4. You can enter, delete, or change the information as required. When you finish,you can
save your changes and exit (or exit without saving the changes). For example, type one
of the following commands:
:wq to save the changes.
:q to exit the file.
:q! to exit without saving any changes you made in the file.
Use caution before changing the DNS information; incorrect changes can impact the oper-
ation of the Netezza system. Review any changes with the DNS administrator at your site to
ensure that the changes are correct.
Overwriting DNS Information with a Text File To change the DNS information by reading the
information from an existing text file:
1. Log in to either host as root.
2. Create a text file with your DNS information. Your text file should have a format similar
to the following:
search yourcompany.com
nameserver 1.2.3.4
nameserver 1.2.5.6
3. Enter the following command, where file is the fully qualified pathname to the text file:
[root@nzhost1 ~]# service nzresolv update file
Appending DNS Information from the Command Prompt To change the DNS information by
entering the information from the command prompt:
1. Log in to either host as root.

20282-20 Rev.1 1-7
Administration Interfaces
2. Enter the following command (note the dash character at the end of the command):
[root@nzhost1 ~]# service nzresolv update -
The command prompt proceeds to a new line where you can enter the DNS informa-
tion. Enter the complete DNS information, because the text that you type replaces the
existing information in the resolv.conf file.
3. After you finish typing the DNS information, type one of the following commands:
Control-D to save the information that you entered and exit the editor.
Control-C to exit without saving any changes.
Setting up Remote Access
Netezza systems are typically installed in a data center which is often highly secured from
user access and sometimes located in a geographically separate location. Thus, you may
need to set up remote access to the Netezza so that your users can connect to the system
through the corporate network. Common ways to remotely log onto another system through
a shell (Telnet, rlogin or rsh) do not encrypt data that is sent over the connection between
the client and the server. Consequently, the type of remote access you choose depends
upon the security considerations at your site. Telnet is the least secure and SSH (Secure
SHell) is the most secure.
If you allow remote access through Telnet, rlogin, or rsh, you can more easily manage this
access through the xinetd daemon (Extended Internet Services). The xinetd daemon starts
programs that provide Internet services. This daemon uses a configuration file,
/etc/xinetd.conf, to specify services to start. Use this file to enable or disable remote access
services according to the policy at your site.
If you use SSH, it does not use xinetd, but rather its own configuration files. For more infor-
mation, see the Red Hat documentation.
Administration Interfaces
Netezza offers several ways or interfaces that allow you to perform the various system and
database management tasks:
Netezza commands (nz* commands) are installed in the /nz/kit/bin directory on the
Netezza host. For many of the nz* commands, you must be able to log on to the
Netezza system to access and run those commands. In most cases, users log in as the
default nz user account, but you may have created other Linux user accounts on your
system. Some commands require you to specify a database user account, password,
and database to ensure that you have permissions to perform the task.
The Netezza CLI client kits package a subset of the nz* commands that can be run
from Windows and UNIX client systems. The client commands may also require you to
specify a database user account, password, and database to ensure that you have data-
base administrative and object permissions to perform the task.
SQL commands. The SQL commands support administration tasks and queries within a
SQL database session. You can run the SQL commands from the Netezza nzsql com-
mand interpreter or through SQL APIs such as ODBC, JDBC, and the OLE DB Provider.
You must have a database user account to run the SQL commands with appropriate
permissions for the queries and tasks that you perform.

1-8 20282-20 Rev.1
IBM Netezza System Administrator’s Guide
NzAdmin tool. NzAdmin is a Netezza interface that runs on Windows client worksta-
tions to manage Netezza systems.
Web Admin. Web Admin is a Web browser client that users can access on the Netezza
system or a compatible Linux server to manage their Netezza systems.
Netezza Performance Portal. The Netezza Performance Portal is a Web browser client
that provides detailed monitoring capabilities for your Netezza systems. You can use
the portal to answer questions about system usage, workload, capacity planning, and
overall query performance.
The nz* commands are installed and available on the Netezza system, but it is more com-
mon for users to install Netezza client applications on client workstations. Netezza
supports a variety of Windows and UNIX client operating systems. Chapter 2, “Installing
the Netezza Client Software,” describes the Netezza clients and how to install them.
Chapter 3, “Using the Netezza Administration Interfaces,” describes how to get started
using the administration interfaces.
The client interfaces provide you with different ways to perform similar tasks. While most
users tend to use the nz* commands or SQL commands to perform tasks, you can use any
combination of the client interfaces, depending upon the task or your workstation environ-
ment, or interface preferences.
Other Netezza Documentation
The Netezza documentation set contains other documents which may help you in your day-
to-day use of the Netezza system and features:
IBM Netezza Database User’s Guide — describes the Netezza SQL commands and how
to use them to create queries as well as how to create and manage database objects
IBM Netezza Data Loading Guide — describes how to load data into a Netezza system
IBM Netezza ODBC, JDBC and OLE DB Installation and Configuration Guide —
describes how to configure data connectivity clients to connect to your Netezza system
and run queries through the supported drivers
IBM Netezza Advanced Security Administrator’s Guide — describes how to manage
multi-level security, audit logging and history, and authentication within the Netezza
database
IBM Netezza Getting Started Tips — provides a high-level overview of Netezza appli-
ances and concepts for the new user, plus an overview of the documentation set
IBM Netezza Software Upgrade Guide — describes how to upgrade the Netezza
software
IBM Netezza Release Notes — describes new features and changes in a Netezza soft-
ware release, as well as a summary of known issues and fixes for customer-reported
issues
There are several Netezza documents that offer more specialized information about fea-
tures or tasks. For more information, see the IBM Netezza Getting Started Tips guide.

2-1
C H A P T E R 2
Installing the Netezza Client Software
What’s in this chapter
Client Software Packages
Installing the Netezza CLI Client on a Linux/UNIX System
Installing the Netezza Tools on a Windows Client
Installing the Web Admin Interface
Clients and Unicode Characters
Client Timeout Controls
Netezza Port Numbers
Creating Encrypted Passwords
Using Stored Passwords
In most cases, the only applications that Netezza administrators or users need to install are
the client applications to access the Netezza system. Netezza provides client software that
runs on a variety of systems such as Windows, Linux, Solaris, AIX, and HP-UX systems. For
a description of the client applications, see “Administration Interfaces” on page 1-7.
This chapter describes how to install the Netezza CLI clients, NzAdmin tool, and Web
Admin interface. Note that the instructions to install and use the Netezza Performance Por-
tal are in the IBM Netezza Performance Portal User’s Guide, which is available with the
software kit for that interface.
Note: This chapter does not describe how to install the Netezza system software or how to
upgrade the Netezza host software. Typically, Netezza Support works with you for any situa-
tions that might require software reinstallations, and the steps to upgrade a Netezza system
are described in the IBM Netezza Software Upgrade Guide.
If your users or their business reporting applications access the Netezza system through
ODBC, JDBC, or OLE-DB Provider APIs, see the IBM Netezza ODBC, JDBC and OLE DB
Installation and Configuration Guide for detailed instructions on the installation and setup
of these data connectivity clients.

2-2 20282-20 Rev.1
IBM Netezza System Administrator’s Guide
Client Software Packages
If you have access to IBM Passport Advantage or the IBM Fix Central downloads area, you
can obtain the Netezza client software. You must have support accounts with permission to
download the IBM Netezza software from these locations.
To access Passport Advantage, go to http://www-01.ibm.com/software/howtobuy/passpor-
tadvantage/ pao_customers.htm.
To access Fix Central, go to http://www-933.ibm.com/support/fixcentral/.
The client packages include
The IBM Netezza Client Components — there are client packages for the supported
client operating systems. The UNIX clients include interface software such as the CLI
and the ODBC/JDBC drivers.
The IBM Netezza Client Components — Windows package contains the interface soft-
ware such as NzAdmin, some nz* commands, the ODBC/JDBC drivers, and the OLE-DB
Provider.
Table 2-1 lists the supported operating systems and revisions for the Netezza CLI clients.
Table 2-1: Netezza Supported Platforms
Operating System 32-bit 64-bit
Windows
Windows 2003, 2008, XP, Vista, 7 Intel/AMD Intel/AMD
Linux
Red Hat LAS Linux 4.0, 5.2, 5.3, 5.5, 6.1 Intel/AMD Intel/AMD
SUSE Linux Enterprise Server 8 and 9 Intel/AMD Intel/AMD
SUSE Linux Enterprise Server 10 and 11,
and Red Hat Enterprise Linux 5.x
IBM System z IBM System z

20282-20 Rev.1 2-3
Installing the Netezza CLI Client on a Linux/UNIX System
Note: The Netezza client kits are designed to run on the vendor’s proprietary hardware
architecture. For example, the AIX, HP-UX, and Solaris clients are intended for each ven-
dor's proprietary RISC architecture. The Linux client is intended for RedHat or SUSE on the
32-bit Intel architecture.
Installing the Netezza CLI Client on a Linux/UNIX System
The Netezza UNIX clients contain a tarfile of the client software for a platform and an
unpack script. You use the unpack script to install the client nz* commands and their nec-
essary files to the UNIX client system. Table 2-1 lists the supported UNIX client operating
systems.
Note: If you plan to install the Netezza client on Red Hat Linux and/or SUSE Linux clients,
note that the client system must have the libssl.so.4 and libcrypto.so.4 packages installed
before you install the Netezza client. These libraries can be obtained from the package
repositories of the operating system vendor. For the instructions to obtain the libraries and
install them, contact your operating system administrator and/or see the information avail-
able on the web site for your client operating system.
Installing on Linux/UNIX Clients
For Netezza clients, the process to install the CLI is the same across the supported Linux
and UNIX platforms. To install the clients:
1. Insert the IBM Netezza Client Components DVD into your client system’s DVD drive.
Note: Make sure that you use the client release that matches the Netezza software
release of your Netezza system. As a best practice, do not use Netezza clients to man-
age Netezza systems that have a different Netezza release.
Note: If you have downloaded the client package (nz-*client-version.archive) to a direc-
tory on your client system, change to that directory and use a command such as tar -xzf
nz-*client-verson.tar.z to untar the package. Proceed to step 5 to run the unpack
command.
2. Log in as a root or superuser account.
3. Depending upon the auto-mounter settings, you may need to mount the media drive.
For example, on Linux the command is similar to:
UNIX
Oracle Solaris 8, 9, 10 SPARC SPARC
Oracle Solaris 10 x86 x86
HP-UX 11i versions 1.6 and 2 (B.11.22
and B.11.23)
Itanium Itanium
IBM AIX 6.1 with 5.0.2.1 C++ runtime
libraries
PowerPC PowerPC
Table 2-1: Netezza Supported Platforms (continued)
Operating System 32-bit 64-bit

2-4 20282-20 Rev.1
IBM Netezza System Administrator’s Guide
mount /media/cdrom
or
mount /media/cdrecorder
Table 2-2 describes other common mount commands for the supported UNIX clients. If
you encounter any problems mounting or accessing the media drive on your client sys-
tem, refer to your operating system documentation or command man pages.
4. To change to the mount point, use the cd command and specify the mount pathname
that you used in step 3. This guide uses the term /mountPoint to refer to the applicable
CD/DVD mount point location on your system, as used in step 3.
cd /mountPoint
5. Navigate to the directory where the unpack command resides and run the unpack com-
mand as follows:
./unpack
Note: On some UNIX systems such as Red Hat 5.3, the auto-mounter settings may not
provide execute permissions by default. If the unpack command returns a “permission
denied” error, you can copy the installation files from the disk to a local directory and
run the unpack command from that local directory.
Note: For installations on Linux, be sure to use the unpack in the linux directory, not
the linux64 directory (which contains only the executable for the 64-bit ODBC driver).
Note: On an HP-UX 11i client, /bin/sh may not be available. You can use the command
form sh ./unpack to unpack the client.
6. The unpack program checks the client system to ensure that it supports the CLI pack-
age and prompts you for an installation location. The default is /usr/local/nz for Linux,
but you can install the CLI tools to any location on the client. The program prompts you
to create the directory if it does not exist. Sample command output follows:
------------------------------------------------------------------
IBM Netezza -- NPS Linux Client 7.0
(C) Copyright IBM Corp. 2002, 2012 All Rights Reserved.
------------------------------------------------------------------
Table 2-2: Sample UNIX CD/DVD Mount Commands
Platform Command
Solaris mount -o ro -F hsfs /dev/dsk/c0t1d0s2 /tmp/cdrom
HP-UX To mount the disk:
pfs_mountd &
pfsd &
pfs_mount /dev/dsk/c0t0d0 /cdrom
Export the library path, where the pathname is the location of the nz files.
Note that the location of the Netezza client files is /usr/local/nz or the loca-
tion you choose to install them.
export SHLIB_PATH=/<path_to_installdir>/bin/lib
AIX mount -v cdrfs -r /dev/cd0 /cdrom

20282-20 Rev.1 2-5
Installing the Netezza Tools on a Windows Client
Validating package checksum ... ok
Where should the NPS Linux Client be unpacked? [/usr/local/nz]
Directory '/usr/local/nz' does not exist; create it (y/n)? [y] Enter
0% 25% 50% 75% 100%
|||||||||||||||||||||||||||||||||||||||||||||||||||
Unpacking complete.
After the installation completes, the Netezza CLI commands will be installed to the speci-
fied destination directory. In addition, the installer stores copies of the software licenses in
the /opt/nz/licenses directory.
Setting the Path for Netezza CLI Client Commands
You can run most of the CLI commands from the Netezza client systems, except for nzstart
and nzstop which run only on the host Netezza system. For more information about the CLI
commands and their locations, see “Command Locations” on page 3-4.
To run the CLI commands on Solaris, you must include /usr/local/lib in your environment
variable LD_LIBRARY_PATH. Additionally, to use the ODBC driver on Linux, Solaris, or HP-
UX, you must include /usr/local/nz/lib, or the directory path to nz/lib where you installed the
Netezza CLI tools.
Removing the CLI Clients from UNIX Systems
To remove the client CLI kits from a UNIX system, change to the directory where you
installed the clients (for example, /usr/local/nz) and manually delete the nz commands.
Installing the Netezza Tools on a Windows Client
The IBM Netezza Client Components — Windows contains the Windows nzsetup.exe com-
mand which installs the IBM Netezza Windows client tools. The installation program
installs the NzAdmin tool, several nz* command line executables and libraries, online help
files, and Netezza guides in PDF format.
Installation Requirements
The installation package requires a computer system running a supported Windows operat-
ing system such as Windows 2003, XP (32- and 64-bit), VISTA (32-bit), 2008 (32- and
64-bit) and Windows 7 (32- and 64-bit). The client system must also have either a CD/DVD
drive or a network connection.
Note: If you will be using or viewing object names that use UTF-8 encoded characters, your
Windows client systems require the Microsoft universal font to display the characters within
the NzAdmin tool. The Arial Unicode MS font is installed by default on Windows XP sys-
tems, but you may need to run a manual installation for other Windows platforms such as
2003 or others. For more information, see the Microsoft support article at
http://office.microsoft.com/en-us/help/hp052558401033.aspx.
2-6 20282-20 Rev.1
IBM Netezza System Administrator’s Guide
Installing the Netezza Tools
To install the Netezza tools on Windows:
1. Insert the IBM Netezza Client Components — Windows in your media drive and navi-
gate to the admin directory.
Note: If you have downloaded the client package (nzsetup.exe) to a directory on your
client system, change to that directory.
2. Double-click or run nzsetup.exe.
This is a standard installation program that consists of a series of steps in which you
select and enter information used to configure the installation. You can cancel the
installation at any time.
The installation program displays a license agreement, which you must accept to install the
client tools. It also allows you to specify the following information:
Destination folder — You can use the default installation folder or specify an alterna-
tive location. The default folder is C:\Program Files\IBM Netezza Tools. If you choose a
different folder, the installation program creates the folder if one does not exist.
Setup type — Select the type of installation: typical, minimal, or custom.
Typical — Installs the nzadmin program, the help file, the documentation, and the
console utilities, including the loader.
Minimal — Installs the nzadmin program and help files.
Custom — Displays a screen where you can select to install any combination of the
administration application, console applications, or documentation.
After you complete the selections and review the installation options, the client installer
creates the Netezza Tools folder, which has several subfolders. You cannot change the sub-
folder names or locations.
Bin — Executables and support files
Doc — Copies of the Netezza user guides and an Acrobat Index to search the doc set
Help — Application help files
jre — Java runtime environment files for the Netezza tools
sys — Application string files
Uninstall Netezza Tools — Files to remove Netezza tools from the client system
The installation program displays a dialog when it completes, and on some systems, it
could prompt you to reboot the system before you use the application.
The installer stores copies of the software licenses in the installation directory, which is
usually C:\Program Files\IBM Netezza Tools (unless you specified a different location).
The installation program adds the Netezza commands to the Windows Start > Programs
menu. The program group is IBM Netezza and it has the suboptions IBM Netezza Adminis-
trator and Documentation. The IBM Netezza Administrator command starts the NzAdmin
tool. The Documentation command lists the PDFs of the installed documentation.
Note: To use the commands in the bin directory, you must open a Windows command line
prompt (a DOS prompt).

20282-20 Rev.1 2-7
Installing the Web Admin Interface
Environment Variables
Table 2-3 lists the operating system environment variables that the installation tool adds
for the Netezza console applications.
Removing the IBM Netezza Tools
You can remove or uninstall the Windows tools using the Windows Add or Remove Programs
interface in the Control Panel. The uninstallation program removes all folders, files, menu
commands, and environment variables. The registry entries created by other Netezza appli-
cations, however, are not removed.
To remove the IBM Netezza Tools from a Windows client:
1. Click Start > Settings > Control Panel > Add or Remove Programs. (Note that the menu
options can vary with each Windows operating system type.)
2. Select IBM Netezza Tools, then click Remove or Uninstall. The removal usually com-
pletes in a few minutes. Wait for the removal to complete.
3. Using the File Explorer, check the installation location (which is usually c:\Program
Files\IBM Netezza Tools). If the Windows client was the only installed Netezza soft-
ware, you can delete the IBM Netezza Tools folder to completely remove the
application.
Installing the Web Admin Interface
The Netezza Web Admin interface is a web-based software package that lets you monitor
and administer a Netezza system using a web browser on client systems. The package con-
sists of web server software and the web page files. Web Admin supports the following
browser applications:
Internet Explorer 7 and later versions
Firefox 3 and later versions
Typically, you install the Web Admin package on the Netezza host system. If you have a
high availability Netezza system, you can perform the installation instructions on both the
active and standby hosts so that Web Admin is available following a cluster migration or
failover.
If you would like to offload the Web Admin interface from the Netezza host, you could also
install it on a Linux Red Hat Enterprise version 5.x or 6.x system which has access to the
Netezza server. The Web Admin client requires certain Red Hat RPMs that can vary for
each Red Hat OS version, so the output could differ based on the version. If any required
packages are missing, the unpack script prompts you to cancel the installation so that you
can install the missing packages. If you continue the installation, the unpack script
Table 2-3: Environment Variables
Variable Operation Setting
PATH append <installation directory>\bin
NZ_DIR set Installation directory (for example C:\Program Files\IBM
Netezza Tools)
2-8 20282-20 Rev.1
IBM Netezza System Administrator’s Guide
attempts to install the packages using the yum command. The yum command must be cor-
rectly configured to retrieve packages from your configured repositories. (Contact your Red
Hat administrator for questions about yum package management and package sources/
repositories in your environment.)
For more information about the Web Admin interface, see “Using the Web Admin Applica-
tion” on page 3-20.
Installing the RPM and Shared Library Files
The Web Admin server package consists of standard RPM files that are consistent with the
Linux Advanced Server system currently installed on Netezza host machines. Netezza pro-
vides an additional shared library that connects to a Netezza system from the web server.
The installation script does the following:
Prompts for a directory into which to install the web files. The default location is
/usr/local/nzWebAdmin.
Installs any required RPMs and copies the shared library to the proper location. If an
RPM file is already installed, the installation script displays a message and proceeds to
the next installation step.
Creates an SSL site certificate, which is used when connecting to the Web Admin
server through secure sockets layer (SSL) protocols.
The installation script takes a conservative approach when installing the RPM set and
libpq.so library file. It does not alter or overwrite RPM packages or other files that exist on
the target system. Therefore, the script looks for any of the packages on the system, and, if
they exist, it skips that RPM or file, and moves on to the next.
Installing the Web Admin Server and Application Files
To install the Web Admin server and its application files:
1. On the Netezza host or another Linux system, insert the IBM Netezza Client Compo-
nents — Linux/UNIX into the media drive.
Note: If you have downloaded the Web Admin package (webadmin.package.tar.z) to a
directory such as /tmp on your Linux system, change to that directory and use a com-
mand such as tar -xzf webadmin.package.tar.z to untar the package. Proceed to Step 5.
2. Log in as a root or superuser account.
3. Mount the disk using a command similar to the following:
mount /media/cdrom
or
mount /media/cdrecorder
If you are not sure which command to use, run the ls /media command to see which
pathname (cdrom or cdrecorder) appears.
4. To change to the mount point, use the cd command and specify the mount pathname
that you used in step 3. This guide uses the term /mountPoint to refer to the applicable
CD/DVD mount point location on your system, as used in step 3.
cd /mountPoint/webadmin
20282-20 Rev.1 2-9
Installing the Web Admin Interface
5. Run the unpack command to add the software files to the system:
[root@nzhost1 ~]# ./unpack
The unpack script installs the software files for the Web Admin interface. During the
unpack process, you may be prompted for instructions to remove existing Web services
RPM packages, to choose whether to use SSL security for Web connections, and other
tasks. This sample output uses Enter to show that the user pressed the Enter key for these
types of prompts. Sample command output follows:
----------------------------------------------------------------------
IBM Netezza -- NPS Web Admin 7.0
(C) Copyright IBM Corp. 2002, 2012 All Rights Reserved.
----------------------------------------------------------------------
Validating package checksum ... ok
Directory '/usr/local/nzWebAdmin' does not exist; create it (y/n)? [y]
Enter
*********************************************************************
Unpacking WebAdmin files into: /usr/local/nzWebAdmin
*********************************************************************
0% 25% 50% 75% 100%
|||||||||||||||||||||||||||||||||||||||||||||||||||
Installing web services RPMs ...
Preparing... #################################### [100%]
1:apr ####################################### [100%]
Preparing... #################################### [100%]
1:apr-util ###################################### [100%]
Preparing... #################################### [100%]
package curl-7.15.5-2.el5.i386 is already installed
Preparing... #################################### [100%]
1:distcache ###################################### [100%]
Preparing... #################################### [100%]
package expat-1.95.8-8.2.1.i386 is already installed
Preparing... #################################### [100%]
1:freetype ###################################### [100%]
Preparing... #################################### [100%]
1:gmp ####################################### [100%]
[Output abbreviated for documentation...]
1:postgresql-libs ###################################### [100%]
Preparing... #################################### [100%]
1:unixODBC ####################################### [100%]
Do you want to support SSL only ? (y/n)? [y] Enter
**********************************************************************
Previous odbc configuration moved to /etc/odbcinst.ini.30724
**********************************************************************
Starting httpd: [ OK ]
Unpacking complete.
2-10 20282-20 Rev.1
IBM Netezza System Administrator’s Guide
The unpacking process automatically starts the Web Admin server. If you need to stop the
Web Admin server at any time, log in as root or a superuser account and use the following
command:
service httpd stop
To start the Web Admin server, log in as root or a superuser account and use the following
command:
service httpd start
Upgrading the Web Admin Interface
If you have installed an existing Web Admin client from a prior release, you can upgrade it
to a new version by removing the old Web Admin client (described in the next section) and
installing the new version.
Note: If you have both the Web Admin interface and the Netezza Performance Portal
installed on the same system and you want to upgrade the Web Admin interface, you must
remove the portal product first and then remove the Web Admin interface. You can then
install the new Web Admin client followed by the portal client software. For the instructions
to install and remove the portal software, see the IBM Netezza Performance Portal User’s
Guide.
To install the new Web Admin client, follow the steps described in the section “Installing
the Web Admin Server and Application Files” on page 2-8.
Removing the Web Admin Interface
You can remove or uninstall the Web Admin interface to remove it from the Linux system
entirely, or if you are planning to upgrade the client to a new version.
To remove the Web Admin interface from your Linux system:
1. Log in to the Linux system as the root user.
2. Change to the /usr/local/nzWebAdmin directory.
3. Run the following command to remove the software:
./uninstallwebclient
Note: During the removal, if you encounter errors that the httpd service failed to start, run
the ldconfig command and restart the httpd service (service httpd start).
Contents of the WebAdmin Directory
During the web server client installation, the installation script copies the software, docu-
ments, help files, RPM files, and scripts to the directory specified during the installation
(the default is /usr/local/nzWebAdmin).
This directory hierarchy must be maintained for the Web Admin interface and online help
to operate properly.

20282-20 Rev.1 2-11
Clients and Unicode Characters
Table 2-4 lists the directory structure.
Installing the Netezza SSL Site Certificate
When you access the Web Admin URL in a browser (https://hostname/admin.html), the
browser displays a warning message for the authentication certificate. The browser offers
you the option to permanently store the Netezza site certificate, which will suppress the
warning each time the site is accessed.
After you choose to install the certificate, a warning message should no longer appear when
connecting to the Web Admin interface.
Note: The hostname entered in the web address must match the name stored in the site
certificate. The hostname is detected by the setup script and is used when generating the
SSL certificate.
Clients and Unicode Characters
If you create object names which use characters outside the 7-bit-ASCII character range,
note that the nzsql command, the ODBC, JDBC, and OLE-DB drivers, the NzAdmin tool,
and the Web Admin interface all support the entering and display of those characters. On
Windows systems, users must ensure that they have appropriate fonts loaded to support
their character sets of choice.
Netezza commands that display object names such as nzload, nzbackup, and nzsession
can also display non-ASCII characters, but they must operate on a UTF-8 terminal or DOS
window to display characters correctly.
For UNIX clients, make sure that the terminal window in which you run these nz commands
uses a UTF-8 locale. The output in the terminal window may not align correctly.
Typically, Windows clients require two setup steps.
Note: This procedure is a general recommendation based on common practices. If you
encounter any difficulty with Windows client setup, refer to Microsoft Support to obtain the
setup steps for your specific platform and fonts.
1. Set the command prompt to use an appropriate True Type font that contains the
required glyphs. To select a font:
a. Select Start > Programs > Accessories.
Table 2-4: Directory Structure
Directory Contents
/usr/local/nzWebAdmin/Admin Web Admin software
/usr/local/nzWebAdmin/lib libpq.so file
/usr/local/nzWebAdmin/RPMs/ LAS4 and RHEL5 subdirectories that contain packages
for the Linux operating system
/var/www/error Contains error message files for the web server
/var/www/icons Image files

2-12 20282-20 Rev.1
IBM Netezza System Administrator’s Guide
b. Right-click Command Prompt and then select Properties from the pop-up menu.
The Command Prompt Properties dialog box appears.
c. Select the Font tab. In the Font list, the True Type fixed width font(s) are controlled
by the registry setting HKEY_LOCAL_MACHINE\SOFTWARE\Microsoft\Windows
NT\CurrentVersion\Console\TrueTypeFont.
On a standard US system, the font is Lucida Console (which does not contain UTF-
8 mapped glyphs for Kanji). On a Japanese system, the font is MS Gothic, which
contains those glyphs.
2. In a DOS command prompt window, change the code page to UTF-8 by entering the
following command:
chcp 65001
As an alternative to these DOS setup steps, the input/output from the DOS clients can be
piped from/to nzconvert and converted to a native code page, such as 932 for Japanese.
On a Windows system, the fonts that you use for your display must meet these following
Microsoft requirements as outlined on the Support site at http://support.microsoft.com/
default.aspx?scid=kb;EN-US;Q247815.
Client Timeout Controls
In some customer environments where users connect over VPNs to the Netezza appliance,
users may encounter issues where active SQL sessions time out due to VPN/TCP connec-
tion settings in the customer environment. For these environments, Netezza has added TCP
KEEPALIVE packet support with the following new settings in the /nz/data/postgresql.conf
file:
tcp_keepidle: The number of seconds between keepalive messages sent on an other-
wise idle connection. A value of 0 uses the system default (7200 seconds). If users
report SQL client session disconnects, set this parameter to the recommended value of
900.
tcp_keepinterval: The number of seconds to wait for a keepalive response before
retransmitting the message. A value of 0 uses the system default (75 seconds).
tcp_keepcount: The number of retransmission attempts that must occur before the
connection is considered dead. A value of 0 uses the system default (9 attempts).
After you define (or modify) these settings in the postgresql.conf file, you must restart the
Netezza software to apply the changes.
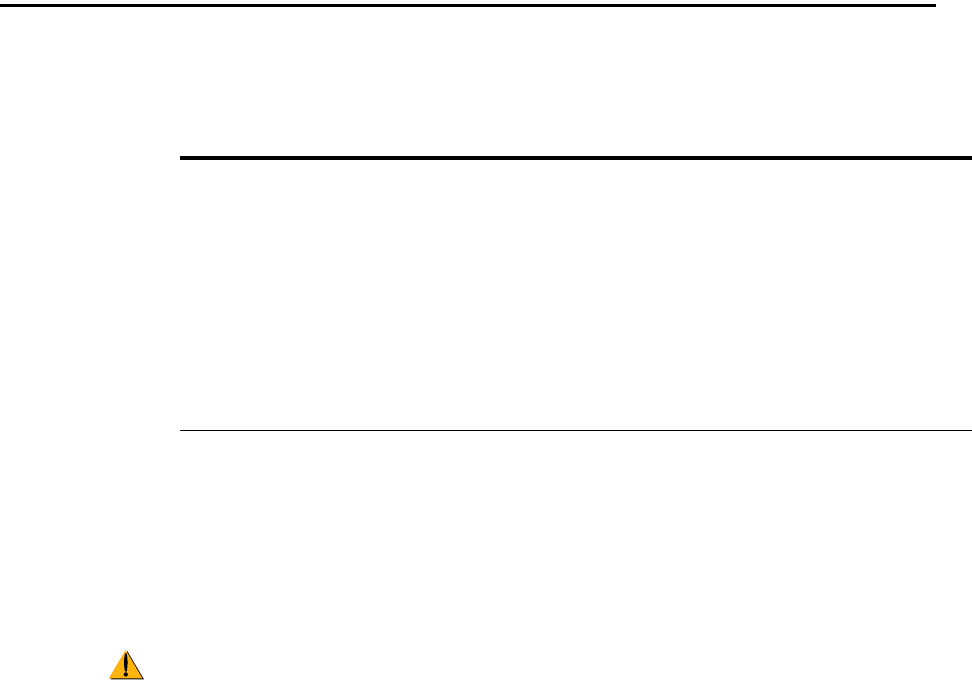
20282-20 Rev.1 2-13
Netezza Port Numbers
Netezza Port Numbers
The Netezza system uses the following port numbers or environmental variables for the CLI
commands and the NzAdmin tool. Table 2-5 lists the default ports and corresponding envi-
ronment variables:
Note: Netezza personnel, if granted access for remote service, use port 22 for SSH, and
ports 20 and 21 for FTP.
Changing the Default Port Numbers
For security or port conflict reasons, you can change one or more default port numbers for
the Netezza database access.
Be very careful when changing the port numbers for the Netezza database access. Errors
could severely impact the operation of the Netezza system. If you are not familiar with edit-
ing resource shell files or changing environment variables, contact Netezza Support for
assistance.
Before you begin, make sure that you choose a port number that is not already in use. To
check the port number, you can review the /etc/services file to see if the port number is
already specified for another process. You can also use the netstat | grep port command to
see if the designated port is in use.
To change the default port numbers for your Netezza system:
1. Log in to the Netezza host as the nz user.
2. Change to the /nz/kit/sys/init directory.
3. Create a backup of the current nzinitrc.sh file:
[nz@nzhost init]$ cp nzinitrc.sh nzinitrc.sh.backup
4. Review the nzinitrc.sh file to see if the Netezza port(s) listed in Table 2-5 that you want
to change are already present in the file. For example, you may find a section that looks
similar to the following, or you might find these variables defined separately within the
nzinitrc.sh file.
# Application Port Numbers
# ------------------------
Table 2-5: Netezza Port Numbers for Database Access
Port Environment Variable Description
5480 NZ_DBMS_PORT The postgres port for the nzsql command, NzAdmin
tool, ODBC, and JDBC.
5481 NZ_CLIENT_MGR_PORT The port for the CLI and NzAdmin tool messaging.
5482 NZ_LOAD_MGR_PORT (Prior to Release 3.1, this port handled loads. As of
Release 3.1, this port is not required.)
5483 NZ_BNR_MGR_PORT The port for the nzbackup and nzrestore
commands.
2-14 20282-20 Rev.1
IBM Netezza System Administrator’s Guide
# To change the application-level port numbers, uncomment the
following lines,
# and then change the numbers to their new values. Note that these
new values
# will need to be set on clients as well.
# NZ_DBMS_PORT=5480; export NZ_DBMS_PORT
# NZ_CLIENT_MGR_PORT=5481; export NZ_CLIENT_MGR_PORT
# NZ_LOAD_MGR_PORT=5482; export NZ_LOAD_MGR_PORT
# NZ_BNR_MGR_PORT=5483; export NZ_BNR_MGR_PORT
# NZ_RECLAIM_MGR_PORT=5484; export NZ_RECLAIM_MGR_PORT
If you do not find your variable(s) in the file, you can edit the file to define each vari-
able and its new port definition. To define a variable in the nzinitrc.sh file, use the for-
mat NZ_DBMS_PORT=value; export NZ_DBMS_PORT as shown above.
Note: As a hint, you can append the contents of the nzinitrc.sh.sample file to the nzini-
trc.sh file to create an editable section of variable definitions. You must be able to log
in to the Netezza host as the root user; then, change to the /nz/kit/sys/init directory and
run the following command:
[nz@nzhost init]$ cat nzinitrc.sh.backup nzinitrc.sh.sample
>nzinitrc.sh
5. Using a text editor, edit the nzinitrc.sh file. For each port that you want to change,
remove the comment symbol (#) from the definition line and specify the new port num-
ber. For example, to change the NZ_DBMS_PORT variable value to 5486:
NZ_DBMS_PORT=5486; export NZ_DBMS_PORT
# NZ_CLIENT_MGR_PORT=5481; export NZ_CLIENT_MGR_PORT
# NZ_LOAD_MGR_PORT=5482; export NZ_LOAD_MGR_PORT
# NZ_BNR_MGR_PORT=5483; export NZ_BNR_MGR_PORT
# NZ_RECLAIM_MGR_PORT=5484; export NZ_RECLAIM_MGR_PORT
6. Review your changes carefully to make sure that they are correct and save the file.
Note: If you change the default port numbers, some of the Netezza CLI commands may
no longer work. For example, if you change the NZ_DBMS_PORT or NZ_CLIENT_MGR_
PORT value, commands such as nzds, nzstate, and others could fail because they
expect the default port value. To avoid this problem, copy the custom port variable def-
initions in the nzinitrc.sh file to the /export/home/nz/.bashrc file. You can edit the
.bashrc file using any text editor.
7. To place the new port value(s) into effect, stop and start the Netezza server using the
following commands:
[nz@nzhost init]$ nzstop
[nz@nzhost init]$ nzstart
Specifying Non-Default NPS Port Numbers for Clients
If your Netezza system uses non-default port numbers, your client users must specify the
port number when they connect using commands such as nzsql, nzload, or using clients
such as NzAdmin. For example, if you change the NZ_DBMS_PORT number from the
default of 5480, your client users need to specify the new port value, otherwise their com-
mands will return an error that they could not connect to the database server at port 5480.

20282-20 Rev.1 2-15
Creating Encrypted Passwords
Some Netezza commands such as nzsql and nzload have a -port option that allows the user
to specify the DB access port. In addition, users could create local definitions of the envi-
ronment variables to specify the new port number.
For example, on Windows clients, users could create an NZ_DBMS_PORT user environment
variable in the System Properties > Environment Variables dialog to specify the non-default
port of the Netezza system. For clients such as NzAdmin, the environment variable is the
only way to specify a non-default database port for a target Netezza system. For many sys-
tems, the variable name and value take effect immediately and are used the next time you
start NzAdmin. When you start NzAdmin and connect to a system, if you receive an error
that you cannot connect to the Netezza database and the reported port number is incorrect,
check the variable name and value to confirm that they are correct. You may need to reboot
the client system for the variable to take effect.
For a Linux system, you could define a session-level variable using a command similar to
the following:
$ NZ_DBMS_PORT=5486; export NZ_DBMS_PORT
For the instructions to define environment variables on your Windows, Linux, or UNIX cli-
ent, refer to the operating system documentation for your client.
If a client user connects to multiple Netezza hosts that each use different port numbers,
those users may need to use the -port option on the commands as an override, or change
the environment variable’s value on the client before they connect to each Netezza host.
Creating Encrypted Passwords
Database user accounts must be authenticated during access requests to the Netezza data-
base. For user accounts that use local authentication, Netezza stores the password in
encrypted form in the system catalog. For more information on encrypting passwords on the
host and the client, see the IBM Netezza Advanced Security Administrator’s Guide.
Note: Local authentication requires a password for every account. If you use LDAP authen-
tication, a password is optional. During LDAP authentication, Netezza uses the services of
an LDAP server in your environment to validate and verify Netezza database users. For more
information on authentication, refer to “Logon Authentication” on page 8-17.
When using the Netezza CLI commands, the clear-text password must be entered on
the command line. Note that you can set the environment variable NZ_PASSWORD to
avoid typing the password on the command line, but the variable is stored in clear text
with the other environment variables.
To avoid displaying the password on the command line, in scripts, or in the environ-
ment variables, you can use the nzpassword command to create a locally stored
encrypted password.
Note: You cannot use stored passwords with ODBC or JDBC.
The nzpassword command syntax is:
nzpassword add -u user -pw password -host hostname
Where:
The user name is the Netezza database user’s name in the Netezza system catalog. If
you do not specify the user name on the command line, the nzpassword command uses
the environment variable NZ_USER.

2-16 20282-20 Rev.1
IBM Netezza System Administrator’s Guide
The password is the Netezza database user’s password in the Netezza system catalog or
the password specified in the environment variable NZ_PASSWORD. If you do not sup-
ply a password on the command line or in the environment variable, the system
prompts you for a password.
The hostname is the Netezza host. If you do not specify the hostname on the command
line, the nzpassword command uses the environment variable NZ_HOST. You can cre-
ate encrypted passwords for any number of user name/host pairs.
When you use the nzpassword add command to cache the password, note that quotation
marks are not required around the user name or password values. You should only qualify
the user name or password with a surrounding set of single-quote double-quote pairs (for
example, '"Bob"') in cases where the value is case-sensitive. If you specify quoted or
unquoted names or passwords in nzpassword or other nz commands, you must use the
same quoting style in all cases.
If you qualify a case-insensitive user name with quotes (for example '"netezza"'), the com-
mand may still complete successfully, but this is not recommended and not guaranteed to
work in all command cases.
After you type the nzpassword command, the system sends the encrypted password to the
Netezza host where it is compared against the user name/password in the system catalog.
If the information matches, the Netezza stores the encrypted information in a local
password cache, and displays no additional message.
On Linux and Solaris, the password cache is the file .nzpassword in the user’s
home directory. Note that the system creates this file without access permissions
to other users, and refuses to honor a password cache whose permission allows
other users access.
On Windows, the password cache is stored in the registry.
If the information does not match, the Netezza displays a message indicating that the
authentication request failed. The Netezza also logs all verification attempts.
If the database administrator changed a user password in the system catalog, the exist-
ing nzpasswords are invalid.
Using Stored Passwords
If client users use the nzpassword command to store database user passwords on a client
system, they can supply only a database user name and host on the command line. Users
can also continue to enter a password on the command line if displaying clear-text pass-
words is not a concern for security.
If you supply a password on the command line, it takes precedence over the environment
variable NZ_PASSWORD. If the environment variable is not set, the system checks the
locally stored password file. If there is no password in this file and you are using the nzsql
command, the system prompts you for a password, otherwise the authentication request
fails.

20282-20 Rev.1 2-17
Using Stored Passwords
In all cases — using the -pw option on the command line, using the NZ_PASSWORD envi-
ronment variable, or using the locally stored password stored through the nzpassword
command — the Netezza compares the password against the entry in the system catalog
for local authentication or against the LDAP account definition. The authentication protocol
is the same, and the Netezza never sends clear-text passwords over the network.
In Release 6.0.x, note that the encryption used for locally encrypted passwords has
changed. In prior releases, Netezza used the Blowfish encryption routines; Release 6.0 now
uses the Advanced Encryption Standard AES-256 standard. When you cache a password
using a release 6.0 client, the password is saved in AES-256 format unless there is an
existing password file in Blowfish format. In that case, new stored passwords will be saved
in Blowfish format.
If you upgrade to a Release 6.0.x or later client, the client can support passwords in either
the Blowfish format or the AES-256 format. If you want to convert your existing password
file to the AES-256 encryption format, you can use the nzpassword resetkey command to
update the file. If you want to convert your password file from the AES-256 format to the
Blowfish format, use the nzpassword resetkey -none command.
Older clients, such as those for Release 5.0.x and those earlier than Release 4.6.6, do not
support AES-256 format passwords. If your password file is in AES-256 format, the older
client commands will prompt for a password, which can cause automated scripts to hang.
Also, if you use an older client to add a cached password to or delete a cached password
from an AES-256 format file, you could corrupt the AES-256 password file and lose the
cached passwords. If you typically run multiple releases of Netezza clients, you should use
the Blowfish format for your cached passwords.
2-18 20282-20 Rev.1
IBM Netezza System Administrator’s Guide

3-1
C H A P T E R 3
Using the Netezza Administration Interfaces
What’s in this chapter
Netezza CLI Overview
SQL Command Overview
NzAdmin Tool Overview
Web Admin Overview
This chapter provides a high-level description of the Netezza administration interfaces,
such as the command line interface, NzAdmin, Web Admin interface, and the SQL
commands. This chapter describes how to access and use these interfaces. For information
about the Netezza Performance Portal, see the IBM Netezza Performance Portal User’s
Guide, which is available with the software kit for that interface.
Note: In general, the Netezza CLI commands are used most often to perform the various
administration tasks. Many of the tasks can also be performed using SQL commands or the
interactive interfaces. Throughout this guide, the primary task descriptions use the CLI
commands and reference other ways to perform the same task.
Netezza CLI Overview
You can use the Netezza command line interface (CLI) to manage the Netezza software,
hardware, and databases. Netezza Support may also ask you to run specific low-level diag-
nostic commands using the CLI to investigate problems. Through this guide, the Netezza
CLI commands are referred to as nz* commands.
The majority of the nz* commands reside on the Netezza host system. A few commands are
included with the Netezza client kits, and some additional nz* commands are available in
optional Support toolkits and other packages. This guide describes the default host and cli-
ent nz* commands.

3-2 20282-20 Rev.1
IBM Netezza System Administrator’s Guide
Summary of Commands
Table 3-1 describes the nz* commands you can use to monitor and manage the Netezza
system. These commands reside in the /nz/kit/bin directory on the Netezza host. Many of
these commands are also installed with the Netezza client kits and can be run from a
remote client workstation.
Table 3-1: Command Line Summary
Command Description For more information…
nzbackup Backs up an existing
database.
For command syntax, see “nzbackup” on
page A-7. For more information, see “Using
the nzbackup Command” on page 10-10.
nzcontents Displays the revision
and build number of all
the executables, plus
the checksum of
Netezza binaries.
For command syntax, see “nzcontents” on
page A-7. For more information, see “Software
Revision Levels” on page 6-1.
nzconvert Converts character
encodings for loading
with the nzload com-
mand or external
tables.
For command syntax, see “nzconvert” on
page A-8. For more information, refer to the
IBM Netezza Database User’s Guide.
nzds Manages and displays
information about the
data slices on the
system.
For command syntax, see “nzds” on page A-8.
nzevent Displays and manages
event rules.
For command syntax, see “nzevent” on
page A-12. For more information, see
Chapter 7, “Managing Event Rules.”
nzhistclean-
updb
Deletes old history
information from a his-
tory database. This
command resides in
/nz/kit/bin/adm.
For command syntax, see “nzhistcleanupdb”
on page A-17. For more information, refer to
Chapter 11, “Query History Collection and
Reporting.”
nzhistcreatedb Creates a history data-
base with all its tables,
views, and objects for
history collection and
reporting. This com-
mand resides in
/nz/kit/bin/adm.
For command syntax, see “nzhistcreatedb” on
page A-20. For more information, refer to
Chapter 11, “Query History Collection and
Reporting.”
nzhostbackup Backs up the host
information, including
users and groups.
For command syntax, see “nzhistcreatedb” on
page A-20.

20282-20 Rev.1 3-3
Netezza CLI Overview
nzhostrestore Restores the host
information.
For command syntax, see “nzhostrestore” on
page A-24.
nzload Loads data into data-
base files.
For command syntax, see the IBM Netezza
Data Loading Guide.
nzodbcsql A client command on
Netezza UNIX clients
that tests ODBC
connectivity.
See the IBM Netezza ODBC, JDBC, and OLE
DB Installation and Configuration Guide.
nzpassword Stores a local copy of
the user’s password.
For command syntax, see “nzpassword” on
page A-33. For more information, see “Creat-
ing Encrypted Passwords” on page 2-15.
nzreclaim Uses the SQL GROOM
TABLE command to
reclaim disk space from
user tables, and also to
reorganize the tables.
For command syntax, see “nzreclaim” on
page A-35. For more information, see “Groom-
ing Tables” on page 9-18.
nzrestore Restores the contents
of a database backup.
For command syntax, see “nzrestore” on
page A-37. For more information, see “Using
the nzrestore Command” on page 10-22.
nzrev Displays the current
software revision for
any Netezza software
release.
For command syntax, see “nzrev” on
page A-37. For more information, see “Soft-
ware Revision Levels” on page 6-1.
nzsession Shows a list of current
system sessions (load,
client, and sql). Sup-
ports filtering by
session type or user,
allows you to abort ses-
sions, and change the
current job list for a
queued session job.
For command syntax, see “nzsession” on
page A-39. For more information, see “Manag-
ing Sessions” on page 9-21.
nzspupart Shows a list of all the
SPU partitions and the
disks that support
them; controls regener-
ations for degraded
partitions.
For usage information, see “nzspupart” on
page A-43.
nzsql Invokes the SQL com-
mand interpreter.
For usage information, see Chapter 9, “Manag-
ing User Content on the Netezza Appliance.”
For command syntax, see the IBM Netezza
Database User’s Guide.
Table 3-1: Command Line Summary
Command Description For more information…

3-4 20282-20 Rev.1
IBM Netezza System Administrator’s Guide
Command Locations
Table 3-2 lists the default location of the Netezza CLI commands and whether they are
available in the various UNIX or Windows client kits. Remember to add the appropriate bin
directory to your search path to simplify command invocation.
nzstart Starts the system. For command syntax, see “nzstart” on
page A-47. For more information, see “Manag-
ing the System State” on page 6-6.
nzstate Displays the current
system state or waits
for a specific system
state to occur before
returning.
For command syntax, see “nzstate” on
page A-48. For more information, see “Dis-
playing the Current System State” on
page 6-3.
nzstats Displays system level
statistics.
For command syntax, see “nzstats” on
page A-50. For more information, see “Dis-
playing Netezza Statistics” on page 13-1.
nzstop Stops the system. For command syntax, see “nzstop” on
page A-53. For more information, see “Manag-
ing the System State” on page 6-6.
nzsystem Changes the system
state or displays the
current system
information.
For command syntax, see “nzsystem” on
page A-55. For more information, see “Manag-
ing the System State” on page 6-6.
Table 3-1: Command Line Summary
Command Description For more information…
Table 3-2: CLI Command Locations
Default Location /nz/kit/
bin /usr/local/nz/bin
C:\Program
Files\Netezza
Tools\Bin
Platform Netezza
Host
Linux
Client
Solaris
Client
HP
Client
AIX
Client Windows Client
nzbackup
—————
nzhistcleanupdb
—————
nzhistcreatedb
—————
nzhostbackup
—————
nzhostrestore
—————
nzrestore
—————
nzstart
—————

20282-20 Rev.1 3-5
Netezza CLI Overview
Netezza CLI Command Syntax
All Netezza CLI commands have the following top-level syntax options:
-h — Displays help. You can also enter -help.
-rev — Displays the program’s software revision level. You can also enter -V.
-hc — Displays help for the subcommand (if the command has subcommands).
Note: For many Netezza CLI commands you can specify a timeout. This is the amount of
time the system waits before abandoning execution of the command. If you specify a time-
nzstop
—————
nzwebstart
—————
nzwebstop
—————
nzcontents
—
——
nzsql
—
nzreclaim
—
nzconvert
nzds
nzevent
nzhw
nzload
nzodbcsql
nzpassword
nzrev
nzsession
nzspupart
nzstate
nzstats
nzsystem
Table 3-2: CLI Command Locations
Default Location /nz/kit/
bin /usr/local/nz/bin
C:\Program
Files\Netezza
Tools\Bin
Platform Netezza
Host
Linux
Client
Solaris
Client
HP
Client
AIX
Client Windows Client
3-6 20282-20 Rev.1
IBM Netezza System Administrator’s Guide
out without a value, the system waits 300 seconds. The maximum timeout value is 100
million seconds.
Using the Netezza Commands
To run an nz* command, you must have access to the Netezza system (either directly on
the Netezza KVM or through a remote shell connection) or you must have installed the
Netezza client kit on your workstation. If you are accessing the Netezza system directly, you
must be able to log in using a Linux account (such as nz).
While some of the nz* commands can operate and display information without additional
access requirements, some commands and operations require that you specify a Netezza
database user account and password. The account may also require appropriate access and
administrative permissions to display information or process a command.
Several examples follow.
To display the state of a Netezza system using a Windows client command:
C:\Program Files\Netezza Tools\Bin>nzstate show -host mynps -u user
-pw passwd
System state is 'Online'.
To display the valid Netezza system states using a Windows client command:
C:\Program Files\Netezza Tools\Bin>nzstate listStates
State Symbol Description
------------ ------------------------------------------------------------
initialized used by a system component when first starting
paused already running queries will complete but new ones are queued
pausedNow like paused, except running queries are aborted
offline no queries are queued, only maintenance is allowed
offlineNow like offline, except user jobs are stopped immediately
online system is running normally
stopped system software is not running
down system was not able to initialize successfully
Note: In this example, note that you did not have to specify a host, user, or password. The
command simply displayed information that was already available on the local Windows
client.
To back up a Netezza database (you must run the command while logged in to the
Netezza system, as this is not supported from a client):
[nz@npshost ~]$ nzbackup -dir /home/user/backups -u user -pw
password -db db1
Backup of database db1 to backupset 20090116125409 completed
successfully.
Specifying Identifiers in Commands
When you use the Netezza commands and specify identifiers for users, passwords, data-
base names, and so on, you can pass normal identifiers unquoted on the Linux command
line. The Netezza server performs the appropriate case-conversion for the identifier.
However, if you use delimited identifiers, the supported way to pass them on the Linux
command line is to use the following syntax:

20282-20 Rev.1 3-7
SQL Command Overview
'\'Identifier\''
The syntax is single-quote, backslash, single-quote, identifier, backslash, single-quote, sin-
gle-quote. This syntax protects the quotes so that the identifier remains quoted in the
Netezza system.
SQL Command Overview
Netezza database users, if permitted, can perform some administrative tasks using SQL
commands while they are logged in via SQL sessions. For example, users can do the
following:
Manage Netezza users and groups, access permissions, and authentication
Manage database objects (create, alter, or drop objects, for example)
Display and manage session settings
Manage query history configurations
Throughout this document, SQL commands are shown in uppercase (for example, CREATE
USER) to stand out as SQL commands. The commands are case-insensitive and can be
entered using any letter casing. Users must have Netezza database accounts and applica-
ble object or administrative permissions to perform tasks. For detailed information about
the SQL commands and how to perform various administrative tasks using them, see the
IBM Netezza Database User’s Guide.
nzsql Command
The nzsql command is a SQL command interpreter. You can use it on the Netezza host or
on UNIX client systems to create database objects, run queries, and manage the database.
Note: The nzsql command is not yet available on Windows client systems.
To invoke the nzsql command, enter:
nzsql [options] [security options] [dbname [user] [password]]
Table 3-3 describes the nzsql command options. For detailed information about the com-
mand options and how to use the command, see the IBM Netezza Database User’s Guide.
Table 3-3: nzsql Command Options
Argument Description
-a Echoes all input from a script.
-A Specifies unaligned table output mode (-P format=unaligned).
-c <query> Runs only a single query (or slash command) and exits.
-d <dbname> Specifies the database name to which to connect.
•
If you do not specify -d, the nzsql command uses the environ-
ment variable NZ_DATABASE.
•
If there is no environment variable and you do not specify -d,
the nzsql command prompts you for a database name.
-e Echoes queries sent to the backend.

3-8 20282-20 Rev.1
IBM Netezza System Administrator’s Guide
-E Displays queries that internal commands generate.
-f <file name> Executes queries from a file, then exits.
-F <string> Sets the field separator (default: “|” (-P fieldsep=).
-h Displays this help.
-H Specifies the HTML table output mode (-P format=html).
-host <host> Specifies the database server host.
-l Lists available databases, then exits.
-n Disables readline. Required when nzsql is used with an input
method such as Japanese, Chinese, or Korean
-o <file name> Sends query output to file name (or |pipe).
-P var[=arg] Sets printing option var to arg.
-port <port> Specifies the database server port (default: hardwired).
-pw <password> Specifies the database user password.
•
If you do not specify -pw, the nzsql command uses the environ-
ment variable NZ_PASSWORD.
•
If there is no environment variable and you do not specify -pw,
the nzsql command prompts you for a password.
-q Runs quietly (no messages, only query output).
-r Suppresses the row count displayed at the end of the SQL output.
-R <string> Sets the record separator (default: newline) (-P recordsep=).
-s Specifies single step mode (confirm each query).
-S Specifies single line mode (newline terminates query).
-t Prints rows only (-P tuples_only).
-time Prints the time taken by queries.
-T text Sets HTML table tag options (width, border) (-P tableattr=).
-u <user name> Specifies the database user name.
•
If you do not specify -u, the nzsql command uses the environ-
ment variable NZ_USER.
•
If there is no environment variable and you do not specify -u,
the nzsql command prompts you for a user name.
-V Shows the version information and exits.
Table 3-3: nzsql Command Options
Argument Description

20282-20 Rev.1 3-9
SQL Command Overview
Within the nzsql command interpreter, you can enter the following commands for help or to
execute a command:
\h — Help for SQL commands.
\? — Internal slash commands. See Table 3-4.
\g or terminate with semicolon — Execute a query.
\q — Quit.
nzsql Session History
The Netezza system stores the history of your nzsql session in the file $HOME/.nzsql_his-
tory. In interactive sessions, you can also use the up-arrow key to see the commands you
have executed.
By default, an nzsql batch session continues even if the system encounters errors. You can
control this behavior with the ON_ERROR_STOP variable, for example:
-v name=value Sets the nzsql variable name to the specified value. You can spec-
ify one or more -v arguments to set several options, for example:
nzsql -v HISTSIZE=600 -v USER=user1 -v PASSWORD=password
-x Turns on expanded table output (-P expanded).
-X Does not read startup file (~/.nzsqlrc).
-securityLevel Specifies the security level that you want to use for the session.
The argument has four values:
•
preferredUnsecured — This is the default value. Specify this
option when you would prefer an unsecured connection, but
you will accept a secured connection if the Netezza system
requires one.
•
preferredSecured — Specify this option when you want a
secured connection to the Netezza system, but you will accept
an unsecured connection if the Netezza system is configured
to use only unsecured connections.
•
onlyUnsecured — Specify this option when you want an unse-
cured connection to the Netezza system. If the Netezza system
requires a secured connection, the connection will be rejected.
•
onlySecured — Specify this option when you want a secured
connection to the Netezza system. If the Netezza system
accepts only unsecured connections, or if you are attempting
to connect to a Netezza system that is running a release prior
to 4.5, the connection will be rejected.
-caCertFile Specifies the pathname of the root CA certificate file on the client
system. This argument is used by Netezza clients who use peer
authentication to verify the Netezza host system. The default
value is NULL which skips the peer authentication process.
Table 3-3: nzsql Command Options
Argument Description

3-10 20282-20 Rev.1
IBM Netezza System Administrator’s Guide
nzsql -v ON_ERROR_STOP=
You do not have to supply a value; simply defining it is sufficient.
You can also toggle batch processing with a SQL script. For example:
\set ON_ERROR_STOP
\unset ON_ERROR_STOP
You can use the $HOME/.nzsqlrc file to store values, such as the ON_ERROR_STOP, and
have it apply to all future nzsql sessions and all scripts.
Displaying Database Information
You can use the nzsql internal slash commands to display information about databases and
objects. Table 3-4 describes some of the internal slash commands that display information
about objects or privileges within the database. You can display all the options using the \?
command within the nzsql interpreter.
Suppressing Row Count Information
You can use the nzsql -r option or the session variable NO_ROWCOUNT to suppress the row
count information that appears at the end of the query output. A sample query that displays
the row count follows:
mydb(myuser)=> select count(*) from nation;
COUNT
-------
25
(1 row)
Table 3-4: nzsql Internal Slash Commands
Argument Description
\d <object> Describe the named object such as a table, view,
sequence, and so on
\d{t|v|i|s|e|x} List tables/views/indices/sequences/temp tables/external
tables
\d{m|y} List materialized views/synonyms
\dS{t|v|i|s} List system tables/views/indexes/sequences
\dM{t|v|i|s} List system management tables/views/indexes/
sequences
\dp <name> List user permissions
\dpu <name> Lis permissions granted to a user
\dpg <name> List permissions granted to a group
\d{u|U} List users (u) or user groups (U)
\df[+] List user-defined functions (+ for detailed information)
\da[+] List user-defined aggregates (+ for detailed information)

20282-20 Rev.1 3-11
NzAdmin Tool Overview
To suppress the row count information, you can use the nzsql -r command when you start
the SQL command line session. When you run a query, the output will not show a row
count:
mydb(myuser)=> select count(*) from nation;
COUNT
-------
25
You can use the NO_ROWCOUNT session variable to toggle the display of the row count
information within a session, as follows:
mydb(myuser)=> select count(*) from nation;
COUNT
-------
25
(1 row)
mydb(myuser)=> \set NO_ROWCOUNT
mydb(myuser)=> select count(*) from nation;
COUNT
-------
25
mydb(myuser)=> \unset NO_ROWCOUNT
mydb(myuser)=> select count(*) from nation;
COUNT
-------
25
(1 row)
NzAdmin Tool Overview
NzAdmin is a windows-based application that runs Windows client systems. It allows users
to manage the system, obtain hardware information and status, and manage various
aspects of the user databases, tables, and objects.
Users must install the Netezza windows client application to access the NzAdmin tool, as
described in “Installing the Netezza Tools on a Windows Client” on page 2-5. Users must
have Netezza database accounts and applicable object or administrative permissions to
perform tasks.
Client Compatibility
The NzAdmin client is intended to monitor Netezza systems that are at the same Netezza
software release level as the client. The client can monitor Netezza hosts with older
releases, but the client functionality may be incomplete. For example, when you monitor
older Netezza systems, some of the System tab features such as system statistics, event
management, and hardware component state changes are typically disabled. The Database
tab features are usually supported for the older systems.
The NzAdmin client is not compatible with Netezza hosts that are running releases at a
later revision. As a best practice, when you upgrade your Netezza system software you
should also upgrade your client software to match.

3-12 20282-20 Rev.1
IBM Netezza System Administrator’s Guide
Starting the NzAdmin Tool
To start an NzAdmin session, click Start > Programs > IBM Netezza > IBM Netezza Admin-
istrator. You can also create a shortcut on the desktop, or run the nzadmin.exe using the
Run window or from a command window, as follows:
Figure 3-1: Sample Run Command Window
If you run the nzadmin.exe in a command window, you can optionally enter the following
login information on the command line to bypass the login dialog:
-host or /host and the name of the Netezza host or its IP address
-user or /user and a valid Netezza database user name
-pw or /pw and a valid password for the Netezza user. The NzAdmin tool also can use
cached passwords on your client system. To specify using a cached password, use the
-pw option without a password string.
You can enter these arguments in any order, but you must separate them with spaces or
commas. You can mix the - and / command forms.
If you enter all three arguments, NzAdmin bypasses the login dialog and connects you
to the host you have specified. If there is an error, NzAdmin displays the login dialog
with the host and user fields completed and you must enter the password.
If you specify only one or two arguments, NzAdmin displays the login dialog. You must
complete the remaining fields.
If you duplicate arguments, that is, specify -host red and -host blue, NzAdmin displays
a warning message and uses the first one (host red).
Note: The NzAdmin tool and Web Admin accept delimited (quoted) user names in their
respective login dialogs. You can also delimit user names passed when invoking the NzAd-
min tool in a command window.
Logging In to NzAdmin
Unless otherwise specified on the command line, the NzAdmin login dialog box requires
three arguments: host, user name, and password. When you enter the password, the NzAd-
min tool allows you to save the encrypted password on the local system. When you login
again, you only need enter the host and user name.

20282-20 Rev.1 3-13
NzAdmin Tool Overview
The drop down list in the host field displays the previous host addresses or names you have
used in the past.
Figure 3-2: Login Dialog Box
Connecting to the Netezza System
When you log on, the NzAdmin tool checks the client/host and major and minor versions of
the Netezza system for a match with the NzAdmin tool’s version.
If they do not match, the NzAdmin tool displays a warning message and disables certain
commands, which causes event rules, statistics and system hardware operations to be
unavailable.
Figure 3-3: Netezza Revision Warning Window
You can suppress subsequent warning messages for version incompatibility by selecting
Don’t warn me about this again and clicking OK.
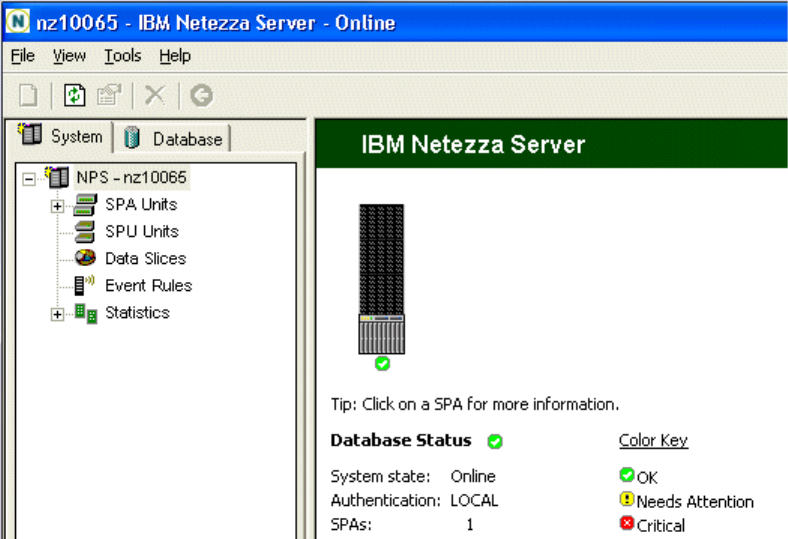
3-14 20282-20 Rev.1
IBM Netezza System Administrator’s Guide
Displaying System Components
After you log on, the NzAdmin tool main window appears. The NzAdmin tool has two main
environment views: System and Database. When you click either tab, the system displays
the tree view on the left side and the data view on the right side. You can switch between
these views at any time; however, the system defaults to the System view. When you start
the NzAdmin tool again, it defaults to your last environment selection.
Figure 3-4: NzAdmin Main System Window
In the main hardware view, NzAdmin displays an image of the Netezza system, which could
be one or more racks for Netezza z-series systems or one or more SPAs for IBM Netezza
100, 1000, C1000, or IBM PureData System for Analytics N1001 systems. As you move
the cursor over the image, NzAdmin displays information such as hardware IDs and other
details and the mouse cursor changes to the hyperlink hand. Clicking the image allows you
to drill down to more information about the component.
In the status bar at the bottom of the window, the NzAdmin tool displays your user name
and the duration of the NzAdmin session. If the host system is not in the online state, the
status bar displays the message “The host is not online.”
You can access commands through the menu bar, the toolbar, or by right-clicking objects.
Interpreting the Color Status Indicators
Each component has a general status indicator based on a color. The color provides a sim-
ple indication of the state of the component.

20282-20 Rev.1 3-15
NzAdmin Tool Overview
Table 3-5 describes the colors and their meaning.
Main Menu Commands
Table 3-6 lists the commands you can execute from the main menu.
Table 3-5: Color Indicators
Status Description
Green Normal. The component is operating normally.
Yellow Warning. The meaning depends on the specific component(s).
Red Failed. The component is down or failed. It can also indicate that a
component is likely to fail, which is the case if two fans on the same
SPA are down.
Empty Missing. A component is missing and no state is available.
Table 3-6: Main Menu Commands
Command Description
File > New Allows you to create a database, table, view, materi-
alized view, sequence, synonym, user or group.
Available only in Database tab.
File > System State Allows you to change the system state.
File > Reconnect Reconnects to the Netezza system with a different
hostname, address or user name.
File > Exit Exits the application.
View > Toolbar Shows/hides the application toolbar.
View > Status Bar Shows/hides the status bar.
View > System Objects Shows/hides system tables and views and applies to
object privilege lists in the Object Privileges
window.
View > SQL Statements Displays the SQL Window that shows a subset of the
SQL commands NzAdmin has used in this session.
View > Refresh F5 Refreshes the entire view — What is refreshed
depends on whether you are viewing the System or
Database section of the NzAdmin tool.

3-16 20282-20 Rev.1
IBM Netezza System Administrator’s Guide
Using the NzAdmin Tool Hyperlinks
Although you can view the system components by navigating the tree control, you can also
navigate to the major hardware components through hyperlinks embedded within the com-
ponent images in the right pane. If you hover your mouse pointer over the system images,
NzAdmin displays information about the components and changes to a “link” hand icon to
show that the image has hyperlinks as shown in Figure 3-5.
Tools > Workload Management Performance — Displays Summary, History, and
Graph Workload Management information.
Settings — Displays the System Defaults that you
can use to set the limits on session timeout, row set,
query timeout, and session priority and the
Resource Allocation that you can use to specify
resource usage among groups.
Tools > Table Skew Table Skew — Displays any tables that meet or
exceed a specified skew threshold.
Tools > Table Storage Table Storage — Displays table and materialized
view storage usage by database or by user.
Tools > Query History Configuration Query History Configuration — Displays a window
that you can use to create and alter query history
configurations, as well as to set the current
configuration.
Tools > Default Settings Default Settings — Displays the materialized view
refresh threshold.
Tools > Options Preferences — Displays the Preferences dialog box
that you can use to set the object naming prefer-
ence and whether you want auto refresh.
Help > NzAdmin Help Displays the online help for the NzAdmin tool.
Help > About NzAdmin Displays the NzAdmin and Netezza revision num-
bers and copyright text.
Table 3-6: Main Menu Commands
Command Description
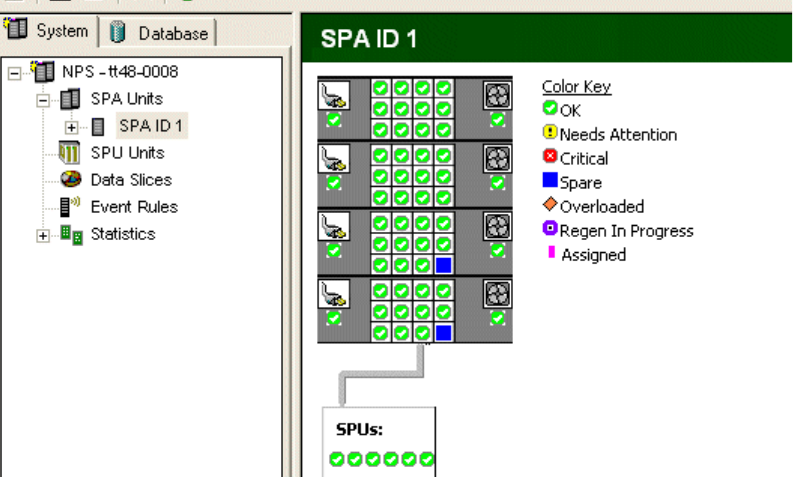
20282-20 Rev.1 3-17
NzAdmin Tool Overview
Figure 3-5: NzAdmin Hyperlink Support
As you move the cursor over the SPA image, the NzAdmin tool displays the slot number,
hardware ID, role, and state of each SPU, and the mouse cursor changes to the hyperlink
hand. Clicking the SPU displays the SPU status window and positions the tree control to
the corresponding entry.
Administration Commands
You can access system and database administration commands from both the tree view and
the status pane of NzAdmin. In either case, a popup or context menu supports the com-
mands related to the components displayed.
To activate a pop-up context menu, right-click a component in a list.
The Options hyperlink menu is located in the top bar of the window.
Setting Automatic Refresh
The NzAdmin tool can automatically refresh system and database status. You can also
manually refresh the current environment by clicking the refresh icon on the tool bar, or by
choosing refresh from individual option or context menus.
Complete the following steps to set auto refresh:
1. Click Tools > Options from the main menu.
2. In the Preferences dialog box, enable automatic refresh and specify a refresh interval.
The default is 60 seconds. You can specify any time between 60 and 9999 seconds.
3-18 20282-20 Rev.1
IBM Netezza System Administrator’s Guide
Figure 3-6: Preferences Dialog Box
If you enable auto refresh, the NzAdmin tool displays a refresh icon in the right corner of
the status bar. The system stores the refresh state and time interval, and maintains this
information across NzAdmin sessions. Therefore, if you set automatic refresh, it remains in
effect until you change it.
To reduce communication with the server, the NzAdmin tool refreshes data based on the
item you select in the left pane. Table 3-7 lists the items and corresponding data retrieved
on refresh.
Table 3-7: Automatic Refresh
Selected Item Data Retrieved
Server (system view)
SPA Units
SPA ID n
SPU units
All topology and hardware state information.
Event rules Event rules.
Individual statistic such as DBMS
Group
Specific statistic information.
Server (database view) All databases and their associated objects, users,
groups, and session information.
Databases All database information and associated objects.
Database <name> Specific database, table, and view information.
Tables Table information.
Views View information.
Sequences Sequences information.
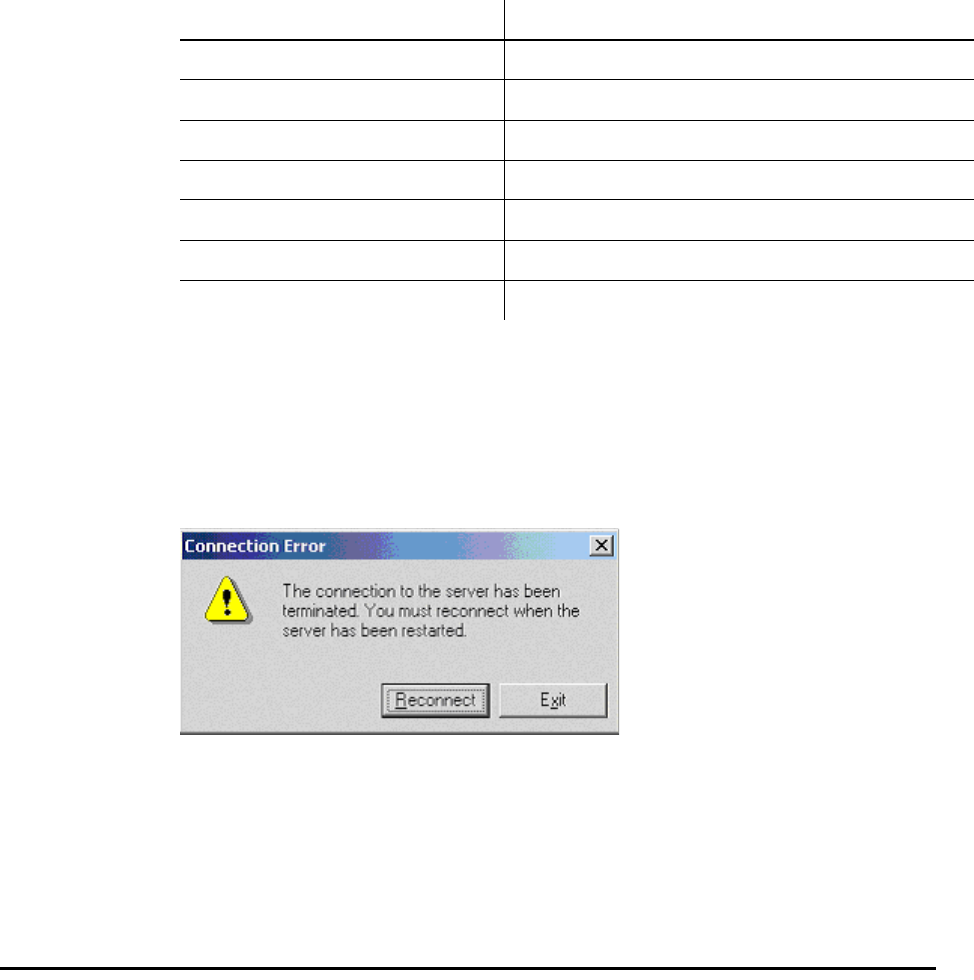
20282-20 Rev.1 3-19
Web Admin Overview
If the NzAdmin tool is already communicating with the backend server, such as processing
a user command or performing a manual refresh, it does not execute an auto refresh.
Controlling NzAdmin Session Termination
When you stop the Netezza Server or a network error occurs, the NzAdmin tool displays an
error message and allows you to reconnect or exit the session.
Figure 3-7: Connection Error window
If you click Reconnect, the NzAdmin tool attempts to establish a connection to the
server.
If you click Exit, NzAdmin terminates your session.
Web Admin Overview
The Netezza Web Admin software package lets you monitor and administer a Netezza sys-
tem from supported web browsers on client systems. Web Admin supports the following
browser applications:
Internet Explorer 7 and later versions
Firefox 3 and later versions
No software is required on the client systems other than the web browser application. The
Web Admin package consists of web server software and the web page files, which com-
prise the Web Admin interface.
Synonyms Synonyms information.
Functions User-defined functions information.
Aggregates User-defined aggregates information.
Procedures Stored procedure information.
Users User information.
Groups Group information.
Sessions Session information.
Table 3-7: Automatic Refresh
Selected Item Data Retrieved
3-20 20282-20 Rev.1
IBM Netezza System Administrator’s Guide
You can install the Web Admin server package on the Netezza host system, or on any Linux
system that can connect to the Netezza system. The Linux system should run an operating
system version that matches the Web Admin installation package.
Using the Web Admin interface you can do the following:
Display the status of Netezza hardware, user and system sessions, data storage usage,
database, tables, views, sequences, synonyms, functions, aggregates, stored proce-
dures, active queries and query history, and users and groups.
Note: The query history information accessible from the Web Admin interface uses the
_v_qryhist and _v_qrystat views for backward compatibility. These views will be depre-
cated in the future. For details on the new query history feature, see Chapter 11,
“Query History Collection and Reporting.”
Create databases, views, sequences, synonyms, users, and groups.
Assign access privileges to users and groups, control group membership, manage
default/user/group settings, rename or change ownership.
Generate reports on table properties, workload management, statistics, and record
distribution.
This chapter provides a overview of the Netezza Web Admin interface. For additional details
see the online help.
Note: The Web Admin accepts delimited (quoted) user names in the login dialog.
Using the Web Admin Application
You connect to the Web Admin server by pointing your web browser at the main HTML login
page, admin.html, at the appropriate server name (for example: https://server_name/
admin.html).
The IBM Netezza Web Admin Interface page is a login page where you enter the name or IP
address of a Netezza server along with a valid Netezza database user name and password.
By default, Netezza uses the Secure Socket Layer (SSL) protocol to ensure that passwords
are encrypted when they travel from client to server. To connect using the secure sockets
layer, the web address must begin with the “https://” prefix. If the Web admin interface
does not use SSL, you can use the “http://” prefix.
Netezza provides a security certificate on the server that the client browser downloads and
flags. The web browser detects the Netezza certificate, and users should permanently
install it in the browser’s local storage. After the certificate is installed, users can connect
to the secure address without further interaction. For more information on how to perma-
nently install the Netezza site certificate, see “Installing the Web Admin Server and
Application Files” on page 2-8.
Understanding the Web Admin Page Layout
All the Web Admin pages except for the login page are divided into three main sections:
A navigation pane along the left side.
A status area at the top.
A general information area that fills the remainder of the page.
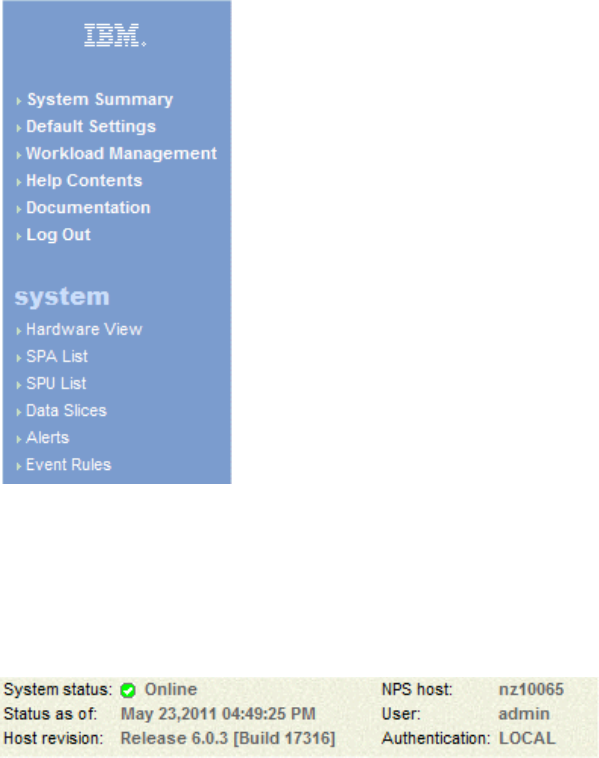
20282-20 Rev.1 3-21
Web Admin Overview
Navigation Pane
The navigation page is on the left side of the page and contains the main list of site links.
This page is fixed and, with a few exceptions, is present on all pages within the site. Most
links are grouped within system and database commands.
Figure 3-8: Navigation Pane
Status Pane
The status pane is at the top of the page, and contains database status and system state,
time of last status update, host revision number, hostname or address, and user name and
authentication setting.
Figure 3-9: Status Pane
The status area also includes a search box, which you can use to search through system
tables. Depending on the search string you enter, the system finds the following items:
If the search string is numeric, the system searches for hardware identifiers or IP
addresses, such as a SPU or SPA.
If the search string is alphanumeric, the system searches for databases, tables, views,
sequences, synonyms, functions, aggregates, procedures, and user or group names.
The alphanumeric search uses the SQL ‘like’ operator, therefore you can augment the
search string with SQL pattern characters. For example, the search string ‘cust%’ finds
all occurrences of the customer table throughout all the databases in the system.
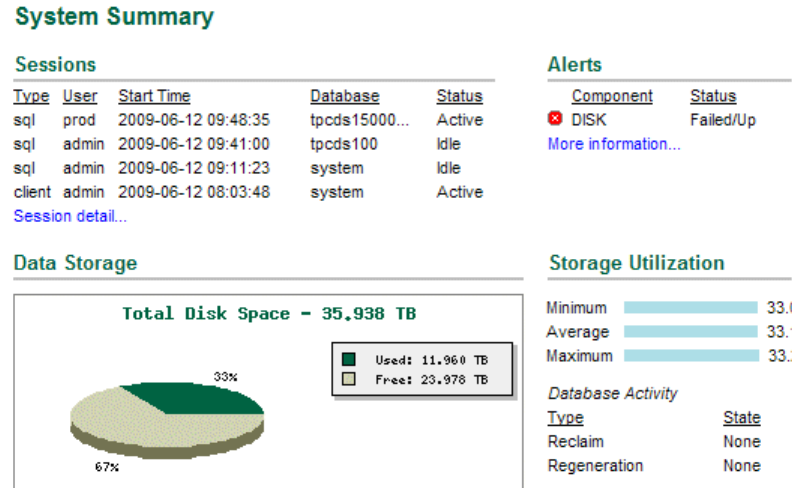
3-22 20282-20 Rev.1
IBM Netezza System Administrator’s Guide
System Summary Page
The System Summary is the interface’s home page. It is the first page you see after logging
in to a Netezza system. It provides a summary view of the system that consolidates session
information, hardware, disk usage, and database status/key activity. The colored text on the
page are links to additional detail or status.
Figure 3-10: System Summary Page
Drilldown Links
The Web Admin interface lets you drill down for more detailed information on system, hard-
ware, and database objects. Many pages contain drilldown links, in text or graphical form.
For example:
In the Hardware View page, you can click on the rack image to drill down to a specific
SPA.
In the SPA Status page, you can click on a SPU within the SPA image to drill down to
detailed information on a SPU.
In the Table List page, you can click on a table name to drill down to table properties.
Action Buttons
At the top of many Web Admin pages, there are action links that provide additional naviga-
tion based on the current page’s content. For example, from the Table Properties page you
can select to view the table record distribution or statistics, or truncate or drop the table.
Online Help
The Web Admin interface provides you with two types of help:
Task-oriented help — Available when you click Help Contents in the navigation pane.
20282-20 Rev.1 3-23
Web Admin Overview
Context-sensitive help — Available when you click the question icon on each page.
Connecting to Systems Running Earlier Software Releases
If you connect to Netezza systems running an earlier software release, some commands
may fail because of inadequate permissions or the presence of status which is not available
in an earlier release.
The system displays the following error messages:
“Information for this command is not available.”
“You either do not have the proper access privileges or the host software is not compat-
ible with this version of WebAdmin.”
3-24 20282-20 Rev.1
IBM Netezza System Administrator’s Guide

4-1
C H A P T E R 4
Managing Netezza HA Systems
What’s in this chapter
Linux-HA and DRBD Overview
Differences with the Previous Netezza HA Solution
Linux-HA Administration
DRBD Administration
Administration Reference and Troubleshooting
The Netezza high availability (HA) solution uses Linux-HA and Distributed Replicated
Block Device (DRBD) as the foundation for cluster management and data mirroring. The
Linux-HA and DRBD applications are commonly used, established, open source projects for
creating HA clusters in various environments. They are supported by a large and active
community for improvements and fixes, and they also offer the flexibility for Netezza to add
corrections or improvements on a faster basis, without waiting for updates from third-party
vendors.
The IBM Netezza 1000, C1000, IBM PureData System for Analytics N1001, and NEC
InfoFrame DWH Appliances are HA systems, which means that they have two host servers
for managing Netezza operations. The host server (often referred to as host within the doc-
umentation) is a Linux server that runs the Netezza software and utilities. This chapter
describes some high-level concepts and basic administration tasks for the Netezza HA
environment.
Linux-HA and DRBD Overview
High-Availability Linux (also referred to as Linux-HA) provides the failover capabilities from
a primary or active Netezza host to a secondary or standby Netezza host. The main cluster
management daemon in the Linux-HA solution is called Heartbeat. Heartbeat watches the
hosts and manages the communication and status checks of services. Each service is a
resource. Netezza groups the Netezza-specific services into the nps resource group. When
Heartbeat detects problems that imply a host failure condition or loss of service to the
Netezza users, Heartbeat can initiate a failover to the standby host. For details about Linux-
HA and its terms and operations, see the documentation at http://www.linux-ha.org.
Distributed Replicated Block Device (DRBD) is a block device driver that mirrors the con-
tent of block devices (hard disks, partitions, logical volumes, and so on) between the hosts.
Netezza uses the DRBD replication only on the /nz and /export/home partitions. As new
4-2 20282-20 Rev.1
IBM Netezza System Administrator’s Guide
data is written to the /nz partition and the /export/home partition on the primary host, the
DRBD software automatically makes the same changes to the /nz and /export/home parti-
tion of the standby host.
The Netezza implementation uses DRBD in a synchronous mode, which is a tightly coupled
mirroring system. When a block is written, the active host does not record the write as com-
plete until both the active and the standby hosts successfully write the block. The active
host must receive an acknowledgement from the standby host that it also has completed
the write. Synchronous mirroring (DRBD protocol C) is most often used in HA environments
that want the highest possible assurance of no lost transactions should the active node fail
over to the standby node. Heartbeat typically controls the DRBD services, but commands
are available to manually manage the services.
For details about DRBD and its terms and operations, see the documentation available at
http://www.drbd.org.
Differences with the Previous Netezza HA Solution
In prior releases, the Netezza HA solution leveraged Red Hat Cluster Manager as the foun-
dation for managing HA host systems. The Linux-HA solution uses different commands to
manage the cluster. Table 4-1 outlines the common tasks and the commands used in each
HA environment.
Some additional points of differences between the solutions:
All Linux-HA and DRBD logging information is written to /var/log/messages on each
host. For more information about the log files, see “Logging and Messages” on
page 4-13.
In the new cluster environment, pingd has replaced netchecker (the Network Failure
Daemon). pingd is a built-in part of the Linux-HA suite.
The cluster manager HA solution also required a storage array (the MSA500) as a quo-
rum disk to hold the shared data. A storage array is not used in the new
Linux-HA/DRBD solution, as DRBD automatically mirrors the data in the /nz and
/export/home partitions from the primary host to the secondary host.
Note: The /nzdata and /shrres file systems on the MSA500 are deprecated.
Table 4-1: HA Tasks and Commands (Old Design and New Design)
Task Old Command (Cluster Manager) New Command (Linux-HA)
Display cluster status clustat -i 5 crm_mon -i5
Relocate NPS service cluadmin -- service relocate nps /nzlocal/scripts/heartbeat_admin.sh --migrate
Enable the NPS service cluadmin -- service enable nps crm_resource -r nps -p target_role -v started
Disable the NPS service cluadmin -- service disable nps crm_resource -r nps -p target_role -v stopped
Start the cluster on each
node
service cluster start service heartbeat start
Stop the cluster on each
node
service cluster stop service heartbeat stop
20282-20 Rev.1 4-3
Linux-HA Administration
In some customer environments that used the previous cluster manager solution, it was
possible to have only the active host running while the secondary was powered off. If
problems occurred on the active host, the Netezza administrator onsite would power off
the active host and power on the standby. In the new Linux-HA DRBD solution, both
HA hosts must be operational at all times. DRBD ensures that the data saved on both
hosts is synchronized, and when Heartbeat detects problems on the active host, the
software automatically fails over to the standby with no manual intervention.
Linux-HA Administration
When you start a Netezza HA system, Heartbeat automatically starts on both hosts. It can
take a few minutes for Heartbeat to start all the members of the nps resource group. You
can use the crm_mon command from either host to observe the status, as described in
“Monitoring the Cluster and Resource Group Status” on page 4-6.
Heartbeat Configuration
Heartbeat uses the /etc/ha.d/ha.cf configuration file first to load its configuration. The file
contains low-level information about fencing mechanisms, timing parameters, and whether
the configuration is v1 (old-style) or v2 (CIB). Netezza uses the v2 implementation.
Do not modify the file unless directed to in Netezza documentation or by Netezza Support.
CIB
The majority of the Heartbeat configuration is stored in the Cluster Information Base (CIB).
The CIB is located on disk at /var/lib/heartbeat/crm/cib.xml. Heartbeat synchronizes it auto-
matically between the two Netezza hosts.
NEVER manually edit the CIB file! You must use cibadmin (or crm_resource) to modify the
Heartbeat configuration. Wrapper scripts like heartbeat_admin.sh will update the file in a
safe way.
Note: It is possible to get into a situation where Heartbeat will not start properly due to a
manual CIB modification—although the CIB cannot be safely modified without Heartbeat
being started (that is, cibadmin cannot run). In this situation, you can run /nzlocal/scripts/
heartbeat_config.sh to reset the CIB and /etc/ha.d/ha.cf to factory-default status. After
doing this, it is necessary to run /nzlocal/scripts/heartbeat_admin.sh --enable-nps to com-
plete the CIB configuration.
Important Information about Host 1 and Host 2
In the Red Hat cluster manager implementation, the HA hosts were commonly referred to
as HA1 and HA2. The terms stemmed from the hardware and rack configurations as HA
systems were typically multi-rack systems, and HA1 was located in the “first” rack (usually
the leftmost rack from the front), while HA2 was in the “second” rack of the HA system.
Either HA1 or HA2 could serve as the active or standby host, although HA1 was most often
4-4 20282-20 Rev.1
IBM Netezza System Administrator’s Guide
the “default” active host and so HA1 is often synonymous with the active host. The names
HA1 and HA2 are still used to refer to the host servers regardless of their active/standby
role.
In IBM Netezza HA system designs, host1/HA1 is configured by default to be the active
host. You can run cluster management commands from either the active or the standby
host. The nz* commands must be run on the active host, but the commands run the same
regardless of whether host 1 or host 2 is the active host. The Netezza software operation is
not affected by the host that it runs on; the operation is identical when either host 1 or host
2 is the active host.
However, when host 1 is the active host, certain system-level operations such as S-Blade
restarts and reboots often complete more quickly than when host 2/HA2 is the active host.
An S-Blade reboot can take one to two minutes longer to complete when host 2 is the
active host. Certain tasks such as manufacturing and system configuration scripts can
require host 1 to be the active host, and they will display an error if run on host 2 as the
active host. The documentation for these commands indicates whether they require host 1
to be the active host, or if special steps are required when host 2 is the active host.
Managing Failover Timers
There are several failover timers that monitor Heartbeat operations and timings. The default
settings were chosen to cover the general range of Netezza system implementations.
Although Netezza has not encountered frequent need to change these values, each cus-
tomer environment is unique. Failover timers should not be changed without consultation
from Netezza Support.
The failover timers are configured in /etc/ha.d/ha.cf.
Deadtime – specifies the failure detection time (default: 30 seconds). For a busy
Netezza system in a heavily loaded environment, you might need to increase this value
if you observe frequent “No local heartbeat” errors or “Cluster node returning after par-
tition” errors in the /var/log/messages file.
Warntime – specifies the warning for late heartbeat (default: 10 seconds).
Keepalive – specifies the interval between liveness pings (default: 2 seconds).
You can change the settings by editing the values in ha.cf on both hosts and restarting
Heartbeat, but use care when editing the file.
Netezza Cluster Management Scripts
Netezza provides wrapper scripts for many of the common cluster management tasks.
These wrapper scripts help to simplify the operations and to guard against accidental con-
figuration changes that could cause the Netezza HA operations to fail.
Note: Table 4-2 lists the common commands. Note that these commands are listed here
for reference, but they are described in detail in the IBM Netezza System Configuration
20282-20 Rev.1 4-5
Linux-HA Administration
Guide for your model type. Refer to that guide if you need to perform any of these
procedures.
Note: The following is a list of other Linux-HA commands available. This list is also pro-
vided as a reference, but it is highly recommended that you do not use any of these
commands unless directed to by Netezza documentation or by Netezza Support.
Linux-HA configuration commands:
cibadmin: Main interface to modify configuration
crm_resource: Shortcut interface for modifying configuration
crm_attribute: Shortcut interface for modifying configuration
crm_diff: Diff and patch two different CIBs
Linux-HA administration commands:
crmadmin: Low-level query and control
crm_failcount: Query and reset failcount
crm_standby: Mark a node as standby, usually for maintenance
Identifying the Active and Standby Nodes
There are two ways to determine which Netezza host is the active host and which is the
standby.
Use the crm_resource command.
Review the output of the crm_mon command.
Table 4-2: Cluster Management Scripts
Type Scripts
Initial installation
scripts
heartbeat_config.sh: Sets up Heartbeat for the first time
heartbeat_admin.sh --enable-nps: Adds Netezza services to clus-
ter control after initial installation
Hostname change heartbeat_admin.sh --change-hostname
Fabric IP change heartbeat_admin.sh --change-fabric-ip
Wall IP change heartbeat_admin.sh --change-wall-ip
Manual migrate
(relocate)
heartbeat_admin.sh --migrate
Linux-HA status and
troubleshooting
commands:
crm_mon: Monitor cluster status
crm_verify: Sanity check configuration, and print status
4-6 20282-20 Rev.1
IBM Netezza System Administrator’s Guide
A sample crm_resource command and its output fofllow.
[root@nzhost1 ~]# crm_resource -r nps -W
crm_resource[5377]: 2009/01/31_10:13:12 info: Invoked: crm_resource -r
nps -W
resource nps is running on: nzhost1
The command output displays a message about how it was invoked, and then displays the
hostname where the nps resource group is running. This is the active host.
You can obtain more information about the state of the cluster and which host is active
using the crm_mon command. Refer to the sample output shown in the next section, “Mon-
itoring the Cluster and Resource Group Status” on page 4-6.
Note: If the nps resource group is unable to start, or if it has been manually stopped (such
as by crm_resource -r nps -p target_role -v stopped), neither host is considered to be active.
If this is the case, crm_resource -r nps -W will not return a hostname.
Monitoring the Cluster and Resource Group Status
To check the state of the cluster and the nps resource group:
crm_mon -i5
Sample output follows. This command refreshes its display every five seconds, but you can
specify a different refresh rate (for example, -i10 is a ten-second refresh rate). Press Con-
trol-C to exit the command.
[root@nzhost1 ~]# crm_mon -i5
============
Last updated: Wed Sep 30 13:42:39 2009
Current DC: nzhost1 (key)
2 Nodes configured.
3 Resources configured.
============
Node: nzhost1 (key): online
Node: nzhost2 (key): online
Resource Group: nps
drbd_exphome_device (heartbeat:drbddisk): Started nzhost1
drbd_nz_device (heartbeat:drbddisk): Started nzhost1
exphome_filesystem (heartbeat::ocf:Filesystem): Started nzhost1
nz_filesystem (heartbeat::ocf:Filesystem): Started nzhost1
fabric_ip (heartbeat::ocf:IPaddr): Started nzhost1
wall_ip (heartbeat::ocf:IPaddr): Started nzhost1
nz_dnsmasq (lsb:nz_dnsmasq): Started nzhost1
mantravm (lsb:mantravm): Started nzhost1
nzinit (lsb:nzinit): Started nzhost1
fencing_route_to_ha1 (stonith:apcmaster): Started nzhost2
fencing_route_to_ha2 (stonith:apcmaster): Started nzhost1
The host running the nps resource group is considered the active host. Every member of the
nps resource group will start on the same host. The output above shows that they are all
running on nzhost1, which means that nzhost1 is the active host.
Note: If the nps resource group is unable to start, or if it has been manually stopped (such
as by crm_resource -r nps -p target_role -v stopped), neither host is considered to be active.
If this is the case, crm_mon will either show individual resources in the nps group as
stopped, or it will not show the nps resource group at all.
20282-20 Rev.1 4-7
Linux-HA Administration
Although the crm_resource output shows that the MantraVM service is started, this is a
general status for Heartbeat monitoring. For details on the MantraVM status, use the ser-
vice mantravm status command which is described in “Displaying the Status of the
MantraVM Service” on page 14-4.
Note: The crm_mon output also shows the name of the Current DC. The Designated Coordi-
nator (DC) host is not an indication of the active host. The DC is an automatically assigned
role that Linux-HA uses to identify a node that acts as a coordinator when the cluster is in
a healthy state. This is a Linux-HA implementation detail and does not impact Netezza.
Each host is capable of recognizing and recovering from failure, regardless of which one is
the DC. For more information about the DC and Linux-HA implementation details, see
http://www.linux-ha.org/DesignatedCoordinator.
The resources under the nps resource group are as follows:
The DRBD devices:
drbd_exphome_device (heartbeat:drbddisk): Started nzhost1
drbd_nz_device (heartbeat:drbddisk): Started nzhost1
Both filesystem mounts:
exphome_filesystem (heartbeat::ocf:Filesystem): Started nzhost1
nz_filesystem (heartbeat::ocf:Filesystem): Started nzhost1
The 10.0.0.1 IP setup on the fabric interface:
fabric_ip (heartbeat::ocf:IPaddr): Started nzhost1
The floating wall IP (external IP for HA1 + 3):
wall_ip (heartbeat::ocf:IPaddr): Started nzhost1
The DNS daemon for Netezza:
nz_dnsmasq (lsb:nz_dnsmasq): Started nzhost1
The MantraVM service:
mantravm (lsb:mantravm): Started nzhost1
The Netezza daemon which performs necessary prerequisite work and then starts the
Netezza software:
nzinit (lsb:nzinit): Started nzhost1
The fence routes for internal Heartbeat use are not part of the nps resource group. If these
services are started, it means that failovers are possible:
fencing_route_to_ha1 (stonith:apcmaster): Started nzhost2
fencing_route_to_ha2 (stonith:apcmaster): Started nzhost1
nps Resource Group
The nps resource group contains the following services or resources:
drbd_exphome_device
drbd_nz_device
exphome_filesystem
nz_filesystem
4-8 20282-20 Rev.1
IBM Netezza System Administrator’s Guide
fabric_ip
wall_ip
nz_dnsmasq
mantravm
nzinit
The order of the members of the group matters; group members are started sequentially
from first to last. They are stopped sequentially in reverse order, from last to first. Heart-
beat blocks on each member’s startup and will not attempt to start the next group member
until the previous member has started successfully. If any member of the resource group is
unable to start (returns an error or times out), Heartbeat performs a failover to the standby
node.
Note: The mantravm resource is not a blocking resource; that is, if the MantraVM service
does not start when the nps resource group is starting, the nps resource group does not wait
for the MantraVM to start.
Failover Criteria
During a failover or resource migration, the nps resource group is stopped on the active
host and started on the standby host. The standby host then becomes the active host.
It is important to differentiate between a resource failover and a resource migration (or relo-
cation). A failover is an automated event which is performed by the cluster manager
without human intervention when it detects a failure case. A resource migration occurs
when an administrator intentionally moves the resources to the standby.
A failover can be triggered by any of the following events:
BOTH maintenance network links to the active host are lost.
ALL fabric network links to the active host are lost.
A user manually stops Heartbeat on the active host.
The active host is cleanly shut down, such as if someone issued the command
shutdown -h on that host.
The active host is uncleanly shut down, such as during a power failure to the system
(both power supplies fail).
If any member of the nps resource group cannot start properly when the resource group
is initially started.
If any one of the following members of the nps resource group fails after the resource
group was successfully started:
drbd_exphome_device or drbd_nz_device: These correspond to low-level DRBD
devices that serve the shared filesystems. If these devices fail, the shared data
would not be accessible on that host.
exphome_filesystem or nz_filesystem: These are the actual mounts for the DRBD
devices.
nz_dnsmasq: The DNS daemon for the Netezza system.
Note: If any of these resource group members experiences a failure, Heartbeat first tries to
restart or repair the process locally. The failover is triggered only if that repair or restart pro-
20282-20 Rev.1 4-9
Linux-HA Administration
cess does not work. Other resources in the group not listed above are not monitored for
failover detection.
The following common situations DO NOT trigger a failover:
Any of the failover criteria occurring on the STANDBY host while the active host is
healthy.
Note: Heartbeat may decide to fence (forcibly power cycle) the standby host when it
detects certain failures to try to restore the standby host to a state of good health.
A single maintenance network link to the active host is lost.
Losing some (but not all) of the fabric network links to the active host.
Network connectivity from the Netezza host (either active or standby) to the customer's
network is lost.
One or both network connections serving the DRBD network fail.
The MantraVM service fails. If the MantraVM service should fail for any reason, it will
not cause a failover of the nps resource group to the standby host.
Relocate to the Standby Node
The following commands can be used to manually relocate the nps resource group from the
active Netezza node to the standby node. At the conclusion of this process, the standby
node becomes the active node and the previous active node becomes the standby.
Note: In the previous Netezza Cluster Manager solution, HA1 is the name of the primary
node, and HA2 the secondary node. In Linux-HA/DRBD, either host could be primary; thus,
these procedures refer to one host as the active host and one as the standby host.
To relocate the nps resource group from the active host to the standby host:
[root@nzhost1 ~]# /nzlocal/scripts/heartbeat_admin.sh --migrate
Testing DRBD communication channel...Done.
Checking DRBD state...Done.
Migrating the NPS resource group from NZHOST1 to
NZHOST2................................................Complete.
20100112_084039 INFO : Run crm_mon to check NPS' initialization
status.
The command blocks until the nps resource group stops completely. To monitor the status,
use the crm_mon -i5 command. You can run the command on either host, although on the
active host you need to run it from a different terminal window.
Safe Manual Control of the Hosts (And Heartbeat)
In general, you should never have to stop Heartbeat unless the Netezza HA system requires
hardware or software maintenance or troubleshooting. During these times, it is important
that you control Heartbeat to ensure that it does not interfere with your work by taking STO-
NITH actions to regain control of the hosts. The recommended practice is to shut down
Heartbeat completely for service.
To shut down the nps resource group and Heartbeat:
1. Identify which node is the active node using the following command:
4-10 20282-20 Rev.1
IBM Netezza System Administrator’s Guide
[root@nzhost1 ~]# crm_resource -r nps -W
resource nps is running on: nzhost1
2. Stop Heartbeat on the standby Netezza host:
[root@nzhost2 ~]# service heartbeat stop
Stopping High-Availability services:
[ OK ]
This command blocks until it completes successfully. It is important to wait and let the
command complete. You can check /var/log/messages for status messages, or you can
monitor progress on a separate terminal session using either of the following com-
mands:
tail -f /var/log/messages
crm_mon -i5
3. Stop Heartbeat on the active Netezza host:
[root@nzhost1 ~]# service heartbeat stop
Stopping High-Availability services:
[ OK ]
In some rare cases, the Heartbeat cannot be stopped using this process. In these cases
you can force Heartbeat to stop as described in “Forcing Heartbeat to Shutdown” on
page 4-17.
Transition to Maintenance (Non-Heartbeat) Mode
To enter into maintenance mode:
1. While logged in to either host as root, display the name of the active node:
[root@nzhost1 ~]# crm_resource -r nps -W
resource nps is running on: nzhost1
2. As root, stop Heartbeat on the standby node (nzhost2 in this example):
[root@nzhost2 ~]# service heartbeat stop
3. As root, stop Heartbeat on the active node:
[root@nzhost1 ~]# service heartbeat stop
4. As root, make sure that there are no open nz sessions or any open files in the /nz and/
or /export/home shared directories. For details, see “Checking for User Sessions and
Activity” on page 4-19.
[root@nzhost1 ~]# lsof /nz /export/home
5. Run the following script in /nzlocal/scripts to make the Netezza system ready for non-
clustered operations. The command prompts you for a confirmation to continue, shown
as Enter in the output.
[root@nzhost1 ~]# /nzlocal/scripts/nz.non-heartbeat.sh
---------------------------------------------------------------
Thu Jan 7 15:13:27 EST 2010
File systems and eth2 on this host are okay. Going on.
File systems and eth2 on other host are okay. Going on.
This script will configure Host 1 or 2 to own the shared disks and
own the fabric.
20282-20 Rev.1 4-11
Linux-HA Administration
When complete, this script will have:
mounted /export/home and /nz
aliased 10.0.0.1 on eth2
run the rackenable script appropriate for this host
based on the last octet of eth2
being 2 for rack 1 or 3 for rack 2
To proceed, please hit enter. Otherwise, abort this. Enter
Okay, we are proceeding.
Thu Jan 7 15:13:29 EST 2010
Filesystem 1K-blocks Used Available Use% Mounted on
/dev/sda6 16253924 935980 14478952 7% /
/dev/sda10 8123168 435272 7268604 6% /tmp
/dev/sda9 8123168 998808 6705068 13% /usr
/dev/sda8 8123168 211916 7491960 3% /var
/dev/sda7 8123168 500392 7203484 7% /opt
/dev/sda3 312925264 535788 296237324 1% /nzscratch
/dev/sda1 1019208 40192 926408 5% /boot
none 8704000 2228 8701772 1% /dev/shm
/dev/sda12 4061540 73940 3777956 2% /usr/local
/dev/drbd0 16387068 175972 15378660 2% /export/home
/dev/drbd1 309510044 5447740 288340020 2% /nz
Done mounting file systems
eth2:0 Link encap:Ethernet HWaddr 00:07:43:05:8E:26
inet addr:10.0.0.1 Bcast:10.0.15.255 Mask:255.255.240.0
UP BROADCAST RUNNING MULTICAST MTU:9000 Metric:1
Interrupt:122 Memory:c1fff000-c1ffffff
Done enabling IP alias
Running nz_dnsmasq: [ OK ]
nz_dnsmasq started.
Ready to use NPS in non-cluster environment
6. As the nz user, start the Netezza software:
[nz@nzhost1 ~] nzstart
Transitioning from Maintenance to Clustering Mode
To reinstate the cluster from a maintenance mode:
1. Stop the Netezza software using the nzstop command.
2. Make sure Heartbeat is not running on either node. Use the service heartbeat stop
command to stop the Heartbeat on either host if it is running.
3. Make sure that there are no nz user login sessions, and make sure that no users are in
the /nz or /export/home directories; otherwise, the nz.heartbeat.sh command will not be
able to unmount the DRBD partitions. For details, see “Checking for User Sessions and
Activity” on page 4-19.
4. Run the following script in /nzlocal/scripts to make the Netezza system ready for clus-
tered operations. The command prompts you for a confirmation to continue, shown as
Enter in the output.
4-12 20282-20 Rev.1
IBM Netezza System Administrator’s Guide
[root@nzhost1 ~]# /nzlocal/scripts/nz.heartbeat.sh
---------------------------------------------------------------
Thu Jan 7 15:14:32 EST 2010
This script will configure Host 1 or 2 to run in a cluster
When complete, this script will have:
unmounted /export/home and /nz
Disabling IP alias 10.0.0.1 from eth2
To proceed, please hit enter. Otherwise, abort this. Enter
Okay, we are proceeding.
Thu Jan 7 15:14:33 EST 2010
Filesystem 1K-blocks Used Available Use% Mounted on
/dev/sda6 16253924 935980 14478952 7% /
/dev/sda10 8123168 435272 7268604 6% /tmp
/dev/sda9 8123168 998808 6705068 13% /usr
/dev/sda8 8123168 211928 7491948 3% /var
/dev/sda7 8123168 500544 7203332 7% /opt
/dev/sda3 312925264 535788 296237324 1% /nzscratch
/dev/sda1 1019208 40192 926408 5% /boot
none 8704000 2228 8701772 1% /dev/shm
/dev/sda12 4061540 73940 3777956 2% /usr/local
Done unmounting file systems
eth2:0 Link encap:Ethernet HWaddr 00:07:43:05:8E:26
UP BROADCAST RUNNING MULTICAST MTU:9000 Metric:1
Interrupt:122 Memory:c1fff000-c1ffffff
Done disabling IP alias
Shutting down dnsmasq: [ OK ]
nz_dnsmasq stopped.
Ready to use NPS in a cluster environment
Note: If the command reports errors that it is unable to unmount /nz or /export/home,
you must manually make sure that both partitions are mounted before running the
command again. The script may have unmounted one of the partitions, even if the
script failed. Otherwise the script may not run.
5. As root, start the cluster on the first node, which will become the active node:
[root@nzhost1 ~] service heartbeat start
Starting High-Availability services:
[ OK ]
6. As root, start the cluster on the second node, which will become the standby node:
[root@nzhost2 ~] service heartbeat start
Starting High-Availability services:
[ OK ]
Cluster Manager Events
You can configure the Cluster Manager to send events when a failover is caused by any of
the following:
Node shutdown
Node reboot

20282-20 Rev.1 4-13
DRBD Administration
Node fencing actions (STONITH actions)
To configure the Cluster Manager:
1. Log into the active host as the root user.
2. Using a text editor, edit the /nzlocal/maillist file as follows. Add the lines shown in bold
below.
#
#Email notification list for the cluster manager problems
#
#Enter email addresses of mail recipients under the TO entry, one
to a line
#
#Enter email address of from email address (if a non-default is
desired)
#under the FROM entry
#
TO:
admin1@yourcompany.com
admin2@yourcompany.com
FROM:
NPS001ClusterManager@yourcompany.com
Note: For the “TO” email addresses, specify one or more email addresses for the users
who wish to receive email about cluster manager events. For the “FROM” email
address, specify the email address that you want to use as the sender of the event
email.
3. Save and close the maillist file.
4. Log in as root to the standby host and repeat steps 2 and 3 on the standby host.
Note: The /nzlocal/maillist files should be identical on both hosts in the cluster.
5. After you configure the maillist files, test the event mail by shutting down or rebooting
either host in the cluster. Your specified TO addresses should receive email about the
event.
Logging and Messages
All the logging information is stored in the /var/log/messages file on each host. The log file
on the active host typically contains more information, but messages can be written to the
log files on both hosts. Any event or change in status for Heartbeat is well-documented in
this log file. If something should go wrong, you can often find the explanation in this log
file. If you are working with Netezza Support to troubleshoot Linux-HA or DRBD issues, be
sure to send a copy of the log files from both Netezza hosts.
DRBD Administration
DRBD provides replicated storage of the data in managed partitions (that is, /nz and /
export/home). When a write occurs to one of these locations, the write action is performed
at both the local node and the peer standby node. Both perform the same write to keep the
data in synchronization. The peer responds to the active node when finished, and if the
local write operation is also successfully finished, the active node reports the write as
complete.
4-14 20282-20 Rev.1
IBM Netezza System Administrator’s Guide
Read operations are always performed by the local node.
The DRBD software can be started, stopped, and monitored using the following command
(as root):
/sbin/service drbd start/stop/status
While you can use the status command as needed, you should only stop and start the
DRBD processes during routine maintenance procedures or when directed by Netezza Sup-
port. As a best practice, do not stop the DRBD processes on a healthy, active Netezza HA
host to avoid the risk of split-brain. For more information, see “Split-Brain.”
Monitoring DRBD Status
You can monitor the DRBD status using one of two methods:
service drbd status
cat /proc/drbd
Sample output of the commands follows. These examples assume that you are running the
commands on the primary (active) Netezza host. If you run them from the standby host,
note that the output shows the secondary status first, then the primary.
[root@nzhost1 ~]# service drbd status
drbd driver loaded OK; device status:
version: 8.2.6 (api:88/proto:86-88)
GIT-hash: 3e69822d3bb4920a8c1bfdf7d647169eba7d2eb4 build by root@nps22094, 2009-06-09
16:25:53
m:res cs st ds p mounted fstype
0:r1 Connected Primary/Secondary UpToDate/UpToDate C /export/home ext3
1:r0 Connected Primary/Secondary UpToDate/UpToDate C /nz ext3
[root@nzhost1 ~]# cat /proc/drbd
version: 8.2.6 (api:88/proto:86-88)
GIT-hash: 3e69822d3bb4920a8c1bfdf7d647169eba7d2eb4 build by root@nps22094, 2009-06-09
16:25:53
0: cs:Connected st:Primary/Secondary ds:UpToDate/UpToDate C r---
ns:15068 nr:1032 dw:16100 dr:3529 al:22 bm:37 lo:0 pe:0 ua:0 ap:0 oos:0
1: cs:Connected st:Primary/Secondary ds:UpToDate/UpToDate C r---
ns:66084648 nr:130552 dw:66215200 dr:3052965 al:23975 bm:650 lo:0 pe:0 ua:0 ap:0 oos:0
In the sample output, note that the states of DRBD are one of the following:
Primary/Secondary — the “healthy” state for DRBD. One device is Primary and one is
Secondary.
Secondary/Secondary — DRBD is in a holding pattern. This usually occurs at boot time
or when the nps resource group is stopped.
Primary/Unknown — One node is available and healthy, the other node is either down
or the cable is not connected.
Secondary/Unknown — This is a rare case where one node is in standby, the other is
either down or the cable is not connected, and DRBD cannot declare a node as the pri-
mary/active node. If the other host also shows this status, the problem is most likely in
the connection between the hosts. Contact Netezza Support for assistance in trouble-
shooting this case.
The common Connection State values include the following:

20282-20 Rev.1 4-15
DRBD Administration
Connected — the normal and operating state; the host is communicating with its peer.
WFConnection — the host is waiting for its peer node connection; usually seen when
other node is rebooting.
Standalone — the node is functioning alone due to a lack of network connection with
its peer and will not try to reconnect. If the cluster is in this state, it means that data is
not being replicated. Manual intervention is required to fix this problem.
The common State values include the following:
Primary — the primary image; local on active host.
Secondary — the mirror image, which receives updates from the primary; local on
standby host.
Unknown — always on other host; state of image is unknown.
The common Disk State values include the following:
UpToDate — the data on the image is current.
DUnknown — this is an unknown data state; usually results from a broken connection.
Sample DRBD Status Output
The DRBD status prior to Heartbeat start:
M:res cs st ds p mounted fstype
0:r1 Connected Secondary/Secondary UpToDate/UpToDate C
1:r0 Connected Secondary/Secondary UpToDate/UpToDate C
The DRBD status when the current node is active and the standby node is down:
m:res cs st ds p mounted fstype
0:r1 WFConnection Primary/Unknown UpToDate/DUnknown C /export/home ext3
1:r0 WFConnection Primary/Unknown UpToDate/DUnknown C /nz ext3
The DRBD status as displayed from the standby node:
m:res cs st ds p mounted fstype
0:r1 Connected Secondary/Primary UpToDate/UpToDate C
1:r0 Connected Secondary/Primary UpToDate/UpToDate C
Split-Brain
Split-brain is an error state that occurs when the images of data on each Netezza host are
different. It typically occurs when synchronization is disabled and users change data inde-
pendently on each Netezza host. As a result, the two Netezza host images are different, and
it becomes difficult to resolve what the latest, correct image should be.
Split-brain does not occur if clustering is enabled. The fencing controls prevent users from
changing the replicated data on the standby node. It is highly recommended that you allow
DRBD management to be controlled by Heartbeat to avoid the “split-brain” problems.
However, if a split-brain problem should occur, the following message appears in the /var/
log/messages file:

4-16 20282-20 Rev.1
IBM Netezza System Administrator’s Guide
Split-Brain detected, dropping connection!
While DRBD does have automatic correction processes to resolve split-brain situations, the
Netezza implementation disables the automatic correction. Manual intervention is
required, which is the best way to ensure that as many of the data changes are restored as
possible.
To detect and repair split-brain, work with Netezza Support to follow this procedure:
1. Look for “Split” in /var/log/messages, usually on the host that you are trying to make
the primary/active host. Let DRBD detect this condition.
2. Because split-brain results from running both images as primary Netezza hosts without
synchronization, check the Netezza logs on both hosts. For example, check the pg.log
files on both hosts to see when/if updates have occurred. If there is an overlap in times,
both images have different information.
3. Identify which host image, if either, is the correct image. In some cases, neither host
image may be fully correct. You must choose the image that is the more correct. The
host that has the image which you decide is correct is the “survivor”, and the other
host is the “victim”.
4. Perform the following procedure:
a. Log in to the victim host as root and run these commands:
Note: As a best practice, perform these steps for one resource at a time; that is, per-
form all the commands in steps b. and c. for r0 and then repeat them all for r1. There
is an all option, but use it carefully. The individual resource commands usually work
more effectively.
drbdadm secondary resource where resource can be r0, r1 or all
drbdadm disconnect resource where resource can be r0, r1 or all
drbdadm -- --discard-my-data connect resource where resource can
be r0, r1 or all
b. Log in to the survivor host as root and run this command:
drbdadm connect resource where resource can be r0, r1 or all
Note: The connect command may display an error that instructs you to run drbdadm
disconnect first.
5. You can check the status of the fix using drbdadm primary resource and the service
drbd status command. Make sure that you run drbdadm secondary resource before you
start Heartbeat.
Administration Reference and Troubleshooting
The following sections describe some common administration task references and trouble-
shooting steps.

20282-20 Rev.1 4-17
Administration Reference and Troubleshooting
IP Address Requirements
Table 4-3 is an example block of the eight IP addresses that are recommended for a cus-
tomer to reserve for an HA system:
In the IP addressing scheme, note that there are two host IPs, two host management IPs,
and the floating IP, which is HA1 + 3.
Forcing Heartbeat to Shutdown
There may be times when you try to stop Heartbeat using the normal process as described
in “Safe Manual Control of the Hosts (And Heartbeat)” on page 4-9, but Heartbeat does
not stop even after a few minutes’ wait. If you must stop Heartbeat, you can use the follow-
ing command to force Heartbeat to stop itself:
crmadmin -K hostname
You need to run this command twice. Then, try to stop Heartbeat again using service heart-
beat stop. Note that this process is not guaranteed to stop all of the resources that
Heartbeat manages, such as /nz mount, drbd devices, nzbootpd, and so on.
Shutting Down Heartbeat on Both Nodes without Causing Relocate
If you stop Heartbeat on the active node first, Linux-HA identifies this as a resource failure
and will initiate a failover to the standby node. To avoid this, always stop Heartbeat on the
standby first. After it has stopped completely, you can stop Heartbeat on the active node.
See “Safe Manual Control of the Hosts (And Heartbeat)” on page 4-9.
Restarting Heartbeat after Maintenance Network Issues
If a host loses its maintenance network connection to the system devices, the Netezza HA
system will perform a fencing operation (STONITH) to stop the failed host. After the host
restarts, Heartbeat will fail to start on the reboot. After the maintenance network is
repaired, you must manually restart Heartbeat to resume normal cluster operations. To
restart Heartbeat on the recovered node, log in to that host as root and use the service
heartbeat start command.
Table 4-3: HA IP Addresses
Entity Sample IP Address
HA1 172.16.103.209
HA1 Host Management 172.16.103.210
MantraVM Management 172.16.103.211
Floating IP 172.16.103.212
HA2 172.16.103.213
HA2 Host Management 172.16.103.214
Reserved 172.16.103.215
Reserved 172.16.103.216
4-18 20282-20 Rev.1
IBM Netezza System Administrator’s Guide
Resolving Configuration Problems
If you make a configuration change to the nps resource group or Heartbeat, and there are
problems following the change, you can often diagnose the problem from the status infor-
mation of the crm_verify command:
crm_verify -LVVVV
You can specify one or more V characters. The more V’s that you specify, the more verbose
the output. Specify at least four or five V’s as a best practice, and increase the number as
needed. You can specify up to 12 V’s, but that large a number is not recommended.
Sample output follows:
[root@ nzhost1 ha.d]# crm_verify -LVVV
crm_verify[18488]: 2008/11/18_00:02:03 info: main: =#=#=#=#= Getting XML
=#=#=#=#=
crm_verify[18488]: 2008/11/18_00:02:03 info: main: Reading XML from: live
cluster
crm_verify[18488]: 2008/11/18_00:02:03 notice: main: Required feature set:
1.1
crm_verify[18488]: 2008/11/18_00:02:03 notice: cluster_option: Using
default value '60s' for cluster option 'cluster-delay'
crm_verify[18488]: 2008/11/18_00:02:03 notice: cluster_option: Using
default value '-1' for cluster option 'pe-error-series-max'
crm_verify[18488]: 2008/11/18_00:02:03 notice: cluster_option: Using
default value '-1' for cluster option 'pe-warn-series-max'
crm_verify[18488]: 2008/11/18_00:02:03 notice: cluster_option: Using
default value '-1' for cluster option 'pe-input-series-max'
crm_verify[18488]: 2008/11/18_00:02:03 notice: cluster_option: Using
default value 'true' for cluster option 'startup-fencing'
crm_verify[18488]: 2008/11/18_00:02:03 info: determine_online_status:
Node nzhost1 is online
crm_verify[18488]: 2008/11/18_00:02:03 info: determine_online_status:
Node nzhost2 is online
Fixed a Problem, but crm_mon Still Shows Failed Items
Heartbeat sometimes leaves error status on crm_mon output, even after an item is fixed. To
resolve this, use crm_resource in Cleanup Mode:
crm_resource -r name_of_resource -C -H hostname
For example, if the fencing route to ha1 is listed as failed on host1, use the following
command:
crm_resource -r fencing_route_to_ha1 -C -H host1
Output From crm_mon Does Not Show the nps Resource Group
If the log messages indicate that the nps resource group “cannot run anywhere”, the cause
is that Heartbeat tried to run the resource group on both HA1 and HA2, but it failed in both
cases. Search in /var/log/messages on each host to find this first failure. Search from the
bottom of the log for the message “cannot run anywhere” and then scan upward in the log
to find the service failures. You must fix the problem(s) that caused a service to fail to start
before you can successfully start the cluster.
After you fix the failure case, you must restart Heartbeat following the instructions in “Tran-
sitioning from Maintenance to Clustering Mode” on page 4-11.
20282-20 Rev.1 4-19
Administration Reference and Troubleshooting
Linux Users and Groups Required for HA
To operate properly, Heartbeat requires the following Linux user and groups which are
added automatically to each of the Netezza hosts during the Heartbeat RPM installation:
User: hacluster:x:750:750::/home/hacluster:/bin/bash
Groups:
hacluster:x:750:
haclient:x:65:
Do not modify or remove the user or groups because those changes will impact Heartbeat
and disrupt HA operations on the Netezza system.
Checking for User Sessions and Activity
Open nz user sessions and nz user activity can cause the procedures to stop Heartbeat and
to return to clustering to fail. Use the nzsession command to see if there are active data-
base sessions in progress. For example:
[nz@nzhost1 ~]$ nzsession -u admin -pw password
ID Type User Start Time PID Database State Priority
Name Client IP Client PID Command
----- ---- ----- ----------------------- ----- -------- ------ -------
------ --------- ---------- ------------------------
16748 sql ADMIN 14-Jan-10, 08:56:56 EST 4500 CUST active normal
127.0.0.1 4499 create table test_2
16753 sql ADMIN 14-Jan-10, 09:12:36 EST 7748 INV active normal
127.0.0.1 7747 create table test_s
16948 sql ADMIN 14-Jan-10, 10:14:32 EST 21098 SYSTEM active normal
127.0.0.1 21097 SELECT session_id, clien
The sample output shows three sessions: the last entry is the session created to generate
the results for the nzsession command. The first two entries are user activity, and you
should wait for those sessions to complete or stop them prior before you use the nz.heart-
beat.sh or nz.non-heartbeat.sh commands.
To check for connections to the /export/home and /nz directory:
1. As the nz user on the active host, stop the Netezza software:
[nz@nzhost1 ~]$ /nz/kit/bin/nzstop
2. Log out of the nz account and return to the root account; then use the lsof command to
list any open files that reside in /nz or /export/home. Sample output follows:
[root@nzhost1 ~]# lsof /nz /export/home
COMMAND PID USER FD TYPE DEVICE SIZE NODE NAME
bash 2913 nz cwd DIR 8,5 4096 1497025 /export/home/nz
indexall. 4493 nz cwd DIR 8,5 4096 1497025 /export/home/nz
less 7399 nz cwd DIR 8,5 4096 1497025 /export/home/nz
lsof 13205 nz cwd DIR 8,5 4096 1497025 /export/home/nz
grep 13206 nz cwd DIR 8,5 4096 1497025 /export/home/nz
tail 22819 nz 3r REG 8,5 146995 1497188 /export/home/nz/fpga_135.log
4-20 20282-20 Rev.1
IBM Netezza System Administrator’s Guide
This example shows that there are several open files in /export/home. If necessary, you
could close the open files using a command such as kill and supplying the process ID (PID)
shown in the second column. Use caution with the kill command; if you are not familiar
with Linux system commands, contact Support or your Linux system administrator for
assistance.

5-1
C H A P T E R 5
Managing the Netezza Hardware
What’s in this chapter
Netezza Hardware Components
Hardware Management Tasks
Managing Data Slices
Power Procedures
This chapter describes administration tasks for hardware components of the Netezza appli-
ance. Most of the administration tasks focus on obtaining status and information about the
operation of the appliance, and in becoming familiar with the hardware states. This chapter
also describes tasks to perform should a hardware component fail.
Netezza Hardware Components
The Netezza appliance has a number of hardware components that support the operation of
the device. The Netezza appliance consists of one or more racks of hardware, with host
servers, switches, SPUs, disks, power controllers, cooling devices, I/O cards, management
modules, and cables. However, in the day-to-day administration of the device, only a subset
of these components require administrative attention of any kind. Many of these compo-
nents are redundant and hot-swappable to ensure highly available operation of the
hardware.
The key hardware components to monitor include the following:
Table 5-1: Key Netezza Hardware Components to Monitor
Component Description Comments/Management Focus
Host servers Each Netezza HA system has one or two host
servers to run the Netezza software and sup-
porting applications. If a system has two
host servers, the hosts operate in a highly
available (HA) configuration; that is, one
host is the active or primary host, and the
other is a standby host ready to take over
should the active host fail.
Tasks include monitoring of the hardware sta-
tus of the active/standby hosts, and
occasional monitoring of disk space con-
sumption on the hosts. At times, the host
may require Linux OS or health driver
upgrades to improve its operational software.

5-2 20282-20 Rev.1
IBM Netezza System Administrator’s Guide
The Netezza appliance uses SNMP events (described in Chapter 7, “Managing Event
Rules”) and status indicators to send notifications of any hardware failures. Most hardware
components are redundant; thus, a failure typically means that the remaining hardware
components will assume the work of the component that failed. The system may or may not
be operating in a degraded state, depending upon the component that failed.
Never run the system in a degraded state for a long period of time. It is imperative to
replace a failed component in a timely manner so that the system returns to an optimal
topology and best performance.
Netezza Support and Field Service will work with you to replace failed components to
ensure that the system returns to full service as quickly as possible. Most of the system
components require Field Service support to replace. Components such as disks can be
replaced by customer administrators.
Snippet pro-
cessing
arrays (SPAs)
SPAs contain the SPUs and associated disk
storage which drive the query processing on
the Netezza appliance. IBM Netezza 100
systems have one host server and thus are
not HA configurations.
Tasks include monitoring of the SPA environ-
ment, such as fans, power, temperature, and
so on. SPUs and disks are monitored
separately.
Storage
Group
In the IBM Netezza High Capacity Appliance
C1000 model, disks reside within a storage
group. The storage group consists of three
disk enclosures: an intelligent storage enclo-
sure with redundant hardware RAID
controllers, and two expansion disk enclo-
sures. There are four storage groups in each
C1000 rack.
Tasks include monitoring the status of the
disks within the storage group.
Disks Disks are the storage media for the user
databases and tables managed by the
Netezza appliance.
Tasks include monitoring the health and sta-
tus of the disk hardware. Should a disk fail,
tasks include regenerating the disk to a spare
and replacing the disk.
Data slices Data slices are virtual partitions on the disks
that contain user databases and tables. Each
partition has a redundant copy to ensure that
the data can survive one disk failure.
Tasks include monitoring the status or health
of the data slices and also the space con-
sumption of the data slice.
Fans and
blowers
These components control the thermal cool-
ing for the racks and components such as
SPAs and disk enclosures.
Tasks include monitoring the status of the
fans and blowers, and should a component
fail, replacing the component to ensure
proper cooling of the hardware.
Power
supplies
These components provide electrical power
to the various hardware components of the
system.
Tasks include monitoring the status of the
power supplies, and should a component fail,
replacing the component to ensure redundant
power to the hardware.
Table 5-1: Key Netezza Hardware Components to Monitor
Component Description Comments/Management Focus

20282-20 Rev.1 5-3
Netezza Hardware Components
Displaying Hardware Components
You use the nzhw show command to display information about the hardware components of
your Netezza system. For details about the nzhw command syntax and options, see “nzhw”
on page A-26.
Note: You can also use the NzAdmin Tool or Web Admin interface to display hardware infor-
mation and status.
To display the hardware summary, enter:
nzhw show
Figure 5-1 shows some sample output and highlights several important fields that describe
status and aspects of the hardware.
Figure 5-1: Sample nzhw show Output
For an IBM Netezza High Capacity Appliance C1000 system, the nzhw output shows the
storage group information, for example:
Description HW ID Location Role State
------------- ----- --------------------------- ------ ------
Rack 1001 rack1 Active Ok
SPA 1002 spa1 Active Ok
EthSw 1003 spa1.ethsw1 Active Ok
MM 1003 spa1.mm1 Active Ok
SPU 1003 spa1.spu7 Active Online
DiskEnclosure 1004 spa1.diskEncl4 Active Ok
Fan 1005 spa1.diskEncl4.fan1 Active Ok
Fan 1006 spa1.diskEncl4.fan2 Active Ok
PowerSupply 1009 spa1.diskEncl4.pwr1 Active Ok
PowerSupply 1010 spa1.diskEncl4.pwr2 Active Ok
Disk 1011 spa1.diskEncl4.disk1 Active Ok
Disk 1012 spa1.diskEncl4.disk2 Active Ok
Disk 1013 spa1.diskEncl4.disk3 Active Ok
...
Hardware Type
Hardware ID Hardware Role
Hardware State

5-4 20282-20 Rev.1
IBM Netezza System Administrator’s Guide
Figure 5-2: Sample nzhw show Output (IBM Netezza C1000 Systems)
Hardware Types
Each hardware component of the Netezza system has a type that identifies the hardware
component. Table 5-2 describes the hardware types. You see these types when you run the
nzhw command or display hardware using the NzAdmin or Web Admin UIs.
Description HW ID Location Role State
------------- ----- ------------------------------- ------ ------
Rack 1001 rack1 Active Ok
SPA 1002 spa1 Active Ok
StorageGroup 1003 spa1.storeGrp1 Active Ok
StorageGroup 1004 spa1.storeGrp2 Active Ok
StorageGroup 1005 spa1.storeGrp3 Active Ok
StorageGroup 1006 spa1.storeGrp4 Active Ok
DiskEnclosure 1007 spa1.storeGrp1.diskEncl1 Active Ok
Disk 1008 spa1.storeGrp1.diskEncl1.disk5 Active Ok
Disk 1009 spa1.storeGrp1.diskEncl1.disk1 Active Ok
Disk 1010 spa1.storeGrp1.diskEncl1.disk12 Failed Ok
Disk 1011 spa1.storeGrp1.diskEncl1.disk9 Active Ok
Disk 1012 spa1.storeGrp1.diskEncl1.disk10 Active Ok
...
Table 5-2: Hardware Description Types
Description Comments
Rack A hardware rack for the Netezza system
SPA Snippet processing array (SPA)
SPU Snippet processing unit (SPU)
Disk Enclosure A disk enclosure chassis, which contains the disk devices
Disk A storage disk, contains the user databases and tables
Fan A thermal cooling device for the system
Blower A fan pack used within the S-Blade chassis for thermal cooling
Power supply A power supply for an enclosure (SPU chassis or disk)
MM A management device for the associated unit (SPU chassis, disk enclo-
sure). These devices include the AMM and ESM components, or a
RAID controller for an intelligent storage enclosure in a Netezza C1000
system.
Store Group A group of three disk enclosures within an IBM Netezza C1000 system
managed by redundant hardware RAID controllers
Ethernet Switch Ethernet switch (for internal network traffic on the system)
Host A high availability (HA) host on the Netezza appliance

20282-20 Rev.1 5-5
Netezza Hardware Components
Hardware IDs
Each hardware component has a unique hardware identifier (ID) which is in the form of an
integer, such as 1000, 1001, 1014, and so on. You can use the hardware ID to perform
operations on a specific hardware component, or to uniquely identify which component in
command output or other informational displays.
To display information about the component with the hardware ID 1001:
[nz@nzhost ~]$ nzhw show -id 1011
Description HW ID Location Role State
----------- ----- -------------------- ------ -----
Disk 1011 spa1.diskEncl4.disk1 Active Ok
Hardware Location
Netezza uses two formats to describe the position of a hardware component within a rack.
The logical location is a string in a dot format that describes the position of a hardware
component within the Netezza rack. For example, the nzhw output shown in Figure 5-1
on page 5-3 shows the logical location for components; a Disk component description
follows:
Disk 1011 spa1.diskEncl1.disk1 Active Ok
In this example, the location of the disk is in SPA 1, disk enclosure one, disk position
one.
Similarly, the disk location for a disk on an IBM Netezza C1000 system shows the loca-
tion including storage group:
Disk 1029 spa1.storeGrp1.diskEncl2.disk5 Active Ok
The physical location is a text string that describes the location of a component. You
can display the physical location of a component using the nzhw locate command. For
example, to display the physical location of disk ID 1011:
[nz@nzhost ~]$ nzhw locate -id 1011
Turned locator LED 'ON' for Disk: Logical
Name:'spa1.diskEncl4.disk1' Physical Location:'1st Rack, 4th
DiskEnclosure, Disk in Row 1/Column 1'
As shown in the command output, the nzhw locate command also lights the locator
LED for components such as SPUs, disks, and disk enclosures. For hardware compo-
nents that do not have LEDs, the command displays the physical location string.
SASController A SAS controller within the Netezza HA hosts
Host disk A disk resident on the host that provides local storage to the host
Database accel-
erator card
A Netezza Database Accelerator Card (DAC), which is part of the S-
Blade/SPU pair
Table 5-2: Hardware Description Types
Description Comments
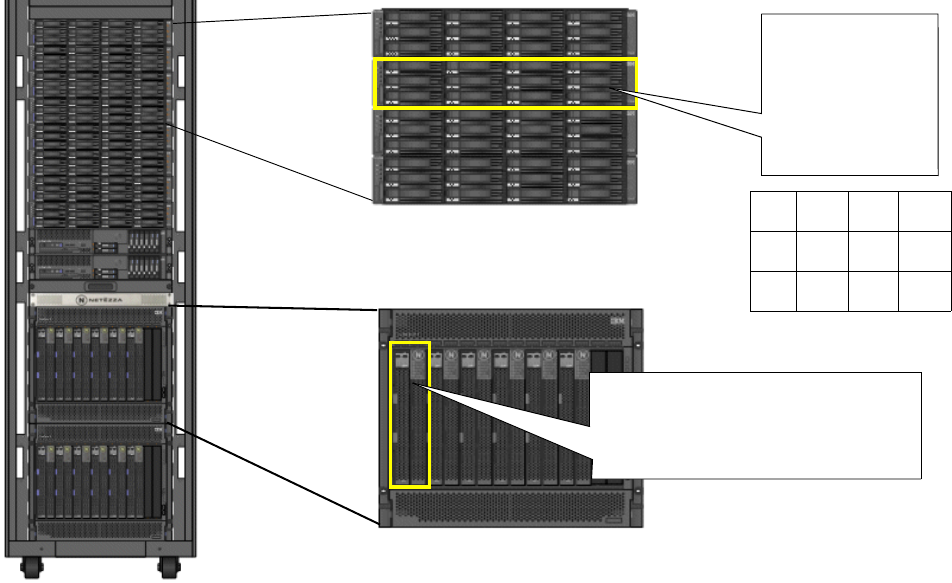
5-6 20282-20 Rev.1
IBM Netezza System Administrator’s Guide
Figure 5-3 shows an IBM Netezza 1000-12 system or an IBM PureData System for Analyt-
ics N1001-010 system with a closer view of the storage arrays and SPU chassis
components and locations.
Figure 5-3: IBM Netezza Full-Rack System Components and Locations
Figure 5-4 shows an IBM Netezza C1000-4 system with a closer view of the storage groups
and SPU chassis components and locations.
Disk Array 1
Disk Array 2
SPU Chassis 1
SPU
Host 1
Host 2
KVM
SPU1 occupies slots 1 and 2;
SPU3 occupies slots 3 and 4, up
to SPU 11 which occupies slots
11 and 12.
Each disk array
has four disk
enclosures; each
enclosure has 12
disks, numbered
as follows:
Enclosure1
Enclosure4
Enclosure2
Enclosure3
Chassis 2
123 4
567 8
9101112
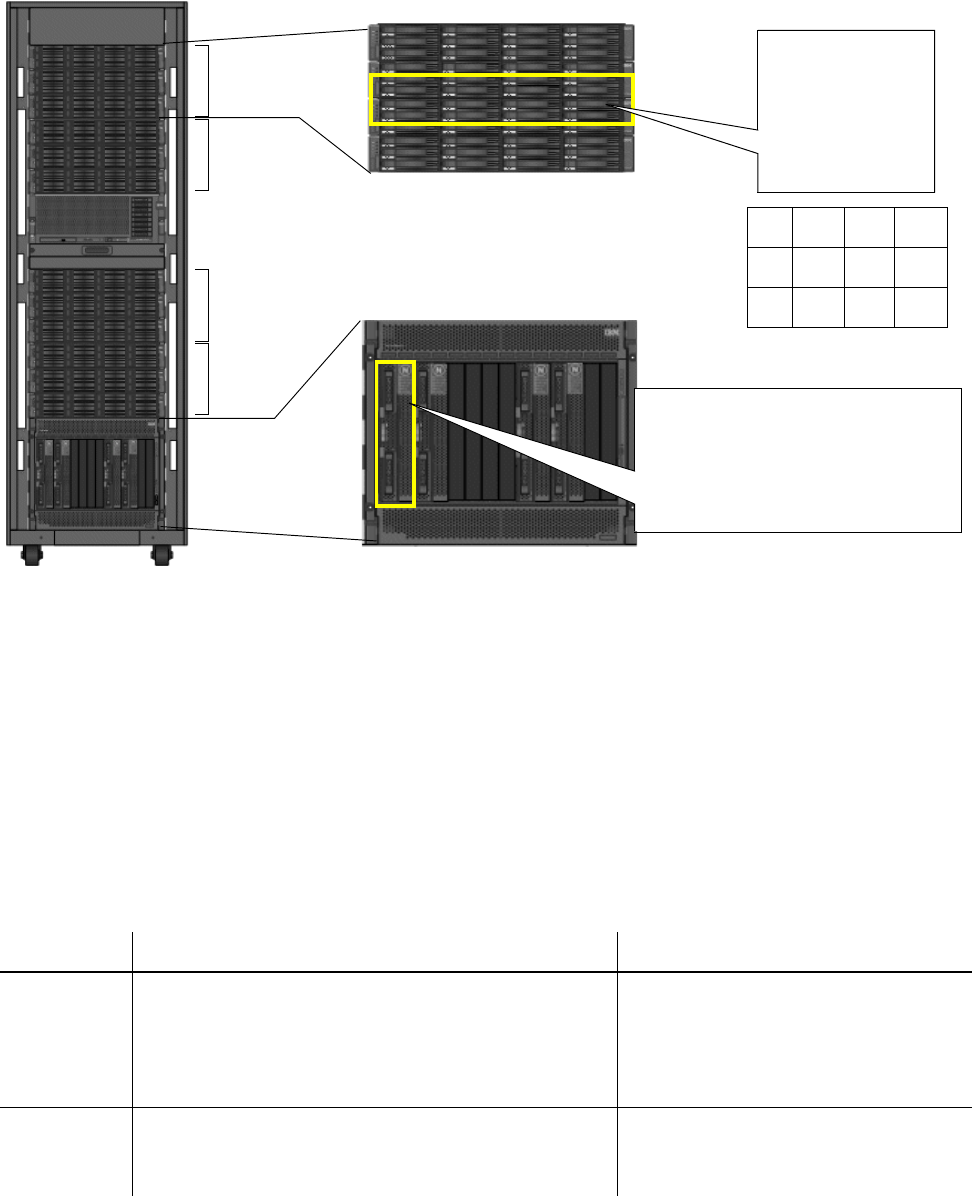
20282-20 Rev.1 5-7
Netezza Hardware Components
Figure 5-4: IBM Netezza C1000 System Components and Locations
For detailed information about the locations of various components in the front and back of
the system racks, see the Site Preparation and Specifications: IBM Netezza C1000 Sys-
tems guide.
Hardware Roles
Each hardware component of the Netezza system has a hardware role, which represents
how the hardware is being used. Table 5-3 describes the hardware roles. You see these
roles when you run the nzhw command or display hardware status using the NzAdmin or
Web Admin UIs.
Storage
SPU Chassis 1
Host
KVM
Each disk array
has three disk
enclosures; each
enclosure has 12
disks, numbered
as follows:
Enclosure 1
Enclosure 2
Enclosure 3
123 4
567 8
9101112
Storage
Storage
Storage
Group 1
Group 2
Group 3
Group 4
Row 1
Row 2
Row 3
SPU1 occupies slots 1 and 2;
SPU3 occupies slots 3 and 4,
SPU9 occupies slots 9 and 10,
SPU 11 occupies slots 11 and 12.
Table 5-3: Hardware Roles
Role Description Comments
None The None role indicates that the hardware is initial-
ized, but it has yet to be discovered by the Netezza
system. This usually occurs during system startup
before any of the SPUs have sent their discovery
information.
All active SPUs must be discovered
before the system can transition from
the Discovery state to the Initializing
state.
Active The hardware component is an active system partici-
pant. Failing over this device could impact the
Netezza system.
Normal system state

5-8 20282-20 Rev.1
IBM Netezza System Administrator’s Guide
Hardware States
The state of a hardware component represents the power status of the hardware. Each
hardware component has a state. Table 5-4 describes the hardware states for all compo-
nents except a SPU.
Note: SPU states are the system states, which are described in Table 6-3 on page 6-4.
You see these states when you run the nzhw command or display hardware status using the
NzAdmin or Web Admin UIs.
Assigned The hardware is transitioning from spare to active. In
IBM Netezza 100, 1000, IBM PureData System for
Analytics N1001, and NEC InfoFrame DWH Appli-
ances, this is the role when a disk is involved in a
regeneration. It is not yet active, so it cannot partici-
pate in queries.
Transitional state
Failed The hardware has failed. It cannot be used as a spare.
After maintenance has been performed, you must acti-
vate the hardware using the nzhw command before it
can become a spare and used in the system.
Monitor your supply of spare disks. Do
not operate without spare disks.
Inactive The hardware is not available for any system opera-
tions. You must activate the hardware using the nzhw
command before it can become a spare and used in
the system.
Mismatched This role is specific to disks. If the disk has a UUID
that does not match the host UUID, then it is consid-
ered mismatched. You must activate the hardware
using the nzhw command before it can become a
spare and used in the system.
To use the SPU as a spare, activate it,
otherwise, remove it from the system.
To delete it from the system catalog,
use the nzhw delete command.
Spare The hardware is not used in the current running
Netezza system, but it is available to become active in
the event of a failover.
Normal system state. After a new disk
is added to the system, its role is set to
Spare.
Incompatible The hardware is incompatible with the system. It
should be removed and replaced with compatible
hardware.
Some examples are disks that are
smaller in capacity than the smallest
disk in use, or blade cards which are
not Netezza SPUs.
Table 5-3: Hardware Roles
Role Description Comments

20282-20 Rev.1 5-9
Netezza Hardware Components
Note: The system manager also monitors the management modules (MMs) in the system,
which have a status view of all the blades in the system. As a result, you may see messages
similar to the following in the sysmgr.log file:
2011-05-18 13:34:44.711813 EDT Info: Blade in SPA 5, slot 11 changed
from state 'good' to 'discovering', reason is 'No critical or warning
events'
2011-05-18 13:35:33.172005 EDT Info: Blade in SPA 5, slot 11 changed
from state 'discovering' to 'good', reason is 'No critical or warning
events'
A transition from “good” to “discovering” indicates that the IMM (a management processor
on the blade) rebooted and that it is querying the blade hardware for status. The blade
remains in the “discovering” state during the query. The IMM then determines whether the
blade hardware state is good, warning, or critical, and posts the result to the AMM. The sys-
tem manager reports the AMM status using these log messages. You can ignore these
normal messages. However, if you see a frequent number of these messages for the same
blade, there may be an issue with the IMM processor on that blade.
Table 5-4: Hardware States
State Description Comments
None The None state indicates that the hardware is ini-
tialized, but it has yet to be discovered by the
Netezza system. This usually occurs during system
startup before any of the SPUs have sent their dis-
covery information.
All active SPUs must be discovered before
the system can transition from the Discov-
ery state to the Initializing state. If any
active SPUs are still in the Booting state,
there could be an issue with the hardware
startup.
Ok The Netezza system has received the discovery
information for this device, and it is working
properly.
Normal state
Down The device has been turned off.
Invalid
Online The system is running normally. It can service
requests.
Missing The system manager has detected a new device in
a slot that was previously occupied but not
deleted.
This typically occurs when a disk or SPU
has been removed and replaced with a
spare without deleting the old device. The
old device is considered absent because
the system manager cannot find it within
the system.
Unreachable The system manager cannot communicate with a
previously discovered device.
The device may have been failed or physi-
cally removed from the system.
Critical The management module has detected a critical
hardware problem, and the problem component’s
amber service light may be illuminated.
Contact Netezza Support to obtain help
with identifying and troubleshooting the
cause the of the critical alarm.
5-10 20282-20 Rev.1
IBM Netezza System Administrator’s Guide
Data Slices, Data Partitions, and Disks
A disk is a physical drive on which data resides. In a Netezza system, host servers have sev-
eral disks that hold the Netezza software, host operating system, database metadata, and
sometimes small user files. The Netezza system also has many more disks that hold the
user databases and tables. For IBM Netezza 1000 or IBM PureData System for Analytics
N1001 systems, 48 disks reside in one storage array for a total of 96 disks in a full rack
configuration. For IBM Netezza C1000 systems, 36 disks reside in each storage group, and
there are four storage groups in a rack for a total of 144 disks.
A data slice is a logical representation of the data saved on a disk. The data slice contains
“pieces” of each user database and table. When users create tables and load their data,
they distribute the data for the table across the data slices in the system using a distribu-
tion key. An optimal distribution is one where each data slice has approximately the same
amount of each user table as any other. The Netezza system distributes the user data to all
of the data slices in the system using a hashing algorithm.
A data partition is a logical representation of a data slice that is managed by a specific
SPU. That is, each SPU owns one or more data partitions, which contains the user data
that the SPU is responsible for processing during queries. For example, in IBM Netezza
1000 or IBM PureData System for Analytics N1001 systems, each SPU typically owns 8
data partitions although one SPU has only 6 partitions. For an IBM Netezza C1000 system,
each SPU owns 9 data partitions by default. SPUs could own more than their default num-
ber of partitions; if a SPU fails, its data partitions are reassigned to the other active SPUs
in the system.
IBM Netezza 100/1000 Storage Design
Figure 5-5 shows a conceptual overview of SPUs, disks, data slices, and data partitions in
an IBM Netezza 1000, IBM PureData System for Analytics N1001, IBM Netezza 100, or
NEC InfoFrame DWH Appliance. In the figure, the SPU owns 8 data partitions which are
numbered from 0 to 7. For SPU ID 1003, its first data partition (0) points to data slice ID
9, which is stored on disk 1070. Each data partition points to a data slice. As an example,
assume that disk 1014 fails and its contents are regenerated to a spare disk ID 1024. In
this situation, the SPU 1003’s data partition 7, which previously pointed to data slice 16
on disk 1014, has been updated to point to data slice 16 on the new disk 1024.
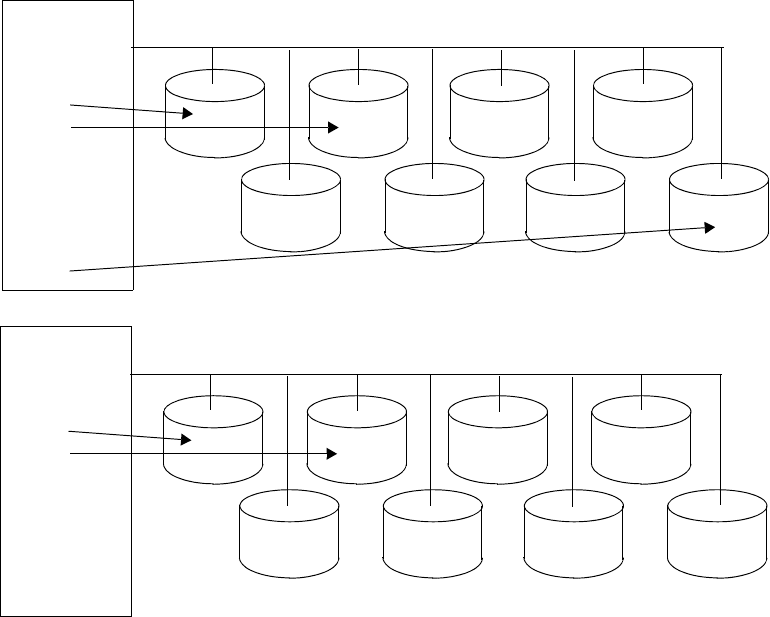
20282-20 Rev.1 5-11
Netezza Hardware Components
Figure 5-5: SPUs, Disks, Data Slices, and Data Partitions
If a SPU fails, the system moves all its data slices to the remaining active SPUs for man-
agement. The system moves them in pairs (the pair of disks that contain the primary and
mirror data slices of each other). In this situation, some SPUs will have 10 data partitions
(numbered 0 — 9).
IBM Netezza C1000 Storage Design
In a Netezza C1000 system, each storage group has an intelligent storage controller which
resides in disk enclosure 3. The intelligent storage controller contains two redundant RAID
controllers that manage the disks and associated hardware within a storage group. The
RAID controllers are caching devices, which improves the performance of the read and
write operations to the disks. The caches are mirrored between the two RAID controllers for
redundancy; each controller has a flash backup device and a battery to protect the cache
against power loss.
The RAID controllers operate independently of the Netezza software and hosts. For exam-
ple, if you stop the Netezza software (such as for an upgrade or other maintenance tasks),
the RAID controllers continue to run and manage the disks within their storage group. It is
common to see the activity LEDS on the storage groups operating even when the Netezza
system is stopped. If a disk fails, the RAID controller initiates the recovery and regeneration
process; the regeneration continues to run even when the Netezza software is stopped. If
SPU
0
1
2
3
4
5
6
7
1003
1070 1032
1071 1033 1052
1051
1014
1013
9
10
11
12
13
14
15
16 Disks
SPU
0
1
2
3
4
5
6
7
1164
1134 1153
1135 1154 1097
1096
1116
1115
55
56
57
58
59
60
61
62 Disks
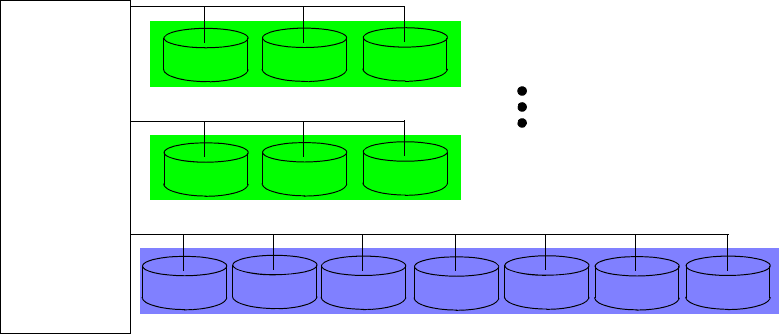
5-12 20282-20 Rev.1
IBM Netezza System Administrator’s Guide
you use the nzhw command to activate, fail, or otherwise manage disks manually, the RAID
controllers will ensure that the action is allowed at that time; in some cases, commands
will return an error when the requested operation, such as a disk failover, is not allowed.
The RAID controller caches are disabled when any of the following conditions occur:
Battery failure
Cache backup device failure
Peer RAID controller failure (that is, a loss of the mirrored cache)
When the cache is disabled, the storage group (and the Netezza system) experiences a per-
formance degradation until the condition is resolved and the cache is enabled again.
Figure 5-6 shows an illustration of the SPU/storage mapping. Each SPU in a Netezza
C1000 system owns 9 user data slices by default. Each data slice is supported by a three-
disk RAID 5 storage array. The RAID 5 array can support a single disk failure within the
three-disk array. (More than one disk failure within the three-disk array results in the loss of
the data slice.) Seven disks within the storage group in a RAID 5 array are used to hold
important system information such as the nzlocal, swap and log partition.
Figure 5-6: Netezza C1000 SPU and Storage Representation
If a SPU fails, the system manager distributes the user data partitions and the nzlocal and
log partitions to the other active SPUs in the same SPU chassis. A Netezza C1000 system
requires a minimum of three active SPUs; if only three SPUs are active and one fails, the
system transitions to the down state.
System Resource Balance Recovery
The system resource balance is an important part of overall system performance. When a
component fails, or when an administrator performs a manual failover, the resulting config-
uration (that is, topology) could result in unequal workloads among the resources and
possible performance impacts.
For example, the default disk topology for IBM Netezza 100/1000 or IBM PureData System
for Analytics N1001 systems configures each S-Blade with eight disks that are evenly dis-
tributed across the disk enclosures of its SPA, as shown in Figure 5-7. If disks failover and
SPU
Data slice 1
Data slice 9
nzlocal, swap, logs
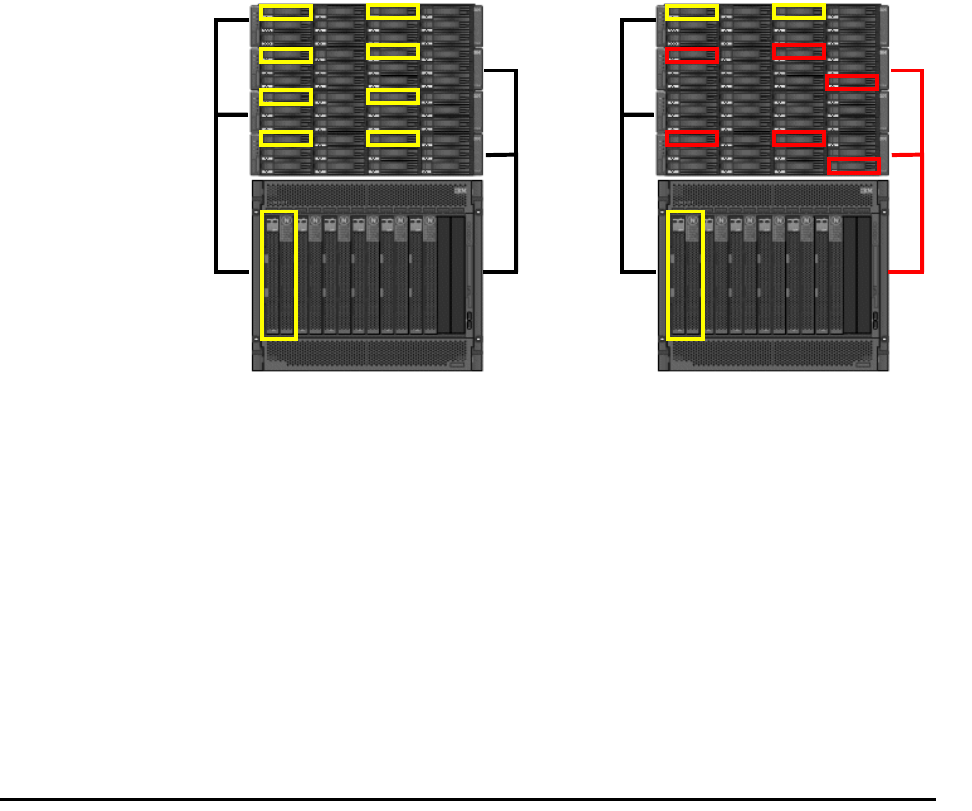
20282-20 Rev.1 5-13
Hardware Management Tasks
regenerate to spares, it is possible to have an unbalanced topology where the disks are not
evenly distributed among the odd- and even-numbered enclosures. This causes one of the
SAS (also called HBA) paths, which are shown as the dark lines connecting the blade chas-
sis to the disk enclosures, to carry more traffic than the other.
Figure 5-7: Balanced and Unbalanced Disk Topologies
The system manager can detect and respond to disk topology issues. For example, if an S-
Blade has more disks in the odd-numbered enclosures of its array, the system manager
reports the problem as an overloaded SAS bus. You can use the nzhw rebalance command
to reconfigure the topology so that half of the disks are in the odd-numbered enclosures
and half in the even-numbered. (The rebalance process requires the system to transition to
the “pausing now” state to accomplish the topology update.)
When the Netezza system restarts, the restart process checks for topology issues such as
overloaded SAS buses or SPAs that have S-Blades with uneven shares of data slices. If the
system detects a spare S-Blade for instance, it will reconfigure the data slice topology to
fairly distribute the workload among the S-Blades.
Hardware Management Tasks
This section describes some administration tasks for the hardware components that are
typically monitored and managed by Netezza administrators. These components include
the following:
Hosts
SPUs
Disks
Other hardware components of the system do not have special administration tasks. In gen-
eral, should one of the other components such as a power supply, fan, host, or other
component fail, you and/or Netezza Support will be alerted. Netezza Support will work with
you to schedule Service so that the failed components can be replaced to restore full oper-
ations and hardware redundancy.
Enclosure1
Enclosure4
Enclosure2
Enclosure3
Balanced Topology Unbalanced Topology
5-14 20282-20 Rev.1
IBM Netezza System Administrator’s Guide
Callhome File
The callHome.txt file resides in the /nz/data/config directory and it defines important infor-
mation about the Netezza system such as primary and secondary administrator contact
information, as well as system information such as location, model number, and serial
number. Typically, the Netezza installation team member edits this file for you when the
Netezza system is installed onsite, but you can review and/or edit the file as needed to
ensure that the contact information is current. For more information about configuring call-
home, see “Adding an Event Rule” on page 7-8.
Displaying Hardware Issues
You can display a list of the hardware components that have problems and require adminis-
trative attention using the nzhw show -issues command. This command displays such
problems as components that have failed or components that are in an “abnormal” state
such as: disks that are assigned, missing, incompatible, or unsupported; SPUs that are
incompatible.
For example, the following command shows two failed disks on the system:
[nz@nzhost ~]$ nzhw show -issues
Description HW ID Location Role State
----------- ----- -------------------- ------ -----
Disk 1034 spa1.diskEncl2.disk5 Failed Ok
Disk 1053 spa1.diskEncl3.disk5 Failed Ok
The disks should be replaced to ensure that the system has spares and an optimal topology.
You can also use the NzAdmin and Web Admin interfaces to obtain visibility to hardware
issues and failures.
Managing Hosts
In general, there are very few management tasks relating to the Netezza hosts. In most
cases, the tasks are best practices for the optimal operation of the host. For example:
Do not change or customize the kernel or operating system files unless directed to do
so by Netezza Support or Netezza customer documentation. Changes to the kernel or
operating system files could impact the performance of the host.
Do not install third-party software on the Netezza host without consulting Netezza Sup-
port. While management agents or other applications may be of interest, it is important
to work with Support to ensure that third-party applications do not interfere with the
host processing.
During Netezza software upgrades, host and kernel software revisions are verified to
ensure that the host software is operating with the latest required levels. The upgrade
processes may display messages informing you to update the host software to obtain
the latest performance and security features.
On IBM Netezza 1000, C1000, IBM PureData System for Analytics N1001, and NEC
InfoFrame DWH Appliances, Netezza uses DRBD replication only on the /nz and
/export/home partitions. As new data is written to the Netezza /nz partition and the
/export/home partition on the primary Netezza system, the DRBD software automati-
cally makes the same changes to the /nz and /export/home partition of the standby
Netezza system.
20282-20 Rev.1 5-15
Hardware Management Tasks
Use caution when saving files to the host disks; in general, it is not recommended that
you store Netezza database backups on the host disks, nor use the host disks to store
large files that could grow and fill the host disks over time. Be sure to clean up and
remove any temporary files that you create on the host disks to keep the disk space as
available as possible for Netezza software and database use.
If the active host fails, the Netezza HA software typically fails over to the standby host to
keep the Netezza operations running. Netezza Support will work with you to schedule field
service to replace the failed host.
Managing SPUs
Snippet Processing Units (SPUs) or S-Blades are hardware components that serve as the
query processing engines of the Netezza appliance. Each SPU has CPUs and FPGAs as well
as memory and I/O to process queries and query results. Each SPU has associated data
partitions that it “owns” to store the portions of the user databases and tables that the SPU
processes during queries.
The basic SPU management tasks are as follows:
Monitor status and overall health
Activate a spare SPU
Deactivate a spare SPU
Failover a SPU
Locate a SPU in the Netezza rack
Reset (power cycle) a SPU
Delete a failed, inactive, or incompatible SPU
Replace a failed SPU
The following sections describe how to perform these tasks.
You can use the nzhw command to activate, deactivate, failover, locate, and reset a SPU, or
delete SPU information from the system catalog. For more information about the nzhw
command syntax and options, see “nzhw” on page A-26.
To indicate which SPU you want to control, you can refer to the SPU using its hardware ID.
You can use the nzhw command to display the IDs, as well as obtain the information from
management UIs such as NzAdmin or Web Admin.
Monitor SPU Status
To obtain the status of one or more SPUs, you can use the nzhw command with the show
options.
To show the status of all the SPUs:
[nz@nzhost ~]$ nzhw show -type spu
Description HW ID Location Role State
----------- ----- ---------- ------ ------
SPU 1003 spa1.spu7 Active Online
SPU 1080 spa1.spu1 Active Online
SPU 1081 spa1.spu3 Active Online
5-16 20282-20 Rev.1
IBM Netezza System Administrator’s Guide
SPU 1082 spa1.spu11 Active Online
SPU 1084 spa1.spu5 Active Online
SPU 1085 spa1.spu9 Active Online
To show detailed information about SPU ID 1082:
[nz@nzhost ~]$ nzhw show -id 1082 -detail
Description HW ID Location Role State Serial Number Hw Version
Details
----------- ----- ---------- ------ ------ ------------- ----------
------------------------------------------------------------------
----------------------------------------------
SPU 1082 spa1.spu11 Active Online 99FB798 10.0 8
CPU Cores; 15.51GB Memory; Dac Serial Number 0921S58200090; 4
FPGAs; Fpga Version: 1.81; Ip Addr: 10.0.10.34;
Activate a SPU
You can use the nzhw command to activate a SPU that is inactive or failed.
To activate a SPU:
nzhw activate -u admin -pw password -host nzhost -id 1004
Deactivate a SPU
You can use the nzhw command to make a spare SPU unavailable to the system. If the
specified SPU is active, the command displays an error.
To deactivate a spare SPU:
nzhw deactivate -u admin -pw password -host nzhost -id 1004
Failover a SPU
You can use the nzhw command to initiate a SPU failover.
To failover a SPU, enter:
nzhw failover -u admin -pw password -host nzhost -id 1004
Locate a SPU
You can use the nzhw command to turn on or off a SPU’s LED and display the physical
location of the SPU. The default is on.
To locate a SPU, enter:
nzhw locate -u admin -pw password -host nzhost -id 1082
Turned locator LED 'ON' for SPU: Logical Name:'spa1.spu11' Physical
Location:'1st Rack, 1st SPA, SPU in 11th slot'
To turn off a SPU’s LED, enter:
nzhw locate -u admin -pw password -host nzhost -id 1082 -off
Turned locator LED 'OFF' for SPU: Logical Name:'spa1.spu11'
Physical Location:'1st Rack, 1st SPA, SPU in 11th slot'

20282-20 Rev.1 5-17
Hardware Management Tasks
Reset a SPU
You can use the nzhw command to power cycle a SPU (a hard reset).
To reset a SPU, enter:
nzhw reset -u admin -pw password -id 1006
Delete a SPU Entry from the System Catalog
You can use the nzhw command to remove a failed, inactive, or incompatible SPU from the
system catalog.
To delete a SPU entry, enter:
nzhw delete -u admin -pw password -host nzhost -id 1004
Replace a Failed SPU
If a SPU hardware component fails and must be replaced, Netezza Support will work with
you to schedule service to replace the SPU.
Managing Disks
The disks on the system store the user databases and tables that are being managed and
queried by the Netezza appliance. The basic disk management tasks are as follows:
Monitor status and overall health
Activate a inactive, failed, or mismatched disk
Deactivate a spare disk
Failover a disk
Locate a disk in the Netezza rack
Delete a failed, inactive, mismatched, or incompatible disk
Replace a failed disk
The following sections describe how to perform these tasks.
You can use the nzhw command to activate, deactivate, failover, and locate a disk, or delete
disk information from the system catalog. The following sections describe how to perform
these tasks. For more information about the nzhw command syntax and options, see
“nzhw” on page A-26.
As a best practice to protect against data loss, never remove a disk from an enclosure or
remove a RAID controller or ESM card from its enclosure unless directed to do so by
Netezza Support or when you are using the hardware replacement procedure documenta-
tion. If you remove an Active or Spare disk drive, you could cause the system to restart or
transition to the down state. Data loss and system issues can occur if these components are
removed when it is not safe to do so.
Note: Netezza C1000 systems have RAID controllers to manage the disks and hardware in
the storage groups. You cannot deactivate a disk on a C1000 system. Also, the commands
to activate, fail, or delete a disk may return an error if the storage group cannot support the
action at that time.
5-18 20282-20 Rev.1
IBM Netezza System Administrator’s Guide
To indicate which disk you want to control, you can refer to the disk using its hardware ID.
You can use the nzhw command to display the IDs, as well as obtain the information from
management UIs such as NzAdmin or Web Admin.
Monitor Disk Status
To obtain the status of one or more disks, you can use the nzhw command with the show
options.
To show the status of all the disks (note that the sample output is abbreviated for the
documentation):
[nz@nzhost ~]$ nzhw show -type disk
Description HW ID Location Role State
----------- ----- --------------------- ------ -----
Disk 1011 spa1.diskEncl4.disk1 Active Ok
Disk 1012 spa1.diskEncl4.disk2 Active Ok
Disk 1013 spa1.diskEncl4.disk3 Active Ok
Disk 1014 spa1.diskEncl4.disk4 Active Ok
Disk 1015 spa1.diskEncl4.disk5 Active Ok
Disk 1016 spa1.diskEncl4.disk6 Active Ok
Disk 1017 spa1.diskEncl4.disk7 Active Ok
Disk 1018 spa1.diskEncl4.disk8 Active Ok
Disk 1019 spa1.diskEncl4.disk9 Active Ok
Disk 1020 spa1.diskEncl4.disk10 Active Ok
To show detailed information about disk ID 1012:
[nz@nzhost ~]$ nzhw show -id 1011 -detail
Description HW ID Location Role State Serial Number Hw
Version Details
----------- ----- -------------------- ------ ----- -------------------- -
--------- ------------------------------
Disk 1011 spa1.diskEncl4.disk1 Active Ok 9QJ3ARET00009909FJXQ
BC1D 931.51 GiB; Model ST31000640SS
Activate a Disk
You can use the nzhw command to make an inactive, failed, or mismatched disk available
to the system as a spare.
To activate a disk:
nzhw activate -u admin -pw password -host nzhost -id 1004
In some cases, the system may display a message that it cannot activate the disk yet
because the SPU has not finished an existing activation request. Disk activation usually
occurs very quickly, unless there are several activations taking place at the same time. In
this case, later activations wait until they are processed in turn.
Note: For a Netezza C1000 system, you cannot activate a disk that is still being used by
the RAID controller for a regeneration or other task. If the disk cannot be activated, an error
message similar to the following appears:
20282-20 Rev.1 5-19
Hardware Management Tasks
Error: Can not update role of Disk 1004 to Spare - The disk is
still part of a non healthy array. Please wait for the array to
become healthy before activating.
Deactivate a Disk
You can use the nzhw command to make a spare disk unavailable to the system.
To deactivate a disk:
nzhw deactivate -u admin -pw password -host nzhost -id 5004
Note: For a Netezza C1000 system, you cannot deactivate a disk. The command is not sup-
ported on the C1000 platform.
Failover a Disk
You can use the nzhw command to initiate a failover. You cannot fail over a disk until the
system is at least in the initialized state.
To failover a disk, enter:
nzhw failover -u admin -pw password -host nzhost -id 1004
On a Netezza C1000 system, when you fail a disk, the RAID controller automatically starts
a regeneration to a spare disk. Note that the RAID controller may not allow you to fail a disk
if you are attempting to fail a disk in a RAID 5 array that already has a failed disk.
Note: For a Netezza C1000 system, the RAID controller still considers a failed disk to be
part of the array until the regeneration is complete. After the regen completes, the failed
disk is logically removed from the array.
Locate a Disk
You can use the nzhw command to turn on or off a disk’s LED. The default is on. The com-
mand also displays the physical location of the disk.
To turn on a disk’s LED, enter:
nzhw locate -u admin -pw password -host nzhost -id 1004
Turned locator LED 'ON' for Disk: Logical
Name:'spa1.diskEncl4.disk1' Physical Location:'1st Rack, 4th
DiskEnclosure, Disk in Row 1/Column 1'
To turn off a disk’s LED, enter:
nzhw locate -u admin -pw password -host nzhost -id 1004 -off
Turned locator LED 'OFF' for Disk: Logical
Name:'spa1.diskEncl4.disk1' Physical Location:'1st Rack, 4th
DiskEnclosure, Disk in Row 1/Column 1'
Delete a Disk Entry from the System Catalog
You can use the nzhw command to remove a disk that is failed, inactive, mismatched, or
incompatible from the system catalog. For Netezza C1000 systems, do not delete the hard-
ware ID of a failed disk until after you have successfully replaced it using the instructions
in the Replacement Procedures: IBM Netezza C1000 Systems.
To delete a disk entry, enter:
nzhw delete -u admin -pw password -host nzhost -id 1004

5-20 20282-20 Rev.1
IBM Netezza System Administrator’s Guide
Replace a Failed Disk
If a disk hardware component fails and must be replaced, Netezza Support will work with
you to schedule service to replace the disk. Details are available in the Replacement Proce-
dures Guide for your appliance model family.
Managing Data Slices
A data slice is a logical representation of the data saved in the partitions of a disk. The data
slice contains pieces of each user database and table. The Netezza system distributes the
user data to all of the disks in the system using a hashing algorithm.
Each data slice has an ID, and is logically owned by a SPU to process queries on the data
contained within that data slice.
The basic data slice management tasks are as follows:
Monitor status, space consumption, and overall health
Rebalance data slices to the available SPUs
Regenerate (or regen) a data slice after a disk failure
Display the current topology of the data slices
The following sections describe how to perform these tasks.
You can use the nzhw, nzds, and nzspupart commands to manage data slices and perform
these tasks.
To indicate which data slice you want to control, you can refer to the data slice using its
data slice ID. You can use the nzds command to display the IDs, as well as obtain the infor-
mation from management UIs such as NzAdmin or Web Admin.
Displaying Data Slice Issues
You can quickly display a list of any data slices that have issues and which may require
administrative attention using the nzds show -issues command. This command displays
data slices that are in the Degraded state (a loss of data redundancy) or that are Repairing
(that is, the data is being regenerated to a spare disk).
[nz@nzhost ~]$ nzds show -issues
Data Slice Status SPU Partition Size (GiB) % Used Supporting Disks
---------- --------- ---- --------- ---------- ------ ----------------
15 Repairing 1137 3 356 46.87 1080,1086
16 Repairing 1137 2 356 46.79 1080,1086
46 Repairing 1135 4 356 46.73 1055,1098
You can also use the NzAdmin and Web Admin interfaces to obtain visibility to hardware
issues and failures.
Monitor Data Slice Status
To obtain the status of one or more data slices, you can use the nzds command with the
show options.
To show the status of all the data slices (note that the sample output is abbreviated for
the documentation):

20282-20 Rev.1 5-21
Managing Data Slices
[nz@nzhost ~]$ nzds show
Data Slice Status SPU Partition Size (GiB) % Used Supporting Disks
---------- ------- ---- --------- ---------- ------ ----------------
1 Repairing 1017 2 356 58.54 1021,1029
2 Repairing 1017 3 356 58.54 1021,1029
3 Healthy 1017 5 356 58.53 1022,1030
4 Healthy 1017 4 356 58.53 1022,1030
5 Healthy 1017 0 356 58.53 1023,1031
6 Healthy 1017 1 356 58.53 1023,1031
7 Healthy 1017 7 356 58.53 1024,1032
8 Healthy 1017 6 356 58.53 1024,1032
Note: Data slice 2 in the sample output is regenerating due to a disk failure. For a Netezza
C1000 system, three disks hold the user data for a data slice; the fourth disk is the regen
target for the failed drive. The the RAID controller still considers a failed disk to be part of
the array until the regeneration is complete. After the regen completes, the failed disk is
logically removed from the array.
To show detailed information about the data slices that are being regenerated:
[nz@nzhost ~]$ nzds show -regenstatus -detail
Data Slice Status SPU Partition Size (GiB) % Used Supporting Disks
Start Time % Done
---------- --------- ---- --------- ---------- ------ -------------------
------------------- ------
2 Repairing 1255 1 3725 0.00 1012,1028,1031,1056
2011-07-01 10:41:44 23
The status of a data slice shows the health of the data slice. Table 5-5 describes the status
values for a data slice. You see these states when you run the nzds command or display
data slices using the NzAdmin or Web Admin UIs.
Regenerate a Data Slice
If a disk is encountering problems or has failed, you perform a data slice regeneration to
create a copy of the primary and mirror data slices on an available spare disk. During regen-
eration, the regular system processing continues for the bulk of the regeneration.
Note: In the IBM PureData System for Analytics N1001 or the IBM Netezza 1000 and later
models, the system does not change states during a regeneration; that is, the system
Table 5-5: Data Slice Status
State Description
Healthy The data slice is operating normally and the data is protected in a
redundant configuration; that is, the data is mirrored (for Netezza
100, Netezza 1000, or N1001 systems), or redundant (for
Netezza C1000 systems).
Repairing The data slice is in the process of being regenerated to a spare
disk due to a disk failure.
Degraded The data slice is not protected in a redundant configuration.
Another disk failure could result in loss of a data slice, and the
degraded condition impacts system performance.
5-22 20282-20 Rev.1
IBM Netezza System Administrator’s Guide
remains online while the regeneration is in progress. There is no synchronization state
change nor interruption to active jobs during this process. If the regeneration process
should fail or be stopped for any reason, the system transitions to the Discovering state to
establish the topology of the system.
You can use the nzspupart regen command or the NzAdmin interface to regenerate a disk.
If you do not specify any options, the system manager checks for any degraded partitions
and if found, starts a regeneration to the appropriate spare disk. An example follows:
nz@nzhost ~]$ nzspupart regen
Are you sure you want to proceed (y|n)? [n] y
Info: Regen Configuration - Regen configured on SPA:1 Data slice 20 and 19
.
You can then use the nzspupart show -regenstatus or the nzds show -regenstatus command
to display the progress and details of the regeneration. Sample command output follows for
the nzds command, which shows the status for the data slices:
[nz@nzhost ~]$ nzds -regenstatus
Data Slice Status SPU Partition Size (GiB) % Used Supporting Disks
Start Time % Done
---------- --------- ---- --------- ---------- ------ ----------------
---------- ------
19 Repairing 1057 3 356 5.80 1040,1052 0
0
20 Repairing 1057 2 356 5.81 1040,1052 0
0
Sample output for the nzspupart command follows. In this example, note that the com-
mand shows more detail about the partitions (data, swap, NzLocal, and log) that are being
regenerated:
[nz@nzhost ~]$ nzspupart show -regenstatus
SPU Partition Id Partition Type Status Size (GiB) % Used Supporting Disks
% Done Starttime
---- ------------ -------------- --------- ---------- ------ --------------------------
--- ------ -------------------
1057 2 Data Repairing 356 0.13 1032,1035 0
2011-12-23 04:37:33
1039 101 Swap Repairing 48 25.04 1030,1031,1032,1035,1036,1037
0 2011-12-23 04:37:33
1039 111 Log Repairing 1 3.47 1032,1035
91.336 2011-12-23 04:37:33
If you want to control the regen source and target destimations, you can specify source
SPU and partition IDs, and the target or destination disk ID. The spare disk must reside in
the same SPA as the disk that you are regenerating. You can obtain the IDs for the source
partition in the nzspupart show -details command.
To regenerate a degraded partition and specify the information for the source and
destination:
nzspupart regen -spu 1035 -part 7 -dest 1024
Note: Regeneration can take several hours to complete. If the system is idle and has no
other activity except the regen, or if the user data partitions are not very full, the regenera-
tion takes less time to complete. You can review the status of the regeneration using the
nzspupart show -regenStatus command. During the regeneration, note that user query per-
20282-20 Rev.1 5-23
Managing Data Slices
formance can be impacted while the system is busy processing the regeneration. Likewise,
user query activity can increase the time required for the regeneration.
A regeneration setup failure could occur if the system manager cannot remove the failed
disk from the RAID array, or if it cannot add the spare disk to the RAID array. If a regenera-
tion failure occurs, or if a spare disk is not available for the regeneration, the system
continues processing jobs. The data slices that lost their mirror continue to operate in an
unmirrored or Degraded state; however, you should replace your spare disks as soon as pos-
sible and ensure that all data slices are mirrored. If an unmirrored disk should fail, the
system will be brought to a down state.
Rebalance Data Slices
Each SPU owns or manages a number of data slices for query processing. The SPUs and
their data slices must reside in the same SPA. If a SPU fails, the system manager reassigns
its data slices to the other active SPUs in the same SPA. The system manager randomly
assigns a pair of data slices (the primary and mirrors) from the failed SPU to an available
SPU in the SPA. The system manager ensures that each SPU has no more than two data
slices more than one of its peers.
After the failed SPU is replaced or reactivated, you must rebalance the data slices to return
to optimal performance. The rebalance process checks each SPU in the SPA; if a SPU has
more than two data slices more than another SPU, the system manager redistributes the
data slices to equalize the workload and return the SPA to an optimal performance topol-
ogy. (The system manager changes the system to the discovering state to perform the
rebalance.)
In addition, if an S-Blade does not have an equal distribution of disks in the odd-numbered
versus even-numbered enclosures of its array, the system manager reports the problem as
an overloaded SAS bus. The nzhw rebalance command will also reconfigure the topology so
that half of the disks are in the odd-numbered enclosures and half in the even-numbered.
For more information, see “System Resource Balance Recovery” on page 5-12.
You can use the nzhw command to rebalance the data slice topology. The system also per-
forms the rebalance check each time the system is restarted, or after a SPU failover or a
disk regeneration setup failure.
To rebalance the data slices:
nzhw rebalance -u admin -pw password
If a rebalance is not required, the command displays a message that a rebalance is not
necessary and exits without performing the step.
You can also use the nzhw rebalance -check option to have the system check the topology
and only report whether a rebalance is needed. If a rebalance is required, you can plan
when to run the operation during a lesser busy system time, for example.
To run a balance check:
nzhw rebalance -check -u admin -pw password
The command displays the message “Rebalance is needed” or “There is nothing to rebal-
ance.” If a rebalance is needed, you can run the nzhw rebalance command to perform the
rebalance, or you could wait until the next time the Netezza software is stopped and
restarted to rebalance the system.
5-24 20282-20 Rev.1
IBM Netezza System Administrator’s Guide
Displaying the Active Path Topology
The active path topology defines the ports and switches that offer the best connection per-
formance to carry the traffic between the S-Blades and their disks. For best system
performance, all links and components must remain balanced and equally loaded.
To display the current storage topology, use the nzds show -topology command:
[nz@nzhost ~]$ nzds show -topology
===============================================================================
Topology for SPA 1
spu0101 has 8 datapartitions: [ 0:1 1:2 2:11 3:12 4:10 5:9 6:18 7:17 ]
hba[0] 4 disks
port[2] 2 disks: [ 1:encl1Slot10 11:encl1Slot06 ] -> switch 0
port[3] 2 disks: [ 10:encl2Slot05 18:encl2Slot09 ] -> switch 1
hba[1] 4 disks
port[0] 2 disks: [ 2:encl2Slot01 12:encl2Slot06 ] -> switch 0
port[1] 2 disks: [ 9:encl1Slot05 17:encl1Slot12 ] -> switch 1
...............................................................................
spu0103 has 8 datapartitions: [ 0:22 1:21 2:16 3:15 4:13 5:14 6:5 7:6 ]
hba[0] 4 disks
port[2] 2 disks: [ 16:encl2Slot02 22:encl2Slot11 ] -> switch 0
port[3] 2 disks: [ 5:encl1Slot03 13:encl1Slot07 ] -> switch 1
hba[1] 4 disks
port[0] 2 disks: [ 15:encl1Slot08 21:encl1Slot11 ] -> switch 0
port[1] 2 disks: [ 6:encl2Slot03 14:encl2Slot07 ] -> switch 1
...............................................................................
spu0105 has 6 datapartitions: [ 0:19 1:20 2:7 3:8 4:4 5:3 ]
hba[0] 3 disks
port[2] 2 disks: [ 7:encl1Slot04 19:encl1Slot09 ] -> switch 0
port[3] 1 disks: [ 4:encl2Slot12 ] -> switch 1
hba[1] 3 disks
port[0] 2 disks: [ 8:encl2Slot04 20:encl2Slot10 ] -> switch 0
port[1] 1 disks: [ 3:encl1Slot01 ] -> switch 1
...............................................................................
Switch 0
port[1] 6 disks: [ 1:encl1Slot10 7:encl1Slot04 11:encl1Slot06 15:encl1Slot08
19:encl1Slot09 21:encl1Slot11 ] -> encl1
port[2] 6 disks: [ 2:encl2Slot01 8:encl2Slot04 12:encl2Slot06 16:encl2Slot02
20:encl2Slot10 22:encl2Slot11 ] -> encl2
Switch 1
port[1] 5 disks: [ 3:encl1Slot01 5:encl1Slot03 9:encl1Slot05 13:encl1Slot07
17:encl1Slot12 ] -> encl1
port[2] 5 disks: [ 4:encl2Slot12 6:encl2Slot03 10:encl2Slot05 14:encl2Slot07
18:encl2Slot09 ] -> encl2
===============================================================================
This sample output shows a normal topology for an IBM Netezza 1000-3 system. The com-
mand output is complex and is typically used by Netezza Support to troubleshoot problems.
If there are any issues to investigate in the topology, the command displays a WARNING
section at the bottom, for example:
WARNING: 2 issues detected
spu0101 hba [0] port [2] has 3 disks
SPA 1 SAS switch [sassw01a] port [3] has 7 disks

20282-20 Rev.1 5-25
Managing Data Slices
These warnings indicate problems in the path topology where storage components are over-
loaded. These problems can affect query performance and also system availability should
other path failures occur. Contact Support to troubleshoot these warnings.
To display detailed information about path failure problems, you can use the following
command:
[nz@nzhost ~]$ nzpush -a mpath -issues
spu0109: Encl: 4 Slot: 4 DM: dm-5 HWID: 1093 SN: number PathCnt: 1
PrefPath: yes
spu0107: Encl: 2 Slot: 8 DM: dm-1 HWID: 1055 SN: number PathCnt: 1
PrefPath: yes
spu0111: Encl: 1 Slot: 10 DM: dm-0 HWID: 1036 SN: number PathCnt: 1
PrefPath: no
If the command does not return any output, there are no path failures observed on the sys-
tem. It is not uncommon for some path failures to occur and then clear quickly. However, if
the command displays some output, as in this example, there are path failures on the sys-
tem and system performance could be degraded. The sample output shows that spu0111
is not using the higher performing preferred path (PrefPath: no) and there is only one path
to each disk (PathCnt: 1) instead of the normal 2 paths. Contact Netezza Support and
report the path failures to initiate troubleshooting and repair.
Note: It is possible to see errors reported in the nzpush command output even if the
nzds -topology command does note report any warnings. In these cases, the errors are still
problems in the topology, but they do not affect the performance and availability of the cur-
rent topology. Be sure to report any path failures to ensure that problems are diagnosed and
resolved by Support for optimal system performance.
Handling Transactions during Failover and Regeneration
When a disk failover occurs, the system continues processing any active jobs while it per-
forms a disk regeneration. No active queries need to be stopped and restarted.
If a SPU fails, the system state changes to the pausing -now state (which stops active jobs),
and then transitions to the discovering state to identify the active SPUs in the SPA. The
system also rebalances the data slices to the active SPUs.
After the system returns to an online state:
The system restarts transactions that had not returned data before the pause -now
transition.
Read-only queries begin again with their original transaction ID and priority.
Table 5-6 describes the system states and the way Netezza handles transactions during
failover.
Table 5-6: System States and Transactions
System State Active Transactions New Transactions
Offline(ing) Now Aborts all transactions. Returns an error.
Offline(ing) Waits for the transaction to finish. Returns an error.
Pause(ing) Now Aborts only those transactions that
cannot be restarted.
Queues the transaction.

5-26 20282-20 Rev.1
IBM Netezza System Administrator’s Guide
The following examples provide specific instances of how the system handles failovers that
happen before, during, or after data is returned.
If the pause -now occurs immediately after a BEGIN command completes, before data
is returned, the transaction is restarted when the system returns to an online state.
If a statement such as the following completes and then the system transitions, the
transaction can restart because data has not been modified and the reboot does not
interrupt a transaction.
BEGIN;
SELECT * FROM emp;
If a statement such as the following completes, but the system goes transitions before
the commit to disk, the transaction is aborted.
BEGIN;
INSERT INTO emp2 FROM emp;
A statement such as the following can be restarted if it has not returned data, in this
case a single number that represents the number of rows in a table. This sample
includes an implicit BEGIN command.
SELECT count(*) FROM small_lineitem;
If a statement such as the following begins to return rows before the system transitions,
the statement will be aborted.
INSERT INTO emp2 SELECT * FROM externaltable;
Note that this transaction, and others that would normally be aborted, would be
restarted if the nzload -allowReplay option applied to the associated table.
Note: There is a retry count for each transaction. If the system transitions to
pause -now more than the number of retries allowed, the transaction is aborted.
Automatic Query and Load Continuation
When a SPU unexpectedly reboots or is failed-over, the system manager initiates a state
change from online to pause -now. During this transition, rather than aborting all transac-
tions, the Netezza system aborts only those transactions that cannot be restarted.
The system restarts the following transactions:
Read-only queries that have not returned data. The system restarts the request with a
new plan and the same transaction ID.
Loads. If you have enabled load continuation, the system rolls back the load to the
beginning of the replay region and resends the data.
Once the system has restarted these transactions, the system state returns to online. For
more information, see the IBM Netezza Data Loading Guide.
Pause(ing) Waits for the transaction to finish. Queues the transaction.
Table 5-6: System States and Transactions
System State Active Transactions New Transactions
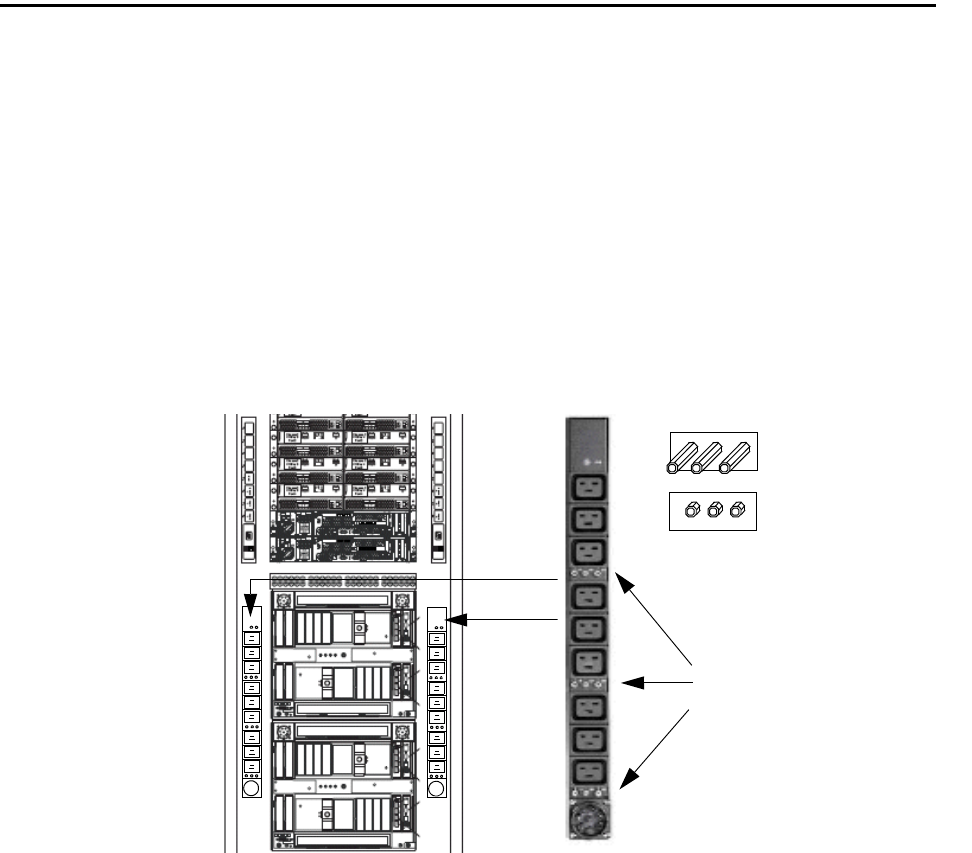
20282-20 Rev.1 5-27
Power Procedures
Power Procedures
This section describes how to power on the Netezza and NEC InfoFrame DWH Appliance
systems as well as how to power-off the system. Typically, you would only need to power off
the system if you are moving the system physically within the data center, or in the event of
possible maintenance or emergency conditions within the data center.
The instructions to power on or off an IBM Netezza 100 system are available in the Site
Preparation and Specifications: IBM Netezza 100 Systems.
Note: To power cycle a Netezza system, you must have physical access to the system to
press power switches and to connect or disconnect cables. Netezza systems have keyboard/
video/mouse (KVM) units which allow you to enter administrative commands on the hosts.
PDU and Circuit Breakers Overview
On the IBM Netezza 1000-6 and larger models, and the IBM PureData System for Analyt-
ics N1001-005 and larger models, the main input power distribution units (PDUs) are
located at the bottom of the rack on the right and left sides, as shown in Figure 5-8.
Figure 5-8: Netezza 1001-6 and N1001-005 and Larger PDUs and Circuit Breakers
To close the circuit breakers (power up the PDUs), press in each of the 9 breaker pins
until they engage. Be sure to close the 9 pins on both main PDUs in each rack of the
system.
To open the circuit breakers (power off the PDUs), pull out each of the 9 breaker pins
on the left and the right PDU in the rack. If it becomes difficult to pull out the breaker
pins using your fingers, you could use a tool such as a pair of needle-nose pliers to gen-
tly pull out the pins.
On the IBM Netezza 1000-3 or IBM PureData System for Analytics N1001-002 models,
the main input power distribution units (PDUs) are located on the right and left sides of the
rack, as shown in Figure 5-9.
PDU circuit breakers (3
rows of 3 breaker pins).
ON
OFF
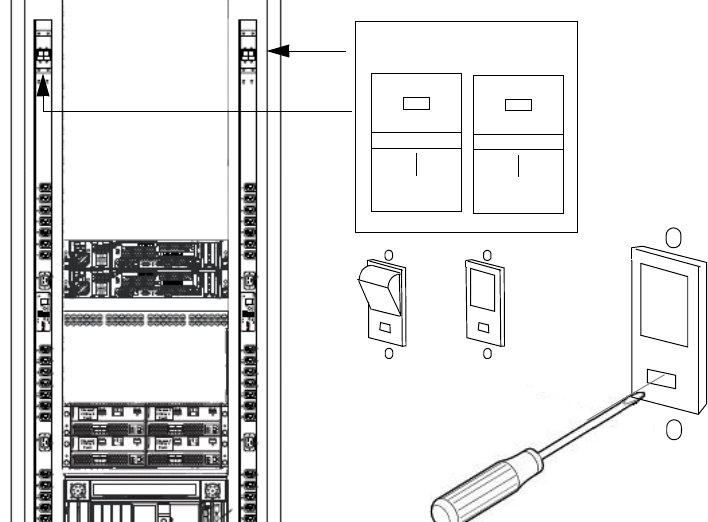
5-28 20282-20 Rev.1
IBM Netezza System Administrator’s Guide
Figure 5-9: IBM Netezza 1000-3 and IBM PureData System for Analytics N1001-002 PDUs and Circuit Breakers
At the top of each PDU is a pair of breaker rocker switches. (Note that the labels on the
switches are upside down when you view the PDUs.)
To close the circuit breakers (power up the PDUs), you push the On toggle of the rocker
switch in. Make sure that you push in all four rocker switches, two on each PDU.
To open the circuit breakers (power off the PDUs), you must use a tool such as a small
flathead screwdriver; insert the tool into the hole labelled OFF and gently press until
the rocker toggle pops out. Make sure that you open all four of the rocker toggles, two
on each PDU.
Powering On the IBM Netezza 1000 and IBM PureData System for Analytics N1001
Follow these steps to power on IBM Netezza 1000 or IBM PureData System for Analytics
N1001 models:
1. Make sure that the two main power cables are connected to the data center drops;
there are two power cables for each rack of the system.
2. Do one of the following steps depending upon which system model you have:
For an IBM Netezza 1000-6 or larger model, or an IBM PureData System for Ana-
lytics N1001-005 or larger model, push in the 9 breaker pins on both the left and
right lower PDUs as shown in Figure 5-8 on page 5-27. (Repeat these steps for
each rack of the system.)
For an IBM Netezza 1000-3 or IBM PureData System for Analytics N1001-002
model, close the two breaker switches on both the left and right PDUs as shown in
Figure 5-9 on page 5-28.
Two circuit
breakers at the
top of the PDU.
ON
OFF
OFF
ON
OFF
ON
20282-20 Rev.1 5-29
Power Procedures
3. The hosts will power on. Wait a a minute for the power processes to complete, then log
in as root to one of the hosts and confirm that the Netezza software has started as
follows:
a. Run the crm_mon command to obtain the cluster status:
[root@nzhost1 ~]# crm_mon -i5
============
Last updated: Tue Jun 2 11:46:43 2009
Current DC: nzhost1 (key)
2 Nodes configured.
3 Resources configured.
============
Node: nzhost1 (key): online
Node: nzhost2 (key): online
Resource Group: nps
drbd_exphome_device (heartbeat:drbddisk): Started nzhost1
drbd_nz_device (heartbeat:drbddisk): Started nzhost1
exphome_filesystem (heartbeat::ocf:Filesystem): Started nzhost1
nz_filesystem (heartbeat::ocf:Filesystem): Started nzhost1
fabric_ip (heartbeat::ocf:IPaddr): Started nzhost1
wall_ip (heartbeat::ocf:IPaddr): Started nzhost1
nz_dnsmasq (lsb:nz_dnsmasq): Started nzhost1
nzinit (lsb:nzinit): Started nzhost1
fencing_route_to_ha1 (stonith:apcmaster): Started nzhost2
fencing_route_to_ha2 (stonith:apcmaster): Started nzhost1
b. Identify the active host in the cluster, which is the host where the nps resource
group is running:
[root@nzhost1 ~]# crm_resource -r nps -W
crm_resource[5377]: 2009/06/01_10:13:12 info: Invoked: crm_resource
-r nps -W
resource nps is running on: nzhost1
c. Log in as nz and verify that the Netezza server is online:
[nz@nzhost1 ~]$ nzstate
System state is 'Online'.
Powering Off the IBM Netezza 1000 or IBM PureData System for Analytics N1001
Follow these steps to power off an IBM Netezza 1000 or IBM PureData System for Analyt-
ics N1001 system:
1. Identify the active host in the cluster, which is the host where the nps resource group is
running:
[root@nzhost1 ~]# crm_resource -r nps -W
crm_resource[5377]: 2009/06/07_10:13:12 info: Invoked: crm_resource
-r nps -W
resource nps is running on: nzhost1
2. Log in as root to the standby host (nzhost2 in this example) and run the following com-
mand to stop heartbeat:
[root@nzhost2 ~]# service heartbeat stop
5-30 20282-20 Rev.1
IBM Netezza System Administrator’s Guide
3. Log in as root to the active host (nzhost1 in this example) and run the following com-
mand to stop heartbeat:
[root@nzhost1 ~]# service heartbeat stop
4. As root on the standby host (nzhost2 in this example), run the following command to
shut down the host:
[root@nzhost2 ~]# shutdown -h now
5. As root on the active host, run the following command to shut down the host:
[root@nzhost1 ~]# shutdown -h now
6. Wait until you see the power lights on both hosts shut off.
7. Do one of the following steps depending upon which IBM Netezza 1000 model you
have:
For an IBM Netezza 1000-6 or larger, or an IBM PureData System for Analytics
N1001-005 or larger model, pull out the 9 breaker pins on both the left and right
lower PDUs as shown in Figure 5-8 on page 5-27. (Repeat these steps for each
rack of the system.)
For an IBM Netezza 1000-3 or IBM PureData System for Analytics N1001-002
model, use a small tool such as a pocket screwdriver to open the two breaker
switches on both the left and right PDUs as shown in Figure 5-9 on page 5-28.
8. Disconnect the main input power cables (two per rack) from the data center power
drops. (As a best practice, do not disconnect the power cords from the plug/connector
on the PDUs in the rack; instead, disconnect them from the power drops outside the
rack.)
Powering on an IBM Netezza C1000 System
Follow these steps to power on an IBM Netezza C1000 System:
1. Make sure that the main power cables for each rack are connected to the data center
drops. For a North American power configuration, there are four power cables for the
first two racks of a Netezza C1000 (or two cables for a European Union power configu-
ration); there are two power cables for each additional rack if present for that model.
2. Switch the breakers to ON on both the left and right PDUs. (Repeat these steps for
each rack of the system.)
3. Press the power button on both host servers and wait for the servers to start. This pro-
cess can take a few minutes.
4. Log in to the host server (ha1) as root.
5. Change to the nz user account and run the following command to stop the Netezza
server:
[nz@nzhost1 ~]$ nzstop
6. Wait for the Netezza system to stop.
7. Log out of the nz account to return to the root account, then type the following com-
mand to power on the storage groups:
[root@nzhost1 ~]# /nzlocal/scripts/rpc/spapwr.sh -on all -j all

20282-20 Rev.1 5-31
Power Procedures
8. Wait five minutes and then type the following command to power on all the S-blade
chassis:
[root@nzhost1 ~]# /nzlocal/scripts/rpc/spapwr.sh -on all
9. Run the crm_mon command to monitor the status of the HA services and cluster
operations:
[root@nzhost1 ~]# crm_mon -i5
The output of the command refreshes at the specified interval rate of 5 seconds (-i5).
10. Review the output and watch for the resource groups to all have a Started status. This
usually takes about 2 to 3 minutes, then proceed to the next step. Sample output
follows:
============
Last updated: Tue Jun 2 11:46:43 2009
Current DC: nzhost1 (key)
2 Nodes configured.
3 Resources configured.
============
Node: nzhost1 (key): online
Node: nzhost2 (key): online
Resource Group: nps
drbd_exphome_device (heartbeat:drbddisk): Started nzhost1
drbd_nz_device (heartbeat:drbddisk): Started nzhost1
exphome_filesystem (heartbeat::ocf:Filesystem): Started nzhost1
nz_filesystem (heartbeat::ocf:Filesystem): Started nzhost1
fabric_ip (heartbeat::ocf:IPaddr): Started nzhost1
wall_ip (heartbeat::ocf:IPaddr): Started nzhost1
nz_dnsmasq (lsb:nz_dnsmasq): Started nzhost1
nzinit (lsb:nzinit): Started nzhost1
fencing_route_to_ha1 (stonith:apcmaster): Started nzhost2
fencing_route_to_ha2 (stonith:apcmaster): Started nzhost1
11. Press Ctrl-C to exit the crm_mon command and return to the command prompt.
12. Log into the nz account.
[root@nzhost1 ~]# su - nz
13. Verify that the system is online using the following command:
[nz@nzhost1 ~]$ nzstate
System state is ‘Online’.
Powering off an IBM Netezza C1000 System
Follow these steps to power off an IBM Netezza C1000 System:
Unless the system shutdown is an emergency situation, do not power down a Netezza
C1000 system when there are any amber (Needs Attention) LEDs illuminated in the stor-
age groups. It is highly recommended that you resolve the problems that are causing the
Needs Attention LEDs before you power off a system to ensure that the power-up proce-
dures are not impacted by the unresolved conditions within the groups.
1. Log in to host 1 (ha1) as root.
Note: Do not use the su command to become root.
5-32 20282-20 Rev.1
IBM Netezza System Administrator’s Guide
2. Identify the active host in the cluster, which is the host where the NPS resource group
is running:
[root@nzhost1 ~]# crm_resource -r nps -W
crm_resource[5377]: 2009/06/07_10:13:12 info: Invoked: crm_resource
-r nps -W
resource nps is running on: nzhost1
3. Log in to the active host (nzhost1 in this example) as nz and run the following com-
mand to stop the Netezza server:
[nz@nzhost1 ~]$ nzstop
4. Type the following commands to stop the clustering processes:
[root@nzhost1 ~]# ssh ha2 'service heartbeat stop'
[root@nzhost1 ~]# service heartbeat stop
5. On ha1, type the following commands to power off the S-blade chassis and storage
groups:
[root@nzhost1 ~]# /nzlocal/scripts/rpc/spapwr.sh -off all
[root@nzhost1 ~]# /nzlocal/scripts/rpc/spapwr.sh -off all -j all
6. Log into ha2 as root and shut down the Linux operating system using the following
command:
[root@nzhost2 ~]# shutdown -h now
The system displays a series of messages as it stops processes and other system activ-
ity. When it finishes, it displays the message “power down” which indicates that it is
now safe to turn off the power to the server.
7. Press the power button on Host 2 (located in the front of the cabinet) to power down
that NPS host.
8. On ha1, shut down the Linux operating system using the following command:
[root@nzhost1 ~]# shutdown -h now
The system displays a series of messages as it stops processes and other system activ-
ity. When it finishes, it displays the message “power down” which indicates that it is
now safe to turn off the power to the server.
9. Press the power button on Host 1 (located in the front of the cabinet) to power down
that NPS host.
10. Switch the breakers to OFF on both the left and right PDUs. (Repeat this step for each
rack of the system.)
NEC InfoFrame DWH PDU and Circuit Breakers Overview
The main input power distribution units (PDUs) are located on the right and left sides at
the rear of the rack, as shown in Figure 5-9. O-25 and O-50 systems both have one PDU on
each side of the rack O-100 has two PDUs on each side.
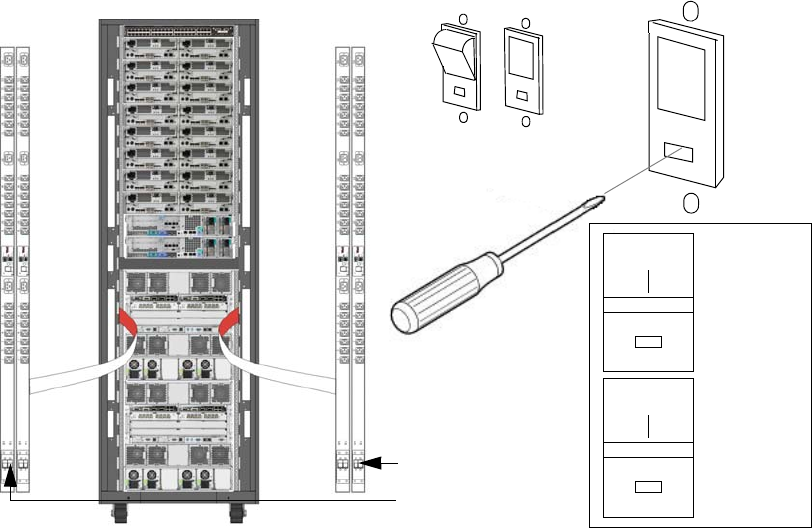
20282-20 Rev.1 5-33
Power Procedures
Figure 5-10: NEC InfoFrame DWH ZA100 PDUs and Circuit Breakers
At the bottom of each PDU is a pair of breaker rocker switches.
To close the circuit breakers (power up the PDUs), you push in the ON toggle of the
rocker switch. Make sure that you push in all four rocker switches, two on each PDU.
To open the circuit breakers (power off the PDUs), you must use a tool such as a small
flathead screwdriver; insert the tool into the hole labelled OFF and gently press until
the rocker toggle pops out. Make sure that you open all of the rocker toggles, two on
each PDU.
Powering On the NEC InfoFrame DWH Appliance
Follow these steps to power on a NEC InfoFrame DWH appliance:
1. Make sure that the main power cables are connected to the data center drops; there are
two power cables for each rack of the ZA25 and ZA50 systems, and four power cables
for each rack of the ZA100 system.
2. Close the two breaker switches on both the left and right PDUs as shown in Figure 5-9
on page 5-28.
3. Press the power button on both host servers and wait for the servers to start. This pro-
cess can take a few minutes.
4. Log in as root to one of the hosts and confirm that the Netezza software has started as
follows:
a. Run the crm_mon command to obtain the cluster status:
ON
OFF
OFF
ON
Two circuit breakers
at the bottom
of each PDU.
OFF
ON
5-34 20282-20 Rev.1
IBM Netezza System Administrator’s Guide
[root@nzhost1 ~]# crm_mon -i5
============
Last updated: Tue Jun 2 11:46:43 2009
Current DC: nzhost1 (key)
2 Nodes configured.
3 Resources configured.
============
Node: nzhost1 (key): online
Node: nzhost2 (key): online
Resource Group: nps
drbd_exphome_device (heartbeat:drbddisk): Started nzhost1
drbd_nz_device (heartbeat:drbddisk): Started nzhost1
exphome_filesystem (heartbeat::ocf:Filesystem): Started nzhost1
nz_filesystem (heartbeat::ocf:Filesystem): Started nzhost1
fabric_ip (heartbeat::ocf:IPaddr): Started nzhost1
wall_ip (heartbeat::ocf:IPaddr): Started nzhost1
nz_dnsmasq (lsb:nz_dnsmasq): Started nzhost1
nzinit (lsb:nzinit): Started nzhost1
fencing_route_to_ha1 (stonith:apcmastersnmp):Started nzhost2
fencing_route_to_ha2 (stonith:apcmastersnmp):Started nzhost1
b. Identify the active host in the cluster, which is the host where the nps resource
group is running:
[root@nzhost1 ~]# crm_resource -r nps -W
crm_resource[5377]: 2009/06/01_10:13:12 info: Invoked: crm_resource
-r nps -W
resource nps is running on: nzhost1
c. Log in as nz and verify that the Netezza server is online:
[nz@nzhost1 ~]$ nzstate
System state is 'Online'.
Powering Off an NEC InfoFrame DWH Appliance
Perform the following procedure to power off an NEC InfoFrame DWH appliance.
1. Logon to ha1 as root user.
Note: Do not issue the su - command to become root.
2. The heartbeat must be stopped.
To check the cluster state, type:
crm_mon -i5
If both hosts are online and all services in the nps resource group are started, then the
cluster is up.
If the cluster is down, go directly to step 3.
If the cluster is up, shutdown the standby node first:
a. Determine the active and standby nodes:
crm_resource -r nps -W
The active node will be listed, so the standby node is the one that is not listed.
20282-20 Rev.1 5-35
Power Procedures
b. To shutdown the standby node, go to the KVM on the standby node and type:
/sbin/service heartbeat stop
Wait until the standby node is down before proceeding.
Note: If you wish to monitor the state of the nodes, you can open another window
(ALT-F2) and run the command crm_mon -i5 in that window. This is optional.
c. When the standby node is down, go to the KVM on the active node and type:
/sbin/service heartbeat stop
Note: Wait until the active node is down before proceeding. Use separate terminal
instance with the crm_mon -i5 command to monitor the state of the active node.
3. Log in to ha2 as root, then shut down the Linux operating system using the following
command:
shutdown -h now
The system displays a series of messages as it stops processes and other system activ-
ity, and the system powers down.
4. Log in to ha1 as root, then shut down the Linux operating system using the following
command:
shutdown -h now
The system displays a series of messages as it stops processes and other system activ-
ity, and the system powers down.
5. Switch off the power to the PDU units (located in the rear of the cabinet) to completely
power down the rack. Make sure that you turn off power to all power switches.
5-36 20282-20 Rev.1
IBM Netezza System Administrator’s Guide

6-1
C H A P T E R 6
Managing the Netezza Server
What’s in this chapter
Software Revision Levels
System States
Managing the System State
System Errors
System Logs
System Configuration
This chapter describes how to manage the Netezza server and processes. The Netezza soft-
ware that runs on the appliance can be stopped and started for maintenance tasks, so this
chapter describes the meaning and impact of system states. This chapter also describes log
files and where to find operational and error messages for troubleshooting activities.
Although the system is configured for typical use in most customer environments, you can
also tailor software operations to meet the special needs of your environment and users
using configuration settings.
Software Revision Levels
The software revision level is the release or version of the Netezza software that is running
on your Netezza appliance. The revision level typically includes a major release number, a
minor release (or service pack number) and possibly a patch number if you have updated
the release to a patch revision.
Displaying the Netezza Software Revision
You can use the nzrev command to display the current Netezza software revision. For more
information about the nzrev command syntax and options, see “nzrev” on page A-37.If you
enter the nzrev command with no arguments, Netezza returns the revision number string
that displays the major and minor number and the build number. Sample output follows:
nzrev
Release 7.0, Dev 1 [Build 24438]
When you enter the nzrev -rev command, Netezza returns the entire revision number string,
including all fields (such as variant and patch level, which in this example are both zero).
nzrev -rev
7.0.0-0.D-1.P-0.Bld-24438

6-2 20282-20 Rev.1
IBM Netezza System Administrator’s Guide
From a client system, you can use the nzsystem showRev -host host -u user -pw password
command to display the revision information.
Displaying the Software Revision Levels
You can use the nzcontents command to display the revision and build number of all the
executables on the host. This command takes several seconds to run and results in multi-
ple lines of output.
Note: Programs with no revisions are scripts or special binaries.
When you enter the nzcontents command, Netezza displays the program names, the revi-
sion stamps, the build stamps, and checksum. Note that the sample output below shows a
small set of output, and the checksum values have been truncated to fit the output mes-
sages on the page.
nzcontents
Table 6-1 describes the components of the Revision Stamp fields.
System States
The Netezza system state is the current operational state of the appliance. In most cases,
the system is online and operating normally. There may be times when you need to stop the
system to perform maintenance tasks or as part of a larger procedure.
You can manage the Netezza system state using the nzstate command. It can display as
well as wait for a specific state to occur. For more information about the nzstate command
syntax and options, see “nzstate” on page A-48.
Program Revision Stamp Build Stamp CheckSum
-------------- ------------------------ --------------------------------- --------------
adm Directory
nzbackup 7.0.0-0.D-1.P-0.Bld-24438 2012-07-28.24438.dev.cm.24438 1821...
nzcontents ab685...
nzconvert 3a52...
nzds 7.0.0-0.D-1.P-0.Bld-24438 2012-07-28.24438.dev.cm.24438 d3f2...
...
Table 6-1: Netezza Software Revision Numbering
Major Minor Subminor -Variant .Stage .Patch (P-n) .Build (Bld-n)
Numeric
Incremented
for major
releases.
Numeric
Incremented
for minor
releases.
Numeric
Incremented
for service
packs.
Numeric
Usually 0.
Used very
rarely.
Alphanumeric
Indicates a stage
of a release. D
(development), A
(alpha), and B
(beta) are internal,
F (final) is for
released software.
The sample output
shows D-1.
Alphanumeric
Incremented for
fix releases.
Note that all
patches are
cumulative and
apply to a spe-
cific, existing
release.
Alphanumeric
Incremented
serially for
every produc-
tion build.
Note that the
prefix cm
denotes a pro-
duction build.

20282-20 Rev.1 6-3
System States
Displaying the Current System State
You can use the nzstate command to display the current system state.
[nz@nzhost ~]$ nzstate
System state is 'Online'.
Table 6-2 lists the common system states and how they are invoked and exited.
Note: When you specify the nzsystem pause, offline, restart, and stop commands, the sys-
tem allows already running queries to finish unless you use the -now switch, which
immediately aborts all running queries. For more information about the nzsystem com-
mand, see “nzsystem” on page A-55.
Table 6-2: Common System States
States Description Invoked Exited
Online Select this state to make the Netezza fully
operational. This is the most common sys-
tem state. In this state, the system is
ready to process or is processing user
queries.
The system enters this state
when you use the nzsystem
restart or resume command,
or after you boot the system.
The system exits the
online state when you
use the nzsystem stop,
offline, pause, or restart
commands.
Note:
You can also use the nzsystem restart command to quickly stop and start all server software.
You can only use the nzsystem restart command on a running Netezza that is in a non-stopped state.
Offline Select this state to interrupt the Netezza.
In this state, the system completes any
running queries, but displays errors for any
queued and new queries.
The system enters this state
when you use the nzsystem
offline command.
The system exits this
state when you use the
nzsystem resume or stop
command.
Paused Select this state when you expect a brief
interruption of server availability. In this
state, the system completes any running
queries, but prevents queued or new que-
ries from starting. Except for the delay
while in the paused state, users should not
notice any interruption in service.
The system enters the paused
state when you use the nzsys-
tem pause command.
The system exits the
paused state when you
use the nzsystem resume
or stop command, or if
there is a hardware fail-
ure on an active SPU.
Down The system enters the down state if there
is insufficient hardware for the system to
function even in failover mode. For more
information about the cause of the Down
state, use the nzstate -reason command.
Not user invokeable. You must repair the sys-
tem hardware and then
use the nzsystem resume
command.
Stopped Select this state for planned tasks such as
installation of new software. In this state,
the system waits for currently running
queries to complete, prevents queued or
new queries from starting, and then shuts
down all Netezza software.
The system enters the
stopped state when you use
the nzsystem stop or the nzs-
top command. Note that if
you use the nzstop command,
the system aborts all running
queries.
The system exits the
stopped state when you
use the nzstart
command.

6-4 20282-20 Rev.1
IBM Netezza System Administrator’s Guide
System States Reference
When the Netezza software is running, the system and SPUs can transition through the fol-
lowing operational states. The states that end in the letters “ing” (such as Pausing, Pausing
Now, Discovering) are typically transitional states that are very short in duration. The other
states such as those described in Table 6-2 on page 6-3 are usually the longer duration
states; the system usually remains in those states until operator action forces a state
change. Table 6-3 describes all of the system states.
Table 6-3: System States Reference
State Description
Down The system has not been configured (there is no configuration infor-
mation for the data slices to SPU topology) or there is not enough
working hardware to operate the system even in failover.
The SPUs can never be in this state.
Discovered The SPUs and other components are discovered, but the system is
waiting for all components to complete start-up before transitioning
to the initializing state.
Discovering The system manager is in the process of discovering all the system
components that it manages.
Going Offline The system is in an interim state going to offline.
Going Offline (Now) The system is in an interim state going to offline now.
Going Pre-Online The system is in an interim state, going to pre-online.
Going to Maintain
Initialized The system uses this state during the initial startup sequence.
Initializing The system is initializing. You cannot execute queries or transac-
tions in this state.
Maintain
Missing The system manager has detected a new, unknown SPU in a slot
that was previously occupied but not deleted.
Offline (Now) This state is similar to offline, except that the system stops user
jobs immediately during the transition to offline.
For more information, see Table 5-4 on page 5-9.
Online The system is running normally. It can service requests.
Paused The system is paused. You cannot run user jobs.
Paused (Now) This state is similar to paused, except that the system stops user
jobs immediately during the transition to paused.
For more information, see Table 5-4 on page 5-9.

20282-20 Rev.1 6-5
System States
Waiting for a System State
You can use the nzstate command to wait for a specific operational state to occur before
proceeding with other commands or actions. You can use the nzstate command to list the
system states that you can wait for, as follows:
[nz@nzhost ~]$ nzstate listStates
State Symbol Description
------------ ------------------------------------------------------------
initialized used by a system component when first starting
paused already running queries will complete but new ones are queued
pausedNow like paused, except running queries are aborted
offline no queries are queued, only maintenance is allowed
offlineNow like offline, except user jobs are stopped immediately
online system is running normally
stopped system software is not running
down system was not able to initialize successfully
To wait for the online state or else timeout after 10 seconds, enter:
nzstate waitfor -u admin -pw password -host nzhost -type online
-timeout 10
Pausing The system is transitioning from online to paused. During this state
no new queries or transactions are queued, although the system
allows current transactions to complete, unless you have specified
the nzsystem pause -now command.
Pausing Now The system is attempting to pause due to a hardware failure, or the
administrator entered the nzsystem pause -now command.
Pre-Online The system has completed initialization. The system goes to the
resume state.
Resuming The system is waiting for all its components (SPUs, SFIs, and host
processes) to reach the online state before changing the system
state to online.
Stopped The system is not running. Note that commands assume this state
when they attempt to connect to a system and get no response.
The SPUs can never be in this state.
Stopped (Now) This state is similar to stopped, except that the system stops user
jobs immediately during the transition to stopped.
Stopping The system is transitioning from online to stopped.
Stopping Now The system is attempting to stop, or the administrator entered the
nzsystem stop -now command.
Unreachable The system manager cannot communicate with the SPU because it
has failed or it has been physically removed from the system.
Table 6-3: System States Reference
State Description

6-6 20282-20 Rev.1
IBM Netezza System Administrator’s Guide
To test scripts or do maintenance, enter:
nzsystem pause -force
nzstate waitfor -u admin -pw password -host nzhost -type paused
-timeout 300
Do some maintenance.
nzsystem resume
nzstate waitfor -u admin -pw password -host nzhost -type online
-timeout 120
Run a query.
Managing the System State
You can use the nzstart and nzstop commands respectively to start and stop the Netezza
system operations. The nzsystem command provides additional state change options, such
as allowing you to pause and resume the system, as well as restart the system.
Note: When you stop and start the Netezza system operations on a Netezza C1000 system,
the storage groups continue to run and perform tasks such as media checks and health
checks for the disks in the array, as well as disk regenerations for disks that fail. The RAID
controllers are not affected by the Netezza system state.
Note: All nzsystem subcommands, except the nzsystem showState and showRev com-
mands, require the Manage System administrative privilege. For more information, see
“Administrator Privileges” on page 8-9.
Start the System
When you start the Netezza system, you bring the system and database processes fully
online so that the Netezza system is ready to perform user queries and other tasks.
You can use the nzstart command to start system operation if the system is in the stopped
state. The nzstart command is a script that initiates a system start by setting up the envi-
ronment and invoking the startup server. The nzstart command does not complete until the
system is online. The nzstart command also verifies the host configuration to ensure that
the environment is configured correctly and completely; it displays messages to direct you
to files or settings that are missing or misconfigured.
For more information about the nzstart command syntax and options, see “nzstart” on
page A-47.
To start the Netezza system, enter:
nzstart
(startupsvr) Info: NZ-00022: --- program 'startupsvr' (23328)
starting on host 'nzhost' ... ---
Note: You must run nzstart on the host and be logged on as the user nz. You cannot run it
remotely from Netezza client systems.
For IBM Netezza 1000 or IBM PureData System for Analytics N1001 systems, a message
is written to the sysmgr.log file if there are any storage path issues detected when the sys-
tem starts. The log displays a message similar to “mpath -issues detected: degraded disk
path(s) or SPU communication error” which helps to identify problems within storage
arrays. For more information about how to check and manage path failures, see “Hardware
Path Down” on page 7-22.
20282-20 Rev.1 6-7
Managing the System State
Stop the System
When you stop the Netezza system, you stop the database processes and services and thus
new user queries or tasks such as loads, backups, and others cannot run. Typically, you only
stop the server when directed to do so as part of a very specific administration procedure or
when you need to perform a major management task You can use the nzstop command to
stop a running system. (You can also use the nzsystem stop command, but nzstop is the
recommended method.) Stopping a system stops all Netezza host processes. Unless you
specify otherwise, stopping the system waits for all running jobs to complete. For more
information about the nzstop command syntax and options, see “nzstop” on page A-53.
Note: You must run nzstop on the host and be logged on as the user nz. You cannot run it
remotely.
To stop the system, enter:
nzstop
To stop the system or exit after attempting for five minutes (300 seconds), enter:
nzstop -timeout 300
Pause the System
Certain management tasks such as host backups require the system to be in the paused
state. When you pause the system, the system queues any new queries or work until the
system is “resumed.” By default, the system finishes the queries and transactions that
were already active at the time the pause command was issued.
To transition the system to the paused state:
[nz@nzhost ~]$ nzsystem pause
Are you sure you want to pause the system (y|n)? [n] y
Enter y to continue. The transition completes quickly on an idle system, but it can take
much longer if the system is busy processing active queries and transactions. When the
transition completes, the system enters the paused state, which you can confirm with the
nzstate command as follows:
[nz@nzhost ~]$ nzstate
System state is 'Paused'.
You can use the -now option to force a transition to the paused state, which causes the sys-
tem to abort any active queries and transactions. As a best practice, you should use the
nzsession show -activeTxn command to display a list of the current active transactions
before you force the system to terminate them.
Resume the System
When a system is paused or offline, you can resume the normal operations by resuming the
system. When you resume the system from a paused state, it will start to process all the
transactions that were submitted and queued while it was paused. In some cases, the sys-
tem will also restart certain transactions that support the restart operations.
To resume the system and return it to the online state:
[nz@nzhost ~]$ nzsystem resume
The command usually completes very quickly; you can confirm that the system has
returned to the online state using the following command:

6-8 20282-20 Rev.1
IBM Netezza System Administrator’s Guide
[nz@nzhost ~]$ nzstate
System state is 'Online'.
Take the System Offline
When you take the system offline, the system will not queue any new work or transactions.
The state only allows maintenance tasks to run. By default, the system finishes the queries
and transactions that were already active at the time the offline command was issued.
To transition the system to the paused state:
[nz@nzhost ~]$ nzsystem offline
Are you sure you want to take the system offline (y|n)? [n] y
Enter y to continue. The transition completes quickly on an idle system, but it can take
much longer if the system is busy processing active queries and transactions. When the
transition completes, the system enters the offline state, which you can confirm with the
nzstate command as follows:
[nz@nzhost ~]$ nzstate
System state is 'Offline'.
You can use the -now option to force a transition to the offline state, which causes the sys-
tem to abort any active queries and transactions. As a best practice, you should use the
nzsession show -activeTxn command to display a list of the current active transactions
before you force the system to terminate them.
Restart the System
When a system is in the online state but a system problem has occurred, you can restart
the system which stops and starts all server software. You can only use the nzsystem restart
command on a running system that is in a non-stopped state.
To restart the system:
[nz@docspubox ~]$ nzsystem restart
Are you sure you want to restart the system (y|n)? [n] y
Overview of the Netezza System Processing
When you start the Netezza system, you automatically launch a number of system pro-
cesses. Table 6-4 describes the Netezza processes.
Table 6-4: Netezza Processes
Process Description
bnrmgr
•
Handles incoming connections from the nzbackup and nzrestore
commands.
•
Launches an instance of the backupsvr or restoresvr to handle each client
instance.
bootsvr
•
Informs TFTP client (the SPUs and SFIs) of the location of their initial
program or download images on the host.
•
Informs the SPUs where to upload their core file in the event that a SPU
is instructed to dump a core image for debugging purposes.

20282-20 Rev.1 6-9
Managing the System State
clientmgr
•
Handles incoming connections from nz applications.
•
This is not unlike the postmaster that handles incoming connections from
nzsql, ODBC, and so on.
dbosDis-
patch
•
Accepts execution plans from the postgres, backup, and restore
process(es).
•
Dynamically generates C code to process the query, and cross-compiles
the query so that it can be run on the host.
•
Broadcasts the compiled code to the SPUs for execution.
dbosEvent
•
Receives responses and results from the SPUs. As appropriate, it may
have the SPUs perform additional steps as part of the query.
•
Rolls up the individual result sets (aggregated, sorted, consolidated, and
so on) and sends the final results back to the client’s postgres, backup, or
restore process.
eventmgr
•
Processes events and event rules. When an event occurs, such as the sys-
tem changes state, a hardware component fails or is restarted, the
eventmgr checks to see if any action needs to be taken based on the
event and if so, performs the action. The action could be sending an e-
mail message or executing an external program.
•
For more information about event rules, see Chapter 7, “Managing Event
Rules.”
loadmgr
•
Handles incoming connections from the nzload command.
•
Launches an instance of the loadsvr to handle each instance of the
nzload command.
nzvacuum-
cat
•
At boot time, the system starts the nzvacuumcat command, which in turn
invokes the internal VACUUM command on system catalogs to remove
unneeded rows from system tables and compact disk space to enable
faster system table scanning.
•
During system operation, the nzvacuumcat program monitors the amount
of host disk space used by system tables in each database. It perfoms
this check every 60 seconds. If the system catalog disk space for a partic-
ular database grows over a threshold amount (128 KB), the nzvacuumcat
program initiates a system table vacuum (VACUUM) on that database.
•
The VACUUM command works on system tables only after obtaining an
exclusive lock on all system catalog tables. If it is unable to lock the sys-
tem catalog tables, it quits and retries. Only when the VACUUM
command succeeds does the nzvacuumcat program change the size of
the database.
•
While the VACUUM command is working, the system prevents any new
SQL or system table activity to start. This window of time is usually about
1 to 2 seconds, but can be longer if significant amounts of system cata-
log updates/deletes have occurred since the last VACUUM operation.
Table 6-4: Netezza Processes
Process Description

6-10 20282-20 Rev.1
IBM Netezza System Administrator’s Guide
System States during Netezza Start-Up
When you boot the system, the Netezza software automatically starts. The system goes
through the following states:
1. Stopped
2. Discovering
3. Initializing
4. Preonlining
5. Resuming
6. Online
postgres
•
Validates the access rights (username, password, ACL).
•
Parses the SQL, and generates the optimized execution plan.
•
Returns the results set to the client application when the query finishes
executing.
Note that two default postgres jobs are associated with the sysmgr and
the sessionmgr processes.
postmaster
•
Accepts connection requests from clients (nzsql, ODBC, and so on).
•
Launches one postgres process per connection to service the client.
sessionmgr
•
Keeps the session table current with the state of the different sessions
that are running the system.
•
For more information, see “Session Manager” on page 6-16.
startupsvr
•
Launches and then monitors all of the other processes. If any system pro-
cess should die, the startupsvr follows a set of predefined rules, and
either restarts the failed process or restarts the entire system.
•
Controlled by /nz/kit/sys/startup.cfg
statsmgr
•
Handles requests for statistics from the nzstats command.
•
For more information, see “Statistics Server” on page 6-17.
statsSvr
•
Communicates with the nzstats command to obtain host-side operational
statistics.
•
Note that the nzstats command communicates with the sysmgr to obtain
SPU statistics.
sysmgr
•
Monitors and manages the overall state of the system.
•
Periodically polls the SPUs and SFIs to ensure that they are operational.
•
Initiates state changes upon requests from the user or as a result of a
change in hardware status (for example, a SPU failure).
Table 6-4: Netezza Processes
Process Description

20282-20 Rev.1 6-11
System Errors
When you power up (or reset) the hardware, each SPU loads an image from its flash mem-
ory and executes it. This image is then responsible for running diagnostics on the SPU,
registering the SPU with the host, and downloading runtime images for the SPU’s CPU and
the FPGA disk controller. The system downloads these images from the host through TFTP.
System Errors
During system operation different types of errors can occur. Table 6-5 describes some of
those errors.
The Netezza system can take the following actions when an error occurs:
Display an error message — Presents an error message string to the users that
describes the error. Generally the system performs this action whenever a user request
is not fulfilled.
Try again — During intermittent or temporary failures, keep trying until the error condi-
tion disappears. The retries are often needed when resources are limited, congested, or
locked.
Fail over — Switches to an alternate or spare component, because an active compo-
nent has failed. Failover is a system-level recovery mechanism and can be triggered by
a system monitor or an error detected by software trying to use the component.
Log the error — Adds an entry to a component log. A log entry contains a date and
time, a severity level, and an error/event description.
Send an event notification — Sends notification through e-mail or by running a com-
mand. The decision whether to send an event notification is based on a set of user-
configurable event rules.
Table 6-5: Error Categories
Category Description Example
User error An error on the part of the user, usu-
ally due to incorrect or invalid input.
Invalid user name, invalid SQL
syntax.
Component
failure
A hardware or software system compo-
nent failure.
SPU/SFI failure; host process
crashes.
Environment
failure
A request of an environment facility
fails. This is often due to resource or
access problems.
A file is locked; a buffer is full.
Recoverable
internal error
A detected internal programming error
that is not severe enough to abort the
program.
Unknown case value or msg
type; file close fails.
Nonrecover
-able internal
error
A detected internal programming error
or corrupt internal state that requires
the program to abort.
Core, memory corruption, assert
fails.

6-12 20282-20 Rev.1
IBM Netezza System Administrator’s Guide
Abort the program — Terminates the program, because it cannot continue due to an
irreparably damaged internal state or because continuing would corrupt user data.
Software asserts that detect internal programming mistakes often fall into this cate-
gory, because it is difficult to determine that it is safe to continue.
Clean up resources — Frees or releases resources that are no longer needed. Software
components are responsible for their own resource cleanup. In many cases, resources
are freed locally as part of each specific error handler. In severe cases, a program
cleanup handler runs just before the program exits and frees/releases any resources
that are still held.
System Logs
All major software components that run on the host have an associated log. Log files have
the following characteristics:
Each log consists of a set of files stored in a component-specific directory. For manag-
ers, there is one log per manager. For servers, there is one log per session, and their log
files have pid and/or date (<pid>.<yyyy-mm-dd>) identifiers.
Each file contains one day of entries, for a default maximum of seven days.
Each file contains entries that have a timestamp (date and time), an entry severity
type, and a message.
The system rotates log files, that is, for all the major components there are the current log
and the archived log files.
For all Netezza components (except postgres) — The system creates a new log file at
midnight if there is constant activity for that component. If, however you load data on
Monday and then do not load again until Friday, the system creates a new log file dated
the previous day from the new activity, in this case, Thursday. Although the size of the
log files is unlimited, every 30 days the system removes all log files that have not been
accessed.
For postgres logs — By default, the system checks the size of the log file daily and
rotates it to an archive file if it is greater than 1 GB in size. The system keeps 28 days
(four weeks) of archived log files. (Netezza Support can help you to customize these
settings if needed.)
To view the logs, log onto the host as user nz. To enable SQL logging, see “Logging Netezza
SQL Information” on page 8-30. For more information about these processes, see “Over-
view of the Netezza System Processing” on page 6-8.
Backup and Restore Server
The backup and restore servers handle requests for the nzbackup/nzrestore commands. The
log files record the start and stop times of the nzbackup/nzrestore processes and starting
and stopping times of the backupsvr and restoresvr processes, respectively.
Log file
/nz/kit/log/backupsvr/backupsvr.log — Current backup log
/nz/kit/log/restoresvr/restoresvr.log — Current restore log
20282-20 Rev.1 6-13
System Logs
/nz/kit/log/backupsvr/backupsvr.<pid>.YYYY-MM-DD.log — Archive backup log
/nz/kit/log/restoresvr/restoresvr.<pid>.YYYY-MM-DD.log — Archive restore log
Sample Log Messages
2004-05-13 08:03:12.791696 EDT Info: NZ-00022: --- program 'bnrmgr' (5006) starting
on host romeo-8400 ... ---
Bootserver Manager
The bootsvr log file records the initiation of all SPUs on the system, usually when the sys-
tem is restarted by the nzstart command and also all stopping and restarting of the bootsvr
process.
Log file
/nz/kit/log/bootsvr/bootsvr.log — Current log
/nz/kit/log/bootsvr/bootsvr.YYYY-MM-DD.log — Archived log
Sample Log Messages
2004-05-13 08:07:31.548940 EDT Info: Number of boots currently in progress= 12
Client Manager
The clientmgr log file records all connection requests to the database server and also all
stopping and starting of the clientmgr process.
Log file
/nz/kit/log/clientmgr/clientmgr.log — Current log
/nz/kit/log/clientmgr/clientmgr.YYYY-MM-DD.log — Archived log
Sample Log Messages
2004-05-13 14:09:31.486544 EDT Info: admin: login successful
Database Operating System
The dbos.log file records information about the SQL plans submitted to the database server
and also the restarting of the dbos process.
Log file
/nz/kit/log/dbos/dbos.log — Current log
/nz/kit/log/dbos/dbos.YYYY-MM-DD.log — Archived log
Sample Log Messages
2011-07-08 00:04:03.245043 EDT Info: NZ-00022: --- program 'dbos'
(16977) starting on host 'nzhost' ... ---
2011-07-06 14:33:04.773920 EDT Debug: startTx implicit RO tx
0x2f30410 cli 205 uid 1205 sid 16226 pid [20050]
6-14 20282-20 Rev.1
IBM Netezza System Administrator’s Guide
2011-07-06 14:33:05.141215 EDT Info: plan queued: planid 1 tx
0x2f3040e cli 206 uid 1206 sid 16225 pid [20049]
2011-07-06 14:33:05.142439 EDT Info: plan in GRA: planid 1 tx
0x2f3040e cli 206 uid 1206 sid 16225 pid [20049]
Plan ID — The plan number queued or started. This number relates to the correspond-
ing execution plan in the nz/data/plans directory. The system increments it for each
new portion of SQL processed and resets it to 1 when you restart the system.
Q ID — The queue to which this plan has been assigned.
Tx ID — The unique transaction identifier.
cli — The ID of the client process.
UID — The unique ID of the dbos client. Every time a client connects it receives a
unique number.
SID — The ID related to the ID returned from the nzsession.
PID — The process ID of the calling process running on the Netezza host.
Event Manager
The eventmgr log file records system events and the stopping and starting of the eventmgr
process.
Log file
/nz/kit/log/eventmgr/eventmgr.log — Current log
/nz/kit/log/eventmgr/eventmgr.YYYY-MM-DD.log — Archived log
Sample Log Messages
2011-07-08 00:11:31.359916 EDT Info: NZ-00022: --- program
'eventmgr' (15113) starting on host 'D400-9E-D' ... ---
2011-07-08 00:11:57.798341 EDT Info: received & processing event
type = hwNeedsAttention, event args = 'hwType=spa, hwId=1006,
location=2nd rack, 1st spa, spaId=2, slotId=1, devSerial=,
errString=One or more drives are either invalid or contain wrong
firmware revision. Run 'sys_rev_check storagemedia' for more
details., eventSource=system' event source = 'System initiated
event'
2011-07-08 00:16:32.454625 EDT Info: received & processing event
type = sysStateChanged, event args = 'previousState=discovering,
currentState=initializing, eventSource=user' event source ='User
initiated event'
event type — The event that triggered the notification.
event args — The argument being processed.
errString — The event message, which can include hardware identifications and other
details.
eventSource — The source of the event; system is the typical value.
20282-20 Rev.1 6-15
System Logs
Flow Communications Retransmit
The flow communications retransmit log file records retransmission processes.
Log file
/nz/kit/log/fcommrtx/fcommrtx.log — Current log
/nz/kit/log/fcommrtx/fcommrtx.2006-03-01.log — Archived log
Sample Log Messages
2011-07-08 00:04:03.243429 EDT Info: NZ-00022: --- program
'fcommrtx' (2331) starting on host 'nzhost' ... ---
Host Statistics Generator
The hostStatsGen log file records the starting and stopping of the hostStatsGen process.
Log file
/nz/kit/log/hostStatsGen/hostStatsGen.log — Current log
/nz/kit/log/hostStatsGen/hostStatsGen.YYYY-MM-DD.log — Archived log
Sample Log Messages
2011-07-08 00:04:04.245426 EDT Info: NZ-00022: --- program
'hostStatsGen' (2383) starting on host 'D400-9E-D' ... ---
2011-07-08 00:11:08.447854 EDT Info: NZ-00023: --- program
'hostStatsGen' (2383) exiting on host 'D400-9E-D' ... ---
Load Manager
The loadmgr log file records details of load requests, and the stopping and starting of the
loadmgr.
Log file
/nz/kit/log/loadmgr/loadmgr.log — Current log
/nz/kit/log/loadmgr/loadmgr.YYYY-MM-DD.log — Archived log
Sample Log Messages
2011-07-08 00:02:02.898247 EDT Info: system is online - enabling
load sessions
Postgres
The postgres log file is the main database log file. It contains information about database
activities.
Log file
/nz/kit/log/postgres/pg.log — Current log
/nz/kit/log/postgres/pg.log.n — Archived log
6-16 20282-20 Rev.1
IBM Netezza System Administrator’s Guide
Sample Log Messages
2011-07-08 09:40:05.336743 EDT [12615] DEBUG: CheckPointTime =
300
2011-07-08 09:40:05.338733 EDT [12616] NOTICE: database system
was shut down at 2011-07-08 09:40:05 EDT
2011-07-08 09:40:07.354693 EDT [12625] DEBUG: connection:
host=127.0.0.1 user=ADMIN database=SYSTEM
2011-07-08 09:40:07.358223 EDT [12625] DEBUG: QUERY: SET
timezone = 'America/New_York'
2011-07-08 09:40:07.358507 EDT [12625] DEBUG: QUERY: select
current_catalog, current_user
2011-07-08 09:40:07.359773 EDT [12625] DEBUG: QUERY: begin local
transaction;
2011-07-08 09:40:07.359950 EDT [12625] DEBUG: QUERY: select
null;
2011-07-08 09:40:07.360159 EDT [12625] DEBUG: QUERY: commit
Session Manager
The sessionmgr log file records details about the starting and stopping of the sessionmgr
process, and any errors associated with this process.
Log file
/nz/kit/log/sessionmgr/sessionmgr.log — Current log
/nz/kit/log/sessionmgr/sessionmgr.YYYY-MM-DD.log — Archived log
Sample Log Messages
2011-07-08 02:16:52.745743 EDT Info: NZ-00022: --- program
'sessionmgr' (3735) starting on host 'nzhost' ... ---
2011-07-08 02:24:01.119537 EDT Info: NZ-00023: --- program
'sessionmgr' (3735) exiting on host 'nzhost' ... ---
SPU Cores Manager
The /nz/kit/log/spucores directory contains core files and other information that is saved
when a SPU aborts on the host. If several SPUs abort, the system creates a core file for two
of the SPUs.
Startup Server
The startupsvr log file records the start up of the Netezza processes and any errors encoun-
tered with this process.
Log file
/nz/kit/log/startupsvr/startupsvr.log — Current log
/nz/kit/log/startupsvr/startupsvr.YYYY-MM-DD.log — Archived log
20282-20 Rev.1 6-17
System Logs
Sample Log Messages
2011-07-08 00:03:54.649179 EDT Info: NZ-00022: --- program
'startupsvr' (932) starting on host 'D400-9E-D' ... ---
2011-07-08 00:03:54.650672 EDT Info: NZ-00307: starting the
system, restart = no
2011-07-08 00:03:54.650735 EDT Info: NZ-00313: running onStart:
'prepareForStart'
2011-07-08 00:03:54 EDT: Rebooting SPUs via RICMP ...
2011-07-08 00:03:57 EDT: Sending 'reboot' to all SPUs ... done
2011-07-08 00:03:57 EDT: Checking database directory sizes...
Statistics Server
The statssvr log file records the details of starting and stopping the statsSvr and any associ-
ated errors.
Log file
/nz/kit/log/statsSvr/statsSvr.log — Current log
/nz/kit/log/statsSvr/statsSvr.YYYY-MM-DD.log — Archived log
Sample Log Messages
2011-07-08 00:03:41.528687 EDT Info: NZ-00023: --- program
'statsSvr' (22227) exiting on host 'nzhost' ... ---
2011-07-08 00:04:04.249586 EDT Info: NZ-00022: --- program
'statsSvr' (2385) starting on host 'nzhost' ... ---
System Manager
The sysmgr log file records details of stopping and starting the sysmgr process, and details
of system initialization and system state status.
Log file
/nz/kit/log/sysmgr/sysmgr.log
Sample Log Messages
2011-07-08 00:04:04.248923 EDT Info: NZ-00022: --- program
'sysmgr' (2384) starting on host 'nzhost' ... ---
The nzDbosSpill File
The host data handling software in DbosEvent has a disk work area that the system uses for
large sorts on the host.
The Netezza system has two sorting mechanisms:
The Host Merge that takes sorted SPU return sets and produces a single-sorted set. It
uses temporary disk space to handle SPU double-duty situations.

6-18 20282-20 Rev.1
IBM Netezza System Administrator’s Guide
A traditional sorter that begins with a random table on the host and sorts it into the
desired order. It can use a simple external sort method to handle very large datasets.
The file on the Linux host for this disk work area is $NZ_TMP_DIR/nzDbosSpill. Within
DBOS there is a database that tracks segments of the file presently in use.
To avoid having a runaway query use up all the host computer's disk space, there is a limit
on the DbosEvent database, and hence the size of the Linux file. This limit is in the
Netezza Registry file. The tag for the value is startup.hostSwapSpaceLimit.
System Configuration
The system configuration file, system.cfg, contains configuration settings that the Netezza
system uses for system startup, system management, host processes, and SPUs. The sys-
tem configuration file is also known as the system registry. Entries in the system.cfg file
allow you to control and tune the system.
As a best practice, you should not change or customize the system registry unless directed
to by Netezza Support or by a documented Netezza procedure. The registry contains
numerous entries, some of which are documented for use or for reference. Most settings are
internal and used only under direction from Netezza Support. Incorrect changes to the reg-
istry can cause performance impacts to the Netezza system. Many of the settings are
documented in Appendix D, “System Configuration File Settings.”
You can display the system configuration file settings using the nzsystem showRegistry
command. For more information, see “nzsystem” on page A-55.
Note: A default of zero in many cases indicates a compiled default not the actual value
zero. Text (yes/no) and numbers indicate actual values.
Display Configuration Information
You can use the nzsystem command to show system registry information and software revi-
sion level.
To display the system registry information:
nzsystem showRegistry -u bob -pw pass -host nzhost
#
# Netezza NPS configuration registry
# Date: 30-Apr-09 12:48:44 EDT
# Revision: 5.0.D1
#
# Configuration options used during system start
# These options cannot be changed on a running system
#
startup.numSpus = 6
startup.numSpares = 0
startup.simMode = no
startup.autoCreateDb = 0
startup.spuSimMemoryMB = 0
startup.noPad = no
startup.mismatchOverRide = yes

20282-20 Rev.1 6-19
System Configuration
startup.overrideSpuRev = 0
startup.dbosStartupTimeout = 300
...
The output from the command is very long; only a small portion is shown in the exam-
ple.
Changing the System Registry
To add or change the value of a system registry setting, you use the nzsystem set -arg com-
mand. For details about the command and its arguments, see “nzsystem” on page A-55.
You must pause the system before changing a setting, and then resume the system after
completing the nzsystem set command.
Do not change your system settings unless directed to do so by Netezza Support.
For example, to specify a system setting:
nzsystem set -arg setting=value
6-20 20282-20 Rev.1
IBM Netezza System Administrator’s Guide

7-1
C H A P T E R 7
Managing Event Rules
What’s in this chapter
Template Event Rules
Managing Event Rules
Template Event Reference
The Netezza event manager monitors the health, status, and activity of the Netezza system
operation and can take action when a specific event occurs. Event monitoring is a proactive
way to manage the system without continuous human observation. You can configure the
event manager to continually watch for specific conditions such as machine state changes,
hardware restarts, faults, or failures. In addition, the event manager can watch for condi-
tions such as reaching a certain percentage of full disk space, queries that have been
running for longer than expected, and other Netezza system behaviors.
This chapter describes how to administer the Netezza system using event rules that you
create and manage.
Template Event Rules
Event management consists of creating rules that define conditions to monitor and the
actions to take when that condition is detected. The event manager uses these rules to
define its monitoring scope, and thus its behavior when a rule is triggered. Creating event
rules can be a complex process because you have to define the condition very specifically
so that the event manager can detect it, and you must define the actions to take when the
match occurs.
To help ease the process of creating event rules, Netezza supplies template event rules that
you can copy and tailor for your system. The template events define a set of common con-
ditions to monitor with actions that are based on the type or impact of the condition. The
template event rules are not enabled by default, and you cannot change or delete the tem-
plate events. You can copy them as “starter rules” for more customized rules in your
environment.
As a best practice, you should begin by copying and using the template rules. If you are
very familiar with event management and the operational characteristics of your Netezza
appliance, you can also create your own rules to monitor conditions which are important to
you. You can display the template event rules using the nzevent show -template command.
Note: Release 5.0.x introduced new template events for IBM Netezza 100, 1000, C1000,
and N1001, and later systems. Previous event template rules specific to the z-series plat-

7-2 20282-20 Rev.1
IBM Netezza System Administrator’s Guide
form do not apply to IBM Netezza 1000 or IBM PureData System for Analytics N1001
systems and have been replaced by similar, new events.
Table 7-1 lists the predefined template event rules.
Table 7-1: Template Event Rules
Template Event Rule Name Description
Disk80PercentFull Notifies you when a disk’s space is more than 80 per-
cent full. “Specifying Disk Space Threshold
Notification” on page 7-24.
Disk90PercentFull Notifies you when a disk’s space is more than 90 per-
cent full. “Specifying Disk Space Threshold
Notification” on page 7-24.
EccError Notifies you when the system detects an error correct-
ing code (ECC) error. For more information, see
“Monitoring for ECC Errors” on page 7-29.
HardwareNeedsAttention Notifies you when the system detects a condition that
could impact the hardware. For more information, see
“Hardware Needs Attention” on page 7-21.
HardwareRestarted Notifies you when a hardware component successfully
reboots. For more information, see “Hardware
Restarted” on page 7-24
HardwareServiceRequested Notifies you of the failure of a hardware component,
which most likely requires a service call and/or
replacement. For more information, see “Hardware
Service Requested” on page 7-20.
HistCaptureEvent Notifies you if there is a problem that prevents the cur-
rent query history collection from writing files to the
staging area.
HistLoadEvent Notifies you if there is a problem that prevents the
loading of the query history files in the staging area to
the target query history database.
HwPathDown Notifies you when the status of a disk path changes
from the Up to the Down state (a path has failed). For
more information, see “Hardware Path Down” on
page 7-22.
NPSNoLongerOnline Notifies you when the system goes from the online
state to another state. For more information, see
“Specifying System State Changes” on page 7-19.
RegenFault Notifies you when the system cannot set up a data
slice regeneration.

20282-20 Rev.1 7-3
Template Event Rules
Note: Netezza may add new event types to monitor conditions on the system. These event
types may not be available as templates, which means you must manually add a rule to
enable them. For a description of additional event types that could assist you with monitor-
ing and managing the system, see “Event Types Reference” on page 7-40.
RunAwayQuery Notifies you when a query exceeds a timeout limit. For
more information, see “Specifying Runaway Query
Notification” on page 7-26.
SCSIDiskError Notifies you when the system manager detects that an
active disk has failed, or when an FPGA error occurs.
SCSIPredictiveFailure Notifies you when a disk’s SCSI SMART threshold is
exceeded.
SpuCore Notifies you when the system detects that a SPU pro-
cess has restarted and resulted in a core file. For more
information, see “Monitoring SPU Cores” on
page 7-37.
SystemHeatThresholdExceeded When any three boards in an SPA reach the red tem-
perature threshold, the event runs a command to shut
down the SPAs, SFIs, and RPCs. For more information,
see “Monitoring System Temperature” on page 7-33.
Enabled by default for z-series systems only.
SystemOnline Notifies you when the system is online. For more infor-
mation, see “Specifying System State Changes” on
page 7-19.
SystemStuckInState Notifies you when the system is stuck in the Pausing
Now state for more than the timeout specified by the
sysmgr.pausingStateTimeout (420 seconds). For more
information, see “Specifying System State Changes”
on page 7-19.
ThermalFault Notifies you when the temperature of a hardware com-
ponent has exceeded its operating thresholds. For
more information, see “Monitoring Hardware Tempera-
ture” on page 7-32.
Transaction Limit Event Sends an email notification when the number of out-
standing transaction objects exceeds 90% of the
available objects. For more information, see “Monitor-
ing Transaction Limits” on page 7-38
VoltageFault Notifies you when the voltage of a hardware compo-
nent has exceeded its operating thresholds. For more
information, see “Monitoring Voltage Faults” on
page 7-37.
Table 7-1: Template Event Rules
Template Event Rule Name Description

7-4 20282-20 Rev.1
IBM Netezza System Administrator’s Guide
The action to take for an event often depends on the type of event (its impact on the system
operations or performance). Table 7-2 lists some of the predefined template events and
their corresponding impacts and actions.
Table 7-2: Netezza Template Event Rules
Template Name Type Notify Severity Impact Action
Disk80PercentFull
Disk90PercentFull
hwDiskFull
(Notice)
Admins,
DBAs
Moder-
ate to
Serious
Full disk pre-
vents some
operations.
Reclaim space or remove
unwanted databases or older
data. For more information,
see “Specifying Disk Space
Threshold Notification” on
page 7-24.
EccError eccError
(Notice)
Admins,
NPS
Moder-
ate
No impact.
Records cor-
rectable
memory
errors.
Ignore if occasional, replace
when occurs often. For more
information, see “Monitoring
for ECC Errors” on
page 7-29.
HardwareNeedsAttention hwNeedsAt-
tention
Admins,
NPS
Moder-
ate
Possible
change or
issue that
could start to
impact
performance.
Investigate hardware prob-
lems and identify whether
steps may be required to
return the component to nor-
mal operations. For more
information, see “Hardware
Needs Attention” on
page 7-21.
HardwareRestarted hwRe-
started
(Notice)
Admins,
NPS
Moder-
ate
Any query or
data load in
progress is
lost.
Investigate whether the
cause is hardware, software.
Check for SPU cores. For
more information, see “Hard-
ware Restarted” on
page 7-24.
HardwareServiceRequested hwService-
Requested
(Warning)
Admins,
NPS
Moder-
ate to
Serious
Any query or
work in
progress is
lost. Disk fail-
ures initiate a
regeneration.
Contact Netezza. For more
information, see “Hardware
Service Requested” on
page 7-20.

20282-20 Rev.1 7-5
Template Event Rules
HistCaptureEvent histCaptu-
reEvent
Admins,
NPS
Moder-
ate to
Serious
Query history
is unable to
save cap-
tured history
data in the
staging area;
query history
will stop col-
lecting new
data.
The size of the staging area
has reached the configured
size threshold, or there is no
available disk space in /nz/
data. Either increase the size
threshold or free up disk
space by deleting old files.
HistLoadEvent histLoadE-
vent
Admins,
NPS
Moder-
ate to
Serious
Query history
is unable to
load history
data into the
database; new
history data
will not be
available in
reports until it
can be
loaded.
The history configuration
may have changed, the his-
tory database may have been
deleted, or there may be
some kind of session connec-
tion error.
HwPathDown hwPath-
Down
Admins Serious
to
Critical
Query perfor-
mance and
possible sys-
tem
downtime.
Contact Netezza Support. For
more information, see “Hard-
ware Path Down” on
page 7-22.
NPSNoLongerOnline
SystemOnline
sysState-
Changed
(Informa-
tion)
Admins,
NPS,
DBAs
Varies Availability
status.
Depends on the current
state. For more information,
see “Specifying System
State Changes” on
page 7-19.
RegenFault regenFault Admins,
NPS
Critical May prevent
user data
from being
regenerated.
Contact Netezza Support. For
more information, see “Moni-
toring Regeneration Errors”
on page 7-29.
RunAwayQuery run-
awayQuery
(Notice)
Admins,
DBAs
Moder-
ate
Can consume
resources
needed for
operations.
Determine whether to allow
to run, manage workload. For
more information, see “Spec-
ifying Runaway Query
Notification” on page 7-26.
SCSIDiskError scsiDiskEr-
ror
Admins,
NPS
Serious Impacts sys-
tem
performance.
Schedule disk replacement
as soon as possible. See
“Monitoring Disk Errors” on
page 7-30.
Table 7-2: Netezza Template Event Rules
Template Name Type Notify Severity Impact Action

7-6 20282-20 Rev.1
IBM Netezza System Administrator’s Guide
Managing Event Rules
To start using events, you must create and enable some event rules. You can use any of the
following methods to create and activate event rules:
Copy and enable a template event rule
Add an event rule
You can copy, modify, and add events using the nzevent command or the NzAdmin inter-
face. You can also generate events to test the conditions and event notifications that you
are configuring. The following sections describe how to manage events using the nzevent
SCSIPredictiveFailure scsiPredic-
tiveFailure
Admins,
NPS
Critical Adversely
affects
performance.
Schedule disk replacement
as soon as possible. See
“Monitoring for Disk Predic-
tive Failure Errors” on
page 7-28.
SpuCore spuCore Admins,
NPS
Moder-
ate
A SPU core
file has
occurred.
The system created a SPU
core file. See “Monitoring
SPU Cores” on page 7-37.
SystemHeatThresholdEx-
ceeded
sysHeat-
Threshold
Admins,
NPS
Critical System
shutdown.
Before powering on machine,
check the SPA that caused
this event to occur. For more
information, see “Monitoring
System Temperature” on
page 7-33
SystemStuckInState system-
StuckInStat
e
(Informa-
tion)
Admins,
NPS
Moder-
ate
A system is
stuck in the
“pausing
now” state.
Contact Support. See “Moni-
toring the System State” on
page 7-27.
ThermalFault hwThermal-
Fault
Admins,
NPS
Serious Can drasti-
cally reduce
disk life
expectancy if
ignored.
Contact Netezza Support. For
more information, see “Moni-
toring Hardware
Temperature” on page 7-32.
TrasactionLimitEvent transaction-
LimitEvent
Admins,
NPS
Serious New transac-
tions are
blocked if the
limit is
reached.
Abort some existing sessions
which may be old and
require cleanup, or stop/start
the Netezza server to close
all existing transactions.
VoltageFault hwVoltage-
Fault
Admins,
NPS
Serious May indicate
power supply
issues.
For more information, see
“Monitoring Voltage Faults”
on page 7-37.
Table 7-2: Netezza Template Event Rules
Template Name Type Notify Severity Impact Action
20282-20 Rev.1 7-7
Managing Event Rules
command. The NzAdmin interface has a very intuitive interface for managing events,
including a wizard tool for creating new events. For information on accessing the NzAdmin
interface, see “NzAdmin Tool Overview” on page 3-11.
Copying a Template Event to Create an Event Rule
You can use the nzevent copy command to copy a predefined template for activation. The
following example copies a template event named NPSNoLongerOnline to create a new
user-defined rule of the same name, adds a sample email address for contact, and acti-
vates the rule:
nzevent copy -u admin -pw password -useTemplate -name
NPSNoLongerOnline -newName NPSNoLongerOnline -on yes -dst
jdoe@company.com
When you copy a template event rule, which is disabled by default, your new rule is like-
wise disabled by default. You must enable it using the -on yes argument. In addition, if the
template rule sends email notifications, you must specify a destination email address.
Copying and Modifying a User-Defined Event Rule
You can copy, modify, and rename an existing user-defined rule using the nzevent copy
command. The following example copies, renames, and modifies an existing event rule:
nzevent copy -u admin -pw password -name NPSNoLongerOnline -newName
MyModNPSNoLongerOnline -on yes -dst jdoe@company.com -ccDst
tsmith@company.com -callhome yes
When you copy an existing user-defined event rule, note that your new rule will be enabled
automatically if the existing rule is enabled. If the existing rule is disabled, your new rule is
disabled by default. You must enable it using the -on yes argument. You must specify a
unique name for your new rule; it cannot match the name of the existing user-defined rule.
Generating an Event
You can use the nzevent generate command to trigger an event for the event manager. If
the event matches a current event rule, the system takes the action defined by the event
rule.
You might generate events for the following cases:
To simulate a system event to test an event rule.
To add new events, because the system is not generating events for conditions for
which you would like notification.
If the event that you want to generate has a restriction, specify the arguments that would
trigger the restriction using the -eventArgs option. For example, if a runaway query event
has a restriction that the duration of the query must be greater than 30 seconds, use a
command similar to the following to ensure that a generated event is triggered:
nzevent generate -eventtype runawayquery -eventArgs 'duration=50'
In this example, the duration meets the event criteria (greater than 30) and the event is
triggered. If you do not specify a value for a restriction argument in the -eventArgs string,
the command uses default values for the arguments. In this example, duration has a
default of 0, so the event would not be triggered since it did not meet the event criteria.
7-8 20282-20 Rev.1
IBM Netezza System Administrator’s Guide
To generate a event for a system state change:
nzevent generate -eventType sysStateChanged
-eventArgs 'previousState=online, currentState=paused'
Deleting an Event Rule
You can delete event rules that you have created. You cannot delete the template events.
To delete an event rule, enter:
nzevent delete -u admin -pw password -name <rule_name>
Disabling an Event Rule
To disable an event rule, do the following:
To disable an event rule, enter:
nzevent modify -u admin -pw password -name <rule_name> -on no
Adding an Event Rule
You can use the nzevent add command to add an event rule. You can also use the NzAdmin
tool to add event rules using a wizard for creating events. Adding an event rule consists of
two tasks: specifying the event match criteria and specifying the notification method.
(These tasks are described in more detail following the examples.)
Note: Although the z-series events do not appear as templates on IBM Netezza 1000 or
N1001 systems, you could add them using nzevent if you have the syntax documented in
the previous releases. However, these events are not supported on IBM Netezza 1000 or
later systems.
To add an event rule that sends an e-mail message when the system transitions from
the online state to any other state, enter:
nzevent add -name TheSystemGoingOnline -u admin -pw password
-on yes -eventType sysStateChanged -eventArgsExpr '$previousState
== online && $currentState != online' -notifyType email -dst
jdoe@company.com -msg 'NPS system $HOST went from $previousState to
$currentState at $eventTimestamp.' -bodyText
'$notifyMsg\n\nEvent:\n$eventDetail\nEvent
Rule:\n$eventRuleDetail'
Note: If you are creating event rules on a Windows client system, use double quotes instead
of single quotes to specify strings.
Specifying the Event Match Criteria
The Netezza event manager uses the match criterion portion of the event rule to determine
which events generate a notification and which ones the system merely logs. A match
occurs if the event type is the same and the optional event args expression evaluates to
true. If you do not specify an expression, the event manager uses only the event type to
determine a match.

20282-20 Rev.1 7-9
Managing Event Rules
The event manager generates notifications for all rules that match the criteria, not just for
the first event rule that matches. Table 7-3 lists the event types you can specify and the
arguments and the values passed with the event. You can list the defined event types using
the nzevent listEventTypes command. Used only on z-series systems such as the 10000-
series, 8000z-series, and 5200-series systems.
Table 7-3: Event Types
Event Type Tag Name Possible Values
sysStateChanged previousState, currentState,
eventSource
<any system state>, <Event Source>
hwFailed Used only on z-series systems such as the 10000-series, 8000z-
series, and 5200-series systems.
hwRestarted hwType, hwId, spaId,
spaSlot, devSerial, devH-
wRev, devFwRev
•
spu, <SPU HW ID>, <SPA ID>,
<SPA Slot>, <SPU/SFI Serial>,
<Hardware Revision>, <Firmware
Revision>
•
sfi, <SFI HW ID>, <SPA ID>, <SPA
Slot>, <SPU/SFI Serial>, <Hard-
ware Revision>, <Firmware
Revision>
•
fan, <FAN HW ID>, <SPA ID>,
<SPA Slot>
•
pwr, <POWER SUPPLY HW ID>,
<SPA ID>, <SPA Slot>
hwDiskFull hwType, hwId, spaId,
spaSlot, diskHwId, location,
partition, threshold,value
spu, <SPU HW ID>, <Spa Id>,<SPA
Slot>, <Disk HW ID>, <Location
String>
<partition #>, <threshold>, <value>
For more information, see “Specifying Disk Space Threshold Notifi-
cation” on page 7-24.
runawayQuery sessionId, planId, duration <Session Id>, <Plan Id>, <seconds>
For more information, see “Specifying Runaway Query Notification”
on page 7-26.
custom1 or
custom2
User-specified rule. Use with the nzevent generate command.
For more information, see “Creating a Custom Event Rule” on
page 7-18.
smartThreshold Used only on z-series systems such as the 10000-series, 8000z-
series, and 5200-series systems.

7-10 20282-20 Rev.1
IBM Netezza System Administrator’s Guide
eccError hwType, hwId, spaId,
spaSlot, errType, errCode,
devSerial, devHwRev,
d e v F w R e v
spu, <SPU HW ID>, <SPA ID>, <SPA
Slot>, <Err Type>, <Err Code>, <SPU/
SFI Serial>, <Hardware Revision>,
<Firmware Revision>
regenError Used only on z-series systems such as the 10000-series, 8000z-
series, and 5200-series systems.
diskError Used only on z-series systems such as the 10000-series, 8000z-
series, and 5200-series systems.
hwHeatThreshold Used only on z-series systems such as the 10000-series, 8000z-
series, and 5200-series systems.
sysHeatThreshold errType, errCode, errString <Err Type>, <Err Code>, <Err String
For more information, see “Monitoring System Temperature” on
page 7-33.
fwMismatch
systemStuckIn-
State
duration, currentState,
expectedState
<seconds>, <any system state>, <any
system state>
For more information, see “Specifying System State Changes” on
page 7-19.
histCaptureEvent configName, histType, stor-
ageLimit, loadMinThreshold,
loadMaxThreshold, dis-
kFullThreshold, loadInterval,
nps, database, capturedSize,
stagedSize, storageSize,
dirName, errCode, errString
<Config Name>, <query/audit>, <Stor-
age Limit>, <Min Threshold>, <Max
Threshold>, <Disk Full Threshold>,
<Load Interval>, <Target NPS>, <Tar-
get DB Name>, <Captured Size MB>,
<Staged Size MB>, <Storage(total)
Size MB>, <Dir Name>, <Err Code>,
<Err String>
histLoadEvent configName, histType, stor-
ageLimit, loadMinThreshold,
loadMaxThreshold, dis-
kFullThreshold, loadInterval,
nps, database, batchSize,
stagedSize, dirName,
errCode, errString
<Config Name>, <query/audit>, <Stor-
age Limit>, <Min Threshold>, <Max
Threshold>, <Disk Full Threshold>,
<Load Interval>, <Target NPS>, <Tar-
get DB Name>, <Batch Size MB>,
<Staged Size MB>, <Dir Name>, <Err
Code>, <Err String>
hwVoltageFault hwType, hwId, label, loca-
tion, curVolt, errString,
eventSource
•
SPU, <SPU HW ID>, <Label
String>, <Location String>, <Cur-
rent Voltage>, <Err String>, <Event
Source>
•
Disk Enclosure, <Encl HW ID>,
<Label String>, <Location String>,
<Current Voltage>, <Err String>,
<Event Source>
Table 7-3: Event Types
Event Type Tag Name Possible Values

20282-20 Rev.1 7-11
Managing Event Rules
spuCore hwId, location, errString,
eventSource
<HW ID>, <Location String>, <Err
String>, <Event Source>
regenFault hwIdSpu, hwIdSrc, location-
Src, hwIdTgt, locationTgt,
errString, devSerial,
eventSource
<SPU HW ID>, <Source Disk HW ID>,
<Source Disk Location>, <Target Disk
HW ID>, <Target Disk Loca-
tion>,<Error String>, <SPU Serial>,
<Event Source>
hwServiceRe-
quested
hwType, hwId, location, err-
String, devSerial,
eventSource
•
spu, <SPU HW ID>, <Location
String>, <Error String>, <SPU
Serial>, <Event Source>
•
disk, <Disk HW ID>, <Location
String>, <Error String>, <Disk
Serial>, <Event Source>
•
disk enclosure power supply, <PS
HW ID>, <Location String>, <Error
String>, <Unknown>, <Event
Source>
•
disk enclosure fan, <Fan HW ID>,
<Location String>, <Error String>,
<Unknown>, <Event Source>
•
AMM, <AMM HW ID>, <Location
String>, <Error String>,
<Unknown>, <Event Source>
•
chassis power supply, <PS HW ID>,
<Location String>, <Error String>,
<Unknown>,<Event Source>
•
chassis fan, <FAN HW ID>, <Loca-
tion String>, <Error String>,
<Unknown>, <Event Source>
scsiDiskError spuHwId, diskHwId, loca-
tion, errType, errCode,oper,
dataPartition, lba, tableId,
dataSliceId,devSerial, fpga-
BoardSerial, diskSerial,
diskModel, diskMfg,
eventSource
<SPU HW ID>, <Location String>,
<Err Type>, <Err Code>, <Oper>,
<Data Partition>, <LBA>, <Table>,
<DataSlice>, <Block>, <SPU Serial>,
<FPGA Board Serial>, <Disk Serial>,
<Disk Model>, <Disk Manufacturer>,
<Event Source>
scsiPredictiveFail-
ure
spuHwId, diskHwId, scsiAsc,
scsiAscq,fru, location,
devSerial, diskSerial, disk-
Model, diskMfg,
eventSource
<SPU HW ID>, <Disk HW ID>, <SCSI
ASC>, <SCSI ASCQ>,<Fru>, <Loca-
tion String>, <SPU Serial>, <Disk
Serial>, <Disk Model>, <Disk Manu-
facturer>, <Event Source>
Table 7-3: Event Types
Event Type Tag Name Possible Values

7-12 20282-20 Rev.1
IBM Netezza System Administrator’s Guide
Specifying the Event Rule Attributes
An event consists of three attributes: an event type, a timestamp, and a list of event-spe-
cific arguments represented as a list of tag=value pairs. Using text substitution in the form
of $tag, you can create an expression to match a specific event instance rather than all
events of a specific type.
For example, to receive an e-mail message when the system is not online, it is not enough
to create an event rule for a sysStateChanged event. Because the sysStateChange event
recognizes every state transition, you could be notified whenever the state changes at all,
such as from online to paused.
You can add an event args expression to further qualify the event for notification. If you
specify an expression, the system substitutes the event arguments into the expression
before evaluating it. The system uses the result in conjunction with the event type to deter-
mine a match. So, to send an e-mail message when the system is no longer online, you
hwThermalFault hwType, hwId, label, loca-
tion, devSerial, errString,
curVal, eventSource
spu, <SPU HW ID>, <Label String>,
<Location String>, <SPU Serial>,
<Error String>, <Current Value>,
<Event Source>
Disk Enclosure, <Encl HW ID>,
<Label String>, <Location String>,
<Error String>, <Current Value>,
<Event Source>
For more information, see “Monitoring Hardware Temperature” on
page 7-32.
transactionLimit-
Event
CurNumTX <Current Number of Transactions>
nwIfChanged hwType, hwId, location,
interfaceName, prevState,
currState
<HW TYPE>, <HW ID>, <Location
String>, <interface name>, <previous
state>, <current state>
numCpuCore-
Changed
hwId, location, initialNum-
Core, lastNumCore,
curNumCore
<SPU HW ID>, <Location String>,
<Number of CPU cores of SPU on ini-
tialization>, <Last Number of Online
CPU cores of SPU>, <Current Number
of Online CPU Cores of SPU>
hwNeedsAttention hwType, hwId, location, err-
String, devSerial,
eventSource
spu, <SPU HW ID>, <Location
String>, <Error String>, <SPU
Serial>, <Event Source>
hwPathDown hwType, hwId, location, err-
String, devSerial,
eventSource
spu, <SPU HW ID>, <Location
String>, <Error String>, <SPU
Serial>, <Event Source>
Table 7-3: Event Types
Event Type Tag Name Possible Values

20282-20 Rev.1 7-13
Managing Event Rules
would use the expression: “$previousState == online && $currentState!=online.” The sys-
tem gets the value of previousState and currentState from the actual argument values of a
sysStateChanged event.
You can specify an event using equality expressions, wildcard expressions, compound AND
expressions, or OR expressions. Table 7-4 describes these expressions.
Specifying the Notification
When an event occurs, you can have the system send an e-mail message or execute an
external command. E-mail messages can be aggregated whereas commands cannot. For
more information about event aggregation, see “Aggregating Event E-mail Messages” on
page 7-16.
To specify an e-mail message, you must specify a notification type (-notifyType email),
a destination (-dst), a message (-msg), and optionally, a body text (-bodyText), and the
callhome file (-callHome).
Note that you can specify multiple e-mail addresses separated by a comma and no
space. For example, jdoe@company.com,jsmith@company.com,sbrown@company.com
To specify that you want to run a command, you must specify a notification type (-noti-
fyType runCmd), a destination (-dst), a message (-msg), and optionally, a body text (-
bodyText), and the callhome file (-callHome).
When defining notification fields that are strings (-dst, -ccDst, -msg, -bodyText), you can
use $tag syntax to substitute known system or event values. Table 7-5 on page 7-14 lists
the system-defined tags that are available.
The sendMail.cfg File
If you send e-mail, you must modify the sendMail.cfg file. It contains the name of the mail
sever and its port, the sender’s name and address, and a CC field for a list of e-mail names
that are automatically appended to the ccDst field defined in the event rule. The send-
Table 7-4: Event Argument Expression Syntax
Expression Syntax Example
EqualityExpr <string> == <string>
<string> != <string>
‘$hwType == spu’
‘$hwType != spu’
WildcardExpr <string> ~ <string>
<string> !~ <string>
'$errString ~ *spu*'
'$errString !~ *ascq*'
AndExpr EqualityExpr ‘&&’ EqualityExpr '$previousState == online &&
$currentState != online’
OrExpr EqualityExpr ‘||’ EqualityExpr '$threshold == 80 || $threshold
== 85’

7-14 20282-20 Rev.1
IBM Netezza System Administrator’s Guide
mail.cfg file also contains options that allow you to specify a user name and password for
authentication on the mailserver. You can find a copy of this file in the /nz/data/config
directory on the Netezza host.
Table 7-5: Notification Substitution Tags
Source Tag Description
Event eventType One of the event types (for example,
sysStateChanged).
eventTimestamp The data and time the event occurred (for example
17-Jun-02, 14:35:33 EDT).
eventArgs The event arguments (for example, hwType = spu,
hwId =1002).
eventDetail Shorthand for the eventType, eventArgs, and
eventTimestamp.
Event rule eventType One of the event types (for example, hwDiskFull).
eventArgsExpr The event argument match expression (for exam-
ple, hwType == spu).
notifyType The type of notification, email or runCmd.
notifyDst The notification destination (from -dst) (for exam-
ple, jdoe@company.com).
notifyCcDst The cc notification destination (from -ccDst) (for
example, jsmith@company.com).
notifyMsg The notification message (from -msg).
notifyCallHome A boolean that indicates whether callhome was
requested (from -callHome).
notifyCallHomeFile The callhome file name.
eventRuleDetail Shorthand for tags eventArgsExpr through
notifyCallHomeFile.
eventAggrCount The aggregate count of events for notification
(email only)

20282-20 Rev.1 7-15
Managing Event Rules
If you specify the email or runCmd arguments, you must enter the destination and the sub-
ject header. You can use all the following arguments with either command, except the
-ccDst argument, which you cannot use with the runCmd. Table 7-6 lists the syntax of the
message.
Environment NZ_HOST The host environment variable.
NZ_DIR The nz directory. For more information about these
directories, see “Directory Structure” on
page 2-11.
NZ_BIN_DIR The nz bin directory.
NZ_DATA_DIR The nz data directory.
NZ_KIT_DIR The nz kit directory.
NZ_LOG_DIR The nz log directory.
NZ_SBIN_DIR The nz sbin directory.
NZ_SYS_DIR The nz system directory.
NZ_TMP_DIR The nz temp directory.
Table 7-6: Notification Syntax
Argument Description Example
-dst Your e-mail address -dst
‘jdoe@company.com,bsmith@company.com’
You can specify multiple recipients.
-msg The subject field of the e-
mail message
-msg ‘NPS system $HOST went from $previ-
ousState to $currentState at
$eventTimestamp.’
This message substitutes the hostname for
$HOST, the previous system state for $previ-
ousState, the current system state for
$currentState, and the date and time the
event occurred for $eventTimeStamp.
-bodyText Optional body of the e-mail
message
-bodyText '$notifyMsg\n\nEvent:\n$eventDe-
tail\nEvent Rule:\n$eventRuleDetail'
This message substitutes the text in the -msg
argument for the $notifyMsg, outputs a new-
line and the word ‘Event’ then the contents of
the eventType through eventArgs, newline and
the word ‘Event Rule’ and then the contents of
eventArgsExpr through notifyCallHomeFile.
Table 7-5: Notification Substitution Tags
Source Tag Description

7-16 20282-20 Rev.1
IBM Netezza System Administrator’s Guide
Aggregating Event E-mail Messages
Some events, such as notification of power recycling, host-to-switch network connectivity
failures, and so on, could generate a large number of e-mail messages. To avoid filling your
inbox with messages, you can aggregate your event rule notifications by defining a system-
wide aggregation time interval and a per-event-rule notification count.
If you set e-mail aggregation and events-per-rule reach the threshold value for the event
rule or the time interval expires, the system aggregates the events and sends a single e-mail
per event rule.
Note: You specify aggregation only for event rules that send e-mails, not for event rules that
run commands.
To set the system-wide aggregation time interval
You can enable event aggregation system-wide and specify the time interval. You can spec-
ify from 0-86400 seconds. If you specify 0 seconds, there is no aggregation, even if
aggregation is specified on individual events.
To set system-wide aggregation, do the following:
1. Pause the system:
nzsystem pause -u bob -pw 1234 -host nzhost
2. Specify aggregation of 2 minutes (120 seconds):
nzsystem set -arg sysmgr.maxAggregateEventInterval=120
3. Resume the system:
nzsystem resume -u bob -pw 1234 -host nzhost
To display the aggregation setting, enter:
nzsystem showRegistry | grep maxAggregateEventInterval
To specify event rule e-mail aggregation
When you add or enable (modify) an event that specifies e-mail notification, you can enable
event aggregation by specifying the aggregation count.
To aggregate e-mail messages for the event rule NPSNoLongerOnline, enter:
nzevent modify -u admin -pw password -name NPSNoLongerOnline -on
yes -dst jdoe@company.com -eventAggrCount 1
You can specify any aggregation count between 1-1000.
-ccDst Optional cc specification -ccDst
‘rdoe@company.com,tsmith@company.com’
You can specify multiple recipients.
-callHome Optional file -callHome yes
Table 7-6: Notification Syntax
Argument Description Example
20282-20 Rev.1 7-17
Managing Event Rules
If you issue the nzstop command, the system sends no in-memory aggregations,
instead it updates the event log. In such cases, you should check the event log, espe-
cially if the aggregation interval is 15 minutes or longer.
If you modify or delete an event rule, the system flushes all events aggregated for the
event rule.
To disable individual event rule e-mail aggregation
If event rule aggregation is enabled system wide, you can disable event rule aggregation for
individual event rules by setting the count to 0.
To disable e-mail messages for the event rule NPSNoLongerOnline, enter:
nzevent modify -u admin -pw password -name NPSNoLongerOnline -on
yes -dst jdoe@company.com -eventAggrCount 1
Sample Aggregated E-Mail Messages
The aggregated e-mail describes the number of messages aggregated and the time interval
for the event rule. The body of the message lists the messages by time, with the earliest
events first. The Reporting Interval indicates whether the notification trigger was the count
or time interval. The Activity Duration indicates the time interval between the first and last
event so that you can determine the granularity of the events.
For example, the following aggregation is for the Memory ECC event:
Subject: NPS nzdev1 : 2 occurrences of Memory ECC Error from 11-Jun-07
18:41:59 PDT over 2 minutes.
Date: Sun, 11 Jun 2007 18:44:05 PDT
From: NPS Event Manager <eventsender@netezza.com>
Reply-To: NPS Event Manager <eventsender@netezza.com>
To: Jane Doe
Message Header
Host : nzdev1.
Event : Memory ECC Error.
Event Rule Detail .
Start : 06-11-07 18:41:59.
Reporting Interval : 2 minutes.
Activity Duration : 00:00:05.
Number of events : 2.
Message Details
1 hwType=spu, hwId=1002, spaId=1, spaSlot=4, errType=2,
errCode=12,devSerial=040908061230, devHwRev=5.20814r1.20806r1,
devFwRev=3.0B1 BLD[4428], eventSource=System initiated, Memory ECC
Error on 06-11-07 18:42:05 PDT
2 hwType=spu, hwId=1002, spaId=1, spaSlot=4, errType=2, errCode=12,
devSerial=040908061230, devHwRev=5.20814r1.20806r1, devFwRev=3.0B1
BLD[4428], eventSource=System initiated, Memory ECC Error on 06-11-07
18:42:10 PDT
7-18 20282-20 Rev.1
IBM Netezza System Administrator’s Guide
Creating a Custom Event Rule
Suppose you want to generate a notification when three different events reach specific val-
ues. Because the system does not generate an event for this condition, you must use the
nzevent command to create an event rule that sends you e-mail when this compound event
occurs.
Note: Because the event manager validates the event syntax, if you enter invalid arguments
the system displays an error message.
1. Write a script that creates a custom event rule. Set the e-mail address.
MY_EMAIL_ADDR=abc@xyz.com
2. Use the nzevent add command to add the event type. The following example creates a
new event type, custom1 with three events, event 1 through 3.
nzevent add -eventType custom1 -name NewRule -notifyType email \
-dst $MY_EMAIL_ADDR \
-msg 'Event #1 ($arg1, $arg2)' \
-bodyText 'Event 1 Body Text\n\narg1 = $arg1\narg2 = $arg2\n' \
-eventArgsExpr '$eventType==NPSNoLongerOnline'
nzevent add -eventType custom1 -name NewRule2 -notifyType email \
-dst $MY_EMAIL_ADDR \
-msg 'Event #2 ($arg1, $arg2)' \
-bodyText 'Event 2 Body Text\n\narg1 = $arg1\narg2 = $arg2\n' \
-eventArgsExpr '$eventType==SystemOnline'
nzevent add -eventType custom1 -name NewRule3 -notifyType email \
-dst $MY_EMAIL_ADDR \
-msg 'Event #3 ($arg1, $arg2)' \
-bodyText 'Event 3 Body Text\n\narg1 = $arg1\narg2 = $arg2\n' \
-eventArgsExpr '$eventType==HardwareFailed'
3. Use the nzevent generate command to generate events when event type NPSNoLong-
erOnline has arguments 3 and 14, event type SystemOnline has arguments 5 and 1,
and event type HardwareFailed has arguments 90 and 15.
nzevent generate -eventType custom1 -eventArgs 'eventType=NPSNoLongerOnline,
arg1=3, arg2=14'
nzevent generate -eventType custom1 -eventArgs 'eventType=SystemOnline, arg1=5,
arg2=1'
nzevent generate -eventType custom1 -eventArgs 'eventType=HardwareFailed,
arg1=90, arg2=15'
4. Save your script.

20282-20 Rev.1 7-19
Template Event Reference
Template Event Reference
The following sections describe the predefined template event rules in more detail.
Specifying System State Changes
The following event rules enable the system to notify you when the system state has
changed, or when a state change has exceeded a specified timeout:
NPSNoLongerOnline
SystemOnline
These events occur when the system is running. The typical states are Online, Pausing
Now, Going Pre-Online, Resuming, Going OffLine Now, Offline (now), Initializing, and
Stopped. The Failing Back and Synchronizing states apply only to z-series systems.
The following is the syntax for the template event rule NPSNoLongerOnline:
Event Rule
NPSNoLongerOnline
-name NPSNoLongerOnline -on no -eventType sysStateChanged
-eventArgsExpr '$previousState == online && $currentState != online'
-notifyType email -dst 'you@company.com' -ccDst '' -msg 'NPS system
$HOST went from $previousState to $currentState at $eventTimestamp
$eventSource.' -bodyText '$notifyMsg\n\nEvent:\n$eventDetail\n'
-callHome yes -eventAggrCount 1
The following is the syntax for event rule SystemOnline:
Event Rule
SystemOnline
-name SystemOnline -on no -eventType sysStateChanged -eventArgsExpr
'$previousState != online && $currentState == online' -notifyType
email -dst 'you@company.com' -ccDst '' -msg 'NPS system $HOST went
online at $eventTimestamp $eventSource.' -bodyText
'$notifyMsg\n\nEvent:\n$eventDetail\n' -callHome yes -eventAggrCount
50
The valid values for the previousState and currentState arguments are:
initializing pausedNow syncingNow
initialized preOnline syncedNow
offlining preOnlining failingBack
offliningNow resuming failedBack
offline restrictedResuming maintaining
offlineNow stopping maintain
online stoppingNow recovering
restrictedOnline stopped recovered
pausing stoppedNow down
pausingNow syncing unreachable
paused synced badState
For more information about states, see Table 5-4 on page 5-9.
Table 7-7 describes the state changes.
Table 7-7: System State Changes
Previous State Current State Severity Notify Impact Action
Online Not Online Varies Admins,
NPS, DBAs
System no longer
processing queries
Determine
cause

7-20 20282-20 Rev.1
IBM Netezza System Administrator’s Guide
Hardware Service Requested
It is important to be notified when a hardware component fails so that Support can notify
service technicians that can replace or repair the component. For devices such as disks, a
hardware failure causes the system to bring a spare disk online, and after an activation
period, the spare disk transparently replaces the failed disk. However, it is important to
replace the failed disk with a healthy disk so that you restore the system to its normal oper-
ation with its complement of spares.
In other cases, such as SPU failures, the system reroutes the work of the failed SPU to the
other available SPUs. The system performance is impacted because the existing healthy
resources take on extra workload. Again, it is critical to obtain service to replace the faulty
component and restore the system to its normal performance.
If you enable the event rule HardwareServiceRequested, the system generates a notifica-
tion when there is a hardware failure and service technicians may be required to replace or
repair components.
The following is the syntax for the event rule HardwareServiceRequested:
Event Rule
HardwareServiceRequ
ested
-name 'HardwareServiceRequested' -on no -eventType hwServiceRequested
-eventArgsExpr '' -notifyType email -dst 'you@company.com' -ccDst ''
-msg 'NPS system $HOST - Service requested for $hwType $hwId at
$eventTimestamp $eventSource.' -bodyText
'$notifyMsg\n\nlocation:$location\nerror
string:$errString\ndevSerial:$devSerial\nevent source:$eventSource\n'
-callHome yes -eventAggrCount 0
Table 7-8 lists the arguments to the Hardware Service Requested event rule.
Not Online Online n/a Admins,
NPS, DBAs
Normal None
Not
Synchronizing
Synchronizing n/a Admins,
NPS
Query processing
suspended until
complete
None
Synchronizing Not
Synchronizing
n/a Admins,
NPS
Query processing
resumed when
Online
Contact
Netezza
Table 7-7: System State Changes
Previous State Current State Severity Notify Impact Action
Table 7-8: Hardware Service Requested Event Rule
Arguments Description Example
hwType The type of hardware affected spu, disk, pwr, fan, mm
hwId The hardware ID of the component
that has reported a problem
1013
location A string that describes the physical
location of the component

20282-20 Rev.1 7-21
Template Event Reference
Note: You should not aggregate this event.
For source disks used in a disk regeneration to a spare disk, the HardwareServiceRequested
event also notifies you when regeneration encounters a read sector error on the source disk.
The event helps you to identify when a regeneration requires some attention to address pos-
sible issues on the source and newly created mirror disks. The error messages in the event
notification and in the sysmgr.log and eventmgr.log files contain information about the bad
sector, as in the following example:
2012-04-05 19:52:41.637742 EDT Info: received & processing event type
= hwServiceRequested, event args = 'hwType=disk, hwId=1073,
location=Logical Name:'spa1.diskEncl2.disk1' Logical Location:'1st
rack, 2nd disk enclosure, disk in Row 1/Column 1', errString=disk md:
md2 sector: 2051 partition type: DATA table: 201328,
devSerial=9QJ2FMKN00009838VVR9...
The errString value contains more information about the sector that had a read error:
The md value specifies the RAID device on the SPU that encounterd the issue.
The sector value specifies which sector in the device has the read error.
The partition type specifies whether the partition is a user data (DATA) or SYSTEM
partition.
The table value specifies the table ID of the user table affected by the bad sector.
If the system notifies you of a read sector error, contact IBM Netezza Support for assistance
with troubleshooting and resolving the problems.
Hardware Needs Attention
The system monitors the overall health and status of the hardware and can notify you when
changes occur that could affect the system availability or performance. These changes can
include replacement disks with invalid firmware, storage configuration changes, unavail-
able/unreachable components, disks that have reached a grown defects early warning
threshold, ethernet switch ports that are down, and other conditions that could be early
warnings of problems that could impact system behavior or the ability to manage devices
within the system.
If you enable the HwNeedsAttention event rule, the system generates a notification when it
detects conditions that could lead to problems or that serve as symptoms of possible hard-
ware failure or performance impacts.
errString Specifies more information about the
error or condition that triggered the
event. If the failed component is not
inventoried, it will be specified in this
string.
devSerial Specifies the serial number of the
component, or Unknown if the com-
ponent has no serial number.
601S496A2012
Table 7-8: Hardware Service Requested Event Rule
Arguments Description Example

7-22 20282-20 Rev.1
IBM Netezza System Administrator’s Guide
The following is the syntax for the HwNeedsAttention event rule:
Event Rule
HwNeedsAttention
-name 'HardwareNeedsAttention' -on no -eventType hwNeedsAttention
-eventArgsExpr '' -notifyType email -dst 'you@company.com' -ccDst ''
-msg 'NPS system $HOST - $hwType $hwId Needs attention. $eventSource.'
-bodyText '$notifyMsg\n\nlocation:$location\nerror
string:$errString\ndevSerial:$devSerial\nevent source:$eventSource\n'
-callHome yes -eventAggrCount 0
Table 7-9 lists the arguments to the Hardware Needs Attention event rule.
Note: You should not aggregate this event.
Hardware Path Down
If the path between an S-Blade/SPU and its disks fails, and you have enabled the HwPath-
Down event rule, the system generates a notification when it detects that a storage path
has transitioned from the Up to the Down state. Failed paths typically impact system and
query performance. For more information about path topology, see “System Resource Bal-
ance Recovery” on page 5-12.
The following is the syntax for the HwPathDown event rule:
Event Rule
HwPathDown
-name 'HwPathDown' -on no -eventType hwPathDown -eventArgsExpr ''
-notifyType email -dst 'you@company.com' -ccDst ''
-msg 'NPS system $HOST - $hwType $hwId - Hardware Path Down.
$eventSource.' -bodyText '$notifyMsg\n\nlocation:$location\nerror
string:$errString\ndevSerial:$devSerial\nevent source:$eventSource\n'
-callHome yes -eventAggrCount 1000
Note: The aggregation count of 1000 is large because some kinds of storage failures can
cause hundreds of path failures on large, multi-rack systems. The aggregation count
reduces the number of email notifications for those cases. All path failures in the last two
minutes are grouped into a single notification email.
Table 7-9: Hardware Needs Attention Event Rule
Arguments Description Example
hwType The type of hardware affected spu
hwId The hardware ID of the component
that has a condition to investigate
1013
location A string that describes the physical
location of the component
errString If the failed component is not inven-
toried, it will be specified in this
string.
devSerial Specifies the serial number of the
component, or Unknown if the com-
ponent has no serial number.
601S496A2012

20282-20 Rev.1 7-23
Template Event Reference
Table 7-10 lists the arguments to the Hardware Path Down event rule.
Note: If you are notified of hardware path down events, you should contact Netezza Sup-
port and alert them to the path failure(s). It is important to identify and resolve the issues
that are causing path failures to return the system to optimal performance as soon as
possible.
A sample email follows:
Event:
Message Header
Host:nzhost.
Event:Hardware Path Down.
Event Rule Detail:.
Start: 11-08-11 11:10:41 EST.
Reporting Interval: 2 minutes.
Activity Duration:00:00:01.
Number of events:12.
Message Details
1 hwType=SPU, hwId=1017, location=1st Rack, 1st SPA, SPU in 9th slot,
devSerial=Y011UF0CJ23G, eventSource=system, errString=Disk path
event:Spu\[1st Rack, 1st SPA, SPU in 9th slot\] to
Disk\[sn=9QJ60E9M000090170SXW hwid=1027 eshp=NA es=encl4Slot01 dev=sda
Major=8 Minor=0 status=DOWN]
If you receive a path down event, you can obtain more information about the problems. This
information may be helpful when you contact Netezza Support.
To see if there are current topology issues, use the nzds show -topology command. The
command displays the current topology, and if there are issues, a WARNING section at
Table 7-10: Hardware Path Down Event Rule
Arguments Description Example
hwType For a path down event, the SPU that
reported the problem
SPU
hwId The hardware ID of the SPU that has
lost path connections to disks
1013
location A string that describes the physical
location of the SPU
1st Rack, 1st SPA, SPU in 3rd slot
errString If the failed component is not inven-
toried, it will be specified in this
string.
Disk path event:Spu[1st Rack, 1st
SPA, SPU in 5th slot] to Disk [disk
hwid=1034
sn="9WK4WX9D00009150ECWM"
SPA=1 Parent=1014 Position=12
Address=0x8e92728 ParentEn-
clPosition=1 Spu=1013]
(es=encl1Slot12 dev=sdl major=8
minor=176 status=DOWN)

7-24 20282-20 Rev.1
IBM Netezza System Administrator’s Guide
the end of the output. For more information, see “Displaying the Active Path Topology”
on page 5-24.
Hardware Restarted
If you enable the event rule HardwareRestarted, you receive notifications when each SPU
successfully re-boots (after the initial startup). Restarts are usually related to a software
fault, whereas hardware causes could include uncorrectable memory faults or a failed disk
driver interaction.
The following is the syntax for the event rule HardwareRestarted:
Event Rule
HardwareRestarted
-name HardwareRestarted -on no -eventType hwRestarted -eventArgsExpr
'' -notifyType email -dst 'you@company.com' -ccDst '' -msg 'NPS system
$HOST - $hwType $hwId restarted at $eventTimestamp.' -bodyText
'$notifyMsg\n\nSPA ID: $spaId\nSPA Slot: $spaSlot\n' -callHome yes -
eventAggrCount 50
You can modify the event rule to specify that the system include the device’s serial number,
its hardware revision, and firmware revision as part of the message and/or subject.
Table 7-11 describes the arguments to the Hardware Restarted event rule.
Note: You should consider aggregating this event. Set the aggregation count to the number
of SPUs in your system divided by 4. For more information about event aggregation, see
“Aggregating Event E-mail Messages” on page 7-16.
Specifying Disk Space Threshold Notification
You can use the hwDiskFull event type (defined in the default event rules
Disk80PercentFull and Disk90PercentFull) to receive notification when any one of the sys-
tem’s SPUs’ disk space becomes more than 80-85, or 90-95 percent full.
The following is the syntax for the event rule Disk80PercentFull:
Event Rule
Disk80PercentFull
-name Disk80PercentFull -on no -eventType hwDiskFull -eventArgsExpr
'$threshold == 80 || $threshold == 85' -notifyType email -dst
'you@company.com' -ccDst '' -msg 'NPS system $HOST - $hwType $hwId
Table 7-11: Hardware Restarted Event Rule
Arguments Description Example
hwType The type of hardware affected spu, sfi, ps, fan
hwId The hardware ID of the regen source SPU
having the problem
1013
spaId The ID of the SPA A number between 1-32
spaSlot The SPA slot number For SPUs, a number between
1-14. For fans, L, M, R. For
power supplies, L or R.
devSerial The serial number of the SPU or SFI 601S496A2012
devHwRev The hardware revision 7.21496rA2.21091rB1
devFwRev The firmware revision 1.36

20282-20 Rev.1 7-25
Template Event Reference
$partition partition is $value % full at $eventTimestamp.' -bodyText
'$notifyMsg\n\nSPA ID: $spaId\nSPA Slot: $spaSlot\nThreshold:
$threshold\nValue: $value\n' -callHome yes -eventAggrCount 50
The following is the syntax for the event rule Disk90PercentFull:
Event Rule
Disk90PercentFull
-name Disk90PercentFull -on no -eventType hwDiskFull -eventArgsExpr
'$threshold == 90 || $threshold == 95' -notifyType email -dst '<your
email here>' -ccDst '' -msg 'URGENT: NPS system $HOST - $hwType $hwId
$partition partition is $value % full at $eventTimestamp.' -bodyText
'$notifyMsg\n\nSPA ID: $spaId\nSPA Slot: $spaSlot\nThreshold:
$threshold\nValue: $value\n' -callHome yes -eventAggrCount 50
Table 7-12 lists the arguments to the Disk Space event rules.
After you enable the event rule, the event manager sends you an e-mail message when the
system disk space percentage exceeds the first threshold and is below the next threshold
value. Note that the event manager sends only one event per sampled value.
For example, if you enable the event rule Disk80PercentFull, which specifies thresholds 80
and 85 percent, the event manager sends you an e-mail message when the disk space is at
least 80, but less than 85 percent full. When you receive the e-mail message, your actual
disk space might have been 84 percent full.
The event manager maintains thresholds for the values 75, 80, 85, 90, and 95. Each of
these values (except for 75) can be in the following states:
Armed — The system has not reached this value.
Disarmed — The system has exceeded this value.
Fired — The system has reached this value.
Re-armed — The system has fallen below this value.
Note: If you enable an event rule after the system has fired a threshold, you will not be
notified that you have reached this threshold until you restart the system.
Table 7-12: Disk Space Event Rules
Arguments Description Example
hwType The type of hardware affected spu, sfi, disk
hwId The hardware ID of the disk that has
the disk space issue
1013
spaId The ID of the SPA
spaSlot The SPA slot number
partition The data slice number 0,1,2,3
threshold The threshold value 75, 80, 85, 90, 95
value The actual percentage full value 84

7-26 20282-20 Rev.1
IBM Netezza System Administrator’s Guide
Table 7-13 lists these thresholds and their states.
After the Netezza System Manager sends an event for a particular threshold, it disarms all
thresholds at or below that value. (So if 90 fires, it will not fire again until it is re-armed).
The Netezza System Manager re-arms all disarmed higher thresholds when the disk space
percentage full value falls below the previous threshold, which can occur when you delete
tables or databases. The Netezza System Manager arms all thresholds (except 75) when
the system starts up.
Note: To ensure maximum coverage, enable both event rules Disk80PercentFull and
Disk90PercentFull.
To send an e-mail message when the disk is more than 80 percent full, enable the pre-
defined event rule Disk80PercentFull:
nzevent modify -u admin -pw password -name Disk80PercentFull -on
yes -dst jdoe@company.com
If you receive diskFull notification from one or two disks, your data may be unevenly dis-
tributed across the data slices (data skew). Data skew can adversely affect performance for
the tables involved and for combined workloads. For more information about skew, see
“Avoiding Data Skew” on page 9-8.
Note: You should consider aggregating the e-mail messages for this event. Set the aggrega-
tion count to the number of SPUs. For more information about aggregation, see
“Aggregating Event E-mail Messages” on page 7-16.
Specifying Runaway Query Notification
You can use the RunAwayQuery event type to monitor queries that exceed configured query
timeout limits. The query timeout is a limit that you can specify system-wide (for all users),
or for specific groups or users. The default query timeout is unlimited for users and groups,
but you can establish query timeout limits using a system default setting, or when you cre-
ate or alter users or groups. For more information about specifying query limits, see
“Specifying Query Timeout Limits” on page 8-29.
The following is the syntax for the event rule RunAwayQuery:
Event Rule
RunAwayQuery
-name 'RunAwayQuery' -on no -eventType runawayQuery -eventArgsExpr ''
-notifyType email -dst 'you@company.com' -ccDst '' -msg 'NPS system
$HOST - long-running query detected at $eventTimestamp.' -bodyText
'$notifyMsg\n\nsessionId: $sessionId\nplanId: $planId\nduration:
$duration seconds' -callHome yes -eventAggrCount 0
Table 7-13: Threshold and States
Threshold Armed Fired Disarmed Re-armed
75 never never never never
80 startup >= 80 && < 85 >= 80 < 75
85 startup >= 85 && < 90 >= 85 < 80
90 startup >= 90 && < 95 >= 90 < 85
95 startup >= 95 >= 95 < 90

20282-20 Rev.1 7-27
Template Event Reference
Table 7-14 lists the arguments to the Runaway Query event rule. Note that the arguments
are case sensitive.
Note: Typically you do not aggregate this event because you should consider the perfor-
mance impact of each individual runaway query.
When you specify the duration argument in the -eventArgsExpr string, you can specify an
operator such as: ‘==’, ‘!=’, ‘>’, ‘>=’, ‘<’, or ‘<=’ to specify when to send the event notifica-
tion. As a best practice, use the greater-than (or less-than) versions of the operators to
ensure that the expression will trigger with a match. For example, to ensure that a notifica-
tion event is triggered when the duration of a query exceeds 100 seconds, specify the
-eventArgsExpr as follows:
-eventArgsExpr '$duration > 100'
If a query exceeds its timeout threshold and you have added a runaway query rule, the sys-
tem sends you an e-mail message telling you how long the query has been running. For
example:
NPS system alpha - long-running query detected at 07-Nov-03, 15:43:49
EST.
sessionId: 10056
planId: 27
duration: 105 seconds
Monitoring the System State
You can also monitor for events when a system is “stuck” in the Pausing Now state. The
following is the syntax for event rule SystemStuckInState:
Event Rule
SystemStuckInState
-name 'SystemStuckInState' -on no -eventType systemStuckInState -
eventArgsExpr '' -notifyType email -dst '<your email here>' -ccDst ''
-msg 'NPS system $HOST - System Stuck in state $currentState for
$duration seconds' -bodyText 'The system is stuck in state change.
Contact Netezza support team\nduration: $duration seconds\nCurrent
State: $currentState\nExpected State: $expectedState' -callHome yes -
eventAggrCount 0
As a best practice, it is important to monitor the transition to or from the Online state,
which affects system availability.
Table 7-14: Runaway Query Event Rule
Arguments Description Examples
sessionId The ID of the runaway session Use these arguments for the email
message.
planId The ID of the plan
duration The amount of time (in seconds) that
the query has been running when it
exceeded its timeout.

7-28 20282-20 Rev.1
IBM Netezza System Administrator’s Guide
Monitoring for Disk Predictive Failure Errors
The hard disks where your user databases reside record certain performance and reliability
data as they perform I/O. This status is referred to as Self-Monitoring Analysis and Report-
ing Technology (SMART) status. You can use the event manager to notify you when certain
threshold values are crossed in the recorded performance or reliability data.
Exceeding these thresholds could indicate that the disk will begin to perform poorly (that
is, it reads or writes data more slowly then it should) and thereby affect the speed at which
queries are processed. It could even indicate that the disk might fail in the near future.
Netezza sets the thresholds based on analysis of disk drives and their performance charac-
teristics. If you receive any these events, you should contact Netezza Support and have
them determine the state of your disk. As a best practice, do not aggregate these events.
The templates do not aggregate these events by default.
The following is the syntax for the event rule SCSIPredictiveFailure event:
Event Rule
SCSIPredictiveFailure
-name 'SCSIPredictiveFailure' -on no -eventType scsiPredictiveFailure
-eventArgsExpr '' -notifyType email -dst 'you@company.com' -ccDst ''
-msg 'NPS system $HOST - SCSI Predictive Failure value exceeded for
disk $diskHwId at $eventTimestamp' -bodyText
'$notifyMsg\n\nspuHwId:$spuHwId\ndisk
location:$location\nscsiAsc:$scsiAsc\nscsiAscq:$scsiAscq\nfru:$fru\nde
vSerial:$devSerial\ndiskSerial:$diskSerial\ndiskModel:$diskModel\ndisk
Mfg:$diskMfg\nevent source:$eventSource\n' -callHome no -
eventAggrCount 0
Table 7-15 lists the output from the SCSIPredictiveFailure event rule.
Note: Do not aggregate this event.
Table 7-15: SCSI Predictive Failure Event Rule
Arguments Description Example
spuHwId The hardware ID of the SPU that owns or
manages the disk that reported the event
diskHwId The hardware ID of the disk 1013
scsiAsc The attribute sense code, which is an
identifier of the SMART attribute
Vendor specific
scsiAscq The attribute sense code qualifier of the
SMART attribute
Vendor specific
fru The FRU ID for the disk
location The location of the disk
devSerial The serial number of the SPU to which
the disk is assigned
601S496A2012
diskSerial The disk’s serial number 7.21496rA2.21091rB1
diskModel The disk’s model number
diskMfg The disk’s manufacturer

20282-20 Rev.1 7-29
Template Event Reference
Monitoring for ECC Errors
The memory system on the SPU automatically corrects for 1-bit memory errors. Because of
this correcting capability, these errors do not affect data integrity. When the system detects
such an error however, it can notify you through the eccError event type. A large number of
these errors could indicate that the memory on a SPU will fail. If you get a significant num-
ber of these errors in a short period of time, you should contact Netezza Support about
replacing the affected SPU.
The following is the syntax for the event rule EccError:
Event Rule EccError
-name EccError -on no -eventType eccError -eventArgsExpr ''
-notifyType runCmd -dst '$NZ_SBIN_DIR/notifyECC' -msg 'NPS system
$HOST -$hwType $hwId Soft (ECC) memory error recorded at
$eventTimestamp' -bodyText '$notifyMsg\n\nSPA ID:$spaId\nSPA
Slot:$spaSlot\n' -callHome no -eventAggrCount 0
You can monitor eccErrors through e-mail messages or through the NzAdmin tool. For more
information about hardware alerts, see “Displaying Alerts” on page 7-41.
Table 7-16 lists the output from the EccError event rule.
Note: Do not aggregate this event.
Monitoring Regeneration Errors
If the system encounters hardware problems while attempting to set up or perform a regen-
eration, the system triggers a regeneration event rule RegenFault.
The following is the syntax for the event rule RegenFault:
Table 7-16: ECC Error Event Rule
Arguments Description Examples
hwType The type of hardware affected spu (and sfi for z-series
systems)
hwId The hardware ID of the problem source
SPU
1013
spaId The SPA ID
spaSlot The SPA slot number
errType The type of error, that is, whether the
error is the type failure, failure possible,
or failure imminent
1 (Failure), 2 (Failure immi-
nent) 3 (Failure possible), 4
(Failure unknown)
errCode The error code 12
devSerial The serial number of the SPU 601S496A2012
devHwRev The hardware revision 7.21496rA2.21091rB1
devFwRev The firmware revision 1.36

7-30 20282-20 Rev.1
IBM Netezza System Administrator’s Guide
-name 'RegenFault' -on no -eventType regenFault -eventArgsExpr ''
-notifyType email -dst '<your email here>' -ccDst '' -msg 'NPS system
$HOST - regen fault on SPU $hwIdSpu.' -bodyText
'$notifyMsg\n\nhwIdSrc:$hwIdSrc\nsource
location:$locationSrc\nhwIdTgt:$hwIdTgt\ntarget
location:$locationTgt\ndevSerial:$devSerial\nerror
string:$errString\nevent source:$eventSource\n' -callHome no
-eventAggrCount 0
The event rule RegenFault is enabled by default.
Table 7-17 lists the output from the event rule RegenFault.
Note: Do not aggregate this event.
Monitoring Disk Errors
When the disk driver detects an error, it notifies the system. If a serious error occurs, the
system fails over the disk. You can also configure the event manager to notify you with
email when the disk is failed over.
Note: If you receive a significant number of disk error messages, you should contact
Netezza Support and have them determine the state of your disks.
If you have enabled the event rule SCSIDiskError, the system sends you an e-mail message
when it fails a disk.
The following is the syntax for the event rule SCSIDiskError:
Event Rule
SCSIDiskError
-name 'SCSIDiskError' -on no -eventType scsiDiskError -eventArgsExpr
'' -notifyType email -dst '<your email here>' -ccDst '' -msg 'NPS
system $HOST - disk error on disk $diskHwId.' -bodyText
'$notifyMsg\nspuHwId:$spuHwId\ndisk location:$location\nerrType:
$errType\nerrCode:$errCode\noper:$oper\ndataPartition:$dataPartition\n
lba:$lba\ndataSliceId:$dataSliceId\ntableId:$tableId\nblock:$block\nde
vSerial:$devSerial\nfpgaBoardSerial:$fpgaBoardSerial\ndiskSerial:$disk
Serial\ndiskModel:$diskModel\ndiskMfg:$diskMfg\nevent
source:$eventSource\n' -callHome no -eventAggrCount 0
Table 7-17: Regen Fault Event Rule
Arguments Description Examples
hwIdSpu The hardware ID of the SPU that owns or manages
the problem disk
1013
hwIdSrc The hardware ID of the source disk
locationSrc The location string of the source disk
hwIdTgt The hardware ID of the target spare disk
locationTgt The location string of the target disk
errString The error string for the regeneration issue
devSerial The serial number of the owning or reporting SPU

20282-20 Rev.1 7-31
Template Event Reference
Table 7-18 lists the output from the SCSIDiskError event rule.
Table 7-18: SCSI Disk Error Event Rule
Argument Description Examples
spuHwId The hardware ID of the SPU that owns
or manages the disk or FPGA
diskHwId The hardware ID of the disk where the
error occurred
1013
location The location string for the disk
errType The type of error, that is, whether the
error is the type failure, failure possible,
or failure imminent
1 (Failure), 2 (Failure imminent)
3 (Failure possible), 4 (Failure
unknown)
errCode The error code specifying the cause of
the error
110
oper The operation performed when the disk
driver encountered the error; the possi-
ble values are read or write
Decimal
dataParti-
tion
The data partition number on which the
error occurred
1
Iba The logical block address where the
error occurred
145214014
tableId The table ID where the error occurred 200350
dataSliceId The data slice ID where the error
occurred
3
block The table-relative block number where
the error occurred
9
devSerial The serial number of the SPU that owns
the disk or FPGA
fpgaBoard-
Serial
The serial number of the Netezza DB
Accelerator card where the FPGA
resides
diskSerial The disk’s serial number 7.21496rA2.21091rB1
diskModel The disk’s model number WesternDigital
diskMfg The disk’s manufacturer

7-32 20282-20 Rev.1
IBM Netezza System Administrator’s Guide
Monitoring Hardware Temperature
The event manager monitors the hardware temperature of key components within the sys-
tem to maintain reliability and prevent failures due to overheating. The system monitors the
actual temperatures from the SPUs and disk enclosures. If the internal temperature rises
above specified operational levels, the system sends the hwThermalFault event through the
event rule ThermalFault.
Running a system at elevated temperatures can adversely affect the system’s disk life
expectancy. If you receive a hardware temperature event, you should do the following:
Physically investigate the machine room.
Verify that the ambient temperate is within acceptable limits.
Check that the airflow to and from the Netezza system is not occluded.
Verify that there are no signs of combustion.
Check that the cooling components (fans and/or blowers) are functioning properly.
Check the temperature event e-mails for specific details.
In some cases you may need to replace components such as cooling units (fans and/or
blowers), or perhaps a SPU.
The following is the syntax for event rule ThermalFault:
Event Rule
ThermalFault
-name 'ThermalFault' -on no -eventType hwThermalFault -eventArgsExpr
'' -notifyType email -dst 'you@company.com' -ccDst '' -msg 'NPS system
$HOST -$hwType $hwId Hardware Thermal Fault at $eventTimestamp'
-bodyText
'$notifyMsg\n\nlabel:$label\nlocation:$location\ncurVal:$curVal\nerror
string:$errString\nevent source:$eventSource\n' -callHome no
-eventAggrCount 0
Table 7-19 lists the output from the Thermal Fault event rule.
Table 7-19: Thermal Fault Event Rule
Argument Description Examples
hwType The hardware type where the error occurred SPU* or disk enclosure
hwId The hardware ID of the component where the
fault occurred
1013
label The label for the temperature sensor. For the
Netezza DB Accelerator card, this is the BIE
temperature. For a disk enclosure, it is temp-1-
1 for the first temperature sensor on the first
enclosure.
location A string that describes the physical location of
the component
curVal The current temperature reading for the hard-
ware component

20282-20 Rev.1 7-33
Template Event Reference
The default behavior is to send e-mail notification.
Monitoring System Temperature
If three boards (SPUs or SFIs) in an SPA reach the red threshold, the system sends the
sysHeatThreshold event through the event rule SystemHeatThresholdExceeded.
The following is the syntax for event rule SystemHeatThresholdExceeded:
Event Rule
SystemHeatThreshold
Exceeded
-name SystemHeatThresholdExceeded -on no -eventType sysHeatThreshold
-eventArgsExpr '' -notifyType runCmd -dst '$NZ_BIN_DIR/adm/nzpwrdown'
-msg 'Urgent: NPS system $HOST -$hwType $hwId System Heat Threshold
Exceeded at $eventTimestamp' -bodyText '$notifyMsg\n\nError
Type:$errType\nError Code:$errCode\nError String:$errString\n' -
callHome no -eventAggrCount 0
Table 7-20 lists the SystemHeatThresholdExceeded event rule arguments.
The default behavior is to execute the nzstop command and then use RPC to power off the
Netezza system.
Before you power on the machine, check the SPA that caused this event to occur. You may
need to replace one or more SPUs or SFIs.
After you confirm that the temperature within the environment has returned to normal, you
can power on the RPCs using the following command. Make sure that you are logged in as
root or that your account has sudo permissions to run this command:
/nzlocal/scripts/rpc/spapwr.sh -on all
errString The error message “The board temperature
for the SPU exceeded 45
degrees centigrade.”
Table 7-19: Thermal Fault Event Rule
Argument Description Examples
Table 7-20: Sys Heat Threshold Event Rule
Argument Description
errCode The integer code for the onboard temper-
ature error
301 for warning, 302 for critical
errString The error message “Thermal overload warning. Mul-
tiple devices are reporting
excessive operating tempera-
tures. Please investigate.”
errType The type of error 4 (Unknown cannot fail over)

7-34 20282-20 Rev.1
IBM Netezza System Administrator’s Guide
Query History Events
There are two event notifications that alert you to issues with query history monitoring:
histCaptureEvent is triggered when there is a problem that prevents the current query
history collection from writing files to the staging area.
histLoadEvent is triggered when there are problems loading the query history files in
the staging area to the target query history database.
The following is the syntax for the histCaptureEvent rule:
-name 'HistCaptureEvent' -on no -eventType histCaptureEvent -
eventArgsExpr '' -notifyType email -dst 'you@company.com' -ccDst '' -
msg 'NPS History Capture Event from $HOST' -bodyText 'History data
capture error:\nConfiguration Name =$configName\nStorage Limit
=$storageLimit\nLoad Min Threshold =$loadMinThreshold\nLoad Max
Threshold =$loadMaxThreshold\nDisk Full Threshold
=$diskFullThreshold\nLoad Interval =$loadInterval\nTarget NPS
=$nps\nTarget Database =$database\nCurrent Batch Size(MB)
=$capturedSize\nStaged Batches Size(MB) =$stagedSize\nTotal Data
Size(MB) =$storageSize\nBatch Directory =$dirName\nError Code
=$errCode\nError Message = $errString\n' -callHome yes -eventAggrCount
0
Table 7-21 describes the output from the histCaptureEvent rule.
Table 7-21: histCaptureEvent Rule
Arguments Description Examples
host The name of the Netezza system that
had the history event
nps1
configName The name of the active history
configuration
fullhist
storageLimit The storage limit size of the staging
area in MB
loadMinThreshold The minimum load threshold value in
MB
loadMaxThreshold The maximum load threshold value in
MB
diskFullThreshold Reserved for future use.
loadInterval The load interval timer value in minutes
nps The Netezza location of the history
database
localhost
database The name of the query history database
into which the captured data will be
loaded

20282-20 Rev.1 7-35
Template Event Reference
The following is the syntax for the histLoadEvent rule:
-name 'HistLoadEvent' -on no -eventType histLoadEvent -eventArgsExpr
'' -notifyType email -dst 'you@company.com' -ccDst '' -msg 'NPS
History Load Event from $HOST' -bodyText 'History data load
error:\nConfiguration Name =$configName\nStorage Limit
=$storageLimit\nLoad Min Threshold =$loadMinThreshold\nLoad Max
Threshold =$loadMaxThreshold\nDisk Full Threshold
=$diskFullThreshold\nLoad Interval =$loadInterval\nTarget NPS
=$nps\nTarget Database =$database\nLoaded Batch Size(MB)
=$batchSize\nStaged Batches Size(MB) =$stagedSize\nBatch Directory
=$dirName\nError Code =$errCode\nError Message = $errString\n' -
callHome yes -eventAggrCount 0
Table 7-22 describes the output from the histLoadEvent rule.
capturedSize The size in MB of the captured data
currently being written to $NZ_DATA/
hist/staging/alc_$TIMESEQUENCE
stagedSize The size in MB of all staged files in the
/nz/data/hist/loading directory
storageSize The size in MB of capturedSize plus
stagedSize
dirName The name of the directory which con-
tains the currently captured data
alc_
$TIMESEQUENCE
errCode The number which represents the error
problem:
•
97=History Storage Limit Exceeded
•
98=History Disk Full Threshold
Exceeded (not used in this release)
•
99=History Capture Failure, which
could be a problem relating to a disk
I/O error or an internal problem
errString The text string (shown in errCode
description) for the related error code
History Storage
Limit Exceeded
Table 7-22: histLoadEvent Rule
Arguments Description Examples
host The name of the Netezza system that had
the history event
nps1
configName Name of the active history configuration
Table 7-21: histCaptureEvent Rule
Arguments Description Examples

7-36 20282-20 Rev.1
IBM Netezza System Administrator’s Guide
storageLimit The storage limit size of the staging area in
MB
loadMinThreshold The minimum load threshold value in MB
loadMaxThreshold The maximum load threshold value in MB
diskFullThreshold Reserved for future use.
loadInterval The load interval timer value in minutes
nps The location of the history database localhost
database The name of the query history database into
which the data failed to load
batchSize The size in MB of the batch of history files
which are currently being loaded
(/nz/data/hist/loading/alc_$TIMESE-
QUENCE directory)
stagedSize The size in MB of all staged files in the /nz/
data/hist/loading directory except the batch
which is currently loading
dirName The name of the directory which contains
the staged batch files
alc_
$TIMESEQUENCE
errCode The number which represents the error
problem:
•
100=History Load Connection Failure
(not used in this release)
•
101=History Load Config Info Not Found,
which indicates that the configuration
used to collect the data could not be
found on the system. The configuration
may have been dropped or renamed
before the files could be loaded. In this
case, many fields in the event rule may be
set to _UNKNOWN_ (for string fields) or -
1 (for int fields).
•
102=History Load Failure, which could
be an ODBC failure such as corrupted
configuration information, or an internal
problem
errString The text string (shown in errCode descrip-
tion) for the related error code
History Load Con-
fig Info Not Found
Table 7-22: histLoadEvent Rule
Arguments Description Examples

20282-20 Rev.1 7-37
Template Event Reference
Monitoring SPU Cores
For IBM Netezza systems such as the 100, 1000, C1000 and N1001, you can now trigger
an event when the system detects a SPU core file. The spuCore event can help you to trou-
bleshoot query problems on the system.
The following is the syntax for the spuCore event:
-name 'SpuCore' -on no -eventType spuCore -eventArgsExpr ''
-notifyType email -dst 'you@company.com' -ccDst '' -msg 'NPS system
$HOST - Process Cored on SPU $hwId at $eventTimestamp' -bodyText
'$notifyMsg\n\nhwId:$hwId\nerror string:$errString\nevent
source:$eventSource\n' -callHome no -eventAggrCount 0
Table 7-23 lists the output from the SpuCore event rule.
Monitoring Voltage Faults
On IBM Netezza systems such as the 100, 1000, C1000 and N1001, the system monitors
the voltages and power for the SPUs and disk enclosures. If the voltage sensors detect vari-
ations that are outside the specified operational range, the system sends the
hwVoltageFault event through the event rule VoltageFault.
The following is the syntax for event rule VoltageFault:
-name 'VoltageFault' -on no -eventType hwVoltageFault -eventArgsExpr
'' -notifyType email -dst 'you@company.com' -ccDst '' -msg 'NPS system
$HOST -$hwType $hwId Hardware Voltage Fault at $eventTimestamp'
-bodyText
'$notifyMsg\n\nlabel:$label\nlocation:$location\nvoltage:$curVolt\nerr
or string:$errString\nevent source:$eventSource\n' -callHome no
-eventAggrCount 0
Table 7-24 lists the output from the VoltageFault event rule.
Table 7-23: SPU Core Event Rule
Argument Description Examples
hwId The hardware ID of the SPU on which a process
cored
1013
errString Specifies the name of the process that created
the core file
Table 7-24: Voltage Fault Event Rule
Argument Description Examples
hwType The hardware type where the error occurred SPU* or disk enclosure
hwId The hardware ID of the component where the
fault occurred
1013
label The label for the nominal voltage sensor. For
example, voltage-1-1 represents the first volt-
age sensor in the first disk enclosure. For the
Netezza DB Accelerator card, BIE 0.9V is an
example for the 0.9V nominal voltage.

7-38 20282-20 Rev.1
IBM Netezza System Administrator’s Guide
Monitoring Transaction Limits
The TransactionLimitEvent sends an email notification when the number of outstanding
transaction objects exceeds 90% of the available objects. There is a limit of approximately
65,000 transaction objects. New transactions are blocked with an error message that there
is no space for the transactions array.
This event notifies you when 90% (approximately 59,000) of the transaction objects are in
use, and also provides information about the oldest transaction. A sample email follows:
NPS system nzhost - current number (59000) of transactions exceeded 90%
of total limit at 30-Aug-11, 14:00:59 EDT.
Oldest Active Transaction:
txid: 0x4eeba
Session id: 101963
PID: 19760
Database: system
User: admin
Client IP: 127.0.0.1
Client PID: 19759
Transaction start date: 2011-08-30 10:55:08
To reduce the outstanding transaction count you may want to consider
completing/aborting the above transaction.
The number of transaction objects in use can drop by the completion of active transactions,
but if the problem relates to older transactions that have not been cleaned up, you can
abort oldest session. In addition, you can use the nzsession -activeTxn command to identify
the active transactions. You can identify and abort the older transactions as necessary to
free the transaction objects. (You could also stop and restart the Netezza software to clean
up the transactions.)
Note: The notification repeats every three hours if the object count remains above 90%, or
when the object count drops below 85% but later reaches 59,000 again.
location A string that describes the physical location of
the component
curVolt Specifies the current voltage of the component,
This value is a string which also includes the
sensor that has exceeded the voltage threshold.
errString Specifies more information about the voltage
fault; if the problem component is the Netezza
DB Accelerator card, it will be specified in the
string.
Table 7-24: Voltage Fault Event Rule
Argument Description Examples

20282-20 Rev.1 7-39
Template Event Reference
Table 7-25 lists the output of the transaction limit event.
Switch Port Events
There are three new configuration settings that control when the system manager logs
events for ports on the switches. Use caution when changing these settings because they
control the frequency of events that are logged for switch port issues.
The sysmgr.numberOfDownPortToRiseEvent setting specifies the number of ports on
the same switch that must be in the down state for a specified time (defined by
sysmgr.portDownTime1ToRiseEvent) before the system logs a HW_NEEDS_ATTENTION
event. The default is 5 ports. If you specify zero (0), the system will not log an event for
this condition.
The sysmgr.portDownTime1ToRiseEvent specifies the number of seconds that a port
must be in the down state before the system logs a HW_NEEDS_ATTENTION event.
(Ports can sometimes change states for short periods of time in normal conditions, so
this setting helps to avoid "false" events for short state changes.) The default is 300
seconds. A value of 0 disables the time duration requirement — as soon as the num-
berOfDownPortToRiseEvent number has been met, the system manager logs an event.
The sysmgr.portDownTime2ToRiseEvent specifies the number of seconds that any one
port must be in the down state before the system logs a HW_NEEDS_ATTENTION event
for that port. The default is 600 seconds. A setting of 0 disables this time check, so
the system manager logs the HW_NEEDS_ATTENTION event when it detects that a
port is down.
To summarize the system manager event criteria:
For chassis switches, the system manager sends a HW_NEEDS_ATTENTION event
when more than numberOfDownPortToRiseEvent ports are in the down state for more
portDownTime1ToRiseEvent seconds, or when any one port is down for more than
portDownTime2ToRiseEvent seconds.
For fabric switches, the system manager sends a HW_NEEDS_ATTENTION event when
it detects that a port/link is down.
For all switches, the system manager sends the HW_RESTARTED event when it detects
that a switch has rebooted.
Reachability and Availability Events
The system manager now detects and logs events when devices such as management mod-
ules, ESMs, SAS switches, and fans/blowers are unreachable or unavailable. These new
monitoring tools help you to identify and troubleshoot possible issues within the system
that could affect system performance.
Table 7-25: Transaction Limit Event Rule
Argument Description Examples
curNumTX Specifies the current number of transaction
objects which are in use.

7-40 20282-20 Rev.1
IBM Netezza System Administrator’s Guide
Availability Event
A device is unavailable to the system when it is in the Down or Missing state. A device
could be unavailable for a short period of time because of system maintenance tasks such
as a part replacement. The system manager now detects extended periods when a device is
unavailable and logs an event to notify you of the problem. The sysmgr.availabilityAlertTime
setting specifies how long the device must be Down or Missing before it is considered
unavailable. The default value is 300 seconds. When the timeout expires, the system man-
ager logs a HW_NEEDS_ATTENTION event to notify you of the problem.
If a device is unavailable, the most common reasons are that the device is no longer operat-
ing normally and has been transitioned to the Down state, it has been powered off, or it has
been removed from the system. You should investigate to determine the cause of the avail-
ability issue and take steps to replace the device or correct the problem.
Reachability Event
A device is unreachable when it does not respond to a status request from its device man-
ager. A device could be unreachable for a short period of time because it is busy and
cannot respond in time to the status request, or there may be congestion on the internal
network of the system that delays the status response. The system manager now detects
extended periods when a device is unreachable and logs an event to notify you of the prob-
lem. The sysmgr.reachabilityAlertTime setting specifies how long the device manager will
wait for status before it declares a device to be unreachable. The default value is 300 sec-
onds. When the timeout expires, the system manager raises a HW_NEEDS_ATTENTION
event to notify you of the problem.
If a device is unreachable, the most common reasons are that the device is very busy and
cannot respond to status requests, or there may be a problem with the device. If the device
is temporarily busy, the problem usually clears when the device can respond to a status
request.
Event Types Reference
This section describes some of the event types that are not available as templates, but that
you can use to create rules for various monitoring events.
Network Interface State Change Event
The Network Interface State Change event sends an email notification when the state of a
network interface on a SPU has changed.
The new event is not available as an event template in Release 5.0.x. You must add the
event using the following command:
[nz@nzhost ~]$ nzevent add -name SpuNetIfChanged -eventType
nwIfChanged -notifyType email -msg 'A network interface on a SPU has
changed states.' -dst <your email here>
Topology Imbalance Event
The Topology Imbalance event sends an email notification when the system detects a disk
topology imbalance after a disk regeneration or when the system transitions to the online
state after a rebalance.

20282-20 Rev.1 7-41
Displaying Alerts
The new event is not yet available as an event template. You must add the event using the
following command:
[nz@nzhost ~]$ nzevent add -name TopologyImbalance -on no -eventType
topologyImbalance -eventArgsExpr '' -notifyType email -dst
'you@company.com' -ccDst '' -msg 'NPS system $HOST - Topology
imbalance event has been recorded at $eventTimestamp $eventSource.' -
bodyText '$notifyMsg\n\nWarning:\n$errString\n' -callHome no
-eventAggrCount 0
When an imbalance problem is detected, the system writes more detailed information to
the sysmgr.log and the eventmgr.log files. A sample email for this event follows:
From: NPS Event Manager [mailto:eventsender@netezza.com]
Sent: Friday, June 15, 2012 6:06 PM
To: <you@company.com>
Subject: NPS system nzhost - Regen imbalance event has been recorded at
15-Jun-12, 08:36:07 EDT System initiated.
NPS system nzhost - Topology imbalance event has been recorded at 15-
Jul-12, 08:36:07 EDT System initiated.
Warning:
Topology imbalance after rebalance :
spu0109 hba [0] port [2] has 3 disks
spu0109 hba [0] port [3] has 3 disks
...
SPA 1 SAS switch [sassw01b] port [4] has 7 disks
Note: For systems that use an older topology configuration, you could encounter situations
where the event is triggered frequently but for a known situation. In that event, you can dis-
able the event by setting the following registry value. You must pause the system, set the
variable, and then resume the system (for a similar example, see “Concurrent Jobs” on
page 12-3):
[nz@nzhost ~]$ nzsystem set -arg
sysmgr.enableTopologyImbalanceEvent=false
S-Blade CPU Core Events
The numCpuCoreChanged event notifies you when a SPU CPU core has gone offline and
the SPU is operating at a reduced performance. You can add the event using a command
similar to the following:
nzevent add -name SpuCpuCoreChangeEvent -eventType numCpuCoreChanged
-notifyType email -msg "Num Core Changed" -dst <email_id> -bodyText
'\n Hardware id = $hwId\n Location = $location\n Current number of
cores = $currNumCore\n Changed number of cores = $changedNumCore'
If a SPU has a core failure, the system manager also fails over that SPU.
Displaying Alerts
If the NzAdmin tool detects an alert, it displays the Alert entry in the navigation list. The
NzAdmin tool displays each error in the list and indicates the associated component. The
Component, Status, and other columns provide additional information.
For the hardware alerts, the alert color indicator takes on the color of the related compo-
nent. If, however, the component is green, the NzAdmin tool sets the alert color to yellow.

7-42 20282-20 Rev.1
IBM Netezza System Administrator’s Guide
Figure 7-1: Alerts Window
To view the alerts list, click the Alerts entry in the left pane.
To get more information about an alert, double-click an entry or right-click and select
Status to display the corresponding component status window.
To refresh alerts, select View > Refresh or click the refresh icon on the toolbar.

8-1
C H A P T E R 8
Establishing Security and Access Control
What’s in this chapter
Netezza Database Users and Groups
Security Model
Logon Authentication
Netezza Client Encryption and Security
Setting User and Group Limits
Group Public Views
Managing security for the Netezza appliance is an important task. You can control access to
the Netezza system itself by placing the appliance in a secured location such as a data
center. You can control access through the network to your Netezza appliance by managing
the Linux user accounts that can log in to the operating system. You control access to the
Netezza database, objects, and tasks on the system by managing the Netezza database
user accounts that can establish SQL connections to the system.
This chapter describes how to manage Netezza database user accounts, and how to apply
administrative and object permissions that allow users access to databases and tasks. This
chapter also describes user session controls such as row limits and priority that help man-
age impacts to system performance by the database users.
Note: Linux accounts allow users to log in to the Netezza server at the operating system
level, but they cannot access the Netezza database via SQL. If some of your users require
Linux accounts to manage the Netezza system as well as database accounts for SQL
access, you could use identical names and passwords for the two accounts to ease manage-
ment. For details on creating Linux user accounts, refer to your Linux documentation or the
quick reference in Appendix B, “Linux Host Administration Reference.” Throughout this
chapter, any references to users and groups imply Netezza database user accounts, unless
otherwise specified.
Netezza Database Users and Groups
To access the Netezza database, users must have Netezza database user accounts. When a
user accesses Netezza databases either via nzsql command line sessions or other SQL
interfaces, the database account determines the access privileges to database objects and
the administrative permissions to various tasks and capabilities.
You can assign privileges to a specific database user account as needed. If you have several
users with similar access needs and permissions, you can create Netezza groups to orga-
nize those users and thus simplify the permission management. You can create a group,
8-2 20282-20 Rev.1
IBM Netezza System Administrator’s Guide
assign permissions and access properties to that group, and then assign members to the
group as applicable. The members of the group automatically inherit the group’s permis-
sions. If you remove a user from the group, the associated permissions for the group are
likewise removed from the user.
If a user is a member of more than one group, the user inherits the “union” of all permis-
sions from those groups, plus whatever permissions may have been assigned to the user
account specifically. So, for example, if you remove a user from a group that has Create
Table permission or privileges, the user loses that permission unless the user is a member
of another group that has been granted that privilege or the user account has been granted
that privilege.
As a best practice, you should use groups to manage the access permissions and rights of
your database users rather than manage user accounts individually. Groups are an efficient
and time-saving way to manage permissions, even if a group has only one member. Over
time, you will typically add new users, drop existing users, and change user permissions as
roles evolve. New Netezza software releases often add new permissions that you may have
to apply to your users. Rather than manage these changes on an account-by-account basis,
manage the permissions via groups and group membership.
Note: You can also use Netezza groups as resource sharing groups (RSGs) for workload
management. That is, you can create groups and assign them resource utilization percent-
ages, which is the percentage of the Netezza resources that the group should receive when
it and other RSGs are using the system. For a description of RSGs, see Chapter 12, “Man-
aging Workloads on the Netezza Appliance.”
You can create and manage Netezza database accounts and groups using any or a combina-
tion of the following methods:
Netezza SQL commands, which are the most commonly used method
NzAdmin tool, which provides a windows interface for managing users, groups, and
permissions
Web Admin, which provides web browser access to the Netezza system for managing
users, groups, and permissions
This chapter describes how to manage users and groups using the SQL commands. The
online help for the NzAdmin and Web Admin interfaces provide more details on how to
manage users and groups via those interfaces.
Develop an Access Model
Netezza recommends that you develop an access model for your Netezza appliance. An
access model is a profile of the users who require access to the Netezza and the permis-
sions or tasks that they will need. Typically, an access model begins very modestly, with a
few users or groups, but it often grows and evolves as new users are added to the system.
The model defines the users, their roles, and the types of tasks that they perform or the
databases to which they require access.
Access models can vary widely for each company and environment. As a very basic exam-
ple, you could develop an access model that defines three initial groups of database users:
Administrators — users who are responsible for managing various tasks and services.
They might manage specific databases, perform user access management, or perform
other tasks such as creating databases, loading data, or backing up/restoring
databases.
20282-20 Rev.1 8-3
Netezza Database Users and Groups
General database users — users who are allowed access to one or more databases for
querying, and who may or may not have access to manage objects in the database.
These users may also have lower priority for their work.
Power database users — users who require access to critical databases and who may
use more complex SQL queries than the general users. These users may require higher
priority for their work. They may also have permissions for tasks such as creating data-
base objects, running user-defined objects (UDXs), or loading data.
The access model serves as a template for the users and groups that you need to create,
and also provides a map of access permission needs. By creating Netezza database groups
to represent these roles or permission sets, you can easily assign users to the groups to
inherit the various permissions, you can change all the users in a role by changing only the
group permissions, and move users from one role to another by changing their groups, or by
adding them to groups that control those permissions.
Default Netezza Groups and Users
The Netezza system has a default Netezza database user named admin and a group named
public.
The admin database user is the database super-user account. The admin user has all privi-
leges and access to all database objects. Therefore, use that account very sparingly and for
only the most critical of tasks. For example, you might use the admin account to start cre-
ating a few Netezza users and groups; afterwards, you can use another administrative-level
account to perform tasks such as user management, database maintenance, and object
creation and management.
The admin user account has the following characteristics:
The default password is password. (Be sure to change the password as soon as possible
for security.)
You cannot delete the admin user.
You cannot change the name or the owner of the admin account.
Unlike all other objects, the admin user has no owner.
The admin user does not appear on a list of users, except in the administrator’s list.
Note: The admin user also has special workload management priority. Because of the pre-
sumed critical nature of the work, it automatically takes half of the system resources, which
can impact other concurrent users and work. For more information, see “Resource Alloca-
tions for the Admin User” on page 12-10.
The public group is the default user group for all Netezza database users. All users are
automatically added as members of this group and cannot be removed from this group. The
admin user is the owner of the public group. You can use the public group to set the default
set of permissions for all Netezza user accounts. You cannot change the name or the own-
ership of the group.
8-4 20282-20 Rev.1
IBM Netezza System Administrator’s Guide
Choosing a User Authentication Method
By default, when you create a new Netezza database user, you specify a password for that
account. The password is saved with the user account in the Netezza database. When the
user logs in to the database or runs a command and specifies the Netezza user account and
password, Netezza verifies that password against the string stored in the Netezza database.
This is referred to as local authentication. The admin user always uses local authentication.
Netezza also supports the option to authenticate users (except admin) using an LDAP
server in your environment. This is referred to as LDAP authentication. You can use an
LDAP name server to authenticate database users and manage passwords as well as
account activations and deactivations. The Netezza system then uses a Pluggable Authenti-
cation Module (PAM) to authenticate users on the LDAP name server. Note that Microsoft
Active Directory conforms to the LDAP protocol, so it can be treated like an LDAP server for
the purposes of LDAP authentication.
Authentication is a system-wide setting; that is, database users are either locally authenti-
cated or LDAP authenticated. If you choose LDAP authentication, you can create users who
are locally authenticated as exceptions to the system-wide setting. The Netezza host sup-
ports LDAP authentication for database user logins only, not for operating system logins on
the host. For more information about LDAP authentication, see “Logon Authentication” on
page 8-17.
Configuring Password Content Controls and Expiration
The Netezza system uses pam_cracklib utilities to enforce database user account pass-
words, which provides a very strong set of rules to help users avoid weaker or more easily
guessed passwords. For example, pam_cracklib has a dictionary that disallows common
words, passwords based on user names, password “reversal” and other shortcuts that can
make passwords more vulnerable to “hacking.”
You can configure system-wide policies for the minimum requirements for a database
user’s password’s length and content, as well as for the duration of time until passwords
expire. These system-wide controls do not apply to the default admin database user, only to
the other database user accounts that you create. You can also tailor the pam-cracklib dic-
tionary to establish policies within your Netezza environment.
Setting Password Expiration
To set a system-wide control for expiring database user account passwords, use the SET
SYSTEM DEFAULT SQL command as follows:
SYSTEM(ADMIN)=> SET SYSTEM DEFAULT PASSWORDEXPIRY TO days;
SET VARIABLE
The days value specifies the number of days that the password is valid, since the last date
when the password changed. Specify a valid of 0 if you do not want passwords to expire
using a system-wide setting. The default system setting is 0.
You can specify user-specific password expiration dates using the CREATE|ALTER USER
SQL commands.
20282-20 Rev.1 8-5
Netezza Database Users and Groups
When a database user’s account expires, the user has very limited access to the Netezza
system. The user can connect to the Netezza database, but the only query that the user is
allowed to run is the following ALTER USER command, where newPassword represents
their new account password:
SYSTEM(myuser)=> ALTER USER myuseracct WITH PASSWORD 'newPassword';
ALTER USER
The admin user can expire a user account password immediately using the following
command:
SYSTEM(ADMIN)=> ALTER USER myuseracct EXPIRE PASSWORD;
ALTER USER
The expiration does not affect the user’s current session if the user is connected to a data-
base. The next time that the user connects to a database, the user will have a restricted-
access session and must change his password using the ALTER USER command.
Setting Password Content Controls
For your database user accounts, you can specify requirements such as length and charac-
ter formatting to ensure that your users select passwords that meet your security policies.
The system calculates and enforces the “strength” of a password using a credit-based algo-
rithm that evaluates the complexity of the characters used in the password and its length.
To set the content requirements for passwords, use the SET SYSTEM DEFAULT SQL com-
mand as follows:
SYSTEM(ADMIN)=> SET SYSTEM DEFAULT PASSWORDPOLICY TO conf;
SET VARIABLE
The conf value is a string of parameters that specify the content requirements and
restrictions:
minlen — Specifies the minimum length in characters (after deducting any credits) for
a password. The default is the minimum value of 6; that is, even with credits, you can-
not specify a password that is less than 6 characters. If you specify 10, for example,
the user must specify at least 9 lowercase characters (with the lowercase letter default
credit of 1) to meet the minimum length criteria.
Note: There is a relationship between the minimum length of a password and its
strength (that is, the use of mixed-case letters, digits, and non-alphanumeric charac-
ters that increase the complexity of the password string). If a user specifies only
lowercase letters, which is considered a “weak” password, the minimum length of the
password is minlen. If the user includes upper- and lowercase letters, digits, and sym-
bols, the minlen requirement can be reduced with “credits” for the number and type of
those additional characters. You can also use the credit values to require the presence
of a minimum number of characters in the password.
dcredit — Specifies the maximum credit for including digits in the password. The
default is 1 credit; if you specify a credit of 3, for example, the user receives 1 credit
per digit up to the maximum of 3 credits to reduce the minlen requirement. If you
specify a negative value such as -2, your users must specify at least two digits in their
password.
8-6 20282-20 Rev.1
IBM Netezza System Administrator’s Guide
ucredit — Specifies the maximum credit for including uppercase letters in the pass-
word. The default is 1 credit; if you specify a credit of 2, for example, the user receives
1 credit per uppercase letter up to the maximum of 2 credits to reduce the minlen
requirement. If you specify a negative value such as -1, your users must specify at least
one uppercase letter in their password.
lcredit — Specifies the maximum credit for including lowercase letters in the pass-
word. The default is 1 credit; if you specify a credit of 2, for example, the user receives
1 credit per lowercase letter up to the maximum of 2 credits to reduce the minlen
requirement. If you specify a negative value such as -1, your users must specify at least
one lowercase letter in their password.
ocredit — Specifies the maximum credit for including non-alphanumeric characters
(often referred to as symbols such as #, &, or *) in the password. The default is 1
credit; if you specify a credit of 1, for example, the user receives 1 credit per non-
alphanumeric character up to the maximum of 1 credits to reduce the minlen require-
ment. If you specify a negative value such as -2, your users must specify at least two
non-alphanumeric characters in their password.
For example, the following command specifies that the minimum length of a “weak” pass-
word is 10, and it must contain at least one uppercase letter. The presence of at least one
symbol or digit allows for a credit of 1 each to reduce the minimum length of the password:
SYSTEM(ADMIN)=> SET SYSTEM DEFAULT PASSWORDPOLICY TO 'minlen=10,
lcredit=0 ucredit=-1 dcredit=-1 ocredit=1';
SET VARIABLE
As another example, the following command specifies that the minimum length of a
“weak” password is 8, it must contain at least two digits and one symbol; and the presence
of lowercase characters offers no credit to reduce the minimum password length:
SYSTEM(ADMIN)=> SET SYSTEM DEFAULT PASSWORDPOLICY TO 'minlen=8,
lcredit=0 dcredit=-2 ocredit=-1';
SET VARIABLE
Configuring the pam_cracklib Dictionary
In the Netezza implementation, the pam_cracklib dictionary resides in the /usr/lib64 direc-
tory. Note that Netezza’s implementation does not allow you to change the dictpath
configuration setting to point to a different dictionary file. However, you can customize the
dictionary file (cracklib_dict.pwd) for your environment and policies. For details on custom-
izing the dictionary files, refer to the Red Hat 5.0 documentation.
Creating Netezza Database Users
To create a Netezza database user, log in to the Netezza database using an account that
has Create User administrative privilege. (For a new Netezza system, you would most likely
log in as admin and connect to the system database to create users.) For example, the fol-
lowing command adds a user to a system that uses local authentication:
SYSTEM(ADMIN)=> CREATE USER dlee WITH PASSWORD 'jw8s0F4';
CREATE USER
20282-20 Rev.1 8-7
Netezza Database Users and Groups
If you are using LDAP authentication, you do not specify a password for the account. The
CREATE USER command has a number of options that you can use to specify timeout
options, account expirations, rowset limits (the maximum number of rows a query can
return), and priority for the user’s session and queries. The resulting user account is
“owned by” the user who created the account.
When you create users and groups, you can also specify session access time limits. The
access time limits specify when users can start database sessions. User may be permitted
to start sessions at any time on any day, or they may be given restricted access to certain
days and/or certain hours of the day. If a user attempts to start a session during a time
when they do not have access, the system displays an error message that they are outside
their access time limits. Also, if a user attempts to run an nz* command that creates a
database session, the command will also return the error if the user is not within the
allowed access time window. For more information, see the access time information in the
IBM Netezza Advanced Security Administrator’s Guide.
Note: Keep in mind that session settings such as access time restrictions, session time-
outs, priority, and rowset limits, can be set on a per-user, per-group, and in some cases a
system-wide level. The Netezza system checks the settings for a user first to find the values
to use; if not set for the user, the system uses the group settings (whatever is the largest or
highest settings for all the groups to which the user belongs); if not set for the group, the
system uses the system-wide settings.
Altering Netezza Database Users
You can use the ALTER USER command to change the name, password, expiration, owner,
and session settings of an existing database user account. You can also unlock an account
if it was configured to lock after a specified number of failed login attempts. To change the
account, log in to the Netezza database using an account that has Alter administrative priv-
ilege. For example, the following command assigns a user to the group named silver:
SYSTEM(ADMIN)=> ALTER USER dlee WITH IN RESOURCEGROUP silver;
ALTER USER
Deleting Netezza Database Users
You can use the DROP USER command to delete or drop a database user account. To drop
the account, log in to the Netezza database using an account that has Drop administrative
privilege. For example, the following command drops the dlee user account:
SYSTEM(ADMIN)=> DROP USER dlee;
DROP USER
The command displays an error if the account that you want to drop owns objects; you must
change the ownership of those objects or drop them before you can drop the user.
Creating Netezza Database Groups
To create a Netezza database group, log in to the Netezza database using an account that
has Create Group administrative privilege. Several example commands follow:
SYSTEM(ADMIN)=> CREATE GROUP engineering;
CREATE GROUP
SYSTEM(ADMIN)=> CREATE GROUP qa WITH USER dlee;
CREATE GROUP

8-8 20282-20 Rev.1
IBM Netezza System Administrator’s Guide
SYSTEM(ADMIN)=> CREATE GROUP execs WITH MAXPRIORITY CRITICAL;
CREATE GROUP
The CREATE GROUP command also includes options that you can use to specify timeout
options, rowset limits (the maximum number of rows a query can return), and priority for
the sessions and queries of the group members. The resulting group is “owned by” the user
who created the group.
Note: Keep in mind that session settings such as timeouts, priority, and rowset limits, can
be set on a per-user, per-group, and system-wide level. The Netezza system checks the set-
tings for a user first to find the values to use; if not set for the user, the system uses the
group settings (whatever is the largest or highest settings for all the groups to which the
user belongs); if not set for the group, the system uses the system-wide settings.
Altering Netezza Database Groups
You can use the ALTER GROUP command to change the name, membership, session set-
tings, or owner of an existing database group. To change the group, log in to the Netezza
database using an account that has Alter administrative privilege. For example, the follow-
ing command removes the member dlee from the group named qa:
SYSTEM(ADMIN)=> ALTER GROUP qa DROP USER dlee;
ALTER GROUP
Deleting Netezza Database Groups
You can use the DROP GROUP command to delete or drop a database group. To drop the
group, log in to the Netezza database using an account that has Drop administrative privi-
lege. For example, the following command drops the qa group:
SYSTEM(ADMIN)=> DROP GROUP qa;
DROP GROUP
Security Model
The Netezza security model is a combination of administrator privileges granted to users
and/or groups, plus object privileges associated with specific objects (for example, table
xyz) and classes of objects (for example, all tables). As part of the model, any privilege
granted to a database group is automatically granted to (that is, inherited by) all the users
who are members of that group.
Note: Privileges are additive, which means that you cannot remove a privilege from a user
who has been granted that privilege as a consequence of being a member of a group.
Each object has an owner. Individual owners automatically have full access to their objects
and do not require individual object privileges to manage them. The database owner, in
addition, has full access to all objects within the database. The admin user owns all pre-
defined objects and has full access to all administrative permissions and objects. For more
information about the admin user, see “Default Netezza Groups and Users” on page 8-3.
Administrator Privileges
Administrator privileges give users and groups permission to execute global operations and
to create objects.

20282-20 Rev.1 8-9
Security Model
Note: When you grant a privilege, the user you grant the privilege to cannot pass that privi-
lege onto another user by default. If you want to allow the user to grant the privilege to
another user, include the WITH GRANT OPTION when you grant the privilege.
Table 8-1 describes the administrator privileges. Note that the words in brackets are
optional.
Table 8-1: Administrator Privileges
Privilege Description
Backup Allows the user to perform backups. The user can run the com-
mand nzbackup.
[Create] Aggregate Allows the user to create user-defined aggregates (UDAs), and to
operate on existing UDAs.
[Create] Database Allows the user to create databases. Permission to operate on exist-
ing databases is controlled by object privileges.
[Create] External
Table
Allows the user to create external tables. Permission to operate on
existing tables is controlled by object privileges.
[Create] Function Allows the user to create user-defined functions (UDFs) and to
operate on existing UDFs.
[Create] Group Allows the user to create groups. Permission to operate on existing
groups is controlled by object privileges.
[Create] Index For system use only. Users cannot create indexes.
[Create] Library Allows the user to create user-defined shared libraries. Permission
to operate on existing shared libraries.
[Create] Materialized
View
Allows the user to create materialized views.
[Create] Procedure Allows the user to create stored procedures.
[Create] Sequence Allows the user to create database sequences.
[Create] Synonym Allows the user to create synonyms.
[Create] Table Allows the user to create tables. Permission to operate on existing
tables is controlled by object privileges.
[Create] Temp Table Allows the user to create temporary tables. Permission to operate
on existing tables is controlled by object privileges.
[Create] User Allows the user to create users. Permission to operate on existing
users is controlled by object privileges.
[Create] View Allows the user to create views. Permission to operate on existing
views is controlled by object privileges.

8-10 20282-20 Rev.1
IBM Netezza System Administrator’s Guide
Object Privileges on Objects
Object privileges apply to individual object instances (a specific user, a single database,
and so on). Because object privileges take effect after an object has been created, you can
only change privileges on existing objects. Like administrator privileges, object privileges
are granted to users and groups. But where administrator privileges apply to the system as
a whole and are far reaching, object privileges are more narrow in scope.
When an object is created, there are no object privileges associated with it. Instead, the
user who creates the object becomes the object’s owner. Initially, only the object’s creator,
the database owner (if the object is a database object), and user admin can view and
manipulate the object. For other users to gain access to the object, either the owner, data-
base owner, or user admin must grant privileges to it.
Table 8-2 describes the list of available object privileges. As with administrator privileges,
specifying the with grant option allows a user to grant the privilege to others.
[Manage] Hardware Allows the user to perform the following hardware-related opera-
tions: view hardware status, manage SPUs, manage topology and
mirroring, and run diagnostics. The user can run these commands:
nzds and nzhw.
[Manage] Security Allows the user to perform commands and operations relating to
history databases such as creating and cleaning up history
databases.
[Manage] System Allows the user to perform the following management operations:
start/stop/pause/resume the system, abort sessions, and view the
distribution map, system statistics, logs, and plan files from active
query or query history lists. The user can use these commands:
nzsystem, nzstate, nzstats, and nzsession priority.
Restore Allows the user to restore the system. The user can run the nzre-
store command.
Unfence Allows the user to create an unfenced user-defined function (UDF)
or user-defined aggregate (UDA), or to unfence an existing fenced
UDF or UDA if the user has permission to create or alter it. For
more information, see the IBM Netezza User-Defined Functions
Developer’s Guide.
Table 8-1: Administrator Privileges
Privilege Description
Table 8-2: Object Privileges
Privilege Description
Abort Allows the user to abort sessions. Applies to groups and users. For more infor-
mation, see “Aborting Sessions or Transactions” on page 9-22.
All Allows the user to have all the object privileges.
Alter Allows the user to modify object attributes. Applies to all objects.

20282-20 Rev.1 8-11
Security Model
Object Privileges by Class
The Netezza system allows you to define privileges on classes of objects (table, view, and so
on). These privileges allow access to all objects of the class, which exist or will exist in the
future. The list of classes available for use in a grant or revoke statement are:
DATABASE, GROUP, SEQUENCE, SYNONYM, TABLE, EXTERNAL TABLE, FUNCTION,
AGGREGATE, PROCEDURE, USER, VIEW, MATERIALIZED VIEW
Scope of Object Privileges
All objects are either global (database, user, or group) or local (exist within a database such
as a table, view, and so on). You can assign object privileges so that they apply to all
objects within all databases, to a single object within a single database, or to any variation
in between. The following example starts as a local definition and moves to a more global
definition.
To assign a privilege to an object in a particular database, sign on to the database and grant
the privilege on the object to a user or group. For this type of privilege, the object must
exist, and this privilege overrides any other defined privilege.
Assign privilege to
object
MYDB(ADMIN)=> GRANT LIST ON testdb TO user1
GRANT
Delete Allows the user to delete table rows. Applies only to tables.
Drop Allows the user to drop all objects.
Execute Allows the user to execute UDFs and UDAs in SQL queries.
GenStats Allows the user to generate statistics on tables or databases. The user can run
the GENERATE STATISTICS command.
Groom Allows the user to perform general housekeeping and cleanup operations on
tables using the GROOM TABLE command. The GROOM TABLE command
performs reclaim operations to remove deleted rows and also reorganizes
tables based on the clustered base table’s organizing keys.
Insert Allows the user to insert rows into a table. Applies only to tables.
List Allows the user to display an object’s name, either in a list or in another man-
ner. Applies to all objects.
Select Allows the user to select (or query) rows within a table. Applies to tables and
views.
Truncate Allows the user to delete all rows from a table with no rollback. Applies only to
tables.
Update Allows the user to modify table rows, such as changing field values or chang-
ing the next value of a sequence. Applies to tables only.
Table 8-2: Object Privileges
Privilege Description
8-12 20282-20 Rev.1
IBM Netezza System Administrator’s Guide
To assign a privilege to a class of objects in a particular database, sign on to the database
and grant the privilege on the class to a user or group. When you assign a privilege to a
class (such as table), the system allows the user or group that privilege on all the objects of
that class whether or not the object existed at the time of the grant.
Assign privilege to
object class
MYDB(ADMIN)=> GRANT SELECT ON TABLE TO user1
GRANT
To assign a privilege to a class of objects in all databases, sign on to the system database
and grant the privilege on the class to a user or group.
Assign privilege to all
databases
SYSTEM(ADMIN)=> GRANT SELECT ON TABLE TO user1
GRANT
Although the two previous GRANTS (GRANT SELECT ON TABLE TO user1) are identical,
the effect of each statement is very different.
The first is granted while you are connected to a particular database (MYDB). There-
fore, the privilege affects only objects within the MYDB database.
The second is granted while you are connected to the system database. This database
has a special meaning because users cannot create objects within it.
When you are defining privileges for user object classes within the system database,
the system assumes you are requesting a global scope.
Note: If both grants are issued on the same system, the grant issued within a database
overrides the grant issued at the system level.
Privilege Precedence — Netezza uses the following order of precedence for permissions:
1. Privileges granted on a particular object within a particular database
2. Privileges granted on an object class within a particular database
3. Privileges granted on an object class within the system database
You can assign multiple privileges for the same object for the same user. The Netezza sys-
tem uses the rules of precedence to determine which privileges to use. For example, you
can grant users privileges on a global level, but user privileges on a specific object or data-
base level override the global permissions. For example, assume the following three GRANT
commands:
Within the system database, enter:
system(admin)=> GRANT SELECT,INSERT,UPDATE,DELETE,TRUNCATE ON TABLE TO
user1
Within the dev database, enter:
dev(admin)=> GRANT SELECT,INSERT,UPDATE ON TABLE TO user1
Within the dev database, enter:
dev(admin)=> GRANT SELECT, LOAD ON customer TO user1
Using these grant statements and assuming that customer is a user table, user 1 has the
following permissions:
With the first GRANT command, user1 has global permissions to SELECT, INSERT,
UPDATE, DELETE, or TRUNCATE any table in any database.
The second GRANT command restricts user1’s permissions specifically on the dev
database. When user1 connects to dev, user1 can perform only SELECT, INSERT, or
UPDATE operations on tables within that database.

20282-20 Rev.1 8-13
Security Model
The third GRANT command overrides privileges for user1 on the customer table within
the dev database. As a result of this command, the only actions that user1 can perform
on the customer table in the dev database are SELECT and LOAD.
Table 8-3 lists the Netezza SQL built-in commands that you can use to display the privi-
leges for users and groups
Note: When revoking privileges, make sure you sign on to the same database where you
granted the privileges, then use the commands in Table 8-3 to verify the results.
Revoking Privileges
You can revoke administrative and object privileges using the REVOKE command. When
you revoke a privilege from a group, all the members of that group lose the privilege unless
they have the privilege from membership in another group or via their user account.
For example, to revoke the Insert privilege for the group public on the table films, enter:
SYSTEM(ADMIN)=> REVOKE INSERT ON films FROM PUBLIC;
REVOKE
Privileges by Object
There are no implicit privileges. For example, if you grant a user all privileges on a data-
base, you did not grant the user all privileges to the objects within that database. Instead,
you granted the user all the valid privileges for a database (that is, alter, drop, and list).
Table 8-3: Netezza SQL Commands for Displaying Privileges
Command Description
\dg Displays a list of all defined groups.
\dG Displays a list of all defined groups and the users in which they are members.
\dp Displays the list of all privileges assigned to a user, regardless of whether those
privileges were assigned directly or through group membership.
\dpg Displays a list of all privileges assigned to a group as a result of the GRANT
command to the group.
\dpu Displays a list of all privileges assigned to a user as a result of the GRANT com-
mand to the user.
\du Displays a list of all defined users.
\dU Displays a list of all defined user and the group in which they are members.

8-14 20282-20 Rev.1
IBM Netezza System Administrator’s Guide
Table 8-4 describes the list of privileges by object.
Table 8-4: Privileges by Object
Privilege Description
Aggregate Alter — Change the name or ownership of a UDA
Drop — Drop a UDA
Execute — Execute a UDA in a query
List — List UDAs
Database Alter — Change the name of a database
Drop — Drop a database
List — See a database and sign on to it
Function Alter — Change the name or ownership of a function
Drop — Drop a function
Execute — Execute a function in a query
List — List functions
Group Abort — Abort a session
Alter — Change the name of a group
Drop — Drop a group
List — See a group
Procedure Alter — Change the name or ownership of a stored procedure
Drop — Drop a procedure
Execute — Execute a procedure in a query
List — List procedures
User Abort — Abort a session or a transaction
Alter — Change the name of a user
Drop — Drop a user
List — See a user
Table
&
External Table
Alter — Change the name of a table
Delete — Delete rows from a table
Drop — Drop a table
GenStats — Generate statistics for the table
Insert — Insert rows into a table
List — View a table
Select — Select rows in a table
Truncate — Delete all rows from a table
Update — Update rows from the table
System Table Delete — Delete rows from a system table
Insert — Insert rows into a system table
List — View a system table
Select — Select rows in a system table
Update — Update rows from the system table

20282-20 Rev.1 8-15
Security Model
Indirect Object Privileges
The Netezza system controls some objects indirectly based on the privileges associated
with the object. Objects in this category include user sessions, transactions, load sessions,
and statistics. Table 8-5 describes the rules for each of these objects.
Sequence Alter — Alter a sequence
Drop — Drop a sequence
List — List a sequence
Select — Select a sequence
Update — Use next value of a sequence
System View List — See a system view
Select — Select rows in a system view
Synonym Alter — Alter a synonym
Delete — Delete rows (if the synonym is pointed at a table)
Drop — Drop a synonym
Insert — Insert rows (if the synonym is pointed at a table)
List — List a synonym
Select — Select a synonym
Update — Update rows (if the synonym is pointed at a table)
View
&
Materialized View
Alter — Alter a view
Drop — Drop a view
List — See a view
Select — Select rows in a view
Table 8-4: Privileges by Object
Privilege Description
Table 8-5: Indirect Object Privileges
Object Type Access Rule
Client session Users can see a session’s user name and query if that user object is
viewable. Users can see the connected database name if that data-
base object is viewable. Users must have the abort privilege on
another user or be the system administrator to abort another user’s
session or transaction.
Database statistic The system displays operational statistics for database-related
objects if the corresponding object is viewable. For example, you can
see the disk space statistics for a table if you can see the table. For
more information, see “Viewing Record Distribution” on page 9-8.
8-16 20282-20 Rev.1
IBM Netezza System Administrator’s Guide
Always Available Functions
Some functions are available to all users and cannot be altered through access controls.
These functions include:
Log on attempt — Anyone can try to log on.
List client sessions — See restrictions in Table 8-5.
Creating an Administrative User Group
As described in “Default Netezza Groups and Users” on page 8-3, the default admin user
account is a powerful database super-user account. It should be used rarely, such as for
documented maintenance or administrative tasks, or when you first set up a Netezza
system.
For continuing administration tasks, you should create an administration group that reflects
an appropriate set of permissions and capabilities. You might decide to give your admin
users an equivalent set of permissions as admin, or only a subset of permissions. You can
then assign users to that group to grant them their administrative permissions. Additionally,
this group can also be used as a resource management group to specify how much of the
resources these administrative users should receive compared to the other resource sharing
groups. If you do not use resource management, then the administrative users are consid-
ered equal to the other users (except admin) when competing for resources. If you use
resource management, you can use GRA to allocate a percentage of system resources for
them compared to the other resource groups.
To create an administrators group that provides similar object and administrative privileges
as the admin user:
1. Connect to the System database as the admin user; for example:
[nz@nzhost ~]$ nzsql -d system -u admin -pw password
Welcome to nzsql, the Netezza SQL interactive terminal.
2. Create a group for your administrative users:
SYSTEM(ADMIN)=> CREATE GROUP administrators;
CREATE GROUP
3. Grant the group all administrative permissions; for example:
SYSTEM(ADMIN)=> GRANT ALL ADMIN TO administrators WITH GRANT
OPTION;
GRANT
4. Grant the group all object permissions; for example:
SYSTEM(ADMIN)=> GRANT ALL ON DATABASE, GROUP, SEQUENCE, SYNONYM,
TABLE, FUNCTION, AGGREGATE, USER, VIEW, PROCEDURE, LIBRARY TO
administrators WITH GRANT OPTION;
GRANT
5. Add users to the group to grant them the permissions of the group; for example:
SYSTEM(ADMIN)=> ALTER USER jlee WITH IN GROUP administrators;
ALTER USER
or
SYSTEM(ADMIN)=> ALTER GROUP administrators WITH USER jlee, bob;
ALTER GROUP

20282-20 Rev.1 8-17
Logon Authentication
Logon Authentication
The Netezza system offers two authentication methods for Netezza database users:
“Local” authentication, where Netezza administrators define the database users and
their passwords using the CREATE USER command or through the Netezza administra-
tive interfaces. In local authentication, you use the Netezza system to manage
database accounts and passwords, as well as to add and remove database users from
the system. This is the default authentication method.
LDAP authentication, where you can use an LDAP name server to authenticate data-
base users and manage passwords as well as database account activations and
deactivations. The Netezza system then uses a Pluggable Authentication Module (PAM)
to authenticate users on the LDAP name server. Note that Microsoft Active Directory
conforms to the LDAP protocol, so it can be treated like an LDAP server for the pur-
poses of LDAP authentication.
Authentication is a system-wide setting; that is, your users must be either locally authenti-
cated or authenticated using the LDAP method. If you choose LDAP authentication, note
that you can create users with local authentication on a per-user basis. Note that the
Netezza host supports LDAP authentication for database user logins only, not for operating
system logins on the host.
Local Authentication
Local authentication validates that the user name and password entered with the logon
match the ones stored in the Netezza system catalog. The manager process that accepts
the initial client connection is responsible for initiating the authentication checks and dis-
allowing any future requests if the check fails. Because users can make connections across
the network, the system sends passwords from clients in an opaque form.
The Netezza system manages users’ names and passwords. It does not rely on the underly-
ing (Linux) operating system’s user name and password mechanism, other than on user nz,
which runs the Netezza software.
Note: When you create a new user for local authentication, you must specify a password for
that account. You can explicitly create a user with a NULL password, but note that the user
will not be allowed to log on if you use local authentication.
LDAP Authentication
The LDAP authentication method differs from the local authentication method in that the
Netezza system uses the user name and password stored on the LDAP server to authenti-
cate the user. Following successful LDAP authentication, the Netezza system also confirms
that the user account is defined on the Netezza system. The LDAP administrator is respon-
sible for adding and managing the user accounts and passwords, deactivating accounts,
and so on, on the LDAP server.
The Netezza administrator must ensure that each Netezza user is also defined within the
Netezza system catalog. The Netezza user names must match the user names defined in
the LDAP server. If the user names do not match, the Netezza administrator should use the
ALTER USER command to change the user name to match the LDAP user name, or contact
the LDAP administrator to change the LDAP user name.
8-18 20282-20 Rev.1
IBM Netezza System Administrator’s Guide
Note the following characteristics of LDAP authentication:
After the LDAP authentication process completes successfully, the Netezza system
looks up the user in the system catalog. The system displays an error message if it does
not find the user, and it terminates the session.
If authentication fails, you will see the message “LDAP authentication failed.” The sys-
tem notes the reason for the failure in the /nz/kit/log/postgres/pg.log file.
Netezza users should notice no difference between LDAP and local authentication.
When you CREATE or ALTER a user account, a password is not required if you use
LDAP authentication. (Local authentication continues to require a password for user
accounts.)
To use LDAP authentication, you use the SET AUTHENTICATION command to select LDAP
authentication and specify the necessary configuration parameters. The command requires
some information about the LDAP server, such as server name or IP address and some
LDAP server configuration settings. The SET AUTHENTICATION command is described in
detail in the IBM Netezza Database User’s Guide; the following sections describe some
important administrative information about LDAP authentication.
LDAP Configuration File
When you use the SET AUTHENTICATION command to change from local to LDAP authen-
tication, the command performs the following tasks:
The command creates a backup copy of the ldap.conf file and saves it as
ldap.conf.orig. In general, you should not manually edit or modify the ldap.conf file, as
changes can impact LDAP authentication and user access to the Netezza.
The command then updates the /etc/ldap.conf file for the settings specified in the SET
AUTHENTICATION command.
You can issue the SET AUTHENTICATION command as often as necessary to specify the
correct configuration options for your LDAP server. Note that the backup copy
ldap.conf.orig is only created when you change from local to LDAP authentication.
Note: After using the SET AUTHENTICATION command or making any manual changes to
the ldap.conf file, restart the Netezza system using the nzstop and nzstart commands. This
ensures that the Netezza system uses the latest settings from the ldap.conf file.
The command does not leverage any of the settings from previous command instances;
make sure that you specify all the arguments that you require when you use the command.
The command updates the ldap.conf file for the configuration settings specified in the lat-
est SET AUTHENTICATION command.
Note: After you change to LDAP authentication, if you later decide to return to local
authentication, you can use the SET AUTHENTICATION LOCAL command to restore the
default behavior. When you return to local authentication, the command overwrites the
ldap.conf file with the ldap.conf.orig file (that is, the ldap.conf file that resulted after the
first SET AUTHENTICATION LDAP command was issued). The Netezza system then starts
to use local authentication, which requires user accounts with passwords on the Netezza
system. If you have Netezza user accounts with no passwords or that were created with a
NULL password, use the ALTER USER command to update each user account with a
password.

20282-20 Rev.1 8-19
Logon Authentication
LDAP Authentication and SSL Security
If you use LDAP authentication, you can also use Secure Sockets Layer (SSL) protocols to
manage the security of the communication between the Netezza system and the LDAP
server. With SSL, the Netezza system and LDAP server use additional protocols to confirm
the “identity” of both servers using digital certificates. You must obtain certification
authority (CA) certificates from the LDAP server and save them in a directory on the
Netezza system. You need three files: a root certificate, the CA client certificate, and the
CA client keys file. These files typically have the extension .pem.
During this procedure, you must manually edit the ldap.conf file to specify the locations of
the CA cert files. Use caution when editing the file — do not delete any existing lines, even
those that appear to be commented out, as they are often used by the LDAP configuration
commands. Simply add the new configuration settings for the LDAP CA certificates.
To configure SSL security for your LDAP server communications:
1. Obtain the three CA certificate files from the LDAP server, and save them on a location
on the Netezza system. For Netezza high availability (HA) systems, save the files in a
location on the shared drive, such as a new directory under /nz. Both HA hosts must be
able to access the certificate files using the same pathname.
2. Use the SET AUTHENTICATION LOCAL command to temporarily restore local authenti-
cation. The command overwrites the ldap.conf file with the ldap.conf.orig backup file.
3. Using any text editor, append the following three lines to the /etc/ldap.conf file and
save the file:
tls_cacertfile pathname_to_cacert.pem_file
tls_cert pathname_to_clientcrt.pem_file
tls_key pathname_to_clientkey.pem_file
For example:
tls_cacertfile /nz/certs/cacert.pem
tls_cert /nz/certs/clientcrt.pem
tls_key /nz/certs/clientkey.pem
4. Use the SET AUTHENTICATION LDAP SSL ON command and any additional configura-
tion arguments (based on your LDAP server configuration) to restore the LDAP
authentication. Since the server is transitioning from local to LDAP authentication, it
copies the ldap.conf file with your new certificate pathnames to ldap.conf.orig, and
enables LDAP authentication.
Note: After using the SET AUTHENTICATION command or making any manual changes to
the ldap.conf file, restart the Netezza system using the nzstop and nzstart commands. This
ensures that the Netezza system uses the latest settings from the ldap.conf file.
Commands Related to Authentication Methods
Table 8-6 lists the commands related to local and LDAP authentication methods. For more
information on these commands, including command syntax, refer to the IBM Netezza
Database User’s Guide.
Table 8-6: Authentication-Related Commands
Command Description
SET AUTHENTICATION Sets the authentication method, either Local or LDAP.

8-20 20282-20 Rev.1
IBM Netezza System Administrator’s Guide
Passwords and Logons
Login authentication validates against the system catalog. The 64-bit DES encryption con-
verts passwords to alphanumeric characters. As administrator, you can do the following to
ensure security:
Specify a minimum password length. For more information, see “Specifying the Mini-
mum Password Length” on page 8-20.
Limit the number of invalid login attempts. For more information, see “Restricting the
Number of Invalid Logon Attempts” on page 8-20.
Limit the authentication timeout for LDAP authentication. For more information, see
Use the nzpassword command to create locally stored encrypted passwords. For more
information, see “Creating Encrypted Passwords” on page 2-15.
The following information on passwords and logons applies regardless of the authentication
method.
Specifying the Minimum Password Length
As database administrator, you can change the minimum password length from four char-
acters to a maximum of 31 characters.
Restricting the Number of Invalid Logon Attempts
By default, there is no limit to the number of times a user can attempt to log on to the
Netezza system. As database administrator, you can set a limit on the number of invalid
logon attempts and when the limit is reached have the system lock the account.
After the Netezza system locks an account, you must manually unlock the account for the
user to be able to access it again.
When users are locked out of their accounts, the system displays the same error message
even if users enter the correct password. For example:
nzsql: Password authentication failed for user 'bob'
SHOW AUTHENTICATION Displays the Netezza system’s current configuration for
authentication.
CREATE USER Creates a Netezza user, including an optional password.
(When you create new users and use local authentica-
tion, you must specify a password.)
ALTER USER Modifies a Netezza user account. (If you change from
LDAP to local authentication, you may need to alter
user accounts to ensure that they have a password
defined on the Netezza system.)
Table 8-6: Authentication-Related Commands
Command Description
20282-20 Rev.1 8-21
Logon Authentication
To change the number of logon attempts
To change the number of logon attempts, do the following:
1. Use a standard editor and open the configuration file, /nz/data/postgresql.conf.
2. Locate the line containing the “invalid_attempts.”
3. Copy the line, paste the copy after the current line, remove the comment character (#),
and change the value for invalid_attempts.
4. Save your changes.
5. Restart the Netezza system for your changes to take effect.
To reset a locked account
To reset a locked account, do the following:
1. Log in to the Netezza SYSTEM database as the admin user or any database user who
has been granted Alter privilege on User objects or the locked user account.
Note: If you created an administrative user group, as described in “Creating an Admin-
istrative User Group” on page 8-16, you could log in as any database user who is a
member of that group to unlock the user account.
2. Use the ALTER USER RESET ACCOUNT command:
SYSTEM(ADMIN)=> ALTER USER username RESET ACCOUNT
Note: If the admin user is locked, you can unlock it using one of the administrative group
of users. If you do not have any users who are granted Alter privileges on user objects or the
admin account, contact Netezza Support to unlock the admin account.
Specifying an Authentication Timeout
By default, LDAP authentication requests have a timeout of 300 seconds. If the LDAP
server requires more time to respond to requests in your environment, you can change the
timeout settings for your system using a postgresql.conf setting.
To change the authentication timeout, do the following:
1. Use a standard editor and open the configuration file, /nz/data/postgresql.conf.
2. Search for an existing definiton for the auth_timeout variable.
3. If the auth_timeout variable is defined in the file, change the variable’s value to the
number of seconds that you want to use for the timeout. Otherwise, you can define the
variable by adding the following line to the file. As a best practice, add the line to the
Security Settings section of the file.
auth_timeout = number_of_seconds
4. Save your changes.
5. Restart the Netezza system for your changes to take effect.

8-22 20282-20 Rev.1
IBM Netezza System Administrator’s Guide
Netezza Client Encryption and Security
The Netezza system supports SSL for encrypting communication with Netezza client users
as well as peer authentication between the client and Netezza host. The encryption pro-
tects the communication for the Netezza client users who access their data using ODBC,
JDBC, nzsql, or the command line interfaces. The peer authentication uses a digital certif-
icate from the Netezza system to confirm the identity of the clients and host (the Netezza
system).
Note: Encrypted communications have a performance impact due to the time and process-
ing required for the encryption and decryption. For Netezza client users who are within a
secure network environment, consider using unsecured connections for best performance.
If you use secure communications to the Netezza, there are some optional configuration
steps for the Netezza host:
Define SSL certification files in the postgresql.conf file for peer authentication
Create connection records to restrict and manage client access to the Netezza system
The Netezza client users must specify security arguments when they connect to the
Netezza. The nzsql command arguments are described in the IBM Netezza Database User’s
Guide. For a description of the changes needed for the ODBC and JDBC clients, refer to the
IBM Netezza ODBC, JDBC and OLE DB Installation and Configuration Guide.
Configuring the SSL Certificate
By default, the Netezza system and clients do not perform peer authentication to verify
each other’s “identity.” If you want to authenticate connection peers, you must create or
obtain from a CA vendor the server certificate and keys file and the CA root certificate for
the client users. The Netezza has a default set of server certificates and keys files (server-
cert.pem and server-keys.pem) located in the /nz/data/security directory. The Netezza sup-
ports files that use the .pem format.
If you use your own CA certificate files, make sure that you save the server CA files in a
location under the /nz directory. If you have an HA Netezza system, save the certificates on
the shared drive under /nz so that either host can access the files using the same path-
name. You must also edit the /nz/data/postgresql.conf file to specify your server certificate
files.
To edit the postgresql.conf file to add your own CA server certificate and keys files, do the
following:
1. Log in to the Netezza system as the nz user account.
2. Using any text editor, open the /nz/data/postgresql.conf file.
Note: Use caution when editing postgresql.conf. It contains important configuration
parameters for the Netezza system operation.
3. Locate the following section in the file:
#
# Connection Parameters
#
#tcpip_socket = false
ssl = true
20282-20 Rev.1 8-23
Netezza Client Encryption and Security
# Uncomment the lines below and mention appropriate path for the
# server certificate and key files. By default the files present
# in the data directory will be used.
#server_cert_file='/nz/data/security/server-cert.pem'
#server_key_file='/nz/data/security/server-key.pem'
4. Delete the pound sign (#) character at the beginning of the server_cert_file and server_
key_file parameters and specify the pathname of your CA server certificate and keys
files where they are saved on the Netezza host.
Client users must install a copy of the CA root certificate file on their client systems.
The client users will specify the location of the CA root certificate when they run com-
mands such as nzsql, nzhw, and others.
Note: Make sure that the keys file is not password protected; by default, it is not.
5. Save and close the postgresql.conf file.
Any changes that you make to the postgresql.conf file take effect the next time that the
Netezza system is stopped and restarted.
Configuring the Netezza Host Authentication for Clients
By default, the Netezza system is configured to accept either secured or unsecured SSL
connections from Netezza clients. The client connection request specifies the user name,
password, database access, and connection type (either secured or unsecured) as well as
the IP address of the client. The Netezza system confirms the account information, then
accepts the connection as either secured or unsecured (based on the client request and the
Netezza host configuration) if the account information is valid.
If your users are already located within the secure firewall of your network or they use a pro-
tocol such as ssh to securely connect to the Netezza system, you might require them to use
unsecured communications, which avoids the performance overhead of secured communi-
cations. If you have one or more clients who are outside that firewall, you might require
them to use secured connections. The Netezza system provides a flexible way to configure
access security and encryption for your client users.
To configure and manage the client access connections, you use the SET CONNECTION,
DROP CONNECTION, and SHOW CONNECTION commands. These commands manage
updates to the /nz/data/pg_hba.conf file for you, and provide mechanisms for remote
updates, concurrent changes from multiple administrators, and protection from accidental
errors editing the file.
Note: Never edit the /nz/data/pg_hba.conf file manually. Use the Netezza SQL commands
to specify the connection records for your Netezza system.
A connection record has the following syntax:
type dbName ipAddress addressMask authType
8-24 20282-20 Rev.1
IBM Netezza System Administrator’s Guide
The field descriptions follow:
type specifies a connection record type. The type field can have one of the following
values:
host specifies the access permission for users who connect to Netezza databases
using IP connections. Users in the specified IP range may use secured or unse-
cured connections; the Netezza host will accept either.
hostssl specifies the access permission for only those users who connect to
Netezza databases using SSL secured IP connections. Users in the specified IP
range who request unsecured connections will be rejected.
hostnossl specifies the authentication for users who request to connect with unse-
cured IP connections. Users in the specified IP range who request secured
connections will be rejected.
local specifies the authentication for users who connect over a UNIX socket; that
is, they are logged in locally to the Netezza system, such as at the administration
console.
dbName specifies the name of the DB to which the user may request a connection. The
value can be ALL to allow connections to any database on the Netezza system (as long
as their user account has object permissions to that database) or a specific database
name.
ipAddress specifies an IP address in standard decimal notation for one or more client
users who might connect to the Netezza system. This field is used only for host,
hostssl, and hostnossl connection types.
addressMask specifies an IP address mask in standard decimal notation to identify a
range of one or more client users who might connect to the Netezza system. This field
is used only for host, hostssl, and hostnossl connection types. For details about subnet
masks, refer to any general TCP/IP documentation. For example, a mask of 0.0.0.0
indicates that the record is for a connection request from the specific ipAddress value.
An ipAddress of 1.2.3.4 and a mask of 255.255.255.0 indicates that the record
defines connection attempts for any client that has an IP address in the range of
1.2.3.1–255.
authType specifies the authentication method for the Netezza system. Specify this
value when you create a connection record for local (for LDAP, you cannot specify an
authentication type). The values are: trust, md5,crypt, password, and SHA_256. For
more information about authentication methods, refer to “Logon Authentication” on
page 8-17. For information on local values, see the IBM Netezza Database User’s
Guide.
Showing Connection Records
The Netezza has a set of predefined connection records. To list the current set of connec-
tion records, use the SHOW CONNECTION command. The command displays a connection
ID to uniquely identify each connection record. A sample command follows:
SYSTEM(ADMIN)=> SHOW CONNECTION;
20282-20 Rev.1 8-25
Netezza Client Encryption and Security
CONNID | CONNTYPE | CONNDB | CONNIPADDR | CONNIPMASK | CONNAUTH
--------+-----------+--------+-------------+-----------------+--------
1 | local | all | | | trust
2 | host | all | 127.0.0.1 | 255.255.255.255 | md5
3 | host | all | 0.0.0.0 | 0.0.0.0 | md5
(3 rows)
In the sample output, the connection requests define the following capabilities:
Connection ID 1 specifies that the Netezza host will accept connection requests from
any local user (someone logged in directly to the Netezza) to all databases.
Connection ID 2 specifies that the host will accept either secured or unsecured con-
nection requests from any local user (connecting via IP) to all databases.
Connection ID 3 specifies that the host will accept either secured or unsecured con-
nection requests from any remote client user (connecting via IP) to any database.
It is important to note that the host may accept a connection request, but the user must
still pass account authentication (username/password verification), as well as have permis-
sions to access the requested database.
The first record that matches the client connection information is used to perform authen-
tication. If the first chosen record does not work, the system does not look for a second
record. If no record matches, access is denied. With the default records shown above, any
client user who accesses the Netezza and has proper user account and password creden-
tials will be allowed a connection; they could request either secured or unsecured
connections, as the Netezza host accepts either type.
Creating Connection Records
Use the SET CONNECTION command to add a connection record for your client users. For
example, if you have one user who connects from outside the network firewall from an IP
address 1.2.3.4, you might want to require that client to use secured SSL connections. You
can create a connection record for that user as follows:
SYSTEM(ADMIN)=> SET CONNECTION HOSTSSL DATABASE 'ALL' IPADDR '1.2.3.4'
IPMASK '255.255.255.255' -AUTH SHA256;
SET CONNECTION
This command adds a connection record to the database. A sample SHOW CONNECTION
command follows, with the new record added as ID 3:
SYSTEM(ADMIN)=> SHOW CONNECTION;
CONNID | CONNTYPE | CONNDB | CONNIPADDR | CONNIPMASK | CONNAUTH
--------+-----------+--------+-------------+-----------------+--------
1 | local | all | | | trust
2 | host | all | 0.0.0.0 | 0.0.0.0 | md5
3 | hostssl | all | 1.2.3.4 | 255.255.255.255 | SHA256
(3 rows)
This example shows the importance of record precedence. Note that record ID 2 will be the
first match for all of the users who remotely connect to the Netezza system. Because it is
set to host, this record will allow either secured or unsecured connections based on the
connection request from the client. To ensure that the user at 1.2.3.4 is authenticated for
a secure connection, drop connection record 2 and add it again using a new SET CONNEC-
TION record to place the more general record after the more specific record for 1.2.3.4.

8-26 20282-20 Rev.1
IBM Netezza System Administrator’s Guide
Dropping Connection Records
To drop a connection record, use the DROP CONNECTION command and specify the con-
nection ID. A sample command follows:
SYSTEM(ADMIN)=> DROP CONNECTION 4;
DROP CONNECTION
Commands Related to Netezza Client Connection Methods
Table 8-7 lists the commands related to Netezza client connection methods. For more
information on these commands, including command syntax, refer to the IBM Netezza
Database User’s Guide.
Setting User and Group Limits
You can place limits on the resources that users and groups can use. You can limit the
number of rows that a query can return (rowset limit), the amount of time a session can
remain idle before it is terminated (session timeout), the amount of time a query can run
before the system notifies you, and the session priority.
The Netezza system calculates the limit for each user based on the following rules:
If the attribute is set for the user account, use that value.
If the attribute is not set for the USER, use the MOST RESTRICTIVE value set for all of
the groups of which that user is a member.
If the attribute is not set for the user or any of the user’s groups, use the system default
value.
Table 8-8 describes these settings.
Table 8-7: Client Connection-Related Commands
Command Description
SET CONNECTION Defines a connection record for client access.
SHOW CONNECTION Displays the current set of connection records for client
access.
DROP CONNECTION Drops or deletes a connection record for client access.
CREATE USER Creates a Netezza user, including an optional password.
(When a client user attempts to connect to the Netezza,
they must have a valid user account and password.)
Table 8-8: User and Group Settings
Setting Scope Valid Range Default Value Description
Rowset limit User, group,
and system
1 to 2,147,483,647 or
unlimited (zero)
Unlimited
(zero)
Maximum rowset limit per query.
For more information, see “Spec-
ifying User Rowset Limits” on
page 8-27.

20282-20 Rev.1 8-27
Setting User and Group Limits
When you change these values, the system sets them at session startup and they remain in
effect for the duration of the session.
You specify the system defaults with the SET SYSTEM DEFAULT command. To display the
system values, use the SHOW SYSTEM DEFAULT command.
To set a system default, use a command similar to the following, which sets the default
session timeout to 300 minutes:
SYSTEM(ADMIN)=> SET SYSTEM DEFAULT SESSIONTIMEOUT TO 300;
SET VARIABLE
To show the system default for the session timeout, use the following syntax:
SYSTEM(ADMIN)=> SHOW SYSTEM DEFAULT sessiontimeout;
NOTICE: 'session timeout' = '300'
SHOW VARIABLE
Specifying User Rowset Limits
You can place a limit on the number of rows a query can return and thus restrict resources
for large result sets. Specifying a rowset limit when you create a user or a group automati-
cally limits the rows returned, so that users do not have to append a limit clause to their
SQL queries.
Note: Rowset limits apply only to user table and view queries, not to system tables and view
queries.
You can also impose rowset limits on both individual users and groups. In addition, users
can set their own rowset limits. The admin user does not have a limit on the amount of rows
a query can return.
Query timeout User, group,
and system
1 to 2,147,483,647
minutes or unlimited
(zero)
Unlimited
(zero)
Maximum time allocated to a
query. For more information, see
“Specifying Query Timeout Lim-
its” on page 8-29.
Session limit User, group,
and system
1 to 2,147,483,647
minutes or unlimited
(zero)
Unlimited
(zero)
When a SQL session is idle for
longer than the specified period,
the system terminates the ses-
sion. For more information, see
“Specifying Session Timeout” on
page 8-29.
Session priority User, group,
and system
Critical, high, normal,
or low
None Defines the default and maxi-
mum priority for the user or
group.
Table 8-8: User and Group Settings
Setting Scope Valid Range Default Value Description
8-28 20282-20 Rev.1
IBM Netezza System Administrator’s Guide
Using Rowset Limit Syntax
You can specify a rowset limit when you create a user or group. You can also alter the
rowset limit of a user or a group. You can specify any number up to one billion or zero,
which means unlimited.
To create a user with a rowset limit, use the following syntax:
CREATE USER username WITH ROWSETLIMIT [number | UNLIMITED]
To create a group with a rowset limit, use the following syntax:
CREATE GROUP name WITH ROWSETLIMIT [number | UNLIMITED]
To modify a user’s rowset limit, use the following syntax:
ALTER USER username WITH ROWSETLIMIT [number | UNLIMITED]
To modify a group’s rowset limit, use the following syntax:
ALTER GROUP name WITH ROWSETLIMIT [number | UNLIMITED]
Overriding the Rowset Limit for a Session
For commands that perform “INSERT TO ... SELECT FROM” or “CREATE TABLE AS ...
SELECT” operations, the rowset limit can affect the results by limiting the number of rows
that are inserted to the resulting table. If you are going to be using these commands to cre-
ate user tables, you can override the rowset limit within your user session to ensure that
those queries complete with all the matching rows. (This override does not change the limit
for other SELECT queries, or for INSERT TO ... SELECT FROM or CTAS queries that write
to external table destinations.)
To override the rowset limit for INSERTS and CTAS operations in a session:
1. Open a session with the Netezza database and log in using your database user account.
2. Use the following command to set the session variable.
MY_DB(NZUSER)=> SET ROWSETLIMIT_LEVEL=0;
SET VARIABLE
To show the status of the rowset limit for the session:
MY_DB(NZUSER)=> SHOW ROWSETLIMIT_LEVEL;
NOTICE: ROWSETLIMIT_LEVEL is off
When the rowset override is enabled (rowsetlimit_level=0), note the following behaviors for
your INSERT and CTAS queries:
A CTAS operation to a user table destination is not subject to the rowset limit.
A CTAS operation to an external table is subject to the rowset override.
An INSERT INTO <table> SELECT FROM operation, where <table> is a user table, is
not subject to the rowset limit override.
An INSERT INTO <table> SELECT FROM operation, where <table> is an external
table, is subject to the rowset limit override.
To disable the override and restore the limit to all queries, set the value of the
rowsetlimit_level session variable to 1 (on).
20282-20 Rev.1 8-29
Setting User and Group Limits
Specifying Query Timeout Limits
You can place a limit on the amount of time a query is allowed to run before the system
notifies you using the runaway query event. The event e-mail tells you how long the query
has been running, and you can decide whether to terminate the query.
Note: To receive a message, you must enable the runawayQuery event rule. For more infor-
mation, see “Specifying Runaway Query Notification” on page 7-26.
You can impose query timeout limits on both individual users and groups. In addition,
users can set their own query timeouts.
Using Query Timeout Syntax
You can specify a query timeout when you create a user or group. You can also alter the
query timeout of a user or a group. Specify the query timeout in minutes.
Note: Changes to the query timeout for the public group does not affect the admin user’s
settings.
To create a user with a query timeout, use the following syntax:
CREATE USER username WITH QUERYTIMEOUT [number | UNLIMITED]
To create a group with a query timeout, use the following syntax:
CREATE GROUP name WITH QUERYTIMEOUT [number | UNLIMITED]
To modify a user’s query timeout, use the following syntax:
ALTER USER username WITH QUERYTIMEOUT [number | UNLIMITED]
To modify a group’s query timeout, use the following syntax:
ALTER GROUP name WITH QUERYTIMEOUT [number | UNLIMITED]
Specifying Session Timeout
You can place a limit on the amount of time a SQL database session is allowed to be idle
before the system terminates it. You can impose timeouts on both individual users and
groups. In addition, users can set their own timeouts.
Using Session Timeout Syntax
You can specify a session timeout when you create a user or group. You can also alter the
session timeout of a user or a group. Specify the timeout in minutes.
Note: Changes to the session timeout for the public group does not affect the admin user
settings.
To create a user with a session timeout, use the following syntax:
CREATE USER username WITH SESSIONTIMEOUT [number | UNLIMITED]
To create a group with a session timeout, use the following syntax:
CREATE GROUP name WITH SESSIONTIMEOUT [number | UNLIMITED]
To modify a user’s session timeout, use the following syntax:
ALTER USER username WITH SESSIONTIMEOUT [number | UNLIMITED]
To modify a group’s session timeout, use the following syntax:
ALTER GROUP name WITH SESSIONTIMEOUT [number | UNLIMITED]

8-30 20282-20 Rev.1
IBM Netezza System Administrator’s Guide
Specifying Session Priority
You can define the default and maximum priority values for a user, a group, or as the sys-
tem default. The system determines the value to use when the user connects to the host
and executes SQL commands.
The possible priorities are critical, high, normal, low, or none. For details on workload man-
agement and session priority, see Chapter 12, “Managing Workloads on the Netezza
Appliance.”
The default priority for users, groups, and the system is none. If you do not set any priori-
ties, user sessions run at normal priority.
The syntax to set system the default and maximum priority is:
SET SYSTEM DEFAULT [DEFPRIORITY | MAXPRIORITY ] to [CRITICAL |
HIGH | NORMAL | LOW | NONE]
The syntax to create a group and set the default priority is:
CREATE GROUP group_name WITH DEFPRIORITY TO HIGH;
Logging Netezza SQL Information
You can log information about all user or application activity on the server, and you can log
information generated by individual Windows clients.
Note: In addition, if you use the Mantra compliance application, you can configure and
monitor details about the query activity based on policies that you create. For more infor-
mation, see Chapter 14, “Managing the MantraVM Service.”
Logging Netezza SQL Information on the Server
To log information on the server, perform the following steps:
1. Using any text editor, modify the file /nz/data/postgresql.conf.
2. Add (or change) the following parameter:
debug_print_query = true
The system writes log information to the /nz/kit/log/postgres/pg.<date>.log file. For more
information, see “System Logs” on page 6-12.
Logging Netezza SQL Information on the Client
To log information on the client Windows system, perform the following steps:
1. Click Start > Settings > Control Panel > Data sources (ODBC).
2. In the ODBC Data Source Administration Screen, click the System DNS tab.
3. Select NZSQL, then Configure.
4. In the NetezzaSQL ODBC Datasource Configuration screen, enter information about
your data source, database, server, and so on.
5. Select Driver Options.

20282-20 Rev.1 8-31
Group Public Views
6. In the Netezza ODBC Driver Configuration, select the CommLog check box. This causes
the system to create a file that contains the following:
The connection string
The SQL commands executed
The first tuple of data returned
The number of tuples returned
The system writes log information to the file specified in the Commlog check box (for exam-
ple, C:\nzsqlodbc_xxxx.log).
Group Public Views
During database initialization, Netezza grants the group public list and select privileges for
system views that retrieve information about users.
Table 8-9 describes the common system views and the type of information that the view
provides. In some cases, the view returns more than the information listed in the table.
Table 8-9: Public Views
View Name Data Returned
_v_aggregate Objid, aggregate name, owner, and create date
_v_database Objid, Database name, owner, and create date
_v_datatype Objid, datatype, owner, description, and size
_v_function Objid, function name, owner, create date, description, result
type, and arguments
_v_group Objid, Group name, owner, and create date
_v_groupusers Objid, Group name, owner, and user name
_v_operator Objid, operator, owner, create date, description, opr name, opr
left, opr right, opr result, opr code, and opr kind
_v_procedure Objid, procedure, owner, create date, object type, description,
result, number of arguments, arguments, procedure signature,
built in, procedure source, proc, executed as owner
_v_relation_column Objid, object name, owner, create date, object type, attr num-
ber, attr name, attr type, and not null indicator
_v_relation_column_def Objid, object name, owner, create date, object type, attr num-
ber, attr name, and attr default value
_v_relation_keydata Database owner, relation, constraint name, contype, conseq,
att name, pk database, pk owner, pk relation, pk conseq, pk att
name, updt_type, del_type, match_type, deferrable, deferred,
constr_ord
_v_sequence Objid, seq name, owner, and create date

8-32 20282-20 Rev.1
IBM Netezza System Administrator’s Guide
Table 8-10 describes the views that show system information. You must have administrator
privileges to display these views.
_v_session ID, PID, UserName, Database, ConnectTime, ConnStatus, and
LastCommand
_v_table Objid, table name, owner, and create date
_v_table_dist_map Objid, table name, owner, create date, dist attr number, and
dist attr name
_v_user Objid, User name, owner, valid until date, and create date
_v_usergroups Objid, User name, owner, and group name
_v_view Objid, view name, owner, create date, rel kind, rel checks, rel
triggers, has rules, unique keys, foreign keys, references, has p
keys, and number attributes
Table 8-10: System Views
View Name Output
_v_sys_group_priv GroupName, ObjectName, DatabaseName, Objecttype, gopobjpriv,
gopadmpriv, gopgobjpriv, and gopgadmpriv
_v_sys_index objid,SysIndexName, TableName, and Owner
_v_sys_priv UserName, ObjectName, DatabaseName, aclobjpriv, acladmpriv,
aclgobjpriv, and aclgadmpriv
_v_sys_table objid, SysTableName, and Owner
_v_sys_user_priv UserName, ObjectName, DatabaseName, ObjectType, uopobjpriv,
uopadmpriv, uopgobjpriv, and uopgadmpriv
_v_sys_view objid, SysViewName, and Owner
Table 8-9: Public Views
View Name Data Returned

9-1
C H A P T E R 9
Managing User Content on the Netezza Appliance
What’s in this chapter
Creating Databases and User Tables
Creating Distribution Keys
Avoiding Data Skew
Using Clustered Base Tables
Updating Database Statistics
Grooming Tables
Managing Sessions
Running Transactions
Netezza Optimizer and Query Plans
Viewing Query Status and History
Unlike other database solutions, the Netezza appliance does not require a database admin-
istrator (DBA) to manage and control user databases. Instead, there are a few system
administration tasks relating to the creation and management of the user content stored on
the system. This chapter describes some basic concepts of Netezza databases, and some
management and maintenance tasks that can help to ensure the best performance for user
queries.
You can manage Netezza databases and their objects using SQL commands that you run
through the nzsql command (which is available on the Netezza system and in the UNIX cli-
ent kits) as well as by using the NzAdmin tool, Web Admin interface, and data connectivity
applications like ODBC, JDBC, and OLE DB. This chapter focuses on running SQL com-
mands (shown in uppercase, such as CREATE DATABASE) via the nzsql command interface
to perform tasks.
Creating Databases and User Tables
On a new Netezza system, there is typically one main database, system, and a database
template, master_db. Netezza uses the master_db as a template for all other user data-
bases that are created on the system.
Initially, only the admin user can create new databases, but the admin user can grant other
users permission to create databases as described in Chapter 8, “Establishing Security and
Access Control.” Users can create databases if they are connected to the system database.

9-2 20282-20 Rev.1
IBM Netezza System Administrator’s Guide
You cannot delete the system database. The admin user can also make another user the
owner of a database, which gives that user admin-like control over that database and its
contents.
The database creator becomes the default owner of the database. The owner can remove
the database and all its objects, even if other users own objects within the database.
Within a database, permitted users can create tables and populate them with data for que-
ries. For details on the loading process options, see the IBM Netezza Data Loading Guide.
Understanding Table Size and Storage Space
When you create a table, the table does not consume any space on the data slices until you
insert one or more rows. As you insert each row to the table, the Netezza system allocates a
minimum of one extent, which is defined as 3 MB of storage space, on each data slice that
stores a row of the table. Each extent is divided into 24 128KB pages (also called a block).
The system uses each 128KB page as needed to store the table rows. When all 24 pages of
an extent are consumed, the system allocates another 3MB extent to hold more rows for the
table on that data slice.
Note: The extent and page sizes maximize the performance of read operations within the
Netezza system. The extent size maximizes the performance of the disk scan operations,
and the page size maximizes the performance of the FPGA as it reads the data that streams
from disk.
For example, assume that you create a table and insert only one row to the table. The sys-
tem allocates one 3MB extent on a data slice to hold that row. The row is stored in the first
128 KB page of the extent. If you view the table size using a tool such as the NzAdmin
interface, the table shows a Bytes Allocated value of 3MB (the allocated extent for the
table), and a Bytes Used value of 128 KB (the used page in that extent).
For tables that are well distributed with rows on each data slice of the system, the table
allocation will be a minimum of 3MB x <numberOfDataSlices> of storage space. If you
have an evenly distributed table with 24 rows on an IBM Netezza 1000-3 system, which
has 24 data slices, the table will allocate 3MB x 24 extents (72MB) of space for the table.
That same table uses 128KB x 24 pages, or approximately 3MB of disk space.
The Bytes Allocated value is always larger than the Bytes Used value. For very small tables,
the Bytes Allocated value may be much larger than the Bytes Used value, especially on
multi-rack Netezza systems with hundreds of data slices. For larger tables, the Bytes Allo-
cated value is typically much closer in size to the Bytes Used value.
Best Practices for Disk Space Usage in Tables
As a best practice, design your tables to use only the disk space you require. For example,
use the fewest digits of precision in numerics to save space, and do not set user-controlla-
ble sizes to their maximum values when smaller sizes are sufficient.
Table 9-1 describes the amount of disk space the following data types use.
Table 9-1: Data Type Disk Usage
Data Type Usage
big integers (INT8) 8 bytes
integers (INT4) 4 bytes

20282-20 Rev.1 9-3
Creating Databases and User Tables
Keep in mind the following characteristics of Netezza tables:
In all tables, every record also includes three 8-byte special fields that represent a
rowid, the transaction ID of the transaction that created the row, and the transaction ID
of the transaction that deleted the row (which is 0 if the row has not been deleted).
These columns are referred to as the special columns or specials.
Every varchar data type whose declared size is greater than 16 and whose actual con-
tent is an odd number of bytes gets a pad byte.
Most records also include a header that consists of a length (2 bytes) and a null vector
(N/8 bytes, where N is the number of columns in the record). The system rounds up the
size of this header to a multiple of 4 bytes. The only time a record does not contain a
header is if there are no nullable columns and no variable-sized columns (varchar and
char data types over 16 bytes).
Because every record begins on a 4-byte boundary, round up your overall record size
accordingly.
small integers (INT2) 2 bytes
tiny integers (INT1) and bools 1 byte
numerics of more than 18 digits of precision 16 bytes
numerics with 10 to 18 digits 8 bytes
numerics of 9 or fewer digits 4 bytes
float8s 8 bytes
float4s 4 bytes
times with time zone and intervals 12 bytes
times and timestamps 8 bytes
dates 4 bytes
char(16) 16 bytes
char(n*) and varchar(n)
Note that char data types of more than 16 bytes
are represented on disk as if they were varchar
data types of the same nominal size.
N+2, or fewer, bytes, depending on
actual content
char(1) 1 byte
nchar(n*) and nvarchar(n)
Note that nchar and nvarchar characters are
always stored as if they were nvarchars.
N+2 to (4 * N) + 2
Table 9-1: Data Type Disk Usage
Data Type Usage
9-4 20282-20 Rev.1
IBM Netezza System Administrator’s Guide
The smallest unit of allocation on a data slice is an extent, which currently is 3 MB of
disk space. Note that this number could change in future releases of the software.
Database and Table Guidelines
When working with database tables, keep the following guidelines in mind:
Pick the right data type or pick the right size. For example:
Use date (4 bytes) rather than datetime (8 bytes).
Use int1 (1 byte) or INT2 (2 bytes) rather than integer (4 bytes).
Use the same data type and size for columns that you will be joining against.
Specify NOT NULL for columns, whenever possible.
NOT NULL requires less processing/instructions.
NOT NULL requires (slightly) less storage.
Select a good distribution key, as described in “Creating Distribution Keys” on
page 9-5.
If necessary, specify organizing keys to improve queries on large fact tables, as
described in “Using Clustered Base Tables” on page 9-11.
Periodically generate statistics for the tables. See “Updating Database Statistics” on
page 9-14.
Accessing Rows in Tables
The rowid is a common feature in most databases. It identifies a specific record in the
database. The rowid is guaranteed to be unique within a table and unique across the entire
system, but not necessarily sequential within a table.
When you run the nzload command, the Netezza host creates records and assigns rowids.
The SPUs can also create records and assign rowids. This happens when you use the com-
mand CREATE TABLE <tablename> AS SELECT.
The system gives the host and each of the SPUs a block of sequential rowids that they can
assign. When they use up a block, the system gives them another block, which explains
why the rowids within a table are not always sequential.
The system stores the rowid with each database record. It is an 8-byte integer value.
You can use the rowid keyword in a query to select, update, or delete records. For example:
SELECT rowid, lname FROM employee_table;
UPDATE employee_table SET lname = ‘John Smith’ WHERE rowid = 234567;
Querying by some other field, such as name, might be difficult if you have 10 John Smiths
in the database.
In a new installation, the initial rowid value is 100,000. The next available rowid value is
stored in the /nz/data/RowCounter file.

20282-20 Rev.1 9-5
Creating Distribution Keys
Understanding Transaction IDs
Transaction IDs (xids) are sequential in nature. Each database record includes two xid
values:
A transaction ID that created the record
A transaction ID that deleted the record (which is set to 0 if it is not deleted)
When the system updates a record, it deletes the original record, inserts a new record, and
preserves the rowid.
Because the system does not update records in place on the disk, data integrity is pre-
served (write once), and rollback and recovery operations are simplified and accelerated.
When you run a query (or backup operation), the system allows the query to access any
record that was created — but not deleted — before this transaction began. Because xid
values are sequential, the system simply needs to compare the create xid and delete xid
values to accomplish this.
The exception is that when a transaction begins, it generates an invisibility list of any other
active transactions (which would thus have a lower xid value). The transaction ignores any
records with a matching create xid value, and includes any records with a matching delete
xid value.
An xid is an 8-byte integer value, of which 48 bits are significant. In new installations, the
initial xid value is 1,024. The system stores the next available xid value in the /nz/data/xid
file.
The size of the xid allows for over 100 trillion transaction IDs, which would take over 4000
years to use up at the rate of 1 transaction per millisecond. In actual practice, transaction
IDs in a Netezza system are likely to be generated at a slower rate and would take longer to
exhaust.
Creating Distribution Keys
Each table in a Netezza database has only one distribution key. The key can consist of one
to four columns of the table.
Note: The columns that you select for the distribution key cannot be updated.
You can use the following Netezza SQL command syntax to create tables and specify distri-
bution keys:
To create an explicit distribution key, the Netezza SQL syntax is:
CREATE TABLE <tablename> [ ( <column> [, … ] ) ]
DISTRIBUTE ON [HASH] ( <column> [ ,… ] ) ;
The phrase DISTRIBUTE ON specifies the distribution key, the word HASH is optional.
To create a table without specifying a distribution key, the Netezza SQL syntax is:
CREATE TABLE <tablename> (col1 int, col2 int, col3 int);
The Netezza selects a distribution key. There is no guarantee what that key is and it
can vary depending on the Netezza software release.
To create a random distribution, the Netezza SQL syntax is:
CREATE TABLE <tablename> [ ( <column> [, … ] ) ]DISTRIBUTE ON RANDOM;
The phrase DISTRIBUTE ON RANDOM specifies a round-robin distribution.
9-6 20282-20 Rev.1
IBM Netezza System Administrator’s Guide
You can also use the NzAdmin tool to create tables and specify the distribution key. For
more information about the CREATE TABLE command, see the IBM Netezza Database
User’s Guide.
Selecting a Distribution Key
When choosing which columns should be the distribution key for a table, your goal should
be uniform distribution of the rows and optimal access to the data.
Consider the following factors:
The more distinct the distribution key values, the better.
The system distributes rows with the same distribution key value to the same data
slice.
Parallel processing is more efficient when you have distributed table rows evenly across
the data slices.
Tables used together should use the same columns for their distribution key. For exam-
ple, in an order system application, use the customer ID as the distribution key for both
the customer table and the order table.
If a particular key is used largely in equi-join clauses, then that key is a good choice for
the distribution key.
Criteria for Selecting Distribution Keys
Use the following rules when selecting a unique or non-unique column as the distribution
key for the table:
Use columns for the distribution key that distribute table rows evenly across the data
slices. The more singular the values for a column, the more optimal their distribution.
Use columns for the distribution key based on the selection set that you use most fre-
quently to retrieve rows from the table.
Select as few columns as possible for the distribution key to optimize the generality of
the selection.
Base the column selection on an equality search, because if both tables distribute on
the equality columns, the system can perform the join operation locally.
Do not use boolean keys, for example, True/False, I/0, or M/F, because the system dis-
tributes rows with the same hash value to the same data slices; thus, the table would
be divided across only two data slices.
Choosing a Distribution Key for a Subset Table
When you run a query, the results flow from the data slices to the SPUs to the host to the
application. A query can create a new table (rather than return results to the application). If
you create a subset/summary table, your subset table inherits the parent table distribution
key, and the subset records are created and stored locally on each data slice.
For example, perhaps you have a large table with a lot of records and columns, and want to
create a summary table from it — maybe with just one day’s worth of data — and with only
some of the original columns. If the new table uses the same distribution key as the origi-
20282-20 Rev.1 9-7
Creating Distribution Keys
nal table, then the new records will be on the same data slices that they started on. The
system has no need to send the records to the host (and consume transmission time and
host processing power). Rather, the SPUs simply create the records locally — read from the
same data slices and write back out to same data slices. This way of creating a new table is
much more efficient. In this case the SPU is basically communicating with only its data
slices.
Choosing the same distribution key causes the system to create the new table local to each
data slice (reading from the original table, writing to the new table).
create [ temporary | temp ] TABLE table_name [ (column [, ...] ) ]
as select_clause [ distribute on ( column [, ...] ) ];
When you create a subset table or temp table, you do not need to specify a new distribution
key or distribution method. Instead, allow the new table to inherit the parent table’s distri-
bution key. This avoids the extra data distribution that can occur because of the non-match
of inherited and specified keys.
Distribution Keys and Collocated Joins
If you have tables that are usually joined, you should distribute them on the same column
that you use to join the tables. The Netezza system can then perform a collocated join that
minimizes data movement and provides optimal performance.
The Netezza architecture distributes processing across many individual SPUs each with its
own dedicated memory and data slices. These individual processors operate in a “shared
nothing” environment that eliminates the contention for shared resources which occurs in a
traditional SMP architecture. In a collocated join, each SPU can operate independently of
the others without network traffic or communication between SPUs.
Dynamic Redistribution or Broadcasts
If your database design or data distribution precludes you from distributing certain tables
on the join key (column), the Netezza system will dynamically redistribute or broadcast the
required data.
When the system redistributes data, it sends each record in the table to a single SPU, but,
which SPU depends on the record. Each SPU scans its own portions of the table and
extracts only the needed columns, determines the destination SPU, and transmits the
records across the internal network fabric. The system performs these operations in parallel
across all SPUs.
When the system broadcasts data, it sends every record in the table to every SPU. Depend-
ing on the size of the table and the way the data is distributed, one method might be more
cost-effective than the other. For more information, see “Execution Plans” on page 9-26.
Verifying Distribution
When the system creates records, it assigns them to a logical data slice based on their dis-
tribution key value. You can use the datasliceid keyword in queries to determine how many
records you have stored on each data slice and thus, whether the data is distributed evenly
across all data slices.
To check your distribution, run the following query:
select datasliceid, count(datasliceid) as “Rows”
from table_name group by datasliceid order by “Rows”;

9-8 20282-20 Rev.1
IBM Netezza System Administrator’s Guide
You can also view the distribution from the NzAdmin tool. To view record distribution for a
table you must have the following object privileges: list on the database, list on the table,
and select on the table.
Viewing Record Distribution
Complete the following steps to view record distribution:
1. Click the Database tab on the NzAdmin tool’s main window.
2. In the left pane, click Databases > a database > Tables.
3. In the right pane, right-click a table, then click Record Distribution.
The Record Distribution window displays the distribution of data across all the data
slices in your system for the specific table. The Records column displays the total num-
ber of records, the minimum number of records, the maximum number of records, the
average records per data slice, and the standard deviation (population computation).
The Distribution Columns Section displays the distribution key columns for the table.
4. To see the specific record count for a data slice, place your cursor over an individual
data slice bar. The system displays the record count and the data slice identifier in the
status bar.
Figure 9-1: Record Distribution Window
Avoiding Data Skew
The performance of the system is directly linked to uniform distribution of the user data
across all of the data slices in the system. When you create a table and then load the data
into the system, the rows of the table should be distributed uniformly among all the data
slices. If some data slices have more rows of a table than others, the data slices with more
data and the SPUs that manage them have to work harder, longer, and need more resources
20282-20 Rev.1 9-9
Avoiding Data Skew
and time to complete their jobs. These data slices and the SPUs that manage them become
a performance bottleneck for your queries. Uneven distribution of data is called skew. An
optimal table distribution has no skew.
Skew can happen while distributing or loading the data into the following types of tables:
Base tables — Database administrators define the schema and create tables.
Intra-session tables — Applications or SQL users create temp tables.
Specifying Distribution Keys
Netezza uses the table’s distribution key to determine how to distribute (or stripe) the
table’s data across all active data slices in the system. The Netezza system requires that all
tables have a distribution method, either hash or random.
When you use the commands CREATE TABLE or CREATE TABLE AS, you can either specify
the method or allow the Netezza to select one.
With the DISTRIBUTE ON (hash) command, you can specify up to four columns as the
distribution key. For more information on choosing a distribution key, see “Criteria for
Selecting Distribution Keys” on page 9-6.
If there is no obvious group of columns that can be combined as the distribution key,
you can specify random distribution. Random distribution means that the Netezza dis-
tributes the data evenly (in a round-robin format) across all the data slices.
Random distribution results in the following:
Avoiding skew when loading data.
Eliminating the need to pick a distribution key when loading a large database that
has many tables with a small number of rows. In such cases picking a good distri-
bution key may have little performance benefit, but it gains the advantage of equal
distribution of data.
Allowing you to verify a good distribution key by first loading the data round-robin,
then using the GENERATE STATISTICS command, and running selects on the
database columns to get the min/max and counts. With this information, you can
better choose which columns to use for the distribution key.
If you do not specify a distribution when you create a table, the system chooses a
distribution key and there is no guarantee what that choice will be.
Viewing Data Skew
The easiest way to check for Table Skew is to use the NzAdmin tool. To view table skew on
all tables in the system, you must have global LIST privileges on databases and tables. If
you have LIST privileges on a subset of databases and/or tables, then you will only be able
to view possible skew for those databases or tables.
Note: To view table skew, the Netezza system must be online.

9-10 20282-20 Rev.1
IBM Netezza System Administrator’s Guide
Table 9-2 displays the following table skew information.
Finding Skewed Tables
With NzAdmin open and while connected to the Netezza system, follow these steps to
locate tables that have a skew greater than a specific threshold:
1. Select Tools > Table Skew.
2. In the Table Skew window, specify a threshold value in megabytes and click OK. The
skew threshold specifies the difference between the size of the smallest data slice for a
table and the size of the largest data slice for that table.
As the system checks the tables, NzAdmin displays a wait dialog that you can cancel at
any time to stop the processing.
If any table meets or exceeds the skew threshold value, the NzAdmin tool displays the
table in the window. You can sort the columns in ascending or descending order.
Note: If no tables meet the threshold, the system displays the message, “No tables
meet the specified threshold.”
Table 9-2: Table Skew
Column Description
Database The database in which the table resides.
Table The name of the table that meets or exceeds the specified skew threshold.
Skew The size difference in megabytes between the smallest data slice for a table
and the largest data slice for the table.
Min/Data
slice
The size of the table’s smallest portion on a data slice in MB.
Max/Data
slice
The size of the table’s largest portion on a data slice in MB.
Avg/Data
slice
The average data slice size in MB across all the data slices.
Total The total table size in MB.
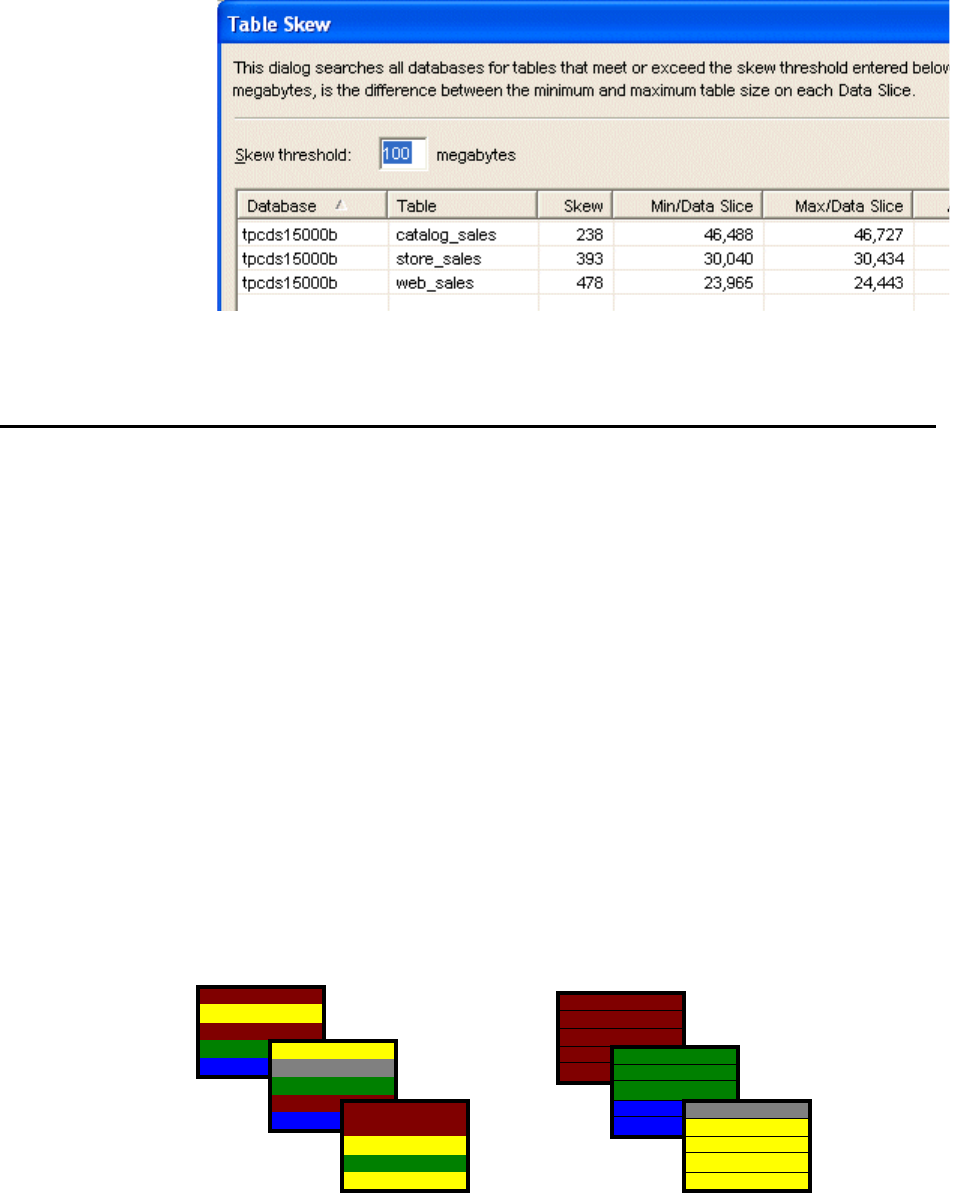
20282-20 Rev.1 9-11
Using Clustered Base Tables
Figure 9-2: Table Skew Window
Using Clustered Base Tables
A clustered base table (CBT) is a user table that contains data which is organized using one
to four organizing keys. An organizing key is a column of the table that you specify for clus-
tering the table records; Netezza uses the organizing keys to group records within the table
and save them in the same or nearby extents. Netezza also creates zone maps for the orga-
nizing columns to accelerate the performance of queries on that table that restrict using
the organizing keys.
Figure 9-3 shows a simple model of a table, such as a transaction table. In its “unorga-
nized” form, the data is organized by the date and time that each transaction occurred, and
the color indicating a unique transaction type. If your queries on the table most often query
by date/time restrictions, those queries will perform well because the date/time organiza-
tion matches the common restrictions of the queries.
However, if most queries restrict on transaction type, you can increase query performance
by organizing the records by transaction type. Queries that restrict on transaction type will
improve performance because the records are organized and grouped by the key restriction;
the query can obtain the relevant records more quickly, whereas they would have to scan
much more of the table in the date/time organization to find the relevant transactions. By
organizing the data in the table so that commonly filtered data is located in the same or
nearby disk extents, your queries can take advantage of the zone maps’ ability to eliminate
unnecessary disk scans to find the relevant records.
Figure 9-3: Organizing Tables with CBTs
“Unorganized” Records CBT Records
9-12 20282-20 Rev.1
IBM Netezza System Administrator’s Guide
CBTs are most often used for large fact or event tables which could have millions or billions
of rows. If the table does not have a record organization that matches the types of queries
that run against it, scanning the records of such a large table requires a lengthy processing
time as full disk scans could be needed to gather the relevant records. By reorganizing the
table to match your queries against it, you can group the records to take advantage of zone
maps and improve performance.
CBTs offer several benefits:
CBTs support “multi-dimension” lookups where you can organize records by one, two,
three, or four lookup keys. In the example shown in Figure 9-3, if your queries com-
monly restrict on transaction type and store ID, you can organize records using both of
those keys to improve query performance.
CBTs improve query performance by adding more zone maps for a table because the
organizing key columns are also zone mapped (if the organizing column data type sup-
ports zone maps).
CBTs increase the supported data types for zone-mapped columns, thus allowing you to
improve performance for queries that restrict along multiple dimensions.
CBTs allow you to incrementally organize data within your user tables in situations
where data cannot easily be accumulated in staging areas for pre-ordering before inser-
tions/loads. CBTs can help you to eliminate or reduce pre-sorting of new table records
prior to a load/insert operation.
CBTs save disk space. Unlike indexes, materialized views and other auxiliary data
structures, CBTs do not replicate the base table data and do not allocate additional
data structures.
Organizing Keys and Zone Maps
Organizing keys and zone maps work together to improve Netezza’s ability to identify the
data saved within specific extents of the database. Zone maps summarize the range of data
inside the columns of the records saved in a disk extent; organizing keys help to narrow the
range of data within the extent by grouping the columns that you most often query. If the
data is well organized within the extent and the zone maps have smaller “ranges” of data,
queries run faster because Netezza can skip the extents that contain unrelated data and
direct its resources to processing the data that matches the query.
Selecting Organizing Keys
Netezza allows you to specify up to four organizing keys when you create or alter a CBT;
however, it is rare that you would use four keys. Most CBTs typically use one, two, or three
keys at most.
As a best practice, review the design and columns of your large fact tables and the types of
queries that run against them. If you typically run queries on one dimension, such as date,
you can load the data by date to take advantage of the zone maps. If you typically query a
table by two dimensions, such as by storeId and customerID for example, CBTs can help to
improve the query performance against that table.
20282-20 Rev.1 9-13
Using Clustered Base Tables
The organizing keys must be columns that can be referenced in zone maps. By default,
Netezza creates zone maps for columns of the following data types:
Integer - 1-byte, 2-byte, 4-byte, and 8-byte
Date
Timestamp
In addition, Netezza also creates zone maps for the following data types if columns of this
type are used as the ORDER BY restriction for a materialized view or as the organizing key
of a CBT:
Char - all sizes, but only the first 8 bytes are used in the zone map
Varchar - all sizes, but only the first 8 bytes are used in the zone map
Nchar - all sizes, but only the first 8 bytes are used in the zone map
Nvarchar - all sizes, but only the first 8 bytes are used in the zone map
Numeric - all sizes up to and including numeric(18)
Float
Double
Bool
Time
Time with timezone
Interval
You specify the organizing keys for a table when you create it (such as using the CREATE
TABLE command), or when you alter it (such as using ALTER TABLE). When you define the
organizing keys for a table, note that Netezza does not automatically take action to reorga-
nize the records; you use the GROOM TABLE command to start the reorganization process.
You can add to, change, or drop the organizing keys for a table using ALTER TABLE. Note
that the additional or changed keys take effect immediately, but you must groom the table
to reorganize the records to the new keys. You cannot drop a column from a table if that
column is specified as an organizing key for that table.
Reorganizing the Table Data
After you specify the organizing key(s) for a table, records are inserted into the CBT as they
would be for a non-CBT table. When you invoke the GROOM TABLE command, Netezza
reorganizes the records based on the specified keys. The GROOM TABLE command per-
forms two operations that are important to the user tables on your system:
It organizes the records for a table so that your related records are relocated to the
same extents.
It removes the deleted and outdated records in user tables to reclaim disk space on
your system.
The GROOM TABLE command processes and reorganizes the table records in each data
slice in a series of “steps.” Users can perform tasks such as SELECT, UPDATE, DELETE,
and INSERT operations while the online data grooming is taking place. The SELECT opera-
9-14 20282-20 Rev.1
IBM Netezza System Administrator’s Guide
tions run in parallel with the groom operations; the INSERT, UPDATE, and DELETE
operations run serially between the groom steps. For CBTs, the groom steps are somewhat
longer than for non-CBT tables, so INSERT, UPDATE, and DELETE operations may pend for
a longer time until the current step completes.
Note: When you specify organizing keys for an existing table to make it a CBT, the new
organization could impact the compression size of the table. The new organization could
create sequences of records that improve the overall compression benefit, or it could create
sequences that do not compress as well. Following a groom operation, your table size could
change somewhat from its size using the previous organization.
Copying Clustered Base Tables
If you copy a CBT using a command similar to CREATE TABLE AS, the target table does not
inherit the organizing keys of the base table. You must use an ALTER TABLE ORAGNIZE
ON command to apply the organizing keys that you want to use for the target table.
Updating Database Statistics
For the system to create the best execution plan for a query, it must make some decisions
based on what it knows about the database tables it is accessing. Without up-to-date statis-
tics the system uses internal, default values that are independent of the actual table and
which result in suboptimal queries with long run times.
Table 9-3 describes the statistics information.
The system uses statistics for many purposes:
Based on the number of records, the number of distinct values for a column, and
assuming uniform distribution between the min and max values, the optimizer esti-
mates the number of relevant rows and determines which is the smaller of two join
tables.
Based on the min and max values, the optimizer determines what type of math needs
to be performed (for example, 64-bit or 128-bit).
If there are nulls in the database tables, then during code generation the system must
generate additional code to test and check fields for null values. Extra code means
extra CPU cycles during execution time.
Table 9-3: Database Information
Element Description
Per table Number of records
Per column
•
Minimum value
•
Maximum value
•
Null counts (per column)
•
Number of distinct values (also called dispersion)

20282-20 Rev.1 9-15
Updating Database Statistics
The GENERATE STATISTICS command collects this information. If you have the GenStats
privilege, you can run this command on a database, table, or individual columns. By
default, the admin user can run the command on any database (to process all the tables in
the database) or any individual table.
The admin user can assign other users this privilege. For example, to give user1 privilege to
run GENERATE STATISTICS on one or all tables in the DEV database, the admin user must
grant user1 LIST privilege on tables in the system database, and GENSTATS from the dev
database, as in these sample SQL commands:
SYSTEM(ADMIN)=> GRANT LIST ON TABLE TO user1;
DEV(ADMIN)=> GRANT GENSTATS ON TABLE TO user1;
For more information about the GenStats privilege, see Table 8-1 on page 8-9.
Table 9-4 describes the nzsql command syntax for these cases.
The GENERATE STATISTICS command reads every row in every table to determine disper-
sion values (no sampling). It provides the most accurate and best quality statistics.
Maintaining Table Statistics Automatically
The Netezza system automatically maintains database statistics and estimated dispersion
statistics, which are not as accurate as the statistics that the system maintains when you
run the GENERATE STATISTICS command. These statistics are, however, generally better
than no statistics.
The Netezza system maintains certain statistics when you perform database operations.
When you use the CREATE TABLE AS command, the system maintains the min/max,
null, and estimated dispersion values automatically.
When you use the INSERT or UPDATE commands, the system maintains the min/max
values for all non-character fields.
When you use the GROOM TABLE command to reclaim deleted records, the system
leaves the min/max, null, and estimated dispersion values unchanged, and updates the
zone map.
Because the groom process merely physically removes records that were logically
deleted, their removal has no effect on any statistics, though it does affect where in the
table the remaining records are, hence the effect on zone maps.
Table 9-4: Generate Statistics Syntax
Description Syntax
A database (all tables) GENERATE STATISTICS;
A specific table (all columns) GENERATE STATISTICS ON table_name;
Individual columns in a table GENERATE STATISTICS ON my_table(name, address,
zip);

9-16 20282-20 Rev.1
IBM Netezza System Administrator’s Guide
Table 9-5 describes when the Netezza automatically maintains table statistics.
Running the GENERATE STATISTICS Command
Although the Netezza system automatically maintains certain statistics, you might want to
run GENERATE STATISTICS command periodically, or in the following cases:
When you have significantly changed the nature of your database, that is, increased or
decreased the number of distinct values, expanded or reduced the min/max values on
joinable or groupable fields, or increased or decreased the size of your database.
When you have static tables that you intend to keep for a long time.
When you have queries that involve three or more joins.
When you have made changes to your tables and observe slower performance when
querying the updated tables.
When you have columns used in WHERE, SORT, GROUP BY or HAVING clauses.
When you have temporary tables that contain a large number of rows and which will be
used in JOIN clauses.
For more information about the GENERATE STATISTICS command, see the IBM Netezza
Database User’s Guide.
Just in Time Statistics
Transparently to users, the system automatically generates Just in Time (JIT) statistics on
user tables to help the optimizer refine planning. (JIT statistics are not run on system
tables, external tables, or virtual tables.) JIT statistics improve selectivity estimations when
a table contains data skew or when there are complex column/join restrictions. The system
also uses JIT statistics to avoid broadcasting large tables that were estimated to be small
based on available statistics. The overhead of these on-the-fly statistics is negligible when
compared to the overall improved query performance and total query time.
JIT statistics use sampler scan functionality and leverage zone map information to condi-
tionally collect several pieces of information:
The number of rows scanned for the target table
The number of extents scanned for the target table
Table 9-5: Automatic Statistics
Command Row counts Min/Max Null Dispersion
(estimated) Zone maps
CREATE TABLE AS yes yes yes yes yes
INSERT yes yes no no yes
DELETE no no no no no
UPDATE yes yes no no yes
GROOM TABLE no no no no yes
20282-20 Rev.1 9-17
Updating Database Statistics
The number of maximum extents scanned for the target table on the data slices with
the greatest skew
The number of rows scanned for the target table that apply to each join
The number of unique values for any target table column used in subsequent join or
group by processing
This information is conditionally requested for and used in estimating the number of rows
resulting from a table scan, join, or “group by” operation.
Note: JIT statistics do not eliminate the need to run the GENERATE STATISTICS com-
mand. While JIT statistics help guide row estimation, there are situations where the catalog
information calculated by GENERATE STATISTICS is used in subsequent calculations to
complement the row estimations. Depending on table size, the GENERATE STATISTICS
process will not collect dispersion because the JIT statistics scan will estimate it on-the-fly
as needed.
The system automatically runs JIT statistics for user tables when it detects the following
conditions:
Tables that contain more than five million records.
Queries that contain at least one column restriction.
Tables that participate in a join or have an associated materialized view. JIT statistics
are integrated with materialized views to ensure the exact number of extents is
scanned.
The system runs JIT statistics even in EXPLAIN mode. To check if JIT statistics were run,
review the EXPLAIN VERBOSE output and look for cardinality estimations that are flagged
with the label JIT.
Zone Maps
Zone maps are automatically generated internal tables that the Netezza system uses to
improve the throughput and response time of SQL queries against large grouped or nearly
ordered date, timestamp, byteint, smallint, integer, and bigint data types.
Zone maps reduce disk scan operations required to retrieve data by eliminating records out-
side the start and end range of a WHERE clause on restricted scan queries. The Netezza
Storage Manager uses zone maps to skip portions of tables that do not contain rows of
interest and thus reduces the number of disk pages and extents to scan and the search
time, disk contention, and disk I/O.
Zone Maps and Rolling History
Zone maps take advantage of the inherent ordering of data and are beneficial for large
grouped or nearly ordered data. This type of data is common in call records, web logs, and
financial transaction databases.
Ordered table data may contain rolling history data that represents many months or years of
activity. A rolling history table typically contains a large number of records. Each day, a new
day’s worth of data is inserted and the oldest day’s data is deleted. Because these rows are
historical in nature, they are rarely, if ever, modified after insertion.

9-18 20282-20 Rev.1
IBM Netezza System Administrator’s Guide
Typically, users run queries against a subset of history such as the records for one week,
one month, or one quarter. To optimize query performance, zone maps help to eliminate
scans of the data that is outside the range of interest.
Zone Maps Automatic Vertical Partitioning
The Netezza system automatically creates new zone maps and refreshes existing zone maps
on each data slice when you insert, update, load data into tables, or generate statistics.
For every column in a table that has a date, timestamp, byteint, smallint, integer, bigint
data type, the system determines the minimum and maximum values per page and extent
and updates the zone map table. When a user truncates or drops a database user table, the
system updates the zone map and removes all records in the zone map that are associated
with the table.
Grooming Tables
As part of your routine database maintenance activities, you should plan to recover disk
space occupied by outdated or deleted rows. In normal Netezza operation, an update or
delete of a table row does not remove the old tuple (version of the row). This approach ben-
efits multiversion concurrency control by retaining tuples that could potentially be visible
to other transactions. Over time however, the outdated or deleted tuples are of no interest
to any transaction. After you have captured them in a backup, you can reclaim the space
they occupy using the SQL GROOM TABLE command.
Note: Starting in Release 6.0, you use the GROOM TABLE command to maintain the user
tables by reclaiming disk space for deleted or outdated rows, as well as to reorganize the
tables by their organizing keys. The GROOM TABLE command processes and reorganizes
the table records in each data slice in a series of “steps.” Users can perform tasks such as
SELECT, UPDATE, DELETE, and INSERT operations while the online data grooming is tak-
ing place. The SELECT operations run in parallel with the groom operations; any INSERT,
UPDATE, and DELETE operations run serially between the groom steps. For details about
the GROOM TABLE command, see the IBM Netezza Database User’s Guide.
Note the following best practices when you groom tables to reclaim disk space:
You should groom tables that receive frequent updates or deletes more often than
tables that are seldom updated.
If you have a mixture of large tables, some of which are heavily updated and others that
are seldom updated, you might want to set up periodic tasks that routinely groom the
frequently updated tables.
Grooming deleted records has no effect on your database statistics, because the pro-
cess physically removes records that were already “logically” deleted. When you groom
a table, the system leaves the min/max, null, and estimated dispersion values
unchanged. For more information on when to run the GENERATE STATISTICS com-
mand, see “Running the GENERATE STATISTICS Command” on page 9-16.
Physically reclaiming the records, however, does affect where the remaining records in
the table are located. So when you physically reclaim records, the system updates the
zone map.
20282-20 Rev.1 9-19
Grooming Tables
Note: When you delete a table’s contents completely, consider using the TRUNCATE rather
than the DELETE command, which eliminates the need to run the GROOM TABLE
command.
GROOM and the nzreclaim Command
When you run the GROOM TABLE command, it removes outdated and deleted records from
tables while allowing access to all tables in the system.
In previous releases, the nzreclaim command could be used to perform reclaims. Starting
in Release 6.0, the nzreclaim command is deprecated, although it is still available for
backward compatibility. As a best practice, you should transition to using the GROOM
TABLE command. If you have scripts that use the nzreclaim command, you should migrate
them to use GROOM TABLE as well. Note that the nzreclaim command syntax has changed
in Release 6.0. For example, the -scanblocks and -scanrecords options are not supported
and will return an error. For details on the supported command syntax, see “nzreclaim” on
page A-35.
Several examples follow:
To use the GROOM TABLE command in a SQL session:
MYDB(USER1)=> GROOM TABLE ORDERS;
NOTICE: Groom processed 25 pages; purged 9 records; scan size
shrunk by 9 pages; table size shrunk by 9 extents.
GROOM RECORDS ALL
If you have created scripts to run nzreclaim from the command line as in the previous
example, you can update those scripts to use the new SQL GROOM TABLE command
as in the following example:
[nz@nzhost ~]$ nzsql mydb -u user1 -pw password -c "groom table
mynation"
If you use the nzreclaim command to groom a table:
[nz@nzhost ~]$ nzreclaim -db mydb -u user1 -pw password -t mynation
nzsql -u user1 -pw password mydb -c"groom table mynation " 2>&1
NOTICE: Groom processed 25 pages; purged 9 records; scan size
shrunk by 9 pages; table size shrunk by 9 extents.
GROOM RECORDS ALL
As shown in the example, the nzreclaim command calls the GROOM TABLE command
to update and reclaim the table. You should migrate to using the GROOM TABLE com-
mand instead of nzreclaim.
Identifying Clustered Base Tables that Require Grooming
The /nz/kit/bin/adm/tools/cbts_needing_groom script identifies CBTs in one, several, or all
databases that require grooming. CBTs that have a large number of ungroomed or empty
pages can slow the performance of queries that use those tables.
The script lists any CBTs in the specified databases that have 960 or more ungroomed or
empty pages in any one data slice. The scipt outputs the SQL commands that identify the
databases and the GROOM TABLE commands for any CBTs that meet the groom threshold.
You can run these command from a command line, or output the command to a file that
you can use as an input script to the nzsql command. You can use script options to specify
the databases to search as well as the threshold for the number of ungroomed pages in a
data slice.
9-20 20282-20 Rev.1
IBM Netezza System Administrator’s Guide
The script has the following syntax:
/nz/kit/bin/adm/tools/cbts_needing_groom [-h] {-alldbs | -db db_name
[db_name ...]} [-th threshold]
A sample script follows:
[nz@nzhost tools]$ ./cbts_needing_groom -alldbs -th 400
\c "my_db"
groom table "lineitem2"; -- 505 / 4037
The script can take a few minutes to run, depending upon the number of databases and
tables that it checks. If the command finds no CBTs that meet the groom threshold criteria,
the command prompt appears with no command output. As the sample shows, one CBTs
has met the user-supplid threshold criteria.
If the script reports any CBTs that would benefit from a groom, you can connect to each
database and run the GROOM TABLE command manually for the specified table. Or, you
can also direct the output of the command to a file that you can use as an input script to
the nzsql command. For example:
[nz@nzhost tools]$ ./cbts_needing_groom -alldbs -th 400 > /export/
home/nz/testgrm.sql
[nz@nzhost tools]$ nzsql -f /export/home/nz/testgrm.sql
You are now connected to database "my_db".
nzsql:/export/home/nz/testgrm.sql:2: NOTICE: Groom processed 4037
pages; purged 0 records; scan size shrunk by 1 pages; table size shrunk
by 1 extents.
GROOM ORGANIZE READY
Table 9-6: cbts_needing_groom Input Options
Option Description
-h Displays the usage for the script.
-alldbs Checks all the databases in the system for CBTs that require
grooming.
-db db_name [db_
name...]
Checks the specified database in the system for CBTs that
require grooming. You can specify one or more database names
to check only those databases.
-th threshold Specifies the minimum number of empty or deleted pages in at
least one data slice for a CBTs to be designated as needing
groom. The default is 960. Although the valid values are from 0
to 2147483647, the practical maximum is about 24,000 pages.
Keep in mind that a value which is too high will cause the com-
mand to igmore CBTs that would benefit from a groom operation,
while a number that is too low could report CBTs for which a
groom is essentially not required.

20282-20 Rev.1 9-21
Managing Sessions
About the Organization Percentage
When you view the status information for tables, such as using the NzAdmin interface or
various system views, the information contains an organization percentage. For clustered
base tables (CBTs), the organization percentage shows the percentage of the table data that
has been organized based on the specified organizing keys for that table. Organized tables
typically have a 100% organization percentage, while tables that are not yet organized have
a 0% percentage. The organization percentage does not apply to tables which are not CBTs.
After you specify the organizing keys for the table and load its data, you typically run a
GROOM TABLE RECORDS ALL command to reorganize the data according to the keys.
After you insert any new data in the table, you should update the organization using the
GROOM TABLE RECORDS READY command to ensure that the organization is up to date.
For more information, see “Identifying Clustered Base Tables that Require Grooming” on
page 9-19.
Groom and Backup Synchronization
By default, the system synchronizes your GROOM TABLE request with the most recent
backup set to avoid reclaiming rows that are not yet captured by incremental backups. In
other words, GROOM TABLE will not remove any data that has been deleted or is outdated
but which has not yet been saved in a backup.
For example:
1. Run a full backup.
2. Delete data B.
3. Run an incremental backup — which captures data B marked as deleted.
4. Delete D.
5. Run GROOM TABLE — which removes B but not D, because D was not captured in the
last backup.
If you maintain two backup sets for a database and you do not want the GROOM TABLE
command to use the default backup set, you can use the backupset option to specify
another backup set. Run the backup history report to learn the ID of the backup set you
want to specify. For more information about the backup history report, see “Backup History
Report” on page 10-19.
Note: If you disable this synchronization and a subsequent incremental backup needs
information that you removed with a reclaim, nzbackup will perform a full backup instead
of the incremental you requested for any reclaimed tables.
Managing Sessions
A session represents a single connection to a Netezza appliance. Sessions begin when
users perform any of the following actions:
Invoke the nzsql command; the session ends when they enter \q (quit) to exit the
session.
invoke the nzload command, the NzAdmin tool, or other client commands; the session
ends when the command completes, or when the user exits the user interface.
9-22 20282-20 Rev.1
IBM Netezza System Administrator’s Guide
Using the nzsession Command
You can use the nzsession command to view and manage sessions. For more information
about the nzsession command, see “nzsession” on page A-39.
Note: You must be the administrator or have the appropriate permissions (described in the
following sections) to show and manage sessions and transactions. Also, you cannot use a
Release 5.0 nzsession client command to manage sessions on a Netezza system that is
running a release prior to 5.0.
Viewing Sessions
You can use the nzsession command to display the list of current user sessions and to list
the session types. You can be logged in as any database user to use the nzsession show
command; however, some of the data displayed by the command could be obscured if your
account does not have correct privileges. The admin user can see all the information.
To list all active sessions, enter:
nzsession show -u admin -pw password
ID Type User Start Time PID Database State
Priority Name Client IP Client PID Command
----- ---- ----- ----------------------- ----- ------------ ------
------------- --------- ---------- ------------------------
16129 sql ADMIN 12-Apr-10, 15:39:11 EDT 11848 TPCH1_NOTHIN idle
normal 127.0.0.1 11821 select * from lineitem;
16133 sql ADMIN 12-Apr-10, 15:45:26 EDT 11964 SYSTEM active
normal 127.0.0.1 11963 SELECT session_id, clien
If you are a database user who does not have any special privileges, information such
as the user name, database, client PID, and SQL command appear only as asterisks,
for example:
nzsession show -u user1 -pw pass
ID Type User Start Time PID Database State
Priority Name Client IP Client PID Command
----- ---- ----- ----------------------- ----- -------- ------ ----
--------- --------- ---------- ------------------------
16129 sql ***** 12-Apr-10, 15:39:11 EDT 11848 ***** idle
normal ***** *****
16134 sql USER1 12-Apr-10, 15:48:00 EDT 12012 SYSTEM active
normal 127.0.0.1 12011 SELECT session_id, clien
For a description of the output from the nzsession command, see “nzsession” on
page A-39.
To list session types, enter:
nzsession listSessionTypes
Aborting Sessions or Transactions
You can use the nzsession command to abort sessions or transactions. You can abort a
transaction if you are the user admin, the owner of the session, or you have Abort privileges
for that user or group.
To abort a session, enter:
nzsession abort -u admin -pw password -id 7895

20282-20 Rev.1 9-23
Running Transactions
Note: Do not abort system sessions. Doing so can cause your system to fail to restart.
To abort transaction SID 31334, enter:
nzsession abortTxn -u admin -pw password -id 31334
The session remains active, only the transaction has been aborted.
Note: You can abort SQL, client, load, backup, and restore sessions.
You can also use the NzAdmin tool to abort a transaction.
For a description of the nzsession command output, see “nzsession” on page A-39.
Running Transactions
A transaction is a series of one or more operations on database-related objects and/or data.
Transactions provide the following benefits:
Ensure integrity among multiple operations by allowing all or none of the operations to
take effect. You accomplish this by starting a transaction, performing operations, and
then executing either a commit or a rollback (also called an abort).
Provide a means of canceling completed work for a series of operations that fail before
finishing.
Provide a consistent view of data to users, in the midst of changes by other users. The
combination of create and delete transaction IDs associated with each data row plus
Netezza internal controls guarantee that once a transaction has begun, new transac-
tions or ones that have yet to be committed do not affect the view of the data.
Transaction Control and Monitoring
From a management/administrative perspective:
Using the nzsql command (or any other SQL front end), privileged users can start, com-
mit, and abort a transaction. User must have list object privileges on the database to
which they are connected.
Using the nzsession command, privileged users can list and abort currently running
SQL transactions.
If the system encounters a deadlock as it is processing transactions, it aborts one of the
deadlocked transactions and displays “Deadlock detected, resubmit your request.”
Transactions Per System
The Netezza has a limit of 63 read/write transactions per system. The following activities
count against the transaction limit:
Using a BEGIN statement or starting a transaction through ODBC, not followed by SET
TRANSACTION READ ONLY, even if you have not submitted a query
UPDATES, DELETES, and INSERTS, even if they have not begun execution
An update that has not finished rolling back or is being recovered after a restart counts
against the limit until the rollback completes
Loading data with the nzload command
9-24 20282-20 Rev.1
IBM Netezza System Administrator’s Guide
The following activities do not count against the read/write transaction limit:
Committed transactions
Transactions that have finished rolling back
SELECT statements that are not inside a multistatement transaction
Transactions that create or modify temporary tables only, and/or modify only tables cre-
ated within the same transaction (for example, CREATE TABLE …AS SELECT…)
Multi-statement read-only transactions (BEGIN …SET TRANSACTION READ ONLY)
Transaction Concurrency and Isolation
The ANSI/ISO SQL standard defines four levels of transaction isolation: uncommitted read,
committed read, repeatable read, and serializable. The Netezza system implements serial-
izable transaction isolation, which provides the highest level of consistency.
With concurrent transactions, this isolation level prevents the following:
Dirty reads where a transaction reads data written by concurrent uncommitted
transactions
Non-repeatable reads where a transaction re-reads data it previously read and finds
that the data has been modified by another transaction
Phantom reads where a transaction re-executes a query returning a set of rows that sat-
isfy a search condition and finds that the set of rows has changed due to another
recently committed transaction
The Netezza system does not use conventional locking to enforce consistency among con-
currently executing transactions, but instead uses a combination of multi-versioning and
serialization dependency checking.
With multi-versioning, each transaction sees a consistent state that is isolated from
other transactions that have not been committed. The Netezza hardware ensures that
the system can quickly provide the correct view to each transaction.
With serialization dependency checking, nonserializable executions are prevented. If
two concurrent transactions attempt to modify the same data, the system automatically
rolls back the youngest transaction. This is a form of optimistic concurrency control
that is suitable for low-conflict environments such as data warehouses.
Note: As a user, you cannot explicitly lock tables.
Concurrent Transaction Serialization and Queueing, Implicit Transactions
An implicit transaction is a single SQL statement that is not framed by a BEGIN statement.
When an Implicit Transaction Fails Serialization
The system responds as follows for an implicit transaction failing serialization:
The system waits for the completion of the transaction that caused the serialization
conflict.
Once that transaction finishes, either by commit or abort, the system resubmits the
waiting requests.

20282-20 Rev.1 9-25
Running Transactions
When the Number of Implicit Transactions Exceeds the Limit
If the system reaches a limit of 63 concurrent read/write transactions, and an implicit
transaction is issued which attempts to modify data, the system saves and queues the
transaction until the number of concurrent read/write transactions falls below the limit.
Modifying the Default Time Limit
Note that the system saves and queues implicit transactions for up to 60 minutes (the
default). If an implicit transaction waits for more than 60 minutes, the transaction fails and
returns the error message “ERROR: Too many concurrent transactions.” You can modify
this default timeout setting using either of the following ways:
To set the value for the current session, issue the following command:
SET serialization_queue_timeout = <number of minutes>
To make the setting global, set the variable serialization_queue_timeout in
postgresql.conf.
Concurrent Transaction Serialization and Queueing, Explicit Transactions
An explicit transaction is one that is framed within a BEGIN statement. If the system
reaches a limit of 63 concurrent read/write transactions, new transaction requests framed
by a BEGIN statement will queue until the concurrent transactions falls below 63, at which
time data modification operations are permitted.
Note that a read-only explicit transaction that intends to issue only SELECT statements will
see its BEGIN statement queued, unless a SET SESSION READ ONLY is executed in the
session prior to the BEGIN.
This queuing behavior is a change from prior releases of Netezza, where a BEGIN that
encounters 63 concurrent read/write transactions is accepted by Netezza but the client’s
transaction is forced to be read-only. If this prior behavior is desired for some reason (with
the understanding that a statement that modifies non-temporary data issued by such a
transaction will fail and not be queued), issue SET begin_queue_if_full = false in the ses-
sion (before the BEGIN).
Table 9-7 summarizes the differences in system response in queueing implicit and explicit
transactions once the number of read/write transactions reaches 63.
Table 9-7: The 64th READ/WRITE Transaction Queueing
Implicit
Explicit
begin_queue_if_full=T
(default)
Explicit
begin_queue_if_full=T
set session read only
Explicit
begin_queue_if_full=F
BEGIN N/A Q X (read only) X (read only)
SELECT XaX (after begin
proceeds)
XX
CREATE XX E E
c
CREATE TABLE AS XX E E
DROP XX E E
9-26 20282-20 Rev.1
IBM Netezza System Administrator’s Guide
Netezza Optimizer and Query Plans
Netezza uses a cost-based optimizer to determine the best method for scan and join opera-
tions, join order, and data movement between SPUs (that is, redistribute or broadcast
operations).
The system may redistribute data for joins, grouping aggregates, create tables, or when
loading. Decisions about redistribution are made by the planner and are based on costs like
expected table sizes. (The planner tries to avoid redistributing large tables because of the
performance impact.)
Note: To learn whether the planner redistributed or broadcast your data, check the plan.
The EXPLAIN VERBOSE command displays the text: “download (distribute or broadcast).”
The optimizer can also dynamically rewrite queries to improve query performance. Many
data warehouses use BI applications that generate SQL that is designed to run on multiple
vendors’ databases. The portability of these applications is often at the expense of efficient
SQL. The SQL that the application generates does not take advantage of the vendor spe-
cific enhancements, capabilities, or strengths. Hence, the optimizer may rewrite these
queries to improve query performance.
Execution Plans
The optimizer uses statistics to determine the optimal execution plan for queries. The sta-
tistics include the following:
The number of rows in the table
The number of unique or distinct values of each column
The number of NULLs in each column
The minimum and maximum of each column
TRUNCATE XX E E
INSERT QbXE E
DELETE QX E E
UPDATE QX E E
CREATE/MODIFY
temporary table
XX X X
a. X = starts executing
b. Q = request queues
c. E = error message
Table 9-7: The 64th READ/WRITE Transaction Queueing
Implicit
Explicit
begin_queue_if_full=T
(default)
Explicit
begin_queue_if_full=T
set session read only
Explicit
begin_queue_if_full=F
20282-20 Rev.1 9-27
Netezza Optimizer and Query Plans
For the optimizer to create the best execution plan that results in the best performance, it
must have the most up-to-date statistics. For more information about running statistics,
see “Updating Database Statistics” on page 9-14.
Displaying Plan Types
You can use EXPLAIN, HTML (also known as bubble), and text plans to analyze how the
Netezza system executes a query.
To obtain these plans, do the following:
To obtain an EXPLAIN plan, add the EXPLAIN VERBOSE keyword before the SQL state-
ment. The system displays the output to stdout unless you redirect it to a file.
EXPLAIN VERBOSE SELECT * FROM foo;
To obtain an HTML plan, use either the EXPLAIN or SET command.
An example using EXPLAIN PLANGRAPH follows.
EXPLAIN PLANGRAPH SELECT * FROM foo;
With EXPLAIN PLANGRAPH, the system displays the output to the nzsql terminal.
You can copy and paste the output into a file that you can open in your browser.
An example using SET follows.
SET enable_print_plan_html=1;
SELECT * FROM FOO;
The SET command saves the output to a file on the host. You can specify the loca-
tion for the file. For example:
SET print_plan_path = ’/tmp’;
In this case, the output would be saved to /tmp/plan#.html (The system begins with
the number 1 and names subsequent output sequentially.)
Whether you use EXPLAIN PLANGRAPH or SET, the output displays the query plan
pictorially as a tree of nodes (ovals), representing how joins are processed. Note
the following in regards to how to interpret the representations.
Ovals formed with unbroken single lines and clear backgrounds (not shaded)
are executed on the SPUs.
Shaded ovals represent nodes that the host (DBOS) executes.
Ovals formed with dashed lines represent virtual nodes (typically subquery
scans).
Ovals formed with double lines represent fabric joins — streaming nodes that
are either broadcast or distributed.
To obtain a text plan, use either the EXPLAIN or SET command.The system displays
the output to the nzsql terminal unless you redirect it to a file.
EXPLAIN PLANTEXT SELECT * FROM foo;
OR
SET enable_print_plan_text=1;
SELECT * FROM foo;
You can also use the NzAdmin tool to display information about queries.

9-28 20282-20 Rev.1
IBM Netezza System Administrator’s Guide
Analyzing Query Performance
To evaluate query performance, use the NzAdmin tool to determine what is running on your
system.
View the active sessions.
View active queries.
Check if any queries are queued.
Check if there are any long-running queries.
Use the EXPLAIN command to display the execution plan for specific queries.
Analyze the query plan.
Review the estimated costs. Do they seem reasonable?
Is the system performing table broadcasts or distributes? If there is a broadcast, is
it on a small table or small result set? If there is a distribute, validate the distribu-
tion for the tables.
Review the scan and join order. Is the largest table scanned last?
Make sure that the optimizer has current statistics. If not, generate statistics.
Evaluate table distributions. Is there a more optimal distribution strategy? If so, change
the distribution method.
Run the query again after you have updated the statistics and changed the distribution.
Use EXPLAIN VERBOSE or the NzAdmin tool to review any changes in the query plan.
Viewing Query Status and History
You can use the system views, _v_qrystat and _v_qryhist, to view the status of queries run-
ning and the recent query history.
Note: This version of the query history and status feature is provided for backward compat-
ibility and will be deprecated in a future release. For more information about the new _v_
query_status and _v_plan_status views and the query history feature, see Chapter 11,
“Query History Collection and Reporting.”
You do not need to be the administrator to view these views, but you must have been
granted list permission for both the user and database objects to the specific users or
groups that want access to this view.
For example, to grant admin1 permission to view bob’s queries on database emp, use the
following SQL commands:
GRANT LIST ON bob TO admin1;
GRANT LIST ON emp TO admin1;
You can also use the nzstats command to view the Query Table and Query History Table. For
more information, see Table 13-12 on page 13-10 and Table 13-13 on page 13-11.

20282-20 Rev.1 9-29
Viewing Query Status and History
Table 9-8 lists the _v_qrystat view, which lists active queries.
Table 9-9 describes the _v_qryhist view, which lists recent queries.
Table 9-8: The _v_qrystat View
Columns Description
Session Id The ID of the session that initiated this query.
Plan Id The internal ID of the plan associated with this query.
Client Id The internal client ID associated with this query.
Client IP address The client IP address.
SQL statement The SQL statement. Note that the statement is not truncated as it is
with the nzstats command.
State The state number.
Submit date The date and time the query was submitted.
Start date The date and time the query started running.
Priority The priority number.
Priority text The priority of the queue when submitted (normal or high).
Estimated cost The estimated cost, as determined by the optimizer. The units are
thousandths of a second, that is, 1000 equals one second.
Estimated disk The estimated disk usage, as determined by the optimizer.
Estimated mem The estimated memory usage, as determined by the optimizer.
Snippets The number of snippets in the plan for this query.
Current Snippet The current snippet the system is processing.
Result rows The number of rows in the result.
Result bytes The number of bytes in the result.
Table 9-9: The _v_qryhist View
Columns Description
Session Id The Id of the session that initiated this query.
Plan Id The internal Id of the plan associated with this query.
Client Id The internal client Id associated with this query.
Client IP address The client IP address.
DB name The name of the database the query ran on.
User The user name.

9-30 20282-20 Rev.1
IBM Netezza System Administrator’s Guide
SQL statement The SQL statement. Note that the statement is not truncated as it is
with the nzstats command.
Submit date The date and time the query was submitted.
Start date The date and time the query started running.
End date The date and time that the query ended.
Priority The priority number.
Priority text The priority of the queue when submitted (normal or high).
Estimated cost The estimated cost, as determined by the optimizer.
Estimated disk The estimated disk usage, as determined by the optimizer.
Estimated mem The estimated memory usage, as determined by the optimizer.
Snippets The number of snippets in the plan for this query.
Snippet done The number of snippets that have completed.
Result rows The number of rows in the result.
Result bytes The number of bytes in the result.
Table 9-9: The _v_qryhist View
Columns Description
10-1
C H A P T E R 10
Backing Up and Restoring Databases
What’s in this chapter
General Information on Backup and Restore Methods
Using the nzbackup Command
Using the nzrestore Command
Using the Symantec NetBackup Connector
Using the IBM Tivoli Storage Manager Connector
Using the EMC NetWorker Connector
This chapter describes how to backup and restore data on the Netezza system. It provides
general information on backup and restore methods, and also describes how to use the
third-party storage solutions that are supported by the Netezza system.
As a best practice, make sure that you schedule regular backups of your user databases
and your system catalog to ensure that you can restore your Netezza system. Make sure that
you run backups prior to (and after) major system changes, so that you have “snapshots” of
the system before and after those changes. A regular and current set of backups can pro-
tect against loss of data following events such as disaster recovery, hardware failure,
accidental data loss, or incorrect changes to existing databases.
General Information on Backup and Restore Methods
Netezza provides several backup and restore methods to cover a variety of data storage and
transfer needs:
Create full and incremental backups of databases in compressed internal format exter-
nal tables using the nzbackup command and restore them to a Netezza system using
nzrestore command.
Unload individual tables data in compressed internal format external tables using the
CREATE EXTERNAL TABLE command. (You load the data using the nzload command.)
Unload individual table data in text format external tables using the CREATE EXTER-
NAL TABLE command. (You load the data using the nzload command on a Netezza
system, but you could also load it to any database that supports text format files.)

10-2 20282-20 Rev.1
IBM Netezza System Administrator’s Guide
Create backups of the system catalog (the /nz/data directory) on the Netezza host using
the nzhostbackup command. If the Netezza host fails, you can reload the system cata-
log and metadata using the nzhostrestore command without a full database reload.
Table 10-1 lists the differences among the backup and restore methods.
The CREATE EXTERNAL TABLE command and the procedures for using external tables are
described in detail in the IBM Netezza Data Loading Guide.
Symantec and NetBackup are trademarks or registered trademarks of Symantec Corpora-
tion or its affiliates in the U.S. and other countries. EMC and NetWorker are registered
trademarks or trademarks of EMC Corporation in the United States and other countries.
Table 10-1: Choosing a Backup and Restore Method
Feature nzbackup and
nzrestore
Compressed
External Tables
Text Format
External Tables
Schema backup
——
Full automatic database backup
——
Manual per-table backup —
Manual per-table restore
Symantec® NetBackup™
——
IBM® Tivoli® Storage Manager
(TSM)
——
EMC® NetWorker®
——
Automatic incremental
——
Compressed internal format
—
Non-proprietary format — —
Machine-size independent
a
a. This method usually takes more time to complete than the compressed internal format backups and loads.
a
Rowid preserved
—
Transaction ID preserved — — —
Upgrade safe
Downgrade safe — —
20282-20 Rev.1 10-3
General Information on Backup and Restore Methods
Overview
The Netezza system contains data which is critical to the operation of the system and to the
user databases and tables stored within the Netezza. The data includes the Netezza catalog
metadata, the user databases and tables, and access information such as users, groups,
and global permissions. Netezza provides a set of commands to backup and restore this
information, as described in Table 10-2.
Note: The Netezza backup processes do not back up host software such as the Linux oper-
ating system files or any applications that you may have installed on the Netezza host, such
as the Web Admin client. If you accidentally remove files in the Web Admin installation
directories, you can reinstall the Web Admin client to restore them. If you accidentally
delete Linux host operating system or firmware files, contact Netezza Support for assis-
tance in restoring them.
Note: The nzbackup and nzrestore commands do not back up the analytic executable
objects created by the IBM Netezza Analytics feature. If you use IBM Netezza Analytics on
your Netezza system, be sure to back up the Netezza databases, users, and global objects
(using nzbackup), the host metadata (using nzhostbackup) and the analytic executables
using inzabackup. For more information about backup and restore commands for the IBM
Netezza Analytics, see the User-Defined Analytic Process Developer's Guide.
The Netezza backup and restore operations can use network filesystem locations as well as
several third-party solutions such as IBM® Tivoli® Storage Manager, Symantec® Net-
Backup™, and EMC® NetWorker® as destinations.
Database Completeness
The standard backup and restore using the nzbackup and nzrestore commands provide
transactionally consistent, automated backup and restore of the schema and data for all
objects of a database, including ownership and permissions for objects within that data-
base. You can use these commands to backup and restore an entire database, as well as to
restore a specific table in a database.
The nzrestore command requires that the database be dropped or empty when you restore
the database. Similarly, before you restore a table, you must first drop the table or use the
-droptables option to allow the command to drop a table that is going to be restored.
Portability
Before performing a backup, consider where you plan to restore the data. For example, if
you are restoring data to the same Netezza system or to another Netezza system (which
could be a different model type or have a later software release), use the compressed inter-
nal format files created by the nzbackup command. The compressed internal format files
are smaller and often load more quickly than text external format files. You can restore a
Table 10-2: Backup/Restore Commands and Content
Information Backup Restore
Netezza host data (catalog metadata) nzhostbackup nzhostrestore
User databases nzbackup nzrestore
Netezza users, groups, and permissions nzbackup nzrestore
10-4 20282-20 Rev.1
IBM Netezza System Administrator’s Guide
database created on one Netezza model type to a different Netezza model type, such as a
backup from an IBM Netezza 1000-6 to a 1000-12, if the destination Netezza has the
same or later Netezza release. A restore runs slower when you change the destination
model type, because the host on the target system must process and distribute the data
slices according to the target model’s “data slices to SPU” topology.
As a best practice, when transferring data to a new Netezza system, or when restoring row-
secure tables, use the nzrestore -globals operation to restore the user, groups, and privi-
leges (that is, the access control and security information) first, before you restore the
databases and tables. If the security information required by a row-secure table is not
present on the system, the restore process exits with an error. For more information about
multi-level security, see the IBM Netezza Advanced Security Administrator’s Guide.
If you plan to load the Netezza data to a different system (that is, a non-Netezza system),
the text format external tables are the most portable. Data in text external tables can be
read by any product that can read text files, and can be loaded into any database that can
read delimited text files.
Compression in Backups and Restores
Choosing to compress the data before a backup or unload can benefit performance,
because less data travels through the fabric, and less data is written to disk thereby saving
space on the storage device. Note, however, that the compression process itself takes some
time, so typically the larger the table the greater the benefit from compression.
Note: The term compression in the database backup and restore context refers to the com-
pressed internal format of external tables, which is different from the compressed data
blocks and tables created by the Compress Engine. Throughout this chapter, compression
refers to the compressed internal format.
A compressed binary format external table (also known as an internal format table) is a pro-
prietary format which typically yields smaller data files, retains information about the
Netezza topology, and thus is often faster to backup and restore. The alternative to com-
pressed binary format is text format, which is a non-proprietary external table format that is
independent of the Netezza topology, but yields larger files and can be slower to backup
and restore.
The different backup/restore methods handle data compression in the following manner:
When you use the standard backup using the nzbackup/nzrestore commands, the sys-
tem automatically uses compressed external tables as the data transfer mechanism.
When you use compressed external table unload, the system compresses the data and
only uncompresses it when you reload the data.
Use manually created external compressed tables for backup when you want table-level
backup or the ability to send data to a named pipe, for example, when using a named
pipe with a third-party backup application.
When you use text format unload, the data is not compressed. For large tables, it is the
slowest method and the one that takes up the most storage space.
Multi-Stream Backup
The Netezza backup process is a multi-stream process. If you specify multiple filesystem
locations, or if you use third-party backup tools that support multiple connections, the
backup process can “parallelize” the work to send the data to the backup destinations.

20282-20 Rev.1 10-5
General Information on Backup and Restore Methods
Multi-stream support can improve backup performance by reducing the time required to
transfer the data to the destination. To use multi-stream backups, you use the -streams
num option of the nzbackup command.
The maximum number of streams is 16. For systems that have less than 16 dataslices,
such as an IBM Netezza 100, the maximum number of streams is limited to the number of
dataslices. For filesystem backups, the system uses one stream for each backup destina-
tion. For third-party backup applications, the system uses the value specified for the -
streams option; or, if not specified, the value of the host.bnrNumStreamsDefault configura-
tion setting.
Note: If you use multi-stream backup to a third-party backup tool, make sure that you
review the support for maximum jobs or parallelism in that tool. Some tools such as Net-
Backup have a limit on the number of concurrent streams. If you specify more streams than
the NetBackup tool supports, the backup job will fail. If you use the EMC NetWorker
backup connector, be sure to review the section “Changing Parallelism Settings” on
page 10-61.
For TSM backups, the maximum number of streams is controlled by the MAXSESSIONS
option in the Tivoli Admin console (dsmadmc). You can display the value using “query
option MAXSESSIONS” and you can set it using “setopt MAXSESSIONS value”. If you
specify more streams than the MAXSESSIONS value, the TSM server displays the error
“Error: Connector init failed: 'ANS1351E (RC51) Session rejected: All server sessions are
currently in use” and the backup aborts.
Netezza backup processes include a test to check that the backup tool supports the num-
ber of requested streams. If that test completes successfully, the actual backup process
starts. If the test fails due to connection timeouts, the nzbackup process exits with the
error: “Stream unresponsive after 300 seconds, operation aborted. Check concurrency lim-
its on server.”
Only backup operations that transfer table data support multiple destinations and streams.
These operations include full and incremental backups. Other operations—such as
-schema-only backup, -globals backup, and the reports—use only a single destination and
a single stream, even if you specify multiple destinations. The restore process is always a
single-stream process.
Special Columns
The backup/restore method you use affects how the system retains specials. The term spe-
cials refers to the end-user-invisible columns in every table that the system maintains. The
specials include rowid, datasliceid, createxid, and deletexid.
Table 10-3 describes how the backup method affects these values.
Table 10-3: Retaining Specials
Special nzbackup and nzrestore Compressed External
Tables
Text Format External
Tables
rowid Retain Retain Not unloaded
datasliceid Retain when the machine
size stays the same, other-
wise recalculates.
Retain when the machine
size stays the same, oth-
erwise recalculates.
Recalculate

10-6 20282-20 Rev.1
IBM Netezza System Administrator’s Guide
Upgrade/Downgrade Concerns
The backup method you select also affects your ability to restore data after a Netezza soft-
ware release upgrade or downgrade.
Backups created with the nzbackup command can be safely reloaded/restored after an
upgrade of the Netezza software. Backups created with the nzbackup command are not
guaranteed to support reload/restore after a Netezza software downgrade. These
backup formats are subject to change between releases.
Compressed external table backups can be safely reloaded/restored after an upgrade of
the Netezza software. Compressed external table backups are not guaranteed to sup-
port reload/restore after a Netezza software downgrade. These backup formats are
subject to change between releases.
Text format external tables are insensitive to software revisions, and can be reloaded to
any Netezza software release.
Note: Starting in Release 6.0.x, the nzrestore process no longer supports the restoring of
backups created using NPS Release 2.2 or earlier.
Compressed Unload and Reload
To backup and restore tables when you are using named pipes, or performing your own
incremental or table-level backups, you can use the CREATE EXTERNAL TABLE command.
The command allows you to insert compressed binary format records into an external table
from a source table of the same schema.
You can then reload those records into the original source table or a new table of the same
schema. For more information, see the IBM Netezza Data Loading Guide.
Encryption Key Management in Backup and Restore
When you create Netezza database users, the account passwords are stored in the database
in encrypted form. The Netezza system has a default encryption process. For additional
security, you could create and specify a host key for encrypting passwords, as described in
the key management chapter of the IBM Netezza Advanced Security Administrator's Guide.
When you back up the user and group information, the backup set saves information about
the password encryption. If you use a custom host key, the host key is included in the
backup set to process the account passwords during a restore. The backup process stores
an encrypted host key using the default encryption process, or you can use the nzbackup
createxid Receive the transaction ID
of transaction performing
the restore.
Receive the transaction
ID of transaction perform-
ing the restore.
Receive the transaction
ID of transaction per-
forming the restore.
deletexid Set to zero. Set to zero. Set to zero.
Table 10-3: Retaining Specials
Special nzbackup and nzrestore Compressed External
Tables
Text Format External
Tables
20282-20 Rev.1 10-7
General Information on Backup and Restore Methods
-secret option to encrypt the host key using a user-supplied string. To restore that backup
set, an administrator must specify the same string in the nzrestore -secret option. To pro-
tect the string, it is not captured in the backup and restore log files.
The -secret option is not required. If you do not specify one, the custom host key is
encrypted using the default encryption process. Also, the -secret option is ignored if you do
not use a custom host key for encrypting passwords on your system.
Filesystem Connector for Backup and Recovery
The Netezza system provides backup connectors that allow you to direct your backups to
specific locations such as network filesystem locations or to a third-party backup and
recovery solution (as described in “Third-Party Backup and Recovery Solutions Support” on
page 10-8).
Filesystem Connector Backups
If you use the default filesystem connector option, make sure that you direct your backups
to one or more filesystems that are large enough to hold your database backups and which
are accessible over reliable, fast, network connections to the Netezza system. You can
specify up to 16 filesystem locations for your backups. The backup process uses the speci-
fied destinations concurrently to save the data using one stream for each destination. The
backup process saves the metadata in one location, but it saves the data across the speci-
fied locations.
If the backup process encounters the file-size limit of a backup destination, it automati-
cally splits the table file it is writing into multiple files to avoid the limit without loss of
data. The backup process writes table files in 1TB “portions” by default. The limit is user-
configured using the registry setting host.bnrFileSizeLimitGB.
If one of the destinations fills and has no free disk space, the backup process automatically
suspends write activity to that location and continues using the other destinations without
loss of data.
If you configure the destinations on unique disk devices that each offer very good perfor-
mance and bandwidth, the database backups will typically take less time to complete than
when you save the backup to only one of those filesystem locations. It is important to
choose your destinations carefully; for example, if you choose two filesystem locations that
reside on the same disk, there is no performance gain because the same disk device is writ-
ing the backup data. Also, note that differences in the write-rate of each filesystem
destination can result in varying completion times.
You can specify the list of locations using the nzbackup -dir option, or you can create a text
file of the locations and specify it in the nzbackup -dirfile command.
Similarly, when you restore backups that are saved on filesystems, you specify the locations
where the backups reside using the nzrestore -dir option, or you can create a text file of the
locations and specify it in the nzrestore -dirfile command. The restore process is always a
single-stream process.
Filesystem Backup Best Practices
Never save your backups on the Netezza host filesystems because the host does not have
enough disk space for database backups. Also, as a best practice for disaster recovery pro-
cedures, you should store backups on systems that are physically and geographically
separated from the system that they are designed to recover.

10-8 20282-20 Rev.1
IBM Netezza System Administrator’s Guide
Third-Party Backup and Recovery Solutions Support
You can use the nzbackup and nzrestore commands to save data to and restore data from
network-accessible filesystems, which is the default behavior for the backup and restore
commands. You can also use these commands with supported third-party backup and
recovery products.
The Netezza system currently offers support for the following backup and recovery
solutions:
Symantec® NetBackup™
IBM® Tivoli® Storage Manager (TSM)
EMC® NetWorker®
If you have one of these backup and recovery solutions in your environment, you can inte-
grate the Netezza system with these solutions to manage the backup and restoration
services for your Netezza system and database. These backup and recovery products have
their own storage devices, file systems, and data clients. They manage the backup and res-
toration of files and databases to and from these managed storage devices.
To use these solutions, you typically install some client software for the solution onto the
Netezza host, and then configure some files and settings to create a connection to the
third-party server. You may also need to perform some configuration steps on the third-party
server to identify and define the Netezza host as a client to that server. The installation and
configuration steps vary for each solution.
You can use the NetBackup and TSM interfaces to schedule and perform all supported
Netezza backup and restore operations. You do not need to logon to the Netezza host to
perform a backup operation, or write the backup archive to the Netezza host disk or a
Netezza mount.
The sections which describe the nzbackup and nzrestore commands also describe how
some of the command options work with the supported storage manager solutions. For
details on using one of the supported backup and recovery products, see “Using the
Symantec NetBackup Connector” on page 10-33, “Using the IBM Tivoli Storage Manager
Connector” on page 10-41, or “Using the EMC NetWorker Connector” on page 10-59.
Host Backup and Restore
A host backup creates a copy of the Netezza data directory and system catalog on the host.
The data directory contains system tables, catalog information, configuration files, and spe-
cial information for the user databases on the Netezza, as well as query plans and cached
executable code for the SPUs. The cache and plans directories are not backed up.
In the rare situations when a Netezza host server or disk fails, but the SPUs and their disks
are still intact, you can restore the /nz/data directory (or the directory you use for the
Netezza data directory) from the host backup without the additional time to restore all of
the databases. This option works best when you have a host backup that is current with the
latest database content and access settings.
Creating a Host Backup
You use the nzhostbackup command to back up the files in the Netezza data directory. The
nzhostbackup command pauses the system while it runs; this allows it to checkpoint and
archive the current /nz/data directory. The command resumes the system when it com-
20282-20 Rev.1 10-9
Host Backup and Restore
pletes. The command typically takes only a few minutes to complete. It is recommended
that you run database and host backups during a time when the Netezza system is least
busy with queries and users.
Note: It is very important to keep the host backups synchronized with the current database
and database backups. After you change the catalog information, such as by adding new
user accounts, new objects such as synonyms or tables, altering objects, dropping objects,
truncating tables, or grooming tables, you should use the nzhostbackup command to cap-
ture the latest catalog information. You should also update your database backups.
An example follows:
nzhostbackup /backups/nzhost_latest.tar.gz
Starting host backup. System state is 'online'.
Pausing the system ...
Checkpointing host catalog ...
Archiving system catalog ...
Resuming the system ...
Host backup completed successfully. System state is 'online'.
For more information about the nzhostbackup command and its options, see “nzhost-
backup” on page A-22.
Restoring the Host Data Directory and Catalog
You use the nzhostbackup and nzhostrestore commands to back up and restore the files in
the Netezza data directory. The nzhostrestore command pauses the system before starting
the restore, and resumes the system after it finishes.
The nzhostrestore command synchronizes the SPUs with the restored catalog on the host;
as a result, it will roll back any transactions that occurred after the host backup. The host
restore operation cannot roll back changes such as drop table, truncate table, or groom
operations. If these changes occurred after the host backup was made, the host restore
could cause those affected tables to be in an inconsistent state. You should inspect the
data in those tables, and if necessary, reload the tables to match the time of the host
backup.
An example follows:
nzhostrestore /backups/nzhost_latest.tar.gz
Starting host restore
Extracting host data archive ...
Restore host data archived Thu Dec 24 03:42:02 EST 2009? (y/n) [n] y
Stopping the system ...
Starting topology restore ...
Stopping the system ...
Warning: The hardware ids will be reassigned.
The hardware id assignments from the archived system catalog have
been saved in '/tmp/hwids-old.z.tar'
Reinitializing hardware metadata ...
Restoring the devmap / topology tables ...
Stopping the system ...
Starting the system ...
Waiting for system to go online ...
Checking for orphaned SPU tables ...
Loading hardware ids ...
Topology recovery completed successfully.
Stopping the system ...
Warning: The restore will now rollback spu data to Thu Dec 24 03:42:02

10-10 20282-20 Rev.1
IBM Netezza System Administrator’s Guide
EST 2009.
This operation cannot be undone. Ok to proceed? (y/n) [n] y
Installing system catalog to '/nz/data.1.0' ...
StarSynchronizing data on spus ...
done.
Stopping the system ...
Restore complete. You can now start the system using 'nzstart'.
After you use the nzhostrestore command, note that you cannot perform an incremental
backup on the database; you must run a full backup first. For more information about the
nzhostrestore command, see “nzhostrestore” on page A-24.
After the restore, the hardware IDs for the SPUs and disks typically change; however, their
location and roles remain the same as they were before the host restore. Note that a failed
SPU could become active again after a host restore.
If any tables were created after the host backup, the nzhostrestore command marks these
tables as “orphans,” which means that they are inaccessible and consume disk space. The
nzhostrestore command checks for orphaned tables and creates a script that you can use to
drop orphaned user tables. The nzhostrestore command also rolls back the data on the
SPUs to match the transaction point of the catalog in the host backup.
Using the nzbackup Command
Use the nzbackup command to backup a database, including all schema objects and all
table data within the database. You can pass parameters to the nzbackup command
directly on the command line, or you can set some parameters as part of your environment.
For example, you can set the NZ_USER or NZ_PASSWORD environment variables instead
of specifying -u or -pw on the command line.
To back up a database, you must have backup privilege. For more information, see “Speci-
fying Backup Privileges” on page 10-14. If you attempt to back up a database in which
tables are being reclaimed, the backup process will wait until the reclaims finish.
While a backup is running on a database, users cannot drop or truncate a table in that
database until the backup completes. The DROP TABLE and TRUNCATE TABLE com-
mands will wait (and appear to hang) until the backup finishes. Operations such as an
insert or load, or creating or dropping other object types such as view, will run without wait-
ing while the backup is in progress. If a GROOM TABLE VERSIONS command runs on a
table that is being backed up, the backup process will exit with an error. You have to restart
the backup process.
Note: In rare cases, a large number of schema objects could cause a backup to fail with a
memory limitation. In such cases, you may need to adjust how you backup your database.
For example, if you attempt to backup a database that includes a large number of columns
(such as 520,000), you would likely receive an error message that indicates a memory lim-
itation. (The memory limitation error could result from a large number or columns or other
schema objects.) You would likely need to segment your database into multiple databases,
each with fewer than 520,000 table columns.

20282-20 Rev.1 10-11
Using the nzbackup Command
The nzbackup Command Syntax
The nzbackup command supports the following syntax:
Usage: nzbackup [-h|-rev] [<options>]
[-v] [-db database] [-dir directory list] [-dirfile dir file]
[-connector conname] [-connectorArgs "args"] [-differential]
[-cumulative] [-globals] [-u username] [-pw password] [-streams num]
[-schema-only] [-history] [-backupset ID] [-secret value]
Table 10-4 describes the command options.
Table 10-4: The nzbackup Command Options
Argument Description Default Value Example
-h Displays the help for the
command.
-rev Displays the software revision of
the command.
-host Specifies the hostname or IP
address of the Netezza host.
Value of NZ_
HOST
-v[erbose] Specifies the verbose mode, lists
the objects being backed up.
-db database Backs up the specified database
and all its objects as well as the
users, groups, and permissions
referenced by those objects.
If you specify this option, you
cannot specify -globals. For more
information, see “Backing Up
and Restoring Users, Groups,
and Permissions” on
page 10-20.
Value of NZ_
DATABASE
-db ttdev
-dir directory Specifies a list of one or more
space-separated, full pathnames
of the directories where the data
is to be stored. This option
applies to filesystem only. You
can specify up to 16 directories.
Note:
The directories you specify
are the root for all backups. The
system manages the backups in
the subdirectories within each
root directory.
— -dir /home/user/
backups
or
-dir /home/
backup1 /home/
backup2/ /home/
backup3/
-dirfile Specifies a file with a list of
backup target directories, one
per line.
— -dirfile /home/
mybackuptargetlist

10-12 20282-20 Rev.1
IBM Netezza System Administrator’s Guide
-connector
conname
Names the connector to which
you are sending the backup.
Valid values are:
•
filesystem
•
tsm
•
netbackup
•
networker
The system “discovers” the
backup software based on the
connector name that you specify.
If there are multiple versions of a
backup connector installed (for
example, TSM 5 and TSM 6),
you can identify a specific ver-
sion using one of these values:
•
tsm5
•
tsm6
•
netbackup6
•
netbackup7
•
networker7
filesystem -connector
netbackup
-connectorArgs
“args”
Specifies a colon-separated list
of passthrough arguments for the
connector. The argument string
must be enclosed in double-quo-
tation marks.
— “name=value[:nam
e=value:...]”
-differential Specifies a differential backup
(that is, only the data that has
changed since the last backup).
——
-cumulative Specifies a cumulative backup
(that is, the command backs-up
only what has changed since the
prior full backup).
——
Table 10-4: The nzbackup Command Options
Argument Description Default Value Example

20282-20 Rev.1 10-13
Using the nzbackup Command
-globals Backs up all users, groups, and
global permissions. The com-
mand also backs up multi-level
security objects such as catego-
ries, cohorts, and levels
(described in the IBM Netezza
Advanced Security Administra-
tor’s Guide).
If you specify this option, you
cannot specify -db. For more
information, see “Backing Up
and Restoring Users, Groups,
and Permissions” on
page 10-20.
— -globals
-u username Specifies the Netezza user name
to connect to the database.
Value of NZ_
USER
-u user_1
-pw password Specifies the user’s password. Value of NZ_
PASSWORD
-pw XXXXXX
-streams num Backs up the data using the
specified number of streams.
See “Multi-
Stream
Backup” on
page 10-4.
-schema-only Saves only the schema of the
specified database, but not the
user data in tables or views. The
schema includes the definitions
of objects such as tables, views,
synonyms, sequences, and oth-
ers, as well as any access
privileges defined in the
database.
This option is an easy way to rep-
licate an empty database schema
within a Netezza system.
—-schema-only
-history Prints the backup history report. —
-backupset ID Specifies the backup set you
wish to use for incremental
backup, rather than the default.
Note:
The default backup set is
the most recent backup set of
the database you specify. You
can override the default by using
this option.
Extends the
most recent
full backup
set
-backupset
2006052320000
0
Table 10-4: The nzbackup Command Options
Argument Description Default Value Example

10-14 20282-20 Rev.1
IBM Netezza System Administrator’s Guide
Specifying Environment Settings
By default, the nzbackup command uses the values of the environment variables NZ_DATA-
BASE, NZ_USER, and NZ_PASSWORD, unless you specify values for -db, -u, and -pw,
respectively.
Table 10-5 lists the nzbackup command environment variables.
Reporting Errors
The nzbackup command writes errors to the log file /nz/kit/log/backupsvr/back-
upsvr.pid.date.log. For more information about the log files, see “System Logs” on
page 6-12.
Specifying Backup Privileges
You must have the backup privilege to back up a database.The backup privilege operates at
the database level. You can grant a global backup privilege for the user to backup any data-
base, or you can grant a backup privilege for the user to backup a specific database.
For example, to allow a user to back up a specific database, perform the following steps:
1. Invoke nzsql and connect to the database you want to allow the user to back up:
nzsql db1
2. Create a user user_backup with password password:
DB1(ADMIN)=> CREATE USER user_backup WITH PASSWORD 'password';
3. Grant backup privilege to user_backup:
DB1(ADMIN)=> GRANT BACKUP TO user_backup;
For example, to allow a user to back up all databases, perform the following steps:
1. Invoke nzsql and connect to the system database:
nzsql system
2. Create a user user_backup with password password:
-secret value Specifies a string value needed
to generate a 256-bit symmetric
key, which is used to encrypt the
host key in the backed up data.
— -secret toplevel
Table 10-5: Environment Settings
Name Corresponding Command Line Parameter
NZ_DATABASE Same as -db
NZ_USER Same as –u
NZ_PASSWORD Same as –pw
Table 10-4: The nzbackup Command Options
Argument Description Default Value Example
20282-20 Rev.1 10-15
Using the nzbackup Command
SYSTEM(ADMIN)=> CREATE USER user_backup WITH PASSWORD 'password';
3. Grant backup privilege to user_backup:
SYSTEM(ADMIN)=> GRANT BACKUP TO user_backup;
nzbackup Examples
Several examples of the nzbackup command follow:
To back up the contents of the database db1 to disk in the /home/user/backups direc-
tory, enter:
nzbackup -dir /home/user/backups -u user -pw password -db db1
The nzbackup command saves the database schema, data, and access permissions for
all the objects and user data in the database. Sample output follows:
Backup of database db1 to backupset 20120319201321 completed
successfully.
You can use the -v (verbose) command option to display more detail about the backup:
[Backup Server] : Starting the backup process
[Backup Server] : Backing up to base directory '/home/user/backups'
[Backup Server] : Backing up libraries
[Backup Server] : Backing up functions
[Backup Server] : Backing up aggregates
[Backup Server] : Transferring external code files
[Backup Server] : Start retrieving the schema
[Backup Server] : Backing up metadata to /home/user/backups/
Netezza/hostid/DB1/20120319201402/1/FULL
[Backup Server] : Retrieving host key information
[Backup Server] : Retrieving user information
[Backup Server] : Backing up sequences
[Backup Server] : Backing up table schema.
[Backup Server] : Backing up External Tables.
[Backup Server] : Backing up External table settings.
[Backup Server] : Backing up External table zone settings.
[Backup Server] : Backing up Table Constraints
[Backup Server] : Backing up synonyms
[Backup Server] : Backing up stored procedures
[Backup Server] : Backing up materialized views
[Backup Server] : Backing up view definitions.
[Backup Server] : Retrieving group information
[Backup Server] : Retrieving group members
[Backup Server] : Backing up ACL information
[Backup Server] : Start retrieving the data.
[Backup Server] : Backing up table AAA
[Backup Server] : Backing up table BBB
[Backup Server] : Backing up table sales %
[Backup Server] : Operation committed
Backup of database db1 to backupset 20120319201402 completed
successfully.
To back up the contents of the database db2 to filesystem locations in the /export/
backups1 and /export/backups2 directories, enter:
nzbackup -dir /export/backups1 /export/backups2 -u user -pw password -
db db2
10-16 20282-20 Rev.1
IBM Netezza System Administrator’s Guide
The nzbackup command saves the database schema, data, and access permissions for all
the objects and user data in the database. The database is saved in the two specified file-
system locations.
To back up only the schema of the database db1 to disk in the /home/user/backups
directory, enter:
nzbackup -dir /home/user/backups -schema-only -u user -pw password
-db db1
The nzbackup command saves the schema (that is, the definition of the objects in the
database and any access permissions defined in the database) to a file. An example
follows (also using the -v option) :
[Backup Server] : Starting the backup process
[Backup Server] : Backing up to base directory '/home/user/backups'
[Backup Server] : Backing up libraries
[Backup Server] : Backing up functions
[Backup Server] : Backing up aggregates
[Backup Server] : Transferring external code files
[Backup Server] : Backing up to /home/user/backups/Netezza/hostid/
DB1/20120319202016/1/SCHEMA/md
[Backup Server] : Retrieving host key information
[Backup Server] : Retrieving user information
[Backup Server] : Backing up sequences
[Backup Server] : Backing up table schema.
[Backup Server] : Backing up External Tables.
[Backup Server] : Backing up External table settings.
[Backup Server] : Backing up External table zone settings.
[Backup Server] : Backing up Table Constraints
[Backup Server] : Backing up synonyms
[Backup Server] : Backing up stored procedures
[Backup Server] : Backing up materialized views
[Backup Server] : Backing up view definitions.
[Backup Server] : Retrieving group information
[Backup Server] : Retrieving group members
[Backup Server] : Backing up ACL information
[Backup Server] : Operation committed
Backup of schema for database db1 completed successfully.
To back up the global objects in the /home/user/backups directory, enter:
nzbackup -dir /home/user/backups -globals -u user -pw password
The nzbackup command saves the users, groups, global permissions, and security cat-
egories, cohorts, and levels for multi-level security. Note that it does not capture user
privileges granted in specific databases — those permissions are captured in database
backups.
[Backup Server] : Starting the backup process
[Backup Server] : Backing up to base directory '/home/user/backups'
[Backup Server] : Backing up security metadata
[Backup Server] : Start retrieving the schema
[Backup Server] : Backing up metadata to /export/home/nz/backups/
Netezza/hostid/SYSTEM/20120319202355/1/USERS/md
[Backup Server] : Retrieving host key information
[Backup Server] : Retrieving user information
[Backup Server] : Retrieving group information
[Backup Server] : Retrieving group members
20282-20 Rev.1 10-17
Using the nzbackup Command
[Backup Server] : Backing up ACL information
[Backup Server] : Operation committed
Backup of global objects completed successfully.
Backup Archive Directory
The Netezza maintains a backup archive directory that records the backup activity for each
database. For example if you performed a full backup and then a differential backup on the
database Orders, the directory structure would look as follows:
Netezza/NPSProduction/Orders/20061120120000/1/FULL
Netezza/NPSProduction/Orders/20061121120000/2/DIFF
Backup and restore both use this directory structure. Backup uses it to find backupsets
with which to associate an incremental. Restore uses it to derive incremental restore
sequences.
The backup process finds the most recent backup set for a given database for incremental
backup (unless you override the backup set). The restore process finds the most recent
backup set for -db or -sourcedb, and current host or -npshost. You can override the most
recent backup set using the nzrestore command options -sourcedb, -npshost, or -backupset
Note: The “most recent” backup set for backup or restore is the most recently begun
backup set, or the most recent full backup.
If you move the backup archives from one storage location to another, you must maintain
the directory structure. If you want to be able to perform an automated restore, all the
backup increments must be accessible.
Incremental Backups
Incremental backups are database backups that save only the data that has changed since
the last backup. Because the system copies a small subset of the data, incremental back-
ups require less time to complete than full backups. They allow you to keep your backups
current while reducing the frequency of time-consuming full backups.
Netezza supports two types of incremental backups: differential and cumulative.
Differential — Includes all the changes made to the database since the previous
backup (full, differential, or cumulative).
Cumulative — Includes all the changes made to the database since the last full
backup. Cumulative backups incorporate and replace any differential backups per-
formed since the last full backup.
Use cumulative backups to consolidate differential backups so that if you need to
restore data the restoration will require fewer steps and less media.
Figure 10-1 shows sample backups, beginning with a full backup, then a series of differen-
tial and cumulative backups.
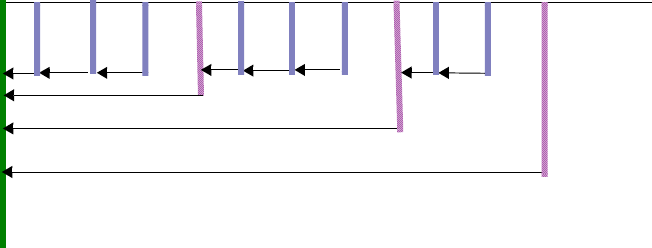
10-18 20282-20 Rev.1
IBM Netezza System Administrator’s Guide
Figure 10-1: Database Backups Timeline
The backups in Figure 10-1 comprise a backup set, which is a collection of backups writ-
ten to a single location consisting of one full backup and any number of incremental
backups.
To Perform a Differential Backup
After you have run a full backup on a database, you can specify an incremental backup. To
run an incremental differential backup on the Netezza host, you use the nzbackup com-
mand and specify the -differential option.
The following is the syntax for a differential backup:
nzbackup -db <db_name> -differential
The following is the syntax for a differential backup written to the NetBackup application:
nzbackup -db <db_name> -differential -connector netbackup
To Perform a Cumulative Backup
After you have run a full backup on a database, you can specify an incremental backup. To
run an incremental cumulative backup on the Netezza host, you use the nzbackup com-
mand and specify the -cumulative option.
The following is the syntax for a cumulative backup:
nzbackup -db <db_name> -cumulative
The following is the syntax for a cumulative backup written to the NetBackup application:
nzbackup -db <db_name> -cumulative -connector netbackup
Reverting to a Full Backup
If you request an incremental backup, note that there are certain conditions that could trig-
ger the nzbackup command to perform a full backup for a particular table, such as:
Dropping and recreating a table
Truncating a table
Using GROOM TABLE VERSIONS to resolve the versions of an altered table
If the nzbackup command performs a full backup of a table instead of an incremental
backup, it writes a message to verbose output and to the backup log.
Full
Diff
Cumulative
Diff Diff Diff Diff Diff Diff Diff
Cumulative Cumulative
20282-20 Rev.1 10-19
Using the nzbackup Command
Note: After you use the nzhostrestore command, note that you cannot perform an incre-
mental backup on the database; you must run a full backup first.
Notes on backup-groom synchronization:
The system keeps groom/reclaim and incremental backups synchronized. GROOM
TABLE uses information stored in the system catalog to identify incremental backups,
using the most recent incremental backup for guidance. Groom limits its operation to
transactions captured by that backup and its predecessors. Groom avoids the reclaim-
ing of rows not yet captured in incremental backup.
You can override the default backup set synchronization by specifying a particular
backup set on the GROOM TABLE command line.
When you perform any backup of a database, you trigger the synchronization. The sys-
tem assumes that incremental backups follow a full backup.
To override the default groom behavior, use the backupset option.
To reclaim all rows, use backupset NONE.
You can also choose a specific backup set. For example, run the nzbackup -history
command to view the backup set IDs in the report:
Database Type Start Date Backup Set
---------------------------------------------------------------
dev Full 2006-06-01 20:00:00 20060601200000
dev Differential 2006-06-04 20:00:00 20060601200000
dev Full 2006-06-08 20:00:00 20060608200000
dev Differential 2006-06-11 20:00:00 20060608200000
From this backup history report, you could choose to use the June 1 backup set rather
than the June 8 backup set:
GROOM TABLE dev RECLAIM BACKUPSET 20060601200000
Release Compatibility for Incremental Backups and Restores
After you upgrade your Netezza system, you can extend backup sets from the earlier release
with incremental backups from the newer release. You can restore the backups and incre-
mentals to the later release. However, if you downgrade to the previous release, note the
following:
You cannot add increments to a backup set that was created on, or last incremented
by, a later Netezza release.
You cannot restore backups or increments created by a later release. For example,
assume that you have backup sets created on the earlier release, and following an
upgrade, you add increments from the later release. If you downgrade to the earlier
release, you can restore the backups and increments created on that earlier release,
but you cannot restore any increments created with the later release.
Backup History Report
Use the Backup History report to view information about the backups have been performed.
You can use the report to display all backups performed from the host system. You can
access the Backup History report in several ways: using the nzbackup -history command,

10-20 20282-20 Rev.1
IBM Netezza System Administrator’s Guide
using the NzAdmin tool, or the Web Admin interface. This section describes how to use the
nzbackup command; for details on the interfaces, refer to the online help for NzAdmin and
Web Admin.
Your Netezza user account must have appropriate permissions to view backup history for
databases:
If you are the admin user, you can view all entries in the backup history list.
If you are not the admin user, you can view entries if you are the database owner, or if
you have backup or restore privileges for the database.
The following is the syntax to display the backup history for a database:
nzbackup -history -db name
Database Backupset Seq # OpType Status Date Log File
-------- -------------- ----- ------- --------- ------------------- ----------------------
SQLEXT 20090109155818 1 FULL COMPLETED 2009-01-09 10:58:18 backupsvr.9598.2009-01-
09.log
Note: You can further refine your results by using the -db and -connector options, or use
the -v option for additional information. You use the -db option to see only the history of a
specified database.
The command displays the following information:
Backing Up and Restoring Users, Groups, and Permissions
When you back up a database using nzbackup -db dbname, the backup includes permis-
sions on objects in the database, and any users and groups referenced by those
permissions. The database backup contains only the users, groups, and privileges as saved
in the specific database; it does not include global privileges that are defined in the system
catalog.
To back up all users, groups, global permissions, specify nzbackup -globals. The nzbackup
-globals command backs up all users and groups regardless of whether they are referenced
by any permission grants within a database, as well as any security categories, cohorts, and
levels for multi-level security. The system also backs up all global-level permissions that are
Table 10-6: Backup History Source
Column Description
Database The name of the backup database.
Backup Set The unique value that identifies the backup set.
Seq.No The sequence number that identifies the increment within the backup set.
Op Type The type of backup (full, differential, cumulative, schema-only, or users).
Date The date/time that the backup was initiated.
Status The current status (completed, failed, in-progress).
Log File The name of the log file.
20282-20 Rev.1 10-21
Using the nzbackup Command
not associated with particular databases. The system does not back up permissions that are
defined in specific databases. Those permissions are saved in the regular database back-
ups for those databases
For example, suppose you have four users (user1 to user4) and you grant them the follow-
ing permissions:
nzsql
SYSTEM(ADMIN)=> GRANT CREATE TABLE TO user1;
SYSTEM(ADMIN)=> \c db_product
DB_PRODUCT(ADMIN)=> GRANT CREATE TABLE TO user2;
DB_PRODUCT(ADMIN)=> GRANT LIST ON TABLE TO user3;
DB_PRODUCT(ADMIN)=> GRANT LIST ON emp TO user4;
User1 has global Create Table permission, which allows table creation in all databases on
the Netezza system. User2 and User3 have Create and List permission to tables in the
db_product database. User4 has List permission only to the emp table in the database
db_product.
Table 10-7 describes the results when you invoke the nzbackup and nzrestore commands
using different options.
A regular backup of the db_product database does not include user1 or the CREATE
TABLE GRANT to user1, because those privileges are defined in the system database
(the system catalog).
A -globals backup and restore includes all users (in this case, users1-4), but it only
includes the Create Table permission for user1, which is also defined in the system
database. The -globals backup and restore does not include the privileges defined spe-
cifically in the db_product database.
A -globals backup and restore does not include the admin user or the public group.
Table 10-7: Backup and Restore Behavior
Method User Backed Up/Restored Permission Backed Up/Restored
nzbackup/nzrestore -db
db_product
user2 CREATE tables in the db_prod-
uct database.
user3 LIST on all tables in the db_
product database.
user4 LIST on the emp table in the
db_product database.
nzbackup/nzrestore
-globals
user1 CREATE tables in the system
database.
user2 —
user3 —
user4 —

10-22 20282-20 Rev.1
IBM Netezza System Administrator’s Guide
Using the nzrestore -globals command allows you to restore users, groups, and permissions.
The restoration of users and groups is nondestructive, that is, the system only creates users
and groups if they do not exist. It does not drop users and groups. Permission restoration is
also nondestructive, that is, the system only grants permissions. It does not revoke
permissions.
Note: Keep in mind when restoring data and users from a backup that the backup reverts
your system to a point in the past. Your user community and their access rights may have
changed, or if you are restoring to a new system, a very stale backup may not reflect your
current user community. After you make any significant user community changes, it is
strongly recommended that you back up the latest changes. After restoring from a backup,
check that the resulting users, groups, and permissions match your current community
permissions.
Using the nzrestore Command
You can use the nzrestore command to restore the contents of a database. To use the
restore command, you must have restore privilege. For more information, see “Specifying
Restore Privileges” on page 10-27. Note that the nzrestore command restores complete
databases or specific tables.
Note: You cannot do a full database restore into an existing database. Instead, specify a
new database or drop the existing database first before you proceed with the nzrestore
command.
If you need to grant a user permission to restore a specific database (versus global restore
permissions), you can create an empty database and grant the user privilege for that data-
base. The user will then be able to restore that database.
You can pass parameters to the nzrestore command directly on the command line, or you
can set parameters as part of your environment. For example, you can set the NZ_USER or
NZ_PASSWORD environment variables instead of specifying -u or -pw on the command
line.
When you do a full restore into a database, the nzrestore command performs the following
actions:
1. Verifies the user name given for backup and restore privileges.
2. Checks to see if the database already exists.
3. Recreates the same schema on the new database, including all objects such as tables,
views, sequences, synonyms, and so on.
4. Applies any access privileges to the database and its objects as stored in the backup. If
necessary, the command creates any users or groups which might not currently exist on
the system to apply the privileges as saved in the database backup. The command also
revokes any current user or group privileges to match the privileges that were saved at
the time of the backup.
5. Restores the data.
If you are performing a table-level restore and the table exists in the database, the nzre-
store command will drop and recreate the table if you specify -droptables. If you do not
specify -droptables, the restore fails.
20282-20 Rev.1 10-23
Using the nzrestore Command
The nzrestore -schema-only command does not restore the /nz/data directory; instead, it
creates a new database or populates an empty database with the database schema from the
backed-up database. The command creates the objects in the database, such as the tables,
synonyms, sequences, views, and so on, and applies any access permissions as defined in
the database. It does not restore data to the user tables in the database; the restored tables
are empty.
Note: In rare cases, a large number of schema objects could cause a restore to fail, with the
system indicating a memory limitation. In such cases, you may need to adjust how you
restore your database. For example, if you attempt to restore a database that includes a
large number of columns (such as 520,000), you would likely receive an error message that
indicates a memory limitation. (The memory limitation error could result from a large num-
ber or columns or other schema objects.) You would likely need to perform a schema-only
restore followed by two or more table-level restore operations.
The nzrestore Command Syntax
The nzrestore command supports the following command line syntax:
usage: nzrestore [-h|-rev] [<options>]
[-v][-db database] [-dir directory list] [-dirfile dir file]
[-connector conname] [-connectorArgs "args"] [-backupset ID]
[-sourcedb dbname] [-npshost host] [-tables tablenames]
[-tablefile filename] [-droptables] [-suspendmviews] [-increment ID]
[-increment NEXT] [-increment REST] [-lockdb] [-unlockdb] [-globals]
[-noUsers] [-noAcl] [-u username] [-pw password] [-schema-only]
[-allincs] [-contents] [-history] [-incrementlist] [-disableGroom]
[-disableSecurityCheck] [-enableSecurityCheck]
[-disableSecurityRestore] [-enableSecurityRestore] [-secret value]
Table 10-8 lists the nzrestore command options.
Table 10-8: The nzrestore Command Options
Argument Description
-h Displays the help for the command.
-rev Displays the software revision of the command.
-v[erbose] Specifies the verbose mode, lists the objects being restored.
-db database Restores the specified database and all its objects as well as the
users, groups, and permissions referenced by those objects.
If you specify this option, you cannot specify -globals. For more infor-
mation, see “Backing Up and Restoring Users, Groups, and
Permissions” on page 10-20.

10-24 20282-20 Rev.1
IBM Netezza System Administrator’s Guide
-dir directory list For restores from a filesystem, specifies the pathnames of the
backup directories where the schema and data files are stored. You
can specify full pathname(s), or the backup “root” directories. (For
example, if you used the root directory /usr/backups when you cre-
ated the backup, specify /usr/backups when you restore from that
backup.)
If you saved the backup to multiple filesystem locations, specify the
roots of all the locations in this argument. For example, if a backup
was written to /home/backup1, /home/backup2, and /home/backup3,
you can restore the data in a single operation by specifying all three
locations.
-dirfile Specifies a file with a list of the backup source directories, one per
line.
-connector
conname
Names the connector to which you are sending the backup. Valid val-
ues are:
•
filesystem
•
tsm
•
netbackup
•
networker
The system “discovers” the backup software based on the connector
name that you specify. If you have multiple versions of a backup con-
nector installed (for example, TSM 5 and TSM 6), you can use a
specific version using one of these values instead of the generic argu-
ments above:
•
tsm5
•
tsm6
•
netbackup6
•
netbackup7
•
networker7
-connectorArgs
“args”
Specifies a colon-separated list of passthrough arguments for the
connector. The argument string must be enclosed in double-quota-
tion marks.
-backupset ID Specifies the backup set, overriding the default.
-sourcedb dbname Specifies the backup set database, overriding the default.
Note:
nzrestore restores the most recent backup of -db unless you
specify a different backup set with the option -sourcedb.
-npshost host By default, restores look for backup sets that were created by the
local Netezza host. If you use nzrestore to migrate databases, sche-
mas, or user backups made on a different Netezza host, use this
option to specify the host that created the backup set.
Table 10-8: The nzrestore Command Options
Argument Description

20282-20 Rev.1 10-25
Using the nzrestore Command
-tables table_list Restores the table or tables as specified in the table_list argument,
which is a space-separated list of tables.
-tablefile filename Restores the tables listed in the table file, which is a file that con-
tains a list of tables with one table per line.
-droptables Drops the tables in the table list before restoring for a table-level
restore.
-suspendMViews Leave materialized views suspended after a table-level or incremental
restore.
-increment [ID |
NEXT | REST]
If you specify an increment ID, the command performs a partial
restore up to the user-specified increment number.
After you perform a partial restore, you can specify NEXT to restore
the next increment from the backup set. If you specify REST, the
command restores the remaining increments from the backup set.
-lockdb Makes the database read-only to prevent modifications during the
restore.
Any of the following can represent “true”: 1, t, T, y, Y, true, TRUE,
yes, Yes, or YES.
Any of the following can represent “false”: 0, f, F, n, N, false, False,
FALSE, no, No, or NO.
Note:
If you do not specify this option, the database remains
unlocked, which will not allow subsequent incremental restore opera-
tions.
-unlockdb Unlocks the database without performing another restore. This option
is useful in cases where a restore is aborted or fails, because the tar-
get database could remain locked. Use this option to unlock the
database.
-globals Restores the users, groups, and global permissions, as well as multi-
level security information such as categories, cohorts, and levels. For
more information, see “Backing Up and Restoring Users, Groups,
and Permissions” on page 10-20. You cannot specify -db when you
specify -globals.
The creation of the users, groups and global permissions is non-
destructive; that is, if a user or group exists, the system will not over-
write it. If you specify verbose mode, the nzrestore command
displays at least one user or group creation error message, and tells
you to view the restore log for details.
As a best practice, when transferring data to a new machine, use
nzrestore -globals first to ensure that the users, groups, permissions
and security information is present before you restore the data.
-noUsers Disables the restoration of users or groups.
-noAcl Disables the restoration of permissions.
Table 10-8: The nzrestore Command Options
Argument Description

10-26 20282-20 Rev.1
IBM Netezza System Administrator’s Guide
-u username Specifies the user name for connecting to the database to perform
the restore.
-pw password Specifies the user’s password.
-schema-only Restores only the database schema (the definitions of objects and
access permissions), but not the data in the restored tables.
-allIncs Used with -schema-only, restores the user-defined objects (functions,
aggregates) in every increment.
-contents Lists the name and type of each database object in a backup archive.
Note:
For file system backup locations, you must also specify -dir for
the location of the backup archive and -db for a specific database.
-history Prints a restore history report.
-incrementlist Prints a report of the available backupsets and increments.
Note:
You must specify -connector. You can also specify -npshost and/
or -sourcedb.
-disableGroom Disables the automatic groom of versioned tables at the end of the
restore operation.
-disableSe-
curityCheck
For nzrestore -db operations, the command confirms that the target
system has all the security metadata in the backup set. The target
must have a compatible MLS model with the levels, categories, and
cohorts defined in the backup set. In some instances, the backup set
could include older, unused metadata that is not present in the target
database; by default, nzrestore -db fails in this case. You can use this
switch to bypass the overall metadata check, but if the backup set
has data that includes a label which is not in the target system, the
restore fails and is rolled back.
-enableSe-
curityCheck
Checks but does not restore any security metadata in the backup set.
-disableSe-
curityRestore
When using nzrestore -globals, this option ignores (does not restore)
security metadata if the backup set contains any.
-enableSe-
curityRestore
For nzrestore -db operations, restores the security metadata in the
backup set to the target system.
-extract [file] Extracts the specified file from the specified backup set. If you do
not specify a file, the option lists all the files in the backup set.
Note that with the -extract option, the restore command does not
restore the specified backupset or files. The -extract option causes
the command to skip the restore operation and output the requested
file or list.
Table 10-8: The nzrestore Command Options
Argument Description

20282-20 Rev.1 10-27
Using the nzrestore Command
Specifying Environment Settings
As an alternative to command-line options, you can specify the following inputs as environ-
ment variables. Table 10-9 describes the environment settings.
Reporting Errors
The nzrestore command writes errors to the /nz/kit/log/restoresvr/restoresvr.pid.date.log file.
For more information about the log files, see “System Logs” on page 6-12.
Specifying Restore Privileges
You must have the restore privilege to restore a database. The restore privilege operates at
the database level. You can grant a global restore privilege for the user to restore any data-
base, or you can grant a restore privilege for the user to restore only an specific database.
For example, to allow a user to restore a specific database, perform the following steps:
1. Invoke nzsql and connect to the database you want to allow the user to restore:
nzsql db1
2. Create a user user_restore with password password:
DB1(ADMIN)=> CREATE USER user_restore WITH PASSWORD 'password';
3. Grant restore privilege to user_restore:
DB1(ADMIN)=> GRANT RESTORE TO user_restore;
Note: If the database does not exist, you must first create an empty database and then
assign the restore privilege to the user. Note that you must assign the restore privilege on
an empty database.
For example, to allow a user to restore all databases, perform the following steps:
1. Invoke nzsql and connect to the system database:
nzsql system;
-extractTo path Specifies the name of a file or a directory where you want to save the
extracted output. If you do not specify directory, the -extract option
saves the file in the current directory where you ran the nzrestore
command.
-secret value Specifies a string value needed to generate a 256- bit symmetric key,
which is used to decrypt the host key in the data.
Table 10-9: Environment Settings
Name Corresponding Command Line Parameter
NZ_USER Same as –u.
NZ_PASSWORD Same as –pw.
Table 10-8: The nzrestore Command Options
Argument Description
10-28 20282-20 Rev.1
IBM Netezza System Administrator’s Guide
2. Create a user user_restore with password password:
SYSTEM(ADMIN)=> CREATE USER user_restore WITH PASSWORD 'password';
3. Grant restore privilege to user_restore:
SYSTEM(ADMIN)=> GRANT RESTORE TO user_restore;
Note: The restored database is owned by the original creator. If that user no longer exists,
the system displays a warning and changes the ownership to the admin user.
nzrestore Examples
Several example of the nzrestore command follow.
To restore the database db1 from the /home/user/backups directory:
nzrestore -db db1 -u user -pw password -dir /home/user/backups -v
An example of the command output follows:
[Restore Server] : Starting the restore process
[Restore Server] : Reading schema from /home/user/backups/Netezza/
hostid/DB1/20090116125619/1/FULL
[Restore Server] : Restoring schema
[Restore Server] : Start restoring the data, compressed format.
[Restore Server] : Restoring data from /home/user/backups/Netezza/
hostid/DB1/20090116125619/1/FULL
[Restore Server] : Restoring AAA
[Restore Server] : Restoring BBB
[Restore Server] : Restoring sales %
[Restore Server] : Restoring views, users, groups, permissions
Restore of increment 1 from backupset 20090116125619 to database
'DB1' committed.
To restore the only the schema (objects and user permissions, but not the table and
view data) of db1 to a new, empty database named new_db1:
nzrestore -db new_db1 -sourcedb db1 -schema-only -u user -pw
password -dir /home/user/backups
To restore the users, groups, and privileges in the system catalog:
nzrestore -globals -u user -pw password -dir /home/user/backups
This command restores the users, groups, and global privileges as defined in the sys-
tem catalog. Note that if a user or group currently exists in the system catalog, the
command grants any additional privileges as defined in the backup. The command
does not revoke any current privileges that are not also defined in the backup.
To list all of the objects such as tables, synonyms, user-defined objects, and others that
were saved in a database backup, use the nzrestore -contents command as follows:
nzrestore -contents -db dev -dir /net/backupsvr/nzbackups
Database: TPCH_TEST
List of relations
Oid | Type | Name
-----------+----------------+-----------------------------
210854 | SEQUENCE | MY_SEQ
203248 | TABLE | NATION
203264 | TABLE | REGION
203278 | TABLE | PART
203304 | TABLE | SUPPLIER
203326 | TABLE | PARTSUPP
20282-20 Rev.1 10-29
Using the nzrestore Command
203344 | TABLE | CUSTOMER
203368 | TABLE | ORDERS
203394 | TABLE | LINEITEM
210853 | SYNONYM | MY_ORDERS
217345 | FUNCTION | ORDERCONV(CHARACTER VARYING(ANY))
If a restore operation fails or is cancelled, the target database could be left in a locked
state. You can use the -unlockdb option of the command to unlock the target database,
for example:
nzrestore -db myrestoredb -unlockdb
Maintaining Database Statistics
After a restore, use the GENERATE STATISTICS command to update your database statis-
tics. For more information about the GENERATE STATISTICS command, see “Updating
Database Statistics” on page 9-14.
Note: When you use the nzhostrestore command to restore host data, you do not have to
regenerate statistics, because the command restores the statistics.
Restoring Tables
You can use the nzrestore command to identify specific tables in an existing backup
archive and restore only those tables to the target database.
Overview of Table-Level Restore
When you request a table-level restore, the system restores individual tables from an exist-
ing full-database backup to a specific database. Table-level restore does not drop the target
database or affect objects in that database other than those you are explicitly restoring.
Table-level restore does the following:
Restores regular tables, not external or temp tables, views, sequences, users or groups.
Replaces tables with the same name if they exist (and you use the -droptables option).
Includes the permissions that directly reference the restored tables.
Restores any foreign keys that are on or reference the tables.
Returns all materialized views to their original state. (Leaves previously active mviews
suspended if you have issued the -suspendmviews option.)
Table-level restore has the following restrictions:
You cannot rename tables during the restoration.
You cannot append to an existing table.
You cannot create users and groups during the restoration. If the owner of the table
does not exist, the admin user becomes the new owner. Permission grants fail for any
users or groups that do not exist during the restore.
You are responsible for ensuring database integrity. If you have foreign keys however,
the system warns you of potential inconsistencies.
10-30 20282-20 Rev.1
IBM Netezza System Administrator’s Guide
Using Table-Level Restore
To perform a table-level restore use the following syntax:
nzrestore -db <dbname> -connector <filesystem> -dir <root dir>
[<opts>] -tables <table1> [ ...]
Note: When listing multiple tables with the -tables option, separate table names with
spaces.
As in a standard restore, by default the system restores the table’s schema and data. To
suppress restoration of the data, use the -schema-only option.
Keep in mind the following:
You can specify the nzrestore command line options in any order.
If your table names contain spaces, enclose the names in double quotes.
If your table names begin with dashes (-), you can restore them by listing them in a sin-
gle file and using the -tablefile option.
You can restore to a different target database than the original backup (use the
-sourcedb option to find the backup).
If the target database does not exist, the system creates it.
If the table exists in the database with the same name as the table you are restoring,
both copies of the table exist until the transaction is complete. If there is not enough
disk space for both versions of the table, you must manually drop the table before run-
ning the table-level restore.
Managing Transactions
As with a full-database restore, the system is available to all users during a table-level res-
toration. The majority of a table-level restoration occurs within a single transaction. The
system handles other concurrent operations on the same table in the following manner:
If a concurrent operation begins before the restore has dropped the table, it succeeds.
If the concurrent operation begins after the restore table drop, the system suspends the
concurrent operation until the restore operation either is committed or rolled back.
If the restore transaction is committed, the concurrent operation fails and the sys-
tem displays an error.
If the restore transaction is rolled back, the concurrent operation succeeds against
the original table.
If a concurrent non-read-only transaction locks the same table, the system suspends
the restore operation.
If you abort the table-level restore, the system returns the database to its original state.

20282-20 Rev.1 10-31
Using the nzrestore Command
Understanding Incremental Restoration
You can restore an entire backup set in a single operation. This is a full restore. You can
also restore a subset of your backups using an incremental or partial restore. The granular-
ity depends on the backup increment — full, differential, or cumulative — that
corresponds to the point in time to which you want to return. For incremental restores, you
must apply the increments in sequence.
When you restore data, the restoration software reads the metadata to frame the increment,
validates the operation against the backup set, and performs the restore. The restore soft-
ware associates the increment with a backup set on either the source Netezza or the target
Storage Management System (SMS) by finding (by default) the most recent backup of the
same database from the same source system.
Using the Increment List Report
You can display all available backup sets on the target system using the -incrementlist
option. The following example displays the available backup sets and increments in a
source storage system:
nzrestore -incrementlist -connector netbackup
The command displays the following information:
Restoring a Full Backup Set
A full restore restores the entire contents of a backup set (one full plus all the incremen-
tals). By default the nzrestore command finds the most recent backup set for the database.
For example, the following command line restores the database dev from the backup set
stored in a NetBackup system.
nzrestore -db dev -connector netbackup
You can override the default host and database. For example, to specify another host use
the -npshost option (where -npshost is the source Netezza system that created the backup),
and to specify another database, specify the -sourcedb option.
nzrestore -db dev -connector netbackup -npshost nps_dev -sourcedb
mydev
If you do not want to restore the most recent backup set, you can specify a specific backup
set with the -backupset option.
nzrestore -db dev -connector netbackup -backupset 20060623200000
Table 10-10: Backup History Target
Column Description
Database The name of the backup database.
Backup Set The unique value that identifies the backup set.
Seq.No The sequence number that identifies the increment within the backup set.
Op Type The type of backup (full, differential, cumulative, schema-only, or users).
Hostname The name of the source system.
10-32 20282-20 Rev.1
IBM Netezza System Administrator’s Guide
Note: Use the -incrementlist option to view a report listing all full and incremental
backups.
Restoring an Incremental Backup
Restoring an incremental backup restores a subset of a backupset that includes a full
backup, and any number of incremental backups. An incremental restore creates a new
database or appends to an existing database created through a prior restore, depending on
the incremental restore type. You can restore using three methods: up-to-x, step-by-step, or
remainder incremental.
For the restore to return a database to a known state, the database must not be allowed to
change during multi-step restore operations. Specifying the -lockdb option makes the data-
base read-only and allows subsequent restore operations to the database.
To restore another increment after you have performed a restore, you must specify -lockdb
before an append restore operation. You cannot do an append restore operation unless you
have locked the database in a prior restore operation.
Once the restore is complete, you can unlock the database by using the nzrestore command
and specify the database, for example:
nzrestore -db dev -unlockdb
Up-to-x Restore Up-to-x restore restores a database from a full backup and then up to the
specified increment. You can follow the up-to-x restore with a step-by-step restore.
Note: Issue the -incrementlist option to view a report listing increment numbers.
For example, the following command restores the full backup of database dev and then up
to increment 4.
nzrestore -db dev -connector netbackup -increment 4
Step-by-step Restore Step-by-step restore restores single incrementals in chronological
order. The nzrestore command maintains a restore history system table on the target system
and queries this table to determine which increment to restore.
Note: Remember to lock the database with the first nzrestore command and to unlock it
with the last.
For example, the following command line restores the full backup and then up to a specific
incremental of the database dev, and then steps through the following incrementals.
nzrestore -db dev -connector netbackup -increment 4 -lockdb true
nzrestore -db dev -connector netbackup -increment Next -lockdb true
nzrestore -db dev -connector netbackup -increment Next -lockdb false
Note: To begin with the first increment when the database does not yet exist, specify the
option, -increment 1. You can then step through the increments by specifying -increment
Next.
Remainder Restore A remainder restore restores all the remaining increments from a
backup set that have not yet been restored. For example, after you restore to an increment
ID (and possibly some step restores), the following command restores any remaining incre-
ments in the backup set.
nzrestore -db dev -connector netbackup -increment REST

20282-20 Rev.1 10-33
Using the Symantec NetBackup Connector
Using the Restore History Report
Use the Restore History report during a multistep restore to learn what restores have been
performed on the system. The following example displays the restore history for a specific
database:
nzrestore -history
Note: You can further refine your results using the -db and -connector options, or use the
-v option for additional information. You use the -db option to see only the history of a spec-
ified database.
The command displays the following information:
Using the Symantec NetBackup Connector
The Symantec® NetBackup® environment includes a NetBackup server, one or more
media servers, and one or more client machines. The Netezza host is a NetBackup client
machine. (Symantec and NetBackup are trademarks or registered trademarks of Symantec
Corporation or its affiliates in the U.S. and other countries.)
You install the 32-bit NetBackup Client for Linux software on the Netezza host and the
Netezza components communicate with the NetBackup client software to perform backup
and restore operations. The Netezza components do not assume any specific media, but
instead rely on the NetBackup Media Server for configuration of the media server and stor-
age devices. The Netezza solution has been tested with NetBackup versions 6.5, and 7.1.
Installing the Symantec NetBackup License
To use the NetBackup-Netezza integration, you must install a license key on the Symantec
NetBackup server that allows you to create a backup policy of type ‘DataStore.’
Table 10-11: Restore History Source
Column Description
Restore DB The name of the restore database.
Backup DB The name of the source database.
Backup Set The unique value that identifies the backup set.
Seq.No The sequence number that identifies the increment within the backup set.
Database The name of the backup database.
OpType The type of restore (for example, users, full, Incr:upto, Incr:next, Incr:rest).
Db Locked Whether the database is locked.
Date The date/time that the restore was initiated.
Status The current status (completed, failed, in-progress).
Log File The log file for the restore.

10-34 20282-20 Rev.1
IBM Netezza System Administrator’s Guide
To add the license:
1. On the NetBackup Administration Console, select Help > License Keys. The
Net-Backup License Keys dialog appears.
2. Click New. The Add a New License Key dialog appears.
3. In the Add a New License Key dialog, enter the following key and then click Add:
DEXW-PM9K-R38B-UZPN-OPPR-PPXP-PPCP-PPPP-PP6
The new license key appears in the license listing.
Configuring NetBackup for a Netezza Client
To backup and restore from NetBackup, you must configure the NetBackup environment,
which includes the following steps:
1. Make the Netezza host network-accessible to the NetBackup Master Server.
2. Confirm that at least one NetBackup Media Server and storage device is connected to
NetBackup, is operational, and is available to NetBackup policies.
3. Install the NetBackup Client for Linux on the Netezza host.
4. Create a NetBackup policy for Netezza backup.
Configuring a NetBackup Policy
A NetBackup policy contains the configuration settings for a Netezza database backup. It
defines the rules that NetBackup uses when backing up clients. You use the NetBackup
Administration Console to configure a NetBackup policy.
For a Netezza database backup the NetBackup policy is a “DataStore” policy. Table 10-12
describes the relevant policy settings.
Table 10-12: NetBackup Policy Settings
Category Setting Value
Attributes Policy Type DataStore
Attributes Storage Unit Previously configured NetBackup Storage Unit, suit-
able for the Netezza database backup destination.
Attributes Keyword Phrase Optional user-supplied keyword phrase. Could be
used to help distinguish between backups in the Cli-
ent Backups Report in NetBackup. You might use the
database name.
Schedule Type of Backup Automatic — For Netbackup-scheduled backups
Application — For user-initiated backups
Schedule * A policy must include at least one schedule with
which you can set the valid time windows for Netezza
backups and the calendar or frequency specifications
for automatic NetBackup-initiated backups. Note
that because you can restore at any time, there is no
need for a schedule.
20282-20 Rev.1 10-35
Using the Symantec NetBackup Connector
Configuring a Netezza Backup Policy
A Netezza database backup policy specifies a single script file to execute on the Netezza to
perform the backup. The script file consists of an nzbackup command line with the appro-
priate arguments. Because the script file cannot be run with additional command-line
arguments, each scheduled, automated backup operation with a distinct nzbackup com-
mand line must have its own policy.
For each database, your system should have a separate policy and script file for each
backup type. For one database, you could have three policy and script files, representing
the full, differential, and cumulative backup types. If you had three databases, you would
have nine policy and script files, plus possibly one for the -globals you had specified.
Integrating Symantec NetBackup to Netezza
This section contains the procedures for integrating Symantec NetBackup with your
Netezza system. This section also describes the procedures for backing up and restoring
your system using the Netezza commands and utilities. For information about using the
Symantec NetBackup utilities, refer to “Procedures for Backing Up and Restoring Using
Symantec NetBackup” on page 10-39.
Note: The following procedures describe in general how to use the UIs. Note that the com-
mands and menus could change with updates or patches to the backup software; these
procedures are intended as a general overview.
Preparing Your System for Integration
To prepare a Netezza system for integration:
1. Obtain the following name information for your Netezza system:
If your system is an HA system, ask your network administrator for your “ODBC
name.”
If your system is a standard (non-HA) system, ask for the external DNS name for
the Netezza host.
Note: Do not proceed without this information.
2. In your /nz/data/config directory, open the file backupHostname.txt using any text edi-
tor and edit the file as follows:
If your system is an HA system, replace the HOSTNAME value with the ODBC
name you obtained in the previous step.
If your system is a non-HA machine, replace the HOSTNAME value with the exter-
nal DNS name.
3. Install the Symantec NetBackup Client Software onto the Netezza host.
Client Name The Netezza hostname
Backup Sections Sections List The Netezza host-resident script file that launches
the appropriate Netezza database backup. Specify
the full path on the Netezza host.
Table 10-12: NetBackup Policy Settings
Category Setting Value
10-36 20282-20 Rev.1
IBM Netezza System Administrator’s Guide
Note: If your system is an HA system, install the software on both hosts.
To check the version and release date of the NetBackup software, view the following
file:
/usr/openv/netbackup/bin/version
4. Edit the following file using any text editor:
/usr/openv/netbackup/bp.conf
The file should include the variables CLIENT_CONNECT_TIMEOUT and CLIENT_
READ_TIMEOUT. Set both to the value 18000. Add the variables if they are not in the
file:
CLIENT_CONNECT_TIMEOUT = 18000
CLIENT_READ_TIMEOUT = 18000
Note: If a database restore fails with the error: “Connector exited with error: 'ERROR:
NetBackup getObject() failed with errorcode (-1): Server Status: Communication with
the server has not been initiated or the server status has not been retrieved from the
server,” the problem could be that the CLIENT_READ_TIMEOUT set on the NetBackup
server expired before the restore finished. This could occur when you are restoring a
database that contains many tables with small changes, such as frequent incremental
backups, or a database that contains many objects such as UDXs, views, or tables. If
your restore fails with this error, you can increase the CLIENT_READ_TIMEOUT value
on the NetBackup server, or you can take steps to avoid the problem by specifying cer-
tain options when you create the database backup. For example, when you create the
database backup, you can specify a multi-stream backup using the nzbackup -streams
num option, or you can reduce the number of files committed in a single transaction
using the nzbackup -connectorArgs "NBC_COMMIT_OBJECT_COUNT=n " option, or
both, to avoid the timeout error. This error message may appear for other reasons, so if
this workaround does not resolve the issue, contact Netezza Support for assistance.
5. Make sure that the backups done by one host are visible to another host. If you have a
Netezza HA environment, for example, the backups performed by Host 1 should be vis-
ible to Host 2.
There are many ways that you can make the backups from one host visible to another.
Refer to the Symantec NetBackup Administrators Guide, Volume I for UNIX and Linux,
and specifically to the chapter on managing client restores. Two possible methods fol-
low:
You can open access to all hosts by touching the following file on the Netbackup
Master Server.
touch /usr/openv/netbackup/db/altnames/No.Restrictions
Note: If the touch command fails, make sure that the altnames directory exists. If nec-
essary, create the altnames directory and re-run the command.
You can give Host1 access to all backups created by Host2 and vice versa. To do
this, you need to touch two files:
touch /usr/openv/netbackup/db/altnames/host1
touch /usr/openv/netbackup/db/altnames/host2
For example, if the names of your HA hosts are nps10200-ha1 and nps10200-ha2
then you would create the following files:
touch /usr/openv/netbackup/db/altnames/nps10200-ha1
touch /usr/openv/netbackup/db/altnames/nps10200-ha2
20282-20 Rev.1 10-37
Using the Symantec NetBackup Connector
Note: You must use one of the two methods above to open access. If you skip this step,
your restore will not work correctly on an HA system. This also applies to redirected
restores. Refer to “Redirecting a Restore” on page 10-39.
Creating a NetBackup Policy
To create a Symantec NetBackup policy:
1. Start the NetBackup Administration Console.
2. In the right-hand pane, select “Create a Backup Policy.” The Backup Policy Configura-
tion Wizard starts.
3. Click Next in the Welcome dialog. The Policy Name and Type dialog appears.
4. In the Policy Name and Type dialog, type a policy name, then select DataStore from the
policy type list, and then click Next. The Client List dialog appears.
5. In the Client List dialog, perform the following steps:
a. Click Add.
b. Enter the ODBC name or the external DNS name (the value you previously entered
for HOSTNAME in the file backupHostname.txt) in the Name field.
c. Click Next.
6. In the pop-up window, click the pull-down menu and select the RedHat Linux operat-
ing system that is running on your Netezza host. Most Netezza systems use
Intel,RedHat 2.4, but if you are not sure, run the uname -r command on your Netezza
host to display the kernel release number. Click OK and then click Next in the Client
List dialog.
Note: The operating systems in the drop-down list are based on the client binaries
installed on the NetBackup master server. The list may be empty, or may not include
the Red Hat Linux client software, if you have not installed the correct client software
on the NetBackup server. For more information about installing the client software,
refer to the Symantec NetBackup Installation Guide.
7. In the Backup Type dialog, select Automatic Backup to enable it, then click Next.
Note: Do not specify values for the full path script. You supply this information in a
later step.
8. In the Rotation dialog, select your time slot rotation for backups and how long to retain
the backups, then click Next.
9. In the Start Window dialog, select the time options for the backup schedule and click
Next.
10. A dialog appears and prompts you to save or cancel the backup policy that you created.
Click Finish to save the backup policy.
Initiating Backups from the NetBackup Administration Console
After you create a backup policy, perform the following steps to initiate an automatic
backup from the NetBackup Administration Console.
1. In the left-pane of the Netbackup Administration Console, expand the Policies list.
10-38 20282-20 Rev.1
IBM Netezza System Administrator’s Guide
2. Double-click the policy that you created in the previous procedure. The Change Policy
dialog appears.
3. In the Change Policy dialog, click the Backup Selections tab.
4. Click New and specify the full path to the backup script that will be invoked by Net-
Backup as part of scheduled automatic backups. The full path is the pathname on the
Netezza host. Usually the backup script contains a single command line that invokes
nzbackup for a particular backup operation. You can create the script manually using a
text editor.
For example, the following line in a text file would back up the database named “sales”
using the Netezza user account “joe”:
/nz/kit/bin/nzbackup -db sales -connector netbackup -u joe -pw
password -connector netbackup -connectorArgs "DATASTORE_
SERVER=NetBackup_master_server:DATASTORE_POLICY=NetBackup_policy_
name"
Note: Rather than specify the -connectorArgs argument, you could set the environment
variables DATASTORE_SERVER and DATASTORE_POLICY. If you set the environment
variables and then use the command line argument -connectorArgs, the command line
argument takes precedence.
If you are concerned about using a clear-text password, you could perform the same
nzbackup as follows:
a. Change user to root.
b. Cache the password for user “joe” by using the nzpassword command.
c. Invoke nzbackup without the password, as follows.
nzbackup -db sales -connector netbackup -u joe
After you cache the password, you can use nzbackup without the -pw option. You
only need to cache the password one time.
Backups initiated using the nzbackup command on the Netezza host use the sched-
ule of type “Application Backup.” You can click the Schedules tab and check that
the schedule for allowing backups is set appropriately.
Initiating Backups from the Netezza CLI
To initiate backups from the Netezza CLI, you must specify the NetBackup datastore server
and NetBackup Policy in the command. Sample syntax follows.
nzbackup -db dbname -connector netbackup -connectorArgs "DATASTORE_
SERVER=NetBackup_master_server:DATASTORE_POLICY=NetBackup_policy_name"
Note: Rather than specify the -connectorArgs argument, you could set the environment
variables DATASTORE_SERVER and DATASTORE_POLICY. If you set the environment vari-
ables and then use the command line argument -connectorArgs, the command line
argument takes precedence.
Restoring a Database from an Existing Backup Using the Netezza CLI
Restore a database by running nzrestore on the Netezza host. Sample syntax follows:
nzrestore -db dbname -connector netbackup -connectorArgs "DATASTORE_
SERVER=NetBackup_master_server"
20282-20 Rev.1 10-39
Using the Symantec NetBackup Connector
Note: Rather than specify the -connectorArgs argument, you could set the environment
variable DATASTORE_SERVER. If you set the environment variable and then use the com-
mand line argument -connectorArgs, the command line argument takes precedence.
The restore operation does not use a NetBackup policy or schedule.
Redirecting a Restore
Typically, you restore a backup to the same Netezza host from which it was created. If you
want to restore a backup created on a different Netezza host:
Configure Symantec NetBackup for a “redirected restore.” Refer to the Symantec Net-
Backup documentation for more information.
Use the -npshost option of the nzrestore command to identify the Netezza host from
which the backup was created. Sample syntax follows:
nzrestore -db dbname -connector netbackup -connectorArgs
"DATASTORE_SERVER=NetBackup_master_server" -npshost origin_nps
Troubleshooting
The Activity Monitor in the NetBackup Administration Console shows the status of all back-
ups and restores. If the monitor shows that a backup or restore failed, you can double-click
the failed entry to obtain more information about the problems that caused the failure.
Procedures for Backing Up and Restoring Using Symantec NetBackup
The procedures in this section describe how to perform backups and restores using the
Symantec NetBackup utilities.
Performing a User-Directed Backup
This section describes how to create a user-directed backup using NetBackup. As an exam-
ple, this procedure performs a host backup using the nzhostbackup command.
Note: The nzhostbackup command creates a single file that is written to the local disk or
other storage accessible from the Netezza host. You can send this file to NetBackup using
the bpbackup command-line utility, which is included with the NetBackup client software
installed on the Netezza host. You can later transfer the file back to its original location
using the bprestore command-line utility (also part of the NetBackup client software). You
can then restore the file using the nzhostrestore command.
Perform the following to create a user-directed backup.
1. Create a NetBackup policy of type Standard.
2. Edit the policy schedule to match your intentions for backup.
3. Specify the Netezza host as a client.
4. Set the storage unit or other policy attributes, as desired.
5. Log on to the Netezza host.
6. Create the host backup following your environment’s backup policy. An example
follows.
nzhostbackup /nz/tmp/hostbackup.20070521
10-40 20282-20 Rev.1
IBM Netezza System Administrator’s Guide
7. Transfer the file to NetBackup using the bpbackup utility. An example follows.
bpbackup -p nzhostbackup -w -L /nz/tmp/hostbackup.log /nz/tmp/
hostbackup.20070521
Note the following important points for the bpbackup utility and the example:
Specify the explicit path to the bpbackup command if it is not part of your account’s
PATH setting. The default location for the utility is /usr/openv/netbackup/bin.
In the sample command, the -L option specifies the log file where the status of the
backup operation is written. You should review the file because the utility does not
return error messages to the console.
The -w option causes the bpbackup utility to run synchronously; it does not return until
the operation has completed.
The -p option specifies the name of the NetBackup policy, which you defined in step 1
on page 10-39.
You can display syntax for the bpbackup utility by running “bpbackup” without
options.
Note: An alternative to the bpbackup command is the “bp” interactive NetBackup client
utility. The utility steps you through a backup or a restore.
Performing a Restore
Run the bprestore NetBackup utility to restore the host backup file. An example follows.
bprestore -p nzhostbackup -w -L /nz/tmp/hostrestore.log /nz/tmp/
hostbackup.20070521
Note the following important points for the bprestore utility and the example:
Specify the explicit path to the bprestore command if it is not part of your account’s
PATH setting. The default location for the utility is /usr/openv/netbackup/bin.
You can display syntax for the bprestore utility by running “bprestore” without options.
You can also refer to the Symantec manual, Symantec NetBackup Commands Refer-
ence Guide.
Note: An alternative to the bprestore command is the “bp” interactive NetBackup client
utility. The utility steps you through a backup or a restore.
Performing an Automatic Host Backup
To set up an automatic host backup, you need to create a script file and two NetBackup
policies.
The script file executes a host backup to a file system accessible from the Netezza
host, and then executes a user-directed transfer of that backup to NetBackup using the
bpbackup utility.
For the two NetBackup policies you create, one performs the user-directed backup and
the other creates an automatic schedule that executes the script.
The contents of a sample script, /nz/opt/backup/nphostbackup.sh, follow:

20282-20 Rev.1 10-41
Using the IBM Tivoli Storage Manager Connector
#!/bin/bash
#
# nphostbackup.sh - perform backup of host catalog and send it
# to NetBackup.
#
# set up the user (password cached using nzpassword)
export NZ_USER=nzuser
# set up the backup filename
today=‘/bin/date +%Y%m%d‘
filename=nzhostbackup.${today}
# path to NetBackup client utilities
nbbin="/usr/openv/netbackup/bin"
# host backup to disk
/bin/bash /nz/kit/bin/nzhostbackup /nz/tmp/${filename}
# transfer backup file to NetBackup using user-directed policy
# for NPS host file system
${nbbin}/bpbackup -p nzhostbackup -w /nz/tmp/${filename}
# return success/failure status to NetBackup for the Activity Monitor
exit $?
Note the following important points for the sample script:
The bpbackup utility references the “nzhostbackup” policy, which is a NetBackup pol-
icy of type Standard. The policy includes a schedule that allows for a user-directed
backup during the desired time period, and lists the Netezza host as a client.
To execute the script, you create a NetBackup policy of type DataStore. You can set
this policy to have an automatic schedule for regular host backups. You set the fre-
quency and time period for the backups. Ensure that the policy lists the script file in
Backup Selections. Note that the script file reference must include the full path to the
backup file as you would reference it on the Netezza host.
Because the script runs as root on the Netezza host, the Netezza user must be set
inside the script using the NZ_USER variable. The user’s password must have been
cached using the nzpassword utility.
Using the IBM Tivoli Storage Manager Connector
The Netezza host allows you to backup data to and restore data from devices managed by
an IBM Tivoli Storage Manager server. This section describes how to install, configure, and
use the integration feature.
About the Tivoli Backup Integration
If you have an IBM Tivoli Storage Manager (TSM) solution in your environment, you can
integrate Netezza data backup and restore operations with that solution. By defining the
Netezza host as a client of the TSM server, you can use the standard Netezza backup solu-
tions to create backups on media devices that are managed by the TSM server. Similarly,
10-42 20282-20 Rev.1
IBM Netezza System Administrator’s Guide
you can use Netezza restore utilities to retrieve and load data from the TSM-managed
backup locations. The Netezza solution has been tested with TSM version 5.4, 5.5. 6.1,
and 6.2
This document does not provide details on the operation or administration of the TSM
server or its commands. For details on the TSM operation and procedures, refer to your
Tivoli Storage Manager user documentation.
Configuring the Netezza Host
This section describes the procedures required to make a Netezza host a client to a TSM
server. The overall process for configuring a Netezza host follows. The details are provided
in the sections that follow.
1. Prepare your system for the TSM integration.
2. Install the TSM client software on the Netezza host.
3. Set up the client configuration files.
Prepare your System for Tivoli Integration
To prepare a Netezza system for integration:
1. Log in to your Netezza system as the nz user.
2. Obtain the following name information for your Netezza system:
If your system is an HA system, ask your network administrator for your “ODBC
name.”
If your system is a standard (non-HA) system, ask for the external DNS name for
the Netezza host.
Note: Do not proceed without this information.
3. In your /nz/data/config directory, open the file backupHostname.txt using any text edi-
tor and edit the file as follows:
If your system is an HA system, replace the HOSTNAME value with the ODBC
name you obtained in the previous step.
If your system is a non-HA machine, replace the HOSTNAME value with the exter-
nal DNS name.
Netezza Host Client Setup Instructions
You install the 32-bit TSM client software on your Netezza host system, to enable the inte-
gration. (You can obtain the TSM client software from IBM. Note that only 32-bit TSM
clients are supported, which means that you may need to use the TSM 6.2 (32-bit) client
with a TSM 6.3 server) If you have an HA Netezza system, repeat these installation steps
on both Host 1 and on Host 2.
To install the IBM TSM client software on the Netezza system, follow these steps:
1. Log in to the Netezza system as the root user.
2. Place the Tivoli Storage Manager UNIX client disk in the drive.
3. Mount the CD/DVD using a command similar to the following:
20282-20 Rev.1 10-43
Using the IBM Tivoli Storage Manager Connector
mount /media/cdrom
or
mount /media/cdrecorder
If you are not sure which command to use, run the ls /media command to see which
pathname (cdrom or cdrecorder) appears.
4. To change to the mount point, use the cd command and specify the mount pathname
that you used in step 3. This guide uses the term /mountPoint to refer to the applicable
disk mount point location on your system, as used in step 3.
cd /mountPoint
5. Change to the directory where the packages are stored:
cd /mountPoint/tsmcli/linux86
6. Enter the following commands to install the 32-bit TSM ADSM API and the Tivoli Stor-
age Manager Backup-Archive (BA) client. (The BA client is optional, but it is
recommended because it provides helpful features such as the ability to cache pass-
words for TSM access and also to create scheduled commands.)
a. rpm -i TIVsm-API.i386.rpm
b. rpm -i TIVsm-BA.i386.rpm
Make sure that you use the default installation directories for the clients (which are usually
/opt/tivoli/tsm/client/api and /opt/tivoli/tsm/client/ba). After the installation completes, pro-
ceed to the next section to configure the Netezza as a client.
Configuring the Netezza Client
Follow these steps to set up the TSM configuration files which make the Netezza system a
client of the TSM server. If you have an HA Netezza system, make sure that you repeat
these configuration steps on both Host 1 and on Host 2.
Note: There are two sets of configuration files, one set for the API client and one set for the
B/A client. Follow these steps to configure the files for the API client. If you also installed
the B/A client RPM as recommended, make sure that the changes that you make to the API
client files are identical to the changes that you make for the BA client files which reside in
the /opt/tivoli/tsm/client/ba/bin directory. You can either repeat these steps for the B/A cli-
ent files or copy the updated API client dsm.opt and dsm.sys files to the B/A bin directory.
1. Make sure that you are logged in to the Netezza system as root.
2. Change to the following directory:
cd /opt/tivoli/tsm/client/api/bin
3. Copy the file dsm.opt.smp to dsm.opt. Save the copy in the current directory. For
example:
cp dsm.opt.smp dsm.opt
4. Edit the dsm.opt file using any text editor. In the dsm.opt file, proceed to the end of
the file and add the following line, shown in bold below, where server is the hostname
of the TSM server in your environment:
******************************************************************
* IBM Tivoli Storage Manager *
* *
10-44 20282-20 Rev.1
IBM Netezza System Administrator’s Guide
* Sample Client User Options file for UNIX (dsm.opt.smp) *
******************************************************************
* This file contains an option you can use to specify the TSM
* server to contact if more than one is defined in your client
* system options file (dsm.sys). Copy dsm.opt.smp to dsm.opt.
* If you enter a server name for the option below, remove the
* leading asterisk (*).
******************************************************************
* SErvername A server name defined in the dsm.sys file
SErvername server
If you have multiple TSM servers in your environment, you can add a definition for each
server. However, only one definition should be the active definition. Any additional def-
initions should be commented out using the asterisk (*) character. The active dsm.opt
entry determines which TSM server is used by the Tivoli connector for backup/restore
operations. If there are multiple uncommented SERVERNAME entries in dsm.opt, the
first uncommented entry is used.
5. Save and close the dsm.opt file.
6. Copy the file dsm.sys.smp to dsm.sys. Save the copy in the current directory. For
example:
cp dsm.sys.smp dsm.sys
7. Edit the dsm.sys file using any text editor. In the dsm.sys file, proceed to the end of
the file and add the settings, shown in bold below, where server is the name of the TSM
server in your environment, serverIP is the hostname or IP address of the TSM server,
and client_NPS is the node name for the Netezza host client:
******************************************************************
* IBM Tivoli Storage Manager *
* *
* Sample Client System Options file for UNIX (dsm.sys.smp) *
******************************************************************
* This file contains the minimum options required to get started
* using TSM. Copy dsm.sys.smp to dsm.sys. In the dsm.sys file,
* enter the appropriate values for each option listed below and
* remove the leading asterisk (*) for each one.
* If your client node communicates with multiple TSM servers, be
* sure to add a stanza, beginning with the SERVERNAME option, for
* each additional server.
******************************************************************
SErvername server
COMMMethod TCPip
TCPPort 1500
TCPServeraddress serverIp
NODENAME client_NPS
As a best practice, for the nodename value, use the naming convention client_NPS,
where client is the hostname of the Netezza host, to help uniquely identify the client
node for the Netezza host system.
20282-20 Rev.1 10-45
Using the IBM Tivoli Storage Manager Connector
If you have multiple TSM servers in your environment, you can create another set of
these definitions and append each set to the file. For example:
SErvername server1
COMMMethod TCPip
TCPPort 1500
TCPServeraddress server1Ip
NODENAME client_NPS
SErvername server2
COMMMethod TCPip
TCPPort 1500
TCPServeraddress server2Ip
NODENAME client_NPS
Note: If you specify more than one TSM server definition in the dsm.sys file, you can
create corresponding definitions in the dsm.opt file as described in step 4.
8. If you installed the Tivoli 5.4 client software on your hosts, you must also add the fol-
lowing options in the dsm.sys file.
ENCRYPTIONTYPE DES56
PASSWORDACCESS prompt
Verify that there are no other uncommented lines for the ENCRYPTIONTYPE and PASS-
WORDACCESS options.
Note: The PASSWORDACCESS prompt option disables automatic, passwordless TSM
authentication. Each operation using the Tivoli connector requires you to enter a pass-
word. You can supply the password in the nzbackup and nzrestore connectorArgs
option as "TSM_PASSWORD=password" or you can set TSM_PASSWORD as an environ-
ment variable.
9. Save and close the dsm.sys file.
10. If you installed the BA client kit, do one of the following steps:
Change to the /opt/tivoli/tsm/client/ba/bin directory and repeat Steps 3 through 9
of this procedure to configure the BA client dsm.opt and dsm.sys files. Make sure
that the changes that you make to the API client files are identical to the changes
that you make for the BA client files.
Copy the dsm.opt and dsm.sys files from the /opt/tivoli/tsm/client/api/bin directory
to the /opt/tivoli/tsm/client/ba/bin directory.
Managing Tivoli Transaction Sizes For Tivoli configurations, the TXNGROUPMAX option
specifies the number of objects that can be transferred between a client and the server in
one backup transaction. The maximum value is 65000. The default value is 256 objects. If
the value is too low, your backups could fail with a “start a new transaction session” error.
If you encounter this error, you should review and increase the TXNGROUPMAX setting to a
value that is larger than the maximum number of objects that a single backup operation
will try to create. For example, if you are performing incremental backups, then use a value
that is at least twice the table count. Also add a small number (5) of additional objects for
backup metadata files. If your database has UDXs, add an additional 2 objects for each
UDX. If you are using multi-stream backups, then use the maximum value of either double
the UDXs, or double the tables divided by the stream count, and add the additional 5
objects for metadata objects.
10-46 20282-20 Rev.1
IBM Netezza System Administrator’s Guide
To set the TXNGROUPMAX value using the GUI, go to the Policy Domains and Client Nodes
- <Your client node> - Advanced Settings - Maximum size of a transaction. The options are
"Use server default" or "Specify a number (4-65,000)". Be sure to repeat this process on
each node (Host 1 and Host 2), and to use the same setting for each node. If you choose
"specify a number", note that the setting cannot be changed from the client. If you chose
"use server default", you can specify the value from the clients using the dsmadmc applica-
tion, 'setopt txngroupmax <value>' or 'update node txngroupmax=<value>').
Cached Password Authentication
An an optional feature, the TSM connector allows users to cache their passwords on their
client system. If you cache the password, you do not have to specify the password for com-
mands to the TSM connector (as described in “Running nzbackup and nzrestore with the
TSM Connector” on page 10-54).
Note: If you use the Tivoli 5.4 client, you cannot use the cached password support. You
must use PASSWORDACCESS prompt for the connector to work correctly.
Note: If you have an HA Netezza system, make sure that you repeat these steps on Host 1
and on Host 2.
To cache a password for authentication:
1. Change to the following directory:
cd /opt/tivoli/tsm/client/ba/bin
2. Edit the dsm.sys file using any text editor and add the following line:
PASSWORDACCESS generate
Review the file to make sure that there are no other lines which contain the PASSWOR-
DACCESS parameter. If there are, comment them out.
3. Save and close the dsm.sys file.
4. As a test, log in as root and run the following command to be prompted for the client
password:
dsmc query session
5. Repeat Steps 1 through 3 to edit the /opt/tivoli/tsm/client/api/bin/dsm.sys API client
file. This allows nzbackup to run using the TSM connector without specifying the TSM
password.
Note: The dsmc command is located in the /opt/tivoli/tsm/client/ba/bin directory. The client
installation also creates symbolic links to the TSM commands in the /usr/bin directory. If
/usr/bin is included in your PATH variable, you will not need to specify a full pathname to
the command.
After the client authentication is successful, subsequent logins will not prompt for a pass-
word until the password changes at the TSM server.
Configuring the Tivoli Storage Manager Server
Although there are several interfaces and methods for configure the TSM server, the ISC
Console is one simple way to set up the backup connector configuration. The following sec-
tions describe how to use the ISC Console to perform the configuration steps.
20282-20 Rev.1 10-47
Using the IBM Tivoli Storage Manager Connector
Note: The following procedures describe in general how to use the UIs. Note that the com-
mands and menus could change with updates or patches to the backup software; these
procedures are intended as a general overview.
Accessing the TSM ISC Console
To access the ISC Console on the TSM server, open a Web browser and point to the follow-
ing URL:
http://tsm_server:8421/ibm/console
The tsm_server value is the hostname or IP address of the TSM server. Log in using an
account created for the TSM server.
For a TSM 6 system, use the following URL:
https://tsm_administration_console:16311/ibm/console/
The tsm_administration_console value is the hostname or IP address of the TSM adminis-
tration center, which may be different than the TSM server. Log in using an account created
for the TSM administration center.
If you cannot access the web interface, the interface may have been stopped on the server.
Refer to your TSM documentation for more information about accessing the TSM server
using a command shell or SSH session, and starting the TSM server and/or ISC Console.
The following procedures assume that you have used a Web browser to connect to the ISC
Console and have logged in successfully.
Overview of the TSM Server Configuration Process
The process to configure the TSM server for Netezza database backups has these steps:
1. Create a storage pool to define the location(s) where the Netezza backups will be saved
by the TSM server.
2. Define a policy domain which specifies the backup policy for a group of client nodes,
such as one or more Netezza systems. A policy specifies such information as where the
backup data is stored, how many backup versions to keep, the amount of time to keep
archive copies, and so on. As a best practice, create one policy domain to manage all of
your Netezza systems.
3. Register each Netezza host that has the Tivoli client software as a client node of a TSM
server.
4. Create a proxy node to represent the Netezza system and grant the Netezza client node
proxy authority over the proxy node.
These steps are described in more detail in the following sections.
Note: The instructions below are specific to TSM 5. The steps are similar for TSM 6, but
there may be minor changes in the names of menus and dialogs in the later release.
Creating a Storage Pool
To create a storage pool on the TSM server:
1. In the left navigation frame of the ISC Console, click Tivoli Storage Manager. A drop-
down list appears.
2. Click Storage Devices. The Storage Devices page appears in the right frame.
10-48 20282-20 Rev.1
IBM Netezza System Administrator’s Guide
3. Select the TSM server from which you will be managing your Netezza systems, and
then select View Storage Pools from the Select Action list. The Storage Pools for server
area appears at the bottom of the page.
4. In the Storage Pools section, select Create a Storage Pool from the Select Action list.
The Create a Storage Pool area appears.
5. Type a name for the storage pool and make sure that the storage pool type is Random
access, then click Next.
6. If you are creating a new pool select Create a new disk volume and enter a volume
name and size. The volume name should be an absolute pathname; for example, if you
want to create a volume named vol under the /home/backups directory, type /home/
backups/vol, then click Next.
7. A Summary window appears to display messages about the successful creation of the
storage pool and its information. Click Finish.
Creating a Policy Domain
To create a policy domain on the TSM server:
1. In the left navigation frame of the ISC Console, click Tivoli Storage Manager. A drop-
down list appears.
2. Click Policy Domains and Client Nodes. The Policy Domains page appears in the right
frame.
3. Select the TSM server from which you will manage your Netezza systems, and then
select View Policy Domains from the Select Action list. The server Policy Domains area
appears.
4. Select Create a Policy Domain from the Select Action list.
5. Type a name for the new policy domain and click Next.
6. Select a storage pool for backup data from the drop down list, such as the one you cre-
ated in “Creating a Storage Pool” on page 10-47, then click Next.
7. In the Assign Client Nodes Now page, the application prompts you to assign client
nodes at this time. If you have already registered the client node/nodes on your TSM
server, select Yes and click Next to proceed. (The Assign Client Nodes page appears
where you can list and select client nodes to add to the domain.) Otherwise, select No
and click Next to proceed.
8. A Summary window appears to display messages about the successful creation of the
policy domain and its information. Click Finish.
Registering a Netezza Client on a TSM Server
To register a Netezza system on the TSM server, you create a client node which represents
the Netezza host. For an HA Netezza system, you must create two client nodes, one for
Host1 and one for Host2; complete these steps for Host 1, then repeat them for Host 2.
20282-20 Rev.1 10-49
Using the IBM Tivoli Storage Manager Connector
To register a Netezza system as a client on a TSM server:
1. In the left navigation frame of the ISC Console, click Tivoli Storage Manager. A drop-
down list appears.
2. Click Policy Domains and Client Nodes. The Policy Domains page appears in the right
frame.
3. Select the TSM server from which you will be managing your Netezza systems, and
then select View Policy Domains from the Select Action list. The server Policy Domains
area appears.
4. Select a policy domain and select Modify Policy Domain from the Select Action list.
The policy_name Properties area appears.
5. Click the arrow to the right of Client Nodes to expand the client nodes list.
6. Select Create a client node from the Select Action drop-down list. The Create Client
Node area appears.
7. Type a name for the Netezza host. The name must match the name specified in the
dsm.sys file on the client system.
8. Enter and confirm a password for client authentication, and choose an expiration for
the password. Click Next to continue. The Administrators area appears.
9. You can either select Create administrator and assign it owner authority to node or
Assign owner authority to selected administrator, then click Next. (The owner authority
allows the administrator of a node to perform administrative tasks such as changing the
client properties.)
10. A Summary window appears to display messages about the successful creation of the
client node. Click Finish. The newly created client node now appears in the Client
Nodes list.
11. Select the newly created client node and select Modify Client Node from the Select
Action drop-down list. The node Properties area appears.
12. Click the Communications tab on the left. The Communications area appears.
13. Type in the TCP address and port in the fields. You can specify the hostname of the cli-
ent (the Netezza system hostname) and any unused port value (for example, 9000). To
list the used ports on the system, use the netstat command.
14. Click the Advanced Settings tab on the left. The Advanced Settings area appears.
15. Change the maximum size of transaction value to a value such as 4096. The maximum
number of objects in a transaction cannot exceed 65000. Use caution when selecting
a maximum for the number of objects per transaction; larger numbers can impact per-
formance. Try to estimate the maximum number of objects in the database and set the
value accordingly. You could begin with an estimate of 3 times the number of tables in
the database, for example.
16. Click OK to save the settings.
10-50 20282-20 Rev.1
IBM Netezza System Administrator’s Guide
Creating a Proxy Node
You must create a proxy node on the TSM server for each Netezza system (HA or standard),
and then grant the client node for the Netezza system proxy authority over the proxy node.
Proxy authority allows the client node to use the proxy node to represent itself; that is, the
proxy node can represent the client node.
To create a proxy node:
1. In the left navigation frame of the ISC Console, click Tivoli Storage Manager. A drop-
down list appears.
2. Click Policy Domains and Client Nodes. The Policy Domains page appears in the right
frame.
3. Select the TSM server from which you will be managing your Netezza systems, and
then select View Policy Domains from the Select Action list. The server Policy Domains
area appears.
4. Select a policy domain and select Modify Policy Domain from the Select Action list.
The policy_name Properties area appears.
5. Click the arrow to the right of Client Nodes to expand the client nodes list.
6. Select Create a client node from the Select Action drop-down list. The Create Client
Node area appears.
7. Type a name for the proxy node. The name must match the name specified in the
/nz/data/config/backupHostname.txt file on the Netezza client system.
8. Enter and confirm the password for client authentication (which was defined in Step 7
of “Registering a Netezza Client on a TSM Server” on page 10-48), and choose an
expiration for the password. Click Next to continue. The Administrators area appears.
9. You can either select Create administrator and assign it owner authority to node or
Assign owner authority to selected administrator, then click Next.
10. A Summary window appears to display messages about the successful creation of the
client node. Click Finish. The newly created client node now appears in the Client
Nodes list.
To grant the client node(s) proxy authority over the new proxy node:
1. In the left navigation frame of the ISC Console, click Tivoli Storage Manager. A drop-
down list appears.
2. Click Policy Domains and Client Nodes. The Policy Domains page appears in the right
frame.
3. Select the TSM server from which you will be managing your Netezza systems, and
then select View Policy Domains from the Select Action list. The server Policy Domains
area appears.
4. Select a policy domain and select Modify Policy Domain from the Select Action list.
The policy_name Properties area appears.
5. Click the arrow to the right of Client Nodes to expand the client nodes list.
20282-20 Rev.1 10-51
Using the IBM Tivoli Storage Manager Connector
6. Select the proxy node and then select Modify Client Node from the Select Action drop-
down list. The client Properties area appears.
7. Select the Proxy Authority tab on the left, and then select Grant Proxy Authority from
the Select Action drop-down list on the right. The Grant Proxy Authority area appears.
8. Select the client node that represents the Netezza host. If the Netezza system is an HA
system, select both client nodes.
9. Click OK to complete the proxy assignment.
Backup Expiration Settings
When you perform a full backup of a database to TSM using nzbackup, any previous back-
ups of that database are marked as inactive. The TSM server configuration settings specify
how it manages inactive files. The TSM default is to make all inactive files immediately
unavailable. If you want the ability to restore from backupsets other than the most recent,
you should review and adjust the TSM configuration setting for Number of days to keep
inactive versions. The default is zero, which means that only the latest backupset is avail-
able for use in restores.
To change the setting:
1. In the left navigation frame of the ISC Console, click Tivoli Storage Manager. A drop-
down list appears.
2. Click Policy Domains and Client Nodes. (In TSM 6, this menu is Policy Domains.) The
Policy Domains page appears in the right frame.
3. Select the TSM server from which you will manage your Netezza systems. A list of
existing policy domains appears.
4. Select the policy domain which has the Netezza host machine as a client node. A prop-
erties page for that policy domain appears.
5. In the Properties section, select the Management Class which governs the Netezza host
client node. A properties page for that management class appears.
6. In the left pane of the class properties page, select Backup settings. The Backup Set-
tings page appears.
7. Review the Number of days to keep inactive versions field to specify how long you want
to keep inactive (that is, older than the latest) backupsets.
Set this value to a positive number to keep and use inactive backupsets for that period
of days. For more information on the range of values and possible impacts to the TSM
server, see the Tivoli documentation.
Redirecting a Restore
Typically, you restore a backup to the same Netezza host from which it was created. If you
want to restore a backup that was created on one Netezza host to a a different Netezza
host, you must adjust the proxy settings.
For example, assume that you have a Netezza host named NPSA, for which you have
defined a client node named “NPSA NPS” and a proxy node named NPSA on the TSM
server. Assume also that there is a backup file for the NPSA host on the TSM server.
10-52 20282-20 Rev.1
IBM Netezza System Administrator’s Guide
If you wish to load the backup file onto a different Netezza host named NPSB, then you
must first ensure that NPSB has been registered as a client to the TSM server. Assume that
there is a client node for “NPSB NPS” and a proxy node named NPSB for this second host.
To redirect the restore file from NPSA to NPSB, you must grant the client node “NPSB
NPS” proxy authority over the proxy node NPSA. After you grant the proxy authority to
“NPSB NPS” you should be able to restore the backup for NPSA to the NPSB host using a
command similar to the following:
nzrestore -db database -connector tivoli -npshost NPSA
The value database is the name of the database which was backed up from the Netezza
host NPSA.
Special Considerations for Large Databases
If your Netezza system has large databases (that is, databases which are greater than sev-
eral hundred GB in size), the default configuration settings for the TSM server may not be
sufficient to manage the backup and restores of those large databases. If the database is
too large for the default configuration settings, the database backups might terminate and
return errors similar to the following:
Error: Connector exited with error: 'ANS1017E (RC-50) Session
rejected: TCP/IP connection failure'
The server does not have enough recovery log space to continue the
current operation
The server does not have enough database space to continue the current
operation
There are some configuration settings changes that can help to avoid these errors and com-
plete the backups for large databases. It is important to note that these configuration
settings depend upon factors such as network speed, TSM server load, network load, and
other factors. The values below are conservative estimates based on testing, but the values
for your environment could be different. As a best practice, if you encounter errors such as
timeouts and space limitations, try these conservative values and adjust them to find the
right balance for your server and environment.
For example:
COMMTIMEOUT — Specifies the time in seconds that the TSM server waits for an
expected client response. The default is 60 seconds. You can obtain the current value
of the setting using the QUERY OPTION COMMTIMEOUT command. For large data-
bases, consider increasing the value to 3600, 5400, or 7200 seconds to avoid timeout
errors, which could occur if the complete transfer of a database does not complete
within the time limit:
SETOPT COMMTIMEOUT 3600
IDLETIMEOUT — Specifies the time in minutes that a client session can be idle before
the TSM server cancels the session. The default is 15 minutes. You can obtain the cur-
rent value of the setting using the QUERY OPTION IDLETIMEOUT command. For large
databases, consider setting the value to 60 minutes as follows:
SETOPT IDLETIMEOUT 60
20282-20 Rev.1 10-53
Using the IBM Tivoli Storage Manager Connector
The default size of the TSM server database, 16MB, may be inadequate for large
Netezza databases. Depending upon the size of your largest Netezza database, you can
increase the default TSM database size to a value such as 500MB.
The size of the recovery log may be inadequate for large Netezza databases or those
that have a large number of objects (tables, UDXs, and so on). An increased value such
as 6GB may be more appropriate. As a best practice, the recovery log should be at least
twice the size in GB as your largest table in TB. For example, if your largest table is
2TB, the recovery log should be at least 4GB. In addition, you may need a larger log
file if you run multiple concurrent backup jobs on the same TSM server, such as several
Netezza backups or a combination of Netezza and other backups within the enterprise.
Increasing Server Database Size
There are two ways to increase the TSM server's database capacity: you can manually add
more database volumes, or you can automatically grow the capacity with a space trigger.
To manually add database volume:
1. In the left navigation frame of the ISC Console, click Tivoli Storage Manager. A drop-
down list appears.
2. Click Server Maintenance.
3. Select the TSM server for which your Netezza system is a client.
4. On the Select Action list, select Server Properties.
5. Select the Database and Log tab from the left navigation frame of the Server Properties
area.
6. In the Database area on the Select Action list, select Add Volume.
7. In the Volume name field, type the absolute path of the new volume you want to create.
8. In the New volume size field, type an appropriate size for the new volume. If you are
not sure, use the value 500.
9. To start using the new volume immediately, select When adding the new volume,
expand the database capacity by and in the field, enter a value that is smaller than the
value specified for the New volume size field.
10. Click OK to create the volume.
To add space automatically with a space trigger:
1. Repeat steps 1 through 5 of the previous procedure to navigate to the Database and
Log area.
2. In the Database area on the Select Action list, select Create Space Trigger.
3. Specify values for the field for the automatic database expansion trigger. Use the
online help to obtain details about the operation of each field and setting. The key
fields to set for your environment are the Begin expansion at this percentage of capac-
ity, Expand the database by this amount, and Maximum size fields.
4. Click OK to create the trigger.
10-54 20282-20 Rev.1
IBM Netezza System Administrator’s Guide
You can also create a database space trigger using the define spacetrigger db command.
For example, the following command creates a trigger which increases the size of database
by 25% when it hits 85% of its capacity with no limit on maximum size:
define spacetrigger db fullpct=85 spaceexpansion=25 maximumsize=0
Increasing Recovery Log Volume
There are two ways to increase the server's recovery log capacity: you can manually add
more log volumes, or you can automatically grow the capacity with a space trigger.
1. Repeat steps 1 through 5 of the previous procedure to navigate to the Database and
Log area.
2. In the Log area on the Select Action list, select Add Volume.
3. In the Volume name field, type the absolute path of the new volume you want to create.
4. In the New volume size field, type an appropriate size for the new volume. If you are
not sure, use the value 500.
5. To start using the new volume immediately, select When adding the new volume,
expand the recovery log capacity by and in the field, enter a value that is smaller than
the value specified for the New volume size field.
6. Click OK to create the volume.
To add space automatically with a space trigger:
1. Repeat steps 1 through 5 of the previous procedure to navigate to the Database and
Log area.
2. In the Log area on the Select Action list, select Create Space Trigger.
3. Specify values for the field for the automatic log expansion trigger. Use the online help
to obtain details about the operation of each field and setting. The key fields to set for
your environment are the Begin expansion at this percentage of capacity, Expand the
log by this amount, and Maximum size fields.
4. Click OK to create the trigger.
You can also create a database space trigger using the define spacetrigger log command.
For example, the following command creates a trigger which increases the size of the recov-
ery log by 25% when it hits 85% of its capacity with no limit on maximum size:
define spacetrigger log fullpct=85 spaceexpansion=25 maximumsize=0
Running nzbackup and nzrestore with the TSM Connector
After successfully configuring the client (the Netezza host) and the server (the TSM server)
for the backup and restore connections, you can run the nzbackup and nzrestore com-
mands and specify options for the TSM connector.
For example, the following sample command backs up the Netezza database using TSM:
nzbackup -db myDb -connector tivoli -connectorArgs "TSM_
PASSWD=password"
In the command, note that the TSM server password is passed as a connector argument.
The TSM_PASSWD is the client password as defined in Step 7 of the “Registering a
Netezza Client on a TSM Server” on page 10-48.
20282-20 Rev.1 10-55
Using the IBM Tivoli Storage Manager Connector
For example, the following sample command restores the Netezza database using TSM:
nzrestore -db myDb -connector tivoli -connectorArgs "TSM_
PASSWD=password"
Host Backup and Restore to the TSM Server
To perform a backup and restore of the Netezza host metadata using the TSM connector,
you can create scripts for the Netezza host which perform a host backup and send the
backup to the TSM server, as well as scripts that retrieve and restore a backup. (The
nzhostbackup and nzhostrestore commands do not directly support the TSM connector.)
For example, the following sample script uses the nzhostbackup command to create a host
backup in the specified /tmp archive and then sends the backup to the TSM server:
#!/bin/bash
#
# nzhostbackup_tsm - back up the host catalog and send it to TSM server
archive="/tmp/nzhostbackup.tar.gz"
# Main script execution starts here
(
nzhostbackup "${archive}"
echo
echo "Sending host backup archive '${archive}' to TSM server ..."
dsmc archive "${archive}"
)
exit 0
Similarly, you can create a script to retrieve and reload a host backup from the TSM server:
#!/bin/bash
#
# nzrestore_tsm - restore host backup from TSM using nzhostbackup_tsm
# Main script execution starts here
if [ "$#" -eq 0 ]; then
archive="'/tmp/nzhostbackup*'"
echo "Querying for backups in ${archive} for host ${hostname} ..."
echo
dsmc query archive "${archive}"
exit 0
fi
if [ "$#" -eq 1 ]; then
archive_name="${1}"
archive="${archive_name}"
echo "Restoring the specified backupset '${archive}' ..."
echo
(
dsmc retrieve "${archive}"
echo
echo "Archive '${archive}' retrieved, restoring it..."
10-56 20282-20 Rev.1
IBM Netezza System Administrator’s Guide
nzhostrestore "${archive}"
)
fi
exit 0
Backing up and Restoring Data Using the TSM Interfaces
You can use the TSM commands and interfaces to create a client node schedule, which is a
record that defines a particular client operation such as a backup or a restore. Using client
schedules, you can automate the backups of data from your Netezza host without any user
operator intervention. You could also automate the restore of data from one Netezza system
to another if you need to load data to a backup Netezza system on a regular basis.
To use the client scheduler to automate tasks for the Netezza host client, you must have
installed the BA client package on the Netezza host as described in “Configuring the
Netezza Host” on page 10-42.
Note: Tivoli offers two ways to manage client scheduling: the client acceptor daemon-man-
aged services, and a TSM traditional scheduler. You can use either method to manage
client schedules. For details about configuring and managing the Tivoli client scheduler,
see the IBM Tivoli Storage Manager for UNIX and Linux Backup-Archive Clients: Installa-
tion and User's Guide. This guide is available from the IBM Support Portal at http://www-
947.ibm.com/support/entry/portal/Documentation.
If you create more than one scheduled operation, note that the TSM scheduler does not
support overlapping schedules for operations; that is, one operation must start and com-
plete before a new operation will be allowed to start. If you create operations with
overlapping schedules, the second operation will likely be skipped (will not start) because
the first operation is still running. Make sure that you allow enough time for the first opera-
tion to complete before a new operation is scheduled to run.
For example, to create a new client schedule:
1. In the left navigation frame of the ISC Console, click Tivoli Storage Manager. A drop-
down list appears.
2. Click Policy Domains and Client Nodes. The Policy Domains page appears in the right
frame.
3. Select the TSM server from which you will be managing your Netezza systems, and
then select View Policy Domains from the Select Action list. The server Policy Domains
area appears.
4. Select the policy domain that you created for your Netezza host (as described in “Cre-
ating a Policy Domain” on page 10-48) and select Modify Policy Domain from the
Select Action list.
5. Select the Client Node Schedules list to expand it.
6. From the Select Action list, select Create a Schedule. The Create Schedule area
appears.
7. In the create schedule area, do the following:
a. Enter a name for the schedule in the Schedule name field. You can also supply an
optional description for the schedule.
20282-20 Rev.1 10-57
Using the IBM Tivoli Storage Manager Connector
b. Select the option Command - run a command on a client node machine.
c. Click Next. The Select Command Options area appears.
8. In the Command to run field, specify the absolute path of the script you wish to exe-
cute and click Next. An example path name follows:
'sh /nz/scripts/mybackup.sh'
Note: The path name is the absolute path of the script file which resides on the
Netezza host and must be preceded by the command sh and enclosed in quotes when
it has spaces, as shown in the example. In most cases, the script is an nzbackup or
nzrestore command operation. For a backup client schedule, the backup script usually
contains a single command line that invokes nzbackup for a particular backup opera-
tion. You can create the script manually using a text editor.
9. In the Select Repetition Options area, select the data and time and the frequency for
the client schedule, then click Next. The Advanced Schedule Options area appears.
Note: Note that the TSM scheduler does not support overlapping schedules for opera-
tions; that is, one operation must start and complete before a new operation will be
allowed to start. Make sure that you allow enough time for the first operation to com-
plete before a new operation is scheduled to run.
10. You can accept the defaults on the Advanced Schedule Options area and click Next.
The Associate Client Nodes area appears.
11. Select the client nodes (one or more Netezza hosts) that you want to associate with this
schedule. Make sure that you select the client node for the Netezza host, not its proxy
node, then click Next. A Summary area appears.
Note: Typically you would select only one client node (that is, one Netezza host) to per-
form this operation at one time. However, it is possible to select multiple client nodes
if you want to schedule the operation for multiple hosts to occur at the same time.
12. Review the information in the Summary and click Finish to create the client schedule.
Because the script runs as root on the Netezza host, the Netezza user must be set inside
the script using the NZ_USER variable or specified with the -u user argument. The user’s
password must have been cached using the nzpassword utility, set inside the script using
NZ_PASSWORD, or specified using the -pw password argument.
You can use the backup history to check the status of a backup operation. For more infor-
mation, see “Backup History Report” on page 10-19.
Troubleshooting
The following sections describe some common problems and workarounds.
Client-Server Connectivity
You can check the network connections and configuration settings to ensure that the
Netezza host (the client) can connect to the TSM server.
To check connectivity, use the following command:
dsmc query session
The command prompts for the client user password, and after a successful authentication,
it shows the session details.
10-58 20282-20 Rev.1
IBM Netezza System Administrator’s Guide
Basic File Backup/Restore
You can verify that the TSM connector is configured properly with a simple backup and
restore process for a file.
To backup a single file, use the following command:
dsmc archive file
The file value specifies the pathname of a file on the Netezza system. As a result of the
command, the file should be saved in the configured storage pool for the Netezza client.
For the test, you could rename the test file to ensure that the subsequent retrieval test
works.
To restore the single file, use the following command:
dsmc retrieve file
As a result of the command, the file should be retrieved from the storage pool archive and
saved on the Netezza system. For complete descriptions of the TSM commands, argu-
ments, and operations, refer to the Tivoli Storage Manager documentation.
Session Rejected
An error such as “Session rejected: Unknown or incorrect ID entered” is probably a result
of one of the following problems:
The Netezza host has not been correctly registered on the TSM server.
The dsm.sys file on the Netezza host is not correct.
You should confirm the information in both configurations and retry the operation.
Not Enough Database Space
The error “The server does not have enough database space to continue the current opera-
tion” usually occurs when the server has run out of database space. You can correct this
problem (or avoid it in the first place) by adding more database volume or creating a space
trigger as described in the section “Special Considerations for Large Databases” on
page 10-52.
Connector Init Failed
An error can occur during connector initialization due of any of the following reasons:
Options file '*' could not be found
This error indicates that the dsm.opt file was not found at the default location. To
resolve this problem, verify that the file exists at the specified location.
An invalid option was found during option parsing
This error can occur if you misspell one or more options in the configuration files
dsm.opt and/or dsm.sys. Review the options specified in the configuration files and
correct any errors.
Unable to open message text file
This error can occur if one or more files is missing, particularly the dsmclientV3.cat file
in the /opt/tivoli/tsm/client/lang/en_US directory. Reinstall the TSM API and BA client
kits on the Netezza host system to resolve this problem.
Access to the specified file or directory is denied

20282-20 Rev.1 10-59
Using the EMC NetWorker Connector
This error typically occurs when the log file dsierror.log is not writable by the user who
invoked the nzbackup or nzrestore operation. Check the permissions on the file as well
as on the directory where it resides (the backupsvr/restoresvr log directory).
Using the EMC NetWorker Connector
This section describes how to backup and restore data on a Netezza system using the
EMC® NetWorker® connector for the Netezza appliance. The Netezza solution has been
tested with EMC NetWorker version 7.6. (EMC and NetWorker are registered trademarks or
trademarks of EMC Corporation in the United States and other countries. EMC disclaims
any and all responsibility for the Developer Application.)
The NetWorker environment includes:
A NetWorker server
One or more storage nodes
One or more client machines (Netezza hosts). For Netezza non-HA systems such as the
Netezza 100, there is one client. For an HA system, there are three clients: one for
each HA hostname and one client that represents the common name of the Netezza
system.
You install the 32-bit NetWorker Client for Linux software on the Netezza host. The Netezza
components communicate with the NetWorker client software to perform backup and
restore operations.
The primary interface for administering the NetWorker server is the NetWorker Management
Console (NMC), a browser-based GUI.
Preparing your System for EMC NetWorker Integration
To prepare a Netezza system for integration:
1. Log in to your Netezza system as the nz user.
2. Obtain the following name information for your Netezza system:
If your system is an HA system, ask your network administrator for your “ODBC
name.”
If your system is a standard (non-HA) system, ask for the external DNS name for
the Netezza host.
Note: Do not proceed without this information.
3. In your /nz/data/config directory, open the file backupHostname.txt using any text edi-
tor and edit the file as follows:
If your system is an HA system, replace the HOSTNAME value with the ODBC
name you obtained in the previous step.
If your system is a non-HA machine, replace the HOSTNAME value with the exter-
nal DNS name.
10-60 20282-20 Rev.1
IBM Netezza System Administrator’s Guide
NetWorker Installation
Complete instructions for installing the NetWorker Connector client on the Netezza host are
included in the EMC NetWorker Release Installation Guide. Refer to the section on Linux
installation for the steps to install the NetWorker client on the Netezza host, which uses a
Red Hat operating system. If your Netezza system is an HA system, install the software on
both hosts.
Before installing the NetWorker client, ensure that the NetWorker server components are
installed and configured.
NetWorker Configuration
The following sections describe the basic steps involved in configuring NetWorker server
and client software for Netezza hosts.
Note: In addition to these steps, ensure that appropriate storage devices and media pools
are configured.
NetWorker Server Configuration
The console package provides a NetWorker Management Console (NMC) which is a browser
based GUI that can be used to manage NetWorker servers. The following section describes
configuration tasks performed using the NMC with a Netezza host.
Note: The following procedures describe in general how to use the UIs. Note that the com-
mands and menus could change with updates or patches to the backup software; these
procedures are intended as a general overview.
Adding the Netezza Host NetWorker Client You must follow these steps to add the Netezza
host NetWorker client to the NetWorker server:
1. Open a browser and log into the NMC.
2. Click the Enterprise icon.
3. Choose the applicable server from the list of servers in the left pane.
4. Launch the NetWorker Managed Application from the right pane, which opens a new
window.
5. Click the Configuration icon from the new window.
6. Right click Clients from the left pane and select New from the pop-up menu, which
opens a new Create Client window.
7. In Create Client window, type the name of the Netezza host (such as, hostname.com-
pany.com) in the Name text box.
8. Select an appropriate browse and retention policy for the client.
9. Confirm that the Scheduled backup checkbox is checked. You will provide further
information on scheduled backups later in the configuration.
10. Check the groups to which you are adding the client. You will be creating additional
groups later in the configuration.
20282-20 Rev.1 10-61
Using the EMC NetWorker Connector
11. From the Globals (1 of 2) tab, set appropriate value for the Parallelism field. This
parameter controls how many streams the NetWorker client can simultaneously send in
one or more backup operations. See the section “Changing Parallelism Settings” on
page 10-61 for help on selecting values for this setting.
12. Under the Globals (2 of 2) tab, add an entry of form user@client in the Remote access
list for any other client that is allowed to restore backups created by this client.
For example, to allow a backup created on Netezza host1 (Netezza-HA-1.netezza.com)
to be restored on Netezza host2 (Netezza-HA-2.netezza.com), ensure that the entry
nz@Netezza-HA-2.netezza.com is present in the Remote access list of Netezza host1
(Netezza-HA-1.netezza.com).
13. Click OK to create the Netezza host NetWorker client.
14. If you have a Netezza HA system, you should also define Netezza host2 (Netezza-HA-
2.netezza.com) as a client, and also allow the backups to be restored on Netezza host1
(Netezza-HA-1.netezza.com). Return to step 6 on page 10-60 and repeat the instruc-
tions to add host2 as a client and ensure that the entry nz@Netezza-HA-1.netezza.com
is present in the Remote access list of Netezza host2 (Netezza-HA-2.netezza.com).
Additionally, if you have more than one Netezza system, you may want to add your
other Netezza systems as clients.
Changing Parallelism Settings Performance may be tuned in the NetWorker environment,
dependant on the client/server configurations and usage. Parallelism settings on the client
and server may be set to optimize backup performance (they do not affect restore/recovery
performance).
To affect parallelism, adjust the settings of the server and client parallelism parameters:
Server parallelism
(Configuration > Server_Name > File > Properties > Parallelism)
This parameter controls how many total streams from all its clients a NetWorker server
allows to be simultaneously active for the purposes of backup.
Client parallelism
(Configuration > Server_Name > Clients > Client_Name > File > Properties >
Globals (1 of 2) > Parallelism)
This parameter controls how many streams a NetWorker client can simultaneously send
in one or more backup operations. The setting for each client is set individually and
may vary according to the client’s particular environment.
Media Pool parallelism
(Media > Media Pools > Media_Pool_Name > File > Properties > Configuration > Max
parallelism)
This parameter controls how many total streams writing to a media pool can be simul-
taneously active for the purposes of backup.
NetWorker Client Configuration
By default a client can access services provided by any NetWorker server physically acces-
sible to the client. To restrict the servers a client can access, a file containing the list of
servers a particular client is allowed to access needs to be created on the client. Refer to
the NetWorker Administration Guide for more information.
10-62 20282-20 Rev.1
IBM Netezza System Administrator’s Guide
NetWorker Backup and Restore
The are two methods available to use nzbackup:
Command Line
Scheduled Backup
Whether using the command line or using a template file for scheduled backups, Net-
Worker requires NSR_SERVER as a mandatory argument. Specify this argument either as a
part of connectorArgs in the nzbackup command or as an environment variable. In
instances where both are specified, the command line argument takes precedence over the
environment variable for NSR_SERVER. When using the NSR_SERVER environment vari-
able, always include the name of the NetWorker server.
There are also optional arguments which the NetWorker Connector supports:
NSR_DATA_VOLUME_POOL
NSR_DEBUG_LEVEL
NSR_DEBUG_FILE
Command Line Backup and Restore After the Netezza host is properly configured for
backup and restores with NetWorker, you can invoke nzbackup and nzrestore at any time
from the Netezza host.
For example, if a NetWorker Server is named "server_name.company.com," the database is
named “test,” a sample command line for backup using NetWorker Connector is:
/nz/kit/bin/nzbackup -db test -connector networker -connectorArgs "NSR_
SERVER=server_name.company.com"
An example of a restore command is:
/nz/kit/bin/nzrestore -db test -connector networker -connectorArgs "NSR_
SERVER=server_name.company.com"
Scheduled Backup This section provides the steps necessary to create and configure
backup groups needed to schedule backups. The NetWorker server runs the nzbackup com-
mand automatically after creating:
At least one backup group
At least one backup command file
A schedule
A separate command file and associated backup group is required for each scheduled
backup operation. The data from the backup operations performed using one specific com-
mand file form a backup group. For example, if you have two databases, DBX and DBY, and
you want to schedule weekly full backups plus nightly differential backups for each, you
must create four command files, one for each of four backup groups.
Add a Backup Group You must add a backup group, specifically associated with each
nzbackup operation, to the list of groups in the NMC. These steps show how to add a
backup group to a given server:
1. Open a browser and log into the NMC.
2. Click the Enterprise icon.
3. Choose the applicable server from the list of servers in the left pane.
20282-20 Rev.1 10-63
Using the EMC NetWorker Connector
4. Launch the NetWorker Managed Application from the right pane, which opens a new
window.
5. On the Configuration page, right click Groups from the left pane and select New from
the pop-up menu, which opens a new Create Group window.
6. Type a name for the new group (such as nz_db1_daily) in the Name text box. You can
also enter text in the Comment text box.
7. To enable automatic scheduled backups for the group, supply the values for Start time
and Autostart.
8. Click OK to create the group.
Command File For each nzbackup operation, you must create a specific command file that
contains the backup command instructions. Logged in as the root user, create the com-
mand files under the directory /nsr/res, and name each file [backup_group].res using any
text editor. Include content like that in the following example. Content varies depending on
backup operation instructions:
Note: The entire precmd entry, up to the semi-colon, must be on a single line.
type: savepnpc;
precmd: "/nz/kit/bin/nzbackup -u <userid> -pw <password> -db <name_
of_database_to_backup> -connector networker -connectorArgs NSR_
SERVER=server_name.company.com -v”;
pstcmd: "echo bye", "/bin/sleep 5";
timeout:
"
12:00:00
"
;
abort precmd with group: No;
Schedule Backups To enable scheduled Netezza backup operations for a Netezza host:
1. Open a browser and log into the NMC.
2. Click the Enterprise icon.
3. Choose the applicable server from the list of servers in the left pane.
4. Launch the NetWorker Managed Application from the right pane, which opens a new
window.
5. From the Configuration page, select Clients in the left pane, which populates the right
pane with a list of clients.
6. Right click the applicable client and select Properties from the pop-up menu, which
opens a new Properties window.
7. Ensure that the Scheduled backup check box is checked.
8. In the Group section, only the group for this backup operation should be checked (such
as nz_db1_daily).
9. Select the schedule from the Schedule drop-down.
10. On the Apps and Modules tab, type savepnpc in the Backup command text box.
11. Click OK to create the scheduled backup.
10-64 20282-20 Rev.1
IBM Netezza System Administrator’s Guide
Redirecting an nzrestore To perform restore operations from one Netezza host to another
(that is, to restore a backupset created by one Netezza host to a different Netezza host),
Remote access must be configured as described in step 12 of “Adding the Netezza Host
NetWorker Client.” By default, NetWorker server does not allow a client access to objects
created by other clients.
To restore a backupset onto host2 that was created on host1, log into host2 and run the fol-
lowing command:
/nz/kit/bin/nzrestore -db
database
-npshost host1 -connector networker
The database value is the name of the database which was backed up from the Netezza
host host1.
Host Backup and Restore
To perform a backup and restore of the Netezza host metadata using the NetWorker con-
nector, you can create scripts for the Netezza host which perform a host backup and send
the backup to the NetWorker server, as well as scripts that retrieve and restore a backup.
(The nzhostbackup and nzhostrestore commands do not directly support the NetWorker
connector.)
For example, the following sample script uses the nzhostbackup command to create a host
backup in the specified /tmp archive and then sends the backup to the NetWorker server:
#!/bin/bash
#
#
nzhostbackup_nw - back up the host catalog and send it to NetWorker
server
archive="/tmp/nzhostbackup.tar.gz"
# Main script execution starts here
(
nzhostbackup "${archive}"
echo
echo "Sending host backup archive '${archive}' to NetWorker server ..."
save -s $NSR_SERVER "${archive}"
)
exit 0
You can also create a script to retrieve and reload a host backup from the NetWorker server:
#!/bin/bash
#
# nzrestore_tsm - restore host backup from TSM using nzhostbackup_tsm
# Main script execution starts here
(
archive="/tmp/nzhostbackup.tar.gz"
echo "Restoring the specified backupset '${archive}' from NetWorker Server ..."
recover -a -s $NSR_SERVER "${archive}"
echo "Performing Host restore"
nzhostrestore "${archive}"
)
exit 0

20282-20 Rev.1 10-65
Using the EMC NetWorker Connector
NetWorker Troubleshooting
This section contains troubleshooting tips to solve common problems.
Basic Connectivity
For problems with basic connectivity, first check that the server and client are correctly set
up and configured. Also confirm that the clocks on both the server and client are synchro-
nized to within a few seconds.
Use the save and recover NetWorker commands to backup and restore a normal file. If
either command fails, the basic configuration is incorrect.
Connector Initialization Errors
If you see an error such as:
nwbsa is retryable error: received a retryable network error (Severity 4
Number 12): Remote system error or nwbsa set option: an entry in the envi-
ronment structure is invalid (NSR SERVER=[server]) during connector
initialization
check if the correct hostname/IP value is specified in NSR SERVER and that the NetWorker
service is running on the specified host.
If an error such as the following occurs:
nwbsa is retryable error: received a network error (Severity 5 Number 13):
client ‘[client]’ is not properly configured on the NetWorker Server
the client may not be added to the server or may not be correctly configured on the server.
Troubleshooting and Help
For troubleshooting and other help, refer to the Troubleshooting section of the NetWorker
Administration Guide and the NetWorker Error Message Guide.
10-66 20282-20 Rev.1
IBM Netezza System Administrator’s Guide

11-1
C H A P T E R 11
Query History Collection and Reporting
What’s in this chapter
Query History Concepts
Query History Loading Process
Disabling History Collection
Changing the Owner of a History Database
Changing Query History Configuration Settings
Displaying Query History Configuration Settings
Dropping History Configurations
Query History Views and User Tables
History Table Helper Functions
Query history captures details about the user activity on the Netezza system, such as the
queries that are run, query plans, table access, column access, session creation, and failed
authentication requests. The history information is saved in a history database. Permitted
users can review the query history information to obtain details about the users and activity
on the Netezza system.
Note: The query history feature replaces any previous query history tools for the Netezza
system. Note that the older query history views _v_qryhist and _v_qrystat provided in previ-
ous Netezza releases are maintained for backward compatibility and they will be
deprecated in a future release.
Query History Concepts
The Netezza system does not automatically collect query history information. The process
to collect query history data consists of these high-level steps:
1. Consider the query history needs of your organization, such as the users who require
access to query history information, and the types of questions they have about the
operation and access to the Netezza system.
2. Create a query history database to hold the data.
3. Create at least one query history configuration, which defines the settings such as the
type of information to collect, the history database in which to save it, and the user
access for the history database and how frequently to load the captured history data.
11-2 20282-20 Rev.1
IBM Netezza System Administrator’s Guide
4. Enable query history collection. The result is a set of captured data files which will be
loaded into the query history database.
5. Enable access privileges for the users who will be reviewing and reporting on the his-
tory information.
The following sections describe these tasks in more detail.
Query History and Audit History
In addition to the query history concepts described in this chapter, Netezza offers more
capabilities for audit history logging and user session monitoring. Query history offers the
most common types of tracking and history collection for monitoring and reporting on the
query activity on the system.
Audit history is a superset of the query history features with additional features for auditing
and security. Audit history collects the same query history information, but the audit history
data is stored in row-secured tables to provide additional security. Audit data is digitally
signed to verify against edits or changes. You can also configure audit history to log the
activity for all users, or for specific users or groups.
A Netezza system can collect either query history or audit history, but it cannot collect both
simultaneously. Although audit history collects the same data as query history, audit history
has additional requirements that may not be needed in your environment. For example,
audit history’s row-secure tables require you to configure multi-level security. Also, if the
audit history data staging area exceeds its STORAGELIMIT value (described later in this
chapter), the Netezza software stops. The administrator must free up space before he can
start the software and resume user activity. With query history, queries on the history tables
usually run faster because they do not have the row-level security checks, and the system
does not stop if the staging area exceeds the STORAGELIMIT threshold.
In general, if you do not require the advanced features of audit history, you should use
query history to monitor the activity on your system. For more information about audit his-
tory and multi-level security, see the IBM Netezza Advanced Security Administrator’s
Guide.
Planning Query History Monitoring Needs
Query history monitoring is a tool that allows database administrators to gain insight to
usage patterns on the Netezza system. The collected data provides insight to the following
types of performance and behavior questions:
The longest and shortest running queries on the system
The queries submitted by specific users or groups of users
The typical or most common types of queries (selects, inserts, deletes, drops, trun-
cates, and so on)
The most frequently accessed tables and/or columns (or, similarly, whether certain
tables may be unused)
The queries in progress at the time of or just preceding a system event such as a SPU
reset or a DBOS restart

20282-20 Rev.1 11-3
Query History Concepts
Within your organization, you might have one user or several users who are responsible for
monitoring query performance, status, and access information. With the Netezza query his-
tory feature, these users can obtain the right information to report on these areas of
performance and operation.
Planning the History Database
The query history database is a special user database which is designed to hold query his-
tory information. You create the database using the nzhistcreatedb command. You can
create one or more query history databases, but the active query history loading process
writes to only one database. As with any user table, you can back up and restore history
databases and tables using the standard Netezza database utilities.
Note: Netezza saves the dates and times for the activity in the history database in GMT
format.
The history database contains special tables to store the history data, and views which
users can query to display the collected history information. Queries on the history data
should use the views to ensure forward compatibility through the releases. Users can be
granted permissions to create additional user tables and views as needed for querying.
Never change, drop, or modify the default tables and views provided in the history data-
base. Any changes to the default tables and views will cause query history collection to stop
working.
There is a latency between the time that the history data is collected and the time when it
is loaded into the history database. The history database is updated at periodic load inter-
vals, which you specify in the history configuration. For more information about the loading
intervals and impacts, see “Configuring the Loader Process” on page 11-9.
Creating a History Database
The nzhistcreatedb command creates a history database. The command allows you to spec-
ify an owner for the database, which could be any Netezza database account on the system.
The following sample command creates a history database named histdb:
[nz@nzhost ~]$ nzhistcreatedb -d histdb -t query -v 1 -u histusr -o
smith -p password
This operation may take a few minutes. Please wait...
Creating tables .................done
Creating views .......done
Granting privileges ....done
History database histdb created successfully !
The command can take several minutes to complete, depending upon how busy the
Netezza system is. This command assigns the user smith as the owner of the database, and
assigns the user histusr as the account which will be used to load the history data which is
collected. If you do not specify a -u value, the owner also become the history user.
Both the owner and user accounts must exist on the Netezza system before you run the
command. The owner account must be granted the Create Database privilege because this
command creates a database. If owner and the user (-u) are different database users, the
owner account must also be granted List privilege on the user account. You cannot specify
the admin user as the owner or user of the database. The command grants the necessary
privileges to the users specified for owner and user. For details about the command, see
“nzhistcreatedb” on page A-20.
11-4 20282-20 Rev.1
IBM Netezza System Administrator’s Guide
Maintaining the History Database
Over time, the history database will grow with the captured history information. You should
plan for routine maintenance of the history database by evaluating the amount of time that
you need to keep the history data. Based on your organization’s needs, you may need to
keep data for only a certain period of time (for example, for the current and previous
month, or the current and previous quarter, or for the current year only).
When you have old history data that you no longer need, you can use the nzhistcleanupdb
command to delete the old history records up to a specified date and time. The database
user you specify in the command must have privileges to access the history database and
also Delete privilege to remove the rows from the history tables.
This command removes the old records, which can help to improve query performance
against the history views. A sample command follows, which cleans the histdb database of
any history data collected prior to October 31, 2009:
[nz@nzhost ~]$ nzhistcleanupdb -d histdb -u smith -pw password -t
"2009-10-31"
About to DELETE all history entries older than 2009-10-31 00:00:00
(GMT) from histdb.
Proceed (yes/no)? :yes
BEGIN
DELETE 0
DELETE 98
DELETE 34
DELETE 0
DELETE 0
DELETE 188
DELETE 188
DELETE 62
DELETE 65
DELETE 0
DELETE 0
DELETE 0
DELETE 503
COMMIT
As a best practice, you should include the -g (or --groom) option to automatically groom the
history tables after they are cleaned. The groom process updates the zone maps for the
tables which will improve the performance of queries against those tables. For more infor-
mation about the command, see “nzhistcleanupdb” on page A-17.
After running the nzhistcleanupdb command, you should use the nzreclaim command to
completely remove the deleted rows in the history database. For example:
[nz@nzhost ~]$ nzreclaim -db histdb -u smith -pw password -alltbls
-records
Dropping a History Database
As with any user databases, you can drop a history database to remove it from your system.
When you drop the database, all the collected history information, tables, and views are
likewise dropped. To drop the database, you must be logged in to the system database as a
user with Drop privileges on the database. A sample command to drop a history database
named qhist follows:
SYSTEM(ADMIN)=> DROP DATABASE qhist;
DROP DATABASE

20282-20 Rev.1 11-5
Query History Concepts
Before you drop a history database, make sure that the active history configuration is not
configured to load data to it. If you drop the active history database, load operations to that
database will fail.
Planning Query History Configurations
The query history tools can collect a variety of information. When enabled, query history
always collects information about login failures, session creation, session termination, and
query history process startup. Optionally, you can collect data about the following areas:
Query collects data about general query parameters. The information includes data
about log entries for the operations performed on the system, session creations, failed
authentications, session completions, user queries, and query status.
Plan collection (which also enables Query by default) collects data about the query
plans for the system. The information is obtained at the start of the plan (prolog data)
as well as at the end of the plan execution (epilog data). The information provides
insights to plan priority and start/finish times, as well as snippet counts, completed
snippet counts, and result data sizes.
Table collection (which also enables Query by default) collects data about table access
history. The data includes information about the table being accessed and the type of
operation being performed against the table, such as a create, insert, select, drop,
delete, update, or lock.
Column collection (which also enables Query and Table by default) collects data about
column access history. The data includes information about the column being accessed
and the type of operation being performed against the column, such as a select, set,
where, group by, having, order by, or alter operation.
The history configuration settings also specify the query history database in which to save
the captured data, the loading schedule, and the Netezza user account and password used
to insert the query history data.
Planning History Data Collection Levels
As a best practice, you can define several history configurations which collect different lev-
els of data. Only one configuration can be the current, or active, configuration at any time.
However, you might have several configurations to choose from based on the current opera-
tional conditions of the Netezza system, for example:
A configuration which collects all possible history data, which you might use when you
introduce a new application or a new group of users, or if you are troubleshooting ser-
vice issues.
A configuration which collects the basic or common query history information, which
you use during routine operational periods.
A configuration that you enable to obtain detailed information about a specific area,
such as access to tables, which you might use to identify tables which could be unused
and perhaps candidates for cleanup.
A configuration which disables query history collection. (To disable the collection pro-
cess, you must change to a configuration that collects no information.)

11-6 20282-20 Rev.1
IBM Netezza System Administrator’s Guide
As a best practice, you should create at least one history configuration to collect the type of
information that interests you, and a configuration to disable history collection.
Creating a History Configuration
To create a query history configuration, you can use the CREATE HISTORY CONFIGURA-
TION command or the NzAdmin tool (described in “Managing History Configurations Using
NzAdmin” on page 11-14). To create, show, and manage history configurations, your data-
base user account must have Manage Security privilege. There must be a history database
already created on the Netezza system. The following command creates a history configura-
tion named all_hist which enables the capture of all history information:
SYSTEM(ADMIN)=> CREATE HISTORY CONFIGURATION all_hist HISTTYPE QUERY
DATABASE histdb USER histusr PASSWORD 'histusrpw' COLLECT PLAN,COLUMN
LOADINTERVAL 5 LOADMINTHRESHOLD 4 LOADMAXTHRESHOLD 20 STORAGELIMIT 25
LOADRETRY 1 VERSION 1;
The configuration name, user name and database name are identifiers and can be enclosed
in quotation marks. For example: “sample configuration”, “sample user”, and “sample
qhist db” are all valid names.
The version number, which must be 1 for Release 4.6 systems, must match the version
number specified in the nzhistcreatedb command; otherwise, the loader process will fail.
The following command creates a history configuration named hist_disabled that disables
history collection:
SYSTEM(ADMIN)=> CREATE HISTORY CONFIGURATION hist_disabled HISTTYPE
NONE;
For details about the command, see the CREATE HISTORY CONFIGURATION command
syntax in the IBM Netezza Database User’s Guide. When you create or alter a history con-
figuration to HISTTYPE NONE, the command automatically sets the default values of
CONFIG_LEVEL, CONFIG_TARGETTYPE, and CONFIG_COLLECTFILTER parameters to
HIST_LEVEL_NONE, HIST_TARGET_LOCAL, and COLLECT_ALL respectively.
Enabling History Collection
After you have created at least one history configuration, you use the SET HISTORY CON-
FIGURATION command to make that configuration the active configuration. You must stop
and restart the Netezza software to place the history configuration into effect, which starts
the history capturing and loading processes using the settings in the configuration.
Note: If there is a current, active history configuration when you issue the SET command,
the current active configuration remains in effect until you stop and restart the Netezza
software. If you use the SHOW HISTORY CONFIGURATION command to display the active
configuration following a SET command, the SHOW command displays the settings for the
configuration that is in effect; it will not show the new configuration that you just SET until
after you restart the Netezza software.
For example, the following sample command sets the configuration to the all_hist
configuration:
SYSTEM(ADMIN)=> SET HISTORY CONFIGURATION all_hist;
Then, to start collecting history using that configuration, you stop and restart the Netezza
software as follows:
nzstop
20282-20 Rev.1 11-7
Query History Loading Process
nzstart
For details about the command, see the SET HISTORY CONFIGURATION command syntax
in the IBM Netezza Database User’s Guide.
Managing Access to the History Database
As with any user database, you can use database access permissions to allow or prevent
access to the query history database. By default, the Netezza admin user has access to the
database, as does the SQL user account which is specified as the “owner” when the history
database is created using the nzhistcreatedb command. The owner account must also have
Create Database privilege before you create the history database. In addition, the SQL user
account who is specified as the “user” (the account used to load the history data) is
granted access to the history database. You cannot specify the admin user as the owner or
user of the database. While the owner and user could be the same user account, you could
also use different user accounts for these roles.
To clean up the history database, the user account that runs nzhistcleanupdb must have
Delete privilege as well as access privileges to the history database.
The password specified in the [CREATE|ALTER] HISTORY CONFIGURATION command
must match the user’s password. If the user’s password changes, you must update the his-
tory configuration with the new password as well, or the loader process will fail.
Based on your organizational model for history reporting and management, you can plan for
the number of Netezza user accounts that require access to the history database. For users
to run reports against the collected history data, the users require List and Select privileges
to the history database. Users may also require Create Table or Create View privileges if
they need to create their own tables and views for history reporting purposes.
As a best practice, if you have several users who require access, consider creating an “audit
history” user group. You assign the correct privileges to the group, and then add or remove
user members as needed. The group members inherit the permissions of the group. This
can help to reduce the time spent managing privileges for individual user accounts. For
more information about user privileges, see Chapter 8, “Establishing Security and Access
Control.”
Query History Loading Process
This section provides a more detailed description of some query history capture and loading
concepts. These concepts can help to clarify the effect and operation of some of the config-
uration settings such as loading settings, staging area, and error management.
After you enable history collection, the Netezza starts the alcapp process to capture the
specified query history data and save it in a staging area. Figure 11-1 on page 11-8 illus-
trates the staging area locations and operations.
11-8 20282-20 Rev.1
IBM Netezza System Administrator’s Guide
Figure 11-1: Query History Staging and Loading Areas
The staging area is located in the $NZ_DATA/hist/staging directory. The staging area could
have one or several subdirectories named alc_$TIMESEQUENCE, which contain batches
(that is, one or more) captured history data files. The captured data history files are saved
as external tables in text format. The alc* directories also have a CONFIG-INFO file to iden-
tify the history configuration which was active when the files were created.
The captured files in the staging area are transferred to the loading area based on the con-
figuration load settings. From the loading area, the alcloader process (the loader) loads the
external tables into the query history database. The loading frequency, as well as the target
history database and the user account to access that database, are specified in the current
configuration settings.
The loading area is located in the $NZ_DATA/hist/loading directory, and it contains a subdi-
rectory named alc_$TIMESEQUENCE for the batch of history files that it is loading (the
load in progress). There could be zero, one, or several subdirectories if there are several
queued batches waiting to be loaded.
Note: If a batch of files cannot be loaded for some reason, the loader moves the batch to
the $NZ_DATA/hist/error directory. This error directory contains any failed loads. Errors can
occur if you deactivate and drop an active configuration before its history files are loaded, if
the query history user password has changed, or if the history database is dropped or
locked. If you want to load files that were moved to the error directory, resolve the problem
condition that caused the loads to fail, then move the directories in $NZ_DATA/hist/error to
$NZ_DATA/hist/loading. You must stop and restart the Netezza software (nzstop/nzstart) to
load the files that you moved to the loading directory.
After history files are successfully loaded, the Netezza system deletes the batch of external
tables to clean up and free the disk space.
History Database
Error Area
Staging Area Loading Area
alc_$TIMESTAMP
alc_$TIMESTAMP3
alc_$TIMESTAMP2
Query Data Capture
alc_$TIMESTAMP
alc_$TIMESTAMP2
alcapp alcloader
nzsql...
SELECT ...
INSERT INTO...
DELETE...
DROP...
...

20282-20 Rev.1 11-9
Query History Loading Process
History Batch Directory Files
Within each of the history areas (staging, loading, and error), you can typically find zero,
one, or more batch directories. A batch directory typically contains a set (or batch) of query
history log files, such as the following:
CONFIG-INFO is a text file which contains the name of the history configuration that
was active when the batch files were collected.
Several alc_id_$TIMESEQUENCE files, where id represents the type of history data in
the file. The id values include the following: ‘co’ for column access data, ‘fa’ for failed
authentication data, ‘tb’ for table access data, ‘le’ for log entry data, ‘pe’ for plan epi-
log data, ‘pp’ for plan prolog data, ‘sp’ for session prolog data, ‘se’ for session epilog
data, ‘qp’ for query prolog data, ‘qe’ for query epilog data, and ‘qo’ for query overflow
data.
Configuring the Loader Process
The load settings of the history configuration control the loading process; that is, how often
history data is loaded into the database. You can configure the loading process based on
time (a loading interval), or the amount of captured data in the staging area, or a combina-
tion of both. There are three load settings to configure:
LOADINTERVAL specifies a loading timer which can range from 1 to 60 minutes. (A
value of 0 disables the timer.) When the load interval timer expires, the Netezza system
checks for captured data in the staging area. Based on the values of the staging size
threshold values, LOADMINTHRESHOLD and LOADMAXTHRESHOLD, and whether the
loader is idle, the data in the staging area may or may not be transferred to the loader.
LOADMINTHRESHOLD specifies the minimum amount of captured history data, in
megabytes, to collect before transferring the batch to the loading area. (A value of 0
disables the minimum threshold check.)
LOADMAXTHRESHOLD specifies the maximum amount of history data to collect in the
staging area before it is automatically transferred to the loading area. (A value of 0 dis-
ables the maximum threshold check.)
The three loader settings and the loader status (idle or busy) can have a zero or non-zero
value, but at least one setting must be non-zero. Table 11-1 outlines the possible value
combinations and resulting behavior for the loading process.
Table 11-1: History Loader Settings and Behavior
Load
Interval
Min
Threshold
Max
Threshold
Loader
State Operation
0 0 Non-zero Idle Transfer the captured data in the staging area to the loading
area, regardless of the staging size.
Note:
This combination is typically used for test/demonstration
environments. Because of the continuous loading of data, this
setting can cause a performance impact on Netezza systems.
Busy When the captured data in the staging area meets or exceeds
the max threshold, transfer it to the loading area.

11-10 20282-20 Rev.1
IBM Netezza System Administrator’s Guide
Depending upon the loader settings and how much history data is collected, it is possible
for the alcloader process to become busy loading history data. You might notice that there
are several batch directories in the loading area, which indicates queued and waiting load
requests. Depending upon how much history data you collect and the overall utilization of
the Netezza system, you might want to try various values for the loader settings to tune it
for best operation in your environment.
Based on the load settings and how busy the loader is, there can be a delay between the
time that query history data is captured, and the time when it is loaded and available for
reporting in the query history database. You can tune the loader settings to help reduce the
0 Non-zero 0 Idle When the captured data in the staging area meets or exceeds
the min threshold, transfer it to the loading area.
Busy Continue collecting data in the staging area until the loader is
idle, then transfer the data to the loading area.
0 Non-zero Non-zero Idle When the captured data in the staging area meets or exceeds
the min threshold, transfer it to the loading area.
Busy Continue collecting data in the staging area until the max
threshold is reached or until the loader is idle, then transfer the
data to the loading area.
Non-
zero
0 0 N/A Transfer any captured data in the staging area to the loading
area when the timer expires, regardless of amount of data or
loader state.
Non-
zero
0 Non-zero N/A Transfer captured data in the staging area to the loader when
the timer expires, or when the data meets or exceeds the max
threshold.
Non-
zero
Non-zero 0 N/A When the timer expires, transfer the captured data in the stag-
ing area to the loading area if it meets or exceeds the min
threshold.
Non-
zero
Non-zero Non-zero Idle When the timer expires, transfer the captured data in the stag-
ing area to the loading area if it meets or exceeds the min
threshold or the max threshold.
Note:
This is the recommended combination for a production
Netezza system. You can “tune” the values of the three loading
settings for your environment as described in the text following
this table.
Busy If the staging area meets or exceeds the max threshold, transfer
the captured data in the staging area to the loading area. Other-
wise, continue collecting data until the next timer expiration.
Table 11-1: History Loader Settings and Behavior
Load
Interval
Min
Threshold
Max
Threshold
Loader
State Operation

20282-20 Rev.1 11-11
Disabling History Collection
delay and balance the load frequency without unduly impacting the Netezza system. Also,
since the captured data is saved in text-based external files, the history reporting users can
also review the files in the staging area to obtain information about very recent activity.
To ensure that the load staging area size does not grow indefinitely, there is a STORAGE-
LIMIT setting which controls how large the staging area can be in MB. If the staging area
reaches or exceeds this size limit, Netezza stops collecting history data. An administrator
must free up disk space in the storage area—usually by adjusting the loader settings—to
free up disk space so that history collection can resume. The STORAGELIMIT value must
be greater than LOADMAXTHRESHOLD.
Query History Log Files
The query history feature adds two new log file directories for error and informational mes-
sages. You can review these log files for information about the operation of the history
collection and loader processes:
The /nz/kit/log/alcapp directory contains log files for the alcapp process. The log files
note such events as the starting and stopping of the alcapp process, the transfer of
batch files from the staging to loading directory, and the cleanup of existing captured
data in the staging area after the process restarts.
The /nz/kit/log/alcloader directory contains log files for the alcloader process. The log
files note such events as the starting and exiting of the alcloader process, schema
check verifications, and the loading of batch files from the loading area.
Disabling History Collection
To stop history collection for any reason, you use the SET HISTORY CONFIGURATION com-
mand to change to a configuration that collects no data. You must restart the Netezza
software to activate the new configuration and stop the history collection processes.
For example, the following sample command sets the history configuration to the
hist_disabled configuration (which was defined in “Creating a History Configuration” on
page 11-6) as follows:
SYSTEM(ADMIN)=> SET HISTORY CONFIGURATION hist_disabled;
Then, to place that configuration into effect, stop and restart the Netezza software:
nzstop
nzstart
Changing the Owner of a History Database
A history database is configured with a specific Netezza database user as the owner. To
change the ownership of a history database, you must change the database owner and give
the new user correct permissions to the history database. You must also alter the history
configuration for that database to ensure that it specifies the correct, new owner.
If you are changing the active (current) history configuration, you must disable history col-
lection (or change to a different configuration) to make the target history configuration
modifiable.

11-12 20282-20 Rev.1
IBM Netezza System Administrator’s Guide
To change the ownership of a history database:
1. Log in to the Netezza system as the nz user.
2. Make sure that you have a database user account for the new owner of the configura-
tion and database, for example:
nzsql -c "create user qhist with password 'qhistpw'"
3. Assign database access permissions to the database owner, for example:
nzsql -c "grant list on database to qhist"
4. If you are changing the active history configuration, disable history collection
(hist_disabled is the sample configuration created earlier in this chapter):
nzsql -c "Set history configuration hist_disabled"
5. Restart the Netezza software to make the change take effect:
nzstop
nzstart
6. Change the history database ownership, where histdb is the name of the history
database:
nzsql c "alter database histdb owner to qhist"
7. Change the owner of the history configuration definition:
nzsql -c "alter history configuration all_hist user qhist password
'qhistpw'"
8. Set the all_hist configuration to be the current history configuration:
nzsql -c "set history configuration all_hist"
9. Repeat Step 5 to restart the Netezza software and resume history collection using the
all_hist configuration.
Changing Query History Configuration Settings
You can use the ALTER HISTORY CONFIGURATION command to change the values for a
configuration. You cannot change the settings for the active configuration.
If you want to change the active configuration, you must first use the SET command to
activate a different configuration (such as a history disabled configuration) and restart the
Netezza software to put that configuration into effect. You can then change the settings for
the configuration that was previously active. You then use the SET command to reactivate
it, and restart the Netezza software to put the modified configuration into effect.
For details about the command, see the ALTER HISTORY CONFIGURATION command syn-
tax in the IBM Netezza Database User’s Guide.
Displaying Query History Configuration Settings
You can use the SHOW HISTORY CONFIGURATION command to display information about
one or more configurations, including the active configuration.

20282-20 Rev.1 11-13
Dropping History Configurations
For example, the following command shows information about the current configuration:
SYSTEM(ADMIN)=> SHOW HISTORY CONFIGURATION;
CONFIG_NAME | CONFIG_NAME_DELIMITED | CONFIG_DBNAME | CONFIG_DBNAME_DELIMITED |
CONFIG_DBTYPE | CONFIG_TARGETTYPE | CONFIG_LEVEL | CONFIG_HOSTNAME | CONFIG_USER |
CONFIG_USER_DELIMITED | CONFIG_PASSWORD | CONFIG_LOADINTERVAL | CONFIG_LOADMINTHRESHOLD
| CONFIG_LOADMAXTHRESHOLD | CONFIG_DISKFULLTHRESHOLD | CONFIG_STORAGELIMIT |
CONFIG_LOADRETRY | CONFIG_ENABLEHIST | CONFIG_ENABLESYSTEM | CONFIG_NEXT |
CONFIG_CURRENT | CONFIG_VERSION
-------------+-----------------------+---------------+-------------------------+------
---------+-------------------+--------------+-----------------+-------------+---------
--------------+-----------------+---------------------+-------------------------+-----
--------------------+--------------------------+---------------------+----------------
--+-------------------+---------------------+-------------+----------------+----------
------
DISABLEQHIST | f | | f | 3
| 1 | 1 | localhost | | f |
| -1 | -1 | -1 |
-1 | -1 | -1 | f | f |
f | f | 1
(1 row)
If you do not specify a configuration name, the command displays information for the
active configuration. If you specify ALL, the command displays information about all the
defined configurations.
If you want to change the active configuration, you must first use the SET command to
activate a different configuration (such as a history disabled configuration) and restart the
Netezza software to put that configuration into effect. You can then change the settings for
the previously active configuration. Use the SET command to reactivate it, and restart the
Netezza software to put the modified configuration into effect.
For details about the command, see the SHOW HISTORY CONFIGURATION command syn-
tax in the IBM Netezza Database User’s Guide.
Dropping History Configurations
You can use the DROP HISTORY CONFIGURATION command to remove a history configu-
ration. You can drop a configuration that is not active. The following sample command
drops the basic_hist history configuration:
SYSTEM(ADMIN)=> DROP HISTORY CONFIGURATION basic_hist;
If you want to drop the active configuration, you must first set to a new configuration and
restart the Netezza software; then you can drop the non-active configuration. As a best
practice, you should not drop the configuration until the loader has finished loading any
captured data for that configuration.
To verify whether there are any batches of history data for the configuration that you want to
drop, you can do the following:
1. Open a shell window to the Netezza system and log in as the admin user.
2. Change to the /nz/data/hist directory.

11-14 20282-20 Rev.1
IBM Netezza System Administrator’s Guide
3. Use a command such as grep to search for CONFIG-INFO files that contain the name
of the configuration that you want to drop. For example:
grep -R -i basic .
4. Review the output of the grep command to look for messages similar to the following:
./loading/alc_20080926_162803.964347/CONFIG-INFO:BASIC_HIST
./staging/alc_20080926_162942.198443/CONFIG-INFO:BASIC_HIST
These messages indicate that there are batches in the loading and staging areas that use
the BASIC_HIST configuration. If you drop that configuration before the batch files are
loaded, the loader will classify them as errors when it attempts to process them later. If you
want to ensure that any captured data for the configuration is loaded, do not drop the con-
figuration until after the command in Step 3 returns no output messages for the
configuration that you want to drop.
For details about the command, see the DROP HISTORY CONFIGURATION command syn-
tax in the IBM Netezza Database User’s Guide.
Query History Event Notifications
There are two event notifications that alert you to issues with query history monitoring:
histCaptureEvent is triggered when there is a problem that prevents the current query
history collection from writing files to the staging area.
histLoadEvent is triggered when there are problems loading the query history files in
the staging area to the target query history database.
For more information about these events and their information, refer to “Query History
Events” on page 7-34.
Managing History Configurations Using NzAdmin
Using the NzAdmin tool, database users who have Manage Security privilege can create,
alter, and set query history configurations. There must be a history database already cre-
ated on the Netezza system.
To access the Query History Configuration dialog, select Tools > Query History Configu-
ration in the menu bar.
The Configuration Name drop-down list contains any configurations already created on the
system, either using this dialog box or by the CREATE HISTORY CONFIGURATION com-
mand. When you select a configuration, the window displays the settings for that
configuration. If you select the current (active) configuration, the dialog box displays a
message that you cannot edit the current configuration. The fields will be displayed but
they are not modifiable.
To create a new history configuration, type a new configuration name and supply the infor-
mation for the required fields. Refer to the CREATE HISTORY CONFIGURATION command
syntax in the IBM Netezza Database User’s Guide for details about the fields and their val-
ues. Click OK to save your new history configuration.

20282-20 Rev.1 11-15
Query History Views and User Tables
To make the selected configuration the current (active) configuration, click Set as Current.
A confirmation dialog appears to inform you that you have changed the current configura-
tion, but the changes will not take effect until you restart the Netezza software. Until you
restart the server, the previously active configuration remains in effect using its settings
specified the last time that the Netezza software was started.
To alter an existing configuration, select it in the Configuration Name drop-down list and
change the settings as applicable. If you want to alter the active configuration, you must
first select a different configuration, then click Set as Current to make it the current config-
uration. You can then select the formerly active configuration to edit it.
Query History Views and User Tables
The Netezza query history feature adds the following views and user tables which allow
users to query information in a query history database.
Note: The history user table names use delimited (quoted) identifiers. When you query
these tables, you must enclose the table name in double-quotation marks. For example:
myDB(admin)=> select * from "$hist_version";
For those tables with names that end in $SCHEMA_VERSION, note that this string is the
version number of the history database. For Release 4.6 and later, which uses version 1,
the table names will be similar to $hist_query_prolog_1 and so on.
Query History and Audit History Views
When you create an audit history database, note that several of the history views are named
$v_sig_hist_*. These views are identical to the similarly named $v_hist_* views described
in the following sections, but they have an additional security label (sec_label) column that
contains the security descriptor string. These audit history views use row-level security to
enforce access to the audit information.
The audit history views include the following:
$v_sig_hist_failed_authentication_$SCHEMA_VERSION
$v_sig_hist_session_prolog_$SCHEMA_VERSION
$v_sig_hist_session_epilog_$SCHEMA_VERSION
$v_sig_hist_query_prolog_$SCHEMA_VERSION
$v_sig_hist_query_epilog_$SCHEMA_VERSION
$v_sig_hist_query_overflow_$SCHEMA_VERSION
$v_sig_hist_log_entry_$SCHEMA_VERSION
$v_sig_hist_plan_prolog_$SCHEMA_VERSION
$v_sig_hist_plan_epilog_$SCHEMA_VERSION
$v_sig_hist_table_access_$SCHEMA_VERSION
$v_sig_hist_column_access_$SCHEMA_VERSION
$v_sig_hist_service_$SCHEMA_VERSION

11-16 20282-20 Rev.1
IBM Netezza System Administrator’s Guide
$v_sig_hist_state_change_$SCHEMA_VERSION
_v_querystatus
The _v_querystatus view shows the query data collected for running/active queries. Even if
history collection is disabled, this view is still populated with data for the active queries.
_v_planstatus
The _v_planstatus view shows the plan data and session data collected for running/active
queries. Even if history collection is disabled, this view is still populated with data for the
active queries..
Table 11-2: _v_querystatus
Name Type Description
npsinstanceid integer Instance ID of the nzstart command
opid bigint Operation ID (This is a key field for joining this
table with _v_planstatus to get a list of the plans
for a running query.)
sessionid integer Client session identifier (as seen by session-
related commands)
clientid integer Client ID of the SQL client
clientpid integer Process ID of the client
clientip name IP address of the client
clienthost name Host name of the client
sessionuserid bigint Session user ID
sessionusername name Session user name
dbid bigint Database ID for the connection
dbname name Database name for the connection
sqltext nvarchar(1024) Up to 1024 bytes of the query string
submittime timestamp Submit time of the query
priority integer Session priority
pritext name Session priority in text string format
Table 11-3: _v_planstatus
Name Type Description
npsinstanceid integer Instance ID of the nzstart command

20282-20 Rev.1 11-17
Query History Views and User Tables
opid bigint Operation ID (This is a key field for joining this
table with _v_querystatus to get a list of the
plans for a running query.)
planid integer DBOS plan ID
xid bigint DBOS transaction ID
sessionid integer Client session identifier (as seen by session-
related commands)
clientid integer Client ID of the SQL client
clientpid integer Process ID of the client
clientip name IP address of the client
clienthost name Host name of the client
sessionuserid bigint Session user ID
sessionusername name Session user name
dbid bigint Database ID for the connection
dbname name Database name for the connection
submittime timestamp Submit time of the plan
queuetime timestamp Time at which the plan was queued to the gate
keeper.
preptime timestamp Time at which the first snippet was prepared
gratime timestamp Time at which the plan was placed on the GRA
queue
starttime timestamp Start time of the plan execution
ismainplan boolean Flag for main plan
priority integer Session priority
pritext name Session priority in text string format
gkpriority integer Gate keeper priority
gkpritext name Gate keeper priority in text string format
state integer State of the plan, which could be: PENDING =
1, QUEUED = 2, RUNNING = 3, ABORTED = 4,
or DONE = 5
Table 11-3: _v_planstatus
Name Type Description

11-18 20282-20 Rev.1
IBM Netezza System Administrator’s Guide
$v_hist_queries
The $v_hist_queries view shows information about the completed queries and their status,
runtime seconds (for total, cumulative queued, prep time and GRA time), and number of
plans.
restarted integer The count of the number of restarts
estimatedcost bigint Estimated total cost
estimateddisk bigint Estimated disk cost
estimatedmem bigint Estimated memory cost
totalsnippets integer Total number of snippets
donesnippets integer Snippets which have completed execution
resultrows bigint Number of result rows
resultbytes bigint Number of result bytes
Table 11-3: _v_planstatus
Name Type Description
Table 11-4: $v_hist_queries View
Name Description
npsid A unique ID for the Netezza system (This value is generated as a
sequence on the target database where this view resides.)
npsinstanceid The instance ID of the nzstart command for the source Netezza
system
opid Operation ID, which is used as a foreign key from query epilog,
overflow as well as plan, table, column access tables.
logentryid A foreign key into the hist_log_entry_$SCHEMA_VERSION table
with the npsid and npsinstanceid
sessionid The session ID (will be NULL for a failed authentication)
dbname The name of the database to which the session is connected
queryid The unique checksum of the query
query The first 8 KB of the query text
submittime The time the query was submitted to Postgres
finishtime The time the query finished execution
runtime
runtime_seconds
The total query runtime (as interval and in seconds)

20282-20 Rev.1 11-19
Query History Views and User Tables
$v_hist_successful_queries and $v_hist_unsuccessful_queries
The $v_hist_successful_queries and $v_hist_unsuccessful_queries views show the same
information as $v_hist_queries, but filters that information based on whether that query
was successful or not.
$v_hist_incomplete_queries
The $v_hist_incomplete_queries view lists the queries that were not captured completely.
The problem may be that there was a system reset at the time of logging or because some
epilog/prolog has not been loaded into the database yet.
status
verbose_status
The Query Completion status (as integer and text string)
queuetime
queued_seconds
The amount of time the query was queued (as interval and in
seconds)
preptime
prep_seconds
The amount of time the query spent in "prep" stage (as interval and
in seconds)
gratime
gra_seconds
The amount of time the query spent in GRA (as interval and in
seconds)
numplans The number of plans generated
numrestarts The cumulative number of times the plans were restarted
Table 11-4: $v_hist_queries View
Name Description
Table 11-5: $v_hist_incomplete_queries View
Name Description
npsid A unique ID for the Netezza system (This value is generated as a
sequence on the target database where this view resides.)
npsinstanceid The instance ID of the nzstart command for the source Netezza
system
opid Operation ID, which is used as a foreign key from query epilog,
overflow as well as plan, table, column access tables.
logentryid A foreign key into the hist_log_entry_$SCHEMA_VERSION table
with the npsid and npsinstanceid
sessionid The session ID (will be NULL for a failed authentication)
dbname The name of the database to which the session is connected
queryid The unique checksum of the query
query The first 8 KB of the query text

11-20 20282-20 Rev.1
IBM Netezza System Administrator’s Guide
$v_hist_table_access_stats
The $v_hist_table_access_stats view lists the names of all the tables captured in table
access and provides some cumulative statistics.
$v_hist_column_access_stats
The $v_hist_column_access_stats view lists the names of all tables captured in table
access and provides some cumulative statistics.
submittime The time the query was submitted to Postgres
Table 11-5: $v_hist_incomplete_queries View
Name Description
Table 11-6: $v_hist_table_access_stats View
Name Description
dbname The name of the database to which the session is connected
schemaname The schema name as specified in catalog.schema.table
tablename The table name of the table
refs The number of times that this table was referenced
num_selected
num_inserted
num_deleted
num_updated
num_truncated
num_dropped
num_created
num_genstats
num_locked
num_altered
The number of times that this table was SELECTED from,
INSERTED into, DELETED from, UPDATED, TRUCATED,
DROPPED, CREATED, "GENSTATS", LOCKED, or ALTERED
Table 11-7: $v_hist_column_access_stats View
Name Description
dbname The name of the database to which the session is connected
schemaname The schema name as specified in catalog.schema.table
tablename The table name of the table
columname The name of the column
Refs The number of times that this column was referenced

20282-20 Rev.1 11-21
Query History Views and User Tables
$v_hist_log_events
The $v_hist_log_events view shows information about the events that occurred on the
system.
num_selected
num_updated
num_where
num_grouped
num_having
num_ordered
num_altered
num_genstats
The number of times this column was referenced in SELECT,
UPDATE, WHERE, GROUP BY, HAVING, ORDER BY, ALTER, or
GENERATE STATISTICS clauses.
Table 11-7: $v_hist_column_access_stats View
Name Description
Table 11-8: $v_hist_log_events View
Name Description
npsid A unique ID for the Netezza system (This value is generated as a
sequence on the target database where this view resides.)
npsinstanceid The instance ID of the nzstart command for the source Netezza
system
opid Operation ID, which is used as a foreign key from query epilog,
overflow as well as plan, table, column access tables.
logentryid A foreign key into the hist_log_entry_$SCHEMA_VERSION table
with the npsid and npsinstanceid
sessionid The session ID (will be NULL for a failed authentication)
dbname The name of the database to which the session is connected
time The timestamp when the operation occurred
op
op_type
The integer code and text string describing the actual operation.
The valid values are one of the following:
•
1 = session create
•
2 = session logout
•
3 = failed authentication
•
4 = query prolog
•
5 = query epilog
•
6 = plan prolog
•
7 = plan epilog

11-22 20282-20 Rev.1
IBM Netezza System Administrator’s Guide
$hist_version
The $hist_version table shows information about the schema version number of the history
database.
$hist_nps_$SCHEMA_VERSION
The $hist_nps_$SCHEMA_VERSION table describes each source Netezza system for which
history is captured in the target database. When a Netezza system connects to a history
database for the first time, a record is added to this table.
checksum
details
These are the checksum and query for query prolog entries, signa-
ture and plan information for plan prolog entries. For other log
entries, checksum is NULL and details will have other information
like status for epilogs.
dbid The OID of the database where the table resides
dbname The name of the database where the table resides
client_type The client type, such as none, nzsql, odbc, jdbc, nz(un)load, cli,
bnr, reclaim, old-loader (depcrecated), or internal
Table 11-8: $v_hist_log_events View
Name Description
Table 11-9: $hist_version
Name Type Description
hversion integer Schema version of the history database
dbtype char(1) Specifies the type of history database ("q" indi-
cates a query database)
Table 11-10: $hist_nps_$SCHEMA_VERSION
Name Type Description
npsid integer A unique ID for the Netezza system, and the pri-
mary key for this table (This value is generated
as a sequence on the target database where this
table resides.)
uuid char(36) UUID of the Netezza system, which is a unique
ID (generated on the source Netezza system)
serverhost varchar(256) Host name of the source Netezza system
serverip char(16) IP address of the source Netezza system
npsinstanceid integer Instance ID of the source Netezza system when
this record was inserted

20282-20 Rev.1 11-23
Query History Views and User Tables
$hist_log_entry_$SCHEMA_VERSION
The $hist_log_entry_$SCHEMA_VERSION table captures the log entries for the operations
performed. It shows the sequence of operations performed on the system. This table is not
populated if history collection has never been enabled or if hist_type = NONE.
$hist_failed_authentication_$SCHEMA_VERSION
The $hist_failed_authentication_$SCHEMA_VERSION table captures only the failed
authentication attempts for every operation that is authenticated. A successful authentica-
tion results in a session creation. A failed authentication does not result in a session
creation, but it instead creates a record with a unique operation ID in this table.
Table 11-11: $hist_log_entry_$SCHEMA_VERSION
Name Type Description
logentryid bigint Unique ID for the operation in the source
Netezza system. This column together with
npsid and npsInstanceId form the primary keys
for this table. Note that logentryid is just a
sequential ID of an operation.
npsinstanceid integer The instance ID of the nzstart command for the
source Netezza system
npsid integer Netezza ID for the source system whose data is
captured in this table
sessionid bigint The session ID (will be NULL for a failed
authentication)
op integer An operation code, which can be one of the
following:
•
OP_SESSION_CREATE = 1
•
OP_SESSION_LOGOUT = 2
•
OP_FAILED_AUTH = 3
•
OP_QUERY_PROLOG = 4
•
OP_QUERY_EPILOG = 5
•
OP_PLAN_PROLOG = 6
•
OP_PLAN_EPILOG = 7
time timestamp The timestamp for this operation
Table 11-12: $hist_failed_authentication_$SCHEMA_VERSION
Name Type Description
npsid integer Netezza ID for the source system whose data is
captured in this table
npsinstanceid integer Instance ID of the nzstart command for the
source Netezza system

11-24 20282-20 Rev.1
IBM Netezza System Administrator’s Guide
$hist_session_prolog_$SCHEMA_VERSION
The $hist_session_prolog_$SCHEMA_VERSION table stores details about each created
session. Every successful authentication or session creation adds an entry to this table with
a unique operation ID.
logentryid bigint A foreign key into the
hist_log_entry_$SCHEMA_VERSION table with
the npsid and npsinstanceid
clientip char(16) IP address of the client that made the connec-
tion attempt
sessionusername nvarchar(512) The name string for the sessionUserId
time timestamp The timestamp when the operation occurred
failuretype integer One of the following codes that represent the
authentication failure type:
•
1 — failed authentication due to bad user-
name/password
•
2 — failed authentication due to concurrency
•
3 — failed authentication due to user access
time limits
•
4 — user account disabled after too many
failed password attempts
failure varchar(512) The text message for the failure type code
Table 11-12: $hist_failed_authentication_$SCHEMA_VERSION
Name Type Description
Table 11-13: $hist_session_prolog_$SCHEMA_VERSION
Name Type Description
npsid integer Unique ID of the source Netezza system
npsinstanceid integer Monotonically increasing nzstart instance ID of
the source Netezza system
logentryid bigint This is a foreign key into the
hist_log_entry_$SCHEMA_VERSION table with
the npsid and npsinstanceid. This with npsid
and npsinstanceid will also be a primary key for
this table.
pid integer Process ID of Postgres on source Netezza system
connecttime timestamp Connection time on the source Netezza system
priority integer Session priority on the source Netezza system

20282-20 Rev.1 11-25
Query History Views and User Tables
maxpriority integer Maximum priority for this session
sessionuserid bigint User ID that created this session
currentuserid bigint Current user ID for this session. This could be
different from the sessionUserId.
operatinguserid bigint The operating user ID for whom the ACL and
permission will be used for validating
permissions
sessionusername nvarchar(128) The session user name which corresponds to
sessionUserId
currentusername nvarchar(128) The user name which corresponds to
currentUserId
operatinguser-
name
nvarchar(128) The user name which corresponds to
operatingUserId
dbid bigint The OID of the database to which the session is
connected
dbname nvarchar(128) The name of the database to which the session
is connected
clienthost varchar(256) The hostname of the client that established the
session
clientip char(16) The IP address of the client making the
connection
clientpid integer The process ID of the client
clienttype integer The type of the client such as:
•
0 – None
•
1 – LibPq client (for example, nzsql)
•
2 – ODBC client
•
3 – JDBC client
•
4 – nzload / nzunload
•
5 – Client of the client manager
•
6 – nzbackup / nzrestore
•
7 – nzreclaim
•
8 – Unused
•
9 – Internal Netezza tool
•
10 – OLE DB client
Table 11-13: $hist_session_prolog_$SCHEMA_VERSION
Name Type Description

11-26 20282-20 Rev.1
IBM Netezza System Administrator’s Guide
$hist_session_epilog_$SCHEMA_VERSION
The $hist_session_epilog_$SCHEMA_VERSION table stores details about each session
when the session is terminated. Each session completion creates an entry in this table with
a unique operation ID.
sessionid integer The Netezza session ID. This is NOT unique
across nzstart. This value along with npsid and
npsinstanceid will be the foreign key from query,
plan, table, and column access tables.
npsclientid integer Netezza client ID of the client
rowsetlimit integer The number of rows that can be returned in a
query for the user. The value 0 indicates that
there is no limit.
sessiontimeout integer The amount of idle time in seconds before the
SQL session is terminated. The value 0 indicates
that there is no limit.
querytimeout integer The maximum allowed runtime for a query in
this session. The value 0 indicates that there is
no limit.
srqueuetimeout integer The timeout value in minutes for a query that is
waiting in the serialization queue
qcmaxrestarts integer The maximum number of restarts for a query in
this session
resourcegroupid bigint The group ID of the WLM resource group for this
session
resourcegroup-
name
nvarchar The resource management group name used for
this session
resourcepercent-
age
integer The percentage of system resources that could
be used for queries in this session
Table 11-13: $hist_session_prolog_$SCHEMA_VERSION
Name Type Description
Table 11-14: $hist_session_epilog_$SCHEMA_VERSION
Name Type Description
npsid integer Unique ID of the source Netezza system
logentryid bigint This is a foreign key into the
hist_log_entry_$SCHEMA_VERSION table with
the npsid and npsinstanceid. This with npsid
and npsinstanceid form the primary key for this
table.

20282-20 Rev.1 11-27
Query History Views and User Tables
$hist_query_prolog_$SCHEMA_VERSION
The $hist_query_prolog_$SCHEMA_VERSION table contains the initial data collected at
the start of a query.
A query with or without a plan, and a plan without a query, causes the creation of a record
with an operation ID in the $hist_operation_$SCHEMA_VERSION table. The query prolog
and epilog, plan prolog and epilog, table access, and column access for that query will
share the same operation ID (opid). Thus, this will be a key for joining all query-related
data. The session related data will be retrieved using the foreign key sessionid.
sessionid bigint The Netezza session ID. This is NOT unique
across nzstart. This with npsid and npsinstan-
ceid will be the foreign key from query, plan,
table, and column access tables.
npsinstanceid integer Monotonically increasing nzstart instance ID of
the source Netezza system
endtime timestamp Timestamp of the session termination
Table 11-14: $hist_session_epilog_$SCHEMA_VERSION
Name Type Description
Table 11-15: $hist_query_prolog_$SCHEMA_VERSION
Name Type Description
npsid integer This value along with the npsInstanceId and
opid form the foreign key into the operation
table.
opid bigint Operation ID, which is used as a foreign key
from query epilog, overflow as well as plan,
table, column access tables.
npsinstanceid integer Instance ID of the source Netezza system
logentryid bigint This is a foreign key into the
hist_log_entry_$SCHEMA_VERSION table with
the npsid and npsinstanceid. This with npsid
and npsinstanceid will also be a primary key for
this table.
sessionid bigint The Netezza session ID. This with npsid and
npsinstanceid will be the foreign key from query,
plan, table, and column access tables.
parentopid bigint Operation ID of the parent stored procedure. For
Release 4.6, this is null.
userid bigint User ID used for execution of this query. For
Release 4.6, this is null.

11-28 20282-20 Rev.1
IBM Netezza System Administrator’s Guide
$hist_query_epilog_$SCHEMA_VERSION
The $hist_query_epilog_$SCHEMA_VERSION table contains the final data collected at the
end of the query.
username nvarchar(128) Username used for execution of this query. For
Release 4.6, this is null.
querytext nvarchar(8192) Up to the first 8 KB of the query text. Any
remaining text in the query is stored in the
$hist_query_overflow_$SCHEMA_VERSION
table.
submittime timestamp Submit time of the query
checksum bigint The checksum of the entire query string, which
can help to identify identical queries.
Table 11-15: $hist_query_prolog_$SCHEMA_VERSION
Name Type Description
Table 11-16: $hist_query_epilog_$SCHEMA_VERSION
Name Type Description
npsid integer This value along with the npsInstanceId and
opid form the foreign key into the operation
table.
opid bigint Operation ID. Used as a foreign key from query
epilog, overflow as well as plan, table, column
access tables to query prolog.
logentryid bigint This is a foreign key into the
hist_log_entry_$SCHEMA_VERSION table with
the npsid and npsinstanceid. This with npsid
and npsinstanceid will also be a primary key for
this table.
npsinstanceid integer Instance ID of the source Netezza system
sessionid bigint The Netezza session ID. This with npsid and
npsinstanceid will be the foreign key from query,
plan, table, and column access tables into ses-
sion tables.
finishtime timestamp Finish time of the query
resultrows bigint The number of rows affected by the SQL query.
Applicable for select, insert, update, delete, and
CTAS queries. Note that the result rows in the
plan epilog is internal to Netezza and specifies
the number that the plan returns to the query.

20282-20 Rev.1 11-29
Query History Views and User Tables
$hist_query_overflow_$SCHEMA_VERSION
The $hist_query_overflow_$SCHEMA_VERSION table stores the remaining characters of
the query string that was stored in the querytext column of the
$hist_query_prolog_$SCHEMA_VERSION table. For performance reasons, each row of this
table stores approximately 8KB of the query string; if the query text overflow cannot fit in
one 8KB row, the table uses multiple rows linked by sequenceid to store the entire query
string.
status integer Completion status of the query. The valid values
are:
•
0: for successfully executed query.
QUERY_EXECUTION_SUCCESS.
•
-1: Query execution aborted. nzsession abort
or SIGTERM. QUERY_ABORTED.
•
-2: Query cancelled by user using Control-C.
This is recorded in QueryCancelHandler()
(postgres.c). QUERY_CANCELLED.
•
-3: Query failed with parsing error.
QUERY_FAILED_PARSING.
•
-4: Query failed during Postgres rewrite.
QUERY_FAILED_REWRITE.
•
-5: Query failed during planning.
QUERY_FAILED_PLANNING.
•
-6: Query failed during execution.
QUERY_FAILED_EXECUTION.
•
-7: Reserved for future use.
•
-8: Query failed ACL check.
QUERY_FAILED_ACLCHECK.
•
-9: Query failed by other generic errors.
QUERY_FAILED_GENERIC.
Table 11-16: $hist_query_epilog_$SCHEMA_VERSION
Name Type Description
Table 11-17: $hist_query_overflow_$SCHEMA_VERSION
Name Type Description
npsid integer This value along with the npsInstanceId and
opid form the foreign key into the operation
table.
opid bigint Operation ID. Used as a foreign key from query
epilog, overflow as well as plan, table, column
access tables to query prolog.
npsinstanceid integer Instance ID of the source Netezza system

11-30 20282-20 Rev.1
IBM Netezza System Administrator’s Guide
$hist_service_$SCHEMA_VERSION
The $hist_service_$SCHEMA_VERSION table records the CLI usage from the localhost or
remote client. It logs the command name and the timestamp of the command issue. This
information is collected in the query history when COLLECT SERVICE is enabled in the his-
tory configuration. For more information, see the IBM Netezza Advanced Security
Administrator’s Guide.
sessionid bigint Session ID. This with npsid and npsinstanceid
will be foreign key from query, plan, table and
column access tables into session tables.
next integer This is the pointer to next ID record (the next
8KB portion of the querytext) in the sequence.
The last record has a next value of -1.
sequenceid integer This is the sequence ID of each entry. There is
one for each query text fragment. The first over-
flow record has sequenceid 0 (zero).
querytext nvarchar(8192) Up to 8KB of the overflow part of the query
string.
Table 11-17: $hist_query_overflow_$SCHEMA_VERSION
Name Type Description
Table 11-18: $hist_service_$SCHEMA_VERSION
Name Type Description
npsid integer This value along with the npsInstanceId and
opid form the foreign key into the operation
table.
npsinstanceid integer Instance ID of the source Netezza system
logentryid bigint This is a foreign key into the
hist_log_entry_$SCHEMA_VERSION table with
the npsid and npsinstanceid. This with npsid
and npsinstanceid will also be a primary key for
this table.
sessionid bigint Session ID. This is a foreign key into
session_$SCHEMAVERSION and is generated by
the source Netezza system. This field along with
npsid will be the foreign key into
session_$SESSIONVERSION.

20282-20 Rev.1 11-31
Query History Views and User Tables
$hist_state_change_$SCHEMA_VERSION
The $hist_state_change_$SCHEMA_VERSION table logs the state changes in the system.
It logs Online, Paused, Offline and Stopped. For the Online state change, the logging
occurs after the system has gone Online. In other cases, the logging occurs before the state
transition is made to the respective state. This information is collected in the query history
when COLLECT STATE is enabled in the history configuration. For more information, see
the IBM Netezza Advanced Security Administrator’s Guide.
servicetype bigint The code for the command, which is one of the
following integer values:
•
1 — nzbackup
•
2 — nzrestore
•
3 — nzevent
•
4 — nzinventory (obsoleted in 5.0)
•
5 — nzreclaim
•
6 — nzsfi (obsoleted in 5.0)
•
7 — nzspu (obsoleted in 5.0)
•
8 — nzstate
•
9 — nzstats
•
10 — nzsystem
service varchar(512) The text string of the servicetype value
Table 11-18: $hist_service_$SCHEMA_VERSION
Name Type Description
Table 11-19: $hist_state_change_$SCHEMA_VERSION
Name Type Description
npsid integer This value along with the npsInstanceId and
opid form the foreign key into the operation
table.
npsinstanceid integer Instance ID of the source Netezza system
logentryid bigint This is a foreign key into the
hist_log_entry_$SCHEMA_VERSION table with
the npsid and npsinstanceid. This with npsid
and npsinstanceid will also be a primary key for
this table.

11-32 20282-20 Rev.1
IBM Netezza System Administrator’s Guide
$hist_table_access_$SCHEMA_VERSION
The $hist_table_access_$SCHEMA_VERSION table records the table access history for a
query. This table becomes enabled whenever query history type is Table.
changetype bigint The code for the change type, which is one of
the following integer values:
•
1 — The system is Online.
•
2 — The system is going into the Paused
state.
•
3 — The system is going into the Offline
state.
•
4 — The system is going into the Stopped
state.
change varchar(512) The text string for the change code as described
in changetype
Table 11-19: $hist_state_change_$SCHEMA_VERSION
Name Type Description
Table 11-20: $hist_table_access_$SCHEMA_VERSION
Name Type Description
npsid integer This value along with the npsInstanceId and
opid form the foreign key into the operation
table.
opid bigint Operation ID. Used as a foreign key from query
epilog, overflow as well as plan, table, column
access tables to query prolog.
sessionid bigint Session ID. This with npsid and npsinstanceid
will be foreign key from query, plan, table and
column access tables into session tables.
seqid integer A plain sequence number of the entry. It starts
at zero for every npsid, npsinstanceid, and opid.
It increments monotonically for table access
records for each query.
npsinstanceid integer Instance ID of the source Netezza system
dbid bigint OID of the database where the table resides
dbname nvarchar(128) The name of the database where the table
resides
schemaid bigint The OID of the schema as specified in
catalog.schema.table

20282-20 Rev.1 11-33
Query History Views and User Tables
$hist_column_access_$SCHEMA_VERSION
The $hist_column_access_$SCHEMA_VERSION table records the column access history
for a query. This table becomes enabled whenever query history type is Column.
schemaname nvarchar(128) The schema name as specified in
catalog.schema.table
tableid bigint The table id of the table
tablename nvarchar(128) The table name of the table
usage integer The following bits will set to true if table appears
in:
(usage & 1) <> 0 = selected
(usage & 2) <> 0 = inserted
(usage & 4) <> 0 = deleted
(usage & 8) <> 0 = updated
(usage & 16) <> 0 = truncated
(usage & 32) <> 0 = dropped
(usage & 64) <> 0 = created
(usage & 128) <> 0 = statsgenerated
(usage & 256) <> 0 = locked
(usage & 512) <> 0 = altered
Table 11-20: $hist_table_access_$SCHEMA_VERSION
Name Type Description
Table 11-21: $hist_column_access_$SCHEMA_VERSION
Name Type Description
npsid integer This value along with the npsInstanceId and
opid form the foreign key into the operation
table.
opid bigint Operation ID. Used as a foreign key from query
epilog, overflow as well as plan, table, column
access tables to query prolog.
sessionid bigint Session ID. This with npsid and npsinstanceid
will be foreign key from query, plan, table and
column access tables into session tables.
npsinstanceid integer Instance ID of the source Netezza system
seqid integer A plain sequence number of the entry. It starts
at zero for every npsid, npsinstanceid, and opid.
It increments monotonically for table access
records for each query.
columnname nvarchar(128) The name of the column

11-34 20282-20 Rev.1
IBM Netezza System Administrator’s Guide
$hist_plan_prolog_$SCHEMA_VERSION
The $hist_plan_prolog_$SCHEMA_VERSION table records the plan history information.
This is the data collected at the beginning of the plan execution. This table becomes
enabled whenever query history type is Plan.
columnid integer The column position as it appears in the logical
table definition; starts at 1
usage integer The following bits will set to true if column
appears in:
(usage & 1) <> 0 = in_select
(usage & 2) <> 0 = in_set
(usage & 4) <> 0 = in_where
(usage & 8) <> 0 = in_groupby
(usage & 16) <> 0 = in_having
(usage & 32) <> 0 = in_orderby
(usage & 64) <> 0 = in_alter
dbid bigint OID of the database where the table resides
dbname nvarchar(128) The name of the database where the table
resides
schemaid bigint The OID of the schema as specified in
catalog.schema.table
schemaname nvarchar(128) The schema name as specified in
catalog.schema.table
tableid bigint The table ID of the table
tablename nvarchar(128) The table name of the table
Table 11-21: $hist_column_access_$SCHEMA_VERSION
Name Type Description
Table 11-22: $hist_plan_prolog_$SCHEMA_VERSION
Name Type Description
npsid integer This value along with the npsInstanceId and
opid form the foreign key into the query table.
npsinstanceid integer Instance ID of the source Netezza system
opid bigint Operation ID. Used as a foreign key from query
epilog, overflow as well as plan, table, column
access tables to query prolog.

20282-20 Rev.1 11-35
Query History Views and User Tables
logentryid bigint This is a foreign key into the
hist_log_entry_$SCHEMA_VERSION table with
the npsid and npsinstanceid. This with npsid
and npsinstanceid will also be a primary key for
this table.
sessionid bigint Session ID. This with npsid and npsinstanceid
will be foreign key from query, plan, table and
column access tables into session tables.
planid integer Plan ID (used to make a equi join in addition to
npsid, npsinstanceid, and opid to match a plan
prolog to a plan epilog record)
xid bigint DBOS transaction id
gkpriority integer Gate keeper priority
submittime timestamp Submit time of the plan
queuetime timestamp Gate keeper queue time of the plan
preptime timestamp Time when the first snippet is prepped
gratime timestamp Time when the plan is queued to GRA
starttime Start time of plan execution
ismainplan Flag for the main plan of a query
estimatedcost The estimated cost of the plan
estimateddisk bigint The estimated disk space of the plan
estimatedmem bigint The estimated memory of the plan
totalsnippets integer The total number of snippets
signature bigint The signature of the plan. If two plans have the
same signature, especially for the same query,
most likely the plans are identical.
qcrestart integer The count of query restart after a state change.
The value is zero if there has been no restart.
Table 11-22: $hist_plan_prolog_$SCHEMA_VERSION
Name Type Description

11-36 20282-20 Rev.1
IBM Netezza System Administrator’s Guide
$hist_plan_epilog_$SCHEMA_VERSION
The $hist_plan_epilog_$SCHEMA_VERSION table records the plan history information.
This is the data collected at the end of the plan execution. This table becomes enabled
whenever query history type is Plan.
History Table Helper Functions
Within the history tables, several of the columns contain data which use mapped values
and bit masks. You can use the following helper functions within your history queries to
return more readable text values and strings for those internal values.
Table 11-23: $hist_plan_epilog_$SCHEMA_VERSION
Name Type Description
npsid integer This value along with the npsInstanceId and
opid form the foreign key into the query table.
npsinstanceid integer Instance ID of the source Netezza system
opid bigint Operation ID. Used as a foreign key from query
epilog, overflow as well as plan, table, column
access tables to query prolog.
logentryid bigint This is a foreign key into the
hist_log_entry_$SCHEMA_VERSION table with
the npsid and npsinstanceid. This with npsid
and npsinstanceid will also be a primary key for
this table.
sessionid bigint Session ID. This with npsid and npsinstanceid
will be foreign key from query, plan, table and
column access tables into session tables.
planid integer The plan ID (used to make a equi join in addi-
tion to npsid, npsinstanceid, and opid to match
a plan prolog to a plan epilog record)
endtime timestamp The ending time of the plan execution
donesnippets integer The number of snippets that are done
resultrows bigint The number of result rows
resultbytes bigint The number of result bytes
status integer A status for the success or failure of the plan.
The value is 0 for a successful completion, or a
non-zero error code for a failure.
20282-20 Rev.1 11-37
History Table Helper Functions
FORMAT_QUERY_STATUS ()
Use this function to display text string versions of the $hist_query_epilog.status column
data. The return value is one of the following status values:
"sucess"
"aborted"
"cancelled"
"failed parsing"
"failed rewrite"
"failed planning"
"failed execution"
"permission denied"
"failed"
"trasaction aborted"
FORMAT_PLAN_STATUS ()
Use this function to display text string versions of the $hist_plan_epilog.status column
data. The return value is one of the following status values:
"sucess"
"aborted"
FORMAT_TABLE_ACCESS()
Use this function to display text string versions of all bits set in the
$hist_table_access.usage column data. The return value is a comma-separated list of one
or more of the following values:
"sel"
"ins"
"del"
"upd"
"drp"
"trc"
"alt"
"crt"
"lck"
"sts"
11-38 20282-20 Rev.1
IBM Netezza System Administrator’s Guide
FORMAT_COLUMN_ACCESS()
Use this function to display text string versions of all bits set in the
$hist_column_access.usage column data. The return value is a comma-separated list of
one or more of the following values:
"sel"
"set"
"res"
"grp"
"hav"
"ord"
"alt"
"sts"
Example Usage
The following sample query shows how you can use these helper functions.
SELECT
substr (querytext, 1, 50) as QUERY,
format_query_status (status) as status,
tb.tablename,
format_table_access (tb.usage),
co.columnname,
format_column_access (co.usage)
from "$hist_query_prolog_1" qp
inner join
"$hist_query_epilog_1" qe using (npsid, npsinstanceid, opid)
inner join
"$hist_table_access_1" tb using (npsid, npsinstanceid, opid)
inner join
"$hist_column_access_1" co using (npsid, npsinstanceid, opid)
where
exists (select tb.dbname
from "$hist_table_access_1" tb
where tb.npsid = qp.npsid and
tb.npsinstanceid = qp.npsinstanceid and
tb.opid = qp.opid and
tb.tablename in (^nation^, ^orders^, ^part^,
^partsupp^, ^supplier^, ^lineitem^,
^region^))
and tb.tableid = co.tableid;

12-1
C H A P T E R 12
Managing Workloads on the Netezza Appliance
What’s in this chapter
Overview
Managing Short Query Bias
Managing GRA
Managing PQE
Managing the Gate Keeper
The workload of a Netezza appliance consists of user-initiated jobs such as SQL queries,
administration tasks, backups, and data loads, as well as system-initiated jobs such as
regenerations and rollbacks. The terms workload and job are used interchangeably to
describe the work being performed by a Netezza system.
Workload management (WLM) is the process of assessing the workload of the system and
using job control and prioritization features to allocate the appropriate share of resources to
jobs running on the system. This chapter describes the Netezza workload management fea-
tures and how to configure them.
As a best practice, work with your Netezza Sales or Support representative to assess the
WLM features that are most appropriate for your environment and users. Do not modify the
WLM configuration settings without careful analysis of the impact of the changes. Inappro-
priate changes and settings can impact system behavior in unintended ways and thus
should be carefully planned and implemented for your business environment.
Overview
The following sections provide information on service level planning and the WLM features.
Service Level Planning
Service level planning helps you to identify the users who require access to the system, the
times when they require access, the types of work that they perform, as well as the priority
of that work to the business. As a best practice, consider service level planning as early as
possible for the Netezza system.
Your Netezza Sales representatives can work with you to proactively assess and plan work-
load management strategies for your system. They can help you to configure tools such as
query history to capture and analyze the query activity on your system.

12-2 20282-20 Rev.1
IBM Netezza System Administrator’s Guide
WLM Feature Summary
Netezza offers several WLM features that are designed to manage resource allocations in
different ways. Table 12-1 summarizes the workload management features.
Most environments typically use only a subset of these features; the features depend upon
the methodology that you use to manage jobs in your environment.
Resource Sharing Design
The inherent design of the Netezza system is to run all of its jobs as fast as possible. For
example, if only one job is active on the system, the system directs all of its resources to
completing that job. If two jobs are active, the system gives half of its available resources to
each job (assuming that both jobs are of equal priority). Similarly, if 40 jobs of equal prior-
ity are running, each job receives 1/40th of the available resources. This form of resource
allocation is often referred to as a fair-sharing model.
Table 12-1: Workload Management Feature Summary
Feature Enabled by
Default Description
Short query bias
(SQB)
Yes A special reserve of resources (that is, scheduling “slots”, memory, and
preferential queue placement) for short queries. Short queries are those
estimated to run in two seconds or less. The time limit is a configurable
setting. With SQB, short queries can run even when the system is busy pro-
cessing other, longer queries.
Guaranteed
resource alloca-
tion (GRA)
Yes
(requires
resource
sharing
groups)
A minimum and/or maximum percentage of the system resources assigned
to specific groups of users. These groups are called resource sharing groups
(RSGs). When users assigned to different RSGs submit work and contend
for resources, the GRA scheduler ensures that each RSG receives a per-
centage of system resources based on its resource minimum percentage.
An RSG could receive more than its minimum when other RSGs are idle,
but an RSG will never receive more than its configured maximum
percentage.
Prioritized query
execution (PQE)
Yes A priority such as critical, high, normal, and low assigned to queries and
work on the system. Netezza uses the priority when it allocates resources
and schedules the work for the job. Critical and high priority jobs get more
resources over normal and low priority jobs based on configured priority
weighting factors. You can specify different priorities for users, groups, or
sessions. If you also use GRA, different priority work within each RSG
receives proportions of the RSG’s resources.
Gate keeper No A process of queuing work based on its assigned priority, and if configured,
the estimated run time of normal priority work. The gate keeper acts as a
throttle that allows only a certain number of different types of jobs to run.
Any jobs that exceed the configured thresholds (or for which there are not
enough resources to run) wait until the gate keeper allows them to pass. By
default, the gate keeper is disabled and the Netezza system passes new
work requests directly to the GRA scheduler.
20282-20 Rev.1 12-3
Overview
When multiple jobs or users compete for system resources, you might want the Netezza
system to prioritize certain jobs over others. Workload management is a process of classify-
ing jobs and specifying resource allocation rules so that the system can assign resources
using a predetermined service policy. You can identify jobs as higher or lower in priority
than other jobs, and you can partition the system resources so that groups of users receive
a minimum or a maximum percentage of resources when several groups compete for system
resources.
Netezza has some predefined service policies to help prioritize certain jobs or work. For
example, the Netezza admin user account has special characteristics that prioritize its work
over other users’ work. Similarly, certain types of jobs may have priority over user queries or
other less-critical system jobs.
Concurrent Jobs
Netezza imposes a limit on the number of concurrent jobs that can run on the system at
one time. The limit is controlled by the system registry setting gkMaxConcurrent, which has
a default value of 48. Therefore, the system can run up to 48 concurrent jobs as long as
there are sufficient resources (CPU, disk, memory, and so on) to support all of those jobs.
In some environments, a smaller value may be appropriate for the types of jobs that typi-
cally run on the system. A smaller number of concurrent jobs may result in better
performance and thus better response time for users. During new system testing, your Sales
representative can work with you to identify whether your environment would benefit from a
smaller gkMaxConcurrent setting.
If you determine that a lower setting might be better for your system, you can change a reg-
istry configuration setting to lower the value. To change the setting, you need access to a
Netezza user account that has Manage System privilege (such as the admin user). The fol-
lowing examples use the sample account usr1.
1. Pause the system:
nzsystem pause
Are you sure you want to pause the system (y|n)? [n] y
2. Specify a maximum concurrent jobs setting of 20:
nzsystem set -arg host.gkMaxConcurrent=20
Are you sure you want to change the system configuration (y|n)? [n]
y
3. Resume the system:
nzsystem resume
You can display the current value of a registry setting using the following command:
nzsystem showRegistry | grep gkMaxConcurrent
host.gkMaxConcurrent = 20

12-4 20282-20 Rev.1
IBM Netezza System Administrator’s Guide
Managing Short Query Bias
SQL queries and jobs usually fall into one of two general categories based on their runtime
estimates:
Short queries typically run very fast. By default, the Netezza defines a short query as
one with a runtime estimation of less than two seconds. These queries can include
“pick list” queries, dimensional data lookups, or other quick data lookups. These que-
ries are often submitted by a business intelligence application when populating
selection lists, or they are entered on a SQL command line by a user who is waiting for
the results.
Long queries can take many seconds, minutes, or hours to run. These queries are typi-
cally complex business intelligence queries that could return gigabytes or terabytes of
results, or ones that perform complex joins, comparisons, or user-defined analysis.
These queries could be entered on a command line, but they are most often the prod-
ucts of business intelligence applications that users might leverage as scheduled
reports for “deep-dives” into the database.
Netezza has internal mechanisms such as “prep” snippets to assess whether a query is
short or long before it actually runs the query. With SQB, Netezza “favors” short-running
queries over longer-running queries. It reserves some scheduling and memory resources for
short queries so that they can continue to run even when the system is busy running other
queries.
Figure 12-1 illustrates a model of the queues and settings used with SQB workload man-
agement. Note that both long and short queries run in the standard scheduler queues;
however, when those queues are fully occupied, short queries can take advantage of the
additional, separate queues. The GRA scheduler reserves 10 “slots” for the short queries,
and the snippet scheduler reserves 6 slots for short queries.
Figure 12-1: SQB Queuing and Priority
Also, because short queries are typically not resource intensive, the Netezza can run several
short queries at a time while the longer work continues.
GRA Scheduler
host.schedSQB-
Netezza Host SPU
Snippet Scheduler
host.schedSQB-
host.schedSQBReservedHostMB=64
host.schedSQBReservedSnMB=50
ReservedGraSlots=10 ReservedSnSlots=6

20282-20 Rev.1 12-5
Managing Short Query Bias
Table 12-2 describes the configuration registry settings that control the SQB defaults. To
change the setting you use the nzsystem command to pause the system, set the value, and
then resume the system.
For example, if you want to change the definition of a short query in your environment from
two seconds to five seconds, do the following (usr1 must have Manage System privilege):
1. Pause the system:
nzsystem pause
Are you sure you want to pause the system (y|n)? [n] y
2. Specify a short query time length of 5 seconds:
nzsystem set -arg host.schedSQBNominalSecs=5
Are you sure you want to change the system configuration (y|n)? [n]
y
3. Resume the system:
nzsystem resume
You can also display the current value of a registry setting as follows:
nzsystem showRegistry | grep schedSQBNominalSecs
host.schedSQBNominalSecs = 5
Table 12-2: Short Query Bias Registry Settings
Name Type Default Description
host.schedSQBEnabled bool true Enables SQB. If you disable SQB, the
Netezza will not reserve any resources for
short queries while it is engaged in other
work. If you disable SQB, users who run a
short query to perform a dimensional
lookup, for example, might observe what
appears to be a “hanging” query until
some ongoing work completes and the sys-
tem runs the short query.
host.schedSQBNominalSecs int 2 Defines the time threshold for queries that
the system defines as “short” in seconds.
host.schedSQBReser-
vedGraSlots
int 10 Defines the number of GRA scheduler
slots reserved for short queries.
host.schedSQBReservedSnSlots int 6 Defines the number of snippet scheduler
slots reserved for short queries.
host.schedSQBReservedSnMb int 50 Specifies how much memory in MB on
each SPU to reserve for short query
execution.
host.schedSQBReservedHostMb int 64 Specifies how much memory in MB to
reserve on the host for short query
execution.

12-6 20282-20 Rev.1
IBM Netezza System Administrator’s Guide
Managing GRA
If your environment has distinct groups of users who use the system at the same time, you
can use GRA to partition the system so that each group receives a portion of the system
resources when the group is active. These groups are called resource sharing groups
(RSGs). GRA is enabled by default.
Resource Percentages and System Resources
A resource percentage is essentially a percentage of the available Netezza system
resources. When you create an RSG, you specify the minimum and maximum resource per-
centages for that group.
The minimum resource percentage is the smallest percentage of available system
resources that the group should receive when other groups are also using the system.
You can specify a value from 0 to 100 for the resource percentage; however, an RSG
can not have a resource minimum of 0.
Note: If a group has a resource minimum of 0 points, the group is not a resource shar-
ing group. Non-RSG groups are typically used for access control management; that is,
organizing user accounts and controlling permission management. For more informa-
tion on access control groups, see Chapter 8, “Establishing Security and Access
Control.”
The maximum resource percentage is the largest percentage of available system
resources that the RSG should receive, regardless of whether other RSGs are using the
system. You can specify a value from 1 to 100 for the maximum resource percentage.
The “available system resources” refers to all the processing power of the Netezza system
that is available to run user queries and jobs. Sometimes the Netezza system performs work
for the admin database user account or for special jobs that require system resources.
When this other work is active, the available system resources are a subset of the total sys-
tem resources. The Netezza system applies the GRA resource minimums and maximums so
that each active RSG can receive its apportioned share of the available resources.
The minimum resource percentage is the minimum percentage when the RSG is active;
that is, if an RSG is not active, its system resources could be used by the other active
RSGs. In the fair-sharing model described in “Resource Sharing Design” on page 12-2, an
active RSG often receives more than its minimum resource percentage when other RSGs
are idle. However, an RSG cannot receive more than its configured maximum percentage.
Note: The NzAdmin interface does not allow you to specify more than 100% as the total
minimum resource percentages for all your RSGs. However, the SQL commands will allow
you to specify a total that exceeds 100% of the system resources. If the total for all your
RSGs is more than 100%, the system equalizes their assigned percentages to 100%. For
example, if you assign a total of 120% of the system resources, and one RSG is assigned
40% of that, the RSG actually receives 40/120 or 33% of the system resources at a
minimum.
20282-20 Rev.1 12-7
Managing GRA
Assigning Users to Resource Groups
By default, all users are added to the Public group when they are created. You can use the
[CREATE|ALTER] USER commands to specify the RSG for a user. For example:
SYSTEM(ADMIN)=> CREATE USER bob WITH PASSWORD 'test96' IN
RESOURCEGROUP rptusers;
CREATE USER
This command creates the bob user account and configures it to use the rptusers RSG. The
rptusers RSG must exist and it must have a non-zero resource minimum for the command
to complete successfully. If at some point you drop the rptusers RSG, the user accounts in
that group are reassigned to the Public RSG. Also, after you assign a user to an RSG, you
cannot change the RSG’s minimum resource percentage to 0.
If you want to remove the user from a resource sharing group, you must alter the user to
add the account to the Public group using a command similar to the following:
SYSTEM(ADMIN)=> ALTER USER bob IN RESOURCEGROUP public;
ALTER USER
Resource Groups Example
As an example of how to partition the Netezza system resources, assume that the Netezza
system is used by three different RSGs: an Analysts group, a RptQuery group, and the
default Public group. These RSGs are configured with the following minimum and maxi-
mum resource percentages:
When all three RSGs are busy with jobs on the system, the GRA scheduler works to balance
the jobs and resource utilization as shown in Figure 12-2.
Table 12-3: Sample Resource Sharing Groups
Group Minimum Resource % Maximum Resource %
Analysts 50 100
RptQuery 30 60
Public 20 80
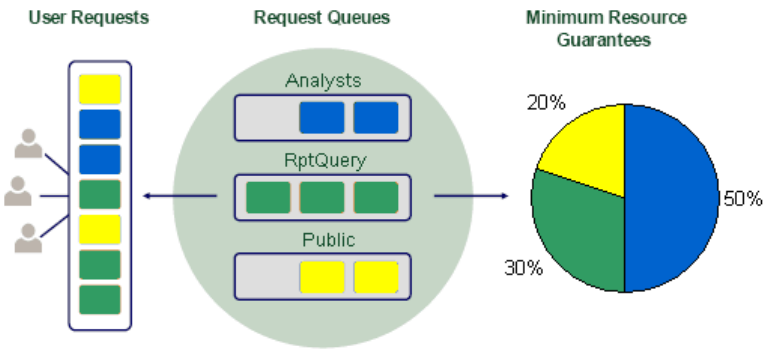
12-8 20282-20 Rev.1
IBM Netezza System Administrator’s Guide
Figure 12-2: GRA Usage Sharing
To create these RSGs and to alter the existing group Public from its default maximum per-
centage, you can use SQL commands or the NzAdmin tool. For a description of creating
groups using NzAdmin, refer to the online help for that interface.
Examples of the SQL commands follow:
SYSTEM(ADMIN)=> CREATE GROUP analysts WITH RESOURCE MINIMUM 50
RESOURCE MAXIMUM 100;
CREATE GROUP
SYSTEM(ADMIN)=> CREATE GROUP rptquery WITH RESOURCE MINIMUM 30
RESOURCE MAXIMUM 60;
CREATE GROUP
SYSTEM(ADMIN)=> ALTER GROUP public WITH RESOURCE MAXIMUM 80;
ALTER GROUP
You can then assign Netezza user accounts to the RSG. For example, the following com-
mand assigns the user bob to the analysts RSG:
SYSTEM(ADMIN)=> ALTER USER bob IN RESOURCEGROUP analysts;
ALTER USER
The Netezza system ensures that members of the Analysts group get at least 50% of the
available system resources when all the RSGs are active. At the same time, the system
ensures that RptQuery group members and Public users are not starved for resources.
Note the following sample command that creates a group and adds users to the group:
SYSTEM(ADMIN)=> CREATE GROUP analysts WITH RESOURCE MINIMUM 50
RESOURCE MAXIMUM 100 USER bob,jlee;
CREATE GROUP
In this example, the users are assigned to the group but not for resource sharing controls.
Instead, the system uses the group definition to manage the security and privileges of the
analysts group. To assign a user to a group for resource sharing purposes, you must use the
[CREATE|ALTER] USER command and the IN RESOURCEGROUP syntax.
20282-20 Rev.1 12-9
Managing GRA
GRA Allocations Example
GRA resource percentages help to ensure that the RSGs receive their minimum percentage
of resources when all the groups are actively submitting jobs. During times when some of
the RSGs are not active, the active RSGS could receive more resources to complete their
work, up to their specified resource maximum percentage.
The Netezza system applies the following rules to determine how to assign system
resources to the active RSGs:
If only a few of the RSGs are busy, the system has more resources to give to the active
RSGs, but it applies the minimum and maximum resource percentages to ensure fair allo-
cations. For example:
If the Analysts RSG is the only active group, it can use up to 100% of the system
resources for its work.
If the RptQuery RSG is the only active group, it can use up to 60% of the available sys-
tem resources (its RESOURCE MAXIMUM). The remaining 40% of the available system
resources remain unallocated until there is new work from other RSGs or the admin
user.
If the Analysts and Public RSGs are busy, their resource minimums total 70% and their
resource maximums total 180%. The system determines their allowed resource per-
centages as follows:
min max allowed
Public 20 80 29% = (20 / (20 + 50))
Analyst 50 100 71% = (50 / (20 + 50))
If the RptQuery and Public RSGs are busy, the system determines their allowed
resource percentages as follows. This example shows that the excess is apportioned to
each RSG, but never to exceed the maximum percentage.
Table 12-4: Assigning Resources to Active RSGs
RSGs with Active Jobs Resource Allocation Rules
The sum of the active RSGs’ RESOURCE
MAXIMUM settings is <= 100
The system allocates resources based on
the RESOURCE MAXIMUM settings.
The sum of the active RSGs’ RESOURCE
MINIMUM settings is >= 100
The system allocates resources in propor-
tion to the RESOURCE MINIMUM settings
for each RSG.
The sum of the active RSGs’ RESOURCE
MINIMUM is <100.
The system allocates resources in propor-
tion to the RESOURCE MINIMUM settings
for each RSG, but the allocations are lim-
ited by their RESOURCE MAXIMUM
settings. Any excess resources are allo-
cated in proportion to the difference
between the allowed resources and the
RESOURCE MAXIMUM settings.
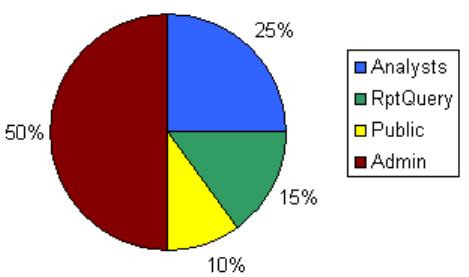
12-10 20282-20 Rev.1
IBM Netezza System Administrator’s Guide
min max allowed
RptQuery 30 50 50% = (30 / (20 + 30))= 60 (but 50 is max%)
Public 20 80 50% = (20 / (20 + 30))= 40 (plus 10 which
RptQuery cannot use)
Netezza frequently adjusts the resource percentages based on the currently active RSGs
and their jobs. Because work is often submitted and finished very quickly, at any one point
in time it might appear that certain RSGs have received no resources (because they are
inactive) while other RSGs are monopolizing the system because they are continually
active.
Over time, and especially during peak times when all RSGs are actively using the system,
the GRA usage typically averages out to the RSG’s allowed percentage. The measure of
whether a group is receiving its allowed resource percentage is called compliance; Netezza
offers several reports that you can use to monitor resource group compliance. For more
information, see “Monitoring Resource Utilization and Compliance” on page 12-15.
Resource Allocations for the Admin User
The Netezza admin user account has a unique and powerful impact on the system and the
GRA allocations. By default, the admin user is allocated 100 resource sharing points,
which means that the admin user typically receives half of the available system resources
when other RSGs are active, and 100% of the system resources when no other RSGs are
busy.
The admin user is a special “super-user” database account intended for emergency
actions, not everyday work. Only one or very few users should ever run jobs as the admin
user, and even then, very infrequently and for only the most urgent operations.
Note: You can create user accounts with administrative privileges to share the capabilities
of the admin user, but without the default resource impact of the admin account. For more
information, see “Creating an Administrative User Group” on page 8-16.
Using the example Analysts, RptQuery, and Public RSGs, assume that users in all of the
RSGs are active and so is the admin user. The resource allocations shown in Figure 12-2 on
page 12-8 would change to the following percentages shown in Figure 12-3.
Figure 12-3: Impacts of the Admin User on GRA
The admin user receives 50% of the available resources, so the other RSGs receive half of
their configured percentages. For example, if admin and all three RSGs are busy, the Ana-
lysts group gets 25%, the RptQuery group gets 15%, and the Public group gets 10%.

20282-20 Rev.1 12-11
Managing GRA
As a best practice, do not let your users run as the admin user for their work. Instead, cre-
ate an administrative users RSG (for example, NzAdmins) with an appropriate resource
percentage and the correct object and administrative permissions. Add your administrative
user accounts as members to that RSG so that their work does not severely impact the
other RSGs. An administrative users group also makes it easier to manage the account per-
missions and membership for those users collectively, rather than managing permissions
for each user account on a case-by-case basis.
Allocations for Multiple Jobs in the Same Group
Within an RSG, the number of concurrent active jobs has an impact on the resource that
are applied to each job. The allocated resources for each RSG are shared among the active
jobs for that RSG.
Assuming that all three example RSGs are busy, if there is one active job for the Analysts
group, that job receives all the group’s allocated resources (50%). If there are two active
jobs that have the same priority, they each get half of the group resources (25% each). If
there are ten active jobs for the Analysts group, all of the same priority, each job gets one-
tenth of the group’s resources. If the concurrent jobs have different priorities, the Netezza
system allocates the resources within the group using priority weighting factors, which is
described in “Priority and GRA Resource Sharing” on page 12-12.
Figure 12-4 shows how a very busy Analysts users group can result in jobs that are given
less overall system resources than a single active job in either the RptQuery or Public
groups.
Figure 12-4: Multiple Jobs in a Group Share the Group’s Resources
As you plan the resource percentages for each RSG, be sure to consider the number of con-
current active jobs that are likely to occur for that group. You may need to adjust the
resource allocation percentages to ensure that very busy groups have enough resources to
complete the expected number of concurrent jobs in a timely manner. You can also config-
ure a limit on the number of active jobs from an RSG to ensure that a specific number of
active jobs have reasonable resource allocations; any additional jobs will wait until the
active jobs finish.
Configuring Job Limits for Groups
You can use the JOB MAXIMUM attribute of the group definition to control the number of
actively running jobs submitted by that group. Any additional jobs are queued until active
jobs from that group finish.
The JOB MAXIMUM attribute can have the following values:
12-12 20282-20 Rev.1
IBM Netezza System Administrator’s Guide
A value of 0 (or OFF) specifies that the group has no maximum for the number of con-
current jobs. The group is restricted by the usual system settings and controls for
concurrent jobs.
A value of 1 to 48 to set the job maximum to the specified integer value.
A value of -1 (or AUTOMATIC) specifies that the system will calculate a job maximum
value based on the group’s resource minimum multiplied by the number of GRA sched-
uler slots (default 48). For example, if a group has a resource minimum of 20%, the
job maximum is (.20 * 48) or approximately 9.
By controlling the number of concurrent jobs, you can help to improve performance for the
active jobs and avoid cases where too many active jobs result in bad performance for all of
them.
Priority and GRA Resource Sharing
When you assign priorities to different jobs within an RSG, the system does not run all the
high priority jobs before all normal ones; instead, the priorities are used as weighting fac-
tors to allocate resources for each job.
Netezza uses the host.snPriorityWeights registry setting to specify the relative weights for
each priority job; that is, the setting controls the ratio of resources to priority. By default,
the host.snPriorityWeights setting is 1,2,4,8, which means that low priority jobs have a
weight of 1, normal=2, high=4, and critical=8. As with the GRA percentages, the Netezza
system sums the weights of all the concurrent jobs and allocates resource percentages
based on the job weight over the sum of the weights.
For example, Figure 12-5 shows how priority of jobs affects the distribution of resources
within a resource group. When the system is fully subscribed, it applies the priority ratios to
identify how much of each group’s resources are applied to each job. For the Analysts group
as described in Figure 12-2 on page 12-8, assume that there is one critical job and one
normal job. The Netezza system uses a default 8:2 weighting ratio (or 4:1) to allocate
resources between critical and normal priority jobs.
Critical job = 8/(8+2) or 80% of the resources for the Analysts group
Normal job = 2/10 or 20% of the resources for the Analysts group
Thus, the critical priority job would receive 80% of the Analysts group’s 50% allocation, for
a total of 40% of the resources. The normal job would receive 20% of the group’s 50% of
resources, which is 10%.

20282-20 Rev.1 12-13
Managing GRA
Figure 12-5: GRA and Priority
For the RptQuery group, which has one Critical and two High priority jobs and a 30%
resource allocation, the system calculates the job resource allocations as follows:
Critical priority job = 8/16 points (50% of the group’s resources).
Each High priority job = 4/16 points (25% of the group’s resources).
Thus, the Critical priority job receives half of the group’s 30% for a total of 15%, and each
each high priority job receives one-quarter of the total 30%, or about 7% of the group’s
resources.
For the Public group, which has two Low priority jobs and a 20% group resource allocation,
the system divides the group’s resources equally. Thus, each low priority job receives
approximately 10% of the system resources.
Guaranteed Resource Allocation Settings
Guaranteed Resource Allocation is enabled by default. You can disable or re-enable it
through the system registry using the nzsystem set command. Table 12-5 describes the
system registry settings that affect GRA.
To change the usage history interval, enter:
nzsystem set -arg host.graVtUpdateInterval=6000
Table 12-5: Guaranteed Resource Allocation Settings
Name Type Default Description
host.schedGRAEnabled bool True Enables or disables GRA.
host.snPriorityWeights 1,2,4,8 Specifies the weights assigned to low, nor-
mal, high, and critical jobs.
host.graVtUpdateInterval 600 Specifies the seconds between updates to
the _vt_sched_gra table.

12-14 20282-20 Rev.1
IBM Netezza System Administrator’s Guide
You must pause the system, change the setting, and resume the system for the changes to
take effect.
Tracking GRA Compliance
The GRA scheduler tracks resource usage to ensure that each RSG receives its minimum
allocation of resources when all groups are actively using the system. The measurement of
how well a group receives its configured resource allocation is called compliance.
The Netezza measures compliance by measuring the work statistics for each job completed
on the system. The GRA scheduler tracks the work statistics for each RSG and divides the
total for the RSG over the total completed for all of the RSGs during that time. The GRA
scheduler uses the resulting “actual use” percentage to determine whether a group is in
compliance or whether it is overserved or underserved. The allowed resources percentage is
the amount of resources that a group should be allocated, based on its minimum and max-
imum resource settings and the activity of other RSGs on the system.
An overserved group is one that has received more resources than its allowed percent-
age. This often happens when one group is very busy but the others are not. Due to the
volume of the activity when other groups are idle, the group has received more than its
allowed share of the resources.
An underserved group is one that has received less than its allowed percentage. Typi-
cally this occurs because a group is idle. If users are not submitting any work, the
group does not require or use the resources apportioned to it.
The GRA scheduler uses the compliance values to rank the groups from very underserved to
very overserved. If a group is underserved, the GRA scheduler will choose the underserved
group’s work ahead of an overserved group’s work.
The GRA scheduler calculates compliance over a horizon value; the horizon is 60 minutes
by default. The horizon is a moving time window of the last hour’s activity to show compli-
ance. Netezza moves the window every 1/60th of the horizon (every minute for GRA, and
every 10 seconds for the snippet scheduler).
Table 12-6 describes the GRA scheduler horizon and compliance registry settings.
Table 12-6: GRA Compliance Registry Settings
Name Type Default Description
host.schedGRAHorizon int 3600 Specifies the amount of time in seconds for
the GRA horizon, which is the time range
over which the GRA scheduler calculates the
compliance of a resource scheduling group.
host.schedGRAVery-
UnderLimit
int -10 Specifies the percentage threshold below
which an RSG is identified as very under-
served. A group that is 10% or more below
its allowed percentage is very underserved.
host.schedGRAUnder-
Limit
int -5 Specifies the percentage threshold below
which an RSG is identified as underserved. A
group that is 5% or more (up to the very
underserved threshold) below its allowed
percentage is underserved.

20282-20 Rev.1 12-15
Managing GRA
Monitoring Resource Utilization and Compliance
Netezza has several methods for monitoring GRA usage and compliance, as well as the
workload itself.
You can use several system views and virtual tables to display information about
resource group utilization and history, as well as system utilization.
You can use the NzAdmin interface offers reports that display information about how
the system is allocating resources.
You can use the Netezza Performance Portal interface to monitor query activity and
workload on your Netezza systems. For details, see the IBM Netezza Performance Por-
tal User’s Guide.
The following sections describe the resource views and NzAdmin reports. For details on the
Netezza Performance Portal reports, refer to the IBM Netezza Performance Portal User’s
Guide or the online help available from the portal interface.
GRA Views and Reporting
You can use the following views to monitor GRA and snippet scheduling data:
_v_sched_gra_ext and _v_sched_sn_ext display information about how busy the system
is and how GRA and snippet resources are being allocated and used by the recent jobs
on the system. These views contain a row for each active group during the report inter-
val. For a system with a small number of RSGs, the _v_sched_gra_ext view typically
contains records for about a week of activity, and the _v_sched_sn_ext view typically
contains a few hours of data. These views reset when the system stops and restarts.
Note: The _v_sched_gra and _v_sched_gra_latest views are still available, but the *_ext
versions of these views in Release 6.0 and later contain more information including the
maximum resource allocations, job limit information, and more.
_v_gra_sched_ext_latest and _v_sched_sn_ext_latest display information about the pre-
vious ten-minute update of scheduling information.
_v_plan_resource view shows resource usage over time to assist with WLM issue trou-
bleshooting and capacity planning. It keeps at least 2000 records of query plan
activity.
host.schedGRAOver-
Limit
int 5 Specifies the percentage threshold above
which an RSG is identified as overserved. A
group that is 5% or more (up to the very
overserved threshold) above its allowed per-
centage is overserved.
host.schedGRAVeryOver-
Limit
int 10 Specifies the percentage threshold above
which an RSG is identified as very over-
served. A group that is 10% or more above
its allowed percentage is very overserved.
Table 12-6: GRA Compliance Registry Settings
Name Type Default Description

12-16 20282-20 Rev.1
IBM Netezza System Administrator’s Guide
_v_system_util view shows system utilization for certain resources such as host and
SPU CPU, disk, memory, and fabric (communication) resources. The table is updated
based on the increment specified in the host.sysUtilVtUpdateInterval setting, with a
default of 60 seconds. It keeps approximately two days of data.
Netezza saves the resource usage information for the horizon in the _v_sched_gra_ext sys-
tem view. Every 600 seconds (by default), the system adds a new row for each active group
with its resource compliance totals for that period. If a group is not active, Netezza does
not create a new row for that group.
Table 12-7 describes the settings that control the compliance monitoring windows.
To display compliance and resource usage using the _v_sched_gra_ext view, you can use a
SQL command similar to the following (note that the output lines are very long and wrap in
the sample below):
For each active resource group, the system provides information about how busy each
group is, and how the scheduler is managing the GRA resources as well as scheduler
resources.
Note: Within the view output, you may notice an _ADMIN_ resource group. This is a sys-
tem-default group for the admin user account and cannot be modified.
NzAdmin GRA Reports
The NzAdmin tool offers three reports that display information about how the system is
allocating resources:
Table 12-7: GRA Report Settings
Name Type Default Description
host.snVtUpdateInterval int 60 sec Specifies how often the snippet scheduler
updates the virtual tables for resource usage
statistics for completed snippets.
host.graVtUpdateInterval int 600 sec Specifies how often the GRA scheduler
updates resource usage statistics for com-
pleted jobs.
SELECT * FROM _v_sched_gra_ext;
ENTRY_TS | GROUPID | PLANS_STARTED | PLANS_FINISHED | PLANS_WAITING_LONG |
PLANS_WAITING_SHORT | PLANS_RUNNING_LONG | PLANS_RUNNING_SHORT | TARGET_JOB_MAX | TARGET_
RSG_PCT | TARGET_RSG_MAX | ACTUAL_RSG_PCT | ACTUAL_RSG_PCT_SAMPLE| ACTUAL_JOB_MAX |
ALLOWED_RSG_PCT | ALLOWED_RSG_PCT_SAMPLE | RSG_HORIZON_US | COMPLIANCE | SAMPLE_SECS |
BUSY_SECS | HOST_CPU_SECS | HOST_DISK_READ_SECS | HOST_DISK_WRITE_SECS | HOST_FABRIC_SECS
| SPU_CPU_SECS | SPU_DISK_READ_SECS | SPU_DISK_WRITE_SECS | SPU_FABRIC_SECS |
GROUPNAME | START_TIME | END_TIME
1280741126077846 | 4900 | 39 | 39 | 0 |
0 | 0 | 0.028 | 0 | 100 | 100 |
0 | 2| 5 | 0 | 2 |
3600000000 | 0 | 599.45 | 14.48 | 9.13 | 0 | 0 |
0 | 0.13 | 0 | 0 | 0 | _ADMIN_
| 2010-0 8-02 04:25:26.077846 | 2010-08-02 05:25:26.0778

20282-20 Rev.1 12-17
Managing GRA
Summary — Displays the GRA performance status for the last 60 minutes. For more
information, see “Resource Allocation Performance Summary” on page 12-17.
History — Displays all available table information from summary data captured in ten-
minute intervals. For more information, see “Resource Performance History” on
page 12-17.
Graph — Displays the resource allocation history for specific days. For more informa-
tion, see “Resource Performance History Graph” on page 12-18.
Resource Allocation Performance Summary
The Resource Allocation Performance summary displays the active resource allocation
groups, their requested versus granted allocation percentages, plus the number of jobs run-
ning and the number of short and long queued jobs.
To view the resource allocation performance summary status, on the NzAdmin toolbar
click Tools > Workload Management > Performance > Summary.
The system displays the Resource Allocation Performance window.
Figure 12-6: Resource Allocation Performance Window
Resource Performance History
The Resource Allocation Performance History window displays the summary for the hourly
horizon with the most recent hour first. The previous horizon summaries appear in descend-
ing order. Review this window to see the actual resource percentages for that hour, and a
snapshot of the job summary status at the conclusion of that hour.
To view the resource allocation performance history, on the toolbar click Tools > Work-
load Management > Performance > History.
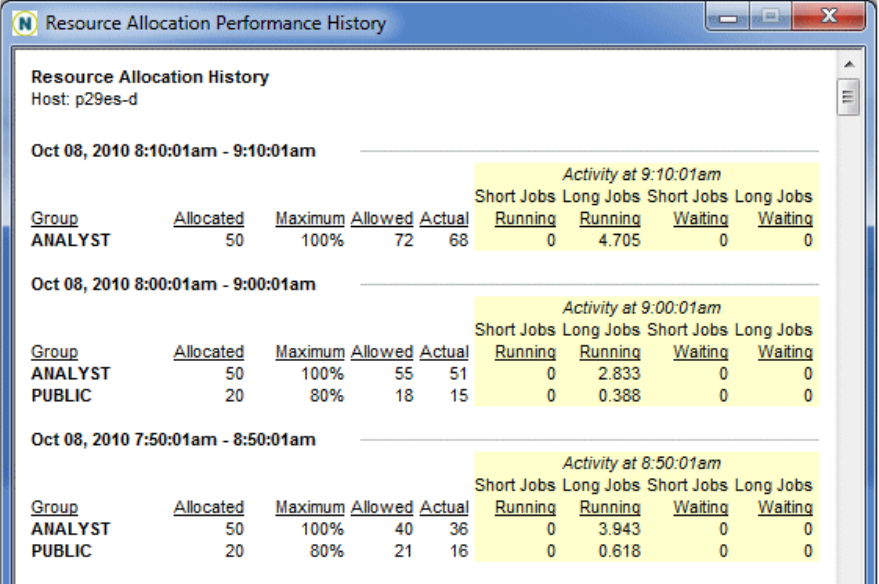
12-18 20282-20 Rev.1
IBM Netezza System Administrator’s Guide
The system displays the Resource Allocation Performance History window.
Figure 12-7: Resource Allocation Performance History Window
Resource Performance History Graph
The Resource Allocation Performance graph compares the allocation percentages for up to
14 groups on a daily basis, along with a summary of the active jobs throughout the day.
To view the resource allocation performance history graph, on the toolbar click Tools >
Workload Management > Performance > Graph.
The system displays the Resource Allocation Performance graph.

20282-20 Rev.1 12-19
Managing PQE
Figure 12-8: Resource Allocation Performance Graph
The lines for each group show the resource usage trends through the day with the
usage percentage on the left vertical axis.
The blue shaded background shows the number of jobs running at each time interval
with the job count on the right side vertical axis)
The drop-down list allows you to select a different day of resource usage to display.
Managing PQE
If your environment has distinct types of jobs that each have different priorities or service
level goals, you can use priority settings to help Netezza identify and prioritize the more
critical jobs over the less critical ones. Netezza uses the priority query execution (PQE) set-
tings to identify the jobs with the highest importance.
When combined with GRA, Netezza assigns more resources to higher priority jobs over
lower priority jobs; for queued jobs waiting to run, Netezza schedules the higher priority
jobs to run before the lower priority jobs. When used with the gate keeper, PQE can be used
queue and control the number of each type of job that is allowed to run at a given time on
the system.
You assign priority to jobs in several ways:
You can assign a priority to a group of users; each user inherits the priority of the
group.
You can assign priority to a user, which can override a priority specified for the user’s
group(s).
You can assign a priority as a system default priority for any users who do not have a
priority set by their group or account.
When you configure priority for a user, group, or system-wide, you can specify a default pri-
ority and a maximum priority. The system does not allow the user to specify a priority
greater than his or her maximum priority.

12-20 20282-20 Rev.1
IBM Netezza System Administrator’s Guide
The admin user as well as permitted users can change the priority of a running job. You can
raise the job’s priority, or decrease a job’s priority. Users can raise their job’s priority to the
maximum allowed for them as individuals or as members of a group. For more information
about priority assignment, see “Specifying Session Priority” on page 12-20.
Netezza Priority Levels
The Netezza system has six priority levels for query queuing and execution. Four of the pri-
ority levels are for user jobs and two are for system resources.
Table 12-8 describes Netezza priorities.
Specifying Session Priority
You can define the default and maximum priority values for a user, a group, or as the sys-
tem default. The system determines the value to use when the user connects to the host
and executes SQL commands.
The possible priorities are critical, high, normal, or low. The default priority setting for
users, groups, and the system is normal. If you specify a priority of none, the user or group
inherits their priority. Users inherit from their group memberships; groups inherit from the
system setting, and the system inherits from the system default priority setting. The
Netezza administrator and permitted users can set priority for users, groups, and sessions,
as well as on a system-wide basis, using SQL commands and the NzAdmin interface.
Some examples of the SQL commands follow. For more information about the SQL com-
mands, see the IBM Netezza Database User’s Guide.
The syntax to set system the default and maximum priority is:
SET SYSTEM DEFAULT [DEFPRIORITY | MAXPRIORITY ] TO [CRITICAL | HIGH |
NORMAL | LOW | NONE]
The syntax to modify the priority for a user is:
ALTER USER tim WITH DEFPRIORITY LOW MAXPRIORITY HIGH;
The syntax to create a group and set the default priority is:
CREATE GROUP group_name WITH DEFPRIORITY HIGH;
Table 12-8: Netezza Priorities
Queue Level User Visible
System critical Highest priority system operations No
Critical Highest priority user Yes
High Priority user jobs. These jobs take precedences over
normal jobs
Yes
Normal Default operation level for all jobs Yes
Low Lowest priority user jobs, background loads, jobs
that should not affect other activity
Yes
System background Lowest priority system jobs No
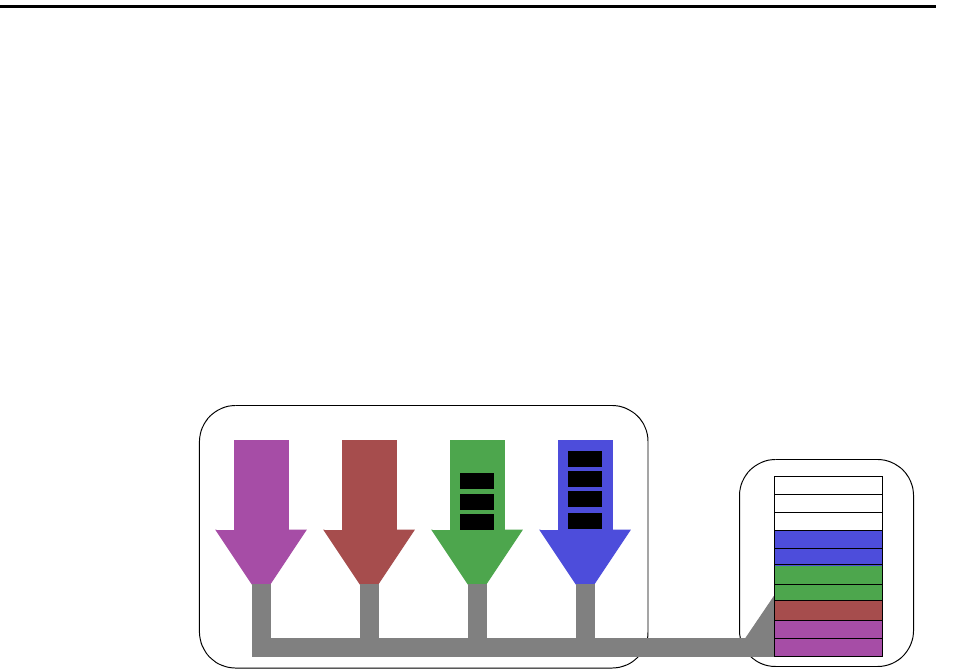
20282-20 Rev.1 12-21
Managing the Gate Keeper
Changing the Priority of Jobs in a Session
You can use the nzsession priority command or the ALTER SESSION command to change
the priority for all jobs for that session. The system assigns priority to all current and new
jobs in the session. You must have Manage System privileges to change the priority of a
session.
To change the priority of a session using the nzsession priority command, enter:
nzsession priority -high -u user -pw password -id 21664
To change the priority of a session using the ALTER SESSION command, enter:
MYDB(USER)=> ALTER SESSION 21664 SET PRIORITY TO HIGH;
ALTER SESSION
You can use the alter session command to change priority within a script. If you do not
specify a session ID, the system assumes the current session.
You can also use the NzAdmin tool to change the priority of sessions. You can use the
nzsession command to show information about the current sessions and their priority.
Note: Use caution in assigning the critical and high priority. If you assign too many jobs to
the high or critical priority, you could bring normal and low priority work to a standstill.
Managing the Gate Keeper
If your environment does not have distinct groups of users, but you can quantify different
types of work on a job-by-job basis, then the gate keeper may be more useful for WLM in
your environment. The gate keeper manages jobs based on their priority, and optionally, by
the estimated runtime for normal-priority queries.
The gate keeper is not enabled by default, so any new work requests pass directly to the
GRA scheduler for processing. If you enable the gate keeper using a system registry setting,
it creates queues to manage jobs submitted to the system before they are passed to the
GRA scheduler. If you also use PQE, the gate keeper creates a queue for Critical, High, Nor-
mal, and Low priority jobs, with settings that control how many of each type of job can run
concurrently on the system.
For example, Figure 12-9 shows how the gate keeper creates queues for jobs of different
priorities. You can configure and use the gatekeeper queues to “throttle” the number of
jobs of each type that are running on the system (the settings are user-configurable).
Figure 12-9: Using PQE to Control Job Concurrency by Runtime and Priority
Netezza Host
Netezza SPUs
Critical High Normal Low
36 4 2 2

12-22 20282-20 Rev.1
IBM Netezza System Administrator’s Guide
In Figure 12-9, the gate keeper configuration settings allow up to 36 critical, 4 high, 2 nor-
mal, and 2 low priority jobs to run concurrently. If the maximum number of jobs for a
specific priority are already running, the gate keeper queues any additional jobs of that type
(as in the Normal and Low queues). A job of any priority could be queued because there are
not enough resources available to run that specific job. (Although not shown in the figure,
requests from the gate keeper proceed to the GRA scheduler for WLM processing before
they proceed to the SPUs.)
Table 12-9 describes the configuration registry settings that you can use to change the gate
keeper defaults. To change the setting you use the nzsystem command to pause the sys-
tem, set the value, and then resume the system.
Table 12-9: Gate Keeper Registry Settings
Name Type Default Description
host.gkEnabled bool yes Enables the gate keeper. If you enable the
gate keeper, jobs submitted to the Netezza
are first processed by the gatekeeper and
allowed to pass to the GRA only when the
number of currently running jobs are less
than the configured priority and/or
response time thresholds.
host.schedAllowGKandGRA bool no Specifies whether gatekeeper and GRA are
both enabled. The default is no.
host.gkHighPriQueries int 36 Specifies the number of high priority que-
ries that the gatekeeper will allow to run at
one time assuming that resources and
query slots are available. High priority jobs
under this threshold will be allowed to
move on to the GRA scheduler for process-
ing; otherwise, the extra jobs are queued.
host.gkLowPriQueries int 36 Specifies the number of low priority que-
ries that the gatekeeper will allow to run at
one time assuming that resources and
query slots are available. High priority jobs
under this threshold will be allowed to
move on to the GRA scheduler for process-
ing; otherwise, the extra jobs are queued.
host.gkMaxPerQueue int 48 Specifies the number of normal priority
queries that the gate keeper sends to the
SPUs for processing. If there are 48 active
queries, any additional queries are queued
at the gate keeper normal queue to wait
for active queries on the SPU to finish. If
you provide a comma-separated list of val-
ues for gkMaxPerQueue, the gate keeper
uses the values to set the queue length for
the normal priority runtime queues.
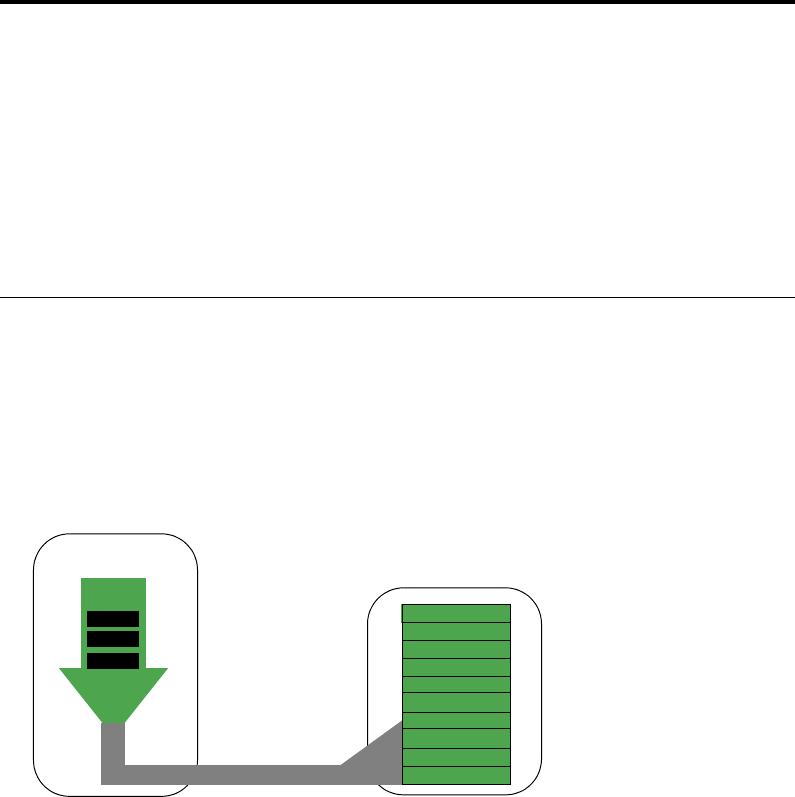
20282-20 Rev.1 12-23
Managing the Gate Keeper
The gate keeper uses a default critical priority queue of 36, so the gate keeper allows up to
36 critical priority queries at one time assuming that resources and query slots are avail-
able. This is a hardcoded configuration setting and cannot be changed.
If you do not use PQE, all jobs are considered Normal; the gate keeper uses only one queue
to process new work requests. Figure 12-10 illustrates the case in which gate keeper is
enabled but PQE is not used to prioritize the queries.
Figure 12-10: Gate Keeper Default Normal Work Queue
Optionally, the Normal queue offers settings that you can use to configure additional queu-
ing controls. For example, Figure 12-11 shows how you can use the host.gkMaxPerQueue
and host.gkQueueThreshold settings to create up to four queues to hold queries of different
estimated runtimes. You can also configure the gate keeper to allow more of the very short
queries to run and less of the longer ones, which can improve performance for the shorter
queries.
host.gkQueueThreshold -1 Specifies the time limit in seconds for
queries in the normal queue. If
gkQueueThreshold=-1, the gate keeper
creates only one normal queue which does
not restrict queries by their runtime. If you
provide a comma-separated list of values
for gkQueueThreshold, the gate keeper
creates several queues to hold the queries
that have an estimated runtime within
that range.
Table 12-9: Gate Keeper Registry Settings
Name Type Default Description
Netezza Host
Netezza SPUs
Normal
48
host.gkMaxPerQueue=48 host.gkMaxConcurrent=48
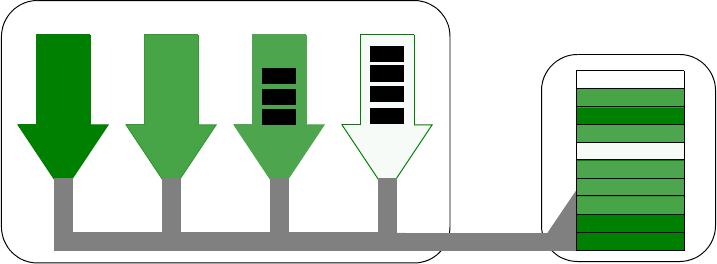
12-24 20282-20 Rev.1
IBM Netezza System Administrator’s Guide
Figure 12-11: Gate Keeper Time-Based Normal Queues and Registry Settings
If you provide a comma-separated list of values for gkQueueThreshold, the gate keeper cre-
ates several queues to hold the queries that have an estimated runtime within that range.
In Figure 12-11, the gkQueueThreshold setting defines four queues: a queue for queries
with estimated runtimes of less than 1 second; one for queries with an estimated runtime
of 1 up to 10 seconds; one for queries with estimated runtimes of 10 up to 60 seconds;
and one for queries that have runtimes of 60 or greater seconds.
Using the gkMaxPerQueue setting, you can control the number of queries from each queue
that are sent to the SPU for processing. In this example, the gate keeper will allow up to 20
queries from the <1 second queue to pass on for processing, with up to 5 queries from the
1-<10 second queue; up to 3 queries from the 10-<60 second queue; and only 1 from the
60> second queue. Thus, the gate keeper will send more of the faster queries and less of
the longer-running queries for processing. With these queue settings, only one 60-second
or greater query can be active on the SPU at one time, and the gate keeper will queue any
additional 60-second or greater queries until the first one completes.
Netezza Host
Netezza SPUs
20 5 3 1
host.gkMaxPerQueue=20,5,3,1
host.gkQueueThreshold=1,10,60,-1
<1 1 – <10 10 – <60 60>

13-1
C H A P T E R 13
Displaying Netezza Statistics
What’s in this chapter
Netezza Stats Tables
Displaying System Statistics
The nzstats command displays operational statistics about system capacity, faults, and
performance. Operational statistics provide you with the following information:
A high-level overview of how your system is running in a context of recent system
activity
Details so that you can diagnose problems, understand performance characteristics,
and interface to system management software
Netezza Stats Tables
The nzstats command allows you to view sets of related operational information. These sets
are organized as groups of related statistics or tables that contain rows of related statistics.
Note: The terms group and table are based on Simple Network Management Protocol
(SNMP) concepts and are not associated with Netezza database groups or tables.
Table 13-1 lists the Netezza core groups and tables that you can view using the nzstats
command.
Table 13-1: Netezza Groups and Tables
Group/Table Description For more information
Database Table Provides information about
databases.
See “Database Table” on
page 13-2.
DBMS Group Provides information about the
database server.
See “DBMS Group” on
page 13-3.
Host CPU Table Provides information about each
host processor.
See “Host CPU Table” on
page 13-3.
Host Filesystem
Table
Provides information about each
local host file system.
See “Host File System Table” on
page 13-4.

13-2 20282-20 Rev.1
IBM Netezza System Administrator’s Guide
Database Table
If you are the user admin, you can use the nzstats command to display the Database Table,
which displays information about the databases. It has the following columns:
Host Interface
Table
Provides information about the
host’s interface.
See “Host Interface Table” on
page 13-4.
Host Mgmt Chan-
nel Table
Provides information about the
system’s management channel
from the host’s viewpoint.
See “Host Management Channel
Table” on page 13-6.
Host Network
Table
Provides information about the
system’s main UDP network layer
from the host’s viewpoint.
See “Host Network Table” on
page 13-7.
Host Table Provides information about each
host.
See “Host Table” on page 13-8.
HW Mgmt Channel
Table
Provides information about each
SPU/SFI management channel
from the SPU’s or SFI’s viewpoint.
See “Hardware Management
Channel Table” on page 13-9.
Per Table Per Data
Slice Table
Provides information about tables
on a per-data slice basis.
See “Per Table Per Data Slice
Table” on page 13-10.
Query Table Provides information about active
queries as obtained from the
_v_qrystat view.
See “Query Table” on
page 13-10.
Query History
Table
Provides a list of the last 2000
queries that completed as
recorded in the _v_qryhist view.
See “Query History Table” on
page 13-11.
SPU Partition
Table
Provides information about a
SPU’s disk partitions.
See “SPU Partition Table” on
page 13-12.
SPU Table Provides information about each
SPU’s memory.
See “SPU Table” on page 13-13.
System Group Provides information about the
system as a whole.
See “System Group” on
page 13-13.
Table Table Provides information about data-
base tables and views.
See “Table Table” on page 13-14.
Table 13-1: Netezza Groups and Tables
Group/Table Description For more information
Table 13-2: Database Table
Column Description
DB Id A unique value for each DBMS database.
DB Name The name of the database.

20282-20 Rev.1 13-3
Netezza Stats Tables
DBMS Group
The DBMS Group displays information about the database server. It has the following
columns:
Host CPU Table
The Host CPU Table displays information about each host’s processors. It has the following
columns:
Create Date The date and time this database was created.
Owner Id The user ID for the user that owns this database.
Num Tables The number of user tables associated with this database.
Num Views The number of user views associated with this database.
Num Active Users The number of users currently attached to this database.
Table 13-2: Database Table
Column Description
Table 13-3: DBMS Group
Column Description
Num Databases The total number of user databases.
Num Groups The total number of groups.
Num Users The total number of database users.
Num Tables The total number of user tables.
Num Views The total number of user views.
Num SQL Sessions The total number of current SQL sessions/connections.
Num Queries The total number of queries that have been submitted, but not
completed.
Num Queries Running The total number of currently executing queries.
Num Queries Waiting The total number of currently queries waiting to be run.
Num Transactions The total number of open and recent transactions maintained
by the Transaction Manager.
Table 13-4: Host CPU Table
Column Description
Host ID The index into the host table.
CPU ID A unique value for each CPU within a host.

13-4 20282-20 Rev.1
IBM Netezza System Administrator’s Guide
Host File System Table
The Host File System Table displays information about each local host filesystem. It has
the following columns:
Host Interface Table
The Host Interface Table displays information about the host’s physical interfaces. It has
the following columns:
Ticks The number of CPU ticks that have occurred. A tick is 1/100th of a sec-
ond. Linux uses the term jiffy for this amount of time.
Idle Ticks The number of ticks where the CPU is not doing anything (that is, run-
ning the idle task).
Non-idle Ticks Non-idle ticks represents time that the CPU is either in user or system
mode.
Avg Load The average, as calculated over the last minute, of the utilization per-
centage for the processor. (Note that commands such as top show the
average utilization for shorter periods of time, such as only the last three
seconds.)
Table 13-4: Host CPU Table
Column Description
Table 13-5: Host File System Table
Column Description
Host ID The index into the host table. Always 1.
FS ID A unique value for each local file system within a host.
Device Name The name of the file system's device.
Mount Point The directory name on which the file system is mounted.
Space The total size in KB.
Free Space The amount of free space in KB.
Used Space The amount of used space in KB.
% Used Space The percentage of used space.
Table 13-6: Host Interfaces Table
Column Description
Host ID The index into the host table.
If ID A unique value for each interface within a host.
Name The operating system name for the interface (eth1).

20282-20 Rev.1 13-5
Netezza Stats Tables
State The current state of the host interface. Up is 1 and down is 2.
State Text The textual description of the interface state.
MTU The size of the largest datagram that can be sent/received on the inter-
face, specified in bytes.
MAC Address The interface's address at the protocol layer immediately below the net-
work layer in the protocol stack.
IP Address The interface's IP address.
In Bytes The total number of bytes received on the interface, including framing
characters.
In Bytes-64 A 64-bit version of the In Bytes managed object, updated every 15
seconds.
In Byte Rate The previous 1 minute average rate of bytes received (15 seconds
granularity).
In Pkts The total number of packets received on the interface.
In Pkt Rate The previous 1 minute average rate of packets received (15 seconds
granularity).
In Errors The number of inbound packets that contain errors preventing them
from being deliverable to a higher-layer protocol.
Out Bytes The total number of bytes transmitted out of the interface, including
framing characters.
Out Bytes-64 A 64-bit version of the Out Bytes managed object, updated every 15
seconds.
Out Byte Rate The previous 1 minute average rate of bytes sent (15 seconds
granularity).
Out Pkts The total number of packets sent on the interface.
Out Pkt Rate The previous 1 minute average rate of packets sent (15 seconds
granularity).
Out Errors The number of outbound packets that could not be transmitted because
of errors.
Table 13-6: Host Interfaces Table
Column Description

13-6 20282-20 Rev.1
IBM Netezza System Administrator’s Guide
Host Management Channel Table
The Host Mgmt Channel Table displays information about the system’s management chan-
nel from the host’s viewpoint. It has the following columns:
Table 13-7: Host Management Channel Table
Column Description
Host ID The index into the host table. Always 1.
In Bytes The total number of bytes received.
In Bytes-64 A 64-bit version of the In Bytes managed object, updated every
15 seconds.
In Byte Rate The previous 1 minute average rate of bytes received (15 sec-
onds granularity).
In Pkts The total number of packets received.
In Acks The total number of ACK packets received.
In Msgs The total number of messages received.
In Msg Rate The previous 1 minute average rate of messages received (15
seconds granularity).
In Msg Q Len The length of the receive packet queue for messages being
assembled.
In Errors The number of inbound errors encountered.
Out Bytes The total number of bytes sent.
Out Bytes-64 A 64-bit version of the Out Bytes managed object, updated every
15 seconds.
Out Byte Rate The previous 1 minute average rate of bytes sent (15 seconds
granularity).
Out Pkts The total number of packets sent.
Out Unicasts The total number of unicast packets sent.
Out Broadcasts The total number of broadcast packets sent.
Out Acks The total number of ACK packets sent.
Out Msgs The total number of messages sent.
Out Msg Rate The previous 1 minute average rate of messages sent (15 sec-
onds granularity).
Out Msg Q Len The length of the send packet queue.
Out Errors The number of outbound errors encountered.
Out Retransmits The total number of outbound retransmissions.

20282-20 Rev.1 13-7
Netezza Stats Tables
Host Network Table
The Host Network Table displays information about the system’s UDP network layer from
the host’s viewpoint. It has the following columns:
Out Retransmit Rate The previous 1 minute average rate of retransmissions (15 sec-
onds granularity).
Out Retransmit Q Len The number of entries in the retransmit queue.
Table 13-7: Host Management Channel Table
Column Description
Table 13-8: Host Network Table
Columns Description
Host ID The index into the host table.
In Bytes The total number of bytes received.
In Bytes-64 A 64-bit version of In bytes, updated every 15 seconds.
In Byte Rate The previous 1 minute average rate of bytes received (15 sec-
onds granularity).
In Pkts The total number of packets received.
In Msgs The total number of messages received.
In Msg Rate The previous 1 minute average rate of messages received (15
seconds granularity).
In Errors The number of inbound errors encountered.
Out Bytes The total number of bytes sent.
Out Bytes-64 A 64-bit version of the Out Bytes managed object, updated
every 15 seconds.
Out Byte Rate The previous 1 minute average rate of bytes sent (15 seconds
granularity).
Out Pkts The total number of packets sent.
Out Unicasts The total number of unicast packets sent.
Out Broadcasts The total number of broadcast packets sent.
Out Msgs The total number of messages sent.
Out Msg Rate The previous 1 minute average rate of messages sent (15 sec-
onds granularity).
Out Errors The number of outbound errors encountered.
Out Retransmits The total number of outbound retransmissions.

13-8 20282-20 Rev.1
IBM Netezza System Administrator’s Guide
Host Table
The Host Table displays information about each host on the system. It has the following
columns:
Out Retransmit Rate The previous 1 minute average rate of retransmissions (15 sec-
onds granularity).
Out Retransmit Q Len The number of entries in the retransmit queue.
Table 13-8: Host Network Table
Columns Description
Table 13-9: Host Table
Column Description
Host ID A unique value for each host in the system (always 1).
OS Type The type of the host's operating system (Linux).
OS Version The version of the host's Linux operating system.
Num CPUs The number of processors in the host.
Num File Systems The number of file systems in the host.
Swap Space The total swap size in KB.
Free Swap Space The amount of free swap space in KB.
Used Swap Space The amount of used swap space in KB.
% Used Swap Space The percent of used disk space.
Real Memory The total real memory in KB.
Free Real Memory The amount of free real memory in KB.
Used Real Memory The amount of used real memory in KB.
% Used Real Memory The percent of used real memory.
Shared Memory The total shared memory in KB.
Free Shared Memory The amount of free shared memory in KB.
Used Shared Memory The amount of used shared memory in KB.
% Used Shared Memory The percent of used shared memory.

20282-20 Rev.1 13-9
Netezza Stats Tables
Hardware Management Channel Table
The Hardware Management Channel Table displays information about the system’s man-
agement channel from each SPU’s and SFI’s viewpoint. It has the following columns:
Table 13-10: Hardware Management Channel Table
Column Description
HW ID The index into the hardware inventory table
In Bytes The total number of bytes received.
In Bytes-64 A 64-bit version of In Bytes, updated every 15 seconds.
In Byte Rate The previous 1 minute average rate of bytes received (15 sec-
onds granularity).
In Pkts The total number of packets received.
In Acks The total number of ACK packets received.
In Msgs The total number of messages received.
In Msg Rate The previous 1 minute average rate of messages received (15
seconds granularity).
In Msg Q Len The length of the receive packet queue - for messages being
assembled.
In Errors The number of inbound errors encountered.
Out Bytes The total number of bytes sent.
Out Bytes-64 A 64-bit version of the Out Bytes managed object, updated every
15 seconds.
Out Byte Rate The previous 1 minute average rate of bytes sent (15 seconds
granularity).
Out Pkts The total number of packets sent.
Out Unicasts The total number of unicast packets sent.
Out Broadcasts The total number of broadcast packets sent.
Out Acks The total number of ACK packets sent.
Out Msgs The total number of messages sent.
Out Msg Rate The previous 1 minute average rate of messages sent (15 sec-
onds granularity).
Out Msg Q Len The length of the send packet queue.
Out Errors The number of outbound errors encountered.
Out Retransmits The total number of outbound retransmissions.

13-10 20282-20 Rev.1
IBM Netezza System Administrator’s Guide
Per Table Per Data Slice Table
The Per Table Per Data Slice Table displays information about tables on a per-data slice
basis. It has the following columns.
Query Table
If you are the admin user, you can use the nzstats command to display the Query Table,
which displays information about the queries currently 'running/executing' on the Netezza
server. Those queries which have completed execution and whose results sets are being
returned to a client user will not be listed in this table. You can use the system view
_v_qrystat to view the status of queries running. For more information see Table 9-8 on
page 9-29.
Note: This query table uses the _v_qrystat view for backward compatibility and will be dep-
recated in a future release. For more information about the new query history feature, see
Chapter 11, “Query History Collection and Reporting.”
The query table has the following columns:
Out Retransmit Rate The previous 1 minute average rate of retransmissions (15 sec-
onds granularity).
Out Retransmit Q Len The number of entries in the transmit queue.
Table 13-10: Hardware Management Channel Table
Column Description
Table 13-11: Per Table Data Slice Table
Column Description
Table Id The ID corresponding to a table.
DS Id The ID corresponding to a data slice.
Disk Space The amount of disk space used for this table in this data slice.
Table 13-12: Query Table
Column Description
Query Id The ID of the query.
Session Id The ID of the session that initiated this query.
Plan Id The internal ID of the plan associated with this query.
Client Id The internal client ID associated with the query’s session.
Client IP Addr The client’s IP address.
SQL Statement The SQL statement. You can see the entire string by increasing the
width of the column.
State The state of the query in integer form.

20282-20 Rev.1 13-11
Netezza Stats Tables
Query History Table
If you are the user admin, you can use the nzstats command to display the Query History
Table, which displays information about the last 15000 completed queries. You can use
the system view _v_qryhist to view the recent query history. For more information, see
Table 9-9 on page 9-29.
Note: This query history table uses the _v_qrystat view for backward compatibility and will
be deprecated in a future release. For more information about the new query history fea-
ture, see Chapter 11, “Query History Collection and Reporting.”
Table 13-13 has the following columns:
State Text The state of the query in text form. Possible states are pending,
queued, running.
Submit Date The date and time that the query was submitted.
Start Date The date and time that the query started running.
Elapsed Time The estimated elapsed time, as determined by the optimizer.
Priority The priority number.
Priority Text The priority text string.
Estimated Cost The estimated seconds, as determined by the optimizer.
Estimated Disk The estimated disk usage, as determined by the optimizer.
Estimated Memory The estimated memory usage, as determined by the optimizer.
Snippets The number of snippets (steps) in the plan for this query.
Snippets Done The number of snippets that have finished.
Snippets Done Pct The percentage of snippets that have finished.
Result Rows The number of rows in the result.
Result Bytes The number of bytes in the result.
Table 13-12: Query Table
Column Description
Table 13-13: Query History Table
Column Description
Query Id The ID of the query.
Session Id The ID of the session that initiated this query.
Plan Id The internal ID of the plan associated with this query
Client ID The internal client ID associated with the query’s session.
Db Id The database ID from which this query is running.

13-12 20282-20 Rev.1
IBM Netezza System Administrator’s Guide
SPU Partition Table
The SPU Partition Table displays information about the SPU’s disk partitions. It has the fol-
lowing columns:
User Id The user’s name.
Client IP Addr The client’s IP address.
SQL Statement The SQL statement. You can see the entire string by increasing the
width of the column.
Submit Date The date and time that the query was submitted.
Start Date The date and time that the query started running.
End Date The date and time that the query completed.
Elapsed Time The estimated elapsed time, as determined by the optimizer.
Priority The priority number.
Priority Text The priority text string.
Estimated Cost The estimated seconds, as determined by the optimizer.
Estimated Disk The estimated disk usage, as determined by the optimizer.
Estimated Mem The estimated memory usage, as determined by the optimizer.
Snippets The number of snippets (steps) in the plan for this query.
Snippets Done The number of snippets processed.
Result Rows The number of rows in the result.
Result Bytes The number of bytes in the result.
Table 13-13: Query History Table
Column Description
Table 13-14: SPU Partition Table
Column Description
HW ID The index into the hardware table for the SPU containing this partition.
Partition Id A unique value (per SPU) for each disk partition within a SPU.
Disk Id The index into the SPU disk table for the disk on which this partition
resides.
Type The type of the partition (core, swap, primary, secondary).
Type Text A description of the partition.
Space The total partition size in KB.
Free Space The amount of free partition space in KB.
20282-20 Rev.1 13-13
Netezza Stats Tables
SPU Table
The SPU Table displays information about each SPU’s processor and memory. It has the
following columns:
System Group
The System Group displays information about the system as a whole. It has the following
columns:
Used Space The amount of used partition space in KB.
% Used Space The percent of used partition space.
Table 13-14: SPU Partition Table
Column Description
Table 13-15: SPU Table
Column Description
HW ID The index into the hardware inventory table.
Memory The total memory in KB.
Free Memory The amount of free memory in KB.
Used Memory The amount of used memory in KB.
% Used Memory The percent of used memory.
Table 13-16: System Group
Column Description
Name The administrator-assigned name of the system.
Description A description of the system.
Contact The name of the contact person for this system and contact
information.
Location The physical location of this node (for example, “telephone closet,
3rd floor.”)
IP Addr The primary IP address of the system.
Up Time The time in seconds since the management portion of the system
was last re-initialized.
Up Time Text The time printed in minutes and seconds.
Date The system’s local date and time of day.
State The current state of the system (from the nzstate command) as an
integer.
13-14 20282-20 Rev.1
IBM Netezza System Administrator’s Guide
Table Table
If you are the user admin, you can use the nzstats command to display the Table Table,
which displays information about database tables. It has the following columns:
State Text The text description of the system state. This matches the display
from the nzstate command.
Model The Netezza model number for this system. Used in the callHome.txt
file.
Serial Num The serial number for this system. Used in the callHome.txt file.
Num Data Slices The number of data slices.
Num SFIs The number of SFIs (sum of all hosts).
Num SPUs The number of SPUs.
Num Failovers The number of failover tasks running.
Num Regen Tasks The number of regeneration tasks running.
Table 13-16: System Group
Column Description
Table 13-17: Table Table
Column Description
DB ld The ID corresponding to the database for this table.
DB Name The name of the database.
Table Id A unique value for this table.
Table Name The name of this table.
Create Date The date and time that this table was created.
Type The type of this table (table, view) expressed as its type integer.
Num Columns The number of table columns.
Row Size The length of a table row.
Disk Space The total disk space used to store this table in KB. You can use the
-allocationUnit option to show the disk space used in extents or
blocks.
Avg Space Per DS The average disk space used by each dataslice of the table in KB.
Max Space Per DS The disk space consumed by the largest dataslice for the table in
KB.
Max Space DS Id The ID of the largest data slice.

20282-20 Rev.1 13-15
Displaying System Statistics
Displaying System Statistics
The nzstats command displays operational statistics about system capacity, system faults,
and system performance. They provide you with a high-level overview of how your system is
running and as well as other details so that you can understand performance
characteristics.
You can also use the NzAdmin tool to display statistics.
The nzstats Command
You can use the nzstats command to display the group and statistics tables. Note that you
must be the user admin or have Manage System privileges to view Netezza statistics. You
must also be the user admin to view the Database, Table, and the Query tables.
To display table types and fields
You can use the nzstats command to display the group and table types. You can also use
the command to display specific fields within a group or table.
To list the tables, enter:
nzstats listTypes
To display specific fields of a table, enter:
nzstats listFields -type dataslice
To display a specific table
You can use the nzstats command to display the statistics of a specific group or table.
To display the System Group table, enter:
nzstats show -type system
Note: The information in the output is obtained from the /nz/data/config/callHome.txt file.
If that file has not been customized for your Netezza system, the command output may
contain general placeholder text. For more information about customizing the callHome.txt
file, see “Callhome File” on page 5-14.
Min Space Per DS The disk space consumed by the smallest dataslice for the table in
KB.
Min Space DS Id The ID of the smallest data slice.
Space Skew The ratio that shows how disparate the dataslice sizes are as calcu-
lated by (maximum dataslice size - minimum dataslice size) /
average dataslice size.
Table 13-17: Table Table
Column Description
13-16 20282-20 Rev.1
IBM Netezza System Administrator’s Guide
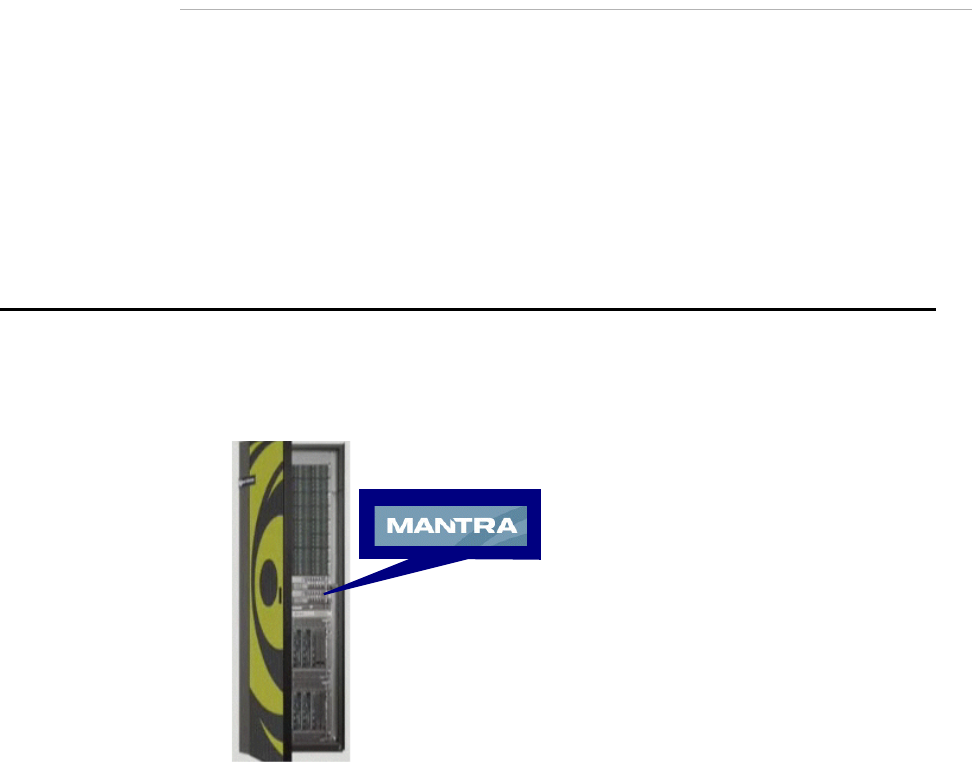
14-1
C H A P T E R 14
Managing the MantraVM Service
What’s in this chapter
Mantra Information
Starting and Stopping the MantraVM Service
Managing the MantraVM Service
Accessing the Mantra Web Interface
Troubleshooting
This chapter describes how to manage and use the MantraVM service. The MantraVM
service is a virtual server environment that runs the Netezza Mantra compliance and audit-
ing application directly on the Netezza host.
Note: The MantraVM service was installed on older IBM Netezza 1000 systems, but it is no
longer installed on new systems. (If your system has an /nz/mantravm directory, the Man-
traVM service is installed on the system.) IBM Netezza 100 systems do not support the
MantraVM service.
Mantra Information
The MantraVM service supports the Netezza Mantra application on IBM Netezza 1000 sys-
tems, as shown in Figure 14-1. You can start, stop, and obtain the status of the MantraVM
service using the service mantravm commands. You use the mantractl command to config-
ure and manage the MantraVM service in this environment.
Figure 14-1: Mantra and MantraVM Service
MantraVM Service
14-2 20282-20 Rev.1
IBM Netezza System Administrator’s Guide
Within the MantraVM service, the Mantra application operates identically to a standalone
Mantra appliance; the management tasks are identical in terms of configuration, reporting,
backups, and so on. For details about Mantra compliance reporting, events, and configura-
tion, see the Netezza Mantra Administration Guide, which is available on the Mantra Web
interface. To access the guide, see “Accessing the Mantra Web Interface” on page 14-8.
MantraVM Hostname and IP Addresses
When the MantraVM service is configured on an IBM Netezza 1000 system, the configura-
tion process defines a hostname and IP addresses for the service. You can display the
configured IP addresses as well as change them using the mantractl command.
The external IP address represents the management address for the Mantra application.
You use the external IP address to connect to the Mantra Web interface from your client
systems.
The internal IP address is an IP address within the Netezza internal network fabric for the
the MantraVM service. The internal IP address is generally used by internal Netezza pro-
cesses and also for possible Support troubleshooting. The internal IP address is associated
with the mantravm01 hostname on the Netezza host servers.
MantraVM and High Availability Systems
On HA systems such as IBM Netezza 1000, the MantraVM service software is installed pri-
marily in the /nz/mantravm shared directory, which is accessible from the active Netezza
host. The installation process also installs some virtual service files in the /usr directories
on both the active and standby hosts. If a failover or migration occurs to the standby host,
the system also migrates the MantraVM service so that it starts on the new active host to
continue compliance reporting and monitoring.
MantraVM Users and Groups
The MantraVM service installation creates a Linux user and group (both named mantravm)
on the Netezza hosts. These accounts are needed to run and manage the MantraVM service
processes and files. Do not delete or modify the mantravm user or group.
MantraVM Log Files
The MantraVM application creates log files in the /var/log directory to store messages and
status information.
The /var/log/servicemantravm.log file contains status information about the MantraVM
service such as configuration messages, details of service starts and stops, and status.
The /var/log/mantractl.log file contains information about configuration command
changes and activity.
During the installation of the MantraVM application, the unpack command creates the
/var/log/mantravm-unpack.log file to log installation messages.

20282-20 Rev.1 14-3
Starting and Stopping the MantraVM Service
Mantra Documentation
The Mantra documentation is installed in the MantraVM service image. To access the docu-
mentation, connect to the Mantra Web interface and go to the Support page to download an
online version of the Netezza Mantra Administration Guide. For a description of how to
access the Mantra Web interface in the MantraVM service environment, see “Accessing the
Mantra Web Interface” on page 14-8.
Also, if you download the Mantra Console from the Web interface Support page, you can
also access the documentation using the Help menu on the Console. For details about the
Netezza Mantra compliance application and how to create policies, run reports, monitor
activity and events, and use the Mantra interfaces, refer to the Netezza Mantra Administra-
tion Guide.
Starting and Stopping the MantraVM Service
The following sections describe how to start, stop, and obtain status for the MantraVM ser-
vice. You can start and stop the service as needed for troubleshooting and other
maintenance tasks. For more information about enabling or disabling the MantraVM ser-
vice, see “Managing the MantraVM Service” on page 14-4.
Starting the MantraVM Service
When you start the MantraVM service, the service verifies that the MantraVM service is
enabled, and then starts the virtual environment and the Mantra agent that monitors the
query activity on the system.
Note: The MantraVM service is started by default when the system is first configured.
To start the MantraVM service:
1. Log in to the active Netezza host as the root user.
2. Run the following command:
[root@nzhost1 ~]# service mantravm start
Starting mantravm service
Note that it might require a few minutes for the MantraVM service to start; until that time,
the external (management) IP address may be unreachable.
If the MantraVM service is disabled, you cannot start the Mantra compliance monitoring.
For example:
[root@nzhost1 ~]# service mantravm start
Service disabled
For more information, see “Enabling the MantraVM Service” on page 14-5.
Stopping the MantraVM Service
When you stop the MantraVM service, you stop the virtual environment and the Mantra
agent (if they are currently running) on the system.
To stop the MantraVM service:
1. Log in to the active Netezza host as the root user.

14-4 20282-20 Rev.1
IBM Netezza System Administrator’s Guide
2. Run the following command:
[root@nzhost1 ~]# service mantravm stop
mantravm service stopped
Displaying the Status of the MantraVM Service
To display status information for the MantraVM service:
1. Log in to the active Netezza host as the root user.
2. Run the following command:
[root@nzhost1 ~]# service mantravm status
Service status: running
mantractl flag: enabled
The command output indicates that the MantraVM service is running on the Netezza host.
In addition, the status shows whether the MantraVM service is enabled or disabled on the
system.
If you log in to the standby host and run the service mantravm status command, the output
appears similar to the following because the service is stopped on the standby host:
[root@nzhost2 ~]# service mantravm status
Service status: stopped
mantractl flag: standby
In the event of a failover or a manual migration to the standby host, the heartbeat pro-
cesses will start the MantraVM service on the host to resume the Mantra capabilities.
Managing the MantraVM Service
You use the mantractl command to configure the MantraVM service. The management
tasks include enabling and disabling the MantraVM service, changing configuration set-
tings, obtaining status, and other options. You can display the online help for the command
using the /nz/mantravm/mantractl help command.
Displaying the MantraVM Service Configuration
To display the current configuration of the MantraVM service:
1. Log in to the active Netezza host as the root user.
2. Change to the following directory or include this path in the command line of Step 3:
[root@nzhost1 ~]# cd /nz/mantravm
3. Run the following command:
[root@nzhost1 ~]# ./mantractl
External IP Address of MantraVM: 1.2.3.4
Internal IP Address of MantraVM: 10.1.2.3
mantravm service enabled? true
MantraVM Version: 1.0.060210-2010
Interfaces Monitored: eth8,usb0
The output shows sample addresses for the external and internal IP addresses. The
external IP address is the management interface—this is the IP address that you use in
a Web browser to connect to the Mantra Web interface. The output also lists the inter-
20282-20 Rev.1 14-5
Managing the MantraVM Service
faces that are being monitored for query activity; if no interfaces are configured for
monitoring, the output displays the word default.
Note that the output also shows that the MantraVM service is enabled. If the service is
not enabled, the service may not be running, or if it is, it will not be restarted the next
time the mantravm service starts. For example:
[root@nzhost1 ~]# ./mantractl
External IP Address of MantraVM: 1.2.3.4
Internal IP Address of MantraVM: 10.1.2.3
mantravm service enabled? false
MantraVM Version: 1.0.060210-2010
Interfaces Monitored: eth8,usb0
Displaying the MantraVM Service Version
The MantraVM service has its own version number to identify the software revision. (This is
not the same as the Mantra software release version; that is, this is the version of the virtual
service envrionment.) To display the current version of the MantraVM service:
1. Log in to the active Netezza host as the root user.
2. Change to the following directory or include this path in the command line of Step 3:
[root@nzhost1 ~]# cd /nz/mantravm
3. Run the following command:
[root@nzhost1 ~]# ./mantractl version
MantraVM Version: 1.0.051010-1810
Enabling the MantraVM Service
When you enable the MantraVM service, you configure the system to start the virtual envi-
ronment and the Mantra agent the next time that you use the service mantravm start
command. Enabling or disabling the MantraVM service does not affect the currently run-
ning service.
Note: The MantraVM service is enabled by default during the system configuration process.
To enable the MantraVM service:
1. Log in to the active Netezza host as the root user.
2. Change to the following directory or include this path in the command line of Step 3:
[root@nzhost1 ~]# cd /nz/mantravm
3. Run the following command:
[root@nzhost1 ~]# ./mantractl enable
The command uses the /nz/mantravm/mantravm.cfg file to define the virtual environment.
If the file does not exist, the command will create a new mantravm.cfg file. Do not modify
or customize the mantravm.cfg file manually; instead, use the mantractl commands to
modify the MantraVM configuration settings.
Disabling the MantraVM Service
When you disable the MantraVM service, you specify that the system cannot run the Man-
traVM service the next time that you use the service mantravm start command. Enabling or
disabling the MantraVM service does not affect the currently running service.
14-6 20282-20 Rev.1
IBM Netezza System Administrator’s Guide
To disable the MantraVM service:
1. Log in to the active Netezza host as the root user.
2. Change to the following directory or include this path in the command line of Step 3:
[root@nzhost1 ~]# cd /nz/mantravm
3. Run the following command:
[root@nzhost1 ~]# ./mantractl disable
Please note disabling the service will not result in the service
being stopped. It prevents further starts or restarts. Service
disabled
Setting the MantraVM IP Address
You can use the mantractl command to set the external IP address of the MantraVM ser-
vice. You also must have the password for the mantravm user account to complete the
command, which is described in “MantraVM Users and Groups” on page 14-2.
To set the MantraVM external IP address:
1. Log in to the active Netezza host as the root user.
2. Change to the following directory:
[root@nzhost1 ~]# cd /nz/mantravm
3. Confirm that the MantraVM service is running using the following command:
[root@nzhost1 mantravm]# service mantravm status
Service status: running
mantractl flag: enabled
If the service status is “stopped”, make sure that the service is enabled and follow the
instructions in “Starting the MantraVM Service” on page 14-3 to start the service.
Repeat the service mantravm status command to confirm that the service is running
before you proceed to the next step.
4. Run the following command, where ipaddr is the new IP address that you are
configuring:
[root@nzhost1 mantravm]# ./mantractl setip ipaddr
Please enter the MantraVM password:
Please wait while the required ip address changes are made.
It can take a few seconds to configure the IP address before users can connect to the Man-
tra console or Web interface. If you run the setip command very soon after starting the
MantraVM service, you could encounter some temporary connection issues (such as an
unreachable host, or unsuccessful mantractl commands) while the IP is being configured.
If you wait a minute or so, then retry the commands, the commands should succeed and
work normally.
Reconfiguring the MantraVM IP Addresses
If you change the IP addresses of the IBM Netezza 1000 system using the IP configuration
process, you must reconfigure the internal IP addresses for the MantraVM as well; other-
wise, the MantraVM service will be unable to monitor the local query activity and may not
be able to perform tasks such as mantractl setip operations.
20282-20 Rev.1 14-7
Managing the MantraVM Service
To reconfigure the MantraVM IP addresses:
1. Log in to the active Netezza host as the root user.
2. Change to the following directory:
[root@nzhost1 ~]# cd /nz/mantravm
3. Confirm that the MantraVM service is running and enabled using the following
command:
[root@nzhost1 mantravm]# service mantravm status
Service status: running
mantractl flag: enabled
If the mantractl flag is disabled, follow the instructions in “Enabling the MantraVM
Service” on page 14-5 to enable the service. If the service status is “stopped”, follow
the instructions in “Starting the MantraVM Service” on page 14-3 to start the service.
Repeat the service mantravm status command to confirm that the service is enabled
and running before you proceed to the next step.
4. Run the following command. You must enter the Mantra admin user password to pro-
ceed with the configuration.
[root@nzhost1 ~]# ./mantractl configip
Please enter the MantraVM password:
Please wait while the required ip address changes are made.
Configuring the MantraVM Monitoring Interfaces
The MantraVM service can monitor up to four host network interfaces for SQL traffic and
activity. If you change the configuration by adding or removing a network adapter to your
host, you can update the MantraVM configuration using the mantractl command. Note that
at least one of the network interfaces of the Netezza host must be on the same subnet as
the external IP address of the MantraVM service.
To configure the MantraVM monitoring interfaces:
1. Log in to the active Netezza host as the root user.
2. Change to the following directory:
[root@nzhost1 ~]# cd /nz/mantravm
3. Confirm that the MantraVM service is running and enabled using the following
command:
[root@nzhost1 mantravm]# service mantravm status
Service status: running
mantractl flag: enabled
If the service status is stopped, follow the instructions in “Starting the MantraVM Ser-
vice” on page 14-3 to start the service. If the mantractl flag is disabled, follow the
instructions in “Enabling the MantraVM Service” on page 14-5 to enable the service.
Repeat the service mantravm status command to confirm that the service is enabled
and running before you proceed to the next step.
4. Run the following command:
[root@nzhost1 ~]# ./mantractl nwreconfig

14-8 20282-20 Rev.1
IBM Netezza System Administrator’s Guide
For systems that have less than four monitoring interfaces available, sample output follows:
mantravm service stopped
Starting mantravm service
Please wait while the MantraVM internal network is being reconfigured.
This will take a few minutes
If the system has more than four network interfaces, the command prompts you to select
the four that you want to monitor as in the following sample output:
The following are the interfaces that can be actively monitored by the
Mantra. Please choose any four of these interfaces. Please note that
one of these interfaces should be on the same subnet as the external ip
being configured on the Mantra to ensure connectivity.
eth13
eth8
eth10
usb0
eth9
Please enter interface 1 to be monitored: eth8
Please enter interface 2 to be monitored: eth10
Please enter interface 3 to be monitored: eth13
Please enter interface 4 to be monitored: eth9
Chosen Interfaces:
mantravm service stopped
Starting mantravm service
Please wait while the MantraVM internal network is being reconfigured.
This will take a few minutes.
If you do not select at least one interface that shares the same subnet as the external IP
address, the command displays an error and exits. You must run the command again to
select the monitoring interfaces.
Displaying the MantraVM Monitoring Interfaces
You can display the list of interfaces that the MantraVM service is monitoring for query
activity.
To display the MantraVM monitoring interfaces:
1. Log in to the active Netezza host as the root user.
2. Change to the following directory:
[root@nzhost1 ~]# cd /nz/mantravm
3. Run the following command:
[root@nzhost1 ~]# ./mantractl monitored
Interfaces Monitored: eth8,usb0
Accessing the Mantra Web Interface
The Mantra Web interface allows users who have Mantra account logins to perform report-
ing and workflow operations including report viewing, report signing, and report approval
tasks. Users can perform system-level monitoring and configuration tasks, enable SNMP

20282-20 Rev.1 14-9
Troubleshooting
traps, configure IP and DNS settings, download Mantra Agent install packages, access user
documentation, and so on. For a full description of the Web Interface, see the Netezza
Mantra Administration Guide.
To access the Mantra Web interface, open a Web browser and enter the following URL
where ipaddr is the external IP address (management address) of the MantraVM
service:
https://ipaddr
Note: You can display the IP address using the mantractl command. Make sure that you
communicate the external IP address to the Mantra users at your site who use the Web
interface or the Console application.
The Netezza Mantra login page appears. Log in using an existing Mantra user account.
There is a default user account named “admin” (which is not the same as the Netezza
admin database user account). The admin password is specified when the MantraVM appli-
cation was installed. The default password is netezza. The admin user can create additional
Mantra user accounts for accessing the console and Web interface.
Troubleshooting
The following sections describe some possible conditions and troubleshooting steps for the
MantraVM service.
Double-Byte Character Support
The Mantra compliance application does not currently support the monitoring of queries
that include multi-byte characters.
Event Throttling
Mantra contains an event throttle mechanism that helps to prevent unintentionally vague or
all-encompassing policies from overwhelming the Mantra database with stored event data.
The event throttle limits the number of events that can be stored in the event database dur-
ing a single calendar day. If your configured policies capture more than the throttle limit of
event data, an alarm is raised and any event traffic that exceeds the limit is monitored and
analyzed, but it is deflected away from the event database until the throttle alarm resets
automatically at midnight or is cleared manually by an administrator. For more information
about event throttling and how to configure it, see the Netezza Mantra Administration
Guide.
/nz Partition is Full
If the /nz shared partition has less than 2GB of unused disk space, the MantraVM service
may become unreachable. Although the service may appear to be started, any attempt to
restart the service displays the error:
Available space is <value>. This is less than the required value to run
the mantravm service.
status is now stopped.
14-10 20282-20 Rev.1
IBM Netezza System Administrator’s Guide
To resolve the issue, remove unnecessary files in the /nz partition to free disk space. If you
are not sure which files to delete, contact Support for assistance to identify temporary and
other files that can be safely removed. After you increase the available disk space, you can
restart the MantraVM service following the instructions in “Starting the MantraVM Service”
on page 14-3.
Mantra Inactivity Timeout
The Mantra application has an activity timer that stops monitoring sessions that remain
open for longer than the configured threshold. In Mantra Release 7.4, the timer default is
15 minutes, but Mantra administrators can customize that threshold. If you have long-run-
ning database sessions such as queries or load processes, the Mantra application will stop
monitoring them after that activity timer expires. For more details on the timed-out session
events and how to customize them, see the Netezza Mantra Administration Guide.

A-1
A P P E N D I X A
Netezza CLI
You can use the Netezza CLI to manage the Netezza software, hardware, and databases.
Netezza Support may also ask you to run specific low-level diagnostic commands to investi-
gate problems. This chapter provides information about the Netezza user commands and
the Netezza Customer Service commands.
Summary of Command Line Commands
Table A-1 describes the commands you can use to monitor and manage the Netezza sys-
tem. These commands reside in the /nz/kit/bin directory on the Netezza host. A subset of
these commands are also installed with the Netezza client kits and can be run from a
remote client system, as described in “Command Locations” on page 3-4.
To run these commands from the Netezza system, you must be able to log in as a valid
Linux user on the Netezza system. Most users typically log in as the nz user. In addition,
many commands require you to specify a valid database user account and password; the
database user may require additional special privileges, as described in “Command Privi-
leges” on page A-4. Throughout this appendix, some command examples show the
database user and password options on the command line, and some examples omit them
with the assumption that the user and password were cached such as by using nzpassword.
Table A-1: Command Line Summary
Command Description For more information…
nzbackup Backs up an existing
database.
For command syntax and more information,
see “Using the nzbackup Command” on
page 10-10.
nzcontents Displays the revision
and build number of all
the executables, plus
the checksum of
Netezza binaries.
For command syntax, see “nzcontents” on
page A-7. For more information, see “Software
Revision Levels” on page 6-1.
nzconvert Converts character
encodings for loading
with the nzload com-
mand or external
tables.
For command syntax, see “nzconvert” on
page A-8. For more information, refer to the
IBM Netezza Database User’s Guide.

A-2 20282-20 Rev.1
IBM Netezza System Administrator’s Guide
nzds Manages and displays
information about the
data slices on the
system.
For command syntax, see “nzds” on page A-8.
nzevent Displays and manages
event rules.
For command syntax, see “nzevent” on
page A-12. For more information, see
Appendix 7, “Managing Event Rules.”
nzhistclean-
updb
Deletes old history
information from a his-
tory database.
For command syntax, see “nzhistcleanupdb”
on page A-17. For more information, refer to
Chapter 11, “Query History Collection and
Reporting.”
nzhistcreatedb Creates a history data-
base with all its tables,
views, and objects for
history collection and
reporting.
For command syntax, see “nzhistcreatedb” on
page A-20. For more information, refer to
Chapter 11, “Query History Collection and
Reporting.”
nzhostbackup Backs up the host
information, including
users and groups.
For command syntax, see “nzhostbackup” on
page A-22.
nzhostrestore Restores the host
information.
For command syntax, see “nzhostrestore” on
page A-24.
nzhw Manages system hard-
ware components.
For command syntax, see “nzhw” on
page A-26.
nzinventory This command is obso-
lete in Release 5.0.
See the command “nzhw” on page A-26.
nzload Loads data into data-
base files.
For command syntax and more information,
see the IBM Netezza Data Loading Guide.
nzpassword Stores a local copy of
the user’s password.
For command syntax, see “nzpassword” on
page A-33. For more information, see “Creat-
ing Encrypted Passwords” on page 2-15.
nzreclaim Grooms databases and
tables to remove
deleted and/or outdated
rows, and also reorga-
nizes the tables based
on their organizing
kets.
For command syntax, see “nzreclaim” on
page A-35. For more information, see “Groom-
ing Tables” on page 9-18.
nzrestore Restores the contents
of a database backup.
For command syntax and more information,
see “Using the nzrestore Command” on
page 10-22.
Table A-1: Command Line Summary
Command Description For more information…

20282-20 Rev.1 A-3
Summary of Command Line Commands
nzrev Displays the current
software revision for
any Netezza software
release.
For command syntax, see “nzrev” on
page A-37. For more information, see “Soft-
ware Revision Levels” on page 6-1.
nzsession Shows a list of current
system sessions (load,
client, and sql). Sup-
ports filtering by
session type or user,
allows you to abort ses-
sions, and change the
current job list for a
queued session job.
For command syntax, see “nzsession” on
page A-39. For more information, see “Manag-
ing Sessions” on page 9-21.
nzsfi This command is obso-
lete in Release 5.0.
See the command “nzhw” on page A-26.
nzspu This command is obso-
lete in Release 5.0.
See the command “nzhw” on page A-26.
nzspupart Shows a list of all the
SPU partitions and the
disks that support
them.
For command syntax, see “nzspupart” on
page A-43.
nzsql Invokes the SQL com-
mand interpreter.
For usage information, see “Creating Data-
bases and User Tables” on page 9-1. For
command syntax, see the IBM Netezza Data-
base User’s Guide.
nzstart Starts the system. For command syntax, see “nzstart” on
page A-47. For more information, see “Manag-
ing the System State” on page 6-6.
nzstate Displays the current
system state or waits
for a specific system
state to occur before
returning.
For command syntax, see “nzstate” on
page A-48. For more information, see “Dis-
playing the Current System State” on
page 6-3.
nzstats Displays system level
statistics.
For command syntax, see “nzstats” on
page A-50. For more information, see “Dis-
playing Netezza Statistics” on page 13-1.
nzstop Stops the system. For command syntax, see “nzstop” on
page A-53. For more information, see “Manag-
ing the System State” on page 6-6.
Table A-1: Command Line Summary
Command Description For more information…

A-4 20282-20 Rev.1
IBM Netezza System Administrator’s Guide
Command Privileges
Table A-2 lists the administrative privileges that may be required for certain commands.
The database user account may require one or more of these privileges for a command to
complete successfully. Note that the terms in square brackets are optional.
nzsystem Changes the system
state or displays the
current system
information.
For command syntax, see “nzsystem” on
page A-55. For more information, see “Manag-
ing the System State” on page 6-6.
nztopology This command is obso-
lete in Release 5.0.
See the command “nzds” on page A-8.
Table A-1: Command Line Summary
Command Description For more information…
Table A-2: Administrator Privileges
Privilege Description
[Create] Aggregate Allows the user to create user-defined aggregates (UDAs). Per-
mission to operate on existing UDAs.
[Create] Database Allows the user to create databases. Permission to operate on
existing databases is controlled by object privileges.
[Create] External Table Allows the user to create external tables. Permission to oper-
ate on existing tables is controlled by object privileges.
[Create] Function Allows the user to create user-defined functions (UDFs). Per-
mission to operate on UDFs.
[Create] Group Allows the user to create groups. Permission to operate on
existing groups is controlled by object privileges.
[Create] Index For system use only. Users cannot create indexes.
[Create] Library Allows the user to create user-defined shared libraries. Per-
mission to operate on existing shared libraries.
[Create] Materialized View Allows the user to create materialized views.
[Create] Procedure Allows the user to create stored procedures.
[Create] Sequence Allows the user to create database sequences.
[Create] Synonym Allows the user to create synonyms.
[Create] Table Allows the user to create tables. Permission to operate on
existing tables is controlled by object privileges.
[Create] Temp Table Allows the user to create temporary tables. Permission to
operate on existing tables is controlled by object privileges.

20282-20 Rev.1 A-5
Summary of Command Line Commands
Table A-3 describes the list of available object privileges. As with administrator privileges,
specifying the WITH GRANT option allows a user to grant the privilege to others.
[Create] User Allows the user to create users. Permission to operate on
existing users is controlled by object privileges.
[Create] View Allows the user to create views. Permission to operate on
existing views is controlled by object privileges.
[Manage] Hardware Allows the user to perform the following hardware-related
operations: view hardware status, manage SPUs, manage
topology and mirroring, and run diagnostics. The user can run
the commands: nzhw and nzds.
[Manage] Security Allows the user to perform commands and operations relating
to history databases such as creating and cleaning up history
databases.
[Manage] System Allows the user to perform the following management opera-
tions: start/stop/pause/resume the system, abort sessions,
view the distribution map, system statistics, and logs. The
user can run the commands: nzsystem, nzstate, nzstats, and
nzsession priority.
Backup Allows user to perform backups. The user can run the com-
mand nzbackup.
Restore Allows the user to restore the system. The user can run the
nzrestore command.
Unfence Allows the user to create an unfenced user-defined function
(UDF) or user-defined aggregate (UDA), or to unfence an exist-
ing fenced UDF or UDA if the user has permission to create or
alter it. For more information, see the IBM Netezza User-
Defined Functions Developer’s Guide.
Table A-3: Object Privileges
Privilege Description
Abort Allows the user to abort sessions. Applies to groups and users.
Alter Allows the user to modify object attributes. Applies to groups, users, and
tables.
Delete Allows the user to delete table rows. Applies only to tables.
Drop Allows the user to drop objects such as databases, groups, users, tables, and
others.
Execute Allows the user to run UDXs such as user-defined functions, aggregates, and
shared libraries.
Table A-2: Administrator Privileges
Privilege Description

A-6 20282-20 Rev.1
IBM Netezza System Administrator’s Guide
Commands without Special Privileges
The following commands do not require special privileges:
You do not need special privileges to run some commands such as nzstate, nzsystem
showRev, or showState commands.
You do not need special privileges to run the nzrev, nzcontents, nzstart, nzhostbackup,
nzhostrestore, and nzstop commands, but you must be able to log on to the host.
You do not need special privileges to run the nzsession show command, however you
can only see objects for which you have privileges.
Exit Codes
The nz* commands typically return 0 to indicate a successful completion. If the command
returns 1 or a non-zero number, the command encountered an error and failed. The error
could be a problem during the nz* command itself or it may be a failure in a subcommand.
If a command failed, refer to the messages that appear in the command shell window for
possible additional information about the cause of the failure.
Netezza CLI Command Syntax
All Netezza CLI commands have the following top-level syntax options:
-h — Displays help. You can also enter -help.
-rev — Displays the program’s software revision level. You can also enter -V.
-hc — Displays help for the subcommand (if the command has subcommands).
Note: For many Netezza CLI commands you can specify a timeout. This is the amount of
time the system waits before abandoning execution of the command. If you specify a time-
GenStats Allows the user to generate statistics on tables or databases. The user can run
the GENERATE STATISTICS command.
Groom Allows the user to groom tables to reclaim disk space and reorganize data. The
user can run the SQL GROOM TABLE command.
Insert Allows the user to insert rows into a table. Applies only to tables.
List Allows the user to display an object’s name, either in a list or in another man-
ner. Applies to all objects.
Select Allows the user to select (or query) rows within a table. Applies to tables and
views.
Truncate Allows the user to delete all rows from a table with no rollback. Applies only to
tables.
Update Allows the user to modify table rows, such as changing field values. Applies
only to tables.
Table A-3: Object Privileges
Privilege Description

20282-20 Rev.1 A-7
nzbackup
out without a value, the system waits 300 seconds. The maximum timeout value is 100
million seconds.
nzbackup
Use the nzbackup command to back up your database. For a complete description of the
nzbackup command and its use, see “The nzbackup Command Syntax” on page 10-11.
nzcontents
Use the nzcontents command to display the Netezza program names, the revision level, the
build level, and the checksum of binaries. This command takes several seconds to run and
results in multiple lines of output. Programs with no revisions are either scripts or special
binaries
Syntax
The nzcontents command uses the following syntax:
nzcontents [-h]
Description
The nzcontents command has the following characteristics.
Privileges Required
You do not need special privileges to run the nzcontents command.
Common Tasks
Use the nzcontents command to display the names of programs, and their revision and
build level.
Related Commands
Use the nzrev command to display the software revision level. Use the nzsystem showRev
command to show software revision levels.
Usage
The following provides some sample usage:
To display the software programs and their revisions, enter:

A-8 20282-20 Rev.1
IBM Netezza System Administrator’s Guide
nzconvert
Use the nzconvert command to convert between any two encodings, between these encod-
ings and UTF-8, and from UTF-32, -16, or -8 to NFC, for loading with the nzload command
or external tables.
Syntax
The nzconvert command uses the following syntax:
nzconvert [-h|-rev] [options]
Options
For information on nzconvert options, refer to the IBM Netezza Database User’s Guide.
Description
The nzconvert command has the following characteristics.
Privileges Required
No special privileges are required to use this command.
Common Tasks
Use the nzconvert command to convert character encoding before loading with the nzload
command or external tables.
Related Commands
Load converted data with the nzload command.
nzds
Use the nzds command to manage and obtain information about the data slices in the
system.
Syntax
The nzds command has the following syntax:
[nz@nzhost ~]$ nzcontents
Program Revision Stamp Build Stamp CheckSum
-------------- ------------------------ --------------------------------- --------------
adm Directory
nzbackup 6.0.0-0.B-1.P-0.Bld-12478 2010-04-15.12478.dev.cm.12478 1821...
nzcontents ab685...
nzconvert 3a52...
nzds 6.0.0-0.B-1.P-0.Bld-12478 2010-04-15.12478.dev.cm.12478 d3f2...
...

20282-20 Rev.1 A-9
nzds
nzds [-h|-rev] [-hc] subcmd [subcmd_options]
Inputs
The nzds command takes the following inputs:
Table A-4: nzds Input Options
Input Description
nzds show [options] Displays information about the data slice topology. The
show subcommand is the default and displays a list of
all the data slices on the system and information about
status, the SPU that manages the data slice, the Pri-
mary Storage (that is, the disk ID where the primary
copy of the data slice resides), the Mirror Storage (that
is, the disk ID where the mirror copy of the data slice
resides), and % Used (the amount of space in the data
slice that contains data).
You can specify one or more options to show specific
output.
nzds show [-detail] Displays information about the data slice topology and
includes information about locations and disk space.
nzds show -spa id Displays information about the data slices which are
owned by a particular S-Blade in the SPA.
nzds show -dsId id Displays information about the specific data slice.
nzds show -id hwId Displays information about the data slices assigned to
the specified hardware.
nzds show -topology Displays the current storage topology. The output
shows how system resources such as SPUs, disks, SAS
switches, and HBA ports are utilized within the system
to support the storage paths.
nzds show -caCertFile path Specifies the pathname of the root CA certificate file
on the client system. This argument is used by
Netezza clients who use peer authentication to verify
the Netezza host system. The default value is NULL
which skips the peer authentication process.

A-10 20282-20 Rev.1
IBM Netezza System Administrator’s Guide
nzds show -securityLevel level Specifies the security level that you want to use for the
session. The argument has four values:
•
preferredUnsecured — This is the default value.
Specify this option when you would prefer an unse-
cured connection, but you will accept a secured
connection if the Netezza system requires one.
•
preferredSecured — Specify this option when you
want a secured connection to the Netezza system,
but you will accept an unsecured connection if the
Netezza system is configured to use only unsecured
connections.
•
onlyUnsecured — Specify this option when you
want an unsecured connection to the Netezza sys-
tem. If the Netezza system requires a secured
connection, the connection will be rejected.
•
onlySecured — Specify this option when you want a
secured connection to the Netezza system. If the
Netezza system accepts only unsecured connec-
tions, or if you are attempting to connect to a
Netezza system that is running a release prior to
4.5, the connection will be rejected.
nzds show -regenStatus [-detail] Displays information about the status of any disk
regenerations that are in progress. The command dis-
plays information about the Data Slice being
regenerated, its SPU owner, the Source data slice ID,
its Destination data slice ID, the Start Time of the
regeneration, and % Done.
Include the -detail option for more information such as
the locations of the SPUs and storage areas.
nzds show -issues [-detail] Displays information about data slices that are report-
ing problems. The command displays a list of data
slices to investigate and their Status, SPU, Primary
Storage, Mirror Storage, and % Used.
Include the -detail option for more information such as
location details and data slice size.
Note:
The size of the data slice is reported in
Gibibytes, which is in units of 10243 bytes.
Table A-4: nzds Input Options
Input Description

20282-20 Rev.1 A-11
nzds
Options
The nzds command takes the following options:
Description
The nzds command has the following description.
Privileges Required
Your database user account must have the Manage Hardware privilege.
Common Tasks
Use the nzds command to manage and display information about the data slices in the sys-
tem. You can also use this command to create a balanced topology for best performance of
the system.
Related Commands
Use in conjunction with other system commands, such as the nzsystem and nzhw
commands.
Usage
The following provides some sample usage:
To regenerate a data slice to a spare disk destination, use the following command:
nzds show -regenstatus
Data Slice SPU Source Destination Start Time % Done
---------- ---- ------ ----------- --------------- --------
5 1092 1035 1014 09-Apr-09, 07:24:55 EDT 0.01
6 1092 1035 1014 09-Apr-09, 07:24:55 EDT 0.01
To show the data slice information for the system, use the following command:
nzds show
Data Slice Status SPU Partition Size (GiB) % Used Supporting
Disks
---------- ------- ---- --------- ---------- ------ ---------------
1 Healthy 1017 2 356 58.54 1021,1029
2 Healthy 1017 3 356 58.54 1021,1029
Table A-5: nzds Options
Option Description
-host hostname Specifies the hostname or IP address of the Netezza system.
-u user Specifies the database user name [NZ_USER].
-pw <password> Specifies the user’s password [NZ_PASSWORD].
-timeout <db name> Specifies the amount of time in seconds to wait for the com-
mand to complete before exiting with a timeout error. Default is
300.

A-12 20282-20 Rev.1
IBM Netezza System Administrator’s Guide
3 Healthy 1017 5 356 58.53 1022,1030
4 Healthy 1017 4 356 58.53 1022,1030
5 Healthy 1017 0 356 58.53 1023,1031
...
Note: The sample output shown for this command is truncated for the documentation.
To show the data slice issues reported for the system, use the following command:
nzds show -issues
Data Slice Status SPU Partition Size (GiB) % Used Supporting Disks
---------- -------- ---- --------- ---------- ------ ------__--------
11 Degraded 1113 4 356 11.80 1091
12 Degraded 1113 5 356 11.79 1091
nzevent
Use the nzevent command to perform any of the following:
Show a list of event rules.
Copy a predefined template event rule and use it as your source to add a new rule.
Modify an existing event rule or a copied predefined template.
Add a new event rule.
Delete an event rule.
Generate events.
Syntax
The nzevent command uses the following syntax:
nzevent [-h|-rev|-hc] subcmd [subcmd options]
Inputs
The nzevent command takes the following inputs:
Table A-6: nzevent Input Options
Input Description
nzevent add options Adds an event rule.
nzevent copy options Copies a predefined template event rule or an existing
event rule.
nzevent delete options Deletes an event rule.
nzevent generate options Generates an event.
nzevent listEventTypes options Lists the valid event types.
nzevent listNotifyTypes options Lists the notification types.
nzevent modify options Modifies an event rule.

20282-20 Rev.1 A-13
nzevent
Options
The nzevent command takes the following options:
nzevent show options Displays the event rules.
Table A-6: nzevent Input Options
Input Description
Table A-7: nzevent Options
Command Option Description
All nzevent
commands
-u user Specifies the database user name [NZ_USER].
-pw password Specifies the user’s password [NZ_PASSWORD].
-host name Specifies the hostname or IP address [NZ_HOST].
-timeout secs Specifies the time to wait before exiting with a
timeout error (default = 300). Does not apply to
listEventTypes and listNotifyTypes.
nzevent add or
nzevent copy or
nzevent modify
-eventType type Specifies the event type for the event. For a list of
the event types, see Table 7-3 on page 7-9.
-eventArgsExpr
expr
Specifies the optional match expression for further
filtering. For more information, Table 7-4 on
page 7-13.
-name value If you are adding a new event, specifies the event
rule name. If you are copying an event, specifies
the name of the event you are copying. If you are
modifying an event, specifies the name of the
event that you are changing.
-newname value If you are modifying or copying an event, specifies
the name of the new event.
-useTemplate If you are copying an existing event, uses the rule
specified with the -name option as a template for
this new rule.
-notifyType type Specifies the type of notification to generate for
this event. The notify types are email and runCmd.
-dst value Specifies the notification destination (notify-type
specific). For email, it is the e-mail address. For
runCmd, it is the full path of the command or
command file to run.
-ccDst value Specifies additional notification destination (email
only).

A-14 20282-20 Rev.1
IBM Netezza System Administrator’s Guide
-msg string Specifies the notification message to send. For
email, this is the subject string and cannot be
blank. For runCmd, this is the argument for
-msg parameter.
-bodyText string Specifies additional text to send with the notifica-
tion message.
-callHome bool Specifies whether to append system information to
the notification message. For email, the system
sends /nz/kit/data/config/callHome.txt as an
attachment. This file contains customer informa-
tion such as company, address, contact, and
system information such as model number, serial
number, and so on. For runCmd, the system
passes the file path to the command.
-on bool Enables or disables processing for this rule.
-eventAggrCount
int
Specifies the number of events to aggregate (email
events only). You can specify a number between 1
and 1000.
nzevent delete -force Does not prompt for confirmation.
-name rule_name Deletes the event rule <rule_name>.
nzevent generate -eventType type Generates the specified type of event. For a list of
the event types, see Table 7-3 on page 7-9.
-eventArgs expr Specifies a list of one or more optional event argu-
ments (<tag>=<value>, ...).
-force Flushes all aggregate events and sends a notifica-
tion (email only).
Table A-7: nzevent Options
Command Option Description

20282-20 Rev.1 A-15
nzevent
nzevent show -name rule_name Displays only the event rule corresponding to the
rule_name. If you do not specify a name, the com-
mand displays all event rules.
-syntax Displays the rule in CLI syntax.
-maxColW chars Specifies the maximum number of characters to
print in each output table column. The default is
24 characters.
-orient type Allows you to specify the output display. The value
values are
•
Horizontal — Displays the event types in a
table.
•
Vertical — Displays each event as a complete
record.
•
Auto — Selects the display based on the num-
ber of rows.
-caCertFile path Specifies the pathname of the root CA certificate
file on the client system. This argument is used by
Netezza clients who use peer authentication to
verify the Netezza host system. The default value
is NULL which skips the peer authentication
process.
Table A-7: nzevent Options
Command Option Description

A-16 20282-20 Rev.1
IBM Netezza System Administrator’s Guide
Description
The nzevent command does the following:
Privileges Required
Your database user account must have Manage System privilege.
Common Tasks
Use the nzevent command to set the preconfigured event rules, and to create your own
event rules.
Related Commands
Use the nzsession command to view and manage sessions. Use the nzsystem command to
change system states.
-securityLevel
level
Specifies the security level that you want to use for
the session. The argument has four values:
•
preferredUnsecured — This is the default
value. Specify this option when you would pre-
fer an unsecured connection, but you will
accept a secured connection if the Netezza sys-
tem requires one.
•
preferredSecured — Specify this option when
you want a secured connection to the Netezza
system, but you will accept an unsecured con-
nection if the Netezza system is configured to
use only unsecured connections.
•
onlyUnsecured — Specify this option when you
want an unsecured connection to the Netezza
system. If the Netezza system requires a
secured connection, the connection will be
rejected.
•
onlySecured — Specify this option when you
want a secured connection to the Netezza sys-
tem. If the Netezza system accepts only
unsecured connections, or if you are attempting
to connect to a Netezza system that is running a
release prior to 4.5, the connection will be
rejected.
Table A-7: nzevent Options
Command Option Description

20282-20 Rev.1 A-17
nzhistcleanupdb
Usage
The following provides some sample usage:
To add an event rule, enter:
nzevent add -name Newrule -u admin -pw password -host nzhost -on
yes -eventType sysStateChanged -eventArgsExpr ‘$previousState ==
online && $currentState != online’ -notifyType email -dst
jdoe@netezza.com -msg ‘NPS system $HOST went from $previousState to
$currentState at $eventTimestamp.’ -bodyText
‘$notifyMsg\n\nEvent:\n$eventDetail\nEvent
Rule:\n$eventRuleDetail’
To copy a template event rule from the template table to the user-modifiable table,
enter:
nzevent copy -u admin -pw password -useTemplate -name
HostNoLongerOnline -on yes -dst jdoe@netezza.com
To delete an event rule, enter:
nzevent delete -u admin -pw password -host nzhost -name Newrule
To generate an event rule, enter:
nzevent generate -u admin -pw password -host nzhost -eventtype
custom1 -eventArgs ‘customType=tooManySessions, numSessions=<n>’
To list event types, enter:
nzevent listEventTypes
To list notification types, enter:
nzevent listNotifyTypes
To modify an existing event rule, enter:
nzevent modify -u admin -pw password -host nzhost -name Newrule -on
yes -dst jdoe@netezza.com
To display a specific event rule, enter:
nzevent show -u admin -pw password -host nzhost -name Newrule
To display event rules vertically, enter:
nzevent show -u admin -pw password -host nzhost -orient vertical
nzhistcleanupdb
Use this command to periodically delete old history information from a history database.
Syntax
The command has the following syntax:
nzhistcleanupdb [options]

A-18 20282-20 Rev.1
IBM Netezza System Administrator’s Guide
Inputs
The nzhistcleanupdb command takes the following input options. Note that the input
options have two forms for the option names.
Description
After running the nzhistcleanupdb command, you can groom the table to completely
remove the deleted rows in the table.
Privileges
You must be the nz user to run this command, and you must specify a database user
account who is either the owner or user of the history database or who has administration
privileges to update the history database and its tables.
Related Commands
See nzhistcreatedb for a description of how to create a history database.
Table A-8: nzhistcleanupdb Input Options
Input Description
-d | --db dbname Specifies the name of the history database from which
you want to remove old data. The name must be a valid,
unquoted, identifier.
-n | --host host Specifies the hostname of the Netezza system where the
database resides. The default and only value for this
option is NZ_HOST.
-u | --user user Specifies the user account that permits access to the
database. The default is NZ_USER. The user must have
Delete privileges on the history database tables.
-p | --pw password Specifies the password for the user account. The default
is NZ_PASSWORD.
-t | --time "<yyyy-mm-
dd[,hh:mm[:ss] ]>"
Specifies a date and time value; all history data with a
time and date prior to this value will be deleted. The year,
month, and day values are required. The hours, minutes,
and seconds values are optional; if they are not specified,
the default is 12:00 AM of the specified day.
-f | --force Does not prompt for confirmation.
-g | --groom Runs a groom operation after the cleanup completes to
improve query performance on the history tables.
-h | --help Displays the usage and syntax for the command.
20282-20 Rev.1 A-19
nzhistcleanupdb
Usage
The following sample command deletes history data which is older than October 31, 2009
from the histdb history database:
[nz@nzhost ~]$ nzhistcleanupdb -d histdb -u smith -pw password -t
"2009-10-31"
About to DELETE all history entries older than 2009-10-31 00:00:00
(GMT) from histdb.
Proceed (yes/no)? :yes
BEGIN
DELETE 0
DELETE 98
DELETE 34
DELETE 0
DELETE 0
DELETE 188
DELETE 188
DELETE 62
DELETE 65
DELETE 0
DELETE 0
DELETE 0
DELETE 503
COMMIT
If you also include the -g (or --groom) option, the command calls the GROOM TABLE com-
mand to update statistics on the history database tables. Sample messages follow:
nzsql:/tmp/temp.2947.2:1: NOTICE: Groom processed 0 pages; purged 0
records; scan size unchanged; table size unchanged.
GROOM DEFAULT
nzsql:/tmp/temp.2947.2:2: NOTICE: Groom processed 0 pages; purged 0
records; scan size unchanged; table size unchanged.
GROOM DEFAULT
nzsql:/tmp/temp.2947.2:3: NOTICE: Groom processed 36 pages; purged
1449 records; scan size shrunk by 36 pages; table size shrunk by 36
extents.
GROOM DEFAULT
nzsql:/tmp/temp.2947.2:4: NOTICE: Groom processed 36 pages; purged
1440 records; scan size shrunk by 36 pages; table size shrunk by 36
extents.
GROOM DEFAULT
nzsql:/tmp/temp.2947.2:5: NOTICE: Groom processed 36 pages; purged
2284 records; scan size shrunk by 36 pages; table size shrunk by 36
extents.
GROOM DEFAULT
nzsql:/tmp/temp.2947.2:6: NOTICE: Groom processed 36 pages; purged
2284 records; scan size shrunk by 36 pages; table size shrunk by 36
extents.
GROOM DEFAULT
nzsql:/tmp/temp.2947.2:7: NOTICE: Groom processed 36 pages; purged
545 records; scan size shrunk by 36 pages; table size shrunk by 36
extents.
GROOM DEFAULT
nzsql:/tmp/temp.2947.2:8: NOTICE: Groom processed 36 pages; purged
545 records; scan size shrunk by 36 pages; table size shrunk by 36
extents.
GROOM DEFAULT
A-20 20282-20 Rev.1
IBM Netezza System Administrator’s Guide
nzsql:/tmp/temp.2947.2:9: NOTICE: Groom processed 36 pages; purged
549 records; scan size shrunk by 36 pages; table size shrunk by 36
extents.
GROOM DEFAULT
nzsql:/tmp/temp.2947.2:10: NOTICE: Groom processed 36 pages; purged
1743 records; scan size shrunk by 36 pages; table size shrunk by 36
extents.
GROOM DEFAULT
nzsql:/tmp/temp.2947.2:11: NOTICE: Groom processed 0 pages; purged 0
records; scan size unchanged; table size unchanged.
GROOM DEFAULT
nzsql:/tmp/temp.2947.2:12: NOTICE: Groom processed 36 pages; purged
8547 records; scan size shrunk by 36 pages; table size shrunk by 36
extents.
GROOM DEFAULT
nzsql:/tmp/temp.2947.2:13: NOTICE: Groom processed 0 pages; purged 0
records; scan size unchanged; table size unchanged.
GROOM DEFAULT
nzhistcreatedb
Use this command to create a history database with all its tables, views, and objects for
history collection and reporting.
Syntax
The command has the following syntax:
nzhistcreatedb [options]
Inputs
The nzhistcreatedb command takes the following input options. Note that the input options
have two forms for the option names.
Table A-9: nzhistcreatedb Input Options
Input Description
-d | --db dbname Specifies the name of the history database that you want
to create.
-n | --host host Specifies the hostname of the Netezza system where the
database will reside. The default and only value for this
option is NZ_HOST.
-t | --db-type dbtype Specifies the type of database to create. The only valid
value is query (or q or Q).

20282-20 Rev.1 A-21
nzhistcreatedb
Outputs
The nzhistcreatedb command has the following output messages.
-o | --owner user Specifies an existing database user account which will be
made the owner of the history database. The specified
user account must have Create Database privilege. The
default is NZ_USER.
If you specify a different account for the -o and -u argu-
ments (owner and user), the specified owner account
must have List privileges on USER objects.
-p | --pw password Specifies the password for the owner user account. The
default is NZ_PASSWORD.
-u | --user user Specifies an existing Netezza user account which will be
used to load history data into the database. The user will
be granted the privileges needed to perform those insert
operations on the history database. The default is the
user specified for owner.
The user’s password is not specified in this command;
instead, it is specified in the history configuration.
-v | --schema num Specifies the schema version of the history database
which will be created. For Release 4.6, the number is 1.
Note:
The version must match the version number speci-
fied for the active history configuration; otherwise, the
loader process will fail.
-h | --help Displays the usage and syntax for the command.
Table A-9: nzhistcreatedb Input Options
Input Description
Table A-10: nzhistcreatedb Output Messages
Message Description
History database name cre-
ated successfully !
The command created the history database and all its
tables and views.
ERROR: History database
qhist not created:
ERROR: GrantRevokeCom-
mand: group/user "name"
not found
The command failed because the specified user name
did not exist on the system.
ERROR: History database
dev not created:
ERROR: createdb: object
"hist1" already exists.
The command failed because the specified database
name already exists on the system.

A-22 20282-20 Rev.1
IBM Netezza System Administrator’s Guide
Description
The nzhistcreatedb command creates a history database and configures its ownership and
access permissions. It creates the history database object, all the history tables and views,
and grants the permissions for the owner and user accounts specified in the command.
Note that the command can take several (four to five) minutes to complete processing.
Privileges
You must be the logged in as the nz user to run this command.
Related Commands
See nzhistcleanupdb for a description of how to periodically delete old history information
from the database.
Usage
The following sample command creates a query history database named qhist:
nzhistcreatedb -d qhist -t q -v 1 -u histusr -o myuser -p password
History database qhist created successfully !
Note: The command usually requires several minutes to complete, depending upon how
busy the Netezza system is.
nzhostbackup
Use the nzhostbackup command to back up the Netezza data directory and system catalog
on the host. In the rare situations when a Netezza host server or disk fails, but the SPUs
and their data are still intact, you can restore the /nz/data directory (or whatever directory
you use for the Netezza data directory) from the host backup without the additional time to
restore all of the databases. For more information, see “Host Backup and Restore” on
page 10-8.
ERROR: History database
hist1 not created:
nzsql: Password authentica-
tion failed for user 'name'
The command failed because the password for the speci-
fied owner was not correct.
ERROR: History database
hist1 not created:
ERROR: CREATE DATA-
BASE: permission denied.
The command failed because the specified owner does
not have Create Database privileges on the system.
ERROR: History database
hist1 not created:
ERROR: GrantRevokeCom-
mand: permission denied on
"bug".
The specified owner account does not have List privilege
on the specified user account or the User object class.
The owner must have List privilege to complete the privi-
lege assignments.
Table A-10: nzhistcreatedb Output Messages
Message Description

20282-20 Rev.1 A-23
nzhostbackup
Before running the nzhostbackup command, you must do one of the following:
Pause the system.
Set the NZ_USER and NZ_PASSWORD environment variables to a user who has per-
mission to pause the system.
Set NZ_USER to a user who has permission to pause the system, and cache that user’s
password.
Note: If you run the nzhostbackup command, then change a user's password and then run
the nzhostrestore command, the old password will be replaced.
Syntax
The nzhostbackup command uses the following syntax:
nzhostbackup [-g GRACE_PERIOD] [-D DATA_DIR] FILE
nzhostbackup -h
Inputs
The nzhostbackup command takes the following inputs:
Description
The nzhostbackup command does the following:
Privileges Required
You must specify a database user account that has Manage System privileges.
Common Tasks
You can run the nzhostbackup command when the system is online, paused, offline, or
stopped.
Table A-11: nzhostbackup Input Options
Input Description
FILE Specifies the pathname of the archive file that you want
to create. This file is a gzipped tar file.
nzhostbackup -h Displays online help for this command.
nzhostbackup -g GRACE_
PERIOD
Specifies the maximum time to wait (in seconds) for
queries (or any system action, such as a load) to finish
before the system begins the backup. After the system
has waited this amount of time, it cancels any remaining
queries and starts the backup. The default is 60
seconds.
nzhostbackup -D DATA_DIR Specifies the pathname of the system data directory to
back up. The default is the NZ_DATA_DIR, which is usu-
ally /nz/data.

A-24 20282-20 Rev.1
IBM Netezza System Administrator’s Guide
If you run the nzhostbackup command while the system is online, the nzhostbackup
command pauses the system for the duration of the backup.
All currently running queries run to completion before the backup begins, subject to
the time_out value you specify, or 60 seconds if you do not specify time_out. The sys-
tem queues new queries until the backup completes.
Determining the Data Directory
The nzhostbackup command uses the same logic as the nzstart command to determine the
data directory. The command uses the following settings in order:
1. -D on command line
2. NZ_DATA_DIR environment variable
3. NZ_DIR/data, where NZ_DIR is determined from NZ_KIT_DIR or relative to the location
of the script itself.
In addition, if you unset NZ_DIR and NZ_KIT_DIR and then run the nzhostbackup backup_
dir command, the command will work because it internally determines the location of NZ_
KIT_DIR, NZ_DIR and NZ_DATA_DIR.
Related Commands
Use the nzhostrestore command to restore your Netezza metadata.
Usage
The following provides some same usage:
To back up the default data directory, enter:
nzhostbackup /home/host/backup.tar.gz
To specify a timeout period of 5 minutes, rather than the default 60 seconds, enter:
nzhostbackup -g 300 /home/host/backup.tar.gz
nzhostrestore
Use the nzhostrestore command to restore your Netezza data directory and metadata. The
nzbackup and nzrestore commands also back up the system catalog and host data, but in
situations where a Netezza host server fails but the SPUs and their data are still intact, you
can use the nzhostrestore command to quickly restore the catalog data without reinitializ-
ing the system and restoring all of the databases. For more information, see “Host Backup
and Restore” on page 10-8.
Note: After you perform an nzhostrestore, the system reverts to the mirroring roles (that is,
topology) it had when it was last online.
After you use the nzhostrestore command, note that you cannot perform an incremental
backup on the database; you must run a full backup first.
Syntax
The nzhostrestore command uses the following syntax:

20282-20 Rev.1 A-25
nzhostrestore
nzhostrestore [-f] [-D DATA_DIR] [-catverok] FILE
nzhostrestore -h
Inputs
The nzhostrestore command takes the following inputs:
Options
The nzhostrestore command uses the following options:
Table A-12: nzhostrestore Input Options
Input Description
FILE Specifies the archive file created by the nzhostbackup com-
mand that you want to restore.
nzhostrestore -h Displays online help for this command.
nzhostrestore -D DATA_DIR Specifies the Netezza data directory to restore. The default
is the data directory (NZ_DATA_DIR), which is usually /nz/
data.
Table A-13: nzhostrestore Options
Option Description
-catverok Skips the catalog verification checks. By default, the command checks the
catalog version of the current /nz/data directory and the archived data
directory. If the catalog versions are not the same, or if the command can-
not detect the catalog version of the current data directory, the command
exits with an error message similar to the following:
Unable to determine catalog version of data directory at
/nz/data.1.0, hence exiting. If you are sure that catalog
versions of current and that of the archived data
directory are same, use the command-line switch -catverok
to skip this check.
Use caution with this switch; if you are not sure that the catalog versions
are the same, do not bypass the checks. Contact Netezza Support for
assistance.
-D data_dir Specifies the data directory to restore (default /nz/data).
-f Specifies force, which causes the command to accept the defaults for
prompts and confirmation requests. The prompts appear at the beginning
and end of the program.
Restore host data archived Thu May 25 11:24:58 EDT 2006?
(y/n) [n]
Warning: The restore will now rollback spu data to Thu
May 25 11:24:58 EDT 2006. This operation cannot be
undone. Ok to proceed? (y/n) [n]

A-26 20282-20 Rev.1
IBM Netezza System Administrator’s Guide
Description
The nzhostrestore command does the following:
Privileges Required
You must specify a database user account that has Manage System privileges.
Common Tasks
The nzhostrestore command pauses the system before starting the restore.
Note: After a restoration, any SPUs that previously had a role other than active, spare, or
failed are assigned to the role mismatched. The previous roles include assigned, inactive,
or mismatched.
For more information about SPU roles, see “Hardware Roles” on page 5-7. For more infor-
mation about the nzhw command, see “nzhw” on page A-26.
Notes
If tables are created after the host backup, the nzhostrestore command marks these tables
as “orphaned” on the SPUs. They are inaccessible and consume disk space. The nzhostre-
store command checks for these orphan tables and creates a script you can use to drop
orphaned user tables.
For example, if you ran the nzhostrestore command and it found orphaned tables, you
would see the following message:
Checking for orphaned SPU tables...
WARNING: found 2 orphaned SPU table(s).
Run ‘sh /tmp/nz_spu_orphans.18662.sh’ after the restore has completed
and the system is Online to remove the orphaned table(s).
To drop the orphan tables, run the script, /tmp/nz_spu_orphans.18662.sh
Related Commands
Use the nzhostbackup command to back up your host metadata.
Usage
The following provides sample usage:
To restore the default data directory, enter:
nzhostrestore /home/host/backup.tar.gz
nzhw
Use the nzhw command to manage the hardware of the Netezza system. The command
allows you to show information about the system hardware as well as take actions such as
activate or deactivate components, locate components, or delete them from the system.

20282-20 Rev.1 A-27
nzhw
Syntax
The nzhw command has the following syntax:
nzhw [-h|-rev] [-hc] subcmd [subcmd options]
Inputs
The nzhw command takes the following inputs:
Table A-14: nzhw Input Options
Input Description
nzhw activate -id hwId Makes a specified hardware component such as a SPU or a
disk available as a spare from a non-Active role (such as
Failed or Mismatched). Specify the hardware ID of the SPU
or disk that you want to activate.
Note:
In some cases, the system may display a message that
it cannot activate the disk because the SPU has not finished
an existing activation request. Disk activation usually occurs
very quickly, unless there are several activations taking
place at the same time. In this case, later activations wait
until they are processed in turn.
nzhw deactivate -id hwId
[-force]
Changes the role of a spare SPU or a spare disk to Inactive,
which makes the component unavailable to the system.
Attempting to deactivate an active component that has a
role other than Spare results in an error.
Specify the hardware ID of the spare SPU or disk that you
want to deactivate. Include the -force option if you do not
want to be prompted with a confirmation.
nzhw failover -id hwId
[-force]
Changes the role of a SPU or disk to Failed, which makes
the component unavailable to the system. If you fail a SPU,
the system reassigns the data slices managed or owned by
that SPU to the other active SPUs in the chassis. Failing a
disk causes the system to use the disk’s mirror partition as
the primary partition. For more information about the pro-
cessing of a failover, see “Failover Information” on
page A-30.
Specify the hardware ID of the spare SPU or disk that you
want to fail. Include the -force option if you do not want to
be prompted with a confirmation.

A-28 20282-20 Rev.1
IBM Netezza System Administrator’s Guide
nzhw locate [-id hwId | -all]
[-off]
Identifies a component and its location in the system.
When used with -id, the command displays a string for the
physical location of the hardware component identified by
the hwid value. For SPUs, disks, and disk enclosures, the
command also turns on its indicator LED so that a techni-
cian at the Netezza system can find the component in the
rack.
Note:
On the NEC InfoFrame DWH Appliance, the locate -id
command for a disk drive may require a few minutes to
complete on a busy system. The locate -all option can some-
times require up to 10 minutes to complete.
When used with -all, the command turns on the indicator
LEDs of all the SPUs and disks in the system.
The -off option specifies that the command should turn off
the indicator LED for the specified component or all SPUs
and disks.
Note:
If the hardware type specified for the command does
not have an LED, the command only displays the location
string for that component.
nzhw reset {-id hwId | -all }
[-force]
Resets the specified hardware component. Currently, only a
SPU is supported as a reset target using this command.
You can specify one of the following target options:
•
-id hwid to reset a particular SPU designated by its hard-
ware ID
•
-all to reset all SPUs in the system
•
-spa spaId to reset all the SPUs in the specific SPA iden-
tified by its SPA ID.
Include the -force option if you do not want to be prompted
with a confirmation.
nzhw delete -id hwId
[-force]
Deletes the specified hardware component from the system
database. The hardware component must have a role of Mis-
matched, Failed, or Inactive. A hardware component in any
other role results in an error. A SPU or disk can be identified
by its unique hardware ID.
Specify the hardware ID of the component that you want to
delete. Include the -force option if you do not want to be
prompted with a confirmation.
nzhw listTypes Displays a list of the valid hardware types that you can input
for the nzhw show -type hardwareType command.
Table A-14: nzhw Input Options
Input Description

20282-20 Rev.1 A-29
nzhw
nzhw show [options] Displays information about the specified hardware compo-
nent(s). If you do not specify any options, the command
displays a list of every component in the system and its
Type, Hardware ID (HW ID), Location, Role, and State. You
can specify one or more options (described as follows) to
show specific output.
nzhw show -caCertFile Specifies the pathname of the root CA certificate file on the
client system. This argument is used by Netezza clients who
use peer authentication to verify the Netezza host system.
The default value is NULL which skips the peer authentica-
tion process.
nzhw show -securityLevel Specifies the security level that you want to use for the ses-
sion. The argument has four values:
•
preferredUnsecured — This is the default value. Specify
this option when you would prefer an unsecured connec-
tion, but you will accept a secured connection if the
Netezza system requires one.
•
preferredSecured — Specify this option when you want a
secured connection to the Netezza system, but you will
accept an unsecured connection if the Netezza system is
configured to use only unsecured connections.
•
onlyUnsecured — Specify this option when you want an
unsecured connection to the Netezza system. If the
Netezza system requires a secured connection, the con-
nection will be rejected.
•
onlySecured — Specify this option when you want a
secured connection to the Netezza system. If the Netezza
system accepts only unsecured connections, or if you are
attempting to connect to a Netezza system that is run-
ning a release prior to 4.5, the connection will be
rejected.
nzhw show -id hwId
[-detail]
Displays information only about the component with the
specified hardware ID. Include the -detail option for more
information such as serial number, hardware version, and
additional details.
nzhw show -spa [spa id] Displays information about the hardware components which
are owned by a particular S-Blade in SPA.
nzhw show -type hwType
[-detail]
Displays information only about the components of the
specified hardware type. To display the supported hardware
types, use the nzhw listTypes command.
If the system has no hardware of the specified type, or if the
type is not supported, the command displays a message.
Include the -detail option for more information such as
serial number, hardware version, and additional details.
Table A-14: nzhw Input Options
Input Description

A-30 20282-20 Rev.1
IBM Netezza System Administrator’s Guide
Options
The nzhw command takes the following options:
Description
The nzhw command has the following description.
Privileges Required
You must specify a database user account that has Manage Hardware privilege.
Common Tasks
Use the nzhw command is the primary command for managing and displaying information
about the Netezza system and its hardware components.
Related Commands
Use in conjunction with other system commands, such as the nzsystem and nzds
commands.
Failover Information
When you use the nzhw command to fail over a component, the command checks the sys-
tem and the affected component to make sure that the command is appropriate before
proceeding. Currently, the command operates only on SPUs and disks.
nzhw show -issues [-detail] Displays information about hardware components that are
reporting problems. The command displays a list compo-
nents to investigate and their Type, Hardware ID (HW ID),
Location, Role, and State. Include the -detail option for
more information such as serial number, hardware version,
and additional details.
Table A-14: nzhw Input Options
Input Description
Table A-15: nzhw Options
Option Description
-host hostname Specifies the hostname or IP address of the Netezza
system.
-u user Specifies the database user name [NZ_USER].
-pw <password> Specifies the user’s password [NZ_PASSWORD].
-timeout <db name> Specifies the amount of time in seconds to wait for the
command to complete before exiting with a timeout
error. Default is 300.
20282-20 Rev.1 A-31
nzhw
For example, if you try to fail over an active component that does not have an available sec-
ondary component (such as SPUs that can take ownership of the data slices managed by
the SPU that you want to failover, or an active mirror for the disk that you want to fail over),
the command returns an error. Similarly, if you try to fail over a component that is not
highly available, the command will return an error.
For IBM Netezza 1000 systems, one SPU can manage up to 16 data slices.
Usage
The following provides some sample usage:
To activate a failed or mismatched SPU identified as ID 1003 use the following
command:
nzhw activate -id 1003 -u user -pw password
To deactivate the spare disk identified by hardware ID 1081 without being prompted,
use the following command:
nzhw deactivate -id 1081 -force
To fail over the SPU identified by hardware ID 1084, use the following command:
nzhw failover -id 1084
To locate the SPU identified by hardware ID 1061, use the following command:
nzhw locate -id 1061
Turned locator LED 'ON' for SPU: Logical Name:'spa1.spu5' Physical
Location:'1st Rack, 1st SPA, SPU in 5th slot'.
To light the locator LED of all the SPUs and disks, use the following command:
nzhw locate -all
Turned locator LED 'ON' for all Spus and Disks.
To reset the SPU identified by hardware ID 1084, use the following command:
nzhw reset -id 1084
To reset all the SPUs in the SPA identified by ID 1002, use the following command:
nzhw reset -spa 1002
To delete the disk identified by hardware ID 1081, use the following command:
nzhw delete -id 1081
To show the hardware information for the system, use the following command:
nzhw show
Description HW ID Location Role State
------------- ----- --------------------- ------ ------
Rack 1001 rack1 Active None
SPA 1002 spa1 Active None
SPU 1003 spa1.spu7 Active Online
DiskEnclosure 1004 spa1.diskEncl4 Active Ok
Fan 1005 spa1.diskEncl4.fan1 Active Ok
Fan 1006 spa1.diskEncl4.fan2 Active Ok
Fan 1007 spa1.diskEncl4.fan3 Active Ok
Fan 1008 spa1.diskEncl4.fan4 Active Ok
PowerSupply 1009 spa1.diskEncl4.pwr1 Active Ok
PowerSupply 1010 spa1.diskEncl4.pwr2 Active Ok
A-32 20282-20 Rev.1
IBM Netezza System Administrator’s Guide
Disk 1011 spa1.diskEncl4.disk1 Active Ok
Disk 1012 spa1.diskEncl4.disk2 Active Ok
...
Note: The sample output shown for this command is truncated for the documentation.
To show specific information for a component such as the SPUs, use the following
command:
nzhw show -type spu
Description HW ID Location Role State
----------- ----- ---------- ------ ------
SPU 1003 spa1.spu7 Active Online
SPU 1080 spa1.spu1 Active Online
SPU 1081 spa1.spu3 Active Online
SPU 1082 spa1.spu11 Active Online
SPU 1084 spa1.spu5 Active Online
SPU 1085 spa1.spu9 Active Online
To show the hardware issues reported for the system, use the following command:
nzhw show -issues
Type HW ID Location Role State
---- ----- --------------------------- ------ -----
Disk 1041 rack1.spa1.diskEncl2.disk12 Failed Ok
To list the supported hardware types for the nzhw show -type hwType command, use
the following command:
nzhw listTypes
Description Type
------------- --------
rack rack
spa spa
spu spu
diskenclosure diskencl
disk disk
fan fan
blower blower
power supply pwr
mm mm
store group storeGrp
ethernet switch ethsw
host host
SAS Controller SASController
host disk hostDisk
database accelerator dac

20282-20 Rev.1 A-33
nzload
nzload
Use the nzload command to load ASCII data into database tables. For a complete descrip-
tion of the nzload command and how to load data into the Netezza system, refer to the IBM
Netezza Data Loading Guide.
nzpassword
Use the nzpassword command to manage passwords. The primary use is to store your pass-
word locally and thus use Netezza CLI commands without having to type your password on
the command line.
Syntax
The nzpassword command uses the following syntax:
nzpassword subcmd [subcmd options]
Inputs
The nzpassword command takes the following inputs:
Table A-16: nzpassword Input Options
Input Description
nzpassword add options Adds a locally cached password.
nzpassword delete options Removes the locally cached passwords.
nzpassword resetkey options In normal system operation and without any options, this
command creates a new, unique client key and re-
encrypts the user passwords with the new key.
If you have an existing password file that was created
using older (pre-Release 6.0 or pre-Release 4.6.6 cli-
ents), this command also converts the old Blowfish-
encrypted passwords to AES-256-encrypted passwords.
The client key used for the encryption is auto-generated.
For more information about using encrypted passwords,
refer to “Creating Encrypted Passwords” on page 2-15.
nzpassword show Displays cached passwords.

A-34 20282-20 Rev.1
IBM Netezza System Administrator’s Guide
Options
The nzpassword command uses the following options:
Description
The nzpassword command does the following:
Privileges Required
You must be logged in as nz or any valid Linux account for the Netezza system.
Common Tasks
Use the nzpassword command to store a local version of your password.
Table A-17: nzpassword Options
Command Option Description
nzpassword add -host name Specifies a hostname or IP address [NZ_
HOST].
-u user Specifies the Netezza user name [NZ_
USER].
-pw password Specifies the user’s password [NZ_
PASSWORD].
-timeout secs Specifies how long to wait for the com-
mand to time out (in seconds) before
returning an error. The default is 300.
nzpassword delete -u user Specifies the database user name [NZ_
USER].
-host name Specifies a hostname or IP address [NZ_
HOST].
-all Deletes all cached passwords.
nzpassword resetkey -none If you must downgrade to a previous
release, or if your client users must sup-
port mixed releases of clients, you can
use the nzpassword resetkey -none com-
mand to convert AES-256-encrypted
passwords to Blowfish-encrypted pass-
words. For more information about using
encrypted passwords, refer to “Creating
Encrypted Passwords” on page 2-15.
nzpassword show N/A Shows the cached passwords for the cur-
rent user. The command displays the
message “No cached passwords” if there
are none to display.

20282-20 Rev.1 A-35
nzreclaim
Related Commands
Use in conjunction with the CREATE USER or ALTER USER command.
Usage
The following provides sample usage:
To add a password, enter:
nzpassword add -u user -pw password -host nzhost
To delete a password, enter:
nzpassword delete -u user -host nzhost
To show the command options, enter:
nzpassword show
To reset the client key and create new encryptions of the passwords, enter:
nzpassword resetkey
For more information about using encrypted passwords, refer to “Creating Encrypted Pass-
words” on page 2-15.
nzreclaim
Use the nzreclaim command to recover disk space used by updated or deleted data using
the GROOM TABLE command.
Note: Starting in Release 6.0, the SQL GROOM TABLE command has replaced the nzre-
claim command. The nzreclaim command is now a “wrapper” that calls the GROOM TABLE
command to reclaim space. if you have existing scripts that use the nzreclaim command,
those scripts will continue to run, although some of the options may be deprecated since
they are not used by GROOM TABLE. You should transition to using the GROOM TABLE
command in your scripts.
Syntax
The nzreclaim command uses the following syntax:
nzreclaim [-h|-rev] [options]

A-36 20282-20 Rev.1
IBM Netezza System Administrator’s Guide
Inputs
The nzreclaim command takes the following inputs:
Options
The nzreclaim command takes the following options:
Description
The nzreclaim command does the following:
Table A-18: nzreclaim Input Options
Input Description
nzreclaim -backupset options Specifies the backup set to use to find the rows that can
be reclaimed. By default, nzreclaim uses the most
recent backup set, but you can use this option to specify
a different backup set for the reclaim-backup synchroni-
zation. If you specify NONE, the command reclaims all
rows regardless of whether they were saved in a backup
set.
nzreclaim -blocks options Removes empty blocks at the beginning of the table.
nzreclaim -records options Removes deleted records from a database or table.
nzreclaim -startEndBlocks
options
Removes empty blocks from the beginning and the end
of the table.
Table A-19: nzreclaim Options
Option Description
-u user Specifies the database user name [NZ_USER].
-pw password Specifies the user’s password [NZ_PASSWORD].
-host name Specifies hostname or IP address [NZ_HOST].
-db database Grooms one or all tables in a specific database [NZ_DATABASE]. You
can use the -t option to specify a table, or -allTbls to groom all the
tables.
-allDbs Grooms all databases. You can use the -t option to specify a table to
groom in all databases, or -allTbls to groom all tables in all databases.
-t tbl Grooms the specified table name. Grooms the specified table name.
You must specify the database where the table resides. You can use
the -db option to groom the table in one database, or -allDbs to groom
that table in all the databases.
-allTbls Grooms all the tables in the database. You can use the -db option to
groom all the tables in one database, or -allDbs to groom all tables in
all databases.

20282-20 Rev.1 A-37
nzrestore
Privileges Required
You must have the Groom object privilege for the tables that you want to reclaim or
reoirganize.
Common Tasks
Use the nzreclaim command to groom tables and recover disk space. Specify either record-
level or block-level reclamation.
To remove all unused records throughout the table, specify nzreclaim -records.
To remove blocks from the beginning of the table, specify nzreclaim -blocks.
To remove unused blocks from the beginning and end of the table, specify nzreclaim
-startEndBlocks.
Related Commands
Use the TRUNCATE command if you are deleting an entire table.
Usage
The following provides sample usage:
To run a record-level groom on all the tables in the emp database, enter:
nzreclaim -u admin -pw password -db emp -t mytable
nzsql -u admin -pw password emp -c"groom table mytable " 2>&1
NOTICE: Groom processed 392131 pages; purged 2342 records; scan
size unchanged; table size unchanged.
GROOM RECORDS ALL
To run a block-level groom on all the tables in the emp database, enter:
nzreclaim -u admin -pw password -blocks -db emp
To run a block-level groom and remove blocks from the beginning and end of the table,
enter:
nzreclaim -u user -pw password -startEndBlocks -db emp
nzrestore
Use the nzrestore command to restore your database from a backup. For a complete
description of the nzrestore command and its use, see “Using the nzrestore Command” on
page 10-22.
nzrev
Use the nzrev command to display the Netezza software revision level.
Note: On Linux systems, you can use the nzcontents command to display the revision and
build number of all the executables, plus the checksum of binaries.
Syntax
The nzrev command uses the following syntax:

A-38 20282-20 Rev.1
IBM Netezza System Administrator’s Guide
nzrev [-h|-rev] [options]
Inputs
The nzrev command takes the following inputs:
Description
The nzrev command does the following:
Privileges Required
You do not need special privileges to run the nzrev command.
Common Tasks
Use the nzrev command to display the revision level of Netezza software components.
Related Commands
See the nzcontents command.
Usage
The following provides sample usage:
To display the directory suffix form, enter:
nzrev -dirSuffix
5.0.6.P1
To display the revision level, enter:
Table A-20: nzrev input Options
Input Description
nzrev -dirSuffix Displays the directory suffix form. For example, for
Release 5.0 Beta1, the output is:
5.0.B1
nzrev -rev Displays the entire revision string including all fields
(such as variant and patch level). For example:
5.0.0-0.B-1.P-0.Bld-7581
Note: Entering the nzrev -rev command on the host is
the same as entering the nzsystem showRev -u user -pw
password -host host command on the client system. If
you use only the nzrev command on the client, the com-
mand displays the revision of the client kit.
nzrev -shortLabel Displays an abbreviated revision label. For example:
5.0.6
nzrev -buildType Displays the type of build. Typical values are opt or dbg.

20282-20 Rev.1 A-39
nzsession
nzrev -rev
Release 5.0.6 (P-1) [Build 11294]
To display the short form, enter:
nzrev -shortLabel
5.0.6
nzsession
Use the nzsession command to view and manage sessions.
Syntax
The nzsession command uses the following syntax:
nzsession subcmd [subcmd options]
Inputs
The nzsession command takes the following inputs:
Table A-21: nzsession Input Options
Input Description
nzsession abort options Aborts a running user session.
nzsession abortTxn options Aborts a user’s transaction.
nzsession listSessionTypes Lists the session types, which include the following:
•
sql — database SQL session
•
sql-odbc — database SQL session through ODBC
•
sql-jdbc — database SQL session through JDBC
•
load — data load session (nzload)
•
client — client UI or CLI session
•
bnr — Backup and restore session
•
reclaim — database reclaim session (nzreclaim)
•
loadsvr — data load session (deprecated loader)
nzsession priority options Changes priority of the current and all subsequent jobs
of this session.
nzsession show options Displays the list of current user sessions.

A-40 20282-20 Rev.1
IBM Netezza System Administrator’s Guide
Options
The nzsession command takes the following options:
Table A-22: nzsession Options
Command Option Description
All nzsession
commands
-u user Specifies the database user name [NZ_USER].
-pw password Specifies the user’s password [NZ_PASSWORD].
-host name Specifies hostname or IP address [NZ_HOST].
Except listSessionTypes.
-caCertFile path Specifies the pathname of the root CA certificate
file on the client system. This argument is used by
Netezza clients who use peer authentication to
verify the Netezza host system. The default value
is NULL which skips the peer authentication
process.
-securityLevel
level
Specifies the security level that you want to use for
the session. The argument has four values:
•
preferredUnsecured — This is the default
value. Specify this option when you would pre-
fer an unsecured connection, but you will
accept a secured connection if the Netezza sys-
tem requires one.
•
preferredSecured — Specify this option when
you want a secured connection to the Netezza
system, but you will accept an unsecured con-
nection if the Netezza system is configured to
use only unsecured connections.
•
onlyUnsecured — Specify this option when you
want an unsecured connection to the Netezza
system. If the Netezza system requires a
secured connection, the connection will be
rejected.
•
onlySecured — Specify this option when you
want a secured connection to the Netezza sys-
tem. If the Netezza system accepts only
unsecured connections, or if you are attempting
to connect to a Netezza system that is running
a release prior to 4.5, the connection will be
rejected.
-timeout secs Specifies the time to wait in seconds for the com-
mand to complete. The default is 300.
nzsession abort,
and abortTxn
-id num Specifies the session ID.
-force Does not prompt for confirmation.

20282-20 Rev.1 A-41
nzsession
Description
The nzsession command does the following:
Privileges Required
The admin user has full privileges to display all session information, to abort sessions and
transactions, and to change the priority of a session. Other database user accounts require
no special privileges to use the nzsession show command to see all the sessions that are
currently active on the system. However, non-admin users will see asterisks instead of the
user name, client process Id (PID), database, and SQL command unless they have List
privilege on User (to see details about the user, client PID, and SQL command) and List
privilege on Database (to see the database name). Users must have the Manage System
privilege to change the priority of sessions, and Abort privilege to abort sessions and/or
transactions.
Common Tasks
Use the nzsession command to manage sessions. Note that you cannot use a Release 5.0
nzsession client command to manage sessions on a Netezza system that is running a
release prior to 5.0.
How the Command Handles Abort Processing
When you invoke the nzsession abort command, the client manager uses the session id to
abort the process.
For example, to abort an nzload session id 2001, the system does the following:
1. The system sends the nzsession abort command to the client manager.
2. The client manager identifies which nzload session to abort.
3. The loadmgr sends the abort signal to the loadsvr and starts the timer.
4. The loadmgr waits the specified timeout value for the loadsvr to abort the session. Note
that the command uses either the default value, or the timeout you specify on the com-
mand line.
nzsession priority -id num Specifies the session ID.
-high Changes the session priority to high.
-normal Changes the session priority to normal.
-low Changes the session priority to low.
-critical Changes the session priority to critical.
nzsession show -activeTxn Displays the active transactions for the system.
-maxColW chars Specifies the maximum number of characters to
print in a column. The default is 24.
Table A-22: nzsession Options
Command Option Description

A-42 20282-20 Rev.1
IBM Netezza System Administrator’s Guide
You can also abort active or idle nzsql sessions.
nzsession Show Output
Table A-23 describes the nzsession show output information. Note that the admin user can
see all the data for sessions; other users can see all the sessions, but data for user, data-
base, client PID, and SQL command are “hidden” unless the user has privileges to see that
data.
Table A-23: Session Information
Column Description
ID The ID of the session.
Type The type of session, which can be one of the following:
•
Client — Client or UI session
•
SQL — Database SQL session
•
Bnr — Backup or restore session
•
Reclaim — Disk reclamation session.
User The name of the session owner.
Start Time The time the session was started.
PID The process identification number of the command you are running.
Database The name of the database.
State The state of the session, which can be one of the following:
•
Idle — The session is connected but it is idle and waiting for a SQL
command to be entered.
•
Active — The session is executing a command (usually applies to a
SQL session that is running a query).
•
Connect — The session is connected, but no commands have been
issued.
•
Tx-Idle — The session is inside an open transaction block (BEGIN
command) but it is idle and waiting for a SQL command to be
entered within the transaction.
Priority Name The priority of the session, which can be one of the following:
•
Critical — The highest priority for user jobs.
•
High — The session jobs are running on the high priority job queue.
•
Normal — The session’s jobs are running on the large or small job
queue.
•
Low — The lowest priority for user jobs.
Client IP The IP address of the client system.
Client PID The process identification number of the client system.
Command The last command executed.

20282-20 Rev.1 A-43
nzspupart
Related Commands
Use in conjunction with the nzstats and nzsystem commands.
Usage
The following provides sample usage:
To show all sessions, enter:
nzsession show -u bob -pw password
ID Type User Start Time PID Database State Priority Name
Client IP Client PID Command
----- ---- -------- ----------------------- ----- -------- ------ -------------
--------- ---------- ------------------------
16049 sql ***** 28-Jan-10, 08:28:24 EST 26399 ***** active normal
***** *****
16052 sql BOB 28-Jan-10, 08:29:27 EST 26612 SYSTEM active normal
127.0.0.1 26611 SELECT session_id, clien
This sample output appears for a user (bob) who does not have permission to see the
details of the sessions on the system. Only the details for bob’s sessions appear. For a
user who has List permission on user and database objects, the output shows all the
details:
nzsession show -u sysadm -pw password
ID Type User Start Time PID Database State Priority Name
Client IP Client PID Command
----- ---- -------- ----------------------- ----- -------- ------ -------------
--------- ---------- ------------------------
16049 sql DBUSR 28-Jan-10, 08:28:24 EST 26399 TPCH1 active normal
127.0.0.1 26398 select * from orders;
16054 sql SYSADM 28-Jan-10, 08:48:22 EST 30515 SYSTEM active normal
127.0.0.1 30514 SELECT session_id, clien
To abort a session, enter:
nzsession abort -u user -pw password -host nzhost -id 1344
To abort a transaction, enter
nzsession abortTxn -u user -pw password -host nzhost -id 437
To list the types of sessions, enter:
nzsession listSessionTypes
To change the session priority, enter:
nzsession priority -u user -pw password -host nzhost -id 437 -high
To show all all the active transactions, enter:
nzsession show -activeTxn
You can use the -activeTxn option to display the active sessions that will be impacted
by a state change (such as pausing -now) before you initiate the state change.
nzspupart
Use the nzspupart command to display information about the SPU partitions on an IBM
Netezza system including status information and the disks that support the partition.

A-44 20282-20 Rev.1
IBM Netezza System Administrator’s Guide
Syntax
The nzspupart command uses the following syntax:
nzspupart [-h|-rev] [-hc] <subcmd> [<subcmd options>]
Inputs
The nzspupart command takes the following inputs:
Options
The nzspupart command takes the following options:
Table A-24: nzspupart Inputs
Input Description
nzspupart show options Displays information about the specified partitions. If you do
not specify any options, the command displays a list of all parti-
tion and their ID, type, status, size, percent used, and
supporting disksYou can specify one or more options to show
specific output.
nzspupart regen options
[-force]
Starts regeneration for SPU partitions. If you do not specify any
options, the command searches for degraded partitions and
starts regeneration processes to the available spare disks.
Optionally, you can use the options -spu spuId, -part partId,
and -dest diskHwId to specify source and target information for
a specific regeneration. Include the -force option to start the
regen without prompting you for a confirmation.
Note that the regen option is not supported on IBM Netezza
C1000 appliances. On those platforms, the hardware controls
regenerations.
nzspupart listTypes Displays a list of the valid hardware types that you can input for
the nzspupart show -type spuPartitionType command.
Table A-25: nzspupart Options
Command Option Description
nzspupart show -u user Specifies the database user name [NZ_USER].
-pw password Specifies the user’s password [NZ_PASSWORD].
-host name Specifies hostname or IP address [NZ_HOST].
-caCertFile path Specifies the pathname of the root CA certificate
file on the client system. This argument is used
by Netezza clients who use peer authentication
to verify the Netezza host system. The default
value is NULL which skips the peer authentica-
tion process.

20282-20 Rev.1 A-45
nzspupart
-securityLevel
level
Specifies the security level that you want to use
for the session. The argument has four values:
•
preferredUnsecured — This is the default
value. Specify this option when you would pre-
fer an unsecured connection, but you will
accept a secured connection if the Netezza
system requires one.
•
preferredSecured — Specify this option when
you want a secured connection to the Netezza
system, but you will accept an unsecured con-
nection if the Netezza system is configured to
use only unsecured connections.
•
onlyUnsecured — Specify this option when
you want an unsecured connection to the
Netezza system. If the Netezza system
requires a secured connection, the connection
will be rejected.
•
onlySecured — Specify this option when you
want a secured connection to the Netezza sys-
tem. If the Netezza system accepts only
unsecured connections, or if you are attempt-
ing to connect to a Netezza system that is
running a release prior to 4.5, the connection
will be rejected.
-timeout secs Specifies the number of seconds to wait for the
command to complete before exiting with a time-
out error. The default is 300.
-id hwId Displays information about the partitions that are
supported by a disk with the specified hardware
ID.
-spa spaId Displays information about the partitions that are
supported by a disk with the specified hardware
ID.
-detail Displays more information about the partitions,
such as
-issues Displays information about partitions that have
issues.
-type
spuPartitionType
Displays information about specific types of par-
titions. The types include data, nzlocal, swap,
and log.
-regenStatus Displays information about disk regenerations
that are in progress.
Table A-25: nzspupart Options
Command Option Description
A-46 20282-20 Rev.1
IBM Netezza System Administrator’s Guide
Description
The nzspupart command has the following description.
Privileges Required
You must specify a database user account that has Manage Hardware privilege.
Common Tasks
Use the nzspupart command to display information about the SPU partitions of an IBM
Netezza C1000 system, or to perform a partition regeneration when th partition is
degraded. You can use the command to obtain status about the partitions and the space
used within them, as well as whether regenerations are in progress, or if there are issues
that require your attention.
Related Commands
Use in conjunction with other system commands, such as the nzhw and nzds commands.
Usage
The following provides sample usage:
To display information about the SPU partitions, enter:
nzspupart
SPU Partition Id Partition Type Status Size (GiB) % Used Supporting Disks
---- ------------ -------------- ------- ---------- ------ -------------------------------
1255 0 Data Healthy 3725 0.00 1129,1151,1167
1255 1 Data Healthy 3725 0.00 1126,1148,1169
1255 2 Data Healthy 3725 0.00 1133,1150,1171
1255 3 Data Healthy 3725 0.00 1132,1145,1170
1255 4 Data Healthy 3725 0.00 1136,1137,1166
1255 5 Data Healthy 3725 0.00 1146,1149,1175
1255 6 Data Healthy 3725 0.00 1130,1153,1165
1255 7 Data Healthy 3725 0.00 1131,1155,1173
1255 8 Data Healthy 3725 0.00 1127,1152,1164
1255 100 NzLocal Healthy 11150 0.00 1134,1135,1147,1154,1168,1172,1174
1255 101 Swap Healthy 24 0.00 1134,1135,1147,1154,1168,1172,1174
1255 110 Log Healthy 1 0.00 1134,1135,1147,1154,1168,1172,1174
To list the SPU partition types, enter:
nzspupart listTypes
Description Type
----------- -------
Data data
NzLocal nzlocal
Swap swap
Log log
To start a partition regeneration:
nzspupart regen
Are you sure you want to proceed (y|n)? [n] y
Info: Regen Configuration - Regen configured on SPA:1 Data slice 2
and 1

20282-20 Rev.1 A-47
nzstart
If there are no degraded partitions, the command outputs the message “No degraded
partitions.” If the regen cannot proceed because there are no spare disks on the sys-
tem, the command outputs the message “No spares disks available.”
nzstart
Use the nzstart command to start system operation after you have stopped the system. The
nzstart command is a script that initiates a system start by setting up the environment and
invoking the startup server.
Note: You must run nzstart on the host. You cannot run it remotely.
Syntax
The nzstart command uses the following syntax:
nzstart [options]
Inputs
The nzstart command takes the following inputs:
Description
The nzstart command does the following:
Privileges Required
You must be able to log on to the host system as the nz user.
Common Tasks
Use the nzstart command to start system operation after you have stopped the Netezza sys-
tem. The nzstart command verifies the host configuration to ensure that the environment is
configured correctly and completely; it displays messages to direct you to files or settings
that are missing or misconfigured.
Table A-26: nzstart Inputs
Input Description
nzstart -h Displays help.
nzstart -D dataDir Specifies the data directory to use. By default, it is install_dir/
data.
nzstart -log file Sends the daemon output to the log file instead of to /dev/null.
nzstart -noWait Does not wait for the system to go online.
nzstart -timeout value Specifies the number of seconds to wait for the command to
complete before exiting with a timeout error. The default is
300.
nzstart -newSystem Start a new Netezza system. (Used only the first time a new sys-
tem is started.)

A-48 20282-20 Rev.1
IBM Netezza System Administrator’s Guide
If the system is unable to start because of a hardware problem, the command typically dis-
plays a timeout error message. You can review the sysmgr.log file to identify what problems
might have caused the nzstart command to fail.
For IBM Netezza 1000 systems, a message is written to the sysmgr.log file if there are any
storage path issues detected when the system starts. The log displays a message similar to
“mpath -issues detected: degraded disk path(s) or SPU communication error” which helps
to identify problems within storage arrays. For more information about how to check and
manage path failures, see “Hardware Path Down” on page 7-22.
Related Commands
See the nzstop command.
Notes
The nzstart script has a default time out, which is 120 seconds + 3* the number of SPUS.
(This default is subject to change in subsequent releases.)
If the system has not started by this time, the nzstart command returns and prints an warn-
ing message indicating that the system has failed to start in xxx seconds. The system,
however, continues to try to start. You can override the default time out by specifying a
timeout.
Usage
The following provides sample usage:
To specify a directory, enter:
nzstart -D /tmp/data
To specify a log file, enter:
nzstart -log /tmp/startlog
To start without waiting, enter:
nzstart -noWait
To specify a timeout, enter:
nzstart -timeout 400
nzstate
Use the nzstate command to display the current system state or to wait for a particular sys-
tem state to occur.
Syntax
The nzstate command uses the following syntax:
nzstate [-h|-rev|-hc] subcmd [subcmd options]]
20282-20 Rev.1 A-49
nzstate
Inputs
The nzstate command takes the following inputs:
Options
The nzstate command takes the following options:
Table A-27: nzstate Inputs
Input Description
nzstate listStates Displays the system states and a description.
nzstate show options Displays the current state. This is the default if you type the
command without any arguments.
nzstate waitFor options Waits for the system to reach the specified state. Note that you
cannot wait for a state that ends in -ing.
Table A-28: nzstate Options
Command Option Description
nzstate listStates Takes no options.
nzstate show -u user Specifies the database user name [NZ_USER].
-pw password Specifies the user’s password [NZ_PASSWORD].
-host name Specifies hostname or IP address [NZ_HOST].
-timeout secs Specifies the number of seconds to wait for the
command to complete before exiting with a time-
out error. The default is 300.
-terse Prints only the current state symbol.
-verbose Prints the expected state if it is different from
the current state.
-reason Displays more information about why the system
is in the Down state.
nzstate waitFor -type state_type Waits for the specified state to occur. Use the
listStates subcommand to display the state
types.
-u user Specifies the database user name [NZ_USER].
-pw password Specifies the user’s password [NZ_PASSWORD].
-host name Specifies hostname or IP address [NZ_HOST].
-timeout secs Specifies the number of seconds to wait for the
command to complete before exiting with a time-
out error. The default is 300.

A-50 20282-20 Rev.1
IBM Netezza System Administrator’s Guide
Description
The nzstate command does the following:
Privileges Required
You do not need special privileges to run the nzstate listStates command. You must specify
a database user account to show or wait for states.
Common Tasks
Use the nzstate command to display the current state.
Related Commands
See the nzsystem command.
Usage
The following provides sample usage
To list the states, enter:
nzstate listStates
State Symbol Description
------------ ------------------------------------------------------------
initialized used by a system component when first starting
paused already running queries will complete but new ones are queued
pausedNow like paused, except running queries are aborted
offline no queries are queued, only maintenance is allowed
offlineNow like offline, except user jobs are stopped immediately
online system is running normally
stopped system software is not running
down system was not able to initialize successfully
To show the current state, enter:
nzstate show -u user -pw password -host nzhost -verbose
To wait for the offline state until the state change occurs or the command timer
expires, enter:
nzstate waitFor -u user -pw password -host nzhost -type offline
To display more information about a system that is in the down state, enter:
nzstate -reason
The system is DOWN because failing over SPUs results in invalid
topology
nzstats
Use the nzstats command to display operational statistics about system capacity, faults,
and performance.
Syntax
The nzstats command uses the following syntax:

20282-20 Rev.1 A-51
nzstats
nzstats [-h|-rev|-hc] subcmd [subcmd options]]
Inputs
The nzstats command takes the following inputs:
Options
The nzstats command takes the following options:
Table A-29: nzstats Inputs
Input Description
nzstats listFields options Displays the fields for a group or a table.
nzstats listTypes Displays the group and table types.
nzstats show options Displays the stats from the System Group table.
Table A-30: nzstats Options
Command Option Description
nzstats listFields -type type Specifies the type of group or table that you want
to list. The default is system. Valid values
include:
•
dbms — DBMS Group
•
system — System Group
•
database — Database Table
•
host — Host Table
•
hostCpu — Host CPU Table
•
hostFileSystem — Host File System Table
•
hostIf — Host Interface Table
•
hostMgmtChan — Host Management Channel
Table
•
hostNet — Host Network Table
•
hwMgmtChan — HW Management Channel
Table
•
query — Query Table
•
queryHist — Query History Table
•
spu — SPU Table
•
spuPartition — SPU Partition Table
•
table — Table Table
•
tableDataSlice — Per Table Per Data Slice
Table
You can list the valid types using the nzstats list-
Types command.

A-52 20282-20 Rev.1
IBM Netezza System Administrator’s Guide
Description
The nzstats command does the following:
Privileges Required
Your database user account must have the Manage System privilege to show the actual sys-
tem statistics. Any user can list the fields and types.
Common Tasks
Use the nzstats command to display operational statistics.
nzstats listTypes — Lists the valid types for which you can display
information, as shown in the listFields
description.
nzstats show -u user Specifies the database user name [NZ_USER].
-pw password Specifies the user’s password [NZ_PASSWORD].
-host name Specifies the hostname or IP address [NZ_
HOST].
-timeout secs Specifies the number of seconds to wait for the
command to complete before exiting with a time-
out error. The default is 300.
-type type Specifies the type of table that you want to show.
The default is system.You can list the valid types
using the nzstats listTypes command.
-cols list Shows only the specified columns (for example,
1,4,5).
-colMatch str Shows only the columns whose name contains
the str string.
-orient type Specifies the output orientation. It can be auto,
horizontal, or vertical.
-fmtNum Formats numbers in the output for improved
readability.
-fmtMemFlds
format
Formats memory fields with size options such as
KB, MB, or GB for improved readability.
-allocationUnit
units
For the Table table, outputs the disk space used
value in bytes (default), extents, or blocks. The
valid values are usedbytes, extents, or
usedblocks.
Table A-30: nzstats Options
Command Option Description

20282-20 Rev.1 A-53
nzstop
Related Commands
Use in conjunction with the nzsession and nzsystem commands.
Usage
The following provides sample usage:
To list the types, enter:
nzstats listTypes
Group/Table Type Description
---------------- ------------------------------
dbms DBMS Group
system System Group
database Database Table
host Host Table
hostCpu Host CPU Table
hostFileSystem Host File System Table
hostIf Host Interface Table
hostMgmtChan Host Management Channel Table
hostNet Host Network Table
hwMgmtChan HW Management Channel Table
query Query Table
queryHist Query History Table
spu SPU Table
spuPartition SPU Partition Table
table Table Table
tableDataSlice Per Table Per Data Slice Table
To show the columns that match the string Num Data Slices, enter:
nzstats show -u user -pw password -host nzhost -colMatch "Num Data
Slices"
Field Name Value
--------------- -----
Num Data Slices 46
nzstop
Use the nzstop command to stop system operation. Stopping a system stops all Netezza
host processes. Unless you specify otherwise, stopping the system waits for all running jobs
to complete.
Use either the nzsystem stop or the nzstop command to stop system operation. The nzstop
command is a script that initiates a system stop by halting all processing.
Note: You must run nzstop while logged in as a valid Linux user such as nz on the host. You
cannot run the command remotely.
Syntax Description
The nzstop command uses the following syntax:
nzstop options

A-54 20282-20 Rev.1
IBM Netezza System Administrator’s Guide
Inputs
The nzstop command takes the following inputs:
Options
The nzstop command takes the following options:
Description
The nzstop command does the following:
Privileges Required
You must be able to log on to the Netezza system as a valid Linux user such as nz.
Common Tasks
Use the nzstop command to stop the system.
Related Commands
See the nzsystem command.
Usage
The following provides sample usage:
To display help, enter:
nzstop -h
To specify a timeout of 300 seconds, enter:
nzstop -timeout 300
Table A-31: nzstop Inputs
Input Description
nzstop -h Displays the help for the nzstop command.
nzstop -timeout secs Specifies the number of seconds to wait for the command to
complete before exiting with a timeout error. The default is
300.
Table A-32: nzstop Options
Command Option Description
nzstop -h — No options.
nzstop -timeout <time to wait> Specifies the timeout value.

20282-20 Rev.1 A-55
nzsystem
nzsystem
Use the nzsystem command to change the system state, and show and set configuration
information.
Syntax
The nzsystem command uses the following syntax:
nzsystem [-h|-rev|-hc] subcmd [subcmd_options]
Inputs
The nzsystem command takes the following inputs:
Table A-33: nzsystem Inputs
Input Description
nzsystem offline options Takes the system offline.
nzsystem pause options Pauses the system. Use this command to pause the sys-
tem for administrative work, but allow all current
transactions to complete.
nzsystem restart options Stops and then automatically restarts the system.
nzsystem resume options Returns the system to the online state.
nzsystem set options Configures a system setting.
Caution: Do not change your system settings unless
directed to do so by Netezza Support.
nzsystem showRegistry options Displays the system’s configuration registry.
nzsystem showRev options Displays the system’s software revision level.
nzsystem showState options Displays the system state. This is the default subcom-
mand if you type the nzsystem command without any
subcommands. It is also the same as the nzstate show
command.
nzsystem showIssues Displays any hardware or dataslice issues found on the
system.
nzsystem stop options Stops the system.

A-56 20282-20 Rev.1
IBM Netezza System Administrator’s Guide
Options
The nzsystem command takes the following options:
Description
The nzsystem command does the following:
Privileges Required
You can run a subset of the commands such as showRev and showState using any database
user account. However, your database user account must have the Manage System privilege
to start or manage the system states as well as to set or show the registry settings.
Common Tasks
Use the nzsystem command to show and change system state.
Table A-34: nzsystem Options
Command Option Description
All nzsystem
commands
-u user Specifies the database user name [NZ_USER].
-pw password Specifies the user’s password [NZ_PASSWORD].
-host name Specifies the hostname or IP address [NZ_
HOST].
-timeout secs Specifies the number of seconds to wait for the
command to complete before exiting with a time-
out error. The default is 300.
offline, pause,
restart, set, stop
-force Does not prompt for confirmation.
offline, pause,
restart, stop
-now Aborts the transactions that cannot be restarted
after the state transition.
-nowAfter
seconds
Specifies the time for the work to finish before
resorting to -now. The default is 300 seconds.
set -regFile file_name Loads the registry configuration file.
-arg Specifies the configuration argument and its
value. Some configuration arguments take a
comma-separated list of multiple values.
(<tag>=<value[, value,...]>).
-ignoreErrors Skips unavailable or erroneous settings.
showRev -build Shows the build string for the Netezza software
as set by the Configuration Manager (CM).
-label Shows the label version of the build string.
20282-20 Rev.1 A-57
nzsystem
Related Commands
See the nzstart, nzstop, and nzstate commands.
Usage
The following provides sample usage:
To take the system offline, enter:
nzsystem offline -u user -password password -host nzhost
To start the system again, use the nzsystem resume command.
To pause the system, enter:
nzsystem pause -u user -password password -host nzhost
To start the system again, use the nzsystem resume command.
To restart the system, enter:
nzsystem restart -u user -password password -host nzhost -now
To resume the system, enter:
nzsystem resume -u user -password password -host nzhost
To configure a system setting, enter:
nzsystem set -u user -password password -host nzhost -regFile
MaxReboot FreqPerHr
To display the system registry settings, enter:
nzsystem showRegistry -u user -password password -host nzhost
To display the revision level, enter:
nzsystem showRev -u user -password password -host nzhost
To display the system state, enter:
nzsystem showState -u user -password password -host nzhost
To display any system issues, enter:
[nz@nzhost ~]$ nzsystem showIssues
Hardware Issues :
Description HW ID Location Role State
----------- ----- -------------------- ------ --------
Disk 1030 spa2.diskEncl1.disk1 Failed Ok
Disk 1031 spa2.diskEncl1.disk2 Failed Ok
PowerSupply 1113 spa1.diskEncl1.pwr1 Active Critical
Disk 1118 spa1.diskEncl1.disk2 Failed Ok
Dataslice Issues :
Data Slice Status SPU Primary Storage Mirror Storage % Used
---------- ---------- ---- ---------------- --------------- -------
5 Unmirrored 1194 1139 95.90
6 Unmirrored 1194 1139 95.63
To stop the system, enter:

A-58 20282-20 Rev.1
IBM Netezza System Administrator’s Guide
nzsystem stop -u user -password password -host nzhost
To start the system again, use the nzstart command.
Customer Service Troubleshooting Commands
Occasionally, Netezza Customer Service may ask you to use commands that are found in
the /nz/kit/bin/adm directory. These are low-level diagnostic commands that can be run only
on the host and require administrative privileges.
Note: Do not run these commands unless explicitly directed to do so by Netezza Customer
Service. Running these commands without supervision could result in system crashes, data
loss, or data corruption.
Table A-35 describes some of the more common commands in the bin/adm directory.
These commands are divided into the following categories:
Safe — Running the command causes no damage, crashes, or unpredictable behavior.
Unsafe — Running the command with some switches could cause no harm, but with
other switches could cause damage.
Dangerous — Running the command could cause data corruption or a crash.
Note that these are unsupported commands and they have not been as rigorously tested as
the end-user commands.
Table A-35: Diagnostic Commands
Command Usage Description
nzconvertsyscase Unsafe Converts the Netezza system to the opposite case, for
example, from upper to lower case. For more infor-
mation, see “nzconvertsyscase” on page A-59.
nzdumpschema Safe Dumps a database schema and some statistics infor-
mation. This command is useful when attempting to
understand a class of query optimization issues. For
more information, see “nzdumpschema” on
page A-61.
nzlogmerge Safe Merges multiple system log files into a chronological
sequence. For more information, see “nzlogmerge”
on page A-62.
nzdbg Unsafe Enables system diagnostic messages. Although many
invocations of this command are safe, some invoca-
tions can cause your system to crash.
nzdumpcat Unsafe Dumps the system catalog information. This com-
mand could cause damage to the system catalog if
used carelessly.
nzdumpmem Unsafe Dumps various database shared-memory data struc-
tures. Although many invocations of this command
are safe, some invocations can cause your system to
crash.

20282-20 Rev.1 A-59
Customer Service Troubleshooting Commands
nzconvertsyscase
Use the nzconvertsyscase command to convert the Netezza system to the opposite case, for
example from upper to lower or vice versa.
Note: Your database must be offline when you use this command (that is, use nzstop first
to stop the system).
Syntax
The nzconvertsyscase command uses the following syntax:
nzdumptxjournal Unsafe Dumps information about the transaction log used by
the database. Although many invocations of this
command are safe, some invocations can crash your
system.
toporegen Unsafe Internal command used when system recovery is
required. Running this command results in data loss.
nzpush Unsafe Provides low-level access to the Linux-based SPUs.
Running this command could cause the system to
crash or data to be lost.
client Dangerous Internal command that performs low-level
diagnostics.
cliqa Dangerous Internal command that performs low-level
diagnostics.
clitest Dangerous Internal command that performs low-level
diagnostics.
nzinitsystem Dangerous Re-initializes the system. This command should be
used only as directed by Technical Support. Running
this command on an operational system results in
data loss. For more information, see “nzinitsystem”
on page A-62.
nzloadcat Dangerous Loads a database catalog. This command is used in
system recovery.
nzmakedatakit Dangerous Used internally by the system during upgrade and
downgrade. Running this command could produce
unexpected results.
nzresetxlog Dangerous Resets the database transaction log. Running this
command could cause data corruption.
nzsqa Dangerous Internal command that performs low-level
diagnostics.
nzlogmerge.info Documentation Nzlogmerge uses some GPL components.
Table A-35: Diagnostic Commands
Command Usage Description

A-60 20282-20 Rev.1
IBM Netezza System Administrator’s Guide
nzconvertsyscase [-h |-rev] [options]
Inputs
The nzconvertsyscase command takes the following inputs:
Note: You must specify either l or u. If you specify neither option, the command displays an
error. After converting your system, you must rebuild all views and synonyms in every
database.
Description
The nzconvertsyscase command does the following:
Privileges Required You must be the system administrator.
Common Tasks Use the nzconvertsyscase command to convert from one default case to
another. The command uses the values in the objdelim and attdelim fields in the system
tables _t_object and _t_attribute to determine if the identifiers should be converted or
retained. The script converts only the names of objects and attributes created as regular
identifiers. It does not convert delimited identifiers.
Note: If you want to convert the identifier case within a database to the opposite of the
default system case, contact Netezza Support.
Usage
The following provides sample usage:
To convert to lowercase, enter:
nzconvertsyscase -l -D /nz/data
To convert to uppercase, enter:
nzconvertsyscase -u -D /nz/data
To validate the conversion, enter:
nzconvertsyscase -v -u -D /nz/data
Table A-36: nzconvertsyscase Input Options
Input Description
nzconvertsyscase -D Specifies the data directory. Required.
nzconvertsyscase -l Converts the system to lower-case character strings.
nzconvertsyscase -u Converts the system to upper-case character strings
nzconvertsyscase -v Validates the conversion without making any changes.
Use this option to check for duplicate names.
nzconvertsyscase -L Logs the command message output to the nzconvertsy-
scase logfile. The default is nzconvertsyscase.log.

20282-20 Rev.1 A-61
Customer Service Troubleshooting Commands
nzdumpschema
Use the nzdumpschema command to generate a shell script with SQL statements that
duplicate a database by extracting the given database's schema and statistics.
Note: Because no actual data is dumped, you cannot use this command to back up a
database.
Syntax
The nzdumpschema command uses the following syntax:
nzdumpschema [-h] [-R] database [outfile] [outdir] [datadir]
The nzdumpschema command takes the following inputs:
Description
You must be the admin user to run the nzdumpschema command.
Common Tasks Use the nzdumpschema command to dump the table and view definitions,
the database statistical information, and optionally, any UDXs that are registered within the
database. It is a diagnostic tool that you can use to troubleshoot a variety of problems relat-
ing to a query.
You must run it from the host Netezza system.
You cannot use -u, -pw, -host, or other nz CLI options.
You have must have set the NZ_USER and NZ_PASSWORD environment variables.
You must specify a database.
If the database includes registered user-defined objects (UDXs), you can also dump
copies of the object files that were registered for use with those routines.
Table A-37: nzdumpschema Inputs
Option Description
-h Displays this help
-R Create a script using the actual database name. Otherwise, the
script uses the placeholder name SHADOW.
database Specifies the name of a database for which you want statistics
and the schema.
outfile Specifies a file to which the command output is written. If you
do not specify an output file, the output is written to standard
output.
outdir
Specifies the output directory where UDX object files registered
in the database will be written.
datadir
Specifies the location of the data directory, which is typically
/nz/data. The default is /nz/data. This option is used only when
outdir is specified.

A-62 20282-20 Rev.1
IBM Netezza System Administrator’s Guide
If you do not specify an output file, the nzdumpschema command writes to standard
output.
Related Commands None
Usage
The following provides sample usage:
To dump table and view definitions to the file named empDBOut, enter:
nzdumpschema empDB empDBOut
To dump the sales database to the file salesSchema and its user-defined objects to the
directory /tmp/UdxObjs, enter:
nzdumpschema sales salesSchema /tmp/UdxObjs
If you relocate the object files in /tmp/UdxObjs to another location, be sure to edit the
object pathnames used in the salesSchema file to reflect the new location of the object
files.
nzinitsystem
Use the nzinitsystem command only under the direction of Technical Support. This is a
dangerous command and must be used with extreme caution to avoid loss of data and sys-
tem behavior.
The nzinitsystem command re-initializes a system by overwriting the catalog information on
the host, which results in loss of data. Typically this command is used to re-initialize a test
system when you want to remove all existing database information on that system. In
extreme cases, this command might be used to recover a system that has been altered
beyond repair, and Support has identified that reinitialization and restores are required for
recovery.
nzlogmerge
Each system component produces a log file that is stored in a subdirectory of the /nz/kit/log
directory. Each entry in this file contains a timestamp. For troubleshooting, it is often
required to merge these entries in chronological order.
To merge all the log files, the nzlogmerge command syntax is:
nzlogmerge list of files to merge
Syntax
The nzlogmerge command takes the following options:
Table A-38: nzlogmerge Options
Option Description
-h or ? Displays this help
-v Verbose mode
-t hours Specifies the log messages in the last t hours

20282-20 Rev.1 A-63
Customer Service Troubleshooting Commands
-a datetime
-b datetime
Captures the log entries after the specified time and before the specified
time. The dattime value must be in the format YYYY-MM-DD HH:MM:SS.
files List of files to merge
Table A-38: nzlogmerge Options
Option Description
A-64 20282-20 Rev.1
IBM Netezza System Administrator’s Guide
B-1
A P P E N D I X B
Linux Host Administration Reference
The Netezza appliance has a host server that runs the Linux™ operating system. The host
manages the other Netezza components and provides support as an administration monitor,
allowing you to manage Netezza functions. The host also converts queries into optimized
execution plans, specifically utilizing the strengths of the Netezza architecture.
Several Netezza models such as IBM Netezza 1000 and others are designed as high avail-
ability (HA) systems and have two hosts; one host serves as the active host and one as the
standby host, which takes over when the active host encounters problems or is manually
shutdown. Any changes that you make to the Linux configuration of one host, such as add-
ing Linux users or groups, managing crontab schedules, or changing NTP settings, you
must also make to the second host to ensure that the hosts have identical configurations.
This appendix describes some of the common Linux procedures. For more details or infor-
mation about other procedures, refer to the Red Hat™ documentation.
Managing Linux Accounts
You can create Linux user accounts to manage user access to the Netezza system.
Accounts can refer to people (accounts associated with a physical person) or logical users
(accounts that exist for an application so that it can perform a specific task). The system
assigns a user ID to every file that a user account creates. Associated with each file are
read, write, and execute permissions.
Note: A Linux user or group does not have Netezza database access. To manage database
users and groups, see “Netezza Database Users and Groups” on page 8-1.
Setting Up Linux User Accounts
You use the useradd command to create a Linux user account on the Netezza host. The
syntax for the useradd command is:
/usr/sbin/useradd [-G list of groups] user_name
The -G switch specifies a comma-separated list of existing Linux groups to which the user
should be added. Do not type any spaces in the comma-separated group list. For example,
to create an account called kilroy and to assign that account to the staff, admin, and dev
Linux user groups, execute the following command as root:
useradd -G staff,admin,dev kilroy
This useradd command creates a user called kilroy and also a user private group called kil-
roy. It also adds user kilroy to the staff, admin, and dev Linux groups.

B-2 20282-20 Rev.1
IBM Netezza System Administrator’s Guide
Modifying Linux User Accounts
The syntax for the usermod command is:
/usr/sbin/usermod [-G list of groups] user_name
To modify an existing Linux user account, enter:
usermod -G staff,admin kilroy
This usermod command changes the groups to which the kilroy user belongs.
Deleting Linux User Accounts
The syntax for the userdel command is:
/usr/sbin/userdel [-r] user_name
To delete an existing Linux user account, enter:
userdel kilroy
This userdel command deletes the kilroy account, but does not delete kilroy’s home
directory.
Changing Linux Account Passwords
There are two ways to change passwords for Linux accounts. If you can log in as the
account, you can change its password. If you are logged on as root, you can manage other
user accounts to change passwords.
To change the password of your current account, enter:
passwd
(current) UNIX password: (enter original password)
New UNIX password: (enter the new password)
Retype new UNIX password: (enter the new password again)
passwd: All authenticaton tokens updated successfully.
To change another account’s password when you are logged in as root, enter:
passwd user_name
New UNIX password: (enter the new password)
Retype new UNIX password: (enter the new password again)
passwd: All authenticaton tokens updated successfully.
Managing Linux Groups
Groups are logical expressions of an organization. Groups relate certain users and give them
the ability to read, write, and execute files, which they may not directly own. You can create
and use Linux groups to associate certain users that have similar permissions. For more
information, see the Red Hat™ documentation.
Adding Linux Groups
When you use the useradd command to create a Linux user, the command automatically
creates a Linux group with the same name. You can use the groupadd command to create a
new Linux group.
20282-20 Rev.1 B-3
Managing the Linux Host System
The syntax for the groupadd command is:
/usr/sbin/groupadd [-G gid [-o][-r][-f] group
To add a group, enter:
groupadd staff
This groupadd command adds the group named staff.
Modifying Linux Groups
The syntax for the groupmod command is:
/usr/sbin/groupmod [-G gid [-o][-n groupname] group
To modify a group, enter:
groupmod -n exestaff staff
This groupmod command changes the group named staff to exestaff.
Deleting Linux Groups
The syntax for the groupdel command is:
/usr/sbin/groupdel <group>
To delete a group, enter:
groupdel staff
This groupdel command deletes the staff group. Note that you cannot remove a user’s pri-
mary group. You must first remove the user or change the user’s primary group.
Managing the Linux Host System
The Netezza host server offers a full-featured linux operating system, with many useful
commands, but because you are using it solely to access the Netezza appliance, the
amount of system maintenance is less than if you were using it in a general purpose server
environment. The following sections explain some of the tasks you might need to perform.
Hostname and IP Address Changes
Contact Netezza Support when you need to change the hostname and/or IP address of your
Netezza system. Netezza Support can work with you to change the information and ensure
that the changes are propagated to the high availability (HA) configuration files and related
services.
Do not follow the general Linux steps to change the hostname or IP address because the
changes could result in split-brain or similar HA problems as well as system downtime.
Rebooting the System
The correct way to reboot the host system is to have Linux close all its data files and stop
all running processes. You should never simply turn off your machine. Use the shutdown(8)
command. You must be root to execute this command.
shutdown -r now

B-4 20282-20 Rev.1
IBM Netezza System Administrator’s Guide
The -r switch causes a reboot. You can specify either the word “now” or any time value. You
could use the -h switch to halt the system. In that case, Linux also powers down the host if
it can.
If you have a Netezza HA system, use caution when shutting down a host. Shutting down
the active host causes the HA software to fail over to the standby host to continue Netezza
operations, which may not be what you intended.
Reformatting the Host Disks
Netezza host systems are pre-configured in manufacturing.The factory-configured system
includes pre-installed software and the Linux operating system configured for Netezza
services.
Never reformat the host disks. Doing so results in loss of data and corruption of the file sys-
tem. If you are experiencing errors see the following section and contact Netezza Support.
Fixing System Errors
Normally the fsck (file system check) program runs automatically without problems. If
there are problems, it requests that you run it manually.
To run the fsck command manually, enter the following command, where x specifies the
disk partition number:
fsck /dev/hdax
Answer yes to all prompts. The goal is to recover metadata, but some data might be lost.
The fsck command should return your system to consistent state; if not, contact Netezza
Support.
Do not use fsck to repair mounted partitions. If you are trying to repair a mounted partition,
you must first unmount the partition using the umount command, or you must boot the
host from the emergency repair CD (the install has a repair mode) to fix a partition such as
the root partition (/).
Viewing System Processes
To view the processes that are running on the Netezza host, you can use the ps command
for a snapshot of the process status or use the top command to display information about
CPU processes.
To display the pid, tty, and cmd of user procs, enter:
ps -u <user name>
To display the pid, tty, time, cmd used by the command, enter:
ps -C dbos -<cmdname>
To display the accumulated CPU time of a process, enter:
ps p <process ID>
To display a full process tree which shows parent/child process relationships, enter:
ps axf
To display a full listing of all processes, enter:
ps -ef

20282-20 Rev.1 B-5
Managing the Linux Host System
To display the process tree hierarchy, enter:
ps -efw --forest
The top command displays real-time information about CPU activity and lists the most CPU
intensive tasks on the system. The system updates the display every five seconds by
default.
To display system CPU utilizations, enter:
top
To update the display every 10 seconds, enter:
top -d -10
Stopping Errant Processes
Stopping a specific Linux process can vary for each process. The fail-safe way is to stop the
process with either the kill or killall command. The difference between these two com-
mands is that you invoke the kill command with a process number, and you invoke the
killall command with a process name. The killall command finds every instance of the pro-
cess you name and tries to stop each one, whereas the kill command stops only the process
specified by the process number.
Never use the Linux kill commands to stop a Netezza database user session or an nz*pro-
cess. Killing sessions or Netezza processes can cause undesired results such as loss of data
and/or Netezza software restarts. Instead, use the nzsession abort command to stop ses-
sions, and use the documented commands such as nzstop to stop Netezza services.
With both commands, you can specify which type of signal to send to stop the task. An
application has the option to intercept various types of signals and keep running, with the
exception of the kill signal (signal number 9, mnemonic SIGKILL). Any UNIX system that
receives a SIGKILL for a process must stop that process without any further action to meet
POSIX compliance (provided that you own the task or you are root). Both the kill and killall
commands accept the signal number as a hyphen argument.
To stop the loadmgr process (number 2146), you could use any of the following commands:
kill -9 2146
killall -KILL loadmgr
kill -SIGKILL 2146
killall -9 loadmgr
Note: When you kill a process with the kill signal, you lose any unsaved data for that
process.
Changing the System Time
To set the system time or current date, as root use the date command (MMDDh-
hmm[[CC]yy][.ss]). It is recommended that you use Network Time Protocol (NTP) at your
site. NTP synchronizes the system clock to that of the NTP server and frees you from hav-
ing to set the time independently.
To change your system time, enter:
date --set=24:00:00EST
The sample date command sets the time to midnight EST.
To set the system date, enter:

B-6 20282-20 Rev.1
IBM Netezza System Administrator’s Guide
date -s "06/01/2009 01:30:00EST
The sample date command sets the date to June 1, 2009, 1:30 AM EST.
Determining the Kernel Release Level
Use the uname command to learn the kernel version that the Netezza host is running. The
command displays system information.
To display the kernel version, enter:
uname -r
System Administration
This section describes some useful Linux commands that you can use.
Displaying Directories
You can use the ls command to display information about directories:
ls -l — Displays the long listing.
ls -lt — Sorts the listing by modification time.
ls -ltu — Sorts the listing by access time. This is useful to find out who accessed the
file, when, and which files were used.
ls -l --full-time — Includes the full date and time in the listing.
Finding Files
You can use several commands to locate files, commands, and packages:
locate string — Locates any file on the system that includes the string within the name.
The search is fast because it uses a cache, but it might not show recently added files.
find -name *string* — Finds any file in the current directory, or below the current
directory, that includes string within the name.
which command — Displays the full path for a command or executable program.
rpm -qa — Lists all the packages installed on the host.
Displaying File Content
The Linux operating system offers several ways to display the content of files. Common
commands include more and editors such as vi. The less command offers a very powerful
set of features for viewing file content, and can even display non-text or compressed files
such as the compressed upgrade logs. The view command is a read-only form of the vi com-
mand and has many features for file viewing.
As a best practice, do not use a file editor such as vi to view active log files such as /var/log/
messages or the pg.log file. Since vi opens the file for viewing/editing, the locking process
could block processes that are writing to the log file. Use commands such as more or less
instead.
20282-20 Rev.1 B-7
System Administration
Finding Netezza Hardware
If you are logged in as the nz user on the active host, you can use the nzhw command with
the egrep command to locate Netezza hardware:
nzhw | egrep “Fan|Power” — Displays the lines that match Fan or Power.
nzhw | egrep -i “spu” — Displays all the lines that contain spu, ignoring case distinc-
tions in the pattern and the data.
nzhw | egrep -vi “fan|power” — Displays lines that do not match fan or power (case
insensitive).
Timing Command Execution
You can use the time command to time the execution of commands:
time command — Times the execution of a command.
time -p command — Displays the execution time in a portable output format.
Setting Default Command Line Editing
You can use the set command to set the command line editing interface:
set -o emacs — Uses an emacs-style command line editing interface and supports the
use of arrow keys. This option is enabled by default when the shell is interactive.
set -o vi — Uses a vi-style command line editing interface.
Miscellaneous Commands
You can use the following commands for system administration:
nohup command — Runs a command immune to hangups and creates a log file. Use
this command when you want a command to run no matter what happens with the sys-
tem. For instance, use this command if you want to avoid having a dialup, VPN
timeout, or a disconnect network cable cancel your job.
unbuffer command — Disables the output buffering that occurs when the program’s
output is redirected. Use this command when you want to see output immediately.
UNIX systems buffer output to a file, so that a command can appear hung until the
buffer is dumped.
colrm [startcol [endcol]] — Removes selected columns from a file or stdin.
split — Splits a file into pieces.
B-8 20282-20 Rev.1
IBM Netezza System Administrator’s Guide

C-1
A P P E N D I X C
Netezza User and System Views
What’s in this appendix
User Views
System Views
This appendix contains information about Netezza user and system views.
User Views
Table C-1 describes the views that display user information. Note that to see a view, users
must have the privilege to list the object.
Table C-1: User Views
View Name Description Output Ordered By nzsql
_v_aggregate Returns a list of all
defined aggregates
objid, Aggregate, Owner,
CreateDate
Aggregate \da
_v_database Returns a list of all
databases
objid, Database, Owner,
CreateDate
Database \l
_v_datatype Returns a list of all sys-
tem datatypes
objid, DataType, Owner, Descrip-
tion, Size
DataType \dT
_v_function Returns a list of all
defined functions
objid, Function, Owner, Create-
Date, Description, Result,
Arguments
Function \df
_v_group Returns a list of all
groups
objid, GroupName, Owner,
CreateDate
GroupName \dg
_v_groupusers Returns a list of all users
of a group
objid, GroupName, Owner,
UserName
GroupName,
UserName
\dG
_v_index Returns a list of all user
indexes
objid, IndexName, TableName,
Owner, CreateDate
TableName,
IndexName
\di
_v_operator Returns a list of all
defined operators
objid, Operator, Owner, Create-
Date, Description, oprname,
oprleft, oprright, oprresult,
oprcode, and oprkind
Operator \do

C-2 20282-20 Rev.1
IBM Netezza System Administrator’s Guide
_v_procedure Returns a list of all the
stored procedures and
their attributes
objid, procedure, owner, create-
date, objtype, description, result,
numargs, arguments, procedures-
ignature, builtin,
proceduresource, sproc, and
executedasowner
Procedure —
_v_relation_
column
Returns a list of all
attributes of a relation
(table, view, index, and
so on.)
objid, ObjectName, Owner, Cre-
ateDate, ObjectType, attnum,
attname, format_
type(attypid,attypmod), and
attnotnull
ObjectName, and
attnum
—
_v_relation_
column_def
Returns a list of all
attributes of a relation
that have defined
defaults
objid, ObjectName, Owner, Cre-
ateDate, Objecttype, attnum,
attname, and adsrc
ObjectName, and
attnum
—
_v_sequence Returns a list of all
defined sequences
objid, SeqName, Owner, and
CreateDate
SeqName \ds
_v_session Returns a list of all active
sessions
ID, PID, UserName, Database,
ConnectTime, ConnStatus, and
LastCommand
ID \act
_v_table Returns a list of all user
tables
objid, TableName, Owner, and
CreateDate
TableName \dt
_v_table_dist_
map
Returns a list of all fields
used to determine the
table’s data distribution
objid, TableName, Owner, Create-
Date, DistNum, and DistFldName
TableName, and
DistNum
—
_v_table_index Returns a list of all user
table indexes
T.objid, TableName, T.Owner,
IndexName, CreateDate, I.indkey,
l.indisunique, l.indisprimary,
T.relhasrules, and T.relnatts
TableName, and
IndexName
—
_v_user Returns a list of all users objid, UserName, Owner, Vali-
dUntil, and CreateDate
UserName \du
_v_usergroups Returns a list of all
groups of which the user
is a member
objid, UserName, Owner, and
GroupName
UserName, and
GroupName
\dU
_v_view Returns a list of all user
views
objid, ViewName, Owner, Create-
Date, relhasindex, relkind,
relchecks, reltriggers, relhasrules,
relukeys, relfkeys, relhaspkey,
and relnatts
ViewName \dv
Table C-1: User Views
View Name Description Output Ordered By nzsql
20282-20 Rev.1 C-3
System Views
System Views
Table C-2 describes the views that display system information. You must have administrator
privileges to display these views.
Table C-2: System Views
View Name Description Output Ordered By nzsql
_v_sys_group_priv Returns a list of all
defined group privileges
GroupName, ObjectName,
DatabaseName, Objecttype,
gopobjpriv, gopadmpriv,
gopgobjpriv, and
gopgadmpriv
DatabaseName,
GroupName, and
ObjectName
\dpg
<group>
_v_sys_index Returns a list of all sys-
tem indexes
objid,SysIndexName, Table-
Name, and Owner
TableName, and
SysIndexName
\dSi
_v_sys_priv Returns a list of all user
privileges. This is a
cumulative list of all
groups and user-specific
privileges.
UserName, ObjectName,
DatabaseName, aclobjpriv,
acladmpriv, aclgobjpriv, and
aclgadmpriv
DatabaseName,
and ObjectName
\dp <user>
_v_sys_table Returns a list of all sys-
tem tables
objid, SysTableName, and
Owner
SysTableName \dSt
_v_sys_user_priv Returns a list of all
defined user privileges
UserName, ObjectName,
DatabaseName, ObjectType,
uopobjpriv, uopadmpriv,
uopgobjpriv, and
uopgadmpriv
Database-
NameUserName,an
d ObjectName
\dpu
<user>
_v_sys_view Returns a list of all sys-
tem views
objid, SysViewName, and
Owner
SysViewName \dSv
C-4 20282-20 Rev.1
IBM Netezza System Administrator’s Guide
D-1
A P P E N D I X D
System Configuration File Settings
What’s in this appendix
System Startup Configuration Options
System Manager Configuration Options
Other Host Processes Configuration Options
SPU Configuration Options
This appendix provides a reference for many of the system configuration file settings. You
can display the current system configuration file settings using the nzsystem showRegistry
command. For more information, see “nzsystem” on page A-55.
Never change or customize the system registry unless directed to by Netezza Support or by
a documented Netezza procedure. The descriptions in this appendix are provided for refer-
ence information only.
Note: A default of zero in many cases indicates a compiled default not the actual value
zero. Text (yes/no) and numbers indicate actual values.
System Startup Configuration Options
Table D-1 lists configuration options used during system start. If you make a change, you
must shutdown and restart the system for the changes to take effect.
Table D-1: Startup Configuration Options
Parameter Default Description
startup.autoCreateDb 0 Creates a database on an uninitialized system. FOR INTERNAL
USE ONLY. DO NOT CHANGE.
startup.autoRestart yes Specifies whether to restart the system if a SPU reset fails. FOR
INTERNAL USE ONLY. DO NOT CHANGE.
startup.dbosStartupTimeout 300 Specifies the starupsvr's timeout for launching the dbos dispatch
process at system startup. FOR INTERNAL USE ONLY. DO NOT
CHANGE.
startup.hostSwapSpaceLimit 131072 Specifies the maximum work space on the host. FOR INTERNAL
USE ONLY. DO NOT CHANGE.

D-2 20282-20 Rev.1
IBM Netezza System Administrator’s Guide
startup.maxConnections 500 Specifies the default maximum number of client connections.
The maximum number of connections is 2000.
startup.maxRebootRetries 3 Specifies the number of times the system tries to reboot.
startup.mismatchOverRide yes Overrides the mismatched SPU designation. FOR INTERNAL
USE ONLY. DO NOT CHANGE.
startup.noLock no Simulator mode. FOR INTERNAL USE ONLY. DO NOT CHANGE.
startup.noPad no Simulator mode. FOR INTERNAL USE ONLY. DO NOT CHANGE.
startup.numSpares 0 Historical.
startup.numSpus 14 Historical.
startup.overrideSpuDiskSize no Specifies whether to override the SPU disk size check. FOR
INTERNAL USE ONLY. DO NOT CHANGE.
startup.overrideSpuRev 0 Overrides the SPU revision. FOR INTERNAL USE ONLY. DO NOT
CHANGE.
startup.planCacheFiles — PARAMETER REMOVED as of Release 4.0.
startup.planHistFiles 2000 Specifies the number of files that can exist in the /nz/kit/log/plan-
hist/ directory.
startup.queryHistTblSize 2000 Specifies the number of queries to maintain in the Query History
table. The default and suggested value is 2,000. The range of
values permitted is 0 to 15000.
Note:
This setting is used for the _v_qryhist view, which is main-
tained for backward compatibility. For more information about the
new query history, see Chapter 11, “Query History Collection and
Reporting.”
startup.runVirtSfi no Simulator mode. FOR INTERNAL USE ONLY. DO NOT CHANGE.
startup.simMode no Simulator mode. FOR INTERNAL USE ONLY. DO NOT CHANGE.
startup.spuSimMemoryMB 0 Simulator mode. FOR INTERNAL USE ONLY. DO NOT CHANGE.
startup.startupTimeout 600 Specifies the number of seconds of grace after system startup.
Allows for staggered starting of SPUs.
startup.stopNow no FOR INTERNAL USE ONLY. DO NOT CHANGE.
startup.virtualDiskSize 128 Simulator mode. FOR INTERNAL USE ONLY. DO NOT CHANGE.
Table D-1: Startup Configuration Options
Parameter Default Description

20282-20 Rev.1 D-3
System Manager Configuration Options
System Manager Configuration Options
Table D-2 describes configuration options used by the system manager. To change these
options, the system must be paused or offline.
Table D-2: System Manager Configuration Options
Option Default Description
sysmgr.btsBootLimit 0 Specifies the bootsvr limit on number of reboots before "pausing" a
SPU (0=compiled-in default, 4). FOR INTERNAL USE ONLY. DO
NOT CHANGE.
sysmgr.checkDiskInterval 15 Specifies the number of seconds a SPU sends disk capacity
information.
sysmgr.coreCountFailover 1 Specifies the number of SPU CPU cores that can fail before the sys-
tem manager fails over the SPU.
sysmgr.devCountSpaOver-
heated
3 Specifies the number of overheated boards that result in powering
off the Netezza system.
sysmgr.eccErrCountFailover 300 Specifies the number of correctable single bit ECC errors to allow
before failing over.
sysmgr.eccErrDurationFailover 0 Specifies the time interval across Netezza reboots that the system
tracks ECC errors. Zero indicated forever.
sysmgr.enableAutoFailover yes Specifies whether to automatically failover SPUs and disks.
sysmgr.enableAutoRegen yes Specifies whether to automatically regen.
sysmgr.enableAutoReset yes Specifies whether to automatically reset SPUs.
sysmgr.enableBalanced
Regen
yes Specifies whether balanced regen is enabled. Does not apply to IBM
Netezza 1000 or IBM PureData System for Analytics N1001
models.
sysmgr.enableDiskFpga-
Failover
yes Specifies whether to failover the disk on an FPGA error. Does not
apply to IBM Netezza 1000 or IBM PureData System for Analytics
N1001 systems.
sysmgr.enAutoRestSpuForQdr-
Failure
no Controls whether the system power cycles an S-Blade when it
detects a quad data rate (QDR) memory failure during system star-
tup. The default of no specifies that the system will not power cycle
the S-Blade. Do not set this value to yes.

D-4 20282-20 Rev.1
IBM Netezza System Administrator’s Guide
sysmgr.enclStatusElementFil-
terForFailover
160 Specifies a decimal value that represents a combination of the SCSI
element status (SES) codes for which the system manager will fail
over a disk drive. The status codes and their numeric values follow:
•
Unsupported = 0
•
OK = 2
•
Critical = 4
•
Non Critical = 8
•
Unrecoverable = 16
•
Not Installed = 32
•
Unknown = 64
•
Not Available = 128
•
No Access = 256
•
Manufacturer’s Reserved = 512
•
Manufacturer’s Reserved = 1024
•
Manufacturer’s Reserved = 2048
•
Manufacturer’s Reserved = 4096
•
Manufacturer’s Reserved = 8192
•
Manufacturer’s Reserved = 16384
•
Manufacturer’s Reserved = 32768
The default value of 160 is a combination of the Not Installed and
Not Available options. This means that, by default, the system will
fail a disk only when its SES status is either "Not Installed" or "Not
Available.’ The system sends a Hardware Status Requested event for
all of these status codes.
sysmgr.logDiskSuccessOnRetry yes Specifies whether to log retry successes for disk I/O operations.
sysmgr.maxAggregateEventInt-
erval
120 Specifies the time interval (seconds) during which events are
aggregated.
sysmgr.maxRebootFreqPerHr 3 Specifies the maximum number of reboots per hour before the sys-
tem marks the SPU as failed.
sysmgr.maxRespawnFreqPerHr 6 Specifies the maximum number of respawns (Netezza software
restarts on the SPU) per hour before the system marks the SPU as
failed.
sysmgr.numberOfDownPort-
ToRiseEvent
5 Specifies the number of ports on the same switch that must be in
the down state for a specified time (defined by
sysmgr.portDownTime1ToRiseEvent) before the system logs a HW_
NEEDS_ATTENTION event. If you specify zero (0), the system will
not log an event for this condition.
sysmgr.numSpuPorts 4 FOR INTERNAL USE ONLY. DO NOT CHANGE.
Table D-2: System Manager Configuration Options
Option Default Description

20282-20 Rev.1 D-5
System Manager Configuration Options
sysmgr.pausingStateTimeout 420 Specifies the number of seconds that the Netezza system can be in
the Pausing Now state before a stuck in state timeout event occurs.
The timeout should be one minute (60 seconds) longer than the
sysmgr.failOverTimeout.
sysmgr.pktReadCount 5 FOR INTERNAL USE ONLY. DO NOT CHANGE.
sysmgr.portDownTime1ToRise
Event
300 Specifies the number of seconds that a port must be in the down
state before the system logs a HW_NEEDS_ATTENTION event.
(Ports can sometimes change states for short periods of time in nor-
mal conditions, so this setting helps to avoid "false" events for short
state changes.) A value of 0 disables the time duration requirement
—as soon as the numberOfDownPortToRiseEvent number has been
met, the system manager logs an event.
sysmgr.portDownTime2ToRise
Event
600 Specifies the number of seconds that any one port must be in the
down state before the system logs a HW_NEEDS_ATTENTION event
for that port. A setting of 0 disables this time check, so the system
manager logs the HW_NEEDS_ATTENTION event when it detects
that a port is down.
sysmgr.sfiResetTimeout 600 Specifies the timeout value of the SFI. The value is in seconds.
sysmgr.smartErrCountFailover 1 Specifies the number of SMART errors to allow before failing over.
sysmgr.smartErrDuration-
Failover
0 Specifies the time interval across Netezza reboots that the system
tracks SMART errors. Zero means forever.
sysmgr.spuAppDownloadTime-
out
480 Specifies the time in seconds to wait for the application data to
download to a SPU before the SPU is reset (that is, power-cycled).
sysmgr.spuDiscoveryTimeout 360 Specifies the time in seconds to wait for a SPU to complete discov-
ery before the SPU is reset (that is, power-cycled).
sysmgr.spuDumpTimeout 1440 Specifies the number of seconds a SPU can send a core file to the
host before it is reset.
sysmgr.spuInitializingTimeout 90 Specifies the time in seconds to wait for a SPU to finish initializing
before the SPU is reset (that is, power-cycled).
sysmgr.spuPollReplyTimeout 600 Specifies the number of seconds to wait for a poll reply from a SPU
before the system manager resets it (that is, reboots Linux on a
SPU).
settingsysmgr.spuPollReply-
WarningInterval
90 Specifies the number of seconds to wait for a poll reply from a SPU
before the system manager logs a warning message in the sysmgr.log
file.
sysmgr.spuResetTimeout 90 This setting is no longer used for Release 5.0.x. See
sysmgr.spuPollReplyTimeout.
Table D-2: System Manager Configuration Options
Option Default Description

D-6 20282-20 Rev.1
IBM Netezza System Administrator’s Guide
Other Host Processes Configuration Options
Table D-3 describes configuration options used by other host processes. To change these
options, the system must be paused or offline.
Note: In the following table, M denotes 8100-8400 and S denotes 8150-8650 systems.
sysmgr.syncingStateTimeout 900 Specifies the number of seconds that the Netezza z-series system
can be in the Syncronizing state before a stuck in state timeout
event occurs. Does not apply to IBM Netezza systems.
sysmgr.testNoRegen no Specifies whether the noregen test is enabled. FOR INTERNAL USE
ONLY. DO NOT CHANGE.
Table D-2: System Manager Configuration Options
Option Default Description
Table D-3: Host Processes
Option Default Description
host.abortIfTxArrayFull yes FOR INTERNAL USE ONLY. DO NOT CHANGE.
host.autoRestartReclaim — Deprecated starting in Release 6.0.
host.bnrEnableUsersBackup yes Enables -globals backup and restore.
host.bnrFileSizeLimitGB 1024 Specifies the maximum file size, in bytes, that the backup
process creates when backing up a database. The backup
process creates a series of files of this size to ensure that it
does not exceed the file size limitations of the backup
destination(s).
host.bnrNumStreamsDefault 0 Specifies the number of streams to use for a backup opera-
tion. A value of zero causes the system to default to one
stream per backup location. For more information, see
“Multi-Stream Backup” on page 10-4.
host.bnrStreamInitTimeoutSec 300 Specifies the number of seconds to wait for the backup pro-
cess to test each stream of a multi-stream backup. If the test
completes within the timeout limit, the backup process con-
tinues with the requested backup. If the timeout expires
before the test completes, the problem typically is that you
requested more streams than the tool can support for one
backup operation. Review the backup tool documentation to
ensure that you do not specify more streams than the tool
can support.
A value of 0 disables the timeout test to each stream.
host.disableClientXoffSpus no Specifies how to handle a query when the spool limit is
reached. No, stops sending date. Yes, aborts the query.
host.expressAckFreq 4 Unused.

20282-20 Rev.1 D-7
Other Host Processes Configuration Options
host.fpgaAllowXIDOverride no Allows access to deleted records. FOR INTERNAL USE
ONLY. DO NOT CHANGE.
host.gencDiabKillOptComplexity 50000 Specifies the maximum number of characters above which
specific compiler optimizations are applied. FOR INTERNAL
USE ONLY. DO NOT CHANGE.
host.gencDiabKillOptMask 4 Specifies the optimization mask for large queries. FOR
INTERNAL USE ONLY. DO NOT CHANGE.
host.gencInvokeOptSnippetCost 4 Specifies the average snippet cost in seconds below which
no compiler optimizations occur. FOR INTERNAL USE
ONLY. DO NOT CHANGE.
host.gencLiteralTypeMask 0 FOR INTERNAL USE ONLY. DO NOT CHANGE.
host.gkEnabled yes Specifies whether gatekeeper queueing is enabled. If it is
not, the gatekeeper does not hold back jobs.
host.gkFastVtScanLimit 8 Specifies the priority threshold of some internal queries.
FOR INTERNAL USE ONLY. DO NOT CHANGE.
host.gkHighPriQueries 36 Specifies the maximum number of high priority queries
allowed to run.
host.gkLowPriQueries 36 Specifies the maximum number of low priority queries
allowed to run.
host.gkMaxConcurrent 48 Specifies the total number of queries allowed to be running
at a time.
host.gkMaxPerQueue 48 Specifies the maximum number of normal priority queries
allowed to run.
host.gkQueueThreshold -1 Specifies unlimited gatekeeper queue threshold.
host.gkVtUpdateInterval 600 Unused.
host.graVtUpdateInterval 600 Specifies the seconds between updates to the _vt_sched_gra
table.
host.hostAckThreshold 0 Specifies the packet acknowledgement frequency.
host.hostMaxMsgsOutstanding 0 Specifies the number of application messages on the host.
host.hostMaxPktsOnWire 0 Specifies the number of packets that can be transmitted
without acknowledgment.
host.hostStaggerConstant 0 Specifies random return of SPU data to reduce network
congestion.
host.maxClientSpoolMB 5120 Specifies the MB per client limit on spool files.
host.maxOutstandingClientResults 2 Specifies the number of in-flight return sets before spooling.
Table D-3: Host Processes
Option Default Description

D-8 20282-20 Rev.1
IBM Netezza System Administrator’s Guide
host.mergeMaxWaitingBlocks 4 Specifies the maximum number of blocks per SPU before
XOFF from the CmergePlan.
host.nzstatsRequireAdmin yes Specifies that only the admin user can run the nzstats com-
mand. If set to no, other users who also have Manage System
privilege will be allowed to run run the following commands:
•
nzstats show -type database
•
nzstats show -type table
•
nzstats show -type query
•
nzstats show -type queryHist
host.qcLoadRegionSize 500 Specifies the maximum size in megabytes of the shared
memory region for a particular idrDataReader process.
host.qcMaxLoadMemory 1350 Specifies the total amount of shared memory available for all
loads. The default calculation is 80 percent of (TotalPhysi-
calMemory - sizeof (Standard Netezza Shared Memory)). If
you specify another number you could reduce the amount of
memory allocated to loads.
host.queryHistShowInternal no This setting is deprecated.
host.reloadDisableValidityCheck no Disables schema validation for compressed external reload.
FOR INTERNAL USE ONLY. DO NOT CHANGE.
host.reloadForceHostUncompress no Enables internal testing of host-side compression. FOR
INTERNAL USE ONLY. DO NOT CHANGE.
host.schedAllowGKandGRA no Specifies whether gatekeeper and GRA are enabled. The
default is disabled.
host.schedGRAEnabled yes Enables guaranteed resource allocation.
host.schedGRAHorizon 3600 Specifies the amount (in seconds) of scheduler usage history
to maintain.
host.schedGRAOverLimit 5 Specifies the over served amount between the actual GRA
and the specified GRA for the resource group.
host.schedGRAUnderLimit -5 Specifies the under served amount between the actual GRA
and the specified GRA for the resource group.
host.schedGRAVeryOverLimit 10 Specifies the very over served amount between the actual
GRA and the specified GRA for the resource group.
host.schedGRAVeryUnderLimit -10 Specifies the very under served amount between the actual
GRA and the specified GRA for the resource group.
host.schedSNHorizon 600 Specifies the amount (in seconds) of snippet scheduler
usage history to maintain.
host.schedSQBEnabled Yes Enables short query bias.
Table D-3: Host Processes
Option Default Description

20282-20 Rev.1 D-9
Other Host Processes Configuration Options
host.schedSQBGRABalBoost 0 Specifies compliance increase to groups with waiting short
queries.
host.schedSQBMistakesSecs 20 Unused.
host.schedSQBNominalSecs 2 Defines a short query in seconds.
host.schedSQBPriorityBoost 0 Specifies the boost given to short queries.
host.schedSQBReservedGraSlots 10 Specifies the number of scheduling positions the GRA
scheduler reserves for short queries.
host.schedSQBReservedSnMB 50 Specifies the amount of SPU memory reserved for short
queries.
host.schedSQBReservedSnSlots 6 Specifies the number of scheduler slots reserved for short
queries.
host.snDiskReadCost 4200 Specifies the cost (in ticks) for reading 128 KB data blocks
from the SPU disks.
host.snDiskWriteCost 4200 Specifies the cost (in ticks) for writing 128 KB data blocks
from the SPU disks.
host.snFabricTableBlocks 1536 Specifies in the assumed size [in 128KB blocks] of a table
that is materialized and processed by DBOS, rather than
streaming through in fixed size work units. This size is
charged against the snHostMemoryQuota for each snippet
that has such a table.
host.snHostFabricCost 4200 Specifies the cost (in ticks) for handling 128 KB data blocks
into/out of the host.
host.snHostMemoryQuota 16384 Specifies the number of 128 KB blocks on the host that the
snippet scheduler resource management allocates to
snippets.
host.snNonGRAScrapPct 20 Specifies a margin of error amount to allow groups assigned
no resources to run.
host.snPriorityWeights 1,2,4,8 Specifies the weights assigned to low, normal, high and crit-
ical jobs.
host.snSchedEnabled yes Enables snippet scheduling. If false, no queueing or
resource checking occurs in the snippet scheduler.
host.snSchedJobMax 40 Specifies the maximum number of queries (at one snippet
per query) that the snippet scheduler allows to run.
host.snSPUFabricCost 31250 Specifies the cost (in ticks) of writing 128 KB data blocks
onto the fabric from the SPU.
Table D-3: Host Processes
Option Default Description

D-10 20282-20 Rev.1
IBM Netezza System Administrator’s Guide
SPU Configuration Options
Table D-4 lists configuration options used by host processes and SPUs. To change these
options, the system must be paused or offline. When you resume the system, the changes
are passed to the SPUs.
host.snSpuMemoryQuota 10000 Specifies the number of 128KB blocks on SPU that the
snippet scheduler resource management allocates to
snippets.
host.snSpuSortSizeFactor 10000 Specifies the scaling factor for the sorted data set size on
SPUs.
host.snVtUpdateInterval 60 Specifies the number of seconds between updates to the _
vt_sched_sn table.
host.spoolRateLimitKBPerSec 14336 Specifies the rate limit for host-result spooling.
host.streamBatchSize 2097152
0
Specifies the return set batch size limit in bytes.
host.sysUtilVtUpdateInterval 60 Specifies the number of seconds between updates of the
_VT_SYSTEM_UTIL virtual table.
host.sysVtUpdateInterval 600 Unused.
host.txRetainReadOnly no Specifies whether to retain Read Only transactions.
host.unloadWriteFlushThresholdMB 100 Specifies the value in MB at which the unload flushes the
page cache. FOR INTERNAL USE ONLY. DO NOT CHANGE.
host.useAndOrTermLimit no Specifies whether to revert to the old behavior of not han-
dling more than 400 terms in an AND or OR expression.
host.zoneMapPrepScanThresh-
oldMs
5000 In 128KB blocks, (320MB). When the optimizer estimate is
greater than this size, the system uses the zone map data for
the scan table time estimate.
Note: The system does not create zone maps when the table
is below a certain size, see
system.zoneMapTableSizeThreshold.
Table D-3: Host Processes
Option Default Description
Table D-4: SPU Configuration Options
Option Default Description
system.abortOnError 0 Specifies the error number on which to abort. FOR INTERNAL
USE ONLY. DO NOT CHANGE.
system.allocateBuffersVirtual no Specifies whether the system assigns all buffer allocations log-
ical addresses that are not the same as their physical
addresses. DO NOT CHANGE, FOR INTERNAL USE ONLY.

20282-20 Rev.1 D-11
SPU Configuration Options
system.allowDiskHashJoin yes Obsolete.
system.asyncSpu2HostRAW 3 Specifies the number of Receive Available Window packets
(RAW) used by the asyncSpu2Host channel. SPUs use the
asyncSpu2Host channel to send errors or other messages not
associated with a specific query. FOR INTERNAL USE ONLY.
DO NOT CHANGE.
system.avoidSwapWDatamgrLock no Waits for the SWAPD to provide memory to progress to a swap-
pable state. Change to ON if experiencing deadlocks.
system.bcastSAW 10 Specifies the send ahead windows for broadcast channels.
Increasing the number could lead to dropped frames under
heavy load. FOR INTERNAL USE ONLY. DO NOT CHANGE.
system.btOnError 0 Specifies the error number on which to generate a back trace.
system.catch9752 no FOR INTERNAL USE ONLY. DO NOT CHANGE.
system.cmdBcastNumReassembly 1 Specifies the number of reassembly buffers allocated by the
SPU for the command broadcast channel.
system.cmdBcastRAW 10 Specifies the RAW for the cmd broadcast channel.
system.CRCUpgraderErrorBuffer-
Limit
3 Specifies the buffer limit. Must be at least 1. FOR INTERNAL
USE ONLY. DO NOT CHANGE.
system.ctrlNumReassembly 2 Specifies the number of reassembly buffers allocated by the
SPU for the spu control channel
system.dataBcastNumReassembly 4 Specifies the number of reassembly buffers allocated on the
SPU for a broadcast channel.
system.dataBcastRAW 10 Specifies the number of Receive Available Window packets
(RAW) used for data broadcast channels. Increasing the num-
ber will cause increased memory usage on the SPUS. FOR
INTERNAL USE ONLY. DO NOT CHANGE.
system.dbfsASpaceLimit 0 Placeholder for future feature.
system.dbfsBSpaceLimit 0 Placeholder for future feature.
system.dbfsChangeLogSize 1024 Placeholder for future feature.
system.dbfsErrorLogSize 256 Placeholder for future feature.
system.dbfsInUse no Placeholder for future feature.
system.dbfsLogBlockChanges no Placeholder for future feature.
system.dbfsMaxPermFiles 2048 Placeholder for future feature.
system.dbfsMaxSwapGrowthPct 25 Placeholder for future feature.
system.dbfsMaxTempFiles 1024 Placeholder for future feature.
Table D-4: SPU Configuration Options
Option Default Description

D-12 20282-20 Rev.1
IBM Netezza System Administrator’s Guide
system.dbfsSwapSpaceLimit 0 Placeholder for future feature.
system.dbosAggrWorkBlocks 4096 Specifies the upper limit (bytes) on the space used for the
aggregation operation. FOR INTERNAL USE ONLY. DO NOT
CHANGE.
system.dbosSortWorkBlocks 4096 Specifies the upper limit (bytes) on the space used for the sort
operation. FOR FOR INTERNAL USE ONLY. DO NOT CHANGE.
system.dbosWindowsAggrWork-
Blocks
4096 Specifies the upper limit (bytes) on the space used for win-
dows aggregation. FOR INTERNAL USE ONLY. DO NOT
CHANGE.
system.disableBlockDataRead-
CRC
no Specifies whether to disable validation of block data during
FPGA reads. FOR INTERNAL USE ONLY. DO NOT CHANGE.
system.disableBlockDataWrite-
CRC
no Specifies whether to disable compute block data prior to writes
and validation of block data during FPGA reads. FOR INTER-
NAL USE ONLY. DO NOT CHANGE.
system.disableGlobalCRC no Specifies whether to disable all new CRC processing. Note that
the FPGA will still calculate (but not validate) CRCs. FOR
INTERNAL USE ONLY. DO NOT CHANGE.
system.disableMicroRegen no Unused.
system.disablePartialWriteRecov-
ery
no Specifies whether the system copies new disk block content to
non-volatile memory. INTERNAL USE ONLY. DO NOT
CHANGE.
system.disableSerialMirroring no Specifies whether to revert to old-style mirroring. FOR INTER-
NAL USE ONLY. DO NOT CHANGE.
system.disableStrmNet no Specifies whether SPU-to-SPU is enabled. FOR INTERNAL
USE ONLY. DO NOT CHANGE.
system.disableStrmNetHost no If set to true disables host-to-SPU distributes through SUDP.
This includes loads and query distributes. The default is false.
FOR INTERNAL USE ONLY. DO NOT CHANGE.
system.disableSwapCRC no Specifies whether the system nether computes nor validates
swap-data CRCs and not request FPGA CRC validation on
reads and writes of the SWAP partition data. FOR INTERNAL
USE ONLY. DO NOT CHANGE.
system.diskSmartPollInterval 86400 Specifies the interval (in seconds) the disk controller for
SMART attribute TEC values is polled.
system.diskXferTimeout 31 Specifies the number of seconds the SPU disk driver waits for
a response after issuing an I/O request. The valid range is from
5-7200 seconds. You cannot set it to a value outside this
range.
Table D-4: SPU Configuration Options
Option Default Description

20282-20 Rev.1 D-13
SPU Configuration Options
system.dumpDetail 5 Specifies whether to display detail-level log information.
system.durableMirroring yes Ensures that the primary and mirror data are updated on trans-
action commit. FOR INTERNAL USE ONLY. DO NOT CHANGE.
system.enableAckAggrLdrRotation yes Specifies broadcast ack aggregation protocol. When No, the
same SPUs will always be the leaders for aggregation. Chang-
ing this parameter could cause decreased performance on
those SPUS. FOR INTERNAL USE ONLY. DO NOT CHANGE.
system.enableClockSync yes Specifies whether to enable clock synchronization for internal
monitoring. FOR INTERNAL USE ONLY. DO NOT CHANGE.
system.enableCompressedTables yes FOR INTERNAL USE ONLY. DO NOT CHANGE.
system.enableJumboFrames no Specifies whether to enable jumbo frames.
system.enableLargeTables yes This option specifies whether or your Netezza system will use
large tables:
•
When set to “yes,” allows a table to consume all of the
available disk space in a dataslice. (Such large tables are
generally not recommended.)
•
When set to “no,” enforces the previous limit that a table
could not consume more than 64GB per dataslice.
system.enableMirrors yes Specifies whether to enable mirroring. FOR INTERNAL USE
ONLY. DO NOT CHANGE.
system.enableResetLog yes Enables the reset log for exception errors. FOR INTERNAL
USE ONLY. DO NOT CHANGE.
system.enableSAWScheme yes Enables spu2spu permission protocol. Disabling the protocol
could cause decreased performance due to packet loss. FOR
INTERNAL USE ONLY. DO NOT CHANGE.
system.errMgrWakeupInterval 1 Specifies the interval (in seconds) at which the SpuErrMgr
checks for ECC errors.
system.extentsPerCRCBurst 2 Specifies the number of disk extents (at 24 blocks per extent
in the data partition) that the upgrade process computes and
validates before sleeping. FOR INTERNAL USE ONLY. DO NOT
CHANGE.
system.failoverReadOnly no Specifies whether data can be up updated during failover.
system.fpgaBools 0 Specifies the bit mask. For diagnostic purposes only.
system.fpgaDump no FOR INTERNAL USE ONLY. DO NOT CHANGE.
system.fpgaFlags 0 FOR INTERNAL USE ONLY. DO NOT CHANGE.
system.fpgaRecSizeIncrPct 0 Enables decreasing the size of the FPGA’s scan buffer. FOR
INTERNAL USE ONLY. DO NOT CHANGE.
Table D-4: SPU Configuration Options
Option Default Description

D-14 20282-20 Rev.1
IBM Netezza System Administrator’s Guide
system.fpgaTotalBufSize 3145728 Enables decreasing the size of the FPGA buffer. FOR INTER-
NAL USE ONLY. DO NOT CHANGE.
system.funnelSAW 1 Specifies the number of send ahead packets allowed when
funneling. FOR INTERNAL USE ONLY. DO NOT CHANGE.
system.funnelsPerNIC 32 Specifies the number of funnels per NIC. to avoid packet loss.
system.hashflags 288 Specifies the details of hash table construction and probing.
FOR INTERNAL USE ONLY. DO NOT CHANGE.
system.heatNotifyEnabled yes Specifies whether notification is send when the SPUs and SFI
cross temperature thresholds.
system.heatThresholdRearmInter-
val
30 Specifies the rearm interval. The rearm policy is the same for
both yellow and red alerts. There is only one interval for the
entire system.
system.host2spuAckFrequency 0 Specifies a single comm ack for this number of packets. The
default is one for every 5 packets. FOR INTERNAL USE ONLY.
DO NOT CHANGE.
system.host2spuRAW 3 Specifies the number of Receive Available Window packets
(RAW) for host-to-spu channels.
system.host2spuRtxTimeout 0 Retransmits timeout (in seconds) for host-SPU distributes (in
milliseconds). FOR INTERNAL USE ONLY. DO NOT CHANGE.
system.host2spuSAW 1 Specifies the SAW for host-to-spu channels.
system.host2spuSendWindow 0 Specifies the send window for host to SPU distributes (in
packets). FOR INTERNAL USE ONLY. DO NOT CHANGE.
system.host2spuTransSkewKB 128 Specifies the number (in kilobytes) to represent the maximum
amount of data expected to cause transient skew. In other
words, at any given time during a load or host distribute, the
host may parse/read 128KB for a particular destination data
slice before finding data for the next data slice. The system
uses this number to calculate the amount of memory for
receive buffers for a host2spu channel
system.hwmgrStaggerMicrosPer-
Spu
1000 Specifies the SPU management channel broadcast response
stagger parameter.
system.jobSwapdAlertBlocks 16 Specifies the threshold of free pages at which a running SPU
job starts interacting with the swapper daemon.
system.lockTracking yes FOR INTERNAL USE ONLY. DO NOT CHANGE.
system.maxActiveRegenBlks 32 Specifies the number of blocks given to the target during
regeneration. This option prevents the memory from filling up.
system.maxBcastMsgKB 1024 Specifies the maximum size in KB of a broadcast message.
Table D-4: SPU Configuration Options
Option Default Description

20282-20 Rev.1 D-15
SPU Configuration Options
system.maxFlowCommChannels 200 Specifies the maximum number of channels that can be
opened at any time. Used by flowcomm when allocating
resources for channel tables. DO NOT CHANGE, unless you
change other variables to allow an increased number of con-
current queries
system.maxFunnelLdrKB 5120 Specifies the maximum number of KB transmitted by one fun-
nel leader, before rotating to another funnel leader. Setting it
to zero disables funnel leader rotation.
system.maxJumboFrameSize 9000 Limits the size of the jumbo frames used in the system. 9000
is the maximum size. FOR INTERNAL USE ONLY. DO NOT
CHANGE
system.maxRegenLoopCount 16 Specifies the maximum number of times regeneration
attempts to synchronize after discovering new writes.
system.maxScanBatchSize 7 Specifies the SPU disk scan "read-ahead" parameter. FOR
INTERNAL USE ONLY. DO NOT CHANGE.
system.maxSmallObjectHeapMB 32 Specifies the maximum size of a small object heap. Do not
change unless instructed by Netezza Support.
system.maxSpringFieldSize 512 Specifies the number of bytes of extra space to accommodate
changing space needs for varchar columns in min/max
aggregations.
system.maxSpuDistPlans 99999 This setting has been deprecated as of Release 4.6 and is no
longer used.
system.maxStrmNetChannels 0 Controls the number of maximum concurrent channels in use
for host and SPU distributions.
system.maxStrmNetDist 0 Specifies the number of maximum concurrent SPU-to-SPU
distributes that can run.
system.maxTransactions 65536 Specifies the maximum number of transactions.
system.maxUnsolicitedReplies 25 Relates to polling. FOR INTERNAL USE ONLY. DO NOT
CHANGE.
sys-
tem.miniSpu2HostNumReassemb
ly
-1 Specifies the number of reassembly buffers required for
miniSpu2host channel. Because this channel sends small
messages by definition, none are required, hence the -1. FOR
INTERNAL USE ONLY. DO NOT CHANGE.
system.miniSpu2HostRAW -1 Specifies the RAW for miniSpu2Host channel.
system.mirroringNumReassembly 4 Specifies the number of reassembly buffers allocated for the
mirror channel.
system.mirroringRAW 4 Specifies the RAW mirroring for the channel.
system.mirroringSAW 4 Specifies the SAW mirroring for the channel.
Table D-4: SPU Configuration Options
Option Default Description

D-16 20282-20 Rev.1
IBM Netezza System Administrator’s Guide
system.nuclStackThreshold 7000 Specifies the expression evaluator stack limit on the SPU.
system.numNICs 1 Specifies the number of network interface cards on the host.
system.osnetrxOomTimeoutSecs 3600 Obsolete.
system.pollInterval 8 Specifies the number of seconds of polling before resetting the
SPUs.
system.printSpuDbosMsgInfo no Obsolete debug message logging facility.
system.realFpga yes FOR INTERNAL USE ONLY. DO NOT CHANGE.
system.recPtrMaxCfg 1677721
6
Specifies the number of array elements used in the sorting
machine.
system.regenAlmostDoneCount 64 Specifies the number of blocks that signal the start of
synchronization.
system.regenBadBlockEmailLimit 25 Specifies how many e-mails a regen-source SPU is allowed to
send for each regen when it encounters a bad disk block.
system.regenBlocksPerCycle 32 Implements regen throttling. The default is system dependent.
system.regenBreatherMs 100 Implements regen throttling. The default is system dependent.
system.regenGenericCtrl 0 FOR INTERNAL USE ONLY. DO NOT CHANGE.
system.regenMode normal FOR INTERNAL USE ONLY. DO NOT CHANGE.
system.regenOomRetryCount 6000 Specifies the total number of retry attempts before aborting an
out of memory regeneration.
system.regenOomRetrySleepMs 100 Specifies the amount of time in milliseconds to sleep before
retrying an out of memory regeneration.
system.regenOomRetryThreshold-
Secs
1800 Specifies the total amount of time (seconds) spend sleeping on
an out of memory regeneration.
system.regenPriority 10 Specifies the NUCLEUS priority of the regen thread.
system.regenRAW 3 Specifies the RAW mirroring for the regen channel.
system.regenSAW 3 Specifies the SAW mirroring for the regen channel.
system.regenSkipBadHead-
erCheck
no Historical.
system.regenTimeSlice 10 The time slice in milliseconds for a regeneration.
system.rowIdChunkSize 100000 Specifies the number of rows IDs assigned at one time.
system.rtxTimeoutMillis 300 Specifies the minimum time (in milliseconds) that fcomm
waits before retransmitting a packet.
Table D-4: SPU Configuration Options
Option Default Description

20282-20 Rev.1 D-17
SPU Configuration Options
system.rtxWakeupMillis 200 Specifies the time interval (in milliseconds) that the fcomm
retransmit task sleeps, before checking if packets need to be
retransmitted
system.secondsBetween-
CRCBursts
1 Specifies the number of seconds that the upgrade process
sleeps between bursts of CRC computation and validation.
FOR INTERNAL USE ONLY. DO NOT CHANGE.
system.sfiCriticalTemperature 70 Specifies the red level, which is 70 degrees centigrade.
system.sfiWarningTemperature 50 Specifies the yellow level, which is 50 degrees centigrade
system.spu2hostNumReassembly -1 Specifies the number of reassembly buffers the host allocates
for a spu2host channel. FOR INTERNAL USE ONLY. DO NOT
CHANGE
system.spu2hostRAW 2 Specifies the RAW for spu2host channels. It must be small,
because there are many SPUs, and only one host. Increasing it
causes packet loss, and increases memory usage. FOR INTER-
NAL USE ONLY. DO NOT CHANGE.
system.spu2hostSAW 1 Specifies the SAW for spu2host channels. It must be small,
because there are many SPUs, and only one host. Increasing it
causes packet loss, and increases memory usage. FOR INTER-
NAL USE ONLY. DO NOT CHANGE.
system.spu2spuAckFrequency 0 Specifies a single comm ack for this number of packets. FOR
INTERNAL USE ONLY. DO NOT CHANGE.
system.spu2spuRtxTimeout 0 Retransmits timeout for SPU-SPU distributes (in millisec-
onds). FOR INTERNAL USE ONLY. DO NOT CHANGE.
system.spu2spuSendWindow 0 Specifies the send window for SPU-SPU distributes (in pack-
ets). FOR INTERNAL USE ONLY. DO NOT CHANGE.
system.spu2spuTransSkewKB 32 Specifies the number (in kilobytes) to represent the maximum
amount of data expected to cause transient skew. In other
words, at any given time during a load or host distribute, the
host may parse/read 128KB for a particular destination data
slice before finding data for the next data slice. The system
uses this number to calculate the amount of memory for
spu2spu distribution for spu2spu channels.
system.spuAbortBackTraceVerbos-
ity
2 Specifies SPU abort print buffer stack dump verbosity level.
system.spuAbortIfTxArrayFull no FOR INTERNAL USE ONLY. DO NOT CHANGE.
system.spuAckThreshold 0 Specifies the packet acknowledgement frequency.
system.spuContinueOnRegenError yes During disk regenerations, continues the regeneration after a
read sector error on the source disk occurs. FOR INTERNAL
USE ONLY. DO NOT CHANGE.
Table D-4: SPU Configuration Options
Option Default Description

D-18 20282-20 Rev.1
IBM Netezza System Administrator’s Guide
system.spuCpuModel 2 Specifies the PowerPC chip. 1 is the 855; 2 is the 405. FOR
INTERNAL USE ONLY. DO NOT CHANGE.
system.spuCriticalTemperature 55 Specifies the red level, which is 55 degrees centigrade.
system.spuCtrlRAW 16 Specifies the RAW for spu control channel. FOR INTERNAL
USE ONLY. DO NOT CHANGE.
system.spuDiskSchedElvDepth -1 Specifies the SPU disk I/O scheduler elevator algorithm
parameter (-1 = use compiled-in default). FOR INTERNAL
USE ONLY. DO NOT CHANGE.
system.spuDiskSchedStarvation-
Threshold
-1 Specifies the SPU disk I/O scheduler scheduling parameter (-1
= use compiled-in default). FOR INTERNAL USE ONLY. DO
NOT CHANGE.
system.spuDistBucketSize 16384 Specifies the size of the messages for SPU-to-SPU
distribution.
system.spuDistSAW 1 Defines the send-ahead-window used for SPU2SPU communi-
cation. FOR INTERNAL USE ONLY. DO NOT CHANGE.
system.spuFecTxCompletionLimit 0 FOR INTERNAL USE ONLY. DO NOT CHANGE.
system.spuHwClass 2 Specifies Mercury (1) or Sparrow (2) class system. FOR
INTERNAL USE ONLY. DO NOT CHANGE.
system.spuJobPrioBias 30 Specifies an adjustment to the internal priority of short jobs.
system.spuJobPrioBiasIntervalMs 2000 Specifies the number of milliseconds that can elapse before a
job is not longer defined as short.
system.spuMACMb 100 Specifies the speed of Ethernet backplane 100 MB for Spar-
row/Finch. 1GB (1000) for Mustang. FOR INTERNAL USE
ONLY. DO NOT CHANGE.
system.spuMaxJobTasks 64 Model dependent. Specifies the maximum number of job
threads. FOR INTERNAL USE ONLY. DO NOT CHANGE.
system.spuMaxPktsOnWire 0 Specifies the number of packets that can be transmitted with-
out acknowledgment on the SPUs.
system.spuMemoryMB 512 Specifies the amount of RAM on the SPU. Internal use only.
system.spuMsgsOutstanding 0 Specifies the number of application messages on the SPUs.
system.spuMTU 0 Specifies the Maximum Transfer Unit, that is, the maximum
packet size.
system.spunetrxOomFatalTime-
outSecs
3600 Specifies the SPI low memory comm receive deadlock thresh-
old for a SPU abort.
system.spunetrxOomTimeoutSecs 360 Specifies the SPI low memory comm receive deadlock thresh-
old for a query abort.
Table D-4: SPU Configuration Options
Option Default Description

20282-20 Rev.1 D-19
SPU Configuration Options
system.spuNonJobReservedBlocks N/A This setting has been obsoleted in Release 5.0.
system.spuPartitionSectorCoun-
tOverride
0 FOR INTERNAL USE ONLY. DO NOT CHANGE.
system.spuPlanWorkBlocks 2000 Specifies the gross (not net) amount of memory available to
one snippet on the SPU.
system.spuRetransmitLoopTicks 0 Specifies the re-send frequency.
system.spuRetransmitRe-
sendTicks
100 Specifies the timeout of unacknowledged packets.
system.spuRetransmitTimeoutCy-
cles
0 Simulator mode. FOR INTERNAL USE ONLY. DO NOT
CHANGE.
system.spuRev 6 Specifies the SPU revision. 4 is Mercury; 5 is Sparrow. 6 is
Mustang. FOR INTERNAL USE ONLY. DO NOT CHANGE.
system.spuRxDescPoolChunks 4 Specifies the SPU comm receive descriptor pool size.
system.spuSwapOrderMethod 2 Specifies the host priority SPU swap order.
system.spuSwapPageAbandon-
ments
1000 Specifies the number of spuSwapWriteRetry attempts across
all users since this SPU started its online session.FOR INTER-
NAL USE ONLY. DO NOT CHANGE.
system.spuSwapSpaceConfigured 0 Controls the size of the dummy swap partition table. The
default value allocates all available swap space. The actual
swap space is the minimum of this option and the SpaceLimit
option or the actual partition size. FOR INTERNAL USE ONLY.
DO NOT CHANGE.
system.spuSwapSpaceLimit 0 Specifies artificially limiting the swap space for testing. FOR
INTERNAL USE ONLY. DO NOT CHANGE.
system.spuSwapWriteRetries 2 Specifies the number of retries of a single failed write to the
swap partition before sending an error. FOR INTERNAL USE
ONLY. DO NOT CHANGE.
system.spuWarningTemperature 45 Specifies the yellow level, which is 45 degrees centigrade.
system.sqbFlags 1 Specifies the snippet scheduler Short Query Bias flags, 1=gen-
erate prep snippets at head of plan. FOR INTERNAL USE
ONLY. DO NOT CHANGE.
system.tolderateOldCRC no Specifies whether the FPGA ignores CRC checks on blocks
whose layout is one. FOR INTERNAL USE ONLY. DO NOT
CHANGE.
system.txIdChunkSize 1024 Specifies the size of transaction IDs.
system.unicast2spuRAW 3 Specifies the RAW for unicast2spu channels. FOR INTERNAL
USE ONLY. DO NOT CHANGE.
Table D-4: SPU Configuration Options
Option Default Description

D-20 20282-20 Rev.1
IBM Netezza System Administrator’s Guide
system.useFpgaPrep yes Specifies whether to generate plans that use the FPGA’s filter
or raw reads.
system.virtabSingleMutex yes Controls the locking of internal tables. FOR INTERNAL USE
ONLY. DO NOT CHANGE.
system.zoneMapJoinBytes 4 Specifies the number of megabytes per SPU that a zonemap
join operation is allowed to consume.
system.zoneMapjoinThreshold 1000 Specifies the maximum number of records in memory per SPU
for a zonemap join. If greater than 1000 records, the system
does not perform a zonemap join.
system.zoneMapTableSizeThresh-
old
10 Specifies the size, in MB per SPU, for a table to merit a zone
map.
Note:
If you change this value, you must regenerate all of your
zone maps or risk wrong results. Do not change this value with-
out consulting Netezza Support.
Table D-4: SPU Configuration Options
Option Default Description

E-1
A P P E N D I X E
Notices and Trademarks
What’s in this appendix
Notices
Trademarks
Electronic Emission Notices
Regulatory and Compliance
This section describes some important notices, trademarks, and compliance information.
Notices
This information was developed for products and services offered in the U.S.A.
IBM may not offer the products, services, or features discussed in this document in other
countries. Consult your local IBM representative for information on the products and ser-
vices currently available in your area. Any reference to an IBM product, program, or service
is not intended to state or imply that only that IBM product, program, or service may be
used. Any functionally equivalent product, program, or service that does not infringe any
IBM intellectual property right may be used instead. However, it is the user's responsibility
to evaluate and verify the operation of any non-IBM product, program, or service.
IBM may have patents or pending patent applications covering subject matter described in
this document. The furnishing of this document does not grant you any license to these
patents. You can send license inquiries, in writing, to: This information was developed for
products and services offered in the U.S.A.
IBM Director of Licensing
IBM Corporation
North Castle Drive
Armonk, NY 10504-1785 U.S.A.
For license inquiries regarding double-byte (DBCS) information, contact the IBM Intellec-
tual Property Department in your country or send inquiries, in writing, to:
IBM World Trade Asia Corporation
Licensing 2-31 Roppongi 3-chome, Minato-ku
Tokyo 106-0032, Japan
The following paragraph does not apply to the United Kingdom or any other country where
such provisions are inconsistent with local law: INTERNATIONAL BUSINESS MACHINES
CORPORATION PROVIDES THIS PUBLICATION "AS IS" WITHOUT WARRANTY OF ANY
KIND, EITHER EXPRESS OR IMPLIED, INCLUDING, BUT NOT LIMITED TO, THE
E-2 20282-20 Rev.1
IBM Netezza System Administrator’s Guide
IMPLIED WARRANTIES OF NON-INFRINGEMENT, MERCHANTABILITY OR FITNESS FOR
A PARTICULAR PURPOSE. Some states do not allow disclaimer of express or implied war-
ranties in certain transactions, therefore, this statement may not apply to you.
This information could include technical inaccuracies or typographical errors. Changes are
periodically made to the information herein; these changes will be incorporated in new edi-
tions of the publication. IBM may make improvements and/or changes in the product(s)
and/or the program(s) described in this publication at any time without notice.
Any references in this information to non-IBM Web sites are provided for convenience only
and do not in any manner serve as an endorsement of those Web sites. The materials at
those Web sites are not part of the materials for this IBM product and use of those Web
sites is at your own risk.
IBM may use or distribute any of the information you supply in any way it believes appropri-
ate without incurring any obligation to you.
Licensees of this program who wish to have information about it for the purpose of
enabling: (i) the exchange of information between independently created programs and
other programs (including this one) and (ii) the mutual use of the information which has
been exchanged, should contact:
IBM Corporation
Software Interoperability Coordinator, Department 49XA
3605 Highway 52 N
Rochester, MN 55901
U.S.A.
Such information may be available, subject to appropriate terms and conditions, including
in some cases, payment of a fee.
The licensed program described in this document and all licensed material available for it
are provided by IBM under terms of the IBM Customer Agreement, IBM International Pro-
gram License Agreement or any equivalent agreement between us.
Any performance data contained herein was determined in a controlled environment.
Therefore, the results obtained in other operating environments may vary significantly.
Some measurements may have been made on development-level systems and there is no
guarantee that these measurements will be the same on generally available systems. Fur-
thermore, some measurements may have been estimated through extrapolation. Actual
results may vary. Users of this document should verify the applicable data for their specific
environment.
Information concerning non-IBM products was obtained from the suppliers of those prod-
ucts, their published announcements or other publicly available sources. IBM has not
tested those products and cannot confirm the accuracy of performance, compatibility or
any other claims related to non-IBM products. Questions on the capabilities of non-IBM
products should be addressed to the suppliers of those products.
All statements regarding IBM's future direction or intent are subject to change or with-
drawal without notice, and represent goals and objectives only.
All IBM prices shown are IBM's suggested retail prices, are current and are subject to
change without notice. Dealer prices may vary.
This information contains examples of data and reports used in daily business operations.
To illustrate them as completely as possible, the examples include the names of individu-
als, companies, brands, and products. All of these names are fictitious and any similarity to
the names and addresses used by an actual business enterprise is entirely coincidental.

20282-20 Rev.1 E-3
Trademarks
COPYRIGHT LICENSE:
This information contains sample application programs in source language, which illustrate
programming techniques on various operating platforms. You may copy, modify, and distrib-
ute these sample programs in any form without payment to IBM, for the purposes of
developing, using, marketing or distributing application programs conforming to the appli-
cation programming interface for the operating platform for which the sample programs are
written. These examples have not been thoroughly tested under all conditions. IBM, there-
fore, cannot guarantee or imply reliability, serviceability, or function of these programs.
Each copy or any portion of these sample programs or any derivative work, must include a
copyright notice as follows:
© your company name) (year). Portions of this code are derived from IBM Corp. Sample
Programs.
© Copyright IBM Corp. _enter the year or years_.
If you are viewing this information softcopy, the photographs and color illustrations may not
appear.
Trademarks
IBM, the IBM logo, ibm.com and Netezza are trademarks or registered trademarks of Inter-
national Business Machines Corporation in the United States, other countries, or both. If
these and other IBM trademarked terms are marked on their first occurrence in this infor-
mation with a trademark symbol (® or ™), these symbols indicate U.S. registered or
common law trademarks owned by IBM at the time this information was published. Such
trademarks may also be registered or common law trademarks in other countries. A current
list of IBM trademarks is available on the Web at “Copyright and trademark information” at
ibm.com/legal/copytrade.shtml.
Adobe is a registered trademark of Adobe Systems Incorporated in the United States, and/
or other countries.
Linux is a registered trademark of Linus Torvalds in the United States, other countries, or
both.
Microsoft, Windows, Windows NT, and the Windows logo are trademarks of Microsoft Corpo-
ration in the United States, other countries, or both.
NEC is a registered trademark of NEC Corporation.
UNIX is a registered trademark of The Open Group in the United States and other
countries.
Java and all Java-based trademarks are trademarks of Sun Microsystems, Inc. in the United
States, other countries, or both.
Red Hat is a trademark or registered trademark of Red Hat, Inc. in the United States and/or
other countries.
D-CC, D-C++, Diab+, FastJ, pSOS+, SingleStep, Tornado, VxWorks, Wind River, and the
Wind River logo are trademarks, registered trademarks, or service marks of Wind River Sys-
tems, Inc. Tornado patent pending.
APC and the APC logo are trademarks or registered trademarks of American Power Conver-
sion Corporation.
Other company, product or service names may be trademarks or service marks of others.

E-4 20282-20 Rev.1
IBM Netezza System Administrator’s Guide
Electronic Emission Notices
When you attach a monitor to the equipment, you must use the designated monitor cable
and any interference suppression devices that are supplied with the monitor.
Federal Communications Commission (FCC) Statement
Note: This equipment has been tested and found to comply with the limits for a Class A
digital device, pursuant to Part 15 of the FCC Rules. These limits are designed to provide
reasonable protection against harmful interference when the equipment is operated in a
commercial environment. This equipment generates, uses, and can radiate radio frequency
energy and, if not installed and used in accordance with the instruction manual, may cause
harmful interference to radio communications. Operation of this equipment in a residential
area is likely to cause harmful interference, in which case the user will be required to cor-
rect the interference at his own expense.
Properly shielded and grounded cables and connectors must be used in order to meet FCC
emission limits. IBM is not responsible for any radio or television interference caused by
using other than recommended cables and connectors or by unauthorized changes or mod-
ifications to this equipment. Unauthorized changes or modifications could void the user's
authority to operate the equipment.
This device complies with Part 15 of the FCC Rules. Operation is subject to the following
two conditions: (1) this device may not cause harmful interference, and (2) this device
must accept any interference received, including interference that might cause undesired
operation.
Industry Canada Class A Emission Compliance Statement
This Class A digital apparatus complies with Canadian ICES-003.
Avis de conformité à la réglementation d'Industrie Canada
Cet appareil numérique de la classe A est conforme à la norme NMB-003 du Canada.
Australia and New Zealand Class A Statement
Attention: This is a Class A product. In a domestic environment this product may cause
radio interference in which case the user may be required to take adequate measures.
European Union EMC Directive Conformance Statement
This product is in conformity with the protection requirements of EU Council Directive
2004/108/EC on the approximation of the laws of the Member States relating to electro-
magnetic compatibility. IBM cannot accept responsibility for any failure to satisfy the
protection requirements resulting from a nonrecommended modification of the product,
including the fitting of non-IBM option cards.
Attention: This is an EN 55022 Class A product. In a domestic environment this product
may cause radio interference in which case the user may be required to take adequate
measures.
Responsible manufacturer:
International Business Machines Corp.
New Orchard Road
Armonk, New York 10504
914-499-1900
20282-20 Rev.1 E-5
Electronic Emission Notices
European Community contact:
IBM Technical Regulations, Department M456
IBM-Allee 1, 71137 Ehningen, Germany
Telephone: +49 7032 15-2937
Email: tjahn@de.ibm.com
Germany Class A Statement
Deutschsprachiger EU Hinweis: Hinweis für Geräte der Klasse A EU-Richtlinie zur Elektro-
magnetischen Verträglichkeit
Dieses Produkt entspricht den Schutzanforderungen der EU-Richtlinie 2004/108/EG zur
Angleichung der Rechtsvorschriften über die elektromagnetische Verträglichkeit in den EU-
Mitgliedsstaaten und hält die Grenzwerte der EN 55022 Klasse A ein.
Um dieses sicherzustellen, sind die Geräte wie in den Handbüchern beschrieben zu instal-
lieren und zu betreiben. Des Weiteren dürfen auch nur von der IBM empfohlene Kabel
angeschlossen werden. IBM übernimmt keine Verantwortung für die Einhaltung der Schut-
zanforderungen, wenn das Produkt ohne Zustimmung der IBM verändert bzw. wenn
Erweiterungskomponenten von Fremdherstellern ohne Empfehlung der IBM gesteckt/einge-
baut werden.
EN 55022 Klasse A Geräte müssen mit folgendem Warnhinweis versehen werden:
“Warnung: Dieses ist eine Einrichtung der Klasse A. Diese Einrichtung kann im Wohnbere-
ich Funk-Störungen verursachen; in diesem Fall kann vom Betreiber verlangt werden,
angemessene Maßnahmen zu ergreifen und dafür aufzukommen.”
Deutschland: Einhaltung des Gesetzes über die elektromagnetische Verträglichkeit von Geräten
Dieses Produkt entspricht dem “Gesetz über die elektromagnetische Verträglichkeit von
Geräten (EMVG)”. Dies ist die Umsetzung der EU-Richtlinie 2004/108/EG in der Bundes-
republik Deutschland.
Zulassungsbescheinigung laut dem Deutschen Gesetz über die elektromagnetische Verträglichkeit von Geräten
(EMVG) (bzw. der EMC EG Richtlinie 2004/108/EG) für Geräte der Klasse A
Dieses Gerät ist berechtigt, in Übereinstimmung mit dem Deutschen EMVG das EG-Konfor-
mitätszeichen - CE - zu führen.
Verantwortlich für die Einhaltung der EMV Vorschriften ist der Hersteller:
International Business Machines Corp.
New Orchard Road
Armonk, New York 10504
914-499-1900
Der verantwortliche Ansprechpartner des Herstellers in der EU ist:
IBM Deutschland
Technical Regulations, Department M456
IBM-Allee 1, 71137 Ehningen, Germany
Telephone: +49 7032 15-2937
Email: tjahn@de.ibm.com
Generelle Informationen:
Das Gerät erfüllt die Schutzanforderungen nach EN 55024 und EN 55022 Klasse A.
E-6 20282-20 Rev.1
IBM Netezza System Administrator’s Guide
Japan VCCI Class A Statement
This is a Class A product based on the standard of the Voluntary Control Council for Inter-
ference (VCCI). If this equipment is used in a domestic environment, radio interference
may occur, in which case the user may be required to take corrective actions.
Japan Electronics and Information Technology Industries Association (JEITA) Statement
Japan Electronics and Information Technology Industries Association (JEITA) Confirmed
Harmonics Guidelines (products less than or equal to 20 A per phase)
Japan Electronics and Information Technology Industries Association (JEITA) Statement
Japan Electronics and Information Technology Industries Association (JEITA) Confirmed
Harmonics Guidelines (products greater than 20 A per phase)
Korea Communications Commission (KCC) Statement
This is electromagnetic wave compatibility equipment for business (Type A). Sellers and
users need to pay attention to it. This is for any areas other than home.
Russia Electromagnetic Interference (EMI) Class A Statement
People's Republic of China Class A Electronic Emission Statement
20282-20 Rev.1 E-7
Regulatory and Compliance
Taiwan Class A Compliance Statement
Regulatory and Compliance
Regulatory Notices
Install the NPS system in a restricted-access location. Ensure that only those trained to
operate or service the equipment have physical access to it. Install each AC power outlet
near the NPS rack that plugs into it, and keep it freely accessible.
Provide approved circuit breakers on all power sources.
Product may be powered by redundant power sources. Disconnect ALL power sources
before servicing.
High leakage current. Earth connection essential before connecting supply. Courant de
fuite élevé. Raccordement à la terre indispensable avant le raccordement au réseau.
Homologation Statement
This product may not be certified in your country for connection by any means whatsoever
to interfaces of public telecommunications networks.
Further certification may be required by law prior to making any such connection. Contact
an IBM representative or reseller for any questions.
WEEE
Netezza Corporation is committed to meeting the requirements of the European Union (EU)
Waste Electrical and Electronic Equipment (WEEE) Directive. This Directive requires pro-
ducers of electrical and electronic equipment to finance the takeback, for reuse or
recycling, of their products placed on the EU market after August 13, 2005.
E-8 20282-20 Rev.1
IBM Netezza System Administrator’s Guide
20282-20 Rev.1 Glossary-1
Glossary
Glossary of Database and System Terms
Access Control List See ACL.
ACID Atomicity/Consistency/Isolation/Durability of data based on transaction processing.
ACL Access Control Lists. On UNIX and UNIX-like systems, file permissions are defined
by the file mode. The file mode contains nine bits that determine access permis-
sions of a file, plus three special bits. This mechanism allows definition of access
permissions for three classes of users: the file owner, the file group, and others.
active node In Linux-HA, the node that controls the resource group. This is called the primary
node in DRBD.
admin user The default Netezza SQL database administrator user.
administrator
privileges
Privileges that authorize database users to administer the database and its objects.
See also object privileges.
aggregate functions Functions that operate on a set of rows to calculate and return a single value. Typical
aggregate functions include avg, count, max, min, and sum.
alias An alternate name for keyword, for renaming columns, also called derived columns.
Column aliases are used for join indexes when two columns have the same name.
AMM Advanced management module. The AMM provides system-management functions
and the external keyboard, mouse, and video connections for use by a local console,
and remote management connection.
AMPP Asymmetric Massively Parallel Processing. Combines both Symmetric Multiprocess-
ing (SMP) and Massive Parallel Processing (MPP) architectures, so data needing
high-level computing at slower speeds can make use of SMP, and data needing more
speed can make use of MPP.
American National Stan-
dards Institute
See ANSI.
ANSI American National Standards Institute. ANSI SQL standards are parallel ISO
standards.
API Application programming interface. A programmatic way to interface with a Netezza
system.
ASCII American Standard Code for Information Interchange. The most widely used charac-
ter coding standard of representing textual data in computer memory and for
communicating with other computers.
Asymmetric Massively
Parallel Processing
See AMPP.
Atomicity/Consistency/
Isolation/Durability
See ACID.
backup increment One component of a backup set, which can be the result of a full backup, a differen-
tial backup, or a cumulative backup.
backup set A collection of one full and any number of incremental backups of a database.
Glossary-2 20282-20 Rev.1
IBM Netezza System Administrator’s Guide
base table A permanent table that stores data persistently until you destroy (drop) the table
explicitly.
Basic Local Alignment
Search Tool
See BLAST.
Binary Large
Object
See BLOB.
BIST Built In Self Test.
BLAST Basic Local Alignment Search Tool is a search algorithm used by blastp, blastn,
blastx, tblastn, and tblastx. You use BLAST functions to perform sequence similarity
searching on CLOBs. You use BLAST-related pseudo fields to obtain statistical data
on sequence matching.
BLOB Binary Large OBject. A data type used in some databases to represent large values
for fields of records; typical examples might be images in various formats (for exam-
ple, a picture of an employee in GIF or JPEG format that is included as part of an
employee record), movies in formats, such as MPEG, audio data, radar data, and so
on.
block A group of contiguous sectors on a disk, contains a block header and some integral
number of records.
blocksize In the Netezza system, blocksize is defined as 128 KB.
boot process A start-up process, such as the process of starting a Netezza system from a powered
off state, as well as the process for starting and initializing SPUs.
Built In Self Test See BIST.
cast Used to convert a value to a different type.
catalog (SPU) A data structure in the core partition that describes table allocation.
catalog (SQL) A catalog groups a collection of schemas into a single unit. A catalog provides a
mechanism for qualifying the schemas names to avoid name conflicts. It is also the
conceptual repository for the schemas’ metadata.
character An abstract linguistic concept such as "the Latin letter A" or "the Chinese character
for sun." A single character can be represented by one or more glyphs.
chassis A general term for a hardware cage that contains devices. For example, a chassis
could contain SPUs, disks, fan units, power supplies, or a combination of such
devices.
CIB A Cluster Information Base (CIB) is a replicated store of cluster-related information.
It typically includes static configuration data which defines the resources, cluster
nodes, and constraints (or dependencies) in the cluster, as well as information about
the current state of the cluster.
CLI (1) Callable language interface (ANSI SQL term). (2) Command Line Interface. Com-
mands that users type at the command line prompt rather than through a graphical
user interface. Netezza CLI commands include nzload, nzsql, nzsystem, and others.
CM Configuration Manager. Defines the production version of the Netezza software.
20282-20 Rev.1 Glossary-3
Glossary
CODASYL Conference on Data Systems Languages. An organization founded in 1959 by the
U.S. Department of Defense. CODASYL was known for its definition of COBOL, but it
was also involved with the network database model and the data description lan-
guage (DDL) for defining database schemas.
code point The name for the binary value associated with each character in a character set,
such as Unicode or Latin-1.
collation Rules that determine how data is compared, ordered, and presented.
column One field of data in a table definition, or in a record or row of a populated database.
combining
sequences
Unicode allows characters to have their own unique code point value and to be rep-
resented as combinations of other characters, called combining sequences. For
example, the Angstrom character can be represented by the code point or by com-
bining sequence "capital A" code point followed by the “combining ring above” code
point.
comments An arbitrary sequence or string of characters that are omitted or ignored during pro-
cessing because they begin and possibly end with special characters that are
recognized by the processor. For example, SQL comments typically begin with dou-
ble dashes and extend to the end of the line.
concurrency control In multi-user environments, a system of controls that ensure that modifications
made by one person do not adversely affect another concurrent user.
Configuration Manager See CM.
constants Symbols that represent specific data values. The format of a constant depends on
the data type of the value it represents. Constants are also called literals.
constraint An integrity condition that a database system must enforce. SQL-92 defines column
constraints, foreign keys, and check conditions.
contention A condition that arises when there are more active consumers of a resource than the
system can serve simultaneously.
control file When you use the nzload command, you can use a control file to specify additional
options that the command line does not support.
Coordinated
Universal Time
See UTC.
core partition A Netezza disk partition that is used for storing information about how disk space is
being used. This includes directories, catalogs, dictionaries, and coarse indices.
cost Estimate of the work (in time) required to execute the query.
CPU Central processing unit. The computing part of the computer.
CRM Customer Relationship Management. An integrated information system that is used
to plan, schedule and control the presales and postsales activities in an organization.
cumulative backup A type of backup used in conjunction with differential backups. A cumulative
backup includes all the changes sine the last full backup. It consolidates and
replaces all previous differential backups.
Glossary-4 20282-20 Rev.1
IBM Netezza System Administrator’s Guide
cross database access The ability to execute queries that reference tables, views, and synonyms in other
databases on the same Netezza server.
data block See block.
Data Control Language See DCL.
Data Definition Language See DDL.
data integrity A state in which all the data values are stored correctly in the database.
Data Manipulation
Language
See DML.
data mining Complex statistical processing used to uncover patterns in large data sets.
data slice The data slice number represents that portion of the database stored on a disk. Each
disk services a primary data slice and mirrors the primary data slice of another disk.
During failover the specific disk on which the data slice resides can change, however
the data slice number remains the same.
database A collection of persistent data, which is used by the application systems of a given
enterprise.
DBOS Database Operating System (runs on the Netezza host processor).
DCE Distributed Computing Environment. A device that establishes, maintains and termi-
nates a session on a network.
DCL Data Control Language. Allows you to grant or revoke privileges to users or groups.
DDBMS Distributed Database Management System. A database physically stored in two or
more computer systems. Although geographically dispersed, a distributed database
system manages and controls the entire database as a single collection of data.
DDL Data Definition Language of SQL for defining tables, columns, views, constraints,
users, privileges; primarily the create, alter and drop commands.
DHCP Dynamic Host Configuration Protocol (RFC 2131). DHCP clients obtain their IP
address assignments and other configuration information from DHCP servers. Pro-
vides a mechanism for allocating IP addresses dynamically so that addresses can be
reused when hosts no longer need them.
designated SPU In IBM Netezza 1000, C1000, and IBM PureData System for Analytics N1001 sys-
tems, a SPU within the SPU chassis that has the responsibility to monitor spare and
inactive disks. Typically, this is the SPU that manages the least number of data
slices.
device mapping file A configuration file that defines the configuration of SPUs and disks within a sys-
tem, specific to the model type of the system. The mapping file is used to create and
initialize the Netezza database the first time the system starts. It also communicates
the device mappings to the SPUs when Netezza starts or after a topology change
such as a SPU failure.
dictionary Data structure that specifies all the tables, their columns, order, and data types.
differential backup A type of incremental backup. It includes all the changes since the last full or incre-
mental backup.
20282-20 Rev.1 Glossary-5
Glossary
directory (SPU) Data structure on a SPU that describes the allocation status of disk extents. See
extents.
dirty read When a SQL transaction reads data written by concurrent uncommitted transactions.
discovery The process of identifying the storage topology and reporting information back to the
system manager. The system manager uses this information to assign SPUs to disks
(and to define the paths connecting them) and also to identify disk enclosure ele-
ments such as fans, power supplies, and sensors for temperature and voltage.
dispersion The number of distinct values in a column. These values are useful to determine a
good distribution column.
Distributed Computing
Environment
See DCE.
Distributed Database Man-
agement System
See DDBMS.
distribution key The column or set of columns used to determine the distribution of data on the data
slices. The Netezza systems uses a hash of the distribution key to determine the
data slice location of a given row of the database.
DML Data Manipulation Language of SQL for accessing and modifying database data; pri-
marily the select, update, insert, delete, commit and rollback commands.
DNS Domain Name System. Used in the Internet for translating names of network nodes
into addresses.
double-duty A condition where a disk is servicing queries on its primary disk partition as well as
its mirror disk partition because it is taking the place of a disk that has failed.
DRBD Distributed Replicated Block Device (DRBD) is a block device driver that mirrors the
content of block devices (hard disks, partitions, logical volumes, and so on) between
servers.
DRBD network Static routes over direct cabling between two hosts, bonded. This network is dedi-
cated to DRBD only.
ECC Error-Correcting Code. A memory system that tests for and corrects errors
automatically.
environment
variables
An item of data that is updated by the operating system or other control program.
They typically reside in memory and can be read by applications to determine the
current status of the system. Netezza environment variables include user name,
password, and database among others.
Ethernet Gigabit Switch A physical switch that resides in a Netezza rack and connects the SPAs to the NICs
installed on the host computer. Each rack includes at least one switch. Depending
upon your Netezza configuration, you could have multiple switches in one or many
racks.
ETL Extract, Transform, and Load. The process by which data is extracted from one or
more source databases, filtered and standardized into common forms and encod-
ings, then loaded into a target database (for example, a Netezza database).
EUC-JP A way to use the Japanese JIS X0208, JIS X0213, and other related standards (usu-
ally called just the "JIS character set"). See Extended UNIX Code.
Glossary-6 20282-20 Rev.1
IBM Netezza System Administrator’s Guide
EUC-KR A way to encode Korean with an 8-bit coding of ISO-2022-KR (KS X 1001), imple-
mented by adding 128 to each byte. See Extended UNIX Code.
execution plan A linear structure that defines the DBOS operations to be performed for a SQL
statement.
expansion rack See rack.
Extended UNIX Code (EUC) is an 8-bit character encoding system used primarily for Japanese, Korean,
and simplified Chinese.
extent The smallest unit of allocation on a disk, contains some number of blocks.
Extract, Transform, and
Load
See ETL.
fabric Connects the host computer (Linux host and SMP host) with the system's SPUs.
Because the Netezza fabric uses IP-based protocols, the devices on the fabric use IP
addresses.
failover For a Netezza HA host, an automatically triggered action by Linux-HA that causes
the resource group to be “failed over” from the active node to the standby node. As a
result, the standby node takes control of the resource group and becomes the active
node. For a Netezza SPU, the process of transparently switching to the mirrored copy
of the data when a SPU fails to respond.
fencing A method that forces a Netezza host out of the cluster after Heartbeat detects prob-
lems on that host which would prevent normal operation. In the Netezza
environment, fencing typically causes a forced powercycle to stop the problematic
host and thus force a failover of the nps resource group to the standby host.
Field
Programmable Gate Array
See FPGA.
float Represents a floating-point number. A floating point number is stored in a column
defined as FLOAT(precision). The precision is greater than or equal to 1 and is
expressed as the number of bits rather than the number of digits.
foreign key The column or combination of columns whose values match the primary key of
another table.
FPGA Field Programmable Gate Array. The FPGA is a Netezza-designed engine that accel-
erates SQL query performance.
full backup The contents of the entire database copied to a new or empty backup destination.
full restore The creation of a new database and restoration of the contents of a full backup set to
that database.
Gb Gigabit. One billion bits (technically 1,073,741,824 bits).
GB Gigabyte (1024 MB).
glyph The concrete visual presentation of a character such as A. A single glyph can repre-
sent more than one character.
20282-20 Rev.1 Glossary-7
Glossary
GRA Guaranteed Resource Allocation. A policy that allows the system resources to be
reserved by percentages. When there is contention for resources, the system grants
access to that resource based on the defined percentage.
host The Linux system on which the Netezza software runs.
Guaranteed Resource
Allocation
See GRA.
Heartbeat The mechanism that checks the health and “liveness” of the two Netezza nodes in
the cluster.
host computer A multiprocessor computer that provides access to monitor basic Netezza functions.
It includes a monitor and keyboard. The host receives queries and converts them
into optimized execution plans. It runs the Linux operating system, and provides
monitoring and diagnostic functions.
host rack See rack.
hot swap The process of replacing hardware components without shutting down the system.
i18N An industry standard abbreviation for Internationalization (because there are 18 let-
ters between the 'I' and the 'n'). It comprises software modifications to support
multiple languages.
ICU International Components for Unicode. A library that enables software programs to
work with text in multiple languages.
Intelligent Query
Streaming
Places the silicon processors in proximity to the storage, so it can filter and process
records as they come off the storage disk drive—taking only the data that is relevant
to the query.
interface A defined set of properties, methods, and collections that form a logical grouping of
behaviors and data.
inter-rack Between racks. For example, inter-rack connections have source and destination
locations that reside on different racks.
intrarack Within a rack. For example, intrarack connections have sources and destinations
within the same rack.
ISO International Organization for Standardization. ISO SQL standards parallel ANSI
standards.
isolation level The property of a transaction that controls the degree to which data is isolated for
use by one process and guarded against interference from other processes.
Java Database
Connectivity
See JDBC.
JBOD Just a Bunch of Disks. A group of hard disks. An optional feature on a host rack, one
3 Unit JBOD can be installed and used as a staging area for data being extracted or
loaded.
JDBC Java Database Connectivity. Java analog to ODBC. A way to abstract access to
databases.
Glossary-8 20282-20 Rev.1
IBM Netezza System Administrator’s Guide
job A piece of a query or other task to be run, including load/unload, mirroring/regen,
DDL/DML operation and disk management.
KB Kilobyte (1024 bytes).
keyword Words that have a fixed meaning in SQL.
KVM Keyboard Video Mouse. Part of the host computer.
LAN Local Area Network. A communications network that serves users within a confined
geographical area.
Latin-1 (ISO 8859-1) Is a an 8-bit character encoding. The 256 values correspond to the
first 256 Unicode code points, and the first 128 values correspond to the 7-bit
ASCII.
Load Replay Region Defines a pre-commit within a load. It is used if the system must restart a load.
maintenance network The network that Heartbeat uses to communicate between the two Netezza nodes.
materialized view Sorted, projected, and materialized views (SPM) are views of user data tables (base
tables) that project a subset of the base table’s columns and are sorted on a specific
set of the projected columns.
Mb Megabit (one million bits).
MB Megabyte (1024 KB).
mean time to
repair
See MTTR.
mean time
between failures
See MTBF.
megabit See Mb.
megabyte See MB.
merge-sort A sorting algorithm that works by merging sorted lists into larger sorted lists; in
Netezza, DBOS on the host performs a merge-sort of sorted data received from mul-
tiple SPUs.
metadata Database description information; the ANSI system catalog contains the schema
metadata for a SQL-92 database.
migration In DRBD terms, a migration (or relocation) occurs when a user manually moves the
nps resource group to the standby host, making the standby the active host.
mirror partition A disk partition used for storing tables that are a copy of another disk’s primary data.
mirroring The SPU software responsible for replicating data stored on one storage device to a
second storage device for high availability of data.
mismatched disk The disk has valid data from another Netezza database. This is the case if you
removed an active disk from another system or storage array, mistaking it for a spare.
20282-20 Rev.1 Glossary-9
Glossary
multipath A storage configuration that supports multiple paths from servers to disks. The
redundant paths, connections, and controller cards provide a degree of recovery and
high availability in the event of failures to a component within the storage
subsystem.
multiple device (MD)
driver
The Linux software RAID driver which is responsible for mirroring using a RAID-1
algorithm.
MTBF Mean Time Between Failures. The average time a component works without failure.
It is the number of failures divided by the hours under observation.
MTTR Mean Time to Repair. The average time it takes to repair a failed component.
namespace A namespace is the structure underlying SQL schemas. The namespace contains all
the objects within the database plus all global objects (databases, users, groups, and
system objects) There is only one namespace for each database.
NaN Not a Number.
nested table A data mining model configuration in which a column of a table contains a table.
Netezza Database Accel-
erator Card
A Netezza-designed expansion board that provides the FPGA analysis engines, mem-
ory, and I/O bandwidth to process the queries and data communications from its
associated SPU to the disks that the SPU owns.
NIC Network Interface Card. A card that attaches to a computer to control the exchange
of data between the computer and components external to the computer. Attached
to the Netezza host computer, a NIC connects the Ethernet switch to the host.
nonrepeatable reads When a SQL transaction re-reads data it previously read and finds that the data has
been modified by another transaction (that committed since the initial read).
normalization Describes the translation of a body of text so that characters with multiple represen-
tations are encoded in one way. Normalization puts different representations of the
same character sequence (as seen by the user) into a single uniform representation,
which can then be subjected to byte-wise binary comparison as an equality test.
NPS Netezza Performance Server. The former name of the Netezza high performance,
integrated database appliance.
null Specifies the absence of a value for a column in a row. Behaves as unknown in
calculations.
nz user Default Netezza system administrator Linux account that is used to run the host soft-
ware on Linux.
NzAdmin tool The Netezza GUI for managing database operations.
Object databases See ODBs.
object privileges Object privileges authorize database users to access and maintain the data within a
database object. See also administrator privileges.
ODBC Open Database Connectivity. A way to abstract access to databases. ODBC 3.0 con-
forms to the SQL2 CLI standards.
ODBs Object databases (ODBs), first designed in the 1980s, were meant to handle the
complexity of data and relationships required by the object model of development.
Glossary-10 20282-20 Rev.1
IBM Netezza System Administrator’s Guide
Open Database
Connectivity
See ODBC.
overallocated SPU A SPU which is connected to more than 8 data slices. By default, a SPU manages 6
or 8 data slices. If a SPU should fail, its data slices are reassigned to the remaining
SPUs.
overhead That part of the system resources consumed by the system itself, not necessarily on
behalf of a user’s operation.
oversubscribed A condition that arises when the demands on the aggregate resources of a system
exceed the system’s total capacity.
partition Area of disk that contains extents. Netezza disks have several partitions such as core
data, swap, primary, and mirror.
PDU Power Distribution Unit. PDUs distribute power to SPUs within a rack, and connect
to the rack’s UPSs or PDUs.
phantom read When a SQL transaction re-executes a query returning a set of rows that satisfy a
search condition and finds that the set of rows has changed due to another recently
committed transaction.
POST Power On Self Test. A series of tests that are run every time a hardware system or
component is first powered on.
PostgreSQL The open source relational database version of the Postgres object database program
from the University of California, Berkeley.
Power Distribution Unit See PDU.
Power On Self Test See POST.
primary key A column or set of columns that uniquely identifies all the rows in a table.
primary partition The disk partition used for storing tables for which this disk is primarily responsible.
public group The default group to which all users belong.
PXE The Preboot Execution Environment (PXE) is a set of methods that are used to boot
an IBM host or server without the need for a disk (hard drive or diskette).
query A user-submitted unit of work that includes SQL statements.
rack The physical structure designed to hold Netezza components securely.
RAID Redundant Array of Independent Disks. A way or arranging disks to provide perfor-
mance and fault tolerance. The host computer includes drives in a RAID
configuration.
RDBMS Relational Database Management System. A database organization method that
links files together as required. In non-relational systems (hierarchical, network),
records in one file contain embedded pointers to the locations of records in another,
such as customers to orders and vendors to purchases.
real The same data type as FLOAT except that the DBMS defines the precision. REAL
takes no arguments.
20282-20 Rev.1 Glossary-11
Glossary
record A single row in a database table stored on a SPU disk with a record header followed
by all the fields (column values) for this row.
referential
integrity
A state in which all foreign key values in a database are valid, by ensuring that the
rows in the other tables exist.
regenerate The process of copying the primary and mirror partitions of a failed disk to a spare
disk.
relational database Refers to a database in which the data is stored in a uniform structure.
relocate (or migrate) A process of manually relocating the nps resource group from the active Netezza
node to the standby node. Also called switchover or migration.
resource A schedulable entity of the system.
resource group A group of all the applications, scripts, or services which are associated with a par-
ticular resource. A resource is a service or facility which is made to be highly
available. The Netezza implementation has one resource group called “nps” which
defines the services and resources that are started and monitored by Heartbeat. (A
resource group was known as a service in the prior Netezza HA implementation.)
roll back To remove the database updates performed by partially completed transactions.
row A table entry consisting of one value for each column in the table. Some column val-
ues can be NULL.
rowset limit A limit on the amount of rows a user query can return. The administrator can specify
this limit when creating a user or a group.
S-Blade In the IBM Netezza 100, 1000, C1000, and IBM PureData System for Analytics
N1001 systems, the combined snippet processing server and Netezza Database
Accelerator card (also referred to as a SPU).
SAS connectivity module SAS Connectivity Module is a switch that resides in the SPU chassis and manages
the connections between the SPUs and their corresponding disk enclosures. There
are two SAS connectivity modules in each SPU chassis to improve availability. Also
called a SAS expander.
saturation A condition that arises when the system resources are oversubscribed and the sys-
tem can no longer demonstrate linear performance with incremental loads.
schema A database contains one or more named schemas, which in turn contain tables.
Schemas also contain other kinds of named objects, including data types, functions,
and operators. Schemas allow you to use the same object name in different schemas
without conflict.
select A command that retrieves information from one or more tables.
sequences A sequence is a named object in a database that supports a get next value method.
A sequence value is an exact numeric that you can use where that type can be used.
Service Level Agreement See SLA.
session A specific connection to the Netezza system that aggregates units of work for a par-
ticular user.
Glossary-12 20282-20 Rev.1
IBM Netezza System Administrator’s Guide
SFI Switching Fabric Interface. On Netezza models such as the z-series and earlier, the
SFI is responsible for network connectivity among all SPUs and the host computer.
The SFI monitors and reports the status of all SPU cards, power supplies, and fans.
Shift_JIS (SJIS) is a character encoding for the Japanese language developed by the Japanese
company ASCII. It is based on character sets defined within JIS standards JIS X
0201:1997 (for the single-byte characters) and JIS X 0208:1997 (for the double
byte characters).
significand The significant digits of floating point numbers are stored as a unit called the man-
tissa (or significand), and the location of the radix point (decimal point in base 10)
is stored in a separate unit called the exponent.
SLA Service Level Agreement. A contact between the owner of the Netezza system and
their customers to provide a certain level of service.
SMART Self Monitoring Analysis and Reporting Technology. A drive technology that reports
its own degradation enabling the operating system to warn the user of potential
failure.
SMP Host The Netezza Symmetric Multiprocessing (SMP) host controls and coordinates SPU
activities, performs query plan optimization, table and database operations, and sys-
tem administration.
SMS Storage Management System. A registered storage location for backups, such as a
file system or a third-party backup system.
snippet A unit of database work (labor) to be performed by a Snippet Processing Unit (SPU).
snippet processing array See SPA.
Snippet Processing Unit See SPU.
snippet-level scheduling The process of making scheduling decisions at the snippet level rather than at the
gatekeeper or GRA level.
snippet processor A logical connection between one CPU core, one FPGA engine, and its associated
memory to process a snippet.
SNMP Simple Network Management Protocol. A widely used network monitoring and con-
trol protocol.
SPA Snippet
processing arr
ay. In a z-series system, a SPA is a collection of 14 SPUs and a
network switch. In an IBM Netezza 1000, C1000, or IBM PureData System for Ana-
lytics N1001 system, the SPA contains an S-Blade chassis and its associated
storage array of disks, as well as AMMs for management services, I/O modules that
connect to the disk enclosures, and I/O modules for communication within the
enclosure and to the hosts and other components of the rack.
SPM Sorted, projected, materialized views. See materialized view.
spare disk The disk is available to become active in the event that a currently active disk has a
nonrecoverable failure.
SPU A Snippet Processing Unit (SPU) performs as much of the query as possible at the
lowest level possible, with query operations being done in parallel across all the
SPUs. In IBM Netezza 1000 and later system architectures, this hardware compo-
nent is referred to as an S-Blade.
20282-20 Rev.1 Glossary-13
Glossary
SQL Structured Query Language. A language used to interrogate and process data in a
relational database. Often pronounced “sequel.”
SQL character set SQL-99 allows for the creation of named character sets and for the declarations of a
table column to include specification of the column’s character set. SQL also has
the notion of a "national character set."
SQL collation SQL-99 allows for the creation of named collations. Each character set has a default
collation, but additional collations can be defined as pertaining to a given character
set. The declaration of a character column can include its character set and its
default collation.
SQL:1999 The target successor to SQL-92.
SQL2 Another name for SQL-92.
SQL3 The successor to SQL2, also called SQL-99.
SQL-92 ANSI SQL standard adopted in 1992, also called SQL2.
standby node In Linux-HA, a backup node for the cluster that takes over in the event of a failover
or relocate. This is called the secondary node in DRBD.
STONITH A “shoot the other node in the head” failover design that detects when one node is
in an unhealthy state and a failover is required. The STONITH process stops the
unhealthy node and then reboots so that the nps resource group will be started on
the other, healthy node. This is the specific implementation for the generic concept
of fencing in Linux-HA.
storage array A storage array is a set of one or more disk enclosures which contain the user data-
bases and tables in the Netezza system. The storage array is connected to and
owned by one SPU chassis.
Storage Management
System
See SMS.
striping Netezza RDBMS evenly distributes (or stripes) all tables across all active (non-spare)
disks based on the distribution key you specify. Striping keeps the system balanced
and prevents overwhelming any one disk with too much data. Striping increases sys-
tem efficiency.
Structured Query
Language
See SQL.
SUDP Streaming User Datagram Protocol. A communications transport layer protocol for
streaming data that is specific to the Netezza system.
swap A disk partition used for the temporary storage of entities too large to fit in random
access memory (RAM).
synonym An alternate way of referencing tables or views that reside in the current or other
databases on the Netezza system. Synonyms allow you to create easy-to-type names
for long table or view names.
system catalog The set of database tables used to hold all the schema information for the system
database.
Glossary-14 20282-20 Rev.1
IBM Netezza System Administrator’s Guide
table A relation. Contains the class of objects and has rows and columns. Table names
must be unique within a schema. Tables can be permanent or temporary (within a
single session).
table lock A lock on a table including all data and indexes preventing simultaneous access to
the table by multiple transactions.
TB Terabyte (1024 GB)
TCP/IP Transmission Control Protocol/Internet Protocol. A communications protocol devel-
oped under contract from the U.S. Department of Defense to internetwork dissimilar
systems. This de facto UNIX standard is the protocol of the Internet and has become
the global standard for communications.
temporary table A table that the DBMS destroys automatically at the end of a session or transaction.
TFTP Trivial File Transfer Protocol. A version of the TCP/IP FTP protocol that has no direc-
tory or password capability.
timeslice A period of time in which a particular job runs as if it had all the resources on the
system.
topology The mapping of portions of the database (called data slices) to individual disks, the
mirroring assignments between the disks, the location of spare disks, and the SPU
ownership for the active data slices.
TPC Transaction Processing Council, a group focused on providing level playing field
benchmarks for databases; currently four flavors: transaction processing (TPC-C), ad
hoc queries (TPC-H), business reporting (TPC-R), and web support (TPC-W).
transaction A group of database operations combined into a logical unit of work that is either
wholly committed or rolled back.
Transaction Processing
Council
See TPC.
UDP User Datagram Protocol. A simple communications transport layer protocol.
Unicode A character encoding representing each of the world’s characters as a unique 32-bit
value, also called a code point. The standards bodies have agreed to limit the code
point values to 21 bits. This means that three bytes are required for every character
versus one byte per character in traditional ASCII. Various encodings are used to
reduce the storage overhead for popular subsets of Unicode.
unicode collation Describes techniques for collating Unicode strings according to the customs of dif-
ferent countries, cultures, and so on. The standard algorithm calls for normalization
of comparands, and the use of potentially three or four levels of comparison rules
and attributes.
UPS Uninterruptible Power Supply. A UPS distributes power within a Netezza rack and
protects against power surges and outages.
User Datagram Protocol See UDP.
UTC Coordinated Universal Time — formerly Greenwich Mean Time (GMT).
UTF-8 An 8-bit scheme for encoding Unicode code points as 1 to 4 bytes.
20282-20 Rev.1 Glossary-15
Glossary
view A view can be either a virtual table or a stored query. The data accessible through a
view is not stored in the database as a distinct object, but rather as a select state-
ment. The result set of the select statement forms the virtual table returned by the
view.
VPD Vital product data (VPD) is information about a device that allows it to be managed
or administered by other system components. VPD information usually includes a
MAC address, serial number, and physical location information for the device.
window A user-specified selection of rows (or a logical partition of a query) that determines
the set of rows used to perform certain calculations with respect to the current row
under examination.
zone maps Automatically created persistent tables that the system uses to improve the through-
put and response time of SQL queries against large, group, or nearly ordered
temporal and integer data.
zoning A SAS feature that separates data traffic such as between servers and disks so that
servers use a certain set of disks. Zoning provides a means of security and access
control between SPUs and their associated data.
Glossary-16 20282-20 Rev.1
IBM Netezza System Administrator’s Guide
Index
Index-1
Index
Symbols
$hist_column_access_$SCHEMA_VERSION table
11-33
$hist_failed_authentication_$SCHEMA_VERSION table
11-23
$hist_log_entry_$SCHEMA_VERSION table
11-23
$hist_nps_$SCHEMA_VERSION table
11-22
$hist_plan_epilog_$SCHEMA_VERSION table
11-36
$hist_plan_prolog_$SCHEMA_VERSION table
11-34
$hist_query_epilog_$SCHEMA_VERSION table
11-28
$hist_query_overflow_$SCHEMA_VERSION table
11-29
$hist_query_prolog_$SCHEMA_VERSION table
11-27
$hist_service_$SCHEMA_VERSION table
11-30
,
11-31
$hist_session_epilog_$SCHEMA_VERSION table
11-26
$hist_session_prolog_$SCHEMA_VERSION table
11-24
$hist_table_access_$SCHEMA_VERSION table
11-32
$hist_version table
11-22
$HOME/.nzsql_history
3-9
$HOME/.nzsqlrc
3-10
/etc/ldap.conf file
8-18
/var/log/messages
4-2
_v_aggregate view
8-31
,
C-1
_v_database view
8-31
,
C-1
_v_datatype view
8-31
,
C-1
_v_function view
8-31
,
C-1
_v_group view
8-31
,
C-1
_v_groupusers view
8-31
,
C-1
_v_index view
C-1
_v_operator view
8-31
,
C-1
_v_planstatus view
11-16
_v_procedure view
8-31
_v_qryhist
9-29
_v_qrystat
9-29
_v_querystatus view
11-16
_v_relation_column view
8-31
,
C-2
_v_relation_column_def view
8-31
,
C-2
_v_relation_keydata, view
8-31
_v_sched_gra view
12-16
_v_sequence view
8-31
,
C-2
_v_session view
8-32
,
C-2
_v_sys_group_priv view
8-32
,
C-3
_v_sys_index view
8-32
,
C-3
_v_sys_priv view
8-32
,
C-3
_v_sys_table view
8-32
,
C-3
_v_sys_user_priv view
8-32
,
C-3
_v_sys_view view
8-32
,
C-3
_v_table view
8-32
,
C-2
_v_table_dist_map view
8-32
,
C-2
_v_table_index view
C-2
_v_user view
8-32
,
C-2
_v_usergroups view
8-32
,
C-2
_v_view view
8-32
,
C-2
A
abort
privilege
8-10
,
A-5
program
6-12
transactions
9-23
absent device
5-9
Access Control List
F-1
access, controlling to Netezza
8-1
accounts
Linux users
B-1
unlocking
8-21
ACID
F-1
ACL
F-1
active hardware
5-7
active host, identifying
4-5
admin
database user account
1-2
definition of
F-1
nzsession
9-22
object privileges
8-10
predefined user
8-3
privileges, user
9-1
user characteristics
8-3
admin user
creating group of
8-16
resource allocations
12-10
administration interfaces
about
3-1
list of
1-7
administration tasks
1-1
about
1-1
hardware
5-1
administrator privileges
admin user
9-1
backup
A-5
create group
A-4
create table
A-4
create user
A-5
create view
A-5
definition of
F-1
description of
8-8
manage hardware
A-5
manage security
A-5
manage system
A-5
restore
A-5
security model
8-8
unfence
A-5
aggregate functions
F-1
alcloader process
11-8
alerts
displaying
7-41
system summary page
3-22
alias
F-1
allowed resources percentage
12-14
ALTER HISTORY CONFIGURATION command
11-12
alter privilege
8-10
,
A-5
American National Standards Institute
F-1
AMPP
F-1
AndExpr event rule
7-13
API
F-1
ASCII
F-1
assigned hardware
5-8
Asymmetric Massively Parallel Processing
F-1
Atomicity/Consistency/Isolation/Durability
F-1
Index-2
Index
authentication methods
8-17
authentication, clients
8-23
automatic host backup
10-40
B
backup
10-31
archive directory
10-17
automatic host
10-40
examples
10-15
Netezza CLI
10-38
permissions
10-20
privileges
8-9
,
10-14
,
A-5
syntax
10-11
type
10-37
backup set
F-1
base table
F-2
base, directory
1-3
Basic Local Alignment Search Tool
F-2
batch, error handling
3-9
bigint, integer type
9-2
bin, directory
1-4
bin/admin, directory
1-4
Binary Large Object
F-2
BIST
F-2
BLAST
F-2
BLOB
F-2
block
F-2
blocks, definition
9-2
blocksize
F-2
bnrmgr, description
6-8
booting
hardware
6-11
software
6-10
bootsvr, description
6-8
build number
6-2
Built In Self Test
F-2
C
CA client certificate
8-19
CA client keys file
8-19
CA server certificate, adding
8-22
cache, directory
1-4
callHome.txt file, editing
5-14
cast
F-2
catalog (SPU)
F-2
catalog (SQL)
F-2
cbts_needing_groom script
9-19
certificate, SSL
8-22
certification authority (CA)
8-19
character
F-2
CIB
about
4-3
avoiding incorrect modifications
4-3
clear-text password
2-15
CLI
F-2
commands, running
2-5
client
command description
A-59
session privilege
8-15
sessions list
8-16
client applications
about
2-1
supported OS
2-2
Unicode support
2-11
UNIX, installing
2-3
clientmgr, description
6-9
cliqa command, description
A-59
clitest command, description
A-59
Cluster Information Base (CIB). SeeCIB.
4-3
cluster status, checking
4-6
clustered base table (CBT)
9-11
clustering mode, transitioning to
4-11
CM
F-2
CODASYL
F-3
code point
F-3
collation
F-3
color indicators, NzAdmin Tool
3-14
column
F-3
combining sequences
F-3
commands, proper format for identifiers
3-6
commands, timing
B-7
comments
F-3
Commlog, ODBC property
8-31
compliance
12-14
monitoring
12-16
component failure
6-11
compressed binary format, for external table unload
10-4
compression, used with backup and restore
10-4
concurrency control
F-3
concurrent jobs
12-3
config, directory
1-4
CONFIG-INFO file
11-9
Configuration Manager
connection methods, commands
8-26
connection record
creating
8-25
dropping
8-26
precedence
8-25
showing
8-24
syntax
8-23
constants
F-3
constraints, definition of
F-3
content of files, displaying
B-6
control file
F-3
Coordinated Universal Time
F-3
core partition
F-3
cost, definition
F-3
CPU
F-3
CPU usage, displaying
B-5
CRC, registry settings
D-11
create database
ability to
9-1
privilege
8-9
,
A-4
create external table
admin privileges
A-4
privilege
8-9
,
A-4
create external table privileges
8-9
create group
A-4
privileges
8-9
CREATE HISTORY CONFIGURATION command, using
11-6
create materialized view, privilege
8-9
,
A-4
create sequence, privilege
8-9
,
A-4
Index
Index-3
create table
privilege
8-9
,
10-21
,
A-4
create temp table, privilege
8-9
,
A-4
create user
A-5
create user, privileges
8-9
create view
privilege
8-9
,
A-5
critical state
5-9
CRM
F-3
crm_mon command, displaying status
4-6
crm_resource command, identifying active host
4-6
crm_verify command
4-18
cross database access
F-4
cumulative backup
F-3
custom1 event type
7-9
D
data block, see block
Data Control Language, see DCL
Data Definition Language, see DDL
data integrity
F-4
Data Manipulation Language. See DML
data mining
F-4
data skew
avoiding
9-8
viewing
9-9
data slice status
5-21
data slices
definition of
F-4
Per Table Per Data Slice Table
13-2
data types, disk space usage
9-2
data, directory
1-3
database administration, about
1-1
database super user account
1-2
Database Table, nzstats
13-1
,
13-2
databases
definition of
F-4
Netezza table
13-1
NzAdmin tool
3-14
nzsql
3-7
privileges
8-14
record header
9-3
statistic privilege
8-15
tuning
9-4
date
command
B-5
disk usage
9-3
DBMS Group, nzstats
13-1
,
13-3
DBOS
definition of
F-4
nzDbosSpill
6-17
dbosDispatch
6-9
dbosEvent
6-9
DCE
F-4
DCL
F-4
DDBMS
F-4
DDL
F-4
default port numbers, changing
2-13
delete, privilege
8-11
,
A-5
delimited identifiers, specifying in commands
3-6
Designated Coordinator (DC) host
4-7
DHCP
F-4
dictionary
F-4
differential backup
F-4
digital certificates, for SSL
8-19
directories, displaying
B-6
directory (SPU)
F-5
dirty read
F-5
disk space
nzDbosSpill
6-17
reclaiming
9-18
threshold events
7-24
usage
9-2
disk status, monitoring disk errors
7-30
diskError event type
7-10
dispersion
automatic statistics
9-15
definition of
F-5
DISTRIBUTE
9-5
distribute on
create table command
9-5
hash
9-5
distribute on random, create table
9-5
Distributed Computing Environment. See DCE
Distributed Database Management System. See DDBMS
Distributed Replicated Block Device (DRBD). SeeDRBD.
4-1
distribution key
9-5
data skew
9-9
definition of
F-5
distribute on
9-5
distribute on random
9-5
random distribution
9-9
selection criteria
9-6
striping
F-13
subset tables
9-6
verifying
9-7
DML
F-5
DNS
F-5
DNS information
changing
1-6
managing
1-5
showing
1-5
down state
5-9
down, system state
6-4
DRBD
about
4-1
administration
4-13
protocol C
4-2
replicated directories
4-1
split-brain
4-15
states
4-14
status examples
4-15
synchronous mode
4-2
DROP HISTORY CONFIGURATION command
11-13
drop privilege
8-11
,
A-5
E
ECC
F-5
ECC errors
7-29
eccError event type
7-10
egrep command
B-7
Index-4
Index
e-mail for events
7-13
EMC NetWorker
10-59
encrypted passwords
2-15
environment
failure
6-11
installer
2-7
NZ_DATABASE
10-14
NZ_HOST
2-16
NZ_PASSWORD
2-17
NZ_USER
2-15
NzAdmin tool
3-14
PATH variable
1-4
port numbers
2-13
restore
10-27
variables
2-7
,
F-5
EqualityExpr event rule
7-13
errors
categories system
6-11
fixing system
B-4
nzbackup
10-14
offline system
6-3
regeneration
7-29
session manager
6-16
startup server
6-16
statistics server
6-17
Ethernet switch
F-5
ETL
F-5
EUC-JP
F-5
EUC-KR
F-6
event
aggregation, time interval
7-16
attributes of
7-12
event rule
actions
7-13
actions overview
7-4
adding
7-8
aggregating notifications
7-16
disabling
7-8
disk errors
7-30
displaying alerts
7-41
ECC/memory failures
7-29
email notifications
7-13
equality expressions
7-13
hardware failed
7-20
hardware needs attention
7-21
hardware path down
7-22
hardware restarted
7-24
hardware temperature
7-32
query history
7-34
regen failures
7-29
runaway query
7-26
runCmd arguments
7-15
See nzevent command
sendMail.cfg
1-4
SPU cores
7-37
substitution tags
7-13
system changes
7-19
system temperature
7-33
template reference
7-19
templates
7-1
TransactionLimitEvent
7-38
voltage faults
7-37
eventmgr, description
6-9
Execute privilege
8-11
,
A-5
execution plans, definition of
F-6
exit code, description for nz commands
A-6
expansion rack
F-6
Extended Internet Services
1-7
extent
definition of
F-6
disk usage
9-4
extent, definition
9-2
external IP address, MantraVM
14-2
external tables, compressed data
10-4
Extract, Transform, and Load. See ETL
F
F5, control key
3-15
failed hardware
5-8
failover
criteria
4-8
error actions
6-11
events
4-8
Linux-HA
4-1
timers
4-4
fair-sharing model
12-2
Field Programmable Gate Array. See FPGA
files, finding
B-6
float
F-6
foreign key
F-6
FORMAT_COLUMN_ACCESS () function
11-38
FORMAT_PLAN_STATUS () function
11-37
FORMAT_QUERY_STATUS () function
11-37
FORMAT_TABLE_ACCESS() function
11-37
FPGA
F-6
fsck, command
B-4
full backup
F-6
full restore
F-6
fwMismatch event type
7-10
G
gate keeper
about
12-21
configuration settings
12-22
Normal queues by runtime
12-23
nzsession command
12-21
GB
F-6
GENERATE STATISTICS
GenStats privilege
A-6
generate statistics
8-11
GenStats privilege
A-6
hints
9-16
syntax
9-15
tuning database tables
9-4
GenStats privileges
8-11
GenStats, privileges
A-6
gkMaxConcurrent setting
12-3
glyph
F-6
GRA
F-7
GROOM command
9-18
groom command
9-18
Groom privileges
8-11
grooming tables
9-18
Index
Index-5
groupadd command
B-3
groups
adding Linux users
B-3
Linux
B-2
methods for managing
8-2
Netezza database
8-1
privilege
8-14
public
1-2
,
8-3
rowset limits
8-27
setting permissions for members
8-2
using to simplify permission management
8-2
guaranteed resource allocation
12-6
H
ha.cf file
4-3
haclient group
4-19
hacluster
group
4-19
user
4-19
hardware
active
5-7
assigned
5-8
critical state
5-9
down state
5-9
failed
5-8
failure events
7-20
inactive
5-8
incompatible
5-8
invalid state
5-9
management channel table
13-2
mismatched
5-8
missing state
5-9
,
6-4
needs attention events
7-21
none state
5-9
ok state
5-9
online state
5-9
path down events
7-22
privileges
A-5
restart events
7-24
roles
5-7
spare
5-8
state
5-8
temperature events
7-32
types
5-4
unreachable state
5-9
Hardware Management Channel Table, nzstats
13-9
hardware privileges
8-10
hardware, displaying
5-3
hash, create table
9-5
Heartbeat
clustering mode
4-11
configuration
4-3
daemon
4-1
failover timers
4-4
forcing shutdown
4-17
maintenance mode
4-10
manually controlling
4-9
required Linux users and groups
4-19
safe shutdown
4-9
startup
4-3
help
about box
3-16
contents and index
3-16
helper functions
example
11-38
query history
11-36
high availability (HA) solution
4-1
High-Availability Linux. See Linux-HA.
histCaptureEvent
11-14
histCaptureEvent event type
7-10
histLoadEvent
11-14
histLoadEvent event type
7-10
history configuration, changing ownership of
11-11
history, sql sessions
3-9
home directory
1-3
host
computer
F-7
definition of
F-7
host CPU table
13-1
host filesystem table
13-1
host interfaces table
13-2
host management channel table
13-2
host net table
13-2
host table
13-2
installation directory
1-3
Host CPU Table, nzstats
13-1
,
13-3
Host Filesystem Table, nzstats
13-1
,
13-4
Host Interfaces Table, nzstats
13-2
,
13-4
Host Mgmt Channel Table, nzstats
13-2
,
13-6
Host Net Table, nzstats
13-2
,
13-7
host rack. See rack.
Host Table, nzstats
13-2
,
13-8
host. bnrNumStreamsDefault setting
D-6
host.abortIfTxArrayFull setting
D-6
host.autoRestartReclaim setting
D-6
host.bnrFileSizeLimitGB setting
D-6
host.bnrStreamInitTimeoutSec setting
D-6
host.disableClientXoffSpus setting
D-6
host.fpgaAllowXIDOverride setting
D-7
host.gencDiabKillOptComplexity setting
D-7
host.gencDiabKillOptMask setting
D-7
host.gencInvokeOptSnippetCost setting
D-7
host.gkEnabled setting
D-7
host.gkFastVtScanLimit, configuration file
D-7
host.gkHighPriQueries setting
D-7
host.gkLowPriQueries setting
D-7
host.gkMaxConcurrent setting
D-7
host.gkMaxPerQueue setting
D-7
host.gkQueueThreshold setting
D-7
host.hostAckThreshold setting
D-7
host.hostMaxMsgsOutstanding setting
D-7
host.hostMaxPktsOnWire setting
D-7
host.hostStaggerConstant setting
D-7
host.maxClientSpoolMB setting
D-7
host.maxOutstandingClientResults setting
D-7
host.nzstatsRequireAdmin setting
D-8
host.qcLoadRegionSize setting
D-8
host.qcMaxLoadMemory setting
D-8
host.reloadDisableValidyCheck setting
D-8
host.reloadForceHostUncompress setting
D-8
host.schedAllowGKandGRA setting
D-8
host.snDiskReadCost setting
D-9
host.snDiskWriteCost setting
D-9
host.snFabricTableBlocks setting
D-9
Index-6
Index
host.snHostFabricCost setting
D-9
host.snHostMemoryQuota setting
D-9
host.snSchedEnabled setting
D-9
host.snSchedJobMax setting
D-9
host.snSPUFabricCost setting
D-9
host.snSpuMemoryQuota setting
D-10
host.snSpuSortSizeFactor setting
D-10
host.spoolRateLimitKBPerSec setting
D-10
host.streamBatchSize setting
D-10
host.txRetainReadOnly setting
D-10
host.zoneMapPrepScanThreshold setting
D-10
hostbnrEnableUsersBackup setting
D-6
hostmergeMaxWaitingBlocks setting
D-8
hot swap
F-7
HW Mgmt Channel Table, nzstats
13-2
hwDiskFull event type
7-9
hwFailed event type
7-9
hwHeatThreshold event type
7-10
hwNeedsAttention event type
7-12
hwPathDown event type
7-12
hwRestarted event type
7-9
hwServiceRequested event type
7-11
hwThermalFault event type
7-12
hwVoltageFault event type
7-10
hyperlinks, NzAdmin tool
3-16
I
i18N, definition of
F-7
ICU, definition of
F-7
identifiers, in CLI
3-6
inactive hardware
5-8
incompatible hardware
5-8
incremental backup restore
10-32
indirect object privileges
8-15
initial configuration
1-2
initialized, system state
6-4
initializing, system state
6-4
,
6-10
insert privilege
8-11
insert, privilege
A-6
installation, Netezza
1-2
integer
nzDbosSpill file
6-18
transaction id
9-5
intelligent query streaming
F-7
interface
F-7
interfaces
1-7
internal IP address
14-2
inter-rack
F-7
intrarack
F-7
invalid state
5-9
IP addresses, for HA system
4-17
ISO
F-7
isolation levels
F-7
J
Java Database Connectivity. See JDBC.
JBOD
F-7
JDBC, definition of
F-7
job
F-8
examples
12-21
K
KB
F-8
keywords, definition of
F-8
kill command
B-5
killall command
B-5
kit
link
1-3
optimized
1-3
rev
1-4
KVM
F-8
L
LAN
F-8
latin-1
F-8
LD_LIBRARY_PATH
2-5
LDAP authentication
8-4
,
8-17
about
8-17
commands
8-19
failures
8-18
returning to local authentication
8-18
LDAP server
managing
8-17
required information for Netezza
8-18
LDAP, configuring SSL security
8-19
ldap.conf file, editing for SSL configuration
8-19
ldap.conf.orig file
8-18
less command
B-6
limit clause
8-27
Linux
accounts
B-1
adding groups
B-3
boot directories
1-3
changing passwords
B-2
command line editing
B-7
common procedures
B-1
deleting accounts
B-2
deleting groups
B-3
directories, displaying
B-6
file content, displaying
B-6
files, finding
B-6
groups
B-2
log files, viewing
B-6
miscellaneous commands
B-7
modifying accounts
B-2
modifying groups
B-3
passwords
8-17
rebooting
B-3
release level
B-6
remote access
1-7
setting up accounts
B-1
statistics
B-4
stopping processes
B-5
string matching
B-7
system errors
B-4
system time
B-5
timing commands
B-7
user
1-2
viewing statistics
B-4
Linux users, adding
B-1
Linux-HA
Index
Index-7
about
4-1
active host, identifying
4-5
administration
4-3
failover
4-1
failover criteria
4-8
IP addresses
4-17
logging and messages
4-13
resource groups
4-1
resource migration
4-8
list privilege
8-11
,
A-6
load replay region
F-8
loadmgr, description
6-9
Local Area Network
See LAN
local authentication
8-17
authentication methods
about
8-4
commands
8-19
password requirements
8-17
log files
query history
11-9
viewing
B-6
log on
authentication
8-17
invalid attempts
8-20
privilege
8-16
log, directory
1-4
logs, types of
6-12
actions
6-11
client
8-30
server
8-30
subdirectory
1-4
M
maintenance mode, transitioning to
4-10
major release
6-2
manage hardware privileges
8-10
manage system privileges
8-10
Mantra documentation, obtaining
14-3
Mantra Web interface
14-8
MantraVM service
14-1
changing IP configuration of
14-6
changing port monitoring
14-7
configuration of
14-4
disabling
14-5
enabling
14-5
hostname and IP address
14-2
internal IP and hostname
14-2
log files
14-2
management address
14-2
setting IP
14-6
starting
14-3
status of
14-4
stopping
14-3
user and group
14-2
version
14-5
mantravm user
14-2
master_db, database template
9-1
MB
F-8
Mb
F-8
Mean Time Between Failures. See MTBF
Mean Time to Repair. See MTTR
Megabit. See Mb.
Megabyte. See MB.
memory failure events
7-29
merge-sort
F-8
metadata
F-8
migration, in HA
4-8
min/max values
9-14
minor release
6-2
mirror partition
F-8
mirroring
definition of
F-8
mismatched
definition of
F-8
hardware
5-8
missing state
5-9
,
6-4
mount commands
2-4
MTBF
F-9
MTTR
F-9
multi-stream backups
10-5
N
namespace
F-9
NaN
F-9
nested table
F-9
NetBackup
10-33
configuring policy
10-34
integrating
10-35
Netezza
definition of
F-9
security model
8-8
starting
6-6
stopping
6-7
system states
6-4
uninstalling Windows tools
2-7
users and groups
8-1
Netezza clients
UNIX, installing
2-3
UNIX, removing
2-5
Netezza Clients media
2-2
Netezza command line interface
3-1
Netezza server, installing Windows tools
2-5
Netezza site certificate
2-11
Netezza system administrator account
1-2
Netezza Tools folder
2-6
Netezza Windows Client media
2-5
Network Interface State Change event
7-40
NetWorker
10-59
NIC
F-9
NO_ROWCOUNT session variable
3-11
non-default port numbers, specifying on clients
2-14
none state
5-9
nonrecoverable internal error
6-11
nonrepeatable reads
F-9
normalization
F-9
notifications for events
7-13
nps resource group
cannot run
4-18
checking
4-6
contents
4-7
relocating to standby node
4-9
Index-8
Index
running on active host
4-6
safe shutdown
4-9
services
4-7
NTP server
B-5
null
F-9
numCpuCoreChanged event
7-41
numCpuCoreChanged event type
7-12
numerics, disk usage
9-3
nwIfChanged event type
7-12
nz
definition of
F-9
directory
1-3
,
1-4
user
1-2
,
1-4
nz directory
1-3
NZ_BNR_MGR_PORT environment variable
2-13
NZ_CLIENT_MGR_PORT environment variable
2-13
NZ_DATABASE, environment variable
10-14
NZ_DBMS_PORT environment variable
2-13
NZ_HOST, environment variable
2-16
NZ_PASSWORD, environment variable
2-17
NZ_TMP_DIR variable
1-3
NZ_USER, environment variable
2-15
NzAdmin Tool
color indicators
3-14
definition of
F-9
installing
2-5
introduction
3-11
nzadmin program
2-6
uninstalling
2-7
using hyperlinks
3-16
viewing, distribution
9-8
,
9-10
nzbackup command
command syntax
10-11
description
3-2
,
A-1
,
A-7
examples
10-15
,
10-16
nzcontents command
description
3-2
,
A-1
,
A-7
example
6-2
,
A-37
nzconvert command
3-2
,
A-1
nzconvertsyscase command
A-59
nzdbg command
A-58
nzDbosSpill, description
6-17
nzds command
3-2
,
A-2
description
A-8
nzdumpcat command
A-58
nzdumpmem command
A-58
nzdumpschema command
A-58
description
A-61
nzdumptxjournal command
A-59
nzevent command
add example
7-8
adding
7-8
attributes
7-12
creating custom events
7-18
deleting
7-8
description
3-2
,
A-2
,
A-12
disabling
7-8
environment tags
7-15
generating
7-7
pre-installed event rules
7-1
setting disk thresholds
7-24
substitution tags
7-13
threshold example
7-26
nzhistcleanupdb command
about
11-4
description
3-2
,
A-2
nzhistcleanupdb command description
A-17
nzhistcreatedb command
about
11-3
description
3-2
,
A-2
nzhistcreatedb command description
A-20
nzhw command, description
A-26
nzhw show command, arguments
5-3
nzinitsystem command
description
A-59
nzload command
description
3-3
,
A-2
,
A-33
nzloadcat command
A-59
nzlogmerge command
description
A-58
syntax
A-62
nzlogmerge.info command
A-59
nzmakedatakit command
A-59
nzpassword command
2-15
,
3-3
,
A-2
nzpassword command, storing passwords
2-16
nzpassword, command
A-33
nzpush command, description
A-59
nzreclaim command
A-2
description
3-3
nzresetxlog command
A-59
nzresolv service
1-5
nzrestore command
description
3-3
,
A-2
,
A-37
environment settings
10-27
overview
10-22
syntax
10-23
nzrev command
6-2
description
3-3
,
A-3
,
A-37
rev
6-1
nzscratch directory
1-3
nzsession command
arguments
9-22
changing priority
12-21
description
3-3
,
A-3
,
A-39
examples
9-23
viewing
9-22
nzspupart command description
3-3
,
A-3
nzsqa command
A-59
nzsql command
description
3-3
,
A-3
,
A-47
managing database
3-7
managing transactions
9-23
ON_ERROR_STOP
3-9
resource control file
3-10
session history
3-9
sessions
9-21
slash commands
3-10
nzstart command
arguments
6-6
description
3-4
,
A-3
,
A-47
nzstate command
arguments
6-3
description
3-4
,
A-3
nzstats command
_v_qryhist
9-29
_v_qrystat
9-29
Index
Index-9
Database Table
13-2
DBMS Group
13-3
description
3-4
,
A-3
Hardware Management Channel Table
13-9
Host CPU Table
13-3
Host Filesystem Table
13-4
Host Interfaces Table
13-4
Host Mgmt Channel Table
13-6
Host Network Table
13-7
Host Table
13-8
overview
13-1
Per Table Per Data Slice Table
13-10
Query History Table
13-11
Query Table
13-10
SPU Partition Table
13-12
SPU Table
13-13
System Group
13-13
Table Table
13-14
nzstop command
arguments
6-7
description
3-4
,
A-3
,
A-53
example
6-7
nzsystem command
description
3-4
,
A-4
system configuration file
A-55
nzvacuumcat, description
6-9
O
Object databases. See ODBs
object privileges
definition of
F-9
description of
8-10
security model
8-8
ODBC
definition of
F-9
setting logs
8-31
ODBs
F-9
offlining, system state
6-4
ok state
5-9
ON_ERROR_STOP
3-9
online state
5-9
online, system state
6-4
,
6-10
Open Database Connectivity. See ODBC
operators, runaway query
7-27
OrExpr event rule
7-13
organization percentage
9-21
organizing key
9-11
overserved group
12-14
P
pages, definition
9-2
pam_cracklib dictionary
8-6
pam_cracklib utilities
8-4
partition
F-10
password
admin user
1-2
authentication, local
8-17
clear-text
2-15
encrypted
2-15
nz user
1-2
NZ_PASSWORD
2-17
nzpassword command
2-15
specifying length
8-20
storing for Netezza users
2-16
password content controls
8-5
password expiration
8-4
PASSWORDEXPIRY setting
8-4
patch release
6-2
paused, system state
6-4
PDU
F-10
Per Table Per Data Slice Table, nzstats
13-2
,
13-10
permissions, backup
10-20
phantom read
F-10
pingd command
4-2
plans, directory
1-4
Pluggable Authentication Module (PAM), for LDAP
8-4
,
8-
17
policy, configuring NetBackup
10-34
ports, numbers
2-13
POST
F-10
postgres, description
6-10
PostgreSQL,definition of
F-10
postmaster, description
6-10
Power Distribution Unit. See PDU.
Power On Self Test. See POST
preonline, system state
6-5
preonlining, system states
6-10
primary key
F-10
primary partition
F-10
prioritized query execution
12-12
about
12-19
priority
assigning to jobs
12-19
example
12-21
jobs
12-12
levels
12-20
nzadmin tool
A-42
privileges
abort
A-5
about
8-8
alter
A-5
backup
10-14
client session
8-15
,
8-16
create database
A-4
create external table
A-4
create materialized view
A-4
create sequence
A-4
create table
10-21
create temp table
A-4
database statistic
8-15
delete
A-5
displaying
8-13
drop
A-5
Execute
A-5
indirect
8-15
insert
A-6
list
A-6
log on
8-16
nzcontents
A-6
nzrev
A-6
nzstart
A-6
nzstop
A-6
object privileges
8-10
Index-10
Index
restore
10-27
select
A-6
transaction
8-16
truncate
A-6
update
A-6
procedure, privilege
8-14
processes
displaying
B-4
stopping on Linux
B-5
ps command
B-4
public group
1-2
,
8-3
public views, system
8-31
Q
queries, short and long
12-4
query
F-10
query history
$hist_column_access.usage column, displaying
11-38
$hist_plan_epilog.status column, displaying
11-37
$hist_query_epilog.status column, displaying
11-37
$hist_table_access.usage column, displaying
11-37
about
11-1
alcloader process
11-8
batch directories
11-9
batches to load, finding
11-13
CONFIG-INFO file
11-9
configuration
activating
11-6
altering
11-12
creating
11-6
dropping
11-13
planning
11-5
samples
11-5
showing
11-12
configuration overview
11-1
database
11-3
creating
11-3
dropping
11-4
granting access to
11-7
loading process overview
11-7
maintaining
11-4
delays in loading data
11-10
error directory
11-8
event notifications
11-14
FORMAT_COLUMN_ACCESS () function
11-38
FORMAT_PLAN_STATUS() function
11-37
FORMAT_QUERY_STATUS() function
11-37
FORMAT_TABLE_ACCESS() function
11-37
helper functions
11-36
helper functions example
11-38
latency of history data
11-3
load settings
11-9
loader settings matrix
11-9
loading area
11-8
LOADINTERVAL
11-9
LOADMAXTHRESHOLD
11-9
LOADMINTHRESHOLD
11-9
log directories
11-11
log files
11-9
staging area
11-7
stopping history collection
11-11
tables
CLI usage
11-30
column access history
11-33
created session
11-24
end of query table
11-28
failed authentication attempts
11-23
log entries for operations
11-23
overflow of query string
11-29
plan history at beginning of plan
11-34
plan history at end of plan execution
11-36
schema version
11-22
session termination
11-26
source Netezza system
11-22
start of query data
11-27
state changes
11-31
table access history
11-32
tables and views
11-3
view naming conventions
11-15
views
plan and session data
11-16
query data
11-16
views and user tables
11-15
query history events
7-34
Query History Table
_v_qryhist
9-29
nzstats
13-2
,
13-11
Query Table
_v_qrystat
9-29
nzstats
13-2
,
13-10
R
rack, definition of
F-10
RAID
F-10
random distribution, benefits
9-9
RDBMS
F-10
real
F-10
rebooting Linux
B-3
record
F-11
recoverable internal error
6-11
Red Hat
1-7
redirecting restore
10-39
referential integrity
F-11
regen events
7-29
regenerate
F-11
regeneration
manual
5-21
regeneration setup failure
5-23
regenError event type
7-10
regenFault event type
7-11
relational database
F-11
release descriptions
6-2
release level
6-2
,
B-6
remote access
1-7
resource groups, about
4-1
resource migration
4-8
resource sharing
12-2
restore
A-5
examples
10-28
nzrestore
10-22
privilege
10-27
redirecting
10-39
Index
Index-11
step-by-step
10-32
syntax
10-23
restore privileges
8-10
restoring, backup
10-31
resuming, system states
6-10
rlogin, remote access
1-7
rollback, definition of
F-11
root certificate
8-19
row
F-11
rowid
9-4
rowset limit
definition of
F-11
specifying
8-27
values
8-28
rsh, remote access
1-7
runaway query events
7-26
runaway query, operators
7-27
runawayQuery event type
7-9
runCmd arguments
7-15
S
saturation
F-11
sbin directory, contents
1-4
schema
F-11
scsiDiskError event type
7-11
scsiPredictiveFailure event type
7-11
Secure Sockets Layer (SSL) protocols. SeeSSL.
security
invalid logons
8-20
managing
8-1
model
8-8
unlocking accounts
8-21
security privileges
A-5
select
definition of
F-11
privilege
8-11
,
A-6
sendMail.cfg file
7-13
sendMail.cfg, event rule
1-4
sequences
definition of
F-11
privilege
8-15
Service Level Agreement
F-11
service level planning
12-1
session
F-11
sessionmgr, description
6-10
sessions
definition
9-21
overview
10-20
viewing
A-42
SET AUTHENTICATION command, using to set LDAP
8-
18
SET HISTORY CONFIGURATION command
11-6
SFI, definition of
F-12
share
directory
1-4
postgres-specific
1-4
short query bias
12-4
settings
12-5
SHOW HISTORY CONFIGURATION command
11-12
shutdown
B-3
significand
F-12
Simple Network Management Protocol. See SNMP
slash commands
3-10
smallint, integer type
9-3
SMART
F-12
smartThreshold, event type
7-9
SMP Host
F-12
snippet
F-12
Snippet Processing Array. See SPA
Snippet Processing Unit. See SPU
snippet-level scheduling
F-12
SNMP
F-12
software version
6-1
,
B-6
SPA, definition of
F-12
spare
definition of
F-12
hardware
5-8
split-brain, recovering from
4-15
SPU
definition of
F-12
managing
5-15
power up
6-11
SPU partition table
13-2
SPU table
13-2
SPU core events
7-37
SPU Partition Table, nzstats
13-2
,
13-12
SPU Table, nzstats
13-2
,
13-13
spuCore event type
7-11
SQL
1999
F-13
definition of
F-13
SQL character set
F-13
SQL collation
F-13
SQL command
CREATE TABLE AS
9-15
GENSTATS
A-6
INSERT command
9-15
UPDATE command
9-15
SQL2
F-13
SQL3
F-13
SQL-92, definition of
F-13
SSH, remote access
1-7
SSL
about
8-22
certificate
8-22
configuration steps for LDAP
8-19
using to secure LDAP communications
8-19
SSL site certificate, for Web Admin
2-8
stage release
6-2
standby host, identifying
4-5
standby node, relocating to
4-9
startup.autoCreateDb setting
D-1
startup.autoRestart setting
D-1
startup.hostSwapSpaceLimit setting
D-1
startup.maxConnections setting
D-2
startup.maxRebootRetries setting
D-2
startup.mismatchOverRide setting
D-2
startup.noLock setting
D-2
startup.noPad setting
D-2
startup.numSpares setting
D-2
startup.numSpus setting
D-2
startup.overrideSpuDiskSize setting
D-2
startup.overrideSpuRev setting
D-2
startup.planCacheFiles setting
D-2
Index-12
Index
startup.queryHistTblSize setting
D-2
startup.runVirtSfi setting
D-2
startup.simMode setting
D-2
startup.spuSimMemoryMB setting
D-2
startup.startupTimeout setting
D-2
startup.stopNow setting
D-2
startup.virtualDiskSize setting
D-2
startupsvr, description
6-10
statistics
automatic statistics
9-16
database tables
9-14
dispersion
9-15
Linux
B-4
updating
9-14
statsmgr, description
6-10
statsSvr, description
6-10
stopped, system state
6-5
stored procedures, privileges
8-14
Structured Query Language. See SQL
subminor release
6-2
SUDP
F-13
superuser, Netezza
8-3
swap
F-13
Switching Fabric Interface. See SFI
Symantec NetBackup
10-33
Synchronous mirroring
4-2
sys, directory
1-4
system configuration files
1-4
sys/init, directory
1-4
sysHeatThreshold event type
7-10
sysmgr, description
6-10
sysmgr.checkDiskInterval setting
D-3
sysmgr.devCountSpaOverheated setting
D-3
sysmgr.eccCountFailover setting
D-3
sysmgr.eccDurationFailover setting
D-3
sysmgr.enableAutoFailover setting
D-3
sysmgr.enableAutoRegen setting
D-3
sysmgr.enableAutoReset setting
D-3
sysmgr.enableBalanced Regen setting
D-3
sysmgr.enableDiskFpgaFailover setting
D-3
sysmgr.enAutoRestSpuForQdrFailure setting
D-3
sysmgr.maxAggregateEventInterval setting
D-4
sysmgr.maxRebootFreqPerHr setting
D-4
sysmgr.numSpuPorts setting
D-4
sysmgr.pausingStateTimeout setting
D-5
sysmgr.pktReadCount setting
D-5
sysmgr.resetTimeout setting
D-5
sysmgr.sfiResetTimeout setting
D-5
sysmgr.smartErrCountFailover setting
D-5
sysmgr.smartErrDurationFailover, configuation file
D-5
sysmgr.spuDumpTimeout setting
D-5
sysmgr.spuPollReplyTimeout setting
D-5
sysmgr.syncingStateTimeout setting
D-6
sysmgr.testNoRegen setting
D-6
sysStateChanged event type
7-9
system
catalog
F-13
default directory
9-1
errors
B-4
logs
6-12
NzAdmin tool
3-14
system group table
13-2
views
C-3
system administration, about
1-1
system administrator account
1-2
system configuration file
description
6-18
nzsystem command
A-55
System Group, nzstats
13-2
,
13-13
system information views
8-32
system state change events
7-19
system states
down
6-4
initialized
6-4
initializing
6-4
,
6-10
nzstate command
6-3
offlining
6-4
online
6-4
,
6-10
paused
6-4
pausing
6-5
preonline
6-5
preonlining
6-10
resuming
6-10
stopped
6-5
types
6-4
system temperature, events
7-33
system time, changing
B-5
system.abortOnError setting
D-10
system.allocateBuffersVirtual setting
D-10
system.allowDiskHashJoin setting
D-11
system.asyncSpu2HostRAW setting
D-11
system.avoidSwapWDatamgrLock setting
D-11
system.bcastSAW setting
D-11
system.btOnError setting
D-11
system.catch9752 setting
D-11
system.cmdBcastNumReassembly setting
D-11
system.CRCUpgraderErrorBufferLimit setting
D-11
system.ctrlNumReassembly setting
D-11
system.dataBcastRAW setting
D-11
system.dbfs.LogBlockChanges setting
D-11
system.dbfsASpaceLimit setting
D-11
system.dbfsBSpaceLimit setting
D-11
system.dbfsChangeLogSize setting
D-11
system.dbfsErrorLogSize setting
D-11
system.dbfsInUse setting
D-11
system.dbfsMaxPermFiles setting
D-11
system.dbfsMaxSwapGrowthPct setting
D-11
system.dbfsMaxTempFiles setting
D-11
system.dbfsSwapSpaceLimit setting
D-12
system.dbosAggrWorkBlocks setting
D-12
system.dbosSortWorkBlocks setting
D-12
system.dbosWindowsAggrWorkBlocks setting
D-12
system.disableBlockDataReadCRC setting
D-12
system.disableBlockDataWriteCRC setting
D-12
system.disableGlobalCRC setting
D-12
system.disableMicroRegen setting
D-12
system.disablePartialWriteRecovery setting
D-12
system.disableSerialMirroring setting
D-12
system.disableStrmNet setting
D-12
system.disableStrmNetHost setting
D-12
system.disableSwapCRC setting
D-12
system.diskSmartPollInterval setting
D-12
system.diskXferTimeout setting
D-12
system.dumpDetail setting
D-13
system.durableMirroring setting
D-13
system.enableAckAggrLdrRotation setting
D-13
Index
Index-13
system.enableClockSync setting
D-13
system.enableJumboFrames setting
D-13
system.enableMirrors setting
D-13
system.enableResetLog setting
D-13
system.enableSAWScheme setting
D-13
system.errMgrWakeupInterval setting
D-13
system.extentsPerCRCBurst setting
D-13
system.failoverReadOnly setting
D-13
system.fpgaBools setting
D-13
system.fpgaDump setting
D-13
system.fpgaFlags setting
D-13
system.fpgaRecSizeIncrPct setting
D-13
system.fpgaTotalBufSize setting
D-14
system.funnelSAW setting
D-14
system.funnelsPerNIC setting
D-14
system.heatNotifyEnabled setting
D-14
system.heatThresholdRearmInterval setting
D-14
system.host2spuAckFrequency setting
D-14
system.host2spuRAW setting
D-14
system.host2spuRtxTimeout setting
D-14
system.host2spuSAW setting
D-14
system.host2spuSendWindow setting
D-14
system.host2spuTransSkewKB setting
D-14
system.hwmgrStaggerMicrosPerSpu setting
D-14
system.jobSwapdAlertBlocks setting
D-14
system.lockTracking setting
D-14
system.maxActiveRegenBlks setting
D-14
system.maxBcastMsgKB setting
D-14
system.maxFlowCommChannels setting
D-15
system.maxFunnelLdrKB setting
D-15
system.maxRegenLoopCount setting
D-15
system.maxSpringFieldSize setting
D-15
system.maxSpuDistPlans setting
D-15
system.maxStrmNetChannels setting
D-15
system.maxStrmNetDist setting
D-15
system.maxTransactions setting
D-15
system.maxUnsolicitedReplies setting
D-15
system.miniSpu2HostNumReassembly setting
D-15
system.miniSpu2HostRAW setting
D-15
system.mirroringNumReassembly setting
D-15
system.mirroringRAW setting
D-15
system.mirroringSAW setting
D-15
system.nuclStackThreshold setting
D-16
system.numNICs setting
D-16
system.osnetrxOomTimeoutSecs setting
D-16
system.pollInterval setting
D-16
system.printSpuDbosMsgInfo setting
D-16
system.realFpga setting
D-16
system.recPtrMaxCfg setting
D-16
system.regenAlmostDoneCount setting
D-16
system.regenBadBlockEmailLimi setting
D-16
system.regenBlocksPerCycle setting
D-16
system.regenBreatherMs setting
D-16
system.regenGenericCtrl setting
D-16
system.regenMode setting
D-16
system.regenOomRetryCount setting
D-16
system.regenOomRetrySleepMs setting
D-16
system.regenOomRetryThresholdSecs setting
D-16
system.regenPriority setting
D-16
system.regenRAW setting
D-16
system.regenSAW setting
D-16
system.regenSkipBadHeaderCheck setting
D-16
system.regenTimeSlice setting
D-16
system.rowIdChunkSize setting
D-16
system.rtxTimeoutMillis setting
D-16
system.rtxWakeupMillis setting
D-17
system.secondsBetweenCRCBursts setting
D-17
system.sfiCriticalTemperature setting
D-17
system.sfiWarningTemperature setting
D-17
system.spu2hostRAW setting
D-17
system.spu2hostSAW setting
D-17
system.spu2spuAckFrequency setting
D-17
system.spu2spuRtxTimeout setting
D-17
system.spu2spuSendWindow setting
D-17
system.spu2spuTransSkewKB setting
D-17
system.spuAbortBackTraceVerbosity setting
D-17
system.spuAbortIfTxArrayFull setting
D-17
system.spuAckThreshold setting
D-17
system.spuContinueOnRegenError setting
D-17
system.spuCpuModel setting
D-18
system.spuCriticalTemperature setting
D-18
system.spuCtrlRAW setting
D-18
system.spuDistBucketSize setting
D-18
system.spuFecTxCompletionLimit setting
D-18
system.spuHwClass setting
D-18
system.spuJobBiasIntervalMs setting
D-18
system.spuJobPrioBias setting
D-18
system.spuMACMb setting
D-18
system.spuMaxJobTasks setting
D-18
system.spuMaxPktsOnWire setting
D-18
system.spuMemoryMB setting
D-18
system.spuMsgsOutstanding setting
D-18
system.spuMTU setting
D-18
system.spunetrxOomFatalTimeoutSecs setting
D-18
system.spunetrxOomTimeoutSecs setting
D-18
system.spuNonJobReservedBlocks setting
D-19
system.spuPartitionSectorCountOverride setting
D-19
system.spuPlanWorkBlocks setting
D-19
system.spuRetransmitLoopTicks setting
D-19
system.spuRetransmitResendTicks setting
D-19
system.spuRetransmitTimeoutCycles setting
D-19
system.spuRev setting
D-19
system.spuRxDescPoolChunks setting
D-19
system.spuSwapOrderMethod setting
D-19
system.spuSwapPageAbandonments setting
D-19
system.spuSwapSpaceConfigured setting
D-19
system.spuSwapSpaceLimit setting
D-19
system.spuSwapWriteRetries setting
D-19
system.spuWarningTemperature setting
D-19
system.tolderateOldCRC setting
D-19
system.txIdChunkSize setting
D-19
system.unicast2spuRAW setting
D-19
system.useFpgaPrep setting
D-20
system.virtabSingleMutex setting
D-20
system.zoneMapJoinBytes setting
D-20
system.zoneMapjoinThreshold setting
D-20
system.zoneMapTableSizeThreshold setting
D-20
systemStuckInState event type
7-10
T
table storage, about
9-2
Table Table, nzstats
13-2
,
13-14
tables
base tables
9-8
,
9-9
Index-14
Index
definition of
F-14
grooming
9-18
intra-session tables
9-8
,
9-9
lock
F-14
privilege
8-14
record header
9-3
special fields
9-3
table table
13-2
tuning
9-4
TB
F-14
TCP/IP
F-14
Telnet, remote access
1-7
temperature events
hardware
7-32
system
7-33
template event rules
7-1
temporary table
F-14
TFTP
bootsvr
6-8
definitiion of
F-14
power up
6-11
threshold
disk space
7-24
example
7-26
time command
B-7
time with time zone, data type
9-3
time, disk usage
9-3
timeslice, definition of
F-14
timestamp, temporal type
9-3
tls_cacertfile option
8-19
tls_cert option
8-19
tls_key option
8-19
tmp, directory
1-3
top command
B-4
topology
F-14
Topology Imbalance event
7-40
toporegen command, description
A-59
TPC, definition
F-14
transaction ID, overview
9-5
transaction objects
monitoring
7-38
Transaction Processing Council. See TPC
TransactionLimitEvent event
7-38
transactionLimitEvent event type
7-12
transactions
definition of
F-14
examples
9-23
managing
9-23
nzsql
9-23
privilege
8-16
system limit
12-21
truncate
privilege
8-11
,
A-6
U
UDP
F-14
uname command
B-6
underserved group
12-14
unfence
A-5
unfence privileges
8-10
Unicode
F-14
unicode collation
F-14
uninstalling Windows tools
2-7
UNIX Netezza clients
installing
2-3
removing
2-5
unreachable state
5-9
update privilege
8-11
,
A-6
UPS
F-14
user accounts
encrypting passwords for
2-15
passwords, storing
2-16
User Datagram Protocol. See UDP
user names, matching Netezza and LDAP
8-17
user privilege
8-14
useradd command
B-1
users
methods for managing
8-2
Netezza database
8-1
rowset limits
8-27
superuser, Netezza
8-3
unlocking
8-21
UTC
F-14
UTF-8
F-14
V
vacuum analyze, see generate statistics
varchar, data type
9-3
variables, environment
2-7
variant release
6-2
version, software
6-1
view command
B-6
View, privilege
8-15
viewing
sessions
A-42
system logs
6-12
views
_v_aggregate
C-1
_v_database
C-1
_v_datatype
C-1
_v_function
C-1
_v_group
C-1
_v_groupusers
C-1
_v_index
C-1
_v_operator
C-1
_v_qryhist
9-29
_v_qrystat
9-29
_v_relation_column
C-2
_v_relation_column_def
C-2
_v_sequence
C-2
_v_session
C-2
_v_sys_group_priv
C-3
_v_sys_index
C-3
_v_sys_priv
C-3
_v_sys_table
C-3
_v_sys_user_priv
C-3
_v_sys_view
C-3
_v_table
C-2
_v_table_dist_map
C-2
_v_table_index
C-2
_v_user
C-2
_v_usergroups
C-2
Index
Index-15
_v_view
C-2
definition of
F-15
system
8-31
,
8-32
,
C-3
voltage fault events
7-37
W
Web Admin interface
directories and files
2-10
installing
2-7
server package
2-8
WildcardExpr event rule
7-13
window
F-15
Windows tools
2-5
workload management
about
12-1
admin user
12-10
compliance
12-14
compliance reports
12-16
features
12-2
gate keeper
12-21
GRA
12-6
overserved and underserved groups
12-14
PQE
12-19
priority
12-12
priority levels
12-20
resource percentages
12-9
resource sharing groups
12-8
SQB
12-4
workload, about
12-1
X
xinetd, remote access
1-7
Z
zone maps
automatic statistics
9-16
definition of
F-15
Index-16
Index
