Configuration Guide Open Stack Cinder Driver
User Manual:
Open the PDF directly: View PDF ![]() .
.
Page Count: 59
- Contents
- 1 Overview
- 2 Version Mappings
- 3 Cinder Driver Installation&deployment
- 4 Cinder Driver Basis Properties Configuration
- 4.1 Configuring the Cinder Driver for iSCSI Storage
- 4.1.1 Configuring the Cinder Driver for OceanStor T Series V1 (iSCSI)
- 4.1.2 Configuring the Cinder Driver for OceanStor T Series V2 (iSCSI)
- 4.1.3 Configuring the Cinder Driver for OceanStor V3/V5(iSCSI)
- 4.1.4 Configuring the Cinder Driver for OceanStor 18000 Series(iSCSI)
- 4.1.5 Configuring the Cinder Driver for Dorado Series V3(iSCSI)
- 4.1.6 Parameters in the Configuration File
- 4.1.7 Configuring iSCSI Multipathing
- 4.1.8 Configuring CHAP and ALUA
- 4.2 Configuring the Cinder Driver for Fibre Channel Storage
- 4.2.1 Configuring the Cinder Driver for OceanStor T Series V1 (Fibre Channel)
- 4.2.2 Configuring the Cinder Driver for OceanStor T Series V2 (Fibre Channel)
- 4.2.3 Configuring the Cinder Driver for OceanStor V3/V5 (Fibre Channel)
- 4.2.4 Configuring the Cinder Driver of OceanStor 18000 Series (Fibre Channel)
- 4.2.5 Configuring the Cinder Driver for Dorado Series V3(Fibre Channel)
- 4.2.6 Configuring the Auto Zoning
- 4.2.7 Parameters in the Configuration File
- 4.2.8 Configuring FC Multipathing
- 4.2.9 Configuring ALUA
- 4.3 Configuring Multi-Storage Support
- 4.4 Using tenant user
- 4.1 Configuring the Cinder Driver for iSCSI Storage
- 5 Cinder Driver Advanced Properties Configuration
- 5.1 Configuring the SmartQoS Property
- 5.2 Configuring the SmartPartition Property
- 5.3 Configuring the Thick Property
- 5.4 Configuring the Thin Property
- 5.5 Configuring the SmartCache Property
- 5.6 Configuring the SmartTier Property
- 5.7 Configuring the HyperMetro Property
- 5.8 Configuring the Replication V2.1
- 5.9 Create a volume on a certain storage pool
- 5.10 Create a volume with a certain disk type
- 5.11 Create a volume on a certain volume back end
- 5.12 Configuring Consistency Groups
- 5.13 Configuring Backup Snapshot
- 5.14 Configuring Certificate Verify
- 5.15 Configuring the Owning Controller of a LUN
- 5.16 Configuring the SmartDedupe Property
- 5.17 Configuring the SmartCompression Property
- 5.18 Create a volume with fast clone
- 5.19 Configuring the LUN Copy Speed
- 6 Best Practices
- 7 FAQ
OpenStack Cinder Driver
Configuration Guide
Issue 01
Date 2018-10-15
HUAWEI TECHNOLOGIES CO., LTD.

Copyright © Huawei Technologies Co., Ltd. 2018. All rights reserved.
No part of this document may be reproduced or transmitted in any form or by any means without prior written
consent of Huawei Technologies Co., Ltd.
Trademarks and Permissions
and other Huawei trademarks are trademarks of Huawei Technologies Co., Ltd.
All other trademarks and trade names mentioned in this document are the property of their respective
holders.
Notice
The purchased products, services and features are stipulated by the contract made between Huawei and the
customer. All or part of the products, services and features described in this document may not be within the
purchase scope or the usage scope. Unless otherwise specified in the contract, all statements, information,
and recommendations in this document are provided "AS IS" without warranties, guarantees or
representations of any kind, either express or implied.
The information in this document is subject to change without notice. Every effort has been made in the
preparation of this document to ensure accuracy of the contents, but all statements, information, and
recommendations in this document do not constitute a warranty of any kind, express or implied.
Huawei Technologies Co., Ltd.
Address: Huawei Industrial Base
Bantian, Longgang
Shenzhen 518129
People's Republic of China
Website: http://www.huawei.com
Email: support@huawei.com
Issue 01 (2018-10-15) Copyright © Huawei Technologies Co., Ltd. i

Contents
1 Overview......................................................................................................................................... 1
2 Version Mappings......................................................................................................................... 2
3 Cinder Driver Installation&deployment.................................................................................. 4
3.1 Obtain Cinder Driver...................................................................................................................................................... 4
3.2 Ubuntu Environment Deployment..................................................................................................................................5
3.3 RedHat OpenStack Deployment.....................................................................................................................................5
4 Cinder Driver Basis Properties Configuration........................................................................ 7
4.1 Configuring the Cinder Driver for iSCSI Storage.......................................................................................................... 7
4.1.1 Configuring the Cinder Driver for OceanStor T Series V1 (iSCSI)............................................................................8
4.1.2 Configuring the Cinder Driver for OceanStor T Series V2 (iSCSI)............................................................................9
4.1.3 Configuring the Cinder Driver for OceanStor V3/V5(iSCSI)...................................................................................10
4.1.4 Configuring the Cinder Driver for OceanStor 18000 Series(iSCSI)......................................................................... 11
4.1.5 Configuring the Cinder Driver for Dorado Series V3(iSCSI)...................................................................................12
4.1.6 Parameters in the Configuration File.........................................................................................................................13
4.1.7 Configuring iSCSI Multipathing............................................................................................................................... 15
4.1.8 Configuring CHAP and ALUA................................................................................................................................. 16
4.2 Configuring the Cinder Driver for Fibre Channel Storage...........................................................................................17
4.2.1 Configuring the Cinder Driver for OceanStor T Series V1 (Fibre Channel)............................................................ 18
4.2.2 Configuring the Cinder Driver for OceanStor T Series V2 (Fibre Channel)............................................................ 19
4.2.3 Configuring the Cinder Driver for OceanStor V3/V5 (Fibre Channel).....................................................................20
4.2.4 Configuring the Cinder Driver of OceanStor 18000 Series (Fibre Channel)............................................................ 21
4.2.5 Configuring the Cinder Driver for Dorado Series V3(Fibre Channel)......................................................................22
4.2.6 Configuring the Auto Zoning.................................................................................................................................... 23
4.2.7 Parameters in the Configuration File.........................................................................................................................24
4.2.8 Configuring FC Multipathing....................................................................................................................................25
4.2.9 Configuring ALUA....................................................................................................................................................26
4.3 Configuring Multi-Storage Support..............................................................................................................................26
4.4 Using tenant user.......................................................................................................................................................... 27
5 Cinder Driver Advanced Properties Configuration............................................................. 28
5.1 Configuring the SmartQoS Property............................................................................................................................ 29
5.1.1 Configuring the Front-end QoS.................................................................................................................................29
5.1.2 Configuring the Maximum Control IOPS................................................................................................................. 30
OpenStack Cinder Driver
Configuration Guide Contents
Issue 01 (2018-10-15) Copyright © Huawei Technologies Co., Ltd. ii

5.1.3 Configuring the Minimum Control IOPS..................................................................................................................31
5.1.4 Configuring the Maximum Control Bandwidth........................................................................................................ 32
5.1.5 Configuring the Minimum Control Bandwidth......................................................................................................... 33
5.1.6 Configuring the Control Latency...............................................................................................................................34
5.1.7 Configuring Multiple Control Policies...................................................................................................................... 35
5.2 Configuring the SmartPartition Property......................................................................................................................37
5.3 Configuring the Thick Property....................................................................................................................................38
5.4 Configuring the Thin Property..................................................................................................................................... 39
5.5 Configuring the SmartCache Property......................................................................................................................... 39
5.6 Configuring the SmartTier Property............................................................................................................................. 40
5.7 Configuring the HyperMetro Property......................................................................................................................... 41
5.8 Configuring the Replication V2.1................................................................................................................................ 43
5.9 Create a volume on a certain storage pool....................................................................................................................45
5.10 Create a volume with a certain disk type....................................................................................................................46
5.11 Create a volume on a certain volume back end.......................................................................................................... 47
5.12 Configuring Consistency Groups............................................................................................................................... 48
5.13 Configuring Backup Snapshot....................................................................................................................................48
5.14 Configuring Certificate Verify....................................................................................................................................48
5.15 Configuring the Owning Controller of a LUN........................................................................................................... 49
5.16 Configuring the SmartDedupe Property..................................................................................................................... 49
5.17 Configuring the SmartCompression Property............................................................................................................ 50
5.18 Create a volume with fast clone................................................................................................................................. 52
5.19 Configuring the LUN Copy Speed............................................................................................................................. 52
6 Best Practices................................................................................................................................ 53
6.1 Quick Interconnection with Huawei Storage................................................................................................................53
7 FAQ................................................................................................................................................ 55
7.1 Need to manually create the mapping associated objects like Host, Host Group or Lun Group on Huawei storage
beforehand before attaching volume via Cinder Driver?................................................................................................... 55
7.2 Nova log prints "lsblk " command execution failed while attaching volume.............................................................. 55
OpenStack Cinder Driver
Configuration Guide Contents
Issue 01 (2018-10-15) Copyright © Huawei Technologies Co., Ltd. iii

1 Overview
This chapter describes the definition of the Cinder Driver.
Cinder Driver is a plug-in that is deployed on the OpenStack Cinder module. The plug-in can
be used to provide functions such as the logical volume and snapshot for virtual machines
(VMs) in the OpenStack Cinder Driver that supports iSCSI and Fibre Channel protocols.
OpenStack Cinder Driver
Configuration Guide 1 Overview
Issue 01 (2018-10-15) Copyright © Huawei Technologies Co., Ltd. 1

2 Version Mappings
This chapter describes the version mappings among the Cinder Driver, Huawei storage
system, and OpenStack.
You can query the version mapping table of eSDK plug-ins to obtain the storage system
versions. To obtain the version mapping table, log in to http://support.huawei.com/
enterprise/en/index.html. In the search box, enter eSDK Enterprise Storage Plugins to
search for and download the eSDK Enterprise Storage Plugins x.x.xxx Version Mapping.
x.x.xxx indicates the version number.
NOTE
Huawei T series storages are not supported anymore from Rocky version.
Table 2-1 Version mappings among the Cinder Driver, Features and OpenStack. (√:support, x:unsupport)
Features Mitaka Newto
n
Ocata Pike Queens Rocky
Create Volume √ √ √ √ √ √
Delete Volume √ √ √ √ √ √
Attach Volume √ √ √ √ √ √
Detach Volume √ √ √ √ √ √
Extend Volume √ √ √ √ √ √
Create Snapshot √ √ √ √ √ √
Delete Snapshot √ √ √ √ √ √
Create Volume from Snapshot √ √ √ √ √ √
Create Volume from Image √ √ √ √ √ √
Create Volume from Volume √ √ √ √ √ √
Create Image from Volume √ √ √ √ √ √
Volume Migration √ √ √ √ √ √
OpenStack Cinder Driver
Configuration Guide 2 Version Mappings
Issue 01 (2018-10-15) Copyright © Huawei Technologies Co., Ltd. 2

Features Mitaka Newto
n
Ocata Pike Queens Rocky
QoS √ √ √ √ √ √
Auto zoning √ √ √ √ √ √
SmartTier √ √ √ √ √ √
SmartCache √ √ √ √ √ √
SmartThin √ √ √ √ √ √
SmartThick √ √ √ √ √ √
SmartPartition √ √ √ √ √ √
HyperMetro √ √ √ √ √ √
Retype √ √ √ √ √ √
Manage/Unmanage Volume √ √ √ √ √ √
Manage/Unmanage Snapshot √ √ √ √ √ √
Replication V2.1 √ √ √ √ √ √
HyperMetro Consistency Group √ √ √ √ √ √
Create a volume on a certain storage pool √ √ √ √ √ √
Create a volume with certain disk type √ √ √ √ √ √
Backup Snapshot √ √ √ √ √ √
Snapshot Consistency Group √ √ √ √ √ √
Multipath √ √ √ √ √ √
Consistency Group √ √ √ √ √ √
lOceanStor Dorado does not support Thick LUN, SmartTier, SmartCache and
SmartPartition features.
lLow-end storage system doesn't support some advanced features, please refer to the
specifications of the corresponding storage system.
OpenStack Cinder Driver
Configuration Guide 2 Version Mappings
Issue 01 (2018-10-15) Copyright © Huawei Technologies Co., Ltd. 3

3 Cinder Driver Installation&deployment
3.1 Obtain Cinder Driver
3.2 Ubuntu Environment Deployment
3.3 RedHat OpenStack Deployment
3.1 Obtain Cinder Driver
Two ways to obtain OpenStack Driver:
One is through the OpenStack community warehouse. From Kilo, Huawei has contributed
Huawei Storage Driver to OpenStack, users can download OpenStack Driver from OpenStack
community for free. After installing the specified OpenStack, OpenStack Driver will be
placed under the catalog of "../cinder/cinder/volume/drivers/huawei". If you don't find the
corresponding installation files, you can download the OpenStack Driver from OpenStack
community warehouse at https://github.com/openstack/cinder.
Another is through Huawei OpenStack Driver warehouse. By visiting https://github.com/
huaweistorage/OpenStack_Driver, you can download OpenStack Driver that corresponds to
OpenStack community version.
Steps to get Cinder Driver are as follows:
NOTE
lA community version cannot be integrated with new features once being released and has security
risks because its debug process is time-consuming.
lHowever, OpenStack Driver obtained from OpenStack Driver repository can be integrated with
newly launched features and debugged in a timely manner, when a supportive framework is used.
lThe community only maintains two stable versions. However, Huawei OpenStack Driver library
maintains six stable versions, ensuring long-term stable running of historical versions.
lYou are strongly recommended to use Huawei OpenStack Driver library versions, instead of
community versions.
Step 1 Enter the above warehouse address in the browser, for example Huawei warehouse address:
https://github.com/huaweistorage/OpenStack_Driver.
Step 2 Click the "Download ZIP" bottom to download Driver, and unzip it.
OpenStack Cinder Driver
Configuration Guide 3 Cinder Driver Installation&deployment
Issue 01 (2018-10-15) Copyright © Huawei Technologies Co., Ltd. 4

Step 3 Find "Cinder" catalog in which the Diver is extracted, there are multiple OpenStack Driver for
different OpenStack version, choose the corresponding Driver.
----End
3.2 Ubuntu Environment Deployment
The OpenStack standard deployment steps are as follows:
Step 1 Before installation, delete all the installation files of Huawei OpenStack Drver, the default
path is /usr/lib/python2.7/dist-packages/cinder/volume/drivers/huawei.
On my host, the version of Python is 2.7, if other version is used, make corresponding
changes to the Driver path. You can also get the Cinder Driver installation directory by the
following method:
root@ubuntu:~# find / -name huawei_driver.py
/usr/lib/python2.7/dist-packages/cinder/volume/drivers/huawei/huawei_driver.py
Step 2 Copy OpenStack Cinder Driver to Cinder Driver installation directory, the default directory
refer to step 1.
Step 3 Refer to chapter 4 and 5 to do the configuration.
Step 4 After configuration, restart Cinder-Volume service:
service cinder-volume restart
Step 5 Check the status of services by inputting cinder service-list, if the "State" status of Cinder-
Volume is up, that means Cinder-Volume is OK.
root@ubuntuL004:/# cinder service-list
+------------------+------------------------+------+---------+-------
+----------------------------+-----------------+|Binary|Host| Zone |Status |
State |Updated_at| Disabled Reason |+------------------+------------------------
+------+---------+-------+----------------------------+-----------------+| cinder-
scheduler |ubuntuL004| nova | enabled |up| 2016-02-01T16:26:00.000000 |-||cinder-
volume|ubuntuL004@v3r3| nova | enabled |up| 2016-02-01T16:25:53.000000 |-|
+------------------+------------------------+------+---------+-------
+----------------------------+-----------------+
----End
3.3 RedHat OpenStack Deployment
RedHat OpenStack deployment steps are as follows:
Step 1 Before installation, delete all the installation files of Huawei OpenStack Drver, the default
path is /usr/lib/python2.7/disk-packages/cinder/volume/drivers/huawei.
OpenStack Cinder Driver
Configuration Guide 3 Cinder Driver Installation&deployment
Issue 01 (2018-10-15) Copyright © Huawei Technologies Co., Ltd. 5

On my host, the version of Python is 2.7, if other version is used, make corresponding
changes to the Driver path.You can also get the Cinder Driver installation directory by the
following method:
root@redhatL004:~# find / -name huawei_driver.py
/usr/lib/python2.7/dist-packages/cinder/volume/drivers/huawei/huawei_driver.py
Step 2 Copy OpenStack Cinder Driver to Cinder Driver installation directory, the default directory
refer to step 1.
Step 3 Refer to chapter 4 and 5 to do the configuration.
Step 4 After configuration, restart Cinder-Volume service:
systemctl restart openstack-cinder-volume.service
Step 5 Check the status of services by inputting cinder service-list, if the "State" status of Cinder-
Volume is up, that means Cinder-Volume is OK.
root@redhatL004:/# cinder service-list
+------------------+------------------------+------+---------+-------
+----------------------------+-----------------+|Binary|Host| Zone |Status |
State |Updated_at| Disabled Reason |+------------------+------------------------
+------+---------+-------+----------------------------+-----------------+| cinder-
scheduler |redhatL004| nova | enabled |up| 2016-02-01T16:26:00.000000 |-||cinder-
volume|redhatL004@v3r3| nova | enabled |up| 2016-02-01T16:25:53.000000 |-|
+------------------+------------------------+------+---------+-------
+----------------------------+-----------------+
----End
OpenStack Cinder Driver
Configuration Guide 3 Cinder Driver Installation&deployment
Issue 01 (2018-10-15) Copyright © Huawei Technologies Co., Ltd. 6
4 Cinder Driver Basis Properties
Configuration
This chapter describes how to configure the Huawei Cinder Driver for iSCSI storage and FC
storage.
The storage pool that driver will use, must make sure that it already exists in Huawei storage,
otherwise please create it manually, and the usage of this storage pool must be "Block Storage
Service".
4.1 Configuring the Cinder Driver for iSCSI Storage
4.2 Configuring the Cinder Driver for Fibre Channel Storage
4.3 Configuring Multi-Storage Support
4.4 Using tenant user
4.1 Configuring the Cinder Driver for iSCSI Storage
This section describes how to configure the Cinder Driver for different products for iSCSI
storage products.
Prerequisites
When create a volume from image, the multipath tool must be installed, and add the following
configuration keys in the target back end configuration group of the /etc/cinder/cinder.conf
file in Cinder Volume node:
use_multipath_for_image_xfer = True
enforce_multipath_for_image_xfer = True
OpenStack Cinder Driver
Configuration Guide 4 Cinder Driver Basis Properties Configuration
Issue 01 (2018-10-15) Copyright © Huawei Technologies Co., Ltd. 7

4.1.1 Configuring the Cinder Driver for OceanStor T Series V1
(iSCSI)
Procedure
Step 1 In /etc/cinder, create a Huawei-customized driver configuration file. The file format is XML.
Change the name of the driver configuration file based on site requirements, for example,
cinder_huawei_conf.xml.
Step 2 Configure parameters in the driver configuration file, including mandatory and optional
parameters.
Mandatory parameters:
<?xml version='1.0' encoding='UTF-8'?>
<config>
<Storage>
<Product>T</Product>
<Protocol>iSCSI</Protocol>
<ControllerIP0>x.x.x.x</ControllerIP0>
<ControllerIP1>x.x.x.x</ControllerIP1>
<UserName>xxx</UserName>
<UserPassword>xxx</UserPassword>
</Storage>
<LUN>
<StoragePool Name="xxx" />
<StoragePool Name="xxx" />
</LUN>
<iSCSI>
<DefaultTargetIP>x.x.x.x</DefaultTargetIP>
</iSCSI>
<Host OSType="Linux" HostIP="x.x.x.x, x.x.x.x" />
</config>
Optional parameters(Pick and add the optional parameter in the above XML file):
<LUN>
<LUNType>xxx</LUNType>
<StripUnitSize>xxx</StripUnitSize>
<WriteType>xxx</WriteType>
<Prefetch Type="xxx" Value="xxx" />
</LUN>
<iSCSI>
<Initiator Name="xxx" TargetIP="x.x.x.x" />
</iSCSI>
NOTE
Make sure the owner and group of "/etc/cinder/cinder_huawei_conf.xml" file are the same as "/etc/
cinder/cinder.conf" file's owner and group.
-rw-r--r-- 1 cinder cinder 2662 Jul 29 02:13 cinder.conf
-rw-r--r-- 1 cinder cinder 778 Jul 30 02:56 cinder_huawei_conf.xml
For details about the parameters in the configuration file, see section "4.1.6 ".
Step 3 Configure the cinder.conf file.
Add a [TV1_iSCSI] section at the end of "/etc/cinder/cinder.conf" file, configure the
TV1_iSCSI back end with the Huawei driver. The volume_driver indicates the loaded driver
file, and cinder_huawei_conf_file indicates the specified Huawei-customized configuration
file.
[TV1_iSCSI]
volume_driver = cinder.volume.drivers.huawei.huawei_t.HuaweiTISCSIDriver
OpenStack Cinder Driver
Configuration Guide 4 Cinder Driver Basis Properties Configuration
Issue 01 (2018-10-15) Copyright © Huawei Technologies Co., Ltd. 8

cinder_huawei_conf_file = /etc/cinder/cinder_huawei_conf.xml
volume_backend_name = TV1_iSCSI
In the [DEFAULT] section, enable the TV1_iSCSI back end:
[DEFAULT]
...
enabled_backends=TV1_iSCSI
Step 4 Restart the Cinder service.
----End
4.1.2 Configuring the Cinder Driver for OceanStor T Series V2
(iSCSI)
Procedure
Step 1 In /etc/cinder, create a Huawei-customized driver configuration file. The file format is XML.
Change the name of the driver configuration file based on site requirements, for example,
cinder_huawei_conf.xml.
Step 2 Configure parameters in the driver configuration file, including mandatory and optional
parameters.
Mandatory parameters:
<?xml version='1.0' encoding='UTF-8'?>
<config>
<Storage>
<Product>TV2</Product>
<Protocol>iSCSI</Protocol>
<RestURL>https://x.x.x.x:8088/deviceManager/rest/</RestURL>
<UserName>xxx</UserName>
<UserPassword>xxx</UserPassword>
</Storage>
<LUN>
<StoragePool>xxx</StoragePool>
</LUN>
<iSCSI>
<DefaultTargetIP>x.x.x.x</DefaultTargetIP>
</iSCSI>
</config>
Optional parameters(Pick and add the optional parameter in the above XML file):
<LUN>
<LUNType>xxx</LUNType>
<WriteType>xxx</WriteType>
<Prefetch Type="xxx" Value="xxx" />
<LUNcopyWaitInterval>xxx</LUNcopyWaitInterval>
<Timeout>432000</Timeout>
</LUN>
<iSCSI>
<Initiator Name="xxx" TargetIP="x.x.x.x" />
</iSCSI>
NOTE
Make sure the owner and group of "/etc/cinder/cinder_huawei_conf.xml" file are the same as "/etc/
cinder/cinder.conf" file's owner and group.
-rw-r--r-- 1 cinder cinder 2662 Jul 29 02:13 cinder.conf
-rw-r--r-- 1 cinder cinder 778 Jul 30 02:56 cinder_huawei_conf.xml
For details about the parameters in the configuration file, see section "4.1.6 ".
OpenStack Cinder Driver
Configuration Guide 4 Cinder Driver Basis Properties Configuration
Issue 01 (2018-10-15) Copyright © Huawei Technologies Co., Ltd. 9

Step 3 Configure the cinder.conf file.
Add a [TV2_iSCSI] section at the end of "/etc/cinder/cinder.conf" file, configure the
TV2_iSCSI back end with the Huawei driver. The volume_driver indicates the loaded driver
file, and cinder_huawei_conf_file indicates the specified Huawei-customized configuration
file.
[TV2_iSCSI]
volume_driver = cinder.volume.drivers.huawei.huawei_driver.HuaweiISCSIDriver
cinder_huawei_conf_file = /etc/cinder/cinder_huawei_conf.xml
volume_backend_name = TV2_iSCSI
In the [DEFAULT] section, enable the TV2_iSCSI back end:
[DEFAULT]
...
enabled_backends=TV2_iSCSI
Step 4 Restart the Cinder service.
----End
4.1.3 Configuring the Cinder Driver for OceanStor V3/V5(iSCSI)
Procedure
Step 1 In /etc/cinder, create a Huawei-customized driver configuration file. The file format is XML.
Change the name of the driver configuration file based on site requirements, for example,
cinder_huawei_conf.xml.
Step 2 Configure parameters in the driver configuration file, including mandatory and optional
parameters.
Mandatory parameters:
<?xml version='1.0' encoding='UTF-8'?>
<config>
<Storage>
<Product>V3</Product>
<Protocol>iSCSI</Protocol>
<RestURL>https://x.x.x.x:8088/deviceManager/rest/</RestURL>
<UserName>xxx</UserName>
<UserPassword>xxx</UserPassword>
</Storage>
<LUN>
<LUNType>Thin</LUNType>
<StoragePool>xxx</StoragePool>
</LUN>
<iSCSI>
<DefaultTargetIP>x.x.x.x</DefaultTargetIP>
</iSCSI>
</config>
Optional parameters(Pick and add the optional parameter in the above XML file):
<LUN>
<WriteType>xxx</WriteType>
<Prefetch Type="xxx" Value="xxx" />
</LUN>
<iSCSI>
<Initiator Name="xxx" TargetIP="x.x.x.x" />
</iSCSI>
OpenStack Cinder Driver
Configuration Guide 4 Cinder Driver Basis Properties Configuration
Issue 01 (2018-10-15) Copyright © Huawei Technologies Co., Ltd. 10

NOTE
Make sure the owner and group of "/etc/cinder/cinder_huawei_conf.xml" file are the same as "/etc/
cinder/cinder.conf" file's owner and group.
-rw-r--r-- 1 cinder cinder 2662 Jul 29 02:13 cinder.conf
-rw-r--r-- 1 cinder cinder 778 Jul 30 02:56 cinder_huawei_conf.xml
For details about the parameters in the configuration file, see section "4.1.6 ".
Step 3 Configure the cinder.conf file.
Add a [V3_iSCSI] section at the end of "/etc/cinder/cinder.conf" file, configure the V3_iSCSI
back end with the Huawei driver. The volume_driver indicates the loaded driver file, and
cinder_huawei_conf_file indicates the specified Huawei-customized configuration file.
[V3_iSCSI]
volume_driver = cinder.volume.drivers.huawei.huawei_driver.HuaweiISCSIDriver
cinder_huawei_conf_file = /etc/cinder/cinder_huawei_conf.xml
volume_backend_name = V3_iSCSI
In the [DEFAULT] section, enable the V3_iSCSI back end:
[DEFAULT]
...
enabled_backends=V3_iSCSI
Step 4 Restart the Cinder service.
----End
4.1.4 Configuring the Cinder Driver for OceanStor 18000
Series(iSCSI)
This section describes how to configure the Cinder Driver for 18000 series for iSCSI storage
products.
Procedure
Step 1 In /etc/cinder, create a Huawei-customized driver configuration file. The file format is XML.
Change the name of the driver configuration file based on site requirements, for example,
cinder_huawei_conf.xml.
Step 2 Configure parameters in the driver configuration file, including mandatory and optional
parameters.
Mandatory parameters:
<?xml version='1.0' encoding='UTF-8'?>
<config>
<Storage>
<Product>18000</Product>
<Protocol>iSCSI</Protocol>
<RestURL>https://x.x.x.x:8088/deviceManager/rest/</RestURL>
<UserName>xxx</UserName>
<UserPassword>xxx</UserPassword>
</Storage>
<LUN>
<StoragePool>xxx</StoragePool>
</LUN>
<iSCSI>
<DefaultTargetIP>x.x.x.x</DefaultTargetIP>
</iSCSI>
</config>
OpenStack Cinder Driver
Configuration Guide 4 Cinder Driver Basis Properties Configuration
Issue 01 (2018-10-15) Copyright © Huawei Technologies Co., Ltd. 11

Optional parameters(Pick and add the optional parameter in the above XML file):
<LUN>
<LUNType>xxx</LUNType>
<WriteType>xxx</WriteType>
<Prefetch Type="xxx" Value="xxx" />
<LUNcopyWaitInterval>xxx</LUNcopyWaitInterval>
<Timeout>432000</Timeout>
</LUN>
<iSCSI>
<Initiator Name="xxx" TargetIP="x.x.x.x" />
</iSCSI>
NOTE
Make sure the owner and group of "/etc/cinder/cinder_huawei_conf.xml" file are the same as "/etc/
cinder/cinder.conf" file's owner and group.
-rw-r--r-- 1 cinder cinder 2662 Jul 29 02:13 cinder.conf
-rw-r--r-- 1 cinder cinder 778 Jul 30 02:56 cinder_huawei_conf.xml
For details about the parameters in the configuration file, see section "4.1.6 ".
Step 3 Configure the cinder.conf file.
Add a [18000_iSCSI] section at the end of "/etc/cinder/cinder.conf" file, configure the
18000_iSCSI back end with the Huawei driver. The volume_driver indicates the loaded
driver file, and cinder_huawei_conf_file indicates the specified Huawei-customized
configuration file.
[18000_iSCSI]
volume_driver = cinder.volume.drivers.huawei.huawei_driver.HuaweiISCSIDriver
cinder_huawei_conf_file = /etc/cinder/cinder_huawei_conf.xml
volume_backend_name = 18000_iSCSI
In the [DEFAULT] section, enable the 18000_iSCSI back end:
[DEFAULT]
...
enabled_backends=18000_iSCSI
Step 4 Restart the Cinder service.
----End
4.1.5 Configuring the Cinder Driver for Dorado Series V3(iSCSI)
Procedure
Step 1 In /etc/cinder, create a Huawei-customized driver configuration file. The file format is XML.
Change the name of the driver configuration file based on site requirements, for example,
cinder_huawei_conf.xml.
Step 2 Configure parameters in the driver configuration file, including mandatory and optional
parameters.
Mandatory parameters:
<?xml version='1.0' encoding='UTF-8'?>
<config>
<Storage>
<Product>Dorado</Product>
<Protocol>iSCSI</Protocol>
<RestURL>https://x.x.x.x:8088/deviceManager/rest/</RestURL>
<UserName>xxx</UserName>
<UserPassword>xxx</UserPassword>
OpenStack Cinder Driver
Configuration Guide 4 Cinder Driver Basis Properties Configuration
Issue 01 (2018-10-15) Copyright © Huawei Technologies Co., Ltd. 12

</Storage>
<LUN>
<LUNType>Thin</LUNType>
<StoragePool>xxx</StoragePool>
</LUN>
<iSCSI>
<DefaultTargetIP>x.x.x.x</DefaultTargetIP>
</iSCSI>
</config>
Optional parameters(Pick and add the optional parameter in the above XML file):
<LUN>
<WriteType>xxx</WriteType>
<Prefetch Type="xxx" Value="xxx" />
</LUN>
<iSCSI>
<Initiator Name="xxx" TargetIP="x.x.x.x" />
</iSCSI>
NOTE
Make sure the owner and group of "/etc/cinder/cinder_huawei_conf.xml" file are the same as "/etc/
cinder/cinder.conf" file's owner and group.
-rw-r--r-- 1 cinder cinder 2662 Jul 29 02:13 cinder.conf
-rw-r--r-- 1 cinder cinder 778 Jul 30 02:56 cinder_huawei_conf.xml
For details about the parameters in the configuration file, see section "4.1.6 ".
Step 3 Configure the cinder.conf file.
Add a [Dorado_iSCSI] section at the end of "/etc/cinder/cinder.conf" file, configure the
Dorado_iSCSI back end with the Huawei driver. The volume_driver indicates the loaded
driver file, and cinder_huawei_conf_file indicates the specified Huawei-customized
configuration file.
[Dorado_iSCSI]
volume_driver = cinder.volume.drivers.huawei.huawei_driver.HuaweiISCSIDriver
cinder_huawei_conf_file = /etc/cinder/cinder_huawei_conf.xml
volume_backend_name = Dorado_iSCSI
In the [DEFAULT] section, enable the Dorado_iSCSI back end:
[DEFAULT]
...
enabled_backends=Dorado_iSCSI
Step 4 Restart the Cinder service.
----End
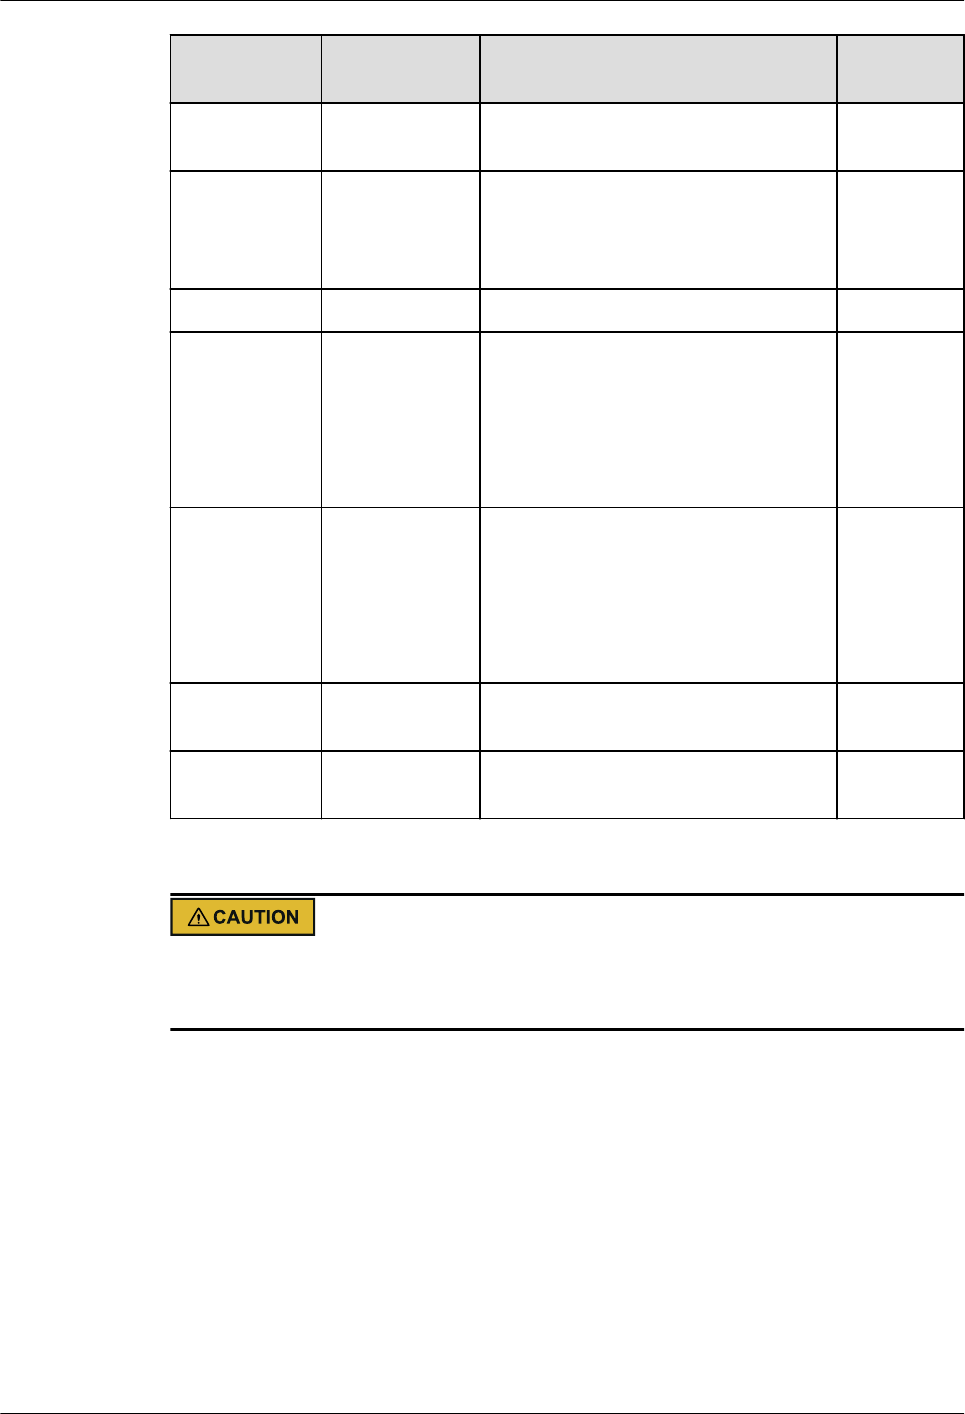
4.1.6 Parameters in the Configuration File
Table 4-1 Mandatory parameters
Parameter Description Applicable
To
Product Type of a storage product. Possible values are T, TV2,
18000, V3, V5 and Dorado.
All
Protocol Type of a connection protocol. The possible value is
iSCSI.
All
OpenStack Cinder Driver
Configuration Guide 4 Cinder Driver Basis Properties Configuration
Issue 01 (2018-10-15) Copyright © Huawei Technologies Co., Ltd. 13

Parameter Description Applicable
To
ControllerIP0 IP address of the primary controller on an OceanStor T
series V100R005 storage device.
T series V1
ControllerIP1 IP address of the secondary controller on an OceanStor T
series V100R005 storage device.
T series V1
RestURL Access address of the REST interface, for example,
https://x.x.x.x:8088/devicemanager/rest/. x.x.x.x
indicates the management IP address. If you need to
configure multiple RestURL, separate them by
semicolons (;).
T series V2
V3
V5
18000
Dorado
UserName User name of a storage administrator. All
UserPassword Password of a storage administrator. All
StoragePool Name of a storage pool to be used. If you need to
configure multiple storage pools, separate them by
semicolons (;). Refer to 4.1.1 to configure TV1 series.
All
DefaultTarget
IP
Default IP address of the iSCSI target port that is
provided for computing nodes.
All
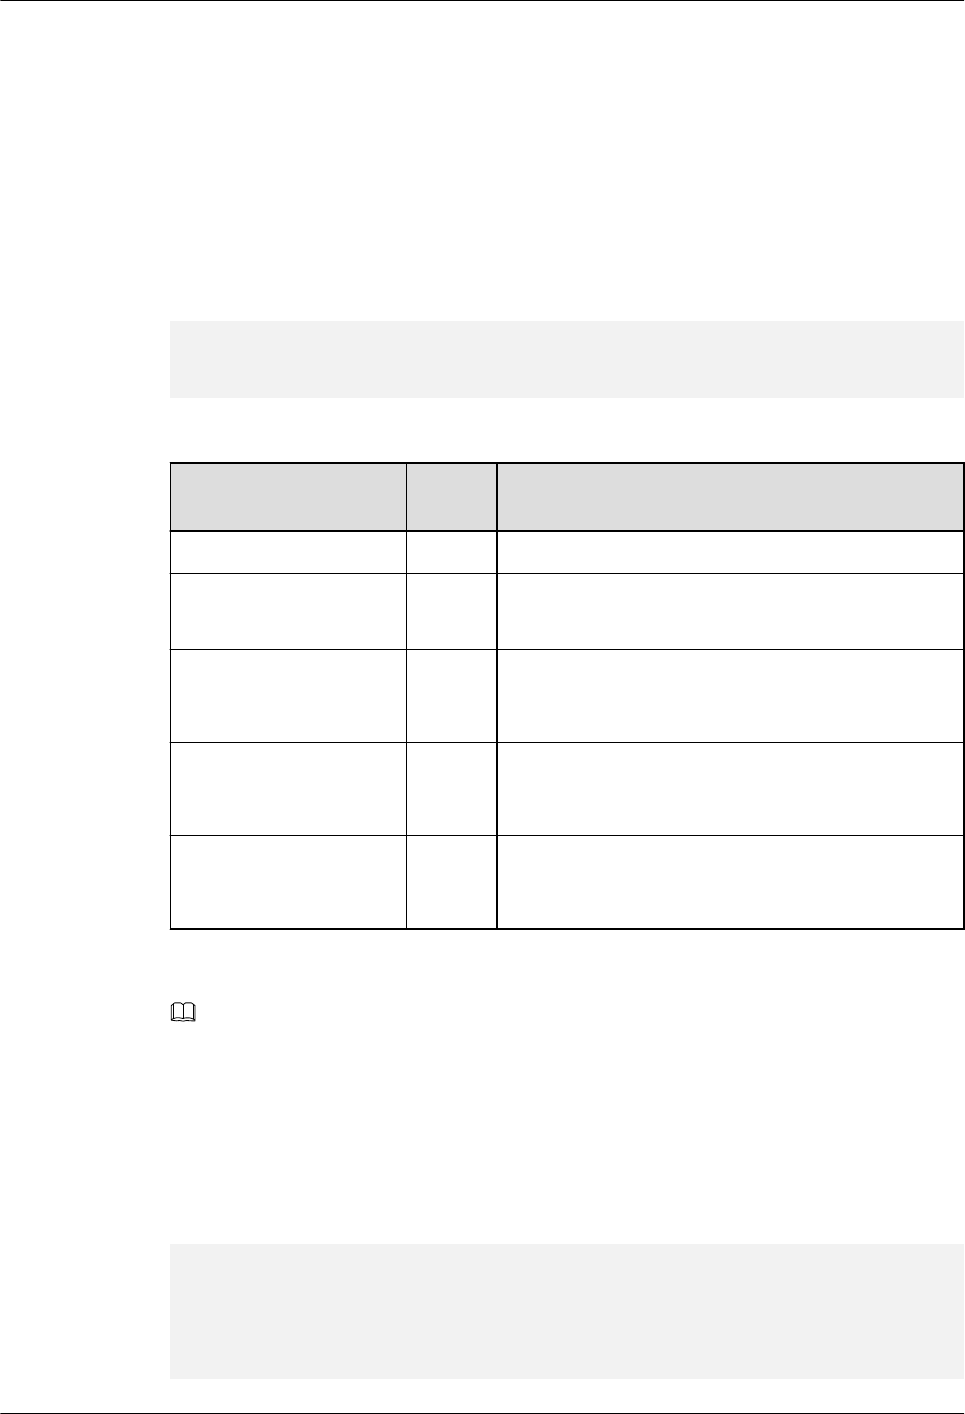
Table 4-2 Optional parameters
Parameter Default Value Description Applicable
To
LUNType Thick(except
Dorado)
Thin(Dorado)
Type of the LUNs to be created.
The value can be Thick or Thin.
Dorado only support Thin LUNs.
All
StripUnitSize 64 Stripe depth of a LUN to be created,
optional values: 4, 8,16, 32, 64, 128,
256, 512. The unit is KB.
This parameter is invalid when a
thin LUN is created.
T series V1
WriteType 1 Cache write type. Possible values
are: 1 (write back), 2 (write
through).
All
Prefetch Type 3 Cache prefetch policy. Possible
values are: 0 (no prefetch), 1 (fixed
prefetch), 2 (variable prefetch) or 3
(intelligent prefetch).
All
Prefetch Value 0 Cache prefetch value. All
OpenStack Cinder Driver
Configuration Guide 4 Cinder Driver Basis Properties Configuration
Issue 01 (2018-10-15) Copyright © Huawei Technologies Co., Ltd. 14

Parameter Default Value Description Applicable
To
LUNcopyWaitI
nterval
5 After LUN copy is enabled, the
plug-in frequently queries the copy
progress. You can set a value to
specify the query interval.
T series V2
V3
V5
18000
Dorado
Timeout 432000 Timeout interval for waiting LUN
copy of a storage device to
complete. The unit is second.
T series V2
V3
V5
18000
Dorado
Initiator Name - Name of a computing node initiator. All
Initiator Target
IP
- IP address of the iSCSI target port
that is provided for computing
nodes.
All
Initiator
TargetPortGro
up
- IP address of the iSCSI target port
that is provided for computing
nodes.
T series V2
V3
V5
18000
Dorado
HostIP - IP address of the Nova compute
node's host.
T series V1
OSType Linux Operating system of the Nova
compute node's host.
T series V1
lThe value of StoragePool cannot contain Chinese characters
lAll of the parameter values cannot include XML special character < > & ' "
4.1.7 Configuring iSCSI Multipathing
If you need to configure the multipathing for iSCSI, configure it as follows:
Procedure
Step 1 Create a port group on the storage device using the DeviceManager, add service links that
require multipathing into the port group.
OpenStack Cinder Driver
Configuration Guide 4 Cinder Driver Basis Properties Configuration
Issue 01 (2018-10-15) Copyright © Huawei Technologies Co., Ltd. 15

Step 2 Add the port group settings in the Huawei-customized driver configuration file, and configure
the port group name needed by an initiator.
<iSCSI>
<Initiator Name="xxxxxx" TargetPortGroup="xxxx"/>
<Initiator Name="xxxxxx" TargetPortGroup="xxxx"/>
</iSCSI>
Step 3 If the version of OpenStack is Juno, Kilo, Liberty or Mitaka, add iscsi_use_multipath = True
in [libvirt] of /etc/nova/nova.conf.
If the version of OpenStack is Newton or Ocata, add volume_use_multipath = True in
[libvirt] of /etc/nova/nova.conf.
Enable the multipathing switch of the OpenStack Nova module.
Step 4 Restart the nova-compute service.
----End
4.1.8 Configuring CHAP and ALUA
On a public network, any application server whose IP address resides on the same network
segment as that of the storage system's iSCSI host port can access the storage system and
perform read and write operations in it. This poses risks to the data security of the storage
system. To ensure the storage system access security, you can configure CHAP authentication
to control application servers' access to the storage system.
Procedure
Configure CHAP and ALUA.
Configure the driver configuration file as follows:
<iSCSI>
<Initiator Name="xxx" ALUA="xxx" FAILOVERMODE="XXX" PATHTYPE="xxx"
CHAPinfo="xxx"/>
<Initiator Name="xxx" ALUA="xxx" FAILOVERMODE="XXX" PATHTYPE="xxx"
CHAPinfo="xxx"/>
</iSCSI>
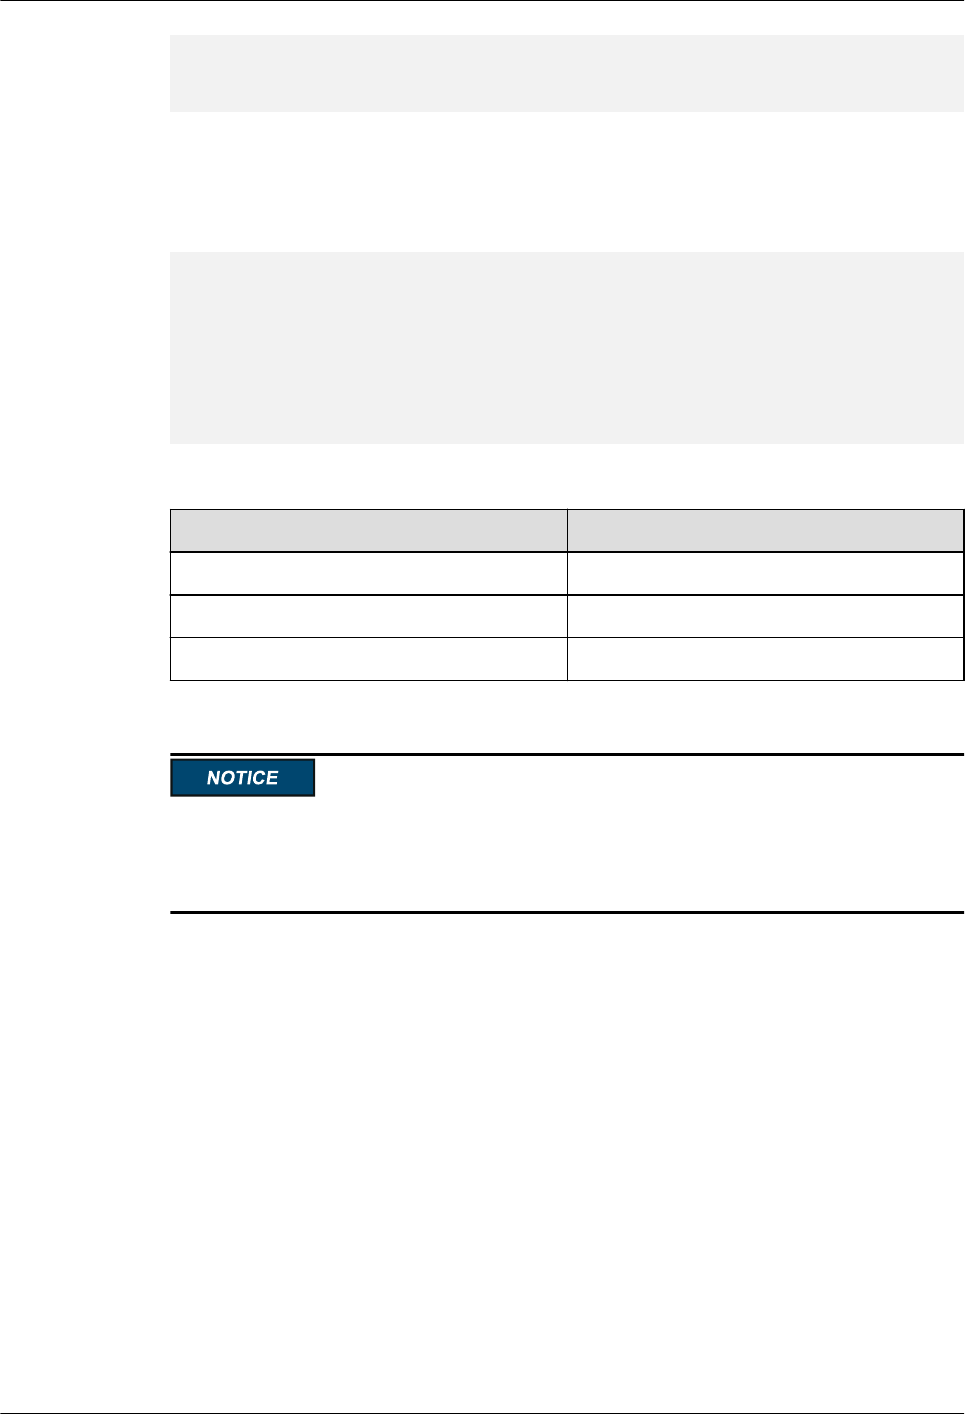
Table 4-3 Parameters description
Parameter Defaul
t
Description
Name - ISCSI initiator name
ALUA 0 0: default(Huawei Ultrapath)
1: uses third-party multipathing software
FAILOVERMODE - Initiator switchover mode, this parameter needs to
be delivered only when uses third-party multipathing
software is enabled
SPECIALMODETYPE - Initiator special mode type, this parameter needs to
be delivered only when initiator switchover mode is
special ALUA
OpenStack Cinder Driver
Configuration Guide 4 Cinder Driver Basis Properties Configuration
Issue 01 (2018-10-15) Copyright © Huawei Technologies Co., Ltd. 16
Parameter Defaul
t
Description
PATHTYPE - Initiator path type, this parameter needs to be
delivered only when uses third-party multipathing
software is enabled
CHAPinfo - The user name and password authenticated by
CHAP.
The format is mm-user;mm-user@storage1. The
user name and password are separated by
semicolons (;)
CHAP name must contain 4 to 223 characters
The password must contain 12 to 16 characters
The password must contain any three types of
uppercase letters, lowercase letters, digits, and
special characters including `~ ! @ # $ % ^ * ( ) - _
= + \ | [ { } ] ; : . / ? and spaces
The password cannot be the same as the account or
mirror writing of the account
NOTE
Due to the valid value ranges of parameter FAILOVERMODE, SPECIALMODETYPE and PATHTYPE
are varied for different Huawei storage system, please refer to the API document of corresponding
Huawei storage in use to get the valid parameter values.
4.2 Configuring the Cinder Driver for Fibre Channel
Storage
This section describes how to configure Cinder Driver for different products for the Fibre
Channel products.
Prerequisites
For a Fibre Channel network, the sg tool must be installed so that storage resources can be
used.
When create a volume from image, the multipath tool must be installed, and add the following
configuration keys in the target back end configuration group of the /etc/cinder/cinder.conf
file in Cinder volume node:
use_multipath_for_image_xfer = True
enforce_multipath_for_image_xfer = True
OpenStack Cinder Driver
Configuration Guide 4 Cinder Driver Basis Properties Configuration
Issue 01 (2018-10-15) Copyright © Huawei Technologies Co., Ltd. 17

4.2.1 Configuring the Cinder Driver for OceanStor T Series V1
(Fibre Channel)
Procedure
Step 1 In /etc/cinder, create a Huawei-customized diver configuration file. The file format is XML.
Change the name of the driver configuration file based on site requirements, for example,
cinder_huawei_conf.xml.
Step 2 Configure parameters in the driver configuration file, including mandatory and optional
parameters.
Mandatory parameters:
<?xml version='1.0' encoding='UTF-8'?>
<config>
<Storage>
<Product>T</Product>
<Protocol>FC</Protocol>
<ControllerIP0>x.x.x.x</ControllerIP0>
<ControllerIP1>x.x.x.x</ControllerIP1>
<UserName>xxx</UserName>
<UserPassword>xxx</UserPassword>
</Storage>
<LUN>
<StoragePool Name="xxx" />
<StoragePool Name="xxx" />
</LUN>
</config>
Optional parameters(Pick and add the optional parameter in the above XML file):
<LUN>
<LUNType>xxx</LUNType>
<StripUnitSize>xxx</StripUnitSize>
<WriteType>xxx</WriteType>
<Prefetch Type="xxx" Value="xxx" />
</LUN>
NOTE
Make sure the owner and group of "/etc/cinder/cinder_huawei_conf.xml" file are the same as "/etc/
cinder/cinder.conf" file's owner and group.
-rw-r--r-- 1 cinder cinder 2662 Jul 29 02:13 cinder.conf
-rw-r--r-- 1 cinder cinder 778 Jul 30 02:56 cinder_huawei_conf.xml
For details about the parameters in the configuration file, see section "4.2.7 ".
Step 3 Configure the cinder.conf file.
Add a [TV1_FC] section at the end of "/etc/cinder/cinder.conf" file, configure the TV1_FC
back end with the Huawei driver. The volume_driver indicates the loaded driver file, and
cinder_huawei_conf_file indicates the specified Huawei-customized configuration file.
[TV1_FC]
volume_driver = cinder.volume.drivers.huawei.huawei_t.HuaweiTFCDriver
cinder_huawei_conf_file = /etc/cinder/cinder_huawei_conf.xml
volume_backend_name = TV1_FC
In the [DEFAULT] section, enable the TV1_FC back end:
[DEFAULT]
...
enabled_backends=TV1_FC
OpenStack Cinder Driver
Configuration Guide 4 Cinder Driver Basis Properties Configuration
Issue 01 (2018-10-15) Copyright © Huawei Technologies Co., Ltd. 18

Step 4 Restart the Cinder service.
----End
4.2.2 Configuring the Cinder Driver for OceanStor T Series V2
(Fibre Channel)
Procedure
Step 1 In /etc/cinder, create a Huawei-customized diver configuration file. The file format is XML.
Change the name of the driver configuration file based on site requirements, for example,
cinder_huawei_conf.xml.
Step 2 Configure parameters in the driver configuration file, including mandatory and optional
parameters.
Mandatory parameters:
<?xml version='1.0' encoding='UTF-8'?>
<config>
<Storage>
<Product>TV2</Product>
<Protocol>FC</Protocol>
<RestURL>https://x.x.x.x:8088/deviceManager/rest/</RestURL>
<UserName>xxx</UserName>
<UserPassword>xxx</UserPassword>
</Storage>
<LUN>
<StoragePool>xxx</StoragePool>
</LUN>
</config>
Optional parameters(Pick and add the optional parameter in the above XML file):
<LUN>
<LUNType>xxx</LUNType>
<WriteType>xxx</WriteType>
<Prefetch Type="xxx" Value="xxx" />
<LUNcopyWaitInterval>xxx</LUNcopyWaitInterval>
<Timeout>432000</Timeout>
</LUN>
NOTE
Make sure the owner and group of "/etc/cinder/cinder_huawei_conf.xml" file are the same as "/etc/
cinder/cinder.conf" file's owner and group.
-rw-r--r-- 1 cinder cinder 2662 Jul 29 02:13 cinder.conf
-rw-r--r-- 1 cinder cinder 778 Jul 30 02:56 cinder_huawei_conf.xml
For details about the parameters in the configuration file, see section "4.2.7 ".
Step 3 Configure the cinder.conf file.
Add a [TV2_FC] section at the end of "/etc/cinder/cinder.conf" file, configure the TV2_FC
back end with the Huawei driver. The volume_driver indicates the loaded driver file, and
cinder_huawei_conf_file indicates the specified Huawei-customized configuration file.
[TV2_FC]
volume_driver = cinder.volume.drivers.huawei.huawei_driver.HuaweiFCDriver
cinder_huawei_conf_file = /etc/cinder/cinder_huawei_conf.xml
volume_backend_name = TV2_FC
In the [DEFAULT] section, enable the TV2_FC back end:
OpenStack Cinder Driver
Configuration Guide 4 Cinder Driver Basis Properties Configuration
Issue 01 (2018-10-15) Copyright © Huawei Technologies Co., Ltd. 19

[DEFAULT]
...
enabled_backends=TV2_FC
Step 4 Restart the Cinder service.
----End
4.2.3 Configuring the Cinder Driver for OceanStor V3/V5 (Fibre
Channel)
Procedure
Step 1 In /etc/cinder, create a Huawei-customized driver configuration file. The file format is XML.
Change the name of the driver configuration file based on site requirements, for example,
cinder_huawei_conf.xml.
Step 2 Configure parameters in the driver configuration file, including mandatory and optional
parameters.
Mandatory parameters:
<?xml version='1.0' encoding='UTF-8'?>
<config>
<Storage>
<Product>V3</Product>
<Protocol>FC</Protocol>
<RestURL>https://x.x.x.x:8088/deviceManager/rest/</RestURL>
<UserName>xxx</UserName>
<UserPassword>xxx</UserPassword>
</Storage>
<LUN>
<LUNType>xxx</LUNType>
<WriteType>xxx</WriteType>
<LUNcopyWaitInterval>xxx</LUNcopyWaitInterval>
<Timeout>432000</Timeout>
<StoragePool>xxx</StoragePool>
</LUN>
</config>
Optional parameters(Pick and add the optional parameter in the above XML file):
<LUN>
<LUNType>xxx</LUNType>
<WriteType>xxx</WriteType>
<Prefetch Type="xxx" Value="xxx" />
<LUNcopyWaitInterval>xxx</LUNcopyWaitInterval>
<Timeout>432000</Timeout>
</LUN>
NOTE
Make sure the owner and group of "/etc/cinder/cinder_huawei_conf.xml" file are the same as "/etc/
cinder/cinder.conf" file's owner and group.
-rw-r--r-- 1 cinder cinder 2662 Jul 29 02:13 cinder.conf
-rw-r--r-- 1 cinder cinder 778 Jul 30 02:56 cinder_huawei_conf.xml
For details about the parameters in the configuration file, see section "4.2.7 ".
Step 3 Configure the cinder.conf file.
Add a [V3_FC] section at the end of "/etc/cinder/cinder.conf" file, configure the V3_FC back
end with the Huawei driver. The volume_driver indicates the loaded driver file, and
cinder_huawei_conf_file indicates the specified Huawei-customized configuration file.
OpenStack Cinder Driver
Configuration Guide 4 Cinder Driver Basis Properties Configuration
Issue 01 (2018-10-15) Copyright © Huawei Technologies Co., Ltd. 20

[V3_FC]
volume_driver = cinder.volume.drivers.huawei.huawei_driver.HuaweiFCDriver
cinder_huawei_conf_file = /etc/cinder/cinder_huawei_conf.xml
volume_backend_name = V3_FC
In the [DEFAULT] section, enable the V3_FC back end:
[DEFAULT]
...
enabled_backends=V3_FC
Step 4 Restart the Cinder service.
----End
4.2.4 Configuring the Cinder Driver of OceanStor 18000 Series
(Fibre Channel)
This section describes how to configure the Cinder Driver for 18000 series for FC storage
products.
Procedure
Step 1 In /etc/cinder, create a Huawei-customized driver configuration file. The file format is XML.
Change the name of the driver configuration file based on site requirements, for example,
cinder_huawei_conf.xml.
Step 2 Configure the cinder.conf file, including mandatory and optional parameters.
Mandatory parameters:
<?xml version='1.0' encoding='UTF-8'?>
<config>
<Storage>
<Product>18000</Product>
<Protocol>FC</Protocol>
<RestURL>https://x.x.x.x:8088/deviceManager/rest/</RestURL>
<UserName>xxx</UserName>
<UserPassword>xxx</UserPassword>
</Storage>
<LUN>
<StoragePool>xxx</StoragePool>
</LUN>
</config>
Optional parameters(Pick and add the optional parameter in the above XML file):
<LUN>
<LUNType>xxx</LUNType>
<WriteType>xxx</WriteType>
<Prefetch Type="xxx" Value="xxx" />
<LUNcopyWaitInterval>xxx</LUNcopyWaitInterval>
<Timeout>432000</Timeout>
</LUN>
NOTE
Make sure the owner and group of "/etc/cinder/cinder_huawei_conf.xml" file are the same as "/etc/
cinder/cinder.conf" file's owner and group.
-rw-r--r-- 1 cinder cinder 2662 Jul 29 02:13 cinder.conf
-rw-r--r-- 1 cinder cinder 778 Jul 30 02:56 cinder_huawei_conf.xml
For details about the parameters in the configuration file, see section"4.2.7 ".
OpenStack Cinder Driver
Configuration Guide 4 Cinder Driver Basis Properties Configuration
Issue 01 (2018-10-15) Copyright © Huawei Technologies Co., Ltd. 21

Step 3 Configure the cinder.conf file.
Add a [18000_FC] section at the end of "/etc/cinder/cinder.conf" file, configure the 18000_FC
back end with the Huawei driver. The volume_driver indicates the loaded driver file, and
cinder_huawei_conf_file indicates the specified Huawei-customized configuration file.
[18000_FC]
volume_driver = cinder.volume.drivers.huawei.huawei_driver.HuaweiFCDriver
cinder_huawei_conf_file = /etc/cinder/cinder_huawei_conf.xml
volume_backend_name = 18000_FC
In the [DEFAULT] section, enable the 18000V3_FC back end:
[DEFAULT]
...
enabled_backends=18000_FC
Step 4 Restart the Cinder service.
----End
4.2.5 Configuring the Cinder Driver for Dorado Series V3(Fibre
Channel)
Procedure
Step 1 In /etc/cinder, create a Huawei-customized driver configuration file. The file format is XML.
Change the name of the driver configuration file based on site requirements, for example,
cinder_huawei_conf.xml.
Step 2 Configure parameters in the driver configuration file, including mandatory and optional
parameters.
Mandatory parameters:
<?xml version='1.0' encoding='UTF-8'?>
<config>
<Storage>
<Product>Dorado</Product>
<Protocol>FC</Protocol>
<RestURL>https://x.x.x.x:8088/deviceManager/rest/</RestURL>
<UserName>xxx</UserName>
<UserPassword>xxx</UserPassword>
</Storage>
<LUN>
<LUNType>Thin</LUNType>
<StoragePool>xxx</StoragePool>
</LUN>
</config>
Optional parameters(Pick and add the optional parameter in the above XML file):
<LUN>
<WriteType>xxx</WriteType>
<Prefetch Type="xxx" Value="xxx" />
</LUN>
NOTE
Make sure the owner and group of "/etc/cinder/cinder_huawei_conf.xml" file are the same as "/etc/
cinder/cinder.conf" file's owner and group.
-rw-r--r-- 1 cinder cinder 2662 Jul 29 02:13 cinder.conf
-rw-r--r-- 1 cinder cinder 778 Jul 30 02:56 cinder_huawei_conf.xml
For details about the parameters in the configuration file, see section "4.2.7 ".
OpenStack Cinder Driver
Configuration Guide 4 Cinder Driver Basis Properties Configuration
Issue 01 (2018-10-15) Copyright © Huawei Technologies Co., Ltd. 22

Step 3 Configure the cinder.conf file.
Add a [Dorado_FC] section at the end of "/etc/cinder/cinder.conf" file, configure the
Dorado_FC back end with the Huawei driver. The volume_driver indicates the loaded driver
file, and cinder_huawei_conf_file indicates the specified Huawei-customized configuration
file.
[Dorado_FC]
volume_driver = cinder.volume.drivers.huawei.huawei_driver.HuaweiFCDriver
cinder_huawei_conf_file = /etc/cinder/cinder_huawei_conf.xml
volume_backend_name = Dorado_FC
In the [DEFAULT] section, enable the Dorado_FC back end:
[DEFAULT]
...
enabled_backends=Dorado_FC
Step 4 Restart the Cinder service.
----End
4.2.6 Configuring the Auto Zoning
Auto zoning is not compulsory, When you need to use this function, do the following
configuration.
Procedure
Step 1 Configure the cinder.conf file.
For more details please refer to https://docs.openstack.org/ocata/config-reference/block-
storage/fc-zoning.html
For example, configure the Brocade Exchanger:
[DEFAULT]
...
zoning_mode = fabric
[fc-zone-manager]
fc_fabric_names = swd77
zoning_policy = initiator
brcd_sb_connector =
cinder.zonemanager.drivers.brocade.brcd_fc_zone_client_cli.BrcdFCZoneClientCLI
fc_san_lookup_service =
cinder.zonemanager.drivers.brocade.brcd_fc_san_lookup_service.BrcdFCSanLookupServi
ce
zone_driver =
cinder.zonemanager.drivers.brocade.brcd_fc_zone_driver.BrcdFCZoneDriver
[swd77]
fc_fabric_address = x.x.x.x
fc_fabric_password = xxx
fc_fabric_port = 22
fc_fabric_user = xxx
principal_switch_wwn = xxx
zone_activate = True
Step 2 Restart the Cinder service.
----End
OpenStack Cinder Driver
Configuration Guide 4 Cinder Driver Basis Properties Configuration
Issue 01 (2018-10-15) Copyright © Huawei Technologies Co., Ltd. 23
lAuto Zoning is not supported for tenant user.
4.2.7 Parameters in the Configuration File
Table 4-4 Mandatory parameters
Parameter Description Applicable
To
Product Type of a storage product. Possible values are T, TV2,
18000, V3, V5 and Dorado.
All
Protocol Type of a connection protocol. Possible value is FC. All
ControllerIP0 IP address of the primary controller on an OceanStor T
series V100R005 storage device.
T series V1
ControllerIP1 IP address of the secondary controller on an OceanStor
T series V100R005 storage device.
T series V1
RestURL Access address of the REST interface, for example,
https://x.x.x.x:8088/devicemanager/rest/. x.x.x.x
indicates the management IP address. If you need to
configure multiple RestURL, separate them by
semicolons (;).
T series V2
V3
V5
18000
Dorado
UserName User name of an administrator. All
UserPassword Password of an administrator. All
StoragePool Name of a storage pool to be used. If you need to
configure multiple storage pools, separate them by
semicolons (;). Refer to 4.1.1 to configure TV1 series.
All
Table 4-5 Optional parameters
Parameter Default Value Description Applicabl
e To
LUNType Thick(except
Dorado)
Thin(Dorado)
Type of the LUNs to be created. The
value can be Thick or Thin. Dorado
only support Thin LUNs.
All
StripUnitSize 64 Stripe depth of a LUN to be created,
optional values: 4, 8,16, 32, 64, 128,
256, 512. The unit is KB.
This parameter is invalid when a thin
LUN is created.
T series V1
OpenStack Cinder Driver
Configuration Guide 4 Cinder Driver Basis Properties Configuration
Issue 01 (2018-10-15) Copyright © Huawei Technologies Co., Ltd. 24
Parameter Default Value Description Applicabl
e To
WriteType 1 Cache write type. Possible values are: 1
(write back), 2 (write through).
All
Prefetch Type 3 Cache prefetch policy. Possible values
are: 0 (no prefetch), 1 (fixed prefetch),
2 (variable prefetch) or 3 (intelligent
prefetch).
All
Prefetch Value 0 Cache prefetch value. All
LUNcopyWait
Interval
5 After LUN copy is enabled, the plug-in
frequently queries the copy progress.
You can set a value to specify the query
interval.
T series V2
V3
V5
18000
Dorado
Timeout 432000 Timeout interval for waiting LUN copy
of a storage device to complete. The
unit is second.
T series V2
V3
V5
18000
Dorado
HostIP - IP address of the Nova compute node's
host.
T series V1
OSType Linux Operating system of the Nova compute
node's host.
T series V1
lThe value of StoragePool cannot contain Chinese characters
lAll of the parameter values cannot include XML special character < > & ' "
4.2.8 Configuring FC Multipathing
If you need to configure the multipathing for FC, configure it as follows:
Procedure
Step 1 Enable the multipathing switch of the OpenStack Nova module.
If the version of OpenStack is Liberty or Mitaka, add iscsi_use_multipath = True in [libvirt]
of /etc/nova/nova.conf.
If the version of OpenStack is Newton or Ocata, add volume_use_multipath = True in
[libvirt] of /etc/nova/nova.conf.
OpenStack Cinder Driver
Configuration Guide 4 Cinder Driver Basis Properties Configuration
Issue 01 (2018-10-15) Copyright © Huawei Technologies Co., Ltd. 25
Step 2 Restart the nova-compute service.
----End
4.2.9 Configuring ALUA
Procedure
Configure ALUA.
Configure the driver configuration file as follows:
<FC>
<Initiator Name="xxx" ALUA="xxx" FAILOVERMODE="xxx" PATHTYPE="xxx"/>
<Initiator Name="xxx" ALUA="xxx" FAILOVERMODE="xxx" PATHTYPE="xxx"/>
</FC>
Table 4-6 Parameters description
Parameter Defaul
t
Description
Name - FC initiator WWN
ALUA 0 0: default(Huawei Ultrapath)
1: uses third-party multipathing software
FAILOVERMODE - Initiator switchover mode, this parameter needs to
be delivered only when uses third-party multipathing
software is enabled
SPECIALMODETYPE - Initiator special mode type, this parameter needs to
be delivered only when initiator switchover mode is
special ALUA
PATHTYPE - Initiator path type, this parameter needs to be
delivered only when uses third-party multipathing
software is enabled
NOTE
Due to the valid value ranges of parameter FAILOVERMODE, SPECIALMODETYPE and PATHTYPE
are varied for different Huawei storage system, please refer to the API document of corresponding
Huawei storage in use to get the valid parameter values.
4.3 Configuring Multi-Storage Support
Example for configuring multiple storage systems in /etc/cinder/cinder.conf:
[DEFAULT]
...
enabled_backends = t_fc, 18000_fc
[t_fc]
volume_driver = cinder.volume.drivers.huawei.huawei_t.HuaweiTFCDriver
cinder_huawei_conf_file = /etc/cinder/cinder_huawei_conf_t_fc.xml
volume_backend_name = t_fc
OpenStack Cinder Driver
Configuration Guide 4 Cinder Driver Basis Properties Configuration
Issue 01 (2018-10-15) Copyright © Huawei Technologies Co., Ltd. 26
[18000_fc]
volume_driver = cinder.volume.drivers.huawei.huawei_driver.HuaweiFCDriver
cinder_huawei_conf_file = /etc/cinder/cinder_huawei_conf_18000_fc.xml
volume_backend_name = 18000_fc
4.4 Using tenant user
Configure the tenant user parameters in the driver configuration file, as below:
<?xml version='1.0' encoding='UTF-8'?>
<config>
<Storage>
...
<UserName>xxx</UserName>
<UserPassword>xxx</UserPassword>
<vStoreName>xxx</vStoreName>
</Storage>
...
</config>
Table 4-7 Tenant parameters description
Parameter Description
UserName Tenant user name
UserPassword Tenant user password
vStoreName vStore name
lHow to configure other parameters, please refer to the chapters above.
lOnly can configure using tenant user while integrated with backend storage that supports
multi-tenant feature.
OpenStack Cinder Driver
Configuration Guide 4 Cinder Driver Basis Properties Configuration
Issue 01 (2018-10-15) Copyright © Huawei Technologies Co., Ltd. 27

5 Cinder Driver Advanced Properties
Configuration
Huawei storage supports advanced properties, such as Smartx and HyperMetro. By
associating with specified volume types in OpenStack, these properties make the combination
of OpenStack and storage advanced properties possible.
5.1 Configuring the SmartQoS Property
5.2 Configuring the SmartPartition Property
5.3 Configuring the Thick Property
5.4 Configuring the Thin Property
5.5 Configuring the SmartCache Property
5.6 Configuring the SmartTier Property
5.7 Configuring the HyperMetro Property
5.8 Configuring the Replication V2.1
5.9 Create a volume on a certain storage pool
5.10 Create a volume with a certain disk type
5.11 Create a volume on a certain volume back end
5.12 Configuring Consistency Groups
5.13 Configuring Backup Snapshot
5.14 Configuring Certificate Verify
5.15 Configuring the Owning Controller of a LUN
5.16 Configuring the SmartDedupe Property
5.17 Configuring the SmartCompression Property
5.18 Create a volume with fast clone
5.19 Configuring the LUN Copy Speed
OpenStack Cinder Driver
Configuration Guide 5 Cinder Driver Advanced Properties Configuration
Issue 01 (2018-10-15) Copyright © Huawei Technologies Co., Ltd. 28
5.1 Configuring the SmartQoS Property
About This Chapter
Qos in OpenStack mainly depends on the front-end Hypervisor and the back-end storage.
Huawei OpenStack Cinder Driver supports "frontend QoS" and "backend QoS". Front-end
QoS options are:
total_bytes_sec, read_bytes_sec, write_bytes_sec, total_iops_sec, read_iops_sec,
write_iops_sec
Huawei storage backends support the following QoS properties. One or multiple properties
can be associated with one QoS property simultaneously.
Protection policies: latency, minIOPS, minBandWidth
Restriction policies: maxIOPS, maxBandWidth
Protection policies and Restriction policies are mutually exclusive. If they are configured
together, volumes will fail to be created.
"IOType" is mandatory. If it isn't configured in qos, volumes will fail to be created.
5.1.1 Configuring the Front-end QoS
This section describes how to configure the front-end qos.
Procedure
Step 1 Run the cinder type-create XXX command to create a volume type. XXX indicates the name
of a volume type.
root@ubuntu:/# cinder type-create high-iops
+--------------------------------------+-----------+-------------+-----------+
| ID | Name | Description | Is_Public |
+--------------------------------------+-----------+-------------+-----------+
| 84b189d3-8984-4e92-aab0-fa4a913126bf | high-iops | - | True |
+--------------------------------------+-----------+-------------+-----------+
Step 2 Run the cinder qos-create xxx consumer="front-end" read_iops_sec=xxx
write_iops_sec=xxx command to create front QoS control property parameters.
read_iops_sec=2000 write_iops_sec=1000 is used as an example.
root@ubuntu:/# cinder qos-create high-iops consumer="front-end"
read_iops_sec=2000 write_iops_sec=1000
+----------+-----------------------------------------------------+
| Property | Value |
+----------+-----------------------------------------------------+
| consumer | front-end |
| id | 7dc73b5b-1b19-4371-8dee-8edbc52cf625 |
| name | high-iops |
| specs | {'write_iops_sec': '1000', 'read_iops_sec': '2000'} |
+----------+-----------------------------------------------------+
OpenStack Cinder Driver
Configuration Guide 5 Cinder Driver Advanced Properties Configuration
Issue 01 (2018-10-15) Copyright © Huawei Technologies Co., Ltd. 29

Step 3 Associate the volume type with QoS control properties.
1. Check the usage of the cinder qos-associate qos command.
The association command format is cinder qos-associate <ID of QoS specifications>
<ID of volume type>.
root@ubuntu:/# cinder qos-associate
usage: cinder qos-associate <qos_specs> <volume_type_id>
try 'cinder help qos-associate' for more information.
2. Run the cinder qos-associate 7dc73b5b-1b19-4371-8dee-8edbc52cf625
84b189d3-8984-4e92-aab0-fa4a913126bf.
----End
Results
lRun the cinder qos-list command to view details about the QoS policy configuration.
root@lc1404:~# cinder qos-list
+--------------------------------------+----------------+-----------
+----------------------------------------------------------+
| ID | Name | Consumer
| specs |
+--------------------------------------+----------------+-----------
+----------------------------------------------------------+
| 7dc73b5b-1b19-4371-8dee-8edbc52cf625 | high-iops | front-end |
{'write_iops_sec': '1000', 'read_iops_sec': '2000'} |
+--------------------------------------+----------------+-----------
+----------------------------------------------------------+
NOTE
If consumer="front-end" is configured in qos, front-end QoS will be created; if not, back-end QoS will
be created.
5.1.2 Configuring the Maximum Control IOPS
This section describes how to configure the maximum Control IOPS.
Procedure
Step 1 Run the cinder type-create XXX command to create a volume type. XXX indicates the name
of a volume type.
root@ubuntu:/# cinder type-create maxIOPS
+--------------------------------------+---------+-------------+-----------+
| ID | Name | Description | Is_Public |
+--------------------------------------+---------+-------------+-----------+
| 3d9cc52e-069b-4245-b201-945e0ef571cf | maxIOPS | - | True |
+--------------------------------------+---------+-------------+-----------+
Step 2 Run the cinder type-key maxIOPS set capabilities:QoS_support='<is> true' command to
set a key-value pair for the maxIOPS volume type.
Step 3 Run the cinder qos-create xxx maxIOPS=xxx IOType=xxx command to create QoS control
property parameters.
lThe first xxx indicates the created QoS control properties name.
lmaxIOPS: indicates the maximum IOPS. The value is an integer larger than 0.
lIOType: indicates the read and write type.0 indicates the control read I/Os, 1 indicates
the control write I/Os, 2 indicates the control read and write I/Os.
OpenStack Cinder Driver
Configuration Guide 5 Cinder Driver Advanced Properties Configuration
Issue 01 (2018-10-15) Copyright © Huawei Technologies Co., Ltd. 30

Dorado storage only supports IOType "2".
maxIOPS=100 IOType=2 is used as an example.
root@ubuntu:/# cinder qos-create maxiops maxIOPS=100 IOType=2
+----------+---------------------------------------+
| property | value |
+----------+---------------------------------------+
| consumer | back-end |
| id | 1f772258-49f0-47a9-aa9c-d8f32d844bb1 |
| name | maxiops |
| specs | {u'IOType': u'2', u'maxIOPS': u'100'} |
+----------+---------------------------------------+
Step 4 Associate the volume type with QoS control properties.
1. Check the usage of the cinder qos-associate qos command.
The association command format is cinder qos-associate <ID of QoS specifications>
<ID of volume type>.
root@ubuntu:/# cinder qos-associate
usage: cinder qos-associate <qos_specs> <volume_type_id>
try 'cinder help qos-associate' for more information.
2. Run the cinder qos-associate 1f772258-49f0-47a9-aa9c-d8f32d844bb1
3d9cc52e-069b-4245-b201-945e0ef571cf.
----End
5.1.3 Configuring the Minimum Control IOPS
This section describes how to configure the minimum Control IOPS.
Procedure
Step 1 Run the cinder type-create XXX command to create a volume type. XXX indicates the name
of a volume type.
root@ubuntu:/# cinder type-create minIOPS
+--------------------------------------+---------+-------------+-----------+
| ID | Name | Description | Is_Public |
+--------------------------------------+---------+-------------+-----------+
| 1a1dcee8-d9ae-4de9-b1c6-2317a4ad7219 | minIOPS | - | True |
+--------------------------------------+---------+-------------+-----------+
Step 2 Run the cinder type-key minIOPS set capabilities:QoS_support='<is> true' command to
set a key-value pair for the minIOPS volume type.
Step 3 Run the cinder qos-create xxx minIOPS=xxx IOType=xxx command to create QoS control
property parameters.
lThe first xxx indicates the created QoS control properties name.
lminIOPS: indicates the minimum IOPS. The value is an integer larger than 0.
lIOType: indicates the read and write type.0 indicates the control read I/Os, 1 indicates
the control write I/Os, 2 indicates the control read and write I/Os.
OpenStack Cinder Driver
Configuration Guide 5 Cinder Driver Advanced Properties Configuration
Issue 01 (2018-10-15) Copyright © Huawei Technologies Co., Ltd. 31

Dorado storage only supports IOType "2".
minIOPS=100 IOType=2 is used as an example.
root@ubuntu:/# cinder qos-create miniops minIOPS=50 IOType=2
+----------+---------------------------------------+
| property | value |
+----------+---------------------------------------+
| consumer | back-end |
| id | 8deaf13c-bf1c-4a71-94d0-1149805693ce |
| name | miniops |
| specs | {u'IOType': u'2', u'minIOPS': u'50'} |
+----------+---------------------------------------+
Step 4 Associate the volume type with QoS control properties.
1. Check the usage of the cinder qos-associate qos command.
The association command format is cinder qos-associate <ID of QoS specifications>
<ID of volume type>.
root@ubuntu:/# cinder qos-associate
usage: cinder qos-associate <qos_specs> <volume_type_id>
try 'cinder help qos-associate' for more information.
2. Run the cinder qos-associate 8deaf13c-bf1c-4a71-94d0-1149805693ce 1a1dcee8-
d9ae-4de9-b1c6-2317a4ad7219.
----End
5.1.4 Configuring the Maximum Control Bandwidth
This section describes how to configure the maximum control bandwidth.
Procedure
Step 1 Run the cinder type-create XXX command to create a volume type. XXX indicates the name
of a volume type.
root@ubuntu:/# cinder type-create maxBandWidth
+--------------------------------------+--------------+-------------+-----------
+
| ID | Name | Description | Is_Public
|
+--------------------------------------+--------------+-------------+-----------
+
| 24200fbb-c984-4d99-9465-a820464662d6 | maxBandWidth | - | True |
+--------------------------------------+--------------+-------------+-----------+
Step 2 Run the cinder type-key maxBandWidth set capabilities:QoS_support='<is> true'
command to set a key-value pair for the maxBandWidth volume type.
Step 3 Run the cinder qos-create xxx maxBandWidth=xxx IOType=xxx command to create QoS
control property parameters.
lThe first xxx indicates the created QoS control properties name.
lmaxBandWidth: indicates the maximum BANDWIDTH. The value is an integer larger
than 0 and expressed in MB/s.
OpenStack Cinder Driver
Configuration Guide 5 Cinder Driver Advanced Properties Configuration
Issue 01 (2018-10-15) Copyright © Huawei Technologies Co., Ltd. 32

lIOType: indicates the read and write type.0 indicates the control read I/Os, 1 indicates
the control write I/Os, 2 indicates the control read and write I/Os.
Dorado storage only supports IOType "2".
maxBandWidth=100 IOType=2 is used as an example.
root@ubuntu:/# cinder qos-create maxbandwidth maxBandWidth=100 IOType=2
+----------+--------------------------------------------+
| property | value |
+----------+--------------------------------------------+
| consumer | back-end |
| id | 2f51c955-e029-48ca-aa8c-5d7ae462481e |
| name | maxbandwidth |
| specs | {u'maxBandWidth': u'100', u'IOType': u'2'} |
+----------+--------------------------------------------+
Step 4 Associate the volume type with QoS control properties.
1. Check the usage of the cinder qos-associate qos command.
The association command format is cinder qos-associate <ID of QoS specifications>
<ID of volume type>.
root@ubuntu:/# cinder qos-associate
usage: cinder qos-associate <qos_specs> <volume_type_id>
try 'cinder help qos-associate' for more information.
2. Run the cinder qos-associate 2f51c955-e029-48ca-aa8c-5d7ae462481e 24200fbb-
c984-4d99-9465-a820464662d6 command.
----End
5.1.5 Configuring the Minimum Control Bandwidth
This section describes how to configure the minimum control bandwidth.
Procedure
Step 1 Run the cinder type-create XXX command to create a volume type. XXX indicates the name
of a volume type.
root@ubuntu:/# cinder type-create minBandWidth
+--------------------------------------+--------------+-------------+-----------
+
| ID | Name | Description | Is_Public
|
+--------------------------------------+--------------+-------------+-----------
+
| 271bed0a-1cce-4e8f-a65e-b85ccb3b9a25 | minBandWidth | - | True |
+--------------------------------------+--------------+-------------+-----------+
Step 2 Run the cinder type-key minBandWidth set capabilities:QoS_support='<is> true'
command to set a key-value pair for the minBandWidth volume type.
Step 3 Run the cinder qos-create xxx minBandWidth=xxx IOType=xxx command to create QoS
control property parameters.
OpenStack Cinder Driver
Configuration Guide 5 Cinder Driver Advanced Properties Configuration
Issue 01 (2018-10-15) Copyright © Huawei Technologies Co., Ltd. 33

lThe first xxx indicates the created QoS control properties name.
lminBandWidth: indicates the minimum BANDWIDTH. The value is an integer larger
than 0 and expressed in MB/s.
lIOType: indicates the read and write type.0 indicates the control read I/Os, 1 indicates
the control write I/Os, 2 indicates the control read and write I/Os.
Dorado storage only supports IOType "2".
minBandWidth=100 IOType=2 is used as an example.
root@ubuntu:/# cinder qos-create minbandwidth minBandWidth=100 IOType=2
+----------+--------------------------------------------+
| property | value |
+----------+--------------------------------------------+
| consumer | back-end |
| id | 59c583d8-69d2-4c39-8c75-c1b21ef85f2e |
| name | minbandwidth |
| specs | {u'IOType': u'2', u'minBandWidth': u'100'} |
+----------+--------------------------------------------+
Step 4 Associate the volume type with QoS control properties.
1. Check the usage of the cinder qos-associate qos command.
The association command format is cinder qos-associate <ID of QoS specifications>
<ID of volume type>.
root@ubuntu:/# cinder qos-associate
usage: cinder qos-associate <qos_specs> <volume_type_id>
try 'cinder help qos-associate' for more information.
2. Run the cinder qos-associate 59c583d8-69d2-4c39-8c75-c1b21ef85f2e
271bed0a-1cce-4e8f-a65e-b85ccb3b9a25.
----End
5.1.6 Configuring the Control Latency
This section describes how to configure the control latency.
Procedure
Step 1 Run the cinder type-create XXX command to create a volume type. XXX indicates the name
of a volume type.
root@ubuntu:/# cinder type-create latency
+--------------------------------------+---------+-------------+-----------+
| ID | Name | Description | Is_Public |
+--------------------------------------+---------+-------------+-----------+
| ae34870a-21c0-4e50-8148-1e26f6ab6eab | latency | - | True |
+--------------------------------------+---------+-------------+-----------+
Step 2 Run the cinder type-key latency set capabilities:QoS_support='<is> true' command to set
a key-value pair for the latency volume type.
Step 3 Run the cinder qos-create xxx latency=xxx IOType=xxx command to create QoS control
property parameters.
OpenStack Cinder Driver
Configuration Guide 5 Cinder Driver Advanced Properties Configuration
Issue 01 (2018-10-15) Copyright © Huawei Technologies Co., Ltd. 34

lThe first xxx indicates the created QoS control properties name.
llatency: indicates LATENCY. The value is an integer larger than 0 and expressed in ms.
lIOType: indicates the read and write type.0 indicates the control read I/Os, 1 indicates
the control write I/Os, 2 indicates the control read and write I/Os.
Dorado storage only supports IOType "2".
latency=100 IOType=2 is used as an example.
root@ubuntu:/# cinder qos-create latency latency=100 IOType=2
+----------+---------------------------------------+
| property | value |
+----------+---------------------------------------+
| consumer | back-end |
| id | 6f305e9f-698b-4e9e-aa68-8efb80b43036 |
| name | latency |
| specs | {u'latency': u'100', u'IOType': u'2'} |
+----------+---------------------------------------+
Step 4 Associate the volume type with QoS control properties.
1. Check the usage of the cinder qos-associate qos command.
The association command format is cinder qos-associate <ID of QoS specifications>
<ID of volume type>.
root@ubuntu:/# cinder qos-associate
usage: cinder qos-associate <qos_specs> <volume_type_id>
try 'cinder help qos-associate' for more information.
2. Run the cinder qos-associate 6f305e9f-698b-4e9e-aa68-8efb80b43036
ae34870a-21c0-4e50-8148-1e26f6ab6eab command.
----End
5.1.7 Configuring Multiple Control Policies
This section describes how to configure multiple control policies.
Procedure
Step 1 Run the cinder type-create XXX command to create a volume type. XXX indicates the name
of a volume type.
root@ubuntu:/# cinder type-create multi-strategy
+--------------------------------------+----------------+-------------
+-----------+
| ID | Name | Description |
Is_Public |
+--------------------------------------+----------------+-------------
+-----------+
| df53d9d7-b1db-4e6b-847a-7a5150c39489 | multi-strategy | - |
True |
+--------------------------------------+----------------+-------------
+-----------+
Step 2 Run the cinder type-key multi-strategy set capabilities:QoS_support='<is> true'
command to set a key-value pair for the multi-strategy volume type.
OpenStack Cinder Driver
Configuration Guide 5 Cinder Driver Advanced Properties Configuration
Issue 01 (2018-10-15) Copyright © Huawei Technologies Co., Ltd. 35

Step 3 Run the cinder qos-create xxx latency=xxx minBandWidth=xxx IOType=xxx command to
create QoS control property parameters.
lThe first xxx indicates the created QoS control properties name.
llatency: indicates LATENCY. The value is an integer larger than 0 and expressed in ms.
lminBandWidth: indicates the minimum BANDWIDTH. The value is an integer larger
than 0 and expressed in MB/s.
lIOType: indicates the read and write type.0 indicates the control read I/Os, 1 indicates
the control write I/Os, 2 indicates the control read and write I/Os.
Dorado storage only supports IOType "2".
latency=100 minBandWidth=100 IOType=2 is used as an example.
root@ubuntu:/# cinder qos-create multi-strategy latency=100 minBandWidth=100
IOType=2
+----------+----------------------------------------------------------+
| Property | Value |
+----------+----------------------------------------------------------+
| consumer | back-end |
| id | 36f0fc4a-d5f5-4862-ab1f-e7fedeeddc41 |
| name | multi-strategy |
| specs | {'IOType': '2', 'minBandWidth': '100', 'latenct': '100'} |
+----------+----------------------------------------------------------+
Step 4 Associate the volume type with QoS control properties.
1. Check the usage of the cinder qos-associate qos command.
The association command format is cinder qos-associate <ID of QoS specifications>
<ID of volume type>.
root@ubuntu:/# cinder qos-associate
usage: cinder qos-associate <qos_specs> <volume_type_id>
try 'cinder help qos-associate' for more information.
2. Run the cinder qos-associate 36f0fc4a-d5f5-4862-ab1f-e7fedeeddc41 df53d9d7-
b1db-4e6b-847a-7a5150c39489.
----End
Results
lRun the cinder qos-list command to view details about the QoS policy configuration.
root@ubuntu:~# cinder qos-list
+--------------------------------------+----------------+----------
+----------------------------------------------------------+
| ID | Name | Consumer
| specs |
+--------------------------------------+----------------+----------
+----------------------------------------------------------+
| 36f0fc4a-d5f5-4862-ab1f-e7fedeeddc41 | multi-strategy | back-end |
{'IOType': '2', 'minBandWidth': '100', 'latenct': '100'} |
| 3e2b2fa5-aebb-4ea0-8dd2-52a577015769 | miniops | back-end
| {'IOType': '2', 'minIOPS': '50'} |
| 3fd0971e-f5fd-48d7-89d9-d2efb6fc44cf | maxbandwidth | back-end
| {'maxBandWidth': '100', 'IOType': '2'} |
| 6a4e24af-0e8c-4a64-91ee-859434414400 | latency | back-end
| {'latency': '100', 'IOType': '2'} |
OpenStack Cinder Driver
Configuration Guide 5 Cinder Driver Advanced Properties Configuration
Issue 01 (2018-10-15) Copyright © Huawei Technologies Co., Ltd. 36

| 9b34fbdf-91b5-473d-a5ff-0b4ea2ed9fd0 | maxiops | back-end
| {'IOType': '2', 'maxIOPS': '100'} |
| f60a3374-cdf3-45cc-86c4-12c06a3db8d4 | minbandwidth | back-end
| {'IOType': '2', 'minBandWidth': '100'} |
+--------------------------------------+----------------+----------
+----------------------------------------------------------+
lRun the cinder type-list command to view the volume type.
root@ubuntu:~# cinder type-list
+--------------------------------------+----------------+-------------
+-----------+
| ID | Name | Description |
Is_Public |
+--------------------------------------+----------------+-------------
+-----------+
| 3f19ccd1-3ac2-4ce7-b907-d532b8ddbe52 | maxBandWidth | - |
True |
| 92dbab58-07d8-46e6-9327-532a9a3b30b6 | maxIOPS | - |
True |
| 98d5ad9c-4591-4d18-ba09-199f6dba95a9 | minBandWidth | - |
True |
| df53d9d7-b1db-4e6b-847a-7a5150c39489 | multi-strategy | - |
True |
| e28d430e-ccc5-4f18-914a-b0c8008dc42d | latency | - |
True |
| f63f6eb4-7036-4452-bc46-9d31cba095d1 | minIOPS | - |
True |
+--------------------------------------+----------------+-------------
+-----------+
5.2 Configuring the SmartPartition Property
The following example describes how to configure the SmartPartition property.
Procedure
Step 1 Run the cinder type-create XXX command to create a volume type. XXX indicates the name
of a volume type.
root@ubuntu-204:~# cinder type-create SmartPartition
+--------------------------------------+----------------+-------------
+-----------+
| ID | Name | Description | Is_Public
|
+--------------------------------------+----------------+-------------
+-----------+
| a7648f77-fb56-41f2-9d50-3c014534ef66 | SmartPartition | - | True
|
+--------------------------------------+----------------+-------------
+-----------+
Step 2 Run the cinder type-key SmartPartition set capabilities:smartpartition='<is> true'
command to set a key-value pair for the SmartPartition volume type.
Step 3 Run the cinder type-key SmartPartition set smartpartition:partitionname
='test_partition'
partitionname indicates the name of a SmartPartition partition that has been configured on
the storage system.
Step 4 Create a volume that supports SmartPartition.
root@ubuntu-204:~# cinder create 1 --display-name test001 --volume-type
SmartPartition
+---------------------+-----------------------------------------+
| property | value |
OpenStack Cinder Driver
Configuration Guide 5 Cinder Driver Advanced Properties Configuration
Issue 01 (2018-10-15) Copyright © Huawei Technologies Co., Ltd. 37
+---------------------+-----------------------------------------+
| attachments | [] |
| availability_zone | nova |
| bootable | false |
| created_at | 2015-06-26t13:40:10.483450 |
| display_description | none |
| display_name | test001 |
| encrypted | false |
| id | 1b2a87e4-eb8c-46ab-922c-63fcd7db8f20 |
| metadata | {} |
| multiattach | false |
| size | 1 |
| snapshot_id | none |
| source_volid | none |
| status | creating |
| volume_type | SmartPartition |
+---------------------+-----------------------------------------+
----End
5.3 Configuring the Thick Property
The following example describes how to configure the Thick property.
Dorado V3 does't support Thick volume.
Procedure
Step 1 Run the cinder type-create XXX command to create a volume type. XXX indicates the name
of a volume type.
root@ubuntu-204:~# cinder type-create Thick
+--------------------------------------+-------+-------------+-----------+
| ID | Name | Description | Is_Public |
+--------------------------------------+-------+-------------+-----------+
| a7648f77-fb56-41f2-9d50-3c014534ef66 | Thick | - | True |
+--------------------------------------+-------+-------------+-----------+
Step 2 Run the cinder type-key Thick set capabilities:thick_provisioning_support='<is> true'
command to set a key-value pair for the Thick volume type.
Step 3 Run the cinder type-key Thick set provisioning:type='thick' command to set the
scheduling mechanism for the Thick volume.
Step 4 Create a volume that supports Thick.
root@ubuntu-204:~# cinder create 1 --display-name test001 --volume-type Thick
+---------------------+-----------------------------------------+
| property | value |
+---------------------+-----------------------------------------+
| attachments | [] |
| availability_zone | nova |
| bootable | false |
| created_at | 2015-06-26t13:40:10.483450 |
| display_description | none |
| display_name | test001 |
| encrypted | false |
| id | 1b2a87e4-eb8c-46ab-922c-63fcd7db8f20 |
| metadata | {} |
| multiattach | false |
OpenStack Cinder Driver
Configuration Guide 5 Cinder Driver Advanced Properties Configuration
Issue 01 (2018-10-15) Copyright © Huawei Technologies Co., Ltd. 38

| size | 1 |
| snapshot_id | none |
| source_volid | none |
| status | creating |
| volume_type | Thick |
+---------------------+-----------------------------------------+
----End
5.4 Configuring the Thin Property
The following example describes how to configure the Thin property.
Procedure
Step 1 Run the cinder type-create XXX command to create a volume type. XXX indicates the name
of a volume type.
root@ubuntu-204:~# cinder type-create Thin
+--------------------------------------+------+-------------+-----------+
| ID | Name | Description | Is_Public |
+--------------------------------------+------+-------------+-----------+
| ba648f77-fb56-41f2-9d50-3c014534eedd | Thin | - | True |
+--------------------------------------+------+-------------+-----------+
Step 2 Run the cinder type-key Thin set capabilities:thin_provisioning_support='<is> true'
command to set key-value pairs of the Thin volume type.
Step 3 Create a volume that supports Thin.
root@ubuntu-204:~# cinder create 1 --display-name test001 --volume-type Thin
+---------------------+---------------------------------------+
| property | value |
+---------------------+---------------------------------------+
| attachments | [] |
| availability_zone | nova |
| bootable | false |
| created_at | 2015-06-26t13:40:10.483450 |
| display_description | none |
| display_name | test001 |
| encrypted | false |
| id | 1b2a87e4-eb8c-46ab-922c-63fcd7db8f20 |
| metadata | {} |
| multiattach | false |
| size | 1 |
| snapshot_id | none |
| source_volid | none |
| status | creating |
| volume_type | Thin |
+---------------------+---------------------------------------+
----End
5.5 Configuring the SmartCache Property
The following example describes how to configure the SmartCache property.
Procedure
Step 1 Run the cinder type-create XXX command to create a volume type. XXX indicates the name
of a volume type.
OpenStack Cinder Driver
Configuration Guide 5 Cinder Driver Advanced Properties Configuration
Issue 01 (2018-10-15) Copyright © Huawei Technologies Co., Ltd. 39

root@ubuntu-204:~# cinder type-create SmartCache
+--------------------------------------+------------+-------------+-----------+
| ID | Name | Description | Is_Public |
+--------------------------------------+------------+-------------+-----------+
| a7648f77-fb56-41f2-9d50-3c014534ef66 | SmartCache | - | True |
+--------------------------------------+------------+-------------+-----------+
Step 2 Run the cinder type-key SmartCache set capabilities:smartcache='<is> true' command to
set a key-value pair for the SmartCache volume type.
Step 3 Run the cinder type-key SmartCache set smartcache:cachename='test_cache' command
to config smartcache name.
cachename is the name of SmartCache partition that has been configured on the storage
system.
Step 4 Create a volume that supports SmartCache.
root@ubuntu-204:~# cinder create 1 --display-name test001 --volume-type
Smartcache
+---------------------+---------------------------------------+
| property | value |
+---------------------+---------------------------------------+
| attachments | [] |
| availability_zone | nova |
| bootable | false |
| created_at | 2015-06-26t13:40:10.483450 |
| display_description | none |
| display_name | test001 |
| encrypted | false |
| id | 1b2a87e4-eb8c-46ab-922c-63fcd7db8f20 |
| metadata | {} |
| multiattach | false |
| size | 1 |
| snapshot_id | none |
| source_volid | none |
| status | creating |
| volume_type | SmartCache |
+---------------------+---------------------------------------+
----End
5.6 Configuring the SmartTier Property
The following example describes how to configure the SmartTier property.
Procedure
Step 1 Run the cinder type-create XXX command to create a volume type. XXX indicates the name
of a volume type.
root@ubuntu-204:~# cinder type-create SmartTier
+--------------------------------------+-----------+-------------+-----------+
| ID | Name | Description | Is_Public |
+--------------------------------------+-----------+-------------+-----------+
| fb3ec327-84f2-4af9-accc-744dd6163dcf | SmartTier | - | True |
+--------------------------------------+-----------+-------------+-----------+
Step 2 Run the cinder type-key SmartTier set capabilities:smarttier='<is> true' command to set
a key-value pair for the SmartTier volume type.
Step 3 Run the cinder type-key SmartTier set smarttier:policy= 'xx'command to set a key-value
pair for the SmartTier volume type.
OpenStack Cinder Driver
Configuration Guide 5 Cinder Driver Advanced Properties Configuration
Issue 01 (2018-10-15) Copyright © Huawei Technologies Co., Ltd. 40

Policy: indicates migration policy. 0 indicates no migration, 1 indicates automatic migration,
2 indicates migration to high performance, 3 indicates migration to low performance.
Step 4 Create a volume that supports SmartTier.
root@ubuntu-204:~# cinder create 1 --display-name test001 --volume-type
SmartTier
+---------------------+--------------------------------------+
| property | value |
+---------------------+--------------------------------------+
| attachments | [] |
| availability_zone | nova |
| bootable | false |
| created_at | 2015-06-26t13:40:10.483450 |
| display_description | none |
| display_name | test001 |
| encrypted | false |
| id | 1b2a87e4-eb8c-46ab-922c-63fcd7db8f20 |
| metadata | {} |
| multiattach | false |
| size | 1 |
| snapshot_id | none |
| source_volid | none |
| status | creating |
| volume_type | SmartTier |
+---------------------+--------------------------------------+
----End
5.7 Configuring the HyperMetro Property
The following example describes how to configure the HyperMetro property.
Prerequisites
Step 1 Add information about remote devices in /etc/cinder/cinder.conf in target back end section.
hypermetro_device =
storage_pool:StoragePool001,
san_address:https://IP:port/deviceManager/rest/,
san_user:xxx,
san_password:xxx,
vstore_name:xxx,
iscsi_default_target_ip:x.x.x.x,
metro_domain:hypermetro-domain
Add information about remote devices for iscsi multipath:
iscsi_info: {Name:xxx;CHAPinfo:user#password;ALUA:1;
TargetIP:0.0.0.0;TargetPortGroup:xxx};
{Name:xxx;CHAPinfo:user#password;ALUA:1;
TargetIP:0.0.0.0;TargetPortGroup:xxx}
Separate the key words by ","; separate the initiator informations in "iscsi_info" by ";".
OpenStack Cinder Driver
Configuration Guide 5 Cinder Driver Advanced Properties Configuration
Issue 01 (2018-10-15) Copyright © Huawei Technologies Co., Ltd. 41

Table 5-1 Parameter specification
Parameter Description
san_address Access address of the REST interface, for example,
https://x.x.x.x:8088/deviceManager/rest/, x.x.x.x
indicates the management IP address.
san_user User name of a storage administrator or tenant of
hypermetro remote device.
san_password Password of a storage administrator or tenant of
hypermetro remote device.
vstore_name vstore name of hypermetro remote device(only
needed using tenant user).
metro_domain Hypermetro domain name configured on
DeviceManager.
storage_pool Remote storage pool for hypermetro.
iscsi_default_target_ip Remote transaction port IP
Initiator Name Name of a computing node initiator.
Initiator Target IP IP address of the iSCSI target port that is provided for
computing nodes.
Initiator TargetPortGroup IP address of the iSCSI target port that is provided for
computing nodes.
Step 2 Restart the Cinder volume service.
----End
Procedure
Step 1 Run the cinder type-create XXX command to create a volume type. XXX indicates the name
of a volume type.
root@ubuntu-204:~# cinder type-create HyperMetro
+--------------------------------------+------------+-------------+-----------+
| ID | Name | Description | Is_Public |
+--------------------------------------+------------+-------------+-----------+
| 0913e3dd-8b68-4b46-80ea-cf255617b13a | HyperMetro | - | True |
+--------------------------------------+------------+-------------+-----------+
Step 2 Run the cinder type-key HyperMetro set capabilities:hypermetro='<is> true' command to
set a key-value pair for the HyperMetro volume type.
Step 3 Create a volume that supports HyperMetro.
root@ubuntu-204:~# cinder create 1 --display-name test001 --volume-type
Hypermetro
+---------------------+-----------------------------------------+
| property | value |
+---------------------+-----------------------------------------+
| attachments | [] |
| availability_zone | nova |
| bootable | false |
OpenStack Cinder Driver
Configuration Guide 5 Cinder Driver Advanced Properties Configuration
Issue 01 (2018-10-15) Copyright © Huawei Technologies Co., Ltd. 42
| created_at | 2015-06-26t13:40:10.483450 |
| display_description | none |
| display_name | test001 |
| encrypted | false |
| id | 1b2a87e4-eb8c-46ab-922c-63fcd7db8f20 |
| metadata | {} |
| multiattach | false |
| size | 1 |
| snapshot_id | none |
| source_volid | none |
| status | creating |
| volume_type | HyperMetro |
+---------------------+-----------------------------------------+
----End
5.8 Configuring the Replication V2.1
The following example describes how to configure the Replication V2.1.
Prerequisites
Step 1 Add information about remote devices in /etc/cinder/cinder.conf in target back end section.
replication_device =
backend_id:huawei-replica-1,
storage_pool:StoragePool001,
san_address:https://IP:port/deviceManager/rest/,
san_user:xxx,
san_password:xxx,
vstore_name:xxx,
iscsi_default_target_ip:x.x.x.x
Add information about remote devices for iscsi multipath:
iscsi_info: {Name:xxx;CHAPinfo:user#password;ALUA:1;
TargetIP:0.0.0.0;TargetPortGroup:xxx};
{Name:xxx;CHAPinfo:user#password;ALUA:1;
TargetIP:0.0.0.0;TargetPortGroup:xxx}
Separate the key words by ","; separate the initiator informations in "iscsi_info" by ";".
Table 5-2 Parameter specification
Parameter Description
backend_id Target device id
storage_pool Pool name of target backend when failover.
san_address Access address of the REST interface, for example,
https://x.x.x.x:8088/deviceManager/rest/, x.x.x.x
indicates the management IP address.
san_user User name of a storage administrator of Replication V2.1
remote device
OpenStack Cinder Driver
Configuration Guide 5 Cinder Driver Advanced Properties Configuration
Issue 01 (2018-10-15) Copyright © Huawei Technologies Co., Ltd. 43

Parameter Description
san_password Password of a storage administrator of Replication V2.1
remote device.
vstore_name vstore name of replication remote device(only needed
using tenant user).
iscsi_default_target_ip Remote transaction port IP
Initiator Name Name of a computing node initiator.
Initiator Target IP IP address of the iSCSI target port that is provided for
computing nodes.
Initiator TargetPortGroup IP address of the iSCSI target port that is provided for
computing nodes.
Step 2 Run the service cinder-volume restart command to restart the Cinder service.
----End
Procedure
Step 1 Run the cinder type-create XXX command to create a volume type. XXX indicates the name
of a volume type.
root@ubuntu-204:~# cinder type-create Replication_V2.1
+--------------------------------------+------------------+-------------
+-----------+
| ID | Name | Description |
Is_Public |
+--------------------------------------+------------------+-------------
+-----------+
| b9ff6a0d-7581-4e50-8ba9-0ab2703e42e7 | Replication_V2.1 | - |
True |
+--------------------------------------+------------------+-------------
+-----------+
Step 2 Run the cinder type-key Replication_V2.1 set capabilities:replication_enabled='<is>
true' command to set a key-value pair for the Replication V2.1 volume type.
Step 3 (Optional)Run the cinder type-key Replication_V2.1 set replication_type='<in> sync'
command to set the type of Replication V2.1.
Optional values of "replication_type" are "sync" and "async". "sync" indicates synchronous
replication; "async" indicates asynchronous replication. when skip this step, asynchronous
replication will be applied.
Step 4 Create a volume that supports Replication V2.1.
root@ubuntu-204:~# cinder create 1 --display-name test001 --volume-type
Replication_V2.1
+---------------------+-----------------------------------------+
| property | value |
+---------------------+-----------------------------------------+
| attachments | [] |
| availability_zone | nova |
| bootable | false |
| created_at | 2015-06-26t13:42:10.483450 |
| display_description | none |
| display_name | test001 |
OpenStack Cinder Driver
Configuration Guide 5 Cinder Driver Advanced Properties Configuration
Issue 01 (2018-10-15) Copyright © Huawei Technologies Co., Ltd. 44

| encrypted | false |
| id | 1b2a87e4-eb8c-46ab-922c-63fcd7db8f31 |
| metadata | {} |
| multiattach | false |
| size | 1 |
| snapshot_id | none |
| source_volid | none |
| status | creating |
| volume_type | Replication_V2.1 |
+---------------------+-----------------------------------------+
----End
5.9 Create a volume on a certain storage pool
This section describes how to create a volume on a certain storage pool in a back end that
manages multiple pools. A volume type with a extra spec specified storage pool should be
created first, then the user can use this volume type to create the volume.
Procedure
Step 1 Run the cinder type-create XXX command to create a volume type. XXX indicates the name
of a volume type.
root@ubuntu-175:~# cinder type-create target-pool
+--------------------------------------+-------------+-------------+-----------
+
| ID | Name | Description | Is_Public |
+--------------------------------------+-------------+-------------+-----------+
| 2ecf5589-507e-4ee5-995f-4aa1d0aaff83 | target-pool | - | True |
+--------------------------------------+-------------+-------------+-----------+
Step 2 Run the following command to configure the storage pool.
lConfigure a single storge pool
cinder type-key target-pool set pool_name=StoragePool001
lConfigure multiple storage pools.
cinder type-key target-pool set pool_name="<or> StoragePool001 <or>
StoragePool002"
Step 3 Create a volume on a certain storage pool.
root@ubuntu-175:~# cinder create --volume-type target-pool 1
+--------------------------------+--------------------------------------+
| Property | Value |
+--------------------------------+--------------------------------------+
| attachments | [] |
| availability_zone | nova |
| bootable | false |
| consistencygroup_id | None |
| created_at | 2016-08-12T08:14:21.000000 |
| description | None |
| encrypted | False |
| id | 3023e949-ec25-4005-8bbc-6aa2c6860235 |
| metadata | {} |
| migration_status | None |
| multiattach | False |
| name | None |
| os-vol-host-attr:host | None |
| os-vol-mig-status-attr:migstat | None |
| os-vol-mig-status-attr:name_id | None |
| os-vol-tenant-attr:tenant_id | 53c46df66a084916876a08d7bcc31d87 |
| replication_status | disabled |
| size | 1 |
| snapshot_id | None |
OpenStack Cinder Driver
Configuration Guide 5 Cinder Driver Advanced Properties Configuration
Issue 01 (2018-10-15) Copyright © Huawei Technologies Co., Ltd. 45

| source_volid | None |
| status | creating |
| updated_at | None |
| user_id | ec5b1bd5fa8646109381755037aacc82 |
| volume_type | target-pool |
+--------------------------------+--------------------------------------+
----End
5.10 Create a volume with a certain disk type
This section describes how to create a volume with a certain disk type.
Procedure
Step 1 Run the cinder type-create XXX command to create a volume type. XXX indicates the name
of a volume type.
root@ubuntu-175:~# cinder type-create disk-type
+--------------------------------------+-----------+-------------+-----------+
| ID | Name | Description | Is_Public |
+--------------------------------------+-----------+-------------+-----------+
| c47fffc4-3510-4c24-b4ac-1880d44f12ff | disk-type | - | True |
+--------------------------------------+-----------+-------------+-----------+
Step 2 Run the following command to configure the certain disk type.
lConfigure one type of disk type.
root@ubuntu-175:~# cinder type-key disk-type set disk_type=sas
lConfigure multiple types of disk type.
root@ubuntu-175:~# cinder type-key disk-type set disk_type="<or> sas <or> ssd"
optional values of disk type can be "ssd", "sas", "nl_sas" or "mix", the "mix" is a mixture of
two or more of "ssd", "sas", "nl_sas".
Step 3 Create a volume with a certain disk type.
root@ubuntu-175:~# cinder create --volume-type disk-type 1
+--------------------------------+--------------------------------------+
| Property | Value |
+--------------------------------+--------------------------------------+
| attachments | [] |
| availability_zone | nova |
| bootable | false |
| consistencygroup_id | None |
| created_at | 2016-08-12T08:24:09.000000 |
| description | None |
| encrypted | False |
| id | eca3a81b-0ef0-49b6-9202-d1bf1c16a96f |
| metadata | {} |
| migration_status | None |
| multiattach | False |
| name | None |
| os-vol-host-attr:host | ubuntu-175@234#StoragePool002 |
| os-vol-mig-status-attr:migstat | None |
| os-vol-mig-status-attr:name_id | None |
| os-vol-tenant-attr:tenant_id | 53c46df66a084916876a08d7bcc31d87 |
| replication_status | disabled |
| size | 1 |
| snapshot_id | None |
| source_volid | None |
| status | creating |
| updated_at | 2016-08-12T08:24:11.000000 |
| user_id | ec5b1bd5fa8646109381755037aacc82 |
OpenStack Cinder Driver
Configuration Guide 5 Cinder Driver Advanced Properties Configuration
Issue 01 (2018-10-15) Copyright © Huawei Technologies Co., Ltd. 46

| volume_type | disk-type |
+--------------------------------+--------------------------------------+
----End
5.11 Create a volume on a certain volume back end
This section describes how to create a volume on a certain volume back end.
Procedure
Step 1 Run the cinder type-create XXX command to create a volume type. XXX indicates the name
of a volume type.
root@u1404:~# cinder type-create volume-backend
+--------------------------------------+----------------+-------------+-----------
+
| ID | Name | Description | Is_Public
|
+--------------------------------------+----------------+-------------+-----------
+
| 97cb1474-6019-41fc-a07c-0eefb19ecb30 | volume-backend | - | True
|
+--------------------------------------+----------------+-------------+-----------
+
Step 2 Configure the volume back end name.
root@u1404:~# cinder type-key volume-backend set volume_backend_name=240_sh
root@u1404:~# cinder extra-specs-list
+--------------------------------------+----------------
+------------------------------------------+
| ID | Name |
extra_specs |
+--------------------------------------+----------------
+------------------------------------------+
| 97cb1474-6019-41fc-a07c-0eefb19ecb30 | volume-backend |
{'volume_backend_name': '240_sh'} |
+--------------------------------------+----------------
+------------------------------------------+
Step 3 Create a volume on the volume back end.
root@u1404:~# cinder create --volume-type volume-backend 1
+--------------------------------+--------------------------------------+
| Property | Value |
+--------------------------------+--------------------------------------+
| attachments | [] |
| availability_zone | nova |
| bootable | false |
| consistencygroup_id | None |
| created_at | 2017-04-17T19:36:11.000000 |
| description | None |
| encrypted | False |
| id | 01d1df8c-45f8-4af3-8ef6-62a708233474 |
| metadata | {} |
| migration_status | None |
| multiattach | False |
| name | None |
| os-vol-host-attr:host | u1404@240_sh#Cinder-HXL |
| os-vol-mig-status-attr:migstat | None |
| os-vol-mig-status-attr:name_id | None |
| os-vol-tenant-attr:tenant_id | 3692e4d8455741a8b0c47a6859f23e1c |
| replication_status | disabled |
| size | 1 |
| snapshot_id | None |
| source_volid | None |
OpenStack Cinder Driver
Configuration Guide 5 Cinder Driver Advanced Properties Configuration
Issue 01 (2018-10-15) Copyright © Huawei Technologies Co., Ltd. 47

| status | creating |
| updated_at | 2017-04-17T19:36:12.000000 |
| user_id | 3fdf4c2ee2964e23bb09decdeb24caa5 |
| volume_type | volume-backend |
+--------------------------------+-------------------------------------
----End
5.12 Configuring Consistency Groups
This section describes how to configure consistency groups and snapshot consistency groups.
Before using consistency groups, you must change policies for the consistency group APIs in
the /etc/cinder/policy.json file. For more details please refer to http://docs.openstack.org/
admin-guide/blockstorage-consistency-groups.html.
5.13 Configuring Backup Snapshot
This section describes how to configure backup snapshot.
Procedure
Step 1 Configure backup driver.
For more details please refer to https://docs.openstack.org/ocata/config-reference/block-
storage/backup-drivers.html, and ensure cinder-backup service is working.
Step 2 Configure the cinder.conffile.
In the [DEFAULT] section add the following configuration.
backup_use_same_host = True
Add the following configuration in the target back end configuration group
backup_use_temp_snapshot = True
Step 3 Run the service cinder-volume restart and service cinder-back restart command to restart
the Cinder service and Backup service.
----End
5.14 Configuring Certificate Verify
This section describes how to enable SSL certificate verify for Huawei storage connection.
Procedure
Step 1 Configure Huawei-defined configuration file of Driver.
Add SSLCertVerify and SSLCertPath in <Storage>, as follow:
<?xml version='1.0' encoding='UTF-8'?>
<config>
<Storage>
<SSLCertVerify>True</SSLCertVerify>
<SSLCertPath>xxx</SSLCertPath>
OpenStack Cinder Driver
Configuration Guide 5 Cinder Driver Advanced Properties Configuration
Issue 01 (2018-10-15) Copyright © Huawei Technologies Co., Ltd. 48

...
</Storage>
...
</config>
SSLCertVerify denotes whether enable certificate verify, which's valid options are True/False.
Default False if not explicitly specified.
SSLCertPath specifies the path to the certificate to use, only works when SSLCertVerify is
True.
Step 2 Restart cinder-volume service.
----End
5.15 Configuring the Owning Controller of a LUN
This section uses an example to describe how to configure the owning controller of a LUN.
Procedure
Step 1 Run the cinder type-create XXX command to create a volume type. In this command, XXX
indicates the volume type, which is specified by users.
root@ubuntu-p-200:~# cinder type-create controller_type_C
+--------------------------------------+-------------------+-------------
+-----------+ | ID | Name |
Description | Is_Public | +--------------------------------------
+-------------------+-------------+-----------+ | a6f65c73-
ff74-4809-9e63-086052169e42 | controller_type_C | - | True |
+--------------------------------------+-------------------+-------------
+-----------+
Step 2 Run the following command to configure the key-value pair whose Huawei_controller
attribute is true.
root@ubuntu-p-200:~# cinder type-key controller_type_C set
capabilities:huawei_controller='<is> true'
Step 3 Configure the huawei_controller name that exists on the storage device and associate
controllername to the volume type.
root@ubuntu-p-200:~# cinder type-key controller_type_C set
huawei_controller:controllername='CTE0.C'
Step 4 Create a volume with the owning controller attribute specified volume type.
----End
5.16 Configuring the SmartDedupe Property
This section uses an example to describe how to configure the SmartDedupe property of a
LUN. Only Thin LUN supports this property.
Enable SmartDedupe Procedure
Step 1 Run the cinder type-create XXX command to create a volume type. In this command, XXX
indicates the volume type name, which is specified by users.
root@ubuntu-p-200:~# cinder type-create Dedup
+--------------------------------------+-------------------+-------------
OpenStack Cinder Driver
Configuration Guide 5 Cinder Driver Advanced Properties Configuration
Issue 01 (2018-10-15) Copyright © Huawei Technologies Co., Ltd. 49

+-----------+
| ID | Name | Description |
Is_Public |
+--------------------------------------+-------------------+-------------
+-----------+
| a6f65c73-ff74-4809-9e63-086052169e42 | Dedup | - |
True |
+--------------------------------------+-------------------+-------------
+-----------+
Step 2 For Newton and later versions, run the cinder type-key Dedup set
capabilities:thin_provisioning_support='<is> true' capabilities:dedup='<is> true'
command to add volume type specs.
For Liberty and Mitaka versions, run the cinder type-key Dedup set
capabilities:thin_provisioning_support='<is> true' capabilities:dedup='<in> true'
command to add volume type specs.
Step 3 Create a SmartDedupe enabled volume by the Dedup volume type.
----End
Disable SmartDedupe Procedure
Step 1 Run the cinder type-create XXX command to create a volume type. In this command, XXX
indicates the volume type name, which is specified by users.
root@ubuntu-p-200:~# cinder type-create NoDedup
+--------------------------------------+-------------------+-------------
+-----------+
| ID | Name | Description |
Is_Public |
+--------------------------------------+-------------------+-------------
+-----------+
| a6f65c73-ff74-4809-9e63-086052169e42 | NoDedup | - |
True |
+--------------------------------------+-------------------+-------------
+-----------+
Step 2 For Newton and later versions, run the cinder type-key NoDedup set
capabilities:thin_provisioning_support='<is> true' capabilities:dedup='<is> false'
command to add volume type specs.
For Liberty and Mitaka versions, run the cinder type-key NoDedup set
capabilities:thin_provisioning_support='<is> true' capabilities:dedup='<in> false'
command to add volume type specs.
Step 3 Create a SmartDedupe disabled volume by the NoDedup volume type.
----End
NOTE
Dorado series storages only support Thin LUN, the capabilities:thin_provisioning_support key at Step
2 is optional.
5.17 Configuring the SmartCompression Property
This section uses an example to describe how to configure the SmartCompression property of
a LUN. Only Thin LUN supports this property.
OpenStack Cinder Driver
Configuration Guide 5 Cinder Driver Advanced Properties Configuration
Issue 01 (2018-10-15) Copyright © Huawei Technologies Co., Ltd. 50

Enable SmartCompression Procedure
Step 1 Run the cinder type-create XXX command to create a volume type. In this command, XXX
indicates the volume type name, which is specified by users.
root@ubuntu-p-200:~# cinder type-create Compression
+--------------------------------------+-------------------+-------------
+-----------+
| ID | Name | Description |
Is_Public |
+--------------------------------------+-------------------+-------------
+-----------+
| a6f65c73-ff74-4809-9e63-086052169e42 | Compression | - |
True |
+--------------------------------------+-------------------+-------------
+-----------+
Step 2 For Newton and later versions, run the cinder type-key Compression set
capabilities:thin_provisioning_support='<is> true' capabilities:compression='<is> true'
command to add volume type specs.
For Liberty and Mitaka versions, run the cinder type-key Compression set
capabilities:thin_provisioning_support='<is> true' capabilities:compression='<in> true'
command to add volume type specs.
Step 3 Create a SmartCompression enabled volume by the Compression volume type.
----End
Disable SmartDedupe Procedure
Step 1 Run the cinder type-create XXX command to create a volume type. In this command, XXX
indicates the volume type name, which is specified by users.
root@ubuntu-p-200:~# cinder type-create NoCompression
+--------------------------------------+-------------------+-------------
+-----------+
| ID | Name | Description |
Is_Public |
+--------------------------------------+-------------------+-------------
+-----------+
| a6f65c73-ff74-4809-9e63-086052169e42 | NoCompression | - |
True |
+--------------------------------------+-------------------+-------------
+-----------+
Step 2 For Newton and later versions, run the cinder type-key NoCompression set
capabilities:thin_provisioning_support='<is> true' capabilities:compression='<is> false'
command to add volume type specs.
For Liberty and Mitaka versions, run the cinder type-key NoCompression set
capabilities:thin_provisioning_support='<is> true' capabilities:compression='<in> false'
command to add volume type specs.
Step 3 Create a SmartCompression disabled volume by the NoCompression volume type.
----End
NOTE
Dorado series storages only support Thin LUN, the capabilities:thin_provisioning_support key at Step
2 is optional.
OpenStack Cinder Driver
Configuration Guide 5 Cinder Driver Advanced Properties Configuration
Issue 01 (2018-10-15) Copyright © Huawei Technologies Co., Ltd. 51
5.18 Create a volume with fast clone
This section describes how to create a volume with the fast clone way of Dorado storage.
Procedure
Step 1 While creating a volume from a snapshot or a source volume, specify the "--metadata"
parameter with a "fastclone" key, as follows:
root@ubuntu:~# cinder create --snapshot-id *** --metadata fastclone=True
root@ubuntu:~# cinder create --source-volid *** --metadata fastclone=True
----End
lIf the fastclone key is not explicitly specified for metadata, it defaults False, which means
LUN copy way will be used as described in 5.19 section.
lOnly Dorado storage system supports this feature.
5.19 Configuring the LUN Copy Speed
Defaultly LUN copy feature of Huawei storage is used to create a volume from a snapshot or
a source volume. This section describes how to specify the LUN copy speed.
Procedure
Step 1 While creating a volume from a snapshot or a source volume, specify the "--metadata"
parameter with a "copyspeed" key, as follows:
root@ubuntu:~# cinder create --snapshot-id *** --metadata copyspeed=2
root@ubuntu:~# cinder create --source-volid *** --metadata copyspeed=2
----End
Table 5-3 Optional value of copyspeed parameter
Parameter value Parameter Description
1 low
2 medium
3 high
4 highest
OpenStack Cinder Driver
Configuration Guide 5 Cinder Driver Advanced Properties Configuration
Issue 01 (2018-10-15) Copyright © Huawei Technologies Co., Ltd. 52

6 Best Practices
6.1 Quick Interconnection with Huawei Storage
6.1 Quick Interconnection with Huawei Storage
Configuration Process
This section demonstrates how to configure OpenStack Huawei Cinder Driver on OpenStack
to interconnect with Huawei Storage.
Step 1 Obtain Cinder Driver.
OpenStack Kilo and later versions released in the OpenStack community are delivered with
Huawei OpenStack Driver. You can obtain the latest codes of Driver through Huawei's
OpenStack Driver repository. For details, see 3 .
NOTE
lA community version cannot be integrated with new features once being released and has security
risks because its debug process is time-consuming.
lHowever, OpenStack Driver obtained from OpenStack Driver repository can be integrated with
newly launched features and debugged in a timely manner, when a supportive framework is used.
lThe community only maintains two stable versions. However, Huawei OpenStack Driver library
maintains six stable versions, ensuring long-term stable running of historical versions.
lYou are strongly recommended to use Huawei OpenStack Driver library versions, instead of
community versions.
Step 2 Create or query the block storage pool which will be used in Huawei storage.
Step 3 Configure file cinder.conf and Huawei-defined configuration file of Driver. (The following
uses Huawei OceanStor V3 series on the iSCSI network as an example. For details, see 4 ).
1. In /etc/cinder, create a Huawei-defined Driver configuration file in .xml format. In this
example, cinder_huawei_conf.xml is used as the file name that can be changed based
on actual conditions.
2. Set parameters for the created file.
<?xml version='1.0' encoding='UTF-8'?>
<config>
<Storage>
<Product>V3</Product>
OpenStack Cinder Driver
Configuration Guide 6 Best Practices
Issue 01 (2018-10-15) Copyright © Huawei Technologies Co., Ltd. 53

<Protocol>iSCSI</Protocol>
<RestURL>https://x.x.x.x:8088/deviceManager/rest/</RestURL>
<UserName>xxx</UserName>
<UserPassword>xxx</UserPassword>
</Storage>
<LUN>
<StoragePool>xxx</StoragePool>
</LUN>
<iSCSI>
<DefaultTargetIP>x.x.x.x</DefaultTargetIP>
</iSCSI>
</config>
3. Check the owner and owning group of the file.
Ensure that the owner and owning group of file /etc/cinder/cinder_huawei_conf.xml is
the same as those of file /etc/cinder/cinder.conf.
-rw-r--r-- 1 cinder cinder 2662 Jul 29 02:13 cinder.conf
-rw-r--r-- 1 cinder cinder 778 Jul 30 02:56 cinder_huawei_conf.xml
4. Configure file cinder.conf.
At the end of file /etc/cinder/cinder.conf, add the following configuration item to add
HuaweiDriver for V3_iSCSI. In this configuration item, volume_driver indicates the
loaded Driver file, and cinder_huawei_conf_file indicates the Huawei-defined
configuration file.
[V3_iSCSI]
volume_driver = cinder.volume.drivers.huawei.huawei_driver.HuaweiISCSIDriver
cinder_huawei_conf_file = /etc/cinder/cinder_huawei_conf.xml
volume_backend_name = V3_iSCSI
In the [DEFAULT] area, modify the configuration as follows to enable the V3_iSCSI
back-end:
[DEFAULT]
...
enabled_backends=V3_iSCSI
Step 4 Restart the Cinder service.
Step 5 Check the service status.
root@u1404:~# cinder service-list +------------------+------------------+------
+---------+-------+----------------------------+-----------------+ |
Binary | Host | Zone | Status | State |
Updated_at | Disabled Reason | +------------------+------------------
+------+---------+-------+----------------------------+-----------------+ |
cinder-volume | u1404@38_sd | nova | enabled | down |
2016-11-17T15:26:32.000000 | | | cinder-volume |
u1404@V3_iSCSI | nova | enabled | up | 2017-04-18T15:44:09.000000 |
- | | cinder-volume | u1404@dorado | nova | enabled | down |
2017-03-17T11:15:43.000000 | - | +------------------
+------------------+------+---------+-------+----------------------------
+-----------------+
In this example, the service status of u1404@V3_iSCSI is up, indicating that the service is
started correctly.
----End
OpenStack Cinder Driver
Configuration Guide 6 Best Practices
Issue 01 (2018-10-15) Copyright © Huawei Technologies Co., Ltd. 54

7 FAQ
7.1 Need to manually create the mapping associated objects like Host, Host Group or Lun
Group on Huawei storage beforehand before attaching volume via Cinder Driver?
7.2 Nova log prints "lsblk " command execution failed while attaching volume.
7.1 Need to manually create the mapping associated
objects like Host, Host Group or Lun Group on Huawei
storage beforehand before attaching volume via Cinder
Driver?
No, because Cinder Driver will create these mapping associated objects and the Mapping
View. On the contrary, if these objects are manually created on Huawei storage, will cause
Cinder Driver not properly function, so that please make sure these objects deleted before
attaching volume.
7.2 Nova log prints "lsblk " command execution failed
while attaching volume.
Nova will utilize "lsblk" tool to query the attached volume information, this error generally
occurs due to this tool is not installed, please make sure it's installed correctly in Nova system.
OpenStack Cinder Driver
Configuration Guide 7 FAQ
Issue 01 (2018-10-15) Copyright © Huawei Technologies Co., Ltd. 55
