Oracle Fusion Middleware Installation Guide For Identity Management
User Manual:
Open the PDF directly: View PDF ![]() .
.
Page Count: 408 [warning: Documents this large are best viewed by clicking the View PDF Link!]
- Contents
- Preface
- Part I Introduction and Preparation
- 1 Understanding Oracle Identity Management
- 1.1 What is Oracle Fusion Middleware?
- 1.2 What is Oracle Identity Management?
- 1.3 Oracle Identity Management 11g Release 1 (11.1.1.6.0) Components
- 1.4 Oracle Identity and Access Management 11g Release 1 (11.1.1.5.0) Components
- 1.5 What Does This Guide Cover?
- 1.5.1 Using This Guide
- 1.5.2 Upgrading to Oracle Identity Management (11.1.1.6.0)
- 1.5.3 Upgrading to Oracle Identity and Access Management (11.1.1.5.0)
- 1.5.4 Installing Oracle Identity Management (11.1.1.6.0) for High Availability
- 1.5.5 Installing Oracle Identity and Access Management (11.1.1.5.0) for High Availability
- 2 Understanding the Oracle Identity Management Installation
- 2.1 Overview and Structure of Oracle Identity Management 11g Installation
- 2.2 Overview of Oracle Identity Management (11.1.1.6.0) Installation
- 2.2.1 Installation Roadmap
- 2.2.2 Installation Types: "Install Software - Do Not Configure" vs. "Install and Configure"
- 2.2.3 Understanding Oracle WebLogic Server Administration Domain Options
- 2.2.4 Installing Components on Separate Systems
- 2.2.5 Executing the oracleRoot.sh Script on UNIX Platforms
- 2.2.6 Understanding the State of Oracle Identity Management Components After Installation
- 2.3 Overview of Oracle Identity and Access Management (11.1.1.5.0) Installation
- 2.3.1 Installation Roadmap
- 2.3.2 Prerequisite Checks Performed by the Oracle Identity and Access Management Installer
- 2.3.3 Understanding Oracle WebLogic Server Administration Domain Options
- 2.3.4 Additional Configuration Using the Oracle Identity Manager 11g Configuration Wizard
- 2.3.5 Additional 11g Release 1 (11.1.1) Deployment Information
- 2.3.6 Silent Installation
- 2.3.7 Installing Components on Separate Systems
- 2.3.8 Screens in Oracle Fusion Middleware Configuration Wizard
- 2.3.9 Understanding the State of Oracle Identity and Access Management Components After Installation
- 3 Preparing to Install
- 3.1 Before Installing Oracle Identity Management (11.1.1.6.0)
- 3.1.1 Reviewing System Requirements and Certification
- 3.1.2 Understanding Oracle Fusion Middleware Support of 64-bit JDK
- 3.1.3 Installing and Configuring Java Access Bridge (Windows Only)
- 3.1.4 Managing the Oracle WebLogic Server Node Manager Utility for Oracle Identity Management Installations
- 3.1.5 Optional Environment-Specific Preparation
- 3.2 Before Installing Oracle Identity and Access Management (11.1.1.5.0)
- 3.2.1 Reviewing System Requirements and Certification
- 3.2.2 Installing and Configuring Java Access Bridge (Windows Only)
- 3.2.3 Obtaining the Latest Oracle WebLogic Server and Oracle Fusion Middleware 11g Software
- 3.2.4 Installing Oracle WebLogic Server and Creating the Oracle Middleware Home
- 3.2.5 Installing Oracle Database
- 3.2.6 Creating Database Schema Using the Oracle Fusion Middleware Repository Creation Utility (RCU)
- 3.2.7 Upgrading an Existing Database Schema
- 3.2.8 Installing the Latest Version of Oracle SOA Suite (Oracle Identity Manager Users Only)
- 3.1 Before Installing Oracle Identity Management (11.1.1.6.0)
- 4 Performing Common Installation Tasks
- 4.1 Common Installation Tasks for Oracle Identity Management (11.1.1.6.0)
- 4.2 Common Installation Tasks for Oracle Identity and Access Management (11.1.1.5.0)
- 4.2.1 Starting an Installation
- 4.2.2 Starting Oracle Fusion Middleware Configuration Wizard
- 4.2.3 List of Executable Files
- 4.2.4 Identifying Installation Directories
- 4.2.5 Determining Port Numbers
- 4.2.6 Completing an Installation
- 4.2.7 Locating Installation Log Files
- 4.2.8 Optional: Updating the WebLogic Administrator Server User Name in Oracle Enterprise Manager Fusion Middleware Control (OIM Only)
- 5 Evaluating Single Sign-On Installations
- 1 Understanding Oracle Identity Management
- Part II Installing and Configuring Oracle Identity Management (11.1.1.6.0)
- 6 Installing and Configuring Oracle Identity Management (11.1.1.6.0)
- 6.1 Important Notes Before You Begin
- 6.2 Installing Oracle Identity Management Using "Install and Configure" Option
- 6.2.1 Obtaining the Oracle Fusion Middleware Software
- 6.2.2 Installing Oracle Database
- 6.2.3 Creating Database Schema Using the Oracle Fusion Middleware Repository Creation Utility (RCU)
- 6.2.4 Required Installation Privileges for Oracle WebLogic Server and Oracle Identity Management on Windows Operating Systems
- 6.2.5 Installing Oracle WebLogic Server 11g Release 1 (10.3.6) and Creating the Middleware Home
- 6.2.6 Creating the Inventory Directory (UNIX Only)
- 6.2.7 Starting an Installation
- 6.2.8 Installing and Configuring Oracle Identity Management 11g Release 1 (11.1.1.6.0) Software
- 6.3 Configuring Oracle Identity Management for "Install Software - Do Not Configure" Option
- 7 Configuring Oracle Internet Directory
- 7.1 OID with ODSM and Fusion Middleware Control in a New WebLogic Domain
- 7.2 OID with ODIP, ODSM, and Fusion Middleware Control in a New WebLogic Domain
- 7.3 OID and OVD with ODSM in a New WebLogic Domain
- 7.4 Only OID in an Existing WebLogic Domain
- 7.5 Only OID Without a WebLogic Domain
- 7.6 Verifying OID Installation
- 7.7 Getting Started with OID After Installation
- 8 Configuring Oracle Virtual Directory
- 9 Configuring Oracle Directory Integration Platform
- 9.1 Prerequisites
- 9.2 Configuring ODIP with Oracle Internet Directory (OID)
- 9.3 Configuring ODIP with Oracle Unified Directory (OUD)
- 9.4 Configuring ODIP with Oracle Directory Server Enterprise Edition (ODSEE)
- 9.5 Verifying ODIP
- 9.6 Getting Started with ODIP After Installation
- 10 Configuring Oracle Directory Services Manager
- 11 Configuring Oracle Identity Federation
- 11.1 Using the Information in This Chapter
- 11.2 Understanding OIF Deployments
- 11.3 Understanding OIF Basic and Advanced Deployments
- 11.4 Configuring Oracle HTTP Server for OIF
- 11.5 Performing Basic Oracle Identity Federation Configurations
- 11.6 Performing Advanced Oracle Identity Federation Configurations
- 11.7 Advanced Example: Configuring OIF with OID in a New WebLogic Domain for LDAP Authentication, User Store, and Federation Store
- 11.8 Advanced Example: Configuring OIF in a New or Existing WebLogic Domain with RDBMS Data Stores
- 11.9 Verifying OIF
- 11.10 Getting Started with OIF After Installation
- 12 Configuring Oracle Unified Directory with Oracle Identity Management 11.1.1.6.0
- 12.1 Before You Begin
- 12.2 Configuring only Oracle Unified Directory (OUD)
- 12.3 Configuring Oracle Unified Directory (OUD) with ODSM
- 12.4 Configuring OUD/ODSM/ODIP/Fusion Middleware Control and OVD/ODSM
- 6 Installing and Configuring Oracle Identity Management (11.1.1.6.0)
- Part III Installing and Configuring Oracle Identity and Access Management (11.1.1.5.0)
- 13 Installing Oracle Identity and Access Management (11.1.1.5.0)
- 14 Understanding Domain Extension Scenarios
- 15 Configuring Oracle Identity Navigator
- 16 Configuring Oracle Identity Manager
- 16.1 OIM Server Configuration Workflow
- 16.2 Important Notes Before You Start Configuring OIM
- 16.3 Creating a new WebLogic Domain for OIM and SOA
- 16.4 Starting the Servers
- 16.5 Configuring OIM Server, Design Console, and Remote Manager
- 16.5.1 Scope of Configuration Using the Oracle Identity Manager 11g Configuration Wizard
- 16.5.2 Scenario 1: Oracle Identity Manager Server and Design Console on Different Machines
- 16.5.3 Scenario 2: Oracle Identity Manager Server and Remote Manager on Different Machines
- 16.5.4 Scenario 3: Oracle Identity Manager Server, Design Console, and Remote Manager on a Single Windows Machine
- 16.6 Before Configuring OIM Server, Design Console, or Remote Manager
- 16.7 Starting the Oracle Identity Manager 11g Configuration Wizard
- 16.8 Configuring OIM Server
- 16.8.1 Appropriate Deployment Environment
- 16.8.2 Components Deployed
- 16.8.3 Dependencies
- 16.8.4 Procedure
- 16.8.5 Completing the Prerequisites for Enabling LDAP Synchronization
- 16.8.6 Running the LDAP Post-Configuration Utility
- 16.8.7 Verifying the LDAP Synchronization
- 16.8.8 Post-Configuration Steps
- 16.8.9 Setting oamEnabled Parameter for Identity Virtualization Library
- 16.8.10 Enabling LDAP Sync after Installing and Configuring OIM Server at a Later Point
- 16.9 Installing and Configuring Only OIM Design Console on Windows
- 16.10 Configuring OIM Design Console
- 16.11 Configuring OIM Remote Manager
- 16.12 Verifying the OIM Installation
- 16.13 Setting Up Integration with OAM
- 16.14 List of Supported Languages
- 16.15 Using the Diagnostic Dashboard
- 16.16 Getting Started with OIM After Installation
- 17 Configuring Oracle Access Manager
- 17.1 Prerequisites
- 17.2 Important Notes Before You Begin
- 17.3 Installing OAM
- 17.4 Oracle Access Manager Domain Configuration Template
- 17.5 OAM in a New WebLogic Domain
- 17.6 OAM and OIN in a New WebLogic Domain
- 17.7 OAM in a Domain Containing OAAM and OIN
- 17.8 Starting the Servers
- 17.9 Optional Post-Installation Tasks
- 17.10 Verifying the OAM Installation
- 17.11 Setting Up OAM Agents
- 17.12 Setting Up Integration with OIM
- 17.13 Getting Started with OAM After Installation
- 18 Configuring Oracle Adaptive Access Manager
- 18.1 Overview
- 18.2 Prerequisites
- 18.3 Important Notes Before You Begin
- 18.4 Installing OAAM
- 18.5 OAAM in a New WebLogic Domain
- 18.6 Configuring Oracle Adaptive Access Manager (Offline)
- 18.7 Starting the Servers
- 18.8 Post-Installation Steps
- 18.9 Verifying the OAAM Installation
- 18.10 Migrating Policy and Credential Stores
- 18.11 Getting Started with OAAM After Installation
- 19 OAM and OAAM Joint Domain Configuration Scenarios
- 19.1 Prerequisites
- 19.2 Important Notes Before You Begin
- 19.3 Installing Oracle Identity and Access Management 11g Release 1 (11.1.1)
- 19.4 OAM, OIM, and OIN in a New WebLogic Domain
- 19.5 OAM, OAAM, and OIN in a New WebLogic Domain
- 19.6 Starting the Servers
- 19.7 Getting Started with OAM After Installation
- 19.8 Getting Started with OAAM After Installation
- 20 Installing and Configuring Oracle Entitlements Server
- 20.1 Overview of Oracle Entitlements Server 11g Installation
- 20.2 Installing Oracle Entitlements Server Administration Server
- 20.2.1 Prerequisites
- 20.2.2 Procedure
- 20.2.2.1 System Requirements and Certification
- 20.2.2.2 Obtaining the Oracle Fusion Middleware Software
- 20.2.2.3 Installing Oracle WebLogic Server and Creating the Oracle Middleware Home
- 20.2.2.4 Installing Oracle Database (Recommended)
- 20.2.2.5 Creating a Schema for Oracle Entitlement Server
- 20.2.2.6 Starting the Installer
- 20.2.2.7 Installation Screens and Instructions
- 20.2.2.8 Verifying Oracle Entitlements Server Installation
- 20.3 Configuring Oracle Entitlements Server Administration Server
- 20.4 Installing Oracle Entitlements Server Client
- 20.5 Configuring Oracle Entitlements Server Client
- 20.6 Getting Started with Oracle Entitlements Server After Installation
- 21 Migrating from Domain Agent to Oracle HTTP Server 10g Webgate for OAM
- 21.1 Installing and Configuring Oracle HTTP Server 11g (11.1.1.5.0)
- 21.2 Provisioning Oracle HTTP Server 10g Webgate for OAM Profile
- 21.3 Installing Oracle HTTP Server 10g Webgate for OAM
- 21.4 Configuring mod_weblogic
- 21.5 Optional: Configuring Host Identifier
- 21.6 Updating OIM Server Configuration
- 21.7 Optional: Disabling Domain Agent
- 21.8 Optional: Updating Oracle Identity Manager Configuration
- 22 Installing and Configuring Oracle HTTP Server 11g Webgate for OAM
- 22.1 Installation Overview
- 22.2 Preparing to Install Oracle HTTP Server 11g Webgate for Oracle Access Manager
- 22.2.1 Oracle Fusion Middleware Certification
- 22.2.2 Installing and Configuring OAM 11g
- 22.2.3 Installing and Configuring Oracle HTTP Server 11g
- 22.2.4 Installing Third-Party GCC Libraries (Linux and Solaris Operating Systems Only)
- 22.2.5 Prerequisites for 64-Bit Oracle HTTP Server 11g Webgates on Windows 2003 and Windows 2008 64-Bit Platforms
- 22.3 Installing Oracle HTTP Server 11g Webgate for Oracle Access Manager
- 22.4 Post-Installation Steps
- 22.5 Verifying the Oracle HTTP Server 11g Webgate for Oracle Access Manager
- 22.6 Getting Started with a New Oracle HTTP Server 11g Webgate Agent for Oracle Access Manager
- 23 Lifecycle Management
- Part IV Appendixes
- A Oracle Identity Management 11.1.1.6.0 Software Installation Screens
- A.1 Welcome
- A.2 Install Software Updates
- A.3 Select Installation Type
- A.4 Prerequisite Checks
- A.5 Select Domain
- A.6 Specify Installation Location
- A.7 Specify Security Updates
- A.8 Configure Components
- A.9 Configure Ports
- A.10 Specify Schema Database
- A.11 Specify Oracle Virtual Directory Information
- A.12 Specify OID Administrator Password
- A.13 Select Oracle Identity Federation Configuration Type
- A.14 Specify Oracle Identity Federation Details
- A.15 Installation Summary
- A.16 Installation Progress
- A.17 Configuration Progress
- A.18 Installation Complete
- B Oracle Identity and Access Management 11.1.1.5.0 Software Installation Screens
- C Oracle Identity Manager Configuration Screens
- D Starting or Stopping the Oracle Stack
- E Preconfiguring Oracle Directory Server Enterprise Edition (ODSEE)
- F Deinstalling and Reinstalling Oracle Identity Management
- G Deinstalling and Reinstalling Oracle Identity and Access Management
- H Performing Silent Installations
- I Troubleshooting the Installation
- J OAAM Partition Schema Reference
- K Software Deinstallation Screens
- A Oracle Identity Management 11.1.1.6.0 Software Installation Screens

Oracle® Fusion Middleware
Installation Guide for Oracle Identity Management
11g Release 1 (11.1.1)
E12002-11
May 2012
Oracle Fusion Middleware Installation Guide for Oracle Identity Management, 11g Release 1 (11.1.1)
E12002-11
Copyright © 2001, 2012, Oracle and/or its affiliates. All rights reserved.
Primary Author: Nisha Singh
Contributors: Don Biasotti, Niranjan Ananthapadmanabha, Heeru Janweja, Deepak Ramakrishnan,
Madhu Martin, Sergio Mendiola, Svetlana Kolomeyskaya, Sid Choudhury, Javed Beg, Eswar Vandanapu,
Harsh Maheshwari, Sidhartha Das, Mark Karlstrand, Daniel Shih, Don Bosco Durai, Kamal Singh, Rey Ong,
Gail Flanegin, Ellen Desmond, Priscilla Lee, Vinaye Misra, Toby Close, Ashish Kolli, Ashok Maram, Peter
LaQuerre, Srinivasa Vedam, Vinay Shukla, Sanjeev Topiwala, Shaun Lin, Prakash Hulikere, Debapriya
Dutta, Sujatha Ramesh, Ajay Keni, Ken Vincent
This software and related documentation are provided under a license agreement containing restrictions on
use and disclosure and are protected by intellectual property laws. Except as expressly permitted in your
license agreement or allowed by law, you may not use, copy, reproduce, translate, broadcast, modify,
license, transmit, distribute, exhibit, perform, publish, or display any part, in any form, or by any means.
Reverse engineering, disassembly, or decompilation of this software, unless required by law for
interoperability, is prohibited.
The information contained herein is subject to change without notice and is not warranted to be error-free. If
you find any errors, please report them to us in writing.
If this is software or related documentation that is delivered to the U.S. Government or anyone licensing it
on behalf of the U.S. Government, the following notice is applicable:
U.S. GOVERNMENT RIGHTS Programs, software, databases, and related documentation and technical data
delivered to U.S. Government customers are "commercial computer software" or "commercial technical
data" pursuant to the applicable Federal Acquisition Regulation and agency-specific supplemental
regulations. As such, the use, duplication, disclosure, modification, and adaptation shall be subject to the
restrictions and license terms set forth in the applicable Government contract, and, to the extent applicable
by the terms of the Government contract, the additional rights set forth in FAR 52.227-19, Commercial
Computer Software License (December 2007). Oracle USA, Inc., 500 Oracle Parkway, Redwood City, CA
94065.
This software or hardware is developed for general use in a variety of information management
applications. It is not developed or intended for use in any inherently dangerous applications, including
applications that may create a risk of personal injury. If you use this software or hardware in dangerous
applications, then you shall be responsible to take all appropriate fail-safe, backup, redundancy, and other
measures to ensure its safe use. Oracle Corporation and its affiliates disclaim any liability for any damages
caused by use of this software or hardware in dangerous applications.
Oracle is a registered trademark of Oracle Corporation and/or its affiliates. Other names may be trademarks
of their respective owners.
This software and documentation may provide access to or information on content, products, and services
from third parties. Oracle Corporation and its affiliates are not responsible for and expressly disclaim all
warranties of any kind with respect to third-party content, products, and services. Oracle Corporation and
its affiliates will not be responsible for any loss, costs, or damages incurred due to your access to or use of
third-party content, products, or services.

iii
Contents
Preface ............................................................................................................................................................... xix
Audience..................................................................................................................................................... xix
Documentation Accessibility................................................................................................................... xix
Related Documents ................................................................................................................................... xix
Conventions ............................................................................................................................................... xxi
Part I Introduction and Preparation
1 Understanding Oracle Identity Management
1.1 What is Oracle Fusion Middleware?........................................................................................ 1-1
1.1.1 What is Oracle Enterprise Manager Fusion Middleware Control?.............................. 1-1
1.2 What is Oracle Identity Management? .................................................................................... 1-1
1.3 Oracle Identity Management 11g Release 1 (11.1.1.6.0) Components................................. 1-2
1.4 Oracle Identity and Access Management 11g Release 1 (11.1.1.5.0) Components ............ 1-2
1.5 What Does This Guide Cover?.................................................................................................. 1-3
1.5.1 Using This Guide ................................................................................................................. 1-3
1.5.2 Upgrading to Oracle Identity Management (11.1.1.6.0)................................................. 1-4
1.5.3 Upgrading to Oracle Identity and Access Management (11.1.1.5.0)............................ 1-4
1.5.4 Installing Oracle Identity Management (11.1.1.6.0) for High Availability.................. 1-4
1.5.5 Installing Oracle Identity and Access Management (11.1.1.5.0) for High Availability .....
1-5
2 Understanding the Oracle Identity Management Installation
2.1 Overview and Structure of Oracle Identity Management 11g Installation ........................ 2-1
2.1.1 Overview............................................................................................................................... 2-1
2.1.2 Structure of the Installation................................................................................................ 2-2
2.2 Overview of Oracle Identity Management (11.1.1.6.0) Installation..................................... 2-3
2.2.1 Installation Roadmap.......................................................................................................... 2-3
2.2.2 Installation Types: "Install Software - Do Not Configure" vs. "Install and Configure".....
2-6
2.2.2.1 Understanding the "Install Software - Do Not Configure" Option....................... 2-6
2.2.2.2 Understanding the "Install and Configure" Option ................................................ 2-6
2.2.3 Understanding Oracle WebLogic Server Administration Domain Options............... 2-6
2.2.3.1 Create New Domain..................................................................................................... 2-7
2.2.3.2 Extend Existing Domain.............................................................................................. 2-7
iv
2.2.3.3 Expand Cluster ............................................................................................................. 2-7
2.2.3.4 Configure Without a Domain ..................................................................................... 2-7
2.2.4 Installing Components on Separate Systems................................................................... 2-8
2.2.5 Executing the oracleRoot.sh Script on UNIX Platforms................................................. 2-8
2.2.6 Understanding the State of Oracle Identity Management Components After
Installation 2-9
2.2.6.1 Default SSL Configurations ........................................................................................ 2-9
2.2.6.2 Default Passwords........................................................................................................ 2-9
2.2.6.3 Ports Assigned Using Auto Port Configuration ...................................................... 2-9
2.3 Overview of Oracle Identity and Access Management (11.1.1.5.0) Installation............. 2-10
2.3.1 Installation Roadmap....................................................................................................... 2-10
2.3.2 Prerequisite Checks Performed by the Oracle Identity and Access Management
Installer 2-13
2.3.3 Understanding Oracle WebLogic Server Administration Domain Options............ 2-14
2.3.3.1 Create a New Domain............................................................................................... 2-14
2.3.3.2 Extend an Existing Domain...................................................................................... 2-14
2.3.4 Additional Configuration Using the Oracle Identity Manager 11g Configuration
Wizard 2-14
2.3.5 Additional 11g Release 1 (11.1.1) Deployment Information....................................... 2-14
2.3.5.1 Upgrading to 11g Release 1 (11.1.1)........................................................................ 2-15
2.3.5.2 Installing 11g Release 1 (11.1.1) for High Availability ......................................... 2-15
2.3.6 Silent Installation .............................................................................................................. 2-15
2.3.7 Installing Components on Separate Systems................................................................ 2-15
2.3.8 Screens in Oracle Fusion Middleware Configuration Wizard................................... 2-16
2.3.9 Understanding the State of Oracle Identity and Access Management Components
After Installation 2-16
2.3.9.1 Default SSL Configurations ..................................................................................... 2-16
2.3.9.2 Default Passwords..................................................................................................... 2-16
3 Preparing to Install
3.1 Before Installing Oracle Identity Management (11.1.1.6.0)................................................... 3-1
3.1.1 Reviewing System Requirements and Certification....................................................... 3-1
3.1.2 Understanding Oracle Fusion Middleware Support of 64-bit JDK.............................. 3-2
3.1.3 Installing and Configuring Java Access Bridge (Windows Only)................................ 3-2
3.1.4 Managing the Oracle WebLogic Server Node Manager Utility for Oracle Identity
Management Installations 3-3
3.1.5 Optional Environment-Specific Preparation ................................................................... 3-3
3.1.5.1 Using Symbolic Links .................................................................................................. 3-4
3.1.5.2 Installing Oracle Identity Management on DHCP Hosts....................................... 3-4
3.1.5.3 Installing Oracle Identity Management on a Multihomed System....................... 3-4
3.2 Before Installing Oracle Identity and Access Management (11.1.1.5.0)............................. 3-5
3.2.1 Reviewing System Requirements and Certification....................................................... 3-5
3.2.2 Installing and Configuring Java Access Bridge (Windows Only)................................ 3-6
3.2.3 Obtaining the Latest Oracle WebLogic Server and Oracle Fusion Middleware 11g
Software 3-6
3.2.4 Installing Oracle WebLogic Server and Creating the Oracle Middleware Home...... 3-6
3.2.5 Installing Oracle Database.................................................................................................. 3-7
3.2.5.1 Oracle Database 11.1.0.7 Patch Requirements for Oracle Identity Manager ....... 3-8
v
3.2.6 Creating Database Schema Using the Oracle Fusion Middleware Repository Creation
Utility (RCU) 3-8
3.2.7 Upgrading an Existing Database Schema ....................................................................... 3-9
3.2.8 Installing the Latest Version of Oracle SOA Suite (Oracle Identity Manager Users
Only) 3-9
3.2.8.1 Obtaining the Latest Oracle WebLogic Server and Oracle SOA Suite Software.........
3-10
3.2.8.2 Installing Oracle WebLogic Server and Creating the Middleware Home ........ 3-10
3.2.8.3 Installing the Latest Version of Oracle SOA Suite................................................ 3-10
4 Performing Common Installation Tasks
4.1 Common Installation Tasks for Oracle Identity Management (11.1.1.6.0)......................... 4-1
4.1.1 Identifying Installation Directories ................................................................................... 4-2
4.1.1.1 Oracle Middleware Home Location .......................................................................... 4-2
4.1.1.2 Oracle Home Directory................................................................................................ 4-2
4.1.1.3 WebLogic Server Directory......................................................................................... 4-2
4.1.1.4 Oracle Instance Location ............................................................................................. 4-3
4.1.1.5 Oracle Instance Name.................................................................................................. 4-3
4.1.2 Determining Port Numbers................................................................................................ 4-3
4.1.3 Optional: Configuring the Minimum Amount for Oracle WebLogic Server’s Maximum
Heap Size 4-4
4.1.4 Locating Installation Log Files........................................................................................... 4-5
4.2 Common Installation Tasks for Oracle Identity and Access Management (11.1.1.5.0) .... 4-5
4.2.1 Starting an Installation........................................................................................................ 4-6
4.2.2 Starting Oracle Fusion Middleware Configuration Wizard.......................................... 4-7
4.2.3 List of Executable Files........................................................................................................ 4-8
4.2.4 Identifying Installation Directories ................................................................................ 4-10
4.2.4.1 Oracle Middleware Home Location ....................................................................... 4-10
4.2.4.2 Oracle Home Directory............................................................................................. 4-11
4.2.4.3 Oracle Common Directory ....................................................................................... 4-11
4.2.4.4 Oracle WebLogic Domain Directory ...................................................................... 4-11
4.2.4.5 WebLogic Server Directory...................................................................................... 4-11
4.2.5 Determining Port Numbers............................................................................................. 4-11
4.2.6 Completing an Installation.............................................................................................. 4-12
4.2.7 Locating Installation Log Files........................................................................................ 4-12
4.2.8 Optional: Updating the WebLogic Administrator Server User Name in Oracle
Enterprise Manager Fusion Middleware Control (OIM Only) 4-13
5 Evaluating Single Sign-On Installations
5.1 Important Notes for Oracle Portal 11g Installations .............................................................. 5-1
5.2 Before You Begin......................................................................................................................... 5-1
5.2.1 Review System Requirements and Specifications .......................................................... 5-2
5.2.2 Review Certification Information...................................................................................... 5-2
5.2.3 Review Interoperability and Compatibility Information .............................................. 5-2
5.3 Single Sign-On Options.............................................................................................................. 5-2
5.4 Single Sign-On Preparation Considerations ........................................................................... 5-2
5.5 Oracle Single Sign-On Known Limitations............................................................................. 5-3
vi
5.6 Recommendations ...................................................................................................................... 5-3
Part II Installing and Configuring Oracle Identity Management (11.1.1.6.0)
6 Installing and Configuring Oracle Identity Management (11.1.1.6.0)
6.1 Important Notes Before You Begin .......................................................................................... 6-1
6.2 Installing Oracle Identity Management Using "Install and Configure" Option................ 6-1
6.2.1 Obtaining the Oracle Fusion Middleware Software....................................................... 6-2
6.2.2 Installing Oracle Database.................................................................................................. 6-2
6.2.3 Creating Database Schema Using the Oracle Fusion Middleware Repository Creation
Utility (RCU) 6-3
6.2.4 Required Installation Privileges for Oracle WebLogic Server and Oracle Identity
Management on Windows Operating Systems 6-4
6.2.5 Installing Oracle WebLogic Server 11g Release 1 (10.3.6) and Creating the Middleware
Home 6-5
6.2.6 Creating the Inventory Directory (UNIX Only) .............................................................. 6-5
6.2.7 Starting an Installation........................................................................................................ 6-6
6.2.8 Installing and Configuring Oracle Identity Management 11g Release 1 (11.1.1.6.0)
Software 6-7
6.3 Configuring Oracle Identity Management for "Install Software - Do Not Configure" Option
6-16
7 Configuring Oracle Internet Directory
7.1 OID with ODSM and Fusion Middleware Control in a New WebLogic Domain ............ 7-2
7.1.1 Appropriate Deployment Environment........................................................................... 7-2
7.1.2 Components Deployed ....................................................................................................... 7-3
7.1.3 Dependencies ....................................................................................................................... 7-3
7.1.4 Procedure .............................................................................................................................. 7-3
7.2 OID with ODIP, ODSM, and Fusion Middleware Control in a New WebLogic Domain .......
7-6
7.2.1 Appropriate Deployment Environment........................................................................... 7-6
7.2.2 Components Deployed ....................................................................................................... 7-6
7.2.3 Dependencies ....................................................................................................................... 7-6
7.2.4 Procedure .............................................................................................................................. 7-7
7.3 OID and OVD with ODSM in a New WebLogic Domain .................................................... 7-9
7.3.1 Appropriate Deployment Environment........................................................................ 7-10
7.3.2 Components Deployed .................................................................................................... 7-10
7.3.3 Dependencies .................................................................................................................... 7-10
7.3.4 Procedure ........................................................................................................................... 7-10
7.4 Only OID in an Existing WebLogic Domain........................................................................ 7-13
7.4.1 Appropriate Deployment Environment........................................................................ 7-14
7.4.2 Components Deployed .................................................................................................... 7-14
7.4.3 Dependencies .................................................................................................................... 7-14
7.4.4 Procedure ........................................................................................................................... 7-14
7.5 Only OID Without a WebLogic Domain .............................................................................. 7-17
7.5.1 Appropriate Deployment Environment........................................................................ 7-17
7.5.2 Components Deployed .................................................................................................... 7-17
vii
7.5.3 Dependencies .................................................................................................................... 7-17
7.5.4 Procedure........................................................................................................................... 7-17
7.6 Verifying OID Installation...................................................................................................... 7-21
7.7 Getting Started with OID After Installation......................................................................... 7-22
8 Configuring Oracle Virtual Directory
8.1 OVD with ODSM and Fusion Middleware Control in a New WebLogic Domain........... 8-1
8.1.1 Appropriate Deployment Environment........................................................................... 8-1
8.1.2 Components Deployed ....................................................................................................... 8-1
8.1.3 Dependencies ....................................................................................................................... 8-2
8.1.4 Procedure.............................................................................................................................. 8-2
8.2 Only OVD in an Existing WebLogic Domain......................................................................... 8-3
8.2.1 Appropriate Deployment Environment........................................................................... 8-4
8.2.2 Components Deployed ....................................................................................................... 8-4
8.2.3 Dependencies ....................................................................................................................... 8-4
8.2.4 Procedure.............................................................................................................................. 8-4
8.3 Only OVD Without a WebLogic Domain................................................................................ 8-6
8.3.1 Appropriate Deployment Environment........................................................................... 8-6
8.3.2 Components Deployed ....................................................................................................... 8-6
8.3.3 Dependencies ....................................................................................................................... 8-6
8.3.4 Procedure.............................................................................................................................. 8-6
8.4 Verifying OVD............................................................................................................................. 8-9
8.5 Getting Started with OVD After Installation.......................................................................... 8-9
9 Configuring Oracle Directory Integration Platform
9.1 Prerequisites ................................................................................................................................ 9-1
9.1.1 Option 1: ODIP with Oracle Internet Directory .............................................................. 9-1
9.1.2 Option 2: ODIP with Oracle Directory Server Enterprise Edition (ODSEE)............... 9-1
9.1.2.1 Installing Oracle Directory Server Enterprise Edition (ODSEE) ........................... 9-2
9.1.2.2 Setting Up Oracle Directory Server Enterprise Edition (ODSEE) ......................... 9-2
9.2 Configuring ODIP with Oracle Internet Directory (OID)..................................................... 9-2
9.2.1 ODIP with Fusion Middleware Control in a New WebLogic Domain ....................... 9-3
9.2.1.1 Appropriate Deployment Environment.................................................................... 9-3
9.2.1.2 Components Deployed................................................................................................ 9-3
9.2.1.3 Dependencies ................................................................................................................ 9-3
9.2.1.4 Procedure....................................................................................................................... 9-3
9.2.2 Only ODIP in an Existing WebLogic Domain................................................................. 9-5
9.2.2.1 Appropriate Deployment Environment.................................................................... 9-5
9.2.2.2 Components Deployed................................................................................................ 9-6
9.2.2.3 Dependencies ................................................................................................................ 9-6
9.2.2.4 Procedure....................................................................................................................... 9-6
9.2.3 Configuring ODIP when OID is Running in SSL Mode 2 - Server Only Authentication.
9-8
9.3 Configuring ODIP with Oracle Unified Directory (OUD).................................................... 9-8
9.4 Configuring ODIP with Oracle Directory Server Enterprise Edition (ODSEE)................. 9-8
9.4.1 ODIP with ODSEE in an Existing WebLogic Domain ................................................... 9-9
viii
9.4.1.1 Components Deployed................................................................................................ 9-9
9.4.1.2 Dependencies ................................................................................................................ 9-9
9.4.1.3 Procedure....................................................................................................................... 9-9
9.4.2 ODIP and ODSEE in a New WebLogic Domain.......................................................... 9-10
9.4.2.1 Components Deployed............................................................................................. 9-10
9.4.2.2 Dependencies ............................................................................................................. 9-10
9.4.2.3 Procedure.................................................................................................................... 9-10
9.4.3 Post-Configuration Steps................................................................................................. 9-12
9.5 Verifying ODIP......................................................................................................................... 9-13
9.6 Getting Started with ODIP After Installation ...................................................................... 9-13
10 Configuring Oracle Directory Services Manager
10.1 Only ODSM in a New WebLogic Domain ........................................................................... 10-1
10.1.1 Appropriate Deployment Environment........................................................................ 10-1
10.1.2 Components Deployed .................................................................................................... 10-1
10.1.3 Dependencies .................................................................................................................... 10-1
10.1.4 Procedure........................................................................................................................... 10-2
10.2 Only ODSM in an Existing WebLogic Domain................................................................... 10-3
10.2.1 Appropriate Deployment Environment........................................................................ 10-3
10.2.2 Components Deployed .................................................................................................... 10-3
10.2.3 Dependencies .................................................................................................................... 10-3
10.2.4 Procedure........................................................................................................................... 10-3
10.3 Verifying ODSM....................................................................................................................... 10-5
10.4 Getting Started with ODSM After Installation.................................................................... 10-5
11 Configuring Oracle Identity Federation
11.1 Using the Information in This Chapter................................................................................. 11-1
11.2 Understanding OIF Deployments ......................................................................................... 11-1
11.3 Understanding OIF Basic and Advanced Deployments.................................................... 11-2
11.3.1 Basic Deployment ............................................................................................................. 11-2
11.3.2 Advanced Deployments .................................................................................................. 11-2
11.4 Configuring Oracle HTTP Server for OIF ........................................................................... 11-3
11.5 Performing Basic Oracle Identity Federation Configurations........................................... 11-4
11.5.1 Appropriate Deployment Environment........................................................................ 11-4
11.5.2 Components Deployed .................................................................................................... 11-4
11.5.3 Dependencies .................................................................................................................... 11-5
11.5.4 Procedure........................................................................................................................... 11-5
11.6 Performing Advanced Oracle Identity Federation Configurations.................................. 11-7
11.6.1 Appropriate Deployment Environment........................................................................ 11-7
11.6.2 Components Deployed .................................................................................................... 11-7
11.6.3 Dependencies .................................................................................................................... 11-7
11.6.4 Procedure........................................................................................................................... 11-8
11.7 Advanced Example: Configuring OIF with OID in a New WebLogic Domain for LDAP
Authentication, User Store, and Federation Store 11-13
11.7.1 Appropriate Deployment Environment...................................................................... 11-13
11.7.2 Components Deployed .................................................................................................. 11-13
11.7.3 Dependencies .................................................................................................................. 11-13
ix
11.7.4 Procedure......................................................................................................................... 11-14
11.8 Advanced Example: Configuring OIF in a New or Existing WebLogic Domain with
RDBMS Data Stores 11-17
11.8.1 Appropriate Deployment Environment...................................................................... 11-17
11.8.2 Components Deployed .................................................................................................. 11-17
11.8.3 Dependencies .................................................................................................................. 11-18
11.8.4 Procedure......................................................................................................................... 11-18
11.9 Verifying OIF.......................................................................................................................... 11-22
11.10 Getting Started with OIF After Installation ....................................................................... 11-22
12 Configuring Oracle Unified Directory with Oracle Identity Management
11.1.1.6.0
12.1 Before You Begin...................................................................................................................... 12-1
12.1.1 Review System Requirements and Specifications ....................................................... 12-1
12.1.2 Review Certification Information................................................................................... 12-1
12.2 Configuring only Oracle Unified Directory (OUD)............................................................ 12-2
12.3 Configuring Oracle Unified Directory (OUD) with ODSM............................................... 12-2
12.4 Configuring OUD/ODSM/ODIP/Fusion Middleware Control and OVD/ODSM ..... 12-2
12.4.1 Part I: Configuring OVD with ODSM and Fusion Middleware Control in a New
WebLogic Administration Domain 12-3
12.4.1.1 Dependencies ............................................................................................................. 12-3
12.4.1.2 Procedure.................................................................................................................... 12-3
12.4.2 Part II: Configuring OUD/ODSM/ODIP and Fusion Middleware Control in a New
WebLogic Administration Domain 12-5
12.4.2.1 Prerequisites ............................................................................................................... 12-5
12.4.2.2 Dependencies ............................................................................................................. 12-6
12.4.2.3 Procedure.................................................................................................................... 12-6
12.4.2.4 Post-Configuration Steps.......................................................................................... 12-8
Part III Installing and Configuring Oracle Identity and Access Management
(11.1.1.5.0)
13 Installing Oracle Identity and Access Management (11.1.1.5.0)
13.1 Installing Oracle Identity and Access Management (11.1.1.5.0) ....................................... 13-1
13.1.1 Products Installed............................................................................................................. 13-1
13.1.2 Dependencies .................................................................................................................... 13-2
13.1.3 Procedure........................................................................................................................... 13-2
13.2 Understanding the Directory Structure After Installation................................................. 13-5
13.3 After Installing the Oracle Identity and Access Management Software.......................... 13-5
13.4 Configuring Oracle Identity and Access Management Products ..................................... 13-5
14 Understanding Domain Extension Scenarios
14.1 Overview................................................................................................................................... 14-1
14.2 Important Notes Before You Begin ....................................................................................... 14-2
14.3 Domain Extension Scenarios.................................................................................................. 14-3
x
14.3.1 Extending an Oracle Identity Management 11.1.1.5.0 Domain to Support OIM, OAM,
OAAM or OIN on the Local Machine 14-3
14.3.2 Understanding Joint Configuration and Domain Extension Scenarios for OIM, OAM,
OAAM, and OIN on the Local Machine 14-4
14.4 Starting the Administration Server on the Local Machine ................................................ 14-5
14.5 Creating Managed Servers on a Remote Machine.............................................................. 14-5
14.5.1 Installing Oracle WebLogic Server and Oracle Identity Management Suite on the
Remote Machine 14-5
14.5.2 Creating and Starting Managed Servers on a Remote Machine................................ 14-5
15 Configuring Oracle Identity Navigator
15.1 General Prerequisites............................................................................................................... 15-1
15.2 Installing OIN........................................................................................................................... 15-1
15.3 Important Notes Before You Begin ....................................................................................... 15-2
15.4 Configuring OIN in a New WebLogic Domain................................................................... 15-2
15.4.1 Appropriate Deployment Environment........................................................................ 15-2
15.4.2 Components Deployed .................................................................................................... 15-3
15.4.3 Dependencies .................................................................................................................... 15-3
15.4.4 Procedure........................................................................................................................... 15-3
15.5 OIN with OIM, OAM, and OAAM ....................................................................................... 15-4
15.5.1 Appropriate Deployment Environment........................................................................ 15-5
15.5.2 Components Deployed .................................................................................................... 15-5
15.5.3 Dependencies .................................................................................................................... 15-5
15.5.4 Procedure........................................................................................................................... 15-5
15.6 Starting the Servers.................................................................................................................. 15-7
15.7 Verifying OIN........................................................................................................................... 15-7
15.8 Getting Started with Oracle OIN After Installation............................................................ 15-8
16 Configuring Oracle Identity Manager
16.1 OIM Server Configuration Workflow................................................................................... 16-1
16.2 Important Notes Before You Start Configuring OIM......................................................... 16-2
16.3 Creating a new WebLogic Domain for OIM and SOA....................................................... 16-4
16.3.1 Appropriate Deployment Environment........................................................................ 16-4
16.3.2 Components Deployed .................................................................................................... 16-4
16.3.3 Dependencies .................................................................................................................... 16-4
16.3.4 Procedure........................................................................................................................... 16-4
16.4 Starting the Servers.................................................................................................................. 16-6
16.5 Configuring OIM Server, Design Console, and Remote Manager ................................... 16-7
16.5.1 Scope of Configuration Using the Oracle Identity Manager 11g Configuration Wizard..
16-7
16.5.2 Scenario 1: Oracle Identity Manager Server and Design Console on Different Machines
16-7
16.5.3 Scenario 2: Oracle Identity Manager Server and Remote Manager on Different
Machines 16-8
16.5.4 Scenario 3: Oracle Identity Manager Server, Design Console, and Remote Manager on
a Single Windows Machine 16-9
16.6 Before Configuring OIM Server, Design Console, or Remote Manager.......................... 16-9
16.6.1 Prerequisites for Configuring OIM Server.................................................................... 16-9
xi
16.6.2 Prerequisites for Configuring Only OIM Design Console on a Different Machine ..........
16-10
16.6.3 Prerequisites for Configuring Only OIM Remote Manager on a Different Machine ........
16-10
16.7 Starting the Oracle Identity Manager 11g Configuration Wizard .................................. 16-10
16.8 Configuring OIM Server....................................................................................................... 16-11
16.8.1 Appropriate Deployment Environment...................................................................... 16-11
16.8.2 Components Deployed .................................................................................................. 16-11
16.8.3 Dependencies .................................................................................................................. 16-11
16.8.4 Procedure......................................................................................................................... 16-11
16.8.5 Completing the Prerequisites for Enabling LDAP Synchronization....................... 16-15
16.8.5.1 Preconfiguring the Identity Store.......................................................................... 16-16
16.8.5.2 Creating Adapters in Oracle Virtual Directory................................................... 16-19
16.8.6 Running the LDAP Post-Configuration Utility.......................................................... 16-31
16.8.7 Verifying the LDAP Synchronization.......................................................................... 16-33
16.8.8 Post-Configuration Steps............................................................................................... 16-33
16.8.9 Setting oamEnabled Parameter for Identity Virtualization Library ....................... 16-34
16.8.10 Enabling LDAP Sync after Installing and Configuring OIM Server at a Later Point........
16-35
16.9 Installing and Configuring Only OIM Design Console on Windows............................ 16-35
16.10 Configuring OIM Design Console....................................................................................... 16-35
16.10.1 Appropriate Deployment Environment...................................................................... 16-36
16.10.2 Components Deployed .................................................................................................. 16-36
16.10.3 Dependencies .................................................................................................................. 16-36
16.10.4 Procedure......................................................................................................................... 16-36
16.10.5 Post-Configuration Steps............................................................................................... 16-37
16.10.6 Updating the xlconfig.xml File to Change the Port for Design Console ................ 16-38
16.10.7 Configuring Design Console to Use SSL..................................................................... 16-38
16.11 Configuring OIM Remote Manager.................................................................................... 16-39
16.11.1 Appropriate Deployment Environment...................................................................... 16-39
16.11.2 Components Deployed .................................................................................................. 16-40
16.11.3 Dependencies .................................................................................................................. 16-40
16.11.4 Procedure......................................................................................................................... 16-40
16.12 Verifying the OIM Installation............................................................................................. 16-41
16.13 Setting Up Integration with OAM....................................................................................... 16-42
16.14 List of Supported Languages ............................................................................................... 16-42
16.15 Using the Diagnostic Dashboard......................................................................................... 16-42
16.16 Getting Started with OIM After Installation...................................................................... 16-43
17 Configuring Oracle Access Manager
17.1 Prerequisites ............................................................................................................................. 17-1
17.2 Important Notes Before You Begin ....................................................................................... 17-2
17.3 Installing OAM......................................................................................................................... 17-2
17.4 Oracle Access Manager Domain Configuration Template................................................ 17-2
17.5 OAM in a New WebLogic Domain ....................................................................................... 17-3
17.5.1 Appropriate Deployment Environment........................................................................ 17-3
17.5.2 Components Deployed .................................................................................................... 17-3
xii
17.5.3 Dependencies .................................................................................................................... 17-3
17.5.4 Procedure........................................................................................................................... 17-3
17.6 OAM and OIN in a New WebLogic Domain....................................................................... 17-5
17.6.1 Appropriate Deployment Environment........................................................................ 17-5
17.6.2 Components Deployed .................................................................................................... 17-5
17.6.3 Dependencies .................................................................................................................... 17-6
17.6.4 Procedure........................................................................................................................... 17-6
17.7 OAM in a Domain Containing OAAM and OIN................................................................ 17-7
17.7.1 Appropriate Deployment Environment........................................................................ 17-7
17.7.2 Components Deployed .................................................................................................... 17-8
17.7.3 Dependencies .................................................................................................................... 17-8
17.7.4 Procedure........................................................................................................................... 17-8
17.8 Starting the Servers.................................................................................................................. 17-9
17.9 Optional Post-Installation Tasks.......................................................................................... 17-10
17.10 Verifying the OAM Installation........................................................................................... 17-10
17.11 Setting Up OAM Agents....................................................................................................... 17-10
17.11.1 Setting Up Oracle HTTP Server WebGate .................................................................. 17-10
17.11.1.1 Installing and Configuring WebGate ................................................................... 17-10
17.11.1.2 Registering WebGate as a Partner Application................................................... 17-11
17.11.1.3 Restarting Managed Servers .................................................................................. 17-11
17.11.2 Setting Up the OSSO Agent .......................................................................................... 17-11
17.11.2.1 Installing mod_osso ................................................................................................ 17-11
17.11.2.2 Restarting Managed Servers .................................................................................. 17-12
17.12 Setting Up Integration with OIM......................................................................................... 17-12
17.13 Getting Started with OAM After Installation .................................................................... 17-12
18 Configuring Oracle Adaptive Access Manager
18.1 Overview................................................................................................................................... 18-1
18.2 Prerequisites ............................................................................................................................. 18-2
18.3 Important Notes Before You Begin ....................................................................................... 18-2
18.4 Installing OAAM...................................................................................................................... 18-2
18.5 OAAM in a New WebLogic Domain.................................................................................... 18-3
18.5.1 Appropriate Deployment Environment........................................................................ 18-3
18.5.2 Components Deployed .................................................................................................... 18-3
18.5.3 Dependencies .................................................................................................................... 18-3
18.5.4 Procedure........................................................................................................................... 18-3
18.6 Configuring Oracle Adaptive Access Manager (Offline)................................................... 18-5
18.6.1 Components Deployed .................................................................................................... 18-5
18.6.2 Dependencies .................................................................................................................... 18-5
18.6.3 Procedure........................................................................................................................... 18-6
18.7 Starting the Servers.................................................................................................................. 18-7
18.8 Post-Installation Steps ............................................................................................................. 18-7
18.9 Verifying the OAAM Installation........................................................................................ 18-10
18.10 Migrating Policy and Credential Stores.............................................................................. 18-11
18.10.1 Creating JPS Root............................................................................................................ 18-11
18.10.2 Reassociating the Policy and Credential Store........................................................... 18-11
18.11 Getting Started with OAAM After Installation................................................................. 18-12
xiii
19 OAM and OAAM Joint Domain Configuration Scenarios
19.1 Prerequisites ............................................................................................................................. 19-1
19.2 Important Notes Before You Begin ....................................................................................... 19-2
19.3 Installing Oracle Identity and Access Management 11g Release 1 (11.1.1) ..................... 19-2
19.4 OAM, OIM, and OIN in a New WebLogic Domain ........................................................... 19-2
19.4.1 Appropriate Deployment Environment........................................................................ 19-3
19.4.2 Components Deployed .................................................................................................... 19-3
19.4.3 Dependencies .................................................................................................................... 19-3
19.4.4 Procedure........................................................................................................................... 19-3
19.5 OAM, OAAM, and OIN in a New WebLogic Domain ...................................................... 19-5
19.5.1 Appropriate Deployment Environment........................................................................ 19-5
19.5.2 Components Deployed .................................................................................................... 19-5
19.5.3 Dependencies .................................................................................................................... 19-6
19.5.4 Procedure........................................................................................................................... 19-6
19.6 Starting the Servers.................................................................................................................. 19-8
19.7 Getting Started with OAM After Installation...................................................................... 19-8
19.8 Getting Started with OAAM After Installation................................................................... 19-8
20 Installing and Configuring Oracle Entitlements Server
20.1 Overview of Oracle Entitlements Server 11g Installation.................................................. 20-1
20.2 Installing Oracle Entitlements Server Administration Server........................................... 20-2
20.2.1 Prerequisites ...................................................................................................................... 20-2
20.2.2 Procedure........................................................................................................................... 20-2
20.2.2.1 System Requirements and Certification................................................................. 20-2
20.2.2.2 Obtaining the Oracle Fusion Middleware Software............................................. 20-2
20.2.2.3 Installing Oracle WebLogic Server and Creating the Oracle Middleware Home.......
20-3
20.2.2.4 Installing Oracle Database (Recommended) ......................................................... 20-3
20.2.2.5 Creating a Schema for Oracle Entitlement Server ................................................ 20-3
20.2.2.6 Starting the Installer.................................................................................................. 20-4
20.2.2.7 Installation Screens and Instructions...................................................................... 20-5
20.2.2.8 Verifying Oracle Entitlements Server Installation................................................ 20-7
20.3 Configuring Oracle Entitlements Server Administration Server...................................... 20-7
20.3.1 Components Deployed .................................................................................................... 20-7
20.3.2 Prerequisites ...................................................................................................................... 20-7
20.3.2.1 Installing Oracle Entitlements Server..................................................................... 20-8
20.3.2.2 Editing the weblogic.policy file............................................................................... 20-8
20.3.2.3 Extracting Apache Derby Template (Optional) .................................................... 20-8
20.3.3 Procedure........................................................................................................................... 20-8
20.3.4 Starting the Administration Server.............................................................................. 20-10
20.3.5 Post-Configuration ......................................................................................................... 20-10
20.3.6 Verifying Oracle Entitlements Server Configuration................................................ 20-11
20.4 Installing Oracle Entitlements Server Client...................................................................... 20-12
20.4.1 Prerequisites .................................................................................................................... 20-12
20.4.2 Obtaining Oracle Entitlements Server Client Software............................................. 20-12
20.4.3 Installing Oracle Entitlements Server Client .............................................................. 20-12
xiv
20.4.4 Verifying Oracle Entitlements Server Client Installation ......................................... 20-13
20.5 Configuring Oracle Entitlements Server Client................................................................. 20-13
20.5.1 Configuring Security Modules in a Controlled Mode (Quick Configuration)...... 20-14
20.5.1.1 Configuring Java Security Module in a Controlled Mode ................................ 20-14
20.5.1.2 Configuring RMI Security Module in a Controlled Mode ................................ 20-14
20.5.1.3 Configuring Web Service Security Module in a Controlled Mode .................. 20-15
20.5.1.4 Configuring Oracle WebLogic Server Security Module in a Controlled Mode..........
20-15
20.5.2 Configuring Distribution Modes.................................................................................. 20-15
20.5.2.1 Configuring Controlled Distribution.................................................................... 20-16
20.5.2.2 Configuring Non-Controlled and Controlled Pull Distribution Mode........... 20-16
20.5.3 Configuring Security Module ....................................................................................... 20-16
20.5.3.1 Creating Java Security Module.............................................................................. 20-17
20.5.3.2 Creating Multi-Protocol Security Module ........................................................... 20-20
20.5.3.3 Creating WebLogic Security Module ................................................................... 20-21
20.5.3.4 Configuring the PDP Proxy Client........................................................................ 20-22
20.5.4 Creating the OES Client Domain.................................................................................. 20-22
20.5.5 Locating Security Module Instances............................................................................ 20-25
20.5.6 Using the Java Security Module ................................................................................... 20-25
20.6 Getting Started with Oracle Entitlements Server After Installation............................... 20-25
21 Migrating from Domain Agent to Oracle HTTP Server 10g Webgate for OAM
21.1 Installing and Configuring Oracle HTTP Server 11g (11.1.1.5.0) ..................................... 21-1
21.2 Provisioning Oracle HTTP Server 10g Webgate for OAM Profile ................................... 21-2
21.3 Installing Oracle HTTP Server 10g Webgate for OAM ...................................................... 21-2
21.4 Configuring mod_weblogic.................................................................................................... 21-2
21.5 Optional: Configuring Host Identifier.................................................................................. 21-3
21.6 Updating OIM Server Configuration.................................................................................... 21-3
21.7 Optional: Disabling Domain Agent....................................................................................... 21-4
21.8 Optional: Updating Oracle Identity Manager Configuration ........................................... 21-5
22 Installing and Configuring Oracle HTTP Server 11g Webgate for OAM
22.1 Installation Overview.............................................................................................................. 22-1
22.2 Preparing to Install Oracle HTTP Server 11g Webgate for Oracle Access Manager ..... 22-3
22.2.1 Oracle Fusion Middleware Certification....................................................................... 22-3
22.2.2 Installing and Configuring OAM 11g............................................................................ 22-3
22.2.3 Installing and Configuring Oracle HTTP Server 11g.................................................. 22-3
22.2.4 Installing Third-Party GCC Libraries (Linux and Solaris Operating Systems Only)........
22-4
22.2.4.1 Verifying the GCC Libraries Version on Linux and Solaris Operating Systems ........
22-4
22.2.5 Prerequisites for 64-Bit Oracle HTTP Server 11g Webgates on Windows 2003 and
Windows 2008 64-Bit Platforms 22-5
22.3 Installing Oracle HTTP Server 11g Webgate for Oracle Access Manager....................... 22-5
22.3.1 Launching the Installer .................................................................................................... 22-5
22.3.2 Installation Flow and Procedure .................................................................................... 22-6
22.4 Post-Installation Steps ............................................................................................................. 22-7
xv
22.5 Verifying the Oracle HTTP Server 11g Webgate for Oracle Access Manager ................ 22-8
22.6 Getting Started with a New Oracle HTTP Server 11g Webgate Agent for Oracle Access
Manager 22-9
22.6.1 Register the New Webgate Agent .................................................................................. 22-9
22.6.2 Copy Generated Files and Artifacts to the Webgate Instance Location ................. 22-13
22.6.3 Restart the Oracle HTTP Server Instance.................................................................... 22-14
23 Lifecycle Management
23.1 How Lifecycle Events Impact Integrated Components...................................................... 23-1
23.2 LCM for Oracle Identity Manager......................................................................................... 23-1
23.3 LCM for Oracle Access Manager........................................................................................... 23-2
23.4 LCM for Oracle Adaptive Access Manager ......................................................................... 23-2
23.5 LCM for Oracle Identity Navigator....................................................................................... 23-3
23.6 References ................................................................................................................................. 23-3
Part IV Appendixes
A Oracle Identity Management 11.1.1.6.0 Software Installation Screens
A.1 Welcome...................................................................................................................................... A-1
A.2 Install Software Updates........................................................................................................... A-2
A.3 Select Installation Type ............................................................................................................. A-3
A.4 Prerequisite Checks ................................................................................................................... A-4
A.5 Select Domain............................................................................................................................. A-5
A.6 Specify Installation Location .................................................................................................... A-8
A.7 Specify Security Updates .......................................................................................................... A-9
A.8 Configure Components........................................................................................................... A-10
A.9 Configure Ports ........................................................................................................................ A-11
A.10 Specify Schema Database ....................................................................................................... A-12
A.11 Specify Oracle Virtual Directory Information ..................................................................... A-14
A.12 Specify OID Administrator Password .................................................................................. A-15
A.13 Select Oracle Identity Federation Configuration Type....................................................... A-16
A.14 Specify Oracle Identity Federation Details........................................................................... A-17
A.15 Installation Summary .............................................................................................................. A-18
A.16 Installation Progress ................................................................................................................ A-19
A.17 Configuration Progress ........................................................................................................... A-20
A.18 Installation Complete .............................................................................................................. A-21
B Oracle Identity and Access Management 11.1.1.5.0 Software Installation
Screens
B.1 Welcome...................................................................................................................................... B-1
B.2 Install Software Updates........................................................................................................... B-2
B.3 Prerequisite Checks ................................................................................................................... B-3
B.4 Specify Installation Location .................................................................................................... B-4
B.5 Installation Summary ................................................................................................................ B-6
B.6 Installation Progress .................................................................................................................. B-6
B.7 Installation Complete ................................................................................................................ B-7
xvi
C Oracle Identity Manager Configuration Screens
C.1 Welcome...................................................................................................................................... C-1
C.2 Components to Configure ........................................................................................................ C-2
C.3 Database ...................................................................................................................................... C-3
C.4 WebLogic Admin Server........................................................................................................... C-5
C.5 OIM Server.................................................................................................................................. C-6
C.6 BI Publisher................................................................................................................................. C-7
C.7 LDAP Server............................................................................................................................... C-7
C.8 LDAP Server Continued ........................................................................................................... C-8
C.9 Configuration Summary........................................................................................................... C-9
D Starting or Stopping the Oracle Stack
D.1 Starting the Stack........................................................................................................................ D-1
D.2 Stopping the Stack ..................................................................................................................... D-3
D.3 Restarting Servers ...................................................................................................................... D-4
E Preconfiguring Oracle Directory Server Enterprise Edition (ODSEE)
F Deinstalling and Reinstalling Oracle Identity Management
F.1 Deinstalling Oracle Identity Management............................................................................. F-1
F.1.1 Deinstalling the Oracle Identity Management Oracle Home....................................... F-1
F.1.2 Deinstalling the Oracle Common Home......................................................................... F-3
F.1.3 Deinstalling Applications Registered with Oracle Single Sign-On 10g Release 10.1.4.3.0
F-4
F.2 Reinstalling Oracle Identity Management ............................................................................. F-4
G Deinstalling and Reinstalling Oracle Identity and Access Management
G.1 Deinstalling Oracle Identity and Access Management ........................................................ G-1
G.1.1 Deinstalling the Oracle Identity and Access Management Oracle Home.................. G-1
G.1.2 Deinstalling the Oracle Common Home......................................................................... G-2
G.2 Reinstalling Oracle Identity and Access Management......................................................... G-3
H Performing Silent Installations
H.1 What is a Silent Installation? .................................................................................................... H-1
H.2 Before Performing a Silent Installation................................................................................... H-1
H.2.1 UNIX Systems: Creating the oraInst.loc File .................................................................. H-1
H.2.2 Windows Systems: Creating the Registry Key............................................................... H-2
H.3 Creating Response Files ............................................................................................................ H-2
H.3.1 OID, OVD, ODSM, ODIP, and OIF.................................................................................. H-3
H.3.2 OIM, OAM, OAAM, OES, and OIN................................................................................. H-3
H.3.3 Securing Your Silent Installation...................................................................................... H-3
H.4 Performing a Silent Installation ............................................................................................... H-3
H.5 Installer Command Line Parameters ...................................................................................... H-4
xvii
I Troubleshooting the Installation
I.1 General Troubleshooting Tips ................................................................................................... I-1
I.2 Installation Log Files ................................................................................................................... I-2
I.3 Configuring OIM Against an Existing OIM 11g Schema....................................................... I-2
I.4 Need More Help?......................................................................................................................... I-3
J OAAM Partition Schema Reference
J.1 Overview...................................................................................................................................... J-1
J.2 Partition Add Maintenance ....................................................................................................... J-2
J.2.1 ..................................................................................Sp_Oaam_Add_Monthly_Partition J-2
J.2.2 ....................................................................................Sp_Oaam_Add_Weekly_Partition J-2
J.3 Partition Maintenance Scripts ................................................................................................... J-3
J.3.1 drop_monthly_partition_tables.sql................................................................................... J-3
J.3.2 drop_weekly_partition_tables.sql .................................................................................... J-3
J.3.3 add_monthly_partition_tables.sql .................................................................................... J-3
J.3.4 add_weekly_partition_tables.sql....................................................................................... J-3
K Software Deinstallation Screens
K.1 Welcome...................................................................................................................................... K-1
K.2 Select Deinstallation Type ........................................................................................................ K-2
K.2.1 Option 1: Deinstall Oracle Home ..................................................................................... K-3
K.2.1.1 Deinstall Oracle Home................................................................................................ K-3
K.2.2 Option 2: Deinstall ASInstances managed by WebLogic Domain .............................. K-3
K.2.2.1 Specify WebLogic Domain Detail ............................................................................. K-3
K.2.2.2 Select Managed Instance ............................................................................................ K-4
K.2.2.3 Deinstallation Summary (Managed Instance)......................................................... K-5
K.2.3 Option 3: Deinstall Unmanaged ASInstances ................................................................ K-6
K.2.3.1 Specify Instance Location........................................................................................... K-6
K.2.3.2 Deinstallation Summary (Unmanaged ASInstance) ............................................. K-6
K.3 Deinstallation Progress ............................................................................................................ K-7
K.4 Deinstallation Complete ........................................................................................................... K-8
xviii

xix
Preface
This Preface provides supporting information for the Oracle Fusion Middleware
Installation Guide for Oracle Identity Management and includes the following topics:
■Audience
■Documentation Accessibility
■Related Documents
■Conventions
Audience
The Oracle Fusion Middleware Installation Guide for Oracle Identity Management is
intended for administrators that are responsible for installing Oracle Identity
Management components.
This document assumes you have experience installing enterprise components. Basic
knowledge about the Oracle Identity Management components and Oracle
Application Server is recommended.
Documentation Accessibility
For information about Oracle's commitment to accessibility, visit the Oracle
Accessibility Program website at
http://www.oracle.com/pls/topic/lookup?ctx=acc&id=docacc.
Access to Oracle Support
Oracle customers have access to electronic support through My Oracle Support. For
information, visit
http://www.oracle.com/pls/topic/lookup?ctx=acc&id=info or visit
http://www.oracle.com/pls/topic/lookup?ctx=acc&id=trs if you are
hearing impaired.
Related Documents
This section identifies additional documents related to Oracle Identity Management.
You can access Oracle documentation online from the Oracle Technology Network
(OTN) Web site at the following URL:
http://www.oracle.com/technetwork/indexes/documentation/index.ht
ml

xx
Refer to the following documents for additional information on each subject:
Oracle Fusion Middleware
■Oracle Fusion Middleware Administrator's Guide
■Oracle Fusion Middleware Security Guide
Oracle Identity Management
■Oracle Fusion Middleware Getting Started with Oracle Identity Management
■Oracle Fusion Middleware User Reference for Oracle Identity Management
Installing and Upgrading
■Oracle Fusion Middleware Installation Planning Guide
■Oracle Fusion Middleware Quick Installation Guide for Oracle Identity Management
■Oracle Fusion Middleware Upgrade Planning Guide
■Oracle Fusion Middleware Upgrade Guide for Oracle Identity Management
■Oracle Fusion Middleware Getting Started With Installation for Oracle WebLogic Server
■Oracle Fusion Middleware Installation Guide for Oracle WebLogic Server
High Availability
■Oracle Fusion Middleware High Availability Guide
■Oracle Fusion Middleware Enterprise Deployment Guide for Oracle Identity Management
Oracle Internet Directory
■Oracle Fusion Middleware Administrator's Guide for Oracle Internet Directory
■Oracle Fusion Middleware Application Developer's Guide for Oracle Identity
Management
Oracle Directory Integration Platform
■Oracle Fusion Middleware Integration Guide for Oracle Identity Management
Oracle Virtual Directory
■Oracle Fusion Middleware Administrator's Guide for Oracle Virtual Directory.
Oracle Directory Services Manager
■Oracle Fusion Middleware Administrator's Guide for Oracle Internet Directory
■Oracle Fusion Middleware Administrator's Guide for Oracle Virtual Directory
Oracle Identity Federation
■Oracle Fusion Middleware Administrator's Guide for Oracle Identity Federation.
Note: Printed documentation is available for sale from the Oracle
Store Web site at the following URL:
http://oraclestore.oracle.com/

xxi
Oracle Single Sign-On
■Oracle Application Server Single Sign-On Administrator's Guide 10g Release 10.1.4.0.1
available at:
http://www.oracle.com/technology/documentation/oim1014.html
Oracle Delegated Administration Services
■Oracle Identity Management Guide to Delegated Administration 10g Release 10.1.4.0.1
available at:
http://www.oracle.com/technology/documentation/oim1014.html
Oracle Fusion Middleware Repository Creation Utility
■Oracle Fusion Middleware Repository Creation Utility User's Guide
Oracle Identity Manager
■Oracle Fusion Middleware Administrator’s Guide for Oracle Identity Manager
Oracle Access Manager
■Oracle Fusion Middleware Administrator’s Guide for Oracle Access Manager
Oracle Adaptive Access Manager
■Oracle Fusion Middleware Administrator’s Guide for Oracle Adaptive Access Manager
Oracle Identity Navigator
■Oracle Fusion Middleware Administrator’s Guide for Oracle Identity Navigator
Conventions
The following text conventions are used in this document:
Convention Meaning
boldface Boldface type indicates graphical user interface elements associated
with an action, or terms defined in text or the glossary.
italic Italic type indicates book titles, emphasis, or placeholder variables for
which you supply particular values.
monospace Monospace type indicates commands within a paragraph, URLs, code
in examples, text that appears on the screen, or text that you enter.
xxii

Part I
Part I Introduction and Preparation
Part I introduces Oracle Identity Management 11g Release 1 (11.1.1) installation and
describes how to perform preparatory and common installation tasks. It contains the
following chapters:
■Chapter 1, "Understanding Oracle Identity Management"
■Chapter 2, "Understanding the Oracle Identity Management Installation"
■Chapter 3, "Preparing to Install"
■Chapter 4, "Performing Common Installation Tasks"

1
Understanding Oracle Identity Management 1-1
1 Understanding Oracle Identity Management
This chapter provides a brief overview of Oracle Identity Management 11g Release 1
(11.1.1) and Oracle Identity and Access Management 11g Release 1 (11.1.1). This
chapter includes the following topics:
■What is Oracle Fusion Middleware?
■What is Oracle Identity Management?
■Oracle Identity Management 11g Release 1 (11.1.1.6.0) Components
■Oracle Identity and Access Management 11g Release 1 (11.1.1.5.0) Components
■What Does This Guide Cover?
1.1 What is Oracle Fusion Middleware?
Oracle Identity Management is part of Oracle Fusion Middleware. Oracle Fusion
Middleware is a collection of standards-based software products that spans a range of
tools and services: From Java EE and developer tools, to integration services, business
intelligence, and collaboration. Oracle Fusion Middleware offers complete support for
development, deployment, and management.
1.1.1 What is Oracle Enterprise Manager Fusion Middleware Control?
Oracle Enterprise Manager Fusion Middleware Control is a Web browser-based
graphical user interface that you can use to monitor and administer Oracle Fusion
Middleware components, including Oracle Identity Management components, that are
installed in Oracle WebLogic Server domains.
1.2 What is Oracle Identity Management?
Oracle Identity Management enables enterprises to manage the end-to-end lifecycle of
user identities across all enterprise resources—both within and beyond the firewall.
With Oracle Identity Management, you can deploy applications faster, apply the most
See: The "Related Documents" section in this guide’s Preface for a
list of documents that provide additional information about the topics
described in this chapter.
Note: When you install some of the Oracle Identity Management
components in a new domain, the Fusion Middleware Control
management component is included.

Oracle Identity Management 11g Release 1 (11.1.1.6.0) Components
1-2 Oracle Fusion Middleware Installation Guide for Oracle Identity Management
granular protection to enterprise resources, automatically eliminate latent access
privileges, and much more.
Oracle Corporation leads the industry with award-winning Identity Management
offerings that constitute the most comprehensive solution offered by any vendor,
including:
■Web Access Control
■Adaptive Access Control
■Identity Federation
■Identity Administration
■User Access Provisioning
■Role Management
■Authorization Policy Management
■Directory Services
For more information about Oracle Identity Management, refer to the Identity
Management home page on Oracle Corporation’s Web site at:
http://www.oracle.com/identity
1.3 Oracle Identity Management 11g Release 1 (11.1.1.6.0) Components
Oracle Identity Management 11g Release 1 (11.1.1.6.0) includes the following
components:
■Oracle Internet Directory (OID)
■Oracle Directory Integration Platform (ODIP)
■Oracle Virtual Directory (OVD)
■Oracle Directory Services Manager (ODSM)
■Oracle Identity Federation (OIF)
1.4 Oracle Identity and Access Management 11g Release 1 (11.1.1.5.0)
Components
Oracle Identity and Access Management 11g Release 1 (11.1.1) includes the following
components:
■Oracle Identity Manager (OIM)
■Oracle Access Manager (OAM)
■Oracle Adaptive Access Manager (OAAM)
■Oracle Identity Navigator (OIN)
■Oracle Entitlements Server (OES)
Note: For more information on Installing and Configuring OID,
OVD, ODSM, ODIP, and OIF (11.1.1.6.0), see Part II.

What Does This Guide Cover?
Understanding Oracle Identity Management 1-3
1.5 What Does This Guide Cover?
This topic describes the scope of information in this guide and how to use it. This topic
includes the following sections:
■Using This Guide
■Upgrading to Oracle Identity Management (11.1.1.6.0)
■Upgrading to Oracle Identity and Access Management (11.1.1.5.0)
■Installing Oracle Identity Management (11.1.1.6.0) for High Availability
■Installing Oracle Identity and Access Management (11.1.1.5.0) for High
Availability
1.5.1 Using This Guide
Each document in the Oracle Fusion Middleware Documentation Library has a
specific purpose. The specific purpose of this guide is to explain how to:
1. Install single instances of Oracle Identity Management 11g Release 1 (11.1.1)
components.
2. Verify the installation was successful.
3. Get started with the component after installation.
This guide covers the most common, certified Oracle Identity Management
deployments. The following information is provided for each of these deployments:
■Appropriate Installation Environment: Helps you determine which installation is
appropriate for your environment.
■Components Installed: Identifies the components that are installed in each
scenario.
■Dependencies: Identifies the components each installation depends on.
■Procedure: Explains the steps for the installation.
Part II of this guide explains how to install Oracle Internet Directory, Oracle Virtual
Directory, Oracle Directory Services Manager, Oracle Directory Integration Platform,
and Oracle Identity Federation Management by using the Oracle Identity Management
11.1.1.6.0 Installer and the Oracle Identity Management Configuration Wizard.
Part III of this guide explains how to install Oracle Identity Manager, Oracle Access
Manager, Oracle Adaptive Access Manager,Oracle Entitlements Server, and Oracle
Identity Navigator by using the Oracle Identity and Access Management 11.1.1.5.0
Installer and the Oracle Fusion Middleware Configuration Wizard. The Oracle
Identity Management 11g Configuration Wizard is used for configuring Oracle
Identity Manager only.
The following is a list of recommendations on how to use the information in this guide
to install Oracle Identity Management 11g Release 1 (11.1.1):
1. Review Chapter 2, "Understanding the Oracle Identity Management Installation,"
for context.
Note: For more information on Installing and Configuring OIM,
OAM, OAAM, OES, and OIN (11.1.1.5.0), see Part III.

What Does This Guide Cover?
1-4 Oracle Fusion Middleware Installation Guide for Oracle Identity Management
2. Review Chapter 3, "Preparing to Install," for information about what you should
consider before you deploy Oracle Identity Management.
3. Review Chapter 4, "Performing Common Installation Tasks," to understand the
tasks that you must perform for most deployments. Understanding this
information before you start will expedite and simplify the deployment process.
4. Install, verify, and get started with your Oracle Identity Management component
by referring to its specific chapter in this guide.
5. Use the appendixes in this guide as needed.
1.5.2 Upgrading to Oracle Identity Management (11.1.1.6.0)
This guide does not explain how to upgrade legacy versions of Oracle Identity
Management components, including any previous database schemas, to Oracle
Identity Management (11.1.1.6.0). To upgrade a legacy version of an Oracle Identity
Management component, refer to the following documents:
■Oracle Fusion Middleware Upgrade Planning Guide
■Oracle Fusion Middleware Upgrade Guide for Oracle Identity Management
1.5.3 Upgrading to Oracle Identity and Access Management (11.1.1.5.0)
This guide does not explain how to upgrade legacy versions of Oracle Identity and
Access Management components, including any previous database schemas, to Oracle
Identity and Access Management (11.1.1.5.0). To upgrade a legacy version of an Oracle
Identity Management component, refer to the following documents:
■Oracle Fusion Middleware Upgrade Planning Guide
■Oracle Fusion Middleware Upgrade Guide for Oracle Identity Management
1.5.4 Installing Oracle Identity Management (11.1.1.6.0) for High Availability
This guide does not explain how to install Oracle Identity Management (11.1.1.6.0)
components in High Availability (HA) configurations. To install an Oracle Identity
See Also: The "Related Documents" section in this guide’s Preface
for a list of documents that provide additional information about
Oracle Identity Management components.
Note: This guide provides information for installing and configuring
Oracle Identity Management (11.1.1.6.0) for new users. If you are an
existing Oracle Identity Management 11g user, refer to "Applying the
Latest Oracle Fusion Middleware Patch Set" in the Oracle Fusion
Middleware Patching Guide.
For complete information about patching your Oracle Fusion
Middleware 11g to the latest release, refer to the Oracle Fusion
Middleware Patching Guide.
Note: This guide provides information for Installing Oracle Identity
and Access Management (11.1.1.5.0) for new users. If you are an
existing Oracle Identity and Access Management 11g user, refer to
"Applying the Latest Oracle Fusion Middleware Patch Set" in the
Oracle Fusion Middleware Patching Guide.

What Does This Guide Cover?
Understanding Oracle Identity Management 1-5
Management component in a High Availability configuration, refer to the following
documents:
■Oracle Fusion Middleware High Availability Guide
■Oracle Fusion Middleware Enterprise Deployment Guide for Oracle Identity Management
1.5.5 Installing Oracle Identity and Access Management (11.1.1.5.0) for High Availability
This guide does not explain how to install Oracle Identity and Access Management
(11.1.1.5.0) components in High Availability (HA) configurations. To install an Oracle
Identity and Access Management component in a High Availability configuration,
refer to the following documents:
■Oracle Fusion Middleware High Availability Guide
■Oracle Fusion Middleware Enterprise Deployment Guide for Oracle Identity Management

What Does This Guide Cover?
1-6 Oracle Fusion Middleware Installation Guide for Oracle Identity Management

2
Understanding the Oracle Identity Management Installation 2-1
2 Understanding the Oracle Identity
Management Installation
This chapter provides an overview of the Oracle Identity Management 11g Release 1
(11.1.1) installation. This chapter includes the following topics:
■Overview and Structure of Oracle Identity Management 11g Installation
■Overview of Oracle Identity Management (11.1.1.6.0) Installation
■Overview of Oracle Identity and Access Management (11.1.1.5.0) Installation
2.1 Overview and Structure of Oracle Identity Management 11g
Installation
This section discusses the following topics:
■Overview
■Structure of the Installation
2.1.1 Overview
Oracle Identity Management 11g includes two distinct suites comprising the following
Oracle Identity Management products:
■Oracle Identity Management 11g Release 1 (11.1.1.6.0)
■Oracle Identity and Access Management 11g Release 1 (11.1.1.5.0)
Oracle Identity Management 11g Release 1 (11.1.1.6.0)
Oracle Identity Management 11g Release 1 (11.1.1.6.0) includes the following
components:
Note: For information about installing the 11g (11.1.1.6.0) version of
Oracle Internet Directory (OID), Oracle Virtual Directory (OVD),
Oracle Directory Services Manager (ODSM), Oracle Directory
Integration Platform (ODIP), and Oracle Identity Federation (OIF), see
Overview of Oracle Identity Management (11.1.1.6.0) Installation.
For information about installing the 11g (11.1.1.5.0) version of Oracle
Identity Manager (OIM), Oracle Access Manager (OAM), Oracle
Adaptive Access Manager (OAAM), Oracle Entitlements Server
(OES), and Oracle Identity Navigator (OIN), see Overview of Oracle
Identity and Access Management (11.1.1.5.0) Installation.

Overview and Structure of Oracle Identity Management 11g Installation
2-2 Oracle Fusion Middleware Installation Guide for Oracle Identity Management
–Oracle Internet Directory (OID)
–Oracle Virtual Directory (OVD)
–Oracle Directory Services Manager (ODSM)
–Oracle Directory Integration Platform (ODIP)
–Oracle Identity Federation (OIF)
Oracle Identity and Access Management 11g Release 1 (11.1.1.5.0)
Oracle Identity and Access Management 11g Release 1 (11.1.1) includes the following
components:
–Oracle Identity Manager (OIM)
–Oracle Access Manager (OAM)
–Oracle Identity Navigator (OIN)
–Oracle Adaptive Access Manager (OAAM)
–Oracle Entitlements Server (OES)
Obtaining the Software
To obtain Oracle Identity and Access Management 11g Release 1 (11.1.1.5.0) software,
refer to Oracle Fusion Middleware Download, Installation, and Configuration ReadMe
available at:
http://download.oracle.com/docs/cd/E23104_01/download_readme.htm
2.1.2 Structure of the Installation
If you install Oracle Identity Management suite and Oracle Identity and Access
Management on the same machine, two Oracle Home (also referred to as IDM_Home
and IAM_Home in this guide) directories are created on the machine. For information
about identifying installation directories, see Section 4.1.1, "Identifying Installation
Directories" and Section 4.2.4, "Identifying Installation Directories".
Note that two IDM_Home directories are mentioned in descriptions and procedures
throughout this guide. For example, the first one, IDM_Home can be the IDM_Home
directory for Oracle Internet Directory, Oracle Virtual Directory, Oracle Directory
Services Manager, Oracle Directory Integration Platform, and Oracle Identity
Federation. The second one, IAM_Home can be the IDM_Home directory for Oracle
Identity Manager, Oracle Access Manager, Oracle Adaptive Access Manager, Oracle
Entitlements Server, and Oracle Identity Navigator.
However, note that IDM_Home and IAM_Home are used as examples in this guide.
You can specify any name for either of your IDM_Home directories. In addition, you
can install the two distinct Oracle Identity Management suites in any order on your
machine.
Note: See Part II, "Installing and Configuring Oracle Identity
Management (11.1.1.6.0)" in this guide for installing and configuring
these products.
Note: See Part III, "Installing and Configuring Oracle Identity and
Access Management (11.1.1.5.0)" in this guide for installing and
configuring these products.

Overview of Oracle Identity Management (11.1.1.6.0) Installation
Understanding the Oracle Identity Management Installation 2-3
If you choose to use the default names, the first installation creates an Oracle_IDM1
directory, and the second installation creates an Oracle_IDM2 directory.
2.2 Overview of Oracle Identity Management (11.1.1.6.0) Installation
This section discusses the following topics:
■Installation Roadmap
■Installation Types: "Install Software - Do Not Configure" vs. "Install and
Configure"
■Understanding Oracle WebLogic Server Administration Domain Options
■Installing Components on Separate Systems
■Executing the oracleRoot.sh Script on UNIX Platforms
■Understanding the State of Oracle Identity Management Components After
Installation
2.2.1 Installation Roadmap
Table 2–1 describes the high-level tasks for installing and configuring Oracle Identity
Management. The table also provides information on where to get more details about
each task.

Overview of Oracle Identity Management (11.1.1.6.0) Installation
2-4 Oracle Fusion Middleware Installation Guide for Oracle Identity Management
Table 2–1 Tasks in the Oracle Identity Management Installation Procedure
Task Description Documentation
Mandatory or
Optional?
Task 1 - Prepare
your environment
for installation.
Ensure that your system
environment meets the general
installation requirements for
Oracle Fusion Middleware as well
as Oracle Identity Management
and RCU.
For system requirements information,
go to:
http://www.oracle.com/technet
work/middleware/ias/downloads
/fusion-requirements-100147.h
tml
For certification information, go to:
http://www.oracle.com/technet
work/middleware/ias/downloads
/fusion-certification-100350.
html
Mandatory
Task 2 - Run RCU
to create the
necessary schemas.
Oracle Identity Management
components require schemas that
must be installed in an Oracle
database. You create and load
these schemas in your database by
using RCU.
Make sure you have a supported Oracle
database up and running. See
http://www.oracle.com/technet
work/middleware/ias/downloads
/fusion-certification-100350.
html for more information.
Instructions for creating the schema are
provided in "Running Oracle Fusion
Middleware Repository Creation Utility
(RCU)" in the Oracle Fusion Middleware
Repository Creation Utility User's Guide.
In addition, refer to Creating Database
Schema Using the Oracle Fusion
Middleware Repository Creation Utility
(RCU) in this guide.
Mandatory

Overview of Oracle Identity Management (11.1.1.6.0) Installation
Understanding the Oracle Identity Management Installation 2-5
Task 3 - Install
Oracle WebLogic
Server 11g Release
1 (10.3.6) and create
a Middleware
home.
Oracle Identity Management
requires a Middleware home
directory. The Middleware home
is created during the Oracle
WebLogic Server installation.
The WebLogic Server installer also
creates the WebLogic home
directory within the Oracle
Middleware home directory.
Installation instructions are provided in
Oracle WebLogic Server Installation Guide.
For more information about the
Middleware home and WebLogic home
directories, see Oracle Fusion Middleware
Concepts Guide.
Mandatory
Task 4 - Install
Oracle Identity
Management
Use the installer to install Oracle
Identity Management 11.1.1.6.0 See Installing Oracle Identity
Management Using "Install and
Configure" Option.
For more information about the
installation types, see Installation Types:
"Install Software - Do Not Configure"
vs. "Install and Configure".
Mandatory
Task 5 - Configure
Oracle Identity
Management
After installing, run the
Configuration Tool to configure
your Oracle Identity Management
components.
Note: This step applies if you
selected Install Software - Do Not
Configure option in the Select
Installation Type screen while
installing Oracle Identity
Management 11g Release 1
(11.1.1.6.0)
See the following topics in this guide:
■Only OID in an Existing WebLogic
Domain
■Only OID Without a WebLogic
Domain
■OID with ODSM and Fusion
Middleware Control in a New
WebLogic Domain
■OID with ODIP, ODSM, and Fusion
Middleware Control in a New
WebLogic Domain
■OVD with ODSM and Fusion
Middleware Control in a New
WebLogic Domain
■Only OVD in an Existing WebLogic
Domain
■Only OVD Without a WebLogic
Domain
■Performing Basic Oracle Identity
Federation Configurations
■Performing Advanced Oracle
Identity Federation Configurations
■ODIP with Fusion Middleware
Control in a New WebLogic
Domain
■Only ODIP in an Existing
WebLogic Domain
■Configuring ODIP when OID is
Running in SSL Mode 2 - Server
Only Authentication
Optional
Table 2–1 (Cont.) Tasks in the Oracle Identity Management Installation Procedure
Task Description Documentation
Mandatory or
Optional?

Overview of Oracle Identity Management (11.1.1.6.0) Installation
2-6 Oracle Fusion Middleware Installation Guide for Oracle Identity Management
2.2.2 Installation Types: "Install Software - Do Not Configure" vs. "Install and
Configure"
The Select Installation Type screen in the Installer presents two options: Install and
Configure and Install Software - Do Not Configure. This section describes both
options:
■Understanding the "Install Software - Do Not Configure" Option
■Understanding the "Install and Configure" Option
2.2.2.1 Understanding the "Install Software - Do Not Configure" Option
Choose the Install Software - Do Not Configure option to install Oracle Identity
Management components without configuring them during installation. If you choose
the Install Software - Do Not Configure option, the Installer installs the component
software and then closes. Oracle Identity Management components will not start
running after deploying them using the Install Software - Do Not Configure option,
as additional configuration is needed.
After you install components using the Install Software - Do Not Configure option,
you can configure them at a later time using the Oracle Identity Management 11g
Release 1 (11.1.1.6.0) Configuration Wizard. To start the Oracle Identity Management
11g Release 1 (11.1.1.6.0) Configuration Wizard, execute the ORACLE_
HOME/bin/config.sh script (config.bat on Windows).
2.2.2.2 Understanding the "Install and Configure" Option
The Install and Configure option allows you to install Oracle Identity Management
components and simultaneously configure some of their fundamental elements, such
as passwords, user names, and so on. Oracle Identity Management components start
running and are immediately ready for use after deploying them using the Install and
Configure option.
2.2.3 Understanding Oracle WebLogic Server Administration Domain Options
During installation, you have several options for choosing how the Oracle Identity
Management components are installed in relation to an Oracle WebLogic Server
administration domain. A domain includes a special WebLogic Server instance called
the Administration Server, which is the central point from which you configure and
manage all resources in the domain.
This section describes each domain option for installing Oracle Identity Management
components:
■Create New Domain
■Extend Existing Domain
■Expand Cluster
■Configure Without a Domain
See: The "Understanding Oracle WebLogic Server Domains" chapter
in the Oracle Fusion Middleware Understanding Domain Configuration for
Oracle WebLogic Server guide for more information about Oracle
WebLogic Server administration domains.

Overview of Oracle Identity Management (11.1.1.6.0) Installation
Understanding the Oracle Identity Management Installation 2-7
2.2.3.1 Create New Domain
Select the Create New Domain option to create a new Oracle WebLogic Server
administration domain and install Oracle Identity Management components in it.
When you install Oracle Identity Management components in a new domain, the
Fusion Middleware Control management component and the Oracle WebLogic
Administration Server are automatically deployed with them.
2.2.3.2 Extend Existing Domain
Select the Extend Existing Domain option to install Oracle Identity Management
components in an existing Oracle WebLogic Server administration domain. When you
install Oracle Identity Management components using this option, they are essentially
"joining" an existing domain.
If you want to install and configure Oracle Identity Management components in an
existing Oracle WebLogic Server administration domain, by using either the Installer
or the Oracle Identity Management 11g Release 1 Configuration Wizard, the existing
domain must have been created using the Oracle Identity Management 11g Release 1
Installer. You cannot extend an existing domain for Oracle Identity Management
components if the domain was created by another program, such as the Oracle SOA
Installer or the Oracle Fusion Middleware Configuration Wizard.
2.2.3.3 Expand Cluster
Select the Expand Cluster option to install Oracle Identity Management components
in an Oracle WebLogic Server cluster for High Availability (HA). This document does
not explain how to install Oracle Identity Management components in HA
configurations. Refer to the following documents for more information:
■Oracle Fusion Middleware High Availability Guide
■Oracle Fusion Middleware Enterprise Deployment Guide for Oracle Identity Management
2.2.3.4 Configure Without a Domain
Select the Configure without a Domain option to install Oracle Identity Management
components and configure them to be without domain membership.
For Oracle Internet Directory, the Configure without a Domain option is appropriate
for environments that have both of the following conditions:
Note: To install Oracle Identity Management components in an
existing Oracle WebLogic Server administration domain, each Oracle
WebLogic Server Home, Oracle Middleware Home, and Oracle Home
directory in the domain must have identical directory paths and
names.
Note: When you install components using the Extend Existing
Domain option, you must provide some credentials for the existing
domain, including the user name for the domain. You must enter the
user name in ASCII characters only.
Note: Only the Oracle Internet Directory and Oracle Virtual
Directory components are certified for installation without a domain.

Overview of Oracle Identity Management (11.1.1.6.0) Installation
2-8 Oracle Fusion Middleware Installation Guide for Oracle Identity Management
■You do not want to include Oracle Internet Directory in a WebLogic Server
administration domain for management purposes.
■You do not want to manage Oracle Internet Directory and Oracle Directory
Services Manager using Fusion Middleware Control.
For Oracle Virtual Directory, the Configure without a Domain option is appropriate if
you want to register Oracle Virtual Directory with a remote WebLogic Administration
Server for management purposes, but you do not want to install Oracle WebLogic
Server locally.
2.2.4 Installing Components on Separate Systems
You can install Oracle Fusion Middleware instances on separate systems. You can also
distribute Oracle Fusion Middleware components over multiple systems, which is
especially useful for Oracle Identity Management components. You might want to
distribute components to improve performance, security, scalability, and availability
of Oracle Identity Management services.
The following are two (of many) examples of Oracle Identity Management
deployments that benefit from distributing components over multiple systems:
■Oracle Internet Directory on one system, and Oracle Directory Services Manager
and Oracle Directory Integration Platform on a separate system.
■Oracle Identity Management components use an Oracle Database to contain the
Oracle Metadata Repository. The Oracle Identity Management components and
the Oracle Database are installed on separate systems.
2.2.5 Executing the oracleRoot.sh Script on UNIX Platforms
During installation on UNIX platforms, the Installer prompts you to log in as the root
user and run the oracleRoot.sh script. You must log in as the root user because the
script creates files, edits files, and changes the permissions of certain Oracle executable
files in the <Oracle_IDM_Home>/bin directory.
If the oracleRoot.sh script finds files of the same name, it prompts you to indicate
whether or not to override the existing files. Back up the existing files (you can do this
from another window), then overwrite them.
Note: If you install Oracle Identity Management components on a
separate system from the database containing the Oracle Metadata
Repository, the Oracle Identity Management components will need
network access to the repository.
See: The following documents if you want to configure more than
one Oracle Internet Directory against the same Oracle Metadata
Repository:
■Oracle Fusion Middleware Installation Planning Guide
■Oracle Fusion Middleware Administrator's Guide for Oracle Internet
Directory

Overview of Oracle Identity Management (11.1.1.6.0) Installation
Understanding the Oracle Identity Management Installation 2-9
2.2.6 Understanding the State of Oracle Identity Management Components After
Installation
This topic provides information about the state of Oracle Identity Management
components after installation, including:
■Default SSL Configurations
■Default Passwords
■Ports Assigned Using Auto Port Configuration
2.2.6.1 Default SSL Configurations
By default, Oracle Internet Directory and Oracle Virtual Directory are installed with
SSL configured. You must configure SSL for the Oracle WebLogic Administration
Server and Oracle WebLogic Managed Server after installation.
2.2.6.2 Default Passwords
By default, the passwords for all Oracle Identity Management components are set to
the password for the Oracle Identity Management Instance. For security reasons, after
installation, you should change the passwords of the various components so they have
different values.
2.2.6.3 Ports Assigned Using Auto Port Configuration
When you use the Auto Port Configuration option during installation, the Installer
follows specific steps to assign ports. The following information describes the default
ports and port assignment logic the Installer uses to assign ports for various Oracle
Identity Management components when you use the Auto Port Configuration option
during installation.
■Oracle Virtual Directory:
–Non-SSL port: 6501
–SSL port: 7501
–Admin port: 8899
–HTTP port: 8080
First, the Installer attempts to assign the default port. If the default port is
unavailable, the Installer tries ports within a range of 50 from the default port. For
example, when the Installer assigns the non-SSL port for Oracle Virtual Directory,
it first attempts to assign 6501. If 6501 is unavailable, it tries ports from 6501 to
6551. The Installer uses this approach to assign all Oracle Virtual Directory ports.
■Oracle Internet Directory:
–Non-SSL port: 3060
See: The Oracle Fusion Middleware Administrator's Guide for more
information.
See: The following documents for information about changing
passwords for Oracle Identity Management components:
■Oracle Fusion Middleware Administrator's Guide
■Component-specific guides listed in the "Related Documents"
section in this guide’s Preface.

Overview of Oracle Identity and Access Management (11.1.1.5.0) Installation
2-10 Oracle Fusion Middleware Installation Guide for Oracle Identity Management
–SSL port: 3131
First, the Installer attempts to assign default ports. If the non-SSL port is
unavailable, the Installer tries ports from 3061 to 3070, then from 13060 to 13070.
Similarly, the Installer first attempts to assign 3131 as the SSL port, then ports from
3132 to 3141, and then from 13131 to 13141.
■Oracle Identity Federation: 7499
First, the Installer attempts to assign the default port. If the default port is
unavailable, the Installer tries ports in increments of one, that is: 7500, then 7501,
then 7502, and so on. The Installer tries ports up until 9000 to find an available
port.
■Oracle Directory Services Manager: 7005
First, the Installer attempts to assign the default port. If the default port is
unavailable, the Installer tries ports in increments of one, that is: 7006, then 7007,
then 7008, and so on. The Installer tries ports up until 9000 to find an available
port.
■Oracle WebLogic Administration Server: 7001
2.3 Overview of Oracle Identity and Access Management (11.1.1.5.0)
Installation
This section discusses the following topics:
■Installation Roadmap
■Prerequisite Checks Performed by the Oracle Identity and Access Management
Installer
■Understanding Oracle WebLogic Server Administration Domain Options
■Additional Configuration Using the Oracle Identity Manager 11g Configuration
Wizard
■Additional 11g Release 1 (11.1.1) Deployment Information
■Silent Installation
■Installing Components on Separate Systems
■Screens in Oracle Fusion Middleware Configuration Wizard
■Understanding the State of Oracle Identity and Access Management Components
After Installation
2.3.1 Installation Roadmap
Table 2–2 lists the tasks required to install and configure Oracle Identity Manager,
Oracle Access Manager, Oracle Adaptive Access Manager, Oracle Entitlements Server,
and Oracle Identity Navigator.

Overview of Oracle Identity and Access Management (11.1.1.5.0) Installation
Understanding the Oracle Identity Management Installation 2-11
Table 2–2 Installation Flow for Oracle Identity and Access Management
No. Task Description
1 Review installation concepts in the
Installation Planning Guide. Read the Oracle Fusion Middleware Installation Planning Guide, which
describes the process for various users to install or upgrade to
Oracle Fusion Middleware 11g (11.1.1.5) depending on the user's
existing environment.
2 Review the system requirements and
certification documents to ensure that
your environment meets the minimum
installation requirements for the
components you are installing.
Read the System Requirements and Specifications document that
covers information such as hardware and software requirements,
minimum disk space and memory requirements, and required
system libraries, packages, or patches:
http://www.oracle.com/technetwork/middleware/ias/d
ownloads/fusion-requirements-100147.html
Read the Certification document that covers supported installation
types, platforms, operating systems, databases, JDKs, and
third-party products:
http://www.oracle.com/technetwork/middleware/ias/d
ownloads/fusion-certification-100350.html
3 Install the Oracle 11.1.1 database and
any required patches. For more information, see Installing Oracle Database.
4Install Oracle WebLogic Server 11g
Release 1 (10.3.5), and create a
Middleware Home.
For more information, see Installing Oracle WebLogic Server and
Creating the Oracle Middleware Home.
5 Run Oracle Fusion Middleware
Repository Creation Utility (RCU) to
create and load the appropriate
schemas for Oracle Identity and Access
Management products.
For more information, see Creating Database Schema Using the
Oracle Fusion Middleware Repository Creation Utility (RCU).
6 Install the Oracle Identity and Access
Management 11g software. For more information, see Installing Oracle Identity and Access
Management (11.1.1.5.0).
7 For Oracle Identity Manager users
only:
Install the latest version of Oracle SOA
Suite 11g (11.1.1.5.0).
Install the 11.1.1.5.0 version of Oracle SOA Suite.
For more information, see Installing the Latest Version of Oracle
SOA Suite (Oracle Identity Manager Users Only).
8 Run the Oracle Fusion Middleware
Configuration Wizard to configure
your Oracle Identity and Access
Management products in a new or
existing WebLogic domain.
For more information, see the following chapters:
■Configuring Oracle Identity Navigator
■Configuring Oracle Identity Manager
■Configuring Oracle Access Manager
■Configuring Oracle Adaptive Access Manager
■Configuring Oracle Entitlements Server Administration Server
9 Start the servers. For more information, see Starting the Stack.
10 For Oracle Identity Manager users
only:
Run the Oracle Identity Manager
Configuration Wizard to configure
Oracle Identity Manager Server,
Design Console, or Remote Manager.
Note that you should run the Oracle
Identity Manager Server after
completing this configuration.
For more information, see the following topics:
■Configuring OIM Server
■Configuring OIM Design Console
■Configuring OIM Remote Manager
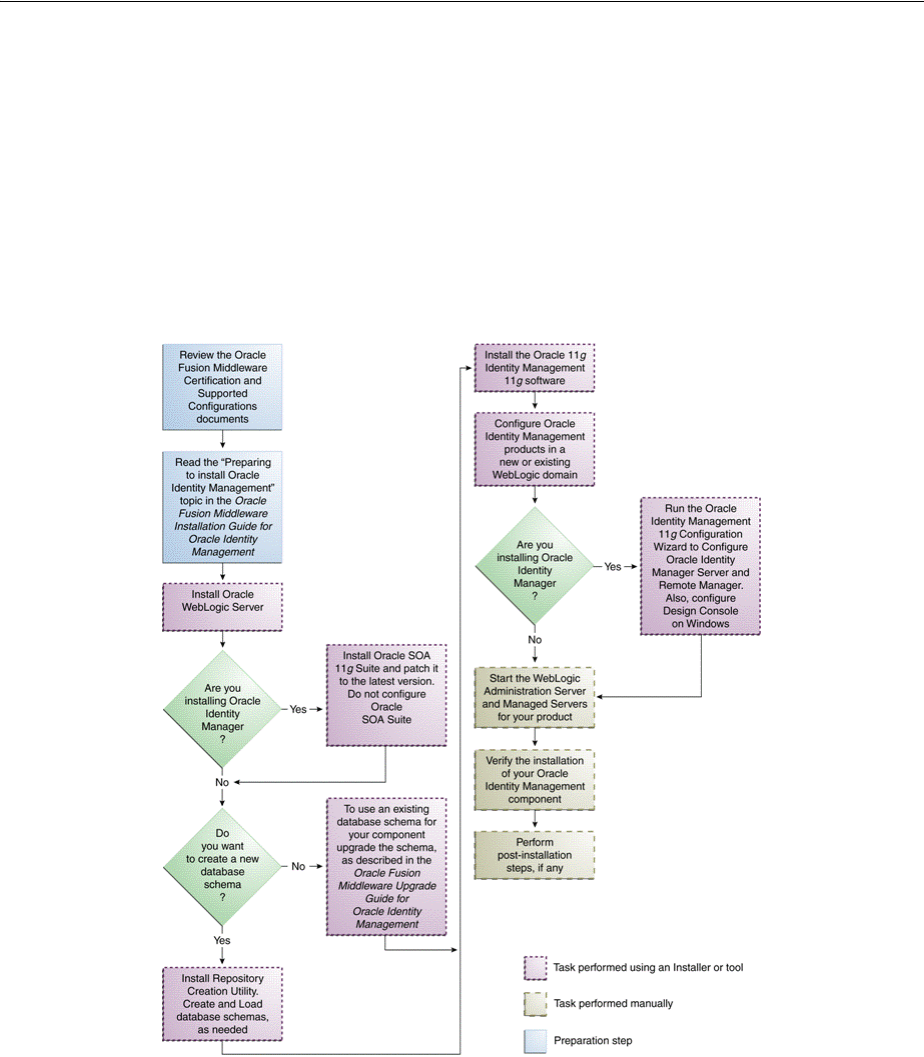
Overview of Oracle Identity and Access Management (11.1.1.5.0) Installation
2-12 Oracle Fusion Middleware Installation Guide for Oracle Identity Management
Oracle Identity and Access Management components will not start running after
installing them using the Oracle Identity and Access Management 11g Installer. For
information about starting the components after installation, see the Getting Started
topics in specific chapters in this guide.
The following figure illustrates the process of installing the Oracle Identity and Access
Management 11g software components (the suite containing OIM, OAM, OAAM, OES,
and OIN).
Figure 2–1 Oracle Identity and Access Management Installation and Configuration
Workflow
OES
***********************************************************************************************
Table 2–3 lists the Installers and tools used to install and configure Oracle Identity and
Access Management 11g components at different stages of the installation process.

Overview of Oracle Identity and Access Management (11.1.1.5.0) Installation
Understanding the Oracle Identity Management Installation 2-13
2.3.2 Prerequisite Checks Performed by the Oracle Identity and Access Management
Installer
The Oracle Identity and Access Management 11g Release 1 (11.1.1) Installer ensures
that your machine has a certified version of the operating system, the correct software
packages (service packs), and sufficient physical memory to install the Oracle Identity
and Access Management applications on your machine.
On Windows operating systems, the Installer verifies the operating system version,
service pack, and physical memory (at least 1024 MB).
On UNIX operating systems, the Installer verifies the operating system version,
operating system packages, kernel parameters, glibc version, and physical memory (at
least 1024 MB).
Table 2–3 Installation and Configuration Tools
Task Tool
Install Oracle WebLogic
Server Oracle WebLogic Server Installer
For more information, see Installing Oracle
WebLogic Server and Creating the Oracle
Middleware Home.
Install Oracle SOA 11g Suite Oracle SOA 11g Suite Installer
For more information, see Installing the Latest
Version of Oracle SOA Suite (Oracle Identity
Manager Users Only).
Create and load database
schema Oracle Fusion Middleware Repository Creation
Utility (RCU)
For more information, see Creating Database
Schema Using the Oracle Fusion Middleware
Repository Creation Utility (RCU).
Upgrade your existing
database schema Oracle Fusion Middleware 11g Upgrade Assistant
For more information, see the guide Oracle Fusion
Middleware Upgrade Guide for Oracle Identity
Management.
Install the Oracle Identity
and Access Management
11g software
Oracle Identity and Access Management 11g
Installer
For more information, see Installing Oracle Identity
and Access Management (11.1.1.5.0).
Create or extend a
WebLogic administration
domain
Oracle Fusion Middleware Configuration Wizard
For more information, see Screens in Oracle Fusion
Middleware Configuration Wizard.
Install and configure Oracle
Identity Manager Server,
Design Console, and
Remote Manager
Oracle Identity Manager 11g Configuration Wizard
For more information, see Configuring OIM Server,
Design Console, and Remote Manager.
See: Oracle Fusion Middleware System Requirements and Specifications
available at:
http://www.oracle.com/technetwork/middleware/ias/dow
nloads/fusion-requirements-100147.html

Overview of Oracle Identity and Access Management (11.1.1.5.0) Installation
2-14 Oracle Fusion Middleware Installation Guide for Oracle Identity Management
2.3.3 Understanding Oracle WebLogic Server Administration Domain Options
After Oracle Identity and Access Management 11g is installed, you are ready to
configure the WebLogic Server Administration Domain for Oracle Identity and Access
Management components. A domain includes a special WebLogic Server instance
called the Administration Server, which is the central point from which you configure
and manage all resources in the domain.
This section describes each domain option for installing Oracle Identity and Access
Management components:
■Create a New Domain
■Extend an Existing Domain
2.3.3.1 Create a New Domain
Select the Create a new WebLogic domain option on the Welcome screen in the Oracle
Fusion Middleware Configuration Wizard to create a new WebLogic Server domain.
2.3.3.2 Extend an Existing Domain
Select the Extend an existing WebLogic domain option on the Welcome screen in the
Oracle Fusion Middleware Configuration Wizard to add Oracle Identity and Access
Management components in an existing Oracle WebLogic Server administration
domain. When you add Oracle Identity and Access Management components using
this option, they are essentially "joining" an existing domain.
For more information, see Understanding Domain Extension Scenarios.
2.3.4 Additional Configuration Using the Oracle Identity Manager 11g Configuration
Wizard
Read this section only if you are installing Oracle Identity Manager. After you install
Oracle Identity Manager by using the Oracle Identity and Access Management 11g
Installer software, you can encrypt secure data in Oracle Identity Manager schema,
create keystores, and so on. You can configure such elements by using the Oracle
Identity Manager 11g Release 1 (11.1.1) Configuration Wizard, which is included with
the release media.
On UNIX operating systems, to start the Oracle Identity Manager 11g Release 1 (11.1.1)
Configuration Wizard, run the <IAM_Home>/bin/config.sh script. On Windows
operating systems, run the <IAM_Home>\bin\config.bat script. Note that IAM_
Home refers to your IDM_Home directory that contains Oracle Identity Manager, Oracle
Access Manager, Oracle Adaptive Access Manager, Oracle Entitlements Server, and
Oracle Identity Navigator.
2.3.5 Additional 11g Release 1 (11.1.1) Deployment Information
This topic describes additional sources for 11g Release 1 (11.1.1) deployment
information, including documentation on the following subjects:
■Upgrading to 11g Release 1 (11.1.1)
■Installing 11g Release 1 (11.1.1) for High Availability
See: The "Understanding Oracle WebLogic Server Domains" chapter
in the Oracle Fusion Middleware Understanding Domain Configuration for
Oracle WebLogic Server guide for more information about Oracle
WebLogic Server administration domains.

Overview of Oracle Identity and Access Management (11.1.1.5.0) Installation
Understanding the Oracle Identity Management Installation 2-15
2.3.5.1 Upgrading to 11g Release 1 (11.1.1)
This guide does not explain how to upgrade previous versions of Oracle Identity and
Access Management components to 11g Release 1 (11.1.1). To upgrade an Oracle
Identity and Access Management component:
From Release 10g to 11g Release 1 (11.1.1), refer to:
■Oracle Fusion Middleware Upgrade Planning Guide
■Oracle Fusion Middleware Upgrade Guide for Oracle Identity Management
2.3.5.2 Installing 11g Release 1 (11.1.1) for High Availability
This guide does not explain how to install Oracle Identity and Access Management
components in High Availability (HA) configurations. To install an Oracle Identity
and Access Management component in a High Availability configuration, refer to the
following documents:
■Oracle Fusion Middleware High Availability Guide
■Oracle Fusion Middleware Enterprise Deployment Guide for Oracle Identity Management
Specifically, see the "Configuring High Availability for Identity Management
Components" topic in the guide Oracle Fusion Middleware High Availability Guide.
2.3.6 Silent Installation
In addition to the standard graphical installation option, you can perform silent
installation of the Oracle Identity and Access Management 11g software. A silent
installation runs on its own without any intervention, and you do not have to monitor
the installation and provide input to dialog boxes.
For more information, see Performing a Silent Installation.
2.3.7 Installing Components on Separate Systems
You can install Oracle Fusion Middleware instances on separate systems. You can also
distribute Oracle Fusion Middleware components over multiple systems, which is
especially useful for Oracle Identity and Access Management components. You might
want to distribute components to improve performance, security, scalability, and
availability of Oracle Identity and Access Management services.
The following are two (of many) examples of Oracle Identity and Access Management
deployments that benefit from distributing components over multiple systems:
■Oracle Identity Manager Server on one system, and Oracle Identity Manager
Design Console on a different system.
■Oracle Identity and Access Management components use an Oracle Database to
contain the Oracle Metadata Repository. The Oracle Identity and Access
Management components and the Oracle Database are installed on separate
systems.
See Also: The "Related Documents" section in this guide’s Preface
for a list of documents that provide additional information about
Oracle Identity and Access Management components.

Overview of Oracle Identity and Access Management (11.1.1.5.0) Installation
2-16 Oracle Fusion Middleware Installation Guide for Oracle Identity Management
2.3.8 Screens in Oracle Fusion Middleware Configuration Wizard
The Oracle Fusion Middleware Configuration Wizard displays screens based on your
domain configuration options. You can use the Oracle Fusion Middleware
Configuration Wizard in the following scenarios:
■Creation of a new WebLogic administration domain, which involves the
configuration of Administration Server parameters, server start mode, and so on.
■Configuration of an existing domain to support Oracle Identity and Access
Management components by extending the domain.
2.3.9 Understanding the State of Oracle Identity and Access Management Components
After Installation
This topic provides information about the state of Oracle Identity and Access
Management components after installation, including:
■Default SSL Configurations
■Default Passwords
2.3.9.1 Default SSL Configurations
By default, most of the Oracle Identity and Access Management 11g components are
not installed with SSL configured. Only Oracle Adaptive Access Manager is
configured with SSL. For other components, you must configure SSL for the Oracle
WebLogic Administration Server and Oracle WebLogic Managed Server after
installation.
2.3.9.2 Default Passwords
By default, the passwords for all Oracle Identity and Access Management components
are set to the password for the Oracle Identity and Access Management Instance. For
security reasons, after installation, you should change the passwords of the various
components so they have different values.
Note: If you install Oracle Identity and Access Management
components on a separate system from the database containing the
Oracle Metadata Repository, the Oracle Identity and Access
Management components will need network access to the repository.
See: The "Customizing the Domain Environment" chapter in the
Oracle Fusion Middleware Creating Domains Using the Configuration
Wizard guide for more information about configuring your domain.
See: The "SSL Configuration in Oracle Fusion Middleware" topic in
the Oracle Fusion Middleware Administrator's Guide for more
information.
See: The following documents for information about changing
passwords for Oracle Identity and Access Management components:
■The "Getting Started Managing Oracle Fusion Middleware" topic
in the guide Oracle Fusion Middleware Administrator's Guide.
■Component-specific guides listed in the "Related Documents"
section in this guide’s Preface.

3
Preparing to Install 3-1
3 Preparing to Install
This chapter provides information you should review before installing Oracle Identity
Management 11g Release 1 (11.1.1) components and Oracle Identity and Access
Management 11g Release 1 (11.1.1). It includes the following topics:
■Before Installing Oracle Identity Management (11.1.1.6.0)
■Before Installing Oracle Identity and Access Management (11.1.1.5.0)
3.1 Before Installing Oracle Identity Management (11.1.1.6.0)
This section discusses the following topics:
■Reviewing System Requirements and Certification
■Understanding Oracle Fusion Middleware Support of 64-bit JDK
■Installing and Configuring Java Access Bridge (Windows Only)
■Managing the Oracle WebLogic Server Node Manager Utility for Oracle Identity
Management Installations
■Optional Environment-Specific Preparation
3.1.1 Reviewing System Requirements and Certification
Before performing any installation, you should read the system requirements and
certification documents to ensure that your environment meets the minimum
installation requirements for the products you are installing.
■Oracle Fusion Middleware System Requirements and Specifications at
http://www.oracle.com/technetwork/middleware/ias/downloads/fu
sion-requirements-100147.html
Note: For information about prerequisites for installing the 11g
(11.1.1.6.0) version of Oracle Internet Directory (OID), Oracle Virtual
Directory (OVD), Oracle Directory Services Manager (ODSM), Oracle
Directory Integration Platform (ODIP), and Oracle Identity Federation
(OIF), see Before Installing Oracle Identity Management (11.1.1.6.0).
For information about prerequisites for installing the 11g (11.1.1.5.0)
version of Oracle Identity Manager (OIM), Oracle Access Manager
(OAM), Oracle Adaptive Access Manager (OAAM), Oracle
Entitlements Server (OES), and Oracle Identity Navigator (OIN), see
Before Installing Oracle Identity and Access Management (11.1.1.5.0).

Before Installing Oracle Identity Management (11.1.1.6.0)
3-2 Oracle Fusion Middleware Installation Guide for Oracle Identity Management
This document contains information related to hardware and software
requirements, minimum disk space and memory requirements, and required
system libraries, packages, or patches.
■Oracle Fusion Middleware Supported System Configurations at
http://www.oracle.com/technetwork/middleware/ias/downloads/fu
sion-certification-100350.html
This document contains information related to supported installation types,
platforms, operating systems, databases, JDKs, and third-party products.
■For interoperability and compatibility issues that may arise when installing, refer
to Oracle Fusion Middleware Interoperability and Compatibility Guide.
This document contains important information regarding the ability of Oracle
Fusion Middleware products to function with previous versions of other Oracle
Fusion Middleware, Oracle, or third-party products. This information is applicable
to both new Oracle Fusion Middleware users and existing users who are
upgrading their existing environment.
3.1.2 Understanding Oracle Fusion Middleware Support of 64-bit JDK
If you are using a 64-bit JVM in your environment, ensure that all your Oracle Fusion
Middleware components are using the 64-bit JVM. You cannot mix components using
a 32-bit JVM with those using a 64-bit JVM.
For more information, refer to the "System Requirements and Supported Platforms for
Oracle Fusion Middleware 11gR1" document, available at the following page:
http://www.oracle.com/technetwork/middleware/ias/downloads/fusio
n-certification-100350.html
If your Oracle Fusion Middleware components are running in a 64-bit JVM
environment, ensure that WebLogic Server is installed with the 64-bit JDK. For 32-bit
JVM support, refer to the Oracle Fusion Middleware Release Notes for information on
how to configure your environment for 32-bit JVM support for your platform.
3.1.3 Installing and Configuring Java Access Bridge (Windows Only)
If you are installing Oracle Identity Management on a Windows system, you have the
option of installing and configuring Java Access Bridge for Section 508 Accessibility.
This is only necessary if you require Section 508 Accessibility features:
1. Download Java Access Bridge from the following Web site:
http://java.sun.com/javase/technologies/accessibility/accessbridge/
2. Install Java Access Bridge.
3. Copy access-bridge.jar and access-1_4.jar from your installation
location to the jre\lib\ext directory.
4. Copy the WindowsAccessBridge.dll, JavaAccessBridge.dll, and
JAWTAccessBridge.dll files from your installation location to the jre\bin
directory.
5. Copy the accessibility.properties file to the jre\lib directory.

Before Installing Oracle Identity Management (11.1.1.6.0)
Preparing to Install 3-3
3.1.4 Managing the Oracle WebLogic Server Node Manager Utility for Oracle Identity
Management Installations
Oracle Directory Integration Platform (ODIP) and Oracle Identity Federation (OIF) are
configured with a WebLogic domain. Oracle Internet Directory (OID) and Oracle
Virtual Directory (OVD) can be configured with or without a WebLogic domain. For
Oracle Identity Management products that require a WebLogic domain, you must
configure Node Manager.
You must perform the following steps after installing Oracle WebLogic Server and
before installing Oracle Identity Management:
1. Verify the Oracle WebLogic Server Node Manager utility is stopped. If it is
running, kill the process. Use the following commands to identify running process
and kill the same:
For example, on UNIX:
1) ps-ef | grep -i nodemanager
This will return the Process Id of the Node Manager Process.
2) kill -9 <Process Id of the Node Manager Process>
On Windows:
Use the Windows Task Manager to identify running Node Manager processes and
kill the same.
2. Determine if the nodemanager.properties file is present in the WL_
HOME/common/nodemanager/ directory.
■If the nodemanager.properties file is not present, then follow the
instructions below:
On UNIX:
Run startNodeManager.sh (Located at <WL_HOME>/server/bin
directory) to start Node Manager.
On Windows:
Run startNodeManager.cmd (Located at <WL_HOME>\server\bin
directory) to start Node Manager.
■If the nodemanager.properties file does exist, open it and verify that the
ListenPort parameter is included and that it is set. If the ListenPort
parameter is not included or set, edit the nodemanager.properties file so
that it is similar to the following, where NODE_MANAGER_LISTEN_PORT
represents the port the Node Manager listens on, such as 5556:
ListenPort=NODE_MANAGER_LISTEN_PORT
3.1.5 Optional Environment-Specific Preparation
This topic describes optional environment-specific tasks you may want to perform
before installing Oracle Identity Management 11g Release 1 (11.1.1.6.0). This topic
includes the following sections:
■Using Symbolic Links
■Installing Oracle Identity Management on DHCP Hosts
■Installing Oracle Identity Management on a Multihomed System

Before Installing Oracle Identity Management (11.1.1.6.0)
3-4 Oracle Fusion Middleware Installation Guide for Oracle Identity Management
3.1.5.1 Using Symbolic Links
If you want to install Oracle Identity Management using symbolic links, you must
create them before installation. For example, you could create symbolic links for the
installation by executing the following commands:
prompt> mkdir /home/basedir
prompt> ln -s /home/basedir /home/linkdir
Then, when you run the Installer to install Oracle Identity Management, you can
specify /home/linkdir as the Oracle Home.
After installation, you cannot create symbolic links to the Oracle Home. Also, you
cannot move the Oracle Home to a different location and create a symbolic link to the
original Oracle Home.
3.1.5.2 Installing Oracle Identity Management on DHCP Hosts
If you plan to install Oracle Identity Management components on a DHCP server, you
must ensure the Installer can resolve host names. This may require editing the
/etc/hosts file on UNIX systems, and installing a loopback adapter on Windows
systems. The following information provides general examples, you should alter these
examples to make them specific to your environment.
On UNIX systems:
Configure the host to resolve host names to the loopback IP address by modifying the
/etc/hosts file to contain the following entries. Replace the variables with the
appropriate host and domain names:
127.0.0.1 hostname.domainname hostname
127.0.0.1 localhost.localdomain localhost
Confirm the host name resolves to the loopback IP address by executing the following
command:
ping hostname.domainname
On Windows systems:
Install a loopback adapter on the DHCP host and assign it a non routable IP address.
After installing the adapter, add a line to the
%SYSTEMROOT%\system32\drivers\etc\hosts file immediately after the localhost
line and using the following format, where IP_address represents the local IP address
of the loopback adapter:
IP_address hostname.domainname hostname
3.1.5.3 Installing Oracle Identity Management on a Multihomed System
You can install Oracle Identity Management components on a multihomed system. A
multihomed system is associated with multiple IP addresses, typically achieved by
having multiple network cards on the system. Each IP address is associated with a
host name and you can create aliases for each host name.
Note: If the environment variable LD_ASSUME_KERNEL is set, it
needs to be unset.

Before Installing Oracle Identity and Access Management (11.1.1.5.0)
Preparing to Install 3-5
The Installer retrieves the fully qualified domain name from the first entry in
/etc/hosts file on UNIX, or the %SYSTEMROOT%\system32\drivers\etc\hosts file
on Windows. For example, if your file looks like the following, the Installer retrieves
myhost1.mycompany.com for configuration:
127.0.0.1 localhost.localdomain localhost
10.222.333.444 myhost1.mycompany.com myhost1
20.222.333.444 devhost2.mycompany.com devhost2
For specific network configuration of a system component, refer to the individual
component's documentation listed in "Related Documents"for more information.
3.2 Before Installing Oracle Identity and Access Management (11.1.1.5.0)
This section discusses the following topics:
■Reviewing System Requirements and Certification
■Installing and Configuring Java Access Bridge (Windows Only)
■Obtaining the Latest Oracle WebLogic Server and Oracle Fusion Middleware 11g
Software
■Installing Oracle WebLogic Server and Creating the Oracle Middleware Home
■Installing Oracle Database
■Creating Database Schema Using the Oracle Fusion Middleware Repository
Creation Utility (RCU)
■Upgrading an Existing Database Schema
■Installing the Latest Version of Oracle SOA Suite (Oracle Identity Manager Users
Only)
3.2.1 Reviewing System Requirements and Certification
Before performing any installation, you should read the system requirements and
certification documents to ensure that your environment meets the minimum
installation requirements for the products you are installing.
■Oracle Fusion Middleware System Requirements and Specifications at
http://www.oracle.com/technetwork/middleware/ias/downloads/fu
sion-requirements-100147.html
This document contains information related to hardware and software
requirements, minimum disk space and memory requirements, and required
system libraries, packages, or patches.
■Oracle Fusion Middleware Supported System Configurations at
http://www.oracle.com/technetwork/middleware/ias/downloads/fu
sion-certification-100350.html
This document contains information related to supported installation types,
platforms, operating systems, databases, JDKs, and third-party products.
■For interoperability and compatibility issues that may arise when installing, refer
to Oracle Fusion Middleware Interoperability and Compatibility Guide.
This document contains important information regarding the ability of Oracle
Fusion Middleware products to function with previous versions of other Oracle
Fusion Middleware, Oracle, or third-party products. This information is applicable

Before Installing Oracle Identity and Access Management (11.1.1.5.0)
3-6 Oracle Fusion Middleware Installation Guide for Oracle Identity Management
to both new Oracle Fusion Middleware users and existing users who are
upgrading their existing environment.
3.2.2 Installing and Configuring Java Access Bridge (Windows Only)
If you are installing Oracle Identity and Access Management on a Windows operating
system, you have the option of installing and configuring Java Access Bridge for
Section 508 Accessibility. This is only necessary if you require Section 508 Accessibility
features:
1. Download Java Access Bridge from the following URL:
http://java.sun.com/javase/technologies/accessibility/accessbridge/
2. Install Java Access Bridge.
3. Copy access-bridge.jar and jaccess-1_4.jar from your installation
location to the jre\lib\ext directory.
4. Copy the WindowsAccessBridge.dll, JavaAccessBridge.dll, and
JAWTAccessBridge.dll files from your installation location to the jre\bin
directory.
5. Copy the accessibility.properties file to the jre\lib directory.
3.2.3 Obtaining the Latest Oracle WebLogic Server and Oracle Fusion Middleware 11g
Software
Refer to the following for more information about the latest Oracle WebLogic Server
and Oracle Fusion Middleware 11g software:
■For more information on obtaining Oracle Fusion Middleware 11g softwares, see
"Obtain the Oracle Fusion Middleware Software" and "Install Oracle WebLogic
Server" in the Oracle Fusion Middleware Installation Planning Guide.
■For information about downloading Oracle WebLogic Server, see "Product
Distribution" in the Oracle Fusion Middleware Installation Guide for Oracle WebLogic
Server.
■For complete information about patching your Oracle Fusion Middleware 11g to
the latest release, refer to the Oracle Fusion Middleware Patching Guide.
3.2.4 Installing Oracle WebLogic Server and Creating the Oracle Middleware Home
Before you can install Oracle Identity and Access Management 11g Release 1 (11.1.1)
components, you must install Oracle WebLogic Server and create the Oracle
Middleware Home directory.
For more information, see "Install Oracle WebLogic Server" in Oracle Fusion Middleware
Installation Planning Guide.
In addition, see Oracle Fusion Middleware Installation Guide for Oracle WebLogic Server for
complete information about installing Oracle WebLogic Server.
Oracle WebLogic Server Directory Structure
After you install Oracle WebLogic Server and create a Middleware Home, a home
directory, such as wlserver_10.3, is created for Oracle WebLogic Server under your
Middleware Home. This home directory is referred to as WL_HOME.

Before Installing Oracle Identity and Access Management (11.1.1.5.0)
Preparing to Install 3-7
At the same level as WL_HOME, separate directories are created for the following
components associated with Oracle WebLogic Server:
■Sun JDK - jdk160_24
■Oracle JRockit - jrockit_1.6.0_24
■Oracle Coherence 3.6
Note that WebLogic domains are created in a directory named domains located in the
user_projects directory under your Middleware Home. After you configure any of
the Oracle Identity and Access Management products in a WebLogic administration
domain, a new directory for the domain is created in the domains directory. In
addition, a directory named applications is created in the user_projects
directory. This applications directory contains the applications deployed in the
domain.
3.2.5 Installing Oracle Database
You must install an Oracle Database before you can install some Oracle Identity and
Access Management components. The database must be up and running to install the
relevant Oracle Identity and Access Management component. The database does not
have to be on the same system where you are installing the Oracle Identity and Access
Management component.
The following database versions are supported:
■10.2.0.4 and higher
■11.1.0.7 and higher
■11.2.0.1 and higher
Table 3–1 lists the databases requirements for RCU at the time of publication:
Note: Ensure that the JDK version you select is Java SE 6 Update 24
or higher.
Note: You can locate the most recent information about supported
databases by referring to the "Reviewing System Requirements and
Certification" topic in this chapter.
Table 3–1 RCU Database Requirements
Category Minimum or Accepted Value
Version Oracle Database 10.2.0.4, 11.1.0.7, or 11.2 (11.1.0.7 or later for non-XE database).
Note: When installing the database, you must choose the AL32UTF8 character set.
Shared Pool Size 147456 KB
SGA Maximum Size 147456 KB
Block Size 8 KB
Processes 500
'open_cursors' >= '500'

Before Installing Oracle Identity and Access Management (11.1.1.5.0)
3-8 Oracle Fusion Middleware Installation Guide for Oracle Identity Management
3.2.5.1 Oracle Database 11.1.0.7 Patch Requirements for Oracle Identity Manager
To identify the patches required for Oracle Identity Manager 11.1.1.5.0 configurations
that use Oracle Database 11.1.0.7, refer to the Oracle Identity Manager section of the
11g Release 1 Oracle Fusion Middleware Release Notes.
3.2.6 Creating Database Schema Using the Oracle Fusion Middleware Repository
Creation Utility (RCU)
You must create and load the appropriate Oracle Fusion Middleware schema in your
database before installing the following Oracle Identity and Access Management
components and configurations:
■Oracle Identity Manager
■Oracle Access Manager
■Oracle Adaptive Access Manager
■Oracle Entitlements Server
You create and load Oracle Fusion Middleware schema in your database using the
Oracle Fusion Middleware Repository Creation Utility (RCU), which is available on
the Oracle Technology Network (OTN) web site. You can access the OTN web site at:
http://www.oracle.com/technetwork/index.html
When you run RCU, create and load only the following schema for the Oracle Identity
and Access Management component you are installing—do not select any other
schema available in RCU:
Note: After installing the Oracle 11g database, you must complete
the following steps:
1. Log in to the database as the sys (default) user.
2. Run the following commands:
alter system set session_cached_cursors=100
scope=spfile;
alter system set processes=500 scope=spfile;
3. Bounce the database and continue with the installation of Oracle Fusion
Middleware Repository Creation Utility (RCU) and loading of schemas.
Note: RCU is available only on Linux and Windows platforms. Use
the Linux RCU to create schemas on supported UNIX databases. Use
Windows RCU to create schemas on supported Windows databases.
After you extract the contents of the rcuHome.zip file to a directory,
you can see the executable file rcu in the BIN directory.
For information about launching and running RCU, see the
"Launching RCU with a Variety of Methods" and "Running Oracle
Fusion Middleware Repository Creation Utility (RCU)" topics in the
guide Oracle Fusion Middleware Repository Creation Utility User's Guide.
For information about troubleshooting RCU, see the "Troubleshooting
Repository Creation Utility" topic in the guide Oracle Fusion
Middleware Repository Creation Utility User's Guide.

Before Installing Oracle Identity and Access Management (11.1.1.5.0)
Preparing to Install 3-9
■For Oracle Identity Manager, select the Identity Management - Oracle Identity
Manager schema. The SOA Infrastructure schema, the User Messaging Service
schema, and the Metadata Services schema are also selected, by default.
■For Oracle Adaptive Access Manager, select the Identity Management - Oracle
Adaptive Access Manager schema. By default, the AS Common Schemas -
Metadata Services schema is also selected.
For Oracle Adaptive Access Manager with partition schema support, select the
Identity Management - Oracle Adaptive Access Manager (Partition Supp...)
schema. By default, the AS Common Schemas - Metadata Services schema is also
selected.
■For Oracle Access Manager, select the Identity Manager - Oracle Access Manager
schema. By default, the AS Common Schema - Audit Services schema is also
selected.
■For Oracle Entitlements Server, select the Identity Management - Oracle
Entitlements Server schema. By default, the AS Common Schemas - Metadata
Services schema is also selected.
3.2.7 Upgrading an Existing Database Schema
If you want to reuse an existing database schema, you must upgrade your old
database schema to work with Oracle Fusion Middleware 11g products and
components.
For information about upgrading your existing database schema, see Oracle Fusion
Middleware Upgrade Guide for Oracle Identity Management.
3.2.8 Installing the Latest Version of Oracle SOA Suite (Oracle Identity Manager Users
Only)
If you are installing Oracle Identity Manager, you must install the latest version of
Oracle SOA Suite (11.1.1.5.0).
Follow the instructions in this section to install the latest Oracle SOA Suite software.
The installation of Oracle SOA Suite is a prerequisite for configuring Oracle Identity
Manager.
Note: For information about Oracle Adaptive Access Manager
schema partitions, see OAAM Partition Schema Reference.
Note: When you create a schema, be sure to remember the schema
owner and password that is shown in RCU.
If you are creating schemas on databases with Oracle Database Vault
installed, note that statements such as CREATE USER, ALTER USER,
DROP USER, CREATE PROFILE, ALTER PROFILE, and DROP
PROFILE can only be issued by a user with the DV_ACCTMGR role.
SYSDBA can issue these statements by modifying the Can Maintain
Accounts/Profiles rule set only if it is allowed.
See: The Oracle Fusion Middleware Repository Creation Utility User's
Guide for complete information.

Before Installing Oracle Identity and Access Management (11.1.1.5.0)
3-10 Oracle Fusion Middleware Installation Guide for Oracle Identity Management
Installing the latest version of Oracle SOA Suite 11g involves the following steps:
1. Obtaining the Latest Oracle WebLogic Server and Oracle SOA Suite Software
2. Installing Oracle WebLogic Server and Creating the Middleware Home
3. Installing the Latest Version of Oracle SOA Suite
3.2.8.1 Obtaining the Latest Oracle WebLogic Server and Oracle SOA Suite
Software
Refer to the following for more information about the latest Oracle WebLogic Server
and Oracle Fusion Middleware 11g software:
■You can download the latest Oracle Fusion Middleware 11g software from the
Oracle Technology Network (OTN):
http://www.oracle.com/technetwork/index.html
■At the time this document was published, the latest release of Oracle Fusion
Middleware 11g was 11g Release 1 (11.1.1.5.0), which provides new features and
capabilities that supersede those available in Oracle Fusion Middleware 11g
Release 1 (11.1.1.1.0) through 11g Release 1 (11.1.1.4.0).
■For complete information about patching your Oracle Fusion Middleware 11g to
the latest release, refer to the Oracle Fusion Middleware Patching Guide.
3.2.8.2 Installing Oracle WebLogic Server and Creating the Middleware Home
Oracle SOA Suite requires Oracle WebLogic Server and a Middleware Home
directory. For more information, see "Install Oracle WebLogic Server" in Oracle Fusion
Middleware Installation Planning Guide. In addition, see "Running the Installation
Program in Graphical Mode" in Oracle Fusion Middleware Installation Guide for Oracle
WebLogic Server.
3.2.8.3 Installing the Latest Version of Oracle SOA Suite
Note that only Oracle Identity Manager requires Oracle SOA Suite 11g (11.1.1.5.0). This
step is required because Oracle Identity Manager uses process workflows in Oracle
SOA Suite to manage request approvals.
Follow the instructions in Table 3–2 to install Oracle SOA Suite. If you need additional
help with any of the installation screens, click Help to access the online help.
To start the Oracle SOA Suite installation wizard, you must complete the following
steps:
1. Extract the contents of the soa.zip (11.1.1.5.0) to a directory, such as soa.
2. From your present working directory, move to the Disk1 directory under soa.
3. From the Disk1 directory, run runInstaller (on UNIX) or setup.exe (on
Windows) executable files to launch the Oracle SOA Suite 11.1.1.5.0 installation
wizard.
Note: If you have already created a Middleware Home before
installing Oracle Identity and Access Management components, do
not create a new Middleware Home again. You must use the same
Middleware Home for installing Oracle SOA Suite.

Before Installing Oracle Identity and Access Management (11.1.1.5.0)
Preparing to Install 3-11
Table 3–2 Installation Flow for Install Only Option
No. Screen Description and Action Required
1 Welcome Screen Click Next to continue.
2 Prerequisite Checks Screen Click Next to continue.
3 Specify Installation Location Screen Specify the Middleware Home and Oracle Home locations. You must
specify the location of the same Middleware Home that contains
Oracle Identity and Access Management components.
For more information about these directories, see "Understanding
Oracle Fusion Middleware Concepts and Directory Structure" in the
Oracle Fusion Middleware Installation Planning Guide.
Click Next to continue.
4 Specify Security Updates Screen Provide your E-mail address to be informed of the latest product
issues.
Click Next to continue.
5 Installation Summary Screen Verify the information on this screen.
Click Install to begin the installation.
6 Installation Progress Screen If you are installing on a UNIX system, you may be asked to run the
ORACLE_HOME/oracleRoot.sh script to set up the proper file and
directory permissions.
Click Next to continue.
7 Installation Complete Screen Click Finish to dismiss the installer.

Before Installing Oracle Identity and Access Management (11.1.1.5.0)
3-12 Oracle Fusion Middleware Installation Guide for Oracle Identity Management

4
Performing Common Installation Tasks 4-1
4
Performing Common Installation Tasks
This chapter describes tasks that are common to most Oracle Identity Management
installations and configurations. It includes the following topics:
■Common Installation Tasks for Oracle Identity Management (11.1.1.6.0)
■Common Installation Tasks for Oracle Identity and Access Management
(11.1.1.5.0)
4.1 Common Installation Tasks for Oracle Identity Management
(11.1.1.6.0)
This section discusses the following topics:
■Identifying Installation Directories
■Determining Port Numbers
■Optional: Configuring the Minimum Amount for Oracle WebLogic Server’s
Maximum Heap Size
■Locating Installation Log Files
Note: By completing the common installation tasks in this chapter,
you are not installing or configuring Oracle Identity Management
software.
For complete information about installing Oracle Identity
Management software, see the following:
■Installing and Configuring Oracle Identity Management
(11.1.1.6.0)
■Installing Oracle Identity and Access Management (11.1.1.5.0)
For complete information about configuring Oracle Identity
Management software, see the individual component specific chapters
in the following links:
■Installing and Configuring Oracle Identity Management
(11.1.1.6.0)
■Installing and Configuring Oracle Identity and Access
Management (11.1.1.5.0)

Common Installation Tasks for Oracle Identity Management (11.1.1.6.0)
4-2 Oracle Fusion Middleware Installation Guide for Oracle Identity Management
4.1.1 Identifying Installation Directories
This topic describes directories you must identify in most Oracle Identity Management
installations and configurations—it does not describe one particular Installer screen.
During installation, you will have to identify other component-specific directories not
described in this topic.
The common directories described in this section include the following:
■Oracle Middleware Home Location
■Oracle Home Directory
■WebLogic Server Directory
■Oracle Instance Location
■Oracle Instance Name
4.1.1.1 Oracle Middleware Home Location
Identify the location of your Oracle Middleware Home directory. The Installer creates
an Oracle Home directory for the component you are installing under the Oracle
Middleware Home that you identify in this field. The Installer also creates an Oracle
Common Home directory under the Oracle Middleware Home. The Oracle Common
Home contains the binary and library files required for Oracle Enterprise Manager
Fusion Middleware Control and Oracle Java Required Files (JRF). There can be only
one Oracle Common Home within each Oracle Middleware Home.
The Oracle Middleware Home directory is commonly referred to as MW_HOME.
4.1.1.2 Oracle Home Directory
Enter a name for the component’s Oracle Home directory. The Installer uses the name
you enter in this field to create the Oracle Home directory under the location you enter
in the Oracle Middleware Home Location field. The Installer installs the files (such as
binaries and libraries) required to host the component in the Oracle Home directory.
The Oracle Home directory is commonly referred to as ORACLE_HOME.
4.1.1.3 WebLogic Server Directory
Enter the path to your Oracle WebLogic Server Home directory. This directory
contains the files required to host the Oracle WebLogic Server. It is commonly referred
to as WL_HOME.
Note: To install Oracle Identity Management components in an
existing Oracle WebLogic Server administration domain, each Oracle
Middleware Home directory in the domain must have identical
directory paths and names.
Note: To install Oracle Identity Management components in an
existing Oracle WebLogic Server administration domain, each Oracle
Home directory in the domain must have identical directory paths
and names.

Common Installation Tasks for Oracle Identity Management (11.1.1.6.0)
Performing Common Installation Tasks 4-3
4.1.1.4 Oracle Instance Location
Enter the path to the location where you want to create the Oracle Instance directory.
The Installer creates the Oracle Instance directory using the location you enter in this
field and using the name you enter in the Oracle Instance Name field. Do not enter a
path to an existing directory that contains files—if you enter a path to an existing
directory, that directory must be empty.
The Installer installs the component's configuration files and runtime components in
the Oracle Instance directory. Runtime components will write only to this directory.
You can identify any location on your system for the Oracle Instance directory—it
does not have to reside inside the Oracle Middleware Home directory.
4.1.1.5 Oracle Instance Name
Enter a name for the Oracle Instance directory. The Installer uses the name you enter
in this field to create the Oracle Instance directory at the location you specify in the
Oracle Instance Location field. This directory is commonly referred to as ORACLE_
INSTANCE.
Instance names are important because Oracle Fusion Middleware uses them to
uniquely identify instances. If you install multiple Oracle Fusion Middleware
instances on the same computer, for example, an Oracle Identity Management instance
and an Oracle WebLogic Server instance, you must give them different names.
The name you enter for the Oracle Instance directory must:
■Contain only alphanumeric and underscore (_) characters
■Begin with an alphabetic character (a-z or A-Z)
■Consist of 4-30 characters
■Not contain the hostname or IP address of the computer
4.1.2 Determining Port Numbers
If you want to install an Oracle Identity Management 11g Release 1 (11.1.1) component
against an existing Oracle Identity Management 11g Release 1 (11.1.1) component, you
may need to identify the ports for the existing component. For example, if you want to
install Oracle Directory Integration Platform 11g Release 1 (11.1.1) against an existing
Oracle Internet Directory 11g Release 1 (11.1.1) component, you must identify its port
when you install Oracle Directory Integration Platform.
You can get information about ports using the following:
■WebLogic Server Administration Console.
Log in to the Administration Console. Click on Servers under Environment to see
what ports are in use for the Administration Server and Managed Servers.
■$ORACLE_INSTANCE/config/OPMN/opmn/ports.prop
Note: To install Oracle Identity Management components in an
existing Oracle WebLogic Server administration domain, each Oracle
WebLogic Server Home directory in the domain must have identical
directory paths and names.
Note: You cannot change the Oracle Instance name after installation.

Common Installation Tasks for Oracle Identity Management (11.1.1.6.0)
4-4 Oracle Fusion Middleware Installation Guide for Oracle Identity Management
■The $ORACLE_INSTANCE/bin/opmnctl status -l command to see port numbers
of components managed by OPMN.
4.1.3 Optional: Configuring the Minimum Amount for Oracle WebLogic Server’s
Maximum Heap Size
After installing Oracle Identity Management 11g Release 1 (11.1.1), if you want to
configure the minimum (lowest) level of maximum heap size (-Xmx) required for
Oracle WebLogic Server to host Oracle Identity Management components, perform the
steps in this section.
The minimum (lowest) levels for maximum heap size are:
■Oracle WebLogic Administration Server: 512 MB
■Oracle WebLogic Managed Server: 256 MB
Perform the following steps to configure the heap size for Oracle WebLogic
Administration Servers and Oracle WebLogic Managed Servers:
1. Open the setDomainEnv script (.sh or .bat) in the MW_HOME/user_
projects/domains/DOMAIN_NAME/bin/ directory.
2. Locate the last occurrence of the EXTRA_JAVA_PROPERTIES entry.
3. In the last occurrence of the EXTRA_JAVA_PROPERTIES entry, locate the last
occurrence of heap size parameters: -Xmx, -Xms, and so on.
4. Set the heap size parameters (-Xms and -Xmx) for the Oracle WebLogic
Administration Server as desired, for example: -Xms256m and -Xmx512m
5. To set the heap size parameters for the Oracle WebLogic Managed Server, enter
the text in Example 4–1 immediately below the last occurrence of the EXTRA_
JAVA_PROPERTIES entry and:
■Set the heap size parameters (-Xms and -Xmx) as desired, for example:
-Xms256m -Xmx256m
■Replace wls_ods1 with the name of the Oracle WebLogic Managed Server
hosting Oracle Directory Services Manager.
■Replace wls_oif1 with the name the Oracle WebLogic Managed Server
hosting Oracle Identity Federation.
Example 4–1 Heap Size Parameters for Oracle WebLogic Managed Server
if [ "${SERVER_NAME}" = "wls_ods1" -o "${SERVER_NAME}" = "wls_oif1" ] ; then
Note: If you change a component's port number after installation,
the ports.prop file is not updated.
Note: This is an optional step, typically performed only for test,
development, or demonstration environments.
Note: These are the heap size parameters for the Oracle WebLogic
Administration Server.

Common Installation Tasks for Oracle Identity and Access Management (11.1.1.5.0)
Performing Common Installation Tasks 4-5
EXTRA_JAVA_PROPERTIES=" ${EXTRA_JAVA_PROPERTIES} -Xms256m -Xmx256m "
export EXTRA_JAVA_PROPERTIES
fi
6. Save and close the setDomainEnv script.
7. Restart the Oracle WebLogic Administration Server and the Oracle WebLogic
Managed Server by referring to Appendix D, "Starting or Stopping the Oracle
Stack."
4.1.4 Locating Installation Log Files
The Installer writes log files to the ORACLE_INVENTORY_LOCATION/logs directory
on UNIX systems and to the ORACLE_INVENTORY_LOCATION\logs directory on
Windows systems.
On UNIX systems, if you do not know the location of your Oracle Inventory directory,
you can find it in the ORACLE_HOME/oraInst.loc file.
On Microsoft Windows systems, the default location for the inventory directory is
C:\Program Files\Oracle\Inventory\logs.
The following install log files are written to the log directory:
■installDATE-TIME_STAMP.log
■installDATE-TIME_STAMP.out
■installActionsDATE-TIME_STAMP.log
■installProfileDATE-TIME_STAMP.log
■oraInstallDATE-TIME_STAMP.err
■oraInstallDATE-TIME_STAMP.log
■opatchDATE-TIME_STAMP.log
4.2 Common Installation Tasks for Oracle Identity and Access
Management (11.1.1.5.0)
This section discusses the following topics:
■Starting an Installation
■Starting Oracle Fusion Middleware Configuration Wizard
■List of Executable Files
■Identifying Installation Directories
■Determining Port Numbers
Note: On UNIX systems, if you execute the ps -ef command and
grep for AdminServer or the name of the Oracle WebLogic
Managed Server (for example, ps -ef | grep AdminServer or
ps -ef | grep wls_oif1), the output contains multiple
occurrences of heap size parameters (-Xmx and -Xms).
Be aware that the last occurrence of the heap size parameters in the
output are effective and have precedence over the preceding
occurrences.

Common Installation Tasks for Oracle Identity and Access Management (11.1.1.5.0)
4-6 Oracle Fusion Middleware Installation Guide for Oracle Identity Management
■Completing an Installation
■Locating Installation Log Files
■Optional: Updating the WebLogic Administrator Server User Name in Oracle
Enterprise Manager Fusion Middleware Control (OIM Only)
4.2.1 Starting an Installation
This topic explains the steps that are common to starting most Oracle Identity and
Access Management installations and configurations. It begins with starting the
Installer and ends after you complete the steps on the Prerequisites Check screen.
Perform the following steps to start an Oracle Identity and Access Management
installation:
1. Extract the contents of the ofm_iam_generic_11.1.1.5.0_disk1_1of1.zip
file to a directory.
2. Move to the Disk1 directory.
3. Start the Installer by executing one of the following commands:
UNIX: <full path to the runInstaller directory>/runInstaller
-jreLoc <Middleware Home>/jrockit_1.6.0_24/jre
Windows: <full path to the setup.exe directory>\ setup.exe
-jreLoc <Middleware Home>\jrockit_1.6.0_24\jre
Notes:
■If you are installing on an IBM AIX operating system, you must
run the rootpre.sh script from the Disk1 directory before you
start the installer.
■Starting the Installer as the root user is not supported.

Common Installation Tasks for Oracle Identity and Access Management (11.1.1.5.0)
Performing Common Installation Tasks 4-7
After the Installer starts, continue by referring to Installing and Configuring
Oracle Identity and Access Management (11.1.1.5.0).
4.2.2 Starting Oracle Fusion Middleware Configuration Wizard
To start the Oracle Fusion Middleware Configuration Wizard, which is used to
configure Oracle Identity and Access Management products in a new or existing
WebLogic administration domain, run the <MW_HOME>/oracle_
common/bin/config.sh script (on UNIX). On Windows, run the <MW_
HOME>\oracle_common\bin\config.cmd script. The Oracle Fusion Middleware
Configuration Wizard is displayed.
Note: The installer prompts you to enter the absolute path of the JDK
that is installed on your system. When you install Oracle WebLogic
Server, the jrockit_1.6.0_24 directory is created under your
Middleware Home. You must enter the absolute path of the JRE folder
located in this JDK when launching the installer. For example, on
Windows, if the JRE is located in
D:\oracle\Middleware\jrockit_1.6.0_24, then launch the
installer from the command prompt as follows:
D:\setup.exe -jreLoc D:\oracle\Middleware\jrockit_
1.6.0_24\jre
If you do not specify the -jreLoc option on the command line when
using the Oracle JRockit JDK, the following warning message is
displayed:
-XX:MaxPermSize=512m is not a valid VM option.
Ignoring
This warning message does not affect the installation. You can
continue with the installation.
On 64 bit platforms, when you install Oracle WebLogic Server using
the generic jar file, the jrockit_1.6.0_24 directory will not be
created under your Middleware Home. You must enter the absolute
path of the JRE folder from where your JDK is located.

Common Installation Tasks for Oracle Identity and Access Management (11.1.1.5.0)
4-8 Oracle Fusion Middleware Installation Guide for Oracle Identity Management
4.2.3 List of Executable Files
Table 4–1 lists the executable files that are included in the Oracle WebLogic Server,
Oracle Identity and Access Management, Oracle SOA Suite, Oracle Web Tier, and
Oracle HTTP Server 11g Webgate for Oracle Access Manager Installers.
Note: When you run the config.cmd or config.sh command, the
following error message might be displayed:
*sys-package-mgr*: can't create package cache dir
The error message indicates that the default cache directory is not
valid. You can change the cache directory by including the
-Dpython.cachedir=<valid_directory> option in the
command line.
After starting the Oracle Fusion Middleware Configuration Wizard,
configure Oracle Identity and Access Management products, as
described in the following links:
■Configuring Oracle Identity Navigator
■Configuring Oracle Identity Manager
■Configuring Oracle Access Manager
■Configuring Oracle Adaptive Access Manager
■OAM and OAAM Joint Domain Configuration Scenarios
■Installing and Configuring Oracle Entitlements Server
■Installing and Configuring Oracle Entitlements Server

Common Installation Tasks for Oracle Identity and Access Management (11.1.1.5.0)
Performing Common Installation Tasks 4-9
Table 4–1 Executable Files
File Description
ofm_iam_generic_
11.1.1.5.0_disk1_
1of1.zip
After you extract the
contents of the ofm_iam_
generic_11.1.1.5.0_
disk1_1of1.zip file to a
directory, you can see the
executable file
runInstaller (for
UNIX) or setup.exe (for
Windows) in the Disk1
directory.
Oracle Identity and Access Management 11g Release 1 (11.1.1.5.0)
Installer for Oracle Identity Manager, Oracle Access Manager, Oracle
Adaptive Access Manager, Oracle Entitlements Server, and Oracle
Identity Navigator
wls_linux32.bin for
32-bit Linux systems,
wls_win32.exe for
32-bit Windows systems,
and wls_generic.jar
for all 64-bit platforms
Oracle WebLogic Server Installer
soa.zip
After you extract the
contents of the soa.zip
file to a directory, you can
see the executable file
runInstaller (for
UNIX) or setup.exe (for
Windows) in the Disk1
directory.
Oracle SOA Suite 11g Release 1 Installer
soa_patchset.zip
After you extract the
contents of the soa_
patchset.zip file to a
directory, you can see the
executable file
runInstaller (for
UNIX) or setup.exe (for
Windows) in the Disk1
directory.
Oracle SOA Suite 11g Release 1 Patch Set Installer

Common Installation Tasks for Oracle Identity and Access Management (11.1.1.5.0)
4-10 Oracle Fusion Middleware Installation Guide for Oracle Identity Management
4.2.4 Identifying Installation Directories
This topic describes directories you must identify in most Oracle Identity and Access
Management installations and configurations—it does not describe one particular
Installer screen. During installation, you will have to identify other component-specific
directories not described in this topic.
The common directories described in this section include the following:
■Oracle Middleware Home Location
■Oracle Home Directory
■Oracle Common Directory
■Oracle WebLogic Domain Directory
■WebLogic Server Directory
4.2.4.1 Oracle Middleware Home Location
Identify the location of your Oracle Middleware Home directory. The Installer creates
an Oracle Home directory for the component you are installing under the Oracle
Middleware Home that you identify in this field. The Oracle Middleware Home
directory is commonly referred to as MW_HOME.
webtier.zip
After you extract the
contents of the
webtier.zip file to a
directory, you can see the
executable file
runInstaller (for
UNIX) or setup.exe (for
Windows) in the Disk1
directory.
Oracle Web Tier 11g Release 1 (11.1.1) Installer
webgate.zip
After you extract the
contents of the
webgate.zip file to a
directory, you can see the
executable file
runInstaller (for
UNIX) or setup.exe (for
Windows) in the Disk1
directory.
Oracle HTTP Server 11g Webgate for Oracle Access Manager Installer
rcuHome.zip
After you extract the
contents of the
rcuHome.zip file to a
directory, you can see the
executable file rcu in the
BIN directory.
Oracle Fusion Middleware Repository Creation Utility (RCU)
Table 4–1 (Cont.) Executable Files
File Description

Common Installation Tasks for Oracle Identity and Access Management (11.1.1.5.0)
Performing Common Installation Tasks 4-11
4.2.4.2 Oracle Home Directory
Enter a name for the Oracle Home directory of the component. The Installer uses the
name you enter in this field to create the Oracle Home directory under the location
you enter in the Oracle Middleware Home Location field.
The Installer installs the files required to host the component, such as binaries and
libraries, in the Oracle Home directory. The Oracle Home directory is commonly
referred to as ORACLE_HOME.
4.2.4.3 Oracle Common Directory
The Installer creates this directory under the location you enter in the Oracle
Middleware Home Location field.
The Installer installs the Oracle Java Required Files (JRF) required to host the
components, in the Oracle Common directory. There can be only one Oracle Common
Home within each Oracle Middleware Home. The Oracle Common directory is
commonly referred to as oracle_common.
4.2.4.4 Oracle WebLogic Domain Directory
A WebLogic domain includes a special WebLogic Server instance called the
Administration Server, which is the central point from which you configure and
manage all resources in the domain. Usually, you configure a domain to include
additional WebLogic Server instances called Managed Servers. You deploy Java
components, such as Web applications, EJBs, and Web services, and other resources to
the Managed Servers and use the Administration Server for configuration and
management purposes only.
Managed Servers in a domain can be grouped together into a cluster.
The directory structure of a domain is separate from the directory structure of the
WebLogic Server home. It can reside anywhere; it need not be within the Middleware
home directory. A domain is a peer of an Oracle instance.
The Oracle Fusion Middleware Configuration Wizard creates a domain in a directory
named user_projects under your Middleware Home (MW_HOME).
4.2.4.5 WebLogic Server Directory
Enter the path to your Oracle WebLogic Server Home directory. This directory
contains the files required to host the Oracle WebLogic Server. It is commonly referred
to as WL_HOME.
4.2.5 Determining Port Numbers
If you want to install an Oracle Identity and Access Management 11g Release 1 (11.1.1)
component against an existing Oracle Identity and Access Management 11g Release 1
(11.1.1) component, you may need to identify the ports for the existing component. For
example, if you want to install Oracle Identity Manager 11g Release 1 (11.1.1) against
an existing Oracle Internet Directory 11g Release 1 (11.1.1) component, you must
identify its port when you install Oracle Identity Manager.
Note: Avoid using spaces in the directory names, including Oracle
Home. Spaces in such directory names are not supported.

Common Installation Tasks for Oracle Identity and Access Management (11.1.1.5.0)
4-12 Oracle Fusion Middleware Installation Guide for Oracle Identity Management
4.2.6 Completing an Installation
This topic explains the steps that are common to completing most Oracle Identity and
Access Management installations and configurations. It begins with the steps on the
Installation Summary screen and ends after the Installation Complete screen.
When the Installation Summary screen appears, perform the following steps to
complete the installation:
1. Verify the installation and configuration information on the Installation Summary
screen.
■Click Save to save the installation response file, which contains your
responses to the Installer prompts and fields. You can use this response file to
perform silent installations. Refer to Performing a Silent Installation for more
information.
■Click Install. The Installation Progress screen appears.
2. Monitor the progress of your installation. The location of the installation log file is
listed for reference. After the installation progress reaches 100%, click OK. The
Installation Complete screen appears.
3. Click Save to save the installation summary file. This file contains information
about the configuration, such as locations of install directories, that will help you
get started with configuration and administration.
Click Finish to close and exit the Installer.
4.2.7 Locating Installation Log Files
The Installer writes log files to the ORACLE_INVENTORY_LOCATION/logs directory
on UNIX systems and to the ORACLE_INVENTORY_LOCATION\logs directory on
Windows systems.
On UNIX systems, if you do not know the location of your Oracle Inventory directory,
you can find it in the ORACLE_HOME/oraInst.loc file.
On Microsoft Windows systems, the default location for the inventory directory is
C:\Program Files\Oracle\Inventory\logs.
The following install log files are written to the log directory:
■installDATE-TIME_STAMP.log
■installDATE-TIME_STAMP.out
■installActionsDATE-TIME_STAMP.log
■installProfileDATE-TIME_STAMP.log
■oraInstallDATE-TIME_STAMP.err
■oraInstallDATE-TIME_STAMP.log
Note: The installation response file is not saved by default—you
must click Save to retain it.
Note: The installation summary file is not saved, by default—you
must click Save to retain it.

Common Installation Tasks for Oracle Identity and Access Management (11.1.1.5.0)
Performing Common Installation Tasks 4-13
4.2.8 Optional: Updating the WebLogic Administrator Server User Name in Oracle
Enterprise Manager Fusion Middleware Control (OIM Only)
Read this section only if the user name for the WebLogic Administrator for the domain
is not weblogic. This task is required only if you are using Oracle Identity Manager.
If your WebLogic administrator user name is not weblogic, complete the following
steps:
1. Ensure that the Oracle Identity Manager Managed server is up and running.
2. Log in to Oracle Enterprise Manager Fusion Middleware Control using your
WebLogic Server administrator credentials.
3. Click Identity and Access > oim > oim(11.1.1.2.0). Right-click and select System
MBean Browser. The System MBean Browser page is displayed.
4. Under Application Defined MBeans, select oracle.iam > Server:oim_
server1 > Application: oim > XMLConfig > config >
>XMLConfig.SOAConfig > SOAConfig.
5. View the attribute username. By default, the value of the attribute is weblogic.
Change this value to your WebLogic administrator user name.
6. Click Apply. Exit Oracle Enterprise Manager Fusion Middleware Control.
7. On the command line, use the cd command to move from your present working
directory to the <IAM_Home>/common/bin directory. IAM_Home is the example
IDM_Home directory for Oracle Identity Manager, Oracle Access Manager, Oracle
Adaptive Access Manager, Oracle Entitlements Server, and Oracle Identity
Navigator.
8. Launch the WebLogic Scripting Tool (WLST) interface as follows:
On UNIX: Run ./wlst.sh on the command line.
On Windows: Run wlst.cmd.
At the WLST command prompt (wls:/offline>), type the following:
connect()
You are prompted to enter the WebLogic Administration Server user name,
password, and URL. For more information about using the WLST interface, see
the topic "Using the WebLogic Scripting Tool" in the guide Oracle Fusion
Middleware Oracle WebLogic Scripting Tool.
a. Run the deleteCred WLST command:
deleteCred(map="oim", key="SOAAdminPassword");
b. Run the createCred WLST command, and replace the ADMIN_PASSWORD
with your WebLogic administrator password:
createCred(map="oim", key="SOAAdminPassword",
user="xelsysadm",password="<ADMIN_PASSWORD>");
c. Run the following WLST command to verify the values:
listCred(map="oim", key="SOAAdminPassword");
d. Type exit() to exit the WLST command shell.
9. Open the Oracle Identity Manager Administration Console, and log in as user
xelsysadm.
10. Create a new user for the user name of your WebLogic administrator.

Common Installation Tasks for Oracle Identity and Access Management (11.1.1.5.0)
4-14 Oracle Fusion Middleware Installation Guide for Oracle Identity Management
11. Search for the Administrators role. Open the role details, and click the Members
tab.
12. Remove all the existing members of the Administrators role.
13. Add the newly created user (the one with your WebLogic administrator user
name) as a member of the Administrators role.
14. Restart Oracle Identity Manager Managed Server, as described in Starting the
Stack.

5
Evaluating Single Sign-On Installations 5-1
5
Evaluating Single Sign-On Installations
This chapter includes the following topics:
■Important Notes for Oracle Portal 11g Installations
■Before You Begin
■Single Sign-On Options
■Single Sign-On Preparation Considerations
■Oracle Single Sign-On Known Limitations
■Recommendations
5.1 Important Notes for Oracle Portal 11g Installations
New installations of Oracle Portal 11g require Oracle Single Sign-On 10g during the
installation process. Such Oracle Portal 11g users should use their existing Oracle
Single Sign-On 10g installation. If you must perform a new installation of Single
Sign-On 10g, consider hardware issues, system corruption, and any unforeseen issues.
Oracle recommends that you follow the system framework supported by 10g for a new
Single Sign-On 10g installation.
After installing Oracle Portal 11g, you may upgrade Oracle Single Sign-On 10g to
Oracle Access Manager 11g. For more information, see Oracle Fusion Middleware
Upgrade Guide for Oracle Identity Management.
5.2 Before You Begin
Before performing any upgrade or installation, you should read the following
documents to ensure that your Oracle Fusion Middleware environment meets the
minimum installation requirements for the products you are installing.
■Review System Requirements and Specifications
■Review Certification Information
■Review Interoperability and Compatibility Information
Note: Existing Oracle Single Sign-On 10g users are encouraged to
upgrade to Oracle Access Manager 11g for a more advanced single
sign-on solution.

Single Sign-On Options
5-2 Oracle Fusion Middleware Installation Guide for Oracle Identity Management
5.2.1 Review System Requirements and Specifications
Oracle Fusion Middleware System Requirements and Specifications document is available
at:
http://www.oracle.com/technetwork/middleware/ias/downloads/fusion-requirem
ents-100147.html
This document covers information such as hardware and software requirements,
database schema requirements, minimum disk space and memory requirements, and
required system libraries, packages, or patches.
5.2.2 Review Certification Information
Oracle Fusion Middleware Supported System Configurations document is available at:
http://www.oracle.com/technetwork/middleware/ias/downloads/fusion-certific
ation-100350.html
This document contains certification information related to supported 32-bit and 64-bit
operating systems, databases, web servers, LDAP servers, adapters, IPv6, JDKs, and
third-party products.
5.2.3 Review Interoperability and Compatibility Information
For interoperability and compatibility issues that may arise when installing, refer to
Oracle Fusion Middleware Interoperability and Compatibility Guide.
This document contains important information regarding the ability of Oracle Fusion
Middleware products to function with previous versions of other Oracle Fusion
Middleware, Oracle, or third-party products. This information is applicable to both
new Oracle Fusion Middleware users and existing users who are upgrading their
existing environment.
5.3 Single Sign-On Options
Following are the options available for a single sign-on solution:
■Use an existing Oracle Single Sign-On 10g 10.1.2.3.
■Use an existing Oracle Single Sign-On 10g 10.1.4.3.
■Install a new Oracle Single Sign-On 10g 10.1.2.3 as part of Oracle Identity
Management 10g 10.1.2.3. For more information, refer to the following link:
http://download.oracle.com/docs/cd/B14099_19/idmanage.htm
■Install a new Oracle Single Sign-On 10g 10.1.4.3 as part of Oracle Identity
Management 10g 10.1.4.3. For more information, refer to the following link:
http://download.oracle.com/docs/cd/B28196_01/idmanage.htm
■Use Oracle Access Manager 11g. For more information on installing and
configuring Oracle Access Manager 11g Release 1 (11.1.1), see Installing Oracle
Identity and Access Management (11.1.1.5.0) and Configuring Oracle Access
Manager.
5.4 Single Sign-On Preparation Considerations
Consider the following when preparing for a single sign-on solution:

Recommendations
Evaluating Single Sign-On Installations 5-3
■What Oracle Fusion Middleware products will be installed or configured to use a
single sign-on solution?
■Will the single sign-on solution be configured during installation or as a
post-installation step?
■If you have an existing Oracle Single Sign-On 10g, when will this installation be
upgraded to Oracle Access Manager 11g?
■Oracle Access Manager 11g is an additional installation after installing Oracle
Internet Directory 11g.
5.5 Oracle Single Sign-On Known Limitations
Following are the Oracle Single Sign-On known limitations:
■New installations of Oracle Portal 11g require Oracle Single Sign-On 10g (10.1.2.3
or 10.1.4.3) during the configuration phase.
■Premier support ends for Oracle Single Sign-On 10g (10.1.2.3) and Oracle Single
Sign-On 10g (10.1.4.3) soon. For complete information, refer to the Oracle Lifetime
Support Policy document available at:
http://www.oracle.com/us/support/library/lifetime-support-middleware-06
9163.pdf
■Premier support has been extended until December 2012 for the use of Oracle
Single Sign-On 10g (10.1.4.3) with existing Oracle Portal, Forms, Reports, and
Discoverer 11g environments, thereby enabling you to prepare for Oracle Access
Manager 11g upgrade.
■New installations of Oracle Single Sign-On 10g (10.1.2.3) are not supported against
the 11g environment.
■New installations of Oracle Single Sign-On 10g (10.1.4.3) have been supported
with the 11g environment through version 11.1.1.4.
5.6 Recommendations
Oracle recommends that you carefully consider the following requirements and
options when choosing a single sign-on solution:
■If an Oracle Single Sign-On 10g with Delegated Administration Services
environment is necessary, use an existing Oracle Single Sign-On 10g with
Delegated Administration Services environment.
■If a new Oracle Single Sign-On 10g environment must be installed, install under
previously supported framework. For example, a full Oracle Identity Management
10g infrastructure, with the intention of upgrading to Oracle Access Manager 11g
in near future and decommission rest of 10g.
■If you are not using Oracle Portal, install and configure Oracle Fusion Middleware
products with Oracle Access Manager 11g.
■If you are installing Oracle Portal 11g for upgrade purposes, use an existing Oracle
Single Sign-On 10g connection during the installation, and upgrade to Oracle
Access Manager 11g at a later time. For more information on upgrading to Oracle
Access Manager 11g, see Oracle Fusion Middleware Upgrade Guide for Oracle Identity
Management.

Recommendations
5-4 Oracle Fusion Middleware Installation Guide for Oracle Identity Management
If you are using Delegated Administration Services, ensure that you run it on
Oracle Application Server Containers for J2EE. Move from Oracle Single Sign-On
10g to Oracle Access Manager 11g on Oracle WebLogic Server.
■New Oracle Forms and Oracle Reports installations should use Oracle Forms and
Oracle Reports Release 2 (11.1.2). This installation has an option to install with
Oracle Single Sign-On 10g or Oracle Access Manager 11g. You may upgrade
Oracle Single Sign-On 10g to Oracle Access Manager 11g before or after this
installation. For more information, see Oracle Fusion Middleware Installation Guide
for Oracle Forms and Reports.
■If you are installing only Oracle Discoverer, do not install the Oracle Single
Sign-On solution during Oracle Discoverer installation. Configure Oracle Access
Manager 11g after the installation.

Part II
Part II
Installing and Configuring Oracle Identity
Management (11.1.1.6.0)
Part II provides information about installing and configuring the following Oracle
Identity Management products:
■Oracle Internet Directory (OID)
■Oracle Virtual Directory (OVD)
■Oracle Directory Services Manager (ODSM)
■Oracle Directory Integration Platform (ODIP)
■Oracle Identity Federation (OIF)
Part II contains the following chapters:
■Chapter 6, "Installing and Configuring Oracle Identity Management (11.1.1.6.0)"
■Chapter 7, "Configuring Oracle Internet Directory"
■Chapter 8, "Configuring Oracle Virtual Directory"
■Chapter 9, "Configuring Oracle Directory Integration Platform"
■Chapter 10, "Configuring Oracle Directory Services Manager"
■Chapter 11, "Configuring Oracle Identity Federation"

6
Installing and Configuring Oracle Identity Management (11.1.1.6.0) 6-1
6 Installing and Configuring Oracle Identity
Management (11.1.1.6.0)
This chapter includes the following topics:
■Important Notes Before You Begin
■Installing Oracle Identity Management Using "Install and Configure" Option
■Configuring Oracle Identity Management for "Install Software - Do Not
Configure" Option
6.1 Important Notes Before You Begin
Before you start installing and configuring Oracle Identity Management products,
keep the following points in mind:
■This chapter provides information for installing and configuring Oracle Identity
Management (11.1.1.6.0) for new users. If you are an existing Oracle Identity
Management 11g user, refer to "Applying the Latest Oracle Fusion Middleware
Patch Set" in the Oracle Fusion Middleware Patching Guide.
For complete information about patching your Oracle Fusion Middleware 11g to
the latest release, refer to the Oracle Fusion Middleware Patching Guide.
■The Select Installation Type screen in the Installer presents two options: Install
and Configure and Install Software - Do Not Configure. For more information
about these options, see Installation Types: "Install Software - Do Not Configure"
vs. "Install and Configure".
6.2 Installing Oracle Identity Management Using "Install and Configure"
Option
Follow the instructions in this section to install and configure the latest Oracle Identity
Management software.
Installing and configuring the latest version of Oracle Identity Management 11g
components involves the following steps:
1. Obtaining the Oracle Fusion Middleware Software
2. Installing Oracle Database
3. Creating Database Schema Using the Oracle Fusion Middleware Repository
Creation Utility (RCU)

Installing Oracle Identity Management Using "Install and Configure" Option
6-2 Oracle Fusion Middleware Installation Guide for Oracle Identity Management
4. Required Installation Privileges for Oracle WebLogic Server and Oracle Identity
Management on Windows Operating Systems
5. Installing Oracle WebLogic Server 11g Release 1 (10.3.6) and Creating the
Middleware Home
6. Creating the Inventory Directory (UNIX Only)
7. Starting an Installation
8. Installing and Configuring Oracle Identity Management 11g Release 1 (11.1.1.6.0)
Software
6.2.1 Obtaining the Oracle Fusion Middleware Software
For installing Oracle Identity Management, you must obtain the following software:
■Oracle WebLogic Server 11g Release 1 (10.3.6)
■Oracle Database
■Oracle Repository Creation Utility
■Oracle Identity Management Suite
For more information on obtaining Oracle Fusion Middleware 11g software, see Oracle
Fusion Middleware Download, Installation, and Configuration ReadMe available at:
http://download.oracle.com/docs/cd/E23104_01/download_readme.htm
6.2.2 Installing Oracle Database
You must install an Oracle Database before you can install some Oracle Identity
Management components, such as:
■Oracle Internet Directory
■Oracle Identity Federation, if you want to use an RDBMS data store
For the latest information about supported databases, visit the following Web site:
http://www.oracle.com/technetwork/middleware/ias/downloads/fusion-certification-100350.html
The database must be up and running to install the relevant Oracle Identity
Management component. The database does not have to be on the same system where
you are installing the Oracle Identity Management component.
The database must also be compatible with Oracle Fusion Middleware Repository
Creation Utility (RCU), which is used to create the schemas that Oracle Identity
Management components require. For information about RCU requirements, refer to
the system requirements document at the following Web site:
http://www.oracle.com/technetwork/middleware/ias/downloads/fusion-requirements-100147.html
Note: Oracle Identity Management 11g Release 1 (11.1.1.6.0) installer
is platform specific.
To install Oracle Identity Management 11g Release 1 (11.1.1.6.0) on a
32-bit operating system, you must use the 32-bit installer and to install
Oracle Identity Management 11g Release 1 (11.1.1.6.0) on a 64-bit
operating system, you must use the 64-bit installer.

Installing Oracle Identity Management Using "Install and Configure" Option
Installing and Configuring Oracle Identity Management (11.1.1.6.0) 6-3
6.2.3 Creating Database Schema Using the Oracle Fusion Middleware Repository
Creation Utility (RCU)
You must create and load the appropriate Oracle Fusion Middleware schema in your
database before installing the following Oracle Identity Management components and
configurations:
■Oracle Internet Directory, if you want to use an existing schema rather than create
a new one using the Installer during installation.
■Oracle Identity Federation Advanced configurations that use RDBMS for the
Federation Store, Session Store, Message Store, or Configuration Store.
You create and load Oracle Fusion Middleware schema in your database using the
RCU, which is available in the Oracle Fusion Middleware 11g Release 1 (11.1.1) release
Note: Ensure that the following database parameters are set:
■'aq_tm_processes' >= 1
■'db_cache_size' >= '150994944'
■'java_pool_size'>= '125829120'
■'shared_pool_size' >= '183500800'
■'open_cursors' >= '500'
If you are installing a new database, be sure to configure your
database to use AL32UTF8 character set encoding. If your database
does not use the AL32UTF8 character set, you will see the following
warning when running RCU: "The database you are connecting is
with non-AL32UTF8 character set. Oracle strongly recommends using
AL32UTF8 as the database character set." You can ignore this warning
and continue using RCU.
Note: When you install Oracle Internet Directory, you have the
choice of using an existing schema or creating a new one using the
Installer. If you want to use an existing schema, you must create it
using the Oracle Fusion Middleware Repository Creation Utility
(RCU) before you can install Oracle Internet Directory. If you choose
to create a new schema during installation, the Installer creates the
appropriate schema for you and you do not need to use the RCU.
If you are installing Oracle Internet Directory and your database is not
configured as per the requirements in the fusion middleware
requirements and prerequisites doc, you would see the following
warnings: "Recommended value for Database initialization parameter
processes is 500. Choose YES to continue or NO to go back to the same
screen and specify different database details." To fix this one can click
No and apply the requisite configuration mentioned in the fusion
middleware requirements and prerequisites doc - section 8 Repository
Creation Utility (RCU) Requirements which can be accessed from the
following link:
http://download.oracle.com/docs/html/E18558_
01/fusion_requirements.htm#CHDJGECA

Installing Oracle Identity Management Using "Install and Configure" Option
6-4 Oracle Fusion Middleware Installation Guide for Oracle Identity Management
media and on the Oracle Technology Network (OTN) Web site. You can access the
OTN Web site at:
http://www.oracle.com/technetwork/index.html
When you run RCU, create and load only the following schema for the Oracle Identity
Management component you are installing—do not select any other schema available
in RCU:
■For Oracle Internet Directory, select only the Identity Management - Oracle
Internet Directory schema
■For Oracle Identity Federation, select only the Identity Management - Oracle
Identity Federation schema
6.2.4 Required Installation Privileges for Oracle WebLogic Server and Oracle Identity
Management on Windows Operating Systems
In order to install Oracle WebLogic Server and Oracle Identity Management on a
Microsoft Windows Vista or newer operating system, the operating system user must
have Windows "Administrator" privileges.
Even when a user with "Administrator" privileges logs in to the machine, the
administrative role is not granted for default tasks. In order to access the Oracle home
files and folders, the user must launch the command prompt or Windows Explorer as
"Administrator" explicitly, even if the user is logged in as the administrator.
To do so, you can do either one of the following:
■Find the Command Prompt icon (for example, from the Start menu or from the
Desktop), right-click on the icon, and select Run as Administrator. Then you can
run the executables (for example, the WebLogic Server installer) from the
command line.
■Start Windows Explorer, find the executable you want to run (for example,
rcu.bat for RCU, config.bat for the Configuration Wizard, or setup.exe for
the installer), right-click on the executable, and select Run as Administrator.
Note: RCU is available only on Linux x86 and Windows x86
platforms. Use the Linux RCU to create schemas on supported UNIX
databases. Use Windows RCU to create schemas on supported
Windows databases.
Note: When you create schema, be sure to remember the schema
owner and password that is shown in RCU. For Oracle Identity
Federation, it is of the form PREFIX_OIF. You will need to provide
this information when configuring Oracle Identity Federation with
RDBMS stores.
See: The Oracle Fusion Middleware Repository Creation Utility User's
Guide for complete information.

Installing Oracle Identity Management Using "Install and Configure" Option
Installing and Configuring Oracle Identity Management (11.1.1.6.0) 6-5
6.2.5 Installing Oracle WebLogic Server 11g Release 1 (10.3.6) and Creating the
Middleware Home
Oracle Identity Management requires Oracle WebLogic Server and a Middleware
home directory.
For more information, see "Install Oracle WebLogic Server" in Oracle Fusion Middleware
Installation Planning Guide. In addition, see Oracle Fusion Middleware Installation Guide
for Oracle WebLogic Server for complete information about installing Oracle WebLogic
Server.
For information on installing the Oracle WebLogic Server, see "Preparing for
Installation" and "Running the Installation Program in Graphical Mode" in the Oracle
Fusion Middleware Installation Guide for Oracle WebLogic Server.
6.2.6 Creating the Inventory Directory (UNIX Only)
If you are installing on a UNIX system, and if this is the first time any Oracle product
is being installed on your system with the Oracle Universal Installer, you will be asked
to provide the location of an inventory directory. This is where the installer will set up
subdirectories and maintain inventory data for each Oracle product that is installed on
this system.
Follow the instructions in Table 6–1 to configure the inventory directory information:
Notes:
■If you are installing Oracle Internet Directory without an Oracle
WebLogic administration domain, you do not need to install
Oracle WebLogic.
■The same user who installed Oracle WebLogic Server must install
Oracle Identity Management.
■Do not log in to the Oracle WebLogic Server Administration
Console during Oracle Identity Management installation.
■If you want to configure the minimum amount for Oracle
WebLogic Server’s maximum heap size, see Optional: Configuring
the Minimum Amount for Oracle WebLogic Server’s Maximum
Heap Size.
Table 6–1 Inventory Directory and Group Screens
Screen Description
Specify Inventory Directory Specify the Oracle inventory directory and group permissions
for that directory. The group must have write permissions to the
Oracle inventory directory.
Click OK to continue.
Inventory Location
Confirmation Run the createCentralInventory.sh script as root.
Click OK to continue.

Installing Oracle Identity Management Using "Install and Configure" Option
6-6 Oracle Fusion Middleware Installation Guide for Oracle Identity Management
6.2.7 Starting an Installation
Perform the following steps to start an Oracle Identity Management installation:
If you are using Sun JDK, start the Installer by executing one of the following
commands:
UNIX: <full path to the runInstaller directory>/runInstaller
Windows: <full path to the setup.exe directory>\ setup.exe
If you are using Oracle JRockit JDK, start the Installer by executing one of the
following commands:
UNIX: <full path to the runInstaller directory>/runInstaller
-jreLoc <Middleware Home>/jrockit_1.6.0_24/jre
Windows: <full path to the setup.exe directory>\ setup.exe
-jreLoc <Middleware Home>\jrockit_1.6.0_24\jre
Note: If you do not want to use the central inventory, you can create
the oraInst.loc file, add the custom location of the inventory, and
run the runInstaller by using the following command:
runInstaller -invPtrLoc <full location to
oraInst.loc>
Note: You must be logged in to the UNIX operating system as a
non-root user to start the Installer.

Installing Oracle Identity Management Using "Install and Configure" Option
Installing and Configuring Oracle Identity Management (11.1.1.6.0) 6-7
6.2.8 Installing and Configuring Oracle Identity Management 11g Release 1 (11.1.1.6.0)
Software
Follow the instructions in Table 6–2 to install and configure Oracle Identity
Management 11.1.1.6.0.
If you need additional help with any of the installation screens, click Help to access the
online help.
Notes:
■If you are using Oracle JRockit JDK, the installer prompts you to
enter the absolute path of the JDK that is installed on your system.
When you install Oracle WebLogic Server, the jrockit_1.6.0_
24 directory is created under your Middleware Home. You must
enter the absolute path of the JRE folder located in this JDK when
launching the installer. For example, on Windows, if the JRE is
located in D:\oracle\Middleware\jrockit_1.6.0_24, then
launch the installer from the command prompt as follows:
D:\setup.exe -jreLoc D:\oracle\Middleware\jrockit_
1.6.0_24\jre
■If you do not specify the -jreLoc option on the command line
when using the Oracle JRockit JDK, the following warning
message is displayed:
-XX:MaxPermSize=512m is not a valid VM option.
Ignoring
This warning message does not affect the installation. You can continue
with the installation.
■On 64 bit platforms, when you install Oracle WebLogic Server
using the generic jar file, the jrockit_1.6.0_24 directory will
not be created under your Middleware Home. You must enter the
absolute path of the JRE folder from where your JDK is located.
■On 64 bit platforms, the MaxPermSize should be set to 512M.
Before launching the Installer, you can set the MaxPermSize in the
environment as follows:
export _JAVA_OPTIONS=-XX:MaxPermSize=512m
If the MaxPermSize is not set to 512M, you will see the following error
message:
java.lang.OutOfMemoryError: PermGen space
■If you are using Sun JDK on 64 bit platforms, note that JDK1.7 is
not supported.

Installing Oracle Identity Management Using "Install and Configure" Option
6-8 Oracle Fusion Middleware Installation Guide for Oracle Identity Management
Table 6–2 Installation and Configuration Flow for Install and Configure Option
No. Screen
When Does This
Screen Appear? Description and Action Required
1Welcome Always Click Next to continue.
2Install Software
Updates Always Specify any software updates to install before you
install Oracle Identity Management.
To get updates from My Oracle Support, you can select
Search My Oracle Support for Updates, specify a user
name and password, and then click Search for Updates.
Before you search, you can click Proxy Settings to
change the settings for the proxy server and Te st
Connection to test the credentials.
To get updates that you have saved to your computer,
you can select Search Local Directory for Updates,
specify a directory, and then click Search for Updates.
If you do not want to update any software, select Skip
Software Updates, and then click Next to continue the
installation.
3Select Installation Type Always Select Install and Configure option.
Notes:
■If you choose Install Software - Do Not Configure
option, you can configure them at a later time using
the Oracle Identity Management 11g Release 1
(11.1.1.6.0) Configuration Wizard. To start the
Oracle Identity Management 11g Release 1
(11.1.1.6.0) Configuration Wizard, execute the
ORACLE_HOME/bin/config.sh script
(config.bat on Windows). For more information,
see Configuring Oracle Identity Management for
"Install Software - Do Not Configure" Option.
■If you want to configure Oracle Directory
Integration Platform with Oracle Unified Directory
(OUD), or Oracle Directory Integration Platform
with Oracle Directory Server Enterprise Edition
(ODSEE), you must select Install Software - Do
Not Configure option while installing Oracle
Identity Management 11g Release 1 (11.1.1.6.0).
After Oracle Identity Management 11g Release 1
(11.1.1.6.0) installation is complete, depending on
the component you choose to configure with Oracle
Directory Integration Platform, refer to the
following sections:
■Configuring ODIP with
Oracle Unified Directory
(OUD)
■Configuring ODIP with
Oracle Directory Server
Enterprise Edition
(ODSEE)
Click Next to continue.
4Prerequisite Checks Always Ensure that all the prerequisites are met.
Click Next to continue.

Installing Oracle Identity Management Using "Install and Configure" Option
Installing and Configuring Oracle Identity Management (11.1.1.6.0) 6-9
5Select Domain This screen is displayed
if you select Install and
Configure option.
Select one of the following options:
■Create New Domain: Enter the User Name, User
Password, and Domain Name for the domain you
want to create.
Depending on the component you choose, refer to
the following sections:
■OID with ODSM and
Fusion Middleware
Control in a New
WebLogic Domain
■OID with ODIP, ODSM,
and Fusion Middleware
Control in a New
WebLogic Domain
■OID and OVD with
ODSM in a New
WebLogic Domain
■OVD with ODSM and
Fusion Middleware
Control in a New
WebLogic Domain
■Only ODSM in a New
WebLogic Domain
■ODIP with Fusion
Middleware Control in a
New WebLogic Domain
■Advanced Example:
Configuring OIF with
OID in a New WebLogic
Domain for LDAP
Authentication, User
Store, and Federation
Store
■Extend Existing Domain: Enter the Host Name,
Port, User Name, and User Password for the
existing domain you want to extend into.
Depending on the component you choose, refer to
the following sections:
■Only OID in an Existing
WebLogic Domain
■Only OVD in an
Existing WebLogic
Domain
■Only ODSM in an
Existing WebLogic
Domain
■Only ODIP in an
Existing WebLogic
Domain
Table 6–2 (Cont.) Installation and Configuration Flow for Install and Configure Option
No. Screen
When Does This
Screen Appear? Description and Action Required

Installing Oracle Identity Management Using "Install and Configure" Option
6-10 Oracle Fusion Middleware Installation Guide for Oracle Identity Management
6Specify Installation
Location Always Specify the Oracle Middleware Home location, Oracle
Home Directory, WebLogic Server Directory, Oracle
Instance Location, and Oracle Instance Name.
For more information about these directories, see
"Understanding Oracle Fusion Middleware Concepts
and Directory Structure" in Oracle Fusion Middleware
Installation Planning Guide.
Click Next to continue.
7Specify Security
Updates Always This screen allows you to decide how you want to be
notified about security issues:
■If you want to be notified about security issues
through E-mail, enter your E-mail address in the
E-mail field.
■If you want to be notified about security issues
through My Oracle Support (formerly MetaLink),
select the My Oracle Support option and enter your
My Oracle Support Password.
■If you do not want to be notified about security
issues, leave all fields empty. You will see the
following message:
You have not provided an E-mail address. Do you
wish to remain uninformed of critical security
issues in your configuration?
Click Yes to continue.
Click Next to continue.
Table 6–2 (Cont.) Installation and Configuration Flow for Install and Configure Option
No. Screen
When Does This
Screen Appear? Description and Action Required

Installing Oracle Identity Management Using "Install and Configure" Option
Installing and Configuring Oracle Identity Management (11.1.1.6.0) 6-11
8Configure Components This screen is displayed
if you select Install and
Configure option.
■Select the Oracle Identity Management components
that you wish to install and configure.
■For Create Domain installations, the Enterprise
Manager checkbox under Management
Components is automatically selected. Oracle
Enterprise Manager Fusion Middleware Control
Console (Fusion Middleware Control Console) will
be installed and configured; you cannot deselect it.
It is implicitly selected for configuration.
■If you select No Domain Flow, only Oracle Internet
Directory and Oracle Virtual Directory will be
available for configuration.
■In installations in which you select to extend the
Domain, Enterprise Manager (Fusion Middleware
Control Console) is not available as a selectable
component. In the extend the domain installation
only Oracle Directory Services Manager is available
as a selection under the Management Components
area.
■Oracle Directory Services Manager can be installed
and configured as a stand-alone component.
■If you select to install Oracle Internet Directory or
Oracle Virtual Directory in the create domain
installation flow, Oracle Directory Services
Manager is automatically selected and cannot be
deselected. For extend domain or expand cluster,
the Oracle Directory Services Manager can be
deselected by you if you select to install Oracle
Internet Directory or Oracle Virtual Directory.
■The Clustered selection field appears and is
available if you at least one Java component
selected for installation and configuration. Only
managed servers and the applications that are
deployed to them can be clustered. Enterprise
Manager (Fusion Middleware Control Console) is
not clustered during the installation because it is
deployed to the administrative server.
■If you select to expand a cluster installation, at least
one cluster should be present when you select this
option.
■If you select to expand a cluster the Java EE
components which are configured as part of the
cluster will be listed.
Click Next to continue.
9Configure Ports This screen is displayed
if you select Install and
Configure option.
Choose how you want the Installer to configure ports:
■Select Auto Port Configuration if you want the
Installer to configure ports from a predetermined
range.
■Select Specify Ports using Configuration File if
you want the Installer to configure ports using the
staticports.ini file. You can click View/Edit File to
update the settings in the staticports.ini file.
Click Next to continue.
Table 6–2 (Cont.) Installation and Configuration Flow for Install and Configure Option
No. Screen
When Does This
Screen Appear? Description and Action Required

Installing Oracle Identity Management Using "Install and Configure" Option
6-12 Oracle Fusion Middleware Installation Guide for Oracle Identity Management
10 Specify Schema
Database This screen is displayed
if you select Install and
Configure option and
choose to configure
Oracle Internet
Directory.
Choose whether to use an existing schema or to create a
new one using the Installer.
Note: If you want to use an existing schema, it must
currently reside in the database to continue with the
installation. If it does not currently reside in the
database, you must create it now using the Oracle
Fusion Middleware Repository Creation Utility.
To use an existing schema:
1. Select Use Existing Schema.
2. Enter the database connection information in the
Connect String field. The connection string must be
in the form of hostname:port:servicename.
For Oracle Real Application Clusters (RAC), the
connection string must be in the form of
hostname1:port1:instance1^hostname2:po
rt2:instance2@servicename.
3. Enter the password for the existing ODS schema in
the Password field.
4. Click Next to continue.
Note: If your existing ODS and ODSSM schemas
have different passwords, the Specify ODSSM
Password screen will appear after you click Next.
Enter the password for your existing ODSSM
schema and click Next.
To create a new schema:
1. Select Create Schema.
2. Enter the database connection information in the
Connect String field. The connection string must be
in the form of hostname:port:servicename.
For Oracle Real Application Clusters (RAC), the
connection string must be in the form of
hostname1:port1:instance1^hostname2:po
rt2:instance2@servicename.
3. Enter the name of the database user in the User
Name field. The user you identify must have DBA
privileges.
Note: If you are using Oracle Database 11g Release
2 (11.2) or higher version, the database user should
be only 'SYS'.
4. Enter the password for the database user in the
Password field.
5. Click Next. The Enter OID Passwords screen
appears.
6. Create a password for the new ODS schema by
entering it in the ODS Schema Password field.
Enter it again in the Confirm ODS Schema
Password field.
7. Create a password for the new ODSSM schema by
entering it in the ODSSM Schema Password field.
Enter it again in the Confirm ODSSM Schema
Password field.
8. Click Next to continue.
Table 6–2 (Cont.) Installation and Configuration Flow for Install and Configure Option
No. Screen
When Does This
Screen Appear? Description and Action Required

Installing Oracle Identity Management Using "Install and Configure" Option
Installing and Configuring Oracle Identity Management (11.1.1.6.0) 6-13
11 Specify Oracle Virtual
Directory Information This screen is displayed
if you select Install and
Configure option and
choose to configure
Oracle Virtual
Directory.
Enter the following information:
■LDAP v3 Name Space: Enter the name space for
Oracle Virtual Directory. The default value is
dc=us,dc=oracle,dc=com.
■HTTP Web Gateway: Select this option to enable
the Oracle Virtual Directory HTTP Web Gateway.
■Secure: Select this option if you enabled the HTTP
Web Gateway and you want to secure it using SSL.
■Administrator User Name: Enter the user name for
the Oracle Virtual Directory administrator. The
default value is cn=orcladmin.
■Password: Enter the password for the Oracle
Virtual Directory administrator.
■Confirm Password: Enter the password for the
Oracle Virtual Directory administrator again.
■Configure Administrative Server in secure mode:
Select this option to secure the Oracle Virtual
Directory Administrative Listener using SSL. This
option is selected by default. Oracle recommends
selecting this option.
Click Next to continue.
12 Specify OID
Administrator
Password
This screen is displayed
if you select Install and
Configure option and
choose to configure
Oracle Internet
Directory.
Enter the password for the Oracle Internet Directory
administrator.
Click Next to continue.
Table 6–2 (Cont.) Installation and Configuration Flow for Install and Configure Option
No. Screen
When Does This
Screen Appear? Description and Action Required

Installing Oracle Identity Management Using "Install and Configure" Option
6-14 Oracle Fusion Middleware Installation Guide for Oracle Identity Management
13 Select Oracle Identity
Federation
Configuration Type
This screen is displayed
if you select Install and
Configure option and
choose to configure
Oracle Identity
Federation.
Select one of the following configuration types:
■Basic: You do not need to choose the datastore and
authentication engine types or specify the
connection details for Oracle Identity Federation.
For more information, see Performing Basic Oracle
Identity Federation Configurations
■Advanced: This option will enable you to choose
the configuration types for the datastores, the
authentication engine, and specify the connection
details datastores and authentication engine.
For more information, see Performing Advanced
Oracle Identity Federation Configurations
Note: The procedure in this table shows the screens
that appears when the Basic option is selected. If
you want to select Advanced option, refer to the
following for complete details:
■Performing Advanced
Oracle Identity
Federation
Configurations
■Advanced Example:
Configuring OIF with
OID in a New WebLogic
Domain for LDAP
Authentication, User
Store, and Federation
Store
■Advanced Example:
Configuring OIF in a
New or Existing
WebLogic Domain with
RDBMS Data Stores
Click Next to continue.
Table 6–2 (Cont.) Installation and Configuration Flow for Install and Configure Option
No. Screen
When Does This
Screen Appear? Description and Action Required

Installing Oracle Identity Management Using "Install and Configure" Option
Installing and Configuring Oracle Identity Management (11.1.1.6.0) 6-15
Oracle Identity Management 11g Release 1 (11.1.1.6.0) is installed and configured if
you selected Install and Configure option in the Select Installation Type screen. By
default Oracle_IDM1 is created as the Oracle Identity Management Oracle home
directory. This home directory is also referred to as IDM_Home in this guide.
To locate the installation log files, see Locating Installation Log Files.
14 Specify Oracle Identity
Federation Details This screen is displayed
if you select Install and
Configure option and
choose to configure
Oracle Identity
Federation.
Enter the following information:
■PKCS12 Password: Enter the password Oracle
Identity Federation will use for encryption and for
signing wallets. The Installer automatically
generates these wallets with self-signed certificates.
Oracle recommends using the wallets only for
testing.
■Confirm Password: Enter the PKCS12 password
again.
■Server ID: Enter a string that will be used to
identify this Oracle Identity Federation instance. A
prefix oif will be added to the beginning of the
string you enter. Each logical Oracle Identity
Federation instance within an Oracle WebLogic
Server administration domain must have a unique
Server ID. Clustered Oracle Identity Federation
instances acting as a single logical instance will
have the same Server ID.
Click Next to continue.
15 Installation Summary Always Verify the information on this screen. If you want to
change any options, you can return to a previous screen
by clicking a link in the navigation tree on the left or by
clicking Back until you get to the screen. After you edit
the required options, you can continue the installation
from the previous screen.
Click Save if you want to save a response file. You will
be prompted for a name and location for the response
file, which will contain information specific to your
installation. After the installer creates the response file,
you can use it exactly as is to replicate the installation
on other systems, or you can modify the response file in
a text editor.
Click Install to begin the installation.
16 Installation Progress Always If you are installing on a UNIX system, you may be
asked to run the ORACLE_HOME/oracleRoot.sh
script to set up the proper file and directory
permissions. For more information, see Executing the
oracleRoot.sh Script on UNIX Platforms.
Click Next to continue.
17 Configuration Progress This screen is displayed
if you select Install and
Configure option.
Click Next to continue.
18 Installation Complete Always Click Save to save the installation configuration, and
then click Finish to exit the installer.
Table 6–2 (Cont.) Installation and Configuration Flow for Install and Configure Option
No. Screen
When Does This
Screen Appear? Description and Action Required

Configuring Oracle Identity Management for "Install Software - Do Not Configure" Option
6-16 Oracle Fusion Middleware Installation Guide for Oracle Identity Management
6.3 Configuring Oracle Identity Management for "Install Software - Do Not
Configure" Option
If you selected Install Software - Do Not Configure option in the Select Installation
Type screen while installing Oracle Identity Management 11g Release 1 (11.1.1.6.0), as
described in Installing and Configuring Oracle Identity Management 11g Release 1
(11.1.1.6.0) Software, you must now start the Oracle Identity Management
Configuration Wizard to configure the following components:
■Oracle Internet Directory (OID)
■Oracle Virtual Directory (OVD)
■Oracle Directory Services Manager (ODSM)
■Oracle Directory Integration Platform (ODIP)
■Oracle Identity Federation (OIF)
Run the Oracle Identity Management 11g Configuration Wizard as follows:
On UNIX systems:
ORACLE_IDM1/bin/config.sh
On Windows systems:
ORACLE_IDM1\bin\config.bat
The Oracle Identity Management 11g Configuration Wizard is displayed. You can use
this wizard to configure your component in a new domain, in an existing domain, or
without a domain. Note that you can install and configure only Oracle Internet
Directory and Oracle Virtual Directory without a domain. For more information, see
the following topics:
■Only OID in an Existing WebLogic Domain
■Only OID Without a WebLogic Domain
■OID with ODSM and Fusion Middleware Control in a New WebLogic Domain
■OID with ODIP, ODSM, and Fusion Middleware Control in a New WebLogic
Domain
■OVD with ODSM and Fusion Middleware Control in a New WebLogic Domain
■Only OVD in an Existing WebLogic Domain
■Only OVD Without a WebLogic Domain
■Performing Basic Oracle Identity Federation Configurations
■Performing Advanced Oracle Identity Federation Configurations
■ODIP with Fusion Middleware Control in a New WebLogic Domain
■Only ODIP in an Existing WebLogic Domain
■Configuring ODIP when OID is Running in SSL Mode 2 - Server Only
Authentication

7
Configuring Oracle Internet Directory 7-1
7 Configuring Oracle Internet Directory
This chapter explains how to configure Oracle Internet Directory (OID).
This chapter discusses the following topics:
■OID with ODSM and Fusion Middleware Control in a New WebLogic Domain
■OID with ODIP, ODSM, and Fusion Middleware Control in a New WebLogic
Domain
■OID and OVD with ODSM in a New WebLogic Domain
■Only OID in an Existing WebLogic Domain
■Only OID Without a WebLogic Domain
■Verifying OID Installation
■Getting Started with OID After Installation
Table 7–1 Oracle Internet Directory Configuration Scenarios
Scenario Description
OID with ODSM and Fusion
Middleware Control in a
New WebLogic Domain
The configuration described in this topic is appropriate for
environments that have all of the following conditions:
■You want to manage Oracle Internet Directory using Fusion
Middleware Control.
■You want Oracle Internet Directory to be in a WebLogic
administration domain.
■There is no WebLogic Administration Server managing
other 11g Release 1 (11.1.1) Oracle Directory Services
components.
■You want to install Oracle Internet Directory and a
WebLogic Administration Server colocated on the same
host.
OID with ODIP, ODSM, and
Fusion Middleware Control
in a New WebLogic Domain
The configuration described in this topic is appropriate for
environments that have both of the following conditions:
■You want to install Oracle Internet Directory and Oracle
Directory Integration Platform colocated on the same host.
■There is no WebLogic Administration Server managing
other 11g Release 1 (11.1.1) Oracle Directory Services
components.

OID with ODSM and Fusion Middleware Control in a New WebLogic Domain
7-2 Oracle Fusion Middleware Installation Guide for Oracle Identity Management
7.1 OID with ODSM and Fusion Middleware Control in a New WebLogic
Domain
This topic describes how to configure Oracle Internet Directory (OID) with Oracle
Directory Services Manager (ODSM) and Fusion Middleware Control in a new
WebLogic administration domain. It includes the following sections:
■Appropriate Deployment Environment
■Components Deployed
■Dependencies
■Procedure
7.1.1 Appropriate Deployment Environment
The configuration described in this topic is appropriate for environments that have all
of the following conditions:
■You want to manage Oracle Internet Directory using Fusion Middleware Control.
■You want Oracle Internet Directory to be in a WebLogic administration domain.
■There is no WebLogic Administration Server managing other 11g Release 1 (11.1.1)
Oracle Directory Services components.
■You want to install Oracle Internet Directory and a WebLogic Administration
Server colocated on the same host.
OID and OVD with ODSM
in a New WebLogic Domain The configuration described in this topic is appropriate for
environments that have the following conditions:
■A new WebLogic Administration Server is necessary to
manage Oracle Internet Directory and Oracle Virtual
Directory components.
■You want to install Oracle Internet Directory and Oracle
Virtual Directory together in the same WebLogic domain,
which can be extended at a later time to add new Oracle
Identity Management components.
Only OID in an Existing
WebLogic Domain The configuration described in this topic is appropriate for
environments that have both of the following conditions:
■A WebLogic Administration Server is available to manage
11g Release 1 (11.1.1) Oracle Directory Services components
and you want Oracle Internet Directory to join that domain.
■You want to install Oracle Internet Directory separately
from the WebLogic Administration Server.
Only OID Without a
WebLogic Domain The configuration described in this topic is appropriate for
environments that have both of the following conditions:
■You do not want to include Oracle Internet Directory in a
WebLogic administration domain for management
purposes.
■You do not want to manage Oracle Internet Directory using
Fusion Middleware Control.
Table 7–1 (Cont.) Oracle Internet Directory Configuration Scenarios
Scenario Description

OID with ODSM and Fusion Middleware Control in a New WebLogic Domain
Configuring Oracle Internet Directory 7-3
7.1.2 Components Deployed
Performing the configuration in this section deploys the following components:
■WebLogic Administration Server
■Oracle Internet Directory
■Oracle Directory Services Manager
■Fusion Middleware Control
7.1.3 Dependencies
The configuration in this section depends on the following:
■Oracle WebLogic Server
■Oracle Database
■If you want to use an existing schema, Identity Management - Oracle Internet
Directory schema existing in the Oracle Database.
7.1.4 Procedure
Perform the following steps to configure Oracle Internet Directory with Oracle
Directory Services Manager and Fusion Middleware Control in a new domain:
1. On the Select Domain screen, select Create New Domain and enter the following
information:
■Enter the user name for the new domain in the User Name field.
■Enter the user password for the new domain in the User Password field.
■Enter the user password again in the Confirm Password field.
■Enter a name for the new domain in the Domain Name field.
Click Next. The Specify Installation Location screen appears.
2. Identify the Homes, Instances, and the WebLogic Server directory by referring to
Identifying Installation Directories. After you enter information for each field,
click Next. The Specify Security Updates screen appears.
3. Choose how you want to be notified about security issues:
Note: If you selected Install and Configure option in the Select
Installation Type screen while installing Oracle Identity Management
11g Release 1 (11.1.1.6.0), as described in Installing and Configuring
Oracle Identity Management 11g Release 1 (11.1.1.6.0) Software, the
Select Domain screen is displayed.
If you selected Install Software - Do Not Configure option in the
Select Installation Type screen while installing Oracle Identity
Management 11g Release 1 (11.1.1.6.0), as described in Installing and
Configuring Oracle Identity Management 11g Release 1 (11.1.1.6.0)
Software, you must now start the Oracle Identity Management
Configuration Wizard. Run <ORACLE_HOME>/bin/config.sh (on
UNIX) or <ORACLE_HOME>\bin\config.bat (on Windows) to start
the Oracle Identity Management Configuration Wizard. The Select
Domain screen is displayed.

OID with ODSM and Fusion Middleware Control in a New WebLogic Domain
7-4 Oracle Fusion Middleware Installation Guide for Oracle Identity Management
■If you want to be notified about security issues through email, enter your
email address in the Email field.
■If you want to be notified about security issues through My Oracle Support
(formerly MetaLink), select the My Oracle Support option and enter your My
Oracle Support Password.
■If you do not want to be notified about security issues, leave all fields empty.
Click Next. The Configure Components screen appears.
4. Select Oracle Internet Directory. The Oracle Directory Services Manager and
Fusion Middleware Control management components are automatically selected
for this installation.
Ensure no other components are selected and click Next. The Configure Ports
screen appears.
5. Choose how you want the Installer to configure ports:
■Select Auto Port Configuration if you want the Installer to configure ports
from a predetermined range.
■Select Specify Ports using Configuration File if you want the Installer to
configure ports using the staticports.ini file. You can click View/Edit File to
update the settings in the staticports.ini file.
Click Next. The Specify Schema Database screen appears.
6. Choose whether to use an existing schema or to create a new one using the
Installer.
To use an existing schema
a. Select Use Existing Schema.
b. Enter the database connection information in the Connect String field. The
connection string must be in the form of hostname:port:servicename. For Oracle
Real Application Clusters (RAC), the connection string must be in the form of
hostname1:port1:instance1^hostname2:port2:instance2@servicename.
c. Enter the password for the existing ODS schema in the Password field.
d. Click Next.
The Create Oracle Internet Directory screen appears.
Note: If you want to use an existing schema, it must currently reside
in the database to continue with the installation. If it does not
currently reside in the database, you must create it now using the
Oracle Fusion Middleware Repository Creation Utility or follow the
To create a new schema section mentioned below.
Refer to Creating Database Schema Using the Oracle Fusion
Middleware Repository Creation Utility (RCU) for more information.
Note: If your existing ODS and ODSSM schemas have different
passwords, the Specify ODSSM Password screen will appear after you
click Next. Enter the password for your existing ODSSM schema and
click Next.

OID with ODSM and Fusion Middleware Control in a New WebLogic Domain
Configuring Oracle Internet Directory 7-5
e. Continue the installation by going to step 7 now.
To create a new schema
a. Select Create Schema.
b. Enter the database connection information in the Connect String field. The
connection string must be in the form of hostname:port:servicename. For Oracle
Real Application Clusters (RAC), the connection string must be in the form of
hostname1:port1:instance1^hostname2:port2:instance2@servicename.
c. Enter the name of the database user in the User Name field. The user you
identify must have DBA privileges.
d. Enter the password for the database user in the Password field.
e. Click Next. The Enter OID Passwords screen appears.
f. Create a password for the new ODS schema by entering it in the ODS Schema
Password field.
Enter it again in the Confirm ODS Schema Password field.
g. Create a password for the new ODSSM schema by entering it in the ODSSM
Schema Password field.
Enter it again in the Confirm ODSSM Schema Password field.
h. Click Next. The Create Oracle Internet Directory screen appears.
7. Enter the following information for Oracle Internet Directory:
■Realm: Enter the location for your realm. For example:
dc=mycompany,dc=com
■Administrator Password: Enter the password for the Oracle Internet Directory
administrator.
■Confirm Password: Enter the administrator password again.
Click Next.
8. The Installation Summary screen appears. Verify the information on this screen.
Click Configure to begin the configuration.
9. The Configuration Progress screen appears. Click Next to continue.
10. The Installation Complete screen appears. Click Save to save the configuration
information to a file, and then click Finish to exit the installer.
Note: If you are using Oracle Database 11g Release 2 (11.2) or higher
version, the database user should be only 'SYS'.

OID with ODIP, ODSM, and Fusion Middleware Control in a New WebLogic Domain
7-6 Oracle Fusion Middleware Installation Guide for Oracle Identity Management
7.2 OID with ODIP, ODSM, and Fusion Middleware Control in a New
WebLogic Domain
This topic describes how to configure Oracle Internet Directory (OID) with Oracle
Directory Integration Platform (ODIP), Oracle Directory Services Manager (ODSM),
and Fusion Middleware Control in a new WebLogic administration domain. It
includes the following sections:
■Appropriate Deployment Environment
■Components Deployed
■Dependencies
■Procedure
7.2.1 Appropriate Deployment Environment
The configuration described in this topic is appropriate for environments that have
both of the following conditions:
■You want to install Oracle Internet Directory and Oracle Directory Integration
Platform colocated on the same host.
■There is no WebLogic Administration Server managing other 11g Release 1 (11.1.1)
Oracle Directory Services components.
7.2.2 Components Deployed
Performing the configuration in this section deploys the following components:
■WebLogic Administration Server
■Oracle Internet Directory
■WebLogic Managed Server
■Oracle Directory Integration Platform
■Oracle Directory Services Manager
■Fusion Middleware Control
7.2.3 Dependencies
The configuration in this section depends on the following:
■Oracle WebLogic Server
■Oracle Database
Note: You may see the following error message in $Instance_
home/diagnostics/logs/OID/oid1/** log files after
configuring Oracle Internet Directory:
"2010-02-01T07:27:42+00:00] [OID] [NOTIFICATION:16]
[] [OIDLDAPD] [host:stadp47] [pid: 26444] [tid: 0]
Main:: FATAL * gslsmaiaInitAudCtx * Audit struct
initialization failed. Audit error code: 62005"
You can ignore this error message.

OID with ODIP, ODSM, and Fusion Middleware Control in a New WebLogic Domain
Configuring Oracle Internet Directory 7-7
■If you want to use an existing schema, Identity Management - Oracle Internet
Directory schema existing in the Oracle Database.
7.2.4 Procedure
Perform the following steps to configure Oracle Internet Directory with Oracle
Directory Integration Platform, Oracle Directory Services Manager, and Fusion
Middleware Control in a new domain:
1. Ensure that Oracle Internet Directory, Oracle Directory Integration Platform, and
Oracle Directory Services Manager are installed, as described in Installation
Roadmap and Installing Oracle Identity Management Using "Install and
Configure" Option.
2. On the Select Domain screen, select Create New Domain and enter the following
information:
■Enter the user name for the new domain in the User Name field.
■Enter the user password for the new domain in the User Password field.
■Enter the user password again in the Confirm Password field.
■Enter a name for the new domain in the Domain Name field.
Click Next. The Specify Installation Location screen appears.
3. Identify the Homes, Instances, and the WebLogic Server directory by referring to
Identifying Installation Directories. After you enter information for each field,
click Next. The Specify Security Updates screen appears.
4. Choose how you want to be notified about security issues:
■If you want to be notified about security issues through email, enter your
email address in the Email field.
■If you want to be notified about security issues through My Oracle Support
(formerly MetaLink), select the My Oracle Support option and enter your My
Oracle Support Password.
■If you do not want to be notified about security issues, leave all fields empty.
Click Next. The Configure Components screen appears.
Note: If you selected Install and Configure option in the Select
Installation Type screen while installing Oracle Identity Management
11g Release 1 (11.1.1.6.0), as described in Installing and Configuring
Oracle Identity Management 11g Release 1 (11.1.1.6.0) Software, the
Select Domain screen is displayed.
If you selected Install Software - Do Not Configure option in the
Select Installation Type screen while installing Oracle Identity
Management 11g Release 1 (11.1.1.6.0), as described in Installing and
Configuring Oracle Identity Management 11g Release 1 (11.1.1.6.0)
Software, you must now start the Oracle Identity Management
Configuration Wizard. Run <ORACLE_HOME>/bin/config.sh (on
UNIX) or <ORACLE_HOME>\bin\config.bat (on Windows) to start
the Oracle Identity Management Configuration Wizard. The Select
Domain screen is displayed.

OID with ODIP, ODSM, and Fusion Middleware Control in a New WebLogic Domain
7-8 Oracle Fusion Middleware Installation Guide for Oracle Identity Management
5. Select Oracle Internet Directory and Oracle Directory Integration Platform. The
Oracle Directory Services Manager and Fusion Middleware Control management
components are automatically selected for this installation.
Ensure no other components are selected and click Next. The Configure Ports
screen appears.
6. Choose how you want the Installer to configure ports:
■Select Auto Port Configuration if you want the Installer to configure ports
from a predetermined range.
■Select Specify Ports using Configuration File if you want the Installer to
configure ports using the staticports.ini file. You can click View/Edit File to
update the settings in the staticports.ini file.
Click Next. The Specify Schema Database screen appears.
7. Choose whether to use an existing schema or to create a new one using the
Installer.
To use an existing schema
a. Select Use Existing Schema.
b. Enter the database connection information in the Connect String field. The
connection string must be in the form of hostname:port:servicename. For Oracle
Real Application Clusters (RAC), the connection string must be in the form of
hostname1:port1:instance1^hostname2:port2:instance2@servicename.
c. Enter the password for the existing ODS schema in the Password field.
d. Click Next.
The Create Oracle Internet Directory screen appears.
e. Continue the installation by going to step 8 now.
To create a new schema
a. Select Create Schema.
b. Enter the database connection information in the Connect String field. The
connection string must be in the form of hostname:port:servicename. For Oracle
Real Application Clusters (RAC), the connection string must be in the form of
hostname1:port1:instance1^hostname2:port2:instance2@servicename.
Note: If you want to use an existing schema, it must currently reside
in the database to continue with the installation. If it does not
currently reside in the database, you must create it now using the
Oracle Fusion Middleware Repository Creation Utility or follow the
To create a new schema section mentioned below.
Refer to "Creating Database Schema Using the Oracle Fusion
Middleware Repository Creation Utility (RCU)" for more information.
Note: If your existing ODS and ODSSM schemas have different
passwords, the Specify ODSSM Password screen will appear after you
click Next. Enter the password for your existing ODSSM schema and
click Next.

OID and OVD with ODSM in a New WebLogic Domain
Configuring Oracle Internet Directory 7-9
c. Enter the name of the database user in the User Name field. The user you
identify must have DBA privileges.
d. Enter the password for the database user in the Password field.
e. Click Next. The Enter OID Passwords screen appears.
f. Create a password for the new ODS schema by entering it in the ODS Schema
Password field.
Enter it again in the Confirm ODS Schema Password field.
g. Create a password for the new ODSSM schema by entering it in the ODSSM
Schema Password field.
Enter it again in the Confirm ODSSM Schema Password field.
h. Click Next. The Create Oracle Internet Directory screen appears.
8. Enter the following information for Oracle Internet Directory:
■Realm: Enter the location for your realm. For example:
dc=mycompany,dc=com
■Administrator Password: Enter the password for the Oracle Internet Directory
administrator.
■Confirm Password: Enter the administrator password again.
Click Next.
9. The Installation Summary screen appears. Verify the information on this screen.
Click Configure to begin the configuration.
10. The Configuration Progress screen appears. Click Next to continue.
11. The Installation Complete screen appears. Click Save to save the configuration
information to a file, and then click Finish to exit the installer.
7.3 OID and OVD with ODSM in a New WebLogic Domain
This topic describes how to configure Oracle Internet Directory (OID) and Oracle
Virtual Directory (OVD) with Oracle Directory Services Manager (ODSM) in a new
WebLogic administration domain. It includes the following sections:
■Appropriate Deployment Environment
Note: If you are using Oracle Database 11g Release 2 (11.2) or higher
version, the database user should be only 'SYS'.
Note: You may see the following error message in $Instance_
home/diagnostics/logs/OID/oid1/** log files after
configuring Oracle Internet Directory:
"2010-02-01T07:27:42+00:00] [OID] [NOTIFICATION:16]
[] [OIDLDAPD] [host:stadp47] [pid: 26444] [tid: 0]
Main:: FATAL * gslsmaiaInitAudCtx * Audit struct
initialization failed. Audit error code: 62005"
You can ignore this error message.

OID and OVD with ODSM in a New WebLogic Domain
7-10 Oracle Fusion Middleware Installation Guide for Oracle Identity Management
■Components Deployed
■Dependencies
■Procedure
7.3.1 Appropriate Deployment Environment
The configuration described in this topic is appropriate for environments that have the
following conditions:
■A new WebLogic Administration Server is necessary to manage Oracle Internet
Directory and Oracle Virtual Directory components.
■You want to install Oracle Internet Directory and Oracle Virtual Directory together
in the same WebLogic domain, which can be extended at a later time to add new
Oracle Identity Management components.
7.3.2 Components Deployed
Performing the configuration in this section deploys the following:
■WebLogic Administration Server
■Oracle Internet Directory
■Oracle Virtual Directory
■WebLogic Managed Server
■Oracle Directory Services Manager
■Fusion Middleware Control
7.3.3 Dependencies
The configuration in this section depends on the following:
■Oracle WebLogic Server
■Oracle Database
■If you want to use an existing schema, Identity Management - Oracle Internet
Directory schema existing in the Oracle Database.
7.3.4 Procedure
Perform the following steps to configure Oracle Internet Directory and Oracle Virtual
Directory in a new domain:
1. Ensure that Oracle Internet Directory and Oracle Virtual Directory are installed, as
described in Installation Roadmap and Installing Oracle Identity Management
Using "Install and Configure" Option.

OID and OVD with ODSM in a New WebLogic Domain
Configuring Oracle Internet Directory 7-11
2. On the Select Domain screen, select Create New Domain and enter the following
information:
■Enter the user name for the new domain in the User Name field.
■Enter the user password for the new domain in the User Password field.
■Enter the user password again in the Confirm Password field.
■Enter a name for the new domain in the Domain Name field.
Click Next. The Specify Installation Location screen appears.
3. Identify the Homes, Instances, and the WebLogic Server directory by referring to
Identifying Installation Directories.
After you enter information for each field, click Next. The Specify Security
Updates screen appears.
4. Choose how you want to be notified about security issues:
■If you want to be notified about security issues through email, enter your
email address in the Email field.
■If you want to be notified about security issues through My Oracle Support
(formerly MetaLink), select the My Oracle Support option and enter your My
Oracle Support Password.
■If you do not want to be notified about security issues, leave all fields empty.
Click Next. The Configure Components screen appears.
5. Select Oracle Internet Directory and Oracle Virtual Directory. The Oracle
Directory Services Manager and Oracle Fusion Middleware Control will be
automatically selected.
Ensure no other components are selected and click Next. The Configure Ports
screen appears.
6. Choose how you want the Installer to configure ports:
■Select Auto Port Configuration if you want the Installer to configure ports
from a predetermined range.
■Select Specify Ports using Configuration File if you want the Installer to
configure ports using the staticports.ini file. You can click View/Edit File to
update the settings in the staticports.ini file.
Note: If you selected Install and Configure option in the Select
Installation Type screen while installing Oracle Identity Management
11g Release 1 (11.1.1.6.0), as described in Installing and Configuring
Oracle Identity Management 11g Release 1 (11.1.1.6.0) Software, the
Select Domain screen is displayed.
If you selected Install Software - Do Not Configure option in the
Select Installation Type screen while installing Oracle Identity
Management 11g Release 1 (11.1.1.6.0), as described in Installing and
Configuring Oracle Identity Management 11g Release 1 (11.1.1.6.0)
Software, you must now start the Oracle Identity Management
Configuration Wizard. Run <ORACLE_HOME>/bin/config.sh (on
UNIX) or <ORACLE_HOME>\bin\config.bat (on Windows) to start
the Oracle Identity Management Configuration Wizard. The Select
Domain screen is displayed.

OID and OVD with ODSM in a New WebLogic Domain
7-12 Oracle Fusion Middleware Installation Guide for Oracle Identity Management
Click Next. The Specify Oracle Virtual Directory Information screen appears.
7. Enter the following information:
■LDAP v3 Name Space: Enter the name space for Oracle Virtual Directory. The
default value is dc=us,dc=oracle,dc=com.
■HTTP Web Gateway: Select this option to enable the Oracle Virtual Directory
HTTP Web Gateway.
■Secure: Select this option if you enabled the HTTP Web Gateway and you
want to secure it using SSL.
■Administrator User Name: Enter the user name for the Oracle Virtual
Directory administrator. The default value is cn=orcladmin.
■Password: Enter the password for the Oracle Virtual Directory administrator.
■Confirm Password: Enter the password for the Oracle Virtual Directory
administrator again.
■Configure Administrative Server in secure mode: Select this option to secure
the Oracle Virtual Directory Administrative Listener using SSL. This option is
selected by default. Oracle recommends selecting this option.
Click Next. The Specify Schema Database screen is displayed.
8. Choose whether to use an existing schema or to create a new one using the
Installer.
To use an existing schema
a. Select Use Existing Schema.
b. Enter the database connection information in the Connect String field. The
connection string must be in the form of hostname:port:servicename. For Oracle
Real Application Clusters (RAC), the connection string must be in the form of
hostname1:port1:instance1^hostname2:port2:instance2@servicename.
c. Enter the password for the existing ODS schema in the Password field.
d. Click Next.
The Create Oracle Internet Directory screen appears.
e. Continue the installation by going to step 8 now.
Note: If you want to use an existing schema, it must currently reside
in the database to continue with the installation. If it does not
currently reside in the database, you must create it now using the
Oracle Fusion Middleware Repository Creation Utility or follow the
To create a new schema section mentioned below.
Refer to Creating Database Schema Using the Oracle Fusion
Middleware Repository Creation Utility (RCU) for more information.
Note: If your existing ODS and ODSSM schemas have different
passwords, the Specify ODSSM Password screen will appear after you
click Next. Enter the password for your existing ODSSM schema and
click Next.

Only OID in an Existing WebLogic Domain
Configuring Oracle Internet Directory 7-13
To create a new schema
a. Select Create Schema.
b. Enter the database connection information in the Connect String field. The
connection string must be in the form of hostname:port:servicename. For Oracle
Real Application Clusters (RAC), the connection string must be in the form of
hostname1:port1:instance1^hostname2:port2:instance2@servicename.
c. Enter the name of the database user in the User Name field. The user you
identify must have DBA privileges.
d. Enter the password for the database user in the Password field.
e. Click Next. The Enter OID Passwords screen appears.
f. Create a password for the new ODS schema by entering it in the ODS Schema
Password field.
Enter it again in the Confirm ODS Schema Password field.
g. Create a password for the new ODSSM schema by entering it in the ODSSM
Schema Password field.
Enter it again in the Confirm ODSSM Schema Password field.
h. Click Next. The Create Oracle Internet Directory screen appears.
9. Enter the following information for Oracle Internet Directory:
■Realm: Enter the location for your realm. For example:
dc=mycompany,dc=com
■Administrator Password: Enter the password for the Oracle Internet Directory
administrator.
■Confirm Password: Enter the administrator password again.
Click Next.
10. The Installation Summary screen appears. Verify the information on this screen.
Click Configure to begin the configuration.
11. The Configuration Progress screen appears. Click Next to continue.
12. The Installation Complete screen appears. Click Save to save the configuration
information to a file, and then click Finish to exit the installer.
7.4 Only OID in an Existing WebLogic Domain
This topic describes how to configure only Oracle Internet Directory (OID) in an
existing WebLogic administration domain. It includes the following sections:
■Appropriate Deployment Environment
■Components Deployed
■Dependencies
■Procedure
Note: If you are using Oracle Database 11g Release 2 (11.2) or higher
version, the database user should be only 'SYS'.

Only OID in an Existing WebLogic Domain
7-14 Oracle Fusion Middleware Installation Guide for Oracle Identity Management
7.4.1 Appropriate Deployment Environment
The configuration described in this topic is appropriate for environments that have
both of the following conditions:
■A WebLogic Administration Server is available to manage 11g Release 1 (11.1.1)
Oracle Directory Services components and you want Oracle Internet Directory to
join that domain.
■You want to install Oracle Internet Directory separately from the WebLogic
Administration Server.
7.4.2 Components Deployed
Performing the configuration in this section deploys only Oracle Internet Directory.
7.4.3 Dependencies
The configuration in this section depends on the following:
■Oracle WebLogic Server
■Oracle Database
■If you want to use an existing schema, Identity Management - Oracle Internet
Directory schema existing in the Oracle Database.
7.4.4 Procedure
Perform the following steps to configure only Oracle Internet Directory in an existing
domain:
1. Ensure that Oracle Internet Directory is installed, as described in Installation
Roadmap and Installing Oracle Identity Management Using "Install and
Configure" Option.
2. On the Select Domain screen, select Extend Existing Domain and enter the
following information:
■Enter the name of the host that contains the domain in the Host Name field.
■Enter the Oracle WebLogic Server listen port in the Port field.
Note: If you selected Install and Configure option in the Select
Installation Type screen while installing Oracle Identity Management
11g Release 1 (11.1.1.6.0), as described in Installing and Configuring
Oracle Identity Management 11g Release 1 (11.1.1.6.0) Software, the
Select Domain screen is displayed.
If you selected Install Software - Do Not Configure option in the
Select Installation Type screen while installing Oracle Identity
Management 11g Release 1 (11.1.1.6.0), as described in Installing and
Configuring Oracle Identity Management 11g Release 1 (11.1.1.6.0)
Software, you must now start the Oracle Identity Management
Configuration Wizard. Run <ORACLE_HOME>/bin/config.sh (on
UNIX) or <ORACLE_HOME>\bin\config.bat (on Windows) to start
the Oracle Identity Management Configuration Wizard. The Select
Domain screen is displayed.

Only OID in an Existing WebLogic Domain
Configuring Oracle Internet Directory 7-15
■Enter the user name for the domain in the User Name field.
■Enter the password for the domain user in the User Password field.
Click Next. The Specify Installation Location screen appears.
3. Identify the Homes, Instances, and the WebLogic Server directory by referring to
Identifying Installation Directories.
After you enter information for each field, click Next. The Specify Security
Updates screen appears.
4. Choose how you want to be notified about security issues:
■If you want to be notified about security issues through email, enter your
email address in the Email field.
■If you want to be notified about security issues through My Oracle Support
(formerly MetaLink), select the My Oracle Support option and enter your My
Oracle Support Password.
■If you do not want to be notified about security issues, leave all fields empty.
Click Next. The Configure Components screen appears.
5. Select only Oracle Internet Directory. Ensure no other components are selected
and click Next. The Configure Ports screen appears.
6. Choose how you want the Installer to configure ports:
■Select Auto Port Configuration if you want the Installer to configure ports
from a predetermined range.
■Select Specify Ports using Configuration File if you want the Installer to
configure ports using the staticports.ini file. You can click View/Edit File to
update the settings in the staticports.ini file.
Click Next. The Specify Schema Database screen appears.
7. Choose whether to use an existing schema or to create a new one using the
Installer.
To use an existing schema
a. Select Use Existing Schema.
Note: To install Oracle Identity Management components in an
existing Oracle WebLogic Server administration domain, each Oracle
WebLogic Server Home, Oracle Middleware Home, and Oracle Home
directory in the domain must have identical directory paths and
names.
Note: If you want to use an existing schema, it must currently reside
in the database to continue with the installation. If it does not
currently reside in the database, you must create it now using the
Oracle Fusion Middleware Repository Creation Utility or follow the
To create a new schema section mentioned below.
Refer to Creating Database Schema Using the Oracle Fusion
Middleware Repository Creation Utility (RCU) for more information.

Only OID in an Existing WebLogic Domain
7-16 Oracle Fusion Middleware Installation Guide for Oracle Identity Management
b. Enter the database connection information in the Connect String field. The
connection string must be in the form of hostname:port:servicename. For Oracle
Real Application Clusters (RAC), the connection string must be in the form of
hostname1:port1:instance1^hostname2:port2:instance2@servicename.
c. Enter the password for the existing ODS schema in the Password field.
d. Click Next.
The Create Oracle Internet Directory screen appears.
e. Continue the installation by going to step 8 now.
To create a new schema
a. Select Create Schema.
b. Enter the database connection information in the Connect String field. The
connection string must be in the form of hostname:port:servicename. For Oracle
Real Application Clusters (RAC), the connection string must be in the form of
hostname1:port1:instance1^hostname2:port2:instance2@servicename.
c. Enter the name of the database user in the User Name field. The user you
identify must have DBA privileges.
d. Enter the password for the database user in the Password field.
e. Click Next. The Enter OID Passwords screen appears.
f. Create a password for the new ODS schema by entering it in the ODS Schema
Password field.
Enter it again in the Confirm ODS Schema Password field.
g. Create a password for the new ODSSM schema by entering it in the ODSSM
Schema Password field.
Enter it again in the Confirm ODSSM Schema Password field.
h. Click Next. The Create Oracle Internet Directory screen appears.
8. Enter the following information for Oracle Internet Directory:
■Realm: Enter the location for your realm. For example:
dc=mycompany,dc=com
■Administrator Password: Enter the password for the Oracle Internet Directory
administrator.
■Confirm Password: Enter the administrator password again.
Click Next.
Note: If your existing ODS and ODSSM schemas have different
passwords, the Specify ODSSM Password screen will appear after you
click Next. Enter the password for your existing ODSSM schema and
click Next.
Note: If you are using Oracle Database 11g Release 2 (11.2) or higher
version, the database user should be only 'SYS'.

Only OID Without a WebLogic Domain
Configuring Oracle Internet Directory 7-17
9. The Installation Summary screen appears. Verify the information on this screen.
Click Configure to begin the configuration.
10. The Configuration Progress screen appears. Click Next to continue.
11. The Installation Complete screen appears. Click Save to save the configuration
information to a file, and then click Finish to exit the installer.
7.5 Only OID Without a WebLogic Domain
This topic describes how to configure only Oracle Internet Directory (OID) without a
WebLogic administration domain. It includes the following sections:
■Appropriate Deployment Environment
■Components Deployed
■Dependencies
■Procedure
7.5.1 Appropriate Deployment Environment
The configuration described in this topic is appropriate for environments that have
both of the following conditions:
■You do not want to include Oracle Internet Directory in a WebLogic
administration domain for management purposes.
■You do not want to manage Oracle Internet Directory and Oracle Directory
Services Manager using Fusion Middleware Control.
7.5.2 Components Deployed
Performing the configuration in this section deploys only Oracle Internet Directory.
7.5.3 Dependencies
The configuration in this section depends on the following:
■Oracle Database
■If you want to use an existing schema, Identity Management - Oracle Internet
Directory schema existing in the Oracle Database.
7.5.4 Procedure
Perform the following steps to configure only Oracle Internet Directory without a
domain:
Note: You may see the following error message in $Instance_
home/diagnostics/logs/OID/oid1/** log files after
configuring Oracle Internet Directory:
"2010-02-01T07:27:42+00:00] [OID] [NOTIFICATION:16]
[] [OIDLDAPD] [host:stadp47] [pid: 26444] [tid: 0]
Main:: FATAL * gslsmaiaInitAudCtx * Audit struct
initialization failed. Audit error code: 62005"
You can ignore this error message.

Only OID Without a WebLogic Domain
7-18 Oracle Fusion Middleware Installation Guide for Oracle Identity Management
1. Ensure that Oracle Internet Directory is installed, as described in Installation
Roadmap and Installing Oracle Identity Management Using "Install and
Configure" Option.
2. On the Select Domain screen, select Configure without a Domain and click Next.
The Specify Installation Location screen appears.
3. Enter the following information in each field:
■Oracle Middleware Home Location: If an Oracle Middleware Home directory
already exists, enter the path to it in this field. If an Oracle Middleware Home
directory does not exist, enter a path to the location where you want the
Installer to create the directory that will contain the Oracle Common Home
and Oracle Home directories. The Installer creates an Oracle Common Home
directory and an Oracle Home directory inside the directory you identify in
this field.
The Oracle Middleware Home directory is commonly referred to as MW_
HOME.
■Oracle Home Directory: Enter a name for the Oracle Home directory. The
Installer uses the name you enter in this field to create the Oracle Home
directory under the location you enter in the Oracle Middleware Home
Location field. The Oracle Home directory is commonly referred to as
ORACLE_HOME.
■Oracle Instance Location: Enter the directory path to the location where you
want to create the Oracle Instance directory. The Installer creates the Oracle
Instance directory using the location you enter in this field and using the name
you enter in the Oracle Instance Name field. You can identify any location on
Notes:
■Installing Oracle WebLogic Server is optional in this particular
scenario. Instead, you can create the Middleware Home by
following the procedure as described later in Step 3.
■If you selected Install and Configure option in the Select
Installation Type screen while installing Oracle Identity
Management 11g Release 1 (11.1.1.6.0), as described in Installing
and Configuring Oracle Identity Management 11g Release 1
(11.1.1.6.0) Software, the Select Domain screen is displayed.
■If you selected Install Software - Do Not Configure option in the
Select Installation Type screen while installing Oracle Identity
Management 11g Release 1 (11.1.1.6.0), as described in Installing
and Configuring Oracle Identity Management 11g Release 1
(11.1.1.6.0) Software, you must now start the Oracle Identity
Management Configuration Wizard. Run <ORACLE_
HOME>/bin/config.sh (on UNIX) or <ORACLE_
HOME>\bin\config.bat (on Windows) to start the Oracle
Identity Management Configuration Wizard. The Select Domain
screen is displayed.
Note: The Oracle Middleware Home directory is not required to
contain an Oracle WebLogic Server installation.

Only OID Without a WebLogic Domain
Configuring Oracle Internet Directory 7-19
your system for the Oracle Instance directory—it does not have to reside
inside the Oracle Middleware Home directory.
■Oracle Instance Name: Enter a name for the Oracle Instance directory. The
Installer uses the name you enter in this field to create the Oracle Instance
directory at the location you specify in the Oracle Instance Location field. This
directory is commonly referred to as ORACLE_INSTANCE.
After you enter information for each field, click Next. The Specify Security
Updates screen appears.
4. Choose how you want to be notified about security issues:
■If you want to be notified about security issues through email, enter your
email address in the Email field.
■If you want to be notified about security issues through My Oracle Support
(formerly MetaLink), select the My Oracle Support option and enter your My
Oracle Support Password.
■If you do not want to be notified about security issues, leave all fields empty.
Click Next. The Configure Components screen appears.
5. On the Configure Components screen, select only Oracle Internet Directory.
Ensure no other components are selected and click Next. The Configure Ports
screen appears.
6. Choose how you want the Installer to configure ports:
■Select Auto Port Configuration if you want the Installer to configure ports
from a predetermined range.
■Select Specify Ports using Configuration File if you want the Installer to
configure ports using the staticports.ini file. You can click View/Edit File to
update the settings in the staticports.ini file.
Click Next. The Specify Schema Database screen appears.
7. Choose whether to use an existing schema or to create a new one using the
Installer.
To use an existing schema
a. Select Use Existing Schema.
b. Enter the database connection information in the Connect String field. The
connection string must be in the form of hostname:port:servicename. For Oracle
Real Application Clusters (RAC), the connection string must be in the form of
hostname1:port1:instance1^hostname2:port2:instance2@servicename.
c. Enter the password for the existing ODS schema in the Password field.
d. Click Next.
Note: If you want to use an existing schema, it must currently reside
in the database to continue with the installation. If it does not
currently reside in the database, you must create it now using the
Oracle Fusion Middleware Repository Creation Utility or follow the
To create a new schema section mentioned below.
Refer to Creating Database Schema Using the Oracle Fusion
Middleware Repository Creation Utility (RCU) for more information.

Only OID Without a WebLogic Domain
7-20 Oracle Fusion Middleware Installation Guide for Oracle Identity Management
The Create Oracle Internet Directory screen appears.
e. Continue the installation by going to step 8 now.
To create a new schema
a. Select Create Schema.
b. Enter the database connection information in the Connect String field. The
connection string must be in the form of hostname:port:servicename. For Oracle
Real Application Clusters (RAC), the connection string must be in the form of
hostname1:port1:instance1^hostname2:port2:instance2@servicename.
c. Enter the name of the database user in the User Name field. The user you
identify must have DBA privileges.
d. Enter the password for the database user in the Password field.
e. Click Next. The Enter OID Passwords screen appears.
f. Create a password for the new ODS schema by entering it in the ODS Schema
Password field.
Enter it again in the Confirm ODS Schema Password field.
g. Create a password for the new ODSSM schema by entering it in the ODSSM
Schema Password field.
Enter it again in the Confirm ODSSM Schema Password field.
h. Click Next. The Create Oracle Internet Directory screen appears.
8. Enter the following information for Oracle Internet Directory:
■Realm: Enter the location for your realm. For example:
dc=mycompany,dc=com
■Administrator Password: Enter the password for the Oracle Internet Directory
administrator.
■Confirm Password: Enter the administrator password again.
Click Next.
9. The Installation Summary screen appears. Verify the information on this screen.
Click Configure to begin the configuration.
10. The Configuration Progress screen appears. Click Next to continue.
11. The Installation Complete screen appears. Click Save to save the configuration
information to a file, and then click Finish to exit the installer.
Note: If your existing ODS and ODSSM schemas have different
passwords, the Specify ODSSM Password screen will appear after you
click Next. Enter the password for your existing ODSSM schema and
click Next.
Note: If you are using Oracle Database 11g Release 2 (11.2) or higher
version, the database user should be only 'SYS'.

Verifying OID Installation
Configuring Oracle Internet Directory 7-21
7.6 Verifying OID Installation
Verify the Oracle Internet Directory (OID) installation by:
■Executing the $ORACLE_INSTANCE/bin/opmnctl status -l command. For
example, if Oracle Internet Directory is configured then the following result can be
seen:
Processes in Instance: asinst_1
---------------------------------+--------------------+---------+----------+---
---------+----------+-----------+------
ias-component | process-type | pid | status |
uid | memused | uptime | ports
---------------------------------+--------------------+---------+----------+---
---------+----------+-----------+------
oid1 | oidldapd | 24032 | Alive |
582907955 | 113004 | 0:00:41 | N/A
oid1 | oidldapd | 24024 | Alive |
582907954 | 56288 | 0:00:42 | N/A
oid1 | oidmon | 24001 | Alive |
582907953 | 50232 | 0:00:43 | LDAPS:3131,LDAP:3060
EMAGENT | EMAGENT | 24000 | Alive |
582907952 | 5852 | 0:00:43 | N/A
■Executing the $ORACLE_HOME/bin/ldapbind command on the Oracle Internet
Directory non-SSL and SSL ports. For example:
On Non-SSL ports:
$ORACLE_HOME/bin/ldapbind -h <hostname> -p <port> -D
cn=orcladmin -w <password>
On SSL ports:
$ORACLE_HOME/bin/ldapbind -h <hostname> -p <port> -D
cn=orcladmin -w <password> -U 1
Note:
■If you perform this installation and configuration, but later decide
you want to manage Oracle Internet Directory using Fusion
Middleware Control, you must register Oracle Internet Directory
with a WebLogic Administration Server.
Refer to the "Registering an Oracle Instance or Component with
the WebLogic Server" section in the Oracle Fusion Middleware
Administrator's Guide for Oracle Internet Directory for more
information.
■You may see the following error message in $Instance_
home/diagnostics/logs/OID/oid1/** log files after
configuring Oracle Internet Directory:
"2010-02-01T07:27:42+00:00] [OID]
[NOTIFICATION:16] [] [OIDLDAPD] [host:stadp47]
[pid: 26444] [tid: 0] Main:: FATAL *
gslsmaiaInitAudCtx * Audit struct initialization
failed. Audit error code: 62005"
You can ignore this error message.

Getting Started with OID After Installation
7-22 Oracle Fusion Middleware Installation Guide for Oracle Identity Management
7.7 Getting Started with OID After Installation
After installing Oracle Internet Directory (OID), refer to the "Getting Started with
Oracle Internet Directory" chapter in the Oracle Fusion Middleware Administrator's Guide
for Oracle Internet Directory.

8
Configuring Oracle Virtual Directory 8-1
8 Configuring Oracle Virtual Directory
This chapter explains how to configure Oracle Virtual Directory (OVD).
This chapter discusses the following topics:
■OVD with ODSM and Fusion Middleware Control in a New WebLogic Domain
■Only OVD in an Existing WebLogic Domain
■Only OVD Without a WebLogic Domain
■Verifying OVD
■Getting Started with OVD After Installation
8.1 OVD with ODSM and Fusion Middleware Control in a New WebLogic
Domain
This topic describes how to configure Oracle Virtual Directory (OVD) with Oracle
Directory Services Manager (ODSM) and Fusion Middleware Control in a new
WebLogic administration domain. It includes the following sections:
■Appropriate Deployment Environment
■Components Deployed
■Dependencies
■Procedure
8.1.1 Appropriate Deployment Environment
The configuration described in this topic is appropriate for environments that have all
of the following conditions:
■You want to manage Oracle Virtual Directory using Fusion Middleware Control.
■You want Oracle Virtual Directory to be in a WebLogic administration domain.
■There is no WebLogic Administration Server managing other 11g Release 1 (11.1.1)
Oracle Directory Services components.
■You want to install Oracle Virtual Directory and a WebLogic Administration
Server colocated on the same host.
8.1.2 Components Deployed
Performing the configuration in this section deploys the following components.

OVD with ODSM and Fusion Middleware Control in a New WebLogic Domain
8-2 Oracle Fusion Middleware Installation Guide for Oracle Identity Management
■WebLogic Administration Server
■Oracle Virtual Directory
■Oracle Directory Services Manager
■Fusion Middleware Control
8.1.3 Dependencies
The configuration in this section depends on Oracle WebLogic Server.
8.1.4 Procedure
Perform the following steps to configure Oracle Virtual Directory with Oracle
Directory Services Manager and Fusion Middleware Control in a new domain:
1. Ensure that Oracle Virtual Directory is installed, as described in Installation
Roadmap and Installing Oracle Identity Management Using "Install and
Configure" Option.
2. On the Select Domain screen, select Create New Domain and enter the following
information:
■Enter the user name for the new domain in the User Name field.
■Enter the user password for the new domain in the User Password field.
■Enter the user password again in the Confirm Password field.
■Enter a name for the new domain in the Domain Name field.
Click Next. The Specify Installation Location screen appears.
3. Identify the Homes, Instances, and the WebLogic Server directory by referring to
Identifying Installation Directories. After you enter information for each field,
click Next. The Specify Security Updates screen appears.
4. Choose how you want to be notified about security issues:
■If you want to be notified about security issues through email, enter your
email address in the Email field.
Note: If you selected Install and Configure option in the Select
Installation Type screen while installing Oracle Identity Management
11g Release 1 (11.1.1.6.0), as described in Installing and Configuring
Oracle Identity Management 11g Release 1 (11.1.1.6.0) Software, the
Select Domain screen is displayed.
If you selected Install Software - Do Not Configure option in the
Select Installation Type screen while installing Oracle Identity
Management 11g Release 1 (11.1.1.6.0), as described in Installing and
Configuring Oracle Identity Management 11g Release 1 (11.1.1.6.0)
Software, you must now start the Oracle Identity Management
Configuration Wizard. Run <ORACLE_HOME>/bin/config.sh (on
UNIX) or <ORACLE_HOME>\bin\config.bat (on Windows) to start
the Oracle Identity Management Configuration Wizard. The Select
Domain screen is displayed.

Only OVD in an Existing WebLogic Domain
Configuring Oracle Virtual Directory 8-3
■If you want to be notified about security issues through My Oracle Support
(formerly MetaLink), select the My Oracle Support option and enter your My
Oracle Support Password.
■If you do not want to be notified about security issues, leave all fields empty.
Click Next. The Configure Components screen appears.
5. Select only Oracle Virtual Directory. The Oracle Directory Services Manager and
Fusion Middleware Control management components are automatically selected
for this installation.
Ensure no other components are selected and click Next. The Configure Ports
screen appears.
6. Choose how you want the Installer to configure ports:
■Select Auto Port Configuration if you want the Installer to configure ports
from a predetermined range.
■Select Specify Ports using Configuration File if you want the Installer to
configure ports using the staticports.ini file. You can click View/Edit File to
update the settings in the staticports.ini file.
Click Next. The Specify Oracle Virtual Directory Information screen appears.
7. Enter the following information:
■LDAP v3 Name Space: Enter the name space for Oracle Virtual Directory. The
default value is dc=us,dc=oracle,dc=com.
■HTTP Web Gateway: Select this option to enable the Oracle Virtual Directory
HTTP Web Gateway.
■Secure: Select this option if you enabled the HTTP Web Gateway and you
want to secure it using SSL.
■Administrator User Name: Enter the user name for the Oracle Virtual
Directory administrator. The default value is cn=orcladmin.
■Password: Enter the password for the Oracle Virtual Directory administrator.
■Confirm Password: Enter the password for the Oracle Virtual Directory
administrator again.
■Configure Administrative Server in secure mode: Select this option to secure
the Oracle Virtual Directory Administrative Listener using SSL. This option is
selected by default. Oracle recommends selecting this option.
Click Next.
8. The Installation Summary screen appears. Verify the information on this screen.
Click Configure to begin the configuration.
9. The Configuration Progress screen appears. Click Next to continue.
10. The Installation Complete screen appears. Click Save to save the configuration
information to a file, and then click Finish to exit the installer.
8.2 Only OVD in an Existing WebLogic Domain
This topic describes how to configure only Oracle Virtual Directory (OVD) in an
existing WebLogic administration domain. It includes the following sections:
■Appropriate Deployment Environment

Only OVD in an Existing WebLogic Domain
8-4 Oracle Fusion Middleware Installation Guide for Oracle Identity Management
■Components Deployed
■Dependencies
■Procedure
8.2.1 Appropriate Deployment Environment
The configuration described in this topic is appropriate for environments that have
both of the following conditions:
■A WebLogic Administration Server is available to manage 11g Release 1 (11.1.1)
Oracle Directory Services components and you want Oracle Virtual Directory to
join that domain.
■You want to install Oracle Virtual Directory separately from the WebLogic
Administration Server.
8.2.2 Components Deployed
Performing the configuration in this section deploys only Oracle Virtual Directory.
8.2.3 Dependencies
The configuration in this section depends on Oracle WebLogic Server.
8.2.4 Procedure
Perform the following steps to configure only Oracle Virtual Directory in an existing
domain:
1. Ensure that Oracle Virtual Directory is installed, as described in Installation
Roadmap and Installing Oracle Identity Management Using "Install and
Configure" Option.
2. On the Select Domain screen, select Extend Existing Domain and enter the
following information:
a. Enter the name of the host that contains the domain in the Host Name field.
b. Enter the Oracle WebLogic Server listen port in the Port field.
c. Enter the user name for the domain in the User Name field.
Note: If you selected Install and Configure option in the Select
Installation Type screen while installing Oracle Identity Management
11g Release 1 (11.1.1.6.0), as described in Installing and Configuring
Oracle Identity Management 11g Release 1 (11.1.1.6.0) Software, the
Select Domain screen is displayed.
If you selected Install Software - Do Not Configure option in the
Select Installation Type screen while installing Oracle Identity
Management 11g Release 1 (11.1.1.6.0), as described in Installing and
Configuring Oracle Identity Management 11g Release 1 (11.1.1.6.0)
Software, you must now start the Oracle Identity Management
Configuration Wizard. Run <ORACLE_HOME>/bin/config.sh (on
UNIX) or <ORACLE_HOME>\bin\config.bat (on Windows) to start
the Oracle Identity Management Configuration Wizard. The Select
Domain screen is displayed.

Only OVD in an Existing WebLogic Domain
Configuring Oracle Virtual Directory 8-5
d. Enter the password for the domain user in the User Password field.
Click Next. The Specify Installation Location screen appears.
3. Identify the Homes, Instances, and the WebLogic Server directory by referring to
Identifying Installation Directories.
After you enter information for each field, click Next. The Specify Security
Updates screen appears.
4. Choose how you want to be notified about security issues:
■If you want to be notified about security issues through email, enter your
email address in the Email field.
■If you want to be notified about security issues through My Oracle Support
(formerly MetaLink), select the My Oracle Support option and enter your My
Oracle Support Password.
■If you do not want to be notified about security issues, leave all fields empty.
Click Next. The Configure Components screen appears.
5. Select only Oracle Virtual Directory. Ensure no other components are selected
and click Next. The Configure Ports screen appears.
6. Choose how you want the Installer to configure ports:
■Select Auto Port Configuration if you want the Installer to configure ports
from a predetermined range.
■Select Specify Ports using Configuration File if you want the Installer to
configure ports using the staticports.ini file. You can click View/Edit File to
update the settings in the staticports.ini file.
Click Next. The Specify Oracle Virtual Directory Information screen appears.
7. Enter the following information:
■LDAP v3 Name Space: Enter the name space for Oracle Virtual Directory. The
default value is dc=us,dc=oracle,dc=com.
■HTTP Web Gateway: Select this option to enable the Oracle Virtual Directory
HTTP Web Gateway.
■Secure: Select this option if you enabled the HTTP Web Gateway and you
want to secure it using SSL.
■Administrator User Name: Enter the user name for the Oracle Virtual
Directory administrator. The default value is cn=orcladmin.
■Password: Enter the password for the Oracle Virtual Directory administrator.
■Confirm Password: Enter the password for the Oracle Virtual Directory
administrator again.
Note: To configure Oracle Identity Management components in an
existing Oracle WebLogic Server administration domain, each Oracle
WebLogic Server Home, Oracle Middleware Home, and Oracle Home
directory in the domain must have identical directory paths and
names.

Only OVD Without a WebLogic Domain
8-6 Oracle Fusion Middleware Installation Guide for Oracle Identity Management
■Configure Administrative Server in secure mode: Select this option to secure
the Oracle Virtual Directory Administrative Listener using SSL. This option is
selected by default. Oracle recommends selecting this option.
Click Next.
8. The Installation Summary screen appears. Verify the information on this screen.
Click Configure to begin the configuration.
9. The Configuration Progress screen appears. Click Next to continue.
10. The Installation Complete screen appears. Click Save to save the configuration
information to a file, and then click Finish to exit the installer.
8.3 Only OVD Without a WebLogic Domain
This topic describes how to configure only Oracle Virtual Directory (OVD) without a
WebLogic administration domain. It includes the following sections:
■Appropriate Deployment Environment
■Components Deployed
■Dependencies
■Procedure
8.3.1 Appropriate Deployment Environment
Perform the configuration in this topic if you want to register Oracle Virtual Directory
with a remote WebLogic Administration Server for management purposes, but you do
not want to install Oracle WebLogic Server locally.
8.3.2 Components Deployed
Performing the configuration in this section deploys only Oracle Virtual Directory.
8.3.3 Dependencies
The configuration in this section depends on Oracle WebLogic Server.
8.3.4 Procedure
Perform the following steps to configure only Oracle Virtual Directory without a
domain:
1. Ensure that Oracle Virtual Directory is installed, as described in Installation
Roadmap and Installing Oracle Identity Management Using "Install and
Configure" Option.
Note: To manage Oracle Virtual Directory using Fusion Middleware
Control in this environment, you must register Oracle Virtual
Directory with the remote WebLogic Administration Server after
installation.

Only OVD Without a WebLogic Domain
Configuring Oracle Virtual Directory 8-7
2. Select Configure without a Domain on the Select Domain screen and click Next.
The Specify Installation Location screen appears.
3. Enter the following information in each field:
■Oracle Middleware Home Location: If an Oracle Middleware Home directory
already exists, enter the path to it in this field. If an Oracle Middleware Home
directory does not exist, enter a path to the location where you want the
Installer to create the directory that will contain the Oracle Common Home
and Oracle Home directories. The Installer creates an Oracle Common Home
directory and an Oracle Home directory inside the directory you identify in
this field.
The Oracle Middleware Home directory is commonly referred to as MW_
HOME.
■Oracle Home Directory: Enter a name for the Oracle Home directory. The
Installer uses the name you enter in this field to create the Oracle Home
directory under the location you enter in the Oracle Middleware Home
Location field. The Oracle Home directory is commonly referred to as
ORACLE_HOME.
■Oracle Instance Location: Enter the directory path to the location where you
want to create the Oracle Instance directory. The Installer creates the Oracle
Instance directory using the location you enter in this field and using the name
you enter in the Oracle Instance Name field. You can identify any location on
your system for the Oracle Instance directory—it does not have to reside
inside the Oracle Middleware Home directory.
Notes:
■Installing Oracle WebLogic Server is optional in this particular
scenario. Instead, you can create the Middleware Home by
following the procedure as described later in Step 3.
■If you selected Install and Configure option in the Select
Installation Type screen while installing Oracle Identity
Management 11g Release 1 (11.1.1.6.0), as described in Installing
and Configuring Oracle Identity Management 11g Release 1
(11.1.1.6.0) Software, the Select Domain screen is displayed.
■If you selected Install Software - Do Not Configure option in the
Select Installation Type screen while installing Oracle Identity
Management 11g Release 1 (11.1.1.6.0), as described in Installing
and Configuring Oracle Identity Management 11g Release 1
(11.1.1.6.0) Software, you must now start the Oracle Identity
Management Configuration Wizard. Run <ORACLE_
HOME>/bin/config.sh (on UNIX) or <ORACLE_
HOME>\bin\config.bat (on Windows) to start the Oracle
Identity Management Configuration Wizard. The Select Domain
screen is displayed.
Note: The Oracle Middleware Home directory is not required to
contain an Oracle WebLogic Server installation.

Only OVD Without a WebLogic Domain
8-8 Oracle Fusion Middleware Installation Guide for Oracle Identity Management
■Oracle Instance Name: Enter a name for the Oracle Instance directory. The
Installer uses the name you enter in this field to create the Oracle Instance
directory at the location you specify in the Oracle Instance Location field. This
directory is commonly referred to as ORACLE_INSTANCE.
After you enter information for each field, click Next. The Specify Security
Updates screen appears.
4. Choose how you want to be notified about security issues:
■If you want to be notified about security issues through email, enter your
email address in the Email field.
■If you want to be notified about security issues through My Oracle Support
(formerly MetaLink), select the My Oracle Support option and enter your My
Oracle Support Password.
■If you do not want to be notified about security issues, leave all fields empty.
Click Next. The Configure Components screen appears.
5. Select only Oracle Virtual Directory. Ensure no other components are selected
and click Next. The Configure Ports screen appears.
6. Choose how you want the Installer to configure ports:
■Select Auto Port Configuration if you want the Installer to configure ports
from a predetermined range.
■Select Specify Ports using Configuration File if you want the Installer to
configure ports using the staticports.ini file. You can click View/Edit File to
update the settings in the staticports.ini file.
Click Next. The Specify Oracle Virtual Directory Information screen appears.
7. Enter the following information:
■LDAP v3 Name Space: Enter the name space for Oracle Virtual Directory. The
default value is dc=us,dc=oracle,dc=com.
■HTTP Web Gateway: Select this option to enable the Oracle Virtual Directory
HTTP Web Gateway.
■Secure: Select this option if you enabled the HTTP Web Gateway and you
want to secure it using SSL.
■Administrator User Name: Enter the user name for the Oracle Virtual
Directory administrator. The default value is cn=orcladmin.
■Password: Enter the password for the Oracle Virtual Directory administrator.
■Confirm Password: Enter the password for the Oracle Virtual Directory
administrator again.
■Configure Administrative Server in secure mode: Select this option to secure
the Oracle Virtual Directory Administrative Listener using SSL. This option is
selected by default. Oracle recommends selecting this option.
Click Next.
8. The Installation Summary screen appears. Verify the information on this screen.
Click Configure to begin the configuration.
9. The Configuration Progress screen appears. Click Next to continue.
10. The Installation Complete screen appears. Click Save to save the configuration
information to a file, and then click Finish to exit the installer.

Getting Started with OVD After Installation
Configuring Oracle Virtual Directory 8-9
11. Execute the following command to register Oracle Virtual Directory with the
WebLogic Administration Server. Registering with the WebLogic Administration
Server allows you to manage Oracle Virtual Directory using Fusion Middleware
Control.
$ORACLE_INSTANCE/bin/opmnctl registerinstance
-adminHost HOSTNAME
-adminPort WEBLOGIC_PORT
-adminUsername WEBLOGIC_ADMIN_USERNAME
For example:
$ORACLE_INSTANCE/bin/opmnctl registerinstance \
-adminHost myhost \
-adminPort 7001 \
-adminUsername weblogic \
8.4 Verifying OVD
Verify the Oracle Virtual Directory (OVD) installation by:
■Starting the Oracle Virtual Directory instance, by executing the following
command:
$ORACLE_INSTANCE/bin/opmnctl startall
■Verifying that Oracle Virtual Directory has started by executing the following
command:
$ORACLE_INSTANCE/bin/opmnctl status -l
■Executing the $ORACLE_HOME/bin/ldapbind command on the Oracle Virtual
Directory non-SSL and SSL ports.
For example:
ldapbind -p <port number>
ldapbind -p <SSL port> -U 1
8.5 Getting Started with OVD After Installation
After installing Oracle Virtual Directory (OVD), refer to the "Getting Started with
Administering Oracle Virtual Directory" chapter in the Oracle Fusion Middleware
Administrator's Guide for Oracle Virtual Directory.
Note: You will be prompted for the WebLogic administrator's user
name and password.
Note: The default administrative port on the WebLogic
Administration Server is 7001.
Note: For more information on OPMN commands, see Oracle Fusion
Middleware Oracle Process Manager and Notification Server
Administrator's Guide.

Getting Started with OVD After Installation
8-10 Oracle Fusion Middleware Installation Guide for Oracle Identity Management

9
Configuring Oracle Directory Integration Platform 9-1
9 Configuring Oracle Directory Integration
Platform
This chapter explains how to configure Oracle Directory Integration Platform (ODIP).
This chapter discusses the following topics:
■Prerequisites
■Configuring ODIP with Oracle Internet Directory (OID)
■Configuring ODIP with Oracle Unified Directory (OUD)
■Configuring ODIP with Oracle Directory Server Enterprise Edition (ODSEE)
■Verifying ODIP
■Getting Started with ODIP After Installation
9.1 Prerequisites
Ensure the prerequisites are met depending on the component you wish to configure.
This section discusses the following topics:
■Option 1: ODIP with Oracle Internet Directory
■Option 2: ODIP with Oracle Directory Server Enterprise Edition (ODSEE)
9.1.1 Option 1: ODIP with Oracle Internet Directory
If you want to configure Oracle Directory Integration Platform (ODIP) with Oracle
Internet Directory, ensure that Oracle Internet Directory is installed and configured as
described in Installing and Configuring Oracle Identity Management 11g Release 1
(11.1.1.6.0) Software.
9.1.2 Option 2: ODIP with Oracle Directory Server Enterprise Edition (ODSEE)
If you want to configure Oracle Directory Integration Platform (ODIP) with Oracle
Directory Server Enterprise Edition (ODSEE) ensure that the following prerequisites
are met.
■Installing Oracle Directory Server Enterprise Edition (ODSEE)
■Setting Up Oracle Directory Server Enterprise Edition (ODSEE)

Configuring ODIP with Oracle Internet Directory (OID)
9-2 Oracle Fusion Middleware Installation Guide for Oracle Identity Management
9.1.2.1 Installing Oracle Directory Server Enterprise Edition (ODSEE)
Ensure that Oracle Directory Server Enterprise Edition (ODSEE) is installed, as
described in the Oracle Directory Server Enterprise Edition Installation Guide 11g Release 1
(11.1.1.5.0), available at the following link:
http://download.oracle.com/docs/cd/E20295_
01/html/821-1218/index.html
9.1.2.2 Setting Up Oracle Directory Server Enterprise Edition (ODSEE)
Follow the steps below for setting Up Oracle Directory Server Enterprise Edition
(ODSEE):
Go to <DSEE_HOME>/bin directory and execute the following commands:
■Create a new ODSEE server instance.
./dsadm create <ODSEE instance>
For Example:
./dsadm create /scratch/<userid>/dsee/dseeinstance1/
■Start the ODSEE server instance.
./dsadm start <ODSEE instance>
For Example:
./dsadm start /scratch/<userid>/dsee/dseeinstance1/
■Create the root suffix.
./dsconf create-suffix -h <ODSEE Server> -p <ODSEE port>
<SUFFIX_DN>
where the SUFFIX_DN is the full DN of the new suffix. For a root suffix, the
convention is to use the domain-component (dc) naming attribute.
For Example, to create a suffix for the DN dc=example,dc=com , use this
command:
./dsconf create-suffix -h localhost -p 1389 dc=example,dc=com
■Enable changelog.
./dsconf set-server-prop -h <ODSEE Server> -p <ODSEE port>
retro-cl-enabled:on
For Example:
./dsconf set-server-prop -h localhost -p 1389
retro-cl-enabled:on
■Restart the ODSEE server instance.
./dsadm restart <ODSEE instance>
For Example:
./dsadm restart /scratch/<userid>/dsee/dseeinstance1/
9.2 Configuring ODIP with Oracle Internet Directory (OID)
This section describes how to configure Oracle Directory Integration Platform (ODIP)
with Oracle Internet Directory (OID). It includes the following topics:

Configuring ODIP with Oracle Internet Directory (OID)
Configuring Oracle Directory Integration Platform 9-3
■ODIP with Fusion Middleware Control in a New WebLogic Domain
■Only ODIP in an Existing WebLogic Domain
■Configuring ODIP when OID is Running in SSL Mode 2 - Server Only
Authentication
9.2.1 ODIP with Fusion Middleware Control in a New WebLogic Domain
This topic describes how to configure Oracle Directory Integration Platform (ODIP)
with Fusion Middleware Control in a new WebLogic administration domain. It
includes the following sections:
■Appropriate Deployment Environment
■Components Deployed
■Dependencies
■Procedure
9.2.1.1 Appropriate Deployment Environment
The configuration described in this topic is appropriate if there is no WebLogic
Administration Server managing other 11g Release 1 (11.1.1) Oracle Directory Services
components and Oracle Internet Directory is installed without a domain.
9.2.1.2 Components Deployed
Performing the configuration in this section deploys the following components:
■WebLogic Managed Server
■Oracle Directory Integration Platform
■WebLogic Administration Server
■Fusion Middleware Control
9.2.1.3 Dependencies
The configuration in this section depends on the following:
■Oracle WebLogic Server
■Oracle Internet Directory
■Oracle Database for Oracle Internet Directory
■Identity Management - Oracle Internet Directory schema existing in the Oracle
Internet Directory database.
9.2.1.4 Procedure
Perform the following steps to configure Oracle Directory Integration Platform with
Fusion Middleware Control in a new domain:
1. Ensure that Oracle Directory Integration Platform is installed, as described in
Installing and Configuring Oracle Identity Management 11g Release 1 (11.1.1.6.0)
Software.

Configuring ODIP with Oracle Internet Directory (OID)
9-4 Oracle Fusion Middleware Installation Guide for Oracle Identity Management
2. On the Select Domain screen, select Create New Domain and enter the following
information:
■Enter the user name for the new domain in the User Name field.
■Enter the user password for the new domain in the User Password field.
■Enter the user password again in the Confirm Password field.
■Enter a name for the new domain in the Domain Name field.
Click Next. The Specify Installation Location screen appears.
3. Identify the Homes, Instances, and the WebLogic Server directory by referring to
Identifying Installation Directories. After you enter information for each field,
click Next. The Specify Security Updates screen appears.
4. Choose how you want to be notified about security issues:
■If you want to be notified about security issues through email, enter your
email address in the Email field.
■If you want to be notified about security issues through My Oracle Support
(formerly MetaLink), select the My Oracle Support option and enter your My
Oracle Support Password.
■If you do not want to be notified about security issues, leave all fields empty.
Click Next. The Configure Components screen appears.
5. Select only Oracle Directory Integration Platform. The Fusion Middleware
Control management component is automatically selected for this installation.
Ensure no other components are selected and click Next. The Configure Ports
screen appears.
6. Choose how you want the Installer to configure ports:
■Select Auto Port Configuration if you want the Installer to configure ports
from a predetermined range.
■Select Specify Ports using Configuration File if you want the Installer to
configure ports using the staticports.ini file. You can click View/Edit File to
update the settings in the staticports.ini file.
Click Next. The Specify OID Details screen appears.
Note: If you selected Install and Configure option in the Select
Installation Type screen while installing Oracle Identity Management
11g Release 1 (11.1.1.6.0), as described in Installing and Configuring
Oracle Identity Management 11g Release 1 (11.1.1.6.0) Software, the
Select Domain screen is displayed.
If you selected Install Software - Do Not Configure option in the
Select Installation Type screen while installing Oracle Identity
Management 11g Release 1 (11.1.1.6.0), as described in Installing and
Configuring Oracle Identity Management 11g Release 1 (11.1.1.6.0)
Software, you must now start the Oracle Identity Management
Configuration Wizard. Run <ORACLE_HOME>/bin/config.sh (on
UNIX) or <ORACLE_HOME>\bin\config.bat (on Windows) to start
the Oracle Identity Management Configuration Wizard. The Select
Domain screen is displayed.

Configuring ODIP with Oracle Internet Directory (OID)
Configuring Oracle Directory Integration Platform 9-5
7. Identify the Oracle Internet Directory for Oracle Directory Integration Platform by
entering the following information:
■Hostname: Enter the hostname or IP address of the Oracle Internet Directory
host.
■Port: Enter the Oracle Internet Directory LDAP SSL port.
■User Name: Enter the user name of the Oracle Internet Directory
Administrator.
■Password: Enter the password for the user name Oracle Directory Integration
Platform will use to connect to Oracle Internet Directory.
Click Next. The Specify Schema Database screen appears.
8. Enter the following information about the Oracle Internet Directory schema:
■Connect String: Enter the database connection information. The connection
string must be in the form of hostname:port:servicename. For Oracle Real
Application Clusters (RAC), the connection string must be in the form of
hostname1:port1:instance1^hostname2:port2:instance2@servicename.
■Password: Enter the password for the ODSSM schema in the Password field.
Click Next.
9. The Installation Summary screen appears. Verify the information on this screen.
Click Configure to begin the configuration.
10. The Configuration Progress screen appears. Click Next to continue.
11. The Installation Complete screen appears. Click Save to save the configuration
information to a file, and then click Finish to exit the installer.
9.2.2 Only ODIP in an Existing WebLogic Domain
This topic describes how to configure only Oracle Directory Integration Platform
(ODIP) in an existing WebLogic administration domain. It includes the following
sections:
■Appropriate Deployment Environment
■Components Deployed
■Dependencies
■Procedure
9.2.2.1 Appropriate Deployment Environment
The configuration described in this topic is appropriate for the following
environments:
An environment that has the following condition:
■A WebLogic Administration Server is managing an 11g Release 1 (11.1.1) Oracle
Internet Directory component and you want Oracle Directory Integration Platform
to join that domain.
An environment that has the following condition:
■A WebLogic Administration Server is managing other 11g Release 1 (11.1.1) Oracle
Directory Services—but not Oracle Internet Directory, which is installed without a
domain.

Configuring ODIP with Oracle Internet Directory (OID)
9-6 Oracle Fusion Middleware Installation Guide for Oracle Identity Management
9.2.2.2 Components Deployed
Performing the configuration in this section deploys the following components:
■WebLogic Managed Server
■Oracle Directory Integration Platform
9.2.2.3 Dependencies
The configuration in this section depends on the following:
■Oracle WebLogic Server
■Oracle Internet Directory
■Oracle Database for Oracle Internet Directory
■Identity Management - Oracle Internet Directory schema existing in the Oracle
Internet Directory database.
9.2.2.4 Procedure
Perform the following steps to configure only Oracle Directory Integration Platform in
an existing domain:
1. Ensure that Oracle Directory Integration Platform is installed, as described in
Installing and Configuring Oracle Identity Management 11g Release 1 (11.1.1.6.0)
Software.
2. On the Select Domain screen, select Extend Existing Domain and enter the
following information:
■Enter the name of the host that contains the domain in the Host Name field.
■Enter the Oracle WebLogic Server listen port in the Port field.
■Enter the user name for the domain in the User Name field.
■Enter the password for the domain user in the User Password field.
Click Next. The Specify Installation Location screen appears.
3. Identify the Homes, Instances, and the WebLogic Server directory by referring to
Identifying Installation Directories.
Note: If you selected Install and Configure option in the Select
Installation Type screen while installing Oracle Identity Management
11g Release 1 (11.1.1.6.0), as described in Installing and Configuring
Oracle Identity Management 11g Release 1 (11.1.1.6.0) Software, the
Select Domain screen is displayed.
If you selected Install Software - Do Not Configure option in the
Select Installation Type screen while installing Oracle Identity
Management 11g Release 1 (11.1.1.6.0), as described in Installing and
Configuring Oracle Identity Management 11g Release 1 (11.1.1.6.0)
Software, you must now start the Oracle Identity Management
Configuration Wizard. Run <ORACLE_HOME>/bin/config.sh (on
UNIX) or <ORACLE_HOME>\bin\config.bat (on Windows) to start
the Oracle Identity Management Configuration Wizard. The Select
Domain screen is displayed.

Configuring ODIP with Oracle Internet Directory (OID)
Configuring Oracle Directory Integration Platform 9-7
After you enter information for each field, click Next. The Specify Security
Updates screen appears.
4. Choose how you want to be notified about security issues:
■If you want to be notified about security issues through email, enter your
email address in the Email field.
■If you want to be notified about security issues through My Oracle Support
(formerly MetaLink), select the My Oracle Support option and enter your My
Oracle Support Password.
■If you do not want to be notified about security issues, leave all fields empty.
Click Next. The Configure Components screen appears.
5. Select only Oracle Directory Integration Platform. Ensure no other components
are selected and click Next. The Configure Ports screen appears.
6. Choose how you want the Installer to configure ports:
■Select Auto Port Configuration if you want the Installer to configure ports
from a predetermined range.
■Select Specify Ports using Configuration File if you want the Installer to
configure ports using the staticports.ini file. You can click View/Edit File to
update the settings in the staticports.ini file.
Click Next. The Specify OID Details screen appears.
7. Identify the Oracle Internet Directory for Oracle Directory Integration Platform by
entering the following information:
■Hostname: Enter the hostname or IP address of the Oracle Internet Directory
host.
■Port: Enter the Oracle Internet Directory LDAP SSL port.
■User Name: Enter the user name of the Oracle Internet Directory
Administrator.
■Password: Enter the password for the user name Oracle Directory Integration
Platform will use to connect to Oracle Internet Directory.
Click Next. The Specify Schema Database screen appears.
8. Enter the following information about the Oracle Internet Directory schema:
■Connect String: Enter the database connection information. The connection
string must be in the form of hostname:port:servicename. For Oracle Real
Application Clusters (RAC), the connection string must be in the form of
hostname1:port1:instance1^hostname2:port2:instance2@servicename.
■Password: Enter the password for the ODSSM schema in the Password field.
Click Next.
Note: To configure Oracle Identity Management components in an
existing Oracle WebLogic Server administration domain, each Oracle
WebLogic Server Home, Oracle Middleware Home, and Oracle Home
directory in the domain must have identical directory paths and
names.

Configuring ODIP with Oracle Unified Directory (OUD)
9-8 Oracle Fusion Middleware Installation Guide for Oracle Identity Management
9. The Installation Summary screen appears. Verify the information on this screen.
Click Configure to begin the configuration.
10. The Configuration Progress screen appears. Click Next to continue.
11. The Installation Complete screen appears. Click Save to save the configuration
information to a file, and then click Finish to exit the installer.
9.2.3 Configuring ODIP when OID is Running in SSL Mode 2 - Server Only
Authentication
You cannot install and configure Oracle Directory Integration Platform (ODIP) 11g
Release 1 (11.1.1) when Oracle Internet Directory (OID) is already installed and
running in SSL Mode 2 - Server Only Authentication.
If Oracle Internet Directory is already installed and running in SSL Mode 2 - Server
Only Authentication, you must perform the following steps to configure Oracle
Directory Integration Platform 11g Release 1 (11.1.1):
1. Configure Oracle Internet Directory to temporarily run in SSL Mode 1 - No
Authentication.
Refer to the "Configuring Secure Sockets Layer (SSL)" chapter in the Oracle Fusion
Middleware Administrator's Guide for Oracle Internet Directory for complete
information.
2. Install Oracle Directory Integration Platform, as described in Installing and
Configuring Oracle Identity Management 11g Release 1 (11.1.1.6.0) Software.
3. Configure Oracle Internet Directory to run in SSL Mode 2 - Server Only
Authentication again. Refer to the "Configuring Secure Sockets Layer (SSL)"
chapter in the Oracle Fusion Middleware Administrator's Guide for Oracle Internet
Directory.
4. Configure Oracle Directory Integration Platform to run in SSL Mode 2 by referring
to the following sections in the Oracle Fusion Middleware Integration Guide for Oracle
Identity Management:
■Configuring Oracle Directory Integration Platform for SSL Mode 2 - Server
Only Authentication
■Managing the SSL Certificates of Oracle Internet Directory and Connected
Directories
9.3 Configuring ODIP with Oracle Unified Directory (OUD)
To configure Oracle Directory Integration Platform (ODIP) with Oracle Unified
Directory (OUD), see Part II: Configuring OUD/ODSM/ODIP and Fusion
Middleware Control in a New WebLogic Administration Domain.
9.4 Configuring ODIP with Oracle Directory Server Enterprise Edition
(ODSEE)
This section describes how to configure Oracle Directory Integration Platform (ODIP)
with Oracle Directory Server Enterprise Edition (ODSEE). It includes the following
topics:
■ODIP with ODSEE in an Existing WebLogic Domain
■ODIP and ODSEE in a New WebLogic Domain

Configuring ODIP with Oracle Directory Server Enterprise Edition (ODSEE)
Configuring Oracle Directory Integration Platform 9-9
■Post-Configuration Steps
9.4.1 ODIP with ODSEE in an Existing WebLogic Domain
This topic describes how to configure Oracle Directory Integration Platform (ODIP)
with Oracle Directory Server Enterprise Edition (ODSEE) in an existing WebLogic
administration domain. It includes the following sections:
■Components Deployed
■Dependencies
■Procedure
9.4.1.1 Components Deployed
Performing the configuration in this section deploys only Oracle Directory Integration
Platform.
9.4.1.2 Dependencies
The configuration in this section depends on the following:
■Oracle WebLogic Server
■Oracle Directory Server Enterprise Edition (ODSEE)
9.4.1.3 Procedure
Perform the following steps to configure Oracle Directory Integration Platform with
Oracle Directory Server Enterprise Edition (ODSEE) in an existing WebLogic
administration domain.
1. Ensure that all the prerequisites are met as described in Option 2: ODIP with
Oracle Directory Server Enterprise Edition (ODSEE).
2. Ensure that Oracle Directory Integration Platform is installed using Install
Software - Do Not Configure option, as described in Installing and Configuring
Oracle Identity Management 11g Release 1 (11.1.1.6.0) Software.
3. Run the <MW_HOME>/oracle_common/bin/config.sh script (on UNIX) or
<MW_HOME>\oracle_common\bin\config.cmd (on Windows). The Oracle
Fusion Middleware Configuration Wizard appears.
4. On the Welcome screen, select the Extend an existing WebLogic domain option.
Click Next.
5. On the Select a WebLogic Domain Directory screen, browse to the directory that
contains the WebLogic domain in which you want to configure Oracle Directory
Integration Platform (ODIP) with Oracle Directory Server Enterprise Edition
(ODSEE). Click Next. The Select Extension Source screen appears.
6. On the Select Extension Source screen, select the Oracle Enterprise Manager -
11.1.1.0 [oracle_common] and Oracle Directory Integration Platform - 11.1.1.2.0
[Oracle_IDM1] domain configuration option.
Click Next. The Specify Domain Name and Location screen appears.
Note: When you select Oracle Directory Integration Platform -
11.1.1.2.0 [Oracle_IDM1] option, Oracle Identity Management -
11.1.1.2.0 [Oracle_IDM1] is also selected by default.

Configuring ODIP with Oracle Directory Server Enterprise Edition (ODSEE)
9-10 Oracle Fusion Middleware Installation Guide for Oracle Identity Management
7. The Specify Domain Name and Location screen automatically selects the
application location. Click Next. The Select Optional Configuration screen
appears.
8. On the Select Optional Configuration screen, select Managed Servers, Clusters,
and Machines option. Click Next. The Configure Managed Servers screen
appears.
9. On the Configure Managed Servers screen, specify the Managed Server name.
Click Next.
10. On the Configure Clusters screen, configure Clusters as required. Click Next.
11. On the Configure Machines screen, select the Machine or Unix Machine tab. Click
on Add and specify the machine name. Click Next.
12. If you added a machine on the Configure Machines screen, then the Assign
Servers to Machines screen appears. On the Assign Servers to Machines screen,
assign the Administration Server and the Managed server to the specified
machine. Click Next.
13. On the Configuration Summary screen, review the domain configuration, and
click Extend to start extending the domain.
14. Click Done, once the domain is extended.
Your existing domain is extended to support Oracle Directory Integration
Platform.
9.4.2 ODIP and ODSEE in a New WebLogic Domain
This topic describes how to configure Oracle Directory Integration Platform (ODIP)
and Oracle Directory Server Enterprise Edition (ODSEE) in a new WebLogic
administration domain. It includes the following sections:
■Components Deployed
■Dependencies
■Procedure
9.4.2.1 Components Deployed
Performing the configuration in this section deploys only Oracle Directory Integration
Platform.
9.4.2.2 Dependencies
The configuration in this section depends on the following:
■Oracle WebLogic Server
■Oracle Directory Server Enterprise Edition (ODSEE)
9.4.2.3 Procedure
Perform the following steps to configure Oracle Directory Integration Platform and
Oracle Directory Server Enterprise Edition (ODSEE) in a new WebLogic
administration domain.
1. Ensure that all the prerequisites are met as described in Option 2: ODIP with
Oracle Directory Server Enterprise Edition (ODSEE).

Configuring ODIP with Oracle Directory Server Enterprise Edition (ODSEE)
Configuring Oracle Directory Integration Platform 9-11
2. Ensure that Oracle Directory Integration Platform is installed, as described in
Installing and Configuring Oracle Identity Management 11g Release 1 (11.1.1.6.0)
Software.
3. Run the <MW_HOME>/oracle_common/bin/config.sh script (on UNIX) or
<MW_HOME>\oracle_common\bin\config.cmd (on Windows). The Oracle
Fusion Middleware Configuration Wizard appears.
4. On the Welcome screen, select the Create a new WebLogic domain option. Click
Next.
5. On the Select Domain Source screen, select Generate a domain configured
automatically to support the following products: option. Select the following
domain configuration options:
■Oracle Enterprise Manager - 11.1.1.0 [oracle_common]
■Oracle Directory Integration Platform - 11.1.1.2.0 [Oracle_IDM1]
Click Next. The Specify Domain Name and Location screen appears.
6. On the Specify Domain Name and Location screen, enter a name and location for
the domain to be created. In addition, enter a location to store applications for the
domain. Click Next. The Configure Administrator User Name and Password
screen is displayed.
7. Configure a user name and a password for the administrator. The default user
name is weblogic. Click Next. The Configure Server Start Mode and JDK screen is
displayed.
8. Choose JRockit SDK 1.6.0_24 and Production Mode in the Configure Server
Start Mode and JDK screen. Click Next. The Select Optional Configuration Screen
is displayed.
9. On the Select Optional Configuration screen, select Managed Servers, Clusters,
and Machines option. Click Next. The Configure Managed Servers screen
appears.
10. On the Configure Managed Servers screen, specify the Managed Server name.
Click Next.
11. On the Configure Clusters screen, configure Clusters as required. Click Next.
12. On the Configure Machines screen, select the Machine or Unix Machine tab. Click
on Add and specify the machine name. Click Next.
13. If you added a machine on the Configure Machines screen, then the Assign
Servers to Machines screen appears. On the Assign Servers to Machines screen,
assign the Administration Server and the Managed server to the specified
machine. Click Next.
14. On the Configuration Summary screen, review the domain configuration, and
click Create to start creating the domain.
15. Click Done, once the domain is created successfully.
Note: When you select Oracle Enterprise Manager - 11.1.1.0 [oracle_
common] and Oracle Directory Integration Platform - 11.1.1.2.0
[Oracle_IDM1], Oracle Identity Management - 11.1.1.2.0 [Oracle_
IDM1] and Oracle JRF 11.1.1.0 [oracle_common] is also selected by
default.

Configuring ODIP with Oracle Directory Server Enterprise Edition (ODSEE)
9-12 Oracle Fusion Middleware Installation Guide for Oracle Identity Management
A new WebLogic domain to support Oracle Directory Integration Platform is
created in the <MW_HOME>\user_projects\domains directory (on Windows).
On UNIX, the domain is created in the <MW_HOME>/user_projects/domains
directory.
9.4.3 Post-Configuration Steps
After configuring Oracle Directory Integration Platform, perform the following tasks:
1. Run the <MW_HOME>/oracle_common/common/bin/setNMProps.sh script
(on UNIX) or <MW_HOME>\oracle_common\common\bin\setNMProps.cmd
(on Windows).
2. Start the Administration Server, Node Manager and Managed Server as described
in Starting the Stack.
3. Set the WL_HOME and ORACLE_HOME environment variables and execute
<ORACLE_HOME>/bin/dipConfigurator. Provide the following information
when prompted for input.
■WebLogic host, port, username and password details.
■Oracle Directory Server Enterprise Edition (ODSEE) host, port, username and
password details.
■Specify the suffix under which DIP metadata is to be stored.
4. Verify the Oracle Directory Integration Platform(ODIP) installation and
configuration. For more information, see Verifying ODIP.
5. The dipConfigurator will set the below ACIs for the specified metadata suffix.
But for the other suffixes, set the below ACIs for the containers in OUD, in order to
write the changes imported from the other sources:
dn: <Container DN>
changetype:modify
add: aci
aci: (target="ldap:///<Container DN>")(version 3.0; acl "Anonymous read-search
access"; allow (read,add,delete,search,write,compare,proxy)
groupdn="ldap:///cn=dipadmingrp,cn=DIPadmins,cn=Directory Integration
Platform,<metadata suffix>"; allow
(read,add,delete,search,write,compare,proxy)
groupdn="ldap:///cn=odipigroup,cn=DIPadmins,cn=Directory Integration
Platform,<metadata suffix>"; )
-
add: aci
aci: (targetattr="*")(version 3.0; acl "Anonymous read-search access"; allow
(search,read,write,compare,add)
groupdn="ldap:///cn=dipadmingrp,cn=DIPadmins,cn=Directory Integration
Platform,<metadata suffix>"; allow (search,read,write,compare,add)
groupdn="ldap:///cn=odipigroup,cn=DIPadmins,cn=Directory Integration
Platform,<metadata suffix>";)
Note: ODIP configuration can be recreated any number of times if
ODIP configuration is deleted or corrupted. However, if there are any
sync profiles that already exists, the connected directory password of
the existing profiles needs to be reset after executing
dipConfigurator.
For recreating the ODIP configuration, re-run step 3 and step 4.

Getting Started with ODIP After Installation
Configuring Oracle Directory Integration Platform 9-13
9.5 Verifying ODIP
Verify the Oracle Directory Integration Platform (ODIP) installation using the
dipStatus command, which is located in the $ORACLE_HOME/bin/ directory.
The following is the syntax for the dipStatus command:
$ORACLE_HOME/bin/dipStatus -h HOST -p PORT -D wlsuser [-help]
■-h | -host identifies the Oracle WebLogic Server where Oracle Directory
Integration Platform is deployed.
■-p | -port identifies the listening port of the Oracle WebLogic Managed Server
where Oracle Directory Integration Platform is deployed.
■-D | -wlsuser identifies the Oracle WebLogic Server login ID.
9.6 Getting Started with ODIP After Installation
After you install Oracle Directory Integration Platform (ODIP), no additional
configuration is needed. The next step is to create synchronization profiles.
The Oracle Fusion Middleware Integration Guide for Oracle Identity Management explains
how to manage Oracle Directory Integration Platform. For information about creating
synchronization profiles using Oracle Enterprise Manager Fusion Middleware Control
Console, refer to the "Managing Synchronization Profiles Using Fusion Middleware
Control" section in that guide.
Note: You must set the WL_HOME and ORACLE_HOME
environment variables before executing the dipStatus command.
Note: You will be prompted for the Oracle WebLogic Server login
password. You cannot provide the password as a command-line
argument.
Best security practice is to provide a password only in response to a
prompt from the command. If you must execute dipStatus from a
script, you can redirect input from a file containing the Oracle
WebLogic Server password. Use file permissions to protect the file
and delete it when it is no longer necessary.

Getting Started with ODIP After Installation
9-14 Oracle Fusion Middleware Installation Guide for Oracle Identity Management

10
Configuring Oracle Directory Services Manager 10-1
10 Configuring Oracle Directory Services
Manager
This chapter explains how to configure Oracle Directory Services Manager (ODSM).
This chapter discusses the following topics:
■Only ODSM in a New WebLogic Domain
■Only ODSM in an Existing WebLogic Domain
■Verifying ODSM
■Getting Started with ODSM After Installation
10.1 Only ODSM in a New WebLogic Domain
This topic describes how to configure only Oracle Directory Services Manager (ODSM)
in a new WebLogic administration domain. It includes the following sections:
■Appropriate Deployment Environment
■Components Deployed
■Dependencies
■Procedure
10.1.1 Appropriate Deployment Environment
The configuration described in this topic is appropriate if Oracle Internet Directory
was installed without a domain and you want to manage it using Oracle Directory
Services Manager.
10.1.2 Components Deployed
Performing the configuration in this section deploys the following components:
■WebLogic Managed Server
■Oracle Directory Services Manager
■WebLogic Administration Server
■Fusion Middleware Control
10.1.3 Dependencies
The configuration in this section depends on Oracle WebLogic Server.

Only ODSM in a New WebLogic Domain
10-2 Oracle Fusion Middleware Installation Guide for Oracle Identity Management
10.1.4 Procedure
Perform the following steps to configure only Oracle Directory Services Manager in a
new domain:
1. Ensure that Oracle Directory Services Manager is installed, as described in
Installation Roadmap and Installing Oracle Identity Management Using "Install
and Configure" Option.
2. On the Select Domain screen, select Create New Domain and enter the following
information:
■Enter the user name for the new domain in the User Name field.
■Enter the user password for the new domain in the User Password field.
■Enter the user password again in the Confirm Password field.
■Enter a name for the new domain in the Domain Name field.
Click Next. The Specify Installation Location screen appears.
3. Identify the Homes, Instances, and the WebLogic Server directory by referring to
Identifying Installation Directories. After you enter information for each field,
click Next. The Specify Security Updates screen appears.
4. Choose how you want to be notified about security issues:
■If you want to be notified about security issues through email, enter your
email address in the Email field.
■If you want to be notified about security issues through My Oracle Support
(formerly MetaLink), select the My Oracle Support option and enter your My
Oracle Support Password.
■If you do not want to be notified about security issues, leave all fields empty.
Click Next. The Configure Components screen appears.
5. Select only Oracle Directory Services Manager. The Fusion Middleware Control
management component is automatically selected for this installation.
Ensure no other components are selected and click Next. The Configure Ports
screen appears.
6. Choose how you want the Installer to configure ports:
Note: If you selected Install and Configure option in the Select
Installation Type screen while installing Oracle Identity Management
11g Release 1 (11.1.1.6.0), as described in Installing and Configuring
Oracle Identity Management 11g Release 1 (11.1.1.6.0) Software, the
Select Domain screen is displayed.
If you selected Install Software - Do Not Configure option in the
Select Installation Type screen while installing Oracle Identity
Management 11g Release 1 (11.1.1.6.0), as described in Installing and
Configuring Oracle Identity Management 11g Release 1 (11.1.1.6.0)
Software, you must now start the Oracle Identity Management
Configuration Wizard. Run <ORACLE_HOME>/bin/config.sh (on
UNIX) or <ORACLE_HOME>\bin\config.bat (on Windows) to start
the Oracle Identity Management Configuration Wizard. The Select
Domain screen is displayed.

Only ODSM in an Existing WebLogic Domain
Configuring Oracle Directory Services Manager 10-3
■Select Auto Port Configuration if you want the Installer to configure ports
from a predetermined range.
■Select Specify Ports using Configuration File if you want the Installer to
configure ports using the staticports.ini file. You can click View/Edit File to
update the settings in the staticports.ini file.
Click Next.
7. The Installation Summary screen appears. Verify the information on this screen.
Click Configure to begin the configuration.
8. The Configuration Progress screen appears. Click Next to continue.
9. The Installation Complete screen appears. Click Save to save the configuration
information to a file, and then click Finish to exit the installer.
10.2 Only ODSM in an Existing WebLogic Domain
This topic describes how to configure only Oracle Directory Services Manager (ODSM)
in an existing WebLogic administration domain. It includes the following sections:
■Appropriate Deployment Environment
■Components Deployed
■Dependencies
■Procedure
10.2.1 Appropriate Deployment Environment
The configuration described in this topic is appropriate if you want to deploy an
additional Oracle Directory Services Manager component in an existing domain.
10.2.2 Components Deployed
Performing the configuration in this section deploys the following components:
■WebLogic Managed Server
■Oracle Directory Services Manager
10.2.3 Dependencies
The configuration in this section depends on Oracle WebLogic Server.
10.2.4 Procedure
Perform the following steps to configure only Oracle Directory Services Manager in an
existing domain:
1. Ensure that Oracle Directory Services Manager is installed, as described in
Installation Roadmap and Installing Oracle Identity Management Using "Install
and Configure" Option.

Only ODSM in an Existing WebLogic Domain
10-4 Oracle Fusion Middleware Installation Guide for Oracle Identity Management
2. On the Select Domain screen, select Extend Existing Domain and enter the
following information:
a. Enter the name of the host that contains the domain in the Host Name field.
b. Enter the Oracle WebLogic Server listen port in the Port field.
c. Enter the user name for the domain in the User Name field.
d. Enter the password for the domain user in the User Password field.
Click Next. The Specify Installation Location screen appears.
3. Identify the Homes, Instances, and the WebLogic Server directory by referring to
"Identifying Installation Directories".
After you enter information for each field, click Next. The Specify Security
Updates screen appears.
4. Choose how you want to be notified about security issues:
■If you want to be notified about security issues through email, enter your
email address in the Email field.
■If you want to be notified about security issues through My Oracle Support
(formerly MetaLink), select the My Oracle Support option and enter your My
Oracle Support Password.
■If you do not want to be notified about security issues, leave all fields empty.
Click Next. The Configure Components screen appears.
5. Select only Oracle Directory Services Manager. Ensure no other components are
selected and click Next. The Configure Ports screen appears.
6. Choose how you want the Installer to configure ports:
Note: If you selected Install and Configure option in the Select
Installation Type screen while installing Oracle Identity Management
11g Release 1 (11.1.1.6.0), as described in Installing and Configuring
Oracle Identity Management 11g Release 1 (11.1.1.6.0) Software, the
Select Domain screen is displayed.
If you selected Install Software - Do Not Configure option in the
Select Installation Type screen while installing Oracle Identity
Management 11g Release 1 (11.1.1.6.0), as described in Installing and
Configuring Oracle Identity Management 11g Release 1 (11.1.1.6.0)
Software, you must now start the Oracle Identity Management
Configuration Wizard. Run <ORACLE_HOME>/bin/config.sh (on
UNIX) or <ORACLE_HOME>\bin\config.bat (on Windows) to start
the Oracle Identity Management Configuration Wizard. The Select
Domain screen is displayed.
Note: To configure Oracle Identity Management components in an
existing Oracle WebLogic Server administration domain, each Oracle
WebLogic Server Home, Oracle Middleware Home, and Oracle Home
directory in the domain must have identical directory paths and
names.

Getting Started with ODSM After Installation
Configuring Oracle Directory Services Manager 10-5
■Select Auto Port Configuration if you want the Installer to configure ports
from a predetermined range.
■Select Specify Ports using Configuration File if you want the Installer to
configure ports using the staticports.ini file. You can click View/Edit File to
update the settings in the staticports.ini file.
Click Next.
7. The Installation Summary screen appears. Verify the information on this screen.
Click Configure to begin the configuration.
8. The Configuration Progress screen appears. Click Next to continue.
9. The Installation Complete screen appears. Click Save to save the configuration
information to a file, and then click Finish to exit the installer.
10.3 Verifying ODSM
To verify the Oracle Directory Services Manager (ODSM) installation, enter the
following URL into your browser's address field:
http://host:port/odsm
■host represents the name of the WebLogic Managed Server hosting Oracle
Directory Services Manager.
■port represents the WebLogic Managed Server listen port. You can determine the
exact port number of the Managed Server through the Oracle WebLogic
Administration Console. After logging in to the console, expand Environment on
the left navigation pane. Click Servers. The Summary of Servers page is displayed.
The port for the Oracle Directory Services Manager (ODSM) Managed Server is
displayed on this page.
Oracle Directory Services Manager is installed and running if the Welcome to Oracle
Directory Services Manage screen appears.
10.4 Getting Started with ODSM After Installation
After you install Oracle Directory Services Manager (ODSM), no additional
configuration is needed. The next step is to log in to Oracle Internet Directory or
Oracle Virtual Directory. The process for logging in to both directory servers is the
same. Information about logging in to both Oracle Internet Directory and Oracle
Virtual Directory provided below so you can learn more about Oracle Directory
Services Manager in the context of each directory server.
■For information about logging in to Oracle Internet Directory from Oracle
Directory Services Manager, refer to the "Logging in to the Directory Server from
Oracle Directory Services Manager" section in the Oracle Fusion Middleware
Administrator's Guide for Oracle Internet Directory.
■For information about logging in to Oracle Virtual Directory from Oracle
Directory Services Manager, refer to the "Logging in to the Directory Server from
Note: While the appearance of the Welcome screen verifies Oracle
Directory Services Manager is installed and running, you cannot
connect to Oracle Internet Directory or Oracle Virtual Directory from
Oracle Directory Services Manager without the appropriate
credentials.

Getting Started with ODSM After Installation
10-6 Oracle Fusion Middleware Installation Guide for Oracle Identity Management
Oracle Directory Services Manager" section in the Oracle Fusion Middleware
Administrator's Guide for Oracle Virtual Directory.

11
Configuring Oracle Identity Federation 11-1
11Configuring Oracle Identity Federation
This chapter explains how to configure Oracle Identity Federation (OIF).
This chapter discusses the following topics:
■Using the Information in This Chapter
■Understanding OIF Deployments
■Understanding OIF Basic and Advanced Deployments
■Configuring Oracle HTTP Server for OIF
■Performing Basic Oracle Identity Federation Configurations
■Performing Advanced Oracle Identity Federation Configurations
■Advanced Example: Configuring OIF with OID in a New WebLogic Domain for
LDAP Authentication, User Store, and Federation Store
■Advanced Example: Configuring OIF in a New or Existing WebLogic Domain
with RDBMS Data Stores
■Verifying OIF
■Getting Started with OIF After Installation
11.1 Using the Information in This Chapter
Oracle Identity Federation deployments vary greatly. As described in the following
topics, there are several components, and several options for those components, that
comprise an Oracle Identity Federation deployment.
Use this chapter as a starting point for your Oracle Identity Federation deployment, as
it does not describe every possible installation and configuration. You should also use
the Oracle Fusion Middleware Administrator's Guide for Oracle Identity Federation,
which provides additional and detailed deployment information, to supplement the
information in this chapter.
11.2 Understanding OIF Deployments
When you configure Oracle Identity Federation (OIF) 11g Release 1 (11.1.1), a
WebLogic Managed Server is created and the Oracle Identity Federation J2EE
application is installed on it. If you configure Oracle Identity Federation in a new
Oracle WebLogic Server administration domain by selecting the Create Domain
option, the Fusion Middleware Control management component is also deployed.

Understanding OIF Basic and Advanced Deployments
11-2 Oracle Fusion Middleware Installation Guide for Oracle Identity Management
Oracle Identity Federation functionality depends on several components and modules.
You can integrate and configure these components and modules during or after the
Oracle Identity Federation installation.
The following is a list and brief description of some of the components and modules
that determine Oracle Identity Federation functionality. Refer to the Oracle Fusion
Middleware Administrator's Guide for Oracle Identity Federation for complete information.
■Authentication Engine: The module that challenges users when they log in.
■User Data Store: The repository containing the identity information of the users
the Oracle Identity Federation system authenticates.
■Federation Data Store: The repository containing federated user account linking
data.
■Service Provider (SP) Integration Engine: The module that creates a local
authenticated session for the user based on a received federated Single Sign-On
(SSO) token.
■User Session Store and Message Store: The repository containing transient
runtime session state data and protocol messages.
■Configuration Data Store: The repository containing Oracle Identity Federation
configuration data.
11.3 Understanding OIF Basic and Advanced Deployments
There are two types of Oracle Identity Federation (OIF) 11g Release 1 (11.1.1)
deployments: Basic and Advanced. This topic describes both types of deployments
and includes the following sections:
■Basic Deployment
■Advanced Deployments
11.3.1 Basic Deployment
The Basic deployment includes Oracle Identity Federation with minimum
functionality enabled and the following configuration:
■No User Data Store
■No Federation Store
■JAAS Authentication Engine
■Test Service Provider (SP) Engine
■Memory Session Data Store
■Memory Message Data Store
■XML file system Configuration Store
11.3.2 Advanced Deployments
The Advanced deployments allows you to choose between different types of data
stores and authentication engines. The following is a list and description of the types
of data stores and authentication engines you can choose during an Advanced
installation:

Configuring Oracle HTTP Server for OIF
Configuring Oracle Identity Federation 11-3
Authentication Engine
■JAAS: Delegates authentication to the application server.
■LDAP: Uses form login and LDAP bind with credentials supplied by user to
authenticate against LDAP repository.
User Data Store
■None: No User Data Store. Typically used with Custom or JAAS Authentication
Engines, environments without user attributes, or Windows CardSpace.
■LDAP: Typical configuration that stores user data in an LDAP repository.
■RDBMS: Uses database tables with user names (and optionally user attributes) in
columns.
Federation Data Store
■None: No Federation Data Store. Typically used when there are no persistent
account linking records. No Federation Data Store is also an alternative to using
name identifiers, such as e-mail address, X.509 DN, Kerberos, or Windows Name
Identifier.
■LDAP: Stores federation in an LDAP repository. Commonly deployed when the
User Data Store is also LDAP.
■RDBMS: Stores federation in a relational database repository. Commonly
deployed when the User Data Store is also RDBMS.
■XML: Stores federation data in an XML file system. Commonly used for testing
purposes.
User Session Store and Message Store
■Memory: Stores transient runtime session state data and protocol messages in
in-memory tables. Commonly used for single instance deployments. Memory
provides better performance than the RDBMS User Session Store, but increases
runtime memory requirements.
■RDBMS: Stores transient runtime session state data and protocol messages in a
relational database. Recommended for High Availability cluster environments.
Configuration Data Store
■File System: Stores Oracle Identity Federation configuration data on the local file
system. Commonly used in single-instance and testing environments.
■RDBMS: Stores Oracle Identity Federation configuration data in a relational
database. Commonly used in High Availability environments or single-instances
with failover redundancy.
11.4 Configuring Oracle HTTP Server for OIF
When you install Oracle Identity Federation (OIF), Oracle HTTP Server also gets
installed. Oracle HTTP Server is required when using Oracle Identity Federation for
enterprise level single sign-on with Oracle Single Sign-On and Oracle Access Manager.
Although Oracle Identity Federation can function without Oracle HTTP Server, there
are advantages to configuring it as a proxy for Oracle Identity Federation.
Note: User Session Store and Message Store appear in the Installer as
separate configuration items, however, most deployments use the
same type of repository for both stores.

Performing Basic Oracle Identity Federation Configurations
11-4 Oracle Fusion Middleware Installation Guide for Oracle Identity Management
To configure the Oracle HTTP Server so that the Oracle Identity Federation application
can be accessed through Oracle HTTP Server ports, you can:
■Ensure that Oracle Identity Federation is installed, as described in Installation
Roadmap and Installing Oracle Identity Management Using "Install and
Configure" Option.
■Run <ORACLE_HOME>/bin/config.sh (On UNIX) or <ORACLE_
HOME>\bin\config.bat to start the Oracle Identity Management Configuration
Wizard. Click Next to continue.
■On the Configure Components screen, select Oracle HTTP Server and Oracle
Identity Federation.
11.5 Performing Basic Oracle Identity Federation Configurations
This topic describes how to perform a Basic Oracle Identity Federation (OIF)
configuration. It includes the following sections:
■Appropriate Deployment Environment
■Components Deployed
■Dependencies
■Procedure
11.5.1 Appropriate Deployment Environment
The Basic Oracle Identity Federation configuration is appropriate for:
■Creating a base to gradually build complex implementations upon after
installation
■Deploying test environments
■Deploying small, self-contained configurations
11.5.2 Components Deployed
Performing the Basic Oracle Identity Federation configuration deploys the following
components:
If you install Oracle Identity Federation in a new domain:
■WebLogic Managed Server
■Oracle Identity Federation
■WebLogic Administration Server
■Fusion Middleware Control
■Optionally, Oracle HTTP Server
If you install Oracle Identity Federation in an existing domain:
■WebLogic Managed Server
■Oracle Identity Federation
See: The "Deploying Oracle Identity Federation with Oracle HTTP
Server" section in the Oracle Fusion Middleware Administrator's Guide
for Oracle Identity Federation for more information about integrating
Oracle Identity Federation and Oracle HTTP Server.

Performing Basic Oracle Identity Federation Configurations
Configuring Oracle Identity Federation 11-5
■Optionally, Oracle HTTP Server
11.5.3 Dependencies
The Basic Oracle Identity Federation configuration depends on Oracle WebLogic
Server.
11.5.4 Procedure
Perform the following steps to deploy a Basic Oracle Identity Federation
configuration:
1. Ensure that Oracle Identity Federation is installed, as described in Installation
Roadmap and Installing Oracle Identity Management Using "Install and
Configure" Option.
2. Run <ORACLE_HOME>/bin/config.sh (On UNIX) or <ORACLE_
HOME>\bin\config.bat to start the Oracle Identity Management Configuration
Wizard. Click Next to continue.
3. On the Select Domain screen, choose whether to configure Oracle Identity
Federation in a new or existing domain:
To configure Oracle Identity Federation in a new domain:
a. Select Create New Domain.
b. Enter the user name for the new domain in the User Name field.
c. Enter the user password for the new domain in the User Password field.
Enter the user password again in the Confirm Password field.
d. Enter a name for the new domain in the Domain Name field.
e. Click Next. The Specify Installation Location screen appears.
Continue the installation by going to step 4 now.
To configure Oracle Identity Federation in an existing domain:
a. Select Extend Existing Domain.
b. Enter the name of the host that contains the domain in the Host Name field.
c. Enter the listen port for the WebLogic Administration Server in the Port field.
d. Enter the user name for the domain in the User Name field.
e. Enter the password for the domain user in the User Password field.
Click Next. The Specify Installation Location screen appears.
4. Identify the Homes, Instances, and the WebLogic Server directory by referring to
"Identifying Installation Directories".
After you enter information for each field, click Next. The Specify Security
Updates screen appears.
Note: To configure Oracle Identity Management components in an
existing Oracle WebLogic Server administration domain, each Oracle
WebLogic Server Home, Oracle Middleware Home, and Oracle Home
directory in the domain must have identical directory paths and
names.

Performing Basic Oracle Identity Federation Configurations
11-6 Oracle Fusion Middleware Installation Guide for Oracle Identity Management
5. Choose how you want to be notified about security issues:
■If you want to be notified about security issues through email, enter your
email address in the Email field.
■If you want to be notified about security issues through My Oracle Support
(formerly MetaLink), select the My Oracle Support option and enter your My
Oracle Support Password.
■If you do not want to be notified about security issues, leave all fields empty.
Click Next. The Configure Components screen appears.
6. Select Oracle Identity Federation—and optionally, Oracle HTTP Server. Refer to
"Configuring Oracle HTTP Server for OIF" on page 11-3 for information about
configuring these two components simultaneously.
If you are installing Oracle Identity Federation in a new domain, the Fusion
Middleware Control management component is automatically selected for
installation.
Ensure no other components are selected and click Next. The Configure Ports
screen appears.
7. Choose how you want the Installer to configure ports:
■Select Auto Port Configuration if you want the Installer to configure ports
from a predetermined range.
■Select Specify Ports using Configuration File if you want the Installer to
configure ports using the staticports.ini file. You can click View/Edit File to
update the settings in the staticports.ini file.
Click Next. The Select Oracle Identity Federation Configuration Type screen
appears.
8. Select Basic and click Next. The Specify OIF Details screen appears.
9. Enter the following information:
■PKCS12 Password: Enter the password Oracle Identity Federation will use for
encryption and for signing wallets. The Installer automatically generates these
wallets with self-signed certificates. Oracle recommends using the wallets only
for testing.
■Confirm Password: Enter the PKCS12 password again.
■Server ID: Enter a string that will be used to identify this Oracle Identity
Federation instance. A prefix of oif will be added to the beginning of the
string you enter. Each logical Oracle Identity Federation instance within an
Oracle WebLogic Server administration domain must have a unique Server
ID. Clustered Oracle Identity Federation instances acting as a single logical
instance will have the same Server ID.
Click Next.
10. The Installation Summary screen appears. Verify the information on this screen.
Click Configure to begin the configuration.
11. The Configuration Progress screen appears. Click Next to continue.
12. The Installation Complete screen appears. Click Save to save the configuration
information to a file, and then click Finish to exit the installer.

Performing Advanced Oracle Identity Federation Configurations
Configuring Oracle Identity Federation 11-7
11.6 Performing Advanced Oracle Identity Federation Configurations
This topic generally describes how to perform an Advanced Oracle Identity Federation
(OIF) configuration. Refer to the next two topics in this chapter for information on
performing specific Advanced Oracle Identity Federation configurations.
This topic includes the following sections:
■Appropriate Deployment Environment
■Components Deployed
■Dependencies
■Procedure
11.6.1 Appropriate Deployment Environment
The Advanced Oracle Identity Federation configuration provides a fast and simplified
method for deploying Oracle Identity Federation with its vital components integrated
and configured.
11.6.2 Components Deployed
Performing the Advanced Oracle Identity Federation configuration deploys the
following components:
If you configure Oracle Identity Federation in a new domain:
■WebLogic Managed Server
■Oracle Identity Federation
■WebLogic Administration Server
■Fusion Middleware Control
■Optionally, Oracle HTTP Server
If you configure Oracle Identity Federation in an existing domain:
■WebLogic Managed Server
■Oracle Identity Federation
■Optionally, Oracle HTTP Server
11.6.3 Dependencies
The Advanced Oracle Identity Federation configuration depends on the following
components:
■Oracle WebLogic Server
■Oracle Database, if using RDBMS for User Store, Federation Store, Session Store,
Message Store, or Configuration Store.
■New Identity Management - Oracle Identity Federation schema existing in the
database, if using RDBMS for Federation Store, Session Store, Message Store, or
Configuration Store.
■Database table for storing user dative using RDBMS for User Store
■LDAP repository, if using LDAP for Authentication, User Store, or Federation
Store.

Performing Advanced Oracle Identity Federation Configurations
11-8 Oracle Fusion Middleware Installation Guide for Oracle Identity Management
11.6.4 Procedure
Perform the following steps to deploy an Advanced Oracle Identity Federation
configuration:
1. Decide if you want to use RDBMS for User Store, Federation Store, Session Store,
Message Store, or Configuration Store. If you do, perform the following steps a
and b.
a. Install the database for Oracle Identity Federation. Refer to Installing Oracle
Database for more information.
b. Create the Identity Management - Oracle Identity Federation schema in the
database. Refer to "Creating Database Schema Using the Oracle Fusion
Middleware Repository Creation Utility (RCU)" for more information.
2. Decide if you want to use an LDAP repository for Authentication, User Store, or
Federation Store. If you do, you must install the LDAP repository before you can
install Oracle Identity Federation.
3. Ensure that Oracle Identity Federation is installed, as described in Installation
Roadmap and Installing Oracle Identity Management Using "Install and
Configure" Option.
4. Run <ORACLE_HOME>/bin/config.sh (On UNIX) or <ORACLE_
HOME>\bin\config.bat to start the Oracle Identity Management Configuration
Wizard. Click Next to continue.
5. On the Select Domain screen, choose whether to install Oracle Identity Federation
in a new or existing domain:
To configure Oracle Identity Federation in a new domain:
a. Select Create New Domain.
b. Enter the user name for the new domain in the User Name field.
c. Enter the user password for the new domain in the User Password field.
d. Enter the user password again in the Confirm Password field.
e. Enter a name for the new domain in the Domain Name field.
f. Click Next. The Specify Installation Location screen appears.
Continue the installation by going to step 6 now.
To configure Oracle Identity Federation in an existing domain:
a. Select Extend Existing Domain.
b. Enter the name of the host that contains the domain in the Host Name field.
c. Enter the listen port for the WebLogic Administration Server in the Port field.
d. Enter the user name for the domain in the User Name field.
e. Enter the password for the domain user in the User Password field.
f. Click Next. The Specify Installation Location screen appears.
6. Identify the Homes, Instances, and the WebLogic Server directory by referring to
Identifying Installation Directories.
Note: The schema is not required for RDBMS User Stores.

Performing Advanced Oracle Identity Federation Configurations
Configuring Oracle Identity Federation 11-9
After you enter information for each field, click Next. The Specify Security
Updates screen appears.
7. Choose how you want to be notified about security issues:
■If you want to be notified about security issues through email, enter your
email address in the Email field.
■If you want to be notified about security issues through My Oracle Support
(formerly MetaLink), select the My Oracle Support option and enter your My
Oracle Support Password.
■If you do not want to be notified about security issues, leave all fields empty.
Click Next. The Configure Components screen appears.
8. Select Oracle Identity Federation—and optionally, Oracle HTTP Server. Refer to
"Configuring Oracle HTTP Server for OIF" on page 11-3 for information about
configuring these two components simultaneously.
If you are installing Oracle Identity Federation in a new domain, the Fusion
Middleware Control management component is automatically selected for
installation.
Ensure no other components are selected and click Next. The Configure Ports
screen appears.
9. Choose how you want the Installer to configure ports:
■Select Auto Port Configuration if you want the Installer to configure ports
from a predetermined range.
■Select Specify Ports using Configuration File if you want the Installer to
configure ports using the staticports.ini file. You can click View/Edit File to
update the settings in the staticports.ini file.
Click Next. The Select Oracle Identity Federation Configuration Type screen
appears.
10. Select Advanced and click Next. The Specify OIF Details screen appears.
11. Enter the following information:
■PKCS12 Password: Enter the password Oracle Identity Federation will use for
encryption and for signing wallets. The Installer automatically generates these
wallets with self-signed certificates. Oracle recommends using the wallets only
for testing.
■Confirm Password: Enter the PKCS12 password again.
■Server ID: Enter a string that will be used to identify this Oracle Identity
Federation instance. A prefix of oif will be added to the beginning of the
string you enter. Each logical Oracle Identity Federation instance within an
Oracle WebLogic Server administration domain must have a unique Server
ID. Clustered Oracle Identity Federation instances acting as a single logical
instance will have the same Server ID.
Note: To install Oracle Identity Management components in an
existing Oracle WebLogic Server administration domain, each Oracle
WebLogic Server Home, Oracle Middleware Home, and Oracle Home
directory in the domain must have identical directory paths and
names.

Performing Advanced Oracle Identity Federation Configurations
11-10 Oracle Fusion Middleware Installation Guide for Oracle Identity Management
Click Next. The Select OIF Advanced Flow Attributes screen appears.
12. Select the appropriate option for each configuration item and click Next.
The screens that appear next depend on the options you selected for the
configuration items on the Select OIF Advanced Flow Attributes screen. The
following information describes all possible screens that may appear. This
information about all possible screens that may appear is not presented in a linear
sequence and your installation may not encounter all of the screens. Enter
information for the appropriate screens and proceed to step 13.
If you selected LDAP for Authentication Type, the Specify Authentication LDAP De-
tails screen will appear. Enter the following information:
■LDAP Type: Select the appropriate LDAP repository.
■LDAP URL: Enter the URL connection string for the LDAP repository in the
form: protocol://hostname:port
■LDAP Bind DN: Enter the bind DN for the LDAP repository.
■LDAP Password: Enter the password for the bind DN.
■User Credential ID Attribute: Enter the LDAP attribute Oracle Identity
Federation will use to authenticate users. For example, if you enter mail and
the value of the mail attribute for a user is jane.doe@domain.com, then Jane
Doe must enter jane.doe.@domain.com when challenged. Values for the
LDAP attribute you identify for User Credential ID Attribute must be unique
for all users.
■User Unique ID Attribute: Enter the LDAP attribute that will uniquely identify
users to Oracle Identity Federation. The value you enter must be identical to
the value you enter for the User Data Store’s User ID Attribute parameter. For
example, if you enter mail for User Unique ID Attribute and you configure the
User Data Store's User ID Attribute parameter with a value of EmailAddress,
then the value of mail in the authentication engine repository must equal the
value of EmailAddress in the User Data Store. Values for the LDAP attribute
you identify for User Unique ID Attribute must be unique for all users.
■Person Object Class: Enter the LDAP object class that represents a user in the
LDAP repository. For example: inetOrgPerson for Oracle Internet Directory
and Sun Java System Directory Server, and user for Microsoft Active
Directory.
■Base DN: Enter the root DN that searches will start from.
If you selected LDAP for User Store, the Specify LDAP Attributes for User Data Store
screen will appear. Enter the following information:
■LDAP Type: Select the appropriate LDAP repository.
Note: User Session Store and Message Store appear in the Installer as
separate configuration items, however, most deployments use the
same type of repository for both stores.
Note: If you selected Microsoft Active Directory for the LDAP Type,
you must specify an SSL LDAP URL, that is, ldaps://hostname:port.

Performing Advanced Oracle Identity Federation Configurations
Configuring Oracle Identity Federation 11-11
■LDAP URL: Enter the URL connection string for the LDAP repository in the
form: protocol://hostname:port
■LDAP Bind DN: Enter the bind DN for the LDAP repository.
■LDAP Password: Enter the password for the bind DN.
■User Description Attribute: Enter the readable LDAP attribute that will
identify the owner of a federation record. For example: uid for Oracle Internet
Directory and Sun Java System Directory Server, and sAMAccountName for
Microsoft Active Directory.
■User ID Attribute: Enter the LDAP attribute that will uniquely identify the
user during authentication. For example: uid for Oracle Internet Directory and
Sun Java System Directory Server, and sAMAccountName for Microsoft
Active Directory.
■Person Object Class: Enter the LDAP object class that represents a user in the
LDAP repository. For example: inetOrgPerson for Oracle Internet Directory
and Sun Java System Directory Server, and user for Microsoft Active
Directory.
■Base DN: Enter the root DN that searches will start from.
If you selected RDBMS for User Store, the Specify User Store Database Details screen
will appear. Enter the following information:
■HostName: Enter the connection string to the database host in the form:
hostname:port:servicename. For Oracle Real Application Clusters (RAC), the
connection string must be in the form:
hostname1:port1:instance1^hostname2:port2:instance2@servicename.
■Username: Enter the database username.
■Password: Enter the password for the database user.
■Login Table: Enter the name of the table that will store user data. The value
you enter must be a valid table name, and the values you enter for User ID
Attribute and User Description Attribute must be valid column names in the
table you identify.
■User ID Attribute: Enter the name of the table column to use for the Oracle
Identity Federation user ID. The value you enter must be a valid column name
in the table you identified for the Login Table parameter.
■User Description Attribute: Enter the name of the table column to use for the
user description. The value you enter must be a valid column name in the
table you identified for the Login Table parameter.
If you selected LDAP for Federation Store, the Specify LDAP Attributes for Federa-
tion Data Store screen will appear. Enter the following information:
■LDAP Type: Select the appropriate LDAP repository.
■LDAP URL: Enter the URL connection string for the LDAP repository in the
form: protocol://hostname:port
Note: If you selected Microsoft Active Directory for the LDAP Type,
you must specify an SSL LDAP URL, that is, ldaps://hostname:port.

Performing Advanced Oracle Identity Federation Configurations
11-12 Oracle Fusion Middleware Installation Guide for Oracle Identity Management
■LDAP Bind DN: Enter the bind DN for the LDAP repository.
■LDAP Password: Enter the password for the bind DN.
■User Federation Record Context: Enter the location of the container where you
want Oracle Identity Federation to store federation records. If the container
you identify does not exist, it will be created at runtime. However, if you
identify cn=example,dc=test,dc=com as the User Federation Record Context,
dc=test,dc=com must exist in the LDAP repository.
■LDAP Container Object Class: Optional. Enter the object class for the container
that stores federation records. If this field is empty, the default value of
applicationProcess is used.
■Active Directory Domain: Appears only if you select Microsoft Active
Directory for the LDAP Type. Enter the name of the Microsoft Active
Directory domain.
If you selected RDBMS for Federation Store, the Specify Federation Store Database
Details screen will appear. Enter the following information:
■HostName: Enter the connection string to the database host in the form:
hostname:port:servicename. For Oracle Real Application Clusters (RAC), the
connection string must be in the form:
hostname1:port1:instance1^hostname2:port2:instance2@servicename.
■Username: Enter the name of the schema owner created by RCU, which is of
the form PREFIX_OIF.
■Password: Enter the password for the database user.
If you selected RDBMS for User Session Store, Message Store, or Configuration
Store, the Specify Transient Store Database Details screen will appear. Enter the fol-
lowing information:
■HostName: Enter the connection string to the database host in the form:
hostname:port:servicename. For Oracle Real Application Clusters (RAC), the
connection string must be in the form:
hostname1:port1:instance1^hostname2:port2:instance2@servicename.
■Username: Enter the name of the schema owner created by RCU, which is of
the form PREFIX_OIF.
■Password: Enter the password for the database user.
Click Next.
13. The Installation Summary screen appears. Verify the information on this screen.
Click Configure to begin the configuration.
14. The Configuration Progress screen appears. Click Next to continue.
15. The Installation Complete screen appears. Click Save to save the configuration
information to a file, and then click Finish to exit the installer.
Note: If you selected Microsoft Active Directory for the LDAP Type,
you must specify an SSL LDAP URL, that is, ldaps://hostname:port.

Advanced Example: Configuring OIF with OID in a New WebLogic Domain for LDAP Authentication, User Store, and Federation
Configuring Oracle Identity Federation 11-13
11.7 Advanced Example: Configuring OIF with OID in a New WebLogic
Domain for LDAP Authentication, User Store, and Federation Store
This section describes how to configure Oracle Identity Federation (OIF) with Oracle
Internet Directory (OID) in a new WebLogic administration domain for LDAP
Authentication, User Store, and Federation Store.
This section includes the following information about this configuration:
■Appropriate Deployment Environment
■Components Deployed
■Dependencies
■Procedure
11.7.1 Appropriate Deployment Environment
Perform the configuration in this topic to quickly deploy Oracle Identity Federation
with Oracle Internet Directory as the LDAP repository for Authentication, User Store,
and Federation Store.
11.7.2 Components Deployed
Performing the configuration in this section deploys the following components:
■WebLogic Managed Server
■Oracle Identity Federation
■Oracle Internet Directory
■Oracle Directory Services Manager
■WebLogic Administration Server
■Fusion Middleware Control
■Optionally, Oracle HTTP Server
11.7.3 Dependencies
The configuration in this section depends on the following components:
■Oracle WebLogic Server
■Oracle Database for Oracle Internet Directory
■Identity Management - Oracle Internet Directory schema existing in the database for
Oracle Internet Directory
■Oracle Database for Oracle Identity Federation, if using RDBMS for Session Store,
Message Store, or Configuration Store.
Note: When you configure Oracle Identity Federation with Oracle
Internet Directory, the Installer automatically configures connection,
credential, attribute, and container settings using the Oracle Internet
Directory configuration.
Advanced Example: Configuring OIF with OID in a New WebLogic Domain for LDAP Authentication, User Store, and Federation
11-14 Oracle Fusion Middleware Installation Guide for Oracle Identity Management
■New Identity Management - Oracle Identity Federation schema existing in the
database for Oracle Identity Federation, if using RDBMS for Session Store,
Message Store, or Configuration Store.
11.7.4 Procedure
Perform the following steps to configure Oracle Identity Federation with Oracle
Internet Directory in a new domain for LDAP Authentication, User Store, and
Federation Store:
1. Decide if you want to use RDBMS for Session Store, Message Store, or
Configuration Store. If you do, perform the following steps a and b.
a. Install the database for Oracle Identity Federation. Refer to Installing Oracle
Database for more information.
b. Create the Identity Management - Oracle Identity Federation schema in the
database. Refer to Creating Database Schema Using the Oracle Fusion
Middleware Repository Creation Utility (RCU) for more information.
2. Install the Oracle Database for Oracle Internet Directory. Refer to Installing Oracle
Database for more information.
3. Create the Identity Management - Oracle Internet Directory schema in the database
for Oracle Internet Directory. Refer to "Creating Database Schema Using the Oracle
Fusion Middleware Repository Creation Utility (RCU)" for more information.
4. Ensure that Oracle Identity Federation is installed, as described in Installation
Roadmap and Installing Oracle Identity Management Using "Install and
Configure" Option.
5. Run <ORACLE_HOME>/bin/config.sh (On UNIX) or <ORACLE_
HOME>\bin\config.bat to start the Oracle Identity Management Configuration
Wizard. Click Next to continue.
6. On the Select Domain screen, select Create New Domain and enter the following
information:
■User Name: Enter the user name for the new domain.
■User Password: Enter the user password for the new domain.
Enter the user password again in the Confirm Password field.
■Domain Name: Enter a name for the new domain.
Click Next. The Specify Installation Location screen appears.
7. Identify the Homes, Instances, and the WebLogic Server directory by referring to
Identifying Installation Directories. After you enter information for each field,
click Next. The Specify Security Updates screen appears.
8. Choose how you want to be notified about security issues:
■If you want to be notified about security issues through email, enter your
email address in the Email field.
■If you want to be notified about security issues through My Oracle Support
(formerly MetaLink), select the My Oracle Support option and enter your My
Oracle Support Password.
■If you do not want to be notified about security issues, leave all fields empty.
Click Next. The Configure Components screen appears.

Advanced Example: Configuring OIF with OID in a New WebLogic Domain for LDAP Authentication, User Store, and Federation
Configuring Oracle Identity Federation 11-15
9. Select Oracle Internet Directory, Oracle Identity Federation, and optionally,
Oracle HTTP Server. Refer to "Configuring Oracle HTTP Server for OIF" on
page 11-3 for information about configuring Oracle HTTP Server with Oracle
Identity Federation.
The Oracle Directory Services Manager and Fusion Middleware Control
management components are automatically selected for this installation.
Ensure no other components are selected and click Next. The Configure Ports
screen appears.
10. Choose how you want the Installer to configure ports:
■Select Auto Port Configuration if you want the Installer to configure ports
from a predetermined range.
■Select Specify Ports using Configuration File if you want the Installer to
configure ports using the staticports.ini file. You can click View/Edit File to
update the settings in the staticports.ini file.
Click Next. The Specify Schema Database screen appears.
11. Identify the ODS schema for Oracle Internet Directory that you created in step 3
by selecting Use Existing Schema and entering the following information:
■Enter the database connection information in the Connect String field. The
connection string must be in the form of hostname:port:servicename. For Oracle
Real Application Clusters (RAC), the connection string must be in the form of
hostname1:port1:instance1^hostname2:port2:instance2@servicename.
■Enter the password for the ODS schema in the Password field and click Next.
The Create Oracle Internet Directory screen appears.
12. Enter the following information for Oracle Internet Directory:
■Realm: Enter the location for your realm.
■Administrator Password: Enter the password for the Oracle Internet Directory
Administrator.
■Confirm Password: Enter the administrator password again.
Click Next. The Specify OIF Details screen appears.
13. Enter the following information:
■PKCS12 Password: Enter the password Oracle Identity Federation will use for
encryption and for signing wallets. The Installer automatically generates these
wallets with self-signed certificates. Oracle recommends using the wallets only
for testing.
■Confirm Password: Enter the PKCS12 password again.
■Server ID: Enter a string that will be used to identify this Oracle Identity
Federation instance. A prefix of oif will be added to the beginning of the
string you enter. Each logical Oracle Identity Federation instance within an
Oracle WebLogic Server administration domain must have a unique Server
Note: If your existing ODS and ODSSM schemas have different
passwords, the Specify ODSSM Password screen will appear after you
click Next. Enter the password for your existing ODSSM schema and
click Next.

Advanced Example: Configuring OIF with OID in a New WebLogic Domain for LDAP Authentication, User Store, and Federation
11-16 Oracle Fusion Middleware Installation Guide for Oracle Identity Management
ID. Clustered Oracle Identity Federation instances acting as a single logical
instance will have the same Server ID.
Click Next. The Select OIF Advanced Flow Attributes screen appears.
14. Select the appropriate option for each configuration item and click Next:
■User Session Store: Memory or RDBMS
–Select Memory to store transient runtime session state data in in-memory
tables.
–Select RDBMS to store transient runtime session state data in a relational
database.
■Message Store: Memory or RDBMS
–Select Memory to store transient protocol messages in in-memory tables
–Select RDBMS to store transient protocol messages in a relational
database.
■Configuration Store: File or RDBMS
–Select File to store Oracle Identity Federation configuration data on the
local file system.
–Select RDBMS to store Oracle Identity Federation configuration data in a
relational database.
15. Enter the following information on the Specify Transient Store Database Details
screen:
Notes:
■Notice that the options for Authentication Type, User Store and
Federation Store are automatically set to LDAP because you are
installing Oracle Internet Directory with Oracle Identity
Federation.
■The Installer sets the User Federation Record Context to
cn=fed,BASE_REALM, where BASE_REALM is typically
dc=us,dc=oracle,dc=com.
Note: User Session Store and Message Store appear in the Installer as
separate configuration items, however, most deployments use the
same type of repository for both stores.
Note: The screens that appear next depend on the options you
selected for the configuration items.
■If you selected RDBMS for User Session Store, Message Store, or
Configuration Store, go to step 15 now.
■If you did not select RDBMS for User Session Store, Message Store,
or Configuration Store, go to step 16 now.

Advanced Example: Configuring OIF in a New or Existing WebLogic Domain with RDBMS Data Stores
Configuring Oracle Identity Federation 11-17
■HostName: Enter the connection string to the database host in the form:
hostname:port:servicename. For Oracle Real Application Clusters (RAC), the
connection string must be in the form:
hostname1:port1:instance1^hostname2:port2:instance2@servicename.
■Username: Enter the name of the schema owner created by RCU, which is of
the form PREFIX_OIF.
■Password: Enter the password for the database user.
Click Next.
16. The Installation Summary screen appears. Verify the information on this screen.
Click Configure to begin the configuration.
17. The Configuration Progress screen appears. Click Next to continue.
18. The Installation Complete screen appears. Click Save to save the configuration
information to a file, and then click Finish to exit the installer.
11.8 Advanced Example: Configuring OIF in a New or Existing WebLogic
Domain with RDBMS Data Stores
This topic describes how to configure Oracle Identity Federation (OIF) in a new or
existing WebLogic administration domain with RDBMS data stores. It includes the
following sections:
■Appropriate Deployment Environment
■Components Deployed
■Dependencies
■Procedure
11.8.1 Appropriate Deployment Environment
Perform the configuration in this topic to quickly deploy Oracle Identity Federation
with RDBMS User Store, Federation Store, Session Store, Message Store, and
Configuration Store.
11.8.2 Components Deployed
Performing the configuration in this section deploys the following components:
If you configure Oracle Identity Federation in a new domain:
■WebLogic Administration Server
■Fusion Middleware Control
■WebLogic Managed Server
■Oracle Identity Federation
■Optionally, Oracle HTTP Server
If you configure Oracle Identity Federation in an existing domain:
■WebLogic Managed Server
■Oracle Identity Federation
■Optionally, Oracle HTTP Server

Advanced Example: Configuring OIF in a New or Existing WebLogic Domain with RDBMS Data Stores
11-18 Oracle Fusion Middleware Installation Guide for Oracle Identity Management
11.8.3 Dependencies
The configuration in this section depends on the following:
■Oracle WebLogic Server
■Oracle Database for User Store, Federation Store, Session Store, Message Store,
and Configuration Store.
■New Identity Management - Oracle Identity Federation schema existing in the
database for Federation Store, Session Store, Message Store, and Configuration
Store.
■Table for storing user data in the User Store database.
■LDAP repository, if using LDAP for Authentication.
11.8.4 Procedure
Perform the following steps to configure Oracle Identity Federation in a new or
existing domain with RDBMS User Store, Federation Store, User Session Store,
Message Store, and Configuration Store:
1. Install the database(s) for the RDBMS User Store, Federation Store, User Session
Store, Message Store, and Configuration Store. Refer to Installing Oracle Database
for more information.
2. Create the Identity Management - Oracle Identity Federation schema in the
database(s). Refer to Creating Database Schema Using the Oracle Fusion
Middleware Repository Creation Utility (RCU) for more information.
3. Decide if you want to use an LDAP repository for Authentication. If you do, you
must install the LDAP repository before you can install Oracle Identity Federation.
4. Ensure that Oracle Identity Federation is installed, as described in Installation
Roadmap and Installing Oracle Identity Management Using "Install and
Configure" Option.
5. Run <ORACLE_HOME>/bin/config.sh (On UNIX) or <ORACLE_
HOME>\bin\config.bat to start the Oracle Identity Management Configuration
Wizard. Click Next to continue.
6. On the Select Domain screen, choose whether to install Oracle Identity Federation
in a new or existing domain:
To configure Oracle Identity Federation in a new domain:
a. Select Create New Domain.
b. Enter the user name for the new domain in the User Name field.
c. Enter the user password for the new domain in the User Password field.
d. Enter the user password again in the Confirm Password field.
e. Enter a name for the new domain in the Domain Name field.
f. Click Next. The Specify Installation Location screen appears.
g. Continue the installation by going to step 7 now.
To install Oracle Identity Federation in an existing domain:
a. Select Extend Existing Domain.
b. Enter the name of the host that contains the domain in the Host Name field.

Advanced Example: Configuring OIF in a New or Existing WebLogic Domain with RDBMS Data Stores
Configuring Oracle Identity Federation 11-19
c. Enter the listen port for the WebLogic Administration Server in the Port field.
d. Enter the user name for the domain in the User Name field.
e. Enter the password for the domain user in the User Password field.
f. Click Next. The Specify Installation Location screen appears.
7. Identify the Homes, Instances, and the WebLogic Server directory by referring to
Identifying Installation Directories.
After you enter information for each field, click Next. The Specify Security
Updates screen appears.
8. Choose how you want to be notified about security issues:
■If you want to be notified about security issues through email, enter your
email address in the Email field.
■If you want to be notified about security issues through My Oracle Support
(formerly MetaLink), select the My Oracle Support option and enter your My
Oracle Support Password.
■If you do not want to be notified about security issues, leave all fields empty.
Click Next. The Configure Components screen appears.
9. Select Oracle Identity Federation—and optionally, Oracle HTTP Server. Refer to
"Configuring Oracle HTTP Server for OIF" on page 11-3 for information about
configuring these two components simultaneously.
If you are installing Oracle Identity Federation in a new domain, the Fusion
Middleware Control management component is automatically selected for
installation.
Ensure no other components are selected and click Next. The Configure Ports
screen appears.
10. Choose how you want the Installer to configure ports:
■Select Auto Port Configuration if you want the Installer to configure ports
from a predetermined range.
■Select Specify Ports using Configuration File if you want the Installer to
configure ports using the staticports.ini file. You can click View/Edit File to
update the settings in the staticports.ini file.
Click Next. The Select Oracle Identity Federation Configuration Type screen
appears.
11. Select Advanced and click Next. The Specify OIF Details screen appears.
12. Enter the following information:
■PKCS12 Password: Enter the password Oracle Identity Federation will use for
encryption and for signing wallets. The Installer automatically generates these
Note: To install Oracle Identity Management components in an
existing Oracle WebLogic Server administration domain, each Oracle
WebLogic Server Home, Oracle Middleware Home, and Oracle Home
directory in the domain must have identical directory paths and
names.

Advanced Example: Configuring OIF in a New or Existing WebLogic Domain with RDBMS Data Stores
11-20 Oracle Fusion Middleware Installation Guide for Oracle Identity Management
wallets with self-signed certificates. Oracle recommends using the wallets only
for testing.
■Confirm Password: Enter the PKCS12 password again.
■Server ID: Enter a string that will be used to identify this Oracle Identity
Federation instance. A prefix of oif will be added to the beginning of the
string you enter. Each logical Oracle Identity Federation instance within an
Oracle WebLogic Server administration domain must have a unique Server
ID. Clustered Oracle Identity Federation instances acting as a single logical
instance will have the same Server ID.
Click Next. The Select OIF Advanced Flow Attributes screen appears.
13. Select the following and click Next:
■Authentication Type: JAAS or LDAP
–Select JAAS to delegate authentication to the application server.
–Select LDAP to authenticate against an LDAP repository.
■User Store: RDBMS
■Federation Store: RDBMS
■User Session Store: RDBMS
■Message Store: RDBMS
■Configuration Store: RDBMS
14. Enter the following information on the Specify Authentication LDAP Details
screen to identify the LDAP repository that will perform authentication:
■LDAP Type: Select the appropriate LDAP repository.
■LDAP URL: Enter the URL connection string for the LDAP repository in the
form: protocol://hostname:port
■LDAP Bind DN: Enter the bind DN for the LDAP repository.
■LDAP Password: Enter the password for the bind DN.
■User Credential ID Attribute: Enter the LDAP attribute Oracle Identity
Federation will use to authenticate users. For example, if you enter mail and
the value of the mail attribute for a user is jane.doe@domain.com, then Jane
Doe must enter jane.doe.@domain.com when challenged. Values for the
Note: The screen that appears next depends on what you selected for
Authentication:
■If you selected LDAP for Authentication Type, the Specify
Authentication LDAP Details screen appears. Continue you
installation by going to step 14 now.
■If you selected JAAS for Authentication Type, the Specify User
Store Database Details screen appears. Continue you installation
by going to step 15 now.
Note: If you selected Microsoft Active Directory for the LDAP Type,
you must specify an SSL LDAP URL, that is, ldaps://hostname:port.

Advanced Example: Configuring OIF in a New or Existing WebLogic Domain with RDBMS Data Stores
Configuring Oracle Identity Federation 11-21
LDAP attribute you identify for User Credential ID Attribute must be unique
for all users.
■User Unique ID Attribute: Enter the LDAP attribute that will uniquely identify
users to Oracle Identity Federation. The value you enter must be identical to
the value you enter for the User Data Store’s User ID Attribute parameter. For
example, if you enter mail for User Unique ID Attribute and you configure the
User Data Store's User ID Attribute parameter with a value of EmailAddress,
then the value of mail in the authentication engine repository must equal the
value of EmailAddress in the User Data Store. Values for the LDAP attribute
you identify for User Unique ID Attribute must be unique for all users.
■Person Object Class: Enter the LDAP object class that represents a user in the
LDAP repository. For example: inetOrgPerson for Oracle Internet Directory
and Sun Java System Directory Server, and user for Microsoft Active
Directory.
■Base DN: Enter the root DN that searches will start from.
Click Next. The Specify User Store Database Details screen appears.
15. Enter the following information to identify the database that will store user data:
■HostName: Enter the connection string to the database host in the form:
hostname:port:servicename. For Oracle Real Application Clusters (RAC), the
connection string must be in the form:
hostname1:port1:instance1^hostname2:port2:instance2@servicename.
■Username: Enter the database username.
■Password: Enter the password for the database user.
■Login Table: Enter the name of the table that will store user data. The value
you enter must be a valid table name, and the values you enter for User ID
Attribute and User Description Attribute must be valid column names in the
table you identify.
■User ID Attribute: Enter the name of the table column to use for the Oracle
Identity Federation user ID. The value you enter must be a valid column name
in the table you identified for the Login Table parameter.
■User Description Attribute: Enter the name of the table column to use for the
user description. The value you enter must be a valid column name in the
table you identified for the Login Table parameter.
Click Next. The Specify Federation Store Database Details screen appears.
16. Enter the following information to identify the database that will store federated
user account linking data:
■HostName: Enter the connection string to the database host in the form:
hostname:port:servicename. For Oracle Real Application Clusters (RAC), the
connection string must be in the form:
hostname1:port1:instance1^hostname2:port2:instance2@servicename.
■Username: Enter the name of the schema owner created by RCU, which is of
the form PREFIX_OIF.
■Password: Enter the password for the database user.
Click Next. The Specify Transient Store Database screen appears.

Verifying OIF
11-22 Oracle Fusion Middleware Installation Guide for Oracle Identity Management
17. Enter the following information to identify the database that will store transient
runtime session state data, protocol messages, and Oracle Identity Federation
configuration data:
■HostName: Enter the connection string to the database host in the form:
hostname:port:servicename. For Oracle Real Application Clusters (RAC), the
connection string must be in the form:
hostname1:port1:instance1^hostname2:port2:instance2@servicename.
■Username: Enter the name of the schema owner created by RCU, which is of
the form PREFIX_OIF.
■Password: Enter the password for the database user.
Click Next.
18. The Installation Summary screen appears. Verify the information on this screen.
Click Configure to begin the configuration.
19. The Configuration Progress screen appears. Click Next to continue.
20. The Installation Complete screen appears. Click Save to save the configuration
information to a file, and then click Finish to exit the installer.
11.9 Verifying OIF
Verify the Oracle Identity Federation (OIF) installation by:
■Accessing the Oracle Identity Federation metadata at the following URL. Oracle
Identity Federation was installed and the Oracle Identity Federation server is
running if you can access the metadata.
http://host:port/fed/sp/metadata
■Accessing Fusion Middleware Control to verify that Oracle Identity Federation is
available and running. For more information, see "Getting Started Using Oracle
Enterprise Manager Fusion Middleware Control" in the Oracle Fusion Middleware
Administrator's Guide.
11.10 Getting Started with OIF After Installation
After installing Oracle Identity Federation (OIF), refer to the "Common Tasks" section
in the Oracle Fusion Middleware Administrator's Guide for Oracle Identity Federation.
Note: host represents the name of the WebLogic Managed Server
where Oracle Identity Federation was installed. port represents the
listen port on that WebLogic Managed Server.

12
Configuring Oracle Unified Directory with Oracle Identity Management 11.1.1.6.0 12-1
12
Configuring Oracle Unified Directory with
Oracle Identity Management 11.1.1.6.0
This chapter discusses the following topics:
■Before You Begin
■Configuring only Oracle Unified Directory (OUD)
■Configuring Oracle Unified Directory (OUD) with ODSM
■Configuring OUD/ODSM/ODIP/Fusion Middleware Control and OVD/ODSM
12.1 Before You Begin
Before performing any installation, you should read the following documents to
ensure that your Oracle Fusion Middleware environment meets the minimum
installation requirements for the products you are installing.
■Review System Requirements and Specifications
■Review Certification Information
12.1.1 Review System Requirements and Specifications
Oracle Fusion Middleware System Requirements and Specifications document is available
at:
http://www.oracle.com/technetwork/middleware/ias/downloads/fusion-requirem
ents-100147.html
This document covers information such as hardware and software requirements,
database schema requirements, minimum disk space and memory requirements, and
required system libraries, packages, or patches.
12.1.2 Review Certification Information
Oracle Fusion Middleware Supported System Configurations document is available at:
http://www.oracle.com/technetwork/middleware/ias/downloads/fusion-certific
ation-100350.html
This document contains certification information related to supported 32-bit and 64-bit
operating systems, databases, web servers, LDAP servers, adapters, IPv6, JDKs, and
third-party products.

Configuring only Oracle Unified Directory (OUD)
12-2 Oracle Fusion Middleware Installation Guide for Oracle Identity Management
12.2 Configuring only Oracle Unified Directory (OUD)
To configure only Oracle Unified Directory (OUD), refer to the following topics of the
Oracle Fusion Middleware Installation Guide for Oracle Unified Directory 11g Release 1
(11.1.1):
■"Installing the Software", available at:
http://download.oracle.com/docs/cd/E22289_
01/html/821-1274/installing-the-software.html#scrolltoc
■"Setting Up the Directory Server", available at:
http://download.oracle.com/docs/cd/E22289_
01/html/821-1274/setting-up-ds.html#scrolltoc
12.3 Configuring Oracle Unified Directory (OUD) with ODSM
To configure Oracle Unified Directory (OUD) with Oracle Directory Services Manager
(ODSM), refer to the following topics:
■Installing Oracle WebLogic Server 11g Release 1 (10.3.5 or 10.3.6). For more
information, see "Install Oracle WebLogic Server" in the Oracle Fusion Middleware
Installation Planning Guide. In addition, see Oracle Fusion Middleware Installation
Guide for Oracle WebLogic Server for complete information about installing Oracle
WebLogic Server.
■"Installing the Software" in the Oracle Fusion Middleware Installation Guide for Oracle
Unified Directory 11g Release 1 (11.1.1), available at:
http://download.oracle.com/docs/cd/E22289_
01/html/821-1274/installing-the-software.html#scrolltoc
■"Setting Up the Directory Server" in the Oracle Fusion Middleware Installation Guide
for Oracle Unified Directory 11g Release 1 (11.1.1), available at:
http://download.oracle.com/docs/cd/E22289_
01/html/821-1274/setting-up-ds.html#scrolltoc
■"Managing Oracle Unified Directory With Oracle Directory Services Manager" in
the Oracle Fusion Middleware Installation Guide for Oracle Unified Directory 11g
Release 1 (11.1.1), available at:
http://download.oracle.com/docs/cd/E22289_
01/html/821-1273/managing-ojd-with-odsm.html
12.4 Configuring OUD/ODSM/ODIP/Fusion Middleware Control and
OVD/ODSM
This topic describes how to configure Oracle Unified Directory (OUD), Oracle
Directory Services Manager (ODSM), Oracle Directory Integration Platform (ODIP)
and Fusion Middleware Control in a new WebLogic administration domain (for
example: domain1); and Oracle Virtual Directory(OVD) and Oracle Directory Services
Manager (ODSM) in a separate WebLogic administration domain (for example:
domain2). It includes the following sections:
Note: In the Specify Installation Location screen enter the location
of the Oracle Middleware Home for the OUD Base Location Home.

Configuring OUD/ODSM/ODIP/Fusion Middleware Control and OVD/ODSM
Configuring Oracle Unified Directory with Oracle Identity Management 11.1.1.6.0 12-3
■Part I: Configuring OVD with ODSM and Fusion Middleware Control in a New
WebLogic Administration Domain
■Part II: Configuring OUD/ODSM/ODIP and Fusion Middleware Control in a
New WebLogic Administration Domain
12.4.1 Part I: Configuring OVD with ODSM and Fusion Middleware Control in a New
WebLogic Administration Domain
This topic describes how to configure Oracle Virtual Directory (OVD) with Oracle
Directory Services Manager (ODSM) and Fusion Middleware Control in a new
WebLogic administration domain. It includes the following sections:
■Dependencies
■Procedure
12.4.1.1 Dependencies
The configuration in this section depends on Oracle WebLogic Server.
12.4.1.2 Procedure
Perform the following steps to configure Oracle Virtual Directory with Oracle
Directory Services Manager and Fusion Middleware Control in a new domain:
1. Ensure that Oracle WebLogic Server 11g Release 1 (10.3.5 or 10.3.6) is installed. For
more information, see "Install Oracle WebLogic Server" in the Oracle Fusion
Middleware Installation Planning Guide. In addition, see Oracle Fusion Middleware
Installation Guide for Oracle WebLogic Server for complete information about
installing Oracle WebLogic Server.
2. Ensure that Oracle Virtual Directory is installed, as described in Installing Oracle
Identity Management Using "Install and Configure" Option.
Note: Part I is optional if you do not wish to use Oracle Virtual
Directory (OVD).
Note: After installing Oracle WebLogic Server, ensure that you
complete the following steps:
1. Open the
setNMProps
file (located at
<MW_HOME>/oracle_
common/common/bin
directory), and ensure that the
StartScriptEnabled
property is set to
true.
2. Run the
<MW_HOME>/oracle_common/common/bin/setNMProps.sh
script
(on UNIX) or
<MW_HOME>\oracle_common\common\bin\setNMProps.cmd
(on Windows).
3. Start the Node Manager by executing the following command:
On UNIX:
Run
startNodeManager.sh
(Located at
<WL_HOME>/server/bin
directory).
On Windows:
Run
startNodeManager.cmd
(Located at
<WL_HOME>\server\bin
directory).

Configuring OUD/ODSM/ODIP/Fusion Middleware Control and OVD/ODSM
12-4 Oracle Fusion Middleware Installation Guide for Oracle Identity Management
3. On the Select Domain screen, select Create New Domain and enter the following
information:
■Enter the user name for the new domain in the User Name field.
■Enter the user password for the new domain in the User Password field.
■Enter the user password again in the Confirm Password field.
■Enter a name for the new domain in the Domain Name field.
Click Next. The Specify Installation Location screen appears.
4. Identify the Homes, Instances, and the WebLogic Server directory by referring to
Identifying Installation Directories. After you enter information for each field,
click Next. The Specify Security Updates screen appears.
5. Choose how you want to be notified about security issues:
■If you want to be notified about security issues through email, enter your
email address in the Email field.
■If you want to be notified about security issues through My Oracle Support
(formerly MetaLink), select the My Oracle Support option and enter your My
Oracle Support Password.
■If you do not want to be notified about security issues, leave all fields empty.
Click Next. The Configure Components screen appears.
6. Select only Oracle Virtual Directory. The Oracle Directory Services Manager and
Fusion Middleware Control management components are automatically selected
for this installation.
Ensure no other components are selected and click Next. The Configure Ports
screen appears.
7. Choose how you want the Installer to configure ports:
■Select Auto Port Configuration if you want the Installer to configure ports
from a predetermined range.
■Select Specify Ports using Configuration File if you want the Installer to
configure ports using the
staticports.ini
file. You can click View/Edit File
to update the settings in the
staticports.ini
file.
Click Next. The Specify Oracle Virtual Directory Information screen appears.
Note: If you selected Install and Configure option in the Select
Installation Type screen while installing Oracle Identity Management
11g Release 1 (11.1.1.6.0), as described in Installing and Configuring
Oracle Identity Management 11g Release 1 (11.1.1.6.0) Software, the
Select Domain screen is displayed.
If you selected Install Software - Do Not Configure option in the
Select Installation Type screen while installing Oracle Identity
Management 11g Release 1 (11.1.1.6.0), as described in Installing and
Configuring Oracle Identity Management 11g Release 1 (11.1.1.6.0)
Software, you must now start the Oracle Identity Management
Configuration Wizard. Run
<ORACLE_HOME>/bin/config.sh
(on
UNIX) or
<ORACLE_HOME>\bin\config.bat
(on Windows) to start the
Oracle Identity Management Configuration Wizard. The Select
Domain screen is displayed.

Configuring OUD/ODSM/ODIP/Fusion Middleware Control and OVD/ODSM
Configuring Oracle Unified Directory with Oracle Identity Management 11.1.1.6.0 12-5
8. Enter the following information:
■LDAP v3 Name Space: Enter the name space for Oracle Virtual Directory. The
default value is
dc=us,dc=oracle,dc=com
.
■HTTP Web Gateway: Select this option to enable the Oracle Virtual Directory
HTTP Web Gateway.
■Secure: Select this option if you enabled the HTTP Web Gateway and you
want to secure it using SSL.
■Administrator User Name: Enter the user name for the Oracle Virtual
Directory administrator. The default value is cn=orcladmin.
■Password: Enter the password for the Oracle Virtual Directory administrator.
■Confirm Password: Enter the password for the Oracle Virtual Directory
administrator again.
■Configure Administrative Server in secure mode: Select this option to secure
the Oracle Virtual Directory Administrative Listener using SSL. This option is
selected by default. Oracle recommends selecting this option.
Click Next.
9. The Installation Summary screen appears. Verify the information on this screen.
Click Configure to begin the configuration.
10. The Configuration Progress screen appears. Click Next to continue.
11. The Installation Complete screen appears. Click Save to save the configuration
information to a file, and then click Finish to exit the installer.
A new WebLogic domain (for example: domain2) is created to support Oracle
Virtual Directory (OVD) with Oracle Directory Services Manager (ODSM) and
Fusion Middleware Control in the
<MW_HOME>\user_projects\domains
directory
(on Windows). On UNIX, the domain is created in the
<MW_HOME>/user_
projects/domains
directory.
For managing Oracle Virtual Directory (OVD) with Oracle Directory Services
Manager (ODSM), refer to the "Getting Started with Administering Oracle Virtual
Directory" chapter in the Oracle Fusion Middleware Administrator's Guide for Oracle
Virtual Directory.
12.4.2 Part II: Configuring OUD/ODSM/ODIP and Fusion Middleware Control in a New
WebLogic Administration Domain
This topic describes how to configure Oracle Unified Directory (OUD), Oracle
Directory Services Manager (ODSM), Oracle Directory Integration Platform (ODIP)
and Fusion Middleware Control in a New WebLogic administration domain. It
includes the following sections:
■Prerequisites
■Dependencies
■Procedure
■Post-Configuration Steps
12.4.2.1 Prerequisites
Ensure that the following prerequisites are met.

Configuring OUD/ODSM/ODIP/Fusion Middleware Control and OVD/ODSM
12-6 Oracle Fusion Middleware Installation Guide for Oracle Identity Management
■Installing Oracle WebLogic Server 11g Release 1
■Installing Oracle Unified Directory
■Setting Up Oracle Unified Directory with Replication Topology Option
12.4.2.1.1 Installing Oracle WebLogic Server 11g Release 1
Ensure that Oracle WebLogic Server 11g Release 1 (10.3.5 or 10.3.6) is installed. For
more information, see "Install Oracle WebLogic Server" in the Oracle Fusion Middleware
Installation Planning Guide. In addition, see Oracle Fusion Middleware Installation Guide
for Oracle WebLogic Server for complete information about installing Oracle WebLogic
Server.
12.4.2.1.2 Installing Oracle Unified Directory
Ensure that Oracle Unified Directory is installed, as described in "Installing the
Software" in the Oracle Fusion Middleware Installation Guide for Oracle Unified Directory
11g Release 1 (11.1.1), available at the following link:
http://download.oracle.com/docs/cd/E22289_
01/html/821-1274/installing-the-software.html#scrolltoc
12.4.2.1.3 Setting Up Oracle Unified Directory with Replication Topology Option
For the first directory server in your replication topology, follow the instructions in
"To Set Up the Directory Server Using the GUI" in the Oracle Fusion Middleware
Installation Guide for Oracle Unified Directory 11g Release 1 (11.1.1), available at the
following link:
http://download.oracle.com/docs/cd/E22289_
01/html/821-1274/ds-gui-setup.html#to-set-up-the-directory-server-using-th
e-gui
12.4.2.2 Dependencies
The configuration in this section depends on the following:
■Oracle WebLogic Server
■Oracle Unified Directory
12.4.2.3 Procedure
Perform the following steps to configure Oracle Unified Directory (OUD), Oracle
Directory Services Manager (ODSM), Oracle Directory Integration Platform (ODIP)
and Fusion Middleware Control in one domain.
1. Ensure that all the prerequisites are met as described in Prerequisites.
Note: In the Specify Installation Location screen enter the location
of the Oracle Middleware Home for the OUD Base Location Home.
Note: To enable the changelog adapter, ensure that Oracle Unified
Directory instance is setup with the replication topology option.
Enabling the changelog adapter is a prerequisite for Oracle Directory
Integration Platform (ODIP).

Configuring OUD/ODSM/ODIP/Fusion Middleware Control and OVD/ODSM
Configuring Oracle Unified Directory with Oracle Identity Management 11.1.1.6.0 12-7
2. Ensure that Oracle Directory Integration Platform is installed using Install
Software - Do Not Configure option, as described in Installing and Configuring
Oracle Identity Management 11g Release 1 (11.1.1.6.0) Software.
3. Run the
<MW_HOME>/oracle_common/common/bin/config.sh
script (on UNIX) or
<MW_HOME>\oracle_common\common\bin\config.cmd
(on Windows). The Oracle
Fusion Middleware Configuration Wizard appears.
4. On the Welcome screen, select the Create a new WebLogic domain option. Click
Next.
5. On the Select Domain Source screen, select Generate a domain configured
automatically to support the following products: option. Select the following
domain configuration options:
■Oracle Enterprise Manager - 11.1.1.0 [oracle_common]
■Oracle Directory Services Manager - 11.1.1.5.0 [Oracle_OUD1]
■Oracle Directory Integration Platform - 11.1.1.2.0 [Oracle_IDM1]
Click Next. The Specify Domain Name and Location screen appears.
6. On the Specify Domain Name and Location screen, enter a name and location for
the domain to be created. In addition, enter a location to store applications for the
domain. Click Next. The Configure Administrator User Name and Password
screen is displayed.
7. Configure a user name and a password for the administrator. The default user
name is weblogic. Click Next. The Configure Server Start Mode and JDK screen is
displayed.
8. Choose
JRockit SDK 1.6.0_24
and Production Mode in the Configure Server
Start Mode and JDK screen. Click Next. The Select Optional Configuration Screen
is displayed.
9. On the Select Optional Configuration screen, select Administration Server and
Managed Servers, Clusters, and Machines option. Click Next. The Configure the
Administration Server screen appears.
10. On the Configure the Administration Server screen, specify the Administration
Server name and the Listen port (the default port is
7001
). Click Next. The
Configure Managed Servers screen appears.
Note: When you select Oracle Enterprise Manager - 11.1.1.0 [oracle_
common] and Oracle Directory Integration Platform - 11.1.1.2.0
[Oracle_IDM1], Oracle Identity Management - 11.1.1.2.0 [Oracle_
IDM1] and Oracle JRF 11.1.1.0 [oracle_common] is also selected by
default.

Configuring OUD/ODSM/ODIP/Fusion Middleware Control and OVD/ODSM
12-8 Oracle Fusion Middleware Installation Guide for Oracle Identity Management
11. On the Configure Managed Servers screen, specify the Managed Server name and
the Listen port (the default port is
7005
). Click Next.
12. On the Configure Clusters screen, configure Clusters as required. Click Next.
13. On the Configure Machines screen, select the Machine or Unix Machine tab. Click
on Add and specify the machine name. Click Next.
14. If you added a machine on the Configure Machines screen, then the Assign
Servers to Machines screen appears. On the Assign Servers to Machines screen,
assign the Administration Server and the Managed server to the specified
machine. Click Next.
15. On the Configuration Summary screen, review the domain configuration, and
click Create to start creating the domain.
16. Click Done, once the domain is created successfully.
A new WebLogic domain (for example: domain1) is created to support Oracle
Unified Directory (OUD), Oracle Directory Services Manager (ODSM), Oracle
Directory Integration Platform (ODIP) and Fusion Middleware Control in the
<MW_
HOME>\user_projects\domains
directory (on Windows). On UNIX, the domain is
created in the
<MW_HOME>/user_projects/domains
directory.
12.4.2.4 Post-Configuration Steps
After configuring Oracle Directory Integration Platform, perform the following tasks:
1. If the Administration Server and the Managed Server is not up and running then
start the Administration Server and the Managed Server (wls_ods2) as described in
Starting the Stack.
2. Verify the Oracle Unified Directory (OUD) server is up and running using the
status
command, which is located in the <OUD_INSTANCE>
/bin
/ directory.
Note: If you used the default values for the Administration Server
name and the Listen port for the Oracle Directory Services Manager
(ODSM) that is managing Oracle Virtual Directory (OVD), then you
must use a different Administration Server name and Listen port for
the Oracle Directory Services Manager (ODSM) that is managing
Oracle Directory Integration Platform (ODIP).
For example, you can use
8001
as the Listen port for the
Administration Server for Oracle Directory Services Manager (ODSM)
that is managing Oracle Directory Integration Platform (ODIP).
Note: If you used the default values for the Managed Server name
and the Listen port for the Oracle Directory Services Manager (ODSM)
that is managing Oracle Virtual Directory (OVD), then you must use a
different Managed Server name and Listen port for the Oracle
Directory Services Manager (ODSM) that is managing Oracle
Directory Integration Platform (ODIP).
For example, you can use wls_ods2 as the Managed Server name and
8005
as the Listen port for the Managed Server for Oracle Directory
Services Manager (ODSM) that is managing Oracle Directory
Integration Platform (ODIP).

Configuring OUD/ODSM/ODIP/Fusion Middleware Control and OVD/ODSM
Configuring Oracle Unified Directory with Oracle Identity Management 11.1.1.6.0 12-9
3. Set the JAVA_HOME, WL_HOME and ORACLE_HOME environment variables
and execute
<ORACLE_HOME>/bin/dipConfigurator.
Provide the following
information when prompted for input.
■WebLogic host, port, username and password details.
■Oracle Unified Directory (OUD) host, port, username and password details.
Also provide Oracle Unified Directory (OUD) admin port which is required to
add global acis to access Changelog for DIP account.
■Specify the suffix under which DIP metadata is to be stored.
Following is a sample output for the
dipConfigurator
command:
Enter WLS Admin Server Host Name : myhost1.mycompany.com
Enter WLS Admin Server Port : 8001
Enter username to contact WebLogic Server : weblogic
[Enter password to contact WebLogic Server : ]
Enter backend LDAP Server HostName : myhost1.mycompany.com
Enter backend LDAP Server Port : 4389
Enter username to contact LDAP server : cn=directory manager
[Enter password to contact LDAP Server : ]
Enter backend LDAP Server Admin Port : 4444
Enter SUFFIX to store DIP metadata : dc=us,dc=mycompany,dc=com
4. Verify the Oracle Directory Integration Platform (ODIP) installation and
configuration. For more information, see Verifying ODIP.
5. The
dipConfigurator
will set the below ACIs for the specified metadata suffix.
But for the other suffixes, set the below ACIs for the containers in OUD, in order to
write the changes imported from the other sources:
dn: <Container DN>
changetype:modify
add: aci
aci: (target="ldap:///<Container DN>")(version 3.0; acl "Anonymous read-search
access"; allow (read,add,delete,search,write,compare,proxy)
groupdn="ldap:///cn=dipadmingrp,cn=DIPadmins,cn=Directory Integration
Platform,<metadata suffix>"; allow
(read,add,delete,search,write,compare,proxy)
groupdn="ldap:///cn=odipigroup,cn=DIPadmins,cn=Directory Integration
Platform,<metadata suffix>"; )
-
add: aci
aci: (targetattr="*")(version 3.0; acl "Anonymous read-search access"; allow
(search,read,write,compare,add)
groupdn="ldap:///cn=dipadmingrp,cn=DIPadmins,cn=Directory Integration
Platform,<metadata suffix>"; allow (search,read,write,compare,add)
groupdn="ldap:///cn=odipigroup,cn=DIPadmins,cn=Directory Integration
Platform,<metadata suffix>";)
Note: dipConfigurator script creates a new ASInstance, and a new
EMAgent component in that ASInstance. These agents are required
for DIP metrics to display in Fusion Middleware Control. The
instance, such as dip_inst1, is created under the MW_HOME directory.

Configuring OUD/ODSM/ODIP/Fusion Middleware Control and OVD/ODSM
12-10 Oracle Fusion Middleware Installation Guide for Oracle Identity Management
Note: ODIP configuration can be recreated any number of times if
ODIP configuration is deleted or corrupted, for example, while setting
up OUD Replication Gateway or OUD Proxy Server. However, if
there are any sync profiles that already exists, the connected directory
password of the existing profiles needs to be reset after executing
dipConfigurator
.
For recreating the ODIP configuration, re-run step 3.

Part III
Part III
Installing and Configuring Oracle Identity
and Access Management (11.1.1.5.0)
Part III provides information about installing and configuring the following Oracle
Identity and Access Management products:
■Oracle Identity Manager (OIM)
■Oracle Access Manager (OAM)
■Oracle Adaptive Access Manager (OAAM)
■Oracle Entitlement Server (OES)
■Oracle Identity Navigator (OIN)
Additionally, Part III provides information about installing and configuring Oracle
HTTP Server 11g Webgate for Oracle Access Manager, and migrating from Domain
Agent to Oracle HTTP Server 10g Webgate for Oracle Access Manager.
Part III contains the following chapters:
■Chapter 13, "Installing Oracle Identity and Access Management (11.1.1.5.0)"
■Chapter 14, "Understanding Domain Extension Scenarios"
■Chapter 15, "Configuring Oracle Identity Navigator"
■Chapter 16, "Configuring Oracle Identity Manager"
■Chapter 17, "Configuring Oracle Access Manager"
■Chapter 18, "Configuring Oracle Adaptive Access Manager"
■Chapter 19, "OAM and OAAM Joint Domain Configuration Scenarios"
■Chapter 20, "Installing and Configuring Oracle Entitlements Server"
■Chapter 21, "Migrating from Domain Agent to Oracle HTTP Server 10g Webgate
for OAM"
■Chapter 22, "Installing and Configuring Oracle HTTP Server 11g Webgate for
OAM"
■Chapter 23, "Lifecycle Management"

13
Installing Oracle Identity and Access Management (11.1.1.5.0) 13-1
13 Installing Oracle Identity and Access
Management (11.1.1.5.0)
This chapter includes the following topics:
■Installing Oracle Identity and Access Management (11.1.1.5.0)
■Understanding the Directory Structure After Installation
■After Installing the Oracle Identity and Access Management Software
■Configuring Oracle Identity and Access Management Products
13.1 Installing Oracle Identity and Access Management (11.1.1.5.0)
This topic describes how to install the Oracle Identity and Access Management 11g
software, which includes Oracle Identity Manager, Oracle Access Manager, Oracle
Adaptive Access Manager, Oracle Identity Navigator, and Oracle Entitlements Server.
It includes the following sections:
■Products Installed
■Dependencies
■Procedure
13.1.1 Products Installed
Performing the installation in this section installs the following products:
■Oracle Identity Manager
■Oracle Access Manager
Note: This chapter provides information for Installing Oracle
Identity and Access Management (11.1.1.5.0) for new users. If you are
an existing Oracle Identity and Access Management 11.1.1.3.0 user,
refer to "Patching Oracle Identity and Access Management 11.1.1.3.0
to 11.1.1.5.0" in the Oracle Fusion Middleware Patching Guide.
Note: When you are installing Oracle Access Manager, Oracle
Secure Token Service will also be installed. For more information on
Oracle Secure Token Service, see Oracle Fusion Middleware
Administrator's Guide for Oracle Access Manager with Oracle Security
Token Service.

Installing Oracle Identity and Access Management (11.1.1.5.0)
13-2 Oracle Fusion Middleware Installation Guide for Oracle Identity Management
■Oracle Adaptive Access Manager
■Oracle Identity Navigator
■Oracle Entitlements Server
13.1.2 Dependencies
The installation in this section depends on the following:
■Oracle WebLogic Server 11g Release 1 (10.3.5)
■Oracle Database and any required patches
■Oracle SOA Suite 11.1.1.5.0 (required for Oracle Identity Manager only)
■JDK (either Oracle WebLogic JRockit JDK or Sun JDK 1.6.0)
13.1.3 Procedure
Complete the following steps to install the Oracle Identity and Access Management
suite that contains Oracle Identity Manager, Oracle Access Manager, Oracle Adaptive
Access Manager, Oracle Identity Navigator, and Oracle Entitlements Server:
1. Install the Oracle Database. Refer to Installing Oracle Database for more
information.
2. Decide if you want to create new schemas for Oracle Identity Manager, Oracle
Access Manager, Oracle Adaptive Access Manager, Metadata Services, and SOA
Infrastructure by using Oracle Fusion Middleware Repository Creation Utility
(RCU) or if you want to use an existing schema:
■If you want to create a new schema using the Oracle Fusion Middleware
Repository Creation Utility (RCU), refer to Creating Database Schema Using
the Oracle Fusion Middleware Repository Creation Utility (RCU) for more
information about creating schemas. After creating schemas, continue this
procedure by going to Step 3.
Note: For Oracle Identity and Access Management 11.1.1.5.0, Oracle
Adaptive Access Manager includes two components
■Oracle Adaptive Access Manager (Online)
■Oracle Adaptive Access Manager (Offline)
Note: When you are installing Oracle Identity and Access
Management, only the Administration Server of Oracle Entitlements
Server is installed.
To install and configure Oracle Entitlements Server Client, see
Installing Oracle Entitlements Server Client.
Note: Ensure that the Oracle database is with the AL32UTF8
character set encoding.

Installing Oracle Identity and Access Management (11.1.1.5.0)
Installing Oracle Identity and Access Management (11.1.1.5.0) 13-3
■If you want to use an existing schema, you must upgrade the schema by using
the Upgrade Assistant tool. For more information, see the Oracle Fusion
Middleware Upgrade Guide for Oracle Identity Management.
3. Install Oracle WebLogic Server. Refer to Installing Oracle WebLogic Server and
Creating the Oracle Middleware Home for more information.
4. Install Oracle SOA 11g suite if you want to use Oracle Identity Manager. For
information about installing the Oracle SOA 11g suite, refer to Installing the Latest
Version of Oracle SOA Suite (Oracle Identity Manager Users Only).
5. Start your installation by performing all the steps in Starting an Installation. After
you complete those steps, the Welcome screen appears.
6. Click Next on the Welcome screen. The Install Software Updates screen appears.
Select whether or not you want to search for updates. Click Next.
7. The Prerequisite Checks screen appears. If all prerequisite checks pass inspection,
click Next. The Specify Installation Location screen appears.
8. On the Specify Installation Location screen, enter the path to the Oracle
Middleware Home installed on your system. Ensure that Oracle WebLogic Server
is already installed on the system in the same Middleware Home. This directory is
the same as the Oracle Home created in the Oracle WebLogic Server installation.
9. In the Oracle Home Directory field, enter a name for the Oracle Home folder that
will be created under your Middleware Home. This directory is also referred to as
IDM_Home or IAM_Home in this book.
Note: If you do not specify a valid Middleware Home directory on
the Specify Installation Location screen, the Installer displays a
message and prompts you to confirm whether you want to proceed
with the installation of only Oracle Identity Manager Design Console
and Oracle Identity Manager Remote Manager. These two
components of Oracle Identity Manager do not require a Middleware
Home directory.
If you want to install only Oracle Identity Manager Design Console or
Remote Manager, you do not need to install Oracle WebLogic Server
or create a Middleware Home directory on the machine where Design
Console or Remote Manager is being configured.
Before using Oracle Identity Manager Design Console or Remote
Manager, you must configure Oracle Identity Manager Server on the
machine where the Administration Server is running. When
configuring Design Console or Remote Manager on a different
machine, you can specify the Oracle Identity Manager Server host and
URL information.

Installing Oracle Identity and Access Management (11.1.1.5.0)
13-4 Oracle Fusion Middleware Installation Guide for Oracle Identity Management
Click Next.
10. The Installation Summary screen appears.
The Installation Summary screen displays a summary of the choices that you
made. Review this summary and decide whether to start the installation. If you
want to modify any of the configuration settings at this stage, select a topic in the
left navigation page and modify your choices. To continue installing Oracle
Identity and Access Management, click Install. The Installation Progress screen
appears.
This installation process copies the Identity Management software to your system
and creates an IDM_Home directory under your Middleware Home. You must
proceed to create a WebLogic Domain, by running the Oracle Fusion Middleware
Configuration Wizard. In addition, you must configure the Administration Server
settings while creating the domain.
If you are configuring Oracle Identity Manager (OIM), after configuring a domain,
you must run the Oracle Identity Manager Configuration Wizard to configure
OIM server, design console, and remote manager.
For information about configuring Oracle Identity and Access Management
products, see the following:
■Configuring Oracle Identity Navigator
■Configuring Oracle Identity Manager
■Configuring Oracle Access Manager
■Configuring Oracle Adaptive Access Manager
■OAM and OAAM Joint Domain Configuration Scenarios
■Installing and Configuring Oracle Entitlements Server
For more information, see Configuring OIM Server, Configuring OIM Design
Console, and Configuring OIM Remote Manager.
Note: The name that you provide for the Oracle Home for installing
the Oracle Identity and Access Management suite should not be same
as the Oracle Home name given for the Oracle Identity Management
suite.
By default the installer chooses an alternate name Oracle_IDM2 if
Oracle_IDM1 oracle home exists and has Oracle Identity
Management components installed. This should not be changed to
Oracle_IDM1.
Note: If you cancel or abort when the installation is in progress, you
must manually delete the <IAM_Home> directory before you can
reinstall the Oracle Identity and Access Management software.
To invoke online help at any stage of the installation process, click the
Help button on the installation wizard screens.

Configuring Oracle Identity and Access Management Products
Installing Oracle Identity and Access Management (11.1.1.5.0) 13-5
13.2 Understanding the Directory Structure After Installation
This section describes the directory structure after installation of Oracle WebLogic
Server and Oracle Identity and Access Management. It also shows the structure of
directories created after the Oracle Identity and Access Management software is
installed.
After you install the Oracle Identity and Access Management suite, an Oracle Home
directory for Oracle Identity and Access Management, such as Oracle_IDM2, is
created under your Middleware Home. This home directory is also referred to as IAM_
Home in this guide.
For more information about identifying installation directories, see Identifying
Installation Directories.
13.3 After Installing the Oracle Identity and Access Management
Software
After installing the Oracle Identity and Access Management software, you must
proceed to configure Oracle Identity and Access Management products in a new or
existing WebLogic domain. In addition, you must configure the Administration Server
settings while creating the domain.You can use the Oracle Fusion Middleware
Configuration Wizard to create a WebLogic domain or extend an existing domain. For
more information about WebLogic administration domain options, see Understanding
Oracle WebLogic Server Administration Domain Options.
To configure Oracle Identity Manager Server, Oracle Identity Manager Design
Console, and Oracle Identity Manager Remote Manager, you must launch the Oracle
Identity Manager 11g Configuration Wizard, as described in Starting the Oracle
Identity Manager 11g Configuration Wizard.
13.4 Configuring Oracle Identity and Access Management Products
For information about configuration scenarios for Oracle Identity and Access
Management products, including joint-installation scenarios, read the following
chapters:
■Configuring Oracle Identity Navigator
■Configuring Oracle Identity Manager
■Configuring Oracle Access Manager
■Configuring Oracle Adaptive Access Manager
■OAM and OAAM Joint Domain Configuration Scenarios
■Installing and Configuring Oracle Entitlements Server
See: The "Understanding Oracle WebLogic Server Domains" chapter
in the Oracle Fusion Middleware Understanding Domain Configuration for
Oracle WebLogic Server guide for more information about Oracle
WebLogic Server administration domains.

Configuring Oracle Identity and Access Management Products
13-6 Oracle Fusion Middleware Installation Guide for Oracle Identity Management

14
Understanding Domain Extension Scenarios 14-1
14Understanding Domain Extension Scenarios
This chapter describes the scenarios in which an existing Oracle Identity Management
domain can be extended to support new Oracle Identity Management products.
It includes the following topics:
■Overview
■Important Notes Before You Begin
■Domain Extension Scenarios
■Starting the Administration Server on the Local Machine
■Creating Managed Servers on a Remote Machine
14.1 Overview
When you extend an Oracle Identity Management domain, you are configuring new
products in the existing domain to support new Oracle Identity Management
products.
For example, you can extend an Oracle Identity Management 11.1.1.5.0 domain to
support Oracle Identity Manager, Oracle Access Manager, Oracle Adaptive Access
Manager, or Oracle Identity Navigator. The existing Oracle Identity Management
11.1.1.5.0 domain may contain one or more of the various combinations of Oracle
Identity Management products, such as Oracle Internet Directory, Oracle Virtual
Directory, Oracle Directory Services Manager, Oracle Identity Federation, or Oracle
Directory Integration Platform.
In addition, you can extend an Oracle Identity Management domain that contains any
of the various combinations of Oracle Identity Manager, Oracle Access Manager,
Oracle Adaptive Access Manager, and Oracle Identity Navigator.
Note: Note that the existing domain must have been created using
the Oracle Identity Management 11g Release 1 (11.1.1) Installer and
configured using the Oracle Identity Management 11g Configuration
Wizard. You cannot extend an existing domain for Oracle Identity
Management components if the domain was created by another
program, such as the Oracle Fusion Middleware 11g Oracle SOA Suite
Installer or the Oracle Fusion Middleware Configuration Wizard.

Important Notes Before You Begin
14-2 Oracle Fusion Middleware Installation Guide for Oracle Identity Management
14.2 Important Notes Before You Begin
Before you start installing and configuring Oracle Identity Management products in
any of the scenarios discussed in this chapter, keep the following points in mind:
■It is assumed that you are installing Oracle Internet Directory, Oracle Virtual
Directory, Oracle Identity Manager, Oracle Access Manager, Oracle Adaptive
Access Manager, and Oracle Identity Navigator on the same machine.
■For Oracle Identity Manager users: You must use the Oracle Identity Manager
Configuration Wizard to configure only Oracle Identity Manager Server, Oracle
Identity Manager Design Console (on Windows only), and Oracle Identity
Manager Remote Manager.
You must complete this additional configuration for Oracle Identity Manager
components after configuring Oracle Identity Manager in a new or existing
WebLogic administration domain. For more information, see the chapter
Configuring Oracle Identity Manager.
If you are configuring Oracle Identity Manager Server, you must run the Oracle
Identity Manager configuration wizard on the machine where the Administration
Server is running. For configuring the Server, you can run the wizard only once
during the initial setup of the Server. After the successful setup of Oracle Identity
Manager Server, you cannot run the Oracle Identity Manager Configuration
Wizard again to modify the configuration of Oracle Identity Manager Server. For
such modifications, you must use Oracle Enterprise Manager Fusion Middleware
Control.
If you are configuring only Design Console or Remote Manager, you can run the
Oracle Identity Manager Configuration Wizard on the machine where Design
Console or Remote Manager is being configured. Note that you can run the Oracle
Identity Manager Configuration Wizard to configure Design Console or Remote
Manager as and when you need to configure them on new machines.
Note that Oracle Identity Manager requires Oracle SOA Suite 11g (11.1.1.5.0),
which should be exclusive to Oracle Identity Management. You must install
Note: In this chapter, two IDM_Home directories are mentioned in
descriptions and procedures. For example, the first one, IDM_Home
can be the IDM_Home directory for Oracle Internet Directory, Oracle
Virtual Directory, Oracle Directory Services Manager, Oracle
Directory Integration Platform, and Oracle Identity Federation. The
second one, IAM_Home can be the IDM_Home directory for Oracle
Identity Manager, Oracle Access Manager, Oracle Adaptive Access
Manager, Oracle Entitlements Server, and Oracle Identity Navigator.
However, note that IDM_Home and IAM_Home are used as
examples in this document. You can specify any name for either of
your IDM_Home directories. In addition, you can install the two Oracle
Identity Management suites (one containing Oracle Internet Directory,
Oracle Virtual Directory, Oracle Directory Services Manager, Oracle
Directory Integration Platform, and Oracle Identity Federation;
another containing Oracle Identity Manager, Oracle Access Manager,
Oracle Adaptive Access Manager, Oracle Entitlements Server, and
Oracle Identity Navigator) in any order on your machine.
For more information, see Overview and Structure of Oracle Identity
Management 11g Installation.

Domain Extension Scenarios
Understanding Domain Extension Scenarios 14-3
Oracle SOA Suite before configuring Oracle Identity Manager. If you are setting
up integration between Oracle Identity Manager and Oracle Access Manager,
ensure that Oracle Identity Manager and Oracle SOA Suite are installed under the
same Middleware Home directory and configured in the same WebLogic domain.
14.3 Domain Extension Scenarios
The following lists the scenarios in which you can extend an existing Oracle Identity
Management domain to support new Oracle Identity Management products:
■Extending an Oracle Identity Management 11.1.1.5.0 Domain to Support OIM,
OAM, OAAM or OIN on the Local Machine
■Understanding Joint Configuration and Domain Extension Scenarios for OIM,
OAM, OAAM, and OIN on the Local Machine
14.3.1 Extending an Oracle Identity Management 11.1.1.5.0 Domain to Support OIM,
OAM, OAAM or OIN on the Local Machine
You can extend an existing Oracle Identity Management 11.1.1.5.0 domain (containing
OID,OVD,ODSM,ODIP, and OIF) to support Oracle Identity and Access Management
11.1.1.5.0 products.
This scenario involves the following tasks:
1. Installing the latest version of Oracle SOA 11g Suite (for Oracle Identity Manager
only), as described in Installing the Latest Version of Oracle SOA Suite (Oracle
Identity Manager Users Only).
2. Installing the Oracle Identity Management Suite under your existing Middleware
Home, as described in Installing Oracle Identity and Access Management
(11.1.1.5.0).
3. Creating and loading the necessary schemas for the new components to be added,
as described in Creating Database Schema Using the Oracle Fusion Middleware
Repository Creation Utility (RCU).
4. Launching the Oracle Fusion Middleware Configuration Wizard <IAM_
Home>/common/bin/config.sh script on UNIX (<IAM_
Home>\common\bin\config.cmd on Windows).
5. Selecting the Extend an existing WebLogic domain option on the Welcome
screen.
6. Selecting the existing Oracle Identity Management 11.1.1.5.0 domain on the Select
a WebLogic Domain Directory screen.
7. Selecting the required domain templates on the Select Extension Source screen to
support Oracle Identity Manager, Oracle Access Manager, Oracle Adaptive Access
Manager, or Oracle Identity Navigator.
8. Modifying JDBC component schemas, configuration of Managed Servers,
Deployments and Services, and so on.
9. Starting the Administration Server on the local machine, as described in Starting
or Stopping the Oracle Stack.
10. Starting Managed Servers, as described in Starting or Stopping the Oracle Stack.

Domain Extension Scenarios
14-4 Oracle Fusion Middleware Installation Guide for Oracle Identity Management
14.3.2 Understanding Joint Configuration and Domain Extension Scenarios for OIM,
OAM, OAAM, and OIN on the Local Machine
It is assumed that you have installed the latest versions of Oracle WebLogic Server and
the Oracle Identity Management Suite. For Oracle Identity Manager, you should have
installed the latest version of Oracle SOA 11g Suite. You should have created and
loaded the necessary schemas by using Oracle Fusion Middleware Repository
Creation Utility (RCU).
You should have configured a new domain to support any of the various
combinations of Oracle Access Manager (OAM), Oracle Adaptive Access Manager
(OAAM), and Oracle Identity Navigator (OIN).
For example, you can configure Oracle Identity Manager in an existing Oracle Identity
Management domain that contains Oracle Access Manager or Oracle Identity
Navigator.
Several combinations are possible, based on your Oracle Identity Management
environment and deployment.
This scenario involves the following tasks:
1. Creating and loading the necessary schemas for the new components to be added,
as described in Creating Database Schema Using the Oracle Fusion Middleware
Repository Creation Utility (RCU).
2. Launching the Oracle Fusion Middleware Configuration Wizard <IAM_
Home>/common/bin/config.sh script on UNIX (<IAM_
Home>\common\bin\config.cmd on Windows).
3. Selecting the Extend an existing WebLogic domain option on the Welcome
screen.
4. Selecting the existing Oracle Identity Management domain (the domain that
contains any of the various combinations of Oracle Access Manager, Oracle
Adaptive Access Manager, and Oracle Identity Navigator) on the Select a
WebLogic Domain Directory screen.
5. Selecting the required domain templates on the Select Extension Source screen to
support Oracle Identity Manager, Oracle Access Manager, Oracle Adaptive Access
Manager, or Oracle Identity Navigator. The choice of domain templates in this
step depends on the component you are trying to configure in the same domain.
6. Modifying JDBC component schemas, configuration of Managed Servers,
Deployments and Services, and so on.
7. Starting the Administration Server on the local machine, as described in Starting
or Stopping the Oracle Stack.
8. Starting Managed Servers, as described in Starting or Stopping the Oracle Stack.
Note: When you extend an existing WebLogic domain to support
Oracle Identity Manager, you should restart the Administration
Server before launching the Oracle Identity Manager Configuration
Wizard to configure Oracle Identity Manager Server.

Creating Managed Servers on a Remote Machine
Understanding Domain Extension Scenarios 14-5
14.4 Starting the Administration Server on the Local Machine
In some scenarios, you may want to install the Administration Server on one machine
and component-specific Managed Servers on another machine. You must start the
Administration Server on the machine where it is installed before you can create and
run Managed Servers on the remote machine.
14.5 Creating Managed Servers on a Remote Machine
Before you can create and run Managed Servers on a remote machine, you must install
Oracle WebLogic Server and Oracle Identity Management Suite on the remote
machine. Then you must use the pack and unpack commands to create Managed
Servers on the remote machine.
14.5.1 Installing Oracle WebLogic Server and Oracle Identity Management Suite on the
Remote Machine
You must install Oracle WebLogic Server and Oracle Identity Management Suite on
the remote machine.
■On the remote machine, install Oracle WebLogic Server and create a Middleware
Home directory, as described in Installing Oracle WebLogic Server and Creating
the Oracle Middleware Home.
■On the remote machine, install Oracle Identity Management Suite, as described in
Installing Oracle Identity and Access Management (11.1.1.5.0).
After this installation, you can create and start Managed Servers on the remote
machine, as described in the following topic.
14.5.2 Creating and Starting Managed Servers on a Remote Machine
To create and start a Managed Server on a remote machine, complete the following
steps:
■On the local machine where the domain is configured and the Administration
Server is created, use the pack command located in the \common\bin directory
under your IDM_Home directory to create a Managed Server template that
contains a subset of the files in a domain that are required to create a Managed
Server domain directory hierarchy on a remote machine.
The -managed={true} parameter of the pack command specifies whether the
template is to be used to create Managed Servers on remote machines.
■Ensure that the Administration Server is up and running on the local machine.
Note: When you extend an existing WebLogic domain to support
Oracle Identity Manager, you should restart the Administration
Server before launching the Oracle Identity Manager Configuration
Wizard to configure Oracle Identity Manager Server.
Note: The structure of Middleware Home and IDM Home
directories on the remote machine should be identical to that of the
local machine.

Creating Managed Servers on a Remote Machine
14-6 Oracle Fusion Middleware Installation Guide for Oracle Identity Management
■On the remote machine, use the unpack command located in the \common\bin
directory under your IDM_Home directory to create the Managed Server domain
directory on the remote machine.
For more information, see the topic "Creating and Starting a Managed Server on a
Remote Machine" in the guide Oracle Fusion Middleware Creating Templates and Domains
Using the Pack and Unpack Commands. In addition, see the topic "Extending WebLogic
Domains" in the guide Oracle Fusion Middleware Creating Domains Using the
Configuration Wizard.
Note: For Oracle Identity Manager users only:
If you want to start the SOA Server on a remote machine, then you
must manually copy the composite files from the <DOMAIN_
HOME>/soa/autodeploy directory on the local machine to the
<DOMAIN_HOME>/soa/autodeploy directory on the remote
machine after running the unpack command on the remote machine.
If the <DOMAIN_HOME>/soa/autodeploy directory does not exist
on the remote machine, you must create this directory before copying
the composite files.

15
Configuring Oracle Identity Navigator 15-1
15Configuring Oracle Identity Navigator
This chapter explains how to configure Oracle Identity Navigator (OIN). It includes
the following topics:
■General Prerequisites
■Installing OIN
■Important Notes Before You Begin
■Configuring OIN in a New WebLogic Domain
■OIN with OIM, OAM, and OAAM
■Starting the Servers
■Verifying OIN
■Getting Started with Oracle OIN After Installation
15.1 General Prerequisites
The following are the general prerequisites for installing and configuring Oracle
Identity and Access Management 11g Release 1 (11.1.1) products:
1. Installing Oracle Database, as described in Installing Oracle Database.
2. Installing Oracle WebLogic Server and creating a Middleware Home, as described
in Installing Oracle WebLogic Server and Creating the Oracle Middleware Home.
3. Installing the Oracle Identity and Access Management 11g Release 1 (11.1.1.5.0)
suite, as described in Installing Oracle Identity and Access Management
(11.1.1.5.0). The Oracle Identity and Access Management suite contains Oracle
Identity Manager (OIM), Oracle Access Manager (OAM), Oracle Adaptive Access
Manager (OAAM), Oracle Entitlements Server (OES), and Oracle Identity
Navigator (OIN).
15.2 Installing OIN
Oracle Identity Navigator (OIN) is included in the Oracle Identity and Access
Management Suite. You can use the Oracle Identity and Access Management 11g
Installer to install Oracle Identity and Access Management Suite, as described in
Installing Oracle Identity and Access Management (11.1.1.5.0).

Important Notes Before You Begin
15-2 Oracle Fusion Middleware Installation Guide for Oracle Identity Management
15.3 Important Notes Before You Begin
Before you start installing and configuring Oracle Identity and Access Management
products in any of the scenarios discussed in this chapter, keep the following points in
mind:
It is assumed that you are installing Oracle Internet Directory, Oracle Virtual
Directory, Oracle Identity Manager, Oracle Access Manager, Oracle Adaptive Access
Manager, and Oracle Identity Navigator on the same machine.
15.4 Configuring OIN in a New WebLogic Domain
This topic describes how to configure only Oracle Identity Navigator (OIN) in a new
WebLogic administration domain. It includes the following sections:
■Appropriate Deployment Environment
■Components Deployed
■Dependencies
■Procedure
15.4.1 Appropriate Deployment Environment
Perform the configuration in this topic if you want to configure Oracle Identity
Navigator with Oracle Identity Manager, Oracle Access Manager, and Oracle
Adaptive Access Manager in a new WebLogic domain and then run the Oracle
Identity Navigator discovery feature. This feature populates links to the product
consoles for Oracle Identity Manager, Oracle Access Manager, and Oracle Adaptive
Access Manager. You can then access those product consoles from within the Oracle
Identity Navigator interface, without having to remember the individual console
URLs.
Note: In this chapter, two IDM_Home directories are mentioned in
descriptions and procedures. For example, the first one, IDM_Home
can be the IDM_Home directory for Oracle Internet Directory, Oracle
Virtual Directory, Oracle Directory Services Manager, Oracle
Directory Integration Platform, and Oracle Identity Federation. The
second one, IAM_Home can be the IDM_Home directory for Oracle
Identity Manager, Oracle Access Manager, Oracle Adaptive Access
Manager, Oracle Entitlements Server, and Oracle Identity Navigator.
However, note that IDM_Home and IAM_Home are used as
examples in this document. You can specify any name for either of
your IDM_Home directories. In addition, you can install the two Oracle
Identity Management suites (one containing Oracle Internet Directory,
Oracle Virtual Directory, Oracle Directory Services Manager, Oracle
Directory Integration Platform, and Oracle Identity Federation;
another containing Oracle Identity Manager, Oracle Access Manager,
Oracle Adaptive Access Manager, Oracle Entitlements Server, and
Oracle Identity Navigator) in any order on your machine.
For more information, see Overview and Structure of Oracle Identity
Management 11g Installation.

Configuring OIN in a New WebLogic Domain
Configuring Oracle Identity Navigator 15-3
15.4.2 Components Deployed
Performing the configuration in this section deploys the Oracle Identity Navigator
application on a new WebLogic Administration Server.
15.4.3 Dependencies
The configuration in this section depends on the following:
■Oracle WebLogic Server
■Installation of the Oracle Identity and Access Management 11g software
For more information, see Preparing to Install and Installing Oracle Identity and
Access Management (11.1.1.5.0).
15.4.4 Procedure
Perform the following steps to configure only Oracle Identity Navigator in a new
WebLogic administration domain:
1. Install Oracle WebLogic Server, and create a Middleware Home, as described in
Installing Oracle WebLogic Server and Creating the Oracle Middleware Home.
2. Install the Oracle Identity and Access Management 11g software. Refer to
Installing Oracle Identity and Access Management (11.1.1.5.0) for more
information.
3. Run the <IAM_Home>/common/bin/config.sh script. (<IAM_
Home>\common\bin\config.cmd on Windows). The Welcome screen of the
Oracle Fusion Middleware Configuration Wizard appears.
4. On the Welcome screen, select Create a new WebLogic domain, and click Next.
The Select Domain Source screen appears.
5. On the Select Domain Source screen, ensure that the Generate a domain
configured automatically to support the following products: option is selected.
Create a WebLogic administration domain, which supports Oracle Identity
Navigator (choose Oracle Identity Navigator - 11.1.1.3.0 [Oracle_IDM2]), and
click Next. The Specify Domain Name and Location screen appears.
6. Enter a name and a location for the domain to be created, and click Next. The
Configure Administrator User Name and Password screen appears.
7. Configure a user name and a password for the administrator. The default user
name is weblogic. Click Next.
Note: IAM_Home is used as an example here. You must run this
script from your IDM_Home directory that contains Oracle Identity
Manager, Oracle Access Manager, Oracle Adaptive Access Manager,
Oracle Entitlements Server, and Oracle Identity Navigator.
Note: When you select the Oracle Identity Navigator - 11.1.1.3.0
[Oracle_IDM2] check box, the Oracle JRF 11.1.1.0 [oracle_common]
option is also selected, by default.

OIN with OIM, OAM, and OAAM
15-4 Oracle Fusion Middleware Installation Guide for Oracle Identity Management
8. Choose JRockit SDK 1.6.0_24 and Production Mode in the Configure Server
Start Mode and JDK screen of the Oracle Fusion Middleware Configuration
Wizard.
The Select Optional Configuration screen appears.
9. On the Select Optional Configuration screen, you can configure Administration
Server and Managed Servers, Clusters, and Machines, Deployments and
Services, and RDBMS Security Store options. Click Next.
10. Optional: Configure the following Administration Server parameters:
■Name
■Listen address
■Listen port
■SSL listen port
■SSL enabled or disabled
11. Optional: Configure Managed Servers, as required.
12. Optional: Configure Clusters, as required.
For more information about configuring clusters for Oracle Identity and Access
Management products, see the "Configuring High Availability for Identity
Management Components" topic in the guide Oracle Fusion Middleware High
Availability Guide.
13. Optional: Assign Managed Servers to clusters, as required.
14. Optional: Configure Machines, as needed. This step is useful when you want to
run the Administration Server on one machine and Managed Servers on another
physical machine.
15. Optional: Assign the Administration Server to a machine.
16. Optional: Select Deployments, such as applications and libraries, and Services to
target them to a particular cluster or server.
17. Optional: Configure RDBMS Security Store, as required.
18. On the Configuration Summary screen, you can view summaries of your
configuration for deployments, application, and service. Review the domain
configuration, and click Create to start creating the domain.
A new WebLogic domain to support Oracle Identity Navigator is created in the <MW_
HOME>\user_projects\domains directory (on Windows). On UNIX, the domain is
created in the <MW_HOME>/user_projects/domains directory.
15.5 OIN with OIM, OAM, and OAAM
This topic describes how to configure Oracle Identity Navigator (OIN) in an existing
Oracle Identity and Access Management domain that contains Oracle Identity
Manager (OIM), Oracle Access Manager (OAM), and Oracle Adaptive Access Manager
(OAAM).
It includes the following sections:
Tip: Before configuring a machine, use the ping command to verify
whether the machine or host name is accessible.

OIN with OIM, OAM, and OAAM
Configuring Oracle Identity Navigator 15-5
■Appropriate Deployment Environment
■Components Deployed
■Dependencies
■Procedure
15.5.1 Appropriate Deployment Environment
Perform the configuration in this topic if you want to install Oracle Identity Navigator
in an existing Oracle Identity and Access Management environment where Oracle
Identity Manager, Oracle Access Manager, and Oracle Adaptive Access Manager are
installed.
After performing this configuration, you can run the discovery feature of Oracle
Identity Navigator to discover the product consoles for Oracle Identity Manager,
Oracle Access Manager, and Oracle Adaptive Access Manager. You can view the
product consoles in the dashboard of Oracle Identity Navigator. Then you can use the
Oracle Identity Navigator user interface to launch consoles for products, such as
Oracle Identity Manager, Oracle Access Manager, Oracle Adaptive Access Manager,
Oracle Enterprise Manager Fusion Middleware Control, and so on.
15.5.2 Components Deployed
Performing the configuration in this section deploys the Oracle Identity Navigator
application on the existing Administration Server. This application is deployed on the
same machine where the Administration Server is running.
15.5.3 Dependencies
The configuration in this section depends on the following:
■Oracle WebLogic Server
■Installation of the Oracle Identity and Access Management 11g software
For more information, see Preparing to Install and Installing Oracle Identity and
Access Management (11.1.1.5.0).
15.5.4 Procedure
To configure only Oracle Identity Navigator in an existing Oracle Identity and Access
Management domain that contains Oracle Identity Manager, Oracle Access Manager,
and Oracle Adaptive Access Manager, complete the following steps:
1. Install Oracle WebLogic Server, and create a Middleware Home, as described in
Installing Oracle WebLogic Server and Creating the Oracle Middleware Home.
2. Install the Oracle Identity and Access Management 11g software. Refer to
Installing Oracle Identity and Access Management (11.1.1.5.0) for more
information.
3. Run the <IAM_Home>/common/bin/config.sh script. (<IAM_
Home>\common\bin\config.cmd on Windows). Use the Oracle Fusion
Middleware Configuration Wizard to create a new domain to support Oracle
Identity Manager, Oracle Access Manager, and Oracle Adaptive Access Manager
in the same domain. Ensure that the appropriate domain templates are selected
during domain configuration.

OIN with OIM, OAM, and OAAM
15-6 Oracle Fusion Middleware Installation Guide for Oracle Identity Management
A new domain with the selected configuration is created in the <MW_
HOME>\user_projects\domains directory (on Windows). On UNIX, the
domain is created in the <MW_HOME>/user_projects/domains directory.
4. Run the <IAM_Home>/common/bin/config.sh script. (<IAM_
Home>\common\bin\config.cmd on Windows). The Oracle Fusion
Middleware Configuration Wizard appears.
5. On the Welcome screen, select the Extend an existing WebLogic domain option.
Click Next.
6. Select your WebLogic domain directory that contains Oracle Identity Manager,
Oracle Access Manager, and Oracle Adaptive Access Manager. Click Next.
7. On the Select Extension Source screen, ensure that the Extend my domain
automatically to support the following products: option is selected. Select Oracle
Identity Navigator - 11.1.1.3.0 [Oracle_IDM2], and click Next. The Configure
JDBC Component Schema screen appears.
8. On the Configure JDBC Component Schema screen, select a component schema
that you want to modify. You can set values for Schema Owner, Schema
Password, Database and Service, Host Name, and Port. Click Next. The Test JDBC
Component Schema screen appears. After the test succeeds, the Select Optional
Configuration screen appears.
9. Optional: On the Select Optional Configuration screen, you can configure
Managed Servers, Clusters, and Machines, Deployments and Services, and JMS
File Store. Select the relevant check boxes, and Click Next.
10. Optional: Configure Clusters, as required.
For more information about configuring clusters for Oracle Identity and Access
Management products, see the "Configuring High Availability for Identity
Management Components" topic in the guide Oracle Fusion Middleware High
Availability Guide.
11. Optional: Assign Managed Servers to clusters, as required.
12. Optional: Configure Machines, as needed. This step is useful when you want to
run the Administration Server on one machine and Managed Servers on another
physical machine.
13. Optional: Assign the Administration Server to a machine.
14. Optional: Select Deployments, such as applications and libraries, and Services to
target them to a particular cluster or server.
15. On the Configuration Summary screen, review the domain configuration, and
click Extend to start extending the domain.
Your existing Oracle Identity and Access Management domain with Oracle
Identity Manager, Oracle Access Manager, and Oracle Adaptive Access Manager
is configured to support Oracle Identity Navigator.
16. Start the Oracle Identity Manager Configuration Wizard, as described in Starting
the Oracle Identity Manager 11g Configuration Wizard.
17. Configure Oracle Identity Manager Server, as described in Configuring OIM
Server.
Tip: Before configuring a machine, use the ping command to verify
whether the machine or host name is accessible.

Verifying OIN
Configuring Oracle Identity Navigator 15-7
18. Follow the wizard and the steps described in Configuring OIM Server to complete
the Oracle Identity Manager Server configuration. Similarly, follow the wizard to
configure Oracle Identity Manager Design Console (Windows only) and to
configure Oracle Identity Manager Remote Server, as described in Configuring
OIM Design Console, and Configuring OIM Remote Manager.
15.6 Starting the Servers
After installing and configuring Oracle Identity Navigator, you must run the Oracle
WebLogic Administration Server and various Managed Servers, as described in
Starting or Stopping the Oracle Stack.
15.7 Verifying OIN
To verify the installation of Oracle Identity Navigator (OIN), complete the following
steps:
1. Launch Oracle Identity Navigator in a browser by using the following URL:
http://<host>:7001/oinav/faces/idmNag.jspx
The Oracle Identity Navigator dashboard and the resource catalog are displayed.
2. Click the Customize link on the upper right corner of the screen to switch to the
Edit mode.
3. Click the Add Content button on the page. A resource catalog pops up.
4. In the pop-up dialog, click the Open link for the folder IDM Product Launcher.
The Launcher task flow pops up.
5. In the pop-up dialog, click the Add link. Verify that the Launcher portlet is added
to the page content. Continue to add News task flows to the page, without closing
the pop-up dialog. Click the up arrow at the upper left corner. The top folder
layout is displayed again. Click the Open link for the folder News. The News and
Announcements task flow pops up.
6. In the News and Announcements pop-up dialog, click the Add link. Verify that
the Report portlet is added to the page content. Continue to add Reports task
flows to the page, without closing the pop-up dialog. Click the up arrow at the
upper left corner. The top folder layout is displayed again. Click the Open link for
the folder My Reports. Click the Add link and the Close button (X). All the three
workflows are added to the page content.
7. Change the default layout, if necessary, by clicking the Pencil icon located on the
upper right area of the screen.
8. To exit the Edit mode, click the Close button.
If the task flows are properly added to the page content, the screen displays the
task flow content.
9. Test the Product Registration functionality as follows:
a. Create, edit, or delete the product information by clicking the Administration
tab.
b. To add a new product, click the Create image icon in the Product Registration
section. The New Product Registration dialog pops up.

Getting Started with Oracle OIN After Installation
15-8 Oracle Fusion Middleware Installation Guide for Oracle Identity Management
c. Enter the relevant information in this dialog, and the new product registration
is updated accordingly. The new product registration data is updated on the
Launcher portlet after you click the Dashboard tab.
d. Click the product link and ensure that a new browser window or tab opens
with the registered product URL.
10. Test the News functionality as follows:
a. Click the refresh icon to update the RSS feed content.
b. Click the news item link to open the source of content in a new browser
window or tab.
11. Test the Reports functionality as follows:
a. Add a report by clicking the Add icon. The Add Report dialog pops up.
b. In this dialog, select a report to add, and click the Add Report button. Verify
that the report is added.
c. Run a report by clicking the report icon. The report opens in a new browser
window or tab.
15.8 Getting Started with Oracle OIN After Installation
After installing Oracle Identity Navigator (OIN), refer to the "Using Identity
Navigator" chapter in the Oracle Fusion Middleware Administrator's Guide for Oracle
Identity Navigator.

16
Configuring Oracle Identity Manager 16-1
16 Configuring Oracle Identity Manager
This chapter explains how to configure Oracle Identity Manager (OIM).
It includes the following topics:
■OIM Server Configuration Workflow
■Important Notes Before You Start Configuring OIM
■Creating a new WebLogic Domain for OIM and SOA
■Starting the Servers
■Configuring OIM Server, Design Console, and Remote Manager
■Before Configuring OIM Server, Design Console, or Remote Manager
■Starting the Oracle Identity Manager 11g Configuration Wizard
■Configuring OIM Server
■Installing and Configuring Only OIM Design Console on Windows
■Configuring OIM Design Console
■Configuring OIM Remote Manager
■Verifying the OIM Installation
■Setting Up Integration with OAM
■Using the Diagnostic Dashboard
■Getting Started with OIM After Installation
16.1 OIM Server Configuration Workflow
This section discusses the following topics:
■OIM Server Configuration Steps for Existing Oracle Identity Management 11g
Release 1 (11.1.1.5.0) Users
■OIM Server Configuration Steps for New Oracle Identity and Access Management
11g Release 1 (11.1.1.5.0) Users
Note: To invoke online help at any stage of the Oracle Identity
Manager configuration process, click the Help button on the Oracle
Identity Manager Configuration Wizard screens.

Important Notes Before You Start Configuring OIM
16-2 Oracle Fusion Middleware Installation Guide for Oracle Identity Management
OIM Server Configuration Steps for Existing Oracle Identity Management 11g
Release 1 (11.1.1.5.0) Users
1. Ensure that Oracle WebLogic Server 10.3.5 is installed.
2. Create and load schemas for OIM and SOA 11.1.1.5.0 components using Oracle
Fusion Middleware Repository Creation Utility (RCU).
3. Install Oracle SOA Suite 11g Release 1 (11.1.1.5.0).
4. Install the Oracle Identity and Access Management 11g Release 1 (11.1.1.5.0) suite
in the same Middleware Home directory where Oracle Identity Management 11g
Release 1 (11.1.1.5.0) suite is installed. The Oracle Identity and Access
Management 11g Release 1 (11.1.1.5.0) suite includes Oracle Identity Manager.
5. Create a new WebLogic domain or extend an existing Identity Management
11.1.1.5.0 domain for Oracle Identity Manager and Oracle SOA.
6. Configure OIM Server using the Oracle Identity Manager Configuration Wizard.
7. Complete post-configuration steps, if any.
OIM Server Configuration Steps for New Oracle Identity and Access
Management 11g Release 1 (11.1.1.5.0) Users
The following lists the high-level steps to configure Oracle Identity Manager. This
procedure applies only to new Oracle Identity and Access Management 11.1.1.5.0
users that have not installed Oracle Identity Management 11.1.1.5.0.
1. Install Oracle WebLogic Server 10.3.5 and create a Middleware Home.
2. Create and load schemas for OIM and SOA 11.1.1.5.0 components using Oracle
Fusion Middleware Repository Creation Utility (RCU).
3. Install Oracle SOA Suite 11g Release 1 (11.1.1.5.0).
4. Install the Oracle Identity and Access Management 11g Release 1 (11.1.1.5.0) suite.
The Oracle Identity and Access Management 11g Release 1 (11.1.1.5.0) suite
includes Oracle Identity Manager.
5. Create a new WebLogic domain or extend an existing Identity Management
11.1.1.5.0 domain for Oracle Identity Manager and Oracle SOA.
6. Configure OIM Server using the Oracle Identity Manager Configuration Wizard.
7. Complete post-configuration steps, if any.
16.2 Important Notes Before You Start Configuring OIM
Before you start configuring Oracle Identity Manager, keep the following points in
mind:

Important Notes Before You Start Configuring OIM
Configuring Oracle Identity Manager 16-3
■By performing the domain configuration procedures described in this chapter, you
can create Managed Servers on a local machine (the machine on which the
Administration Server is running). However, you can create and start Managed
Servers for Oracle Identity and Access Management components on a remote
machine. For more information, see the "Creating and Starting a Managed Server
on a Remote Machine" topic in the guide Oracle Fusion Middleware Creating
Templates and Domains Using the Pack and Unpack Commands.
■You must use the Oracle Identity Manager Configuration Wizard to configure
Oracle Identity Manager Server, Oracle Identity Manager Design Console (on
Windows only), and Oracle Identity Manager Remote Manager.
If you are configuring Oracle Identity Manager Server, you must run the Oracle
Identity Manager configuration wizard on the machine where the Administration
Server is running. For configuring the Server, you can run the wizard only once
during the initial setup of the Server. After the successful setup of Oracle Identity
Manager Server, you cannot run the Oracle Identity Manager Configuration
Wizard again to modify the configuration of Oracle Identity Manager Server. For
such modifications, you must use Oracle Enterprise Manager Fusion Middleware
Control.
If you are configuring only Design Console or Remote Manager, you can run the
Oracle Identity Manager Configuration Wizard on the machine where Design
Console or Remote Manager is being configured. You can configure Design
Console or Remote Manager after configuring the OIM Server. Note that you can
run the Oracle Identity Manager Configuration Wizard to configure Design
Console or Remote Manager as and when you need to configure them on new
machines.
Note that Oracle Identity Manager requires Oracle SOA Suite 11g (11.1.1.5.0),
which should be exclusive to Oracle Identity and Access Management. You must
install Oracle SOA Suite before configuring Oracle Identity Manager. If you are
setting up integration between Oracle Identity Manager and Oracle Access
Manager, ensure that Oracle Identity Manager, Oracle Access Manager, and
Oracle SOA Suite are configured in the same domain.
Note: In this chapter, two IDM_Home directories are mentioned in
descriptions and procedures. For example, the first one, IDM_Home
can be the IDM_Home directory for Oracle Internet Directory, Oracle
Virtual Directory, Oracle Directory Services Manager, Oracle
Directory Integration Platform, and Oracle Identity Federation. The
second one, IAM_Home can be the IDM_Home directory for Oracle
Identity Manager, Oracle Access Manager, Oracle Adaptive Access
Manager, Oracle Entitlements Server, and Oracle Identity Navigator.
However, note that IDM_Home and IAM_Home are used as
examples in this document. You can specify any name for either of
your IDM_Home directories. In addition, you can install the two Oracle
Identity Management suites (one containing Oracle Internet Directory,
Oracle Virtual Directory, Oracle Directory Services Manager, Oracle
Directory Integration Platform, and Oracle Identity Federation;
another containing Oracle Identity Manager, Oracle Access Manager,
Oracle Adaptive Access Manager, Oracle Entitlements Server, and
Oracle Identity Navigator) in any order on your machine.
For more information, see Overview and Structure of Oracle Identity
Management 11g Installation.

Creating a new WebLogic Domain for OIM and SOA
16-4 Oracle Fusion Middleware Installation Guide for Oracle Identity Management
16.3 Creating a new WebLogic Domain for OIM and SOA
This topic describes how to create a new WebLogic domain for OIM and SOA. It
includes the following sections:
■Appropriate Deployment Environment
■Components Deployed
■Dependencies
■Procedure
16.3.1 Appropriate Deployment Environment
Perform the configuration in this topic if you want to install Oracle Identity Manager
in an environment where you may use Oracle Identity Manager as a provisioning or
request solution. This option is also appropriate for Oracle Identity Manager
environments that do not use Single Sign-On (SSO) or Oracle Access Manager.
16.3.2 Components Deployed
Performing the configuration in this section installs the following components:
■Administration Server
■A Managed Server for Oracle Identity Manager
■Oracle Identity Administration Console, Oracle Identity Manager Self Service
Console, and Oracle Identity Manager Advanced Administration Console on the
Oracle Identity Manager Managed Server
16.3.3 Dependencies
The configuration in this section depends on the following:
■Oracle WebLogic Server.
■Installation of the Oracle Identity and Access Management 11g software.
■Installation of the latest version of Oracle SOA Suite.
■Database schemas for Oracle Identity Manager and Oracle SOA 11g Suite. For
more information, see Creating Database Schema Using the Oracle Fusion
Middleware Repository Creation Utility (RCU).
16.3.4 Procedure
Complete the following steps to create a new WebLogic domain for OIM and SOA and
to configure Oracle Identity Manager Server, Design Console, and Remote Manager:
1. Review the section Important Notes Before You Start Configuring OIM.
2. Run the <IAM_Home>/common/bin/config.sh script (on UNIX). (<IAM_
Home>\common\bin\config.cmd on Windows). The Welcome screen of the
Oracle Fusion Middleware Configuration Wizard appears.
3. On the Welcome screen, select Create a new WebLogic domain, and click Next.
The Select Domain Source screen appears.
4. On the Select Domain Source screen, ensure that the Generate a domain
configured automatically to support the following products: option is selected.
Select Oracle Identity Manager - 11.1.1.3.0 [Oracle_IDM2].

Creating a new WebLogic Domain for OIM and SOA
Configuring Oracle Identity Manager 16-5
The Oracle SOA Suite - 11.1.1.1.0 [Oracle_SOA1] option, the Oracle JRF 11.1.1.0
[oracle_common] option, the Oracle Enterprise Manager - 11.1.1.0 [oracle_
common], and the Oracle WSM Policy Manager 11.1.1.0 [oracle_common] option
are also selected, by default.
Click Next. The Specify Domain Name and Location screen appears.
5. Enter a name and a location for the domain to be created, and click Next. The
Configure Administrator User Name and Password screen appears.
6. Configure a user name and a password for the administrator. The default user
name is weblogic. Click Next.
7. Choose JRockit SDK 1.6.0_24 and Production Mode in the Configure Server
Start Mode and JDK screen of the Oracle Fusion Middleware Configuration
Wizard. Click Next. The Configure JDBC Component Schema screen appears. This
screen displays a list of the following component schemas:
■SOA Infrastructure
■User Messaging Service
■OIM MDS Schema
■OWSM MDS Schema
■SOA MDS Schema
■OIM Infrastructure
8. On the Configure JDBC Component Schema screen, for the OIM and its
dependant schemas, specify the schema owner and password that you set in RCU
when creating and loading the schemas. Click Next. The Test JDBC Component
Schema screen appears. After the test succeeds, the Select Optional Configuration
screen appears.
9. On the Select Optional Configuration screen, you can configure the
Administration Server, JMS Distributed Destination, Managed Servers,
Clusters, and Machines, Deployments and Services. Click Next.
10. Optional: Configure the following Administration Server parameters:
■Name
■Listen address
■Listen port
■SSL listen port
■SSL enabled or disabled
Click Next.
11. Optional: Configure JMS Distributed Destination, as required. Click Next.
12. Optional: Configure Managed Servers, as required. Click Next.
13. Optional: Configure Clusters, as required. Click Next.
For more information about configuring clusters for Oracle Identity and Access
Management products, see the "Configuring High Availability for Identity
Management Components" topic in the guide Oracle Fusion Middleware High
Availability Guide.
14. Optional: Assign Managed Servers to Clusters, as required. Click Next.

Starting the Servers
16-6 Oracle Fusion Middleware Installation Guide for Oracle Identity Management
15. Optional: Configure Machines, as needed. This step is useful when you want to
run the Administration Server on one machine and Managed Servers on another
physical machine.Click Next.
16. Optional: Assign servers to machines. Click Next.
17. Optional: Select Deployments, such as applications and libraries, and Services to
target them to a particular cluster or server. Click Next.
18. On the Configuration Summary screen, you can view summaries of your
configuration for deployments, application, and service. Review the domain
configuration, and click Create to start creating the domain.
After the domain configuration is complete, click Done to close the configuration
wizard.
A new WebLogic domain to support Oracle Identity Manager is created in the
<MW_HOME>\user_projects\domains directory (on Windows). On UNIX, the
domain is created in the <MW_HOME>/user_projects/domains directory.
19. Start the Administration Server, as described in Starting or Stopping the Oracle
Stack.
20. Start the Oracle Identity Manager Configuration Wizard, as described in Starting
the Oracle Identity Manager 11g Configuration Wizard.
21. Configure the Oracle Identity Manager Server, Design Console, or Remote
Manager, as described in Configuring OIM Server, Configuring OIM Design
Console, and Configuring OIM Remote Manager.
16.4 Starting the Servers
After installing and configuring Oracle Identity Manager in a WebLogic domain, you
must run the Oracle WebLogic Administration Server and various Managed Servers,
as described in Starting the Stack.
Tip: Before configuring a machine, use the ping command to verify
whether the machine or host name is accessible.
Note: If weblogic is not your WebLogic administrator user name,
you must complete a set of manual steps after starting the servers. For
more information, see Optional: Updating the WebLogic
Administrator Server User Name in Oracle Enterprise Manager
Fusion Middleware Control (OIM Only).
Notes:
■If weblogic is not your WebLogic administrator user name, you
must complete a set of manual steps after starting the servers. For
more information, see Optional: Updating the WebLogic
Administrator Server User Name in Oracle Enterprise Manager
Fusion Middleware Control (OIM Only).
■Oracle Identity Manager requires Oracle SOA Suite. In order to
avoid concurrent update, wait for the first server (OIM server or
SOA server) to come up before starting the other server. OIM and
SOA servers should not be started simultaneously.

Configuring OIM Server, Design Console, and Remote Manager
Configuring Oracle Identity Manager 16-7
16.5 Configuring OIM Server, Design Console, and Remote Manager
The Oracle Identity Management 11g Configuration Wizard enables you to configure
Oracle Identity Manager (OIM) Server, Design Console (Windows only), and Remote
Manager.
If you are configuring OIM Server, you must run this configuration wizard on the
machine where the Administration Server is running.
You must complete this additional configuration for Oracle Identity Manager
components after configuring Oracle Identity Manager in a new or existing WebLogic
administration domain.
Note that Oracle Identity Manager requires Oracle SOA Suite 11g (11.1.1.5.0), which
should be exclusive to Oracle Identity and Access Management. You must install
Oracle SOA Suite before configuring Oracle Identity Manager.
This section discusses the following topics:
■Scope of Configuration Using the Oracle Identity Manager 11g Configuration
Wizard
■Scenario 1: Oracle Identity Manager Server and Design Console on Different
Machines
■Scenario 2: Oracle Identity Manager Server and Remote Manager on Different
Machines
■Scenario 3: Oracle Identity Manager Server, Design Console, and Remote Manager
on a Single Windows Machine
16.5.1 Scope of Configuration Using the Oracle Identity Manager 11g Configuration
Wizard
You can use the Oracle Identity Manager 11g Configuration Wizard to configure the
non-J2EE components and elements of Oracle Identity Manager. Most of the J2EE
configuration is done automatically in the domain template for Oracle Identity
Manager.
16.5.2 Scenario 1: Oracle Identity Manager Server and Design Console on Different
Machines
In this scenario, you configure Oracle Identity Manager Server on one machine, and
install and configure only Oracle Identity Manager Design Console on a different
Windows machine (a development or design system).
Perform the following tasks:
Note: You can run the Oracle Identity Manager Configuration
Wizard to configure Oracle Identity Manager Server only once during
the initial setup. After the initial setup, you cannot run the Oracle
Identity Manager Configuration Wizard again to modify the
configuration of Oracle Identity Manager Server, Design Console, or
Remote Manager. For such modifications, you must use Oracle
Enterprise Manager Fusion Middleware Control.

Configuring OIM Server, Design Console, and Remote Manager
16-8 Oracle Fusion Middleware Installation Guide for Oracle Identity Management
1. Install and configure Oracle Identity Manager Server on a machine after
completing all of the prerequisites, as described in Configuring OIM Server.
Ensure that the Oracle Identity Manager Server is up and running.
2. On the Windows machine on which the Design Console is to be installed, install a
JDK in a path without a space such as c:/jdk1.6.0_24.
3. Create a Middleware_Home folder such as c:/oracle/Middleware.
4. Run setup.exe from the installation media disk1 and follow the prompts
selecting the Middleware_Home created above.
5. The installer will install the Oracle Identity and Access Management suite needed
to install the Design Console .
6. On the Windows machine where you installed the Oracle Identity and Access
Management 11g software, run the Oracle Identity Manager Configuration Wizard
to configure only Design Console. Note that you must provide the Oracle Identity
Manager Server information, such as host and URL, when configuring Design
Console. For more information, see Installing and Configuring Only OIM Design
Console on Windows.
16.5.3 Scenario 2: Oracle Identity Manager Server and Remote Manager on Different
Machines
In this scenario, you configure Oracle Identity Manager Server on one machine, and
install and configure only Oracle Identity Manager Remote Manager on a different
machine.
The following are the high-level tasks in this scenario:
1. Install and configure Oracle Identity Manager Server on a machine after
completing all of the prerequisites, as described in Configuring OIM Server.
Ensure that the Oracle Identity Manager Server is up and running.
2. On a different machine, install the Oracle Identity and Access Management 11g
software containing Oracle Identity Manager, Oracle Access Manager, Oracle
Adaptive Access Manager, Oracle Entitlements Server, and Oracle Identity
Navigator. For information, see Installing Oracle Identity and Access Management
(11.1.1.5.0).
3. On the machine where you installed the Oracle Identity and Access Management
11g software, run the Oracle Identity Manager Configuration Wizard to configure
only Remote Manager. Note that you must provide the Oracle Identity Manager
Server information, such as host and URL, when configuring Remote Manager.
For more information, see Configuring OIM Remote Manager.
Note: When you specify the location of the Middleware_Home, you
will see a message "Specified middleware home is not valid. If you
continue with this installation only Remote Manager and Design
Console can be configured." This is a valid message if you intend to
install only the Design Console.

Before Configuring OIM Server, Design Console, or Remote Manager
Configuring Oracle Identity Manager 16-9
16.5.4 Scenario 3: Oracle Identity Manager Server, Design Console, and Remote
Manager on a Single Windows Machine
In this scenario, suitable for test environments, you install and configure Oracle
Identity Manager Server, Design Console, and Remote Manager on a single Windows
machine.
The following are the high-level tasks in this scenario:
1. Install and configure Oracle Identity Manager Server on a machine after
completing all the prerequisites, as described in Configuring OIM Server. Ensure
that the Oracle Identity Manager Server is up and running.
2. On the same machine, configure Design Console, as described in Configuring OIM
Design Console.
3. On the same machine, configure Remote Manager, as described in Configuring
OIM Remote Manager.
16.6 Before Configuring OIM Server, Design Console, or Remote Manager
Before configuring Oracle Identity Manager (OIM) using the Oracle Identity Manager
Wizard, ensure that you have installed and configured Oracle Identity Manager and
SOA in a WebLogic.
The Oracle Identity Manager 11g Configuration Wizard prompts you to enter
information about certain configurations, such as Database, Schemas, WebLogic
Administrator User Name and Password, and LDAP Server. Therefore, keep this
information ready with you before starting the Identity Management 11g
Configuration Wizard.
This section discusses the following topics:
■Prerequisites for Configuring OIM Server
■Prerequisites for Configuring Only OIM Design Console on a Different Machine
■Prerequisites for Configuring Only OIM Remote Manager on a Different Machine
16.6.1 Prerequisites for Configuring OIM Server
Before you can configure Oracle Identity Manager (OIM) Server using the Oracle
Identity Manager Configuration Wizard, you must complete the following
prerequisites:
1. Installing Oracle WebLogic Server and creating a Middleware Home directory.
For more information, see Installing Oracle WebLogic Server and Creating the
Oracle Middleware Home.
2. Installing a supported version of Oracle database. For more information, see
Installing Oracle Database.
3. Creating and loading the required schemas in the database. For more information,
see Creating Database Schema Using the Oracle Fusion Middleware Repository
Creation Utility (RCU).
4. Installing Oracle SOA Suite 11g Release 1(11.1.1.5.0) under the same Middleware
Home directory. For more information, see Installing the Latest Version of Oracle
SOA Suite (Oracle Identity Manager Users Only).
5. Installing the Oracle Identity and Access Management Suite (the suite that
contains Oracle Identity Manager, Oracle Access Manager, Oracle Adaptive

Starting the Oracle Identity Manager 11g Configuration Wizard
16-10 Oracle Fusion Middleware Installation Guide for Oracle Identity Management
Access Manager, Oracle Entitlements Server, and Oracle Identity Navigator)
under the Middleware Home directory. For more information, see Installing
Oracle Identity and Access Management (11.1.1.5.0).
6. Creating a new WebLogic domain or extending an existing Identity Management
11.1.1.5.0 domain for Oracle Identity Manager and Oracle SOA. For more
information, see Creating a new WebLogic Domain for OIM and SOA.
7. Starting the Oracle WebLogic Administration Server for the domain in which the
Oracle Identity Manager application is deployed. For more information, see
Starting the Stack.
16.6.2 Prerequisites for Configuring Only OIM Design Console on a Different Machine
On the machine where you are installing and configuring Design Console, you must
install the Oracle Identity and Access Management 11g (11.1.1.5.0) software containing
Oracle Identity Manager, Oracle Access Manager, Oracle Adaptive Access Manager,
Oracle Entitlements Server, and Oracle Identity Navigator. For information, see
Installing Oracle Identity and Access Management (11.1.1.5.0).
Before you can configure Oracle Identity Manager (OIM) Design Console by running
the Oracle Identity Manager Configuration Wizard, you should have configured the
Oracle Identity Manager Server, as described in Configuring OIM Server on a local or
remote machine. In addition, the Oracle Identity Manager Server should be up and
running.
16.6.3 Prerequisites for Configuring Only OIM Remote Manager on a Different Machine
On the machine where you are installing and configuring Remote Manager, you must
install the Oracle Identity and Access Management 11g (11.1.1.5.0) software containing
Oracle Identity Manager, Oracle Access Manager, Oracle Adaptive Access Manager,
Oracle Entitlements Server, and Oracle Identity Navigator. For information, see
Installing Oracle Identity and Access Management (11.1.1.5.0).
Before you can configure Oracle Identity Manager (OIM) Remote Manager by running
the Oracle Identity Manager Configuration Wizard, you should have configured the
Oracle Identity Manager Server, as described in Configuring OIM Server. In addition,
the Oracle Identity Manager Server should be up and running.
16.7 Starting the Oracle Identity Manager 11g Configuration Wizard
To start the Oracle Identity Manager 11g Configuration Wizard, execute the <IAM_
Home>/bin/config.sh script (on UNIX) on the machine where the Administration
Note: Oracle Identity Manager Design Console is supported on
Windows operating systems only. If you are installing and
configuring only Design Console on a machine, you do not need to
install Oracle WebLogic Server and create a Middleware Home
directory before installing the Oracle Identity and Access
Management software.
Note: If you are installing and configuring only Remote Manager on
a machine, you do not need to install Oracle WebLogic Server and
create a Middleware Home directory before installing the Oracle
Identity and Access Management software.

Configuring OIM Server
Configuring Oracle Identity Manager 16-11
Server is running. (<IAM_Home>\bin\config.bat on Windows). The Oracle
Identity Management 11g Configuration Wizard starts, and the Welcome Screen
appears.
16.8 Configuring OIM Server
This topic describes how to install and configure only Oracle Identity Manager (OIM)
Server. It includes the following sections:
■Appropriate Deployment Environment
■Components Deployed
■Dependencies
■Procedure
■Completing the Prerequisites for Enabling LDAP Synchronization
■Running the LDAP Post-Configuration Utility
■Verifying the LDAP Synchronization
■Post-Configuration Steps
■Setting oamEnabled Parameter for Identity Virtualization Library
■Enabling LDAP Sync after Installing and Configuring OIM Server at a Later Point
16.8.1 Appropriate Deployment Environment
Perform the configuration in this topic if you want to install Oracle Identity Manager
Server on a separate host.
16.8.2 Components Deployed
Performing the configuration in this section deploys only Oracle Identity Manager
Server.
16.8.3 Dependencies
The installation and configuration in this section depends on Oracle WebLogic Server,
on Oracle SOA Suite, and on the installation of Oracle Identity ans Access
Management 11g software. For more information, see Preparing to Install and
Installing Oracle Identity and Access Management (11.1.1.5.0).
16.8.4 Procedure
Perform the following steps to configure only Oracle Identity Manager Server:
1. Ensure that all the prerequisites, described in Prerequisites for Configuring OIM
Server, are satisfied. In addition, see Important Notes Before You Start Configuring
OIM.
Note: If you have extended an existing WebLogic domain to support
Oracle Identity Manager, you must restart the Administration Server
before starting the Oracle Identity Manager Configuration Wizard to
configure Oracle Identity Manager Server, Design Console, or Remote
Manager.

Configuring OIM Server
16-12 Oracle Fusion Middleware Installation Guide for Oracle Identity Management
2. On the machine where the Administration Server is running, start the Oracle
Identity Manager Configuration Wizard, as described in Starting the Oracle
Identity Manager 11g Configuration Wizard. The Welcome screen appears.
3. On the Welcome screen, click Next. The Components to Configure screen appears.
On the Components to Configure screen, ensure that only the OIM Server option
is selected. It is selected, by default. Click Next. The Database screen appears.
4. On the Database screen, enter the full path, listen port, and service name for the
database in the Connect String field. For a single host instance, the format of
connect string is hostname:port:servicename. For example, if the hostname
is aaa.bbb.com, port is 1234, and the service name is xxx.bbb.com, then you
must enter the connect string for a single host instance as follows:
aaa.bbb.com:1234:xxx.bbb.com
If you are using a Real Application Cluster database, the format of the database
connect string is as follows:
hostname1:port1^hostname2:port2@servicename
5. In the OIM Schema User Name field, enter the name of the schema that you
created for Oracle Identity Manager using the Oracle Fusion Middleware
Repository Creation Utility (RCU). For more information, see Creating Database
Schema Using the Oracle Fusion Middleware Repository Creation Utility (RCU).
6. In the OIM Schema Password field, enter the password for the Oracle Identity
Manager schema that you set while creating the schema using the Oracle Fusion
Middleware Repository Creation Utility (RCU).
7. If you want to use a different database for the Metadata Services (MDS) schema,
select the Select different database for MDS Schema check box.
8. If you choose to use a different database for MDS schema, in the MDS Connect
String field, enter the full path, listen port, and service name for the database
associated with the MDS schema. For the format of the connect string, see Step 4.
In the MDS Schema User Name field, enter the name of the schema that you
created for AS Common Services - Metadata Services using the Oracle Fusion
Middleware Repository Creation Utility (RCU). For more information, see
Creating Database Schema Using the Oracle Fusion Middleware Repository
Creation Utility (RCU).
In the MDS Schema Password field, enter the password for the AS Common
Services - Metadata Services schema that you set while creating the schema using
the Oracle Fusion Middleware Repository Creation Utility (RCU). Click Next. The
WebLogic Admin Server screen appears.
9. On the WebLogic Admin Server screen, in the WebLogic Admin Server URL
field, enter the URL of the WebLogic Administration Server of the domain in the
following format:
t3://hostname:port
In the UserName field, enter the WebLogic administrator user name of the domain
in which the Oracle Identity Manager (OIM) application and the Oracle SOA Suite
Note: You can use the same database or different databases for
creating the Oracle Identity Manager schema and the Metadata
Services schema.

Configuring OIM Server
Configuring Oracle Identity Manager 16-13
application are deployed. If you are setting up integration between Oracle Identity
Manager and Oracle Access Manager, the Oracle Access Manager application is
also configured in the same domain.
In the Password field, enter the WebLogic administrator password of the domain
in which the Oracle Identity Manager (OIM) application and the Oracle SOA Suite
application are deployed. Click Next.
The OIM Server screen appears. The OIM Server screen enables you to set a
password for the system administrator (xelsysadm).
10. On the OIM Server screen, in the OIM Administrator Password field, enter a new
password for the administrator. A valid password contains at least 6 characters;
begins with an alphabetic character; includes at least one number, one uppercase
letter, and one lowercase letter. The password cannot contain the first name, last
name, or the login name for Oracle Identity Manager.
11. In the Confirm User Password field, enter the new password again.
12. In the OIM HTTP URL field, enter the http URL that front-ends the Oracle
Identity Manager application.
The URL is of the format: http(s)://<oim_host>:<oim_port>. For example,
https://localhost:7002.
13. In the KeyStore Password field, enter a new password for the keystore. A valid
password can contain 6 to 30 characters, begin with an alphabetic character, and
use only alphanumeric characters and special characters like Dollar ($),
Underscore (_), and Pound (#). The password must contain at least one number.
14. In the Confirm Keystore Password field, enter the new password again. Click
Next. The BI Publisher screen appears.
The BI Publisher screen enables you to perform the following optional tasks:
■Configure Oracle Identity Manager to use Oracle BI Publisher for reporting
purposes
■Enable synchronization of Oracle Identity Manager roles, users, and their
hierarchy to an LDAP directory
15. Optional: To configure Oracle Identity Manager to use Oracle BI Publisher for
reporting purposes, select the Configure BI Publisher option, and enter the BI
Publisher URL in the BI Publisher URL field. Note that you should have installed
Oracle BI Publisher on a local or remote machine before selecting the Configure BI
Publisher option on the BI Publisher screen. In addition, ensure that Oracle BI
Publisher is up and running.
16. Optional: To enable LDAP Sync, you must select the Enable LDAP Sync option on
the BI Publisher screen.
Note: If you want to enable LDAP Sync, before enabling LDAP Sync
you must complete the steps, as described in Completing the
Prerequisites for Enabling LDAP Synchronization.
Once LDAP Sync is enabled on the BI Publisher screen and
prerequisites are completed, you must continue to configure the OIM
Server. After you have configured the OIM Server and exited the
Oracle Identity Management Configuration Wizard, you must run the
LDAP post-configuration utility as described in Running the LDAP
Post-Configuration Utility.

Configuring OIM Server
16-14 Oracle Fusion Middleware Installation Guide for Oracle Identity Management
17. After making your selections, click Next on the BI Publisher screen. If you chose to
enable LDAP Sync, the LDAP Server screen appears.
The LDAP Server screen enables you to specify the following information:
■Directory Server Type - Select the desired Directory Server from the
dropdown list. You have the following options:
–OID
–ACTIVE_DIRECTORY
–IPLANET
–OVD
■Directory Server ID - enter the Directory Server ID. It can be any unique
value.
For example: oid1 for OID, iplanet1 for IPLANET, and ad1 for ACTIVE_
DIRECTORY
■Server URL - enter the LDAP URL in the format ldap://oid_host:oid_
port.
■Server User - enter the user name for Directory Server administrator.
For example: cn=oimAdminUser,cn=systemids,dc=mycompany,dc=com
■Server Password - enter the OIM admin password.
■Server SearchDN - enter the Distinguished Names (DN). For example,
dc=exampledomain, dc=com. This is the top-level container for users and
roles in LDAP, and Oracle Identity Manager uses this container for
reconciliation.
Click Next. The LDAP Server Continued screen appears.
18. On the LDAP Server Continued screen, enter the following LDAP information:
■LDAP RoleContainer - enter a name for the container that will be used as a
default container of roles in the LDAP directory. You can configure isolation
rules in Oracle Identity Manager to create roles in different containers in
LDAP. For example, cn=groups, dc=mycountry, dc=com.
■LDAP RoleContainer Description - enter a description for the default role
container.
■LDAP Usercontainer - enter a name for the container that will be used as a
default container of users in the LDAP directory. You can configure isolation
Notes:
■IPLANET is also referred to as Oracle Directory Server Enterprise
Edition (ODSEE) in this guide.
■If you choose to use OID, ACTIVE_DIRECTORY or IPLANET as
the Directory Server and if you want to integrate OIM and OAM,
you must set the oamEnabled parameter to true. To set the
oamEnabled parameter to true in case of Identity Virtualization
Library, see Setting oamEnabled Parameter for Identity
Virtualization Library.

Configuring OIM Server
Configuring Oracle Identity Manager 16-15
rules in Oracle Identity Manager to create users in different containers in
LDAP. For example, cn=users, dc=mycountry, dc=com.
■LDAP Usercontainer Description - enter a description for the default user
container.
■User Reservation Container - enter a name for the container that will be used
for reserving user names in the LDAP directory while their creation is being
approved in Oracle Identity Manager. When the user names are approved,
they are moved from the reservation container to the user container in the
LDAP directory. For example, cn=reserve, dc=mycountry, dc=com.
After enabling LDAP synchronization and after running the LDAP
post-configuration utility, you can verify it by using the Oracle Identity Manager
Administration Console. For more information, see Verifying the LDAP
Synchronization. Click Next. The Configuration Summary screen appears.
19. If you did not choose the Enable LDAP Sync option on the BI Publisher screen,
the Configuration Summary screen appears after you enter information in the
OIM Server screen.
The Configuration Summary screen lists the applications you selected for
configuration and summarizes your configuration options, such as database
connect string, OIM schema user name, MDS schema user name, WebLogic
Admin Server URL, WebLogic Administrator user name, and OIM HTTP URL.
Review this summary and decide whether to start the configuration. If you want
to modify any of the configuration settings at this stage, select a topic in the left
navigation page and modify your choices. To continue installing this configuration
of the Oracle Identity Manager Server, click Configure.
After you click Configure, the Configuration Progress screen appears. Click Next.
A configuration log is saved to the logs directory under Oracle Inventory
directory. For information about the log files, see Installation Log Files. If the
Configuration Progress screen displays any errors, click Abort to stop the
installation and restart the Oracle Identity Manager Configuration Wizard.
20. Click Finish.
16.8.5 Completing the Prerequisites for Enabling LDAP Synchronization
You must complete the following prerequisites:
■Preconfiguring the Identity Store
Note: Before configuring an application, you can save your
configuration settings and preferences in a response file. Response
files are text files that you can create or edit in a text editor. You can
use response files to perform a silent installation or use as templates
or customized settings for your environment. For more information,
see Performing a Silent Installation.
Note: If the configuration fails, click Abort to stop the installation
and restart the Oracle Identity Manager Configuration Wizard, as
described in Starting the Oracle Identity Manager 11g Configuration
Wizard.

Configuring OIM Server
16-16 Oracle Fusion Middleware Installation Guide for Oracle Identity Management
■Creating Adapters in Oracle Virtual Directory
16.8.5.1 Preconfiguring the Identity Store
Before you can use your LDAP directory as an Identity store, you must preconfigure
it.
You must complete the following steps to preconfigure the Identity Store if you have
not configured already:
1. Create User, Group and Reserve Containers.
2. Create the proxy user for OIM, namely oimadminuser in the Directory Server
outside the search base used for OIM reconciliation. This OIM proxy user should
not be reconciled into OIM Database.
3. Create the oimadmingroup and assign the oimadminuser to the group.
4. Add the ACIs to the group and user container for the OIM proxy user to have
access to all entries in those containers.
5. Extend OIM Schema for non-OID Directory Servers.
■For Active Directory
–The OIM Schema for Active Directory is in the following location :
$MW_HOME/oracle_common/modules/oracle.ovd_
11.1.1/oimtemplates
–Run the following command to extend Active Directory schema:
On Windows:
extendadschema.bat -h AD_host -p AD_port -D <adminis-
trator@mydomain.com> -q -AD <dc=mydomain,dc=com> -OAM
true
On UNIX:
sh extendadschema.sh -h AD_host -p AD_port -D adminis-
trator@mydomain.com -q -AD dc=mydomain,dc=com -OAM true
■For ODSEE/iPlanet
–The OIM Schema for iPlanet (also known as ODSEE) is in the following
location :
$MW_HOME/oracle_common/modules/oracle.ovd_
11.1.1/oimtemplates/sunOneSchema.ldif
–Run the following command to extend ODSEE schema:
Note: Follow the steps in this section if you are using any one of the
Directory Servers mentioned below for LDAP Synchronization:
■OID
■Active Directory
■iPlanet/ODSEE
■OVD

Configuring OIM Server
Configuring Oracle Identity Manager 16-17
ldapmodify -h <ODSEE Server> -p <ODSEE port> -D <ODSEE
Admin ID> -w <ODSEE Admin password> -f sunOne-
Schema.ldif
6. If you want to enable OAM-OIM integration, extend the following OAM Schema :
■For OID
–To extend OAM Schema for OID, locate the following files:
$IAM_HOME/oam/server/oim-intg/ldif/oid/schema/OID_
oblix_pwd_schema_add.ldif
$IAM_HOME/oam/server/oim-intg/ldif/oid/schema/OID_
oblix_schema_add.ldif
$IAM_HOME/oam/server/oim-intg/ldif/oid/schema/OID_oim_
pwd_schema_add.ldif
$IAM_HOME/oam/server/oim-intg/ldif/oid/schema/OID_
oblix_schema_index_add.ldif
–Use ldapmodify from the command line to load the four LDIF files :
cd $IAM_HOME/oam/server/oim-intg/ldif/oid/schema/
ldapmodify -h <OID Server> -p <OID port> -D <OID Admin
ID> -w <OID Admin password> -f OID_oblix_pwd_schema_
add.ldif
ldapmodify -h <OID Server> -p <OID port> -D <OID Admin
ID> -w <OID Admin password> -f OID_oblix_schema_
add.ldif
ldapmodify -h <OID Server> -p <OID port> -D <OID Admin
ID> -w <OID Admin password> -f OID_oim_pwd_schema_
add.ldif
ldapmodify -h <OID Server> -p <OID port> -D <OID Admin
ID> -w <OID Admin password> -f OID_oblix_schema_index_
add.ldif
■For Active Directory
–To extend OAM Schema for Active Directory, locate the following files:
$IAM_HOME/oam/server/oim-intg/ldif/ad/schema/ADUser-
Schema.ldif
$IAM_HOME/oam/server/oim-intg/ldif/ad/schema/AD_oam_
pwd_schema_add.ldif
In both the above files, replace the domain-dn with the appropriate
domain-dn value.
–Use ldapadd from the command line to load the two LDIF files, as follows:
cd $IAM_HOME/oam/server/oim-intg/ldif/ad/schema/
ldapadd -h <activedirectoryhostname> -p <activedirecto-
ryportnumber> -D <AD_administrator> -q -c -f ADUser-
Schema.ldif
ldapadd -h <activedirectoryhostname> -p <activedirecto-
ryportnumber> -D <AD_administrator> -q -c -f AD_oam_
pwd_schema.ldif

Configuring OIM Server
16-18 Oracle Fusion Middleware Installation Guide for Oracle Identity Management
where AD_administrator is a user which has schema extension privi-
leges to the directory.
For example:
ldapadd -h activedirectoryhost.mycompany.com -p 389 -D
adminuser –q -c -f ADUserSchema.ldif
■For ODSEE/iPlanet
–To extend OAM Schema for ODSEE, locate the following files :
$IAM_
HOME/oam/server/oim-intg/ldif/iplanet/schema/iPlanet7_
user_index_add.ldif
$IAM_
HOME/oam/server/oim-intg/ldif/iplanet/schema/iPlanet7_
user_index_generic.ldif
$IAM_
HOME/oam/server/oim-intg/ldif/iplanet/schema/iPlanet_
oam_pwd_schema_add.ldif
$IAM_
HOME/oam/server/oim-intg/ldif/iplanet/schema/iPlanet_
user_schema_add.ldif
$IAM_
HOME/oam/server/oim-intg/ldif/iplanet/schema/iPlanet_
user_index_add.ldif
–Use ldapmodify from the command line to load the four LDIF files :
cd $IAM_HOME/oam/server/oim-intg/ldif/iplanet/schema/
ldapmodify -h <ODSEE Server> -p <ODSEE port> -D <ODSEE
Admin ID> -w <ODSEE Admin password> -f iPlanet_oam_pwd_
schema_add.ldif
ldapmodify -h <ODSEE Server> -p <ODSEE port> -D <ODSEE
Admin ID> -w <ODSEE Admin password> -f iPlanet_user_
schema_add.ldif
ldapmodify -h <ODSEE Server> -p <ODSEE port> -D <ODSEE
Admin ID> -w <ODSEE Admin password> -f iPlanet_user_
index_add.ldif
7. If you are using Oracle Directory Server Enterprise Edition (ODSEE), you must
enable moddn and Changelog properties in the ODSEE Directory Server.
Skip this step if you are using Oracle Internet Directory (OID) or Active Directory.
Note: If you are not sure about the which index-root you should
use, instead of iPlanet7_user_index_add.ldif, please use
iPlanet7_user_index_generic.ldif file which also has step by
step instructions on finding index-root.

Configuring OIM Server
Configuring Oracle Identity Manager 16-19
16.8.5.2 Creating Adapters in Oracle Virtual Directory
Oracle Virtual Directory communicates with other directories through adapters.
Before you can start using Oracle Virtual Directory as an identity store, you must
create adapters to each of the directories you want to use.The procedure is slightly
different, depending on the directory you are connecting to.
The following sections show how to create adapters for the respective directories:
■Creating Adapters for Oracle Internet Directory
■Creating Adapters for Microsoft Active Directory Server
■Creating Adapters for Oracle Directory Server Enterprise Edition (ODSEE)
■Important Notes on Changelog Plugin Configuration
16.8.5.2.1 Creating Adapters for Oracle Internet Directory
User Adapter
Create the user adapter for Oracle Virtual Directory. Follow the steps below to create
the User Adapter in Oracle Virtual Directory using Oracle Directory Services Manager.
1. Open a browser and bring up the ODSM console at
http://hostname:port/odsm
2. Connect to Oracle Virtual Directory by using the appropriate connection entry.
Note: The preconfiguration differs, depending on the directory store
you wish to use to hold your identity information. For a sample
procedure of preconfiguring the Identity Store, refer to
"Preconfiguring Oracle Directory Server Enterprise Edition (ODSEE)".
Note: This procedure is applicable only if you are using OVD as the
Directory Server. If you choose to use OID, Active Directory or Oracle
Directory Server Enterprise Edition (ODSEE) as the Directory Server,
the required adapters are created and configured while installing and
configuring the OIM server. For more information on managing the
adapters, see "Managing Identity Virtualization Library (libOVD)
Adapters" in the Oracle Fusion Middleware Administrator's Guide for
Oracle Identity Manager.
The User Management and Changelog adapters for Identity
Virtualization Library configured by the OIM installer are stored in
adapters.os_xml file. The adapters.os_xml will be in the
following location:
$DOMAIN_HOME/config/fmwconfig/ovd/<context>/
For example:
$DOMAIN_HOME/config/fmwconfig/ovd/oim1/adapters.os_
xml
Note: The default port number is 7005.

Configuring OIM Server
16-20 Oracle Fusion Middleware Installation Guide for Oracle Identity Management
3. On the Home page, click the Adapter tab.
4. Start the New Adapter Wizard by clicking Create Adapter at the top of the
adapter window.
5. Create a new adapter using the New Adapter Wizard, with the following
parameters:
Verify that the summary is correct and then click Finish.
6. Edit the User Adapter as follows:
a. Select the User Adapter.
b. Click the Plug-ins Tab.
c. Click the User Management Plug-in, then click Edit in the plug-ins table. The
plug-in editing window appears.
d. In the Parameters table, update the parameter values as follows:
e. Click OK.
f. Click Apply.
Table 16–1 Parameters for User Adapter Creation
Screen Field Value/Step
Type Adapter Type LDAP
Adapter Name User Adapter
Adapter Template User_OID
Connection Use DNS for Auto
Discovery
No
Host idstore.mycompany.com
Port 389
Server Proxy Bind DN cn=oimAdminUser,cn=systemids,dc=
mycompany,dc=com
Proxy Password Password for oimadmin user.
Connection Test Validate that the test succeeds.
Namespace Remote Base dc=mycompany,dc=com
Mapped Namespace dc=mycompany,dc=com
Table 16–2 User Adapter Parameter Values
Parameter Value
directoryType oid
pwdMaxFailure 10
oamEnabled true or false
Note that this parameter should be set to true only
if you are setting up integration between Oracle
Identity Manager and Oracle Access Manager at a
later time.
mapObjectclass container=orclContainer

Configuring OIM Server
Configuring Oracle Identity Manager 16-21
Change Log Adapter
Create the change log adapter for Oracle Virtual Directory. Follow the steps below to
create the Change Log Adapter in Oracle Virtual Directory using Oracle Directory
Services Manager.
1. Open a browser and bring up the ODSM console at
http://hostname:port/odsm
2. Connect to Oracle Virtual Directory by using the appropriate connection entry.
3. On the Home page, click on the Adapter tab.
4. Start the New Adapter Wizard by clicking Create Adapter at the top of the
adapter window.
5. Create a new adapter using the New Adapter Wizard, with the following
parameters:
Verify that the summary is correct, then click Finish.
6. To edit the change adapter follow the steps below:
a. Select the OIM Change Log Adapter.
b. Click the Plug-ins tab.
c. In the Deployed Plus-ins table, click the changelog plug-in, then click Edit in
the plug-ins table. The plug-in editing window appears.
d. In the Parameters table, update the parameter values.
Edit the Change Log Adapter to either add or modify the properties so that
they match the values shown in the following table. You must add the
modifierDNFilter, sizeLimit, and targetDNFilter properties to the
adapter.
Note: The default port number is 7005.
Table 16–3 Parameters for Change Log Adapter Creation
Screen Field Value/Step
Type Adapter Type LDAP
Adapter Name Change Log Adapter
Adapter Template Changelog_OID
Connection Use DNS for Auto
Discovery
No
Host policystore.mycompany.com
Port 389
Server Proxy Bind DN cn=oimAdminUser,cn=systemids,dc=
mycompany,dc=com
Proxy Password Password for oimadmin user
Connection Test Validate that the test succeeds
Namespace Remote Base Remote Base should be empty
Mapped Namespace cn=changelog

Configuring OIM Server
16-22 Oracle Fusion Middleware Installation Guide for Oracle Identity Management
e. Click OK.
f. Click Apply.
Restarting Oracle Virtual Directory
Restart Oracle Virtual Directory, as described in Starting or Stopping the Oracle Stack.
16.8.5.2.2 Creating Adapters for Microsoft Active Directory Server
User Adapter
Create the user adapter for Oracle Virtual Directory. Follow these steps to create the
User Adapter in Oracle Virtual Directory using Oracle Directory Services Manager.
1. Start the Administration Server and the ODSM Managed Server as described
in Starting or Stopping the Oracle Stack.
2. Open a browser and bring up the ODSM console at
http://hostname:port/odsm
Table 16–4 Changelog Adapter Parameter Values
Parameter Value
directoryType oid
mapAttribute targetGUID=orclguid
requiredAttribute orclguid
modifierDNFilter !(modifiersname=cn=oimadmin,cn=systemids,<ro
ot suffix>)
Note : This is an example. This value can be of any Proxy
DN that the customer defines.
For example: rootSuffix can be dc=mycompany,dc=com
sizeLimit 1000
targetDNFilter Optional parameter.
For more information, see Important Notes on Changelog
Plugin Configuration.
oamEnabled true or false
Note that this parameter should be set to true only if you
are setting up integration between Oracle Identity
Manager and Oracle Access Manager at a later time.
mapUserState true
For more information, see Important Notes on Changelog
Plugin Configuration.
virtualDITAdapterNa
me
Name of the OID User Management adapter.
For more information, see Important Notes on Changelog
Plugin Configuration.
Note: For more information about these plug-in parameters, refer to
the Understanding the Oracle Virtual Directory Plug-ins section in the
Oracle Fusion Middleware Administrator's Guide for Oracle Virtual
Directory 11g Release 1 (11.1.1).

Configuring OIM Server
Configuring Oracle Identity Manager 16-23
3. Connect to Oracle Virtual Directory by using the appropriate connection
entry.
4. On the Home page, click the Adapter tab.
5. Start the New Adapter Wizard by clicking Create Adapter at the top of the
adapter window.
6. Create a new adapter using the New Adapter Wizard, with the following
parameters:
Verify that the summary is correct and then click Finish.
7. Edit the User Adapter as follows:
a. Select the OIM User Adapter.
b. Click the Plug-ins Tab.
c. Click the User Management Plug-in, then click Edit in the plug-ins table.
The plug-in editing window appears.
d. In the Parameters table, update the parameter values as follows:
Note: The default port number is 7005.
Table 16–5 Parameters for New User Adapter Creation
Screen Field Value/Step
Type Adapter Type LDAP
Adapter Name User Adapter
Adapter Template User_ActiveDirectory
Connection Use DNS for Auto
Discovery
No
Host Active Directory host/virtual name
Port Active Directory SSL port
Server Proxy Bind DN cn=oimAdminUser,cn=systemids,dc=
mycompany,dc=com
Proxy Password Password for oimadmin user.
User SSL/TLS Selected
SSL Authentication
Mode
Server Only Authentication
Connection Test Validate that the test succeeds.
Namespace Remote Base dc=mycompany,dc=com
Mapped Namespace dc=mycompany,dc=com
Table 16–6 User Adapter Parameter Values
Parameter Value
directoryType activedirectory
mapAttribute orclguid=objectGuid
mapAttribute uniquemember=member

Configuring OIM Server
16-24 Oracle Fusion Middleware Installation Guide for Oracle Identity Management
e. Click OK.
f. Click Apply.
Important Notes on User Management Plugin Configuration
oimLanguages attribute: For language support, you need to edit the User
Management plugin to add a new configuration parameter oimLanguages.
For example, if the Managed Localization for the DisplayName while creating the
User in OIM is selected as French, then the value for oimLanguages in the User
Management adapter plugin should be fr. If you have other languages to be
supported, say Japanese, then the value for the parameter should be fr,ja.
This parameter is functional only when the directoryType parameter is set to
activedirectory.
The User Management plugin has the following configuration parameters:
oimLanguages , <separated list of language codes to be used in attribute language
subtypes>.
addAttribute user,samaccountname=%uid%,%orclshortuid%
mapAttribute mail=userPrincipalName
mapAttribute ntgrouptype=grouptype
mapObjectclass groupofUniqueNames=group
mapObjectclass inetOrgPerson=user
mapObjectclass orclidxperson=user
mapPassword true
exclusionMapping orclappiduser,uid=samaccountname
pwdMaxFailure 10
oamEnabled true or false
Note that this parameter should be set to true only if you
are setting up integration between Oracle Identity Manager
and Oracle Access Manager at a later time.
oimLanguages For language support, you need to edit the User
Management plugin to add a new configuration parameter
oimLanguages.
See Important Notes on User Management Plugin
Configuration.
Table 16–6 (Cont.) User Adapter Parameter Values
Parameter Value

Configuring OIM Server
Configuring Oracle Identity Manager 16-25
Change Log Adapter
Follow the steps below to create the Change Log Adapter in Oracle Virtual Directory
using Oracle Directory Services Manager.
1. Open a browser and bring up the ODSM console at
http://hostname:port/odsm
2. Connect to Oracle Virtual Directory by using the appropriate connection entry.
3. On the Home page, click on the Adapter tab.
4. Start the New Adapter Wizard by clicking Create Adapter at the top of the
adapter window.
5. Create a new adapter using the New Adapter Wizard, with the following
parameters:
Table 16–7 Language Codes'for the MLS Enabled Attributes
Objectclasses MLS Enabled Attributes Language Codes
orclIDXPerson cn, sn, givenName,
middleName, displayName,
o, ou, title,
postalAddress, st,
description,
orclGenerationQualifier
sq, ar, as, az, bn, bg,
be, ca, zh-CN, zh-TW,
hr, cs, da, nl, en, et,
fi, fr, de, el, gu, he,
hi, hu, is, id, it, ja,
kn, kk, ko, lv, lt, mk,
ms, ml, mr, no, or, pl,
pt, pt-BR, pa, ro, ru,
sr, sk, sl, es, sv, ta,
te, th, tr, uk, uz, vi
orclIDXGroup cn, displayName,
description
sq, ar, as, az,
bn, bg, be, ca,
zh-CN, zh-TW, hr,
cs, da, nl, en,
et, fi, fr, de,
el, gu, he, hi,
hu, is, id, it,
ja, kn, kk, ko,
lv, lt, mk, ms,
ml, mr, no, or,
pl, pt, pt-BR, pa,
ro, ru, sr, sk,
sl, es, sv, ta,
te, th, tr, uk,
uz, vi
Note: If you are using Identity Virtualization Library, then see
"Managing Identity Virtualization Library (libOVD) Adapters" in the
Oracle Fusion Middleware Administrator's Guide for Oracle Identity
Manager.
Note: The default port number is 7005.
Table 16–8 Parameters for New Change Log Adapter Creation
Screen Field Value/Step
Type Adapter Type LDAP

Configuring OIM Server
16-26 Oracle Fusion Middleware Installation Guide for Oracle Identity Management
Verify that the summary is correct and then click Finish.
6. To edit the change adapter follow the steps below:
a. Select the OIM Change Log Adapter.
b. Click the Plug-ins tab.
c. In the Deployed Plus-ins table, click the changelog plug-in, then click Edit in
the plug-ins table. The plug-in editing window appears.
d. In the Parameters table, update the parameter values.
Edit the Change Log Adapter to either add or modify the properties so that
they match the values shown in Table 16–9. You must add the sizeLimit,
and targetDNFilter properties to the adapter.
Adapter Name OIM Change Log Adapter
Adapter Template Changelog_ActiveDirectory
Connection Use DNS for Auto
Discovery
No
Host Active Directory host/virtual name
Port 389
Server Proxy Bind DN cn=oimAdminUser,cn=systemids,dc=
mycompany,dc=com
Proxy Password Password for oimadmin user
Connection Test Validate that the test succeeds
Namespace Remote Base Remote Base should be empty
Mapped Namespace cn=changelog
Table 16–9 Changelog Adapter Parameter Values
Parameter Value
directoryType activedirectory
mapAttribute targetGUID=objectGuid
requiredAttribute samaccountname
sizeLimit 1000
targetDNFilter Optional parameter.
For more information, see Important Notes on Changelog
Plugin Configuration .
oamEnabled true or false
Note that this parameter should be set to true only if you
are setting up integration between Oracle Identity
Manager and Oracle Access Manager at a later time.
mapUserState true
For more information, see Important Notes on Changelog
Plugin Configuration .
Table 16–8 (Cont.) Parameters for New Change Log Adapter Creation
Screen Field Value/Step

Configuring OIM Server
Configuring Oracle Identity Manager 16-27
e. Click OK.
f. Click Apply.
16.8.5.2.3 Creating Adapters for Oracle Directory Server Enterprise Edition (ODSEE)
User Adapter
Create the user adapter for Oracle Virtual Directory. Follow the steps below to create
the User Adapter in Oracle Virtual Directory using Oracle Directory Services Manager.
1. Start the Administration Server and the ODSM Managed Server as described in
Starting or Stopping the Oracle Stack.
2. Open a browser and bring up the ODSM console at
http://hostname:port/odsm
3. Connect to Oracle Virtual Directory by using the appropriate connection entry.
4. On the Home page, click on the Adapter tab.
5. Start the New Adapter Wizard by clicking on Create Adapter at the top of the
adapter window.
6. Create a new adapter using the New Adapter Wizard, with the following
parameters:
virtualDITAdapterName The name of the User adapter
For more information, see Important Notes on Changelog
Plugin Configuration.
Note: The parameter modifierDNFilter should not be added to
Active Directory Changelog plugin adapter.
Note: The default port number is 7005.
Table 16–10 Parameters for New User Adapter Creation
Screen Field Value/Step
Type Adapter Type LDAP
Adapter Name User Adapter
Adapter Template User_SunOne
Connection Use DNS for Auto
Discovery
No
Host Sun Java System Directory Server
host/virtual name
Port Sun Java System Directory Server port
Server Proxy Bind DN cn=oimAdminUser,cn=systemids,dc=
mycompany,dc=com
Table 16–9 (Cont.) Changelog Adapter Parameter Values
Parameter Value

Configuring OIM Server
16-28 Oracle Fusion Middleware Installation Guide for Oracle Identity Management
Verify that the summary is correct and then click Finish.
7. Edit the User Adapter as follows:
a. Select the OIM User Adapter.
b. Click the Plug-ins Tab.
c. Click the User Management Plug-in, then click Edit in the plug-ins table. The
plug-in editing window appears.
d. In the Parameters table, update the parameter values as follows:
e. Click OK.
f. Click Apply.
Change Log Adapter
Follow the steps below to create the Change Log Adapter in Oracle Virtual Directory
using Oracle Directory Services Manager.
1. Open a browser and bring up the ODSM console at
http://hostname:port/odsm
Proxy Password Password for oimadmin user
(cn=oimAdminUser,cn=systemids,dc=m
ycompany,dc=com)
Connection Test Validate that the test succeeds.
Namespace Remote Base dc=mycompany,dc=com
Mapped Namespace dc=mycompany,dc=com
Note: For information about creating Oracle Identity Manager (OIM)
user adapter by using Oracle Directory Services Manager, refer to the
"Creating LDAP Adapters" topic in the Oracle Fusion Middleware
Administrator's Guide for Oracle Virtual Directory.
Table 16–11 User Adapter Parameter Values
Parameter Value
directoryType sunone
mapAttribute orclGUID=nsUniqueID
mapObjectclass container=nsContainer
pwdMaxFailure 10
oamEnabled true or false
Note that this parameter should be set to true only if
you are setting up integration between Oracle Identity
Manager and Oracle Access Manager at a later time.
Note: The default port number is 7005.
Table 16–10 (Cont.) Parameters for New User Adapter Creation
Screen Field Value/Step

Configuring OIM Server
Configuring Oracle Identity Manager 16-29
2. Connect to Oracle Virtual Directory by using the appropriate connection entry.
3. On the Home page, click on the Adapter tab.
4. Start the New Adapter Wizard by clicking on Create Adapter at the top of the
adapter window.
5. Create a new adapter using the New Adapter Wizard, with the following
parameters:
Verify that the summary is correct, then click Finish.
6. To edit the change adapter follow the steps below:
a. Select the OIM Change Log Adapter.
b. Click the Plug-ins tab.
c. In the Deployed Plus-ins table, click the changelog plug-in, then click Edit in
the plug-ins table. The plug-in editing window appears.
d. In the Parameters table, update the parameter values.
Edit the Change Log Adapter to either add or modify the properties so that
they match the values shown in the following table. You must add the
mapObjectclass, modifierDNFilter, sizeLimit, and
targetDNFilter properties to the adapter.
Table 16–12 Parameters for New Change Log Adapter Creation
Screen Field Value/Step
Type Adapter Type LDAP
Adapter Name OIM Change Log Adapter
Adapter Template Changelog_SunOne
Connection Use DNS for Auto
Discovery
No
Host Sun Java System Directory Server host
virtual name
Port Sun Java System Directory Server port
Server Proxy Bind DN cn=oimAdminUser,cn=systemids,dc=
mycompany,dc=com
Proxy Password Password for oimadmin user.
(cn=oimAdminUser,cn=systemids,dc=m
ycompany,dc=com)
Connection Test Validate that the test succeeds.
Namespace Remote Base
Mapped Namespace cn=changelog
Note: For information about creating Oracle Identity Manager (OIM)
user adapter by using Oracle Directory Services Manager, refer to the
"Creating LDAP Adapters" topic in the Oracle Fusion Middleware
Administrator's Guide for Oracle Virtual Directory.

Configuring OIM Server
16-30 Oracle Fusion Middleware Installation Guide for Oracle Identity Management
e. Click OK.
f. Click Apply.
16.8.5.2.4 Important Notes on Changelog Plugin Configuration
■The virtualDITAdapterName parameter must be added after the changelog
adapter is created.
virtualDITAdapterName identifies the corresponding user profile adapter name.
For example, in a single-directory deployment, you can set this parameter value to
A1, which is the user adapter name.
If you set this parameter virtualDITAdapterName to A1, the plug-in fetches the
mapAttribute and mapObjectclass configuration in the UserManagementPlugin
of adapter A1, so you do not have to duplicate those configurations.
This configuration is a must for directoryType=ActiveDirectory for the GUID
mapping to happen in the case of incremental reconciliation to avoid the missing
required attribute exception. (LDAP GUID=null).
Table 16–13 Changelog Adapter Parameter Values
Parameter Value
directoryType sunone
mapAttribute targetGUID=targetUniqueID
mapObjectclass changelog=changelogentry
modifierDNFilter !(modifiersname=cn=oimadmin,cn=systemids,<ro
ot suffix>)
Note : This is an example. This value can be of any Proxy
DN that the customer defines.
For example: rootSuffix can be dc=mycompany,dc=com
sizeLimit 1000
virtualDITAdapterName Name of the iPlanet User Management adapter.
For more information, see Important Notes on Changelog
Plugin Configuration.
targetDNFilter Optional parameter.
For more information, see Important Notes on Changelog
Plugin Configuration.
oamEnabled true or false
Note that this parameter should be set to true only if you
are setting up integration between Oracle Identity Manager
and Oracle Access Manager at a later time.
mapUserState true
For more information, see Important Notes on Changelog
Plugin Configuration.
Note: For more information about these plug-in parameters, refer to
the Understanding the Oracle Virtual Directory Plug-ins section in the
Oracle Fusion Middleware Administrator's Guide for Oracle Virtual
Directory 11g Release 1 (11.1.1).

Configuring OIM Server
Configuring Oracle Identity Manager 16-31
Add the attribute virtualDITAdapterName and set it to the value of the Active
Directory User Management adapter name in the Active Directory changelog
plugin. This is required to pick up the attribute mappings set in the Active
Directory User Management adapter plugin as the Active Directory schema and
OIM schema are different.
■targetDNFilter attribute should be set if you want to perform reconciliation from a
certain user container and group container instead of from the root suffix.
These values should be the ones entered for User Container and Role Container
during the configuration of Oracle Identity Manager when LDAP Sync is enabled.
For example:
targetDNFilter : cn=Users,dc=mycountry,dc=mycompany,dc=com
targetDNFilter : cn=Groups,dc=mycountry,dc=mycompany,dc=com
These settings would pull in/reconcile all users and groups from the above
mentioned containers in the backend Directory Server.
■The changelog adapter plugin should always have the attribute mapUserState set
to true for the attribute orclaccountenabled to return in the search result.
16.8.6 Running the LDAP Post-Configuration Utility
You must run the LDAP post-configuration utility after you have configured the OIM
Server and exited the Oracle Identity Management Configuration Wizard. The LDAP
configuration post-setup script enables all the LDAP Sync-related incremental
Reconciliation Scheduler jobs, which are disabled by default.
Run the LDAP post-configuration utility as follows:
1. Open the ldapconfig.props file in a text editor. This file is located in the
server/ldap_config_util directory under the IAM_Home for Oracle Identity
and Acccess Management.
2. In the ldapconfig.props file, set values for the following parameters:
■OIMProviderURL - Specify the URL for the OIM provider in the format:
t3://localhost:8003
■OIMAdminUser - Specify the Oracle Identity Manager system administrator.
Note: If you are using Identity Virtualization Library, then see
"Managing Identity Virtualization Library (libOVD) Adapters" in the
Oracle Fusion Middleware Administrator's Guide for Oracle Identity
Manager.
For more information about these plug-in parameters, refer to the
"Understanding the Oracle Virtual Directory Plug-ins" section in the
Oracle Fusion Middleware Administrator's Guide for Oracle Virtual
Directory 11g Release 1 (11.1.1).
Note: This procedure is applicable to all the Directory Server
options. The LDAP post-configuration utility must be run after
configuring OIM server. This procedure is required only if you chose
to enable and configure LDAP Sync during the OIM Server
configuration.

Configuring OIM Server
16-32 Oracle Fusion Middleware Installation Guide for Oracle Identity Management
For example:
OIMAdminUser=xelsysadm
■OIDURL - Specify the URL for the OID instance.
For example:
OIDURL=ldap://localhost:389
■OIDAdminUsername - Specify the OID Administrator’s user name, such as
cn=orcladmin.
■OIDSearchBase - Specify the OID search base, such as dc=us,
dc=mycompany,dc=com.
■UserContainerName - Specify the name of the user container, which is used
as a default container of users in the LDAP directory.
■RoleContainerName - Specify the name of the user container, which is used
as a default container of roles in the LDAP directory.
Note: If you are using Active Directory as the directory server,
specify the URL for the Active Directory instance.
If you are using Oracle Directory Server Enterprise Edition (ODSEE)
as the directory server, specify the URL for the Oracle Directory
Server Enterprise Edition (ODSEE) instance.
If you are using Oracle Virtual Directory (OVD) as the directory
server, specify the URL for the Oracle Virtual Directory (OVD)
instance.
Notes:
■OIDAdminUsername is the name of user used to connect to
Identity Store.
For example:
cn=oimadmin,cn=systemids,dc=mycompany,dc=com
This user should not be located in cn=Users,dc=mycompany,dc=com.
■If you are using Active Directory as the directory server, specify
the Active Directory Administrator’s user name.
If you are using Oracle Directory Server Enterprise Edition (ODSEE) as
the directory server, specify the Oracle Directory Server Enterprise
Edition (ODSEE) Administrator’s user name.
Note: If you are using Active Directory as the directory server,
specify the Active Directory search base.
If you are using Oracle Directory Server Enterprise Edition (ODSEE)
as the directory server, specify the Oracle Directory Server Enterprise
Edition (ODSEE) search base.
If you are using Oracle Virtual Directory (OVD) as the directory
server, specify the Oracle Virtual Directory (OVD) search base.

Configuring OIM Server
Configuring Oracle Identity Manager 16-33
■ReservationContainerName - Specify the name of the user reservation
container, which is used to reserve users while waiting for user creation
approvals in Oracle Identity Manager. When the user creation is approved,
users are moved from the reservation container to the actual user container.
3. Ensure that the WL_HOME environment variable is set to the wlserver_10.3
directory under your Middleware Home. On UNIX, it is the <MW_
HOME>/wlserver_10.3 directory. On Windows, it is the <MW_
HOME>\wlserver_10.3 directory. In addition, set the JAVA_HOME
environment variable to the directory where the JDK is installed on your machine.
4. Start the OIM Managed Server. For more information, see Starting the Servers.
5. On the command line, run the LDAP configuration post-setup script
(LDAPConfigPostSetup.bat on Windows, and LDAPConfigPostSetup.sh
on UNIX). The files are located in the server/ldap_config_util directory
under your IAM_Home for Oracle Identity Manager, Oracle Access Manager,
Oracle Adaptive Access Manager, Oracle Entitlements Server, and Oracle Identity
Navigator.
6. When prompted, enter the OIM administrator’s password and the xelsysadm
password.
16.8.7 Verifying the LDAP Synchronization
To verify the configuration of LDAP with Oracle Identity Manager, complete the
following steps:
1. Ensure that the WebLogic Administration Server is up and running.
2. Invoke the Oracle Identity Manager Administration Console
(http://<host>:<port>/oim), which is deployed on the Administration
Server.
3. In this console, click Search under Configurations -> Manage IT Resource. If the
LDAP information is correct, the resource information is displayed.
For more information, see “Managing IT Resources” in the Oracle Fusion
Middleware Developer's Guide for Oracle Identity Manager.
4. Create a normal user using the same console.
5. If a user is created, verify the creation in the chosen LDAP store or OVD using any
ldap client.
16.8.8 Post-Configuration Steps
After installing and configuring Oracle Identity Manager Server, you must complete
the following manual steps:
Note: usercontainerName, rolecontainername, and
reservationcontainername are not used in this step. Even
though these three parameters are not used, the input would be
expected by the utility.
Note: Ensure that the chosen Directory server or OVD and Oracle
Identity Manager are up and running.

Configuring OIM Server
16-34 Oracle Fusion Middleware Installation Guide for Oracle Identity Management
■Set the XEL_HOME variable in the setenv script (setenv.bat on Windows, and
setenv.sh on UNIX) as follows:
On Windows: Open the <IAM_Home>\server\bin\setenv.bat file and search
for XEL_HOME variable. Update the path of the XEL_HOME variable to the absolute
path of <IAM_Home>\server. For example, if your IDM_Home is the
C:\oracle\Middleware\IAM_Home directory, then set XEL_HOME in the
setenv.bat file to the C:\oracle\Middleware\IAM_Home\server
directory.
On UNIX: Open the <IAM_Home>/server/bin/setenv.sh file and search for
XEL_HOME variable.Update the path of the XEL_HOME variable to the absolute
path of <IAM_Home>/server. For example, if your IDM_Home is the
/test/Middleware/IAM_Home directory, then set XEL_HOME in the
setenv.sh file to the /test/Middleware/IAM_Home/server directory.
16.8.9 Setting oamEnabled Parameter for Identity Virtualization Library
Follow these steps for setting oamEnabled parameter. You must set oamEnabled
parameter to true only if you want to integrate OIM and OAM at a later time. This
procedure applies only if you use Identity Virtualization Library.
1. Log in into Oracle Enterprise Manager Fusion Middleware Control at
http://adminvhn.mycompany.com:7001/em as user weblogic.
2. Right click on Oim(11.1.1.3.0), and click System Mbean Browser.
3. Go to: Application defined MBeans -> com.oracle -> Domain:base_domain ->
OVD
4. There are two AdaptersConfig options. Click on the one that has a plus (+)
symbol, indicating a subtree. Then click on OVDAdaptersConfig. You should see
CHANGELOG_oid1 and oid1.
5. Configure oamenabled in both the adapters.
Follow these steps to configure oamenabled in the Changelog adapter:
a. Click on CHANGELOG_oid1 and keep going down the tree until the very
end. You should see changelog with a bean symbol. Double click on
changelog.
b. Click on the operations subtab.
c. Click on removeParam operation.
d. Enter oamEnabled in the textbox and click invoke. It should give you a false
or a true.
e. Return to the original page with operations.
f. Click on AddParam operation.
g. Edit the names and values to contain oamEnabled and true.
h. Click invoke to complete the addParam operation.
Follow these steps to configure oamenabled in the Usermanagement adapter:
a. Click on oid1 and keep going down the tree until the very end. You should see
oid1 with a bean symbol. Double click on oid1.
b. Click on the operations subtab.
c. Click on removeParam operation.

Configuring OIM Design Console
Configuring Oracle Identity Manager 16-35
d. Enter oamEnabled in the textbox and click invoke. It should give you a false
or a true.
e. Return to the original page with operations.
f. Click on AddParam operation.
g. Edit the names and values to contain oamEnabled and true.
h. Click invoke to complete the addParam operation.
6. Restart OIM Managed Server and SOA Managed Server.
16.8.10 Enabling LDAP Sync after Installing and Configuring OIM Server at a Later
Point
LDAP Sync can be enabled at any point after installing and configuring OIM Server.
For more infromation on enabling LDAP Sync after installing and configuring OIM
Server, see "Enabling LDAP Synchronization" in the Oracle Fusion Middleware
Administrator's Guide for Oracle Identity Manager.
16.9 Installing and Configuring Only OIM Design Console on Windows
Table 16–14 lists the steps required to install and configure only Oracle Identity
Manager (OIM) Design Console on Windows operating systems.
16.10 Configuring OIM Design Console
This topic describes how to install and configure only Oracle Identity Manager (OIM)
Design Console, which is supported on Windows operating systems only.
It includes the following sections:
Table 16–14 Design Console Installation and Configuration Workflow
Task For more information
Installing the Oracle Identity and Access
Management 11g Release 1 (11.1.1.5.0) suite
containing Oracle Identity Manager, Oracle
Access Manager, Oracle Adaptive Access
Manager, Oracle Entitlements Server, and
Oracle Identity Navigator on the Windows
machine where you want to install only
Design Console
See Installing Oracle Identity and Access Management
(11.1.1.5.0).
Configuring Oracle Identity Manager Server
on a local or remote machine
Note: The Oracle Identity Manager Server
must be up and running when you configure
only Design Console.
See Configuring OIM Server.
Configuring Oracle Identity Manager Design
Console on the Windows machine where
you want to install only Design Console
See Configuring OIM Design Console.
Completing any post-configuration steps See Post-Configuration Steps.
Note: For more information, see Prerequisites for Configuring Only
OIM Design Console on a Different Machine and Scenario 1: Oracle
Identity Manager Server and Design Console on Different Machines.

Configuring OIM Design Console
16-36 Oracle Fusion Middleware Installation Guide for Oracle Identity Management
■Appropriate Deployment Environment
■Components Deployed
■Dependencies
■Procedure
■Post-Configuration Steps
■Updating the xlconfig.xml File to Change the Port for Design Console
■Configuring Design Console to Use SSL
16.10.1 Appropriate Deployment Environment
Perform the installation and configuration in this topic if you want to install Oracle
Identity Manager Design Console on a separate Windows machine where Oracle
Identity Manager Server is not configured. For more information, see Scenario 1:
Oracle Identity Manager Server and Design Console on Different Machines.
16.10.2 Components Deployed
Performing the installation and configuration in this section deploys only Oracle
Identity Manager Design Console on the Windows operating system.
16.10.3 Dependencies
The installation and configuration in this section depends on the installation of Oracle
Identity and Access Management 11g software and on the configuration of Oracle
Identity Manager Server. For more information, see Installing Oracle Identity and
Access Management (11.1.1.5.0) and Configuring OIM Server.
16.10.4 Procedure
Perform the following steps to install and configure only Oracle Identity Manager
Design Console on the Windows operating system:
1. Ensure that all the prerequisites, described in Prerequisites for Configuring Only
OIM Design Console on a Different Machine, are satisfied. In addition, see
Important Notes Before You Start Configuring OIM.
2. On the Windows machine where Oracle Identity Manager Design Console should
be configured, start the Oracle Identity Manager Configuration Wizard, as
described in Starting the Oracle Identity Manager 11g Configuration Wizard. The
Welcome screen appears.
3. On the Welcome screen, click Next. The Components to Configure screen appears.
On the Components to Configure screen, select only the OIM Design Console
check box. Click Next. The OIM Server Host and Port screen appears.
4. On the OIM Server Host and Port screen, enter the host name of the Oracle
Identity Server Manager Server in the OIM Server Hostname field. In the OIM
Server Port field, enter the port number for the Oracle Identity Manager Server on
which the Oracle Identity Manager application is running. Click Next. The
Configuration Summary screen appears.
The Configuration Summary screen lists the application that you selected for
configuration and summarizes your configuration options, such as OIM Server
host name and port.

Configuring OIM Design Console
Configuring Oracle Identity Manager 16-37
Review this summary and decide whether to start the configuration. If you want
to modify any of the configuration settings at this stage, select a topic in the left
navigation page and modify your choices. To continue installing this configuration
of the Oracle Identity Management Design Console, click Configure.
After you click Configure, the Configuration Progress screen appears. A
configuration log is saved to the logs directory under Oracle Inventory directory.
For information about the log files, see Installation Log Files. If the Configuration
Progress screen displays any errors, click Abort to stop the installation and restart
the Oracle Identity Manager Configuration Wizard.
5. Click Finish.
16.10.5 Post-Configuration Steps
Complete the following steps after configuring the Oracle Identity Manager Design
Console on the Windows operating system:
1. On the machine where Oracle WebLogic Server is installed (the machine where
Oracle Identity Manager Server is installed), create the wlfullclient.jar file
as follows:
a. Use the cd command to move from your present working directory to the
<MW_HOME>\wlserver_10.3\server\lib directory.
b. Ensure that JAVA_HOME is set, as in the following example:
D:\oracle\<MW_HOME>\jdk160_24
To set this variable, right-click the My Computer icon and select Properties.
The System Properties screen is displayed. Click the Advanced tab and click
the Environment Variables button. The Environment Variables screen is
displayed. Ensure that the JAVA_HOME variable in the User Variables section
is set to the path of the JDK directory installed on your machine.
After setting the JAVA_HOME variable, select the Path variable in the System
Variables section on the same Environment Variables screen, and click Edit.
The Edit System Variable dialog box is displayed. In the variable value field,
enter the complete path to your JAVA_HOME, such as D:\oracle\<MW_
HOME>\jdk160_24, preceded by a semicolon (;). The semicolon is used as the
delimiter for multiple paths entered in this field.
c. After verifying the values, click OK.
2. Use the following steps to create a wlfullclient.jar file for JDK 1.6 client
application:
Note: Before configuring an application, you can save your
configuration settings and preferences in a response file. Response
files are text files that you can create or edit in a text editor. You can
use response files to perform a silent installation or use as templates
or customized settings for your environment. For more information,
see Performing a Silent Installation.
Note: If the configuration fails, click Abort to stop the installation
and restart the Oracle Identity Manager Configuration Wizard, as
described in Starting the Oracle Identity Manager 11g Configuration
Wizard.

Configuring OIM Design Console
16-38 Oracle Fusion Middleware Installation Guide for Oracle Identity Management
a. Change directories to the server/lib directory.
cd WL_HOME/server/lib
b. Use the following command to create wlfullclient.jar in the
server/lib directory:
java -jar wljarbuilder.jar
This command generates the wlfullclient.jar file.
3. Copy the wlfullclient.jar file to the <IAM_Home>\designconsole\ext\
directory on the machine where Design Console is configured.
4. Ensure that the Administration Server and the Oracle Identity Manager Managed
Server are started. For information about starting the servers, see Starting the
Stack.
5. Start the Design Console client by running the xlclient.cmd executable script,
which is available in the <IAM_Home>\designconsole\ directory.
6. Log in to the Design Console with your Oracle Identity Manager user name and
password.
16.10.6 Updating the xlconfig.xml File to Change the Port for Design Console
To update the xlconfig.xml file and start the Design Console on a new port as
opposed to what was set during configuration, complete the following steps:
1. In a text editor, open the <IAM_
Home>\designconsole\config\xlconfig.xml file.
2. Edit the following tags:
■ApplicationURL
■java.naming.provider.url
3. Change the port number.
4. Restart the Design Console.
16.10.7 Configuring Design Console to Use SSL
To configure the Design Console to use SSL, complete the following steps:
1. Add the WebLogic Server jar files required to support SSL by copying the
webserviceclient+ssl.jar file from the <WL_HOME>/server/lib
directory to the <IAM_Home>/designconsole/ext directory.
2. Use the server trust store in Design Console as follows:
a. Log in to the Oracle WebLogic Administration Console using the WebLogic
administrator credentials.
b. Under Domain Structure, click Environment > Servers. The Summary of
Servers page is displayed.
Note: You do not have to perform this procedure during installation.
It is required if you want to change ports while using the product.
You must ensure that the Oracle Identity Manager server port is
changed to this new port before performing these steps.

Configuring OIM Remote Manager
Configuring Oracle Identity Manager 16-39
c. Click on the Oracle Identity Manager server name (for example, oim_server1).
The Settings for oim_server1 is displayed.
d. Click the Keystores tab.
e. From the Tr u s t section, note down the path and file name of the trust
keystore.
3. Set the TRUSTSTORE_LOCATION environment variable as follows:
■If Oracle Identity Manager Design Console and Oracle Identity Manager
Server are installed and configured on the same machine, set the
TRUSTSTORE_LOCATION environment variable to the location of the trust
keystore that you noted down.
For example, setenv TRUSTSTORE_LOCATION=/test/DemoTrust.jks
■If Oracle Identity Manager Design Console and Oracle Identity Manager
Server are installed and configured on different machines, copy the trust
keystore file to the machine where Design Console is configured. Set the
TRUSTSTORE_LOCATION environment variable to the location of the copied
trust keystore file on the local machine.
4. If the Design Console was installed without SSL enabled, complete the following
steps:
a. Open the <IAM_Home>/designconsole/config/xlconfig.xml file in a
text editor.
b. Edit the <ApplicationURL> entry to use HTTPS, T3S protocol, and SSL port
to connect to the server, as in the following example:
<ApplicationURL>https://<host>:<sslport>/xlWebApp/loginWor
kflowRenderer.do</ApplicationURL>
c. Save the file and exit.
16.11 Configuring OIM Remote Manager
This topic describes how to install and configure only Oracle Identity Manager (OIM)
Remote Manager. It includes the following sections:
■Appropriate Deployment Environment
■Components Deployed
■Dependencies
■Procedure
16.11.1 Appropriate Deployment Environment
Perform the installation and configuration in this topic if you want to install Oracle
Identity Manager Remote Manager on a separate machine. For more information, see
Note: For a clustered installation, you can send an https request to
only one of the servers in the cluster, as shown in the following
element:
<java.naming.provider.url>t3s://<host>:<sslport></ja
va.naming.provider.url>

Configuring OIM Remote Manager
16-40 Oracle Fusion Middleware Installation Guide for Oracle Identity Management
Scenario 2: Oracle Identity Manager Server and Remote Manager on Different
Machines.
16.11.2 Components Deployed
Performing the installation and configuration in this section deploys only Oracle
Identity Manager Remote Manager.
16.11.3 Dependencies
The installation and configuration in this section depends on the installation of Oracle
Identity and Access Management 11g software and on the configuration of OIM
Server. For more information, see Installing Oracle Identity and Access Management
(11.1.1.5.0) and Prerequisites for Configuring Only OIM Remote Manager on a
Different Machine.
16.11.4 Procedure
Perform the following steps to install and configure only Oracle Identity Manager
Remote Manager:
1. Ensure that all the prerequisites, described in Prerequisites for Configuring Only
OIM Remote Manager on a Different Machine, are satisfied. In addition, see
Important Notes Before You Start Configuring OIM.
2. On the machine where Oracle Identity Manager Remote Manager should be
configured, start the Oracle Identity Manager Configuration Wizard, as described
in Starting the Oracle Identity Manager 11g Configuration Wizard. The Welcome
screen appears.
3. On the Welcome screen, click Next. The Components to Configure screen appears.
On the Components to Configure screen, select only the OIM Remote Manager
check box. Click Next. The Remote Manager screen appears.
4. On the Remote Manager screen, enter the service name in the Service Name field.
Oracle Identity Manager Remote Manager will be registered under this service
name. The service name is used with the Registry URL to a build fully qualified
service name, such as rmi://host:RMI Registry Port/service name.
5. In the RMI Registry Port field, enter the port number on which the RMI registry
should be started. The default port number is 12345.
6. In the Listen Port (SSL) field, enter the port number on which a secure socket is
opened to listen to client requests. The default port number is 12346. Click Next.
The Keystore Password screen appears.
7. On the KeyStore Password screen, in the KeyStore Password field, enter a new
password for the keystore. A valid password contains 6 to 30 characters, begins
with an alphabetic character, and uses only alphanumeric characters and special
characters like Dollar ($), Underscore (_), and Pound (#). The password must
contain at least one number. In the Confirm KeyStore Password field, enter the
new password again. Click Next. The Configuration Summary screen appears.
8. The Configuration Summary screen lists the application that you selected for
configuration and summarizes your configuration options, such as Remote
Manager Service Name, RMI Registry Port, and Remote Manager Listen Port
(SSL).

Verifying the OIM Installation
Configuring Oracle Identity Manager 16-41
Review this summary and decide whether to start the configuration. If you want
to modify any of the configuration settings at this stage, select a topic in the left
navigation page and modify your choices. To continue installing this configuration
of the Oracle Identity Manager Remote Manager, click Configure.
9. After you click Configure, the Configuration Progress screen appears. A
configuration log is saved to the logs directory under Oracle Inventory directory.
For information about the log files, see Installation Log Files. If the Configuration
Progress screen displays any errors, click Abort to stop the installation and restart
the Oracle Identity Manager Configuration Wizard.
10. Click Finish.
16.12 Verifying the OIM Installation
Before you can verify the Oracle Identity Manager (OIM) installation, ensure that the
following servers are up and running:
■Administration Server for the domain in which the Oracle Identity Manager
application is deployed
■Managed Server hosting Oracle Identity Manager
■Managed Server hosting the Oracle SOA 11g suite
You can verify your Oracle Identity Manager installation by:
■Checking the Oracle Identity Manager Server URL, such as
http://<Hostname>:<Port>/oim/faces/faces/pages/Admin.jspx.
■Checking the Identity Management shell, such as
http://<Hostname>:<Port>/admin/faces/pages/Admin.jspx. This shell
is used for Users and Role Management tasks.
■Checking the Oracle Identity Manager Self Service URL, such as
http://<Hostname>:<Port>/oim.
■Verifying the configuration between Oracle Identity Manager and Oracle SOA
(BPEL Process Manager) as follows:
Note: Before configuring an application, you can save your
configuration settings and preferences in a response file. Response
files are text files that you can create or edit in a text editor. You can
use response files to perform a silent installation or use as templates
or customized settings for your environment. For more information,
see Performing a Silent Installation.
Note: Oracle Identity Manager Server certificates, such as
xlserver.cert, are created in the DOMAIN_
HOME/config/fmwconfig/ directory. You can use these certificates
if you require server-side certificates for configuring Oracle Identity
Manager Remote Manager.
If the configuration fails, click Abort to stop the installation and
restart the Oracle Identity Manager Configuration Wizard, as
described in Starting the Oracle Identity Manager 11g Configuration
Wizard.

Setting Up Integration with OAM
16-42 Oracle Fusion Middleware Installation Guide for Oracle Identity Management
a. Log in to the Oracle Identity Manager Administration Console, with
xelsysadm:
http://<host>:<oim_port>/oim/faces/pages/Admin.jspx
b. Create a Request, such as modifying a user profile.
c. Log in to the SOA Infrastructure to verify whether the composite applications
are displayed.
http://<host>:<bpel_port>/soa-infra
d. Log in to the BPEL Worklist application, with xelsysadm:
http://<host>:<soa_port>/integration/worklistapp
e. In the list of tasks, verify whether the request has come for approval.
f. Click on the task, and click Approve in the Actions tab.
g. Click on the refresh icon. The request comes back. Approve it again.
h. Go to http://<host>:<oim_port>/oim/faces/pages/Admin.jspx
and verify whether the request is completed.
i. Go to http://<host>:<oim_port>/admin/faces/pages/Admin.jspx
and verify whether the user profile is modified.
■Logging in to the Design Console, xelsysadm, and the appropriate password. A
successful login indicates that the installation was successful.
■Starting the Remote Manager service by running remotemanager.sh or
remotemanager.bat, as appropriate. (remotemanager.sh on UNIX or
remotemanager.bat on Windows resides in your Oracle Home directory under a
folder named remote_manager.
16.13 Setting Up Integration with OAM
For information about setting up integration between Oracle Identity Manager (OIM)
and Oracle Access Manager (OAM), see "Integrating Oracle Access Manager and
Oracle Identity Manager" in the Oracle Fusion Middleware Integration Guide for Oracle
Access Manager.
16.14 List of Supported Languages
Oracle Identity Manager supports the following languages:
Arabic, Brazilian Portuguese, Czech, Danish, Dutch, Finnish, French, German, Greek,
Hebrew, Hungarian, Italian, Japanese, Korean, Norwegian, Polish, Portuguese,
Romanian, Russian, Simplified Chinese, Slovak, Spanish, Swedish, Thai, Traditional
Chinese, and Turkish
16.15 Using the Diagnostic Dashboard
Diagnostic Dashboard is a stand-alone application that helps you validate some of the
Oracle Identity Manager prerequisites and installation.
You must have the appropriate system administrator permissions for your
Application Server and Oracle Identity Manager environments to use this tool. You
need DBA-level permissions to execute some database-related tests.

Getting Started with OIM After Installation
Configuring Oracle Identity Manager 16-43
16.16 Getting Started with OIM After Installation
After installing Oracle Identity Manager (OIM), refer to "Part 1: Oracle Identity
Manager System Administration Console" and "Part 2: Oracle Identity Manager
Administrative and User Console" in the Oracle Fusion Middleware Administrator's
Guide for Oracle Identity Manager.
Note: The Diagnostic Dashboard and Oracle Identity Manager must
be installed on the same application server.
For more information about installing and using the Diagnostic
Dashboard for Oracle Identity Manager, see the "Working with the
Diagnostic Dashboard" topic in the Oracle Fusion Middleware System
Administrator's Guide for Oracle Identity Manager.

Getting Started with OIM After Installation
16-44 Oracle Fusion Middleware Installation Guide for Oracle Identity Management

17
Configuring Oracle Access Manager 17-1
17Configuring Oracle Access Manager
This chapter explains how to configure Oracle Access Manager (OAM). It includes the
following topics:
■Prerequisites
■Important Notes Before You Begin
■Installing OAM
■Oracle Access Manager Domain Configuration Template
■OAM in a New WebLogic Domain
■OAM and OIN in a New WebLogic Domain
■OAM in a Domain Containing OAAM and OIN
■Starting the Servers
■Optional Post-Installation Tasks
■Verifying the OAM Installation
■Setting Up OAM Agents
■Setting Up Integration with OIM
■Getting Started with OAM After Installation
17.1 Prerequisites
The following are the prerequisites for installing and configuring Oracle Identity and
Access Management 11g Release 1 (11.1.1) products:
1. Installing Oracle Database, as described in Installing Oracle Database.
2. Installing Oracle WebLogic Server 11g Release 1 (10.3.5) and creating a
Middleware Home, as described in Installing Oracle WebLogic Server and
Creating the Oracle Middleware Home.
3. Creating and loading schemas using Oracle Fusion Middleware Repository
Creation Utility (RCU), as described in Creating Database Schema Using the
Oracle Fusion Middleware Repository Creation Utility (RCU).
4. Installing the Oracle Identity and Access Management 11g Release 1 (11.1.1.5.0)
suite, as described in Installing Oracle Identity and Access Management
(11.1.1.5.0). The Oracle Identity and Access Management suite contains Oracle
Identity Manager (OIM), Oracle Access Manager (OAM), Oracle Adaptive Access
Manager (OAAM), Oracle Entitlements Server (OES), and Oracle Identity
Navigator (OIN).

Important Notes Before You Begin
17-2 Oracle Fusion Middleware Installation Guide for Oracle Identity Management
17.2 Important Notes Before You Begin
Before you start installing and configuring Oracle Identity and Access Management
products in any of the scenarios discussed in this chapter, keep the following points in
mind:
It is assumed that you are installing Oracle Internet Directory, Oracle Virtual
Directory, Oracle Identity Manager, Oracle Access Manager, Oracle Adaptive Access
Manager, and Oracle Identity Navigator on the same machine.
17.3 Installing OAM
Oracle Access Manager (OAM) is included in the Oracle Identity and Access
Management Suite. You can use the Oracle Identity and Access Management 11g
Installer to install the Oracle Identity and Access Management Suite. For more
information, see Preparing to Install and Installing Oracle Identity and Access
Management (11.1.1.5.0).
17.4 Oracle Access Manager Domain Configuration Template
When configuring Oracle Access Manager in a new or existing WebLogic
administration domain, you must choose Oracle Access Manager with Database Policy
Store - 11.1.1.3.0 [Oracle_IDM2] as the domain configuration template on the Select
Domain Source screen in the Oracle Fusion Middleware Configuration Wizard.
A database policy store offers more security measures that can be layered based on the
storage, thereby ensuring higher resiliency to corruption and better high availability.
Note: In this chapter, two IDM_Home directories are mentioned in
descriptions and procedures. For example, the first one, IDM_Home
can be the IDM_Home directory for Oracle Internet Directory, Oracle
Virtual Directory, Oracle Directory Services Manager, Oracle
Directory Integration Platform, and Oracle Identity Federation. The
second one, IAM_Home can be the IDM_Home directory for Oracle
Identity Manager, Oracle Access Manager, Oracle Adaptive Access
Manager, Oracle Entitlements Server, and Oracle Identity Navigator.
However, note that IDM_Home and IAM_Home are used as
examples in this document. You can specify any name for either of
your IDM_Home directories. In addition, you can install the two Oracle
Identity Management suites (one containing Oracle Internet Directory,
Oracle Virtual Directory, Oracle Directory Services Manager, Oracle
Directory Integration Platform, and Oracle Identity Federation;
another containing Oracle Identity Manager, Oracle Access Manager,
Oracle Adaptive Access Manager, Oracle Entitlements Server, and
Oracle Identity Navigator) in any order on your machine.
For more information, see Overview and Structure of Oracle Identity
Management 11g Installation.
Note: When you are installing Oracle Access Manager, Oracle
Secure Token Service will also be installed. For more information on
Oracle Secure Token Service, see Oracle Fusion Middleware
Administrator's Guide for Oracle Access Manager with Oracle Security
Token Service.

OAM in a New WebLogic Domain
Configuring Oracle Access Manager 17-3
To configure Oracle Access Manager with a database policy store, choose the Oracle
Access Manager with Database Policy Store - 11.1.1.3.0 [Oracle_IDM2] option on the
Select Domain Source screen in the Oracle Fusion Middleware Configuration Wizard.
For a list of screens in the Oracle Fusion Middleware Configuration Wizard, see
Screens in Oracle Fusion Middleware Configuration Wizard.
17.5 OAM in a New WebLogic Domain
This topic describes how to configure Oracle Access Manager (OAM) in a new
WebLogic domain.
It includes the following sections:
■Appropriate Deployment Environment
■Components Deployed
■Dependencies
■Procedure
17.5.1 Appropriate Deployment Environment
Perform the configuration in this topic if you want to install only Oracle Access
Manager in an environment where you may add other Oracle Identity and Access
Management 11g components, such as Oracle Identity Navigator, Oracle Identity
Manager, and Oracle Adaptive Access Manager at a later time in the same domain.
17.5.2 Components Deployed
Performing the configuration in this section deploys the following:
■WebLogic Administration Server
■Managed Server for Oracle Access Manager
■Oracle Access Manager Console on the Administration Server
17.5.3 Dependencies
The configuration in this section depends on the following:
■Oracle WebLogic Server
■Installation of the Oracle Identity and Access Management 11g software
■Database schemas for Oracle Access Manager. For more information, see Creating
Database Schema Using the Oracle Fusion Middleware Repository Creation Utility
(RCU).
17.5.4 Procedure
Perform the following steps to configure Oracle Access Manager in a new WebLogic
domain:
Note: It is recommended that you use a database policy store in
production environments.

OAM in a New WebLogic Domain
17-4 Oracle Fusion Middleware Installation Guide for Oracle Identity Management
1. Ensure that all prerequisites, listed in Prerequisites, are satisfied. In addition, see
Important Notes Before You Begin.
2. Run the <IAM_Home>/common/bin/config.sh script (on UNIX). (<IAM_
Home>\common\bin\config.cmd on Windows). The Oracle Fusion
Middleware Configuration Wizard appears.
3. On the Welcome screen, select the Create a new WebLogic domain option. Click
Next. The Select Domain Source screen appears.
4. On the Select Domain Source screen, ensure that the Generate a domain
configured automatically to support the following products: option is selected.
Select Oracle Access Manager with Database Policy Store - 11.1.1.3.0 [Oracle_
IDM2], and click Next. The Select Domain Name and Location screen appears.
5. Enter a name and a location for the domain to be created, and click Next. The
Configure Administrator User Name and Password screen appears.
6. Configure a user name and a password for the administrator. The default user
name is weblogic. Click Next.
7. Choose JRockit SDK 1.6.0_24 and Production Mode in the Configure Server
Start Mode and JDK screen of the Oracle Fusion Middleware Configuration
Wizard. Click Next. The Configure JDBC Component Schema screen appears.
8. On the Configure JDBC Component Schema screen, select a component schema,
such as the OAM Infrastructure Schema that you want to modify.
You can set values for Schema Owner, Schema Password, Database and Service,
Host Name, and Port. Click Next. The Test JDBC Component Schema screen
appears. After the test succeeds, the Select Optional Configuration screen appears.
9. On the Select Optional Configuration screen, you can configure the
Administration Server and Managed Servers, Clusters, and Machines. Click
Next.
10. Optional: Configure the following Administration Server parameters:
■Name
■Listen address
■Listen port
■SSL listen port
■SSL enabled or disabled
11. Optional: Configure Managed Servers, as required.
12. Optional: Configure Clusters, as required.
Note: When you select the Oracle Access Manager with Database
Policy Store - 11.1.1.3.0 [Oracle_IDM2] option, the Oracle JRF 11.1.1.0
[Oracle_Common] option is also selected, by default.
Note: If you want to configure the Managed Server on the same
machine, ensure that the port is different from that of the
Administration Server.

OAM and OIN in a New WebLogic Domain
Configuring Oracle Access Manager 17-5
For more information about configuring clusters for Oracle Identity and Access
Management products, see the "Configuring High Availability for Identity
Management Components" topic in the guide Oracle Fusion Middleware High
Availability Guide.
13. Optional: Assign Managed Servers to clusters, as required.
14. Configure Machines, as needed. This step is useful when you want to run the
Administration Server on one machine and Managed Servers on another physical
machine.
15. If the Administration Server is not assigned to a machine, you can assign it to a
machine.
Note that deployments, such as applications and libraries, and services that are
targeted to a particular cluster or server are selected, by default.
16. Assign the newly created Managed Server, such as oam_server1, to a machine.
17. On the Configuration Summary screen, review the domain configuration, and
click Create to start creating the domain.
A new WebLogic domain to support Oracle Access Manager is created in the <MW_
HOME>\user_projects\domains directory (on Windows). On UNIX, the domain is
created in the <MW_HOME>/user_projects/domains directory.
17.6 OAM and OIN in a New WebLogic Domain
This topic describes how to configure Oracle Access Manager (OAM) and Oracle
Identity Navigator (OIN) together in a new WebLogic domain. It includes the
following sections:
■Appropriate Deployment Environment
■Components Deployed
■Dependencies
■Procedure
17.6.1 Appropriate Deployment Environment
Perform the configuration in this topic if you want to install Oracle Access Manager in
an environment where you may add other Oracle Identity and Access Management
products, such as Oracle Identity Access Manager and Oracle Adaptive Access
Manager, at a later time. You can use Oracle Identity Navigator to discover and launch
the Oracle Access Manager Console from within the Oracle Identity Navigator user
interface.
17.6.2 Components Deployed
Performing the configuration in this section deploys the following:
■Administration Server
■Managed Server for Oracle Access Manager
Tip: Before configuring a machine, use the ping command to verify
whether the machine or host name is accessible.

OAM and OIN in a New WebLogic Domain
17-6 Oracle Fusion Middleware Installation Guide for Oracle Identity Management
■Oracle Access Manager Console and Oracle Identity Navigator application on the
Administration Server
17.6.3 Dependencies
The configuration in this section depends on the following:
■Oracle WebLogic Server.
■Installation of the Oracle Identity and Access Management 11g software.
■Database schemas for Oracle Access Manager. For more information, see Creating
Database Schema Using the Oracle Fusion Middleware Repository Creation Utility
(RCU).
17.6.4 Procedure
Perform the following steps to configure Oracle Access Manager and Oracle Identity
Navigator in a new WebLogic domain:
1. Ensure that all prerequisites, listed in Prerequisites, are satisfied. In addition, see
Important Notes Before You Begin.
2. Run the <IAM_Home>/common/bin/config.sh script (on UNIX). (<IAM_
Home>\common\bin\config.cmd on Windows). The Oracle Fusion
Middleware Configuration Wizard appears.
3. On the Welcome screen, select the Create a new WebLogic domain option. Click
Next. The Select Domain Source screen is displayed.
4. On the Select Domain Source screen, select the Generate a domain configured
automatically to support the following products: option.
5. Select the following domain configuration options:
■Oracle Access Manager with Database Policy Store - 11.1.1.3.0 [Oracle_
IDM2]
■Oracle Identity Navigator - 11.1.1.3.0 [Oracle_IDM2]
6. After selecting the domain configuration options, click Next. The Specify Domain
Name and Location screen is displayed.
7. On the Specify Domain Name and Location screen, enter a name and location for
the domain to be created. In addition, enter a location to store applications for the
domain. Click Next. The Configure Administrator User Name and Password
screen is displayed.
8. Configure a user name and a password for the administrator. The default user
name is weblogic. Click Next. The Configure Server Start Mode and JDK screen is
displayed.
9. Choose JRockit SDK 1.6.0_24 and Production Mode in the Configure Server
Start Mode and JDK screen of the Oracle Fusion Middleware Configuration
Wizard. Click Next. The Configure JDBC Data Sources Screen is displayed.
Note: When you select the Oracle Access Manager with Database
Policy Store - 11.1.1.3.0 [Oracle_IDM2] option, the Oracle JRF -
11.1.1.0 [oracle_common] option is also selected, by default.

OAM in a Domain Containing OAAM and OIN
Configuring Oracle Access Manager 17-7
10. On the Configure JDBC Sources screen, configure the oamDS data source, as
required. After the test succeeds, the Select Optional Configuration screen is
displayed.
11. On the Select Optional Configuration screen, you can configure Administration
Server, Managed Servers, Clusters, and Machines, Deployments and Services,
and RDBMS Security Store. Select the relevant check boxes and click Next.
■Optional: Configure Administration Server, as required.
■Optional: Configure Managed Servers, as required.
■Optional: Configure Clusters, as required.
For more information about configuring clusters for Oracle Identity and
Access Management products, see the "Configuring High Availability for
Identity Management Components" topic in the guide Oracle Fusion
Middleware High Availability Guide.
■Optional: Assign Managed Servers to Clusters, as required.
■Optional: Configure Machines, as needed. This step is useful when you want
to run the Administration Server on one machine and Managed Servers on
another physical machine.
■Optional: Assign the Administration Server to a machine.
■Optional: Select Deployments, such as applications and libraries, and Services
to target them to a particular cluster or server.
■Optional: Configure RDBMS Security Store, as required.
12. On the Configuration Summary screen, review the domain configuration, and
click Create to start creating the domain.
A new WebLogic domain to support Oracle Access Manager and Oracle Identity
Navigator is created in the <MW_HOME>\user_projects\domains directory (on
Windows). On UNIX, the domain is created in the <MW_HOME>/user_
projects/domains directory.
17.7 OAM in a Domain Containing OAAM and OIN
This topic describes how to configure Oracle Access Manager (OAM) in an Oracle
Identity and Access Management domain that has Oracle Adaptive Access Manager
(OAAM) and Oracle Identity Navigator (OIN) installed. It includes the following
sections:
■Appropriate Deployment Environment
■Components Deployed
■Dependencies
■Procedure
17.7.1 Appropriate Deployment Environment
Perform the configuration in this topic if you want to install Oracle Access Manager in
an environment where Oracle Adaptive Access Manager and Oracle Identity
Tip: Before configuring a machine, use the ping command to verify
whether the machine or host name is accessible.

OAM in a Domain Containing OAAM and OIN
17-8 Oracle Fusion Middleware Installation Guide for Oracle Identity Management
Navigator are already installed. At a later time, you may install Oracle Identity
Manager in the same domain and set up integration between Oracle Access Manager
and Oracle Identity Manager. You can also set up integration between Oracle
Adaptive Access Manager and Oracle Access Manager, as described in the "Integrating
OIM, OAM, and OAAM" topic in the Oracle Fusion Middleware Developer's Guide for
Oracle Adaptive Access Manager.
You can use Oracle Identity Navigator to discover and launch Consoles for Oracle
Access Manager, Oracle Adaptive Access Manager, and Oracle Identity Manager from
within the Oracle Identity Navigator user interface
17.7.2 Components Deployed
Performing the configuration in this section deploys the following:
■Managed Server for Oracle Access Manager
■Oracle Access Manager Console on the existing Administration Server
17.7.3 Dependencies
The configuration in this section depends on the following:
■Oracle WebLogic Server.
■Installation of the Oracle Identity and Access Management 11g software.
■Database schemas for Oracle Access Manager and Oracle Adaptive Access
Manager. For more information, see Creating Database Schema Using the Oracle
Fusion Middleware Repository Creation Utility (RCU).
■Installation and configuration of Oracle Adaptive Access Manager with Oracle
Identity Navigator in a new WebLogic domain, as described in OAAM in a New
WebLogic Domain.
17.7.4 Procedure
Perform the following steps to configure Oracle Access Manager in an Oracle Identity
and Access Management domain that has Oracle Adaptive Access Manager and
Oracle Identity Navigator installed:
1. Ensure that all prerequisites, listed in Prerequisites, are satisfied. In addition, see
Important Notes Before You Begin.
2. Configure Oracle Adaptive Access Manager and Oracle Identity Navigator in a
new WebLogic domain, as described in OAAM in a New WebLogic Domain. A
new WebLogic domain to support Oracle Adaptive Access Manager and Oracle
Identity Navigator is created in the <MW_HOME>\user_projects\domains
directory (on Windows). On UNIX, the domain is created in the <MW_
HOME>/user_projects/domains directory.
3. Run the <IAM_Home>/common/bin/config.sh script (on UNIX). (<IAM_
Home>\common\bin\config.cmd on Windows). The Oracle Fusion
Middleware Configuration Wizard appears.
4. On the Welcome screen, select the Extend an existing WebLogic domain option.
Click Next.
5. On the Select a WebLogic Domain Directory screen, browse to the directory that
contains the WebLogic domain in which you configured Oracle Adaptive Access

Starting the Servers
Configuring Oracle Access Manager 17-9
Manager and Oracle Identity Navigator. Click Next. The Select Extension Source
screen appears.
6. On the Select Extension Source screen, select the Oracle Access Manager with
Database Policy Store - 11.1.1.3.0 [Oracle_IDM2] domain configuration option.
7. After selecting the domain configuration options, click Next. The Configure JDBC
Data Sources Screen is displayed. Configure the oamDS data source, as required.
After the test succeeds, the Configure JDBC Component Schema screen is
displayed.
8. On the Configure JDBC Component Schema screen, select a component schema,
such as the OAAM Admin Server Schema, the OAAM Admin MDS Schema, the
User Messaging Service Schema, the OWSM MDS Schema, the OIM MDS Schema,
or the SOA MDS Schema, that you want to modify.
You can set values for Schema Owner, Schema Password, Database and Service,
Host Name, and Port. Click Next. The Test JDBC Component Schema screen
appears. After the test succeeds, the Select Optional Configuration screen appears.
9. On the Select Optional Configuration screen, you can configure Managed Servers,
Clusters, and Machines and Deployments and Services. Select the relevant check
boxes and click Next.
■Optional: Configure Managed Servers, as required.
■Optional: Configure Clusters, as required.
For more information about configuring clusters for Oracle Identity and
Access Management products, see the "Configuring High Availability for
Identity Management Components" topic in the guide Oracle Fusion
Middleware High Availability Guide.
■Optional: Assign Managed Servers to Clusters, as required.
■Optional: Configure Machines, as needed. This step is useful when you want
to run the Administration Server on one machine and Managed Servers on
another physical machine.
■Optional: Assign the Administration Server to a machine.
■Optional: Select Deployments, such as applications and libraries, and Services
to target them to a particular cluster or server.
10. On the Configuration Summary screen, review the domain configuration, and
click Extend to start extending the domain.
Your existing domain with Oracle Adaptive Access Manager and Oracle Identity
Navigator is extended to support Oracle Access Manager.
17.8 Starting the Servers
After configuring Oracle Access Manager in a new or existing domain, you must start
the Oracle WebLogic Administration Server and various Managed Servers, as
described in Starting or Stopping the Oracle Stack.
Tip: Before configuring a machine, use the ping command to verify
whether the machine or host name is accessible.

Optional Post-Installation Tasks
17-10 Oracle Fusion Middleware Installation Guide for Oracle Identity Management
17.9 Optional Post-Installation Tasks
After installing and configuring Oracle Access Manager, you can perform the
following optional tasks:
■Configure your own LDAP to use instead of the default embedded LDAP, which
comes with Oracle WebLogic Server.
■Configure a policy store to protect resources.
■Add more Managed Servers to the existing domain.
■Add a Managed Server instance.
For more information, see the Oracle Fusion Middleware Administrator's Guide for Oracle
Access Manager with Oracle Security Token Service.
17.10 Verifying the OAM Installation
After completing the installation process, including post-installation steps, you can
verify the installation and configuration of Oracle Access Manager (OAM) as follows:
1. Ensure that the Administration Server and the Managed Server are up and
running.
2. Log in to the Administration Console for Oracle Access Manager using the URL:
http://<adminserver-host>:<adminserver-port>/oamconsole
When you access this Administration Console running on the Administration
Server, you are prompted to enter a user name and password. Note that you must
have Administrator’s role and privileges.
3. Verify the Oracle WebLogic Server Administration Console. If the installation and
configuration of Oracle Access Manager is successful, this console shows the
Administration Server (for example, oam_admin) and the Managed Server (for
example, oam_server) in the running mode. In addition, if you check Application
Deployments in this console, both oam_admin and oam_server must be in active
state.
17.11 Setting Up OAM Agents
You can set up either Oracle HTTP Server WebGate or mod_OSSO as an Agent for
Oracle Access Manager (OAM). Setting up an Agent involves the following steps:
1. Installing and Configuring the Agent (WebGate or mod_osso)
2. Registering the Agent as a Partner Application
3. Restarting the WebLogic Managed Servers
17.11.1 Setting Up Oracle HTTP Server WebGate
Oracle HTTP Server WebGate is a Web server plug-in that is shipped out-of-the-box
with Oracle Access Manager. The Oracle HTTP Server WebGate intercepts HTTP
requests from users for Web resources and forwards them to the Access Server for
authentication and authorization. Oracle HTTP Server WebGate installation packages
are found on media and virtual media that is separate from the core components.
17.11.1.1 Installing and Configuring WebGate
To install and configure Oracle HTTP Server WebGate, complete the following steps:

Setting Up OAM Agents
Configuring Oracle Access Manager 17-11
1. Install Oracle HTTP Server 11g WebGate for Oracle Access Manager, as described
in Installing and Configuring Oracle HTTP Server 11g Webgate for OAM.
2. Complete the post-installation steps and the registration setup, as described in
Post-Installation Steps and Getting Started with a New Oracle HTTP Server 11g
Webgate Agent for Oracle Access Manager.
17.11.1.2 Registering WebGate as a Partner Application
For information about registering WebGate as a Partner Application, refer to the
"Agent Registration" topic and the "Managing Agents: OAM (WebGate) and OSSO
(mod_osso)" chapter in the Oracle Fusion Middleware Administrator's Guide for Oracle
Access Manager. Note that the Administration Server must be up and running when
you are registering WebGate as a Partner Application.
17.11.1.3 Restarting Managed Servers
For information about restarting Managed Servers, see Starting the Stack.
17.11.2 Setting Up the OSSO Agent
OSSO Agent (mod_osso) is used by Oracle HTTP Server to check for an existing, valid
Oracle HTTP Server cookie. If necessary, it redirects to the Oracle Access Manager
runtime server to communicate with the directory during authentication. In addition,
it decrypts the encrypted user identity populated by the OSSO server and sets the
headers with user attributes.
17.11.2.1 Installing mod_osso
To install mod_osso, complete the following steps:
1. Install the latest version of Oracle HTTP Server. For information about installing
the Web Tier, including Oracle HTTP Server, see Installing and Configuring Oracle
HTTP Server 11g.
2. After patching your Oracle Web Tier software to the latest version, run the
configuration tool to configure Oracle HTTP Server.
On UNIX operating systems:
<Web_Tier_ORACLE_HOME>/bin/config.sh
On Windows operating systems:
<Web_Tier_ORACLE_HOME>\bin\config.bat
For complete instructions, go to "Configuring Your Components" in Oracle Fusion
Middleware Installation Guide for Oracle Web Tier.
3. Copy the mod_osso.conf file from the <ORACLE_
INSTANCE>/config/OHS/<OHS_INSTANCE>/disabled directory to the
<ORACLE_INSTANCE>/config/OHS/<OHS_INSTANCE>/moduleconf
directory.
4. Register mod_osso as a Partner Application.
Note: After you configure Oracle HTTP Server, a working instance
of Oracle HTTP Server is configured in an Instance Home.

Setting Up Integration with OIM
17-12 Oracle Fusion Middleware Installation Guide for Oracle Identity Management
For information about registering mod_osso as a Partner Application, refer to the
"Agent Registration" topic and the "Managing Agents: OAM (WebGate) and OSSO
(mod_osso)" chapter in the Oracle Fusion Middleware Administrator's Guide for
Oracle Access Manager. Note that the Administration Server must be up and
running when you are registering mod_osso as a Partner Application.
5. Edit the mod_osso.conf file to update the location of the osso.conf file as
follows:
<IfModule osso_module>
OssoIpCheck off
OssoIdleTimeout off
OssoSecureCookies off
OssoConfigFile <location of the osso.conf>
<Location>
require valid-user
AuthType Osso
</Location>
</IfModule osso_module>
6. Restart Oracle HTTP Server by running the restartproc command in Oracle
Process Manager and Notification Server (OPMN) or by using Oracle Fusion
Middleware Control.
17.11.2.2 Restarting Managed Servers
For information about restarting Managed Servers, see Starting the Stack.
17.12 Setting Up Integration with OIM
For information about setting up integration between Oracle Access Manager and
Oracle Identity Manager (OIM), see "Integrating Oracle Access Manager and Oracle
Identity Manager" in the Oracle Fusion Middleware Integration Guide for Oracle Access
Manager.
17.13 Getting Started with OAM After Installation
After installing Oracle Access Manager (OAM), refer to the "Getting Started with
Administering Oracle Access Manager" chapter in the Oracle Fusion Middleware
Administrator's Guide for Oracle Access Manager.

18
Configuring Oracle Adaptive Access Manager 18-1
18 Configuring Oracle Adaptive Access
Manager
This chapter explains how to configure Oracle Adaptive Access Manager (OAAM). It
includes the following topics:
■Overview
■Prerequisites
■Important Notes Before You Begin
■Installing OAAM
■OAAM in a New WebLogic Domain
■Configuring Oracle Adaptive Access Manager (Offline)
■Starting the Servers
■Post-Installation Steps
■Verifying the OAAM Installation
■Migrating Policy and Credential Stores
■Getting Started with OAAM After Installation
18.1 Overview
For Oracle Identity and Access Management 11.1.1.5.0, Oracle Adaptive Access
Manager includes two components:
■Oracle Adaptive Access Manager (Online)
■Oracle Adaptive Access Manager (Offline)
Note: Oracle Adaptive Access Manager (Offline) is included in the
Oracle Identity and Access Management Suite. When you are
installing Oracle Identity and Access Management 11.1.1.5.0, Oracle
Adaptive Access Manager (Offline) is also installed along with Oracle
Adaptive Access Manager (OAAM). For configuring Oracle Adaptive
Access Manager (Offline), see Configuring Oracle Adaptive Access
Manager (Offline).

Prerequisites
18-2 Oracle Fusion Middleware Installation Guide for Oracle Identity Management
18.2 Prerequisites
The following are the prerequisites for installing and configuring Oracle Identity and
Access Management 11g Release 1 (11.1.1) products:
1. Installing Oracle Database, as described in Installing Oracle Database.
2. Installing Oracle WebLogic Server and creating a Middleware Home, as described
in Installing Oracle WebLogic Server and Creating the Oracle Middleware Home.
3. Creating and loading schemas using Oracle Fusion Middleware Repository
Creation Utility (RCU), as described in Creating Database Schema Using the
Oracle Fusion Middleware Repository Creation Utility (RCU).
4. Installing the Oracle Identity and Access Management 11g Release 1 (11.1.1.5.0)
suite, as described in Installing Oracle Identity and Access Management
(11.1.1.5.0). The Oracle Identity and Access Management suite contains Oracle
Identity Manager (OIM), Oracle Access Manager (OAM), Oracle Adaptive Access
Manager (OAAM), Oracle Entitlements Server (OES), and Oracle Identity
Navigator (OIN).
18.3 Important Notes Before You Begin
Before you start installing and configuring Oracle Identity and Access Management
products in any of the scenarios discussed in this chapter, keep the following points in
mind:
It is assumed that you are installing Oracle Internet Directory, Oracle Virtual
Directory, Oracle Identity Manager, Oracle Access Manager, Oracle Adaptive Access
Manager, and Oracle Identity Navigator on the same machine.
18.4 Installing OAAM
Oracle Adaptive Access Manager (OAAM) is included in the Oracle Identity and
Access Management 11g Release 1 (11.1.1) Suite. You can use the Oracle Identity and
Note: In this chapter, two IDM_Home directories are mentioned in
descriptions and procedures. For example, the first one, IDM_Home
can be the IDM_Home directory for Oracle Internet Directory, Oracle
Virtual Directory, Oracle Directory Services Manager, Oracle
Directory Integration Platform, and Oracle Identity Federation. The
second one, IAM_Home can be the IDM_Home directory for Oracle
Identity Manager, Oracle Access Manager, Oracle Adaptive Access
Manager, Oracle Entitlements Server, and Oracle Identity Navigator.
However, note that IDM_Home and IAM_Home are used as
examples in this document. You can specify any name for either of
your IDM_Home directories. In addition, you can install the two
Oracle Identity Management suites (one containing Oracle Internet
Directory, Oracle Virtual Directory, Oracle Directory Services
Manager, Oracle Directory Integration Platform, and Oracle Identity
Federation; another containing Oracle Identity Manager, Oracle
Access Manager, Oracle Adaptive Access Manager, Oracle
Entitlements Server, and Oracle Identity Navigator) in any order on
your machine.
For more information, see Overview and Structure of Oracle Identity
Management 11g Installation.

OAAM in a New WebLogic Domain
Configuring Oracle Adaptive Access Manager 18-3
Access Management 11g Installer to install the Oracle Identity and Access
Management Suite. For more information, see Preparing to Install and Installing
Oracle Identity and Access Management (11.1.1.5.0).
18.5 OAAM in a New WebLogic Domain
This topic describes how to configure Oracle Adaptive Access Manager (OAAM) in a
new WebLogic administration domain. It includes the following sections:
■Appropriate Deployment Environment
■Components Deployed
■Dependencies
■Procedure
18.5.1 Appropriate Deployment Environment
Perform the configuration in this topic if you want to install Oracle Adaptive Access
Manager in an environment where you may install other Oracle Identity and Access
Management 11g components, such as Oracle Identity Navigator, Oracle Access
Manager, or Oracle Identity Manager at a later time in the same domain.
You can use the Oracle Identity Navigator interface and dashboard to discover and
launch the Oracle Adaptive Access Manager console from within Oracle Identity
Navigator.
18.5.2 Components Deployed
Performing the configuration in this section deploys the following:
■WebLogic Administration Server
■Managed Servers for Oracle Adaptive Access Manager, depending on the Oracle
Adaptive Access Manager Domain Configuration template you choose.
■Oracle Adaptive Access Manager Console and Oracle Identity Navigator
application on the Administration Server.
18.5.3 Dependencies
The configuration in this section depends on the following:
■Oracle WebLogic Server.
■Installation of the Oracle Identity and Access Management 11g software.
■Database schema for Oracle Adaptive Access Manager. For more information
about schemas specific to Oracle Adaptive Access Manager, see Creating Database
Schema Using the Oracle Fusion Middleware Repository Creation Utility (RCU).
18.5.4 Procedure
Perform the following steps to configure only Oracle Adaptive Access Manager in a
new WebLogic domain:
1. Ensure that all prerequisites, listed in Prerequisites, are satisfied. In addition, see
Important Notes Before You Begin.

OAAM in a New WebLogic Domain
18-4 Oracle Fusion Middleware Installation Guide for Oracle Identity Management
2. Run the <IAM_Home>/common/bin/config.sh script (on UNIX). (<IAM_
Home>\common\bin\config.cmd on Windows). The Fusion Middleware
Configuration Wizard appears.
3. On the Welcome screen, select the Create a new WebLogic domain option. Click
Next. The Select Domain Source screen appears.
4. On the Select Domain Source screen ensure that the Generate a domain
configured automatically to support the following products: option is selected.
Select Oracle Adaptive Access Manager Admin Server - 11.1.1.3.0 [Oracle_
IDM2], which is mandatory.
In addition, you can select Oracle Adaptive Access Manager - Server Offline -
11.1.1.3.0, which is optional. Click Next. The Select Domain Name and Location
screen appears.
5. Enter a name and a location for the domain to be created, and click Next. The
Configure Administrator User Name and Password screen appears.
6. Configure a user name and a password for the administrator. The default user
name is weblogic. Click Next.
7. Choose JRockit SDK 1.6.0_24 and Production Mode in the Configure Server
Start Mode and JDK screen of the Oracle Fusion Middleware Configuration
Wizard. Click Next. The Configure JDBC Component Schema screen is displayed.
8. On the Configure JDBC Component Schema screen, select a component schema,
such as the OAAM Admin Server Schema or the OAAM Admin MDS Schema,
that you want to modify.
You can set values for Schema Owner, Schema Password, Database and Service,
Host Name, and Port. Click Next. The Test JDBC Component Schema screen
appears. After the test succeeds, the Select Optional Configuration screen appears.
9. On the Select Optional Configuration screen, you can configure the
Administration Server and Managed Servers, Clusters, and Machines, and
Deployments and Services, and RDBMS Security Store. Click Next.
10. Optional: Configure the following Administration Server parameters:
■Name
■Listen address
■Listen port
■SSL listen port
■SSL enabled or disabled
11. On the Select Optional Configuration screen, select Managed Servers, Clusters
and Machines to configure the managed server. For more information, see
Note: When you select the Oracle Adaptive Access Manager Admin
Server - 11.1.1.3.0 [Oracle_IDM2], the following options are also
selected, by default:
■Oracle Enterprise Manager 11.1.1.0 [oracle_common]
■Oracle JRF 11.1.1.0 [oracle_common]
■Oracle Identity Navigator - 11.1.1.3.0 [Oracle_IDM2]

Configuring Oracle Adaptive Access Manager (Offline)
Configuring Oracle Adaptive Access Manager 18-5
"Configure Managed Servers" in the Oracle Fusion Middleware Creating Domains
Using the Configuration Wizard.
12. Optional: Configure Clusters, as required.
For more information about configuring clusters for Oracle Identity and Access
Management products, see the "Configuring High Availability for Identity
Management Components" topic in the guide Oracle Fusion Middleware High
Availability Guide.
13. Optional: Assign Managed Servers to Clusters, as required.
14. Optional: Configure Machines, as needed. This step is useful when you want to
run the Administration Server on one machine and Managed Servers on another
physical machine.
15. Optional: Assign the Administration Server to a machine.
16. Optional: Select Deployments, such as applications and libraries, and Services to
target them to a particular cluster or server.
17. Optional: Configure RDBMS Security Store, as required.
18. On the Configuration Summary screen, review the domain configuration, and
click Create to start creating the domain.
A new WebLogic domain to support Oracle Adaptive Access Manager is created in the
<MW_HOME>\user_projects\domains directory (on Windows). On UNIX, the
domain is created in the <MW_HOME>/user_projects/domains directory.
18.6 Configuring Oracle Adaptive Access Manager (Offline)
This topic describes how to configure Oracle Adaptive Access Manager (Offline) in a
new WebLogic domain. It includes the following topics:
■Components Deployed
■Dependencies
■Procedure
18.6.1 Components Deployed
Performing the configuration in this section deploys the following:
■WebLogic Administration Server
■Oracle Adaptive Access Manager (Offline) application on the Administration
Server
18.6.2 Dependencies
The configuration in this section depends on the following:
■Oracle WebLogic Server.
■Installation of the Oracle Identity and Access Management 11g software.
■Database schema for Oracle Adaptive Access Manager (Offline).
Tip: Before configuring a machine, use the ping command to verify
whether the machine or host name is accessible.

Configuring Oracle Adaptive Access Manager (Offline)
18-6 Oracle Fusion Middleware Installation Guide for Oracle Identity Management
18.6.3 Procedure
Perform the following steps to configure Oracle Adaptive Access Manager (Offline) in
a new WebLogic domain:
1. Ensure that all prerequisites, listed in Prerequisites, are satisfied.
2. Run the <IAM_Home>/common/bin/config.sh script (on UNIX). (<IAM_
Home>\common\bin\config.cmd on Windows). The Oracle Fusion
Middleware Configuration Wizard appears.
3. On the Welcome screen, select the Create a new WebLogic domain option. Click
Next. The Select Domain Source screen appears.
4. On the Select Domain Source screen, ensure that the Generate a domain
configured automatically to support the following products: option is selected.
Select the Oracle Adaptive Access Manager Offline - 11.1.3.0 [Oracle_IDM2]
option. When you select this option, the following options are also selected by
default:
■Oracle Enterprise Manger - 11.1.1.0 [oracle_common]
■Oracle Identity Navigator - 11.1.1.3.0 [Oracle_IDM2]
■Oracle JRF 11.1.1.0 [oracle_common]
Click Next. The Specify Domain Name and Location screen appears.
5. Enter a name and a location for the domain to be created, and click Next. The
Configure Administrator User Name and Password screen appears.
6. Configure a user name and a password for the administrator. The default user
name is weblogic. Click Next. The Configure Server Start Mode and JDK screen
appears.
7. Choose JRockit SDK 1.6.0_24 and Production Mode in the Configure Server
Start Mode and JDK screen. Click Next. The Configure JDBC Component Schema
screen is displayed.
8. On the Configure JDBC Component Schema screen, select a component schema,
such as the OAAM Offline MDS Schema or the OAAM Offline Schema that you
want to modify. You can set values for Schema Owner, Schema Password,
Database and Service, Host Name, and Port. Click Next. The Test JDBC
Component Schema screen appears. After the test succeeds, click Next. The Select
Optional Configuration screen appears.
9. On the Select Optional Configuration screen, you can configure the
Administration Server, Managed Servers, Clusters, Machines, Deployments and
Services, and RDBMS Security Store. Select the relevant check boxes and click
Next.
■Optional: Configure the following Administration Server parameters:
–Name
–Listen Address
–Listen Port
–SSL Listen Port
–SSL Enabled

Post-Installation Steps
Configuring Oracle Adaptive Access Manager 18-7
■Optional: Add and configure Managed Servers, as required. Note that Oracle
Entitlements Server does not require a Managed Server because the
application is deployed on the WebLogic Administration Server.
■Optional: Configure Clusters, as required.
For more information about configuring clusters for Oracle Identity and
Access Management products, see the "Configuring High Availability for
Identity Management Components" topic in the Oracle Fusion Middleware High
Availability Guide.
■Optional: Configure Machines, as needed. This step is useful when you want
to run the Administration Server on one machine and Managed Servers on
another physical machine.
■Optional: Assign the Administration Server to a machine.
■Optional: Select Deployments, such as applications and libraries, and Services
to target them to a particular cluster or server.
■Optional: Configure RDBMS Security Store Database, as required.
10. On the Configuration Summary screen, review the domain configuration, and
click Create to start creating the domain.
A new WebLogic domain to support Oracle Adaptive Access Manager (Offline) is
created in the <MW_HOME>\user_projects\domains directory (on Windows). On
UNIX, the domain is created in the <MW_HOME>/user_projects/domains
directory.
18.7 Starting the Servers
After installing and configuring Oracle Adaptive Access Manager, you must run the
Oracle WebLogic Administration Server and various Managed Servers, as described in
Starting the Stack.
18.8 Post-Installation Steps
After installing and configuring Oracle Adaptive Access Manager, you must complete
the following tasks:
1. Create Oracle WebLogic Server Users as follows:
a. Log in to the Oracle WebLogic Administration Console for your WebLogic
administration domain.
b. Click on Security Realms, and then click on your security realm.
c. Click the Users and Groups tab, and then click the Users tab under it.
Tip: Before configuring a machine, use the ping command to verify
whether the machine or host name is accessible.
Note: If you are upgrading from Oracle Adaptive Access Manager
10g to Oracle Adaptive Access Manager 11g, do not start Oracle
Adaptive Access Manager Managed Servers until you have performed
the Oracle Adaptive Access Manager Middle Tier Upgrade using the
Upgrade Assistant tool. For more information, see the Oracle Fusion
Middleware Upgrade Guide for Oracle Identity Management.

Post-Installation Steps
18-8 Oracle Fusion Middleware Installation Guide for Oracle Identity Management
d. Create a user, such as user1, in the security realm.
e. Assign the user user1 to rule administrators and environment administrators
groups.
2. Set up and back up Oracle Adaptive Access Manager Encryption Keys, as
described in the "Setting Up Encryption and Database Credentials for OAAM"
topic in the Oracle Fusion Middleware Administrator's Guide for Oracle Adaptive
Access Manager. Ensure that you have a backup of the Oracle Adaptive Access
Manager Encryption Keys; they are required if you want to re-create the Oracle
Adaptive Access Manager domain.
3. Import Snapshot of Policies as follows:
A full snapshot of policies, dependent components and configurations is shipped
with Oracle Adaptive Access Manager. The snapshot is in the oaam_base_
snapshot.zip file and located in the MW_HOME/IAM_ORACLE_
HOME/oaam/init directory.
It contains the following items that must be imported into OAAM:
■Challenge questions for English (United States)
During registration, which could be enrollment, opening a new account, or
another events such as a reset, the user selects different questions from a list of
questions and enters answers to them. These questions, called challenge
questions, are used to authenticate users.
Questions for the languages you want to support must be in the system before
users can be asked to register. These questions may also be required to log in
to OAAM Server.
■Entity definitions
The actors that are tracked during authentication are called authentication
entities and include user, city, device, and so on. These base entities are
required to enable conditions that are used for patterns.
■Out-of-the-box patterns
Patterns are used by Oracle Adaptive Access Manager to either define one
bucket or dynamically create buckets. Oracle Adaptive Access Manager
collects data and populates these buckets with members based on pattern
parameters, and rules perform risk evaluations on dynamically changing
membership and distributions of the buckets.
■Out-of-the-box configurable actions
Configurable actions are actions that are triggered based on the result action
or risk scoring or both after a checkpoint execution. The configurable actions
are built using action templates.
■Out-of-the-box policies
Note: If you are upgrading from Oracle Adaptive Access Manager
10.1.4.5 to Oracle Adaptive Access Manager 11g, you will see that the
names and descriptions of the out-of-the-box action templates are
slightly different, since the action templates in Oracle Adaptive Access
Manager 11g are globalized and hence the difference.

Post-Installation Steps
Configuring Oracle Adaptive Access Manager 18-9
Policies are designed to help evaluate and handle business activities or
potentially risky activities that are encountered in day-to-day operation.
■Any groups
Collections of items used in rules, user groups, and action and alert groups are
shipped with OAAM.
For upgrading policies, components, and configurations, perform a backup, and
then import the separate file. The following are available:
■Default questions are shipped in the oaam_kba_questions_
<locale>.zip files, which are located in the <MW_HOME>/<IAM_
ORACLE_HOME>/oaam/init/kba_questions directory. The locale
identifier <locale> specifies the language version.
■Base policies are shipped in the oaam_sample_policies_for_uio_
integration.zip file, which is located in the <MW_HOME>/<IAM_
ORACLE_HOME>/oaam/init directory.
■Configurable action templates are shipped in the OOTB_Configurable_
Actions.zip file, which is located in the <MW_HOME>/<IAM_ORACLE_
HOME>/oaam/init directory.
■Base-authentication required entities are shipped in the Auth_
EntityDefinition.zip file, which is located in the <MW_HOME>/<IAM_
ORACLE_HOME>/oaam/init directory.
4. Load Location Data into the Oracle Adaptive Access Manager database as follows:
a. Configure the IP Location Loader script, as described in the topics "OAAM
Command Line Interface Scripts" and "Importing IP Location Data" in the
Oracle Fusion Middleware Administrator's Guide for Oracle Adaptive Access
Manager.
b. Make a copy of the sample.bharosa_location.properties file, which
is located under the <MW_HOME>/<IAM_Home>/oaam/cli directory. Enter
Notes:
■If you need to customize any properties, you should import the
snapshot into your new test system, make the changes, export the
snapshot, and import it into your new system. Alternatively you
can import the snapshot on the new system and make the
property changes directly, thereby eliminating the test system
completely.
■For customers who are upgrading from 11.1.1.3.0 to 11.1.1.5.0: Do
not import the snapshot. This procedure is only for first time
initial setup. Importing a snapshot wipes out the existing
environment and replaces it with a new one. For upgrades, import
separate zip files for the entities, definitions, or policies.
Note: For more information about policies, see "Importing the
OAAM Snapshot" and "Managing Policies, Rules, and Conditions"
topics in the Oracle Fusion Middleware Administrator’s Guide for Oracle
Adaptive Access Manager.

Verifying the OAAM Installation
18-10 Oracle Fusion Middleware Installation Guide for Oracle Identity Management
location data details in the location.data properties, as in the following
examples:
location.data.provider=quova
location.data.file=/tmp/quova/EDITION_Gold_2008-07-22_
v374.dat.gz
location.data.ref.file=/tmp/quova/EDITION_Gold_2008-07-22_
v374.ref.gz
location.data.anonymizer.file=/tmp/quova/anonymizers_
2008-07-09.dat.gz
c. Run the loader on the command line as follows:
On Windows: loadIPLocationData.cmd
On UNIX: ./loadIPLocationData.sh
Ensure that the Oracle Middleware Home (MW_HOME) environment variable
is set before running the loadIPLocationData script.
18.9 Verifying the OAAM Installation
After completing the installation process, including post-installation steps, you can
verify the installation and configuration of Oracle Adaptive Access Manager (OAAM)
as follows:
1. Start the Administration Server to register the newly created managed servers
with the domain. To start the Administration Server, run the following command:
■On Windows: At the command prompt, run the startWebLogic script to
start the Administration Server, as in the following example:
\middleware\user_projects\domains\base_
domain\bin\startWebLogic
■On UNIX: At the $ prompt, run the startWebLogic.sh script, as in the
following example:
sh /MW_HOME/user_projects/domains/base_
domain/bin/startWebLogic.sh
2. Start the Managed Server, as described in Starting the Servers.
Wait for the Administration Server and the Managed Server to start up.
3. Log in to the Administration Server for Oracle Adaptive Access Manager, using
the admin server username and password. Log in to the Administration Server
using the following URL:
http://<host>:<oaam_admin_server1_port>/oaam_admin
4. Log in to the Oracle Adaptive Access Managed Server using the following URL:
https://<host>:<oaam_server_server1_sslport>:oaam_server
Note: If you wish to generate CSF keys or passwords manually, see
the "Setting Up Encryption and Database Credentials for OAAM"
topic in the Oracle Fusion Middleware Administrator's Guide for Oracle
Adaptive Access Manager.

Migrating Policy and Credential Stores
Configuring Oracle Adaptive Access Manager 18-11
18.10 Migrating Policy and Credential Stores
You begin policy and credential store migration by creating the JPS root and then you
reassociate the policy and credential store with Oracle Internet Directory.
Migrating policy and credential stores involves the following steps:
1. Creating JPS Root
2. Reassociating the Policy and Credential Store
18.10.1 Creating JPS Root
Create the jpsroot in Oracle Internet Directory using the command line ldapadd
command as shown in these steps:
1. Create an ldif file similar to this:
dn: cn=jpsroot_iam
cn: jpsroot_iam_iam
objectclass: top
objectclass: orclcontainer
2. Use ORACLE_HOME/bin/ldapadd to add these entries to Oracle Internet
Directory. For example:
ORACLE_HOME/bin/ldapadd -h oid.mycompany.com -p 389 -D cn="orcladmin" -w
welcome1 -c -v -f jps_root.ldif
18.10.2 Reassociating the Policy and Credential Store
To reassociate the policy and credential store with Oracle Internet Directory, use the
WLST reassociateSecurityStore command. Follow these steps:
1. From IAMHOST1, start the wlst shell from the ORACLE_HOME/common/bin
directory. For example:
./wlst.sh
2. Connect to the WebLogic Administration Server using the wlst connect
command shown below.
connect('AdminUser',"AdminUserPassword",t3://hostname:port')
For example:
connect("weblogic_iam,"welcome1","t3://iamhost-vip.mycompany.com:7001")
3. Run the reassociateSecurityStore command as shown below:
Syntax:
reassociateSecurityStore(domain="domainName",admin="cn=orcladmin",
password="orclPassword",ldapurl="ldap://LDAPHOST:LDAPPORT",servertype="OID",
jpsroot="cn=jpsRootContainer")
For example:
wls:/IAMDomain/serverConfig> reassociateSecurityStore(domain="IAMDomain",
admin="cn=orcladmin",password="password",
ldapurl="ldap://oid.mycompany.com:389",servertype="OID",
jpsroot="cn=jpsroot_iam_iamhost1")

Getting Started with OAAM After Installation
18-12 Oracle Fusion Middleware Installation Guide for Oracle Identity Management
The output for the command is as follows:
{servertype=OID, jpsroot=cn=jpsroot_iam, admin=cn=orcladmin,
domain=IAMDomain, ldapurl=ldap://oid.mycompany.com:389, password=password}
Location changed to domainRuntime tree. This is a read-only tree with
DomainMBean as the root.
For more help, use help(domainRuntime)
Starting Policy Store reassociation.
LDAP server and ServiceConfigurator setup done.
Schema is seeded into LDAP server
Data is migrated to LDAP server
Service in LDAP server after migration has been tested to be available
Update of jps configuration is done
Policy Store reassociation done.
Starting credential Store reassociation
LDAP server and ServiceConfigurator setup done.
Schema is seeded into LDAP server
Data is migrated to LDAP server
Service in LDAP server after migration has been tested to be available
Update of jps configuration is done
Credential Store reassociation done
Jps Configuration has been changed. Please restart the server.
4. Restart the Administration Server after the command completes successfully. For
information about restarting the Administration Server, see Starting the Servers.
18.11 Getting Started with OAAM After Installation
After installing Oracle Adaptive Access Manager (OAAM), refer to the Oracle Fusion
Middleware Administrator's Guide for Oracle Adaptive Access Manager.

19
OAM and OAAM Joint Domain Configuration Scenarios 19-1
19 OAM and OAAM Joint Domain
Configuration Scenarios
This chapter explains how to configure Oracle Access Manager (OAM) and Oracle
Adaptive Access Manager (OAAM) with other Oracle Identity and Access
Management components, such as Oracle Identity Manager (OIM) and Oracle Identity
Navigator (OIN), in a new or existing WebLogic domain. It includes the following
topics:
■Prerequisites
■Important Notes Before You Begin
■Installing Oracle Identity and Access Management 11g Release 1 (11.1.1)
■OAM, OIM, and OIN in a New WebLogic Domain
■OAM, OAAM, and OIN in a New WebLogic Domain
■Starting the Servers
■Getting Started with OAM After Installation
■Getting Started with OAAM After Installation
19.1 Prerequisites
The following are the prerequisites for installing and configuring Oracle Identity and
Access Management 11g Release 1 (11.1.1) products:
1. Installing Oracle Database, as described in Installing Oracle Database.
2. Installing Oracle WebLogic Server and creating a Middleware Home, as described
in Installing Oracle WebLogic Server and Creating the Oracle Middleware Home.
3. For Oracle Identity Manager users only: Installing Oracle SOA Suite 11g Release
1 (11.1.1.5.0), as described in Installing the Latest Version of Oracle SOA Suite
(Oracle Identity Manager Users Only).
4. Creating and loading schemas using Oracle Fusion Middleware Repository
Creation Utility (RCU), as described in Creating Database Schema Using the
Oracle Fusion Middleware Repository Creation Utility (RCU).
5. Installing the Oracle Identity and Access Management 11g Release 1 (11.1.1.5.0)
suite, as described in Installing Oracle Identity and Access Management
(11.1.1.5.0). The Oracle Identity and Access Management suite contains Oracle
Identity Manager (OIM), Oracle Access Manager (OAM), Oracle Adaptive Access
Manager (OAAM), Oracle Entitlements Server (OES), and Oracle Identity
Navigator (OIN).

Important Notes Before You Begin
19-2 Oracle Fusion Middleware Installation Guide for Oracle Identity Management
19.2 Important Notes Before You Begin
Before you start installing and configuring Oracle Identity and Access Management
products in any of the scenarios discussed in this chapter, keep the following points in
mind:
It is assumed that you are installing Oracle Internet Directory, Oracle Virtual
Directory, Oracle Identity Manager, Oracle Access Manager, Oracle Adaptive Access
Manager, and Oracle Identity Navigator on the same machine.
19.3 Installing Oracle Identity and Access Management 11g Release 1
(11.1.1)
You can use the Oracle Identity and Access Management 11g Installer to install the
Oracle Identity and Access Management 11g Release 1 (11.1.1) suite that contains
Oracle Access Manager (OAM), Oracle Identity Manager (OIM), Oracle Adaptive
Access Manager (OAAM), Oracle Entitlements Server (OES), and Oracle Identity
Navigator (OIN). For more information, see Preparing to Install and Installing Oracle
Identity and Access Management (11.1.1.5.0).
19.4 OAM, OIM, and OIN in a New WebLogic Domain
This topic describes how to configure Oracle Access Manager (OAM), Oracle Identity
Manager (OIM), and Oracle Identity Navigator (OIN) in a new WebLogic
administration domain. It includes the following sections:
■Appropriate Deployment Environment
■Components Deployed
■Dependencies
■Procedure
Note: In this chapter, two IDM_Home directories are mentioned in
descriptions and procedures. For example, the first one, IDM_Home
can be the IDM_Home directory for Oracle Internet Directory, Oracle
Virtual Directory, Oracle Directory Services Manager, Oracle
Directory Integration Platform, and Oracle Identity Federation. The
second one, IAM_Home can be the IDM_Home directory for Oracle
Identity Manager, Oracle Access Manager, Oracle Adaptive Access
Manager, Oracle Entitlements Server, and Oracle Identity Navigator.
However, note that IDM_Home and IAM_Home are used as
examples in this document. You can specify any name for either of
your IDM_Home directories. In addition, you can install the two Oracle
Identity Management suites (one containing Oracle Internet Directory,
Oracle Virtual Directory, Oracle Directory Services Manager, Oracle
Directory Integration Platform, and Oracle Identity Federation;
another containing Oracle Identity Manager, Oracle Access Manager,
Oracle Adaptive Access Manager, Oracle Entitlements Server, and
Oracle Identity Navigator) in any order on your machine.
For more information, see Overview and Structure of Oracle Identity
Management 11g Installation.

OAM, OIM, and OIN in a New WebLogic Domain
OAM and OAAM Joint Domain Configuration Scenarios 19-3
19.4.1 Appropriate Deployment Environment
Perform the configuration in this topic if you want to install Oracle Access Manager,
Oracle Identity Manager, and Oracle Identity Navigator together in an environment.
You can also set up integration between Oracle Identity Manager and Oracle Access
Manager, as described in "Integrating Oracle Access Manager and Oracle Identity
Manager" in the Oracle Fusion Middleware Integration Guide for Oracle Access Manager.
19.4.2 Components Deployed
Performing the installation and configuration in this section deploys the following:
■Administration Server
■Managed Servers for Oracle Access Manager and Oracle Identity Manager
■Oracle Identity Administration Console, Oracle Identity Manager Self Service
Console, and Oracle Identity Manager Advanced Administration Console on the
Oracle Identity Manager Managed Server
■Oracle Access Manager Console and Oracle Identity Navigator application on the
Administration Server
19.4.3 Dependencies
The installation and configuration in this section depends on the following:
■Oracle WebLogic Server.
■Complete installation of the Oracle Identity and Access Management 11g software.
■Installation of Oracle SOA Suite
■Database schemas for Oracle Identity Manager, Oracle SOA Suite, and Oracle
Access Manager. For more information about schemas specific to Oracle Identity
Manager and Oracle Access Manager, see Creating Database Schema Using the
Oracle Fusion Middleware Repository Creation Utility (RCU).
19.4.4 Procedure
Perform the following steps to install and configure Oracle Access Manager, Oracle
Identity Manager, and Oracle Identity Navigator in a new WebLogic administration
domain:
1. Ensure that all the prerequisites, listed in Prerequisites, are satisfied. In addition,
see Important Notes Before You Begin.
2. Run the <Oracle_IDM2>/common/bin/config.sh script. (<Oracle_
IDM2>\common\bin\config.cmd on Windows). The Oracle Fusion
Middleware Configuration Wizard appears.
3. On the Welcome screen, select the Create a new WebLogic domain option. Click
Next. The Select Domain Source screen is displayed.
4. On the Select Domain Source screen, select the Generate a domain configured
automatically to support the following products: option.
5. Select the following domain configuration options:
■Oracle Access Manager with Database Policy Store - 11.1.1.4.0 [Oracle_
IDM2]

OAM, OIM, and OIN in a New WebLogic Domain
19-4 Oracle Fusion Middleware Installation Guide for Oracle Identity Management
■Oracle Identity Navigator - 11.1.1.3.0 [Oracle_IDM2]
■Oracle Identity Manager - 11.1.1.3.0 [Oracle_IDM2]
6. After selecting the domain configuration options, click Next. The Specify Domain
Name and Location screen is displayed.
7. On the Specify Domain Name and Location screen, enter a name and location for
the domain to be created. In addition, enter a location to store applications for the
domain. Click Next. The Configure Administrator User Name and Password
screen is displayed.
8. Configure a user name and a password for the administrator. The default user
name is weblogic. Click Next. The Configure Server Start Mode and JDK screen is
displayed.
9. Choose JRockit SDK 1.6.0_24 and Production Mode in the Configure Server
Start Mode and JDK screen of the Oracle Fusion Middleware Configuration
Wizard. Click Next. The Configure JDBC Data Sources Screen is displayed.
Configure the oamDS data source, as required. After the test succeeds, the
Configure JDBC Component Schema screen is displayed.
10. On the Configure JDBC Component Schema screen, select a component schema,
such as the OIM Infrastructure Schema, the SOA Infrastructure Schema, the User
Messaging Service Schema, the OWSM MDS Schema, the OIM MDS Schema, or
the SOA MDS Schema, that you want to modify.
You can set values for Schema Owner, Schema Password, Database and Service,
Host Name, and Port. Click Next. The Test JDBC Component Schema screen
appears. After the test succeeds, the Select Optional Configuration screen appears.
11. On the Select Optional Configuration screen, you can configure Administration
Server, Managed Servers, Clusters, and Machines, Deployments and Services,
JMS File Store, and RDBMS Security Store. Select the relevant check boxes and
click Next.
■Optional: Configure Administration Server, as required.
■Optional: Configure Managed Servers, as required.
■Optional: Configure Clusters, as required.
For more information about configuring clusters for Oracle Identity and
Access Management products, see the "Configuring High Availability for
Identity Management Components" topic in the guide Oracle Fusion
Middleware High Availability Guide.
■Optional: Assign Managed Servers to Clusters, as required.
Note: When you select the Oracle Access Manager with Database
Policy Store - 11.1.1.4.0 [Oracle_IDM2] option, the Oracle JRF -
11.1.1.0 [oracle_common] option is also selected, by default.
Note: When you select the Oracle Identity Manager - 11.1.1.3.0
[Oracle_IDM2] option, the following options are also selected, by
default: Oracle SOA Suite - 11.1.1.0 [Oracle_SOA1], Oracle
Enterprise Manager - 11.1.1.0 [oracle_common], and Oracle WSM
Policy Manager - 11.1.1.0 [oracle_common].

OAM, OAAM, and OIN in a New WebLogic Domain
OAM and OAAM Joint Domain Configuration Scenarios 19-5
■Optional: Configure Machines, as needed. This step is useful when you want
to run the Administration Server on one machine and Managed Servers on
another physical machine.
■Optional: Assign the Administration Server to a machine.
■Optional: Select Deployments, such as applications and libraries, and Services
to target them to a particular cluster or server.
■Optional: Configure JMS File Store, as required.
■Optional: Configure RDBMS Security Store, as required.
12. On the Configuration Summary screen, review the domain configuration, and
click Create to start creating the domain.
A new WebLogic domain to support Oracle Identity Manager, Oracle Access
Manager, and Oracle Identity Navigator is created in the <MW_HOME>\user_
projects\domains directory (on Windows). On UNIX, the domain is created in
the <MW_HOME>/user_projects/domains directory.
13. Start the Oracle Identity Manager Configuration Wizard, as described in Starting
the Oracle Identity Manager 11g Configuration Wizard.
14. Configure Oracle Identity Manager Server, as described in Configuring OIM
Server.
15. Follow the wizard and the steps described in Configuring OIM Server to complete
the Oracle Identity Manager Server configuration. Similarly, follow the wizard to
configure Oracle Identity Manager Design Console (Windows only) and to
configure Oracle Identity Manager Remote Server, as described in Configuring
OIM Design Console, and Configuring OIM Remote Manager.
19.5 OAM, OAAM, and OIN in a New WebLogic Domain
This topic describes how to configure Oracle Access Manager (OAM), Oracle Adaptive
Access Manager (OAAM), and Oracle Identity Navigator (OIN) together in a new
WebLogic administration domain. It includes the following sections:
■Appropriate Deployment Environment
■Components Deployed
■Dependencies
■Procedure
19.5.1 Appropriate Deployment Environment
Perform the configuration in this topic if you want to install Oracle Access Manager,
Oracle Access Manager, and Oracle Identity Navigator together in an environment.
19.5.2 Components Deployed
Performing the installation and configuration in this section deploys the following:
■Administration Server
Tip: Before configuring a machine, use the ping command to verify
whether the machine or host name is accessible.

OAM, OAAM, and OIN in a New WebLogic Domain
19-6 Oracle Fusion Middleware Installation Guide for Oracle Identity Management
■Managed Servers for Oracle Access Manager and Oracle Adaptive Access
Manager
■Oracle Access Manager Console, Oracle Adaptive Access Manager Console, and
Oracle Identity Navigator application on the Administration Server
19.5.3 Dependencies
The installation and configuration in this section depends on the following:
■Oracle WebLogic Server.
■Complete installation of the Oracle Identity and Access Management 11g software.
■Database schemas for Oracle Access Manager and Oracle Adaptive Access
Manager. For more information about schemas specific to Oracle Adaptive Access
Manager and Oracle Access Manager, see Creating Database Schema Using the
Oracle Fusion Middleware Repository Creation Utility (RCU).
19.5.4 Procedure
Perform the following steps to install and configure Oracle Access Manager, Oracle
Adaptive Access Manager, and Oracle Identity Navigator in a new WebLogic
administration domain:
1. Ensure that all the prerequisites, listed in Prerequisites, are satisfied. In addition,
see Important Notes Before You Begin.
2. Run the <Oracle_IDM2>/common/bin/config.sh script. (<Oracle_
IDM2>\common\bin\config.cmd on Windows). The Oracle Fusion
Middleware Configuration Wizard appears.
3. On the Welcome screen, select the Create a new WebLogic domain option. Click
Next. The Select Domain Source screen is displayed.
4. On the Select Domain Source screen, select the Generate a domain configured
automatically to support the following products: option.
5. Select the following domain configuration options:
■Oracle Access Manager with Database Policy Store - 11.1.1.4.0 [Oracle_
IDM2]
■Oracle Identity Navigator - 11.1.1.3.0 [Oracle_IDM2]
■Oracle Adaptive Access Manager Admin Server - 11.1.1.3.0 [Oracle_IDM2],
which is mandatory.
and
Optionally, Oracle Adaptive Access Manager - Server - 11.1.1.3.0 [Oracle_
IDM2]
Note: When you select the Oracle Access Manager with Database
Policy Store - 11.1.1.4.0 [Oracle_IDM2] option, the Oracle JRF -
11.1.1.0 [oracle_common] option is also selected, by default.

OAM, OAAM, and OIN in a New WebLogic Domain
OAM and OAAM Joint Domain Configuration Scenarios 19-7
6. After selecting the domain configuration options, click Next. The Specify Domain
Name and Location screen is displayed.
7. On the Specify Domain Name and Location screen, enter a name and location for
the domain to be created. Click Next. The Configure Administrator User Name
and Password screen is displayed.
8. Configure a user name and a password for the administrator. The default user
name is weblogic. Click Next. The Configure Server Start Mode and JDK screen is
displayed.
9. Choose JRockit SDK 1.6.0_24 and Production Mode in the Configure Server
Start Mode and JDK screen of the Oracle Fusion Middleware Configuration
Wizard. Click Next. The Configure JDBC Data Sources Screen is displayed.
Configure the oamDS data source, as required. After the test succeeds, the
Configure JDBC Component Schema screen is displayed.
10. On the Configure JDBC Component Schema screen, select a component schema,
such as the OAAM Admin Server Schema, the OAAM Admin MDS Schema, that
you want to modify.
You can set values for Schema Owner, Schema Password, Database and Service,
Host Name, and Port. Click Next. The Test JDBC Component Schema screen
appears. After the test succeeds, the Select Optional Configuration screen appears.
11. On the Select Optional Configuration screen, you can configure Administration
Server, Managed Servers, Clusters, and Machines, Deployments and Services,
and RDBMS Security Store. Select the relevant check boxes and click Next.
■Optional: Configure Administration Server, as required.
■Optional: Configure Managed Servers, as required.
■Optional: Configure Clusters, as required.
For more information about configuring clusters for Oracle Identity and
Access Management products, see the "Configuring High Availability for
Identity Management Components" topic in the guide Oracle Fusion
Middleware High Availability Guide.
■Optional: Assign Managed Servers to Clusters, as required.
■Optional: Configure Machines, as needed. This step is useful when you want
to run the Administration Server on one machine and Managed Servers on
another physical machine.
■Optional: Assign the Administration Server to a machine.
Note: When you select the Oracle Adaptive Access Manager -
Server - 11.1.1.30 [Oracle_IDM2] option, the Oracle WSM Policy
Manager - 11.1.1.0 [oracle_common] option is also selected, by
default.
When you select the Oracle Adaptive Access Manager Admin Server
- 11.1.1.3.0 [Oracle_IDM2} option, the Oracle Identity Navigator -
11.1.1.3.0 [Oracle_IDM2] option is also selected, by default.
Tip: Before configuring a machine, use the ping command to verify
whether the machine or host name is accessible.

Starting the Servers
19-8 Oracle Fusion Middleware Installation Guide for Oracle Identity Management
■Optional: Select Deployments, such as applications and libraries, and Services
to target them to a particular cluster or server.
■Optional: Configure RDBMS Security Store, as required.
12. On the Configuration Summary screen, review the domain configuration, and
click Create to start creating the domain.
A new WebLogic domain to support Oracle Adaptive Access Manager, Oracle Access
Manager, and Oracle Identity Navigator is created in the <MW_HOME>\user_
projects\domains directory (on Windows). On UNIX, the domain is created in the
<MW_HOME>/user_projects/domains directory.
19.6 Starting the Servers
After installing and configuring Oracle Access Manager and Oracle Adaptive Access
Manager, you must run the Oracle WebLogic Administration Server and various
Managed Servers, as described in Starting or Stopping the Oracle Stack.
19.7 Getting Started with OAM After Installation
After installing Oracle Access Manager (OAM), refer to the "Getting Started with
Administering Oracle Access Manager" chapter in the Oracle Fusion Middleware
Administrator's Guide for Oracle Access Manager.
19.8 Getting Started with OAAM After Installation
After installing Oracle Adaptive Access Manager (OAAM), refer to the Oracle Fusion
Middleware Administrator's Guide for Oracle Adaptive Access Manager.

20
Installing and Configuring Oracle Entitlements Server 20-1
20Installing and Configuring Oracle
Entitlements Server
This chapter describes how to install and configure Oracle Entitlements Server 11g
Release 1 (11.1.1).
It discusses the following topics:
■Overview of Oracle Entitlements Server 11g Installation
■Installing Oracle Entitlements Server Administration Server
■Configuring Oracle Entitlements Server Administration Server
■Installing Oracle Entitlements Server Client
■Configuring Oracle Entitlements Server Client
■Getting Started with Oracle Entitlements Server After Installation
20.1 Overview of Oracle Entitlements Server 11g Installation
Oracle Entitlements Server, formerly AquaLogic Enterprise Security, is a fine-grained
authorization and entitlement management solution that can be used to precisely
control the protection of application resources. It simplifies and centralizes security for
enterprise applications and SOA by providing comprehensive, reusable, and fully
auditable authorization policies and a simple, easy-to-use administration model. For
more information, see "Introducing Oracle Entitlements Server" in the Oracle Fusion
Middleware Administrator's Guide for Oracle Entitlements Server.
Oracle Entitlements Server 11g includes two distinct components:
■Oracle Entitlements Server Administration Server (Authorization Policy Manager)
■OES Client (Security Module)
Oracle Entitlements Server Administration Server (Authorization Policy
Manager)
This component is included in the Oracle Identity and Access Management 11g
Release 1 (11.1.1.5.0) installation and requires Oracle WebLogic Server that creates the
Middleware Home directory.
OES Client (Security Module)
This component has its own installer and it is not included in the Oracle Identity and
Access Management 11g Release 1 (11.1.1.5.0) installation. The OES Client does not
require Oracle WebLogic Server.

Installing Oracle Entitlements Server Administration Server
20-2 Oracle Fusion Middleware Installation Guide for Oracle Identity Management
20.2 Installing Oracle Entitlements Server Administration Server
This section contains the following topics:
■Prerequisites
■Procedure
20.2.1 Prerequisites
The following are the prerequisites for installing Oracle Entitlements Server 11g
Release 1 (11.1.1):
■Oracle WebLogic Server 11g Release 1 (10.3.5)
■One of the following database for the Oracle Entitlements Server policy store:
–Oracle Database
–Apache Derby, an evaluation database included in your Oracle WebLogic
Server installation
20.2.2 Procedure
Installing Oracle Entitlements Server 11g Administration Server involves the following
steps:
■System Requirements and Certification
■Obtaining the Oracle Fusion Middleware Software
■Installing Oracle WebLogic Server and Creating the Oracle Middleware Home
■Installing Oracle Database (Recommended)
■Creating a Schema for Oracle Entitlement Server
■Editing the weblogic.policy file
■Starting the Installer
■Installation Screens and Instructions
■Verifying Oracle Entitlements Server Installation
20.2.2.1 System Requirements and Certification
For more information, see Reviewing System Requirements and Certification.
20.2.2.2 Obtaining the Oracle Fusion Middleware Software
For installing Oracle Entitlements Server Administration Server, you must obtain the
following software:
■Oracle WebLogic Server
■Oracle Database (Recommended)
■Oracle Repository Creation Utility
■Oracle Identity and Access Management Suite
For more information on obtaining Oracle Fusion Middleware 11g software, see Oracle
Fusion Middleware Download, Installation, and Configuration ReadMe.

Installing Oracle Entitlements Server Administration Server
Installing and Configuring Oracle Entitlements Server 20-3
20.2.2.3 Installing Oracle WebLogic Server and Creating the Oracle Middleware
Home
Before you can install Oracle Identity and Access Management 11g Release 1 (11.1.1)
components, you must install Oracle WebLogic Server and create the Oracle
Middleware Home directory.
For more information, see "Install Oracle WebLogic Server" in Oracle Fusion Middleware
Installation Planning Guide.
In addition, see Oracle Fusion Middleware Installation Guide for Oracle WebLogic Server for
complete information about installing Oracle WebLogic Server.
20.2.2.4 Installing Oracle Database (Recommended)
For more information, see Installing Oracle Database.
20.2.2.5 Creating a Schema for Oracle Entitlement Server
Depending on the policy store you choose for Oracle Entitlements Server, complete
one of the following:
■Using Oracle Database for Oracle Entitlement Server Policy Store
■Using Apache Derby for Oracle Entitlement Server Policy Store
Using Oracle Database for Oracle Entitlement Server Policy Store
If you are using Oracle Database for Oracle Entitlements Server policy store, then
create an OES schema and an MDS schema by using the Oracle Fusion Middleware
Repository Creation Utility (RCU). Refer to Creating Database Schema Using the
Oracle Fusion Middleware Repository Creation Utility (RCU) for more information
about creating schemas.
Using Apache Derby for Oracle Entitlement Server Policy Store
If you are using Apache Derby for Oracle Entitlements Server policy store, then you
must complete the following:
1. Open setNetworkServerCP (Located at wlserver_
10.3/common/derby/bin on UNIX) or setNetworkServerCP.bat (Located
at wlserver_10.3\common\derby\bin on Windows) in a text editor and
specify the DERBY_HOME as shown in the following example:
DERBY_HOME="Oracle/Middleware/wlserver_10.3/common/derby"
2. Start the Apache Derby database by running the following commands:
■setNetworkServerCP (UNIX) or setNetworkServerCP.bat (Windows).
■startNetworkServer (Located at wlserver_10.3/common/derby/bin
on UNIX) or startNetworkServer.bat (Located at wlserver_
10.3\common\derby\bin on Windows).
Note: Oracle Entitlements Server also supports Apache Derby
10.5.3.0, an evaluation database included in your Oracle WebLogic
Server installation.
Note: When you create a schema, be sure to remember the schema
owner and password that is shown in RCU.

Installing Oracle Entitlements Server Administration Server
20-4 Oracle Fusion Middleware Installation Guide for Oracle Identity Management
You can also run startDerby.sh (Located at wlserver_10.3/common/bin)
or startDerby.cmd (Located at wlserver_10.3\common\bin) to start the
Apache Derby database. The Apache Derby database also starts automatically
when you start Oracle WebLogic Server.
3. Test the network server connection, by running ij(Located at wlserver_
10.3/common/derby/bin on UNIX) or ij.bat (Located at wlserver_
10.3\common\derby\bin on Windows) as follows:
bin/ij
4. Connect to the Apache Derby Server, as shown in the following example:
ij> connect 'jdbc:derby://127.0.0.1:1527/data/oesdb;create=true';
oesdb is the name of database and data is the relative path (based on the
directory where you start the server. In this example, it is
Oracle/Middleware/wlserver_10.3/common/derby/bin where the
database files will be saved.
5. Open opss_user.sql (Located at RCU_
HOME/rcu/integration/apm/sql/derby) in a text editor and replace &&1
with the schema user name.
Repeat the above steps for the following SQL files (Located at RCU_
HOME/rcu/integration/apm/sql/derby):
■opss_tables.sql
■opss_version.sql
■opss_gencatalog.sql
6. Run the following SQL files (Located at RCU_
HOME/rcu/integration/apm/sql/derby) in the ij console:
■run’opss_user.sql’;
■run’opss_tables.sql’;
■run’opss_version.sql’;
■run’opss_gencatalog.sql’;
20.2.2.6 Starting the Installer
This topic explains the steps that are common to starting most Oracle Identity and
Access Management installations and configurations. It begins with starting the
Installer and ends after you complete the steps on the Prerequisites Check screen.
Note: This is the schema name you will specify when you configure
the Oracle Entitlements Server described in Configuring Oracle
Entitlements Server Administration Server.
Note: Ensure that you run the SQL files in the same order listed
above and make a note of the schema owner and password that you
have created.
Note: Starting the Installer as the root user is not supported.

Installing Oracle Entitlements Server Administration Server
Installing and Configuring Oracle Entitlements Server 20-5
Perform the following steps to start an Oracle Identity and Access Management
installation:
1. Download the contents of the ofm_iam_generic_11.1.1.5.0_disk1_
1of1.zip file to a directory. By default, this directory is named ofm_iam_
generic_11.1.1.5.0_disk1_1of1.
2. Change your present working directory to ofm_iam_generic_11.1.1.5.0_
disk1_1of1/Disk1 directory under the ofm_iam_generic_11.1.1.5.0_
disk1_1of1 folder.
3. Start the Installer by executing one of the following commands:
UNIX: <full path to the runInstaller directory>/runInstaller
-jreLoc <Middleware Home>/jdk160_24/jre
Windows: <full path to the setup.exe directory>\ setup.exe
-jreLoc <Middleware Home>\jdk160_24\jre
20.2.2.7 Installation Screens and Instructions
Follow the instructions in Table 20–1 to install Oracle Entitlements Server.
If you need additional help with any of the installation screens, click Help to access the
online help.
Note: Oracle Entitlements Server Administration is a part of the
Oracle Identity and Access Management Suite.
Note: The installer prompts you to enter the absolute path of the JDK
that is installed on your system. When you install Oracle WebLogic
Server, the jdk160_24 directory is created under your Middleware
Home. You must enter the absolute path of the JRE folder located in
this JDK when launching the installer. For example, on Windows, if
the JRE is located in C:\oracle\Middleware\jdk160_24, then
launch the installer from the command prompt as follows:
C:\setup.exe -jreLoc C:\oracle\Middleware\jdk160_
24\jre
You must specify the -jreLoc option on the command line when
using the JDK to avoid installation issues. If this option is not specified
on the command line, then you might get the following error:
InvocationTargetException
Note: IDM_HOME is mentioned in descriptions and procedures
throughout this guide for the Oracle Identity and Access Management
home directory. You can specify any name for your IDM_Home
directory.

Installing Oracle Entitlements Server Administration Server
20-6 Oracle Fusion Middleware Installation Guide for Oracle Identity Management
Table 20–1 Installation Flow for the Oracle Entitlements Server
No. Screen Description and Action Required
1Welcome Click Next to continue.
2Install Software Updates Select one of the following and then click Next:
■Skip Software Updates: Select this option to skip this screen.
The installer will not check for updates that might be applicable
to the current product installation.
■Search My Oracle Support for Updates: If you have a My
Oracle Support account, then select this option to have the
installer automatically search My Oracle Support for software
updates that apply to the software products are about to install.
Enter your My Oracle Support account name and password, and
then click Search for Updates.
The installer automatically downloads applicable software
updates from My Oracle Support.
Before you search for update, you can test your login credentials
and the connection to My Oracle Support by clicking Te st
Connection. Click Proxy Settings to configure a proxy server if
one is required.
■Search Local Directory for Updates: Select this option if you
already downloaded the latest software updates and you want
the installer to search a local directory for updates applicable to
the products you are about to install.
When you select this option, the installer displays an additional
field and Browse button that you can use to identify the local
directory where your updates are located.
3Prerequisite Checks If all prerequisite checks pass inspection, then click Next to continue.
Note: You can ignore warnings about missing Operating System
Packages. If you using this product for evaluation purpose, then
ignore the warning about Kernel Parameter.
4Specify Installation Location In the Oracle Middleware Home field, enter the path to the Oracle
Middleware Home installed on your system. Ensure that Oracle
WebLogic Server is already installed on the system in the same
Middleware Home as described in Installing Oracle WebLogic Server
and Creating the Oracle Middleware Home. This directory is the
same as the Oracle Home created in the Oracle WebLogic Server
installation.
In the Oracle Home Directory field, enter a name for the Oracle
Home folder that will be created under your Middleware Home. This
directory is also referred to as IDM_HOME.
Click Next to continue.

Configuring Oracle Entitlements Server Administration Server
Installing and Configuring Oracle Entitlements Server 20-7
20.2.2.8 Verifying Oracle Entitlements Server Installation
To verify that your Oracle Entitlements Server Administration Server install was
successful, go to your Oracle Middleware Home directory associated with the Oracle
Identity and Access Management 11g Release 1 (11.1.1.5.0) installation and verify that
the OES folder is created under IDM_HOME.
20.3 Configuring Oracle Entitlements Server Administration Server
This topic describes how to configure Oracle Entitlements Server in a new WebLogic
domain. It includes the following sections:
■Components Deployed
■Prerequisites
■Procedure
■Starting the Administration Server
■Post-Configuration
■Verifying Oracle Entitlements Server Configuration
20.3.1 Components Deployed
Performing the configuration in this section deploys the following:
■WebLogic Administration Server
■Oracle Entitlements Server application on the Administration Server
20.3.2 Prerequisites
The following are the prerequisites for configuring Oracle Entitlements Server 11g
Release 1 (11.1.1):
■Installing Oracle Entitlements Server
■Editing the weblogic.policy file
5Installation Summary The Summary Page screen displays a summary of the choices that
you made. Review this summary and decide whether to start the
installation. If you want to modify any of the configuration settings
at this stage, select a topic in the left navigation page and modify
your choices. To continue installing Oracle Identity and Access
Management, click Install.
6Installation Progress If you are installing on a UNIX system, you may be asked to run the
ORACLE_HOME/oracleRoot.sh script to set up the proper file and
directory permissions.
Click Next to continue.
7Installation Complete Click Finish to dismiss the installer.
This installation process copies the Oracle Identity and Access
Management software to your system and creates an IDM_Home
directory under your Middleware Home. You must proceed to create
a WebLogic Domain, by running the Oracle Fusion Middleware
Configuration Wizard. In addition, you must configure the
Administration Server settings while creating the domain.
Table 20–1 (Cont.) Installation Flow for the Oracle Entitlements Server
No. Screen Description and Action Required

Configuring Oracle Entitlements Server Administration Server
20-8 Oracle Fusion Middleware Installation Guide for Oracle Identity Management
■Extracting Apache Derby Template (Optional)
20.3.2.1 Installing Oracle Entitlements Server
You must install Oracle Entitlements Server Administration Server as described in
Installing Oracle Entitlements Server Administration Server.
20.3.2.2 Editing the weblogic.policy file
To edit the weblogic.policy file, run the following command:
IDM_HOME/common/bin/wlst.sh IDM_HOME/oes/modifygrants.py
20.3.2.3 Extracting Apache Derby Template (Optional)
If you are using Apache Derby, then you must extract the oracle.apm_
11.1.1.3.0_template_derby.zip file (Located at IDM_
HOME/common/templates/applications) and save oracle.apm_11.1.1.3.0_
template_derby.jar file to the following location:
IDM_HOME\common\templates\applications
20.3.3 Procedure
Perform the following steps to configure Oracle Entitlements Server in a new
WebLogic domain:
1. Run the IDM_HOME/common/bin/config.sh script on UNIX or IDM_
HOME\common\bin\config.cmd on Windows.
The Fusion Middleware Configuration Wizard appears.
2. On the Welcome screen, select the Create a new WebLogic domain option. Click
Next.
The Select Domain Source screen appears.
Note: The above command will only work if use the default policy
name, weblogic.policy file. If you change the default name for the
policy file, then you must open the file in a text editor and add the
following lines, as shown in the example:
grant codeBase "file:${idm.opss.oracle.home}/modules/oracle.jps_
${jrf.version}/*" {
permission java.security.AllPermission;
};
grant codeBase "file:${idm.opss.oracle.home}/oes/*" {
permission java.security.AllPermission;
};
grant codeBase "file:${oes.client.home}/-" {
permission java.security.AllPermission;
};
Note: You must have a dedicated Oracle WebLogic Server domain
for Oracle Entitlements Server. Do not configure any other Oracle
Identity and Access Management components in this domain.

Configuring Oracle Entitlements Server Administration Server
Installing and Configuring Oracle Entitlements Server 20-9
3. On the Select Domain Source screen, ensure that the Generate a domain
configured automatically to support the following products: option is selected.
Select the Oracle Entitlements Server - 11.1.1.0 [Oracle_IDM1] option, and click
Next.
The Specify Domain Name and Location screen appears.
4. Enter a name and a location for the domain to be created, and click Next.
The Configure Administrator User Name and Password screen appears.
5. Enter a user name and a password for the administrator. The default user name is
weblogic. Click Next.
The Configure Server Start Mode and JDK screen appears.
6. Choose a JDK from the Available JDKs and then select a WebLogic Domain
Startup Mode. Click Next.
The Configure JDBC Component Schema screen is displayed.
7. On the Configure JDBC Component Schema screen, select the Oracle Entitlements
Server schema and the MDS Schema, then specify the Schema Owner, Schema
Password, Database and Service, Host Name, and Port. Click Next.
The Test JDBC Component Schema screen appears.
8. Select the component schema you want to test, and click Test Connecti o n s . After
the test succeeds, click Next.
The Select Optional Configuration screen appears.
9. On the Select Optional Configuration screen, you can configure the
Administration Server, Managed Servers, Clusters, Machines, Deployments and
Services, and RDBMS Security Store. Select the relevant check boxes, and click
Next.
Notes:
■When you select the Oracle Entitlements Server - 11.1.1.0 [Oracle_
IDM1] option, the Oracle JRF 11.1.1.0 [Oracle_Common] option is
also selected, by default.
■If you using Apache Derby, then select the Oracle Entitlements
Server Derby template.
Note: When you enter the user name and the password for the
administrator, be sure to remember them.
Note: Ensure that the JDK version you select is Java SE 6 Update 24
or higher.
Note: You get the Schema information from the steps you completed
in Section 20.2.2.5, "Creating a Schema for Oracle Entitlement Server".

Configuring Oracle Entitlements Server Administration Server
20-10 Oracle Fusion Middleware Installation Guide for Oracle Identity Management
10. On the Configuration Summary screen, review the domain configuration, and
click Create to start creating the domain.
A new WebLogic domain to support Oracle Entitlements Server is created in the <MW_
HOME>\user_projects\domains directory (on Windows). On UNIX, the domain is
created in the <MW_HOME>/user_projects/domains directory.
20.3.4 Starting the Administration Server
You must start the Administration Server by running the following command on the
command line:
Windows
MW_HOME\user_projects\domains\domain_name\bin\startWebLogic.cmd
UNIX
MW_HOME/user_projects/domains/domain_name/bin/startWebLogic.sh
20.3.5 Post-Configuration
To complete the configuration, run the following command in the command line:
1. Run wlst.sh (located at IDM_HOME/common/bin).
2. Connect to your Administration Server using the following command:
connect('weblogic-username', 'weblogic-password','t3://host:port')
3. Run the following WLST(online) command depending on your policy store:
Oracle Database
configureOESAdminServer(servertype="DB_ORACLE");
Note: This step is optional.
Note: Ensure that your Administration Server is up and running.
Table 20–2 WLST Command Oracle Database
Argument Definition
domain Name of the Oracle Entitlements Server domain. The default
value is oes_domain.
jpsroot Specifies the root node in the target repository under which all
data is migrated. The default value is cn=jpsroot.
datasourcename Name of the data source. The default value is jdbc/APMDBDS.
servertype Name of the target database server. Enter DB_ORACLE.

Configuring Oracle Entitlements Server Administration Server
Installing and Configuring Oracle Entitlements Server 20-11
Apache Derby
configureOESAdminServer(servertype="DB_DERBY");
For more information about WLST command, see Oracle Fusion Middleware Oracle
WebLogic Scripting Tool and Oracle Fusion Middleware WebLogic Scripting Tool
Command Reference.
4. Restart the Oracle Entitlements Server Administration Server as described in
Restarting Servers.
20.3.6 Verifying Oracle Entitlements Server Configuration
To verify that your Oracle Entitlements Server Administration Server configuration
was successful, use the following URL to log in to the Oracle Entitlements Server
Administration Console:
http://hostname:port/apm/
Where hostname is the DNS name or IP address of the Administration Server and
port is the address of the port on which the Administration Server listens for
requests.
For more information, see the section "Logging In to and Signing Out of the User
Interface" in the Oracle Fusion Middleware Administrator's Guide for Oracle Entitlements
Server.
Note: You can enter domain, jpsroot, and datasourcename
arguments on the command line if you want to change the default
values. For example, configureOESAdminServer(domain="oes_
domain", servertype="DB_ORACLE",
jpsroot="cn=jpsroot", datasourcename="jdbc/APMDBDS")
Table 20–3 WLST Command Apache Derby
Argument Definition
domain Name of the Oracle Entitlements Server domain. The default
value is oes_domain.
jpsroot Specifies the root node in the target repository under which all
data is migrated. The default value is cn=jpsroot.
datasourcename Name of the data source. The default value is jdbc/APMDBDS.
servertype Name of the target database server. Enter DB_DERBY.
Note: You can enter domain, jpsroot, and datasourcename
arguments in the command line, if you want to change the default
values. For example,
configureOESAdminServer(domain="farm",
servertype="DB_DERBY", jpsroot="cn=root",
datasourcename="jdbc/APMDBDS");.

Installing Oracle Entitlements Server Client
20-12 Oracle Fusion Middleware Installation Guide for Oracle Identity Management
20.4 Installing Oracle Entitlements Server Client
This section contains the following topic:
■Prerequisites
■Obtaining Oracle Entitlements Server Client Software
■Installing Oracle Entitlements Server Client
■Verifying Oracle Entitlements Server Client Installation
20.4.1 Prerequisites
You must install and configure Oracle Entitlements Server Administration Server, as
described in Installing Oracle Entitlements Server Administration Server and
Configuring Oracle Entitlements Server Administration Server.
20.4.2 Obtaining Oracle Entitlements Server Client Software
For more information on obtaining OES Client 11g software, see Oracle Fusion
Middleware Download, Installation, and Configuration ReadMe.
20.4.3 Installing Oracle Entitlements Server Client
To install Oracle Entitlements Server 11g Release 1 (11.1.1.5.0) installation, extract the
content of oesclient.zip to your local directory and then run setup.exe (for
Windows) or./runInstaller (for UNIX) from the Disk1 directory.
Follow the instructions in Table 20–4 to install OES Client.
If you need additional help with any of the installation screens, click Help to access the
online help.
Note: The installer prompts you to enter the absolute path of the JDK
that is installed on your system. When you install Oracle WebLogic
Server, the jdk160_24 directory is created under your Middleware
Home. You must enter the absolute path of the JRE folder located in
this JDK when launching the installer. For example, on Windows, if
the JRE is located in C:\oracle\Middleware\jdk160_24, then
launch the installer from the command prompt as follows:
C:\setup.exe -jreLoc C:\oracle\Middleware\jdk160_
24\jre
You must specify the -jreLoc option on the command line when
using the JDK to avoid installation issues.

Configuring Oracle Entitlements Server Client
Installing and Configuring Oracle Entitlements Server 20-13
20.4.4 Verifying Oracle Entitlements Server Client Installation
To verify that your OES Client install was successful, go to your Oracle Home
directory which you specified during installation and verify that the OES Client
installation files are created.
20.5 Configuring Oracle Entitlements Server Client
OES Client distributes policies to individual Security Modules that protect
applications and services. Policy data is distributed in a controlled manner or in a
non-controlled manner. The distribution mode is defined in the jps-config.xml
configuration file for each Security Module. The specified distribution mode is
applicable for all Application Policy objects bound to that Security Module.
This section describes how to configure the following:
■Configuring Security Modules in a Controlled Mode (Quick Configuration)
Table 20–4 Installation Flow for the OES Client
No. Screen Description and Action Required
1Welcome Click Next to continue.
2 Prerequisite Checks If all prerequisite checks pass inspection, then click Next to continue.
3 Specify Installation Location In the Oracle Home Directory field, enter the directory where you
want to save the OES client installation to. This directory is also
referred to as OES_Client_Home in this book.
Oracle Entitlements Server Client does not require a Middleware
Home with the Oracle WebLogic Server installed.
Oracle recommends that you save the OES client installation in a
separate directory in the same Middleware Home where the Oracle
Entitlements Server Administration server is installed. For example,
MW_HOME/Oracle_OESClient.
Click Next to continue.
4 Installation Summary The Installation Summary Page screen displays a summary of the
choices that you made. Review this summary and decide whether to
start the installation. If you want to modify any of the configuration
settings at this stage, select a topic in the left navigation page and
modify your choices. To continue installing OES Client Management,
click Install.
5 Installation Progress If you are installing on a UNIX system, you may be asked to run the
ORACLE_HOME/oracleRoot.sh script to set up the proper file and
directory permissions.
Click Next to continue.
8 Installation Complete Click Finish to dismiss the installer.
This installation process copies the Identity Management software to
your system and creates an IDM_Home directory under your
Middleware Home. You must proceed to create a WebLogic Domain,
by running the Oracle Fusion Middleware Configuration Wizard. In
addition, you must configure the Administration Server settings
while creating the domain.
Note: Oracle recommends that you to configure OES Client in the
controlled distribution mode.

Configuring Oracle Entitlements Server Client
20-14 Oracle Fusion Middleware Installation Guide for Oracle Identity Management
■Configuring Distribution Modes
■Configuring Security Module
■Creating the OES Client Domain
■Locating Security Module Instances
■Using the Java Security Module
20.5.1 Configuring Security Modules in a Controlled Mode (Quick Configuration)
These section describes how to configure the Security Module quickly using
pre-existing smconfig.prp files.
■Configuring Java Security Module in a Controlled Mode
■Configuring RMI Security Module in a Controlled Mode
■Configuring Web Service Security Module in a Controlled Mode
■Configuring Oracle WebLogic Server Security Module in a Controlled Mode
20.5.1.1 Configuring Java Security Module in a Controlled Mode
To configure Java Security Module instance in a controlled distribution mode, do the
following:
1. Open smconfig.java.controlled.prp file (Located at, OES_CLIENT_
HOME/oessm/SMConfigTool) in a text editor, and then specify the parameters
described in Table 20–5.
2. Run the config.sh (Located at OES_CLIENT_HOME/oessm/bin on UNIX) or
config.cmd (Located at OES_CLIENT_HOME\oessm\bin on Windows) as follows:
config.sh –smConfigId <SM_NAME> -prpFileName OES_CLIENT_
HOME/oessm/SMConfigTool/smconfig.java.controlled.prp
3. When prompted, specify the following:
■Oracle Entitlements Server user name (This is the Administration Server’s user
name).
■Oracle Entitlements Server password (This is the Administration Server’s
password)
■New key store password for enrollment
20.5.1.2 Configuring RMI Security Module in a Controlled Mode
To configure RMI Security Module instance in a controlled distribution mode, then do
the following:
1. Open smconfig.rmi.controlled.prp file (Located at OES_CLIENT_
HOME/oessm/SMConfigTool) in a text editor, and then specify the parameters
described in Table 20–5.
2. Run the config.sh (Located at OES_CLIENT_HOME/oessm/bin on UNIX) or
config.cmd (Located at OES_CLIENT_HOME\oessm\bin on Windows) as
follows:
config.sh –smConfigId <SM_NAME> -RMIListeningPort <RMISM_PORT> -prpFileName
OES_CLIENT_HOME/oessm/SMConfigTool/smconfig.rmi.controlled.prp
3. When prompted, specify the following:

Configuring Oracle Entitlements Server Client
Installing and Configuring Oracle Entitlements Server 20-15
■Oracle Entitlements Server user name (This is the Administration Server’s user
name)
■Oracle Entitlements Server Password (This is the Administration Server’s
password)
■New key store password for enrollment
20.5.1.3 Configuring Web Service Security Module in a Controlled Mode
To configure Webservice Security Module instance in a controlled distribution mode,
do the following:
1. Open smconfig.ws.controlled.prp file (Located at OES_CLIENT_
HOME/oessm/SMConfigTool) in a text editor, and then specify the parameters
described in Table 20–5.
2. Run the config.sh (Located at OES_CLIENT_HOME/oessm/bin on UNIX) or
config.cmd (Located at OES_CLIENT_HOME\oessm\bin on Windows) as
follows:
config.sh –smConfigId <SM_NAME> -WSListeningPort <WSSM_PORT> -prpFileName OES_
CLIENT_HOME/oessm/SMConfigTool/smconfig.ws.controlled.prp
3. When prompted, specify the following:
■Oracle Entitlements Server user name (This is the Administration Server’s user
name)
■Oracle Entitlements Server password (This is the Administration Server’s
password)
■Key store password for enrollment
20.5.1.4 Configuring Oracle WebLogic Server Security Module in a Controlled
Mode
To configure Oracle WebLogic Server Security Module instance in a controlled
distribution mode, do the following:
1. Open smconfig.wls.controlled.prp file (Located at OES_CLIENT_
HOME/oessm/SMConfigTool) in a text editor, and then specify the parameters
described in Table 20–5.
2. Run the config.sh (Located at OES_CLIENT_HOME/oessm/bin on UNIX) or
config.cmd (Located at OES_CLIENT_HOME\oessm\bin for Windows) as
follows:
config.sh –smConfigId <SM_NAME> -prpFileName $OES_CLIENT_
HOME/oessm/SMConfigTool/smconfig.wls.controlled.prp –serverLocation <Location
of Web Logic Server Home
3. Create a OES Client, as described in Section 20.5.4, "Creating the OES Client
Domain".
20.5.2 Configuring Distribution Modes
For more information about distribution modes, see the section "Defining Distribution
Modes" in the Oracle Fusion Middleware Developer's Guide for Oracle Entitlements Server.
The following sections explains how to configure distribution modes.
■Configuring Controlled Distribution

Configuring Oracle Entitlements Server Client
20-16 Oracle Fusion Middleware Installation Guide for Oracle Identity Management
■Configuring Non-Controlled and Controlled Pull Distribution Mode
20.5.2.1 Configuring Controlled Distribution
To configure a controlled Distribution mode, open the smconfig.prp file (Located at
OES_CLIENT_HOME/oessm/bin/SMConfigTool) in a text editor, and edit the
following parameters described in Table 20–5.
20.5.2.2 Configuring Non-Controlled and Controlled Pull Distribution Mode
Open the smconfig.prp file (Located at OES_CLIENT_
HOME/oessm/bin/SMConfigTool) in a text editor and edit the following
parameters described in Table 20–6.
When prompted, specify the following:
■Oracle Entitlements Server user name (This is the Administration Server’s user
name).
■Oracle Entitlements Server password (This is the Administration Server’s
password)
■New key store password for enrollment
20.5.3 Configuring Security Module
OES Client includes the following Security Modules:
Table 20–5 smconfig.prp File Parameters (Controlled Distribution)
Parameter Description
oracle.security.jps.runti
me.pd.client.policyDistri
butionMode
Accept the default value controlled-push as the
distribution mode.
oracle.security.jps.runti
me.pd.client.Registration
ServerHost
Enter the address of the Oracle Entitlements Server
Administration Server.
oracle.security.jps.runti
me.pd.client.Registration
ServerPort
Enter the SSL port number of the Oracle Entitlements
Server Administration Server. You can find the SSL port
number from the WebLogic Administration console.
Table 20–6 smconfig.prp File Parameters Non- Controlled Distribution
Parameter Description
oracle.security.jps.runt
ime.pd.client.policyDist
ributionMode
Enter non-controlled or controlled-pull as the
distribution mode.
oracle.security.jps.poli
cystore.type
Specify the policy store type. For example, DB for Oracle
Database, OID for Oracle Internet Directory, and Derby for
Apache Derby.
jdbc.url Specify your database policy store JDBC URL.
ldap.url Specify your LDAP URL.
oracle.security.jps.farm
.name
Specify your domain name. The default value is cn=oes_
domain.
oracle.security.jps.ldap
.root.name
Specify the root name of jps context. The default value is
cn=jpsroot.

Configuring Oracle Entitlements Server Client
Installing and Configuring Oracle Entitlements Server 20-17
■Java Security Module
■Multi-Protocol Security Module
■WebLogic Security Module
For more information, see "Understanding the Types of Security Modules" in the
Oracle Fusion Middleware Administrator's Guide for Oracle Entitlements Server.
20.5.3.1 Creating Java Security Module
The Java Security Module is a generic Policy Decision Point that provides
authorization decisions using Java API. This Security Module can be configured on:
■Java Standard Edition (JSE)
■IBM WebSphere
Java Standard Edition (JSE)
To create a Java Security Module instance, you must run the config.sh (Located at
OES_CLIENT_HOME/oessm/bin on UNIX) or config.cmd (Located at OES_
CLIENT_HOME\oessm\bin on Windows) as follows:
config.sh -smType java -smConfigId mySM_Java_Controlled -pdServer <oes_server_
address> -pdPort <oes_server_ssl_port>
In controlled push mode, you will be prompted for the Oracle Entitlements Server
Administration Server username, password, and a new key store password for
enrollment.
In non-controlled and controlled pull modes, you will be prompted for Oracle
Entitlements Server schema username, and Password.
Table 20–7 describes the parameters you specify on the command line.
The Java Security Module Instance is created at OES_CLIENT_HOME/oes_sm_
instances/mySM_java. If you use the default values described in Table 20–7.
Note: If you are using Java Security Module in the proxy mode with
Web Service Security Module or RMI Security Module, then you must
use oes-ws-client.jar or oes-rmi-client.jar and ensure
that you do not use oes-client.jar.
Table 20–7 JSE Security Module Parameters
Parameter
Distributio
n Mode Description
smType All Type of security module instance you want to
create. For example, java.
smConfigId All Name of the security module instance. For
example, mySM_java.
pdServer controll
ed-push
The address of the Oracle Entitlements Server
Administration Server.
pdPort controll
ed-push
The SSL port number of the Oracle Entitlements
Server Administration Server. For example, 7002.

Configuring Oracle Entitlements Server Client
20-18 Oracle Fusion Middleware Installation Guide for Oracle Identity Management
IBM WebSphere
To configure Java Security Module on IBM WebSphere, complete the following steps:
1. Create a new application server using the IBM WebSphere console and name it
OesServer.
2. Start the Oracle Entitlements Server (OesServer) you created for IBM WebSphere.
3. Deploy was-client.war (Located at OES_CLIENT_HOME/oessm/pd) to the
Oracle Entitlements Server you created.
4. Open the smconfig.prp file in a text editor and specify the pd client port and
the pd app client context. The pd client port number is the SSL port number of the
IBM WebSphere application server and pd app client contex is the location where
the was-client.jar is deployed. For example:
oracle.security.jps.pd.was.client.appcontext=pd-client
oracle.security.jps.pd.clientPort=8002
5. Run the config.sh command as follows:
$OES_CLIENT_HOME/oessm/bin/config.sh -smType was -smConfigId mySM_WAS -pdServer
<oes_admin_server> -pdPort <oes_admin_port> -serverNodeName <was_node_name>
-serverName <server_name> -serverLocation WAS_HOME
WAS_HOME is the location of the IBM WebSphere Application Server.
For any distribution mode you choose, you must specify the IBM WebSphere
server user name and password, when prompted.
In controlled push mode, you will be prompted for Oracle Entitlements Server
Administration Server user name, Oracle Entitlements Server Administration
Server password, and a new key store password for enrollment.
In non-controlled and controlled-pull modes, you will be prompted for Oracle
Entitlements Server schema user name and password.
Table 20–8 describes the parameters you specify on the command line.
6. Configure SSL for the IBM WebSphere application server as follows:
a. Import the Oracle WebLogic Server demo trust certificate into IBM
WebSphere node default trust keystore and cell default trust keystore by using
keytool to export WLS demo trust certificate from WLS demo trust keystore
file, or OES trust.jks file into a .der, as shown in the following example:
Table 20–8 IBM WebSphere Security Module Parameter
Parameter
Distribution
Mode Description
smType All Type of security module instance you want to create.
For example, was.
smConfigId All Name of the security module instance. For example,
mySM_WAS.
pdServer controlled-push The address of the Oracle Entitlements Server
Administration Server.
pdPort controlled-push The SSL port number of the Oracle Entitlements Server
Administration Server. For example, 7002.
serverLocati
on
All Location of the IBM WebSphere Server.

Configuring Oracle Entitlements Server Client
Installing and Configuring Oracle Entitlements Server 20-19
keytool -exportcert -keystore $OES_CLIENT_HOME/oessm/enroll/DemoTrust.jks
-alias wlscertgencab -file ~/was.der
b. Import the was.der file into WAS node default trust keystore and cell default
trust keystore. as follows:
–You may find the import in IBM WebSphere Administration Server
console:
security->SSL certificate and key management -> Key stores and certifi-
cates -> <NodeDefaultTrustStore> <CellDefaultTrustStore> (here you
need to choose one name) -> Signer certificates.
–Click Add.
–Enter an alias. For example, WLS.
–Choose the .der file that you exported earlier, and select data type as
DER.
c. Import the issued private key into the IBM WebSphere node default keystore
as follows:
–You may find the import in IBM WebSphere Administration Server
console:
security->SSL certificate and key management -> Key stores and certifi-
cates -> NodeDefaultKeyStore -> Personal certificates.
–Click Import.
–Select Keystore and enter the path to the keystore file (Located at OES_
CLIENT_HOME/oes_sm_instances/mySM_
WAS/security/identity.jks)
–Select JKS as type and enter the password you used to create the keystore
file.
–The certificate alias name is the same name as the hostname.
d. Enable Inbound SSL for the server running IBM WebSphere Security Module
as follows:
–In the IBM WebSphere administration console, go to Security >SSL
certificate and key management -> Manage endpoint security
configurations.
–Expand inbound tree to
get:Inbound->DefaultCell(CellDefaultSSLSettings) -> nodes ->
DefaultCellFederatedNode -> servers -> <server name running IBM
WebSphere Security Module> and select the server.
–In the General Properties page, select Override inherited values.
–From the SSL configuration list, select NodeDefaultSSLSettings.
–Click Update certificate alias list button and then choose the new
imported private key alias in the Certificate alias in key store list.
Note: You must import demo trust certificate into two trust stores
for the WAS ND edition. For the private key, you must import one
keystore.

Configuring Oracle Entitlements Server Client
20-20 Oracle Fusion Middleware Installation Guide for Oracle Identity Management
–Click Apply.
e. Enable Out bound SSL for the server running IBM WebSphere Security
Module, follows:
–In the IBM WebSphere administration console, go to Security >SSL
certificate and key management -> Manage endpoint security
configurations.
–Expand inbound tree to
get:Outbound->DefaultCell(CellDefaultSSLSettings) -> nodes ->
DefaultCellFederatedNode -> servers -> <server name running IBM
WebSphere Security Module> and select the server.
–In the General Properties page, select Override inherited values.
–From the SSL configuration list, select NodeDefaultSSLSettings.
–Click Update certificate alias list and choose the new imported private
key alias in the Certificate alias in key store list.
–Click Apply.
20.5.3.2 Creating Multi-Protocol Security Module
The Multi-Protocol Security Module is an authorization service (based on
service-oriented architecture principles) wrapped around a generic Java Security
Module. This section describes how to configure Multi-Protocol Security Module
using:
■RMI
■Web Service
RMI
To configure a RMI Security Module Instance, you must run the config.sh (Located
at OES_CLIENT_HOME/oessm/bin for UNIX) or config.cmd (Located at OES_
CLIENT_HOME\oessm\bin for Windows) as follows:
config.sh -smType rmi -smConfigId mySM_Rmi_Controlled -pdServer <oes_server_
address> -pdPort <oes_server_ssl_port> -RMIListeningPort 9405
In controlled push mode, when prompted, specify the Oracle Entitlements Server
Administration Server user name, Oracle Entitlements Server Administration Server
password, and a new key store password for enrollment.
In non-controlled and controlled-pull distribution modes when prompter specify the
Oracle Entitlements Server schema username and password.
Table 20–9 describes the parameters you specify on the command line.
Table 20–9 RMI Security Module Parameters
Parameter
Distribution
Mode Description
smType All The type of security module instance you want to
create. For example, rmi.
smConfigId All The name of the security module instance. For
example, mySM_rmi_Controlled.
pdserver controlled-push The address of the Oracle Entitlements Server
Administration Server.

Configuring Oracle Entitlements Server Client
Installing and Configuring Oracle Entitlements Server 20-21
This command also creates client configuration for the RMI Security Module Instance.
Web Service
To create a Webservice Security Module instance, you must run the config.sh
(Located at OES_CLIENT_HOME/oessm/bin for UNIX) or config.cmd (Located at
OES_CLIENT_HOME\oessm\bin for Windows) as follows:
config.sh -smType ws -smConfigId mySM_Ws_Controlled -pdServer <oes_server_address>
-pdPort <oes_server_ssl_port> -WSListeningPort 9410
In controlled push mode, when prompted, specify the Oracle Entitlements Server
Administration Server user name, Oracle Entitlements Server Administration Server
password, and a new key store password for enrollment.
In non-controlled and controlled-pull distribution modes when prompted, specify the
Oracle Entitlements Server schema user name and password.
Table 20–10 describes the parameters you specify on the command line.
This command also creates client configuration for Webservice Security Module
Instance.
20.5.3.3 Creating WebLogic Security Module
The WebLogic Security Module is a custom Java Security Module that includes both a
Policy Decision Point and a Policy Enforcement Point. It can receive requests directly
from the WebLogic Server without the need for explicit authorization API calls. It will
only run on the WebLogic Server container.
To configure a WebLogic Server Security Module instance, you must run the
config.sh (Located at OES_CLIENT_HOME/oessm/bin on UNIX) or config.cmd
(Located at OES_CLIENT_HOME\oessm\bin on Windows) as follows:
config.sh -smType wls -smConfigId mySM_WLS -pdServer <oes server> -pdPort <oes_
pdPort controlled-push The SSL port of the Oracle Entitlements Server
Administration Server. For example, 7002.
RMIListeningPor
t
All The RMI listening port. For example, 9405.
Table 20–10 Web Service Security Module Parameter
Parameters
Distribution
Mode Description
smType All Type of security module instance you want to create.
For example, ws.
smConfigId All Name of the security module instance. For example,
mySM_ws_Controlled.
pdserver controlled-push The address of the Oracle Entitlements Server
Administration Server.
pdPort controlled-push The SSL port of the Oracle Entitlements Server
Administration Server. For example, 7002.
WSListeningPort All The web service listening port. For example, 9410.
Table 20–9 (Cont.) RMI Security Module Parameters
Parameter
Distribution
Mode Description

Configuring Oracle Entitlements Server Client
20-22 Oracle Fusion Middleware Installation Guide for Oracle Identity Management
server_ssl_port> -serverLocation MW_HOME/wlserver_10.3/
In non-controlled and controlled-pull distribution modes, when prompted, specify the
Oracle Entitlements Server schema user name and password.
Table 20–11 described the parameters you specify on the command line.
The Configuration Wizard is displayed. Create a OES Client as described in
Section 20.5.4, "Creating the OES Client Domain".
20.5.3.4 Configuring the PDP Proxy Client
Configure a PDP Proxy Client for your web service Security Module or RMI Security
Module, as described in Table 20–12:
You must run the config.sh (Located at OES_CLIENT_HOME/oessm/bin on UNIX)
or config.cmd (Located at OES_CLIENT_HOME\oessm\bin on Windows) as shown
in the following example:
For Java Security Module:
OES_CLIENT_HOME/oessm/bin/config.sh -smType <SM_TYPE> -smConfigId <SM_NAME>
The SM_TYPE can be java, wls, or was. and for SM_NAME enter an appropriate name.
20.5.4 Creating the OES Client Domain
To create the OES Client domain, complete the following steps:
Table 20–11 Oracle WebLogic Server Security Module Parameters
Parameter
Distribution
Mode Description
smType All Type of security module instance you want to create.
For example, WLS.
smConfigId All Name of the security module instance. For example,
mySM_WLS_Controlled.
pdServer controlled-p
ush Address of the Oracle Entitlements Server
Administration server.
pdPort controlled-p
ush The SSL port of the Oracle Entitlements Server
Administration server. For example, 7002.
serverLocation All Location of the Oracle WebLogic Server.
Table 20–12 PDP Proxy Client Security Module Parameters
Parameter Description
oracle.security.jps.p
dp.isProxy
Specify true as the value.
oracle.security.jps.p
dp.PDPTransport
Specify Web Service (WS) or RMI.
oracle.security.jps.p
dp.proxy.PDPAddress
Specify http://hostname:port (WS) or
rmi://hostname:port (RMI).

Configuring Oracle Entitlements Server Client
Installing and Configuring Oracle Entitlements Server 20-23
1. The Fusion Middleware Configuration Wizard appears after you invoke the
Security Module configuration tool.
2. On the Welcome screen, select the Create a new WebLogic domain option. Click
Next.
The Select Domain Source screen appears.
3. On the Select Domain Source screen, ensure that the Generate a domain
configured automatically to support the following products: option is selected.
Select the Oracle Entitlements Server WebLogic Security Module - 11.1.1.0
[OESCLIENT] option. Click Next.
The Specify Domain Name and Location screen appears.
4. Enter a name and a location for the domain to be created, and click Next.
The Configure Administrator User Name and Password screen appears.
5. Enter a user name and a password for the administrator. The default user name is
weblogic. Click Next.
The Configure Server Start Mode and JDK screen appears.
6. Choose a JDK from the Available JDKs and then select a WebLogic Domain
Startup Mode. Click Next.
The Select Optional Configuration screen is displayed.
7. On the Select Optional Configuration screen, select Administration Server and
Managed Servers, Clusters and Machines, Deployments and Services check
boxes and click Next.
The Configure the Administration Servers screen is displayed.
8. In the Configure the Administration Servers screen, enter the following details:
■Name: Valid server names are a string of characters (alphabetic and numeric).
The name must be unique in the domain. For example, AdminServer.
Note: You can extend an existing Oracle WebLogic Server domain
for Oracle Entitlements Server. Any existing domain with JRF is not
supported.
Note: Ensure that you do not select the domain template associated
with the Oracle Entitlements Server Administration Server from the
IDM_HOME.
Note: When you enter the user name and the password for the
administrator, be sure to remember them.
Note: Ensure that the JDK version you select is Java SE 6 Update 24
or higher.

Configuring Oracle Entitlements Server Client
20-24 Oracle Fusion Middleware Installation Guide for Oracle Identity Management
■Listen address: From the drop-down list, select a value for the listen address.
See Specifying the Listen Address for information about the available values.
■Listen port—Enter a valid value for the listen port to be used for regular,
nonsecure requests (through protocols such as HTTP and T3). The default
value is the next available listen port. If you leave this field blank, the default
value is used. For example, 8001.
■SSL enabled—Select this check box to enable the SSL listen port. By default,
SSL is disabled for all new servers.
■SSL listen port—Enter a valid value to be used for secure requests (through
protocols such as HTTPS and T3S). The default value is the next available
listen port. If you leave this field blank, the default value is used. For example,
8002.
9. In the Configure Managed Servers screen, click Add and create two Managed
Servers. Enter the following information:
■Name: Enter OES_ManagedServer_1 and OES_ManagedServer_2.
■Listen address: From the drop-down list, select a value for the listen address
for OES_ManagedServer_1 and OES_ManagedServer_2.
■Listen port—Enter a valid value for the listen port to be used for OES_
ManagedServer_1 and OES_ManagedServer_2. The default value is the next
available listen port. If you leave this field blank, the default value is used. The
valid listen port range is 1 to 65535.
■SSL enabled—Select this check box to enable the SSL listen port. By default,
SSL is disabled for all new servers.
■SSL listen port—Enter a valid value to be used for secure requests (through
protocols such as HTTPS and T3S) for OES_ManagedServer_1 and OES_
ManagedServer_2. The default value is the next available listen port. If you
leave this field blank, the default value is used. The valid listen port range is 1
to 65535.
Click Next.
10. The Configure Clusters screen is displayed, click Next.
11. The Configure Machines screen is displayed, click Next.
12. On the Configuration Summary screen, review the domain configuration, and
click Create to start creating the domain.
13. Create three directories under DOMAIN_HOME/config/oeswlssmconfig and
name them as follows:
■AdminServer
■OES_ManagedServer_1
Note: After you specify the SSL listen port value, you must update
the oracle.security.jps.pd.clientPort property in the
smconfig.wls.controlled.prp file or smconfig.prp file with
the SSL listen port value. You must then run the smconfig tool for
Oracle WebLogic Server Security Module and set the Administration
Server SSL port to the port specified in
oracle.security.jps.pd.clientPort.

Getting Started with Oracle Entitlements Server After Installation
Installing and Configuring Oracle Entitlements Server 20-25
■OES_ManagedServer_2
14. Select and copy all the files except the new folder you created above in DOMAIN_
HOME/config/oeswlssmconfig and paste them to the following newly created
folders:
■AdminServer
■OES_ManagedServer_1
■OES_ManagedServer_2
15. Open jps-config.xml (Located at DOMAIN_
HOME/config/oeswlssmconfig/OES_ManagedServer_1) and specify the
OES_ManagedServer_1 Managed Server host name and port number for
oracle.security.jps.runtime.pd.client.DistributionServiceURL.
16. Open jps-config.xml (Located at DOMAIN_
HOME/config/oeswlssmconfig/OES_ManagedServer_2) and specify the
OES_ManagedServer_2 Managed Server host name and port number for
oracle.security.jps.runtime.pd.client.DistributionServiceURL.
17. Open setDomainEnv.sh (UNIX) or setDomainEnv.cmd (Windows) in a text
editor and edit the line -Doracle.security.jps.config=${DOMAIN_
HOME}/config/oeswlssmconfig/jps-config.xml as follows:
b.-Doracle.security.jps.config=${DOMAIN_HOME}/config/oeswlssmconfig/${SERVER_
NAME}/jps-config.xml
20.5.5 Locating Security Module Instances
The Oracle Entitlements Server security module instances are created in the OES_
CLIENT_HOME/oes_sm_instances. directory.
For Oracle WebLogic Server security module, the domain configuration is located at
DOMAIN_HOME/config/oeswlssmconfig.
You can create, delete, or modify the security module instances, as required.
20.5.6 Using the Java Security Module
After configuring Java Security Module for your program, you must start the Java
Security module for your program by completing the following:
1. Set a new Java System Property with the location of the jps-config.xml created
at OES_CLIENT_HOME/oes_sm_instances/<SM_
NAME>/config/jps-config.xml. as the value.
2. Enter oes-client.jar (Located at OES_CLIENT_
HOME/modules/oracle.oes_sm.1.1.1) into the Classpath of the program.
20.6 Getting Started with Oracle Entitlements Server After Installation
After installing Oracle Entitlements Server, refer to the following documents:
■Oracle Fusion Middleware Administrator's Guide for Oracle Entitlements Server
■Oracle Fusion Middleware Developer's Guide for Oracle Entitlements Server

Getting Started with Oracle Entitlements Server After Installation
20-26 Oracle Fusion Middleware Installation Guide for Oracle Identity Management

21
Migrating from Domain Agent to Oracle HTTP Server 10g Webgate for OAM 21-1
21 Migrating from Domain Agent to Oracle
HTTP Server 10g Webgate for OAM
This chapter describes how to migrate from the Domain Agent to Oracle HTTP Server
10g Webgate for Oracle Access Manager (OAM) to protect applications by using the
same policy domain used by the Domain Agent. By default, applications deployed in
an Oracle Identity and Access Management 11.1.1.5.0 domain are protected by the
Domain Agent.
This chapter discusses the following topics:
■Installing and Configuring Oracle HTTP Server 11g (11.1.1.5.0)
■Provisioning Oracle HTTP Server 10g Webgate for OAM Profile
■Installing Oracle HTTP Server 10g Webgate for OAM
■Configuring mod_weblogic
■Optional: Configuring Host Identifier
■Updating OIM Server Configuration
■Optional: Disabling Domain Agent
■Optional: Updating Oracle Identity Manager Configuration
21.1 Installing and Configuring Oracle HTTP Server 11g (11.1.1.5.0)
If you do not have an existing Oracle HTTP Server 11g (11.1.1.5.0) installation, you can
install Oracle HTTP Server 11.1.1.2.0 and patch it to the latest version 11.1.1.5.0.
Oracle HTTP Server 11.1.1.2.0 is included in the Oracle Web Tier 11g Installer, you
must download the Oracle Web Tier 11g (11.1.1.2.0) Installer from the Oracle
Technology Network (OTN):
http://www.oracle.com/technology/software/products/middleware/htdocs/fmw_11_
download.html
Note: Read this chapter only if you want to use Oracle HTTP Server
10g Webgate for Oracle Access Manager after setting up integration
between Oracle Identity Manager and Oracle Access Manager, as
described in the chapter "Integrating Oracle Access Manager and
Oracle Identity Manager" in the Oracle Fusion Middleware Integration
Guide for Oracle Access Manager.

Provisioning Oracle HTTP Server 10g Webgate for OAM Profile
21-2 Oracle Fusion Middleware Installation Guide for Oracle Identity Management
Alternatively, you can download the latest Oracle Fusion Middleware 11g software
from the following website:
http://edelivery.oracle.com/
21.2 Provisioning Oracle HTTP Server 10g Webgate for OAM Profile
For information about provisioning a profile for Oracle HTTP Server 10g Webgate for
use with Oracle Access Manager 11g server, see the "Provisioning a 10g WebGate for
Use with OAM 11g" topic in the Oracle Fusion Middleware Administrator's Guide for
Oracle Access Manager.
21.3 Installing Oracle HTTP Server 10g Webgate for OAM
For information about installing Oracle HTTP Server 10g Webgate for Oracle Access
Manager (OAM), see the "Locating and Installing the Latest OAM 10g WebGate for
OAM 11g" topic in the Oracle Fusion Middleware Administrator's Guide for Oracle Access
Manager.
21.4 Configuring mod_weblogic
After installing Oracle HTTP Server 10g Webgate for Oracle Access Manager, you
must configure the Web server to forward requests to the applications deployed on the
WebLogic Server.
Open the mod_wl_ohs.conf, which is located in <OHS_Instance_
Home>/config/OHS/<Instance_Name>, in a text editor and add appropriate
entries, as in the following example:
<IfModule weblogic_module>
<Location /oamconsole>
SetHandler weblogic-handler
WebLogicHost examplehost.exampledomain.com
WebLogicPort 6162
</Location>
<Location /apmconsole>
SetHandler weblogic-handler
WebLogicHost examplehost.exampledomain.com
WebLogicPort 6162
Note: For information about installing and configuring Oracle HTTP
Server 11g (11.1.1.2.0), see the "Installing Oracle Web Tier" topic in the
Oracle Fusion Middleware Installation Guide for Oracle Web Tier. For
information about patching Oracle HTTP Server 11.1.1.2.0 to 11.1.1.5.0
using the Patch Set Installer, see the "Applying the Latest Oracle
Fusion Middleware Patch Set" topic in the Oracle Fusion Middleware
Patching Guide.
After you install and configure Oracle HTTP Server, a working
instance of Oracle HTTP Server is configured in an Instance Home.
Note: Ensure that the hostIdentifier parameter is set to IDMDomain
and the autoCreatePolicy parameter is set to false when you are
provisioning Oracle HTTP Server 10g Webgate to replace Domain
Agent for OAM-OIM integration.

Updating OIM Server Configuration
Migrating from Domain Agent to Oracle HTTP Server 10g Webgate for OAM 21-3
</Location>
</IfModule>
Add similar Location entries for all the URIs for all the applications that were
previously accessed directly on WebLogic Server.
After making the changes, restart Oracle HTTP Server. You can use the OPMN
command-line tool to start or stop your Oracle HTTP Server instance. If any instances
are running, run the following command on the command-line to stop all running
instances:
<Oracle_Home_for_Oracle_HTTP_Server>/opmn/bin/opmnctl stopall
To restart the Oracle HTTP Server instance, run the following commands on the
command line:
1. <Oracle_Home_for_Oracle_HTTP_Server>/opmn/bin/opmnctl start
2. <Oracle_Home_for_Oracle_HTTP_Server>/opmn/bin/opmnctl
startproc ias-component=<Oracle_HTTP_Server_Instance_Name>
21.5 Optional: Configuring Host Identifier
This task is required only if you have set up integration between Oracle Identity
Manager and Oracle Access Manager.
To configure host identifiers for auto-login functionality, complete the following steps:
1. Launch the Oracle Access Manager Administration Console
(http://<oamserverhost>:<adminport>/oamconsole).
2. Click the Policy Configuration tab.
3. On the left navigation pane, click Host Identifiers > IDMDomain. The Host
Identifier page is displayed.
4. In the Operations section on the Host Identifier page, all the host name and port
number combinations are listed. Verify whether the section includes the host
name and port number of the web server on which the Oracle HTTP Server 10g
Webgate is configured.
If it is not listed, add an entry as follows:
a. On the Operation section, click the + icon. A new blank row is added to the
Operations section.
b. In the Host Name field, enter the host name of the web server on which the
Oracle HTTP Server 10g Webgate is configured.
c. In the Port field, enter the port number.
d. Click Apply.
21.6 Updating OIM Server Configuration
Update the Oracle Identity Manager (OIM) configuration in the oam-config.xml file
(located in the <DOMAIN_HOME>/config/fmwconfig directory) to ensure that the
Host and Port attributes of the IdentityManagement element in the file point to the
Oracle HTTP Server on which the Oracle HTTP Server Webgate 10g is configured:
1. Open the oam-config.xml file in a text editor.
2. Update the entries as follows:

Optional: Disabling Domain Agent
21-4 Oracle Fusion Middleware Installation Guide for Oracle Identity Management
<Setting Name="IdentityManagement" Type="htf:map">
<Setting Name="ServerConfiguration" Type="htf:map">
<Setting Name="OIM-SERVER-1" Type="htf:map">
<Setting Name="Host" Type="xsd:string">OHS-HOST</Setting>
<Setting Name="Port" Type="xsd:integer">OHS-PORT</Setting>
<Setting Name="SecureMode" Type="xsd:boolean">false</Setting>
</Setting>
</Setting>
After updating OIM Server configuration, you must perform logout configuration as
follows:
1. Copy the logout.html file from the <IDM_ORACLE_
HOME>/oam/server/oamsso directory to the
<10gWebgateInstallation>/access/oamsso directory.
2. Edit the SERVER_LOGOUTURL variable in the logout.html file to point to the
host and port of the Oracle Access Manager Server. Follow the instructions in the
logout.html file.
3. If the http.conf file of the web server includes the following entries, remove the
entries from the http.conf file:
<LocationMatch "/oamsso/*">
Satisfy any
</LocationMatch>
21.7 Optional: Disabling Domain Agent
Domain Agent, which runs on the Administration Server and all Managed Servers in
the Oracle Identity and Access Management domain, automatically detects the
existence of a Webgate in the request flow. You do not need to disable the Domain
Agent. However, if you want to disable the out-of-the-box Domain Agent, you can
complete the following steps:
1. From your present working directory, move to the <MW_HOME>/user_
projects/domains/<name_of_your_WebLogic_domain> directory (On
UNIX). On Windows, move to the <MW_HOME>\user_
projects\domains\<name_of_your_WebLogic_domain> directory.
2. To disable the Domain Agent running on the Administration Server, start the
WebLogic Administration Server on the command line as follows:
On UNIX:
./startWebLogic.sh -DWLSAGENT_DISABLED=true
On Windows:
startWebLogic.cmd -DWLSAGENT_DISABLED=true
3. From your present working directory, move to the <MW_HOME>/user_
projects/domains/<name_of_your_WebLogic_domain>/bin directory
Note: Ensure that you have set up integration between Oracle
Identity Manager and Oracle Access Manager, as described in the
topic "Integrating Oracle Access Manager and Oracle Identity
Manager" in the Oracle Fusion Middleware Integration Guide for Oracle
Access Manager.

Optional: Updating Oracle Identity Manager Configuration
Migrating from Domain Agent to Oracle HTTP Server 10g Webgate for OAM 21-5
(On UNIX). On Windows, move to the <MW_HOME>\user_
projects\domains\<name_of_your_WebLogic_domain</bin directory.
4. To disable the Domain Agent running on Managed Servers in the domain, start
the Managed Servers on the command line as follows:
On UNIX:
./startManagedWebLogic.sh <name_of_your_Managed_Server>
-DWLSAGENT_DISABLED=true
On Windows:
startManagedWebLogic.cmd <name_of_your_Managed_Server>
-DWLSAGENT_DISABLED=true
21.8 Optional: Updating Oracle Identity Manager Configuration
You can update the <OHS_Instance_Home>/config/OHS/<ohs_name>/mod_wl_
ohs.conf to front-end Oracle Identity Manager URLs with Oracle HTTP Server.
To do so, complete the following steps:
Open the mod_wl_ohs.conf file in a text editor and add appropriate entries, as in
the following example:
<IfModule weblogic_module>
WebLogicHost OIM_MANAGED_SERVER_HOST
WebLogicPort OIM_MANAGED_SERVER_PORT
MatchExpression /oim*
MatchExpression /admin*
MatchExpression /xlWebApp*
MatchExpression /Nexaweb*
MatchExpression /workflowservice*
MatchExpression /callbackService*
MatchExpression /SchedulerService-web*
MatchExpression /iam-consoles-faces*
</IfModule>
Replace the values of OIM_MANAGED_SERVER_HOST and OIM_MANAGED_SERVER_
PORT with the values of Oracle Identity Manager Managed Server’s host and port.
After making the changes, restart Oracle HTTP Server. You can use the OPMN
command-line tool to start or stop your Oracle HTTP Server instance. If any instances
are running, run the following command on the command-line to stop all running
instances:
<Oracle_Home_for_Oracle_HTTP_Server>/opmn/bin/opmnctl stopall
To restart the Oracle HTTP Server instance, run the following commands on the
command line:
1. <Oracle_Home_for_Oracle_HTTP_Server>/opmn/bin/opmnctl start
2. <Oracle_Home_for_Oracle_HTTP_Server>/opmn/bin/opmnctl
startproc ias-component=<Oracle_HTTP_Server_Instance_Name>
Updating the OIM Configuration When the OAM URL or Agent Profile Changes
You can update the Oracle Identity Manager configuration when the name of the
agent profile is modified or the OAM URL is modified.
To update Oracle Identity Manager configuration, complete the following steps:

Optional: Updating Oracle Identity Manager Configuration
21-6 Oracle Fusion Middleware Installation Guide for Oracle Identity Management
1. Export the oim-config.xml file from metadata by running <IDM_ORACLE_
HOME>/server/bin/weblogicExportMetadata.sh (on UNIX), and export
the file - /db/oim-config.xml. On Windows operating systems, you can use
the weblogicExportMetadata.bat file located in the same directory.
2. Update the file to use Oracle HTTP Server 10g Webgate by updating following
element under the <ssoConfig> tag:
<webgateType>javaWebgate</webgateType> to
<webgateType>ohsWebgate10g</webgateType>
3. Import oim-config.xml back to metadata by running <IDM_
Home>/server/bin/weblogicImportMetadata.sh on UNIX. On Windows,
use the weblogicImportMetadata.bat located in the same directory.
4. Log in to Oracle Enterprise Manager Fusion Middleware Control using your
WebLogic Server administrator credentials.
5. Click Identity and access > oim > oim(version). Right-click and select System
MBean Browser. The System MBean Browser page is displayed.
6. Under Application Defined MBeans, select oracle.iam > Server:oim_
server1 > Application: oim > XMLConfig > config.
7. Replace the front-end URL with the URL of Oracle HTTP Server. This should be
the same Oracle HTTP Server that was used before installing Oracle HTTP Server
10g Webgate for Oracle Access Manager. Complete the following steps:
a. Under XMLConfig MBean, move to XMLConfig.DiscoveryConfig.
b. Update OimFrontEndURL with the URL of Oracle HTTP Server.
c. Click Apply.
8. Restart the OIM server.

22
Installing and Configuring Oracle HTTP Server 11g Webgate for OAM 22-1
22Installing and Configuring Oracle HTTP
Server 11g Webgate for OAM
This chapter describes how to install and configure Oracle HTTP Server 11g Webgate
for Oracle Access Manager.
It discusses the following topics:
■Installation Overview
■Preparing to Install Oracle HTTP Server 11g Webgate for Oracle Access Manager
■Installing Oracle HTTP Server 11g Webgate for Oracle Access Manager
■Post-Installation Steps
■Verifying the Oracle HTTP Server 11g Webgate for Oracle Access Manager
■Getting Started with a New Oracle HTTP Server 11g Webgate Agent for Oracle
Access Manager
22.1 Installation Overview
Installing Oracle HTTP Server 11g Webgate for Oracle Access Manager involves the
following steps:
1. Installing Oracle HTTP Server 11g (11.1.1.3.0, 11.1.1.4.0, or 11.1.1.5.0)
2. On Linux and Solaris operating systems: Installing third-party GCC libraries
3. Running the Oracle HTTP Server Webgate Installer to install Oracle HTTP Server
11g Webgate for Oracle Access Manager
4. Verifying the installation of Oracle HTTP Server 11g Webgate for Oracle Access
Manager
5. Completing post-installation configuration steps
6. Registering the new Webgate agent
The following figure illustrates the process of installing Oracle HTTP Server 11g
Webgate for Oracle Access Manager.
Note: Oracle HTTP Server 11g Webgate for Oracle Access Manager
is not intended for use in Oracle Identity and Access Management
environments where you want to set up integration among Oracle
Identity and Access Management components.
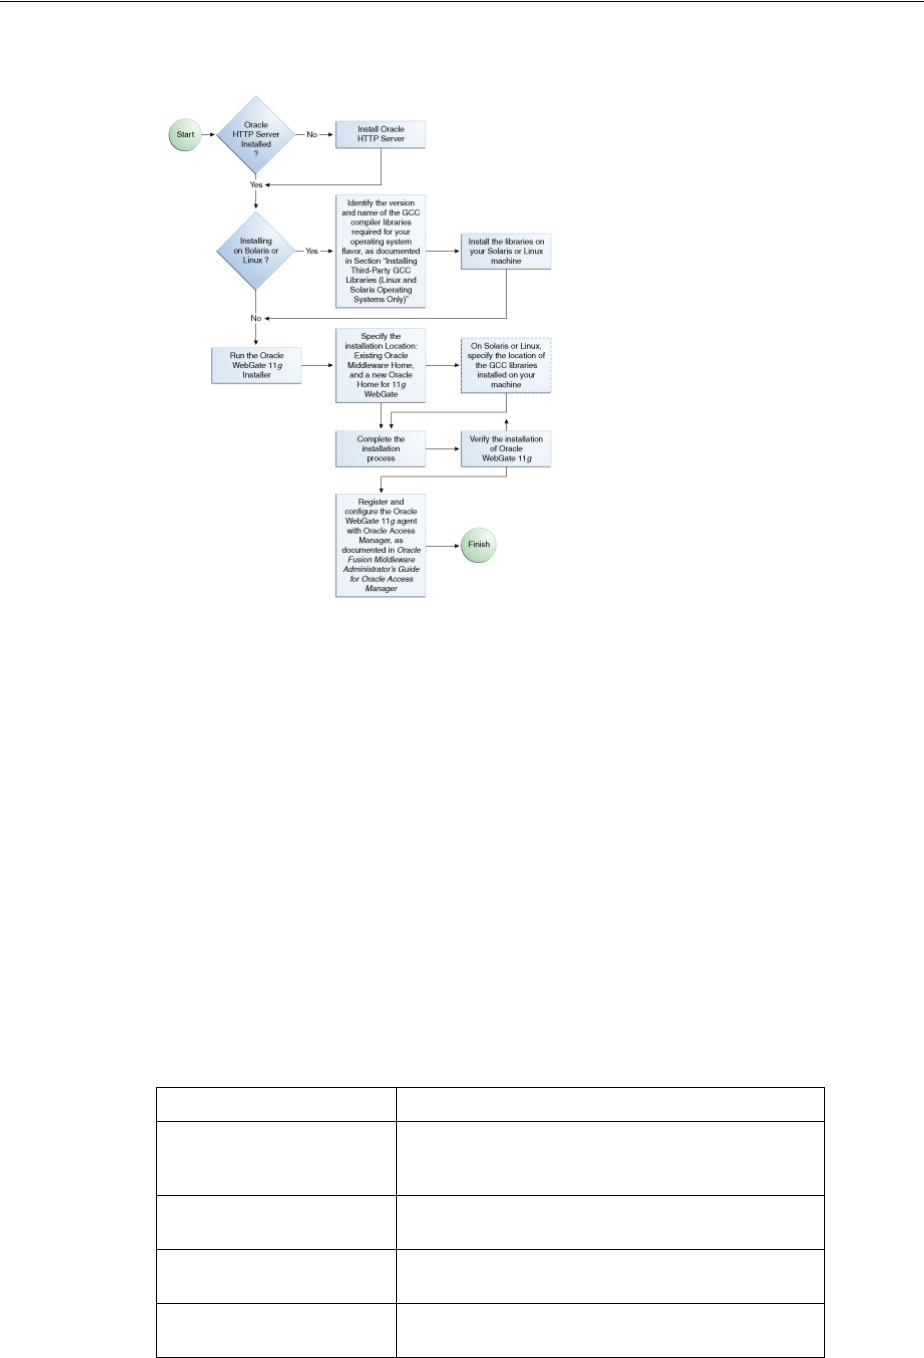
Installation Overview
22-2 Oracle Fusion Middleware Installation Guide for Oracle Identity Management
Figure 22–1 Oracle HTTP Server 11g Webgate Installation Process
As a standard practice, complete the following prerequisites for installing Oracle
Fusion Middleware software:
1. Review Oracle Fusion Middleware certification information.
http://www.oracle.com/technetwork/middleware/ias/downloads/fusion-c
ertification-100350.html
2. Review the system requirements.
3. Satisfy all dependencies, such as installing Oracle HTTP Server, which is included
in the Oracle Web Tier Installer.
4. Perform the installation procedure for the appropriate component.
5. Verify the installation.
Table 22–1 lists the Installers and tools used to install and configure Oracle HTTP
Server 11g Webgate for Oracle Access Manager at different stages of the installation
and configuration process.
Table 22–1 Installation and Configuration Tools
Task Tool
Install Oracle HTTP Server
(11.1.1.3.0, 11.1.1.4.0, or
11.1.1.5.0)
Oracle Web Tier Installer based on the version you
want to use
Install Oracle HTTP Server
Webgate 11g
Oracle HTTP Server Webgate 11g Installer
Register Webgate Agent RREG Tool, or the Oracle Access Manager
Administration Console
Start or Stop Process
Instances OPMN Command-Line Tool

Preparing to Install Oracle HTTP Server 11g Webgate for Oracle Access Manager
Installing and Configuring Oracle HTTP Server 11g Webgate for OAM 22-3
22.2 Preparing to Install Oracle HTTP Server 11g Webgate for Oracle
Access Manager
Oracle HTTP Server 11g Webgate for Oracle Access Manager requires Oracle HTTP
Server 11g (11.1.1.3.0, 11.1.1.4.0, or 11.1.1.5.0), which is included in the Oracle Web Tier
11g Installer. For information about installing Oracle HTTP Server, see the Oracle
Fusion Middleware Installation Guide for Oracle Web Tier corresponding to the Oracle
HTTP Server version you are using.
In addition, if you are using the Linux or Solaris operating system, you must install
third-party GCC libraries on your machine before installing Oracle HTTP Server 11g
Webgate for Oracle Access Manager.
This section discusses the following topics:
■Oracle Fusion Middleware Certification
■Installing and Configuring OAM 11g
■Installing and Configuring Oracle HTTP Server 11g
■Installing Third-Party GCC Libraries (Linux and Solaris Operating Systems Only)
■Prerequisites for 64-Bit Oracle HTTP Server 11g Webgates on Windows 2003 and
Windows 2008 64-Bit Platforms
22.2.1 Oracle Fusion Middleware Certification
The Oracle Fusion Middleware Supported System Configurations document provides
certification information for Oracle Fusion Middleware, including supported
installation types, platforms, operating systems, databases, JDKs, and third-party
products related to Oracle Identity and Access Management 11g Release 1 (11.1.1).
You can access the Oracle Fusion Middleware Supported System Configurations document
by searching the Oracle Technology Network (OTN) web site:
http://www.oracle.com/technetwork/middleware/ias/downloads/fusio
n-certification-100350.html
22.2.2 Installing and Configuring OAM 11g
For information about installing Oracle Access Manager (OAM), see Installing Oracle
Identity and Access Management (11.1.1.5.0). For information about configuring
Oracle Access Manager in a new or existing WebLogic administration domain, see
Configuring Oracle Access Manager.
In addition, see the "Securing Communication Between OAM 11g Servers and
WebGates" topic in the Oracle Fusion Middleware Administrator's Guide for Oracle Access
Manager for information about configuring Oracle Access Manager in Open, Simple, or
Cert mode.
22.2.3 Installing and Configuring Oracle HTTP Server 11g
Oracle HTTP Server 11g Webgate for Oracle Access Manager is supported on Oracle
HTTP Server 11.1.1.3.0, Oracle HTTP Server 11.1.1.4.0, and Oracle HTTP Server
11.1.1.5.0. You can choose to install any of these versions. You must install the Oracle
HTTP Server 11.1.1.2.0 software before patching it to 11.1.1.3.0, 11.1.1.4.0, or 11.1.1.5.0.
If you do not have Oracle HTTP Server 11.1.1.2.0 installed, you can download the
Oracle Web Tier 11g (11.1.1.2.0) Installer from the Oracle Technology Network (OTN):

Preparing to Install Oracle HTTP Server 11g Webgate for Oracle Access Manager
22-4 Oracle Fusion Middleware Installation Guide for Oracle Identity Management
http://www.oracle.com/technology/software/products/middleware/htdocs/fmw_11_
download.html
Alternatively, you can download the latest Oracle Fusion Middleware 11g software
from the following website:
http://edelivery.oracle.com/
22.2.4 Installing Third-Party GCC Libraries (Linux and Solaris Operating Systems Only)
If you are installing Oracle HTTP Server 11g Webgate for Oracle Access Manager on a
Linux or Solaris operating system, you must download and install third-party GCC
libraries on your machine. See Table 22–2 for more information.
You can download the appropriate GCC library from the following third-party
website:
http://gcc.gnu.org/
22.2.4.1 Verifying the GCC Libraries Version on Linux and Solaris Operating
Systems
Perform the following checks to verify the version of GCC libraries:
Note: For information about installing and configuring Oracle HTTP
Server 11g (11.1.1.2.0), see the "Installing Oracle Web Tier" topic in the
Oracle Fusion Middleware Installation Guide for Oracle Web Tier. For
information about patching Oracle HTTP Server 11.1.1.2.0 to 11.1.1.3.0,
11.1.1.4.0, or 11.1.1.5.0 using the corresponding Patch Set Installer, see
the "Applying the Latest Oracle Fusion Middleware Patch Set" topic in
the Oracle Fusion Middleware Patching Guide.
After you install and configure Oracle HTTP Server, a working
instance of Oracle HTTP Server is configured in an Instance Home.
Note: You must download sources from this website and compile
them to obtain the GCC libraries.
For some operating systems, the required libraries may be available as
installable packages from the support websites of operating system
vendors.
Table 22–2 Versions of GCC Third-Party Libraries for Linux and Solaris
Operating
System Architecture GCC Libraries
Required
Library
Version
Linux 32-bit x86 libgcc_s.so.1
libstdc++.so.5
3.3.2
Linux 64-bit x64 libgcc_s.so.1
libstdc++.so.6
3.4.6
Solaris 64-bit SPARC libgcc_s.so.1
libstdc++.so.5
3.3.2

Installing Oracle HTTP Server 11g Webgate for Oracle Access Manager
Installing and Configuring Oracle HTTP Server 11g Webgate for OAM 22-5
On the Linux32 on i386 platform:
Run the following commands and ensure that their output is always greater than 0:
strings -a libgcc_s.so.1 | grep -c "GCC_3.0"
strings -a libgcc_s.so.1 | grep -v "GCC_3.3.1" | grep -c "GCC_3.3"
file libgcc_s.so.1 | grep "32-bit" | grep -c "80386"
file libstdc++.so.5 | grep "32-bit" | grep -c "80386"
On the Linux 64 on x86-64 platform:
Run the following commands and ensure that their output is always greater than 0:
strings -a libgcc_s.so.1 | grep -c "GCC_3.0"
strings -a libgcc_s.so.1 | grep -v "GCC_3.3.1" | grep -c "GCC_3.3"
strings -a libgcc_s.so.1 | grep -c "GCC_4.2.0"
file libgcc_s.so.1 | grep "64-bit" | grep -c "x86-64"
file -L libstdc++.so.6 | grep "64-bit" | grep -c "x86-64"
On the Solaris 64 on SPARC platform:
Run the following commands and ensure that their output is always greater than 0:
strings -a libgcc_s.so.1 | grep -c "GCC_3.0"
strings -a libgcc_s.so.1 | grep -v "GCC_3.3.1" | grep -c "GCC_3.3"
file libgcc_s.so.1 | grep "64-bit" | grep -c "SPARC"
file libstdc++.so.5 | grep "64-bit" | grep -c "SPARC"
22.2.5 Prerequisites for 64-Bit Oracle HTTP Server 11g Webgates on Windows 2003
and Windows 2008 64-Bit Platforms
If you are using Windows 2003 or Windows 2008 64-bit operating systems, you must
install Microsoft Visual C++ 2005 libraries on the machine hosting the Oracle HTTP
Server 11g Webgate for Oracle Access Manager.
These libraries are included in the Microsoft Visual C++ 2005 SP1 Redistributable
Package (x64), which can be downloaded from the following website:
http://www.microsoft.com/DownLoads/details.aspx?familyid=EB4EBE2
D-33C0-4A47-9DD4-B9A6D7BD44DA&displaylang=en
In addition, install the Microsoft Visual C++ 2005 Service Pack 1 Redistributable
Package MFC Security Update, which can be downloaded from the following website:
http://www.microsoft.com/downloads/en/details.aspx?familyid=fb01
abe6-9099-4544-9aec-0ac13f19bc50&displaylang=en
22.3 Installing Oracle HTTP Server 11g Webgate for Oracle Access
Manager
This section discusses the following topics:
■Launching the Installer
■Installation Flow and Procedure
22.3.1 Launching the Installer
The Installer program for Oracle HTTP Server 11g Webgate for Oracle Access Manager
is included in the webgate.zip file.
Perform the following steps to start the installation wizard:

Installing Oracle HTTP Server 11g Webgate for Oracle Access Manager
22-6 Oracle Fusion Middleware Installation Guide for Oracle Identity Management
1. Extract the contents of the webgate.zip file to a directory. By default, this
directory is named webgate.
2. Move to the Disk1 directory under the webgate folder.
3. Start the Installer by executing one of the following commands:
UNIX: <full path to the runInstaller directory>./runInstaller
-jreLoc <WebTier_Home>/jdk
Windows: <full path to the setup.exe directory>\ setup.exe
-jreLoc <WebTier_Home>\jdk
After the Installer starts, the Welcome screen appears. Continue by referring to the
section Installation Flow and Procedure for installing Oracle HTTP Server 11g
Webgate for Oracle Access Manager.
22.3.2 Installation Flow and Procedure
Follow the instructions in Table 22–3 to install Oracle HTTP Server 11g Webgate for
Oracle Access Manager.
If you need additional help with any of the installation screens, click Help to access the
online help.
Note: When you install Oracle HTTP Server, the jdk directory is
created under the <WebTier_Home> directory. You must enter the
absolute path of the JRE folder located in this JDK when launching the
installer. For example, on Windows, if the JDK is located in
D:\oracle\Oracle_WT1\jdk, then launch the installer from the
command prompt as follows:
D:\setup.exe -jreLoc D:\oracle\Oracle_WT1\jdk
Table 22–3 Installation Flow
No. Screen Description and Action Required
1 Welcome Screen Click Next to continue.
2 Prerequisite Checks Screen Click Next to continue.
3 Specify Installation Location Screen Specify the Middleware Home and Oracle Home locations.
Note that the Middleware Home should contain an Oracle Home for
Oracle Web Tier. Oracle WebLogic Server is not a prerequisite for
installing Oracle HTTP Server Webgate. However, Oracle HTTP
Server, which is a component of Oracle Web Tier, requires only the
directory structure for the Middleware home.
For more information about these directories, see "Understanding
Oracle Fusion Middleware Concepts and Directory Structure" in
Oracle Fusion Middleware Installation Planning Guide.
Click Next to continue.
4 On selected UNIX operating
systems only (Linux 32- and 64-bit,
and Solaris 64-bit):
Specify GCC Library Screen
Specify the directory that contains the GCC libraries.
Click Next to continue.

Post-Installation Steps
Installing and Configuring Oracle HTTP Server 11g Webgate for OAM 22-7
22.4 Post-Installation Steps
You must complete the following steps after installing Oracle HTTP Server 11g
Webgate for Oracle Access Manager:
1. Move to the following directory under your Oracle Home for Webgate:
On UNIX operating systems:
<Webgate_Home>/webgate/ohs/tools/deployWebGate
On Windows operating systems:
<Webgate_Home>\webgate\ohs\tools\deployWebGate
2. On the command line, run the following command to copy the required bits of
agent from the Webgate_Home directory to the Webgate Instance location:
On UNIX operating systems:
./deployWebgateInstance.sh -w <Webgate_Instance_Directory>
-oh <Webgate_Oracle_Home>
On Windows operating systems:
deployWebgateInstance.bat -w <Webgate_Instance_Directory> -oh
<Webgate_Oracle_Home>
Where <Webgate_Oracle_Home> is the directory where you have installed
Oracle HTTP Server Webgate and created as the Oracle Home for Webgate, as in
the following example:
<MW_HOME>/Oracle_OAMWebGate1
The <Webgate_Instance_Directory> is the location of Webgate Instance
Home, which is same as the Instance Home of Oracle HTTP Server, as in the
following example:
<MW_HOME>/Oracle_WT1/instances/instance1/config/OHS/ohs1
Note that an Instance Home for Oracle HTTP Server is created after you configure
Oracle HTTP Server. This configuration is performed after installing Oracle HTTP
Server 11.1.1.2.0 or patching to Oracle HTTP Server 11.1.1.5.0.
3. Run the following command to ensure that the LD_LIBRARY_PATH variable
contains <Oracle_Home_for_Oracle_HTTP_Server>/lib:
On UNIX (depending on the shell):
export LD_LIBRARY_PATH=$LD_LIBRARY_PATH:<Oracle_Home_for_
Oracle_HTTP_Server>/lib
On Windows:
5 Installation Summary Screen Verify the information on this screen.
Click Install to begin the installation.
6 Installation Progress Screen If you are installing on a UNIX system, you may be asked to run the
ORACLE_HOME/oracleRoot.sh script to set up the proper file and
directory permissions.
Click Next to continue.
7 Installation Complete Screen Click Finish to dismiss the installer.
Table 22–3 (Cont.) Installation Flow
No. Screen Description and Action Required

Verifying the Oracle HTTP Server 11g Webgate for Oracle Access Manager
22-8 Oracle Fusion Middleware Installation Guide for Oracle Identity Management
Set the <Webgate_Installation_Directory>\webgate\ohs\lib location
and the <Oracle_Home_for_Oracle_HTTP_Server>\bin location in the
PATH environment variable. Add a semicolon (;) followed by this path at the end
of the entry for the PATH environment variable.
4. From your present working directory, move up one directory level:
On UNIX operating systems, move to:
<Webgate_Home>/webgate/ohs/tools/setup/InstallTools
On Windows operating systems, move to:
<Webgate_Home>\webgate\ohs\tools\EditHttpConf
5. On the command line, run the following command to copy the apache_
webgate.template from the Webgate_Home directory to the Webgate Instance
location (renamed to webgate.conf) and update the httpd.conf file to add
one line to include the name of webgate.conf:
On UNIX operating systems:
./EditHttpConf -w <Webgate_Instance_Directory> [-oh <Webgate_
Oracle_Home>] [-o <output_file>]
On Windows operating systems:
EditHttpConf.exe -w <Webgate_Instance_Directory> [-oh
<Webgate_Oracle_Home>] [-o <output_file>]
Where <Webgate_Oracle_Home> is the directory where you have installed
Oracle HTTP Server Webgate for Oracle Access Manager and created as the Oracle
Home for Webgate, as in the following example:
<MW_HOME>/Oracle_OAMWebGate1
The <Webgate_Instance_Directory> is the location of Webgate Instance
Home, which is same as the Instance Home of Oracle HTTP Server, as in the
following example:
<MW_HOME>/Oracle_WT1/instances/instance1/config/OHS/ohs1
The <output_file> is the name of the temporary output file used by the tool, as
in the following example:
Edithttpconf.log
Note that an Instance Home for Oracle HTTP Server is created after you configure
Oracle HTTP Server. This configuration is performed after installing Oracle HTTP
Server 11.1.1.2.0 or patching to Oracle HTTP Server 11.1.1.5.0.
22.5 Verifying the Oracle HTTP Server 11g Webgate for Oracle Access
Manager
After completing the installation of Oracle HTTP Server 11g Webgate for Oracle
Access Manager, including the post-installation steps, you can examine the
installDATE-TIME_STAMP.out log file to verify the installation.
Note: The -oh <WebGate_Oracle_Home> and -o <output_
file> parameters are optional.

Getting Started with a New Oracle HTTP Server 11g Webgate Agent for Oracle Access Manager
Installing and Configuring Oracle HTTP Server 11g Webgate for OAM 22-9
On UNIX systems, if you do not know the location of your Oracle Inventory directory,
you can find it in the <Webgate_Home>/oraInst.loc file.
On Microsoft Windows systems, the default location for the inventory directory is
C:\Program Files\Oracle\Inventory\logs.
22.6 Getting Started with a New Oracle HTTP Server 11g Webgate Agent
for Oracle Access Manager
Before you can get started with the new Oracle HTTP Server 11g Webgate agent for
Oracle Access Manager, you must complete the following tasks:
1. Register the New Webgate Agent
2. Copy Generated Files and Artifacts to the Webgate Instance Location
3. Restart the Oracle HTTP Server Instance
22.6.1 Register the New Webgate Agent
You can register the new Webgate agent with Oracle Access Manager by using the
Oracle Access Manager Administration Console. For more information, see the
"Registering Partners (Agents and Applications) by Using the Console" topic in the
Oracle Fusion Middleware Administrator's Guide for Oracle Access Manager.
Alternatively, you can use the RREG command-line tool to register a new Webgate
agent. The tool can be run in two modes: In-Band mode, and Out-Of-Band mode.
Setting Up the RREG Tool
1. After installing and configuring Oracle Access Manager, navigate to the following
location:
On UNIX operating systems:
<Oracle_IDM2>/oam/server/rreg/client
On Windows operating systems:
<Oracle_IDM2>\oam\server\rreg\client
2. On the command line, untar the RREG.tar.gz file using gunzip, as in the
following example:
gunzip RREG.tar.gz
tar -xvf RREG.tar
The tool used to register the agent is located in the following location:
On UNIX operating systems:
<RREG_Home>/bin/oamreg.sh
On Windows operating systems:
<RREG_Home>\bin\oamreg.bat
Note: <RREG_Home> is the directory where you extracted the
contents of RREG.tar.gz/rreg to.

Getting Started with a New Oracle HTTP Server 11g Webgate Agent for Oracle Access Manager
22-10 Oracle Fusion Middleware Installation Guide for Oracle Identity Management
Set the following environment variables in the oamreg.sh script or in the
oamreg.bat script:
■OAM_REG_HOME - Set this variable to the absolute path to the directory where you
extracted the contents of RREG.tar/rreg.
■JDK_HOME - Set this variable to the absolute path to the directory where Java/JDK
is installed on your machine.
Updating the OAM11gRequest.xml File
You must update the agent parameters, such as agentName, in the
OAM11GRequest.xml file located in the <RREG_Home>\input directory on the
Windows operating system. On the UNIX operating system, the file is located in the
<RREG_Home>/input directory.
Modify the following required parameters in the OAM11GRequest.xml file or in the
OAM11GRequest_short.xml file:
■<serverAddress>
Specify the host and the port of the Administration Server.
■<agentName>
Specify any custom name for the agent.
■<agentBaseUrl>
Specify the host and the port of the machine where Oracle HTTP Server 11g
Webgate is installed.
■<preferredHost>
Specify the host and the port of the machine where Oracle HTTP Server 11g
Webgate is installed.
■<security>
Specify the security mode, such as open, based on the Webgate installed.
■<primaryServerList>
Specify the host and the port of Managed Server for Oracle Access Manager proxy,
under a <Server> container element.
After modifying the file, save the file and close.
In-Band Mode
If you run the RREG tool once after updating the Webgate parameters in the
OAM11GRequest.xml file, the files and artifacts required by Webgate are generated
in the following directory:
On UNIX operating systems:
<RREG_Home>/output/<agent_name>
On Windows operating systems:
<RREG_Home>\output\<agent_name>
Note: The OAM11GRequest.xml file or the short version
OAM11GRequest_short.xml is used as a template. You can copy
this template file and use.

Getting Started with a New Oracle HTTP Server 11g Webgate Agent for Oracle Access Manager
Installing and Configuring Oracle HTTP Server 11g Webgate for OAM 22-11
Complete the following steps:
1. Open the OAM11GRequest.xml file, which is located in the input directory
(<RREG_Home>/input/ on UNIX, and <RREG_Home>\input on Windows).
<RREG_Home> is the directory where you extracted the contents of
RREG.tar.gz/rreg to. Edit this XML file and fill in parameters for the new
Oracle HTTP Server Webgate for Oracle Access Manager.
2. Run the following command on the command line:
On UNIX operating systems:
./<RREG_Home>/bin/oamreg.sh inband input/OAM11GRequest.xml
On Windows operating systems:
<RREG_Home>\bin\oamreg.bat inband input\OAM11GRequest.xml
Out-Of-Band Mode
If you are an end-user with no access to the server, you can email your updated
OAM11GRequest.xml file to the system administrator, who can run RREG in the
Out-Of-Band mode. You can collect the generated <AgentID>_Response.xml file
from the system administrator and run RREG on this file to obtain the Webgate files
and artifacts you require.
After you receive the generated <AgentID>_Response.xml file from the
administrator, you must manually copy the file to the input directory on your
machine.
Complete the following steps:
1. If you are an end-user with no access to the server, open the
OAM11GRequest.xml file, which is located in the input directory (<RREG_
Home/input/ on UNIX, and <RREG_Home\input\ on Windows). <RREG_
Home> is the directory where you extracted the contents of RREG.tar.gz/rreg
to. Edit this XML file and fill in parameters for the new Oracle HTTP Server
Webgate for Oracle Access Manager. Send the updated file to your system
administrator.
2. If you are an administrator, copy the updated OAM11GRequest.xml file to the
input directory on your machine (<RREG_Home>/input/ on UNIX, and
<RREG_Home>\input\ on Windows). This is the file you received from the
end-user. Move to your (administrator’s) RREG_Home directory and run the
following command on the command line:
On UNIX operating systems:
./<RREG_Home>/bin/oamreg.sh outofband input/OAM11GRequest.xml
On Windows operating systems:
<RREG_Home>\bin\oamreg.bat outofband input\OAM11GRequest.xml
An <Agent_ID>_Response.xml file is generated in the output directory on the
administrator’s machine (<RREG_Home>/output/ on UNIX, and <RREG_
Home>output\ on Windows). Send this file to the end-user who sent you the
updated OAM11GRequest.xml file.
Note: You can run RREG either on a client machine or on the server
machine. If you are running it on the server machine, you must
manually copy the artifacts back to the client machine.

Getting Started with a New Oracle HTTP Server 11g Webgate Agent for Oracle Access Manager
22-12 Oracle Fusion Middleware Installation Guide for Oracle Identity Management
3. If you are an end-user, copy the generated <Agent_ID>_Response.xml file to
your input directory (<RREG_Home>/input/ on UNIX, and <RREG_
Home>input\ on Windows). This is the file you received from the administrator.
Move to your (client’s) RREG home directory and run the following command on
the command line:
On UNIX operating systems:
./<RREG_Home>/bin/oamreg.sh outofband input/<Agent_ID>_
Response.xml
On Windows operating systems:
<RREG_Home>\bin\oamreg.bat outofband input\<Agent_ID>_
Response.xml
Files and Artifacts Generated by RREG
Regardless of the method or mode you use to register the new Webgate agent, the
following files and artifacts are generated in the <RREG_Home>/output/<Agent
ID> directory:
■cwallet.sso
■ObAccessClient.xml
■In the SIMPLE mode, RREG generates:
–password.xml, which contains the obfuscated global passphrase to encrypt
the private key used in SSL. This passphrase can be the same as the
passphrase used on the server.
–aaa_key.pem
–aaa_cert.pem
■In the CERT mode, RREG generates:
password.xml, which contains the obfuscated global passphrase to encrypt the
private key used in SSL. This passphrase can be different than the passphrase used
on the server.
Note: If you register the Webgate agent using the Oracle Access
Manager Administration Console, as described in the "Registering
Partners (Agents and Applications) by Using the Console" topic in the
Oracle Fusion Middleware Administrator's Guide for Oracle Access
Manager, you must manually copy the files and artifacts generated
after the registration from the server machine (the machine where
Oracle Access Manager Administration Console is running) to the
client machine. The files and artifacts are generated in the <MW_
HOME>/user_projects/domains/<name_of_the_WebLogic_
domain_for_OAM>/output/<Agent_ID> directory.
Note: You can use these files generated by RREG to generate a
certificate request and to get it signed by a third-party Certification
Authority. To install an existing certificate, you must use the existing
aaa_cert.pem and aaa_chain.pem files along with
password.xml and aaa_key.pem.

Getting Started with a New Oracle HTTP Server 11g Webgate Agent for Oracle Access Manager
Installing and Configuring Oracle HTTP Server 11g Webgate for OAM 22-13
22.6.2 Copy Generated Files and Artifacts to the Webgate Instance Location
After RREG generates these files and artifacts, you must manually copy them
(cwallet.sso, ObAccessClient.xml, password.xml, aaa_key.pem,
aaa_cert.pem, based on the security mode you are using) from the <RREG_
Home>/output/<Agent ID> directory to the <Webgate_Instance_Home>
directory.
In OPEN mode, copy the following files from the <RREG_Home>/output/<Agent_
ID> directory to the <Webgate_Instance_Home>/webgate/config directory:
■ObAccessClient.xml
■cwallet.sso
In SIMPLE mode, copy the following files from the <RREG_
Home>/output/<Agent_ID> directory to the <Webgate_Instance_
Home>/webgate/config directory:
■ObAccessClient.xml
■cwallet.sso
■password.xml
In addition, copy the following files from the <RREG_Home>/output/<Agent_ID>
directory to the <Webgate_Instance_Home>/webgate/config/simple
directory:
■aaa_key.pem
■aaa_cert.pem
In CERT mode, copy the following files from the <RREG_Home>/output/<Agent_
ID> directory to the <Webgate_Instance_Home>/webgate/config directory:
■ObAccessClient.xml
■cwallet.sso
■password.xml
After copying the files, you must either generate a new certificate or migrate an
existing certificate.
Generating a New Certificate
You can generate a new certificate as follows:
1. From your present working directory, move to the <Webgate_
Home>/webgate/ohs/tools/openssl directory.
2. On the command line, create a certificate request as follows:
./openssl req -utf8 -new -nodes -config openssl_silent_
ohs11g.cnf -keyout aaa_key.pem -out aaa_req.pem -rand
<Webgate_Home>/webgate/ohs/config/random-seed
3. Self-sign the certificate as follows:
./openssl ca -config openssl_silent_ohs11g.cnf -policy
policy_anything -batch -out aaa_cert.pem -infiles aaa_req.pem
4. Copy the following generated certificates to the <Webgate_Instance_
Home>/webgate/config directory:
■aaa_key.pem

Getting Started with a New Oracle HTTP Server 11g Webgate Agent for Oracle Access Manager
22-14 Oracle Fusion Middleware Installation Guide for Oracle Identity Management
■aaa_cert.pem
■cacert.pem located in the simpleCA directory
Migrating an Existing Certificate
If you want to migrate an existing certificate (aaa_key.pem, aaa_cert.pem, and
aaa_chain.pem), be sure to remember the passphrase that you used to encrypt aaa_
key.pem. You must enter the same passphrase during the RREG registration process.
If you do not use the same passphrase, the password.xml file generated by RREG
does not match the paraphrase used to encrypt the key.
If you enter the same passphrase, you can copy these certificates as follows:
1. From your present working directory, move to the <Webgate_Instance_
Home>/webgate/config directory.
2. Copy the following certificates to the <Webgate_Instance_
Home>/webgate/config directory:
■aaa_key.pem
■aaa_cert.pem
■aaa_chain.pem
22.6.3 Restart the Oracle HTTP Server Instance
You can use the Oracle Process Manager and Notification Server (OPMN)
command-line tool to start or stop your Oracle HTTP Server instance. If any instances
are running, run the following command on the command-line to stop all running
instances:
<Oracle_Home_for_Oracle_HTTP_Server>/opmn/bin/opmnctl stopall
To restart the Oracle HTTP Server instance, run the following commands on the
command line:
1. <Oracle_Home_for_Oracle_HTTP_Server>/opmn/bin/opmnctl start
2. <Oracle_Home_for_Oracle_HTTP_Server>/opmn/bin/opmnctl
startproc ias-component=<Oracle_HTTP_Server_Instance_Name>
Note: After copying the cacert.pem file, you must rename the file
to aaa_chain.pem.

23
Lifecycle Management 23-1
23 Lifecycle Management
This chapter explains how to address situations where a lifecycle change event occurs
for an Oracle Identity and Access Management component that is integrated with one
or more components.
Topics include:
■How Lifecycle Events Impact Integrated Components
■LCM for Oracle Identity Manager
■LCM for Oracle Access Manager
■LCM for Oracle Adaptive Access Manager
■LCM for Oracle Identity Navigator
■References
23.1 How Lifecycle Events Impact Integrated Components
Following are ways in which certain lifecycle events, sometimes referred to as
rewiring, affect a component that is already integrated with others:
■Reassociation
The hostname or port of an integrated component is reassociated. For example, the
hostname of an OVD server changes.
■Test to Production
When entities in a test or pilot environment are migrated into a pre-installed
production environment, this can affect dependent components. For example,
moving Oracle Identity Manager Navigator to a new production environment.
23.2 LCM for Oracle Identity Manager
Lifecycle management events for Oracle Identity Manager include:
■reassociation when the host or port changes for these components:
–Oracle Virtual Directory
Note: For some components, "rewiring" to achieve Test to
Production is not feasible, and it is advisable to simply create a new
production instance of the server. Oracle Identity Federation is an
example of a server that is freshly installed in the production
environment rather than changing the test configuration.

LCM for Oracle Access Manager
23-2 Oracle Fusion Middleware Installation Guide for Oracle Identity Management
–Oracle SOA Suite
–MDS
■moving metadata from a test environment to a production environment
Refer to the following sources for lifecycle management procedures relating to OIM:
■"Oracle Virtual Directory Host and Port Changes" in the Oracle Fusion Middleware
System Administrator's Guide for Oracle Identity Manager
■"Changing OVD Password" in the Oracle Fusion Middleware System Administrator's
Guide for Oracle Identity Manager
■"SPML Client Host and Port Changes" in the Oracle Fusion Middleware System
Administrator's Guide for Oracle Identity Manager
■"SOA Host and Port Changes" in the Oracle Fusion Middleware System
Administrator's Guide for Oracle Identity Manager
■"Oracle Identity Manager Database Host and Port Changes" in the Oracle Fusion
Middleware System Administrator's Guide for Oracle Identity Manager
■"Oracle Identity Manager (OIM) Rewiring with Existing Oracle Adaptive Access
Manager (OAAM)" in the Oracle Fusion Middleware Developer's Guide for Oracle
Adaptive Access Manager
■"Changing Oracle Identity Manager Database Password" in the Oracle Fusion
Middleware System Administrator's Guide for Oracle Identity Manager
■"Configuring LDAP Adapters" in the Oracle Fusion Middleware Administrator's
Guide for Oracle Virtual Directory
■"Adding a Component Link to the Product Launcher by Using Product Discovery"
in the Oracle Fusion Middleware Administrator's Guide for Oracle Identity Navigator
■"Editing Adapter Plug-Ins" in the Oracle Fusion Middleware Administrator's Guide for
Oracle Virtual Directory
■"Move Oracle Identity Manager to a New Production Environment" in the Oracle
Fusion Middleware Administrator's Guide
■"Move Oracle Identity Manager to an Existing Production Environment" in the
Oracle Fusion Middleware Administrator's Guide
23.3 LCM for Oracle Access Manager
Lifecycle events for Oracle Access Manager include replicating the policy
configuration information from the test system into production.
Refer to the following sources for lifecycle management procedures relating to OAM:
■"Adding a Component Link to the Product Launcher by Using Product Discovery"
in the Oracle Fusion Middleware Administrator's Guide for Oracle Identity Navigator
■"Moving OAM 11g Data from a Test to a Production Deployment" in the Oracle
Fusion Middleware Administrator's Guide for Oracle Access Manager
23.4 LCM for Oracle Adaptive Access Manager
Lifecycle events for Oracle Adaptive Access Manager include reassociation when the
host or port changes for the following components:
■Oracle Virtual Directory

References
Lifecycle Management 23-3
■Oracle Internet Directory
■Oracle Database
■Oracle Identity Manager
Refer to the following sources for lifecycle management procedures relating to OAAM:
■"Adding a Component Link to the Product Launcher by Using Product Discovery"
in the Oracle Fusion Middleware Administrator's Guide for Oracle Identity Navigator
■"Oracle Virtual Directory (OVD) Rewiring with Existing Oracle Adaptive Access
Manager (OAAM)" in the Oracle Fusion Middleware Developer's Guide for Oracle
Adaptive Access Manager
■"Oracle Identity Manager (OIM) Rewiring with Existing Oracle Adaptive Access
Manager (OAAM)" in the Oracle Fusion Middleware Developer's Guide for Oracle
Adaptive Access Manager
■"OID Rewiring with Existing OAAM (in Cases without OVD)" in the Oracle Fusion
Middleware Developer's Guide for Oracle Adaptive Access Manager
■"Database Rewiring with Existing OAAM" in the Oracle Fusion Middleware
Developer's Guide for Oracle Adaptive Access Manager
■"Move Oracle Adaptive Access Manager to a New Production Environment" in the
Oracle Fusion Middleware Administrator's Guide
■"Move Oracle Adaptive Access Manager to an Existing Production Environment"
in the Oracle Fusion Middleware Administrator's Guide
23.5 LCM for Oracle Identity Navigator
Lifecycle events for Oracle Identity Navigator include migrating from test to
production, and rewiring the integration with Oracle Business Intelligence Publisher.
Refer to the following sources for lifecycle management procedures relating to OIN:
■"Migrating Oracle Identity Navigator from Test to Production" in the Oracle Fusion
Middleware Administrator's Guide for Oracle Identity Navigator.
■"Configuring Oracle Business Intelligence Publisher" in the Oracle Fusion
Middleware Administrator's Guide for Oracle Identity Navigator.
■"Adding a Component Link to the Product Launcher by Using Product Discovery"
in the Oracle Fusion Middleware Administrator's Guide for Oracle Identity Navigator
■"Migrating Oracle Identity Navigator from Test to Production" in the Oracle Fusion
Middleware Administrator's Guide for Oracle Identity Navigator
23.6 References
For additional information about lifecycle management in Oracle Fusion Middleware,
see "Part V Advanced Administration: Expanding Your Environment" in the Oracle
Fusion Middleware Administrator's Guide.

References
23-4 Oracle Fusion Middleware Installation Guide for Oracle Identity Management

Part IV
Part IV
Appendixes
Part IV contains the following appendixes:
■Appendix A, "Oracle Identity Management 11.1.1.6.0 Software Installation
Screens"
■Appendix B, "Oracle Identity and Access Management 11.1.1.5.0 Software
Installation Screens"
■Appendix C, "Oracle Identity Manager Configuration Screens"
■Appendix D, "Starting or Stopping the Oracle Stack"
■Appendix E, "Preconfiguring Oracle Directory Server Enterprise Edition (ODSEE)"
■Appendix F, "Deinstalling and Reinstalling Oracle Identity Management"
■Appendix G, "Deinstalling and Reinstalling Oracle Identity and Access
Management"
■Appendix H, "Performing Silent Installations"
■Appendix I, "Troubleshooting the Installation"
■Appendix J, "OAAM Partition Schema Reference"
■Appendix K, "Software Deinstallation Screens"

Oracle Identity Management 11.1.1.6.0 Software Installation Screens A-1
A
Oracle Identity Management 11.1.1.6.0
Software Installation Screens
This appendix describes the screens of the Oracle Identity Management 11g software
Installation and Wizard that enables you to install and configure Oracle Internet
Directory, Oracle Virtual Directory, Oracle Directory Services Manager, Oracle
Directory Integration Platform, and Oracle Identity Federation.
It contains the following topics:
■Welcome
■Install Software Updates
■Select Installation Type
■Prerequisite Checks
■Select Domain
■Specify Installation Location
■Specify Security Updates
■Configure Components
■Configure Ports
■Specify Schema Database
■Specify Oracle Virtual Directory Information
■Specify OID Administrator Password
■Select Oracle Identity Federation Configuration Type
■Specify Oracle Identity Federation Details
■Installation Summary
■Installation Progress
■Configuration Progress
■Installation Complete
A.1 Welcome
The Welcome screen is displayed each time you start the Oracle Identity Management
11g Installer wizard.

Install Software Updates
A-2 Oracle Fusion Middleware Installation Guide for Oracle Identity Management
Figure A–1 Welcome Screen
Click Next to continue.
A.2 Install Software Updates
This screen enables you to search for and install software updates before you install
Oracle Identity Management.

Oracle Identity Management 11.1.1.6.0 Software Installation Screens A-3
Figure A–2 Install Software Updates Screen
To get updates from My Oracle Support, you can select Search My Oracle Support for
Updates, specify a user name and password, and then click Search for Updates.
Before you search, you can click Proxy Settings to change the settings for the proxy
server and Test Connection to test the credentials.
To get updates that you have saved to your computer, you can select Search Local
Directory for Updates, specify a directory, and then click Search for Updates.
If you do not want to update any software, you can select Skip Software Updates. The
link on the left changes from My Oracle Support Updates to Skip Software Updates.
Click Next to start the software updates or continue the installation.
A.3 Select Installation Type
This screen enables you to select the installation type.
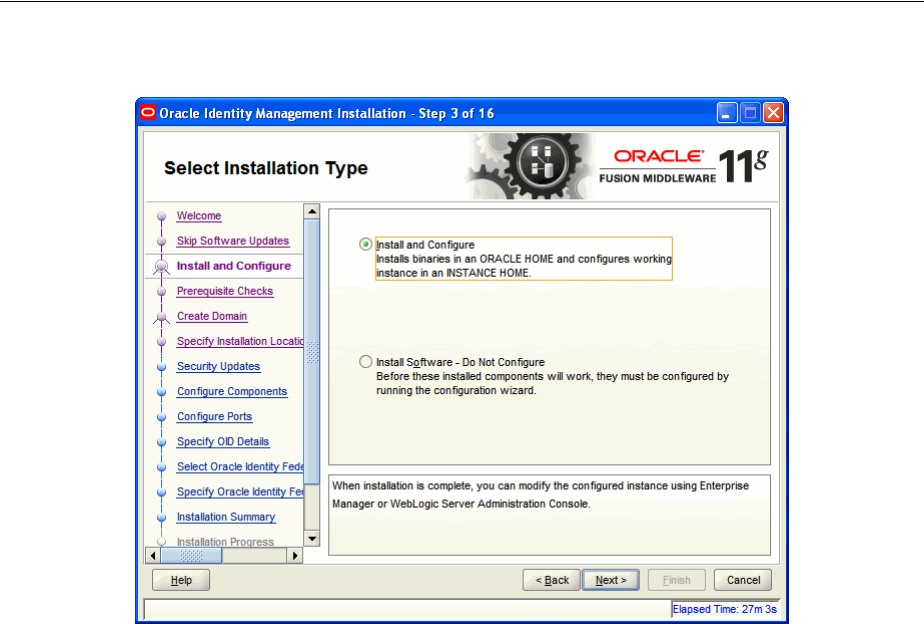
Prerequisite Checks
A-4 Oracle Fusion Middleware Installation Guide for Oracle Identity Management
Figure A–3 Select Installation Type Screen
The Select Installation Type screen presents two options: Install and Configure and
Install Software - Do Not Configure.
■Choose the Install and Configure option to install Oracle Identity Management
components and simultaneously configure some of their fundamental elements,
such as passwords, user names, and so on. Oracle Identity Management
components start running and are immediately ready for use after deploying them
using the Install and Configure option.
■Choose the Install Software - Do Not Configure option to install Oracle Identity
Management components without configuring them during installation. If you
choose the Install Software - Do Not Configure option, the Installer installs the
component software and then closes. Oracle Identity Management components
will not start running after deploying them using the Install Software - Do Not
Configure option, as additional configuration is needed.
After you install components using the Install Software - Do Not Configure
option, you can configure them at a later time using the Oracle Identity
Management 11g Release 1 (11.1.1.6.0) Configuration Wizard. To start the Oracle
Identity Management 11g Release 1 (11.1.1.6.0) Configuration Wizard, execute the
ORACLE_HOME/bin/config.sh script (config.bat on Windows).
Click Next to continue.
A.4 Prerequisite Checks
The installation program ensures that you have a certified version, the correct software
packages, sufficient space and memory to perform the operations that you have
selected. If any issues are detected, errors appear on this page.
The following example screen applies to Windows operating systems only.
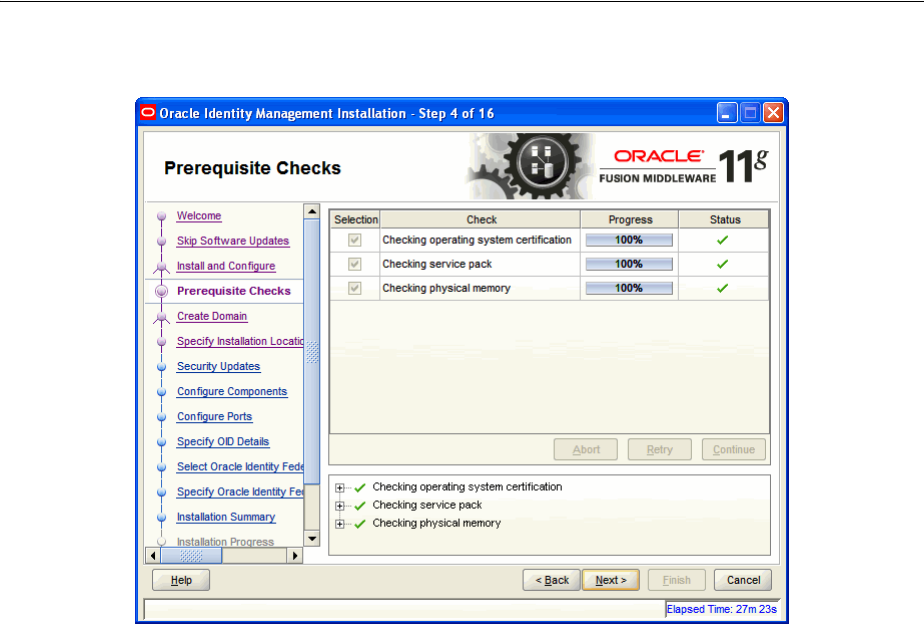
Oracle Identity Management 11.1.1.6.0 Software Installation Screens A-5
Figure A–4 Prerequisite Checks Screen
On this screen, you can select to Abort, Retry, or Continue with the installation.
If all the prerequisite checks pass inspection, click Next to continue.
A.5 Select Domain
This screen allows you to select the Domain. Select one of the following options:
■Option 1: Create New Domain
■Option 2: Extend Existing Domain
■Option 3: Expand Cluster
■Option 4: Configure Without a Domain
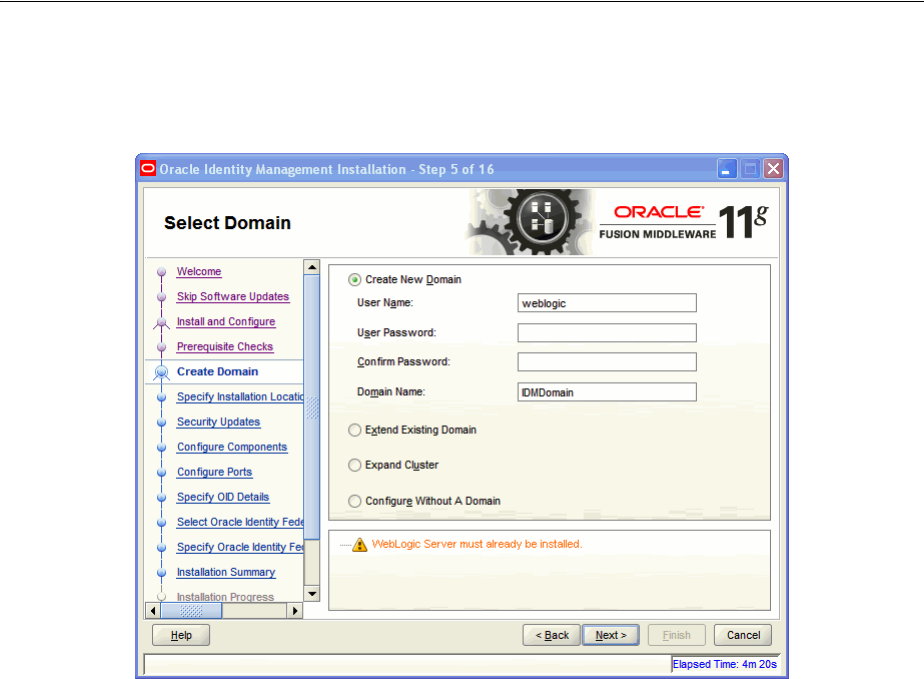
Select Domain
A-6 Oracle Fusion Middleware Installation Guide for Oracle Identity Management
Option 1: Create New Domain
Figure A–5 Create New Domain option
Enter the User Name, User Password, and Domain Name for the domain you want to
create.
Click Next to continue.
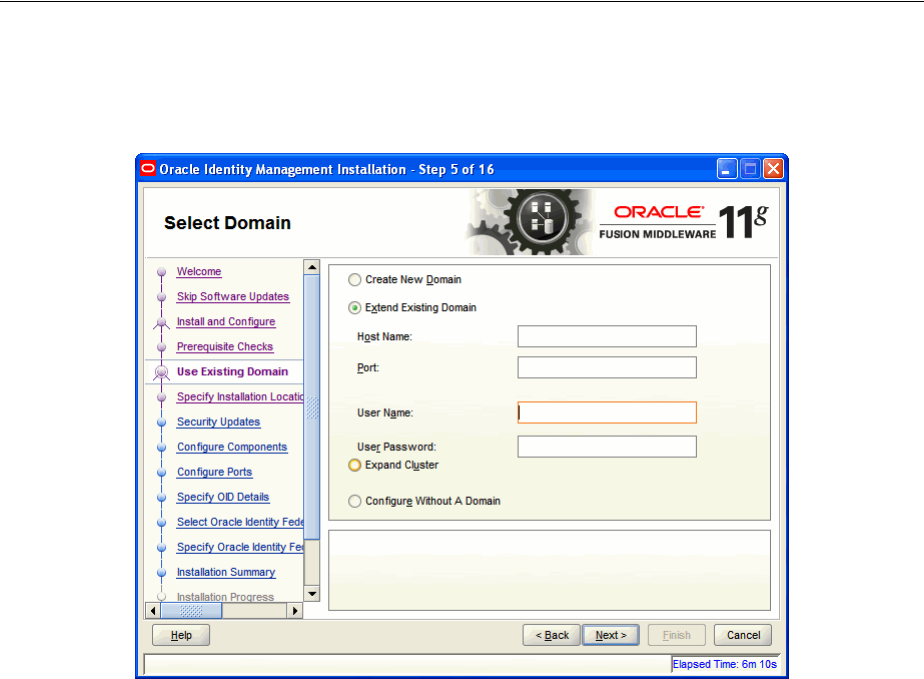
Oracle Identity Management 11.1.1.6.0 Software Installation Screens A-7
Option 2: Extend Existing Domain
Figure A–6 Extend Existing Domain option
Enter the Host Name, Port, User Name, and User Password for the existing domain
you want to extend into.
Click Next to continue.
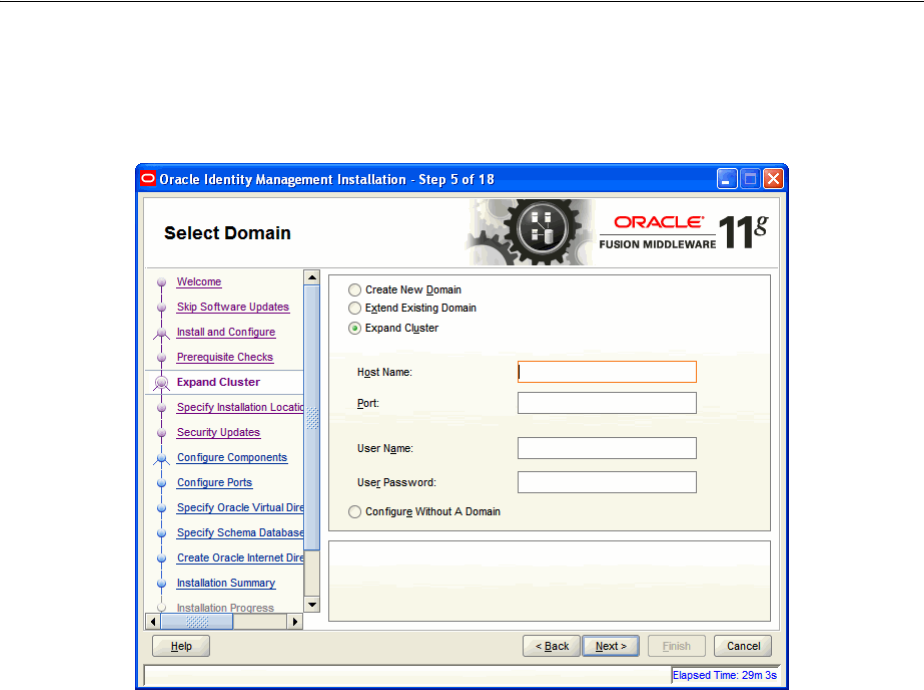
Specify Installation Location
A-8 Oracle Fusion Middleware Installation Guide for Oracle Identity Management
Option 3: Expand Cluster
Figure A–7 Expand Cluster option
Enter the information for the existing cluster you want to expand your Oracle Identity
Management installation into. Enter the Host Name, Port, User Name, and User
Password for cluster inclusion.
Click Next to continue.
Option 4: Configure Without a Domain
If you select this option, you will not be creating or extending the domain of your
installation.
Click Next to continue.
A.6 Specify Installation Location
This screen allows you to enter a location for the new Oracle Identity Management 11g
software being installed.
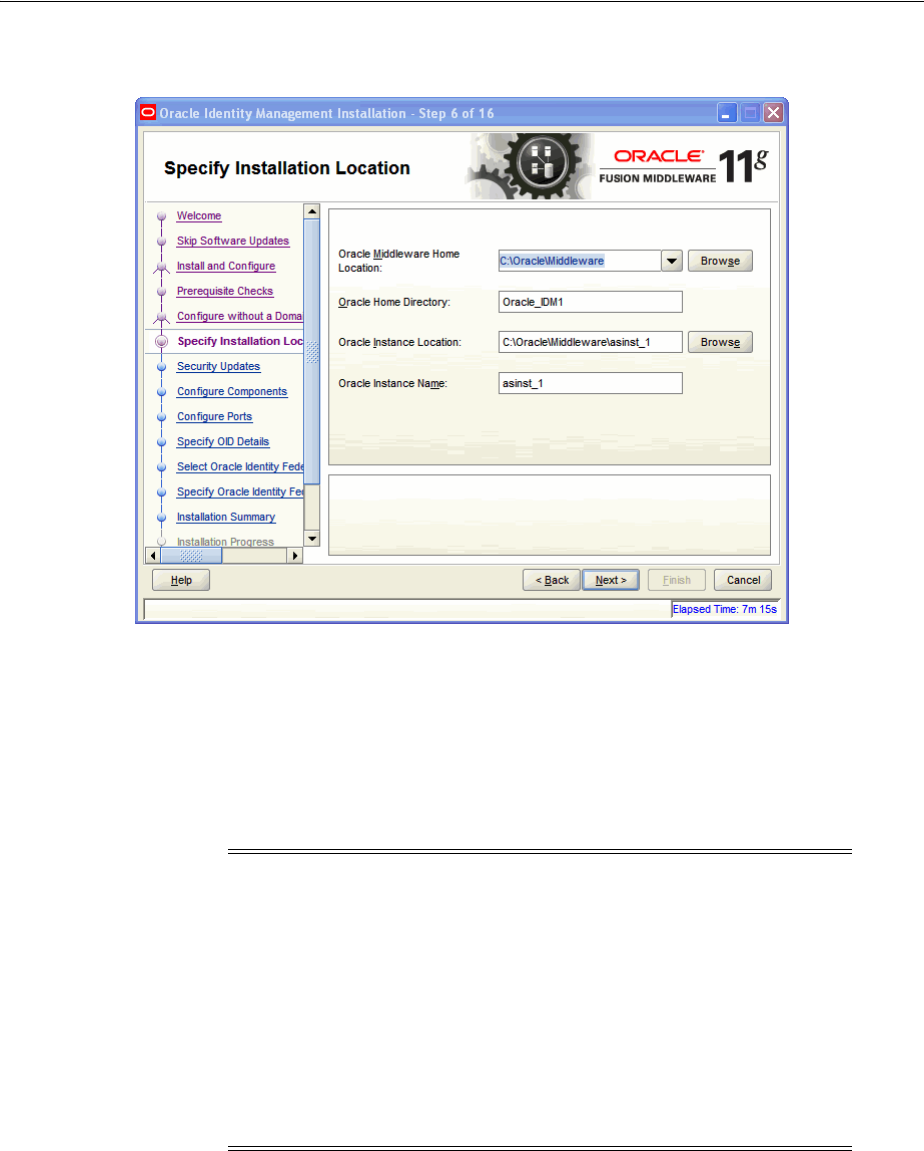
Oracle Identity Management 11.1.1.6.0 Software Installation Screens A-9
Figure A–8 Specify Installation Location Screen
Ensure that Oracle WebLogic Server is already installed on your machine. Navigate to
the Oracle Fusion Middleware Home directory by clicking Browse. Enter a name for
the new Oracle Home directory for Oracle Identity Management 11g components.
If the Middleware location does not exist, you must install WebLogic Server and create
a Middleware Home directory, as described in Installing Oracle WebLogic Server and
Creating the Oracle Middleware Home, before running the Oracle Identity
Management Installer.
Click Next to continue.
A.7 Specify Security Updates
This screen allows you to provide your E-mail address to be informed of the latest
product issues.
Note: If you do not specify a valid Middleware Home directory on
the Specify Installation Location screen, the Installer displays a
message and prompts you to confirm whether you want to proceed
with the installation of only Oracle Identity Manager Design Console
and Oracle Identity Manager Remote Manager. These two
components of Oracle Identity Manager do not require a Middleware
Home directory.
If you want to install only Oracle Identity Manager Design Console or
Remote Manager, you do not need to install Oracle WebLogic Server
or create a Middleware Home directory on the machine where Design
Console or Remote Manager is being configured.
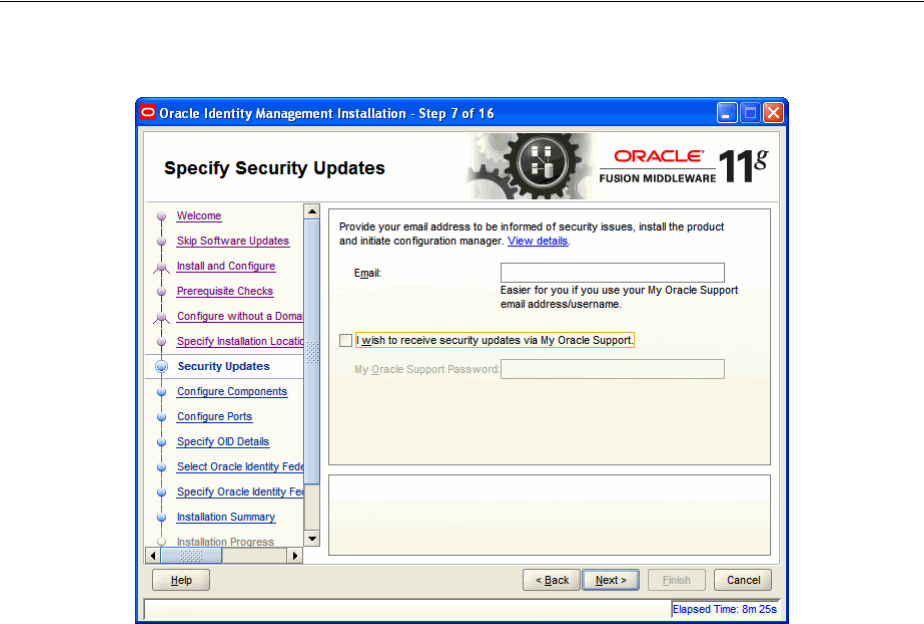
Configure Components
A-10 Oracle Fusion Middleware Installation Guide for Oracle Identity Management
Figure A–9 Specify Security Updates Screen
Click Next to continue.
A.8 Configure Components
This screen allows you to select the Oracle Identity Management components that you
wish to install and configure.
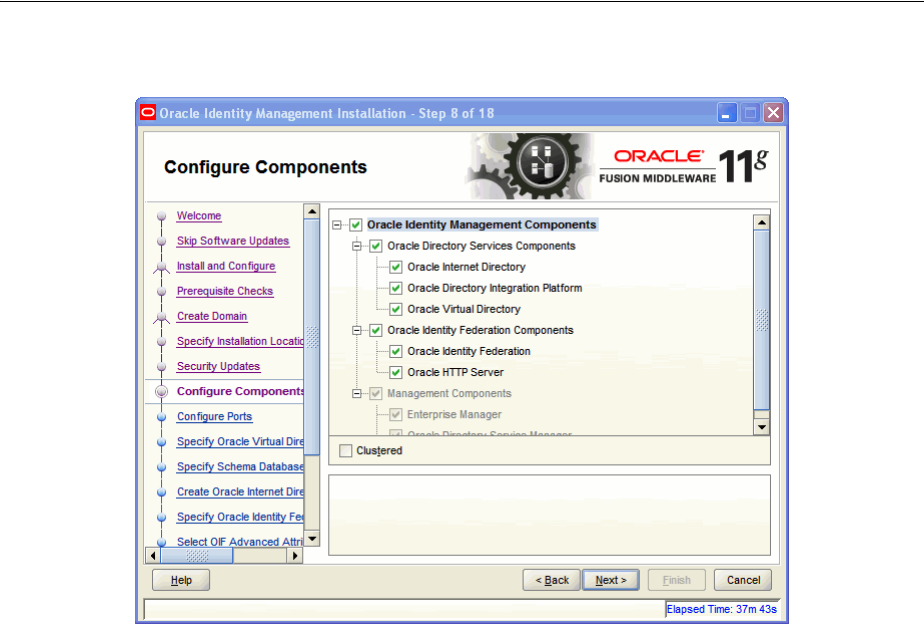
Oracle Identity Management 11.1.1.6.0 Software Installation Screens A-11
Figure A–10 Configure Components Screen
Click Next to continue.
A.9 Configure Ports
This screen allows you to choose how you want the Installer to configure ports.
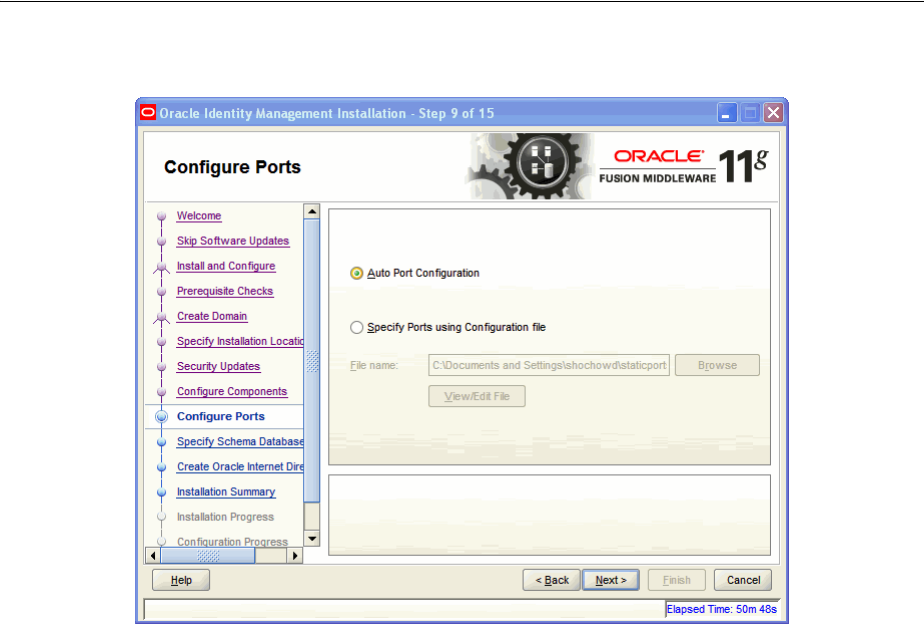
Specify Schema Database
A-12 Oracle Fusion Middleware Installation Guide for Oracle Identity Management
Figure A–11 Configure Ports Screen
The screen presents two options:
■Select Auto Port Configuration if you want the Installer to configure ports from a
predetermined range.
■Select Specify Ports using Configuration File if you want the Installer to
configure ports using the staticports.ini file. You can click View/Edit File to
update the settings in the staticports.ini file.
Click Next to continue.
A.10 Specify Schema Database
This screen is displayed if you selected Oracle Internet Directory. This screen allows
you to choose whether to use an existing schema or to create a new one using the
Installer.
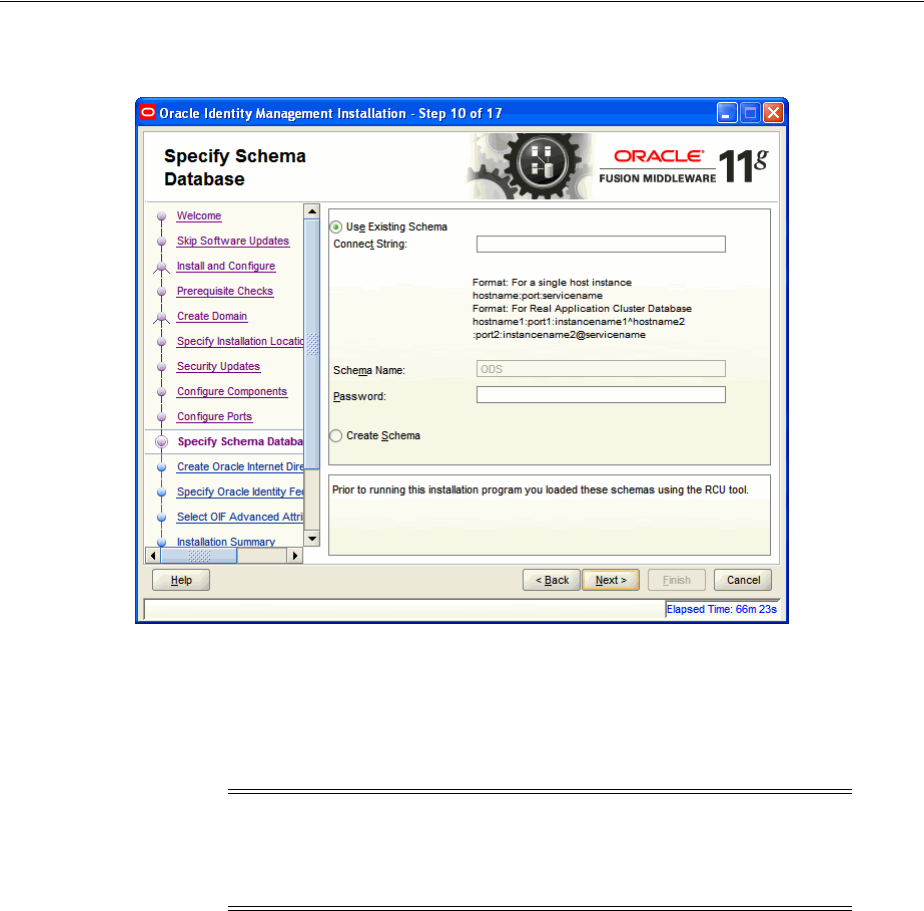
Oracle Identity Management 11.1.1.6.0 Software Installation Screens A-13
Figure A–12 Specify Schema Database Screen
This figure shows the Specify Schema Database screen in the Oracle Identity
Management software Installer.
***********************************************************************************************
The Specify Schema Database screen presents two options:
■Use Existing Schema
To use an existing schema:
1. Select Use Existing Schema.
2. Enter the database connection information in the Connect String field. The
connection string must be in the form of hostname:port:servicename.
For Oracle Real Application Clusters (RAC), the connection string must be in
the form of
hostname1:port1:instance1^hostname2:port2:instance2@servic
ename.
3. Enter the password for the existing ODS schema in the Password field.
4. Click Next to continue.
Note: If you want to use an existing schema, it must currently reside
in the database to continue with the installation. If it does not
currently reside in the database, you must create it now using the
Oracle Fusion Middleware Repository Creation Utility.

Specify Oracle Virtual Directory Information
A-14 Oracle Fusion Middleware Installation Guide for Oracle Identity Management
■Create Schema
To create a new schema:
1. Select Create Schema.
2. Enter the database connection information in the Connect String field. The
connection string must be in the form of hostname:port:servicename.
For Oracle Real Application Clusters (RAC), the connection string must be in
the form of
hostname1:port1:instance1^hostname2:port2:instance2@servic
ename.
3. Enter the name of the database user in the User Name field. The user you
identify must have DBA privileges.
4. Enter the password for the database user in the Password field.
5. Click Next. The Enter OID Passwords screen appears.
6. Create a password for the new ODS schema by entering it in the ODS Schema
Password field.
Enter it again in the Confirm ODS Schema Password field.
7. Create a password for the new ODSSM schema by entering it in the ODSSM
Schema Password field.
Enter it again in the Confirm ODSSM Schema Password field.
8. Click Next to continue.
A.11 Specify Oracle Virtual Directory Information
This screen is displayed if you selected Oracle Virtual Directory. This screen allows
you to specify Oracle Virtual Directory information.
Note: If your existing ODS and ODSSM schemas have different
passwords, the Specify ODSSM Password screen will appear after you
click Next. Enter the password for your existing ODSSM schema and
click Next.
Note: If you are using Oracle Database 11g Release 2 (11.2) or higher
version, the database user should be only 'SYS'.
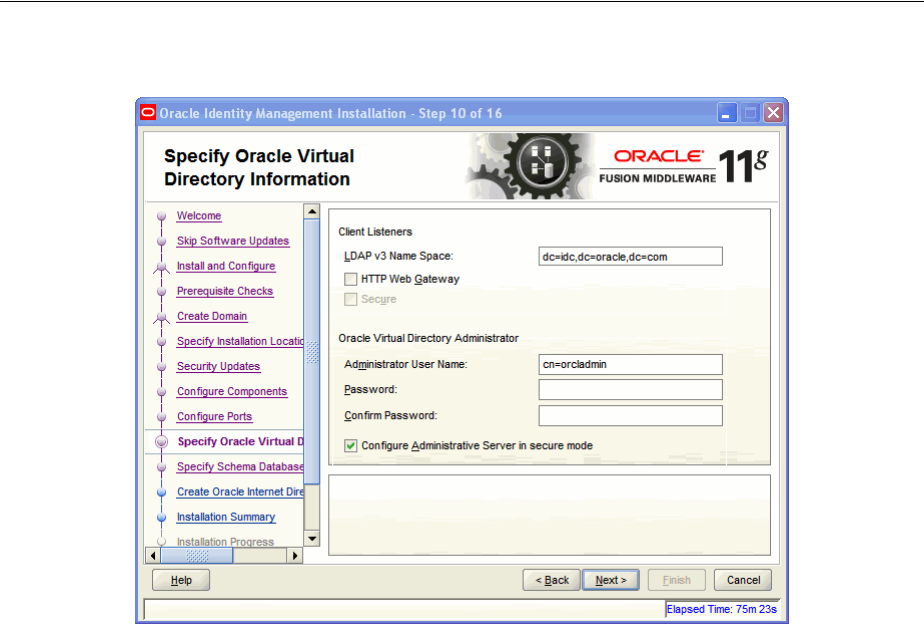
Oracle Identity Management 11.1.1.6.0 Software Installation Screens A-15
Figure A–13 Specify Oracle Virtual Directory Information Screen
This figure shows the Specify Oracle Virtual Directory Information screen in the
Oracle Identity Management software Installer.
***********************************************************************************************
Enter the following information:
■LDAP v3 Name Space: Enter the name space for Oracle Virtual Directory. The
default value is dc=us,dc=oracle,dc=com.
■HTTP Web Gateway: Select this option to enable the Oracle Virtual Directory
HTTP Web Gateway.
■Secure: Select this option if you enabled the HTTP Web Gateway and you want to
secure it using SSL.
■Administrator User Name: Enter the user name for the Oracle Virtual Directory
administrator. The default value is cn=orcladmin.
■Password: Enter the password for the Oracle Virtual Directory administrator.
■Confirm Password: Enter the password for the Oracle Virtual Directory
administrator again.
■Configure Administrative Server in secure mode: Select this option to secure the
Oracle Virtual Directory Administrative Listener using SSL. This option is selected
by default. Oracle recommends selecting this option.
Click Next to continue.
A.12 Specify OID Administrator Password
This screen is displayed if you selected Oracle Internet Directory.
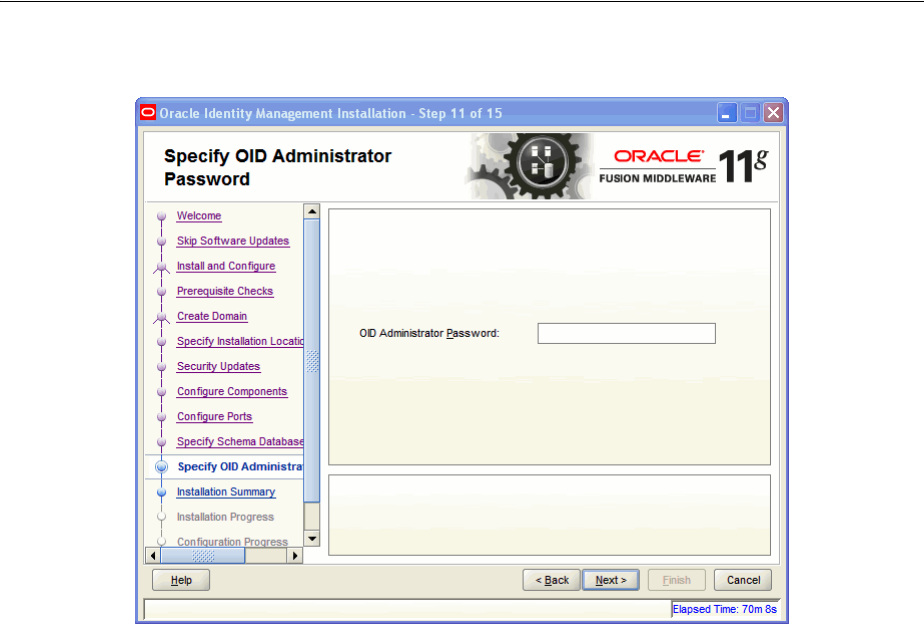
Select Oracle Identity Federation Configuration Type
A-16 Oracle Fusion Middleware Installation Guide for Oracle Identity Management
Figure A–14 Specify OID Administrator Password Screen
This figure shows the Specify OID Administrator Password screen in the Oracle
Identity Management software Installer.
***********************************************************************************************
Enter the password for the Oracle Internet Directory administrator.
Click Next to continue.
A.13 Select Oracle Identity Federation Configuration Type
This screen is displayed if you selected Oracle Identity Federation.
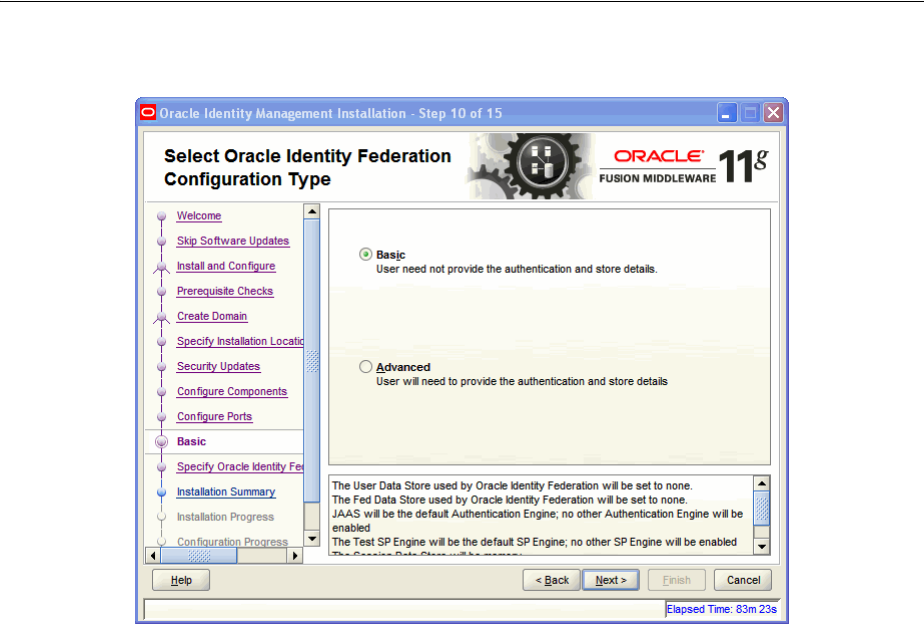
Oracle Identity Management 11.1.1.6.0 Software Installation Screens A-17
Figure A–15 Select Oracle Identity Federation Configuration Type Screen
This figure shows the Select Oracle Identity Federation Configuration Type screen in
the Oracle Identity Management software Installer.
***********************************************************************************************
Select one of the following configuration types:
■Basic: You do not need to choose the datastore and authentication engine types or
specify the connection details for Oracle Identity Federation.
■Advanced: This option will enable you to choose the configuration types for the
datastores, the authentication engine, and specify the connection details datastores
and authentication engine.
Click Next to continue.
A.14 Specify Oracle Identity Federation Details
This screen is displayed if you selected Oracle Identity Federation.
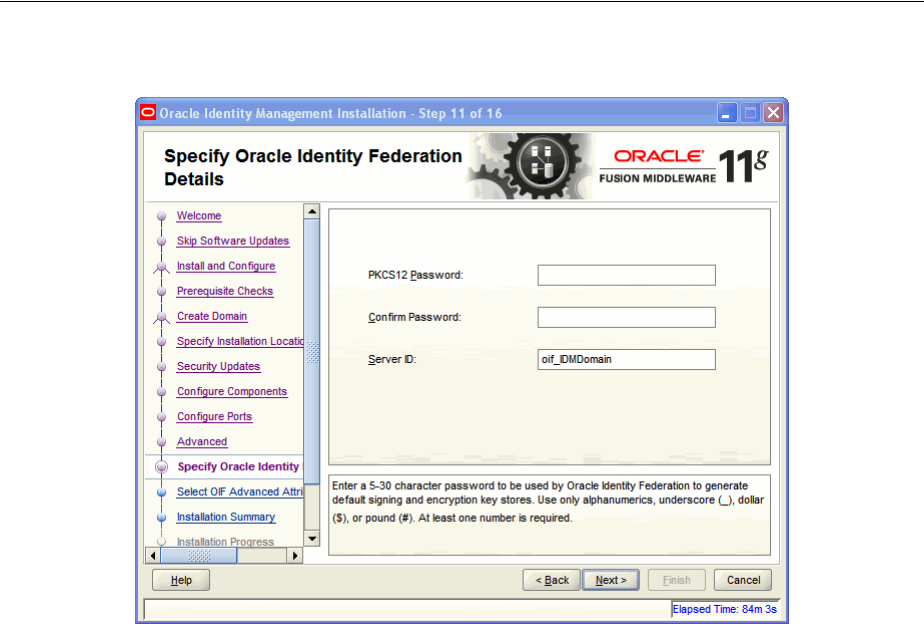
Installation Summary
A-18 Oracle Fusion Middleware Installation Guide for Oracle Identity Management
Figure A–16 Specify Oracle Identity Federation Details Screen
This figure shows the Specify Oracle Identity Federation Details screen in the Oracle
Identity Management software Installer.
***********************************************************************************************
Enter the following information:
■PKCS12 Password: Enter the password Oracle Identity Federation will use for
encryption and for signing wallets. The Installer automatically generates these
wallets with self-signed certificates. Oracle recommends using the wallets only for
testing.
■Confirm Password: Enter the PKCS12 password again.
■Server ID: Enter a string that will be used to identify this Oracle Identity
Federation instance. A prefix oif will be added to the beginning of the string you
enter. Each logical Oracle Identity Federation instance within an Oracle WebLogic
Server administration domain must have a unique Server ID. Clustered Oracle
Identity Federation instances acting as a single logical instance will have the same
Server ID.
Click Next to continue.
A.15 Installation Summary
This screen displays a summary of your Oracle Identity Management 11g installation.
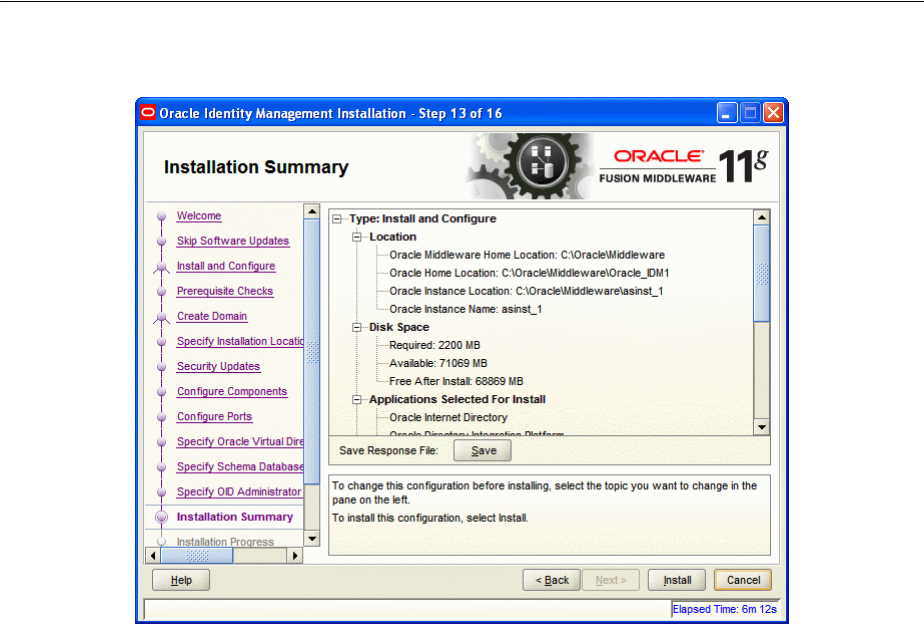
Oracle Identity Management 11.1.1.6.0 Software Installation Screens A-19
Figure A–17 Installation Summary Screen
Review the contents of this screen, and click Install to start installing the Oracle
Identity Management 11g software.
A.16 Installation Progress
This screen displays the progress of the Oracle Identity Management installation.

Configuration Progress
A-20 Oracle Fusion Middleware Installation Guide for Oracle Identity Management
Figure A–18 Installation Progress Screen
If you want to quit before the installation is completed, click Cancel. The installation
progress indicator gives a running inventory of the files that are being installed. If you
are only installing the software binaries, installation is complete after all of the binaries
have been installed.
Click Next to continue.
A.17 Configuration Progress
This screen displays the progress of the Oracle Identity Management configuration.
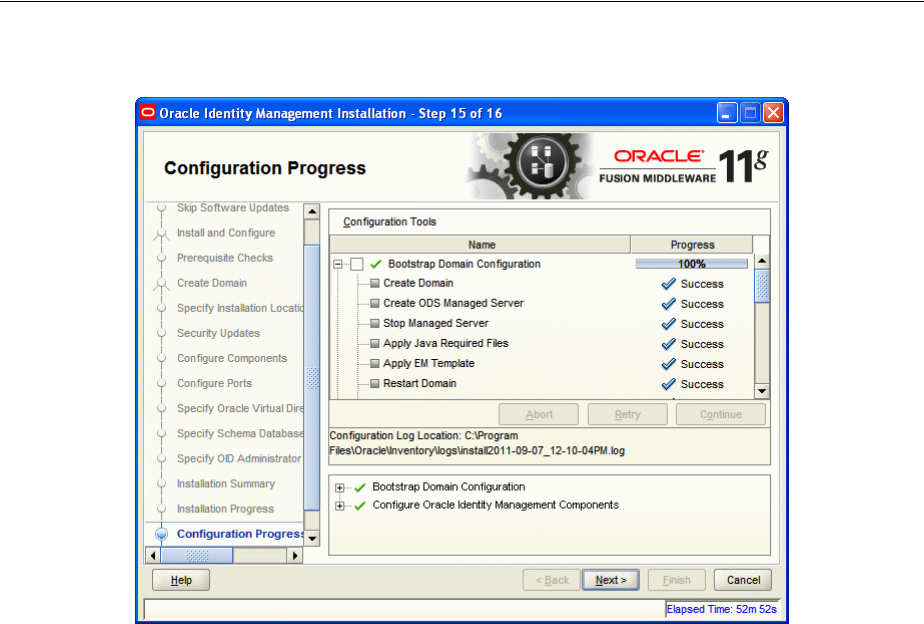
Oracle Identity Management 11.1.1.6.0 Software Installation Screens A-21
Figure A–19 Configuration Progress Screen
If you want to abort the configuration before the configuration is completed, click
Abort. If you want to retry the configuration, click Retry.
Click Next to continue.
A.18 Installation Complete
This screen displays a summary of the installation parameters, such as Location, Disk
Space, and Applications. To save the installation configuration in a response file,
which is used to perform silent installations, click Save.
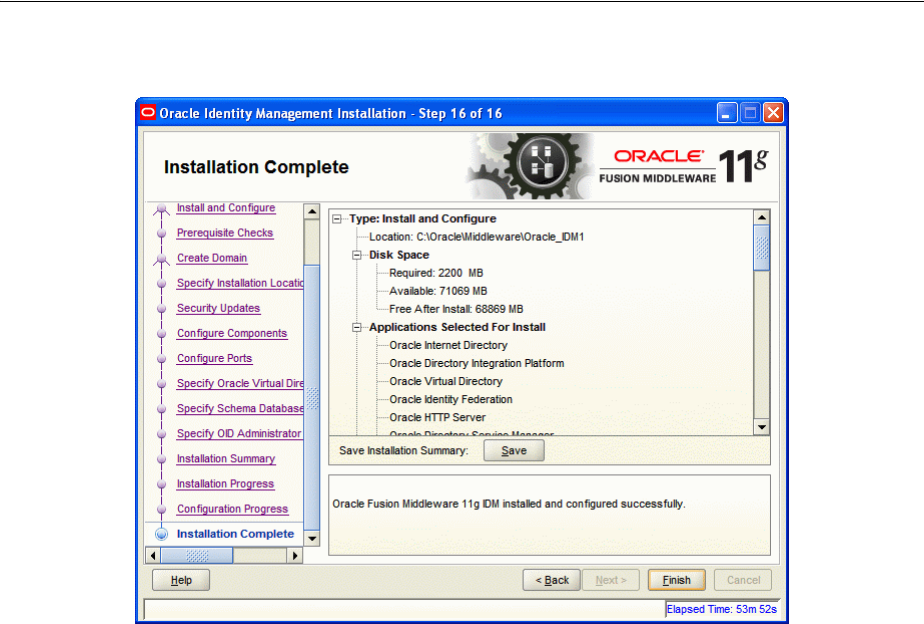
Installation Complete
A-22 Oracle Fusion Middleware Installation Guide for Oracle Identity Management
Figure A–20 Installation Complete Screen
Click Finish to complete the installation process.

Oracle Identity and Access Management 11.1.1.5.0 Software Installation Screens B-1
B
Oracle Identity and Access Management
11.1.1.5.0 Software Installation Screens
This appendix describes the screens of the Oracle Identity and Access Management
11g software Installation Wizard that enables you to install Oracle Identity Manager,
Oracle Access Manager, Oracle Adaptive Access Manager, Oracle Entitlements Server,
and Oracle Identity Navigator.
It contains the following topics:
■Welcome
■Install Software Updates
■Prerequisite Checks
■Specify Installation Location
■Installation Summary
■Installation Progress
■Installation Complete
B.1 Welcome
The Welcome screen is displayed each time you start the Oracle Identity and Access
Management 11g Installer wizard.
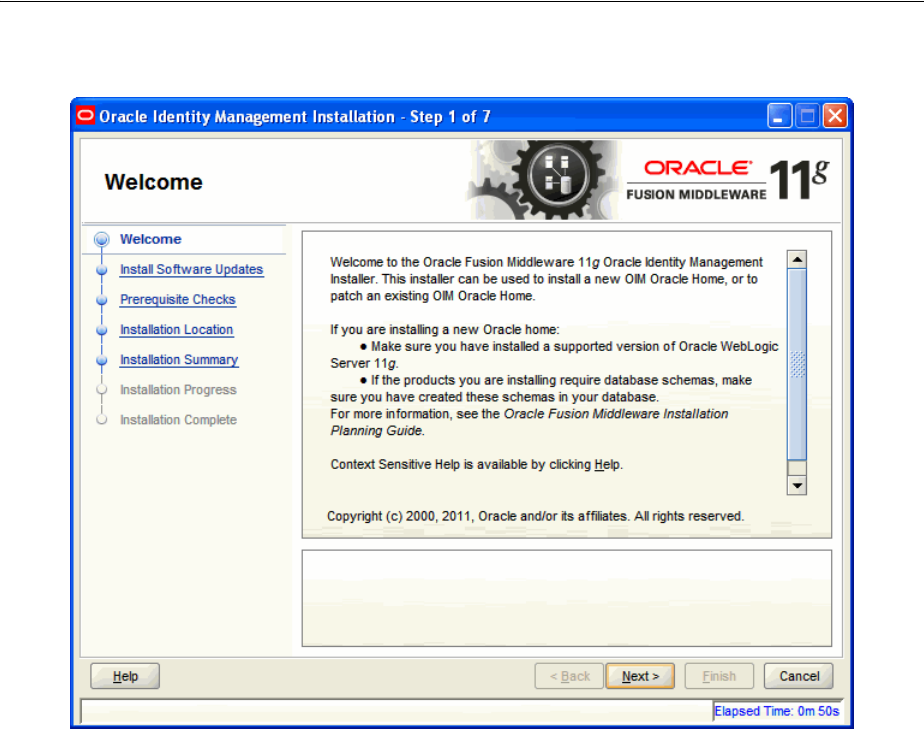
Install Software Updates
B-2 Oracle Fusion Middleware Installation Guide for Oracle Identity Management
Figure B–1 Welcome Screen
Click Next to continue.
B.2 Install Software Updates
This screen helps to quickly and easily search for the latest software updates,
including important security updates, via your My Oracle Support account.
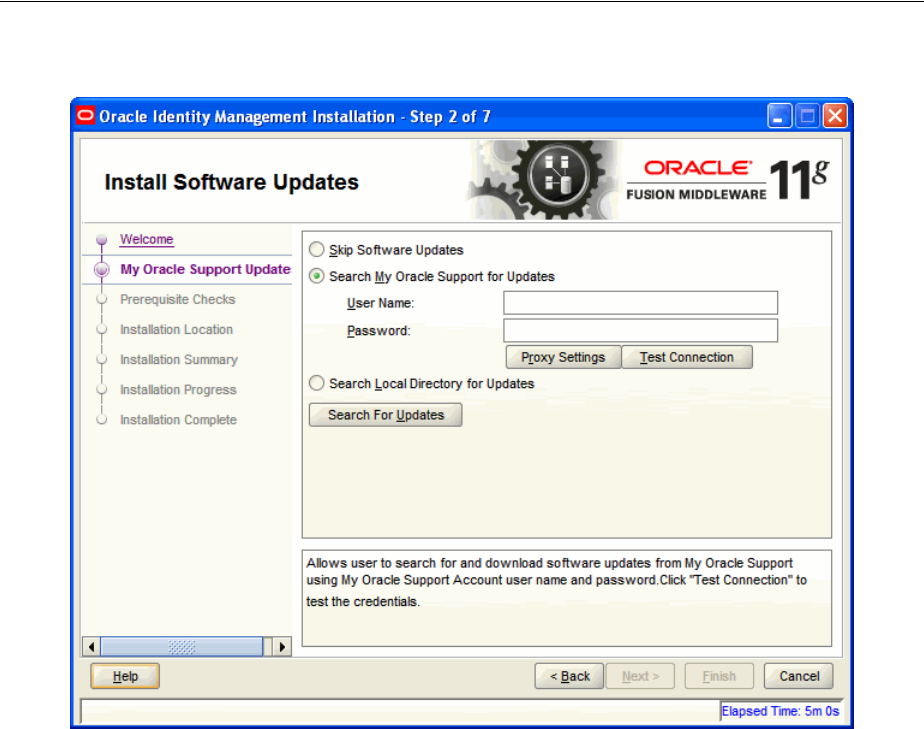
Oracle Identity and Access Management 11.1.1.5.0 Software Installation Screens B-3
Figure B–2 Install Software Updates
B.3 Prerequisite Checks
The installation program ensures that you have a certified version, the correct software
packages, sufficient space and memory to perform the operations that you have
selected. If any issues are detected, errors appear on this page.
The following example screen applies to Windows operating systems only. For more
information about prerequisite checks performed by the Installer, see Prerequisite
Checks Performed by the Oracle Identity and Access Management Installer.

Specify Installation Location
B-4 Oracle Fusion Middleware Installation Guide for Oracle Identity Management
Figure B–3 Prerequisite Checks Screen
On this screen, you can select to Abort, Retry, or Continue with the installation.
If all the prerequisite checks pass inspection, click Next to continue.
B.4 Specify Installation Location
In this screen, you enter a location for the new Oracle Identity and Access
Management 11g software being installed.
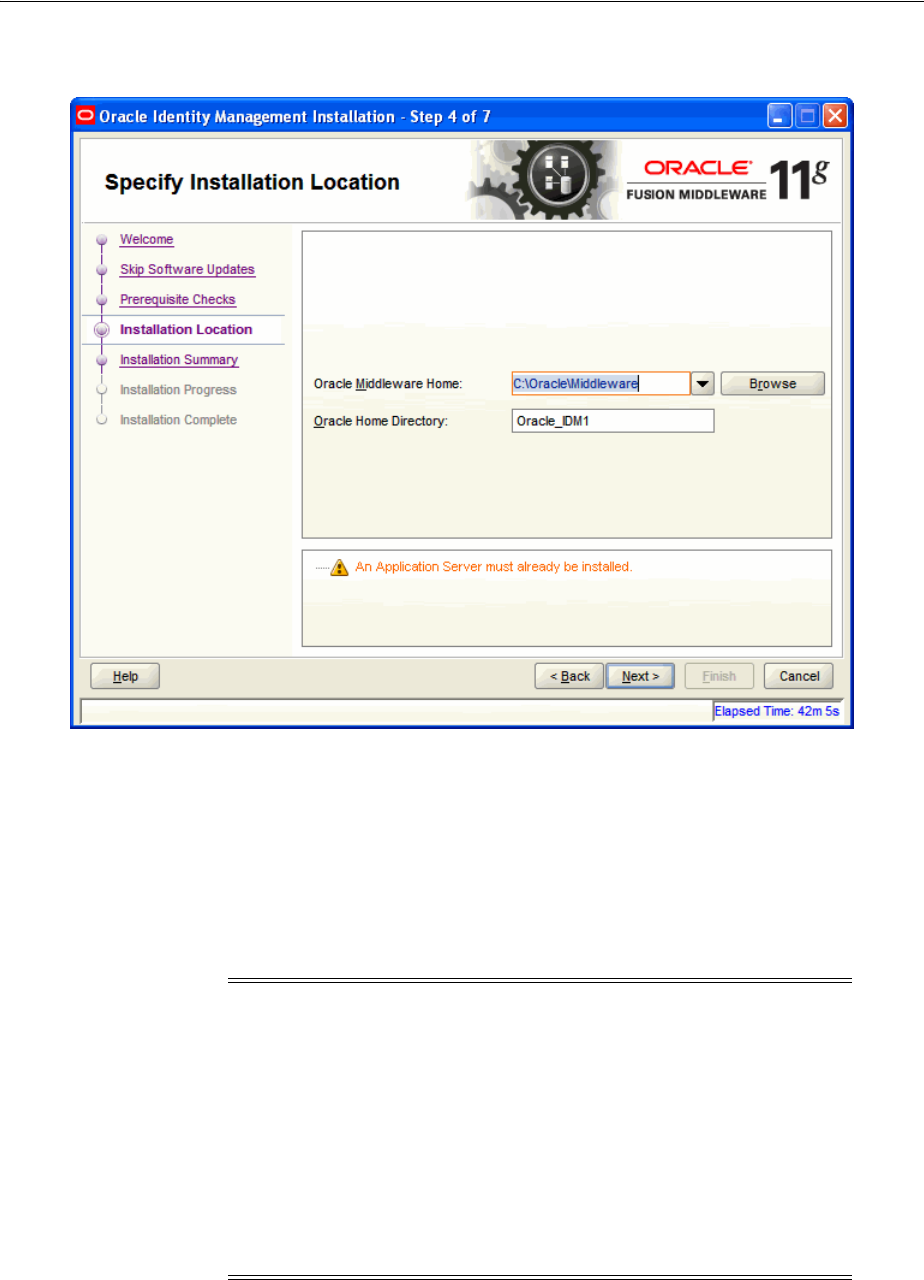
Oracle Identity and Access Management 11.1.1.5.0 Software Installation Screens B-5
Figure B–4 Specify Installation Location Screen
Ensure that Oracle WebLogic Server is already installed on your machine. Navigate to
the Oracle Fusion Middleware Home directory by clicking Browse. Enter a name for
the new Oracle Home directory for Oracle Identity and Access Management 11g
components.
If the Middleware location does not exist, you must install WebLogic Server and create
a Middleware Home directory, as described in Installing Oracle WebLogic Server and
Creating the Oracle Middleware Home, before running the Oracle Identity and Access
Management Installer.
Click Next to continue.
Note: If you do not specify a valid Middleware Home directory on
the Specify Installation Location screen, the Installer displays a
message and prompts you to confirm whether you want to proceed
with the installation of only Oracle Identity Manager Design Console
and Oracle Identity Manager Remote Manager. These two
components of Oracle Identity Manager do not require a Middleware
Home directory.
If you want to install only Oracle Identity Manager Design Console or
Remote Manager, you do not need to install Oracle WebLogic Server
or create a Middleware Home directory on the machine where Design
Console or Remote Manager is being configured.
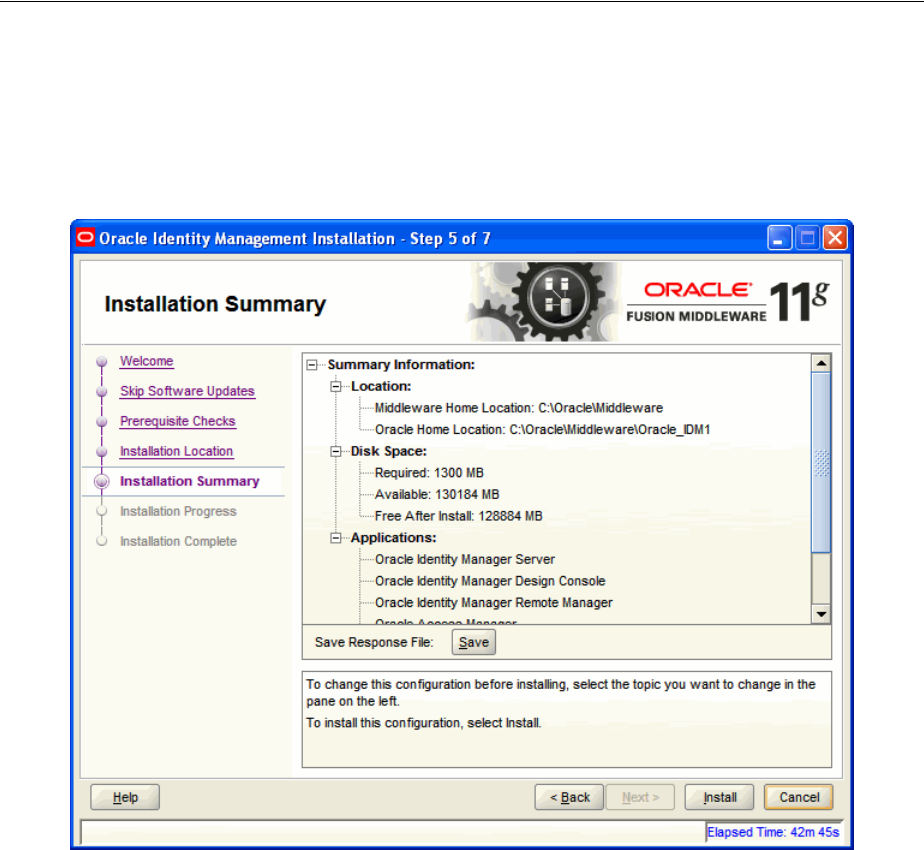
Installation Summary
B-6 Oracle Fusion Middleware Installation Guide for Oracle Identity Management
B.5 Installation Summary
This screen displays a summary of your Oracle Identity and Access Management 11g
installation.
Figure B–5 Installation Summary Screen
Review the contents of this screen, and click Install to start installing the Oracle
Identity and Access Management 11g software.
B.6 Installation Progress
This screen displays the progress of the Oracle Identity and Access Management
installation.
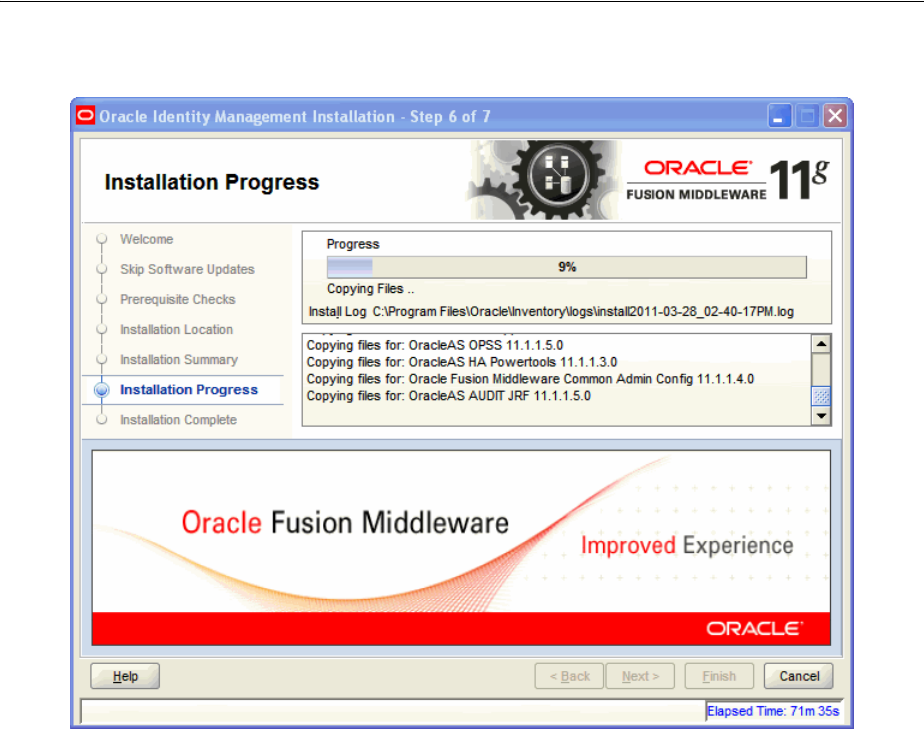
Oracle Identity and Access Management 11.1.1.5.0 Software Installation Screens B-7
Figure B–6 Installation Progress Screen
If you want to quit before the installation is completed, click Cancel. The installation
progress indicator gives a running inventory of the files that are being installed. If you
are only installing the software binaries, installation is complete after all of the binaries
have been installed.
B.7 Installation Complete
This screen displays a summary of the installation parameters, such as Location, Disk
Space, and Applications. To save the installation configuration in a response file,
which is used to perform silent installations, click Save.
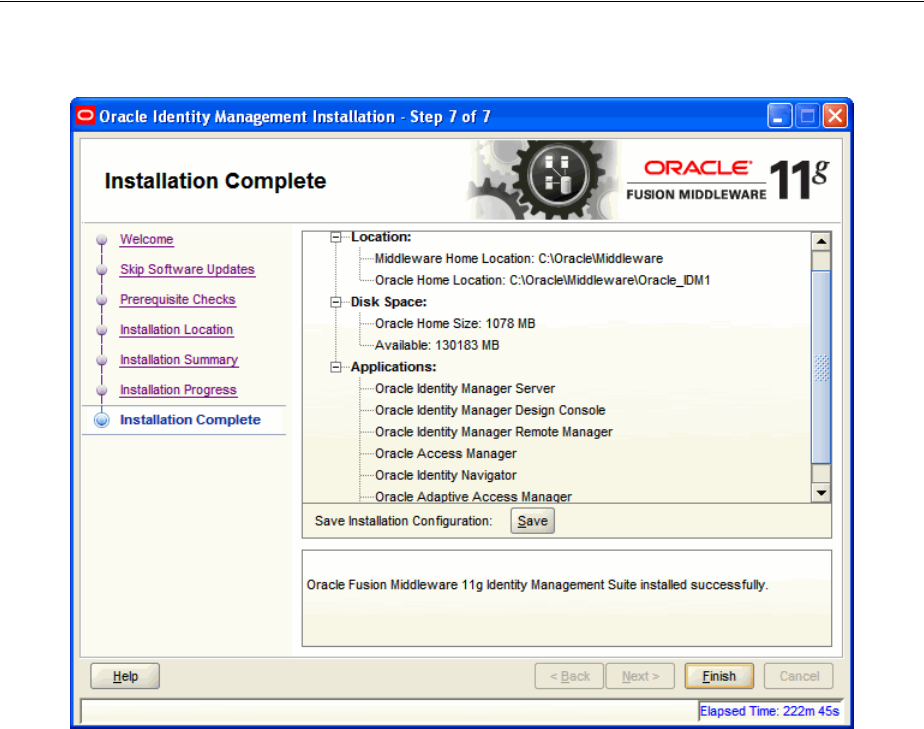
Installation Complete
B-8 Oracle Fusion Middleware Installation Guide for Oracle Identity Management
Figure B–7 Installation Complete Screen
Click Finish to complete the installation process.

Oracle Identity Manager Configuration Screens C-1
C
Oracle Identity Manager Configuration
Screens
This appendix describes the screens of the Oracle Identity Manager 11g Configuration
Wizard that enables you to configure Oracle Identity Manager Server, Oracle Identity
Manager Design Console, and Oracle Identity Manager Remote Manager.
This appendix contains the following topics:
■Welcome
■Components to Configure
■Database
■WebLogic Admin Server
■OIM Server
■BI Publisher
■LDAP Server
■LDAP Server Continued
■Configuration Summary
C.1 Welcome
The Welcome screen is displayed each time you start the Oracle Identity Manager
Configuration Wizard.
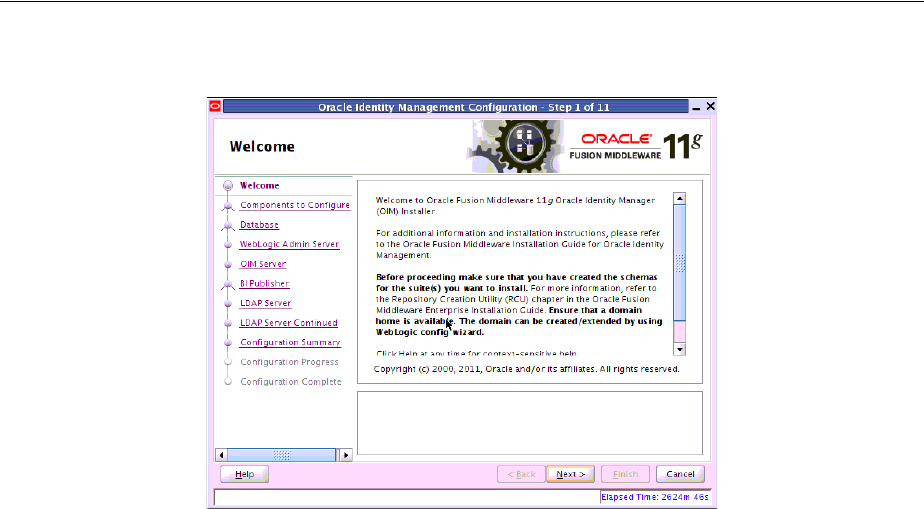
Components to Configure
C-2 Oracle Fusion Middleware Installation Guide for Oracle Identity Management
Figure C–1 Welcome Screen
You can use the Oracle Identity Manager Configuration Wizard only once during
initial setup for configuring Oracle Identity Manager Server. After configuring Oracle
Identity Manager Server using this wizard, you cannot re-run this wizard to modify
the configuration of Oracle Identity Manager. You must use Oracle Enterprise
Manager Fusion Middleware Control to make such modifications. However, you can
run this wizard on other machines, where Design Console or Remote Manager is
configured, as and when needed.
Ensure that you have configured Oracle Identity Manager in a new or existing
WebLogic domain before launching the Oracle Identity Manager Configuration
Wizard to configure Oracle Identity Manager Server, Design Console on Windows,
and Remote Manager.
If you are configuring Server, you must run this wizard on the machine where the
WebLogic Administration Server is running (the Administration Server for the domain
in which Oracle Identity Manager is deployed). Ensure that the Administration Server
is up and running before you start configuring Oracle Identity Manager Server.
If you are configuring only Design Console, you must run this wizard on the Windows
machine where Design Console should be configured. If you are configuring only
Remote Manager, you must run this wizard on the machine where Remote Manager is
being configured. Note that the Oracle Identity Manager Server should be configured
before you can configure Design Console or Remote Manager.
Click Next to continue.
C.2 Components to Configure
Use this screen to select the Oracle Identity Manager components that you want to
configure. Oracle Identity Manager components include Server, Design Console, and
Remote Manager.
Before configuring Oracle Identity Manager Server, Design Console or Remote
Manager, ensure that you have configured Oracle Identity Manager in a new or
existing WebLogic domain using the Oracle Fusion Middleware Configuration
Wizard.
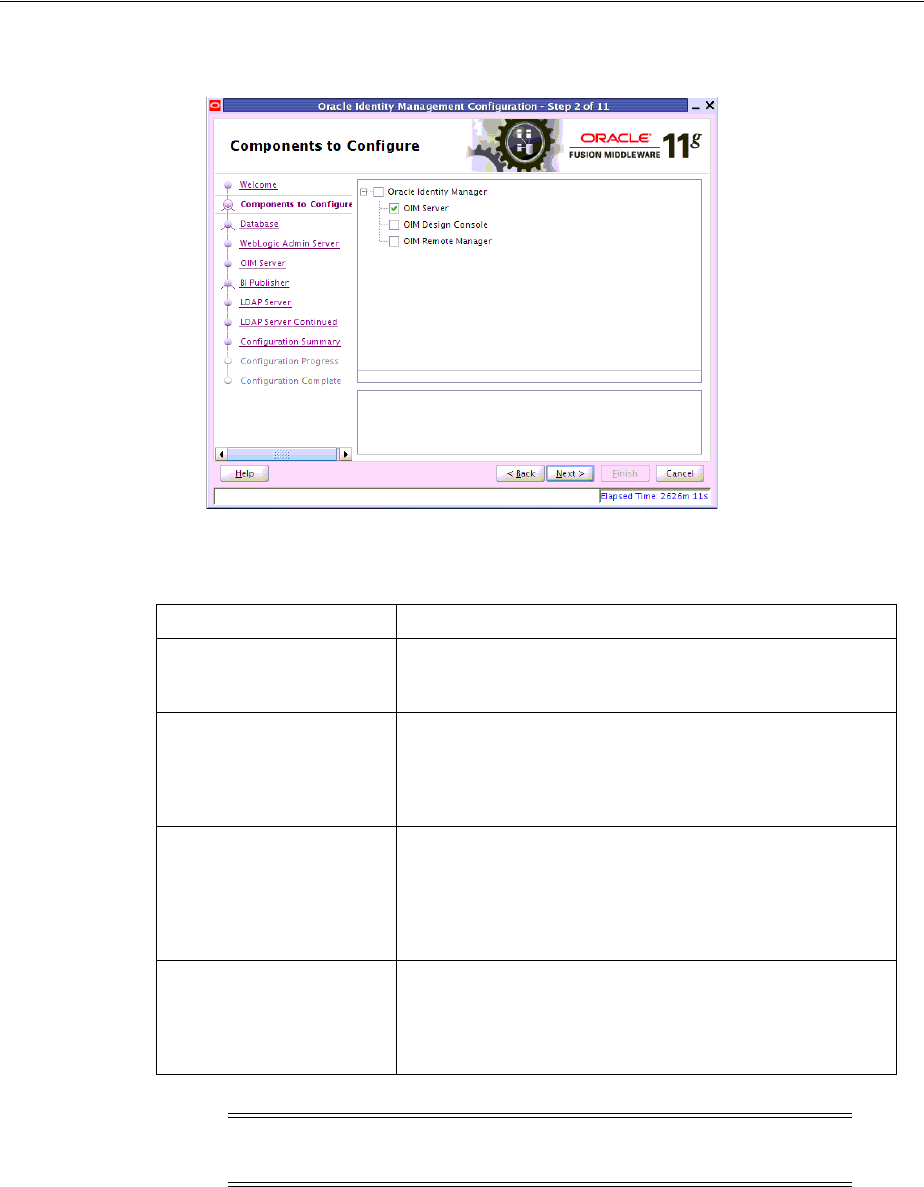
Oracle Identity Manager Configuration Screens C-3
Figure C–2 Components to Configure Screen
Table C–1 describes the Oracle Identity Manager components that you can choose.
C.3 Database
In this screen, you specify the database and schema information. Note that you should
have created and loaded Oracle Identity Manager schemas using the Oracle Fusion
Middleware Repository Creation Utility (RCU) before configuring Oracle Identity
Manager Server. For information about creating and loading Oracle Identity Manager
Table C–1 Oracle Identity Manager Configuration Choices
Option Description
Configure all components
on this screen To configure Oracle Identity Manager Server, Design
Console, and Remote Manager simultaneously on the same
machine, select the Oracle Identity Manager option.
Configure only Oracle
Identity Manager Server To configure only Oracle Identity Manager Server, select the
OIM Server option. This option is selected, by default. Note
that WebLogic Administration Server for the domain (the
domain in which Oracle Identity Manager is deployed)
should be up and running.
Configure only Oracle
Identity Manager Design
Console
To configure only Oracle Identity Manager Design Console,
select the OIM Design Console option. However, note that
Oracle Identity Manager Server must be configured either on
the local machine or on a remote machine before you can run
Design Console on development machines. Design Console
is supported on Windows operating systems only.
Configure only Oracle
Identity Manager Remote
Manager
To configure only Oracle Identity Manager Remote Manager,
select the OIM Remote Manager option. However, note that
Oracle Identity Manager Server must be configured either on
the local machine or on a remote machine before you can run
Remote Manager.
Note: You can also select any combination of two of the three Oracle
Identity Manager components.
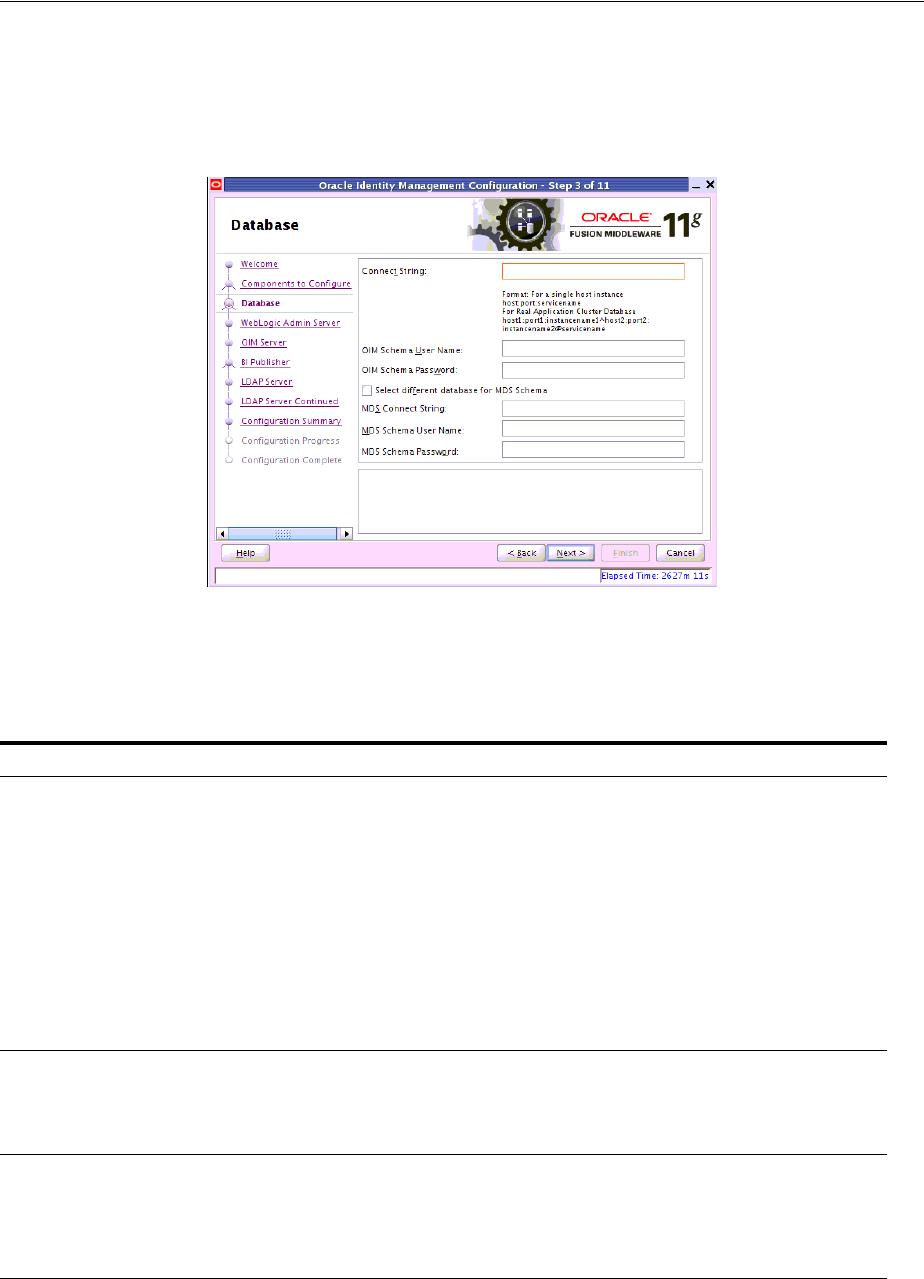
Database
C-4 Oracle Fusion Middleware Installation Guide for Oracle Identity Management
schemas, see Creating Database Schema Using the Oracle Fusion Middleware
Repository Creation Utility (RCU).
Figure C–3 Database Screen
You can use the same database or different databases for creating the Oracle Identity
Manager schema and the Metadata Services schema.
Table C–2 describes the database connection information that you must specify.
Table C–2 Fields in the Database Screen
Field Description
Connect String Enter the full path, listen port, and service name for your Oracle database. For a
single host instance, the format of connect string is
hostname:port:servicename.
For example, if the hostname is aaa.bbb.com, port is 1234, and the service name
is xxx.bbb.com, then you must enter the connect string for a single host instance
as follows:
aaa.bbb.com:1234:xxx.bbb.com
If you are using a Real Application Cluster database, the format of the database
connect string is as follows:
hostname1:port1:instancename1^host2:port2:instancename2@ser
vicename
OIM Schema User Name Enter the name of the schema user that you created for Oracle Identity Manager
using the Oracle Fusion Middleware Repository Creation Utility.
If you upgraded your existing Oracle Identity Manager schema to 11g Release 1
(11.1.1), enter the user name for your existing schema.
OIM Schema Password Enter the password for the Oracle Identity Manager schema user that you set
while creating the schema using the Oracle Fusion Middleware Repository
Creation Utility (RCU).
If you upgraded your existing Oracle Identity Manager schema to 11g Release 1
(11.1.1), enter the password for your existing schema.
Select different database
for MDS schema
Select this check box if you want to use a different database for the Metadata
Services (MDS) schema.

Oracle Identity Manager Configuration Screens C-5
After entering information in the fields, click Next to continue.
C.4 WebLogic Admin Server
In this screen, you specify the t3 URL, user name and password for the WebLogic
administration domain in which the Oracle Identity Manager application is deployed.
Ensure that the Administration Server is up and running.
Figure C–4 WebLogic Admin Server Screen
In the WebLogic Admin Server URL text box, enter the t3 URL of the Administration
Server for the WebLogic domain in the following format:
t3://hostname:port
In the UserName text box, enter the WebLogic Administrator user name.
In the Password text box, enter the WebLogic Administrator password.
After entering information in the fields, click Next to continue.
MDS Connect String If you are using a different database for the Metadata Services (MDS) schema,
enter the full path, listen port, and service name for the database associated with
the MDS schema. The format of the connect string is similar to that of the
standard Connect String.
MDS Schema User Name Enter the name of the schema user that you created for AS Common Services -
Metadata Services by using the Oracle Fusion Middleware Repository Creation
Utility (RCU).
If you upgraded your existing Metadata Services schema to 11g Release 1
(11.1.1), enter the user name for your existing schema.
MDS Schema Password Enter the password for the AS Common Services - Metadata Services schema
user that you set while creating the schema by using the Oracle Fusion
Middleware Repository Creation Utility (RCU).
If you upgraded your existing Oracle Identity Manager schema to 11g Release 1
(11.1.1), enter the password for your existing schema.
Table C–2 (Cont.) Fields in the Database Screen
Field Description
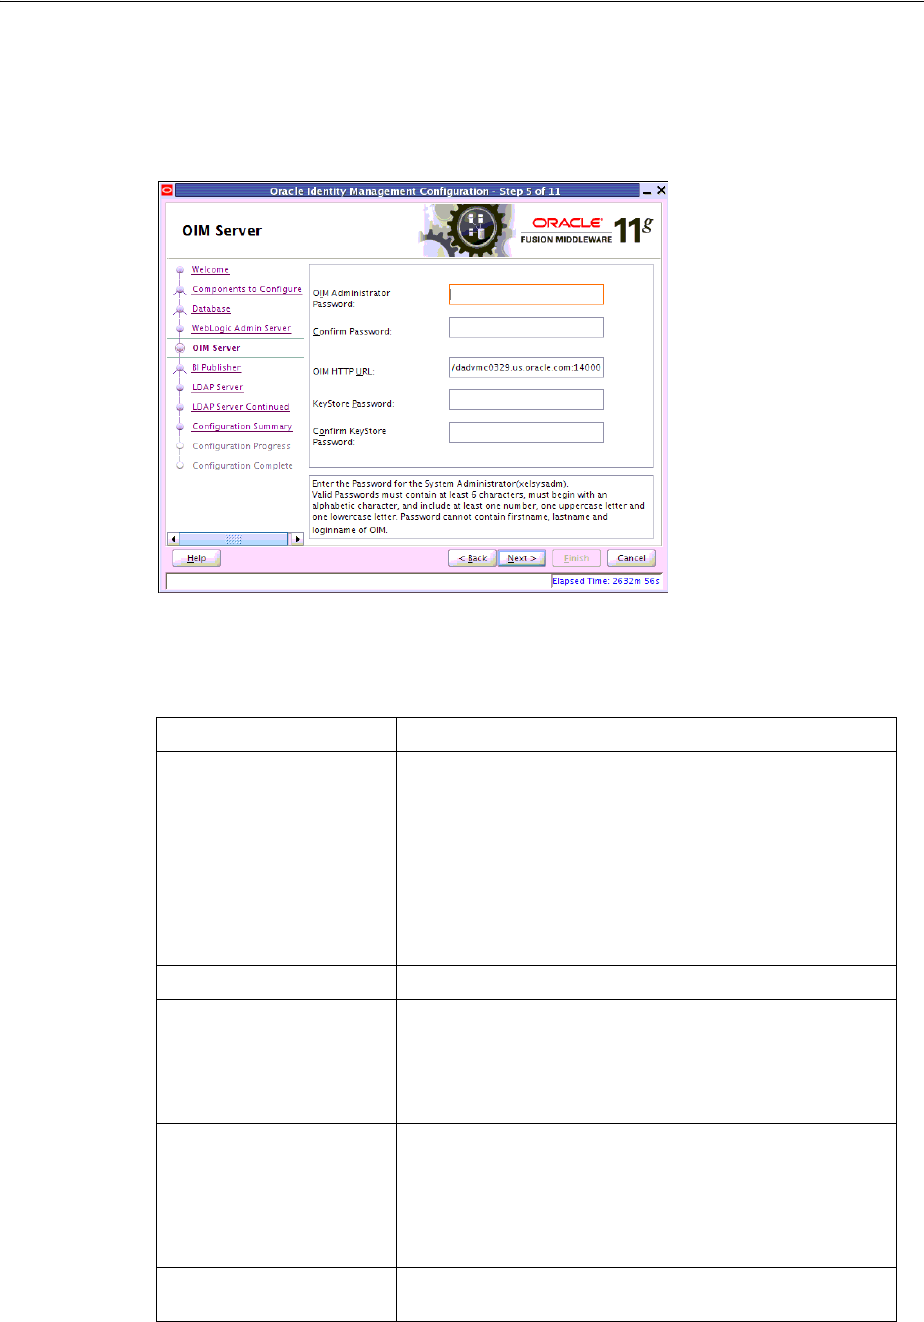
OIM Server
C-6 Oracle Fusion Middleware Installation Guide for Oracle Identity Management
C.5 OIM Server
Use this screen to set a password for the for the system administrator (xelsysadm).
Figure C–5 OIM Server Screen
Table C–3 describes the Oracle Identity Manager Server parameters that you can
configure.
After entering information in the fields, click Next to continue.
Table C–3 Oracle Identity Manager Server Configuration Parameters
Field Name Description
OIM Administrator
Password Enter a new password for the administrator.
A valid password contains at least six characters, begins with
an alphabetic character, and includes at least one number,
one uppercase letter and one lowercase letter. The password
cannot contain first name, last name, or login name of Oracle
Identity Manager.
Note that you are not prompted to enter this password in
upgrade scenarios. You must set a password only if you are
performing a new 11g installation.
Confirm Password Enter the new password again to confirm.
OIM HTTP URL Enter the http URL that front-ends the Oracle Identity
Manager application. For example,
http://localhost:7002.
By default, this field contains the URL of the Oracle Identity
Manager Managed Server.
KeyStore Password Enter new password for the keystore.
A valid password can contain 6 to 30 characters, begin with
an alphabetic character, and use only alphanumeric
characters and special characters like Underscore (_), Dollar
($), Pound (#). The password must contain at least one
number.
Confirm KeyStore
Password
Enter the new password again to confirm.
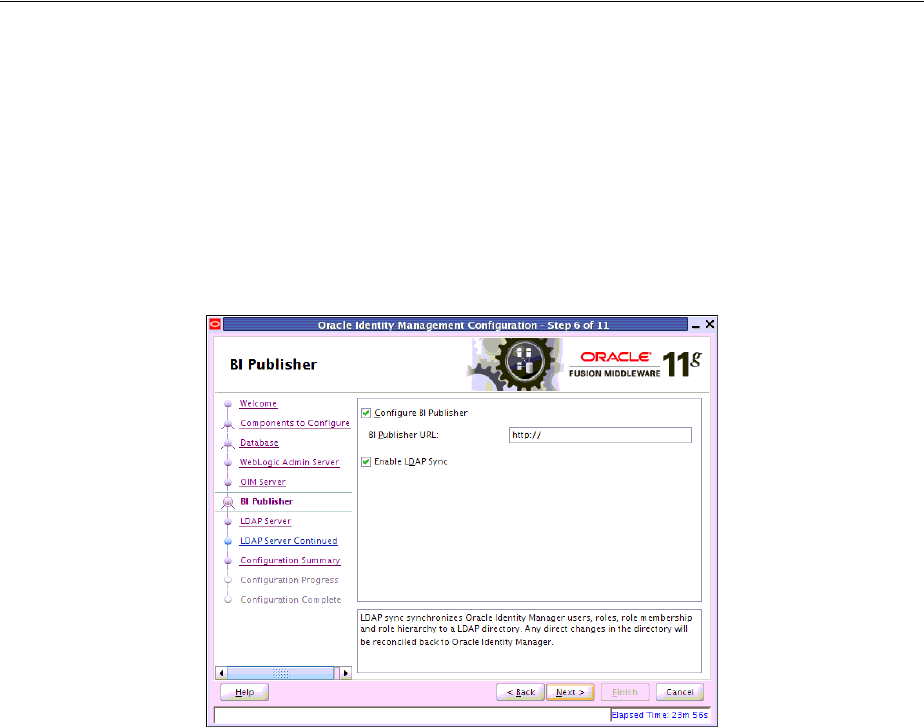
Oracle Identity Manager Configuration Screens C-7
C.6 BI Publisher
In this screen, you can perform the following optional tasks:
■Enable synchronization of Oracle Identity Manager roles, users, and their
hierarchy to an LDAP directory
■Configure Oracle Identity Manager to use Oracle BI Publisher by specifying the BI
publisher URL
Figure C–6 BI Publisher Screen
Enabling OIM-LDAP Synchronization
If you want to enable LDAP sync, you must first set up LDAP Sync for Oracle Identity
Manager (OIM) before selecting the Enable LDAP Sync option on this screen. For
information about setting up OIM-LDAP Sync, see Completing the Prerequisites for
Enabling LDAP Synchronization. After completing the prerequisites for enabling
LDAP Synchronization, select the Enable LDAP Sync option.
If you do not want to perform the other optional tasks, click Next to continue.
Configuring Oracle Identity Manager to Use Oracle BI Publisher
Ensure that Oracle BI Publisher is installed on your local or remote machine.
To configure Oracle Identity Manager to use Oracle BI Publisher, select the Configure
BI Publisher option, and enter the BI Publisher URL in the BI Publisher URL text box.
The URL is of the format: http://hostname:port/xmlpserver, where hostname
and port are the host name and the port on which the Oracle BI Publisher server is
running.
After entering information in the fields, click Next to continue.
C.7 LDAP Server
This screen is displayed only if you select the Enable LDAP Sync option on the BI
Publisher screen. In the LDAP Server screen, you should specify the authentication
information for the Directory Server, as you want to synchronize Oracle Identity
Manager roles, users, and their hierarchy to an LDAP directory.
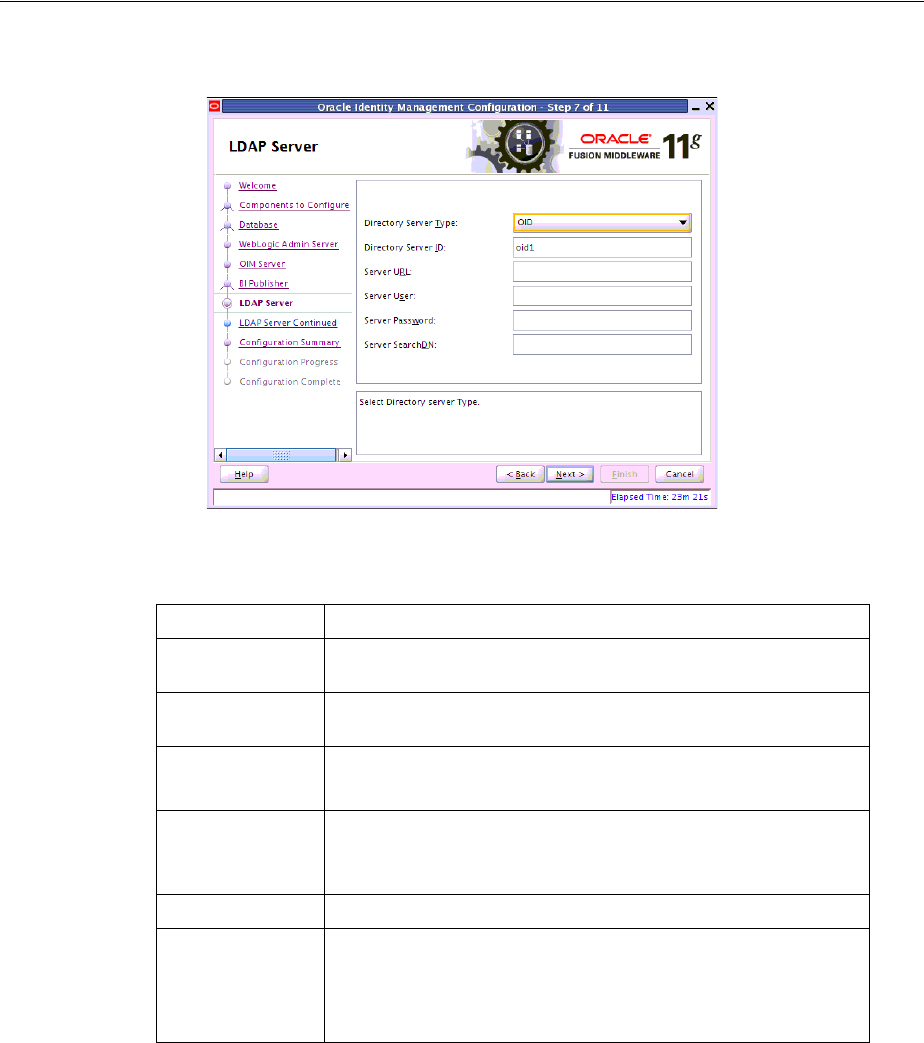
LDAP Server Continued
C-8 Oracle Fusion Middleware Installation Guide for Oracle Identity Management
Figure C–7 LDAP Server Screen
Table C–4 describes the parameters that you must specify.
After entering information in the fields, click Next to continue.
C.8 LDAP Server Continued
This screen is a continuation of the LDAP Server screen.
Table C–4 LDAP Server Information
Field Name Description
Directory Server
Type
Select the desired Directory Server from the dropdown list.
Directory Server
ID
Enter the Directory Server ID.
Server URL Enter the LDAP URL in the format:
ldap://oid_host:oid_port
Server User Enter the user name for the Directory Server administrator.
For example:
cn=oimAdminUser,cn=Users,dc=us,dc=oracle,dc
Server Password Enter the OIM admin password
Server SearchDN Enter the Distinguished Names (DN).
For example, dc=acme, dc=com
This is the top-level container for users and roles in LDAP that is
used for Oracle Identity Manager for reconciliation purposes.
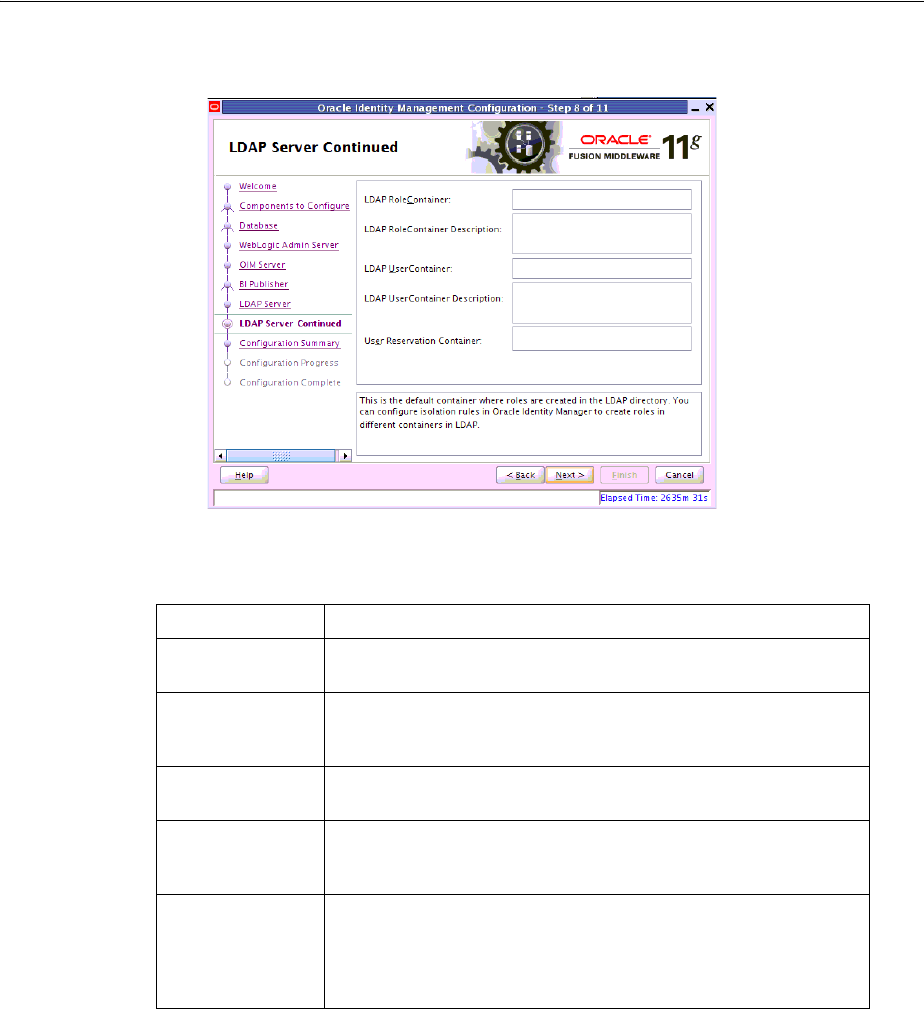
Oracle Identity Manager Configuration Screens C-9
Figure C–8 LDAP Server Continued Screen
Table C–5 describes the LDAP parameters that you must specify.
After entering information in the fields, click Next to continue.
C.9 Configuration Summary
This screen displays a list of the applications or components you have selected for
configuration. It includes the following information:
■Location of your installation
■Disk space that will be used for the installation
■Applications or components you have selected for configuration
■Configuration choices you made on different screens in the Oracle Identity
Manager Configuration Wizard
Table C–5 LDAP Server Continued Information
Field Name Description
LDAP
RoleContainer
Enter a name for the container that will be used as a default
container of roles in the LDAP directory.
LDAP
RoleContainer
Description
Type a description for the role container.
LDAP
UserContainer
Enter a name for the container that will be used as a default
container of users in the LDAP directory.
LDAP
UserContainer
Description
Type a description for the user container.
User Reservation
Container
Enter a name for the container that will be used for reserving user
names in the LDAP directory while their creation is being
approved in Oracle Identity Manager. When the user names are
approved, they are moved from the reservation container to the
user container in the LDAP directory.
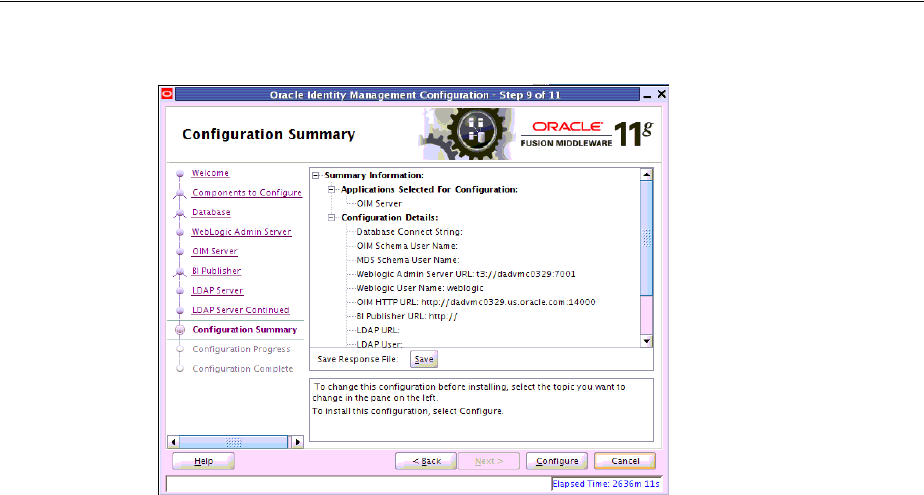
Configuration Summary
C-10 Oracle Fusion Middleware Installation Guide for Oracle Identity Management
Figure C–9 Configuration Summary Screen
Review this summary screen.
Additionally, you can select to create a response file from your installation selections
by clicking on the Save button in the Save Response File field. A response file can be
used for silent or non-interactive installations of software requiring no or very little
user input.
Click Configure to start configuring the selected Oracle Identity Manager
components.

Starting or Stopping the Oracle Stack D-1
D
Starting or Stopping the Oracle Stack
You must start or stop the components of the Oracle stack in a specific order. This
appendix describes that order and contains the following topics:
■Starting the Stack
■Stopping the Stack
■Restarting Servers
D.1 Starting the Stack
After completing the installation and domain configuration, you must start the
Administration Server and various Managed Servers to get your deployments up and
running:
1. To start the Administration Server, run the startWebLogic.sh (on UNIX
operating systems) or startWebLogic.cmd (on Windows operating systems)
script in the directory where you created your new domain.
On UNIX systems:
MW_HOME/user_projects/domains/domain_name/startWebLogic.sh
On Windows systems:
MW_HOME\user_projects\domains\domain_name\startWebLogic.cmd
You entered the domain name and location on the Specify Domain Name and
Location Screen in the Configuration Wizard.
2. Ensure that the Node Manager is running. Oracle WebLogic Administration
Server does not do this automatically. If the Node Manager is not running, start
the Node Manager by executing the following command:
Note: When executing the startManagedWebLogic and
stopManagedWebLogic scripts described in the following topics:
■SERVER_NAME represents the name of the Oracle WebLogic
Managed Server, such as wls_oif1, wls_ods1, or oam_server1.
■You will be prompted for values for USER_NAME and PASSWORD
if you do not provide them as options when you execute the
script.
■The value for ADMIN_URL will be inherited if you do not provide
it as an option when you execute the script.

Starting the Stack
D-2 Oracle Fusion Middleware Installation Guide for Oracle Identity Management
$WLS_HOME/server/bin/startNodeManager.sh
3. Start system components, such as Oracle Internet Directory and Oracle Virtual
Directory, by executing the following command:
ORACLE_INSTANCE/bin/opmnctl startall
You can verify that the system components have started by executing the
following command:
ORACLE_INSTANCE/bin/opmnctl status -l
4. To start the Managed Servers, run the startManagedWebLogic.sh (on UNIX
operating systems) or startManagedWebLogic.cmd (on Windows operating
systems) script in the bin directory inside the directory where you created your
domain. You must start these Managed Servers from the command line.
This command also requires that you specify a server name. You must start the
servers you created when configuring the domain, as shown in the following
example:
■oam_server1 (Oracle Access Manager Server)
■oim_server1 (Oracle Identity Manager Server)
For example, to start Oracle Access Manager Server on a UNIX system:
MW_HOME/user_projects/domains/domain_name/bin/startManagedWebLogic.sh oam_
server1
On Windows systems:
MW_HOME\user_projects\domains\domain_name\bin\startManagedWebLogic.cmd oam_
server1
Before the Managed Server is started, you are prompted for the WebLogic Server
user name and password. These were provided on the Configure Administrator
Username and Password Screen in the Configuration Wizard.
If your Administration Server is using a non-default port, or resides on a different
host than your Managed Servers (in a distributed environment), you must also
specify the URL to access your Administration Server.
On UNIX systems:
MW_HOME/user_projects/domains/domain_name/bin/startManagedWebLogic.sh oam_
server1 http://host:admin_server_port
On Windows systems:
MW_HOME\user_projects\domains\domain_name\bin\startManagedWebLogic.cmd oam_
server1 http://host:admin_server_port
Instead of being prompted for the Administration Server user name and
password, you can also specify them directly from the command lime.
On UNIX systems:
MW_HOME/user_projects/domains/domain_name/bin/startManagedWebLogic.sh oam_
server1 http://host:admin_server_port -Dweblogic.management.username=user_name
-Dweblogic.management.password=password
On Windows systems:
MW_HOME\user_projects\domains\domain_name\bin\startManagedWebLogic.cmd oam_

Starting or Stopping the Oracle Stack D-3
server1 http://host:admin_server_port -Dweblogic.management.username=user_name
-Dweblogic.management.password=password
If you do not know the names of the Managed Servers that should be started, you can
view the contents of the following file on UNIX systems:
MW_HOME/user_projects/domains/domain_name/startManagedWebLogic_readme.txt
On Windows systems:
MW_HOME\user_projects\domains\domain_name\startManagedWebLogic_readme.txt
Or, you can access the Administration Server console at the following URL:
http://host:admin_server_port/console
Supply the user name and password that you specified on the Configure
Administrator Username and Password Screen of the Configuration Wizard. Then,
navigate to Environment > Servers to see the names of your Managed Servers.
D.2 Stopping the Stack
You can stop the Oracle WebLogic Administration Server and all the managed servers
by using Oracle WebLogic Administration Console. See Oracle Fusion Middleware
Introduction to Oracle WebLogic Server for more information.
To stop the stack components from the command line, perform the following steps:
1. Stop WebLogic managed components, such as Oracle Directory Integration
Platform, Oracle Identity Federation, Oracle Directory Services Manager, Oracle
Access Manager, Oracle Identity Manager, and Oracle Adaptive Access Manager,
by executing the following command:
MW_HOME/user_projects/domains/DOMAIN_NAME/bin/stopManagedWebLogic.sh \
{SERVER_NAME} {ADMIN_URL} {USER_NAME} {PASSWORD}
2. Stop system components, such as Oracle Internet Directory and Oracle Virtual
Directory, by executing the following command:
ORACLE_INSTANCE/bin/opmnctl stopall
3. Stop the Oracle WebLogic Administration Server by executing the following
command:
MW_HOME/user_projects/domains/DOMAIN_NAME/bin/stopWebLogic.sh
4. If you want to stop the Node Manager, you can use the kill command:
kill -9 PID
Note: You can use the Oracle WebLogic Administration Console to
start managed components in the background. See Oracle Fusion
Middleware Introduction to Oracle WebLogic Server for more information.

Restarting Servers
D-4 Oracle Fusion Middleware Installation Guide for Oracle Identity Management
D.3 Restarting Servers
To restart the Administration Server or Managed Servers, you must stop the running
Administration Server or Managed Servers first before starting them again. For more
information, see Stopping the Stack and Starting the Stack.

E
Preconfiguring Oracle Directory Server Enterprise Edition (ODSEE) E-1
EPreconfiguring Oracle Directory Server
Enterprise Edition (ODSEE)
Before you can use your LDAP directory as an Identity store, you must preconfigure
it. The procedure in this section enables you to preconfigure Oracle Directory Server
Enterprise Edition (ODSEE) for using Oracle Directory Server Enterprise Edition
(ODSEE) as your LDAP Identity store.
You must complete the following steps to preconfigure the Identity Store:
1. Create a new file
iPlanetContainers.ldif
. Add the following entries and save
the file.
dn:cn=Users,dc=mycompany,dc=com
cn:Users
objectClass:nsContainer
dn:cn=Groups,dc=mycompany,dc=com
cn:Groups
objectClass:nsContainer
dn:cn=Reserve,dc=mycompany,dc=com
cn:Reserve
objectClass:nsContainer
2. Import the containers into iPlanet Directory Server with
ldapadd
command. This
will create the user, group and reserve containers.
ldapadd -h <ODSEE Server> -p <ODSEE port> -D <ODSEE Admin ID> -w <ODSEE Admin
password> -c -f ./iPlanetContainers.ldif
For example:
ldapadd -h localhost -p 1389 -D "cn=Directory Manager" -w "welcome1" -c -f
./iPlanetContainers.ldif
If the above gives authentication error, try the command with '-x' option with
simple bind option.
ldapadd -h localhost -p 1389 -x -D "cn=Directory Manager" -w "welcome1" -c -f
./iPlanetContainers.ldif
Note: If your LDAP Identity store (Oracle Directory Server
Enterprise Edition (ODSEE) or iPlanet) has been configured for the
containers and oimadminuser with the schema extension, you need
not follow the below mentioned configuration steps.

E-2 Product Title/BookTitle as a Variable
3. Enable the
moddn
property for the rename of entries to happen between nodes.
..dsee7/bin/dsconf set-server-prop -h <ODSEE Server> -p <ODSEE port>
moddn-enabled:on
For example:
..dsee7/bin/dsconf set-server-prop -h localhost -p 1389 moddn-enabled:on
4. Enable changelog.
..dsee7/bin/dsconf set-server-prop -h <ODSEE Server> -p <ODSEE port>
retro-cl-enabled:on
For example:
..dsee7/bin/dsconf set-server-prop -h localhost -p 1389 retro-cl-enabled:on
5. Check the status.
..dsee7/bin/dsccsetup status
6. Stop and Start the ODSEE server instance.
..dsee7/bin/dsadm stop <ODSEE instance>
..dsee7/bin/dsadm start <ODSEE instance>
For example:
..dsee7/bin/dsadm stop /scratch/<userid>/iPlanet/dsinst1/
..dsee7/bin/dsadm start /scratch/<userid>/iPlanet/dsinst1/
7. Extend the Sun schema to include OIM-specific Object Classes and Attribute
Types.
cd to $MIDDLEWARE_HOME/oracle_common/modules/oracle.ovd_11.1.1/oimtemplates
Run the following command to load the ldif file,
sunOneSchema.ldif
.
ldapmodify -h <ODSEE Server> -p <ODSEE port> -D <ODSEE Admin ID> -w <ODSEE
Admin password> -f sunOneSchema.ldif
For example:
./ldapmodify -h localhost -p 1389 -D "cn=directory manager" -w welcome1 -c -f
sunOneSchema.ldif
8. Enable Referential Integrity for OIM's Common Name Generation feature.
Anytime the DN or RDN is being modified, then the Referential Integrity needs to
be enabled in OIM and OID/Active Directory/ODSEE.
If Referential Integrity is enabled in the Directory Server, then customers need to
set the OIM property
XL.IsReferentialIntegrityEnabledInLDAP
to
TRUE
as by
default it is set to
FALSE
. To set
XL.IsReferentialIntegrityEnabledInLDAP
to
TRUE
, log into OIM and go to Advanced > System Management > System
Configuration. Search for System Properties
(
XL.IsReferentialIntegrityEnabled
), and set the property value to
TRUE
.
a. Use the following command to see the value of the referential integrity
property.
..dsee7/bin/dsconf get-server-prop -h <ODSEE server> -p <ODSEE port>
ref-integrity-enabled
Enter "cn=Directory Manager" password:

Preconfiguring Oracle Directory Server Enterprise Edition (ODSEE) E-3
ref-integrity-enabled : off
b. Use the following commands to enable the referential integrity property.
./dsconf set-server-prop -h <ODSEE server> -p <ODSEE port>
ref-integrity-enabled:on
Enter "cn=Directory Manager" password:
Directory Server must be restarted for changes to take effect. Restart
ODSEE/iPlanet Server after enabling referential integrity property.
..dsee7/bin/dsadm stop <ODSEE instance>
..dsee7/bin/dsadm start <ODSEE instance>
For Example:
..dsee7/bin/dsadm stop /scratch/<userid>/iPlanet/dsinst1/
..dsee7/bin/dsadm start /scratch/<userid>/iPlanet/dsinst1/
c. Now query to see if the value has been set correctly.
..dsee7/bin/dsconf get-server-prop -h <ODSEE server> -p <ODSEE port>
ref-integrity-enabled
Enter "cn=Directory Manager" password:
ref-integrity-enabled : on
9. Create the OIM Admin User, Group and the ACIs. Open a new file
oimadminuser.ldif
. This oimadminuser would be used as a proxy user for OIM.
The root suffix is given as 'dc=mycompany,dc=com'. This can be replaced with the
appropriate root suffix of the ODSEE server.
a. Add the following LDAP entries and save the file
oimadminuser.ldif
. Run
the following command to load the ldif file,
oimadminuser.ldif
.
ldapmodify -h <ODSEE Server> -p <ODSEE port> -D <ODSEE Admin ID> -w <ODSEE
Admin password> -f oimadminuser.ldif
dn: cn=systemids,dc=mycompany,dc=com
changetype: add
objectclass: nsContainer
objectclass: top
cn: systemids
dn: cn=oimAdminUser,cn=systemids,dc=mycompany,dc=com
changetype: add
objectclass: top
objectclass: person
objectclass: organizationalPerson
objectclass: inetorgperson
mail: oimAdminUser
givenname: oimAdminUser
sn: oimAdminUser
cn: oimAdminUser
uid: oimAdminUser
userPassword: welcome1
dn: cn=oimAdminGroup,cn=Groups,dc=mycompany,dc=com
changetype: add
objectclass: groupOfUniqueNames
objectclass: top
cn: oimAdminGroup

E-4 Product Title/BookTitle as a Variable
description: OIM administrator role
uniquemember: cn=oimAdminUser,cn=systemids,dc=mycompany,dc=com
dn: cn=users,dc=mycompany,dc=com
changetype: modify
add: aci
aci: (target = "ldap:///cn=users,dc=mycompany,dc=com")(targetattr =
"*")(version 3.0; acl "Allow OIMAdminGroup add, read and write access to
all attributes"; allow (add, read, search, compare,write, delete, import)
(groupdn = "ldap:///cn=oimAdminGroup,cn=Groups,dc=mycompany,dc=com");)
dn: cn=Groups,dc=mycompany,dc=com
changetype: modify
add: aci
aci: (target = "ldap:///cn=Groups,dc=mycompany,dc=com")(targetattr =
"*")(version 3.0; acl "Allow OIM AdminGroup to read and write access";
allow (read, search, compare, add, write,delete) (groupdn =
"ldap:///cn=oimAdminGroup,cn=Groups,dc=mycompany,dc=com");)
dn: cn=reserve,dc=mycompany,dc=com
changetype: modify
add: aci
aci: (target = "ldap:///cn=reserve,dc=mycompany,dc=com")(targetattr =
"*")(version 3.0; acl "Allow OIM AdminGroup to read and write access";
allow (read, search, compare, add, write,delete,export) (groupdn =
"ldap:///cn=oimAdminGroup,cn=Groups, dc=mycompany,dc=com");)
dn: cn=changelog
changetype: modify
add: aci
aci: (target = "ldap:///cn=changelog")(targetattr = "*")(version 3.0; acl
"Allow OIM AdminGroup to read and write access"; allow (read, search,
compare, add, write,delete,export) (groupdn =
"ldap:///cn=oimAdminGroup,cn=Groups, dc=mycompany,dc=com");)
b. Use the following commands to check for the entries and ACI in the LDAP:
ldapsearch -h <ODSEE Server> -p <ODSEE Port> -x -D "cn=Directory Manager"
-w <ODSEE Admin Password> -b "cn=changelog" -s sub "objectclass=*" aci
ldapsearch -h <ODSEE Server> -p <ODSEE Port> -x -D "cn=Directory Manager"
-w <ODSEE Admin Password> -b "cn=users,dc=mycompany,dc=com" -s sub
"objectclass=*" aci
ldapsearch -h <ODSEE Server> -p <ODSEE Port> -x -D "cn=Directory Manager"
-w <ODSEE Admin Password> -b "cn=groups,dc=mycompany,dc=com" -s sub
"objectclass=*" aci
ldapsearch -h <ODSEE Server> -p <ODSEE Port> -x -D "cn=Directory Manager"
-w <ODSEE Admin Password> -b "cn=reserve,dc=mycompany,dc=com" -s sub
"objectclass=*" aci

F
Deinstalling and Reinstalling Oracle Identity Management F-1
F Deinstalling and Reinstalling Oracle Identity
Management
This appendix provides information about deinstalling and reinstalling Oracle Identity
Management 11g Release 1 (11.1.1). It contains the following topics:
■Deinstalling Oracle Identity Management
■Reinstalling Oracle Identity Management
F.1 Deinstalling Oracle Identity Management
This topic contains procedures for deinstalling Oracle Identity Management. It
contains the following sections:
■Deinstalling the Oracle Identity Management Oracle Home
■Deinstalling the Oracle Common Home
■Deinstalling Applications Registered with Oracle Single Sign-On 10g Release
10.1.4.3.0
F.1.1 Deinstalling the Oracle Identity Management Oracle Home
The deinstaller attempts to remove the Oracle Home directory from which it was
started. Before you choose to remove your Oracle Identity Management Oracle Home
directory, make sure that it is not in use by an existing domain and that you stop all
running processes that use this Oracle Home.
Deinstalling Oracle Identity Management will not remove any WebLogic domains that
you have created—it only removes the software in the Oracle Identity Management
Oracle Home directory.
Note: Always use the instructions provided in this appendix for
removing the software. If you try to remove the software manually,
you may experience problems when you try to reinstall the software.
Following the procedures in this appendix ensures that the software is
properly removed.
Note: The oraInventory is required for removing instances and
Oracle Home. For example, on UNIX it can be found in the following
location:
/etc/oraInst.loc

Deinstalling Oracle Identity Management
F-2 Oracle Fusion Middleware Installation Guide for Oracle Identity Management
This section describes how to deinstall your Oracle Identity Management Oracle
Home using the graphical, screen-based deinstaller. However, you can also perform a
silent deinstallation using a response file. A deinstall response file template that you
can customize for your deinstallation is included in the Disk1/stage/Response
directory on UNIX, or in the Disk1\stage\Response directory on Windows.
Perform the following steps to deinstall your Oracle Identity Management Oracle
Home using the graphical, screen-based deinstaller:
1. Verify your Oracle Identity Management Oracle Home is not in use by an existing
domain.
2. Stop all processes that use the Oracle Identity Management Oracle Home.
3. Open a command prompt and move (cd) into the IDM_ORACLE_HOME/oui/bin
directory (UNIX) or the IDM_ORACLE_HOME\oui\bin directory
(Windows).
4. Invoke the Deinstaller from command line using the -deinstall option. For
example:
On UNIX:
./runInstaller -deinstall
On Windows:
setup.exe -deinstall
The Welcome screen appears.
5. Click Next.
■If you are deinstalling Oracle Internet Directory, Oracle Virtual Directory,
Oracle Directory Services Manager, Oracle Directory Integration Platform, or
Oracle Identity Federation, the Select Deinstallation Type screen appears.
Select the deinstallation type you want to perform. Table F–1 lists and
describes each of the deinstallation types:
Table F–1 Deinstallation Types
Type Description
Deinstall Oracle Home Select this option to deinstall the binaries contained in the listed
Oracle Identity Management Oracle Home.
If you select this option, the Deinstall Oracle Home screen
appears next, where you can save a response file that contains
the deinstallation settings before deinstalling.
Deinstall ASInstances
managed by WebLogic
Domain - Applicable to
Oracle Internet Directory
and Oracle Virtual Directory
only.
Select this option to deinstall the Oracle Identity Management
system component instances, such as Oracle Internet Directory
and Oracle Virtual Directory, that are registered in a WebLogic
domain.
If you select this option, the Specify WebLogic Domain Detail
screen appears next where you identify the administration
domain containing the system components you want to
deinstall. The Select Managed Instance screen appears next,
where you identify the instances you want to deinstall.

Deinstalling Oracle Identity Management
Deinstalling and Reinstalling Oracle Identity Management F-3
Regardless of the option you choose and the subsequent screens that appear,
you will arrive at the Deinstall Progress screen, which shows the progress and
status of the deinstallation. If you want to quit before the deinstallation is
completed, click Cancel.
Click Finish after the deinstallation progresses to 100%. The Deinstallation
Complete screen appears.
6. Click Finish on the Deinstallation Complete screen to exit the deinstaller.
F.1.2 Deinstalling the Oracle Common Home
The ORACLE_COMMON_HOME directory located in the MW_HOME directory contains the
binary and library files required for Oracle Enterprise Manager Fusion Middleware
Control and Oracle Java Required Files (JRF). Before you deinstall the ORACLE_
COMMON_HOME directory, ensure that no other Oracle Fusion Middleware software,
such as Oracle SOA Suite, depends on ORACLE_COMMON_HOME. You cannot deinstall
the ORACLE_COMMON_HOME directory until all software that depends on it has been
deinstalled.
Perform the following steps to deinstall the ORACLE_COMMON_HOME directory:
1. Stop all processes that use the ORACLE_COMMON_HOME directory. To know all the
processes that are using ORACLE_COMMON_HOME directory use the following
commands:
On UNIX:
ps-ef grep <oracle_common>
On Windows:
Use the Windows Task Manager to identify the processes that use the ORACLE_
COMMON_HOME directory.
2. Deinstall your Oracle Identity Management Oracle Home by performing the steps
in Deinstalling the Oracle Identity Management Oracle Home.
3. Open a command prompt and move (cd) into the ORACLE_COMMON_
HOME/oui/bin/ directory (on UNIX) or the ORACLE_COMMON_
HOME\oui\bin\ directory (on Windows).
4. Invoke the Deinstaller from command line using the -deinstall option and the
-jreLoc option, which identifies the location where Java Runtime Environment
(JRE) is installed. For example:
On UNIX:
./runInstaller -deinstall -jreLoc FULL_PATH_TO_JRE_DIRECTORY
On Windows:
DeInstall Unmanaged
ASInstances - Applicable to
Oracle Internet Directory
and Oracle Virtual Directory
only.
Select this option to deinstall the Oracle Identity Management
system component instances, such as Oracle Internet Directory
and Oracle Virtual Directory, that are not registered in a
WebLogic domain.
If you select this option, the Specify Instance Location screen
appears next where you identify the instances you want to
deinstall.
Table F–1 (Cont.) Deinstallation Types
Type Description

Reinstalling Oracle Identity Management
F-4 Oracle Fusion Middleware Installation Guide for Oracle Identity Management
setup.exe -deinstall -jreLoc FULL_PATH_TO_JRE_DIRECTORY
The Welcome screen appears.
5. Click Next. The Select Deinstallation Type screen appears.
6. Select the Deinstall Oracle Home option at the top of the Select Deinstallation
Type screen.
Click Next. The Deinstall Oracle Home screen appears.
7. Confirm the correct ORACLE_COMMON_HOME directory is listed and click Deinstall.
The Deinstallation Progress screen appears, along with a Warning dialog box
prompting you to confirm that you want to deinstall the ORACLE_COMMON_HOME
directory.
8. Click Yes on the Warning dialog box to confirm you want to remove the ORACLE_
COMMON_HOME directory. The deinstallation begins.
9. Click Finish after the deinstallation progresses to 100%. The Deinstallation
Complete screen appears.
10. Click Finish on the Deinstallation Complete screen to exit the deinstaller.
F.1.3 Deinstalling Applications Registered with Oracle Single Sign-On 10g Release
10.1.4.3.0
To deinstall a partner application registered with Oracle Single Sign-On 10g Release
10.1.4.3.0, you must manually deregister the partner application from Oracle Single
Sign-On. Refer to the "Reregister mod_osso on the single sign-on middle tiers" section
in Chapter 9 of the Oracle Application Server Single Sign-On Administrator's Guide 10g
Release 10.1.4.0.1 available at:
http://www.oracle.com/technology/documentation/oim1014.html
F.2 Reinstalling Oracle Identity Management
Perform the following steps to reinstall Oracle Identity Management:
1. Verify the directory you want to reinstall Oracle Identity Management into does
not contain an existing Oracle Identity Management instance. If it does, you must
deinstall it before reinstalling. You cannot reinstall Oracle Identity Management
11g Release1(11.1.1) in a directory that contains an existing Oracle Identity
Management instance.
2. Reinstall Oracle Identity Management as if it was the first installation by
performing the steps in the appropriate procedure in this guide.
Note: The path to the ORACLE_COMMON_HOME directory appears in
the text describing the Deinstall Oracle Home option.
Note: Reinstalling Oracle Directory Integration Platform and Oracle
Directory Services Manager in the same domain from where it was
deinstalled, is supported.

G
Deinstalling and Reinstalling Oracle Identity and Access Management G-1
G Deinstalling and Reinstalling Oracle Identity
and Access Management
This appendix provides information about deinstalling and reinstalling Oracle Identity
and Access Management 11g Release 1 (11.1.1). It contains the following topics:
■Deinstalling Oracle Identity and Access Management
■Reinstalling Oracle Identity and Access Management
G.1 Deinstalling Oracle Identity and Access Management
This topic contains procedures for deinstalling Oracle Identity and Access
Management. It contains the following sections:
■Deinstalling the Oracle Identity and Access Management Oracle Home
■Deinstalling the Oracle Common Home
G.1.1 Deinstalling the Oracle Identity and Access Management Oracle Home
The deinstaller attempts to remove the Oracle Home directory from which it was
started. Before you choose to remove your Oracle Identity and Access Management
Oracle Home directory, make sure that it is not in use by an existing domain and that
you stop all running processes that use this Oracle Home.
Deinstalling Oracle Identity and Access Management will not remove any WebLogic
domains that you have created—it only removes the software in the Oracle Identity
and Access Management Oracle Home directory.
This section describes how to deinstall your Oracle Identity and Access Management
Oracle Home using the graphical, screen-based deinstaller. However, you can also
Note: Always use the instructions provided in this appendix for
removing the software. If you try to remove the software manually,
you may experience problems when you try to reinstall the software.
Following the procedures in this appendix ensures that the software is
properly removed.
Note: The oraInventory is required for removing instances and
Oracle Home. For example, on UNIX it can be found in the following
location:
/etc/oraInst.loc

Deinstalling Oracle Identity and Access Management
G-2 Oracle Fusion Middleware Installation Guide for Oracle Identity Management
perform a silent deinstallation using a response file. A deinstall response file template
that you can customize for your deinstallation is included in the
Disk1/stage/Response directory on UNIX, or in the Disk1\stage\Response
directory on Windows.
Perform the following steps to deinstall your Oracle Identity and Access Management
Oracle Home using the graphical, screen-based deinstaller:
1. Verify your Oracle Identity and Access Management Oracle Home is not in use by
an existing domain.
2. Stop all processes that use the Oracle Identity and Access Management Oracle
Home.
3. Open a command prompt and move (cd) into the IDM_ORACLE_HOME/oui/bin
directory (UNIX) or the IAM_HOME\oui\bin directory (Windows).
4. Invoke the Deinstaller from command line using the -deinstall option. For
example:
On UNIX:
./runInstaller -deinstall
On Windows:
setup.exe -deinstall
The Welcome screen appears.
5. Click Next.
In the Deinstall Oracle Home screen, you can save a response file that contains the
deinstallation settings before deinstalling. Click Deinstall. The Deinstall Progress
screen appears. This screen shows the progress and status of the deinstallation.
Click Finish after the deinstallation progresses to 100%. The Deinstallation
Complete screen appears.
6. Click Finish on the Deinstallation Complete screen to exit the deinstaller.
G.1.2 Deinstalling the Oracle Common Home
The ORACLE_COMMON_HOME directory located in the MW_HOME directory contains the
binary and library files required for Oracle Enterprise Manager Fusion Middleware
Control and Oracle Java Required Files (JRF). Before you deinstall the ORACLE_
COMMON_HOME directory, ensure that no other Oracle Fusion Middleware software,
such as Oracle SOA Suite, depends on ORACLE_COMMON_HOME. You cannot deinstall
the ORACLE_COMMON_HOME directory until all software that depends on it has been
deinstalled.
Perform the following steps to deinstall the ORACLE_COMMON_HOME directory:
1. Stop all processes that use the ORACLE_COMMON_HOME directory. To know all the
processes that are using ORACLE_COMMON_HOME directory use the following
commands:
On UNIX:
ps-ef grep <oracle_common>
On Windows:

Reinstalling Oracle Identity and Access Management
Deinstalling and Reinstalling Oracle Identity and Access Management G-3
Use the Windows Task Manager to identify the processes that use the ORACLE_
COMMON_HOME directory.
2. Deinstall your Oracle Identity and Access Management Oracle Home by
performing the steps in Deinstalling the Oracle Identity and Access Management
Oracle Home.
3. Open a command prompt and move (cd) into the ORACLE_COMMON_
HOME/oui/bin/ directory (on UNIX) or the ORACLE_COMMON_
HOME\oui\bin\ directory (on Windows).
4. Invoke the Deinstaller from command line using the -deinstall option and the
-jreLoc option, which identifies the location where Java Runtime Environment
(JRE) is installed. For example:
On UNIX:
./runInstaller -deinstall -jreLoc FULL_PATH_TO_JRE_DIRECTORY
On Windows:
setup.exe -deinstall -jreLoc FULL_PATH_TO_JRE_DIRECTORY
The Welcome screen appears.
5. Click Next. The Select Deinstallation Type screen appears.
6. Select the Deinstall Oracle Home option at the top of the Select Deinstallation
Type screen.
Click Next. The Deinstall Oracle Home screen appears.
7. Confirm the correct ORACLE_COMMON_HOME directory is listed and click Deinstall.
The Deinstallation Progress screen appears, along with a Warning dialog box
prompting you to confirm that you want to deinstall the ORACLE_COMMON_HOME
directory.
8. Click Yes on the Warning dialog box to confirm you want to remove the ORACLE_
COMMON_HOME directory. The deinstallation begins.
9. Click Finish after the deinstallation progresses to 100%. The Deinstallation
Complete screen appears.
10. Click Finish on the Deinstallation Complete screen to exit the deinstaller.
G.2 Reinstalling Oracle Identity and Access Management
Perform the following steps to reinstall Oracle Identity and Access Management:
1. Verify the directory you want to reinstall Oracle Identity and Access Management
into, does not contain an existing Oracle Identity and Access Management
instance. If it does, you must deinstall it before reinstalling. You cannot reinstall
Oracle Identity and Access Management 11g Release1(11.1.1) in a directory that
contains an existing Oracle Identity and Access Management instance.
2. Reinstall Oracle Identity and Access Management as if it was the first installation
by performing the steps in the appropriate procedure in this guide.
Note: The path to the ORACLE_COMMON_HOME directory appears in
the text describing the Deinstall Oracle Home option.

Reinstalling Oracle Identity and Access Management
G-4 Oracle Fusion Middleware Installation Guide for Oracle Identity Management

Performing Silent Installations H-1
H
Performing Silent Installations
This appendix describes how to install Oracle Identity Management in silent mode.
This appendix contains the following topics:
■What is a Silent Installation?
■Before Performing a Silent Installation
■Creating Response Files
■Performing a Silent Installation
■Installer Command Line Parameters
H.1 What is a Silent Installation?
A silent installation eliminates the need to monitor the Oracle Identity Management
installation because no graphical output is displayed and no input by the user is
required.
To perform a silent Oracle Identity Management installation, you invoke the Installer
with the -silent flag and provide a response file from the command line. The response
file is a text file containing variables and parameter values which provide answers to
the Installer prompts.
H.2 Before Performing a Silent Installation
This topic describes tasks that may be required before you perform a silent
installation. This topic includes the following sections:
■UNIX Systems: Creating the oraInst.loc File
■Windows Systems: Creating the Registry Key
H.2.1 UNIX Systems: Creating the oraInst.loc File
The Installer uses the Oracle inventory directory to keep track of all Oracle products
installed on the systems. The inventory directory is stored in a file named oraInst.loc.
If this file does not already exist on your system, you must create it before starting a
silent installation.
Perform the following steps to create the oraInst.loc file if it does not exist:
1. Log in as the root user.
2. Using a text editor such as vi or emacs, create the oraInst.loc file in any directory.
The contents of the file consist of the following two lines:

Creating Response Files
H-2 Oracle Fusion Middleware Installation Guide for Oracle Identity Management
inventory_loc=oui_inventory_directory
inst_group=oui_install_group
Replace oui_inventory_directory with the full path to the directory where you want
the Installer to create the inventory directory. Replace oui_install_group with the
name of the group whose members have write permissions to this directory.
3. Exit from the root user.
H.2.2 Windows Systems: Creating the Registry Key
If you have not installed Oracle Identity Management on your system, you must create
the following Registry key and value:
HKEY_LOCAL_MACHINE / SOFTWARE / Oracle / inst_loc = [inventory_directory]
Replace inventory_directory with the full path to your Installer files. For example:
C:\Program Files\Oracle\Inventory
H.3 Creating Response Files
Before performing a silent installation, you must provide information specific to your
installation in a response file. Response files are text files that you can create or edit in
a text editor. The Installer will fail if you attempt a silent installation using a response
file that is not configured correctly.
Several default response files, which you can use as templates and customize for your
environment, are included in the installation media. These default response files are
located in the Disk1/stage/Response directory on UNIX, or in the
Disk1\stage\Response directory on Windows.
Creating Response Files for Oracle Identity Management Software Installation
When you use the Oracle Identity Management Installation Wizard to install the
software for the first time, you can save a summary of your installation in a response
file.
To create a response file for Oracle Identity and Access Management software Installer
for Oracle Identity Manager, Oracle Access Manager, Oracle Adaptive Access
Manager, Oracle Entitlements Server, and Oracle Identity Navigator, complete the
following steps:
1. On the Installation Summary screen in the installation wizard, click Save in the
Save Response File field.
2. When prompted, save the file to a local directory.
Creating Response Files for Oracle Identity Manager Configuration
When you use the Oracle Identity Manager Configuration Wizard to configure Oracle
Identity Manager Server, Design Console, or Remote Manager for the first time, you
can save a summary of your configuration in a response file.
To create this response file, complete the following steps:
Note: After you performing the silent installation on UNIX
platforms, you must run the ORACLE_HOME/root.sh script as the
root user. The root.sh script detects settings of environment variables
and enables you to enter the full path of the local bin directory.

Performing Silent Installations H-3
1. On the Configuration Summary screen in the installation wizard, click Save in the
Save Response File field.
2. When prompted, save the file to a local directory.
H.3.1 OID, OVD, ODSM, ODIP, and OIF
The following is a list of the default response files included in the installation media
for the Oracle Identity Management Suite containing Oracle Internet Directory (OID),
Oracle Virtual Directory (OVD), Oracle Directory Services Manager (ODSM), Oracle
Directory Integration Platform (ODIP), and Oracle Identity Federation (OIF):
■im_install_only.rsp: Use this response file to install Oracle Identity Management
components without configuring them.
■im_install_config.rsp: Use this response file to install and configure Oracle Identity
Management components.
■im_config_only.rsp: Use this response file with the Oracle Identity Management
11g Release 1 (11.1.1) Configuration Wizard (config.sh script or config.bat) in
ORACLE_HOME/bin/ to configure installed components.
H.3.2 OIM, OAM, OAAM, OES, and OIN
The following is a list of the default response files included in the installation media
for the Oracle Identity Management Suite containing Oracle Identity Manager (OIM),
Oracle Access Manager (OAM), Oracle Adaptive Access Manager (OAAM), Oracle
Entitlements Server (OES), and Oracle Identity Navigator (OIN):
■iamsuite_install_only.rsp: Use this response file to install Oracle Identity
Management components without configuring them.
■iamsuite_config_only.rsp: Use this response file with the Oracle Identity Manager
11g Release 1 (11.1.1) Configuration Wizard (config.sh script or config.bat) in
ORACLE_HOME/bin/ to configure Oracle Identity Manager Server, Design
Console, and Remote Manager.
■deinstall_oh.rsp: Use this response file with the Oracle Identity Management 11g
Release 1 (11.1.1) Deinstaller to deinstall installed components.
H.3.3 Securing Your Silent Installation
Your response files contain certain passwords required by the Installer. To minimize
security issues regarding these passwords in the response file, follow these guidelines:
■Set the permissions on the response files so that they are readable only by the
operating system user who will be performing the silent installation.
■If possible, remove the response files from the system after the silent installation is
completed.
H.4 Performing a Silent Installation
To perform a silent Oracle Identity Management installation, you invoke the Installer
with the -silent flag and provide a response file from the command line.
On UNIX
The following is the syntax for running the Installer from the command line on UNIX
systems:

Installer Command Line Parameters
H-4 Oracle Fusion Middleware Installation Guide for Oracle Identity Management
runInstaller [-mode] [-options] [(COMMAND_LINE_VARIABLE=VARIABLE_VALUE)*]
For example:
./runInstaller -silent -response FILE
On Windows
The following is the syntax for running the Installer from the command line on
Windows systems:
setup.exe [-mode] [-options] [(COMMAND_LINE_VARIABLE=VARIABLE_VALUE)*]
For example:
setup.exe -silent -response FILE
H.5 Installer Command Line Parameters
Table H–1 lists and describes supported Installer command line parameters:
Table H–1 Installer Command Line Parameters
Parameter Description
Installation Modes - Only One Mode Can be Specified
-i | -install Launches the Installer in GUI mode. This is the default mode
and is used if no mode is specified on the command line.
-silent Install in silent mode. The Installer must be passed either a
response file or command line variable value pairs.
-d | -deinstall Launches the Installer in GUI mode for deinstallation.
-p | -prerequisite Launches the Installer in GUI mode but only checks the
prerequisites. No software is installed.
-v | -validate Launches the Installer in GUI mode and performs all
prerequisite and validation checking, but does not install any
software.
-sv | -silentvalidate Performs all prerequisite and validation checking in silent mode.
You must pass the Installer either a response file or a series of
command line variable value pairs.
Installation Options
-help | --help | --usage Displays the usage parameters for the runInstaller command.
-invPtrLoc file Pointer to the inventory location file. Replace file with the full
path and name of the oraInst.loc file.
-response file |
-responseFile file
Pointer to the response file. Replace file with the full path and
name of the response file.
-jreLoc location Pointer to the location where Java Runtime Environment (JRE) is
installed. Replace location with the full path to the jre directory
where your JRE is installed.

Performing Silent Installations H-5
-logLevel level Specify the level of logging performed by the Installer; all
messages with a lower priority than the specified level will be
recorded. Valid levels are:
■severe
■warning
■info
■config
■fine
■finer
■finest
-debug Obtain debug information from the Installer.
-force Allow the silent installation to proceed in a non-empty directory.
-printdiskusage Log debugging information pertaining to disk usage.
-printmemory Log debugging information pertaining to memory usage.
-printtime Log debugging information pertaining to time usage. This
command causes the timeTakentimestamp.log file to be created.
-waitforcompletion Windows only - the Installer will wait for completion instead of
spawning the Java engine and exiting.
-noconsole Messages will not be displayed to the console window.
-ignoreSysPrereqs Ignore the results of the system prerequisite checks and continue
with the installation.
-executeSysPrereqs Execute the system prerequisite checks only, then exit.
-paramFile file Specify the full path to the oraparam.ini file. This file is the
initialization file for the Installer. The default location of this file
is Disk1/install/platform.
-novalidation Disables all validation checking performed by the Installer.
-nodefaultinput For the GUI install, several screens have information or default
values pre-populated. Specifying this option disables this
behavior so that no information or values are pre-populated.
Command Line Variables
Installer Variables Installer variables are specified using varName=value. For
example:
ORACLE_HOME=/scratch/install/IDM_Home
Session Variables Session variables are specified using session:varName=value
Table H–1 (Cont.) Installer Command Line Parameters
Parameter Description

Installer Command Line Parameters
H-6 Oracle Fusion Middleware Installation Guide for Oracle Identity Management

I
Troubleshooting the Installation I-1
I Troubleshooting the Installation
This appendix describes solutions to common problems that you might encounter
when installing Oracle Identity Management. It contains the following topics:
■General Troubleshooting Tips
■Installation Log Files
■Configuring OIM Against an Existing OIM 11g Schema
■Need More Help?
I.1 General Troubleshooting Tips
If you encounter an error during installation:
■Consult the Oracle Fusion Middleware 11g Release 1 (11.1.1). You can access the
Release Notes on the Oracle Technology Network (OTN) Documentation Web site.
To access this Web site, go to the following URL:
http://www.oracle.com/technetwork/indexes/documentation/index.html
■Verify your system and configuration is certified. See Reviewing System
Requirements and Certification for more information.
■Verify your system meets the minimum system requirements. See Reviewing
System Requirements and Certification for more information.
■Verify you have satisfied the dependencies for the deployment you are
attempting. Each deployment documented in this guide contains a
"Dependencies" section.
■If you entered incorrect information on one of the installation screens, return to
that screen by clicking Back until you see the screen.
■If an error occurred while the Installer is copying or linking files:
1. Note the error and review the installation log files.
2. Remove the failed installation. See "Deinstalling Oracle Identity Management"
on page F-1 for more information.
3. Correct the issue that caused the error.
4. Restart the installation.
■If an error occurred while configuring Oracle Identity Manager using the Oracle
Identity Manager Configuration Wizard:
1. Note the error and review the configuration log files.

Installation Log Files
I-2 Oracle Fusion Middleware Installation Guide for Oracle Identity Management
2. Verify whether the dependencies are met. For example, Administration Server
and Database should be up and running.
3. Correct the issue that caused the error.
4. Restart the Oracle Identity Manager Configuration Wizard.
I.2 Installation Log Files
The Installer writes log files to the ORACLE_INVENTORY_LOCATION/logs directory
on UNIX systems and to the ORACLE_INVENTORY_LOCATION\logs directory on
Windows systems.
On UNIX systems, if you do not know the location of your Oracle Inventory directory,
you can find it in the ORACLE_HOME/oraInst.loc file.
On Microsoft Windows systems, the default location for the inventory directory is
C:\Program Files\Oracle\Inventory\logs.
The server log files are created in the <DOMAIN_HOME>/server/<servername/logs
directory.
The following install log files are written to the log directory:
■installDATE-TIME_STAMP.log
■installDATE-TIME_STAMP.out
■installActionsDATE-TIME_STAMP.log
■installProfileDATE-TIME_STAMP.log
■oraInstallDATE-TIME_STAMP.err
■oraInstallDATE-TIME_STAMP.log
I.3 Configuring OIM Against an Existing OIM 11g Schema
In this scenario, you have created and loaded the appropriate Oracle Identity Manager
(OIM) schema, installed and configured Oracle Identity Manager in a new or existing
WebLogic domain. During domain configuration, you have configured JDBC
Component Schemas by using the Oracle Fusion Middleware Configuration Wizard.
If you want to configure Oracle Identity Manager in a second WebLogic domain
against the existing Oracle Identity Manager 11g schemas, you must complete the
following steps when you try to configure Oracle Identity Manager using the Oracle
Identity Manager Configuration Wizard:
1. When prompted, you must copy the .xldatabasekey file from the first
WebLogic domain directory (/<MW_HOME>/user_projects/domains/<name_
of_your_first_oim_domain>/config/fmwconfig/) to the second
WebLogic domain directory (/<MW_HOME>/user_projects/domains/<name_
of_your_second_oim_domain>/config/fmwconfig/). Proceed with the
Oracle Identity Manager configuration.
2. After configuring Oracle Identity Manager using the Oracle Identity Manager
Configuration Wizard, copy the cwallet.so, default_keystore.jks, and
xlserver.crt files from the first WebLogic domain directory (/<MW_
HOME>/user_projects/domains/<name_of_your_first_oim_
domain>/config/fmwconfig/) to the second domain Home directory (/<MW_
HOME>/user_projects/domains/<name_of_your_second_oim_
domain>/config/fmwconfig/).

Need More Help?
Troubleshooting the Installation I-3
3. After copying the files, start the Oracle Identity Manager Managed Server, as
described in Starting the Stack.
I.4 Need More Help?
If you cannot solve a problem using the information in this appendix, look for
additional information in My Oracle Support at
http://support.oracle.com.
If you cannot find a solution to your problem, open a service request.

Need More Help?
I-4 Oracle Fusion Middleware Installation Guide for Oracle Identity Management

J
OAAM Partition Schema Reference J-1
J OAAM Partition Schema Reference
This appendix provides information about tables and stored procedures used with
Oracle Adaptive Access Manager (OAAM) with Partition support.
It contains the following topics:
■Overview
■Partition Add Maintenance
■Partition Maintenance Scripts
J.1 Overview
Database tables in the Oracle Adaptive Access Manager database are divided into the
following categories:
■Static partition tables
■Transactional partition tables
■Non-partitioned tables
Note: All the tables contain the composite partition (RANGE,
HASH). The Range partition is created using CREATE_TIME while
the HASH key is defined based on application logic.
lists the Oracle Adaptive Access Manager (OAAM) partition tables.
All the other tables are non-partitioned.

Partition Add Maintenance
J-2 Oracle Fusion Middleware Installation Guide for Oracle Identity Management
J.2 Partition Add Maintenance
After the initial Oracle Adaptive Access Manager repository setup, the following
stored procedures are set up as dbms_jobs to maintain the partitions on a regular
basis:
■Sp_Oaam_Add_Monthly_Partition
■Sp_Oaam_Add_Weekly_Partition
J.2.1 Sp_Oaam_Add_Monthly_Partition
This stored procedure adds partitions for tables with the monthly frequency.
The script runs at the end of each month to create partitions for the following month.
To simultaneously add partitions for subsequent months, the partitions are added
based on the partition of the previous month.
If this stored procedure fails to exceute (if your monthly partition is missing), you may
see database errors, "ORA-14400 and ORA-14401," forcing the Oracle Adaptive
Access Manager application to stop.
J.2.2 Sp_Oaam_Add_Weekly_Partition
This stored procedure adds partitions for tables with the weekly frequency.
The script runs at the end of each week to create partitions for the following week. To
simultaneously add partitions for subsequent weeks, the partitions are added based
on the partition of the previous week.
Table J–1 OAAM Database Partition Tables
Table Type Frequency Table Name
Static Partition Monthly V_USER_QA
V_USER_QA_HIST
Transactional Partition Monthly VCRYPT_TRACKER_NODE_HISTORY
VCRYPT_TRACKER_USERNODE_LOGS
VCRYPT_TRACKER_NODE
VT_USER_DEVICE_MAP
V_MONITOR_DATA
VT_SESSION_ACTION_MAP
VT_ENTITY_ONE
VT_ENTITY_ONE_PROFILE
VT_USER_ENTITY1_MAP
VT_ENT_TRX_MAP
VT_TRX_DATA
VT_TRX_LOGS
Transactional Partition Weekly VR_POLICYSET_LOGS
VR_POLICY_LOGS
VR_RULE_LOGS
VR_MODULE_LOGS

Partition Maintenance Scripts
OAAM Partition Schema Reference J-3
If this stored procedure fails to exceute (if your weekly partition is missing), you may
see database errors, "ORA-14400 and ORA-14401," forcing the Oracle Adaptive
Access Manager application to stop.
J.3 Partition Maintenance Scripts
After the initial Oracle Adaptive Access Manager repository setup, use the following
scripts with purging or archiving maintenance scripts to maintain the partitions on a
regular basis:
■drop_monthly_partition_tables.sql
■drop_weekly_partition_tables.sql
■add_monthly_partition_tables.sql
■add_weekly_partition_tables.sql
The above mentioned scripts are located at <IDM_ORACLE_HOME>\oaam\oaam_db_
maint_scripts\oaam_db_partition_maint_scripts
J.3.1 drop_monthly_partition_tables.sql
You can use this script to drop partitions for tables with the monthly frequency. You
should run this script at the end of each month to drop partitions older than sixth
months, based on the requirements of the Oracle Adaptive Access Manager
application. Note that these tables will have six partitions at a given time.
J.3.2 drop_weekly_partition_tables.sql
You can use this script to drop partitions for tables with the weekly frequency. You
should run this script either at the end of every fourteenth day or at the end of third
week from the day the Oracle database was created to the dropping of partitions older
than two weeks, based on the requirements of the Oracle Adaptive Access Manager
application.
J.3.3 add_monthly_partition_tables.sql
You can use this script to add partitions for tables with the monthly frequency. You
should run this script at the end of each month to create partitions for the following
month. To add partitions for subsequent months at the same time, run this script
multiple times. When you run the script multiple times, partitions are added based on
the previous month’s partition.
J.3.4 add_weekly_partition_tables.sql
You can use this script to add partitions for tables with the weekly frequency. You
should run this script at the end of each month to create partitions for the following
week. To add partitions for subsequent weeks at the same time, run this script
multiple times. When you run the script multiple times, partitions are added based on
the previous week’s partition.
Note: You do not have to execute partition add scripts. You should
only use them to create partitions manually because other automated
dbms_jobs create partitions at regular intervals.

Partition Maintenance Scripts
J-4 Oracle Fusion Middleware Installation Guide for Oracle Identity Management
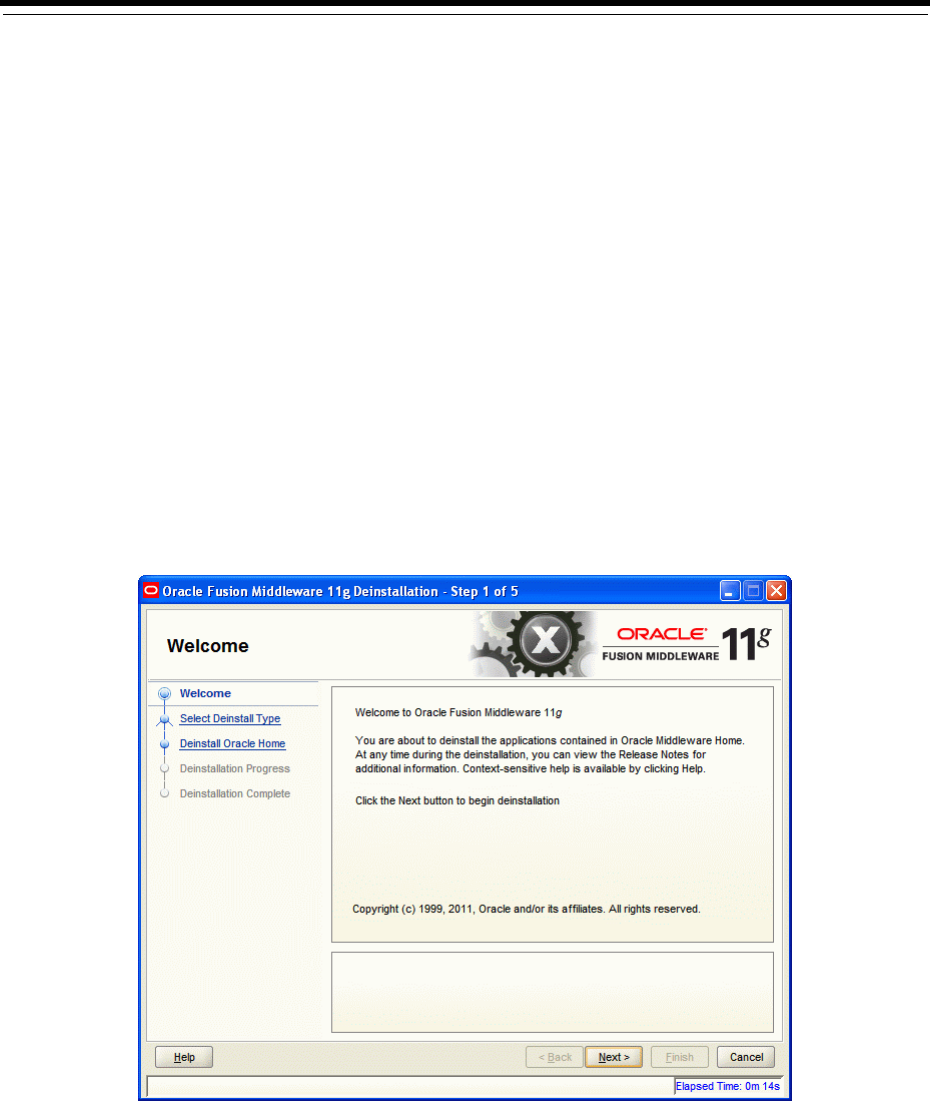
Software Deinstallation Screens K-1
K
Software Deinstallation Screens
This appendix describes the screens of the Oracle Fusion Middleware 11g
Deinstallation Wizard that enables you to remove the Oracle Identity Management
software from your machine. This appendix contains the following topics:
■Welcome
■Select Deinstallation Type
■Deinstallation Progress
■Deinstallation Complete
K.1 Welcome
The Welcome screen is the first screen that appears when you start the Oracle Fusion
Middleware 11g Deinstallation Wizard.
Figure K–1 Welcome Screen
Click Next to continue.
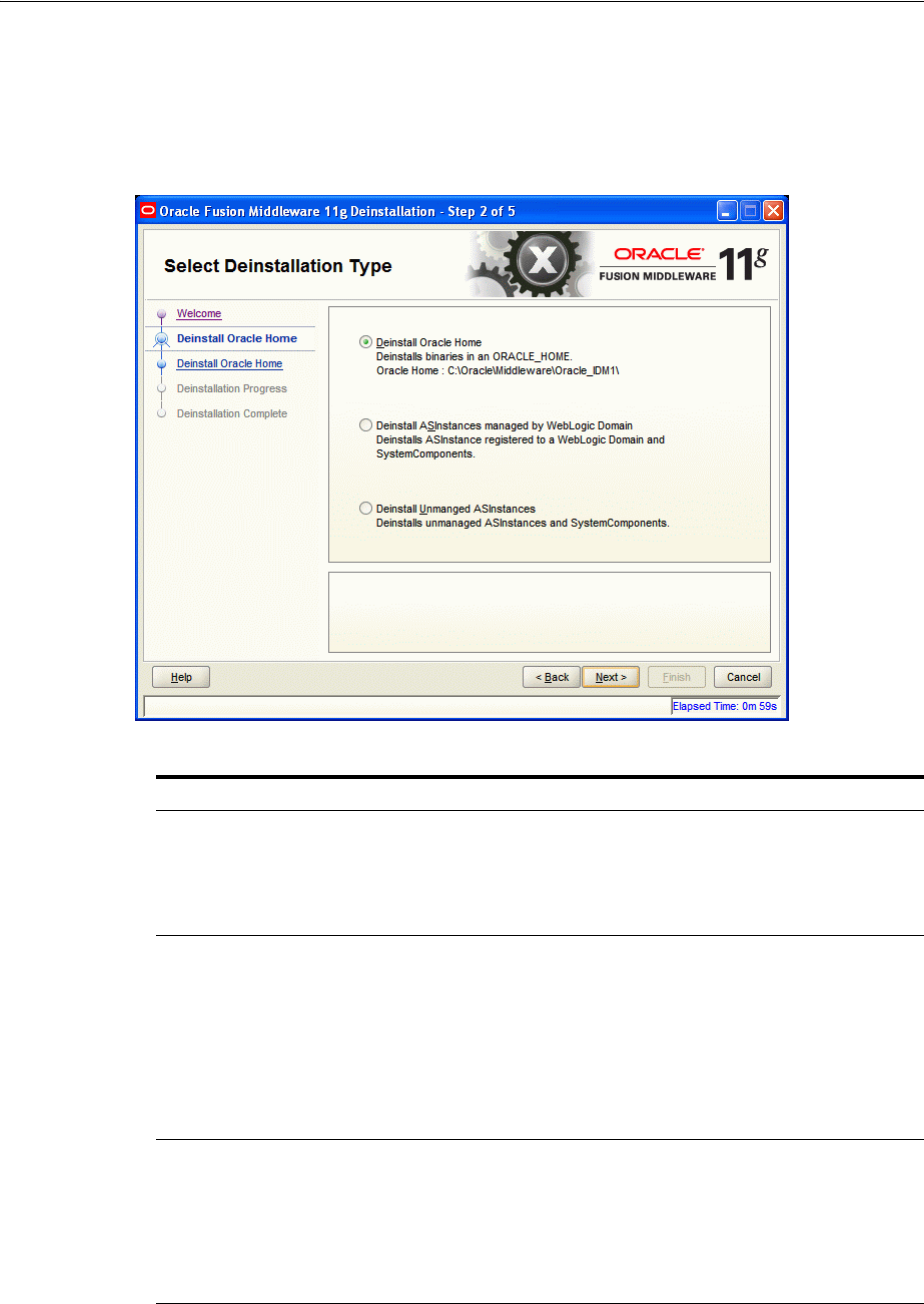
Select Deinstallation Type
K-2 Oracle Fusion Middleware Installation Guide for Oracle Identity Management
K.2 Select Deinstallation Type
Select the type of deinstallation you want to perform.
Figure K–2 Select Deinstallation Type Screen
Click Next to continue.
Table K–1 Deinstallation Types
Type Description
Deinstall Oracle Home Select this option to deinstall the binaries contained in the listed
Oracle Identity Management Oracle Home.
If you select this option, the Deinstall Oracle Home screen
appears next, where you can save a response file that contains
the deinstallation settings before deinstalling.
Deinstall ASInstances
managed by WebLogic
Domain - Applicable to
Oracle Internet Directory
and Oracle Virtual Directory
only.
Select this option to deinstall the Oracle Identity Management
system component instances, such as Oracle Internet Directory
and Oracle Virtual Directory, that are registered in a WebLogic
domain.
If you select this option, the Specify WebLogic Domain Detail
screen appears next where you identify the administration
domain containing the system components you want to
deinstall. The Select Managed Instance screen appears next,
where you identify the instances you want to deinstall.
Deinstall Unmanaged
ASInstances - Applicable to
Oracle Internet Directory
and Oracle Virtual Directory
only.
Select this option to deinstall the Oracle Identity Management
system component instances, such as Oracle Internet Directory
and Oracle Virtual Directory, that are not registered in a
WebLogic domain.
If you select this option, the Specify Instance Location screen
appears next where you identify the instances you want to
deinstall.
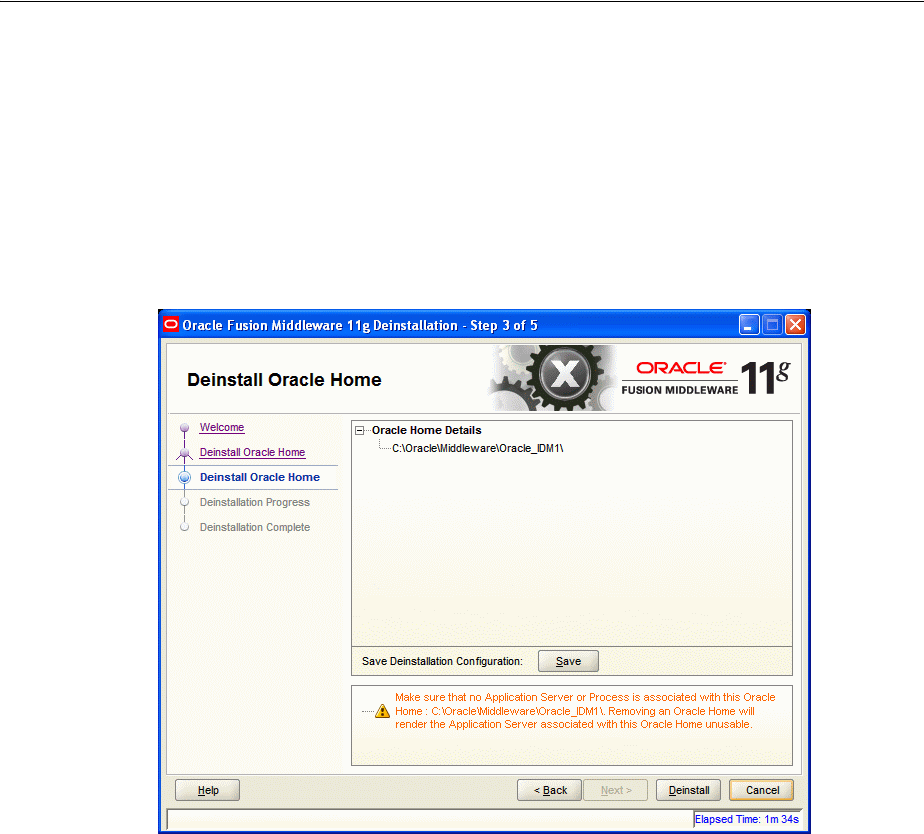
Software Deinstallation Screens K-3
K.2.1 Option 1: Deinstall Oracle Home
If you selected Deinstall Oracle Home on the Select Deinstallation Type screen, the
following screen appears:
K.2.1.1 Deinstall Oracle Home
This screen shows the Oracle Home directory that is about to be deinstalled. It is the
Oracle Home directory in which the deinstaller was started.
Figure K–3 Deinstall Oracle Home Screen
Verify that this is the correct directory, and also verify that there are no processes
associated with this Oracle Home.
Click Deinstall to start the deinstallation process.
K.2.2 Option 2: Deinstall ASInstances managed by WebLogic Domain
If you selected Deinstall ASInstances managed by WebLogic Domain on the Select
Deinstallation Type screen, the following screens appears:
■Specify WebLogic Domain Detail
■Select Managed Instance
■Deinstallation Summary (Managed Instance)
K.2.2.1 Specify WebLogic Domain Detail
Specify the WebLogic Domain credentials:
■Domain Host Name
The name of the system on which the WebLogic Domain is running.
■Domain Port No
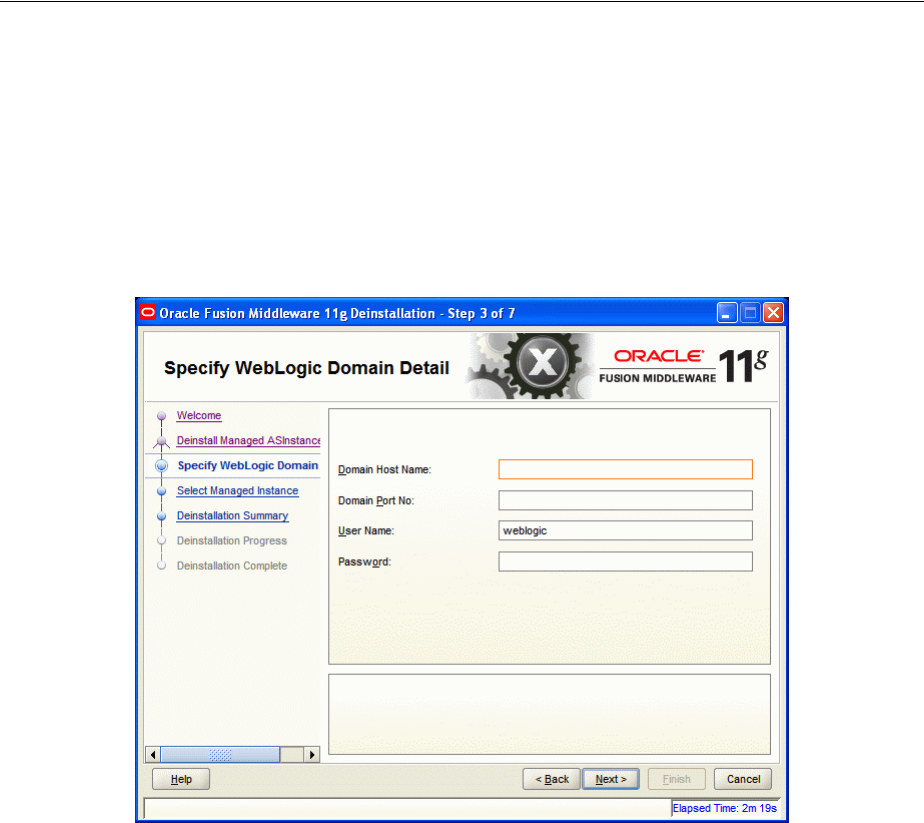
Select Deinstallation Type
K-4 Oracle Fusion Middleware Installation Guide for Oracle Identity Management
Listen port number of the domain. The default port number is 7001.
■User Name
The WebLogic Domain user name.
■Password
The password of the WebLogic Domain user.
Figure K–4 Specify WebLogic Domain Detail Screen
Click Next to continue.
K.2.2.2 Select Managed Instance
Select the managed instance you want to deinstall.
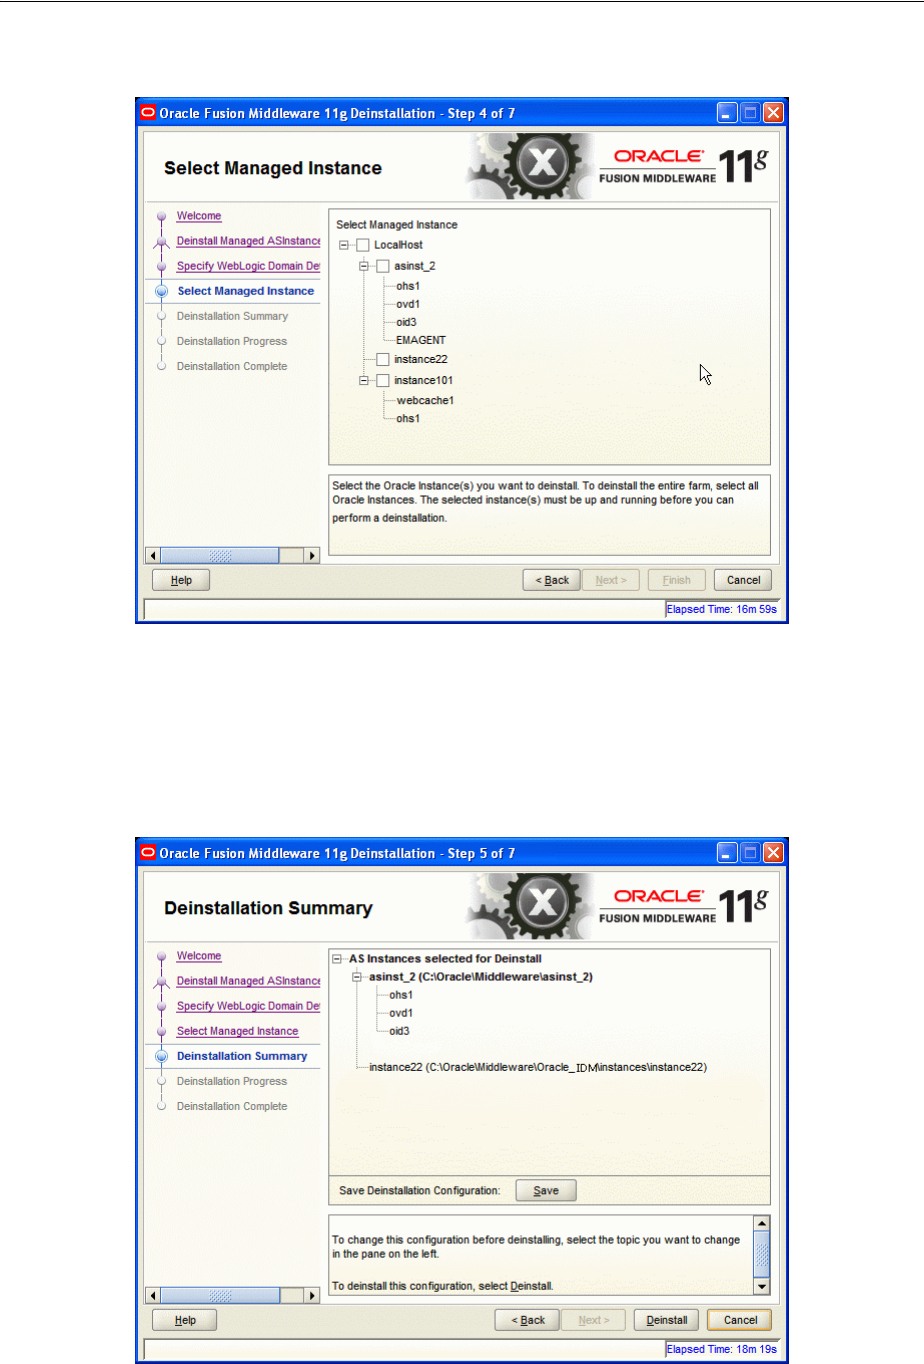
Software Deinstallation Screens K-5
Figure K–5 Select Managed Instance Screen
Click Next to continue.
K.2.2.3 Deinstallation Summary (Managed Instance)
Verify that the specified instance is the one you want to deinstall.
Figure K–6 Deinstallation Summary Screen

Select Deinstallation Type
K-6 Oracle Fusion Middleware Installation Guide for Oracle Identity Management
Click Deinstall to start the deinstallation process.
K.2.3 Option 3: Deinstall Unmanaged ASInstances
If you selected Deinstall Unmanaged ASInstances on the Select Deinstallation Type
screen, the following screen appears:
■Specify Instance Location
■Deinstallation Summary (Unmanaged ASInstance)
K.2.3.1 Specify Instance Location
Specify the full path to your Oracle Instance directory. If you are unsure, click Browse
to find this directory on your system.
Figure K–7 Specify Instance Location Screen
Click Next to continue.
K.2.3.2 Deinstallation Summary (Unmanaged ASInstance)
Verify that the specified instance is the one you want to deinstall.

Software Deinstallation Screens K-7
Figure K–8 Deinstallation Summary Screen
Click Deinstall to start the deinstallation process.
K.3 Deinstallation Progress
This screen shows you the progress of the deinstallation.
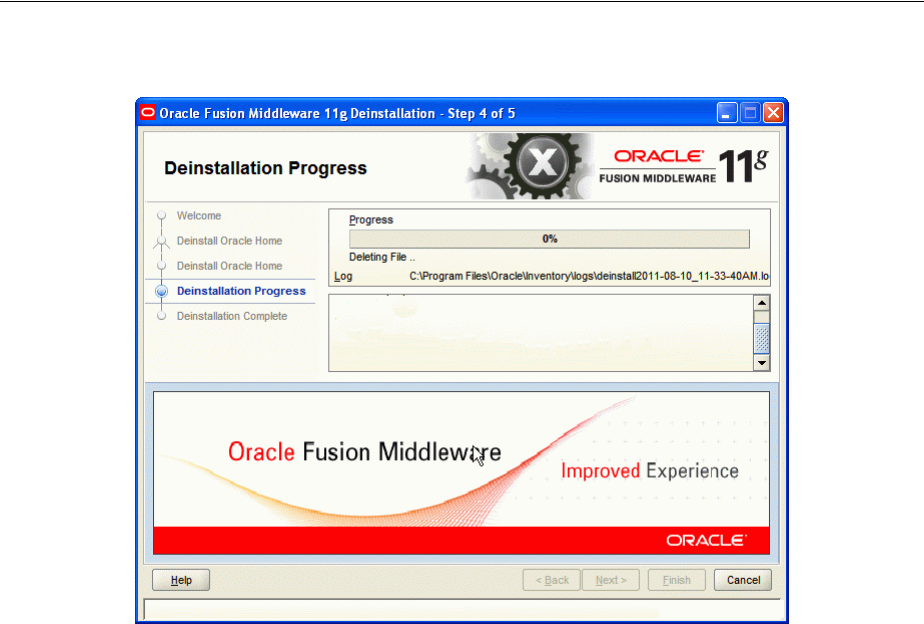
Deinstallation Complete
K-8 Oracle Fusion Middleware Installation Guide for Oracle Identity Management
Figure K–9 Deinstallation Progress Screen
If you want to quit before the deinstallation is completed, click Cancel.
K.4 Deinstallation Complete
This screen summarizes the deinstallation that was just completed.
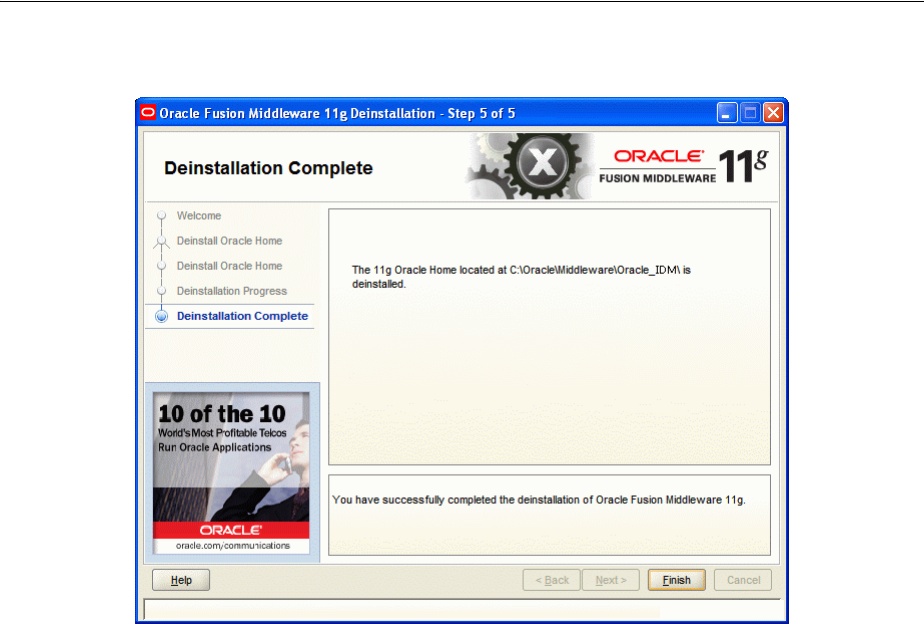
Software Deinstallation Screens K-9
Figure K–10 Deinstallation Complete Screen
Click Finish to dismiss the deinstaller.

Deinstallation Complete
K-10 Oracle Fusion Middleware Installation Guide for Oracle Identity Management
