Creating A Raspberry Pi 3 Cluster Supercomputer, For Parallel Computing. ~ Random Thoughts On Coding And Technology Instructions
User Manual:
Open the PDF directly: View PDF ![]() .
.
Page Count: 44
Thoughts about Delphi, C#, .NET and Software Architecture.
Creating a Raspberry Pi 3 Cluster - "Supercomputer",
for parallel computing.
22:53:00 JORDI CORBILLA ARCHITECTURE , COMPUTING , LINUX , NETWORK ,
PARALLEL , RASPBERRY PI , RPI3 , SUPERCOMPUTER 60 COMMENTS
HOME OPEN SOURCE FLICKR ANALYTICS MVP
In this quick article I will show you how to create
your own Raspberry Pi cluster for parallel
computing via MPI (Messaging Passing Interface)
library. This is a nice summer project now that I'm
free from my Master's duties until September and
I have been wanting to build this for a while.
Thanks to the low prices of the Raspberry Pi we
Creating a Raspberry Pi 3 Cluster - "Supercomputer", for parallel compu... http://thundaxsoftware.blogspot.com/2016/07/creating-raspberry-pi-3-clu...
1 of 44
1/1/2019, 4:38 PM

are now able to build this without spending too
much. See below for the list of items you will need
and price for the whole kit with 4 Pi's.
The main decision behind this architecture is to
choose which operating system and
programming language to use to implement parallel computing. Because of
my experience with HPC (High Performance Computing) and SGE (Sun Grid
Engine) the best way to achieve this is by using either OpenMPI or MPICH3.
These two are free open distributions, portable and very popular. As per the
programming language, we have several alternatives: we could use c++, c#,
python, etc. I could use winIoT for Rpi or simply a Linux distro. I'm a geek so I
went for the latter as I do like interacting with command line interfaces, there is
some beauty there that I can't explain :).
So my decision is to use a Linux distribution as OS. In this case I'm choosing
Raspbian Jessie which comes with some goodies installed by default and it will
allow me to install all the components I need for my little project.
The second decision to make is to choose the programming language. In this
case I'm choosing Python as I'm very familiar with it, it has plenty of libraries
available and a nice integration with MPI via mpi4py library.
The other factor to take into account here is that I have two different models of
RPi and I need to make sure that whatever I install on those will work well for both
instances. I won't be able to install WinIoT to my old Rpi model A.
Building the cluster of Rpi's
The material that you will need is listed below with links included:
4 x Rpi 3 model B = 4 x £30 = £120
4 x 16Gb microSD card (Kingston) = 4 x £4.84 = £19.36
4 x USB to Micro USB Cable 0.5m = 4 x £0.88 = £3.5
2 x Multi-Pi Stackable Raspberry Pi Case = 2 x £13 = £26
1 x 5 port desktop switch = 1 x £6.49 = £6.49
5 x Ethernet patch cable 0.3m = 5 x £2.90 = £14.5
Creating a Raspberry Pi 3 Cluster - "Supercomputer", for parallel compu... http://thundaxsoftware.blogspot.com/2016/07/creating-raspberry-pi-3-clu...
2 of 44
1/1/2019, 4:38 PM
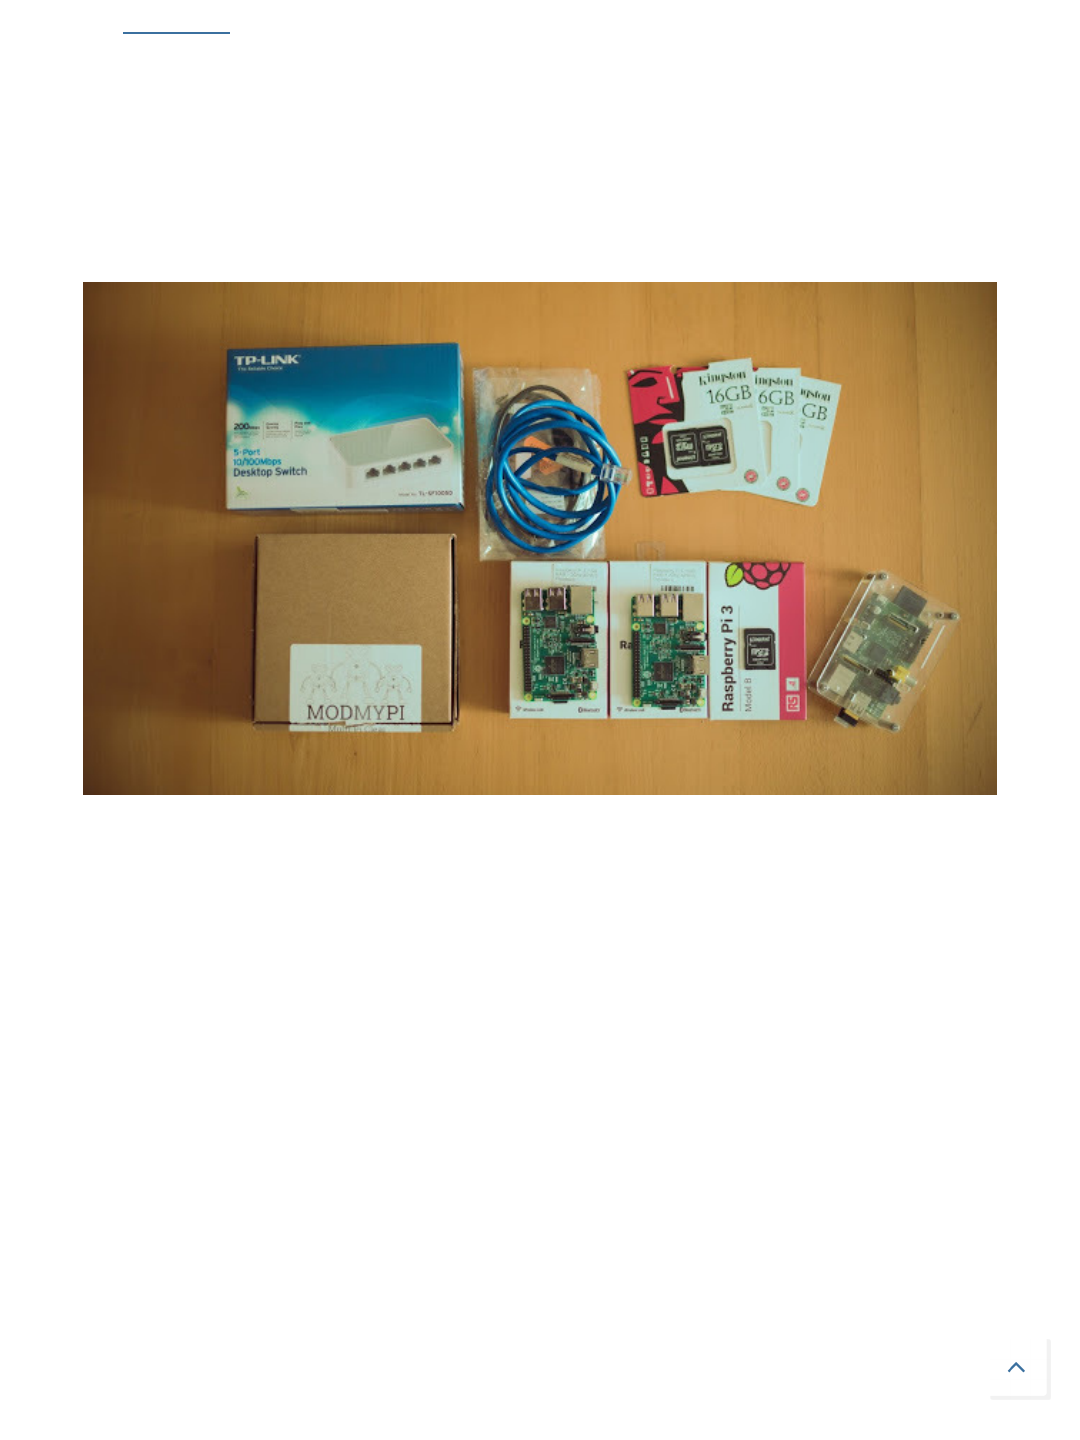
1 x USB Hub = 1 x £2.53 = £2.53
Total = £192.38 (without considering delivery)
*This is a common configuration but you can start with just 2 or 3 RPi's and keep
adding hardware later on.
Once all the components are assembled using the stackable case you should
have something like the image below:
Creating a Raspberry Pi 3 Cluster - "Supercomputer", for parallel compu... http://thundaxsoftware.blogspot.com/2016/07/creating-raspberry-pi-3-clu...
3 of 44
1/1/2019, 4:38 PM
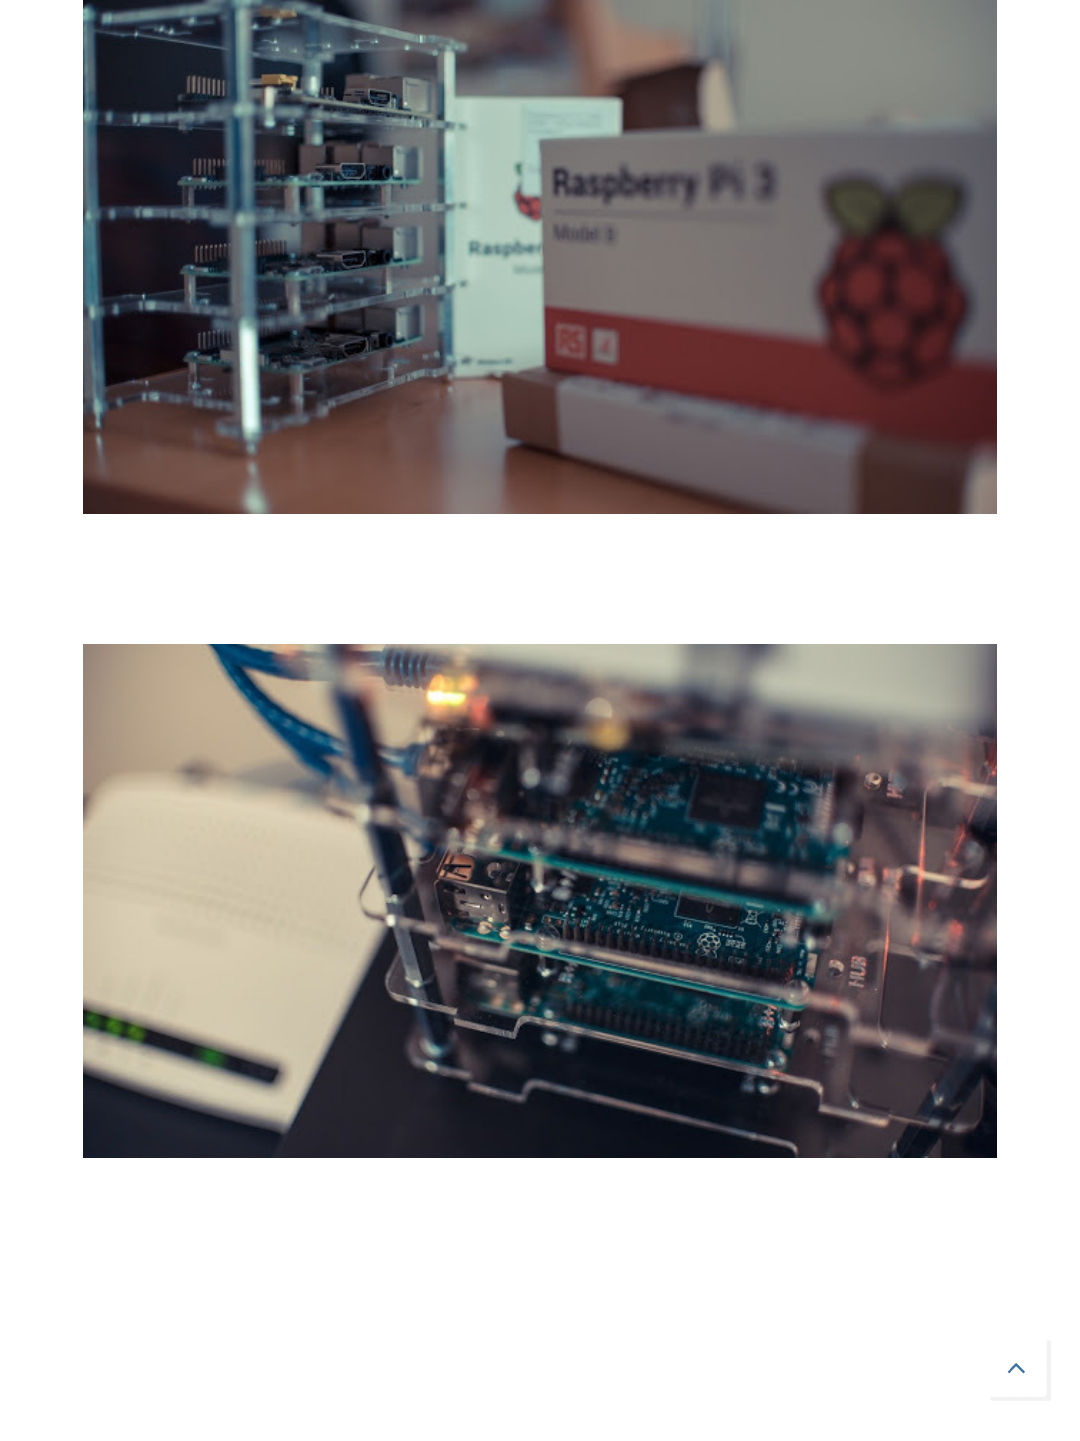
Below the image of my cluster up and running (see configuration section for more):
Configuring your cluster of RPi's
The idea is to configure one of the RPi's and then just clone the SD card and plug
it to the next Rpi. Here you'll find a summary description of the steps to do to get
you up and running:
Creating a Raspberry Pi 3 Cluster - "Supercomputer", for parallel compu... http://thundaxsoftware.blogspot.com/2016/07/creating-raspberry-pi-3-clu...
4 of 44
1/1/2019, 4:38 PM
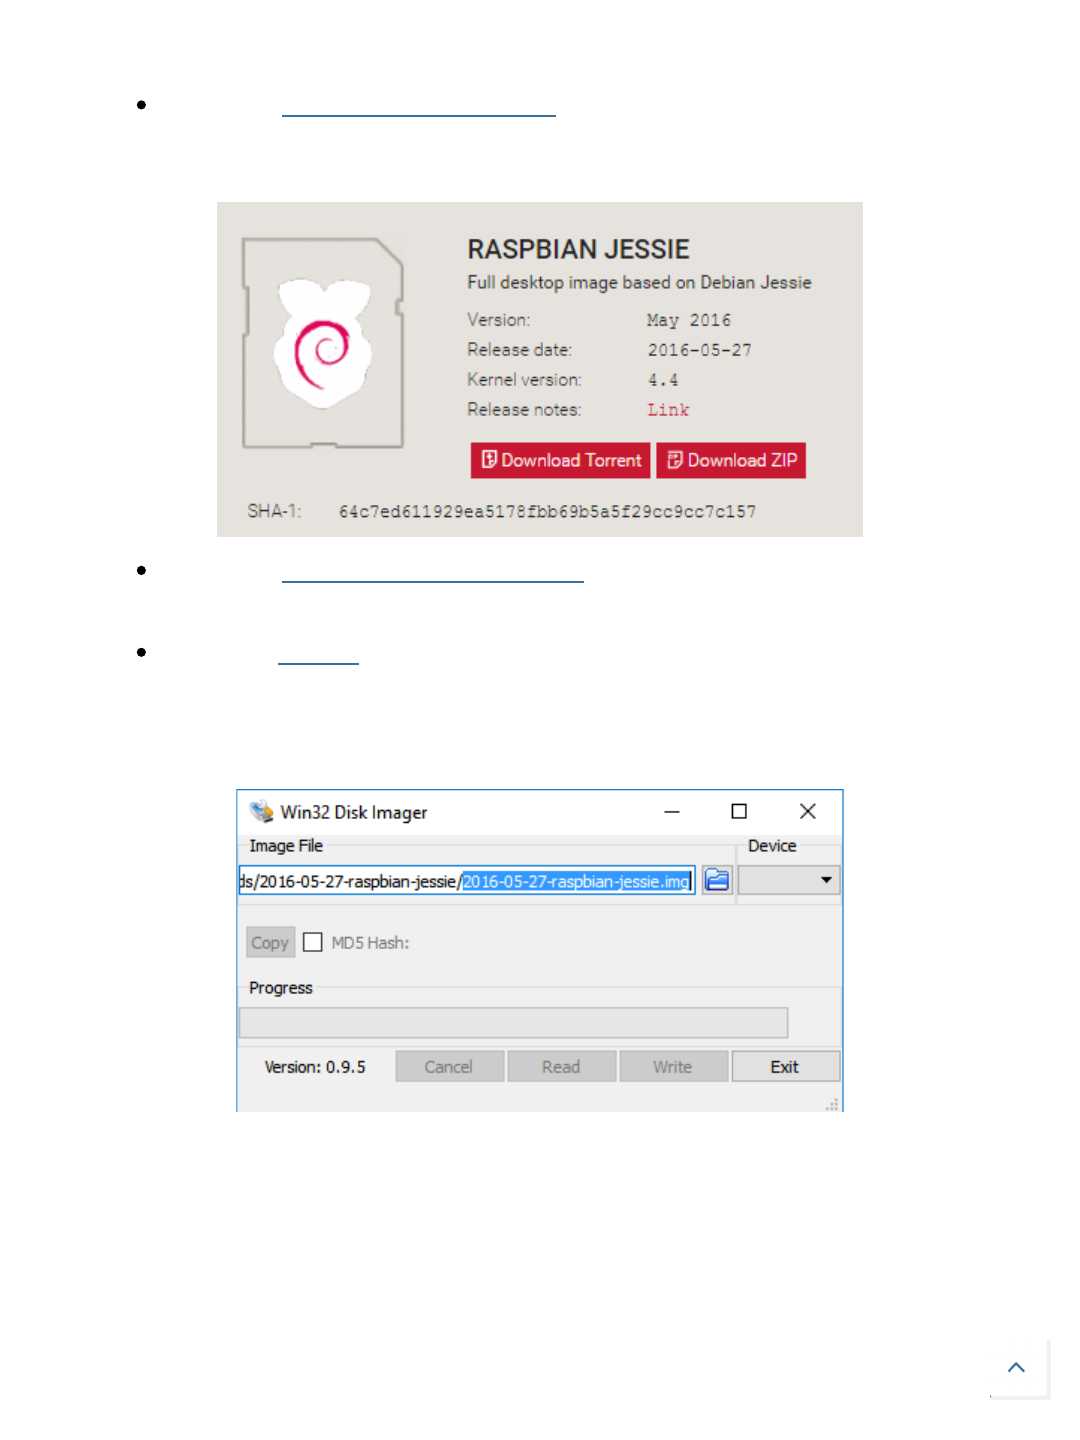
Installing the OS
Download Raspbian Jessie image. I had some trouble downloading the
zip file so I used the torrent link instead. See the version used below (4.4)
Download Win32DiskImager installer. We will use this to burn Raspbian
image to our SD card.
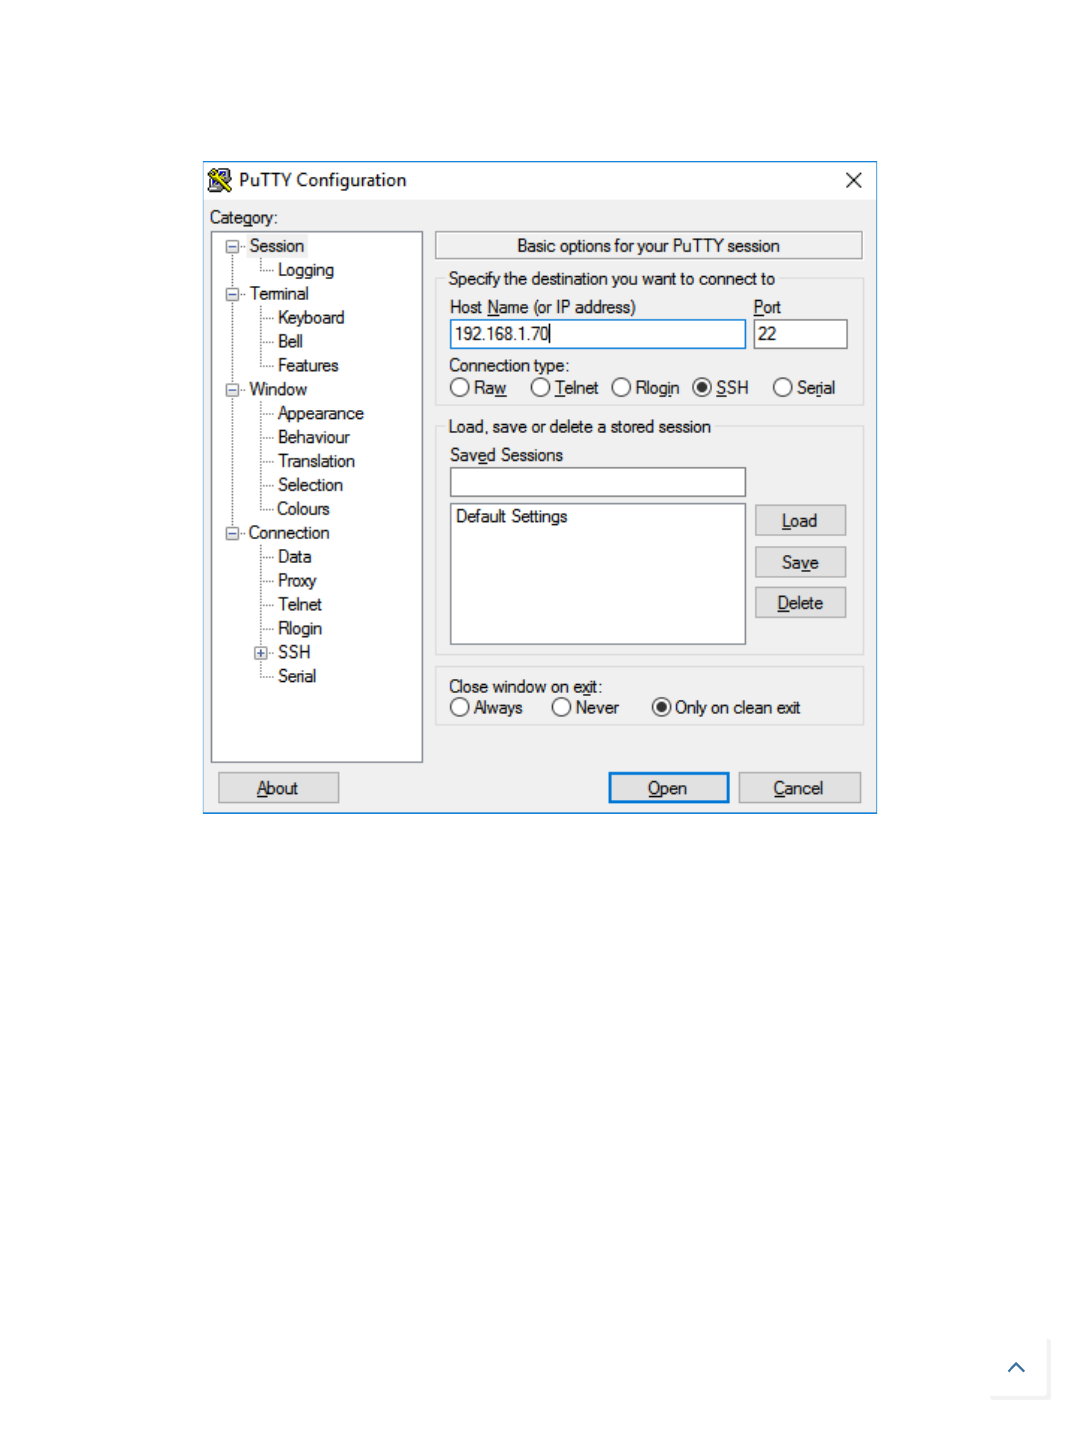
Download PuTTY SSH client to connect to our Rpi's.
Once the OS image is downloaded, burn it to the SD card using
Win32DiskImager:
Plug the microSD card to the first Pi (my PiController in my case) and power it up.
Plug the Ethernet cable and head back to your computer to access the Pi
remotely.
Open a command prompt (I'm using Win10 as my main computer) and type
"ping raspberrypi". By default the Rpi's are named raspberrypi so they are easy
Creating a Raspberry Pi 3 Cluster - "Supercomputer", for parallel compu... http://thundaxsoftware.blogspot.com/2016/07/creating-raspberry-pi-3-clu...
5 of 44
1/1/2019, 4:38 PM
to spot in your network. Once you ping it, you will be able to see the ip address of
the device. Save this IP address for later as we will use it in PuTTY.
Launch PuTTY and type the IP address of the RaspberryPi:
You should see something similar to the image below:
Creating a Raspberry Pi 3 Cluster - "Supercomputer", for parallel compu... http://thundaxsoftware.blogspot.com/2016/07/creating-raspberry-pi-3-clu...
6 of 44
1/1/2019, 4:38 PM
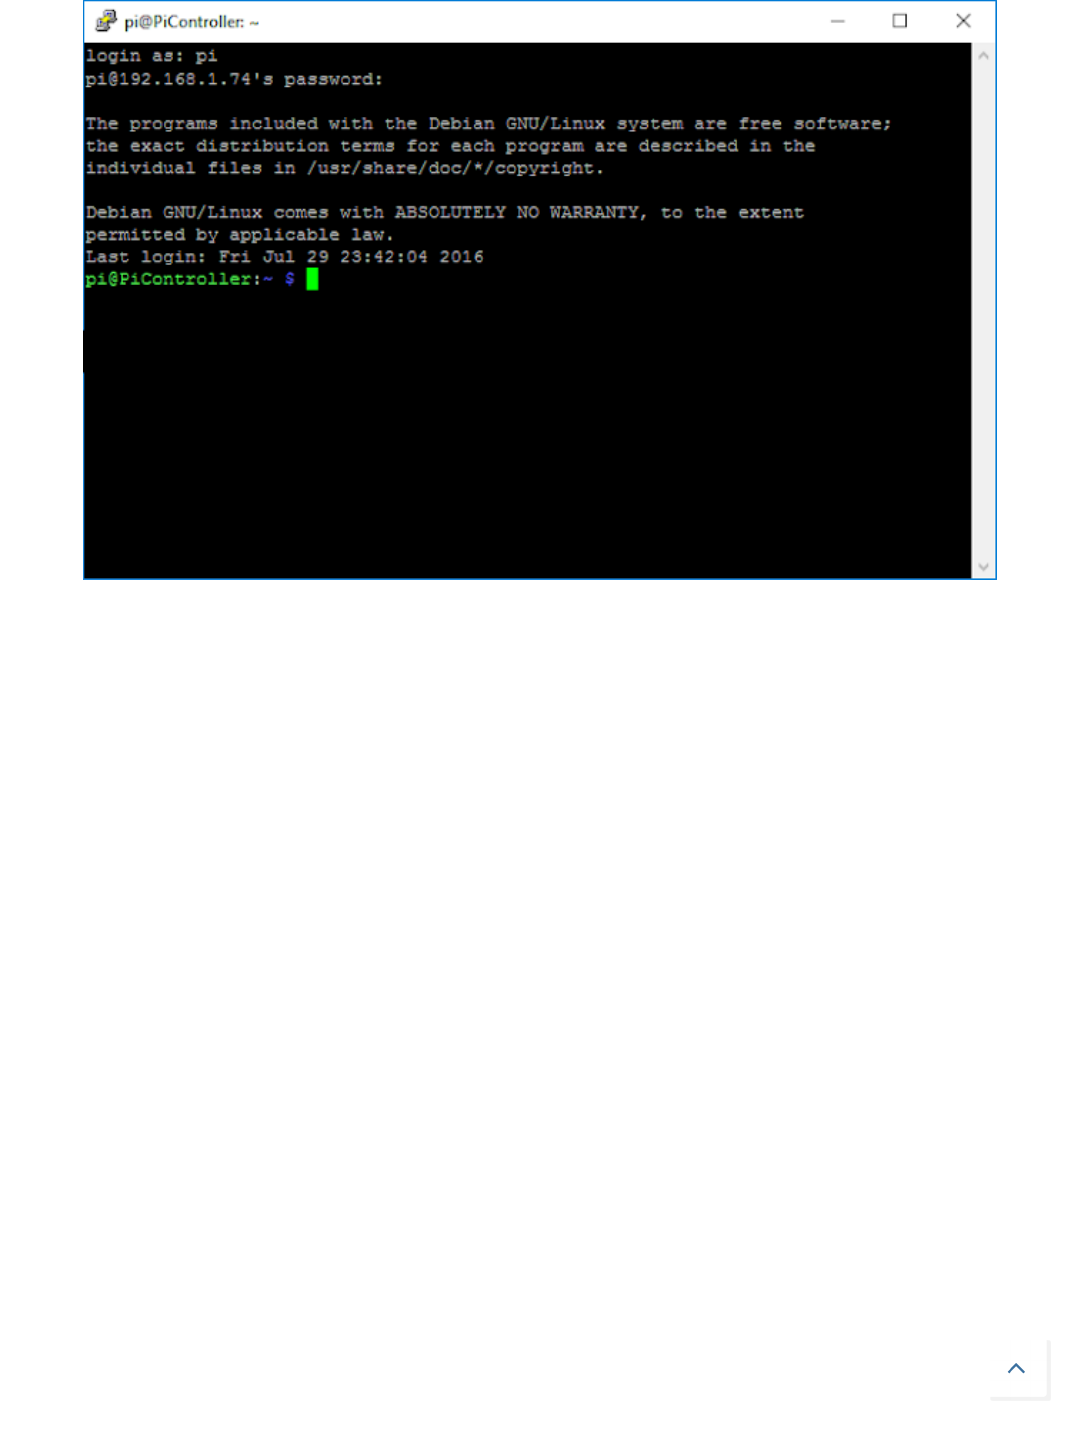
login as: pi and password: raspberry (each Rpi uses same login/password)
Type: sudo raspi-config to configure our device:
Go to Expand File System1.
Go to Advanced Options -> HostName -> set it to PiController2.
Go to Advanced Options -> MemorySplit -> set it to 16.3.
Go to Advanced Options -> SSH -> Enable.4.
Finish and leave the configuration.5.
Creating a Raspberry Pi 3 Cluster - "Supercomputer", for parallel compu... http://thundaxsoftware.blogspot.com/2016/07/creating-raspberry-pi-3-clu...
7 of 44
1/1/2019, 4:38 PM

Now we can start installing MPICH3 and MPI4PY. Notice that these steps take a
while (> 4h) so arrange some free time for this beforehand:
Installing MPICH3
Follow the steps below to install version 3.2 of MPICH:
# ******************************
# These steps will allow you to install MPICH3 to your Raspbian Jessie distro
# Jordi Corbilla
# ******************************
# update the system
sudo apt-get update
# update packages
sudo apt-get dist-upgrade
# create the folder for mpich3
sudo mkdir mpich3
cd ~/mpich3
# download the version 3.2 of mpich
sudo wget http://www.mpich.org/static/downloads/3.2/mpich-3.2.tar.gz
Creating a Raspberry Pi 3 Cluster - "Supercomputer", for parallel compu... http://thundaxsoftware.blogspot.com/2016/07/creating-raspberry-pi-3-clu...
8 of 44
1/1/2019, 4:38 PM

view rawmpich3install.sh hosted with ❤ by GitHub
Once you've got everything installed you should see something like the image
below:
# unzip it
sudo tar xfz mpich-3.2.tar.gz
# create folders for mpi
sudo mkdir /home/rpimpi/
sudo mkdir /home/rpimpi/mpi-install
mkdir /home/pi/mpi-build
# install gfortran
sudo apt-get install gfortran
# configure and isntall mpich
sudo /home/pi/mpich3/mpich-3.2/configure -prefix=/home/rpimpi/mpi-install
sudo make
sudo make install
# edit the bash script using nano editor that runs everytime the Pi starts
cd ..
nano .bashrc
# Add the following to the end of the file
# PATH=$PATH:/home/rpimpi/mpi-install/bin
# to save the details press "CTRL + ^x" -> using CTRL 6 and x
# press "y" and hit enter to leave.
# Reboot the Pi
sudo reboot
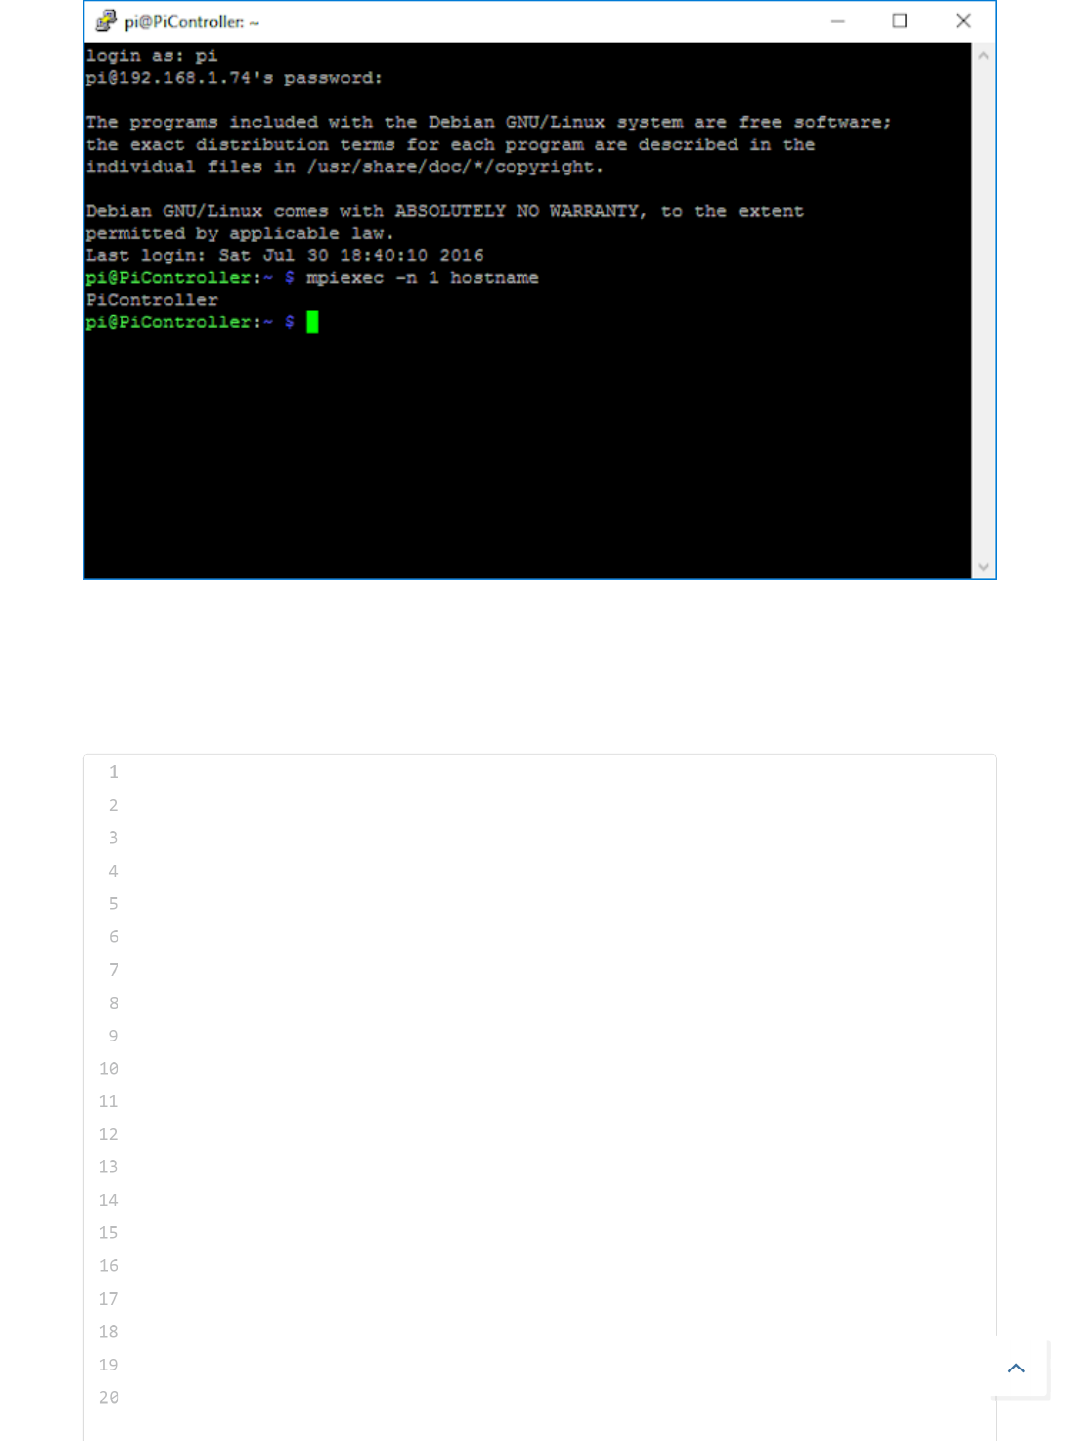
# Test that MPI works
mpiexec -n 1 hostname
Creating a Raspberry Pi 3 Cluster - "Supercomputer", for parallel compu... http://thundaxsoftware.blogspot.com/2016/07/creating-raspberry-pi-3-clu...
9 of 44
1/1/2019, 4:38 PM
Installing MPI4PY
Follow the steps below to install version 2.0 of MPI4PY:
# ******************************
# These steps will allow you to install MPI4PY to your Raspbian Jessie distro
# Jordi Corbilla
# ******************************
# download mpi4py
wget https://bitbucket.org/mpi4py/mpi4py/downloads/mpi4py-2.0.0.tar.gz
#unzip the file
sudo tar -zxf mpi4py-2.0.0.tar.gz
# go to the directory
cd mpi4py-2.0.0
# install python-dev package
sudo aptitude install python-dev
# run the setup
python setup.py build
sudo python setup.py install
Creating a Raspberry Pi 3 Cluster - "Supercomputer", for parallel compu... http://thundaxsoftware.blogspot.com/2016/07/creating-raspberry-pi-3-clu...
10 of 44
1/1/2019, 4:38 PM
view rawmpi4pyinstall.sh hosted with ❤ by GitHub
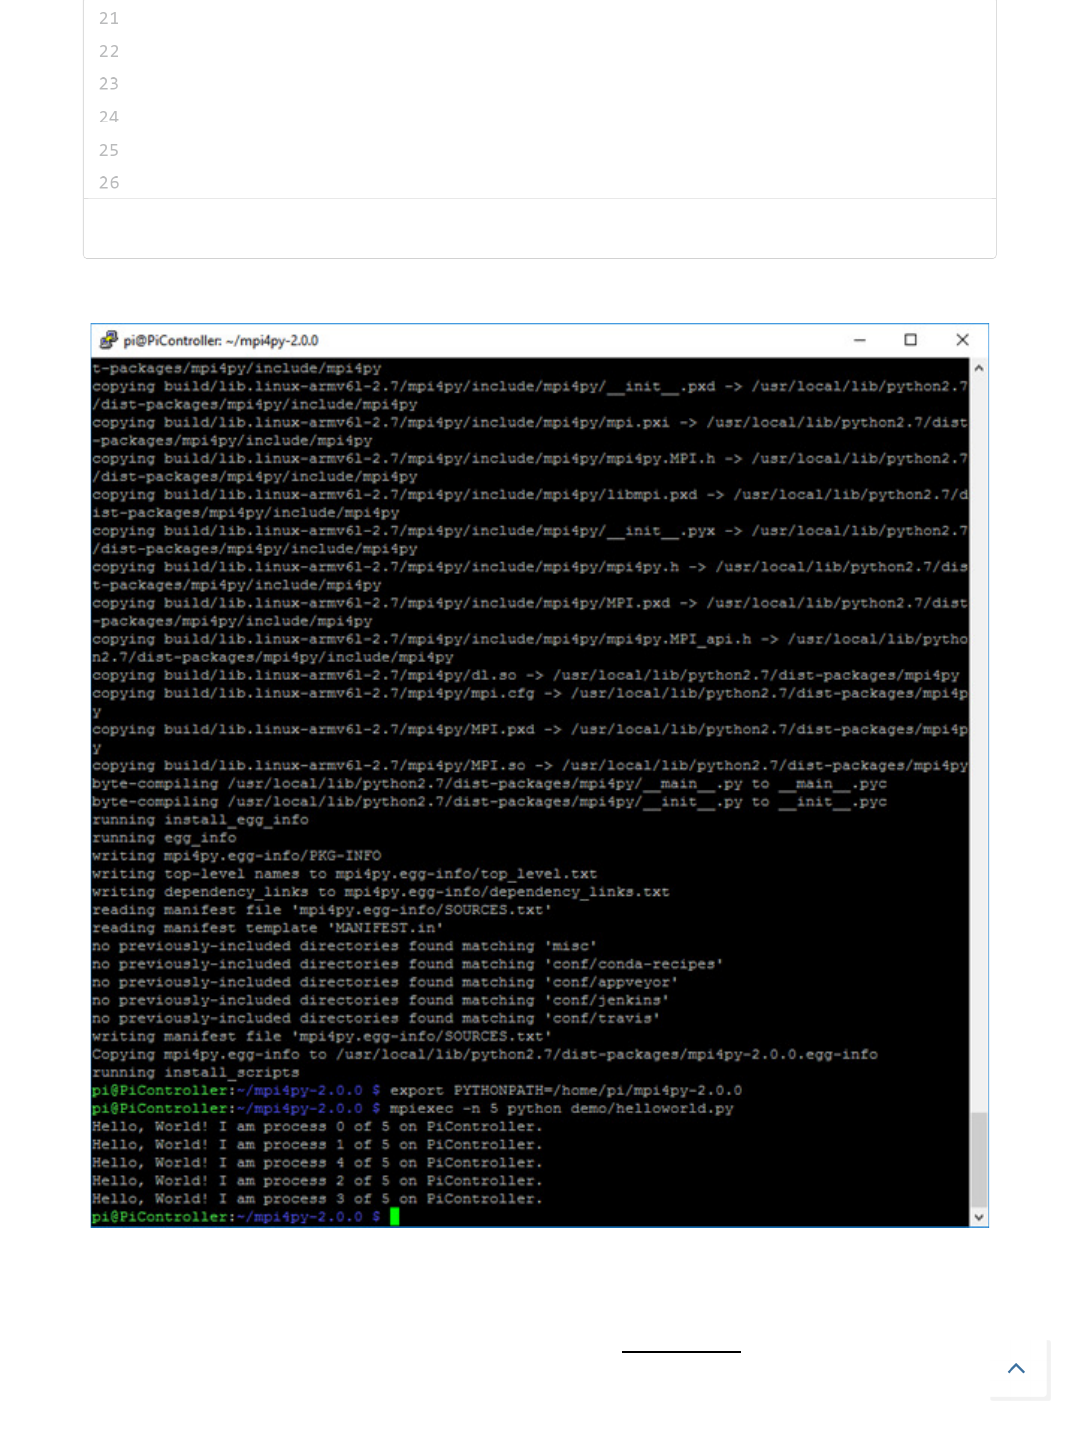
once installed you should see something like the image below:
Now we have finished configuring the first RPi. Believe it or not if you reach this
step and everything is working you should be proud of it. Now we will have to
clone this SD card and place them into the other RPi's.
# Set the python path
export PYTHONPATH=/home/pi/mpi4py-2.0.0
# Test that MPI works on your device
mpiexec -n 5 python demo/helloworld.py
Creating a Raspberry Pi 3 Cluster - "Supercomputer", for parallel compu... http://thundaxsoftware.blogspot.com/2016/07/creating-raspberry-pi-3-clu...
11 of 44
1/1/2019, 4:38 PM

Preparing the other RPi's
As mentioned in the step above, bring the SD card to your main computer and
save the content of the SD card using Win32DiskImager. Now copy this new
image to the other SD cards. You should have now 4 SD cards with the same
image. As now we have 4 cloned SD cards, my advice is to plug every Rpi
individually and change the host name of every new added Rpi into the network,
e.g. pi01, pi02, pi03, etc.
Do the following for every new RPi added into the network:
pi01:
scan the network for a newly added device to find its IP address using a network
scanner. Once found, use PuTTY to access it and use the commands below to set
it up:
Type: sudo raspi-config to configure our device:
Go to Expand File System1.
Go to Advanced Options -> HostName -> set it to pi012.
Go to Advanced Options -> MemorySplit -> set it to 16.3.
Go to Advanced Options -> SSH -> Enable.4.
Finish and leave the configuration.5.
sudo reboot.6.
Do the same for pi02 and pi03. Note that you can name your RPis the way you
want.
Once done you should be able to see them all 4 using PuTTY:
Creating a Raspberry Pi 3 Cluster - "Supercomputer", for parallel compu... http://thundaxsoftware.blogspot.com/2016/07/creating-raspberry-pi-3-clu...
12 of 44
1/1/2019, 4:38 PM

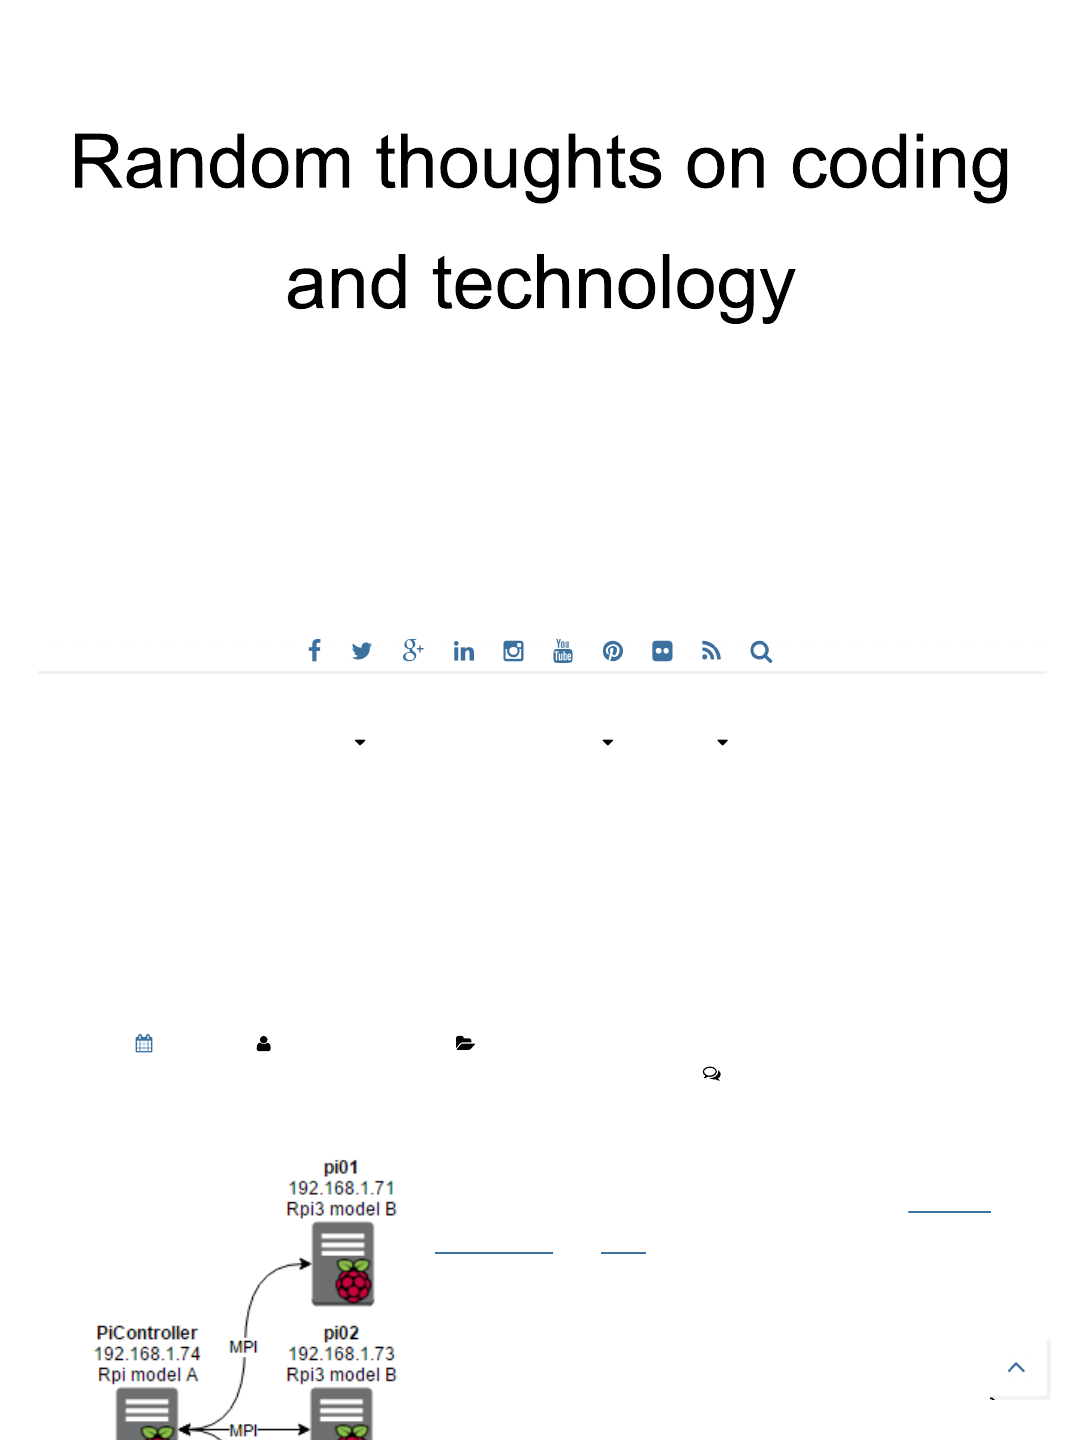
Once completed, each Rpi will have its own IP. We need now to store each IP
address into a host file also known as machinefile. This file contains the hosts
which to start the processes on.
Go to your first RPi and type:
nano machinefile
and add the following IP addresses: (Note that you will have to add your own):
Creating a Raspberry Pi 3 Cluster - "Supercomputer", for parallel compu... http://thundaxsoftware.blogspot.com/2016/07/creating-raspberry-pi-3-clu...
13 of 44
1/1/2019, 4:38 PM
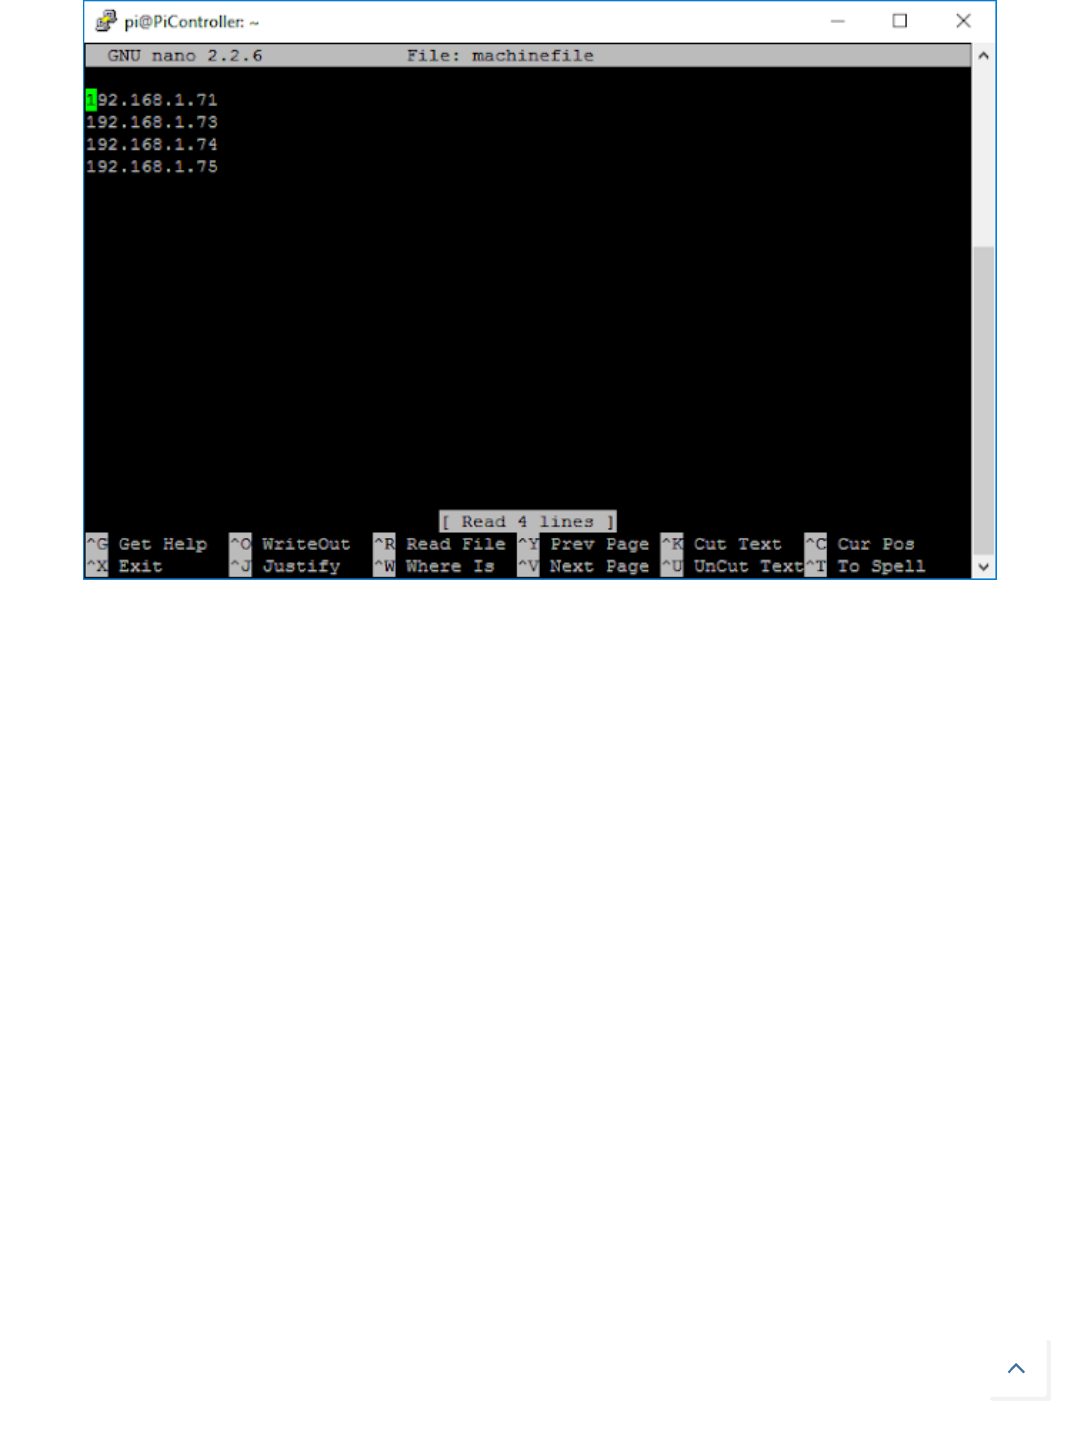
This will be used by the MPICH3 to communicate and send/receive messages
between various nodes.
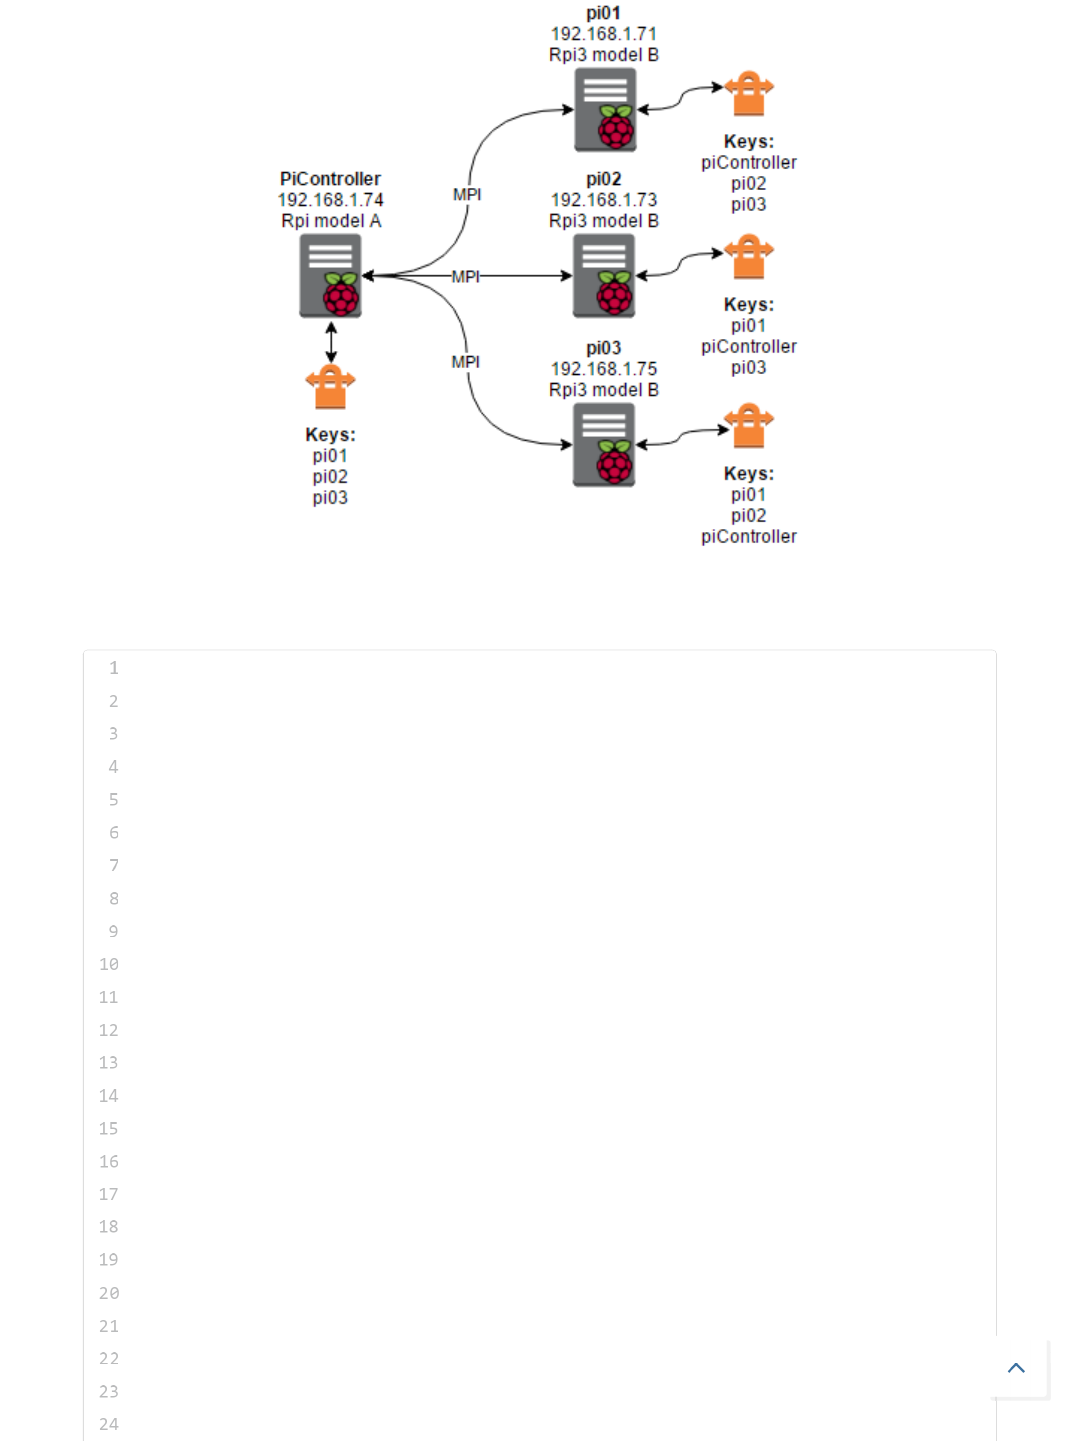
Configuring SSH keys for each RPi
Now we need to be able to command each RPi without using users/passwords.
To do this we will have to generate SSH keys for each RPi and then share each
key to each device under authorised devices. This is the way MPI will be able to
talk to each device without worrying about credentials. This process is a bit
tedious but once completed you will be able to run MPI without problems.
Creating a Raspberry Pi 3 Cluster - "Supercomputer", for parallel compu... http://thundaxsoftware.blogspot.com/2016/07/creating-raspberry-pi-3-clu...
14 of 44
1/1/2019, 4:38 PM
Run the following commands from the first Pi (PiController):
# ******************************
# These steps will allow you to configure SSH on every device
# Run the commands below from PiController device
# Jordi Corbilla
# ******************************
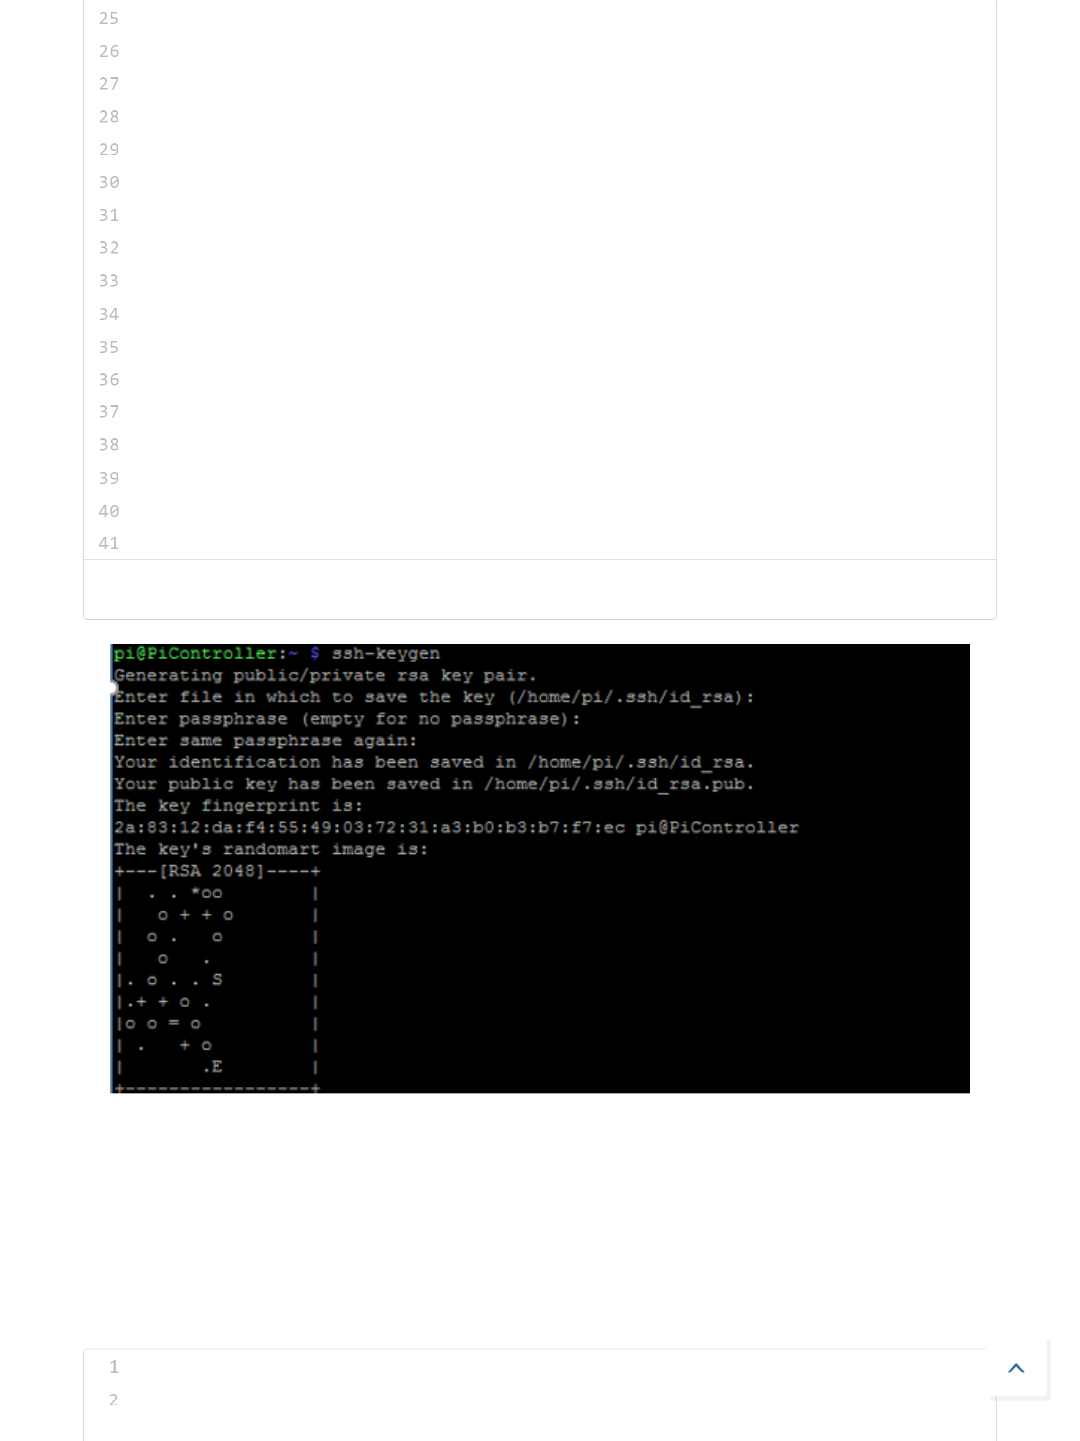
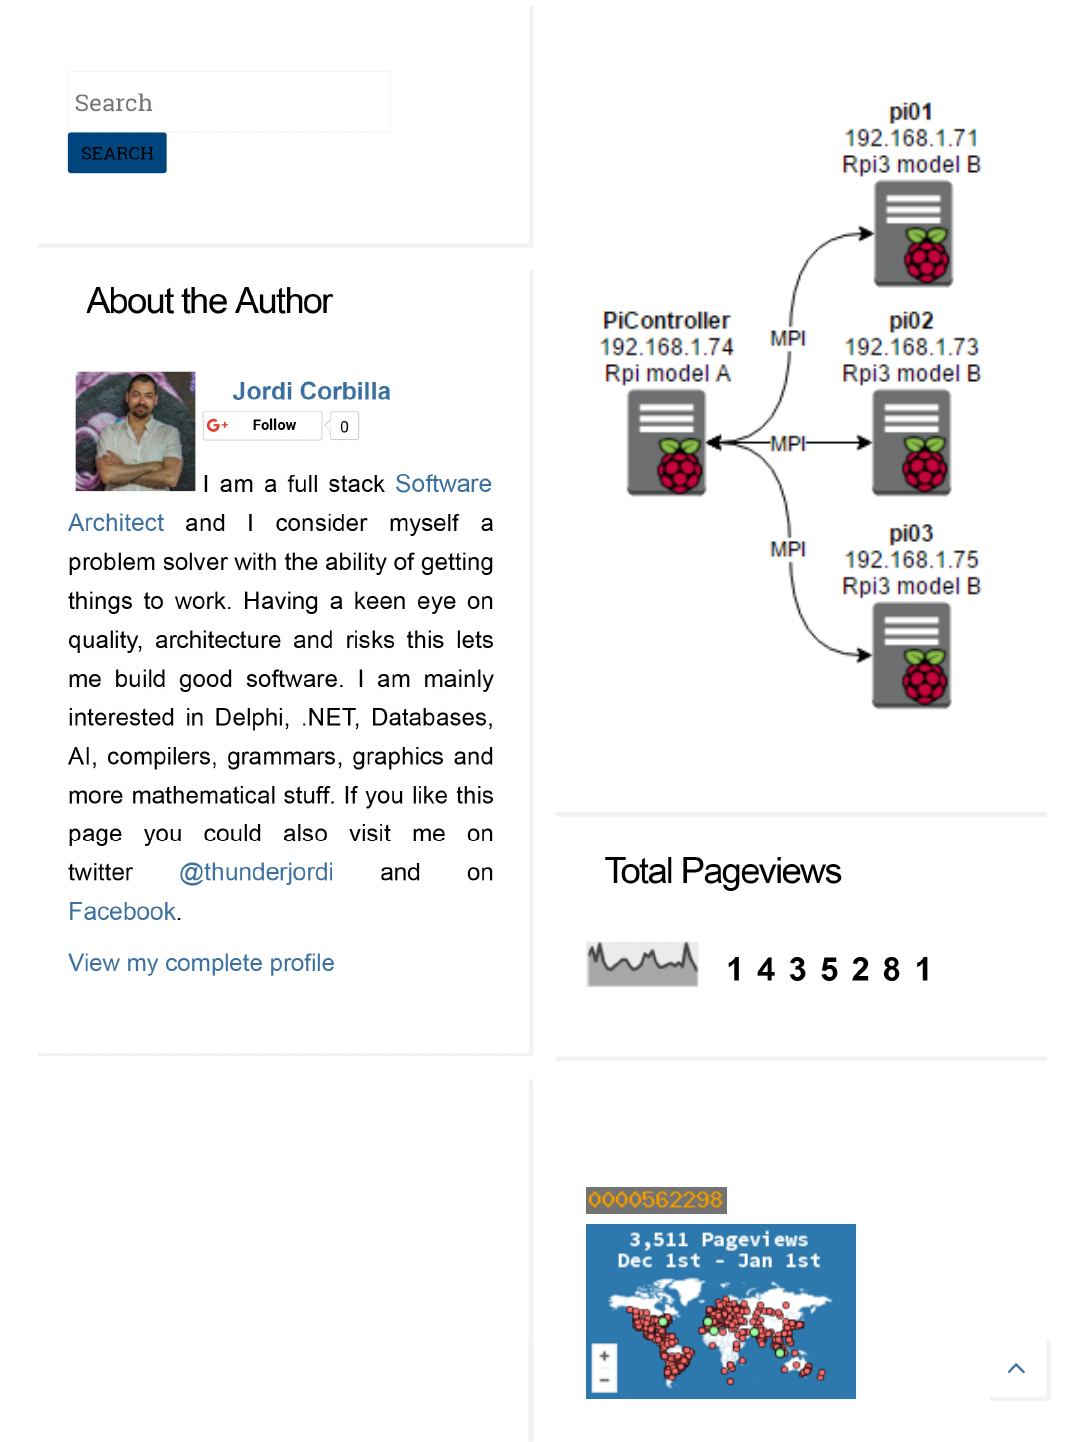
# PiController (192.168.1.74)
ssh-keygen
cd ~
cd .ssh
cp id_rsa.pub PiController
# pi01 (192.168.1.71)
ssh pi@192.168.1.71
ssh-keygen
cd .ssh
cp id_rsa.pub pi01
scp 192.168.1.74:/home/pi/.ssh/PiController .
cat PiController >> authorized_keys
exit
# pi02 192.168.1.73
Creating a Raspberry Pi 3 Cluster - "Supercomputer", for parallel compu... http://thundaxsoftware.blogspot.com/2016/07/creating-raspberry-pi-3-clu...
15 of 44
1/1/2019, 4:38 PM
view rawsshKeysRpi.sh hosted with ❤ by GitHub
When running the ssh-keygen just hit enter (if you don't want to add specific
passphrase) and the RSA key will be generated for you automatically.
Now we have configured the link between PiController to every single device but
we still need to configure the other way around. So you will have to run the
following commands from every individual device:
ssh pi@192.168.1.73
ssh-keygen
cd .ssh
cp id_rsa.pub pi02
scp 192.168.1.74:/home/pi/.ssh/PiController .
cat PiController >> authorized_keys
exit
# pi03 192.168.1.75
ssh pi@192.168.1.75
ssh-keygen
cd .ssh
cp id_rsa.pub pi03
scp 192.168.1.74:/home/pi/.ssh/PiController .
cat PiController >> authorized_keys
exit
# ******************************
# These steps will allow you to configure SSH on every device
Creating a Raspberry Pi 3 Cluster - "Supercomputer", for parallel compu... http://thundaxsoftware.blogspot.com/2016/07/creating-raspberry-pi-3-clu...
16 of 44
1/1/2019, 4:38 PM

view rawsshKeysIndividualRPi.sh hosted with ❤ by GitHub
open the authorized_keys files and you will see the additional keys there. Each
# Jordi Corbilla
# ******************************
# run this from PiController using PuTTY
cd ~
cd .ssh
scp 192.168.1.71:/home/pi/.ssh/pi01 .
cat pi01 >> authorized_keys
scp 192.168.1.73:/home/pi/.ssh/pi02 .
cat pi02 >> authorized_keys
scp 192.168.1.75:/home/pi/.ssh/pi03 .
cat pi03 >> authorized_keys
# run this from pi01 using PuTTY
cd ~
cd .ssh
scp 192.168.1.73:/home/pi/.ssh/pi02 .
cat pi02 >> authorized_keys
scp 192.168.1.75:/home/pi/.ssh/pi03 .
cat pi03 >> authorized_keys
# run this from pi02 using PuTTY
cd ~
cd .ssh
scp 192.168.1.71:/home/pi/.ssh/pi01 .
cat pi01 >> authorized_keys
scp 192.168.1.75:/home/pi/.ssh/pi03 .
cat pi03 >> authorized_keys
# run this from pi03 using PuTTY
cd ~
cd .ssh
scp 192.168.1.71:/home/pi/.ssh/pi01 .
cat pi01 >> authorized_keys
scp 192.168.1.73:/home/pi/.ssh/pi02 .
cat pi02 >> authorized_keys
# Inspect each authorized_keys file on each device and you will see the keys there for every device
Creating a Raspberry Pi 3 Cluster - "Supercomputer", for parallel compu... http://thundaxsoftware.blogspot.com/2016/07/creating-raspberry-pi-3-clu...
17 of 44
1/1/2019, 4:38 PM
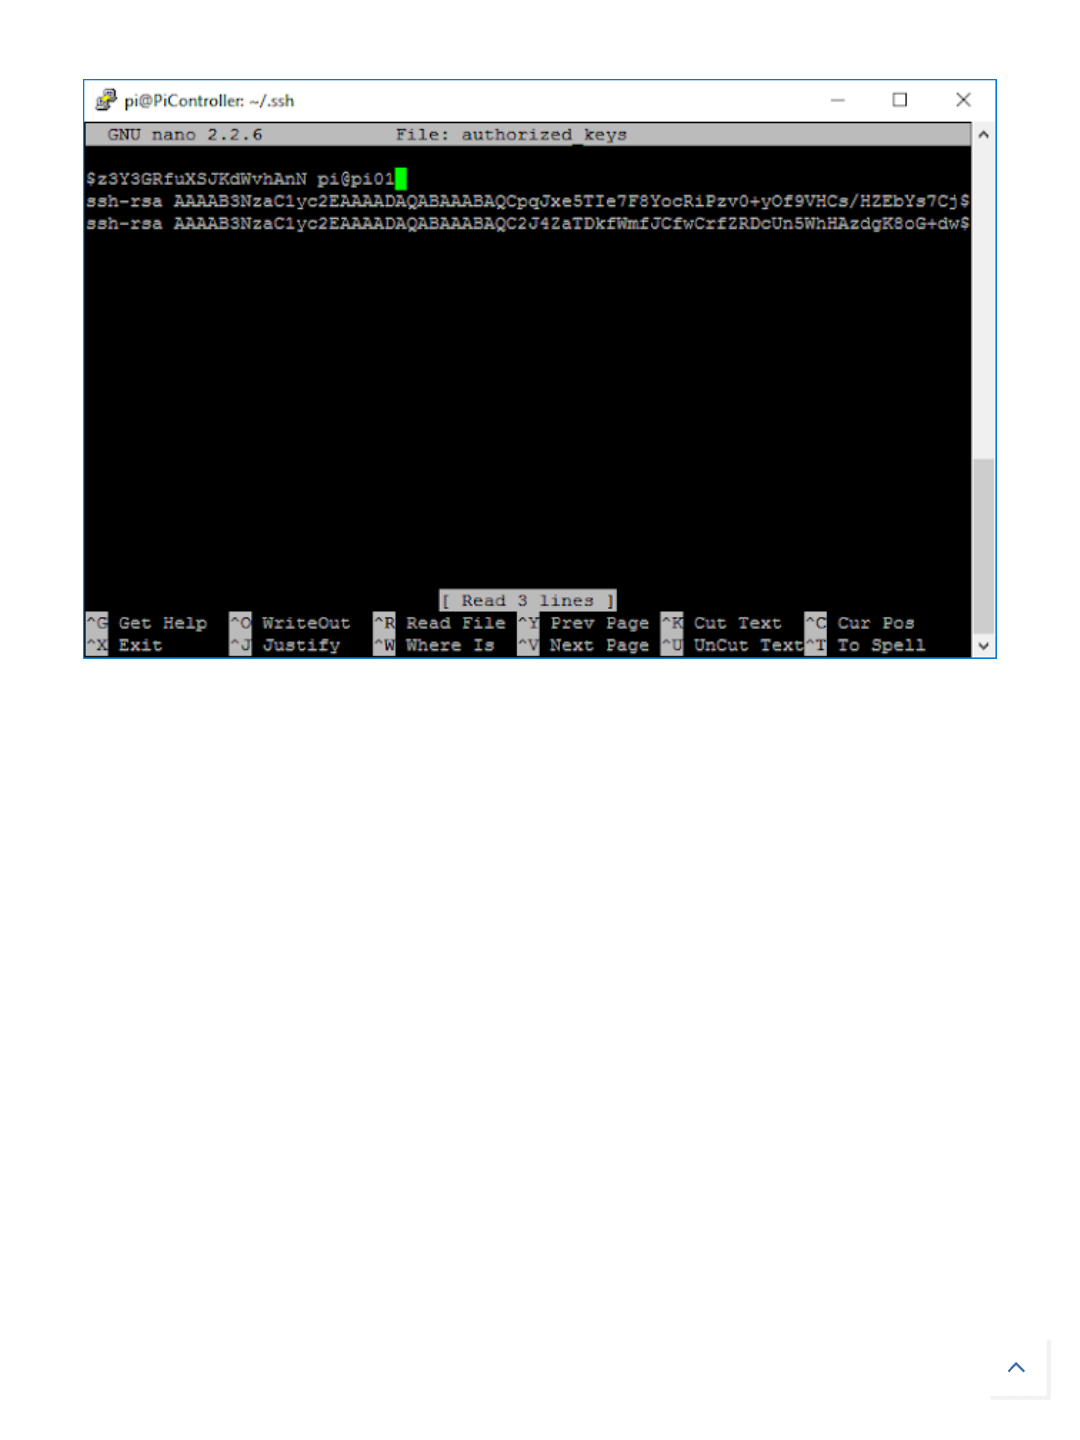
authorized_keys file on each device should contain 3 keys (as stated in the
architecture diagram above).
Now the system is ready for testing.
Note that if your IP address changes, the keys will not be valid and the steps will
have to be repeated.
Testing the cluster
At this point I will just include a small example for you to test that the cluster
works as expected. Later on I will publish a more complex scenario with a refined
configuration to maximise the power of the cluster.
If everything is configured correctly, the following command should work correctly:
mpiexec -f machinefile -n 4 hostname
Creating a Raspberry Pi 3 Cluster - "Supercomputer", for parallel compu... http://thundaxsoftware.blogspot.com/2016/07/creating-raspberry-pi-3-clu...
18 of 44
1/1/2019, 4:38 PM
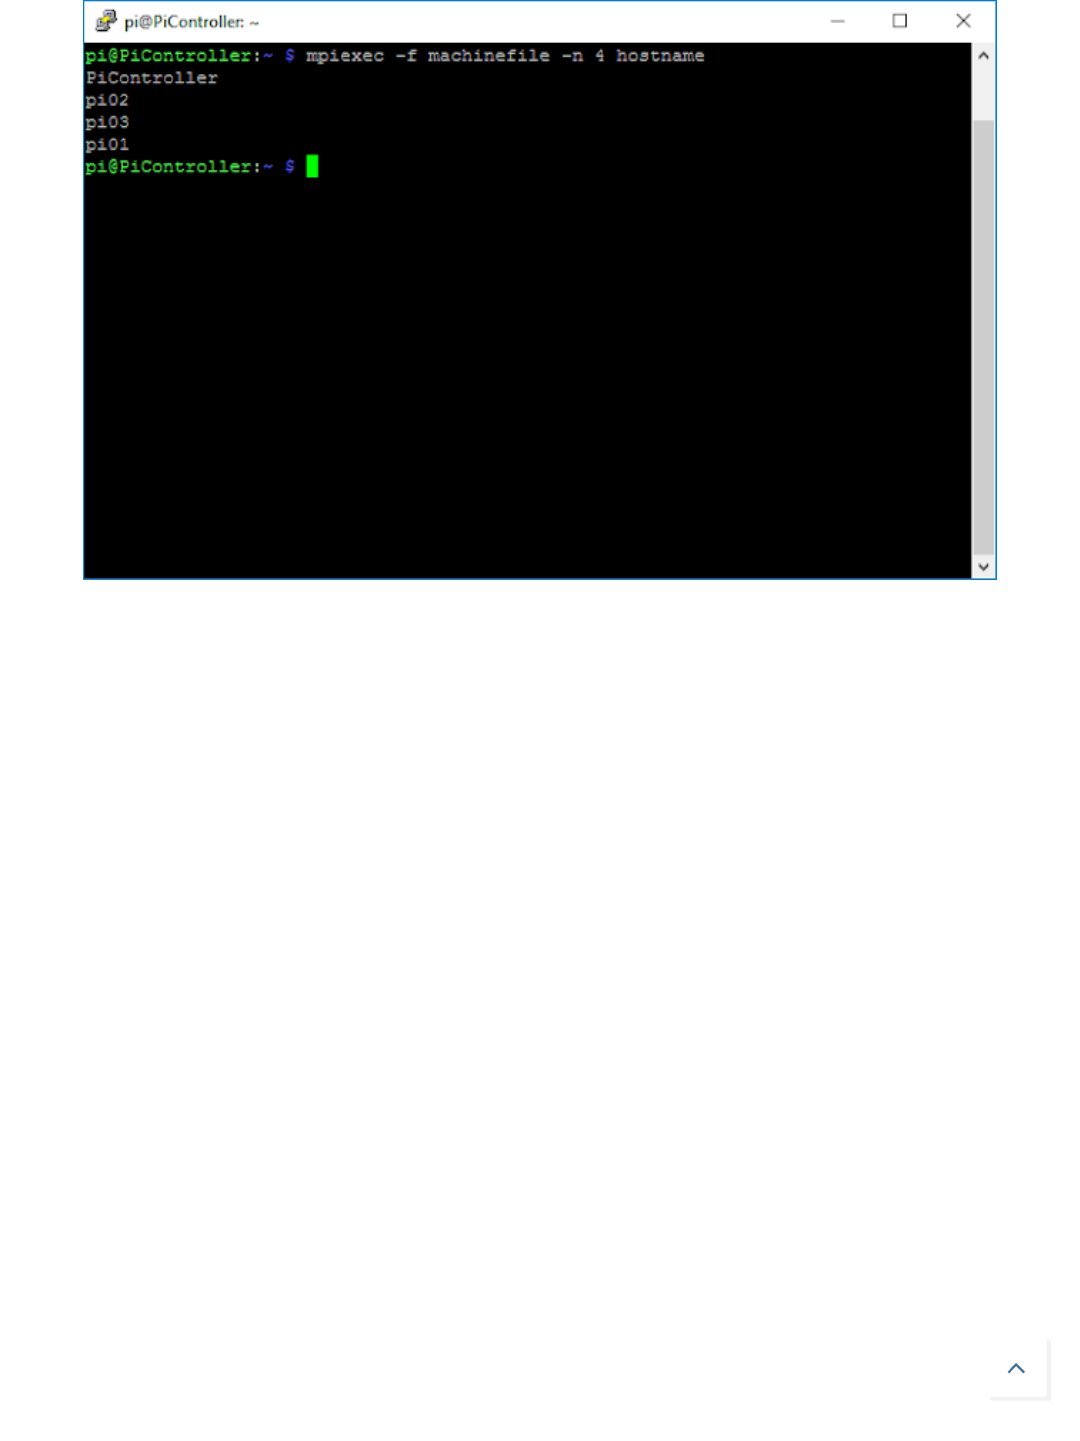
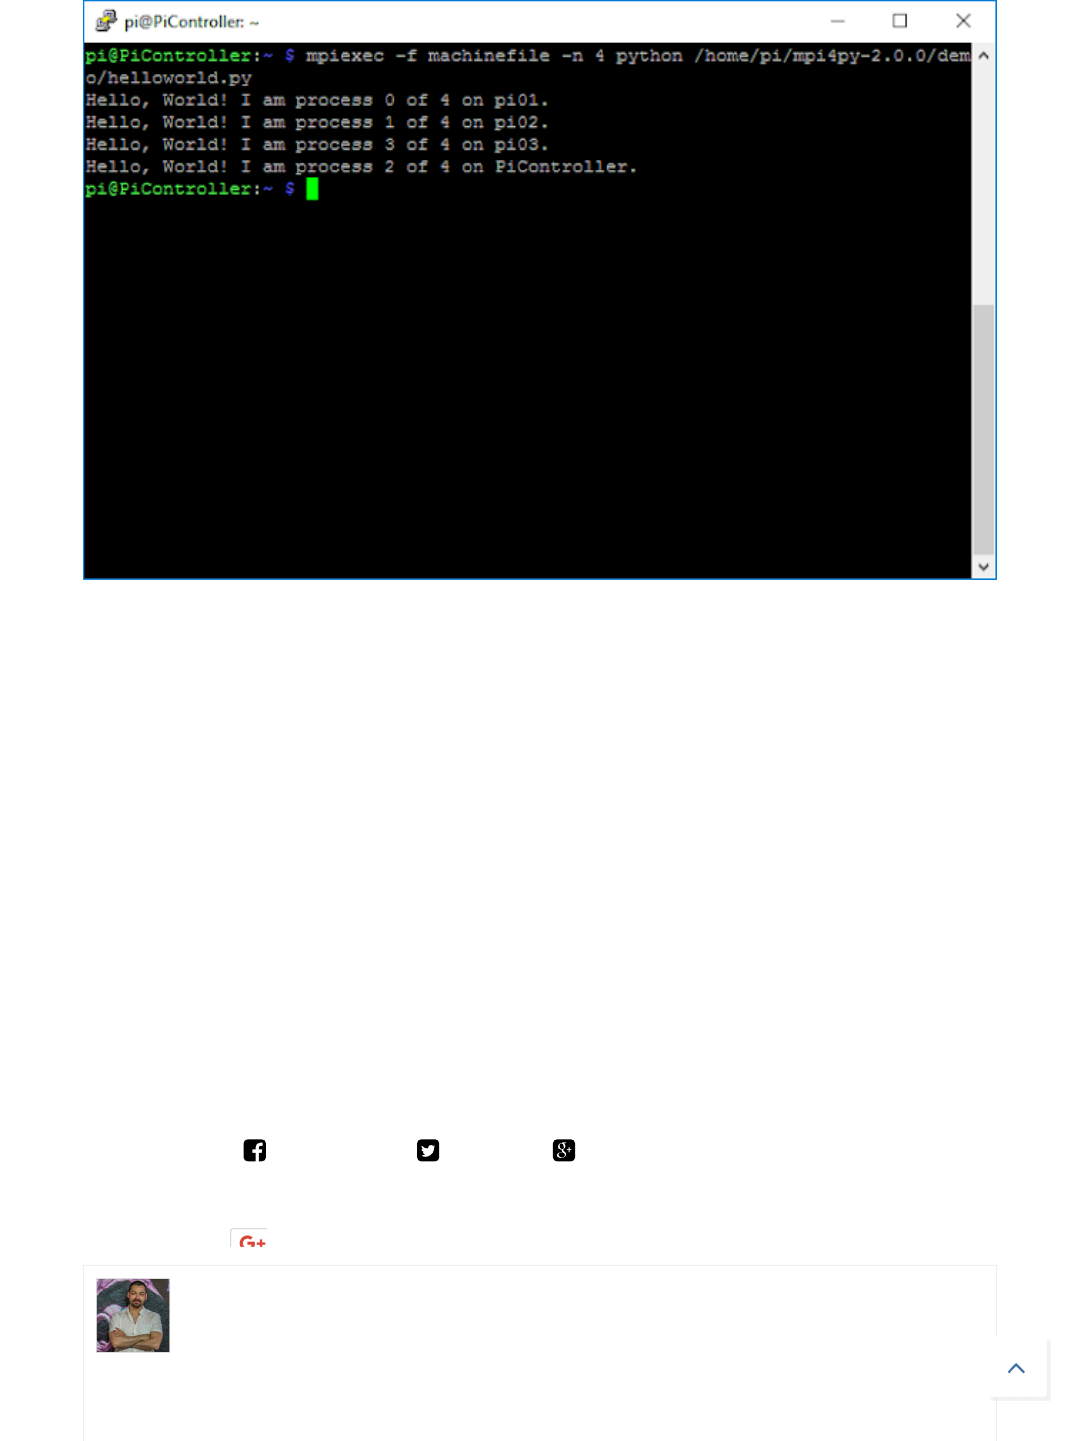
You can see that each Device has replied back and every key is used without
problems.
Now run the following command to test a helloworld example:
mpiexec -f machinefile -n 4 python /home/pi/mpi4py-2.0.0/demo
/helloworld.py
You should see something like the image below:
Creating a Raspberry Pi 3 Cluster - "Supercomputer", for parallel compu... http://thundaxsoftware.blogspot.com/2016/07/creating-raspberry-pi-3-clu...
19 of 44
1/1/2019, 4:38 PM
Jordi Corbilla
I am a full stack Software Architect and I consider myself a problem
solver with the ability of getting things to work. Having a keen eye on quality,
Share This: Facebook Twitter Google+
Now our system is ready to take any parallel computing application we want to
develop.
Watch this space for more!.
Next steps
I will be creating more complex scenarios and squeezing the architecture to test
its limits. Soon more!. Give it a go and let me know if you face any problem during
the set up.
Jordi
Creating a Raspberry Pi 3 Cluster - "Supercomputer", for parallel compu... http://thundaxsoftware.blogspot.com/2016/07/creating-raspberry-pi-3-clu...
20 of 44
1/1/2019, 4:38 PM

Newer Post Older Post
architecture and risks this lets me build good software. I am mainly interested in
Delphi, .NET, Databases, AI, compilers, grammars, graphics and more
mathematical stuff. If you like this page you could also visit me on
twitter @thunderjordi and on Facebook.
Related Posts:
Creating a Raspberry Pi 3 Cluster - "Supercomputer", for parallel
computing.
In this quick article I will show you how to create your own
Raspberry Pi cluster for parallel computing via MPI (Messaging Passing
Interface) li… Read More
Home
60 comments:
Replies
Herbert Sauro 4 August 2016 at 02:44
I'll be interested to see how you get on with this, especially what
kind of performance you get.
Reply
Jordi Corbilla 4 August 2016 at 23:29
Hi Herbert,
Sure, I'm still in the coding phase testing the
cluster. Soon I'll share my results.
Cheers,
Jordi
Creating a Raspberry Pi 3 Cluster - "Supercomputer", for parallel compu... http://thundaxsoftware.blogspot.com/2016/07/creating-raspberry-pi-3-clu...
21 of 44
1/1/2019, 4:38 PM

Reply
Replies
akshay pai 7 April 2017 at 19:33
Great article. I had built one using 70 Raspberry Pis as my final
year college project but they were made from Raspberry pi B+
models and we faced a lot of issues: sourcedexter.com/6-
common-errors-when-building-a-raspberry-pi-supercomputer/ .
However, we succeeded in building it and also ran a multi-
document text summarization algorithm on it.
Reply
Anonymous 25 May 2017 at 20:29
Thank you for this tutorial.
I'm having a problem with the line
scp 192.168.1.74:/home/pi/.ssh/PiController
when I try to use that commmand I end up with
usage: scp [-12346BCpqrv] [-c cipher] etc. etc.
Any advice?
Thanks!
Reply
Creating a Raspberry Pi 3 Cluster - "Supercomputer", for parallel compu... http://thundaxsoftware.blogspot.com/2016/07/creating-raspberry-pi-3-clu...
22 of 44
1/1/2019, 4:38 PM

Reply
Replies
Reply
Anonymous 1 June 2017 at 04:27
I forgot the . at the end, it works when you
include it.
scp 192.168.1.74:/home/pi/.ssh/PiController .
Anonymous 4 June 2017 at 18:42
Good tutorial, hi i got a problem when i write the command ping
raspberrypi, and it doesn't recognized this, any advice
Reply
Jordi Corbilla 7 June 2017 at 11:18
you mean that it doesn't recognise the ping
command? you might have to make sure your
system32 folder is part of your path.
Ethernet Cables 7 July 2017 at 10:52
The article you have shared here very awesome. I really like and
appreciated your work. I read deeply your article, the points you
have mentioned in this article are useful
Reply
Creating a Raspberry Pi 3 Cluster - "Supercomputer", for parallel compu... http://thundaxsoftware.blogspot.com/2016/07/creating-raspberry-pi-3-clu...
23 of 44
1/1/2019, 4:38 PM

Replies
Reply
Replies
Jordi Corbilla 7 July 2017 at 12:35
Many thanks. much appreciated.
Michael Goodwin 23 July 2017 at 06:36
Hi Jordi, very interested in this and keen to get started. The goal is
less about parallel computing and more about having GNS3 on a
cluster for my CCNA studies. I found this https://www.gns3.com
/discussions/the-worlds-first-gns3-beowulf-cl and have had all
kinds of dramas getting MPICH and MPI4PY installed. So I'll give
this a go. If I get GNS 3 installed as a step just prior to the image
creation/duplication.. would you expect any/many issues? I've
posted questions on Jason's forum but alas he seemed to have
dropped off the face of the earth in 2015 lol
Reply
Jordi Corbilla 25 July 2017 at 16:57
Hi Michael,
I don't expect many issues but you'll have to
check the version and its dependencies as GNS
3 might require a different version that I used
during my testing.
Cheers,
Creating a Raspberry Pi 3 Cluster - "Supercomputer", for parallel compu... http://thundaxsoftware.blogspot.com/2016/07/creating-raspberry-pi-3-clu...
24 of 44
1/1/2019, 4:38 PM

Reply
Replies
Jordi
Michael Goodwin 23 July 2017 at 12:08
Hi, I get to the step where I install MPI4PI and this throws a
spanner in the works: python setup.py build. It gives:
Assembler messages:
Fatal error: can't create build/temp.linux-armv7l-2.7/src/MPI.o:
Permission denied
error: command '/home/rpimpi/mpi-install/bin/mpicc' failed with exit
status 1
Reply
Jordi Corbilla 25 July 2017 at 17:01
weird, are you running as root? Just make sure
that you have permissions to write. It sounds
like you don't have enough permissions there.
cheers,
Jordi
Michael Goodwin 30 July 2017 at 11:07
Hi dude, yeah I just ch pwned that the
mpi4py-2.0.0 and it all went swimmingly.
Next step is to get GNS3 on one, then continue
the rest.. then copy the image to the others and
Creating a Raspberry Pi 3 Cluster - "Supercomputer", for parallel compu... http://thundaxsoftware.blogspot.com/2016/07/creating-raspberry-pi-3-clu...
25 of 44
1/1/2019, 4:38 PM

Reply
Replies
Reply
see how we go
Jordi Corbilla 31 July 2017 at 10:44
Excellent great to hear!
Anonymous 24 July 2017 at 03:53
Hello Jordi at what point should I plug my other pis into my
network switch ?
Reply
Jordi Corbilla 25 July 2017 at 17:00
Once you have cloned the SD cards, you can
just keep plugging them in one by one and
change the IP address on each one prior to
connecting the next one. That should do.
Cheers,
Jordi
Michael Goodwin 31 July 2017 at 10:46
I know this is kind of unrelated to the mpich thing [got that bit
working].. Anyone know how/where to get qemu-kvm for armhf
Creating a Raspberry Pi 3 Cluster - "Supercomputer", for parallel compu... http://thundaxsoftware.blogspot.com/2016/07/creating-raspberry-pi-3-clu...
26 of 44
1/1/2019, 4:38 PM

Replies
Reply
from? I've tried many places and sudo apt-get instal qemu-kvm
[prereq for gns3-server] i get:
Package qemu-kvm is not available, but is referred to by another
package.
This may mean that the package is missing, has been obsoleted,
or
is only available from another source
E: Package 'qemu-kvm' has no installation candidate
Any ideas?
Reply
Jordi Corbilla 31 July 2017 at 12:18
I don't know if this package is available for
ARM. Have you tried kvmtool? It's an
alternative: https://github.com/clearlinux/kvmtool
Christinat Damien 27 August 2017 at 00:20
hi.. i got a small problem. all works fine exept this : when i plug a
usb disk or other on node 2,3 .. master node dosen't will see it. is
there a fix for it ?
sorry for my english but i live in switzerland and i never has learn
it...
thanks for response
Reply
Creating a Raspberry Pi 3 Cluster - "Supercomputer", for parallel compu... http://thundaxsoftware.blogspot.com/2016/07/creating-raspberry-pi-3-clu...
27 of 44
1/1/2019, 4:38 PM

Replies
Reply
Replies
Jordi Corbilla 2 October 2017 at 10:52
Hi Cristinat,
this might be a problem with that USB, you
might have to enable the USB form the Pi.
Cheers,
Jordi
Unknown 1 October 2017 at 10:30
can i use this to run SETI@home (BOINC).
Does the BOINC Client use all 4 Pis?
Reply
Peter Wildbichler 1 October 2017 at 10:31
can i use this to run SETI@home (BOINC).
Does the BOINC Client use all 4 Pis?
Reply
Jordi Corbilla 2 October 2017 at 10:51
Hi Peter,
I don't know if BOINC is able to get the cluster
Creating a Raspberry Pi 3 Cluster - "Supercomputer", for parallel compu... http://thundaxsoftware.blogspot.com/2016/07/creating-raspberry-pi-3-clu...
28 of 44
1/1/2019, 4:38 PM

Reply
Replies
altogether. You might have to run 4 individual
BOINCs and then find a way to make the
hardware available in some way.
Cheers,
Jordi
Anonymous 3 October 2017 at 06:24
Hello I've been going over this tutorial with 3 of my Raspberry Pis.
I'm having an issue with authorized_keys. I have created them for
each pi and each pi knows the key for the others. I've confirmed
the keys are identical just in case.
However, when checking if the configuration was successful with
mpi, PiController works, but Pi01 and Pi02 are access denied.
Was wondering if something was missing or perhaps I did
something wrong?
Reply
Anonymous 3 October 2017 at 11:38
Never mind. I realized I used the PiController,
Pi01 and Pi02 files, not the .pub files
Jordi Corbilla 3 October 2017 at 12:18
Cool that you could solve it. Usually it's
Creating a Raspberry Pi 3 Cluster - "Supercomputer", for parallel compu... http://thundaxsoftware.blogspot.com/2016/07/creating-raspberry-pi-3-clu...
29 of 44
1/1/2019, 4:38 PM

Reply
Replies
Reply
something like that as it's quite straightforward.
Cheers,
Jordi
Unknown 3 October 2017 at 12:31
For mpiexec -f machinefile -n 4 hostname I get...
PiController
Pi01
But Pi02 is never reached and eventually times out. However I can
ssh to it through PiController and Pi02 can ssh to PiController.
Any help in regards to this?
Reply
Jordi Corbilla 4 October 2017 at 13:42
can you ping Pi02?
Unknown 8 October 2017 at 22:33
Hey, This is a great tutorial, absolutely love it, thanks man
Creating a Raspberry Pi 3 Cluster - "Supercomputer", for parallel compu... http://thundaxsoftware.blogspot.com/2016/07/creating-raspberry-pi-3-clu...
30 of 44
1/1/2019, 4:38 PM

Replies
Reply
Reply
Jordi Corbilla 9 October 2017 at 10:38
Thanks, really happy you found it useful!
Cheers,
Jordi
cyril Marteau 16 November 2017 at 00:04
Hello Jordi,
First of all, congrats for this post !
I have a project with a friend. Building a cluster of computer with
an x86 architecture and we w'de like the Rpi as frontend. Do you
think this might work ? If I install debian with mpich3 and openmpi
packages on the computers ?
Thank you in advance for your answer.
Best regards
Reply
cyril Marteau 16 November 2017 at 00:06
Hello Jordi,
Congrats for your post !
We have a project with a friend. To build a cluster of computers
but we would like the raspberry pi 3 as frontend. Do you think it
might be possible ?
Creating a Raspberry Pi 3 Cluster - "Supercomputer", for parallel compu... http://thundaxsoftware.blogspot.com/2016/07/creating-raspberry-pi-3-clu...
31 of 44
1/1/2019, 4:38 PM

Replies
Reply
If we install the two packages mpich3 and openmpi ?
Thank you in advance for your answer !
Cyril
Reply
Jordi Corbilla 17 November 2017 at 13:12
Hi Cyril,
Yes, it should work.
Cheers,
Jordi
Anonymous 16 November 2017 at 07:50
Hi, great article and would love to put something like this together.
Wanted to point out that the ssh keys aren't tied to IPs so you can
reuse the keys even if IP changes. If it didn't work for you, it may
have been due to the Host ssh keys changing. This happens when
you reinstall the OS, but the individual user keys shouldn't be
affected. Just make sure to clear out ~pi/.ssh/known_hosts file and
you'll be good to go.
Reply
Creating a Raspberry Pi 3 Cluster - "Supercomputer", for parallel compu... http://thundaxsoftware.blogspot.com/2016/07/creating-raspberry-pi-3-clu...
32 of 44
1/1/2019, 4:38 PM

Replies
Reply
Helmut Hauck 16 November 2017 at 19:41
Hi
Really an excellent tutorial. Thank you very much.
Reply
Jordi Corbilla 17 November 2017 at 13:11
Many thanks Helmut! much appreciated!
Salvatore Mandaglio 26 November 2017 at 12:47
Hi
Thank you for this tutorial. I followed every step and everything
worked fine until the final cluster test. When i try to execute
mpiexec -f machinefile -n 4 hostname i'm getting following error.
Do you have any idea what i did wrong?
[mpiexec@PiController] HYDU_parse_hostfile (/home/pi/mpich3
/mpich-3.2/src/pm/hydra/utils/args/args.c:319): unable to open
host file: machinefile
[mpiexec@PiController] mfile_fn (/home/pi/mpich3/mpich-3.2/src
/pm/hydra/ui/mpich/utils.c:336): error parsing hostfile
[mpiexec@PiController] match_arg (/home/pi/mpich3/mpich-
3.2/src/pm/hydra/utils/args/args.c:152): match handler returned
error
[mpiexec@PiController] HYDU_parse_array (/home/pi/mpich3
/mpich-3.2/src/pm/hydra/utils/args/args.c:174): argument matching
returned error
[mpiexec@PiController] parse_args (/home/pi/mpich3/mpich-
3.2/src/pm/hydra/ui/mpich/utils.c:1596): error parsing input array
Creating a Raspberry Pi 3 Cluster - "Supercomputer", for parallel compu... http://thundaxsoftware.blogspot.com/2016/07/creating-raspberry-pi-3-clu...
33 of 44
1/1/2019, 4:38 PM

Replies
Reply
[mpiexec@PiController] HYD_uii_mpx_get_parameters (/home
/pi/mpich3/mpich-3.2/src/pm/hydra/ui/mpich/utils.c:1648): unable
to parse user arguments
[mpiexec@PiController] main (/home/pi/mpich3/mpich-3.2/src
/pm/hydra/ui/mpich/mpiexec.c:153): error parsing parameters
Thanks in advance
Salvi
Reply
Jordi Corbilla 27 November 2017 at 14:36
Hi Salvi,
Are you running this with elevated permissions?
Cheers,
Jordi
Armando Jipsion 26 November 2017 at 18:09
Hello Jordi
Congratulations a great article, install the cluster without problems.
I would like to know if the c and c ++ libraries can be integrated
into the cluster
You could indicate me where to download other examples to run
them in the cluster
Thank you
Reply
Creating a Raspberry Pi 3 Cluster - "Supercomputer", for parallel compu... http://thundaxsoftware.blogspot.com/2016/07/creating-raspberry-pi-3-clu...
34 of 44
1/1/2019, 4:38 PM

Replies
Reply
Replies
Reply
Jordi Corbilla 27 November 2017 at 14:36
Hi Armando, I don't know which libraries are
you referring to.
Cheers,
Jordi
Anonymous 15 December 2017 at 11:30
Dear all, thank you for the very well done instructions. Just want to
ask you how to start all the nodes, wich is the command. When i
launch my command from the master "./cpuminer ..." the other
nodes doesn't listen this command, it seems that only my master
is working. Thank you for any help.
Reply
Anonymous 26 December 2017 at 00:48
Hi, correct machinefile: set PiController IP on
the last line.
And then:
mpiexec -machinefile /home/pi/machinefile -n 3
~/cpuminer-multi/./cpuminer ...
Creating a Raspberry Pi 3 Cluster - "Supercomputer", for parallel compu... http://thundaxsoftware.blogspot.com/2016/07/creating-raspberry-pi-3-clu...
35 of 44
1/1/2019, 4:38 PM

Replies
Jared McCart 23 December 2017 at 12:24
Hello Mr. Corbilla, great turoial. Only 1 of 3 tutorials that has
allowed me to run MPI.
!!!PROBLEM!!!
INPUT:
mpiexec -f machinefile -n 4 hostname
OUTPUT:
mpiexec: Error: unknown option "-f"
Type 'mpiexec --help' for usage.
Please advise.
P.S. Happy Holidays in advance.
Reply
Anonymous 26 December 2017 at 00:42
mpiexec -machinefile /home/pi/machinefile -n 4
hostname
Jordi Corbilla 5 January 2018 at 11:56
thanks!
Jared McCart 8 January 2018 at 02:43
Thank you, but this only gives me one host
name witch is my PiController.
INPUT
mpiexec -machinefile /home/pi/machinefile -n 4
hostname
Creating a Raspberry Pi 3 Cluster - "Supercomputer", for parallel compu... http://thundaxsoftware.blogspot.com/2016/07/creating-raspberry-pi-3-clu...
36 of 44
1/1/2019, 4:38 PM

Reply
Replies
OUTPUT
PiController
PiController
Picontroller
Picontroller
I have changed the order of IP adresses in the
machinefile and it will only read the first IP and
give that hostname 4 times.
Jordi Corbilla 8 January 2018 at 11:18
Hi Jared,
That behaviour is a bit weird. Can you test your
machinefile with just 2 IPs? and see if the
behaviour is the same?
Cheers,
Jordi
DIWAKAR DIWEDI 4 January 2018 at 11:07
This comment has been removed by the author.
Reply
Jordi Corbilla 5 January 2018 at 11:53
Hi Diwakar,
Creating a Raspberry Pi 3 Cluster - "Supercomputer", for parallel compu... http://thundaxsoftware.blogspot.com/2016/07/creating-raspberry-pi-3-clu...
37 of 44
1/1/2019, 4:38 PM

Reply
Have you configured correctly MPI on those
nodes? You should only get 1 output in the
master node.
Cheers,
Jordi
DIWAKAR DIWEDI 10 January 2018 at 14:04
This comment has been removed by the author.
Anonymous 24 January 2018 at 14:37
Hi,
What is the difference between a Beowulf cluster and an MPI
cluster?
Reply
Shubham 19 February 2018 at 12:32
Hi
First of all a great tutorial. I simply copy pasted it for further use. I
am planning to build a 32 node nano super computer using
raspberry pi3B models. My aim is not just to try out the rig for
computational fluid dynamics but also for running certain codes
through my web browser, say firefox. Right now I am in the
process of buying the materials as a 32 node system will cost me
about 100,000 INR. My main concern is as follows. 1. Can I use
Creating a Raspberry Pi 3 Cluster - "Supercomputer", for parallel compu... http://thundaxsoftware.blogspot.com/2016/07/creating-raspberry-pi-3-clu...
38 of 44
1/1/2019, 4:38 PM

Replies
Reply
Ubuntu OS for the master as well as the slave nodes? 2. If I open
a web browser through the master node and run my
program/codes inside the browser will it be able to use the
combined CPU power of all the nodes?
Thanks in advance
Reply
Jordi Corbilla 26 February 2018 at 16:10
Hi Shubham,
For what you are after you have to follow a
different approach, with the current design it
won't work. I'm working towards this idea so,
when I have it done I will publish it.
Cheers,
Jordi
Anonymous 7 March 2018 at 09:43
Hi Jordi,
great tutorial, got the cluster running. Still being a python and
raspberry NOOB I was wondering if you could help me out. I got
cpuminer-multi running on the main node only I want to run it om
all nodes in my cluster, could you tell me how I could accomplish
this?
Creating a Raspberry Pi 3 Cluster - "Supercomputer", for parallel compu... http://thundaxsoftware.blogspot.com/2016/07/creating-raspberry-pi-3-clu...
39 of 44
1/1/2019, 4:38 PM

Replies
Reply
Thanks,
Simon
Reply
Jordi Corbilla 7 March 2018 at 13:39
Hi Simon,
You'll have to look into it. That package has
different settings so probably there is help
online talking about it.
Cheers,
Jordi
Anonymous 19 March 2018 at 18:57
Hi Jordi,
You should look at this article. Someone is using your work.
https://www.techworm.net/2018/03/learn-build-supercomputer-
raspberry-pi-3-cluster.html
Reply
Ahmad Ridwan 24 April 2018 at 06:40
Hi Jordi,
Creating a Raspberry Pi 3 Cluster - "Supercomputer", for parallel compu... http://thundaxsoftware.blogspot.com/2016/07/creating-raspberry-pi-3-clu...
40 of 44
1/1/2019, 4:38 PM

Notify me
Comment as:
Publish
Great tutorial! I got my cluster running.
but can you give some of code or project that test performance of
cluster (execution time) ?
sorry for my english.
Regards,
Ahmad Ridwan
Reply
usb cables 9 May 2018 at 07:35
Nice post, Thanks for sharing with us
Reply
Anonymous 19 September 2018 at 03:39
Yay, I got mine to work. I had slightly older software as I was
following a set of instructions very similar to this so when it came
to the final test, I had to change the mpi4py version to the one I
am using and it worked. I am so happy.
Reply
Creating a Raspberry Pi 3 Cluster - "Supercomputer", for parallel compu... http://thundaxsoftware.blogspot.com/2016/07/creating-raspberry-pi-3-clu...
41 of 44
1/1/2019, 4:38 PM
Creating a Raspberry Pi 3
Cluster - "Supercomputer", for
parallel computing.
In this quick article I will show you how
to create your own Raspberry Pi cluster
for parallel computing via MPI
Featured post
(Messaging Passing ...
Recent Posts
Creating a Raspberry Pi 3 Cluster - "Supercomputer", for parallel compu... http://thundaxsoftware.blogspot.com/2016/07/creating-raspberry-pi-3-clu...
42 of 44
1/1/2019, 4:38 PM

► 2013 (4)
► 2012 (16)
► 2011 (42)
► 2010 (82)
► 2009 (285)
► 2008 (46)
Creating a Raspberry Pi 3 Cluster - "Supercomputer", for parallel compu... http://thundaxsoftware.blogspot.com/2016/07/creating-raspberry-pi-3-clu...
43 of 44
1/1/2019, 4:38 PM

Copyright © 2019 Random thoughts on coding and technology | Powered by Blogger
| All code samples included in this blog are licensed under a Creative Commons Attribution 4.0
International License.
Design by CrestaProject | Blogger Theme by Lasantha - PremiumBloggerTemplates.com |
Distributed By Gooyaabi Templates
Creating a Raspberry Pi 3 Cluster - "Supercomputer", for parallel compu... http://thundaxsoftware.blogspot.com/2016/07/creating-raspberry-pi-3-clu...
44 of 44
1/1/2019, 4:38 PM
