SFD AISC 360 05
User Manual: SFD-AISC-360-05
Open the PDF directly: View PDF ![]() .
.
Page Count: 197 [warning: Documents this large are best viewed by clicking the View PDF Link!]
- Title
- Copyright
- Disclaimer
- Contents
- Chapter 01 Introduction
- Chapter 02 Design Algorithms
- 2.1 Check and Design Capability
- 2.2 Design and Check Stations
- 2.3 Demand/Capacity Ratios
- 2.4 Design Load Combinations
- 2.5 Second Order P-Delta Effects
- 2.6 Analysis Methods
- 2.7 Notional Load Patterns
- 2.8 Member Unsupported Lengths
- 2.9 Effects of Breaking a Member into Multiple Elements
- 2.10 Effective Length Factor (K)
- 2.11 Supported Framing Types
- 2.12 Continuity Plates
- 2.13 Doubler Plates
- 2.14 Choice of Units
- Chapter 03 Design Using ANSI/AISC 360-05
- 3.1 Notations
- 3.2 Design Loading Combinations
- 3.3 Classification of Sections for Local Buckling
- 3.4 Calculation of Factored Forces and Moments
- 3.5 Calculation of Nominal Strengths
- 3.5.1 Nominal Tensile Strength
- 3.5.2 Nominal Compressive Strength
- 3.5.3 Nominal Flexure Strength
- 3.5.3.1 Doubly Symmetric I-Sections
- 3.5.3.2 Singly Symmetric I-Sections
- 3.5.3.3 Channel and Double Channel Sections
- 3.5.3.4 Box Sections
- 3.5.3.5 Pipe Sections
- 3.5.3.6 T-Shapes and Double Angle Sections
- 3.5.3.7 Single Angle Sections
- 3.5.3.8 Rectangular Sections
- 3.5.3.9 Circular Sections
- 3.5.3.10 General Sections and Section Designer Sections
- 3.5.4 Nominal Shear Strength
- 3.5.5 Nominal Torsional Strength
- 3.6 Design of Members for Combined Forces
- Chapter 04 Special Seismic Provisions (ANSI/AISC 341-05)
- 4.1 Notations
- 4.2 Design Preferences
- 4.3 Overwrites
- 4.4 Supported Framing Types
- 4.5 Applicability of the Seismic Requirements
- 4.6 Design Load Combinations
- 4.7 Classification of Sections for Local Buckling
- 4.8 Special Check for Column Strength
- 4.9 Member Design
- 4.9.1 10BSpecial Moment Frames (SMF)
- 4.9.2 11BIntermediate Moment Frames (IMF)
- 4.9.3 12BOrdinary Moment Frames (OMF)
- 4.9.4 13BSpecial Truss Moment Frames (STMF)
- 4.9.5 14BSpecial Concentrically Braced Frames (SCBF)
- 4.9.6 15BOrdinary Concentrically Braced Frames (OCBF)
- 4.9.7 16BOrdinary Concentrically Braced Frames from Isolated Structures (OCBFI)
- 4.9.8 17BEccentrically Braced Frames (EBF)
- 4.9.9 18BBuckling Restrained Braced Frames (BRBF)
- 4.9.10 19BSpecial Plate Shear Walls (SPSW)
- 4.10 Joint Design
- Chapter 05 Design Output
- Appendices
- Bibliography
Steel Frame Design Manual
AISC 360-05 / IBC 2006

Steel Frame
Design Manual
AISC 360-05 / IBC 2006
For SAP2000®
ISO SAP102816M8 Rev. 0
Proudly developed in the United States of America October 2016

Copyright
Copyright Computers and Structures, Inc., 1978-2016
All rights reserved.
The CSI Logo® and SAP2000® are registered trademarks of Computers and Structures,
Inc. Watch & LearnTM is a trademark of Computers and Structures, Inc.
The computer program SAP2000® and all associated documentation are proprietary and
copyrighted products. Worldwide rights of ownership rest with Computers and
Structures, Inc. Unlicensed use of these programs or reproduction of documentation in
any form, without prior written authorization from Computers and Structures, Inc., is
explicitly prohibited.
No part of this publication may be reproduced or distributed in any form or by any
means, or stored in a database or retrieval system, without the prior explicit written
permission of the publisher.
Further information and copies of this documentation may be obtained from:
Computers and Structures, Inc.
www.csiamerica.com
info@csiamerica.com (for general information)
support@csiamerica.com (for technical support questions)
DISCLAIMER
CONSIDERABLE TIME, EFFORT AND EXPENSE HAVE GONE INTO THE
DEVELOPMENT AND DOCUMENTATION OF THIS SOFTWARE. HOWEVER,
THE USER ACCEPTS AND UNDERSTANDS THAT NO WARRANTY IS
EXPRESSED OR IMPLIED BY THE DEVELOPERS OR THE DISTRIBUTORS ON
THE ACCURACY OR THE RELIABILITY OF THIS PRODUCT.
THIS PRODUCT IS A PRACTICAL AND POWERFUL TOOL FOR STRUCTURAL
DESIGN. HOWEVER, THE USER MUST EXPLICITLY UNDERSTAND THE BASIC
ASSUMPTIONS OF THE SOFTWARE MODELING, ANALYSIS, AND DESIGN
ALGORITHMS AND COMPENSATE FOR THE ASPECTS THAT ARE NOT
ADDRESSED.
THE INFORMATION PRODUCED BY THE SOFTWARE MUST BE CHECKED BY
A QUALIFIED AND EXPERIENCED ENGINEER. THE ENGINEER MUST
INDEPENDENTLY VERIFY THE RESULTS AND TAKE PROFESSIONAL
RESPONSIBILITY FOR THE INFORMATION THAT IS USED.

Contents
1 Introduction
1.1 Load Combinations and Notional Loads 1-2
1.2 Stress Check 1-2
1.3 Direct Analysis Method vs. Effective Length Method 1-4
1.3.1 Effective Length Method 1-4
1.3.2 Direct Analysis Method 1-5
1.4 User Options 1-5
1.5 Non-Automated Items in the AISC 360-05/IBC 2006
Steel Frame Design 1-6
2 Design Algorithms
2.1 Check and Design Capability 2-1
2.2 Design and Check Stations 2-2
2.3 Demand/Capacity Ratios 2-3
i

Steel Frame Design AISC 360-05/IBC 2006
2.4 Design Load Combinations 2-4
2.5 Second Order P-Delta Effects 2-5
2.6 Analysis Methods 2-6
2.7 Notional Load Patterns 2-11
2.8 Member Unsupported Lengths 2-11
2.9 Effects of Breaking a Member into Multiple Elements 2-13
2.10 Effective Length Factor (K) 2-15
2.11 Supported Framing Types 2-18
2.12 Continuity Plates 2-19
2.13 Doubler Plates 2-21
2.14 Choice of Units 2-22
3 Steel Frame Design Using ANSI/AISC 360-05
3.1 Notations 3-2
3.2 Design Loading Combinations 3-6
3.3 Classification of Sections for Local Buckling 3-9
3.4 Calculation of Factored Forces and Moments 3-18
3.5 Calculation of Nominal Strengths 3-22
3.5.1 Nominal Tensile Strength 3-22
3.5.2 Nominal Compressive Strength 3-23
3.5.3 Nominal Flexure Strength 3-34
ii

Contents
3.5.4 Nominal Shear Strength 3-65
3.5.5 Nominal Torsional Strength 3-71
3.6 Design of Members for Combined Forces 3-73
3.6.1 Doubly and Singly Symmetric Members
Subjected to Flexure and Axial Compression 3-74
3.6.2 Doubly and Singly Symmetric Members
Subjected to Flexure and Axial Tension 3-77
3.6.3 Unsymmetric Members Subjected to Flexure
and Axial Force 3-79
3.6.4 Members Subject to Torsion, Flexure, Shear
and Axial Force 3-81
4 Special Seismic Provisions (ANSI/AISC 341-05)
4.1 Notations 4-2
4.2 Design Preferences 4-2
4.3 Overwrites 4-3
4.4 Supported Framing Types 4-3
4.5 Applicability of the Seismic Requirements 4-4
4.6 Design Load Combinations 4-5
4.7 Classification of Sections for Local Buckling 4-7
4.8 Special Check for Column Strength 4-11
4.9 Member Design 4-12
4.9.1 Special Moment Frames (SMF) 4-12
4.9.2 Intermediate Moment Frame (IMF) 4-13
4.9.3 Ordinary Moment Frames (OMF) 4-13
4.9.4 Special Tress Moment Frames (STMF) 4-14
4.9.5 Special Concentrically Braced Frames (SCBF) 4-14
iii

Steel Frame Design AISC 360-05/IBC 2006
4.9.6 Ordinary Concentrically Braced Frames (OCBF) 4-16
4.9.7 Ordinary Concentrically Braced Frames from
Isolated Structures (OCBFI) 4-17
4.9.8 Eccentrically Braced Frames (EBF) 4-18
4.9.9 Buckling Restrained Braced Frames (BRBF) 4-22
4.9.10 Special Plate Shear Walls 4-22
4.10 Joint Design 4-22
4.10.1 Design of Continuity Plates 4-23
4.10.2 Design of Doubler Plates 4-29
4.10.3 Weak Beam Strong Column Measure 4-33
4.10.4 Evaluation of Beam Connection Shears 4-36
4.10.5 Evaluation of Brace Connection Forces 4-39
5 Design Output
5.1 Graphical Display of Design Information 5-2
5.2 Tabular Display of Design Information 5-5
5.3 Detailed Display of Member Specific Information 5-8
5.4 Output of Design Information 5-13
5.5 Error Messages and Warnings 5-16
Appendix A P-Delta Effects
Appendix B Steel Frame Design Preferences
Appendix C Steel Frame Design Procedure Overwrites
Appendix D Interactive Steel Frame Design
Appendix E Analysis Sections vs. Design Sections
Appendix F Error and Warning Messages
Bibliography
iv

Chapter 1
Introduction
The design/check of steel frames is seamlessly integrated within the program.
Initiation of the design process, along with control of various design parame-
ters, is accomplished using the Design menu. Automated design at the object
level is available for any one of a number of user-selected design codes, as
long as the structures have first been modeled and analyzed by the program.
Model and analysis data, such as material properties and member forces, are
recovered directly from the model database, and are used in the design process
in accordance with the user defined or default design settings. As with all de-
sign applications, the user should carefully review all of the user options and
default settings to ensure that the design process is consistent with the user’s
expectations. The AISC 360-05/IBC 2006 steel frame design options include
the use of the Direct Analysis Method. The software is well suited to make use
of the Direct Analysis Method because it can capture the second-order P-Delta
and P-δ effects, provided the user specifies that a nonlinear P-Delta analysis be
performed.
It should be noted that two design processes are available in CSiBridge: super-
structure design (on the Design/Rating tab) and design of the individual ele-
ments comprising the structure (the Advanced > Frame Design commands).
This manual addresses the second design process.
Chapter 2 addresses prerequisites related to modeling and analysis for a suc-
cessful design in accordance with ”AISC 360-05/IBC 2006.” Chapter 3 pro-
1 - 1

Steel Frame Design AISC 360-05/IBC 2006
vides detailed descriptions of the specific requirements as implemented in
”AISC 360-05/IBC 2006.” Chapter 4 provides detailed descriptions of the spe-
cific requirements for seismic loading as required by the specification in AN-
SI/AISC 341-05 code. The appendices provide details on various topics
referenced in this manual. The user also should review the AISC Direct Analy-
sis Method Practical Guide.
1.1 Load Combinations and Notional Loads
The design is based on a set of user-specified loading combinations. However,
the program provides default load combinations for each supported design
code. If the default load combinations are acceptable, no definition of addition-
al load combinations is required. The Direct Analysis Method requires that a
notional load, N = 0.002Yi , where Yi is the gravity load acting at level i, be
applied to account for the destabilizing effects associated with the initial imper-
fections and other conditions that may induce sway not explicitly modeled in
the structure. The user must be aware that notional loads must be defined and
assigned by the user. Currently, the software creates design combinations that
include notional loads and gravity loads only. If the user needs notional loads
that include combinations containing lateral loads, the user must define such
combinations manually. The automation of combinations, including notional
loads, is currently limited to gravity loads only. Design load combinations of
notional loads acting together with lateral loads currently are NOT automated
by the software.
1.2 Stress Check
Steel frame design/check consists of calculating the flexural, axial, and shear
forces or stresses at several locations along the length of a member, and then
comparing those calculated values with acceptable limits. That comparison
produces a demand/capacity ratio, which typically should not exceed a value of
one if code requirements are to be satisfied. The program follows the same
review procedures whether it is checking a user-specified shape or a shape
selected by the program from a predefined list. The program also checks the
requirements for the beam-column capacity ratio, checks the capacity of the
1 - 2 Load Combinations and Notional Loads

Chapter 1 Introduction
panel zone, and calculates the doubler plate and continuity plate thickness, if
needed. The program does not do the connection design. However, it calculates
the design basis forces for connection design.
Program output can be presented graphically on the model, in tables for both
input and output data, or in calculation sheets prepared for each member. For
each presentation method, the output is in a format that allows the engineer to
quickly study the stress conditions that exist in the structure, and in the event
the member is not adequate, aid the engineer in taking appropriate remedial
measures, including altering the design member without re-running the entire
analysis.
The program supports a wide range of steel frame design codes, including
many national building codes. This manual is dedicated to the use of the menu
option ”AISC 36005/IBC 2006.” This option covers the ”ANSI/AISC 360-05
Specification for Structural Steel Buildings” (AISC 2005a, b), and the ”ANSI/
AISC 341-05 Seismic Provisions for Structural Steel Buildings Including Sup-
plement No. 1” (AISC 2005c) codes.
The implementation covers loading and load combinations from ”ASCE/SEI
705 Minimum Design Loads for Buildings and Other Structures” (ASCE
2005), and also special requirements from ”IBC 2006 International Building
Code” (IBC 2006). Both LRFD (Load and Resistance Factor Design) and ASD
(Allowable Strength Design) codes are included in this implementation under
the same ”AISC 360-05/IBC 2006” code name. The LRFD and ASD are avail-
able as two options in the program’s preferences feature. In both cases, the
strengths are calculated in the nominal levels. The phi (LRFD) and Omega
(ADS) factors are applied during calculation of demand/capacity ratios only.
The design codes supported under ”AISC 360-05/IBC 2006” are written in kip-
inch units. All the associated equations and requirements have been imple-
mented in the program in kip-in units. The program has been enabled with unit
conversion capability. This allows the users to enjoy the flexibility of choosing
any set of consistent units during creating and editing models, exporting and
importing the model components, and reviewing the design results.
Stress Check 1 - 3

Steel Frame Design AISC 360-05/IBC 2006
1.3 Direct Analysis Method vs. Effective Length
Method
The Direct Analysis Method described in AISC 360-05/IBC 2006, Appendix 7,
is substantially different from previous design methods supported by AISC.
The user should be knowledgeable about the Stability Analysis and Design
(Chapter C) requirements and the requirements pertaining to consideration of
the geometric imperfections, stiffness reductions, and the P-Δ and P-δ effects.
Several methods for consideration of the second-order effects are available to
the users. Each of these are described in detail in a subsequent section (see
User Options in this chapter) and in the Steel Frame Design Preferences,
Appendix B of this manual. Alternatively, if the user desires to use a more
traditional design method, the Effective Length method can be specified using
the Design Preferences.
1.3.1 Effective Length Method
For structures exhibiting small second-order effects, the effective length
method may be suitable. The effective length approach relies on two main
assumptions, namely, that the structural response is elastic and that all columns
buckle simultaneously. The effective length method also relies on a calibrated
approach to account for the differences between the actual member response
and the 2nd-order elastic analysis results. The calibration is necessary because
the 2nd-order elastic analysis does not account for the effects of distributed
yielding and geometric imperfections. Since the interaction equations used in
the effective length approach rely on the calibration corresponding to a 2nd-
order elastic analysis of an idealized structure, the results are not likely
representative of the actual behavior of the structure. However, the results are
generally conservative. In the AISC 360-05/IBC 2006 code, the effective
length method is allowed provided the member demands are determined using
a second-order analysis (either explicit or by amplified first-order analysis) and
notional loads are included in all gravity load combinations. K-factors must be
calculated to account for buckling (except for braced frames, or where
Δ2 /Δ1 < 1.0, K = 1.0)
1 - 4 Direct Analysis Method vs. Effective Length Method

Chapter 1 Introduction
1.3.2 Direct Analysis Method
The Direct Analysis Method is expected to more accurately determine the
internal forces of the structure, provided care is used in the selection of the
appropriate methods used to determine the second-order effects, notional load
effects and appropriate stiffness reduction factors as defined in AISC 2.2, App.
7.3(3). Additionally, the Direct Analysis Method does not use an effective
length factor other than k = 1.0. The rational behind the use of k = 1.0 is that
proper consideration of the second-order effects (P-∆ and P-δ), geometric
imperfections (using notional loads) and inelastic effects (applying stiffness
reductions) better accounts for the stability effects of a structure than the earlier
Effective Length methods.
1.4 User Options
In addition to offering ASD and LRFD design, the Design Options menu pro-
vides seven analysis methods for design, as follows:
General Second Order Elastic Analysis (AISC C2.2a)
Second Order Analysis by Amplified First Order Analysis (AISC C2.1b)
Limited First Order Elastic Analysis (AISC 2.2b, App. 7.3(1))
Direct Analysis Method with General Second Order Analysis and Variable
Factor Stiffness Reduction (AISC 2.2, App. 7.3(3))
Direct Analysis Method with General Second Order Analysis and Fixed
Factor Stiffness Reduction (AISC 2.2, App. 7.3(3))
Direct Analysis Method with Amplified First Order Analysis and Variable
Factor Stiffness Reduction (AISC 2.2, App. 7.3(3))
Direct Analysis Method with Amplified First Order Analysis and Fixed
Factor Stiffness Reduction (AISC 2.2, App. 7.3(3))
These options are explained in greater detail in Chapter 2. The first three op-
tions make use of the effective length approach to determine the effective
length factors, K. The four options available for the Direct Design Method dif-
User Options 1 - 5

Steel Frame Design AISC 360-05/IBC 2006
fer in the use of a variable or fixed stiffness reduction factor and the method
used to capture the second-order effects. All four Direct Analysis Methods op-
tions use an effective length factor, K = 1.0.
1.5 Non-Automated Items in the AISC 360-05/IBC
2006 Steel Frame Design
Currently, the software does not automate the following:
Notional loads combinations that include lateral wind and quake loads
The validity of the analysis method. The user must verify the suitability of
the specified analysis method used under the User Options described in the
preceding sections. The AISC code requires, for instance, that the Direct
Analysis Method be used when a ratio of the second order displacements to
the first order displacements exceeds 1.5. This check currently must be
performed by the user.
P-Δ analysis. Since many different codes are supported by the software and
not all require a P-Δ analysis, the user must specify that a P-Δ analysis be
performed during the analysis phase so that the proper member forces are
available for use in the design phase. See the AISC Direct Analysis Method
Practical Guide for additional information.
1 - 6 Non-Automated Items in the AISC 360-05/IBC 2006 Steel Frame Design

Chapter 2
Design Algorithms
This chapter provides an overview of the basic assumptions, design precondi-
tions, and some of the design parameters that affect the design of steel frames.
For referring to pertinent sections of the corresponding code, a unique prefix is
assigned for each code.
• Reference to the ANSI/AISC 360-05 code is identified with the prefix
"AISC."
• Reference to the ANSI/AISC 341-05 code is identified with the prefix
"AISC SEISMIC" or sometimes "SEISMIC" only.
• Reference to the ASCE/SEI 7-05 code is identified with the prefix
"ASCE."
• Reference to the IBC 2006 code is identified with the prefix "IBC."
2.1 Check and Design Capability
The program has the ability to check adequacy of a section (shape) in accord-
ance with the requirements of the selected design code. Also the program can
automatically choose (i.e., design) the optimal (i.e., least weight) sections from
a predefined list that satisfies the design requirements.
2 - 1

Steel Frame Design AISC 360-05/IBC 2006
To check adequacy of a section, the program checks the demand/capacity
("D/C") ratios at a predefined number of stations for each design load combina-
tion. It calculates the envelope of the D/C ratios. It also checks the other re-
quirements on a pass or fail basis. If the capacity ratio remains less than or
equal to the D/C ratio limit, which is a number close to 1.0, and if the section
passes all the special requirements, the section is considered to be adequate,
else the section is considered to be failed. The D/C ratio limit is taken as 0.95
by default. However, this value can be overwritten in the Preferences (see
Chapter 3).
To choose (design) the optional section from a predefined list, the program first
orders the list of sections in increasing order of weight per unit length. Then it
starts checking each section from the ordered list, starting with the one with
least weight. The procedure of checking each section in this list is exactly the
same as described in the preceding paragraph. The program will evaluate each
section in the list until it finds the least weight section that passes the code
checks. If no section in the list is acceptable, the program will use the heaviest
section but flag it as being overstressed.
To check adequacy of an individual section, the user must assign the section
using the Assign menu. In that case, both the analysis and design sections will
be changed.
To choose the optimal section, the user must first define a list of steel sections,
the Auto Select sections list. The user must next assign this list, in the same
manner as any other section assignment, to the frame members to be opti-
mized. The program will use the median section by weight when doing the ini-
tial analysis. Check the program Help for more information about defining and
assigning Auto Select Section lists.
2.2 Design and Check Stations
For each design combination, steel frame members (beams, columns, and
braces) are designed (optimized) or checked at a number of locations (stations)
along the length of the object. The stations are located at equally spaced
segments along the clear length of the object. By default, at least three stations
will be located in a column or brace member, and the stations in a beam will be
spaced at most 2 feet apart (0.5 m if the model has been created in metric
2 - 2 Design and Check Stations

Chapter 2 Design Algorithms
units). The user can overwrite the number of stations in an object before the
analysis is run and refine the design along the length of a member by request-
ing more stations. Refer to the program Help for more information about
specifying the number of stations in an object.
2.3 Demand/Capacity Ratios
Determination of the controlling demand/capacity (D/C) ratios for each steel
frame member indicates the acceptability of the member for the given loading
conditions. The steps for calculating the D/C ratios are as follows:
The factored forces are calculated for axial, flexural, and shear at each de-
fined station for each design combination. The bending moments are calcu-
lated about the principal axes. For I-Shape, Box, Channel, T-Shape, Dou-
ble-Angle, Pipe, Circular, and Rectangular sections, the principal axes co-
incide with the geometric axes. For Single-Angle sections, the design con-
siders the principal properties. For General sections, it is assumed that all
section properties are given in terms of the principal directions.
For Single-Angle sections, the shear forces are calculated for directions
along the geometric axes. For all other sections, the program calculates the
shear forces along the geometric and principal axes.
The nominal strengths are calculated for compression, tension, bending
and shear based on the equations provided later in this manual. For flexure,
the nominal strengths are calculated based on the principal axes of bend-
ing. For the I-Shape, Box, Channel, Circular, Pipe, T-Shape, Double-Angle
and Rectangular sections, the principal axes coincide with their geometric
axes. For the Angle sections, the principal axes are determined and all
computations related to flexural stresses are based on that.
The nominal strength for shear is calculated along the geometric axes for
all sections. For I-Shape, Box, Channel, T-Shape, Double-Angle, Pipe,
Circular, and Rectangular sections, the principal axes coincide with their
geometric axes. For Single-Angle sections, principal axes do not coincide
with the geometric axes.
Demand/Capacity Ratios 2 - 3

Steel Frame Design AISC 360-05/IBC 2006
Factored forces are compared to nominal strengths to determine D/C ratios.
In either case, design codes typically require that the ratios not exceed a
value of one. A capacity ratio greater than one indicates a member that has
exceeded a limit state.
2.4 Design Load Combinations
The design load combinations are the various combinations of the prescribed
load cases for which the structure needs to be checked. The program creates a
number of default design load combinations for steel frame design. Users can
add their own design combinations as well as modify or delete the program
default design load combinations. An unlimited number of design load combi-
nations can be specified.
To define a design load combination, simply specify one or more load cases,
each with its own scale factor. The scale factors are applied to the forces and
moments from the load cases to form the factored design forces and moments
for each design load combination.
For normal loading conditions involving static dead load (DL), live load (LL),
roof live load (RL), snow load (SL), wind load (WL), earthquake load (EL),
notional load (NL), and dynamic response spectrum load (EL), the program has
built-in default design combinations for the design code. These are based on
the code recommendations.
The default design combinations assume all load cases declared as dead or live
to be additive. However, each load case declared as wind, earthquake, or
response spectrum cases, is assumed to be non-additive with other loads and
produces multiple lateral combinations. Also static wind, earthquake and
notional load responses produce separate design combinations with the sense
(positive or negative) reversed. The notional load patterns are added to load
combinations involving gravity loads only.
For other loading conditions involving moving load, time history, pattern live
load, separate consideration of roof live load, snow load, and the like, the user
must define the design load combinations in lieu of or in addition to the default
design load combinations. If notional loads are to be combined with other load
combinations involving wind or earthquake loads, the design load combina-
2 - 4 Design Load Combinations

Chapter 2 Design Algorithms
tions need to be defined in lieu of or in addition to the default design load com-
binations.
For multi-valued design combinations, such as those involving response spec-
trum, time history, moving loads and envelopes, where any correspondence
between forces is lost, the program automatically produces sub-combinations
using the maxima/minima values of the interacting forces. Separate combina-
tions with negative factors for response spectrum load cases are not required
because the program automatically takes the minima to be the negative of the
maxima response when preparing the sub-combinations described previously.
The program allows live load reduction factors to be applied to the member
forces of the reducible live load case on a member-by-member basis to reduce
the contribution of the live load to the factored responses.
2.5 Second Order P-Delta Effects
The AISC 360-05/IBC 2006 steel frame design options include the use of the
Direct Analysis Method. The software is well suited to make us of the Direct
Analysis Method because each program can capture the second-order P-∆ and
P-δ effects, provided the user specifies that a nonlinear P-Delta analysis be per-
formed.
Second Order P-Delta Effects 2 - 5
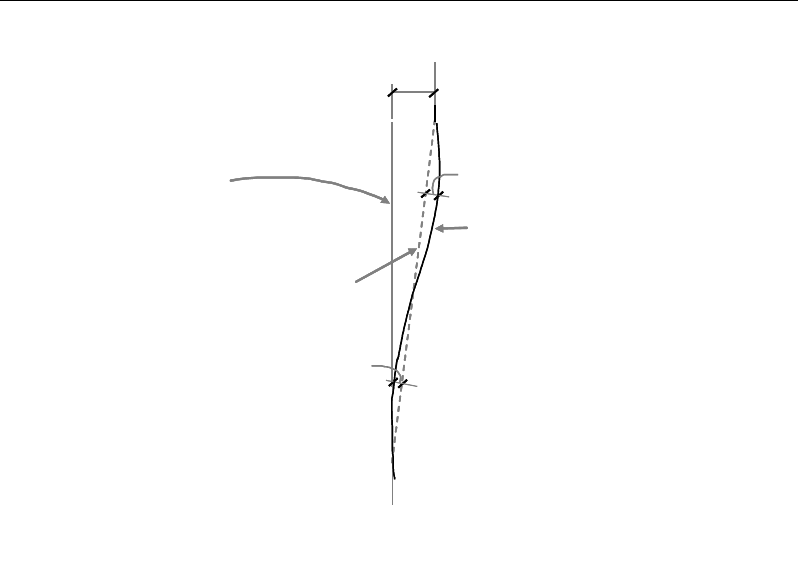
Steel Frame Design AISC 360-05/IBC 2006
∆
Original position of frame
element shown by vertical
line
Position of frame element
as a result of global lateral
translation,
∆
, shown by
dashed line
Final deflected position of the
frame element that includes the
global lateral translation, ∆, and
the local deformation of the
element,
δ
δ
δ
P
∆
Original position of frame
element shown by vertical
line
Position of frame element
as a result of global lateral
translation,
∆
, shown by
dashed line
Final deflected position of the
frame element that includes the
global lateral translation, ∆, and
the local deformation of the
element,
δ
δ
δ
P
For a detailed discussion of the program capabilities and limitations, see
Appendix A.
2.6 Analysis Methods
The code requires that stability shall be provided for the structure as a whole
and for each of the elements. Any method of analysis that considers the influ-
ence of second order effects of
P-
∆
and
P-
δ
, geometric imperfections, out-of-
plumbness, and member stiffness reduction due to residual stresses are permit-
ted by the code. The effects of geometric imperfection and out-of-plumbness
generally are captured by the use of notional loads. The effect of axial, shear
and flexural deformations and the effects of residual stresses on the member
stiffness reduction has been considered in a specialized method called "Direct
Analysis Method." This method can come in different incarnations (formats)
according to the choice of the engineer as allowed in the code.
The program offers the user seven analysis options for design:
Direct Analysis Method
Figure 2-1 System sway and element order effects
2 - 6 Analysis Methods

Chapter 2 Design Algorithms
• General Second Order Elastic Analysis with
τ
b variable (user option 1, Default)
τ
b fixed (user option 2)
• Amplified First Order Elastic Analysis with
τ
b variable (user option 3)
τ
b fixed (user option 4)
Equivalent Length Method
• General Second Order Elastic Analysis (AISC C2.1a) (user option 5)
• Amplified First Order Elastic Analysis (AISC C2.1b) (user option 6)
Limited First-Order Analysis (AISC 2.2b, App. 7.3(1)) (user option 7)
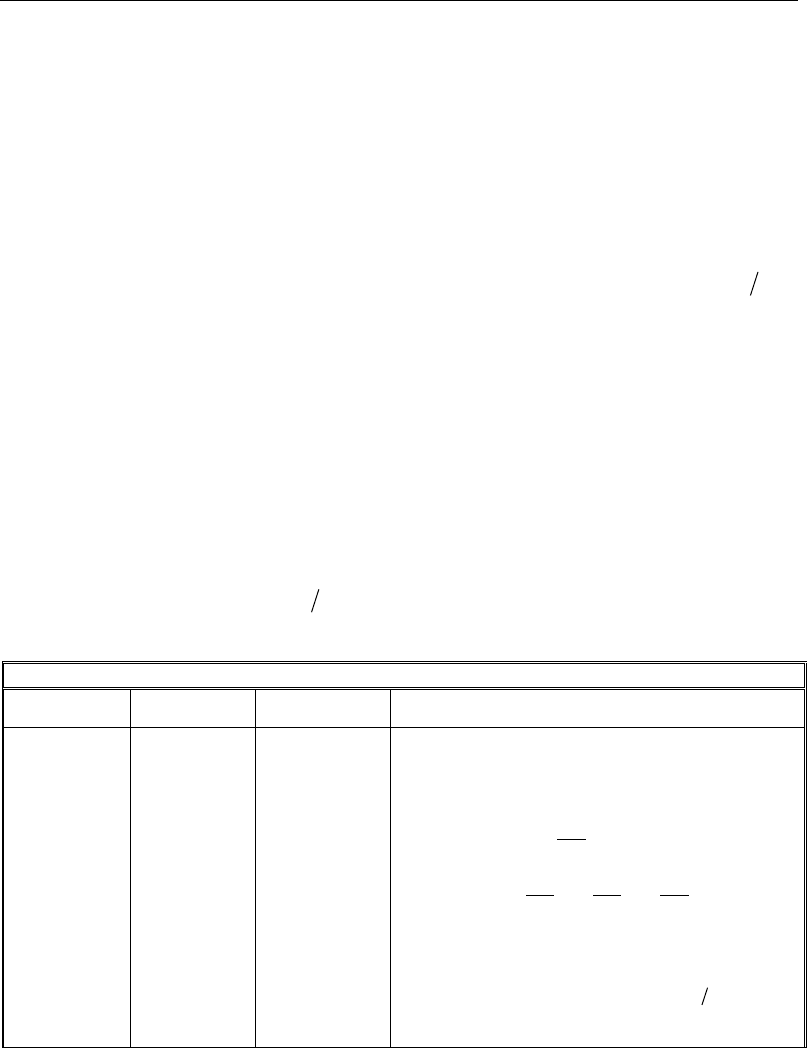
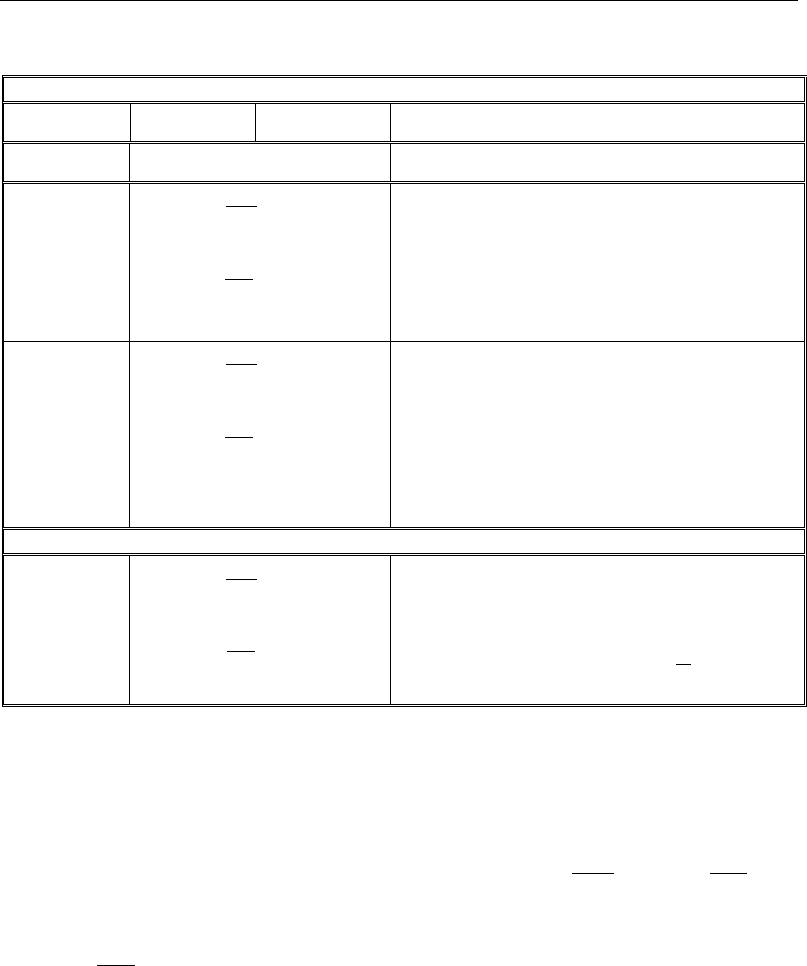
A summary of all of the user options and requirements is provided in
Table 2-1. The main difference between the various options concerns the use of
the Direct Analysis Method or the Equivalent Length Method. Within each of
the categories, the user can choose the method to calculate the second-order
effects, namely, by a General Second Order Analysis or an Amplified First-
Order Analysis. When the amplified first-order analysis is used, the force
amplification factors,
1
B
and
2
B
(AISC C2.1b), are needed. The
1
B
factor is
calculated by the program; however, the
2
B
factor is not. The user will need to
provide this value using the overwrite options that are described in Appendix
B.
When the user selects one of the options available under the Direct Analysis
Method, the user must further choose how the stiffness reduction factors for
EI
and
AE
are to be considered. For options 1 and 3, Table 2-1, the stiffness
reduction factors (
b
τ
) are variable because they are functions of the axial force
in the members, while for methods 2 and 4, the stiffness reduction factors are
fixed (0.8), and not a function of axial force. If the user desires, the stiffness
reduction factors (
b
τ
) can be overwritten. When options 2 and 4 are used, a
higher notional load coefficient (0.003) must be used compared to methods 1
and 3 for which the notional load coefficient is 0.002. Also, all the direct anal-
ysis methods (methods 1 through 4) allow use of
K
-factors for sway condition
Analysis Methods 2 - 7
Steel Frame Design AISC 360-05/IBC 2006
(
2
K
) to be equal to 1, which is a drastic simplification over the other effective
length method.
The AISC requirements to include notional loads are also summarized in Table
2-1. The notional load coefficients (AISC C2.2a, App. 7.3) are summarized as
well. The program automates creation of notional load combinations for all
gravity loads but does not automate the creation of notional load combinations
that include lateral wind or seismic loads. Combinations for notional loads with
lateral loads are required for the Direct Analysis Method when the
2nd 1st
∆∆
exceeds 1.5. Additionally, combinations for notional loads with lateral loads
are required if the Limited First Order Analysis, option 7, is used.
The Limited First Order Analysis, option 7, does not include the secondary
P-
∆
and
P-
δ
effects. This method has very limited applicability and might be
appropriate only when the axial forces in the columns are very small compared
to their Euler buckling capacities.
When using the LRFD provision, the actual load combinations are used for
second order P-∆ effects. When using the ASD provision, the load combina-
tions are first amplified by 1.6 before the P-∆ analysis and then the results are
reduced by a factor of
()
1 1.6
(AISC 2.2a, App. 7.3).
Table 2-1 The Essentials and Limitations of the Design Analysis Methods
Direct Analysis Method
Option Variable
Limitation or
Applicability
Essentials of the Method
General Second
Order Analysis
Variable
Factor Stiffness
Reduction
No limitation
2nd Order Analysis
Reduced stiffness
τ
=
b
EI* 0.8 EI
=EA* 0.8EA
for
for
α
τααα
≤
=
−≥
r
y
b
rrr
yyy
P
1.0 0.5
P
PPP
4 1 0.5
PPP
1
B
and
2
B
not used
2
1 (used for )=
n
KP
Notional load with all combos, except for
∆∆
≤
2nd 1st
1.5
for
which notional load with gravity combos only
Notional load coefficient = 0.002 (typically)
2 - 8 Analysis Methods
Chapter 2 Design Algorithms
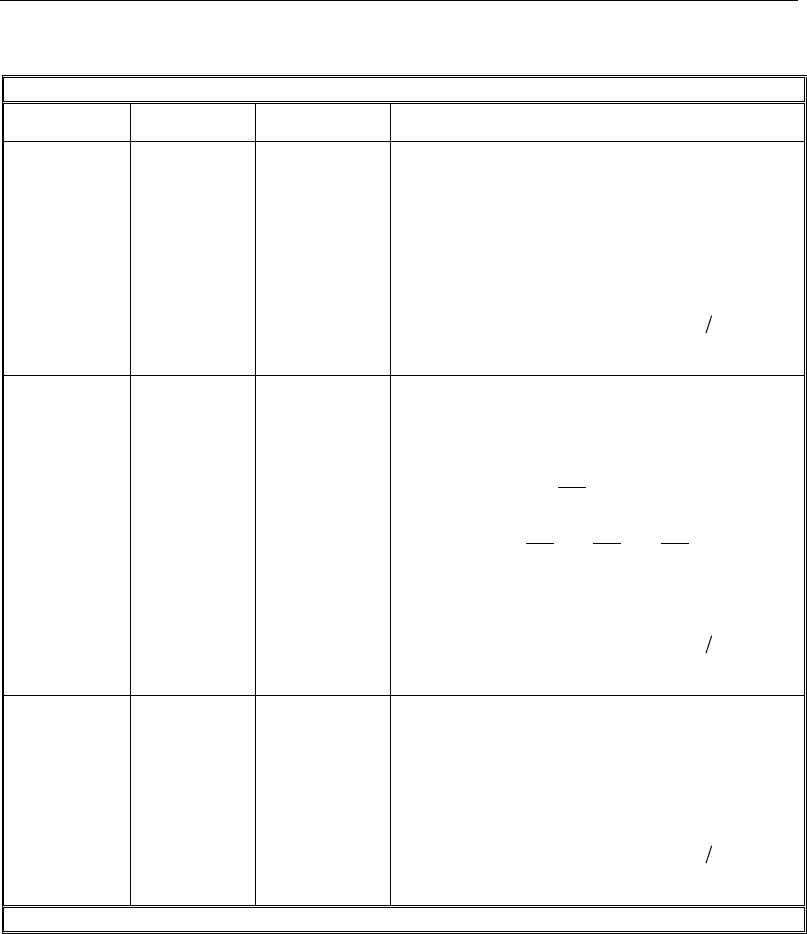
Table 2-1 The Essentials and Limitations of the Design Analysis Methods
Direct Analysis Method
Option Variable
Limitation or
Applicability
Essentials of the Method
Fixed Factor
Stiffness
Reduction
No limitation
2nd Order Analysis
Reduced stiffness
τ
=b
EI* 0.8 EI
=EA* 0.8EA
τ
=1.0
b
1
B
and
2
B
not used
2
1 (used for )
=
n
KP
Notional load with all combos, except for
∆∆
≤
2nd 1st
1.5
for which notional load with gravity combos only
Notional load coefficient = 0.003 (typically)
Amplified First
Order Analysis
Variable
Factor Stiffness
Reduction
No limitation
1st Order Analysis
Reduced Stiffness
τ
=
b
EI* 0.8 EI
=EA* 0.8EA
α
τααα
≤
=
−≥
r
y
b
rrr
yyy
P
1.0 for 0.5
P
PPP
4 1 for 0.5
PPP
11
1 for =KB
22
1 for and
=
n
K PB
Notional load with all combos, except for
∆∆
≤
2nd 1st
1.5
for which notional load with gravity combos only
Notional load coefficient = 0.002 (typically)
Amplified First
Order Analysis
Fixed Factor
Stiffness
Reduction
No limitation
2nd Order Analysis
Reduced stiffness
τ
=b
EI* 0.8 EI
EA* 0.8EA=
τ
=
b1.0
2
1 (used for )
=
n
KP
Notional load with all combos, except for
∆∆
≤
2nd 1st
1.5
for which notional load with gravity combos only
Notional load coefficient = 0.003 (typically)
Effective Length Method
Analysis Methods 2 - 9
Steel Frame Design AISC 360-05/IBC 2006
Table 2-1 The Essentials and Limitations of the Design Analysis Methods
Direct Analysis Method
Option Variable
Limitation or
Applicability
Essentials of the Method
Option
Limitation or
Applicability
Essentials of the Method
General Second
Order Elastic
Analysis
(for all stories)
∆
∆
≤
2nd
1st
1.5
α
=
r
y
Pany
P
(for all columns)
2nd Order Analysis
Unreduced Stiffness
2
=KK
(used for
n
P
)
Notional load with gravity combos only
Notional load coefficient = 0.002 (typically)
1
B
= 1
2
B
= 1
Amplified First
Order Analysis
(for all stories)
∆
∆
≤
2nd
1st
1.5
α
=
r
y
Pany
P
(for all columns)
1st Order Analysis
Unreduced stiffness
1
K
for
1
B
2
K
for
2
B
2
=KK
(used for
n
P
)
Notional load with gravity combos only
Notional load with coefficient = 0.002 (typically)
Use of
1
B
and
2
B
Limited First Order Analysis
Limited First
Order Elastic
Analysis
(for all stories)
∆
∆
≤
2nd
1st
1.5
α
≤0.5
r
y
P
P
(for all columns)
1st Order Analysis
Unreduced stiffness
2
K
for
n
P
(not
2
B
)
Notional load with all combos
Notional load with coefficient =
()
∆
≥
2 0.0042
L
The program has several limitations that have been stated in Section 1-5 and
the preceding paragraphs. Additionally, the user must be aware that it is possi-
ble to choose a design option that violates certain provisions of the AISC code
that will not be identified by the program. The limitation for the use of the
effective length method, namely, the requirement that
2
1
1.5
nd
st
∆≤
∆
and
α
r
e
P
P
must
be verified by the user. To assist users to in making validity checks, the ratio
α
r
e
P
P
and τ are now reported in tabular form for each member.
2 - 10 Analysis Methods

Chapter 2 Design Algorithms
2.7 Notional Load Patterns
Notional loads are lateral loads that are applied at each framing level and are
specified as a percentage of the gravity loads applied at that level. They are
intended to account for the destabilizing effects of out-of-plumbness, geometric
imperfections, inelasticity in structural members, and any other effects that
could induce sway and that are not explicitly considered in the analysis.
The program allows the user to create a Notional Load pattern as a percentage
of the previously defined gravity load pattern to be applied in one of the global
lateral directions: X or Y. The user can define more than one notional load
pattern associated with one gravity load by considering different factors and
different directions. In the ANSI/AISC 360-05 code, the notional loads are
typically suggested to be 0.2% (or 0.002) (AISC C2.2a, App. 7.3(2)), a factor
referred to as the notional load coefficient in this document. The notional load
coefficient can be 0.003 (AISC App 7.3(3)). In some cases, it can be a function
of second order effects measured by relative story sway (AISC C2.26). The
code also gives some flexibility to allow the engineer-of-record to apply
judgment (AISC App. 7.3(2)).
The notional load patterns should be considered in combination with appropri-
ate factors, appropriate directions, and appropriate senses. Some of the design
analysis methods need the notional loads to be considered only in gravity load
combinations (AISC App. 7.3(2)), and some of the methods need the notional
loads to be considered in all the design load combinations (AISC App 7.3(2)).
For a complete list, see Table 2-1 in the preceding "Second Order Effects and
Analysis Methods" section of this chapter.
Currently, the notional loads are not automatically included in the default
design load combinations that include lateral loads. However, the user is free to
modify the default design load combinations to include the notional loads with
appropriate factors and in appropriate load combinations.
2.8 Member Unsupported Lengths
The column unsupported lengths are required to account for column
slenderness effects for flexural buckling and for lateral-torsional buckling. The
Notional Load Patterns 2 - 11

Steel Frame Design AISC 360-05/IBC 2006
program automatically determines the unsupported length ratios, which are
specified as a fraction of the frame object length. These ratios times the frame
object lengths give the unbraced lengths for the member. These ratios can also
be overwritten by the user on a member-by-member basis, if desired, using the
overwrite option.
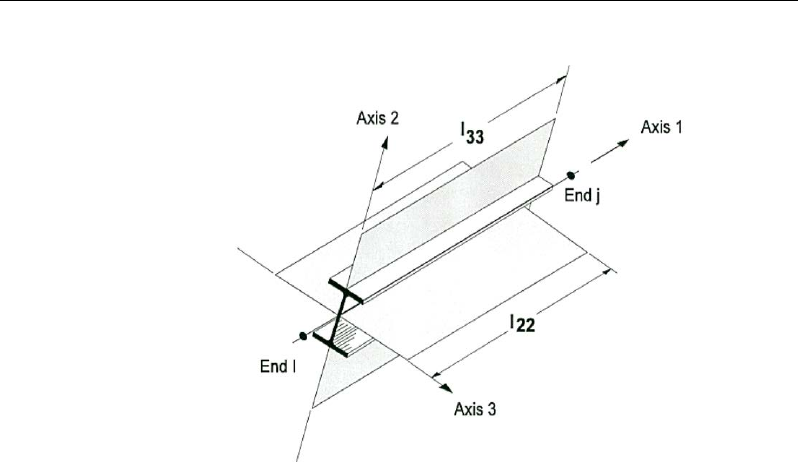
Two unsupported lengths,
33
l
and
22
l
, as shown in Figure 2-2 are to be
considered for flexural buckling. These are the lengths between support points
of the member in the corresponding directions. The length
33
l
corresponds to
instability about the 3-3 axis (major axis), and
22
l
corresponds to instability
about the 2-2 axis (minor axis). The length
LTB
l,
not shown in the figure, is
also used for lateral-torsional buckling caused by major direction bending (i.e.,
about the 3-3 axis).
In determining the values for
22
l
and
33
l
of the members, the program recog-
nizes various aspects of the structure that have an effect on these lengths, such
as member connectivity, diaphragm constraints and support points. The pro-
gram automatically locates the member support points and evaluates the corre-
sponding unsupported length.
It is possible for the unsupported length of a frame object to be evaluated by
the program as greater than the corresponding member length. For example,
assume a column has a beam framing into it in one direction, but not the other,
at a floor level. In this case, the column is assumed to be supported in one
direction only at that story level, and its unsupported length in the other direc-
tion will exceed the story height.
By default, the unsupported length for lateral-torsional buckling,
LTB
l,
is taken
to be equal to the
22
l
factor. Similar to
22
l
and
33
l,
LTB
l
can be overwritten.
2 - 12 Member Unsupported Lengths
Chapter 2 Design Algorithms
Figure 2-2 Unsupported lengths
33
l
and
22
l
2.9 Effects of Breaking a Member into Multiple
Elements
The preferred method is to model a beam, column or brace member as one sin-
gle element. However, the user can request that the program break a member
internally at framing intersections and at specified intervals. In this way, accu-
racy in modeling can be maintained, at the same time design/check specifica-
tions can be applied accurately. There is special emphasis on the end forces
(moments in particular) for many different aspects of beam, column and brace
design. If the member is manually meshed (broken) into segments, maintaining
the integrity of the design algorithm becomes difficult.
Manually, breaking a column member into several elements can affect many
things during design in the program.
1. The unbraced length: The unbraced length is really the unsupported length
between braces. If there is no intermediate brace in the member, the un-
braced length is typically calculated automatically by the program from the
top of the flange of the beam framing the column at bottom to the bottom
of the flange of the beam framing the column at the top. The automatically
Effects of Breaking a Member into Multiple Elements 2 - 13

Steel Frame Design AISC 360-05/IBC 2006
calculated length factor typically becomes less than 1. If there are interme-
diate bracing points, the user should overwrite the unbraced length factor in
the program. The user should choose the critical (larger) one. Even if the
user breaks the element, the program typically picks up the unbraced length
correctly, provided that there is no intermediate bracing point.
2. K-factor: Even if the user breaks the member into pieces, the program typi-
cally can pick up the
-factorsK
correctly. However, sometimes it can not.
The user should note the
-factorsK
. All segments of the member should
have the same
-factorK
and it should be calculated based on the entire
member. If the calculated
-factorK
is not reasonable, the user can over-
write the
-factorsK
for all the segments.
3.
m
C
factor: The
m
C
factor should be based on the end moments of
unbraced lengths of each segment and should not be based on the end
moments of the member. The program already calculates the m
C
factors
based on the end moments of unbraced lengths of each segment. If the
break-up points are the brace points, no action is required by the user. If
the broken segments do not represent the brace-to-brace unsupported
length, the program calculated
m
C
factor is conservative. If this
conservative value is acceptable, no action is required by the user. If it is
not acceptable, the user can calculate the
m
C
factor manually for the
critical combination and overwrite its value for that segment.
4.
b
C
factor: The logic is similar to that for the m
C
factor.
5.
1
B
factor: This factor amplifies the factored moments for the P-
δ
effect. In
its expression, there are the
m
C
factor and the Euler Buckling capacity
e
P
.
If the user keeps the unbraced length ratios (
33
l
and
22
l
) and the
-factorsK
( )
and
33 22
KK
correct, the
1
B
factor would be correct. If the
axial force is small, the
1
B
factor can be 1 and have no effect with respect
to modeling the single segment or multi-segment element.
6.
2
B
factor: The program does not calculate the
2
B
factor. The program
assumes that the user turns on the P-
∆
. In such cases,
2
B
can be taken as
equal to 1. That means the modeling with one or multiple segments has no
effect on this factor.
2 - 14 Effects of Breaking a Member into Multiple Elements

Chapter 2 Design Algorithms
If the user models a column with a single element and makes sure that the
L
-
factors and
K
-factors are correct, the effect of
1
B
and
2
B
will be picked up
correctly. The factors
m
C
and
b
C
will be picked up correctly if there is no in-
termediate bracing point. The calculated
m
C
and
b
C
factors will be slightly
conservative if there are intermediate bracing points.
If the user models a column with multiple elements and makes sure that
L
-
factors and
-factorsK
are correct, the effect of
1
B
and
2
B
will be picked up
correctly. The factors
m
C
and
b
C
will be picked up correctly if the member is
broken at the bracing points. The calculated m
C
and
b
C
factors will be con-
servative if the member is not broken at the bracing points.
2.10 Effective Length Factor (K)
The effective length method for calculating member axial compressive strength
has been used in various forms in several stability based design codes. The
method originates from calculating effective buckling lengths, KL, and is based
on elastic/inelastic stability theory. The effective buckling length is used to
calculate an axial compressive strength, Pn, through an empirical column curve
that accounts for geometric imperfections, distributed yielding, and residual
stresses present in the cross-section.
There are two types of
-factorsK
in the ANSI/AISC 360-05 code. The first
type of
-factor
K
is used for calculating the Euler axial capacity assuming that
all of the beam-column joints are held in place, i.e., no lateral translation is al-
lowed. The resulting axial capacity is used in calculation of the
1
B
factor. This
K
-factor is named as
1
K
in the code. This
1
K
factor is always less than 1 and
is not calculated. By default the program uses the value of 1 for
1
K
. The pro-
gram allows the user to overwrite
1
K
on a member-by-member basis.
The other
-factorK
is used for calculating the Euler axial capacity assuming
that all the beam-column joints are free to sway, i.e., lateral translation is al-
lowed. The resulting axial capacity is used in calculating
n
P
. This
-factorK
is
named as
2
K
in the code. This
2
K
is always greater than 1 if the frame is a
sway frame. The program calculates the
2
K
factor automatically based on
sway condition. The program also allows the user to overwrite
2
K
factors on a
Effective Length Factor (K) 2 - 15

Steel Frame Design AISC 360-05/IBC 2006
member-by-member basis. The same
2
K
factor is supposed to be used in cal-
culation of the
2
B
factor. However the program does not calculate
2
B
factors
and relies on the overwritten values. If the frame is not really a sway frame, the
user should overwrite the
2
K
factors.
Both
1
K
and 2
K
have two values: one for major direction and the other for
minor direction,
1minor
K
,
1major
K
,
2minor
K
,
2major
K
.
There is another
-factorK
.
ltb
K
for lateral torsional buckling. By default,
ltb
K
is taken as equal to
2minor
K
. However the user can overwrite this on a member-
by-member basis.
The rest of this section is dedicated to the determination of
2
K
factors.
The
-factor
K
algorithm has been developed for building-type structures,
where the columns are vertical and the beams are horizontal, and the behavior
is basically that of a moment-resisting frame for which the
-factorK
calcula-
tion is relatively complex. For the purpose of calculating
-factorsK
, the ob-
jects are identified as columns, beam and braces. All frame objects parallel to
the
Z
-axis are classified as columns. All objects parallel to the
X
-
Y
plane are
classified as beams. The remainders are considered to be braces.
The beams and braces are assigned
-factorsK
of unity. In the calculation of the
-factorsK
for a column object, the program first makes the following four
stiffness summations for each joint in the structural model:
=
∑
cc
cx cx
EI
SL
bb
bx bx
EI
SL
=
∑
cc
cy cy
EI
SL
=
∑
bb
by by
EI
SL
=
∑
where the x and y subscripts correspond to the global X and Y directions and
the c and b subscripts refer to column and beam. The local 2-2 and 3-3 terms
22 22
EI L
and
33 33
EI L
are rotated to give components along the global X and
Y directions to form the
( )
x
EI L
and
( )
y
EI L
values. Then for each column,
the joint summations at END-I and the END-J of the member are transformed
back to the column local 1-2-3 coordinate system, and the
G
-values for END-I
2 - 16 Effective Length Factor (K)

Chapter 2 Design Algorithms
and the END-J of the member are calculated about the 2-2 and 3-3 directions as
follows:
22
22
22
b
I
c
I
I
S
S
G=
22
22
22
b
J
c
J
J
S
S
G=
33
33
33
b
I
c
I
I
S
S
G=
33
33
33
b
J
c
J
J
S
S
G=
If a rotational release exists at a particular end (and direction) of an object, the
corresponding value of
G
is set to 10.0. If all degrees of freedom for a particu-
lar joint are deleted, the
G
-values for all members connecting to that joint will
be set to 1.0 for the end of the member connecting to that joint. Finally, if
I
G
and
J
G
are known for a particular direction, the column
-factorsK
for the cor-
responding direction is calculated by solving the following relationship for α:
α
αα
tan
)
(6
36
2=
+
−
JI
JI
GG
GG
from which
K
= π/α. This relationship is the mathematical formulation for the
evaluation of
-factorsK
for moment-resisting frames assuming sidesway to be
uninhibited. For other structures, such as braced frame structures, the
-factorsK
for all members are usually unity and should be set so by the user.
The following are some important aspects associated with the column
-factor
K
algorithm:
An object that has a pin at the joint under consideration will not enter the
stiffness summations calculated above. An object that has a pin at the far
end from the joint under consideration will contribute only 50% of the cal-
culated EI value. Also, beam members that have no column member at the
far end from the joint under consideration, such as cantilevers, will not en-
ter the stiffness summation.
If there are no beams framing into a particular direction of a column mem-
ber, the associated G-value will be infinity. If the G-value at any one end
of a column for a particular direction is infinity, the
K
-factor correspond-
ing to that direction is set equal to unity.
If rotational releases exist at both ends of an object for a particular direc-
tion, the corresponding
-factorK
is set to unity.
Effective Length Factor (K) 2 - 17

Steel Frame Design AISC 360-05/IBC 2006
The automated
-factor
K
calculation procedure can occasionally generate
artificially high
-factorsK
, specifically under circumstances involving
skewed beams, fixed support conditions, and under other conditions where
the program may have difficulty recognizing that the members are laterally
supported and
-factorsK
of unity are to be used.
All
-factorsK
produced by the program can be overwritten by the user.
These values should be reviewed and any unacceptable values should be
replaced.
The beams and braces are assigned
-factorsK
of unity.
When a steel frame design is performed in accordance with ANSI/AISC 360-
05 provision and the analysis method is chosen to be any of the four direct
analysis methods, the
ltb
K
and 2
K
factors (
2minor
K
and
2major
K
) are automati-
cally taken as 1 (AISC App. 7.1). However, their overwritten values are con-
sidered in design even if any of the Direct Analysis Methods is chosen.
2.11 Supported Framing Types
The code (ANSI/AISC 341-05) recognizes the following types of framing
systems.
Framing Type References
SMF (Special Moment Frame) AISC SEISMIC 9
IMF (Intermediate Moment Frame) AISC SEISMIC 10
OMF (Ordinary Moment Frame) AISC SEISMIC 11
STMF (Special Truss Moment Frame) AISC SEISMIC 12
SCBF (Special Concentrically Braced Frame) AISC SEISMIC 13
OCBF (Ordinary Concentrically Braced Frame) AISC SEISMIC 14
EBF (Eccentrically Braced Frame) AISC SEISMIC 15
BRBF (Buckling Restrained Braced Frame) AISC SEISMIC 16
SPSW (Special Plate Shear Wall) AISC SEISMIC 17
2 - 18 Supported Framing Types

Chapter 2 Design Algorithms
With regard to these framing types, the program has implemented specifica-
tions for all types of framing systems, except STMF, BRBF, and SPSW. Im-
plementing those three types of framing require further information about
modeling.
The program recognizes the OCBF framing in its two separate incarnations:
OCBF for regular Ordinary Concentrically Braced Frames (AISC SEISMIC
14) and OCBFI for (base) Isolated Ordinary Concentrically Braced Frames
(AISC SEISMIC 14.5).
See Chapter 4 Special Seismic Provisions (ANSI/AISC 314-05) for additional
requirements.
2.12 Continuity Plates
In a plan view of a beam/column connection, a steel beam can frame into a
column in the following ways:
The steel beam frames in a direction parallel to the column major direction,
i.e., the beam frames into the column flange.
The steel beam frames in a direction parallel to the column minor direc-
tion, i.e., the beam frames into the column web.
The steel beam frames in a direction that is at an angle to both of the prin-
cipal axes.
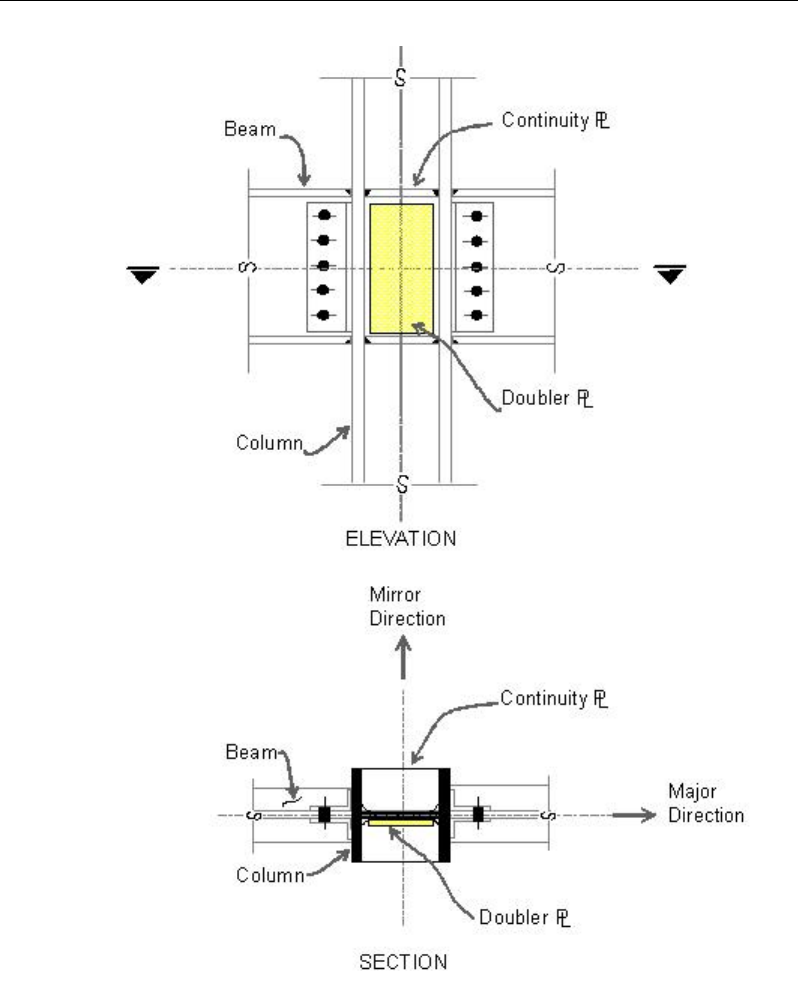
To achieve a beam/column moment connection, continuity plates, such as
shown in Figure 2-3, are usually placed on the column, in line with the top and
bottom flanges of the beam, to transfer the compression and tension flange
forces of the beam into the column.
For connection conditions described in the last two bullet items, the thickness
of such plates is usually set equal to the flange thickness of the corresponding
beam.
Continuity Plates 2 - 19
Steel Frame Design AISC 360-05/IBC 2006
Figure 2-3 Doubler Plates and Continuity Plates
2 - 20 Continuity Plates

Chapter 2 Design Algorithms
However, for the connection condition described by the first bullet item, where
the beam frames into the flange of the column, such continuity plates are not
always needed. The requirement depends upon the magnitude of the beam
flange force and the properties of the column.
The program investigates whether the continuity plates are needed based on the
requirements of the selected code. Columns of I-sections supporting beams of
I-sections only are investigated. The program evaluates the continuity plate re-
quirements for each of the beams that frame into the column flange and reports
the maximum continuity plate area that is needed for each beam flange. The
continuity plate requirements are evaluated for moment frames only.
2.13 Doubler Plates
One aspect of the design of a steel framing system is an evaluation of the shear
forces that exist in the region of the beam column intersection known as the
panel zone. Shear stresses seldom control the design of a beam or column
member. However, in a moment resisting frame, the shear stress in the beam-
column joint can be critical, especially in framing systems when the column is
subjected to major direction bending and the web of the column resists the joint
shear forces. In minor direction bending, the joint shear is carried by the col-
umn flanges, in which case the shear stresses are seldom critical, and the pro-
gram does therefore not investigate this condition.
Shear stresses in the panel zone, due to major direction bending in the column,
may require additional plates to be welded onto the column web, depending
upon the loading and the geometry of the steel beams that frame into the col-
umn, either along the column major direction, or at an angle so that the beams
have components along the column major direction. See Figure 3-3. When
code appropriate, the program investigates such situations and reports the
thickness of any required doubler plates. Only columns with I-shapes and only
supporting beams with I-shapes are investigated for doubler plate requirements.
Also, doubler plate requirements are evaluated for moment frames only.
Doubler Plates 2 - 21

Steel Frame Design AISC 360-05/IBC 2006
2.14 Choice of Units
English as well as SI and MKS metric units can be used for input. The codes
are based on a specific system of units. All equations and descriptions present-
ed in the subsequent chapters correspond to that specific system of units unless
otherwise noted. However, any system of units can be used to define and de-
sign a structure in the program.
It should be noted that two design processes are available in CSiBridge: super-
structure design (on the Design/Rating tab) and design of the individual ele-
ments comprising the structure (the Advanced > Frame Design commands).
This manual addresses the second design process.
2 - 22 Choice of Units

Chapter 3
Design Using ANSI/AISC 360-05
This chapter provides a detailed description of the algorithms used by the pro-
grams in the design/check of structures in accordance with "ANSI/AISC 360-
05 — Specifications for Structural Steel Building" (AISC 2005a, b). The menu
option "AISC 360-05/IBC 2006" also covers the "ANSI/AISC 341-05 —
Seismic Provisions for Structural Steel Building Including Supplement No. 1"
(AISC 2005c), which is described in the next chapter. The implementation co-
vers load combinations from "ASCE/SEI 7-05," which is described in the sec-
tion "Design Loading Combinations" in this chapter. The loading based on
"ASCE/SEI 7-05" has been described in a separate document entitled "CSI
Lateral Load Manual" (CSI 2007). References also are made to IBC 2006 in
this document.
For referring to pertinent sections of the corresponding code, a unique prefix is
assigned for each code.
• Reference to the ANSI/AISC 360-05 code is identified with the prefix
"AISC."
• Reference to the ANSI/AISC 341-05 code is identified with the prefix
"AISC SEISMIC" or sometimes "SEISMIC" only.
• Reference to the ASCE/SEI 7-05 code is identified with the prefix
"ASCE."
• Reference to the IBC 2006 code is identified with the prefix "IBC."
3 - 1

Steel Frame Design AISC 360-05
3.1 Notations
The various notations used in this chapter are described herein.
A
Cross-sectional area, in2
A
e
Effective cross-sectional area for slender sections, in2
A
g
Gross cross-sectional area, in2
A
v2
,A
v3
Major and minor shear areas, in2
A
w
Shear area, equal dt
w
per web, in2
B
1
Moment magnification factor for moments not causing sidesway
B
2
Moment magnification factor for moments causing sidesway
C
b
Bending coefficient
C
m
Moment coefficient
C
w
Warping constant, in6
D
Outside diameter of pipes, in
E
Modulus of elasticity, ksi
F
cr
Critical compressive stress, ksi
F
r
Compressive residual stress in flange assumed 10.0 for rolled
sections and 16.5 for welded sections, ksi
F
y
Yield stress of material, ksi
G
Shear modulus, ksi
I
22
Minor moment of inertia, in4
I
33
Major moment of inertia, in4
J
Torsional constant for the section, in4
3 - 2 Notations

Chapter 3 - Design using ANSI/AISC 360-05
K
Effective length factor
K
1
Effective length factor for braced condition
K2
Effective length factor for unbraced condition
K
33
,K
22
Effective length K-factors in the major and minor directions for
appropriate braced (K1) and unbraced (K2) condition
L
b
Laterally unbraced length of member, in
L
p
Limiting laterally unbraced length for full plastic capacity, in
L
r
Limiting laterally unbraced length for inelastic lateral-torsional
buckling, in
Mcr
Elastic buckling moment, kip-in
Mlt
Factored moments causing sidesway, kip-in
Mnt
Factored moments not causing sidesway, kip-in
Mn33,Mn22
Nominal bending strength in major and minor directions, kip-in
Mob
Elastic lateral-torsional buckling moment for angle sections, kip-
in
M
r33
, M
r22
Major and minor limiting buckling moments, kip-in
Mu
Factored moment in member, kip-in
M
u33
, M
u22
Factored major and minor moments in member, kip-in
P
e
Euler buckling load, kips
Pn
Nominal axial load strength, kip
P
u
Factored axial force in member, kips
P
y
A
g
F
y
, kips
Q
Reduction factor for slender section, =
QaQs
Q
a
Reduction factor for stiffened slender elements
Notations 3 - 3

Steel Frame Design AISC 360-05
Q
s
Reduction factor for unstiffened slender elements
S
Section modulus, in3
S33,S22
Major and minor section moduli, in
3
S
eff,33
,S
eff,22
Effective major and minor section moduli for slender sections,
in3
S
c
Section modulus for compression in an angle section, in3
V
n2
,V
n3
Nominal major and minor shear strengths, kips
V
u2
,V
v3
Factored major and minor shear loads, kips
Z
Plastic modulus, in3
Z
33
,Z
22
Major and minor plastic moduli, in3
b
Nominal dimension of plate in a section, in
longer leg of angle sections, bf − 2tw for welded and bf − 3tw for
rolled box sections, and the like
be
Effective width of flange, in
b
f
Flange width, in
d
Overall depth of member, in
de
Effective depth of web, in
h
c
Clear distance between flanges less fillets, in
assumed d − 2k for rolled sections, and d − 2tf for welded sec-
tions
k
Distance from outer face of flange to web toe of fillet, in
kc
Parameter used for section classification
kc =
4
w
ht ,
0.35 ≤
c
k
≤ 0.763
l
33
,l
22
Major and minor directions unbraced member lengths, in
r
Radius of gyration, in
3 - 4 Notations

Chapter 3 - Design using ANSI/AISC 360-05
r
33
,r
22
Radii of gyration in the major and minor directions, in
t
Thickness, in
tf
Flange thickness, in
t
w
Thickness of web, in
β
w
Special section property for angles, in
λ
Slenderness parameter
λ
c
,λ
e
Column slenderness parameters
λ
p
Limiting slenderness parameter for compact element
λr
Limiting slenderness parameter for non-compact element
λ
s
Limiting slenderness parameter for seismic element
λ
slender
Limiting slenderness parameter for slender element
ϕb
Resistance factor for bending
ϕ
c
Resistance factor for compression
ϕ
t
Resistance factor for tension yielding
ϕT
Resistance factor for torsion
ϕ
v
Resistance factor for shear
Ω
b
Safety factor for bending
Ωc
Safety factor for compression
Ω
t
Safety factor for tension
Ω
T
Safety factor for torsion
Ωv
Safety factor for shear
Notations 3 - 5

Steel Frame Design AISC 360-05
3.2 Design Loading Combinations
The structure is to be designed so that its design strength equals or exceeds the
effects of factored loads stipulated by the applicable design code. The default
design combinations are the various combinations of the already defined load
cases, such as dead load (DL), live load (LL), roof live load (RL), snow load
(SL), wind load (WL), and horizontal earthquake load (EL).
AISC 360-05 refers to the applicable building code for the loads and load com-
binations to be considered in the design, and to ASCE 7-05 in the absence of
such a building code. Hence, the default design combinations used in the cur-
rent version are the ones stipulated in ASCE 7-05:
For design in accordance with LRFD provisions:
1.4 DL (ASCE 2.3.2-1)
1.2 DL + 1.6 LL + 0.5 RL (ASCE 2.3.2-2)
1.2 DL + 1.0 LL + 1.6 RL (ASCE 2.3.2-3)
1.2 DL + 1.6 LL + 0.5 SL (ASCE 2.3.2-2)
1.2 DL + 1.0 LL + 1.6 SL (ASCE 2.3.2-3)
0.9 DL ± 1.6 WL (ASCE 2.3.2-6)
1.2 DL + 1.6 RL ± 0.8 WL (ASCE 2.3.2-3)
1.2 DL + 1.0 LL + 0.5RL ± 1.6 WL (ASCE 2.3.2-4)
1.2 DL + 1.6 SL ± 0.8 WL (ASCE 2.3.2-3)
1.2 DL + 1.0 LL + 0.5SL ± 1.06 WL (ASCE 2.3.2-4)
0.9 DL ± 1.0 EL (ASCE 2.3.2-7)
1.2 DL + 1.0 LL + 0.2SL ± 1.0EL (ASCE 2.3.2-5)
For design in accordance with ASD provisions:
1.0 DL (ASCE 2.4.1-1)
1.0 DL + 1.0 LL (ASCE 2.4.1-2)
1.0 DL + 1.0 RL (ASCE 2.4.1-3)
1.0 DL + 0.75 LL + 0.75 RL (ASCE 2.3.2-4)
1.0 DL + 1.0 SL (ASCE 2.4.1-3)
1.0 DL + 0.75 LL + 0.75 SL (ASCE 2.3.2-4)
3 - 6 Design Loading Combinations

Chapter 3 - Design using ANSI/AISC 360-05
1.0 DL ± 1.0 WL (ASCE 2.4.1-5)
1.0 DL + 0.75 LL + 0.75 RL ± 0.75 (WL) (ASCE 2.4.1-6)
1.0 DL + 0.75 LL + 0.75 SL ± 0.75 (WL) (ASCE 2.4.1-6)
0.6 DL ± 1.0 WL (ASCE 2.4.1-7)
1.0 DL ± 0.7 EL (ASCE 2.4.1-5)
1.0 DL + 0.75 LL + 0.75 SL ± 0.75(0.7 EL) (ASCE 2.4.1-6)
0.6 DL ± 0.7 EL (ASCE 2.4.1-8)
Most of the analysis methods recognized by the code are required to consider
Notional Load in the design loading combinations for steel frame design. The
program allows the user to define and create notional loads as individual load
cases from a specified percentage of a given gravity load acting in a particular
lateral direction. These notional load patterns should be considered in the com-
binations with appropriate factors, appropriate directions, and appropriate
senses. Currently, the program automatically includes the notional loads in the
default design load combinations for gravity combinations only. The user is
free to modify the default design load combinations to include the notional
loads. For further information, refer to the "Notional Load Patterns" section in
Chapter 2.
The program automatically considers seismic load effects, including over-
strength factors (ASCE 12.4.3), as special load combinations that are created
automatically from each load combination, involving seismic loads. In that
case, the horizontal component of the force is represented by Ehm and the verti-
cal component of the force is represented byEv , where
Ehm = Ω0QE (ASCE 12.4.3.1)
Ev = 0.2SDSD (ASCE 12.4.2.2)
where, Ωo is the overstrength factor and it is taken from ASCE 7-05 Table
12.2-1. The factor SDS is described later in this section. Effectively, the special
seismic combinations that are considered for the LRFD provision are
(0.9 − 0.2SDS)DL ± Ω0QE (ASCE 12.4.3.2)
(1.2 − 0.2SDS)DL ± Ω0QE + 1.0LL (ASCE 12.4.3.2)
and for the ASD provision the combinations are
(1.0 − 0.14SDS)DL ± 0.7Ω0QE (ASCE 12.4.3.2)
Design Loading Combinations 3 - 7

Steel Frame Design AISC 360-05
(1.0 + 0.105SDS)DL ± 0.75(0.7Ω0)QE + 0.75LL (ASCE 12.4.3.2)
(0.6 − 0.14SDS)DL ± 0.7Ω0QE (ASCE 12.4.3.2)
The program assumes that the defined earthquake load is really the strength
level earthquake, which is equivalent to QE as defined in Section 12.4.2.1 of
the ASCE 7-05 code. For regular earthquake, load is considered to have two
components: horizontal, Eh and vertical Ev , which are taken as
Eh = ρθE (ASCE 12.4.2.1)
Ev = 0.2SDSD (ASCE 12.4.2.2)
where, ρ is the redundancy factor as defined in Section 12.3.4 of ASCE 7-05,
and the SDS is the design earthquake spectral response acceleration parameters
at short periods, as defined in Section 11.4.4 of ASCE 7-05 code.
Effectively, the seismic load combination for the LRFD provision becomes:
(1.2 + 0.2SDS)DL ± ρQE (ASCE 2.3.2-5, 12.4.2.3)
(1.2 + 0.2SDS)DL ± ρQE + 1.0LL (ASCE 2.3.2-5, 12.4.2.3)
(0.9 − 0.2SDS)DL ± ρQE (ASCE 2.3.2-7, 12.4.2.3)
The seismic load combinations for the ASD provision become:
(1.0 + 0.14SDS)DL ± 0.7ρQE (ASCE 2.4.1-5, 12.4.2.3)
(1.0 + 0.105SDS)DL ± 0.75(0.7ρ)QE + 0.75LL (ASCE 2.4.1-6, 12.4.2.3)
(0.6 − 0.14SDS)DL ± 0.7ρQE (ASCE 2.4.1-7, 12.4.2.3)
The program assumes that the seismic loads defined as the strength level load
is the program load case. Otherwise, the factors ρ, Ωo , and SDS will not be able
to scale the load to the desired level.
The combinations described herein are the default loading combinations only.
They can be deleted or edited as required by the design code or engineer-of-
record.
3 - 8 Design Loading Combinations

Chapter 3 - Design using ANSI/AISC 360-05
The program allows live load reduction factors to be applied to the member
forces of the reducible live load case on a member-by-member basis to reduce
the contribution of the live load to the factored responses.
3.3 Classification of Sections for Local Buckling
The nominal strengths for axial, compression, and flexure are dependent on the
classification of the section as Seismically Compact, Compact, Noncompact,
Slender, or Too Slender. Compact or Seismically Compact sections are capable
of developing the full plastic strength before local buckling occurs. Non-
compact sections can develop partial yielding in compression, and buckle
inelastically before reaching to a fully plastic stress distribution. Slender sec-
tions buckle elastically before any of the elements yield under compression.
Seismically Compact sections are capable of developing the full plastic
strength before local buckling occurs when the section goes through low cycle
fatigue and withstands reversal of load under seismic conditions.
Sections are classified as Compact, Noncompact, or Slender sections in
accordance with Section B4 of the code (AISC B4). For a section to qualify as
Compact, its flanges must be continuously connected to the web or webs and
the width-thickness ratios of its compression elements must not exceed the
limiting width-thickness ratios λp from Table B4.1 of the code. If the width-
thickness ratio of one or more compression elements exceeds λp, but does not
exceed λr from Table B4.1, the section is Noncompact. If the width-thickness
ratio of any element exceeds λr but does not exceed λs, the section is Slender.
If the width-thickness ratio of any element exceed λs, the section is considered
Too Slender. The expressions of λp, λr, and λs, as implemented in the program,
are reported in Table 3-1 (AISC Table B4.1, B4, F8, F13.2). In that table all
expressions of λp and λr are taken from AISC section B4 and AISC Table
B4.1. The limit demarcating Slender and Too Slender has been identified as λs
in this document. The expressions of λs for I-Shape, Double Channel, Channel
and T-Shape sections are taken from AISC section F13.2. The expression of λs
for Pipe Sections is taken from AISC section F8. The expression of λp for
Angle and Double Angle sections is taken from AISC Seismic code
ANSI/AISC 341-05 Table I-8-1.
Classification of Sections for Local Buckling 3 - 9

Steel Frame Design AISC 360-05
The table uses the variables kc, FL, h, hp, hc, bf, tf, tw, b, t, D, d, and so on. The
variables b, d, D and t are explained in the respective figures inside the table.
The variables bf, tf, h, hp, hc, and tw are explained in Figure 3-1. For Doubly
Symmetric I-Shapes, h, hp, and hc are all equal to each other.
3 - 10 Classification of Sections for Local Buckling
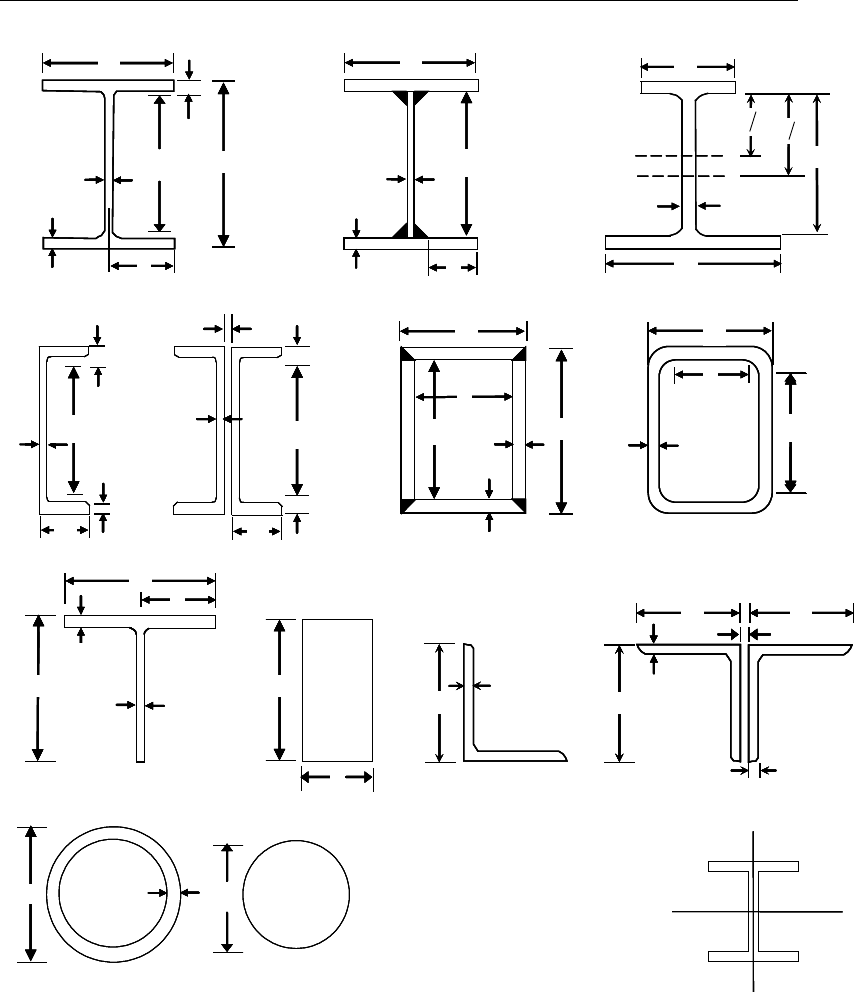
Chapter 3 - Design using ANSI/AISC 360-05
Figure 3-1 AISC 360-05 Definition of Geometric Properties
2, y
2, y
3, x3, x
AISC-2005: Axes Conventions
2-2 is the cross section axis
parallel to the webs, the
longer dimension of tubes,
the longer leg of single
angles, or the side by side
legs of double anges. This is
the same as the y-y axis.
3-3 is orthogonal to 2-2. This is
the same as the x-x axis.
cp
hh h
= =
f
b
k
b
w
t
f
t
d
f
b
cp
hh h
= =
f
t
w
t
b
w
t
k
f
b
f
t
cp
hh h
= =
d
td
D
f
b
d
w
t
f
t
c
h
b
w
t
d
s
f
b
f
b
f
t
b
t
fw
b b 3t
= −
w
t
f
b
b
cf
h d 3t= −
d
f
b
b
f
t
w
th
b
f
t
f
b
w
t
cp
hh h= =
k
s
ft
b
w
t
h
c
h2
p
h2
PNA
NA
fc
b
2, y
2, y
3, x3, x
2, y
2, y
3, x3, x
AISC-2005: Axes Conventions
2-2 is the cross section axis
parallel to the webs, the
longer dimension of tubes,
the longer leg of single
angles, or the side by side
legs of double anges. This is
the same as the y-y axis.
3-3 is orthogonal to 2-2. This is
the same as the x-x axis.
AISC-2005: Axes Conventions
2-2 is the cross section axis
parallel to the webs, the
longer dimension of tubes,
the longer leg of single
angles, or the side by side
legs of double anges. This is
the same as the y-y axis.
2-2 is the cross section axis
parallel to the webs, the
longer dimension of tubes,
the longer leg of single
angles, or the side by side
legs of double anges. This is
the same as the y-y axis.
3-3 is orthogonal to 2-2. This is
the same as the x-x axis.
3-3is orthogonal to 2-2. This is
the same as the x-x axis.
cp
hh h
= =
f
b
k
b
w
t
f
t
d
cp
hh h
= =
f
b
k
b
w
t
f
t
d
f
b
cp
hh h
= =
f
t
w
t
b
f
b
cp
hh h
= =
f
t
w
t
b
w
t
k
f
b
f
t
cp
hh h= =
w
t
k
f
b
f
t
cp
hh h= =
d
td
D
d
td
D
f
b
d
w
t
f
t
c
h
b
f
b
d
w
t
f
t
f
t
c
h
b
w
t
d
s
f
b
f
b
f
t
w
t
d
s
f
b
f
b
f
t
d
s
f
b
f
b
f
t
b
t
b
t
fw
b b 3t= −
w
t
f
b
b
cf
h d 3t= −
fw
b b 3t= −
w
t
f
b
b
cf
h d 3t= −
d
f
b
b
f
t
w
t
d
f
b
b
f
t
w
th
b
h
b
f
t
f
b
w
t
cp
hh h= =
k
s
f
t
f
b
w
t
cp
hh h= =
k
s
ft
b
w
t
h
c
h2
p
h2
PNA
NA
fc
b
Classification of Sections for Local Buckling 3 - 11

Steel Frame Design AISC 360-05
For unstiffened elements supported along only one edge parallel to the direc-
tion of compression force, the width shall be taken as follows:
(a) For flanges of I-shaped members and tees, the width b is one-half the full-
flange width, bf.
(b) For legs of angles and flanges of channels and zees, the width b is the full
nominal dimension.
(c) For plates, the width b is the distance from the free edge to the first row of
fasteners or line of welds.
(d) For stems of tees, d is taken as the full nominal depth of the section.
Refer to Table 3-1 (AISC Table B4.1) for the graphic representation of unstiff-
ened element dimensions.
For stiffness elements supported along two edges parallel to the direction of the
compression force, the width shall be taken as follows:
(a) For webs of rolled or formed sections, h is the clear distance between
flanges less the fillet or corner radius at each flange; hc is twice the dis-
tance from the centroid to the inside face of the compression flange less the
fillet or corner radius.
(b) For webs of built-up sections, h is the distance between adjacent lines of
fasteners or the clear distance between flanges when welds are used, and hc
is twice the distance from the centorid to the nearest line of fasteners at the
compression flange or the inside face of the compression flange when
welds are used; hp is twice the distance from the plastic neutral axis to the
nearest line of fasteners at the compression flange or the inside face of the
compression flange when welds are used.
(c) For flange or diaphragm plates in built-up sections, the width b is the dis-
tance between adjacent lines of fasteners or lines of welds.
3 - 12 Classification of Sections for Local Buckling
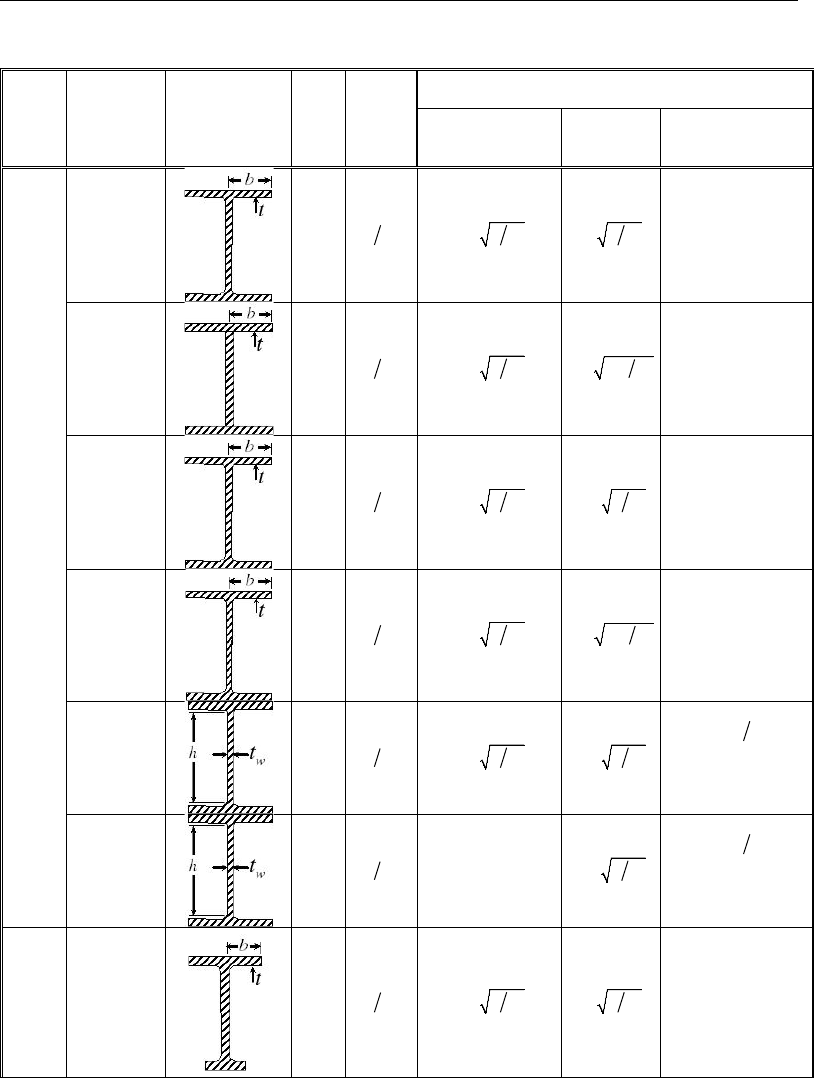
Chapter 3 - Design using ANSI/AISC 360-05
Table 3-1 Limiting Width-Thickness Ratios of Compression Elements for Classification Sections
Section
Type
Description
of Element
Example
AISC
Case
No.
Width-
Thickness
Ratio,
( )
λ
Limiting Width-Thickness Ratios for Compression
Element
Compact
( )
p
λ
NonCompact
( )
r
λ
Slender
( )
s
λ
Doubly Symmetric I-Shape
Flexural
compression
of flanges of
rolled
I-Shapes
1
2
ff
bt
0.38
y
EF
1.0 y
EF
No Limit
Flexural
compression
in flanges of
built-up
I-Shapes
2
2
ff
bt
0.38
y
EF
0.95
cL
kE F
No Limit
Axial only
compression
in flanges of
rolled
I-Shapes
3
2
ff
bt
0.38
y
EF
0.56 y
EF
No Limit
Axial only
compression
in flanges of
built-up
I-Shapes
4
2
ff
bt
0.38
y
EF
0.64
cL
kE F
No Limit
Flexure in web
9
w
ht
3.76
y
EF
5.70 y
EF
{ }
min 0.42 ,260
y
EF
(beams)
No limit for columns
and braces
Web in axial
only
compression
10
w
ht
NA
1.49 y
EF
{ }
min 0.42 ,260
y
EF
(beams)
No limit for columns
and braces
Singly Symmetric
I-Shapes
Flexural
Compression
of flanges of
rolled
I-Shapes
1
2
ff
bt
0.38
y
EF
1.0
y
EF
No Limit
Classification of Sections for Local Buckling 3 - 13
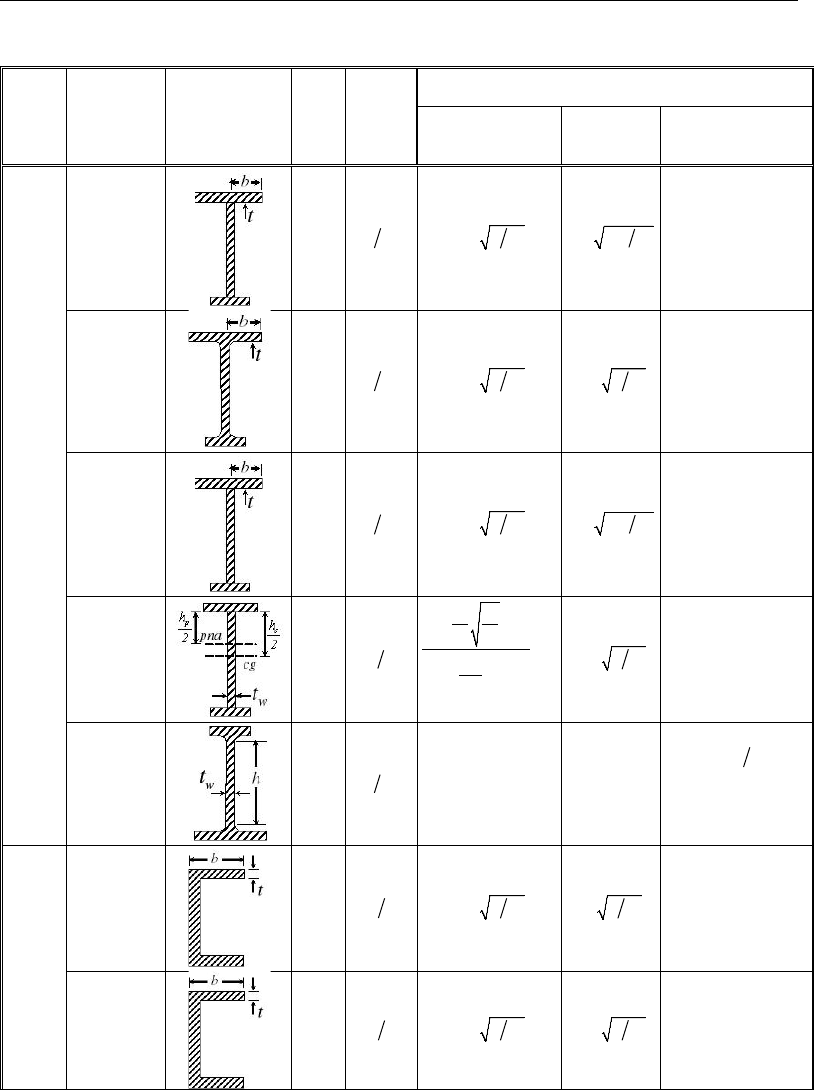
Steel Frame Design AISC 360-05
Table 3-1 Limiting Width-Thickness Ratios of Compression Elements for Classification Sections
Section
Type
Description
of Element
Example
AISC
Case
No.
Width-
Thickness
Ratio,
( )
λ
Limiting Width-Thickness Ratios for Compression
Element
Compact
( )
p
λ
NonCompact
( )
r
λ
Slender
( )
s
λ
Singly Symmetric I-Shapes (continued)
Flexural
Compression
in flanges of
built-up
I-Shapes
2
2
ff
bt
0.38
y
EF
0.95
cL
kE F
No Limit
Axial only
compression
in flanges of
rolled
I-Shapes
3
2
ff
bt
0.38
y
EF
.0 56 y
EF
No Limit
Axial only
compression
in flanges of
built-up
I-Shapes
4
2
ff
bt
0.38
y
EF
0.64
cL
kE F
No Limit
Flexure in
Web
11
cw
ht
2
0.54 0.09
c
p
p
y
r
hE
hF
M
M
≤λ
−
5.70
y
EF
No Limit
Flexure in
Web
w
ht
NA NA
{ }
min 0.42 ,260
y
EF
(beams)
No limit for columns
and braces
Channel
Flexural
compression
in flanges
1
ff
bt
0.38
y
EF
1.0 y
EF
No Limit
Axial only
compression
in flanges
3
ff
bt
0.38
y
EF
0.56 y
EF
No Limit
3 - 14 Classification of Sections for Local Buckling
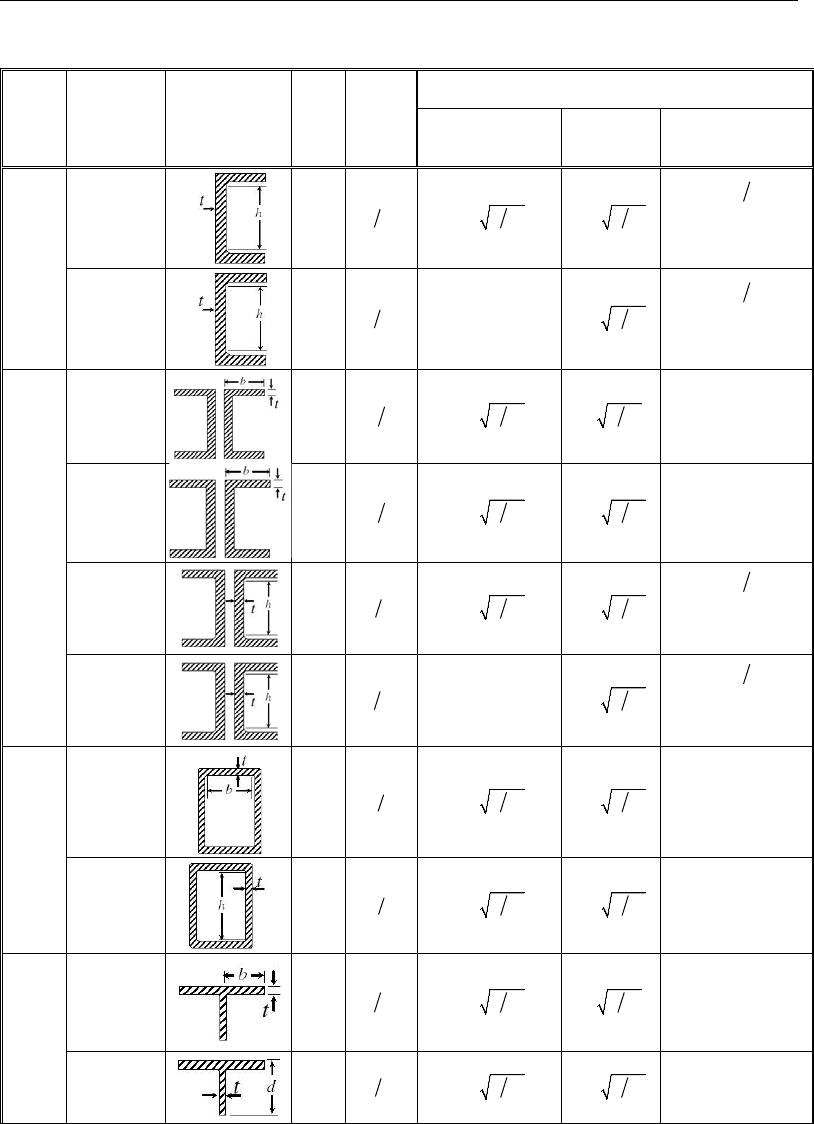
Chapter 3 - Design using ANSI/AISC 360-05
Table 3-1 Limiting Width-Thickness Ratios of Compression Elements for Classification Sections
Section
Type
Description
of Element
Example
AISC
Case
No.
Width-
Thickness
Ratio,
( )
λ
Limiting Width-Thickness Ratios for Compression
Element
Compact
( )
p
λ
NonCompact
( )
r
λ
Slender
( )
s
λ
Channel (continued)
Flexure in web
9
w
ht
3.76
y
EF
5.70 y
EF
{ }
min 0.42 ,260
y
EF
(beams)
No limit for columns
and braces
Web in axial
only
compression
10
w
ht
NA
1.49
y
EF
{ }
min 0.42 ,260
y
EF
(beams)
No limit for columns
and braces
Double Channel
Flexural
compression
in flanges
1
ff
bt
0.38
y
EF
1.0 y
EF
No Limit
Axial only
compression
in flanges
3
ff
bt
0.38
y
EF
0.56 y
EF
No Limit
Flexure in web
9
w
ht
3.76
y
EF
5.70
y
EF
{ }
min 0.42 ,260
y
EF
(beams)
No limit for columns
and braces
Web in axial
only
compression
10
w
ht
NA
1.49
y
EF
{ }
min 0.42 ,260
y
EF
(beams)
No limit for columns
and braces
Box
Flexural or
axial
compression
of flanges
under major
axis bending
12
bt
1.12 y
EF
1.40
y
EF
No Limit
Flexure in web
13
ht
2.42
y
EF
5.70
y
EF
No Limit
T-Shape
Flexural or
axial
compression
in flanges
7
2
ff
bt
0.38
y
EF
1.0
y
EF
No Limit
Compression
in stems
8
w
dt
0.30
y
EF
0.75 y
EF
No Limit
Classification of Sections for Local Buckling 3 - 15
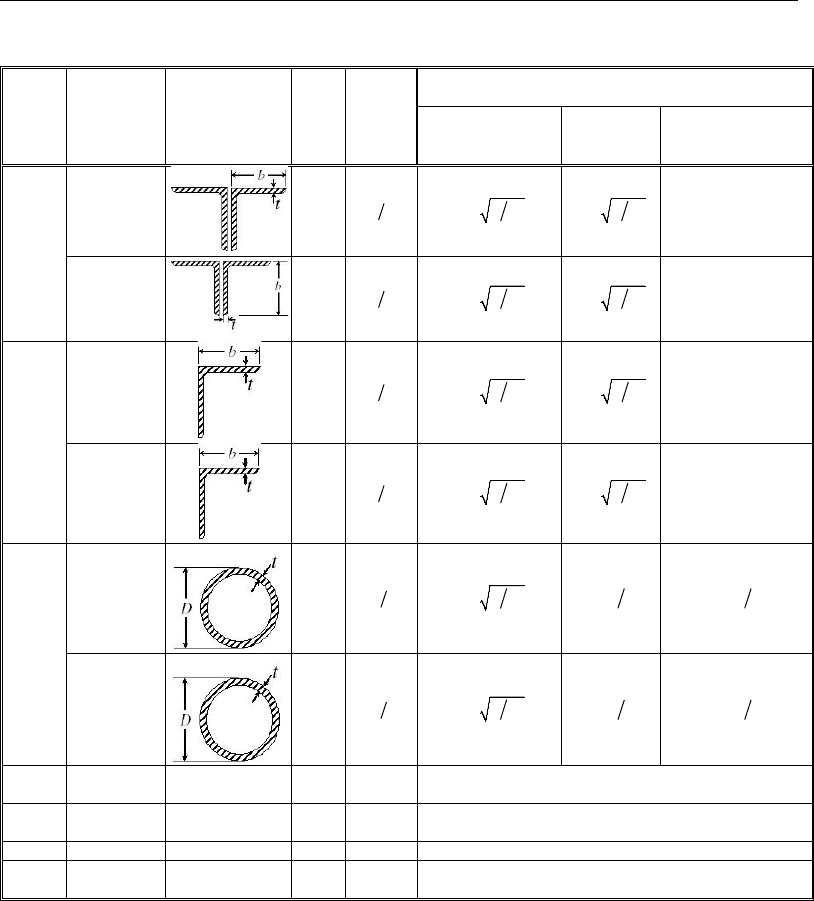
Steel Frame Design AISC 360-05
Table 3-1 Limiting Width-Thickness Ratios of Compression Elements for Classification Sections
Section
Type
Description
of Element
Example
AISC
Case
No.
Width-
Thickness
Ratio,
( )
λ
Limiting Width-Thickness Ratios for Compression
Element
Compact
( )
p
λ
NonCompact
( )
r
λ
Slender
( )
s
λ
Double Angle
Any type of
compression
in leg
6
bt
0.30
y
EF
0.45
y
EF
No Limit
Any type of
compression
in leg
6
bt
0.30
y
EF
0.45
y
EF
No Limit
Angle
Flexural
compression
in any leg
7
bt
0.54
y
EF
0.91
y
EF
No Limit
Axial only
compression
in any leg
6
bt
0.30
y
EF
0.45
y
EF
No Limit
Pipe
Flexural
compression
15
Dt
0.07
y
EF
0.31 y
EF
0.45 y
EF
Axial only
compression
15
Dt
0.07
y
EF
0.11 y
EF
0.45 y
EF
Round
Bar
――― ――― ―― ――― Assumed Noncompact
Rectan-
gular
――― ――― ―― ――― Assumed Noncompact
General
―――
―――
――
―――
Assumed Noncompact
SD
Section
――― ――― ―― ――― Assumed Noncompact
(d) For flanges of rectangular hollow structural sections (HSS), the width b is
the clear distance between webs less the inside corner radius on each side.
For webs of rectangular HSS, h is the clear distance between the flanges
less the inside corner radius on each side. If the corner radius is not known,
b and h shall be taken as the corresponding outside dimension minus three
times the thickness. The thickness, t, shall be taken as the design wall
thickness, in accordance with AISC Section B3.12.
3 - 16 Classification of Sections for Local Buckling
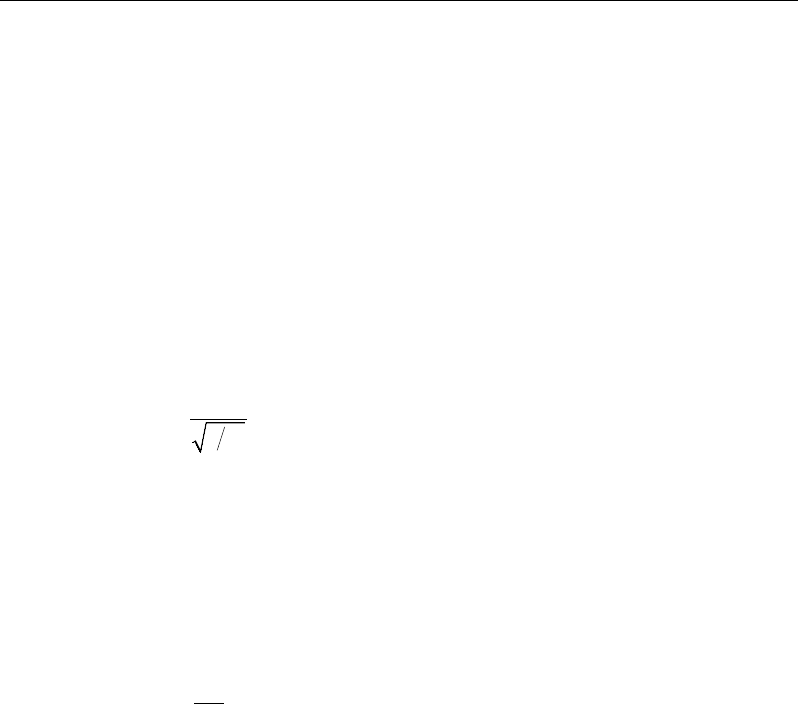
Chapter 3 - Design using ANSI/AISC 360-05
Refer to Table 3-5 (AISC Table B4.1) for the graphic representation of stiff-
ened element dimensions.
The design wall thickness, t, for hollow structural sections, such as Box and
Pipe sections, is modified for the welding process (AISC B3.12). If the welding
process is ERW (Electric-Resistance Welding), the thickness is reduced by a
factor of 0.93. However, if the welding process is SAW (Submerged Arc
Welded), the thickness is not reduced. The Overwrites can be used to choose if
the thickness of HSS sections should be reduced for ERW on a member-by-
member basis. The Overwrites can also be used to change the reduction factor.
The variable kc can be expressed as follows:
4,
c
w
kht
=
(AISC Table B4.1 Note a)
0.35 ≤ kc ≤ 0.76. (AISC Table B4.1 Note a)
For Doubly Symmetric I-Shapes, Channels, and Double Channels, FL can be
expressed as follows:
FL = 0.7Fy, (AISC Table B4.1 Note b)
and for Singly Symmetric I-Shape sections, FL can be expressed as follows:
,
xt
Ly
xc
S
FF
S
=
where (AISC Table B4.1 Note b, F4-6)
0.5Fy ≤ FL ≤ 0.7Fy. (AISC Table B4.1 Note b, F4-6)
Seismically Compact sections are compact sections that satisfy a more strin-
gent width-thickness ratio limit,
λ
ps. This limit
λ
ps is presented in Table 4-1 in
Chapter 4, which is dedicated to the seismic code.
In classifying web slenderness of I-Shapes, Box, Channel, Double Channel,
and all other sections, it is assumed that there are no intermediate stiffeners.
Double angles and channels are conservatively assumed to be separated.
Stress check of Too Slender sections is beyond the scope of this program.
Classification of Sections for Local Buckling 3 - 17

Steel Frame Design AISC 360-05
3.4 Calculation of Factored Forces and Moments
The factored member loads that are calculated for each load combination are
Pr, Mr33, Mr22, Vr2, Vr3 and Tr corresponding to factored values of the axial load,
the major and minor moments and shears, and torsion, respectively. These fac-
tored loads are calculated at each of the previously defined stations.
The factored forces can be amplified to consider second order effects, depend-
ing on the choice of analysis method chosen in the Preferences. If the analysis
method is chosen to be General Second Order Elastic Analysis or any of the
Direct Analysis methods with General Second Order Analysis, it is assumed
that the analysis considers the influence of second-order effects (P-∆ and P-δ
effects); hence the analysis results are used without amplification (AISC C2.1,
C2.2a, App 7.3). Second-order effects due to overall sway of the structure can
usually be accounted for, conservatively, by considering the second-order ef-
fects on the structure under one set of loads (usually the most severe gravity
load case), and performing all other analyses as linear using the stiffness matrix
developed for this one set of P-delta loads (see also White and Hajjar 1991).
For a more accurate analysis, it is always possible to define each loading com-
bination as a nonlinear load case that considers only geometric nonlinearities.
For both approaches, when P-δ effects are expected to be important, use more
than one element per line object (accomplished using the automatic frame sub-
divide option; refer to the program Help for more information about automatic
frame subdivide).
If the analysis method is chosen to be Second Order Analysis by Amplified
First Order Analysis or any of the Direct Analysis Methods with Amplified
First Order Analysis (AISC C2.1b, C2.2, App 7.3), it is assumed that the analy-
sis does not consider the influence of second order effects (P-∆ and P-δ).
Hence the analysis results are amplified using B1 and B2 factors using the fol-
lowing approximate second-order analysis for calculating the required flexural
and axial strengths in members of lateral load resisting systems. The required
second-order flexural strength, Mr , and axial strength, Pr are determined as fol-
lows:
Mr = B1Mnt + B2Mlt (AISC C2-1a)
Pr = Pnt + B2Plt (AISC C2-1b)
where,
3 - 18 Calculation of Factored Forces and Moments

Chapter 3 - Design using ANSI/AISC 360-05
1
1
1,
1
m
r
e
C
BP
P
= ≥
−α
and (AISC C2-2)
2
2
11,
1nt
e
BP
P
= ≥
αΣ
−Σ
(AISC C2-3)
where,
1.0 for LRFD,
= 1.6 for ASD,
α
Mr = required second-order flexural strength using LFRD and ASD
load combinations, kip-in (N-mm)
Mnt = first-order moment using LFRD and ASD load combinations,
assuming there is no lateral translation of the frame, kip-in. (N-
mm)
Mlt = first-order moment using LRFD or ASD load combinations
caused by lateral translation of the frame only, kip-in (N-mm)
Pr = required second-order axial strength using LRFD or ASD load
combinations, kip (N)
Pnt = first-order axial force using LRFD or ASD load combinations,
assuming there is no lateral translation of the frame, kips (N)
ΣPnt = total vertical load supported by the story using LRFD or ASD
load combinations, including gravity column loads, kips (N)
Plt = first-order axial force using LRFD or ASD load combinations
caused by lateral translation of the frame only, kips (N)
Cm = a coefficient assuming no lateral translation of the frame,
whose value is taken as follows:
(i) For beam-columns not subject to transverse loading be-
tween supports in the plane of bending,
Calculation of Factored Forces and Moments 3 - 19

Steel Frame Design AISC 360-05
( )
0.6 0.4 ,
m ab
C MM= −
(AISC C2-4)
where, Ma and Mb, calculated from a first-order analysis,
are the smaller and larger moments, respectively, at the
ends of that portion of the member unbraced in the plane
of bending under consideration.
ab
MM
is positive when
the member is bent in reverse curvature, negative when
bent in single curvature.
(ii) For beam-columns subjected to transverse loading between
supports, the value of Cm is conservatively taken as 1.0 for
all cases.
When Mb is zero, Cm is taken as 1.0, the program defaults
Cm to 1.0, if the unbraced length is more than actual mem-
ber length. The user can overwrite the value of Cm for any
member. Cm can be expressed as follows:
1.00, if length is more than actual length,
1.00, if tension member,
1.00, if both ends unrestrained,
0.6 0.4 , if no transverse loading, and
1.00, if transverse loading is present.
m
a
b
C
M
M
=
−
(AISC C2-1b)
Pel = elastic critical buckling resistance of the member in the plane
of bending, calculated based on the assumption of zero side-
sway, kips (N)
( )
2
12
1
e
EI
PKL
π
=
(AISC C2-5)
If any of the direct analysis methods are used, the reduced val-
ue of EI is used (AISC App. 7.3(1)).
3 - 20 Calculation of Factored Forces and Moments

Chapter 3 - Design using ANSI/AISC 360-05
ΣPe2 = elastic critical buckling resistance for the story determined by
sidesway buckling analysis, kips (N)
For moment frames, where sidesway buckling effective length
factors K2 are determined for the columns, it is the elastic story
sidesway buckling resistance and calculated as
( )
2
22
2
,
e
EI
PKL
π
Σ=Σ
(AISC C2-6a)
where,
E = modulus of elasticity of steel = 29,000 ksi
(200,000 MPa)
If any of the direct analysis methods are used,
the reduced value of EI is used (AISC App.
7.3(1)).
I = moment of inertia in the plane of bending, in.4
(mm4)
L = story height, in. (mm)
K1 = effective length factor in the plane of bending,
calculated based on the assumption of no lateral
translation. It is taken to be equal to 1.0, conser-
vatively. The Overwrites can be used to change
the value of K1 for the major and minor direc-
tions.
K2 = effective length factor in the plane of bending,
calculated based on a sidesway buckling analy-
sis. The Overwrites can be used to change the
value of K2 for the major and minor directions.
In the expression of B1, the required axial force Pr is used based on its first or-
der value. The magnification factor B1 must be a positive number. Therefore,
αPr must be less than Pe1. If αPr is found to be greater than or equal to Pe1 a
failure condition is declared.
Calculation of Factored Forces and Moments 3 - 21

Steel Frame Design AISC 360-05
If the program assumptions are not satisfactory for a particular structural model
or member, the user has the choice to explicitly specify the values of B1 for any
member.
Currently, the program does not calculate the B2 factor. The user is required to
overwrite the values of B2 for the members.
3.5 Calculation of Nominal Strengths
The nominal strengths in compression, tension, bending, and shear are comput-
ed for Compact, Noncompact, and Slender members in accordance with the
following sections. The nominal flexural strengths for all shapes of sections
are calculated based on their principal axes of bending. For the Rectangular, I-
Shape, Box, Channel, Double Channel, Circular, Pipe, T-Shape, and Double
Angle sections, the principal axes coincide with their geometric axes. For the
Single Angle sections, the principal axes are determined and all computations
except shear are based on that.
For all sections, the nominal shear strengths are calculated for directions
aligned with the geometric axes, which typically coincide with the principal
axes. Again, the exception is the Single Angle section.
If the user specifies nonzero nominal capacities for one or more of the
members on the Steel Frame Overwrites form, those values will override
the calculated values for those members. The specified capacities should
be based on the principal axes of bending for flexure, and the geometric
axes for shear.
3.5.1 Nominal Tensile Strength
This section applies to the members subject to axial tension.
Although there is no maximum slenderness limit for members designed to re-
sist tension forces, the slenderness ratio preferably should not exceed 300
(AISC D1). A warning message to that effect is printed for such slender ele-
ments under tension.
The design tensile strength, φtPn, and the allowable tensile strength,
,
nt
PΩ
of
tension members is taken as the lower value obtained according to the limit
3 - 22 Calculation of Nominal Strengths

Chapter 3 - Design using ANSI/AISC 360-05
states of yielding of gross section under tension and tensile rupture in the net
section.
3.5.1.1 Tensile Yielding in the Gross Section
Pn = Fy Ag (AISC D2-1)
φ1 = 0.90 (LRFD) (AISC D2)
Ωt = 1.67 (ASD) (AISC D2)
3.5.1.2 Tensile Rupture in the Net Section
Pn = Fu Ae (AISC D2-2)
φ1 = 0.75 (LRFD) (AISC D2)
Ωt = 2.00 (ASD) (AISC D2)
The effective net area, Ae, is assumed to be equal to the gross cross-sectional
area, Ag, by default. For members that are connected with welds or members
with holes, the
eg
AA
ratio must be modified using the steel frame design
Overwrites to account for the effective area.
3.5.2 Nominal Compressive Strength
The design compressive strength, φcPn, and the allowable compressive
strength,
,
nc
PΩ
of members subject to axial compression are addressed in this
section. The resistance and safety factors used in calculation of design and al-
lowable compressive strengths are:
φc = 0.90 (LRFD) (AISC E1)
Ωc = 1.67 (ASD) (AISC E1)
In the determination, the effective length factor K2 is used as the K-factor. If
the chosen analysis method in the Preferences is the General Second Order
Elastic Analysis, the First Order Analysis using Amplified First Order Analy-
sis, or the Limited First Order Analysis, the calculated K2 factors are used. If
the user overwrites the K2 factors, the overwritten values are used. If the cho-
sen analysis method is one of any Direct Analysis Methods, the effective
Calculation of Nominal Strengths 3 - 23

Steel Frame Design AISC 360-05
length factor, K, for calculation of Pn is taken as one (AISC App 7.1). The
overwritten value of K2 will have no effect for the latter case.
The nominal axial compressive strength, Pn , depends on the slenderness ratio,
,Kl r
where
33 33 22 22
33 22
max , .
Kl Kl
Kl
r rr
=
For all sections except Single Angles, the principal radii of gyration r22 and r33
are used. For Single Angles, the minimum (principal) radius of gyration, rz , is
used instead of r22 and r33 , conservatively, in computing
.Kl r
K33 and K22 are
two values of K2 for the major and minor axes of bending.
Although there is no maximum slenderness limit for members designed to re-
sist compression forces, the slenderness ratio preferably should not exceed 200
(AISC E2). A warning message to that effect is given for such slender elements
under compression.
The members with any slender element and without any slender elements are
handled separately.
The limit states of torsional and flexural-torsional buckling are ignored for
closed sections (Box and Pipe sections), solid sections, general sections, and
sections created using Section Designer.
3.5.2.1 Members without Slender Elements
The nominal compressive strength of members with compact and noncompact
sections, Pn , is the minimum value obtained according to the limit states of
flexural buckling, torsional and flexural-torsional buckling.
3.5.2.1.1 Flexural Buckling
For compression members with compact and noncompact sections, the nominal
compressive strength, Pn , based on the limit state of flexural buckling, is given
by
Pn = Fcr Ag. (AISC E3-1)
The flexural buckling stress, Fcr , is determined as follows:
3 - 24 Calculation of Nominal Strengths
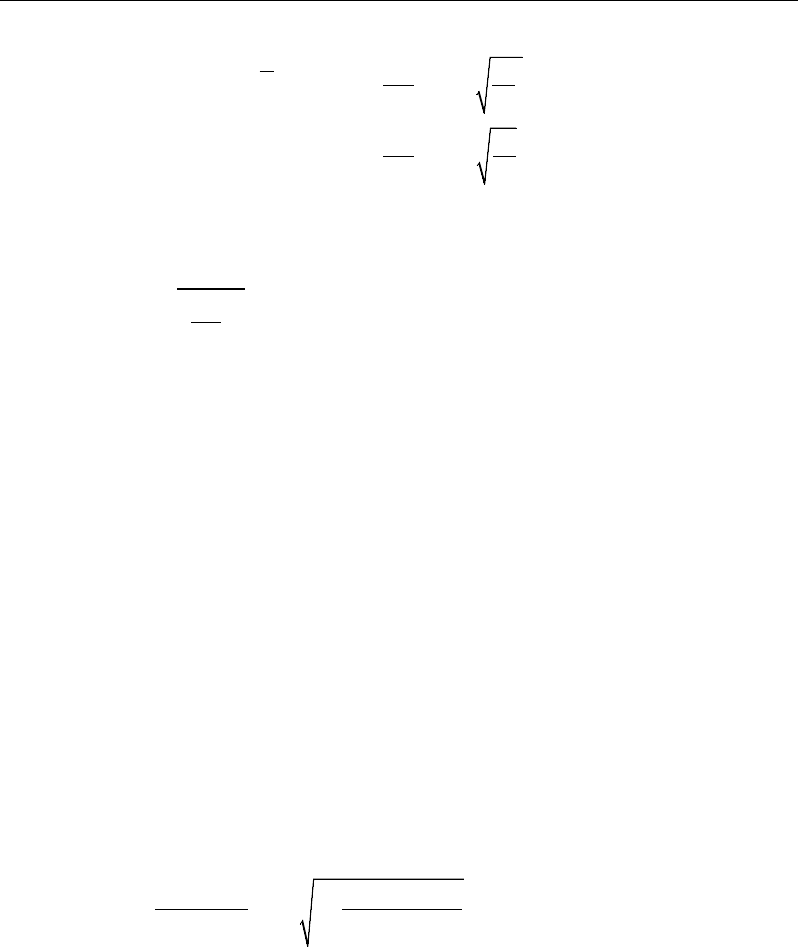
Chapter 3 - Design using ANSI/AISC 360-05
≤
=
>
0.658 , if 4.71 ,
0.877 , if 4.71 ,
y
e
F
Fyy
cr
ey
KL E
FrF
FKL E
FrF
(AISC E3-2, E3-3)
where Fe is the elastic critical buckling stress given by
2
2.
eE
FKL
r
π
=
(AISC E3-4)
3.5.2.1.2 Torsional and Flexural-Torsional Buckling
For compression members with compact and noncompact sections, the nominal
compressive strength, Pn , based on the limit state of torsional and flexural-
torsional buckling is given by
Pn = Fcr Ag (AISC E4-1)
where Ag is the gross area of the member. The flexural buckling stress, Fcτ , is
determined as follows.
3.5.2.1.2.1 Box, Pipe, Circular, Rectangular, General and Section Design-
er Sections
The limit states of torsional and flexural-torsional buckling are ignored for
members with closed sections, such as Box and Pipe sections, solid sections
(Circular and Rectangular), General sections and sections created using the
Section Designer.
3.5.2.1.2.2 Double Angle and T-Shapes
( )
22 22
2
22
4
11 ,
2
cr crz cr crz
cr
cr crz
F F F FH
FHFF
+
= −−
+
(AISC E4-2)
where,
Calculation of Nominal Strengths 3 - 25
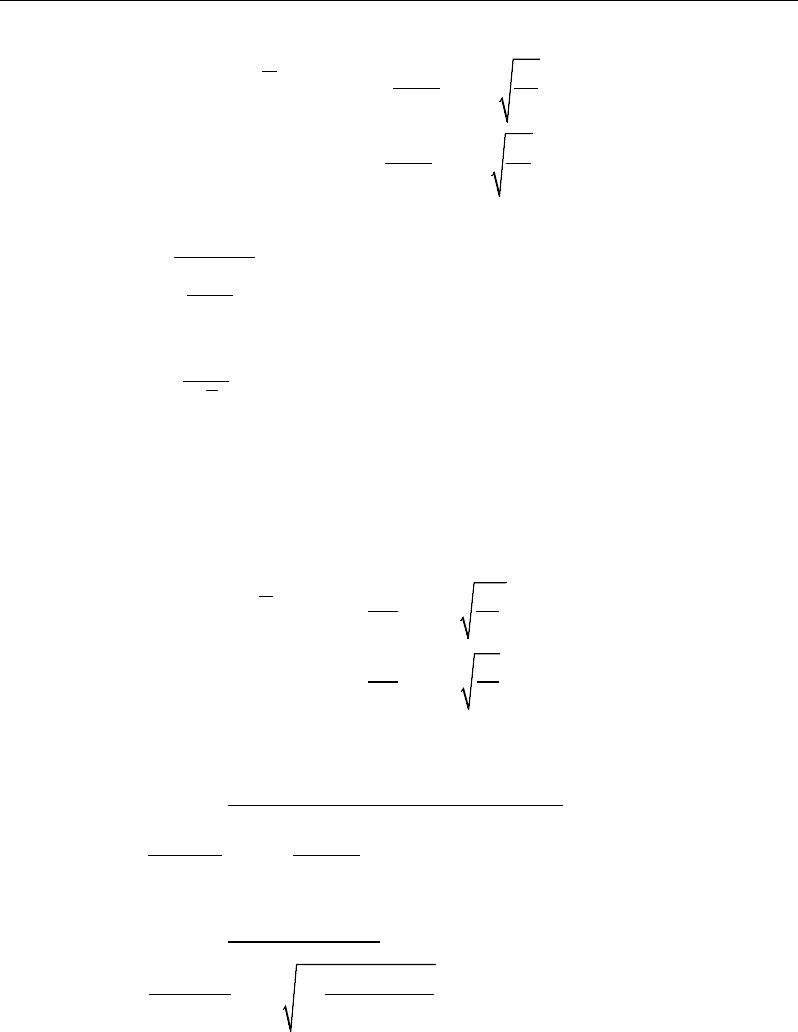
Steel Frame Design AISC 360-05
22
22
22
22
22
(0.658 ) , if 4.71 ,
0.877 , if 4.71 ,
y
e
F
Fy
y
cr
e
y
KL E
FrF
FKL E
FrF
≤
=
>
(AISC E3-2, E3-3)
2
2
22
22
,
e
E
FKL
r
π
=
and (AISC E3-4)
2
0
.
crz
g
GJ
FAr
=
(AISC E4-3)
3.5.2.1.2.3 I-Shape, Double Channel, Channel, Single Angle Sections
For I-Shape, Double Channel, Channel, and Single Angle sections, Fcτ is calcu-
lated using the torsional or flexural-torsional elastic buckling stress, Fe , as fol-
lows:
≤
=
>
0.658 , if 4.71 ,
0.877 , if 4.71 .
y
e
F
Fyy
cr
ey
KL E
FrF
FKL E
FrF
(AISC E3-2, E3-3, E-4b)
where Fe is calculated from the following equations:
3.5.2.1.2.3.1 I-Shapes and Double Channel Sections
()
2
222 33
1
w
e
zz
EC
F GJ II
KL
π
= +
+
(AISC E4-4)
3.5.2.1.2.3.2 Channel Sections
( )
33 33
2
33
4
11
2
e ez e ez
e
e ez
F F F FH
FHFF
+
= −−
+
(AISC E4-5)
3 - 26 Calculation of Nominal Strengths
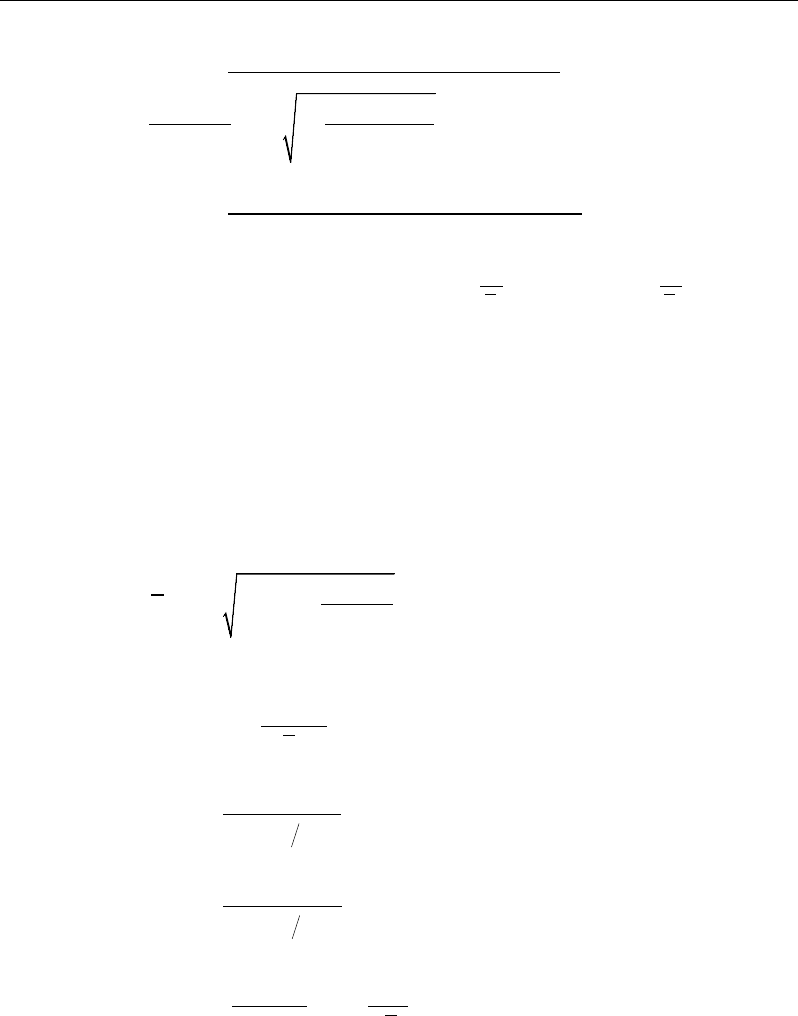
Chapter 3 - Design using ANSI/AISC 360-05
3.5.2.1.2.3.3 Single Angle Sections with Equal Legs
( )
33 33
2
33
4
11
2
e ez e ez
e
e ez
F F F FH
FHFF
+
= −−
+
(AISC E4-5)
3.5.2.1.2.3.4 Single Angle Sections with Unequal Legs
Fe is the lowest root of the cubic equation.
( )( )
( )
( ) ( )
2
22
33 22 22 33
00
0
oo
ee ee eez eee eee
xy
FF FF FF FFF FFF
rr
− − −−− −− =
(AISC E4-6)
In the preceding equations,
Cw is the warping constant, in6 (mm6)
x0, y0 are the coordinates of the shear center with respect to the cen-
troid, x0 = 0 for Double Angle and T-Shaped members (y-axis
symmetry)
0
r
=
2222 33
oo
g
II
xy A
+
++ =
polar radius of gyration about the shear
center (AISC E4-7)
H =
22
2
1
oo
xy
r
+
−
(AISC E4-8)
33
e
F
=
( )
2
2
33 33 33
E
KL r
π
(AISC E4-9)
22e
F
=
( )
2
2
22 22 22
E
KL r
π
(AISC E4-10)
ez
F
=
( )
2
22
0
1
w
zz
EC GJ Ar
KL
π
+
(AISC E 4-11)
K22, K33 are effective length factors K2 in minor and major directions
Calculation of Nominal Strengths 3 - 27

Steel Frame Design AISC 360-05
Kz is the effective length factor for torsional buckling, and it is
taken equal to KLTB in this program; it can be overwritten
L22, L33 are effective lengths in the minor and major directions
r22, r33 are the radii of gyration about the principal axes
Lz is the effective length for torsional buckling and it is taken
equal to L22 by default, but it can be overwritten.
For angle sections, the principal moment of inertia and radii of gyration
are used for computing Fe. Also, the maximum value of KL, i.e.,
max(K22L22, K33L33), is used in place of K22L22 or K33 L33 in calculating
Fe22 and Fe33 in this case. The principal maximum value rmax is used for
calculating Fe33 , and the principal minimum value rmin is used in calculat-
ing Fe22.
3.5.2.2 Members with Slender Elements
The nominal compressive strength of members with slender sections, Pn , is the
minimum value obtained according to the limit states of flexural, torsional and
flexural-torsional buckling.
3.5.2.2.1 Flexural Buckling
For compression members with slender sections, the nominal compressive
strength, Pn , based on the limit state of flexural buckling, is given by
Pn = Fcr Ag. (AISC E7-1)
The flexural buckling stress, Fcr , is determined as follows:
≥
=
<
0.658 , if 0.44 , and
0.877 , if 0.44 ,
y
e
QF
Fye y
cr
e ey
Q F F QF
F
F F QF
(AISC E7-2, E7-3)
where Fe is the elastic critical buckling stress for flexural buckling limit state.
3 - 28 Calculation of Nominal Strengths

Chapter 3 - Design using ANSI/AISC 360-05
2
2
.
e
E
FKL
r
π
=
(AISC E3-4)
3.5.2.2.2 Torsional and Flexural-Torsional Buckling
For compression members with slender sections, the nominal compressive
strength, Pn , based on Torsional and Flexural-Torsional limit state is given by:
Pn = Fcr Ag , where (AISC E7-1)
Fcr is determined as follows:
≥
=
<
0.658 if 0.44 , and
0.877 if 0.44 ,
y
e
QF
Fyy y
cr
e yy
Q F F QF
F
F FF
(AISC E7-2, E7-3)
where, Fe is the elastic critical buckling stress for torsional and flexural-
torsional limit states, which are given for different shapes as follows.
3.5.2.2.2.1 Box, Pipe, Circular, Rectangular, General and Section Design-
er Sections
The limit states of torsional and flexural-torsional buckling are ignored for
members with closed (Box and Pipe), solid (Circular and Rectangular), General
sections and sections created using the Section Designer.
3.5.2.2.2.2 I-Shape and Double Channel Sections
( )
2
222 33
22
1
w
e
EC
F GJ II
KL
π
= +
+
(AISC E7, E4-4)
3.5.2.2.2.3 Channel Sections
( )
33 33
2
33
4
11
2
e ez e ez
e
e ez
F F F FH
FHFF
+
= −−
+
(AISC E7, E4-5)
Calculation of Nominal Strengths 3 - 29
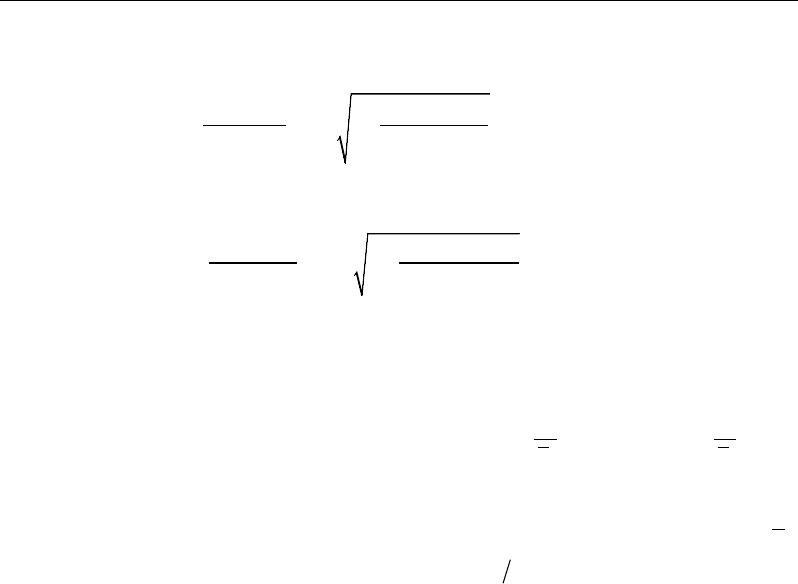
Steel Frame Design AISC 360-05
3.5.2.2.2.4 Double Angle Sections and T-Shapes
( )
22 22
2
33
4
11
2
e ez e ez
e
e ez
F F F FH
FHFF
+
= −−
+
(AISC E7, E4-5)
3.5.2.2.2.5 Single Angle Sections with Equal Legs
( )
33 33 2
33
4
11
2
e ez e ez
e
e ez
F F F FH
FHFF
+
= −−
+
(AISC E7, E4-5)
3.5.2.2.2.6 Single Angle Sections with Unequal Legs
Fe is the lowest root of the cubic equation.
()( )
( )
( ) ()
22
22
33 22 22 33 0
oo
ee ee eez eee eee
oo
xy
FF FF FF FFF FFF
rr
− − −−− −− =
(AISC E7, E4-6)
The variables used in the preceding expressions for Fe , such as Cw, x0, y0,
o
r
,
H, Fe33, Fe22, Fez, K22, K33, Kz, L22, L33, Lz,
,KL r
and so on, were explained in
the previous section.
3.5.2.2.3 Reduction Factor for Slenderness
The reduction factor for slender compression elements, Q, is computed as fol-
lows:
Q = QsQa , (AISC E7)
where Qs and Qa are reduction factors for slender unstiffened compression el-
ements (flanges of I-Shapes, T-Shapes, Double Angles, Channels, and Double
Channels; legs of angles; and stems of T-Shapes) and slender stiffened com-
pression elements (webs of I-Shapes, Channels, and Boxes; and Pipe sections),
respectively. For cross-sections composed of only unstiffened slender ele-
ments, Q = Qs (Qa = 1) and for cross-sections composed of only stiffened slen-
der elements, Q = Qa (Qs = 1).
The reduction factor, Qs , for slender unstiffened elements is defined as follows:
3.5.2.2.3.1 Flange of I-Shape, T-Shape, Channel and Double Channel
Sections
Rolled:
3 - 30 Calculation of Nominal Strengths
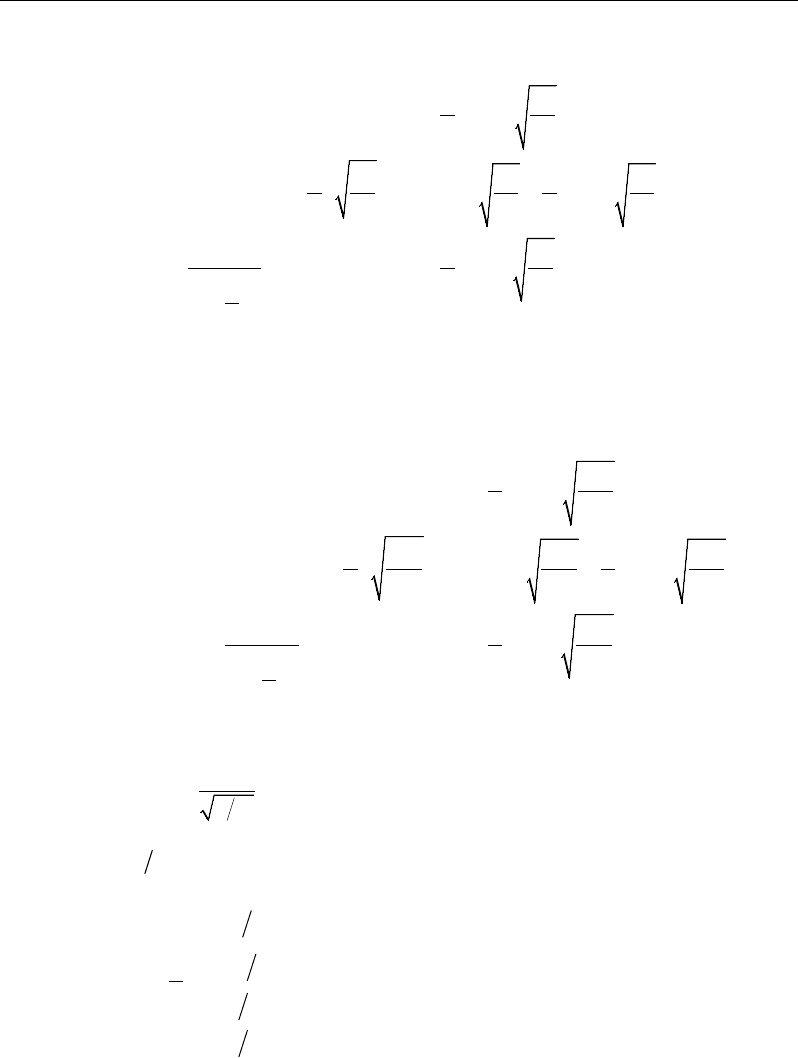
Chapter 3 - Design using ANSI/AISC 360-05
2
1.0, if 0.56 ,
1.415 0.74 , if 0.56 1.03 , and
0.69 , if 1.03 .
y
y
s
yy
y
y
bE
tF
F
b Eb E
QtE Ft F
E bE
tF
b
Ft
≤
= − <≤
>
(AISC E7-4, E7-5, E7-6)
Built-Up:
2
1.0, if 0.64 ,
1.415 0.65 , if 0.64 1.17 ,
0.90 , if 1.17 ,
c
y
ycc
s
c yy
cc
y
y
Ek
b
tF
FEk Ek
bb
Qt Ek F t F
Ek Ek
b
tF
b
Ft
≤
= − <≤
>
(AISC E7-7, E7-8, E7-9)
where
4
c
w
kht
=
and 0.35 ≤ kc ≤ 0.76, (AISC E7.1b)
and
bt
is defined as
( )
( )
2 for I Shapes,
2 for T Shapes,
for Channels,
for Double Channels.
tf
ff
ff
ff
bt
bt
b
tbt
bt
=
(AISC B4.1a, E7.1)
Calculation of Nominal Strengths 3 - 31
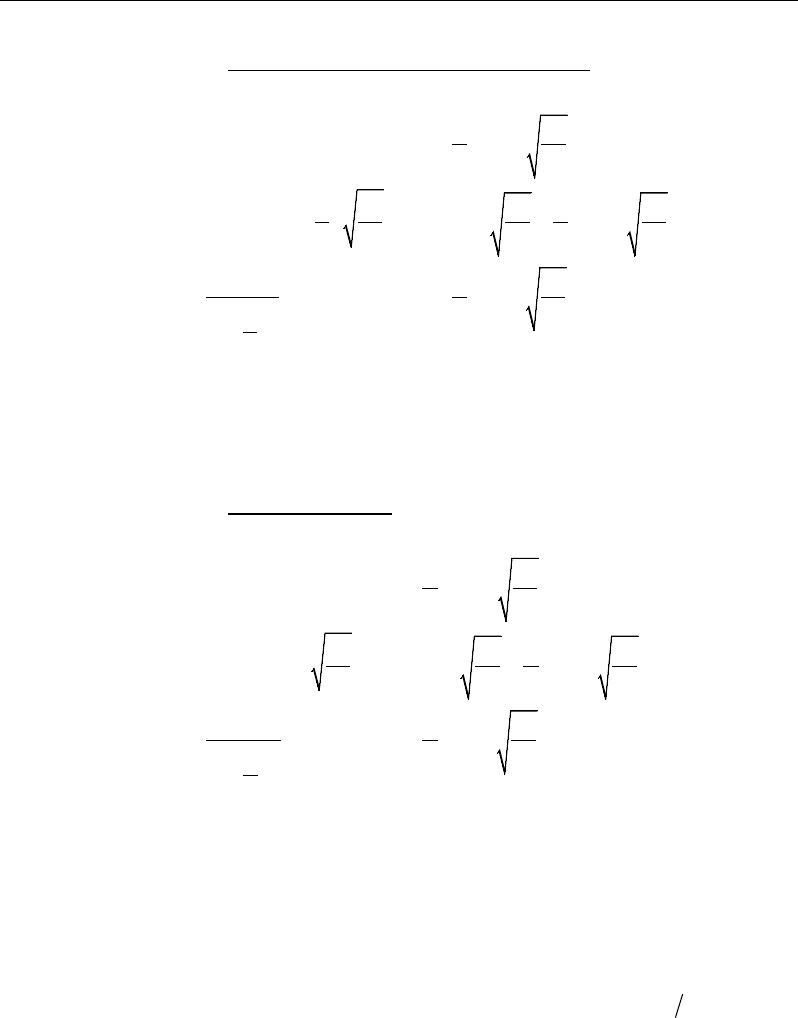
Steel Frame Design AISC 360-05
3.5.2.2.3.1.1 Legs of Single and Double Angle Sections
2
1.0, if 0.45 ,
1.34 0.76 , if 0.45 0.91 , and
0.53 , if 0.91 ,
y
y
s
yy
y
y
bE
tF
F
b Eb E
QtE Ft F
E bE
tF
b
Ft
≤
= − <≤
>
(AISC E7-10, E7-11, E7-12)
where b is the full width of the longest leg, and t is the corresponding thickness
(AISC B4.1b, E7.1c).
3.5.2.2.3.1.2 Stem of T-Sections
2
1.0, if 0.75 ,
1.908 1.22 , if 0.75 1.03 , and
0.69 , if 1.03 ,
y
y
s
yy
y
y
dE
tF
FEd E
QE Ft F
E dE
tF
d
Ft
≤
= − <≤
>
(AISC E7-13, E7-14, E7-15)
where d is the full nominal depth of the tee and t is the thickness of the element
(AISC B4.1d).
For T-Shapes, the Qs is calculated for the flange and web separately, and the
minimum of the two values is used as Qs. For Angle and Double Angle sec-
tions, Qs is calculated based on the leg that gives the largest
bt
and so the
smallest Qs .
The reduction factor, Qa, for slender stiffened elements is defined as follows:
3 - 32 Calculation of Nominal Strengths
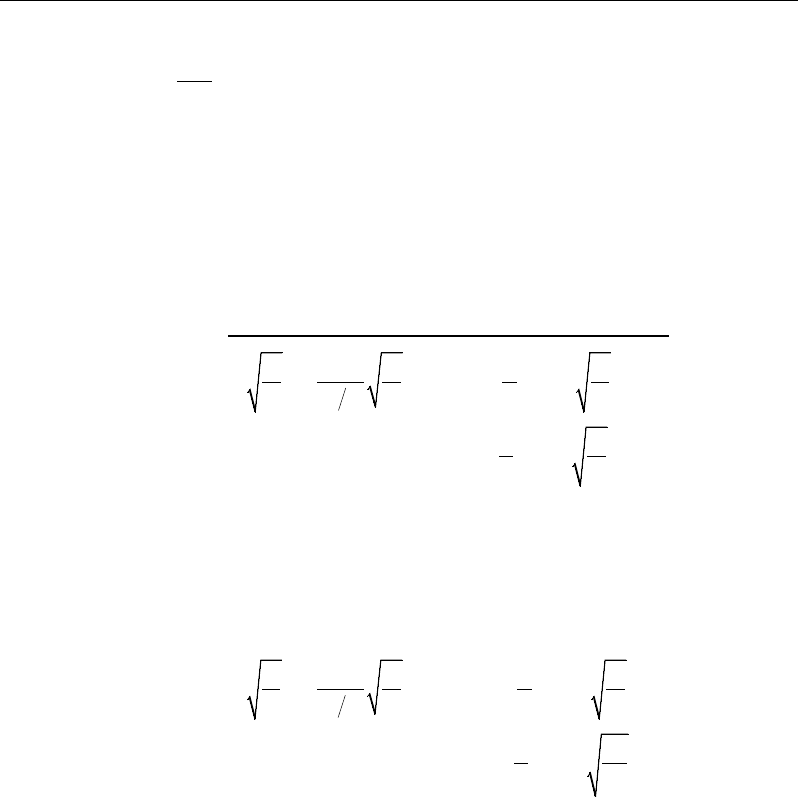
Chapter 3 - Design using ANSI/AISC 360-05
,
eff
a
A
QA
=
(AISC E7-16)
where A is the total cross sectional area of the member, and Aeff is the summa-
tion of the effective areas of the cross-section,
Aeff = A − Σ (b − be)t ,
based on the reduced effective width, be , which is determined as follows.
3.5.2.2.3.1.3 Webs of I -Shapes, Channels, and Double Channels
( )
0.34
1.92 1- , if 1.49 , and
, if 1.49 ,
e
E E bE
tb
f bt F t f
bbE
btf
≤≥
=
<
(AISC E7-17)
where f is taken as Fcr with Q = 1.0 (AISC 7.2a), and b is taken for rolled
shapes as the clear distance between flanges less the corner radius, and is taken
for welded shapes as the clear distance between flanges.
3.5.2.2.3.2 Webs and Flanges of Box Sections
()
0.38
1.92 1- , if 1.40 , and
, if 1.40 ,
e
y
E E bE
tb
f bt F t f
bbE
btF
≤≥
=
<
(AISC E7-18)
where f is conservatively taken as Fy (AISC 7.2b). The flange, b, is taken as
bf − 3tw, and for webs, b is taken as h − 3tf (AISC B4.1d). The design wall
thickness is modified for the welding process (AISC B3.12)
3.5.2.2.3.3 Pipe Sections
The reduction factor for slender stiffened elements is given directly by:
Calculation of Nominal Strengths 3 - 33
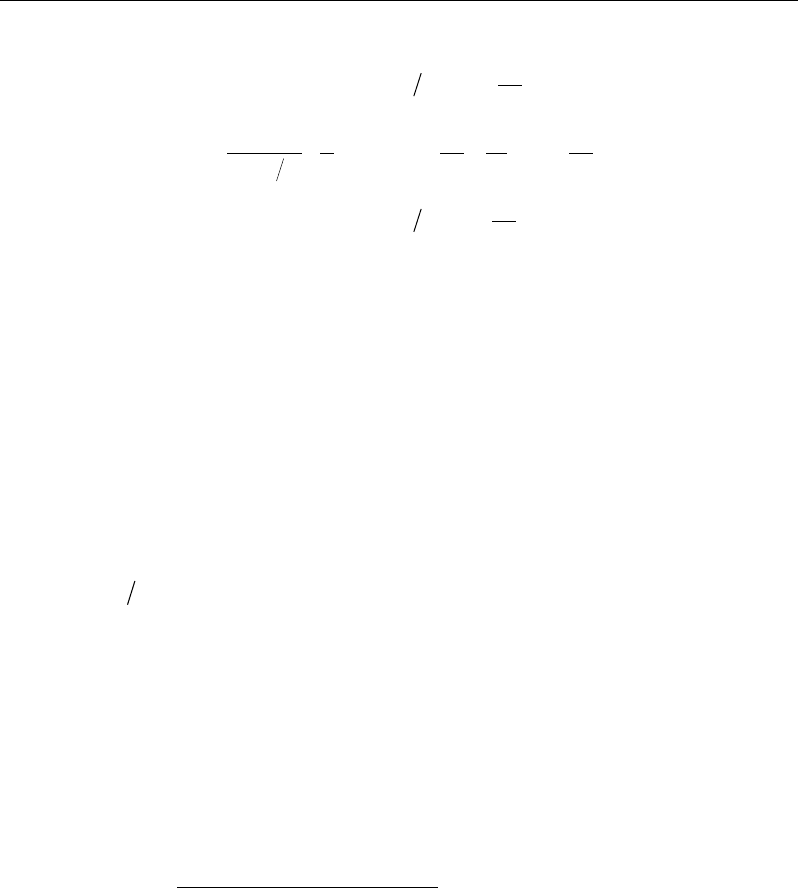
Steel Frame Design AISC 360-05
( )
y
1.0, if 0.11 ,
0.038E 2
+ , if 0.11 0.45 , and
F3
1.0, if 0.45 ,
y
a
yy
y
E
Dt F
ED E
QQ Dt F t F
E
Dt F
<
== <<
>
(AISC E7-19)
where D is the outside diameter and t is the wall thickness. The design wall
thickness is modified for the welding process (AISC B3.12). If
D/t
exceeds
0.45
/,
y
EF
the section is considered to be too slender and it is not designed.
3.5.3 Nominal Flexure Strength
This section applies to members subject to simple bending about one principal
axis. The members are assumed to be loaded in a plane parallel to a principal
axis that passes through the shear center, or restrained against twisting.
The design flexural strength, φbMn, and the allowable flexural strength,
nb
M,
Ω
are determined using the following resistance and safety factors:
φb = 0.90 (LRFD) (AISC F1(1))
Ωb = 1.67 (ASD) (AISC F1(1))
When determining the nominal flexural strength about the major principal axis
for any sections for the limit state of lateral-torsional buckling, it is common to
use the term Cb, the lateral-torsional buckling modification factor for non-
uniform moment diagram. Cb is calculated as follows:
max
max
12.5 3.0,
2.5 3 4 3
bm
ABc
M
CR
M MMM
= ≤
+++
(AISC F1-1)
where,
Mmax = absolute value of maximum moment in unbraced segment, kip-in.
(N-mm)
MA = absolute value of moment at quarter point of the unbraced seg-
ment, kip-in. (N-mm)
3 - 34 Calculation of Nominal Strengths
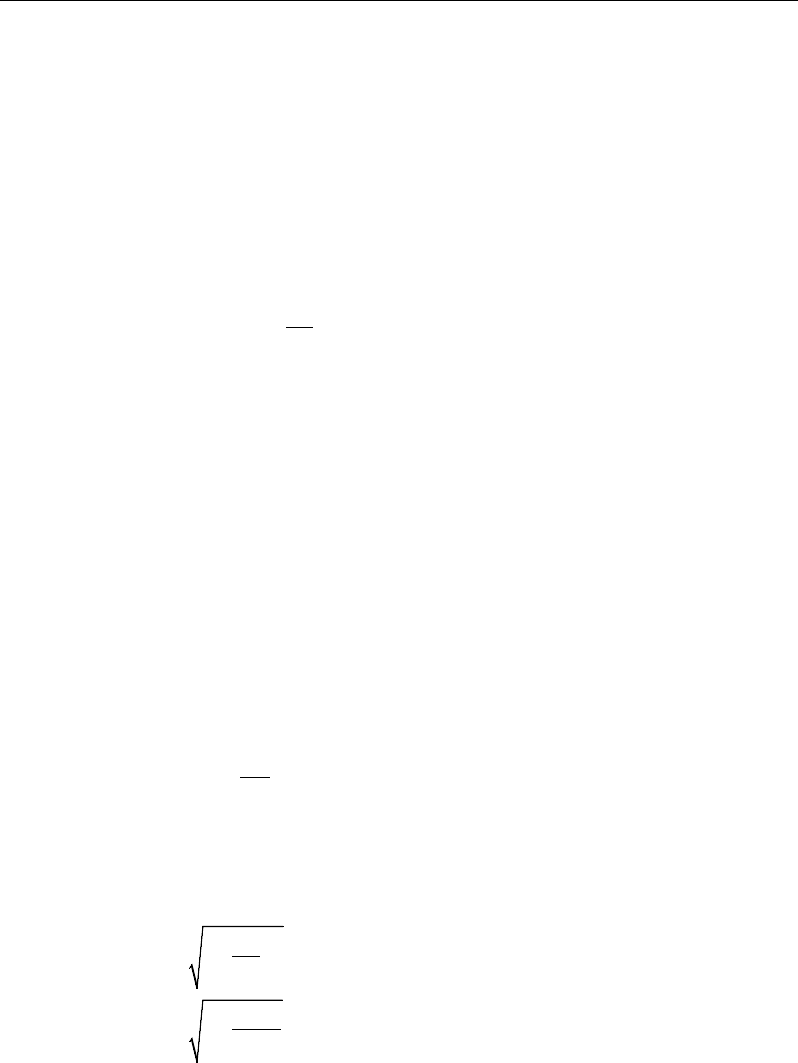
Chapter 3 - Design using ANSI/AISC 360-05
MB = absolute value of moment at centerline of the unbraced segment,
kip-in. (N-mm)
MC = absolute value of moment at three-quarter point of the unbraced
segment, kip-in. (N-mm)
Rm = cross-section monosymmetry parameter
= 1.0, doubly symmetric members
= 1.0, singly symmetric member subject to single curvature bending
=
2
0.5 2 ,
yc
y
I
I
+
singly symmetric members subjected to reverse
curvature bending
Iy = moment of inertia about the principal y-axis, in.4 (mm4)
Iyc = moment of inertia about y-axis referred to the compression flange,
or if reverse curvature bending, referred to the smaller flange, in.4
(mm4)
1.0, for Double Channel, Box, Pipe, and
doubly symmetric I Shapes,
1.0, for Channel, Tee, Double Angle and singly symmetric
I Shapes subjected to curvature bending, and
2
0.5 2 , for Channel
m
R
Iyc
Iy
=
+
, Tee, Double Angle, and singly symmetric
I Shapes subjected to reverse curvature bending.
If the member is under tension and if the section is doubly symmetric, Cb is in-
creased by a factor fcb where Ra is given as follows:
1 (LRFD)
1.5
1 (ASD)
u
ey
a
a
ey
P
P
RP
P
+
=
+
(AISC H1.2)
Cb should be taken as 1.0 for cantilevers. However, the program is unable to
detect whether the member is a cantilever. The user should overwrite Cb for
Calculation of Nominal Strengths 3 - 35
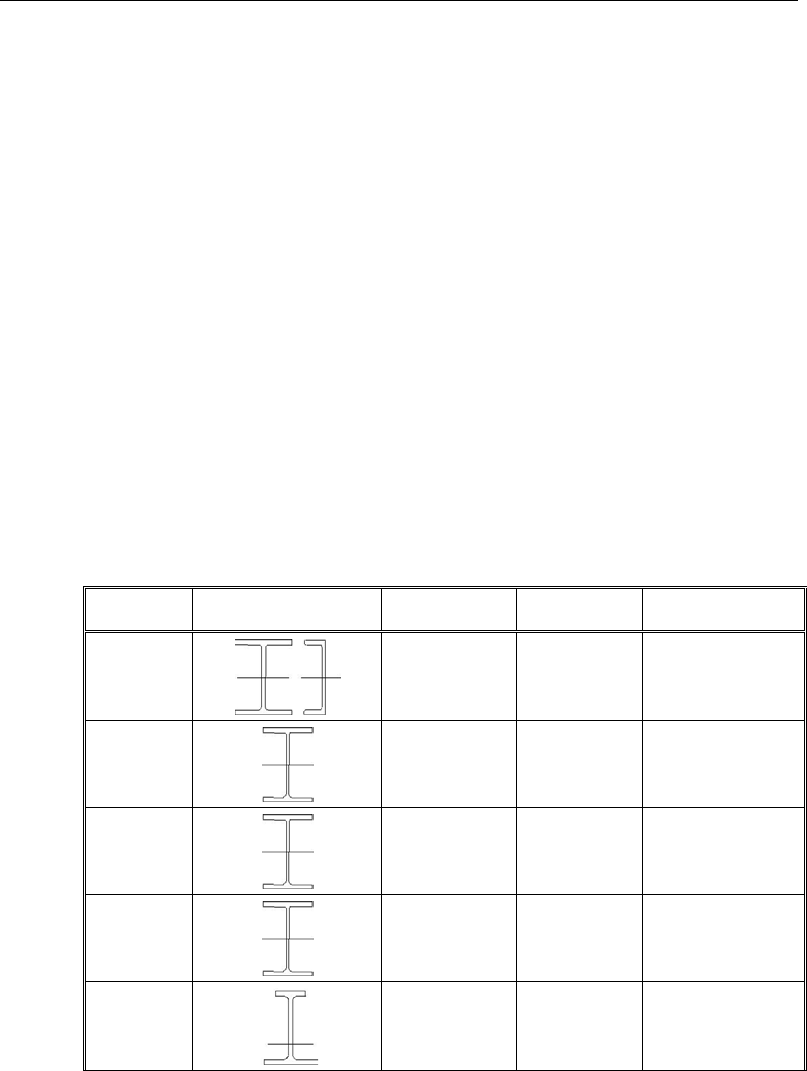
Steel Frame Design AISC 360-05
cantilevers. The program also defaults Cb to 1.0 if the minor unbraced length,
l22, is redefined to be more than the length of the member by the user or the
program, i.e., if the unbraced length is longer than the member length. The
Overwrites can be used to change the value of Cb for any member.
The nominal bending strength depends on the following criteria: the geometric
shape of the cross-section; the axis of bending; the compactness of the section;
and a slenderness parameter for lateral-torsional buckling. The nominal bend-
ing strength is the minimum value obtained according to the limit states of
yielding, lateral-torsional buckling, flange local buckling, web local buckling,
tension flange yielding as appropriate to different structural shapes. The fol-
lowing sections describe how different members are designed against flexure
in accordance with AISC Chapter F. AISC, in certain cases, gives options in
the applicability of its code section, ranging from F2 to F12. In most cases, the
program follows the path of the sections that gives more accurate results at the
expense of more detailed calculation. In some cases, the program follows a
simpler path. For an easy reference, Table 3-2 shows the AISC sections for the
various scenarios.
Table 3.2 Selection Table for the Application of Chapter F Sections
Section in
Chapter F
Cross Section
Flange
Slenderness
Web
Slenderness
Limit States
F2
C C Y, LTB
F3
NC, S C LTB, FLB
F4
C, NC, S NC Y, LTB, FLB
F5
C, NC, S S Y, LTB, FLB
F4
C, NC, S C, NC Y, LTB, FLB, TFY
3 - 36 Calculation of Nominal Strengths
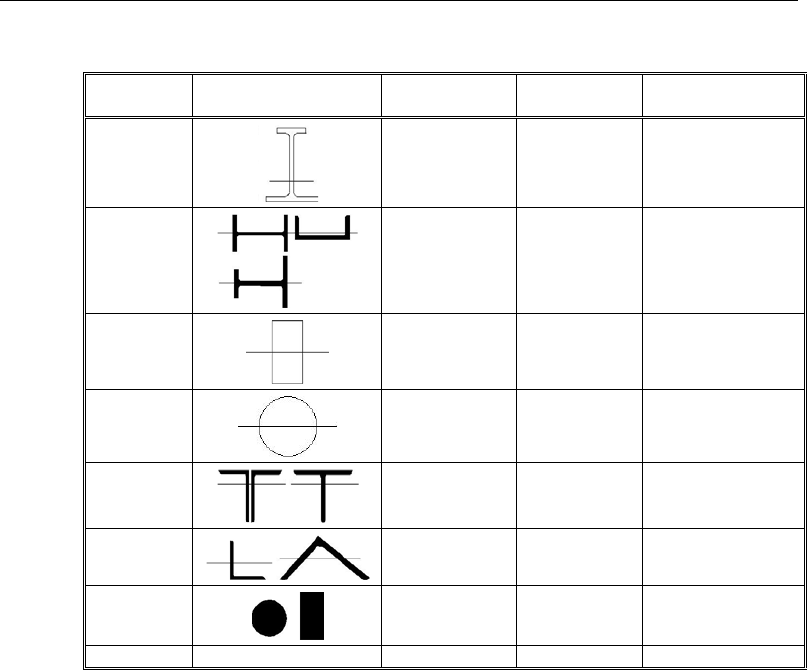
Chapter 3 - Design using ANSI/AISC 360-05
Table 3.2 Selection Table for the Application of Chapter F Sections
Section in
Chapter F
Cross Section
Flange
Slenderness
Web
Slenderness
Limit States
F5
C, NC, S S Y, LTB, FLB, TFY
F6
C, NC, S Any Y, FLB
F7
C, NC, S C, NC Y, FLB, WLB
F8
N/A N/A Y, LB
F9
C, NC, S Any Y, LTB, FLB
F10 N/A N/A Y, LTB, LLB
F11 N/A Any Y, LTB
F12
Unsymmetrical shapes
N/A
N/A
All limit states
Y = yielding
LTB = lateral-torsional buckling
FLB = flange local buckling
WLB = web local buckling
TFY = tension flange yielding
LLB = leg local buckling
LB = local buckling
C = compact or seismically compact
NC = noncompact
S = slender
3.5.3.1 Doubly Symmetric I-Sections
3.5.3.1.1 Major Axis Bending
The nominal flexural strength for major axis bending depends on compactness
of the web and flanges.
3.5.3.1.1.1 Compact Webs with Compact Flanges
The nominal flexural strength is the lowest value obtained according to the
limit states of yielding (plastic moment) and lateral-torsional buckling.
Calculation of Nominal Strengths 3 - 37
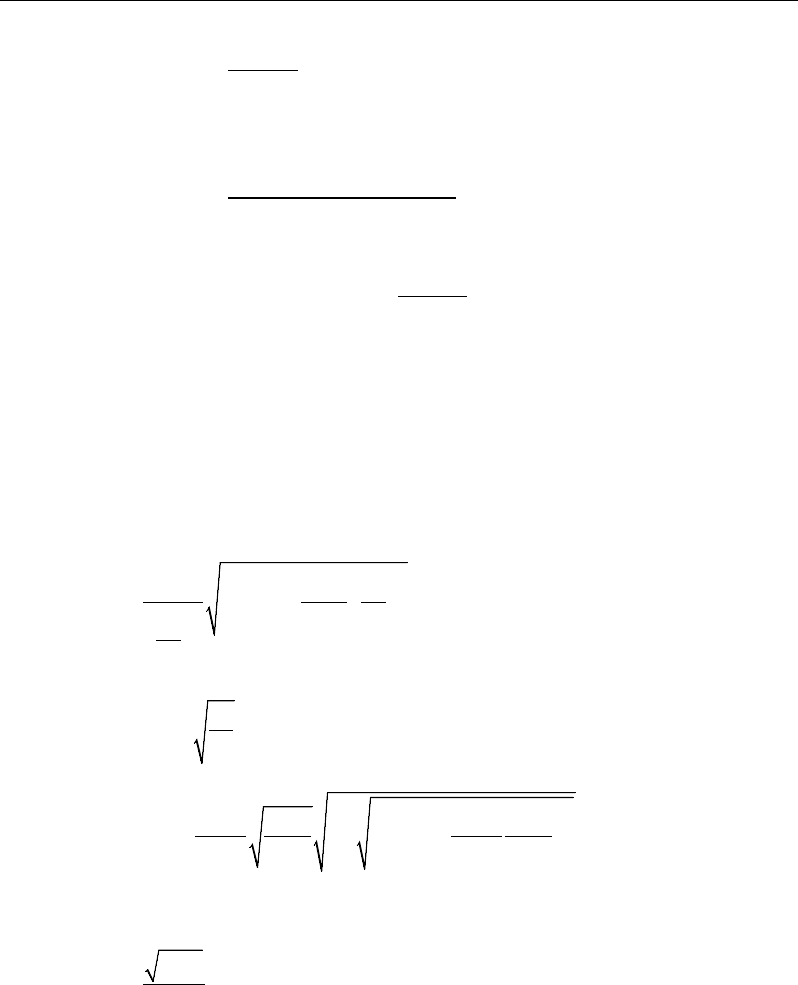
Steel Frame Design AISC 360-05
3.5.3.1.1.1.1 Yielding
Mn = Mp = FyZ33 , (AISC F2-1)
where, Z33 is the plastic section modulus about the major axis.
3.5.3.1.1.1.2 Lateral-Torsional Buckling
()
33
33
, if ,
0.7 , if , and
, if ,
p bp
bp
n bp p y p pbr
rp
cr p p r
M LL
LL
M C M M FS M L L L
LL
FS M L L
≤
−
= − − ≤ <<
−
≤>
(AISC F2-1, F2-2, F2-3)
where, S33 is the elastic section modulus taken about the major axis, Lb is the
unbraced length, Lp and Lr are limiting lengths, and Fcr is the critical buckling
stress. Fcr , Lp , and Lr are given by:
2
2
2
33 0
1 0.078 ,
bb
cr
ts
b
ts
CE L
Jc
FSh r
L
r
π
= +
(AISC F2-4)
1.76 ,
py
y
E
Lr
F
=
(AISC F2-5)
2
33 0
33 0
0.7
1.95 1 1 6.76 ,
0.7
y
r ts
y
FSh
E Jc
Lr
F S h E Jc
= ++
(AISC F2-6)
where,
2
33
,
yw
ts
IC
rS
=
(AISC F2-7)
c = 1, and (AISC F2-8a)
h0 is the distance between flange centroids.
3 - 38 Calculation of Nominal Strengths
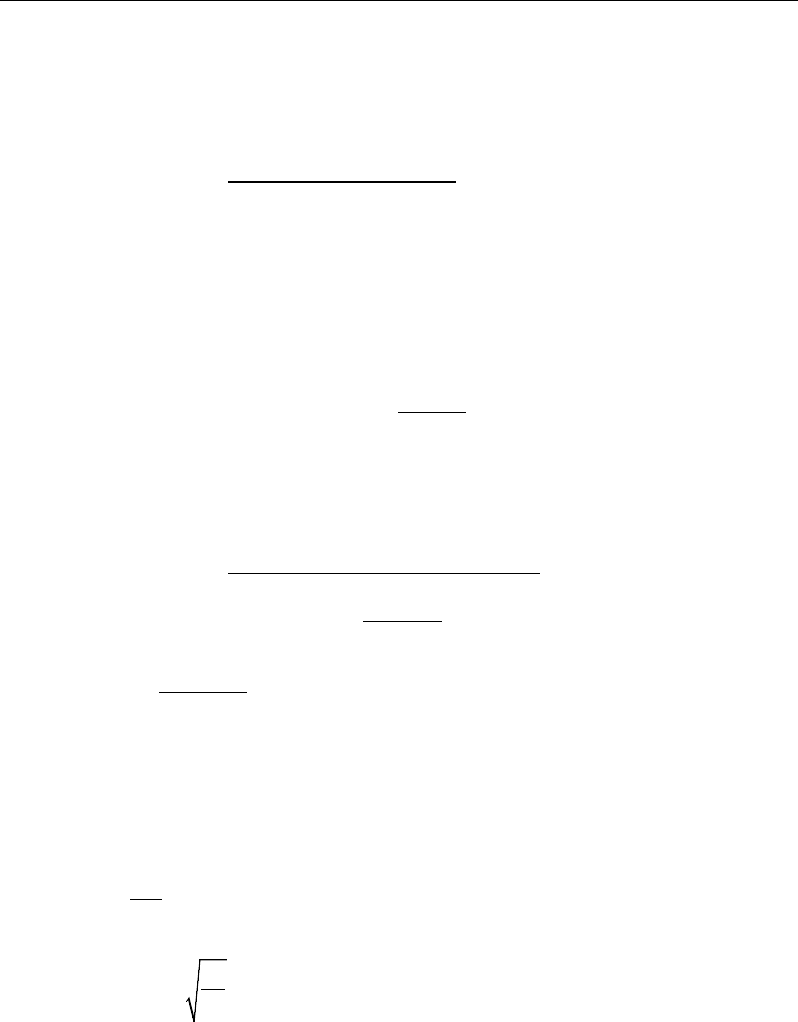
Chapter 3 - Design using ANSI/AISC 360-05
3.5.3.1.1.2 Compact Webs with Noncompact or Slender Flanges
The nominal flexural strength is the lowest value obtained from the limit states
of lateral-torsional buckling and compression flange local buckling.
3.5.3.1.1.2.1 Lateral-Torsional Buckling
The provisions of lateral-torsional buckling for "Compact Web and Flanges" as
described in the provision pages also apply to the nominal flexural strength of
I-Shapes with compact webs and noncompact or slender flanges bent about
their major axis.
()
33
33
, if ,
0.7 , if , and
, if .
p bp
bp
n bp p y p pbr
rp
cr p p r
M LL
LL
M C M M FS M L L L
LL
FS M L L
≤
−
= − − ≤ <<
−
≤>
(AISC F3.1, F2-1, F2-2, F2-3)
3.5.3.1.1.2.2 Compression Flange Local Buckling
( )
33
33
2
,
0.7 , for noncompact flanges,
0.9 , for slender flanges
pf
pp y
rf pf
n
c
M M FS
MEk S
λ−λ
−−
λ −λ
=
λ
(AISC F3-1, 3-2)
where λ,
λ
pf , and
λ
rf are the slenderness and limiting slenderness for compact
and noncompact flanges from Table 3.5, respectively,
,
2
f
f
b
t
λ=
0.38 ,
pf
y
E
F
λ=
(AISC Table B4.1, F3.2)
Calculation of Nominal Strengths 3 - 39
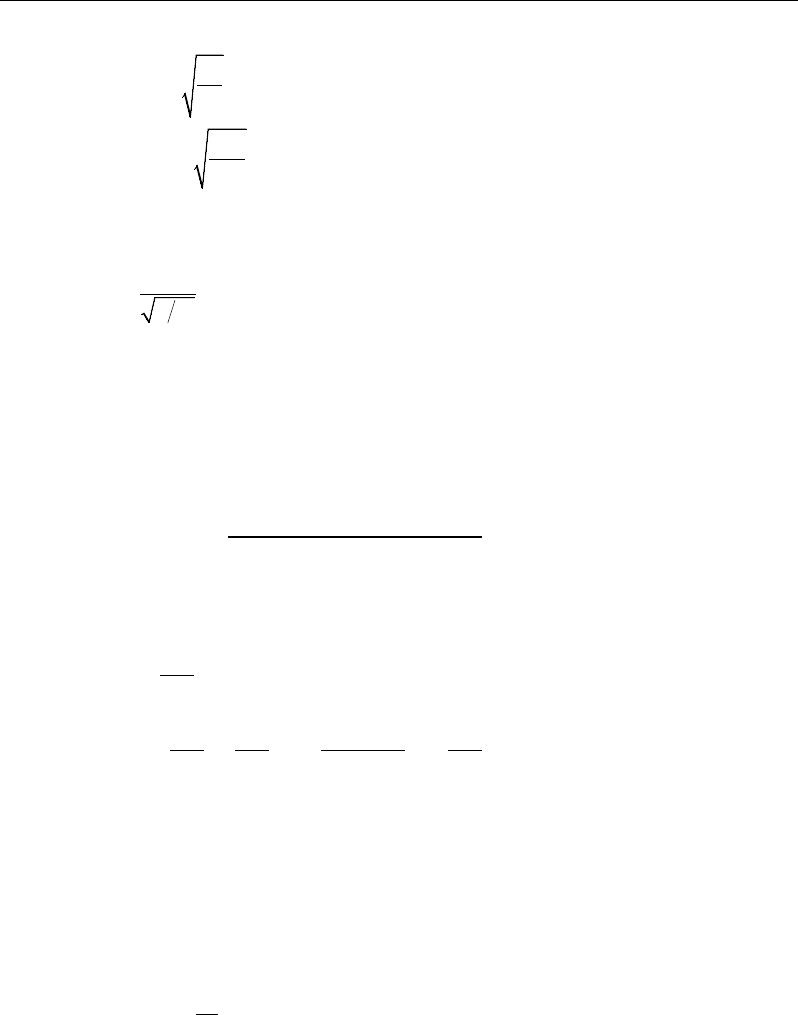
Steel Frame Design AISC 360-05
1.0 (Rolled),
0.95 (Welded),
y
rf
c
L
E
F
kE
F
λ=
(AISC Table B4.1, F3.2)
and kc is given by
4,
c
w
kht
=
0.35 ≤ kc ≤0.76. (AISC F.3.2)
3.5.3.1.1.3 Noncompact Webs with Compact, Noncompact and Slender
Flanges
The nominal flexural strength is the lowest values obtained from the limit
states of compression flange yielding, lateral-torsional buckling, and compres-
sion flange local buckling.
3.5.3.1.1.3.1 Compression Flange Yielding
Mn = RpcMy, (AISC F4-1)
where, Rpc is the web plasticity factor, which is determined as follows:
, if ,
1 , if ,
ppw
y
pc
p p pw p pw w rw
y y rw pw y
M
M
RMM M
MM M
λ≤λ
=
λ−λ
− − ≤ λ <λ ≤λ
λ −λ
(AISC F4-9a, F4-9b)
where,
Mp = Z33Fy ≤ 1.6S33Fy (AISC F4-2)
S33 = elastic section modulus for major axis bending
w
λ
=
c
w
h
t
(AISC F4.2, Table B4.1)
pw
λ
=
p,
λ
the limiting slenderness for a compact web, as given in
Table 3-5 (AISC Table B4.1)
3 - 40 Calculation of Nominal Strengths
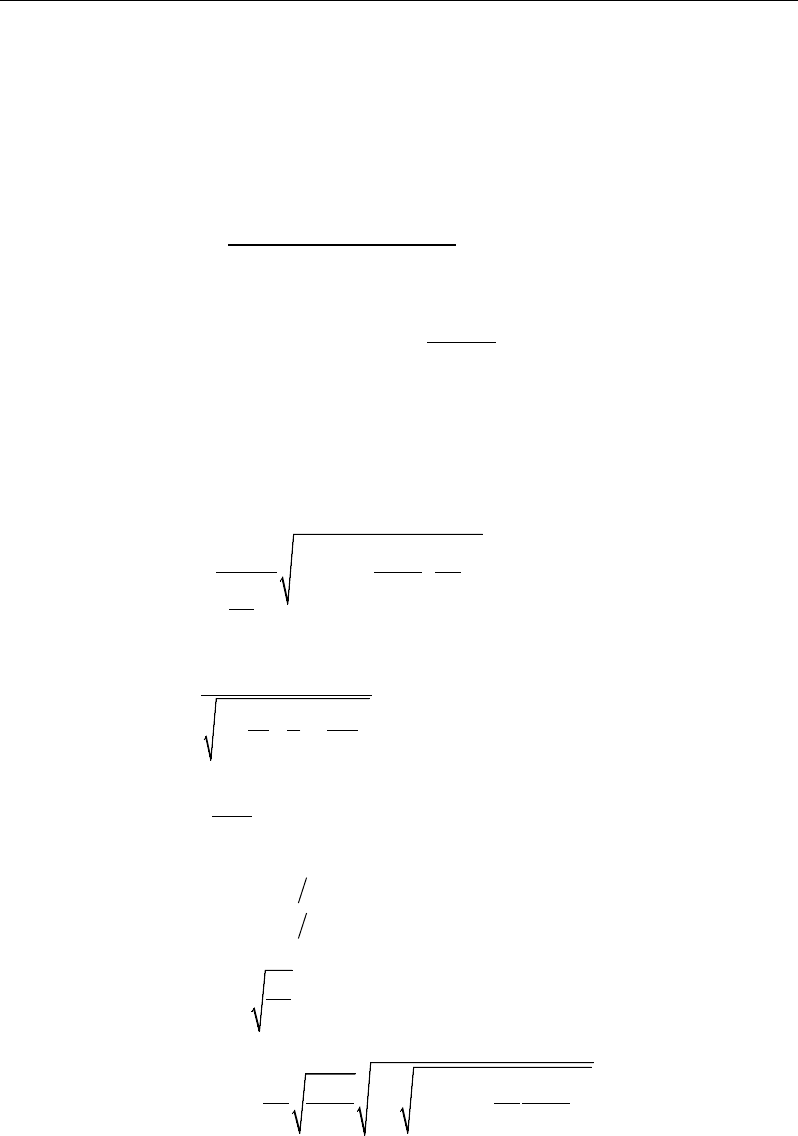
Chapter 3 - Design using ANSI/AISC 360-05
λrw = λr, the limiting slenderness for a noncompact web, as given in
Table 3-5 (AISC Table B4.1)
and My is the yield moment, which is determined as follows:
My = S33Fy (AISC F4-1)
3.5.3.1.1.3.2 Lateral-Torsional Buckling
()
33
33
, if ,
, if ,
, if ,
pc y b p
bp
n b pc y pc y L pc y p b r
rp
cr pc y b r
RM L L
LL
M C RM RM FS RM L L L
LL
FS R M L L
≤
−
= − − ≤ <≤
−
≤>
(AISC F4-1, F4-2, F4-3)
where,
2
2
233
1 0.078
b cb
cr
ot
b
t
CE J L
FSh r
L
r
π
= +
(AISC F4-5)
2
0
0
1
12 6
f
t
w
b
rhh
a
d hd
=
+
(AISC F4-10)
10
cw
w
ff
ht
abt
= ≤
(AISC F4-11)
1, if 0.23
0, if 0.23
yc y
yc y
II
CII
>
=≤
(AISC F4.2)
.11
pt
y
E
Lr
F
=
(AISC F4-7)
2
33
33
1.95 1 1 6.76 Lo
rt
Lo
E J FSh
Lr
F Sh E J
= ++
(AISC F4-8)
Calculation of Nominal Strengths 3 - 41
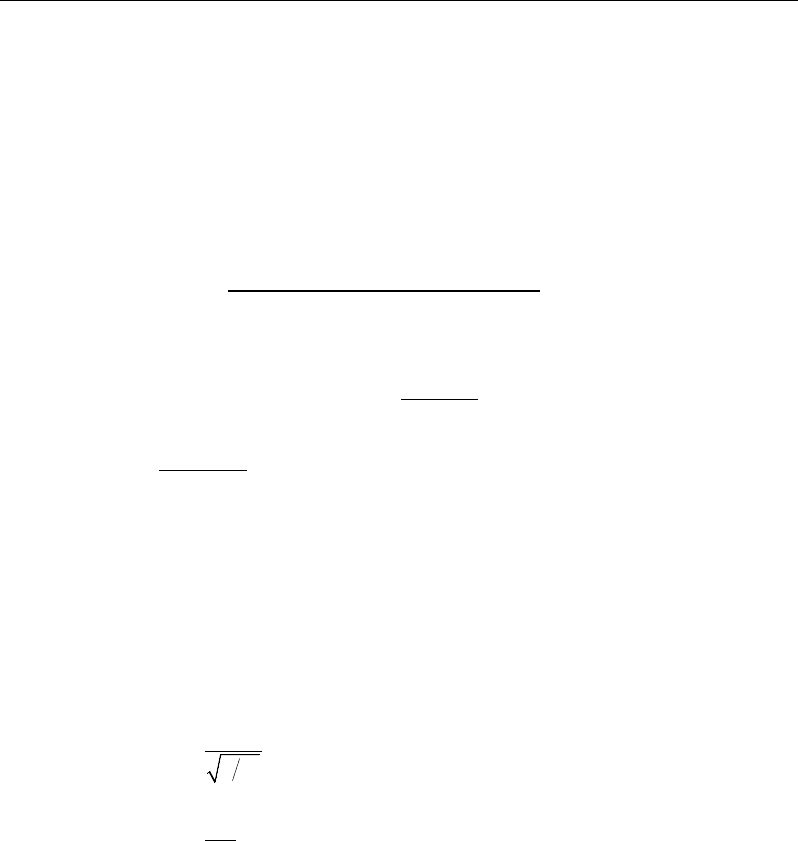
Steel Frame Design AISC 360-05
FL = 0.7Fy (AISC F4-6a)
Rpc = web plastification factor, which is determined using a formula de-
scribe previously (AISC F4-9)
Iyc = moment of inertia of the compression flange about the minor axis
Iy = moment of inertia of the entire section about the minor axis.
3.5.3.1.1.3.3 Compression Flange Local Buckling
( )
33
33
2
, if flanges are compact,
, if flanges are noncompact, and
0.9 , if flanges are slender,
pc y
pt
n pc y pc y L
rf pt
c
RM
M R M R M FS
Ek S
λ−λ
= −−
λ −λ
λ
(AISC F4-1, F4-12, F4-13)
where,
FL = 0.7Fy (AISC F4-6a, F4.3)
Rpc = is the web plastification factor, which is determined using a formu-
la described previously (AISC F4-9, F4.3)
kc =
4
w
,
ht
35 0 76≤≤
c
k.
(AISC F4.3, Table B4.1)
λ =
2
f
f
b
t
λpf = λp , the limiting slenderness for compact flange, as given in Table
3-5 (AISC Table B4.1, B4.3)
λrf = λr , the limiting slenderness for noncompact flange, as given in Ta-
ble 3-5 (AISC Table B4.1, B4.3).
3 - 42 Calculation of Nominal Strengths
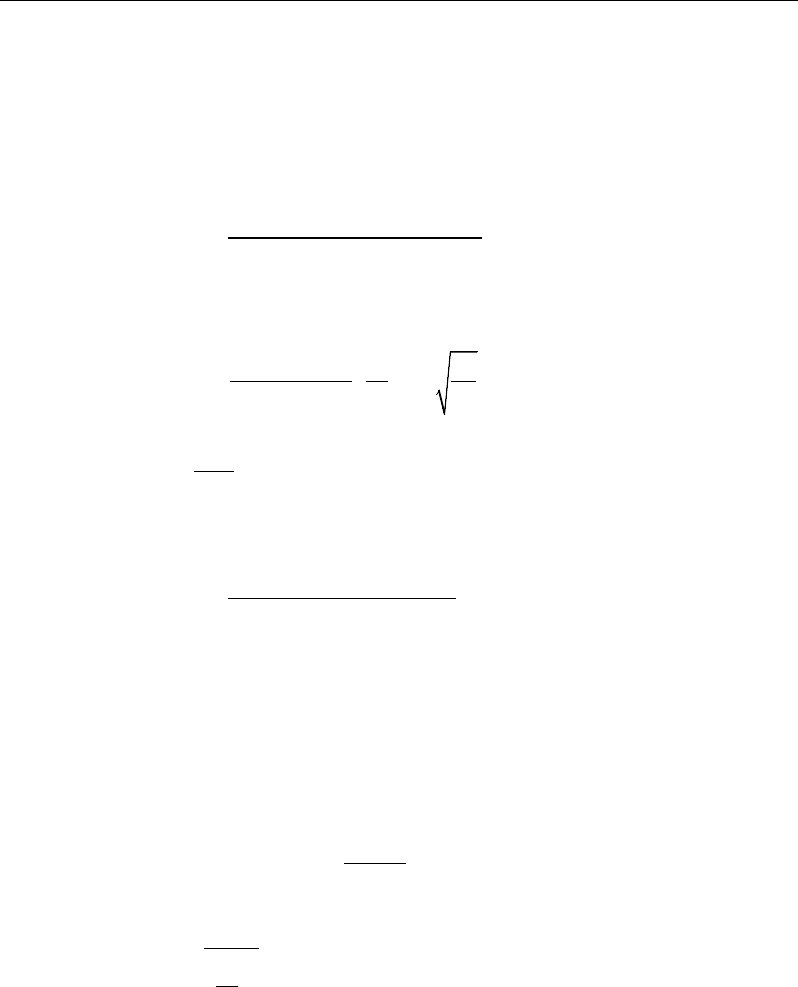
Chapter 3 - Design using ANSI/AISC 360-05
3.5.3.1.1.4 Slender Webs with Compact, Noncompact, and Slender
Flanges
The nominal flexural strength is the lowest value obtained from the limit states
of compression flange yielding, lateral-torsional buckling, and compression
flange local buckling.
3.5.3.1.1.4.1 Compression Flange Yielding
Mn = RpgFyS33 , (AISC F5-1)
where Rpg is the bending strength reduction factor given by
1 5.7 1.0,
1200 300
wc
pg
ww y
ahE
Rat F
=− −≤
+
(AISC F5-6)
10,
w
w
ff
ht
abt
= ≤
(AISC F5.2, F4-11)
where h0 is the distance between flange centroids (AISC F2.2).
3.5.3.1.1.4.2 Lateral-Torsional Buckling
Mn = RpgFcrS33 , (AISC F5-2)
where Fcr is the critical lateral-torsional buckling stress given by
( )
2
2
,
, if ,
0.3 , if , and
, if
y bp
bp
cr b y y y p b r
rp
by pr
b
t
F LL
LL
F CF F F L L L
LL
CE
F LL
L
r
≤
−
= − ≤ <≤
−
π≤>
(AISC F5-1, F5-3, 5-4)
where,
Calculation of Nominal Strengths 3 - 43
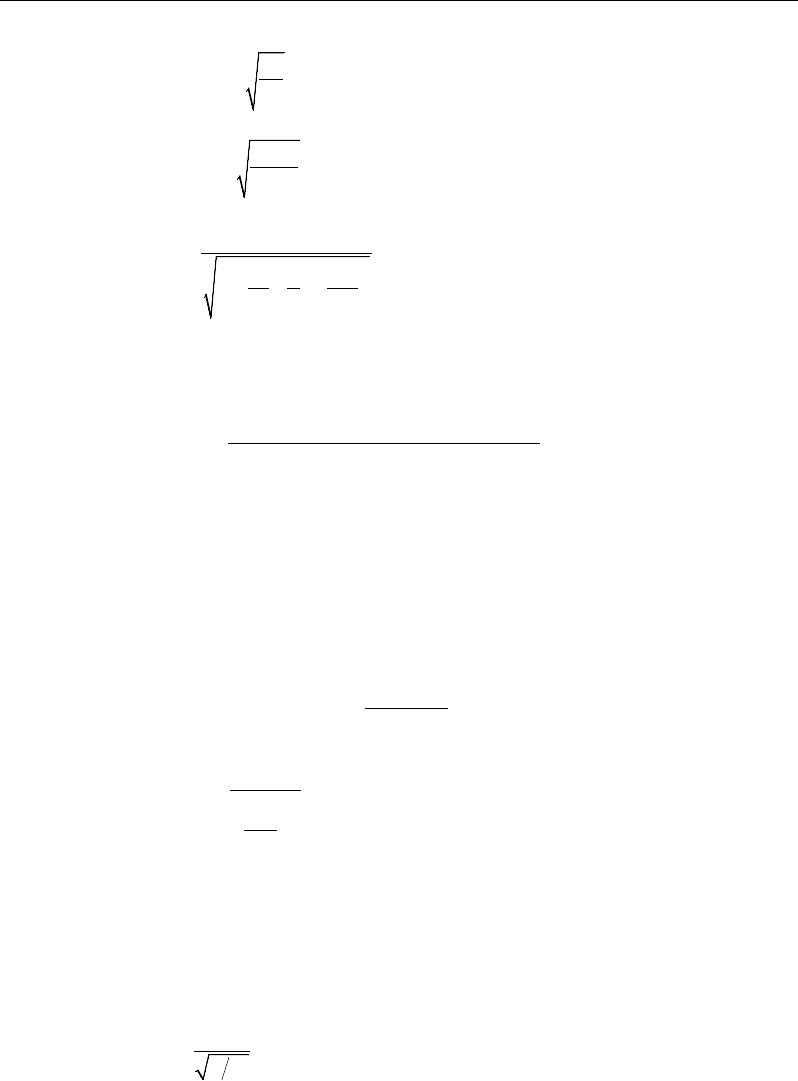
Steel Frame Design AISC 360-05
1.1
pt
y
E
Lr
F
=
(AISC F5.2, 4-7)
0.7
rt
y
E
Lr F
= π
(AISC F5-5)
2
0
0
1
12 6
f
t
w
b
rhh
a
d hd
=
+
(AISC F5.2, F4-10)
Rpg is the bending strength reduction factor, which has been described in the
previous section.
3.5.3.1.1.4.3 Compression Flange Local Buckling
Mn = RpgFcrS33 , (AISC F5-7)
where Fcr is the critical buckling stress given by
()
2
, if flanges are compact,
0.3 , if flanges are noncompact, and
0.9 , if flanges are slender,
2
y
pf
cr y y
rf pf
cy
f
f
F
FF F
Ek F
b
t
λ−λ
= −
λ −λ
≤
(AISC F5-1, F5-8, F5-9)
and λ, λpf, and λrf are the slenderness and the limiting slenderness ratios for
compact and noncompact flanges from Table 3.5, respectively, and kc is given
by
4
c
w
kht
=
where 0.35 ≤ kc ≤ 0.76. (AISC 5.3)
3 - 44 Calculation of Nominal Strengths

Chapter 3 - Design using ANSI/AISC 360-05
3.5.3.1.2 Minor Axis Bending
The nominal flexural strength is the lower value obtained according to the limit
states of yielding (plastic moment) and flange local buckling.
3.5.3.1.2.1 Yielding
Mn = Mp = FyZ22 ≤ 1.6FyS22, (AISC F6-1)
where S22 and Z22 are the section and plastic moduli about the minor axis, re-
spectively.
3.5.3.1.2.2 Flange Local Buckling
( )
22
22
, for compact flange,
0.7 , for noncompact flanges, and
, for slender flanges,
n
p
pf
pp y
rf pf
cr
M
M
M M FS
FS
=
λ−λ
−−
λ −λ
(AISC F6-1, F6-2, F6-3)
where,
2
0.69
cr
E
F=λ
(AISC 6-4)
2
f
f
b
t
λ=
(AISC F6.2)
and λpf and λrf are the limiting slendernesses for compact and noncompact
flanges, respectively, as described in Table 3-5 (AISC B4.1).
3.5.3.2 Singly Symmetric I-Sections
3.5.3.2.1 Major Axis Bending
The nominal of flexural strength for major axes bending depends on compact-
ness of the web and flanges.
3.5.3.2.1.1 Compact and Noncompact Webs with Compact, Noncompact
and Slender Flanges
The nominal flexural strength is the lowest values obtained from the limit sates
of compression flange yielding, lateral-torsional buckling, compression flange
local buckling, and tension flange yielding.
Calculation of Nominal Strengths 3 - 45

Steel Frame Design AISC 360-05
3.5.3.2.1.2 Compression Flange Yielding
Mn = RpcMyc, (AISC F4-1)
where, Rpc is the web plasticity factor, which is determined as follows:
, if ,
1 , if ,
ppw
yc
pc
p p pw p pw w rw
yc yc rw pw yc
M
M
RMM M
MM M
λ≤λ
=
λ−λ
− − ≤ λ <λ ≤λ
λ −λ
(AISC F4-9a, F4-9b)
where,
Mp = Z33Fy ≤ 1.6S33cFy (AISC F4-2)
S33c = elastic section modulus for major axis bending referred to
compression flange
S33t = elastic section modulus for major axis bending referred to ten-
sion flange
λ =
c
w
h
t
(AISC F4.2, Table B4.1)
λpw = λp, the limiting slenderness for a compact web, as given in
Table 3-5 (AISC Table B4.1)
λrw = λr , the limiting slenderness for a noncompact web, as given in
Table 3-5 (AISC Table B4.1)
and Myc is the yield moment for compression flange yielding, which is
determined as follows:
Myc = S33cFy. (AISC F4-1)
3 - 46 Calculation of Nominal Strengths
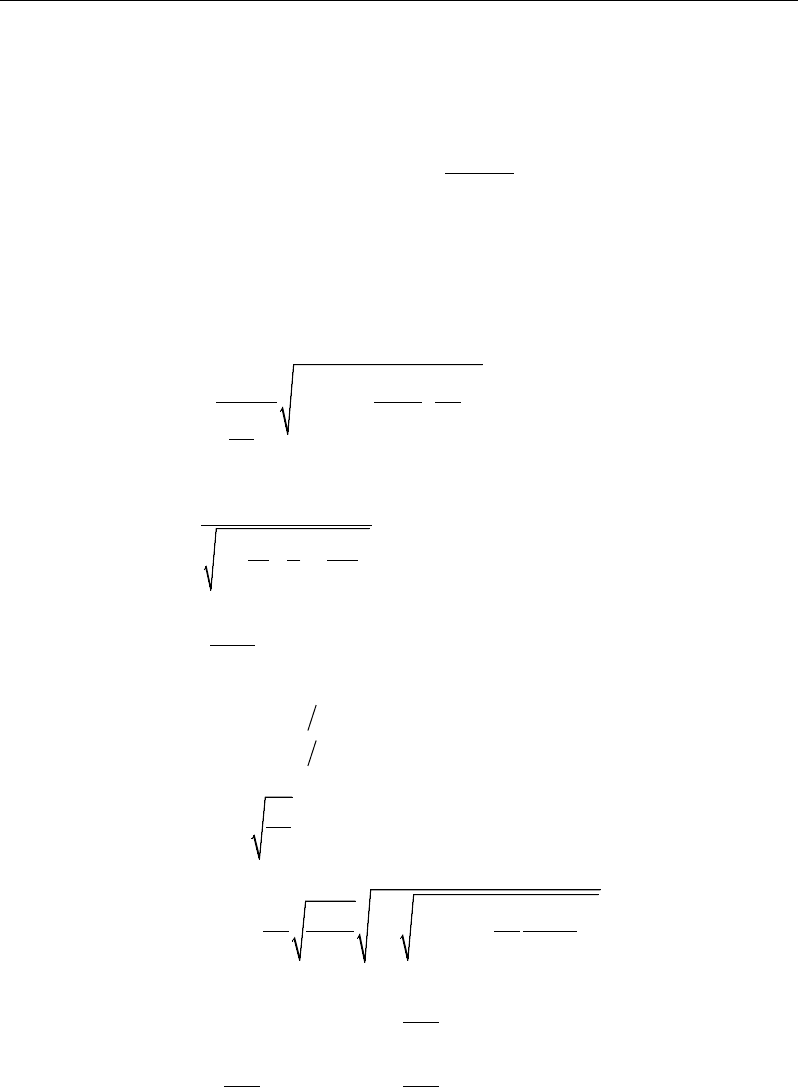
Chapter 3 - Design using ANSI/AISC 360-05
3.5.3.2.1.3 Lateral-Torsional Buckling
( )
33
33
, if
, if ,
, if ,
pc yc b p
bp
n b pc yc pc yc L c pc yc p b r
rp
cr c pc yc b r
RM L L
LL
M C RM RM FS RM L L L
LL
FS R M L L
≤
−
= − − ≤ <≤
−
≤>
(AISC F4-1, F4-2, F4-3)
where,
2
2
233
1 0.078
b cb
cr
ot
b
t
CE J L
FSh r
L
r
π
= +
(AISC F4-5)
2
0
0
1
12 6
fc
t
w
b
rhh
a
d hd
=
+
(AISC F4-10)
10
cw
w
fe fc
ht
abt
= ≤
(AISC F4-11)
1, if 0.23
0, if 0.23
yc y
yc y
II
CII
>
=≤
(AISC F4.2)
1.1
pt
y
E
Lr
F
=
(AISC F4-7)
2
33
33
1.95 1 1 6.76
L co
rt
Lo
E J FS h
Lr
F Sh E J
= ++
(AISC F4-8)
33
33
33 33
33 33
0.7 , if 0.7
0.5 , if 0.7
t
y
c
L
tt
yy
cc
S
FS
FSS
FF
SS
≥
=
≥≤
(AISC F4-6a, F4-6b)
Calculation of Nominal Strengths 3 - 47
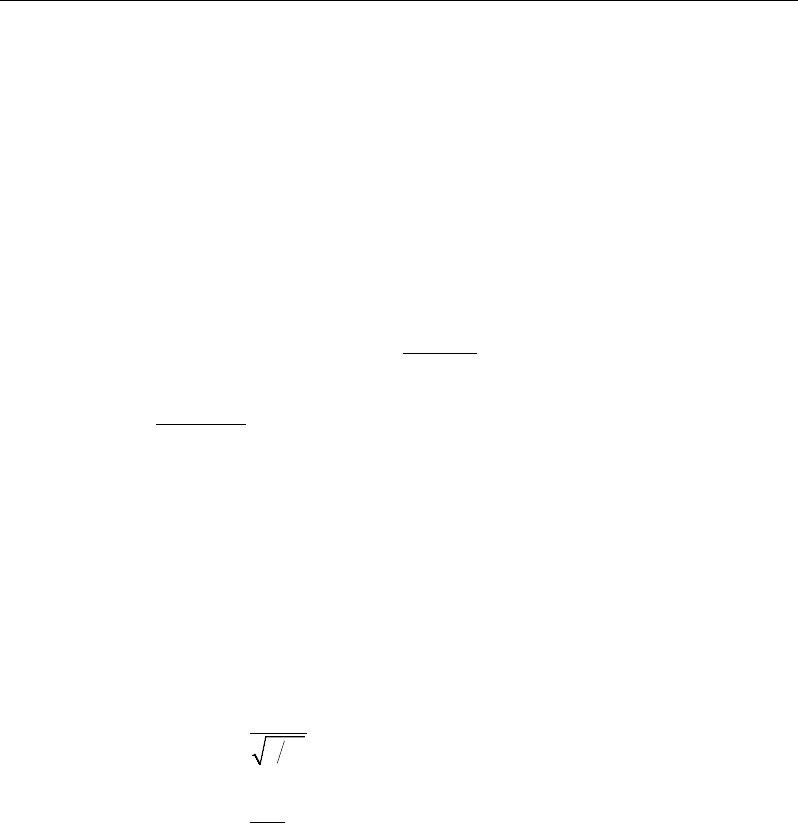
Steel Frame Design AISC 360-05
Rpc = web plastification factor, which is determined using a formula
describe previously (AISC F4-9)
Iyc = moment of inertia of the compression flange about the minor axis
Iy = moment of inertia of the section about the minor axis.
3.5.3.2.1.4 Compression Flange Local Buckling
( )
33
33
2
, if flanges are compact,
, if flanges are noncompact, and
0.9 , if flanges are slender,
pc yc
pt
n pc yc pc yc L c
rf pt
cc
RM
M RM RM FS
Ek S
λ−λ
= −−
λ −λ
λ
(AISC F4-1, F4-12, F4-13)
where,
FL = is a calculated stress, which has been defined previously
(AISC F4-6a, F4-6b, F4.3)
Rpc = is the web plastification factor, which is determined using a
formula described previously (AISC F4-9, F4.3)
kc =
4,
w
ht
35 ≤ kc ≤ 0.76 (AISC F4.3, Table B4.1)
λ =
2
fc
fc
b
t
λpf = λp , the limiting slenderness for compact flange, as given in
Table 3-5 (AISC Table B4.1, B4.3)
λrf = λr , the limiting slenderness for noncompact flange, as given
in Table 3-5 (AISC Table B4.1, B4.3).
3.5.3.2.1.5 Tension Flange Yielding
33 33
33 33
, if
, if
p tc
n
pt yt t c
M SS
MRM S S
≥
=<
(AISC F4-14)
3 - 48 Calculation of Nominal Strengths

Chapter 3 - Design using ANSI/AISC 360-05
where, Rpt is the web plastification factor corresponding to the tension flange
yielding limit state. It is determined as follows:
, if
1 , if
ppw
yt
pt
p p pw pw rw
yt yt rw pw
M
M
RMM
MM
λ≤λ
λ−λ
− − λ <λ≤λ
λ −λ
(AISC F4-15a, F4-15b)
where,
Mp = Z33Fy (AISC F4-2)
S33c = elastic section modulus for major axis bending referred to
compression flange
S33t = elastic section modulus for major axis bending referred to ten-
sion flange
λw =
c
w
h
t
(AISC F4.2, Table B4.1)
λwp = λp , the limiting slenderness for a compact web, as given in
Table 3-5 (AISC Table B4.1)
λrw = λr , the limiting slenderness for a noncompact web, as given in
Table 3-5. (AISC Table B4.1)
3.5.3.2.1.6 Slender Webs with Compact, Noncompact and Slender Flang-
es
The nominal flexural strength is the lowest value obtained from the limit states
of compression flange yielding, lateral-torsional buckling, compression flange
local buckling, and tension flange yielding.
3.5.3.2.1.6.1 Compression Flange Yielding
Mn = RpgFyS33c , (AISC F5-1)
where, Rpg is the bending strength reduction factor given by
Calculation of Nominal Strengths 3 - 49
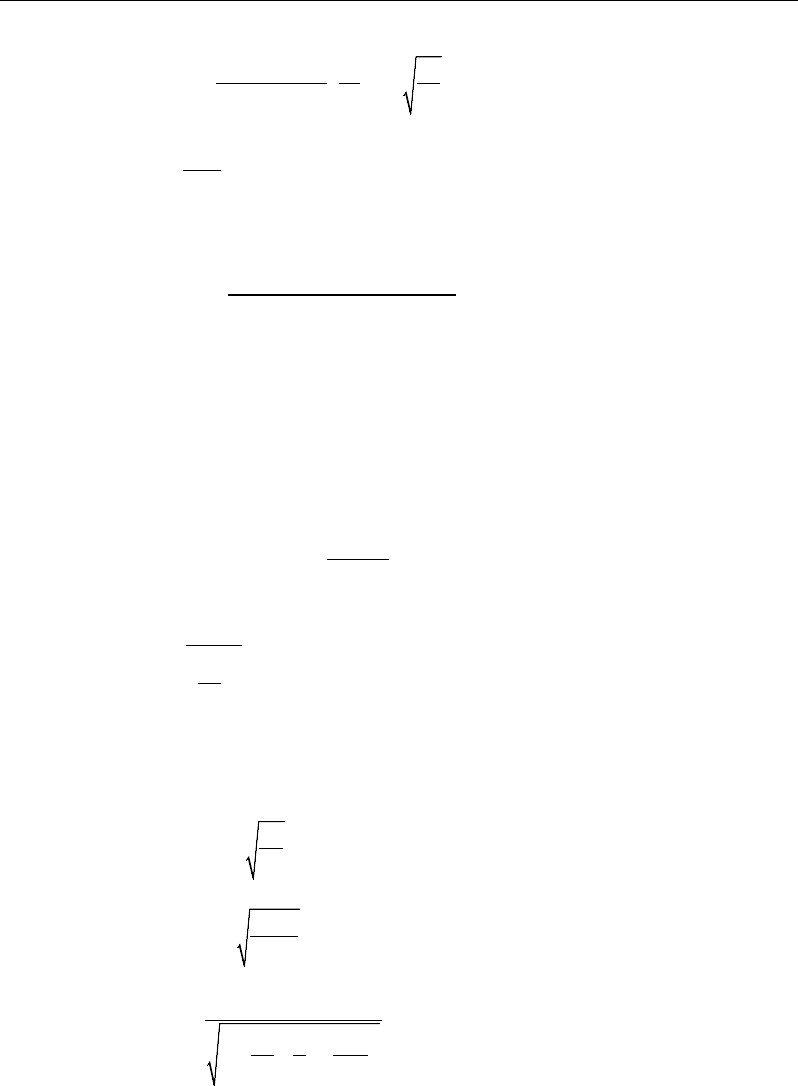
Steel Frame Design AISC 360-05
1 5.7 1.0
1200 300
wc
pg
ww y
ahE
Rat F
=− −≤
+
(AISC F5-6)
10
w
w
ff
ht
abt
= ≤
(AISC F5.2, F4-11)
where, h0 is the distance between flange centroids (AISC F2.2).
3.5.3.2.1.6.2 Lateral-Torsional Buckling
Mn = RpgFcrS33c , (AISC F5-2)
where, Fcr is the critical lateral-torsional buckling stress given by
( )
2
2
,
, if ,
0.3 , if , and
, if
y bp
bp
cr b y y y p b r
rp
by pr
b
t
F LL
LL
F CF F F L L L
LL
CE
F LL
L
r
≤
−
= − ≤ <≤
−
π≤>
(AISC F5-1, F5-3, 5-4)
where,
1.1
pt
y
E
Lr
F
=
(AISC F5.2, 4-7)
0.7
rt
y
E
Lr F
= π
(AISC F5-5)
2
0
0
1
12 6
=
+
fc
t
w
b
r
hh
a
d hd
(AISC F5.2, F4-10)
3 - 50 Calculation of Nominal Strengths
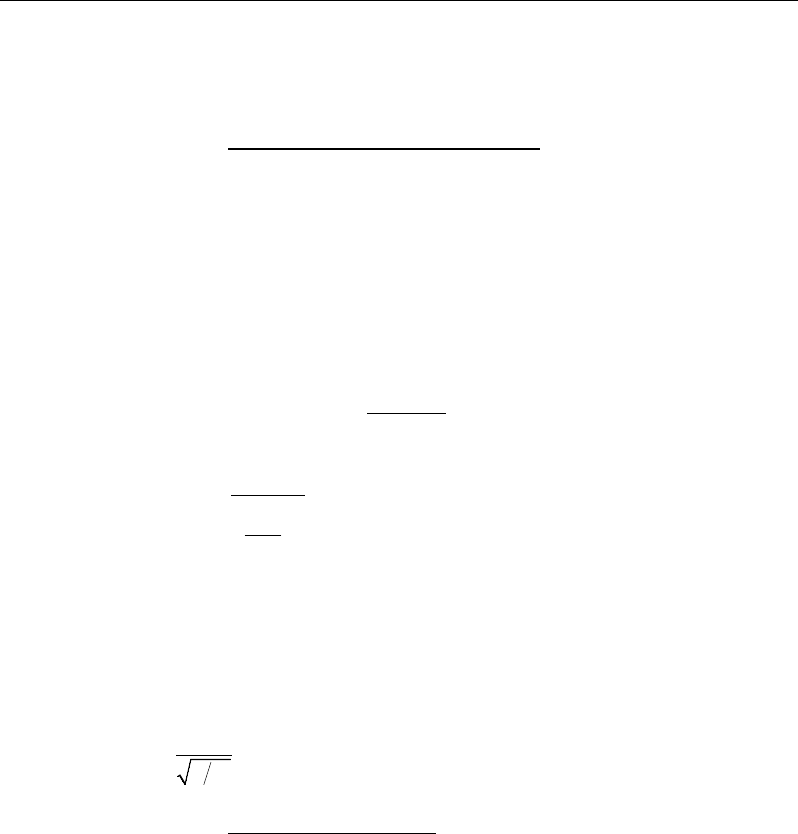
Chapter 3 - Design using ANSI/AISC 360-05
Rpg is the bending strength reduction factor, which has been described
in a previous section.
3.5.3.2.1.6.3 Compression Flange Local Buckling
Mn = RpgFcrS33c , (AISC F5-7)
where, Fcr is the critical buckling stress given by
( )
if flanges are compact
if flanges are noncompact, and
if flanges are slender,
y
pf
cr y y
rf pf
cy
2
fc
fc
F, ,
F F 0.3F ,
0.9Ek F,
b
2t
−
= −
−
≤
λλ
λλ
(AISC F5-1, F5-8, F -9)
and λ, λpf, and λrf are the slenderness and the limiting slenderness ratios for
compact and noncompact flanges from Table 3.5, respectively, and kc is given
by
4,
c
w
kht
=
where 0.35 ≤ kc ≤ 0.76. (AISC 5.3)
3.5.3.2.1.6.4 Tension Flange Yielding
33 33
33 33 33
if ,
if .
p tc
n
yt t c
M SS
MFS S S
≥
=<
(AISC F5-10)
3.5.3.2.2 Minor Axis Bending
The nominal flexural strength is the lower value obtained according to the limit
states of yielding (plastic moment) and flange local buckling.
3.5.3.2.2.1 Yielding
Mn = Mp = Fy Z22 ≤ 1.6Fy S22, (AISC F6-1)
Calculation of Nominal Strengths 3 - 51

Steel Frame Design AISC 360-05
where, S22 and Z22 are the section and plastic moduli about the minor axis, re-
spectively.
3.5.3.2.2.2 Flange Local Buckling
( )
22
22
, for compact flange,
0.7 , for noncompact flanges, and
, for slender flanges,
n
p
pf
pp y
rf pf
cr
M
M
M M FS
FS
=
λ−λ
−−
λ −λ
(AISC F6-1, F6-2, F6-3)
where,
2
0.69
cr
E
F=λ
(AISC 6-4)
max ,
fb ft
tb ft
bb
tt
λ=
(AISC F6.2)
and λpf and λrf are the limiting slendernesses for compact and noncompact
flanges, respectively, as described in Table 3-5 (AISC B4.1).
3.5.3.3 Channel and Double Channel Sections
3.5.3.3.1 Major Axis Bending
The nominal flexural strength is the lowest value obtained according to the
limit states of yielding (plastic moment), lateral-torsional buckling, and com-
pression flange local buckling.
3.5.3.3.1.1 Yielding
Mn = Mp =Fy Z33 , (AISC F2-1)
where Z33 is the plastic section modulus about the major axis.
3 - 52 Calculation of Nominal Strengths
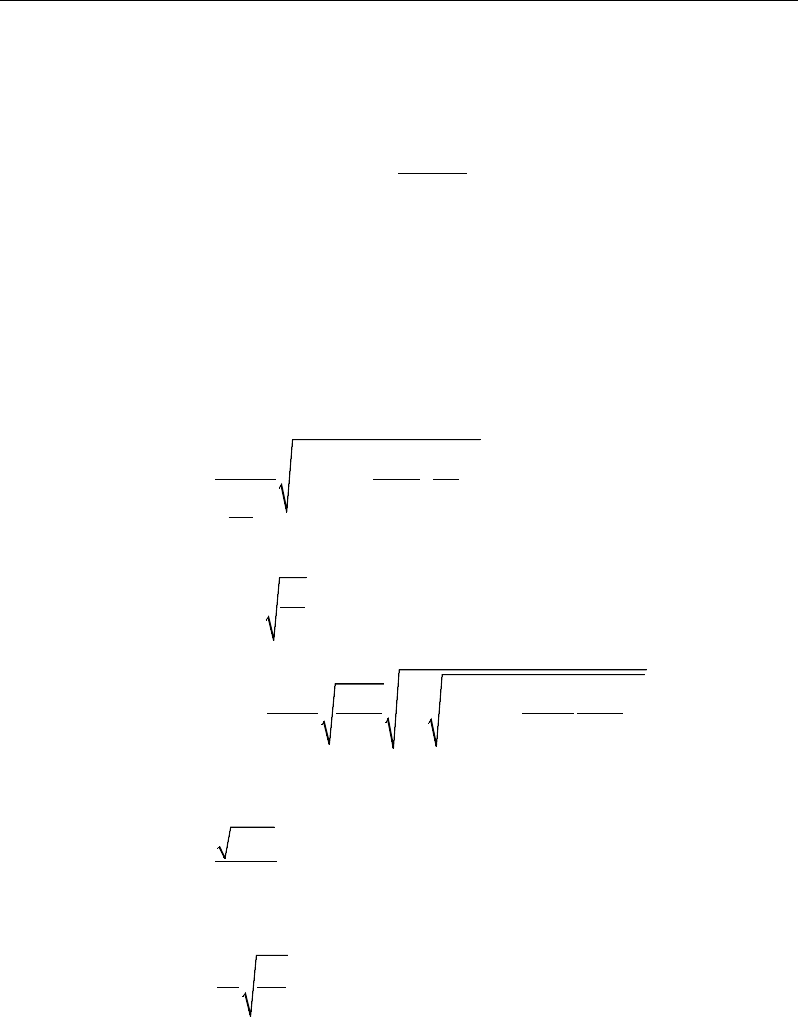
Chapter 3 - Design using ANSI/AISC 360-05
3.5.3.3.1.2 Lateral-Torsional Buckling
()
33
33
, if ,
0.7 if , and
, if ,
p bp
bp
n bp p y p pbr
rp
cr p p r
M LL
LL
M C M M FS M L L L
LL
FS M L L
≤
−
= − − ≤ <<
−
≤>
(AISC F2-1, F2-2, F2-3)
where S33 is the elastic section modulus taken about the major axis, Lb is the
unbraced length, Lp and Lr are limiting lengths, and Fcr is the critical buckling
stress. Fcr , Lp and Lr are given by
2
2
2
33 0
1 0.078
bb
cr
ts
b
ts
CE L
Jc
FSh r
L
r
π
= +
(AISC F2-4)
1.76
py
y
E
Lr
F
=
(AISC F2-5)
2
33 0
33 0
0.7
1.95 1 1 6.76
0.7
y
r ts
y
FSh
E Jc
Lr
F S h E Jc
= ++
(AISC F2-6)
where
2
33
yw
ts
IC
rS
=
(AISC F2-7)
1 for Double Channel sections
for Channel sections
2
y
o
w
CI
h
C
=
(AISC F2-8a, F2-8b)
and h0 is the distance between flange centroids.
Calculation of Nominal Strengths 3 - 53

Steel Frame Design AISC 360-05
3.5.3.3.1.3 Compression Flange Local Buckling
The nominal strength for compression flange local buckling is determined
based on whether the web is compact, noncompact, or slender.
If the web is compact,
( )
33
33
2
, for compact flanges,
0.7 , for noncompact flanges, and
0.9 , for slender flanges,
n
p
pf
pp y
rf pf
c
M
M
M M FS
Ek S
=
λ−λ
−−
λ −λ
λ
(AISC F2-1, F3-1, F3-2)
if the web is noncompact,
()
33
33
2
, for compact flange,
, for noncompact flanges, and
0.9 , for slender flanges,
n
pc y
pf
pc y pc y L
rf pf
c
M
RM
RM RM FS
Ek S
=
λ−λ
−−
λ −λ
λ
(AISC F4-1, F4-12, F4-13)
and if the web is slender,
Mn = RpgFcr S33 (AISC F5-7)
where, Fcr is the critical buckling stress give by
( )
2
, if flanges are compact,
0.3 , if the flanges are noncompact,
0.9 , if the flanges are slender,
y
pf
cr y y
rf pf
cy
F
FF F
Ek F
λ−λ
= −
λ −λ
≤
λ
where,
3 - 54 Calculation of Nominal Strengths
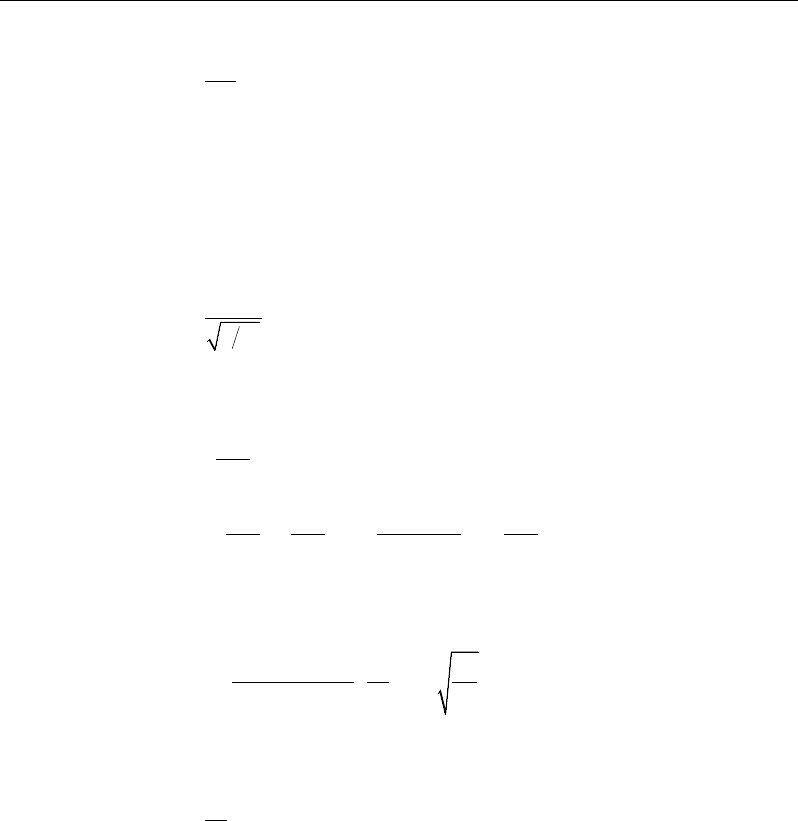
Chapter 3 - Design using ANSI/AISC 360-05
λ =
2
f
f
b
t
λpf = λp , the limiting slenderness for compact flange, as given in Table
3-5 (AISC Table B4.1, B4.3)
λrf = λr , the limiting slenderness for noncompact flange, as given in
Table 3-5 (AISC Table B4.1, B4.3)
kc =
4,
w
ht
35 ≤ kc ≤ 0.76 (AISC F4.3, Table B4.1)
FL = 0.7Fy (AISC F4-6a, F4.3)
Rpc =
, if
1 , if
pw pw
y
p p pw p pw w rw
y y rw pw y
M
M
MM M
MM M
λ ≤λ
λ−λ
− − ≤ λ <λ ≤λ
λ −λ
(AISC F4-9a, F4-9b)
Rpg =
1 5.7 1.0
1200 300
wc
ww y
ahE
at F
− −≤
+
(AISC F5-6)
S33 = elastic section modulus for major axis bending,
λw =
c
w
h
t
λpw = λp , the limiting slenderness for compact web, as given in Table 3-5
(AISC Table B4.1)
λrw = λr , the limiting slenderness for a noncompact web, as given in
Table 3-5 (AISC Table B4.1)
Rpg is the bending strength reduction factor, which has been described in a
previous section.
Calculation of Nominal Strengths 3 - 55

Steel Frame Design AISC 360-05
3.5.3.3.2 Minor Axis Bending
The nominal flexural strength is the lower value obtained according to the limit
states of yielding (plastic moment) and flange local buckling.
3.5.3.3.2.1 Yielding
Mn = Mp = Fy Z22 ≤ 1.6Fy S22 (AISC F6-1)
where, S22 and Z22 are the section and plastic moduli about the minor axis, re-
spectively.
3.5.3.3.2.2 Flange Local Buckling
( )
22
22
, for compact flange,
0.7 , for noncompact flanges, and
, for slender flanges,
n
p
pf
pp y
rf pf
cr
M
M
M M FS
FS
=
λ−λ
−−
λ −λ
(AISC F6-1, F6-2, F6-3)
where,
2
0.69
cr
E
F=λ
(AISC 6-4)
2
f
f
b
t
λ=
(AISC F6.2)
and λpf and λrf are the limiting slendernesses for compact and noncompact
flanges, respectively, as described in Table 3-5 (AISC B4.1).
3.5.3.4 Box Sections
This section applies to Box sections with compact or noncompact webs and
compact, noncompact or slender flanges, bent about either axis. The program
uses the same set of formulas for both major and minor direction bending, but
with appropriate parameters.
The nominal flexural strength is the lowest value obtained according to the
limit states of yielding (plastic moment), flange local buckling and web local
buckling.
3 - 56 Calculation of Nominal Strengths
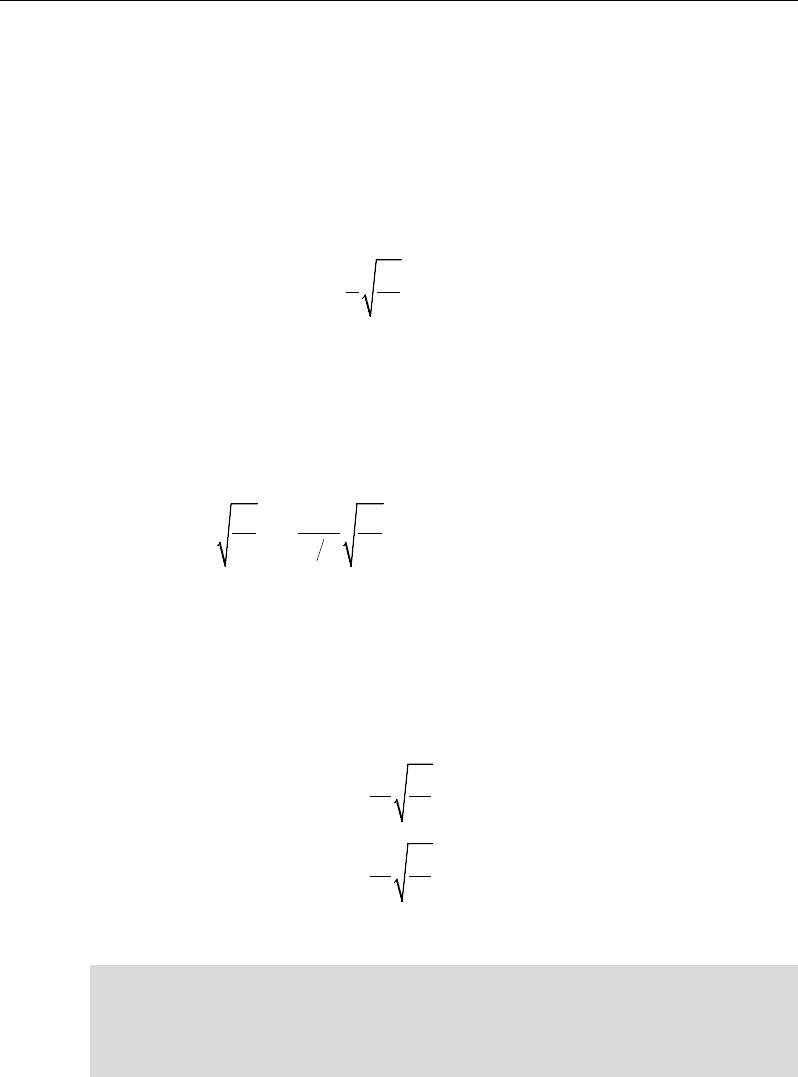
Chapter 3 - Design using ANSI/AISC 360-05
3.5.3.4.1 Yielding
Mn = Mp = FyZ, (AISC F7-1)
where, Z is the plastic section modulus about the axis of bending.
3.5.3.4.2 Flange Local Buckling
( )
, for compact flanges,
3.57 4.0 for noncompact flanges, and
for slender flanges,
,
,
y
n p py p
y eff
p
M
F
b
M M M FS M
tE
FS
= − −≤
−
(AISC F7-1, F7-2, F7-3)
where, Seff is the effective section modulus determined using the effective com-
pressive flange width, be ,
0.38
1.92 1 .
e
yy
EE
bt b
F bt F
= −≤
(AISC F7-4)
See the "Reduction Factor for Slenderness" section for details (AISC F7, E7.2).
3.5.3.4.3 Web Local Buckling
( )
( )
33
33
, for compact webs, and
0.305 0.738 for noncompact webs,
0.305 0.738 for slender webs.
,
,
y
n p py p
y
p py p
p
w
w
M
F
h
M M M FS M
tE
F
h
M M FS M
tE
= − −≤
− −≤
−
−
(AISC F7-1, F7-5)
Note that the code does not cover the Box section flexure strength if the web is
slender. The program uses the same flexure strength formula for Box sections
with noncompact and slender webs, even though the formula applies only to
noncompact section.
Calculation of Nominal Strengths 3 - 57

Steel Frame Design AISC 360-05
3.5.3.5 Pipe Sections
This section applies to pipe sections with
Dt
ratio less than
0.45
y
E
F
. If a Pipe
section violates this limit, the program reports an error.
The nominal flexural strength is the lowest value obtained according to the
limit states of yielding (plastic moment) and local buckling. The same set of
formulas is used for both major and minor axes of bending.
3.5.3.5.1 Yielding
Mn = Mp = FyZ (AISC F8-1)
3.5.3.5.2 Local Buckling
0.021
, for compact sections,
, for noncompact sections, and
, for slender sections,
y
p
n
cr
EFS
D
t
M
M
FS
+
=
(AISC F8-1, F8-2, F8-3)
where, S is the elastic section modulus and Fcr is the critical buckling stress,
where,
0.33 .
cr
E
FD
t
=
(AISC F8-4)
3.5.3.6 T-Shapes and Double Angle Sections
3.5.3.6.1 Major Axes Bending
The nominal flexural strength for T-Shapes and Double Angles bent about their
major (3-3) axis, i.e., the axis perpendicular to the axis of symmetry, is taken as
the lowest value obtained according to the limit states of yielding (plastic mo-
ment), lateral-torsional buckling, and flange local buckling.
3 - 58 Calculation of Nominal Strengths
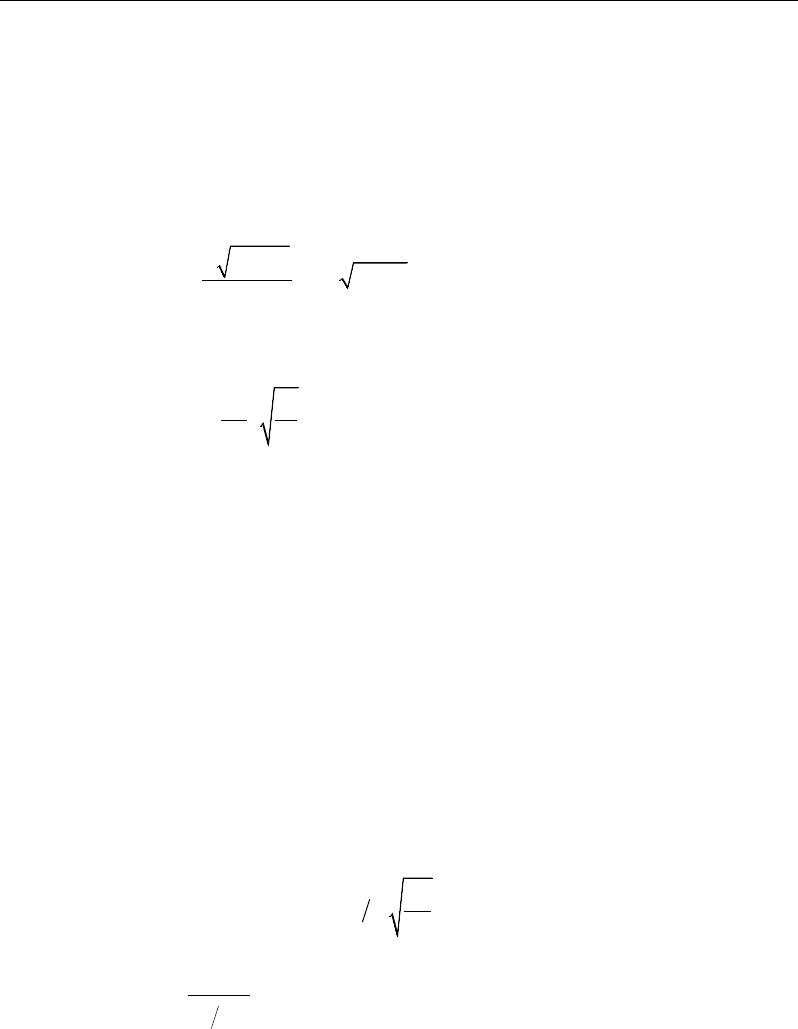
Chapter 3 - Design using ANSI/AISC 360-05
3.5.3.6.1.1 Yielding
33
33
for stems in compression, and
1.6 for stems in tension.
,
,
= ≤
== ≤
py y
n
py
y
M FZ M
MM FZ M
(AISC F9-1, F9-2, F9-3)
3.5.3.6.1.2 Lateral-Torsional Buckling
2
1,
y
n cr
b
EI GJ
MM B B
L
π
= = ++
(AISC F9-4)
where, B is taken conservatively as:
2.3 .
y
b
I
d
BLJ
= ±
(AISC5 F9-5)
The plus sign for B applies when the stem is in tension (M > 0) and the minus
sign applies when the stem is in compression (M < 0).
3.5.3.6.1.3 Flange Local Buckling
When the flange is under compression (i.e., when the factored moment Mr is
positive), the nominal moment capacity is taken as follows:
Mn = FcrSxc , (AISC F9-6)
where. Sxc is the elastic section modulus about the compression flange, and Fcr
is determined as follows:
( )
( )
2
for compact sections,
, for noncompact sections, and
, for slender sections,
,
1.19 0.50
0.69
cr
y
y
y
F
F
F bt
bt
F
E
E
=
−
(AISC F9-1, F9-7, F9-8)
where,
Calculation of Nominal Strengths 3 - 59

Steel Frame Design AISC 360-05
,
2
f
f
b
b
tt
=
(for T-Shapes)
,
f
f
b
b
tt
=
(for Double Angles)
and bf and tf are described in Figure 3-1.
When the flange is in tension, i.e., when the factored moment Mr is negative,
this limit state is not considered in the program.
3.5.3.6.2 Minor Axes Bending
The nominal flexural strength for T-Shapes and Double Angles bent about their
minor (2-2) axes, i.e., the axis of symmetry, is taken as the lowest value ob-
tained according to the limit states of yielding (plastic moment) and flange lo-
cal buckling.
3.5.3.6.2.1 Yielding
Mn = Mp = FyZ22 ≤ 1.6FyS22 (AISC F6-1)
where, S22 and Z22 are the section and plastic moduli about the minor axis, re-
spectively.
3.5.3.6.2.2 Flange Local Buckling
( )
22
22
, for compact flange,
0.7 , for noncompact flanges, and
, for slender flanges,
n
p
pf
pp y
rf pf
cr
M
M
M M FS
FS
=
λ−λ
−−
λ −λ
(AISC F6-6)
where,
2
0.69
cr
E
F=λ
(AISC 6-4)
2
f
f
b
t
λ=
(for T-Shapes)
3 - 60 Calculation of Nominal Strengths
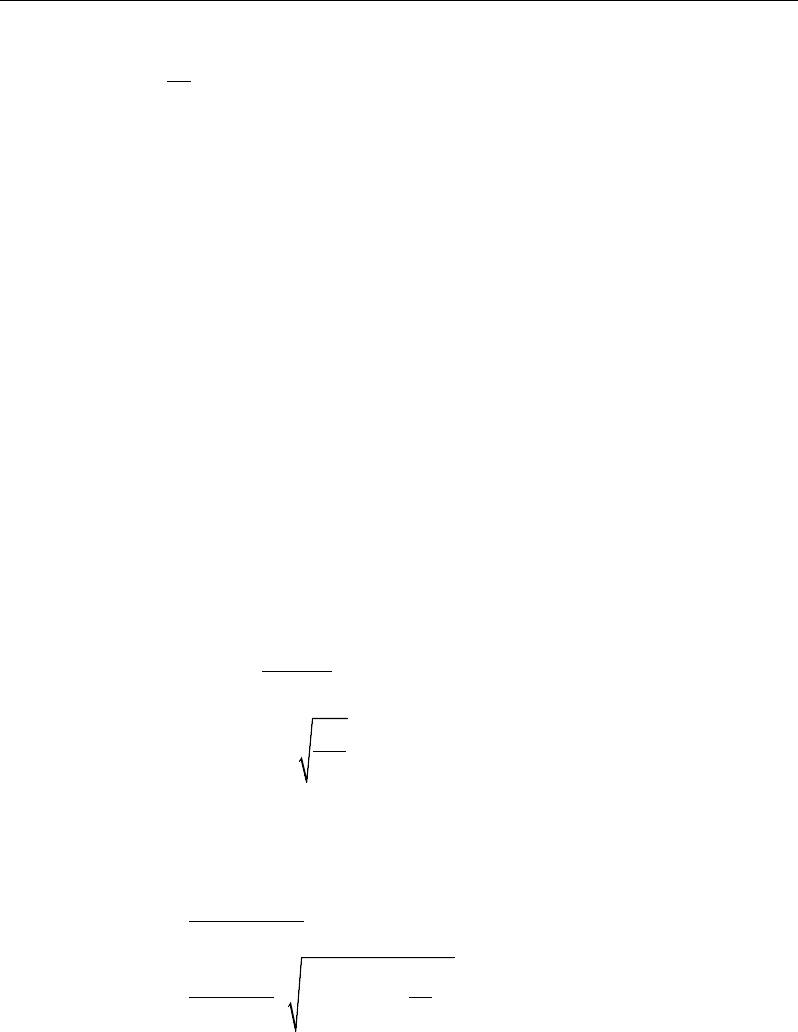
Chapter 3 - Design using ANSI/AISC 360-05
λ
=f
f
b
t (for Double Angles)
and λpf and λrf are the limiting slendernesses for compact and noncompact
flanges, respectively, as described in Table 3-5 (AISC B4.1).
3.5.3.7 Single Angle Sections
The nominal flexural strength of angle sections is conservatively calculated
based on the principal axes of bending. The nominal flexural strength about the
major principal axis is the lowest value obtained according to the limit states of
yielding (plastic moment), lateral-torsional buckling, and leg local buckling.
3.5.3.7.1 Yielding
Mn = 1.5My , (AISC F10-1)
where, My is the yield moment about the axis of bending.
3.5.3.7.2 Lateral-Torsional Buckling
The nominal flexure strength for bending about the major principal axis for the
limit state of lateral-torsional buckling is given as follows:
0.17
0.92 , if , and
0.92 1.17 1.5 , if ,
n
ee ey
y
y
y y ey
e
M
MM MM
M
MM M MM
M
=
−≤
−≤ >
(AISC F10-2, F-10-3)
where Me is the elastic lateral-torsional buckling moment defined as follows:
22
2
2
2
0.46 for equal-leg angles,
4.9 0.052 for unequal-leg angles.
b
ebww
z
z
M
Eb t C
L
EI C Lt
r
L
=
β + +β
(AISC F10-5,6)
where,
Calculation of Nominal Strengths 3 - 61

Steel Frame Design AISC 360-05
Cb = lateral-torsional buckling modification factor for nonuniform mo-
ment diagram. It is computed using equation AISC F1-1. A limit on
Cb is imposed (Cb ≤ 1.5) in the program (AISC F10).
L = laterally unbraced length of the member. It is taken as the max(L22,
L33) in the program because L22 and L33 are not defined in the princi-
pal direction, in. (mm).
I2 = minor principal axis moment of inertia, in.4 (mm4),
rt = radius of gyration for the minor principal axis, in. (mm),
t = angle leg thickness, in. (mm). It is taken as min(tb , tf )
βw = a section property for unequal-legged angles. It is given as follows:
( )
22 0
12
I
w
wA
z w z dA zβ= + −
∫
(AISC Table C-F10.1)
βw is positive for short leg in compression, negative for long leg in
compression, and zero for equal-leg angles. If the long leg is in com-
pression anywhere along the unbraced length of the member, the
negative value of βw should be used (AISC F10.2). It is conservative-
ly taken as negative for unequal-leg angles.
z = coordinate along the minor principal axis
w = coordinate along the major principal axis
z0 = coordinate of the shear center along the z-axis with respect to
the centroid
Iw = major principal axis moment of inertia
Iz = minor principal axis moment of inertia.
In the preceding equation, My is taken as the yield moment about the major
principal axis of bending, considering the possibility of yielding at the heel and
both of the leg tips.
3 - 62 Calculation of Nominal Strengths
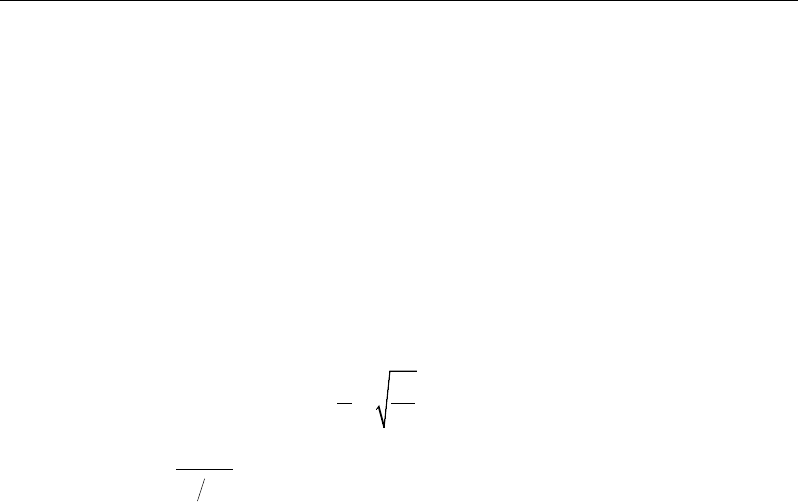
Chapter 3 - Design using ANSI/AISC 360-05
The nominal flexural strength for bending about the minor principal axis for
the limit state of lateral-torsional buckling is not needed because the limit state
of lateral-torsional buckling does not apply for minor axis bending.
3.5.3.7.3 Leg Local Buckling
The nominal flexural strength for bending about the major and minor principal
axes of single angle sections for the limit state of hg local buckling are given as
follows:
( )
2
1.5 if compact,
2.43 1.72 if noncompact, and
0.71 if slender,
yc
y
n yc
c
FS
F
b
M FS tE
ES
bt
−
(AISC F10-7, F10-8, F10-9)
where,
Sc = elastic section modulus to the toe in compression relative to the axis
of bending
t = thickness of the leg under consideration
b = outside width of the leg under consideration.
In calculating the bending strengths for single-angles for the limit state of leg
local buckling, the capacities are calculated for both the principal axes consid-
ering the assumption that either of the two tips (toes) can be under compres-
sion. The minimum capacities are considered.
3.5.3.8 Rectangular Sections
This section applies to rectangular sections bent about either axis.
The nominal flexural strength is the lowest value obtained according to the
limit states of yielding (plastic moment) and lateral-torsional buckling.
Calculation of Nominal Strengths 3 - 63

Steel Frame Design AISC 360-05
3.5.3.8.1 Yielding
Mn = Mp = Fy Z ≤ 1.6My (AISC F11-1)
3.5.3.8.2 Lateral-Torsional Buckling
Limit state of lateral-torsional buckling does not apply to rectangular sections
bent about their moving axis. For rectangular sections, Mn about major axis, is
given by the following:
2
22
33 2
0.08
, if ,
0.08 1.9
1.52 0.274 , if ,
1.9
, if ,
e
b
p
y
y
bb
b yp
yy
b
cr p
y
M
MC
F
Ld E
F
t
F
Ld Ld
EE
MM
E FF
tt
Ld E
SM F
t
=
≤
− ≤ <≤
≤>
(AISC F11-1, F11-2, F11-3)
where, Fcr is the critical buckling stress, which is given by
2
1.9 ,
b
cr b
EC
FLd
t
=
(AISC F11-4)
where, t is the width of the rectangular bar parallel to axis of bending; d is the
depth of the rectangular bar; and Lb is the length unbraced against lateral dis-
placement of the compression region or twist of the cross-section.
3.5.3.9 Circular Sections
The nominal flexural strength is the value obtained according to the limit states
of yielding (plastic moment).
Mn = Mp = Fy Z ≤ 1.6My (AISC F11-1)
For this section, the limit state of lateral-torsional buckling need not be consid-
ered (AISC F11.2(c)).
3.5.3.10 General Sections and Section Designer Sections
For General sections and Section Designer sections, the nominal major and
minor direction bending strengths are assumed as:
3 - 64 Calculation of Nominal Strengths

Chapter 3 - Design using ANSI/AISC 360-05
Mn = My = SFy.
The program does not check any lateral-torsional buckling, flange local buck-
ling, web local buckling, or tension flange yielding. The program assumptions
may not be conservative. The user is expected to calculate the capacity and
overwrite it.
3.5.4 Nominal Shear Strength
The nominal shear strengths are calculated for shears along the geometric axes
for all sections. For I-Shape, Box, Channel, Double Channel, T-Shape, Double
Angle, Pipe, Circular and Rectangular sections, the principal axes coincide
with their geometric axes. For Angle sections, principal axes do not coincide
with their geometric axes.
In calculating nominal strength for shear, Vn , it is assumed that there is no in-
termedial stiffeners used to enhance shear strength of a section (AISC G2-2).
The code allows the use of one of following methods: (a) the limit state of
shear yielding and shear buckling without using tension-field-action (AISC
G2); and (b) post buckling strength of the member or tension-field-action
(AISC G3). The program uses the first method to calculate shear strengths.
The design shear strength, φvVn , and the allowable shear strength,
,
nv
VΩ
are
determined using the following factors.
For all sections in both the major and minor directions, except for the web of
rolled I-Shaped members with
2.24
wy
ht EF≤
φv = 0.9 (LRFD) (AISC G1)
Ω v = 1.67 (LRFD) (AISC G1)
For the web of rolled I-Shaped members with
2.24
wy
ht EF≤
and for ma-
jor direction shear only
φv = 1.0 (LRFD) (AISC G2.1a)
Ω v = 1.50 (ASD) (AISC G2.1a)
Calculation of Nominal Strengths 3 - 65
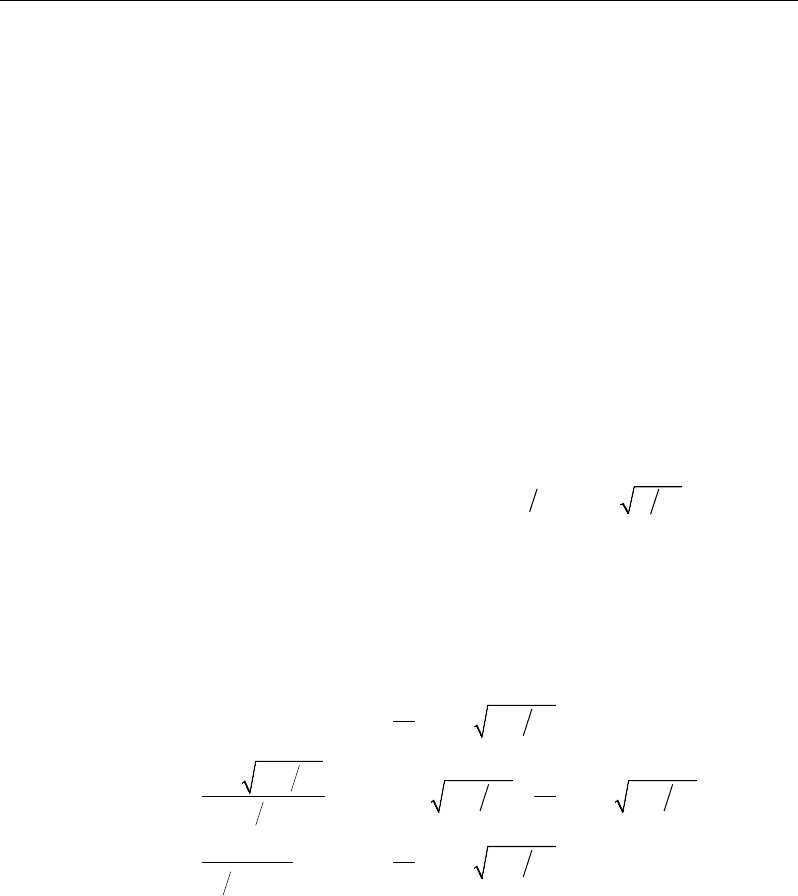
Steel Frame Design AISC 360-05
3.5.4.1 Shear in the Major Direction
The nominal shear strength for major direction, Vn2 , is evaluated according to
the limit states of shear yielding and shear buckling
Vn = 0.6Fy Aw Cv , (AISC G2-1)
where Aw is the area of the web (overall depth times the web thickness, dtw),
and Cv is the web shear coefficient. The expressions of Aw and Cv differ from
section to section, as follows.
3.5.4.1.1 I-Shapes
For all I-shaped members, Aw is taken as the overall depth of the member times
the web thickness
Aw = dtw. (AISC G2.1(b))
For the webs of rolled I-shaped members with
2.24 ,
wy
ht EF≤
Cv is taken
as 1.
Cv = 1. (AISC G2-2)
For webs of all other I-shaped members, including both singly and doubly
symmetric and both rolled and welded sections, Cv is taken as follows:
()
2
1.0
, if 1.10 ,
1.10 , if 1.10 1.37 , and
1.51 , if 1.37 ,
vy
w
vy
v vy vy
ww
vvy
w
wy
C
hkEF
t
kEF h
kEF kEF
ht t
Ek hkEF
t
ht F
=
≤
<≤
>
(AISC G2-3, G2-4, G2-5)
where kv is the web plate bucking coefficient and it is taken as
kv = 5. (AISC G2.1(b)(i))
In the preceding expression, for rolled shapes, h is taken as the clear distance
between flanges less the fillet or corner radii, and for built-up welded sections,
h, is taken as the clear distance between flanges (AISC G2.1(b), B4.2).
3 - 66 Calculation of Nominal Strengths
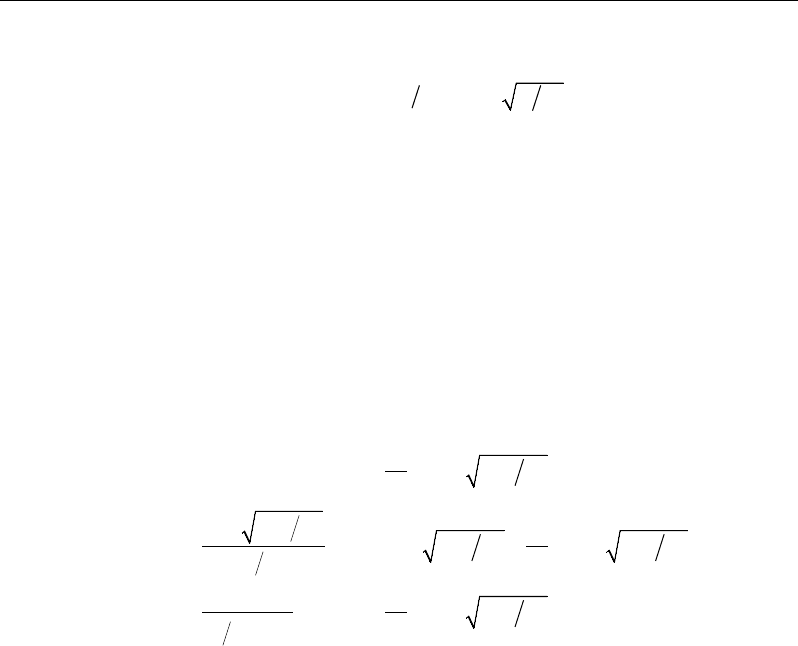
Chapter 3 - Design using ANSI/AISC 360-05
It should be observed that the φv factor, also the Ωv factor, differs for the web
of rolled I-shaped members with
2.24
wy
ht EF≤
from the web of other I-
shaped members.
3.5.4.1.2 Channel, Double Channel, and T-Shape Sections
Aw is taken as the overall depth of the member times the web thickness
Aw = dtw for Channel sections, (AISC G2.1(b))
Aw = 2dtw for Double Channel sections, (AISC G2.1(b))
Aw = dtw for T-Shape sections. (AISC G2.1(b))
Cv is taken as follows:
( )
2
1.0, if 1.10 ,
1.10 if 1.10 1.37 , and
1.51 if 1.37 ,
vy
w
vy
v vy vy
ww
vvy
w
wy
C
hkEF
t
kEF h
kEF kEF
ht t
Ek hkEF
t
ht F
=
≤
<≤
>
(AISC G2-3, G2-4, G2-5)
where,
kv = 5 for Channel and Double Channel sections (AISC G2.1(b)(i))
kv = 1.2 for T-Shape sections (AISC G2.1(b)(i))
and for Channel and Double Channel sections, h is taken as the clear distance
between flanges less the fillet or corner radii (AISC G2.1(b), B4.2); and for T-
Shape sections, h is taken as the overall depth (AISC G2.1(b)).
3.5.4.1.3 Box Sections
Aw is taken as follows:
Aw = 2htw. (AISC G5)
Cv is taken as follows:
Calculation of Nominal Strengths 3 - 67

Steel Frame Design AISC 360-05
( )
2
1.0
, if 1.10 ,
1.10 , if 1.10 1.37 , and
1.51 , if 1.37 ,
vy
w
vy
v vy vy
ww
vvy
w
wy
C
hkEF
t
kEF h
kEF kEF
ht t
Ek hkEF
t
ht F
=
≤
<≤
>
(AISC G5, G2-3, G2-4, G2-5)
where,
kv = 5 (AISC G5)
h = d − 3tf . (AISC G5)
Note that the design thickness of the Box section can differ by a reduction fac-
tor from its nominal thickness if the welding process is ERW (AISC B3.12).
The choice of reduction and the reduction factor C can be overwritten on a
member-by-member basis.
3.5.4.1.4 Angle Sections
Aw and Cv are taken as follows:
Aw = bt (AISC G4)
Cv = 1.0 (AISC G4)
where b is the width of the leg resisting the shear force.
3.5.4.1.5 Double Angle Sections
Aw and Cv are taken as follows:
Aw = 2bt (AISC G4)
Cv = 1.0 (AISC G4)
where b is the width of the leg resisting the shear force.
3.5.4.1.6 Rectangular, Circular (Round), General and SD Sections
For these sections, Aw is calculated as the effective shear area from the basic
principle of elastic shear distribution, and Cv is taken as 1 for simplicity.
3 - 68 Calculation of Nominal Strengths
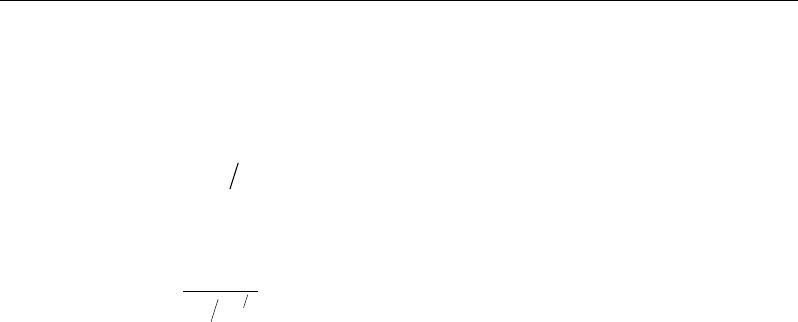
Chapter 3 - Design using ANSI/AISC 360-05
3.5.4.1.7 Pipe Section
The nominal shear strength, Vn , of round HSS (i.e, Pipe sections) according to
the limit state of shear yielding and shear buckling is taken as
2
n cr g
V FA=
(AISC G6-1)
where,
()
32
0.78 0.6 .
cr y
E
FF
Dt
= ≤
(AISC G6-2b)
The code allows Fcr to be taken as the maximum of two alternate values. The
program conservatively uses one of the two expressions only. In the preceding
equations,
Ag = gross area of section based on design wall thickness
D = outside diameter
t = design wall thickness.
The design wall thickness is equal to 0.93 times the nominal wall thickness for
ERW HSS, and equal to the nominal wall thickness for SAW HSS. However,
the choice of thickness reduction and the reduction factor can be overwritten in
the program on a member-by-member basis.
3.5.4.2 Shear in Minor Direction
The nominal shear strength for minor directions, Vn3 , is evaluated according to
the limit states of shear yielding and shear buckling as follows:
Vn = 0.6Fy Aw Cv , (AISC G2-1)
where, Aw is the shear area for minor direction shear, and Cv is the web shear
coefficient. The expression of Aw and Cv differs from section to section as fol-
lows.
3.5.4.2.1 I-Shapes, Channel, Double Channel, and T- Shapes
Aw is taken as the sum of flange areas.
Calculation of Nominal Strengths 3 - 69
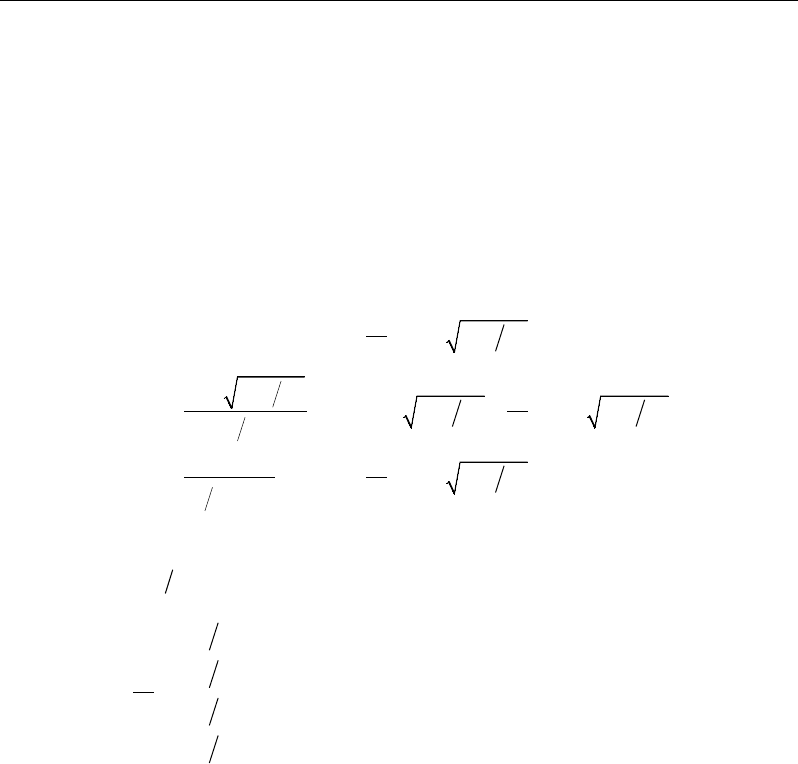
Steel Frame Design AISC 360-05
2
2
4
Doubly Symmetric I-Shapes
Singly Symmetric I-Shapes
Channels
Double Channels
T Shapes
w
ff
fb fb ft ft
ff
ff
ff
A
b
b
b
b
b
t
t bt
t
t
t
=
+
(AISC G7)
Cv is taken as follows:
( )
2
1.0, if 1.10 ,
1.10 , if 1.10 1.37 , and
1.51 , if 1.37 ,
vy
w
vy
v vy vy
ww
vvy
w
wy
C
hkEF
t
kEF h
kEF kEF
ht t
Ek hkEF
t
ht F
=
≤
<≤
>
(AISC G7, G2-3, G2-4, G2-5)
where
w
ht
is really meant for flange and is taken as follows,
I Shapes
Channels
Double Channels
T Shapes
2
2
w
ff
ff
ff
ff
h
t
bt
bt
bt
bt
=
(AISC G7)
and kv is taken as 1.2,
kv = 1.2. (AISC G7)
All dimensions used in the preceding equation are explained in Figure 3-1. For
Singly Symmetric I-Shapes where each flange has its own properties, the shear
capacity contribution is calculated for each flange separately based on its own
dimensions, and then the combinations are added together.
3.5.4.2.2 Box Sections, Angles, and Double Angles
The shear capacity in the minor direction, Vn3 , is calculated in exactly the same
way as for calculation of the major shear capacity, Vn2 , except that the appro-
priate dimensions are used (AISC G4, G5, G1).
3 - 70 Calculation of Nominal Strengths

Chapter 3 - Design using ANSI/AISC 360-05
3.5.4.2.3 Pipe Sections
The shear capacity in the minor direction, Vn3 , is exactly the same as that for
major direction (AISC G6).
3.5.4.2.4 Rectangular, Circular (Round), General and SD Sections
For these sections, Aw is calculated as the effective shear area from the basic
principle of elastic stress distribution. Cv is taken as 1 for simplicity. Then,
equation G2-1 is used to calculate the shear capacity.
3.5.5 Nominal Torsional Strength
The nominal torsion strengths are calculated for closed sections such as Boxes
and Pipes only. Torsion is ignored in design for all other section types.
The design torsional strength, φTTn, and the allowable torsional strength,
,
nT
TΩ
are determined using the following resistance and safety factors:
φT = 0.90 (LRFD) (AISC H3.1)
ΩT = 1.67 (ASD) (AISC H3.1)
The nominal torsional strength, Tn , according to the limit states of torsional
yielding and torsional buckling, is as follows:
Tn = Fcr C, (AISC H3-1)
where C is the torsional shear constant, and Fcr is the critical buckling stress.
For round HSS (i.e., Pipe sections), C is taken conservatively as
( )
2
2
Dtt
Cπ−
=
(AISC H3.1 Note)
Fcr is taken as,
Fcr = max(Fcr1, Fcr2) ≤ 0.6Fy , (AISC H3.1)
where,
Calculation of Nominal Strengths 3 - 71
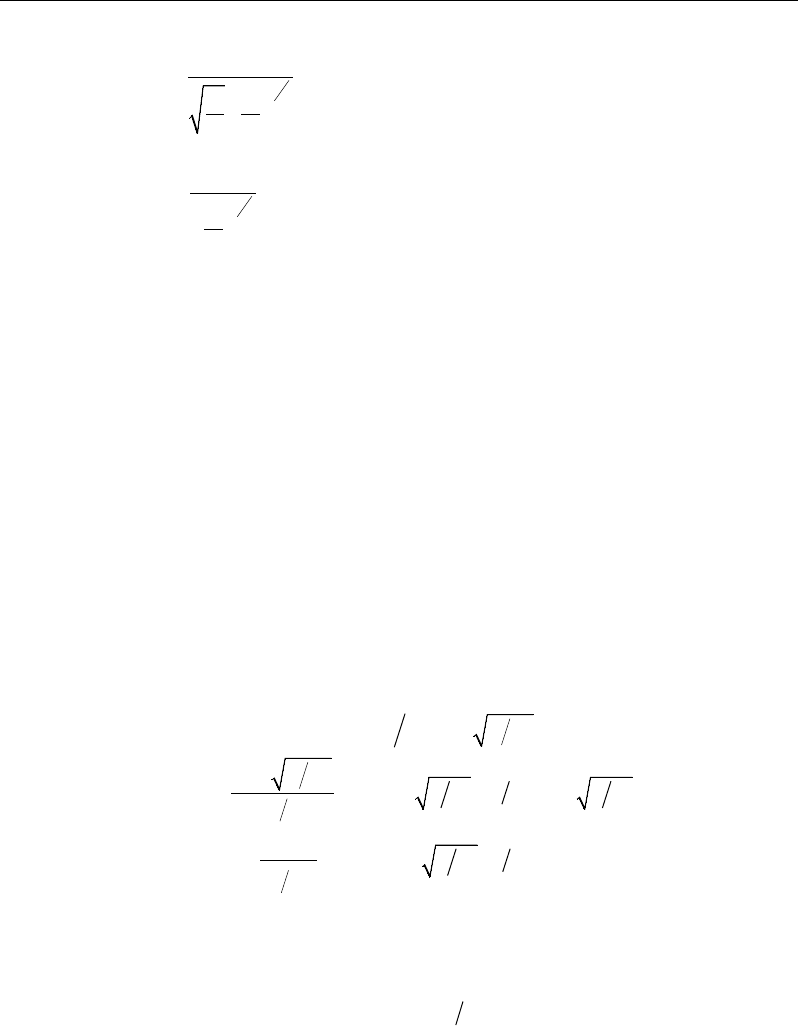
Steel Frame Design AISC 360-05
154
1.23 ,
cr E
FLD
Dt
=
and (AISC H3-2a)
232
0.60
.
cr
E
FD
t
=
(AISC H3-2b)
In the preceding equations,
L = torsional unbraced length of the member, LLTB. This length is taken
as the minor direction unbraced length for flexural buckling, L22 , by
default. However, this length can be overwritten in the program.
D = outside diameter of the Pipe section
t = design wall thickness
For regular HSS (i.e., Box sections),
( )( ) ( ){ }
( )
( )( )
{ }
3
2 min , 4.5 4 min ,
f w f wf fw
C b t d t tt tt= − − − −π
(AISC H3.1)
( )
( )
2
2
0.6
0.6 2.45
, if 2.45 ,
2.45 , if 3.07 , and
0.458 , if 3.07 < 26.0.
yy
y
cr y y y
y
F
F F EF ht EF
EF ht
ht EF
EF
ht
E
ht
=
≤
<≤
π≤
(AISC H3-3, H3-4, H3-5)
The variables bf , tw , d, tf , h and t used in the preceding expression have been
explained in Figure 3-1. In calculating
,ht
the maximum of the ratio of depth
to thickness and width to thickness are considered.
Here t is the design thickness. The design wall thickness is equal to 0.93 times
the nominal wall thickness for ERW HSS and equal to the nominal wall thick-
3 - 72 Calculation of Nominal Strengths

Chapter 3 - Design using ANSI/AISC 360-05
ness for SAW HSS. However, the choice of thickness reduction and the reduc-
tion factor can be overwritten in the program on a member-by-member basis.
3.6 Design of Members for Combined Forces
Previous sections of this design manual address members subject to only one
type of force, namely axial tension, axial compression, flexure or shear. This
section addresses the design of members subject to a combination of two or
more of the individual forces.
In the calculation of the demand/capacity (D/C) ratios, first, for each station
along the length of the member, the actual member force/moment components
are calculated for each design combination. Then, the corresponding capacities
are calculated. Then, the D/C ratios are calculated at each station for each
member under the influence of each of the design combinations. The control-
ling D/C ratio is then obtained, along with the associated station and design
combination. A D/C ratio greater than the D/C ratio limit (whose default value
is 1.0) indicates exceeding a limit state.
During the design, the effect of the presence of bolts or welds is not consid-
ered.
3.6.1 Doubly and Singly Symmetric Members Subjected to
Flexure and Axial Compression
The interaction of flexure and axial compression in all members with Doubly
Symmetric sections (I-Shapes, Double Channel, Box, Pipe, Solid Circular, Sol-
id Rectangular) and Singly Symmetric sections (Channel, T-Shape, Double
Angle), with some exceptional cases, is given as follows:
For
0.2
r
c
P
P≥
33 22
33 22
81.0.
9
r
rr
c cc
M
PM
P MM
+ +≤
(AISC H1-1a)
For
0.2
r
c
P
P<
Design of Members for Combined Forces 3 - 73

Steel Frame Design AISC 360-05
33 22
33 22
1.0,
2
r
rr
cc c
M
PM
PM M
++≤
(AISC H1-1b)
where, Pr and Pc are the required and available axial strengths; Mr and Mc are
the required and available flexural strengths; and 3 and 2 represent the strong
and weak axes, respectively.
Depending on the selected design provisions (LRFD or ASD), the aforemen-
tioned terms are defined as follows:
For design according to LRFD provisions:
Pt = required axial compressive strength using LRFD load combinations
Pc = design axial compressive strength = φcPn
Mr = required flexural strength using LRFD load combinations
Mc = design flexural strength = φbMn
φc = resistance factor for compression = 0.90
φb = resistance factor for flexure = 0.90
For design according to ASD provisions:
Pt = required axial compressive strength using ASD load combinations
Pc = allowable axial compressive strength = Pn/Ωc
Mr = required flexural strength using ASD load combinations
Mc = allowable flexural strength = Mn/Ωb
Ωc = safety factor for compression = 1.67
Ωb = safety factor for flexure = 1.67
As an exception, for Circular and Pipe sections, an SRSS (Square Root of Sum
of Squares) combination is made first of the two bending components before
adding the axial load component, instead of the single algebraic addition as
implied by the interaction equations given by AISC H1-1a and AISC H1-1b.
The resulting interaction equation is given by the following:
For
0.2
r
c
P
P≥
3 - 74 Design of Members for Combined Forces
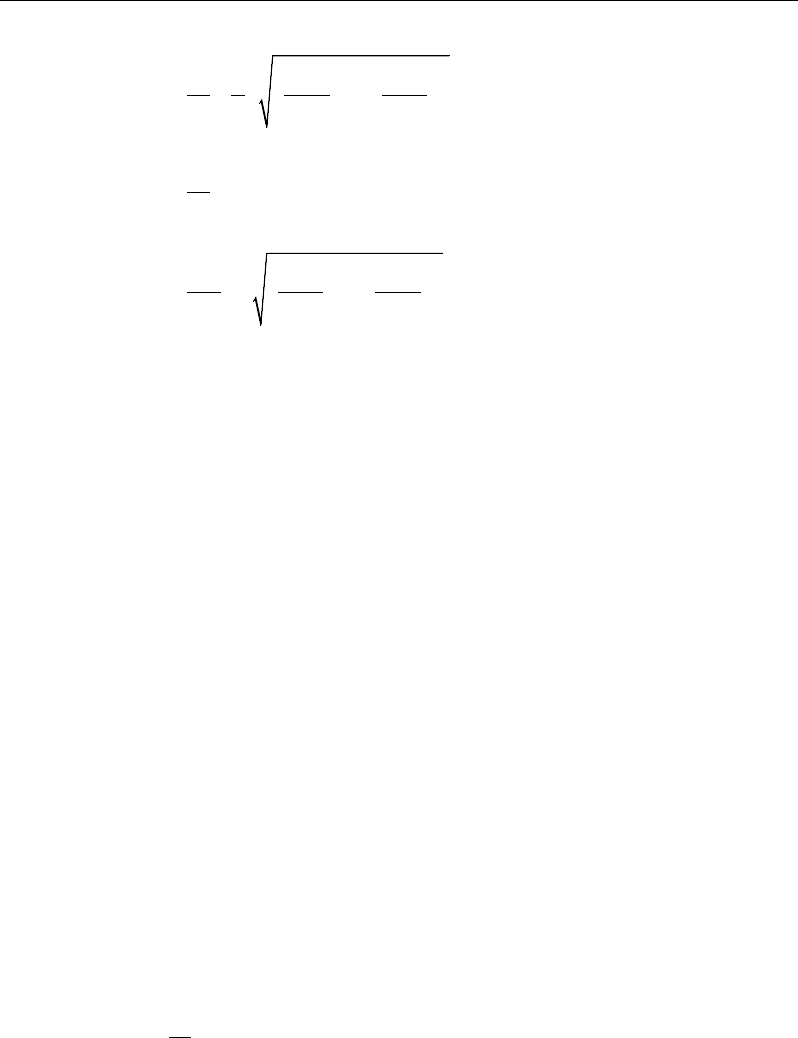
Chapter 3 - Design using ANSI/AISC 360-05
22
33 22
33 22
81.0.
9
r
rr
c cc
M
PM
P MM
+ +≤
For
0.2
r
c
P
P<
22
33 22
33 22
1.0.
2
r
rr
cc c
M
PM
PM M
+ +≤
The philosophy behind the preceding modification is that the engineer has the
freedom to choose the principal axis. The engineer can easily choose the prin-
cipal axis to match with the resultant moment so that the design is always
based on the uniaxial bending with axial force. In that case, the moment will be
the resultant (SRSS) moment from the two components. The resultant D/C ra-
tio calculated using the preceding equations will match the calculated D/C ratio
from the pure resultant moment for the Pipe section. The reason is that Mn for
the Pipe section is independent of the K and L factors. However, for solic cir-
cular (round) sections, the resultant stress ratio calculated using the preceding
equations will not match exactly with the calculated D/C ratio from the pure
resultant moment because Mn for this section depends on the K and L factors,
which are known for only two given principal directions.
As an exception, for members with double symmetric sections in flexure and
compression with negligible minor axis bending moment, two independent
limit states, namely in-plane instability and out-of-plane buckling, also are
considered separately considering the combined approach provided in AISC
equations H1-1a and H1-1b. The minimum ratio provided by the original ap-
proach (AISC H1-1a, H1-1b) and the alternative approach described herein are
taken as the resulting D/C ratio.
a) For the limit state of in-plane instability, equations H1-1a and H1-1b are
used with Mc having a different meaning.
For
0.2
r
c
P
P≥
Design of Members for Combined Forces 3 - 75

Steel Frame Design AISC 360-05
33 22
33, 22
81.0.
9
r
rr
c c NoLTB c
M
PM
PM M
+ +≤
(AISC H1-1a, H1.3a)
For
0.2
r
c
P
P<
33 22
33, 22
1.0,
2
r
rr
c c NoLTB c
M
PM
PM M
+ +≤
(AISC H1-1b, H1.3a)
where, all the terms in the preceding equations are the same as explained
earlier in this section, except Mc33,NoLTB is explained as follows:
For LRFD:
Mc33,NoLTB = φbMn33 = design flexural strength determined in accord-
ance with Chapter F, except that in determining Mn33 , in this case, the
lateral torsional buckling is not considered.
For ASD:
Mn33,NoLTB =
33nb
MΩ
= allowable flexural strength determined in ac-
cordance with Chapter F, except that in determining Mn33 , in this case,
the lateral torsional buckling is not considered.
In general, Mn33,NoLTB is either larger than the regular Mn33 or equal to (for
Pipe sections) the regular Mn33 . The negligibility of the minor axis moment
is tested in the program by using a tolerance (0.001) multiplied by the mi-
nor direction capacity (Mn22).
b) For the limit state of out-of-plane buckling, the following interaction equa-
tion is used
2
33
33
1.0
r
r
co c
M
P
PM
+≤
(AISC H1-2)
where
Pco = available compressive strength considering out-of-plane
bending; it is taken equal to φcPn ,
3 - 76 Design of Members for Combined Forces

Chapter 3 - Design using ANSI/AISC 360-05
Mc33 = available flexural strength considering all limit states, in-
cluding lateral-torsional buckling.
As an exception, any singly-symmetric I-Shape section with
yc y
II
beyond the
range of
0.1 0.9
yc y
II≤≤
is considered beyond the scope of the code (AISC
H.1, F13.2). Those sections are not checked by the program.
As an exception, all General sections and section created using Section De-
signer are treated as Doubly or Singly Symmetric sections. The equations H1-
1a and H1-1b are use for calculation of the D/C ratios.
The program considers the left-hand side to calculate the D/C ratio. The D/C
ratio is really compared with the D/C ratio limit rather than 1. By default, the
D/C ratio limit is 0.95. This limit can be changed in the Preferences.
3.6.2 Doubly and Singly Symmetric Members Subjected to
Flexure and Axial Tension
The interaction of flexure and axial tension in all members with Doubly Sym-
metric sections (I, Double Channel, Box, Pipe, Solid Circular, Solid Rectangu-
lar) and Singly Symmetric sections (Channel, T-Shapes, Double Angle), with
some exceptional cases, are given as follows:
For
0.2
r
c
P
P≥
33 22
33 22
81.0
9
r
rr
c cc
M
PM
P MM
+ +≤
(AISC H1-2, H1-1a)
For
0.2
r
c
P
P<
33 22
33 22
1.0,
2
r
rr
cc c
M
PM
PM M
++≤
(AISCH1-2, H1-1b)
where, Pr and Pc are the required and available axial strengths; Mr and Mc are
the required and available flexural strengths; and 3 and 2 represent the strong
and weak axes, respectively.
Design of Members for Combined Forces 3 - 77

Steel Frame Design AISC 360-05
Depending on the selected design provisions (LRFD or ASD), the aforemen-
tioned terms are defined as follows:
For design in accordance with LRFD provisions:
Pt = required axial tensile strength using LRFD load combinations
Pc = design axial tensile strength = φcPn
Mr = required flexural strength using LRFD load combinations
Mc = design flexural strength = φbMn
φt = resistance factor for tension (0.90 yielding, 0.75 rupture) (AISC D2)
φb = resistance factor for flexure = 0.90
For design in accordance with ASD provisions:
Pt = required axial compressive strength using ASD load combinations
Pc = allowable axial compressive strength = Pn/Ωc
Mr = required flexural strength using ASD load combinations
Mc = allowable flexural strength = Mn/Ωb
Ωt = safety factor for tension (1.67 yielding, 2.00 rupture) (AISC D2)
Ωb = safety factor for flexure = 1.67
As an exception, for Circular and Pipe sections, an SRSS (Square Root of Sum
of Squares) combination is made first of the two bending components before
adding the axial load component, instead of the single algebraic addition as
implied by the interaction equations given by AISC H1-1a and AISC H1-1b.
The resulting interaction equation is given by the following:
For
0.2
r
c
P
P≥
22
33 22
33 22
81.0
9
r
rr
c cc
M
PM
P MM
+ +≤
For
0.2
r
c
P
P<
3 - 78 Design of Members for Combined Forces
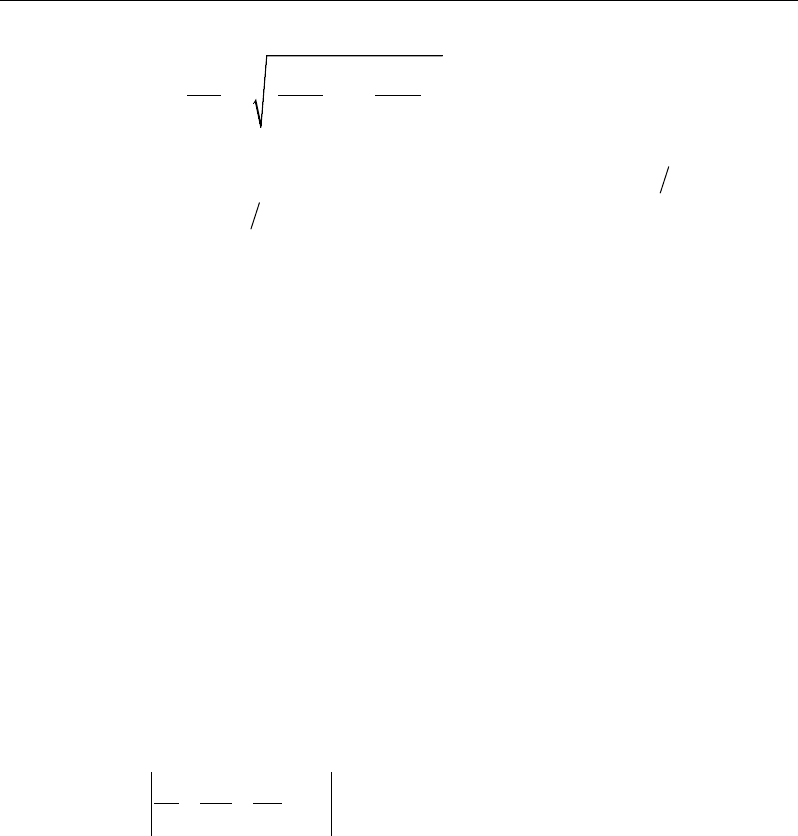
Chapter 3 - Design using ANSI/AISC 360-05
22
33 22
33 22
1.0.
2
r
rr
cc c
M
PM
PM M
+ +≤
As an exception, any single-symmetric I-Shape section with
yc y
II
beyond the
range of
0.1 0.9
yc y
II≤≤
is considered beyond the scope of the code (AISC
H.1, F13.2). These sections are not checked by the program.
As an exception, all General sections and section created using Section De-
signer are treated as Doubly or Singly Symmetric sections. The equations H1-
1a and H1-1b are use for calculation of the D/C ratios.
The program considers the left-hand side to calculate the D/C ratio. The D/C
ratio is really compared with the D/C ratio limit rather than 1. By default, the
D/C ratio limit is 0.95. This limit can be changed in the Preferences.
3.6.3 Unsymmetric Members Subjected to Flexure and Axial
Force
Unlike I-Shapes, Box, Channel, Double Channel, T-Shapes, Double Angle,
Pipe, Circular, and Rectangular sections, the principal axes of unsymmetric
(unequal leg) Single Angle sections do not coincide with their geometric axes.
For Single Angle sections, the principal properties of the section are deter-
mined. The forces are resolved in the principal directions (w and z). The itera-
tion of flexure and axial stress is calculated as follows:
1.0
bz
a bw
a bw bz
f
ff
FF F
++≤
(AISC H2-1)
where fa and Fa are the required and available axial stresses at the point of con-
sideration; fb and Fb are required and available bending stresses; w is the sub-
script related to the major principal axis bending; and z is the subscript related
to the minor principal axis bending.
For design in accordance with LRFD provisions:
fa = required axial stress using LRFD load combinations
Fa = design axial stress = φcFcr or φt Fy
fbw , ftz = required flexural stress using LRFD load combinations
Design of Members for Combined Forces 3 - 79

Steel Frame Design AISC 360-05
Fbw , Ftz = design flexural stress =
bn
M
S
φ
φc = resistance factor for compression = 0.90
φf = resistance factor for tension (0.9 for yielding, 0.75 for rupture)
(Section AISC D2)
φb = resistance factor for flexure = 0.90
For design in accordance with ASD provisions:
fa = required axial stress using ASD load combinations
Fa = allowable axial stress = Fcr / Ωc or Fy / Ωt
fbw , fbz = required flexural stress using ASD load combinations
Fbw , Fbz = allowable flexural stress =
n
b
M
SΩ
Ωc = safety factor for compression = 1.67
Ωf = safety factor for tension (1.67 for yielding, 2.00 for rupture)
(Section AISC D2)
Ωb = safety factor for flexure = 1.67
For General sections and Section Designer sections, it is assumed that the sec-
tion properties are given in terms of principal directions. These two types of
sections are treated as symmetric sections for interaction purposes.
3.6.4 Members Subject to Torsion, Flexure, Shear and Axial
Force
The interaction of torsion, flexure, shear, and axial force is considered only for
Box and Pipe sections and only if the torsion is significant. Torsion is consid-
ered significant when the required torsional strength, Tr , is more than 20% of
the available torsional strength, Tc (AISC H3.2). The interaction of torsion with
other forces is ignored when
Tr ≤ 0.2Tc , (AICS H3.2)
and for members with Box sections, the interaction of torsion, shear, flexure
and axial force is given by
3 - 80 Design of Members for Combined Forces
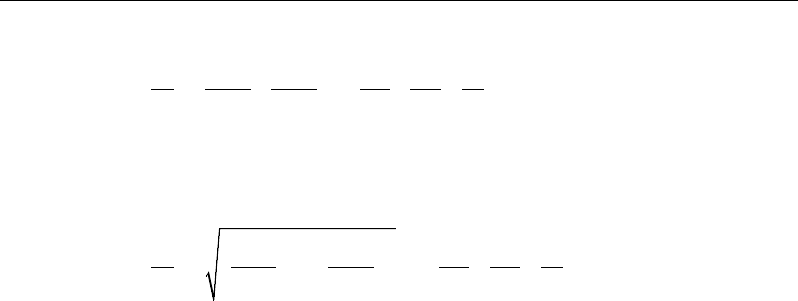
Chapter 3 - Design using ANSI/AISC 360-05
2
33 3
22 2
33 22 3 2
1.0,
rr
r r rr
c c c ccc
MV
P M VT
P M M VVT
+ + + ++ ≤
(AISC H3-6)
and for members with Pipe sections, the interaction of torsion, shear, flexure,
and axial forces is given by
22 2
33 3
22 2
33 22 3 2
1.0,
rr
r r rr
c c c ccc
MV
P M VT
P M M VVT
+ + + ++ ≤
(AISC H3-6)
where, Pr and Pc are the required and available axial strength; Mr and Mc are
required and available flexural strength; Vr and Vc are required and available
shear strength; and Tr and Tc are required and available torsional strength, re-
spectively.
For design in accordance with LRFD provisions:
Pr = required axial strength using LRFD load combinations
Pc = design compressive/tensile strength = φcPn or φt Pn
Mr = required flexural strength using LRFD load combinations
Mc = design flexural strength = φbMn
Vr = required shear strength using LRFD load combinations
Vc = desire shear strength = φ vVn
Tr = required torsional strength using LRFD load combinations
Tc = design torsional strength = φTTn
φc = resistance factor for compression = 0.90
φt = resistance factor for tension (0.9 for yielding, 0.75 for rupture) (from AISC D2)
φb = resistance factor for flexure = 0.90
φv = resistance factor for shear = 0.90
φT = resistance factor for torsion = 0.9
For design in accordance with ASD provisions:
Pr = required axial strength using ASD load combinations
Pc = allowable compressive/tensile strength = Pn / Ωc or Pn / Ωt
Mr = required flexural strength using ASD load combinations
Design of Members for Combined Forces 3 - 81

Steel Frame Design AISC 360-05
Mc = allowable flexural strength = Mn / Ωb
Vr = required shear strength using ASD load combinations
Vc = allowable shear strength = Vn /Ωv
Tr = required torsional strength using ASD load combinations
Tc = allowable torsional strength = Tn / Ωr
Ωc = safety factor for compression = 0.90
Ωt = safety factor for tension (1.67 for yielding, 2.0 for rupture) (from AISC D2)
Ωb = safety factor for flexure = 0.90
Ωv = safety factor for shear = 0.90
Ωr = safety factor for torsion = 0.90
3 - 82 Design of Members for Combined Forces

Chapter 4
Special Seismic Provisions
(ANSI/AISC 341-05)
This chapter provides a detailed description of the algorithms related to special seismic
provisions in the design/check of structures in accordance with the "ANSI/AISC 341-
05―Seismic Provisions for Structural Steel Buildings Including Supplement No. 1"
(AISC 2005). The code option "AISC 360-05/IBC 2006" covers these provisions. The
same code option covers "ANS/AISC 360-05―Specifications for Structural Steel
Building" (AISC 2005a, b) as the basic code. The implementation covers load
combinations from "ASCE/SEI 7-05," which is described in the section "Design
Loading Combination" of Chapter 3. The loading based on "ASCE/SEI 7-05" has been
described in a separate document entitled "CSI Lateral Load Manual" (CSI 2007).
References are also made to IBC 2006 in this chapter.
For referring to pertinent sections of the corresponding code, a unique prefix is
assigned for each code.
Reference to the ANSI/AISC 360-05 code carries the AISC prefix.
Reference to the ANSI/AISC 341-05, Part I code carries the AISC SEISMIC prefix
or sometimes SEISMIC only.
Reference to the ASCE/SEI 7-05 code carries the ASCE prefix.
Reference to the IBC 2006 code carries the IBC prefix.
4 - 1

Steel Frame Design AISC 360-05/IBC 2006
4.1 Notations
Most of the notations used in this chapter have been described previously in Chapter 3.
Any additional notations used in this chapter are described herein.
DS
S
Design earthquake spectral response acceleration parameter at short
period (ASCE 11.4.4)
P
Redundancy factor (ASCE 12.3.4)
O
Ω
Overstrength factor (ASCE Table 12.2-1)
n
E
Effect of horizontal component of design seismic force, including the
effect of
P
(ASCE 12.4.2.1)
v
E
Effect of vertical component of design seismic force (ASCE 12.4.2.2)
nm
E
Horizontal seismic load effects with overstrength factor (ASCE
12.4.3.1)
E
Q
Effects of horizontal seismic forces (ASCE 12.4.2.1, 12.4.3.1, 12.8.1)
4.2 Design Preferences
The steel frame design Preference are basic assignments that apply to all of the steel
frame members. The Preferences are described in Appendix B. Tables
B-1, B-2, and B-3 list the steel frame design Preferences. The following steel frame
design Preferences are relevant to the special seismic provisions.
Framing Type
Notional Load Coefficient
Seismic Design Category
Ignore Seismic Code?
Ignore Special Seismic Load?
Is Doubler Plate Plug Welded?
4 - 2 Notations

Chapter 4 Special Seismic Provisions
4.3 Overwrites
The steel frame design Overwrites are basic assignments that apply only to those
elements to which they are assigned. The overwrites are described in Appendix C.
Table C-1 lists the steel frame design Overwrites. The following steel frame design
overwrites are relevant to the special seismic provisions.
Frame Type
Omega0
Overstrength factor,
y
R
4.4 Supported Framing Types
The code (ANSI/AISC 341-05) now recognizes the following types of framing systems
(AISC SEISMIC 9, 10, 11, 12, 13, 14, 15, 16, 17).
Framing Type References
SMF (Special Moment Frame) AISC SEISMIC 9
IMF (Intermediate Moment Frame) AISC SEISMIC 10
OMF (Ordinary Moment Frame) AISC SEISMIC 11
STMF (Special Truss Moment Frame) AISC SEISMIC 12
SCBF (Special Concentrically Moment Frame) AISC SEISMIC 13
OCBF (Ordinary Concentrically Moment Frame) AISC SEISMIC 14
EBF (Eccentrically Moment Frame) AISC SEISMIC 15
BRBF (Buckling Restrained Moment Frame) AISC SEISMIC 16
SPSW (Special Plate Shear Wall) AISC SEISMIC 17
With regard to these framing types, the program has implemented specifica-tions for
all types of framing systems, except STMF, BRBF, and SPSW. Implementing those
three types of framing requires further information about modeling.
Overwrites 4 - 3

Steel Frame Design AISC 360-05/IBC 2006
The program recognizes the OCBF framing in its two separate incarnations: OCBF for
regular Ordinary Concentrically Braced Frames (AISC SEISMIC 14) and OCBFI for
(base) Isolated Ordinary Concentrically Braced Frames (AISC SEISMIC 14.5).
By default, the frame type is taken as Special Moment Frame (SMF) in the program.
However, the default frame type can be changed in the Preference form for all frames
or in the Overwrites form on a member-by-member basis (Chapter 3). If a frame type
Preference is revised in an existing model, the revised frame type does not apply to
frames that have already been assigned a frame type through the Overwrites; the
revised Preference applies only to new frame members added to the model after the
Preference change and to the old frame members that were not assigned a frame type
though the Overwrites.
4.5 Applicability of the Seismic Requirements
Ideally, the special seismic provisions shall apply when the seismic response
modification factor,
R,
is taken as greater than 3, regardless of the seismic design
category (AISC SEISMIC 1).
R
is specified by the applicable building code (local
code or IBC). IBC actually refers to ASCE 7-05 for the value of
R
(IBC 2205.2.1).
Again, when
R
is taken as 3 or less, the structure is not required to satisfy these
provisions, unless specifically required by the applicable building code.
The applicable building code generally restricts buildings designed with an
R
factor of
3 or less to Seismic Design Category (SDC) A, B, or C; however, some systems that
have
R
factors less than 3 are permitted in SDC D, E, or F (IBC 2205.2, ASCE 12.2.1,
ASCE Table 12.2-1).
The program assumes that the special seismic provisions are applicable to any
structural steel structure that is assigned to SDC D, E, or F, irrespective of the value
of
R,
and to any structural steel structure designed with an
R
greater than 3 and that is
assigned to SDC A, B, or C. In addition, the program allows the user to change the
default applicability of special seismic provisions using the "Ignore Seismic Code?"
Preference item.
4 - 4 Applicability of the Seismic Requirements

Chapter 4 Special Seismic Provisions
4.6 Design Load Combinations
The program creates the default design load combinations based on the specification of
ASCE 7-05 code. The default load combinations are generated differently when the
LRFD (ASCE 2.3.2) and ASD (ASCE 2.4.1) provisions are chosen. The default
combinations have been described in "Design Loading Combinations" in Chapter 3.
Additional information may be found in "Design Load Combinations" in Chapter 2.
The user may change the default load combinations if the governing code is different
(AISC SEISMIC 4.1).
The program assumes that the defined earthquake load is really the strength level
earthquake, which is equivalent to
θ
E
as defined in Section 12.4.2.1 in ASCE 7-05
code. For a regular earthquake, load is considered to have two components: horizontal,
h
E
and vertical
v
E,
which are taken as
ρθ
=
hE
E,
(ASCE 12.4.2.1)
=
v DS
E 0.2S D,
(ASCE 12.4.2.2)
where,
ρ
is the redundancy factor as defined in Section 12.3.4 of ASCE 7-05, and the
DS
S
is the design earthquake spectral response acceleration parameters at short
periods, as defined in Section 11.4.4 of ASCE 7-05 code.
Effectively, the seismic load combinations for the LRFD provision become
( )
12 02 DL
DS E
. .S
ρθ
+±
(ASCE 2.3.2-7, 12.4.2.3)
( )
12 02 DL 10 LL
DS E
. .S .
ρΩ
+ ±+
(ASCE 2.3.2-7, 12.4.2.3)
( )
09 02 DL
ρΩ
−±
DS E
. .S .
(ASCE 2.3.2-7, 12.4.2.3)
The seismic load combinations for the ASD provision become
( )
10 014 DL 07
DS E
. .S .
ρΩ
+±
(ASCE 2.4.1-5, 12.4.2.3)
( ) ( )
10 0105 DL 075 07 075 LL
DS E
. .S . . .
ρΩ
+±+
(ASCE 2.4.1-6, 12.4.2.3)
( )
06 014 DL 07
ρΩ
−±
DS E
. .S . .
(ASCE 2.4.1-7, 12.4.2.3)
Design Load Combinations 4 - 5

Steel Frame Design AISC 360-05/IBC 2006
The program automatically considers seismic load effects, including overstrength
factors (ASCE 7-05 12.4.3), as special load combinations that are created automatically
from each load combination involving seismic loads. In that case, the horizontal
component of the force is represented by
hm
E,
and vertical component of the force is
represented by
v
E
, where,
hm o E
EQ
Ω
=
and (ASCE 12.4.3.1)
02=
v DS
E . S D.
(ASCE 12.4.2.2)
Effectively, the special seismic combinations for the LRFD provision are
( )
09 02 DL
DS o E
. .S Q
Ω
−±
(ASCE 2.3.2-7, 12.4.3.2)
( )
12 02 DL 10LL
DS o E
. .S Q .
Ω
+ ±+
(ASCE 2.3.2-5, 12.4.3.2)
and for the ASD provision, the combinations are
( )
10 014 DL 07
DS o E
. .S .
Ωθ
+±
(ASCE 2.4.1-7, 12.4.3.2)
( ) ( )
10 0105 DL 075 07 075LL
DS o E
. .S . . .
Ωθ
+±+
(ASCE 2.4.1-6, 12.4.3.2)
( )
06 014 DL 07
DS o E
. .S .
Ωθ
−±
(ASCE 2.4.1-7, 12.4.3.2)
The factor
DS
S
is described earlier in this section.
0
Ω
is the seismic force
amplification factor that is required to account for structural overstrength. The factor
0
Ω
is the overstrength factor, and it should be picked up from ASCE 7-05, Table 12.2-
1 by the user and input in the Preferences and auto-seismic load definition. The default
value of
0
Ω
is taken as 3.0 in the program. If the user defines one or more auto-
seismic loads, the values of
0
Ω
are taken as the maximum of all the
0
Ω
defined for
each auto-seismic load case. Also if the user defines special seismic data that includes
an
0
Ω
value and requests that the program include the special seismic design data,
then this
0
Ω
takes precedence over the default values and those defined for the auto-
seismic load cases. Moreover,
0
Ω
can be overwritten for each individual member. The
overwritten
0
Ω
gets the highest precedence. The guideline for selecting a reasonable
value for
0
Ω
can be found in ASCE 7-05, Table 12.2-1.
4 - 6 Design Load Combinations

Chapter 4 Special Seismic Provisions
Those combinations involving
0
Ω
are internal to the program. The user does NOT
need to create additional load combinations for those load combinations. The special
circumstances for which those load combinations are additionally checked are
described later in this chapter, as appropriate. The special loading combination factors
are applied directly to the load cases. It is assumed that any required scaling (such as
may be required to scale response spectra results) has already been applied to the load
cases.
The program assumes that the seismic loads defined as the strength level load is the
program load case. Otherwise, the factors
,
ρ
0
,
Ω
and
DS
S
will be unable to scale the
load to the desired level.
4.7 Classification of Sections for Local Buckling
The sections are classified in the program as Seismically Compact, Compact,
Noncompact, Slender, and Too Slender. The sections are classified as Compact,
Noncompact, or Slender sections in accordance with Section B4 of the regular code
(AISC B4, AISC Table B4.1). The limiting width/thickness ratios, p
,
λ
r,
λ
and
s
,
λ
that
demarcate the slenderness limits for Compact, Noncompact, Slender and Too Slender
sections were given in Table 3-5 in "Classification of Sections for Local Buckling" in
Chapter 3.
Seismically compact sections are capable of developing the full plastic strength before
local buckling occurs when the section goes through low cycle fatigue and withstands
reversal of load under seismic conditions. The width/thickness ratio (
λ
) should be less
than the limit,
ps
λ
, for the section to be Seismically Compact. The limiting
width/thickness ratio,
ps
λ
, for compression elements is given in Table 4-1 and is based
on the Seismic code (AISC SEISMIC 8.2,
Table I-8-1). The Seismically Compact sections are reported as "Seismically
Compact," or sometimes as "Seismic" only for brevity in the design output.
Classification of Sections for Local Buckling 4 - 7
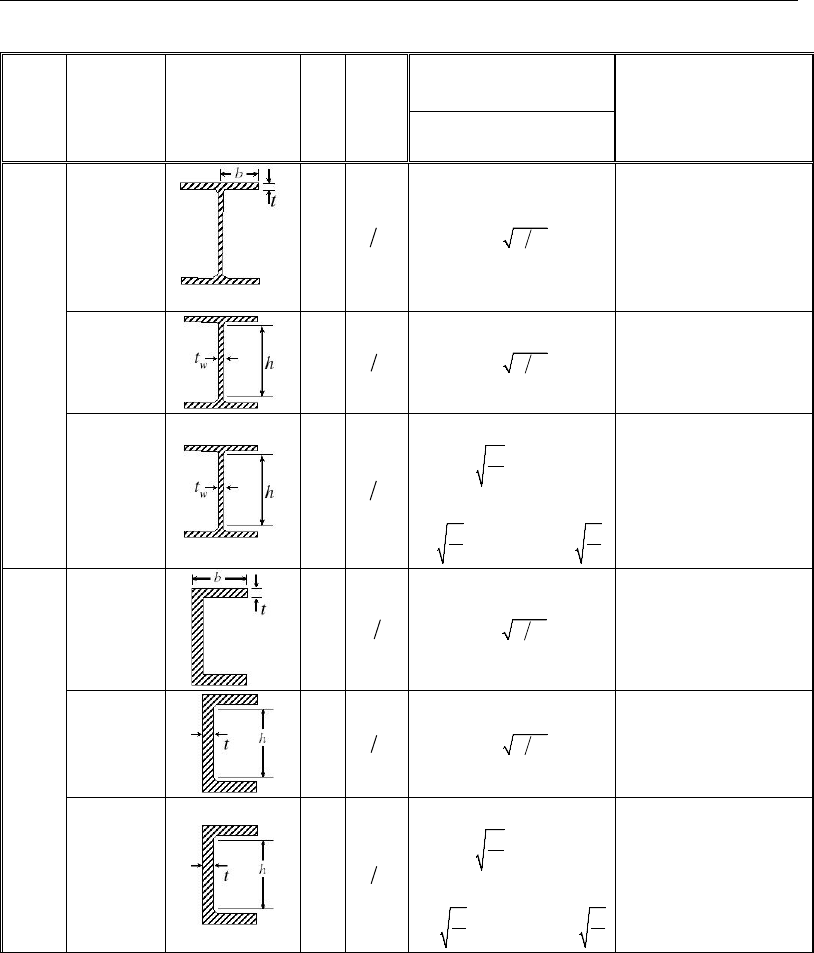
Steel Frame Design AISC 360-05/IBC 2006
Table 4-1 Limiting Width-Thickness Ratios of Compression Elements for Classification Sections
Section
Type
Description
of Element
Graphical
Example
Given
Case
No.
Width-
Thick-
ness
Ratio,
( )
λ
Limiting Width-Thickness
Ratios for Compression
Elements
Applicable Situation
with Code Reference
Seismically Compact
(
ps
λ
)
Singly or Doubly Symmetric I Shapes
Flexural or
uniform
compression
in flanges of
rolled and
welded
I-Shaped
sections
1,2
ff
b 2t
0.30
y
EF
Beams in SMF (SEISMIC 9)
Beams in BRBF (SEISMIC 16)
Links in EBF (SEISMIC 15)
Columns in SMF (SEISMIC 9)
Columns in SCBF (SEISMIC 13)
Columns in BRBF (SEISMIC 16)
Braces in SCBF (SEISMIC 13)
Braced in OCBF (SEISMIC 14)
Flexural
compression
in beam web
9
w
ht
2.45
y
EF
Beams in SMF (SEISMIC 9)
Webs in
flexural
compression
or combined
flexural and
axial
compression
10
w
ht
If
0 125
a
C.≤
( )
3 14 1 1 54
a
y
E
. .C
F−
If
0 125
a
C.
>
( )
1 12 2 33 1 49
a
yy
EE
. .C .
FF
−≥
Beams in BRBF (SEISMIC 16)
Columns in SMF (SEISMIC 9)
Columns in SCBF (SEISMIC 13)
Columns in EBF (SEISMIC 15)
Columns in BRBF (SEISMIC 16)
Braces in SCBF (SEISMIC 13)
Braces in OCBF (SEISMIC 14)
Channel
Flexural or
Uniform
compression
in flanges
4
ff
bt
0 30
y
. EF
Columns in SCBF (SEISMIC 13)
Braces in SCBF (SEISMIC 13)
Flexural
compression
in beam web
9
w
ht
2 45
y
. EF
Beams in SMF (SEISMIC 9)
Webs in
flexural
compression
or combined
flexural and
axial
compression
10
w
ht
If
0 125
a
C.≤
( )
3 14 1 1 54
a
y
E
. .C
F−
If
0 125
a
C.>
( )
1 12 2 33 1 49
yy
a
EE
. .C .
FF
−≥
Beams in BRBF (SEISMIC 16)
Columns in SMF (SEISMIC 9)
Columns in SCBF (SEISMIC 13)
Columns in EBF (SEISMIC 15)
Columns in BRBF (SEISMIC 16)
Braces in SCBF (SEISMIC 13)
Braces in OCBF (SEISMIC 14)
4 - 8 Classification of Sections for Local Buckling
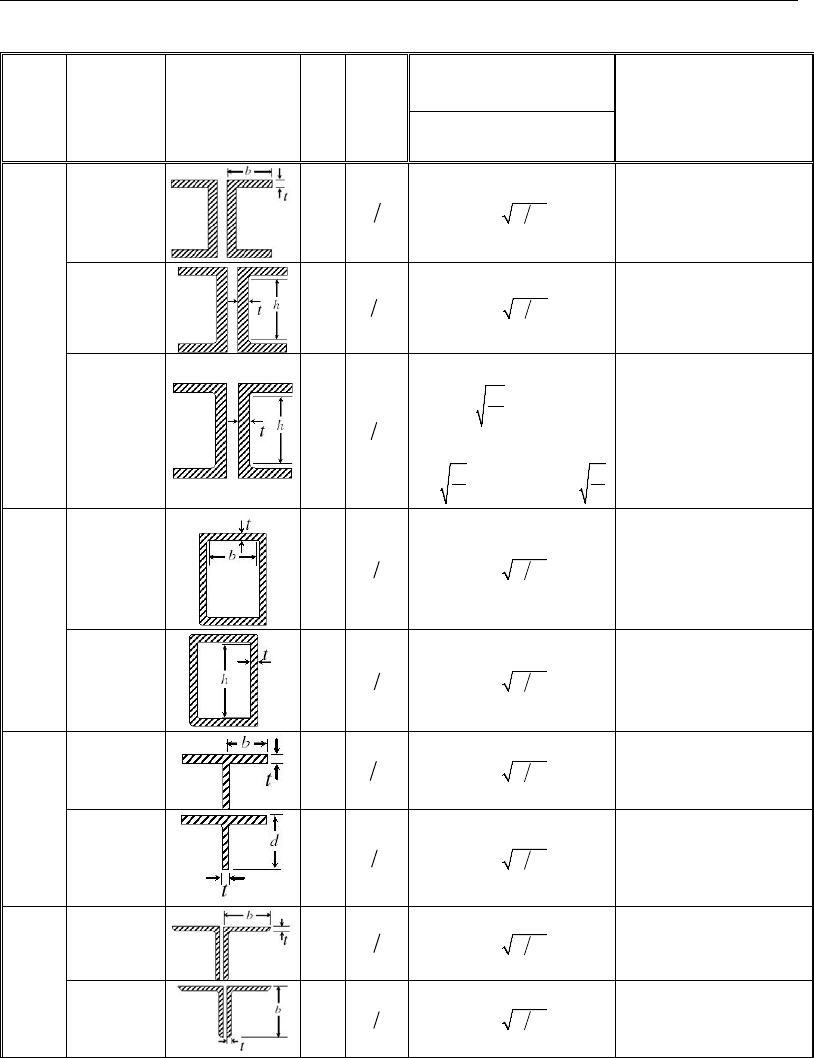
Chapter 4 Special Seismic Provisions
Table 4-1 Limiting Width-Thickness Ratios of Compression Elements for Classification Sections
Section
Type
Description
of Element
Graphical
Example
Given
Case
No.
Width-
Thick-
ness
Ratio,
( )
λ
Limiting Width-Thickness
Ratios for Compression
Elements
Applicable Situation
with Code Reference
Seismically Compact
(
ps
λ
)
Double Channel
Flexural or
Uniform
compression
in flanges
4
ff
bt
0 30
y
. EF
Columns in SCBF (SEISMIC 13)
Braces in SCBF (SEISMIC 13)
Flexure
compression
in beam web
9
w
ht
2 45
y
. EF
Beams in SMF (SEISMIC 9)
Webs in
flexural
compression
or combined
flexural and
axial
compression
10
w
ht
If
0 125
a
C.
≤
( )
3 14 1 1 54
a
y
E
. .C
F−
If
0 125
a
C.>
( )
1 12 2 33 1 49
yy
a
EE
. .C .
FF
−≥
Beams in BRBF (SEISMIC 16)
Columns in SMF (SEISMIC 9)
Columns in SCBF (SEISMIC 13)
Columns in EBF (SEISMIC 15)
Columns in BRBF (SEISMIC 16)
Braces in SCBF (SEISMIC 13)
Braces in OCBF (SEISMIC 14)
Box
Flexural or
axial
compression
of flanges
under major
axis bending
12
bt
0 64
y
. EF
Columns in SCBF (SEISMIC 13)
Braces in SCBF (SEISMIC 13)
Braces in OCBF (SEISMIC 14)
Flexural
compression
of webs under
minor axis
bending
12
ht
0 64
y
. EF
Columns in SCBF (SEISMIC 13)
Braces in SCBF (SEISMIC 13)
Braces in OCBF (SEISMIC 14)
T Shape
Flexural or
axial
compression
in flanges
7
ff
b 2t
0 30
y
. EF
Chord of STMF (SEISMIC 12)
Compression
in stems
8
w
dt
0 30
y
. EF
Chord of STMF (SEISMIC 12)
Double Angle
Any type of
compression
in leg
7
bt
0 30
y
. EF
Chord of STMF (SEISMIC 12)
Any type of
compression
in leg
7
bt
0 30
y
. EF
Chord of STMF (SEISMIC 12)
Classification of Sections for Local Buckling 4 - 9
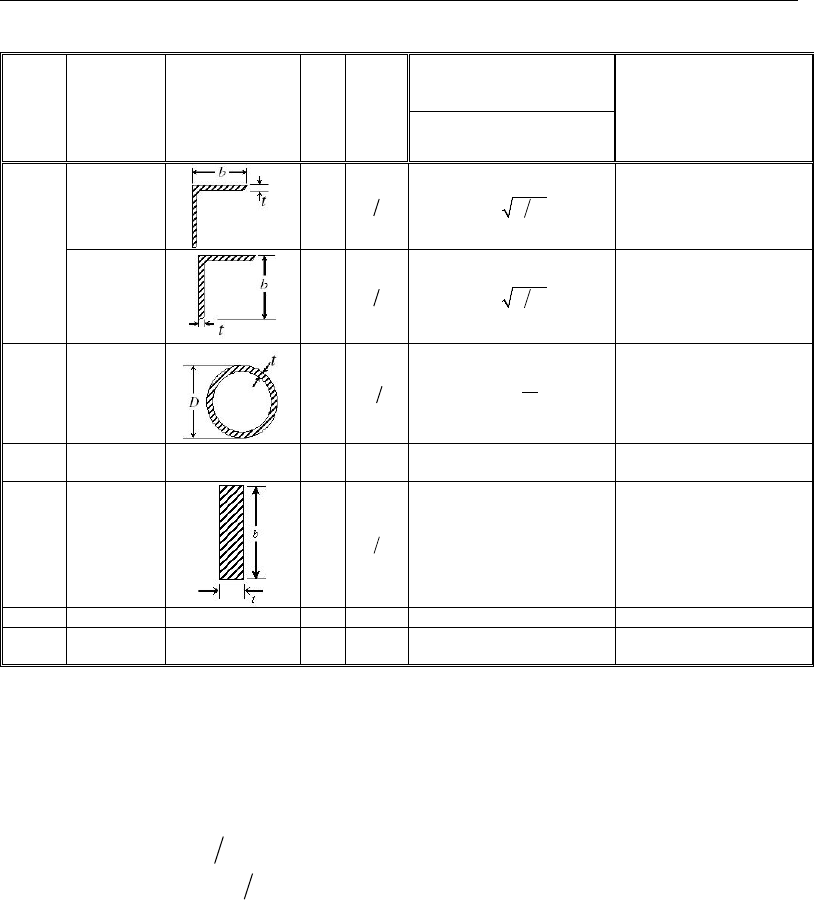
Steel Frame Design AISC 360-05/IBC 2006
Table 4-1 Limiting Width-Thickness Ratios of Compression Elements for Classification Sections
Section
Type
Description
of Element
Graphical
Example
Given
Case
No.
Width-
Thick-
ness
Ratio,
( )
λ
Limiting Width-Thickness
Ratios for Compression
Elements
Applicable Situation
with Code Reference
Seismically Compact
(
ps
λ
)
Angle
Any type of
compression
in any leg
7
bt
0 30
y
. EF
Chord of STMF (SEISMIC 12)
Any type of
compression
in any leg
7
bt
0 30
y
. EF
Chord of STMF (SEISMIC 12)
Pipe
Flexural or
axial
compression
11
Dt
0 044
y
E
.F
Columns in SCBF (SEISMIC 13)
Braces in SCBF (SIESMIC 13)
Braces in OCBF (SIESMIC 14)
Round
Bar
――― ――― ―― ――― Assumed non-compact
Rectangular
Any
compression
6
bt
2.5
Diagonal web member in STMF
(SEISMIC 12)
General
―――
―――
――
―――
Assumed non-compact
SD
Section
――― ――― ―― ――― Assumed non-compact
The table uses the dimension-related variables, such as
f
b,
f
t,
w
t,
b,
t,
h,
D,
and
so forth. Some of those variables have been explained in the table itself. Some are
explained in Figure 3-1 and also explained in the code (AISC B4.1, B4.2, Table B4.1).
The variable
a
C
can be expressed as follows:
( )
for LRFD
for ASD
u by
a
ba y
PP
CPP
φ
Ω
=
(AISC SEISMIC Table I-8-1 Note K)
where,
a
P
= Required compressive strength (ASD)
u
P
= Required compressive strength (LRFD)
y
P
= Axial yield strength
4 - 10 Classification of Sections for Local Buckling

Chapter 4 Special Seismic Provisions
b
φ
= 0.90
b
Ω
= 1.67
When satisfying the Special Seismic criteria, it is in general not necessary for the
design sections to be Seismically Compact (AISC SEISMIC 8.2). However, for certain
special cases, the design sections must be Seismically Compact (AISC SEISMIC 8.2b)
or Compact (AISC SEISMIC 8.2a, AISC Table B4.1) as described in the "Seismic
Requirements" section of this chapter. For a situation when the code requires the
design section to be Seismically Compact, but the section fails to satisfy the criteria,
the user must modify the section. In that case, the program issues an error message in
the output.
4.8 Special Check for Column Strength
When
φ
/
u cn
PP
for LRFD provision or
ca n
PP
Ω
for ASD provision in columns due
to prescribed loading combination without consideration of amplified seismic load is
greater than 0.4, the axial compressive and tensile strengths are checked in the absence
of any applied moment and shear for the amplified seismic load combinations (AISC
SEISMIC 8.3(1), 4.1).
For LRFD provisions,
( )
Ω
−±
0
09 02 DS E
. . S DL Q
(ASCE 12.4.3.2, 2.3.2-7)
()
Ω
+ ±+
0
12 02 10
DS E
. . S DL Q . LL
(ASCE 12.4.3.2, 2.3.2-5)
For ASD provisions,
( )
Ω
+±
0
10 014 07
DS E
. . S DL . Q
(ASCE 12.4.3.2, 2.4.1-5)
( ) ( )
Ω
+± +
0
10 0105 07 07 075
DS E
. . S DL . . Q . LL
(ASCE 12.4.3.2, 2.4.1-6)
( )
Ω
−±
0
06 014 07
DS E
. . S DL . Q
(ASCE 12.4.3.2, 2.4.1-7)
where
0
Ω
and
DS
S
are as described in the "Design Load Combinations" section in
Chapter 3.
Special Check for Column Strength 4 - 11

Steel Frame Design AISC 360-05/IBC 2006
The preceding load combinations are used to calculate axial force only because other
forces and moments are ignored. This axial capacity check is in addition to regular
strength checks for the regularly specified load combinations (AISC SEISMIC 8.3).
Those combinations involving
0
Ω
are internal to the program. The user does NOT
need to create additional load combinations for such load combinations. The special
circumstances for which these load combinations are additionally checked are
described later in this chapter, as appropriate. The special loading combination factors
are applied directly to the load cases. It is assumed that any required scaling (such as
may be required to scale response spectra results) has already been applied to the load
cases.
If the overwrite item "Ignore Special Seismic Load?" is set to yes, the preceding check
will not be performed.
4.9 Member Design
This section describes the special requirements for designing a member. The section
has been divided into subsections for each framing type.
4.9.1 10BSpecial Moment Frames (SMF)
For this framing system, the following additional requirements are checked or reported
(AISC SEISMIC 9).
When
φ
/
u cn
PP
(or
ca n
PP
Ω
in ASD) in columns due to prescribed loading
combinations without consideration of amplified seismic load is greater than 0.4, the
axial compressive and tensile strengths are checked in absence of any applied
moment and shear for the special seismic load combination as described previously
in the "Special Check for Column" section of this manual (AISC SEISMIC 8.3, 4.1).
All beams and columns are required to be Seismically Compact (AISC SEISMIC
9.4a, 8.2b, Table I-8-1). The limits of the width-thickness ratio,
ps
λ
, has been
presented in this manual in Table 4-1. If these criteria are satisfied, the section is
reported as SEISMIC as described earlier under the "Classification of Sections for
4 - 12 Member Design

Chapter 4 Special Seismic Provisions
Local Buckling" section. If these criteria are not satisfied, the program issues an
error message.
The program checks the slenderness ratio,
L r,
for columns to be less than 60
(AISC SEISMC 9.7b(2)). If this criterion is not satisfied, the program issues an error
message.
The program checks the laterally unsupported length of beams not to exceed
( )
0 086 yy
. EF r
(AISC SEISMIC 9.8). If this criterion is not satisfied, the program
issues an error message.
4.9.2 11BIntermediate Moment Frames (IMF)
For this framing system, the following additional requirements are checked and
reported (AISC SEISMIC 10).
When
φ
/
u cn
PP
(or
ca n
PP
Ω
in ASD) in columns due to prescribed loading
combinations without consideration of amplified seismic load is greater than 0.4, the
axial compressive and tensile strengths are checked in absence of any applied
moment and shear for the special seismic load combinations as described previously
in the "Special Check for Column" section of this manual (AISC SEISMIC 8.3, 4.1).
All beams and columns are checked to be Compact (AISC SEISMIC 10.4a, 8.2a,
AISC Table B4.1). The limits of the width-thickness ratio, p
,
λ
have been presented
in this manual in Table 3-5. If this criterion is satisfied, the section is reported as
Compact as described earlier under the "Classification of Sections for Local
Buckling" section in Chapter 3. If this criterion is not satisfied, the program issues an
error message.
The program checks the laterally unbraced length of beams between lateral braces
not to exceed the limiting value
( )
0 17
yy
. EF r
(AISC SEISMIC 10.8). If this
criterion is not satisfied, the program issues an error message.
4.9.3 12BOrdinary Moment Frames (OMF)
For this framing system, the following additional requirement is checked and reported
(AISC SEISMIC 11).
Member Design 4 - 13

Steel Frame Design AISC 360-05/IBC 2006
When
φ
/
u cn
PP
(or
ca n
PP
Ω
for ASD) in columns due to prescribed loading
combinations without consideration of amplified seismic load is greater than 0.4, the
axial compressive and tensile strengths are checked in absence of any applied
moment and shear for the special seismic load combinations as described previously
in the "Special Check for Column" section of this manual (AISC SEISMIC 8.3, 4.1).
4.9.4 13BSpecial Truss Moment Frames (STMF)
No special consideration for this type of framing system is given by the program. The
user is required to check the seismic design requirements for STMF independently.
4.9.5 14BSpecial Concentrically Braced Frames (SCBF)
For this framing system, the following additional requirements are checked or reported
(AISC SEISMIC 13).
When
φ
/
uc n
PP
(or
ca n
PP
Ω
for ASD) in columns due to prescribed loading
combinations without consideration of amplified seismic load is greater than 0.4, the
axial compressive and tensile strengths are checked in the absence of any applied
moment and shear for the special seismic load combinations as described previously
in the "Special Check for Column" section of this manual (AISC SEISMIC 8.3, 4.1).
All column and brace members are checked to be Seismically Compact according to
Table 4-1 (AISC SEISMIC 13.2d, 8.2b, Table I-8-1). If these criteria are satisfied,
the section is reported as SEISMIC as described earlier under "Classification of
Sections for Local Buckling" in this chapter. If these criteria are not satisfied, the
program issues an error message.
The maximum
Kl r
ratio of the braces is checked not to exceed
y
4 EF
(AISC
SEISMC 13.2a). If this criterion is not satisfied, the program issues an error message.
The program checks the following requirements for V-type or inverted V-type SCBF
frames.
The program checks the laterally unbraced length of beams between lateral braces
not to exceed the limiting value of
pd
L
(AISC SEISMIC 13.4a(2)). The expression
for
pd
L
for Box and Solid rectangular sections is given as follows:
4 - 14 Member Design

Chapter 4 Special Seismic Provisions
1
2
017 010 01
pd y y
yy
ME E
L . . r . r.
MF F
=+≥
(AISC A-1-8, AISC SEISMIC 13.4a(2))
For all other sections,
pd
L
is take as follows:
1
2
0 12 0 076
pd y
y
ME
L . . r,
MF
= +
(AISC A-1-7, AISC SEISMIC 13.4a(2))
where,
1
M
= Smaller moment at the end of the unbraced length of beam,
2
M
= Larger moment at the end of the unbraced length of the beam,
y
r
= Radius of gyration about minor axis.
12
MM
is positive for reverse curvature bending and negative for single curvature
bending (AISC A1.7).
Note: Beams intersected by chevron (V or inverted-V) braces are NOT currently
checked to have a strength to support loads for the following two conditions (AISC
SEISMIC 13.4a):
(a) A beam that is intersected by braces shall be designed to support the effects of
all tributary dead and live loads from load combinations stipulated by the code,
assuming the bracings are not present.
(b) A beam that is intersected by braces and supporting earthquake load shall be
designed to resist the effects of the load combinations stipulated by the code,
except the brace forces have to be replaced by their capacities. The forces in all
braces in tension shall be assumed to be equal to
yyg
RFA
(AISC SEISMIC
13.4a(1)a). The forces in all braces in compression shall be assumed to be equal
to 0.3
n
P
(AISC SEISMIC 13.4a(1)b).
Member Design 4 - 15

Steel Frame Design AISC 360-05/IBC 2006
4.9.6 15BOrdinary Concentrically Braced Frames (OCBF)
For this framing system, the following additional requirements are checked or reported
(AISC SEISMIC 14).
When
φ
/
uc n
PP
(or
ca n
PP
Ω
for ASD) in columns due to prescribed loading
combinations without consideration of amplified seismic load is greater than 0.4,
the axial compressive and tensile strengths are checked in the absence of any
applied moment and shear for the special seismic load combinations as described
previously in the "Special Check for Column" section of this manual (AISC
SEISMIC 8.3, 4.1).
All brace members are checked to be Seismically Compact according to Table 4-1
(AISC SEISMIC 14.2, 8.2b, Table I-8-1). If the criteria are satisfied, the section is
reported as SEISMIC as described earlier in "Classification of Sections for Local
Buckling" in this chapter. If this criterion is not satisfied, the program issues an
error message.
The program checks the laterally unbraced length of beams for V or inverted V
configurations between lateral braces not to exceed the limiting value of
pd
L
(AISC SEISMIC 14.3(2)). The expression for
pd
L
for Box and Solid rectangular
sections is given as follows:
1
pd y y
2y y
ME E
L 0.17 0.10 r 0.1 r .
MF F
=+≥
(AISC A-1-8, AISC SEISMIC 14.3(2))
For all other sections,
pd
L
is take as follows:
1
2
0.12 0.076 ,
pd y
y
ME
Lr
MF
= +
(AISC A-1-7, AISC SEISMIC 14.3(2))
where,
1
M
= Smaller moment at the end of the unbraced length of beam,
2
M
= Larger moment at the end of the unbraced length of the beam,
4 - 16 Member Design
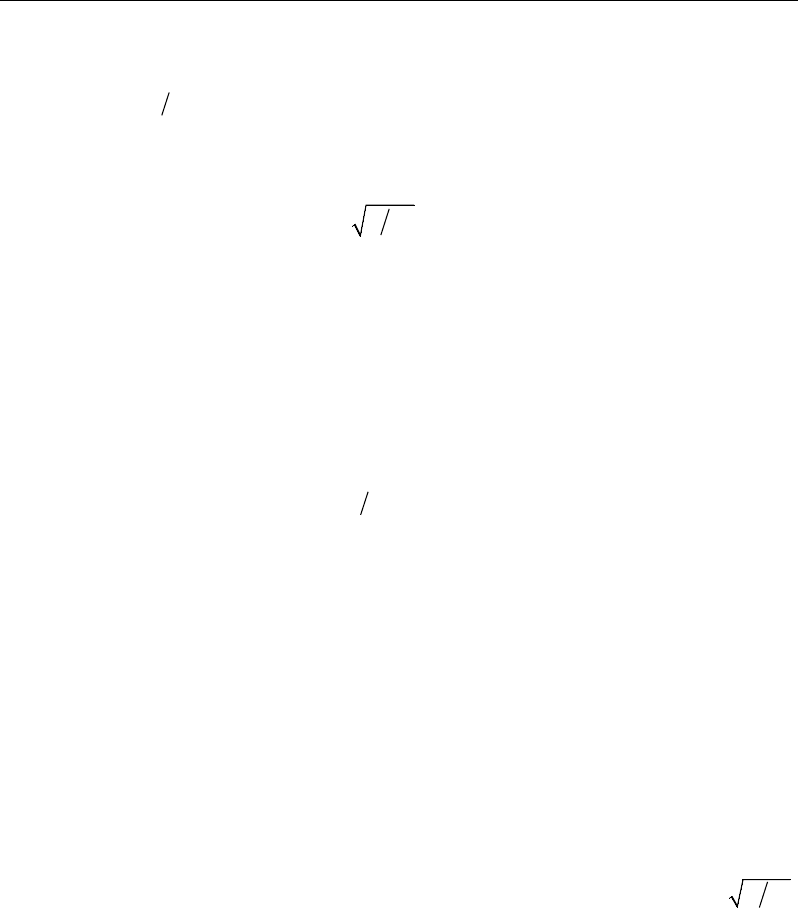
Chapter 4 Special Seismic Provisions
y
r
= Radius of gyration about minor axis.
12
MM
is positive for reverse curvature bending and negative for single
curvature bending (AISC A1.7).
The maximum
/Kl r
ratio of the braces for V or inverted-V configurations is
checked not to exceed
40.y
EF
(AISC SEISMIC 14.2). If this criterion is not
met, an error message is reported in the output.
4.9.7 16BOrdinary Concentrically Braced Frames from Isolated
Structures (OCBFI)
For this framing system, the following additional requirements are checked or reported
(AISC SEIAMIC 14.5).
When
φ
/
u cn
PP
(or
ca n
PP
Ω
in ASD) in columns due to prescribed loading
combinations without consideration of amplified seismic load is greater than 0.4,
the axial compressive and tensile strengths are checked in absence of any applied
moment and shear for the special seismic load combinations as described
previously in the "Special Check for Column" section of this manual (AISC
SEISMIC 8.3, 4.1).
All braces are required to be Compact (AISC SEISMIC 14.5a, 8.2a, AISC Table
B4.1). The limits of the width-thickness ratio,
p,
λ
have been presented in this
manual in Table 3-5. If these criteria are satisfied, the section is reported as
Compact as described previously under the "Classification of Sections for Local
Buckling" section in Chapter 3. If this criterion is not satisfied, the program issues
an error message.
The maximum
/Kl r
ratio for the braces is checked not to exceed
y
4 EF
(AISC SEISMIC 14.5a). If this criterion is not met, an error message is reported in
the output.
Member Design 4 - 17
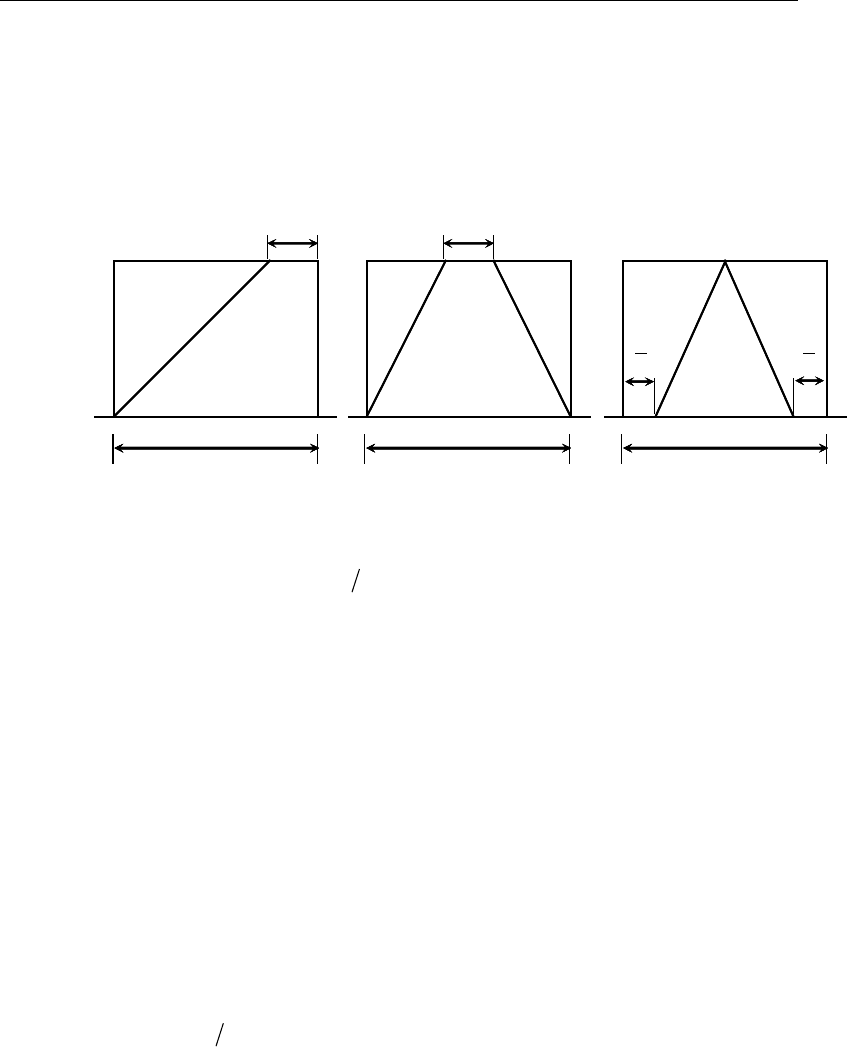
Steel Frame Design AISC 360-05/IBC 2006
4.9.8 17BEccentrically Braced Frames (EBF)
For this framing system, the program looks for and recognizes the eccentrically braced
frame configurations shown in Figure 4-1. The following additional requirements are
checked or reported for the beams, columns and braces associated with these
configurations (AISC SEISMIC 15).
Figure 4-1. Eccentrically Braced Frame Configurations
When
φ
/
uc n
PP
(or
ca n
PP
Ω
for ASD) in columns due to prescribed loading
combinations without consideration of amplified seismic load is greater than 0.4,
the axial compressive and tensile strengths are checked in absence of any applied
moment and shear for the special seismic load combinations as described
previously in the "Special Check for Column" section of this manual (AISC
SEISMIC 8.3, 4.1).
The beams are checked to be Seismically Compact according to Table 4-1 (AISC
SEISMIC 15.2a, 8.2b, Table I-8-1). If this criterion is satisfied, the section is
reported as SEISMIC as described earlier under "Classification of Sections for
Local Buckling Section" in this chapter. If this criterion is not satisfied, the
program issues an error message.
The shear strength for link beams is taken as follows (AISC SEISMIC 15.2b):
u vn
VV≤φ
(LRFD) or (AISC SEISMIC 15.2b)
a nv
VV≤Ω
(ASD), (AISC SEISMIC 152b)
where,
e
L
e
L
e
2
e
2
L
(a) (b) (c)
e
LL
e
LL
e
2
e
2
LL
(a) (b) (c)
4 - 18 Member Design

Chapter 4 Special Seismic Provisions
min( 2 )
n pa pa
V V Me= ,/
(AISC SEISMIC 15.2b)
2
1
r
pa p
c
P
VV P
= −
(AISC SESIMIC 15-1)
1 18 1
r
pa p
c
P
MM
P
=. −,
(AISC SEISMIC 15-2)
06 ( 2 )
p y fw
V Fd t t
=.−,
(AISC SEISMIC 15.2b)
py
M ZF=
(AISC SEISMIC 15.2b)
v
φ=φ
(default is 0.9) (AISC SEISMIC 15.2b)
v
Ω=Ω
(default is 1.67) (AISC SEISMIC 15.2b)
ru
PP
=
(LRFD) (AISC SEISMIC 15.2b)
ra
PP
=
(ASD) (AISC SEISMIC 15.2b)
cy
PP=
(LRFD) (AISC SEISMIC 15.2b)
15
cy
P P.=
(ASD) (AISC SEISMIC 15.2b)
y gy
P AF= .
(AISC SEISMIC 15.2b)
If
0 15
u gy
P AF>.
(LRFD) or
( )
>01515
a gy
P . . AF
(ASD), the link beam length,
,e
is checked not to exceed the following:
– if
03
w
g
A
A
′
ρ ≥.
1.15 0.5 1.6
p
w
gp
M
A
eAV
′
≤ −ρ
(AISC SEISMIC 15-3)
Member Design 4 - 19

Steel Frame Design AISC 360-05/IBC 2006
– if
03
w
g
A
A
′
ρ <.
1.6 p
p
M
eV
≤
(AISC SEISMIC 15-4)
where,
( 2)
w fw
A d tt= −
(AISC SEISMIC 15.2b)
rr
PV
′
ρ= /
(AISC SEISMIC 15.2b)
ru
VV
=
(LRFD) (AISC SEISMIC 15.2b)
ra
VV
=
(ASD) (AISC SEISMIC 15.2b)
If the check is not satisfied, the program reports an error message.
The link beam rotation,
θ
,
of the individual bay relative to the rest of the beam is
calculated as the story drift
∆
times bay length (
L
) divided by the total lengths of
link beams
()e
in the bay.
The link rotation,
θ
,
is checked as follows (AISC SEISMIC 15.2c):
L
e
∆
θ=
–
0 08.θ≤
radian, where link beam clear length,
≤16 pp
e .M V
–
0 02.θ≤
radian, where link beam clear length,
≥26 pp
e .M V
–
θ≤
value interpolated between 0.08 and 0.02 as the link beam clear
length varies from
16 pp
.M V
to
26
pp
. M V.
The story drift is calculated as
sd
C,
I
∆
∆=
(ASCE 12.8-15)
4 - 20 Member Design

Chapter 4 Special Seismic Provisions
where
d
C
is a System Deflection Amplification Factor and
I
is the system
Importance Factor.
The beam strength outside the link is checked to be at least
11 y
.R
times the beam
force corresponding to the controlling link beam shear strength (AISC SEISMIC
15.6b). The controlling link beam nominal shear strength is taken as follows:
min( 2 ).
n pa pa
V V Me= ,/
(AISC SEISMIC 15.6, 15.2)
The values of
pa
V
and
pa
M
are calculated following the procedure described
previously (AISC SEISMIC 15.2). The correspondence between brace force and
link beam force is obtained from the associated load cases, whichever has the
highest link beam force of interest.
For load combinations including seismic effects, a load
1
Q
is substituted for the
term
E,
where
1
Q
is defined as the axial forces and moments generated by at least
1.1 times the expected nominal shear strength
yn
RV
(ASIC SEISMIC 15.6b).
All braces are checked to be at least Compact (AISC SEISMIC 15.6a, 8.2a, AISC
Table B4.1). The limits of the width-thickness ratio,
p,λ
have been presented in
this manual in Table 3-5. If this criterion is satisfied, the section is reported as
Compact as described earlier under the "Classification of Sections for Local
Buckling" section in Chapter 3. If this criterion is not satisfied, the program issues
an error message.
The brace strength is checked for
1.25
y
R
times the brace forces corresponding to
the controlling link beam nominal shear strength amplified by
y
R
( )
yn
RV
(AISC
SEISMIC 15.6a). The controlling link beam nominal shear strengths are obtained
by the process described earlier (AISC SEISMIC 15.2b).
For load combinations including seismic effects, a load
v1
Q
is substituted for the
term
E,
where
1
Q
is defined as axial forces and moments generated by at least
1.25 times the expected nominal shear strength of the link
yn
RV
(ASIC SEISMIC
15.6a).
All column members are checked to be Seismically Compact according to Table
4-1 (AISC SEISMIC 15.8, 8.2b, Table I-8-1). If these criteria are satisfied, the
section is reported as SEISMIC as described earlier under the "Classification of
Member Design 4 - 21

Steel Frame Design AISC 360-05/IBC 2006
Sections for Local Buckling" in this chapter. If these criteria are not satisfied, the
program issues an error message.
The column strength is checked for
11 y
R.
times the column forces corresponding
to the controlling link beam nominal shear strength (AISC SEISMIC 15.8). The
controlling link beam nominal shear strength and the corresponding forces are
obtained by the process described previously.
Note: Axial forces in the beams are included in checking the beams. The user is
reminded that using a rigid diaphragm model will result in zero axial forces in the
beams. The user must disconnect some of the column lines from the diaphragm to
allow beams to carry axial loads. It is recommended that only one column line per
eccentrically braced frame be connected to the rigid diaphragm or that a flexible
diaphragm model be used.
4.9.9 18BBuckling Restrained Braced Frames (BRBF)
No special consideration for this type of framing system is given by the program. The
user is required to check the seismic design requirements for BRBF independently.
4.9.10 19BSpecial Plate Shear Walls (SPSW)
No special consideration for this type of framing system is given by the program. The
user is required to check the seismic design requirements for SPSW independently.
4.10 Joint Design
When using the SEISMIC design code, the structural joints are checked and designed
for the following.
Check the requirement of continuity plate and determination of its area
Check the requirement of doubler plate and determination of its thickness
Check the ratio of beam flexural strength to column flexural strength
Report the beam connection shear
4 - 22 Joint Design

Chapter 4 Special Seismic Provisions
Report the brace connection force
4.10.1 20BDesign of Continuity Plates
In a plan view of a beam-column connection, a steel beam can frame into a column in
the following ways.
The steel beam frames in a direction parallel to the column major direction, i.e.,
the beam frames into the column flange.
The steel beam frames in a direction parallel to the column minor direction, i.e.,
the beam frames into the column web.
The steel beam frames in a direction that is at an angle to both of the principal axes
of the column, i.e., the beam frames partially into the column web and partially
into the column flange.
To achieve a proper beam-column moment connection strength, continuity plates such
as shown in Figure 2.3 of Chapter 2 are usually placed on the column, in line with the
top and bottom flanges of the beam, to transfer the compression and tension flange
forces of the beam into the column. For connection conditions described by the first
bullet, where the beam frames into the flange of the column, such continuity plates are
not always needed. The requirement depends on the magnitude of the beam-flange
force and the properties of the column. This is the condition that the program
investigates. Columns of I Sections only are investigated. The program evaluates the
continuity plate requirements for each of the beams that frame into the column flange
(i.e., parallel to the column major direction) and reports the maximum continuity plate
area that is needed for each beam flange. The continuity plate requirements are
evaluated for moment frames (OMF, IMF, SMF) only. No check is made for braced
frames (OCBE, SCBF, EBF, BRBF).
The program first evaluates the need for continuity plates. When the required
strength
bf
P
exceeds the available strength
n
Rφ
(LRFD) or
n
RΩ
(ASD), as
appropriate, a continuity plate will be required. The program checks the following limit
states.
The column flange design strength,
,
n
R
φ
and the allowable strength,
,
n
RΩ
for the
limit state of flange local bending is given as follows:
Joint Design 4 - 23
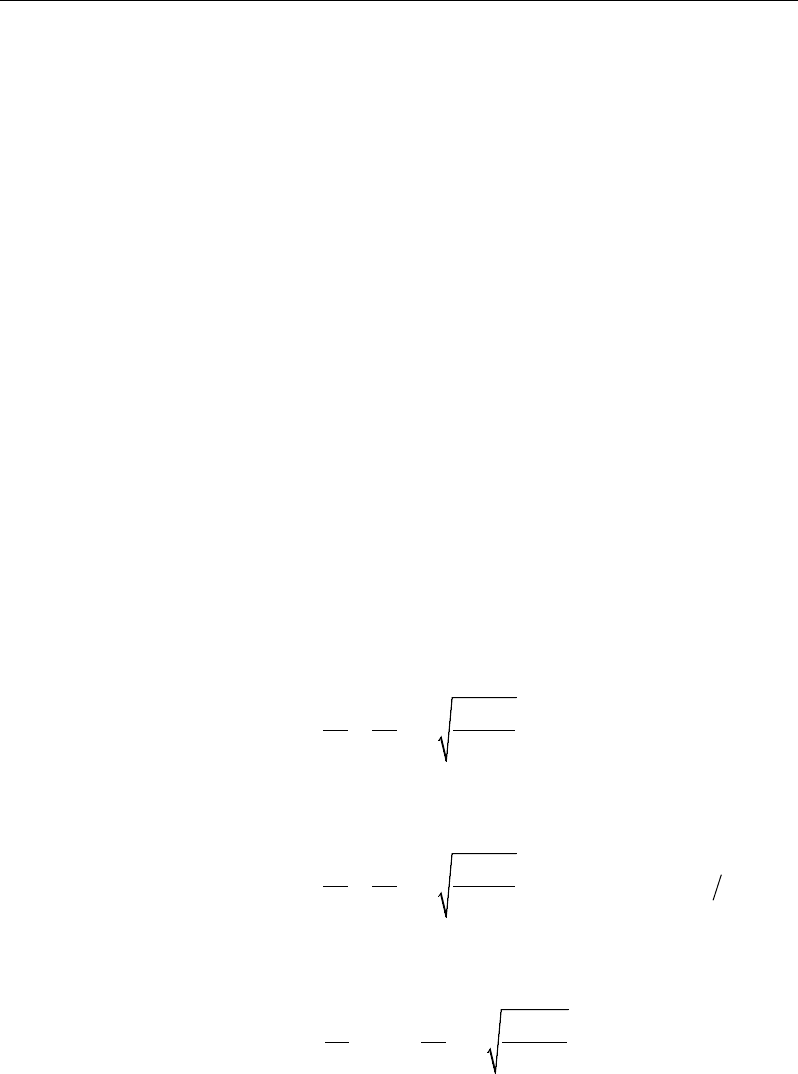
Steel Frame Design AISC 360-05/IBC 2006
2
6 25= .
n fc yc
R tF
if not at top story (AISC J10-1)
2
(05)625=..
n fc yc
R tF
if at top story (AISC J10.1)
where
0.9φ=
(LRFD)
1.67Ω=
(ASD)
The available strength of the column web against local yielding at the toe of the fillet
is given as follows:
(5 0 )=.+
n c fb yc wc
R k t Ft
if not at top story (AISC J10-2)
(2 5 )
=.+
n c fb yc wc
R k t Ft
if at top story (AISC J10-3)
where
1.0φ=
(LRFD)
1.5Ω=
(ASD)
The available strength of the column web against crippling is given as follows:
1.5
2
0 80 1 3 ,
fb yc fc
tw
n wc
c fc wc
t EF t
t
Rt dt t
=.+
if not at top story
(AISC J10-4)
1.5
2
0 40 1 3 fb yc fc
tw
n wc
c fc wc
t EF t
t
Rt dt t
=.+ ,
if at top story and
fb c
t d 0.2≤
(AISC J10-5a)
=. +− ,
1.5
2
0 40 1 4 0.2
fb yw fc
tw
n wc
fc wc
t EF t
t
Rt dt t
(AISC J10-5b)
4 - 24 Joint Design
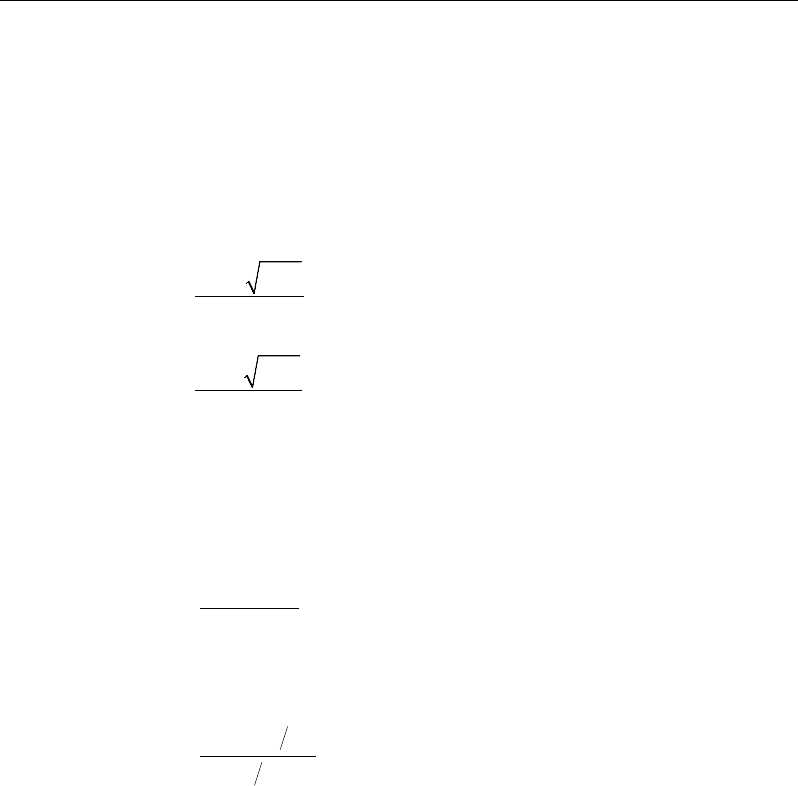
Chapter 4 Special Seismic Provisions
where
0.75φ=
(LRFD)
2.0Ω=
(ASD)
The available compressive strength of the column web against local buckling is
given as follows:
3
24 ,
wc yc
n
c
t EF
Rd
=
if not at the top story (AISC J10.8)
3
12 ,
wc yc
n
c
t EF
Rd
=
if at the top story. (AISC J10.8, J10.5)
If any of the preceding conditions are not met, the program calculates the required
continuity plate area as follows.
For LRFD:
( )
bf n
cp
c cr
PR
AF
−φ
= ,
φ
(AISC J10, J10.8, E3)
For ASD:
( )
bf n
cp
cr c
PR
AF
−Ω
= ,
Ω
(AISC J10, J10.8, E3)
In the preceding expressions, φc, Ωc, and Fcr are taken as follows:
φc = 0.90 (LFRD) (AISC E1)
Ωc, = 1.67 (ASD) (AISC E1)
Fcr = Flexural buckling stress of equivalent column
related to the beam-column joint
The flexural buckling stress, Fcr , is determined as follows:
Joint Design 4 - 25

Steel Frame Design AISC 360-05/IBC 2006
≤
=
>
0.658 , if 4.71 ,
0.877 , if 4.71 ,
y
e
F
Fyy
cr
ey
KL E
FrF
FKL E
FrF
(AISC J10.8, E3)
where Fe is the elastic critical buckling stress given by
2
2.
e
E
FKL
r
π
=
(AISC E3-4)
The member properties of the equivalent column are taken as follows:
The cross-section is comprised of two stiffeners and a strip of the web having
a width of 25twc at the interior stiffener and 12twc at the ends of the columns
(AISC J10.8).
The effective length is taken as 0.75h, i.e., K = 0.75 and L = h = dc − 2tfc
(AISC J10.8).
KL
r
is calculated based on the equivalent cross-section and equivalent length
stated here.
In addition to satisfying the preceding limit states, it is made sure that the
equivalent section, consisting of the stiffeners and part of the web plate, is able
to resist the compressive concentrated force (AISC J8). This is similar to a col-
umn capacity check. For this condition, the program calculates the required
continuity plate area as follows:
For LRFD:
2
25 ,
bf
cp wc
c cr
P
At
F
= −
φ
if not at top story
4 - 26 Joint Design

Chapter 4 Special Seismic Provisions
2
12 ,
bf
cp wc
c cr
P
At
F
= −
φ
if at top story (AISC J10.8, E3)
For ASD:
2
25 ,
bf
cp wc
cr c
P
At
F
= −
Ω
if not at top story
2
12 ,
bf
cp wc
cr c
P
At
F
= −
Ω
if at top story (AISC J10.8, E3)
An iterative process is involved as Acp, r, and Fcr are interdependent. If Acp is
needed, iteration starts with the minimum thickness and minimum width of the
continuity plate. A maximum of three iterations is performed.
If
0
cp
A≤
, no continuity plates are required. If continuity plates are required, they
must satisfy a minimum area specification defined as follows:
The minimum thickness of the stiffeners is taken as follows:
min
05
cp fb
tt= .
(AISC J10.8)
If the maximum thickness is more than the upper limit, the program reports an error.
Here it is assumed that the continuity plate can extend for the full width of the
column flange.
The minimum width of the continuity plate on each side plus 1/2 the thickness of the
column web shall not be less than 1/3 of the beam flange width, or
min 232
fp wc
cp
bt
b
= −
(AISC J10.8)
So that the minimum area is given by
min min min
.
cp cp cp
A tb=
(AISC J10.8)
Therefore, the continuity plate area provided by the program is zero or the greater of
cp
A
and
min
.
cp
A
Joint Design 4 - 27

Steel Frame Design AISC 360-05/IBC 2006
In the preceding equations,
cp
A
= Required continuity plate area
yc
F
= Yield stress of the column and continuity plate material
b
d
= Beam depth
c
d
= Column depth
h
= Clear distance between flanges of column less fillets for rolled shapes
c
k
= Distance between outer face of the column flange and web toe of its fillet
u
M
= Factored beam moment
bf
P
= Beam flange force, assumed as
( )
u b tb
Mdt/−
n
R
= Nominal strength
fb
t
= Beam flange thickness
fc
t
= Column flange thickness
wc
t
= Column web thickness
φ
= Resistance factor (LRFD)
Ω
= Safety factor (ASD)
The special seismic requirements additionally checked by the program are dependent
on the type of framing used. Continuity plate requirements for seismic design are
evaluated for moment frames (OMF, IMF, SMF) only. No checks are performed for
braced frames (OCBF, SCBF, and EBF).
For OMF, the continuity plates are checked and designed for a beam flange force,
()
bf pb b fb
P M dt
= /−
,
()= /−
bf pb b fb
P M dt
(AISC SEISMIC 11.5)
4 - 28 Joint Design

Chapter 4 Special Seismic Provisions
For SMF and IMF, the continuity plates are checked and designed for a beam flange
force,
bf y y fb fb
P RFb t=
,
bf y y fb fb
P RFb t=
(AISC SEISMIC 9.5, 10.5)
Note that the code insists on designing the continuity plate to match with tested
connection (AISC SEISMIC 9.5, 10.5, 11.5).
4.10.2 21BDesign of Doubler Plates
One aspect of the design of a steel framing system is an evaluation of the shear forces
that exist in the region of the beam-column intersection known as the panel zone.
Shear stresses seldom control the design of a beam or column member. However, in a
Moment-Resisting frame, the shear stress in the beam-column joint can be critical,
especially in framing systems when the column is subjected to major direction bending
and the joint shear forces are resisted by the web of the column. In minor direction
bending, the joint shear is carried by the column flanges, in which case the shear
stresses are seldom critical, and this condition is therefore not investigated by the
program.
Shear stresses in the panel zone, due to major direction bending in the column, may
require additional plates to be welded onto the column web, depending on the loading
and the geometry of the steel beams that frame into the column, either along the
column major direction or at an angle so that the beams have components along the
column major direction. See Figure 2-3 of Chapter 2. The program investigates such
situations and reports the thickness of any required doubler plates. Only columns with I
Shapes are investigated for doubler plate requirements. Also doubler plate
requirements are evaluated for moment frames (OMF, IMF, SMF) only. No check is
made for braced frames (OCBF, SCBF, EBF).
The program calculates the required thickness of doubler plates using the following
algorithms. The shear force in the panel zone, is given by
1
cos .
b
nbn n
pc
nn fn
M
VV
dt
θ
=
= −
−
∑
Joint Design 4 - 29
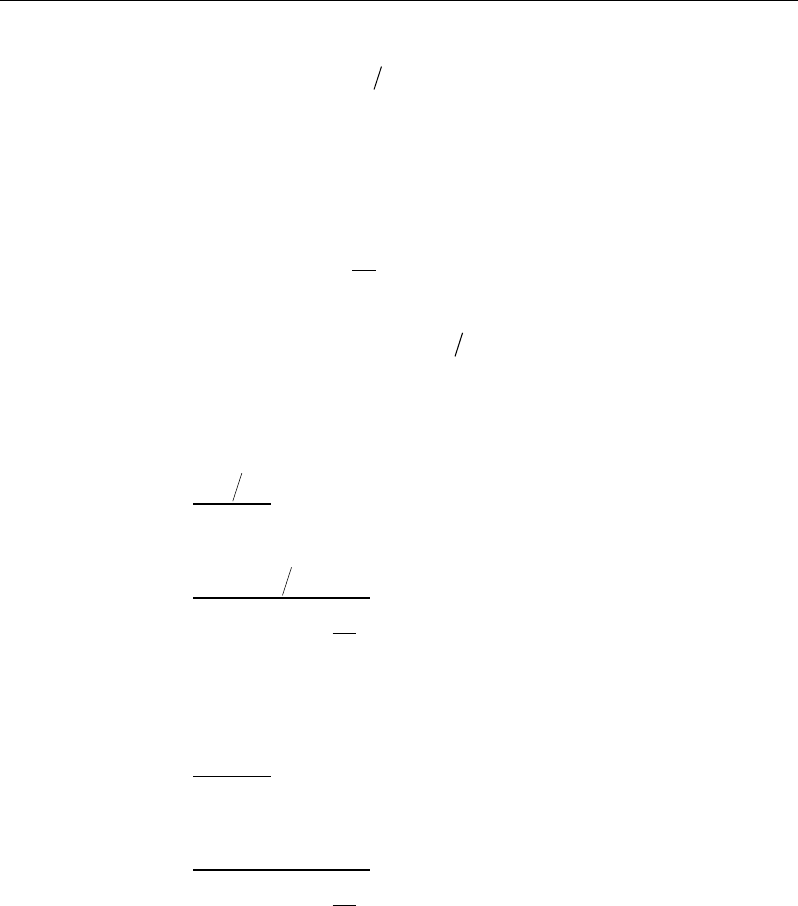
Steel Frame Design AISC 360-05/IBC 2006
The available strength of the web panel zone for the limit state of shear yielding is
determined as
n
R
φ
(LFRD) or
n
R
Ω
(ASD), as appropriate. Assuming that the effect
of panel zone deformation on frame stability has not been considered in analysis, the
nominal strength,
n
R,
is determined as follows:
06
=.,
n y cp
R Fdt
for
0.4
rc
PP≤
, and (LRFD J10-9)
0 6 1.4
=. −,
r
n y cp
c
P
R Fdt P
for
0.4 .
rc
PP>
(LRFD J10-10)
By using
pn
VR= φ
(LRFD) or
= Ω
pn
VR
(ASD), as appropriate, the required
column panel zone thickness
p
t
is found as follows.
For LRFD:
,
0.6
p
p
yc
V
tFd
φ
=
for
≤04
rc
P .P
,
0.6 1.4
p
p
r
yc
c
V
tP
Fd P
φ
=
−
for
04
rc
P . P.
>
For ASD:
,
0.6
Ω
=
p
p
yc
V
tFd
for
≤04
rc
P .P
,
0.6 1.4
Ω
=
−
p
p
r
yc
c
V
tP
Fd P
for
04
rc
P .P>
The extra thickness, or the required thickness of the doubler plate is given as follows:
= −
dp p w
t t t,
where
4 - 30 Joint Design

Chapter 4 Special Seismic Provisions
y
F
= Column and doubler plate yield stress
p
t
= Required column panel zone thickness
fn
t
= Flange thickness of
n
-th beam
dp
t
= Required doubler plate thickness
fc
t
= Column flange thickness
w
t
= Column web thickness
p
V
= Required panel zone shear capacity
c
k
c
V
= Column shear in column above
b
n
= Number of beams connecting to column
n
d
= Overall depth of
n
-th beam connecting to column
n
θ
= Angle between
n
-th beam and column major direction
c
d
= Overall depth of column
bn
M
= Factored beam moment from corresponding loading combination
n
R
= Nominal shear strength of panel
r
P
= Required axial strength,
u
P
(LRFD) or
a
P
(ASD)
y
P
= Column axial yield strength,
y
FA
c
P
=
y
P
(LRFD) or
y
0.6F
(ASD)
φ
= 0.9 (LRFD)
Ω
= 1.67 (ASD)
The largest calculated value of
dp
t
, calculated for any of the load combinations based
on the factored beam moments and factored column axial loads, is reported.
Joint Design 4 - 31
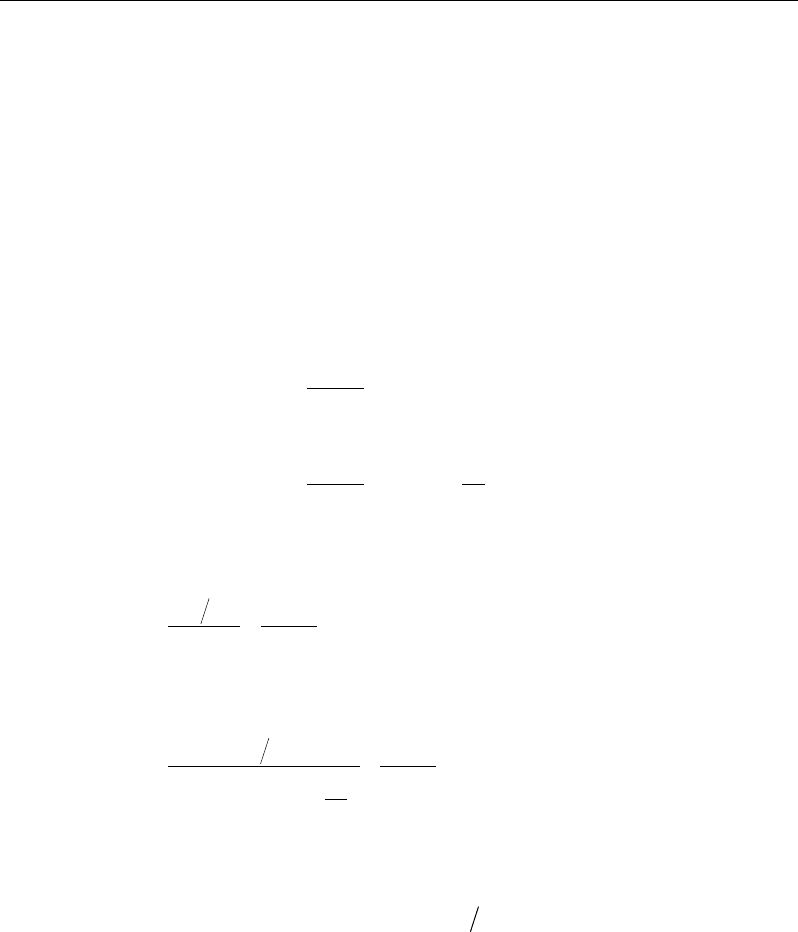
Steel Frame Design AISC 360-05/IBC 2006
Doubler plate requirements for seismic design are evaluated for SMF only. No further
check/design is performed for other types of frames.
For SMF, the panel zone doubler plate requirements that are reported will develop at
least the beam moments equal to the expected plastic moment capacity of the beam
()
yp
RM ,
or beam moments due to specified load combinations involving seismic
load (AISC SEISMIC 9.3a). For seismic design,
p
V
is calculated using the equation
given previously, except that
pb
M
is taken as
33yy
RFZ
.
The capacity of the panel zone in resisting this shear is taken as:
2
3
0 60 1 ,
cf cf
n y cp
b cp
bt
V Fdt ddt
=.+
for
0 75
uy
PP≤.
(AISC J10-11)
2
3
0 60 1 1.9 1.2 ,
cf cf r
n y cp
b cp c
bt P
V Fdt ddt P
=.+ −
for
0.75
rc
PP
>
(AISC J10-12)
giving the required panel zone thickness as
2
3
06
p v cf cf
p
yc bc
V bt
tFd dd
φ
= −,
.
if
0.75
rc
PP≤
(AISC SEISMIC 9.3a, AISC J10-11)
2
3
0 6 1.9 1.2
p v cf cf
p
bc
r
yc
c
V bt
tdd
P
Fd P
φ
= −,
.−
if
0.75 .
rc
PP>
(AISC SEISMIC 9.3a, AISC J10-12)
In the preceding expression, the term
pv
Vφ
is replaced by
vp
VΩ
if the ASD
provision is followed. The required doubler plate thickness is calculated as
dp
t
=
−
p wc
tt
where,
4 - 32 Joint Design

Chapter 4 Special Seismic Provisions
φ
= 1.0 (LRFD) (AISC J10.6, SEISMIC 9.3a)
Ω
= 1.50 (ASD) (AISC J10.6, SEISMIC 9.3a)
cf
b
= width of column flange
cf
t
= thickness of column flange
p
t
= required column web thickness
b
d
= depth of deepest beam framing into the major direction of the
column
All other terms were explained previously.
For SMF, the program checks the following panel zone column web thickness
requirement:
( ) ( )
22
.
90
c fc b fb
dt dt
t− +−
≥
(AISC SEISMIC 9.3b)
Here,
t
is taken as
wc dp
tt+
when the doubler plate is plug welded to prevent local
buckling. In such cases,
dp
t
is increased if necessary to meet this criterion. If the
doubler plate is not plug welded to the web,
t
is taken as
wc
t
and also as
dp
t
for
checking both the plates. If
wc
t
cannot satisfy the criteria, then a failure condition is
declared. If
dp
t
does not satisfy this criterion, then its value is increased to meet the
criteria. If the check is not satisfied, it is noted in the output.
4.10.3 22BWeak Beam Strong Column Measure
Only for Special Moment Frames (SMF) with seismic design category (SDC) A to F,
the code requires that the sum of column flexure strengths at a joint should be more
than the sum of beam flexure strengths (AISC SEISMIC 9.6). The column flexure
strength should reflect the presence of axial force present in the column. The beam
flexural strength should reflect potential increase in capacity for strain hardening. To
facilitate the review of the strong column weak beam criterion, the program will report
a beam-column plastic moment capacity ratio for every joint in the structure.
Joint Design 4 - 33

Steel Frame Design AISC 360-05/IBC 2006
For the major direction of any column (top end), the beam-to-column-strength ratio is
obtained as
1
cos
.
b
n
pbn n
n
maj
pcax pcbx
M
RMM
∗
=
∗∗
θ
=+
∑
(AISC SEISMIC 9.6)
For the minor direction of any column, the beam-to-column-strength ratio is obtained
as
1
sin
b
n
pbn n
n
maj
pcay pcby
M
RMM
∗
=
∗∗
θ
= ,
+
∑
(AISC SEISMIC 9.6)
where,
maj
R
= Plastic moment capacity ratios, in the major directions of the
column
min
R
= Plastic moment capacity ratios, in the minor directions of the
column
∗
pbn
M
= Plastic moment capacity of
-th
n
beam connecting to column
n
θ
= Angle between the
-thn
beam and the column major direc-
tion
∗
,pcax y
M
= Major and minor plastic moment capacities, reduced for axial
force effects, of column above story level
∗
,pcbx y
M
= Major and minor plastic moment capacities, reduced for axial
force effects, of column below story level
b
n
= Number of beams connecting to the column
The plastic moment capacities of the columns are reduced for axial force effects and
are taken as
4 - 34 Joint Design
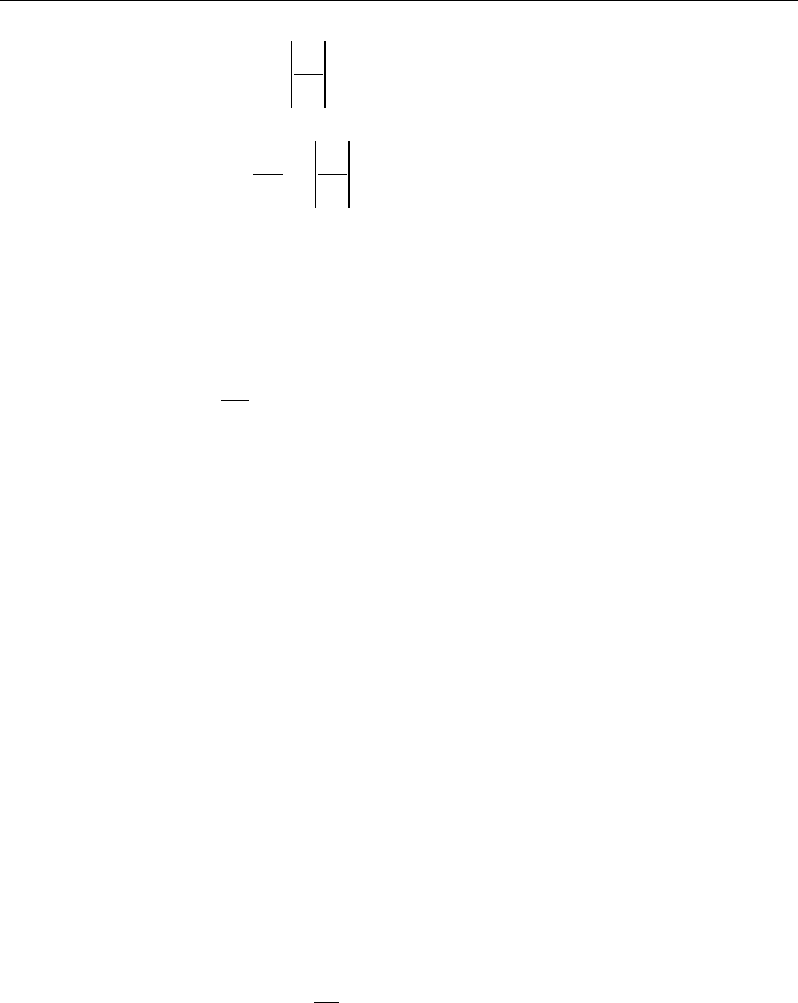
Chapter 4 Special Seismic Provisions
uc
pc c yc
g
P
M ZF A
∗
= −
(LRFD) (AISC SEISMIC 9.6)
1.5
yc uc
pc c
g
FP
MZ A
∗
= −
(ASD) (AISC SEISMIC 9.6)
The plastic moment capacities of the beams are amplified for potential increase in
capacity for strain hardening as
11
∗= .
pb y yb b mv
M RF Z f
(LFRD) (AISC SEISMIC 9.6)
1.1
1.5
∗
= ,
pb y yb b mv
M RF Z f
(ASD) (AISC SEISMIC 9.6)
where,
b
Z
= Plastic modulus of beam
c
Z
= Plastic modulus of column
yb
F
= Yield stress of beam material
yc
F
= Yield stress of column material
uc
P
= Axial compression force in column for given load combination
g
A
= Gross area of column
mv
f
= The moment amplification factor. It is taken as the ratio of beam
moment at the centerline of column to the moment of the column face.
This factor takes care of the
uv
M
(LRFD) or
av
M
(ASD) of the code
(AISC SEISMIC 9.6).
mv
f
is taken as follows:
mv
f
=
1
c
b
d
L
+
where,
c
d
= Depth of column section, and
Joint Design 4 - 35

Steel Frame Design AISC 360-05/IBC 2006
b
L
= clear span length of the beam.
For the preceding calculations, the section of the column above is taken to be the same
as the section of the column below, assuming that the column splice will be located
some distance above the story level.
4.10.4 23BEvaluation of Beam Connection Shears
For each steel beam in the structure, the program will report the maximum major
shears at each end of the beam for the design of the beam shear connections. The beam
connection shears reported are the maxima of the factored shears obtained from the
loading combinations.
For special seismic design, the beam connection shears are not taken less than the
following special values for different types of framing. The special seismic
requirements additionally checked by the program are dependent on the type of
framing used and the Seismic Design Category.
For SMF, the beam connection shear is taken as the maximum of those from regular
load combinations and those required for the development of full plastic moment
capacity of the beam. The connection shear for the development of the full plastic
moment capacity of beam is as follows:
pb
u DL LL
h
CM
V VV
L
= ++
(LRFD), (AISC SEISMIC 9.2a(3))
( )
07= ++
pb
a DL LL
n
CM
V . VV
L
(ASD), (AISC SEISMIC 9.2a(3))
where,
V
= Shear force corresponding to END I or END J or beam
C
= 0 if beam ends are pinned, or for cantilever beam
= 1 if one end of the beam is pinned
= 2 if no ends of the beam are pinned
pb
M
= Plastic moment capacity of beam = 1.1
yp
RM
4 - 36 Joint Design

Chapter 4 Special Seismic Provisions
h
L
= Clear length of the beam
DL
V
= Absolute maximum of the calculated beam shears at the
corresponding beam ends from the factored dead load only
LL
V
= Absolute maximum of the calculated beam shears at the
corresponding beam ends from the factored live load only
For IMF, the beam connection shear is taken as the minimum of the two values: (a)
maximum shear from the load combinations and (b) maximum shear based on beam
moment capacity of the beam (AISC SEISMIC 10.2a(2)).
The maximum shear from the load combinations is determined from all of the
regular load combinations and also from the amplified seismic load combinations
(AISC SEISMIC 10.2a(2), ASCE 14.4.3). For LRFD or ASD provisions, appropriate
load combinations are considered. The load combination for amplified seismic load
combinations are also described previously in the "Design Loading Combinations"
section.
The maximum shear based on beam moment capacity is calculated for any load
combination involving seismic load by replacing the seismic effect on shear force
with the capacity shear as follows:
pb
u DL LL
h
CM
V VV
L
= ++
(LFRD), (AISC SEISMIC 10.2a(2))
( )
0.7
pb
a DL LL
h
CM
V VV
L
= ++
(ASD). (AISC SEISMIC 10.2a(2))
All parameters in the preceding equation have been described previously in this
section.
For OMF, the beam connection shear is taken as the minimum of the two values: (a)
maximum shear from the load combinations and (b) maximum shear based on beam
moment capacity of the beam (AISC SEISMIC 11.2a(4)).
The maximum shear from the load combinations is determined from all of the
regular load combinations and also from the amplified seismic load combinations
(AISC SEISMIC 11.2a(4), ASCE 14.42.3). For LRFD or ASD provisions,
appropriate load combinations are considered. The load combination for amplified
Joint Design 4 - 37

Steel Frame Design AISC 360-05/IBC 2006
seismic load combinations also are described previously in the "Design Loading
Combinations" section.
The maximum shear based on beam moment capacity is calculated for any load
combination involving seismic load by replacing the seismic effect on shear force
with the capacity shear as follows:
pb
u DL LL
h
CM
V VV
L
= ++
(LFRD), (AISC SEISMIC 11.2a(4))
( )
0.7
pb
a DL LL
h
CM
V VV
L
= ++
(ASD). (AISC SEISMIC 11.2a(4))
All parameters in the preceding equation have been described previously in this
section. The moment connection is assumed to be FR.
For SCBF the beam connection shear is taken as the maximum of those from
regular load combination and those from amplified seismic load combinations.
For OCBF and OBFI, the beam connection shear is taken as the maximum of those
from regular load combinations and those from amplified seismic load
combinations.
For EBF, the beam connection shear is taken as the minimum of the two values:
(a) maximum shear from the load combinations and (b) maximum shear based on
link beam shear capacity (AISC SEISMIC 15.7, 11.2a(4)).
The maximum shear from the load combinations is determined from all of the
regular load combinations and also from the amplified seismic load combinations
(AISC SEISMIC 15.7, 11.2a(4), ASCE 14.2.3). For LRFD or ASD, appropriate load
combinations are considered. The load combinations for amplified seismic load
combinations also were described previously in the "Design Loading Combination"
section of this chapter.
The maximum beam connection shear based on link beam shear capacity is taken as
the beam connection shear that can be developed when the link beam yields in shear.
The load factor for the seismic component of the load in the combination is
calculated to achieve forces related to yielding of the link beam. For connection
shear determination, the forces are further amplified by 1.1
y
R
(AISC SEISMIC
15.7, 11.2a(4)).
4 - 38 Joint Design

Chapter 4 Special Seismic Provisions
If the beam-to-column connection is modelled with a pin in the program by releasing
the beam end, it automatically affects the beam connection shear.
4.10.5 24BEvaluation of Brace Connection Forces
For each steel brace in the structure, the program reports the maximum axial force at
each end of the brace for the design of the brace-to-beam connections. The brace
connection forces reported are the maxima of the factored brace axial forces obtained
from the loading combinations.
For special seismic design, the brace connection forces are not taken less than the
following special values for different types of framing. The special seismic
requirements additionally checked by the program are dependent on the type of
framing used.
Bracer axial forces for seismic designs are evaluated for braced frames (SCBF, IOBF,
OCBF, EBF) only. No special checks are performed for moment frames (OMF, IMF,
SMF).
For SCBF, the bracing connection force is taken as the minimum of the two values
(AISC SEISMIC 13.3a):
The expected yield strength in tension of the bracing member, determined as
yyg
RFA
(LFRD) or
15
yyg
RFA .
(ASD), as appropriate (AISC SEISMIC
13.3a(a)).
The maximum load effect of the amplified seismic load combination (AISC
SEISMIC 13.3a(b)).
Note that the required bracing connection force for the required compressive
strength of the brace based on limit state of buckling that is equal to
11 yn
. RP
(LFRD) or
()
1115
yn
. . RP
(ASD), as appropriate (AISC SEISMIC 13.3c), is
always less than the corresponding value considered in case (a). So this limit
state is not considered.
Joint Design 4 - 39

Steel Frame Design AISC 360-05/IBC 2006
For OCBF or OCBFI, the bracing connection force is taken as the minimum of the
two values (AISC SEISMIC 14.4):
a. The expected yield strength in tension of the bracing member, deter-
mined as
yyg
RFA
(LFRD) or
15
yyg
RFA .
(ASD), as appropriate (AISC
SEISMIC 14.4(2)).
b. The maximum load effect of the amplified seismic load combination
(AISC SEISMIC 14.4 Exception (b)).
For EBF, the required strength of the diagonal brace connection at both ends of the
brace is taken as the maximum of the following two values: (a) the maximum
connection force from the design load combinations, and (b) the maximum brace
connection force based on the link beam shear capacity (AISC SEISMIC 15.6c, and
15.6a).
The maximum connection force from the load combinations is determined for all the
regular load combinations. The amplified seismic load combinations are not
considered.
The maximum brace connection force based on link beam shear capacity is taken as
the brace connection force that can be developed when the link beam yields in shear.
The load factor for seismic component of the load in the combination is calculate to
achieve forces related to yielding of the link beam. For connection force
determination, the forces are further amplified by
1 25
y
.R
(AISC SEISMIC 15.6e,
15.6a).
4 - 40 Joint Design

Chapter 5
Design Output
The program has the capacity to create design output in four major ways –
graphical display, file output, tabular display, and member specific detailed de-
sign information. The graphical display includes input and output design in-
formation for members visible in the active window; the display can be sent
directly to a printer or saved to a file. The file output includes both summary and
detail design data that can be saved in RTF, HTML and plain text formats. The
tabular display output includes both summary and detail design data that can be
displayed or saved in many formats, including Excel, Access, RTF, HTML and
plain text. The member specific detailed design information shows the details of
the calculation.
The following sections describe some of the typical graphical display, file out-
put, tabular display output, and member specific detailed design information.
Some of the design information is very specific to the chosen steel design code.
This manual addresses "AISC 360-05/IBC 2006" design code related output
information only.
5.1 Graphical Display of Design Information
The graphical display of design output includes input and output design infor-
mation for all steel frame members that are visible in the active window. The
5 - 1

Steel Frame Design AISC 360-05/IBC 2006
graphical output can be produced in color or in gray-scaled screen display. The
active screen display can be sent directly to the printer or saved to a file in sev-
eral formats.
Design input data displayed includes the following items for the "AISC
360-05/IBC 2006" code, as shown in Figure 5-1:
Design sections
Design framing type
Live load reduction factors
Unbraced length ratios,
factors,L
for major and minor direction of bending,
and for lateral-torsional buckling
Effective length factor for non-sway condition, 1
K
factors, for major and
minor directions of bending
Effective length factor for sway condition,
2
K
factors, for major and minor
directions of bending
Effective length factors,
,
z
K
for lateral-torsional buckling
m
C
factors for major and minor directions of bending
b
C
factors for major and minor directions of bending
1
B
factors for major and minor directions of bending
2
B
factors for major and minor directions of bending
5 - 2 Graphical Display of Design Information
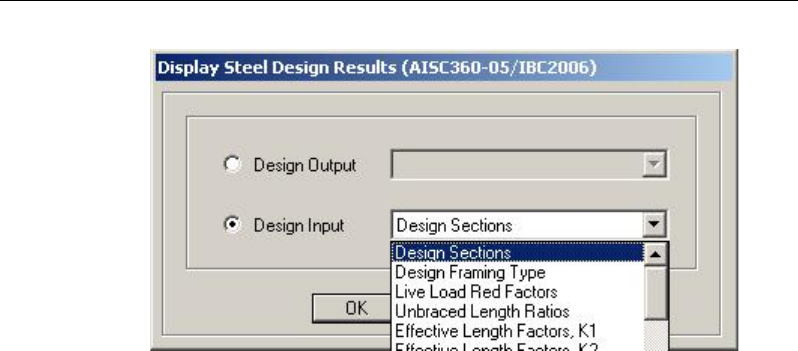
Chapter 5 Design Output
Figure 5-1 Choice of design input data for display on the model
in the active window
0
Ω
factors
Yield stress,
y
F
Nominal axial capacities
Nominal bending capacities
Nominal shear capacities
Output design data plotted on the model includes the following items for the
"ACI 360-05/IBC 2006" code as shown in Figure 5-2:
P-M stress ratio values with members color-coded based on the ratio
Shear stress ratio
Continuity plate and doubler plate thickness
Beam/column capacity ratios
Beam connection shear force
Brace connection axial force
Graphical Display of Design Information 5 - 3
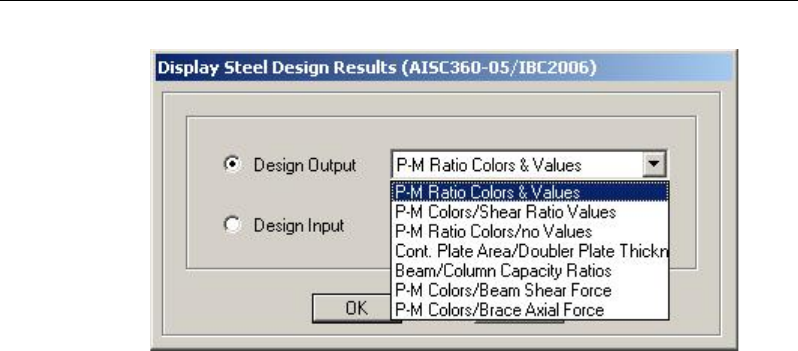
Steel Frame Design AISC 360-05/IBC 2006
Figure 5-2 Choice of design output data for display on the model
in the active window
Use the Design menu > Steel Frame Design > Display Design Info command
in SAP2000/ETABS and the Advanced > Frame Design > Steel > Display
Design Information command in CSiBridge to plot design input and output
values directly on the model. The Display Steel Design Results form shown in
Figures 5-1 and 5-2 will display. Choose the Design Output or Design Input
option. One item can be selected from the drop-down list. For example, the P-M
interaction ratios can be displayed by choosing the Design Output option and
selecting P-M Ratio Colors & Values from the drop-down list. Click the OK
button to display the longitudinal reinforcing in the active window.
The graphics can be displayed in 3D or 2D mode. The standard view transfor-
mations are available for all steel design information displays. Several buttons
on the toolbar can be used to switch between 3D and 2D views. Alternatively,
click the View menu and the Set 3D View or Set 2D View commands.
The onscreen graphical display can be sent to printer using any of the following
commands. Use the File menu > Print Graphics command in
SAP2000/ETABS and the Orb > Print > Print Graphics command in
CSiBridge to print the active window. To capture the graphical display in a file
for printing through another application, use the File menu > Capture En-
hanced Metafile command in SAP2000/ETABS and the Orb > Pictures >
Metafile command in CSiBridge to create an .emf file, or use the File menu >
Capture Picture command in SAP2000/ETAB and the Orb > Pictures com-
mands in CSiBridge to create a bitmap (.bmp) file. Create a screen capture of the
active window using the Alt+ Print Screen keyboard keys in SAP2000/ETABS
5 - 4 Graphical Display of Design Information

Chapter 5 Design Output
or create a screen capture of the entire window using the Ctrl + Print Screen
keyboard keys. Then use the Ctrl+V keyboard keys to paste the saved image
into Paint or other graphical program.
By default the graphical displays are in color. It may be advantageous to view or
present the display in gray-scale graphics or using a white background. Use the
Options menu > Color command in SAP2000/ETABS and the Orb > Settings
> Colors command in CSiBridge to set these options.
5.2 Tabular Display of Design Information
In addition to model definition and analysis results, the design information for
all steel frame members or for only selected members can be displayed in tabular
spreadsheet format. Currently, the program generates design summary data,
PMM design details and shear design details. The tabular spreadsheet output can
be displayed by selecting the Display menu > Show Tables command in
SAP2000/ETABS and Home > Display > Show Tables command in CSiBridge
to access the Choose Tables for Display form, an example of which is shown in
Figure 5-3. That form can be used to choose which tables or sets of tables are to
be displayed.
The names of the tables are displayed in a tree structure, which can be collapsed
or expanded by clicking on an item in the tree. Click on the small check boxes
preceding the items to select those tables for display. If a branch of the tree is
selected, all of the tables under that branch are selected. The selected set of ta-
bles can be saved as a Named Set using the Save Named Set button. This named
set can be used in the future for quick selection. If one or more frame members
are selected on the structural model before accessing the Choose Tables for
Display form, the Selection Only check box will be checked when the form
displays and, the program will display information for the selected members
only; uncheck the check box to display information for all applicable "unse-
lected" members in the model. If the Show Unformatted check box is checked,
the numbers will be displayed unformatted, instead of being displayed using a
limited number of decimal digits. The unformatted option provides higher pre-
cision output that can then be copied into other programs.
Tabular Display of Design Information 5 - 5
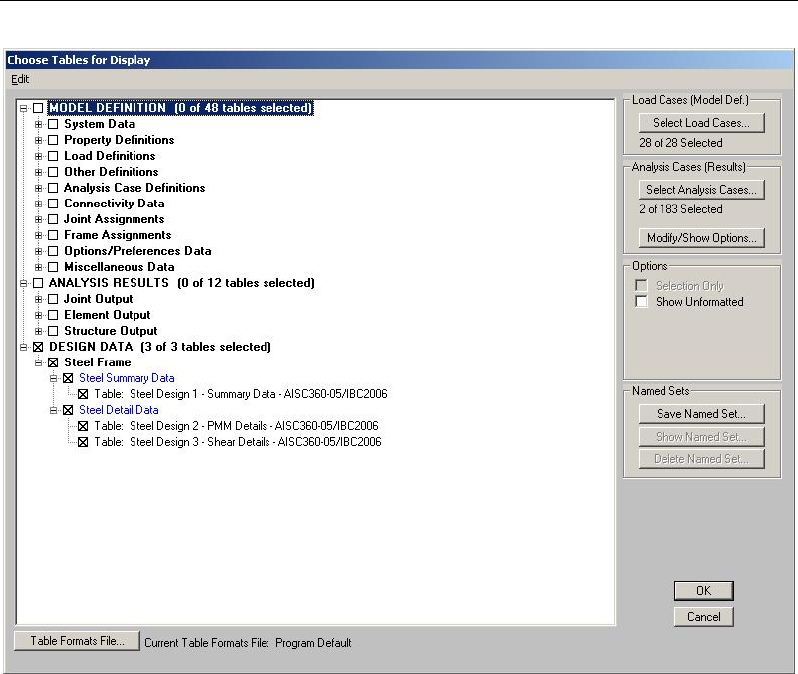
Steel Frame Design AISC 360-05/IBC 2006
Figure 5-3 Choice of design data tables for tabular display
Use the other buttons in the form to tailor the data display. For example, click the
Select Load Patterns button to specify which load patterns are to be included in
the display of model definition data; click the Select Load Case and Modi-
fy/Show Options to specify which load cases are to be included and how
analysis results are displayed.
After selecting all of the tables for steel frame design and the display options,
click the OK button to display a form showing one of the selected design tables,
with a drop-down list in the upper right-hand corner of the form that can be used
to select other tables for display. A typical design table is shown in Figure 5-4.
5 - 6 Tabular Display of Design Information
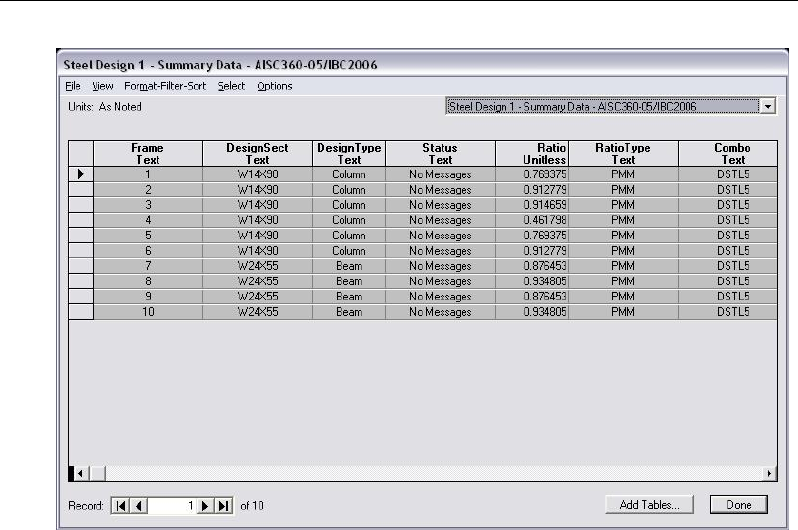
Chapter 5 Design Output
Figure 5-4 A typical tabular display of design data
Use the scroll bars on the bottom and right side of the tables to scroll right and
left or up and down if portions of the data table can not be displayed in the form's
display area. The columns can be resized by clicking the left mouse button on
the separator of the headers, holding down the left mouse button and then
dragging the mouse to the left or right. Reset the column widths to their default
values by selecting the Format-Filter-Sort menu > Reset Default Column
Widths command on the form. The table can be split into two or more tables by
clicking on the small black rectangular area near the bottom-left corner of the
table, holding down the left mouse button, and then dragging the mouse button
to the left or right. Repeat this process to add more splits. Use the split and
horizontal scroll bar to put two columns side by side for easier comparison. The
splits can be removed by selecting the Format-Filter-Sort menu > Remove
Splits command on the form. Alternatively, remove the split by clicking, hold-
ing and dragging the left mouse button to merge the split key to its original lo-
cation.
Select multiple consecutive columns by putting the cursor on the header, holding
down the mouse button, and then dragging the mouse button left or right. Al-
ternatively, depress the Shift key and click the left mouse button to select a range
of columns.
Tabular Display of Design Information 5 - 7

Steel Frame Design AISC 360-05/IBC 2006
Each of the individual fields (columns) can be formatted. Fields with text in-
formation can be set for specific types of alignment (center, left, right) and to
specific widths. In addition to setting the alignment and column widths, fields
with numeric data can be set for the maximum number of characters, zero tol-
erance, number of decimal digits and so forth. The tables can be formatted, fil-
tered and sorted using multiple criteria accessed using the Format-Filter-Sort
menu on the form. Filtering and sorting features can be useful in identifying
critical cases. After specifying the table formatting information, save it to a
format file that can be used in the future by selecting the appropriate feature
available under the Format-Filter-Sort menu.
The current table (i.e., the table in the active window) can be exported to Excel,
Access, .rtf., .html, and plain text formats. In both Excel spreadsheet and Access
database formats, the tables can have many columns, making the tables very
wide. In .rft and .html formats, the tables are split at convenient points to make a
reasonably printable document. In plain text format, the tables can be saved with
or without the splits. To export a table to Excel, for example, select the File
menu > Export Current Table > To Excel command. The program will export
the entire table to an Excel spreadsheet workbook and will automatically open
the file in MS Excel. Similarly, if the table is exported to other formats, the
default editor specific to that format will open the document, provided that the
editor is available in the computer. The table will be saved in that format only if
the relevant editor is not available. Instead of exporting or displaying the cur-
rently displayed table, the entire set of available tables can be exported and
displayed in the afore-mentioned formats by selecting the File menu and the
appropriate submenu command. With these exporting and display features, the
tables can be saved in many required formats and can be printed. Many other
features of the design tables are left for the user to discover by using the pro-
gram.
5.3 Detailed Display of Member Specific Information
The program has the capability to display the design details for a specific
member. The information includes member identification, shape name, section
properties, design combination name, design combination forces, and other de-
sign input data to check the design results. The information also includes stress
ratios for P-M-M and other interactions, demand/capacity ratios from shear,
5 - 8 Detailed Display of Member Specific Information
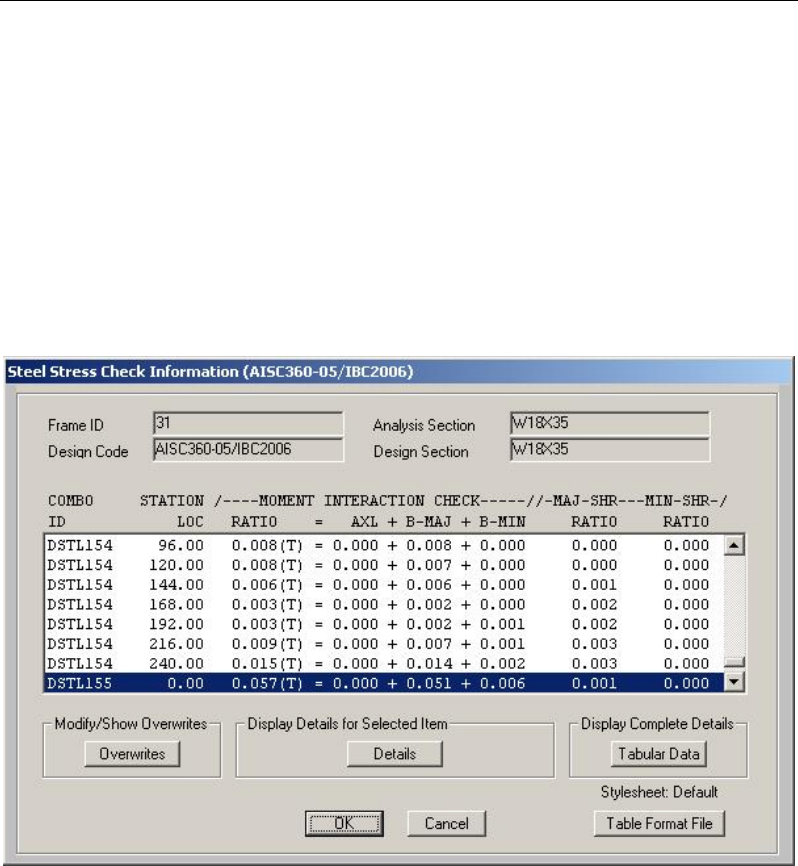
Chapter 5 Design Output
nominal strengths, design factors such as
,
K
,
m
C
,
b
C
1
,B
2
,B
and so forth. The
design details are displayed in a summary form and also are displayed for a
specific load combination and for a specific station of a frame member.
When the design results are displayed on the model in the active window, the
detailed design information can be accessed by right clicking on the desired
frame member to display the Steel Stress Check Information form. Alterna-
tively, click the Design menu > Steel Frame Design > Interactive Steel
Frame Design command and then right click on the frame member. An example
of that form is shown in Figure 5-5.
Figure 5-5 A typical member specific steel stress check information summary
The Steel Stress Check Information form identifies the frame members and the
analysis and design section, and includes a display area of mostly de-
mand/capacity ratio data and a set of buttons that access forms that provide
further details about the selected frame member. The display area reports the
load combinations, the stress check stations, the P-M-M interaction ratio along
with its axial and flexural components, and the shear stress ratios. The load
combination is reported by its name, while the station is reported by its location,
Detailed Display of Member Specific Information 5 - 9

Steel Frame Design AISC 360-05/IBC 2006
which is measured from the I-end of the column. The number of reported line
items in the text box is equal to the number of design combinations multiplied by
the number of stations. Only one line item is highlighted in blue when the form
first displays. That item highlights the largest demand/capacity ratio from
P-M-M, major and minor shear or any other considered interaction ratio, unless
a line item(s) has design overstress or an error. In that case, the item with the
overstress or error will be selected and highlighted. If many line items are
overstressed or have an error, the last among all such line items will be selected
and highlighted.
The stress check information is always reported for the design section. If the
member is assigned an individual section, the analysis and design section are
always the same. If the member is assigned an Auto Select Section (a list of
sections), the analysis and design section can be different, unless the design has
converged.
The Overwrites and Details buttons near the bottom of the Steel Stress Check
Information form can be used to access the Steel Frame Design Overwrites form,
and the Steel Stress Check Data form, which displays detailed information about
the selected frame element. While the latter form displays information in a
non-editable format, the Overwrites form display the overwrite data in editable
format. This allows the user to enter an interactive mode of design.
Overwrites button. Click this button to access the Steel Frame Design
Overwrites form. Use that form to make revisions to the steel frame design
overwrites and then immediately review the new design results as a summary
using the Steel Stress Check Information form, or in detail by clicking the
Details button to access the Steel Stress Check Data form. Clicking the OK
button on the Steel Frame Design Overwrites form temporarily saves any
changes. To make the changes permanent, click the OK button on the Steel
Stress Check Information form. To disregard the changes, click the Cancel
button on the Steel Stress Check Information form. An example of an Over-
writes form is shown in Figure 5-6.
5 - 10 Detailed Display of Member Specific Information
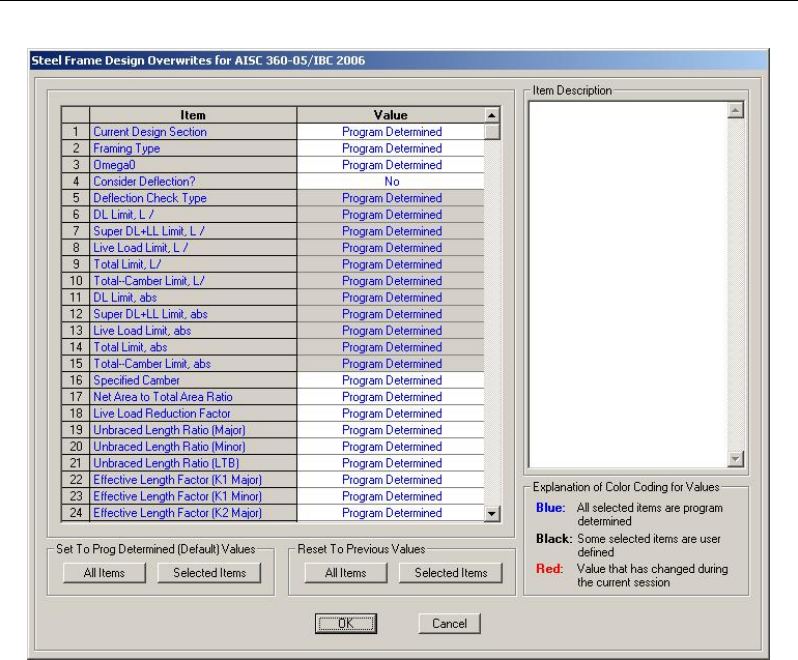
Chapter 5 Design Output
Figure 5-6 A typical member specific Steel Frame Design Overwrites form
Details button. Click this button to access the Steel Stress Check Data form.
Use the form to review all of the design details for the highlighted item. An
example of a Steel Stress Check Data form is shown in Figure 5-7. The in-
formation includes the member ID, load combo and station identifications,
steel design sections, section properties, design combination forces, stress ra-
tios for P-M-M and other interactions, stress ratios for shear, nominal
strengths, and design factors such as,
,
m
C
,
b
C
1
,B
2
,B
and so forth. Values
that are not applicable are reported as N/A. Similarly, N/C and N/N indicate an
item is “Not Calculated” and “Not Needed.”
Detailed Display of Member Specific Information 5 - 11
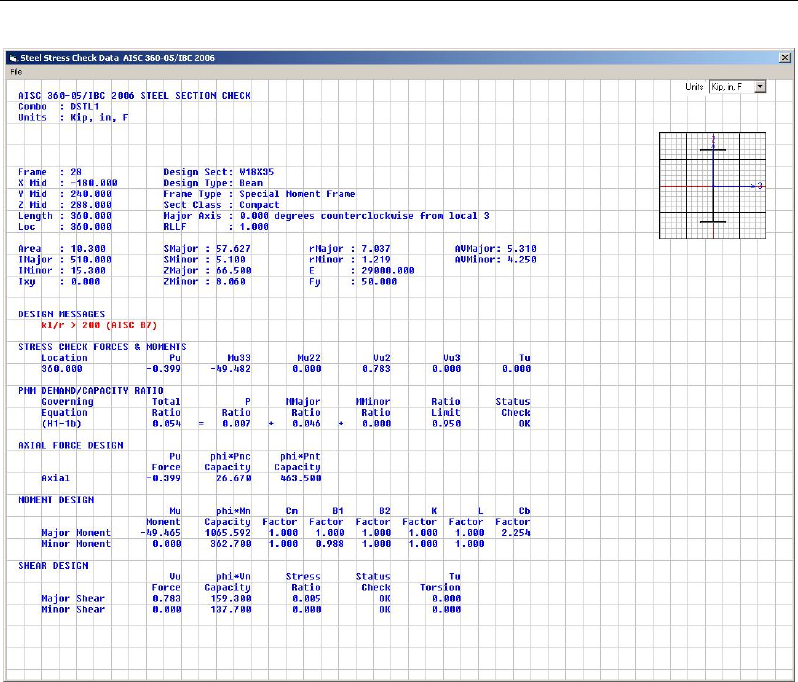
Steel Frame Design AISC 360-05/IBC 2006
Figure 5-7 A typical Steel Stress Check Data form
Before clicking the button, highlight an item for the desired design station
and design load combination in the Steel Stress Check Information display
area by clicking on the line. The data subsequently displayed will relate to
the highlighted item. By default, the most critical line item is selected
when the form first displays, as described previously.
To increase or decrease the width of the Steel Stress Check Data form, put
the cursor near the right edge of the form, click the left mouse button, and
drag the mouse cursor towards the left or right. Similarly, the height of the
form can be increased or decreased.
The text in the form can be dragged in any direction by positioning the
cursor in the middle of the form, and then clicking the left mouse button
5 - 12 Detailed Display of Member Specific Information
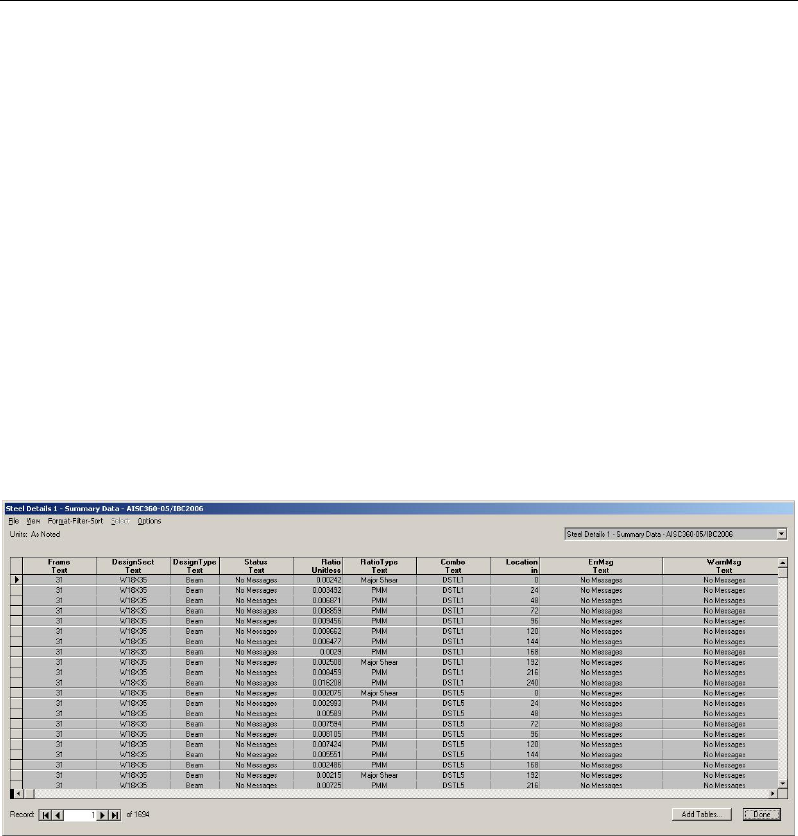
Chapter 5 Design Output
and dragging the text in the desired direction. Similarly, the graphical
display of the column section can also be dragged in any direction.
Use the Units drop-down list in the upper right-hand corner of the form to
change the units used to display the data. Data displayed on the form can
be sent directly to the printer by selecting the File menu > Print command
on the form. The program allows limited page setup options using the
Print Setup Command on the File menu on the form.
The Steel Stress Check Information form also includes a Tabular Data button
that when clicked displays member specific design details in a spreadsheet type
format. The tabular display of design information has been described in the
previous section. In that case, the information displayed is specific to the se-
lected member only. The tabular output is shown for all stations and all design
load combinations for the selected member. An example of design details table
that displays after clicking the Tabular Data button is shown in Figure 5-8.
Figure 5-8 Member specific design details in tabular format
5.4 Output of Design Information
In addition to model definition and analysis results, the design information for
all steel frame members or for selected frames only can be saved in tabular
format. Currently for AISC 360-05/IBC 2006 code, the program saves design
summary data, PMM design details, and shear design details. Save the file
output by selecting the File menu > Print Tables command in SAP2000/ETAB
Output of Design Information 5 - 13
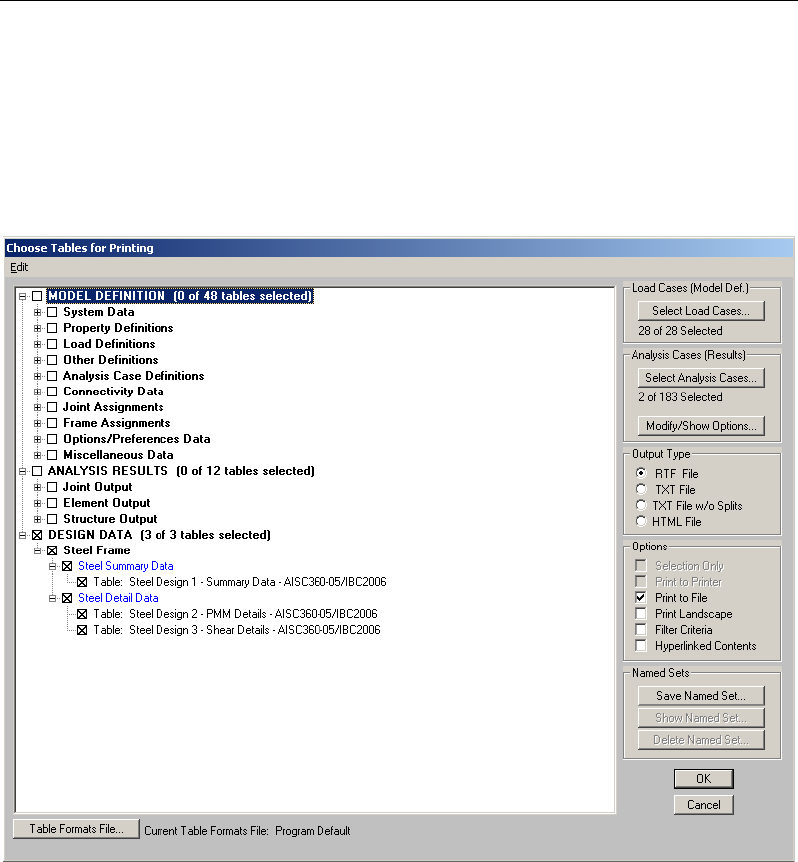
Steel Frame Design AISC 360-05/IBC 2006
and the Orb > File > Print > Print Tables command in CSiBridge to access the
Choose Tables for Printing form. An example of that form is shown in Figure
5-9. Use the options on the form to choose which table or set of tables to save in
a file or print. This form is very similar to the Choose Tables for Display form,
which has been described earlier in this chapter in the "Tabular Display of De-
sign Information" section.
Figure 5-9 Choice of design tables for saving in a file or printing
The name of the tables are displayed in a tree structure, which can be collapsed
or expanded by clicking on an item in the tree. Click on the small check boxes
preceding the items to select those tables for printing or saving to a file. If a
branch of the tree is selected, all of the tables under that branch are selected.
When all options for printing or saving the data to file have been specified, the
settings can be saved as a Named Set using the Save Named Set button. The
Named Set can be easily recalled in the future, reducing the need to reselect the
options and ensuring that output is consistent from one printing effort to another.
5 - 14 Output of Design Information

Chapter 5 Design Output
If one or more structural members are selected before the Choose Tables for
Printing form is accessed, the Selection Only check box will be checked, and the
program will save or print the data for the selected members only; uncheck the
check box to save or print the data for all appropriate "unselected" members.
The output can be generated in a variety of formats, including rich text format
(.rft), plain text with and without splits or page breaks (.txt), and hyperlink text
markup language (.htm) by choosing the appropriate option on the right side of
the form.
Printed output can be specified to have a landscaped orientation, in which the
width of the resulting printout on a given page is longer than the height of the
printout.
Filtering criteria can be applied if those criteria were specified using the For-
mat-Filter-Sort menu > Format Table command when the selected data tables
were displayed using the Display menu > Show Tables command in
SAP2000/ETABS and the Home > Display > Show Tables command in
CSiBridge. The output also can be specified to include a hyperlinked contents to
facilitate accessing specific areas of the printout.
There are other buttons on the form that do not affect saving or printing design
information. For example, the Select Load Patterns button affects only sav-
ing/printing model definition data. The Select Load Cases and Modify/Show
Options buttons affect only saving/printing analysis results.
After clicking all the necessary tables for steel frame design and all necessary
options, clicking the OK button will save/print the design tables.
Although the File name > Print Tables command and the Orb > File > Print >
Print Tables command paths are dedicated for saving/printing design infor-
mation, these are not the only paths to do so. Design tables can be saved in
different formats using the Display menu > Show Tables command in
SAP2000/ETABS and the Home > Display > Show Tables command in
CSiBridge.
Output of Design Information 5 - 15

Steel Frame Design AISC 360-05/IBC 2006
5.5 Error Messages and Warnings
Error messages and warnings may be displayed in the steel frame design output.
The messages are numbered. A list of error messages and warnings used in Steel
Frame Design for all the design codes is provide in Appendix F. However, all of
the messages are not applicable to the AISC 360-05/IBC 2006 Code.
5 - 16 Error Messages and Warnings

Appendix A
P-Delta Effects
Modern design provisions are based on the principle that the member forces are
calculated by a second-order elastic analysis, where the equilibrium is satisfied
on the deformed geometry of the structure. The effects of the loads acting on the
deformed geometry of the structure are known as the second-order or the P-Delta
effects.
The P-Delta effects come from two sources: global lateral translation of the
frame and the local deformation of members within the frame.
Consider the frame object shown in Figure A-1, which is extracted from a story
level of a larger structure. The overall global translation of this frame object is
indicated by
∆
. The local deformation of the member is shown as
δ
. The total
second order P-Delta effects on this frame object are those caused by both
∆
and δ.
The program has an option to consider P-Delta effects in the analysis. When you
consider P-Delta effects in the analysis, the program does a good job of cap-
turing the effect due to the
∆
deformation (
P-
∆
effect) shown in Figure
B-1, but it does not typically capture the effect of the δ deformation (
P-
δ
effect), unless, in the model, the frame object is broken into multiple elements
over its length.
Appendix A - 1
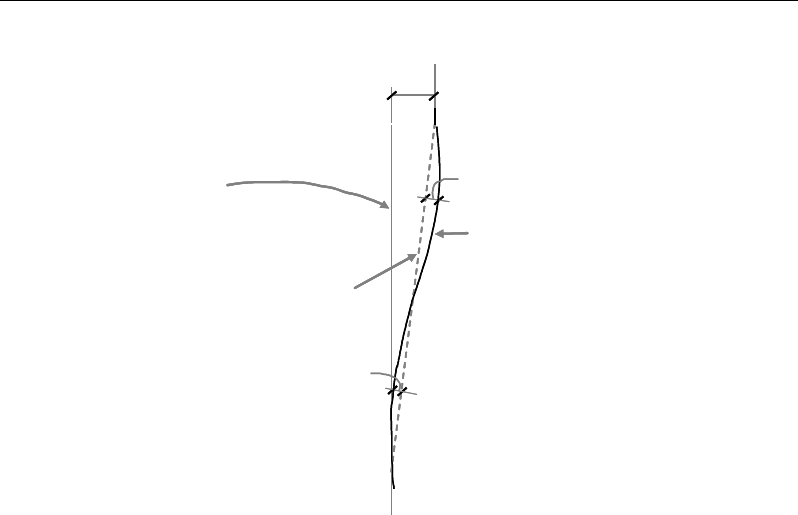
Steel Frame Design AISC 360-05/IBC 2006
∆
Original position of frame
element shown by vertical
line
Position of frame element
as a result of global lateral
translation, ∆, shown by
dashed line
Final deflected position of the
frame element that includes the
global lateral translation, ∆, and
the local deformation of the
element, δ
δ
δ
P
∆
Original position of frame
element shown by vertical
line
Position of frame element
as a result of global lateral
translation, ∆, shown by
dashed line
Final deflected position of the
frame element that includes the
global lateral translation, ∆, and
the local deformation of the
element, δ
δ
δ
P
Figure A-1
P-
∆
and
P-
δ
effects
In design codes, required strengths are usually required to be determined using a
second-order analysis that considers both
P-
∆
and
P-
δ
effects. Approximate
second-order analysis procedures based on amplification of responses from
first-order analysis for calculating the required flexural and axial strengths are
common in current design codes and have the following general form:
12
= +
CAP nt lt
M BM BM
(AISC C2-1a)
2
= +
CAP nt lt
P P BP
(AISC C2-1b)
where,
,
CAP CAP
MP
= Required axial and flexural design capacities
,
nt nt
MP
= Required axial and flexural capacities from first-order analy-
sis of the member assuming there is no translation of the
frame (i.e., associated with the δ deformation in Figure 2-1)
,
lt lt
MP
= Required axial and flexural capacities from first-order analy-
sis of the member as a result of lateral translation of the frame
Appendix A - 2

Appendix A – P-Delta Effects
only (i.e., associated with the
∆
deformation in
Figure A-1)
1
B
= Unitless amplification factor multiplying
nt
M
2
B
= Unitless amplification factor multiplying
,
lt lt
MP
Depending on the choice of analysis methods, which is provided by the
ANSI/AISC 360-05 code, a rigorous second order analysis or the amplification
of first order analysis results to estimate the effect of second order effects is
required. The program has the capability of performing both. In the first case, the
required strengths are determined directly from the analysis results without any
amplification factors (i.e.,
1
B
and
2
B
are equal to 1). However, these amplifi-
cation factors can always be overwritten by the user on a member-by-member
basis, if desired, using the overwrite option.
To properly capture the P-δ effect in a finite element analysis, each element,
especially column elements, must be broken into multiple finite elements. Alt-
hough a single element per member can capture the P-δ effect to some extent, the
program considers that inadequate. For practical reasons, the software internally
divides the column elements into two members. The user must provide addi-
tional subdivisions where a column is expected to have multiple inflection
points.
In general, steel frame design requires consideration of P-Delta effects in the
analysis before the check/design is performed. Although two elements per line
object are generally adequate to capture the P-∆ effect, it is recommended to use
more than two elements per line object for the cases where both P-∆ and P-δ
effects are to be considered for a member having multiple points of inflection.
However, explicit manual breaking of the member into elements has other
consequences related to member end moments and unbraced segment end mo-
ment. It is recommended that the members be broken internally by the program.
In this way, the member is recognized as one unit, end of the members are
identified properly, and P-∆ and P-δ effects are captured better.
Appendix A - 3

Appendix B
Steel Frame Design Preferences
The Steel Frame Design Preferences are basic assignments that apply to all of
the steel frame members. Tables B-1, B-2, and B-3 list Steel Frame Design
Preferences for "AISC 360-05/IBC 2006." Default values are provided for all
preference items. Thus, it is not necessary to specify or change any of the pref-
erences. However, at least review the default values to ensure they are accepta-
ble. Some of the preference items also are available as member specific
overwrite items. The Overwrites are described in Appendix C. Overwritten
values take precedence over the preferences.
Table B-1: Steel Frame Design Preferences
Item Possible Values Default Value Description
Design Code Design codes
available in the
current version
AISC360-05/
IBC 2006 The selected design code. Subsequent design is
based on this selected code.
Time History Design Envelopes,
Step-by-Step Envelopes Toggle for design combinations that include a time
history designed for the envelope of the time history,
or designed step-by-step for the entire time history.
If a single design combination has more than one
time history case in it, that design combination is
designed for the envelopes of the time histories,
regardless of what is specified here.
Appendix B - 1
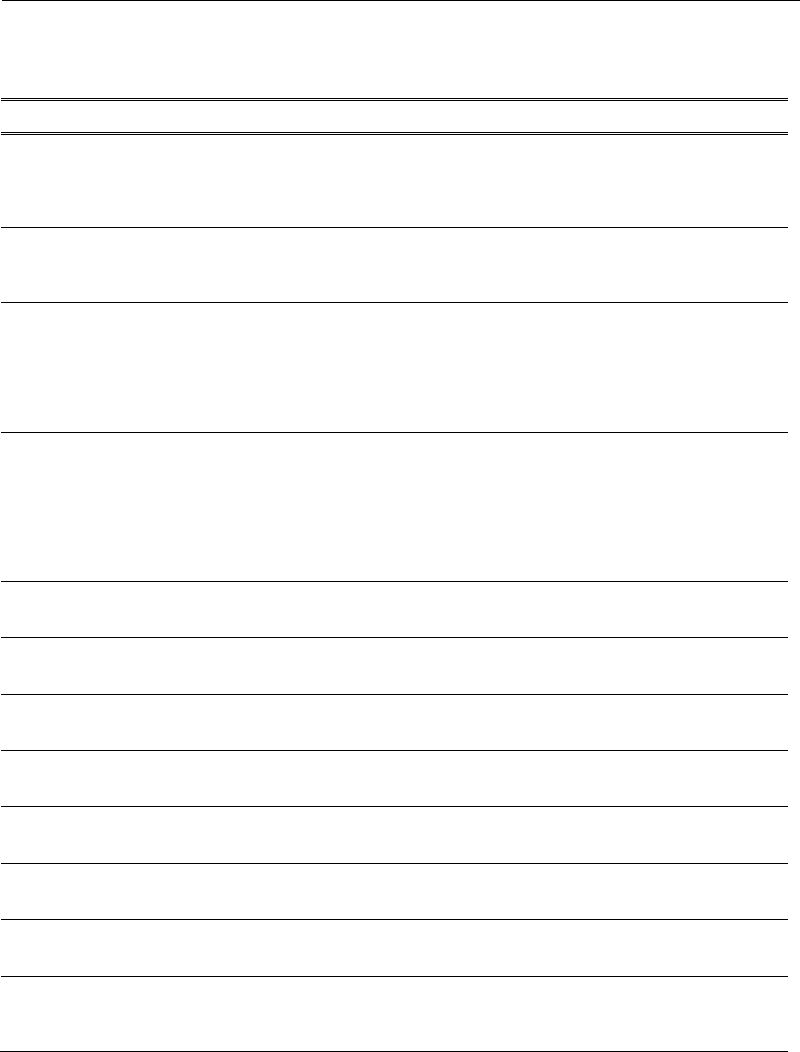
Steel Frame Design Manual AISC 360-05/IBC 2006
Table B-1: Steel Frame Design Preferences
Item Possible Values Default Value Description
Framing Type SMF, IMF,
OMF, SCBF,
OCBF, OCBFI,
EBF
SMF This item is used for ductility considerations in the
design, when seismic provisions are considered.
Seismic Design
Category A, B, C, D, E, F D This item varies with the Seismic Hazard Exposure
Group and the Effective Peak Velocity Related
Acceleration.
Design Provision ASD, LRFD LRFD Application provisions for calculation of
allowable/design and required strength of individual
elements. Selection of ASD will enable additional
fields for safety facto
r overwrites, whereas selection
of LRFD will enable additional fields for resistance
factors.
Analysis Method 7 Values Direct Analysis
Method with
General 2nd Order
Analysis and
b
τ
Fixed
Indicates the method used to check/design the steel
members. The design module does not verify the
acceptability of the selected design analysis method;
the user is expected to verify acceptabil
ity. Also, the
user is expected to set the appropriate stiffness
modification factors and to supply the combinations
with appropriate notional loads.
Notional Load
Coefficient > 0 0.002
The coefficient used to define the notional load as a
fraction of a given gravity load pattern.
Ignore Seismic Code? Yes, No No Toggle to consider (No) or not consider (Yes) the
seismic part of the code in design.
Ignore Special
Seismic Load? Yes, No No Toggle to consider (No) or not consider (Yes)
special seismic load combinations in design.
Is Doubler Plate Plug
Welded? Yes, No Yes Toggle to indicate if the doubler-p
late is plug welded
(Yes) or it is not plug welded (No).
HSS Welding Type ERW, SAW ERW Indicates the procedure used for welding the steel
members.
Reduce HSS
Thickness? Yes, No Yes Toggle to consider if the HS (Box or Pipe) thickness
is reduced (Yes) or should not be reduced (No).
Consider
Deflection? Yes, No No Toggle to consider the deflection limit (Yes) or to
not consider the deflection limit (No).
DL Limit, L/ ≥ 0 120
Deflection limit for dead load. Inputting 120 means
that the limit is L/120. Inputting zero means no
check will be made of this item.
Appendix B - 2

Appendix B Steel Frame Design Preferences
Table B-1: Steel Frame Design Preferences
Item Possible Values Default Value Description
Super DL+LL Limit, L/ ≥ 0 120 Deflection limit for superimposed dead plus live
load. Inputting 120 means that the limit is L/120.
Inputting zero means no check will be made of this
item.
Live Load Limit, L/ ≥ 0 360 Deflection limit for superimposed live load.
Inputting 360 means that the limit is L/360.
Inputting zero means no check will be made of this
item.
Total Limit, L/ ≥ 0 240 Deflection limit for total load. Inputting 240 means
that the limit is L/240. Inputting zero means no
check will be made of this item.
Total-Camber Limit, L/ ≥ 0 240
Limit for net deflection. Camber is subtracted from
the total load deflection to get net deflection.
Inputting 240 means that the limit is L/240.
Inputting
zero means no check will be made of this item.
Pattern Live Load
Factor ≤1.0 0.75 The live load factor for automatic genera
tion of load
combinations involving pattern live loads and dead
loads.
D/C Ratio Limit ≤1.0 0.95 The demand/capacity ratio limit to be used for
acceptability. D/C ratios that are less than or equal to
this value are considered acceptable. The program
will select members from the auto select list with
D/C ratios less than or equal to this value.
Maximum Number of Auto
Iteration ≥ 1 1 Sets the number of iterations of the analysis-design
cycle that the program will complete automatically
assuming that the frame members have been
assigned auto select sections. This is currently only
available in ETABS.
Table B-2 Additional Steel Frame Design Preferences LRFD Provision
Item Possible Values Default Value Description
Phi (Bending) ≤1.0 0.9 Resistance factor for flexure.
Phi (Compression) ≤1.0 0.9 Resistance factor for compression.
Phi (Tension-Yielding) ≤1.0 0.9 Resistance factor for yielding in tension.
Phi (Tension-Fracture) ≤1.0 0.75 Resistance factor for tension rupture.
Phi (Shear) ≤1.0 0.9 Resistance factor for shear.
Phi (Shear, Short Webbed
Rolled I-Shapes) ≤1.0 1.0 Resistance factor for shear for specific
short-webbed rolled I-Shapes.
Phi (Torsion) ≤1.0 0.9 Resistance factor for torsion.
Appendix B - 3
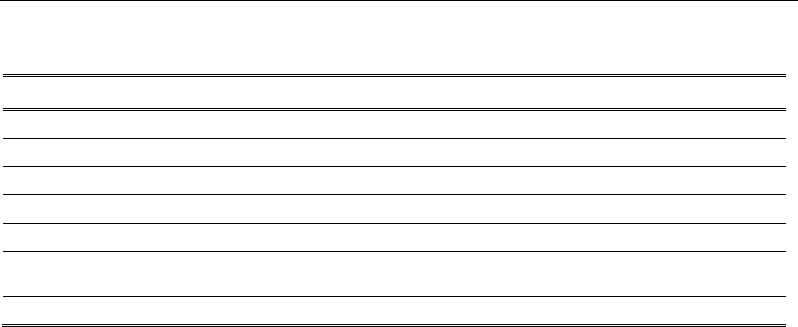
Steel Frame Design Manual AISC 360-05/IBC 2006
Table B-3 Additional Steel Frame Design Preferences for ASD Provision
Item Possible Values Default Value Description
Omega (Bending) ≥ 1.0 1.67 Safety factor for flexure.
Omega (Compression) ≥ 1.0 1.67 Safety factor for compression.
Omega (Tension-Yielding) ≥ 1.0 1.67 Safety factor for yielding in tension.
Omega (Tension-Fracture) ≥ 1.0 2.00 Safety factor for tension rupture.
Omega (Shear)
≥ 1.0
1.67
Safety factor for shear.
Omega (Shear, Short
Webbed Rolled I-Shape) ≥ 1.0
1.50
Safety factor for shear for specific short-webbed
rolled I-Shapes.
Omega (Torsion) ≥ 1.0 1.67 Safety factor torsion.
Appendix B - 4

Appendix C
Steel Frame Design Procedure Overwrites
The structural model may contain frame elements made of several structural
materials: steel, concrete, aluminum, cold-formed steel and other materials.
The program supports separate design procedures for each material type. By
default the program determines the design procedure from the material of the
frame member.
The software allows the user to turn off or turn on design of specific members
by selecting No Design or Default from material. Refer to the program Help for
information about overwriting the design procedure.
Overwrites
The steel frame design Overwrites are basic assignments that apply only to
those elements to which they are assigned. Table C-1 lists Steel Frame Design
Overwrites for "AISC 360-05/IBC 2006." Default values are provided for all
overwrite items. Thus, it is not necessary to specify or change any of the
overwrites. However, at least review the default values to ensure they are
acceptable. When changes are made to overwrite items, the program applies the
changes only to the elements to which they are specifically assigned.
overwritten values take precedence over the preferences (Appendix B).
Appendix C - 1

Steel Frame Design AISC 360-05/IBC 2006
Table C-1 Steel Frame Design Overwrites for "AISC 360-05/IBC 2006"
Item Possible Values Default Value Description
Current Design
Section Any defined steel
section Analysis section The design section for the selected frame object.
When this Overwrite is applied, any previous auto
select section assigned to the frame object is
removed.
Fame Type SMF, IMF,
OMF, SCBF,
OCBF, OCBFI,
EBF
From Preferences This item is used for ductility considerations in the
design.
Omega O ≥ 1.0 Calculated This factor is related to seismic force and ductility.
Consider
Deflection? Yes, No From Preferences To
ggle to consider the deflection limit (Yes) or to not
consider the deflection limit (No) in design.
Deflection Check
Type Ratio,
Absolute,
Both
Both
Choose to consider deflection limit as an absolute, as
a divisor of the beam length, as both, or with no
deflection limit.
DL Limit, L/ ≥ 0 From Preferences Deflection limit for dead load. Inputting 120 means
that the limit is L/120. Inputting zero means no
check will be made of this item.
Super DL+LL
Limit, L/ ≥ 0 From Preferences Deflection limit for superimposed dead plus live
load. Inputting 120 means that the limit is L/120.
Inputting zero means no check will be made of this
item.
Live Load Limit, L/ ≥ 0 From Preferences
Deflection limit for superimposed live load. Inputting
360 means that the limit is L/360. Inputting zero
means no check will be made of this item.
Total Limit, L/ ≥ 0 From Preferences Deflection limit for total load. Inputting 240 means
that the limit is L/240. Inputting zero means no check
will be made of this item.
Total-
Camber Limit,
L/ ≥ 0 From Preferences Limit for net deflection. Camber is subtracted from
the total load deflection to get net deflection.
Input
ting 240 means that the limit is L/240. Inputting
zero means no check will be made of this item.
DL Limit, abs ≥ 0 1. Deflection limit for dead load. Inputting zero means
no check will be made of this item.
Super DL+LL Limit,
abs ≥ 0 1. Deflection limit for superimposed dead plus live
load. Inputting zero means no check will be made of
this item.
Live Load Limit, abs
≥ 0 1.
Deflection limit for superimposed live load. Inputting
zero means no check will be made of this item.
Total Limit, abs ≥ 0 1. Deflection limit for total load. Inputting zero means
no check will be made of this item.
Appendix C - 2

Appendix C Frame Design Overwrites
Table C-1 Steel Frame Design Overwrites for "AISC 360-05/IBC 2006"
Item Possible Values Default Value Description
Total–
Camber Limit,
abs ≥ 0 1. Deflection limit for net deflection. Camber is
subtracted from the total load deflection to get net
deflection. Inputting a value of 240 means that the
limit is L/240. Inputting zero means no check will be
made of this item.
Specified Camber ≥ 0 0
The specified amount of camber to be reported in the
design output and to be used in the net deflection
check.
Live Load Reduction
Factor ≥ 0 Calculated
The reducible live load is multiplied by this factor to
obtain the reduced live load for the frame object.
Specifying zero means the value is program
determined.
Net Area to Total
Area Ratio ≥ 0 1.0 The ratio of the net area at the end joint to gross
cross-sectional area of the section. This ratio affects
the design of axial tension members. Specifying zero
means the value is the program default, which is 1.
Unbraced Length
Ratio (Major) ≥ 0 Calculated
Unbraced length factor for buckling about the frame
object major axis; specified as a fraction of the frame
object length. This factor times the frame object
length gives the unbraced length for the object.
Specifying zero means the value is program
determined.
Unbraced Length
Ratio (Minor) ≥ 0 Calculated
Unbraced length factor for buckling about the frame
object minor axis; specified as a fraction of the frame
object length. This factor times the frame object
length gives the unbraced length for the object.
Specifying zero means the value is program
determined.
Unbraced Length
Ratio (LTB) ≥ 0 L22 Unbraced length factor for lateral-torsional buckling
for the frame object; specified as a fraction of the
frame object length. This factor times the frame
object length gives the unbraced length for the
object. Specifying zero means the value is program
determined.
Effective Length
Factor (K1 Major) ≥ 0 1.0 Effective length factor for buckling about the frame
object major axis; specified as a frac
tion of the frame
object length. This factor times the frame object
length gives the effective length for the object.
Specifying zero means the value is program
determined. For beam design, this factor is always
taken as 1, regardless of any other value specified in
the Overwrites. This factor is used for the B1 factor.
Appendix C - 3

Steel Frame Design AISC 360-05/IBC 2006
Table C-1 Steel Frame Design Overwrites for "AISC 360-05/IBC 2006"
Item Possible Values Default Value Description
Effective Length
Factor (K1 Minor) ≥ 0 1.0 Effective length factor for buckling about the frame
object minor axis; specified as a frac
tion of the frame
object length. This factor times the frame object
length gives the effective length for the object.
Specifying zero means the value is program
determined. For beam design, this factor is always
taken as 1, regardless of any other value specified in
the Overwrites. This factor is used for the B1 factor.
Effective Length
Factor (K2 Major) ≥ 0 Calculated Effective length factor for buckling about the frame
object major axis assuming that the frame is braced
at the joints against sidewsway; specified as a
fraction of the frame object length. This factor times
the frame object length gives the effective length for
the object. Specifying zero means the value is
program determined. For beam design, this factor is
always 1, regardless of any other values specified in
the Overwrites. The factor is used for axial
compression capacity.
Effective Length
Factor (K2 Minor) ≥ 0 Calculated Effective length factor for buckling about the frame
object minor axis assuming that the frame is braced
at the joints against sidewsway; specified as a
fraction of the frame object length. This factor times
the frame object length gives the effective length for
the object. Specifying zero means the value is
program determined. For beam design, this factor is
always 1, regardless of any other values specified in
the Overwrites. The factor is used for axial
compression capacity.
Effective Length
Factor (K LTB) ≥ 0 K2 minor Effective length factor for lateral-torsional buckling;
specified as a fraction of the frame object length.
This factor times the frame object length gives the
effective length for the object. Specifying zero means
the value is program determined. For beam design,
this factor is taken as 1 by default
. The values should
be set by the user.
Moment Coefficient
(Cm Major) ≥ 0 Calculated
Unitless factor; Cm for major axis bending is used in
determining the interaction ratio. Inputting zero
means the value is program determined.
Moment Coefficient
(Cm Minor) ≥ 0 Calculated
Unitless factor; Cm for minor axis bending is used in
determining the interaction ratio. Inputting zero
means the value is program determined.
Bending Coefficient
(Cb) ≥ 0 Calculated Unitless factor; Cb is used in determining the
interaction ratio. Inputting zero means the value is
program determined.
NonSway Moment
Factor (B1 Major) ≥ 0 Calculated
Unitless moment magnification factor for non-sway
major axis bending moment. Specifying zero means
the value is program determined.
NonSway Moment
Factor (B1 Minor) ≥ 0 Calculated Unitless moment magnification factor for non-sway
minor axis bending moment. Specifying zero means
the value is program determined.
Appendix C - 4

Appendix C Frame Design Overwrites
Table C-1 Steel Frame Design Overwrites for "AISC 360-05/IBC 2006"
Item Possible Values Default Value Description
Sway Moment
Factor (B2 Major) ≥ 0 1.0 Unitless moment magnification factor for sway
major-axis bending moment. Specifying zero means
the value is program determined. The program
determined value is taken as 1 because it is assumed
that P-Delta effects were specified to be included in
the analysis, and thus no further magnification is
required.
Sway Moment
Factor (B2 Minor) ≥ 0 1.0 Unitless moment magnification factor for sway
major-axis bending moment. Specifying zero means
the value is program determined. The program
determined value is taken as 1 because it is assumed
that P-Delta effects were specified to be included in
the analysis, and thus no further magnification is
required.
HSS Welding Type ERW, SAW From Preferences Indicates the procedure used to check/design the steel
members.
Reduce HSS
Thickness? Yes, No From Preferences Toggle to consider if the HS (Box or Pipe) thickness
is reduced (Yes) or should not be reduced (No).
Yield Stress, Fy ≥ 0 From Material Material yield strength used in the design/check.
Specifying zero means the value is program
determined. The program determined value is taken
from the material property assigned to the frame
object.
Overstrength
Factory, Ry ≥ 0 From Material The ratio of the expected yield strength to the
minimum specified yield strength. This ratio is used
in capacity-based design for special seismic cases.
Specifying zero means the value is program
determined.
Compressive
Capacity, Pnc ≥ 0 Calculated Nominal axial compressive capacity. Specifying
zero means the value is program determined.
Tensile Capacity,
Pnt ≥ 0 Calculated Nominal axial tensile capacity. Specifying zero
means the value is program determined.
Major Bending
Capacity, Mn3 ≥ 0 Calculated Nominal bending moment capacity in major axis
bending. Specifying zero means the value is program
determined.
Minor Bending
Capacity, Mn2 ≥ 0 Calculated Nominal bending moment capacity in minor axis
bending. Specifying zero means the value is program
determined.
Major Shear
Capacity, Vn2 ≥ 0 Calculated Nominal shear capacity force for major direction
shear. Specifying zero means the value is program
determined.
Minor Shear
Capacity, Vn3 ≥ 0 Calculated Nominal shear capacity force for minor direction
shear. Specifying zero means the value is program
determined.
Appendix C - 5

Steel Frame Design AISC 360-05/IBC 2006
Table C-1 Steel Frame Design Overwrites for "AISC 360-05/IBC 2006"
Item Possible Values Default Value Description
D/C Ratio Limit ≥ 0 Calculated The demand/capacity ratio limit to be used for
acceptability. D/C ratios that are less than or equal to
this value are considered acceptable. Specifying zero
means the value is program determined.
Appendix C - 6

Appendix D
Interactive Steel Frame Design
The Interactive Steel Frame Design command is a powerful mode that allows
the user to review the design results for any steel frame design and
interactively revise the design assumptions and immediately review the revised
results.
Note that a design must have been run for the interactive design mode to be
available. With the design results displayed, right click on a frame object to
display the Steel Stress Check Information form for the member. Click on the
Overwrites button to display the Design Overwrites form, where the member
section or other design parameters may be changed. Clicking OK on this form
results in an immediate updating of the results displayed on the Steel Stress
Check Information form.
Appendix D - 1

Appendix E
Analysis Sections vs. Design Sections
Analysis sections are those section properties used to analyze the model when
an analysis is run (refer to the program Help for information about running an
analysis). The design section is whatever section is used in the steel frame
design. It is possible for the last used analysis section and the current design
section to be different. For example, an analysis may be run using a W18X35
beam, and then in the design, it may be found that a W16X31 beam worked. In
that case, the last used analysis section is the W18X35 and the current design
section is the W16X31. Before the design process is complete, verify that the
last used analysis section and the current design section are the same. Refer to
the program Help for information about completing this task.
The program keeps track of the analysis section and the design section
separately. Note the following about analysis and design sections:
Assigning a frame section property assigns the section as both the analysis
section and the design section.
Running an analysis always sets the analysis section to be the same as the
current design section.
Assigning an Auto Select section list to a frame object initially sets the
analysis and design section to be the section in the list with the median
weight.
Appendix E - 1

Steel Frame Design AISC 360-05/IBC 2006
Unlocking a model deletes the design results, but it does not delete or
change the design section.
Altering the Design Combinations in any way deletes the design results,
but does not delete or change the design section.
Altering any of the steel frame design preferences deletes the design
results, but does not delete or change the design section.
Appendix E - 2
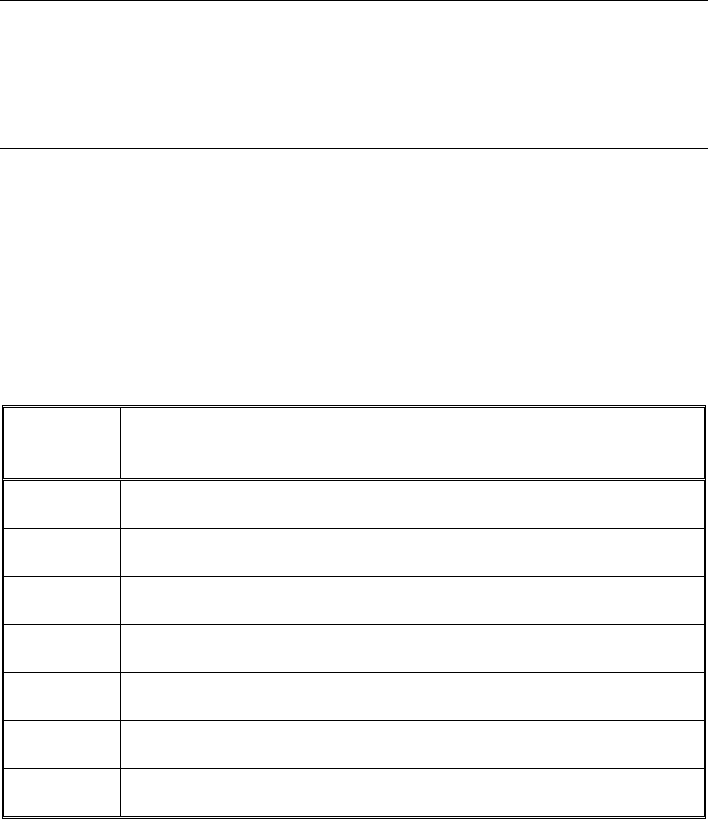
Appendix F
Error and Warning Messages
This appendix provides all the possible error message that can be offered by the
Steel Frame Design model of the program. Some of these messages are relevant
to the "AISC 360-05/IBC 2006" design code. Others are relevant to the other
design codes supported by the program. However, the entire list is presented
here for completeness.
Error
Number Description
1 kl/r > 200
2 l/r > 300
3 P > Pe
4 P > 0.85Py
5 P . 075Py
6 1/r > 720/sqrt(Fy)
7 1 > 96ry
Appendix F - 1

Steel Frame Design AISC 360-05/IBC 2006
Error
Number Description
8 h/tw > 380/sqrt(Fy)
9 Section is slender
10 Section is Class 4
11 Section is not plastic
12 Pu > Pe(B1 is undefined)
13 Cf > Ce (U1 is undefined)
14 bf/2tf > 52/sqrt(Fy)
15 1u > 76bf/sqrt(Fy)
16 fe > Fe
17 l/r > 180
18 l/r > 250
19 1/r > 120
20 l/r > 140
21 Pu > Phi * Pe (Delta b is undefined)
22 N/C (Not Calculated)
23 Internal Program Error
24 Section is too slender
25 1/r > 1000/sqrt (Fy)
26 Story drift too high
27 bf/2tf > 52/sqrt (Fy)
Appendix F - 2

Appendix I Error and Warning Messages
Error
Number Description
28 b/t > 100/Sqrt (Fy)
29 d/t > 1300/Fy
30 b/t > 52/sqrt (Fy)
31 Section is not compact
32 tz < (dz+wz)/90
33 b/t > 100/Sqrt (Fy)
34 1/r > 2500/Fy
35 Fy > 50 ksi
36 Link is too long
37 Section is not seismically compact
38 Phi factor less than or equal to zero
39 1o/f > 150*Sqrt (235/fy)
40 1o/f > 300*Sqrt (235/fy)
41 1o/f > 200*Sqrt (235/fy)
42 1o/f > 150*Sqrt (235/fy)
43 1o/f > 120*Sqrt (235/fy)
44 1o/f > 100*Sqrt (235/fy)
45 1o/f > 90*Sqrt (235/fy)
46 1o/f > 80*Sqrt (235/fy)
47 1o/f > 60*Sqrt (235/fy)
Appendix F - 3

Steel Frame Design AISC 360-05/IBC 2006
Error
Number Description
48 tz < (dz+wz)/70
49 1/r >60
50 1/r > 0.086*ry*E/Fy
51 kl/r > 4.23*Sqr(e/Ey
52 Link Rotaion is too high
53 Phib factor less than or equal to zero
54 Lambda_y > 120*sqrt(235/fy): Phib is no longer correct
55 0.8 N/Ney > .0 : Column is unstable
56 Beam/Column capacity ratio exceeds limit
57 Capacity ratio exceeds limit
58 Section is seismically slender &
59 tz < (dz+wz)/90
60 Beam/column capacity ratio exceed limit
61 Section is slender
62 Section is unknown
63 Section is not supported for design
64 Section is too slender – Effective area negative
65 Section is too slender – Effective Moment of inertia negative
66 Section is too slender – D/t high
67 kl/r > 150
Appendix F - 4
Appendix I Error and Warning Messages
Error
Number Description
68 kl/r > 250
69 l/r > 500
70 Unequal legs
71 Nue * N > Ncr
72 1/r > 5.87*ry*E/Fy
73 kl/r > 180 (IS 3.7, Table 3.1)
74 kl/r > 250 (IS 3.7, Table 3.1)
75 l/r > 400 (IS 3.7, Table 3.1)
76 Signa_ac, cal > 0.6*fcc (Excessive amplification) (IS 7.1.1)
Appendix F - 5

Bibliography
AISC, 2005a. ANSI/AISC 360-05: An American National Standard – Speci-
fication for Structural Steel Building, American Institute of Steel Con-
struction. One East Wacker Drive, Suite 700, Chicago, Illinois, 60601.
March 9.
AISC, 2005b. Commentary on the Specification for Structural Steel Buildings,
American Institute of Steel Construction. One East Wacker Drive, Suite
700, Chicago, Illinois, 60601. March 9.
AISC, 2005c. Seismic Provisions for Structural Steel Buildings, Including
Supplemental No. 1. American Institute of Steel Construction. One East
Wacker Drive, Suite 700, Chicago, Illinois, 60601. March 9. Supplement,
November 16.
ASCE, 2005. SEI/ASCE 7-05. Minimum Design Loads for Buildings and Other
Structures. ASCE Standard, Including Supplement No. 1. American So-
ciety of Civil Engineers.
Boresi, A. P., 1985. Advanced Mechanics of Materials, John Wiley & Sons Inc.
ISBN 0-471-88392-1.
CSI, 2007. CSI Lateral Load Manual. Computers and Structures, Inc., 1995
University Avenue, Berkeley, California, 94704.
Bibliography - 1

Steel Frame Design AISC 360-05/IBC 2006
IBC, 2006. International Building Code, International Code Council, 4051 West
Flossmoor Road, Country Club Hills, Illinois, 60478. January.
Popov, E. P., 1990. Engineering Mechanics of Solids, Prentice-Hall Inc. ISBN
0-13279258-3.
White, D.L. and J. F. Hajjar, 1991. “Application of Second-Order Elastic
Analysis in LRFD: Research to Practice,” Engineering Journal, ACI, Vol.
28, No. 4, pp. 133–148.
Wilson, E. L., 1965, "Structural Analysis of Axisymmetric Solids," AIAA
Journal 3, 2269–2274.
Bibliography - 2