Sterling Supplier Portal SP_Partner_User_Guide SP Partner User Guide
User Manual: SP_Partner_User_Guide user guide pdf - FTP File Search (14/20)
Open the PDF directly: View PDF ![]() .
.
Page Count: 194 [warning: Documents this large are best viewed by clicking the View PDF Link!]
- Contents
- Chapter 1. Introduction to IBM Sterling Supplier Portal
- Chapter 2. Service Agents
- Chapter 3. EDI Capable Suppliers
- Chapter 4. Using Sterling Supplier Portal For the First Time (Partner Task)
- Chapter 5. Dashboards
- Chapter 6. Review and Process New and Change Orders (Partner Task)
- Chapter 7. Review a Payment
- Chapter 8. Complete a Draft Document (Partner Task)
- Chapter 9. Respond to Invitations (Partner Task)
- Chapter 10. Select a Contact for Step When Responding to an Invitation (Partner Task)
- Chapter 11. View a Message (Partner Task)
- Chapter 12. Manage the Packing Profile (Partner Task)
- Chapter 13. View the Details of a Shipping Window Order (Partner Task)
- Chapter 14. View the Details of an Order (Partner Task)
- Chapter 15. Acknowledge an Order (Partner Task)
- Chapter 16. Rejection of an Order by the Supplier
- Chapter 17. Delete a Draft Acknowledgement (Partner Task)
- Chapter 18. View the Acknowledgement of an Order (Partner Task)
- Chapter 19. Print an Order (Partner Task)
- Chapter 20. Pack an Order or a Shipment (Partner Task)
- Chapter 21. View the Details of a Container (Partner Task)
- Chapter 22. Ship an Order (Partner Task)
- Chapter 23. Delete a Draft Shipment (Partner Task)
- Chapter 24. Ship From Locations
- Chapter 25. View Payment Terms
- Chapter 26. View the Payment Details for an Order (Partner Task)
- Chapter 27. View Charges and Allowances (Partner Task)
- Chapter 28. View the Details of a Shipment (Partner Task)
- Chapter 29. Resend a Shipment (Partner Task)
- Chapter 30. Cancel a Shipment (Partner Task)
- Chapter 31. Invoices
- Chapter 32. Printing Forms and Labels
- Chapter 33. Vendor Compliance Module
- Chapter 34. View the Details of an Agreement (Partner Task)
- Chapter 35. Catalogs
- Chapter 36. Edit Basic Profile Information (Partner Task)
- Chapter 37. Modify Partner's Public Profile (Partner Task)
- Chapter 38. Configure a Rule for an Item (Partner Task)
- Chapter 39. Upload Inventory Information (Partner Task)
- Chapter 40. Route Planning
- Chapter 41. Currency Codes
- Notices
- Index
Sterling Supplier Portal
Partner User Guide
Documentation Date: 10 June 2014

Note
Before using this information and the product it supports, read the information in “Notices” on page 183.
This edition applies to the 11 November 2012 release of IBM Sterling Supplier Portal and to all subsequent releases
and modifications until otherwise indicated in new editions.
© Copyright IBM Corporation 2000, 2014.
US Government Users Restricted Rights – Use, duplication or disclosure restricted by GSA ADP Schedule Contract
with IBM Corp.

Contents
Chapter 1. Introduction to IBM Sterling
Supplier Portal ............1
Configure Dashboard ...........1
Create Documents ............1
View Documents .............1
View Agreements .............2
Perform Setup Tasks ............2
Chapter 2. Service Agents .......3
Chapter 3. EDI Capable Suppliers....5
Chapter 4. Using Sterling Supplier Portal
For the First Time (Partner Task) ....7
Chapter 5. Dashboards ........9
Configure Dashboard (Partner Task) ......9
Configure the Dashboard to view the Overview
Panel (Partner Task) ..........10
Configure the Dashboard to View the Overdue
Tasks Panel (Partner Task) ........10
Configure the Next Tasks Panel (Partner Task). . 10
Configure the Open Orders Panel (Partner Task) 10
Using the Dashboard (Partner Task) ......12
See an Overview of New Communications,
Tasks, and Draft Documents ........12
See Your Next Tasks ..........13
See Your Overdue Tasks .........15
See the Summary of Open Orders ......15
See the List of Invitations Received from
Sponsors ..............16
See the List of Messages Received from Sponsors 16
See the List of Alerts ..........16
See the New Communications .......16
Chapter 6. Review and Process New
and Change Orders (Partner Task) . . . 17
Review and Process a New Purchase Order When
Mark As Read Option is Enabled .......17
Review and Process a New Purchase Order When
Mark As Read Option is Disabled .......18
Review and Process a Changed Order When Mark
As Read Option is Enabled .........20
Review and Process a Change Order When Mark As
Read Option is Disabled ..........21
Chapter 7. Review a Payment .....25
Chapter 8. Complete a Draft Document
(Partner Task)............27
Chapter 9. Respond to Invitations
(Partner Task)............29
Chapter 10. Select a Contact for Step
When Responding to an Invitation
(Partner Task)............31
Create and Associate a New Contact to the Step . . 31
Associate an Existing Contact to the Step ....32
Chapter 11. View a Message (Partner
Task) ...............33
Chapter 12. Manage the Packing Profile
(Partner Task)............35
Chapter 13. View the Details of a
Shipping Window Order (Partner Task) . 37
Chapter 14. View the Details of an
Order (Partner Task) .........39
View Order Schedules ...........49
Chapter 15. Acknowledge an Order
(Partner Task)............51
Acknowledge an Order at the Order Level ....51
Acknowledge an Order at the Order Line Level . . 56
Chapter 16. Rejection of an Order by
the Supplier ............59
Chapter 17. Delete a Draft
Acknowledgement (Partner Task) . . . 61
Chapter 18. View the Acknowledgement
of an Order (Partner Task) ......63
Chapter 19. Print an Order (Partner
Task) ...............67
Chapter 20. Pack an Order or a
Shipment (Partner Task) .......71
Pack an Order from the Home Page ......71
Pack a Shipment from the Create Shipment Page . . 75
© Copyright IBM Corp. 2000, 2014 iii
Chapter 21. View the Details of a
Container (Partner Task) .......77
Chapter 22. Ship an Order (Partner
Task) ...............79
Add an Order to a Shipment ........88
Chapter 23. Delete a Draft Shipment
(Partner Task)............91
Chapter 24. Ship From Locations . . . 93
Configure Ship From Locations (Partner Task) . . . 93
Add Ship From Location (Partner Task) .....93
Modify Ship From Location (Partner Task) ....94
Delete Ship From Location (Partner Task) ....95
Chapter 25. View Payment Terms . . . 97
View Payment Terms for New Orders or Change
Orders ................97
View Payment Terms for an Existing Order....97
View Payment Terms When Acknowledging an
Order................97
View Payment Terms When Invoicing a Shipment 98
View Payment Terms When Invoicing an Order . . 98
View Payment Terms for Sent Invoice .....99
Payment Terms Screen...........99
Chapter 26. View the Payment Details
for an Order (Partner Task) .....101
Chapter 27. View Charges and
Allowances (Partner Task) ......103
Chapter 28. View the Details of a
Shipment (Partner Task).......107
Chapter 29. Resend a Shipment
(Partner Task) ...........113
Chapter 30. Cancel a Shipment
(Partner Task) ...........115
Chapter 31. Invoices ........117
Send an Invoice for an Order (Partner Task) . . . 117
Adding Multiple Taxes to an Invoice Line . . . 123
Send an Invoice for a Shipment (Partner Task) . . 125
Adding Multiple Taxes to an Invoice Line in a
Shipment Invoice ...........132
View the Details of an Invoice (Partner Task) . . . 133
Chapter 32. Printing Forms and
Labels ..............141
Generate and Print a Packing Slip (Partner Task) 141
Generate a Tracking Number and Print a Carrier
Label (Partner Task) ...........142
Regenerate a Tracking Number and Print a Carrier
Label ................144
Reprint a Carrier Label (Partner Task) .....146
Generate and Print Container Labels (Partner Task) 148
Generate and Print Container Labels from the
Home Page .............148
Generate and Print Container Labels from the
Shipment Detail Screen .........149
Generate and Print Container Labels from the
Resend Shipment Screen.........149
Chapter 33. Vendor Compliance
Module ..............153
About Vendor Compliance (Partner Task) ....153
View the Chargeback Details (Partner Task) . . . 154
Non-Compliance Summary Report (Partner Task) 158
Chapter 34. View the Details of an
Agreement (Partner Task) ......161
Chapter 35. Catalogs ........163
Add an Item to the Catalog (Partner Task)....163
Manage an Item in the Catalog (Partner Task) . . 164
Modify an Item in the Catalog (Partner Task). . . 164
Delete an Item from the Catalog (Partner Task) . . 165
Chapter 36. Edit Basic Profile
Information (Partner Task) ......167
Chapter 37. Modify Partner's Public
Profile (Partner Task) ........169
Chapter 38. Configure a Rule for an
Item (Partner Task) .........171
Chapter 39. Upload Inventory
Information (Partner Task) ......173
Chapter 40. Route Planning .....175
Sending a Shipment for Route Planning (Partner
Task) ................175
Receiving a Route Plan for a Shipment (Partner
Task) ................176
Chapter 41. Currency Codes .....177
Notices ..............183
Index ...............187
iv Sterling Supplier Portal: Partner User Guide

Chapter 1. Introduction to IBM Sterling Supplier Portal
Sponsors are organizations that buy products from Partners. Sponsor are also
known as Buyers. Partners are organizations that supply products to Sponsors.
Partners are also known as Suppliers.
IBM®Sterling Supplier Portal enables you to conduct electronic business as part of
a Web trading community. As a Sterling Supplier Portal Partner, you can perform
various tasks such as configuring your organization, creating and managing users,
modifying your own public profile, and viewing the community with the
corresponding Sponsors, generating and printing Packing Slips, and updating
inventory information.
Partners receive an invitation from the Sponsors to join their community. Based on
the community configuration a Partner can send acknowledgements, Advance
Shipment Notifications, and invoices for the shipped quantity.
Configure Dashboard
The Sterling Supplier Portal Dashboard enables you to view a summary of the data
pertaining to the on-boarding processes.
The Sterling Supplier Portal Dashboard is the first screen that is displayed when
you log in. The data is displayed in panels.
You can configure the Dashboard to display the Overview, Next Tasks, Overdue
Tasks, and Open Orders. The Dashboard provides an updated snapshot of those
aspects of on-boarding that are most pertinent to your company.
One of the advantages of the Dashboard is that you can configure it to display the
details you want to view often. You can select Dashboard panels based on the
applications you have subscribed to.
Create Documents
Sterling Supplier Portal enables you to create various types of documents such as
acknowledgements for orders, Advance Shipment Notices, invoice for orders and
so on.
Using Sterling Supplier Portal you can:
vSend Acknowledgements for the orders and the Change POs received.
vSend Advance Shipment Notifications for orders.
vSend Invoices for orders and Advance Shipment Notifications.
View Documents
Sterling Supplier Portal enables you to search and view the details of orders,
shipments, and invoices.
You can also create Acknowledgements, Shipments, and Invoices if these are a part
of the choreography.
© Copyright IBM Corp. 2000, 2014 1

Note: When Sponsors configure their community as a Web community, they must
select a sequence of Electronic Data Interchange (EDI) documents to set the rules
for their community. This sequence of EDI documents is termed as the choreography
for that community.
View Agreements
An agreement is a documented understanding between the corresponding parties.
Sterling Supplier Portal enables you to view the details of the agreements
pertaining to your organization.
Perform Setup Tasks
Sterling Supplier Portal enables you to perform various setup tasks such as
configuring your profile, managing items and item rules, and updating inventory
information.
2Sterling Supplier Portal: Partner User Guide

Chapter 2. Service Agents
Sterling Supplier Portal supports the concept of Service Agents, which are third
party vendors. The Service Agents are companies or individuals that supply
products to the sponsors and handle multiple suppliers.
A sponsor can have more than one Service Agent that caters to a group of
suppliers. In Sterling Supplier Portal, the sponsor company is the parent company
of a Service Agent. The Service Agent can view the chargeback data and the
related documents for all the suppliers pertaining to it. A Service Agent is
onboarded in the same way as a partner, although some additional configuration
must be performed to enable the partner as a Servicing Agent. For this, you must
contact IBM support.
The following diagram displays the hierarchy for setting up a Service Agent in
Sterling Supplier Portal.
The following rules apply to Service Agents:
vA Service Agent can have only one sponsor.
vA sponsor can have multiple Service Agents that each work with a different set
of suppliers.
vWhen a chargeback alert is received and the Service Agent opens the chargeback
alert first, the alert is not displayed in the dashboard for the suppliers that work
with the Service Agent.
vA Service Agent can only view the chargeback details for their suppliers.
© Copyright IBM Corp. 2000, 2014 3
4Sterling Supplier Portal: Partner User Guide

Chapter 3. EDI Capable Suppliers
EDI capable suppliers can use Sterling Supplier Portal for the Vendor Compliance
feature.
They can register as partner to a Chargeback Only community and can access their
chargeback and the supporting documents as well as review the non-compliance
summary report.
Note:
vAn EDI capable supplier can either be a member of a Chargeback Only
community or a Non-Chargeback Only community for the same Sponsor at the
same time.
vAn EDI capable Partner registered as a Chargeback Only community can only
view the order, shipment, and invoice details. The Partner cannot perform any of
the related tasks pertaining to an order, shipment, and invoice.
vThe Dashboard for EDI capable suppliers displays only the New
Communications panel and New Messages panel by default. The My
Documents menu displays only the Chargebacks command.
© Copyright IBM Corp. 2000, 2014 5
6Sterling Supplier Portal: Partner User Guide

Chapter 4. Using Sterling Supplier Portal For the First Time
(Partner Task)
Partners can use Sterling Supplier Portal to conduct business with your sponsors
through a Web trading community.
A Sponsor company creates a community and then invites you to join its
community. You can become a member of two different communities, owned by
the same or different Sponsors, if you have received invitations to these
communities. The Sterling Supplier Portal application Home page is the first screen
that is displayed when you log in to Sterling Supplier Portal. Alternatively, you can
also click the Home hyperlink to view the Home Detail screen, which enables you
to view the Dashboard, and the Application Links, Menu Tabs, and Panels. When
performing specific tasks on other screens, you can click the Home hyperlink to
view the Home page.
As a Sterling Supplier Portal Partner, you have many features and capabilities
available to you. First you need to accept the Sponsor's invitation and join the
community.
After becoming a member of the Sponsor's community, log in to Sterling Supplier
Portal as a Partner and you can use the following workflow to begin using the
application effectively:
1. Configure the Dashboard.
You can configure the Dashboard preferences to view the information you need
to see often. You can configure your Dashboard to view specific panels in your
Dashboard and arrange Dashboard panels in the order that you want.
2. Use the Dashboard.
Depending on your Dashboard configuration, you can use the Dashboard to
perform some or all of the following tasks:
vSee an overview of the number of tasks that are overdue, number of tasks
you need to perform next, number of documents that you have saved as
draft, and the number of new communications that you need to act upon.
vSee the list of alerts, and the number of alerts associated with each alert type,
and number of alerts assigned to you.
vSee the list of tasks that you need to complete next and also by when you
need to complete the task depending upon the choreography selected by
your Sponsor.
vSee the list of tasks that are in overdue status and also the duration for
which each task has been overdue.
vSee the list of POs that you have received from different Sponsors and the
current status of each PO.
vSee the list of invitations that you have received from Sponsors to join their
communities.
vSee the messages received from Sponsors.
vSee the list of new communications that you have received from Sponsors.
3. Accept the Sponsor's Invitation.
You need to respond to the invitations to join your Sponsor's communities and
adhere to the choreography and business rules defined by your Sponsor. If you
© Copyright IBM Corp. 2000, 2014 7
do not respond to the invitations within the duration mentioned by your
Sponsors you cannot be a member of their community.
You can specify the agreement date from when you want to start the
transactions. After accepting the terms and conditions set by your Sponsor, you
become a Partner in your Sponsor's community and can start transacting with
the Sponsor.
4. View Messages (Optional).
You can view the messages received from your Sponsor. A message may
contain business information that a Sponsor wants to share with members of a
community.
5. Review, Process, Acknowledge, Ship, and Send Invoices for Orders.
Your Sponsors send you orders or change orders. After you receive the
documents, you have to mark the order as read. You can then perform the
following tasks:
vView the Details of an Order (Partner Task)
vView the Payments for an Order (Partner Task)
vAcknowledge an Order (Partner Task)
vView the Acknowledgement of an Order (Partner Task)
vShip an Order (Partner Task)
vGenerate and Print a Packing Slip (Partner Task)
vView the Details of a Shipment (Partner Task)
vComplete a Draft Document (Partner Task)
vInvoice an Order (Partner Task)
vInvoice a Shipment (Partner Task)
vView the Details of an Invoice (Partner Task)
vView Charges and Allowances (Partner Task)
vView Payment Terms for New Orders or Change Orders
You can also use the Dashboard to review and process the orders.
6. Manage your Profile, Item Rules, and Items.
Sterling Supplier Portal enables you to edit your profile information. You can
view the agreement details.
You can define your item rules for your organization in order to manage
Sponsor items. You can choose to retain the same item identifier (ID) as defined
by your Sponsor or can define different item ID.
You can manage items and can also perform the following additional tasks,
such as:
vAdd an Item to the Catalog (Partner Task)
vModify an Item in the Catalog (Partner Task)
vDelete an Item from the Catalog (Partner Task)
vManage an Item in the Catalog (Partner Task)
You can also send an updated inventory picture to your Sponsors, so that
they will have up-to-date information about your available inventory.
7. View Reports.
Sterling Supplier Portal enables you to view the Non-Compliance Summary
report to analyze the chargeback documents that are received in a specified
month.
8Sterling Supplier Portal: Partner User Guide
Chapter 5. Dashboards
Configure Dashboard (Partner Task)
Before you start using the Dashboard, you may want to configure it to view
information that you need most often.
About this task
You can configure the Dashboard to see any of the following panels:
vOverview: This panel provides an overview of new documents received from
your Sponsors, tasks that you need to perform within a configured period of
time, tasks that are overdue, and documents that you have saved as draft.
vNext Tasks: This panel lists the tasks that you need to perform within a
configured period of time to fulfill your Sponsors' orders.
vOverdue Tasks: This panel lists the tasks which were not completed within the
configured period of time.
vOrder List: This panel lists orders received in the last <n> days, where you can
configure the value of <n>.
vMessage List: This panel lists the messages received from your Sponsors.
vAlert List: This panel lists alerts that can be used to monitor community-related
tasks.
You can view a maximum of five panels in your Dashboard. You can also change
the order in which these panels are displayed in the Dashboard.
To configure the Dashboard, perform the following steps.
Procedure
1. In the Home page, click Configure Dashboard.
2. From the Dashboard Panel drop-down list, select the panel or panels that you
want to view, and click Save.
The following table describes the fields that make up the individual Dashboard
panels in the Configure Dashboard screen.
Field Description
Dashboard Panel From the drop-down list, select the dashboard panel you want to
view on the Dashboard. You can select the following dashboard
panels from the drop-down list:
vOverview
vOverdue Tasks
vNext Tasks
vOpen Orders
Dashboard Panel
Image
Displays the selected Dashboard Panel or Panels.
© Copyright IBM Corp. 2000, 2014 9

Configure the Dashboard to view the Overview Panel (Partner
Task) About this task
To configure the Overview Panel in the Dashboard, follow this procedure.
Procedure
1. In the Home page, click Configure Dashboard.
2. The various Dashboard panels that are available are displayed. Select Overview
from the Dashboard panel drop-down list.
Configure the Dashboard to View the Overdue Tasks Panel
(Partner Task)
About this task
To configure the Overdue Tasks panel in the Dashboard, follow this procedure.
Procedure
1. In the Home page, click Configure Dashboard.
2. From the Dashboard panel drop-down list, select Overdue Tasks.
Configure the Next Tasks Panel (Partner Task)
Sterling Supplier Portal enables you to configure the Next Tasks panel.
About this task
To configure the Next Tasks panel in the Dashboard, follow this procedure.
Procedure
1. In the Home page, click Configure Dashboard.
2. From the Dashboard panel drop-down list, select Next Tasks. The Next Tasks
panel displays a list of tasks to be completed.
3. Click the Configure hyperlink in the Configure Dashboard panel.
4. The Configure Next Tasks screen is displayed. Click Save.
The following table describes the fields that make up the Configure Next Tasks
screen.
Field Description
Number of Days to Look
Ahead
Enter the number of days to look ahead for completing the
tasks. The maximum number of days that can be specified to
look ahead is 14.
Maximum Number of
Records to Show
Enter the maximum number of records to be displayed. The
maximum number of records that can be displayed is 500.
Configure the Open Orders Panel (Partner Task)
About this task
To configure the Open Orders panel in the Dashboard, follow this procedure.
10 Sterling Supplier Portal: Partner User Guide

Procedure
1. In the Home page, click Configure Dashboard.
2. From the Dashboard panel drop-down list, select Order List.IntheOpen
Orders panel, a list of orders is displayed.
The following table describes the fields that make up the Open Orders panel.
Field Description
Order # Indicates the order number. Click the corresponding Order Number
hyperlink to view the Order Detail screen that displays the details
pertaining to the selected order.
Customer Indicates the customer. Click the corresponding Customer hyperlink
to view the details of the customer.
Community Indicates the community. Click the corresponding Community
hyperlink to view the details of the community.
Order Date Indicates the date on which the order was placed.
Order Total Indicates the total cost of the order in dollars.
a Location Indicates the location where the order has to be shipped.
Order Delivery Date Indicates the date on which the order is delivered.
Order Status Provides a series of indicators to show the current status of the
purchase orders:
Created - Indicates that the purchase order is created.
Acknowledged - Indicates that the order has been fully
acknowledged. For a partially acknowledged order, the indicator will
be half filled. If the order is yet to be acknowledged, the indicator
remains colorless.
Shipped - Indicates that the order has been completely
shipped. For partially a shipped order, the indicator will be half
filled. If the order has not been shipped, the indicator remains
colorless.
Invoiced - Indicates that the invoice is complete. For a
partially invoiced order, the indicator will be half filled. If the order
has not been invoiced, the indicator remains colorless.
Paid - Indicates that the payment for the order has been
received and reviewed. For partial payment, the indicator will be
half filled. If payment has not been made for the order, the indicator
remains colorless.
3. Click the Configure hyperlink in the Configure Dashboard panel.
4. The Configure Open Orders screen is displayed. Click Save.
The following table describes the fields that make up the Configure Open
Orders screen.
Chapter 5. Dashboards 11

Field Description
Orders opened
within the last days
Enter the number of orders that are in Opened status, and should be
displayed in the Open Orders panel.
Maximum Number
of Records to Show
Enter the maximum number of records to be displayed in the Open
Orders panel.
Using the Dashboard (Partner Task)
Sterling Supplier Portal application provides a task based User Interface (UI) in the
form of Dashboard panels. The task based UI enables you to view documents
received from your Sponsors and tasks that you need to perform to fulfill the
Sponsor's order.
The Dashboard is displayed as the Home page when you log in to Sterling
Supplier Portal. You can also view the Dashboard from any other screen by
clicking the Home hyperlink.
You can choose to see any of the following panels in your Dashboard:
vOverview: This panel provides an overview of new documents received from
your Sponsors, tasks that you need to perform within a configured period of
time, tasks that are overdue, new communications that you receive, and
documents that you have saved as draft.
vNext Tasks: This panel lists the tasks that you need to perform within a
configured period of time to fulfill your Sponsors' orders.
vOverdue Tasks: This panel lists the tasks that were not completed within the
configured period of time.
vOrder List: This panel lists orders received in the last <n> days, where you can
configure the value of <n>.
vMessage List: This panel lists the messages received from your Sponsors.
vAlert List: This panel lists alerts that can be used to monitor community-related
tasks.
vNew Communications: This panel lists the documents received from the
Sponsors. If you are an EDI trading partner you can view only the chargeback
documents.
You can view a maximum of five panels in your Dashboard. You can configure the
panels that you need to see in your Dashboard. You can also change the order in
which these panels are displayed in the Dashboard.
See an Overview of New Communications, Tasks, and Draft
Documents
The Overview panel is visible in your Dashboard if you have configured the
Dashboard to display this panel.
The Overview panel displays the following:
vNumber of new communications (documents) received from your Sponsors.
When you receive documents (Order, Change Order, Chargeback, Changed
Chargeback, or Payment) from your Sponsors, these documents get listed as new
communications in the Overview panel. Click the <number> hyperlink adjacent
to New Communications to view the New Communications screen, which
displays the list of New POs, Changed POs, Chargeback, Changed Chargeback,
12 Sterling Supplier Portal: Partner User Guide
and Payments that you have received from your Sponsors. For each document,
the name of the Sponsor that sent the document, and the date and time on
which the document was received, is displayed.
To process the new document, select the check box against the relevant
document and click View Details. This will take you to the detail screen for the
document, where you can perform the appropriate action on the document. If
your Sponsor does not select the Mark as Read option when configuring a
community, new communication alerts generated for new POs or Change POs
are closed automatically when you navigate to the corresponding details screen.
The new communication alerts generated for the chargebacks or the changed
chargebacks are closed automatically when you navigate to the corresponding
Detail screen.
vNumber of tasks that you need to perform next.
Based on the community configuration by your Sponsor, a document can be
marked as read manually or automatically when it is received in your system.
When a document is marked as read, a few tasks get generated for that
document, depending upon the community's choreography. By default, the tasks
that you need to perform today are listed as your next tasks. You can change the
configuration to include tasks that you need to perform in the next <n> days.
Based on the requested date and the business rules configured by your Sponsor
for the community, these tasks remain in your Next Task bin for a specific
number of days. Click the <number> hyperlink adjacent to Next Tasks to view
the task list.
vNumber of tasks that are overdue
Based on the requested date and the business rules configured by your Sponsor
for the community, tasks need to be completed within a specified period of time.
If you do not complete tasks within this time, these tasks get added to your list
of overdue tasks. Click the <number> hyperlink adjacent to Overdue Tasks to
view the overdue task list.
vNumber of documents that you have saved as draft
When acknowledging or shipping an order, you can choose to save the
Acknowledgement or Advance Shipment Notice (ASN) in Draft status and
complete the draft later. The Overview panel lists the number of documents that
you have saved as draft. To view the list of documents that you have saved as
draft, click the <number> hyperlink adjacent to Saved as Draft.
Note:
– When a document is saved as draft, the related task is not considered to be
complete. For example, if you are shipping an order and you save the
Shipment as draft, the task will remain in your Next Tasks panel until you
ship the order. If you do not ship the order within the completion due date,
this task will move to the Overdue Tasks panel.
– The Overview panel also enables you to access and process orders directly
from the Dashboard if you know the order number. You can enter the order
number in the Order # text box and click Find to view the order details. You
can also enter the order number and click Acknowledge,Ship,orInvoice to
acknowledge, ship, or invoice the order directly from the dashboard.
See Your Next Tasks
When an order is marked as read either manually or automatically, different tasks
are generated for the order, depending on the community's choreography:
Chapter 5. Dashboards 13
vIf Acknowledge, Ship, and Invoice are present in the community's choreography,
tasks get generated for acknowledging and shipping the order. When the order
is shipped, a task gets generated for invoicing the shipment, with the task
completion due date as the next day.
vIf only Acknowledge and Invoice are present in the community's choreography,
tasks for acknowledging and invoicing the order get generated as soon as the
order is marked as read either manually or automatically.
Note: If an order contains multiple order lines, tasks get generated only for the
order line with the earliest ship date. If a task is completed for the entire order
or a part of the order (for example, if a partial shipment is sent), this task is
considered to be completed and is not listed as a next task.
The Next Tasks panel is visible in your Dashboard if you have configured the
Dashboard to view this panel. You can configure the number of next tasks that you
want to view in this panel. You can also configure the number of business days to
look ahead. For example, if you configure this panel to look five business days
ahead, it will display all the tasks that can be performed in the next five business
days.
Note: Next Tasks are displayed in the Dashboard based on the business calendar
configured for the Sponsor Organization. For example, if an order is received on a
non-working day, task generation for the order begins on the next business day. If
the date on which a task has to be completed falls on a day that is preceded by a
non-working day, the system assumes that the task must be completed on the
same day. Partners cannot view the business calendar.
You can use the Next Tasks panel to view the list of tasks that you need to
perform, along with details on when the task is due to be completed. Click a
<task> hyperlink to view details of that task and complete the task.
The Next Tasks panel lists five tasks at a time. If you have configured this panel to
view more than five tasks, click the More>> hyperlink to view the next list of
tasks.
The date when the task is due for completion is determined by the requested date
and the business rules configured by your Sponsor for the community. If you
specify a different date when acknowledging the order, or if the Sponsor sends a
Change PO with a different requested date, the completion due date of the task
will change. This task may not be listed in the Next Tasks panel if the due date
falls beyond the look ahead date configured by you. If you cancel a shipment, the
task of invoicing the shipment is deleted from the Next Tasks panel. However, if
you resend a shipment, the earlier task of invoicing the shipment is replaced with
a new task of invoicing the shipment with a new date in the New Tasks panel.
If an order that requires route planning is marked as read either manually or
automatically, the Send routing request for <Order number> task instead of Ship
<Order number> task is listed in the Next Tasks panel. When the shipment is sent
for route planning, the Ship <Shipment number> task replaces the earlier task in
the Next Tasks panel.
Note: The routing task and shipment task after sending routing requests will not
display the order date or the shipping window in the new and overdue tasks.
14 Sterling Supplier Portal: Partner User Guide
See Your Overdue Tasks
If you do not complete certain tasks within the completion due dates, these tasks
get added to your list of overdue tasks.
The Overdue Tasks panel is visible in your Dashboard if you have configured the
Dashboard to view this panel. You can use the Overdue Tasks panel to view the
list of tasks that are overdue, along with details on when the task was due to be
completed. Click a <task> hyperlink to view details of that task and complete the
task. Click [trash icon image] to delete the task without completing it.
Note: Overdue tasks will continue to get listed in the Overdue Tasks panel until
you either complete or delete the task.
The Overdue Tasks panel lists five tasks at a time. If you configure this panel to
view more than five tasks, you can click the More>> hyperlink to view the next
list of tasks.
The date when the task was due for completion is determined by the requested
date and the business rules configured by your Sponsor for the community. If you
specify a later date when acknowledging the order, or if the Sponsor sends a
Change PO with a later requested date, the completion due date of the task will
change. This task may be removed from the Overdue Tasks panel and listed in the
Next Tasks panel.
Note: Overdue Tasks are displayed in the Dashboard based on the business
calendar configured for the Sponsor Organization. For example, if a task was due
to be completed on Monday and as per the business calendar configured, Tuesday
is a non-working day, the corresponding task will be moved to Overdue Tasks on
Wednesday.
If you do not receive a route plan for a shipment from your Sponsor by the end of
that day, the Routing response for <Shipment number> due task is generated the
next day in the Overdue Tasks panel. Contact your Sponsor to ask about the delay
in receiving the corresponding route plan so you can send the shipment to the
Sponsor.
Delayed Payment Advice notifications are directly displayed in the Overdue Tasks
panel when the Payment Advice are not received within the payment advice due
date. The payment advice due date is either specified in the business rules
configured by your Sponsor for the community or provided by you when
invoicing the order. However, this notification is displayed only if your Sponsor
has configured the corresponding business rule to send Payment Advice for the
community.
Note: The routing task and shipment task after sending routing requests will not
display the order date or the shipping window in the new and overdue tasks.
See the Summary of Open Orders
The Open Orders panel is visible in your Dashboard if you have configured the
Dashboard to view this panel. You can configure this panel to specify the number
of POs that you want to list in the panel. You can also specify that you want to see
all orders which have been received in the last <n> days.
The Open Orders panel provides a comprehensive view of POs that you have
received from different Sponsors. The panel provides information about the order
Chapter 5. Dashboards 15
number, order date, Sponsor, community, expected delivery date, order amount,
and the address where the shipment is to be sent. It also displays the current status
of each PO. Click the Order Number hyperlink to view the order details for
processing. Click the Customer and Community hyperlink to view the Sponsor
and community details.
See the List of Invitations Received from Sponsors
The Invitation List panel is visible in your Dashboard if you have configured the
Dashboard to view this panel. You can use the Invitation List panel to view the
list of the invitations received from Sponsors to join their communities.
See the List of Messages Received from Sponsors
The Message List panel is visible in your Dashboard if you have configured the
Dashboard to view this panel. You can use the Message List panel to view a list of
messages received from your Sponsors. These messages are broadcast messages
sent to all Partners belonging to a community.
See the List of Alerts
The Alert Summary panel is visible in your Dashboard if you have configured the
Dashboard to view this panel.
You can use the Alert Summary panel to view a comprehensive, high-level list of
alerts to monitor community-related tasks. This panel displays different Alert
Types, along with the total number of raised alerts associated with each type. The
My Alerts column displays the number of alerts associated with your profile. Click
the <number> hyperlink to view the details of an alert. Click the Total Alerts
hyperlink to view all the alerts raised for that alert type.
Note: Alerts are displayed in the Dashboard based on the business calendar
configured for the organization.
See the New Communications
The New Communications panel is visible in your Dashboard if you have
configured the Dashboard to view this panel. You can use this panel to view the
new communications received from your Sponsors.
If you are an EDI trading partner you can view only the chargeback documents in
the New Communications panel. The New Communications panel and the
Messages List panel is displayed by default in your Dashboard.
16 Sterling Supplier Portal: Partner User Guide
Chapter 6. Review and Process New and Change Orders
(Partner Task)
Sterling Supplier Portal enables you to review and process the new orders and
change orders sent by Sponsors. New Customer Purchase Orders (POs) and change
Customer POs sent by Sponsors are displayed in the New Communications panel
of the Dashboard as New PO alert and Change PO alert respectively.
Depending on the community configuration, a new PO or change PO can be
confirmed as being read either manually or automatically. If the Mark As Read
option is enabled, it indicates that your Sponsor has configured a community such
that you need to manually mark documents as read. If this option is not displayed,
it indicates that your Sponsor has configured a community such that the order or
change order is confirmed as read automatically when you navigate to the
corresponding details screen from the New Communications screen. Therefore,
depending on the community configuration you may have to perform the
following tasks:
vReview and Process a New Purchase Order When Mark As Read Option is
Enabled
vReview and Process a New Purchase Order When Mark As Read Option is
Disabled
vReview and Process a Changed Order When Mark As Read Option is Enabled
vReview and Process a Change Order When Mark As Read Option is Disabled
Review and Process a New Purchase Order When Mark As Read
Option is Enabled
When your Sponsor sets up a community, the Sponsor can select the Mark As
Read option. As the partner, you have to manually mark new purchase orders as
being read.
Procedure
If your community has the Mark As Read option enabled, follow these steps to
review and process a new PO:
1. On the Home page, click New Communications in the Overview panel.
2. The New Communications screen is displayed. .
The following table describes the settings on the New Communications screen.
Action Description
Delete You can remove a new communication. Select the check box
for that new communication and click Delete.
When you click Delete, a warning message is displayed: “Do
you really want to delete this communication?” Click OK to
remove that record from the New Communications screen.
View Details Click View Details to open the Order Detail screen.
Field Description
© Copyright IBM Corp. 2000, 2014 17
Action Description
Subject Shows the subject of the new communication.
You can click the Subject hyperlink of the purchase order to
open the Order Detail page.
From Shows the name of the customer.
Received Shows the date the communication was received.
3. Select the check box for the New PO alert and click View Details. You can also
click the Subject hyperlink of the corresponding PO. The Order Detail screen is
displayed.
4. Click Mark As Read to confirm the order and do additional processing.
5. You might have configured an item rule such that your Item ID is different
from your customer's Item ID. As a result, you might receive an order from
your Sponsor containing Item IDs that cannot be linked to your Item IDs. You
can use the following process to specify the matching Item ID:
a. In the Item Line(s) panel of the Order Detail screen, enter the identifier of
the item.
b. You can also click the icon to search for the Item ID. Enter the
appropriate search criteria and click Search to view the list of items that
match the search criteria.
c. Click Mark As Read.
d. Click the icon for the appropriate item. The selected Item ID is
displayed.
Note: If your Sponsor has sent a change order for this order, the change order
is not marked as read automatically, even if your Item ID and the customer's
Item ID match. You must manually mark the change order as read by
navigating to the corresponding detail screen from the New Communications
screen.
Review and Process a New Purchase Order When Mark As Read
Option is Disabled
When your Sponsor set ups a community, the Sponsor can disable the Mark As
Read option. The purchase order is automatically confirmed as read when you
navigate to the corresponding details screen from the New Communications
screen.
Procedure
If your community has the Mark As Read option disabled, follow these steps to
review and process a new PO:
1. On the Home page, click New Communications in the Overview panel.
2. The New Communications screen is displayed.
The following table describes the settings on the New Communications screen.
18 Sterling Supplier Portal: Partner User Guide
Action Description
Delete You can remove a new communication. Select the check box
for that new communication and click Delete.
When you click Delete, a warning message is displayed: “Do
you really want to delete this communication?” Click OK to
remove that record from the New Communications screen.
View Details Click View Details to open the Order Detail screen.
Field Description
Subject Shows the subject of the new communication.
You can click the Subject hyperlink of the purchase order to
open the Order Detail page.
From Shows the name of the customer.
Received Shows the date the communication was received.
3. Select the check box for the New PO alert and click View Details. You can also
click the Subject hyperlink of the corresponding PO. The Order Detail screen is
displayed.
When this PO is received in your system, it is set to the Created status and all
the tasks are generated.
4. You might have configured an item rule such that your Item ID is different
from your customer's Item ID. As a result, you might receive an order from
your Sponsor containing Item IDs that cannot be linked to your Item IDs. The
order is not marked as read automatically unless the customer Item ID is
mapped to your Item ID:
a. In the Item Line(s) panel of the Order Detail screen, enter the identifier of
the item.
b. You can also click the icon to search for the Item ID. Enter the
appropriate search criteria and click Search to view the list of items that
match the search criteria.
c. Click the icon for the appropriate item. The selected Item ID is
displayed.
d. Click Save Changes to mark the order as read and process it further.
e. When you click Save Changes, the PO is set to the Created status.
However, the other tasks generated for this PO on the New
Communications screen are not resolved. You must open these tasks from
the New Communications screen to resolve them.
Notes:
vIf your Sponsor has sent a change order, the change order is not marked as
read automatically, even if your Item ID matches the customer's Item ID. You
must manually mark the change order as read by navigating to the
corresponding detail screen from the New Communications screen.
vIf you delete a record from the new communication list accidentally, you can
always view the deleted records by using the enhanced Search Criteria -
Find Order panel in the Find Order screen. You can select a date range in the
Received Date field to search for a PO that was marked as read
automatically. If your Item ID is different from your customer's Item ID, you
can select Unread Orders to display the list of POs that are not confirmed
because mapping does not exist for the order lines.
Chapter 6. Review and Process New and Change Orders (Partner Task) 19

Review and Process a Changed Order When Mark As Read Option is
Enabled
When your Sponsor sets up a community, the Sponsor can select the Mark As
Read option. As the partner, you have to manually mark change orders as being
read.
About this task
A Sponsor cannot send a change request to a Partner under the following
circumstances:
vThe Sponsor cannot send a Change PO request when all of the documents
pertaining to the choreography have been sent by the Partner.
vThe Sponsor cannot cancel or reschedule the shipment of the order lines to an
earlier date, which have already been shipped.
Note: If a change order is rejected, a Partner cannot view an error message. Only
your Sponsor can view the corresponding error when viewing the error summary
report.
Procedure
If your community has the Mark As Read option enabled, follow these steps to
review and process a new PO:
1. In the Home page, click New Communications in the Overview panel.
2. The New Communications screen is displayed. Select the check box against the
Changed PO alert and click View Details. Alternatively, you can click the
Subject hyperlink of the corresponding alert.
3. The Change Order Detail screen is displayed. Click Mark As Read to confirm
the order and process it further.
Note: If you delete a record from the new communication list accidentally, you
can always view the deleted records by using the enhanced Search Criteria -
Find Order panel in the Find Order screen. You can select the Unread Change
Orders radio button to display the list of change POs that are not marked as
read.
To view the changes made to the order:
a. In the Home page, click New Communications in the Overview panel.
b. The New Communications screen is displayed. Select the check box against
the Changed PO alert hyperlink and click View Details. Alternatively, you
can click the Subject hyperlink of the corresponding alert.
c. The Change Order Detail screen is displayed. Click View Changes.
The Change Log dialog box is displayed containing information about the
changes, including the field names or attributes, and the values.
Note:
vIf notes have been added, a message is displayed indicating that the notes
have been added. You need to navigate to the Order Detail screen to view
the added notes.
vModifications, if any, in the Sponsor notes will not be displayed.
vIf the Sponsor includes the notes from PO in the corresponding change
order, duplicate entries for these notes may be created.
20 Sterling Supplier Portal: Partner User Guide
The following table describes the fields that make up the Change Log
dialog box in the Change Order Detail screen.
Field Description
Attribute Indicates the name of the field in which the value has been changed.
New Value Indicates the changed value.
Old Value Indicates the earlier value.
Note: The Item ID and description are displayed below each order line. The
changed order line displays all the changed attributes pertaining to that order
line. The Item ID is always displayed below the changed order line header
details.
To view the complete order details:
a. In the Home page, click New Communications in the Overview panel.
b. The New Communications screen is displayed. Select the check box against
the Changed PO alert hyperlink and click View Details. Alternatively, you
can click the Subject hyperlink of the corresponding alert.
c. The Change Order Detail screen is displayed. Click View Complete Order.
The Order Detail screen containing the complete details is displayed.
Review and Process a Change Order When Mark As Read Option is
Disabled
About this task
A Sponsor cannot send a change request to a Partner under the following
circumstances:
vThe Sponsor cannot send a Change PO request when all of the documents
pertaining to the choreography have been sent by the Partner.
vThe Sponsor cannot cancel or reschedule the shipment of the order lines to an
earlier date, which have already been shipped.
Note:
vIf a change order is rejected, a Partner cannot view an error message. Only your
Sponsor can view the corresponding error when viewing the error summary
report.
vIf multiple change orders have been received for the order, you must either open
these change orders from the New Communications screen or view the Order
Detail screen corresponding to the PO to resolve the corresponding new
communication alerts.
If you belong to a community for which your Sponsor has disabled the Mark As
Read option when configuring the community, you need to perform the following
steps in order to review and process a change PO.
Procedure
1. In the Home page, click New Communications in the Overview panel.
2. The New Communications screen is displayed. Select the check box against the
Changed PO alert and click View Details. Alternatively, you can click the
Subject hyperlink of the corresponding alert.
Chapter 6. Review and Process New and Change Orders (Partner Task) 21

The Change Order Detail screen is displayed containing only the changes made
to the order.
Note:
vIf you delete a record from the new communication list accidentally, you can
always view the deleted records by using the enhanced Search Criteria -
Find Order panel in the Find Order screen. You can select a date range in the
Received Date field to search for a change PO that was marked as read
automatically. If your Item ID is different form your customer's Item ID, you
can select the Unread Change Orders radio button to display the list of
change POs that are not confirmed due to reasons such as the items are not
mapped or the original PO is not yet confirmed.
vWhen the following sequence of events occurs, the Save Changes button is
displayed and you must click this button to mark the change order as read:
You have configured an item rule such that your Item ID is different from
your customer's Item ID.
You receive a change order from your Sponsor containing Item IDs that
cannot be linked to your Item IDs.
vWhen the following sequence of events occurs, the Mark as Read button is
displayed and you must save the changes in the original order and then click
the Mark as Read button to apply the changes on the original order:
You have configured an item rule such that your Item ID is different from
your customer's Item ID.
The original order is in the Draft status.
You receive a change order from your Sponsor containing Item IDs that are
linked to your Item IDs.
To view the changes made to the order:
a. In the Home page, click New Communications in the Overview panel.
b. The New Communications screen is displayed. Select the check box against
the Changed PO alert hyperlink and click View Details. Alternatively, you
can click the Subject hyperlink of the corresponding alert.
c. The Change Order Detail screen is displayed. Click View Changes.
The Change Log dialog box is displayed containing information about the
changes, including the field names or attributes, and the values.
Note:
vIf notes have been changed, a message is displayed indicating that the
notes have been updated. You need to navigate to the Order Detail screen
to view the updated notes.
vModifications, if any, in the Sponsor notes will not be displayed.
vIf the Sponsor includes the notes from PO in the corresponding change
order, duplicate entries for these notes may be created.
The following table describes the fields that make up the Change Log
dialog box in the Change Order Detail screen.
Field Description
Attribute Indicates the name of the field in which the value has been changed.
New Value Indicates the changed value.
Old Value Indicates the earlier value.
22 Sterling Supplier Portal: Partner User Guide
Note: The Item ID and description are displayed below each order line. The
changed order line displays all the changed attributes pertaining to that order
line. The Item ID is always displayed below the changed order line header
details.
To view the complete order details:
a. In the Home page, click New Communications in the Overview panel.
b. The New Communications screen is displayed. Select the check box against
the Changed PO alert hyperlink and click View Details. Alternatively, you
can click the Subject hyperlink of the corresponding alert.
c. The Change Order Detail screen is displayed. Click View Complete Order
Details.
The Order Detail screen containing the complete details is displayed.
Chapter 6. Review and Process New and Change Orders (Partner Task) 23
24 Sterling Supplier Portal: Partner User Guide
Chapter 7. Review a Payment
You can use Sterling Supplier Portal to review your payments from the sponsor.
About this task
If your Sponsor has configured the community so that you are not required to
manually mark a PO or Change PO as Read, the payment is reviewed
automatically. In such a scenario, the Reviewed button on the Payments page is
not displayed.
However, if multiple payments are received for an order, you must open each
payment from the New Communications page to resolve the corresponding tasks.
Procedure
To review a payment, follow these steps:
1. On the Home page, click New Communications in the Overview Panel of the
Dashboard. The New Communications page is displayed.
2. Select a new payment and click View Details. Alternatively, you can click the
corresponding new payment hyperlink. The Payments page is displayed.
3. Click Reviewed to mark the payment as reviewed.
The following table describes the fields that make up the New Communications
page.
Action Description
View Details Click this to view the details of the new payment.
Alternatively, you can click the Subject hyperlink of the
corresponding new payment.
Field Description
Subject Shows the subject of the communication received.
Click the Subject hyperlink of the corresponding new payment
to view the details.
From Shows the name of the customer.
Received Shows the date on which the communication is received.
The following table describes the fields that make up the Order Header panel
of the Order Detail page.
Field Description
Order # Shows the number of the purchase order.
Req. Ship Date Shows the shipment date requested by the Sponsor.
Status Shows the status of the order. The identifier of the status is also
displayed in the panel.
Order Date Shows the date on which the order was placed.
Req. Delv. Date Shows the delivery date requested by the Sponsor.
Terms Shows the terms of the order.
© Copyright IBM Corp. 2000, 2014 25
Field Description
Customer Shows the name of the customer.
Click the corresponding Customer hyperlink to view information
about the customer.
Community Shows the name of the community.
Click the corresponding Community hyperlink to view information
about the community.
Order Amount Shows the total order amount.
The following table describes the fields that make up the Payment Details
panel.
Field Description
Currency Shows the currency type of the order.
Payment Date Shows the date on which the payment was made by the Sponsor.
Amount Shows the total order amount in the currency specified in the order.
Type Shows the mode of payment.
Payment Reference # Shows the reference number that was assigned to the payment:
vIf the payment method used by the Sponsor is Check, the Check
Number is displayed.
vIf the payment method used by the Sponsor is Credit Card, the
Credit Card Number is displayed.
vIf the payment method used by the Sponsor is SWIFT, the Bank
Identifier Code (BIC) is displayed.
vIf the payment method used by the Sponsor is CHIPS, the 3-digit
or 4-digit international interbank transaction number is displayed.
Invoice # Shows the invoice number.
Click the Invoice Number hyperlink to view information about the
invoice.
26 Sterling Supplier Portal: Partner User Guide

Chapter 8. Complete a Draft Document (Partner Task)
About this task
Sterling Supplier Portal enables you to save the Acknowledgement and Advance
Shipment Notifications (ASNs) of an order in draft form, and complete them at a
later stage.
To complete a draft document, follow these steps.
Procedure
1. In the Home screen, click Saved as Draft in the Overview panel.
2. The Drafts screen is displayed. In the Drafts panel, click the link pertaining to
the document you want to complete.
3. To complete the Acknowledgement that is in draft form, enter the appropriate
values in the fields, and perform one of the following tasks:
vClick Save Draft to save the changes made to the draft document.
vClick Send Acknowledgement to send the acknowledgement to the Sponsor.
vClick Reject to reject an order.
vClick Delete to delete the acknowledgement.
4. To complete the ASN of an order that is in draft form, enter the appropriate
values in the fields, and perform one of the following tasks:
vClick Save Draft to save the changes made to the draft document.
vClick Send ASN to send the ASN to the Sponsor.
vClick Delete to delete the ASN.
© Copyright IBM Corp. 2000, 2014 27
28 Sterling Supplier Portal: Partner User Guide

Chapter 9. Respond to Invitations (Partner Task)
To join a community, you have to respond to the invitation that your Sponsor
sends you.
Procedure
To respond to an invitation to join a Sterling Supplier Portal community, follow
these steps:
1. Navigate to the Respond to Invitation page. You have the following options:
Menu Bar
Click Inbox >View Invitations. The My Invitations page is displayed.
Click the Subject link to open the Respond to Invitation page.
Home Page
In the Alert Summary panel, click the Total Alerts hyperlink. The
Alert Detail page is displayed.
In the Detail field, click the Invitation hyperlink to open the Respond
to Invitation page.
2. Review the following panels on the Respond to Invitation page:
Contact for Step
Displays the details of the Sponsor's contact for the step. The fields in
this panel are read-only and cannot be edited.
The fields in the Contact for Step panel are only populated if your
Sponsor assigned a contact to the step when the Sponsor executed the
program.
Choreography
Displays the type of choreography that your Sponsor selected for the
Supplier community. The choreography can be one of the following
entries:
vANSI X12 EDI
vEDIFACT
vSterling XML
3. Sponsors can provide their own custom terms and conditions document for
the community. If your sponsor has provided a terms and conditions
document, the Review Community Configuration step displays the following
notice:
Attention! Download Terms and Conditions document. Click Next if you
agree with its contents.
After you review the document, click Next to accept the terms and conditions
and move to the next step of the invitation process.
Note: You will only see this step in the invitation process if your Sponsor has
uploaded a custom terms and conditions document.
4. When the Business Rules panel opens for the selected choreography, you can
view the business rules the Sponsor defined.
© Copyright IBM Corp. 2000, 2014 29
For example:
vThe Sponsor can specify how many days the partner has to submit each
Purchase Order acknowledgement. If you do not send the acknowledgment
within the specified number of days after receiving the purchase order, the
acknowledgement is marked as overdue.
vFor the Advance Ship Notice (ASN), the Sponsor can specify how many
days after the requested shipping date that you are required to ship the
product. If you do not ship the product within the specified number of
days, the shipment is marked as overdue
5. Click Next to open the Payment Method panel. Sponsors can pay suppliers
using Cash, Credit Card, Check, CHIPS, or SWIFT transactions.
6. When you are done viewing the payment methods, click Step Completed. The
Contact for Step and Accept Community Configurations panels are displayed.
7. In the Contact for Step panel, click Select Contact to assign a contact to the
step. You can either create and assign a new contact to the step or assign an
existing contact to the step.
8. In the Accept Community Configurations panel, set I agree to the terms and
conditions of the community to Yes.
9. When you are done viewing the terms and conditions, click Step Completed.
10. After you complete all the steps of the program, the Capture Agreement Start
Date panel is displayed. You can enter the date you want to join the
community. Select a date and click Finalize to join the community.
30 Sterling Supplier Portal: Partner User Guide

Chapter 10. Select a Contact for Step When Responding to an
Invitation (Partner Task)
You can create and associate a new contact or associate an existing contact to the
step. A contact is the person that is associated to a Partner and can be contacted
for information about the step.
Procedure
To select a contact for the step, follow these steps:
1. Navigate to the Respond to Invitation screen in either of the following ways:
vFrom the Home page
In the Alert Summary panel, click the Total Alerts hyperlink.
The Alert Detail screen is displayed. In the Detail field, click the Invitation
hyperlink to respond to the Sponsor's invitation.
vFrom the menu bar
Navigate to Inbox >View Invitations.
The My Invitations screen is displayed. Click the Subject link to respond to
the Sponsor's invitation.
2. The Respond to Invitation screen containing the Contact for Step panel is
displayed. The Contact for Step panel displays the details of the Sponsor's
contact pertaining to the step that enables you to respond to the invitation. The
fields in this panel are read-only and cannot be edited.
Note: The fields in the Contact for Step panel are populated only if your
Sponsor has associated a contact to the step when executing a program.
3. In the Respond to Invitation screen, click Next.
4. The Business Rules panel for selected choreography is displayed. Click Next.
5. The Payment Method panel is displayed. The various payment methods that a
sponsor can use to pay the suppliers are Cash, Credit Card, Check, CHIPS, and
SWIFT. Click Step Completed. The Contact for Step and Accept Community
Configurations panels are displayed.
6. In the Contact for Step panel, click Select Contact to associate a contact to the
step.
7. In the dialog box that is displayed, perform either of the following tasks:
vCreate and associate a new contact to the step.
vAssociate an existing contact to the step.
8. To save the contact details and associate the contact to the step, click Save.
Create and Associate a New Contact to the Step
Procedure
1. In the dialog box, select the Create New Contact radio button.
2. The Create Contact panel is displayed. Enter the appropriate values in the
fields.
The following table describes the fields in the Create Contact panel of the
dialog box.
© Copyright IBM Corp. 2000, 2014 31
Field Description
First Name Enter the first name of the contact.
Last Name Enter the last name of the contact.
Email* Enter the e-mail address of the contact.
Address Line1 Enter the first line of the address.
Address Line2 Enter the second line of the address, if applicable.
Address Line3 Enter the third line of the address, if applicable.
City Enter the city in which the contact is located.
State Enter the state in which the contact is located.
Zip Enter the zip code of the city in which the contact is located.
Country From the drop-down list, select the country in which the contact is
located.
Daytime Phone # Enter the phone number of the contact when at work.
Mobile Phone # Enter the mobile phone number of the contact.
Fax # Enter the fax number of the contact.
Job Title Enter the designation of the contact.
Note: * = Mandatory field
Associate an Existing Contact to the Step
Procedure
1. In the dialog box, select the Use Existing Contact radio button.
2. The Contact List panel is displayed. Click adjacent the contact that you
want to associate to the answer block.
The contacts in the Contact List panel are the contacts that your Sponsor has
created for you when managing contacts.
The following table describes the fields in the Contact List panel of the dialog
box.
Field Description
Contact Name Indicates the name of the contact.
Job Title Indicates the designation of the contact.
Email Indicates the e-mail address of the contact.
32 Sterling Supplier Portal: Partner User Guide

Chapter 11. View a Message (Partner Task)
Sterling Supplier Portal enables you to view the messages received from your
Sponsor. A message may contain business information that a Sponsor wants to
share with you, if you are a member of their community.
© Copyright IBM Corp. 2000, 2014 33
34 Sterling Supplier Portal: Partner User Guide

Chapter 12. Manage the Packing Profile (Partner Task)
About this task
You can enter your company's Global Standard 1 (GS1) prefix that is used when
printing container labels.
To manage the packing profile of a Partner, follow these steps.
Procedure
1. From the menu bar, navigate to Setup >Manage Packing Profile.
2. The Manage Packing Profile screen is displayed. In the Enter your company's
GS1 prefix field, enter your company's GS1 prefix. The system supports
between seven to nine digits in this field.
3. Click Save.
© Copyright IBM Corp. 2000, 2014 35
36 Sterling Supplier Portal: Partner User Guide

Chapter 13. View the Details of a Shipping Window Order
(Partner Task)
About this task
You can use Sterling Supplier Portal to search for and view the details of shipping
window orders. A shipping window order is an order where the sponsor/buyer
specifies the date range at the order level (and not at line level) so that the entire
order is shipped between the desired date range. The shipping window label is
displayed in the order, acknowledgement, and shipment detail screens for a
shipping window order.
Notes:
vThe shipping window order should be specified at the order header level. The
same details are carried over to the line level.
vWhen a shipping window order is acknowledged, the shipping window is
broken down and the validations are done based on the acknowledged date.
© Copyright IBM Corp. 2000, 2014 37
38 Sterling Supplier Portal: Partner User Guide
Chapter 14. View the Details of an Order (Partner Task)
You can search for orders and view the details of these orders.
About this task
If you are an EDI-capable Partner and are registered in a Chargeback Only
community, you can only view the order details. You cannot perform any of the
related order tasks.
This topic describes the default layout of the Find Order page:
vThe Sponsor might have created the layout to hide or disable some of the fields.
vThe Sponsor can choose which fields are required.
vThe order of the fields might vary, if the Sponsor has selected a different user
interface layout.
Procedure
To search for confirmed orders, follow these steps:
1. From the menu bar, click My Documents >Orders.
2. The Search Criteria - Find Order panel is displayed on the Find Order page.
Enter the search criteria and click Search.
The following table describes the actions and fields in the Search Criteria - Find
Order panel on the Find Order page.
Action Description
Favorite Searches Click this to search for a saved search and execute it. This option is
available only if a set of search criteria has been saved as a favorite
search.
Save Search Click this to save the current search criteria as a favorite search. On
clicking this, the Save Search dialog box is displayed. Enter the
name that you want to associate to the search criteria. Select the
Auto Execute check box to automatically execute the search each
time you navigate to the Order Search page.
Delete Current
Search
Click this to delete the current search criteria that has been saved as
a favorite. This action is enabled when you are viewing a saved
search.
Field Description
Order # Enter the Order # you want to search for. You can also select one of
the following options:
vis: The application searches for the exact order number.
vstarts with: The application searches for order numbers that start
with the specified value.
Community Enter the name of the community created by the Sponsor to whom
the purchase order belongs. Alternatively, click to search for a
community.
Order Date Enter the date range between which the purchase order was created,
and which is to be included in the search. Alternatively, click to
select the date range.
© Copyright IBM Corp. 2000, 2014 39
Action Description
Item ID Enter the identifier of the item to be included in the search.
Item Description Enter the description of the item to be included in the search.
Status From the drop-down list, select the status of the order to be included
in the search.
Received Date Enter the date range within which orders were created. You can also
click to select the appropriate date.
<Order Delivery
Date or Order Ship
Date> Is on <date>
or
Within <number>
Days
After.
From the first drop-down list, select either the Order Delivery Date
or Order Ship Date option and enter the corresponding date in the
text box. You can also click to select the appropriate date.
From the second drop-down list, which is enabled only after
entering the date in the Is On date field, select the number of days.
Also, the date selected from this second drop-down list decides the
range of the Order Delivery Date and Order Ship Date.
The search includes all the shipments that are expected to be
delivered (or shipped) between the date that is entered and the day
after the selected number of days.
In case the shipment contains only shipping window orders then the
literal will be shown as shipping window.
If the shipment contains even one order which is not a shipping
window orders then the literal will be shown as order ship date.
Include Archived
Orders
Select this check box to include the archived orders in the search.
Archived orders are orders that have not been processed for 3
months.
User-Defined Fields Enter the user-defined fields (UDF) you want to search for. You can
also select one of the following options:
vis: The application searches for the exact user-defined field value.
vstarts with: The application searches for the user-defined fields
that start with the specified value.
If the Partner belongs to more than one community, you must select
a value in the Community field to view the user-defined fields on
the Search Criteria page.
Read Orders Select this option to display the list of POs that you have Marked as
Read.
Unread Orders Select this option to display the list of POs that are not marked as
read.
If your Sponsor has configured the community so that the orders are
automatically marked as read, selecting Unread Orders might not
provide any search results. However, if your Item ID is different
from your customer's Item ID, you can select Unread Orders to
display the list of POs that are not marked as read.
40 Sterling Supplier Portal: Partner User Guide
Action Description
Unread Change
Orders
Select this option to display the list of Changed POs that are not
marked as read.
If your Sponsor has configured the community so that the change
orders are automatically marked as read, selecting Unread Change
Orders might not provide any search results. However, if your Item
ID is different from your customer's Item ID, you can select Unread
Change Orders to display the list of change POs that are not
marked as read.
Sort Result by Select the attribute by which the search result should be sorted when
displayed in the Search List panel.
If you select a value here, the search result in the Search List panel
will be sorted in ascending order. To sort the result in descending
order, select the Sort in Descending Order check box.
If you do not select a value here, the search result in the Search List
panel will not be sorted.
Sort in Descending
Order
Select this check box to sort the search result in the Search List panel
in descending order.
Max Records Shows the maximum number of orders that will be displayed in the
Search List panel. You can enter the maximum number of orders to
be displayed as Search results.
Note: If you select the Unread Orders or Unread Change Orders option, the
Search List panel displays only unread orders or unread change orders.
3. The Search List panel is displayed with the list of orders. From this list, select
the check box against the orders whose details you want to view and click
View Details. Alternatively, you can click the Order Number hyperlink. The
Order Detail page is displayed.
The following table describes the fields and the action that make up the Search
List panel on the Find Order page.
Action Description
View Details Click this to view the Order Detail page.
Print Click this to print a PDF version of the order. You can only select
one order to print at a time.
Note: Make sure the Read Orders option is selected in the search
criteria, otherwise the Print button is not available.
Field Description
Order # Shows the order number. Click the corresponding Order Number
hyperlink to view the Order Detail page, which displays the details
pertaining to the Order Number selected.
Customer Shows the details of the customer. Click the corresponding Customer
hyperlink to view the details of the customer.
Community Shows the community that is created by the Sponsor to whom the
Purchase Order belongs.
Order Date Shows the date on which the order was placed.
Order Total Shows the total cost of the order in the currency specified in the
order.
Order Delivery Date Shows the date on which the order is expected to be delivered.
Chapter 14. View the Details of an Order (Partner Task) 41
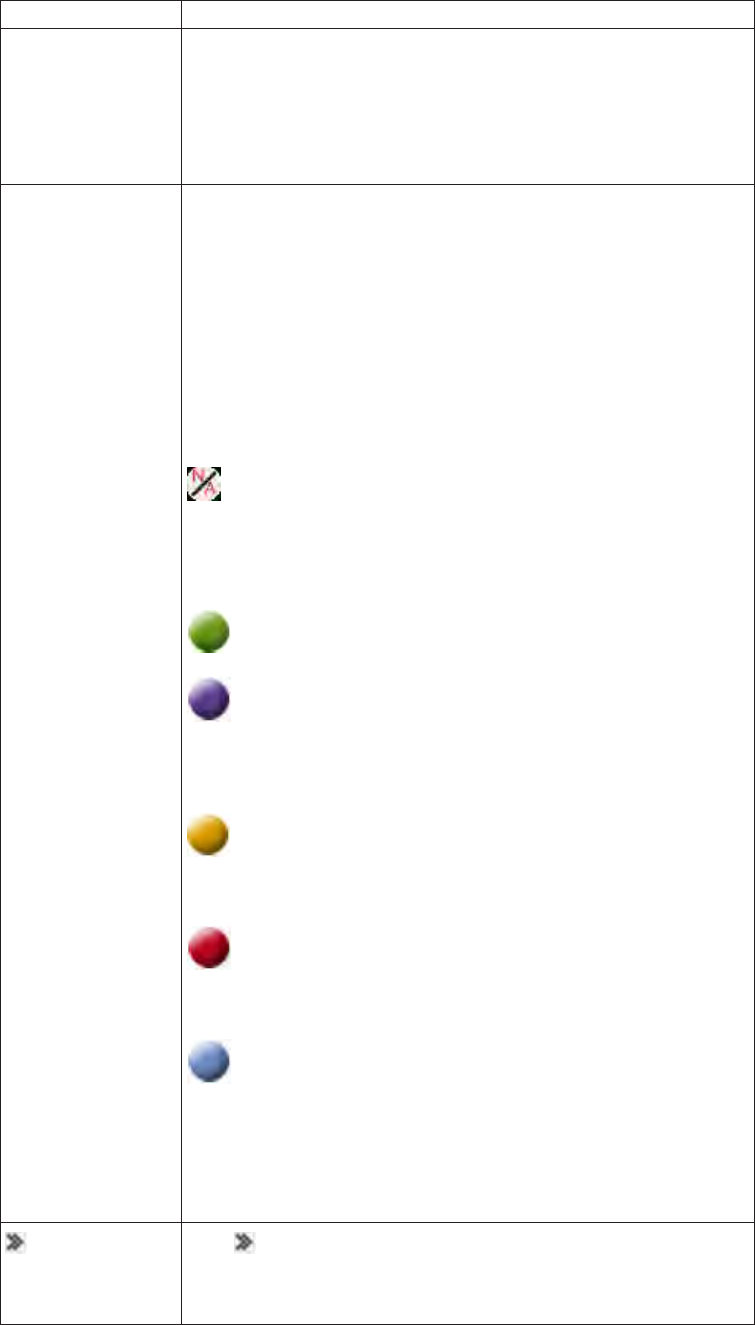
Action Description
Order Ship Date /
Shipping Window
Shows the date on which the order is expected to ship.
If the shipment contains only shipping window orders, the field is
displayed as Shipping Window.
If the shipment contains at least one order that is not a shipping
window order, the field is displayed as Order Ship Date.
Status Provides a series of indicators to show the current status of the
purchase orders. When viewing the indicators, consider the
following:
Partial indicators represent a partially complete document, where
each order line quantity in that status is greater than zero and less
than the ordered quantity. However, in the case of Paid status,
partial indicator represents a partially complete document where the
paid amount for an order is greater than zero and less than the
ordered amount.
Complete indicators represent a completed document.
is displayed as a status if the task is not included in the
choreography for an order.
The following are the indicators that show the current status of the
purchase orders:
Created - Shows that the purchase order is created.
Acknowledged - Shows that the order has been fully
acknowledged. For a partially acknowledged order, the indicator will
be half filled. If the order is yet to be acknowledged, the indicator
remains colorless.
Shipped - Shows that the order has been completely shipped.
For a partially shipped order, the indicator will be half filled. If the
order has not been shipped, the indicator remains colorless.
Invoiced - Shows that the invoice is complete. For a partially
invoiced order, the indicator will be half filled. If the order has not
been invoiced, the indicator remains colorless.
Paid - Shows that the payment for the order has been
received and reviewed. For partial payment, the indicator will be
half filled. If the payment for the order has not been made, the
indicator remains colorless.
Note: If you select the Unread Orders or Unread Change Orders
option to be included in the search criteria, then in the Search List
panel the status indicators will be colorless.
Click to view the user-defined fields for an order.
The user-defined fields are only shown if your Sponsor configured
them to be displayed on the List page.
42 Sterling Supplier Portal: Partner User Guide
The following table describes the fields and the action that make up the
Primary Information panel on the Order Detail page. If you are viewing the
details pertaining to a change PO, the Change Order Detail page is displayed.
Action Description
Mark as Read Click this to process the order. After confirming the order, tasks such
as Acknowledge the Order and Ship the Order are displayed in the
Overview,Next Tasks, and Overdue Tasks panels of the Dashboard.
Note:
vThis action is displayed only if your Sponsor has configured a
community such that you must manually mark documents as read
in order to process the documents further.
vThis action is displayed only for new or change POs.
vIf a user inadvertently clicks Mark as Read twice, an error is
thrown and the order will not be processed. It is therefore
recommended that the user clicks this only once.
Print Click this to view a PDF version of the order.
Note: This option is available only after the order is marked as
Read. (It is not available if the status of the order is Draft.)
Related Tasks Click this to perform the additional tasks related to the order. You
can perform the following tasks:
Ack. PO - Click this to acknowledge an order.
Ship PO - Click this to send an ASN of an order to the Sponsor.
Invoice PO - Click this to invoice an order.
View Acknowledgement - Click this to view the acknowledgement
for an order.
View Shipments - Click this to view the shipments associated with
the order.
View Invoices - Click this to view the invoices associated with the
order.
View Payments - Click this to view the payment details associated
with the order.
View New Communications - This related task is displayed only if
you have navigated to this page from the New Communications
page. Click this to navigate to the New Communications page.
View Complete Order Details - This related task is displayed on the
Change Order Detail page. Click this to navigate to the Order Detail
page.
Note: These tasks are available depending on the choreography of
the community to which you belong.
Notes Click this action to view the Sterling as a Service Applications
pop-up window, which displays the notes added at the header-level
of the order. Notes added by Sponsor at the order header-level are
indicated by the icon, and notes added by Partner at the order
header-level are indicated by the icon.
Enter your note in the Add Note panel and click Add to save the
contents of the note.
View Payment
Terms
Click this to view the Payment Terms page that displays the
payment terms for the order.
Chapter 14. View the Details of an Order (Partner Task) 43
Action Description
Field Description
Order # Shows the order number.
Click the icon to view the Sterling as a Service Applications
pop-up window, which displays the notes added at the header-level
of the order. Notes added by Sponsor at the order header-level are
indicated by the icon, and notes added by Partner at the order
header-level are indicated by the icon.
Enter your note in the Add Note panel and click Add to save the
contents of the note.
Order Date Shows the date on which the order was placed.
Customer's PO # Shows the customer's Purchase Order number.
Order Ship Date
(Requested)
Shows the requested date range for the shipment.
Notes:
vFor an order or a change PO, the shipping date range that is
defined at the header level is applied to all the order lines.
vIf schedules are passed at line level, the shipping dates in the
schedules will be consolidated and validated against the shipping
date range defined at the header level.
If the shipping date range in the schedule is larger than the shipping
date range at the order header-level, the order will not be accepted.
vIf a change order contains a change in the shipping dates, either
in the shipping date or the shipping date range, all the order lines
will be modified with this change.
vIf a change order is received for a shipped order, the start ship
date of the shipping date range must not be earlier than the start
ship date of the original order.
Order Delivery Date
(Requested)
Shows the Requested delivery date range.
Order Cancel Date Shows the date on which the order will be considered as cancelled if
it is not fulfilled by then.
Order Ship Date Shows the order shipment date.
Order Delivery Date Indicated the order delivery date.
Customer Shows the customer. Click the Customer hyperlink to view the
details of the customer.
Community Shows the community that is created by the Sponsor to whom the
Purchase Order belongs. Click the Community hyperlink to view the
business rules set by the Sponsor for the community.
Order Amount Shows the total amount of the order in the currency specified in the
order.
44 Sterling Supplier Portal: Partner User Guide
Action Description
Acknowledged
Amount
Shows the total order amount calculated on the basis of the
acknowledgement sent for this order.
Notes:
vThe Acknowledged Amount field will be displayed as blank if
you have not acknowledged the order.
vThe Acknowledged Amount field is displayed only if the order
belongs to a community that has Acknowledgement in the
choreography and the corresponding Order Amount field has
been configured in the PO Acknowledgement Excel spreadsheet to
be displayed on the page.
vThe charges specified in the order are considered when calculating
the acknowledged amount.
vThe value of the acknowledged amount is the sum of the
(acknowledged quantity * acknowledged price) for all the order
lines.
Status Shows the status of the order. The identifier of the status is also
displayed in the panel.
Terms Shows the terms of the order.
Freight Terms Shows the freight terms of the order.
SCAC Shows the Standard Carrier Alpha Code (SCAC), which is a unique
2-4 letter code used to identify transportation companies.
Drop Ship Order Shows whether the order is a drop-ship order or not.
Header Charge Shows the total charge provided to the Buyer for the order at the
header level. Click the value of the header charge to view the
Charges page, which displays the charge name and its value. The
total charge is displayed in the currency specified in the order.
Chapter 14. View the Details of an Order (Partner Task) 45

Action Description
Additional
Information
Click this hyperlink to view additional information about the order.
When this is clicked, the following fields are displayed in the
Primary Information panel:
vAcknowledgement Type - Shows the Acknowledgement type
configured by the Sponsor when creating the community.
vTransportation Method - Shows the mode of transportation.
vCarrier Service Code - Shows the carrier service code.
vSCAC - Enter the Standard Carrier Alpha Code (SCAC), which is
a unique 2-4 letter code used to identify transportation companies.
vRouting - Shows the mode of routing.
vBuyer Tax ID - Shows the Tax identifier of the Sponsor (Buyer).
The value for Buyer Tax ID is passed in the order.
vSupplier Tax ID - Shows the Tax identifier of the Partner
(Supplier). The value for Supplier Tax ID is passed by the Partner
when sending the Invoice.
vTax Jurisdiction - Shows the tax jurisdiction. You can also use this
field to display the Tax Law Reference.
vTax Exempt - Shows whether the order is exempt from tax or not.
vPO Type - Shows the purchase order type.
vRelease # - Shows the release number of the order.
vContract # - Shows the contract number of the order.
vInvoice Type - Shows the type of the invoice.
vTransaction Type - Shows the type of the transaction.
vSpecification # - Shows the specification number.
vCurrency Conversion Rate - Shows the currency conversion rate.
vUser-Defined Fields - Shows the user-defined fields added for an
order at Order header level. The user-defined fields are displayed
only if your Sponsor has configured them to be displayed on the
Order Detail page.
Ship To Shows the name, address, and identifier of the company to whom
the order needs to be shipped.
Note: The Buyer ID attribute is the Data Universal Numbering
System (DUNS) number for the Sponsor that has been passed in the
order XML. If the Buyer ID is not passed in the order, the Sponsor's
DUNS number as entered in IBMSterling B2B Collaboration Network
is displayed in the Order.
Bill To Shows the name, address, and identifier of the company to whom
the bill needs to be sent.
Note: The Buyer ID attribute is the Data Universal Numbering
System (DUNS) number for the Sponsor that has been passed in the
order XML. If the Buyer ID is not passed in the order, the Sponsor's
DUNS number as entered in Sterling B2B Collaboration Network is
displayed in the order.
46 Sterling Supplier Portal: Partner User Guide
Action Description
Event Log Shows the dates on which the events are completed when an order
is being processed. For example, in the Event Log panel, you can
view the date on which the acknowledgement of the order was sent.
You can also view whether the order has been rejected by you or
cancelled by the Sponsor.
An order is considered to be rejected by you if you send the
acknowledgement of the order with zero quantity. An order is
considered to be cancelled by a Sponsor if the Sponsor sends a
changed order with all the line-level quantities as zero.
You can view the documents pertaining to change order request,
shipment, invoice, and payment. You can also view the date on
which a shipment has been resent or cancelled. If a shipment has
been cancelled, resent multiple times or sent for route planning, you
can view entries for all the events. However, you can view only the
latest shipment details by clicking the link displayed for the latest
event. In the case of a cancelled shipment, the latest shipment details
with acknowledged quantity as being zero are displayed.
The Routing Request Sent for <Shipment number> event is
displayed when you have sent a shipment for route planning. You
can view the Create Shipment page by clicking the Shipment
Number hyperlink but you cannot perform any task in this page
except deleting the shipment that has been saved as a draft. When
the route plan for the shipment has been received, the earlier
hyperlink is disabled and a new hyperlink with the Routing
Response Received for <Shipment number> event is displayed. You
can then view the Create Shipment page by clicking the new
Shipment number hyperlink and send the shipment or perform any
other tasks related to the shipment. If the shipment has been deleted,
the Routing Canceled Request Sent for <Shipment Number> event is
displayed. You can view the date on which the shipment was
deleted but the hyperlink to the shipment details page is disabled.
Note: This panel is not displayed for new or change POs.
The following table describes the fields and actions described in the Order
Line(s) panel on the Order Detail page. If you are viewing the details
pertaining to a change PO, the Change Order Detail page is displayed.
Action Description
Notes Click this action corresponding to the selected Order Line(s) in the
list to view the Sterling as a Service Applications pop-up window.
The notes added at the line-level of the order are displayed. Notes
added by Sponsor at the order line-level are indicated by the
icon, and notes added by Partner at the order line-level are indicated
by the icon.
Enter your note in the Add Note panel and clickAdd to save the
contents of the note.
View Schedules Click this to view the schedules pertaining to the selected Order
Line(s) in the list. The View Schedules dialog box is displayed with
the details.
Field Description
Chapter 14. View the Details of an Order (Partner Task) 47

Action Description
Notes Click the icon corresponding to the Order Line(s) in the list to
view the Sterling as a Service Applications pop-up window. The
notes added at the line-level of the order are displayed. Notes added
by Sponsor at the order line-level are indicated by the icon, and
notes added by Partner at the order line-level are indicated by the
icon.
Enter your note in the Add Note panel and click Add to save the
contents of the note.
Line Identifier Shows the identifier of the order line.
Item Shows the name of the item as known to the Partner. If you have
configured an item rule such that your Item ID is same as your
customer's Item ID, the hover help containing item attributes is
displayed when you place your mouse over the icon adjacent to this
field. This hover help is displayed only if your Sponsor has
configured these attributes to display on Supplier Portal when
configuring the corresponding template.
Sterling Supplier Portal supports attributes Color, Size, Product, Sub
Product, and General Description for the item in addition to the Item
ID and Item Description.
Ordered Qty. Shows the ordered quantity of the item.
UOM Shows the unit of measure of the item.
Order Ship Date
(Requested)
Shows the requested date range for the shipment.
Order Delivery Date
(Requested)
Shows the requested date range for the delivery.
Unit Price Shows the unit price of the item in the currency specified in the
order.
Acknowledged Price Shows the price of the item as acknowledged by you when sending
the acknowledgement for this order.
Note:
vThe Acknowledged Price field will be displayed only if this field
has been configured as displayable in the PO Acknowledgement
Excel spreadsheet.
vThe Acknowledged Price field will be displayed as blank if you
have not acknowledged the order.
Line Charge Shows the line charge provided to the Buyer for each order line in
the order. Click the value of the line charge to view the Charges
page, which displays the charge name and its value. The line charge
is displayed in the currency specified in the order.
Status Shows the status of the order. However, Payment is not displayed as
a status at the order-line level.
Customer Item Shows the name of the item as known to the customer.
If you have configured an item rule so that your Item ID is different
from your customer's Item ID, hover help is displayed when you
place your mouse over the icon for this field. The hover help
displays the item attributes if your Sponsor has configured the
template to display these attributes and the Customer ID.
Examples of these attributes are Color, Size, Product, Sub Product,
General Description, Item ID, and Item Description.
48 Sterling Supplier Portal: Partner User Guide

Action Description
Click to view additional fields in the Order Line(s) panel:
UPC Code
Shows the Universal Product Code of the item.
GTIN
Shows the Global Trade Item Number of the item.
Product Class
Shows the product class of the item.
User-Defined Fields
Shows the user-defined fields that were added to the order
at the Order Line level. The user-defined fields are only
shown if your Sponsor has configured them to be displayed
on the Order Detail page.
View Order Schedules
About this task
To view the schedule of an order, in the Order Line(s) panel of the Order Detail
screen, select the check box against the corresponding Line Identifier of the order
whose schedules you want to view, and click View Schedules. The View Schedules
dialog box is displayed.
The following table describes the fields that make up the Requested Line Item
panel in the Order Detail screen.
Field Description
Line Identifier Indicates the line number of the item.
Item Indicates the name of the item.
UOM Indicates the unit of measure of the item.
UPC Code Indicates the Universal Product Code of the item.
Ordered Quantity Indicates the ordered quantity of the item.
Order Ship Date
(Requested)
Indicates the requested shipment date range.
Order Delivery Date
(Requested)
Indicates the requested delivery date range.
The following table describes the fields that make up the Manage Schedules panel.
Field Description
Quantity Indicates the quantity of items ordered.
Ship Date Indicates the actual shipment date. This should be a date that falls
within the date range specified in the Requested Ship Date field.
Delivery Date Indicates the actual delivery date. This should be a date that falls
within the date range specified in the Requested Delivery Date
field.
Chapter 14. View the Details of an Order (Partner Task) 49
50 Sterling Supplier Portal: Partner User Guide

Chapter 15. Acknowledge an Order (Partner Task)
You can acknowledge an order either at the order level or order line level after the
corresponding order is confirmed.
You can acknowledge an order either at the order level or order line level after the
corresponding order is confirmed. However, an order can be acknowledged at the
order line level only if your Sponsor has configured the community to which you
belong in such a way that acknowledging an order by line item is allowed. If your
Sponsor has sent an order with multiple order lines, you must acknowledge the
order at the order line level by managing multiple schedules.
You can partially acknowledge an order depending on community configuration.
The acknowledgment can be sent in multiple steps by adding part of the quantity
at a time. The partially acknowledged quantity should satisfy the configured
business rules. You can also exclude some of the order lines while sending an
acknowledgment. The acknowledgment sent to your Sponsor will not contain the
excluded orderlines.You can acknowledge an order in the following ways:
vAcknowledge an Order at the Order Level
vAcknowledge an Order at the Order Line Level
Acknowledge an Order at the Order Level
You can acknowledge an order at the order level.
Procedure
To acknowledge an order at the order level, follow these steps:
1. From the menu bar, click My Documents >Orders.
2. The Search Criteria - Find Order panel is displayed on the Find Order page.
Enter the Order # you want to search for. You can also select one of the
following options:
vis: The application searches for the exact order number.
vstarts with: The application searches for order numbers that start with the
specified value.
3. Enter the search criteria and click Search.
4. The Search List panel is displayed with the list of orders. Select the check box
against the order whose details you want to view and click View Details.
Alternatively, you can click the corresponding Order Number hyperlink.
5. The Order Detail page is displayed. Click Ack PO.
Notes:
vThe Ack PO task is available as a Related Task only if Acknowledgement is a
part of the choreography of the community.
vAn order can be over acknowledged.
vIf an order has been shipped (either partially or completely), then the
acknowledged quantity should be greater than the shipped quantity.
vAcknowledgement cannot be sent for a fully invoiced order.
© Copyright IBM Corp. 2000, 2014 51
vA Sponsor can set up the configuration so the Supplier cannot edit the
quantity on the acknowledgement.
6. The Create Acknowledgement page is displayed. Enter the appropriate values
in the fields and perform one of the following tasks:
vClick Save Draft to save the document in draft form and complete it later.
vClick Send Acknowledgement to send the acknowledgement for the order to
the Sponsor.
vClick Reject to reject the order.
vClick Delete to delete the draft form of the document. This button is enabled
when you are viewing the latest saved draft.
Note: If you know the Sponsor's Purchase Order number, you can directly
acknowledge the order in the Overview panel of the Dashboard.
The following table describes the fields and the action that make up the
Primary Information panel on the Create Acknowledgement page.
Action Description
Notes Click this action to view the Sterling as a Service Applications
pop-up window, which displays the notes added at the header-level
of the acknowledgement or PO. Enter your note in the Add Note
panel and click Add to save the contents of the note.
In the Notes panel, notes added by Sponsor at the header-level of
the acknowledgment or PO are indicated by the icon, and notes
added by Partner at the header-level of the acknowledgment or PO
are indicated by the icon.
Note:
vIf the Sponsor has configured the application to carry over the
notes added in PO to the acknowledgement, notes added by both
Sponsor and Partner in the PO will be displayed in the Notes
panel of the Sterling as a Service Applications pop-up window.
vWhen PO notes are carried over to acknowledgment, no indicators
will be provided to differentiate between notes of a PO and the
notes of the corresponding acknowledgment.
vWhen an acknowledgement is sent again with a new note, all the
notes present in the previous acknowledgment will be sent along
with the new note.
View Payment
Terms
Click this to view the Payment Terms page that displays the
payment terms for the order.
Field Description
52 Sterling Supplier Portal: Partner User Guide
Action Description
Order # Shows the order number. Click the Order Number hyperlink to view
the Order Detail page, which displays the details of the selected
Order Number.
Click the icon to view the Sterling as a Service Applications
pop-up window, which displays the notes added at the header-level
of the acknowledgement or PO. Enter your note in the Add Note
panel and click Add to save the contents of the note.
In the Notes panel, notes added by Sponsor at the header-level of
the acknowledgment or PO are indicated by the icon, and notes
added by Partner at the header-level of the acknowledgment or PO
are indicated by the icon.
Note:
vIf the Sponsor has configured the application to carry over the
notes added in PO to the acknowledgement, notes added by both
Sponsor and Partner in the PO will be displayed in the Notes
panel of the Sterling as a Service Applications pop-up window.
vWhen PO notes are carried over to acknowledgment, no indicators
will be provided to differentiate between notes of a PO and the
notes of the corresponding acknowledgment.
vWhen an acknowledgement is sent again with a new note, all the
notes present in the previous acknowledgment will be sent along
with the new note.
Order Date Shows the date on which the order was created.
Order Amount Shows the total amount of the order in the currency specified in the
order.
Customer Shows the details of the customer. Click the Customer hyperlink to
view the details of the customer.
Community Shows the community that is created by the Sponsor to whom the
Purchase Order belongs. Click the Community hyperlink to view the
details of the community.
Release # Enter the release number of the order.
Contract # Enter the contract number of the order.
Freight Terms Enter the freight terms of the order.
Transportation
Method
Enter the mode of transportation.
SCAC Enter the Standard Carrier Alpha Code (SCAC), which is a unique
2-4 letter code used to identify transportation companies.
Alternatively, click to search for the SCAC.
Carrier Service Code Enter the carrier service code.
Routing Enter the mode of routing.
Transaction Type Enter the type of transaction.
Currency
Conversion Rate
Enter the currency conversion rate.
Header Charge Shows the total charge provided to the Buyer for the order at header
level. Click the value of the header charge to view the Charges page,
which displays the charge name and its value. The total charge is
displayed in the currency specified in the order.
Chapter 15. Acknowledge an Order (Partner Task) 53
Note:
vSome fields in the panel may be hidden or disabled by the Sponsor. Sponsors
can also choose to make some of the fields mandatory
vThe order of the fields may vary if the Sponsor has selected a different User
Interface layout for this form.
vIrrespective of community configuration, the drop-ship PO cannot be over
acknowledged.
The following table describes the fields and actions that make up the Order
Line(s) panel on the Create Acknowledgement page.
Action Description
Notes Click this action corresponding to the selected Order Line(s) in the
list to view the Sterling as a Service Applications pop-up window,
which displays the notes added at the corresponding line-level of the
acknowledgement or PO. Enter your note in the Add Note panel
and click Add to save the contents of the note.
In the Notes panel, notes added by Sponsor at the line-level of the
acknowledgment or PO are indicated by the icon, and notes
added by Partner at the line-level of the acknowledgment or PO are
indicated by the icon.
Notes:
vIf the Sponsor has configured the application to carry over the
notes added in PO to the acknowledgement, notes added by both
Sponsor and Partner in the PO will be displayed in the Notes
panel of the Sterling as a Service Applications pop-up window.
vWhen PO notes are carried over to acknowledgment, no indicators
will be provided to differentiate between notes of a PO and the
notes of the corresponding acknowledgment.
vWhen an acknowledgement is sent again with a new note, all the
notes present in the previous acknowledgment will be sent along
with the new note.
Manage Multiple
Schedules
Click this action pertaining to the selected Order Line(s) to manage
the multiple schedules of the item in the list. The Manage Multiple
Schedules dialog box is displayed.
Reset Click this action to discard all the previous acknowledgments and
revert all the changes to the initial acknowledgment status.
Note: If the acknowledgement(s) sent previously has multiple
schedules, then the line schedule is reset to acknowledged schedules
and not to ordered schedules. This is a limitation.
Field Description
54 Sterling Supplier Portal: Partner User Guide

Action Description
Notes Click the icon corresponding to the Order Line(s) in the list to
view the Sterling as a Service Applications pop-up window. The
notes added at the line-level of the order are displayed. Notes added
by Sponsor at the order line-level are indicated by the icon, and
notes added by Partner at the order line-level are indicated by the
icon.
Enter your note in the Add Note panel and click Add to save the
contents of the note.
Notes:
vIf the Sponsor has configured the application to carry over the
notes added in PO to the acknowledgement, notes added by both
Sponsor and Partner in the PO will be displayed in the Notes
panel of the Sterling as a Service Applications pop-up window.
vWhen PO notes are carried over to acknowledgment, no indicators
will be provided to differentiate between notes of a PO and the
notes of the corresponding acknowledgment.
vWhen an acknowledgement is sent again with a new note, all the
notes present in the previous acknowledgment will be sent along
with the new note.
Line Identifier Shows the identifier of the line.
Item Shows the name of the item. If you have configured an item rule
such that your Item ID is same as your customer's Item ID, the
hover help containing item attributes is displayed when you hover
your mouse over the icon adjacent to this field. This hover help is
displayed only if your Sponsor has configured these attributes to
display on Supplier Portal when configuring the corresponding
template.
Sterling Supplier Portal supports attributes Color, Size, Product, Sub
Product, and General Description for the item in addition to the Item
ID and Item Description.
Ordered Qty. Shows the quantity of the item ordered in the order.
UOM Shows the unit of measure of the item.
Ack'd Qty. Shows the already acknowledged quantity of the item in the order.
Shipped Qty. Shows the quantity of the item already shipped.
Invoiced Qty. Shows the quantity of the item already invoiced.
Qty. to be Ack'd Enter the quantity of the item to be acknowledged in an order. By
default the remaining quantity of the item that needs to be
acknowledged is displayed.
Order Ship Date
(Requested) /
Shipping Window
Shows the requested shipment date range.
In case the shipment contains only shipping window orders then the
literal will be shown as shipping window.
If the shipment contains even one order which is not a shipping
window orders then the literal will be shown as order ship date.
Order Delivery Date
(Requested)
Shows the requested delivery date range.
Order Ship Date Shows the order shipment date.
Note: You can enter the order shipment date either beyond or before
the requested shipment date based on the date tolerance configured
by your Sponsor for the community.
Chapter 15. Acknowledge an Order (Partner Task) 55
Action Description
Line Charge Shows the line charge provided to the Buyer for each order line in
the order. Click the value of the line charge to view the Charges
page, which displays the charge name and its value. The line charge
is displayed in the currency specified in the order.
Order Delivery Date Shows the order delivery date.
Note: You can enter the order delivery date either beyond or before
the requested delivery date based on the date tolerance configured
by your Sponsor for the community.
Click to view the additional fields in the panel. Following are the
fields that are displayed:
vUnit Price - Shows the unit price of the item in the currency
specified in the order. You can also modify the unit price of the
item as required. The modified price is displayed in the
Acknowledged Price field of the Order Detail page. The
Acknowledged Amount displayed on the Order Detail page is
calculated based on the modified price. Ensure that you enter only
numbers in this field.
vCustomer Item - Shows the customer item. If you have configured
an item rule such that your Item ID is different from your
customer's Item ID, item attributes are displayed in a hover help
when you hover the mouse over the icon adjacent to this field.
This hover help is displayed only if your Sponsor has configured
these attributes and Customer ID to display on Supplier Portal
when configuring the corresponding template. If your Sponsor has
not selected this configuration, the hover help is not displayed.
Sterling Supplier Portal supports attributes Color, Size, Product,
Sub Product, and General Description for the item in addition to
the Item ID and Item Description.
vUPC Code - Shows the Universal Product Code of the item.
vGTIN - Shows the Global Trade Item Number of the item.
vProduct Class - Shows the product class of the item.
Order Ship Date Enter the order shipment date and time. Alternatively, you can click
to select the date, and to select the time.
Note: You can enter the acknowledge shipment date either beyond
or before the requested shipment date based on the date tolerance
configured by your Sponsor for the community.
Order Delivery Date Enter the order delivery date and time. Alternatively, you can click
to select the date, and to select the time.
Exclude Select this check box for the order line that you want to exclude
from an acknowledgment.
Notes:
vSome fields on the panel can be hidden or disabled by the Sponsor. Sponsors
can also choose to make some of the fields mandatory.
vThe order of the fields may vary if the Sponsor has selected a different User
Interface layout for this form.
Acknowledge an Order at the Order Line Level
Sterling Supplier Portal enables you to acknowledge an order at the order line
level.
56 Sterling Supplier Portal: Partner User Guide
About this task
To acknowledge an order at the order line level, follow these steps.
Procedure
1. In the Order Lines panel of the Create Acknowledgement screen, select the
check box against the item for which you want to manage multiple schedules
and click Manage Multiple Schedules.
2. The Sterling as a Service Applications dialog box is displayed. Select the check
box against the schedule and enter the appropriate values in the fields.
The following table describes the fields and actions that make up the
Requested Line Item panel in the Sterling as a Service Applications dialog box.
Action Description
Save Click this to add the schedule.
Field Description
Line Identifier Indicates the line number of the item.
Item Indicates the name of the item.
UOM Indicates the unit of measure of the item.
UPC Code Indicates the Universal Product Code of the item.
Ordered Quantity Indicates the quantity of the item requested in the order line.
Order Ship Date
(Requested) /
Shipping Window
Indicates the order shipment date range.
In case the shipment contains only shipping window orders then the
literal will be shown as shipping window.
If the shipment contains even one order which is not a shipping
window orders then the literal will be shown as order ship date.
Order Delivery Date
(Requested)
Indicates the order delivery date range.
The following table describes the fields and actions that make up the Manage
Schedules panel in the Manage Multiple Schedules dialog box.
Action Description
Delete Click this to delete the schedule.
Add/Copy Row Click Add/Copy Row to add a new row;
vTo add a row, enter the quantity in the Add/Copy field and click
.
vTo copy a row, select the line that you want to copy and click
.
vTo copy multiple records, select the lines that you want to copy,
enter the quantity in the Add/Copy field, and click .
Field Description
Quantity Enter the quantity of the item.
Shipping Date Enter the date on which the items are to be shipped. Alternatively,
click to select the date.
Note: You can enter the acknowledged shipment date either beyond
or before the requested shipment date based on the date tolerance
configured by your Sponsor for the community.
Chapter 15. Acknowledge an Order (Partner Task) 57
Action Description
Delivery Date Enter the date on which the items are to be delivered. Alternatively,
click to select the date.
Note: You can enter the acknowledged delivery date either beyond
or before the requested delivery date based on the date tolerance
configured by your Sponsor for the community.
Note:
vValidation for date tolerance is performed at the line level. If a line has
multiple schedules, the minimum and maximum dates from these schedules
are used for validation at the order line level.
vValidation for date tolerance is performed only for the acknowledged
quantity.
58 Sterling Supplier Portal: Partner User Guide

Chapter 16. Rejection of an Order by the Supplier
When an order is rejected in Sterling Supplier Portal , all the order-level tasks
related to the order will be resolved.
If the order has all the order lines in either Rejected or Canceled status, then the
tasks related to this order are also removed from the Next/Overdue task list.
The tasks are regenerated for a rejected order during this workflow:
1. The supplier re-acknowledges the order.
2. A change order is received to increase the order line quantity or add another
order line to the rejected order.
Notes:
vTasks are not regenerated when a change order arrives that changes the price,
changes the date, or reduces the ordered quantity.
vNo shipment tasks are resolved when the order is rejected. Examples of
shipment tasks are Routing Response Awaited or Ship the Shipment.
© Copyright IBM Corp. 2000, 2014 59
60 Sterling Supplier Portal: Partner User Guide

Chapter 17. Delete a Draft Acknowledgement (Partner Task)
About this task
You can delete an acknowledgement that has been saved as a draft.
To perform this task, follow these steps.
Procedure
1. In the Home screen, click Saved as Draft in the Overview panel.
2. The Drafts screen is displayed. In the Drafts panel, click the link pertaining to
the acknowledgement you want to delete.
3. The Create Acknowledgement screen is displayed. Click Delete to delete the
draft form of the acknowledgement.
© Copyright IBM Corp. 2000, 2014 61
62 Sterling Supplier Portal: Partner User Guide

Chapter 18. View the Acknowledgement of an Order (Partner
Task)
You can view the acknowledgement of an order. This feature is available if your
Sponsor selected the Acknowledgement in the choreography for your community.
Procedure
To view the acknowledgment for an order, follow these steps:
1. From the menu bar, click My Documents >Orders.
2. The Search Criteria - Find Order panel is displayed on the Find Order page.
Enter the Order # you want to search for. You can also select one of the
following options:
vis: The application searches for the exact order number.
vstarts with: The application searches for order numbers that start with the
specified value.
3. Enter the search criteria and click Search.
4. The Search List panel is displayed with the list of orders. Select the check box
against the order whose details you want to view and click View Details.
Alternatively, you can click the corresponding Order Number hyperlink.
5. The Order Detail page is displayed. Click View Acknowledgement. The
Acknowledgement Detail page is displayed.
The following table describes the fields that make up the Primary Information
panel on the Acknowledgement Detail page.
Action Description
Notes Click Notes to enter additional information about the
acknowledgment.
Write your note in the Add Note dialog box and click Add to save
the note.
Field Description
Order # Shows the order number. Click the corresponding Order Number
hyperlink to view the Order Detail page, which displays the details
of the selected Order Number.
Order Date Shows the date the order was created.
Order Amount Shows the total order amount, in the currency specified in the order.
Customer Shows the identifier of the customer. Click the Customer hyperlink
to view the Customer Detail page, which displays the details of the
corresponding customer.
Community Shows the community that is created by the Sponsor to which the
Purchase Order belongs. Click the corresponding Community
hyperlink to view the business rules set for the community by the
Sponsor.
Release # Shows the release number of the order.
Contract # Shows the contract number.
Freight Terms Shows the freight terms of the order.
© Copyright IBM Corp. 2000, 2014 63
Action Description
Transportation
Method
Shows the mode of transportation.
Carrier Service Code Shows the carrier service code.
SCAC Enter the Standard Carrier Alpha Code (SCAC), which is a unique
2-4 letter code used to identify transportation companies.
Routing Shows the mode of routing.
Transaction Type Shows the type of transaction.
Currency
Conversion Rate
Shows the currency conversion rate.
User-Defined Fields Enter the user-defined fields (UDF) you want to search for. You can
also select one of the following options:
vis: The application searches for the exact user-defined field value.
vstarts with: The application searches for the user-defined fields
that start with the specified value.
If the Partner belongs to more than one community, you must select
aCommunity to view the user-defined fields on the Search Criteria
page.
The following table describes the fields that make up the Additional
Information panel on the Acknowledgement Detail page.
Field Description
User-Defined Fields Shows the user-defined fields that are carried over from the Order
page. The user-defined fields are displayed only if your Sponsor has
configured them to be displayed on the Acknowledgement Details
page.
Additional
Information
Click this hyperlink to view more user-defined fields.
The following table describes the fields and actions that make up the Order
Line(s) panel in the Acknowledgement Detail page.
Action Description
Notes Click this to enter additional information. Enter your note in the
Add Note dialog box and click Add to save the contents of the note.
View Multiple
Schedules
Click this to view the multiple schedules pertaining to the selected
item in the list. The View Multiple Schedules dialog box is
displayed.
Field Description
Line Identifier Shows the identifier of the line.
Item Shows the name of the item. If you have configured an item rule
such that your Item ID is same as your customer's Item ID, the
hover help containing item attributes is displayed when you place
your mouse over the icon adjacent to this field. This hover help is
displayed only if your Sponsor has configured these attributes to
display on Supplier Portal when configuring the corresponding
template.
Sterling Supplier Portal supports attributes Color, Size, Product, Sub
Product, and General Description for the item in addition to the Item
ID and Item Description.
64 Sterling Supplier Portal: Partner User Guide
Action Description
Ordered Qty. Shows the ordered quantity of the item.
UOM Shows the unit of measure of the item.
Ack'd Qty. Enter the acknowledged quantity of the item.
Order Ship Date
(Requested) /
Shipping window
Shows the Requested shipment date range.
In case the shipment contains only shipping window orders then the
literal will be shown as shipping window.
If the shipment contains even one order which is not a shipping
window orders then the literal will be shown as order ship date.
Order Delivery Date
(Requested)
Shows the Requested delivery date range.
Order Ship Date Shows the order shipment date.
Order Delivery Date Enter the order delivery date.
Click to view the additional fields in the panel:
Unit Price
Shows the unit price of the item, in the currency specified
in the order.
If you changed the unit price of the item when you sent the
acknowledgement, the acknowledged price is displayed.
Customer Item
Shows the name of the item as known to the customer.
If you have configured an item rule so that your Item ID is
different from your customer's Item ID, hover help is
displayed when you place your mouse over the icon for
this field. The hover help displays the item attributes if
your Sponsor has configured the template to display these
attributes and the Customer ID.
Examples of these attributes are Color, Size, Product, Sub
Product, General Description, Item ID, and Item
Description.
UPC Code
Shows the Universal Product Code of the item.
GTIN
Shows the Global Trade Item Number of the item.
Product Class
Shows the product class of the item.
User-Defined Fields
Shows the user-defined fields that were added for an
acknowledgment at the Order Line level. The user-defined
fields are only displayed if your Sponsor has configured
them to be displayed on the Acknowledgement Detail page.
Chapter 18. View the Acknowledgement of an Order (Partner Task) 65
66 Sterling Supplier Portal: Partner User Guide

Chapter 19. Print an Order (Partner Task)
Sterling Supplier Portal allows you to print orders.
About this task
You can only print an order after it is marked as “Read.” You cannot print an
order that has a status of “Draft.”
Procedure
To print an order, follow these steps.
1. From the menu bar, click My Documents >Orders. The Search Criteria - Find
Order panel is displayed on the Find Order page.
2. Enter the Order # you want to search for. You can also select one of the
following options:
vis: The application searches for the exact order number.
vstarts with: The application searches for order numbers that start with the
specified value.
3. Enter the search criteria and click Search. The Search List panel is displayed
with the list of orders.
Note: Make sure the Read Orders option is selected, otherwise the Print button
is not available.
4. From this list, select the check box for the order you want to print and click
Print. Alternatively, you can go to the Order Detail page for the order and click
Print.
Note: You can select only one order at a time to print.
5. In the File Download dialog, click Open. A PDF version of the order is
displayed.
6. Select File > Print.
The following section is an example of a purchase order:
The following fields appear in the PDF version of the order:
© Copyright IBM Corp. 2000, 2014 67
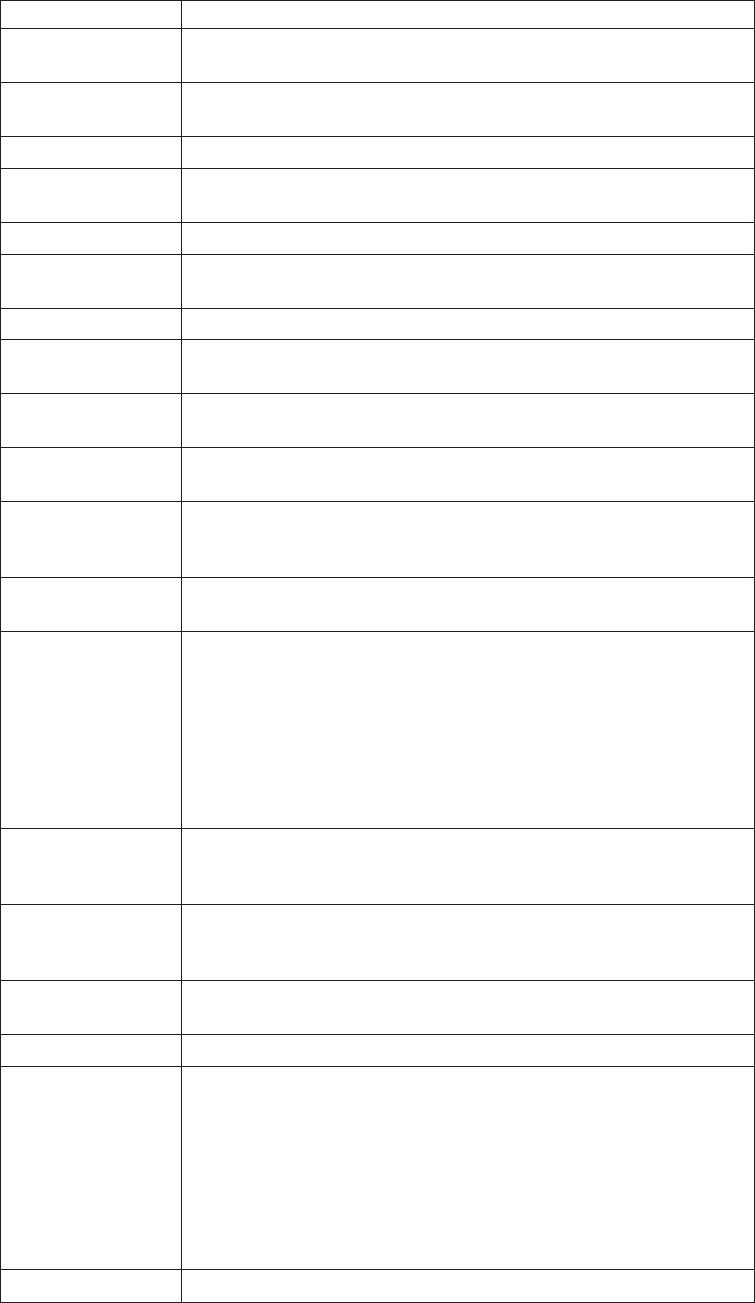
Field Description
Purchase Order
Number
Shows the order number.
Ship To Shows the name, address, and identifier of the company to whom
the order needs to be shipped.
Customer Name Shows the name of the customer.
Bill To Shows the name, address, and identifier of the company to whom
the bill needs to be sent.
Order Date Shows the date on which the order was placed.
Community Shows the community that is created by the Sponsor to whom the
Purchase Order belongs.
Freight Terms Shows the freight terms of the order.
SCAC The Standard Carrier Alpha Code (SCAC), which is a unique 2-4
letter code used to identify transportation companies.
Order Shipment
Date (Requested)
Shows the requested shipment date.
Order Delivery Date
(Requested)
Shows the requested delivery date.
Order Cancel Date Shows the date on which the order will be considered as cancelled if
it is not fulfilled by then.
Note: In the case of a range of dates, only the end date is displayed.
Order Amount Shows the total amount of the order in the currency specified in the
order.
Acknowledged
Amount
Shows the total order amount calculated on the basis of the
acknowledgement sent for this order.
Note:
vThe charges specified in the order are considered when calculating
the acknowledged amount.
vThe value of the acknowledged amount is the sum of the
(acknowledged quantity * acknowledged price) for all the order
lines.
Acknowledged On Shows the date and time at which the order was Acknowledged.
Note: In the case of multiple acknowledgments, this is the latest
date/time.
Ref1 – Ref5 Up to five order header-level fields that are defined by the Sponsor,
along with their corresponding values. Any fields that are not
defined are not displayed.
Header-level Notes Header-level notes about the order (added from the Order Detail
page). Each note is on a separate line.
Line ID Shows the identifier of the order line.
Item Shows the item description and item ID (in parentheses) as known
to the Partner. This section may include item-level notes (added
from the Order Detail page), each of which is on a separate line.
Note: If the Customer Item ID is different from Supplier Item ID,
then the customer Item ID is displayed in brackets. Otherwise, it is
not displayed.
In the example above, this is displayed as Reebok Shoes (RBK001)
[Customer Item: REE9980].
UOM Shows the unit of measure of the item.
68 Sterling Supplier Portal: Partner User Guide
Field Description
Ordered Qty
(Acknowledged)
Shows the ordered quantity of the item.
Note: If the line is acknowledged, the acknowledged quantity
appears in parentheses (whether the acknowledged quantity is the
same or different than the ordered quantity). If the line is not
acknowledged, only the ordered quantity appears.
Order Ship Date
(Requested)
Shows the requested date for the order to ship.
Note: If the committed ship date is different from the requested ship
date, then it will appear in parentheses. Otherwise, it will not
appear. In the case of a range of dates, only the end date is
displayed.
Order Delivery Date
(Requested)
Shows the requested date for the order to be delivered.
Note: If the committed delivery date is different from the requested
delivery date, then it will appear in parentheses. Otherwise, it will
not appear. In the case of a range of dates, only the end date is
displayed.
Unit Price Shows the unit price of the item in the currency specified in the
order.
References Up to five order-line level fields that are defined by the Sponsor,
along with their corresponding values. Each field-value pair appears
on a separate line. Any fields that are not defined are not displayed
Chapter 19. Print an Order (Partner Task) 69
70 Sterling Supplier Portal: Partner User Guide

Chapter 20. Pack an Order or a Shipment (Partner Task)
Your Sponsor can require partners in a community to pack items in cases, pallets,
or both.
If your Sponsor requires the packing step, you will not be able to send a shipment
before you pack the complete shipment and generate the corresponding container
labels for the cases or pallets.
If your Sponsor has not made packing a mandatory task for your community, you
will not be able to perform the packing process or generate container labels.
You can pack an order from the Sterling Supplier Portal Home page. You can pack
a shipment from the Create Shipment page.
Note: As a best practice, do not pack an order or a shipment in more than 99
containers.
Pack an Order from the Home Page
If you know the order number, you can pack the order from the Sterling Supplier
Portal Home page.
About this task
The following rules apply to packing an order or shipment:
vYou have to pack the complete order or shipment at one time because the
packing information cannot be saved. If you exit the Pack Shipment Wizard, you
will have to pack the order or shipment all over again.
vIf a shipment contains multiple orders, you will pack all the orders in the
shipment, even though you only entered one order number.
vThe Sponsor can require you to send an acknowledgement for an order. If the
acknowledgement is required, make sure to send it before you pack the order.
Otherwise, you will receive the following error when you try to pack the order:
Order cannot be packed in this status.
Procedure
To pack an order from the Home page, follow these steps:
1. On the Home page, enter the Order # in the Overview panel.
2. Click Pack. Depending on the tasks that you have completed for this order, one
of the following pages opens:
Create Shipment page
If you have not created a draft shipment for this order, the Create
Shipment page is displayed in the Pack Shipment Wizard. You can use
the Line Items panel to add or delete order lines from the shipment.
When you are done working with the order lines, click Save.
Draft Shipment List page
© Copyright IBM Corp. 2000, 2014 71
If you have created multiple draft shipments for this order, the Draft
Shipment List page is displayed in the Pack Shipment Wizard. Select
the shipment that you want to pack, and click Proceed.
Record Packing and Print Container Labels page
If you have created one draft shipment for the order, the Record
Packing and Print Container Labels page is displayed in the Pack
Shipment Wizard.
Manage Profile Packing page
If the GS1 prefix for your company has not been configured, the
following message is displayed:
Do you want to configure GS1 prefix and proceed to packing?
Click OK to open the Manage Profile Packing page in the Pack
Shipment Wizard. Enter your company's GS1 prefix and click Save.
To return to the Sterling Supplier Portal Home page, click Cancel on
the Manage Profile Packing page.
3. Use the Record Packing and Print Container Labels page to pack the shipment.
The following table describes the actions and fields on the Record Packing and
Print Container Labels page:
Field Description
Shipment # Shows the shipment number.
Order # Shows the order number.
If there are multiple orders in a shipment, Multiple is displayed.
Item Shows the name and description of the item that is being packed.
If there are two shipment lines with the same Item ID, these are
displayed as two different items in the "Labels for items in their
original packing" panel.
UOM Shows the unit of measurement for the item.
Case Qty Enter the number of units that you are packing in a case.
The following rules apply to defining the case quantity:
vYou cannot pack the units for one item in both a case and pallet.
vThe case quantity that you enter for this shipment is used as the
default case quantity the next time you pack the same item.
vIf your Sponsor made Packing a mandatory task and selected only
the Pallet option for your community, Case Qty is not displayed.
vIf you enter a value in the Case Qty, the Plt Qty field is disabled.
vIf you enter zero for the case quantity, the Plt Qty field is enabled.
# Cases Shows the number of cases in the prepacked container.
When you enter the Case Qty, Sterling Supplier Portal automatically
calculates the # Cases.
If your Sponsor made Packing a mandatory task and selected only
the Pallet option for your community, # Cases is not displayed.
72 Sterling Supplier Portal: Partner User Guide

Field Description
Plt Qty Enter the number of item units that you are packing on a pallet.
The following rules apply to defining the pallet quantity:
vYou cannot pack the units for one item in both a case and pallet.
vThe pallet quantity that you enter for this shipment is used as the
default pallet quantity the next time you pack the same item.
vIf your Sponsor made Packing a mandatory task and selected only
the Case option for your community, Plt Qty is not displayed.
vIf you enter a value in the Plt Qty, the Case Qty field is disabled.
vIf you enter zero for the pallet quantity, the Case Qty field is
enabled.
# Plts Shows the number of pallets in the prepacked container.
When you enter the Plt Qty, Sterling Supplier Portal automatically
calculates the # Plts.
If your Sponsor made Packing a mandatory task and selected only
the Case option for your community, # Plts is not displayed.
Loose Qty Shows the number of loose units for the item.
When the # Cases and # Pallets fields are set to zero, all items are
counted as loose quantity.
Total Shows the total number of units that must be packed for the item.
Sterling Supplier Portal calculates the total number of units as the
sum of the following entries:
vCase Qty multiplied by # Of Cases
vPallet Qty multiplied by # Of Pallets
vLoose Qty
Total Cases Shows the total number of cases in the prepacked container.
Total Pallets Shows the total number of pallets in the prepacked container.
Total Qty Shows the total number of units for all the items in the prepacked
container.
4. To pack the unpacked shipment lines, click Next. The Container Build panel is
displayed.
Tip: If you want to start over on the packing process, click Previous. The Pack
Shipment Wizard is refreshed and you can pack the order again.
5. Use the Container Build panel to pack the loose units of the items.
The following table describes the actions and fields that make up the Container
Build panel:
Action Description
Close Container When you click Close Container, Sterling Supplier Portal performs
the following updates:
vThe units in the Pack Qty field are packed in the container and
the Pack Qty is set to zero.
vThe Total Loose Units field is set to the value in the Yet to Pack
field.
Field Description
Chapter 20. Pack an Order or a Shipment (Partner Task) 73
Action Description
Shipment # Shows the shipment number.
Order # Shows the order number.
If there are multiple orders in a shipment, Multiple is displayed.
Container is a Select one of the following options:
Case
Pack the loose units in a case.
Pallet
Pack the loose units on a pallet.
The display of the Case and Pallet options is controlled by the
choreography your Sponsor defined for the community:
vIf your Sponsor did not make Packing a mandatory task, you can
select either Case or Pallet.
vIf your Sponsor made Packing a mandatory task and specified
that both cases and pallets can be used, you can select either Case
or Pallet.
vIf your Sponsor made Packing a mandatory task and specified
that only cases can be used, you can only select Case.
vIf your Sponsor made Packing a mandatory task and specified
that only pallets can be used, you can only select Pallet.
Enter Item Enter the identifier of the item that you are packing manually.
When you enter an Item ID, the Pack Qty value increases by one
and the Yet to Pack value decreases by one.
If there are two shipment lines with the same Item ID, pack the first
line completely and then pack the other line.
Item Shows the name and description of the item that is being packed.
UOM Shows the unit of measurement for the item.
Total Loose Units Shows the total number of loose units for the item.
Yet to Pack Shows the number of loose units that have not been packed in a
case or pallet.
Pack Qty Shows the number of loose units that are packed in a case or pallet.
Packing Instruction Shows the packing instructions for the line item.
The packing instructions for the complete order are displayed next
to the Close Container button at the header level.
If the shipment has multiple orders, the shipping instructions are
displayed in a separate row for each order.
Total Cases Shows the total number of cases in the prepacked container and the
number of cases that were used to pack the loose units.
Total Pallets Shows the total number of pallets in the prepacked container and
the number of pallets that were used to pack the loose units.
Total Qty Shows the total number of units for the order. The total quantity
includes the following entries:
vAll the items in the prepacked container
vThe cases and pallets that were used to pack the loose units
6. When you are done packing the loose items, click Finish.
74 Sterling Supplier Portal: Partner User Guide

Note: You have to pack the complete order or shipment at one time. The
packing information cannot be saved. If you close the Pack Shipment Wizard or
click Finish without packing the shipment completely, a confirmation message
is displayed. Click OK to proceed to the next step without saving the packing
information.
7. After you click Finish, the container labels are displayed in PDF format. After
you have generated and printed the container labels, the Record Packing and
Print Container Labels page is displayed again.
8. To pack more orders or shipments, repeat steps 1 through 7.
Pack a Shipment from the Create Shipment Page
You can pack a shipment from the Create Shipment page.
About this task
The Ship PO task is only available on the Order Detail page if your Sponsor
specified the ASN in the choreography for your Sterling Supplier Portal
community.
The following rules apply to packing a shipment:
vYou must pack the complete order or shipment at one time because the packing
information cannot be saved. If you exit the Pack Shipment Wizard, you will
have to pack the order or shipment all over again.
vYou cannot "over pack" items. You cannot exceed the Shipment Line Quantity in
a draft shipment.
vYou cannot change the quantity after you pack a shipment.
Procedure
To pack a shipment, follow these steps:
1. From the menu bar, click My Documents >Orders. The Search Criteria panel is
displayed on the Find Order page.
2. Enter the search criteria and click Search. The Search List panel displays the
orders.
3. Select the order that you want to ship and click View Details. You can also
click the Order Number hyperlink.
4. On the Order Detail page, click Ship PO. The Create Shipment page is
displayed.
5. Use the Containers panel to add information about each container, such as the
gross weight.
6. In the Containers panel, click Pack Shipment. This button is only displayed if
the shipment is saved as a draft shipment.
7. When the Pack Shipment Wizard opens, you can pack the shipment. For more
information about the Pack Shipment Wizard, refer to “Pack an Order from the
Home Page” on page 71.
8. After you pack and save a shipment, you can click View Container Details to
add additional information for the containers. If your sponsor has configured
the following fields in Sterling Supplier Portal, you can enter the fields for each
container:
vLot Number
vManufacturing Date
Chapter 20. Pack an Order or a Shipment (Partner Task) 75
vQuantity
What to do next
If you want to reduce the shipped quantity for a shipment, you must reduce the
packed quantity before you reduce the shipped quantity.
To reduce the packed quantity, follow these steps:
1. Click Remove Containers in the Containers panel of the Create Shipment page.
Sterling Supplier Portal resets the packed quantity to zero.
2. You can then reduce the shipped quantity and click Pack Shipment in the
Containers panel of the Create Shipment page.
76 Sterling Supplier Portal: Partner User Guide
Chapter 21. View the Details of a Container (Partner Task)
About this task
After you have started packing an order or a shipment, you can view the details of
a container in which the items are packed. You can view the number of item units
that are packed in cases and pallets.
To view the details of a container, follow these steps.
Procedure
1. From the menu bar, navigate to My Documents >Shipments.
2. The Search Criteria - Find Shipment panel is displayed in the Find Shipment
screen. Enter the search criteria and click Search.
3. The results of the search are displayed in the Search List panel of the Search
Criteria screen. From the list of shipments, select the shipment that has already
been packed in containers, and click View Details.
4. The Shipment Detail screen is displayed. In the Containers panel, click
Container Details.
The Container Details dialog box containing the Primary Info panel, Container
SCM (Case) panel, and Container SCM (Pallet) panel is displayed.
The following table describes the fields that make up the Primary Info panel in
the Container Details dialog box:
Field Description
Shipment # Indicates the shipment number.
Customer Indicates the name of the customer.
SCAC Indicates the Standard Carrier Alpha Code (SCAC), which is a
unique 2-4 letter code used to identify transportation companies.
Carrier Service Code Indicates the carrier service code of the shipment.
The following table describes the fields that make up the Container SCM
(Case) panel in the Container Details dialog box:
Field Description
Item Indicates the name of the item that is packed. The description of the
item is also displayed adjacent to the item name.
Pack Qty Indicates the packed units of the item in the case.
The following table describes the fields that make up the Container SCM
(Pallet) panel in the Container Details dialog box:
Field Description
Item Indicates the name of the item that is packed.
Pack Qty Indicates the packed units of the item in the pallet.
© Copyright IBM Corp. 2000, 2014 77
78 Sterling Supplier Portal: Partner User Guide

Chapter 22. Ship an Order (Partner Task)
You can use Sterling Supplier Portal to manage the shipping process for your
orders. When you ship an order, you are completing the Advance Shipment
Notification (ASN) process for the order.
About this task
This topic describes the default layout of the Create Shipment page:
vThe Sponsor might have created the page layout to hide, disable, or change the
order of some of the fields.
vThe Sponsor selects which fields are required.
The following rules apply to shipping an order:
Ship PO Task
The Ship PO task is only available as a Related Task on the Order Detail
page if the choreography of the community includes the ASN.
Overshipping
Your Sponsor can configure the community to allow you to ship a larger
quantity than the requested quantity in the order. This feature is referred to
as overshipping or an overshipment.
If overshipping is allowed for the community, and the first shipment that
is created equals the acknowledged quantity, you cannot create a new
shipment that contains additional items.
Shipping Date Range
An order can contain a shipping window that spans multiple days.
If the acknowledgment is not a part of the choreography of your
community, Sterling Supplier Portal validates the shipping date range
against the requested dates the Sponsor specified in the order.
Carrier Labels
Your Sponsor can configure your community to allow you to generate
carrier labels. For these communities, you can only manage one container
for each shipment.
You can only generate carrier labels for domestic United States shipments.
You cannot send shipments to other countries.
Sterling Supplier Portal supports carrier labels for Federal Express, United
States Postal Service (USPS), and United Parcel Service (UPS).
Route Planning
An order might require route planning. You must send the shipment for
that order to the Sponsor for route planning before you send the order to
the Sponsor.
If your Sponsor sends you an order that requires route planning, the
following buttons are available when you first open the Create Shipment
page:
vSend Routing Request
© Copyright IBM Corp. 2000, 2014 79
vGenerate Packing Slip
vSave Draft
vPack Shipment
vGenerate Container Labels
When you send the shipment to the Sponsor for route planning, the
Sponsor plans the route and updates the carrier information, pickup time,
and other shipment attributes.
As a best practice, the Sponsor will send the route plan back to you the
same day. If you do not receive the route plan by the end of that day, the
Routing response for <Shipment number> due task is displayed in the
Overdue Tasks panel of the Dashboard. You can contact your Sponsor to
find out about the route plan for the shipment.
When you receive the route plan for the shipment, the fields that the
Sponsor changed are automatically updated on the Create Shipment page.
For example, if your Sponsor has modified the mode of routing, the
Routing field in the Transportation Details panel is automatically updated
when you receive the route plan.
After you send the shipment for route planning, you cannot modify any
field on the Create Shipment page.
Packing Containers
Your Sponsor can make packing items in cases or pallets a mandatory task
for your community.
If packing is required, you cannot send a shipment until you perform the
following steps:
1. Pack the complete shipment in cases, pallets, or both.
2. Generate the container labels for the cases or pallets.
If your Sponsor has not made packing a mandatory task for your
community, you cannot perform the packing process or generate container
labels.
Sterling Supplier Portal provides these additional options for working with
shipments:
vIf you know the Sponsor's Purchase Order number, you can ship the order from
the Overview panel of the Dashboard. When you click Ship in the Overview
panel of the Dashboard, the Create Shipment page is displayed.
vIf a draft shipment exists for the order, the Draft Shipment page is displayed
when you click Ship in the Dashboard.
vIf you have created multiple draft shipments for the order, the Draft Shipment
List page is displayed when you click Ship in the Dashboard. You can select the
shipment that you want to send and click View Details.
Procedure
To ship an order, follow these steps:
1. From the menu bar, click My Documents >Orders. The Search Criteria - Find
Order panel is displayed on the Find Order page.
2. Enter the Order # you want to search for. You can also select one of the
following options:
vis: The application searches for the exact order number.
80 Sterling Supplier Portal: Partner User Guide
vstarts with: The application searches for order numbers that start with the
specified value.
3. Enter the search criteria and click Search. The Search List panel displays the list
of orders.
4. Select the order that you want to ship and click View Details. You can also
click the Order Number hyperlink. The Order Detail page is displayed.
5. Click Ship PO. The Create Shipment page is displayed.
The following table describes the buttons on the Create Shipment page:
Button Description
Save Draft Save a document in draft form and complete it later.
Send Routing
Request
Send the shipment to your Sponsor for route planning.
If this button is enabled, all buttons on the Create Shipment page are
disabled except for Save Draft,Generate Packing Slip, and Delete:
vWhen you send the shipment for route planning, the shipment is
saved as a draft. The draft shipment contains read-only fields.
vIf you want to replace this shipment, you can delete the shipment
and create a new shipment.
vUntil you receive the route plan from your Sponsor, the only task
you can perform is to generate a packing slip for the shipment.
Generate Packing
Slip
Generate and print a packing slip.
This button is only available if your Sponsor configured the
community to allow you to generate a packing slip.
Generate Carrier
Label
Generate and print a carrier label.
This button is only available if your Sponsor configured the
community to allow you to generate carrier labels. The Sponsor also
must have completed the carrier integration process with IBM.
Regenerate Carrier
Label
Generate and print an updated carrier label.
This button is only available after you have generated a carrier label
for the shipment.
Reprint Carrier
Label
Reprint a carrier label.
This button is only available after you have generated a carrier label
for the shipment.
Generate Container
Label
Generate and print container labels for the cases or pallets that were
used to pack the shipment.
This button is only available if the following conditions are satisfied:
vYour Sponsor configured the community to require you to pack
items in cases, pallets, or both.
vYour Sponsor configured the community to require you to
generate container labels.
vThe packing is in progress or complete.
Chapter 22. Ship an Order (Partner Task) 81

Button Description
Send ASN Send the ASN to the Sponsor.
When you send the shipment to the Sponsor after you receive the
route plan, the draft form of the shipment is deleted and a new
shipment is created with the same shipment number.
If you changed the quantity in the shipment after packing the
shipment, you are notified about this change when you click Send
ASN.
Delete Delete the draft form of the ASN.
This button is only available when you are viewing the current draft
of the shipment.
The following table describes the fields in the Shipping Information panel on
the Create Shipment page:
Action Description
Notes Opens a Sterling as a Service Applications pop-up window, which
displays the notes that were added at the header level of the
corresponding PO.
In the Notes panel, the icon indicates notes that were added by
the Sponsor at the header level of the PO.
The icon indicates notes that were added by the Partner at the
header level of the PO.
The Sponsor can configure the application to copy the notes from
the PO to the shipment. Notes that the Sponsor and Partner added
to the PO are displayed in the Notes panel.
Field Description
Shipment # Shows the default shipment number. This field is required and is
automatically generated when you open the Create Shipment page.
However, you can enter a new shipment number.
Click the icon to open the Sterling as a Service Applications
pop-up window, which displays the notes that were added at the
header level of the corresponding PO.
The following rules apply to shipment numbers:
vFor a community that uses ANSI X12 EDI, the shipment number
can be from 2 to 30 characters.
vFor a community that uses EDIFACT, the shipment number can be
from 1 to 35 characters.
vFor a community that uses Sterling XML, the shipment number
can be from 1 to 40 characters.
vIf the order that corresponds to this shipment requires route
planning, you cannot edit the Shipment #. This field is
automatically populated when the shipment is saved as a draft or
sent for route planning.
82 Sterling Supplier Portal: Partner User Guide

Action Description
Customer Shows the name of the customer.
Click the Customer hyperlink to view information about the
customer.
Community Shows the community you are using to work with the Sponsor.
Click the Community hyperlink to view information about the
community.
Shipment On Enter the date and time the shipment will be sent.
You can also click to select the date and click to select the
time.
Note: If you will send this shipment for route planning, the
Shipment On field is required.
Weight Enter the weight of the order and select the unit of measurement.
The following rules apply to specifying the weight:
vIf you will send the shipment for route planning, the weight is
required.
vFor orders that require route planning, you can only select
Kilogram,Ton ,orPounds.
vThe Weight field is disabled when you resend a shipment that you
sent earlier for route planning.
Order Delivery Date Enter the date and time the shipment is expected to be delivered.
You can also click to select the date and click to select the
time.
Volume Enter the volume of the order and select the unit of measurement.
The following rules apply to specifying the volume:
vIf you will send the shipment for route planning, the volume is
required.
vFor orders that require route planning, you can only select Gallon,
Cubic Feet,orCubic Meters.
vThe Volume field is disabled when you resend a shipment that
you sent earlier for route planning.
Perishable Allowed Select this option if perishable items are allowed in the shipment.
Hazmat Allowed Select this option if hazardous items are allowed in the shipment.
Drop Ship Shipment Shows whether this is a drop ship shipment.
Packing Status Shows the status of the packing process:
vNot Started
vIn Progress
vCompleted
The following table describes the fields in the Transportation Details panel on
the Create Shipment page:
Field Description
# of Cartons Enter the number of cartons included in the shipment.
By default, this field shows the number of cartons that were used
when you packed the shipment.
Chapter 22. Ship an Order (Partner Task) 83
Field Description
# of Pallets Enter the number of pallets included in the shipment.
By default, this field shows the number of pallets that were used
when you packed the shipment.
SCAC Enter the Standard Carrier Alpha Code (SCAC), which is a unique
code used to identify transportation companies.
You can also click to select the SCAC from the SCAC and
Carrier Service List page.
The SCAC field is disabled when you resend a shipment that you
sent earlier for route planning.
If you want to generate a carrier label for this shipment, ensure that
you enter the same SCAC that your Sponsor configured during the
Carrier Integration process.
Carrier Service Code Select the carrier service code of the shipment.
BOL # Enter the Bill of Lading number for the shipment.
Pro # Enter the Progressive (PRO) number for the shipment.
Transportation
Method
Select the mode of transportation.
Routing Enter the mode of routing for the shipment.
Freight Terms Enter the payment method for the shipment.
If your Sponsor configured the community to allow you to generate
tracking numbers and carrier labels, Sterling Supplier Portal always
uses Prepaid as the freight term, even if you enter Collect.
Equipment Type Select the equipment that will be used to deliver the shipment.
Routing Attribute Select the Routing Attribute details for the shipment.
If your Sponsor configured the community to allow you to generate tracking
numbers and carrier labels, the Containers panel is displayed on the Create
Shipment page. You can only manage one container for each shipment in this
community.
The following table describes the fields in the Containers panel:
Action Description
Remove Containers Delete the selected container.
Add/Copy Row Adds a new row:
vTo add rows, enter the number of rows in the Add/Copy field and
click .
vTo copy a row, select the line that you want to copy and click .
vTo copy multiple records, select the lines that you want to copy,
enter the number of rows in the Add/Copy field, and click .
Pack Shipment Pack the shipment in containers.
The Pack Shipment button is only displayed if the shipment has
been saved as a draft.
84 Sterling Supplier Portal: Partner User Guide
Action Description
Repack Shipment Pack the shipment again.
The Repack Shipment is only displayed if the packing is in progress
or complete.
View Container
Details
Opens the View Container Details page, where you can view up to
1000 containers for your shipment.
If your sponsor configured the following fields, you can add the
entries for each container:
vLot Number
vManufacturing Date
vQuantity
The View Container Details button is only available if the packing
is in progress or complete.
Show All Containers Opens the Container Details page, where you can view a list of 30
containers at a time.
The Show All Containers button is only displayed if there are more
than 30 containers.
You can perform the following tasks on the Container Details page:
vModify the container details and click Save.
vSelect an item and click Remove Containers to delete a container
from the shipment.
Field Description
Container Seq. # Enter the sequence number of the container.
Container # Enter the container number. By default, this field shows the
container that was used to pack the shipment.
Container Type Select the container type.
Note: If you are packing the shipment in containers and generating
container labels, ensure that you do not change the default container
type that is shown here.
Seal # Enter the seal number of the container.
Height Enter the height of the container. The default value is the height that
your Sponsor configured for the default container in this community.
Width Enter the width of the container. The default value is the width that
your Sponsor configured for the default container in this community.
Length Enter the length of the container. The default value is the length that
your Sponsor configured for the default container in this community.
Size UOM Select the unit of measurement. The default value is the unit of
measurement that your Sponsor configured for the default container
in this community.
Tracking # Shows the tracking number of the container:
vIf you are allowed to edit this field, you can enter the tracking
number for the container.
vIf this field is read-only, the tracking number is automatically
populated when you generate the carrier label.
Gross Weight Enter the gross weight of the container.
Weight UOM Select the unit of measurement for the gross weight.
Chapter 22. Ship an Order (Partner Task) 85
The following table describes the fields in the Ship To panel on the Create
Shipment page:
Field Description
Company Enter the name of the company that is receiving the shipment.
First Name Enter the given name (first name) of the contact person.
Last Name Enter the family name (last name) of the contact person.
Address Line 1 Enter the first line of the company address.
Address Line 2 Enter the second line of the address, if applicable.
Buyer ID Enter the Buyer ID of the company that is receiving the shipment.
Phone Enter the phone number of the contact person.
The phone number is required if you want to generate a tracking
number and print a carrier label.
City Enter the city of the company office.
State Enter the state or province of the company office.
Zip Enter the postal code of the company office.
Country Enter the country or region of the company office.
Note: You can only generate a carrier label for shipments that are
being delivered within the United States.
The following table describes the fields in the Ship From panel on the Create
Shipment page:
Field Description
Location ID Select the required Location ID.
The ship from locations in the list are based on the locations your
Sponsor defined for the community.
Company Enter the name of the company that is shipping the freight.
First Name Enter the given name (first name) of the contact person.
Last Name Enter the family name (last name) of the contact person.
Address Line 1 Enter the first line of the company address.
Address Line 2 Enter the second line of the address, if applicable.
Supplier ID Enter the Supplier ID of the company that is shipping the freight.
City Enter the city of the company office.
State Enter the state or province of the company office.
Zip Enter the postal code of the company office.
Country Enter the country or region of the company office.
Note: You can only generate a carrier label for shipments that are
being delivered within the United States.
The following table describes the fields and actions in the Line Items panel on
the Create Shipment page:
Action Description
Add More Orders Add orders to the shipment.
Remove Lines Delete the selected order line items from the shipment.
86 Sterling Supplier Portal: Partner User Guide
Action Description
Notes Opens a Sterling as a Service Applications pop-up window, which
displays the notes that were added at the line level of the
corresponding PO.
You can also click the icon for an Order Line to view these
notes.
In the Notes panel, the icon indicates notes that were added by
the Sponsor at the line level of the PO.
The icon indicates notes that were added by the Partner at the
line level of the PO.
Field Description
# Enter the sequence number of the shipment line.
Order # Shows the order number.
Click the Order # hyperlink to open the Order Detail page, which
displays information about the order.
Order Date Shows the date the order was placed.
Line Identifier Shows the line item identifier.
Item Shows the name of the item.
If you have configured an item rule to make your Item ID the same
as your customer's Item ID, hover help is displayed when you place
your mouse over the icon for this field. The hover help displays the
item attributes if your Sponsor configured the template to display
these attributes.
Examples of these attributes are Color, Size, Product, General
Description, Item ID, and Item Description.
Expected Ship Date Shows the expected ship date.
Ordered Qty. Shows the ordered quantity.
Shipped Qty. Shows the quantity of the items that have shipped.
Qty. in Shipment Enter the quantity of the items to be included in the shipment.
UOM Shows the unit of measurement for the item.
Chapter 22. Ship an Order (Partner Task) 87
Action Description
Click to view additional fields in the Line Items panel:
Customer Item
Shows the name of the item as known to the customer.
If you have configured an item rule so that your Item ID is
different from your customer's Item ID, hover help is
displayed when you place your mouse over the icon for
this field. The hover help displays the item attributes if
your Sponsor configured the template to display these
attributes and the Customer ID.
Examples of these attributes are Color, Size, Product,
General Description, Item ID, and Item Description.
UPC Code
Shows the Universal Product Code of the item.
GTIN
Shows the Global Trade Item Number of the item.
Product Class
Shows the product class of the item.
Release #
Shows the release number for the shipment.
Contract #
Shows the contract number for the shipment.
Customer #
Shows the customer number for the shipment.
Add an Order to a Shipment
You can use Sterling Supplier Portal to add more orders to a shipment.
About this task
The Ship PO task is only available as a Related Task on the Order Detail page if
the choreography of the community includes the ASN.
Procedure
To add an order to a shipment, follow these steps:
1. From the menu bar, click My Documents >Orders. The Search Criteria - Find
Order panel is displayed on the Find Order page.
2. Enter the search criteria and click Search. The Search List panel displays the list
of orders.
3. Select the order you want to ship and click View Details. You can also click the
Order Number hyperlink. The Order Detail page is displayed.
4. Click Ship PO. The Create Shipment page is displayed.
5. In the Line Items panel, click Add More Orders.
88 Sterling Supplier Portal: Partner User Guide

6. When the Search Criteria - Find Order page opens, enter the search criteria and
click Search. The Search List panel is displayed with a list of orders.
If the shipment that corresponds to an order requires route planning, the Search
List panel only displays the orders that require route planning.
7. Click for the order you want to add to the shipment. The selected order is
added to the shipment.
Chapter 22. Ship an Order (Partner Task) 89
90 Sterling Supplier Portal: Partner User Guide

Chapter 23. Delete a Draft Shipment (Partner Task)
About this task
You can delete a shipment that has been saved as a draft.
To perform this task, follow these steps.
Procedure
1. In the Home screen, click Saved as Draft in the Overview panel.
2. The Drafts screen is displayed. In the Drafts panel, click the link pertaining to
the shipment you want to delete.
3. The Create Shipment screen is displayed. Click Delete to delete the draft form
of the shipment.
Note:
vWhen you delete a draft form of a shipment that was sent for route
planning, an update is sent to your Sponsor that route planning is no longer
required if you have not received the route plan yet.
vWhen you delete a draft form of the shipment for which you have received
the route plan, an update is sent to your Sponsor to delete the corresponding
order from the load.
vIf you receive a route plan for a shipment that has been deleted, the
document is rejected.
© Copyright IBM Corp. 2000, 2014 91
92 Sterling Supplier Portal: Partner User Guide

Chapter 24. Ship From Locations
Configure Ship From Locations (Partner Task)
Sterling Supplier Portal enables you to configure the Ship From Locations. You can
maintain a list of ship from locations. While creating a shipment, based on the
community configuration by your Sponsor, a list of ship from locations are
available. When you modify the ship from location details, the Sponsor is notified
of the change. Sponsors can view the ship from location details of their Partners.
Sponsors can also create their version of ship from location list.
About this task
While creating a community, the Sponsor can set the ship from location option for
their Partners to any of the following rules:
vYou can ship the orders from any location. This will be the default option.
vYou can ship the orders only from the locations approved by your Sponsor. The
approved list of ship from locations is available as a drop-down list in the From
Address panel in the Create Shipment screen. If the approved list is not
available, you cannot send the Advance Shipment Notice (ASN).
vYou can ship the orders only from locations uploaded by your Sponsors. You
can view the list of ship from locations that are uploaded by your Sponsors. The
approved list of ship from locations is available as a drop-down list in the From
Address panel in the Create Shipment screen. You can also request your Sponsor
to add a new ship from location if required.
You can add, modify, and delete the ship from locations that you have configured.
Add Ship From Location (Partner Task)
Sterling Supplier Portal enables you to add the Ship From Locations.
About this task
To add the ship from location details, perform the following steps:
Procedure
1. In the Sterling Supplier Portal Console, navigate to Setup > Configure Ship
From Locations.
2. The Configure Ship From Locations screen is displayed.
3. Click Add. The Add Ship From Location pop-up window is displayed. Enter
the appropriate values in the fields and click Save.
Note: While modifying a community, if a Sponsor makes any fields of the Ship
From Location screen mandatory, then the Partner should ensure that the
mandatory fields of the Ship From Location screen are added for all the
pre-configured ship from locations also.
The following table describes the fields that make up the Add Ship From
Location pop-up.
© Copyright IBM Corp. 2000, 2014 93
Field Description
Location ID * Enter the location ID of the location from where the order is
shipped. You can add all the alphanumeric characters, special
characters, and symbols except the % symbol.
Company Enter the name of the company from which the order is shipped.
Supplier ID Enter the identifier of the company from which the order is shipped.
First Name Enter the first name of the contact person.
Last Name Enter the last name of the contact person.
Address Line 1 * Enter the first line of the company address.
Address Line 2 Enter the second line of address, if applicable.
City * Enter the city in which the contact is located.
State Enter the state in which the contact is located.
Zip Code * Enter the zip code of the city in which the contact is located.
Country * Enter the name of the country in which the contact is located.
Phone # Enter the phone number of the contact person.
Email Enter the email ID of the contact person.
* = Mandatory field
Note: You cannot create multiple ship from locations with the same
information in the fields such as address line 1, address line 2, city, state,
country, and zip code.
When a Partner is not a member of the community at the time when the
Sponsor uploads the ship from location data, this information is retained by the
system for 30 days and is processed when the Partner joins the community.
Modify Ship From Location (Partner Task)
About this task
Sterling Supplier Portal enables a Partner organization to modify its Ship From
Locations.
To modify the ship from locations, perform the following steps.
Procedure
1. In the Sterling Supplier Portal Console, navigate to Setup > Configure Ship
From Locations.
2. The Configure Ship From Locations screen is displayed. From the list of ship
from locations, select the check box against the Location ID that you want to
modify and click Modify.
3. The Modify Ship From Location screen is displayed. Modify the required
values in the Location Info panel and click Save.
The following table describes the fields that make up the Modify Ship From
Location screen:
94 Sterling Supplier Portal: Partner User Guide
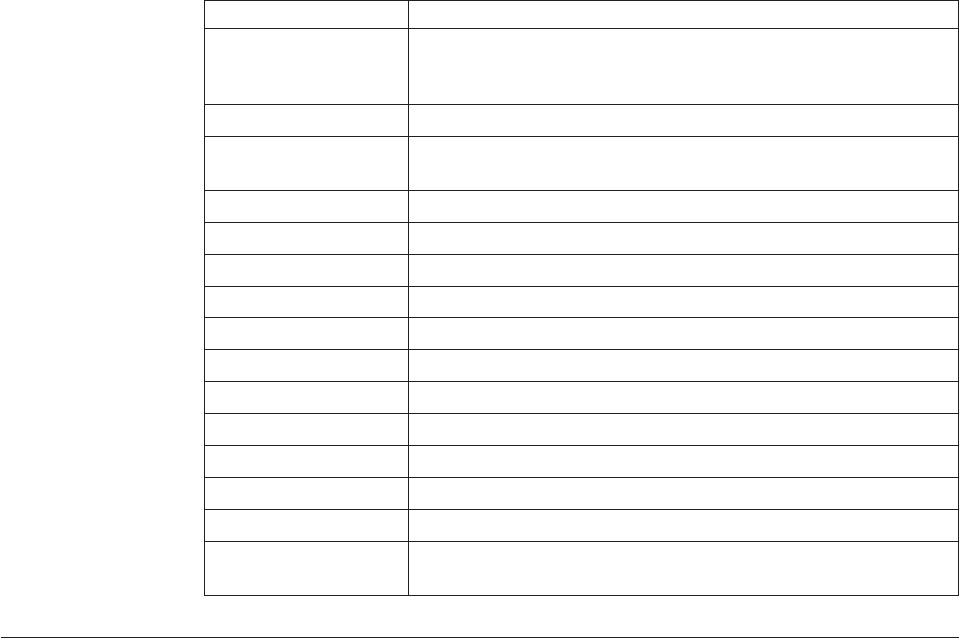
Field Description
Location ID Enter the location ID of the location from where the order is
shipped. You can add all the alphanumeric characters, special
characters, and symbols except the % symbol.
Company Enter the name of the company from which the order is shipped.
Supplier ID Enter the identifier of the company from which the order is
shipped.
First Name Enter the first name of the contact person.
Last Name Enter the last name of the contact person.
Address Line 1 Enter the first line of the company address.
Address Line 2 Enter the second line of address, if applicable.
City Enter the city in which the contact is located.
State Enter the state in which the contact is located.
Zip Code Enter the zip code of the city in which the contact is located.
Country Enter the name of the country in which the contact is located.
Phone # Enter the phone number of the contact person.
Email Enter the e-mail ID of the contact person.
Customer Indicates the name of the customer.
Customer's
Configuration
Indicates the Sponsor's version of the ship from location details.
Delete Ship From Location (Partner Task)
About this task
Sterling Supplier Portal enables you to delete a ship from location that you have
added.
To delete the ship from location details, perform the following steps.
Procedure
1. In the Sterling Supplier Portal Console, navigate to Setup > Configure Ship
From Locations.
2. The Configure Ship From Locations screen is displayed. From the list of ship
from locations, select the check box against the Location ID that you want to
delete and click Delete.
To delete all the ship from locations at the same time, select the check box
against the Location ID field name and click Delete.
Note: When you delete a ship from location, the corresponding Sponsor
version also gets deleted.
Chapter 24. Ship From Locations 95
96 Sterling Supplier Portal: Partner User Guide

Chapter 25. View Payment Terms
View Payment Terms for New Orders or Change Orders
About this task
To view the payment terms for a new order or change order, perform the following
tasks.
Procedure
1. In the Home Page, click New Communications in the Overview Panel.
2. In the New Communications screen:
vTo view the payment terms for a new order, select the check box against the
New PO message whose payment terms you want to view and click View
Details. Alternatively, you can click the Subject hyperlink of the
corresponding purchase order. The Order Detail screen is displayed.
vTo view the payment terms for a change order, select the check box against
the Change PO message whose payment terms you want to view and click
View Details. Alternatively, you can click the Subject hyperlink of the
corresponding purchase order. The Change Order Detail screen is displayed.
3. Click the View Payment Terms action to view the Payment Terms screen.
View Payment Terms for an Existing Order
About this task
To view the payment terms for an existing order, perform the following tasks.
Procedure
1. From the menu bar, navigate to My Documents >Orders.
2. The Search Criteria - Find Order panel is displayed in the Find Order screen.
Enter the search criteria and click Search.
3. The Search List panel is displayed with the list of orders. From this list, select
the check box against the orders whose payment terms you want to view and
click View Details. Alternatively, you can click the Order Number hyperlink.
The Order Detail screen is displayed.
4. In the Order Detail screen, click the View Payment Terms action to view the
Payment Terms screen.
View Payment Terms When Acknowledging an Order
About this task
To view the payment terms while acknowledging an order, perform the following
tasks.
Procedure
1. From the menu bar, navigate to My Documents >Orders.
2. The Search Criteria - Find Order panel is displayed in the Find Order screen.
Enter the search criteria and click Search.
© Copyright IBM Corp. 2000, 2014 97

3. The Search List panel is displayed with the list of orders. From this list, select
the check box against the order you want to acknowledge and click View
Details. Alternatively, you can click the Order Number hyperlink.
4. The Order Detail screen is displayed, click Ack PO. The Create
Acknowledgement screen is displayed.
5. In the Create Acknowledgement screen, click the View Payment Terms action
to view the Payment Terms screen.
View Payment Terms When Invoicing a Shipment
About this task
To view the payment terms while invoicing a shipment, perform the following
tasks.
Procedure
1. From the menu bar, navigate to My Documents >Shipments.
2. The Search Criteria - Find Shipment panel is displayed in the Find Shipment
screen. Enter the search criteria and click Search.
3. The Search List panel is displayed with the list of shipments. From this list,
select the check box against the shipment whose payment terms you want to
view and click View Details. Alternatively, you can click the Shipment
Number hyperlink. The Shipment Detail screen is displayed.
4. In the Shipment Detail screen, click Create Invoice. The Create Invoice screen is
displayed.
5. In the Create Invoice screen, click the View Payment Terms action to view the
Payment Terms screen.
Note:
vIf there are multiple orders in the invoice, payment terms for the order with
maximum pay by date will be displayed.
vIf a Sponsor sends the description for the payment term in the PO, then the
pay by date field in the Create Invoice screen does not get populated based
on payment term.
View Payment Terms When Invoicing an Order
About this task
To view the payment terms when invoicing an order, perform the following tasks.
Procedure
1. From the menu bar, navigate to My Documents >Orders.
2. The Search Criteria - Find Order panel is displayed in the Find Order screen.
Enter the search criteria and click Search.
3. The Search List panel is displayed with the list of orders. From this list, select
the check box against the order whose payment details you want to view and
click View Details. Alternatively, you can click the Order Number hyperlink.
The Order Detail screen is displayed.
4. In the Order Detail screen, click Invoice PO.The Create Invoice screen is
displayed.
98 Sterling Supplier Portal: Partner User Guide

5. In the Create Invoice screen, click the View Payment Terms action to view the
Payment Terms screen.
Note: If a Sponsor sends the description for the payment term in the PO, then
the pay by date field in the Create Invoice screen does not get populated based
on payment term.
View Payment Terms for Sent Invoice
About this task
To view the payment terms for a sent invoice, perform the following tasks.
Procedure
1. From the menu bar, navigate to My Documents >Invoices.
2. The Search Criteria - Find Invoice panel is displayed in the Find Invoice
screen. Enter the search criteria and click Search.
3. The Search List panel is displayed with the list of invoices. From this list, select
the check box against the invoice whose payment terms you want to view and
click View Details. Alternatively, you can click the Invoice Number hyperlink.
The Invoice Detail screen is displayed.
4. In the Invoice Detail screen, click the View Payment Terms action to view the
Payment Terms screen.
Payment Terms Screen
The Payment Terms screen displays the following:
vPayment Term - Indicates the terms type for each payment term sent by the
Sponsor in the PO.
Note: If a Sponsor sends the description for the payment terms in the PO, then
the Payment Term type is always displayed as Basic and the description passed
is displayed in the Payment Terms screen.
vPayment Due Information: Indicates one or both of the following details:
– The date by which the payment is due.
– The number of days after invoice date or ship date or delivery date by which
the payment is due.
vTerm Discount Information: Indicates one of the following details:
– The date by which the Sponsor should make the payment in order to receive
the discount
– The number of days after invoice date or ship date or delivery date by which
the Sponsor should make the payment in order to receive the discount.
– The discount percentage and discount amount.
Note:
vThe Sponsor should send a consolidated list of payment terms while sending
Change PO.
vThe Payments Terms screen displays discount percentage and the discount
amount as received in the PO without computing it.
Chapter 25. View Payment Terms 99
100 Sterling Supplier Portal: Partner User Guide

Chapter 26. View the Payment Details for an Order (Partner
Task)
You can use Sterling Supplier Portal to view the Payment Detail page for an order.
About this task
Each payment is made based on one invoice. If there are multiple orders for the
invoice, only the first order displays the Payment status.
Procedure
To view the Payment Detail page, follow these steps:
1. From the menu bar, click My Documents >Orders. The Search Criteria - Find
Order panel is displayed on the Find Order page.
2. Enter the search criteria and click Search. The results of the search are
displayed in the Search List panel.
3. Select an order and click View Details. You can also click the corresponding
Order Number hyperlink. The Order Detail page is displayed.
4. Click View Payments. The Payment Detail page is displayed.
The Order Header panel on the Payment Detail page contains the following
entries:
Field Description
Order # Shows the order number.
Click the Order Number hyperlink to open the Order Detail page.
Req. Ship Date Shows the requested ship date.
Status Shows the order status.
Order Date Shows the order date.
Req. Delv. Date Shows the requested delivery date.
Terms Shows the terms of an order.
Customer Shows the customer's name.
Click the Customer Name hyperlink to open the Customer Detail
page.
Community Shows the community name.
Click the Community Name hyperlink to open the Community
Detail page.
Order Amount Shows the total cost of the order.
The Payment List panel on the Payment Detail page contains the following
entries:
Field Description
Currency Shows the currency of the order.
Payment Date Shows the payment date.
© Copyright IBM Corp. 2000, 2014 101
Field Description
Amount Shows the amount.
Type Shows the payment type.
Payment Reference # Shows the reference number that was assigned to the payment:
vIf the payment method used by the Sponsor is Check, the Check
Number is displayed.
vIf the payment method used by the Sponsor is Credit Card, the
Credit Card Number is displayed.
vIf the payment method used by the Sponsor is SWIFT, the Bank
Identifier Code (BIC) is displayed.
vIf the payment method used by the Sponsor is CHIPS, the 3-digit
or 4-digit international interbank transaction number is displayed.
Invoice # Shows the invoice number.
What to do next
As an alternative, perform the following steps to view the payment for an order:
1. In the Overview panel of the Dashboard, click the New Communications
hyperlink. The New Communications page is displayed.
2. Select the check box for the payment you want to view. You can also click the
corresponding Subject hyperlink. The Payment Detail page is displayed.
3. When you are done viewing payment details, you can click View New
Communications in the Order Header panel of the Payment Detail page. The
New Communications page opens, where you can see all the new
communications that were received in the system.
102 Sterling Supplier Portal: Partner User Guide

Chapter 27. View Charges and Allowances (Partner Task)
You can view the details of charges and allowances from the Order Detail page,
Create Invoice page, Invoice Detail page, and Create Acknowledgement page.
Procedure
To view the charges and allowances from the Order Detail page, perform the
following tasks.
1. From the menu bar, navigate to My Documents >Orders.
2. The Search Criteria - Find Order panel is displayed in the Find Order page.
Enter the search criteria and click Search.
3. The Search List panel is displayed with the list of orders. From this list, select
the check box against the orders whose details you want to view and click
View Details. Alternatively, you can click the Order Number hyperlink. The
Order Detail page is displayed.
4. In the Order Detail page:
vClick the header charge amount to view the charge detail in the Charges
pop-up window, which provides the lists of header charges associated with
the order.
vClick the line charge amount to view the charge detail in the Charges pop-up
window, which provides the lists of line charges associated with each order
line.
What to do next
To view the charges and allowances from the Create Invoice page, perform the
following tasks:
1. From the menu bar, navigate to My Documents >Orders.
2. The Search Criteria - Find Order panel is displayed in the Find Order page.
Enter the search criteria and click Search.
3. The Search List panel is displayed with the list of orders. From this list, select
the check box against the order whose details you want to view and click View
Details. Alternatively, you can click the Order Number hyperlink. The Order
Detail page is displayed.
4. In the Order Detail page, click Invoice PO. The Create Invoice page is
displayed.
5. Alternatively, from the menu bar, navigate to My Documents >Shipments.
6. The Search Criteria - Find Shipment panel is displayed in the Find Shipment
page. Enter the search criteria and click Search.
7. The Search List panel is displayed with the list of shipments. From this list,
select the check box against the shipment whose details you want to view and
click View Details. Alternatively, you can click the Shipment Number
hyperlink. The Shipment Detail page is displayed.
8. In the Shipment Detail page, click Create Invoice. The Create Invoice page is
displayed.
9. In the Create Invoice page:
© Copyright IBM Corp. 2000, 2014 103

vClick the header charge amount to view the charge detail in the Charges
pop-up window, which provides the lists of header charges associated with
the order.
vClick the line charge amount to view the charge detail in the Charges pop-up
window, which provides the lists of line charges associated with each order
line.
Note: The charge and allowance displayed in the Charges pop-up window
are recomputed based on the quantity mentioned in the invoice.
To view the charges and allowances from the Invoice Detail page, perform the
following tasks:
1. From the menu bar, navigate to My Documents >Invoices.
2. The Search Criteria - Find Invoice panel is displayed in the Find Invoice page.
Enter the search criteria and click Search.
3. The Search List panel is displayed with the list of invoices. From this list, select
the check box against the invoice whose details you want to view and click
View Details. Alternatively, you can click the Invoice Number hyperlink. The
Invoice Detail page is displayed.
4. In the Invoice Detail page:
vClick the header charge amount to view the charge detail in the Charges
pop-up window, which provides the lists of header charges associated with
the order.
vClick the line charge amount to view the charge detail in the Charges pop-up
window, which provides the lists of line charges associated with each order
line.
To view the charges and allowances from the Create Acknowledgement page,
perform the following tasks:
1. From the menu bar, navigate to My Documents >Orders.
2. The Search Criteria - Find Order panel is displayed in the Find Order page.
Enter the search criteria and click Search.
3. The Search List panel is displayed with the list of orders. From this list, select
the check box against the orders whose details you want to view and click
View Details. Alternatively, you can click the Order Number hyperlink.
4. The Order Detail page is displayed. Click Ack PO. The Create
Acknowledgement page is displayed.
5. In the Create Acknowledgement page:
vClick the header charge amount to view the charge detail in the Charges
pop-up window, which provides the lists of header charges associated with
the order.
vClick the line charge amount to view the charge detail in the Charges pop-up
window, which provides the lists of line charges associated with each order
line.
The following table describes the fields that make up the Charges page.
Field Description
Name Indicates the name of the charge or discount.
Type Indicates whether the charge is an allowance (associated amount that
gets deducted from the order amount) or a charge (associated
amount that gets added to the order amount).
104 Sterling Supplier Portal: Partner User Guide

Field Description
Amount Indicates the charge amount in the currency specified in the order.
% Indicates the percentage of unit price provided to the Buyer for a
charge or discount.
Chapter 27. View Charges and Allowances (Partner Task) 105
106 Sterling Supplier Portal: Partner User Guide

Chapter 28. View the Details of a Shipment (Partner Task)
You can use Sterling Supplier Portal to search for and view the details of
shipments that were created by your Sponsors.
About this task
If you have resent this shipment, only the latest shipment details are displayed.
If you have canceled the shipment, the latest shipment details with a shipped
quantity of zero are displayed.
In the case of a replaced shipment, the latest shipment details are displayed on the
Shipment Detail page. You cannot view the original shipment.
If you are an EDI-capable Partner and are registered in a Chargeback Only
community, you can only view the Shipment details. You cannot perform any of
the related shipment tasks.
Procedure
To view the details of a shipment that is associated with a particular order, follow
these steps:
1. From the menu bar, click My Documents >Orders.
2. The Search Criteria - Find Order panel is displayed on the Find Order page.
Enter the Order # you want to search for. You can also select one of the
following options:
vis: The application searches for the exact order number.
vstarts with: The application searches for order numbers that start with the
specified value.
3. Enter the search criteria and click Search.
4. The results of the search are displayed in the Search List panel. Select the
check box against the appropriate order and click View Details.
5. The Order Detail page is displayed. Click View Shipments. The Shipment
Detail page is displayed, containing the details of the shipment associated with
the order you specified.
Note: In the Related Task, Viewing the ASN option is available only if it has
been included as a part of the choreography.
What to do next
To view the shipments directly, follow these steps:
1. From the menu bar, navigate to My Documents >Shipments.
2. The Search Criteria - Find Shipment panel is displayed on the Find Shipment
page. Enter the search criteria and click Search.
The following table describes the fields and actions that make up the Search
Criteria - Find Shipment panel on the Find Shipment page.
Action Description
© Copyright IBM Corp. 2000, 2014 107

Favorite Searches Click this to search for a saved search in order to execute it.
Save Search Click this to save the current search criteria that you have entered as
a favorite search.
Delete Current
Search
This icon is enabled when you are viewing the current saved search.
Click this to delete the current saved search criteria.
Field Description
Shipment # Enter the shipment number to be included in the search.
Transportation
Method
From the drop-down list, select the mode of transportation.
Order # Enter the Order # you want to search for. You can also select one of
the following options:
vis: The application searches for the exact order number.
vstarts with: The application searches for order numbers that start
with the specified value.
Community Enter the community name that is to be included in the search.
You can also click to search for a specific Community.
Item ID Enter the identifier of the item that is to be included in the search.
Item Description Enter the description of the item that is to be included in the search.
BOL # Enter the bill of lading number that is to be included in the search.
SCAC Enter the carrier type that is to be included in the search.
You can also click to search for a specific carrier.
Shipment Date Enter the date and time range, on which the shipment that is to be
included in the search was created.
You can also click to select the date range.
You can also click to select the time range.
Status From the drop-down list, select the status of the document. For
example, select Created to search for shipments that are saved as a
draft.
Sort Result by From the drop-down list, select the attribute by which the search
result should be sorted when displayed in the Search List panel.
If you select a value here, the search result in the Search List panel
will be sorted in ascending order. To sort the result in descending
order, select the Sort in Descending Order check box.
If you do not select a value here, the search result in the Search List
panel will not be sorted.
User-Defined Fields Enter the user-defined fields (UDF) for the shipments you are
searching for. You can also select one of the following options:
vis: The application searches for the exact field.
vstarts with: The application searches for user-defined fields that
start with the specified value.
If the Partner is on-boarded to more than one community, you must
select a value in the Community field to select the user-defined
fields on the Search Criteria page.
Sort in Descending
Order
Select this check box to sort the search result in the Search List
panel in descending order.
108 Sterling Supplier Portal: Partner User Guide

Max Records Shows the maximum number of shipments that will be displayed in
the Search List panel. You can enter the maximum number of
shipments to be displayed as search results.
3. The results of the search are displayed in the Search List panel of the Search
Criteria page. From the list of shipments, select the shipment whose details you
want to view and click View Details.
Alternatively, you can also click the corresponding Shipment Number
hyperlink. The Shipment Detail page is displayed.
The following table describes the fields and the action that make up the Search
List panel on the Search Criteria page.
Action Description
View Detail Click this to view the Shipment Detail page that displays the
shipment details.
Field Description
Shipment # Shows the shipment number.
Click the Shipment Number hyperlink to view the Shipment Detail
page, which displays the shipment details.
BOL # Shows the bill of lading number of the shipment.
Order # Shows the order number.
Click the Order Number hyperlink to view the Order Detail page,
which displays the order details.
Note: The Order Number hyperlink is disabled for draft shipments.
Customer Shows the name of the customer.
Click the Customer hyperlink to view the details of the customer.
Community Shows the name of the community to which the Partner belongs.
SCAC Shows the name of the shipment carrier service.
Shipment Date Shows the date on which the shipment was shipped.
Status Shows the current status of the shipment.
Click to view the user-defined fields added for a Shipment. The
user-defined fields are displayed only if your Sponsor has
configured them to be displayed on the List page.
The following table describes the action that make up the Shipment Detail page.
Action Description
Generate Packing
Slip
Click this to generate and print a Packing Slip.
Reprint Carrier
Label
Click this to reprint a Carrier Label.
Note: This button is displayed only when a Carrier Label has been
generated at least once.
The following table describes the fields that make up the Shipping Information
panel on the Shipment Detail page.
Chapter 28. View the Details of a Shipment (Partner Task) 109
Field Description
Shipment # Shows the shipment number.
Customer Click this to view the customer details.
Community Click this link to view the details of the community.
Shipment On Shows the date and time on which the shipment is scheduled to be
shipped.
Weight Shows the weight of the shipment.
Order Delivery Date Shows the date on which the shipment is expected to be delivered.
Volume Shows the total volume of the shipment.
Perishable Allowed Shows if perishable items are allowed in the shipment.
Hazmat Allowed Shows if hazardous items are allowed in the shipment.
Drop Ship Shipment Shows whether the shipment is a drop ship shipment or not.
Packing Status Shows the status of packing.
vNot Packed: Shows that the shipment was not packed before
sending it to the Sponsor.
vPartially Packed: Shows that the shipment was partially packed
before sending it to the Sponsor.
vFully Packed: Shows that the shipment was fully packed before
sending it to the Sponsor.
User-Defined Fields Shows the user-defined fields added for a shipment at the Shipment
header level. The user-defined fields are displayed only if your
Sponsor has configured them to be displayed in the Shipment
Information panel.
The following table describes the fields that make up the Transportation Details
panel on the Shipment Detail page.
Field Description
# of Cartons Shows the total number of cartons included in the shipment.
# of Pallets Shows the total number of pallets included in the shipment.
SCAC Shows the carrier service used for shipping.
Carrier Service Code Shows the carrier service code used for shipping.
BOL # Shows the bill of lading number of the shipment.
Pro # Shows the progressive number of the shipment.
Transportation
Method
Shows the mode of transportation.
Routing Shows the mode of routing.
Freight Terms Shows whether the shipment comes under Prepaid or Collect.
User-Defined Fields Shows the user-defined fields added for a shipment at the Shipment
header level. The user-defined fields are displayed only if your
Sponsor has configured them to be displayed in the Transportation
Details panel.
Equipment Type The Equipment type details provided while sending ASN will be
displayed.
Routing Attribute The Routing Attribute details provided while sending ASN will be
displayed.
110 Sterling Supplier Portal: Partner User Guide
The following table describes the fields that make up the Additional Information
panel on the Shipment Detail page.
Field Description
User-Defined Fields Shows the user-defined fields carried over from the
Acknowledgement and Order pages. The user-defined fields are
displayed only if your Sponsor has configured them to be displayed
in the Shipment Details panel.
Additional
Information
Click this hyperlink to view more user-defined fields.
The following table describes the fields that make up the Containers panel on the
Create Shipment page. If you have generated a tracking number and carrier label
for this shipment, the Container panel is displayed.
Field Description
Container Seq. # Shows the sequence number of the container.
Container # Shows the container number.
Container Type Shows the container type.
Seal # Shows the seal number of the container.
Height Shows the height of the container.
Length Shows the length of the container.
Width Shows the width of the container.
Weight Shows the gross weight of the container.
Size UOM From the drop-down list, select the unit of measure.
Tracking # Shows the tracking number of the container.
UOM Shows the unit of measure.
Ship To Shows the name, address, and identifier of the of the company to
whom the order needs to be shipped.
Note: The Buyer ID attribute is the Data Universal Numbering
System (DUNS) number for the Sponsor that has been passed in the
order XML. If the Buyer ID is not passed in the order, the Sponsor's
DUNS number as entered in Sterling B2B Collaboration Network is
displayed in the order.
Ship From Shows the name, address, and identifier of the of the company from
which the order is shipped.
Note: The Supplier ID attribute is the Data Universal Numbering
System (DUNS) number for the Partner organization. The value for
Supplier ID is passed during the shipment and Invoice creation by
the Partner.
The following table describes the fields that make up the Line Items panel of the
Shipment Detail page.
Field Description
# Shows the sequence number of the line.
Order # Shows the order number.
Click the Order Number hyperlink to view the Order Detail page
that displays the order details.
Chapter 28. View the Details of a Shipment (Partner Task) 111

Field Description
Order Date Shows the date on which the order was placed.
Line Identifier Shows the identifier of the line.
Item Shows the identifier of the item. If you have configured an item rule
such that your Item ID is same as your customer's Item ID, the
hover help containing item attributes is displayed when you place
your mouse over the icon adjacent to this field. This hover help is
displayed only if your Sponsor has configured these attributes to
display on Supplier Portal when configuring the corresponding
template.
Sterling B2B Collaboration Network supports attributes Color, Size,
Product, Sub Product, and General Description for the item in
addition to the Item ID and Item Description.
Order Ship Date /
Shipping window
Shows the order ship date.
In case the shipment contains only shipping window orders then the
literal will be shown as shipping window.
If the shipment contains even one order which is not a shipping
window orders then the literal will be shown as order ship date.
Customer Item Shows the customer's item. If you have configured an item rule such
that your Item ID is different from your customer's Item ID, item
attributes are displayed in a hover help when you place your mouse
over the icon adjacent to this field. This hover help is displayed only
if your Sponsor has configured these attributes and Customer ID to
display on Supplier Portal when configuring the corresponding
template. If your Sponsor has not selected this configuration, the
hover help is not displayed. Sterling B2B Collaboration Network
supports attributes Color, Size, Product, Sub Product, and General
Description for the item in addition to the Item ID and Item
Description.
Ordered Qty. Shows the ordered quantity.
Shipped Qty. Shows the shipped quantity.
Note: The value in this field is zero, if the corresponding shipment
has been cancelled.
Qty. In Shipment Shows the quantity of the items that have been shipped.
UOM Shows the Unit of Measure.
Click to view the additional fields in the panel. Following are the
fields that are displayed:
vUPC Code - Shows the Universal Product Code.
vGTIN - Shows the Global Trade Item Number.
vProduct Class - Shows the product class of the item.
vRelease # - Shows the release number of the shipment.
vContract # - Shows the contract number of the shipment.
vUser-Defined Fields - Shows the user-defined fields added for a
Shipment at the Shipment Line level. The user-defined fields are
displayed only if your Sponsor has configured them to be
displayed on the Shipment Detail page.
112 Sterling Supplier Portal: Partner User Guide

Chapter 29. Resend a Shipment (Partner Task)
You can replace a shipment that has already been sent. When replacing the
shipment, you can modify all the fields except the shipment number.
About this task
You can replace a shipment if the following conditions are fulfilled:
vYour Sponsor has configured the community so that you are allowed to resend
the shipment.
vThe shipment has not been invoiced completely or partially.
Procedure
To resend shipments that are associated with an order, follow these steps.
1. From the menu bar, navigate to My Documents >Orders.
2. The Search Criteria - Find Order panel is displayed on the Find Order screen.
Enter the search criteria and click Search.
3. The results of the search are displayed in the Search List panel. Select the
check box for the appropriate order and click View Details. Alternately, click
the Order Number hyperlink to view the order details.
4. The Order Detail screen is displayed. Click View Shipments.
Note: In the Related Task, the View Shipments option is available only if your
Sponsor has included it as a part of the choreography for the community.
5. The Shipment Detail screen is displayed, containing the details of the shipment
associated with the order you specified. Click the Resend ASN related task.
6. The Resend Shipment screen is displayed. Enter the appropriate values in the
fields, and click Resend ASN.
What to do next
To resend a shipment directly, follow these steps:
1. From the menu bar, navigate to My Documents >Shipments.
2. The Search Criteria - Find Shipment panel is displayed on the Find Shipment
screen. Enter the search criteria and click Search.
3. The results of the search are displayed in the Search List panel on the Search
Criteria screen. From the list of shipments displayed, select the shipment that
you want to resend and click View Details. Alternatively, you can also click the
corresponding Shipment Number hyperlink.
4. The Shipment Detail screen is displayed. Click the Resend ASN related task.
5. The Resend Shipment screen is displayed. Enter the appropriate values in the
fields, and click Resend ASN.
Notes:
vThe Shipment # field in the Shipping Information panel of the Resend
Shipment screen is a read-only field. You cannot edit the value in the field.
vYou cannot resend a shipment that has been canceled.
© Copyright IBM Corp. 2000, 2014 113
vYou cannot resend a shipment if the corresponding order has been invoiced
completely or partially.
vYou cannot send a shipment for route planning when resending the shipment if
it corresponds to an order that requires route planning.
vIf you have sent the earlier shipment for route planning, the Weight,Volume,
and SCAC fields are disabled on the Resend Shipment screen. The Generate
Carrier Label,Regenerate Carrier Label, and Reprint Carrier Label buttons are
also not displayed on the Resend Shipment screen.
vIf you want to reduce the shipped quantity for a shipment that has been packed
and sent, you must reduce the packed quantity before you reduce the shipped
quantity. To reduce the packed quantity, click Remove Containers in the
Containers panel of the Resend Shipment screen. Sterling Supplier Portal will
reset the packed quantity to zero. You can then reduce the shipped quantity and
click Pack Shipment in the Containers panel of the Resend Shipment screen.
vIf your sponsor did not make packing a mandatory task when it set up the
community, you will not be able to perform packing or generate container labels.
vYour sponsor can modify the community to which you belong. If the sponsor
changes the profile for the ship from location, you might not be able to resend a
shipment that you created before the sponsor updated the community. Instead,
you have to cancel the shipment and then send a new shipment.
114 Sterling Supplier Portal: Partner User Guide

Chapter 30. Cancel a Shipment (Partner Task)
About this task
You can cancel a shipment if it has not been invoiced, and send it again with a
new shipment number. A shipment can be cancelled only if this shipment belongs
to the community for which your Sponsor has allowed you to cancel a shipment.
To cancel shipments associated with an order, follow these steps.
Procedure
1. From the menu bar, navigate to My Documents >Orders.
2. The Search Criteria - Find Order panel is displayed in the Find Order screen.
Enter the search criteria and click Search.
3. The results of the search are displayed in the Search List panel. Select the
check box against the appropriate order and click View Details. Alternately,
click the Order Number hyperlink to view the order details.
4. The Order Detail screen is displayed. Click View Shipments.
Note: In the Related Task, the View Shipments option is available only if your
Sponsor has included it as a part of the choreography for the community.
5. The Shipment Detail screen is displayed, containing the details of the shipment
associated with the order you specified. Click the Cancel ASN related task.
6. A message asking for confirmation is displayed. Click OK to cancel the
shipment.
What to do next
To cancel the shipments directly:
1. From the menu bar, navigate to My Documents >Shipments.
2. The Search Criteria - Find Shipment panel is displayed in the Find Shipment
screen. Enter the search criteria and click Search.
3. The results of the search are displayed in the Search List panel in the Search
Criteria screen. From the list of shipments displayed, select the shipment that
you want to cancel and click View Details. Alternatively, you can also click the
corresponding Shipment Number hyperlink.
4. The Shipment Detail screen is displayed. Click Cancel ASN related task.
5. A message asking for confirmation is displayed. Click OK to cancel the
shipment.
Note:
vYou cannot resend a cancelled shipment. Instead, you will need to create a new
shipment.
vYou cannot cancel a shipment if the corresponding order has been invoiced
completely or partially.
vWhen a shipment is cancelled, the status of the shipment is Cancelled and the
status of the order goes back to the earlier status based on the choreography
selected for the community, by your Sponsor.
vWhen a shipment that was sent for route planning is cancelled, a request is sent
to your Sponsor to remove the shipment from the load planned for it.
© Copyright IBM Corp. 2000, 2014 115
vWhen a shipment that has already been packed and shipped is cancelled, the
containers are also deleted from the shipment.
116 Sterling Supplier Portal: Partner User Guide
Chapter 31. Invoices
Send an Invoice for an Order (Partner Task)
You can send an invoice for an order to your sponsor. This feature is available if
your Sponsor selected Invoices in the choreography for your community.
About this task
This topic describes the default layout of the Create Invoice and Invoice Detail
pages:
vThe Sponsor might have created the invoice layout to hide, disable, or change
the order of some of the fields.
vThe Sponsor selects which fields are required.
The following rules apply to sending an invoice for an order:
vThe Invoice PO task is only available as a Related Task if the choreography of
the community includes Invoices.
vThe Invoice PO task is not available until the order has been shipped (either
partially or completely).
Tip: If you know the Sponsor's Purchase Order number, you can send the invoice
for the order directly from the Overview panel of the Dashboard.
Procedure
To send the invoice for an order to a Sponsor, follow these steps:
1. From the menu bar, click My Documents >Orders. The Find Order page
opens.
2. In the Search Criteria - Find Order panel, enter the Order # you want to search
for. You can also select one of the following options:
vis: The application searches for the exact order number.
vstarts with: The application searches for order numbers that start with the
specified value.
3. Enter the search criteria and click Search. The Search List panel is displayed
with the list of orders.
4. Select the order and click View Details. You can also click the Order Number
hyperlink. The Order Detail page is displayed.
5. Click Invoice PO. The Create Invoice page is displayed and shows the order
lines that have been shipped.
6. Enter the appropriate values in the fields and click Send Invoice to send the
invoice to the Sponsor.
The following table describes the fields in the Invoice Header panel on the
Create Invoice page:
Action Description
View Payment
Terms
Opens the Payment Terms page, which displays the payment terms
for the order.
© Copyright IBM Corp. 2000, 2014 117
Action Description
Notes Opens a Sterling as a Service Applications pop-up window, which
displays the notes that were added at the header level of the
corresponding PO.
In the Notes panel, the icon indicates notes that were added by
the Sponsor at the header level of the PO.
The icon indicates notes that were added by the Partner at the
header level of the PO.
The Sponsor can configure the application to copy the notes from
the PO to the invoice. Notes that the Sponsor and Partner added to
the PO are displayed in the Notes panel.
Field Description
Invoice # Enter the invoice number. This field is required.
Click the icon to open the Sterling as a Service Applications
pop-up window, which displays the notes that were added at the
header level of the corresponding PO.
Invoice Date Enter the date of the invoice. You can also click to select the date.
Order # Shows the order number. Click the Order Number hyperlink to view
the Order Detail page, which displays the details for the selected
order.
Order Date Shows the date the order was created.
Invoice Type Select the type of invoice.
Pay by Date Enter the date by which the Sponsor has to make the payment.
You can also click to select the date.
If payment terms for the order exist, Sterling Supplier Portal
automatically calculates and displays the Pay By Date.
Tax Exempt Shows whether the order is exempt from taxes.
Buyer Tax ID Shows the Tax identifier of the Sponsor (Buyer). By default, the
Buyer Tax ID is submitted in the order.
You can modify this value if your Sponsor configured the Buyer Tax
ID as an editable value for the community.
Supplier Tax ID Shows the Tax identifier of the Partner (Supplier). When you send
an invoice for the first time, you must enter the Supplier Tax ID.
By default, subsequent invoices use the Supplier Tax ID from the
first invoice.
Release # Shows the release number of the order.
Community Shows the community that is associated with the Purchase Order.
Click the Community hyperlink to view the business rules that the
Sponsor defined for the community.
Customer Shows the name of the customer. Click the Customer hyperlink to
view information about this organization.
118 Sterling Supplier Portal: Partner User Guide

Action Description
Header Charge Shows the total amount of the invoice, in the currency that was
specified in the order.
Click the value of the header charge to open the Charges page,
which displays the charge name and value.
If the order status is Partially Invoiced, the header-level charges are
not included in the invoice that is created for the order.
The following table describes the fields in the Remit To panel on the Invoice
Detail page:
Field Description
Company Enter the name of the company that will be paid for the invoice.
Supplier ID Enter the Supplier ID of the company that will be paid for the
invoice.
First Name Enter the given name (first name) of the contact person.
Last Name Enter the family name (last name) of the contact person.
Address Line 1 Enter the first line of the company address.
Address Line 2 Enter the second address line, if applicable.
City Enter the city of the company office.
State Enter the state or province of the company office.
Zip Enter the postal code of the company office.
Country Enter the country or region of the company office.
The following table describes the fields in the Bill To panel on the Invoice
Detail page:
Field Description
Company Enter the name of the Sponsor company that will be billed for the
invoice.
Buyer ID Enter the Buyer ID of the company that will be billed for the
invoice.
First Name Enter the given name (first name) of the contact person.
Last Name Enter the family name (last name) of the contact person.
Address Line 1 Enter the first line of the company address.
Address Line 2 Enter the second address line, if applicable.
City Enter the city of the company office.
State Enter the state or province of the company office.
Zip Enter the postal code of the company office.
Country Enter the country or region of the company office.
The following table describes the fields and actions in the Line Items panel on
the Invoice Detail page:
Action Description
Remove Lines Select the order line that you want to delete and click Remove
Lines.
Chapter 31. Invoices 119

Action Description
Notes Opens a Sterling as a Service Applications pop-up window, which
displays the notes that were added at the line level of the
corresponding PO.
You can also click the icon for an Order Line to view these
notes.
In the Notes panel, the icon indicates notes that were added by
the Sponsor at the line level of the PO.
The icon indicates notes that were added by the Partner at the
line level of the PO.
The Sponsor can configure the application to copy the notes from
the PO to the invoice. Notes that the Sponsor and Partner added to
the PO are displayed in the Notes panel.
Field Description
Line Identifier Shows the line item identifier.
Item Shows the name of the item.
If you have configured an item rule to make your Item ID the same
as your customer's Item ID, hover help is displayed when you place
your mouse over the icon for this field. The hover help displays the
item attributes if your Sponsor has configured the template to
display these attributes.
Examples of these attributes are Color, Size, Product, Sub Product,
General Description, Item ID, and Item Description.
Ordered Qty. Shows the ordered quantity of the item.
Shipped Qty. Shows the quantity of the items that have shipped.
Invoiced Qty. Shows the quantity of the items that were billed in an invoice.
Qty. in Invoice Enter the total quantity of the items that will be included in an
invoice.
UOM Shows the unit of measurement for the quantity.
Unit Price Shows the unit price of the item, in the currency that was specified
in the order.
If you changed the unit price of the item when you acknowledged
the order, the acknowledged price is displayed.
Tax Name Select the tax you want to apply to this line item.
When you add a tax to an invoice line, the tax name is required.
You can only edit the tax name from the Line Items panel if a single
tax is assigned to this line.
To add multiple taxes, click the Add/Copy Taxes hyperlink to open
the Sterling as a Service Applications pop-up window. You can
define additional tax entries.
120 Sterling Supplier Portal: Partner User Guide

Action Description
Tax Jurisdiction Enter the tax jurisdiction. You can also use this field to display the
Tax Law Reference.
On the Line Items panel, you can select a new value if there is a
single tax for this line.
If you enter more than 30 characters, the Tax Jurisdiction field in the
Line items panel will not display the entire entry. You can click the
Tax Jurisdiction field and use the arrow keys on your keyboard to
scroll through all the characters in the entry. You can also click the
Add/Copy Taxes hyperlink to view the tax jurisdiction.
Tax % Enter the percentage of the tax.
When you add a tax to an invoice line, the percentage is required.
You can only edit the tax percentage from the Line Items panel if a
single tax is assigned to this line.
If multiple taxes are assigned to this line, click the Add/Copy Taxes
hyperlink to open the Sterling as a Service Applications pop-up
window. You can delete the existing tax and add it again with a new
tax percentage.
Line Charges Shows the charge for the order line, in the currency that was
specified in the order. Click the value of the line charge to open the
Charges page, which displays the charge name and its value.
If the order line status is Partially Invoiced, the line-level charges are
not included for the invoice that is created for the order.
Line Total Shows the total amount of the order line, in the currency that was
specified in the order.
If you entered a different price when you acknowledged the order,
the line total is calculated as the sum of (invoiced quantity x
acknowledged price) + tax amount for this line.
Click to view the additional fields in the Line Items panel:
Customer Item
Shows the name of the item as known to the customer.
If you have configured an item rule so that your Item ID is
different from your customer's Item ID, hover help is
displayed when you place your mouse over the icon for
this field. The hover help displays the item attributes if
your Sponsor has configured the template to display these
attributes and the Customer ID.
Examples of these attributes are Color, Size, Product, Sub
Product, General Description, Item ID, and Item
Description.
UPC Code
Shows the Universal Product Code of the item.
GTIN
Shows the Global Trade Item Number of the item.
Product Class
Shows the product class of the item.
Chapter 31. Invoices 121
The following table describes the fields and actions in the Taxes panel on the
Invoice Detail page:
Action Description
Add/Copy Row Adds a new row:
vTo add rows, enter the number of rows in the Add/Copy field and
click .
vTo copy a row, select the line that you want to copy and click .
vTo copy multiple records, select the lines that you want to copy,
enter the number of rows in the Add/Copy field, and click .
Field Description
Tax Name Select the name of the tax.
Tax % Enter the tax percentage.
Category Select the tax category.
If the Category is not displayed, then it is no longer supported for
this community.
Tax Jurisdiction Enter the tax jurisdiction. You can also use this field to display the
Tax Law Reference.
Amount Enter the total tax amount, in the currency that was specified in the
order.
The following table describes the fields and actions in the Charges and
Allowances panel on the Invoice Detail page:
Action Description
Add/Copy Row Adds a new row:
vTo add rows, enter the number of rows in the Add/Copy field and
click .
vTo copy a row, select the line that you want to copy and click .
vTo copy multiple records, select the lines that you want to copy,
enter the quantity in the Add/Copy field, and click .
Field Description
Charge Name Select the charge. The charge description is displayed in parentheses.
Reason Code Enter the reason code for the charge.
Category Select the charge category.
Amount Enter the total amount of the charges, in the currency that was
specified in the order.
The following table describes the fields and the action in the Invoice Totals
panel on the Invoice Detail page:
Action Description
Calculate Total Click Calculate Total to recalculate the total amount if any changes
were made to the Total Tax or Terms Discount fields.
Field Description
Item Invoice Total Shows the item invoice total.
Total Supplier
Charges
Shows the total amount that your organization is charging to the
Sponsor.
122 Sterling Supplier Portal: Partner User Guide

Action Description
Total Charges Shows the total charges.
Total Tax Shows the total tax amount.
Terms Discount Shows the terms of the discount.
Total Amount Shows the total amount of the order.
If you entered a different price when you acknowledged the order,
the total amount is calculated as the sum of (invoiced quantity x
acknowledged price) for all the lines.
Adding Multiple Taxes to an Invoice Line
You can assign multiple taxes to an invoice line. This feature is available if your
Sponsor selected Invoices in the choreography for your community.
About this task
This topic describes the default layout of the Create Invoice page:
vThe Sponsor might have created the invoice layout to hide, disable, or change
the order of some of the fields.
vThe Sponsor selects which fields are required.
The following rules apply to adding multiple taxes to an invoice line:
vThe Invoice PO task is only available as a Related Task if the choreography of
the community includes Invoices.
vThe Invoice PO task is not available until the order has been shipped (either
partially or completely). This rule applies when the choreography of the
community includes Shipments.
vThe Create Invoice page only displays the order lines that have been shipped.
This rule applies when the choreography of the community includes Shipments.
Procedure
To add multiple taxes to an invoice line, follow these steps:
1. From the menu bar, click My Documents >Orders. The Search Criteria - Find
Order panel is displayed on the Find Order page.
2. Enter the search criteria and click Search. The Search List panel is displayed
with the list of orders.
3. Select the order and click View Details. You can also click the corresponding
Order Number hyperlink.
4. On the Order Detail page, click Invoice PO. The Create Invoice page is
displayed.
5. Click the Add/Copy Taxes hyperlink for the invoice line where you want to
add additional taxes. The Sterling as a Service Applications pop-up window is
displayed.
The following table describes the fields and the action in the Taxes panel in the
Sterling as a Service Applications pop-up window.
Action Description
Chapter 31. Invoices 123

Click this icon to delete the corresponding tax. You have the
following options:
vClick OK to delete this tax from all invoice lines that contain this
tax.
vClick Cancel to only delete this tax from the corresponding
invoice line.
Note: You cannot cancel this pop-up window without deleting a tax.
To exit this pop-up window, you must click OK,Cancel,orthe
Close (X) icon in the upper right corner of the pop-up window.
However, if you click the Close icon, the tax is still deleted from the
corresponding invoice line.
Field Description
Tax Name Shows the type of tax.
Tax Jurisdiction Shows the tax jurisdiction. You can also use this field to display the
Tax Law Reference.
Tax % Shows the percentage of the tax.
Amount Shows the total amount of tax on the item, in the currency specified
in the order.
The following table describes the fields and the action in the Enter Tax panel in
the Sterling as a Service Applications pop-up window.
Action Description
Add Click Add to define the tax for the line items. When you are done
defining the tax, you have the following options:
OK
Applies the tax to all invoice lines in the invoice.
If you add a new tax and other invoice lines have a tax
with the same name, Sterling Supplier Portal replaces the
tax jurisdiction and tax percentage in the other invoice lines
with the values from the new tax.
Cancel
Only applies this tax to the corresponding invoice line.
Note: You cannot cancel this pop-up window without adding a tax.
To exit this pop-up window, you must click OK,Cancel,orthe
Close (X) icon in the upper right corner of the pop-up window.
However, if you click the Close icon, the tax is still added to the
corresponding invoice line.
After you add a tax, you cannot modify the values. You must delete
the tax and add it again with the new values.
Tax Name Select the tax you want to apply to this line item. The tax name is
required.
You cannot add the same tax more than once to an invoice line.
After you select a tax, the name no longer appears in the Tax Name
list.
124 Sterling Supplier Portal: Partner User Guide
Action Description
Tax Jurisdiction Enter the tax jurisdiction. You can also use this field to display the
Tax Law Reference.
If you enter more than 30 characters, the Tax Jurisdiction field will
not display the entire entry. You can click the Tax Jurisdiction field
and use the arrow keys on your keyboard to scroll through all the
characters in the entry. You can also click the Add/Copy Taxes
hyperlink to view the tax jurisdiction.
Tax % Enter the percentage of the tax. The percentage is required.
Send an Invoice for a Shipment (Partner Task)
You can send an invoice for a shipment to your sponsor. This feature is available if
your Sponsor selected Invoices in the choreography for your community.
About this task
This topic describes the default layout of the Create Invoice page:
vThe Sponsor might have created the invoice layout to hide, disable, or change
the order of some of the fields.
vThe Sponsor selects which fields are required.
Tip: If you know the Sponsor's Purchase Order number, you can submit an invoice
for a shipment directly from the Overview panel of the Dashboard.
Procedure
To send an invoice for a shipment, follow these steps:
1. From the menu bar, click My Documents >Shipments. The Find Shipment
page opens.
2. In the Search Criteria - Find Shipment panel, enter the search criteria and click
Search. The Search List panel is displayed with the list of shipments.
3. Select the shipment and click View Details. You can also click the Shipment
Number hyperlink. The Shipment Detail page is displayed.
4. Click Create Invoice. The page that opens depends on whether the shipment
contains more than one eligible order for the invoice:
Single Order
If the shipment contains only one eligible order for an invoice, the
Create Invoice page opens.
Multiple Orders
If the business rule Invoice should contain lines only from single
order is selected, the Select an Order to be Invoiced page opens. This
page lists the orders for which you can submit an invoice.
For each order, the Select an Order to be Invoiced page displays the
following information:
Order #
Shows the Customer PO number.
Order Ship Date or Shipping Window
Chapter 31. Invoices 125
Shows the expected ship date of the order.
If the shipment only contains shipping window orders, the field
is called Shipping Window.
If the shipment contains at least one order that is not a
shipping window order, the field is called Order Ship Date.
Status
Shows the Order Status.
Select one of the orders in the list to open the Create Invoice page. The
Create Invoice page displays the lines from the order you selected.
5. Define the invoice settings on the Create Invoice page.
The following table describes the fields in the Invoice Header panel on the
Create Invoice page:
Action Description
View Payment
Terms
Opens the Payment Terms page, which displays the payment terms
for the orders in the shipment.
Notes Opens a Sterling as a Service Applications pop-up window, which
displays the notes that were added at the header level of the
corresponding PO.
In the Notes panel, the icon indicates notes that were added by
the Sponsor at the header level of the PO.
The icon indicates notes that were added by the Partner at the
header level of the PO.
The Sponsor can configure the application to copy the notes from
the PO to the invoice. Notes that the Sponsor and Partner added to
the PO are displayed in the Notes panel.
Field Description
Invoice # Enter the invoice number. This field is required.
Click the icon to open the Sterling as a Service Applications
pop-up window, which displays the notes that were added at the
header level of the corresponding PO.
Invoice Date Enter the date of the invoice. You can also click to select the date.
Invoice Type Select the type of invoice.
Pay by Date Enter the date by which the Sponsor has to make the payment.
You can also click to select the date.
If payment terms for the order exist, Sterling Supplier Portal
automatically calculates and displays the Pay by Date.
Tax Exempt Shows whether the order is exempt from taxes.
Buyer Tax ID Shows the Tax identifier of the Sponsor (Buyer). By default, the
Buyer Tax ID is submitted in the order.
You can modify this value if your Sponsor configured the Buyer Tax
ID as an editable value for the community.
126 Sterling Supplier Portal: Partner User Guide
Supplier Tax ID Shows the Tax identifier of the Partner (Supplier). When you send
an invoice for the first time, you must enter the Supplier Tax ID.
By default, subsequent invoices use the Supplier Tax ID from the
first invoice.
Release # Shows the release number of the order.
Community Shows the community that is associated with the Purchase Order.
Click the Community hyperlink to view the business rules that the
Sponsor defined for the community.
Customer Shows the name of the customer. Click the Customer hyperlink to
view information about this organization.
Header Charge Shows the total amount of the invoice, in the currency that was
specified in the order.
Click the value of the header charge to open the Charges page,
which displays the charge name and value.
The following table describes the fields and the action in the Shipment
Information panel on the Create Invoice page:
Action Description
Shipment Address Click Shipment Address to view the address details for the Ship To
and Ship From locations.
Field Description
Shipment # Shows the shipment number. Click the Shipment Number hyperlink
to open the Shipment Detail page, which displays details about the
shipment.
Shipment On Shows the date the shipment is scheduled to depart after the pickup.
Pro # Shows the Progressive (PRO) number of the shipment.
Transportation
Method
Shows the transportation mode, such as Truckload or Rail.
SCAC Enter the Standard Carrier Alpha Code (SCAC), which is a unique
code used to identify transportation companies.
Carrier Service Code Shows the carrier service code.
Routing Shows the mode of routing.
The following table describes the fields and the action in the Remit To panel on
the Create Invoice page:
Field Description
Company Enter the name of the company that will be paid for the invoice.
Supplier ID Enter the Supplier ID of the company that will be paid for the
invoice.
First Name Enter the given name (first name) of the contact person.
Last Name Enter the family name (last name) of the contact person.
Address Line 1 Enter the first line of the company address.
Address Line 2 Enter the second address line, if applicable.
City Enter the city of the company office.
State Enter the state or province of the company office.
Chapter 31. Invoices 127
Field Description
Zip Enter the postal code of the company office.
Country Enter the country or region of the company office.
The following table describes the fields and the action in the Bill To panel on
the Create Invoice page:
Field Description
Company Enter the name of the Sponsor company that will be billed for the
invoice.
Buyer ID Enter the Buyer ID of the company that will be billed for the
invoice.
First Name Enter the given name (first name) of the contact person.
Last Name Enter the family name (last name) of the contact person.
Address Line 1 Enter the first line of the company address.
Address Line 2 Enter the second address line, if applicable.
City Enter the city of the company office.
State Enter the state or province of the company office.
Zip Enter the postal code of the company office.
Country Enter the country or region of the company office.
The following table describes the fields and the action in the Line Items panel
on the Create Invoice page:
Action Description
Remove Lines Select the order line that you want to delete and click Remove
Lines.
Notes Opens a Sterling as a Service Applications pop-up window, which
displays the notes that were added at the line level of the
corresponding PO.
You can also click the icon for an Order Line to view these
notes.
In the Notes panel, the icon indicates notes that were added by
the Sponsor at the line level of the PO.
The icon indicates notes that were added by the Partner at the
line level of the PO.
The Sponsor can configure the application to copy the notes from
the PO to the invoice. Notes that the Sponsor and Partner added to
the PO are displayed in the Notes panel.
Field Description
Line Identifier Shows the line item identifier.
Order # Shows the order number. Click the Order Number hyperlink to
open the Order Detail page, which displays information about the
order.
128 Sterling Supplier Portal: Partner User Guide

Item Shows the name of the item.
If you have configured an item rule to make your Item ID the same
as your customer's Item ID, hover help is displayed when you place
your mouse over the icon for this field. The hover help displays the
item attributes if your Sponsor has configured the template to
display these attributes.
Examples of these attributes are Color, Size, Product, Sub Product,
General Description, Item ID, and Item Description.
Ordered Qty. Shows the ordered quantity of the item.
Shipped Qty. Shows the quantity of the items that have shipped.
Invoiced Qty. Shows the quantity of the items that were billed in an invoice.
Qty. in Invoice Enter the total quantity of the items that will be included in an
invoice.
UOM Shows the unit of measurement for the quantity.
Tax Name Select the tax you want to apply to this line item.
When you add a tax to an invoice line, the tax name is required.
You can only edit the tax name from the Line Items panel if a single
tax is assigned to this line.
If multiple taxes have been applied to this line, click the Add/Copy
Taxes hyperlink to open the Sterling as a Service Applications
pop-up window. You can delete the corresponding tax and add it
again with a new name.
Tax Jurisdiction Enter the tax jurisdiction. You can also use this field to display the
Tax Law Reference.
On the Line Items panel, you can select a new value if there is a
single tax for this line.
If multiple taxes have been applied to this line, click the Add/Copy
Taxes hyperlink to open the Sterling as a Service Applications
pop-up window. You can delete the corresponding tax and add it
again with a new tax jurisdiction.
If you enter more than 30 characters, the Tax Jurisdiction field in the
Line items panel will not display the entire entry. You can click the
Tax Jurisdiction field and use the arrow keys on your keyboard to
scroll through all the characters in the entry. You can also click the
Add/Copy Taxes hyperlink to view the tax jurisdiction.
Tax % Enter the percentage of the tax.
When you add a tax to an invoice line, the percentage is required.
You can only edit the tax percentage from the Line Items panel if a
single tax is assigned to this line.
If multiple taxes are assigned to this line, click the Add/Copy Taxes
hyperlink to open the Sterling as a Service Applications pop-up
window. You can delete the existing tax and add it again with a new
tax percentage.
Line Charges Shows the charge for the order line, in the currency that was
specified in the order. Click the value of the line charge to open the
Charges page, which displays the charge name and its value.
Chapter 31. Invoices 129
Unit Price Shows the unit price of the item, in the currency specified in the
order.
If you entered a different price when you acknowledged the order,
the acknowledged price is displayed as the unit price.
Click to view the additional fields in the Line Items panel:
Line Total
Shows the total amount of the order line, in the currency
that was specified in the order.
If you entered a different price when you acknowledged the
order, the line total is calculated as the sum of (invoiced
quantity x acknowledged price) + tax amount for this line.
Customer Item
Shows the name of the item as known to the customer.
If you have configured an item rule so that your Item ID is
different from your customer's Item ID, hover help is
displayed when you place your mouse over the icon for
this field. The hover help displays the item attributes if
your Sponsor has configured the template to display these
attributes and the Customer ID.
Examples of these attributes are Color, Size, Product, Sub
Product, General Description, Item ID, and Item
Description.
UPC Code
Shows the Universal Product Code of the item.
GTIN
Shows the Global Trade Item Number of the item.
Product Class
Shows the product class of the item.
The following table describes the fields and the action in the Taxes panel on the
Create Invoice page:
Action Description
Add/Copy Row Adds a new row:
vTo add rows, enter the number of rows in the Add/Copy field and
click .
vTo copy a row, select the line that you want to copy and click .
vTo copy multiple records, select the lines that you want to copy,
enter the number of rows in the Add/Copy field, and click .
Field Description
Tax Name Select the name of the tax.
Tax % Enter the tax percentage.
Category Select the tax category.
If the Category is not displayed, then it is no longer supported for
this community.
130 Sterling Supplier Portal: Partner User Guide

Action Description
Tax Jurisdiction Enter the tax jurisdiction. You can also use this field to display the
Tax Law Reference.
Amount Enter the total tax amount, in the currency that was specified in the
order.
The following table describes the fields and the action in the Charges and
Allowances panel on the Create Invoice page:
Action Description
Add/Copy Row Adds a new row:
vTo add rows, enter the number of rows in the Add/Copy field and
click .
vTo copy a row, select the line that you want to copy and click .
vTo copy multiple records, select the lines that you want to copy,
enter the quantity in the Add/Copy field, and click .
Field Description
Charge Name Select the charge. The charge description is displayed in parentheses.
Reason Code Enter the reason code for the charge.
Category Select the charge category.
Amount Enter the total amount of the charges, in the currency that was
specified in the order.
The following table describes the fields and the action in the Invoice Totals
panel on the Create Invoice page:
Action Description
Calculate Total Click Calculate Total to recalculate the total amount if any changes
were made to the Total Tax or Terms Discount fields.
Field Description
Item Invoice Total Shows the item invoice total.
Total Supplier
Charges
Shows the total amount that your organization is charging to the
Sponsor.
Total Charges Shows the total charges.
Total Tax Shows the total tax amount.
Terms Discount Shows the terms of the discount.
Order Amount Shows the total amount of the order.
If you entered a different price when you acknowledged the order,
the total amount is calculated as the sum of (invoiced quantity x
acknowledged price) for all the lines.
6. When you are done defining the invoice settings, click Send Invoice to submit
the shipment invoice to the Sponsor
What to do next
If you try to submit an invoice for a shipment that contains multiple orders, you
might receive the following error:
Community is configured to accept single order invoice
Chapter 31. Invoices 131

If you receive this error, use the following workflow:
1. Delete all the orders except one from the shipment.
2. Submit an invoice for that order.
3. Create a separate invoice for each order, until you have submitted an invoice
for all the orders.
Adding Multiple Taxes to an Invoice Line in a Shipment
Invoice
You can assign multiple taxes to an invoice line in a shipment invoice. This feature
is available if your Sponsor selected Invoices in the choreography for your
community.
About this task
This topic describes the default layout of the Create Invoice page:
vThe Sponsor might have created the invoice layout to hide, disable, or change
the order of some of the fields.
vThe Sponsor selects which fields are required.
The Invoice PO task is only available as a Related Task if the choreography of the
community includes Invoices.
Procedure
To add multiple taxes to an invoice line, follow these steps:
1. From the menu bar, click My Documents >Shipments. The Search Criteria -
Find Shipment panel is displayed on the Find Shipment page.
2. Enter the search criteria and click Search. The Search List panel is displayed
with the list of shipments.
3. Select the shipment and click View Details. You can also click the
corresponding Shipment Number hyperlink.
4. On the Shipment Detail page, click Create Invoice. The Create Invoice page is
displayed.
5. Click the Add/Copy Taxes hyperlink for the invoice line where you want to
add additional taxes. The Sterling as a Service Applications pop-up window is
displayed.
The following table describes the fields and the action in the Taxes panel in the
Sterling as a Service Applications pop-up window.
Action Description
Click this icon to delete the corresponding tax. You have the
following options:
vClick OK to delete this tax from all invoice lines that contain this
tax.
vClick Cancel to only delete this tax from the corresponding
invoice line.
Note: You cannot cancel this pop-up window without deleting a tax.
To exit this pop-up window, you must click OK,Cancel,orthe
Close (X) icon in the upper right corner of the pop-up window.
However, if you click the Close icon, the tax is still deleted from the
corresponding invoice line.
132 Sterling Supplier Portal: Partner User Guide
Field Description
Tax Name Shows the type of tax.
Tax Jurisdiction Shows the tax jurisdiction. You can also use this field to display the
Tax Law Reference.
Tax % Shows the percentage of the tax.
Amount Shows the total amount of tax on the item, in the currency specified
in the order.
The following table describes the fields and the action in the Enter Tax panel in
the Sterling as a Service Applications pop-up window.
Action Description
Add Click Add to define the tax for the line items. When you are done
defining the tax, you have the following options:
OK
Applies the tax to all invoice lines in the invoice.
If you add a new tax and other invoice lines have a tax
with the same name, Sterling Supplier Portal replaces the
tax jurisdiction and tax percentage in the other invoice lines
with the values from the new tax.
Cancel
Only applies this tax to the corresponding invoice line.
Note: You cannot cancel this pop-up window without adding a tax.
To exit this pop-up window, you must click OK,Cancel,orthe
Close (X) icon in the upper right corner of the pop-up window.
However, if you click the Close icon, the tax is still added to the
corresponding invoice line.
After you add a tax, you cannot modify the values. You must delete
the tax and add it again with the new values.
Tax Name Select the tax you want to apply to this line item. The tax name is
required.
You cannot add the same tax more than once to an invoice line.
After you select a tax, the name no longer appears in the Tax Name
list.
Tax Jurisdiction Enter the tax jurisdiction. You can also use this field to display the
Tax Law Reference.
If you enter more than 30 characters, the Tax Jurisdiction field will
not display the entire entry. You can click the Tax Jurisdiction field
and use the arrow keys on your keyboard to scroll through all the
characters in the entry. You can also click the Add/Copy Taxes
hyperlink to view the tax jurisdiction.
Tax % Enter the percentage of the tax. The percentage is required.
View the Details of an Invoice (Partner Task)
You can search for invoices and view the invoice details. You can only select
Invoice as a Related Task if your Sponsor selected the Invoice in the choreography
for your community.
Chapter 31. Invoices 133

About this task
If you are an EDI-capable Partner and are registered to a Chargeback Only
community, you can only view the Invoice details. You cannot perform any of the
related invoicing tasks.
Procedure
To view the details of an invoice that is associated with an order, follow these
steps:
1. From the menu bar, click My Documents >Orders.
2. The Search Criteria - Find Order panel is displayed on the Find Order page.
Enter the order # you want to search for. You can also select one of the
following options:
vis: The application searches for the exact order number.
vstarts with: The application searches for order numbers that start with the
specified value.
3. Enter the search criteria and click Search.
4. The results of the search are displayed in the Search List panel. Select an order
and click View Details.
5. The Order Detail page is displayed. Click View Invoices. The Invoice Detail
page is displayed, along with details of the invoice associated with the order
that you specified.
What to do next
To view the details of an invoice associated with a particular shipment:
1. From the menu bar, click My Documents >Shipments.
2. The Search Criteria - Find Shipment panel is displayed on the Find Shipment
page. Enter the search criteria and click Search.
3. The Search List panel is displayed with the list of shipments. Select the check
box against the shipment for which you want to view the invoice, and click
View Details. Alternatively, you can click the corresponding Shipment
Number hyperlink.
4. The Shipment Detail page is displayed. Click View Invoices. The Invoice Detail
page is displayed.
You can also view the invoices directly:
1. From the menu bar, navigate to My Documents >Invoices.
2. The Search Criteria - Find Invoice panel is displayed on the Find Invoice page.
Enter the search criteria and click Search.
3. The results of the search are displayed in the Search List panel. From the list of
invoices displayed, select the invoice whose details you want to view and click
View Details. Alternatively, you can also click the Invoice Number hyperlink.
The Invoice Detail page is displayed.
The following table describes the fields and actions that make up the Search
Criteria - Find Invoice panel on the Find Invoice page.
Action Description
Favorite Searches Click this to search for a saved search that is to be executed.
Save Search Click this to save the current search as a favorite search.
134 Sterling Supplier Portal: Partner User Guide
Action Description
Delete Current
Search
This icon is enabled when you are viewing the current saved search.
Click this to delete the current saved search criteria.
Field Description
Invoice # Enter the invoice number to be included in the search.
Order # Enter the order number you want to search for. You can also select
one of the following options:
vis: The application searches for the exact order number.
vstarts with: The application searches for order numbers that start
with the specified value.
Invoice Date Enter the invoice date range to be included in the search.
You can also click to select the date range.
Payment Due Date Enter the payment due date range to be included in the search.
You can also click to select the date range.
Community Enter the community to be included in the search.
You can also click to search the specific community.
Shipment # Enter the shipment number to be included in the search.
User-Defined Fields Enter the user-defined fields (UDF) you want to search for. You can
also select one of the following options:
vis: The application searches for the exact user-defined field value.
vstarts with: The application searches for the user-defined fields
that start with the specified value.
If the Partner belongs to more than one community, you must select
aCommunity to view the user-defined fields on the Search Criteria
page.
Sort Result by From the drop-down list, select the attribute by which the search
result should be sorted when displayed in the Search List panel.
If you select a value here, the search result in the Search List panel
will be sorted in ascending order. To sort the result in descending
order, select the Sort in Descending Order check box.
If you do not select a value here, the search result in the Search List
panel will not be sorted.
Sort in Descending
Order
Select this check box to sort the search result in the Search List panel
in descending order.
Max Records Shows the maximum number of invoices that will be displayed in
the Search List panel. You can enter the maximum number of
invoices to be displayed as search results.
The following table describes the fields that make up the Search List panel.
Action Description
View Details Click this to view the Invoice Detail page.
Field Description
Chapter 31. Invoices 135
Action Description
Invoice # Shows the invoice number.
Click the Invoice Number hyperlink to view the Invoice Detail page,
which displays the invoice details.
Order # Shows the order number.
Click the Order Number hyperlink to view the Order Detail page,
which displays the order details.
Shipment # Shows the shipment number.
Click the Shipment Number hyperlink to view the Shipment Detail
page, which displays the shipment details.
Customer Shows the customer name.
Click the Customer hyperlink to view the Customer Information
page, which displays the customer details.
Community Shows the community name.
Amount Shows the total amount in the currency specified in the order.
Invoice Date Shows the date on which the invoice was generated.
Payment Due Date Shows the date on which the payment is due to the Supplier.
Click to view the user-defined fields added for an Invoice. The
user-defined fields are displayed only if your Sponsor has
configured them to be displayed on the Invoice List page.
The following table describes the fields that make up the Invoice Header panel on
the Invoice Detail page.
Action Description
View Payment
Terms
Click this to view the Payment Terms page that displays the
payment terms for the orders in the invoice.
Field Description
Invoice # Shows the invoice number.
Invoice Date Shows the date and time on which the invoice was generated.
Order # Shows the order number.
Click the Order Number hyperlink to view the Order Detail page,
which displays the order details.
Order Date Shows the date on which the order was placed.
Invoice Type Shows the type of invoice.
Pay By Date Shows the date on which the payment to the Supplier is due.
Tax Exempt Shows whether this is exempt from tax or not.
Buyer Tax ID Shows the Tax identifier of the Sponsor (Buyer). The value for Buyer
Tax ID is passed in the order.
Supplier Tax ID Shows the Tax identifier of the Partner (Supplier). The value for
Supplier Tax ID is passed by the Partner when sending the Invoice.
Release # Shows the release number.
136 Sterling Supplier Portal: Partner User Guide
Action Description
Community Shows the community name.
Click the Community Name hyperlink to view the Community
Detail page, which displays the community details.
Customer Shows the customer name.
Click the Customer Name hyperlink to view the Customer Detail
page, which displays the customer details.
Header Charge Shows the total amount for the invoice in the currency specified in
the order. Click the value of the header charge to view the Charges
page, which displays the charge name and its value.
If the order status is partially invoiced, then the header level charges
are not included for the invoice being created for that order.
Remit To Shows the name, address, and identifier of the of the company to
which the shipment bill is remitted.
Bill To Shows the name, address, and identifier of the company to whom
the shipment bill is sent.
User-Defined Fields Shows the user-defined fields added for an Invoice at the Invoice
header level. The user-defined fields are displayed only if your
Sponsor has configured them to be displayed on the Invoice Detail
page.
The following table describes the fields that make up the Additional Information
panel on the Invoice Detail page.
Field Description
User-Defined Fields Shows the user-defined fields that are carried over from the
Shipment, Acknowledgement, and Order pages. The user-defined
fields are displayed only if your Sponsor has configured them to be
displayed on the Invoice Detail page.
Additional
Information
Click this hyperlink to view more user-defined fields.
The following table describes the fields that make up the Line Items panel on the
Invoice Detail page.
Field Description
Line Identifier Shows the line identifier of the item.
Item Shows the name of the item. If you have configured an item rule
such that your Item ID is same as your customer's Item ID, the
hover help containing item attributes is displayed when you place
your mouse over the icon adjacent to this field. This hover help is
displayed only if your Sponsor has configured these attributes to
display on Supplier Portal when configuring the corresponding
template.
Sterling Supplier Portal supports attributes Color, Size, Product, Sub
Product, and General Description for the item in addition to the Item
ID and Item Description.
Ordered Qty. Shows the ordered quantity.
Shipped Qty. Shows the shipped quantity.
Chapter 31. Invoices 137
Field Description
Invoiced Qty. Shows the invoiced quantity.
Qty. in Invoice Shows the quantity included in the invoice.
UOM Shows the unit of measure.
Unit Price Shows the unit price of each item in the currency specified in the
order. If you have changed the unit price of the item when
acknowledging the order, the acknowledged price is displayed in the
Unit Price field.
Line Charges Shows the amount for the order line in the currency specified in the
order. Click the value of the line charge to view the Charges page,
which displays the charge name and its value.
Note: If the order line status is partially invoiced, then the line level
absolute charges are not included for the invoice being created for
that order line.
Tax Amount Shows the amount of the line-level tax levied in the currency
specified in the order. Click the value of the tax amount to view the
Sterling as a Service Applications pop-up window, which displays
the various tax names, tax percentages, and tax amounts applied to
this invoice line.
Line Total Shows the total amount of the items in the currency specified in the
order. If you have entered a different price when acknowledging the
order, the line total is calculated as the sum of (invoiced quantity *
acknowledged price) for this line.
Customer Item Shows the item required by the customer. If you have configured an
item rule such that your Item ID is different from your customer's
Item ID, item attributes are displayed in a hover help when you
hover the mouse over the icon adjacent to this field. This hover help
is displayed only if your Sponsor has configured these attributes and
Customer ID to display on Supplier Portal when configuring the
corresponding template. If your Sponsor has not selected this
configuration, the hover help is not displayed. Sterling Supplier
Portal supports attributes Color, Size, Product, Sub Product, and
General Description for the item in addition to the Item ID and Item
Description.
Click to view the additional fields in the panel. The following
fields are displayed:
vUPC Code - Shows the Universal Product Code.
vGTIN - Shows the Global Trade Item Number.
vProduct Class - Shows the product class of the item.
vUser-Defined Fields - Shows the user-defined fields added for an
Invoice at the Invoice Line level. The user-defined fields are
displayed only if your Sponsor has configured them to be
displayed on the Invoice List page.
The following table describes the fields that make up the Taxes panel on the
Invoice Detail page.
Field Description
Tax Name Shows the type of tax.
Tax % Shows the percentage of the tax.
138 Sterling Supplier Portal: Partner User Guide
Field Description
Category Shows the category type.
This field is no longer supported and might not be displayed in this
panel.
Tax Jurisdiction Shows the tax jurisdiction. You can also use this field to display the
Tax Law Reference.
Amount Shows the total amount of tax on the list in the currency specified in
the order.
The following table describes the fields that make up the Charges and Allowances
panel on the Invoice Detail page.
Field Description
Charge Name Shows the charge name and its description. The description is
displayed along with the charge name in parentheses “()”.
Reason Code Shows the reason code.
Category Shows the category.
Amount Shows the amount in the currency specified in the order.
The following table describes the fields that make up the Invoice Totals panel on
the Invoice Detail page.
Field Description
Item Invoice Total Shows the total amount of the invoice items.
Total Supplier
Charges
Shows the total amount charged by the Supplier.
Total Charges Shows the total charges.
Total Tax Shows the total tax amount.
Terms Discount Shows the terms of discount.
Total Amount Shows the total amount of invoice, including the charges.
Note: If you have entered a different price when acknowledging the
order, the order amount is calculated as the sum of (invoiced
quantity * acknowledged price) for all the lines.
Chapter 31. Invoices 139
140 Sterling Supplier Portal: Partner User Guide

Chapter 32. Printing Forms and Labels
Generate and Print a Packing Slip (Partner Task)
About this task
Sterling Supplier Portal enables you to generate and print a Packing Slip that will
accompany the shipments when delivered directly to the consumer or to the retail
outlet. You can re-print a Packing Slip for a shipment as many times as needed.
You can generate and print a Packing Slip from the Create Shipment and Shipment
Detail screens.
To generate and print a Packing Slip from the Create Shipment screen, follow these
steps.
Procedure
1. From the menu bar, navigate to My Documents >Orders.
2. The Search Criteria - Find Order panel is displayed in the Find Order screen.
Enter the search criteria and click Search.
3. The results of the search are displayed in the Search List panel. From the list of
orders displayed, select the order whose details you want to view and click
View Details. Alternatively, you can click the corresponding Order Number
hyperlink.
4. The Order Detail screen is displayed. Click Ship PO.
Note: The Ship PO is available as a Related Task only if Advance Shipment
Notification (ASN) is a part of the choreography of the community to which
the Partners belongs.
5. The Create Shipment screen is displayed. Enter the required information and
then click Generate Packing Slip to generate and print a Packing Slip.
If you click Generate Packing Slip without saving the shipment, “Please save
the shipment as draft before generating Packing Slip" message is displayed.
After saving shipment as draft the Packing Slip is displayed in PDF format.
6. The Packing Slip is displayed as a PDF, which you can print using any
Windows printer.
What to do next
To generate and print a Packing Slip from the Shipment Detail screen:
1. From the menu bar, navigate to My Documents >Shipments.
2. The Search Criteria - Find Shipment panel is displayed in the Find Shipment
screen. Enter the search criteria and click Search.
3. The results of the search are displayed in the Search List panel. From the list of
shipments displayed, select the shipment whose details you want to view and
click View Details. Alternatively, you can click the corresponding Shipment
Number hyperlink.
4. The Shipment Detail screen is displayed. Enter the required information and
then click Generate Packing Slip to generate and print a Packing Slip.
© Copyright IBM Corp. 2000, 2014 141
5. The Packing Slip is displayed as a PDF, which you can print using any
Windows printer.
The following table describes the fields that make up the Packing Slip.
Field Description
Header Message Indicates the header information provided by the Sponsor. For
example, information such as the Sponsor's fax number and e-mail
address is displayed here.
Bill To Indicates the name and address of the organization or person to
whom the bill is sent.
Ship To Indicates the name and address of the organization or person to
whom the order is shipped.
Order # Indicates the Sales Order number.
Shipment # Indicates the shipment number.
Customer Order # Indicates the customer Purchase Order sent to you by the Sponsor.
Carrier Service Code Indicates the carrier service code.
Carrier Account # Indicates the mode of routing.
Item ID Indicates the identifier of each item in the shipment as specified by
the customer.
Item Description Indicates the description of the items as specified by the customer.
Order Qty Indicates the quantity of items ordered.
Ship Qty Indicates the quantity of items shipped.
UOM Indicates the unit of measure for the item.
Footer Message Indicates the footer information provided by the Sponsor. For
example, information about discounts or the return policy, if
applicable, may be displayed here.
Note: If order lines from different orders are added in one shipment, then Ship to,
Bill to, Order #, and Customer Order # of the first shipment line should be
displayed.
Generate a Tracking Number and Print a Carrier Label (Partner Task)
You can use Sterling Supplier Portal to generate a tracking number and print a
carrier label. The label will accompany the container in a shipment that is
delivered to the consumer or to the retail outlet.
About this task
You can generate a tracking number and print a carrier label only for domestic
U.S. shipments.
You can only generate a tracking number and print a carrier label if your Sponsor
has included the Advance Shipment Notice (ASN) as a part of the choreography.
The Sponsor also must have configured an ASN business rule to allow you to
generate a carrier label, and set up your account with IBM for carrier integration.
Sterling Supplier Portal supports carrier labels for Federal Express (FedEx), United
States Postal Service (USPS), and United Parcel Service (UPS).
142 Sterling Supplier Portal: Partner User Guide
For communities that allow you to generate tracking numbers and print carrier
labels, shipments can be created with only one container each.
Ensure that you have disabled the pop-up blockers in your web browser so that
the dialog box containing the carrier label is displayed. Acrobat Reader is also
needed to view the carrier label in PDF format.
Procedure
To generate a tracking number and print a carrier label for a shipment from the
Create Shipment page, follow these steps:
1. From the menu bar, click My Documents >Orders.
2. The Search Criteria - Find Order panel is displayed on the Find Order page.
Enter the Order # you want to search for. You can also select one of the
following options:
vis: The application searches for the exact order number.
vstarts with: The application searches for order numbers that start with the
specified value.
3. Enter the search criteria and click Search
4. The results of the search are displayed in the Search List panel. From the list of
orders displayed, select the order whose details you want to view and click
View Details. Alternatively, you can click the corresponding Order Number
hyperlink.
5. The Order Detail page is displayed. Click Ship PO.
Note: The Ship PO option is available as a Related Task only if Advance
Shipment Notification (ASN) is a part of the choreography of the community to
which the Partners belongs.
6. The Create Shipment page is displayed. Enter values in the following fields and
panels:
vIn the SCAC box, enter the Standard Carrier Alpha Code (SCAC), which is a
unique 2-4 letter code used to identify transportation companies. This must
be same as specified in the corresponding Purchase Order (PO).
vIn the Container panel, enter the dimensions of the container.
vIn the Ship To panel, enter the phone number.
7. Click Generate Carrier label to generate and print a carrier label. The shipment
is saved as draft and the File Download dialog box is displayed.
vTo view the carrier label in PDF format, click Open. The carrier label is
displayed in the print size of 4X6. You can print this carrier label using any
printer.
vTo save the carrier label, click Save.
Though the tracking number is generated, the Tracking # field is not
populated when you click Generate Carrier Label. To view the value in the
Tracking # field, you have to close the dialog box containing the message
that the carrier label is being generated.
What to do next
To generate a tracking number and print a carrier label for a shipment from the
Resend Shipment page:
1. From the menu bar, navigate to My Documents >Orders.
Chapter 32. Printing Forms and Labels 143

2. The Search Criteria - Find Order panel is displayed on the Find Order page.
Enter the Order # you want to search for. You can also select one of the
following options:
vis: The application searches for the exact order number.
vstarts with: The application searches for order numbers that start with the
specified value.
3. Enter the search criteria and click Search.
4. The results of the search are displayed in the Search List panel. Select the
check box against the appropriate order and click View Details. Alternately,
click the Order Number hyperlink to view the order details.
5. The Order Detail page is displayed. Click View Shipments.
Note: In the Related Task, the View Shipments option is available only if your
Sponsor has included it as a part of the choreography for the community.
6. The Shipment Detail page is displayed, containing the details of the shipment
associated with the order you specified. Click the Resend ASN related task.
7. The Resend Shipment page is displayed. Enter values in the following fields
and panels:
vIn the SCAC box, enter the Standard Carrier Alpha Code (SCAC), which is a
unique 2-4 letter code used to identify transportation companies. This must
be same as specified in the corresponding Purchase Order (PO).
vIn the Container panel, enter the dimensions of the container.
vIn the Ship To panel, enter the phone number.
8. Click Generate Carrier label to generate and print a carrier label. The shipment
is saved as draft and the File Download dialog box is displayed.
vTo view the carrier label in PDF format, click Open. The carrier label is
displayed in the print size of 4X6. You can print this carrier label using any
printer.
vTo save the carrier label, click Save.
Though the tracking number is generated, the Tracking # field is not
populated when you click Generate Carrier Label. To view the value in the
Tracking # field, you have to close the dialog box containing the message
that the carrier label is being generated.
9. Click Resend ASN.
Note: Ensure that you resend the shipment, otherwise your Sponsor will not have
the latest shipment with the generated tracking number.
Regenerate a Tracking Number and Print a Carrier Label
You can use Sterling Supplier Portal to regenerate a new tracking number and
print a carrier label for the container in a shipment after the carrier label has
already been printed once. The previous tracking number is voided by the system.
About this task
You can generate a tracking number and print a carrier label only for domestic
U.S. shipments.
You can only generate a tracking number and print a carrier label if your Sponsor
has included the Advance Shipment Notice (ASN) as a part of the choreography.
The Sponsor also must have configured an ASN business rule to allow you to
generate a carrier label, and set up your account with IBM for carrier integration.
144 Sterling Supplier Portal: Partner User Guide
Sterling Supplier Portal supports carrier labels for Federal Express (FedEx), United
States Postal Service (USPS), and United Parcel Service (UPS).
For communities that allow you to generate tracking numbers and print carrier
labels, shipments can be created with only one container each.
Ensure that you have disabled the pop-up blockers in your web browser so that
the dialog box containing the carrier label is displayed. Acrobat Reader is also
needed to view the carrier label in PDF format.
Procedure
To regenerate and print a carrier label from the Create Shipment page, follow these
steps:
1. In the Overview panel of the Home page, click the Number hyperlink adjacent
to Saved as Draft.
2. The Drafts page containing the saved documents is displayed. Click the
Subject hyperlink corresponding to the shipment for which you want to
regenerate a tracking number and print a carrier label.
3. The Create Shipment page is displayed. Enter values in the following fields and
panels:
vIn the SCAC box, enter the Standard Carrier Alpha Code (SCAC), which is a
unique 2-4 letter code used to identify transportation companies. This must
be same as specified in the corresponding Purchase Order (PO).
vIn the Container panel, enter the dimensions of the container.
vIn the Ship To panel, enter the phone number.
4. Click Regenerate Carrier label to regenerate and print a carrier label. The
shipment is saved as draft and the File Download dialog box is displayed.
vTo view the carrier label in PDF format, click Open. The carrier label is
displayed in the print size of 4X6. You can print this carrier label using any
printer.
vTo save the carrier label, click Save.
Though the tracking number is generated, the Tracking # field is not
populated when you click Regenerate Carrier Label. To view the value in
the Tracking # field, you have to close the dialog box containing the message
that the carrier label is being generated.
What to do next
To regenerate a tracking number and print a carrier label for a shipment from the
Resend Shipment page:
1. From the menu bar, navigate to My Documents >Orders.
2. The Search Criteria - Find Order panel is displayed on the Find Order page.
Enter the Order # you want to search for. You can also select one of the
following options:
vis: The application searches for the exact order number.
vstarts with: The application searches for order numbers that start with the
specified value.
3. Enter the search criteria and click Search.
4. The results of the search are displayed in the Search List panel. Select the
check box against the appropriate order and click View Details. Alternately,
click the Order Number hyperlink to view the order details.
Chapter 32. Printing Forms and Labels 145

5. The Order Detail page is displayed. Click View Shipments.
Note: In the Related Task, the View Shipments option is available only if your
Sponsor has included it as a part of the choreography for the community.
6. The Shipment Detail page is displayed, containing the details of the shipment
associated with the order you specified. Click the Resend ASN related task.
7. The Resend Shipment page is displayed. Enter values in the following fields
and panels:
vIn the SCAC box, enter the Standard Carrier Alpha Code (SCAC), which is a
unique 2-4 letter code used to identify transportation companies. This must
be same as specified in the corresponding PO.
vIn the Container panel, enter the dimensions of the container.
vIn the Ship To panel, enter the phone number.
8. Click Regenerate Carrier label to regenerate and print a carrier label. The
shipment is saved as draft and the File Download dialog box is displayed.
vTo view the carrier label in PDF format, click Open. The carrier label is
displayed in the print size of 4X6. You can print this carrier label using any
printer.
vTo save the carrier label, click Save.
Though the tracking number is generated, the Tracking # field is not
populated when you click Regenerate Carrier Label. To view the value in
the Tracking # field, you have to close the dialog box containing the message
that the carrier label is being generated.
9. Click Resend ASN.
Note: Ensure that you resend the shipment, otherwise your Sponsor will not have
the latest shipment with the newly generated tracking number.
Reprint a Carrier Label (Partner Task)
You can use Sterling Supplier Portal to reprint a carrier label for the container in a
shipment for which a carrier label has already been printed.
About this task
You can print a carrier label only for domestic U.S. shipments.
You can only print a carrier label if your Sponsor has included the Advance
Shipment Notice (ASN) as a part of the choreography. The Sponsor also must have
configured an ASN business rule to allow you to generate a carrier label, and set
up your account with IBM for carrier integration.
Sterling Supplier Portal supports carrier labels for Federal Express (FedEx), United
States Postal Service (USPS), and United Parcel Service (UPS).
For communities that allow you to generate tracking numbers and print carrier
labels, shipments can be created with only one container each.
Ensure that you have disabled the pop-up blockers in your web browser so that
the dialog box containing the carrier label is displayed. Acrobat Reader is also
needed to view the carrier label in PDF format.
146 Sterling Supplier Portal: Partner User Guide
Procedure
To reprint a carrier label for a shipment from the Create Shipment page, follow
these steps:
1. From the menu bar, clickMy Documents >Orders.
2. The Search Criteria - Find Order panel is displayed on the Find Order page.
Enter the Order # you want to search for. You can also select one of the
following options:
vis: The application searches for the exact order number.
vstarts with: The application searches for order numbers that start with the
specified value.
3. Enter the search criteria and click Search.
4. The results of the search are displayed in the Search List panel. From the list of
orders displayed, select the order whose details you want to view and click
View Details. Alternatively, you can click the corresponding Order Number
hyperlink.
5. The Order Detail page is displayed. Click Ship PO.
Note: The Ship PO option is available as a Related Task only if Advance
Shipment Notification (ASN) is a part of the choreography of the community to
which the Partners belongs.
6. The Create Shipment page is displayed. Click Reprint Carrier label to reprint a
carrier label.
7. In the File Download dialog box, perform any one of the following tasks:
vTo open the carrier label in PDF format, click Open. The carrier label is
displayed in PDF format. You can print this carrier label using any printer in
the print size of 4X6.
vTo save the carrier label, click Save.
What to do next
To reprint a carrier label for a shipment from the Shipment Detail page:
1. From the menu bar, navigate to My Documents >Shipments.
2. The Search Criteria - Find Shipment panel is displayed on the Find Shipment
page. Enter the search criteria and click Search.
3. The results of the search are displayed in the Search List panel. From the list of
shipments displayed, select the shipment whose details you want to view and
click View Details. Alternatively, you can click the corresponding Shipment
Number hyperlink.
4. The Shipment Detail page is displayed. Click Reprint Carrier label to reprint a
carrier label.
5. In the File Download dialog box, perform any one of the following tasks:
vTo open the carrier label in PDF format, click Open. The carrier label is
displayed in PDF format. You can print this carrier label using any printer in
the print size of 4X6.
vTo save the carrier label, click Save.
To reprint a carrier label for a shipment from the Resend Shipment page:
1. From the menu bar, navigate to My Documents >Orders.
Chapter 32. Printing Forms and Labels 147

2. The Search Criteria - Find Order panel is displayed on the Find Order page.
Enter the Order # you want to search for. You can also select one of the
following options:
vis: The application searches for the exact order number.
vstarts with: The application searches for order numbers that start with the
specified value.
3. Enter the search criteria and click Search.
4. The results of the search are displayed in the Search List panel. Select the
check box against the appropriate order and click View Details. Alternately,
click the Order Number hyperlink to view the order details.
5. The Order Detail page is displayed. Click View Shipments.
Note: In the Related Task, the View Shipments option is available only if your
Sponsor has included it as a part of the choreography for the community.
6. The Shipment Detail page is displayed, containing the details of the shipment
associated with the order you specified. Click the Resend ASN related task.
7. The Resend Shipment page is displayed. Click Reprint Carrier label to reprint
a carrier label.
8. In the File Download dialog box, perform any one of the following tasks:
vTo open the carrier label in PDF format, click Open. The carrier label is
displayed in PDF format. You can print this carrier label using any printer in
the print size of 4X6.
vTo save the carrier label, click Save.
vTo close the dialog box, click Cancel.
Generate and Print Container Labels (Partner Task)
Your Sponsor can make packing items in cases, pallets, or both a mandatory task
when configuring the community. In such a scenario, you cannot send a shipment
before packing the complete shipment in cases, pallets, or both. After packing,
Sterling Supplier Portal enables you to generate and print the corresponding
container labels that will accompany the containers in the shipment.
If your Sponsor has not made packing a mandatory task when configuring the
community, you will not be able to perform packing or generate container labels.
You can pack an order from the Homepage, and generate and print a container
label from the Pack Shipment Wizard. You can also generate and print a container
label directly from the Shipment Detail screen and Resend Shipment screen.
vGenerate and Print Container Labels from the Home Page
vGenerate and Print Container Labels from the Shipment Detail Screen
Generate and Print Container Labels from the Home Page
About this task
You can pack an order from the Homepage and generate and print a container
label from the Pack Shipment Wizard.
To generate and print container labels from the Home page, follow these steps.:
Procedure
1. In the Home page, enter the order number of the order that you want to pack
in the Order # field of the Overview panel.
148 Sterling Supplier Portal: Partner User Guide
2. Click Pack.
Note: Ensure that you enter a valid order number. If Acknowledgement is part
of the community choreography, ensure the order to be packed is
acknowledged. Otherwise, the “Order cannot be packed in this status” error
message is displayed.
3. The Pack Shipment Wizard is displayed. Pack the items in containers.
4. After packing the items in the Container Build dialog box, click Finish.
5. The File Download dialog box is displayed.
vTo view the container labels in PDF format, click Open. To view the
container labels in PDF format, click Open. The container labels for all the
cases and pallets are displayed in the print size of 4X6 each. You can print
these container labels using a PDF compatible printer. These container labels
are generated in the same order as you packed the items in the cases or
pallets.
vTo save the container labels, click Save.
Generate and Print Container Labels from the Shipment Detail
ScreenAbout this task
To generate and print a container label from the Shipment Detail screen, follow
these steps.
Procedure
1. From the menu bar, navigate to My Documents >Shipments.
2. The Search Criteria - Find Shipment panel is displayed in the Find Shipment
screen. Enter the search criteria and click Search.
3. The results of the search are displayed in the Search List panel of the Search
Criteria screen. From the list of shipments, select the shipment that has already
been packed in containers, and click View Details.
4. The Shipment Detail screen is displayed. Click Generate Container Label.
5. The File Download dialog box is displayed.
vTo view the container labels in PDF format, click Open. The container labels
for all the cases and pallets are displayed in the print size of 4X6 each. You
can print these container labels using a PDF compatible printer. These
container labels are generated in the same order as you packed the items in
the cases or pallets.
vTo save the container labels, click Save.
Generate and Print Container Labels from the Resend
Shipment Screen
About this task
To generate and print a container label from the Resend Shipment screen, follow
these steps.
Procedure
1. From the menu bar, navigate to My Documents >Shipments.
2. The Search Criteria - Find Shipment panel is displayed in the Find Shipment
screen. Enter the search criteria and click Search.
Chapter 32. Printing Forms and Labels 149
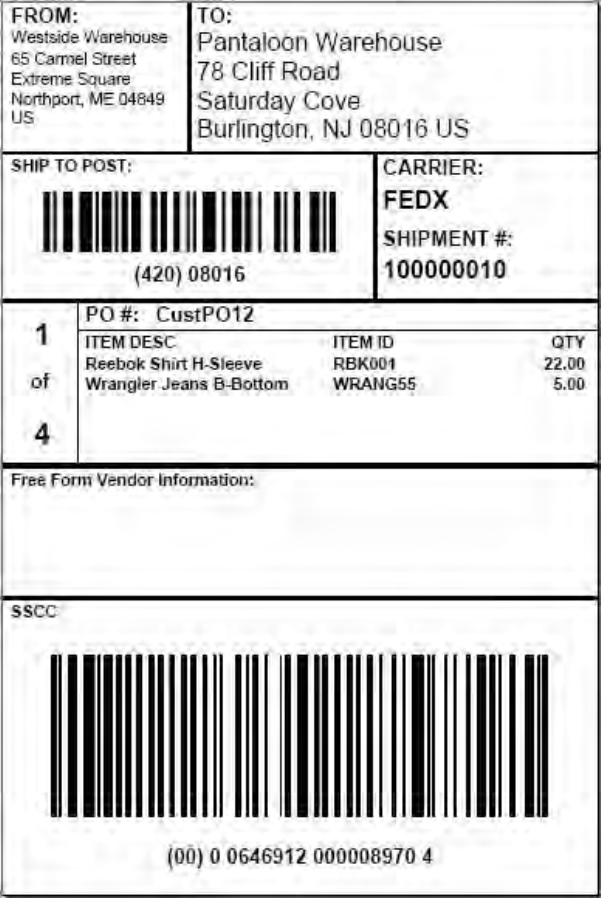
3. The results of the search are displayed in the Search List panel of the Search
Criteria screen. From the list of shipments, select the shipment that has already
been packed in containers, and click View Details.
4. The Shipment Detail screen is displayed. Click Resend ASN.
5. The Resend Shipment screen is displayed. Click Generate Container Label.
6. The File Download dialog box is displayed.
vTo view the container labels in PDF format, click Open. The container labels
for all the cases and pallets are displayed in the print size of 4X6 each. You
can print these container labels using a PDF compatible printer. These
container labels are generated in the same order as you packed the items in
the cases or pallets.
vTo save the container labels, click Save.
Sterling Supplier Portal supports the GS1-128 format for the container labels.
The following default container label is provided by Sterling Supplier Portal. To
customize the default container label to suit your requirements, your Sponsor
will need to contact IBM.
150 Sterling Supplier Portal: Partner User Guide

The following table describes the fields that make up the out-of-the-box
container label:
Field Description
FROM Indicates the address of the company from which the order is
shipped. This field contains the following address details:
vCompany: Indicates the name of the company from which the
order is shipped.
vAddress Line 1: Indicates the first line of the company address.
vAddress Line 2: Indicates the second line of the company address.
vCity: Indicates the name of the city.
vState: Indicates the name of the state.
vZip Code: Indicates the zip code.
vCountry: Indicates the name of the country.
TO Indicates the address of the company to which the order is shipped.
This field contains the following address details:
vCompany: Indicates the name of the company to which the order
is shipped.
vAddress Line 1: Indicates the first line of the company address.
vAddress Line 2: Indicates the second line of the company address.
vCity: Indicates the name of the city.
vState: Indicates the name of the state.
vZip Code: Indicates the zip code.
vCountry: Indicates the name of the country.
SHIP TO POST Indicates the carrier routing bar code. In this code, (420) is the
application identifier of the zip code of the company to which the
container is shipped.
For example, in the illustrated container label, (420) 08016 indicates
the carrier routing bar code. Here, 08016 is the zip code of the
company.
Note: When this code is scanned, all the spaces and special
characters are ignored.
CARRIER Indicates the carrier used to ship the container.
SHIPMENT # Indicates the shipment number to which the container belongs. If the
shipment number is more than 12 characters long, only 12 characters
are displayed and the remaining characters are truncated.
<sequence of
container label>
Indicates the sequence of the container label. This sequence might
not be the same as the sequence number of the containers in which
the items are packed.
PO # Indicates the order number to which the shipment belongs. If the
container contains items from multiple orders, Multiple is displayed
in this field.
ITEM DESC Indicates the item description. The system supports only five items
for which descriptions can be displayed.
Note: If you have configured an item rule such that your Item ID is
different from the customer's Item ID, the system displays the
customer's item description in this field. If the customer's item
description is not found, your item description is displayed. If the
item description is not found, this field is displayed as blank.
Chapter 32. Printing Forms and Labels 151
Field Description
ITEM ID Indicates the unique identifier of the item. The system supports only
five items for which IDs can be displayed.
Note: If you have configured an item rule such that your Item ID is
different from the customer's Item ID, the system displays the
customer's item ID in this field. If the customer's item description is
not found, your item ID is displayed.
QTY Indicates the quantity of an item that is contained in the container.
The system supports only five items for which quantity can be
displayed.
Free Form Vendor
Information
After printing the container label using a PDF compatible printer,
enter any additional information, if required.
SSCC Indicates the Serial Shipping Container Code (SSCC) bar code used
to track the container and its contents. The SSCC is a 20 digit code
comprised of the sellers EAN/UCC number and a sequence number.
It is a mandatory field for UCC/EAN compliance. (00) is the
application identifier of the SSCC.
For example, in the illustrated container label, (00) 0 0646912
000008970 4 indicates the SSCC bar code for the container label.
Here, 0 indicates that the container type is case. 0646912 is the GS1
prefix of the your company. 000008970 is the unique serial number
assigned to the container. 4 is the data check character used to
ensure data integrity.
Note: When this code is scanned, all the spaces and special
characters are ignored.
152 Sterling Supplier Portal: Partner User Guide

Chapter 33. Vendor Compliance Module
About Vendor Compliance (Partner Task)
The Vendor Compliance is an optional module that allows Sterling Supplier Portal
Sponsors to set up and enforce compliance levels with their Supplier.
When tolerances are exceeded, such as shipments being delivered late or inaccurate
quantities being shipped, the condition is detected. Both you and your Sponsor are
notified:
vYour Sponsor is notified through the Sterling Supply Chain Visibility application.
In Sterling Supply Chain Visibility, your Sponsor is called the Buyer.
vYour Partner organization is notified through your Sterling Supplier Portal
Dashboard. In Sterling Supply Chain Visibility, the Partner organization is called
the Seller.
Your Sponsor sets up compliance tolerances, chargeback amounts (financial
penalties), and other compliance criteria. When a noncompliance event occurs, a
process begins that brings a resolution within a specific time frame, called the
mediation period. At the end of the mediation period, your Sponsor can bill you
for the chargeback in the manner that your organizations agreed to.
As a Sterling Supplier Portal Partner, you can view all chargebacks that are sent to
you, and you can enter private notes into the system.
Vendor Compliance Process
The following workflow describes the sequence of events in the Vendor
Compliance process.
In this workflow, your Sponsor is referred to as the Buyer. Your Partner organization
is referred to as the Supplier.
1. A noncompliant event is detected.
Sterling Supply Chain Visibility detects a noncompliant condition, such as
a late shipment or inaccurate shipment quantity.
An external document that is sent from a Buyer ERP system to Sterling
Supply Chain Visibility can also trigger a noncompliance event.
2. The Supplier and Buyer are notified.
Sterling Supply Chain Visibility sends a chargeback notice to the Sterling
Supplier Portal Partner dashboard to notify the Supplier of the compliance
violation and the chargeback amount.
This information is also presented to the Buyer in Sterling Supply Chain
Visibility.
In addition, Sterling Supply Chain Visibility begins a countdown for this
event, which is called the mediation period. The Vendor Compliance
process is concluded at the end of this time frame.
3. Dispute mediation.
© Copyright IBM Corp. 2000, 2014 153

The Buyer and Supplier can meet to perform any dispute mediation or
negotiation. This process is done outside of the IBM supply chain
applications.
4. Manual Chargeback adjustment or cancellation.
Depending on the outcome of the dispute mediation, the Buyer can
manually adjust or waive the compliance penalty, or can cancel the
chargeback.
If a chargeback is adjusted or canceled, Sterling Supplier Portal notifies the
Supplier by sending a new chargeback notice to the Sterling Supplier
Portal Partner Dashboard.
5. Final Chargeback is distributed.
At the end of the mediation period, Sterling Supply Chain Visibility can
optionally route the final chargeback to a Buyer ERP system, such as a
billing system.
View the Chargeback Details (Partner Task)
You can use Sterling Supplier Portal to view the details for the chargebacks you
receive from your Sponsor.
Procedure
To search for chargebacks, follow these steps:
1. From the menu bar, click My Documents >Chargebacks.
2. The Search Criteria panel is displayed on the Chargeback Search page. Enter
the search criteria and click Search.
The following table describes the actions and fields in the Search Criteria panel
on the Chargeback Search page.
Action Description
Saved Searches Click this to view the saved searches.
Save this Search Click this to open the Save Search page, where you can enter a name
for your saved search.
If you want the search to be run automatically, select the Auto
Execute check box.
Field Description
Event Name Enter the event name you want to search for. You can also select one
of the following options:
vis: The application searches for the exact event name.
vstarts with: The application searches for event names that start
with the specified value.
vcontains: The application searches for event names that contain
the specified value.
154 Sterling Supplier Portal: Partner User Guide

Order # Enter the order number you want to search for. You can also select
one of the following options:
vis: The application searches for the exact order number.
vstarts with: The application searches for order numbers that start
with the specified value.
This search option applies to chargebacks that were generated from
order-based events.
Community Enter a community name to search for chargebacks that apply to this
community. Your Sponsor created the communities and assigned the
partner organizations to the community.
Alternatively, click to search for a community.
Shipment # Enter the shipment number you want to search for.
This search option applies to chargebacks that were generated from
shipment-based events.
Amount Enter the chargeback amount to be included in the search. You can
also select one of the following qualifiers to direct your search for an
amount:
is: when selected, the application searches for the exact value
entered.
greater than or equal to: when selected, the application searches for
all the values that are greater than or equal to the value entered.
less than or equal to: when selected, the application searches for all
the values that are less than or equal to the value entered.
not equal to: when selected, the application searches for all the
values that do not match the value entered.
less than: when selected, the application searches for all the values
that are less than the value entered.
greater than: when selected, the application searches for all the
values that are greater than the value entered.
Invoice # Enter the invoice number to be included in the search. This is
applicable only for the chargebacks generated from invoice based
events.
Event Date Enter the date range between which the chargeback was created, and
which is to be included in the search. Alternatively, click to select
the date range.
Charged Date Enter the date range between which the chargeback was finalized,
and which is to be included in the search. Alternatively, click to
select the date range.
Transaction Id Enter the transaction ID to be included in the search. The transaction
ID is a unique alphanumeric code that is generated for each
chargeback.
Supplier From the drop-down list, select the supplier to be included in the
search. This field is displayed only for a Service Agent.
Max Records Enter the maximum number of records to be displayed as Search
results.
Chapter 33. Vendor Compliance Module 155
3. The Listing panel is displayed with the list of chargebacks. From this list, select
the check box against the event date whose details you want to view and click
View Details. The Chargeback Detail page is displayed.
The following table describes the fields and the action in the Listing panel on
the Find Order page.
Action Description
View Details Select the check box adjacent to the required Event Date, and click
this action to view the Chargeback Detail page of the corresponding
event.
Export List as CSV Click this action to view the Chargeback list in CSV format. Based
on the search criteria, up to 1000 records can be exported in CSV
format.
Note: When you export the Chargeback List Report in CSV format,
the Event Name, Order #, Shipment #, Invoice #, and Receiving
Location fields are prefixed with single quotes. You can double-click
these fields to view their exact values.
This is a pre-existing behavior for order listing pages.
Field Description
Event Date Shows the event date.
Event Name Shows the event name.
Community Shows the community that is created by the Sponsor.
Supplier Shows the name and ID of the supplier against whom the
chargeback is raised. This field is displayed only for a Service Agent.
Amount Shows the chargeback amount in the specified currency.
Order # Shows the order number for which the chargeback is generated.
Shipment # Shows the shipment number for which the chargeback is generated.
Invoice # Shows the invoice number of the order for which the chargeback is
generated.
Transaction Id Shows the transaction ID of the chargeback. The transaction ID is a
unique alphanumeric code that is generated for each chargeback.
Charged Date Shows the date on which the chargeback is finalized.
Status Shows the current status of the chargeback.
The following table describes the fields in the Chargeback Amount panel on the
Chargeback Detail page. If you are viewing the details pertaining to a changed
Chargeback, the Changed Chargeback Detail page is displayed.
Action Description
Related Tasks Click this to perform the additional task related to Chargeback. You
can perform the following task:
View Non-Compliance Summary - Click this to view the
noncompliance summary report for the chargeback.
Field Description
Chargeback Amount Shows the value of the chargeback amount in the specified currency.
This panel also displays the event name, the status of the
chargeback, and the charged date.
156 Sterling Supplier Portal: Partner User Guide
The following table describes the fields and the action in the Primary
Information panel on the Chargeback Detail page. If you are viewing the
details pertaining to a changed Chargeback, the Changed Chargeback Detail
page is displayed.
Action Description
Additional
Reference(s)
Click this to view the additional references in the chargeback. You
can view the reference name and reference value.
Field Description
Transaction Id Shows the transaction ID of the chargeback. The transaction ID is a
unique alphanumeric code that is generated for each chargeback.
Customer Shows the name of the customer. Click the Customer hyperlink to
view the details of the customer.
Event Date Shows the date on which the chargeback was created.
Order # Shows the order number associated with this chargeback. Click the
Order Number hyperlink to view the Order Detail page, which
displays the details of the selected Order Number.
The hyperlink is displayed only if the order number exists in the
system.
Shipment # Shows the shipment number. Click the Shipment Number hyperlink
to view the Shipment Detail page, which displays the details of the
selected Shipment Number.
The hyperlink is displayed only if the shipment number exists in the
system.
Invoice # Shows the Invoice number. Click the Invoice Number hyperlink to
view the Invoice Detail page, which displays the details of the
selected Invoice Number.
The hyperlink is displayed only if the invoice number exists in the
system.
Community Shows the community that is created by the Sponsor. Click the
Community hyperlink to view the business rules set by the Sponsor
for the community.
Supplier Shows the name and ID of the supplier against whom the
chargeback is raised. This field is displayed only for a Service Agent.
Detail Provides the details about the chargeback.
Note: Up to 4000 characters can be used in this text box.
The following table describes the fields and actions described in the Private
Notes panel on the Chargeback Detail page. If you are viewing the details
pertaining to a changed Chargeback, the Changed Chargeback Detail page is
displayed.
Action Description
Add Private Note Click this to enter additional information about the chargeback.
Enter the required note in the Add Private Note dialog window and
click Save to add the contents.
Note: Up to 250 characters can be used in this text box.
Chapter 33. Vendor Compliance Module 157
Action Description
The Private Notes panel displays notes added for the chargeback by various users. This
panel also displays the user name, date, and the time when the note was added. These
private notes are not shared with the customer and can only be viewed by the supplier.
They are intended to allow the supplier to add notes to the chargeback for their viewing
only.
The following table describes the fields and actions described in the Audits
panel on the Chargeback Detail page. If you are viewing the details pertaining
to a changed Chargeback, the Changed Chargeback Detail page is displayed.
Field Description
Modified On Shows the date and time when the chargeback was modified.
Old Amount Shows the chargeback amount before the modification.
New Amount Shows the modified chargeback amount.
Reason Code Shows the reason code for modifying the chargeback amount or
cancelling the chargeback.
Reason Text Shows the description for the change in the value of the chargeback
amount or cancellation of the chargeback.
Non-Compliance Summary Report (Partner Task)
About this task
You can view the non-compliance summary report that provides information about
the chargeback documents, the chargeback amount for an event in a particular
month, and the number of chargebacks in a month.
The non-compliance summary report is displayed as a chart and a table. This
report enables you to view the number of chargebacks and the chargeback amount
summarized for the last the 12 months and the current month.
To view the non-compliance summary report, follow these steps.
Procedure
1. From the menu bar, navigate to Reports >Non-Compliance Summary.
2. The Non-Compliance Summary screen is displayed. By default, this screen
displays non-compliance summary information pertaining to various events for
the last 12 months and the current month. If you are a Service Agent, select the
required filter criteria and click Apply. For Service Agent, by default, no data
is displayed.
The following table describes the fields in the Non-Compliance Summary -
Chart panel of the Non-Compliance Summary screen:
Field Description
Supplier From the drop-down list, select the supplier to be included in the
chart. If you do not select any supplier, the chart is displayed for all
the suppliers. This field is displayed only for Service Agent.
Transaction Period From the drop-down list, select the transaction period to be included
in the chart. This field is displayed only for a Service Agent.
Amount Indicates the chargeback amount for the corresponding month and
event.
158 Sterling Supplier Portal: Partner User Guide
Field Description
Count Indicates the number of chargebacks for the corresponding month.
Month Indicates the month for which the chargeback is applied.
The line graph represents the number of chargeback documents received in a month and
the bar graph represents the chargeback amount for a month.
The following table describes the fields the Non-Compliance Summary - Data
panel of the Non-Compliance Summary screen:
Field Description
Month Indicates the month for which the chargeback is applied. To view the
chargeback details for the selected month, you can click the month
hyperlink to display the Chargeback Search screen.
Supplier Indicates the name and ID of the supplier against whom the
chargeback is raised. This field is displayed only for a Service Agent.
Event Name Indicates the event name.
Amount Indicates the chargeback amount for an event in the specified month.
Count Indicates the number of chargebacks for an event in the specified
month.
Chapter 33. Vendor Compliance Module 159
160 Sterling Supplier Portal: Partner User Guide

Chapter 34. View the Details of an Agreement (Partner Task)
You can use Sterling Supplier Portal to view the agreements you have entered into
with your Sponsors. The agreements are an arrangement that is accepted by the
parties involved.
Procedure
To view the details of an agreement, follow these steps:
1. In the Sterling Supplier Portal Console, click Setup >Configure My Profile >
View Agreements. The Agreement Search page is displayed.
The following table describes the fields and actions in the Search Criteria panel
on the Agreement Search page:
Action Description
Saved Searches Click Saved Searches to view your saved searches.
Save this Search Opens the Save Search page, where you can enter a name for your
saved search.
If you want the search to be run automatically, select the Auto
Execute check box.
Field Description
Sponsor Name Enter the Sponsor you want to search for.
Program Name Enter the program you want to search for.
You can also click to search for a specific program.
Question Block
Category
Select the question block category you want to search for.
Effect Start Date
From
Enter the effective date of the agreements you want to search for.
This date shows the start date that the agreement took effect.
You can also click to select the date.
Use the within option to add more days to the date search range.
Expiry Date Enter the expiration date of the agreements you want to search for.
You can also click to select the date.
Use the within option to add more days to the date search range.
Status Select the status to be included in the search:
vActive
vSoft Delete
vPending
Max Records Enter the maximum number of records to include in the search
results.
2. Select the agreement and click View Details. The Agreement Detail page is
displayed.
The following table describes the fields in the Listing Records panel on the
Agreement Detail page:
© Copyright IBM Corp. 2000, 2014 161
Action Description
Export Details as
XML
Exports the details of the selected agreements in XML format.
Export Details as
PDF
Exports the details of the selected agreements in PDF format.
Terminate
Agreement
Terminates the selected agreement.
Field Description
Agreement ID Shows the unique identifier of the agreement.
Campaign Name Shows the name of the campaign that is associated with the
agreement.
Sponsor Name Shows the Sponsor name.
Effective Start Date Shows the date the agreement takes effect.
Effective End Date Shows the date the agreement expires.
Status Shows the current status of the agreement, such as Active or
Pending.
The following table describes the fields in the Agreement Dates panel on the
Agreement Details page.
Field Description
Agreement Start
Date
Enter the effective date of the agreement.
Program Name Enter the program name.
Sponsor Name Enter the Sponsor name.
Partner Name Enter the Partner name.
The My Answer Block(s) panel displays the answer block.
The Sponsor Answer Block(s) panel displays the Partner's answer block.
The following table describes the fields in the Contact panel on the Agreement
Detail page.
Field Description
Contact Name Shows the name of the contact person in the Sponsor organization.
Email Shows the e-mail address of the contact person.
Daytime Phone # Shows the daytime telephone phone number of the contact person.
Mobile Phone # Shows the mobile telephone number of the contact person.
Fax # Shows the fax number of the contact person.
Job Title Shows the job title of the contact person.
162 Sterling Supplier Portal: Partner User Guide
Chapter 35. Catalogs
Add an Item to the Catalog (Partner Task)
About this task
You should add items to the catalog if you want to link your corresponding Item
IDs with that of your customers. For a particular item, you can define Color, Size,
Product, Sub Product, and General Description in addition to the Item ID and Item
Description. However, each Item ID can have only one set of these five attributes.
Though you can define attributes of an item, the Order Detail screen, Shipment
Detail screen, and Invoice Detail screen display the attributes as specified in the
corresponding order by your Sponsor.
Note: If you have configured a rule for the item such that your Item ID is different
from the customer's Item ID, these attributes of the item are not considered when
matching the items.
To add an item to the catalog, follow these steps.
Procedure
1. From the menu bar, navigate to Setup > Manage Items.
2. The Search Criteria - Find Item panel is displayed in the Find Item screen.
Enter the search criteria and click Search.
3. The Search List panel is displayed with a list of items. Click Add.
4. The Add Item dialog box is displayed. Enter the appropriate values in the
fields and click Save.
The following table describes the fields that make up the Search Criteria - Find
Item panel.
Field Description
Item ID Enter the identifier of the item to be included in the search.
Item Description Enter the description of the item to be included in the search.
Max Records Indicates the maximum number of items that will be displayed in
the Search List panel. You can enter the maximum number of items
to be displayed in the search results.
The following table describes the fields that make up the Search List panel.
Field Description
Item ID Indicates the identifier of the item.
Item Description Indicates the description of the item.
The following table describes the fields that make up the Add Item dialog box.
Field Description
Item ID Enter the identifier of the item to be added in the Search List.
Item Description Enter a brief description of the item.
© Copyright IBM Corp. 2000, 2014 163
Field Description
Color Enter the color of the item. The system supports a maximum of 40
characters in this field.
Size Enter the size of the item. The system supports a maximum of 40
characters in this field.
Product Indicates the name of the product. For example, Apparel. The system
supports a maximum of 40 characters in this field.
Sub Product Indicates the name of the sub product. For example, Shirts. The
system supports a maximum of 40 characters in this field.
General Description Enter additional description of the item, as required. The system
supports a maximum of 40 characters in this field.
Manage an Item in the Catalog (Partner Task)
About this task
Sterling Supplier Portal enables Partners to maintain and link their Item IDs with
that of their customers.
To manage an item in the catalog, follow these steps.
Procedure
1. From the menu bar, navigate to Setup >Manage Items.
2. The Search Criteria - Find Item panel is displayed in the Item Search screen.
Enter the search criteria and click Search.
3. The Search List panel is displayed with a list of items. Select the check box
against the item that you want to manage and click Manage Customer's Item.
4. The Customer's Item dialog box is displayed. Enter the appropriate values in
the fields and click Save.
The following table describes the actions and fields that make up the
Customer's Item dialog box.
Action Description
Add/Copy Row Click this to add a new row, which in turn enables you to select the
customer identifier from the drop-down list. You can enter the
identifier and the description of the item that belongs to the selected
customer. To add multiple rows, enter the number of rows in the
text box against Add/Copy and click Add/Copy.
Remove Row Click this to remove a row.
Field Description
Customer From the drop-down list, select the identifier of the customer.
Item ID Enter the identifier of the item.
Item Description Enter a brief description of the item.
Modify an Item in the Catalog (Partner Task)
About this task
You can modify the description of an item in order to link it with the customer's
Item ID. You can modify the items that have been added to the catalog. For a
164 Sterling Supplier Portal: Partner User Guide
particular item, you can define Color, Size, Product, Sub Product, and General
Description in addition to the Item ID and Item Description. However, each Item
ID can have only one set of these five attributes. Though you can define attributes
of an item, the Order Detail screen, Shipment Detail, and Invoice Detail screen
display the attributes as specified in the corresponding order by your Sponsor.
Note:
vIf you have configured a rule for the item such that your Item ID is different
from the customer's Item ID, these attributes of the item are not considered
when matching the items.
vIf you have configured a rule for the item such that your Item ID is same as the
customer's Item ID and your Sponsor sends a different order containing the
same item but different additional attributes, then the additional attributes in the
Customer's Item dialog box are automatically overridden.
To modify an item in the catalog, follow these steps.
Procedure
1. From the menu bar, navigate to Setup >Manage Items.
2. The Search Criteria - Find Item panel is displayed in the Find Item screen.
Enter the search criteria and click Search.
3. The Search List panel is displayed with the list of items. Select the check box
against the item that you want to modify and click Modify.
4. The Modify dialog box is displayed. Enter the new description for the item and
click Save. This replaces the existing Item Description.
The following table describes the fields in the Modify dialog box.
Field Description
Item ID Indicates the identifier of the item.
Item Description Enter a brief description for the item.
Color Enter the color of the item. The system supports a maximum of 40
characters in this field.
Size Enter the size of the item. The system supports a maximum of 40
characters in this field.
Product Indicates the name of the product. For example, Apparel. The system
supports a maximum of 40 characters in this field.
Sub Product Indicates the name of the sub product. For example, Shirts. The
system supports a maximum of 40 characters in this field.
General Description Enter additional description of the item, as required. The system
supports a maximum of 40 characters in this field.
Delete an Item from the Catalog (Partner Task)
About this task
You should delete items from the catalog if you do not want to link your
corresponding Item IDs with that of your customers.
To delete an item from the catalog, follow these steps.
Chapter 35. Catalogs 165
Procedure
1. From the menu bar, navigate to Setup >Manage Items.
2. The Search Criteria - Find Item panel is displayed in the Find Item screen.
Enter the search criteria and click Search.
3. The Search List panel is displayed with the list of items. Select the check box
against the corresponding Item ID that you want to delete and click Delete.
To delete all the items from the catalog at the same time, select the check box
against the Item ID field name and click Delete.
166 Sterling Supplier Portal: Partner User Guide
Chapter 36. Edit Basic Profile Information (Partner Task)
About this task
Sterling Supplier Portal enables a Partner organization to edit its basic information.
Partners supply products to Sponsors (Buyers). Partners are also known as
Suppliers.
To edit the basic profile of a Partner organization, follow these steps.
Procedure
1. From the Sterling Supplier Portal Console, navigate to Setup >Configure My
Profile >Edit Basic Info.
2. The Edit Basic Information screen is displayed. In the Edit Basic Information
panel, make the necessary changes, and click Save.
The following table describes the fields that make up the Edit Basic
Information panel in the Edit Basic Information screen.
Field Description
Company* Enter the name of the company.
Address Line 1 Enter the line of the company address.
Address Line 2 Enter the second address line, if applicable.
Address Line 3 Enter the third address line, if applicable.
City Enter the name of the city.
State/Province Enter the name of the state.
Zip/Postal Code Enter the zip code.
Country Select the name of the country.
Phone # Enter the phone number of the contact person.
Email ID Enter the e-mail ID of the contact person.
* = Mandatory field.
© Copyright IBM Corp. 2000, 2014 167
168 Sterling Supplier Portal: Partner User Guide

Chapter 37. Modify Partner's Public Profile (Partner Task)
About this task
Sterling Supplier Portal enables a Partner organization to modify its public profile.
Partners supply products to Sponsors (Buyers). Partner are also known as
Suppliers.
To modify the public profile of a Partner organization, follow these steps.
Procedure
1. In the Sterling Supplier Portal Console, navigate to Setup >Configure My
Profile >Modify Public Profile.
2. The Modify Public Profile screen is displayed. In the Modify Public Profile
panel, select the information that you want to make public, and click Save.
Note: A Partner Associate is not allowed to modify the public profile of a
Partner's organization.
© Copyright IBM Corp. 2000, 2014 169
170 Sterling Supplier Portal: Partner User Guide

Chapter 38. Configure a Rule for an Item (Partner Task)
About this task
You can either have the same Item IDs as your Sponsors or Item IDs that are
different from that of your Sponsors. Sterling Supplier Portal enables you to
configure the rules for Item IDs. These rules enable you to link your Item IDs with
your Sponsors' IDs in case the Item IDs are different.
To configure a rule for an item, follow these steps.
Procedure
1. From the menu bar, navigate to Setup >Manage Item Rule.
2. The Manage Partner's Item screen is displayed. Select one of the following rules
and click Save.
Note:
vMy Item ID is same as Customer's Item ID - Select this so that your item ID
will be same as the Sponsor (seller) item ID.
vMy Item ID is different from Customer's Item ID - Select this so that your
item ID will be different from the Sponsor (seller) item ID.
© Copyright IBM Corp. 2000, 2014 171
172 Sterling Supplier Portal: Partner User Guide
Chapter 39. Upload Inventory Information (Partner Task)
The Sponsor might have set up your community to require you to upload an
inventory list. You have to upload the inventory details in a Microsoft Excel
spreadsheet.
About this task
You can download a sample spreadsheet template from Sterling Supplier Portal.
You can update the spreadsheet with your inventory information and then upload
the spreadsheet.
You can upload an Excel spreadsheet for only one Sponsor at a time.
Procedure
To upload inventory information, follow these steps:
1. From the menu bar, click Setup >Send Inventory Snapshot. The Inventory
Upload page is displayed.
2. Click the Download Sample hyperlink to download the spreadsheet and save
it to your computer.
3. Update the following fields in the spreadsheet:
Field Description
Item ID Enter the identifier of an item. This field is required.
You can enter a maximum of 40 characters for an Item ID.
Quantity Enter the quantity of available items. This field is required.
You can enter a maximum of 14 digits. You can include up to 4
decimal places.
If any items are out of stock, mark the quantity as zero in the
spreadsheet.
Unit Of Measure Enter the Unit Of Measure (UOM) of the items, as configured
by the Sponsor. This field is required.
You can enter a maximum of 40 characters for each UOM.
Product Class Enter the Product Class of the items, as configured by the
Sponsor.
You can enter a maximum of 10 characters for a Product Class.
UPC Code Enter the Universal Product Code of the item.
You can enter a maximum of 100 characters for a UPC.
GTIN Enter the Global Trade Item Number of the item.
You can enter a maximum of 128 characters for a GTIN.
4. Click Upload to upload the updated sheet:
a. Select the Sponsor to which you are sending the inventory update. The
customer list only shows the Sponsors that require you to send the
© Copyright IBM Corp. 2000, 2014 173
inventory updates. If you are a member of more than one community for
the same Sponsor, the Sponsor's name and Community ID are both listed.
b. Enter the file name that you want to upload. You can also click Browse,
navigate to the appropriate folder, and select the file.
174 Sterling Supplier Portal: Partner User Guide

Chapter 40. Route Planning
Sending a Shipment for Route Planning (Partner Task)
About this task
If your Sponsor includes Advance Shipment Notice in the choreography of the
community to which you belong, and sends an order that requires route planning,
then you must send the shipment corresponding to that order for route planning
before sending it to the customer. Your Sponsor plans the route, and updates the
carrier information, pickup time, and so on.
After you have sent a shipment for route planning, you should receive the route
plan by the end of that day. If you do not receive the route plan for the shipment,
the Routing response for <Shipment number> due task is displayed in the
Overdue Tasks panel of the dashboard and you can contact your Sponsor.
If you have saved a shipment as a draft, perform the following steps to send the
shipment for route planning.
Procedure
1. From the menu bar, navigate to My Documents >Orders.
2. The Search Criteria - Find Order panel is displayed in the Find Order screen.
Enter the Order # you want to search for. You can also select one of the
following options:
vis: The application searches for the exact order number.
vstarts with: The application searches for order numbers that start with the
specified value.
3. Enter the search criteria and click Search.
4. The Search List panel is displayed with the list of orders. Select the check box
against the order that you want to ship and click View Details. Alternatively,
you can also click the corresponding Order Number hyperlink.
5. The Order Detail screen is displayed. Click Ship PO.
Note: The Ship PO task is available as a Related Task only if ASN is a part of
the choreography of the community to which the Partners belongs.
6. The Create Shipment screen is displayed. Enter the appropriate values in the
fields.
7. Click the Send Routing Request button.
The shipment is saved as a draft containing read-only fields, and the request
for route planning is sent to your Sponsor.
a. In the Home screen, click Saved as Draft in the Overview panel.
b. The Drafts screen is displayed. In the Drafts panel, click the link pertaining
to the Shipment you want to send for route planning.
c. The Create Shipment screen is displayed. Enter the appropriate values in
the fields.
d. Click the Send Routing Request button.
The Send ASN button is disabled in the Create Shipment screen because
you cannot send the shipment unless you receive the corresponding route
plan from your Sponsor. The Routing Request Sent for <Shipment
© Copyright IBM Corp. 2000, 2014 175

number> event is displayed in the Event Log panel of the Order Detail
screen when you have sent a shipment for route planning. You can view the
Create Shipment screen by clicking the Shipment number hyperlink.
After you have sent the shipment for route planning, the Delete and
Generate Packing Slip buttons are enabled.
Note: You cannot send the same shipment for route planning multiple
times. The Send Routing Request button is removed from the Create
Shipment screen after you click it once. If you want to send a new shipment
pertaining to the order for route planning, you must delete the shipment
and create a new one. However, when a new shipment is created, new tasks
are not listed in the Dashboard and the tasks pertaining to the earlier
shipment are deleted.
Receiving a Route Plan for a Shipment (Partner Task)
Sterling Supplier Portal enables you to receive a route plan for a shipment.
If you receive an order that requires route planning, you must send the
corresponding shipment for route planning. Your Sponsor plans the load and
updates the carrier details, pick up time, and so on.
When the route plan for the shipment is received, the Routing Response Received
for <Shipment number> event is displayed in the Event Log panel in the Order
Detail screen. The fields that your Sponsor has modified are automatically updated
in the corresponding draft form of the shipment. You can click the Shipment
Number hyperlink adjacent to the Routing Response Received for <Shipment
number> event in the Event Log panel to view the updated Create Shipment
screen. All the buttons are enabled and you can perform other tasks pertaining to
the shipment such as generating a Packing Slip, sending the shipment to your
Sponsor, and so on.
After sending the shipment for route planning, if you do not receive the route plan
by the end of that day, the Routing response for <Shipment number> due task is
generated the next day in the Overdue Tasks panel of the Dashboard. You can
contact your Sponsor for the route plan.
After you send out a shipment for route planning, you may receive multiple load
updates until this shipment is finally sent to your Sponsor. Each load update can
consist of multiple shipments. When you receive the route plan you can send the
shipment to your Sponsor. After you have sent the shipment to your Sponsor, you
can perform tasks such as sending an invoice for the shipment based on the
choreography selected by your Sponsor for the community to which you belong.
176 Sterling Supplier Portal: Partner User Guide
Chapter 41. Currency Codes
In Sterling Supplier Portal, currency amounts are displayed with the associated
currency code.
The following currencies are displayed as symbols:
vUSD Dollars (USD)- $
vEuros (EUR)- €
vBritish Pounds (GBP)- £
Sterling Supplier Portal supports the following currency codes:
Currency Code Country and Currency
AED United Arab Emirates, Dirham
AFN Afghanistan, Afghani
ALL Albania, Lek
AMD Armenia, Dram
ANG Netherlands, Antillean Guilder
AOA Angola, Kwanza
ARS Argentina, Peso
AUD Australia, Dollar
AWG Aruba, Florin
AZN Azerbaijan, Manat
BAM Bosnia And Herzegovina, Convertible Mark
BBD Barbados, Dollar
BDT Bangladesh, Taka
BGN Bulgaria, Lev
BHD Bahrain, Dinar
BIF Burundi, Franc
BMD Bermuda, Dollar
BND Brunei, Dollar
BOB Bolivia, Boliviano
BRL Brazil, Real
BSD Bahamas, Dollar
BTN Bhutan, Ngultrum
BWP Botswana, Pula
BYR Belarus, Ruble
BZD Belize, Dollar
CAD Canada, Dollar
CDF Democratic Republic of Congo, Franc
CHE Switzerland, WIR Bank (Complementary Currency)
CHF Switzerland, Franc
© Copyright IBM Corp. 2000, 2014 177

Currency Code Country and Currency
CHW Switzerland, WIR Bank (Complementary Currency)
CLP Chile, Peso
CNY China, Yuan Renminbi
COP Colombia, Peso
COU Colombia, Unidad de Valor Real
CRC Costa Rica, Colon
CUC Cuba, Convertible Peso
CUP Cuba, Peso
CVE Cape Verde, Escudo
CZK Czech Republic, Koruna
DJF Djibouti, Franc
DKK Denmark, Krone
DOP Dominican Republic, Peso
DZD Algeria, Dinar
EEK Estonia, Kroon
EGP Egypt, Pound
ERN Eritrea, Nakfa
ETB Ethiopia, Birr
FJD Fiji, Dollar
FKP Falkland Islands, Pound
GEL Georgia, Lari
GHS Ghana, Cedi
GIP Gibraltar, Pound
GMD Gambia, Dalasi
GNF Guinea, Franc
GTQ Guatemala, Quetzal
GYD Guyana, Dollar
HKD Hong Kong, Dollar
HNL Honduras, Lempira
HRK Croatia, Kuna
HTG Haiti, Gourde
HUF Hungary, Forint
IDR Indonesia, Rupiah
ILS Israel, New Sheqel
INR India, Rupee
IQD Iraq, Dinar
IRR Iran, Rial
ISK Iceland, Krona
JMD Jamaica, Dollar
JOD Jordan, Dinar
JPY Japan, Yen
178 Sterling Supplier Portal: Partner User Guide

Currency Code Country and Currency
KES Keny, Shilling
KGS Kyrgyzstan, Som
KHR Cambodia, Riel
KMF Comoros, Franc
KPW North Korea, Won
KRW South Korea, Won
KWD Kuwait, Dinar
KYD Cayman Islands, Dollar
KZT Kazakhstan, Tenge
LAK Laos, Kip
LBP Lebanon, Pound
LKR Sri Lanka, Rupee
LRD Liberia, Dollar
LSL Lesotho, Loti
LTL Lithuania, Litas
LVL Latvia, Lats
LYD Libya, Dinar
MAD Morocco, Dirham
MDL Moldova, Leu
MGA Malagascar, Ariary
MKD Republic of Macedonia, Denar
MMK Myanmar, Kyat
MNT Mongolia, Tugrik
MOP Macau, Pataca
MRO Mauritania, Ouguiya
MUR Mauritius, Rupee
MVR Maldives, Rufiyaa
MWK Malawi, Kwacha
MXN Mexico, Peso
MYR Malaysia, Ringgit
MZN Mozambique, Metical
NAD Namibia, Dollar
NGN Nigeria, Naira
NIO Nicaragua, Cordoba Oro
NOK Norway, Krone
NPR Nepal, Rupee
NZD New Zealand, Dollar
OMR Oman, Rial
PAB Panama, Balboa
PEN Peru, Nuevo Sol
PGK Papua New Guinea, Kina
Chapter 41. Currency Codes 179
Currency Code Country and Currency
PHP Philippines, Peso
PKR Pakistani, Rupee
PLN Poland, Zloty
PLZ Poland, Zloty
PYG Paraguay, Guarani
QAR Qatar, Rial
ROL Romania, Lei
RON Romania, New Leu
RSD Serbia, Dinar
RUB Russia, Rouble
RUR Russia, Rouble
RWF Rwanda, Franc
SAR Saudi Arabia, Riyal
SBD Solomon Islands, Dollar
SCR Seychelles. Rupee
SDG Sudan, Pound
SEK Sweden, Krona
SGD Singapore, Dollar
SHP Saint Helena, Pound
SLL Sierra Leone, Leone
SOS Somalia, Shilling
SRD Suriname, Dollar
STD Sao Tome And Principe, Dobra
SYP Syria, Pound
SZL Swaziland, Lilangeni
THB Thailand, Baht
TJS Tajikistan, Somoni
TMT Turkmenistan, Manat
TND Tunisia, Dinar
TOP Tonga, Pa'anga
TRL Turkey, Lira
TRY Turkey, Lira
TTD Trinidad And Tobago, Dollar
TWD Taiwan, Dollar
TZS Tanzania, Shilling
UAH Ukraine, Hryvnia
UGX Uganda, Shilling
UYU Uruguay, Peso
UZS Uzbekistan, Som
VEF Venezuela, Bolivar Fuerte
VND Vietnam, Dong
180 Sterling Supplier Portal: Partner User Guide
Currency Code Country and Currency
VUV Vanuatu, Vatu
WST Samoa, Tala
XAF Cameroon, Central African Republic, Republic of the Congo,
Chad, Equatorial Guinea, and Gabon - CFA Franc BEAC
XCD Anguilla, Antigua and Barbuda, Dominica, Grenada, Montserrat,
Saint Kitts and Nevis, Saint Lucia, Saint Vincent and the
Grenadines - East Caribbean Dollar
XPF French Polynesia, New Caledonia, Wallis and Futuna - CFP
Franc
YER Yemen, Rial
ZAR South Africa, Rand
ZMK Zambia, Kwacha
ZWL Zimbabwe, Dollar
Chapter 41. Currency Codes 181
182 Sterling Supplier Portal: Partner User Guide

Notices
This information was developed for products and services offered in the U.S.A.
IBM may not offer the products, services, or features discussed in this document in
other countries. Consult your local IBM representative for information on the
products and services currently available in your area. Any reference to an IBM
product, program, or service is not intended to state or imply that only that IBM
product, program, or service may be used. Any functionally equivalent product,
program, or service that does not infringe any IBM intellectual property right may
be used instead. However, it is the user's responsibility to evaluate and verify the
operation of any non-IBM product, program, or service.
IBM may have patents or pending patent applications covering subject matter
described in this document. The furnishing of this document does not grant you
any license to these patents. You can send license inquiries, in writing, to:
IBM Director of Licensing
IBM Corporation
North Castle Drive
Armonk, NY 10504-1785
U.S.A.
For license inquiries regarding double-byte character set (DBCS) information,
contact the IBM Intellectual Property Department in your country or send
inquiries, in writing, to:
Intellectual Property Licensing
Legal and Intellectual Property Law
IBM Japan Ltd.
19-21, Nihonbashi-Hakozakicho, Chuo-ku
Tokyo 103-8510, Japan
The following paragraph does not apply to the United Kingdom or any other
country where such provisions are inconsistent with local law:
INTERNATIONAL BUSINESS MACHINES CORPORATION PROVIDES THIS
PUBLICATION "AS IS" WITHOUT WARRANTY OF ANY KIND, EITHER
EXPRESS OR IMPLIED, INCLUDING, BUT NOT LIMITED TO, THE IMPLIED
WARRANTIES OF NON-INFRINGEMENT, MERCHANTABILITY OR FITNESS
FOR A PARTICULAR PURPOSE. Some states do not allow disclaimer of express or
implied warranties in certain transactions, therefore, this statement may not apply
to you.
This information could include technical inaccuracies or typographical errors.
Changes are periodically made to the information herein; these changes will be
© Copyright IBM Corp. 2000, 2014 183
incorporated in new editions of the publication. IBM may make improvements
and/or changes in the product(s) and/or the program(s) described in this
publication at any time without notice.
Any references in this information to non-IBM Web sites are provided for
convenience only and do not in any manner serve as an endorsement of those Web
sites. The materials at those Web sites are not part of the materials for this IBM
product and use of those Web sites is at your own risk.
IBM may use or distribute any of the information you supply in any way it
believes appropriate without incurring any obligation to you.
Licensees of this program who wish to have information about it for the purpose
of enabling: (i) the exchange of information between independently created
programs and other programs (including this one) and (ii) the mutual use of the
information which has been exchanged, should contact:
IBM Corporation
J46A/G4
555 Bailey Avenue
San Jose, CA 95141-1003
U.S.A.
Such information may be available, subject to appropriate terms and conditions,
including in some cases, payment of a fee.
The licensed program described in this document and all licensed material
available for it are provided by IBM under terms of the IBM Customer Agreement,
IBM International Program License Agreement or any equivalent agreement
between us.
Any performance data contained herein was determined in a controlled
environment. Therefore, the results obtained in other operating environments may
vary significantly. Some measurements may have been made on development-level
systems and there is no guarantee that these measurements will be the same on
generally available systems. Furthermore, some measurements may have been
estimated through extrapolation. Actual results may vary. Users of this document
should verify the applicable data for their specific environment.
All statements regarding IBM's future direction or intent are subject to change or
withdrawal without notice, and represent goals and objectives only.
This information is for planning purposes only. The information herein is subject to
change before the products described become available. This information contains
examples of data and reports used in daily business operations. To illustrate them
as completely as possible, the examples include the names of individuals,
companies, brands, and products. All of these names are ficticious and any
similarity to the names and addresses used by an actual business enterprise is
entirely coincidental.
COPYRIGHT LICENSE:
184 Sterling Supplier Portal: Partner User Guide
This information contains sample application programs in source language, which
illustrate programming techniques on various operating platforms. You may copy,
modify, and distribute these sample programs in any form without payment to
IBM, for the purposes of developing, using, marketing or distributing application
programs conforming to the application programming interface for the operating
platform for which the sample programs are written. These examples have not
been thoroughly tested under all conditions. IBM, therefore, cannot guarantee or
imply reliability, serviceability, or function of these programs. The sample
programs are provided "AS IS", without warranty of any kind. IBM shall not be
liable for any damages arising out of your use of the sample programs.
Each copy or any portion of these sample programs or any derivative work, must
include a copyright notice as follows:
© IBM 2014. Portions of this code are derived from IBM Corp. Sample Programs.
© Copyright IBM Corp. 2014.
If you are viewing this information softcopy, the photographs and color
illustrations may not appear.
Trademarks
IBM, the IBM logo, and ibm.com are trademarks or registered trademarks of
International Business Machines Corp., registered in many jurisdictions worldwide.
Other product and service names might be trademarks of IBM or other companies.
A current list of IBM trademarks is available on the Web at “Copyright and
trademark information” at http://www.ibm.com/legal/copytrade.shtml.
Adobe, the Adobe logo, PostScript, and the PostScript logo are either registered
trademarks or trademarks of Adobe Systems Incorporated in the United States,
and/or other countries.
Microsoft, Windows, Windows NT, and the Windows logo are trademarks of
Microsoft Corporation in the United States, other countries, or both.
Connect Control Center®, Connect:Direct®, Connect:Enterprise, Gentran®,
Gentran:Basic®, Gentran:Control®, Gentran:Director®, Gentran:Plus®,
Gentran:Realtime®, Gentran:Server®, Gentran:Viewpoint®, Sterling Commerce™,
Sterling Information Broker®, and Sterling Integrator®are trademarks or registered
trademarks of Sterling Commerce, Inc., an IBM Company.
Other company, product, and service names may be trademarks or service marks
of others.
Notices 185
186 Sterling Supplier Portal: Partner User Guide

Index
A
Add/Copy Row field 122, 130, 164
Address Line 1 field 119, 127
Address Line 2 field 119, 127
Amount field 26, 122, 131
Application field 135, 136
B
Buyer ID field 119, 128
Buyer Tax ID field 118, 126
C
cancel a shipment 115
Carrier Account # field 142
Carrier Service Code field 127
Category field 122, 130, 131
Charge Name field 122, 131
chargeback 154
City field 119, 127, 128
Community field 118, 127
Company field 119, 127
container
view details 77
Contract # field 53
Country field 119, 128
Customer field 118, 127, 164
D
dashboard 1
Dashboard Panel field 9
F
First Name field 119, 127, 128
Footer Message field 142
H
Header Charge 119
Header Message field 142
I
Introduction
dashboard 1
setup 2
Invoice # field 26, 118, 126
Invoice Date field 118, 126
Invoice Type field 118, 126
Invoiced Qty. field 120
Item Description field 163, 164
Item field 120
Item ID field 163, 164
L
Last Name field 119, 127, 128
Line Identifier field 120
Line Total field 121
M
Maximum Number of Records to Show
field 10, 12
N
Non-Compliance Summary 158
Number of Days to Look Ahead field 10
O
Order # field 118
Order Date field 118
Ordered Qty. field 120
Orders opened within the last days
field 12
P
Payment Date field 26
Payment Ref # field 26
Payment Reference # field 26
Pro # field 127
Q
Qty. in Invoice field 120
R
Reason Code field 122, 131
Recalculate Total field 122, 131
Release # field 118, 127
Remove Lines field 119, 128
Routing field 127
S
SCAC field 127
shipment
send shipment for route
planning 175
Shipment # field 127
Shipment Address field 127
Shipment On field 127
Shipped Qty. field 120
State field 119, 127, 128
Supplier ID field 119, 127
Supplier Tax ID field 118, 127
T
Tax Exempt field 118, 126
Tax Jurisdiction field 122, 131
Tax Name field 122, 130
Total Supplier Charges field 122, 131,
139
Transportation Method field 127
Type field 26
U
Unit Price field 120
UOM field 120
V
Vendor Compliance 153
Z
ZIP field 119, 128
© Copyright IBM Corp. 2000, 2014 187
188 Sterling Supplier Portal: Partner User Guide
Product Number: 5725-E38
Printed in USA
