125 3201 Siemens SED2 Startup Drive Only
User Manual: Siemens-SED2-Startup-Drive-Only Igor's of metalworking and electrical manuals
Open the PDF directly: View PDF ![]() .
.
Page Count: 132 [warning: Documents this large are best viewed by clicking the View PDF Link!]
Item Number 125-3201, Rev. 012
SED2 Variable Frequency Drives
Startup, Operation, and
Maintenance Manual

SED2 Variable
Frequency Drives
Startup, Operation, and
Maintenance Manual

NOTICE
The information contained within this document is subject to change without
notice and should not be construed as a commitment by Siemens Building
Technologies, Inc. Siemens Building Technologies, Inc. assumes no
responsibility for any errors that may appear in this document.
All software described in this document is furnished under a license and may be
used or copied only in accordance with the terms of such license.
SERVICE STATEMENT
Control devices are combined to make a system. Each control device is
mechanical in nature and all mechanical components must be regularly serviced
to optimize their operation. All Siemens Building Technologies, Inc. branch
offices and authorized distributors offer technical support programs that will
ensure your continuous, trouble-free system performance.
For further information, contact your nearest Siemens Building Technologies, Inc.
representative.
CREDITS
Product or company names mentioned herein may be the trademarks of their
respective owners.
Copyright © 2003 by Siemens Building Technologies, Inc.
TO THE READER
Your feedback is important to us. If you have comments about this manual,
please submit them to technical.editor@siemens.com.
Printed in U.S.A.

Table of Contents
Siemens Building Technologies, Inc. i
Table of Contents
How To Use This Manual ...................................................... 1
Manual Organization .......................................................... 1
Manual Notations................................................................ 2
Where To Send Comments................................................ 2
Reference Documents........................................................ 2
Safety Instructions ................................................................ 3
General............................................................................... 3
Environmental Compatibility and Disposal ......................... 4
Mechanical Installation ......................................................... 5
Product Numbers................................................................ 5
Frame Sizes........................................................................ 6
Interpreting Serial Numbers and Date Codes .................... 7
Output Ratings.................................................................... 8
Accessories ........................................................................ 10
Environmental Conditions................................................... 11
Dimensions and Mounting for IP20 SED2s........................ 12
Overall Dimensions and Mounting Specifications......... 12
Mounting Dimensions.................................................... 13
Mounting Instructions .................................................... 13
Gland Plate Installation and Conduit Connections........ 14
Dimensions and Mounting for NEMA Type 1 SED2s......... 17
Overall Dimensions and Mounting Specifications......... 17
Mounting Dimensions.................................................... 18
Mounting Instructions .................................................... 18
Dimensions and Mounting for IP54,
NEMA Type 12 SED2s ....................................................... 19
Overall Dimensions and Mounting Specifications......... 19
Mounting Dimensions.................................................... 20
Mounting Instructions .................................................... 21
Electrical Installation............................................................. 22
Extended Storage: Conditioning of Capacitors .................. 23
Input Power and Motor Connections .................................. 24
Operation in Ungrounded Systems............................... 25

SED2 VFD Startup, Operation, and Maintenance Manual
ii Siemens Building Technologies, Inc.
Ungrounded Systems and Y Capacitor......................... 25
Access to Connection Terminals................................... 28
Motor Frequency and Unit of Measurement
DIP Switches ................................................................. 31
Input Power and Motor Terminal Layout ....................... 32
Tightening Torque for Input Power and
Motor Connections ........................................................ 34
Cable Cross-Sections for Input Power and
Motor Cables ................................................................. 34
Input Power Connection ................................................ 37
Motor Cable Length....................................................... 38
Motor Connection (Wye "Y"/Star or
Delta Configuration) ...................................................... 39
Direction of Motor Rotation............................................ 40
Motor Overload Protection ............................................ 41
Connection of Multiple Motors....................................... 42
Analog Input DIP Switches............................................ 43
Control Terminal Connections............................................ 44
Control Terminal Layout ................................................ 44
Analog and Digital I/O Control
Terminal Connections ................................................... 47
Parameters ............................................................................. 49
Overview............................................................................. 49
Parameter Structure ........................................................... 49
Parameter Indexes ............................................................. 49
SED2 Operator Panels........................................................... 51
Overview............................................................................. 51
Basic Operator Panel (BOP) .............................................. 51
Advanced Operator Panel (AOP) ....................................... 52
BOP Display and Pushbuttons ........................................... 52
Commissioning...................................................................... 55
Motor Nameplate Data for Parameter Settings .................. 56
Prerequisites to Startup Procedure .................................... 57
SED2 (stand-alone) Startup Procedure.............................. 59
Quick Commissioning Procedure ....................................... 61

Table of Contents
Siemens Building Technologies, Inc. iii
Additional Parameter Settings............................................ 70
Flying Start .................................................................... 70
Automatic Restart.......................................................... 72
Vdc Controller................................................................ 74
Pulse Frequency ........................................................... 74
Reset to Factory Defaults.............................................. 75
Network Communications ............................................. 76
Changing Individual Parameter Digits ................................ 77
Maintenance ........................................................................... 78
Prerequisites....................................................................... 78
General Inspection and Cleaning ....................................... 78
Muffin Fan Inspection and Cleaning................................... 78
Re-energize Unit................................................................. 79
DC Bus Integrity Test ......................................................... 79
Contactors and Switches.................................................... 79
Motor Bearing Wear ........................................................... 79
Troubleshooting..................................................................... 80
Reading Faults ................................................................... 80
Resetting Faults.................................................................. 81
Troubleshooting the Operator Panel .................................. 82
Troubleshooting Using the Operator Panel........................ 83
Fault Codes ........................................................................ 84
Warning Messages............................................................. 92
Replacement Parts ................................................................ 96
Repair...................................................................................... 97
Technical Specifications....................................................... 98
Appendix A: Parameters, Defaults, and Settings............... 100
Appendix B: SED2 Point Maps............................................. 111
Glossary.................................................................................. 117

How to Use This Manual
Siemens Building Technologies, Inc. 1
How To Use This Manual
This manual is written for users of Siemens Building Technologies, Inc.
SED2 Variable Frequency Drives (VFDs). It contains information to
install, commission, and set parameters for SED2s in order to provide
effective and trouble-free operation.
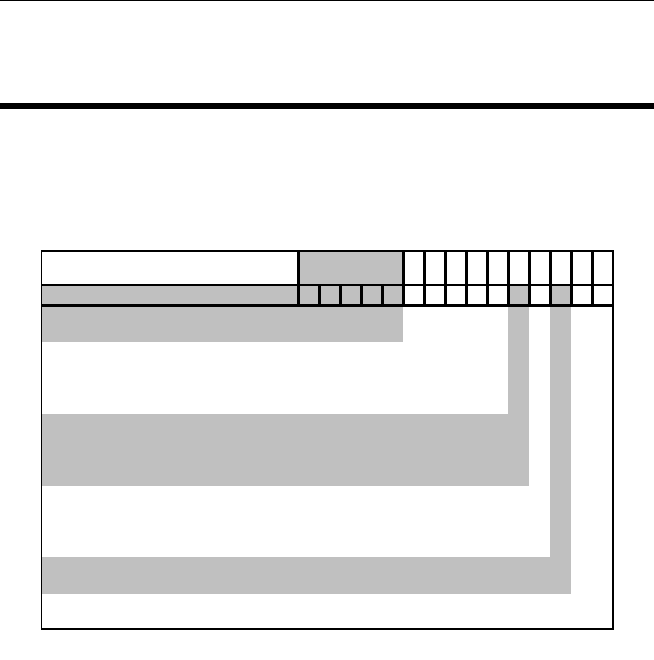
Manual Organization
This manual contains the following sections:
Section Description
How to Use this
Manual Describes the organization of this manual, its notations,
and lists reference documents.
Safety Instructions Presents general safety regulations, guidelines, and
recommendations.
Mechanical
Installation Provides information for mounting and installing a
SED2.
Electrical Installation Provides information for installing and terminating SED2
wiring.
Parameters Provides an overview about SED2 parameters.
SED2 Operator
Panels Provides an overview about the SED2 Basic Operator
Panel and its pushbuttons
Commissioning Describes how to commission and start a SED2 for
operation.
Maintenance Provides preventive maintenance information.
Troubleshooting Lists SED2 fault codes, and warning messages.
Replacement Parts Provides a list of SED2 replacement parts.
Repairs Provides repair information.
Appendix A:
Parameters, Defaults,
and Settings
Provides a table of SED2 parameters with the number,
title, and user access level.
Appendix B: SED2
Point Maps Provides a SED2 P1 point map for APOGEE®
Automation Systems and a SED2 N2 point map for
Johnson Controls, Inc. systems.
Glossary Defines terms related to the SED2.
SED2 VFD Startup, Operation, and Maintenance Manual
2 Siemens Building Technologies, Inc.
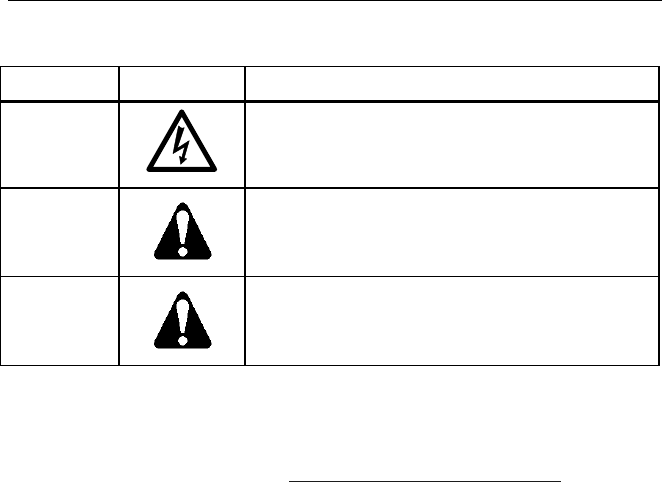
Manual Notations
Notation Symbol Meaning
DANGER:
Indicates that personal injury, or loss of life may
occur if you do not perform a procedure as
specified.
WARNING:
Indicates that personal injury, or equipment
damage may occur if you do not perform a
procedure as specified.
CAUTION:
Indicates that equipment damage, or loss of data
may occur if you do not perform a procedure as
specified.
Where To Send Comments
Your feedback is important to us. If you have comments about this
manual, please submit them to technical.editor@siemens.com.
Reference Documents
SED2s control the speed of fan and pump motors. SED2s can also be
programmed to manage many other motor functions and limits set by
parameters, which are programmed using the SED2 keypad. See the
SED2 VFD Parameter Reference Guide (125-3214) for more details and
a complete listing of the SED2 parameters.
The following SED2 documentation is available from your local Siemens
Building Technologies, Inc. representative:
• SED2 VFD AOP Operating Instructions (125-3206), operating
instructions and procedures for the SED2 Advanced Operator Panel.
• SED2 VFD Conventional Bypass Operating Instructions (125-3215),
start-up and operation of the SED2 Conventional Bypass Option.
• SED2 VFD Electronic Bypass Operating Instructions (125-3208),
start-up, application, and operation of the SED2 Electronic Bypass
Option.
• SED2 VFD LON Interface Option Operating Instructions (125-3212),
startup and operation of the SED2 LON® Interface Option.

Safety Instructions
Siemens Building Technologies, Inc. 3
Safety Instructions
General
The following general guidelines are provided for your safety, to prevent
damage, and to extend the service life of the SED2 product and any
connected equipment. Read this information carefully. Specific
Warnings, Cautions, and Notes are provided in the relevant sections of
this manual.
WARNING:
• The SED2 uses hazardous voltages and controls
potentially dangerous rotating mechanical parts. Non-
compliance with warnings, or failure to follow the
instructions contained in this manual, can result in loss
of life, severe personal injury, or serious damage to
property/equipment.
• Only authorized personnel should work on this
equipment, and only after becoming familiar with all local
regulations and ordinances, safety notices, and
procedures in this manual. Successful and safe
operation of this equipment depends upon its proper
handling, installation, operation, and maintenance.
• Before doing any installation and commissioning
procedures, you must read all safety instructions and
warnings, including all warning labels attached to the
equipment. Ensure that the warning labels are legible
and replace missing or damaged labels.
• Observe the regulations of safety codes whenever
working with live equipment and high-voltage
installations. Also, use suitable tools and protective
equipment.
• Prevent any unauthorized person from accessing or
approaching this equipment.
NOTE: Keep this manual near the equipment and available to all
users.

SED2 VFD Startup, Operation, and Maintenance Manual
4 Siemens Building Technologies, Inc.
Environmental Compatibility and
Disposal
The SED2s are developed and manufactured using materials and
processes that take full account of environmental issues and which
comply with environmental standards. For disposal at the end of the
SED2 service life or in the event of its replacement, note the following:
• For disposal purposes, this product is defined as waste derived from
electrical and electronic equipment (“electronic waste”) and must not
be disposed of as household waste. This applies particularly to the
PCB assembly.
• Always use the most environmentally compatible method of disposal,
in line with the latest developments in environmental protection,
recycling, and waste management. Observe all local legislation and
applicable laws.
• Always aim for maximum re-use of the basic materials, and minimum
environmental stress. Observe any notes about materials and
disposal that may be attached to individual components.
• Use local depots and waste management companies, or see your
supplier or manufacturer to return used products or to obtain further
information on environmental compatibility and waste disposal.
• Special handling of components such as electrolytic capacitors and
LCD panels may in some cases be compulsory by law or
environmentally desirable.
• The SED2 is delivered in re-usable packaging. Please retain this
packaging for later use or in case you need to return the product.
Mechanical Installation
Siemens Building Technologies, Inc. 5
Mechanical Installation
Product Numbers
The following chart shows SED2 product numbers:
SED2 -
S
E
D
2
-
0
.
7
5
/
2
2
X
5 = NEMA Type 12 (IP54) *
* Available with Voltage Codes 3 and 4.
X = Other
Voltage:
kW:
0.37, 0.55, 0.75, 1.1, 1.5, 2.2,
3, 4, 5.5, 7.5, 11, 15, 18.5,
2 = 200 to 240
1 = NEMA Type 1
(leave blank)
(use 2 to 4 spaces
plus a divider "/")
3 = 380 to 480
4 = 500 to 600
2 = (IP20)
22, 30, 37, 45, 55, 75, 90
NEMA:
Other:
Your Product Number:
Example Product Number:
Model:
SED2-
Example shown:
SED2-0.75/22X = SED2 only, 0.75 kW (1 hp), 200V to 240V,
open type IP20.
SED2 VFD Startup, Operation, and Maintenance Manual
6 Siemens Building Technologies, Inc.
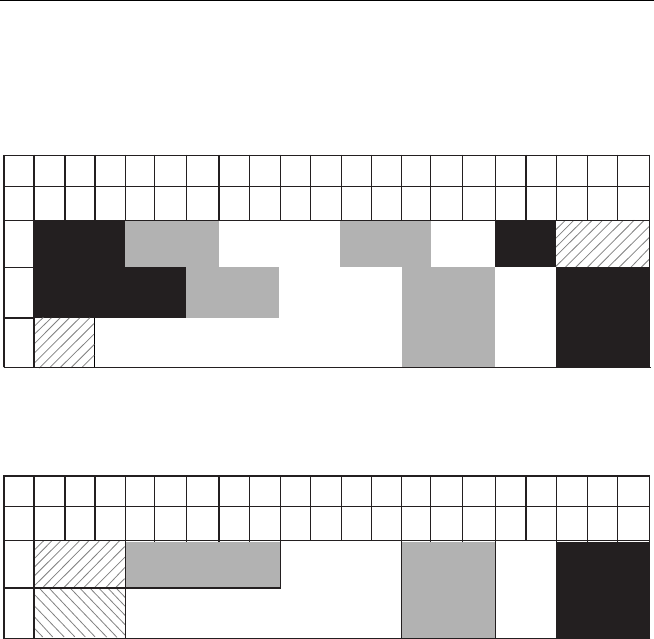
Frame Sizes
The following chart shows SED2 IP20 and NEMA Type 1 (drive only)
frame sizes and power ranges.
HP 4321.51.7.5 5 7.5 403025201510 125100756050
kW 32.21.51.1.75.5.37 4 5.5 30221915117.5 9075554537
240V
480V575V
ABC DE
F
F
C
ED
ABC
The following chart shows SED2 IP54, NEMA Type 12 (drive only) frame
sizes and power ranges.
HP 4321.51.7.5 5 7.5 403025201510 125100756050
kW 32.21.51.1.75.5.37 4 5.5 30221915117.5 9075554537
480V575V
C
BE
CDF
Mechanical Installation
Siemens Building Technologies, Inc. 7
Interpreting Serial Numbers and Date
Codes
Each SED2 has a manufacturing/serial number. The date of
manufacture, or the date code, is part of the serial number. The following
examples show how to interpret the date code and serial code.
Example 1:
A SED2 manufactured April 21, 2000 with a 000219 serial number.
X A M 4 2 1 - 0 0
0 2 1 9
Indicates
manufacturing
location
Year:
M = 00
N = 01
O = 02
P = 03
Q = 04
Month:
Jan = 1,
Feb = 2,
.
.
.
Sept = 9,
Oct = O,
Nov = N,
Dec = D
Day:
01
through
31
A
separator
to facilitate
reading of
the serial
number.
Six-digit serial number
in the range of 1
through 999999.
Example 2:
A SED2 manufactured July 24, 2001 with a 00535 serial number.
T - N 7 2 4 6
2 0 0 0 5 3 5
Indicates
manufacturing
location
Year:
M = 00
N = 01
O = 02
P = 03
Q = 04
Month:
Jan = 1,
Feb = 2,
.
.
.
Sept = 9,
Oct = O,
Nov = N,
Dec = D
Day:
01
through
31
Product
number Five-digit serial number
in the range of 1
through 99999.
SED2 VFD Startup, Operation, and Maintenance Manual
8 Siemens Building Technologies, Inc.
Output Ratings
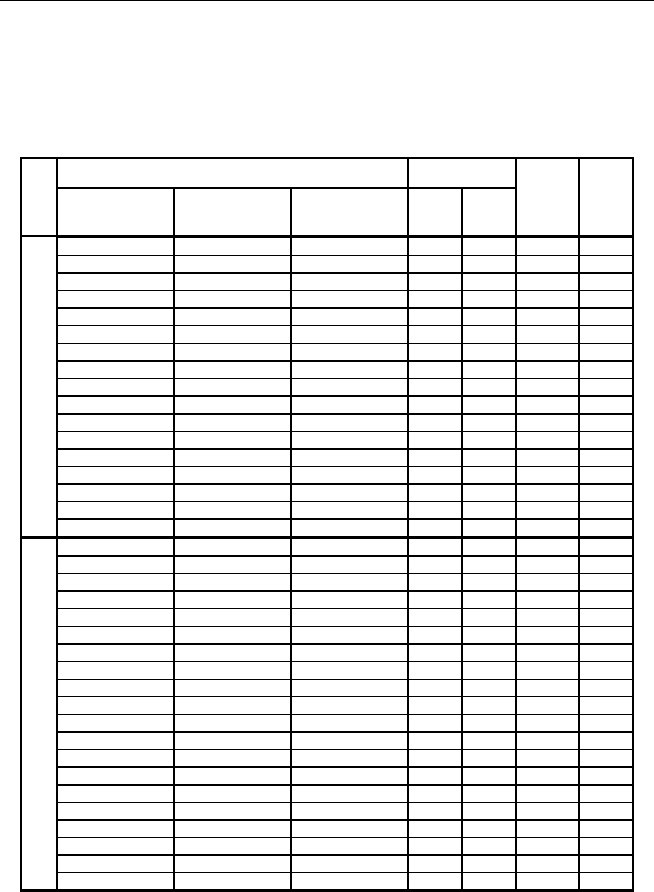
Table 1 shows SED2 product numbers and the associated output ratings.
Table 1. SED2 Product Numbers and Output Ratings.
Product Number Output Rating
Voltage
(±10%)
IP20 NEMA Type 1 IP54, NEMA
Type 12 HP kW
Output
Current
Max.
(amps)
Frame
Size
SED2-0.37/22X SED2-0.37/21X — 0.5
0.37
2.3
A
SED2-0.55/22X SED2-0.55/21X — 0.75
0.55
3.0
A
SED2-0.75/22X SED2-0.75/21X — 1.0
0.75
3.9
A
SED2-1.1/22X SED2-1.1/21X — 1.5
1.1 5.5
B
SED2-1.5/22X SED2-1.5/21X — 2.0
1.5 7.4
B
SED2-2.2/22X SED2-2/21X — 3.0
2.2 10.4
B
SED2-3/22X SED2-3/21X — 4.0
3.0 13.6
C
SED2-4/22X SED2-4/21X — 5.0
4.0 17.5
C
SED2-5.5/22X SED2-5.5/21X — 7.5
5.5 22.0
C
SED2-7.5/22X SED2-7.5/21X — 10.0
7.5 28.0
C
SED2-11/22X SED2-11/21X — 15.0
11.0 42.0
D
SED2-15/22X SED2-15/21X — 20.0
15.0 54.0
D
SED2-18.5/22X SED2-18.5/21X — 25.0
18.5 68.0
D
SED2-22/22X SED2-22/21X — 30.0
22.0 80.0
E
SED2-30/22X SED2-30/21X — 40.0
30.0 104.0
E
SED2-37/22X SED2-37/21X — 50.0
37.0 130.0
F
208V to 240V (3-Phase)
SED2-45/22X SED2-45/21X — 60.0
45.0 154.0
F
SED2-0.37/32X SED2-0.37/31X — 0.5
0.37
2.1
A
SED2-0.55/32X SED2-0.55/31X — 0.75
0.55
2.6
A
SED2-0.75/32X SED2-0.75/31X — 1.0
0.75
2.1
A
SED2-1.1/32X SED2-1.1/31X SED2-1.1/35X 1.5
1.1 3.0
A *
SED2-1.5/32X SED2-5/31X SED2-1.5/35X 2.0
1.5 4.0
A *
SED2-2.2/32X SED2.2/31X SED2-2/35X 3.0
2.2 5.9
B
SED2-3/32X SED2-3/31X SED2-3/35X 4.0
3.0 7.7
B
SED2-4/32X SED2-4/31X SED2-4/35X 5.0
4.0 10.2
B
SED2-5.5/32X SED2-5.5/31X SED2-5.5/35X 7.5
5.5 13.2
C
SED2-7.5/32X SED2-7.5/31X SED2-7/5/35X 10.0
7.5 18.4
C
SED2-11/32X SED2-11/31X SED2-11/35X 15.0
11.0 26.0
C
SED2-15/32X SED2-15/31X SED2-15/35X 20.0
15.0 32.0
C
SED2-18.5/32X SED2-18.5/31X SED2-18.5/35X 25.0
18.5 38.0
D
SED2-22/32X SED2-22/31X SED2-22/35X 30.0
22.0 45.0
D
SED2-30/32X SED2-30/31X SED2-30/35X 40.0
30.0 62.0
D
SED2-37/32X SED2-37/31X SED2-37/35X 50.0
37.0 75.0
E
SED2-45/32X SED2-45/31X SED2-45/35X 60.0
45.0 90.0
E
SED2-55/32X SED2-55/31X SED2-55/35X 75.0
55.0 110.0
F
SED2-75/32X SED2-75/31X SED2-75/35X 100.0
75.0 145.0
F
380V to 480V (3-Phase)
SED2-90-32X SED2-90/31X SED2-90/35X 125.0
90.0 178.0
F
* IP54, NEMA Type 12 drives start at Frame Size B.
Mechanical Installation
Siemens Building Technologies, Inc. 9
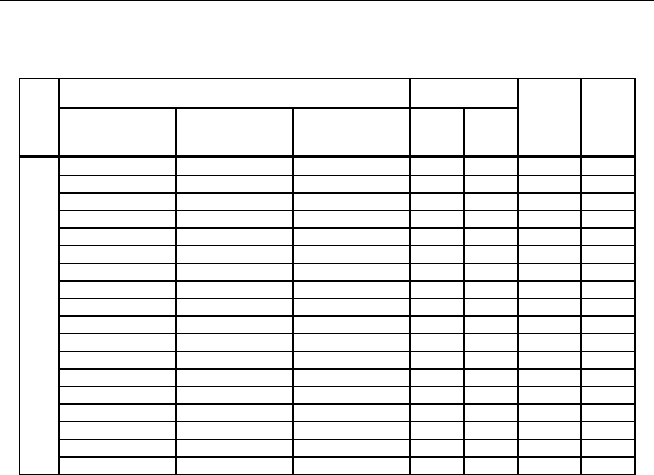
Table 1. SED2 Product Numbers and Output Ratings. (Continued)
Product Number Output Rating
Voltage
(±10%)
IP20 NEMA Type 1 IP54, NEMA
Type 12 HP kW
Output
Current
Max.
(amps)
Frame
Size
SED2-0.75/42X SED2-0.75/41X — 1.0
0.75
1.4
C
SED2-1.1/42X SED2-1.1/41X SED2-1.1/45X 1.5
1.1 2.1
C
SED2-1.5/42X SED2-1.5/41X SED2-1.5/45X 2.0
1.5 2.7
C
SED2-2.2/42X SED2-2.2/41X SED2-2.2/45X 3.0
2.2 3.9
C
SED2-3/42X SED2-3/41X SED2-3/45X 4.0
3.0 5.4
C
SED2-4/42X SED2-4/41X SED2-4/45X 5.0
4.0 6.1
C
SED2-5.5/42X SED2-5.5/41X SED2-5.5/45X 7.5
5.5 9.0
C
SED2-7.5/42X SED2-7.5/41X SED2-7.5/45X 10.0
7.5 11.0
C
SED2-11/42X SED2-11/41X SED2-11/45X 15.0
11.0 17.0
C
SED2-15/42X SED2-15/41X SED2-15/45X 20.0
15.0 22.0
C
SED2-18.5/42X SED2-18.5/41X SED2-18.5/45X 25.0
18.5 27.0
D
SED2-22/42X SED2-22/41X SED2-22/45X 30.0
22.0 32.0
D
SED2-30/42X SED2-30/41X SED2-30/45X 40.0
30.0 41.0
D
SED2-37/42X SED2-37/41X SED2-37/45X 50.0
37.0 52.0
E
SED2-45/42X SED2-45/41X SED2-45/45X 60.0
45.0 62.0
E
SED2-55/42X SED2-55/41X SED2-55/45X 75.0
55.0 77.0
F
SED2-75/42X SED2-75/41X SED2-75/45X 100.0
75.0 99.0
F
500V to 600V (3-Phase)
SED2-90/42X SED2-90/41X SED2-90/45X 125.0
90.0 125.0
F

SED2 VFD Startup, Operation, and Maintenance Manual
10 Siemens Building Technologies, Inc.
Accessories
SED 2 accessories include the following:
Gland Plates
• SED2-GL-A, Gland Plate, Frame A (included with NEMA Type 1)
• SED2-GL-B, Gland Plate, Frame B (included with NEMA Type 1)
• SED2-GL-C, Gland Plate, Frame C (included with NEMA Type 1)
BOP/AOP Door Mounting Kits
• SED2-Door-Kit1, BOP/AOP Single Inverter Door Mounting Kit
• SED2-Door-Kit2, AOP Multi-Inverter Door Mounting Kit
Protection Shields (included with NEMA Type 1)
• SED2-PS-A, Protection Shield, Frame A
• SED2-PS-B, Protection Shield, Frame B
• SED2-PS-C, Protection Shield, Frame C
• SED2-PS-DE, Protection Shield, Frame D, E
Operator Panel
• SED2-BOP1, Basic Operator Panel (included with all SED2s)
• SED2-AOP1, Advanced Operator Panel
LON Interface Option
• SED2-LONI/F
Modbus Interface Cable
• SED2-MODBUS1, Converts SED2 USS bus to Modbus RTU

Mechanical Installation
Siemens Building Technologies, Inc. 11
Environmental Conditions
Install the SED2 in a heated, indoor-controlled environment that is free of
moisture and conductive contaminants, such as condensation and dust.
The air entering the unit for ventilation or cooling must be clean and free
of corrosive materials. If installed in a confined space, remove the heat
from the area by ventilation or by air conditioning equipment. The
ambient temperature must be between 14°F and 104°F (–10°C and
40°C) and the relative humidity must be 0% to 95% non-condensing. Do
not mount unit in direct sunlight.
Storage Temperature:
Maximum temperature: +158°F (+70°C) *
Minimum temperature: –40°F (–40°C)
Operating Temperature:
Maximum temperature: +104°F (+40°C) *
Minimum temperature: +14°F (–10°C)
* Be aware of the potential increase in temperature inside a control
cabinet (de-rating is required; contact the factory).
Humidity: Maximum 95% rh (non-condensing)
Altitude: The SED2 can be installed at altitudes up to 3280 ft (1000 m)
above sea level with no reduction in output current rating (contact the
factory).
NOTE: If installing the SED2 at an altitude higher than 3280 ft
(1000 m) above sea level, de-rating is required.
Location: Do not install the SED2 in an area that is exposed to repeated
shock or vibration, water hazards, or atmospheric pollutants such as dust
and corrosive gases.
EMI and RFI: Do not install the SED2 near powerful sources of
electromagnetic interference (EMI) and radio frequency interference
(RFI) without a suitable filter.

SED2 VFD Startup, Operation, and Maintenance Manual
12 Siemens Building Technologies, Inc.
Dimensions and Mounting for IP20
SED2s
Overall Dimensions and Mounting
Specifications
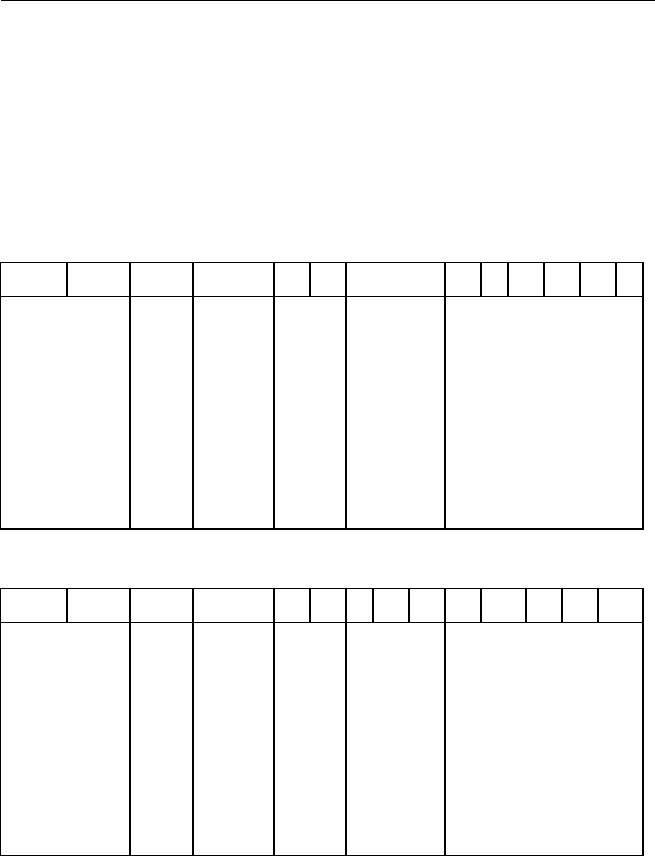
Table 2. Overall Dimensions of IP20 SED2 in Inches (Millimeters).
Frame
Size Height
Width
Depth Mounting Specification
Tightening
Torque
lb-in (Nm)
Weight
lb (kg)
A 6.8
(173) 2.9
(73) 5.9
(149)
2 x M4 Bolts, Nuts, and
Washers, or
Connecting to DIN rail
22
(2.5) 2.9
(1.3)
B 8.0
(202) 5.9
(149)
6.8
(172) 4 x M4 Bolts, Nuts, and
Washers 22
(2.5) 7.5
(3.4)
C 9.6
(245) 7.3
(185)
7.7
(195) 4 x M5 Bolts, Nuts, and
Washers 26
(3.0) 12.1
(5.5)
D 20.5
(520) 10.8
(275)
9.6
(245) 4 x M8 Bolts, Nuts, and
Washers 115
(13) 35.3
(16)
E 25.6
(650) 10.8
(275)
9.6
(245) 4 x M8 Bolts, Nuts, and
Washers 115
(13) 44.1
(20)
F 33.5
(850) 13.8
(350)
12.6
(320) 4 x M8 Bolts, Nuts, and
Washers 221
(25) 116
(53)
Mechanical Installation
Siemens Building Technologies, Inc. 13
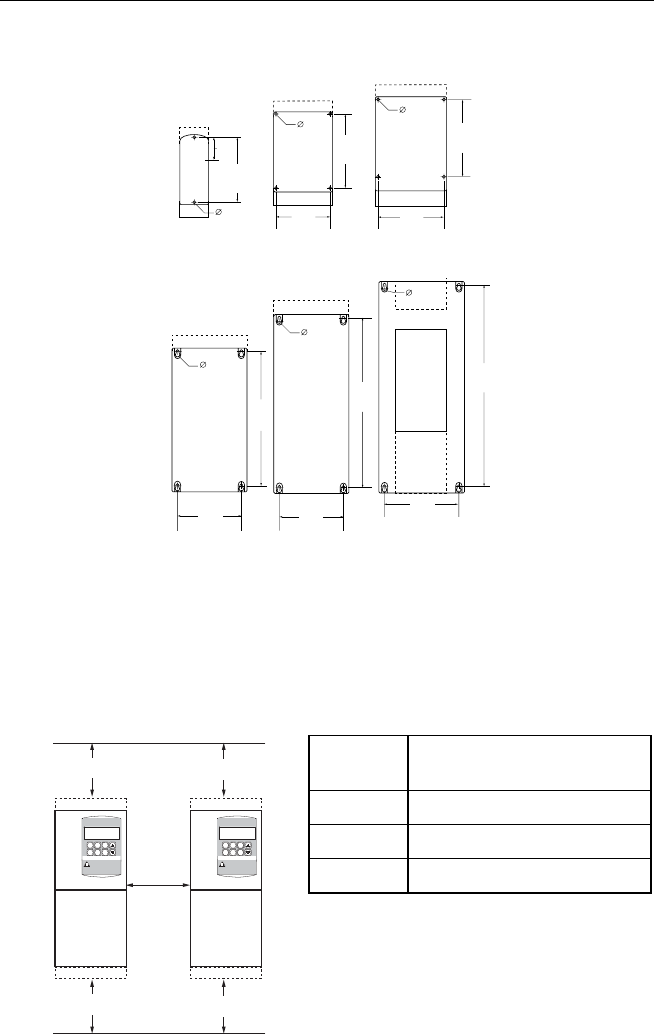
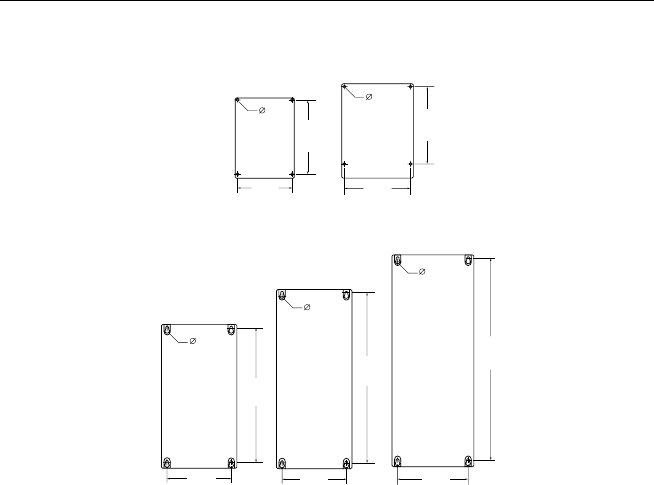
Mounting Dimensions
Frame Size A Frame Size B Frame Size C
Frame Size D
Frame Size E
Frame Size F
0.19
(4.8)
5.4
(138)
6.9
(174)
0.22
(5.5)
6.9
(174)
8.0
(204)
0.68
(17.5)
19.1
(486)
9.3
(235)
0.68
(17.5)
24.3
(616)
9.3
(235)
0.59
(15)
31.9
(810)
11.8
(300)
6.3
(160)
0.17
(4.5)
0.22
(5.5)
VFD0012R1
Figure 1. Mounting Dimensions of IP20 SED2 in Inches (Millimeters).
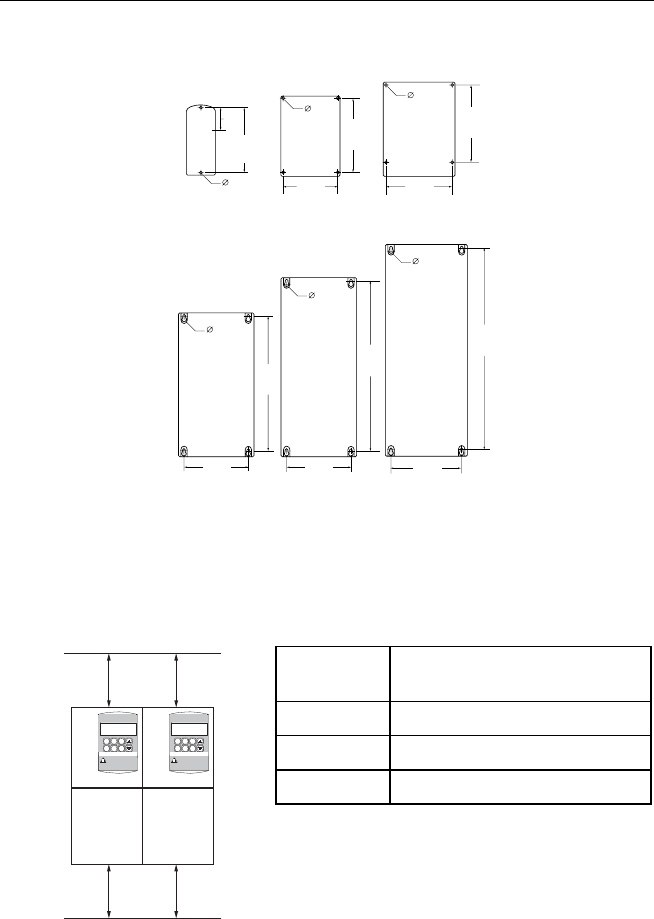
Mounting Instructions
The IP20 SED2 can mount side-by-side without space in between units.
There must be a minimum clearance at the top and bottom for ventilation
and equipment access.
Frame
Size Vmin Minimum Clearance in
Inches (Millimeters)
A, B, C 4 (100)
D, E 11-3/4 (300)
F 13-3/4 (350)
SED2
SIEMENS
Vmin.
Vmin.
VFD0143R1
SED2
SIEMENS
Mounting Clearance Note:
If fitted with a protective shield, allow 12-inches (305 mm) of space
between each SED2 to allow for sufficient heat dissipation.
SED2 VFD Startup, Operation, and Maintenance Manual
14 Siemens Building Technologies, Inc.
Gland Plate Installation and Conduit
Connections
CAUTION:
Bonding between conduit connections is not automatic and
must be provided as part of the installation.
Each bonding conductor must be equal or greater in cross-
section to the power supply cable.
.90
(22.8)
Ground
Ground
VFD0002R1
Conduit
Connections:
Installation:
Figure 2. Gland Plate Installation and Conduit Connection Diameters for
Frame Size A.
Mechanical Installation
Siemens Building Technologies, Inc. 15
Frame Size B Frame Size C
.90
(22.8) .90
(22.8)
.74
(18.8) 1.10
(28) 1.10
(28)
.74
(18.8)
Ground
VFD0003R1
Conduit Connections:
Installation:
Figure 3. Gland Plate Installation and Conduit Connection Diameters for
Frame Size B and C.
SED2 VFD Startup, Operation, and Maintenance Manual
16 Siemens Building Technologies, Inc.
20 21 22 23 24 25
29 3017 26 27 2812 13 14 15 16
10 11678912345
ON
12
PE
VFD0062R1
1.77
(45.0)
.90
(22.8)
1.10
(28.4)
1.77
(45.0)
1.77
(45.0)
Figure 4. Conduit Connection Diameters for Frame Size D and E
in Inches (Millimeters).
VFD0091R1
1.0
(25)
14.0
(356)
13.5
(343) 6.8
(173)
1.5
(38)
.35
(9)
0.25
(6)
6.1
(155) 3.5
(89)
1.8
(46) 1.8
(46)
.3
(58)
o
o
9.0
(229)
1.4
(36)
4.4
(112)
o
o
Figure 5. Conduit Connection Diameters (Bottom View)
for Frame Size F in Inches (Millimeters).

Mechanical Installation
Siemens Building Technologies, Inc. 17
Dimensions and Mounting for NEMA
Type 1 SED2s
Overall Dimensions and Mounting
Specifications
Table 3. Overall Dimensions of NEMA Type 1 SED2 Assembled with a
Protective Shield and a Gland Plate. Dimensions in Inches (Millimeters).
Frame
Size Height
Width
Depth
Mounting Specification
Tightening
Torque
lb-in (Nm)
Weight
lb (kg)
A 9.1
(231) 2.9
(73) 5.9
(149)
2 x M4 Bolts, Nuts, and
Washers, or
Connecting to DIN rail
22
(2.5) 3.2
(1.5)
B 11.8
(300) 5.9
(149) 6.8
(172)
4 x M4 Bolts, Nuts, and
Washers 22
(2.5) 8.3
(3.8)
C 13.8
(351) 7.3
(185) 7.7
(195)
4 x M5 Bolts, Nuts, and
Washers 26
(3.0) 13.6
(6.2)
D 24.6
(625) 10.8
(275) 9.6
(245)
4 x M8 Bolts, Nuts, and
Washers 115
(13) 37.5
(17.1)
E 29.7
(754) 10.8
(275) 9.6
(245)
4 x M8 Bolts, Nuts, and
Washers 115
(13) 46.4
(21.1)
F 54.5
(1384)
16.0
(406) 14.0
(356)
4 x M8 Bolts, Nuts, and
Washers 221
(25) 200
(91)
SED2 VFD Startup, Operation, and Maintenance Manual
18 Siemens Building Technologies, Inc.
Mounting Dimensions
9.3
(235)
Frame Size A
Frame Size B Frame Size C
Frame Size D
Frame Size E
6.3
(160)
0.17
(4.5)
0.22
(5.5)
5.4
(138)
0.19
(4.8) 6.9
(174)
6.9
(174)
0.22
(5.5) 8.0
(204)
0.68
(17.5)
19.1
(486)
9.3
(235)
0.68
(17.5)
24.3
(616)
Frame Size F
15
(381)
0.59
(15)
51
(1295)
VFD0092R2
Figure 6. Mounting Dimensions of NEMA Type 1 SED2
in Inches (Millimeters).
Mounting Instructions
The NEMA Type 1 SED2 must have a minimum clearance at the top and
bottom for ventilation and equipment access. In addition, allow 12-inches
(305 mm) of space between each SED2 to allow for sufficient heat
dissipation.
Frame
Size
Vmin Minimum Clearance
in Inches (Millimeters)
A, B, C 4 (100)
D, E 11-3/4 (300)
F 13-3/4 (350)
SED2
VFD0143R1
Vmin.
Vmin.
Vmin.
Vmin.
12 Inches
(305 mm)
SIEMENS SIEMENS
SED2

Mechanical Installation
Siemens Building Technologies, Inc. 19
Dimensions and Mounting for IP54,
NEMA Type 12 SED2s
Overall Dimensions and Mounting
Specifications
Table 4. Overall Dimensions and Mounting Clearances for IP54, NEMA
Type 12 SED2. Dimensions in Inches (Millimeters).
Overall Dimensions Mounting Clearance
Frame
Size Height
Width
Depth Top Bottom
Sides
Mounting
Specification
Tightening
Torque
lb-in (Nm)
Weight
lb (kg)
B 15.2
(385)
10.6
(270)
10.6
(268)
5.9
(150)
5.9
(150)
3.9
(100)
4 x M6 Bolts,
Nuts, and
Washers
44
(5) 22
(10)
C 23.9
(606)
13.8
(350)
11.2
(284)
5.9
(150)
5.9
(150)
3.9
(100)
4 x M6 Bolts,
Nuts, and
Washers
44
(5) 42
(19)
D 27.0
(685)
14.2
(360)
13.9
(353)
7.9
(200)
7.9
(200)
5.9
(150)
4 x M8 Bolts,
Nuts, and
Washers
115
(13) 77
(35)
E 34.8
(885)
14.2
(360)
17.8
(453)
7.9
(200)
7.9
(200)
5.9
(150)
4 x M8 Bolts,
Nuts, and
Washers
115
(13) 105
(48)
F 45.3
(1150)
17.7
(450)
18.6
(473)
11.8
(300)
9.8
(250)
5.9
(150)
4 x M8 Bolts,
Nuts, and
Washers
177
(20) 178
(81)
SED2 VFD Startup, Operation, and Maintenance Manual
20 Siemens Building Technologies, Inc.
Mounting Dimensions
Frame Size B Frame Size C
0.19
(4.8)
9.1
(230)
13.5
(343)
0.22
(5.5)
12.3
(313)
22.2
(564)
Frame Size D
Frame Size E
Frame Size F
0.59
(15)
43.8
(1112)
15.7
(400)
0.68
(17.5)
25.5
(647)
12.2
(310)
0.68
(17.5)
33.5
(847)
12.2
(310)
VFD0013R1
Figure 7. Mounting Dimensions of IP54, NEMA Type 12 SED2
in Inches (Millimeters).

Mechanical Installation
Siemens Building Technologies, Inc. 21
Mounting Instructions
There must be a clearance of at least 5-7/8 inches (150 mm) in all
directions. A good bonding between the SED2 and the metal backplate is
necessary to ensure good grounding and low RFI (radio frequency
interference). If necessary, remove some backplate paint and/or use
toothed washers to ensure safety and EMC (electro-magnetic
compatibility). Earth braid screened armored cable provides the best
bond.
VFD0144R1
Smin.
Vmin.
Smin.
Smin.
Vmin.
SED2
SIEMENS
SED2
SIEMENS
Frame Size
Smin Minimum Clearance
in Inches (Millimeters) Vmin Minimum Clearance
in Inches (Millimeters)
B, C 5-7/8 (150) 5-7/8 (150)
D, E 5-7/8 (150) 11-3/4 (300)
F 5-7/8 (150) 13-3/4 (350)
NOTE: Install the SED2 vertically for optimum cooling. Do not
obstruct the vents on the SED2. Additional ventilation may be
required if the SED2 is mounted horizontally.

SED2 VFD Startup, Operation, and Maintenance Manual
22 Siemens Building Technologies, Inc.
Electrical Installation
DANGER:
• To ensure safe operation of the SED2, authorized persons
must install and commission it in full compliance with the
warnings, cautions, and notes in this manual. Authorized
persons must also follow general and regional installation
and safety regulations regarding working with high voltages
as well as relevant regulations for the correct use of tools
and protective equipment.
• The SED2 must be grounded (per IEC 536, Class 1, NEC
and other relevant industry standards). Extremely
hazardous conditions may result if the SED2 is not correctly
grounded.
NOTE: IP20 and NEMA Type 1 SED2s can operate in
ungrounded systems if the Y capacitor is
disconnected or removed.
IP54, NEMA Type 12 SED2s cannot operate in
ungrounded systems. See the Operation in
Ungrounded Systems section for more details.
• The SED2 is suitable for use in a circuit capable of
delivering not more than 10,000 symmetrical amperes, for
a maximum voltage of 240/480/575V when protected by a
time delay Type J, H, or K fuse or circuit breaker.
• Always wait 5 minutes after disconnecting the SED2 from
the power source before performing any work. The DC link
capacitors of all SED2s remain charged with dangerous
voltages for 5 minutes after all power sources have been
disconnected. When working on IP20 units, note that live
parts are exposed. Do not touch these parts.
• In cases where a fault in the input or output power wiring
could cause significant equipment damage or severe
physical injury (such as potentially dangerous short
circuits), use additional external precautions to ensure safe
operation (such as independent limit switches and
mechanical interlocks).

Electrical Installation
Siemens Building Technologies, Inc. 23
Extended Storage: Conditioning of
Capacitors
After an extended period of storage, recharge the capacitors in the SED2.
Calculate the storage time from the date of manufacture or the date code,
and not from the date of delivery. (See the Interpretation of Serial
Numbers and Date Codes section for more details.) The recharge
procedure varies according to the storage period as follows:
Period of
Storage Required Action Total Preparation
Time
1 year or less Recharging not required. No preparation
1 to 2 years Before issuing the “run” command, connect
the SED2 to input power for one hour. 1 hour
2 to 3 years Use a variable AC power source as follows:
• Apply 25% of the input voltage for
30 minutes.
• Increase the voltage to 50% for an
additional 30 minutes.
• Increase the voltage to 75% for an
additional 30 minutes.
• Increase the voltage to 100% for an
additional 30 minutes.
The SED2 is then ready for operation.
2 hours
3 or more
years Use a variable AC power source as follows:
• Apply 25% of the input voltage for
2 hours.
• Increase the voltage to 50% for an
additional 2 hours.
• Increase the voltage to 75% for an
additional 2 hours.
• Increase the voltage to 100% for an
additional 2 hours.
The SED2 is then ready for operation.
8 hours
CAUTION:
After an extended period of storage, if capacitors are not
properly recharged, catastrophic damage to the drive can
result.
SED2 VFD Startup, Operation, and Maintenance Manual
24 Siemens Building Technologies, Inc.
Input Power and Motor Connections
DANGER:
• Make certain that the motor rated full load amps (FLA)
does NOT exceed the rated output current of the SED2
controlling it.
When multiple motors are simultaneously operated by the
SED2, the sum of all motor rated FLA values must be
less than or equal to the SED2 controlling them.
• Never switch on the SED2 with it open.
• Always isolate the input power cables before connecting
them to the SED2.
• Always use insulated tools when working on input power
and motor terminals.
• Ensure that terminal covers are securely replaced after
connecting the input power and motor cables.
WARNING:
• Verify that the SED2 and motor are correctly rated for the
input power voltage.
• Verify that the input power cables are correctly sized for
the anticipated use.
• Confirm that appropriate circuit breakers or fuses have
been installed between the input power supply and the
SED2.
• Never use high-voltage insulation test equipment on any
cables connected to the SED2.
Electrical Installation
Siemens Building Technologies, Inc. 25
Operation in Ungrounded Systems
IP20 and NEMA Type 1 SED2s can operate in ungrounded systems if the
Y capacitor is disconnected or removed. They remain in operation when
an input ground fault occurs. In the event of an output ground fault, the
SED2 switches off and displays fault code F0001.
NOTE: IP54, NEMA Type 12 SED2s cannot operate in ungrounded
systems.
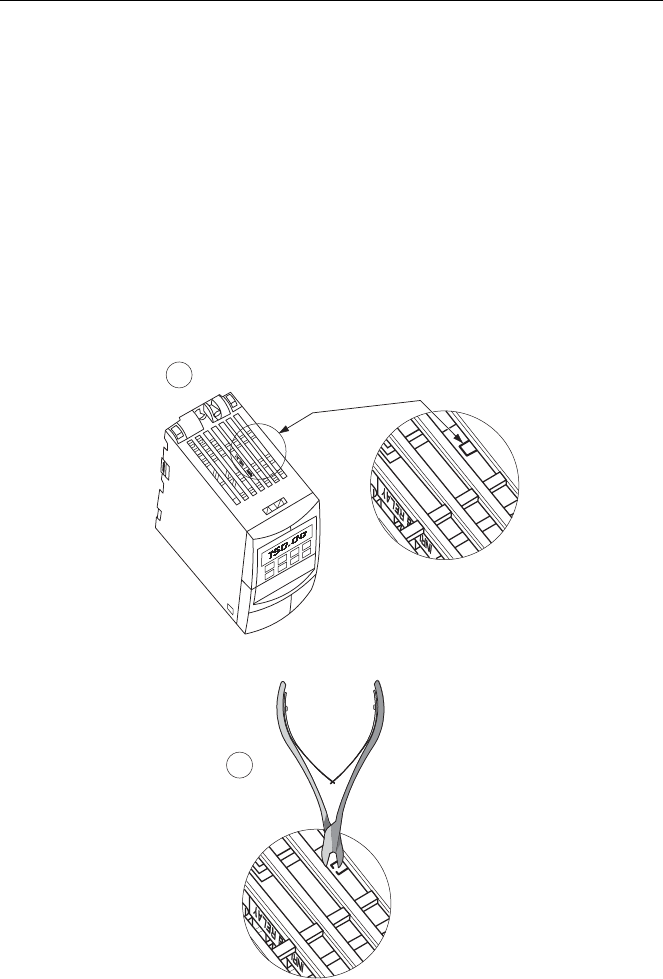
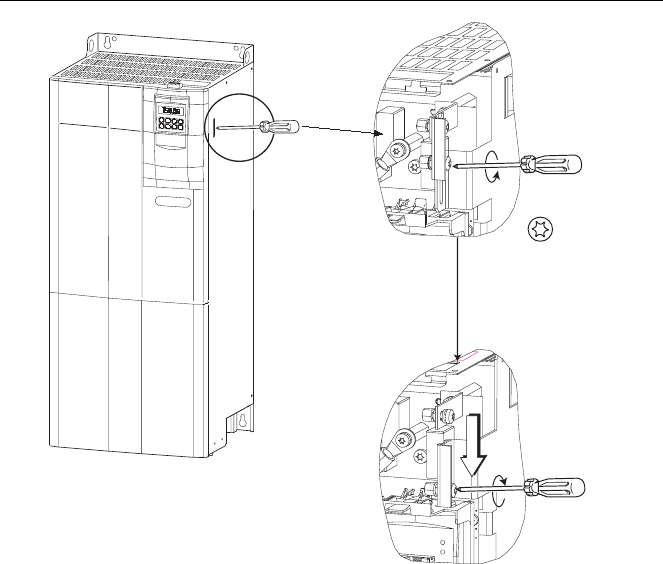
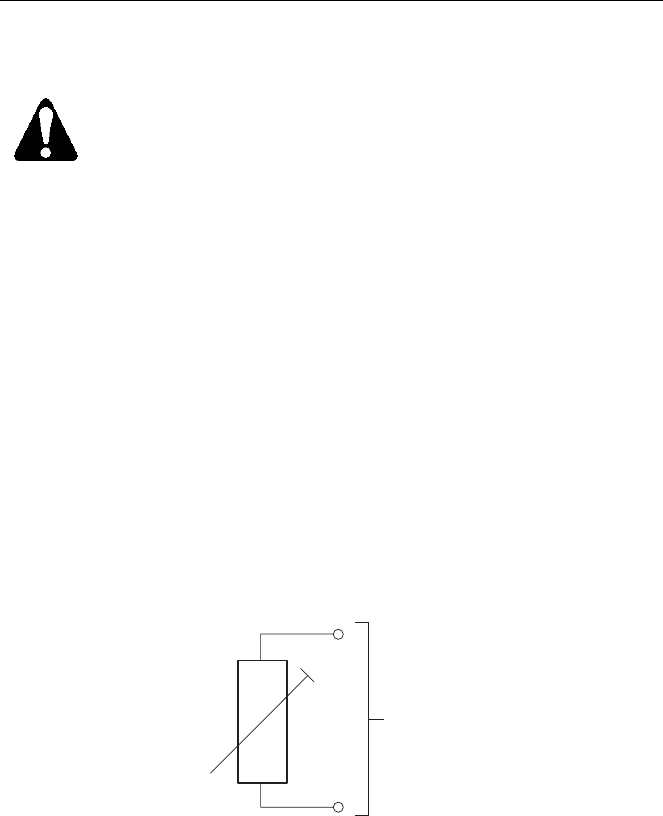
Ungrounded Systems and Y Capacitor
In ungrounded systems, remove or disconnect the Y capacitor (and install
an output choke/load reactor) per Figures 8 through 11.
1
2
VFD060R1
Figure 8. Disconnecting Y Capacitor in SED2 Frame Size A.
SED2 VFD Startup, Operation, and Maintenance Manual
26 Siemens Building Technologies, Inc.
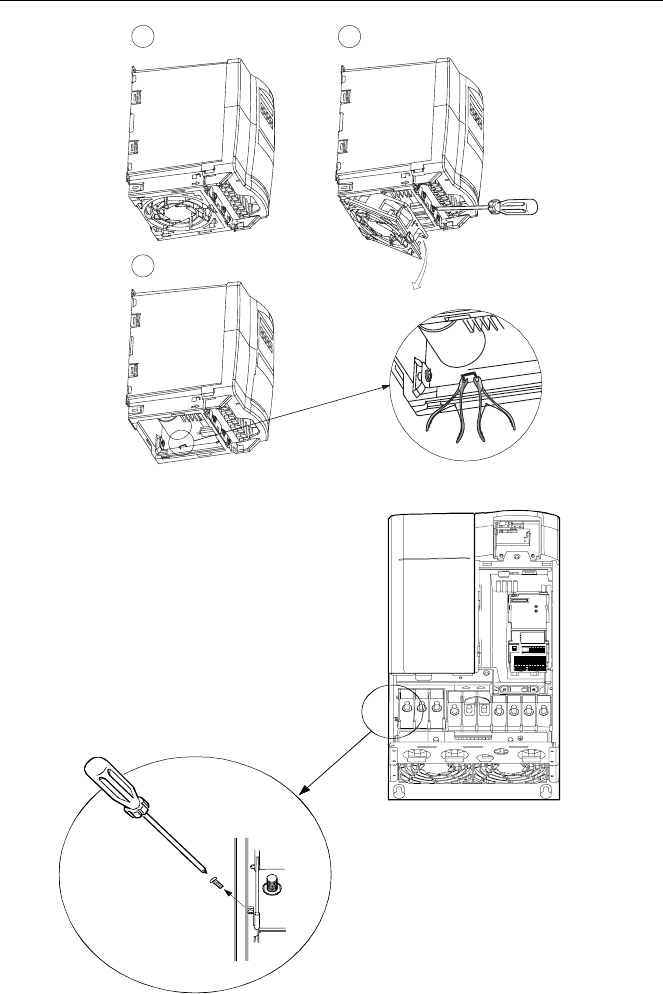
12
3
VFD0061R1
Figure 9. Disconnecting Y Capacitor in SED2 Frame Size B and C.
20 21 22 2 3 24 25
29 3017 26 27 2812 13 14 15 16
10 11678912345
ON
12
PE
5192Z03en
Torx driver T20
M4
Screw
Figure 10. Disconnecting Y Capacitor in SED2 Frame Size D and E.
Electrical Installation
Siemens Building Technologies, Inc. 27
M6
T30
Torx screwdriver
VFD0063R1
Figure 11. Disconnecting Y Capacitor in SED2 Frame Size F.
SED2 VFD Startup, Operation, and Maintenance Manual
28 Siemens Building Technologies, Inc.
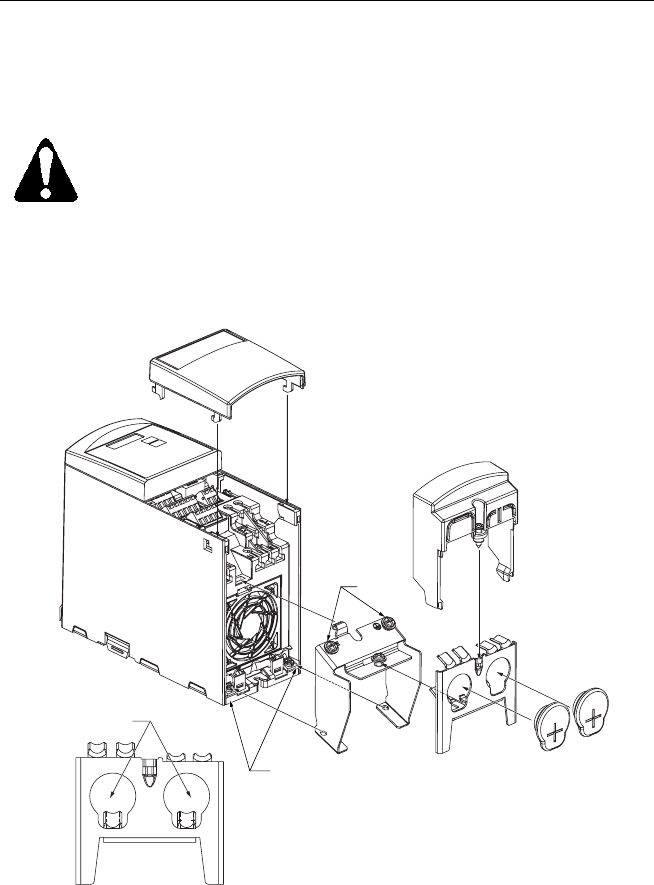
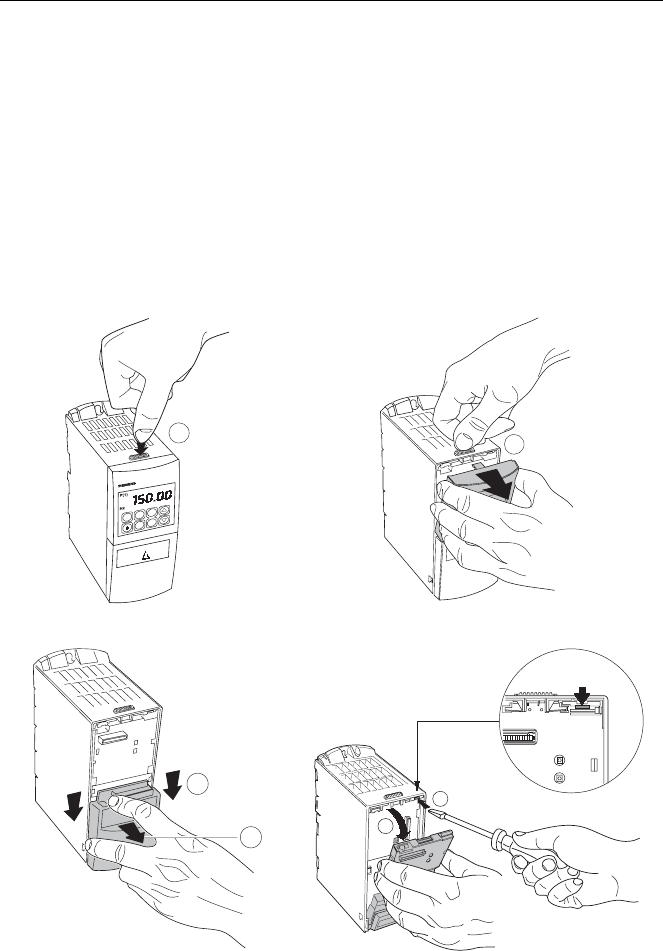
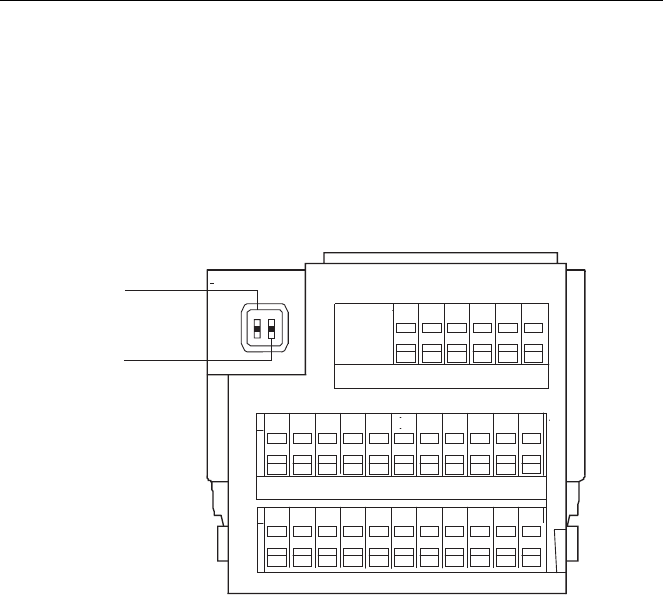
Access to Connection Terminals
To access input power and output motor connection terminals, remove
the cover, operator panel, terminal cover, and I/O module per Figures 12
through 17.
The I/O module is located under the operator panel. In frame sizes A
through C/IP20, and NEMA Type 1 SED2s, the operator panel directly
connects to the I/O module. In frame sizes D through F, and all IP54
NEMA Type 12 SED2s, the operator panel connects to the I/O module via
a cable.
In all SED2s, the control module is located under the I/O module.
VFD0064R1
1
VFD0065R1
2
Figure 12. Removing Operator Panel (All Frame Sizes).
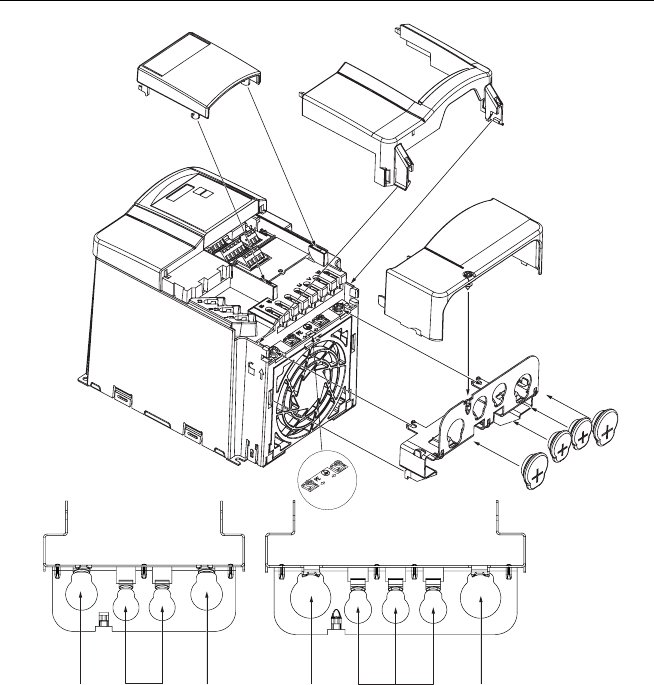
VFD0066R1
2
1
1
2
VFD0067R1
Figure 13. Removing Terminal
Cover (All Frame Sizes). Figure 14. Removing I/O Module
(All Frame Sizes).

Electrical Installation
Siemens Building Technologies, Inc. 29
1
VFD0068R1
Figure 15. Removing Cover on Frame Sizes B and C.
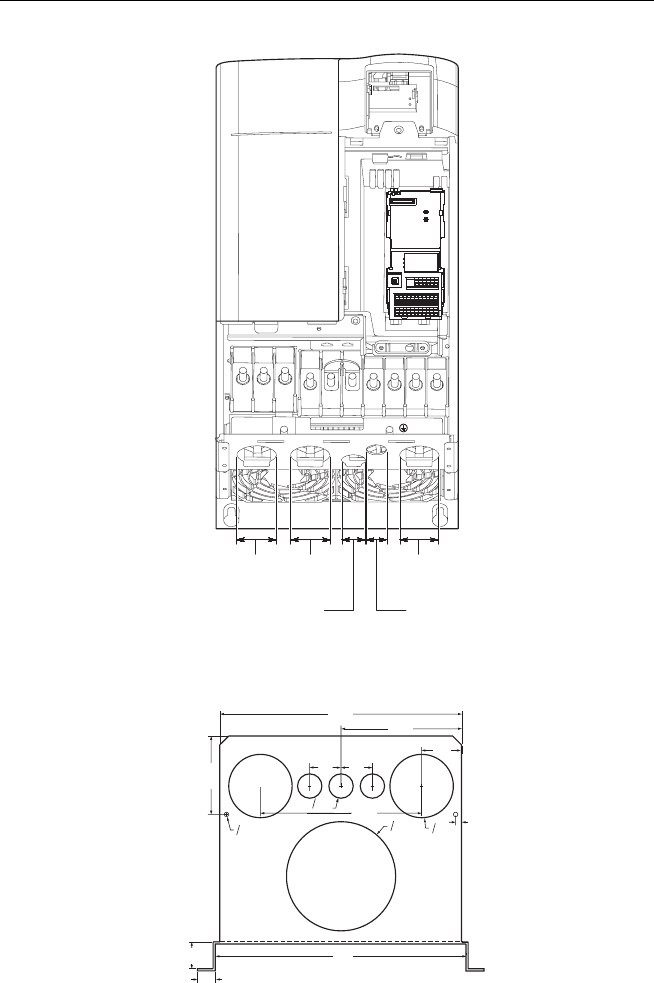
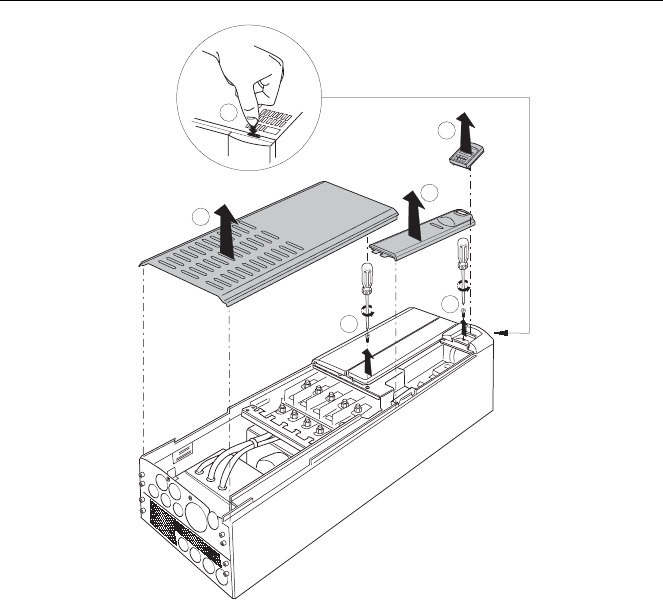
3
1
2
5
6
4
VFD0069R1
Figure 16. Accessing Connection Terminals for Frame Sizes D and E.
SED2 VFD Startup, Operation, and Maintenance Manual
30 Siemens Building Technologies, Inc.
2
3
4
1
5
6
VFD0070R1
Figure 17. Accessing Connection Terminals for Frame Size F.
Electrical Installation
Siemens Building Technologies, Inc. 31
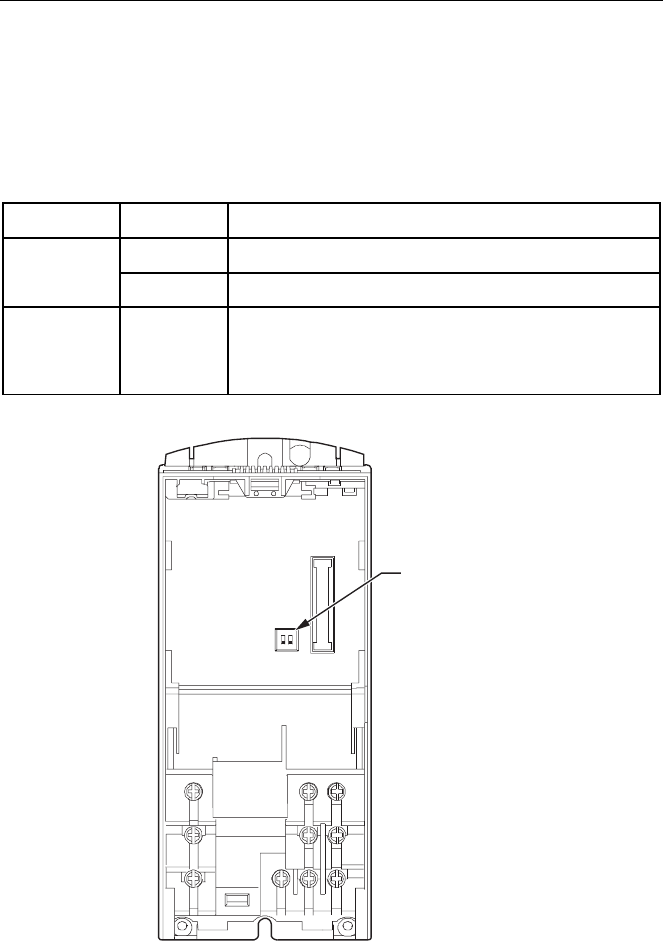
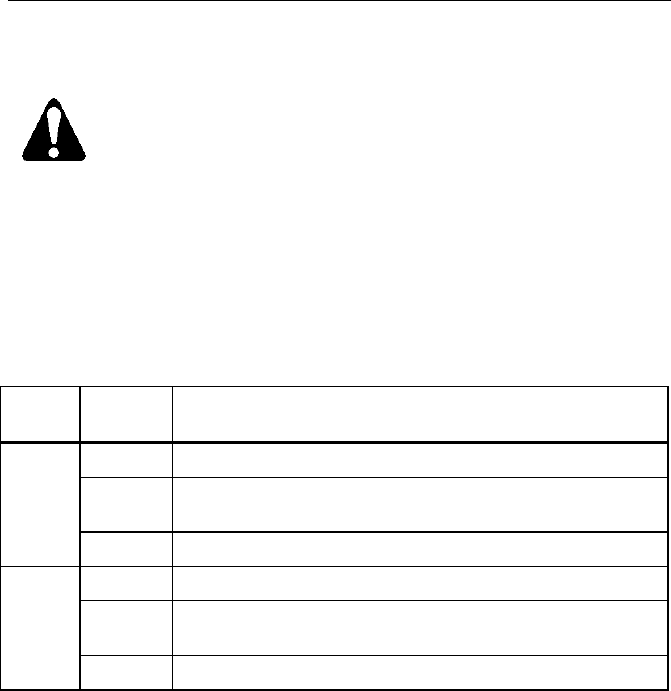
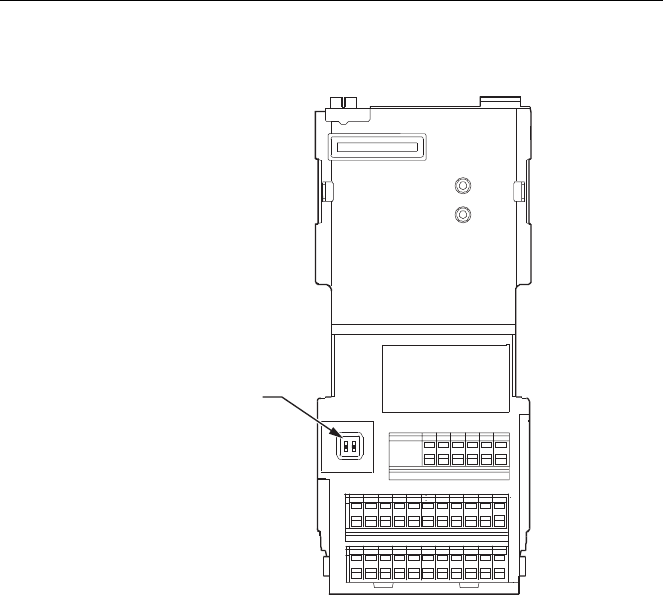
Motor Frequency and Unit of Measurement DIP
Switches
In all versions of the SED2, DIP switches for selecting motor frequency
and unit of measurement are located on the control module under the I/O
module. (See Access to Connection Terminals section for disassembly
instructions.)
DIP Switch Position Function
ON North American operation (60 Hz, hp). 2 *
OFF European operation (50 Hz, kW), factory default.
1 OFF Not for customer use.
NOTE:
This switch must be OFF for correct operation.
* Set DIP switch 2 ON (60 Hz, hp) for all North American installations.
VFD0145R1
ON
12
DIP SWITCHES
Figure 18. Location of Motor Frequency and Unit of Measurement DIP
Switches on Control Module.

SED2 VFD Startup, Operation, and Maintenance Manual
32 Siemens Building Technologies, Inc.
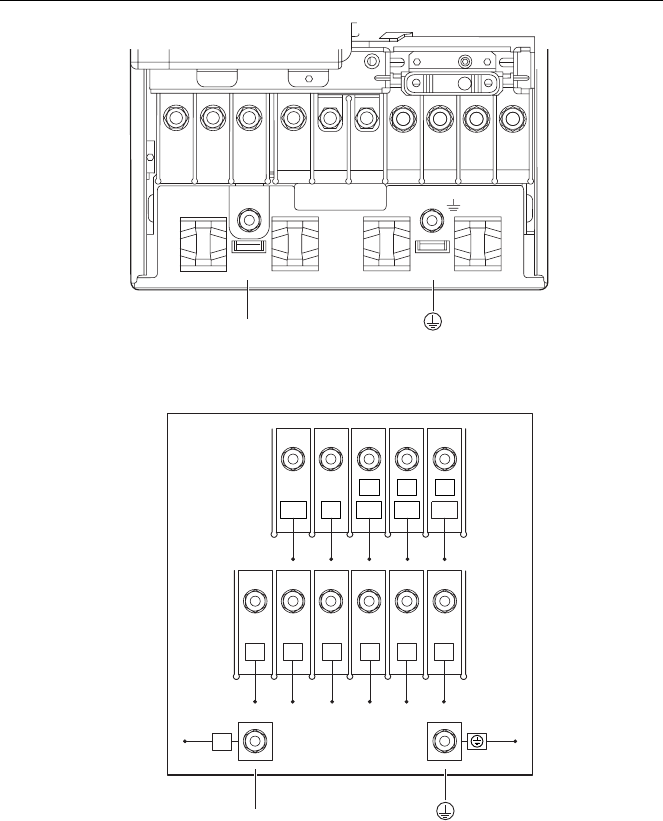
Input Power and Motor Terminal Layout
DANGER:
The following terminals carry hazardous voltages even when
the SED2 is not running:
• Input power terminals: L1, L2, L3
• Motor terminals: U, V, W
• Link terminals: DC-, DC+/B+, DC/R+, B- (not for
customer use)
(Ground)
PE
(Ground)
L1
L2
L3
DC+ DC-
UVW
DC
R+ B-
VFD0071R1
Figure 19. Input Power and Motor Terminal Layout for SED2 Frame Size A.
UVWDC- DC+
B+ DC
R+ B -
L3
L2
L1
PE
VFD0072R1
(Ground)
PE
(Ground)
Figure 20. Input Power and Motor Terminal Layout for SED2
Frame Size B and C.
Electrical Installation
Siemens Building Technologies, Inc. 33
L1 L2 L3 DC- DC+
B+ DC
R+ B- U V W
VFD0073R1
(Ground)
PE
(Ground)
Figure 21. Input Power and Motor Terminal Layout for SED2
Frame Size D and E.
VFD0074R1
DC+DC+DC+DC- B-
R+ B+ B+
L3 U V WL2L1
PE
(Ground)
PE
(Ground)
Figure 22. Input Power and Motor Terminal Layout for SED2
Frame Size F.

SED2 VFD Startup, Operation, and Maintenance Manual
34 Siemens Building Technologies, Inc.
Tightening Torque for Input Power and Motor
Connections
Frame size A B C D E F
Tightening
torque
lb-in (Nm)
9.7
(1.1) 13.3
(1.5) 19.9
(2.25) 88.5
(10) max.
88.5
(10) max. 442
(50)
Cable Cross-Sections for Input Power and Motor
Cables
Table 5. Cable Cross-Sections for Input Voltage Range
3Ø AC 200V through 240V.
Input Power Cable Motor Cable
Maximum
Output
rating
kW (hp)
Minimum
Cross-
Section
AWG (mm2)
Maximum
Cross-
Section
AWG (mm2)
Minimum
Cross-
Section
AWG (mm2)
Maximum
Cross-
Section
AWG (mm2)
0.37 (.50)
17 (1) 13 (2.5) 17 (1) 13 (2.5)
0.55 (.75)
17 (1) 13 (2.5) 17 (1) 13 (2.5)
0.75 (1.0)
17 (1) 13 (2.5) 17 (1) 13 (2.5)
1.1 (1.5) 17 (1) 9 (6) 17 (1) 9 (6)
1.5 (2.0) 15 (1.5) 9 (6) 17 (1) 9 (6)
2.2 (3.0) 13 (2.5) 9 (6) 17 (1) 9 (6)
3 (4.0) 11 (4) 7 (10) 15 (1.5) 7 (10)
4 (5.0) 11 (4) 7 (10) 11 (4) 7 (10)
5.5 (7.5) 11 (4) 7 (10) 11 (4) 7 (10)
7.5 (10) 7 (10) 2 (35) 7 (10) 2 (35)
11 (15) 5 (16) 2 (35) 16 (5) 2 (35)
15 (20) 5 (16) 2 (35) 5 (16) 2 (35)
18.5 (25) 3 (25) 2 (35) 5 (16) 2 (35)
22 (30) 2 (35) 2 (35) 2 (35) 2 (35)
30 (40) 0 (50) -5 (150) 0 (50) -5 (150)
37 (50) -2 (70) -5 (150) -2 (70) -5 (150)
45 (60) -2 (70) -5 (150) -3 (95) -5 (150)

Electrical Installation
Siemens Building Technologies, Inc. 35
Table 6. Cable Cross-Sections for Input Voltage Range
3Ø AC 380V through 480V.
Input Power Cable Motor Cable
Maximum
Output
rating
kW (hp)
Minimum
Cross-
Section
AWG (mm2)
Maximum
Cross-
Section
AWG (mm2)
Minimum
Cross-
Section
AWG (mm2)
Maximum
Cross-
Section
AWG (mm2)
0.37 (.50)
17 (1) 13 (2.5) 17 (1) 13 (2.5)
0.55 (.75)
17 (1) 13 (2.5) 17 (1) 13 (2.5)
0.75 (1.0)
17 (1) 13 (2.5) 17 (1) 13 (2.5)
1.1 (1.5) 17 (1) 13 (2.5) 17 (1) 13 (2.5)
1.5 (2.0) 17 (1) 13 (2.5) 17 (1) 13 (2.5)
2.2 (3.0) 17 (1) 9 (6) 17 (1) 9 (6)
3 (4.0) 17 (1) 9 (6) 17 (1) 9 (6)
4 (5.0) 17 (1) 9 (6) 17 (1) 9 (6)
5.5 (7.5) 13 (2.5) 7 (10) 13 (2.5) 7 (10)
7.5 (10) 11 (4) 7 (10) 11 (4) 7 (10)
11 (15) 9 (6) 7 (10) 9 (6) 7 (10)
15 (20) 7 (10) 2 (35) 7 (10) 2 (35)
18.5 (25) 7 (10) 2 (35) 7 (10) 2 (35)
22 (30) 5 (16) 2 (35) 5 (16) 2 (35)
30 (40) 3 (25) 2 (35) 3 (25) 2 (35)
37 (50) 3 (25) 2 (35) 2 (35) 2 (35)
45 (60) 2 (35) -5 (150) 2 (35) -5 (150)
55 (75) -2 (70) -5 (150) -2 (70) -5 (150)
75 (100) -2 (70) -5 (150) -3 (95) -5 (150)
90 (125) -2 (70) -5 (150) -3 (95) -5 (150)

SED2 VFD Startup, Operation, and Maintenance Manual
36 Siemens Building Technologies, Inc.
Table 7. Cable Cross-Sections for Input Voltage Range
3Ø AC 500V through 600V.
Input Power Cable Motor Cable
Maximum
Output
rating
kW (hp)
Minimum
Cross-
Section
AWG (mm2)
Maximum Cross-
Section
AWG (mm2)
Minimum
Cross-
Section
AWG (mm2)
Maximum Cross-
Section
AWG (mm2)
0.75 (1.0)
17 (1) 7 (10) 17 (1) 7 (10)
1.1 (1.5) 17 (1) 7 (10) 17 (1) 7 (10)
1.5 (2.0) 17 (1) 7 (10) 17 (1) 7 (10)
2.2 (3.0) 17 (1) 7 (10) 17 (1) 7 (10)
3 (4.0) 17 (1) 7 (10) 17 (1) 7 (10)
4 (5.0) 17 (1) 7 (10) 17 (1) 7 (10)
5.5 (7.5) 15 (1.5) 7 (10) 15 (1.5) 7 (10)
7.5 (10) 13 (2.5) 7 (10) 13 (2.5) 7 (10)
11 (15) 11 (4) 7 (10) 11 (4) 7 (10)
15 (20) 9 (6) 2 (35) 9 (6) 2 (35)
18.5 (25) 9 (6) 2 (35) 9 (6) 2 (35)
22 (30) 7 (10) 2 (35) 7 (10) 2 (35)
30 (40) 5 (16) 2 (35) 5 (16) 2 (35)
37 (50) 3 (25) 2 (35) 5 (16) 2 (35)
45 (60) 3 (25) -5 (150) 3 (25) -5 (150)
55 (75) 0 (50) -5 (150) 2 (35) -5 (150)
75 (100) -2 (70) -5 (150) 0 (50) -5 (150)
90 (125) -2 (70) -5 (150) 0 (50) -5 (150)

Electrical Installation
Siemens Building Technologies, Inc. 37
Input Power Connection
DANGER:
• As supplied, the SED2 must be grounded (per IEC
536, Class 1, NEC and other relevant industry
standards). Extremely hazardous conditions can occur if
the SED2 is not correctly grounded.
• Use only permanently wired input power connections.
Only hard-
wired input power connections are permissible.
Use Class 1 60/75° copper wire only.
• The cross-section of the ground-bonding conductor must
be at least equal to the input power cables.
• The following terminals can carry hazardous voltages
even when the SED2 is not running:
− Input power terminals: L1, L2, L3
− Motor terminals: U, V, W
− Link terminals: DC-, DC+/B+, DC/R+, B- (not for
customer use)
Connect input power to SED2 terminals L1, L2, and L3 (Figures 19
through 22).
SED2 VFD Startup, Operation, and Maintenance Manual
38 Siemens Building Technologies, Inc.
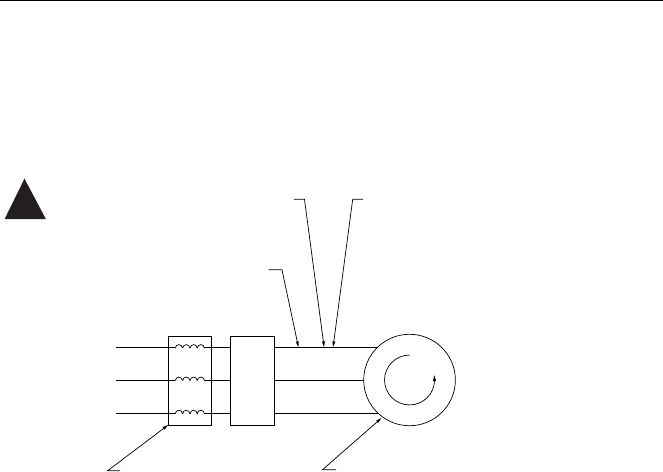
Motor Cable Length
Maximum motor cable length is 164 ft (50m). Motor cable length is given
to ensure performance of only the SED2, not the suitability of the motor
when connected to a SED2 at this distance.
M
SED2
3. If needed, use
SBT-specified input line
reactors to ensure a good
impedance match with
your drive.
1. Never run control or drive input
wires in the same conduit as
the drive output wires.
4. If a disconnect is mounted on the
load side of your drive, it is desirable
to wire an auxiliary contact to the drive
that will disable drive operation when
the disconnect opens. (The wiring for
this contact must not be run in the same
conduit as the drive output wires).
5. Inverter duty motors are recommended.
Install motors within their guidelines. Use
dV/dT filters, output reactors, or other load
conditioners as applicable or as specified
by the motor manufacturer.
2. Keep the distance from the drive
to the motor as short as possible
to maximize motor life.
VFD0014R2
!
Figure 23. Motor Cable Installation Notes.
NOTE: If connecting multiple motors to one SED2, the total length of
the individual motor cables must not exceed the maximum
motor cable length.
Electrical Installation
Siemens Building Technologies, Inc. 39
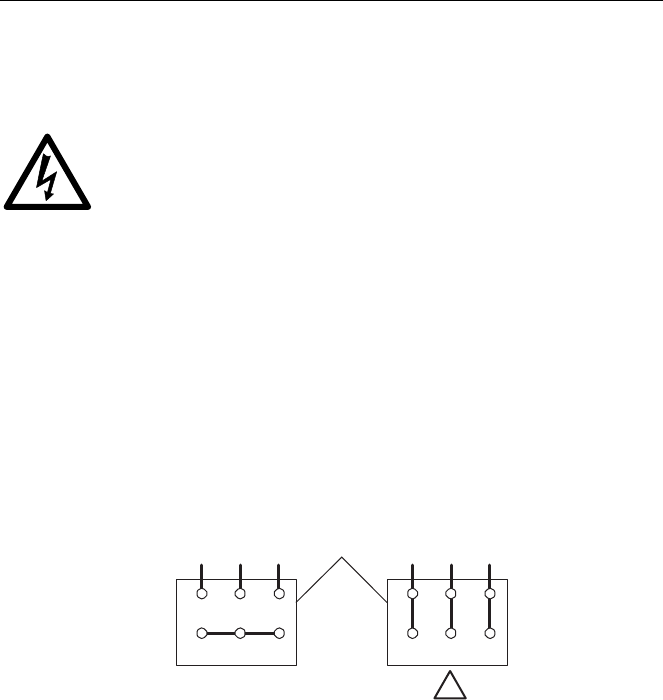
Motor Connection
(Wye "Y"/Star or Delta Configuration)
DANGER:
Do not use the SED2 with a motor of higher nominal power
rating than the SED2, or a nominal power less than half that
of the SED2. Only operate the SED2 when the nominal
current (P0305) is set to match motor rating continuous
current.
The motor nameplate indicates the required supply voltage and method of
connection. In general, larger 400/690V motors connect in a delta (∆)
configuration and smaller 230/400V motors connect in a Wye “Y” or star
configuration (Figure 24).
Connect motor wiring to SED2 terminals U, V, and W (Figures 19 through
22).
MOTOR TERMINALS
U2 V2W2
U1 V1 W1
U2 V2W2
U1 V1 W1
VFD0029R2
Wye "Y"
Figure 24. Delta and Star (Wye, Y) Motor Connections.
SED2 VFD Startup, Operation, and Maintenance Manual
40 Siemens Building Technologies, Inc.
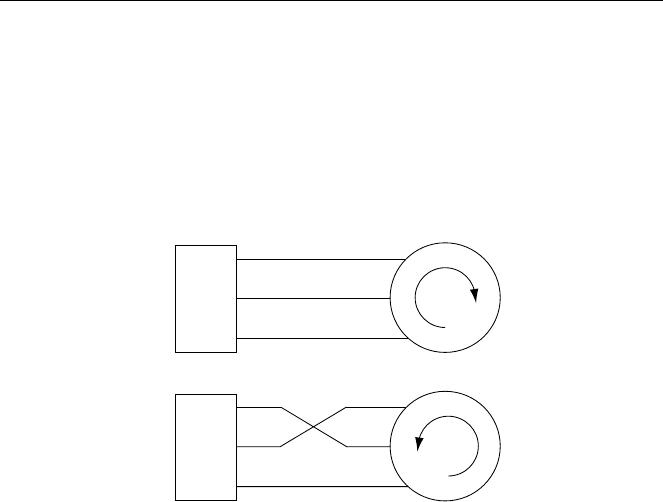
Direction of Motor Rotation
To change the direction of motor rotation, cross-connect two of the output
conductors on the SED2 (Figure 25). This is the desired method for
changing rotation.
NOTE: The Reverse Output Phase Sequence parameter (P1820) can
also reverse the direction of rotation. However, if the SED2 is
reset to factory defaults, P1820 is reset to OFF.
SED2
U
W
V
U
W
V
SED2
U
W
V
V
W
U
M
M
VFD0030R1
Figure 25. Direction of Motor Rotation.
Electrical Installation
Siemens Building Technologies, Inc. 41
Motor Overload Protection
WARNING:
The SED2 is capable of providing internal motor overload
protection in accordance with UL508C, Section 42. Accurately
configure motor parameters for the motor overload protection
to operate correctly. See Motor I2t Temperature Reaction
parameter (P0610); I2t is On by default.
Motor overload protection also can be provided using an
external PTC temperature-thermistor sensor (disabled by
default via Motor Temperature Sensor parameter (P0601)).
During operation below nominal speed, the cooling effect of the fans
mounted to the motor shaft is reduced. Therefore, most motors require
de-rating if operated continuously at low frequencies. To ensure that
motors are protected from overheating under these conditions, mount a
PTC temperature-thermistor sensor to the motor and connect it to the
control terminals of the SED2.
NOTE: To enable the switch-off function with a PTC temperature-
thermistor sensor, set Motor Temperature Sensor parameter
(P0601) to 1 for PTC temperature-thermistor sensor. Use a
shielded cable to connect the PTC temperature-thermistor
sensor.
14
15
SED2
CONTROL
TERMINALS
VFD0031R1
Figure 26. External Motor Overload Protection.
SED2 VFD Startup, Operation, and Maintenance Manual
42 Siemens Building Technologies, Inc.
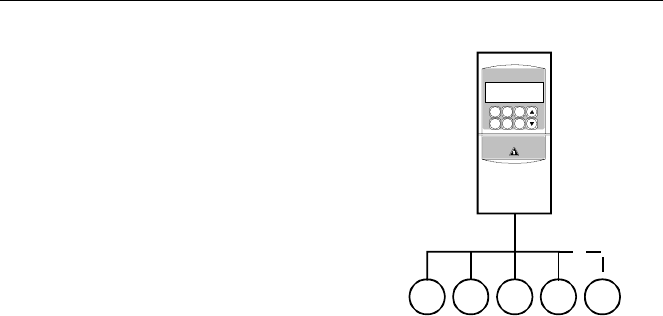
Connection of Multiple
Motors
The SED2 can control several motors in
parallel as long as all of the motors have
the same power rating. When multiple
motors connect to the SED2 in parallel,
the motors cannot operate individually.
NOTES:
1. When determining the required
power, take into account the total
current from all the motors (or the
total of all ratings).
2. The sum of all individual motor cable
lengths must not exceed the
maximum motor cable length.
SED2
M1M2M3M4Mn
5192Z10
∑ IM1..Mn ≤ ISED2, max.
∑ PM1..Mn ≤ PSED2, max.
Figure 27. SED2 Connection
to Multiple Motors.
Electrical Installation
Siemens Building Technologies, Inc. 43
Analog Input DIP Switches
WARNING:
When using analog inputs, the DIP switches must be correctly
set and the analog inputs correctly configured before being
enabled. If this is not done, the motor may start inadvertently.
After completing settings for motor frequency and unit of measurement
DIP switches, and wiring for input power and motor connections, reattach
the I/O module.
For all versions of the SED2, the DIP switches used to configure the
analog inputs are located on the I/O module. (See Access to Connection
Terminals section for disassembly instructions.)
DIP
Switch Position Function
OFF Analog Input 1, voltage 0 to 10 Vdc, factory default.
OFF Analog Input 1, Ni 1000 sensor input with parameter setting
P0756[0]=5.
1
ON Analog Input 1, current 0 to 20 mA.
OFF Analog Input 2, voltage 0 to 10 Vdc, factory default.
OFF Analog Input 2, Ni 1000 sensor input with parameter setting
P0756[1]=5.
2
ON Analog Input 2, current 0 to 20 mA.
SED2 VFD Startup, Operation, and Maintenance Manual
44 Siemens Building Technologies, Inc.
VFD0146R1
DIP SWITCHES
20 21 22 23 24 25
29 3017 26 27 2812 13 14 15 16
10 11678912345
ON
12
Figure 28. Location of Analog Input DIP Switches on I/O Module.
Control Terminal Connections
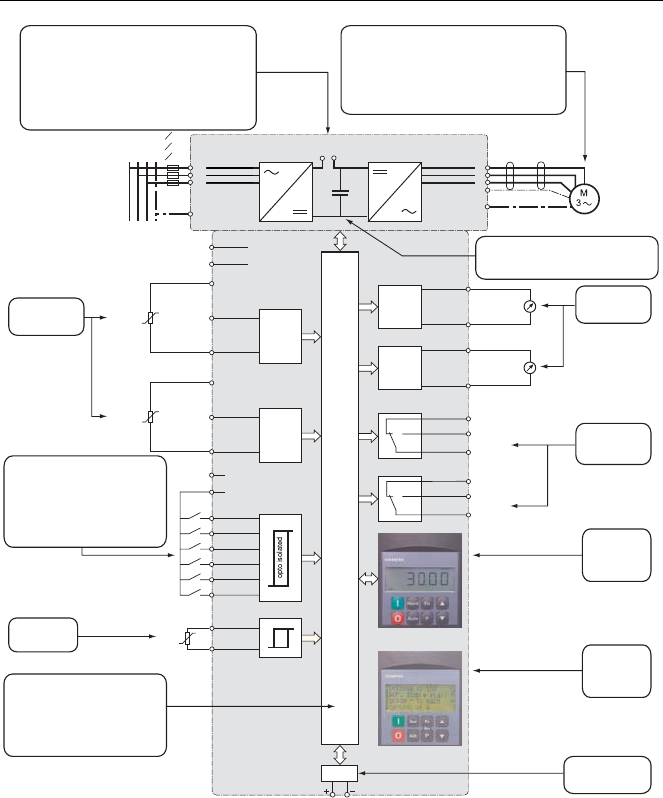
Control Terminal Layout
The control terminals (Figures 29 and 30) are located on the I/O module.
The I/O module is identical for all versions of the SED2. The I/O module is
located under the operator panel. (See the Access to Connection
Terminals section for disassembly instructions.)
Connect control wiring to SED2 control terminals 1 through 30 per site-
specific drawings. See the Analog and Digital I/O Control Terminal
Connections section for examples of connections.
Electrical Installation
Siemens Building Technologies, Inc. 45
NOTE:
1.
Use only shielded cables for control cables.
2.
Route control cables in separate cable trunks at least
7-3/4 inches (20 cm) away from motor and power cables.
After completing analog input DIP switch settings and wiring for control
terminal connections, reattach the SED2 cover and operator panel.
20 21 22 23 24 25
29 3017 26 27 2812 13 14 15 16
10 11678912345
ON
1
RL1
NC RL1
NO RL1
COM RL2
NC RL2
NO RL2
COM
AOUT
1+ AOUT
1- PTC
APTC
BDIN
5DIN
6AOUT
2+ AOUT
2- ISO
0V P+ N-
10V 0V AIN
1+ AIN
1- DIN
1DIN
2DIN
3DIN
4ISO
24V AIN
2+ AIN
2-
AIN1
On = [A], 0 - 20 mA
Off = [V], 0 - 10 V
AIN2
On = [A], 0 - 20 mA
Off = [V], 0 - 10 V
2
VFD0017R1
Figure 29. SED2 Control Terminals on I/O Module.
NOTES: 1. Analog inputs 1 and 2 can be optionally configured for direct
connection of a Ni 1000 temperature sensor. The sensor
connects between terminals 4 and 2 or 11 and 2.
2. 0 to 10 Vdc analog inputs connect between terminals 2 and 3.
3. 0 mA to 20 mA and 4 mA to 20 mA analog inputs connect
between terminals 3 and 4.
When using a 4 mA to 20 mA input, DIP switches must be
set to appropriate input.
SED2 VFD Startup, Operation, and Maintenance Manual
46 Siemens Building Technologies, Inc.
Drive Parameters
P0003
P0010
r0026
r0039 - P0040
P0100
r0206 - r0209
P1000 - P1028
P1080 - P1110
User acces level
Commissioning parameter filter
VFD DC-link voltage
Energy consumption meter
US / Europe
Performance data
Frequency setpoint
Frequency adjustment
Motor Parameters
r0021 - r0035
P0304 - P0313
P0340
P0601 - P0640
P1910
P2000
Motor performance data
Standard data
Calculation of motor parameters
Motor protection
Motor data identification
Reference frequency
Drive Features
P1270
P1210 - P1212 Enable essential mode
Automatic restart
Analog Output
r0770 - P0781
Digital Output
P0731 - P0732
r0747 - r0748
BOP
r0000
P0005
r0019 - r0039
AOP
See AOP
Operating
Instructions
PTC
P0601
Analog Inputs
1 and 2
P0756 - P0762
PID
P2200
P2201 - P2231
P2240 - r2260
P2253 - P2305
P2264 - r2272
Enable PID
Fixed setpoint
PID setpoint
Standard setpoint
PID feedback
Digital Input
P0700
P0701 - P0706
P0722 - P0725
P0707 - P0708
Command source
P0705 counter
NPN / PNP
Analog Inputs
1 and 2 configured
as digital inputs
Communications
P2000 - r2091
120V, 2A or 230V, 1A
120V, 2A or 230V, 1A
200 to 240V, 3OAC
380 to 480V, 3OAC
500 to 600V, 3OAC L1
L2
L3
L1 L2 L3
PE
PE
Motor
PTC
DC/R+
DC/B+
AO1
U
V
W
PE
PE
AO2
D/A
A/D
D/A
A/D
AI1
AI2 Relay
Output 1
Relay
Output 2
BOP (Standard)
AOP (Optional)
RS-485
CPU
Ni 1000 V: 0 to 10V
2 to 10V
I: 0 to 20 mA
4 to 20 mA
+10Vdc
+0Vdc
0V
DI1
DI2
DI3
DI4
DI5
DI6
Isolated 0V (output)
Isolated 50 mA at
18 to 32Vdc (output)
V: 0 to 10V
2 to 10V
I: 0 to 20 mA
4 to 20 mA
V: 0 to 10V
2 to 10V
I: 0 to 20 mA
4 to 20 mA
1
2
4
3
11
10
2
6
8
9
28
5
7
17
16
0V
2
15
14
3029
25
23
24
22
21
20
27
26
13
12
+
-
+
-
Ni 1000 V: 0 to 10V
2 to 10V
I: 0 to 20 mA
4 to 20 mA
Figure 30. SED2 Terminal Connections and Related Parameters.
Electrical Installation
Siemens Building Technologies, Inc. 47
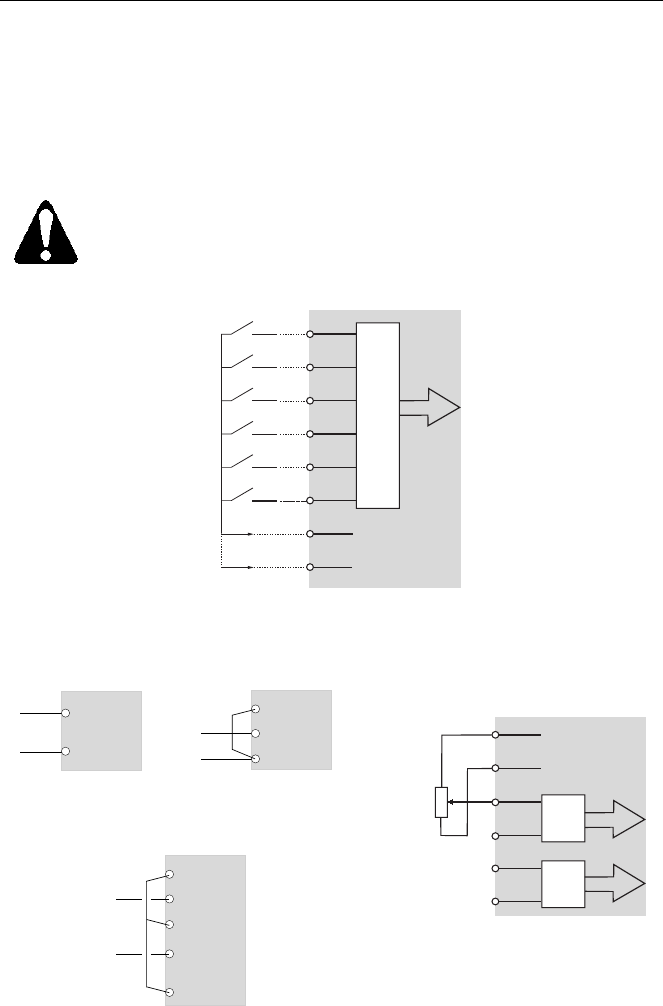
Analog and Digital I/O Control Terminal
Connections
Figures 31 through 35 show typical analog and digital input/output control
terminal connections.
WARNING:
When using analog inputs, the DIP switches must be correctly
set and the analog inputs correctly configured before enabling
them. If this is not done, the motor may start inadvertently.
VFD0048R1
5
6
7
9
16
17
28
PNP
NPN
DIN1
DIN2
DIN3
DIN4
DIN5
DIN6
8
or
ISOLATED +24 Vdc
(OUTPUT)
ISOLATED 0 Vdc
(OUTPUT)
DC-ISOLATED
Figure 31. Digital Inputs 1 through 6.
2
3
4
EXTERNAL 0-20 mA
3
2
-
+
EXTERNAL 0-10V
VFD0022R1
2
3
4
VFD 24V dc Powered 0-20 mA Device
28
9
mA
24V ac Power
(Power consumption cannot exceed 100 mA)
VFD0021R1
VFD0050R1
1
2
3
10
11
AIN1+
4
MINIMUM
4.7k OHM
AIN1-
AIN2+
AIN2-
+10 V
0 V
A/D
A/D
SPEED POTENTIOMETER
Figure 32. Analog Inputs 1 and 2.
SED2 VFD Startup, Operation, and Maintenance Manual
48 Siemens Building Technologies, Inc.
VFD0049R1
1
2
3
4
DIN7
1
2
11
12
DIN8
Figure 33. Connection of Analog Inputs 1 and 2 as
Digital Inputs 7 and 8.
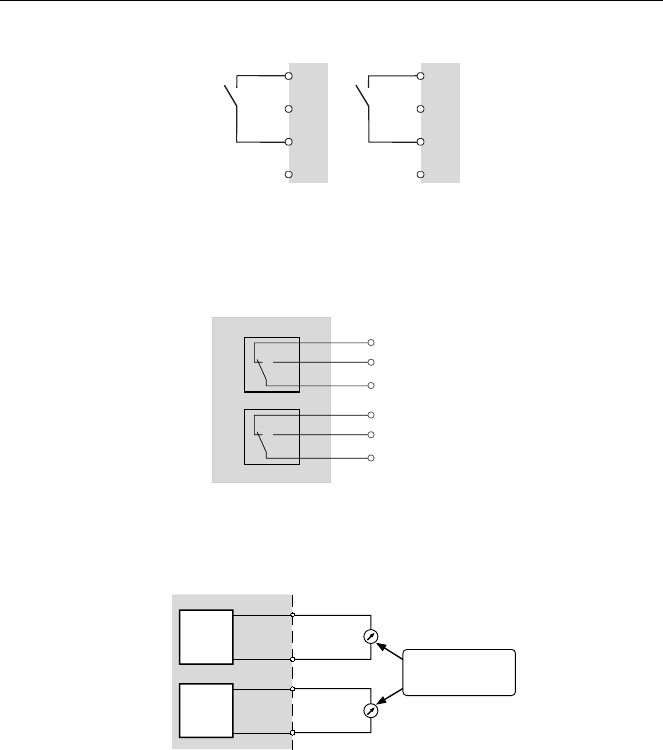
VFD0150R1
20
22
21 RELAY
OUTPUT 1
23
25
24 RELAY
OUTPUT 2
120V, 2A or 230V, 1A
120V, 2A or 230V, 1A
Figure 34. Digital Outputs 1 and 2.
VFD0051R1
AOU T1
D / A
V: 0 - 10 V
2 - 1 0 V
I: 0 - 20 mA
4 - 20mA
13
-
+
-
+
12
AOU T2
D / A
V: 0 - 10 V
2 - 1 0 V
I: 0 - 20mA
4 - 20mA
27
26
ANALOG OUTPUT
r0770 - P0781
Figure 35. Analog Outputs 1 and 2.

Parameters
Siemens Building Technologies, Inc. 49
Parameters
Overview
The SED2 uses parameters to define the required operating
characteristics, such as motor data, ramp times, and maximum and
minimum frequency. Users enter and modify the SED2 parameters using
the Basic Operator Panel, the Advanced Operator Panel, or a serial
interface.
Each parameter consists of the letter "r" or "P", followed by four
numbers, such as r0000 or P0010. The letter "r" identifies read-only
parameters. The letter "P" identifies programmable parameters.
Parameter Structure
Figure 36 depicts the structure of the SED2 parameters.
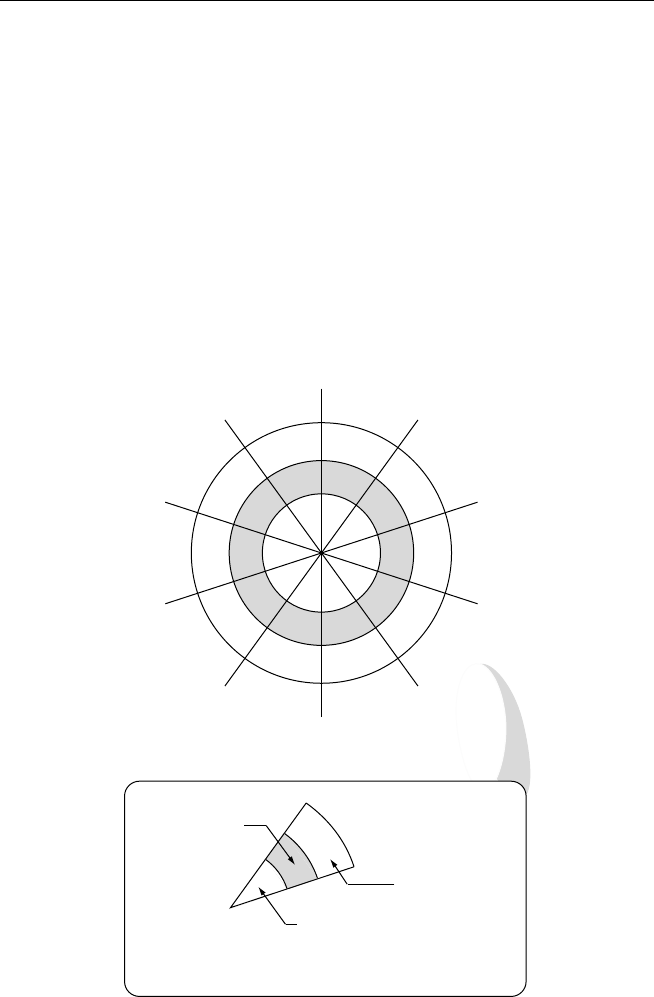
• User Access Level parameter (P0003) selects the access level for
using the parameters (1=standard, 2=extended, or 3=expert). The
access level selected via parameter P0003 determines the number
of parameters that are accessible by the user. For most applications,
the Standard (1) and Extended (2) levels are sufficient. The factory
default setting is P0003=1 (Standard).
• The filters of Parameter Filter parameter (P0004) categorize the
parameters that are available via the access level according to
functionality. The filters/categories enable a more focused
operational approach. If parameter P0004=0 for no filter/category,
then all parameters for a selected user access level are available.
NOTE: Some parameters are intended for commissioning only and
can be viewed as a function of this filter. In order to set these
parameters, P0010 must be set to 1 (quick commissioning).
Parameter Indexes
Certain parameters have indexes. The indexes provide subsets of a
particular parameter function and group together closely related
parameter type information. The Parameter Reference Guide (Document
Number 125-3214) lists any indexes associated with a parameter.
SED2 VFD Startup, Operation, and Maintenance Manual
50 Siemens Building Technologies, Inc.
The following indexes are associated with P0700, P1000, and digital
input and output parameters:
• IN000 (AUTO), 1st command data set (CDS)
• IN001 (HAND), 2nd command data set (CDS)
The following indexes are associated with analog input and output
parameters:
• IN000, Analog input 1, AO1
• IN001, Analog input 2, AO2
NOTE: Throughout this manual, a parameter number followed by [0]
or [1] denotes index number 000 or 001 respectively.
P0004=3
Motor Data
P0004=22
PI Controller P0004=2
Inverter Unit
P0004=21
Alarms, Warnings,
and Monitoring
P0004=7
Commands and
Digital I/O
P0004=20
Communication
P0004=8
Analog I/O
P0004=10
Setpoint Channel
and Ramp Generator
P0004=12
Drive Features
P0004=13
Motor Control
VFD0019R1
P
0
0
0
3
=
3
,
A
c
c
e
s
s
L
e
v
e
l
E
x
p
e
r
t
P
0
0
0
3
=
2
,
A
c
c
e
s
s
L
e
v
e
l
E
x
t
e
n
d
e
d
P
0
0
0
3
=
1
,
A
c
c
e
s
s
L
e
v
e
l
S
t
a
n
d
a
r
d
P0004=8, P0003=2
Parameters in
Access Levels 1 and 2
associated with
Analog I/O are Available
P0004=8
Analog I/O
P0004=8, P0003=1
Parameters in
Access Levels 1
associated with
Analog I/O are Available
P0004=8, P0003=3
Parameters in
Access Levels 1, 2, and 3
associated with
Analog I/O are Available
Figure 36. SED2 Parameter Access Levels and Filters.
SED2 Operator Panels
Siemens Building Technologies, Inc. 51
SED2 Operator Panels
Overview
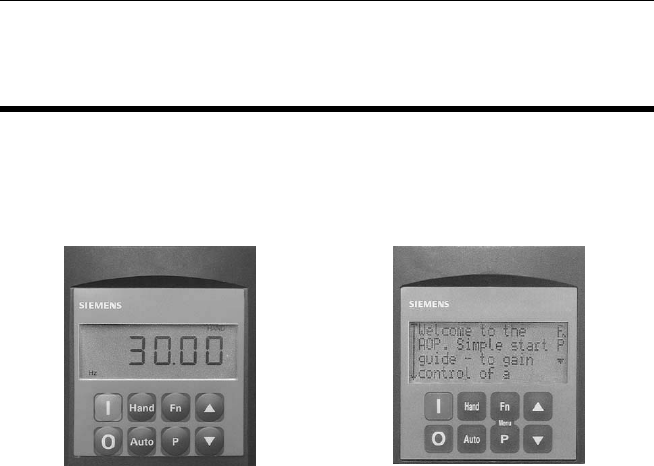
The SED2 includes the Basic Operator Panel (BOP) mounted as
standard. An Advanced Operator Panel (AOP) is available as an option.
Figure 37. Basic Operator Panel
(BOP).
Figure 38. Advanced Operator
Panel (AOP).
NOTES:
1. On initial startup, the SED2 display values alternate
between 0.0 Hz (zero) and the speed it would be running if
it were given a start command.
2. The BOP or AOP can connect to or disconnect from the
SED2 without switching off power.
Basic Operator Panel (BOP)
The BOP provides access to the parameters of the SED2 and allows for
application-specific settings of the SED2.
The parameters and measured values are shown in a 5-digit LCD
display. The BOP can mount directly onto the SED2 or, alternatively, it
can mount into a control cabinet door using a special installation kit
(SED2-DOOR-KIT1 or SED2-DOOR-KIT2).
The BOP cannot store parameter data.
SED2 VFD Startup, Operation, and Maintenance Manual
52 Siemens Building Technologies, Inc.
Advanced Operator Panel (AOP)
For information on the AOP, see the AOP Operating Instructions
(Document Number 125-3206). AOP features include a real-time clock,
ability to upload/download parameter sets, and control of a network of up
to 31 drives.
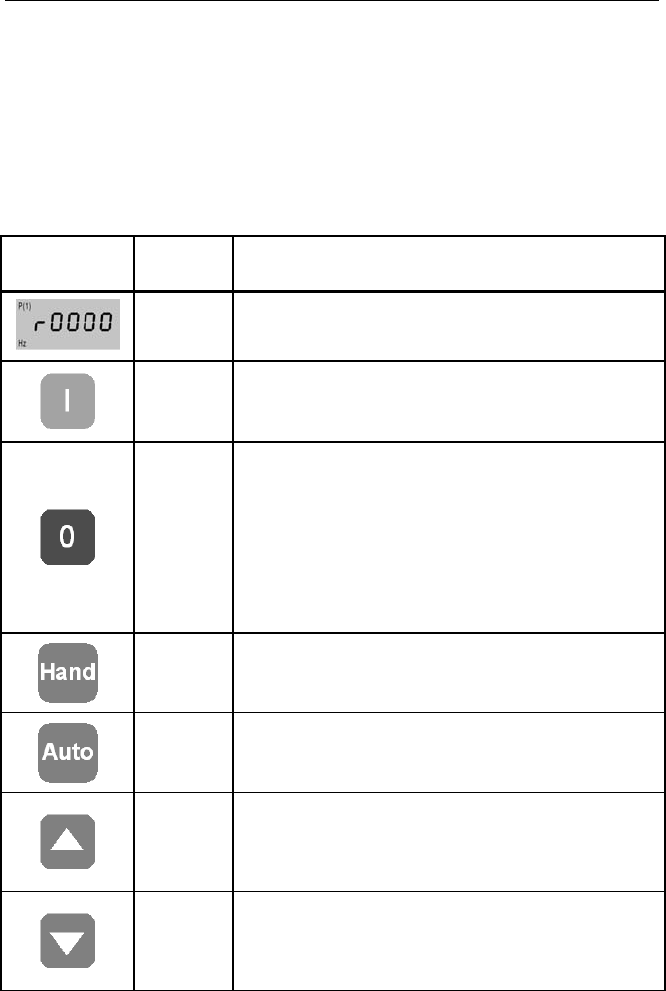
BOP Display and Pushbuttons
Operator
Panel/Button Function Description
Status
display
The LCD (five-digit display for BOP; multi-line, clear-text
display for AOP) displays the settings presently used by
the SED2 or used to set parameters in the SED2.
Start motor
Press this pushbutton to start the SED2.
As part of the factory setting, this pushbutton is enabled for
manual mode.
Stop motor
OFF1 Press this pushbutton to stop the SED2 within
the selected ramp-down time.
As part of the factory setting, this pushbutton is
enabled for manual mode.
OFF2 Press this pushbutton twice (or once with
sustained pressure) to cause the motor to
coast freely to a standstill.
This function is enabled in the manual and
automatic operating modes.
Change to
manual
control Places the SED2 in HAND mode.
Change to
automatic
control Places the SED2 in AUTO mode.
Increase
value
Press this pushbutton to increase the current display value
during parameter setting.
In manual mode, this pushbutton increases the speed
(internal motor potentiometer).
Decrease
value
Press this pushbutton to decrease the current display
value during parameter setting.
In manual mode, this pushbutton decreases the speed
(internal motor potentiometer).
SED2 Operator Panels
Siemens Building Technologies, Inc. 53
Operator
Panel/Button Function Description
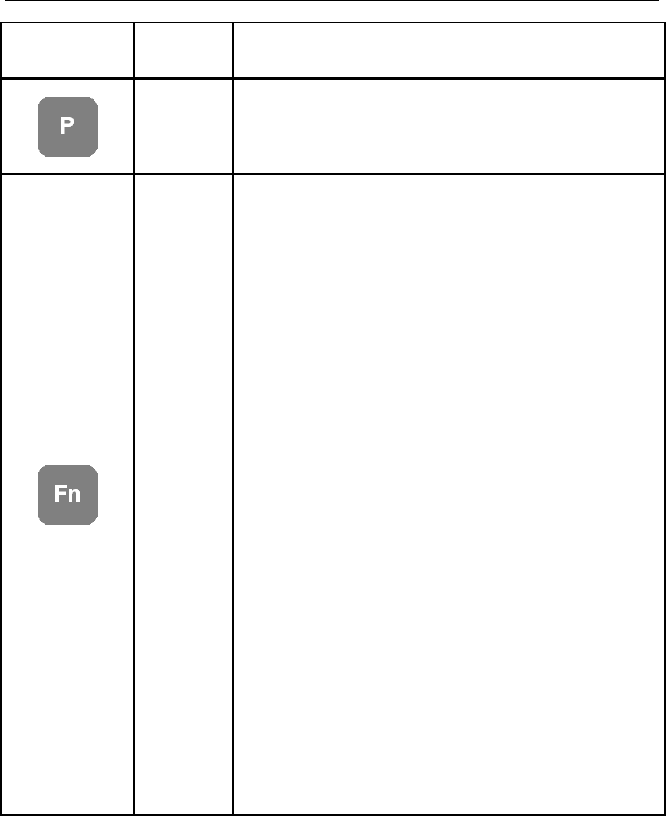
Access to
parameters
Press this pushbutton to do one of the following:
• Access the parameters.
• Exit a parameter by accepting its value.
Functions
Press this pushbutton to display additional information.
Press and hold this pushbutton for three seconds for a
quick view display.
Press this pushbutton repeatedly to display DC-V/A/Hz/V.
Press and hold this pushbutton for three seconds to return
to normal view.
Multiple display mode:
When you press this pushbutton for three seconds with
power applied, the following information displays:
• DC link voltage
(indicated by d – units V)
• Output current (A)
• Output frequency (Hz)
• Output voltage
(indicated by o – units V)
Repeatedly press the pushbutton to cycle through these
display items. Press this pushbutton again for a sustained
time to exit the multiple display mode.
The value selected in P0005 (Drive Display for r0000
parameter). If P0005 is configured to display any of these
items (1 to 4), the value does not redisplay.
Jump function:
You can jump from any parameter (rXXXX or PXXXX)
directly to r0000 (Drive Display parameter) by briefly
pressing the Fn pushbutton. This allows you to modify
another parameter if required. After jumping to r0000,
press the Fn pushbutton again to return to the starting
point.

SED2 VFD Startup, Operation, and Maintenance Manual
54 Siemens Building Technologies, Inc.
NOTES:
1. If you attempt to modify a parameter that cannot be modified under the
current conditions (for example, a parameter that cannot be modified during
operation or that can only be modified in the Quick Commissioning mode),
the display reads:
2. Busy Signal — While changing parameters, the BOP can display:
for a maximum of 5 seconds. This display means that the SED2 is busy
with higher-priority activities.
3.
Displays when SED2 is processing information and will not respond to input
actions until processing is complete.

Commissioning
Siemens Building Technologies, Inc. 55
Commissioning
WARNING:
• Only authorized personnel trained in the setup, installation,
commissioning, and operation of the SED2 may work on the
product and mechanical system.
• SED2s operate at high voltages. In some components,
operation of electrical equipment involves using dangerous
voltages.
• In cases where faults in the control equipment could cause
significant equipment damage or severe physical injury (such
as potentially dangerous short circuits), use external
precautions to ensure and to enforce safe operation (such as
independent limit switches and mechanical interlocks).
• Emergency stop facilities must remain functional in all operating
modes of the control equipment. Resetting the emergency stop
facility must not result in an uncontrolled or undefined restart.
Do not use the SED2 as an emergency stop mechanism.
• The equipment incorporates internal motor overload protection
in accordance with UL508C, Section 42. See Motor I2t
Temperature Reaction parameter (P0610); I2t is ON by default.
(Motor overload protection can also be provided with an
external PTC temperature-thermistor sensor disabled by default
via Motor Temperature Sensor parameter (P0601). See the
Motor Overload Protection section in this manual for details.)
For reliable motor overload protection, the motor parameters
must be configured accurately.
• Certain parameter settings can cause the SED2 to start
automatically or to restart automatically after a fault or an input
power failure (provided the fault is eliminated or acknowledged
or the supply voltage is restored).
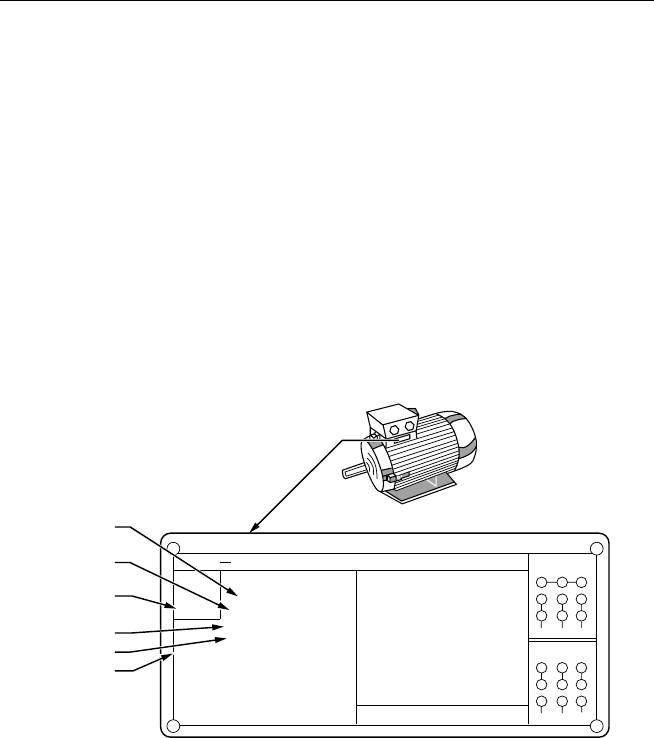
SED2 VFD Startup, Operation, and Maintenance Manual
56 Siemens Building Technologies, Inc.
Motor Nameplate Data for Parameter
Settings
You can modify motor data via the parameter settings only if
Commissioning Parameter Filter P0010=1, for the quick commissioning
procedure.
Motor control via the BOP is enabled in Hand mode by default. To
enable motor control via the BOP during the quick commissioning
procedure, set Selection of Command Source parameter P0700[0]=1 (for
BOP) and Selection of Frequency Setpoint P1000[0]=1 (for motor
potentiometer setpoint).
If the BOP is configured for control (P0700[0]=1 for BOP), the motor
stops when the BOP is removed.
SIEMENS
PE 21 PLUS
TM
PREMIUM EFFICIENCY
TEFC
3 PH
60 Hz
Type :
HP :
Volts :
Amps :
RPM :
NEMA nom Eff :
Frame :
Sh end brg :
Opp end brg :
Part No :
RGZZESD
3
230YY/460Y
7,8 / 3,9
1740
87,5 %
182 T
30BC02JP3
30BC02JP3
1MJP1824YP60 LR 39020
Rating :
Ins Class :
Serv Factor :
Amb Temp :
Temp Rise :
NEMA design :
KVA Code :
Weight :
Serial No : M
Cont
F
1,0
40 C
Class B
B
K
95 lbs
00T0194 CE 18
LOW VOLTAGE
CONNECTION
HIGH VOLTAGE
CONNECTION
LINE
LINE
5
4 6
87 9
21 3
54 6
87 9
21 3
o
P0304
P0305
P0307
P0310
P0311
P0309
VFD0032R1
Figure 39. Motor Nameplate Data for Commissioning Parameters.
Commissioning
Siemens Building Technologies, Inc. 57
Prerequisites to Startup Procedure
To ensure reliable SED2 operation and to avoid any extra costs related
to loss or reduction of warranty coverage, a factory certified specialist
should complete this startup procedure.
Complete the following checklist and maintain it in a secure location as
service personnel may request this information.
CAUTION:
The SED2 has no isolating switch on the input power and is live as
soon as the input power is connected. The SED2 remains with the
output disabled until you press (green start pushbutton) or until it
receives a digital On command signal.
Check Step
( ) 1. The SED2 is thoroughly tested at the factory. Verify that the
SED2 is free of shipping and installation damage. Shipping
damage is not covered by the Siemens Building
Technologies, Inc. warranty; claims must be filed directly
with the shipping company as soon as possible.
( ) 2. Verify that the model numbers and the voltage ratings are as
specified in the purchase order by matching the nameplate
data of each unit to the purchase order.
( ) 3. Review the appropriate sections of this manual and verify
that the mechanical and electrical installation procedures
are complete.
Review any option instructions and job schematics provided
with the SED2.
CAUTION:
Failure to comply with mechanical and electrical installation
requirements may void the product warranty.
( ) 4. Verify that the 50/60 Hz DIP switch has been set to the
appropriate setting, as instructed in the Motor Frequency
and Unit of Measurement DIP Switches section of this
manual.

SED2 VFD Startup, Operation, and Maintenance Manual
58 Siemens Building Technologies, Inc.
( ) 5. Inspect the security of the input power wiring, ground
connections, motor wiring, and all control circuit
connections, as identified in the SED2 documentation.
IMPORTANT: Verify that the cross–section and length of
the input power and motor cables are
correct.
IMPORTANT: Confirm that the input power connects to
the SED2 input terminals: (L1, L2, L3)
and NOT to the output motor terminals:
(U, V, W).
IMPORTANT: Verify that all input power wires (L1, L2, L3)
and motor wires (U, V, W) are securely
tightened down to their lugs. Loose wire
connections may cause problems at any
time, and are not covered under warranty.
( ) 6. Review the installer’s as-wired schematic. Determine where
the motor safety circuit is connected. Verify that the
customer’s emergency contacts are properly terminated in
the SED2 safety shutdown circuit or bypass option.
Verify that all other field-installed wires are correctly
terminated (including the shields).
( ) 7. Verify the motor is free to move mechanically.
( ) 8. For pump applications, verify the medium (such as water) is
available (no dry run).
( ) 9. Record the motor(s) nameplate information:
Voltage: Service Factor:
Efficiency %: Full Load Amps (FLA):
RPM: Hp:
( ) 10. Verify that the input power voltage matches the rating of the
SED2.
( ) 11. Verify that the motor is wired for the application voltage.
( ) 12. IMPORTANT: Verify that the motor rated full load amps
(FLA) does NOT exceed the rated output
current of the SED2 controlling it.
When multiple motors are simultaneously operated by the
SED2, the sum of all motor rated FLA values must be less
than or equal to that of the SED2 controlling them.

Commissioning
Siemens Building Technologies, Inc. 59
( ) 13. Record any other connections to the SED2 by terminal
number to determine if special programming is required.
Record any changes in Appendix A: Parameters, Defaults,
and Settings.
( ) 14. Make certain the immediate area around the SED2 is free of
debris and miscellaneous items.
( ) 15. If applicable, verify that the building automation system logic
is ready to perform adequately for start, stop, and speed
command functions.
This concludes the preparation process for SED2 startup.
Keep this manual, option schematics, and any other instructions sent
with the SED2 easily accessible to assist you through the remainder of
this startup process.
SED2 (stand-alone) Startup
Procedure
NOTE: For SED2 with bypass option, see the documentation
provided with bypass for startup instructions.
Check Step
( ) 1. Make sure that all three power phases are present and that
the input voltage is correct for the SED2 being started.
Apply SED2 power and verify that the SED2 display is on.
If the display indicates a fault, press to reset it.
( ) 2. Perform quick commissioning according to the Quick
Commissioning Procedure section in this manual.
On completion of the quick commissioning procedure,
proceed to step 3.
( ) 3. Press and to return to the SED2 operating mode.
Press to place SED2 in Hand mode.
( ) 4. To start the SED2, press (green start pushbutton). The
SED2 will ramp up to 10 Hz (or minimum speed). Verify
that the direction of motor rotation is correct.
CAUTION:
If the direction of motor rotation is wrong, turn power Off!

SED2 VFD Startup, Operation, and Maintenance Manual
60 Siemens Building Technologies, Inc.
DANGER:
Wait for 5 minutes. Always wait 5 minutes after
disconnecting the SED2 from the power source before
performing any work. The DC link capacitors of all SED2s
remain charged with dangerous voltages for 5 minutes
after all supplies have been disconnected. When working
on open equipment, note that live parts are exposed. Do
not touch these parts.
Swap wires on the motor terminals (U, V) or on the output
terminals of the motor overload relay. Tighten the terminal
lugs, reapply power, and recheck the direction of motor
rotation.
( ) 5. With correct motor rotation, manually run the SED2
throughout its entire operating range while observing
operation.
If the SED2 trips on over-current during acceleration,
increase the acceleration time rate via parameter P1120.
If the SED2 trips on over-voltage during deceleration,
adjust the deceleration time rate via parameter P1121.
If excessive vibration of the driven load is noted at specific
frequencies, use Skip Frequency parameters P1091
through P1094 to eliminate this vibration.
( ) 6. Determine whether the remote speed reference is a 0 to
10 Vdc or a 4 to 20 mA signal. Connect or verify
connection of signal wires. Set or verify that analog input
DIP switch has been set to the appropriate setting as
instructed in the Analog Input DIP Switches section of this
manual.
( ) 7. Check the signal for proper polarity. Observe if the remote
speed command can achieve the minimum and maximum
speeds desired. If not, scale as required. The signal value
can be read at r0752 and the scaled value can be read at
r0754.
( ) 8. Make additional SED2 application parameter settings as
required and record them in Appendix A: Parameters,
Defaults, and Settings.
( ) 9. Press to place SED2 in Auto mode.
This completes the startup procedure for the SED2.
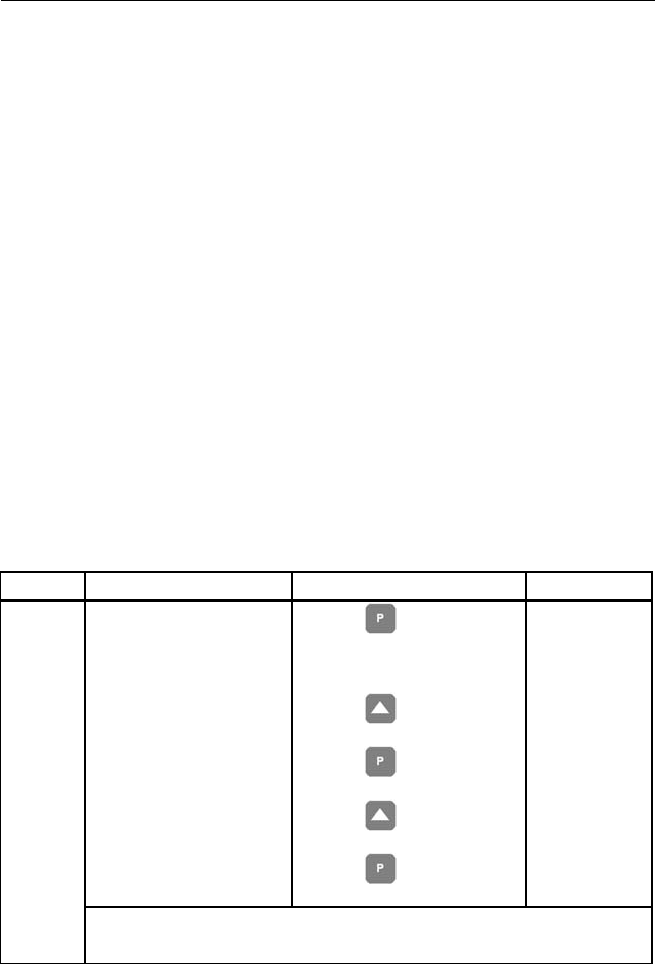
Commissioning
Siemens Building Technologies, Inc. 61
Quick Commissioning Procedure
Parameter P0010 is the Commissioning Parameter Filter. It allows you to
select a group of parameters that can be used for quick commissioning,
including motor data (Figure 39), and motor ramp-up and ramp-down
settings.
It is important to use parameter P0010 to commission the SED2, P0003
to select the access level for using parameters, and P0004 to filter the
parameters according to their functionality. When Commissioning
Parameter Filter P0010=1, it initiates the quick commissioning
procedure.
It is recommended that you use the quick commissioning procedure.
However, experienced users may commission the equipment without the
P0004 filter functions.
At the end of the quick commissioning procedure, set parameter
P3900=1. This setting performs the necessary motor calculations and
sets all remaining parameters (those not included in P0010=1) to the
factory default values. If P3900 is set to a value greater than 0, P0010 is
automatically reset to 0. (If P0010=1, the SED2 cannot start.) The
process of performing motor calculations and setting all parameters to
factory default values is only possible via quick commissioning.
Parameter Description Action Setting/ Default
User Access Level
Allows you to access more
parameters.
1 = Standard
2 = Extended
3 = Expert
1. Press to access
parameter r0000 and to
enter the SED2 parameter
mode.
2. Press to advance to
parameter P0003.
3. Press to access the
parameter values level.
4. Press to advance to 3
(expert level).
5. Press to confirm and
save the P0003=3 setting.
Setting = 3
Default = 1
P0003
NOTE:
1. Before starting quick commissioning, set P0003=3 to ensure all necessary
parameters are available during quick commissioning.
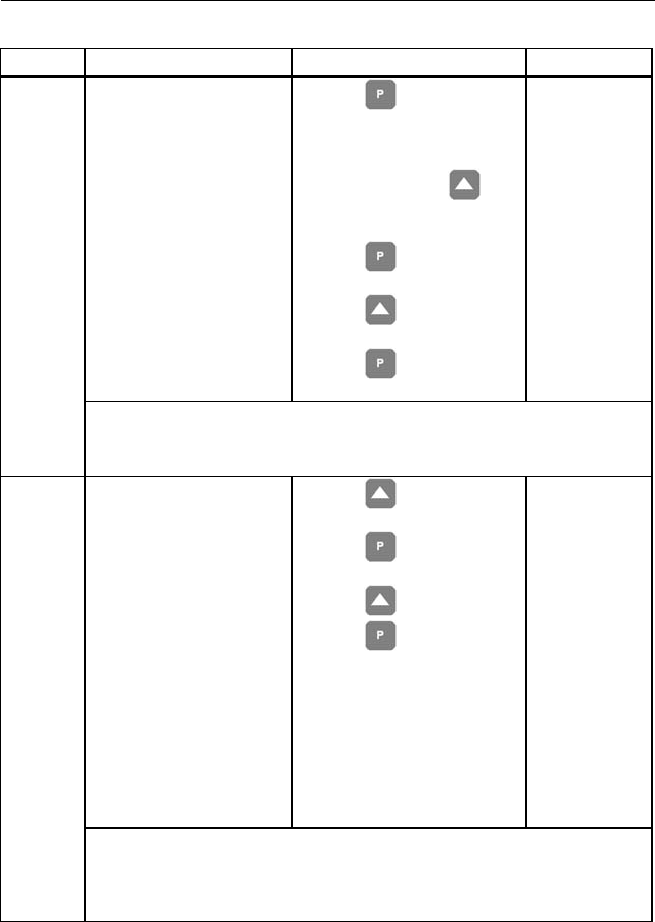
SED2 VFD Startup, Operation, and Maintenance Manual
62 Siemens Building Technologies, Inc.
Parameter Description Action Setting/ Default
Quick Commissioning
0 = Ready to Run
1 = Quick
Commissioning
30 = Factory Setting
1. Press to access
parameter r0000 and to
enter the SED2 parameter
mode.
2. Repeatedly press to
advance to parameter
P0010.
3. Press to access the
parameter values level.
4. Press to advance
to 1.
5. Press to confirm and
save the P0010=1 setting.
Setting = 1
Default = 0
P0010
NOTES:
1. P0010 must always be set back to 0 before operating the motor.
2. If P3900 is greater than 0 on completion of commissioning, P0010 is
automatically set back to 0.
Operation for Europe/
N. America
0 = 50 Hz, kW (Europe),
factory default
1 = 60 Hz, hp
(North America)
2 = 60 Hz, kW
(North America)
The setting of Motor
Frequency and Unit of
Measurement DIP switch 2
overrides P0100 settings 0
and 1.
See the Motor Frequency
and Unit of Measurement
DIP Switch Settings section
in this manual for details.
1. Press to advance to
parameter P0100.
2. Press to access the
parameter values level.
3. Press to advance to 1.
4. Press to confirm and
save the P0100=1 setting.
Setting = 1
Default = 0 or 1
(Default is
determined by
the settin
g of the
Motor
Frequency and
Unit of
Measurement
DIP switches.)
P0100
NOTES:
1. Stop the SED2 (that is, disable all pulses) before changing this parameter.
2. Changing P0100 resets all rated motor parameters as well as other
parameters that depend on the rated motor parameters (such as P0340,
Calculation of Motor Parameters).
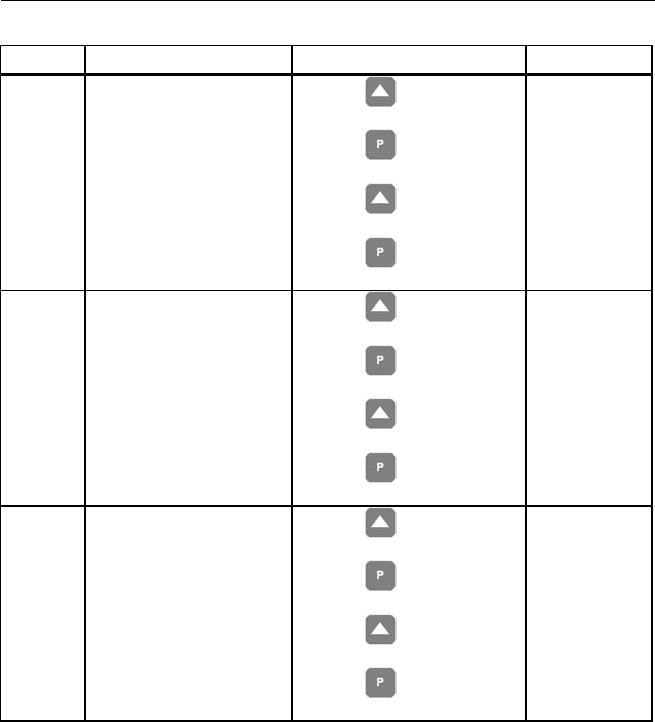
Commissioning
Siemens Building Technologies, Inc. 63
Parameter Description Action Setting/ Default
P0304 * Rated Motor Voltage
10V to 2000V
Rated motor voltage (V)
from motor nameplate.
1. Press to advance to
parameter P0304.
2. Press to access the
parameter values level.
3. Press to advance to
nominal voltage.
4. Press to confirm and
save the setting.
Motor
nameplate
Default = Varies
by model
P0305 * Rated Motor Current
0A to 10,000A
Rated motor current (A)
from motor nameplate.
1. Press to advance to
parameter P0305.
2. Press to access the
parameter values level.
3. Press to advance to
nominal current.
4. Press to confirm and
save the setting.
Motor
nameplate
Default = Varies
by model
P0307 * Rated Motor Power
0 kW or hp to 2000 kW
or hp
Rated motor power (kW or
hp) from motor nameplate.
If P0100=1 (60 Hz, hp,
North America), then motor
power is in hp.
1. Press to advance to
parameter P0307.
2. Press to access the
parameter values level.
3. Press to advance to
nominal power.
4. Press to confirm and
save the setting.
Motor
nameplate
Default = Varies
by model
* Motor related parameters.
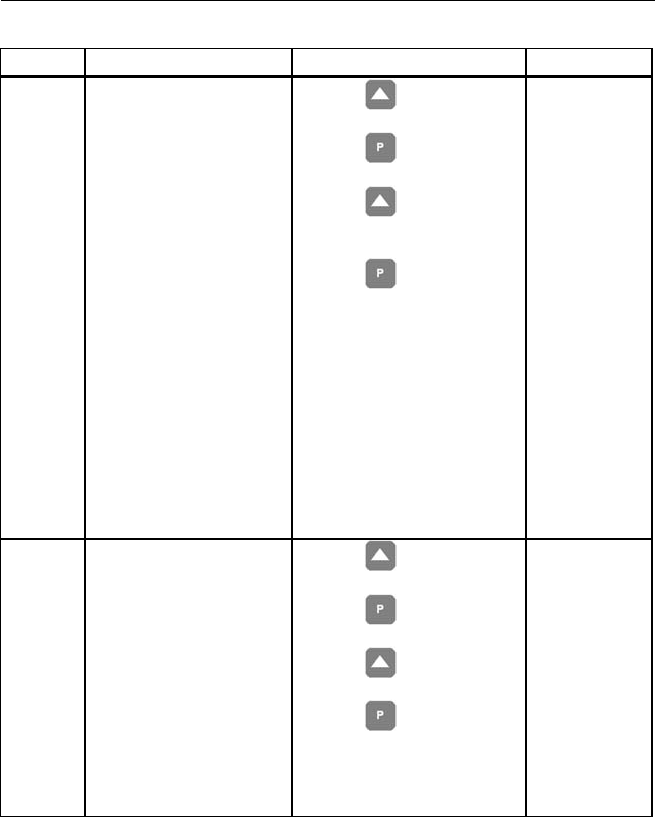
SED2 VFD Startup, Operation, and Maintenance Manual
64 Siemens Building Technologies, Inc.
Parameter Description Action Setting/ Default
P0308 *,
or
P0309 *
Rated Motor cosPhi
(P0308), or
Rated Motor Efficiency
(P0309)
0.000 to 1.000 (P0308) or
0.0 to 99.9 (P0309)
Rated motor cosPhi or
motor efficiency from motor
nameplate.
If P0100=0 or 2 and
P0307=kW, P0308
displays;
if P0100=1 and P0307=hp,
P0309 displays.
P0309=100% corresponds
to superconducting.
NOTE:
This parameter is available
when P0003 = 3 and
P0010 = 1.
1. Press to advance to
parameter P0308 or P0309.
2. Press to access the
parameter values level.
3. Press to advance to
nominal cosPhi or motor
efficiency.
4. Press to confirm and
save the setting.
Motor
nameplate
P0308 Default =
0.000
P0309 Default =
varies
(hp/voltage
dependent)
P0310 * Rated Motor Frequency
12 Hz to 650 Hz
Rated motor frequency (Hz)
from motor nameplate.
Pole pair number is
recalculated automatically if
the parameter is changed.
1. Press to advance to
parameter P0310.
2. Press to access the
parameter values level.
3. Press to advance to
nominal frequency (60 Hz).
4. Press to confirm and
save the setting.
Motor
nameplate
60 Hz
Default = 50 Hz/
60 Hz
Default is
dependent on
the setting of the
Motor
Frequency and
Unit of
Measurement
DIP switches.
* Motor related parameters.
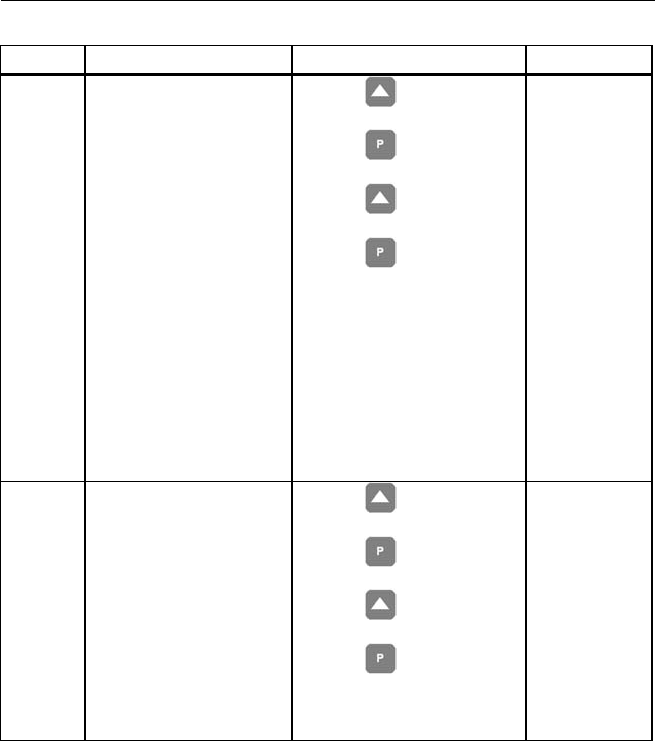
Commissioning
Siemens Building Technologies, Inc. 65
Parameter Description Action Setting/ Default
P0311 * Rated Motor Speed
0 to 40,000 1/min
Rated motor speed (rpm)
from motor nameplate.
A setting of 0 causes an
internal calculation of this
value.
Vector control and V/f
control with speed controller
require this value.
Slip compensation in V/f
control requires this value
for correct operation.
Pole pair number is
recalculated automatically if
the parameter is changed.
1. Press to advance to
parameter P0311.
2. Press to access the
parameter values level.
3. Press to advance to
nominal motor speed.
4. Press to confirm and
save the setting.
Motor
nameplate
Default = 0
P0640 Motor Overload Factor
10% to 400%
Limited to the maximum
SED2 output current rating
or to 400% of the rated
current (P0305), whichever
is lower.
NOTE:
This parameter is available
when P0003 = 3 and
P0010 = 1.
1. Press to advance to
parameter P0640.
2. Press to access the
parameter values level.
3. Press to advance to
desired value.
4. Press to confirm and
save the setting.
Site setting
Default = 110
* Motor related parameters.
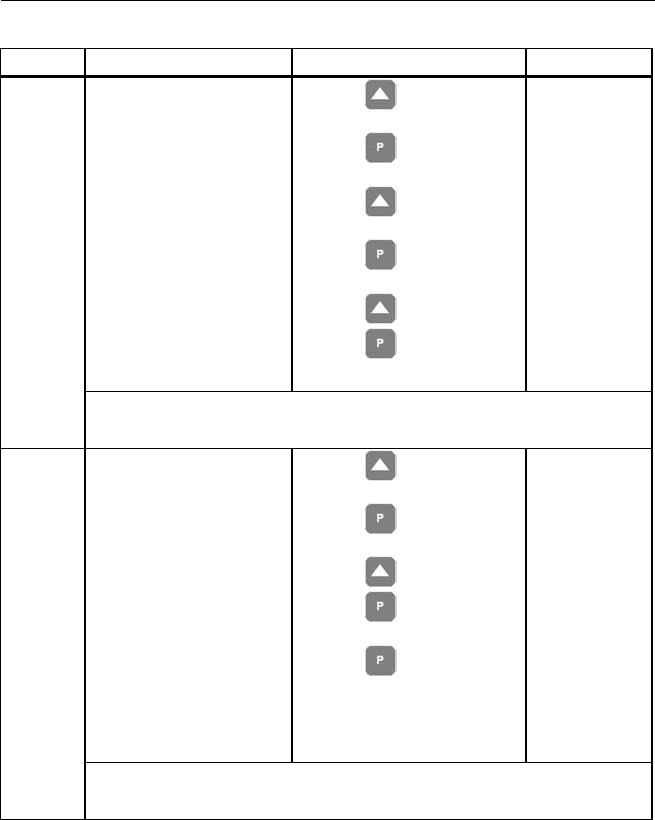
SED2 VFD Startup, Operation, and Maintenance Manual
66 Siemens Building Technologies, Inc.
Parameter Description Action Setting/ Default
Selection of Command
Source
(Start Command)
Selects the command
source as follows:
0 = Factory default
setting
1 = BOP (keypad)
2 = Terminal digital input
4 = USS on BOP link
(AOP)
5 = USS on COM link
6 = CB (communications
board or module) on
COM link (P1/N2)
1. Press to advance to
parameter P0700.
2. Press to access the
parameter indexes.
3. Press to advance to
index [0], IN000, AUTO.
4. Press to confirm index
selection.
5. Press to advance to 2.
6. Press to confirm and
save the setting.
Setting = 2
Default = 2
P0700[0]
**
NOTE:
Changing this parameter resets (to default) all setting on the selected item. For
example, changing from 1 to 2 resets all digital inputs to default settings.
Selection of Command
Source
(Start Command)
Selects the command
source as follows:
0 = Factory default
setting
1 = BOP (keypad)
2 = Terminal digital input
4 = USS on BOP link
(AOP)
5 = USS on COM link
6 = CB (communications
board or module) on
COM link (P1/N2)
1. Press to advance to
index [1], IN001, HAND.
2. Press to confirm index
selection.
3. Press to advance to 1.
4. Press to confirm and
save the setting.
5. Press
again to return to
the parameter selection
level.
Setting = 1
Default = 1
P0700[1]
**
NOTE:
Changing this parameter resets (to default) all setting on the selected item. For
example, changing from 1 to 2 resets all digital inputs to default settings.
** Parameters have two index settings: IN000=Auto and IN001=Hand.
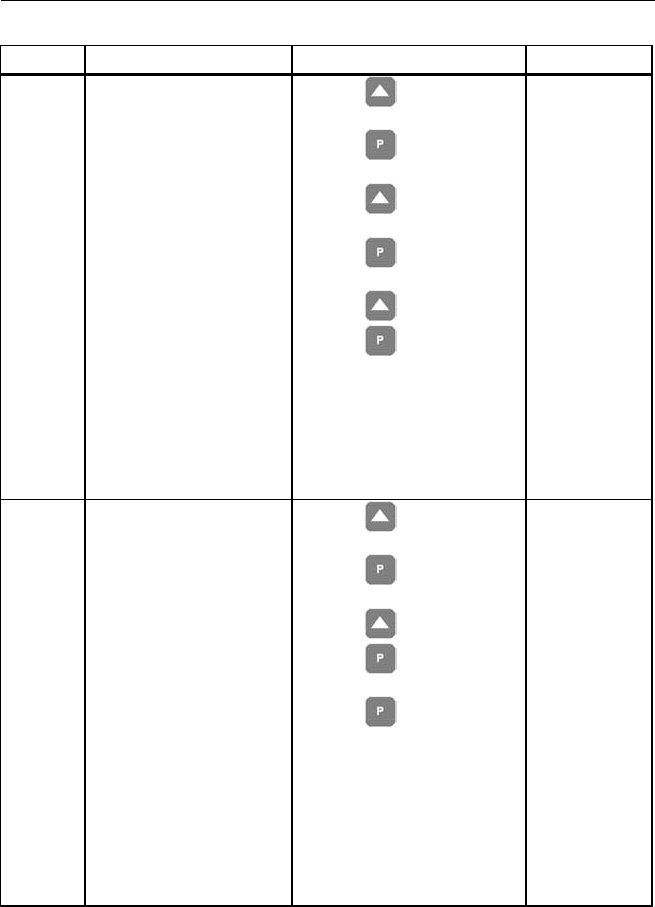
Commissioning
Siemens Building Technologies, Inc. 67
Parameter Description Action Setting/ Default
P1000[0]
** Selection of Frequency
Setpoint
(Speed Command
Source)
Selects the frequency
setpoint source as follows:
1 = Motor potentiometer
setpoint/
BOP keypad
2 = Analog input
3 = Fixed frequency
setpoint
4 = USS on BOP
Link/AOP
5 = USS on COM link
6 = CB
(communications
board or module) on
COM link/
P1-N2
communications
1. Press to advance to
parameter P1000.
2. Press to access the
parameter indexes.
3. Press to advance to
index [0], IN000, AUTO.
4. Press to confirm index
selection.
5. Press to advance to 2.
6. Press to confirm and
save the setting.
Setting = 2
Default = 2
P1000[1]
** Selection of Frequency
Setpoint
(Speed Command
Source)
Selects the frequency
setpoint source as follows:
1 = Motor potentiometer
setpoint/
BOP keypad
2 = Analog input
3 = Fixed frequency
setpoint
4 = USS on BOP
Link/AOP
5 = USS on COM link
6 =
CB (communications
board or module) on
COM link/
P1-N2
communications
1. Press to advance to
index [1], IN001, HAND.
2. Press to confirm index
selection.
3. Press to advance to 1.
4. Press to confirm and
save the setting.
5. Press
again to return to
the parameter selection
level.
Setting = 1
Default = 1
** Parameters have two index settings: IN000=Auto and IN001=Hand.
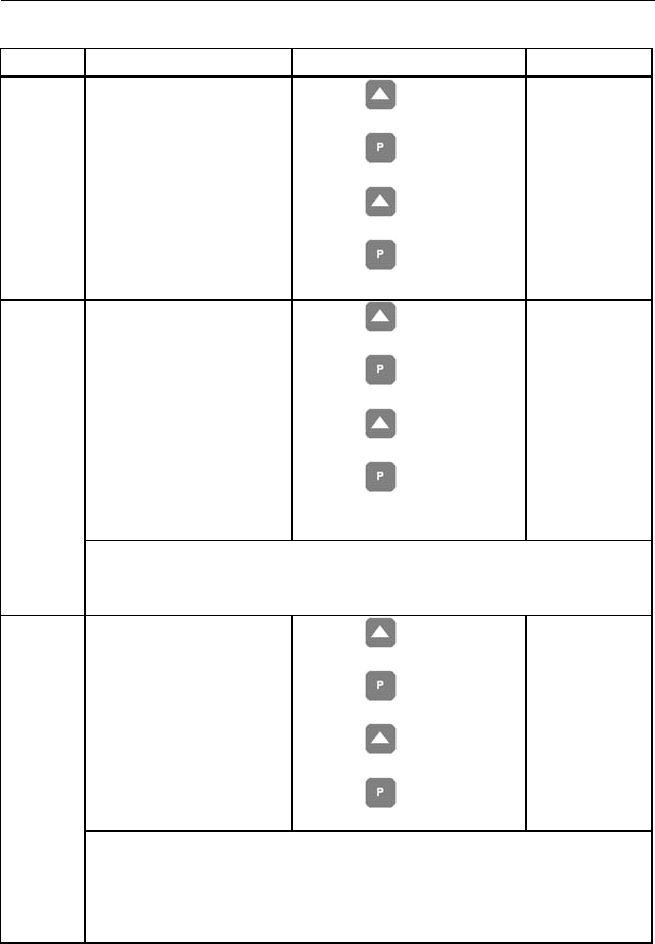
SED2 VFD Startup, Operation, and Maintenance Manual
68 Siemens Building Technologies, Inc.
Parameter Description Action Setting/ Default
P1080 Minimum Motor
Frequency
0 Hz to 650 Hz
Minimum motor frequency
at which the motor will run
irrespective of the
frequency setpoint. This
value applies to both
clockwise and
counterclockwise rotation.
1. Press to advance to
parameter P1080.
2. Press to access the
parameter values level.
3. Press to advance to
desired value.
4. Press to confirm and
save the setting.
Site Setting
(20-30% Max)
Default = 10
Maximum Motor
Frequency
0 Hz to 650 Hz
Maximum motor frequency
at which the motor will run
regardless of the frequency
setpoint. This value applies
to both clockwise and
counterclockwise rotation.
1. Press to advance to
parameter P1080.
2. Press to access the
parameter values level.
3. Press to advance to
desired value.
4. Press to confirm and
save the setting.
Site Setting
Default = 50 or
60
(Default is
determined by
the setting of the
Motor
Frequency and
Unit of
Measurement
DIP switches.)
P1082
NOTE:
This value is limited internally to 200 Hz or five times the rated motor frequency
(P0305) when P1300is greater than or equal to 20 (control mode=vector
control). The value displays via r0209 (maximum frequency).
Ramp-up Time
0s to 650s
1. Press to advance to
parameter P1120.
2. Press to access the
parameter values level.
3. Press to advance to
desired value.
4. Press to confirm and
save the setting.
Site Setting
Default = 10
Typical fan =
120s.
Typical pump =
30s.
P1120
NOTES:
1. Setting the ramp-up time too short can cause the SED2 to trip (F0001
overcurrent, F0002 overvoltage, or F0003 undervoltage).
2. If using an external frequency setpoint with set ramp rates (such as from a
PLC), achieve optimum SED2 performance by setting ramp times (P1120
and P1121) slightly shorter than those of the PLC.
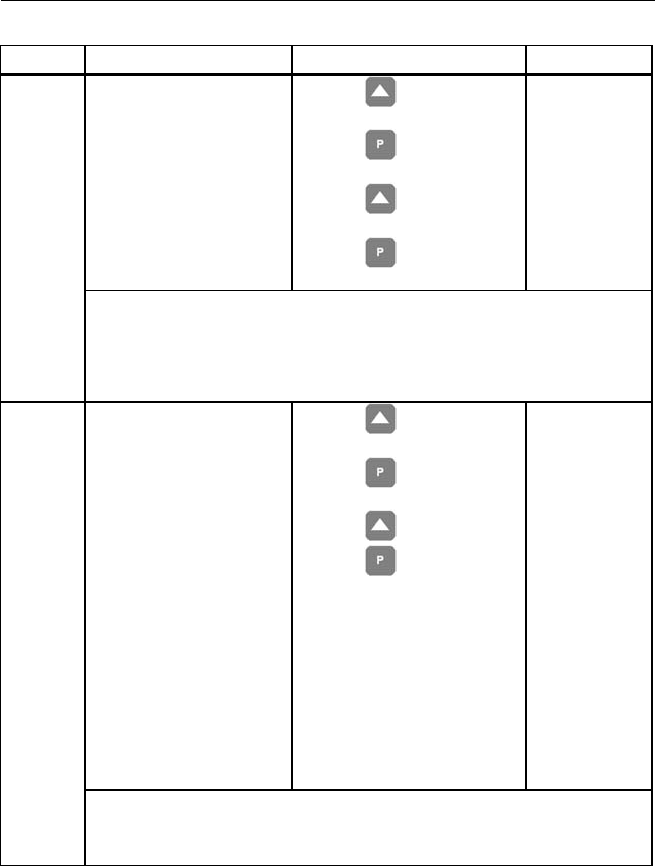
Commissioning
Siemens Building Technologies, Inc. 69
Parameter Description Action Setting/ Default
Ramp-down Time
0s to 650s
3.
1. Press to advance to
parameter P1121.
2. Press to access the
parameter values level.
3. Press to advance to
desired value.
4. Press to confirm and
save the setting.
Site Setting
Default = 30
Typical fan =
120s.
Typical pump =
30s.
P1121
NOTES:
1. Setting the ramp-up time too short can cause the SED2 to trip (F0001
overcurrent, F0002 overvoltage, or F0003 undervoltage).
2. If using an external frequency setpoint with set ramp rates (such as from a
PLC), achieve optimum SED2 performance by setting ramp times (P1120
and P1121) slightly shorter than those of the PLC.
End Quick
Commissioning
0 = End without motor
calculation or
factory
reset.
1 = End with motor
calculation and
factory reset
(recommended on
SED2 without
bypass option).
2 = End with motor
calculation and with
I/O reset
(recommended on
SED2 with bypass
option).
3 = End with motor
calculation but
without I/O reset.
1. Press to advance to
parameter P3900.
2. Press to access the
parameter values level.
3. Press to advance to 1.
4. Press to confirm the
setting.
Setting = 1
Default = 0
P3900
NOTES:
1. P0010 must always be set back to 0 before operating the motor.
2. If P3900 is less than 0 on completion of commissioning, P0010 is
automatically set back to 0.
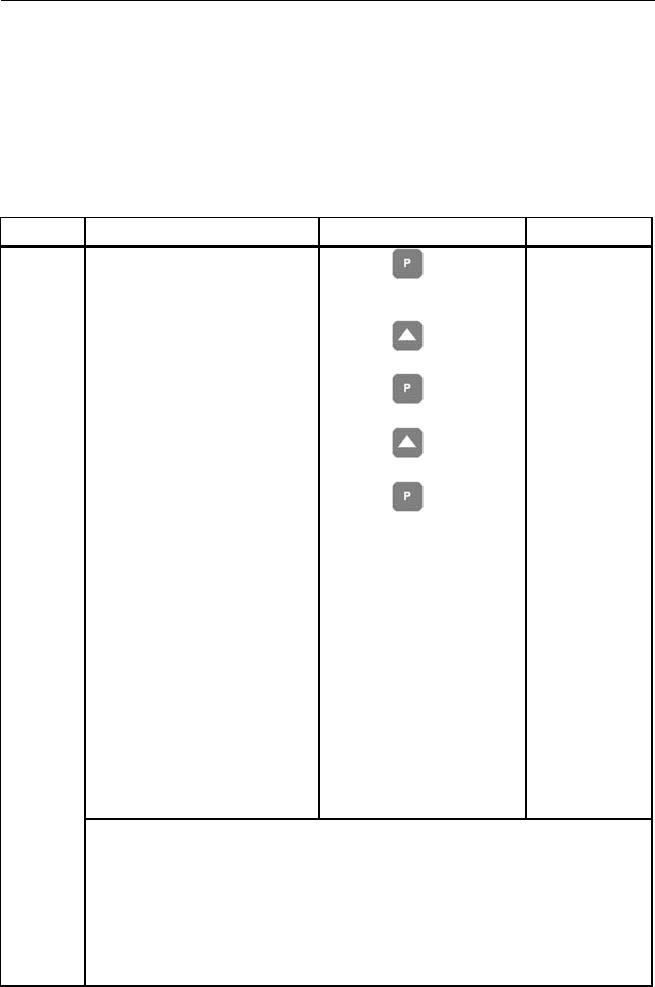
SED2 VFD Startup, Operation, and Maintenance Manual
70 Siemens Building Technologies, Inc.
Additional Parameter Settings
NOTE: If Display Selection for r0000, parameter P0005=21 (actual
frequency), then the BOP display alternately shows setpoint
values and the actual value (0 Hz).
Flying Start
Parameter Description Action Setting/ Default
Flying Start
Starts SED2 into a spinning
motor by rapidly changing the
output frequency of the SED2
until the actual motor speed is
found. Then, the motor runs up
to setpoint using the normal
ramp time.
0 = Flying start disabled
1 = Flying start is always
active, start in direction of
setpoint
2 = Flying start is active if
power on, fault, OFF2,
start in direction of
setpoint
3 = Flying start is active if
fault, OFF2, start in
direction of setpoint
4 = Flying start is always
active, only in direction of
setpoint
5 = Flying start is active if
power on, fault, OFF2,
only in direction of
setpoint
6 = Flying start is active if
fault, OFF2, only in
direction of setpoint
1. Press to enter the
SED2 parameter mode
and to display r0000.
2. Press to advance
to parameter P1200.
3. Press to access
the
parameter values level.
4. Press to advance
to desired setting.
5. Press to confirm
and save the setting.
Minimum: 0
Default: 0
Maximum: 6
P1200
NOTES:
1. Flying start is useful for motors with high inertia loads.
2. Se
ttings 1 to 3 search in both directions. Settings 4 through 6 search only in
direction of setpoint.
3. Flying start must be used in cases where the motor may still be turning
(such as after a brief input power break) or can be driven by the load.
Otherwise, overcurrent trips occur.
4. If the SED2 faults on F0002 (overvoltage) on a start command, flying start
may have to be optimized by reducing the values in P1203 and P1202.
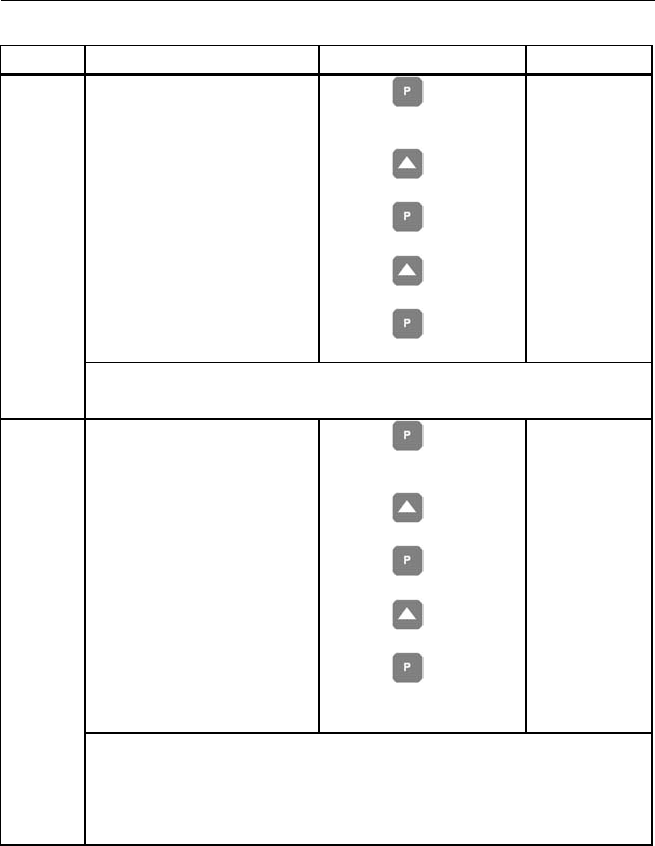
Commissioning
Siemens Building Technologies, Inc. 71
Parameter Description Action Setting/ Default
Motor Current: Flying Start
Defines search current used for
flying start. Value is in % based
on the rated motor current
(P0305).
1. Press to enter the
SED2 parameter mode
and to display r0000.
2. Press to advance
to parameter P1200.
3. Press
to access the
parameter values level.
4. Press to advance
to desired value.
5. Press to confirm
and save the setting.
Minimum: 10
Default: 100
Maximum: 200
P1202
NOTE:
Reducing the search current may improve performance for flying start if the
inertia of the system is not very high.
Search Rate: Flying Start
Sets factor by which the output
frequency changes during flying
start to synchronize with the
turning motor. This value,
entered in % relative to the
default time factor, defines the
initial gradient and influences
the time taken to search for the
motor frequency.
The search time is the time
taken to search through all
frequencies between
f_max + 2 × f_slip to 0 Hz.
1. Press to enter the
SED2 parameter mode
and to display r0000.
2. Press to advance
to parameter P1202.
3. Press
to access the
parameter values level.
4. Press to advance
to desired value.
5. Press to confirm
and save the setting.
Minimum: 10
Default: 100
Maximum: 200
P1203
NOTES:
1. P1203=100% is defined as giving a rate of 2% of f_slip,nom/ms.
2. P1203=200% would result in a rate of frequency change of 1% of
f_slip,nom/ms.
3. A higher value produces a flatter gradient, and thus a longer search time. A
lower value has the opposite effect.
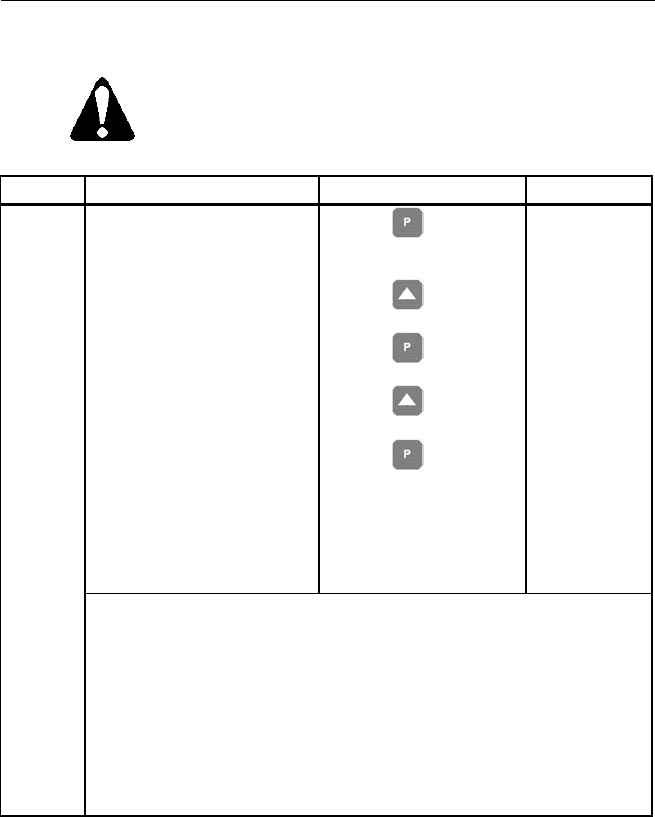
SED2 VFD Startup, Operation, and Maintenance Manual
72 Siemens Building Technologies, Inc.
Automatic Restart
CAUTION:
Setting 2 through 5 can cause the motor to restart unexpectedly.
Parameter Description Action Setting/ Default
Automatic Restart
Enables SED2 restart after a
supply power break or after a
fault.
0 = Disabled
1 = Trip reset after power
on (P1211 disabled)
2 = Restart after supply
power blackout
(P1211 disabled)
3 = Restart after brownout
or fault
(P1211 enabled)
4 = Restart after supply
power brownout
(P1211 disabled)
5 = Restart after blackout
or fault
(P1211 disabled)
1. Press to enter the
SED2 parameter mode
and to display r0000.
2. Press to advance
to parameter P1210.
3. Press
to access the
parameter values level.
4. Press to advance
to desired setting.
5. Press to confirm
and save the setting.
Minimum: 0
Default: 1
Maximum: 5
Setting: 3
P1210
NOTES:
1. Auto restart requires a constant ON command (such as via a digital input).
2. P1200 flying start must be used in cases where the motor may still be
turning, such as after a brief input power break, or can be driven by the
load.
3. A supply power brownout is when the power is interrupted and reapplied
before the operator panel display has gone dark. It is a very short supply
power break where the DC link has not fully collapsed
4. A supply power blackout is when the operator panel display has gone
dark before the power is reapplied. It is a long supply power break where
the DC link has fully collapsed.
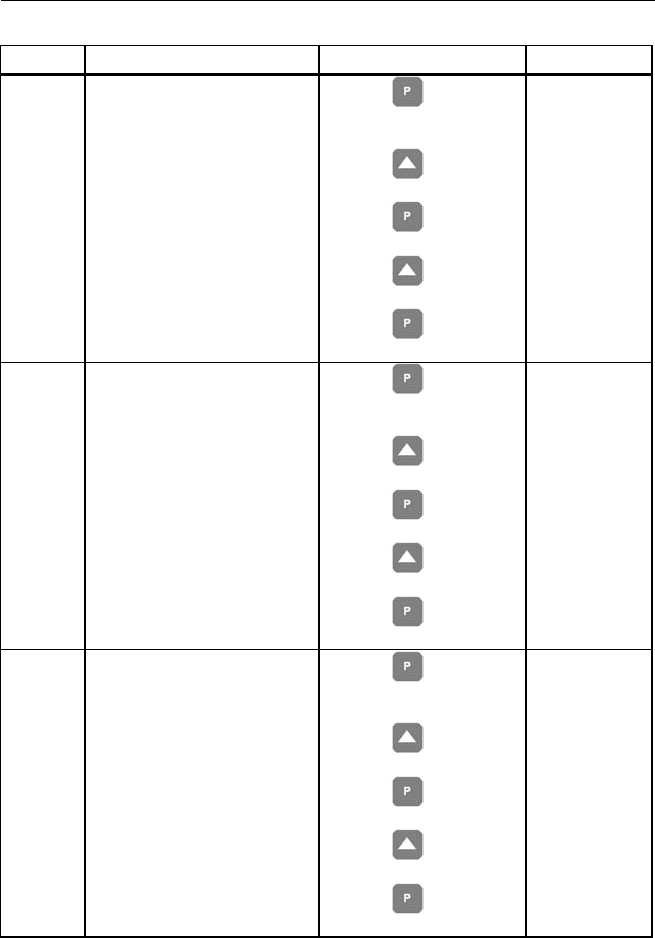
Commissioning
Siemens Building Technologies, Inc. 73
Parameter Description Action Setting/ Default
P1211 Number of Restart Attempts
Specifies number of times
SED2 will attempt to restart
after supply power brownout or
fault, if P1210 automatic restart
is activated.
1. Press to enter the
SED2 parameter mode
and to display r0000.
2. Press to advance
to parameter P1211.
3. Press
to access the
parameter values level.
4. Press to advance
to desired value.
5. Press to confirm
and save the setting.
Minimum: 0
Default: 3
Maximum: 10
P1212 Time to First Restart
Selects the time (seconds)
before the SED2 is restarted for
the first time if P1210 automatic
restart is activated
1. Press to enter the
SED2 parameter mode
and to display r0000.
2. Press to advance
to parameter P1212.
3. Press
to access the
parameter values level.
4. Press to advance
to desired value.
5. Press to confirm
and save the setting.
Minimum: 0
Default: 30
Maximum: 1000
P1213 Restart Time Increment
Selects the amount (seconds)
that the restart time is
incremented for each restart of
the SED2 if P1210 automatic
restart is activated
1. Press to enter the
SED2 parameter mode
and to display r0000.
2. Press to advance
to parameter P1213.
3. Press
to access the
parameter values level.
4. Press to advance
to desired value.
5. Press to confirm
and save the setting.
Minimum: 0
Default: 30
Maximum: 1000
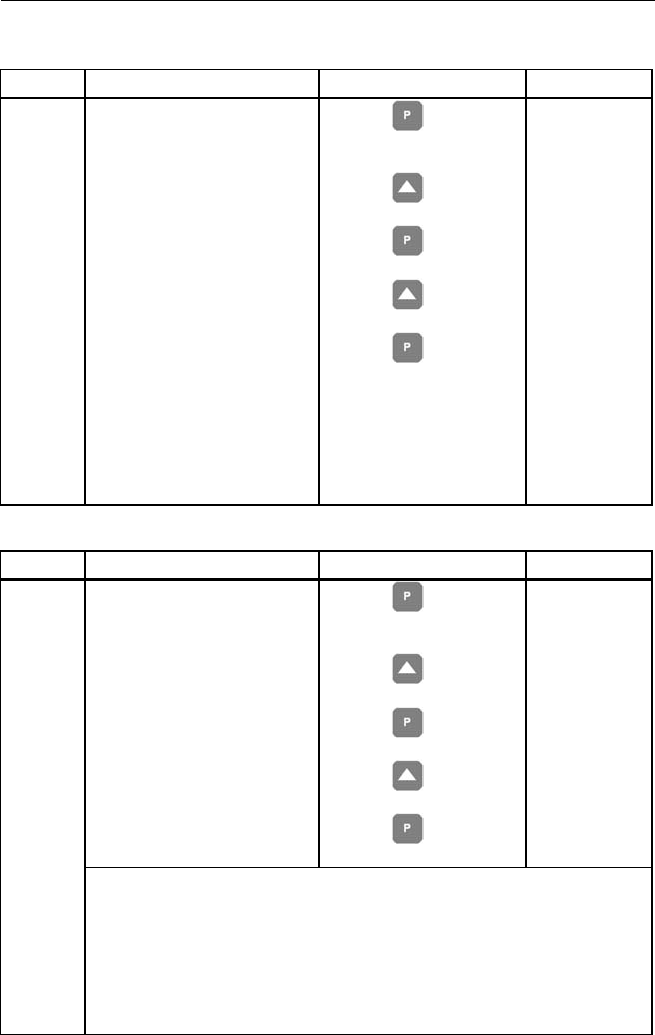
SED2 VFD Startup, Operation, and Maintenance Manual
74 Siemens Building Technologies, Inc.
Vdc Controller
Parameter Description Action Setting/ Default
P1240 Configuration of Vdc
Controller
Enables/disables Vdc
controller.
The Vdc controller dynamically
controls the DC link voltage to
prevent overvoltage trips on
high inertia systems.
Vdc-max automatically
increases ramp-down times to
keep the DC link voltage
(r0026) within limits.
0 = Vdc controller disabled
1 = Vdc-max controller
enabled
2 = Reserved
3 = Reserved
1. Press to enter the
SED2 parameter mode
and to display r0000.
2. Press to advance
to parameter P1240.
3. Press t
o access the
parameter values level.
4. Press to advance
to desired value.
5. Press to confirm
and save the setting.
Minimum: 0
Default: 1
Maximum: 3
Pulse Frequency
Parameter Description Action Setting/ Default
Pulse Frequency
Sets pulse frequency (kHz) of
power switches in SED2. The
frequency can be changed in
increments of 2 kHz.
Pulse frequencies > 4 kHz
selected on 380V to 480V units
reduce the maximum
continuous motor current.
1. Press to enter the
SED2 parameter mode
and to display r0000.
2. Press to advance
to parameter P1800.
3. Press
to access the
parameter values level.
4. Press to advance
to desired value.
5. Press to confirm
and save the setting.
Minimum: 2
Default:
Varies by model
(hp/voltage
dependent)
Maximum: 16
P1800
NOTES:
1. Minimum pulse frequency depends on P1082 (maximum frequency) and
P0310 (rated motor frequency).
2. At 4 kHz, full output curre
nt is obtained up to 50 degrees C (CT mode); over
50 degrees C, full output may be obtained at 8 kHz.
3. If silent operation is not absolutely necessary, lower pulse frequencies may
be selected to reduce SED2 losses and radio-frequency emissions.
4. Under certain circumstances, the SED2 may reduce the switching
frequency to provide protection against over-temperature.
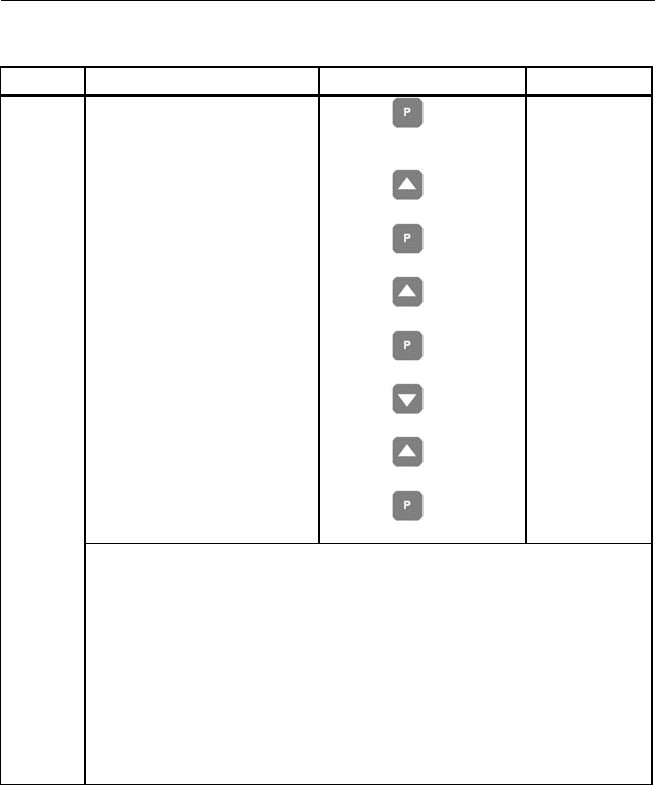
Commissioning
Siemens Building Technologies, Inc. 75
Reset to Factory Defaults
Parameter Description Action Setting/ Default
Reset to Factory Default
Resets SED2 parameters to
the
factory defaults.
1. Press to enter the
SED2 parameter mode
and to display r0000.
2. Press to advance
to parameter P1010.
3. Press
to access the
parameter values level.
4. Press to advance
to 30.
5. Press to confirm
and save the setting.
6. Press to go to
parameter P0970.
7. Press to advance
to 1.
8. Press to confirm
and save the setting.
P0010:
Setting = 30
Default = 0
P0970:
Setting = 1
Default = 0
P0010
P0970
NOTES:
1. First set P0010=30.
2. Stop SED2 (that is, disable all pulses) before you reset parameters to
factory default values.
3. The following parameters retain their values after a factory reset:
• P0918 (address of CB, communications board or module)
• P2010 (USS baud rate)
• P2011 (USS address)
4. The reset process takes about 10 seconds.
5. Appendix A: Parameters, Defaults, and Settings lists SED2 parameters and
their factory defaults.
SED2 VFD Startup, Operation, and Maintenance Manual
76 Siemens Building Technologies, Inc.
Network Communications
Table 8 lists the parameters required for correct APOGEE™ system FLN
communications and control of the SED2.
CAUTION:
Changes made to the parameters other than what is listed in
Table 8 can result in damaging the drive or building equipment.
Table 8. Parameters for Network Communications.
Parameter Value
P0003:
User access
Level
Set to 3 to allow access to required parameters.
P2040:
CB telegram
off time
Set to 0 (watchdog disabled) to tell the SED2 to start looking
for communication via the setting of P2041.
P2041[0]:
CB parameter Set to 1 for FLN (P1) control.
(Set to 2 for FLN (N2) control.)
P0918:
CB address Set to 99 for (P1) addressing of the device.
(Set to 3 for (N2) addressing of the device.)
Unit must be powered down to establish P1 communications,
and then the address is assigned.
The address will return to the default of 99 when the drive is
powered down.
P0700[0] Set to 6 tells the SED2 to look for a start command from the
network in the auto mode.
P1000[0] Set to 6 tells the SED2 to look for its speed source from the
network in the auto mode.
Since there is a limited life to EEPROM writes, set the Network Fault
Indicator to 0 only when troubleshooting a communications problem.
If a factory reset of parameters is desired, set P0010 to 30 and then set
P0970 to 1.
Appendix B: SED2 Point Maps provides a SED2 P1 point map for
APOGEE® Automation Systems and a SED2 N2 point map for Johnson
Controls, Inc. systems.

Commissioning
Siemens Building Technologies, Inc. 77
Changing Individual Parameter Digits
To quickly change the value of a parameter, modify the individual digits
in the display as follows:
1. Verify that you are at the parameter values level by following these
steps:
a. Press to enter the parameter level.
b. Press to advance to the desired parameter.
c. Press to access the parameter values level.
2. Press the right-most digit starts to flash.
3. Modify the value of this digit with the and pushbuttons.
4. Press again. The next digit starts flashing.
5. Repeat steps 3 and 4 until the required value displays.
6. Press to exit the parameter values level.

SED2 VFD Startup, Operation, and Maintenance Manual
78 Siemens Building Technologies, Inc.
Maintenance
Perform SED2 maintenance semi-annually. Estimated maintenance time
is one hour.
Prerequisites
1. Confer with customer and log any comments about specific SED2s.
2. Verify with customer that SED2 can be serviced and explain the
service steps.
3. Document last trip error (if any).
4. Verify SED2 Emergency Services are de-energized.
5. De-energize unit.
6. Follow standard lockout, tag-out procedures and verify that input
power is removed.
General Inspection and Cleaning
NOTE: See the appropriate sections in this manual for mechanical
and electrical installation instructions.
1. Open unit.
2. Inspect unit and verify that all connections have continuity.
3. Visually inspect unit for signs of arching or overheating.
4. Vacuum and dust unit interior using a non-static generating device.
5. Verify environmental conditions conform to drive specifications.
6. Inspect outer casing for cleanliness and corrosion.
Muffin Fan Inspection and Cleaning
1. Clean dirt or debris from fan housing and blades.
2. Check fan bearings.
• You should not be able to move the blades forward or backward.
• The blades should free wheel and not appear to be binding.

Maintenance
Siemens Building Technologies, Inc. 79
• There should be no mechanical whining sound made from the
fan
3. Close unit.
4. Remove lockout, tag-out materials.
Re-energize Unit
1. Verify 3-phase power supply is within SED2 ratings.
2. Check for input phase balance legs: A to B, B to C, and C to A.
Phase balance should be within 10V to 15V of each other.
DC Bus Integrity Test
1. At this time, the SED2 should have power applied but not be enabled
to run.
2. Check the Actual DC Link Voltage using parameter r0026 index 000
and 001.
• With index 000 displayed, there should be no more than a 25V
fluctuation.
• With index 001 displayed, there should be no more than a 25V
fluctuation.
Contactors and Switches
Verify with infrared temperature that no hot spots have occurred in
contactors and switches.
Motor Bearing Wear
To determine motor bearing wear, use an amphere probe at 60 Hz on
SED2 motor output leads to document full running amps.
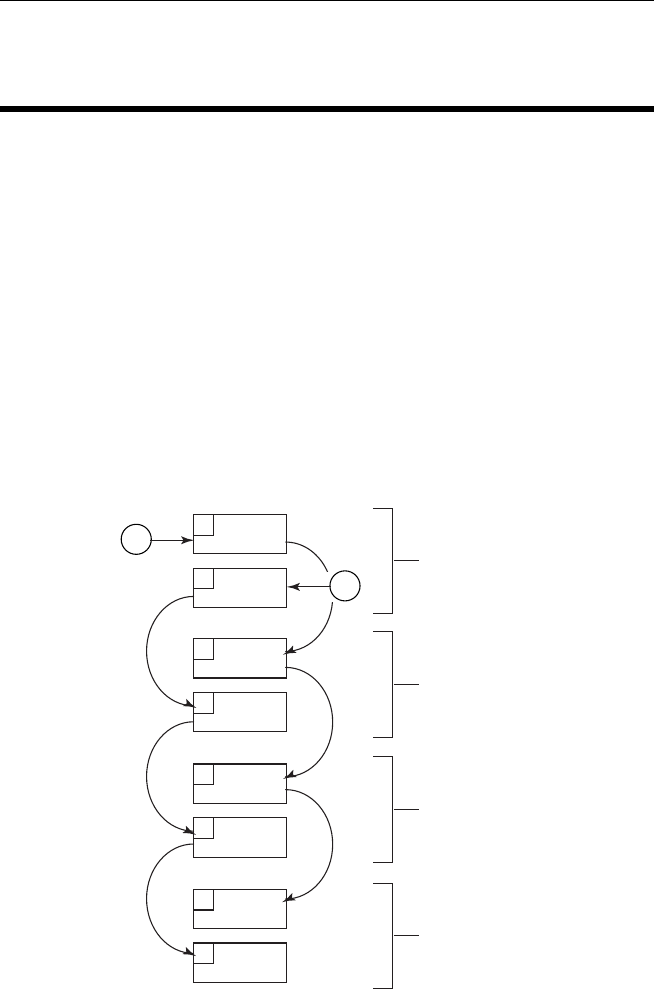
SED2 VFD Startup, Operation, and Maintenance Manual
80 Siemens Building Technologies, Inc.
Troubleshooting
Reading Faults
• OK FAULT (r0052, bit 3) is a read-only fault status point (0=OK,
1=Fault).
• LAST FAULT (r0947(0)) shows the code for the most recent fault.
Fault history displays according to Figure 40, where:
F1 = The first active fault (not yet acknowledged)
F2 = The second active fault (not yet acknowledged)
F1e = The occurrence of the fault acknowledgement for F1 and F2.
This moves the value in the two indexes down to the next pair of
indexes, where they are stored. Indexes 0 and 1 contain the active
faults. When faults are acknowledged, indexes 0 and 1 are reset to 0.
F1 0
1
2
3
4
5
6
7
F2
F1e
F1e
F1e
F1e
F1e
F1e
ACTIVE FAULT
CODES
MOST RECENT
FAULT CODES - 1
MOST RECENT
FAULT CODES - 2
MOST RECENT
FAULT CODES - 3
Figure 40. Display of Fault History.

Troubleshooting
Siemens Building Technologies, Inc. 81
• For example:
If the SED2 trips on undervoltage and then receives an external trip
before the undervoltage is acknowledged, you will obtain:
Index 0 = 3, undervoltage
Index 1 = 85, external trip
Whenever a fault in index 0 is acknowledged (F1e), the fault history
shifts as indicated in the diagram.
• Indexes:
r0947[0] = Recent fault trip –, fault 1
r0947[1] = Recent fault trip –, fault 2
r0947[2] = Recent fault trip -1, fault 3
r0947[3] = Recent fault trip -1, fault 4
r0947[4] = Recent fault trip -2, fault 5
r0947[5] = Recent fault trip -2, fault 6
r0947[6] = Recent fault trip -3, fault 7
r0947[7] = Recent fault trip -3, fault 8
Index 2 is used only if a second fault occurs before the first fault is
acknowledged.
Resetting Faults
• Press to reset a fault condition manually.
• OK FAULT (r0052, bit 3) is a read-only fault status point (0=OK,
1=Fault). It can be acknowledged with FAULT ACK (r0054, bit 7).
Setting FAULT ACK (r0054, bit 7) resets the fault (1=Reset Fault).
• It is possible that motor performance may be affected at low
frequencies if parameter P1310 falls under 50% (default value).
• It is recommended to make provision to reset faults automatically if
the unit is operated in auto mode.
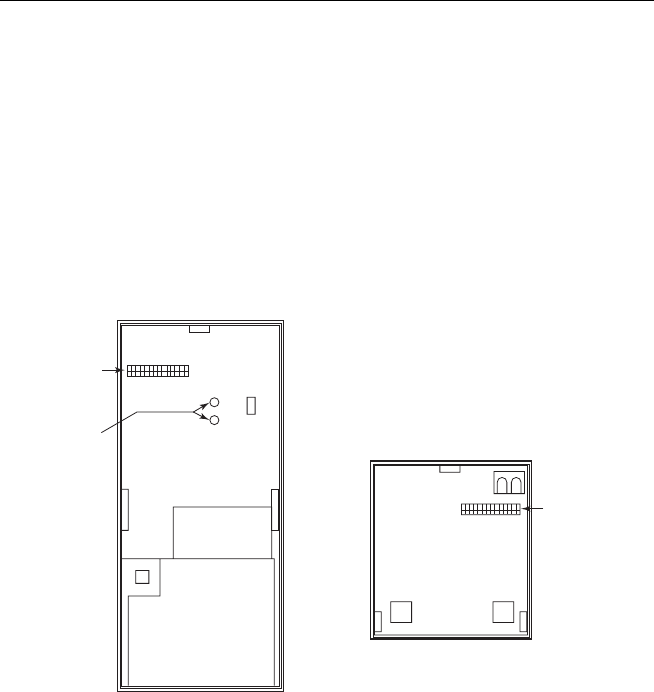
SED2 VFD Startup, Operation, and Maintenance Manual
82 Siemens Building Technologies, Inc.
Troubleshooting the Operator Panel
If the display shows P – – – – or it is a blank screen, make certain
connection pins are not bent on the I/O module (Figure 41) and that
connection openings on the back of the operator panel are free from
obstructions (Figure 42).
NOTE: For Frame Size D through F, verify ribbon cable connector is
not loose or damaged. Verify functionality of the operator
panel by plugging it directly into the control module.
VERIFY THAT
CONNECTION
PINS ARE
NOT BENT
VERIFY THAT
INDICATING
LIGHTS ARE
ILLUMINATING
Figure 41. Connection Pins on I/O
Module.
VERIFY THAT
CONNECTION
OPENINGS ARE
FREE FROM
OBSTRUCTIONS
Figure 42. Connection Openings on
Back Side of Operator Panel.

Troubleshooting
Siemens Building Technologies, Inc. 83
Troubleshooting Using the Operator
Panel
NOTE: The voltage and current range of the SED2 must match the
motor data.
If the motor does not start with the ON command:
1. Check if Commissioning Parameter Filter P0010=0 (factory setting).
2. Check if there is a valid ON signal.
3. Check if Selection of Command Source parameter P0700[0]=2 (for
digital input control) or P0700[1]=1 (for BOP control).
4. Check if the correct setpoint is available (0 to 10V on terminal 3), or if
the setpoint was entered in the correct location for the setpoint
source (Selection of Frequency Setpoint parameter P1000[0]=2).
If the motor does not start after checking these parameters, reset the
SED2 to the factory-default parameter values according to the Reset to
Factory Defaults section in this manual.
Use a switch between terminals 5 and 9 on the control terminal bar. The
SED2 should now run according to the default setpoint at the analog
input.
Use r0722 to check on/off status of digital inputs. Use r0752 to check the
smoothed value of analog inputs.

SED2 VFD Startup, Operation, and Maintenance Manual
84 Siemens Building Technologies, Inc.
Fault Codes
Error Cause Diagnosis/Remedy
Drive
Reaction
F0001,
Overcurrent • Motor power (P0307) is
greater than SED2 power
(P0206).
• Motor lead short circuit.
• Ground faults.
• Motor is pulling more
current than rating
because of mechanical
issues.
• Motor power (P0307) SED2
power (P0206).
• Cable length limits must not be
exceeded.
• Short circuits or ground faults in
motor cable and motor.
• Motor parameters must match
the motor in use.
• Value of stator resistance
(P0350) must be correct.
• Motor is obstructed or
overloaded.
• Increase ramp-up time.
• Reduce boost level.
Off2

Troubleshooting
Siemens Building Technologies, Inc. 85
Error Cause Diagnosis/Remedy
Drive
Reaction
F0002,
Overvoltage
• DC link voltage (r0026)
exceeds trip level.
• Overvoltage can be
caused either by the input
supply voltage being too
high or if motor is in
regenerative mode.
• Regenerative mode can
be caused by fast ramp
downs or if the motor is
driven from an active
load.
• Supply voltage must lie within the
limits indicated on the SED2
rating plate.
• DC link voltage controller must be
enabled (P1240) and
parameterized correctly.
• Ramp-down time (P1121) must
match inertia of load.
• Loose wire on output.
• Set P1800=2 to reduce pulse
size.
• Review quick commissioning with
User Access Level P0003=3
(expert) and specify a value for
P0309, rated motor efficiency.
• On systems with multiple motors,
one may be pushing the other.
• System electrical disturbance
may need correction.
• If the SED2 faults on F0002
(overvoltage) on a start
command, flying start may have
to be optimized. This is typically
done by reducing the values in
P1203 and P1202.
NOTE: Higher inertia requires long
ramp-down times.
Off2
F0003,
Undervoltage
• Input power supply failed.
• Shock load outside the
specified limits.
• Supply voltage must lie within the
limits indicated on the SED2
rating plate.
• Supply voltage must not be
susceptible to temporary failures
or voltage reductions outside
tolerance.
• Use Ramp-up Time P1120 to
increment the ramp-up time.
Off2

SED2 VFD Startup, Operation, and Maintenance Manual
86 Siemens Building Technologies, Inc.
Error Cause Diagnosis/Remedy
Drive
Reaction
F0004,
SED2 over-
temperature
• Ventilation is inadequate.
• Fan is inoperative.
• The ambient temperature
is too high.
• Fan must turn when the SED2 is
running.
• Pulse frequency must be set to a
lower value.
• Ambient temperature could be
higher than specified for the
SED2.
Off2
F0005,
SED2 I2t • The SED2 is overloaded.
• Duty cycle is outside the
tolerance.
• Motor power (P0307)
exceeds the SED2 power
(P0206).
• Load cycle must lie within the
limits specified.
• Motor power (P0307) ≤ SED2
power (P0206).
Off2
F0011, Motor
over-
temperature
• Motor is overloaded
• Protection is too finely
tuned for the duty cycle.
• Rated Motor Efficiency
P0309 is not accurate.
• Make sure that the load duty
cycle (temporary overload) lies
within the limits specified.
• Verify P0640 is set for the
application.
• Verify motor efficiency setup via
P0309 equals motor nameplate
data.
NOTE: Set P0003=3 and P0010=1
and then advance to P0309. Set
efficiency to motor rated efficiency,
or 99. Advance to P3900=3.
Off2
F0012,
SED2
temperature
signal lost
Wire breakage of the SED2
temperature sensor (heat
sink).
— Off2
F0015, Moto
r
temperature
signal lost
• Breakage or short-circuit
of the motor temperature
sensor.
• If a signal loss is
detected, temperature
monitoring switches to
monitoring the thermic
motor image.
— Off2
F0020, 1
phase for
input power
supply
missing
One of the 3 phases of the
input power supply voltage
is missing.
Check wiring of the 3 phases at the
SED2 input supply voltage. Off2

Troubleshooting
Siemens Building Technologies, Inc. 87
Error Cause Diagnosis/Remedy
Drive
Reaction
F0021,
Ground fault The ground fault occurs if
the sum of the phase
currents is higher than 5%
of the nominal SED2
current.
NOTE: This error
message occurs on SED2s
with three current sensors;
that is, for SED2s of frame
sizes D to F.
— Off2
F0022,
Power stack
fault
The fault is caused by the
following events:
(1) dc link overcurrent =
short circuit of IGBT.
(2) short circuit of dc link
chopper
(3) ground fault.
Frame sizes A to C =
(1),(2),(3).
Frame sizes D to E =
(1),(2).
Frame size F = (2).
Since all these faults are
assigned to one signal on
the power stack, it is not
possible to establish which
one actually occurred.
• Check for loose output or short.
• Possible drive component failure.
Off2
F0023, Fault
at SED2
output
On-phase is interrupted at
the SED2 output. — Off2
F0024,
Rectifier
over-
temperature
• Ventilation is inadequate.
• Fan is inoperative.
• Ambient temperature is
too high.
• Fan must turn when the SED2 is
running.
• Pulse frequency (P1800) must be
set to default value 4 kHz.
—
F0030, Fan
fault Fan no longer works. •
Fault cannot be masked while the
options module (BOP or AOP) is
connected.
• Replace the fan.
Off2

SED2 VFD Startup, Operation, and Maintenance Manual
88 Siemens Building Technologies, Inc.
Error Cause Diagnosis/Remedy
Drive
Reaction
F0041,
Motor data
identification
failure
• Motor data identification
failed
• Alarm value = 0: Load is
missing
• Alarm value = 1: Current
limit value reached during
identification.
• Alarm value = 2:
Identified stator
resistance less than 0.1%
or more than 100%.
• Alarm value = 3:
Identified rotor resistance
less than 0.1% or more
than 100%.
• Alarm value = 4:
Identified stator reactance
less than 50% or more
than 500%.
• Alarm value = 5:
Identified input power
reactance less than 50%
or more than 500%.
• Alarm value = 6:
Identified rotor time
constant less than 10 ms
or more than 5s.
• Alarm value = 7:
Identified total leakage
reactance less than 5% or
more than 50%.
• Alarm value = 8:
Identified stator leakage
reactance less than 25%
or more than 250%.
• Alarm value = 9:
Identified rotor leakage
reactance less than 25%
or more than 250%.
(Continued)
0: Check if the motor is
connected to the SED2.
1-40: Check if the motor data in
P0304 to P0311 are correct.
Check the type of motor wiring
required (star, delta).
Off2

Troubleshooting
Siemens Building Technologies, Inc. 89
Error Cause Diagnosis/Remedy
Drive
Reaction
(Continued)
F0041,
Motor data
identification
failure
• Alarm value = 20:
Identified IGBT ON-
voltage less than 0.5 or
more than 10V.
• Alarm value = 30: Current
controller at voltage limit.
• Alarm value = 40:
Inconsistency of identified
data set, at least one
identification failed.
Percentage values based
on impedance
Zb =
Vmot,nom/sqrt(3)/Imot,nom.
0: Check if the motor is
connected to the SED2.
1-40: Check if the motor data in
P0304 to P0311 are correct.
Check the type of motor wiring
required (star, delta).
Off2
F0051,
Parameter
EEPROM
fault
Read or write failure while
saving non-volatile
parameter
Reset SED2 to factory setting and
perform quick commissioning. Off2
F0052,
Power stack
fault
Read failure for power stack
information or invalid data. Replace SED2. Off2
F0053, I/O
EEPROM
fault
Read failure for I/O
EEPROM information or
invalid data.
• Check the data.
• Replace the I/O module.
Off2
F0054,
Wrong I/O
connection
I/O connection is invalid. • Check data flow.
• Replace I/O module.
Off2
F0060, ASIC
timeout Internal communication
error. • If error reappears, replace SED2.
• Contact your supplier.
Off2
F0070, CB
setpoint fault
No setpoints from CB
(communications board or
module) during telegram off
time.
Check CB (communications board
or module) and communications
partner.
Off2
F0071, USS
(BOP link)
setpoint fault
No setpoints from USS
during telegram off time. • Check communications to data
transmission module.
• Check USS master.
Off2
F0072, USS
(COM link)
setpoint fault
No setpoints from USS
during telegram off time Check USS master. Off2

SED2 VFD Startup, Operation, and Maintenance Manual
90 Siemens Building Technologies, Inc.
Error Cause Diagnosis/Remedy
Drive
Reaction
F0080,
Analog input
signal lost
• Broken wire at analog
input.
• Signal level outside
defined limits.
— Off2
F0085,
External fault
External fault triggered via
input terminals. • Disable input terminals for fault
trigger, or eliminate external fault.
• Check if digital input is set to ON.
Off2
F0101, Stack
overflow Software or processor error.
Run self-test routines. Off2
F0221, PID
feedback
below min.
value
PID feedback below
minimum value of P2268,
minimum value for PID
feedback.
• Change value of P2268.
• Adjust feedback amplification.
Off2
F0222 PID feedback above
maximum value. • PID feedback, maximum value of
P2267 (maximum value for PID
feedback).
• Adjust feedback amplification.
Off2
F0450, BIST
tests failure Alarm value:
1. Some power section
tests have failed.
2. Some control module
tests have failed.
4. Some functional tests
have failed.
8. Some I/O module tests
have failed.
16. Internal RAM failed on
power-up check.
• SED2 may run, but some
functions do not work properly.
• Replace the SED2.
Off2

Troubleshooting
Siemens Building Technologies, Inc. 91
Error Cause Diagnosis/Remedy
Drive
Reaction
F0452, Belt
failure
detected
Load condition changes at
the motor indicate a belt
failure or mechanical fault.
• Motor belt OK? Is the motor
obstructed or seized?
• If external speed sensor is used,
check proper function. Also
check:
— P0409 (pulses/sec at rated
frequency)
— P2191 (belt failure speed
tolerance monitoring)
— P2192 (delay time for
P2191).
• For belt failure detection without
sensor, check:
— P2182 (threshold frequency
f1)
— P2183 (threshold frequency
f2)
— P2184 (threshold frequency
f3)
— P2185 (upper torque
threshold 1)
— P2186 (lower torque
threshold 1)
— P2187 (upper torque
threshold 2)
— P2188 (lower torque
threshold 2)
— P2189 (upper torque
threshold 3)
— P2190 (lower torque
threshold 3)
— P2192 (delay for belt failure).
• Lubricate the motor if necessary.
Off2

SED2 VFD Startup, Operation, and Maintenance Manual
92 Siemens Building Technologies, Inc.
Warning Messages
Error Cause Diagnosis and Remedy Drive
Reaction
A0501, Current
limit • Motor power>SED2 power.
• Motor cables are too long.
• Ground faults.
• Check belt tension.
• Motor power (P0307)
>SED2 power (P0206).
• Cable length limits must
not be exceeded.
• Motor cable and motor
must not have short
circuits or ground faults.
• Motor parameters must
match the motor in use.
• Value of stator resistance
(P0350) must be correct.
• The motor must not be
obstructed or overloaded.
• Check belt tension, if
applicable.
• Increase ramp-up time.
• Reduce boost level.
—
A0502,
Overvoltage
limit
Overvoltage limit is reached.
This warning may appear on
ramp-down if the DC link is
disabled (P1240 = 0).
If this warning is displayed
permanently, check the
SED2 input voltage or
extend the ramp-down time
for the SED2.
—
A0503,
Undervoltage
limit
Input power failed.
The input power and
consequently the DC link
voltage (r0026) are below the
defined threshold value.
Check input supply voltage.
—
A0504, SED2
over-
temperature
The warning level of the SED2
heat sink temperature (r0037) is
exceeded.
This results in a reduced pulse
frequency and/or a reduced
output frequency (dependent
on parameter setting in
(P0610).
• The ambient temperature
must lie within the limits
specified.
• The load conditions and
duty cycle must lie within
the specified conditions.
• The fan must turn when
the SED2 is running.
—

Troubleshooting
Siemens Building Technologies, Inc. 93
Error Cause Diagnosis and Remedy Drive
Reaction
A0505, SED2
I2t Warning level exceeded. The
current supply is reduced if
parameter P0610=1.
Check that the duty cycle
lies within the limits
specified.
Motor power
(P0307)>SED2 power
(P0206).
—
A0506, SED2
duty cycle Difference between the heat
sink temperature and IGBT
exceeds the warning levels.
Make sure that the load
duty cycles (temporary
overload) lie
within the limits
specified.
—
A5011, Motor
over-
temperature I2t
• Motor is overloaded.
• Duty cycle is outside the
tolerance.
• Correct overload.
• Adjust duty cycle.
• Re-run quick
commissioning.
• Verify motor efficiency
setup via P0309 equals
motor nameplate data.
NOTE: Set P0003=3 and
P0010=1 and then advance
to P0309. Set efficiency to
motor rated efficiency, or
99. Advance to P3900=3.
—
A0520,
Rectifier over-
temperature
Warning level of the rectifier
heat sink temperature is
exceeded.
• Ambient temperature m
ust
lie within the limits
specified.
• Load conditions and duty
cycle must lie within the
specified conditions.
• Fan must turn when the
SED2 is running.
—
A0523, SED2
output fault On-phase is interrupted at the
SED2 output. — —
A0541, Motor
data
identification
enabled
Motor data identification
(P1910) selected or running. — —
A0600, RTOS
data loss — — —

SED2 VFD Startup, Operation, and Maintenance Manual
94 Siemens Building Technologies, Inc.
Error Cause Diagnosis and Remedy Drive
Reaction
A0910, Vdc
(max.)
controller
disabled
• Vdc maximum controller
disabled as not able to keep
the DC link voltage (r0026)
within threshold limits.
• Permanent supply
overvoltage.
• Occurs if the motor is driven
by a load forcing the motor to
go into energy recovery
operation.
• Occurs during ramp-down of
very high duty cycles.
• Input voltage must lie
within specified range.
• Load must be adjusted.
• In some cases, brake
resistance must be
applied.
—
A0911, Vdc
(max.)
controller
enabled
Vdc maximum controller is
enabled.
Ramp-down times are
increased automatically to keep
the DC link voltage (r0026)
within the limits specified.
Increase ramp-down time. —
A0912, Vdc
(min) controller
enabled
• Vdc minimum controller
enabled if the DC link voltage
(r0026) drops below the
minimum value.
• Motor kinetic energy is used
to buffer the DC link voltage
and thus slow the SED2.
• Temporary supply failures do
not automatically lead to
undervoltage shutdown.
— —
A0920, Analog
input
parameters not
set properly
• Analog input parameters
must not be set to identical
values, as illogical values
would result.
• Index 0: Parameter settings
for output identical.
• Index 1: Parameter settings
for input identical.
• Index 2: Parameter settings
for input do not correspond to
analog input type.
— —

Troubleshooting
Siemens Building Technologies, Inc. 95
Error Cause Diagnosis and Remedy Drive
Reaction
A0921, Analog
output
parameters not
set properly
• Analog output parameters
must not be set to identical
values, as illogical values
would result.
• Index 0: Parameter settings
for output identical.
• Index 1: Parameter settings
for input identical.
• Index 2: Parameter settings
for output do not correspond
to analog output type.
— —
A0922, No load
applied to
SED2
• No load is applied to the
SED2.
• Some functions may not work
as under normal load
conditions.
— —
A0923, Both
JOG left and
JOG right are
requested
Both JOG right and JOG left
have been requested. This
freezes the RFG (ramp function
generator) output frequency at
its current value.
— —
A0952, Belt
failure detected
Load conditions at the motor
indicate a belt failure or
mechanical fault.
• No breakage, seizure, or
obstruction of SED2 train.
• Correct operation of
external speed sensor, if
in use.
—

SED2 VFD Startup, Operation, and Maintenance Manual
96 Siemens Building Technologies, Inc.
Replacement Parts
Replacement Part Description Part Number
Frame Size A, Fan Assembly, 3-Wire SED2-FAN-20A
Frame Size B, Fan Assembly, 3-Wire SED2-FAN-20B
Frame Size C, Fan Assembly, 3-Wire SED2-FAN-20C
DIM Module Assembly, Frame Sizes D through F SED2-DIMMOD-DF
Frame Size D & E, Fan Assembly 1 (ADDA) SED2-FAN-20DE1
Frame Size D & E, Fan Assembly 2 (PAPST) SED2-FAN-20DE2
Frame Size F, Fan Assembly SED2-FAN-20F
I/O Module MM436 (SBT) Frame Size A through F SED2-IOBD1
Terminal Cover, Frame Size A through C SED2-COV1-ABC
420/440 Frame Size B, Power Connections Cover SED2-COV2-B
420/440 Frame Size C, Power Connections Cover SED2-COV2-C
Frame Size B, Fan Assembly IP54 (SBT) SED2-FAN-54B
Frame Size C, Fan Assembly IP54 (SBT) SED2-FAN-54C
Frame Size D & E, Fan Assembly IP54 (SBT) SED2-FAN-54DE
Frame Size F, Fan Assembly IP54 (SBT SED2-FAN-54F
Repair
Siemens Building Technologies, Inc. 97
Repair
Only Siemens service departments, repair centers authorized by
Siemens Building Technologies, Inc., or authorized personnel who are
fully acquainted with the SED2 may repair this equipment. Replace
defective parts or components using original manufacturer parts.
DANGER:
Always disconnect the power source before opening the
SED2.
Always wait 5 minutes after disconnecting the SED2 from
the power source before performing any work. The DC link
capacitors of all SED2s remain charged with dangerous
voltages for 5 minutes after all supplies have been
disconnected. When working on open equipment, note that
live parts are exposed. Do not touch these parts.
WARNING:
Only use this equipment for the purpose specified by the
manufacturer. Unauthorized modifications and the use of
spare parts and accessories that are not sold or
recommended by the manufacturer of the equipment can
cause fires, electric shocks, and injuries.

SED2 VFD Startup, Operation, and Maintenance Manual
98 Siemens Building Technologies, Inc.
Technical Specifications
Table 9. Drive Specifications.
Drive Specifications Description
200V to 240V, 3AC±10%. 1/2 hp to 60 hp
380V to 480V, 3AC ±10% 1/2 hp to 125 hp
Input voltage and
power (3 phase) 500V to 600V, 3 AC ±10% 1 hp to 125 hp
Input frequency 47 Hz to 63 Hz
Output frequency 0 Hz to 150 Hz
Power factor ≥0.9
VFD degree of
efficiency 96% to 97%
Switch-on current Less than nominal input current
Auxiliary supply 24V Glavanically separated, unregulated auxiliary supply (18V to
32V) 100 mA
Overload capacity 100% for 60 seconds, 150% for 3 seconds
Control method Linear, parabolic and programmable V/f; and flux current control
low-power mode
PWM frequency 2k Hz to 16k Hz (adjustable in 2k Hz increments)
Fixed frequencies 15 programmable
Skip frequency bands 4 programmable
0.01 Hz digital
0.01 Hz serial
Setpoint resolution
10 bit analog
Digital inputs
(sink/source) 6: fully programmable and scalable isolated digital inputs,
switchable
Analog inputs 2: 0 Vdc to 10 Vdc, 0/4 mA to 20 mA, can also be configured as
digital inputs or Ni 1000 input
Relay outputs 2: configurable 30 Vdc /5A (resistive), 250 Vac 2A (inductive)
Analog outputs 2: programmable (0/4 mA to 20 mA)
Serial interface RS-485;
Protocols: USS, P1 and N2;
Transmission rate: Up to 38.4k Baud
IP20
NEMA Type 1 with protective shield and gland plate installed
Protection level
NEMA Type 12/IP54
Operating: 14°F to 104°F (–10°C to 40°C)
Temperature ranges Storage: –40°F to 158°F (–40°C to 70°C)
Humidity 95% rh, non-condensing
Operational altitudes Up to 3280 ft (1000m) above sea level without derating

Technical Specifications
Siemens Building Technologies, Inc. 99
Drive Specifications Description
• Under-voltage
• Over-voltage
• Overload
• Ground fault
• Short circuit
• Stall prevention
• Locked motor
• Motor overtemperature l2 t, PTC
• Over-temperature
Protection
features
• Parameter PIN protection
Standards UL, cUL, CE, C-tick
CE conformity Conformity with EC Low Voltage Directive 73/23/EEC

SED2 VFD Startup, Operation, and Maintenance Manual
100 Siemens Building Technologies, Inc.
Appendix A: Parameters,
Defaults, and Settings
Parameter
Description Unit
User
Setting Min Default Max
Access
Level
r0000 Drive display (defined in
P0005) — — — — All
r0002 Drive state (actual) — — — — 3
P0003 User access level — 0 1 4 1
P0004 Parameter filter — 0 0 22 1
P0005 Display selection for r0000 — 2 21 2294 2
P0006 Display mode for r0000 — 0 2 4 3
P0010 Commissioning parameter filter
— 0 0 30 1
P0011 Lock for user-defined
parameter — 0 0 65535 3
P0012 Key for user-defined parameter
— 0 0 65535 3
P0013 User-defined parameter — 0 0 65535 3
r0018 Firmware version — — — — 3
r0019 CO/BO: BOP control word — — — — 3
r0020 CO: Actual frequency setpoint Hz — — — 3
r0021 CO: Actual frequency Hz — — — 3
r0022 Actual Rotor speed 1/min
— — — 3
r0024 CO: Actual output frequency Hz — — — 3
r0025 CO: Actual output voltage V — — — 3
r0026 CO: Actual DC link output
voltage V — — — 3
r0027 CO: Actual output current A — — — 3
r0031 Actual torque Nm — — — 3
r0032 Actual power — — — — 3
r0035 CO: Actual Motor temperature
°C — — — 3
r0039
CO: Energy consumption meter
kWh — — — 3

Appendix A: Parameters, Defaults, and Settings
Siemens Building Technologies, Inc. 101
Parameter
Description Unit
User
Setting Min Default Max
Access
Level
P0040 Reset energy consumption
meter — 0 0 1 3
r0050 CO: Active command data set — — — — 3
r0052 CO/BO: Actual status word 1 — — — — 3
r0053 CO/BO: Actual status word 2 — — — — 3
r0054 CO/BO: Actual control word 1 — — — — 3
r0055 CO/BO: Additional actual
control word — — — — 3
r0056 CO/BO: Status of motor control
— — — — 3
r0061 Actual rotor speed — — — — 3
r0086 CO: Actual active current A — — — 3
P0100 Europe/North America power
settings [kW or hp] — 0 0 2 1
r0200 Actual power stack code
number — — — — 3
r0206 Rated inverter power [kW]/[hp] — — — — 3
r0207 Rated inverter current A — — — 3
r0208 Rated inverter voltage V — — — 3
r0209 Maximum inverter current A — — — 3
P0304 Rated motor voltage V 10 Varies 2000 1
P0305 Rated motor current A 0.01 Varies 10000.00 1
P0307 Rated motor power — 0.01 Varies 2000.00 1
P0308 Rated motor cosPhi — 0.000 0.000 1.000 3
P0309 Rated motor efficiency % 0.0 Varies 99.9 3
P0310 Rated motor frequency Hz 12.00 50.00 or
60.00 650.00 1
P0311 Rated motor speed 1/min
0 Varies 40000 1
r0313 Motor pole pairs — — — — 3
P0340 Calculation of motor
parameters — 0 0 4 3
P0350 Stator resistance (line-to-line) ohm 0.00001 Varies 2000.0 3
r0395 CO: Total stator resistance [%]
% — — — 3
P0400 Select encoder type — 0 0 12 3

SED2 VFD Startup, Operation, and Maintenance Manual
102 Siemens Building Technologies, Inc.
Parameter
Description Unit
User
Setting Min Default Max
Access
Level
P0409 Pulses per second at Rated
Frequency — 1 25 500 3
P0501 Type of sensor — 0 0 29 2
P0506 Parameter list — 0 — 4000 3
P0507 Scalar values — 0 1.0 9999.9 3
P0508 Unit — 0 0 65535 3
P0509 String — 0 0 65535 3
P0601 Motor temp. sensor — 0 0 2 3
P0610 Motor I2t temperature reaction — 0 2 2 3
P0640 Motor overload factor [%] % 10.0 110.0 400.0 3
P0700 Selection of command source — 0 [0] 2,
[1] 1 6 1
P0701 Function of digital input 1 — 0 [0] 1,
[1] 0 99 2
P0702 Function of digital input 2 — 0 [0] 12,
[1] 0 99 2
P0703 Function of digital input 3 — 0 9 99 2
P0704 Function of digital input 4 — 0 15 99 2
P0705 Function of digital input 5 — 0 15 99 2
P0706 Function of digital input 6 — 0 15 99 2
P0707 Function of digital input 7 — 0 0 99 3
P0708 Function of digital input 8 — 0 0 99 3
P0718 CO/BO: Hand/Auto — 0 0 1 3
r0722 CO/BO: Binary input values — - - - 3
P0725 PNP/NPN digital inputs — 0 1 1 3
P0731 BI: Function of digital output 1 — 0:0 52:3 4000:0 2
P0732 BI: Function of digital output 2 — 0:0 52:2 4000:0 2
r0747 CO/BO: State of digital outputs
— — — — 3
P0748 Invert digital outputs — 0 0 7 3
r0752 Actual input of ADC (analog
input) [V] or [mA] — — — — 2
P0753 Smooth time ADC (analog
input) ms 0 100 10000 3

Appendix A: Parameters, Defaults, and Settings
Siemens Building Technologies, Inc. 103
Parameter
Description Unit
User
Setting Min Default Max
Access
Level
r0754 Actual ADC (analog input)
value after scaling [%] % — — — 2
r0755 CO: Actual ADC (analog input)
after scaling [4000h] — — — — 3
P0756 Type of ADC (analog input) — 0 0 5 2
P0757 Value x1 of ADC (analog input)
scaling [V/mA] — -50.0 0 150.0 2
P0758 Value y1 of ADC (analog input)
scaling % -99999.9 0.0 99999.9 2
P0759 Value x2 of ADC (analog input)
scaling [V/mA] — -50.0 10.0 150.0 2
P0760 Value y2 of ADC (analog input)
scaling % -99999.9 100.0 99999.9 2
P0761 Width of ADC (analog input)
deadband [V/mA] — 0 0 150.0 3
P0771 CI: DAC (analog output) — 0:0 21:0 4000:0 2
P0773 Smooth time DAC (analog
output) ms 0 100 1000 3
r0774 Actual DAC (analog output)
value [V] or [mA] — — — — 3
P0776 Type of DAC (analog output) — 0 1 1 3
P0777 Value x1 of DAC (analog
output) scaling % -99999.0 0.0 99999.0 2
P0778 Value y1 of DAC (analog
output) scaling — 0 0 20 2
P0779 Value x2 of DAC (analog
output) scaling % -99999.0 100.0 99999.0 2
P0780 Value y2 of DAC (analog
output) scaling — 0 10 20 2
P0781 Width of DAC (analog output)
deadband — 0 0 20 3
P0809 Copy CDS (command data set)
— 0 0 2 3
P0810 BI: CDS (command data set)
bit 0 (Local/Remote) — 0:0 718:0 4095:0 3
P0918 CB (communications board or
module) address — 0 3 65535 3
P0927 Parameter changeable via — 0 — 15 3

SED2 VFD Startup, Operation, and Maintenance Manual
104 Siemens Building Technologies, Inc.
Parameter
Description Unit
User
Setting Min Default Max
Access
Level
r0947 Last fault code — — — — 3
r0948 Fault time — — — — 3
r0949 Fault value — — — — 3
P0952 Total number of faults — 0 0 8 3
r0967 Control word 1 — — — — 3
r0968 Status word 1 — — — — 3
P0970 Factory reset — 0 0 1 1
P0971 Transfer data from RAM to
EEPROM — 0 0 1 3
P1000 Selection of frequency setpoint
— 0 2 77 1
P1001 Fixed frequency 1 Hz -650.0 0.00 650.00 3
P1002 Fixed frequency 2 Hz -650.0 5.00 650.00 3
P1003 Fixed frequency 3 Hz -650.0 10.00 650.00 3
P1004 Fixed frequency 4 Hz -650.0 15.00 650.00 3
P1005 Fixed frequency 5 Hz -650.0 20.00 650.00 3
P1006 Fixed frequency 6 Hz -650.0 25.00 650.00 3
P1007 Fixed frequency 7 Hz -650.0 30.00 650.00 3
P1008 Fixed frequency 8 Hz -650.0 35.00 650.00 3
P1009 Fixed frequency 9 Hz -650.0 40.00 650.00 3
P1010 Fixed frequency 10 Hz -650.0 45.00 650.00 3
P1011 Fixed frequency 11 Hz -650.0 50.00 650.00 3
P1012 Fixed frequency 12 Hz -650.0 55.00 650.00 3
P1013 Fixed frequency 13 Hz -650.0 60.00 650.00 3
P1014 Fixed frequency 14 Hz -650.0 65.00 650.00 3
P1015 Fixed frequency 15 Hz -650.0 65.00 650.00 3
P1016 Fixed frequency mode-Bit 0 — 1 1 3 3
P1017 Fixed frequency mode-Bit 1 — 1 1 3 3
P1018 Fixed frequency mode-Bit 2 — 1 1 3 3
P1019 Fixed frequency mode-Bit 3 — 1 1 3 3
P1020 BI: Fixed frequency selection
Bit 0 — 0:0 0:0 4000:0 3

Appendix A: Parameters, Defaults, and Settings
Siemens Building Technologies, Inc. 105
Parameter
Description Unit
User
Setting Min Default Max
Access
Level
P1021 BI: Fixed frequency selection
Bit 1 — 0:0 0:0 4000:0 3
P1022 BI: Fixed frequency selection
Bit 2 — 0:0 0:0 4000:0 3
P1023 BI: Fixed frequency selection
Bit 3 — 0:0 722:3 4000:0 3
r1024 CO: Act. fixed frequency Hz — — — 3
P1025 Fixed frequency mode – Bit 4 — 1 1 3 3
P1026 BI: Fixed frequency selection
Bit 4 — 0:0 722:4 4000:0 3
P1027 Fixed frequency mode – Bit 5 — 1 1 3 3
P1028 BI: Fixed frequency selection
Bit 5 — 0:0 722:5 4000:0 3
P1031 Setpoint memory of the motor
potentiometer — 0 1 1 3
P1032 Inhibit reverse direction of
motor potentiometer — 0 1 1 3
P1040 Setpoint of the motor
potentiometer Hz -650.00 10.00 650.00 2
r1050 CO: Act. Output frequency of
the motor potentiometer Hz — — — 3
r1078 CO: Total frequency setpoint Hz — — — 3
P1080 Minimum frequency Hz 0.00 10.00 650.00 1
P1082 Maximum frequency Hz 0.00 50.00/
60.00
Varies 150.00 1
P1091 Skip frequency 1 Hz 0.00 0.00 650.00 3
P1092 Skip frequency 2 Hz 0.00 0.00 650.00 3
P1093 Skip frequency 3 Hz 0.00 0.00 650.00 3
P1094 Skip frequency 4 Hz 0.00 0.00 650.00 3
P1101 Skip frequency bandwidth Hz 0.00 2.00 10.00 3
P1110 BI: Inhibit neg. frequency
Setpoint — 0:0 1 4000:0 3
P1120 Ramp-up time s 0.00 10.00 650.00 1
P1121 Ramp-down time s 0.00 30.00 650.00 1

SED2 VFD Startup, Operation, and Maintenance Manual
106 Siemens Building Technologies, Inc.
Parameter
Description Unit
User
Setting Min Default Max
Access
Level
P1135 OFF3 ramp-down time s 0.00 5.00 650.00 3
P1140 BI: RFG (ramp function
generator) enable — 0:0 1:0 4000:0 3
P1141 RFG (ramp function generator)
start — 0.00 1.0 4000.0 3
P1142 RFG (ramp function generator)
enable setpoint — 0.00 1.0 4000.0 3
P1200 Flying start — 0 0 6 3
P1202 Motor-current: flying start % 10 100 200 3
P1203 Search rate: flying start % 10 100 200 3
P1210 Automatic restart — 0 1 5 3
P1211 Number of restart attempts — 0 3 10 3
P1212 Time to first restart s 0 30 1000 3
P1213 Restart time increment s 0 30 1000 3
P1230 BI: Enable DC braking — 0:0 0:0 4000:0 3
P1232 DC braking current % 0 100 250 3
P1233 Duration of DC braking s 0 0 250 3
P1236 Compound braking current % 0 0 250 3
P1240 Configuration of Vdc controller — 0 1 3 3
P1270 BI: Enable essential service — 0:0 0:0 4000:0 3
P1300 Control mode — 0 2 23 3
P1310 Continuous boost % 0.0 50.0 250.0 3
P1311 Acceleration boost % 0.0 0.0 250.0 3
P1312 Starting boost % 0.0 0.0 250.0 3
P1335 Slip compensation % 0.0 0.0 600.0 3
P1336 Slip limit % 0 250 600 3
r1337 CO: V/f slip frequency % - - - 3
P1800 Pulse frequency kHz 2 Varies 16 2
r1801 CO: Actual switching frequency
kHz — — — 3
P1820 Reverse output phase
sequence — 0 0 1 3
P1910 Select motor data identification
— 0 0 20 3

Appendix A: Parameters, Defaults, and Settings
Siemens Building Technologies, Inc. 107
Parameter
Description Unit
User
Setting Min Default Max
Access
Level
r1912 Identified stator resistance ohm — — — 3
P2000 Reference frequency Hz 1.00 50/60 650.00 2
P2001 Reference voltage V 10 1000 2000 3
P2002 Reference current A 0.10 Varies 10000.00 3
P2004 Reference power — — — — 3
P2009 USS normalization — 0 0 1 3
P2010 USS baud rate — 4 6 12 3
P2011 USS address — 0 0 31 3
P2014 USS telegram off time ms 0 0 65535 3
P2040 CB telegram off time ms 0 20 65535 3
P2041 CB parameter — 0 0 65535 3
r2050 PZD from CB — — — — 3
P2051 PZD to CB — 0:0 52:0 4000:0 3
r2053 CB identification — — — — 3
r2054 CB diagnosis — — — — 3
P2100 Alarm number selection — 0 0 65535 3
P2101 Stop reaction value — 0 0 5 3
r2110 Warning number — — — — 3
P2111 Total number of warnings — 0 0 4 3
r2114 Run time counter — — — — 3
P2115 AOP real time clock — 0 0 65535 3
P2155 Threshold frequency f_1 Hz 0.00 30.00 650.00 3
P2156 Delay time of threshold
frequency f_1 ms 0 10 10000 3
P2167 Switch-off frequency f_off Hz 0.00 1.00 10.00 3
P2168 Delay time T_off ms 0 10 10000 3
P2181 Belt failure detection mode — 0 0 6 3
P2182 Belt threshold frequency 1 Hz 0.00 5.00 650.00 3
P2183 Belt threshold frequency 2 Hz 0.00 30.00 650.00 3
P2184 Belt threshold frequency 3 Hz 0.00 50.00 650.00 2
P2185 Upper torque threshold 1 Nm 0.0 99999.0 99999.0 3

SED2 VFD Startup, Operation, and Maintenance Manual
108 Siemens Building Technologies, Inc.
Parameter
Description Unit
User
Setting Min Default Max
Access
Level
P2186 Lower torque threshold 1 Nm 0.0 0.0 99999.0 3
P2187 Upper torque threshold 2 Nm 0.0 99999.0 99999.0 3
P2188 Lower torque threshold 2 Nm 0.0 0.0 99999.0 3
P2189 Upper torque threshold 3 Nm 0.0 99999.0 99999.0 3
P2190 Lower torque threshold 3 Nm 0.0 0.0 99999.0 3
P2191 Belt failure speed tolerance Hz 0.00 3.00 20.00 3
P2192 Time delay for belt failure s 0 10 65 3
r2197 CO/BO: Monitoring word 1 — — — — 3
r2198 CO/BO: Monitoring word 2 — — — — 3
P2200 BI: Enable PID controller — 0:0 0:0 4000:0 3
P2201 Fixed PID setpoint 1 % -200.00 0.00 200.00 3
P2202 Fixed PID setpoint 2 % -200.00 10.00 200.00 3
P2203 Fixed PID setpoint 3 % -200.00 20.00 200.00 3
P2204 Fixed PID setpoint 4 % -200.00 30.00 200.00 3
P2205 Fixed PID setpoint 5 % -200.00 40.00 200.00 3
P2206 Fixed PID setpoint 6 % -200.00 50.00 200.00 3
P2207 Fixed PID setpoint 7 % -200.00 60.00 200.00 3
P2208 Fixed PID setpoint 8 % -200.00 70.00 200.00 3
P2209 Fixed PID setpoint 9 % -200.00 80.00 200.00 3
P2210 Fixed PID setpoint 10 % -200.00 90.00 200.00 3
P2211 Fixed PID setpoint 11 % -200.00 100.00 200.00 3
P2212 Fixed PID setpoint 12 % -200.00 110.00 200.00 3
P2213 Fixed PID setpoint 13 % -200.00 120.00 200.00 3
P2214 Fixed PID setpoint 14 % -200.00 130.00 200.00 3
P2215 Fixed PID setpoint 15 % -200.00 130.00 200.00 3
P2216 Fixed PID setpoint mode-Bit 0 — 1 1 3 3
P2217 Fixed PID setpoint mode-Bit 1 — 1 1 3 3
P2218 Fixed PID setpoint mode-Bit 2 — 1 1 3 3
P2219 Fixed PID setpoint mode-Bit 3 — 1 1 3 3
P2220
BI: Fixed PID setpoint select Bit
0 — 0:0 0:0 4000:0 3

Appendix A: Parameters, Defaults, and Settings
Siemens Building Technologies, Inc. 109
Parameter
Description Unit
User
Setting Min Default Max
Access
Level
P2221
BI: Fixed PID setpoint select Bit
1 — 0:0 0:0 4000:0 3
P2222
BI: Fixed PID setpoint select Bit
2 — 0:0 0:0 4000:0 3
P2223
BI: Fixed PID setpoint select Bit
3 — 0:0 722:3 4000:0 3
r2224 CO: Act. fixed PID setpoint % — — — 3
P2225 Fixed PID setpoint mode-Bit 4 — 1 1 2 3
P2226
BI: Fixed PID setpoint select Bit
4 — 0:0 722:4 4000:0 3
P2227 Fixed PID setpoint mode-Bit 5 — 1 1 2 3
P2228
BI: Fixed PID setpoint select Bit
5 — 0:0 722:5 4000:0 3
P2231 Setpoint memory of PID-motor
potentiometer — 0 1 1 3
P2232 Inhibit rev. direct. of PID-motor
potentiometer — 0 1 1 3
P2240 Setpoint of PID-motor
potentiometer % -200.00 10.00 200.00 3
r2250 CO: Output setpoint of PID-
motor potentiometer % — — — 3
P2253 CI: PID setpoint — 0:0 2250:0 4000:0 2
P2254 CI: PID trim — 0:0 0:0 4000:0 3
P2261 PID setpoint filter — 0.00 0.00 60.00 3
r2262 CO: Act. PID filtered setpoint % — — — 3
P2264 CI: PID feedback — 0:0 755:1 4000:0 2
P2265 PID feedback filter time
constant s 0.00 0.00 60.00 3
P2267 Max. value for PID feedback % -200.00 150.00 200.00 3
P2268 Min. value for PID feedback % -200.00 -50.00 200.00 3
P2269 Gain applied to PID feedback — 0.00 100.00 500.00 3
P2270 PID feedback function selector — 0 0 3 3
P2271 PID transducer type — 0 0 1 3
r2272 CO: PID scaled feedback % — — — 3
r2273 CO: PID error % — — — 3

SED2 VFD Startup, Operation, and Maintenance Manual
110 Siemens Building Technologies, Inc.
Parameter
Description Unit
User
Setting Min Default Max
Access
Level
P2274 PID derivative time s 0 0 65535 2
P2279 PID neutral zone % 0.00 0.00 100.00 3
P2280 PID proportional gain — 0.000 1.200 65.000 2
P2285 PID integral time s 0 30 65535 2
P2291 PID output upper limit % 0.00 100.00 100.00 2
P2292 PID output lower limit % -200.00 0.00 200.00 2
P2293 PID limit ramp time s 0.00 0.00 100.00 3
r2294 CO: Actual PID output % — — — 3
P2303 PID output offset — 0.0 0.0 4000.0 2
P2304 PID opening time — 0 0 65535 2
P2305 PID closing time — 0 0 65535 2
P2306 PID actuator direction — 0 1 1 2
P2370 Selection of motor staging stop
mode — 0 0 1 3
P2371 Selection of external motor
configuration — 0 0 8 3
P2372 Enable motor cycling — 0 0 1 3
P2373 Motor staging hysteresis % 0.0 20.0 200.0 3
P2374 Motor staging delay s 0 30 650 3
P2375 Motor de-staging delay s 0 30 650 3
P2376 Delay override % 0.0 25.0 200.0 3
P2377 Delay override lockout timer s 0 30 650 3
P2378 Staging frequency f, %fMax % 0.0 50.0 120.0 3
r2379 CO/BO: Status of motor
staging — — — — 3
P2380 Motor hours run h 0 0 100000 3
P2390 Hibernation setpoint % -200.00 0.00 200.00 3
P2391 Hibernation timer s 0 0 254 3
P2392 Restart PID error % -200.00 0.00 200.00 3
P3900 End of quick commissioning — 0 0 3 1

SED2 VFD Startup, Operation, and Maintenance Manual
111 Siemens Building Technologies, Inc.
Appendix B: SED2 Point
Maps
Table 10. SBT P1 Point Cross Reference to SED2.
Point
No.
Point
Type
Descriptor
Factory
Default
(SI
Units)
Eng.
Units
(SI
Units)
On Text Off
Text SED2
Reference
01 LAO CTLR ADDRESS 99 – – – SBT
02 LAO APPLICATION 2722 – – – SBT
03 LAI FREQ OUTPUT 0 HZ – – r0021
05 LAI SPEED 0 RPM – – Calculated
based on
P0311
06 LAI CURRENT 0 A – – r0027
07 LAI TORQUE 0 NM – – r0031
08 LAI ACTUAL POWER 0 HP/
KW – – r0032
09 LAI TOTAL KWH 0 KWH – – r0039
13 LAI DC BUS VOLT 0 V – – r0026
14 LAI REFERENCE 0 HZ – – r0020
16 LAI RATED PWR 0 HP/
KW – – P0307
17 LAI OUTPUT VOLTS 0 V – – r0025
20 LAO OVRD TIME 1 HRS – –
21 LDI FWD.REV FWD – REV FWD r0054 bit 11
22 LDO CMD FWD.REV FWD – REV FWD P0842(2)
23 LDI STOP.RUN STOP – RUN STOP r0019 bit 1
24 LDO CMD STP.STRT STOP – START STOP P0840(2)
25 LDI AT MAX FREQ NO – MAX NO
26 LDI CONTROL MODE
SERIAL – SERIAL LOCAL
P0700(2)
27 LDI ENABLED OFF – ENABLED
OFF r0052 bit 0
28 LDI READY TO RUN OFF – READY OFF r0052 bit 1

SED2 VFD Startup, Operation, and Maintenance Manual
112 Siemens Building Technologies, Inc.
Table 10. SBT P1 Point Cross Reference to SED2.
Point
No.
Point
Type
Descriptor
Factory
Default
(SI
Units)
Eng.
Units
(SI
Units)
On Text Off
Text SED2
Reference
29 LDO DAY.NIGHT DAY – NIGHT DAY SBT
30 LAO CURRENT LIM 1400 PCT – – r0067
31 LAO ACCEL TIME 1 500 SEC – – read P1120
32 LAO DECEL TIME 1 500 SEC – – read P1121
34 LDO SEL HND.AUTO
(reference) AUTO – AUTO HAND P1000(2)
35 LDO RUN ENABLE ENABLE
– ENABLE OFF r0052 bit 0
40 LDO DIGITAL OUT 1 OFF – ON OFF P0731(2) read
at r0747
41 LDO DIGITAL OUT 2 OFF – ON OFF P0732(2) read
at r0747
45 LAI ANALOG IN 1 0 PCT – – r0754(0)
46 LAI ANALOG IN 2 0 PCT – – r0754(1)
47 LAI ANALOG OUT 1 0 PCT – –
–
48 LAI ANALOG OUT 2 0 PCT – –
–
51 LAO FREQ REF 0 PCT – – r0754(0)
52 LAI FREQ ACTUAL 0 PCT – – r0754(0)
53 LAO FREQ MAX 2450 HZ – – P1082
55 LAO PID SETP REF 8602 PCT – – r0754(0)
56 LAI PID SETP OUT 0 PCT – – r2294
57 LAO PID UP LMT 12288 PCT – – P2291
58 LAO PID LO LMT 8192 PCT – – P2292
59 LAI PID OUTPUT 0 PCT – – r2294
60 LAI PI FEEDBACK 0 PCT – – r2272
61 LAI P GAIN 0 PCT – – P2280
62 LAI I GAIN 0 PCT – – P2285
63 LAI D GAIN 0 PCT – – P2274
64 LDO ENABLE PID 0 ON OFF P2200
66 LAI FEEDBK GAIN 0 PCT – – P2269

Appendix B: SED2 Point Cross-Reference
Siemens Building Technologies, Inc. 113
Table 10. SBT P1 Point Cross Reference to SED2.
Point
No.
Point
Type
Descriptor
Factory
Default
(SI
Units)
Eng.
Units
(SI
Units)
On Text Off
Text SED2
Reference
68 LAI LOW PASS 0 – – –
–
71 LDI DIGITAL IN 1 0 – ON OFF r0722 bit 0
72 LDI DIGITAL IN 2 0 – ON OFF r0722 bit 1
73 LDI DIGITAL IN 3 0 – ON OFF r0722 bit 2
74 LDI DIGITAL IN 4 0 – ON OFF r0722 bit 3
75 LDI DIGITAL IN 5 0 – ON OFF r0722 bit 4
76 LDI DIGITAL IN 6 0 – ON OFF r0722 bit 5
80 LAO WDOG TIME 0 – – –
–
83 LAI INVERTER VER 0 – – – r0018
84 LAI DRIVE MODEL 0 – – –
–
90 LAI LAST FAULT 0 – – – r0947(0)
91 LAI 1st FAULT 0 – – – r0947(1)
92 LAI 2nd FAULT 0 – – – r0947(2)
93 LAI 3rd FAULT 0 – – – r0947(3)
94 LDI OK FAULT 0 – FAULT OK r0052 bit 3
95 LDO FAULT ACK 0 – ON OFF r0054 bit 7
96 LDI WARNING 0 – WARN OK r0052 bit 7
97 LAI LAST WARNING 0 – – –
r2110 (0)
99 LAO ERROR STATUS 0 – – – –

SED2 VFD Startup, Operation, and Maintenance Manual
114 Siemens Building Technologies, Inc.
Table 11. JCI N2 Point Cross Reference to SED2.
On
Text Off
Text
Point
Number
Name
Default
Value Units
Notes
Or Range
SED2
Ref.
AI1 FREQ OUTPUT 0 HZ No Override
-650.00 to 650.00
r0024
AI2 SPEED 0 RPM No Override
-16250 to 16250 r0022
AI3 CURRENT 0 A No Override
0 to 1638.35 r0027
AI4 TORQUE 0 NM No Override
-3250.0 to 3250.0
r0031
AI5 DC BUS VOLTS 0 V No Override
0 to 32767 r0026
AI6 REFERENCE 0 HZ No Override
-650.00 to 650.00
r0020
AI7 OUTPUT VOLTS 0 V No Override
0 to 32767 r0025
AI8 ANALOG IN 1 0 PCT No Override
-300.0 to 300.0 r0754/0
AI9 ANALOG IN 2 0 PCT No Override
-300.0 to 300.0 r0754/1
AI10 PI FEEDBACK 0 PCT No Override
-100.0 to 100.0 r2266
AI11 ANALOG OUT 1 0 PCT No Override
-100.0 to 100.0 r0774/0
AI12 ANALOG OUT 2 0 PCT No Override
-100.0 to 100.0 r0774/1
AI13 PID SETP OUT 0 PCT No Override
-100.0 to 100.0 r2250
AI14 PID OUTPUT 0 PCT No Override
-100.0 to 100.0 r2294
AI15 ACTUAL PWR 0 KW No Override
0 to 327.67 r0032
AI16 TOTAL KWH 0 KWH No Override
0 to 32767 r0039
AI17 FREQ ACTUAL 0 PCT No Override
-100.00 to 100.00
HIW
AO1 FREQ REF 0 PCT – 0.00 to 100.00 HSW
BI1 ENABLED 0 – No Override
ON OFF ZSW:0
BI2 READY TO RUN 0 – No Override
READY OFF ZSW:1
BI3 STOP RUN 0 – No Override
RUN STOP ZSW:2
BI4 AT MAX FREQ 0 – No Override
MAX NO ZSW:10
BI5 CONTROL MODE 1 – No Override
SERIAL LOCAL
ZSW:9
BI6 FAULT 0 – No Override
FAULT OK ZSW:3
BI7 WARNING 0 – No Override
WARN OK ZSW:7
BI8 DIGITAL IN 1 0 – No Override
ON OFF r0722:0
BI9 DIGITAL IN 2 0 – No Override
ON OFF r0722:1

Appendix B: SED2 Point Cross-Reference
Siemens Building Technologies, Inc. 115
Table 11. JCI N2 Point Cross Reference to SED2.
On
Text Off
Text
Point
Number
Name
Default
Value Units
Notes
Or Range
SED2
Ref.
BI10 DIGITAL IN 3 0 – No Override
ON OFF r0722:2
BI11 DIGITAL IN 4 0 – No Override
ON OFF r0722:3
BI12 DIGITAL IN 5 0 – No Override
ON OFF r0722:4
BI13 DIGITAL IN 6 0 – No Override
ON OFF r0722:5
BI14 FWD REV 0 – No Override
FWD REV ZSW:14
BO1 CMD START 0 – – START STOP STW:0
BO2 RUN ENABLE 1 – – ENABLE
OFF STW:3
BO3 FAULT ACK 0 – – ON OFF STW:7
BO4 HAND AUTO 0 – – HAND AUTO P0718
BO5 DIGITAL OUT 1 0 – – ON OFF P0731
BO6 DIGITAL OUT 2 0 – – ON OFF P0733
BO7 CMD FWD REV 0 – – REV FWD STW:11
BO8 ENABLE PID 0 – – ON OFF P2200
ADF1 ACCEL TIME 1 10.00 SEC – 0.00 to 650.00 P1120
ADF2 DECEL TIME 1 10.00 SEC – 0.00 to 650.00 P1121
ADF3 CURRENT LMT 150.0 PCT – 10.0 to 400.0 P0640
ADF4 P GAIN 3.000 – – 0.000 to 65.000 P2280
ADF5 I GAIN 0 SEC – 0.000 to 60.000 P2285
ADF6 D GAIN 0 – – 0.000 to 60.000 P2274
ADF7 FEEDBK GAIN 100.00 PCT – 0.00 to 500.00 P2269
ADF8 LOW PASS 0 – – 0.00 to 60.00 P2265
ADF9 PID SETP REF 0 PCT – -200.0 to 200.0 P2240
ADF10 PID UP LMT 100.0 PCT – -200.0 to 200.0 P2291
ADF11 PID LO LMT 0 PCT – -200.0 to 200.0 P2292
ADF12 FREQ MAX 50.00 HZ – 1.00 to 650.00 P2000
ADF13 RATED PWR 0 KW Read Only 0 to 327.67 r0206
ADF14 INVERTER VER 0 – Read Only 0.00 to 327.67 r0018
ADI1 WDOG TIME 0 MS – 9999 P2040

SED2 VFD Startup, Operation, and Maintenance Manual
116 Siemens Building Technologies, Inc.
Table 11. JCI N2 Point Cross Reference to SED2.
On
Text Off
Text
Point
Number
Name
Default
Value Units
Notes
Or Range
SED2
Ref.
ADI2 DRIVE MODEL 0 -- Read Only 0 to 32767 r0200
ADI3 LAST FAULT 0 -- Read Only 0 to 32767 r0947
ADI4 1ST FAULT 0 -- Read Only 0 to 32767 r0947
ADI5 2ND FAULT 0 -- Read Only 0 to 32767 r0947
ADI6 3RD FAULT 0 -- Read Only 0 to 32767 r0947
ADI7 LAST WARNING 0 -- Read Only 0 to 32767 r2110

SED2 VFD Startup, Operation, and Maintenance Manual
117 Siemens Building Technologies, Inc.
Glossary
Access Level
The degree of authorization a user has when using SED2 parameters.
Also see User Access Level parameter P0003.
ADC
Analog to Digital Converter; refers to analog inputs.
AOP
Advanced Operator Panel.
Boost
Applies an offset relative to the rated motor current. Boost is useful for
loads with high inertia. Also see Continuous Boost parameter P1310,
Acceleration Boost parameter P1311, and Starting Boost parameter
P1312.
BOP
Basic Operator Panel.
CDS
Command Data Set.
Control Mode
Controls relationship between speed of motor and voltage supplied by
SED2. Also see Control Mode parameter P1300.
DAC
Digital to Analog Converter; refers to analog outputs
DC Braking
Causes the motor to stop rapidly by applying a DC braking current
(current applied also holds motor shaft stationary). When the DC braking
signal is applied, the SED2 output pulses are blocked and the DC current
is not applied until the motor has been sufficiently demagnetized. Also
see Enable DC Braking parameter P1230).
EMC
Electromagnetic Compatibility.

SED2 VFD Startup, Operation, and Maintenance Manual
118 Siemens Building Technologies, Inc.
EMI
Electromagnetic Interference.
Fixed Frequency
Frequency setpoints that are based on selection of a predetermined
source.
Flying Start
Starts SED2 onto a spinning motor by rapidly changing the output
frequency of the SED2 until the actual motor speed has been found.
Then, the motor runs up to setpoint using the normal ramp time.
Inverter
Another term for a variable frequency drive (VFD).
IP20
IP20 is the enclosure rating for the standard SED2 from Europe; there is
no equivalent North American enclosure rating. An enclosure with an
IP20 rating is protected against penetration of solid objects greater than
0.47 inches (12mm) and it is protected against vertically falling drops of
water such as from condensation.
Mains
Another term for input line power.
Motor I2t Temperature
Provides a model for estimating the thermal motor value; used for
internal motor overload protection. Also see Motor I2t Temperature
Reaction parameter P0610 and Motor temperature Sensor parameter
P0601.
Motor Pole Pairs
One of the pole pairs is called a winding.
NEMA Type 1
NEMA Type 1 SED2s include gland plates (frame sizes A through C) and
protection shields. An enclosure with a NEMA Type 1 rating is intended
for indoor use, primarily to provide a degree of protection against contact
with the enclosed equipment or for locations where unusual service
conditions do not exist. NEMA Type 1 enclosures protect the operator
from electric hazard and protect the equipment from falling material.

Glossary
Siemens Building Technologies, Inc. 119
NEMA Type 12/IP54
IP54 is a European enclosure rating; there is no equivalent North
American rating, although it exceed the NEMA Type 12 rating. An
enclosure with a NEMA Type 12 rating is intended for indoor use,
primarily to provide a degree of protection against dust, falling dirt, and
dripping non-corrosive liquids. An enclosure with an IP54 rating is
protected against dust (limited ingress, no harmful deposit) and it is
protected against water sprayed from all directions (limited ingress
permitted).
OFF1
The OFF1 command stops the SED2 within the selected ramp-down
time (P1121).
OFF2
The OFF2 command causes a free coasting of the motor to a standstill
(impulses for the power section of the SED2 are disabled).
OFF3
The OFF3 command causes the motor to decelerate rapidly.
Overcurrent
A SED2 fault condition that occurs, for example, when motor power is
greater than SED2 power. Also see Fault Code F0001.
Overvoltage
A SED2 fault condition that occurs, for example, when the input line
power is too high or if the motor is in regenerative mode (caused by fast
ramp downs or if the motor id drive from an active load). Also see Fault
Code F0002.
Parameter Filter
Functional categories of parameters that are available to a user. Also
see Parameter Filter P0004.

SED2 VFD Startup, Operation, and Maintenance Manual
120 Siemens Building Technologies, Inc.
Parameter Index/Indexes
Subsets of closely related information associated with a particular
parameter function.
For example, the following indexes are associated with P0700, P1000,
and digital input and output parameters:
IN000 (AUTO), 1st Command Data Set (CDS)
IN001 (HAND, 2nd Command Data Set (CDS)
The following indexes are associated with analog input and output
parameters:
IN000, Analog Input 1
IN001, Analog Input 2.
PID
Proportional, Integral, Derivative.
Quick Commissioning
Predefined procedure consisting of fundamental parameters to configure
the SED2 for operation.
Ramp-down Time
Time for the motor to ramp down. Also see Ramp-down Time parameter
P1121.
Ramp-up Time
Time for the motor to ramp up. Also see Ramp-up Time parameter
P1120.
RFG
Ramp Function Generator.
RFI
Radio Frequency Interference.
Skip Frequency
Frequencies that are skipped to avoid effects of mechanical resonance.
Also see Skip Frequency parameter P1091.

Glossary
Siemens Building Technologies, Inc. 121
Slip Compensation
Dynamically adjusts the output frequency of the SED2 so that the motor
speed is kept constant independent of the motor load. Also see Slip
Compensation parameter P1335.
Stator Resistance
Impedance produced from each motor winding.
Train (HVAC)
Sequence or succession of mechanical equipment.
Undervoltage
A SED2 fault condition that occurs, for example, when input line power
has failed or is outside the voltage reduction tolerance. Also see Fault
Code F0003.
VFD/VSD
Variable Frequency Drive/Variable Speed Drive. Both terms are used for
a device that controls the frequency or speed of another device such as
a fan or pump motor.

SED2 VFD Startup, Operation, and Maintenance Manual
Siemens Building Technologies, Inc.
1000 Deerfield Parkway
Buffalo Grove, IL 60089-4513
Tel: +1 847-215-1000
Fax +1 847-215-1093
Siemens Building Technologies, Ltd.
2 Kenview Blvd.
Brampton, Ontario
Canada L6T 5E4
Tel: +1 905-799-9937
Siemens Building Technologies AG
Gubelstrasse 22
CH-6301 Zug
Tel: +41 41 724 24 24
Fax +41 41 724 35 22
Siemens Building Technologies Ltd.
16/F, Laford Centre
838 Lai Chi Kok Road
Kowloon, Hong Kong
Tel: +852 2917 5700
Fax +852 2904 1126
www.sbt.siemens.com
