ICO PE 285 GU FR V1 Telium Manager Reference Manual
User Manual:
Open the PDF directly: View PDF ![]() .
.
Page Count: 166 [warning: Documents this large are best viewed by clicking the View PDF Link!]

www.ingenico.com
28/32, boulevard de Grenelle, 75015 Paris - France / (T) +33 (0)1 58 01 80 00 / (F) +33 (0)1 58 01 91 35
Ingenico – S.A. au capital de 53 086 309 € / 317 218 758 RCS PARIS
TELIUM
MANAGER
REFERENCE
MANUAL
Reference: ICO-OPE-00986
Revision: 1.5
Enter Date: 01/12/2015

ICO-OPE-00986
REFERENCE MANUAL
Restricted
2/166
Ingenico document - Reproduction or disclosure prohibited without written authorization
Please check document validity before using
Table of Contents
1 Information relative to document __________________________ 11
1_1 Change History ______________________________________________________ 11
1_2 Validation ___________________________________________________________ 11
1_3 Objective ___________________________________________________________ 11
2 Function of applications manager _________________________ 12
3 General information _____________________________________ 13
3_1 Display _____________________________________________________________ 13
3_2 Display area_________________________________________________________ 13
3_3 Keypad ____________________________________________________________ 14
3_4 Function area _______________________________________________________ 14
3_5 Terminal screens _____________________________________________________ 15
4 Condition of terminal at power-up _________________________ 16
5 Preparatory information for initialization ____________________ 19
5_1 Storage of parameters entered __________________________________________ 19
5_2 Drop data entry in progress _____________________________________________ 19
5_3 Parameters forming initialization _________________________________________ 19
5_4 Access to parameters by a shortcut ______________________________________ 19
6 Initialization of “applications manager” parameters __________ 20
6_1 Initialization of language _______________________________________________ 23
6_2 Initialization of date and time ____________________________________________ 23
6_2_1 Setting the date ________________________________________________________ 24
6_2_2 Setting the time ________________________________________________________ 24

ICO-OPE-00986
REFERENCE MANUAL
Restricted
3/166
Ingenico document - Reproduction or disclosure prohibited without written authorization
Please check document validity before using
6_2_3 Setting the date format __________________________________________________ 24
6_2_4 Setting the time format __________________________________________________ 24
6_3 Setting the terminal number ____________________________________________ 25
6_4 Initialization of currency ________________________________________________ 25
6_5 Initialization of switchboard _____________________________________________ 26
6_5_1 Switchboard configured with “Yes” _________________________________________ 26
6_5_2 Switchboard configured with “Alpha” ________________________________________ 27
6_6 Initialization of PINPAD ________________________________________________ 27
6_6_1 Initialization of pinpad type _______________________________________________ 28
6_6_2 Pinpad auto detect _____________________________________________________ 29
6_6_3 Initialization of the stripe reader on a P30 pinpad ______________________________ 29
6_6_4 Initialization of the background color of a IPP250 pinpad ________________________ 29
6_7 Initialization of the contactless function ____________________________________ 30
6_8 Initialization of magnetic strip reader ______________________________________ 31
6_9 Display of Serial Number _______________________________________________ 31
6_10 Initialization of the network access ______________________________________ 32
6_10_1 PSTN network ________________________________________________________ 33
6_10_1_1 PSTN type _________________________________________________________ 33
6_10_1_2 Gateway for IP/ETH access ___________________________________________ 33
6_10_1_3 SSL for IP/ETH access _______________________________________________ 33
6_10_1_4 IP address _________________________________________________________ 34
6_10_1_5 port ______________________________________________________________ 34
6_10_2 ISDN network ________________________________________________________ 35
6_10_3 External modem network _______________________________________________ 35
6_10_4 External GSM network _________________________________________________ 36
6_10_5 Internal GSM network __________________________________________________ 36
6_10_5_1 V32bis PAD ________________________________________________________ 37
6_10_5_2 V32bis prefixed _____________________________________________________ 37
6_10_5_3 Connection type on base _____________________________________________ 38
6_10_5_4 Display in the status bar ______________________________________________ 38
6_10_6 GPRS network _______________________________________________________ 39
6_10_6_1 Serial link _________________________________________________________ 39
6_10_6_2 APN ______________________________________________________________ 39
6_10_6_3 Login _____________________________________________________________ 39
6_10_6_4 Password _________________________________________________________ 40

ICO-OPE-00986
REFERENCE MANUAL
Restricted
4/166
Ingenico document - Reproduction or disclosure prohibited without written authorization
Please check document validity before using
6_10_6_5 Gateway __________________________________________________________ 40
6_10_6_6 SSL ______________________________________________________________ 40
6_10_6_7 IP address _________________________________________________________ 41
6_10_6_8 Port ______________________________________________________________ 41
6_10_6_9 GPRS module startup ________________________________________________ 41
6_10_6_10 Connection type on base ____________________________________________ 42
6_10_6_11 Display in the status bar _____________________________________________ 42
6_10_7 IP EXT network _______________________________________________________ 43
6_10_7_1 Gateway __________________________________________________________ 43
6_10_7_2 SSL ______________________________________________________________ 43
6_10_7_3 IP address _________________________________________________________ 44
6_10_7_4 Port ______________________________________________________________ 44
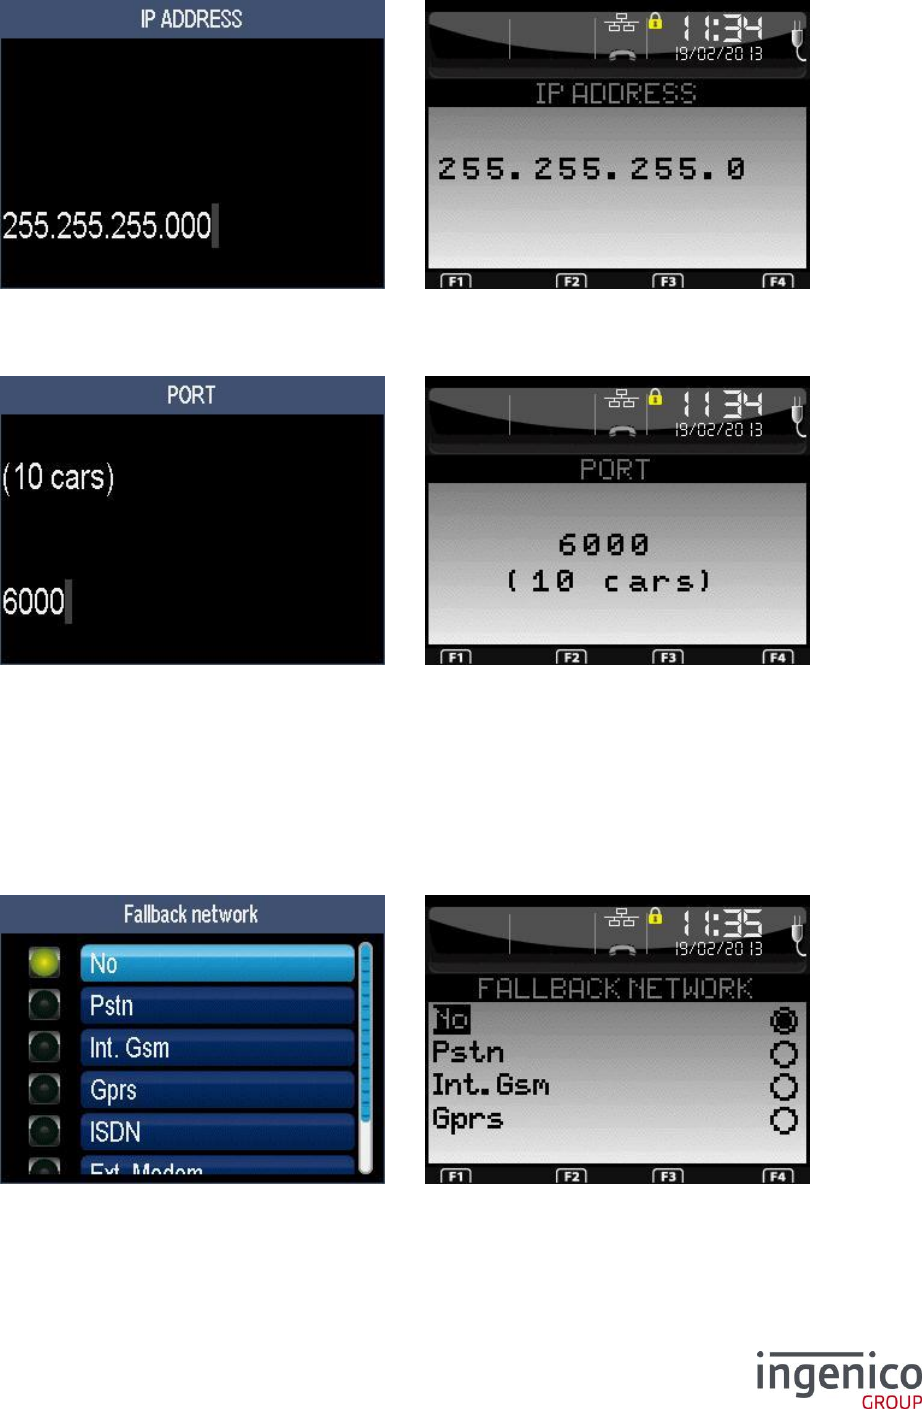
6_11 Initialization of fallback network ________________________________________ 44
6_12 Initialization of cash register connection __________________________________ 46
6_12_1 Activation of the cash register connection ___________________________________ 46
6_12_2 Initialization of the cash register connection _________________________________ 46
6_13 Initialization of TMS network ___________________________________________ 47
6_13_1 Internal modem TMS network ____________________________________________ 48
6_13_1_1 TMS type __________________________________________________________ 48
6_13_1_2 TMS PAD number ___________________________________________________ 49
6_13_1_3 TMS center number _________________________________________________ 49
6_13_2 ISDN TMS network ____________________________________________________ 49
6_13_2_1 TMS serial link______________________________________________________ 49
6_13_2_2 TMS center number _________________________________________________ 50
6_13_3 External modem TMS network ___________________________________________ 50
6_13_3_1 TMS type __________________________________________________________ 50
6_13_3_2 TMS serial link______________________________________________________ 50
6_13_3_3 TMS PAD number ___________________________________________________ 51
6_13_3_4 TMS center number _________________________________________________ 51
6_13_4 Internal GSM TMS network ______________________________________________ 51
6_13_4_1 TMS type __________________________________________________________ 51
6_13_4_2 TMS PAD number ___________________________________________________ 52
6_13_4_3 TMS center number _________________________________________________ 52
6_13_5 IP/GPRS TMS network _________________________________________________ 52
6_13_5_1 TMS type __________________________________________________________ 52
6_13_5_2 SSL activation ______________________________________________________ 53
6_13_5_3 Address ___________________________________________________________ 53
6_13_5_4 Port ______________________________________________________________ 54

ICO-OPE-00986
REFERENCE MANUAL
Restricted
5/166
Ingenico document - Reproduction or disclosure prohibited without written authorization
Please check document validity before using
6_13_5_5 APN ______________________________________________________________ 55
6_13_5_6 Login _____________________________________________________________ 55
6_13_5_7 Password _________________________________________________________ 55
6_13_6 IP EXT TMS network ___________________________________________________ 56
6_13_7 IP/PSTN TMS network _________________________________________________ 56
6_13_7_1 Provider number ____________________________________________________ 56
6_13_7_2 SSL activation ______________________________________________________ 56
6_13_7_3 Address ___________________________________________________________ 57
6_13_7_4 Port ______________________________________________________________ 58
6_13_7_5 APN ______________________________________________________________ 58
6_13_7_6 Login _____________________________________________________________ 59
6_13_7_7 Password _________________________________________________________ 59
6_13_8 IP/ETH TMS network __________________________________________________ 59
6_13_8_1 SSL activation ______________________________________________________ 59
6_13_8_2 Address ___________________________________________________________ 60
6_13_8_3 Port ______________________________________________________________ 61
6_13_9 Common TMS ________________________________________________________ 61
6_13_9_1 TMS identifier ______________________________________________________ 61
6_13_9_2 Download protection _________________________________________________ 62
6_14 Initialization of PCI v4 Time Slot ________________________________________ 63
6_14_1 Time slot activation ____________________________________________________ 63
6_14_2 Time slot minimum ____________________________________________________ 63
6_14_3 Time slot maximum ____________________________________________________ 64
6_15 Exit “Parameters Initialization” _________________________________________ 64
7 Initialization menu functions ______________________________ 65
7_1 Initialization of SIM code _______________________________________________ 65
7_2 Initialization of PUK code ______________________________________________ 65
7_3 Restoration of default configuration ______________________________________ 65
7_4 Initialization of idle screen ______________________________________________ 66
7_5 Initialization of protection manager password _______________________________ 66
7_6 Status bar __________________________________________________________ 67
7_6_1 Display of the status bar _________________________________________________ 67
7_6_2 Status bar examples ____________________________________________________ 68
7_6_3 Current application _____________________________________________________ 68

ICO-OPE-00986
REFERENCE MANUAL
Restricted
6/166
Ingenico document - Reproduction or disclosure prohibited without written authorization
Please check document validity before using
7_6_4 Date ________________________________________________________________ 68
7_6_5 Time ________________________________________________________________ 69
7_6_6 Battery level __________________________________________________________ 69
7_6_7 Main power connection __________________________________________________ 70
7_6_8 Landline network connection ______________________________________________ 70
7_6_9 Ethernet network connection ______________________________________________ 70
7_6_10 Bluetooth connection___________________________________________________ 71
7_6_11 GPRS network connection ______________________________________________ 72
7_6_12 Wi-Fi connection ______________________________________________________ 72
7_6_13 Contactless Connection ________________________________________________ 73
7_6_14 PKI level ____________________________________________________________ 73
7_7 Footer _____________________________________________________________ 74
7_8 Buzzer _____________________________________________________________ 74
7_9 Buzzer on pincode ____________________________________________________ 74
7_10 IPP 3XX Pinpad emulation mode _______________________________________ 75
8 Access to manager functions _____________________________ 76
8_1 Lookup functions _____________________________________________________ 77
8_1_1 State ________________________________________________________________ 78
8_1_2 Transaction ___________________________________________________________ 78
8_1_3 Calls ________________________________________________________________ 78
8_1_4 Software and hardware configurations ______________________________________ 78
8_1_4_1 Lookup hardware configuration __________________________________________ 78
8_1_4_2 Lookup Software Configuration __________________________________________ 79
8_2 Upgrade function _____________________________________________________ 80
8_2_1 Upgrade by load menu __________________________________________________ 80
8_2_1_1 Upgrade by load menu through external support ____________________________ 81
8_2_2 Upgrade by download menu ______________________________________________ 83
8_3 Diagnostic function ___________________________________________________ 83
8_3_1 Local diagnostic _______________________________________________________ 84
8_3_2 Erase diagnostic _______________________________________________________ 84
8_4 Delete software ______________________________________________________ 84
8_5 Modify configuration __________________________________________________ 85
8_6 License management _________________________________________________ 86

ICO-OPE-00986
REFERENCE MANUAL
Restricted
7/166
Ingenico document - Reproduction or disclosure prohibited without written authorization
Please check document validity before using
8_6_1 Consult licences _______________________________________________________ 86
8_6_2 Add licenses __________________________________________________________ 87
9 Hardware configuration __________________________________ 88
9_1 Configuration of modem _______________________________________________ 89
9_1_1 Transmit level _________________________________________________________ 91
9_1_2 Line type _____________________________________________________________ 91
9_1_3 Reduced speed ________________________________________________________ 91
9_1_4 Print_________________________________________________________________ 91
9_1_5 Save ________________________________________________________________ 92
9_1_6 Reload configuration ____________________________________________________ 92
9_1_7 Default configuration ____________________________________________________ 92
9_1_8 Exit _________________________________________________________________ 92
9_1_9 Limitation of current_____________________________________________________ 93
9_1_10 Automatic fallback function ______________________________________________ 93
9_1_10_1 Number of days _____________________________________________________ 93
9_1_10_2 Number of failures ___________________________________________________ 94
9_1_10_3 Depth ____________________________________________________________ 94
9_2 ETHERNET Configuration ______________________________________________ 94
9_2_1 Boot protocol __________________________________________________________ 98
9_2_2 IP address ____________________________________________________________ 99
9_2_3 Network mask _________________________________________________________ 99
9_2_4 Gateway _____________________________________________________________ 99
9_2_5 DNS1 ______________________________________________________________ 100
9_2_6 DNS2 ______________________________________________________________ 100
9_2_7 Rate _______________________________________________________________ 100
9_2_8 Ping ________________________________________________________________ 100
9_2_9 Print________________________________________________________________ 101
9_2_10 Save ______________________________________________________________ 101
9_2_11 Exit _______________________________________________________________ 101
9_2_12 Configuration reload __________________________________________________ 102
9_2_13 Configuration Reset __________________________________________________ 102
9_3 Standby setup ______________________________________________________ 102
9_3_1 Standby type _________________________________________________________ 102
9_3_2 Standby delay ________________________________________________________ 102
9_4 Energy save________________________________________________________ 103
9_4_1 Backlight ____________________________________________________________ 103

ICO-OPE-00986
REFERENCE MANUAL
Restricted
8/166
Ingenico document - Reproduction or disclosure prohibited without written authorization
Please check document validity before using
9_4_2 Standby _____________________________________________________________ 103
9_5 Battery Setup _______________________________________________________ 104
9_5_1 Battery change _______________________________________________________ 105
9_5_2 Tilt _________________________________________________________________ 105
9_5_3 USB Charge _________________________________________________________ 105
9_5_4 Time before standby ___________________________________________________ 106
9_5_5 Standby on cradle _____________________________________________________ 106
9_5_6 ECO mode __________________________________________________________ 106
9_6 Bluetooth Configuration _______________________________________________ 106
9_6_1 Association __________________________________________________________ 107
9_6_1_1 New base _________________________________________________________ 107
9_6_1_2 Select Base ________________________________________________________ 109
9_6_1_3 Remove Base ______________________________________________________ 109
9_6_1_4 Print Base _________________________________________________________ 109
9_6_2 Advanced functions ____________________________________________________ 110
9_6_2_1 Modem ___________________________________________________________ 111
9_6_2_2 COM0 ____________________________________________________________ 111
9_6_2_3 COMU ____________________________________________________________ 112
9_6_2_4 COM1 ____________________________________________________________ 112
9_6_2_5 COMN ____________________________________________________________ 113
9_6_2_6 COMH ____________________________________________________________ 113
9_6_2_7 Change base name __________________________________________________ 113
9_6_2_8 Print ______________________________________________________________ 114
9_6_2_9 Clear Secret _______________________________________________________ 114
9_6_3 Base state ___________________________________________________________ 114
9_7 Base update _______________________________________________________ 115
9_8 Wi-Fi configuration __________________________________________________ 115
9_8_1 New Profile __________________________________________________________ 117
9_8_1_1 Automatic search ___________________________________________________ 117
9_8_1_2 Manual entry _______________________________________________________ 118
9_8_1_3 Security ___________________________________________________________ 118
9_8_1_4 Report ____________________________________________________________ 119
9_8_2 Enterprise Security ____________________________________________________ 119
9_8_2_1 EAP Method _______________________________________________________ 119
9_8_2_2 WPA_EAP TLS _____________________________________________________ 119
9_8_2_3 WPA_EAP TTLS ____________________________________________________ 121
9_8_2_4 WPA_EAP PEAP ___________________________________________________ 123
9_8_2_5 WPA_EAP SIM _____________________________________________________ 125

ICO-OPE-00986
REFERENCE MANUAL
Restricted
9/166
Ingenico document - Reproduction or disclosure prohibited without written authorization
Please check document validity before using
9_8_3 Home Security _______________________________________________________ 125
9_8_3_1 WEP64 ___________________________________________________________ 126
9_8_3_2 WEP128 __________________________________________________________ 126
9_8_3_3 WPA/WPA2 ________________________________________________________ 127
9_8_4 Active Profile _________________________________________________________ 127
9_8_5 Change Profile _______________________________________________________ 128
9_8_5_1 Profile ____________________________________________________________ 128
9_8_5_2 Security ___________________________________________________________ 129
9_8_5_3 Authentication ______________________________________________________ 129
9_8_5_4 Report ____________________________________________________________ 129
9_8_6 Delete Profile ________________________________________________________ 130
9_8_7 IP configuration _______________________________________________________ 130
9_8_7_1 Boot Protocol ______________________________________________________ 131
9_8_7_2 IP address _________________________________________________________ 132
9_8_7_3 Network mask ______________________________________________________ 132
9_8_7_4 Gateway __________________________________________________________ 132
9_8_7_5 DNS1 ____________________________________________________________ 133
9_8_7_6 DNS2 ____________________________________________________________ 133
9_8_7_7 Print ______________________________________________________________ 133
9_8_7_8 Ping ______________________________________________________________ 134
9_8_7_9 Reset Conf ________________________________________________________ 134
9_8_8 General setting _______________________________________________________ 134
9_8_8_1 Radio ON/OFF _____________________________________________________ 134
9_8_8_2 DFS ON/OFF ______________________________________________________ 135
9_9 Configuration of screen _______________________________________________ 135
9_9_1 Backlighting __________________________________________________________ 136
9_9_2 Backlight duration _____________________________________________________ 136
9_9_3 Colors ______________________________________________________________ 136
9_10 Proxy ____________________________________________________________ 137
9_10_1 SOCKS4 protocol ____________________________________________________ 138
9_10_2 SOCKS5 protocol ____________________________________________________ 138
9_11 Bluetooth Audio ____________________________________________________ 139
9_11_1 Activation __________________________________________________________ 140
9_11_2 Deactivation ________________________________________________________ 140
9_11_3 Information _________________________________________________________ 141
9_11_4 Peripheral research ___________________________________________________ 141
9_11_5 Pincode ____________________________________________________________ 142
9_12 Bluetooth _________________________________________________________ 142

ICO-OPE-00986
REFERENCE MANUAL
Restricted
10/166
Ingenico document - Reproduction or disclosure prohibited without written authorization
Please check document validity before using
9_12_1 Enable/Disable ______________________________________________________ 143
9_12_2 Pair with phone ______________________________________________________ 144
9_12_3 Add device _________________________________________________________ 148
9_12_4 Paired devices ______________________________________________________ 149
9_12_5 Advanced options ____________________________________________________ 152
9_12_5_1 Rename _________________________________________________________ 152
9_12_5_2 Pairing mode ______________________________________________________ 152
9_12_5_3 Power saving _____________________________________________________ 153
9_12_5_4 Smart Connection __________________________________________________ 153
9_12_5_4_1 Enable/Disable __________________________________________________ 154
9_12_5_4_2 Max interval _____________________________________________________ 154
9_12_5_4_3 Timeout ________________________________________________________ 155
9_13 Stylus ___________________________________________________________ 156
10 Home screen ________________________________________ 157
10_1 Activation_________________________________________________________ 157
10_2 Format ___________________________________________________________ 158
10_3 Header __________________________________________________________ 160
10_4 Time-out _________________________________________________________ 160
10_5 Applications _______________________________________________________ 160
11 Appendix ____________________________________________ 161
11_1 List of shortcuts for TELIUM MANAGER functions ________________________ 161
11_2 List of the gateway numbers __________________________________________ 163
11_3 Call tree of Tellium Manager __________________________________________ 164

ICO-OPE-00986
REFERENCE MANUAL
Restricted
11/166
Ingenico document - Reproduction or disclosure prohibited without written authorization
Please check document validity before using
1 Information relative to document
1_1 Change History
Revision
Change
Written by
Date
1
Update based on document ICO-PE-285-GU-EN-V2 =>
ENNOV
Compliant with Telium Manager 78xx
08/20/2013
1.1
Compliant with Telium Manager 80xx
Evolutions in Wi-Fi Setup 9_8
09/13/2013
1.2
Compliant with Telium Manager 82xx
Precisions in Header description / LED
01/14/2014
1.3
Compliant with Telium Manager 84xx
Precisions in Wi-Fi Setup 9_8 (Warning)
06/11/2014
1.4
Compliant with Telium Manager 84xx
Evolutions in Bluetooth menu 9_12
09/04/2014
1.5
Compliant with Telium Manager 84xx
Evolutions in Bluetooth menu 9_12
01/12/2015
1_2 Validation
Name
Function
Signature
Date
Checked by
FORIEL L
Telium Manager Developper
01/12/2015
Checked by
ROUXEL A
Telium Manager & schemes
Team Leader
01/12/2015
Checked by
FRIMOUR JL
Software Platform Architect
01/12/2015
Approved
by
BARTHELEMY C
Software Platform Product
Manager
01/12/2015
1_3 Objective
This document describes the procedure:
To configure a terminal,
To look up the various states of a terminal,
To update a terminal,
To diagnose problems on a terminal.

ICO-OPE-00986
REFERENCE MANUAL
Restricted
12/166
Ingenico document - Reproduction or disclosure prohibited without written authorization
Please check document validity before using
2 Function of applications manager
The Applications manager is called "Telium manager".
The applications manager is a software package loaded into the terminal either using a local loading
tool (LLT) or by remote downloading (Ingestate or TMS).
The primary purpose of the applications manager is to activate various functions of the
software used in the terminal.
In this respect, several softwares can be loaded into a terminal, independently of each other. The
softwares are “tight” with respect to each other: they securely execute their own resources.
After a loading operation or after switching on the terminal, the operating system launches the
applications manager.
The applications manager of the terminal then ensures the following functions:
to prompt the operator to initialize his terminal, or an application, if necessary;
to supervise the input of an amount and the passage of a card; then, to request the concerned
application to execute the debit, credit or cancellation operation;
to monitor the F (function) key to detect the other transactions or operations requested by the
operator, after which it requests execution by the concerned application (modification of
initialization parameters, lookup of transactions file or state of all applications, program
upgrade…);
to request installed applications to execute their periodic tasks (remote collection …).
The applications manager of the terminal accepts the French Banking and Non-Banking, French
Health system and Export applications.
ICO-OPE-00986
REFERENCE MANUAL
Restricted
13/166
Ingenico document - Reproduction or disclosure prohibited without written authorization
Please check document validity before using
3 General information
3_1 Display
Tellium Manager adapts a set of information taking into account different parameters:
Display resolutions,
Display modes: Black and white, Color (LibGr), Advanced color (GOAL),
Display orientation (portrait / landscape autodetection – tilt),
In addition, the GOAL mode manages the touch screen capability.
Examples of menu selection screen:
Black and White Terminal
Color Terminal, LibGr Mode
Color Terminal, GOAL Mode
Examples of data selection screen:
Black and White Terminal
Color Terminal, LibGr Mode
Color Terminal, GOAL Mode
In this document, screen shots are from an ICT250 terminal (GOAL mode on the left side, LibGr mode
on the right side) except for some specific items for which the terminal type is precised.
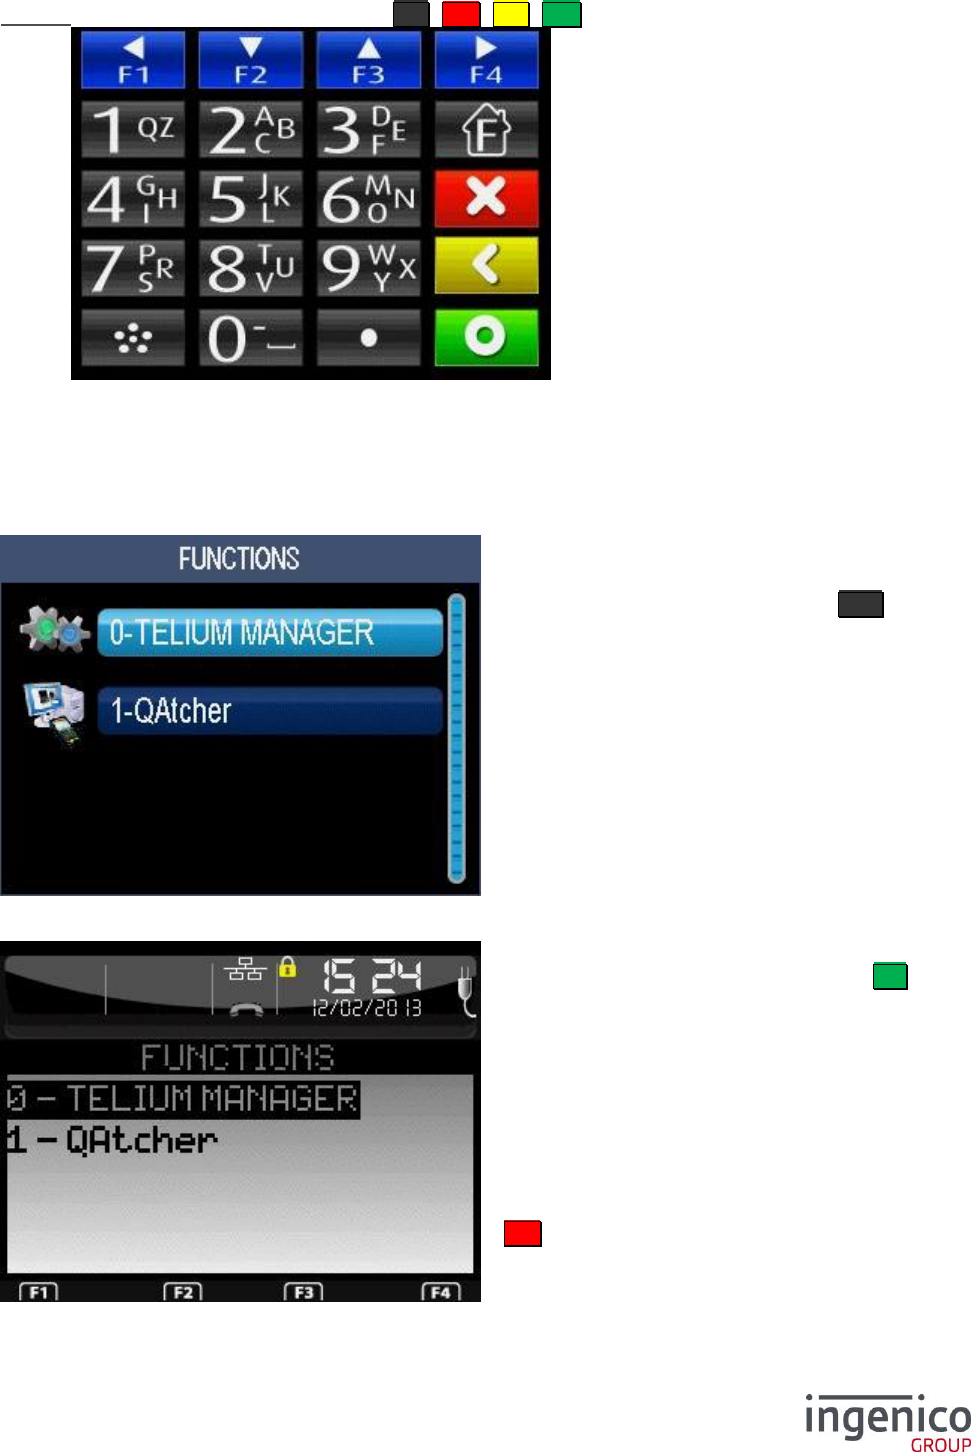
3_2 Display area
Depending on the type of terminal and the display mode, some screens are divided into 4 parts: leds,
status bar, selection area and function area.
Except for the color, the selection area is strictly the same for the Black and White and Color displays.
ICO-OPE-00986
REFERENCE MANUAL
Restricted
14/166
Ingenico document - Reproduction or disclosure prohibited without written authorization
Please check document validity before using
For example, for the Color mode on an ICT250 terminal:
3_3 Keypad
The keypad type depends on the terminal.
Terminals equipped with a man-machine interface have, at the least,
the following keys:
one green validation key O ;
one red cancellation key X ;
one yellow correction key < ;
ten digital keys (from 0 to 9 );
one decimal dot key . ;
one function key F ;
four function keys F1 , F2 , F3 , F4 , which can be
screen-printed depending on the terminal type.
Some terminals have other keys. Refer to the terminal user manual
for more information.
3_4 Function area
The function area is located at the bottom, at the right or at the left of the terminal screen, depending
on the position of the context-sensitive keys. This area describes the functionality associated to each
of the function keys.
The function area depends on the terminal type and on the running application. Hereafter are the
default footers of some terminals:
iWL250 and iCT250 which have a sufficient keypad.
iWL280 which do not have function keys on its keypad.
Status bar (cf. chapter 7_6 )
Selection area
Function area
Software LEDs
ICO-OPE-00986
REFERENCE MANUAL
Restricted
15/166
Ingenico document - Reproduction or disclosure prohibited without written authorization
Please check document validity before using
iWL350 which have a minimal keypad (only F , X , < , O keys).
3_5 Terminal screens
This section describes the various types of screen, taking account of the user area. On terminals
equipped with touch screens, a function can be selected by pressing on the screen.
Color Terminal, GOAL interface:
Color Terminal, LibGR inteface:
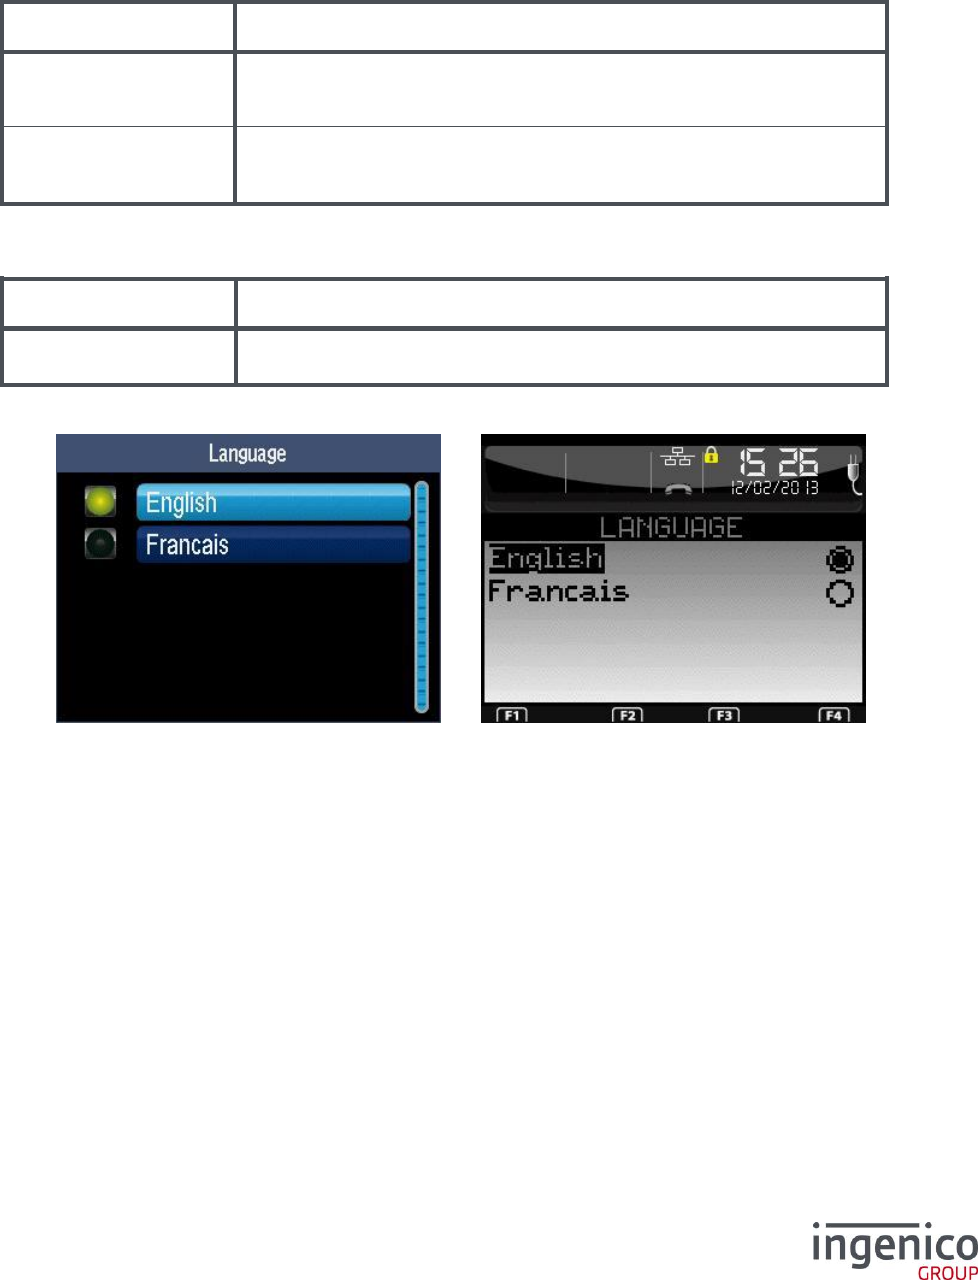
When the terminal is on the home screen
(initialized terminal), you must press F to
access this screen.
This screen lists the applications loaded into
the terminal (including Telium Manager). Only
the Telium Manager application is described
in this manual. The other applications are not
described here.
With the GOAL interface, the each
application is represented by an icon.
You can move between the applications
using the up and down keys.
Telium Manager or another installed
application can be selected by pressing O
or the context-sensitive "Validate" key with
the GOAL interface.
With the “LibGR” interface, each application
is represented by a number which appears
before its name. You can select an
application by pressing on the key
corresponding to this number (0 for Telium
Manager).
X is used to return to the startup screen.
ICO-OPE-00986
REFERENCE MANUAL
Restricted
16/166
Ingenico document - Reproduction or disclosure prohibited without written authorization
Please check document validity before using
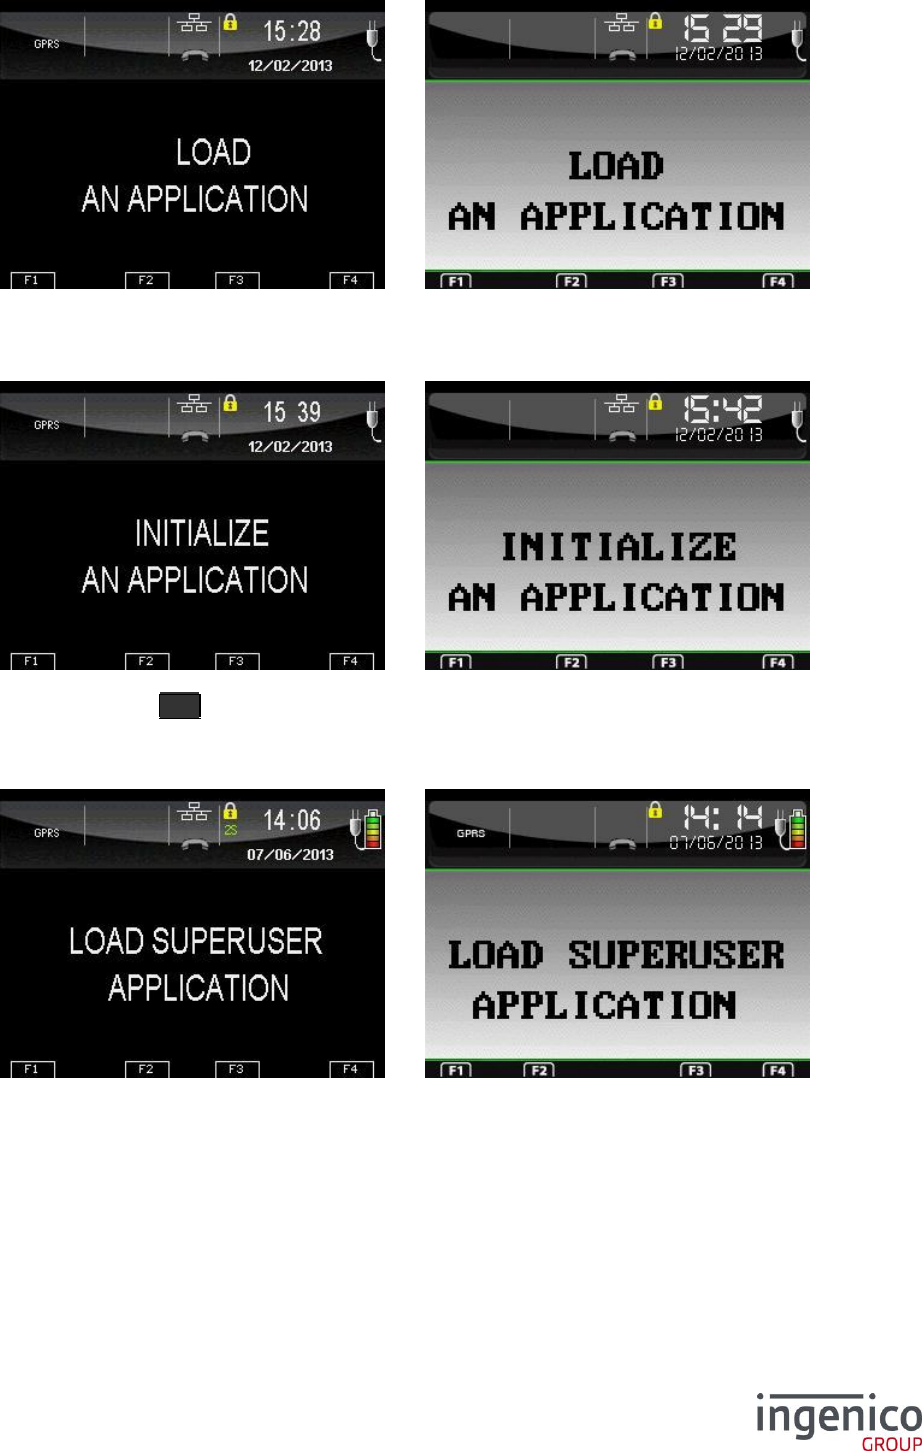
4 Condition of terminal at power-up
When the terminal is switched on, the message displayed depends on the following factors:
No operating system
SCREEN
MEANING
“ : ( “
The terminal operating system has not been loaded.
The terminal is not activated (symbol).
The unit must be sent to the maintenance shop.
“ :-) “
The terminal operating system has not been loaded.
The terminal is activated (symbol).
The unit must be sent to the maintenance shop.
Applications manager present or not
SCREEN
MEANING
LLT
The terminal applications manager has not been loaded. Load the
applications manager. The procedure is given in the loading manual.
Applications manager initialization status
Terminal is in standby for applications manager initialization. Select the language as detailed in the
“Applications manager initialization” section of this manual. Several languages may appear on the
screen depending on the configuration loaded.
No software
ICO-OPE-00986
REFERENCE MANUAL
Restricted
17/166
Ingenico document - Reproduction or disclosure prohibited without written authorization
Please check document validity before using
The applications manager is initialized but no application is present. Load or download an application.
The procedure is given in the terminal loading manual.
Presence of a software
The terminal applications manager is initialized but none of the applications present are initialized.
Press the function key F and select the application to be initialized. Refer to the reference manual
of the selected procedure for the initialization procedure.
No security component on terminal configured for health system
The terminal is initialized but the security software (HEALTH) is not present: load the software.
Initialization status of at least one application.
ICO-OPE-00986
REFERENCE MANUAL
Restricted
18/166
Ingenico document - Reproduction or disclosure prohibited without written authorization
Please check document validity before using
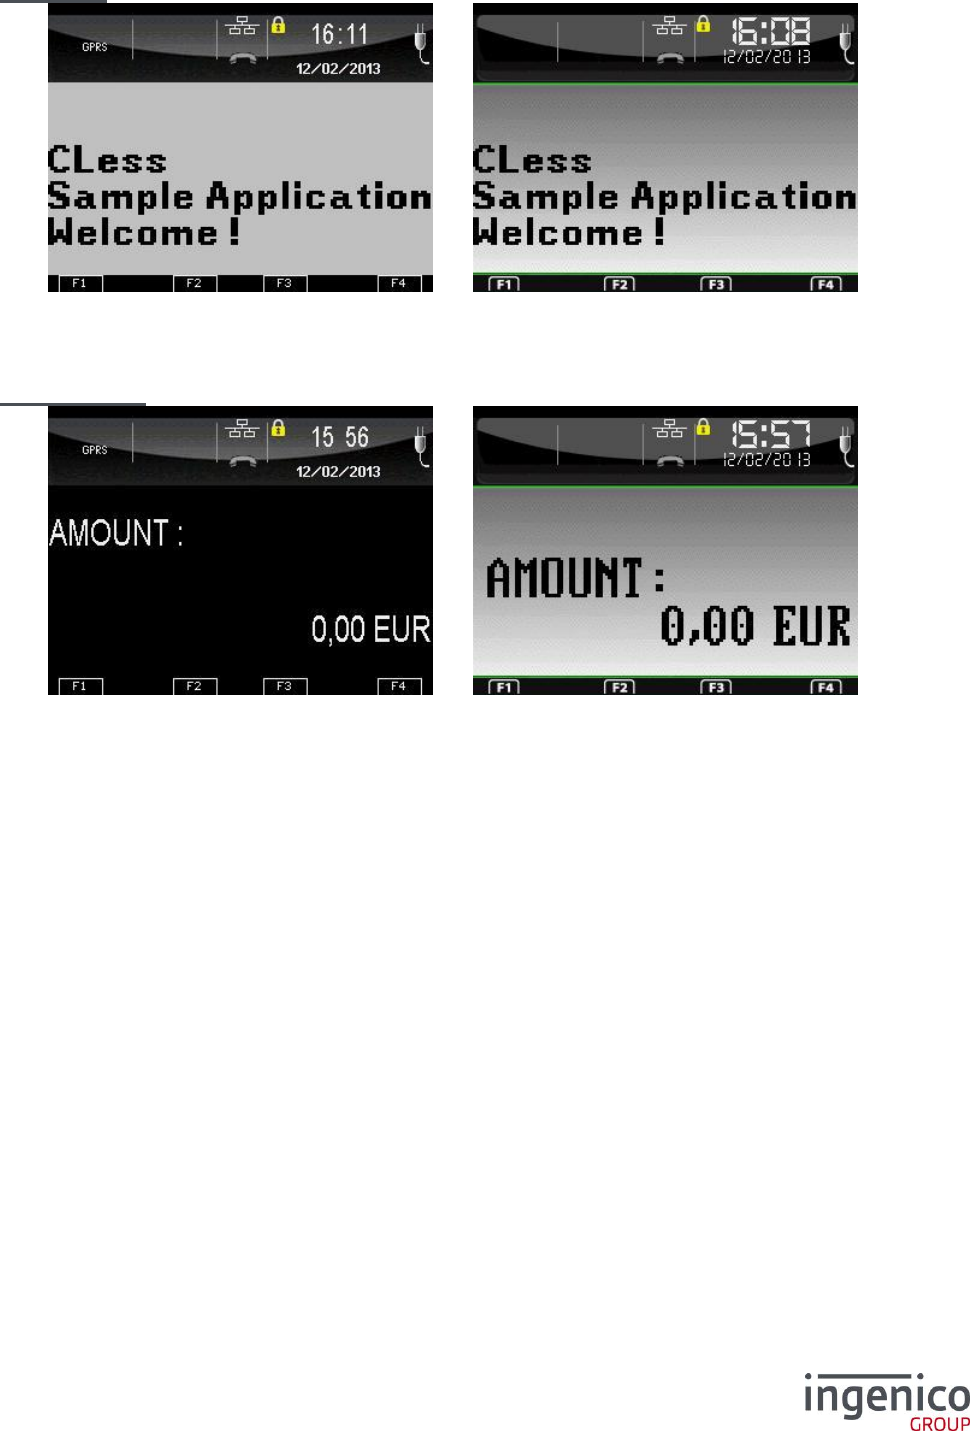
Idle Screen
The terminal Applications manager is initialized and at least one application is initialized. The terminal
is operational with the initialized application(s).
One of these applications manages the idle screen of the terminal.
Amount screen
The terminal Applications manager is initialized and at least one application is initialized. The terminal
is operational with the initialized application(s).
The idle screen of the terminal is managed by the applications manager.

ICO-OPE-00986
REFERENCE MANUAL
Restricted
19/166
Ingenico document - Reproduction or disclosure prohibited without written authorization
Please check document validity before using
5 Preparatory information for initialization
5_1 Storage of parameters entered
For the first initialization, the parameters are stored only if all parameters required by the
initialization have been covered. This does not apply to the date and time which are stored.
Following this, all the values entered during an initialization procedure are stored as soon as they are
validated.
5_2 Drop data entry in progress
On each screen displayed during the initialization procedure, the operator can abort the current data
entry by pressing the red (abort) key. In this case, the terminal will return to the screen displayed prior
to the initialization request.
5_3 Parameters forming initialization
For the first initialization, all of the parameters forming the manager initialization are displayed
successively and must be entered.
For the following initializations, and depending on the application software configuration (CB,
health, export…), some parameters are masked by the applications.
Some parameters can disappear from the menus if the terminal considers that they are no longer
updatable.
5_4 Access to parameters by a shortcut
Each parameter of the manager can be accessed by a key sequence which is activated by pressing
the function key F , followed by the dot key . , followed by a number.
The list of these shortcuts can be printed out by typing the sequence “F.0” on a terminal having a
printer, and is also available in appendix.
ICO-OPE-00986
REFERENCE MANUAL
Restricted
20/166
Ingenico document - Reproduction or disclosure prohibited without written authorization
Please check document validity before using
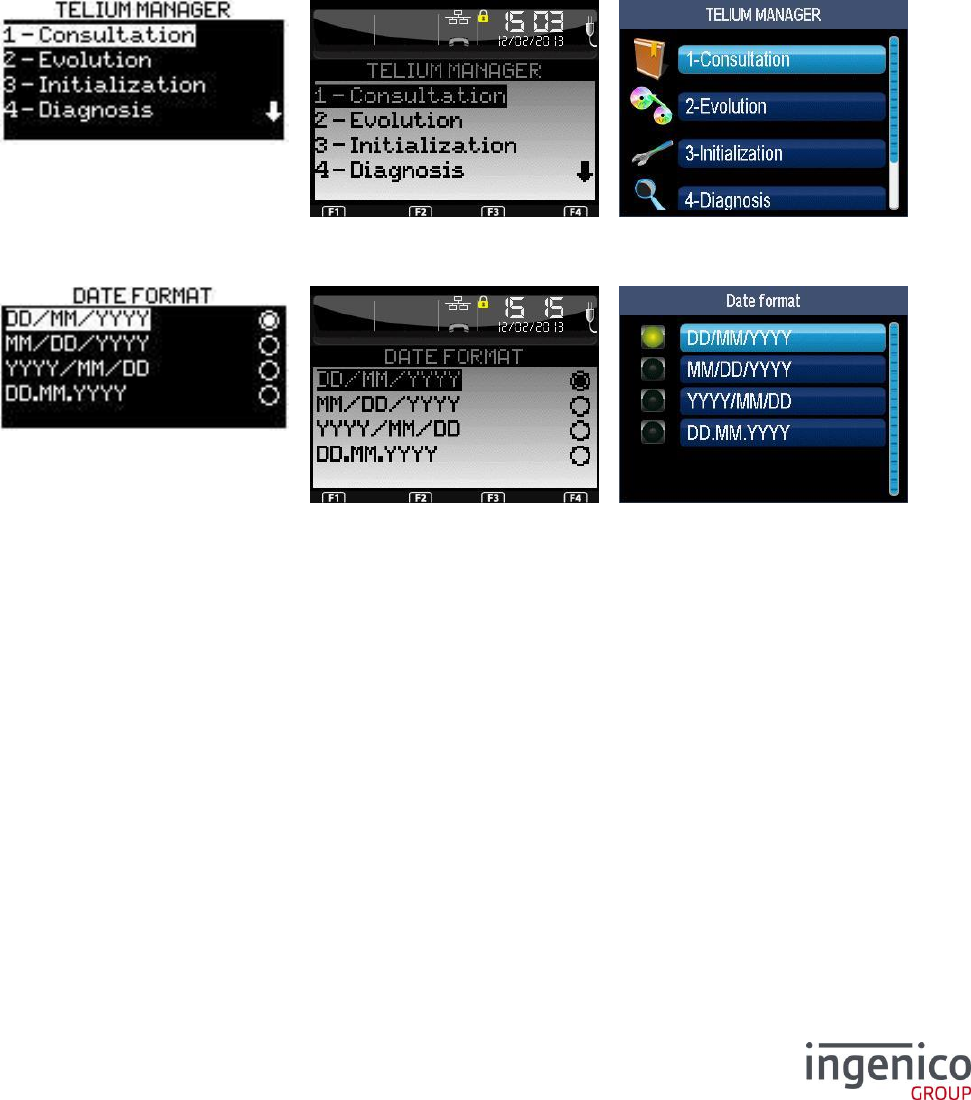
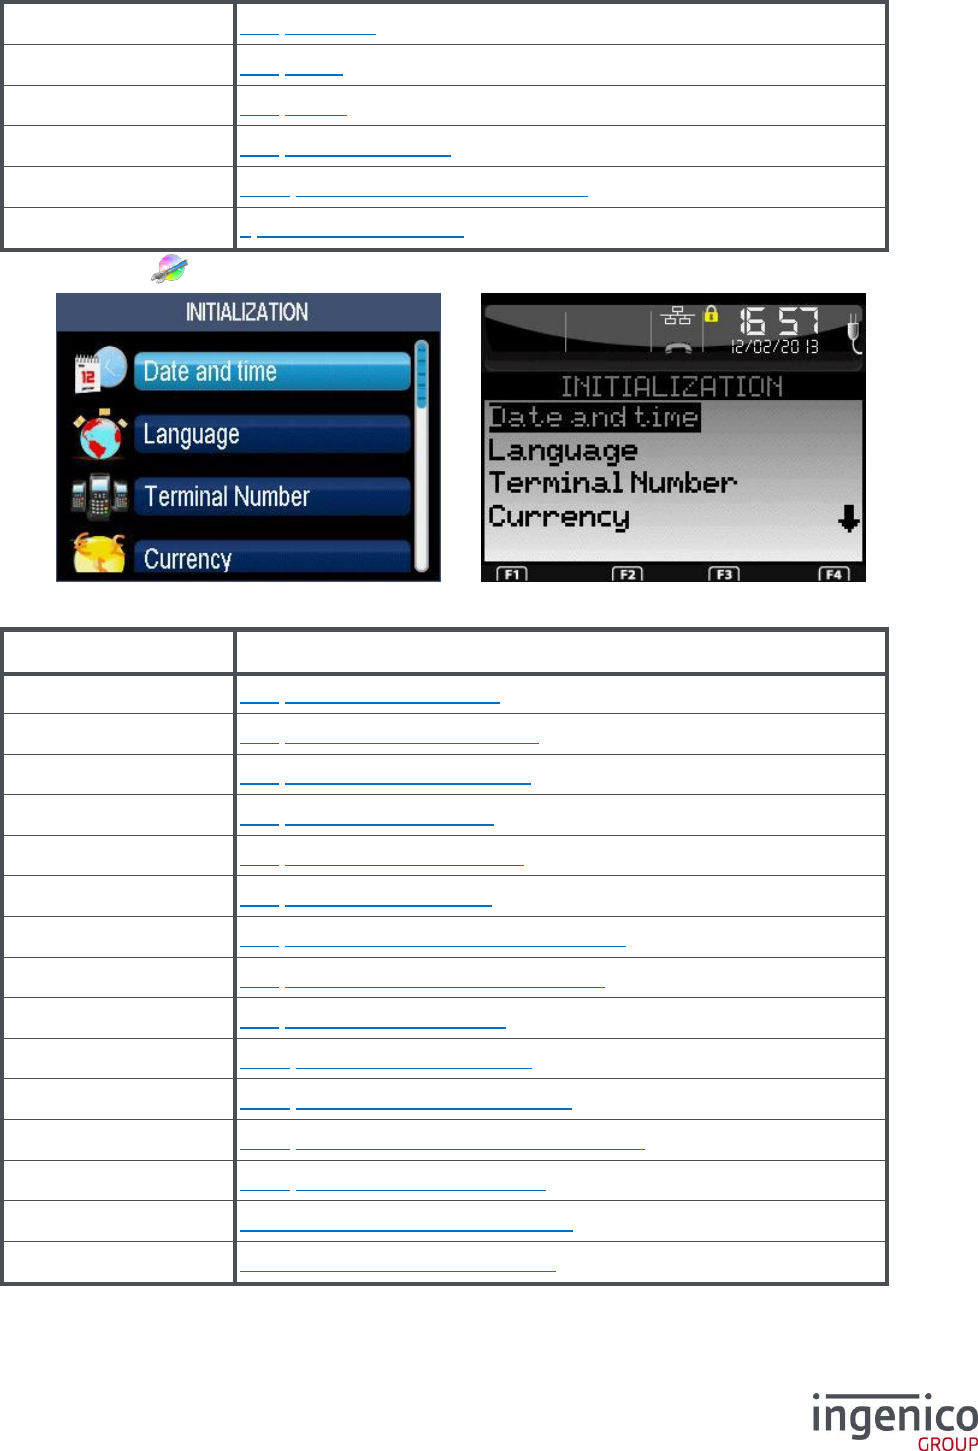
6 Initialization of “applications manager”
parameters
From the idle screen, press the function key F .
Then select the icon or the “Telium Manager” item and validate (shortcut: F.48).
ICO-OPE-00986
REFERENCE MANUAL
Restricted
21/166
Ingenico document - Reproduction or disclosure prohibited without written authorization
Please check document validity before using
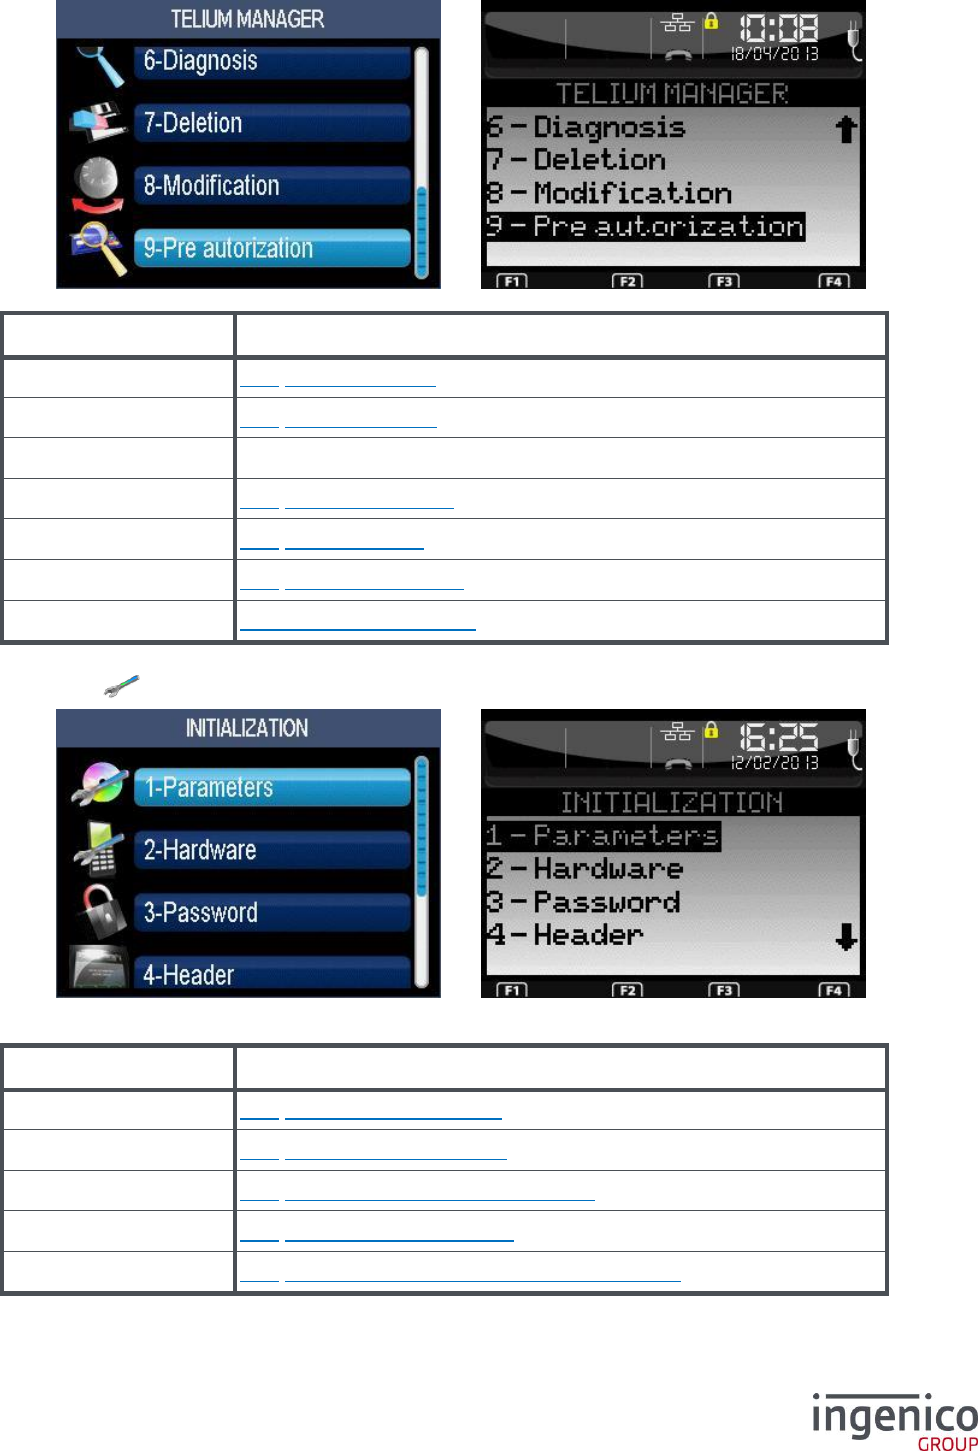
Item
Reference
Consultation
8_1 Lookup functions
Evolution
8_2 Upgrade function
Initialization
Below
Diagnosis
8_3 Diagnostic function
Deletion
8_4 Delete software
Modification
8_5 Modify configuration
License
8_6 License management
Select the icon or the “Initialization” item and validate.
For other items; refer to the following table.
Item
Reference
SIM Code
7_1 Initialization of SIM code
PUK Code
7_2 Initialization of PUK code
Default Conf.
7_3 Restoration of default configuration
Screen Saver
7_4 Initialization of idle screen
Password
7_5 Initialization of protection manager password
ICO-OPE-00986
REFERENCE MANUAL
Restricted
22/166
Ingenico document - Reproduction or disclosure prohibited without written authorization
Please check document validity before using
Header
7_6 Status bar
Footer
7_7 Footer
Beep On Key
7_8 Buzzer
Beep On Pincode
7_9 Buzzer on pincode
PINPAD Emulation
7_10 IPP 3XX Pinpad emulation mode
Hardware
9 Hardware configuration
Then select the icon or the “Parameters” item and validate.
Each icon or item corresponds to a parameter of the manager:
Item
Reference
Language
6_1 Initialization of language
Date and time
6_2 Initialization of date and time
Terminal Number
6_3 Setting the terminal number
Currency
6_4 Initialization of currency
Switchboard
6_5 Initialization of switchboard
Pinpad
6_6 Initialization of PINPAD
Contactless
6_7 Initialization of the contactless function
Stripe Reader
6_8 Initialization of magnetic strip reader
Serial Number
6_9 Display of Serial Number
Network Type
6_10 Initialization of the network
Fallback Network
6_11 Initialization of fallback network
Cash Connection
6_12 Initialization of cash register connection
TMS Network
6_13 Initialization of TMS network
PCI V4 Time Slot
6_14 Initialization of PCI v4 Time Slot
“Red key”
6_15 Exit “Parameters Initialization”
ICO-OPE-00986
REFERENCE MANUAL
Restricted
23/166
Ingenico document - Reproduction or disclosure prohibited without written authorization
Please check document validity before using
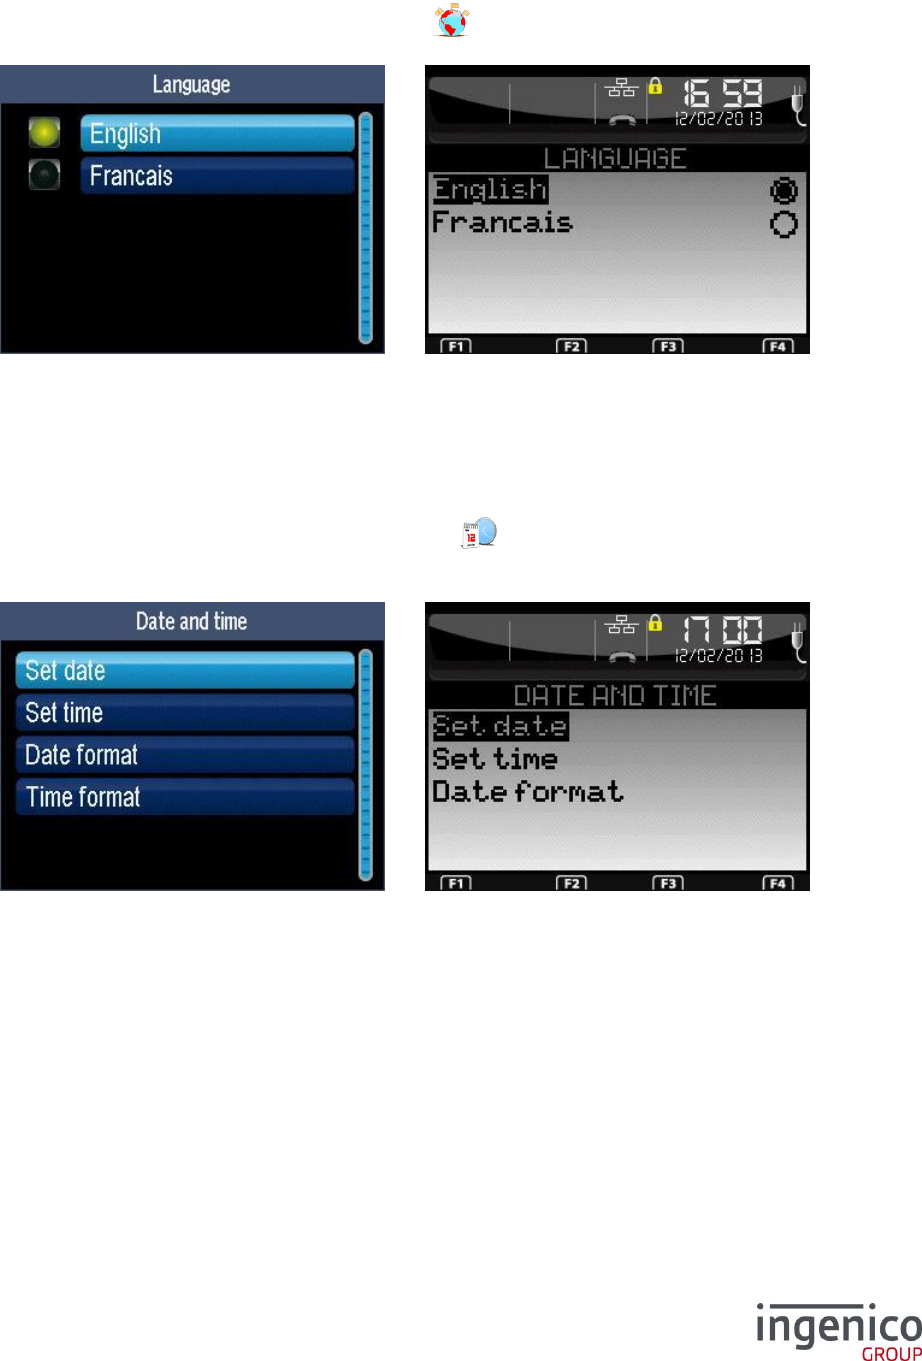
6_1 Initialization of language
Shortcut: F.13
From the “Parameters Initialization” screen, select the icon or the “Language” item and validate.
The list of languages depends on the loaded configuration. Select the desired language.
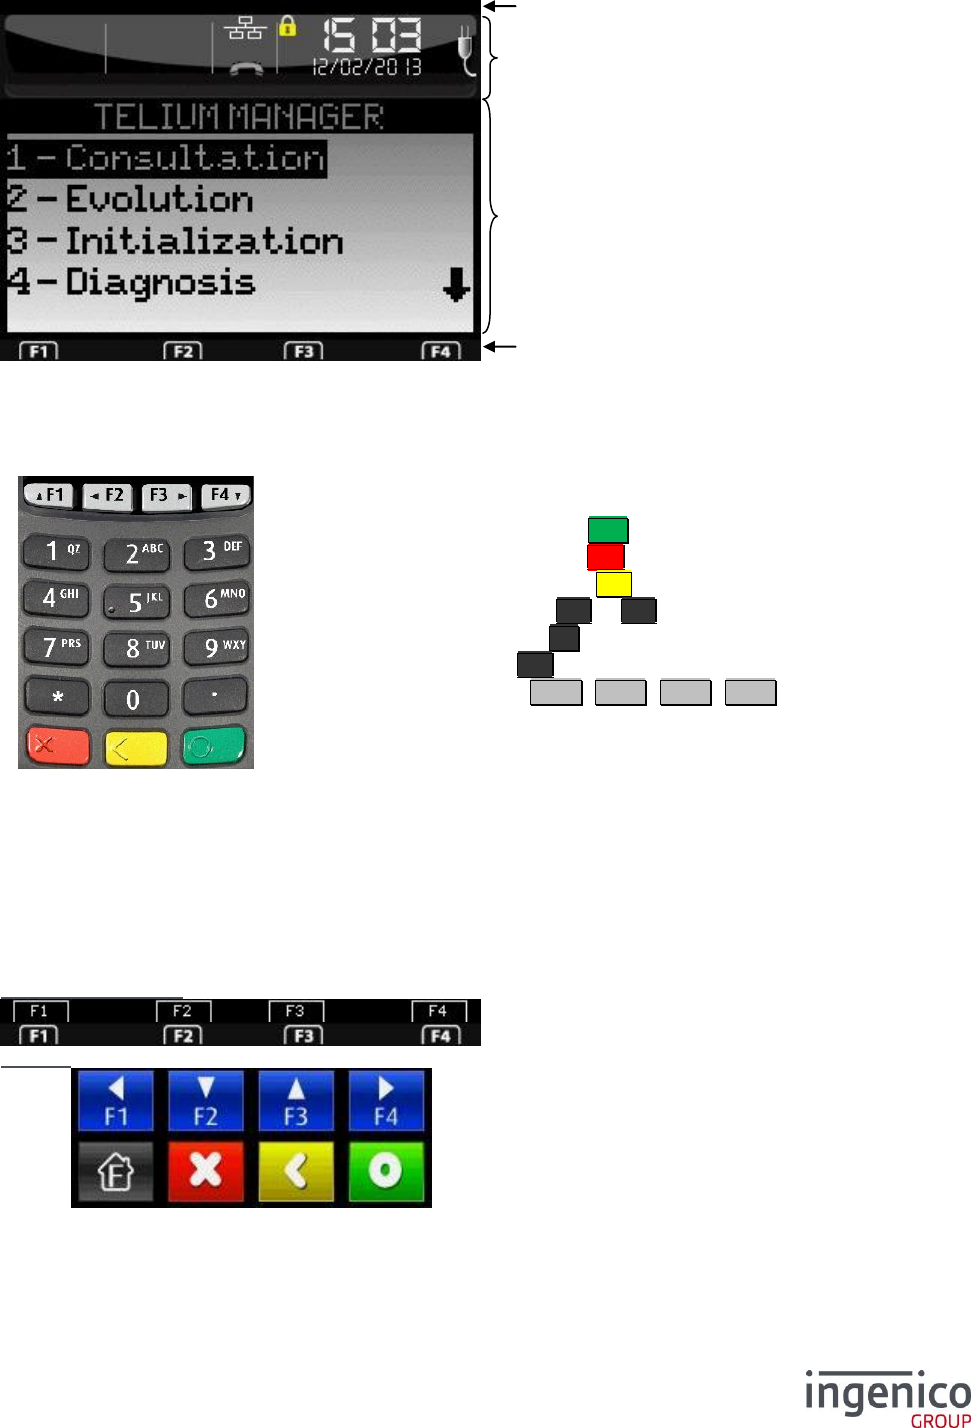
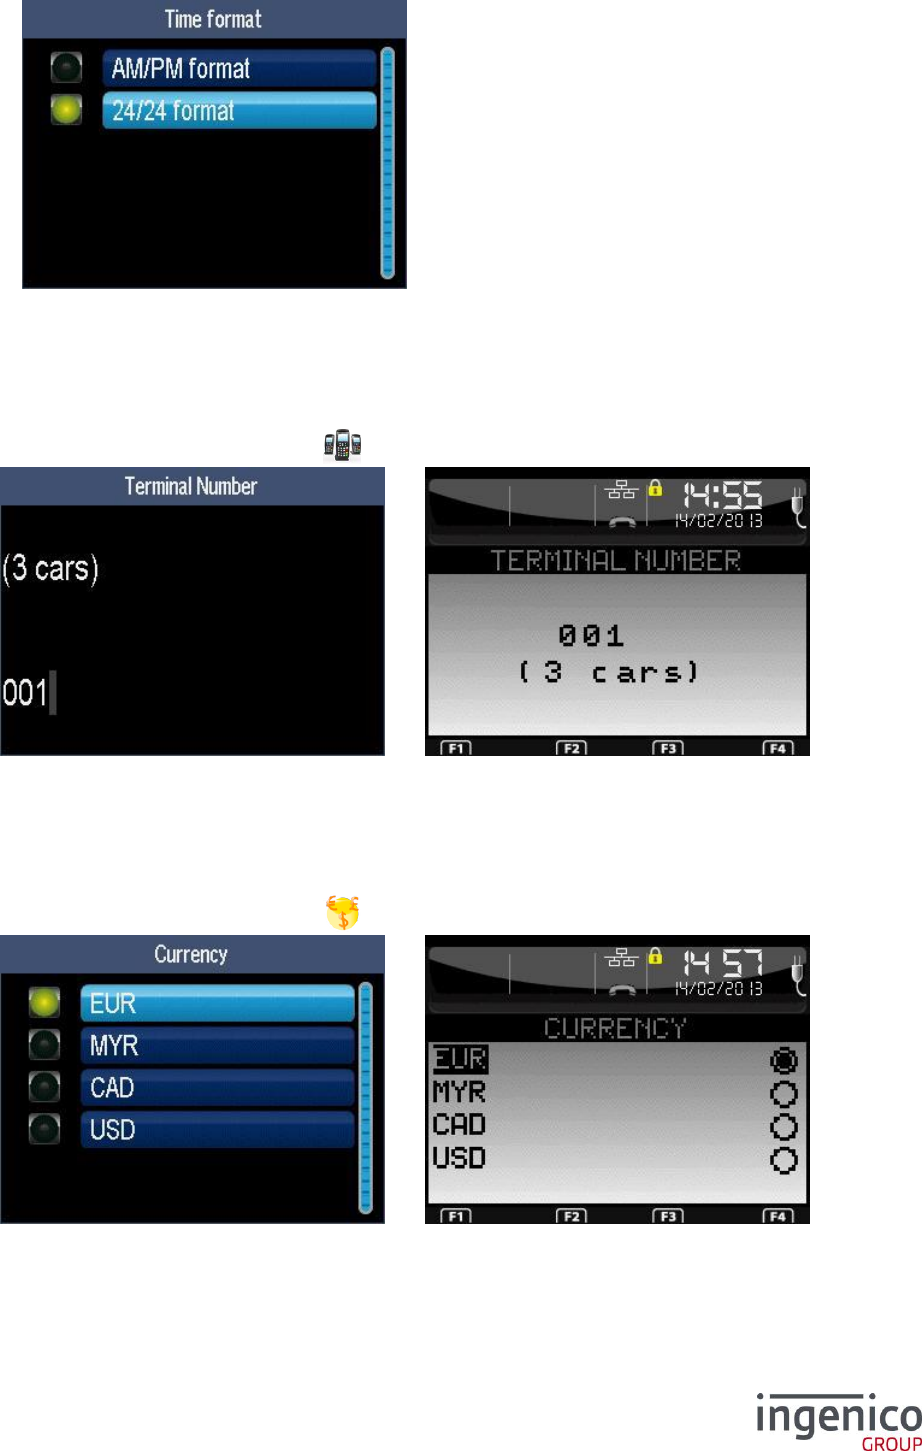
6_2 Initialization of date and time
Shortcut: F.12
From the “Parameters Initialization” screen, select the icon or the “Date and Time” item and
validate.
Choose the type of setting to be performed.

ICO-OPE-00986
REFERENCE MANUAL
Restricted
24/166
Ingenico document - Reproduction or disclosure prohibited without written authorization
Please check document validity before using
6_2_1 Setting the date
Enter the date in accordance with the date format then validate. A validity check is performed.
6_2_2 Setting the time
Enter the time then validate. A validity check is performed.
In “GOAL” mode and AM/PM format, user also has to select either “AM” or “PM”.
6_2_3 Setting the date format
Choose the desired format (Standard, US, Chinese and German) then validate.
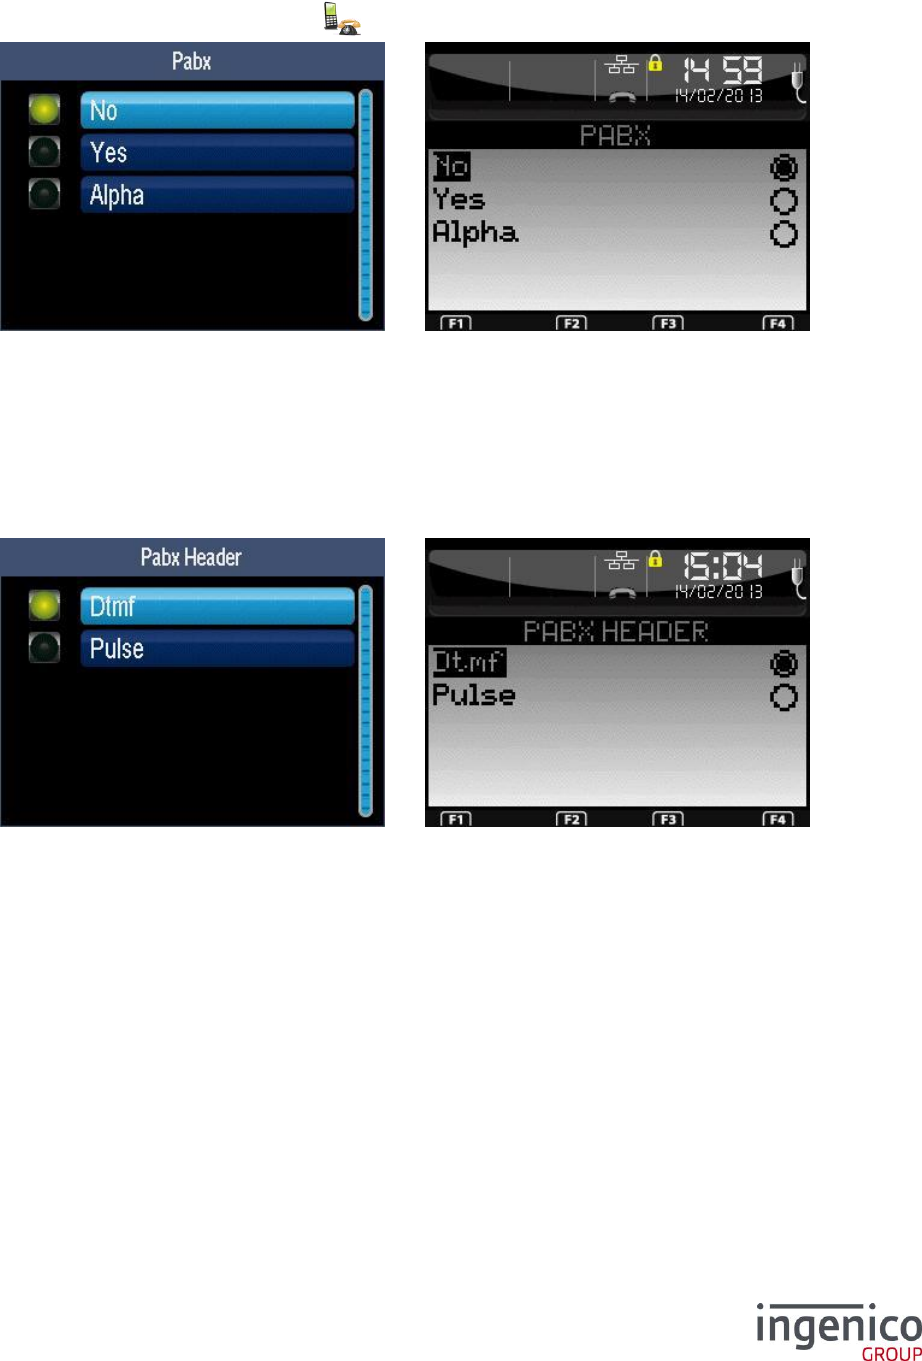
6_2_4 Setting the time format
In this version of documentation, this item is only described in “GOAL” mode. Other mode will be
documented in future documentation.
ICO-OPE-00986
REFERENCE MANUAL
Restricted
25/166
Ingenico document - Reproduction or disclosure prohibited without written authorization
Please check document validity before using
Select the display format of the time. Then validate.
6_3 Setting the terminal number
Shortcut: F.14
From the “Initialization” screen, select the icon or the “Terminal Number” item and validate.
Enter the terminal number (three digits required) then validate.
6_4 Initialization of currency
Shortcut: F.15
From the “Initialization” screen, select the icon or the “Currency” item and validate.
Select the default currency to be displayed on the amount screen of the terminal. Then validate.
ICO-OPE-00986
REFERENCE MANUAL
Restricted
26/166
Ingenico document - Reproduction or disclosure prohibited without written authorization
Please check document validity before using
6_5 Initialization of switchboard
Shortcut: F.16
From the “Initialization” screen, select the icon or the “Switchboard” item and validate.
This menu is used to adapt the terminal to the phone line on which it is connected by defining the
following parameters:
presence (or absence) of private switchboard between the terminal and the phone line,
DTMF or pulse dialing,
Other parameters like tone detection, various hold…
6_5_1 Switchboard configured with “Yes”
Choose the dialing mode before the private switchboard: either DTMF (voice frequency dialing) or
pulse (decimal dialing).

ICO-OPE-00986
REFERENCE MANUAL
Restricted
27/166
Ingenico document - Reproduction or disclosure prohibited without written authorization
Please check document validity before using
Enter the number (1 to 13 alphanumeric characters) to use to connect the terminal to the public
network through the private switchboard.
Choose the dialing mode after the private switchboard: either DTMF (voice frequency dialing) or pulse
(decimal dialing).
6_5_2 Switchboard configured with “Alpha”
Enter up to fifteen characters. Press “F1” key for help.
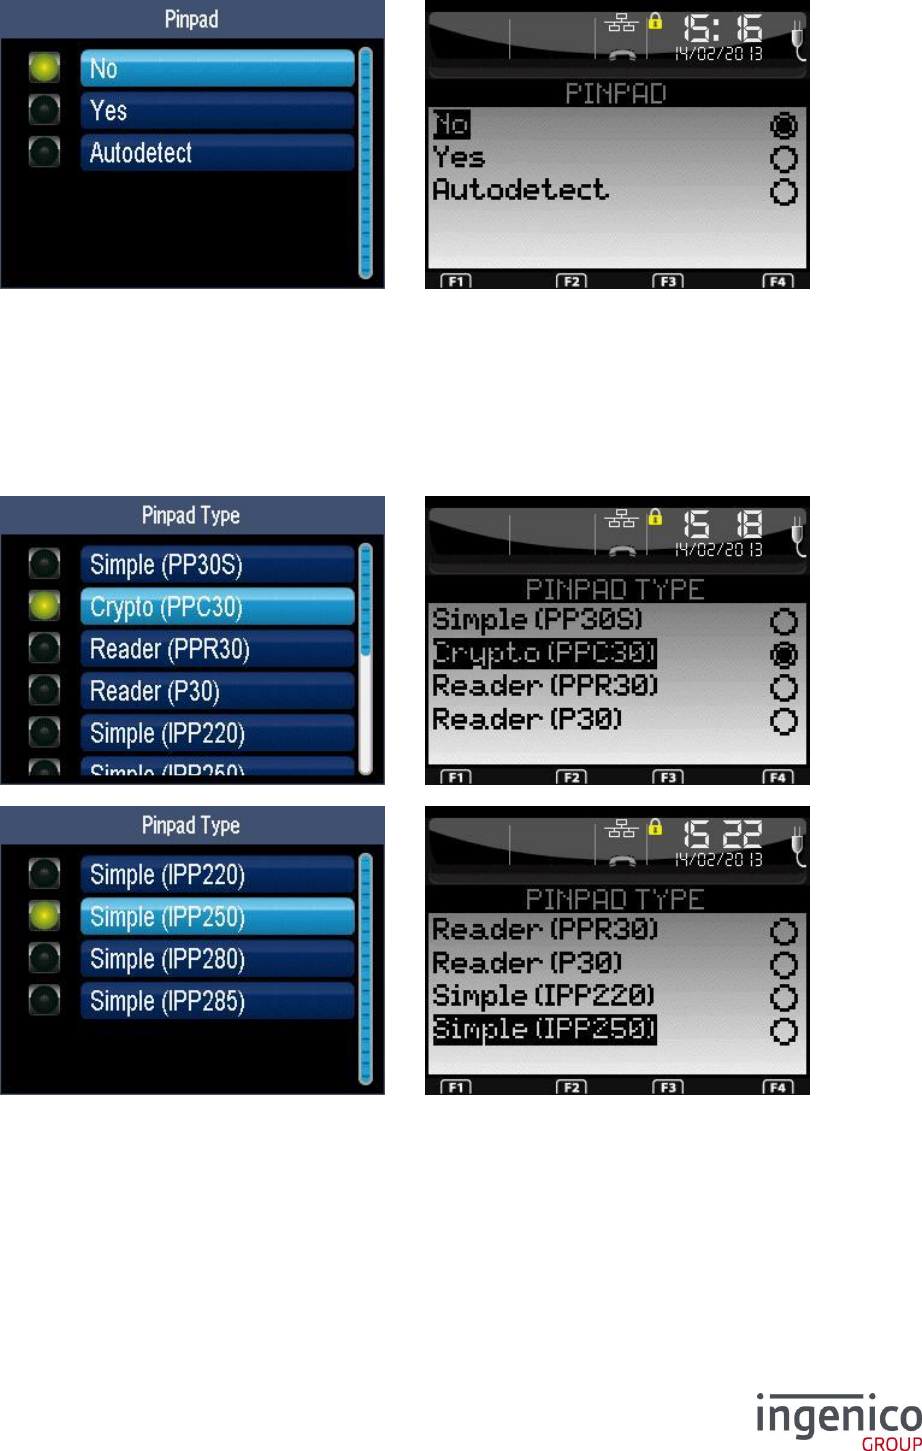
6_6 Initialization of PINPAD
Shortcut: F.17
From the “Parameters Initialization” screen, select the icon or the “Pinpad” item and validate.
ICO-OPE-00986
REFERENCE MANUAL
Restricted
28/166
Ingenico document - Reproduction or disclosure prohibited without written authorization
Please check document validity before using
Select in the list either:
“None” to inhibit the pinpad or because there is no pinpad, or
“Yes” to select manually the pinpad, or
“Autodetect” to let the terminal select the pinpad
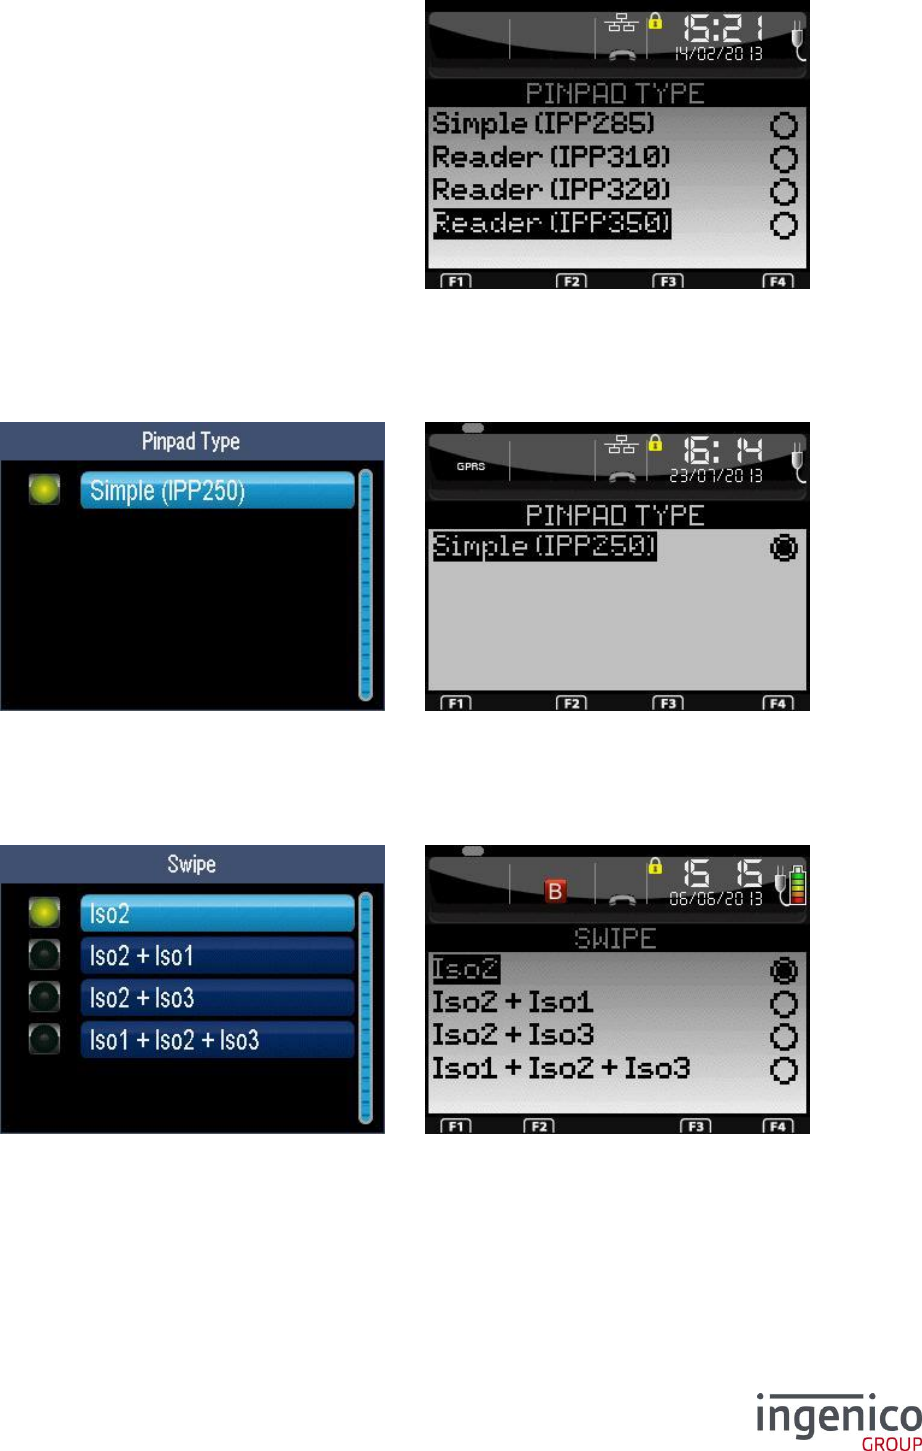
6_6_1 Initialization of pinpad type
ICO-OPE-00986
REFERENCE MANUAL
Restricted
29/166
Ingenico document - Reproduction or disclosure prohibited without written authorization
Please check document validity before using
Choose the type of the PINPAD in the proposed list. After validation, terminal may propose to
configure it (refer 6_6_3 Initialization of the stripe reader on a P30 pinpad and 6_6_4 Initialization of
the background color of a IPP250 pinpad).
6_6_2 Pinpad auto detect
The terminal detects the pinpad type. After validation, terminal may propose to configure it (refer
6_6_3 Initialization of the stripe reader on a P30 pinpad and 6_6_4 Initialization of the background
color of a IPP250 pinpad).
6_6_3 Initialization of the stripe reader on a P30 pinpad
Configure the type of the stripe reader on the pinpad.
This screen appears only if the terminal offers fewer reading possibilities than the pinpad.
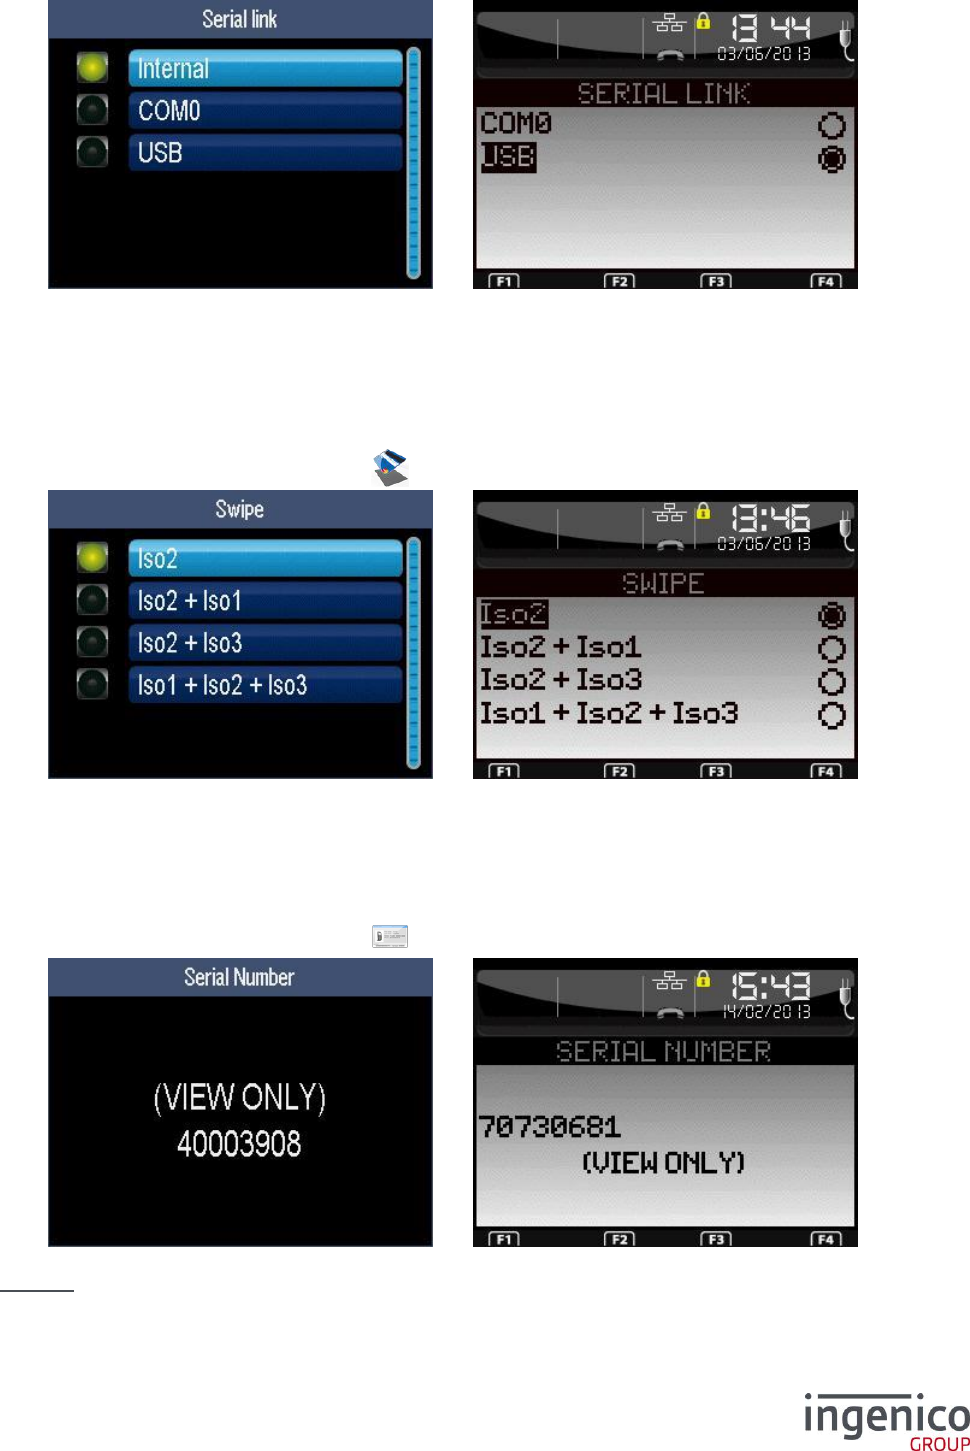
6_6_4 Initialization of the background color of a IPP250 pinpad
ICO-OPE-00986
REFERENCE MANUAL
Restricted
30/166
Ingenico document - Reproduction or disclosure prohibited without written authorization
Please check document validity before using
Select the desired color using the navigation keys.
Only with “LibGR”, press the “F” key then use the navigation keys to refine the color.
6_7 Initialization of the contactless function
Shortcut: F.41
From the “Parameters Initialization” screen, select the icon or the “Contactless” item and validate.
The contactless function is activated by selecting the “Yes” option.
ICO-OPE-00986
REFERENCE MANUAL
Restricted
31/166
Ingenico document - Reproduction or disclosure prohibited without written authorization
Please check document validity before using
Select the type of the target connected to the terminal. The “Internal” option means that the
contactless function is integrated into the terminal.
6_8 Initialization of magnetic strip reader
Shortcut: F.18
From the “Initialization” screen, select the icon or the “Stripe Reader” item and validate.
Select the tracks to read on the magnetic strip of a card. Then validate.
6_9 Display of Serial Number
Shortcut: F.19
From the “Initialization” screen, select the icon or the “Serial Number” item and validate.
By default, the displayed number is the production serial number.
Caution: This parameter can not be entered (factory data).
ICO-OPE-00986
REFERENCE MANUAL
Restricted
32/166
Ingenico document - Reproduction or disclosure prohibited without written authorization
Please check document validity before using
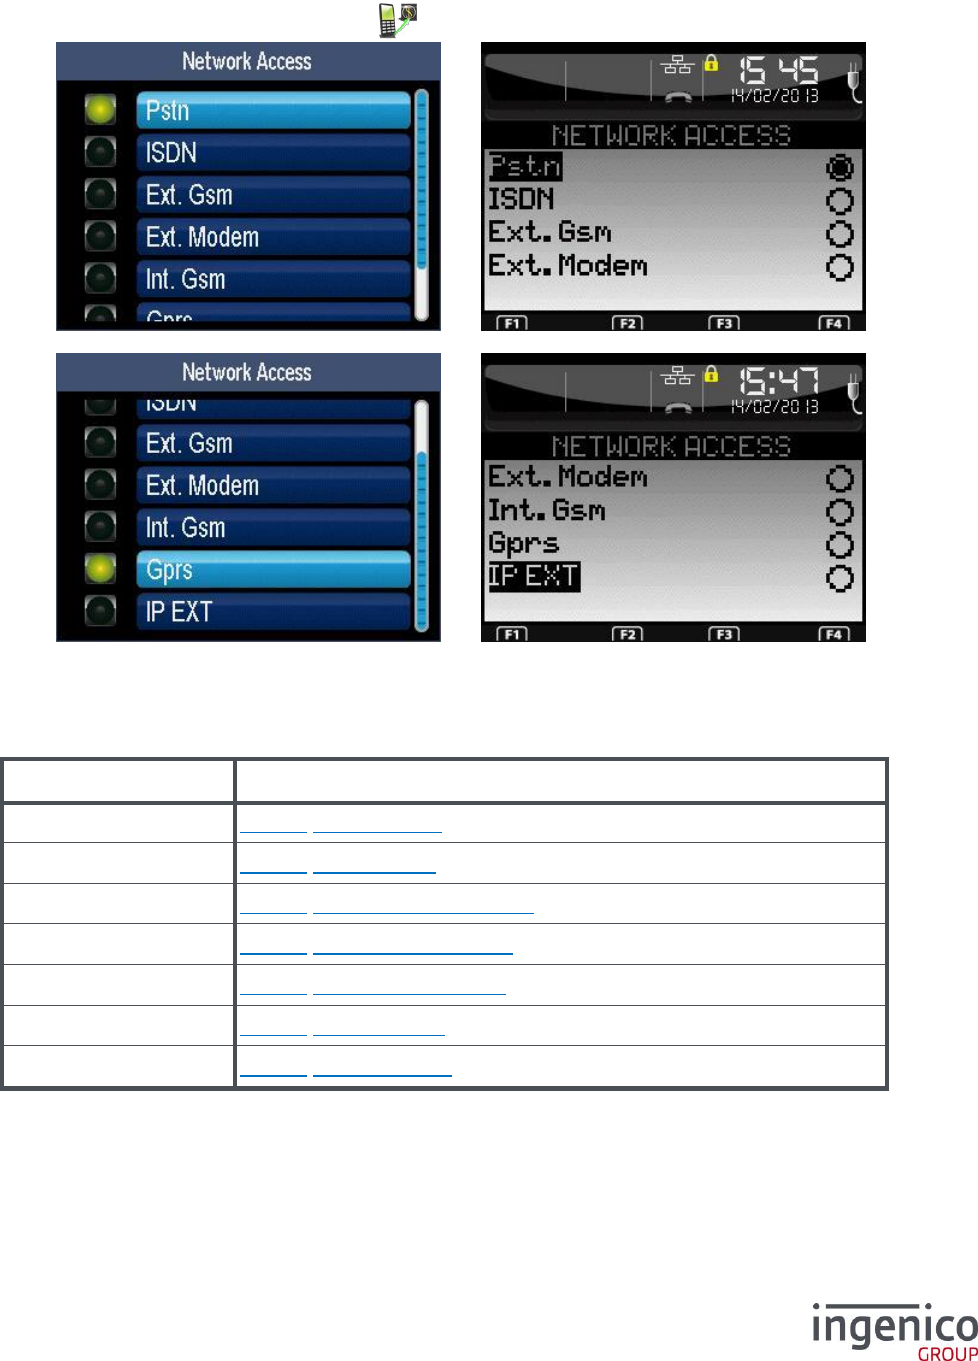
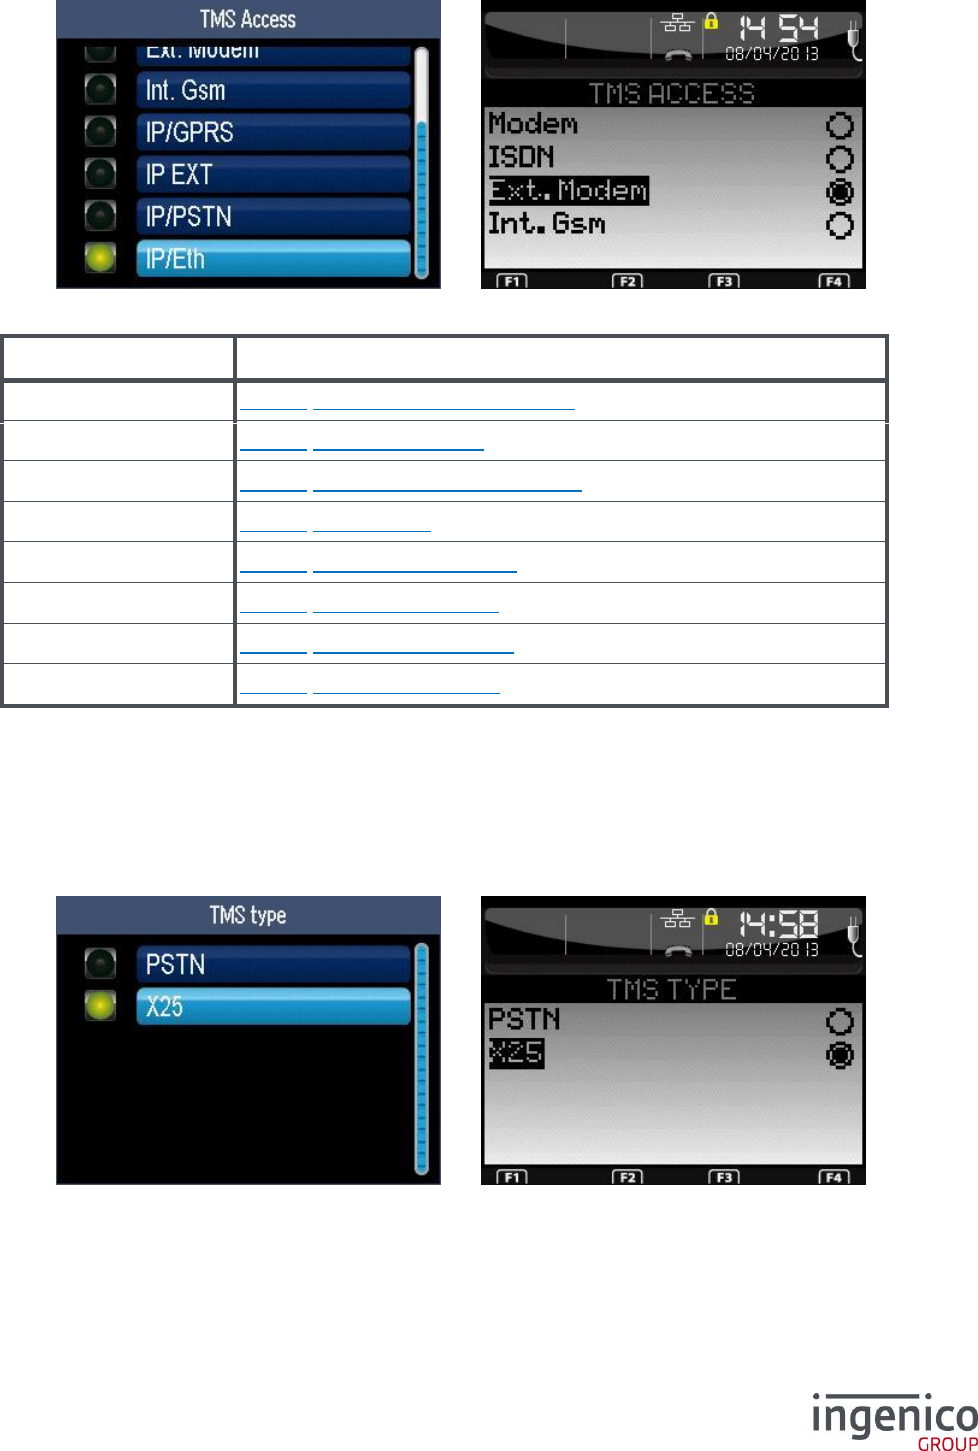
6_10 Initialization of the network access
Shortcut: F.20
From the “Initialization” screen, select the icon or the “Network Type” item and validate.
Select the network access to be used for transfert of the application data streams (not for download).
Depending on the terminal type, some options are not available.
Item
Reference
PSTN
6_10_1 PSTN network
ISDN
6_10_2 ISDN network
Ext. Modem
6_10_3 External modem network
Ext. GSM
6_10_4 External GSM network
Int. GSM
6_10_5 Internal GSM network
GPRS
6_10_6 GPRS network
IP EXT
6_10_7 IP EXT network
ICO-OPE-00986
REFERENCE MANUAL
Restricted
33/166
Ingenico document - Reproduction or disclosure prohibited without written authorization
Please check document validity before using
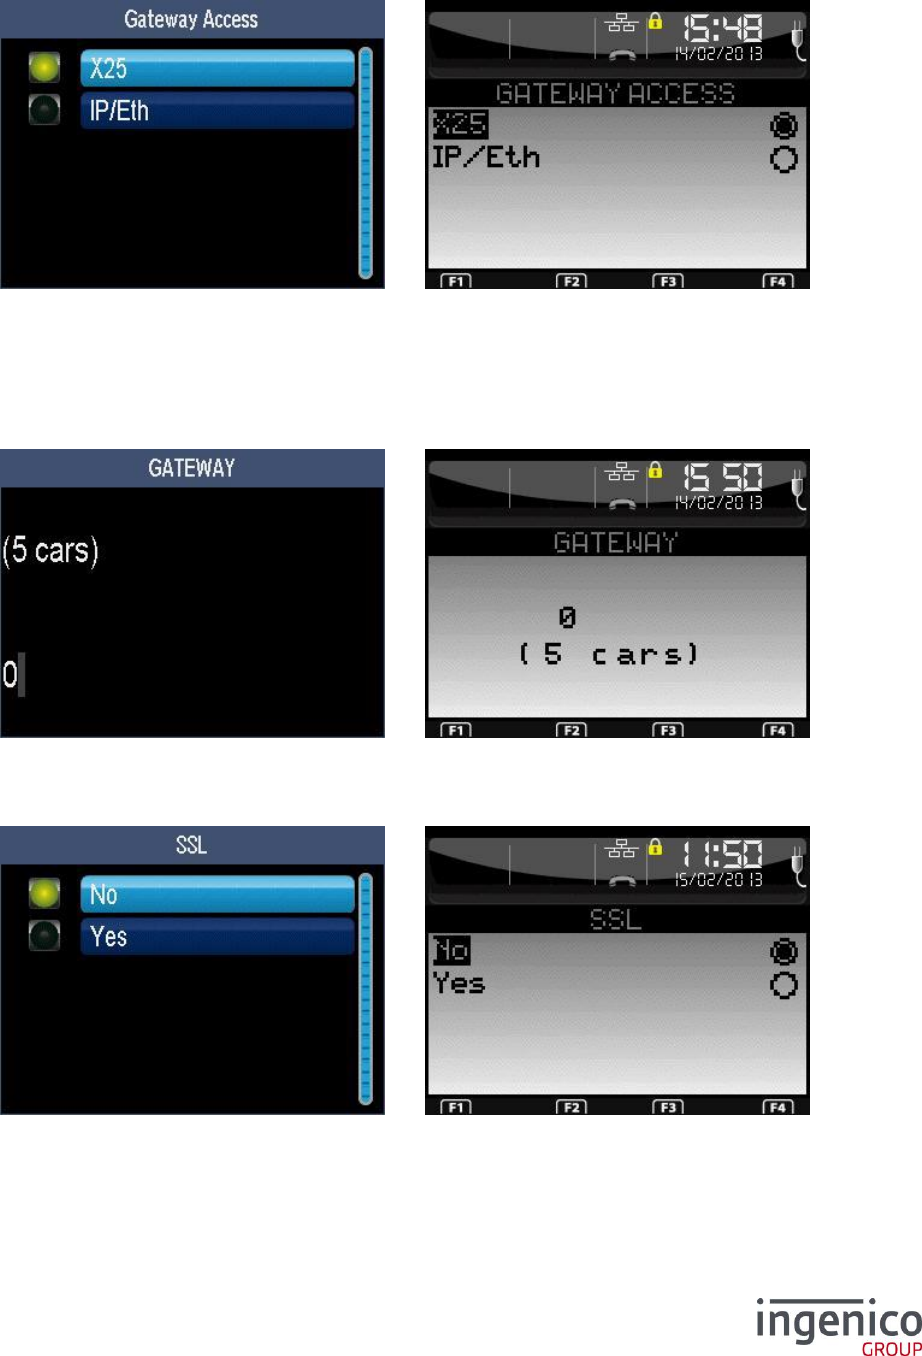
6_10_1 PSTN network
6_10_1_1 PSTN type
Select one of the two possibilities:
X25 – access to Transpac servers via internal modem and PAD. If selected, the configuration
of the network is finished.
IP/Eth – access to Transpac servers via IP/X25 gateway.
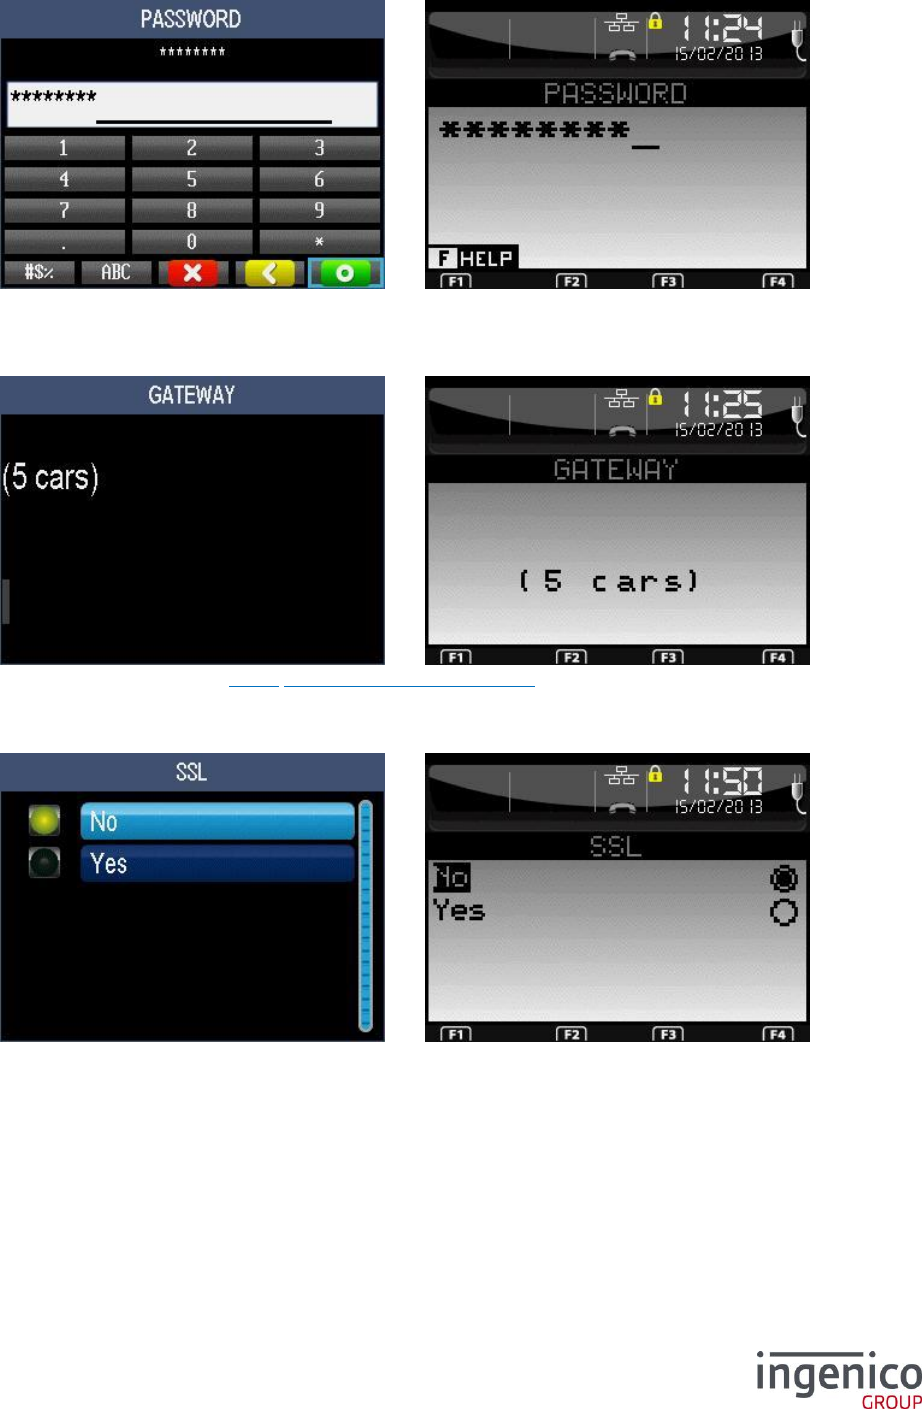
6_10_1_2 Gateway for IP/ETH access
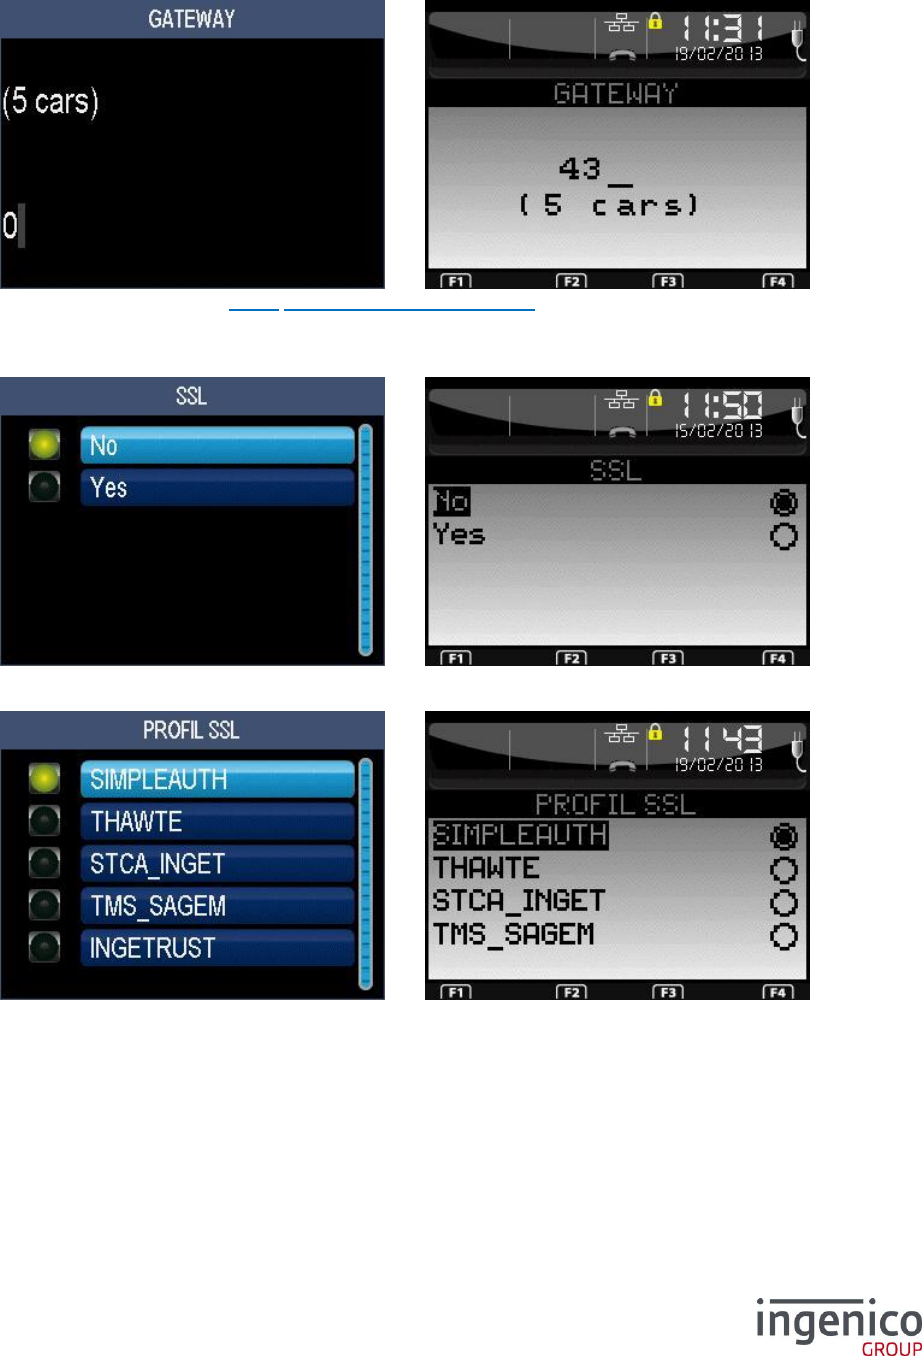
Enter the gateway number (refer 11_2 List of the gateway numbers).
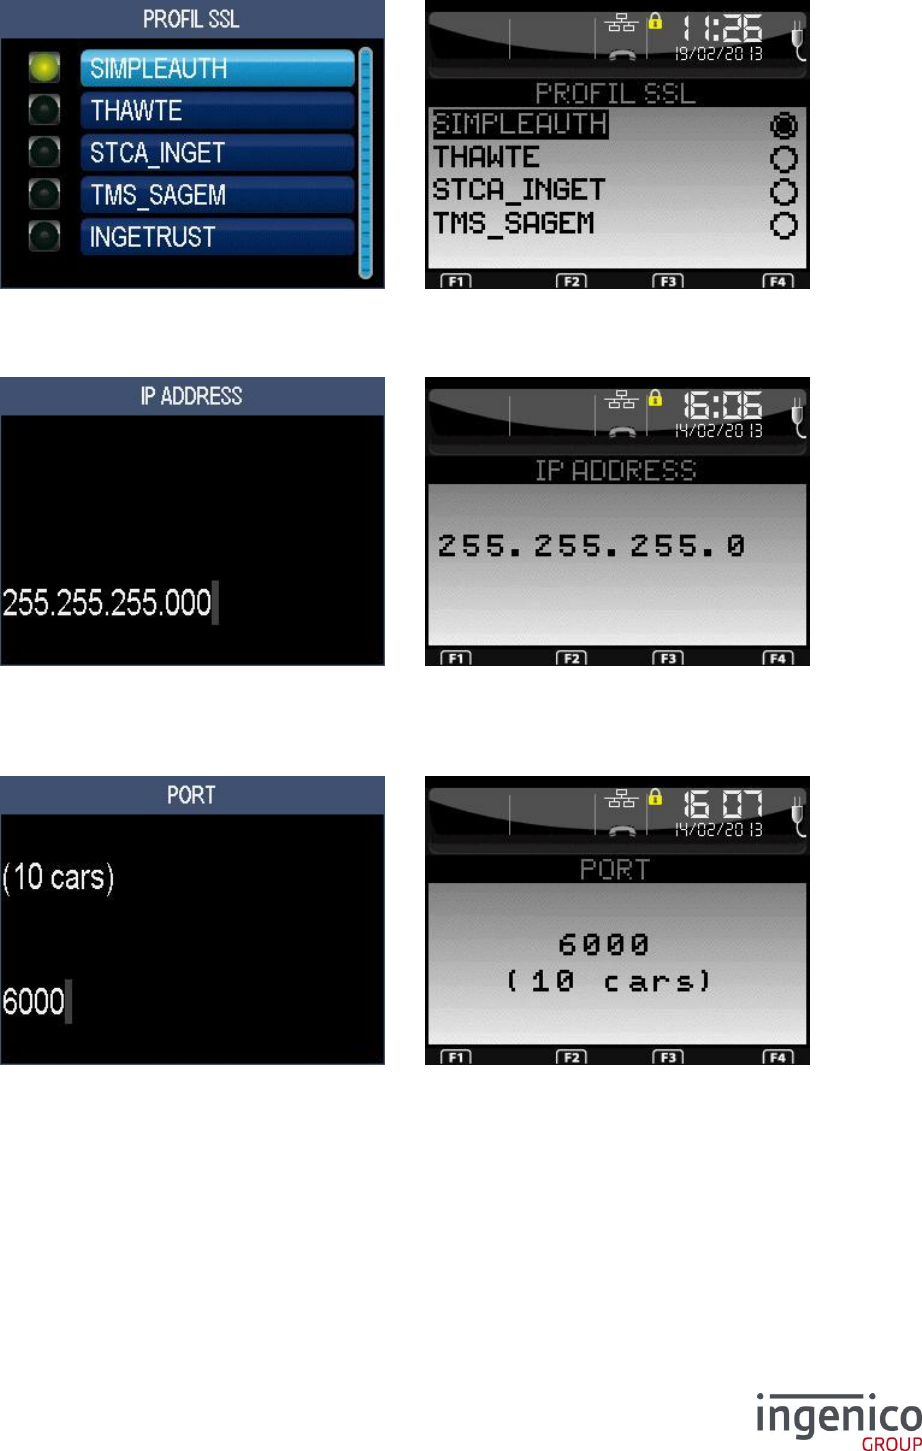
6_10_1_3 SSL for IP/ETH access
Activate SSL if the gateway number is odd.
ICO-OPE-00986
REFERENCE MANUAL
Restricted
34/166
Ingenico document - Reproduction or disclosure prohibited without written authorization
Please check document validity before using
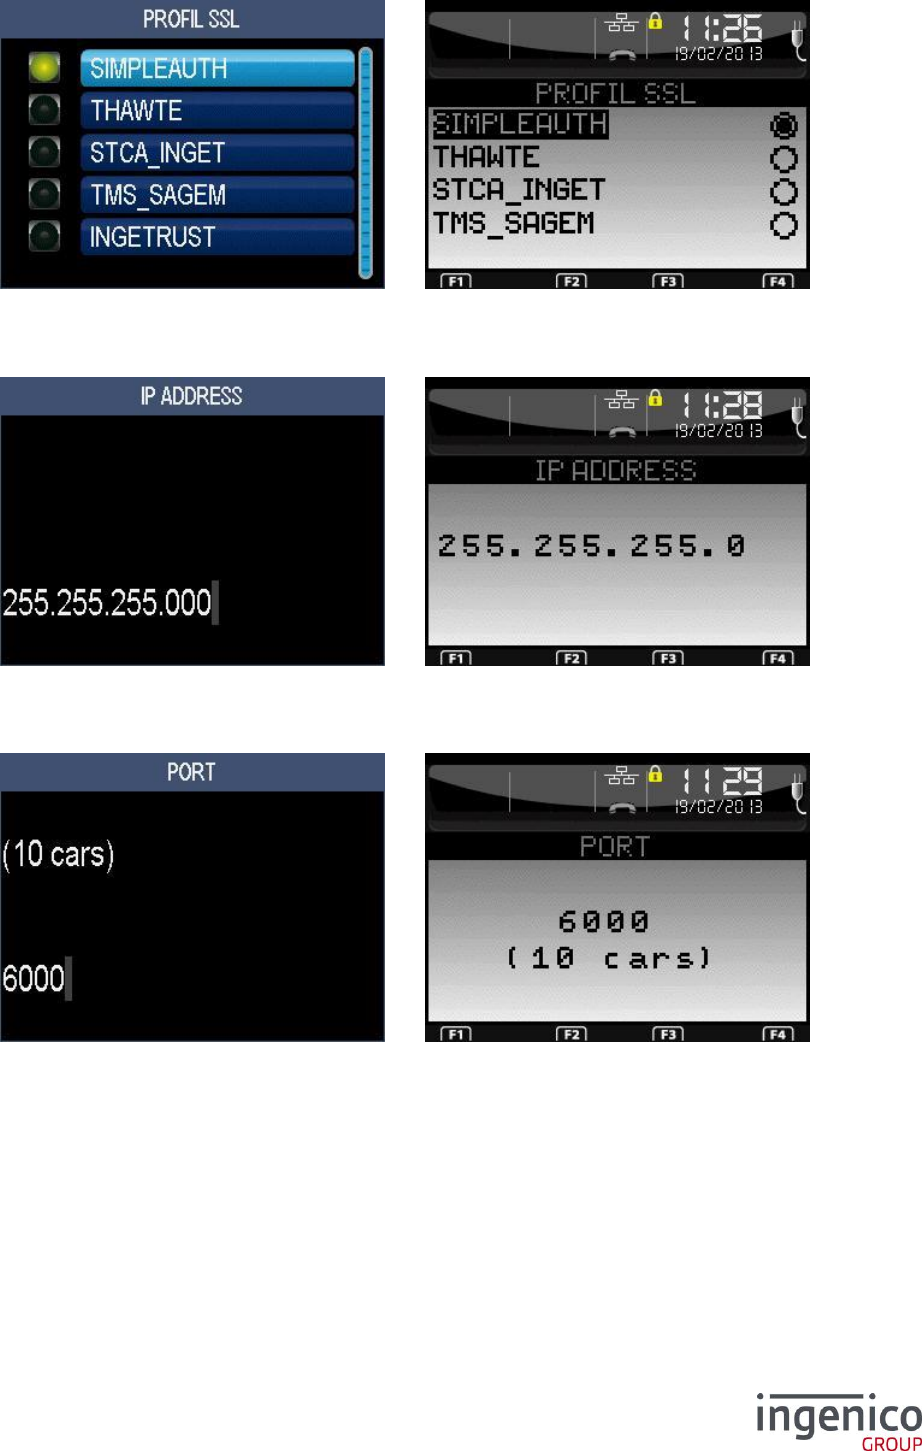
If SSL is activated, select a SSL profile in the list.
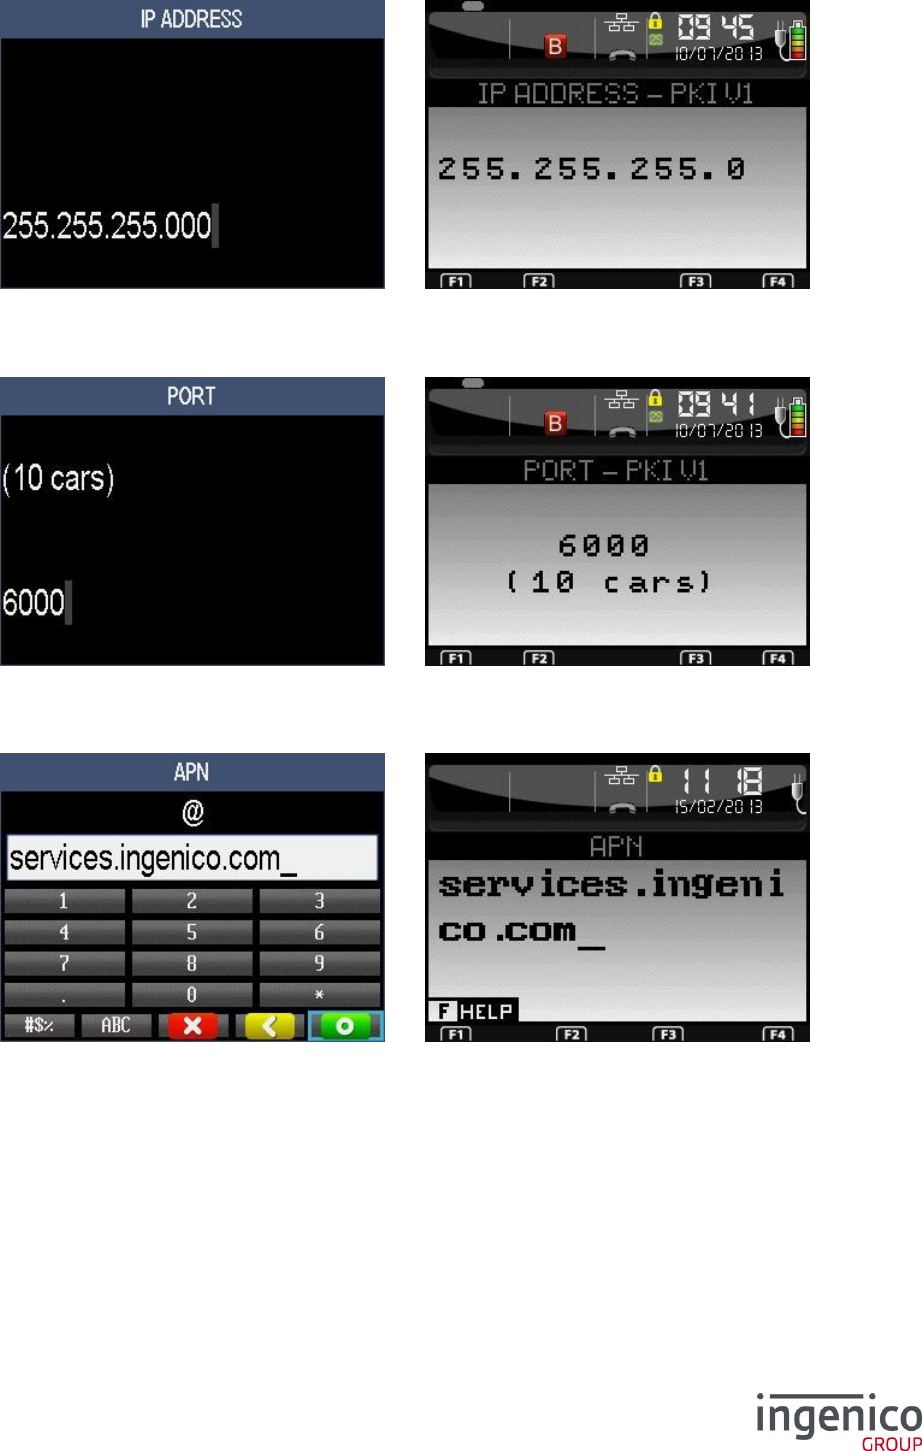
6_10_1_4 IP address
Enter the IP address. IP Address is composed of four digital fields, each one from 0 to 255.
6_10_1_5 port
Enter the port number (up to ten digits). Then refer to 6_11 Initialization of fallback network.
ICO-OPE-00986
REFERENCE MANUAL
Restricted
35/166
Ingenico document - Reproduction or disclosure prohibited without written authorization
Please check document validity before using
6_10_2 ISDN network
The list depends on the hardware configuration.
Select the command mode. Then refer to 6_11 Initialization of fallback network.
6_10_3 External modem network
The list depends on the hardware configuration.
ICO-OPE-00986
REFERENCE MANUAL
Restricted
36/166
Ingenico document - Reproduction or disclosure prohibited without written authorization
Please check document validity before using
6_10_4 External GSM network
The list depends on the hardware configuration.
6_10_5 Internal GSM network
The list depends on the hardware configuration. This screen is not available for the GSM terminal.
Select if the GSM module shall be activated at start-up or not (available only for export configurations).
ICO-OPE-00986
REFERENCE MANUAL
Restricted
37/166
Ingenico document - Reproduction or disclosure prohibited without written authorization
Please check document validity before using
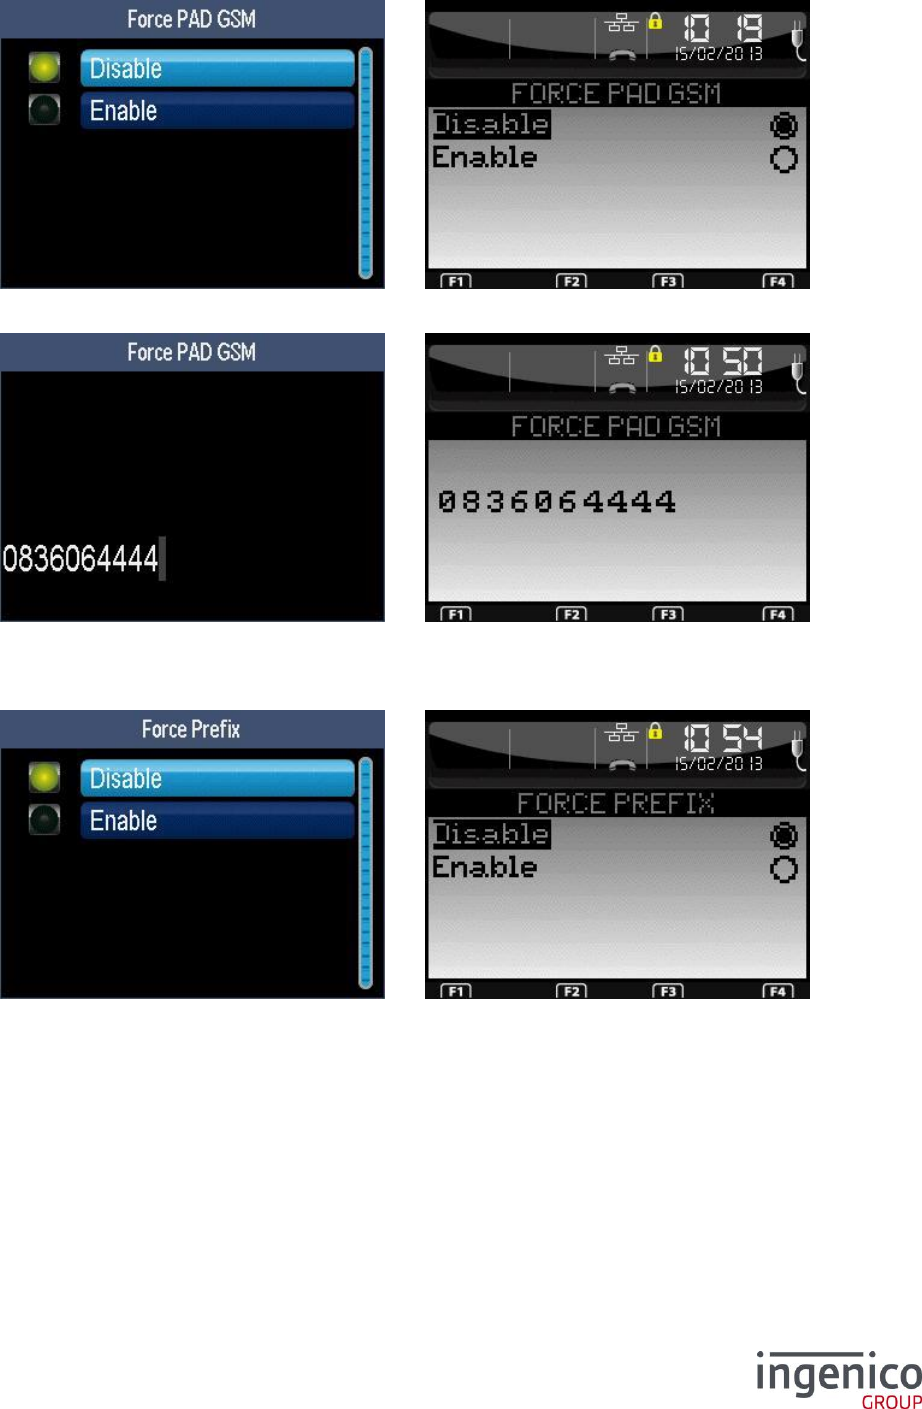
6_10_5_1 V32bis PAD
To force GSM communication via a V32bis PAD number (other than that configured by bank server).
Enter the PAD number (displayed only if you select “Enable” on previous screen).
6_10_5_2 V32bis prefixed
Define a fixed dialing prefix for electronic banking communications from abroad.
ICO-OPE-00986
REFERENCE MANUAL
Restricted
38/166
Ingenico document - Reproduction or disclosure prohibited without written authorization
Please check document validity before using
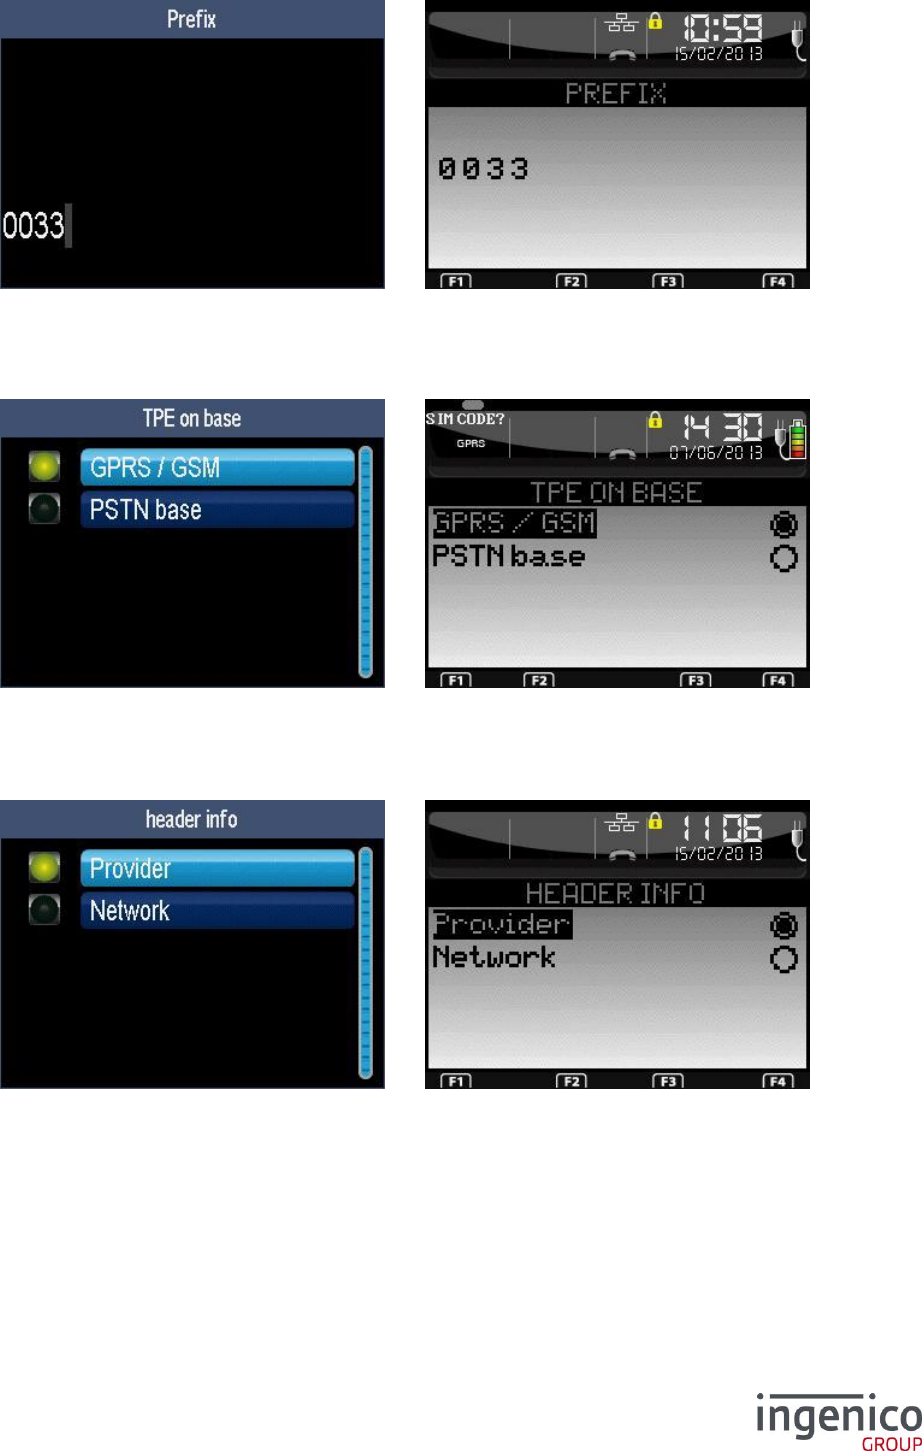
Enter the prefix number as "0033" to reach a server in France (displayed only if you select “Enable” on
previous screen).
6_10_5_3 Connection type on base
Select the type of electronic banking communications when the terminal is on its base.
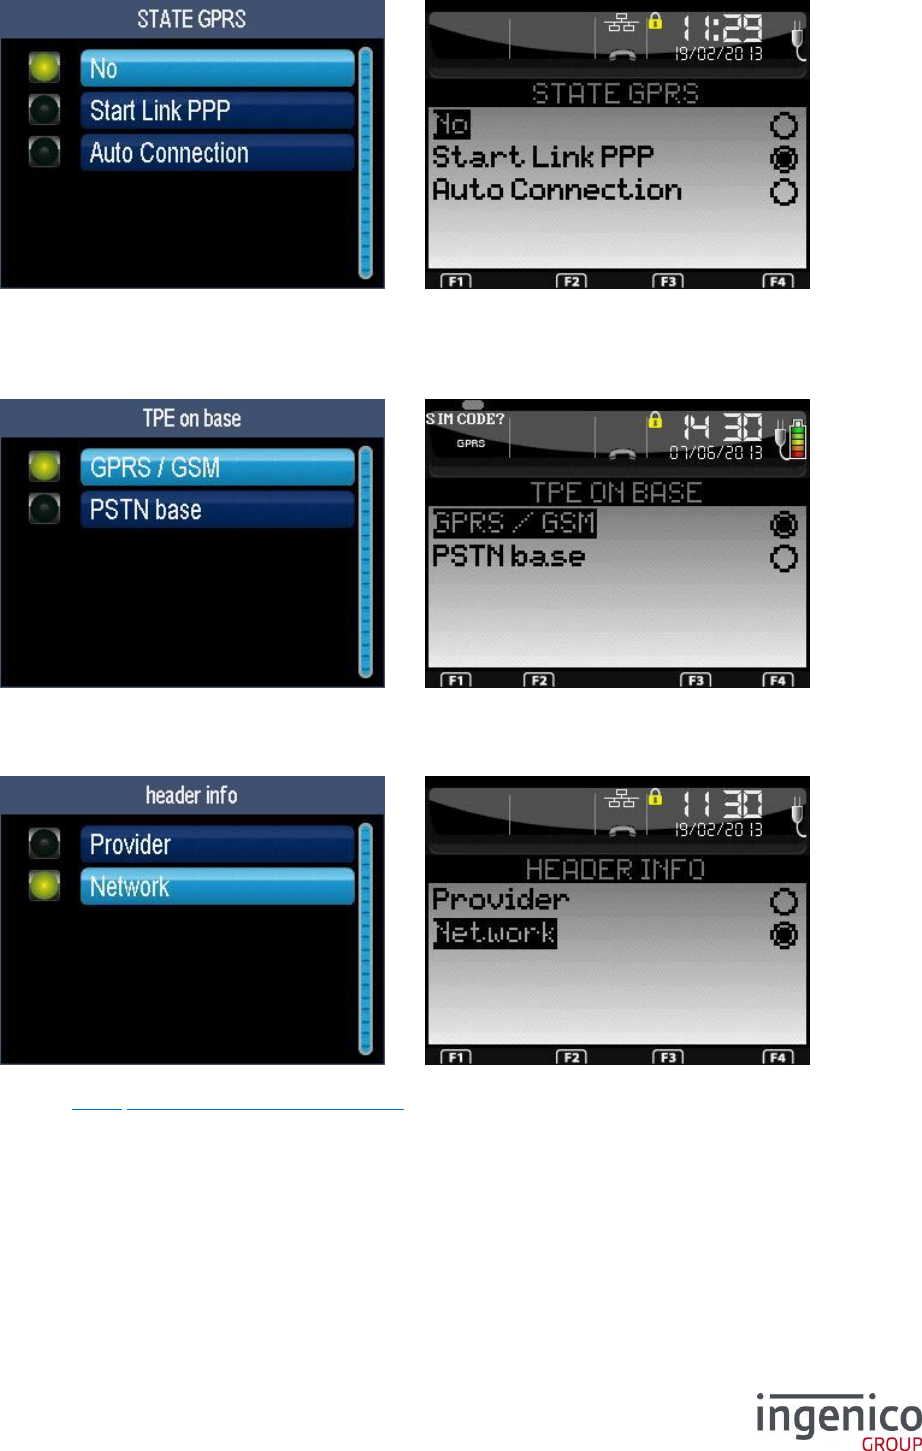
6_10_5_4 Display in the status bar
Select the name to display in the status bar: either the access provider (MVNO) or the operator.
ICO-OPE-00986
REFERENCE MANUAL
Restricted
39/166
Ingenico document - Reproduction or disclosure prohibited without written authorization
Please check document validity before using
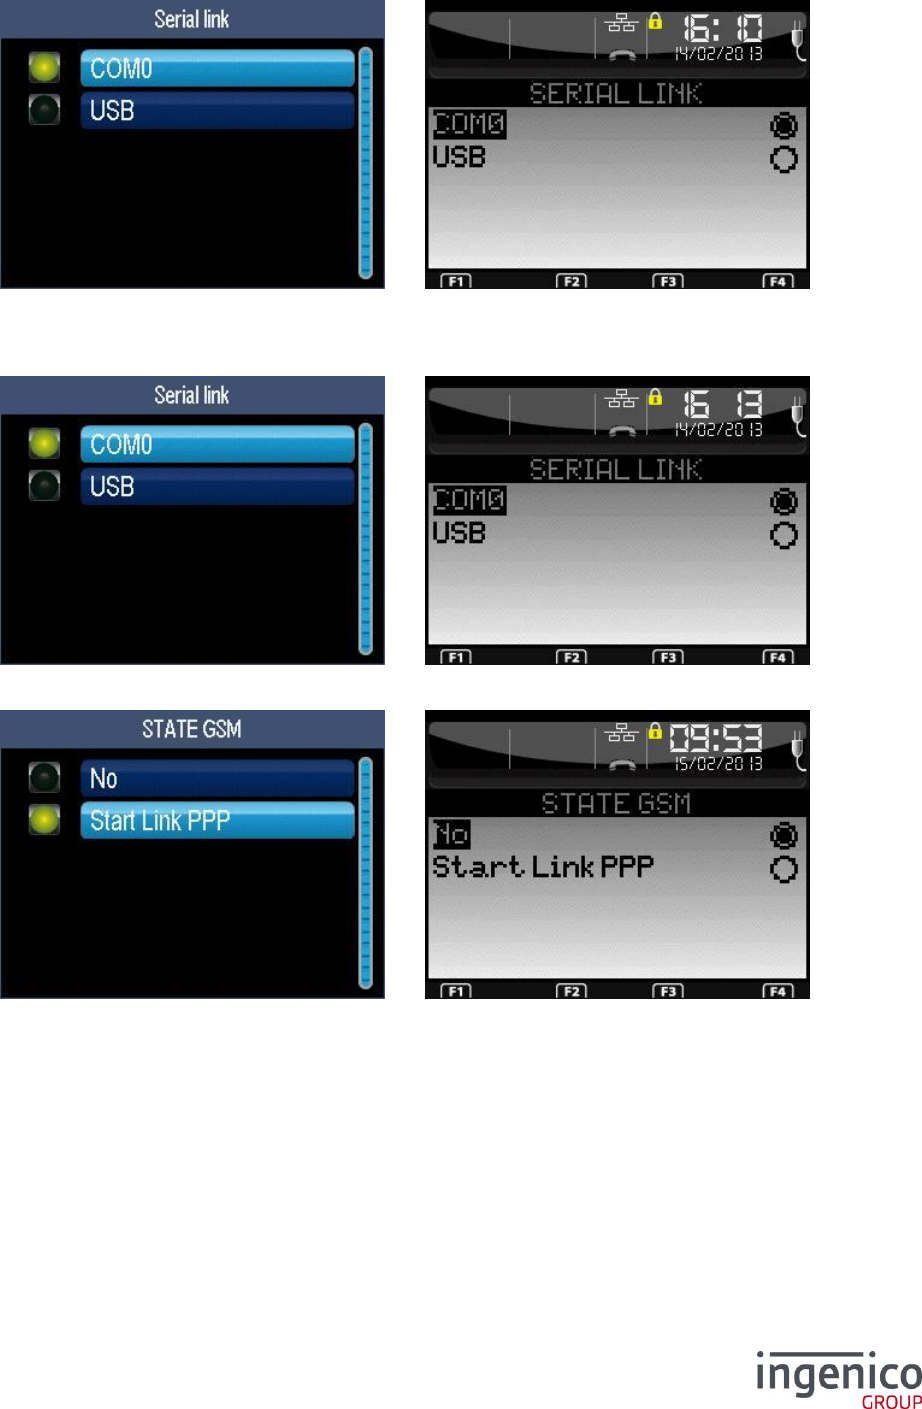
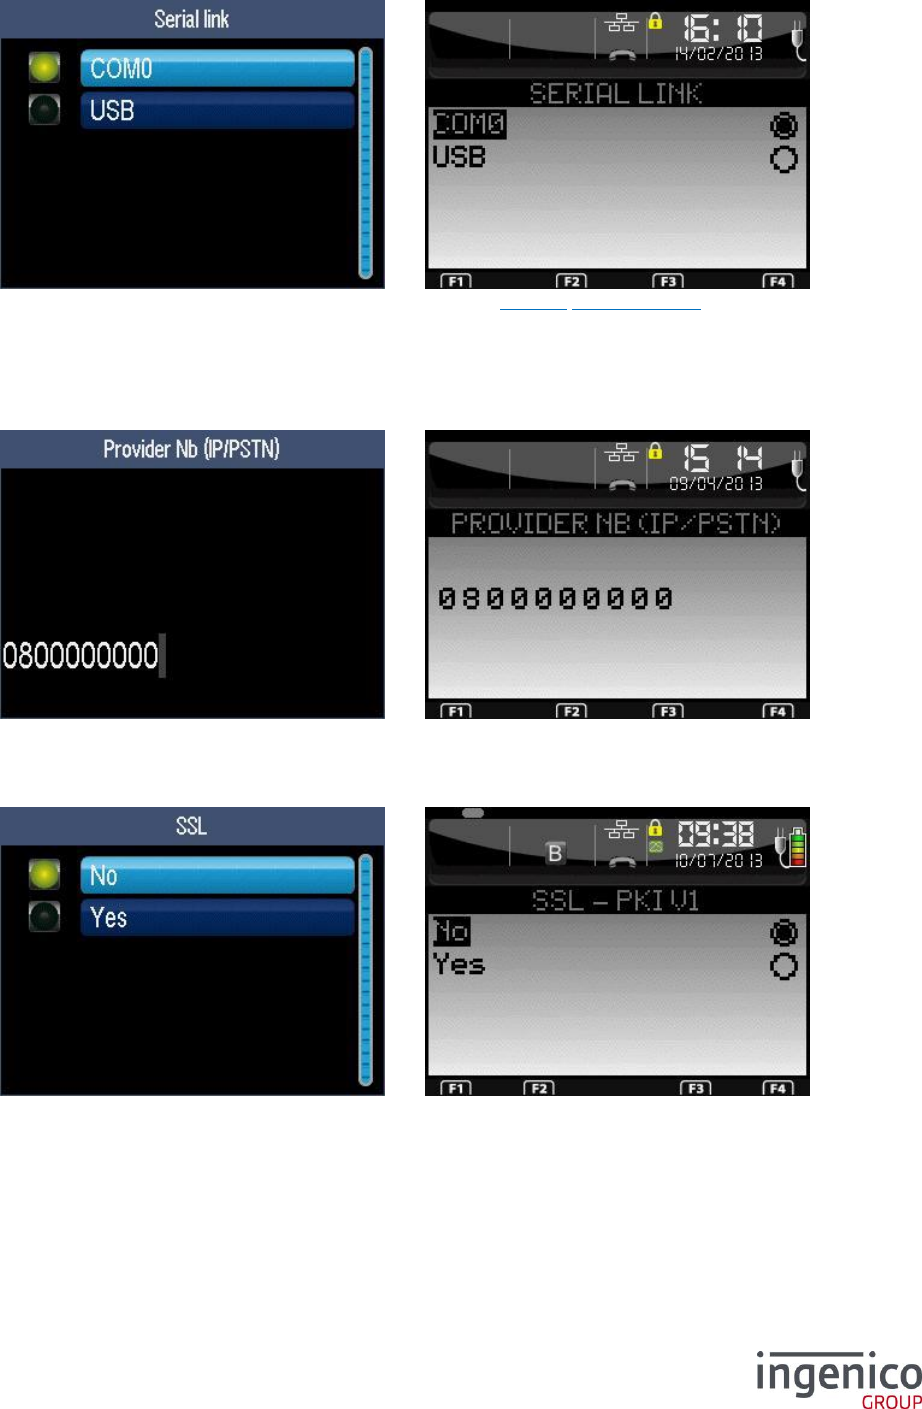
6_10_6 GPRS network
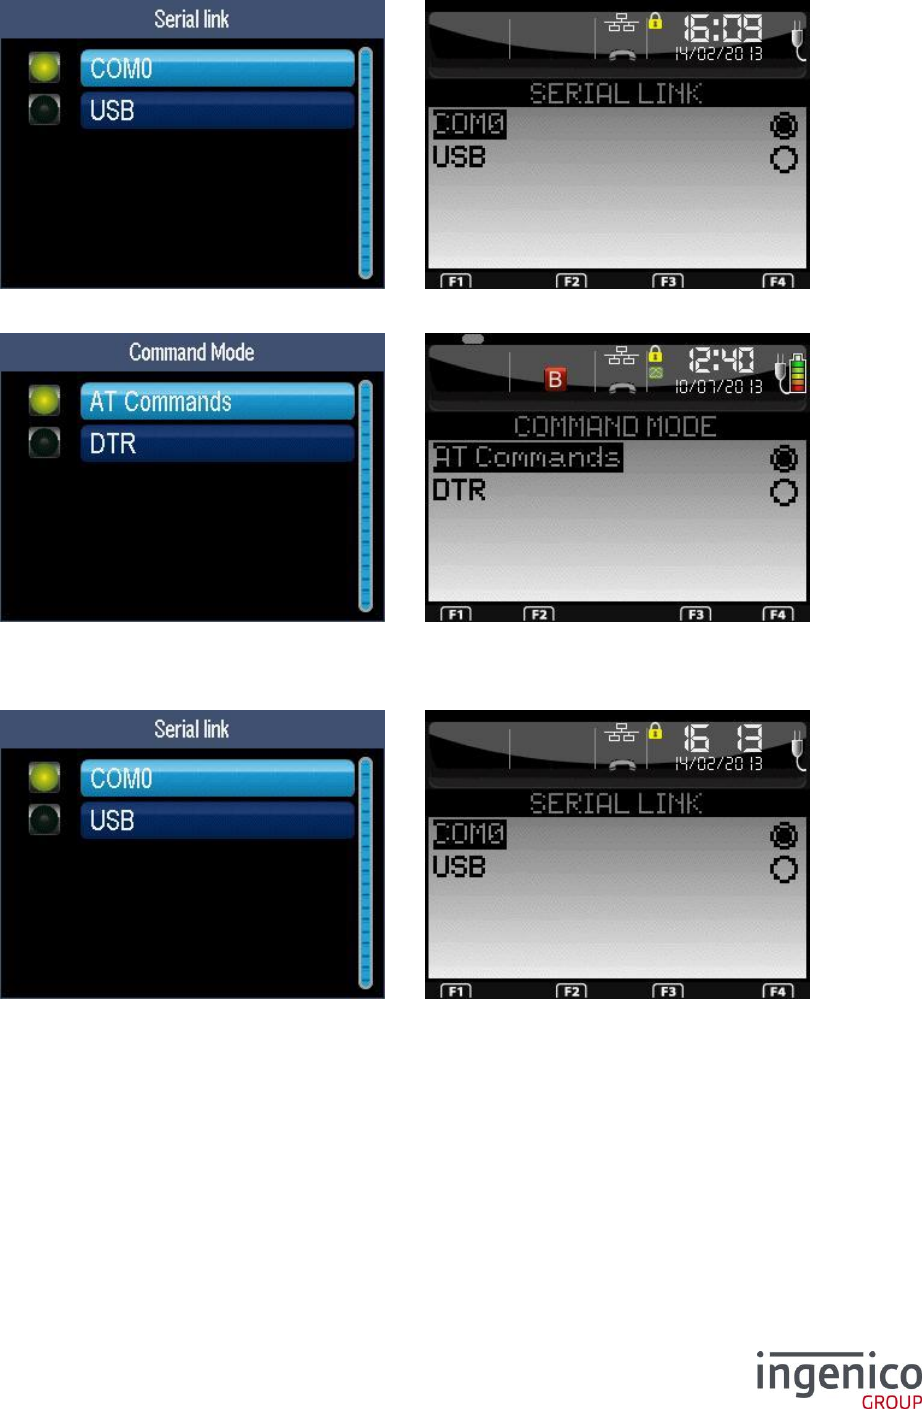
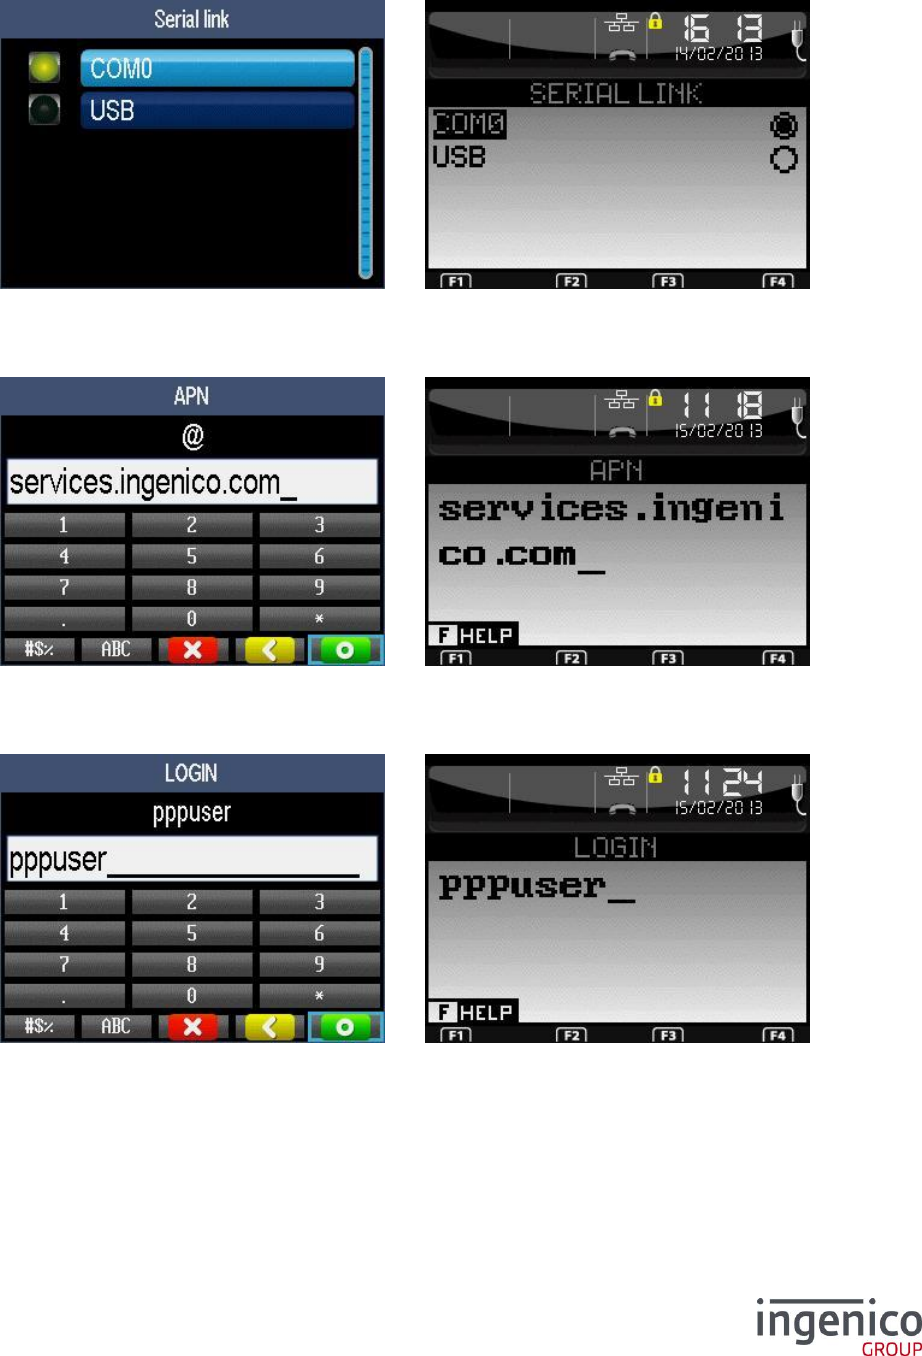
6_10_6_1 Serial link
The list depends on the hardware configuration. This screen is not available for the GPRS terminal.
6_10_6_2 APN
Enter the APN then validate.
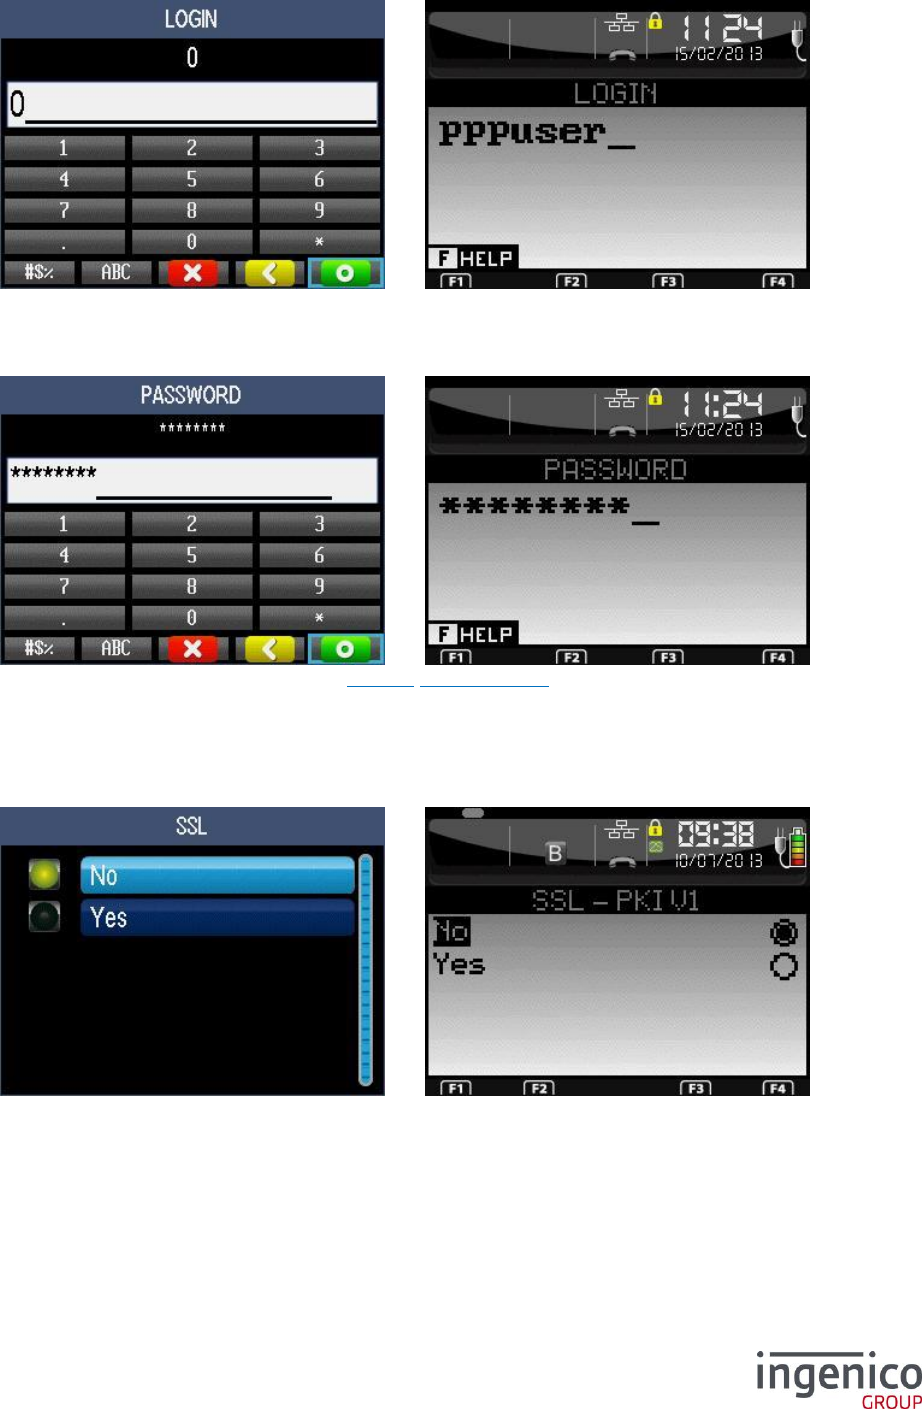
6_10_6_3 Login
Enter the login then validate.
ICO-OPE-00986
REFERENCE MANUAL
Restricted
40/166
Ingenico document - Reproduction or disclosure prohibited without written authorization
Please check document validity before using
6_10_6_4 Password
Enter the password then validate.
6_10_6_5 Gateway
Enter a gateway number (refer 11_2 List of the gateway numbers).
6_10_6_6 SSL
Activate SSL if the gateway number is odd.
ICO-OPE-00986
REFERENCE MANUAL
Restricted
41/166
Ingenico document - Reproduction or disclosure prohibited without written authorization
Please check document validity before using
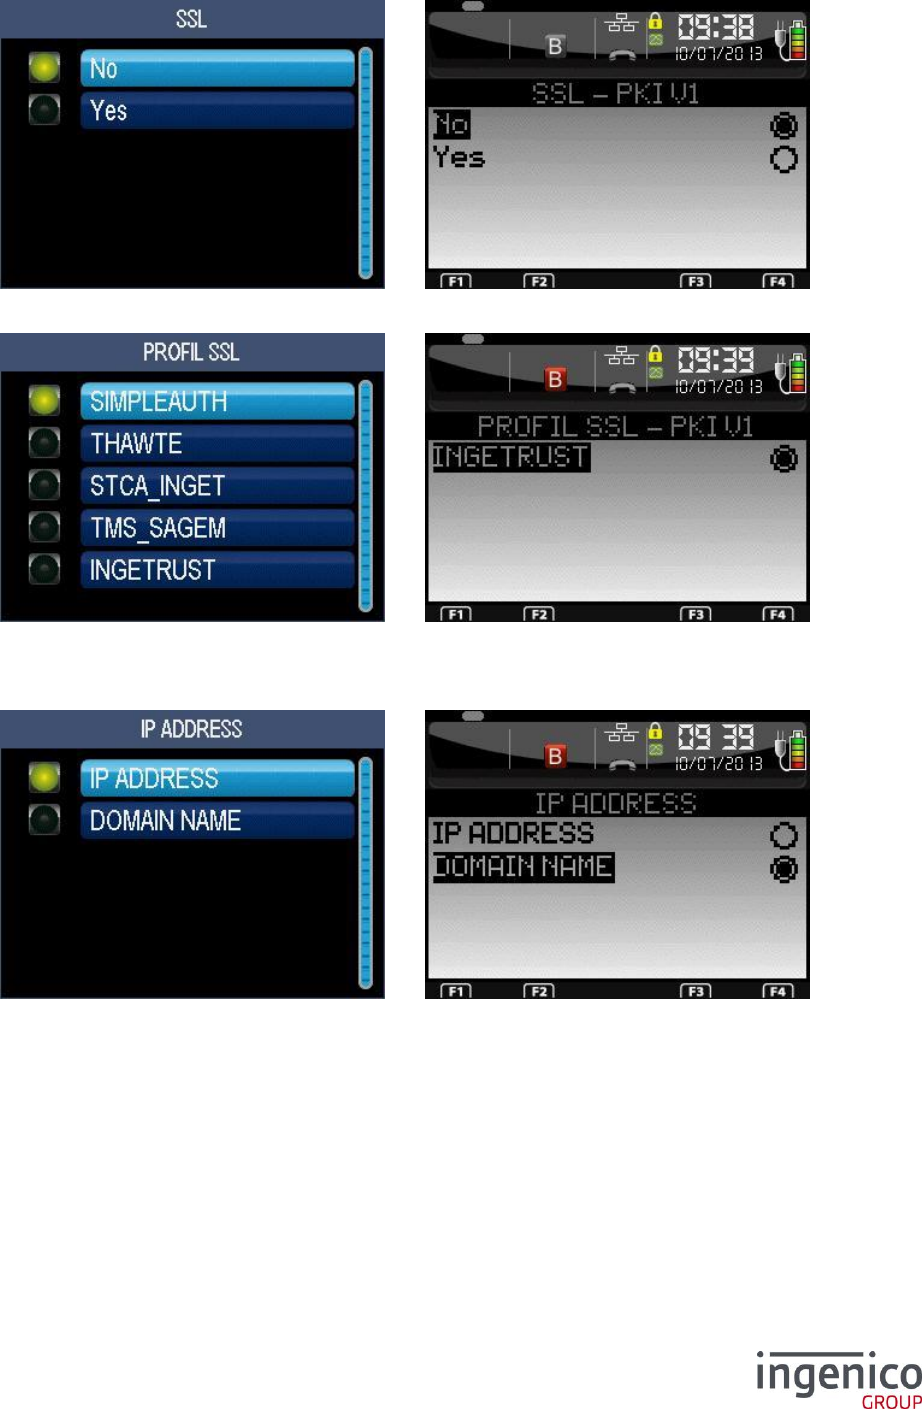
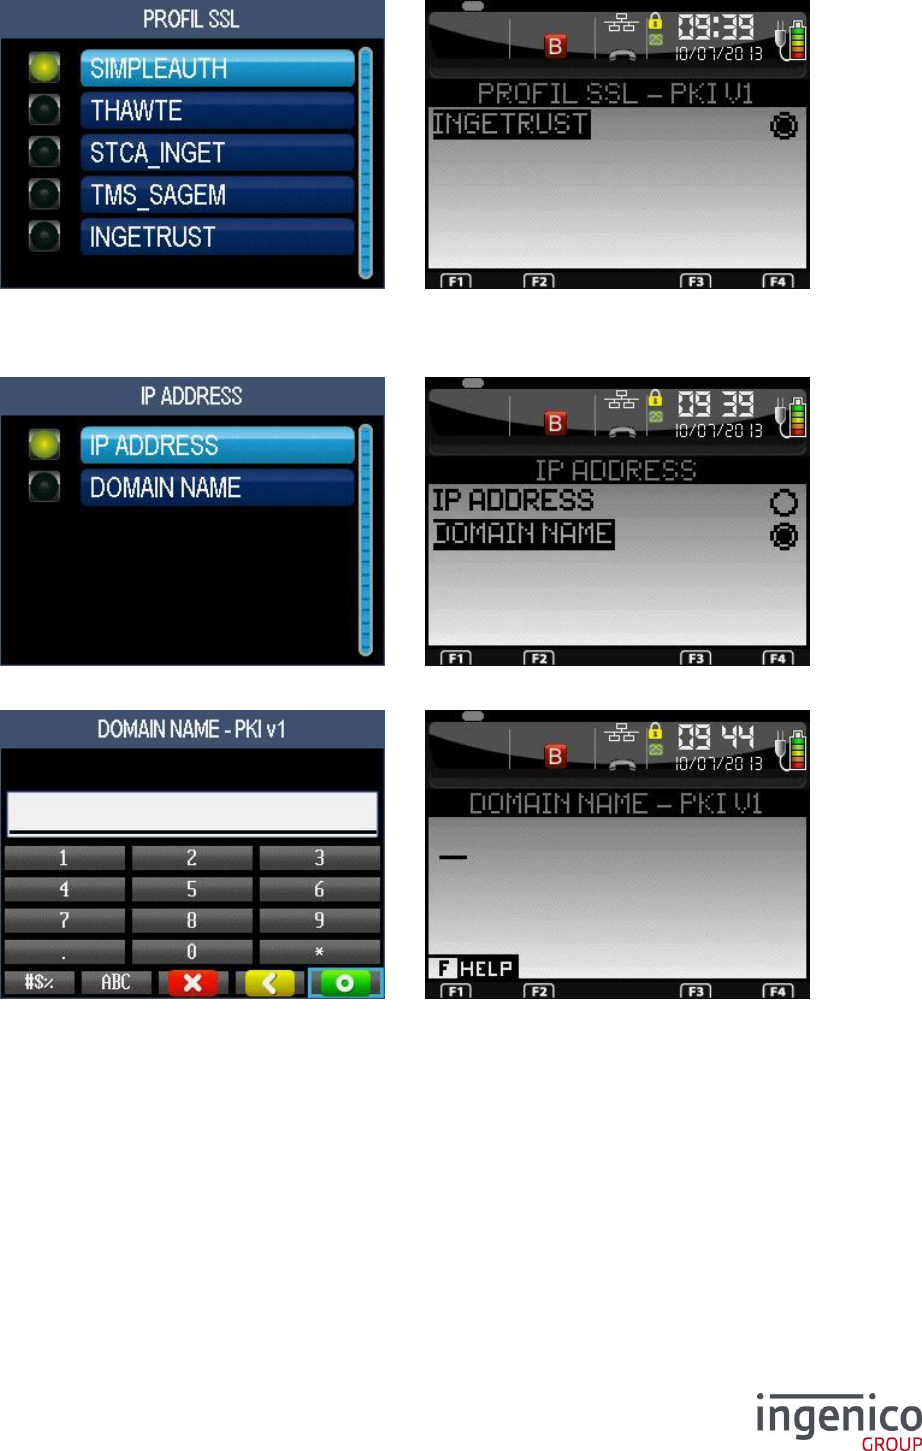
If SSL is activated, select a SSL profile in the list.
6_10_6_7 IP address
Enter the IP address. IP Address is composed of four digital fields, each one from 0 to 255.
6_10_6_8 Port
Enter the port number (up to ten digits).
6_10_6_9 GPRS module startup
ICO-OPE-00986
REFERENCE MANUAL
Restricted
42/166
Ingenico document - Reproduction or disclosure prohibited without written authorization
Please check document validity before using
Select if the GPRS module shall be activated at start-up or not (available only for export
configurations).
6_10_6_10 Connection type on base
Select the type of electronic banking communications when the terminal is on its base.
6_10_6_11 Display in the status bar
Select the name to display in the status bar: either the access provider (MVNO) or the operator.
Then refer to 6_11 Initialization of fallback network.
ICO-OPE-00986
REFERENCE MANUAL
Restricted
43/166
Ingenico document - Reproduction or disclosure prohibited without written authorization
Please check document validity before using
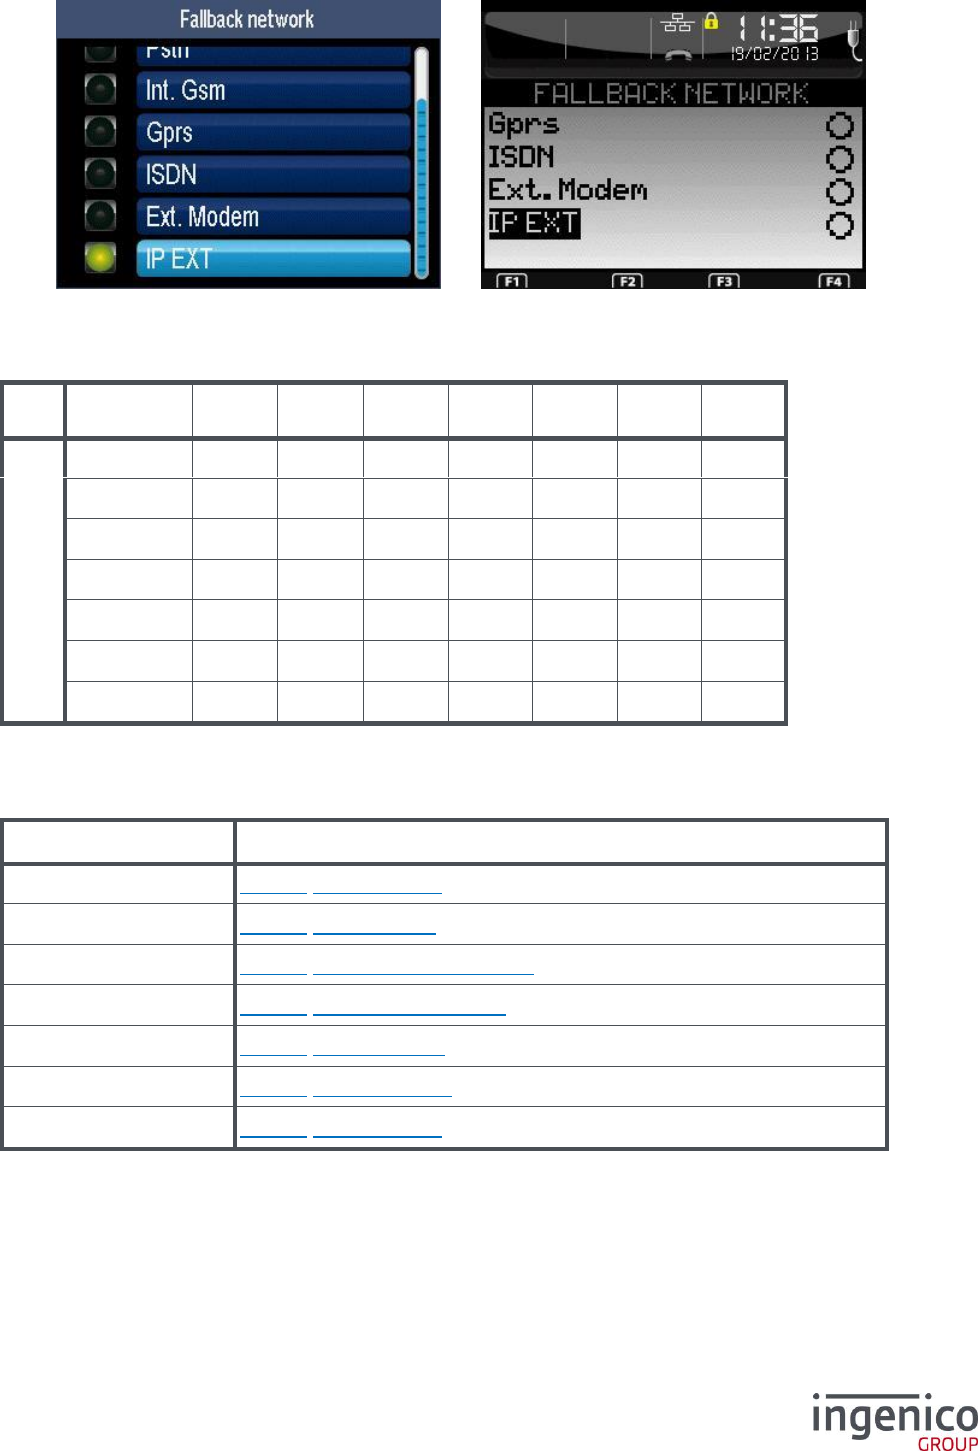
6_10_7 IP EXT network
6_10_7_1 Gateway
Enter a gateway number (refer 11_2 List of the gateway numbers).
6_10_7_2 SSL
Activate SSL if the gateway number is odd.
If SSL is activated, select a SSL profile in the list.
ICO-OPE-00986
REFERENCE MANUAL
Restricted
44/166
Ingenico document - Reproduction or disclosure prohibited without written authorization
Please check document validity before using
6_10_7_3 IP address
Enter the IP address (four digital fields, each one from 0 to 255).
6_10_7_4 Port
Enter the port number (up to ten digits). Then refer to 6_11 Initialization of fallback network.
6_11 Initialization of fallback network
The following screen is displayed subsequently to the network configuration selecting either:
PSTN with IP/Eth access, or
ISDN, or
GPRS, or
IP EXT
ICO-OPE-00986
REFERENCE MANUAL
Restricted
45/166
Ingenico document - Reproduction or disclosure prohibited without written authorization
Please check document validity before using
Select a fallback network in case of communication failure of the main network.
Depending on the terminal type and on the main network, some options are not available. The
following table describes all possible associations:
No
PSTN
ISDN
Ext.
GSM
Int.
GSM
GPRS
IP EXT
Main network
PSTN
X
X
X
X
X
X
X
ISDN
X
X
X
X
X
X
Ext. Modem
Ext. GSM
Int. GSM
GPRS
X
X
X
X
X
X
X
IP EXT
X
X
X
X
X
X
X
For the configuration of a fallback network, refer to its equivalent in the main network:
Item
Reference
PSTN
6_10_1 PSTN network
ISDN
6_10_2 ISDN network
Ext. Modem
6_10_3 External modem network
Ext. GSM
6_10_5 Internal GSM network
Int. GSM
6_10_6 GPRS network
GPRS
6_10_7 IP EXT network
IP EXT
6_10_1 PSTN network
ICO-OPE-00986
REFERENCE MANUAL
Restricted
46/166
Ingenico document - Reproduction or disclosure prohibited without written authorization
Please check document validity before using
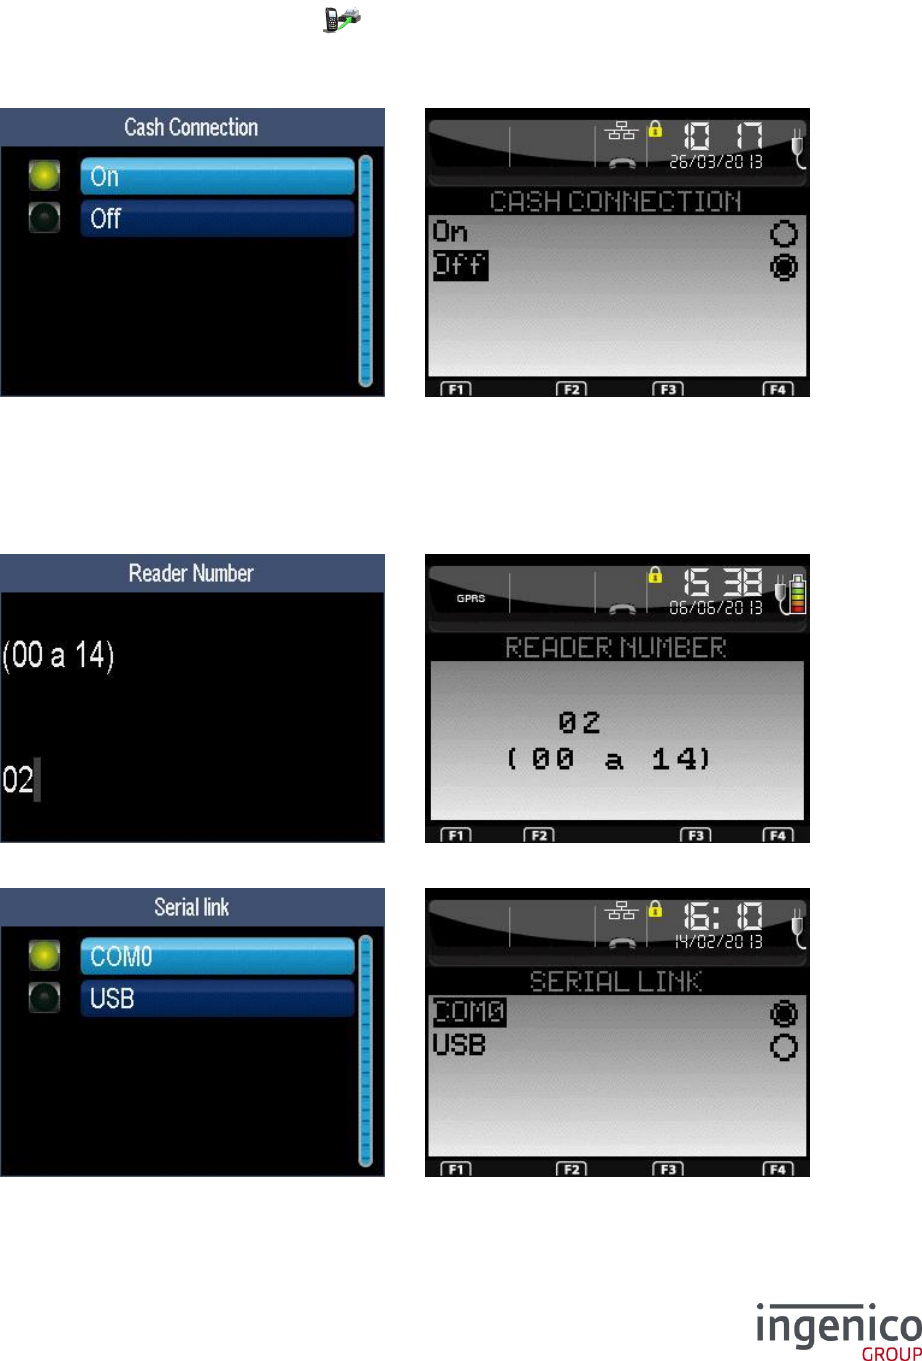
6_12 Initialization of cash register connection
Shortcut: F.21
From the “Initialization” screen, select the icon or the “Cash register” item and validate.
6_12_1 Activation of the cash register connection
Declare (or not) the connection to a computer system. Activate only if there is an effective connection
to a computer system, in particular in the “health” system context.
Following screens are for “health” system context only.
6_12_2 Initialization of the cash register connection
Enter the reader number (two digits – usually "02", “01” being reserved to the workstation).
The list depends on the hardware configuration.
ICO-OPE-00986
REFERENCE MANUAL
Restricted
47/166
Ingenico document - Reproduction or disclosure prohibited without written authorization
Please check document validity before using
Select the dialog speed on the serial link.
6_13 Initialization of TMS network
Shortcut: F.22
From the “Initialization” screen, select the icon or the “TMS” item and validate.
Access to the TMS menu may be protected by password.
ICO-OPE-00986
REFERENCE MANUAL
Restricted
48/166
Ingenico document - Reproduction or disclosure prohibited without written authorization
Please check document validity before using
The list depends on the hardware configuration.
Item
Reference
Modem
6_13_1 Internal modem TMS network
ISDN
6_13_2 ISDN TMS network
Ext. Modem
6_13_3 External modem TMS network
Int. GSM
6_13_4 Internal GSM
IP/GPRS
6_13_5 IP/GPRS TMS network
IP EXT
6_13_6 IP EXT TMS network
IP/PSTN
6_13_7 IP/PSTN TMS network
IP/Eth
6_13_8 IP/ETH TMS network
6_13_1 Internal modem TMS network
6_13_1_1 TMS type
The X25 access provides access to Transpac servers by internal modem and PAD.
ICO-OPE-00986
REFERENCE MANUAL
Restricted
49/166
Ingenico document - Reproduction or disclosure prohibited without written authorization
Please check document validity before using
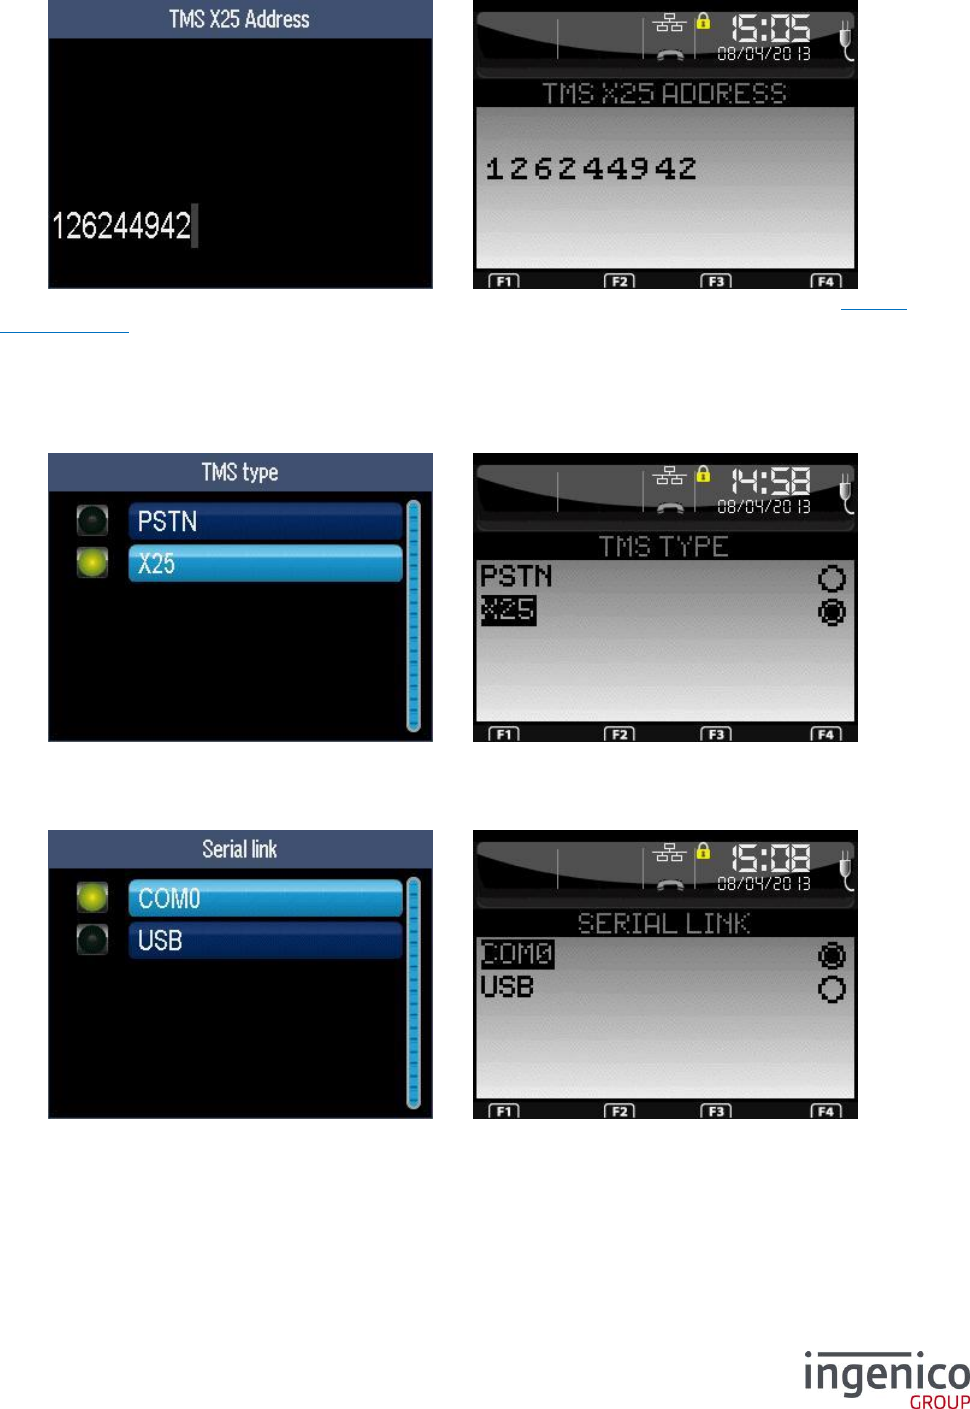
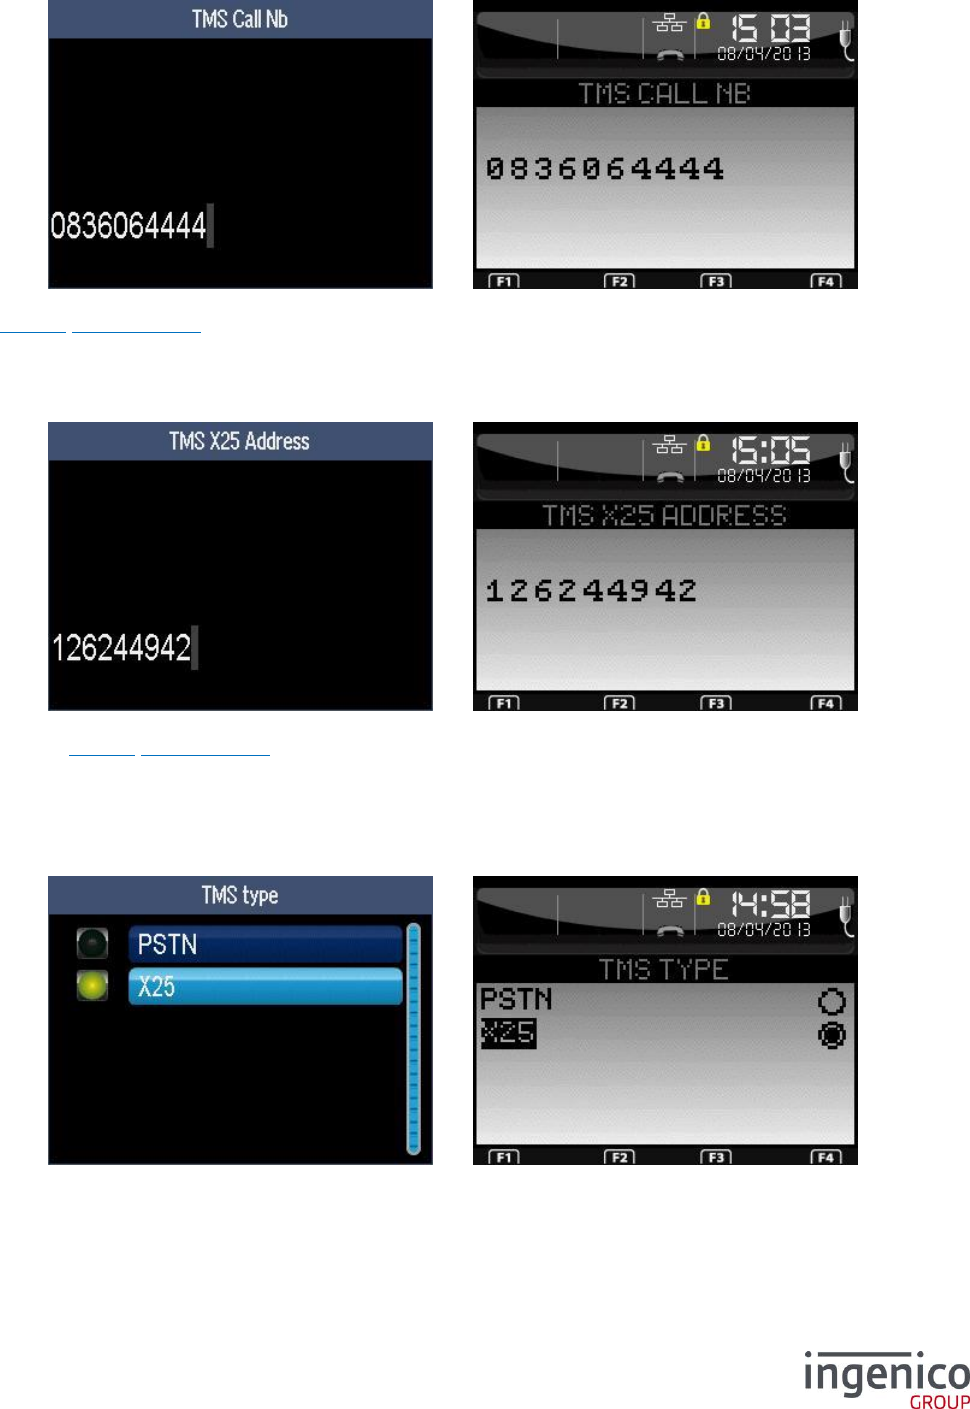
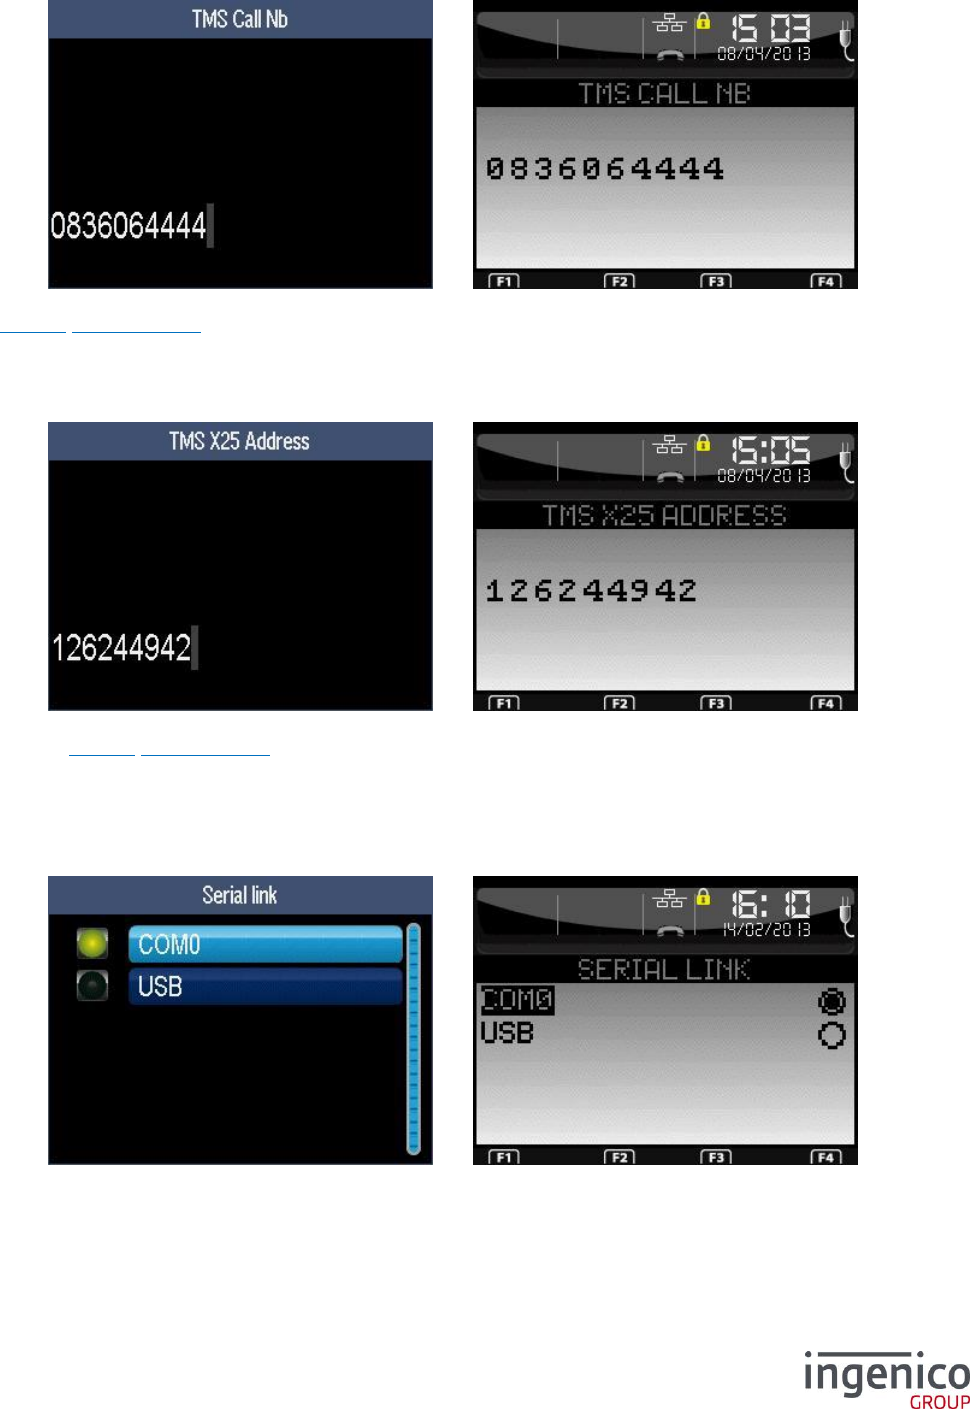
6_13_1_2 TMS PAD number
If “PSTN” was selected, enter the TMS phone number (up to 15 digits). After validation, refer to
6_13_9 Common TMS.
If “X25” was selected, enter the PAD number.
6_13_1_3 TMS center number
For “X25” only, enter the X25 subscriber number (TRANSPAC, up to 14 digits) to call. After validation,
refer to 6_13_9 Common TMS.
6_13_2 ISDN TMS network
6_13_2_1 TMS serial link
The list depends on the hardware configuration.
ICO-OPE-00986
REFERENCE MANUAL
Restricted
50/166
Ingenico document - Reproduction or disclosure prohibited without written authorization
Please check document validity before using
6_13_2_2 TMS center number
Enter the X25 subscriber number (TRANSPAC, up to 14 digits) to call. After validation, refer to 6_13_9
Common TMS.
6_13_3 External modem TMS network
6_13_3_1 TMS type
The X25 access provides access to Transpac servers by internal modem and PAD.
6_13_3_2 TMS serial link
The list depends on the hardware configuration.
ICO-OPE-00986
REFERENCE MANUAL
Restricted
51/166
Ingenico document - Reproduction or disclosure prohibited without written authorization
Please check document validity before using
6_13_3_3 TMS PAD number
If “PSTN” was selected, enter the TMS phone number (up to 15 digits). After validation, refer to
6_13_9 Common TMS.
If “X25” was selected, enter the PAD number.
6_13_3_4 TMS center number
For “X25” only, enter the X25 subscriber number (TRANSPAC, up to 14 digits) to call. After validation,
refer to 6_13_9 Common TMS.
6_13_4 Internal GSM TMS network
6_13_4_1 TMS type
The X25 access provides access to Transpac servers by internal modem and PAD.
ICO-OPE-00986
REFERENCE MANUAL
Restricted
52/166
Ingenico document - Reproduction or disclosure prohibited without written authorization
Please check document validity before using
6_13_4_2 TMS PAD number
If “PSTN” was selected, enter the TMS phone number (up to 15 digits). After validation, refer to
6_13_9 Common TMS.
If “X25” was selected, enter the PAD number.
6_13_4_3 TMS center number
For “X25” only, enter the X25 subscriber number (TRANSPAC, up to 14 digits) to call. After validation,
refer to 6_13_9 Common TMS.
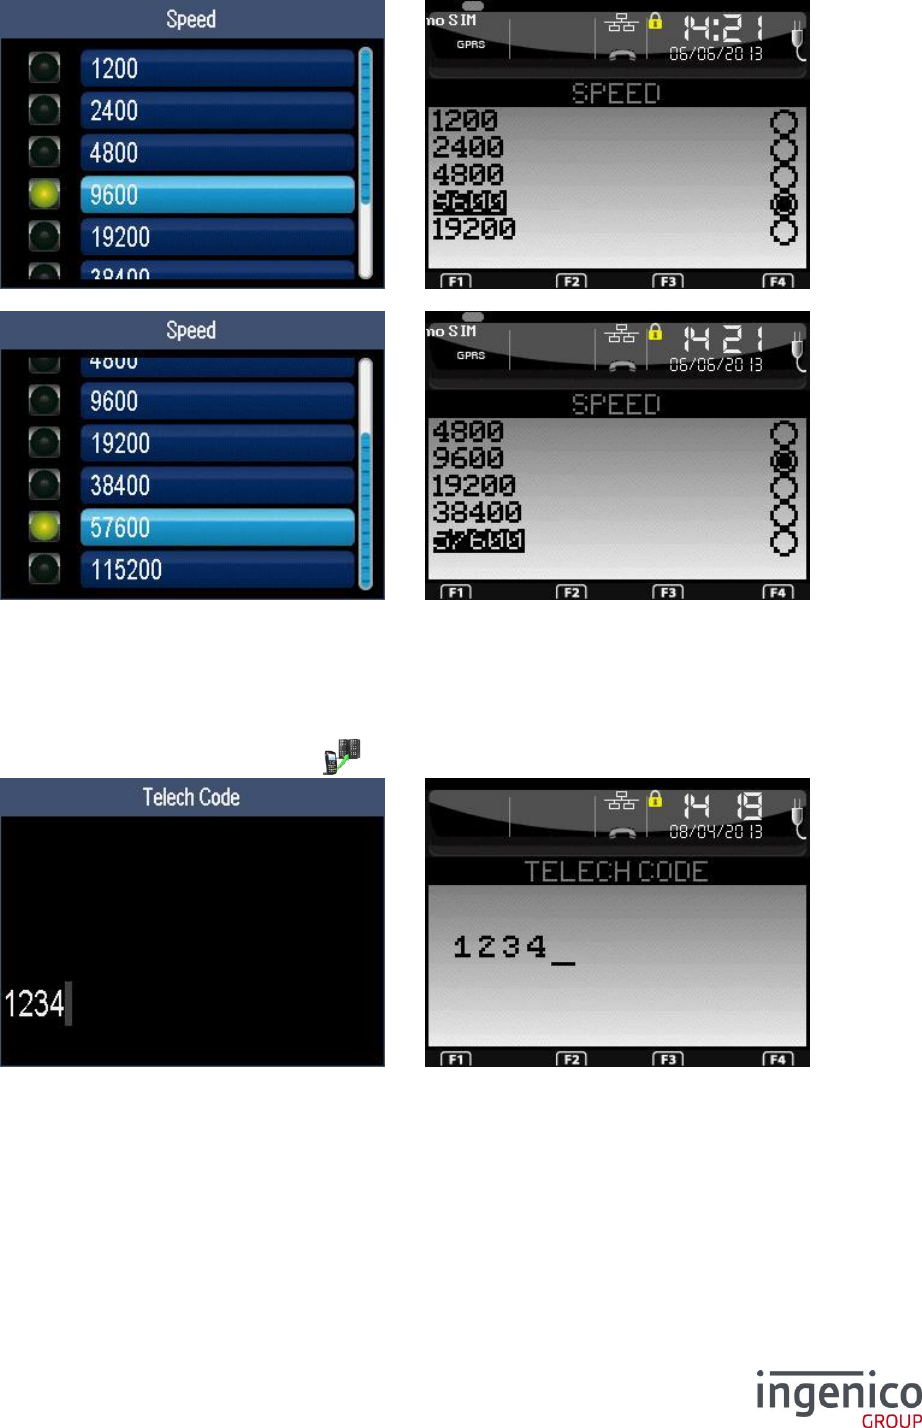
6_13_5 IP/GPRS TMS network
6_13_5_1 TMS type
The list depends on the hardware configuration. This screen is not available for the GPRS terminal.
ICO-OPE-00986
REFERENCE MANUAL
Restricted
53/166
Ingenico document - Reproduction or disclosure prohibited without written authorization
Please check document validity before using
6_13_5_2 SSL activation
Activate SSL if necessary.
Select a SSL profile in the list. This screen is displayed only if SSL was activated on previous screen.
6_13_5_3 Address
Select the type of the address.
ICO-OPE-00986
REFERENCE MANUAL
Restricted
54/166
Ingenico document - Reproduction or disclosure prohibited without written authorization
Please check document validity before using
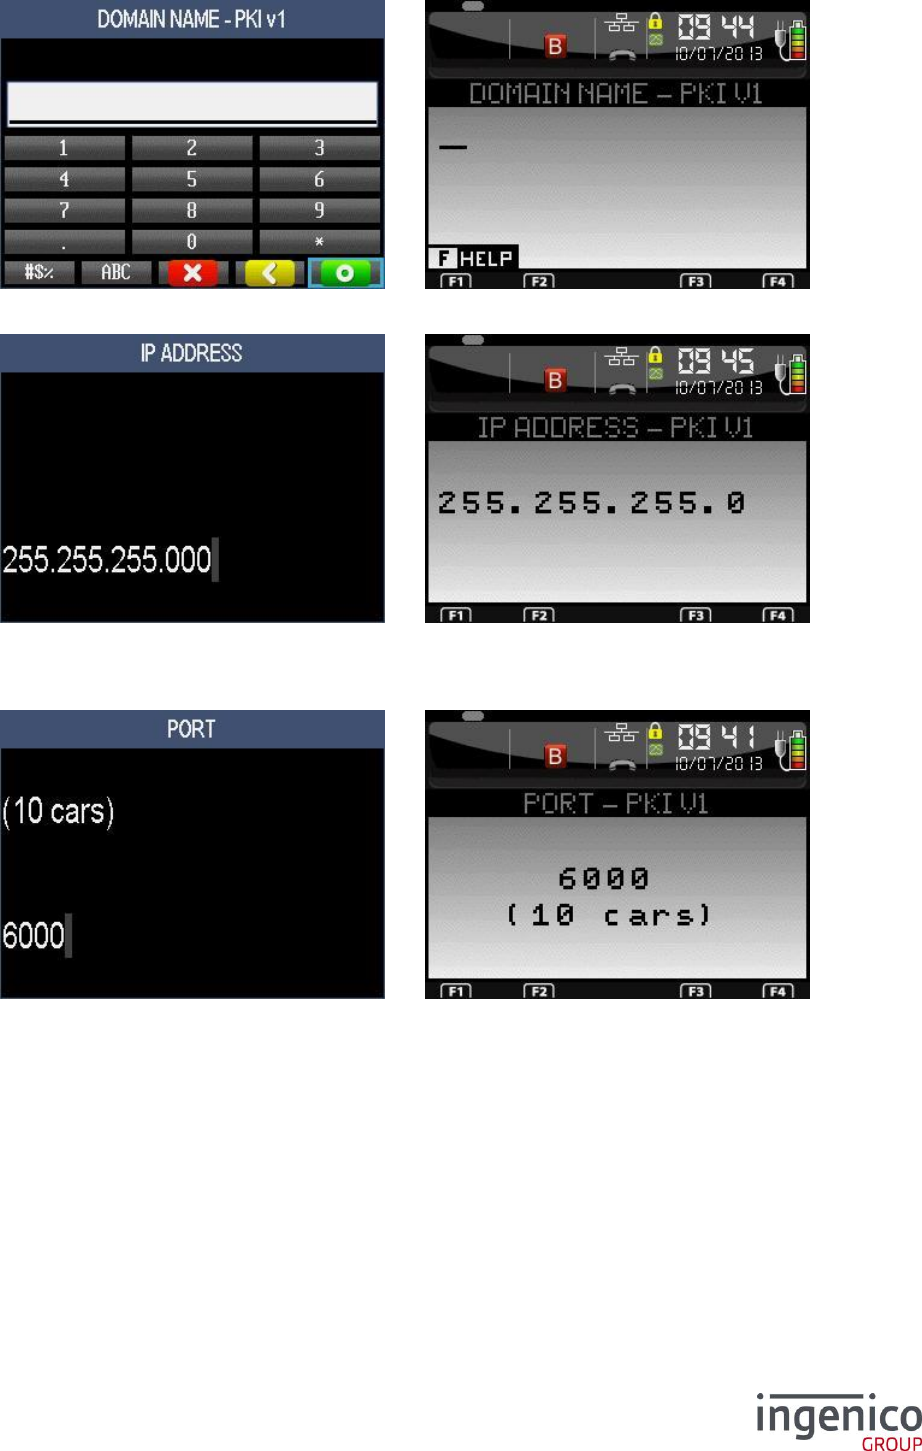
If “Domain Name” was selected, enter the domain name (alphanumeric field).
If “IP Address” was selected, enter the IP address (four digital fields, each one from 0 to 255).
6_13_5_4 Port
Enter the port number (up to ten digits).
ICO-OPE-00986
REFERENCE MANUAL
Restricted
55/166
Ingenico document - Reproduction or disclosure prohibited without written authorization
Please check document validity before using
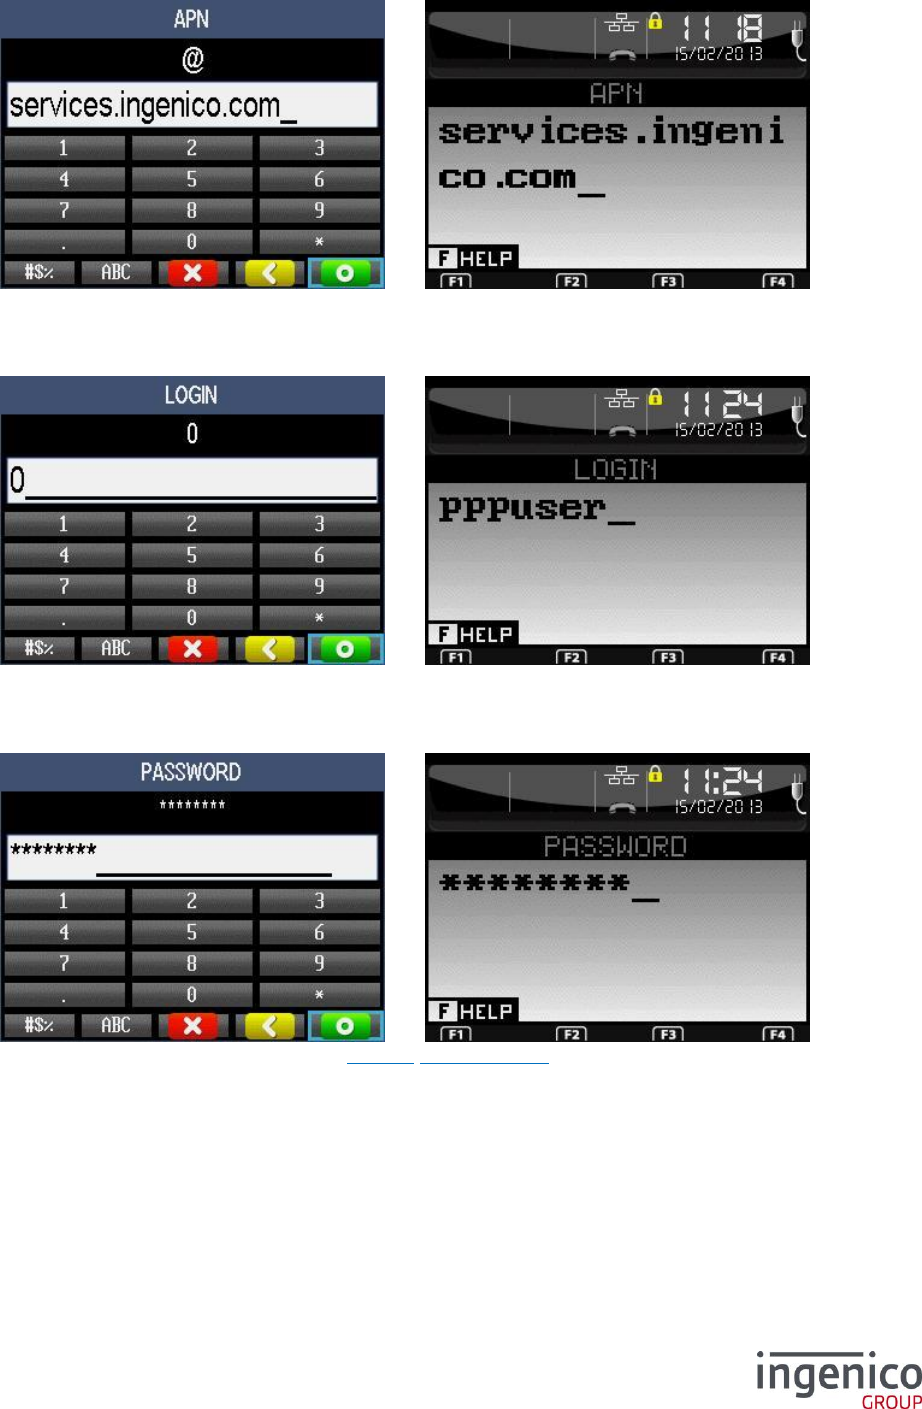
6_13_5_5 APN
Enter the APN then validate.
6_13_5_6 Login
Enter the login then validate.
6_13_5_7 Password
Enter the password. After validation, refer to 6_13_9 Common TMS.
ICO-OPE-00986
REFERENCE MANUAL
Restricted
56/166
Ingenico document - Reproduction or disclosure prohibited without written authorization
Please check document validity before using
6_13_6 IP EXT TMS network
The list depends on the hardware configuration. Then refer to 6_13_9 Common TMS.
6_13_7 IP/PSTN TMS network
6_13_7_1 Provider number
Enter the phone number of the Internet Access Provider (up to fifteen digits).
6_13_7_2 SSL activation
Activate SSL if necessary.

ICO-OPE-00986
REFERENCE MANUAL
Restricted
57/166
Ingenico document - Reproduction or disclosure prohibited without written authorization
Please check document validity before using
Select a SSL profile in the list. This screen is displayed only if SSL was activated on previous screen.
6_13_7_3 Address
Select the type of the address.
If “Domain Name” was selected, enter the domain name (alphanumeric field).
ICO-OPE-00986
REFERENCE MANUAL
Restricted
58/166
Ingenico document - Reproduction or disclosure prohibited without written authorization
Please check document validity before using
If “IP Address” was selected, enter the IP address (four digital fields, each one from 0 to 255).
6_13_7_4 Port
Enter the port number (up to ten digits).
6_13_7_5 APN
Enter the APN then validate.
ICO-OPE-00986
REFERENCE MANUAL
Restricted
59/166
Ingenico document - Reproduction or disclosure prohibited without written authorization
Please check document validity before using
6_13_7_6 Login
Enter the login then validate.
6_13_7_7 Password
Enter the password. After validation, refer to 6_13_9 Common TMS.
6_13_8 IP/ETH TMS network
6_13_8_1 SSL activation
Activate SSL if necessary.
ICO-OPE-00986
REFERENCE MANUAL
Restricted
60/166
Ingenico document - Reproduction or disclosure prohibited without written authorization
Please check document validity before using
Select a SSL profile in the list. This screen is displayed only if SSL was activated on previous screen.
6_13_8_2 Address
Select the type of the address.
If “Domain Name” was selected, enter the domain name (alphanumeric field).
ICO-OPE-00986
REFERENCE MANUAL
Restricted
61/166
Ingenico document - Reproduction or disclosure prohibited without written authorization
Please check document validity before using
If “IP Address” was selected, enter the IP address (four digital fields, each one from 0 to 255).
6_13_8_3 Port
Enter the port number (up to ten digits). After validation, refer to 6_13_9 Common TMS.
6_13_9 Common TMS
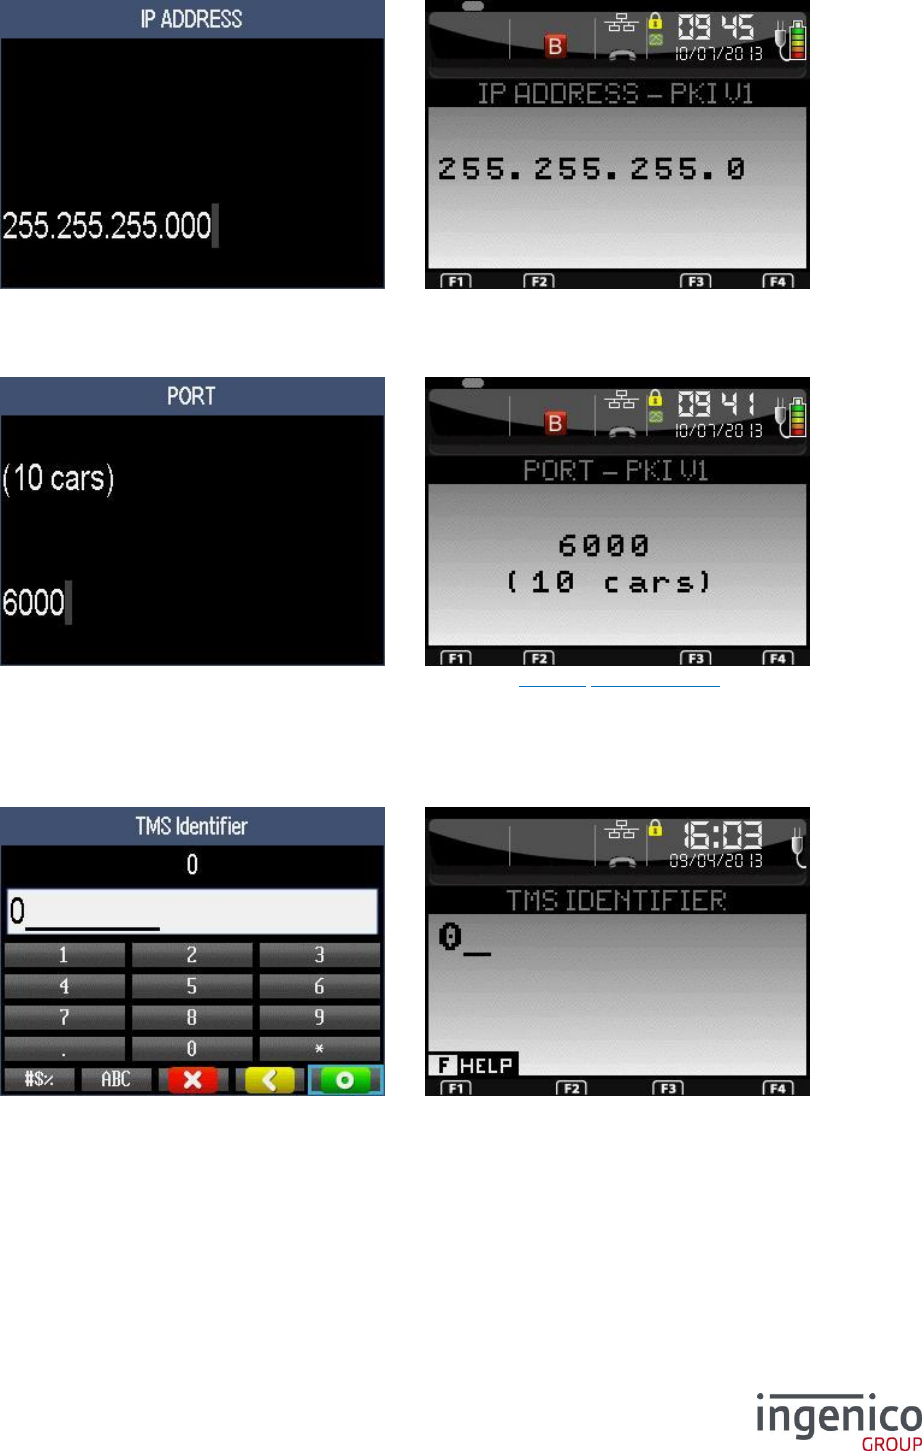
6_13_9_1 TMS identifier
Enter the recognition code (up to nine digits) authorizing terminal to connect to TMS.
ICO-OPE-00986
REFERENCE MANUAL
Restricted
62/166
Ingenico document - Reproduction or disclosure prohibited without written authorization
Please check document validity before using
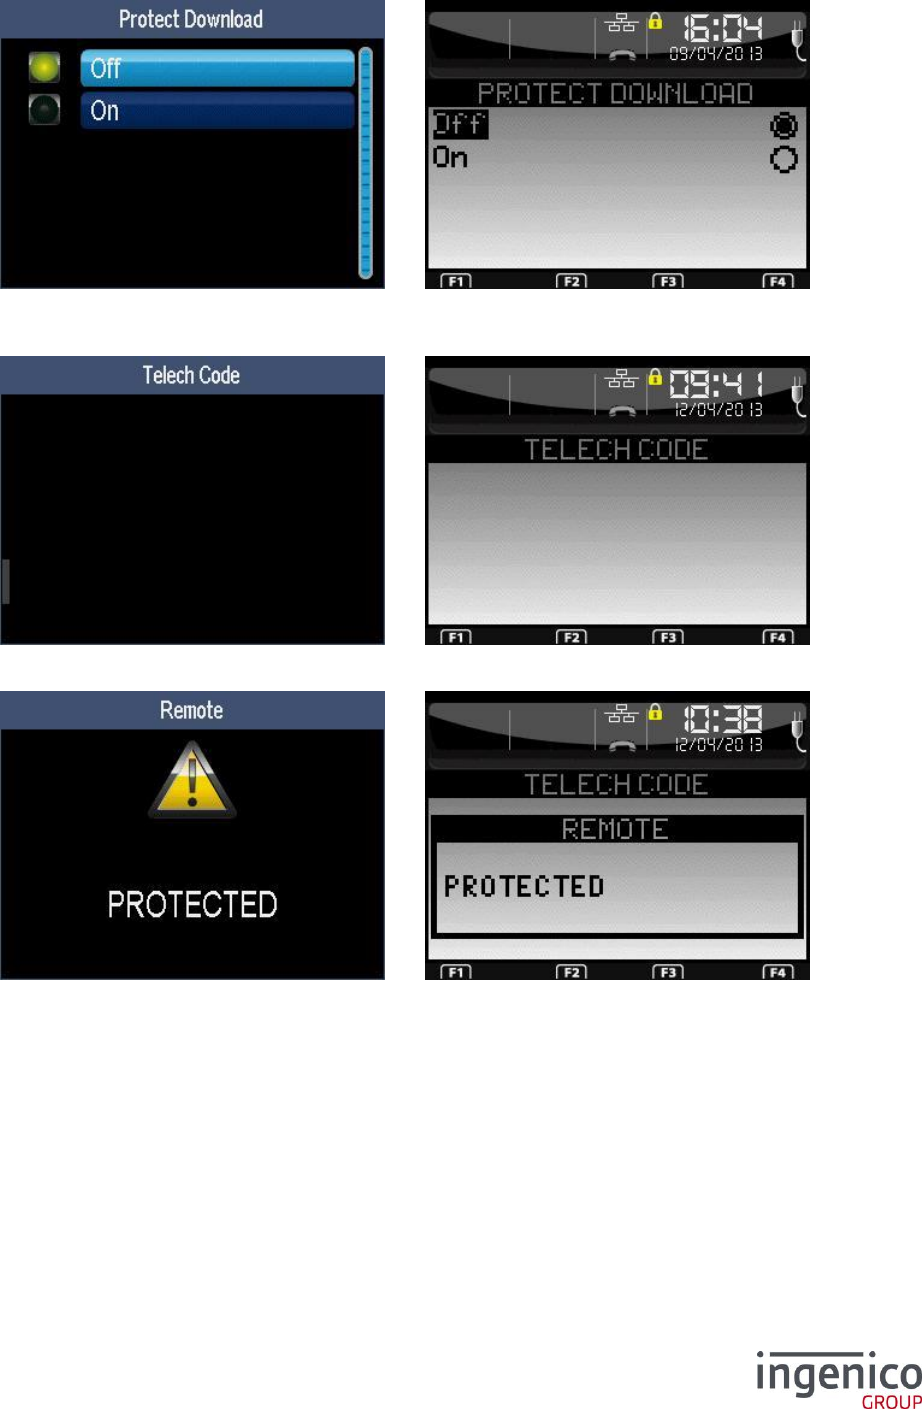
6_13_9_2 Download protection
Select if downloading is protected or not.
If downloading is protected, enter the downloading code:
After validation, the following screen appears.
ICO-OPE-00986
REFERENCE MANUAL
Restricted
63/166
Ingenico document - Reproduction or disclosure prohibited without written authorization
Please check document validity before using
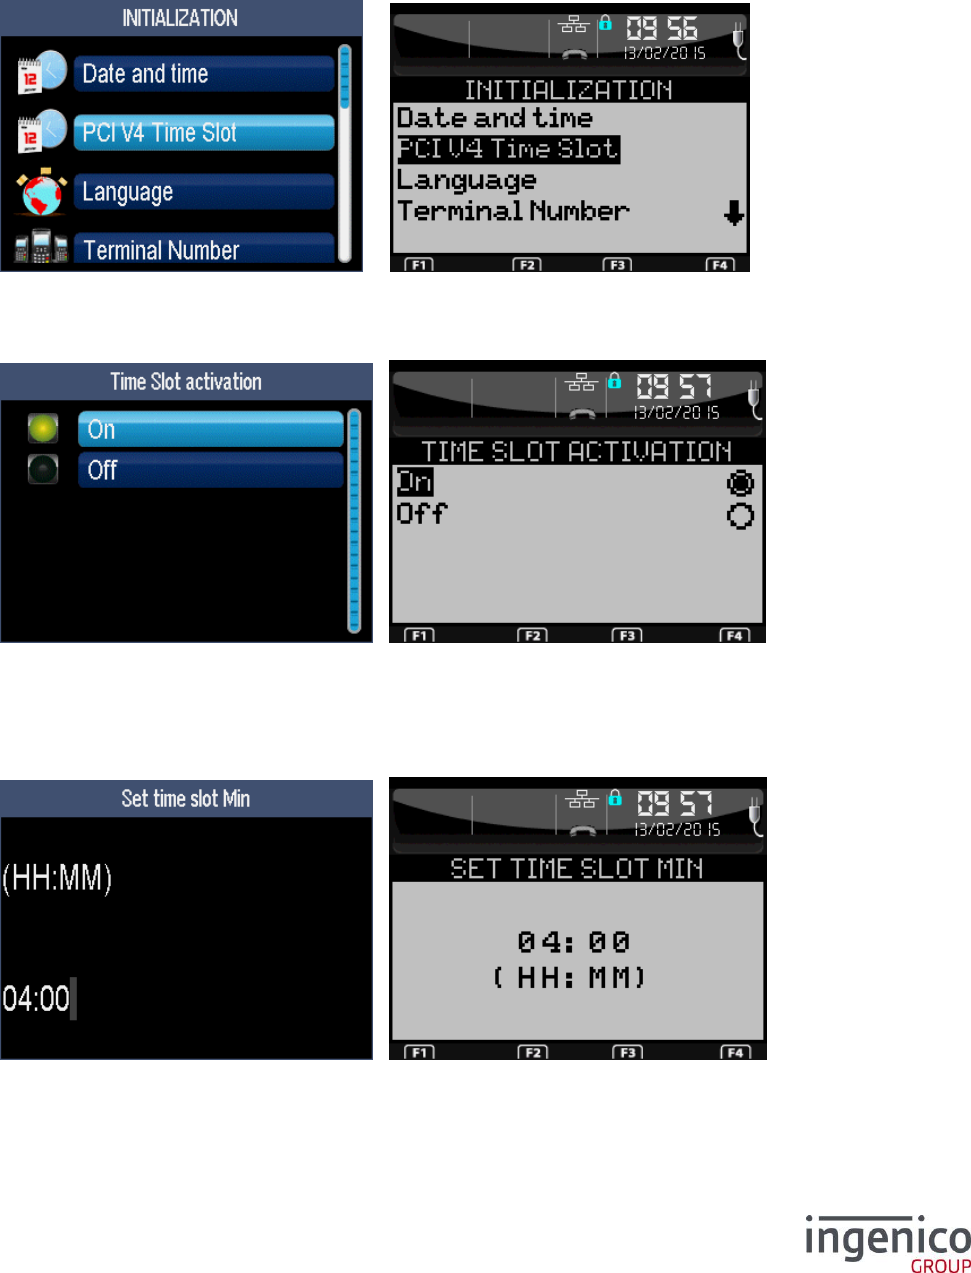
6_14 Initialization of PCI v4 Time Slot
The PCI v4 Time Slot menu is only present for PCI v4 terminal.
When the terminal is PCI v4, it reset every 24h and the specific message “MANDATORY SECURITY
CHECK IN PROGRESSS” appears on start.
The terminal will reset during the time slot indicates or by default betwwen 04:00AM and 05:00AM.
6_14_1 Time slot activation
It’s possible to activate or desactive the time slot.
By default, the time slot is activated.
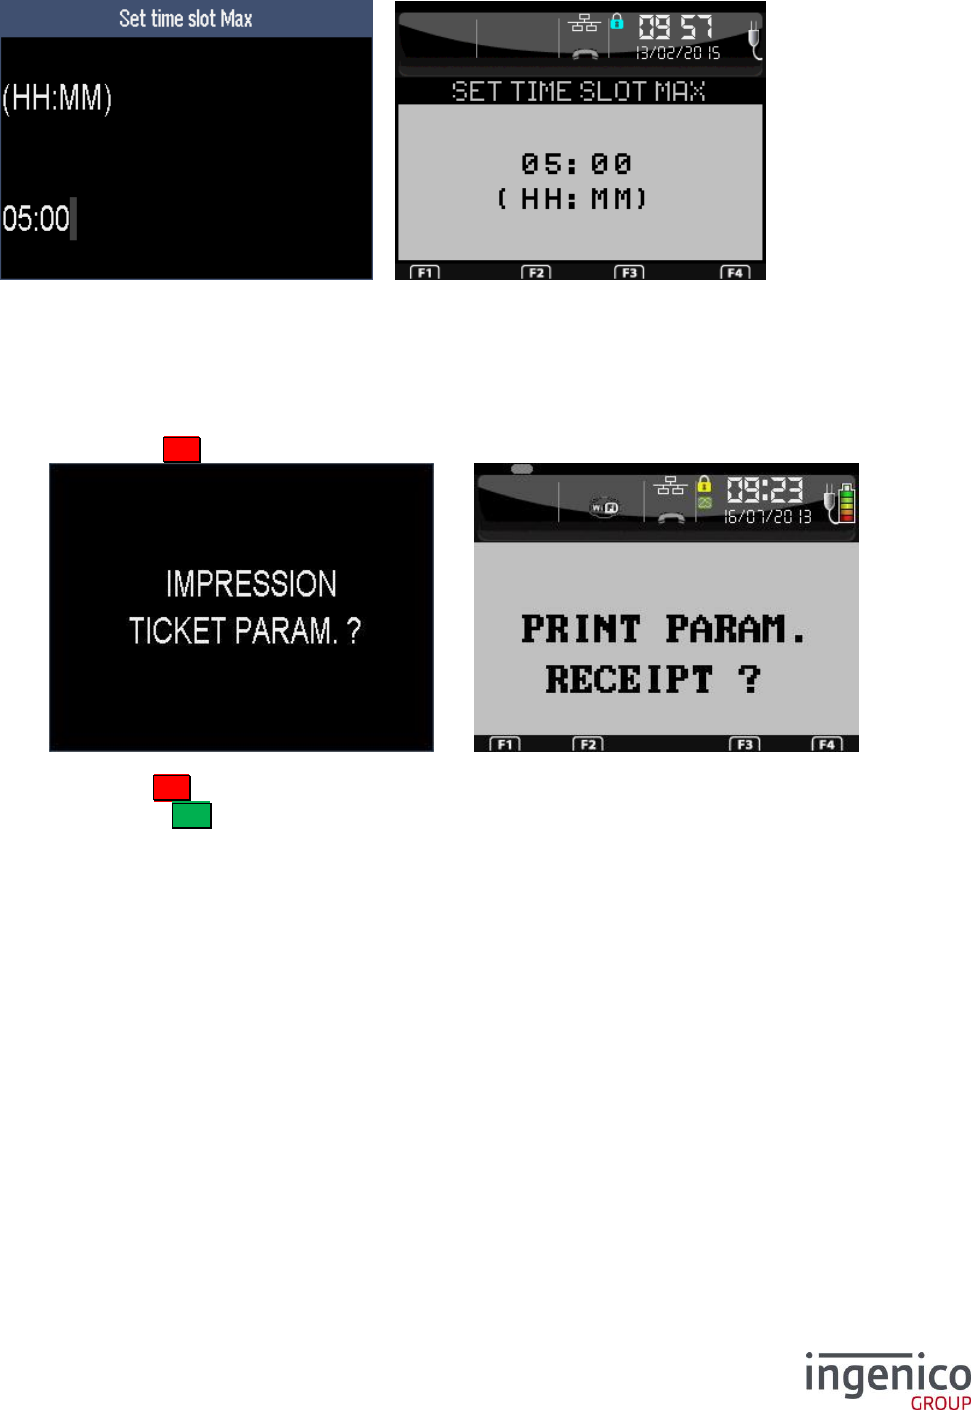
6_14_2 Time slot minimum
Set the time slot mimum for 24h reset.
By default, the time slot minimum is 04:00 AM
ICO-OPE-00986
REFERENCE MANUAL
Restricted
64/166
Ingenico document - Reproduction or disclosure prohibited without written authorization
Please check document validity before using
6_14_3 Time slot maximum
Set the time slot maximum for 24h reset
By default, the time slot maximum is 05:00 AM
6_15 Exit “Parameters Initialization”
Press the red key X to exit the “parameters initialization” screen and go back to the idle screen.
The terminal proposes to print the parameters:
Red key X to exit without printing,
Green key O to print the parameters (shortcut F.43) and exit.
ICO-OPE-00986
REFERENCE MANUAL
Restricted
65/166
Ingenico document - Reproduction or disclosure prohibited without written authorization
Please check document validity before using
7 Initialization menu functions
From the idle screen, press the function key F .
Then select the icon or the “Telium Manager” item and validate.
Finally, select the icon or the “Initialization” item and validate.
For screen examples, refer to 6 Initialization of “applications manager” parameters.
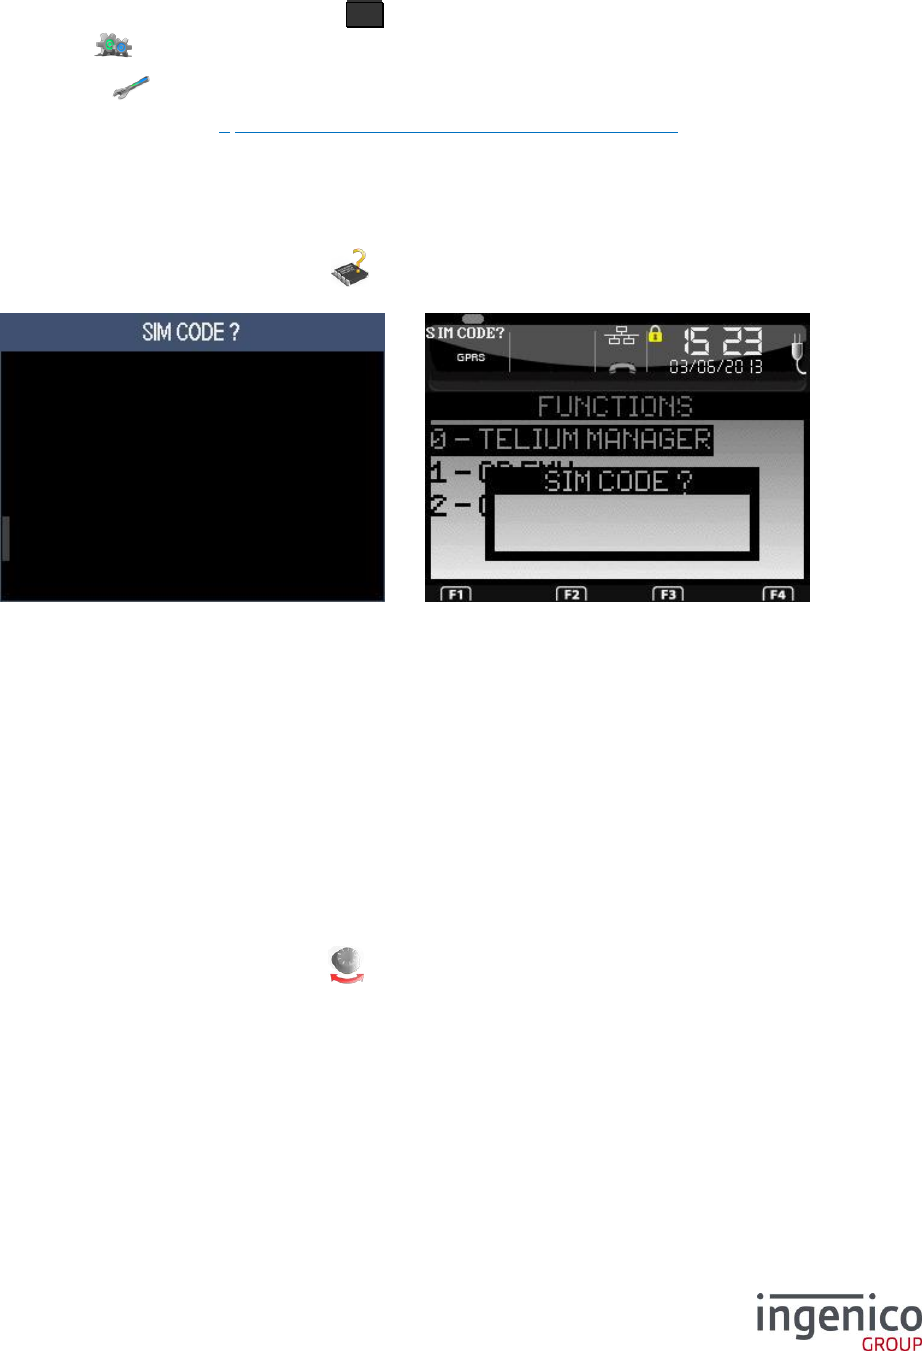
7_1 Initialization of SIM code
Shortcut: F.23
From the “Initialization” screen, select the icon or the “SIM Code” item and validate. This item is
present only on GPRS terminals.
Enter the PIN code of the SIM. Then validate.
7_2 Initialization of PUK code
Shortcut: F.54
From the “Initialization” screen, select the “PUK Code.” item and validate. This item is present only on
GPRS terminals and the SIM card requires the PUK code.
Enter the PUK code. Then validate.
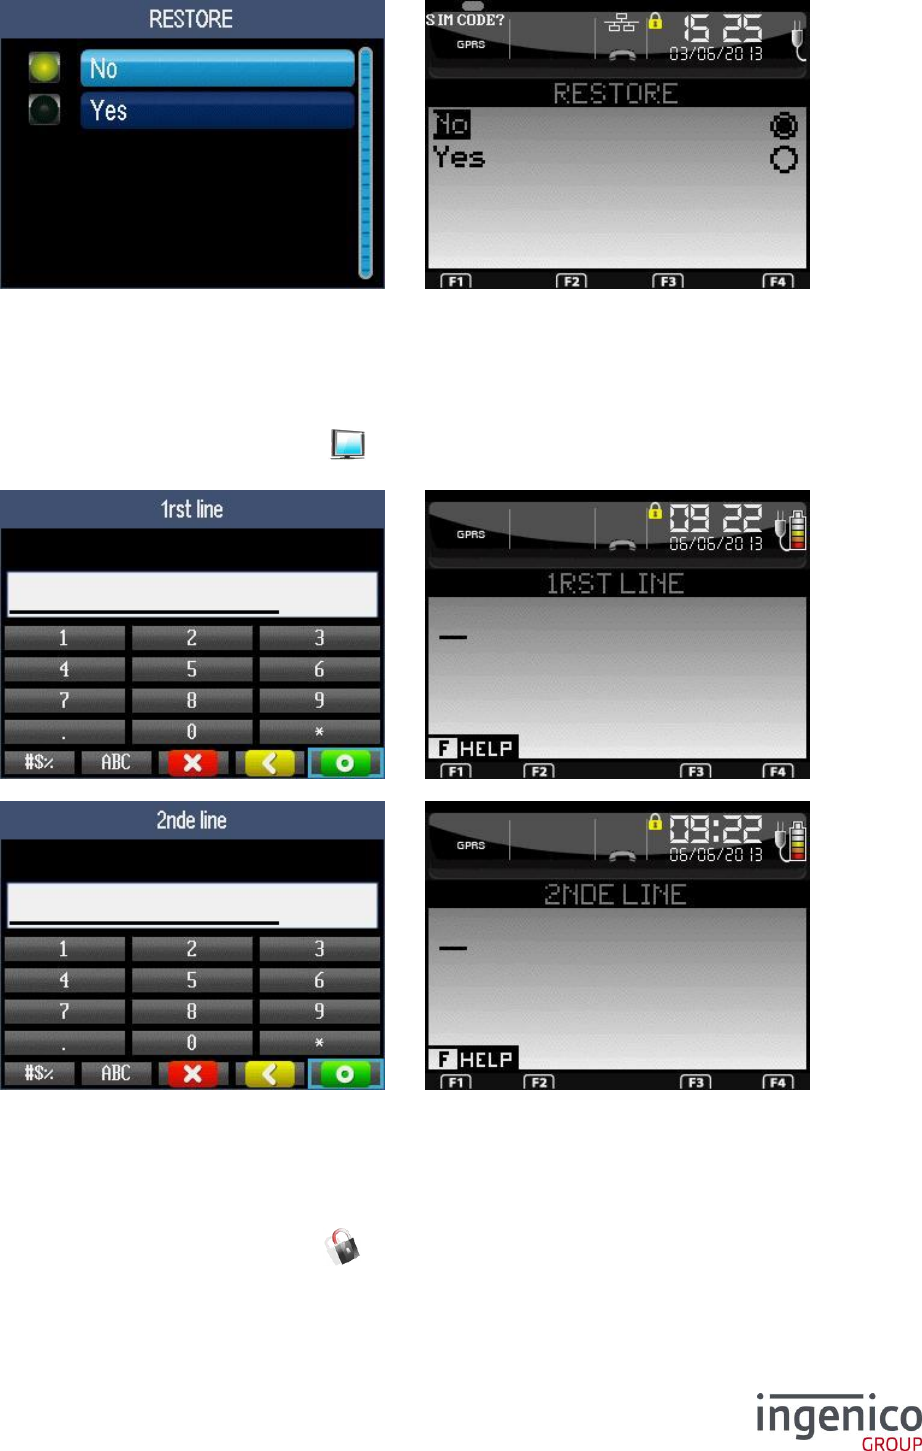
7_3 Restoration of default configuration
Shortcut: F.24
From the “Initialization” screen, select the icon or the “Default Conf.” item and validate. This item
is present only if the terminal has been initialized at least once using the “manager.par” file.
ICO-OPE-00986
REFERENCE MANUAL
Restricted
66/166
Ingenico document - Reproduction or disclosure prohibited without written authorization
Please check document validity before using
Confirm the restoration of parameters from the “manager.par” file.
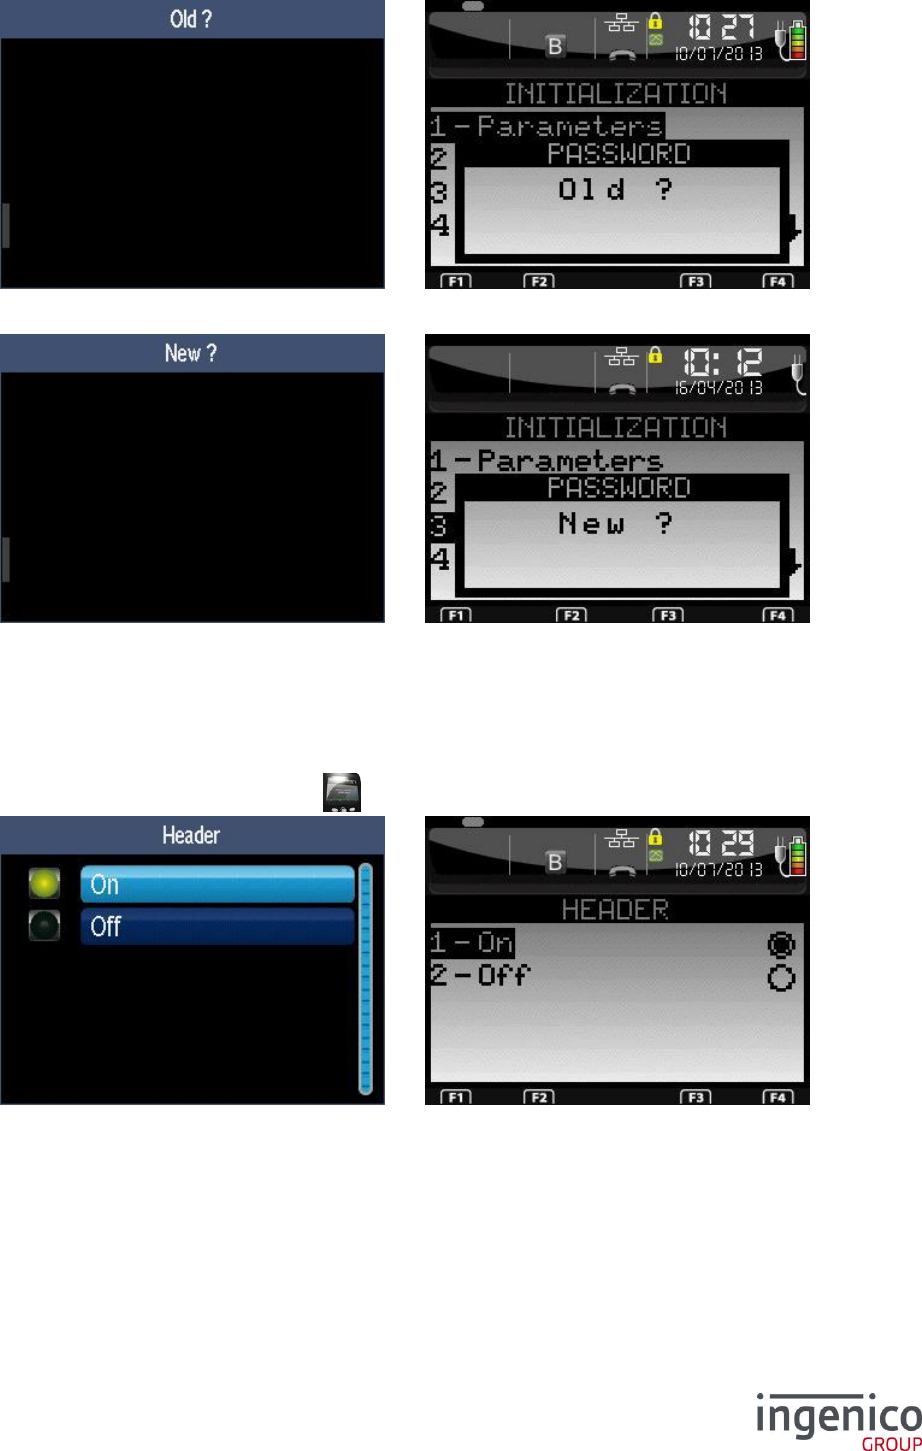
7_4 Initialization of idle screen
Shortcut: F.25
From the “Initialization” screen, select the icon or the “Screen saver” item and validate. This item
is present only on mobile terminals.
Idle screen is composed of two alphanumeric lines. Enter the message to be displayed on each line.
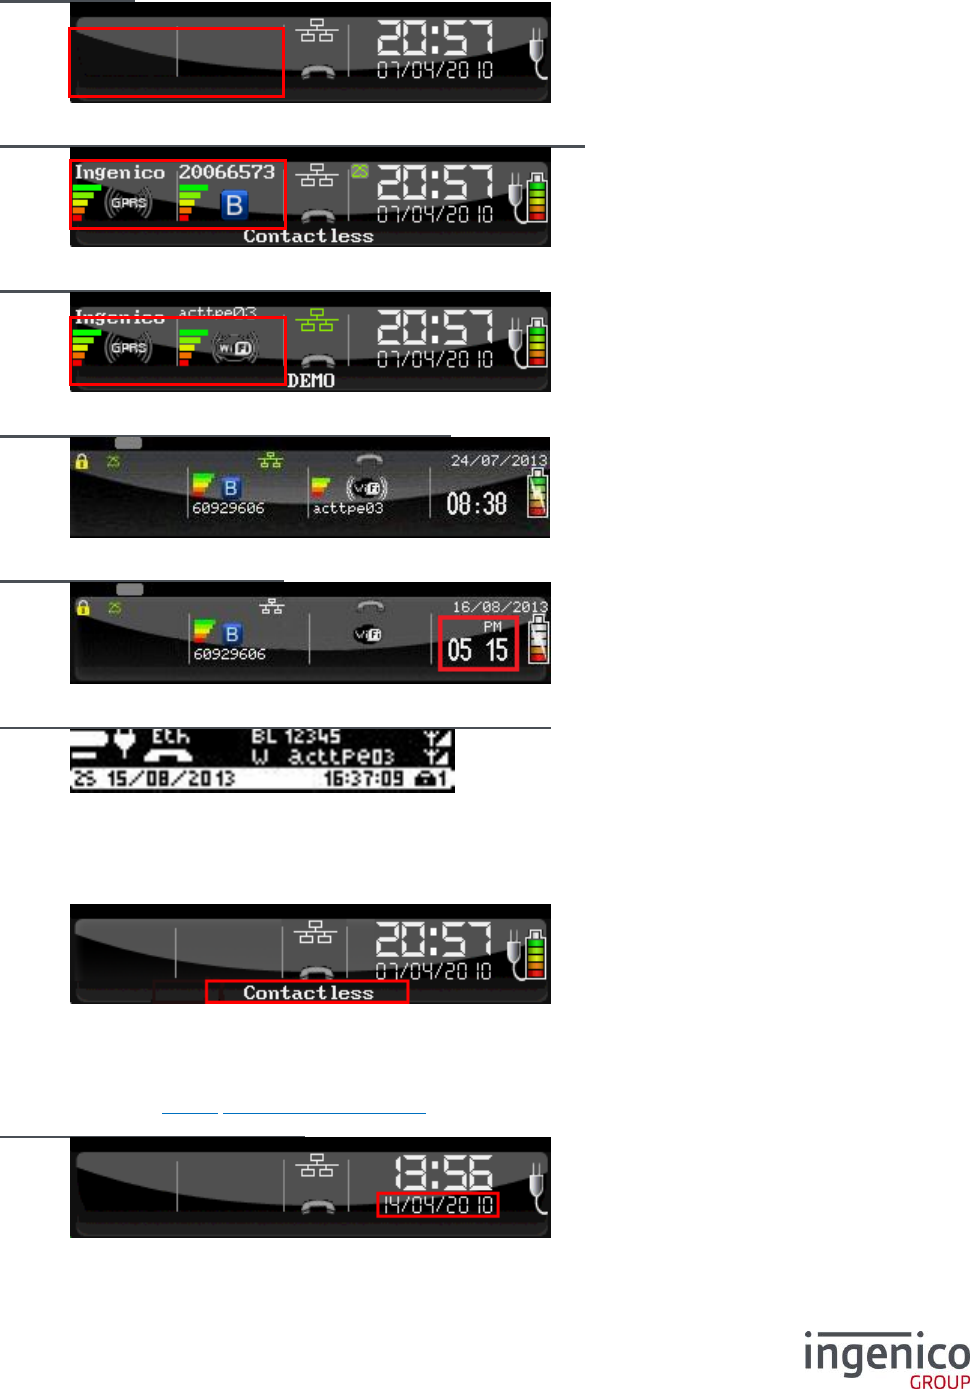
7_5 Initialization of protection manager password
Shortcut: F.26
From the “Initialization” screen, select the icon or the “Password” item and validate.
ICO-OPE-00986
REFERENCE MANUAL
Restricted
67/166
Ingenico document - Reproduction or disclosure prohibited without written authorization
Please check document validity before using
This screen is displayed when a password already exists. Enter the current password.
Enter the new password.
7_6 Status bar
7_6_1 Display of the status bar
From the “Initialization” screen, select the icon or the “Header” item and validate.
Activate or disable the display of the status bar on the top of the screen.
In the following chapter, each element (highlighted by a red rectangle) of the status bar is explained.
ICO-OPE-00986
REFERENCE MANUAL
Restricted
68/166
Ingenico document - Reproduction or disclosure prohibited without written authorization
Please check document validity before using
7_6_2 Status bar examples
Fixed terminal
Bluetooth mobile terminal linked to an external GPRS modem
WI-FI mobile terminal linked to an external GPRS modem
WI-FI & Bluetooth terminal – latest color header
Terminal in AM/PM time mode
WI-FI & Bluetooth terminal – latest black and white header
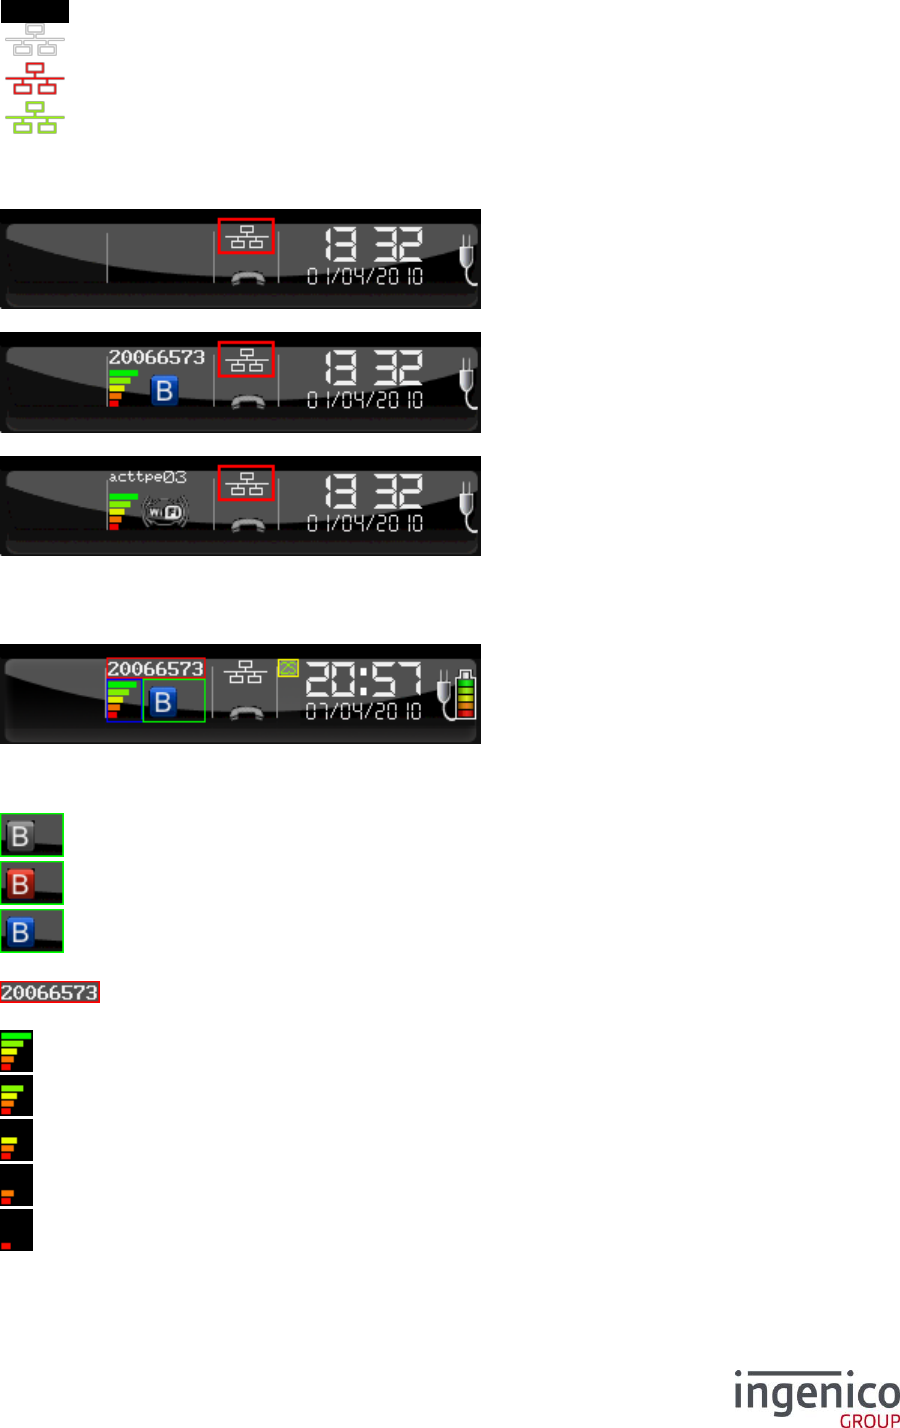
7_6_3 Current application
The terminal displays the name of the application currently being executed. If the current application is
the Manager, the area is empty.
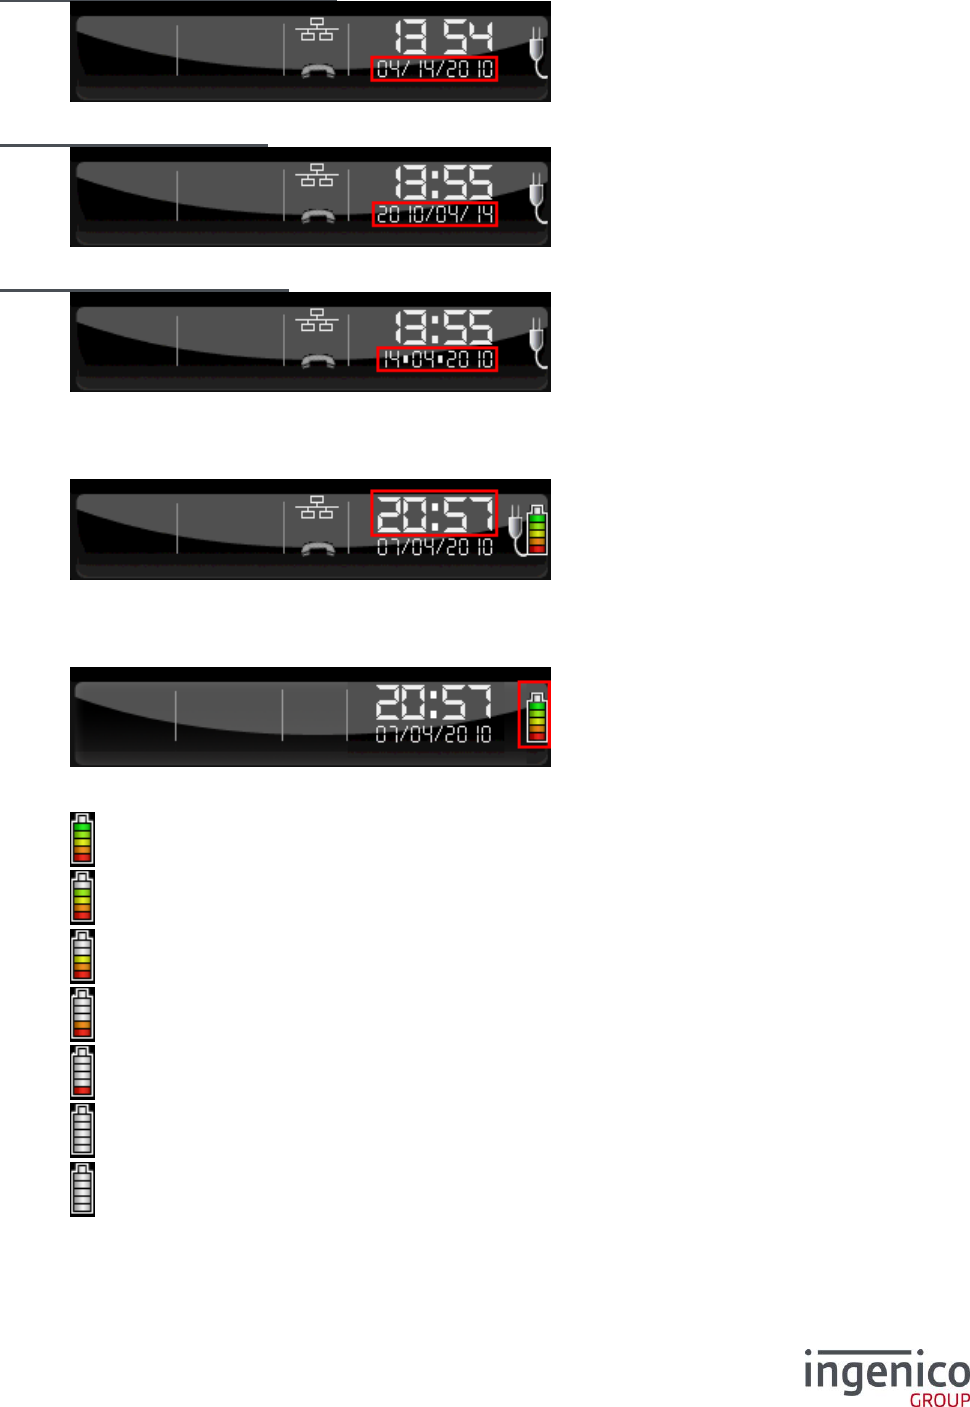
7_6_4 Date
The terminal displays its current date. The date is displayed in accordance with the format chosen at
initialization (refer 6_2_3 Setting the date format).
European format (DD/MM/YYYY)
ICO-OPE-00986
REFERENCE MANUAL
Restricted
69/166
Ingenico document - Reproduction or disclosure prohibited without written authorization
Please check document validity before using
Anglo-Saxon format (MM/DD/YYYY)
Asian format (YYYY/MM/DD)
German format (DD.MM.YYYY)
7_6_5 Time
The terminal displays its current time with the HH:MM format. The “:” blinks at 1Hz frequency.
7_6_6 Battery level
The terminal displays the battery charge status.
Depending on the battery charge level, one of the following icons is displayed:
Battery charge greater than 80%,
Battery charge greater than 60% and less than 80%,
Battery charge greater than 40% and less than 60%,
Battery charge greater than 20% and less than 40%,
Battery charge greater than 10 % and less than 20%,
Battery charge greater than 5% and less than 10%,
blinking Battery charge less than 5%,
ICO-OPE-00986
REFERENCE MANUAL
Restricted
70/166
Ingenico document - Reproduction or disclosure prohibited without written authorization
Please check document validity before using
or Without battery (and connected to a power supply)
When the terminal is charging and the charge status is not greater than 80%, the battery pictograms
are displayed in sequence starting with the current charge status up to the pictogram of the 80%
charge status to indicate that the battery is charging. For this example, the current charge is 30%:
…
Or
…
7_6_7 Main power connection
The following display indicates that the terminal is connected to a power supply.
This symbol is also displayed when a mobile terminal is charging its battery because:
The terminal is on its base which is connected to main power, or
The terminal is connected to a battery charging system via an USB link (PC, HUB…, refer
9_5_3 USB Charge).
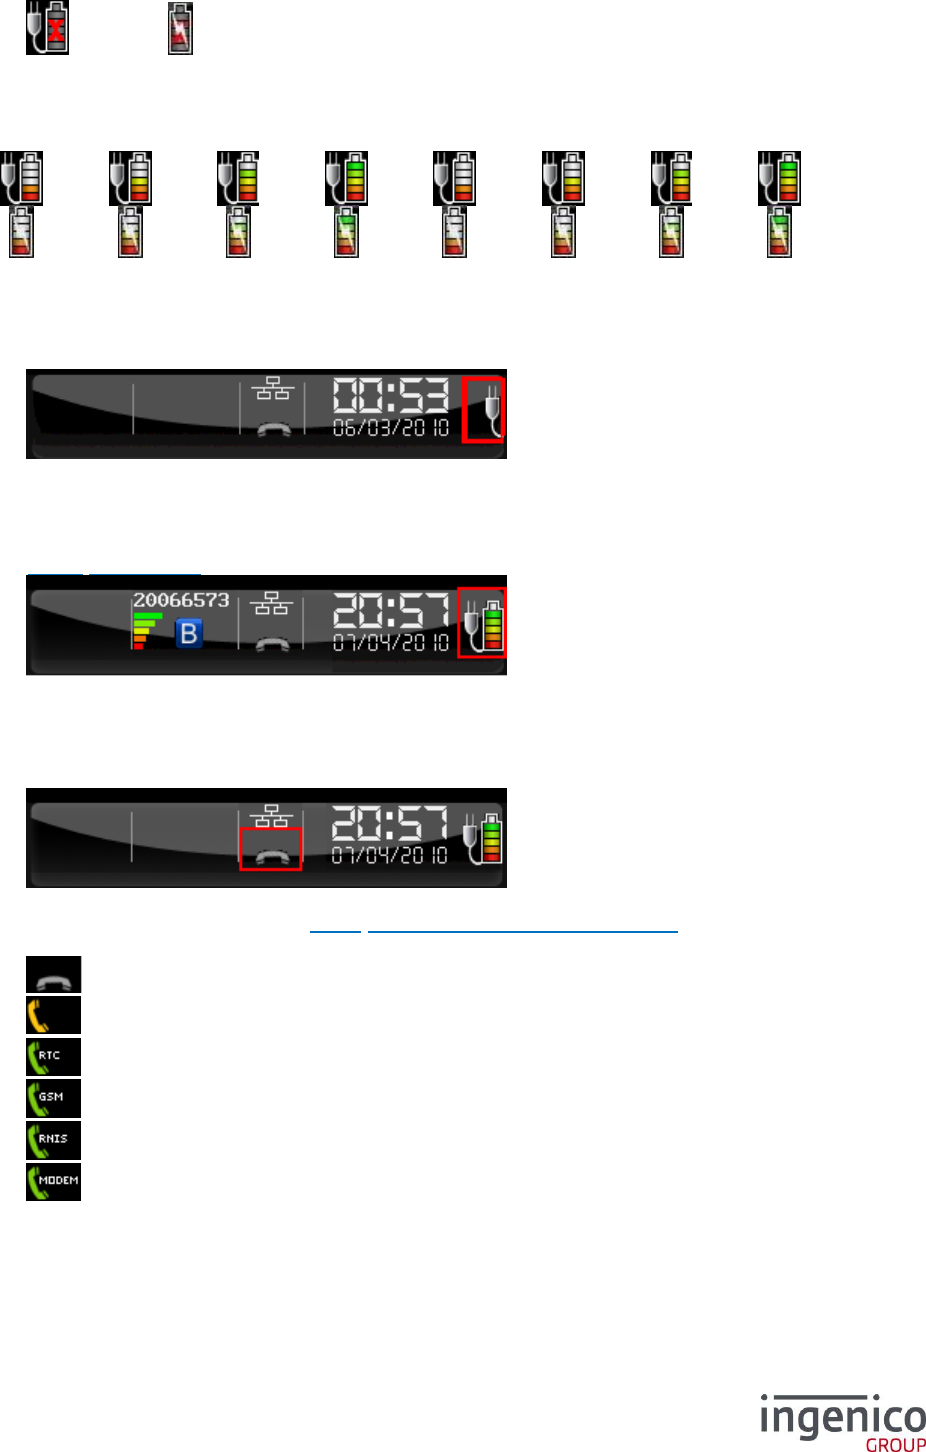
7_6_8 Landline network connection
The following pictograms are displayed in the status bar to indicate the landline connection status
(STN, ISDN, External modem).
Depending on the landline (selected in 6_10 Initialization of the network access) and the connection
status, one of the following icons is displayed:
Terminal not connected.
. Terminal connection to network in progress (dialing, for example)
Terminal connected to Switched Telephone Network (STN).
Terminal connected to telephone network via GSM.
Terminal connected to ISDN network.
Terminal connected to telephone network by External modem.
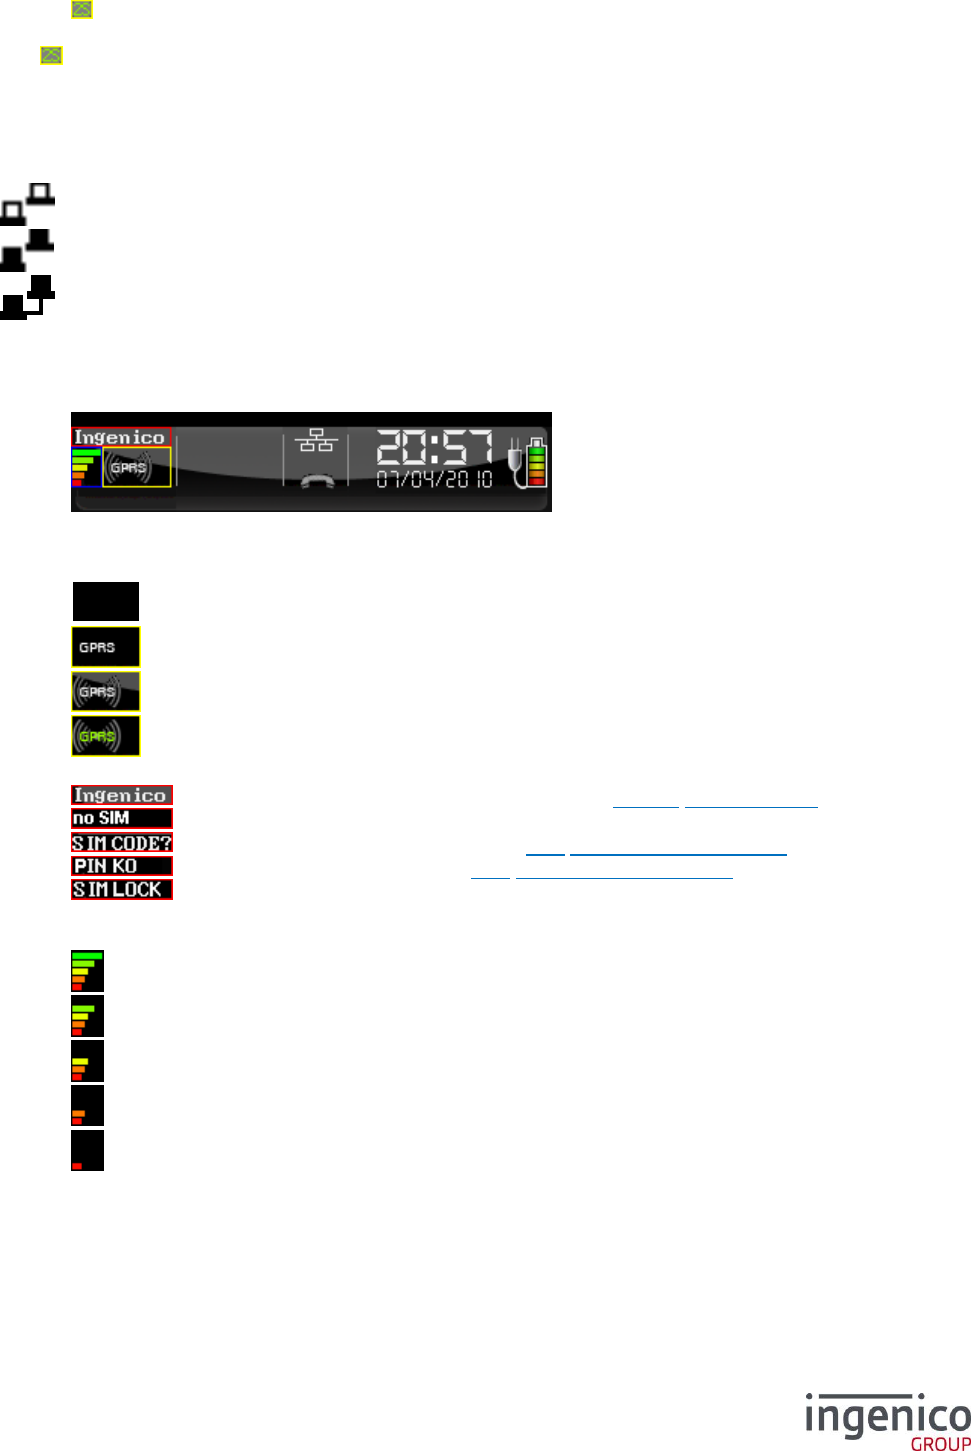
7_6_9 Ethernet network connection
ICO-OPE-00986
REFERENCE MANUAL
Restricted
71/166
Ingenico document - Reproduction or disclosure prohibited without written authorization
Please check document validity before using
The following icons indicate the Ethernet link status of the terminal:
No icon No Ethernet capability;
Ethernet capable but link not connected (“Eth” for black and white screen);
Ethernet link connected but IP address not negociated (DHCP mode);
Operational Ethernet connection (“ETH” for black and white screen).
This Ethernet link is either:
internal to the reader (EFT30Smart, ICT2XX , …), or
acquired via an Ethernet Bluetooth base, or
acquired via Wi-Fi (internal asEFT930W or Wi-Fi dongle connected to the terminal).
7_6_10 Bluetooth connection
The terminal displays the status of the Bluetooth connection.
The Bluetooth connection is represented by four elements:
The connection status:
Bluetooth module starting up, or
Terminal associated to at least one base, but no base is replying, or
Terminal connected to at least one base or one Bluetooth device.
The serial number of a base connected to the terminal:
The terminal is connected to at least one base.
The reception level of Bluetooth signal (only for bases):
Maximum reception level (100%)
High reception level (75%)
Medium reception level (50%)
Low reception level (25%)
Very low reception level (<5%)
The association status:
ICO-OPE-00986
REFERENCE MANUAL
Restricted
72/166
Ingenico document - Reproduction or disclosure prohibited without written authorization
Please check document validity before using
Terminal associated to a smart base.
The pictogram can appear on a non-Bluetooth terminal if it is associated to a base.
If the terminal is associated to several bases, the serial numbers are displayed alternately every 5 s
with the reception level corresponding to the base.
For iOs devices, there is an other information on iSMP and iCMP’s header:
Device is present
Device is authentificated
Device is connected
7_6_11 GPRS network connection
The terminal displays the status of the GPRS connection
The GPRS network connection is represented by three elements:
GPRS connection status:
No GPRS module;
GPRS module not started;
GPRS module attached to network;
GPRS module connected to a server;
Network name:
Name of network or virtual operator (refer 6_10_6 GPRS network),
SIM card is absent,
SIM Code to be initialized (refer 7_1 Initialization of SIM code),
Incorrect SIM Code (refer 7_1 Initialization of SIM code),
SIM card locked (3 incorrect codes). To unlock the SIM card, use a mobile
phone and enter the PUK code.
Reception level of GPRS signal:
Maximum reception level (100%)
High reception level (75%)
Medium reception level (50%)
Low reception level (25%)
Very low reception level (<5%)
7_6_12 Wi-Fi connection
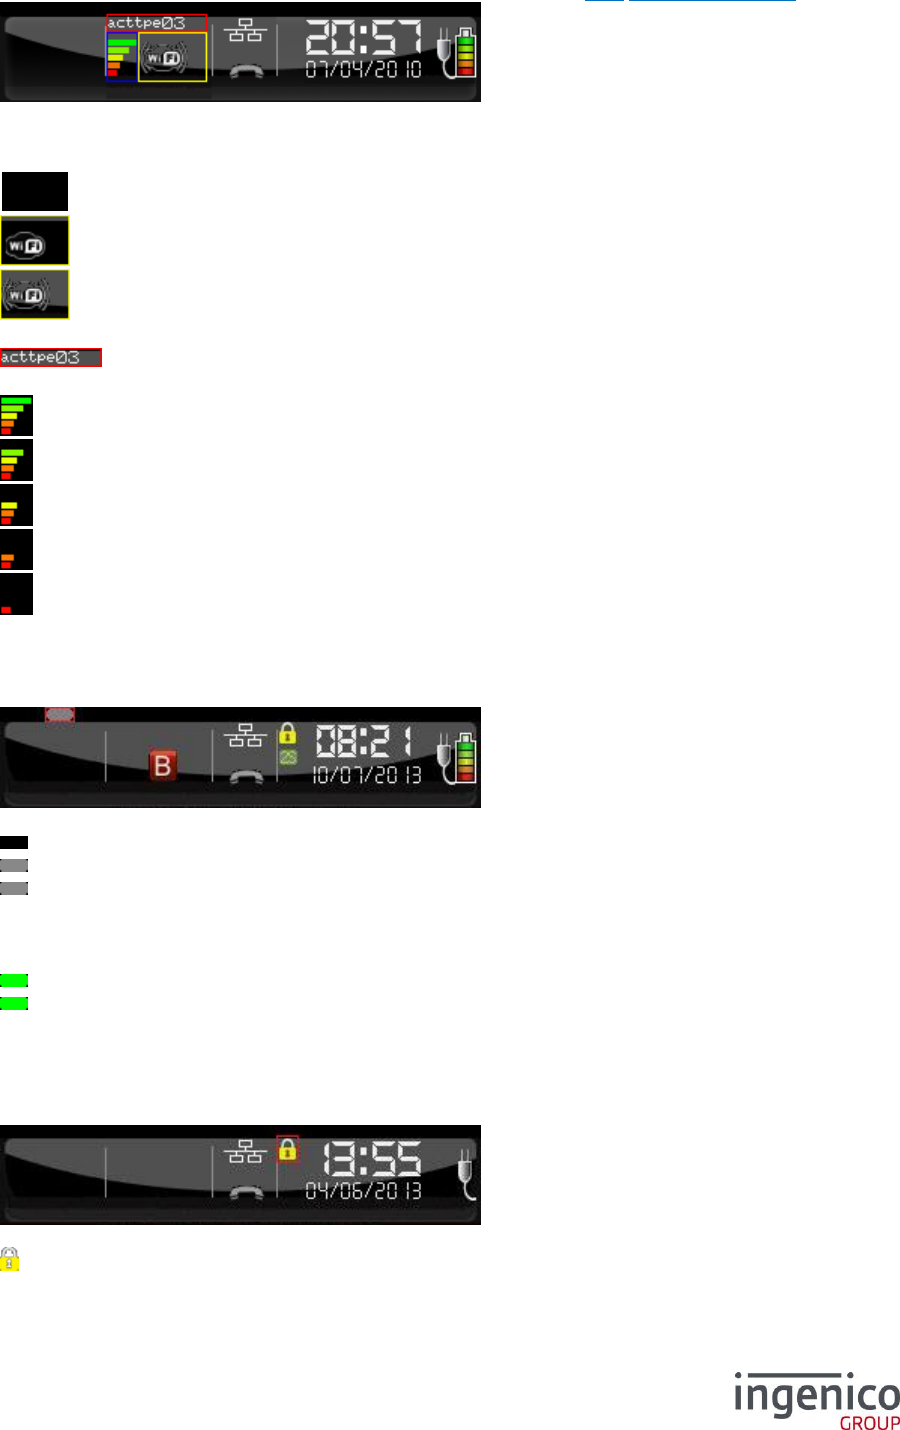
ICO-OPE-00986
REFERENCE MANUAL
Restricted
73/166
Ingenico document - Reproduction or disclosure prohibited without written authorization
Please check document validity before using
The terminal displays the Wi-Fi connection status. For configuration, refer 9_8 Wi-Fi configuration.
The Wi-Fi connection is represented by three elements:
Wi-Fi connection status:
No Wi-Fi module;
Wi-Fi module not started;
Wi-Fi module attached to network;
Network name:
Name of network (ESSID) if attached to network;
Reception level of Wi-Fi signal:
Maximum reception level (100%);
High reception level (75%);
Medium reception level (50%);
Low reception level (25%);
Very low reception level (<5%).
7_6_13 Contactless Connection
The terminal displays the Contactless connection status (only terminals with software LEDs).
The contactless connection status is represented by a LED:
BLACK No Contactless capability
GRAY Contactless HW capable
GRAY blinking Contactless HW & SW capable
Contactless DLL and driver already loaded on terminal
To use the contactless feature, the user has to activate the functionality
through the manager menu
GREEN Blinking Contactless HW & SW capable and READY.
GREEN Static Contactless field turned ON, waiting the contactless card.
7_6_14 PKI level
The terminal displays its PKI (Public Key Infrastructure) level.
The PKI level is represented by a padlock:
PKI level 1;

ICO-OPE-00986
REFERENCE MANUAL
Restricted
74/166
Ingenico document - Reproduction or disclosure prohibited without written authorization
Please check document validity before using
PKI level 3.
7_7 Footer
From the “Initialization” screen, select the icon or the “Footer” item and validate.
Activate or disable the display of the footer on the bottom of the screen.
7_8 Buzzer
Shortcut: F.50
From the “Initialization” screen, select the icon or the “Beep On Key” item and validate.
Select “Yes” to emit a sound when pressing a key.
7_9 Buzzer on pincode
From the “Initialization” screen, select the icon or the “Beep On Pincode” item and validate. This
item is present only on iWL350.

ICO-OPE-00986
REFERENCE MANUAL
Restricted
75/166
Ingenico document - Reproduction or disclosure prohibited without written authorization
Please check document validity before using
Select “Yes” to emit a sound when entering a pincode.
7_10 IPP 3XX Pinpad emulation mode
Shortcut: F.53
From the “Initialization” screen, select the icon or the “PINPAD Emulation” item and validate. This
item is present only on IPP320 and IPP350 terminals.
After validation, the terminal resets. Then it displays the icon once ready.
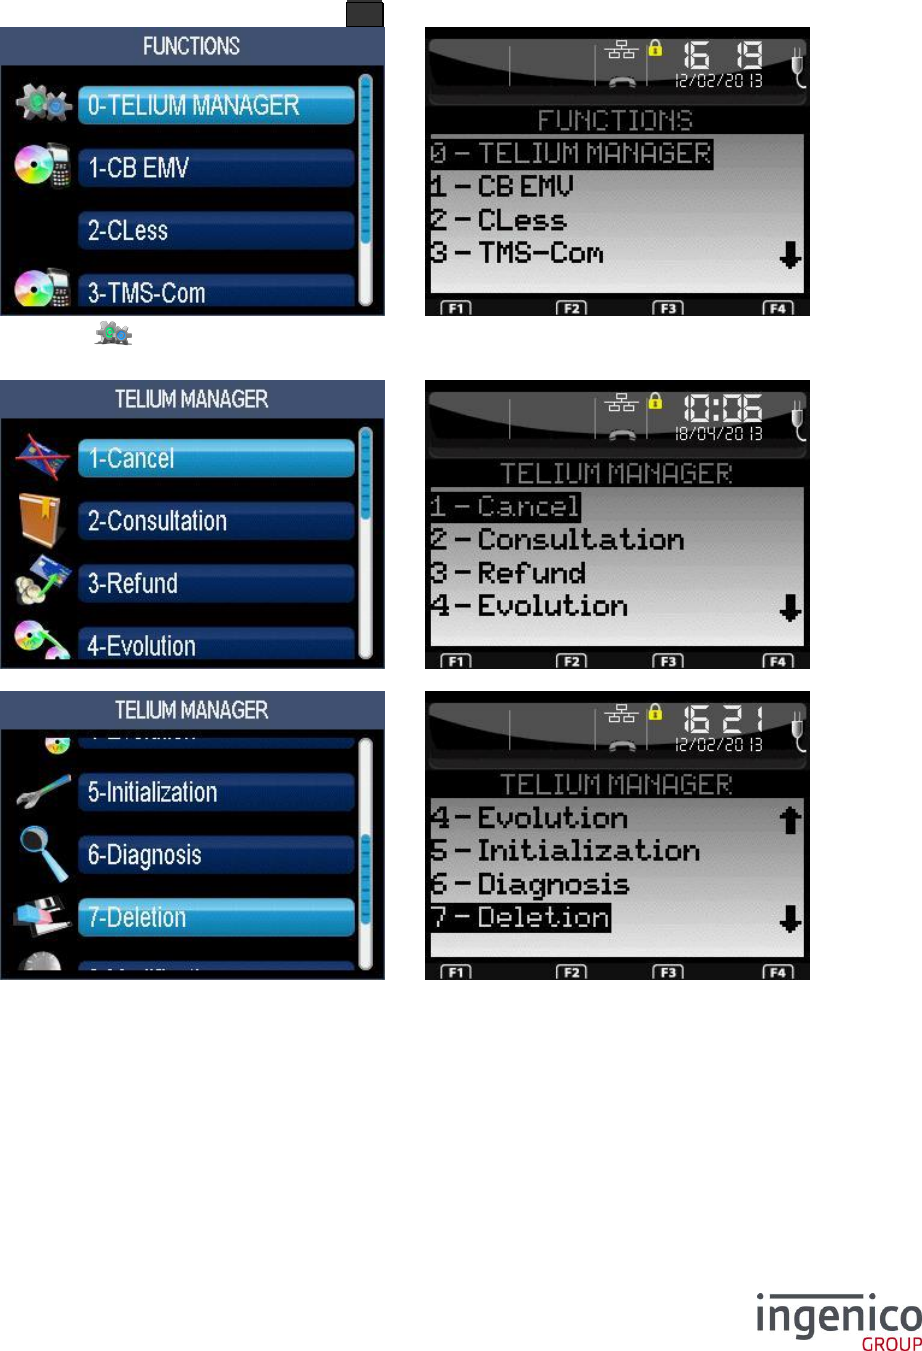
ICO-OPE-00986
REFERENCE MANUAL
Restricted
76/166
Ingenico document - Reproduction or disclosure prohibited without written authorization
Please check document validity before using
8 Access to manager functions
From the idle screen, press the function key F .
Then select the icon or the “Telium Manager” item and validate.
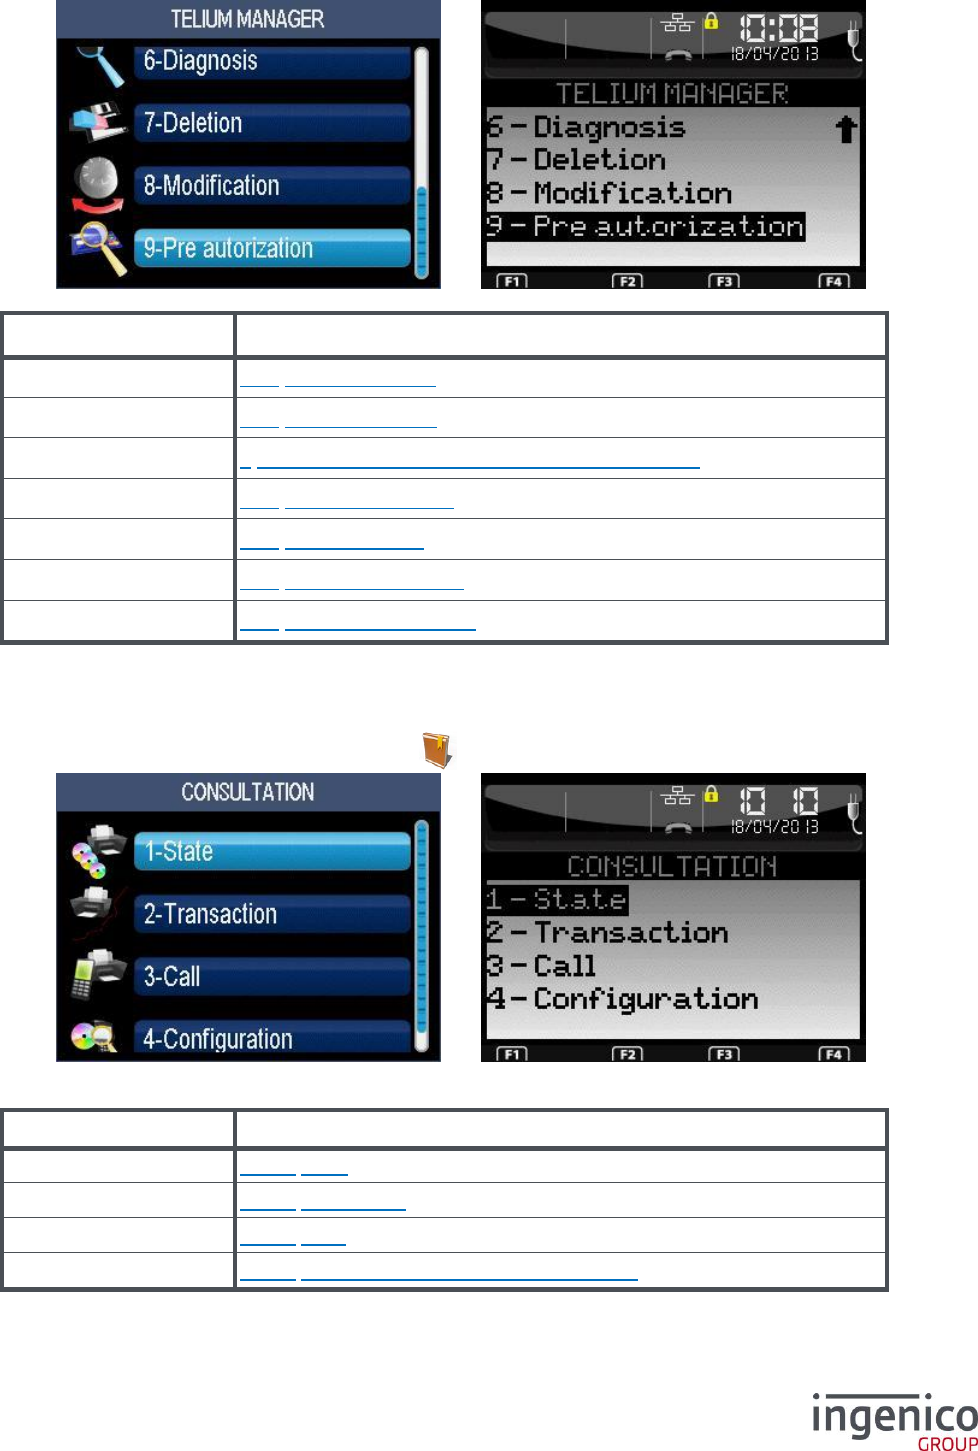
ICO-OPE-00986
REFERENCE MANUAL
Restricted
77/166
Ingenico document - Reproduction or disclosure prohibited without written authorization
Please check document validity before using
Item
Reference
Consultation
8_1 Lookup functions
Evolution
8_2 Upgrade function
Initialization
6 Initialization of “applications manager” parameters
Diagnosis
8_3 Diagnostic function
Deletion
8_4 Delete software
Modification
8_5 Modify configuration
License
8_6 License management
8_1 Lookup functions
From the “Telium Manager” screen, select the icon or the “Consultation” item and validate.
This screen is to display (not to modify) many parameters and status:
Item
Reference
State
8_1_1 State
Transaction
8_1_2 Transaction
Call
8_1_3 Calls
Configuration
8_1_4 Software and hardware configurations
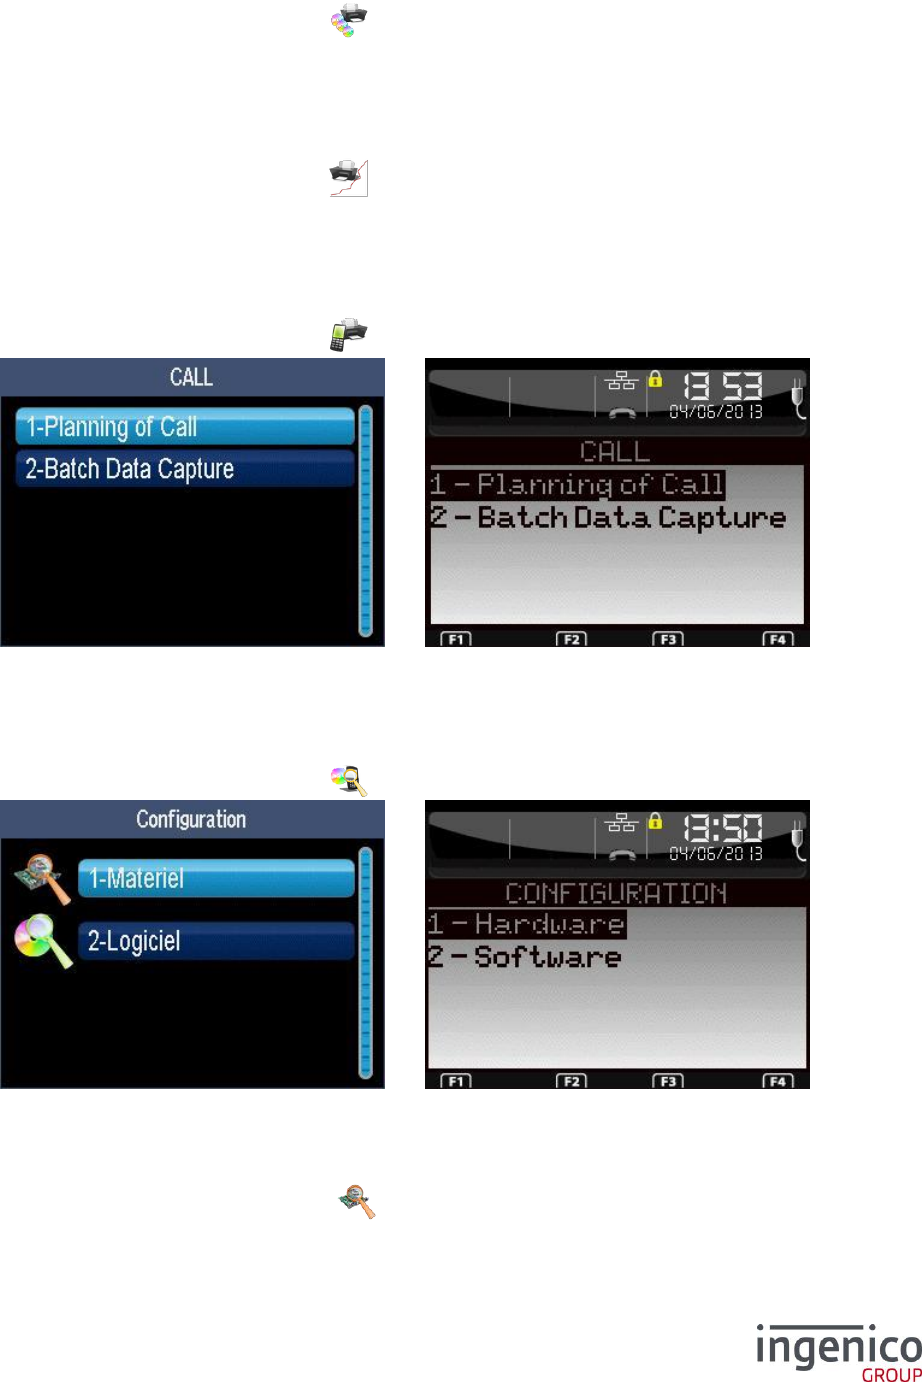
ICO-OPE-00986
REFERENCE MANUAL
Restricted
78/166
Ingenico document - Reproduction or disclosure prohibited without written authorization
Please check document validity before using
8_1_1 State
Shortcut: F.1
From the “Consultation” screen, select the icon or the “State” item and validate.
Print the status of the applications. This item is available only on terminals equipped with a printer.
8_1_2 Transaction
Shortcut: F.2
From the “Consultation” screen, select the icon or the “Transaction” item and validate.
Print the log of the transactions. This item is available only on terminals equipped with a printer.
8_1_3 Calls
Shortcut: F.3
From the “Consultation” screen, select the icon or the “Call” item and validate.
“Planning of Call” is to print the schedule of coming automatic calls (as calls for downloading).
“Batch Data Capture” is to force the remote collection of all applications.
8_1_4 Software and hardware configurations
From the “Consultation” screen, select the icon or the “Configuration” item and validate.
8_1_4_1 Lookup hardware configuration
Shortcut: F.4, F.39 (Pinpad), F.37 (TPASS) or F.58(Software infos)
From the “Configuration” screen, select the icon or the “Hardware” item and validate.
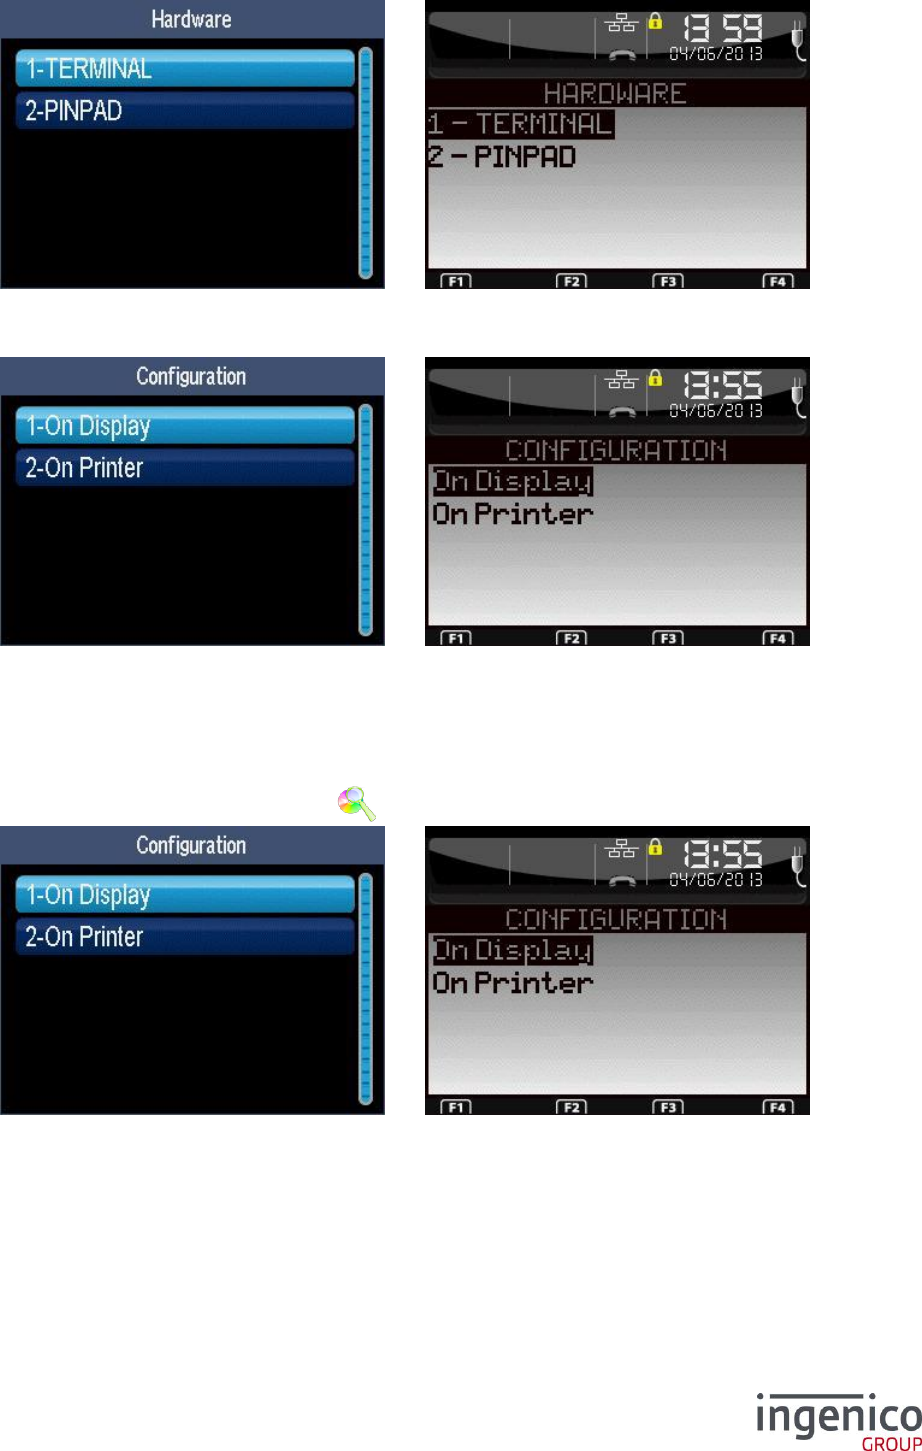
ICO-OPE-00986
REFERENCE MANUAL
Restricted
79/166
Ingenico document - Reproduction or disclosure prohibited without written authorization
Please check document validity before using
Select the hardware item to print out its ticket. The list depends on the peripherals connected to the
terminal. For “Terminal”, refer to the following screens.
By selecting “On Printer”, the full hardware configuration is printed.
By selecting “On Display”, you have to select the subset of the hardware configuration to be displayed.
8_1_4_2 Lookup Software Configuration
Shortcut: F.5, F.6, F.40 (Pinpad) or F.38 (Target)
From the “Configuration” screen, select the icon or the “Software” item and validate.
Select the viewing medium: either displayed on the screen (F.5) or printed (F.6).
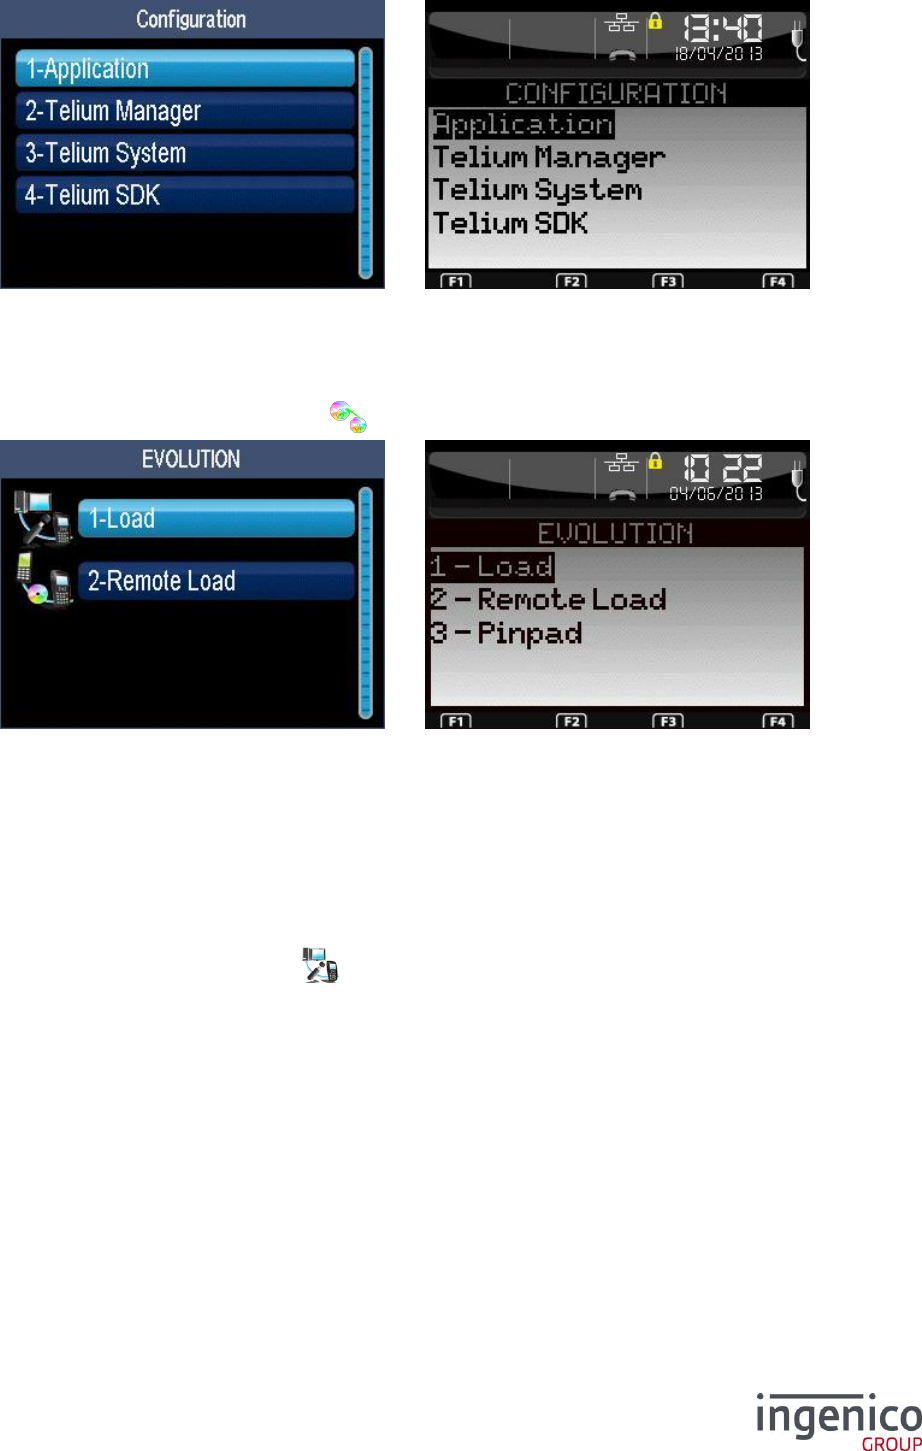
ICO-OPE-00986
REFERENCE MANUAL
Restricted
80/166
Ingenico document - Reproduction or disclosure prohibited without written authorization
Please check document validity before using
Select the item to be viewed. The list depends on software configuration (drivers and libraries).
8_2 Upgrade function
From the “Consultation” screen, select the icon or the “Evolution” item and validate.
Select the way to upgrade the terminal. The list depends on the configuration and items can be:
Local load (via PC or USB key),
Download (TMS call),
Parameters (TMS call),
Remote download Pinpad (IPP3XX emulation mode – Shortcut: F.52),
Remote download target IST (Shortcut: F.51).
8_2_1 Upgrade by load menu
From the “Evolution” screen, select the icon or the “Load” item and validate.
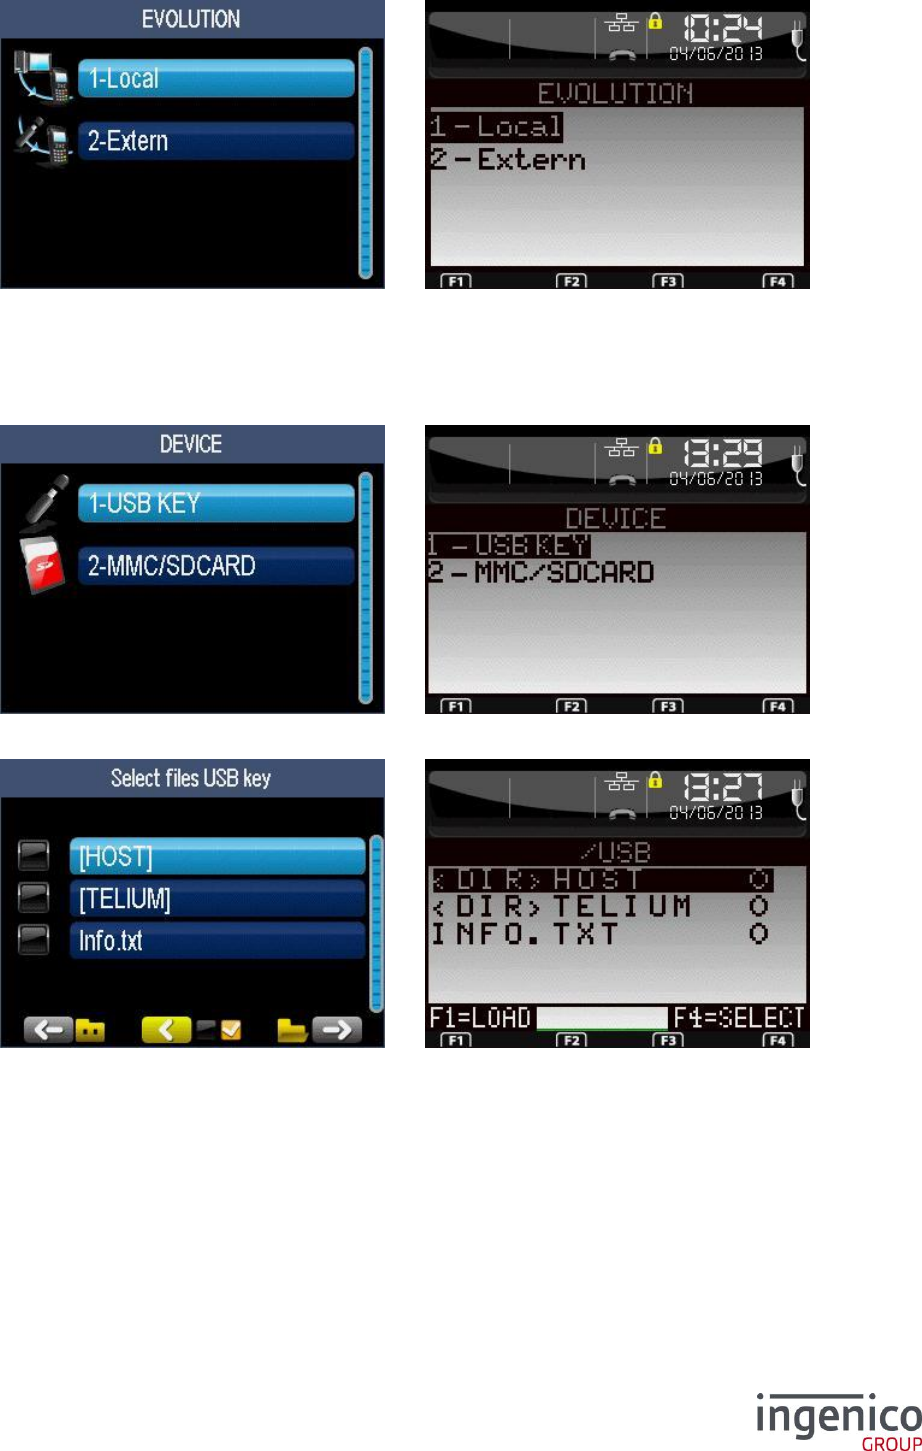
ICO-OPE-00986
REFERENCE MANUAL
Restricted
81/166
Ingenico document - Reproduction or disclosure prohibited without written authorization
Please check document validity before using
Select the resource to upgrade the terminal:
Local (LLT, shortcut F.7), or
External for USB key (shortcut F.8) or MMC (shortcut F.9).
8_2_1_1 Upgrade by load menu through external support
Select the memory device.
The terminal displays the tree structure of the memory device (USB key, MMC or SDCard). <DIR>XXX
or [XXX] indicate that the “XXX” item is a directory.
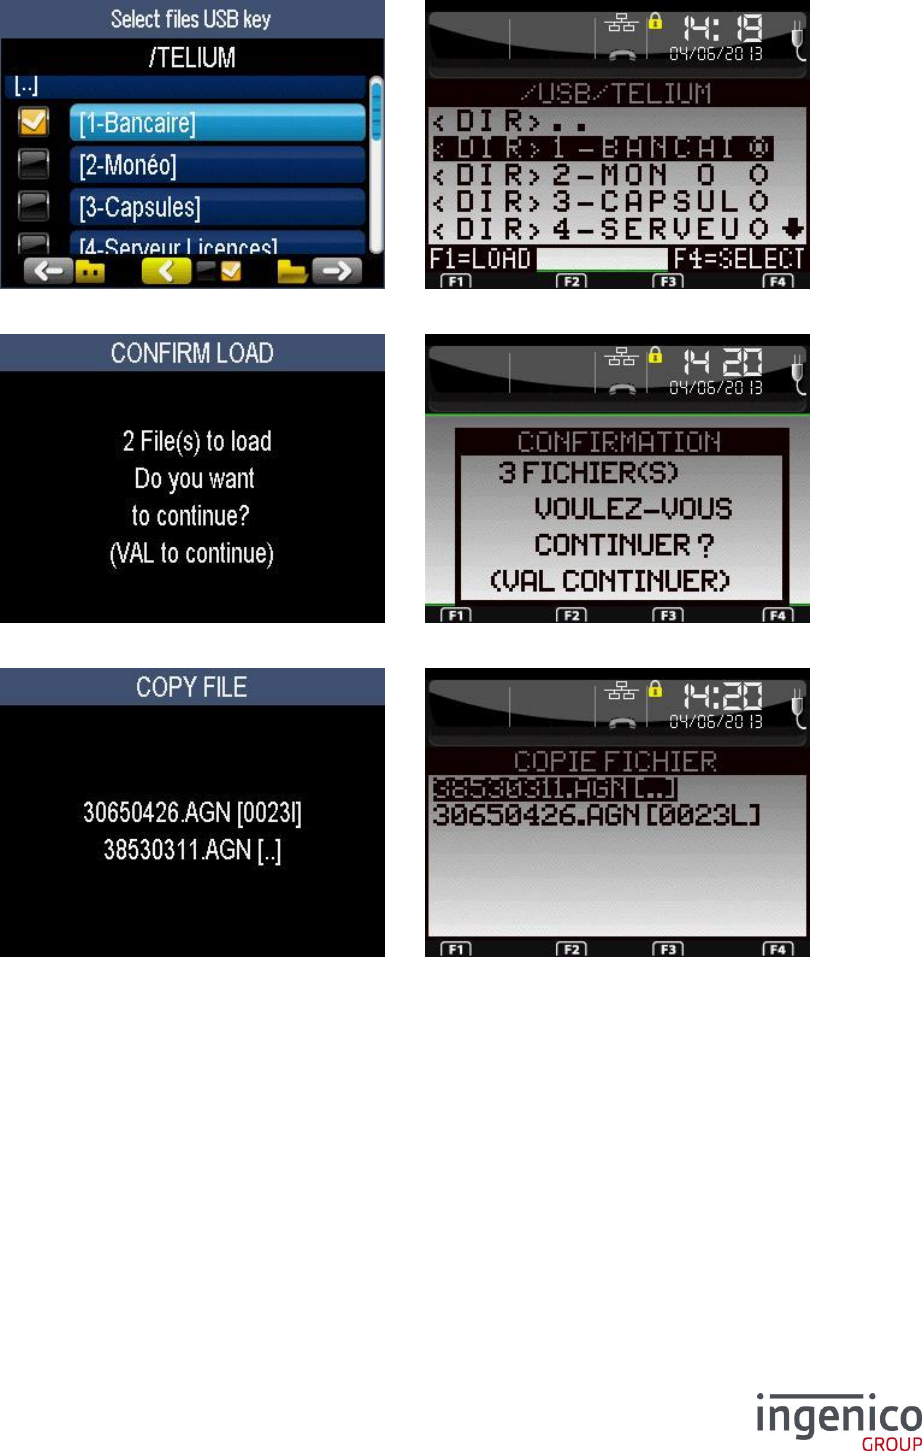
ICO-OPE-00986
REFERENCE MANUAL
Restricted
82/166
Ingenico document - Reproduction or disclosure prohibited without written authorization
Please check document validity before using
Select the files to be loaded. Once selection is finished, launch the load.
Confirm the download.
The list of the files being loaded is displayed. Once finished, the terminal restarts.
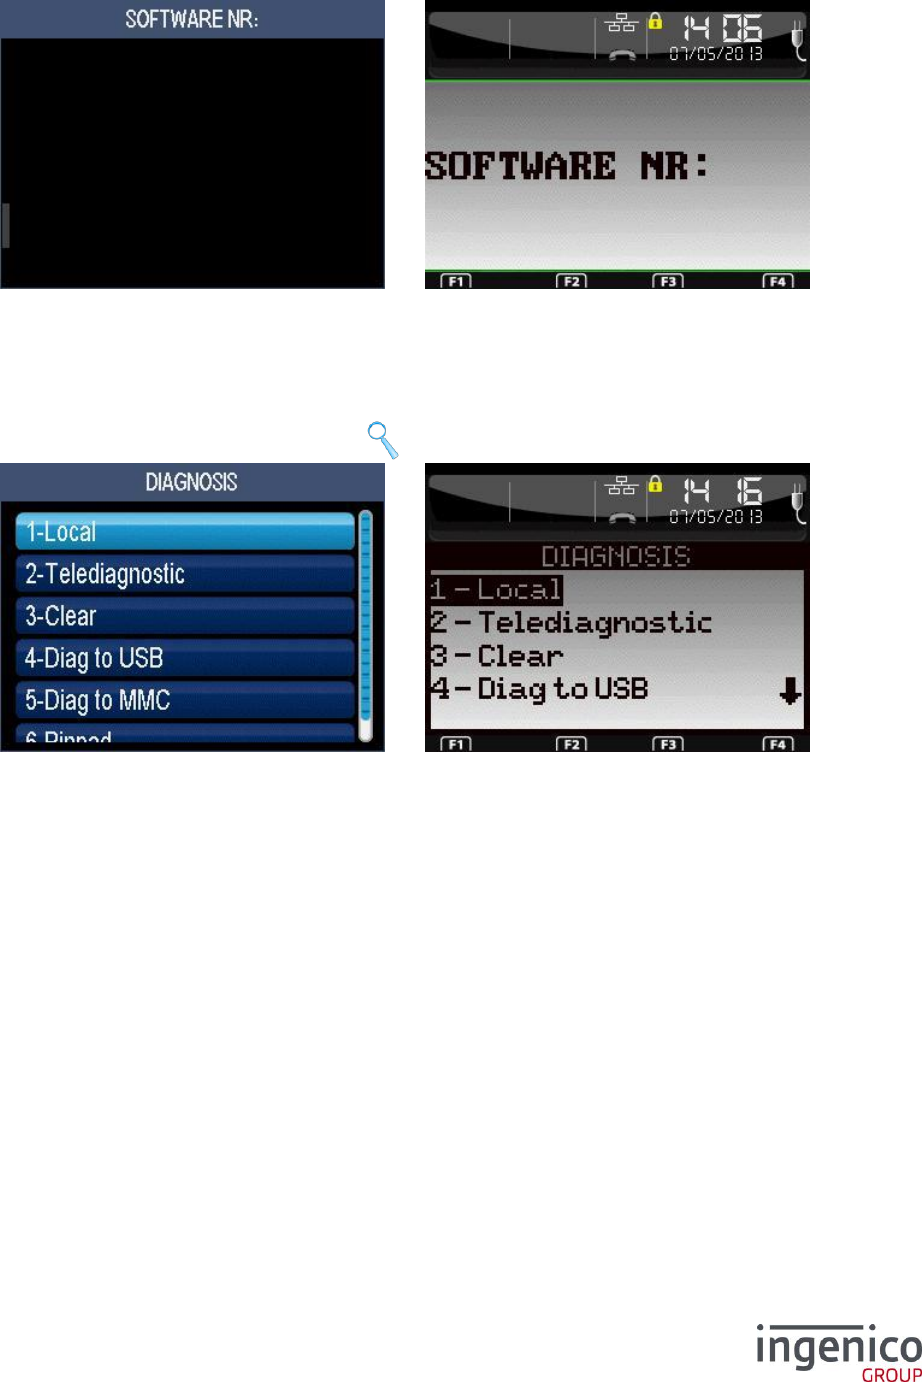
ICO-OPE-00986
REFERENCE MANUAL
Restricted
83/166
Ingenico document - Reproduction or disclosure prohibited without written authorization
Please check document validity before using
8_2_2 Upgrade by download menu
Shortcut: F.10
Enter the software ID to be downloaded or validate to download all of the softwares associated to the
TMS identifier.
8_3 Diagnostic function
From the “Telium Manager” screen, select the icon or the “Diagnosis” item and validate.
Select between:
Local – a diagnostic ticket is printed or sent to external printer via the COM0/USB link.
Telediagnostic – no ticket is printed; the terminal transmits the information by calling the TMS
whose access parameters have been specified in the initialization (shortcut: F.29).
Clear – Erased the saved diagnostic.
Diag to USB – diagnosis result is saved on the USB key.
Diag to MMC – diagnosis result is saved on the MMC/SD card.
PINPAD – this item is proposed if a Pin-Pad Reader has been activated (shortcut: F.44).
TeliumPass diagnostic – this item is proposed if a TeliumPass is connected.
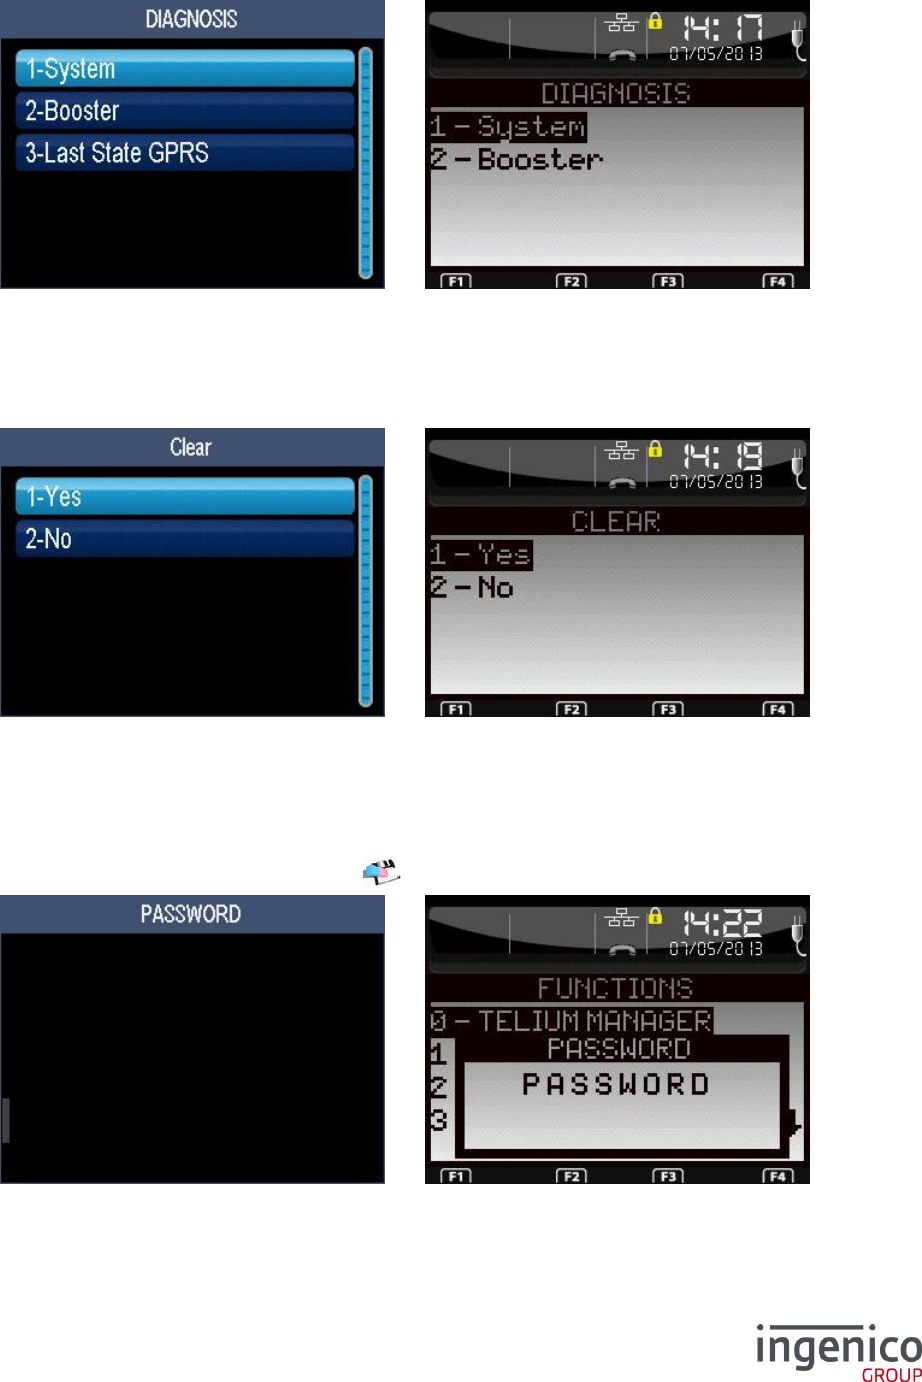
ICO-OPE-00986
REFERENCE MANUAL
Restricted
84/166
Ingenico document - Reproduction or disclosure prohibited without written authorization
Please check document validity before using
8_3_1 Local diagnostic
Shortcut: F.27 and F.28
Select the type of diagnostic to print. The GPRS startup diagnostic is present only if the GPRS
automatic startup parameter has been activated
8_3_2 Erase diagnostic
Shortcut: F.30
Reset local diagnosis ticket.
8_4 Delete software
Shortcut: F.42
From the “Telium Manager” screen, select the icon or the “Deletion” item and validate.
If requested, enter the password to access the maintenance functions.
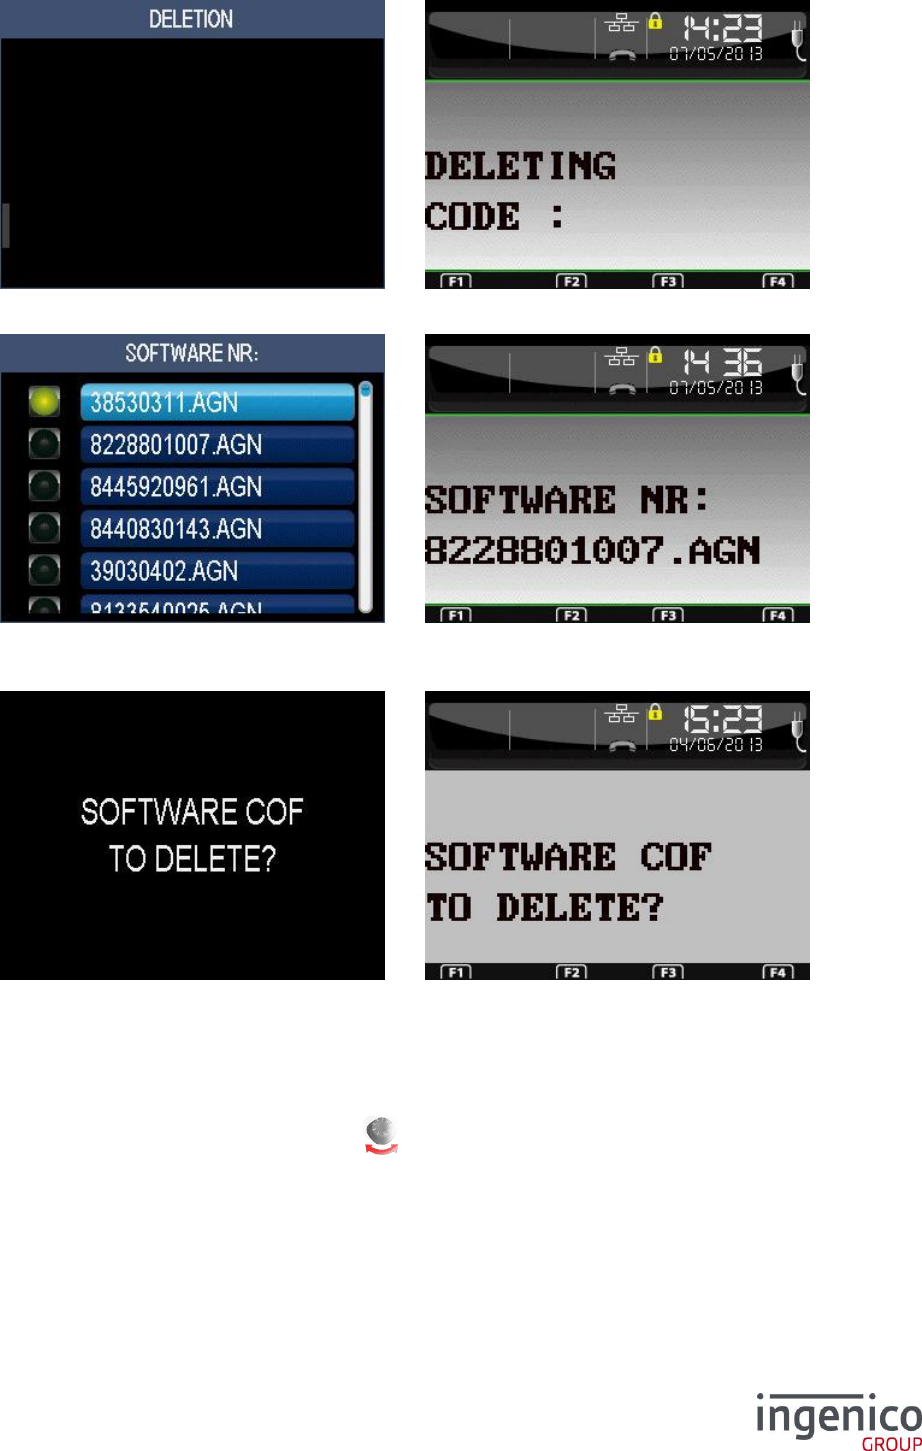
ICO-OPE-00986
REFERENCE MANUAL
Restricted
85/166
Ingenico document - Reproduction or disclosure prohibited without written authorization
Please check document validity before using
Enter the code to access the delete function.
Select in the list the component to delete (use the “up” the “down” keys to scroll the list). Then
validate.
Confirm the deletion of the software component.
8_5 Modify configuration
Shortcut: F.31 and F.32
From the “Telium Manager” screen, select the icon or the “Modification” item and validate.
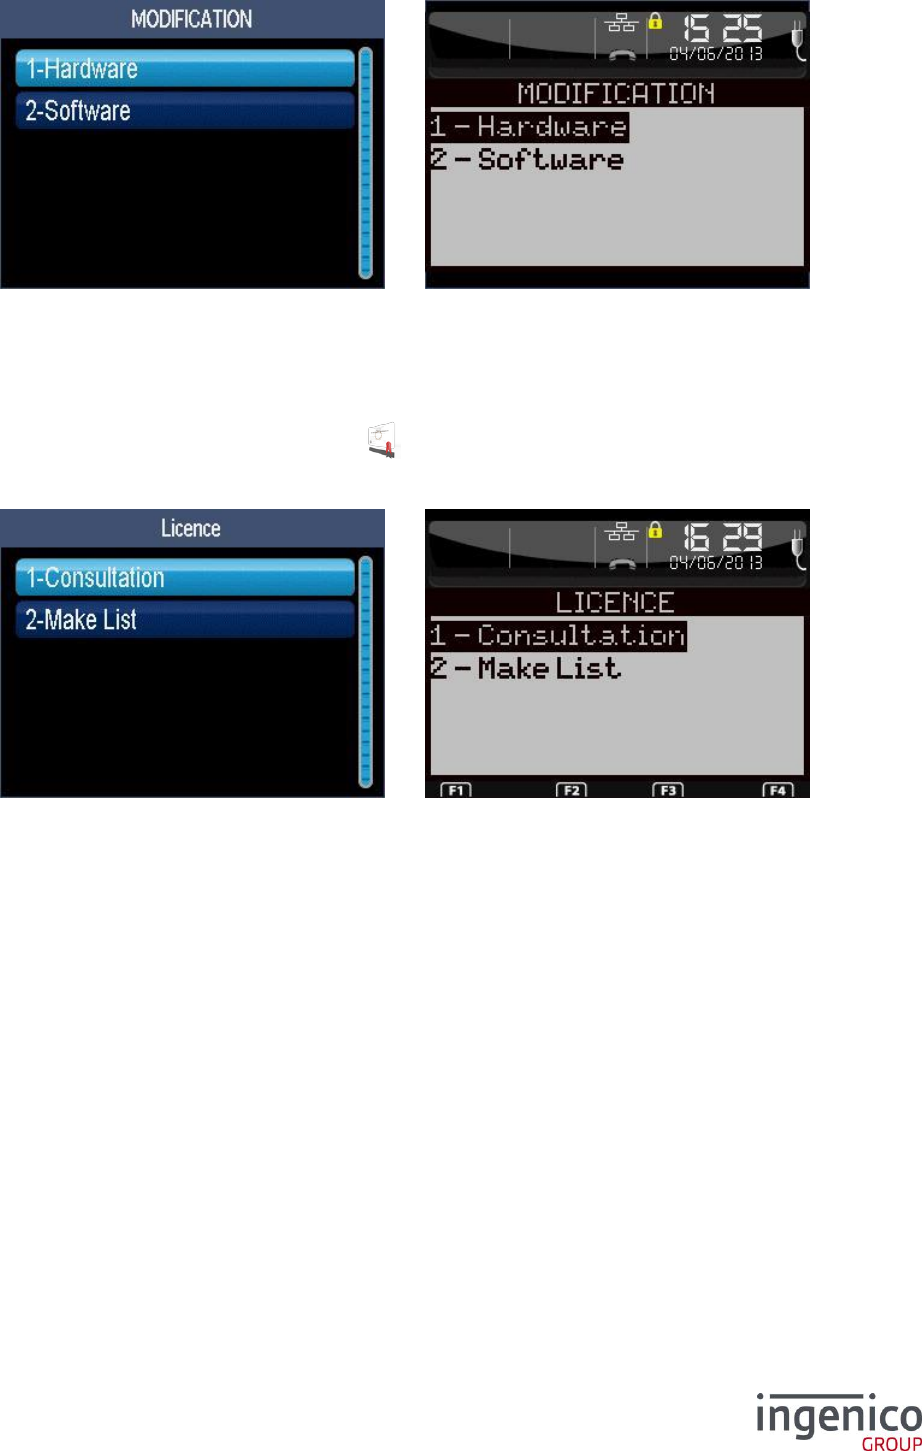
ICO-OPE-00986
REFERENCE MANUAL
Restricted
86/166
Ingenico document - Reproduction or disclosure prohibited without written authorization
Please check document validity before using
Used by application to force a call to the tele-configuration center subsequent to a hardware or
software upgrade.
8_6 License management
From the “Telium Manager” screen, select the icon or the “Licence” item and validate.
This function is present when the licenses have been activated on the terminal (remote configuration
or local load of an activation file).
Lookup or Add a licence by calling the license server.
8_6_1 Consult licences
Shortcut: F.33
The “Consultation” function gives a status of the licenses for each present application (provisional, in
sleep mode, or operational).
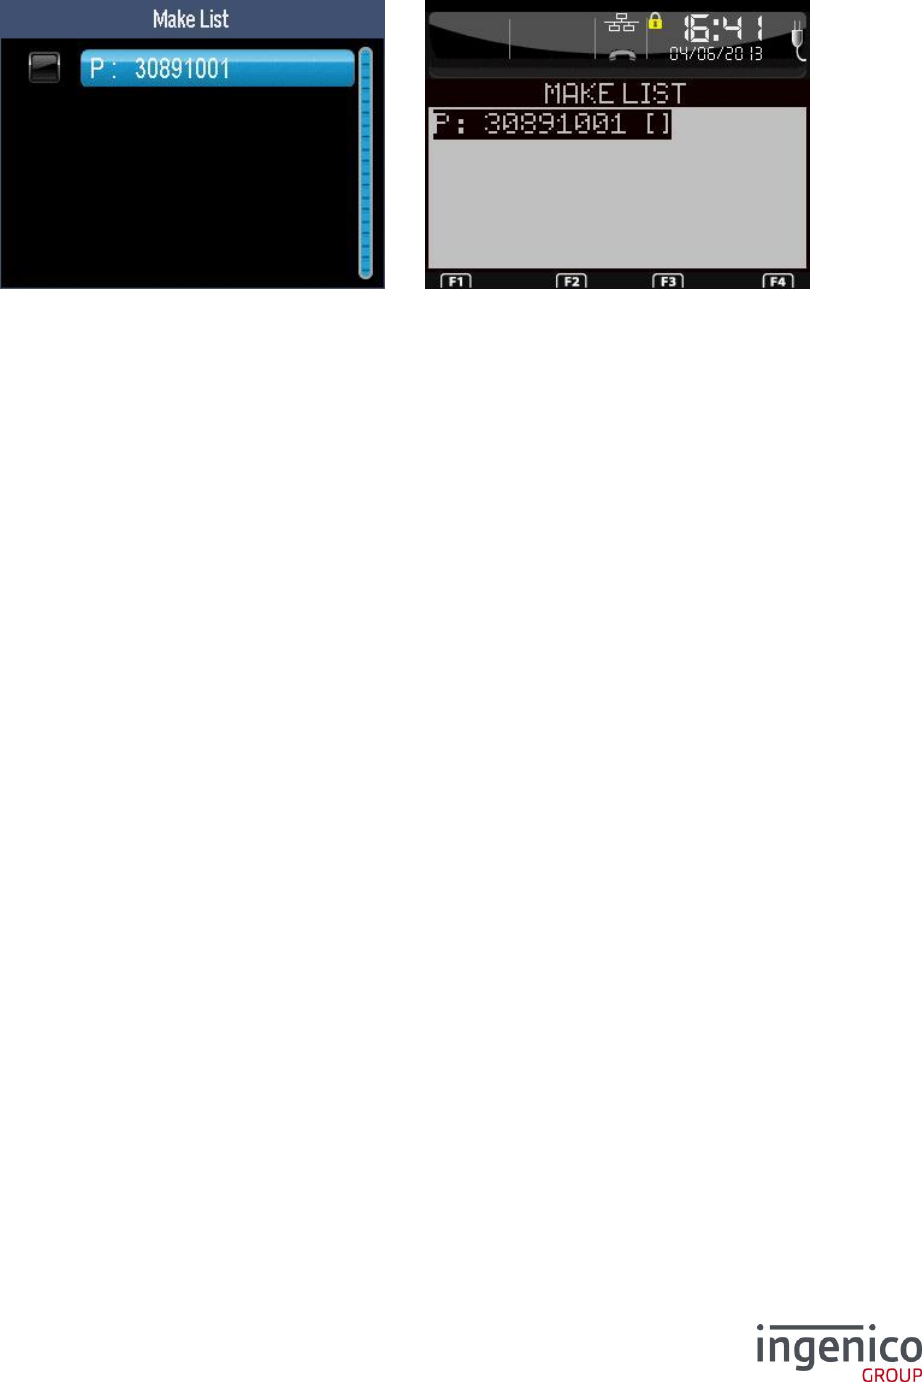
ICO-OPE-00986
REFERENCE MANUAL
Restricted
87/166
Ingenico document - Reproduction or disclosure prohibited without written authorization
Please check document validity before using
8_6_2 Add licenses
Shortcut: F.34
Select in the list the applications you want a licence (as part of the process, the license server is called
with the created list):
Scroll the list using the up and down arrow keys.
Select/unselect an application using the yellow key (by default, all applications are
unselected).
Add licences of the selected application using the green key.
Exit and drop the list using the red key.
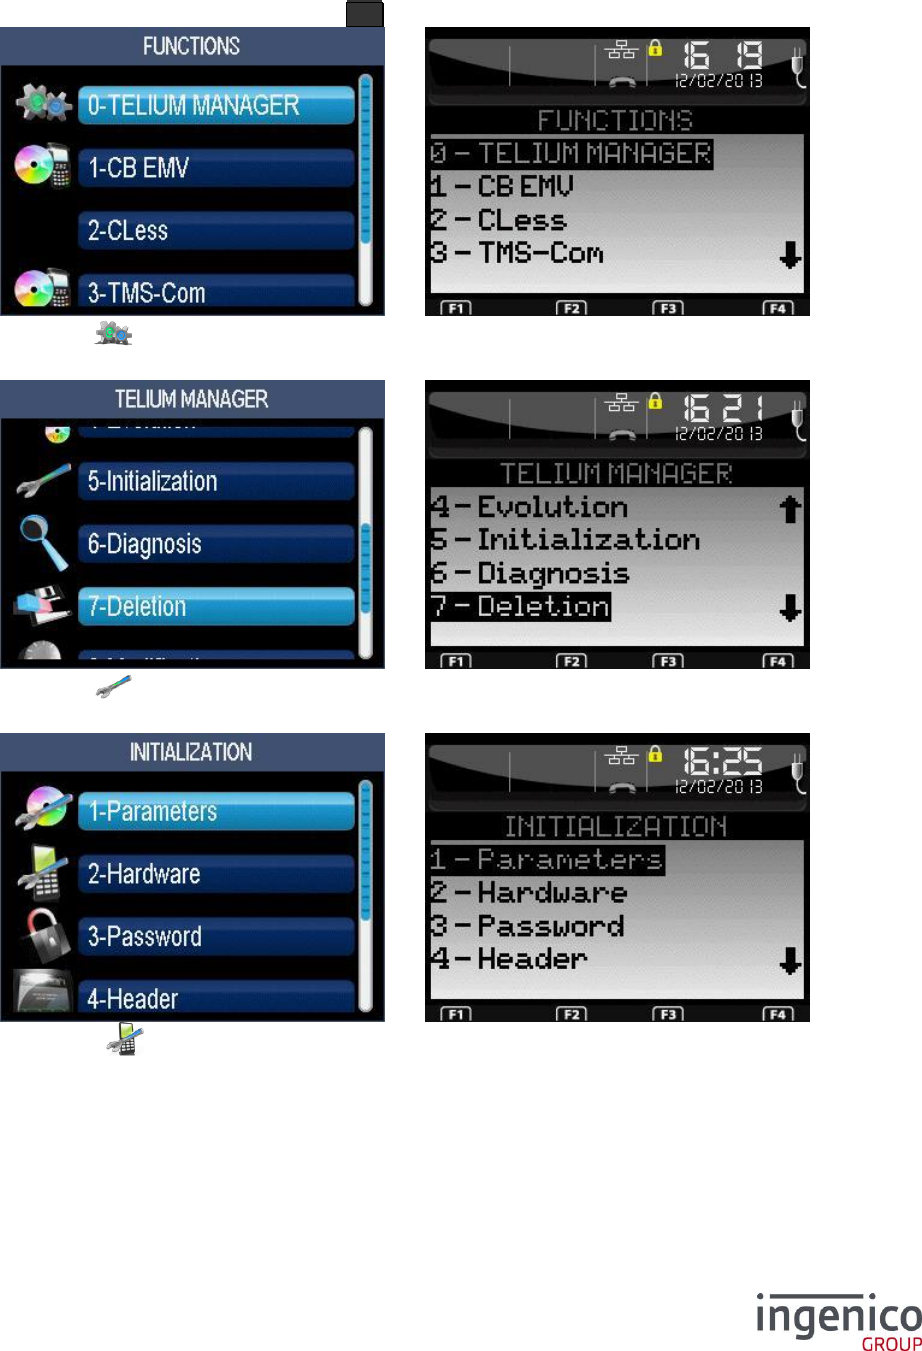
ICO-OPE-00986
REFERENCE MANUAL
Restricted
88/166
Ingenico document - Reproduction or disclosure prohibited without written authorization
Please check document validity before using
9 Hardware configuration
From the idle screen, press the function key F .
Then select the icon or the “Telium Manager” item and validate.
Then select the icon or the “Initialization” item and validate.
Finally select the icon or the “Hardware” item and validate.
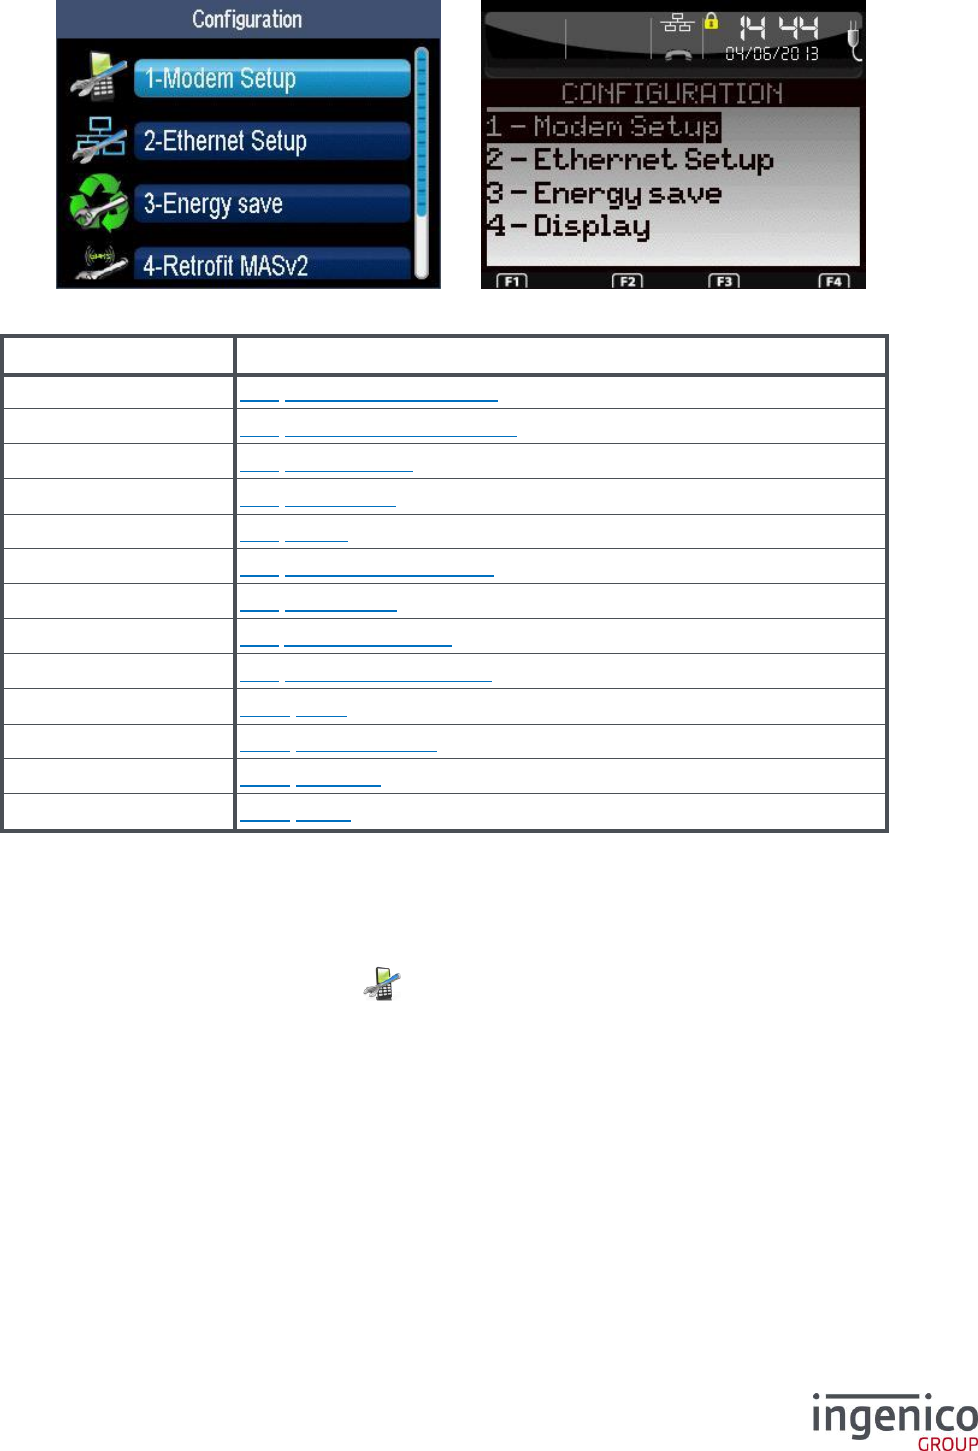
ICO-OPE-00986
REFERENCE MANUAL
Restricted
89/166
Ingenico document - Reproduction or disclosure prohibited without written authorization
Please check document validity before using
Item
Reference
Modem Setup
9_1 Configuration of modem
Ethernet Setup
9_2 ETHERNET Configuration
Standby Setup
9_3 Standby setup
Energy Save
9_4 Energy save
Battery Setup
9_5 Battery
Cradle Setup
9_6 Bluetooth Configuration
Base Update
9_7 Base update
Wi-Fi Setup
9_8 Wi-Fi configuration
Display
9_9 Configuration of screen
Proxy
9_10 Proxy
Bluetooth Audio
9_11 Bluetooth Audio
Bluetooth
9_12 Bluetooth
Stylet
9_13 Stylus
9_1 Configuration of modem
From the “Hardware” screen, select the icon or the “Modem Setup” item and validate. This item is
displayed only on terminals equipped with an integrated modem.
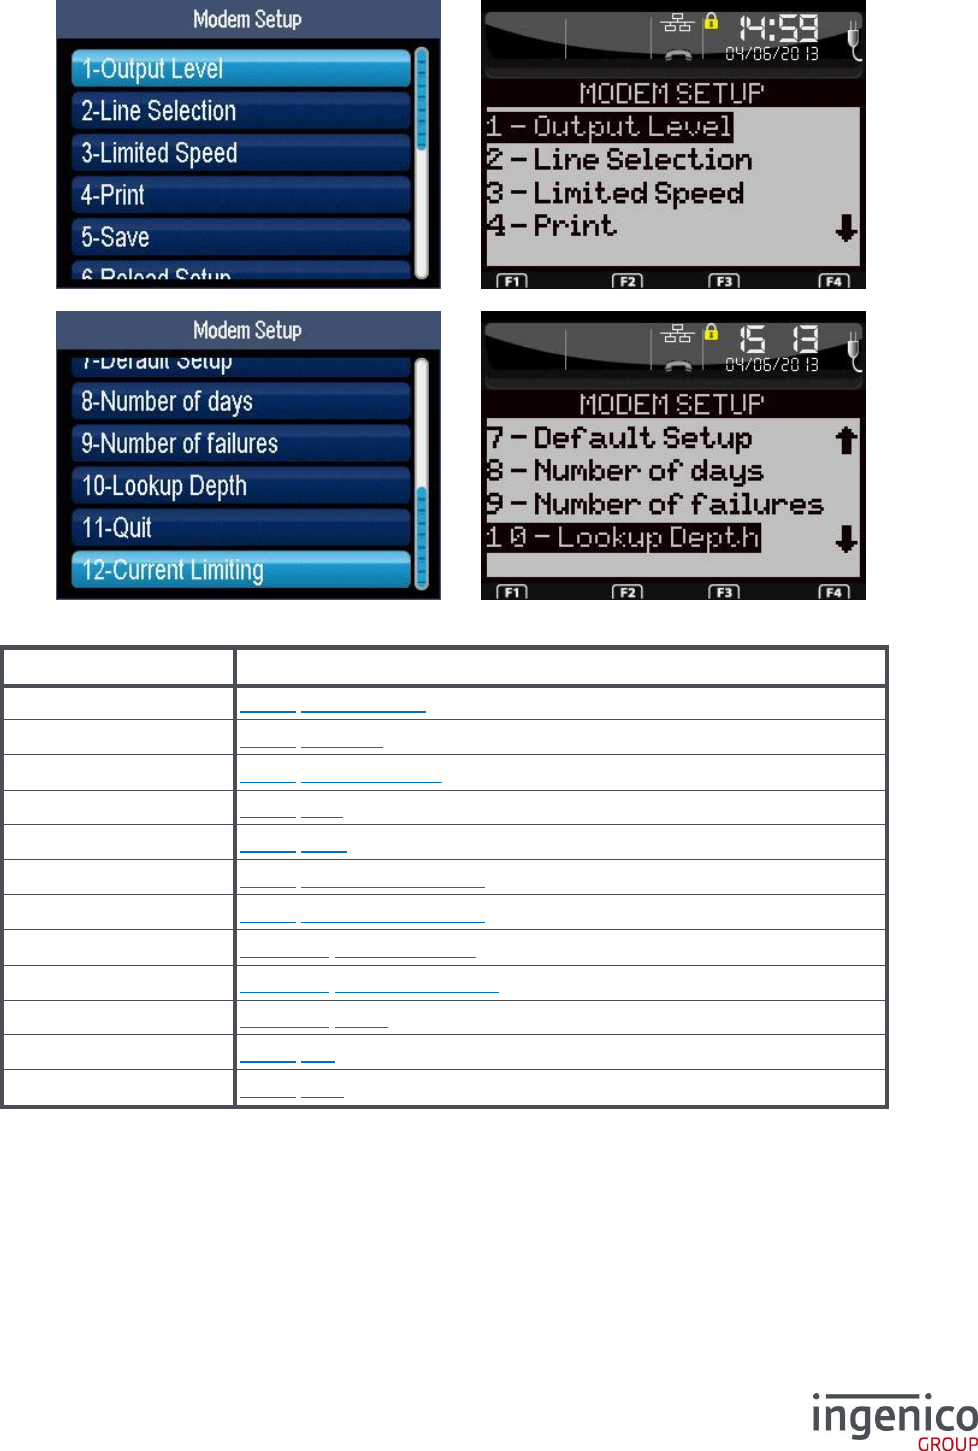
ICO-OPE-00986
REFERENCE MANUAL
Restricted
90/166
Ingenico document - Reproduction or disclosure prohibited without written authorization
Please check document validity before using
Item
Reference
Output Level
9_1_1 Transmit level
Line Selection
9_1_2 Line type
Limited speed
9_1_3 Reduced speed
Print
9_1_4 Print
Save
9_1_5 Save
Reload Setup
9_1_6 Reload configuration
Default Setup
9_1_7 Default configuration
Number of days
9_1_10_1 Number of days
Number of failure
9_1_10_2 Number of failures
Lookup Depth
9_1_10_3 Depth
Quit
9_1_8 Exit
Current Limiting
9_1_9 Limit
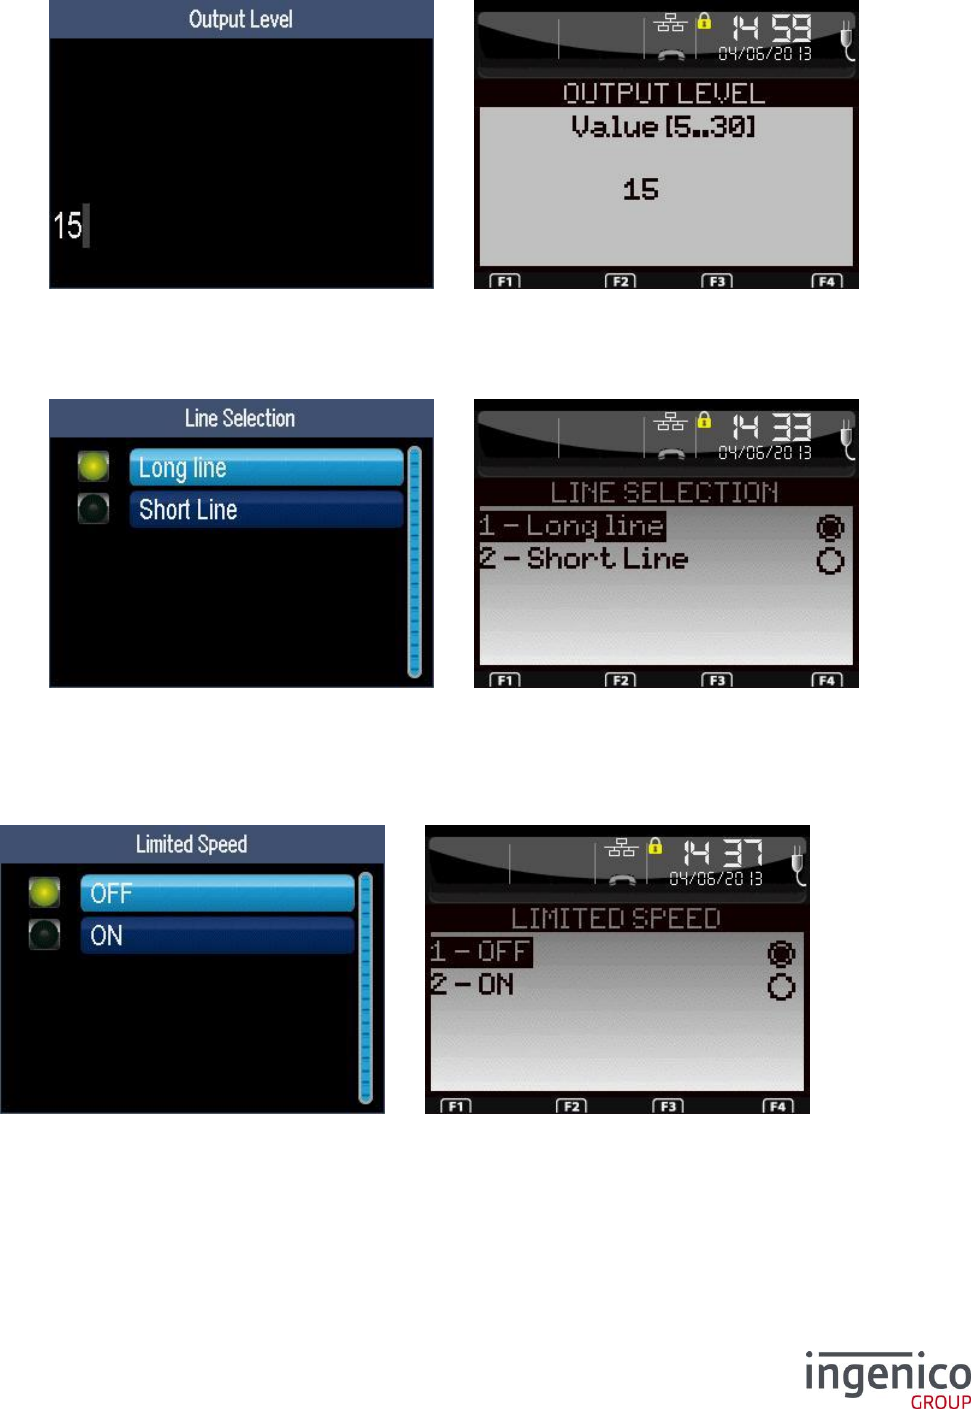
ICO-OPE-00986
REFERENCE MANUAL
Restricted
91/166
Ingenico document - Reproduction or disclosure prohibited without written authorization
Please check document validity before using
9_1_1 Transmit level
Enter the attenuation level (from 5 to 30) of the modem transmission and validate. The standard level
is 15 corresponding to 15dBm.
9_1_2 Line type
This setting is to adapt the line termination:
Long line (with complex impedance) when modem is linked to an external “public” line, or
Short line (with real impedance) when modem is linked to a switchboard.
9_1_3 Reduced speed
Select “ON” to downgrade the modem speed to V22Bis. Then validate.
9_1_4 Print
A ticket is printed with the current configuration (for example to quickly verify the value of modem
options before saving).
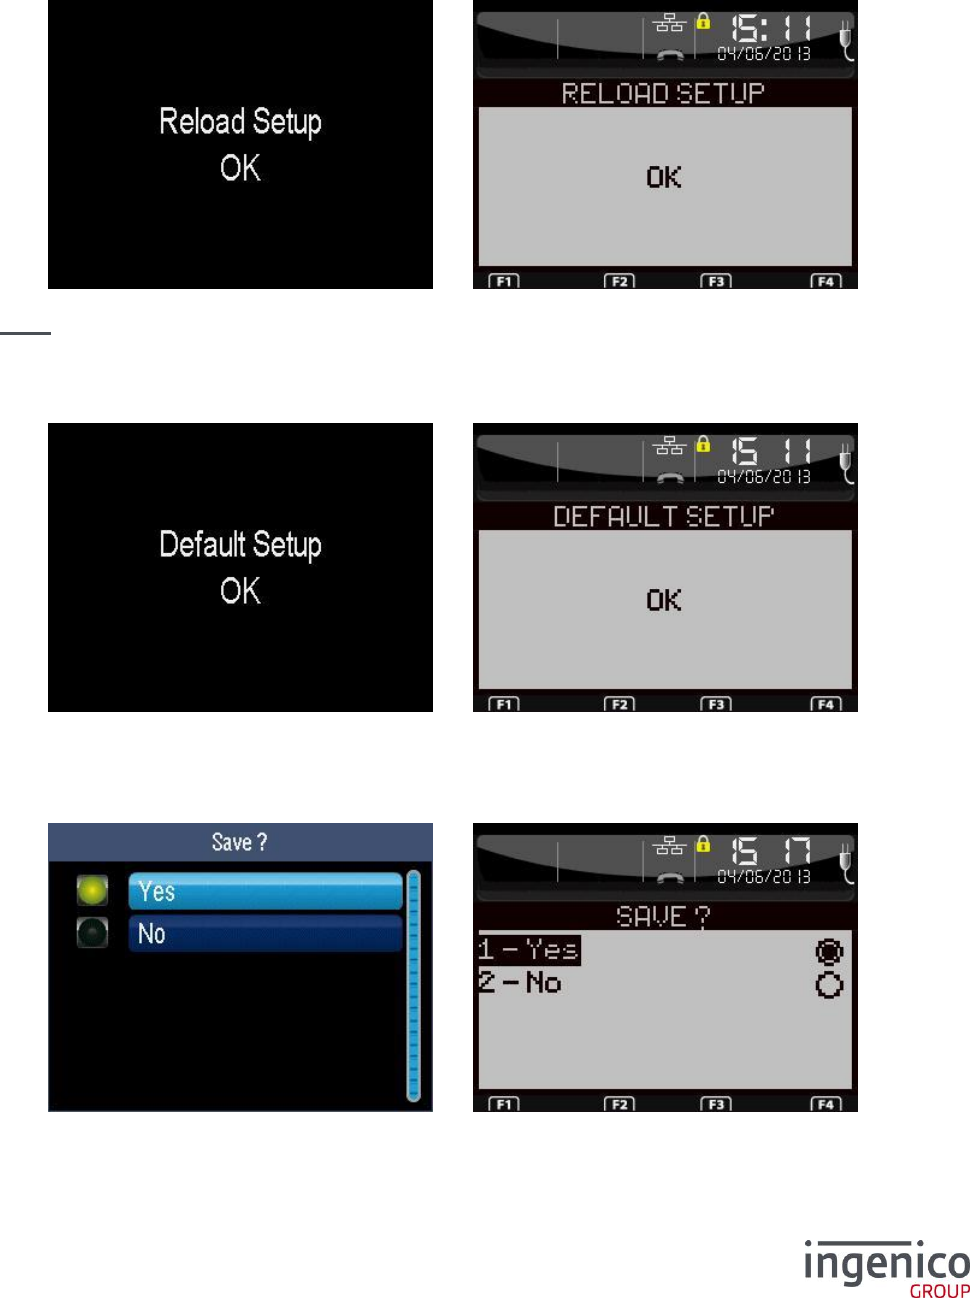
ICO-OPE-00986
REFERENCE MANUAL
Restricted
92/166
Ingenico document - Reproduction or disclosure prohibited without written authorization
Please check document validity before using
9_1_5 Save
Modem configuration is stored. Then the terminal resets to apply the new configuration leading to a
return to the home screen.
9_1_6 Reload configuration
Confirm the reload of the saved configuration. That leads to the loss of all changed parameters.
Nota: At first start, the saved configuration is initialized with default values then updated by the
configuration file.
9_1_7 Default configuration
Confirm the load of the default configuration (TBR21, with no special option). Configuration has to be
saved to be applied.
9_1_8 Exit
This screen is displayed even if no parameter has been changed.
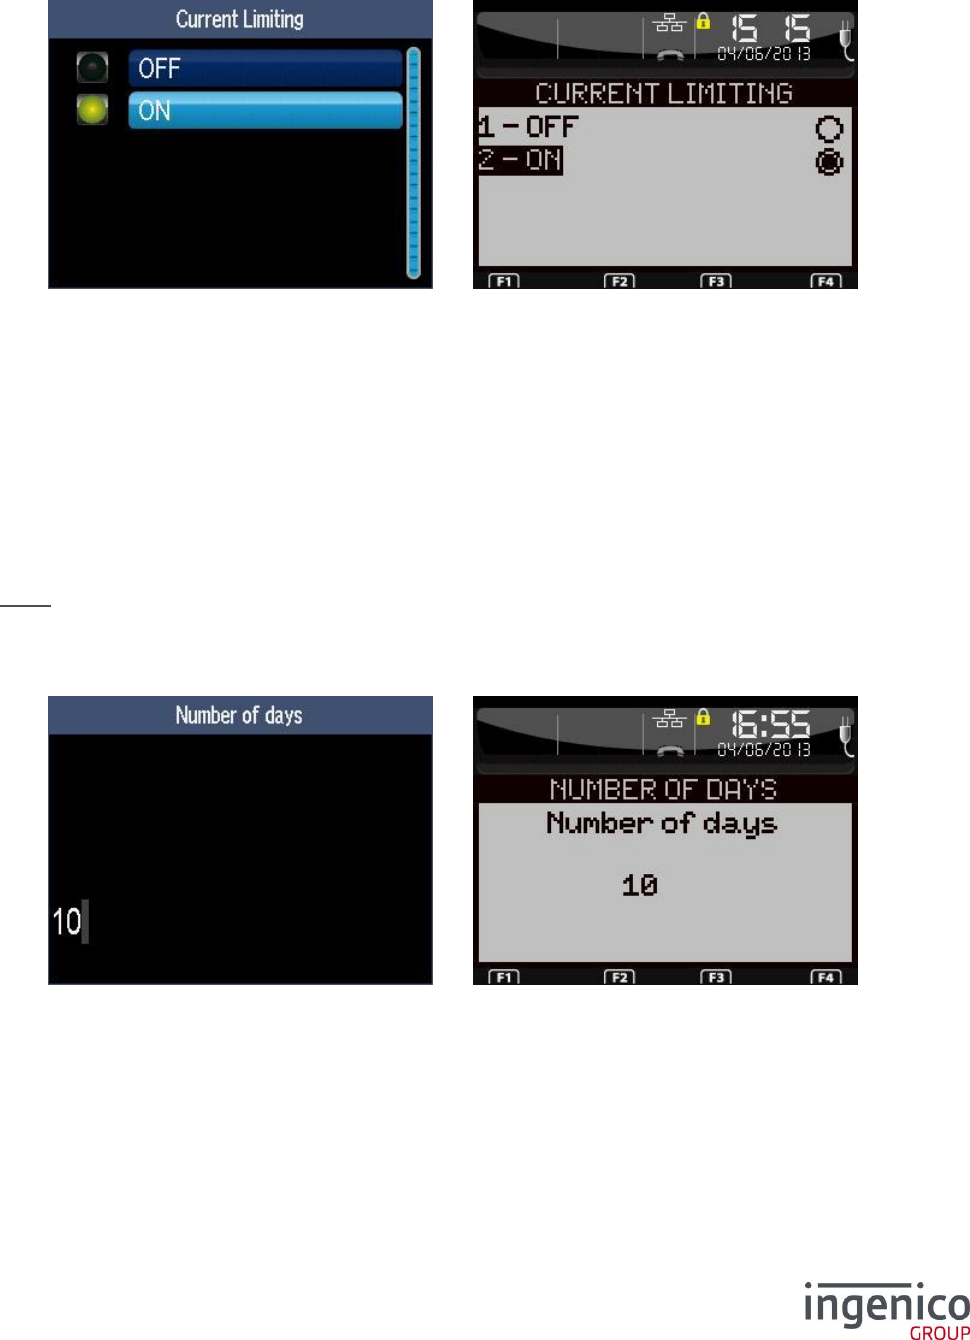
ICO-OPE-00986
REFERENCE MANUAL
Restricted
93/166
Ingenico document - Reproduction or disclosure prohibited without written authorization
Please check document validity before using
If “Yes” is selected, modem configuration is stored. Then the terminal resets to apply the new
configuration leading to a return to the home screen.
9_1_9 Limitation of current
Activate (or not) the limitation of current limitation (some problems on site may be resolved by this
way).
9_1_10 Automatic fallback function
The “Number of days”, “Number of failures” and “Lookup depth” items are used to configure the
automatic fallback function when too many failures.
System switches to its fall back mode (V.22Bis) when the number of call failure reaches the “Number
of failures” threshold for the last “Lookup depth” call attempts. Example: “Number of failures” set to “4”
and “Lookup depth” set to “5” system will switch to fall back mode if “4” call failures occur among
the “5” last attempts.
System switches to its normal mode (V.32Bis) after the “number of days” delay.
Nota: terminal has to restart to change the modem mode. It performs two successive restarts if the
“number of days” delay is reached and the fall back condition is still true.
9_1_10_1 Number of days
Enter the number of days (up to 300 days) before return to normal speed mode. Default value is 10.
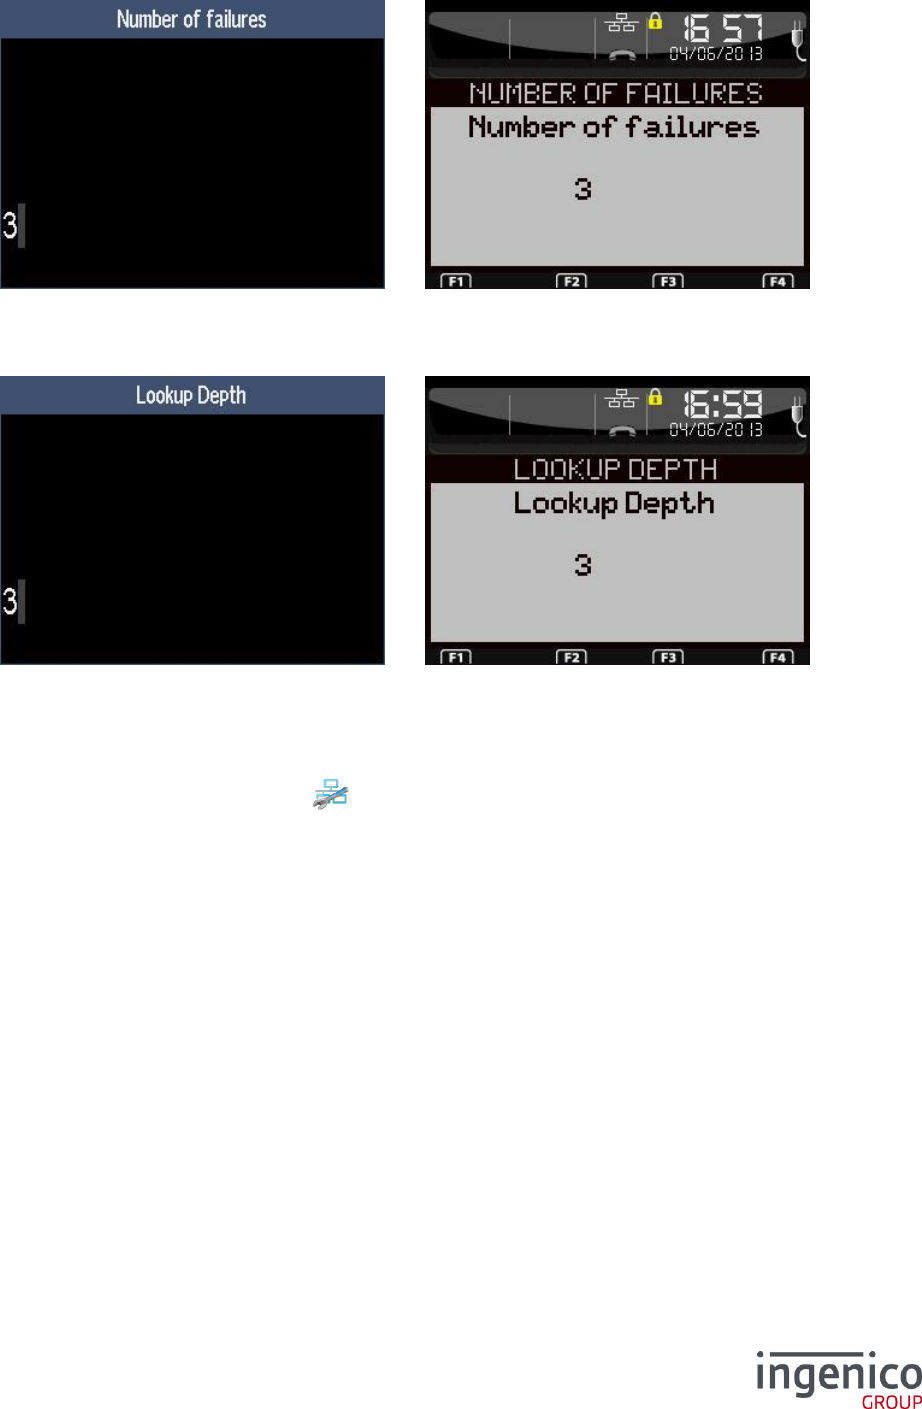
ICO-OPE-00986
REFERENCE MANUAL
Restricted
94/166
Ingenico document - Reproduction or disclosure prohibited without written authorization
Please check document validity before using
9_1_10_2 Number of failures
Enter the number of failures (up to 30) before switching in fallback mode. Default value is 3.
9_1_10_3 Depth
Enter the number of call attempts used for the computation of the number of call failures.
9_2 ETHERNET Configuration
From the “Hardware” screen, select the icon or the “Ethernet Setup” item and validate. This item
is displayed only on terminals equipped with an integrated Ethernet link.
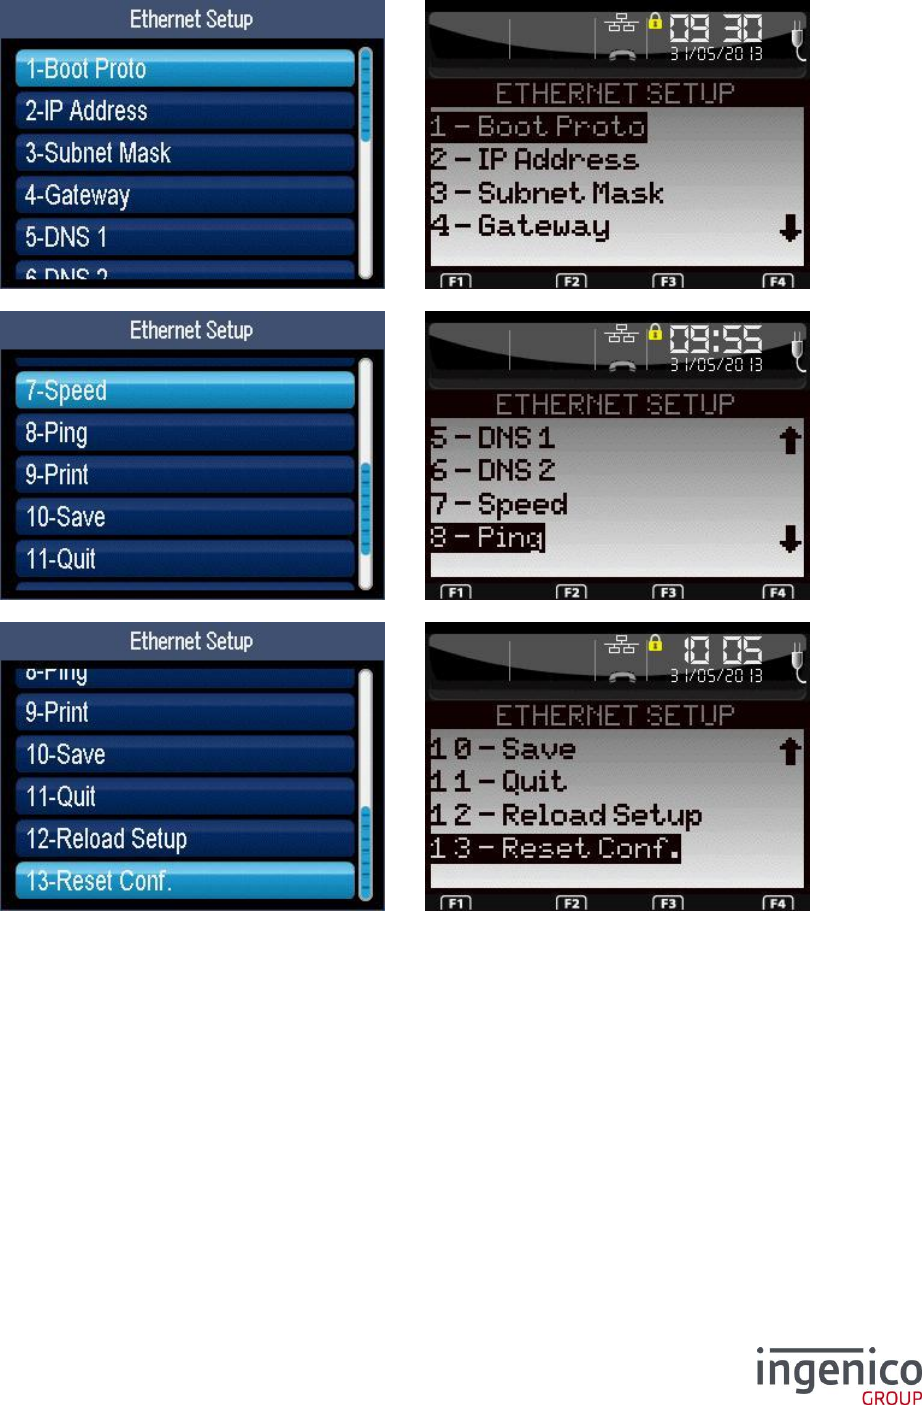
ICO-OPE-00986
REFERENCE MANUAL
Restricted
95/166
Ingenico document - Reproduction or disclosure prohibited without written authorization
Please check document validity before using
When BOOT Proto is STATIC
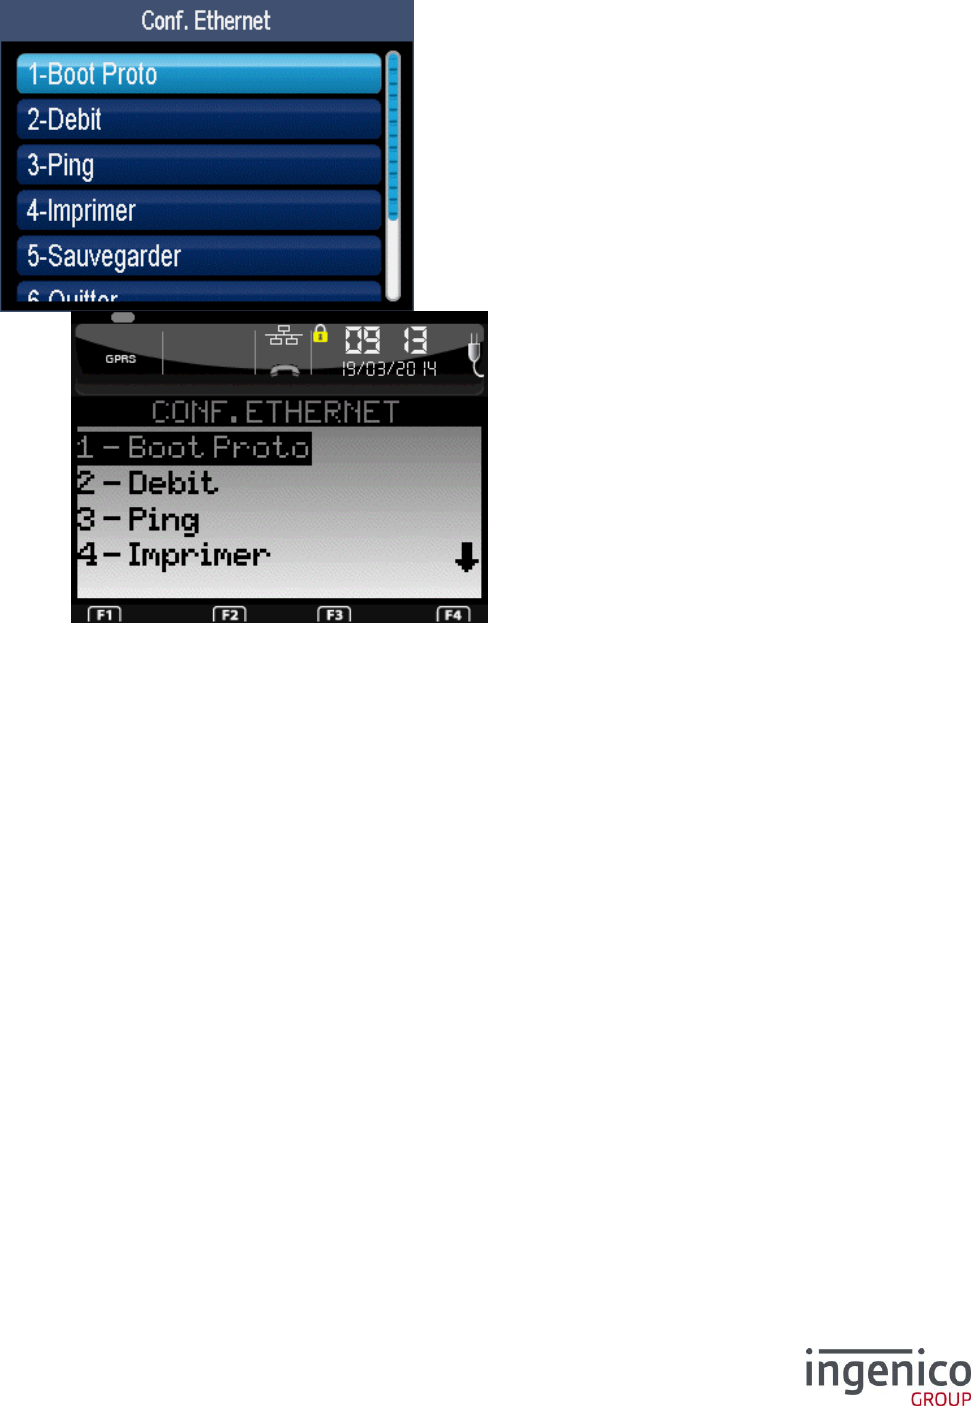
ICO-OPE-00986
REFERENCE MANUAL
Restricted
96/166
Ingenico document - Reproduction or disclosure prohibited without written authorization
Please check document validity before using
When BOOT Proto is DHCP
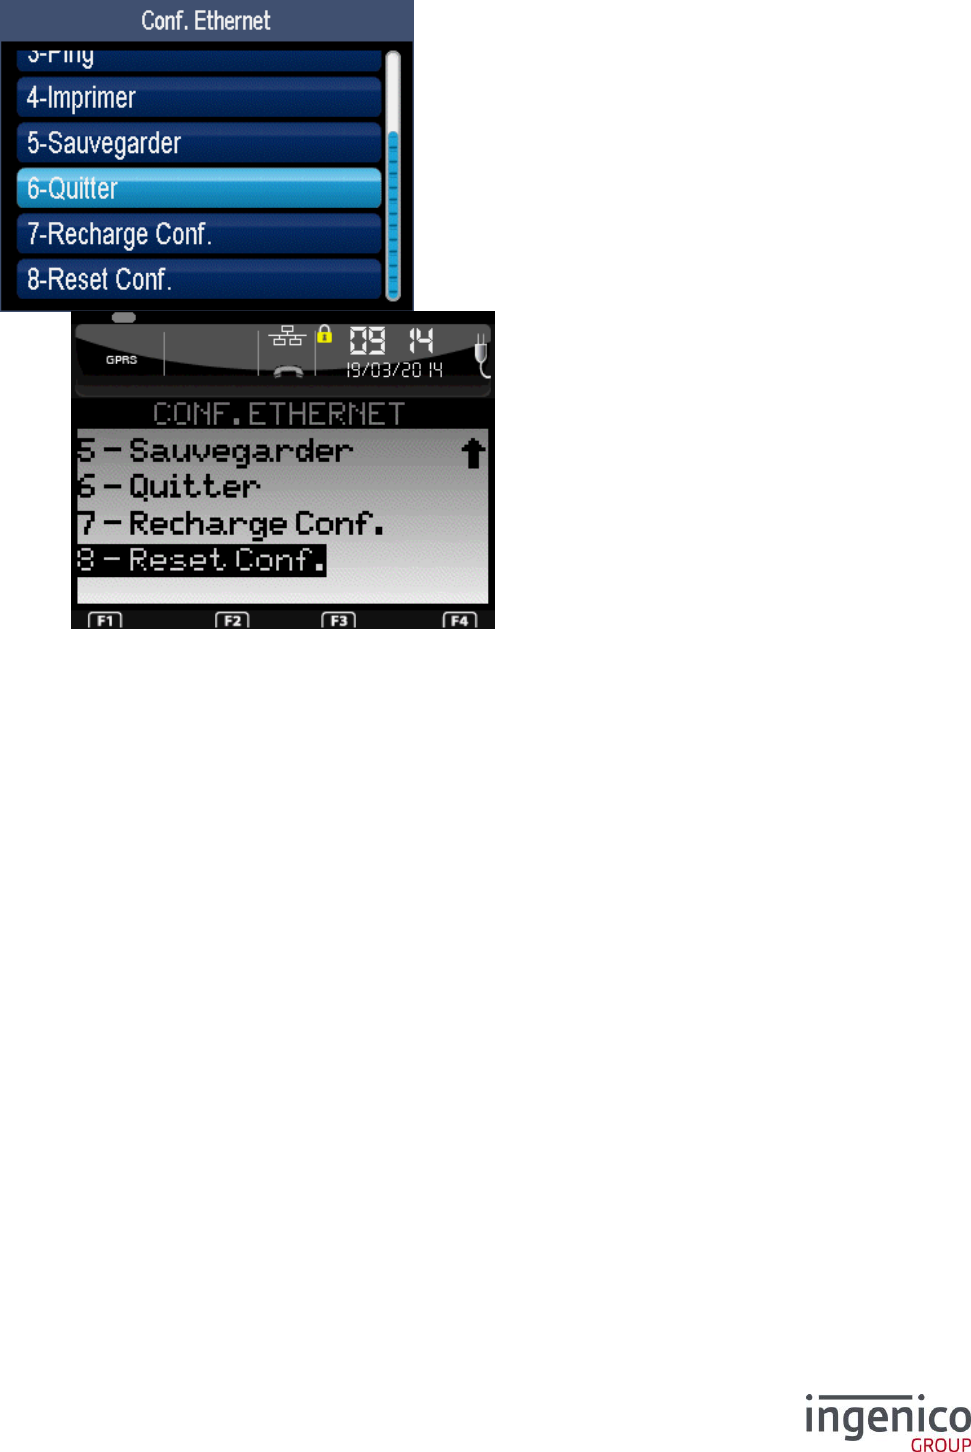
ICO-OPE-00986
REFERENCE MANUAL
Restricted
97/166
Ingenico document - Reproduction or disclosure prohibited without written authorization
Please check document validity before using
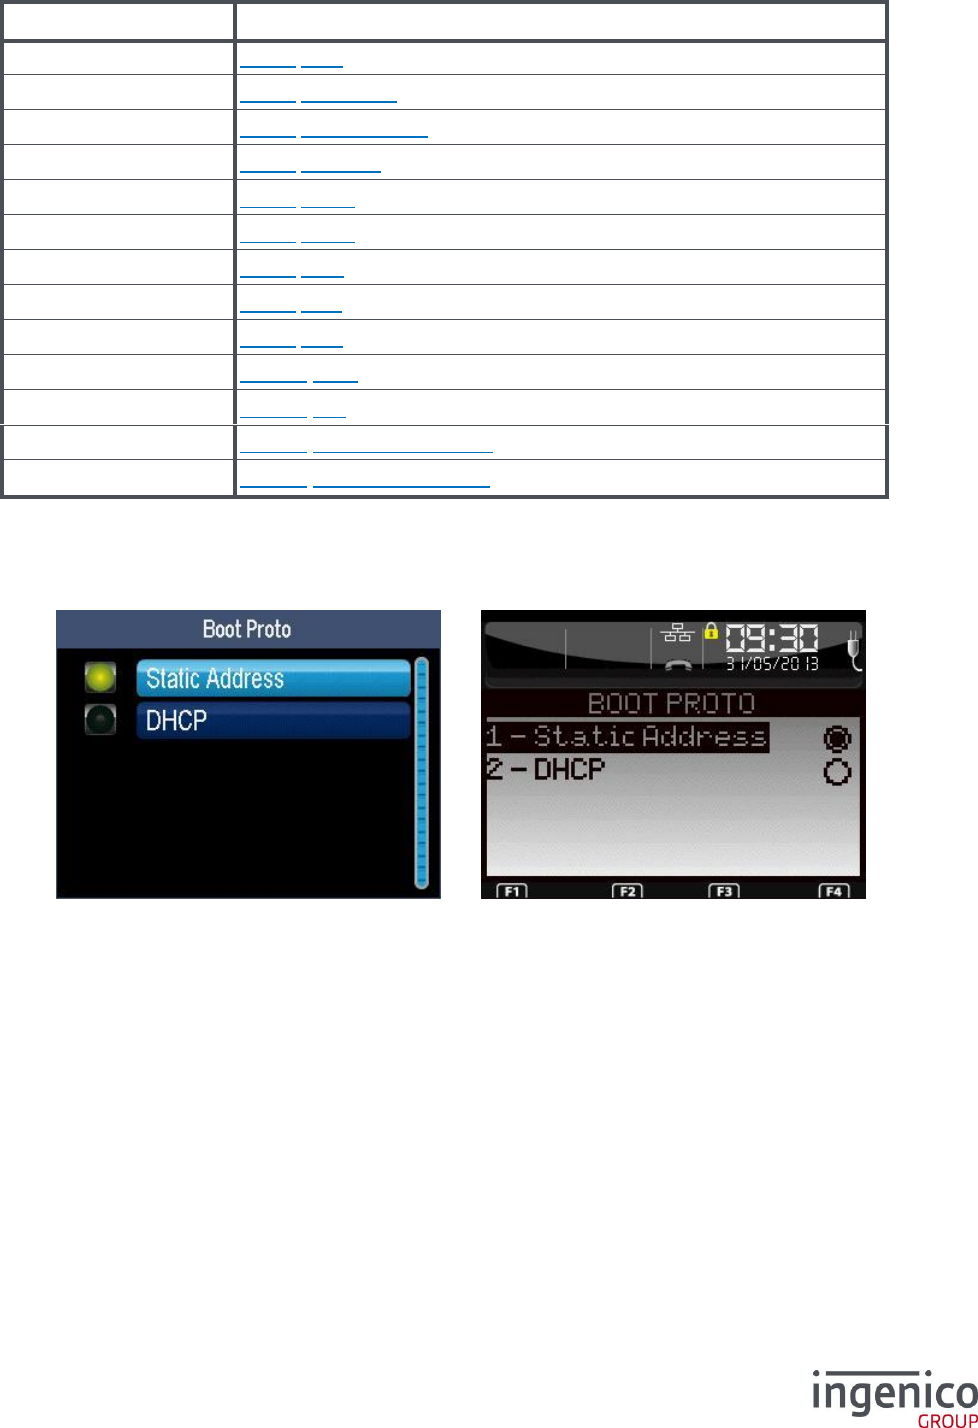
ICO-OPE-00986
REFERENCE MANUAL
Restricted
98/166
Ingenico document - Reproduction or disclosure prohibited without written authorization
Please check document validity before using
Item
Reference
Boot Proto
9_2_1 Boot
IP Address
9_2_2 IP address
Subnet Mask
9_2_3 Network mask
Gateway
9_2_4 Gateway
DNS1
9_2_5 DNS1
DNS2
9_2_6 DNS2
Speed
9_2_7 Rate
Ping
9_2_8 Ping
Print
9_2_9 Print
Save
9_2_10 Save
Quit
9_2_11 Exit
Reload Setup
9_2_12 Configuration reload
Reset Conf.
9_2_13 Configuration Reset
9_2_1 Boot protocol
Select the network configuration mode:
“Static Address” requiring IP address, Network mask, Gateway, DSN1 and DSN2 parameters,
or
“DHCP” (Dynamic Host Configuration Protocol) in which parameters are negociated at startup
of the terminal (the other parameters have no effect but can still be entered).
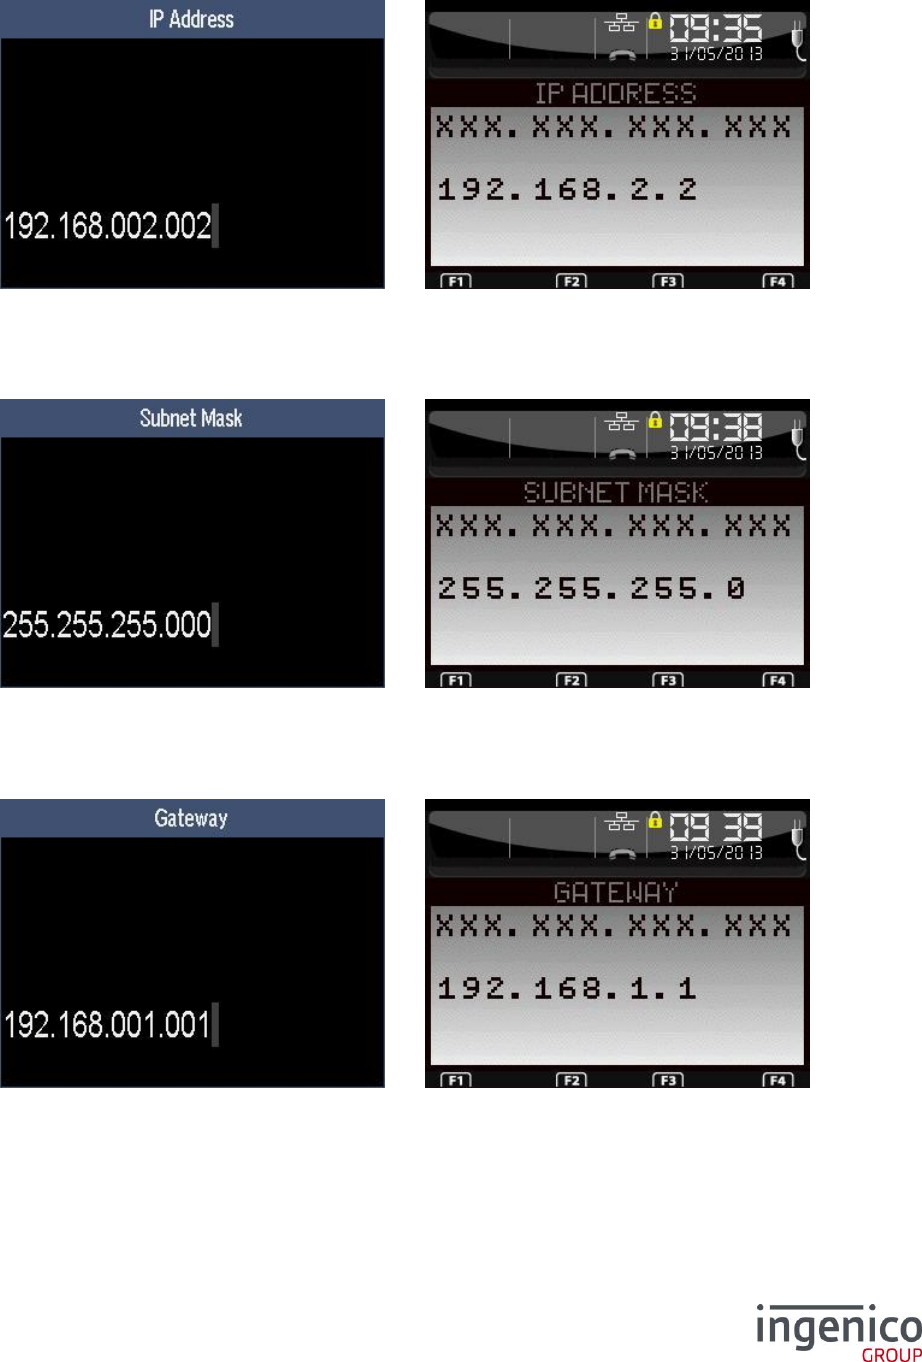
ICO-OPE-00986
REFERENCE MANUAL
Restricted
99/166
Ingenico document - Reproduction or disclosure prohibited without written authorization
Please check document validity before using
9_2_2 IP address
Enter the IP address of the terminal (supplied by the administrator of the local network). IP Address is
composed of four digital fields, each one from 0 to 255.
9_2_3 Network mask
Enter the sub-network mask of the Ethernet interface (usually 255.255.255.000). As IP Address, the
sub-network mask is composed of four digital fields, each one from 0 to 255.
9_2_4 Gateway
Enter Gateway address (supplied by the administrator of the local network) which is the IP address of
the machine used by gateway to join other networks.
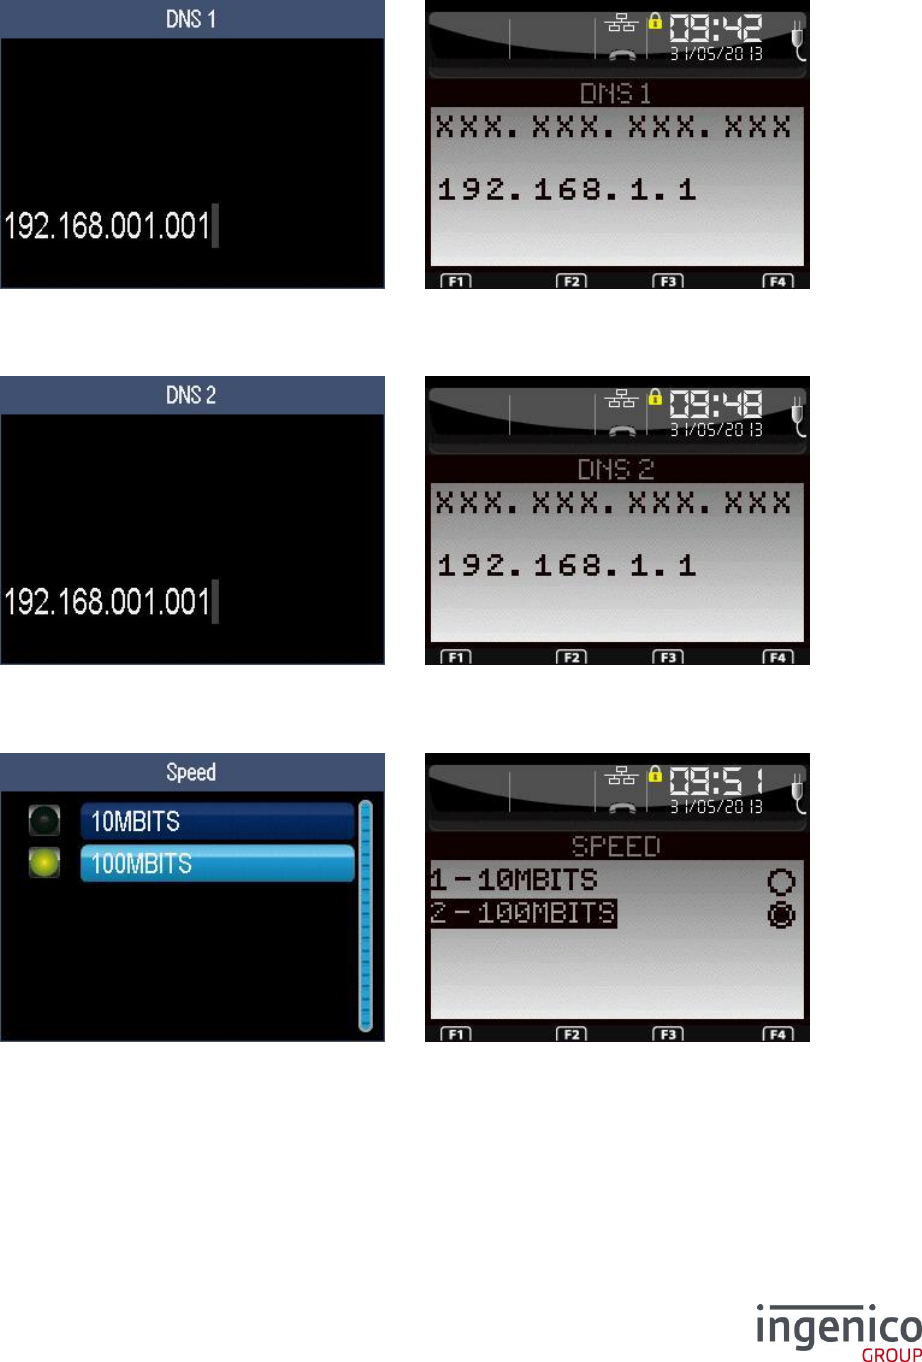
ICO-OPE-00986
REFERENCE MANUAL
Restricted
100/166
Ingenico document - Reproduction or disclosure prohibited without written authorization
Please check document validity before using
9_2_5 DNS1
Enter the IP address of Domain Name Servers 1 (supplied by the administrator of the local network).
9_2_6 DNS2
Enter the IP address of Domain Name Servers 2 (supplied by the administrator of the local network).
9_2_7 Rate
Select the speed of the Ethernet link: either 10 or 100 Mbits per second (required for some networks).
9_2_8 Ping
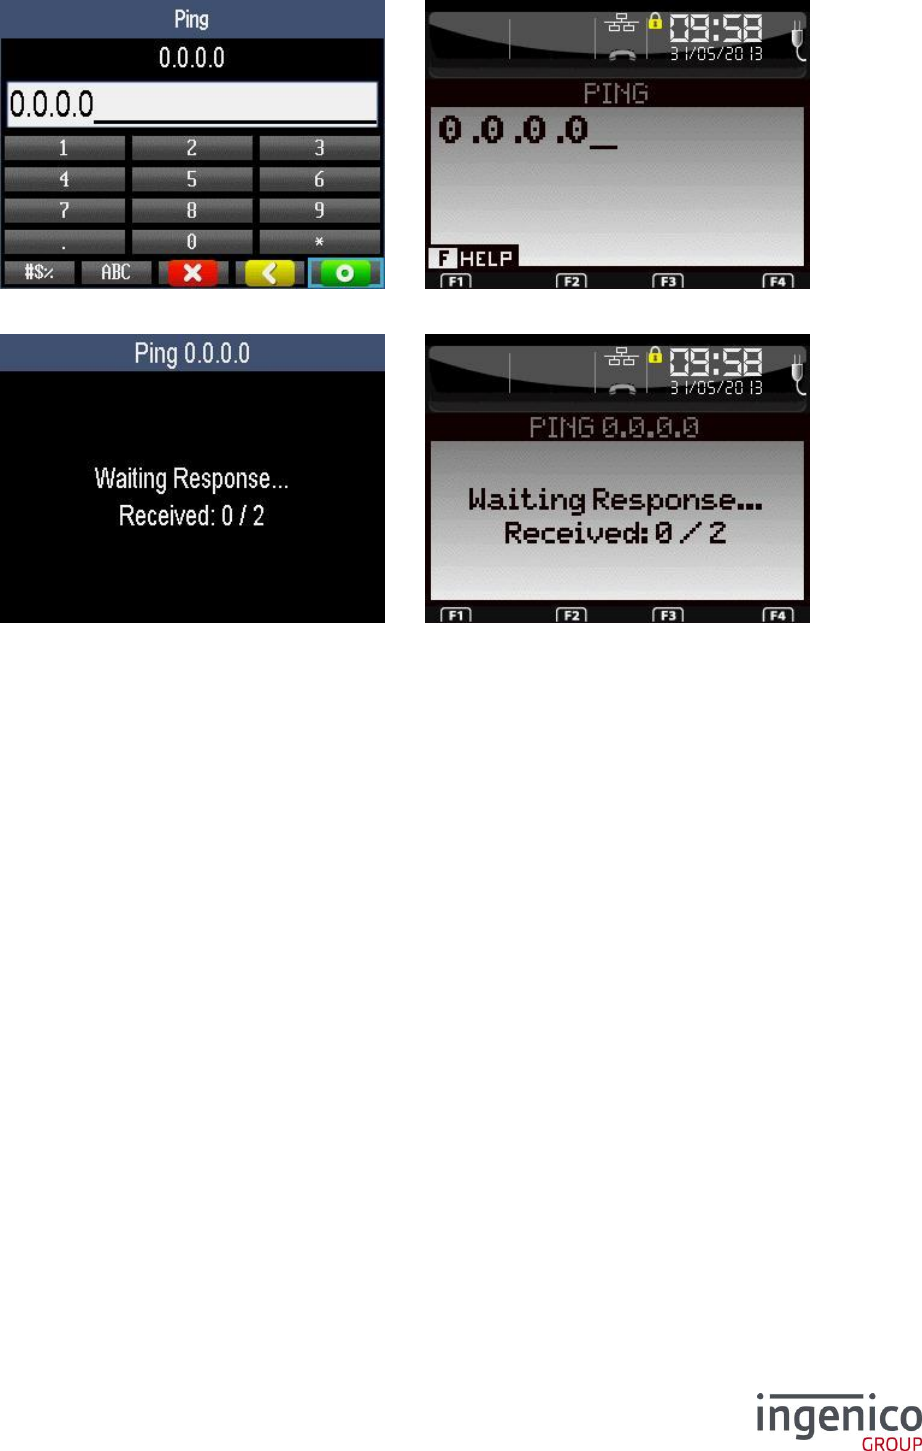
ICO-OPE-00986
REFERENCE MANUAL
Restricted
101/166
Ingenico document - Reproduction or disclosure prohibited without written authorization
Please check document validity before using
Enter the IP address of the machine to “ping” (test of the machine and network).
This screen is the result of the “ping” request.
9_2_9 Print
A ticket is printed with the current configuration (for example to quickly verify the value of modem
options before saving).
9_2_10 Save
Ethernet parameters are stored. Then the terminal resets to apply the new configuration leading to a
return to the home screen.
9_2_11 Exit
Select this item to exit the Ethernet configuration application.
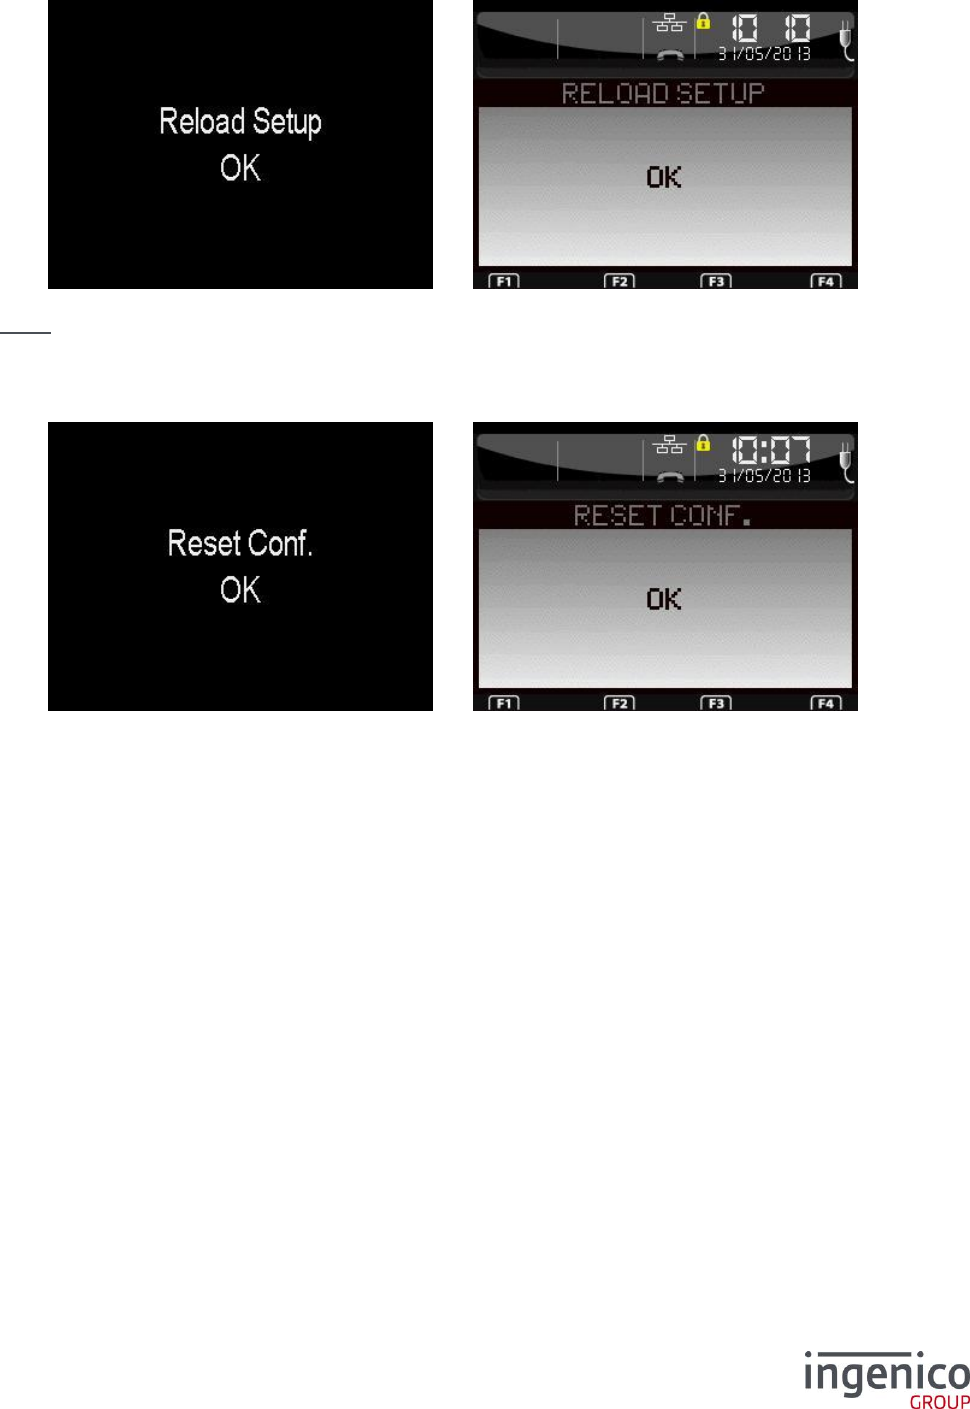
ICO-OPE-00986
REFERENCE MANUAL
Restricted
102/166
Ingenico document - Reproduction or disclosure prohibited without written authorization
Please check document validity before using
9_2_12 Configuration reload
Confirm the reload of the saved configuration. That leads to the loss of all changed parameters.
Nota: At first start, the saved configuration is initialized with default values then updated by the
configuration file.
9_2_13 Configuration Reset
Confirm the load of the factory configuration.
9_3 Standby setup
This item is available only on MR40 cash dispensers.
Select in the list either:
Standby type, or
Standby delay.
9_3_1 Standby type
Select in the list either:
None, or
Light, or
Deep.
9_3_2 Standby delay
Enter the inactivity duration (in seconds, form 0 to 900) before switching to standby mode.
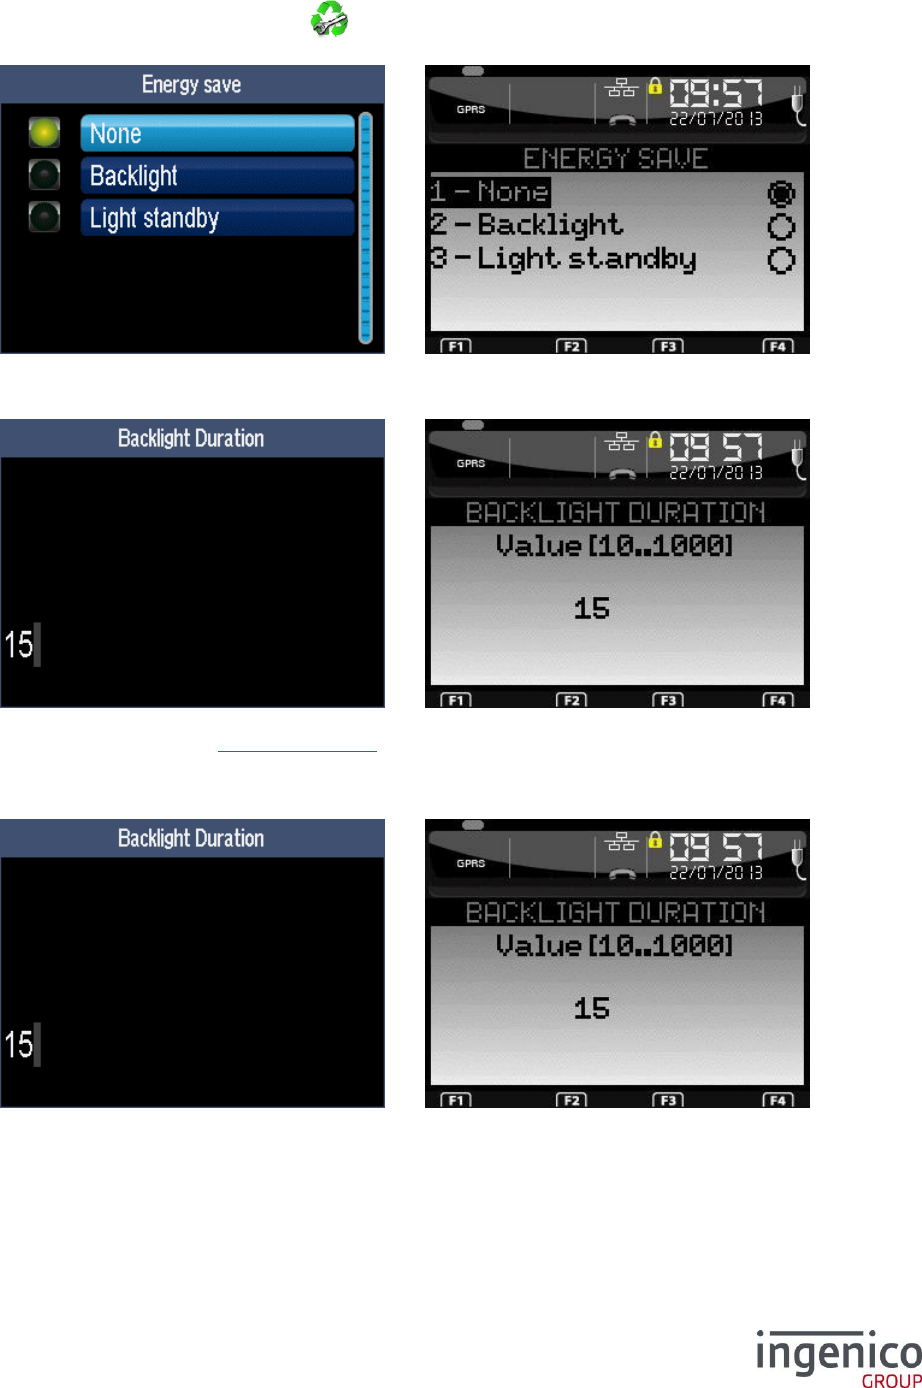
ICO-OPE-00986
REFERENCE MANUAL
Restricted
103/166
Ingenico document - Reproduction or disclosure prohibited without written authorization
Please check document validity before using
9_4 Energy save
From the “Hardware” screen, select the icon or the “Energy Save” item and validate. This item is
displayed only on fixed terminals.
9_4_1 Backlight
Enter the duration of the backlightning (in seconds, from 10 to 1000). Then validate.
This item is same as “Display/Backlight duration”.
9_4_2 Standby
Enter the duration of the backlightning (in seconds, from 10 to 1000). Then validate.

ICO-OPE-00986
REFERENCE MANUAL
Restricted
104/166
Ingenico document - Reproduction or disclosure prohibited without written authorization
Please check document validity before using
Enter the delay to switch off the display (in seconds, from 10 to 999999999).
Press a key to exit the standby mode.
9_5 Battery Setup
From the “Hardware” screen, select the icon or the “Battery Setup” item and validate. This item is
displayed only on terminals equipped with a battery.
Item
Reference
New Battery
9_5_1 Battery change
Tilt
9_5_2 Tilt
USB Charging
9_5_3 USB Charge
Standby Delay
9_5_4 Time before standby
Standby On Cradle
9_5_5 Standby on cradle
ECO Mode
9_5_6 ECO mode

ICO-OPE-00986
REFERENCE MANUAL
Restricted
105/166
Ingenico document - Reproduction or disclosure prohibited without written authorization
Please check document validity before using
9_5_1 Battery change
Select “Yes” and validate to indicate to the system that you have changed the battery and to avoid an
overload (unless you are able to follow the battery change procedure with restart on the base without
battery, the terminal may not detect the change of battery).
9_5_2 Tilt
Select “Yes” to automatically wake up the terminal when it is picked up while in standby. Select “No” to
wake up the terminal only by pressing a key.
This item is displayed only on products equipped with a motion sensor as EFT930B.
9_5_3 USB Charge
This item is available only on EFT930 terminals.
Select “Yes” or “No” to respectively enable or disable charging by USB link. This item is to avoid
discharging the battery of the unit on which the terminal is connected by USB like a portable computer.
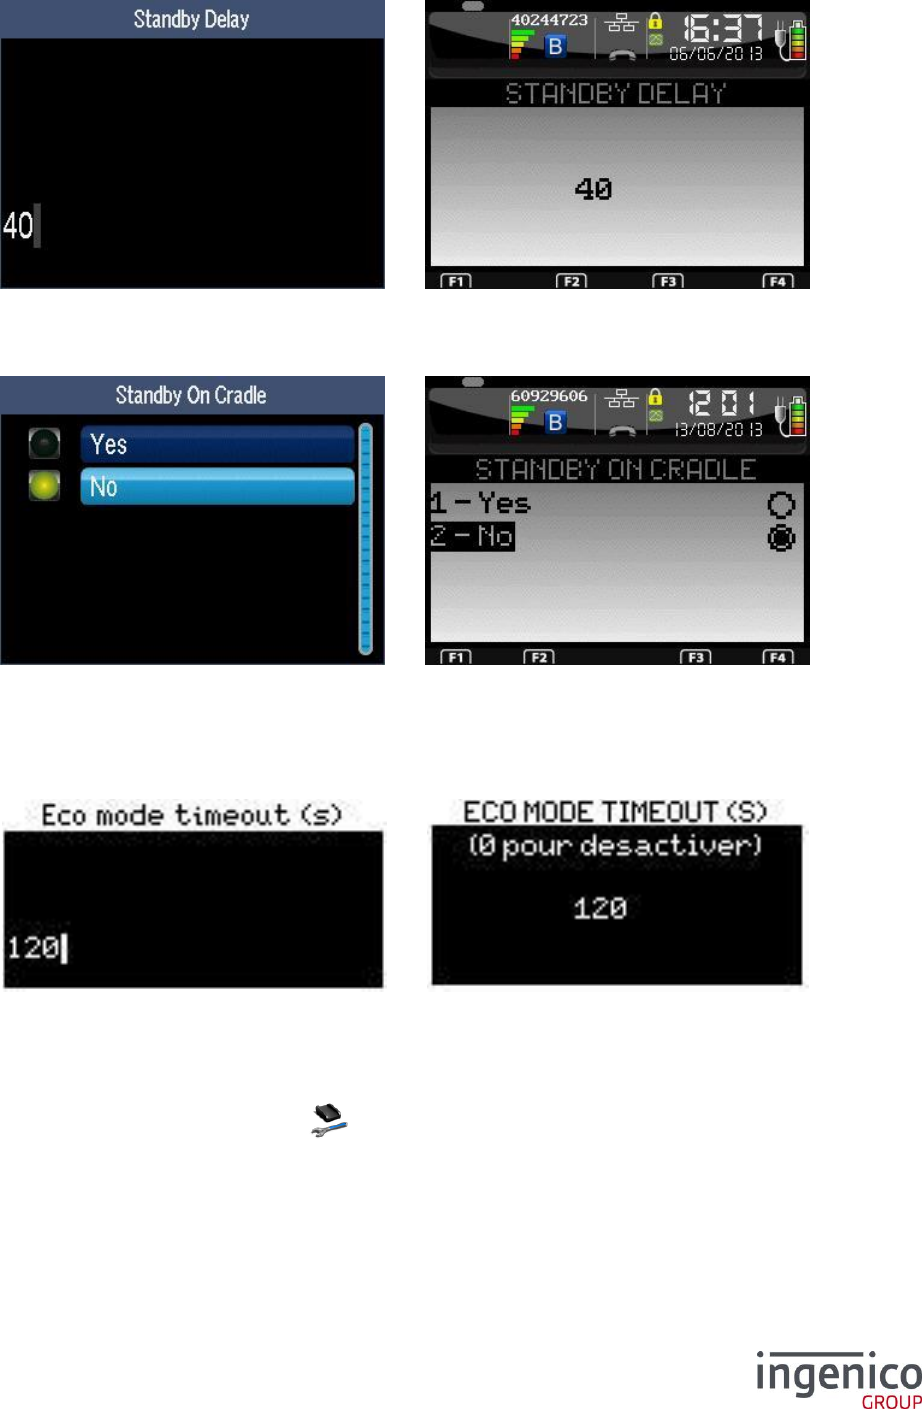
ICO-OPE-00986
REFERENCE MANUAL
Restricted
106/166
Ingenico document - Reproduction or disclosure prohibited without written authorization
Please check document validity before using
9_5_4 Time before standby
Enter the inactivity duration (in seconds, from 10 to 120) before going in standby mode.
9_5_5 Standby on cradle
Select if the terminal have to switch in standby mode when on a base or to stay active as it is
powered.
9_5_6 ECO mode
This item is available only on iCMP terminals.
Enter the standby duration (in seconds, from 10 to 999999999) before switching off the terminal.
9_6 Bluetooth Configuration
From the “Hardware” screen, select the icon or the “Cradle Setup” item and validate. This item is
displayed only on Bluetooth terminals.
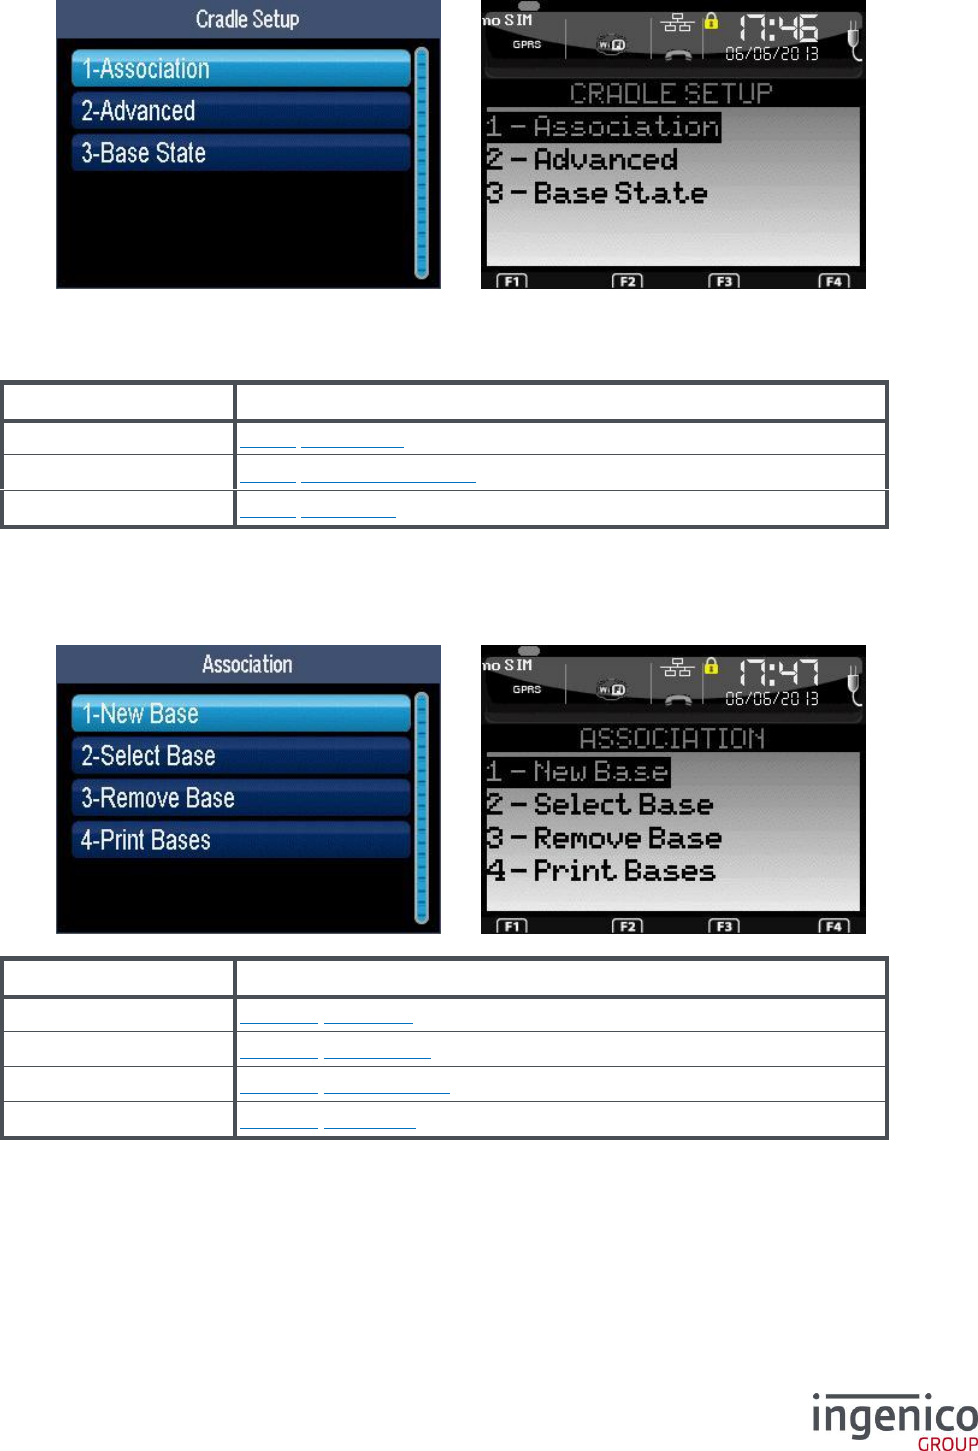
ICO-OPE-00986
REFERENCE MANUAL
Restricted
107/166
Ingenico document - Reproduction or disclosure prohibited without written authorization
Please check document validity before using
To be operational, a Bluetooth terminal shall be associated to at least one base (“Association” item).
Once associated, the terminal can use one of the base communication ports (“Advanced” item) like
modem, USB, Ethernet…
Item
Reference
Association
9_6_1 Association
Advanced
9_6_2 Advanced functions
Base State
9_6_3 Base state
9_6_1 Association
Shortcut: F.49
Item
Reference
New Base
9_6_1_1 New base
Select Base
9_6_1_2 Select Base
Remove Base
9_6_1_3 Remove Base
Print Bases
9_6_1_4 Print Base
9_6_1_1 New base
Before selecting the “New base” item, the terminal shall be placed on the base to be associated.
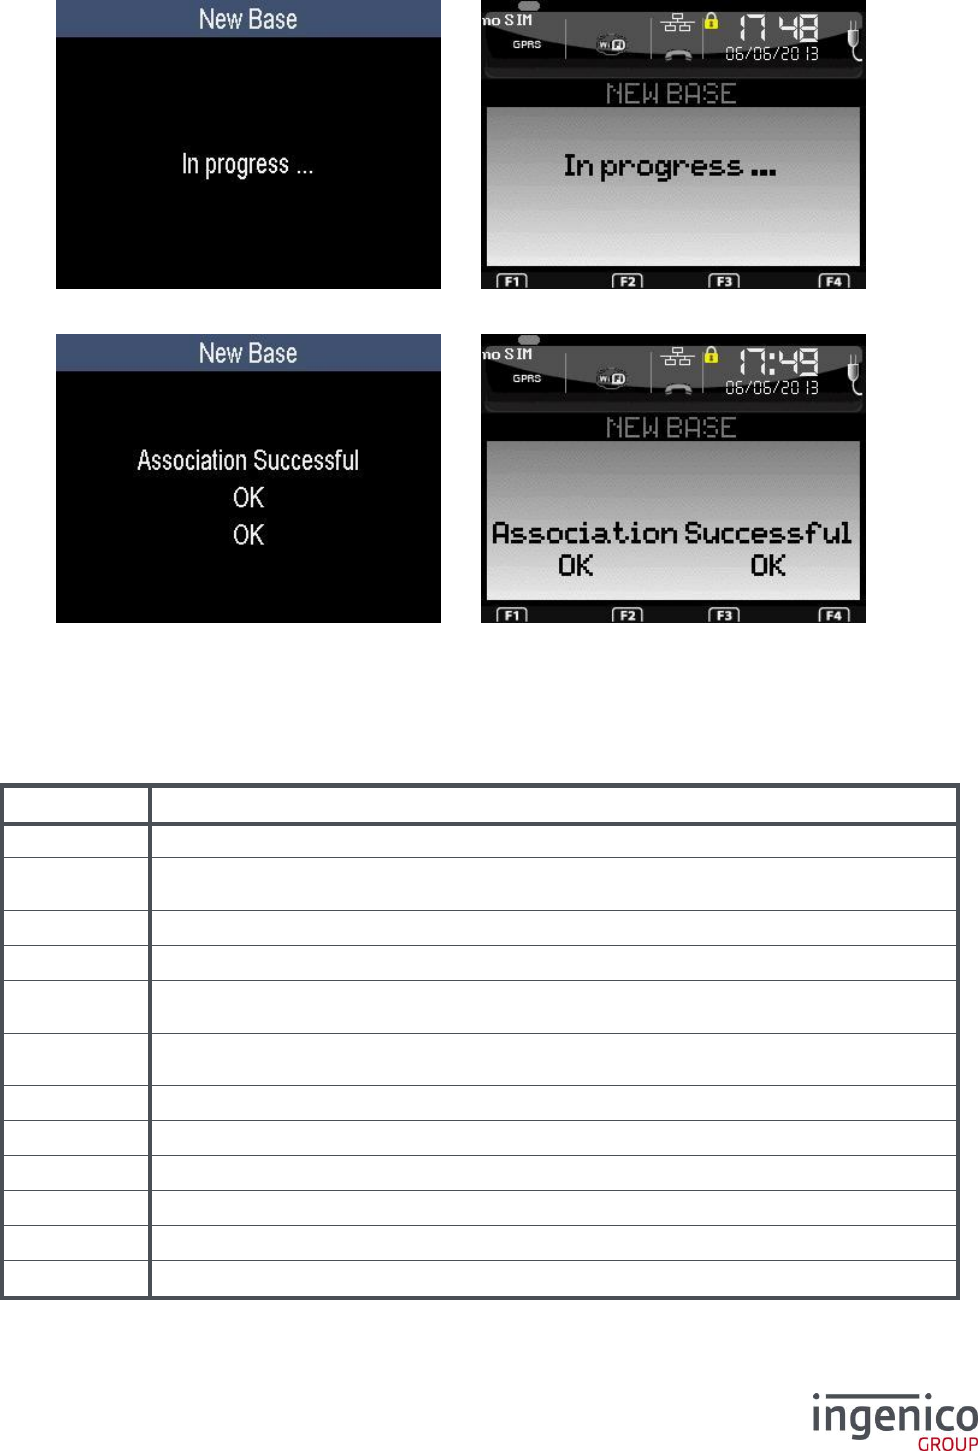
ICO-OPE-00986
REFERENCE MANUAL
Restricted
108/166
Ingenico document - Reproduction or disclosure prohibited without written authorization
Please check document validity before using
This screen is displayed while the terminal is trying to associate to a new base.
When the “Association” attempt is finished, the terminal displays a result screen.
If the association is successful, the result screen contains the "Association OK" message and the
status bar is updated (refer to 7_6_10 Bluetooth connection): reception level, serial number, “2S”
icon…
If the association is not successful, the result screen contains the "Association not possible" message
and the error type: either its digital code or its textutal description (refer to the following table).
Error code
Description
0
Association OK
-1
Association not possible: IR link unavailable (active trace, MODEM_IS_IR or
COM0_IS_IR set to ON).
-2
Association not possible: connection not possible with base (Is it a smart base?).
-3
Association not possible: the terminal fails to transmit its association request.
-4
Association not possible: the terminal has transmitted its association request but has not
received a reply.
-5
Association not possible: base has returned a null address (base not yet started up or out
of order).
-6
Association not possible: portable terminal not on a base.
-7
Association not possible: driver to be updated.
-8
Association not possible: software version of the base is unknown.
-9
Association not possible: software version of the terminal is unknown.
-10
Association not possible: software version of the base is incorrect.
-11
Association not possible: software version of the terminal is incorrect.
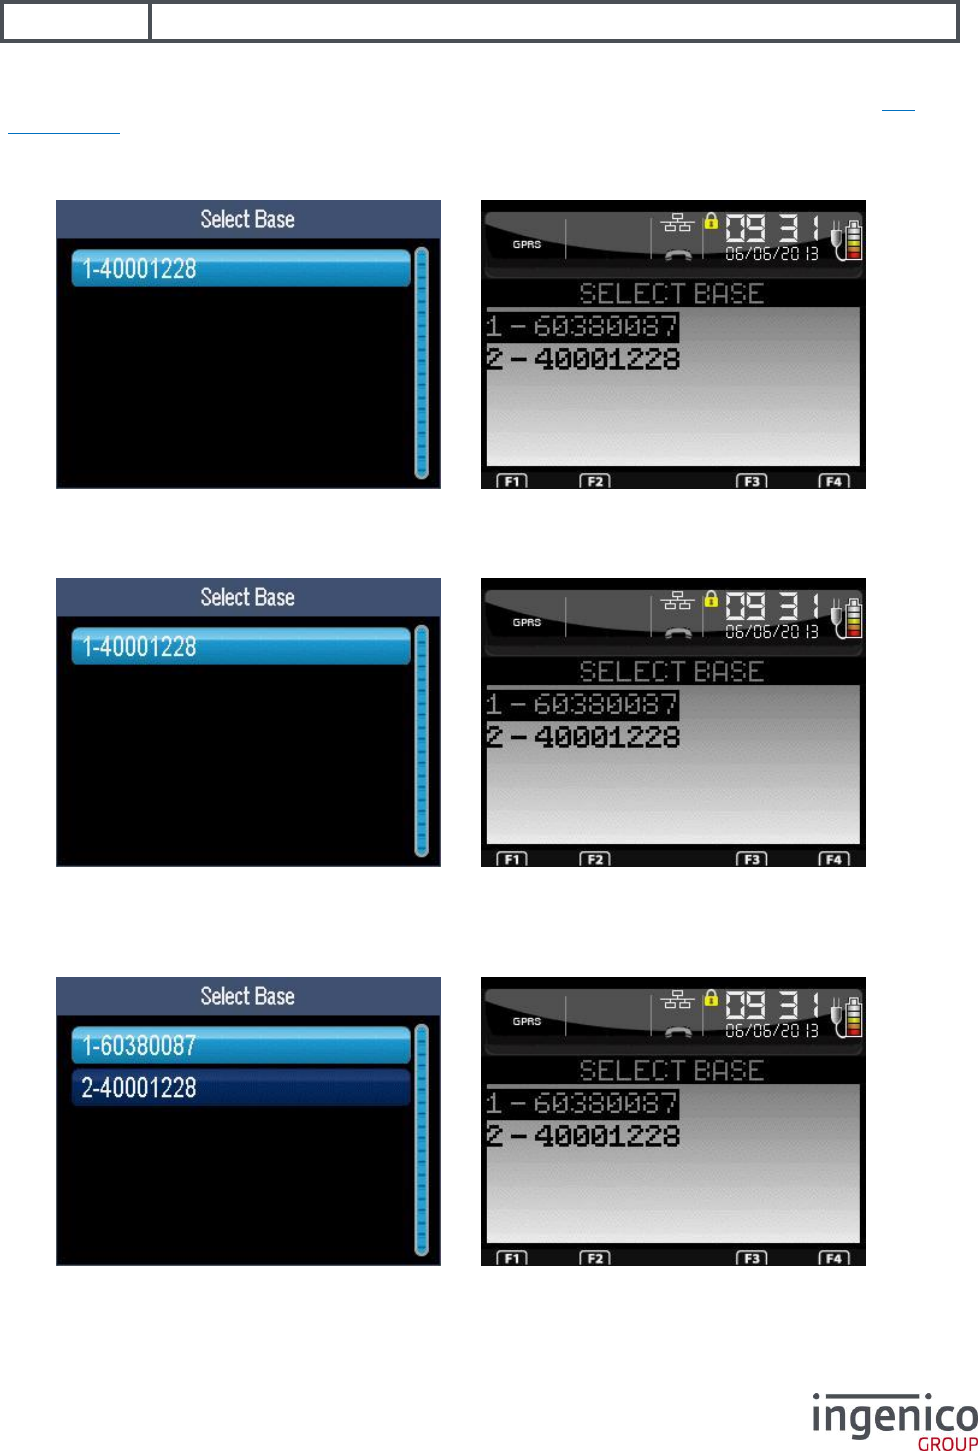
ICO-OPE-00986
REFERENCE MANUAL
Restricted
109/166
Ingenico document - Reproduction or disclosure prohibited without written authorization
Please check document validity before using
-12
Association not possible: software versions of both base and terminal are incorrect.
Then if the association was successful, the terminal may propose updating base software (refer 9_7
Base update).
9_6_1_2 Select Base
Select in the list of associated bases the one to use as peripheral.
9_6_1_3 Remove Base
Select in the list of associated bases the one to delete. Peripherals are automatically reassigned to the
first known base.
9_6_1_4 Print Base
Select a base in the proposed list to print its name, type, Bluetooth address and serial number.
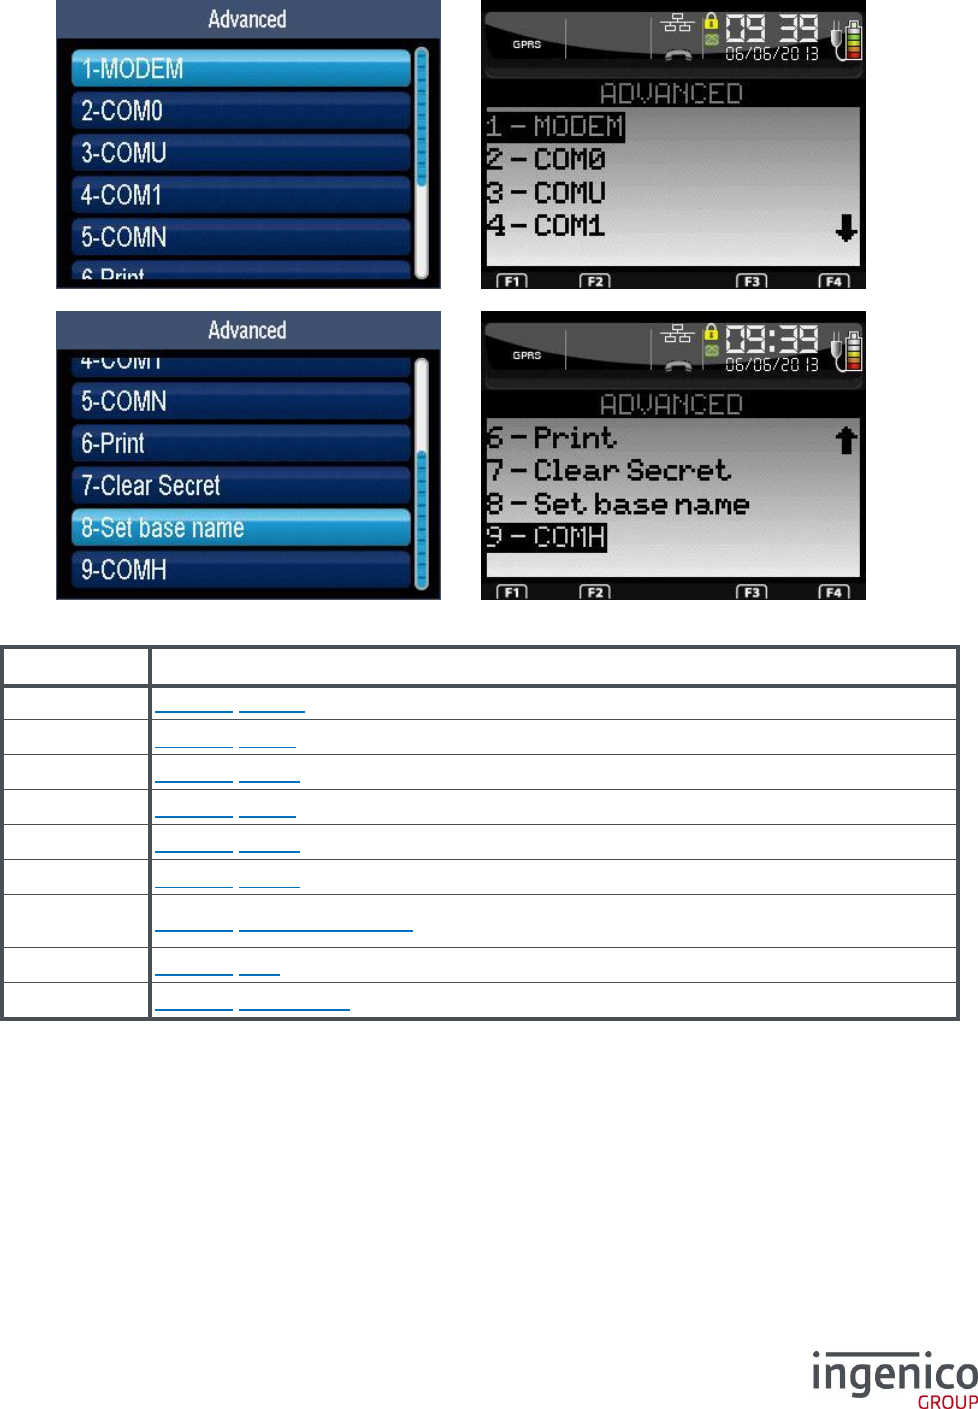
ICO-OPE-00986
REFERENCE MANUAL
Restricted
110/166
Ingenico document - Reproduction or disclosure prohibited without written authorization
Please check document validity before using
9_6_2 Advanced functions
Item
Reference
Modem
9_6_2_1 Modem
COM0
9_6_2_2 COM0
COMU
9_6_2_3 COMU
COM1
9_6_2_4 COM1
COMN
9_6_2_5 COMN
COMH
9_6_2_6 COMH
Set base
name
9_6_2_7 Change base name
Print
9_6_2_8 Print
Clear Secret
9_6_2_9 Clear Secret
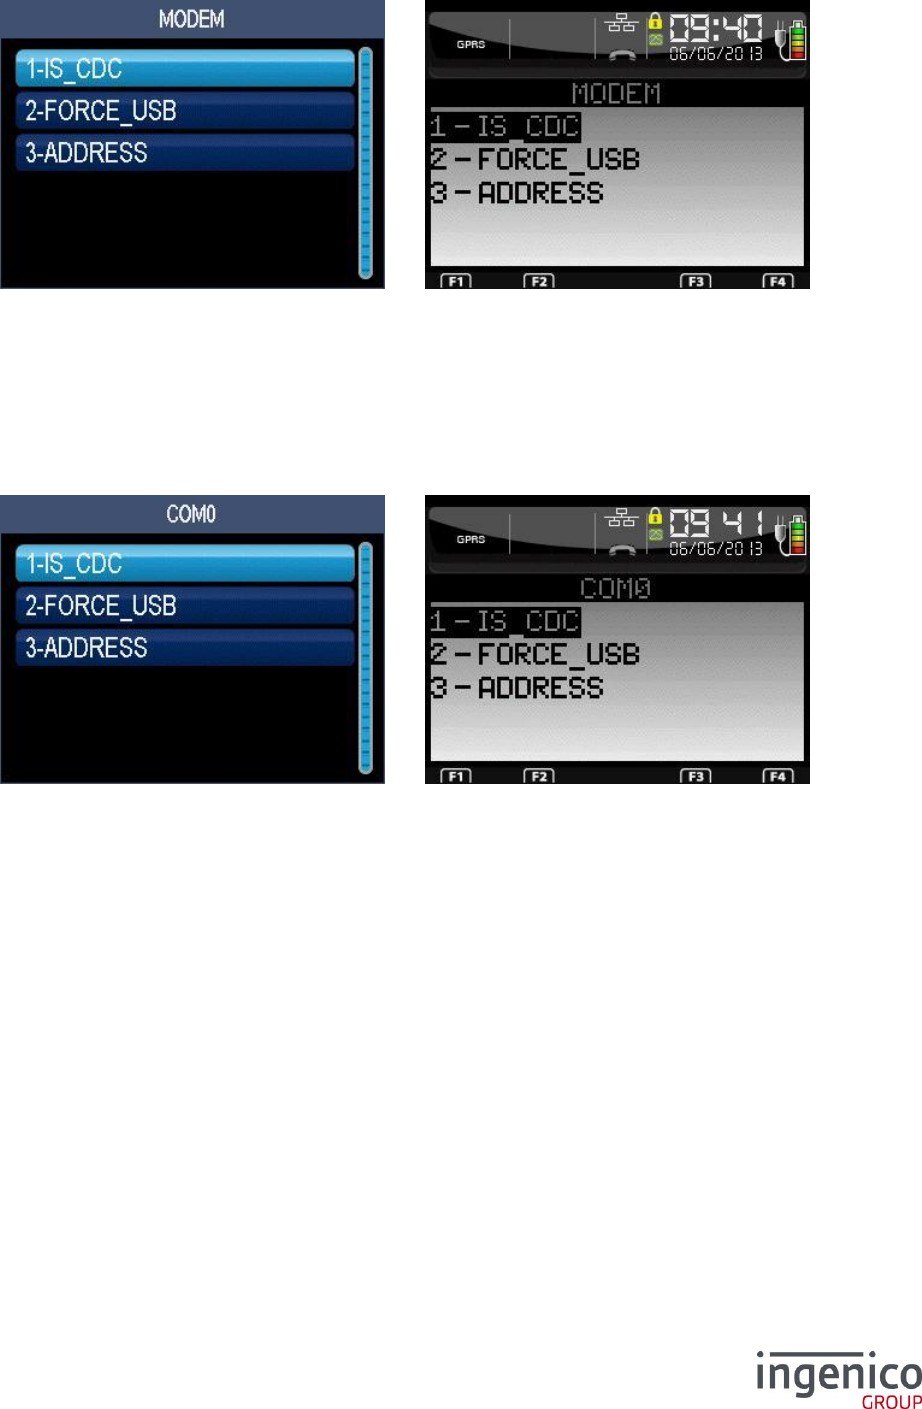
ICO-OPE-00986
REFERENCE MANUAL
Restricted
111/166
Ingenico document - Reproduction or disclosure prohibited without written authorization
Please check document validity before using
9_6_2_1 Modem
Select the way to communicate via a modem (from highest to lowest priority):
FORCE_USB (FORCE_IR on old terminal): set “ON” to force the use of the serial link even if
the selected base has a “Bluetooth” interface;
ADDRESS: force the use of a specific “Bluetooth” base;
IS_CDC (IS_IR on old terminal): set “ON” to enable the use of the serial if the selected base
has no “Bluetooth” interface.
9_6_2_2 COM0
Select the way to communicate via COM0 serial port (from highest to lowest priority):
FORCE_USB (FORCE_IR on old terminal): set “ON” to force the use of the serial link even if
the selected base has a “Bluetooth” interface;
ADDRESS: force the use of a specific “Bluetooth” base;
IS_CDC (IS_IR on old terminal): set “ON” to enable the use of the serial if the selected base
has no “Bluetooth” interface.
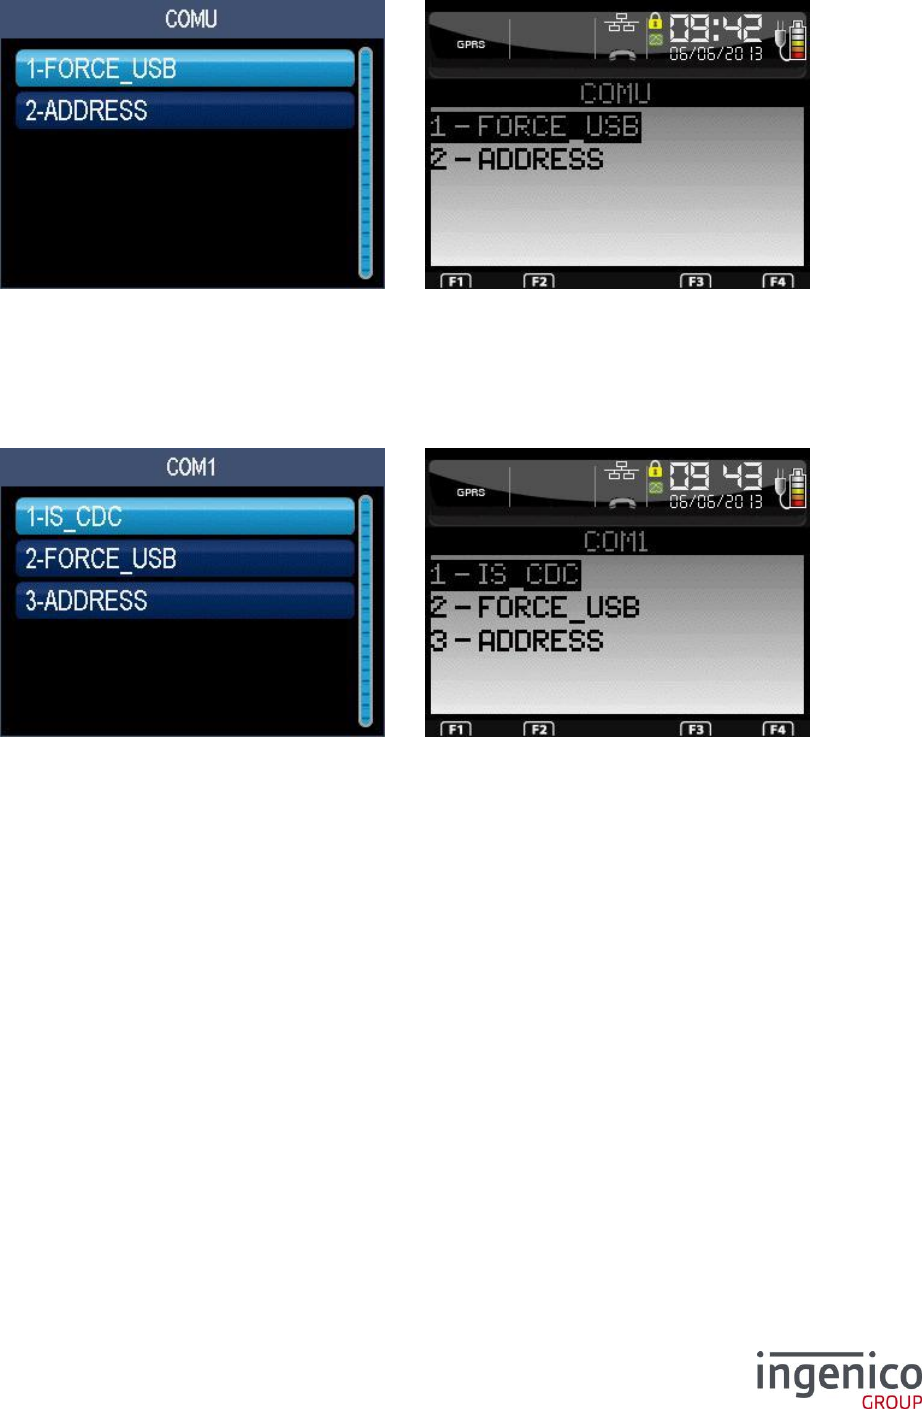
ICO-OPE-00986
REFERENCE MANUAL
Restricted
112/166
Ingenico document - Reproduction or disclosure prohibited without written authorization
Please check document validity before using
9_6_2_3 COMU
Select the way to communicate via COMU USB port (from highest to lowest priority):
FORCE_USB (FORCE_IR on old terminal): set “ON” to force the use of the serial link even if
the selected base has a “Bluetooth” interface;
ADDRESS: force the use of a specific “Bluetooth” base.
9_6_2_4 COM1
Select the way to communicate via COM1 serial port (from highest to lowest priority):
FORCE_USB (FORCE_IR on old terminal): set “ON” to force the use of the serial link even if
the selected base has a “Bluetooth” interface;
ADDRESS: force the use of a specific “Bluetooth” base;
IS_CDC (IS_IR on old terminal): set “ON” to enable the use of the serial if the selected base
has no “Bluetooth” interface.
ICO-OPE-00986
REFERENCE MANUAL
Restricted
113/166
Ingenico document - Reproduction or disclosure prohibited without written authorization
Please check document validity before using
9_6_2_5 COMN
Select the way to communicate via COMN Ethernet port (from highest to lowest priority):
FORCE_USB (FORCE_IR on old terminal): set “ON” to force the use of the serial link even if
the selected base has a “Bluetooth” interface;
ADDRESS: force the use of a specific “Bluetooth” base.
9_6_2_6 COMH
Select the way to communicate via COMH Host USB port (from highest to lowest priority):
FORCE_USB (FORCE_IR on old terminal): set “ON” to force the use of the serial link even if
the selected base has a “Bluetooth” interface;
ADDRESS: force the use of a specific “Bluetooth” base.
9_6_2_7 Change base name
Enter the name of the base which will be displayed in the status bar. Then validate.
ICO-OPE-00986
REFERENCE MANUAL
Restricted
114/166
Ingenico document - Reproduction or disclosure prohibited without written authorization
Please check document validity before using
Then the report of the name change request is displayed.
9_6_2_8 Print
Print information about configuration and association of all Bluetooth ports.
9_6_2_9 Clear Secret
Place the terminal on the base on which you want to erase the association list. After this operation,
terminals have to be associated again to use this base.
9_6_3 Base state
Select in the proposed list the base to to get the software version. After validation, terminal prints out
its report.
ICO-OPE-00986
REFERENCE MANUAL
Restricted
115/166
Ingenico document - Reproduction or disclosure prohibited without written authorization
Please check document validity before using
9_7 Base update
Select in the list the base to update (software).
Terminal displays an update report (very fleeting if already updated).
9_8 Wi-Fi configuration
From the “Hardware” screen, select the icon or the “Cradle Setup” item and validate. This item is
displayed only on Wi-Fi terminals.
WI-FI configuration consists in creating a profile, i.e. the set of parameters required for connection to
an Access Point. Several profiles can be created if connection is required to more than one Access
Point. In this case, you can choose the profile which is active and the Access Point to which you want
to connect.
Security note:
If the WiFi interface is used to transfer any sensitive authentication data, including but not limited
to the encrypted PIN or account data, the Wi-Fi interface must enforce encryption.
The WIFI configuration profile shall be consistent with the PCI DSS v2 Wireless Guidance.
ICO-OPE-00986
REFERENCE MANUAL
Restricted
116/166
Ingenico document - Reproduction or disclosure prohibited without written authorization
Please check document validity before using
Select an item:
“Profiles” to manage (create, activate, modify, delete) the Wi-Fi profiles (Shortcut: F.55);
“Infos” to print the WI-FI terminal parameter and the list of known Access Points (profiles);
“IP Setup” to configure the IP parameters of the WI-FI connection (refer 9_8_7 IP
configuration).
“General” to configure general wifi parameter (ON/OFF and DFS)
After the selection of the “Profiles” item; the following screen is displayed:
Select an item:
“New Profile” to create a new Wi-Fi network (refer 9_8_1 New Profile);
“Active Profile” to activate the Wi-Fi connection to a known Wi-Fi network (refer 9_8_4 Active
Profile);
“Modify Profile” to the configuration of a known Wi-Fi network (refer 9_8_5 Change Profile);
“Remove Profile” to suppress a Wi-Fi network (refer 9_8_6 Delete Profile).
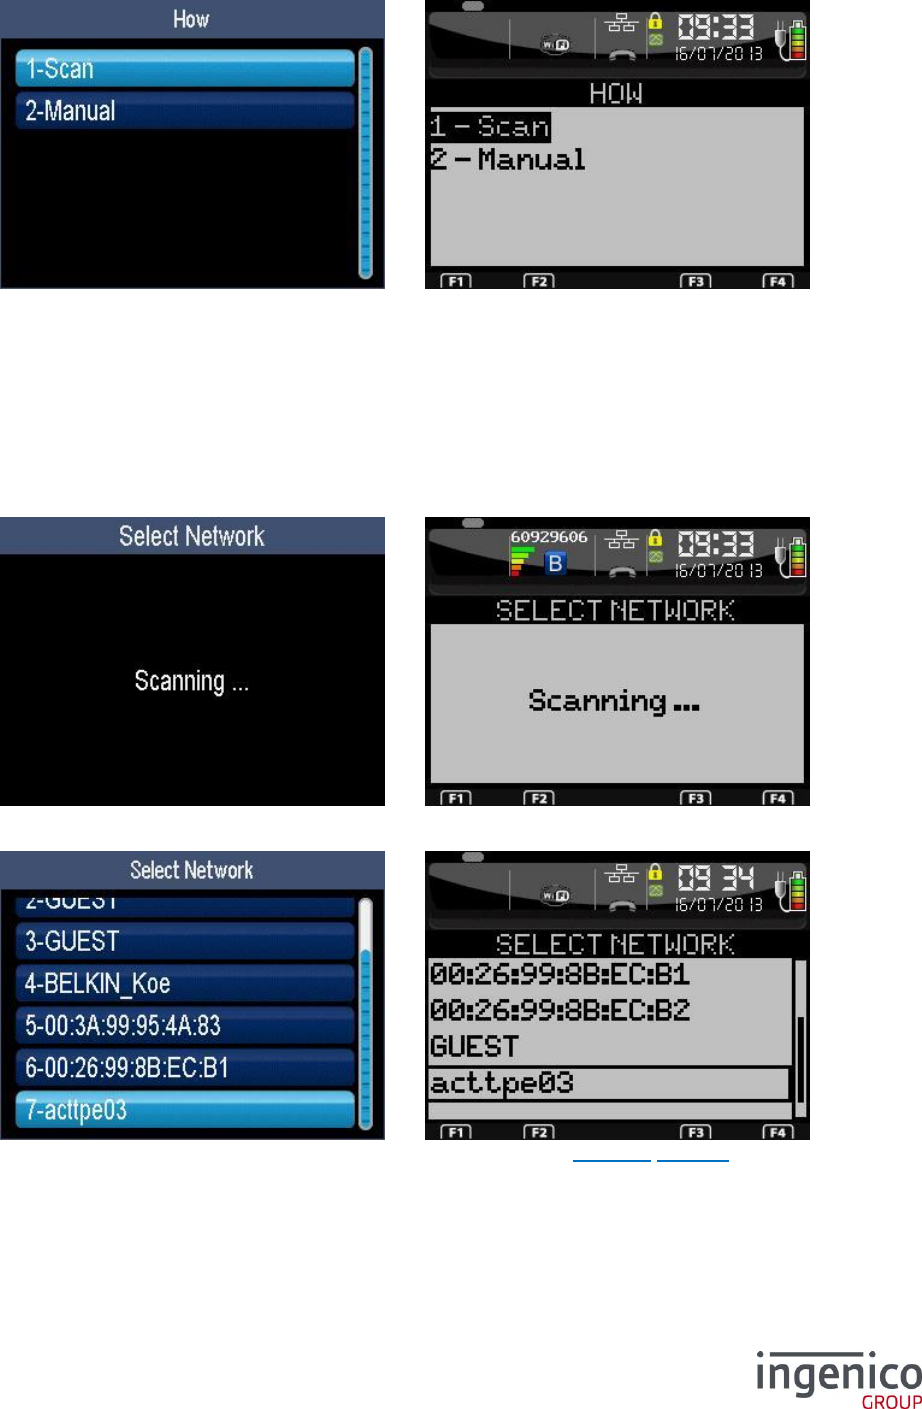
ICO-OPE-00986
REFERENCE MANUAL
Restricted
117/166
Ingenico document - Reproduction or disclosure prohibited without written authorization
Please check document validity before using
9_8_1 New Profile
Select the way to add a new Wi-Fi network:
“Scan” to select a network among all visible ones;
“Manual” to add a new network even if not visible.
WARNING : Use the manual entry to be able to connect and to roam between different access points
with the same name (connection to ESS).
Use automatic scan to limit the connection to the selected access point only (connection to BSSID).
9_8_1_1 Automatic search
The terminal is scanning all Wi-Fi networks within its range.
Then select a network among all visible ones. After validation, refer to 9_8_1_3 Security.
As some access points can spend too much time to send their answers, you may have to request a
new scan for a complete list (exit with the red key).
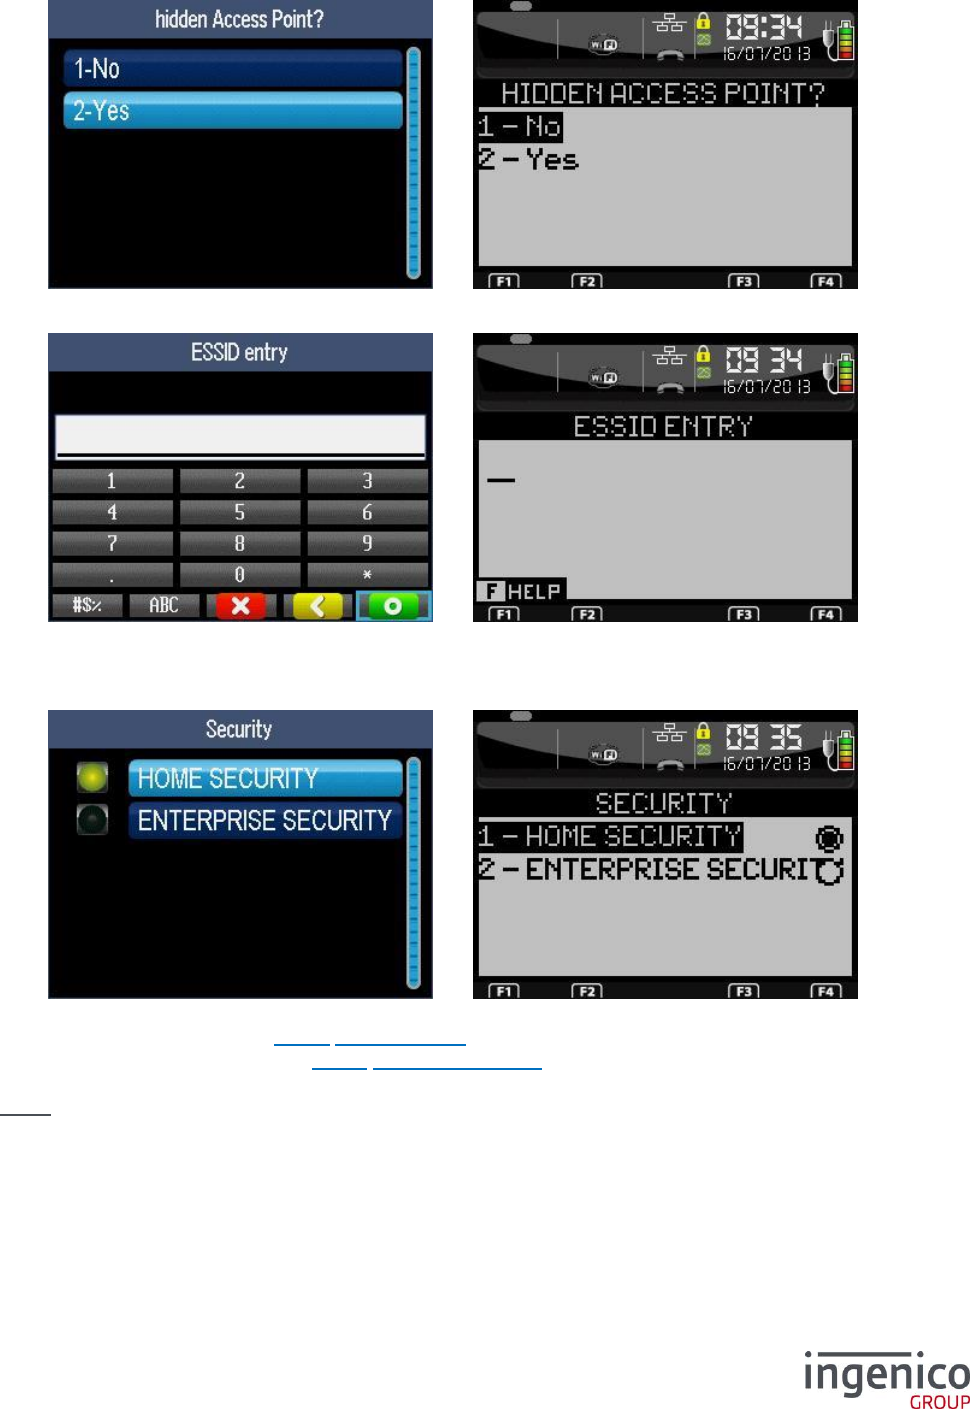
ICO-OPE-00986
REFERENCE MANUAL
Restricted
118/166
Ingenico document - Reproduction or disclosure prohibited without written authorization
Please check document validity before using
9_8_1_2 Manual entry
Select if the network is hidden or not. It is recommended to select “No” if the network is really visible.
Enter the Wi-Fi network name (ESSID). Then validate.
9_8_1_3 Security
After the identification of the network either manually or by scan, select the security level:
“Home Security”, refer 9_8_3 Home Security,
“Enterprise Security”, refer 9_8_2 Enterprise Security.
Nota: “Enterprise Security” requires a “RADIUS” server on the selected Wi-Fi network.
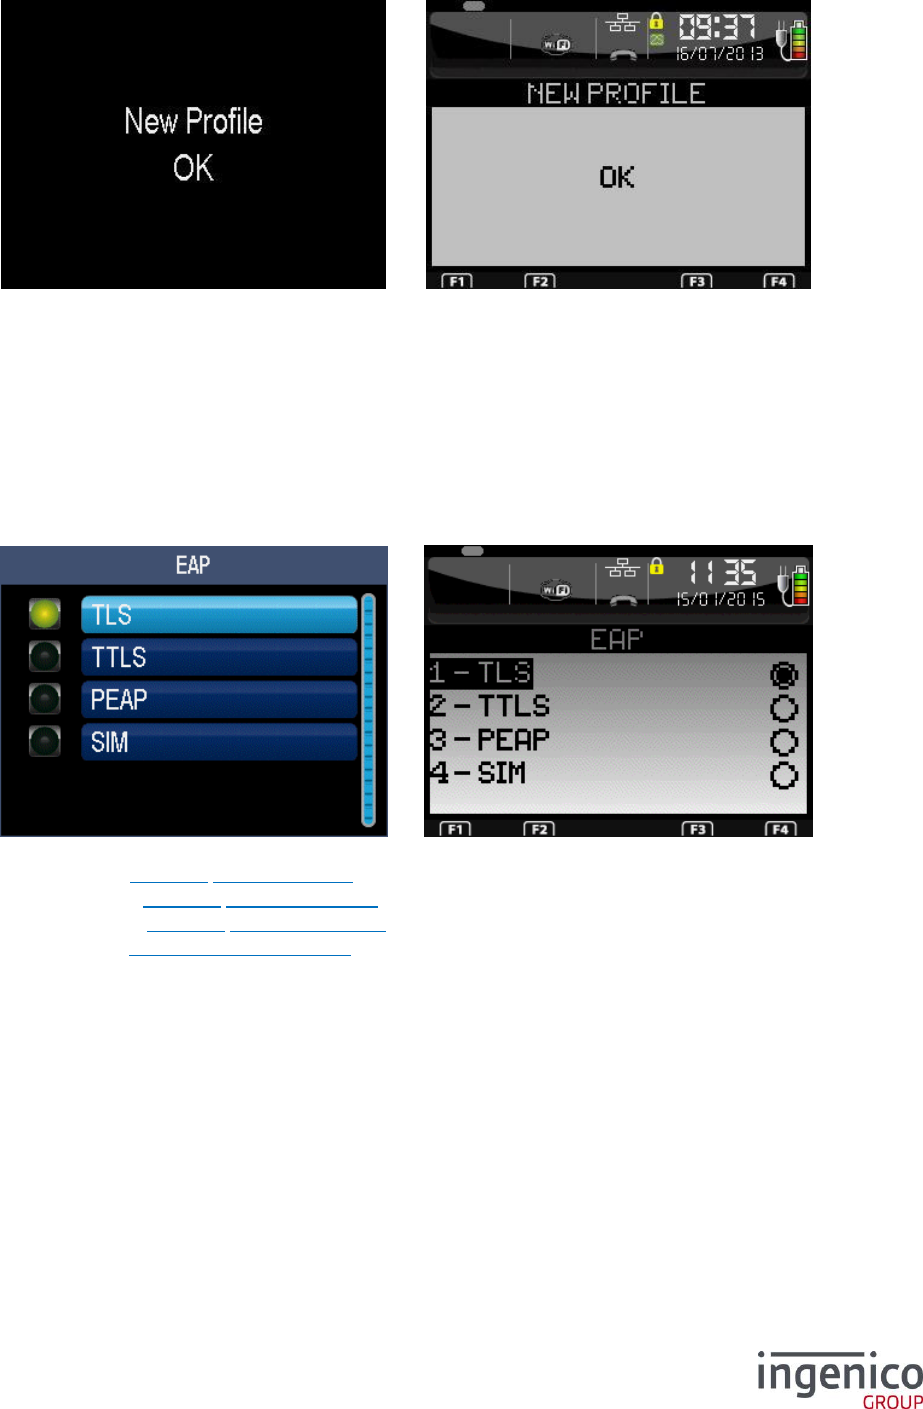
ICO-OPE-00986
REFERENCE MANUAL
Restricted
119/166
Ingenico document - Reproduction or disclosure prohibited without written authorization
Please check document validity before using
9_8_1_4 Report
Once the configuration of the security is finished, the report is displayed. After validation, the terminal
goes back to the “Profiles” menu. The terminal must connect immediately. If this is not the case, it will
connect on the next restart or on the next wakeup.
9_8_2 Enterprise Security
9_8_2_1 EAP Method
The following screen is displayed after selecting the “Enterprise Security” from the “New Profile” or
“Change Profile” procedure.
Select the authentication type:
TLS – refer 9_8_2_2 WPA_EAP TLS, or
TTLS – refer 9_8_2_3 WPA_EAP TTLS, or
PEAP – refer 9_8_2_4 WPA_EAP PEAP or
SIM – refer 9_8_2_5 WPA_EAP SIM
9_8_2_2 WPA_EAP TLS
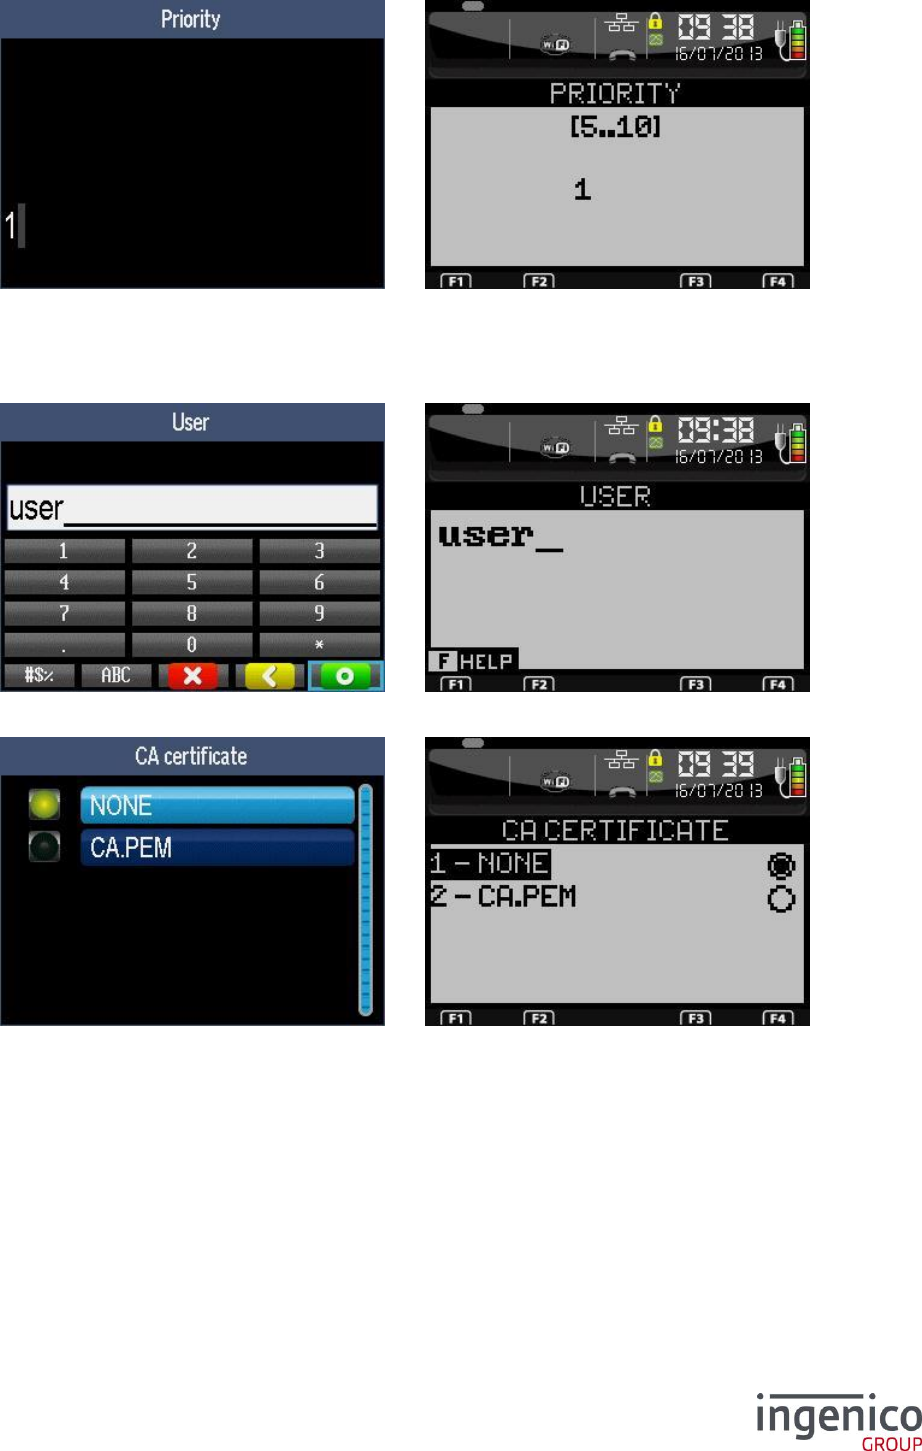
ICO-OPE-00986
REFERENCE MANUAL
Restricted
120/166
Ingenico document - Reproduction or disclosure prohibited without written authorization
Please check document validity before using
Enter the priority (from 1 to 20) and validate.
Priority is the preference order between known Wi-Fi networks: “1” (recommended value) for lowest
priority, “20” for the preferred network. The Wi-Fi network is automatically selected according to its
visibility and its priority.
Enter the user name. Then validate.
Select the root certificate. Then validate.
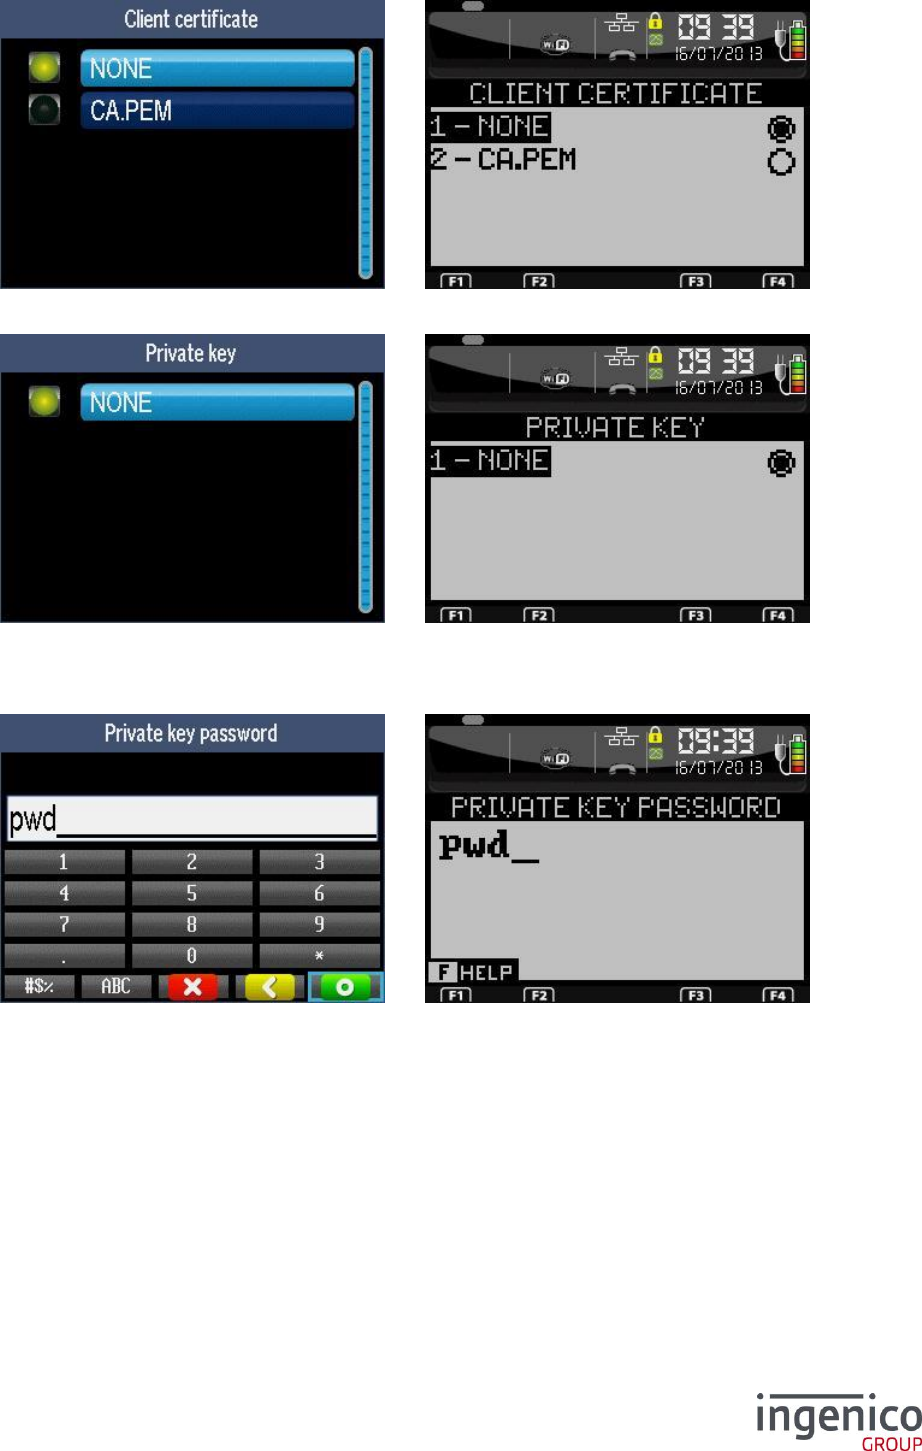
ICO-OPE-00986
REFERENCE MANUAL
Restricted
121/166
Ingenico document - Reproduction or disclosure prohibited without written authorization
Please check document validity before using
Select the client certificate. Then validate.
Select the private key. Then validate.
WARNING Private key MUST BE PKCS8 format.
Enter the password of the private key. After validation, a report is displayed.
9_8_2_3 WPA_EAP TTLS
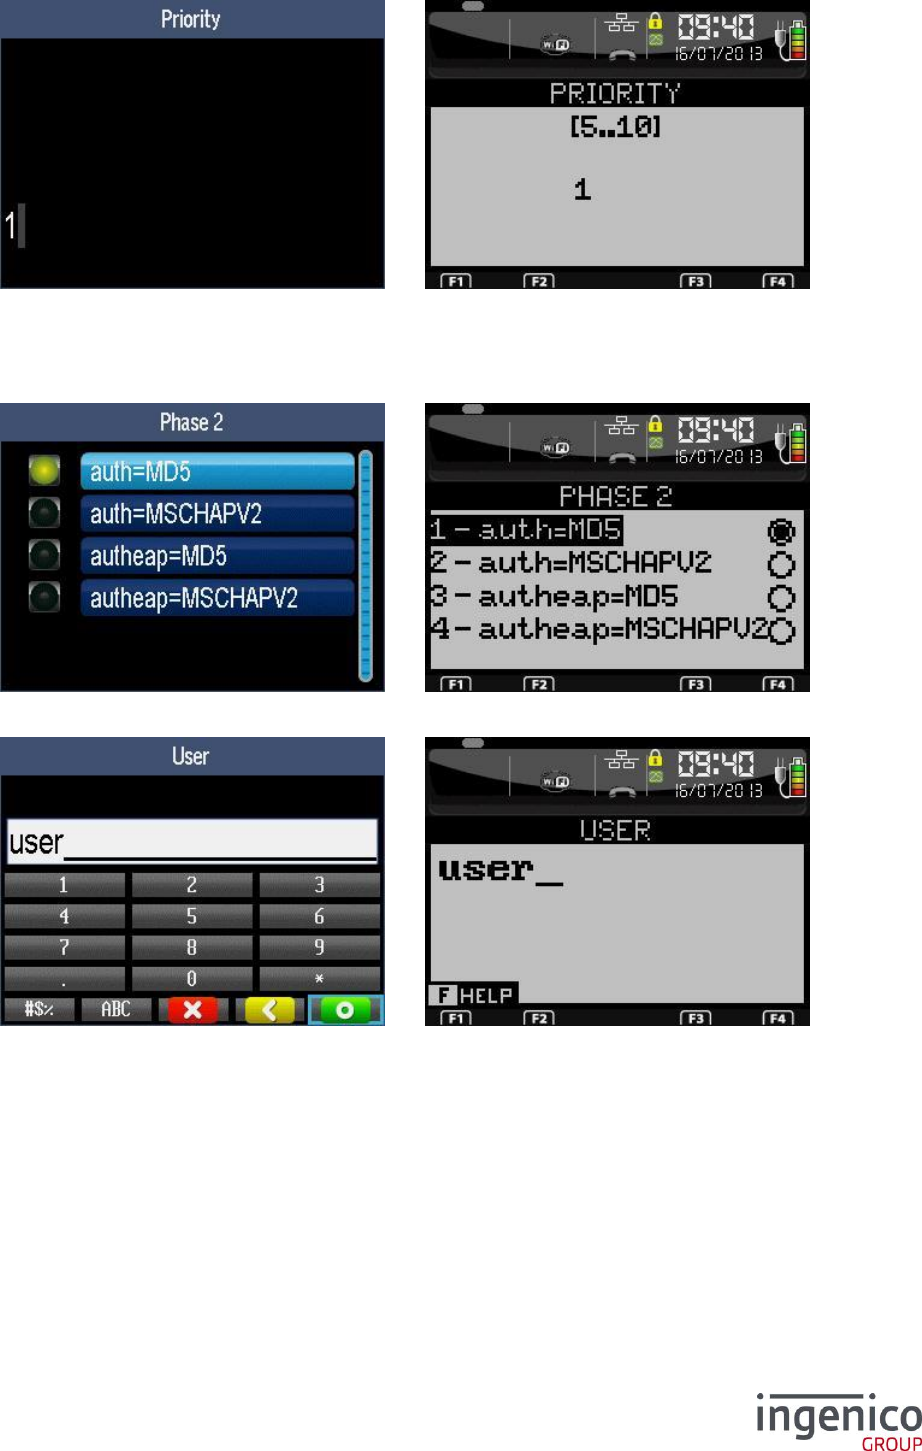
ICO-OPE-00986
REFERENCE MANUAL
Restricted
122/166
Ingenico document - Reproduction or disclosure prohibited without written authorization
Please check document validity before using
Enter the priority (from 1 to 20) and validate.
Priority is the preference order between known Wi-Fi networks: “1” (recommended value) for lowest
priority, “20” for the preferred network. The Wi-Fi network is automatically selected according to its
visibility and its priority.
Select the “Phase 2” negociation and validate.
Enter the user name. Then validate.
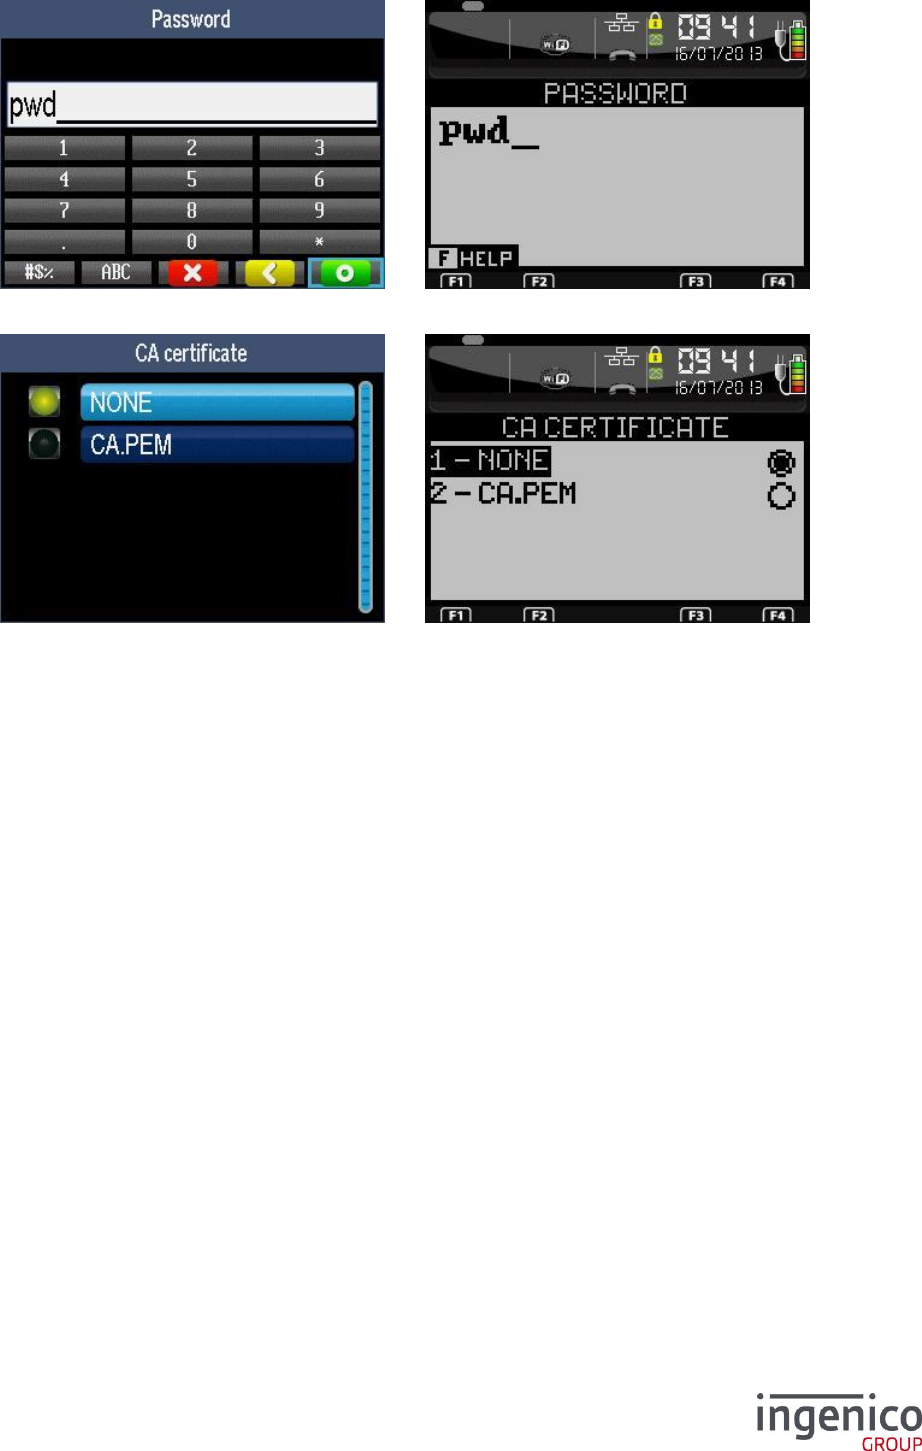
ICO-OPE-00986
REFERENCE MANUAL
Restricted
123/166
Ingenico document - Reproduction or disclosure prohibited without written authorization
Please check document validity before using
Enter the password. Then validate.
Select the root certificate. After validation, a report is displayed.
9_8_2_4 WPA_EAP PEAP
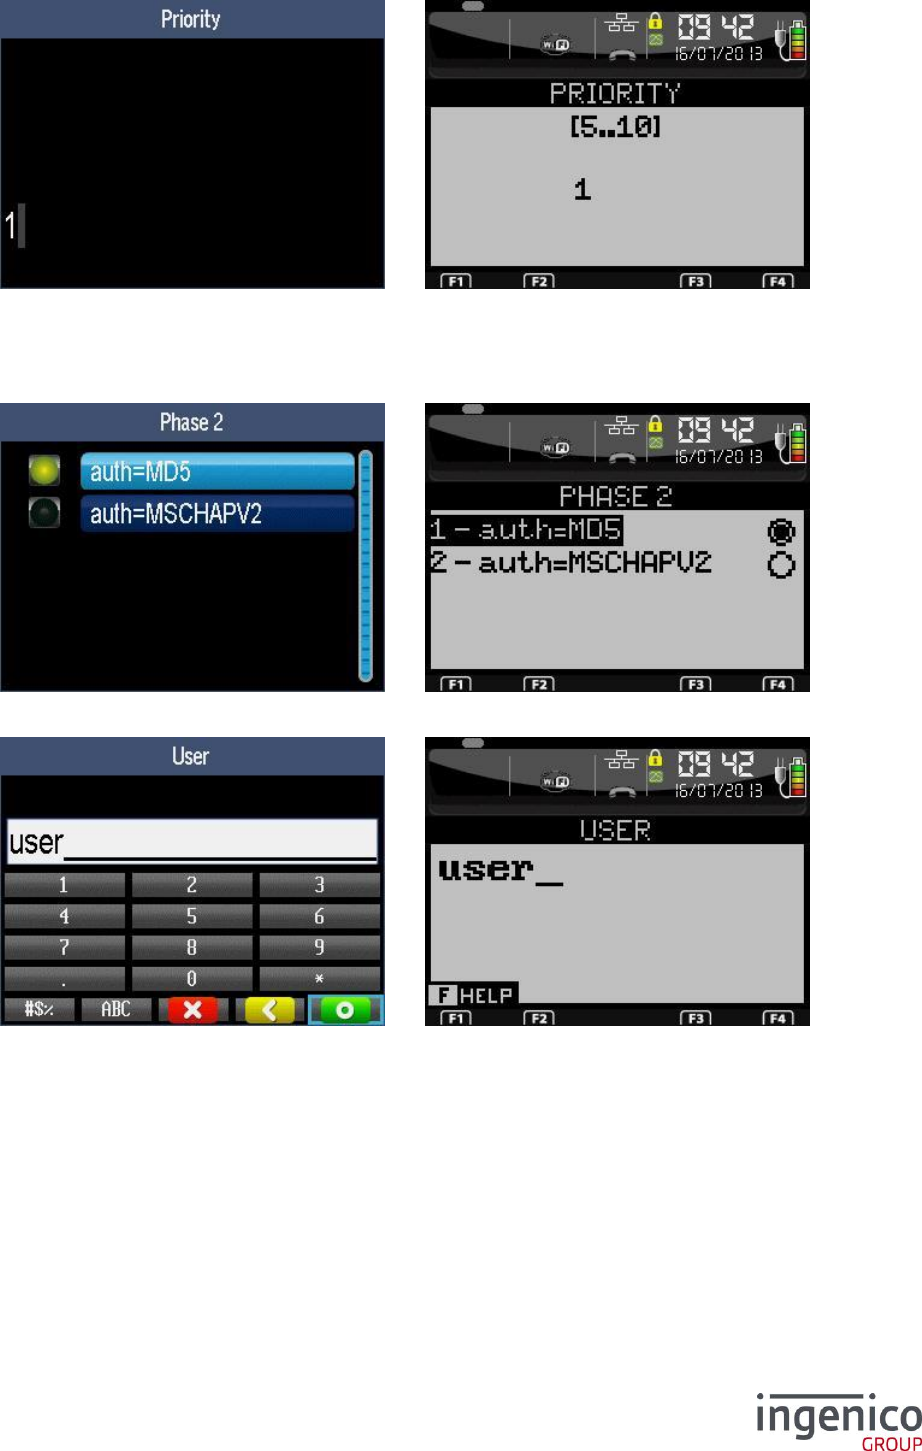
ICO-OPE-00986
REFERENCE MANUAL
Restricted
124/166
Ingenico document - Reproduction or disclosure prohibited without written authorization
Please check document validity before using
Enter the priority (from 1 to 20) and validate.
Priority is the preference order between known Wi-Fi networks: “1” (recommended value) for lowest
priority, “20” for the preferred network. The Wi-Fi network is automatically selected according to its
visibility and its priority.
Select the “Phase” negociation and validate.
Enter the user name. Then validate.
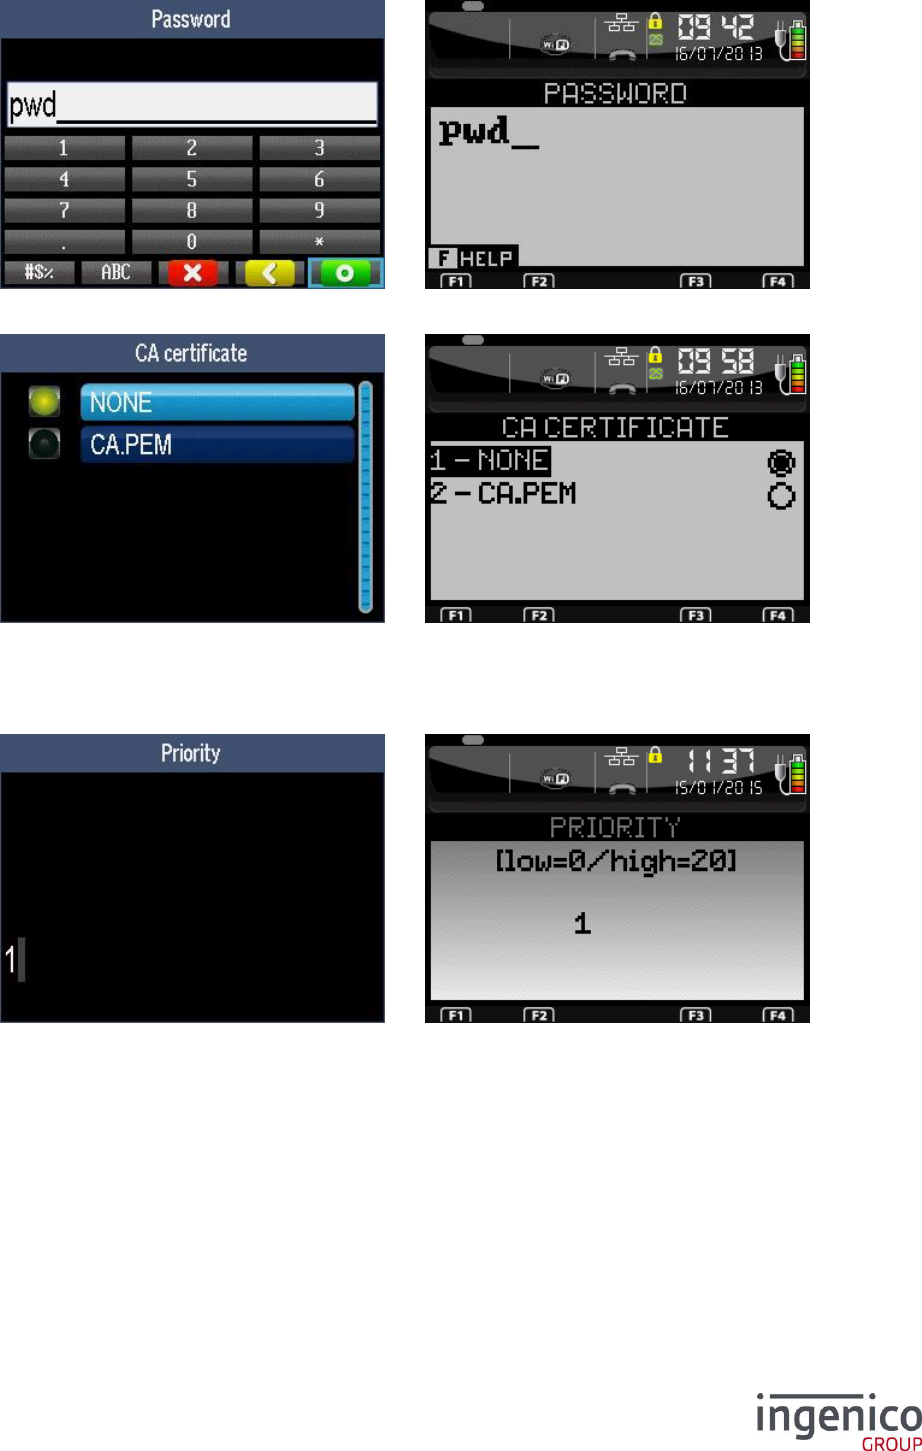
ICO-OPE-00986
REFERENCE MANUAL
Restricted
125/166
Ingenico document - Reproduction or disclosure prohibited without written authorization
Please check document validity before using
Enter the password. Then validate.
Select the root certificate. After validation, a report is displayed.
9_8_2_5 WPA_EAP SIM
Enter the priority (from 1 to 20) and validate.
Priority is the preference order between known Wi-Fi networks: “1” (recommended value) for lowest
priority, “20” for the preferred network. The Wi-Fi network is automatically selected according to its
visibility and its priority.
9_8_3 Home Security
The following screen is displayed after selecting the “Home Security” from the “New Profile” or
“Change Profile” procedure.
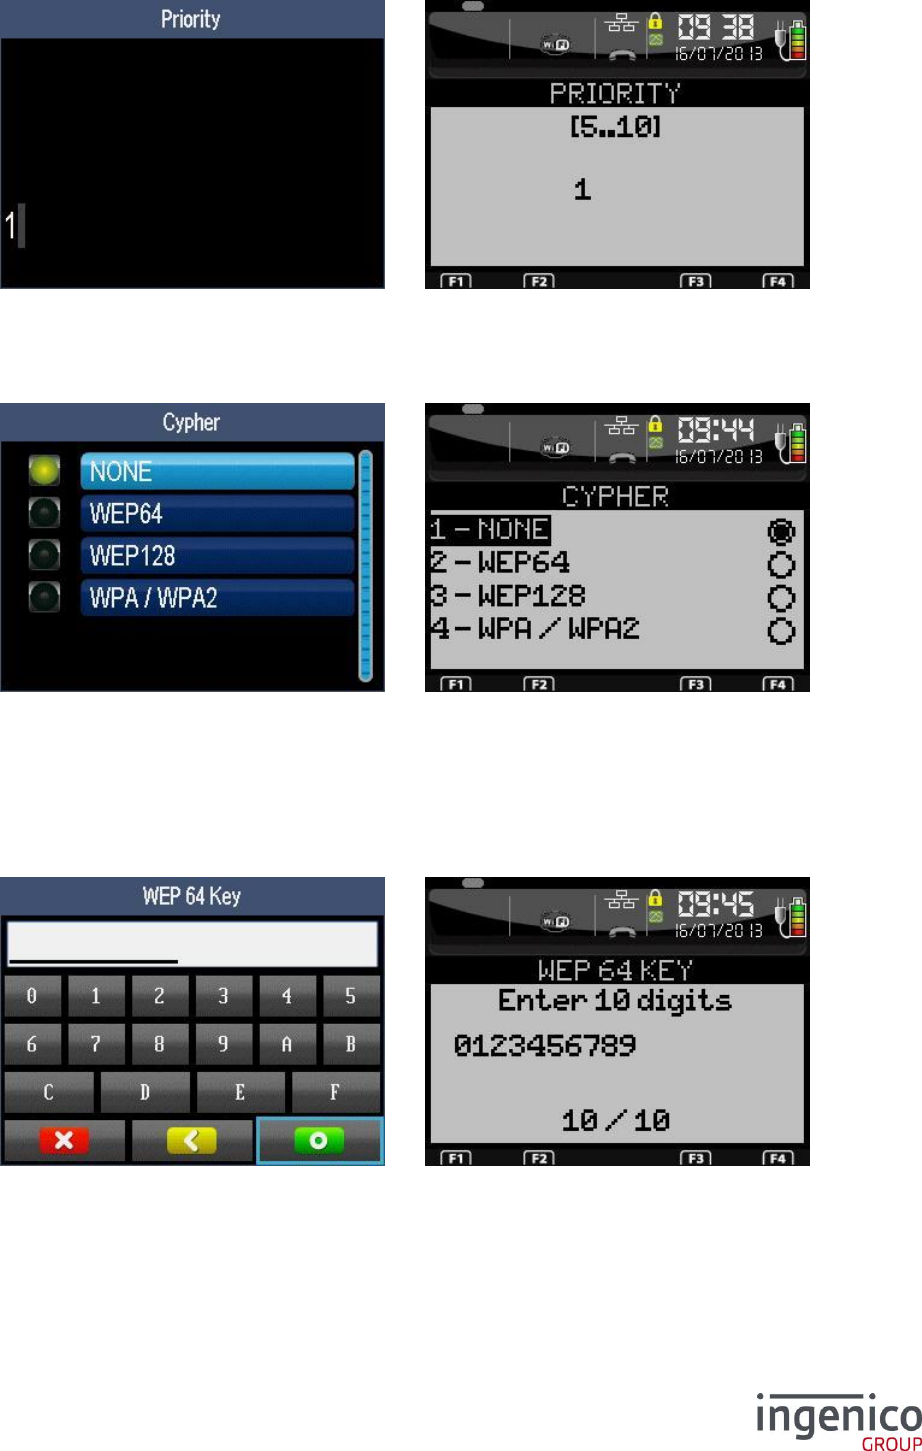
ICO-OPE-00986
REFERENCE MANUAL
Restricted
126/166
Ingenico document - Reproduction or disclosure prohibited without written authorization
Please check document validity before using
Enter the priority (from 1 to 20) and validate.
Priority is the preference order between known Wi-Fi networks: “1” (recommended value) for lowest
priority, “20” for the preferred network. The Wi-Fi network is automatically selected according to its
visibility and its priority.
If required by the wireless network, select the type of ciphering:
NONE: no ciphering protection,
WEP64: WEP ciphering protection with a 64bits key,
WEP128 (default choice): WEP ciphering protection with a 128bits key,
WPA/WPA2: WPA ciphering protection with a 256bits key.
9_8_3_1 WEP64
Enter the WEP key (10 hexadecimal digits). After validation, a report is displayed.
9_8_3_2 WEP128
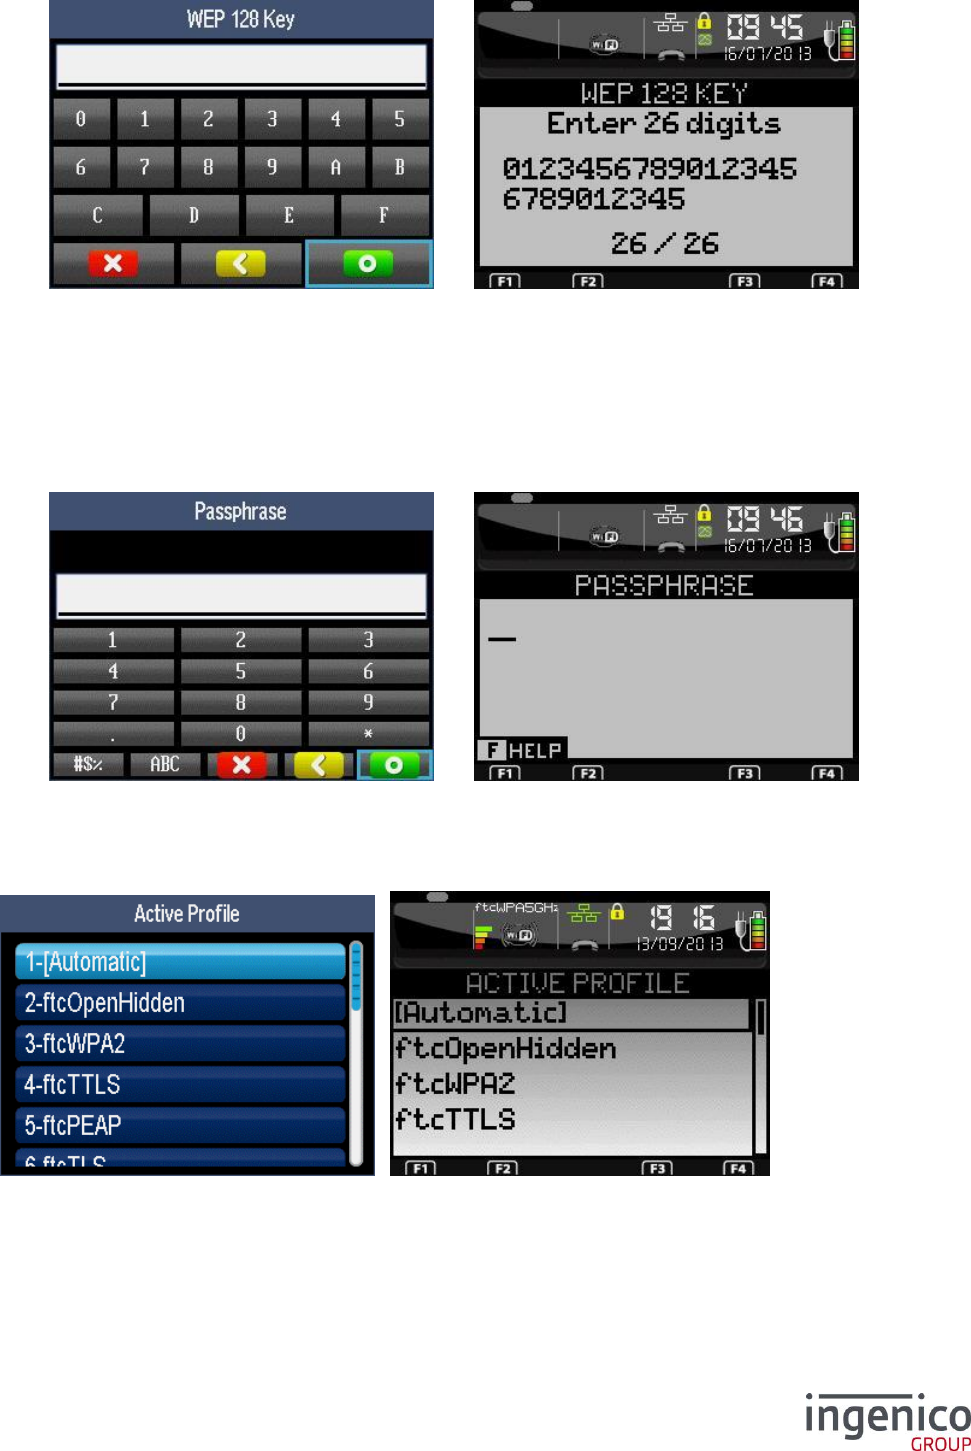
ICO-OPE-00986
REFERENCE MANUAL
Restricted
127/166
Ingenico document - Reproduction or disclosure prohibited without written authorization
Please check document validity before using
Enter the WEP key (26 hexadecimal digits). After validation, a report is displayed.
9_8_3_3 WPA/WPA2
Enter the WAP passphrase (up to 63 caracters). After validation, a report is displayed.
9_8_4 Active Profile
Select in the list the Wi-Fi network to use.
Select Automatic to activate the priority mechanism and let the supplicant choosing the best profile
automatically and let it roaming if necessary.
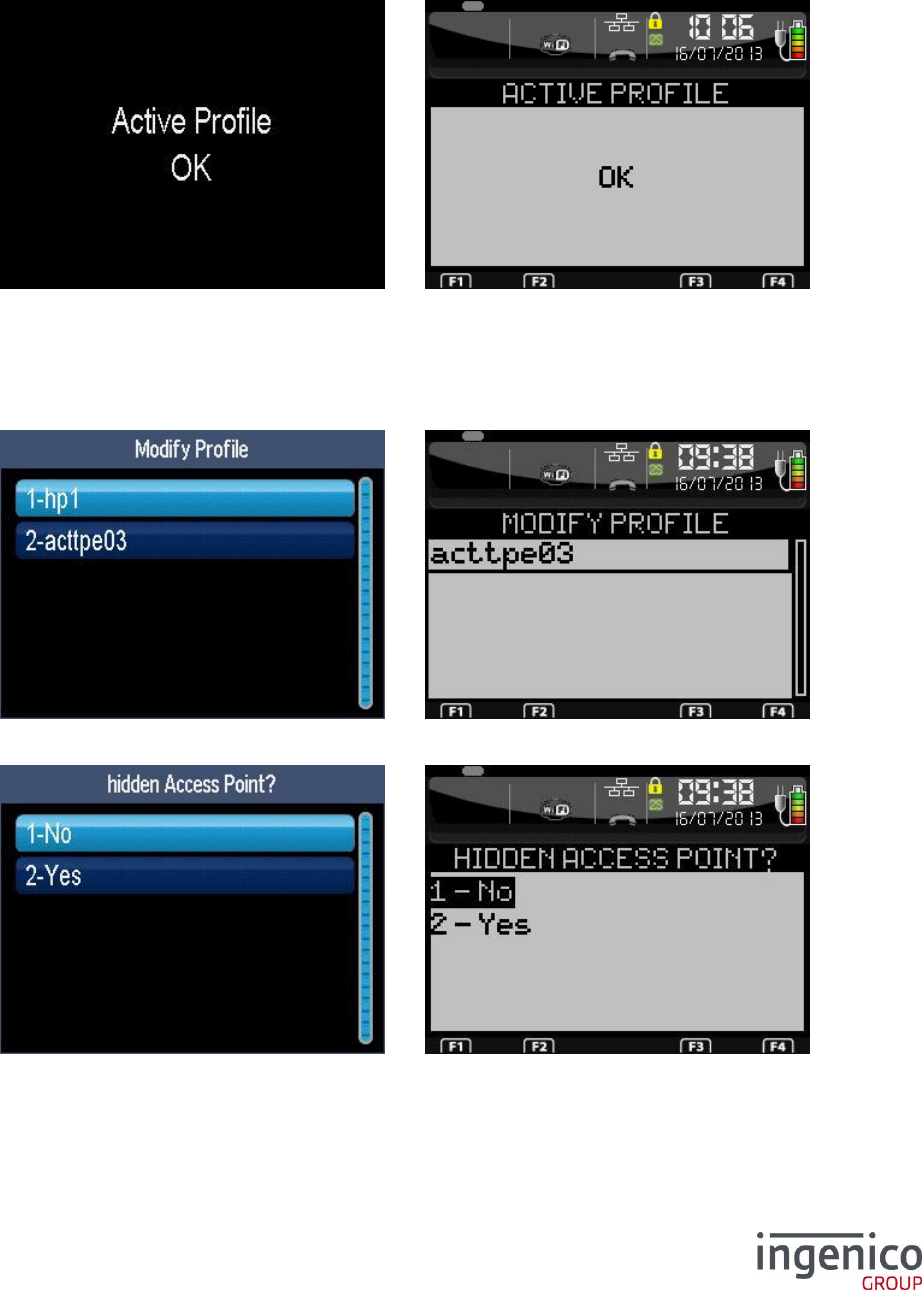
ICO-OPE-00986
REFERENCE MANUAL
Restricted
128/166
Ingenico document - Reproduction or disclosure prohibited without written authorization
Please check document validity before using
Note : prioritity criteria is in preferred order :
1 / the priority number
2 / security priority (open and wep are less priority than other security) / if priority is equal
3 / signal strength / if priority and security equal
Note 2 : When access point is hidden, it doesn’t enter into priority mechanism.
Then an activation report is displayed.
9_8_5 Change Profile
9_8_5_1 Profile
Select in the list the network profile to modify. Then validate.
Select if the access point is visible or not. Then validate.

ICO-OPE-00986
REFERENCE MANUAL
Restricted
129/166
Ingenico document - Reproduction or disclosure prohibited without written authorization
Please check document validity before using
9_8_5_2 Security
Select the security level:
“Home Security”,
“Enterprise Security”, refer 9_8_2 Enterprise Security.
Nota: “Enterprise Security” requires a “RADIUS” server on the selected Wi-Fi network.
9_8_5_3 Authentication
If “Home security” was selected, select the authentication type. After validation, refer 9_8_3 Home
Security.
9_8_5_4 Report
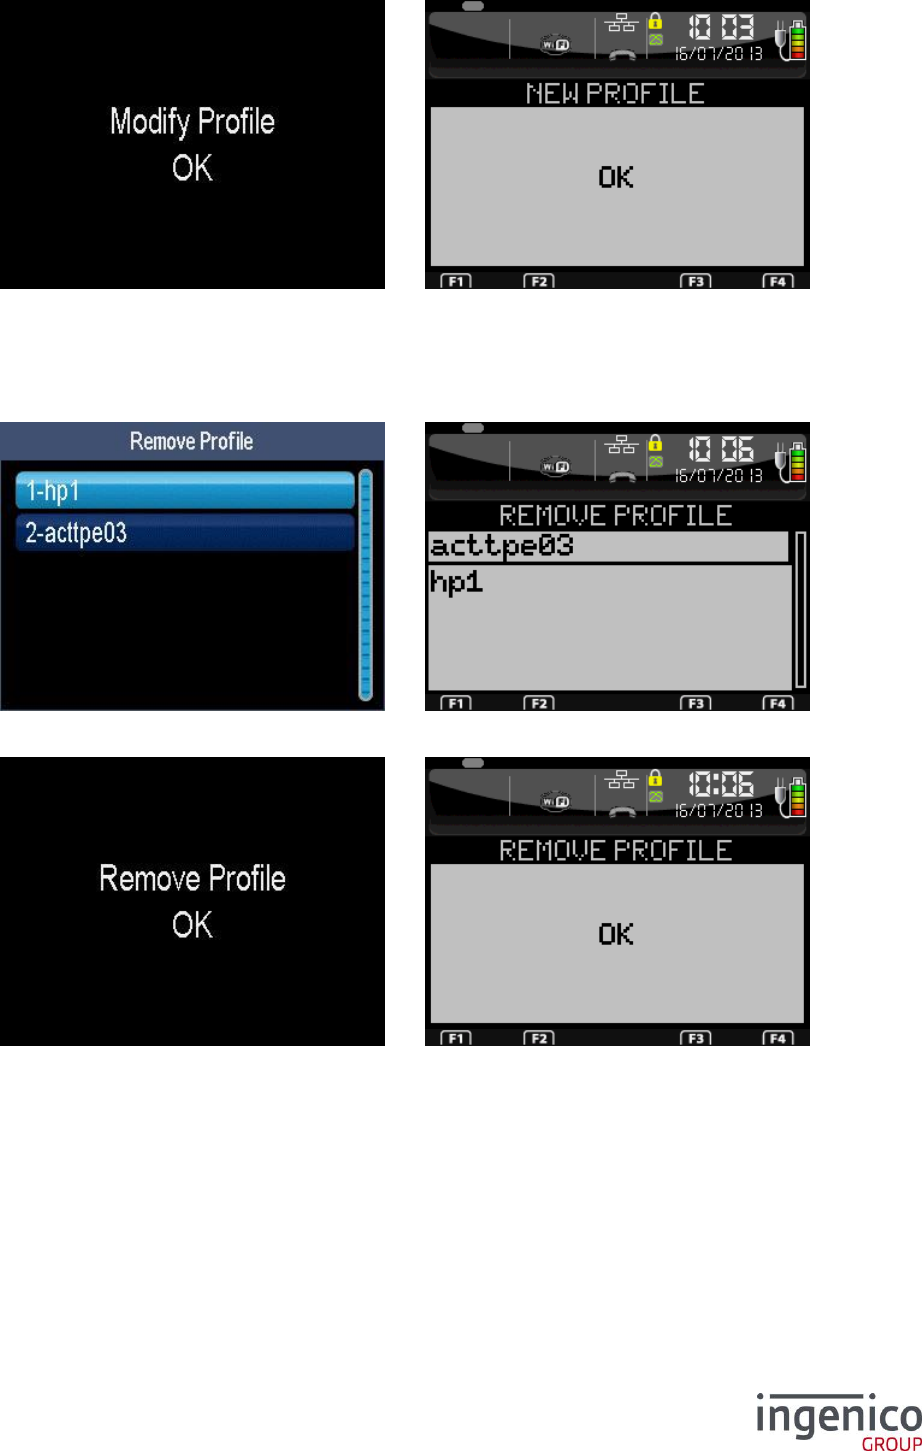
ICO-OPE-00986
REFERENCE MANUAL
Restricted
130/166
Ingenico document - Reproduction or disclosure prohibited without written authorization
Please check document validity before using
Once the configuration of the security is finished, the report is displayed. After validation, the terminal
goes back to the “Profiles” menu. The terminal must connect immediately. If this is not the case, it will
connect on the next restart or on the next wakeup.
9_8_6 Delete Profile
Select in the list the profile to suppress.
Then the deletion report is displayed.
9_8_7 IP configuration
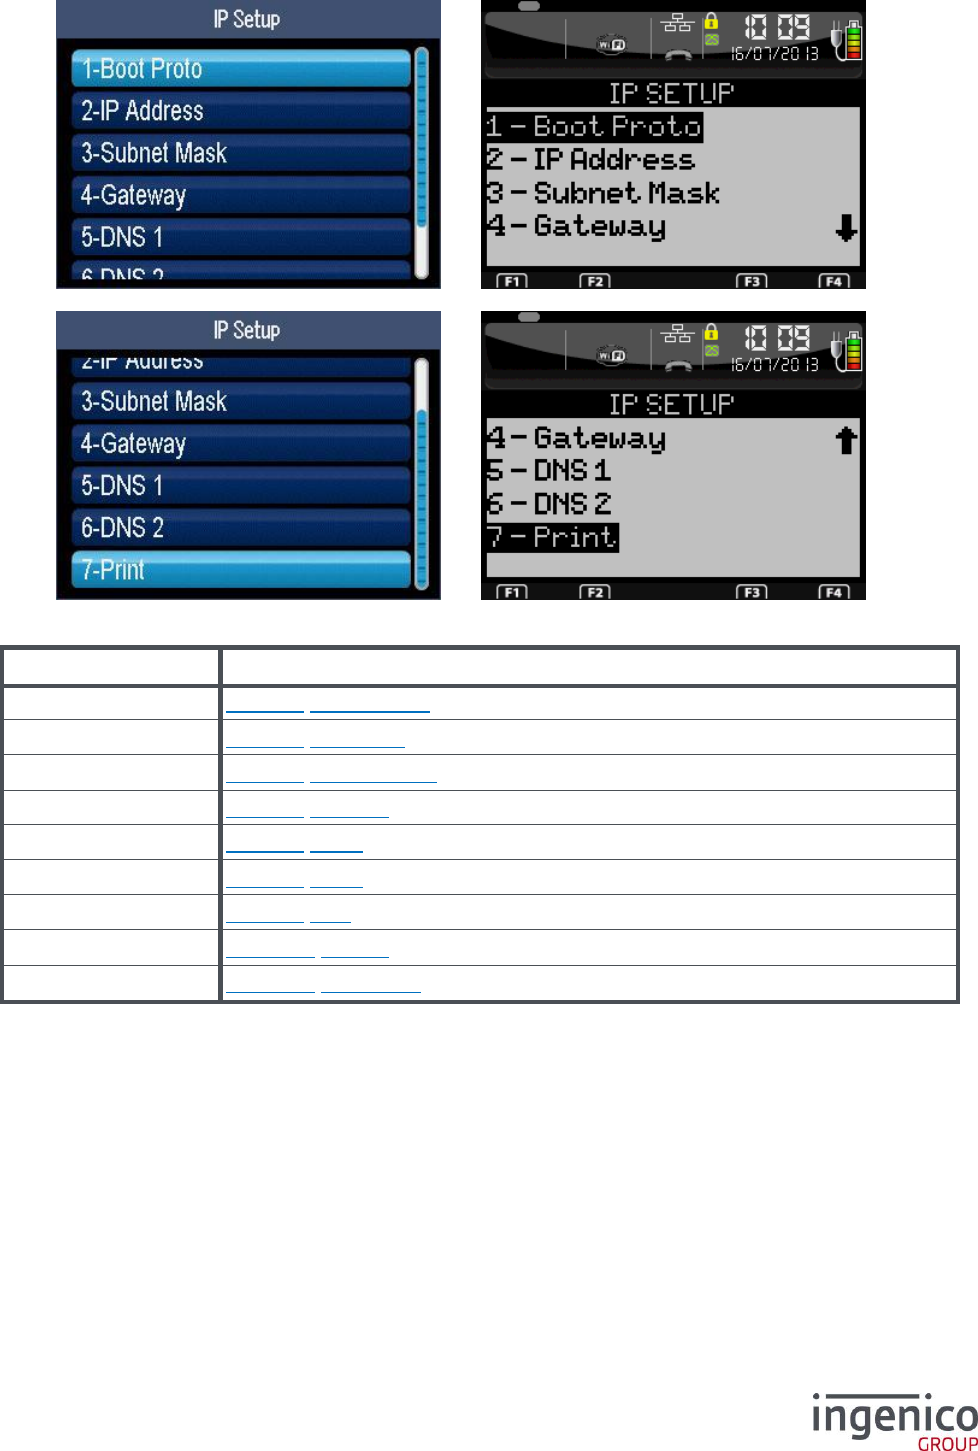
ICO-OPE-00986
REFERENCE MANUAL
Restricted
131/166
Ingenico document - Reproduction or disclosure prohibited without written authorization
Please check document validity before using
Item
Reference
Boot Proto
9_8_7_1 Boot Protocol
IP Address
9_8_7_2 IP address
Subnet Mask
9_8_7_3 Network mask
Gateway
9_8_7_4 Gateway
DNS1
9_8_7_5 DNS1
DNS2
9_8_7_6 DNS2
Print
9_8_7_7 Print
Ping
9_8_7_78 Printing
Reset Conf
9_8_7_78 Reset Conf
9_8_7_1 Boot Protocol
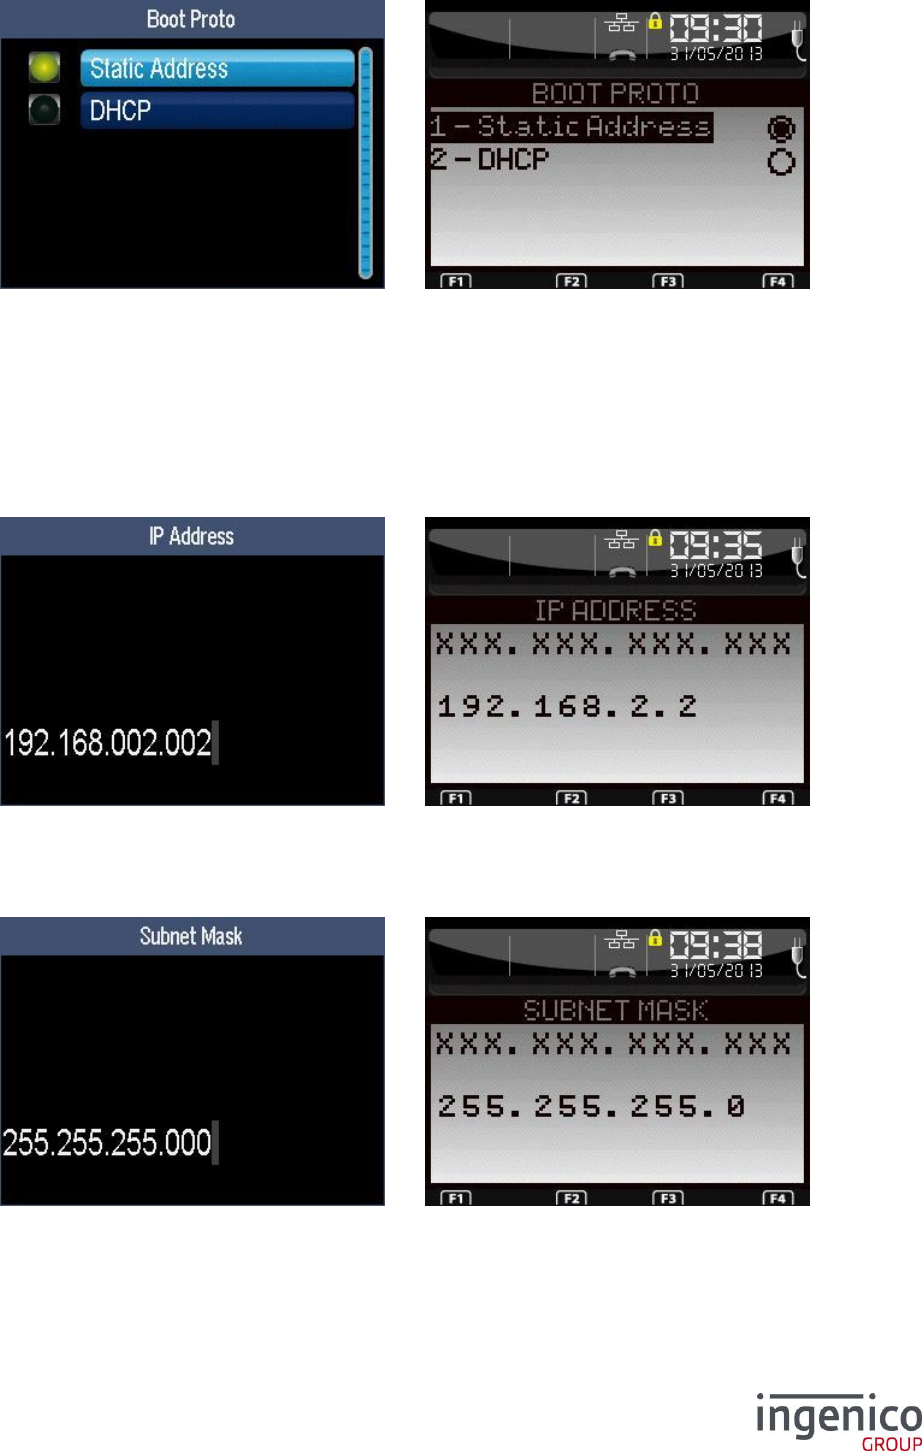
ICO-OPE-00986
REFERENCE MANUAL
Restricted
132/166
Ingenico document - Reproduction or disclosure prohibited without written authorization
Please check document validity before using
Select the network configuration mode:
“Static Address” requiring IP address, Network mask, Gateway, DSN1 and DSN2 parameters,
or
“DHCP” (Dynamic Host Configuration Protocol) in which parameters are negociated at startup
of the terminal (the other parameters have no effect but can still be entered).
9_8_7_2 IP address
Enter the IP address of the terminal (supplied by the administrator of the local network). IP Address is
composed of four digital fields, each one from 0 to 255.
9_8_7_3 Network mask
Enter the sub-network mask of the Ethernet interface (usually 255.255.255.000). As IP Address, the
sub-network mask is composed of four digital fields, each one from 0 to 255.
9_8_7_4 Gateway
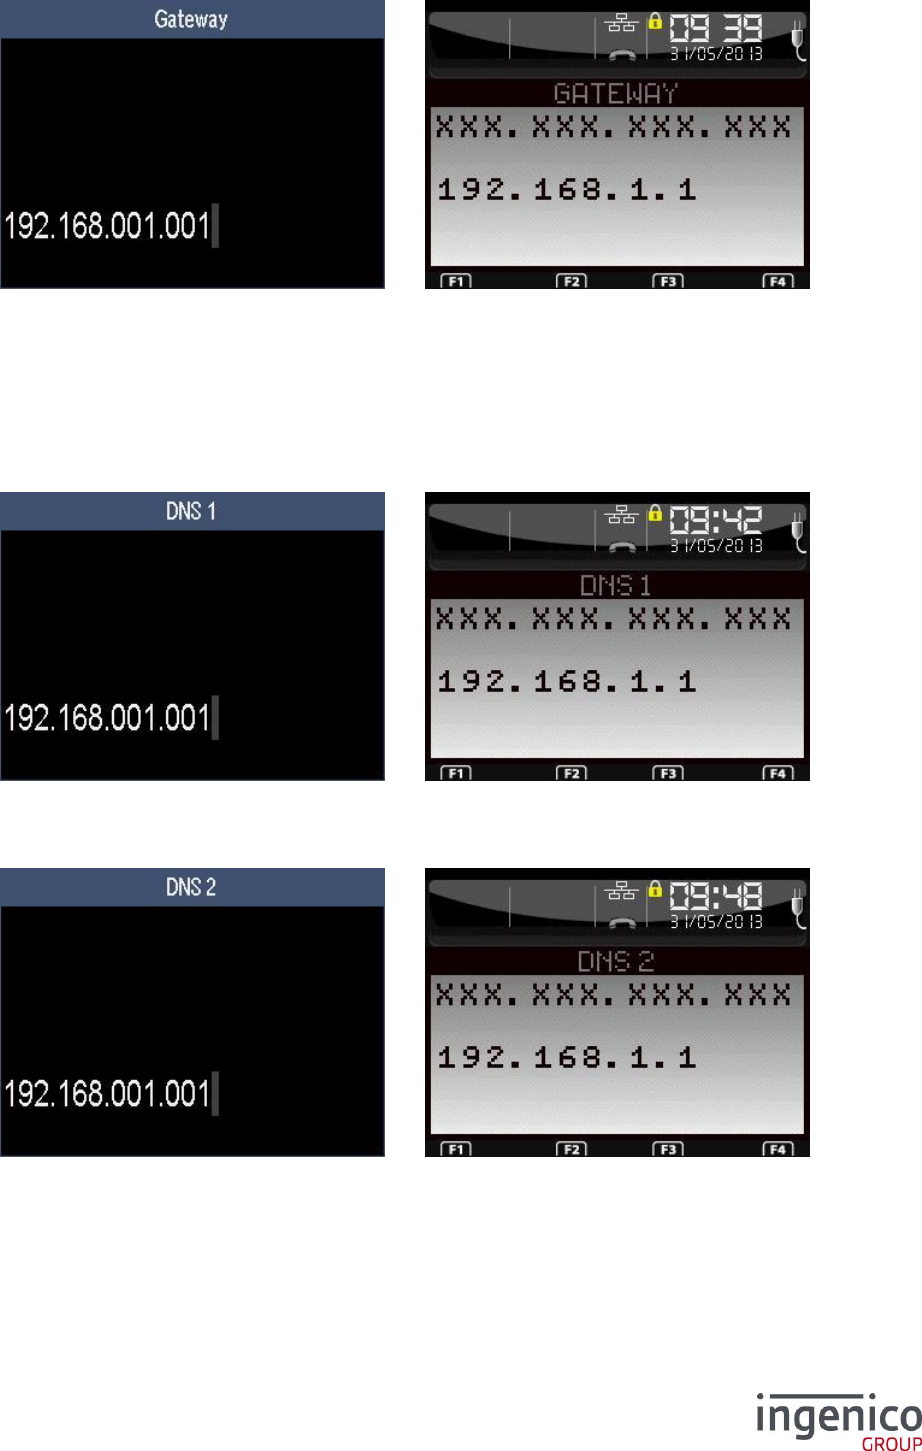
ICO-OPE-00986
REFERENCE MANUAL
Restricted
133/166
Ingenico document - Reproduction or disclosure prohibited without written authorization
Please check document validity before using
Enter Gateway address (supplied by the administrator of the local network) which is the IP address of
the machine used by gateway to join other networks.
9_8_7_5 DNS1
Enter the IP address of Domain Name Servers 1 (supplied by the administrator of the local network).
9_8_7_6 DNS2
Enter the IP address of Domain Name Servers 2 (supplied by the administrator of the local network).
9_8_7_7 Print
A ticket is printed with the current configuration (for example to quickly verify the value of modem
options before saving).
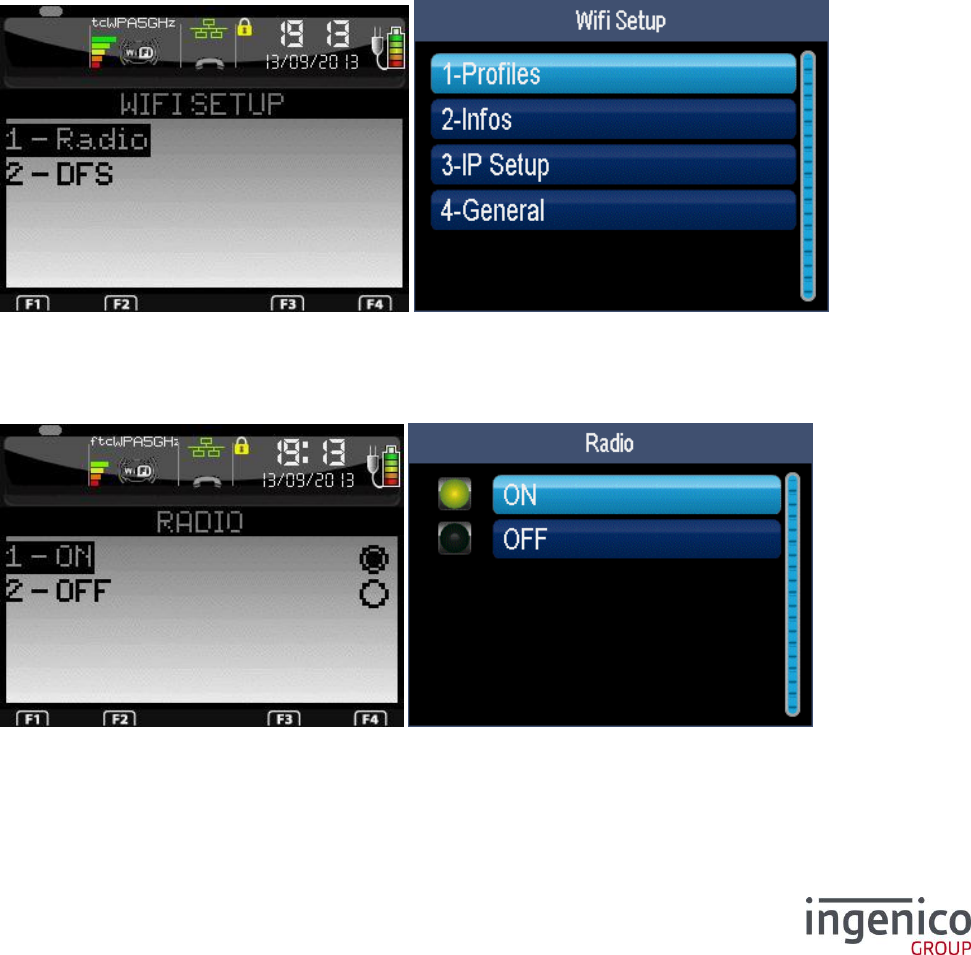
ICO-OPE-00986
REFERENCE MANUAL
Restricted
134/166
Ingenico document - Reproduction or disclosure prohibited without written authorization
Please check document validity before using
9_8_7_8 Ping
Ping is described on the Ethernet configuration. This is the same function.
9_8_7_9 Reset Conf
Reset conf will delete all the wifi profiles recorded.
9_8_8 General setting
Select setting you want to change RADIO On/OFF or DFS
9_8_8_1 Radio ON/OFF
Select OFF to power OFF the radio. OFF is persistant after reboot.
Select ON to power ON the radio. ON is persistant after reboot.
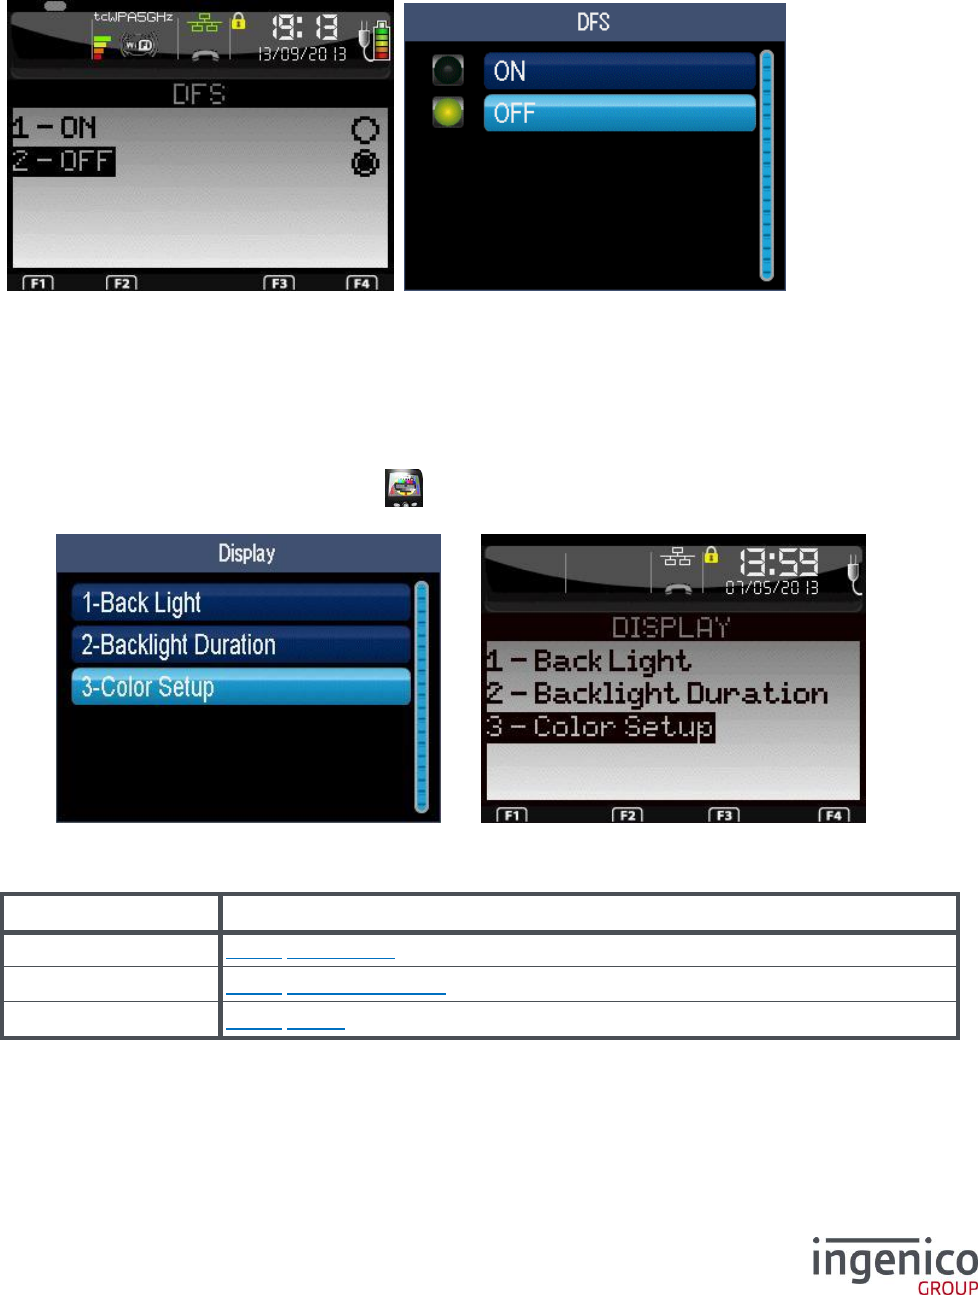
ICO-OPE-00986
REFERENCE MANUAL
Restricted
135/166
Ingenico document - Reproduction or disclosure prohibited without written authorization
Please check document validity before using
9_8_8_2 DFS ON/OFF
DFS is used on 5GHz channels to shut down or change chanell when it is required by DFS satellite. In
any case the DFS is active. When setted ON, the the scan become passive (no broadcast) to be quite
in any AP DFS request case. This could delay a little bit the scan time and connection time.
Select OFF to select a passive scan for DFS. OFF is persistant after reboot.
Select ON to select an active scan for DFS. ON is persistant after reboot.
9_9 Configuration of screen
From the “Hardware” screen, select the icon or the “Display” item and validate. This item is
displayed only on terminals equipped with an integrated modem.
Item
Reference
Back Light
9_9_1 Backlighting
Backlight Duration
9_9_2 Backlight duration
Color Setup
9_9_3 Colors
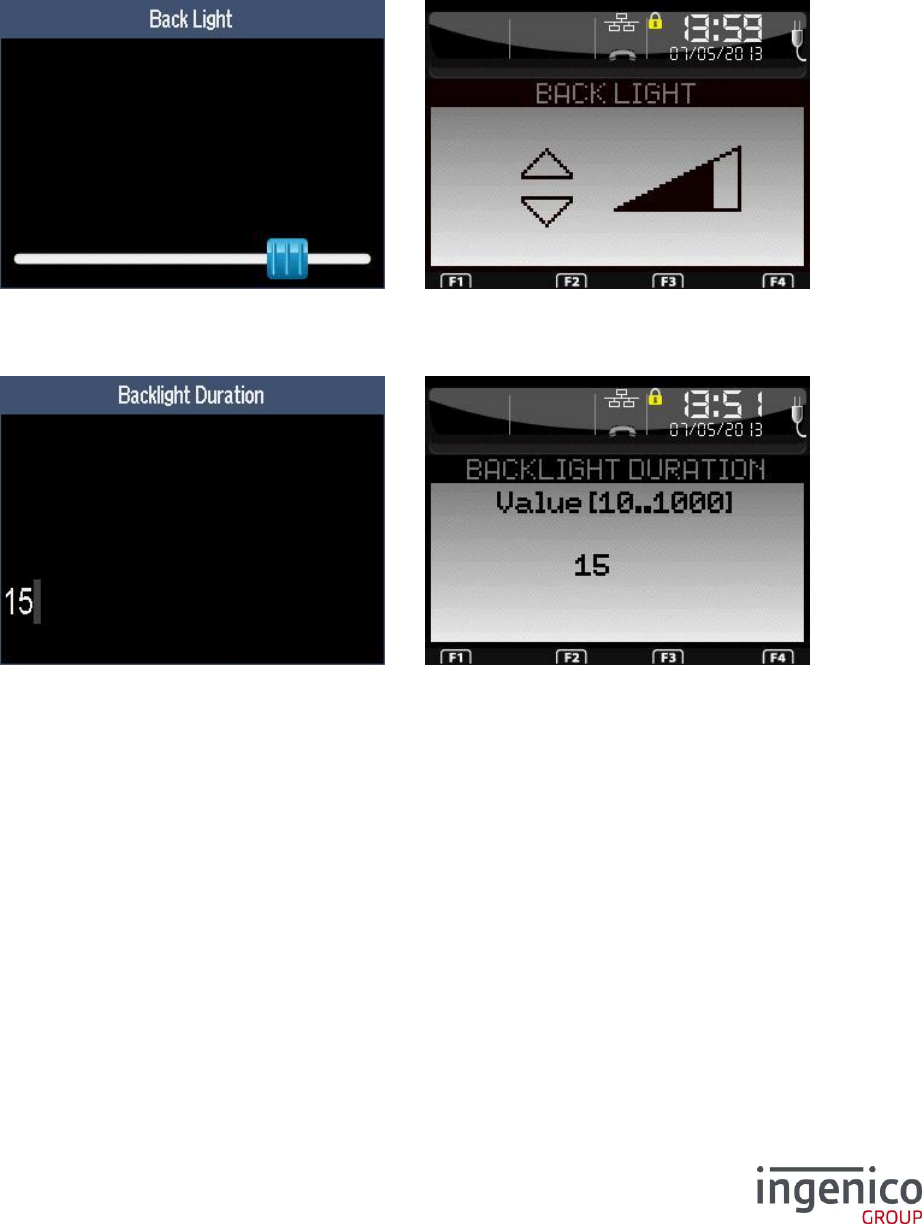
ICO-OPE-00986
REFERENCE MANUAL
Restricted
136/166
Ingenico document - Reproduction or disclosure prohibited without written authorization
Please check document validity before using
9_9_1 Backlighting
Adjust the intensity of the backlighting using the “up” or “down” keys of the navigator. Then validate.
9_9_2 Backlight duration
Enter the duration of the backlightning (in seconds, from 10 to 1000). Then validate.
9_9_3 Colors
From the “Display” screen, select the “Color” item and validate.
Then for “Goal”, select either “Background color” or “text color” item.
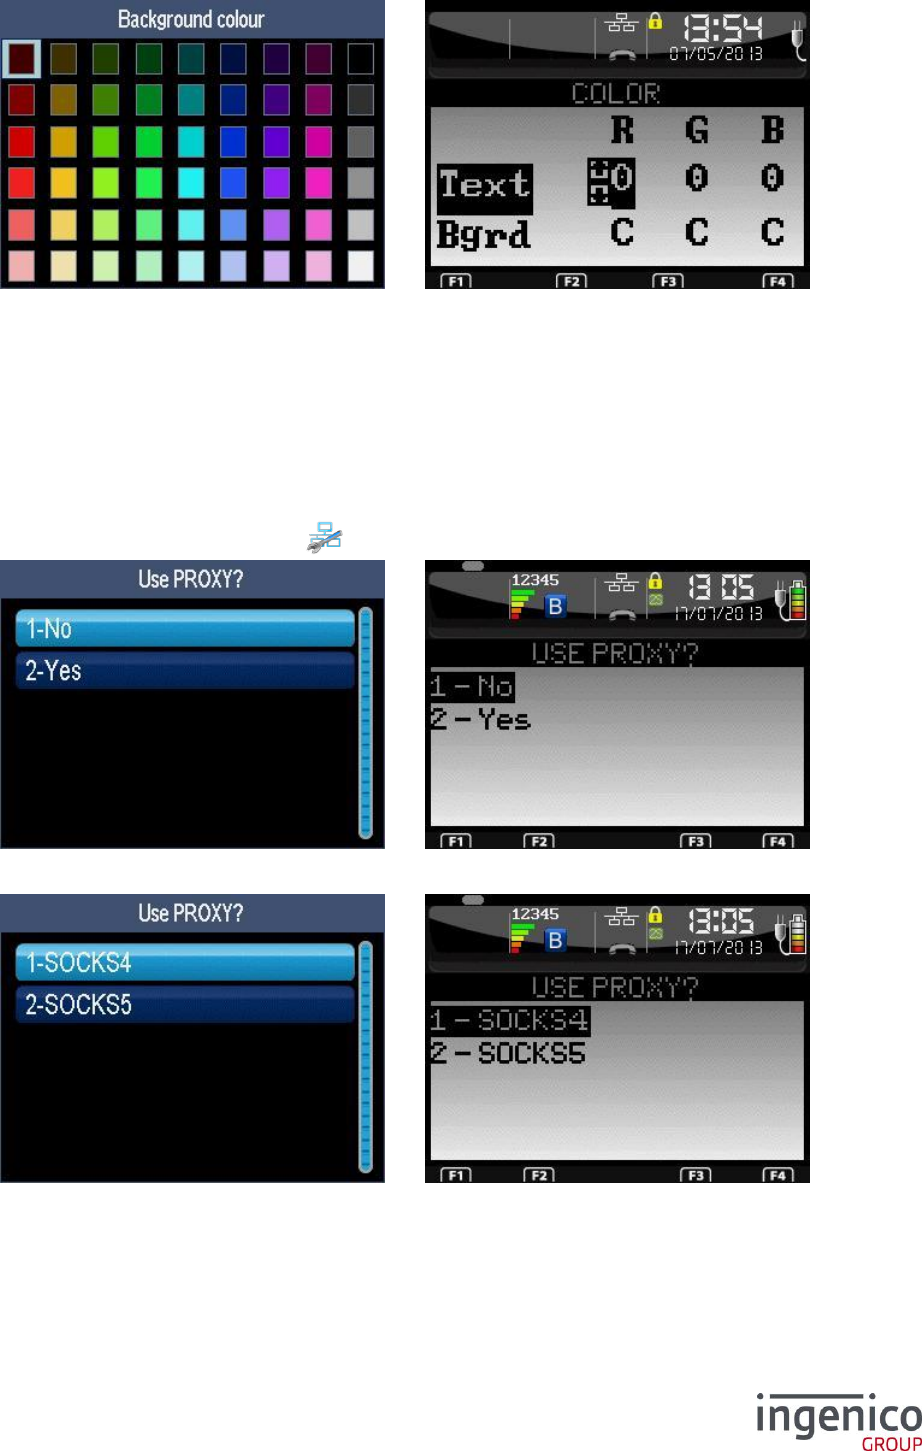
ICO-OPE-00986
REFERENCE MANUAL
Restricted
137/166
Ingenico document - Reproduction or disclosure prohibited without written authorization
Please check document validity before using
For “Goal”, select the color then validate.
For “LibGR”, enter the “Red Green Blue” color code:
Up and down keys to change the hexadecimal value to the highlighted RGB parameter;
Green key to go to another RGB parameter;
Yellow key to change line (Text Background);
Red key to exit the menu and save the colors.
9_10 Proxy
From the “Hardware” screen, select the icon or the “Proxi” item and validate.
Select “Yes” if the terminal reaches the bank server via a proxy server.
If there is a proxy server, select the protocol type either:
SOCKS4 requiring IP address, port and optionally a user ID, or
SOCKS5 requiring IP address, port and optionally a login and a password.
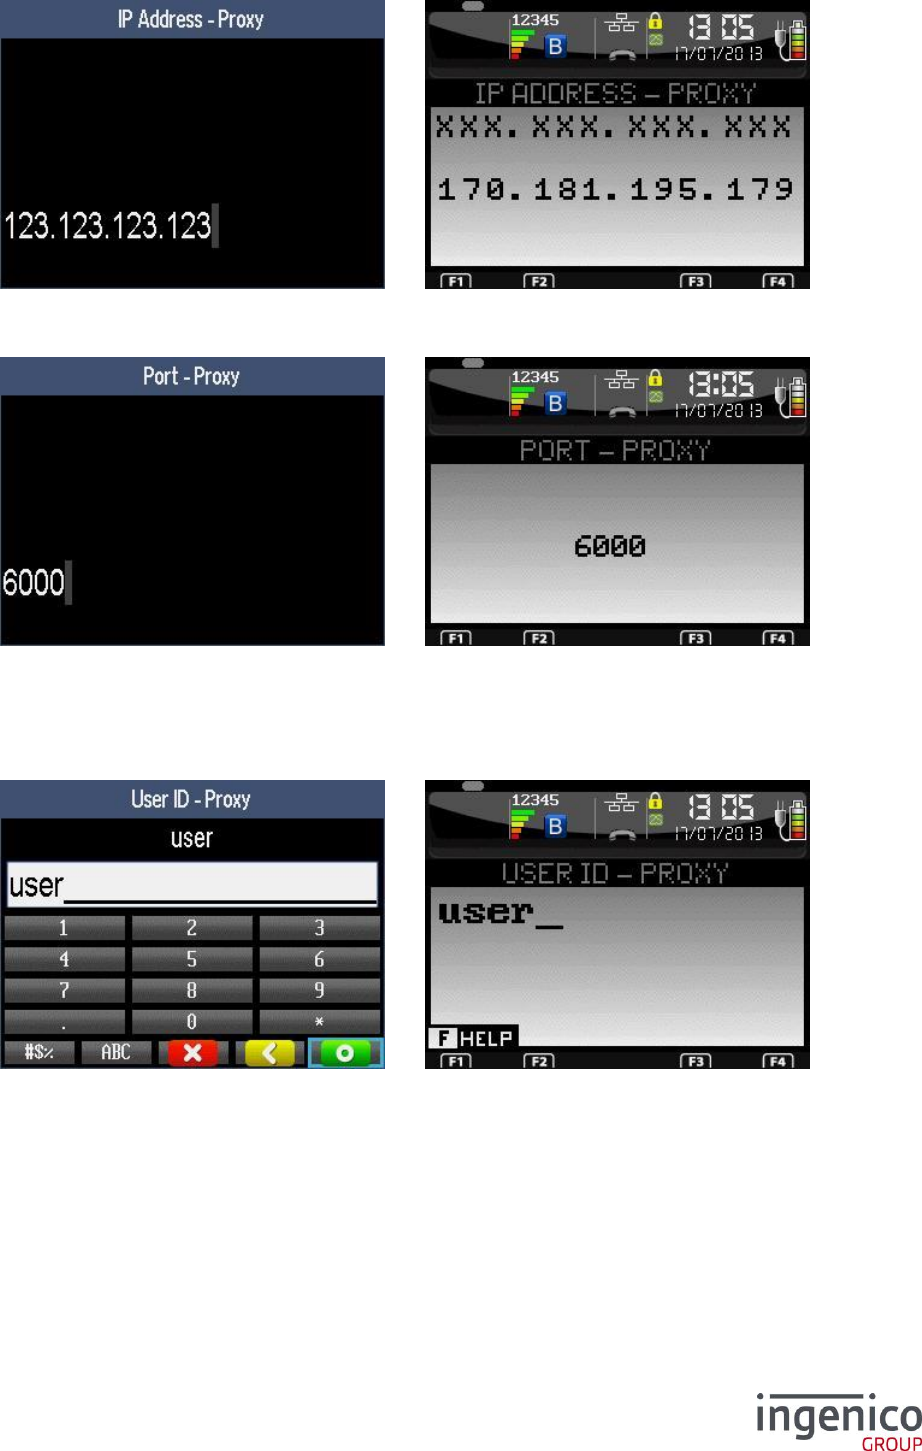
ICO-OPE-00986
REFERENCE MANUAL
Restricted
138/166
Ingenico document - Reproduction or disclosure prohibited without written authorization
Please check document validity before using
Enter the IP address of the terminal (supplied by the administrator of the local network). IP Address is
composed of four digital fields, each one from 0 to 255.
Enter the port number. Then validate.
9_10_1 SOCKS4 protocol
The following screen is displayed only by selecting “SOCKS4” protocol and activating “user
authentication”.
Enter the user ID for proxy server. Then validate.
9_10_2 SOCKS5 protocol
The following screens are displayed only by selecting “SOCKS5”.
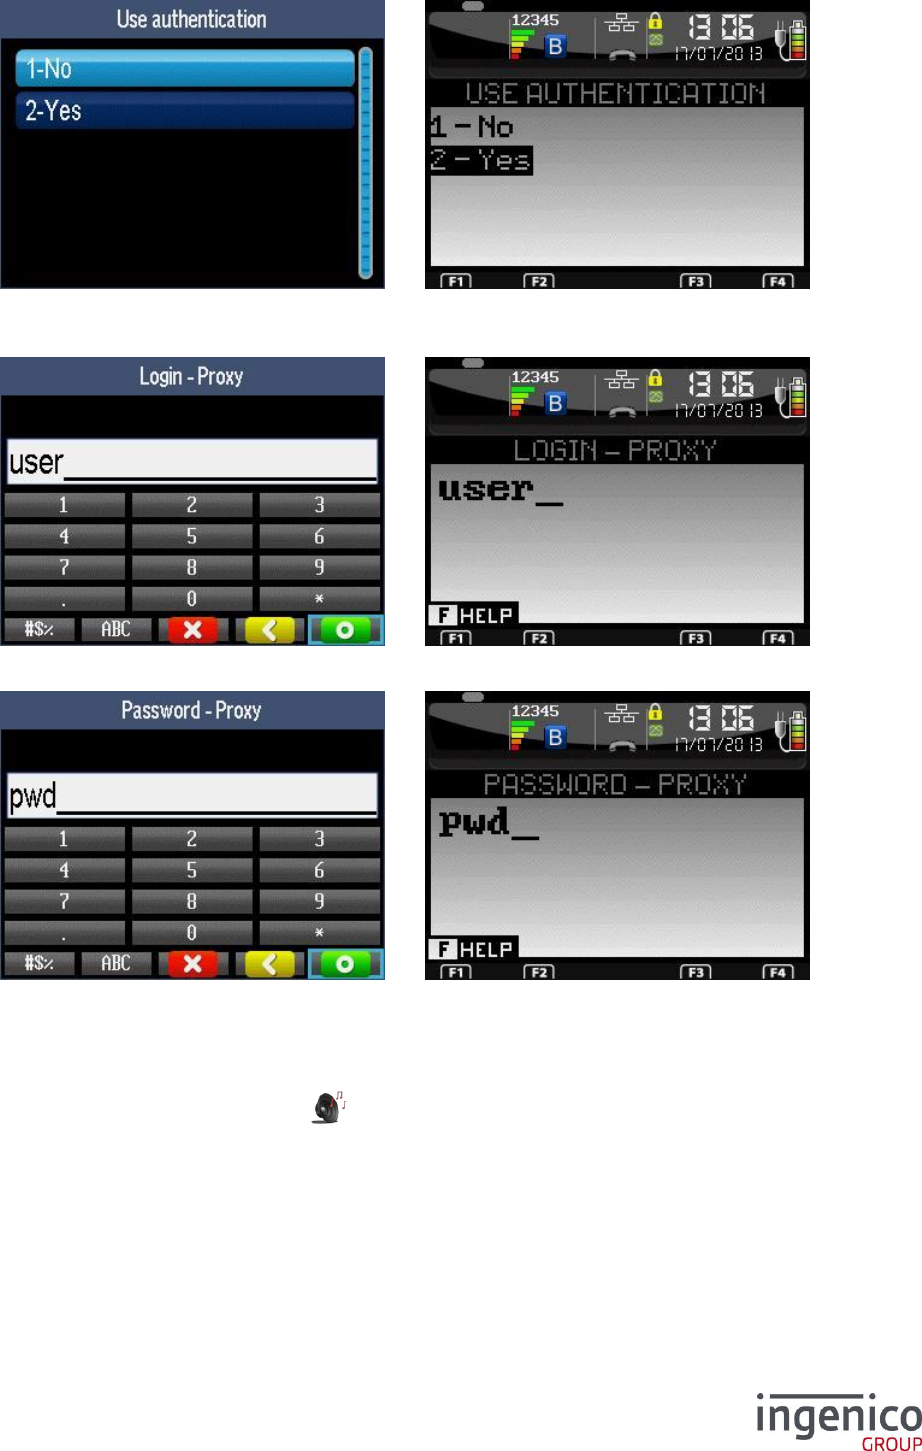
ICO-OPE-00986
REFERENCE MANUAL
Restricted
139/166
Ingenico document - Reproduction or disclosure prohibited without written authorization
Please check document validity before using
Select “Yes” if the proxy server requires a user authentication. After validation, refer the following
screens. If “No” is selected and validated, the configuration of the proxy server is finished.
Enter the login of the user. Then validate.
Enter the password of the user. Then validate.
9_11 Bluetooth Audio
From the “Hardware” screen, select the icon or the “Bluetooth Streaming” item and validate. This
item is available only on mobile Bluetooth iWL280/350.
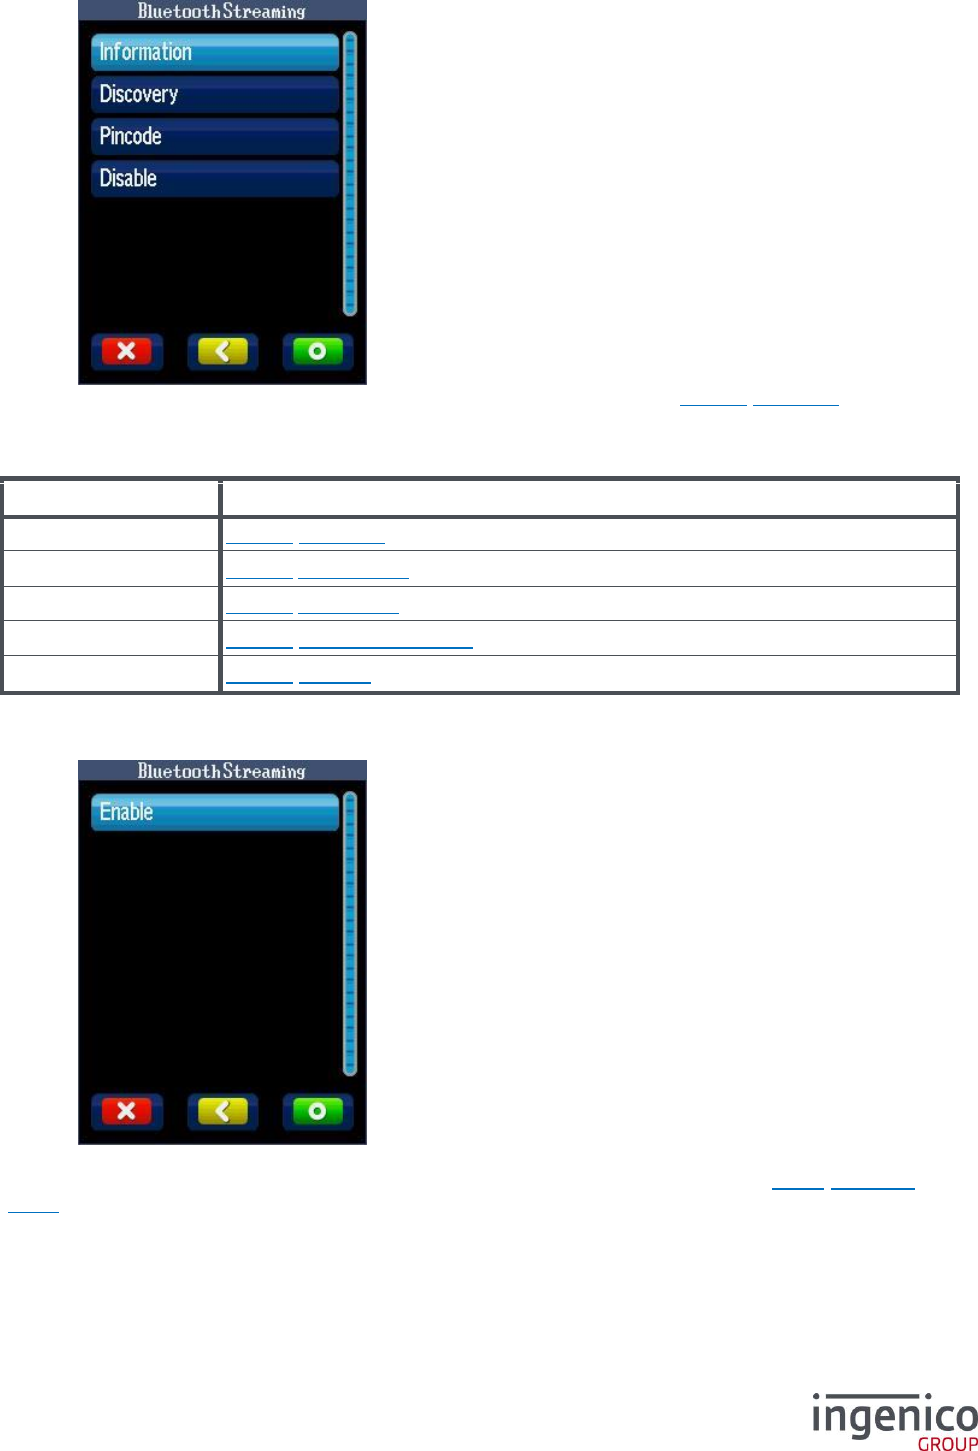
ICO-OPE-00986
REFERENCE MANUAL
Restricted
140/166
Ingenico document - Reproduction or disclosure prohibited without written authorization
Please check document validity before using
This screen is displayed only if the functionality is enabled. If disabled, refer 9_11_1 Activation.
Item
Reference
Enable
9_11_1 Activation
Disable
9_11_2 Deactivation
Information
9_11_3 Information
Discovery
9_11_4 Peripheral research
Pincode
9_11_5 Pincode
9_11_1 Activation
This screen is displayed only if the functionality is disabled.
Select “Enable” to activate the functionality. After validation, the screen presented in 9_11 Bluetooth
Audio is displayed.
9_11_2 Deactivation
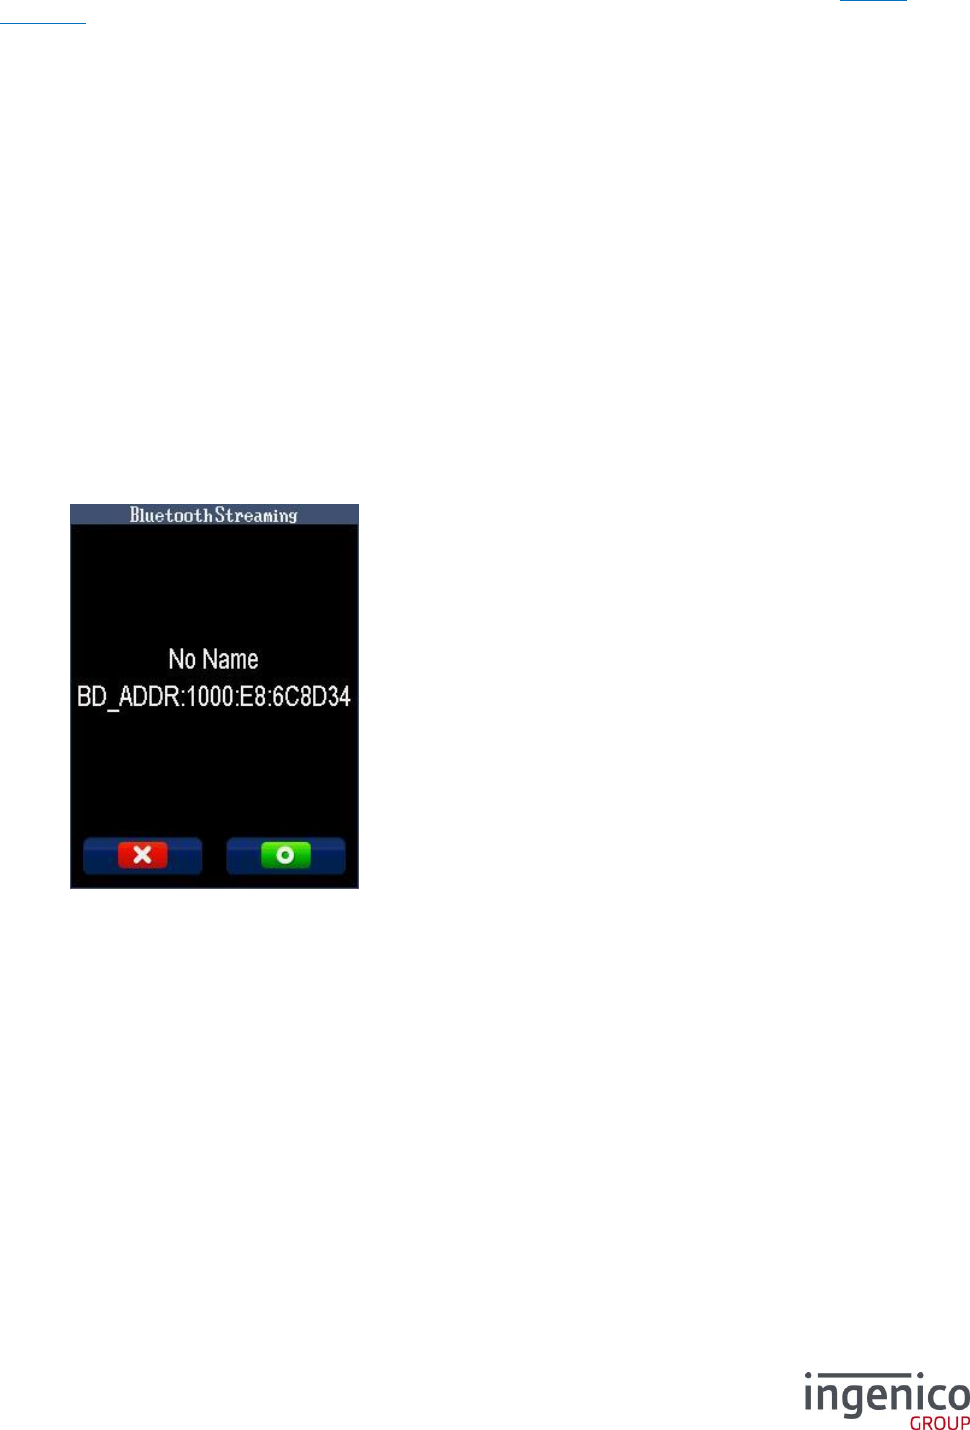
ICO-OPE-00986
REFERENCE MANUAL
Restricted
141/166
Ingenico document - Reproduction or disclosure prohibited without written authorization
Please check document validity before using
Select “Disable” to deactivate the functionality. After validation, the screen presented in 9_11_1
Activation is displayed.
9_11_3 Information
The terminal displays information about the Bluetooth headset associated to the functionality (empty
screen if no associated peripheral).
9_11_4 Peripheral research
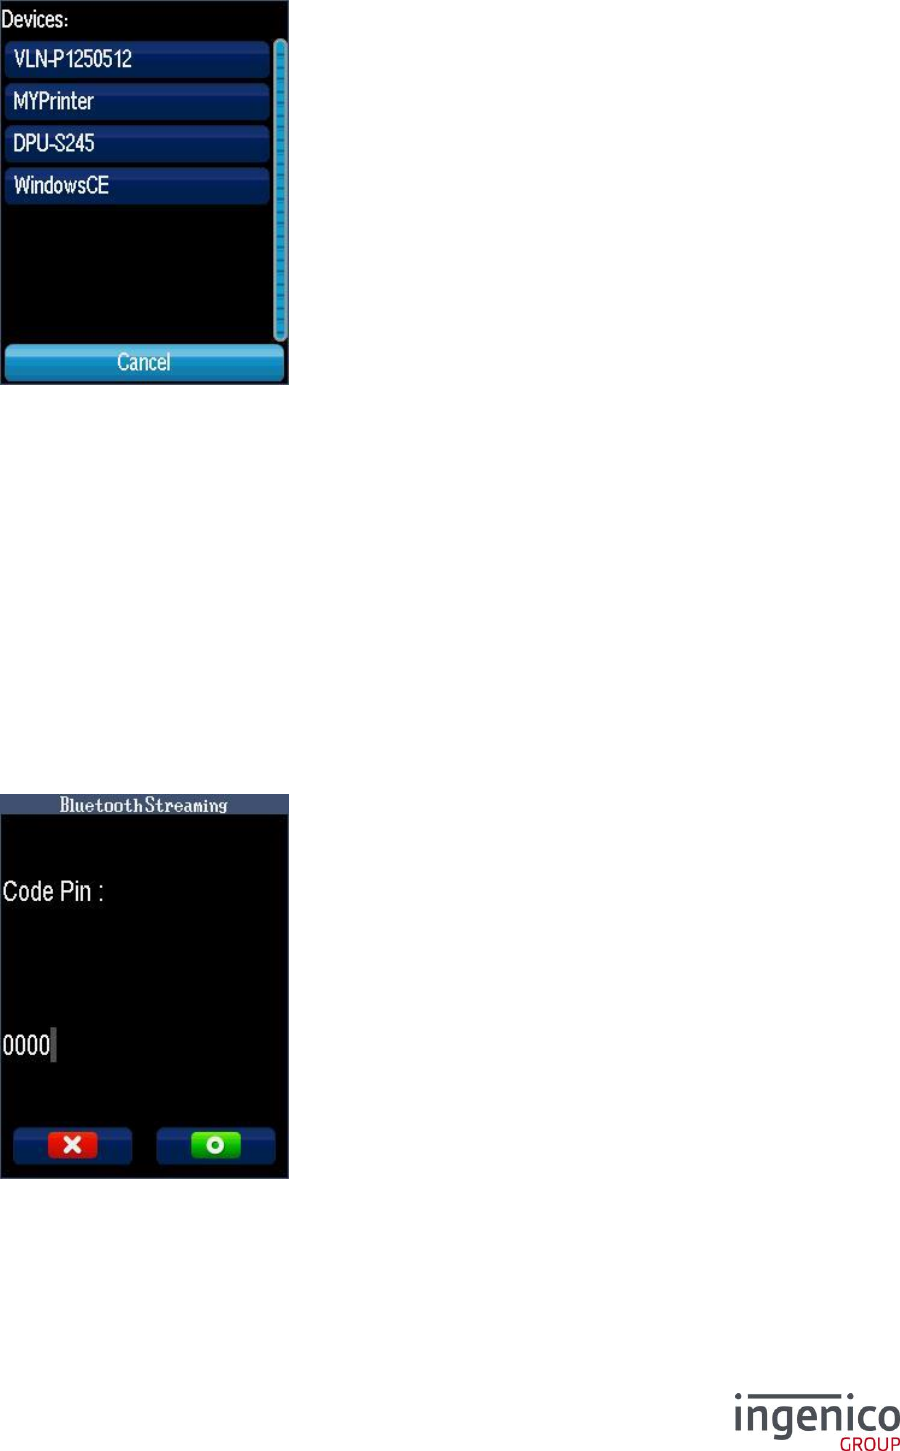
ICO-OPE-00986
REFERENCE MANUAL
Restricted
142/166
Ingenico document - Reproduction or disclosure prohibited without written authorization
Please check document validity before using
The terminal looks for Bluetooth peripherals. Select in the list the Bluetooth headset. Then validate.
9_11_5 Pincode
Enter the pin code furnished by the headset to unlock the connection. Then validate.
9_12 Bluetooth
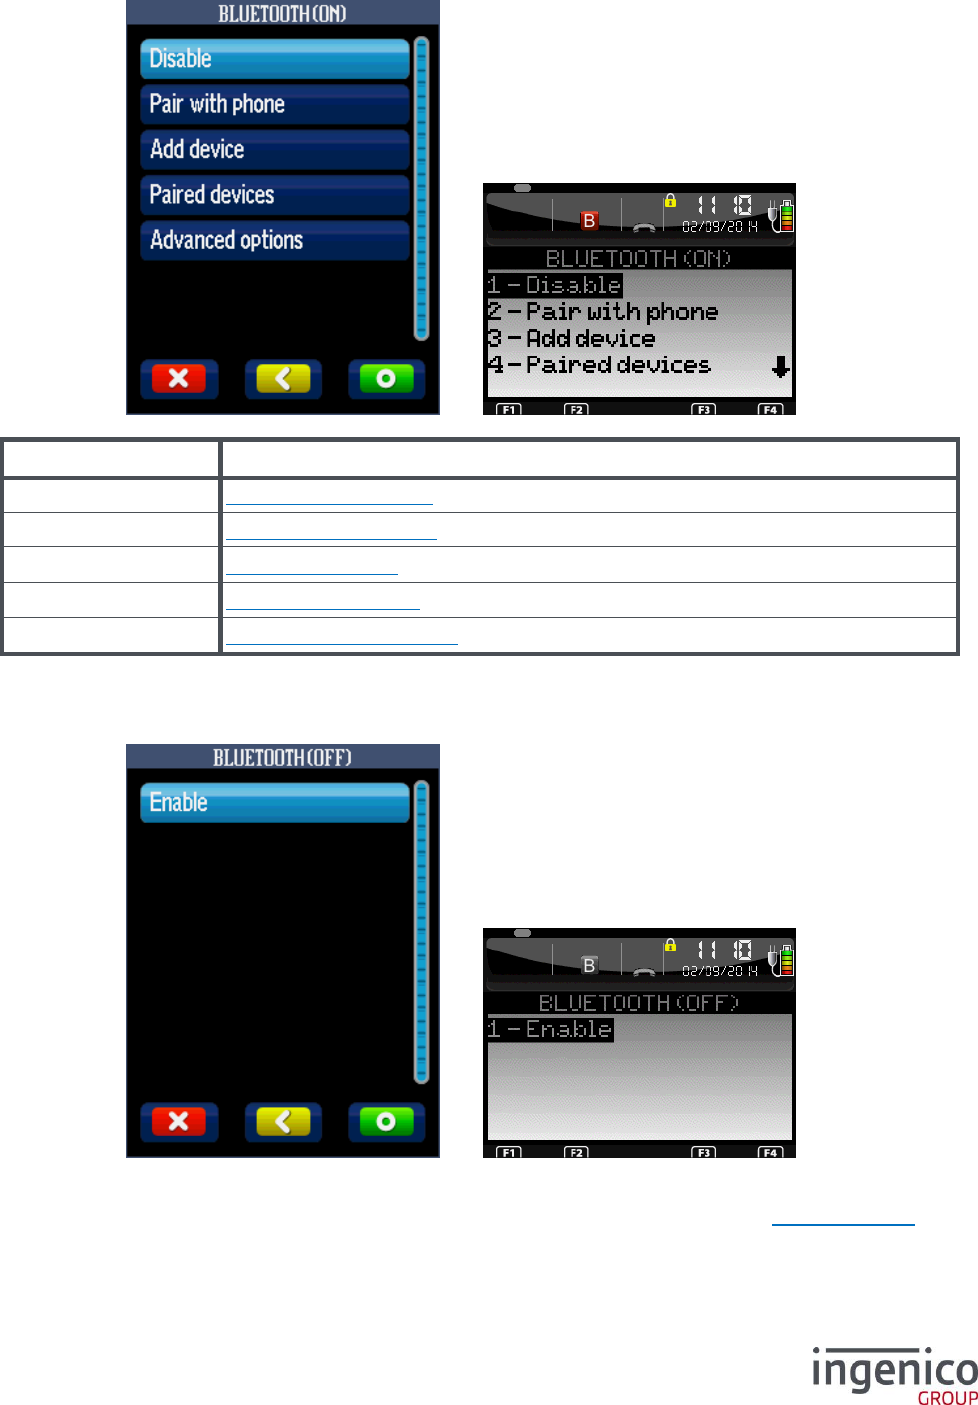
ICO-OPE-00986
REFERENCE MANUAL
Restricted
143/166
Ingenico document - Reproduction or disclosure prohibited without written authorization
Please check document validity before using
This item is available only on Bluetooth terminals.
Item
Reference
Enable/Disable
9_12_1 Enable/Disable
Pair with phone
9_12_2 Pair with phone
Add device
9_12_3 Add device
Paired devices
9_12_4 Paired device
Advanced options
9_12_5 Advanced options
9_12_1 Enable/Disable
This screen is displayed only if the functionality is disabled.
Select “Enable” to activate the functionality. After validation, the screen presented in 9_12 Bluetooth
is displayed.
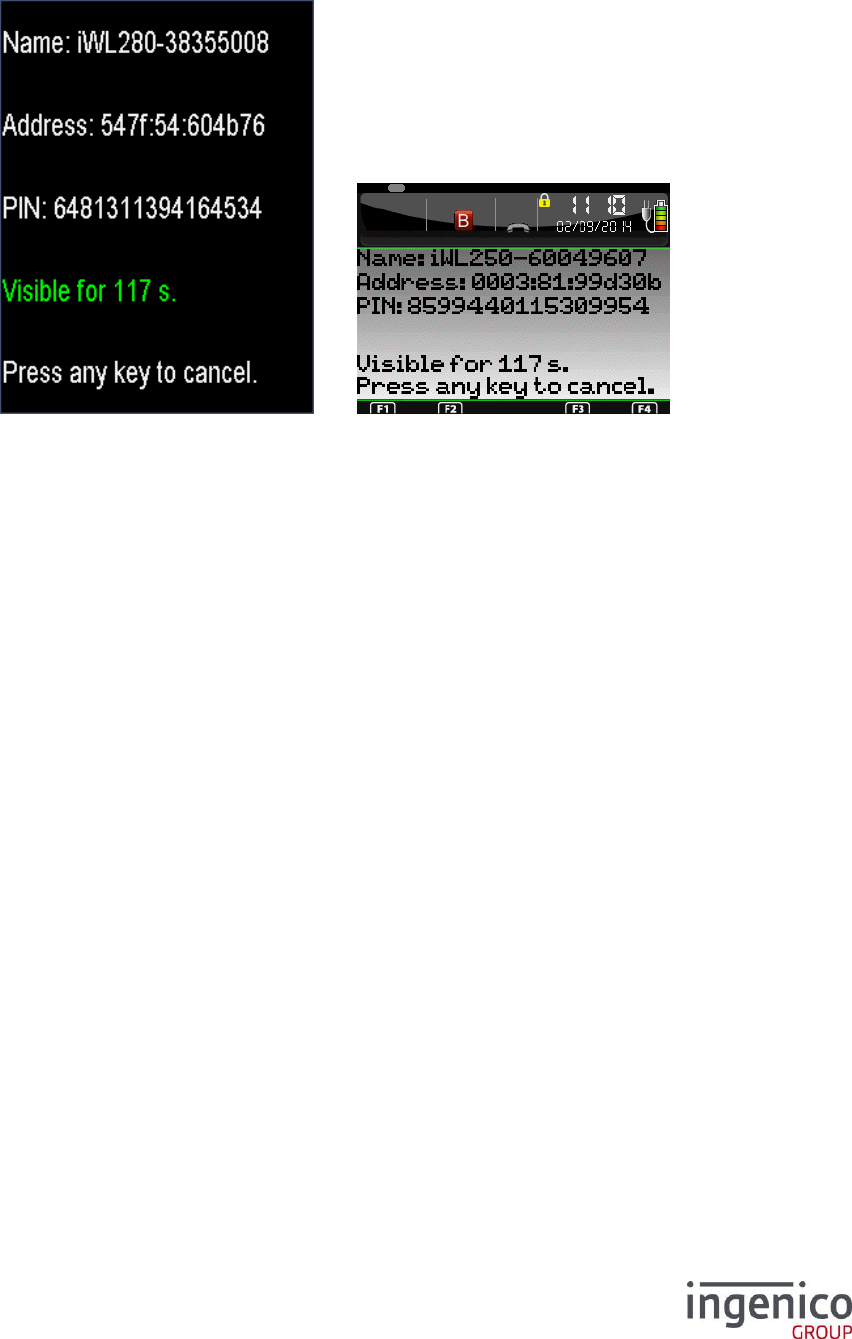
ICO-OPE-00986
REFERENCE MANUAL
Restricted
144/166
Ingenico document - Reproduction or disclosure prohibited without written authorization
Please check document validity before using
9_12_2 Pair with phone
Select “Pair with phone” to pair a Bluetooth phone or tablet to the terminal. After validation the
following screen is displayed.
On the phone or tablet side select the terminal in the list of discovered Bluetooth devices.
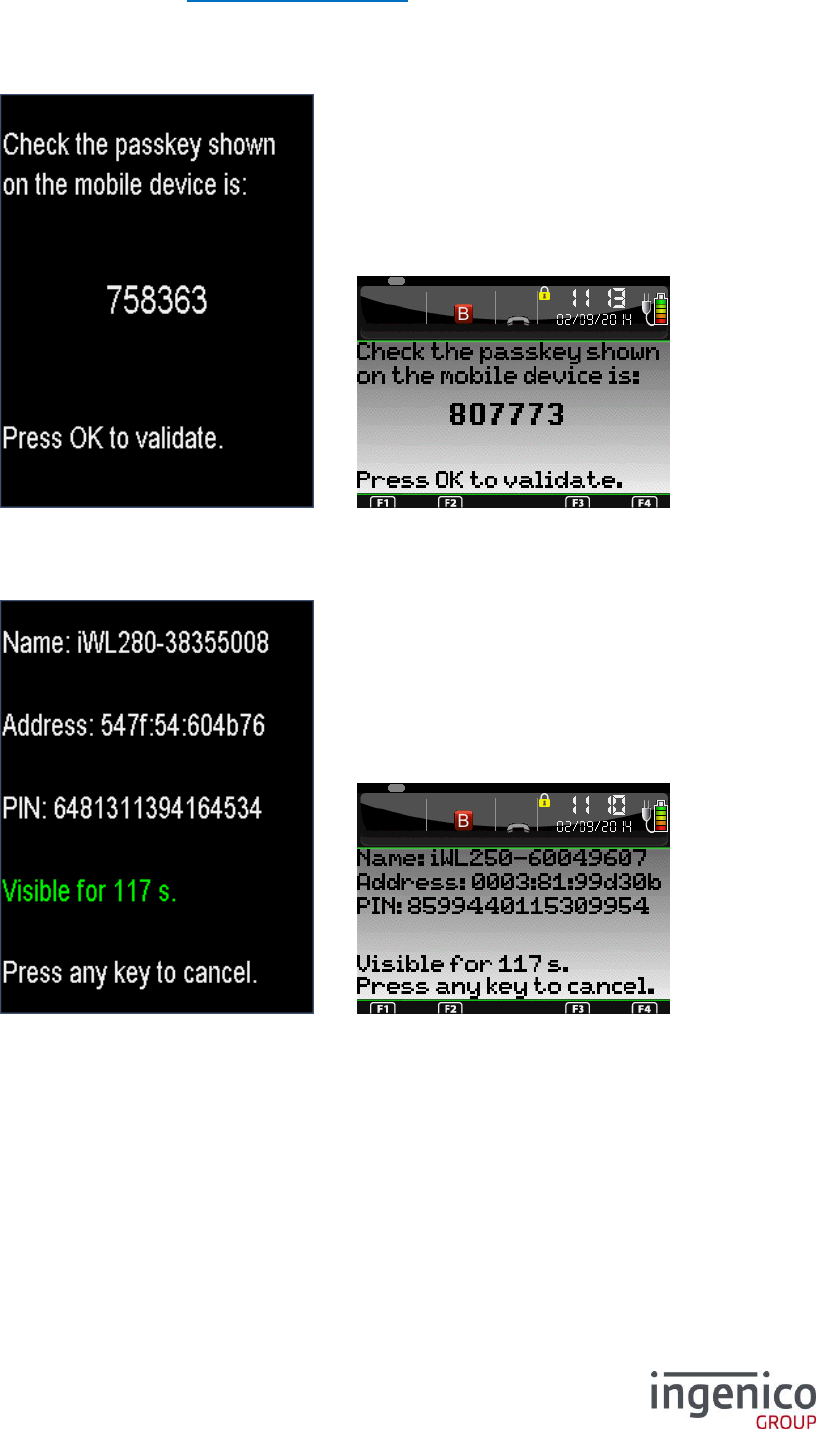
ICO-OPE-00986
REFERENCE MANUAL
Restricted
145/166
Ingenico document - Reproduction or disclosure prohibited without written authorization
Please check document validity before using
If the pairing mode (refer to 9_12_5_2 Pairing mode for more informations) is set to “Pin
Comparison” you should have to compare the passkey on the tablet or phone to the terminal
one and validate on the two sides.
Else if the pairing mode is set to “Pin entry” you should have to enter the 16 digits Pincode
displayed on the terminal to the tablet or smartphone and validate.
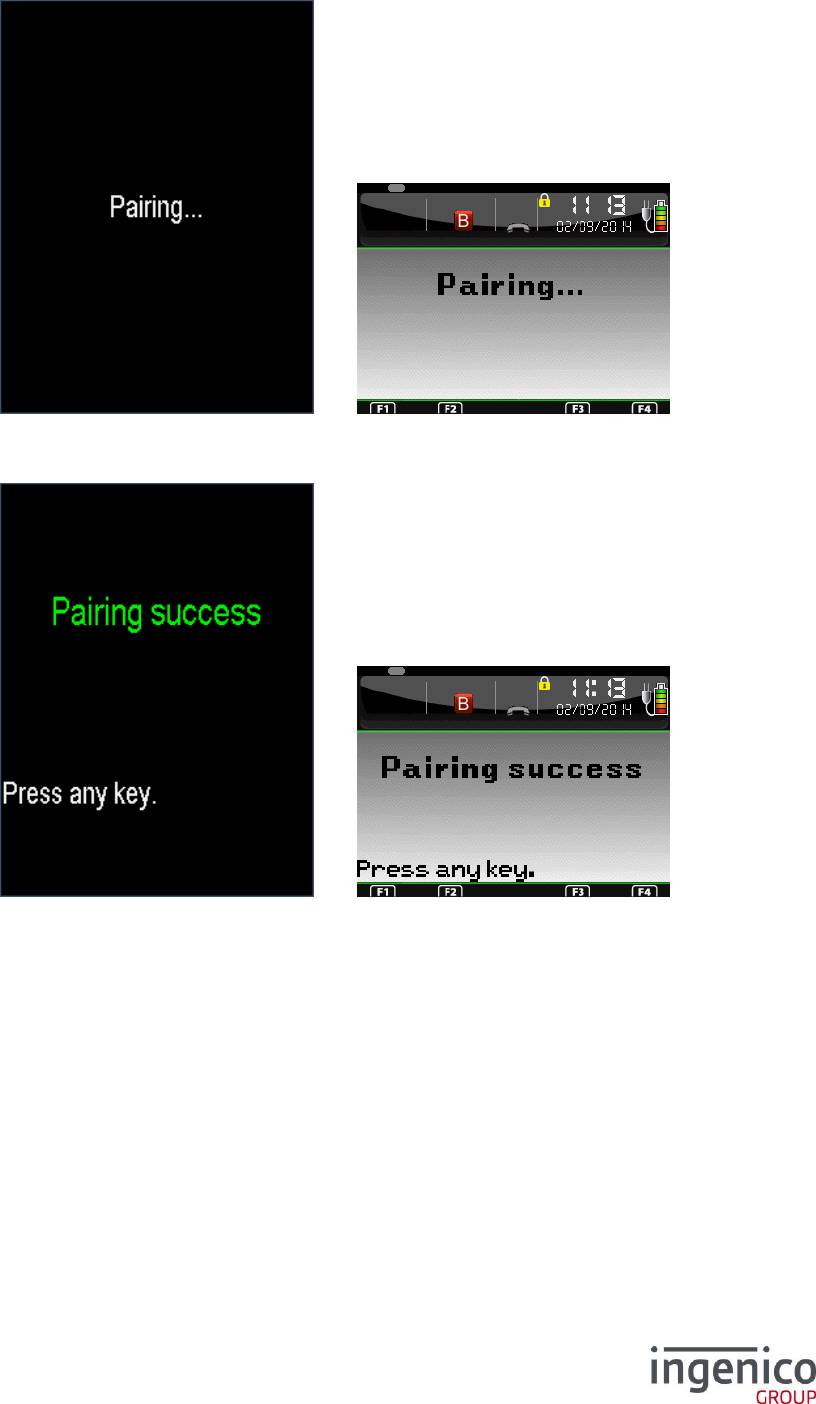
ICO-OPE-00986
REFERENCE MANUAL
Restricted
146/166
Ingenico document - Reproduction or disclosure prohibited without written authorization
Please check document validity before using
After validation the following screen is displayed a few seconds.
At the end of the pairing phase your device should be paired and the following screen is
displayed

ICO-OPE-00986
REFERENCE MANUAL
Restricted
147/166
Ingenico document - Reproduction or disclosure prohibited without written authorization
Please check document validity before using
If the pairing failed, the following screen is displayed.
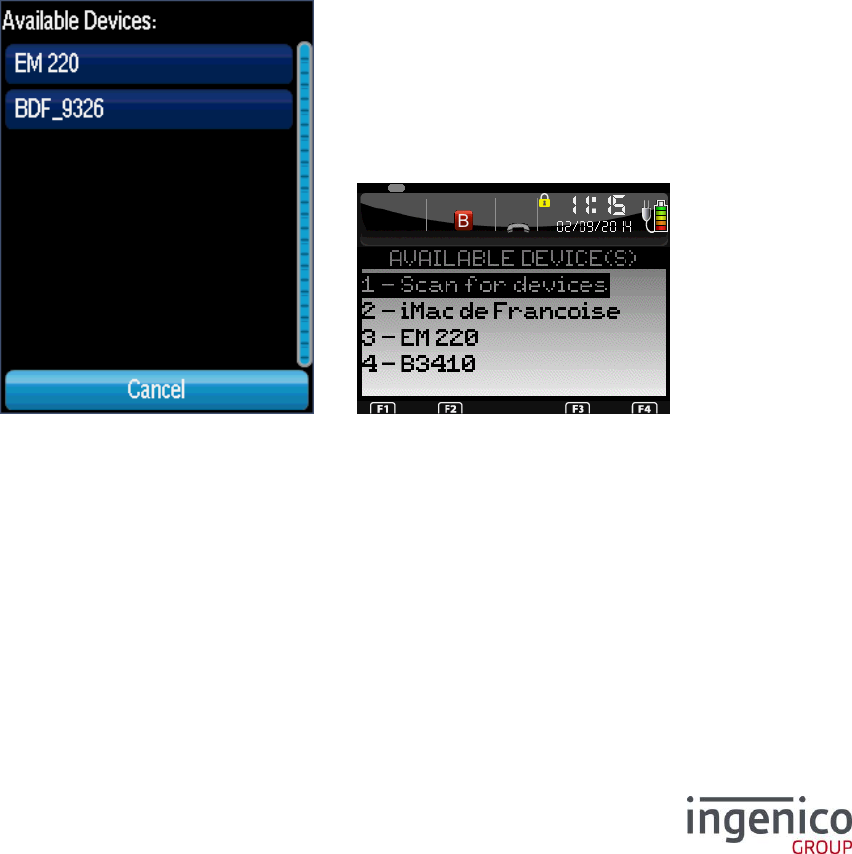
ICO-OPE-00986
REFERENCE MANUAL
Restricted
148/166
Ingenico document - Reproduction or disclosure prohibited without written authorization
Please check document validity before using
9_12_3 Add device
In this item you can pair a device to the Bluetooth terminal. But the type of device to pair depends on
the type of Bluetooth terminal.
Bluetooth printer:
o iCM122
o iMP322/iMP352
o iUC180B
o iUP250
o iUI120
Bluetooth barcode reader:
o iWL222 / iWL252
o iWL282 / iWL284 / iWL286
o iWL354 / iWL356
iOS bridge:
o iCM122
o iMP322
o iMP352
An iOS bridge is a type of Bluetotoh device that will be physically connected to the Telium terminal but
will be functionnaly driven by the iOS application. That’s why this type is only available on device with
the iAP chip.
Once the item selected, a screen will display the available Bluetooth devices
Select the device you want to pair. If the device does not appear, wait some time (GOAL terminals) or
hit Scan for devices (Libgr terminals).
Optionnaly, a new screen will appear, to specify whart type of deivce is being paired. The screen will
not lways appear, as for some case, Telium can automatically determine whether the device is a
printer or a barcode reader.
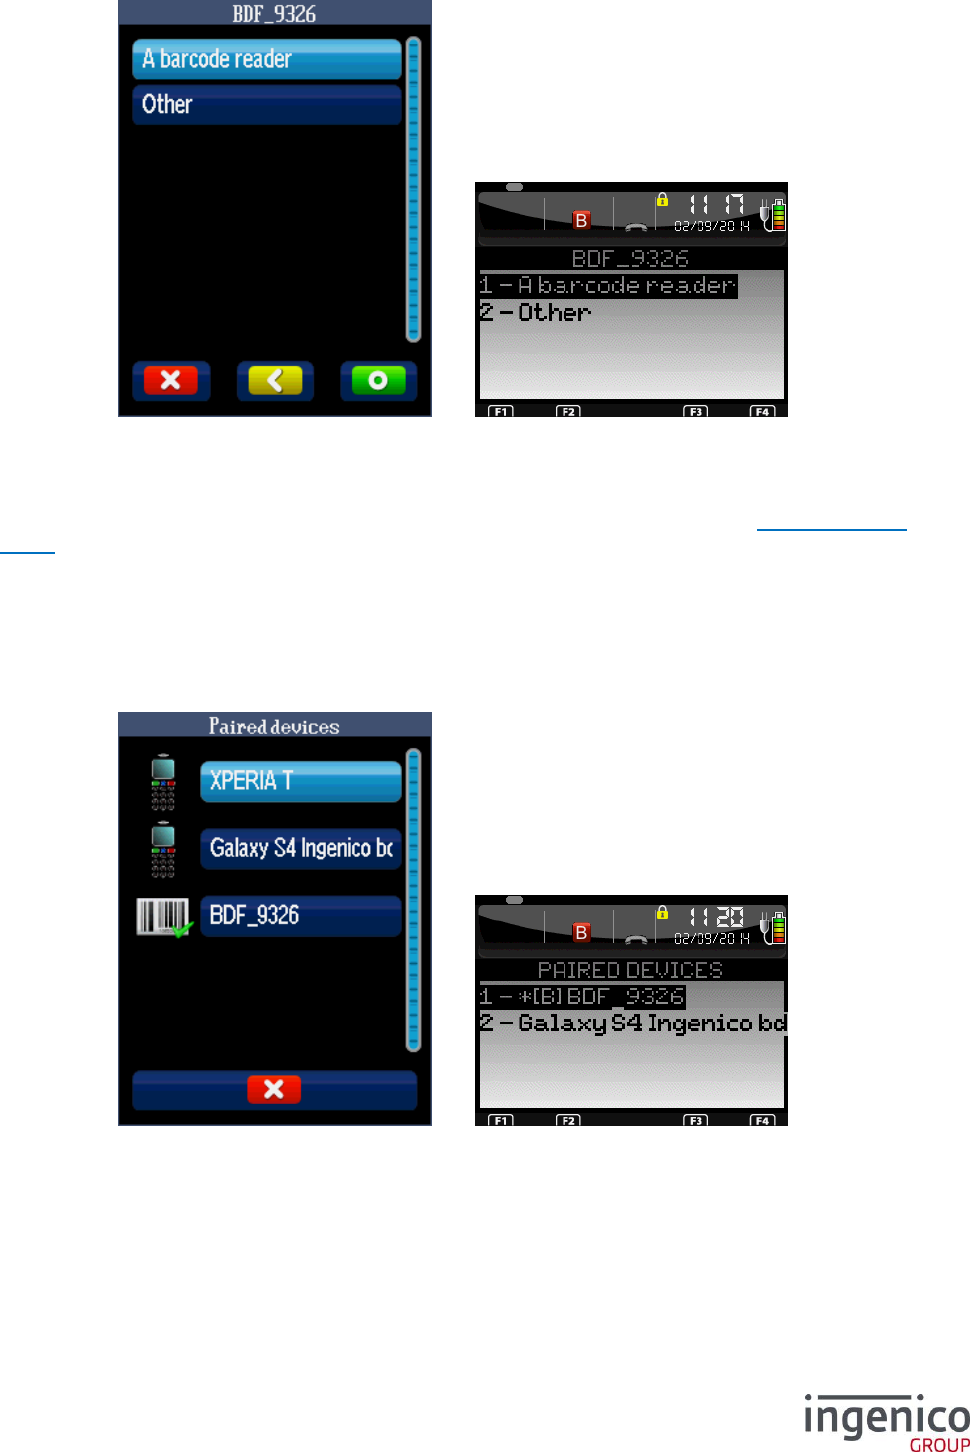
ICO-OPE-00986
REFERENCE MANUAL
Restricted
149/166
Ingenico document - Reproduction or disclosure prohibited without written authorization
Please check document validity before using
The rest of the pairing process is the same as when pairing a phone (refer to section 9_12_2 Pair with
phone)
9_12_4 Paired devices
In this item you can display and modify the paired devices. After validation the following screen is
displayed.
Depending on the device type the icons (for GOAL) or prefixes (for Libgr) are:
Bluetooth printer:

ICO-OPE-00986
REFERENCE MANUAL
Restricted
150/166
Ingenico document - Reproduction or disclosure prohibited without written authorization
Please check document validity before using
o or if it is the selected printer in GOAL
o and [P] or *[P] in Libgr (* identify the selected device)
Bluetooth barcode reader:
o or if it is the selected barcode reader in GOAL
o And [B] or *[B] in Libgr (* identify the selected device)
iOS bridge (previously named SPP):
o or if it is the selected phone or tablet
o And [i] or *[i] in Libgr (* identify the selected device)
Mobile device for other cases (smartphone or tablet):
o in GOAL and no prefix in Libgr

ICO-OPE-00986
REFERENCE MANUAL
Restricted
151/166
Ingenico document - Reproduction or disclosure prohibited without written authorization
Please check document validity before using
Selecting a device you can manage it. The options depend on the type of device:
Bluetooth printer:
o Remove: unpair the device
o Auto connect: (if this option is supported by the printer)
YES to keep the connection alive. This will increase the power consumption
(lower battery life) but speed up the printing
NO to connect on demand (managed by the Telium application). This will
slow the printing as the Bluetooth connection will have to be established each
time
o Set / Unset as default: To set the printer to use by default
Bluetooth barcode reader:
o Remove: unpair the device
o Set / Unset as default: To set the barcode reader to use by default
iOS bridge:
o Remove: unpair the device
o Set / Unset as default: To set the iOS bridge to use
Mobile device for other cases (smartphone or tablet):
o Remove: unpair the device
o Set / Unset as default: To set the Apple device to use (item only available on Apple
device)
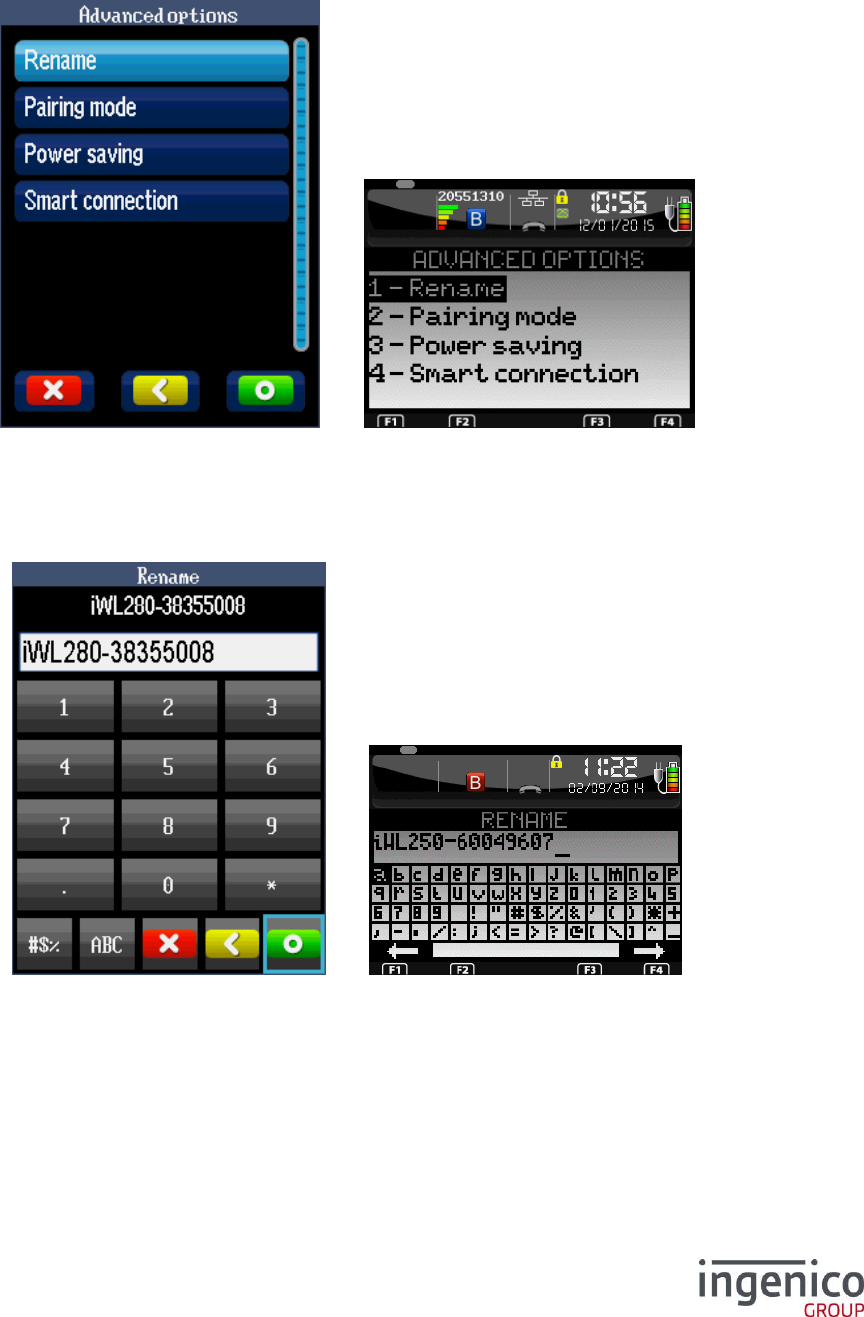
ICO-OPE-00986
REFERENCE MANUAL
Restricted
152/166
Ingenico document - Reproduction or disclosure prohibited without written authorization
Please check document validity before using
9_12_5 Advanced options
In this item you can modify the advanced functions. After validation the following screen is displayed.
9_12_5_1 Rename
In this item you can modify the terminal Bluetooth name. After validation the following screen is
displayed.
9_12_5_2 Pairing mode
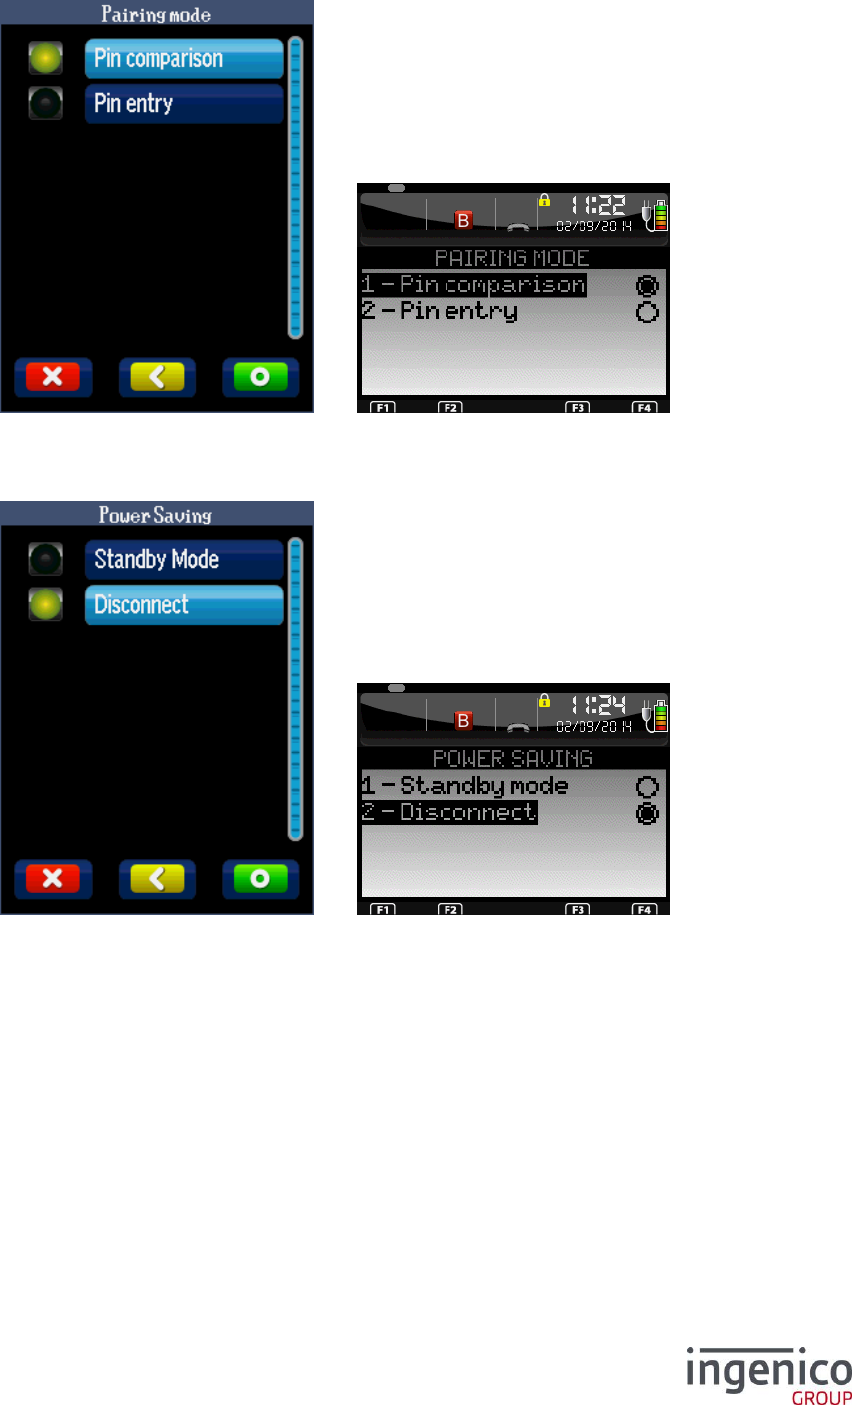
ICO-OPE-00986
REFERENCE MANUAL
Restricted
153/166
Ingenico document - Reproduction or disclosure prohibited without written authorization
Please check document validity before using
In this item you can modify the Bluetooth pairing security mode. After validation the following screen is
displayed.
9_12_5_3 Power saving
Select “Standby Mode” to maintain the Bluetooth connection with devices if the terminal is in stanby
mode. In this case the terminal can be woken up from smartphone or tablet.
The Bluetooth connection will be maintained in a low energy mode to reduce the battery usage.
9_12_5_4 Smart Connection
In this item you can modify the parameters of smart connection to customize Bluetooth paging. After
validation the following screen is displayed
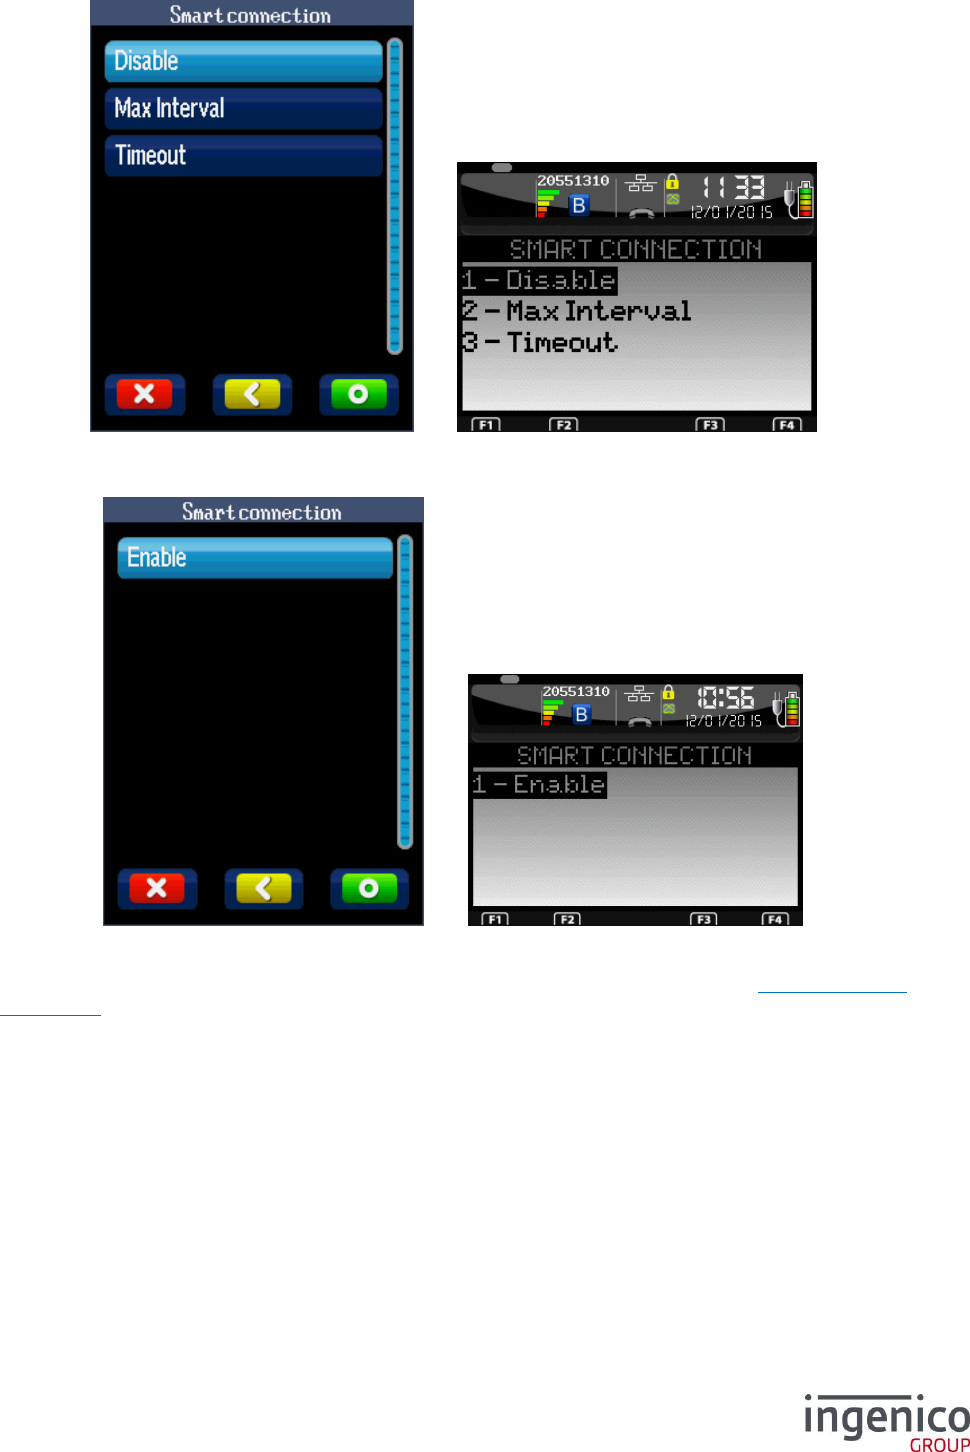
ICO-OPE-00986
REFERENCE MANUAL
Restricted
154/166
Ingenico document - Reproduction or disclosure prohibited without written authorization
Please check document validity before using
9_12_5_4_1 Enable/Disable
This screen is displayed only if the functionality is disabled.
Select “Enable” to activate the functionality. After validation, the screen presented in 9_12_5_4 Smart
Connection is displayed.
9_12_5_4_2 Max interval
In this item you can modify the maximum interval for Bluetooth paging. The value must be between 10
and 3600 seconds
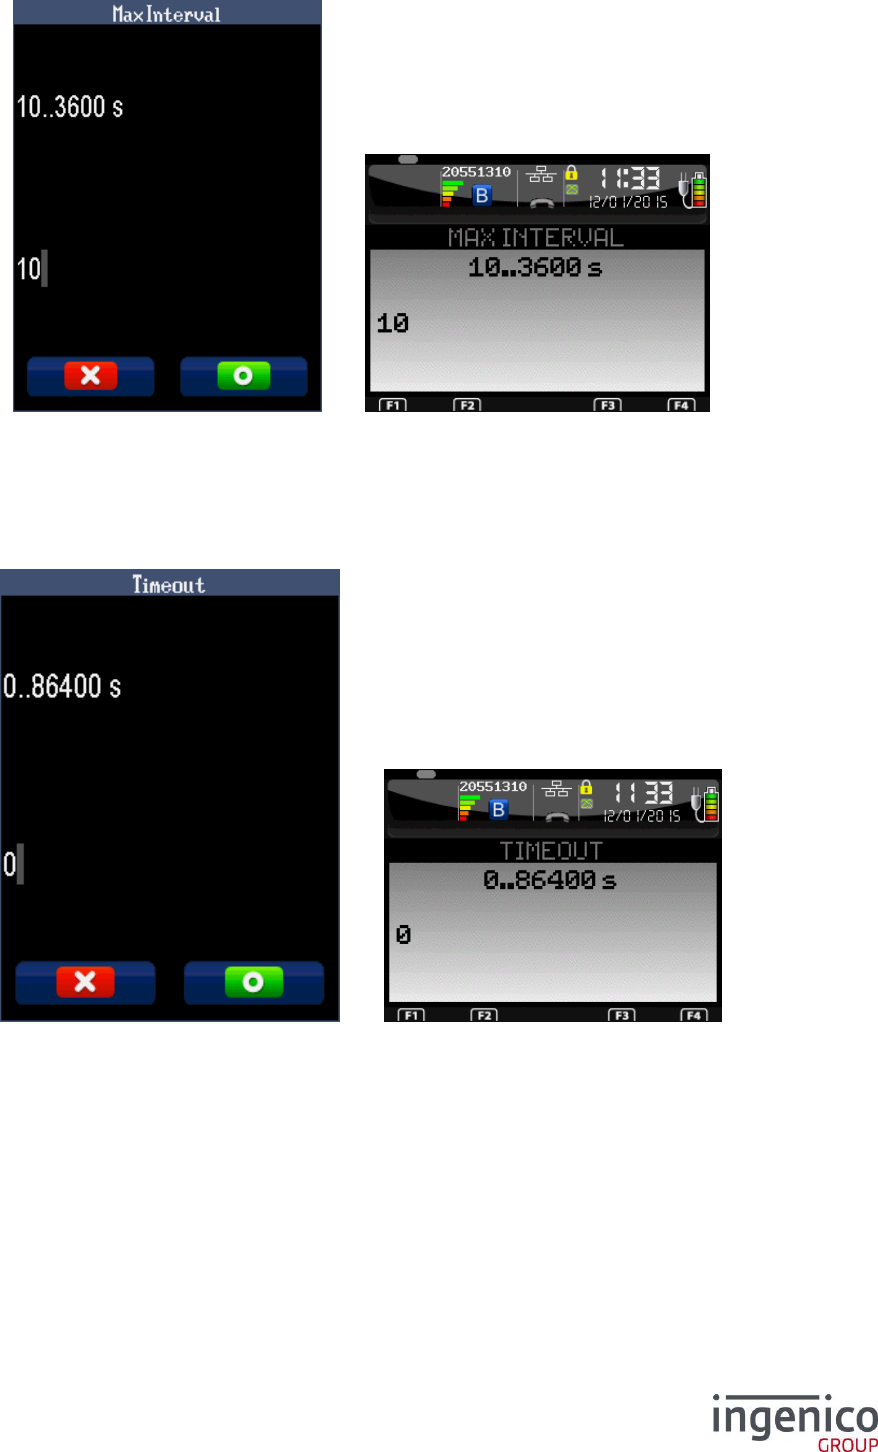
ICO-OPE-00986
REFERENCE MANUAL
Restricted
155/166
Ingenico document - Reproduction or disclosure prohibited without written authorization
Please check document validity before using
9_12_5_4_3 Timeout
In this item you can modify the timeout for Bluetooth paging. The value must be between 0 and 86400
seconds. The value 0 means infinite.

ICO-OPE-00986
REFERENCE MANUAL
Restricted
156/166
Ingenico document - Reproduction or disclosure prohibited without written authorization
Please check document validity before using
9_13 Stylus
This item is available only on iSC terminals.
Select in the list the kind of stylus used on the terminal. Then validate.
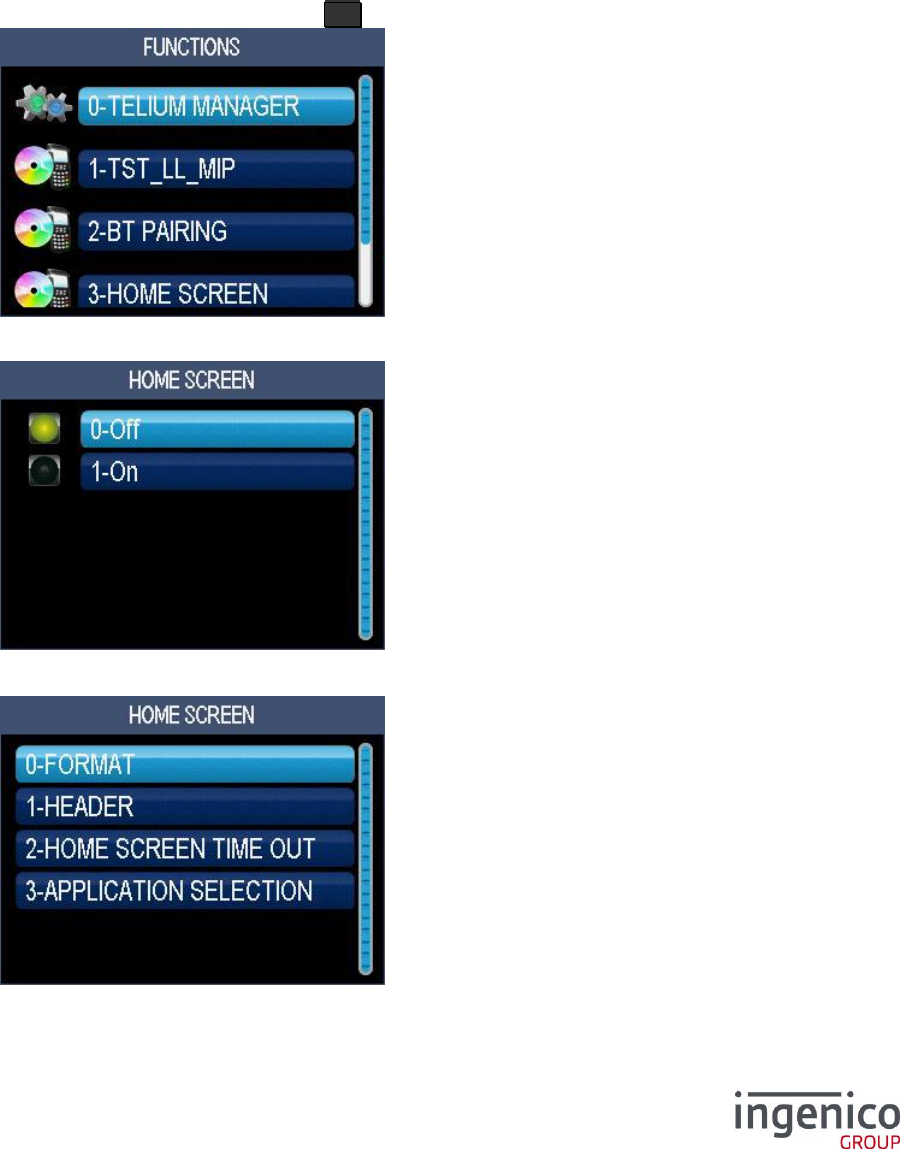
ICO-OPE-00986
REFERENCE MANUAL
Restricted
157/166
Ingenico document - Reproduction or disclosure prohibited without written authorization
Please check document validity before using
10 Home screen
“Home screen” is an application installed with the manager and only in “GOAL” mode.
When activated, “Home screen” displays the list of all runnable applications (select one to launch it).
Once the inactivity delay of the “home screen” is elapsed, it realases the focus to the system to display
the “Idle screen”. If no application manages the “Idle screen”, focus is given back to the “Home
screen”.
10_1 Activation
From the idle screen, press the function key F .
Then select the “Home Screen” item and validate.
Select “On” to enable the display of the “Home screen”. Otherwise, select “Off”.
This screen is displayed only if “On” was validated.

ICO-OPE-00986
REFERENCE MANUAL
Restricted
158/166
Ingenico document - Reproduction or disclosure prohibited without written authorization
Please check document validity before using
Item
Reference
Fomat
10_2 Format
Header
10_3 Header
Home screen time-out
10_4 Time-out
Application selection
10_5 Applications
10_2 Format
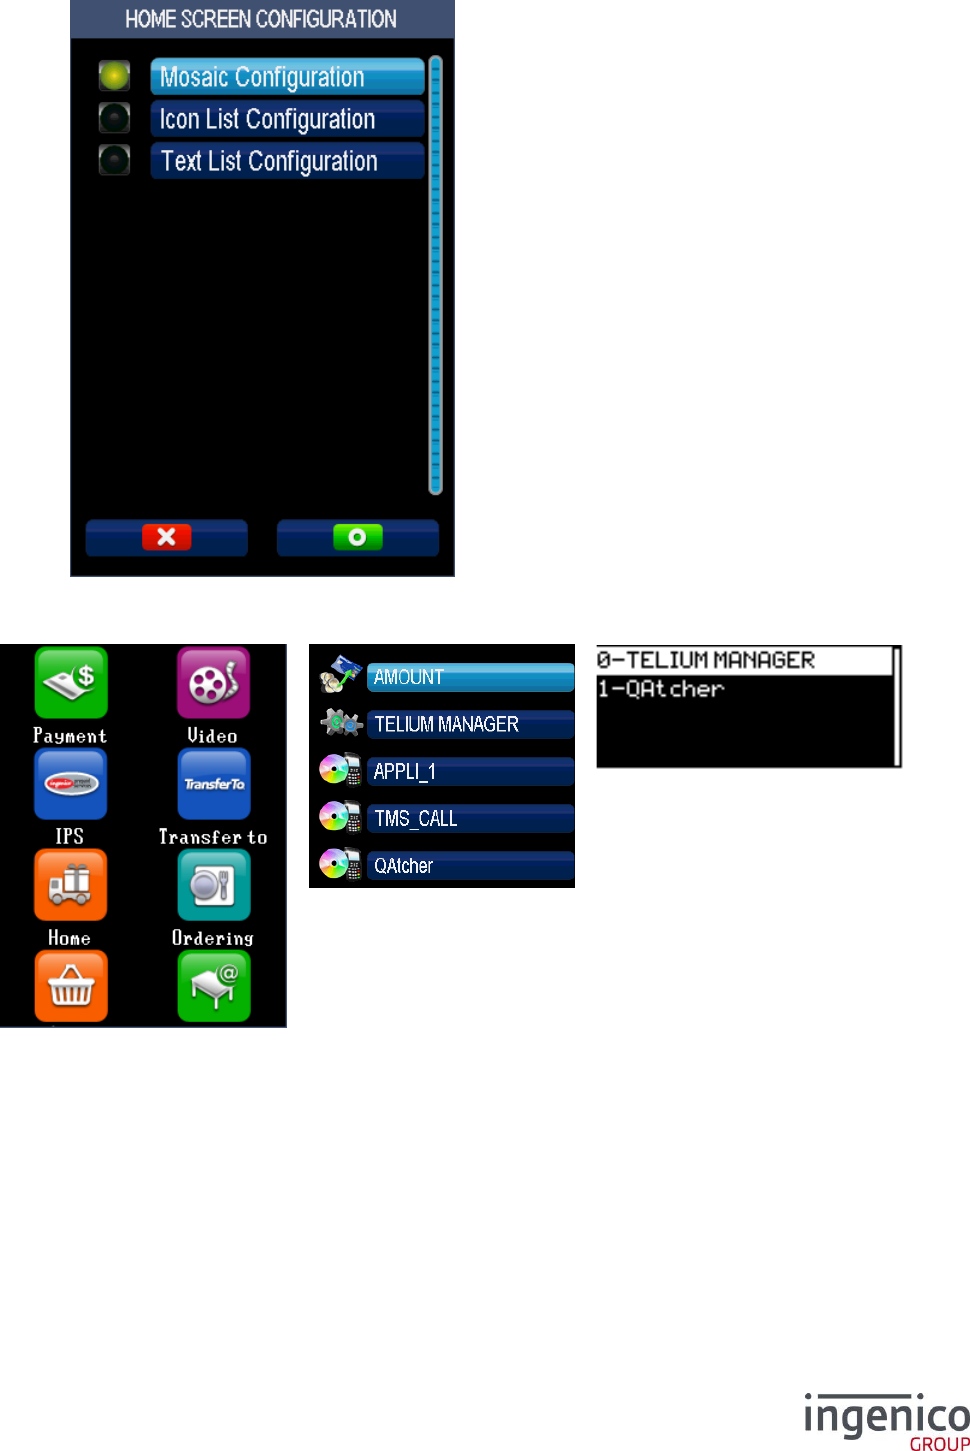
ICO-OPE-00986
REFERENCE MANUAL
Restricted
159/166
Ingenico document - Reproduction or disclosure prohibited without written authorization
Please check document validity before using
Select in the list the type of display on the home screen:
Mosaic
(touch screen only)
Icon
(color screen only)
Text
(all screens)
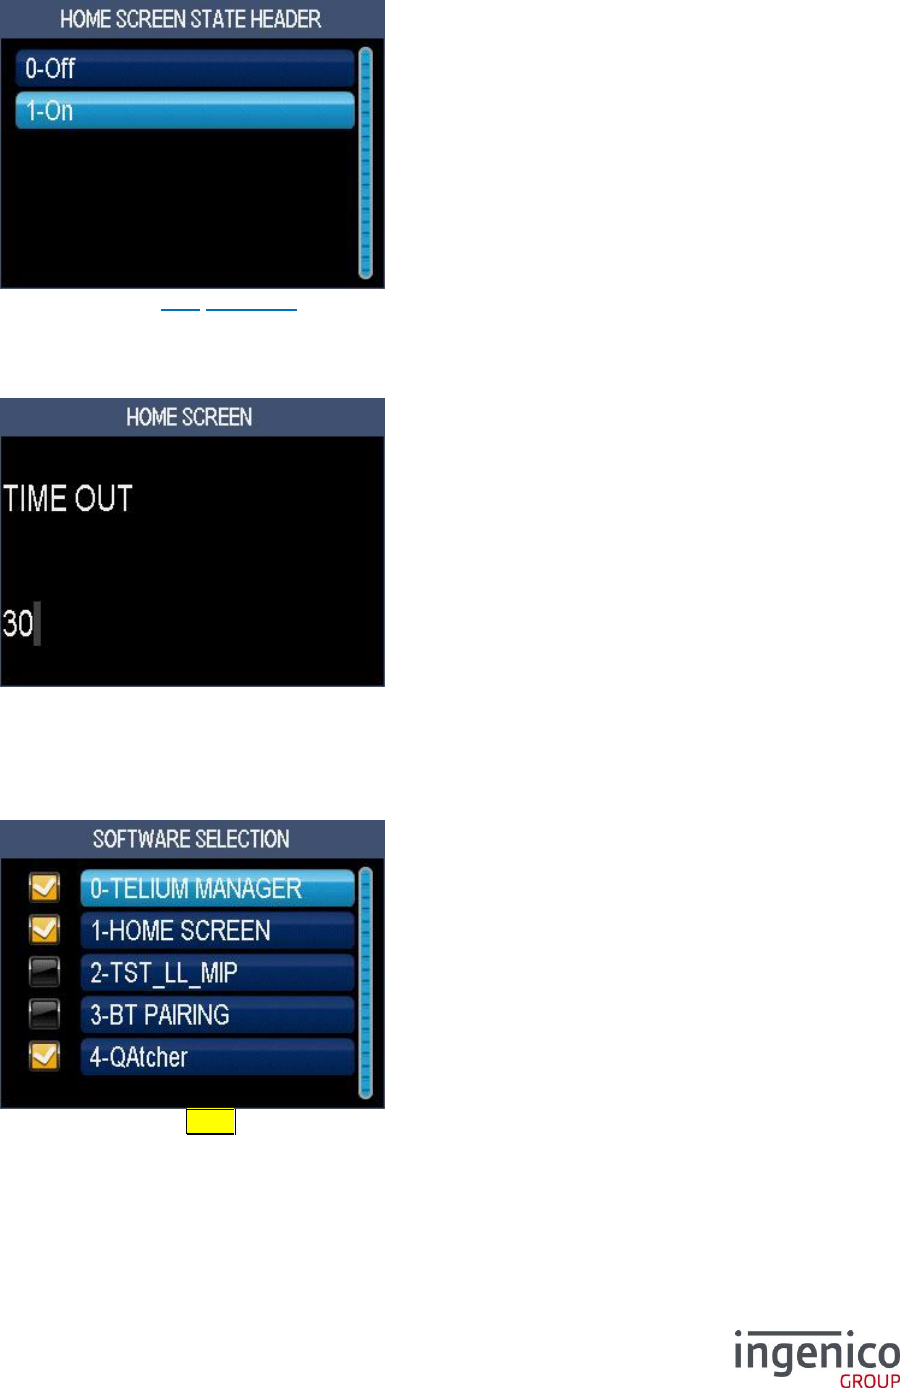
ICO-OPE-00986
REFERENCE MANUAL
Restricted
160/166
Ingenico document - Reproduction or disclosure prohibited without written authorization
Please check document validity before using
10_3 Header
Select if the header (refer 7_6 Status bar) is displayed or not on the home screen.
10_4 Time-out
Enter the duration (in seconds) of the home screen display before switching on the “idle screen”. Then
validate.
10_5 Applications
Select / unselect using the < key the application to be displayed on the “home screen”. Then
validate.
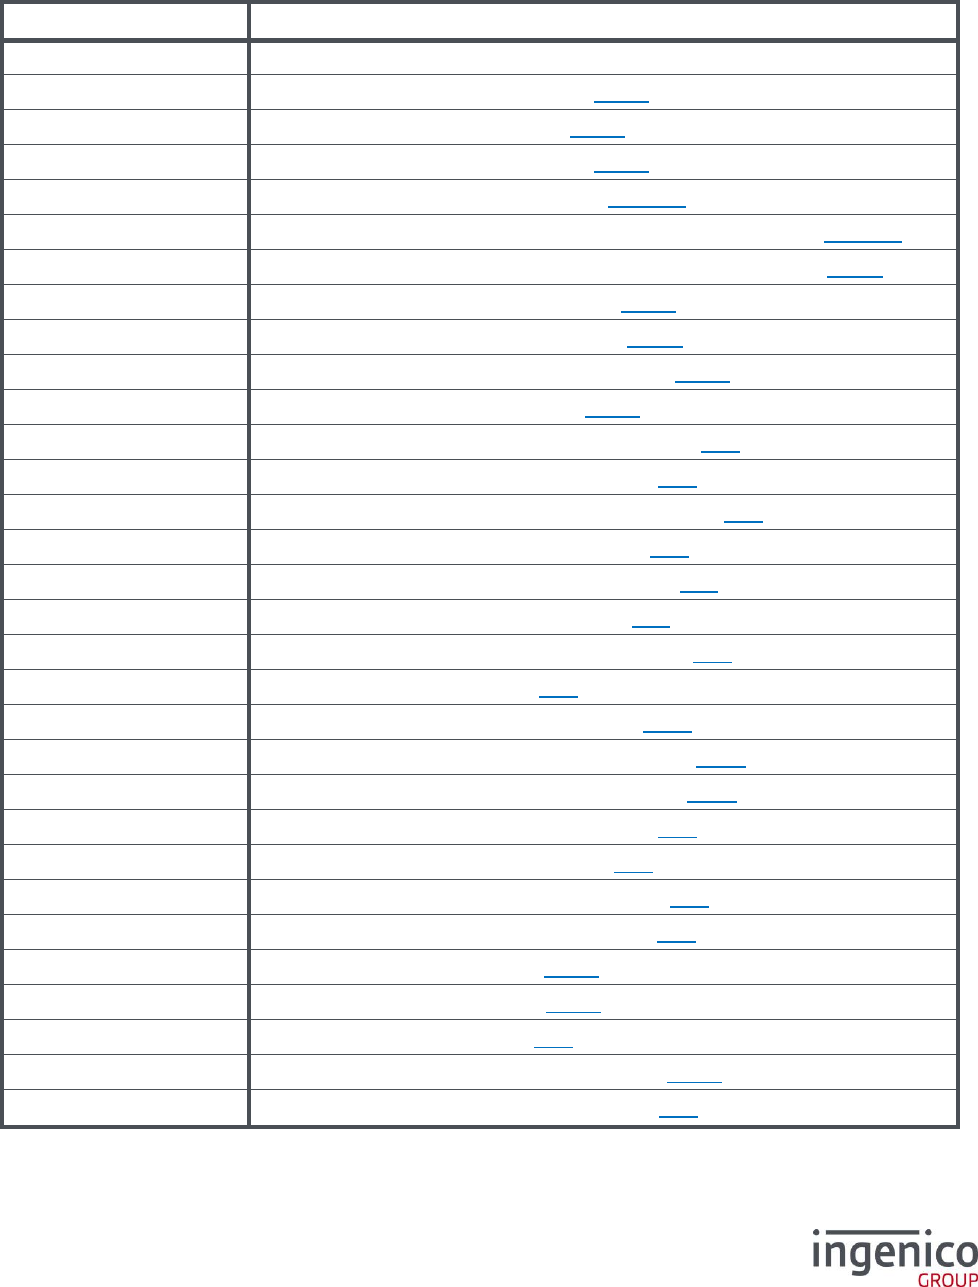
ICO-OPE-00986
REFERENCE MANUAL
Restricted
161/166
Ingenico document - Reproduction or disclosure prohibited without written authorization
Please check document validity before using
11 Appendix
11_1 List of shortcuts for TELIUM MANAGER functions
Shortcut
Description
F.0
Print the list of shortcuts.
F.1
Print the status of the applications (cf. 8_1_1).
F.2
Print the log of the transactions (cf. 8_1_2).
F.3
Go to the Call consultation screen (cf. 8_1_3).
F.4
Print the full hardware configuration (cf. 8_1_4_1).
F.5
Go to the selection screen for software configuration display (cf. 8_1_4_2).
F.6
Go to the selection screen for software configuration printing (cf. 8_1_4).
F.7
Launch the software local load – LLT (cf. 8_2_1).
F.8
Launch the software load by USB key (cf. 8_2_1).
F.9
Launch the software load by MMC/SD card (cf. 8_2_1).
F.10
Launch the software remote load (cf. 8_2_2).
F.12
Go to the “Date and Time” initialization screen (cf. 6_2 ).
F.13
Go to the “Language” initialization screen (cf. 6_1 ).
F.14
Go to the “Terminal Number” initialization screen (cf. 6_3 ).
F.15
Go to the “Currency” initialization screen (cf. 6_4 ).
F.16
Go to the “Switchboard” initialization screen (cf. 6_5 ).
F.17
Go to the “Pinpad” initialization screen (cf. 6_6 ).
F.18
Go to the “Stripe Reader” initialization screen (cf. 6_8 ).
F.19
Display the “Serial Number” (cf. 6_9 ).
F.20
Go to the “Network” initialization screen (cf. 6_10 ).
F.21
Go to the “Cash Register” initialization screen (cf. 6_12 ).
F.22
Go to the “TMS network” initialization screen (cf. 6_13 ).
F.23
Go to the “SIM Code” initialization screen (cf. 7_1 ).
F.24
Restore the “param.par” parameters (cf. 7_3 ).
F.25
Go to the “Idle Screen” initialization screen (cf. 7_4 ).
F.26
Go to the “Password” initialization screen (cf. 7_5 ).
F.27
Print the “System” diagnosis (cf. 8_3_1).
F.28
Print the “Booster” diagnosis (cf. 8_3_1).
F.29
Send the diagnosis to TMS (cf. 8_3 ).
F.30
Go to the “local diagnosis” deletion screen (cf. 8_3_2).
F.31
Go to the “Hardware Modification” screen (cf. 8_5 ).
ICO-OPE-00986
REFERENCE MANUAL
Restricted
162/166
Ingenico document - Reproduction or disclosure prohibited without written authorization
Please check document validity before using
F.32
Go to the “Software Modification” screen (cf. 8_5 ).
F.33
Lookup Licence (cf. 8_6_1).
F.34
Go to the “Add Licence” screen (cf. 8_6_2).
F.37
Print the TPASS hardware configuration (cf. 8_1_4_1).
F.38
Print the target software configuration (cf. 8_1_4_2).
F39
Print the pinpad hardware configuration (cf. 8_1_4_1).
F40
Print the pinpad software configuration (cf. 8_1_4_2).
F.41
Go to the “Contactless” initialization screen (cf. 6_7 ).
F.42
Go to the “Deletion” screen (cf. 8_4 ).
F.43
Print the “Initialization” parameters (cf. 6_14 ).
F.44
Pinpad reader diagnosis (cf. 8_3 )
F.48
Go to the “Telium Manager” screen (cf. 6).
F.49
Go to the “Bluetooth Association” screen (cf. 9_6_1).
F.50
Go to the “Beep On Key” screen (cf. 7_8 ).
F.51
Remote download IST (cf. 8_2 )
F.52
Remote download IPP (cf. 8_2 )
F.53
Pinpad emulation (cf. 7_10 )
F.54
Go to the “PUK code” screen (cf. 7_2 )
F.55
Go to the “Wifi profiles” screen (cf. 9_8 )
F.56
Go to the “Wifi IP” screen (cf. 9_8_7 )
F.57
Go to the “Bluetooth” screen (cf. 9_12 )
F.58
Go to screen for the software information of hardware configuration on display
(cf. 8_1_4_1).

ICO-OPE-00986
REFERENCE MANUAL
Restricted
163/166
Ingenico document - Reproduction or disclosure prohibited without written authorization
Please check document validity before using
11_2 List of the gateway numbers
Item
Reference
0
NO GATEWAY
32
NO X28
33
PAD X28 SSL
40
RFC1086
41
RFC1086 SSL
42
RFC1086+
43
RFC1086+ SSL
64
GIPX25 V2
65
GIPX25 V2 SSL
66
GIPX25 V1
67
GIPX25 V1 SSL

ICO-OPE-00986
REFERENCE MANUAL
Restricted
164/166
Ingenico document - Reproduction or disclosure prohibited without written authorization
Please check document validity before using
11_3 Call tree of Tellium Manager
Consultation 8_1
State 8_1_1
Transaction 8_1_2
Call 8_1_3
Configuration 8_1_4
Evolution 8_2
Load 8_2_1
Local
Extern
Remote Load 8_2_2
Pinpad
Initialization 6
Parameters
Language 6_1
Date and time 6_2
Terminal Number 6_3
Currency 6_4
Switchboard 6_5
Pinpad 6_6
Contactless 6_7
Stripe Reader 6_8
Serial Number 6_9
Network Type 6_10
Fallback Network 6_11
Cash Connection 6_12
TMS Network 6_13
SIM Code 7_1
PUK Code 7_2
Default Conf. 7_3
Screen Saver 7_4
Password 7_5
Header 7_6
Footer 7_7
Beep On Key 7_8
Beep On Pincode 7_9
PINPAD Emulation 7_10
Hardware 9
Modem Setup 9_1
Output Level 9_1_1
Line Selection 9_1_2
Limited speed 9_1_3
Print 9_1_4
Save 9_1_5
Reload Setup 9_1_6
Default Setup 9_1_7
Number of days 9_1_10_1
Number of failure 9_1_10_2
Lookup Depth 9_1_10_3
Quit 9_1_8
Current Limiting 9_1_9
Ethernet Setup 9_2
Boot Proto 9_2_1
IP Address 9_2_2

ICO-OPE-00986
REFERENCE MANUAL
Restricted
165/166
Ingenico document - Reproduction or disclosure prohibited without written authorization
Please check document validity before using
Subnet Mask 9_2_3
Gateway 9_2_4
DNS1 9_2_5
DNS2 9_2_6
Speed 9_2_7
Ping 9_2_8
Print 9_2_9
Save 9_2_10
Quit 9_2_11
Reload Setup 9_2_12
Reset Conf. 9_2_13
Standby Setup 9_3
Energy Save 9_4
Backlight 9_4_1
Light standby 9_4_2
Battery Setup 9_5
New Battery 9_5_1
Tilt 9_5_2
USB Charging 9_5_3
Standby Delay 9_5_4
Standby On Cradle 9_5_5
ECO Mode 9_5_6
Cradle Setup 9_6
Association 9_6_1
New Base 9_6_1_1
Select Base 9_6_1_2
Remove Base 9_6_1_3
Print Bases 9_6_1_4
Advanced 9_6_2
Modem 9_6_2_1
COM0 9_6_2_2
COMU 9_6_2_3
COM1 9_6_2_4
COMN 9_6_2_5
COMH 9_6_2_6
Set base name 9_6_2_7
Print 9_6_2_8
Clear Secret 9_6_2_9
Base State 9_6_3
Base Update 9_7
Wi-Fi Setup 9_8
Profiles New Profile 9_8_1
Active Profile 9_8_4
Modify Profile 9_8_5
Remove Profile 9_8_6
Infos
IP Setup 9_8_7
Boot Proto 9_8_7_1
IP Address 9_8_7_2
Subnet Mask 9_8_7_3
Gateway 9_8_7_4
DNS1 9_8_7_5
DNS2 9_8_7_6
Print 9_8_7_7
Display 9_9

ICO-OPE-00986
REFERENCE MANUAL
Restricted
166/166
Ingenico document - Reproduction or disclosure prohibited without written authorization
Please check document validity before using
Back Light 9_9_1
Backlight Duration 9_9_2
Color Setup 9_9_3
Proxy 9_10
SOCKS4 9_10_1
SOCKS5 9_10_2
Bluetooth Audio 9_11
Enable 9_11_1
Disable 9_11_2
Information 9_11_3
Discovery 9_11_4
Pincode 9_11_5
Bluetooth 9_12
Enable/Disable 9_12_1
Pair with phone 9_12_2
Add device 9_12_3
Paired device 9_12_4
Advanced options 9_12_5
Stylet 9_13
Diagnosis 8_3
Local
Telediagnostic
Clear
Diag to USB
Diag to MMC
PINPAD
TeliumPass diagnostic
Deletion 8_4
Modification 8_5
Hardware
Sorftware
License 8_6
Consultation 8_6_1
Make list 8_6_2
