DF1000 Verification Procedure For Accuracy And Precision
User Manual: DF1000
Open the PDF directly: View PDF ![]() .
.
Page Count: 24
Verication Procedure
for
Accuracy and Precision
(defined for Users to incorporate in SOPs)
In accordance with ISO8655 Standard
Procedure LT802292/F - © 2007 Gilson SAS All rights reserved August 2007
Standard Operating Procedure for Pipettes

Page 2
Contents
In this document the word “tip” is used in the generic sense, where tip
is the disposable part that must be used with the pipette: for Distriman
this means “DistriTip”, for Microman “capillary-piston” and for Pipetman
“Gilson Diamond Tip”.
Glossary 3
Introduction 4
Environmental Conditions 5
Technician 6
Pipette Operation 6
Training 6
Pipette Tips 7
Test Equipment 8
Balance 8
Thermometer, Hygrometer and Barometer 8
Weighing Containers 9
Water 9
Verification Procedure 10
Procedure Summary 10
Multichannel Pipettes 10
Test Volumes 11
Estimating the Evaporation Rate (Mass Loss/Cycle) 12
Gravimetric Test 13
Calculations
Formulae 14
Z-factor 15
Verification Procedure Report 16
Appendix 18
Associated Documents 22
Notes 23

Page 3
Glossary
adjustment manufacture of an apparatus within
appropriate tolerances, or the suppli-
er’s setting of the apparatus, ensur-
ing the metrological performance,
as specified in the applicable part of
ISO 8655.
calibration set of operations that establish the
relationship between the dispensed
volume and the corresponding
nominal or selected volume of the
apparatus.
maximum permissible error upper or lower permitted extreme
value for the deviation of the dis-
pensed volume from the nominal
volume or selected volume of a
piston-operated volumetric appa-
ratus.
systematic error difference between the dispensed
volume and the nominal volume or
selected volume of the piston-oper-
ated volumetric apparatus.
random error scatter of the dispensed volumes
around the mean of the dispensed
volumes.
uncertainty of measurement parameter, associated with the dis-
pensed volume, that characterizes
the dispersion of the volumes that
could reasonably be attributed to
the dispensed volume.
nominal volume volume specified by the manufac-
turer and used for identification
and for indication of the measuring
range.

Page 4
Introduction
This document describes a verification procedure for the following
Gilson pipettes: Pipetman® Ultra (Single and Multichannel), Pipetman®
Concept (Single and Multichannel), Pipetman® P, Pipetman® Neo,
Pipetman® F, Pipetman® 8X200, Microman® and Distriman®.
The procedure is for verifying pipette performance using gravimetric
tests of repeated aspirate and dispense cycles with distilled water
(grade 3, ISO 3696), in controlled conditions. The test conditions and
methods described herein are fully compatible with ISO 8655 and are
often stricter than those specified in the international standard, as
are the expected results for maximum permissible errors, which are
tabulated in the Appendix.
So, adherence to this procedure assures conformity to Gilson’s
specifications for accuracy (systematic error) and precision (random
error) and to ISO requirements.
The procedure, which for small volumes includes a correction for
evaporation loss, evaluates the total system of pipetting: pipette, tip,
and operator. Therefore the procedure must be carried out by suitably
qualified and trained technicians. In calculating the volumes from
balance readings, corrections are made for the temperature and air
pressure when the test was made (Z-factor, refer to page 15).
Although the document does not directly concern itself with other
tests performed by the user, the method and calculations described
herein may be applied in other tests, outside the scope of this docu-
ment. Users shall establish a regular testing routine at least once a
year for their piston pipettes according to: accuracy and precision
requirements, frequency of use, number of operators using the pipette,
number of operations on each occasion of use and the nature of the
liquids being dispensed.
In the case of Pipetman Ultra and Pipetman Concept, the number of
cycles can be the basis of your regular testing routine.

Page 5
Environmental Conditions
The test shall be carried out in a draught-free room with a stable
environment.
The test room (laboratory) shall have humidity and temperature
control so that the atmospheric conditions of the environment
where the procedure will take place and the temperature of the
equipment used are stable and homogeneous before and during
the procedure.
The use of a chart recorder is recommended.
The temperature of the pipettes being verified and the distilled
water (grade 3, ISO 3696) used in the gravimetric test should have
stabilized before the procedure commences.
The pipettes, water and test apparatus should have been placed
in the test room at least 2 hours before starting the tests.
Ideally, verification takes place under the following conditions:
1) Temperature (t)
ISO 8655 recommends that the gravimetric tests take place where
the ambient and water temperature (t) are stable (± 0.5 °C) between
15 °C and 30 °C. Gilson recommends a range between 20 °C and 23
°C with a constant temperature (± 0.5 °C) between the beginning
and the end of gravimetric tests. It is recommended to put water
and pipettes at least 2 hours in the calibration room to reach an
equilibrium with the room conditions. Z-factor is used to convert
mass into volume according to temperature and pressure.
2) Relative humidity (RH)
ISO 8655 states that the RH must be greater than 50%. However,
Gilson recommends that a humidity range of between 50% and
75% be maintained throughout the verification procedure. In all
cases, the evaporation rate will be evaluated for volumes 50 µL.
3) Barometric pressure
Gilson’s tests should take place at 1013 ± 25 hPa. The barometric
pressure in the test room shall be recorded to the nearest 0.5 kPa.
Z-factor is used to convert mass into volume according to tem-
perature and pressure.

Page 6
Technician
Pipette Operation
Consistency of pipetting technique contributes significantly to the
reproducibility of the results of the Verification Procedure. Inexpe-
rienced technicians can cause substantial variations in apparent
pipette performance. For meaningful test results, the technicians
must be well-trained and qualified.
You should operate the pipette according to the instructions given
in the user’s guide of the pipette under test. Attention should be
given to maintain a steady rhythm when aspirating and dispensing
samples, speed and smoothness when pressing and releasing the
push-button, and tip immersion depth. The test cycle time shall be
kept to a minimum. It should not exceed 60 s.
Training
The Verification Procedure described in this document must be car-
ried out by a suitably qualified technician. We strongly recommend
that the technician succefully completes a suitable Gilson training
program. Please contact your local Gilson distributor for details.

Page 7
Pipette Tips
In accordance with the instructions given in its user’s guide, the pipette
under test must be clean (refer to the decontamination procedure),
correctly assembled (refer to the user’s guide), and fitted with a new
Gilson tip before starting the Verification Procedure.
Because the quality of the tip used is a significant factor in ensuring
that a pipette performs to specifications, tip selection is specially
important in verification procedure.
For example, all models of Pipetman are calibrated at the factory using
Gilson Diamond tips, which are of the highest quality. Therefore, for
Pipetman, you must only use the Gilson Diamond tips when carrying
out the gravimetric test to have the best performance and results.
DF30
D5000
DF1200D1200
100 µL to 1200 µL
D200
Pipette model Volume range Tips Filter Tips
P2, P2N, U2 0.2 µL to 2 µL
P10, P10N, U10 1.0 µL to 10 µL D10, DL10 DF10, DFL10
C10, C8x10, C12x10 0.5 to 10 µL
P20, P20N, U20 2 µL to 20 µL
U8x20, U12x20 1 µL to 20 µL DL10
P100N 10 µL to 100 µL
P100, U100, 20 µL to 100 µL
C100 5 µL to 100 µL DF100
C8x100, C12x100 5 µL to 100 µL
P200 50 µL to 200 µL
F2 to F200* 2 µL to 200 µL
P200N, U200 20 µL to 200 µL DF200
P8x200 20 µL to 200 µL
U8x300, U12x300
C300 20 µL to 300 µL D300 DF300
C8x300, C12x300
P1000N 100 µL to 1000 µL
P1000, U1000 200 µL to 1000 µL D1000 DF1000
F250 to F1000 250 µL to 1000 µL
C1200
C8x1200, C12x1200
P5000, U5000 1 mL to 5 mL
F5000 5 mL
C5000 0.5 mL to 5 mL
P10ml, U10ml, C10ml 1 mL to 10 mL D10ml
*: Not valid with filter tips D200.

Page 8
Test Equipment
To ensure the integrity of the Verification Procedure, all of the measur-
ing instruments: balances, hygrometer and thermometers should be
checked regularly.
Balance
Information on suitable balances (some of which have more than one
sensitivity range) is available from the International Organization of
Legal Metrology (OIML). Appropriate balances, conforming to OIML
R76-1, should be used. Balances should be serviced, calibrated and
certified by qualified technicians using weights traceable to an inter-
nationally recognized authority (OIML).
The sensitivity of the balance chosen must be consistent
with the accuracy required, which is one tenth of the devia-
tion to be assessed.
For Pipetman (all models) and Microman, select the
sensitivity according to the pipette’s nominal volume (see
table).
For Distriman, test volumes are specified for each DistriTip
model according to specific aliquot volumes (choose the
sensitivity accordingly).
The table on which the balance is placed must be equipped with a
marble surface plate that is independent of the perimeter, to avoid
transmitting vibrations. For the same reason, the table must not be
in contact with a wall. Avoid placing the balance near to a window or
near to a door to avoid too long a response time for the balance and
irregular evaporation caused by drafts or greenhouse effects.
Thermometer, Hygrometer, and Barometer
Use a calibrated thermometer to measure the water temperature at the
beginning and at the end of each test series. Use a thermometer with a
maximum uncertainty of measurement of 0.2 °C. The hygrometer shall
have a standard maximum uncertainty of 10% and the barometer a
standard uncertainty of less than or equal to 0.5 kPa.
Note: These requirements are more rigorous
than those specified in ISO 8655-6, Table 1.
Nominal Display Balance
Volume (µL) (mg) Sensitivity
< 100 0.001 10-6g
100 µL to 1000 0.01 10-5g
> 1000 0.1 10-4g
Page 9
Test Equipment
Weighing Containers
Special containers are used to receive water from the test pipette
during weighing. Controlling evaporation during the gravimetric test
is essential. To minimize evaporation, Gilson uses custom-designed
cylindrical flat-bottomed weighing containers made of nonporous
plastic.
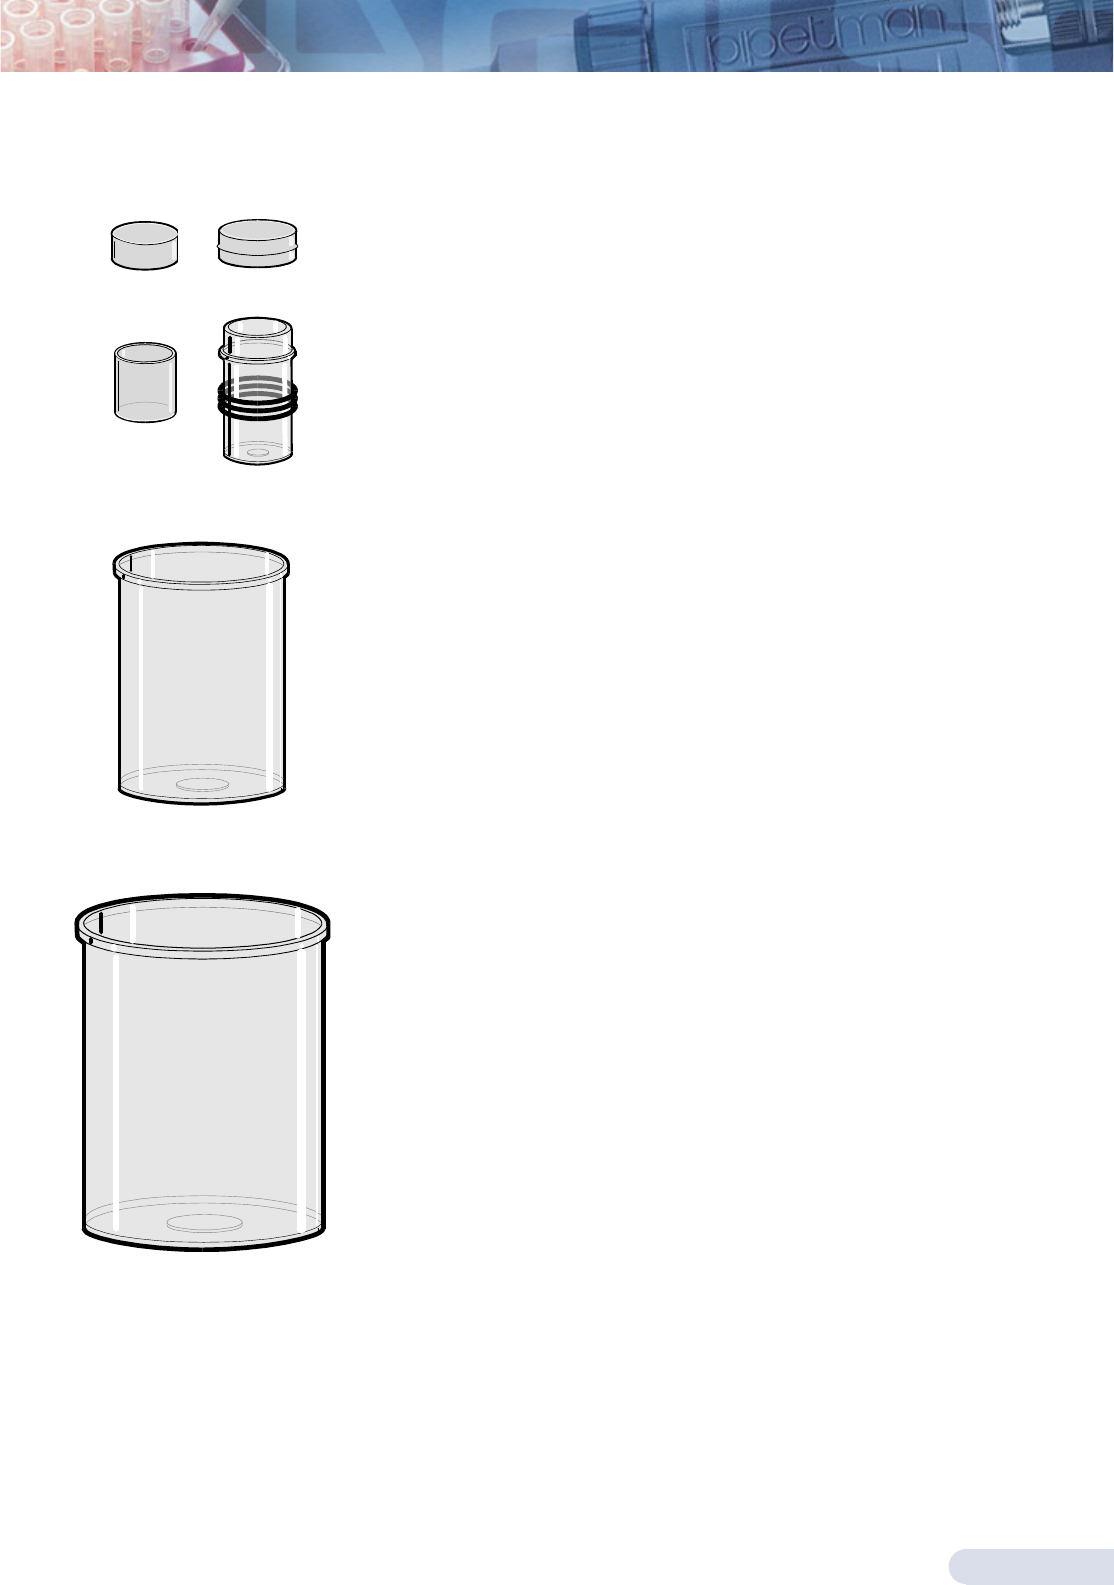
A Weighing Kit (ref: F144700) consisting of four sizes of container (Pot
A, B, C, and D), filters (ref: F123854) for cleaning them and tweezers
(ref: F144706), is available from Gilson. Individual components of the
kit are available as spares.
When the volumes to be tested are less than 200 µL, Gilson uses weigh-
ing containers equipped with lids (see below).
Pot A container and lid, both of which must be manipulated using
tweezers to avoid handwarming, for volumes up to 20 µL.
Pot B container and lid for volumes from 20 to 200 µL. This container
is fitted with P 5000 O-rings to avoid hand-warming.
Pot C container (50 mm x 35 mm) for volumes from 200 to 5000 µL.
Pot D container (70 mm x 50 mm) for volumes greater than 5000 µL.
Water
The liquid used for testing must be distilled or deionized water grade
3 (degassed) conforming to ISO3696 at room temperature. To avoid
fluctuations in water temperature, use a large container as a water
reservoir (Pot C or Pot D). The reservoir should contain sufficient water
for all of the tests.
Pot A
Pot B
Pot C
Pot D
Ref: 95F10018
Ref: 544301006
Ref: F1090303
Ref: F1490343
Lid Lid

Page 10
Verication Procedure
Procedure Summary
The Verification Procedure certifies both pipette accuracy and
precision. Environmental conditions, test equipment, and other
qualifications previously described in this document should be
implemented to assure the validity of the test results.
After pre-rinsing the tip, record ten individual weighings per se-
lected volume. For variable volume pipettes, three volume settings
are selected per pipette model based on the pipette’s useful volume
range (nominal, approximately 50 % and minimum volume or 10
% of the nominal volume). For fixed volume pipettes (Pipetman F)
only the nominal volume is used.
1 Set the pipette to its test volume (see table opposite).
2 Estimate the evaporation loss (for small volumes).
3 Perform the gravimetric test: record the weighings on the
Verification Procedure Report.
4 Perform the calculations: record the results on the Verification
Procedure Report.
5 Compare the results with the accuracy and precision specifica-
tions given in the user’s guide of the test pipette.
Multichannel Pipettes
According to ISO 8655-6, “For the purpose of the test, each channel
shall be regarded as a single channel and reported as such”. Con-
sequently, for each of the following procedures: fill all channels
simultaneously when aspirating the test liquid, then expel only
the test liquid aspirated by the channel being tested into the
weighing vessel.
Note: Gilson recommends simplifying
the process by fitting a tip to the tested
channel, only.

Page 11
Verication Procedure
Test Volumes
Minimum Mid Range Nominal
Volume (µL) Volume (µL) Volume (µL)
Pipetman
P2N 0.2 1 2
P2, U2 0.5 1 2
P10, U10, P10N 1 5 10
P20, U20, P20N 2 10 20
P100N 10 50 100
P100, U100 20 50 100
P200N 20 100 200
P200, U200 50 100 200
P1000N 100 500 1000
P1000, U1000 200 500 1000
P5000, U5000 1000 2500 5000
P10ml, U10ml 1000 5000 10000
Microman
M10 1 5 10
M25 3 10 25
M50 20 - 50
M100 10 50 100
M250 50 125 250
M1000 100 500 1000
Distriman
DistriTip Micro 2 5 10
DistriTip Mini 20 50 100
DistriTip Maxi 200 500 1000
Pipetman Multichannel
8X200 20 100 200
Pipetman Ultra Multichannel
8x20 2 10 20
12x20 2 10 20
8x300 30 150 300
12x300 30 150 300
Pipetman Concept
C10 1 5 10
C100 10 50 100
C300 30 150 300
C1200 120 600 1200
C5000 500 2500 5000
C10ml 1000 5000 10000
Pipetman Concept Multichannel
C8x10, C12x10 1 5 10
C8x100, C12x100 10 50 100
C8x300, C12x300 30 150 300

Page 12
Verication Procedure
Estimating the Evaporation Rate (Mass Loss/Cycle)
Weighing requires special care, for small volumes (< 50 µL, accord-
ing to ISO 8655) use tweezers and weighing containers fitted with
lids (Pot A). The goal is to minimize, control and quantify evapora-
tion loss during the weighing cycle.
Apart from the design of the weighing vessel, the test cycle time
is important. Evaporation is estimated by performing a series of
four simulated weighings, repeating the weighing cycle without
dispensing to the weighing container. The total difference attrib-
utable to evaporation is calculated and divided by 4 to obtain an
average. The rate is expressed in mg/cycle (or for one cycle the loss
may be expressed in mg).
For example, evaporation rates usually range for Pot A between
0.010 mg to 0.025 mg per weighing cycle. Recalculate the evapora-
tion rate every 4 hours or whenever ambient conditions change
(temperature, pressure, and humidity).
1 Add water to the weighing container until it is about one-third
full.
2 Fit the weighing container with its lid and use tweezers to place
it on the balance pan.
3 Using the pipette, aspirate a sample from the reservoir at the
test volume setting.
4 Tare the balance and remove the weighing container from the
balance pan.
5 Use tweezers to remove the lid.
6 Dispense the sample into the reservoir or to waste, not the
weighing container.
7 Fit the weighing container with its lid and use tweezers to put
it back on the balance pan.
8 Record the result e1.
9 Repeat steps 3 through 8 three times to obtain e2, e3, and e4.
10 Calculate the loss/cycle: e = | e1 + e2 + e3 + e4 | /4 (mg).
11 The evaporation loss/cycle e (mg) should be added to the mean
mass before calculating the mean volume.

Page 13
Verication Procedure
Note *: ISO recommends that the
orifice of the tip be immersed to
between 2 mm and 3 mm below the
surface of the water. However, you
should first consult the user’s guide
for the model of Gilson pipette that
you are testing.
Gravimetric Test
According to ISO 8655-6: “The test shall be carried out in a draught-free
room with stable environment.”
1 Place distilled or deionized water from the container in the weigh-
ing vessel to a depth of at least 3 mm.* (Refit lid for Pot A and B.)
2 Record the test conditions (ambient and water temperature, rela-
tive humidity, barometric pressure).
3 Select the test volume of your variable-volume piston pipette.
4 Fit the tip or capillary/piston assembly to the pipette (the manu-
facturer specifications are valid only when test executed with the
manufacturers tips).
5 Wet pipette tip five times to reach equilibrium in the dead air
volume (not needed for Distriman and Microman), but do not
take into account for calculations.
One test cycle should take less than 1 min.
A consistent rhythm during weighing operation should be maintained.
6 Change tip.
7 Pre-wet the tip once.
8 Pipette the test volume.
9 Determine tare mass (reset balance).
10 Remove the lid if needed (using the tweezers for pot A)
11 Open balance door, retrieve weighing container, deliver sample,
refit its lid, if needed, using the tweezers, replace on the balance
and close the door.
12 After allowing display to stabilize and record the mass.
13 Repeat the test cycle until ten measurements have been recorded
as a series of masses m1 to m10.
14 For sample below or equal to 50µl, estimate evaporation loss by
repeating steps 8 to 10 exactly as a normal sample weighing but
without actually adding any sample to the weighing container.
Record absolute value (ei) and repeat several (m) times.
15 Record the test conditions (ambient temperature, relative
humidity, barometric pressure). Check that values are still within
recommended limits.
Repeat these steps

Page 14
Formulae
1 Calculate the mean temperature (t) of the distilled water (rounded
to the nearest 0.5 °C).
2 Use the average barometric pressure (B) and mean temperature (t)
to find the corresponding Z-factor from the table.
3 Multiply the weighings (mg), after any required correction for
evaporation, by the Z-factor to obtain a series of volumes (µL).
4 Compute the mean volume from the series of volumes (µL).
5 Calculate the systematic error, which is the difference between
the mean volume of actual measurements and the true value as
specified by the volume setting of the pipette (selected volume).
For fixed volume pipettes, replace Vs with Vo = nominal volume.
Accuracy may be expressed in µL or ...
... as a percentage.
6 Calculate the random error, which is the closeness of agreement
between individual weighings. Quantifies the magnitude of scatter
due to random error. Also known as Repeatability Standard Devia-
tion (RSD).
As a percentage, also known as coefficient of variation (CV).
Calculations
CV = 100 x s/ V
B = (B1 + B2 )/2
t = (t1 + t2 )/2
Vi
= individual volumes (µL)
Vi
= Z (mi + e)
mi
= individual masses (mg)
e = evaporation loss (mg)
Z = Z-factor (µL/mg)
V = i = 1
n
n
ΣVi
Vi = individual volumes
V = mean volume
n = number of weighings
es
= systematic error
Vs = selected volume
es
= V - Vs
V = mean volume
es
= 100 (V - Vs )/Vs %
i = 1
n - 1
n
Σ(Vi - V)2
S =
V = mean volume
n = number of measurements
s = repeatability standard
deviation
Vi
= individual volumes
(calculated as above)

Page 15
Z-factor
Z correction factors for distilled water as a function of test temperature
and air pressure.
Calculations
Z= Conversion factor (µL/mg)
t = Average temperature (°C)
B = Air pressure (kPa)
B (kPa) 80 85 90 95 100 101.3 105
t (°C) Z (µL/mg)
15.0 1.0017 1.0018 1.0019 1.0019 1.0020 1.0020 1.0020
15.5 1.0018 1.0019 1.0019 1.0020 1.0020 1.0021 1.0021
16.0 1.0019 1.0020 1.0020 1.0021 1.0021 1.0021 1.0022
16.5 1.0020 1.0020 1.0021 1.0021 1.0022 1.0022 1.0022
17.0 1.0021 1.0021 1.0022 1.0022 1.0023 1.0023 1.0023
17.5 1.0022 1.0022 1.0023 1.0023 1.0024 1.0024 1.0024
18.0 1.0022 1.0023 1.0023 1.0024 1.0025 1.0025 1.0025
18.5 1.0023 1.0024 1.0024 1.0025 1.0025 1.0026 1.0026
19.0 1.0024 1.0025 1.0025 1.0026 1.0026 1.0027 1.0027
19.5 1.0025 1.0026 1.0026 1.0027 1.0027 1.0028 1.0028
20.0 1.0026 1.0027 1.0027 1.0028 1.0028 1.0029 1.0029
20.5 1.0027 1.0028 1.0028 1.0029 1.0029 1.0030 1.0030
21.0 1.0028 1.0029 1.0029 1.0030 1.0031 1.0031 1.0031
21.5 1.0030 1.0030 1.0031 1.0031 1.0032 1.0032 1.0032
22.0 1.0031 1.0031 1.0032 1.0032 1.0033 1.0033 1.0033
22.5 1.0032 1.0032 1.0033 1.0033 1.0034 1.0034 1.0034
23.0 1.0033 1.0033 1.0034 1.0034 1.0035 1.0035 1.0036
23.5 1.0034 1.0035 1.0035 1.0036 1.0036 1.0036 1.0037
24.0 1.0035 1.0036 1.0036 1.0037 1.0037 1.0038 1.0038
24.5 1.0037 1.0037 1.0038 1.0038 1.0039 1.0039 1.0039
25.0 1.0038 1.0038 1.0039 1.0039 1.0040 1.0040 1.0040
25.5 1.0039 1.0040 1.0040 1.0041 1.0041 1.0041 1.0042
26.0 1.0040 1.0041 1.0041 1.0042 1.0042 1.0043 1.0043
26.5 1.0042 1.0042 1.0043 1.0043 1.0044 1.0044 1.0044
27.0 1.0043 1.0044 1.0044 1.0045 1.0045 1.0045 1.0046
27.5 1.0045 1.0045 1.0046 1.0046 1.0047 1.0047 1.0047
28.0 1.0046 1.0046 1.0047 1.0047 1.0048 1.0048 1.0048
28.5 1.0047 1.0048 1.0048 1.0049 1.0049 1.0050 1.0050
29.0 1.0049 1.0049 1.0050 1.0050 1.0051 1.0051 1.0051
29.5 1.0050 1.0051 1.0051 1.0052 1.0052 1.0052 1.0053
30.0 1.0052 1.0052 1.0053 1.0053 1.0054 1.0054 1.0054

Page 16
Sample of a Verication Procedure Report
Pipetting System Information
Selected Mean Systematic error Random error
Volume Volume Results Target Status Results Target Status
(µL) (µL) Es (µL) Es (%) µL % SD (µL) CV (%) SD (µL) CV (%)
Vmin Vmean,min
Vint Vmean,int
Vnom Vmean,nom
Statistics Summary
Serial number: Calibration date:
Model: Manufacturer:
Pipette owner:
Number of channels: Status:
Pipette
Tip model: Manufacturer: Batch number:
Tips
Environmental Factors
Temperature air (°C): Pressure (hPa):
Hygrometry (%): Temperature water (°C):
Z-factor: Evaporation (Yes/No):
General Information
Decontamination (Yes/No): Repair (Yes/No):
Adjustment (Yes/No): Basis of adjustment (Ex/In):
SD: Standard Deviation
CV: Coefficient of Variation
Es: Systematic Error
Selected Mean Systematic error Random error
Volume Volume Results Target Status Results Target Status
(µL) (µL) Es (µL) Es (%) µL % SD (µL) CV (%) SD (µL) CV (%)
1 Vmin1 Vmean,min1
1 Vint1 Vmean,int1
1 Vnom1 Vmean,nom1
... Vmin Vmean,min
... Vint Vmean,int
... Vnom Vmean,nom
N VminN Vmean,minN
N VintN Vmean,intN
N VnomN Vmean,nomN
Channel #
or

Page 17
Calibration Details
Sample of a Verication Procedure Report
Selected Minimum Volume Mid Range Volume Nominal Volume
Volume (value µL) (value µL) (value µL)
1 Va1 Vb1 Vc1
2
3
4
...
10 Va10 Vb10 Vc10
or
Selected Minimum Volume Mid Range Volume Nominal Volume
Volume (value µL) (value µL) (value µL)
1 1 Va1,1 Vb1,1 Vc1,1
2
3
4
...
10 Va1,10 Vb1,10 Vc1,10
i 1 Vai,1 Vbi,1 Vci,1
2
3
4
...
10 Vai,10 Vbi,10 Vci,10
N 1 VaN,1 VbN,1 VcN,1
2
3
4
...
10 VaN,10 VbN,10 VcN,10
Ch. #

Page 18
Pipetman P / Neo
Pipetman Ultra
Here are comparative tables for maximum permissible errors between
ISO 8655 and Gilson. ISO 8655 maximum permissible errors are very
wide, so as to have a conformity-basis for all pipettes. At Gilson our
knowledge and kno-how allows us to be more stringent, which means
the best pipette-performance.
Appendix
Systematic error: expressed as the deviation of the mean of a tenfold measurement from the nominal or selected
volume (see ISO 8655-6).
Random error: expressed as the repeatability standard deviation of a tenfold measurement (see ISO 8655-6).
Maximum Permissible Errors
Model Volume Gilson ISO 8655
(Reference) (µL) Systematic Random Systematic Random
error (µL) error (µL) error (µL) error (µL)
P2 (F144801) Min 0.2 ± 0.024 0.012 ± 0.08 0.04
P2N (F144561) 0.5 ± 0.025 0.012 ± 0.08 0.04
U2 (F21021) Max. 2 ± 0.030 0.014 ± 0.08 0.04
P10 (F144802) Min. 1 ± 0.025 0.012 ± 0.12 0.08
P10N (F144562) 5 ± 0.075 0.030 ± 0.12 0.08
U10 (F21022) Max 10 ± 0.100 0.040 ± 0.12 0.08
P20 (F123600) Min. 2 ± 0.10 0.03 ± 0.20 0.10
P20N (F144563) 5 ± 0.10 0.04 ± 0.20 0.10
U20 (F21023) 10 ± 0.10 0.05 ± 0.20 0.10
Max. 20 ± 0.20 0.06 ± 0.20 0.10
P100 (F123615) Min. 10 ± 0.35 0.10 ± 0.80 0.30
P100N (F144564) 20 ± 0.35 0.10 ± 0.80 0.30
U100 (F21024) 50 ± 0.40 0.12 ± 0.80 0.30
Max. 100 ± 0.80 0.15 ± 0.80 0.30
P200 (F123601) Min. 20 ± 0.50 0.20 ± 1.60 0.60
P200N (F144565) 50 ± 0.50 0.20 ± 1.60 0.60
U200 (F21025) 100 ± 0.80 0.25 ± 1.60 0.60
Max. 200 ± 1.60 0.30 ± 1.60 0.60
P1000 (F123602) Min. 100 ± 3 0.6 ± 8 3.0
P1000N (F144566)
200 ± 3 0.6 ± 8 3.0
U1000 (F21026) 500 ± 4 1.0 ± 8 3.0
Max. 1000 ± 8 1.5 ± 8 3.0
P5000 (F123603) Min. 1000 ± 12 3 ± 40 15
and 2000 ± 12 5 ± 40 15
U5000 (F21027) Max. 5000 ± 30 8 ± 40 15
P10ml (F161201) Min. 1 mL ± 30 6 ± 60 30
and 2 mL ± 30 6 ± 60 30
U10ml (F21028) 5 mL ± 40 10 ± 60 30
Max. 10 mL ± 60 16 ± 60 30
Except for Pipetman Neo.
Only for Pipetman Neo.

Page 19
Appendix
Pipetman F Maximum Permissible Errors
Model Volume Gilson ISO 8655
(Reference) (µL) Systematic Random Systematic Random
error (µL) error (µL) error (µL) error (µL)
F2 (F123770) 2 ± 0.08 0.03 ± 0.08 0.04
F5 (F123771) 5 ± 0.10 0.04 ± 0.125 0.075
F10 (F123772) 10 ± 0.10 0.05 ± 0.12 0.08
F20 (F123604) 20 ± 0.20 0.06 ± 0.20 0.10
F25 (F123775) 25 ± 0.25 0.07 ± 0.50 0.20
F50 (F123778) 50 ± 0.40 0.15 ± 0.50 0.20
F100 (F123784) 100 ± 0.80 0.25 ± 0.80 0.30
F200 (F123605) 200 ± 1.60 0.30 ± 1.60 0.60
F250 (F123787) 250 ± 3.00 0.75 ± 4.00 1.50
F300 (F123788) 300 ± 3.50 0.75 ± 4.00 1.50
F400 (F123789) 400 ± 3.60 0.80 ± 4.00 1.50
F500 (F123790) 500 ± 4.00 1.00 ± 4.00 1.50
F1000 (F123606) 1000 ± 8.00 1.30 ± 8.00 3.00
F5000 (F123607) 5000 ± 30.00 8.00 ± 40.00 15.00
Pipetman Concept Maximum Permissible Errors
Model Volume Gilson ISO 8655
(Reference) (µL) Systematic Random Systematic Random
error (µL) error (µL) error (µL) error (µL)
C10 (F31012) Min. 0.5 ± 0.040 0.013 ± 0.120 0.080
1 ± 0.025 0.012 ± 0.120 0.080
5 ± 0.060 0.020 ± 0.120 0.080
Max. 10 ± 0.080 0.025 ± 0.120 0.080
C100 (F31013) Min. 5 ± 0.35 0.10 ± 0.8 0.30
10 ± 0.30 0.10 ± 0.8 0.30
50 ± 0.38 0.12 ± 0.8 0.30
Max. 100 ± 0.4 0.15 ± 0.8 0.30
C300 (F31014) Min. 20 ± 0.80 0.16 ± 4.00 1.50
30 ± 0.70 0.20 ± 4.00 1.50
150 ± 0.90 0.23 ± 4.00 1.50
Max. 300 ± 1.05 0.30 ± 4.00 1.50
C1200 (F31015) Min. 100 ± 2.5 0.4 ± 16.0 6.0
120 ± 2.4 0.4 ± 16.0 6.0
600 ± 3.6 0.8 ± 16.0 6.0
Max. 1200 ± 6.0 1.2 ± 16.0 6.0
C5000 (F31016) Min. 500 ± 10 2 ± 40 15
2500 ± 15 4 ± 40 15
5000 ± 25 7 ± 40 15
C10ml (F31017) Min. 1000 ± 25 4 ± 60 30
5000 ± 30 8 ± 60 30
10000 ± 50 12 ± 60 30

Page 20
Appendix
Microman Maximum Permissible Errors
Model Volume Gilson ISO 8655
(Reference) (µL) Systematic Random Systematic Random
error (µL) error (µL) error (µL) error (µL)
Min. 1 ± 0.09 0.03 ± 0.20 0.10
M10 (F148501) 5 ± 0.10 0.03 ± 0.20 0.10
Max 10 ± 0.15 0.06 ± 0.20 0.10
Min. 3 ± 0.25 0.08 ± 0.70 0.30
M25 (F148502) 10 ± 0.27 0.08 ± 0.70 0.30
Max. 25 ± 0.30 0.10 ± 0.70 0.30
M50 (F148503) Min. 20 ± 0.34 0.20 ± 0.70 0.30
Max. 50 ± 0.70 0.30 ± 0.70 0.30
Min. 10 ± 0.50 0.20 ± 1.50 0.60
M100 (F148504) 50 ± 0.75 0.30 ± 1.50 0.60
Max. 100 ± 1.00 0.40 ± 1.50 0.60
Min. 50 ± 1.50 0.30 ± 6.00 2.00
M250 (F148505) 100 ± 1.70 0.30 ± 6.00 2.00
Max. 250 ± 2.50 0.50 ± 6.00 2.00
Min. 100 ± 3.00 1.60 ± 12.00 4.00
M1000 (F148506) 500 ± 5.00 2.50 ± 12.00 4.00
Max. 1000 ± 8.00 4.00 ± 12.00 4.00
Distriman Maximum Permissible Errors
DistriTips Volume Gilson ISO 8655
Model (µL) Systematic Random Systematic Random
(Reference) error (µL) error (µL) error (µL) error (µL)
125 µL Min. 2 ± 0.100 0.080 ± 0.20 0.10
Micro (F164100) 5 ± 0.125 0.075 ± 0.20 0.10
Micro ST (F164130) Max 10 ± 0.200 0.100 ± 0.20 0.10
1250 µL Min. 20 ± 0.80 0.20 ± 1.50 0.60
Mini (F164110) 50 ± 1.00 0.40 ± 1.50 0.60
Mini ST (F164140) Max. 100 ± 1.00 0.60 ± 1.50 0.60
12.5 mL Min. 200 ± 6.00 1.00 ± 12.00 4.00
Maxi (F164120) 500 ± 7.50 1.50 ± 12.00 4.00
Maxi ST (F164150) Max. 1000 ± 10.00 2.50 ± 12.00 4.00
ST means Sterilized.

Page 21
Pipetman Ultra
Multichannel
Appendix
Pipetman 8X200
Maximum Permissible Errors
Model Volume Gilson ISO 8655
(Reference) (µL) Systematic Random Systematic Random
error (µL) error (µL) error (µL) error (µL)
8x20 (F21040) Min. 1 ± 0.10 0.08 ± 0.40 0.20
and 2 ± 0.10 0.08 ± 0.40 0.20
12x20 (F21041) 10 ± 0.20 0.10 ± 0.40 0.20
Max 20 ± 0.40 0.20 ± 0.40 0.20
8x300 (F21042) Min. 20 ± 1.00 0.35 ± 8 3.00
and 30 ± 1.00 0.35 ± 8 3.00
12x300 (F21043) 150 ± 1.50 0.60 ± 8 3.00
Max. 300 ± 3.00 1.00 ± 8 3.00
Maximum Permissible Errors
Model Volume Gilson ISO 8655
(Reference) (µL) Systematic Random Systematic Random
error (µL) error (µL) error (µL) error (µL)
8x200 (F161004) Min. 20 ± 0.50 0.25 ± 3.20 1.20
50 ± 0.50 0.25 ± 3.20 1.20
100 ± 1.00 0.50 ± 3.20 1.20
Max. 200 ± 2.00 1.00 ± 3.20 1.20
Pipetman Concept
Multichannel Maximum Permissible Errors
Model Volume Gilson ISO 8655
(Reference) (µL) Systematic Random Systematic Random
error (µL) error (µL) error (µL) error (µL)
C8x10 (F31032) Min. 1 ± 0.04 0.02 ± 0.24 0.16
and 5 ± 0.08 0.04 ± 0.24 0.16
C12x10 (F31042) Max. 10 ± 0.10 0.06 ± 0.24 0.16
C8x100 (F31033) Min. 10 ± 0.25 0.14 ± 1.60 0.60
and 50 ± 0.50 0.20 ± 1.60 0.60
12x100 (F31043) Max. 100 ± 0.80 0.25 ± 1.60 0.60
C8x300 (F31034) Min. 30 ± 1.00 0.18 ± 8.00 3.00
and 150 ± 1.50 0.38 ± 8.00 3.00
C12x300 (F31044) 300 ± 2.40 0.60 ± 8.00 3.00

Page 22
Associated Documents
Documents Gilson Reference
Pipetman Ultra User’s Guide LT801441
Pipetman P User’s Guide LT801117
Pipetman Neo Addendum LT801511
Pipetman F User’s Guide LT801118
Pipetman 8X200 User’s Guide LT801236
Pipetman Ultra Multichannel User’s Guide LT801462
Pipetman Concept User’s Guide LT801489
Microman User’s Guide LT801502
Distriman User’s Guide LT801285
Decontamination Procedure LT802288

Page 23
Notes

World Wide Web
: www.gilson.com
&
: sales@gilson.com, service@gilson.com, training@gilson.com
World Headquarters
Gilson, Inc.
3000 Parmenter Street, P.O. Box 620027, Middleton, WI 53562-0027, USA
Telephone: (1) 800-445-7661 or (1) 608-836-1551 • Fax: (1) 608-831-4451
Gilson SAS
19 avenue des Entrepreneurs, B.P. 145
95400 Villiers-le-Bel, France
Telephone: (33) 1-34-29-50-00 • Fax: (33) 1-34-29-50-20