Vimba Manual For Linux
Vimba%20Manual
User Manual:
Open the PDF directly: View PDF ![]() .
.
Page Count: 48
- Contacting Allied Vision
- Document history and conventions
- Vimba SDK Overview
- Vimba Class Generator (not for ARM systems)
- Vimba Firmware Updater
- Vimba Setup
- Vimba - Feature Overview
- Vimba System
- Info [Allied Vision]
- Discovery [Allied Vision]
- GeVDiscoveryAllOff [Allied Vision]
- GeVDiscoveryAllAuto [Allied Vision]
- GeVDiscoveryAllOnce [Allied Vision]
- GeVDiscoveryStatus [Allied Vision]
- GeVDiscoveryAllDuration [Allied Vision]
- DiscoveryCameraIdent [Allied Vision]
- DiscoveryCameraEvent [Allied Vision]
- DiscoveryInterfaceIdent [Allied Vision]
- DiscoveryInterfaceEvent [Allied Vision]
- ForceIP [Allied Vision]
- ActionControl [Allied Vision]
- Ancillary Data Features
- References

Vimba
Vimba Manual for Linux
2.1.3
Vimba Manual for Linux 2.1.3 September 2017

Legal Noce
Legal Notice
Trademarks
Unless stated otherwise, all trademarks appearing in this document of Allied Vision Technologies are
brands protected by law.
Warranty
The information provided by Allied Vision is supplied without any guarantees or warranty whatsoever,
be it specific or implicit. Also excluded are all implicit warranties concerning the negotiability, the
suitability for specific applications or the non-breaking of laws and patents. Even if we assume that the
information supplied to us is accurate, errors and inaccuracy may still occur.
Copyright
All texts, pictures and graphics are protected by copyright and other laws protecting intellectual
property. It is not permitted to copy or modify them for trade use or transfer, nor may they be used on
websites.
Allied Vision Technologies GmbH 09/2017
All rights reserved.
Managing Director: Mr. Frank Grube
Tax ID: DE 184383113
Headquarters:
Taschenweg 2a
D-07646 Stadtroda, Germany
Tel.: +49 (0)36428 6770
Fax: +49 (0)36428 677-28
e-mail: info@alliedvision.com
Vimba Manual for Linux 2.1.3 2

Contents
Contents
1 Contacting Allied Vision 6
2 Document history and conventions 7
2.1 Documenthistory...................................... 8
2.2 Conventions used in this manual . . . . . . . . . . . . . . . . . . . . . . . . . . . . . . 8
2.2.1 Styles........................................ 8
2.2.2 Symbols....................................... 9
3 Vimba SDK Overview 10
3.1 Compatibility ........................................ 11
3.2 Architecture......................................... 12
3.3 APIEntitiesOverview.................................... 13
3.4 FeaturesinVimba...................................... 14
3.5 Vimba’sTransportLayers .................................. 14
3.6 Synchronous and asynchronous image acquisition . . . . . . . . . . . . . . . . . . . . . 15
3.7 Notifications......................................... 18
3.8 Buildingapplications .................................... 19
3.8.1 Setting up Visual Studio . . . . . . . . . . . . . . . . . . . . . . . . . . . . . . 19
4 Vimba Class Generator (not for ARM systems) 20
4.1 Mainwindow ........................................ 21
4.2 C++codegeneration .................................... 22
5 Vimba Firmware Updater 23
5.1 Uploadingfirmware..................................... 24
5.2 Abortingafirmwareupload................................. 25
5.3 Troubleshooting....................................... 26
5.4 Command line Firmware Updater . . . . . . . . . . . . . . . . . . . . . . . . . . . . . 26
6 Vimba Setup 28
6.1 Prerequisites ........................................ 29
6.2 InstallingVimba....................................... 29
6.3 UninstallingVimba ..................................... 30
7 Vimba - Feature Overview 31
8 Vimba System 32
8.1 Info[AlliedVision]...................................... 33
8.1.1 Elapsed [Allied Vision] . . . . . . . . . . . . . . . . . . . . . . . . . . . . . . . 33
8.1.2 GeVTLIsPresent [Allied Vision] . . . . . . . . . . . . . . . . . . . . . . . . . . . 33
8.1.3 UsbTLIsPresent [Allied Vision] . . . . . . . . . . . . . . . . . . . . . . . . . . . 34
Vimba Manual for Linux 2.1.3 3

Contents
8.2 Discovery[AlliedVision]................................... 35
8.2.1 GeVDiscoveryAllOff [Allied Vision] . . . . . . . . . . . . . . . . . . . . . . . . . 36
8.2.2 GeVDiscoveryAllAuto [Allied Vision] . . . . . . . . . . . . . . . . . . . . . . . . 36
8.2.3 GeVDiscoveryAllOnce [Allied Vision] . . . . . . . . . . . . . . . . . . . . . . . . 36
8.2.4 GeVDiscoveryStatus [Allied Vision] . . . . . . . . . . . . . . . . . . . . . . . . . 37
8.2.5 GeVDiscoveryAllDuration [Allied Vision] . . . . . . . . . . . . . . . . . . . . . . 37
8.2.6 DiscoveryCameraIdent [Allied Vision] . . . . . . . . . . . . . . . . . . . . . . . 37
8.2.7 DiscoveryCameraEvent [Allied Vision] . . . . . . . . . . . . . . . . . . . . . . . 38
8.2.8 DiscoveryInterfaceIdent [Allied Vision] . . . . . . . . . . . . . . . . . . . . . . . 38
8.2.9 DiscoveryInterfaceEvent [Allied Vision] . . . . . . . . . . . . . . . . . . . . . . 39
8.3 ForceIP[AlliedVision].................................... 40
8.3.1 GeVForceIPAddressMAC [Allied Vision] . . . . . . . . . . . . . . . . . . . . . . 40
8.3.2 GeVForceIPAddressIP [Allied Vision] . . . . . . . . . . . . . . . . . . . . . . . . 40
8.3.3 GeVForceIPAddressSubnetMask [Allied Vision] . . . . . . . . . . . . . . . . . . 41
8.3.4 GeVForceIPAddressGateway [Allied Vision] . . . . . . . . . . . . . . . . . . . . 41
8.3.5 GeVForceIPAddressSend [Allied Vision] . . . . . . . . . . . . . . . . . . . . . . 41
8.4 ActionControl [Allied Vision] . . . . . . . . . . . . . . . . . . . . . . . . . . . . . . . . 42
8.4.1 ActionCommand [Allied Vision] . . . . . . . . . . . . . . . . . . . . . . . . . . 42
8.4.2 ActionDeviceKey [Allied Vision] . . . . . . . . . . . . . . . . . . . . . . . . . . 42
8.4.3 ActionGroupKey [Allied Vision] . . . . . . . . . . . . . . . . . . . . . . . . . . . 42
8.4.4 ActionGroupMask [Allied Vision] . . . . . . . . . . . . . . . . . . . . . . . . . . 43
8.4.5 GevActionDestinationIPAddress [Allied Vision] . . . . . . . . . . . . . . . . . . . 43
9 Ancillary Data Features 44
9.1 ChunkData[AlliedVision].................................. 45
9.1.1 ChunkAcquisitionFrameCount [Allied Vision] . . . . . . . . . . . . . . . . . . . 45
9.1.2 ChunkUserValue [Allied Vision] . . . . . . . . . . . . . . . . . . . . . . . . . . 45
9.1.3 ChunkExposureTime [Allied Vision] . . . . . . . . . . . . . . . . . . . . . . . . 46
9.1.4 ChunkGain [Allied Vision] . . . . . . . . . . . . . . . . . . . . . . . . . . . . . 46
9.1.5 ChunkSyncInLevels [Allied Vision] . . . . . . . . . . . . . . . . . . . . . . . . . 46
9.1.6 ChunkSyncOutLevels [Allied Vision] . . . . . . . . . . . . . . . . . . . . . . . . 47
10 References 48
Vimba Manual for Linux 2.1.3 4


1 Contacng Allied Vision
1 Contacting Allied Vision
Connect with Allied Vision by function
https://www.alliedvision.com/en/meta-header/contact
Find an Allied Vision office or distributor
https://www.alliedvision.com/en/about-us/where-we-are
Email
info@alliedvision.com
support@alliedvision.com
Telephone
EMEA: +49 36428-677-0
The Americas: +1 978-225-2030
Asia-Pacific: +65 6634-9027
China: +86 (21) 64861133
Headquarters
Allied Vision Technologies GmbH
Taschenweg 2a
07646 Stadtroda
Germany
Tel: +49 (0)36428 677-0
Fax: +49 (0)36428 677-28
President/CEO: Frank Grube
Registration Office: AG Jena HRB 208962
Vimba Manual for Linux 2.1.3 6


2 Document history and convenons
2.1 Document history
Version Date Changes
1.0 2013-04-03 Initial version
1.1 2013-05-13 Different links, small changes
1.2 2013-06-18 Added chapter for Class Generator, small corrections, layout changes
1.3 2014-07-09 Major rework of the whole document
1.4 2015-11-09 Renamed several Vimba components and documents (”AVT” no longer
in use), links to new Allied Vision website, new document layout
2.0 2016-02-27 New document layout
2.1 2017-01-27 Added Action Commands, Updated supported operating systems and
SOM, updated layout
2.1.3 September 2017 Integration of Vimba Features Manual, updated section Tested embed-
ded systems and operating systems
2.2 Convenons used in this manual
To give this manual an easily understood layout and to emphasize important information, the following
typographical styles and symbols are used:
2.2.1 Styles
Style Function Example
Emphasis Programs, or highlighting important things Emphasis
Publication title Publication titles Title
Web reference Links to web pages Link
Document reference Links to other documents Document
Output Outputs from software GUI Output
Input Input commands, modes Input
Feature Feature names Feature
Vimba Manual for Linux 2.1.3 8

2 Document history and convenons
2.2.2 Symbols
Practical Tip
Safety-related instructions to avoid malfunctions
Instructions to avoid malfunctions
i
Further information available online
Vimba Manual for Linux 2.1.3 9

3 Vimba SDK Overview
This chapter includes:
3.1 Compability . . . . . . . . . . . . . . . . . . . . . . . 11
3.2 Architecture . . . . . . . . . . . . . . . . . . . . . . . . 12
3.3 API Enes Overview . . . . . . . . . . . . . . . . . . . 13
3.4 Features in Vimba . . . . . . . . . . . . . . . . . . . . . 14
3.5 Vimba's Transport Layers . . . . . . . . . . . . . . . . . 14
3.6 Synchronous and asynchronous image acquision . . . 15
3.7 Noficaons........................ 18
3.8 Building applicaons . . . . . . . . . . . . . . . . . . . 19
3.8.1 Seng up Visual Studio . . . . . . . . . . . . . 19
Vimba Manual for Linux 2.1.3 10

3 Vimba SDK Overview
3.1 Compability
Vimba for Linux is an SDK for all Allied Vision cameras with GigE and USB interface. Vimba is designed to
be compatible with future Allied Vision cameras connected to other hardware interfaces. Since Vimba is
based on GenICam, common third-party software solutions can easily be supported.
Supported cameras
• Allied Vision GigE cameras
• Allied Vision USB cameras
Tested PC operating systems
• Ubuntu (Tested with version 14.04 LTS ”Trusty Tahr” 32-bit)
• Ubuntu (Tested with version 16.04 LTS ”Xenial Xerus” 32-bit)
• Debian (Tested with version 7 ”Wheezy” 64-bit)
• Fedora (Tested with version 23 64-bit)
Tested embedded systems and operating systems
Vimba runs on ARM boards with ARMv7-compatible 32-bit processor (500 MHz or better). VFP3
support and Thumb extension are required. Vimba was tested with ODROID-XU boards. Tested
operating systems: Ubuntu 14.04 LTS and Ubuntu 16.04 LTS.
Tested SOM Vimba was tested with Jetson TX1 (system-on-module). Tested operating systems: Linux
for Tegra X1 R24.2.1 (Jetson TX1 system-on-module). Note that R24.2.1 contains Ubuntu 16.04 and
several bug fixes. Please do not use its predecessor Tegra X1 R24.2.
Tested operating systems Vimba was tested with the following ARMv7 (32-bit hard-float) and
ARMv8 (64-bit hard-float) operating systems:
• Ubuntu 32-bit (tested with version 14.04 LTS ”Trusty Tahr”)
• Linux for Tegra X1 R24.2.1 (Jetson TX1 system-on-module). Note that R24.2.1 contains Ubuntu
16.04 and several bug fixes. Please do not use its predecessor Tegra X1 R24.2.
To optimize the performance of Jetson TX1, see the document
Recommended Embedded Systems on the Vimba website.
You can download application notes about installing Vimba under Linux,
recommended embedded systems, and cross-compiling to ARM from:
http://www.alliedvision.com/en/products/software.html
Vimba and third-party software
Vimba’s transport layers (GenTL producers) are based on GenICam and thus can be used with any
third-party software that includes a GenTL consumer. For more information, see chapter Vimba’s
Transport Layers.
Vimba Manual for Linux 2.1.3 11
3 Vimba SDK Overview
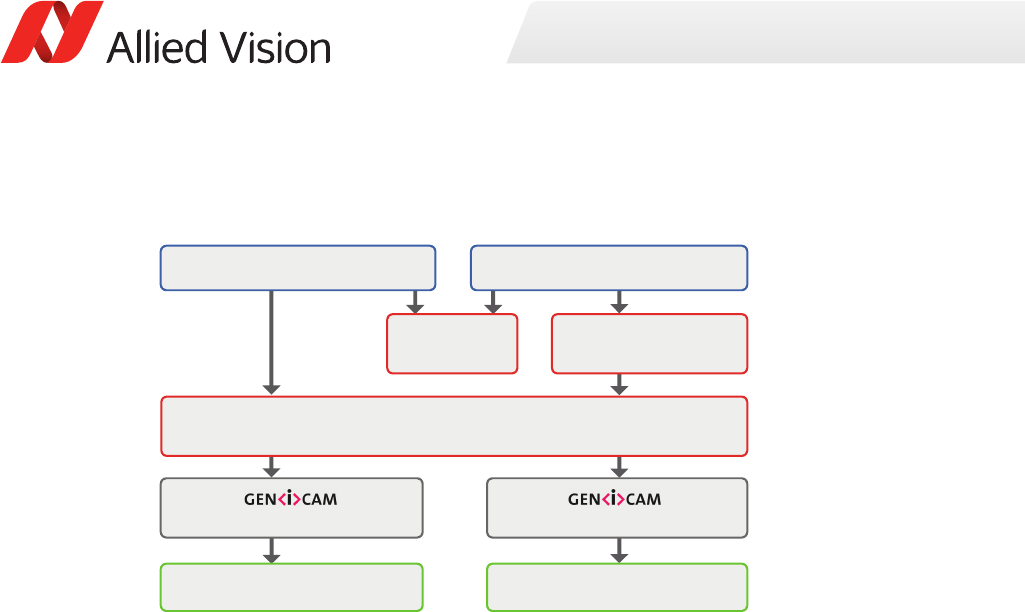
3.2 Architecture
C Applicaon C++ Applicaon
Vimba C++ API
Vimba C API
Image Transform
Library
Network interface card
USB interface card
USB Transport Layer GigE Transport Layer
Figure 1: Vimba Architecture
Vimba provides two APIs:
• The C API is Vimba’s basic API. It can also be used as an API for C++ applications. The C API is also
recommended to easily migrate from PvAPI to Vimba.
• The C++ API is designed as a highly efficient and sophisticated API for advanced object-oriented
programming including shared pointers, the STL (Standard Template Library), and interface classes.
All APIs cover the following functions:
• Listing currently connected cameras
• Controlling camera features
• Receiving images from the camera
• Notifications about camera connections or disconnections
The Image Transform Library converts camera images into other pixel formats and creates color images
from raw images (debayering).
The APIs use GenICam transport layer (GenTL) libraries to actually communicate with the cameras.
These libraries (Vimba GigE TL, and Vimba USB TL) can not be accessed directly through Vimba.
For more detailed information, please refer to the following documents:
•Vimba C Manual (includes a function reference)
•Vimba C++ Manual (includes a function reference)
•Vimba Image Transform Manual
Vimba Manual for Linux 2.1.3 12
3 Vimba SDK Overview
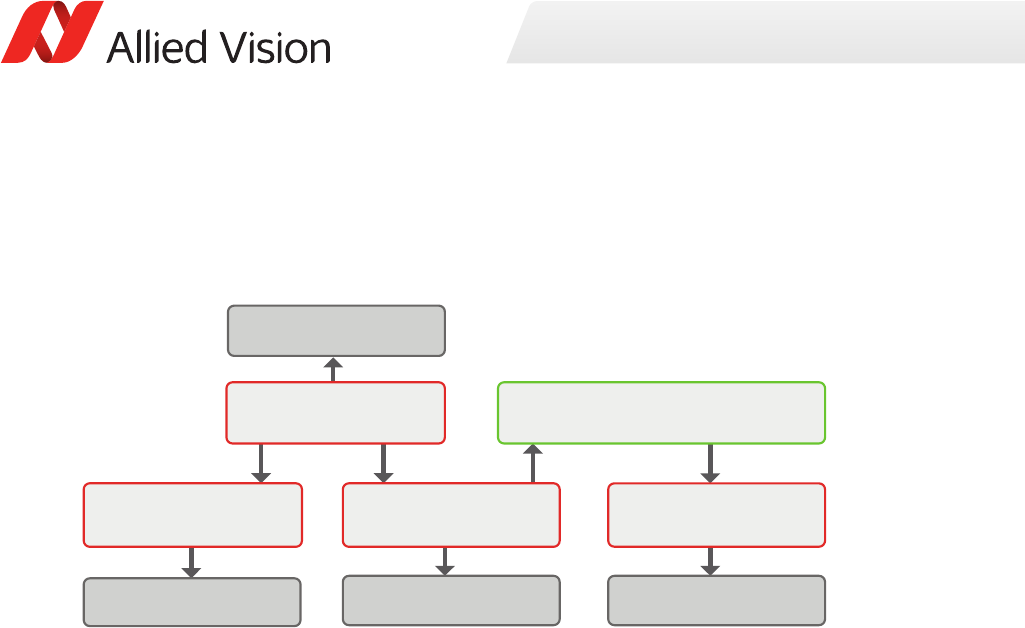
3.3 API Enes Overview
This chapter provides a rough overview of Vimba’s entities to explain their basic principles. The exact
functionalities depend on the programming language.
System
(represents the API)
Camera
(physical camera)
Interface
(GigE or USB card)
Ancillary Data
(non-image data)
Frame
(wraps image data and addi!onal data)
Features
(AncillaryData contents)
Features
(camera se"ngs)
Features
(interface card se"ngs)
Features
(API-wide se"ngs)
Figure 2: Vimba API Entities
All Vimba APIs use the same basic model for providing access to its entities. For object-oriented
programming languages, this model is reflected in the class design, but even the C API supports this
model by using handles as a representation of the different entities.
The System entity represents the API itself. Thus, only one instance of it is available. The application has
to initialize the System entity before any other function can be used. When the application has finished
using the API, it shuts it down through the System entity. The System entity holds a list of interfaces and
cameras internally and serves as the main access point to these entities.
ACamera entity controls a physical camera and receives images from the camera. Its functions are
independent of the underlying interface technology.
An Interface entity represents a port on a physical interface card in the PC. Configuring the interface card
is the main purpose of the Interface entity. The camera can directly be accessed via the System entity.
Frames contain image meta-data as well as references to the data that were sent by the camera (image
and ancillary data). For use in Vimba, they must be created by the application and then be queued at
the corresponding camera. When an image was received, the next available frame is filled and handed
over to the application through a dedicated notification. After having processed the image data, the
application should return the frame to the API by re-enqueuing it at the corresponding camera.
These Vimba entities can be controlled and set up via features:
The System Features contain information about API-wide settings, for example, which transport layer
has been loaded.
The Camera Features configure camera settings such as the exposure time or the pixel format.
Interface Features represent the settings of a physical interface card in the PC, for example, the IP
address of a network interface card.
Vimba Manual for Linux 2.1.3 13

3 Vimba SDK Overview
Frames wrap image data and, if enabled, AncillaryData (e.g., camera settings at the time of acquisition),
which may also be queried via feature access.
3.4 Features in Vimba
Within Vimba, settings and options are controlled by features. Many features come from the camera,
which provides a self-describing XML file . Vimba can read and interpret the camera XML file. This
means that Vimba is immediately ready-to-use with any Allied Vision camera. Even if the camera has a
unique, vendor-specific feature, Vimba does not need to be updated to use this feature because it gets
all necessary information from the XML file. Other features are part of Vimba’s core and transport layers.
Vimba provides several feature types:
• Integer
• Float
• Enum
• String
• Command
• Boolean
• Raw data
Vimba’s features are based on the GenICam industry standard; therefore, Vimba enables using Allied
Vision cameras with GenICam-based third-party software.
Further readings
• In-depth information about GenICam is available on the EMVA website:
http://www.emva.org/standards-technology/genicam/
• Allied Vision GigE camera features are described in the GigE Features Reference.
• Allied Vision USB camera features are described in the USB Features Reference.
3.5 Vimba's Transport Layers
A transport layer (TL) transports the data from the camera to an application on the PC. Vimba contains
GenICam transport layers (GenTL) for Allied Vision GigE and USB cameras.
Since Vimba’s transport layers support GenICam, Allied Vision GigE and USB cameras can easily be used
with a GenICam-compliant third-party software.
For a feature list, see:
•Vimba GigE TL Features Manual
•Vimba USB TL Features Manual
Vimba Manual for Linux 2.1.3 14

3 Vimba SDK Overview
3.6 Synchronous and asynchronous image
acquision
This chapter explains the principles of synchronous and asynchronous image acquisition. For details,
please refer to the API manuals.
Note that the C++ API provides ready-made convenience functions for standard applications. These
functions perform several procedures in just one step. However, for complex applications with special
requirements, manual programming as described here is still required.
Vimba Manual for Linux 2.1.3 15

3 Vimba SDK Overview
Buffer management
Every image acquisition requires allocating memory and handling frame buffers. Independent from the
API, the following interaction between the user and the API is required:
User:
1. Allocate memory for the frame buffers on the host PC.
2. Announce the buffer (this hands the frame buffer over to the API).
3. Queue a frame (prepare buffer to be filled).
Vimba:
4. Vimba fills the buffer with an image from the camera.
5. Vimba returns the filled buffer (and hands it over to the user).
User:
6. Work with the image.
7. Requeue the frame to hand it over to the API.
Synchronous image acquisition
Synchronous image acquisition is simple, but does not allow reaching high frame rates. Its principle is to
handle only one frame buffer and the corresponding image at a time, which is comparable to juggling
with one ball.
Asynchronous image acquisition
Asynchronous image acquisition is comparable to juggling with several balls: While you work with an
image, the next image is being acquired. Simplified said: the more images within a given time you want
to work with, the more buffers you have to handle.
Vimba Manual for Linux 2.1.3 16

3 Vimba SDK Overview
4
User Vimba
Image acquisi!on
Work with image
Image acquisi!on
Work with image
synchronous
User Vimba
Image acquisi!on
Work with image
Image acquisi!on
Work with image
Image acquisi!on
Image acquisi!on
Image acquisi!onWork with image
Work with image
Work with image Image acquisi!on
asynchronous
Image acquisi!on
Figure 3: Acquisition Models
Vimba Manual for Linux 2.1.3 17

3 Vimba SDK Overview
3.7 Noficaons
In general, a vision system consisting of cameras and PCs is asynchronous, which means that certain
events usually occur unexpectedly. This includes - among others - the detection of cameras connected
to the PC or the reception of images. A Vimba application can react on a particular event by registering
a corresponding handler function at the API, which in return will be called when the event occurs. The
exact method how to register an event handler depends on the programming language. For further
details, refer to the example programs.
The registered functions are usually called from a different thread than the
application. So extra care must be taken when accessing data shared between
these threads (multithreading environment).
Furthermore, the Vimba API might be blocked while the event handler is
executed. Thus, it is highly recommended to exit the event handler function as
fast as possible.
Not all API functions may be called from the event handler function. For more
details, see the API Manual for the programming language of your choice:
Vimba C Manual or Vimba C++ Manual.
Vimba Manual for Linux 2.1.3 18

3 Vimba SDK Overview
3.8 Building applicaons
3.8.1 Seng up Visual Studio
To ensure backward compatibility, Vimba examples are compatible with Visual
Studio 10 and higher.
The easiest way to set up Visual Studio for C or C++ projects is using the property sheet Examples.props
from the Vimba examples folder. The description below uses C++, but the principle can be applied to
the C API as well. Users of the .NET API can start without any special preparations.
1. In Visual Studio, create a new project. Ignore the Application Wizard, just click Finish.
2. Insert this code into YourProjectName.cpp:
Listing 1: CPP code
#include " stdafx.h"
#include <iostream >
#include " VimbaCPP/ Include/ VimbaCPP.h"
using namespace AVT:: VmbAPI;
int _tmain(int argc , _TCHA R* argv [])
{
std::cout << "Hello Vimba" << std :: endl;
VimbaSystem& sys = VimbaSystem::GetInstance();
VmbVersionInfo_t version;
if ( VmbE rr orSucc ess == sys .QueryVersio n( ve rsion ))
{
std::cout << "Version:" << version .major << "." << version .minor << std :: endl;
}
getchar ();
return 0;
}
3. Open the Property Manager window. In most Visual Studio editions, you can find it by clicking
View -> Other Windows -> Property Manager.
4. In the Property Manager window, click the Add Existing Property Sheet icon .
5. Go to the VimbaCPP_Examples folder. Unless you have changed the folder location during the
Vimba installation, it is located at: C:\Users\Public\Documents\Allied Vision\Vimba_x.x. You need
at least the Examples.props file, which is located in the Build\VS2010 folder. You can add the other
PROPS files later as needed.
Now Visual Studio is set up and you can debug the solution.
Vimba Manual for Linux 2.1.3 19


4 Vimba Class Generator (not for ARM systems)
The Vimba Class Generator is a tool for easily creating classes for Vimba C++ API. The generated classes
offer access functions for each found feature, depending on the type of the feature.
After a camera firmware update, regenerate the files and merge the access
functions for new features manually into your previously generated code by
copy & paste.
4.1 Main window
To generate classes, carry out the following steps (refer to the numbers in Figure 4):
1. Select the camera for which you would like to generate code
2. Choose the destination folder for the generated files
3. Customize the code generation with several visible options and template files
Figure 4: Vimba Class Generator - Main Window
The cameras detected during the program startup are listed in the Detected cameras box. Select the
camera for which you want to obtain code.
To detect new cameras, click the Refresh button.
Vimba Manual for Linux 2.1.3 21

4 Vimba Class Generator (not for ARM systems)
To change the default destination folder, click the button beside the text field Destination Folder.
Alternatively, enter a path manually (make sure that it is valid).
By default, the Vimba Class Generator warns you before overwriting existing files. To change this
behavior, select the checkbox Overwrite Files without Warning.
The options below Programming Language allow you to configure the code generation, see chapter C++
code generation.
If everything is configured, the Run button is enabled. Click it to generate the code for the selected
camera, programming language, and options.
The Messages text box informs you, e.g., about changed camera names.
4.2 C++ code generaon
In the C++ tab of the main window, you have the following options:
• Class Name: The name of the generated class.
• Header File Name: The name of the header file to create.
• Source File Name: The name of the cpp file to create.
• Getter prefix: The text that is inserted before the feature name for each getter function.
• Getter suffix: The text that is added after the feature name for each getter function.
• Setter prefix: The text that is inserted before the feature name for each setter function.
• Setter suffix: The text that is added after the feature name for each setter function.
• Header template: The file that is used as a template for generating the header file.
• Source template: The file that is used as a template for generating the cpp file.
Templates for the header file and the cpp file are available in a subfolder below the class generator
program. A template file for the header file contains the following hashtags that serve as placeholders:
• ### HEADER_FILE_MACRO_NAME ###: Generated from the Header File Name in the main window.
• ### CLASS_NAME ###: Corresponds to Class Name in the main window.
• ### ENUM_DECLARATIONS ###: This is where the enum declarations are inserted.
• ### METHOD_DECLARATIONS ###: This is where the method declarations are inserted.
• ### VARIABLE_DECLARATIONS ###: This is where the variable declarations are inserted.
A template file for the cpp file may contain the following placeholders:
• ### HEADER_FILE_NAME ###: Corresponds to Header File Name in the main window.
• ### CLASS_NAME ###: Corresponds to Class Name in the main window.
• ### METHOD_IMPLEMENTATIONS ###: This is where the method implementations are inserted.
In the template file, you can change the order of the variables to generate files that better suit your
requirements.
Vimba Manual for Linux 2.1.3 22

5 Vimba Firmware Updater
This chapter includes:
5.1 Uploading firmware . . . . . . . . . . . . . . . . . . . . 24
5.2 Aborng a firmware upload . . . . . . . . . . . . . . . 25
5.3 Troubleshoong . . . . . . . . . . . . . . . . . . . . . . 26
5.4 Command line Firmware Updater . . . . . . . . . . . . 26
Vimba Manual for Linux 2.1.3 23
5 Vimba Firmware Updater
The Vimba Firmware Updater supports firmware uploads to Allied Vision USB cameras cameras. New
firmware for each connected camera is automatically detected and selected. You can update several
cameras in one step. Uploading older firmware is also possible. Compatibility:
• The GUI application is available for x86 host PCs systems.
• The command line application is available for all x86 systems and x64 host PCs.
If you prefer to upload firmware via command line, see chapter Command line Firmware Updater.
i
Download the latest USB firmware from our website:
https://www.alliedvision.com/en/support/firmware.html.
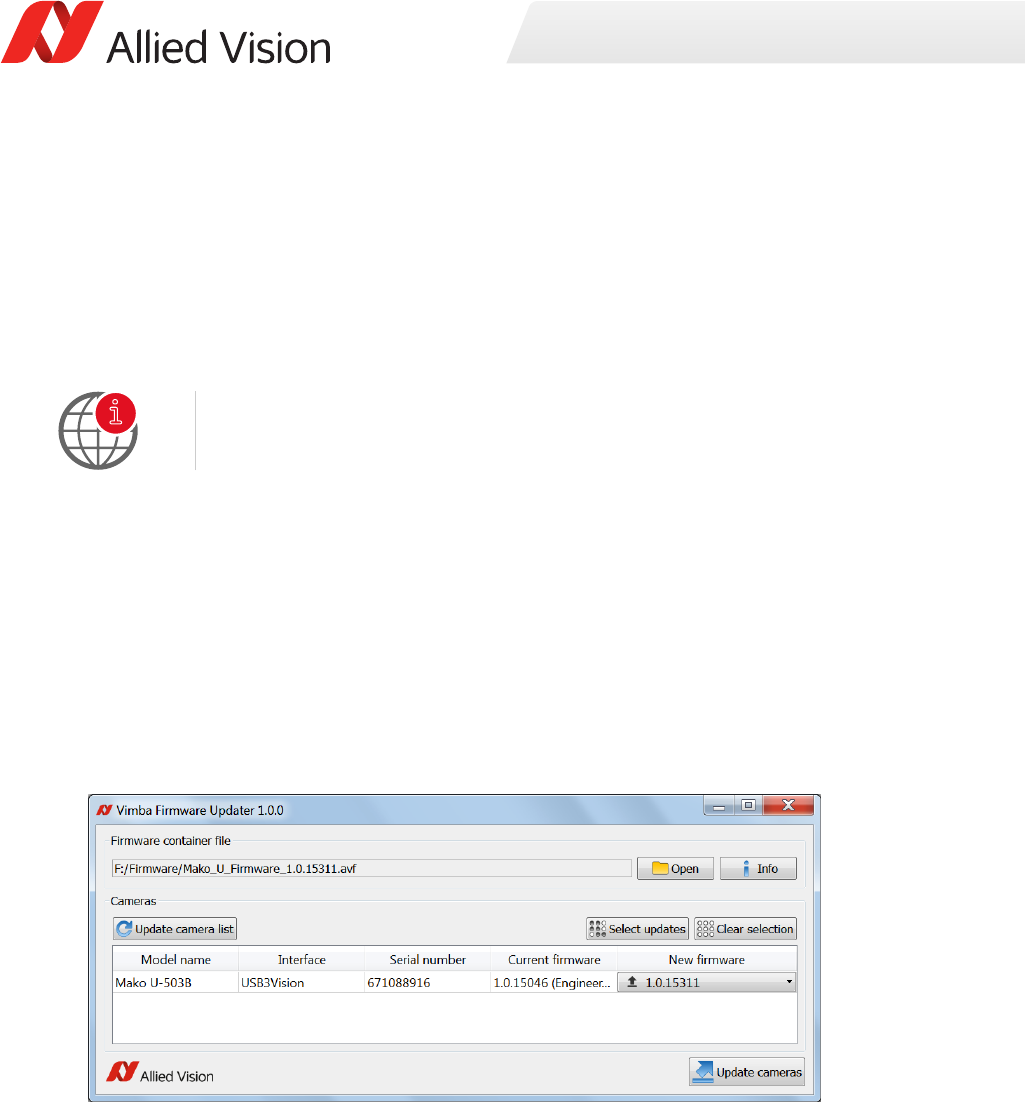
5.1 Uploading firmware
To upload new firmware to your cameras, carry out the following steps (see Figure 5):
1. Connect your Allied Vision cameras and start Vimba Firmware Updater.
2. Click Open and select a firmware container file.
Optional: Click Info to get details about the selected firmware.
3. Click Update cameras to upload the automatically selected firmware to your cameras.
Figure 5: Firmware Updater - Main Window
Vimba Manual for Linux 2.1.3 24

5 Vimba Firmware Updater
To manually select the updates, click the drop-down field:
Figure 6: Firmware Updater - Manual Update
Update cameras becomes active as soon as a firmware is chosen.
Optionally, you can use the buttons Select updates and Clear selection, which switch on/off the
automatic selection of firmware with higher versions than the firmware on the cameras.
5.2 Aborng a firmware upload
The firmware upload to several cameras takes some time. During the upload, the Abort button finishes
the upload to the current camera, but does not upload firmware to the next models.
Figure 7: Firmware Updater - Abort
Vimba Manual for Linux 2.1.3 25

5 Vimba Firmware Updater
5.3 Troubleshoong
If your camera is not detected or the firmware cannot be updated:
• Make sure no other application uses the camera.
• Restart the PC.
• Start the firmware upload again. Check if the camera works with Vimba Viewer. If not, start the
command line Firmware Updater and use repair mode or contact our support team:
https://www.alliedvision.com/support
• Make sure the USB transport layer is available (run its shell script with root privileges).
• If you connected your USB camera to a hub, unplug the hub from the PC and disconnect its power
supply. Reconnect it and try again.
• Connect your USB camera to a different USB 3.0 input or a different hub.
5.4 Command line Firmware Updater
To update firmware via command line, use FWUpdaterConsole. This tool provides two main
functionalities:
• ”–show” or ”-s” displays information about camera firmware or a firmware file.
• ”–write” or ”-w” performs the actual update.
See the following list of use cases:
Vimba Manual for Linux 2.1.3 26

5 Vimba Firmware Updater
Use case Parameters
Show device info for list of cameras --show --device "list of ids"
Show a list of matching firmware sets for all
cameras
--show --container "file" --device all
Show detailed info about matching firmware
sets for one camera
--show --container "file" --device "id"
Show firmware set info for one set --show --container "file" --index
"index"
Show firmware set info for list of sets --show --container "file" --index "list
of indices"
Show firmware set info for whole container --show --container "file"
Write one firmware set to one camera --write --container "file" --device "id"
--index "index"
Write ’best’ (latest) firmware set to list of cam-
eras
--write --container "file" --device
"list of ids"
Write ’best’ (latest) firmware set to all cameras --write --container "file" --device all
Write one firmware set to one camera in repair
mode
--write --repair --container "file"
--device "id" --index "index"
Table 1: Use cases for the command line Firmware Updater
The following options may be added to the ”show” or ” the ”write” functionality:
Option Parameters
Show full information --verbose, -v
Force writing --force, -f
Repair device firmware during write --repair, -r
Table 2: Command options for the firmware update
By calling FWUpdaterConsole –help [command/option], you get more details
about the tool or its parameters.
Vimba Manual for Linux 2.1.3 27


6 Vimba Setup
6.1 Prerequisites
If you wish to compile the examples that come with Vimba and the open source Vimba C++ API, you
need to make sure you have installed the following library packages. You will probably find most of them
being already part of your system.
• tar
• make
• pkg-config
• ffmpeg
• g++ (PC: Version 4.4.5 or higher / ARM: Version 4.7.3 or above)
• glibc6 (PC: Version 2.11 or higher / ARM: Version 2.15 or higher)
• libqt4 (PC: Version 4.8.4 / ARM: n.a.)
• TinyXML (Version 2.5.3 or higher)
Except for tar and the C runtime library glibc6, you will need these libraries (and the according
development packages) only if you intend to compile the Vimba examples or the Vimba C++ API. Use the
provided Makefiles to compile the examples. The remaining necessary runtime libraries for executing
the examples including the VimbaViewer are provided with Vimba. Furthermore, the Vimba C++
example AsynchronousOpenCVRecorder requires OpenCV 3.0 and comes with a script for compilation
and installation of OpenCV.
i
OpenCV can be downloaded from http://opencv.org
.
6.2 Installing Vimba
Vimba comes as a tarball. In order to set up Vimba, follow these steps:
1. Uncompress the archive with the command tar -xf ./Vimba.tgz to a directory you have writing
privileges for, e.g. /opt. Under this directory, Vimba will be installed in its own folder. In the
following, we will refer to this path as [InstallDir].
2. Go to [InstallDir]/Vimba_2_1/VimbaGigETL (USB: VimbaUSBTL) and execute the shell script
Install.sh with super user privileges (e.g., sudo ./Install.sh or su -c ./Install.sh). This registers the
GENICAM_GENTL32_PATH and / or the GENICAM_GENTL64_PATH environment variable through a
startup script in /etc/profile.d so that every GenICam GenTL consumer (such as the examples that
ship with Vimba) can access the Vimba GigE Transport Layer.
3. Log off once. When you log on again, these changes will have been applied to the system. If you
encounter problems detecting USB cameras, please reboot your machine.
Now you are ready to run the Vimba Viewer that can be found in, e.g.,
Vimba_2_1/Tools/Viewer/Bin/x86_32bit/VimbaViewer. This program allows you to configure your Allied
Vision cameras and capture images.
Vimba Manual for Linux 2.1.3 29

6 Vimba Setup
In order to change the IP configuration of a camera in a foreign subnet, Vimba Viewer must be run with
super user privileges (e.g., sudo -E ./VimbaViewer or su -m -c ./VimbaViewer). Note that running it as
root user instead of using sudo -E (or su -m) requires the GENICAM_GENTL32_PATH and / or
GENICAM_GENTL64_PATH being set for the root user as well.
Running and compiling the examples
Vimba includes many precompiled examples that can be found in Vimba/VimbaC/Examples/Bin and
Vimba/VimbaCPP/Examples/Bin.
If you want to compile the examples yourself (not required on ARM systems), navigate to Build/Make in
the VimbaC and VimbaCPP example folders and type make in your shell.
6.3 Uninstalling Vimba
Remove the startup scripts by running the shell scripts [InstallDir]/GigETL/Uninstall.sh and
[InstallDir]/USBTL/Uninstall.sh as super user. This prevents any GenTL consumer from loading the Vimba
GigE and USB Transport Layers. Then simply remove the installation directory.
Vimba Manual for Linux 2.1.3 30

7 Vimba - Feature Overview
7 Vimba - Feature Overview
Vimba provides additional functionality that is not directly covered by API functions with GenICam
Features. These Features can only be accessed via certain entities within Vimba. According to the API
Entity Model described in chapter API Entities Overview, the entities providing Feature access are:
• The Vimba System, which includes functionality for managing interfaces and cameras.
• The Interface, which allows configuration of hardware interfaces (e.g. a GigE port).
• The Camera, which allows access to all features provided by camera device, data transport
features, and some driver features.
• The AncillaryData for each Frame.
Features are described in the following documents:
• Vimba System features are described in chapter Vimba System in this document.
• GigE or USB Interface features are handled by the Transport Layer, see chapter ”Interface Features”
in the Vimba GigE TL Features Manual and the Vimba USB TL Features Manual,.
• Camera features for GigE or USB cameras are listed in the GigE Features Reference or USB Features
Reference.
• Ancillary Data features are described in chapter Ancillary Data Features in this document.
i
For the latest version of GigE or USB camera features, download the
corresponding Features Reference manual:
https://www.alliedvision.com/en/support/technical-documentation.html.
Vimba Manual for Linux 2.1.3 31

8 Vimba System
This chapter includes:
8.1 Info [Allied Vision] . . . . . . . . . . . . . . . . . . . . 33
8.1.1 Elapsed [Allied Vision] . . . . . . . . . . . . . . 33
8.1.2 GeVTLIsPresent [Allied Vision] . . . . . . . . . . 33
8.1.3 UsbTLIsPresent [Allied Vision] . . . . . . . . . . 34
8.2 Discovery [Allied Vision] . . . . . . . . . . . . . . . . . 35
8.2.1 GeVDiscoveryAllOff [Allied Vision] . . . . . . . . 36
8.2.2 GeVDiscoveryAllAuto [Allied Vision] . . . . . . . 36
8.2.3 GeVDiscoveryAllOnce [Allied Vision] . . . . . . . 36
8.2.4 GeVDiscoveryStatus [Allied Vision] . . . . . . . . 37
8.2.5 GeVDiscoveryAllDuraon [Allied Vision] . . . . . 37
8.2.6 DiscoveryCameraIdent [Allied Vision] . . . . . . 37
8.2.7 DiscoveryCameraEvent [Allied Vision] . . . . . . 38
8.2.8 DiscoveryInterfaceIdent [Allied Vision] . . . . . . 38
8.2.9 DiscoveryInterfaceEvent [Allied Vision] . . . . . . 39
8.3 ForceIP [Allied Vision] . . . . . . . . . . . . . . . . . . . 40
8.3.1 GeVForceIPAddressMAC [Allied Vision] . . . . . 40
8.3.2 GeVForceIPAddressIP [Allied Vision] . . . . . . . 40
8.3.3 GeVForceIPAddressSubnetMask [Allied Vision] . 41
8.3.4 GeVForceIPAddressGateway [Allied Vision] . . . 41
8.3.5 GeVForceIPAddressSend [Allied Vision] . . . . . 41
8.4 AconControl [Allied Vision] . . . . . . . . . . . . . . . 42
8.4.1 AconCommand [Allied Vision] . . . . . . . . . 42
8.4.2 AconDeviceKey [Allied Vision] . . . . . . . . . 42
8.4.3 AconGroupKey [Allied Vision] . . . . . . . . . . 42
8.4.4 AconGroupMask [Allied Vision] . . . . . . . . . 43
8.4.5 GevAconDesnaonIPAddress [Allied Vision] . . 43
Vimba Manual for Linux 2.1.3 32

8 Vimba System
This chapter lists features that are potentially available in this module. Some features are only available
under certain circumstances.
The following categories can be found below the Root category:
• Info
• Discovery
• ForceIP
• ActionControl
8.1 Info [Allied Vision]
8.1.1 Elapsed [Allied Vision]
Name Elapsed
Interface IFloat
Access Read
Visibility Beginner
Values 0.0..
Elapsed time since the API was initialized.
8.1.2 GeVTLIsPresent [Allied Vision]
Name GeV TL Is Present
Interface IBoolean
Access Read
Visibility Beginner
The GigE Vision Transport Layer is present and working.
Vimba Manual for Linux 2.1.3 33

8 Vimba System
8.1.3 UsbTLIsPresent [Allied Vision]
Name Usb TL Is Present
Interface IBoolean
Access Read
Visibility Beginner
The USB Transport Layer is present and working.
Vimba Manual for Linux 2.1.3 34

8 Vimba System
8.2 Discovery [Allied Vision]
This category contains features for camera and interface discovery with Vimba, for example:
• Camera availability
• Notifications about camera availability
• Discovery process for GigE devices
The description below applies to the C API. For more information, see Vimba C
Manual or Vimba CPP Manual.
Discovery of GigE cameras
The discovery process of GigE cameras usually takes some time, especially if multiple cameras are
connected. Many applications open only one camera directly By its ID, IP address or MAC address.
Consequently, Vimba initially does not discover devices automatically.
• GeVDiscoveryAllOnce starts the discovery once to get a complete camera list.
• GeVDiscoveryAllAuto detects GigE cameras permanently, which consumes a considerable amount
of bandwidth.
• Both commands wait for GeVDiscoveryDuration milliseconds before returning. This allows you to
directly get the list of cameras afterwards.
• GeVDiscoveryAllOff stops automatic discovery.
Notifications
Notifications about camera discovery and interface discovery work with the same mechanism:
• DiscoveryCameraEvent notifies about changes to the overall camera list and changes of the
accessibility status of the cameras. During a notification, querying DiscoveryCameraIdent returns
the camera change that caused the notification.
• DiscoveryInterfaceEvent notifies about interface-related changes, and querying
DiscoveryInterfaceIdent returns the interface identifier.
For more information, see chapter Using Event in the API manuals.
Vimba Manual for Linux 2.1.3 35

8 Vimba System
8.2.1 GeVDiscoveryAllOff [Allied Vision]
Name GeV Discovery All Off
Interface ICommand
Access Read/Write
Visibility Beginner
Turns devices discovery OFF for all GigE interfaces.
8.2.2 GeVDiscoveryAllAuto [Allied Vision]
Name GeV Discovery All Auto
Interface ICommand
Access Read/Write
Visibility Beginner
Turns devices discovery ON for all GigE interfaces.
8.2.3 GeVDiscoveryAllOnce [Allied Vision]
Name GeV Discovery All Once
Interface ICommand
Access Read/Write
Visibility Beginner
Turns devices discovery temporary ON for all GigE interfaces.
Vimba Manual for Linux 2.1.3 36

8 Vimba System
8.2.4 GeVDiscoveryStatus [Allied Vision]
Name GeV Discovery Status
Interface IEnumeration
Access Read
Visibility Beginner
Values AllOff, AllAuto, AllOnce
Provides state of discovery for GigE interfaces.
Possible values:
• AllOff: Discovery is OFF for all GigE interfaces.
• AllAuto: Discovery is ON for all GigE interfaces.
• AllOnce: Discovery is temporary ON for all GigE interfaces.
8.2.5 GeVDiscoveryAllDuraon [Allied Vision]
Name GeV Discovery Duration
Interface IInteger
Access Read/Write
Visibility Beginner
The time in ms to wait for response from any device after device discovery was started in mode ”Once”
or ”Auto”.
Defaults to 150 ms.
8.2.6 DiscoveryCameraIdent [Allied Vision]
Name Discovery Camera Ident
Interface IString
Access Read/Write
Visibility Beginner
Identifier of the camera that triggered the last camera discovery event.
Vimba Manual for Linux 2.1.3 37

8 Vimba System
8.2.7 DiscoveryCameraEvent [Allied Vision]
Name Discovery Camera Event
Interface IEnumeration
Access Read/Write
Visibility Beginner
Values Missing, Detected, Reachable, Unreachable
Indicates the last camera discovery event.
Possible values:
• Missing: The camera is missing.
• Detected: The camera was detected.
• Reachable: The camera is reachable (can be talked to).
• Unreachable: The camera is unreachable (cannot be talked to).
8.2.8 DiscoveryInterfaceIdent [Allied Vision]
Name Discovery Interface Ident
Interface IString
Access Read/Write
Visibility Beginner
Identifier of the interface that triggered the last interface discovery event.
Vimba Manual for Linux 2.1.3 38

8 Vimba System
8.2.9 DiscoveryInterfaceEvent [Allied Vision]
Name Discovery Interface Event
Interface IEnumeration
Access Read/Write
Visibility Beginner
Values Unavailable, Available
Indicates the last interface discovery event.
Vimba Manual for Linux 2.1.3 39

8 Vimba System
8.3 ForceIP [Allied Vision]
This category contains features to force port features of a camera that would otherwise be inaccessible
via Vimba.
1. Set the MAC address of the used camera in feature GeVForceIPAddressMAC
2. Set the required values of GeVForceIPAddressIP, GeVForceIPAddressSubnetMask, or
GeVForceIPAddressGateway
3. To send these values to the camera, run GeVForceIPAddressSend.
8.3.1 GeVForceIPAddressMAC [Allied Vision]
Name Camera MAC Address
Interface IInteger
Access Read/Write
Visibility Expert
48-bit MAC address of the camera to force IP setup
8.3.2 GeVForceIPAddressIP [Allied Vision]
Name Camera’s desired IP Address
Interface IInteger
Access Read/Write
Visibility Expert
IP address of the camera to be forced to
Vimba Manual for Linux 2.1.3 40

8 Vimba System
8.3.3 GeVForceIPAddressSubnetMask [Allied Vision]
Name Camera’s desired subnet mask
Interface IInteger
Access Read/Write
Visibility Expert
Subnet mask of the camera to be forced to
8.3.4 GeVForceIPAddressGateway [Allied Vision]
Name Camera’s desired gateway
Interface IInteger
Access Read/Write
Visibility Expert
Gateway of the camera to be forced to
8.3.5 GeVForceIPAddressSend [Allied Vision]
Name Send camera force address
Interface ICommand
Access Read/Write
Visibility Expert
Send the force address command on all interfaces
Vimba Manual for Linux 2.1.3 41

8 Vimba System
8.4 AconControl [Allied Vision]
8.4.1 AconCommand [Allied Vision]
Name Action Command
Interface ICommand
Access Read/Write
Visibility Expert
Send created Action Command.
8.4.2 AconDeviceKey [Allied Vision]
Name Action Device Key
Interface IInteger
Access Read/Write
Visibility Expert
The Device Key for the Action Command to be created.
This Key has to match Action Device Key within desired device(s).
8.4.3 AconGroupKey [Allied Vision]
Name Action Group Key
Interface IInteger
Access Read/Write
Visibility Expert
The Group Key for the Action Command to be created.
This Key has to match Action Group Key within desired device(s).
Vimba Manual for Linux 2.1.3 42

8 Vimba System
8.4.4 AconGroupMask [Allied Vision]
Name Action Group Mask
Interface IInteger
Access Read/Write
Visibility Expert
The Group Mask Key for the Action Command to be created.
This Key has to match Action Group Mask Key within desired device(s).
8.4.5 GevAconDesnaonIPAddress [Allied Vision]
Name Gev Action Destination IP Address
Interface IInteger
Access Read/Write
Visibility Expert
Specifies the destination IP address for the Action Command.
Vimba Manual for Linux 2.1.3 43

9 Ancillary Data Features
This chapter includes:
9.1 ChunkData [Allied Vision] . . . . . . . . . . . . . . . . . 45
9.1.1 ChunkAcquisionFrameCount [Allied Vision] . . 45
9.1.2 ChunkUserValue [Allied Vision] . . . . . . . . . 45
9.1.3 ChunkExposureTime [Allied Vision] . . . . . . . 46
9.1.4 ChunkGain [Allied Vision] . . . . . . . . . . . . 46
9.1.5 ChunkSyncInLevels [Allied Vision] . . . . . . . . 46
9.1.6 ChunkSyncOutLevels [Allied Vision] . . . . . . . 47
Vimba Manual for Linux 2.1.3 44

9 Ancillary Data Features
This chapter lists the available features for Ancillary Data.
The following categories can be found below the Root category:
• ChunkData
9.1 ChunkData [Allied Vision]
Ancillary Data are non-image data that are part of the camera transfers. It relates to GenICam’s Chunk
Data.
Allied Vision GigE cameras usually don’t expose the layout of their Ancillary Data via camera features,
but the layout is the same for all cameras. Instead, they only provide feature ChunkModeActive, which
is disabled be default. To enable transfer of Ancillary Data, set ChunkModeActive to ”True”.
9.1.1 ChunkAcquisionFrameCount [Allied Vision]
Name Chunk Acquisition Frame Count
Interface IInteger
Access Read
Visibility Beginner
This is the number of the frame during the current acquisition.
9.1.2 ChunkUserValue [Allied Vision]
Name Chunk User Value
Interface IInteger
Access Read
Visibility Beginner
User value
Vimba Manual for Linux 2.1.3 45

9 Ancillary Data Features
9.1.3 ChunkExposureTime [Allied Vision]
Name Chunk Exposure Time
Interface IFloat
Access Read
Visibility Beginner
Exposure duration, in microseconds.
9.1.4 ChunkGain [Allied Vision]
Name Chunk Gain
Interface IFloat
Access Read/Write
Visibility Beginner
Gain value of analog A/D stage.
Units are usually in dB.
9.1.5 ChunkSyncInLevels [Allied Vision]
Name Chunk Sync In Levels
Interface IInteger
Access Read/Write
Visibility Beginner
Momentary logic levels of the hardware line inputs.
Vimba Manual for Linux 2.1.3 46

9 Ancillary Data Features
9.1.6 ChunkSyncOutLevels [Allied Vision]
Name Chunk Sync Out Levels
Interface IInteger
Access Read/Write
Visibility Beginner
Output levels of hardware sync outputs, for output(s) in GPO mode.
Vimba Manual for Linux 2.1.3 47

10 References
10 References
This section lists documents with more detailed information about the components of Vimba. Please
note that the links are valid only if the corresponding component has been installed.
Allied Vision Vimba GigE Transport Layer and cameras:
•Vimba GigE TL Features Manual
•GigE Features Reference
Allied Vision Vimba USB Transport Layer and cameras:
•Vimba USB TL Features Manual
•USB Features Reference
Vimba Image Transform Library:
•Vimba Image Transform Manual
Vimba C API:
•Vimba C Manual
Vimba C++ API:
•Vimba C++ Manual
Vimba Manual for Linux 2.1.3 48
