Warehouse_Staging_Guide Warehouse Staging Guide
User Manual:
Open the PDF directly: View PDF ![]() .
.
Page Count: 44
- Contents
- About Staging TiVo Devices
- Staging TiVo Devices
- How Auto-Staging works
- Preparing for Auto-Staging
- Auto-Staging a TiVo device
- Completing staging for TiVo DVRs and TiVo Preview
- Completing staging for CAL-based devices
- Verifying staging by using the TiVo Slide remote control
- Using Clear & Delete Everything to force Auto-Staging
- Refreshing PGD on a previously-staged device
- Staging TiVo Stream
- Troubleshooting Auto-Staging Issues
- LED Staging Behavior for TiVo Devices
- TiVo T6 DVR LED staging behavior
- TiVo Roamio DVR LED staging behavior
- TiVo-Pace MG1 DVR LED staging behavior
- TiVo Premiere Q DVR LED staging behavior
- TiVo Preview LED staging behavior
- TiVo-Evolution IP Hybrid set-top box LED staging behavior
- TiVo Mini LED staging behavior
- TiVo-Pace Mi3 LED staging behavior
- Ports and Connections for TiVo Devices

TiVo Warehouse Staging
Guide
for MSOs
v9.0

© 2016 TiVo Inc. All rights reserved.
This document contains TiVo Confidential and Proprietary Information. No part of this document may
be reproduced or transmitted in any form or by any means, electronic or mechanical, for any purpose,
without the express written permission of TiVo. TiVo may have patents, patent applications,
trademarks, copyrights or other intellectual property rights covering subject matter in this document.
The furnishing of this document does not give you any license to these patents, trademarks, copyrights
or other intellectual property. This document is furnished by TiVo as is without any representation
regarding its accuracy, completeness, fitness for a particular purpose or any other representation or
warranty of any kind. Information in this document is subject to change without notice.
TiVo and the TiVo logo are registered trademarks of TiVo Inc. or its subsidiaries worldwide.
All other trademarks are the property of their respective owners.
This content is based on TiVo software version 20.6.1.
Publication Date: June 2016

Contents
3 TiVo Warehouse Staging Guide for MSOs • TiVo® Proprietary and Confidential
1 About Staging TiVo Devices
Audience for this document . . . . . . . . . . . . . . . . . . . . . . . . . . . . . . . . . . . . . . . . . . . . . . . . . . 5
Requirements for the warehouse staging environment . . . . . . . . . . . . . . . . . . . . . . . . . . . . . . 6
Warehouse Configured Headend installation versus Installer Configured Headend installation 6
2 Staging TiVo Devices
How Auto-Staging works . . . . . . . . . . . . . . . . . . . . . . . . . . . . . . . . . . . . . . . . . . . . . . . . . . . . 7
Preparing for Auto-Staging . . . . . . . . . . . . . . . . . . . . . . . . . . . . . . . . . . . . . . . . . . . . . . . . . . . 8
Auto-Staging a TiVo device . . . . . . . . . . . . . . . . . . . . . . . . . . . . . . . . . . . . . . . . . . . . . . . . . . . 8
Completing staging for TiVo DVRs and TiVo Preview . . . . . . . . . . . . . . . . . . . . . . . . . . . . . . . . 9
Completing staging for CAL-based devices . . . . . . . . . . . . . . . . . . . . . . . . . . . . . . . . . . . . . . 10
Verifying staging by using the TiVo Slide remote control . . . . . . . . . . . . . . . . . . . . . . . . . . . . 10
Using Clear & Delete Everything to force Auto-Staging . . . . . . . . . . . . . . . . . . . . . . . . . . . . . 11
To run the Clear & Delete Everything option . . . . . . . . . . . . . . . . . . . . . . . . . . . . . . . . . . . 11
Refreshing PGD on a previously-staged device . . . . . . . . . . . . . . . . . . . . . . . . . . . . . . . . . . . 12
3 Staging TiVo Stream
About TiVo Stream . . . . . . . . . . . . . . . . . . . . . . . . . . . . . . . . . . . . . . . . . . . . . . . . . . . . . . . . 13
Compatible host DVRs . . . . . . . . . . . . . . . . . . . . . . . . . . . . . . . . . . . . . . . . . . . . . . . . . . . 14
Device specifications . . . . . . . . . . . . . . . . . . . . . . . . . . . . . . . . . . . . . . . . . . . . . . . . . . . . . . 14
Back panel . . . . . . . . . . . . . . . . . . . . . . . . . . . . . . . . . . . . . . . . . . . . . . . . . . . . . . . . . . . . 14
Ethernet link LEDs . . . . . . . . . . . . . . . . . . . . . . . . . . . . . . . . . . . . . . . . . . . . . . . . . . . . . . 15
Status LED . . . . . . . . . . . . . . . . . . . . . . . . . . . . . . . . . . . . . . . . . . . . . . . . . . . . . . . . . . . . 15
Staging TiVo Stream devices . . . . . . . . . . . . . . . . . . . . . . . . . . . . . . . . . . . . . . . . . . . . . . . . . 16
TiVo Stream LED staging behavior . . . . . . . . . . . . . . . . . . . . . . . . . . . . . . . . . . . . . . . . . . 17
Troubleshooting TiVo Stream staging issues . . . . . . . . . . . . . . . . . . . . . . . . . . . . . . . . . . . . . 17
All LEDs are off. . . . . . . . . . . . . . . . . . . . . . . . . . . . . . . . . . . . . . . . . . . . . . . . . . . . . . . . . 17
Solid amber (for 20 minutes or more) . . . . . . . . . . . . . . . . . . . . . . . . . . . . . . . . . . . . . . . . 17
Rapidly flashing amber . . . . . . . . . . . . . . . . . . . . . . . . . . . . . . . . . . . . . . . . . . . . . . . . . . . 18
Flashing amber for brief period . . . . . . . . . . . . . . . . . . . . . . . . . . . . . . . . . . . . . . . . . . . . . 18
Flashing white (for 20 minutes or more) . . . . . . . . . . . . . . . . . . . . . . . . . . . . . . . . . . . . . . 18

Contents
4 TiVo Warehouse Staging Guide for MSOs
4 Troubleshooting Auto-Staging Issues
Returned TiVo device displays Welcome screen with U.S. and Canada options . . . . . . . . . . . 19
Solution . . . . . . . . . . . . . . . . . . . . . . . . . . . . . . . . . . . . . . . . . . . . . . . . . . . . . . . . . . . . . . 19
Returned TiVo device displays TiVo Central screen . . . . . . . . . . . . . . . . . . . . . . . . . . . . . . . . 19
Solution . . . . . . . . . . . . . . . . . . . . . . . . . . . . . . . . . . . . . . . . . . . . . . . . . . . . . . . . . . . . . . 19
Front panel LEDs display failure pattern . . . . . . . . . . . . . . . . . . . . . . . . . . . . . . . . . . . . . . . . 20
Solution . . . . . . . . . . . . . . . . . . . . . . . . . . . . . . . . . . . . . . . . . . . . . . . . . . . . . . . . . . . . . . 20
Device fails automatic TiVo Service call . . . . . . . . . . . . . . . . . . . . . . . . . . . . . . . . . . . . . . . . 20
Solution . . . . . . . . . . . . . . . . . . . . . . . . . . . . . . . . . . . . . . . . . . . . . . . . . . . . . . . . . . . . . . 20
After Clear & Delete Everything, Auto-Staging does not start . . . . . . . . . . . . . . . . . . . . . . . . . 20
Solution . . . . . . . . . . . . . . . . . . . . . . . . . . . . . . . . . . . . . . . . . . . . . . . . . . . . . . . . . . . . . . 20
A LED Staging Behavior for TiVo Devices
TiVo T6 DVR LED staging behavior . . . . . . . . . . . . . . . . . . . . . . . . . . . . . . . . . . . . . . . . . . . . 24
TiVo Roamio DVR LED staging behavior . . . . . . . . . . . . . . . . . . . . . . . . . . . . . . . . . . . . . . . . 25
TiVo-Pace MG1 DVR LED staging behavior . . . . . . . . . . . . . . . . . . . . . . . . . . . . . . . . . . . . . . 26
TiVo-Pace MG1 DVR seven-segment status and error display . . . . . . . . . . . . . . . . . . . . . . 27
TiVo-Pace MG1 DVR Auto-Staging states . . . . . . . . . . . . . . . . . . . . . . . . . . . . . . . . . . . . . 27
TiVo-Pace MG1 DVR staging error codes. . . . . . . . . . . . . . . . . . . . . . . . . . . . . . . . . . . . . . 27
TiVo-Pace MG1 DVR staging errors . . . . . . . . . . . . . . . . . . . . . . . . . . . . . . . . . . . . . . . . . . 28
TiVo Premiere Q DVR LED staging behavior . . . . . . . . . . . . . . . . . . . . . . . . . . . . . . . . . . . . . . 29
TiVo Preview LED staging behavior . . . . . . . . . . . . . . . . . . . . . . . . . . . . . . . . . . . . . . . . . . . . 30
TiVo-Evolution IP Hybrid set-top box LED staging behavior . . . . . . . . . . . . . . . . . . . . . . . . . . 31
TiVo Mini LED staging behavior . . . . . . . . . . . . . . . . . . . . . . . . . . . . . . . . . . . . . . . . . . . . . . . 32
TiVo-Pace Mi3 LED staging behavior . . . . . . . . . . . . . . . . . . . . . . . . . . . . . . . . . . . . . . . . . . . 33
B Ports and Connections for TiVo Devices
TiVo T6 DVR back panel . . . . . . . . . . . . . . . . . . . . . . . . . . . . . . . . . . . . . . . . . . . . . . . . . . . . 36
TiVo Roamio DVR back panel . . . . . . . . . . . . . . . . . . . . . . . . . . . . . . . . . . . . . . . . . . . . . . . . 37
TiVo-Pace MG1 DVR back panel . . . . . . . . . . . . . . . . . . . . . . . . . . . . . . . . . . . . . . . . . . . . . . 38
TiVo Premiere Q DVR back panel . . . . . . . . . . . . . . . . . . . . . . . . . . . . . . . . . . . . . . . . . . . . . . 39
TiVo Preview back panel . . . . . . . . . . . . . . . . . . . . . . . . . . . . . . . . . . . . . . . . . . . . . . . . . . . . 40
TiVo-Evolution IP Hybrid set-top box back panel . . . . . . . . . . . . . . . . . . . . . . . . . . . . . . . . . . 41
TiVo Mini back panel . . . . . . . . . . . . . . . . . . . . . . . . . . . . . . . . . . . . . . . . . . . . . . . . . . . . . . . 42
TiVo-Pace Mi3 back panel . . . . . . . . . . . . . . . . . . . . . . . . . . . . . . . . . . . . . . . . . . . . . . . . . . 43
TiVo Stream back panel . . . . . . . . . . . . . . . . . . . . . . . . . . . . . . . . . . . . . . . . . . . . . . . . . . . . 44

1
TiVo Warehouse Staging Guide for MSOs • TiVo® Proprietary and Confidential 5
About Staging TiVo Devices
The TiVo Warehouse Staging Guide for MSOs provides a single reference for MSO warehouse
technicians to perform staging procedures on all TiVo devices.
CableCo is the generic name used to represent any domestic Multi-System Operator (MSO).
Staging is the process of preparing a TiVo device for use by the subscriber. Many MSOs stage TiVo
DVRs and other TiVo devices at a warehouse before delivering the devices to subscribers. Although
not required, staging TiVo devices at the warehouse reduces the time needed for onsite installation.
The following chapters are included in this guide:
-Chapter 1, About Staging TiVo Devices—Provides information about the audience for this
guide, the overview of the staging process, and the requirements for the staging
environment.
-Chapter 2, Staging TiVo Devices—Describes the warehouse staging process for the TiVo
T6 DVR, the TiVo Roamio DVR, the TiVo-Pace MG1 DVR, the TiVo Premiere Q DVR,
the TiVo-Evolution IP Hybrid set-top box, TiVo Preview, TiVo Mini, and TiVo-Pace Mi3.
-Chapter 3, Staging TiVo Stream—Describes the warehouse staging process for TiVo
Stream.
-Appendix A, LED Staging Behavior for TiVo Devices—Provides hardware information for
each TiVo device.
-Appendix B, Ports and Connections for TiVo Devices—Provides hardware information for
each TiVo device.
Audience for this document
The TiVo Warehouse Staging Guide for MSOs is designed for MSO warehouse technicians who have
experience with Auto-Staging TiVo devices, and a working knowledge of racking procedures.
This guide assumes that the technician has the access and ability to issue a serviceReset API call
on the devices to be staged.

Requirements for the warehouse staging environment
6 Chapter 1 — About Staging TiVo Devices
Requirements for the warehouse staging environment
To manage and stage multiple devices at once, make sure that your warehouse meets the following
requirements:
-Staging racks in a room with adequate ventilation and cooling.
-Staging racks should accommodate approximately 40 TiVo DVRs standing on end with
non-marring cushioning.
-Adequate power to support every TiVo DVR—TiVo DVRs might draw up to 35 watts
each. Other devices might draw less power.
-Power strip with outlets to support 40 devices and additional supporting equipment.
-Ethernet connection to each device, with full access to the Internet and stable connectivity.
-Gigabit switch or managed switch to support all equipment.
-Enough RF feeds for all TiVo DVRs being staged on the rack.
-HDMI-capable TV with an HDMI cable long enough to reach all DVRs.
-Optional—HDMI switch, TiVo staging appliance, Barcode printer, Fineline Barcode
reader, and a laptop or computer to enter staging data and to perform CableCARD pairing.
Warehouse Configured Headend installation versus Installer
Configured Headend installation
For the Warehouse Configured Headend installation, the TiVo DVR has already been configured for
the subscriber’s specific headend and the Program Guide Data (PGD) has been indexed during the
warehouse staging process. You will need to set the service state and perform some setup tasks, but
you won’t need to perform Guided Setup. Because most of the DVR setup has been completed in the
warehouse, this installation takes less time onsite than the Installer Configured Headend installation.
For the Installer Configured Headend installation, device configuration for the subscriber’s specific
headend has not been done during warehouse staging. The additional steps that are performed will
configure the device to the subscriber’s correct channel lineup based on their subscription. An
Installer Configured Headend installation requires a briefer warehouse staging time, but a longer time
at the subscriber’s site.

2
TiVo Warehouse Staging Guide for MSOs • TiVo® Proprietary and Confidential 7
Staging TiVo Devices
This chapter describes the warehouse staging procedures for the TiVo T6 DVR, the TiVo Roamio
DVR, the TiVo-Pace MG1 DVR, the TiVo Premiere Q DVR, the TiVo-Evolution IP Hybrid set-top
box, TiVo Preview, TiVo Mini, and TiVo-Pace Mi3. The following topics are included:
-How Auto-Staging works on page 7
-Preparing for Auto-Staging on page 8
-Auto-Staging a TiVo device on page 8
-Completing staging for TiVo DVRs and TiVo Preview on page 9
-Verifying staging by using the TiVo Slide remote control on page 10
-Using Clear & Delete Everything to force Auto-Staging on page 11
-LED Staging Behavior for TiVo Devices on page 23
For TiVo Stream staging information, see Staging TiVo Stream on page 13.
For Troubleshooting information, see Troubleshooting Auto-Staging Issues on page 19.
How Auto-Staging works
The Auto-Staging process for TiVo DVRs/STBs, TiVo Mini, and TiVo-Pace Mi3 includes the
following events:
1. Checking the software version and upgrading the software as needed
If the software version has changed or if the device has been marked for restaging, Auto-
Staging downloads the software from the TiVo Service.
2. Reimaging each of the partitions by removing any previous data
If the device has a CableCARD, then the CableCARD pairing data is preserved. After the
new images are installed on the hard disk, the TiVo device restarts using the new software.
3. Performing a sequence of MSO and headend configuration tasks
The TiVo UI displays a set of screens (these screens are different from Guided Setup
screens). The device does not respond to remote control input during the Auto-Staging
process.
4. Removing the previous subscriber settings and setting the device to its MSO default
(service state 22)
5. Indicating a successful Auto-Staging operation
See LED Staging Behavior for TiVo Devices on page 23.
The device is ready to be scheduled for onsite installation. For TiVo Stream staging information, see
Staging TiVo Stream on page 13.

Preparing for Auto-Staging
8 Chapter 2 — Staging TiVo Devices
Preparing for Auto-Staging
1. Verify that each TiVo device has gone through a serviceReset API call and is in service
state 22.
Follow the instructions for issuing the Service Reset that the MSO has provided.
2. Set the msoServiceId, siteID, and tier values by using a deviceInfoStore API call
on the TiVo Service Number (TSN).
Auto-Staging configuration parameters are stored within the msoServiceIds that has
been assigned to the MSO.
These commands are typically available through tools that are provided by the MSO’s IT
group.
-msoServiceId—Sets the ZIP code, market, and region information. The device sets
its Program Guide Data (PGD) and channel lineup according to the ZIP code.
-siteID—Configures the market-specific Video on Demand (VOD) parameters.
Note: Other configuration parameters such as the channel guide display, recorded shows sorting
display, and mandatory PGD are downloaded to the device during the Auto-Staging
process.
The device is ready for Auto-Staging.
Auto-Staging a TiVo device
After completing the Auto-Staging preparation steps, follow these steps to start the Auto-Staging
process:
1. Connect the device to Ethernet.
2. Power up the device.
Applying power to the device automatically starts the Auto-Staging process.
Note: Do not connect the device to the coaxial input.
3. (Optional) To see the messages displayed during Auto-Staging, connect the device to a
TV with an HDMI connection.
4. Observe the pattern of LEDs on the front panel of the device to ensure that Auto-Staging is
proceeding correctly.
See LED Staging Behavior for TiVo Devices on page 23 for details about each device.
5. Wait until the LEDs indicate that Auto-Staging is complete, or Staging Complete screen
displays (if connected to a TV).
a. Observe the pattern of LEDs for errors.
b. If there are Auto-Staging errors, troubleshoot the errors.
For TiVo-Pace MG1 errors, see TiVo-Pace MG1 DVR seven-segment status and
error display on page 27 and Table A–1 on page 28.
Completing staging for TiVo DVRs and TiVo Preview
TiVo Warehouse Staging Guide for MSOs • TiVo® Proprietary and Confidential 9
For general Auto-Staging troubleshooting tips, see Troubleshooting Auto-Staging
Issues on page 19.
Note: TiVo Mini and TiVo-Pace Mi3 Auto-Staging is now complete. No further action
is necessary.
6. After staging is complete, the device automatically initiates two calls to the TiVo Service
to download PGD. Do not unplug the device for 90 minutes.
7. For TiVo/Pace DVRs and TiVo Preview, proceed to Completing staging for TiVo DVRs
and TiVo Preview to activate the CableCARD and to verify video decryption.
8. For the TiVo-Evolution IP Hybrid set-top box, proceed to Completing staging for CAL-
based devices to activate the CAL software and to verify video decryption.
Completing staging for TiVo DVRs and TiVo Preview
The post-staging tasks described in this section apply only to TiVo DVRs and TiVo Preview, not to the
TiVo-Evolution IP Hybrid set-top box, TiVo Mini, or TiVo-Pace Mi3. After staging has completed
successfully, perform the following steps:
1. Plug in the coaxial cable.
Note: If TiVo DVR is intended for an OTA install, skip to step 5.
2. Activate the CableCARD and confirm CableCARD pairing.
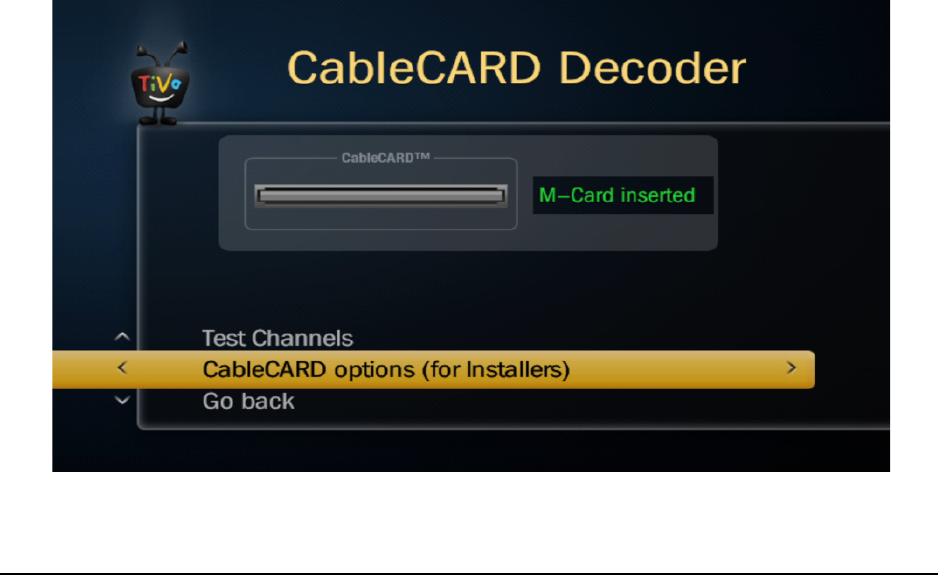
a. Insert the CableCARD into the TiVo device.
b. From TiVo Central, choose Settings & Messages > Settings > Remote, CableCARD,
& Devices > CableCARD Decoder > CableCARD options (for Installers)
(Figure 2–1).
Figure 2–1: CableCARD options (for Installers)

Completing staging for CAL-based devices
10 Chapter 2 — Staging TiVo Devices
3. Verify various types of channels.
a. Tune to unencrypted channels.
b. Tune to encrypted channels.
c. Tune to Premium channels.
4. Verify that the VOD launch point goes to the VOD catalog.
5. Verify that the MSO branding is correct.
The TiVo DVRs and TiVo Preview are staged and ready to be sent for onsite installation.
Completing staging for CAL-based devices
The post-staging tasks described in this section apply only to the TiVo-Evolution IP Hybrid set-top
box. After staging has completed successfully, perform the following steps:
1. Plug in the coaxial cable.
2. Activate the CAL software.
3. Verify various types of channels.
a. Tune to unencrypted channels.
b. Tune to encrypted channels.
c. Tune to Premium channels.
4. Verify that the MSO branding is correct.
The TiVo-Evolution IP Hybrid set-top box is staged and ready to be sent for onsite installation.
Verifying staging by using the TiVo Slide remote control
Note: If you are using the standard TiVo remote control, do not use it in RF mode for warehouse
staging purposes.
TiVo recommends that you use the TiVo Slide remote control with a Bluetooth USB receiver for
verification purposes. You can plug the USB receiver into one device at a time for verification
purposes without disrupting other devices. For information about how to obtain the TiVo Slide remote
control and USB receiver, contact your TiVo account representative.
Alternatively, you can use the TiVo remote control in IR mode. To switch the remote control from RF
mode to IR mode, press and hold the TiVo+Red C buttons until the activity indicator lights.
Using Clear & Delete Everything to force Auto-Staging
TiVo Warehouse Staging Guide for MSOs • TiVo® Proprietary and Confidential 11
Using Clear & Delete Everything to force Auto-Staging
Some staging scenarios do not automatically start Auto-Staging. In these scenarios, use the Clear &
Delete Everything option to force Auto-Staging.
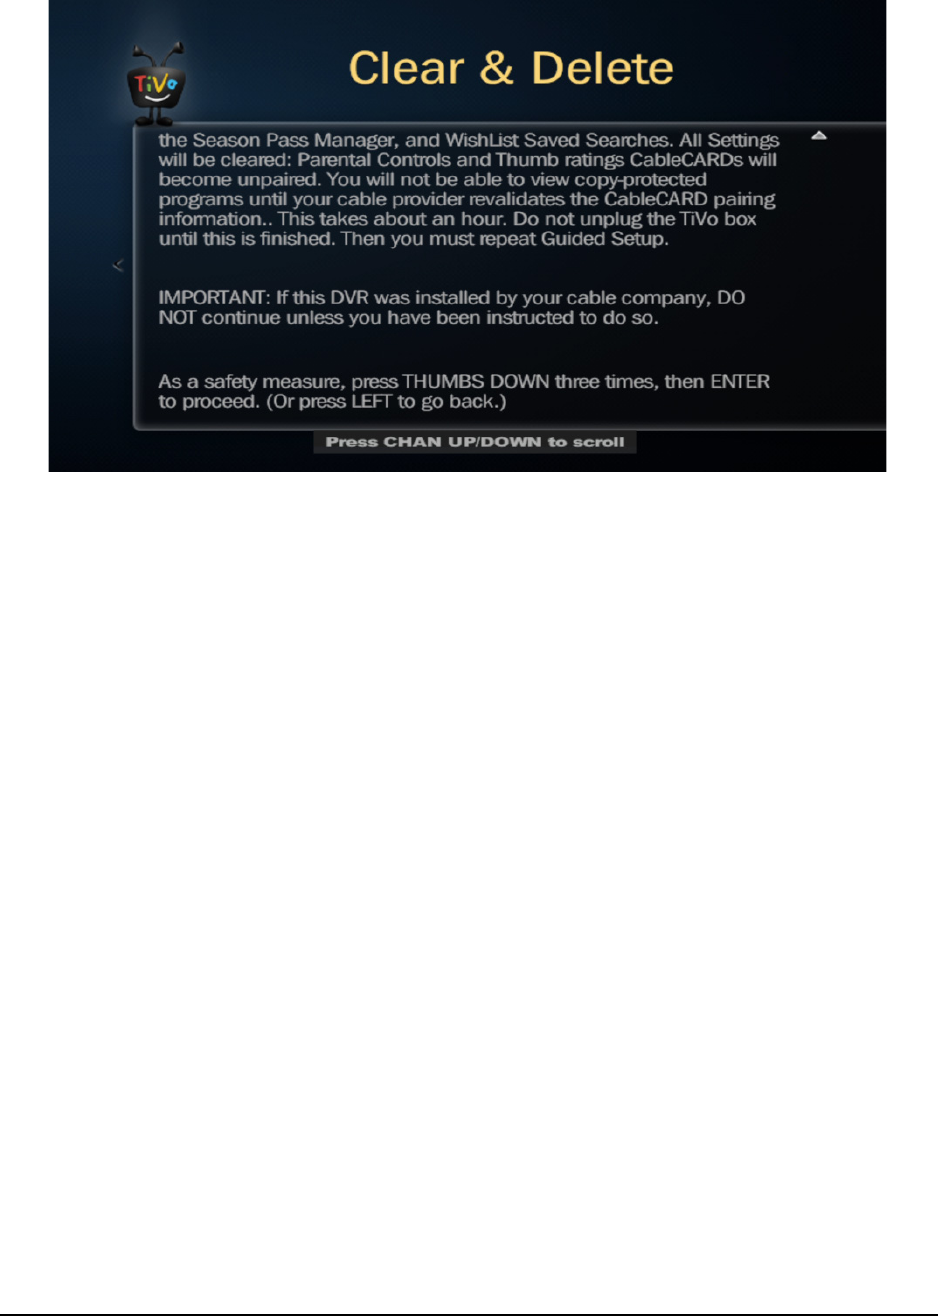
Warning: Before proceeding, be aware of what the Clear & Delete Everything option does.
-Deletes everything in My Shows, the To Do list, the Season Pass Manager, and WishList
saved searches.
-Clears all settings, including Parental Controls and Thumb ratings.
To run the Clear & Delete Everything option
1. Before you start this procedure, complete these tasks:
a. Ensure that an msoServiceId is configured for the TiVo device.
b. Ensure that the TiVo device has a working Ethernet connection.
c. Ensure that the TiVo device is in service state 22.
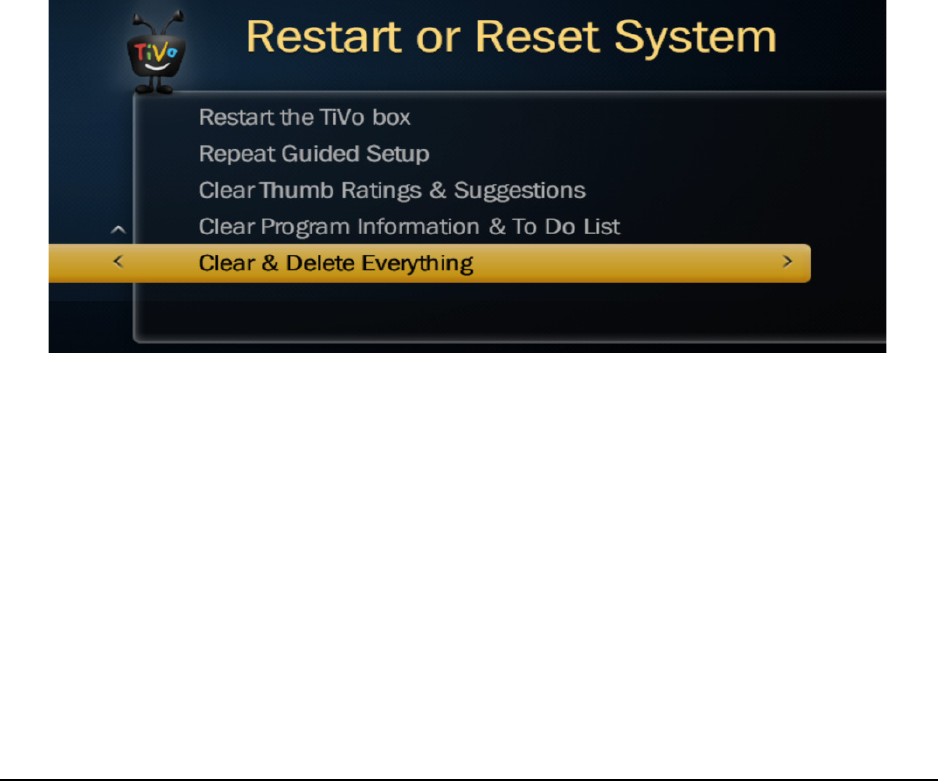
2. From TiVo Central, choose Settings & Messages > Help > Restart or Reset > Restart or
Reset.
Figure 2–2: Clear & Delete Everything option
3. On the Restart or Reset System menu (Figure 2–2), select Clear & Delete Everything.
Note: If the Clear & Delete Everything option is not displayed on the Restart or Reset System
menu, press Clear+Pause+Thumbs Up+Enter on the remote control.
The Clear & Delete screen appears.
Refreshing PGD on a previously-staged device
12 Chapter 2 — Staging TiVo Devices
Figure 2–3: Clear & Delete screen
4. Press Thumbs Down three times (Figure 2–3), and then press Enter.
After the Clear & Delete Everything process completes, the Welcome! Starting up screen
appears.
5. Wait for a few minutes until Auto-Staging automatically starts.
6. Observe the pattern of LEDs on the front panel of the device to ensure that Auto-Staging is
complete.
Refreshing PGD on a previously-staged device
If you need to populate the PGD on the device before the device is installed at a subscriber’s site, you
have two options:
-Power up the device, connect to the network, and then wait for the device to make a TiVo
Service call to download the PGD.
-Power up the device, connect to the network, and then force a TiVo Service call:
From TiVo Central, choose Settings & Messages > Settings > Network > Connect to the
TiVo Service now.
3
TiVo Warehouse Staging Guide for MSOs • TiVo® Proprietary and Confidential 13
Staging TiVo Stream
This chapter describes the warehouse staging procedures and troubleshooting for TiVo Stream. The
following topics are included:
-About TiVo Stream on page 13
-Device specifications on page 14
-Staging TiVo Stream devices on page 16
-Troubleshooting TiVo Stream staging issues on page 17
This chapter assumes that you know how to stage TiVo devices, are familiar with racking procedures,
and have the appropriate power supply for TiVo Stream devices.
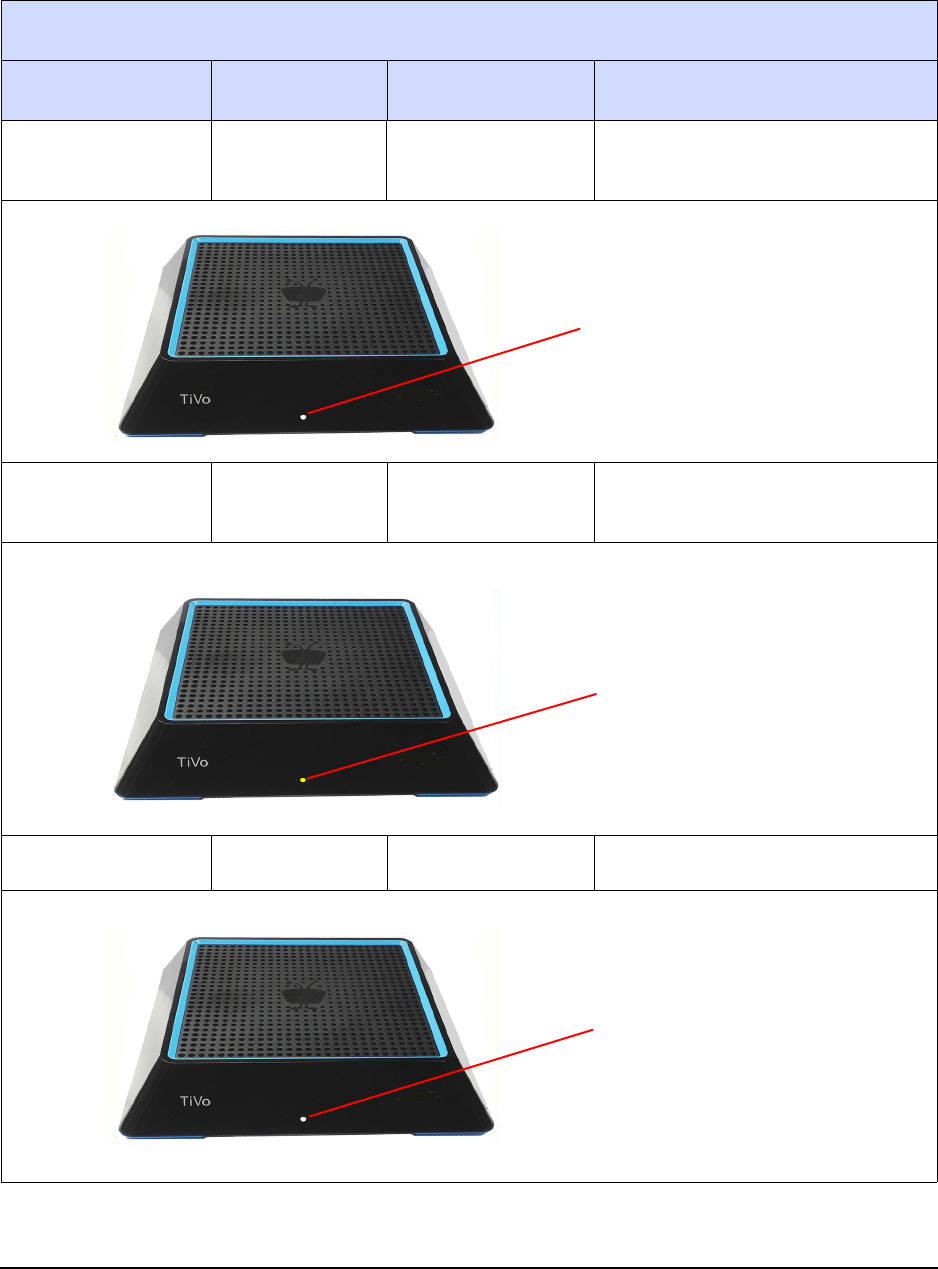
About TiVo Stream
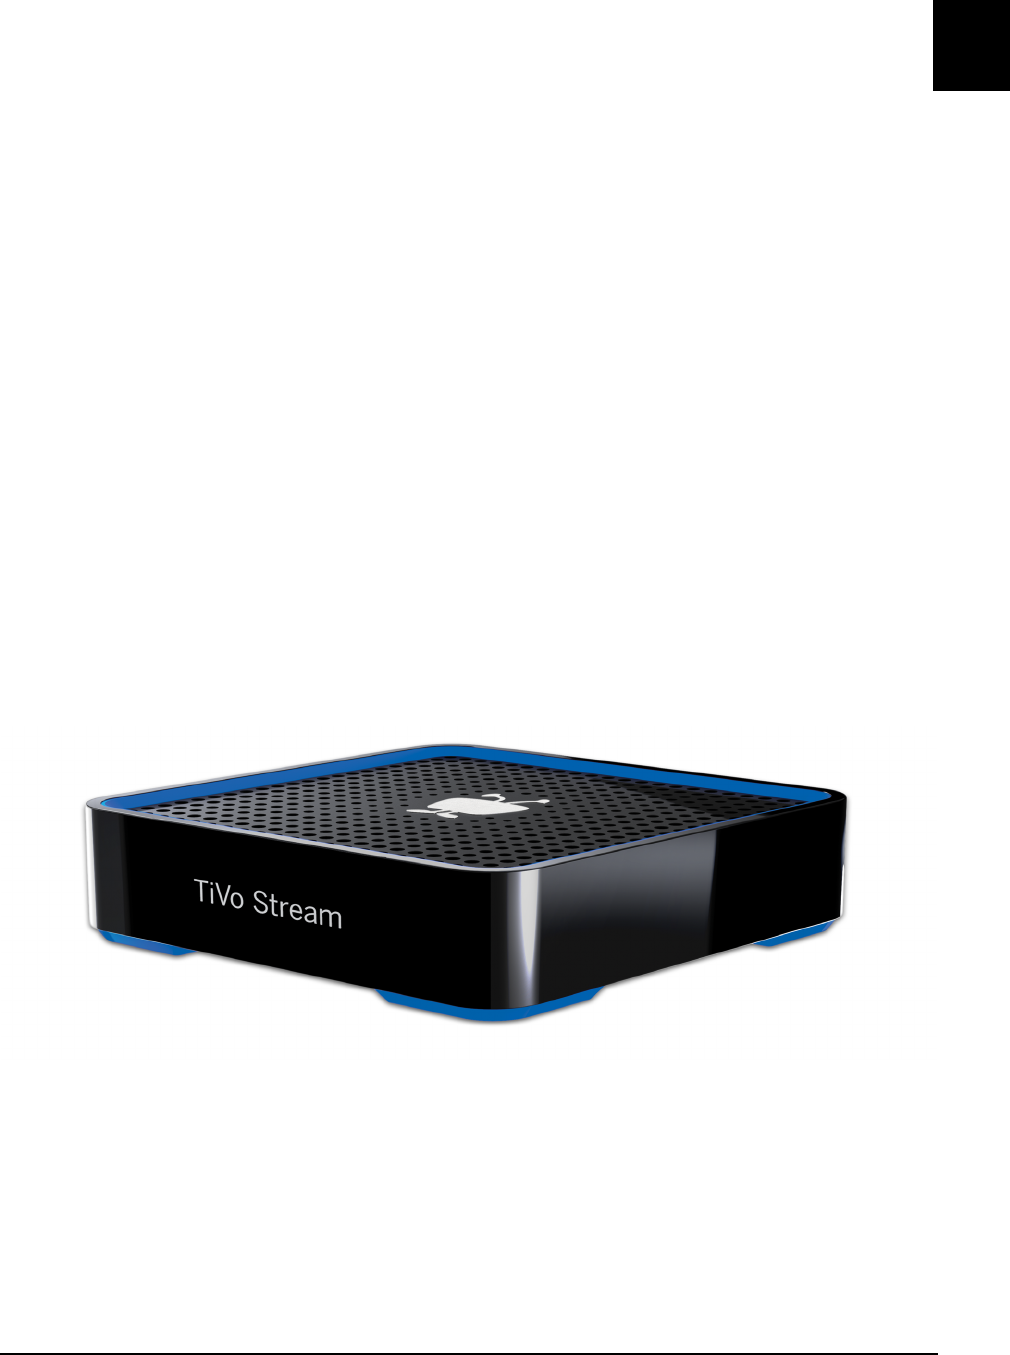
TiVo Stream is a network (Ethernet) attached transcoding device that converts MPEG-2 streams to
MPEG-4 streams, and then it streams the converted video to mobile devices. TiVo Stream allows
subscribers to:
-Stream DVR recordings (including in-progress recordings) to watch on mobile devices
within the home.
-Transfer DVR recordings to take out of the home on mobile devices.
Figure 3–1: TiVo Stream
Device specifications
14 Chapter 3 — Staging TiVo Stream
Compatible host DVRs
TiVo Stream is compatible with the following DVRs running software release 20.2.1 or later:
-TiVo T6
-TiVo Roamio DVR
-TiVo-Pace MG1
-TiVo Premiere Q
Device specifications
TiVo Stream has the following component dimensions and weight:
-Dimensions: 4" W x 4" D x 1.05" H
-Weight: 0.3 lbs.
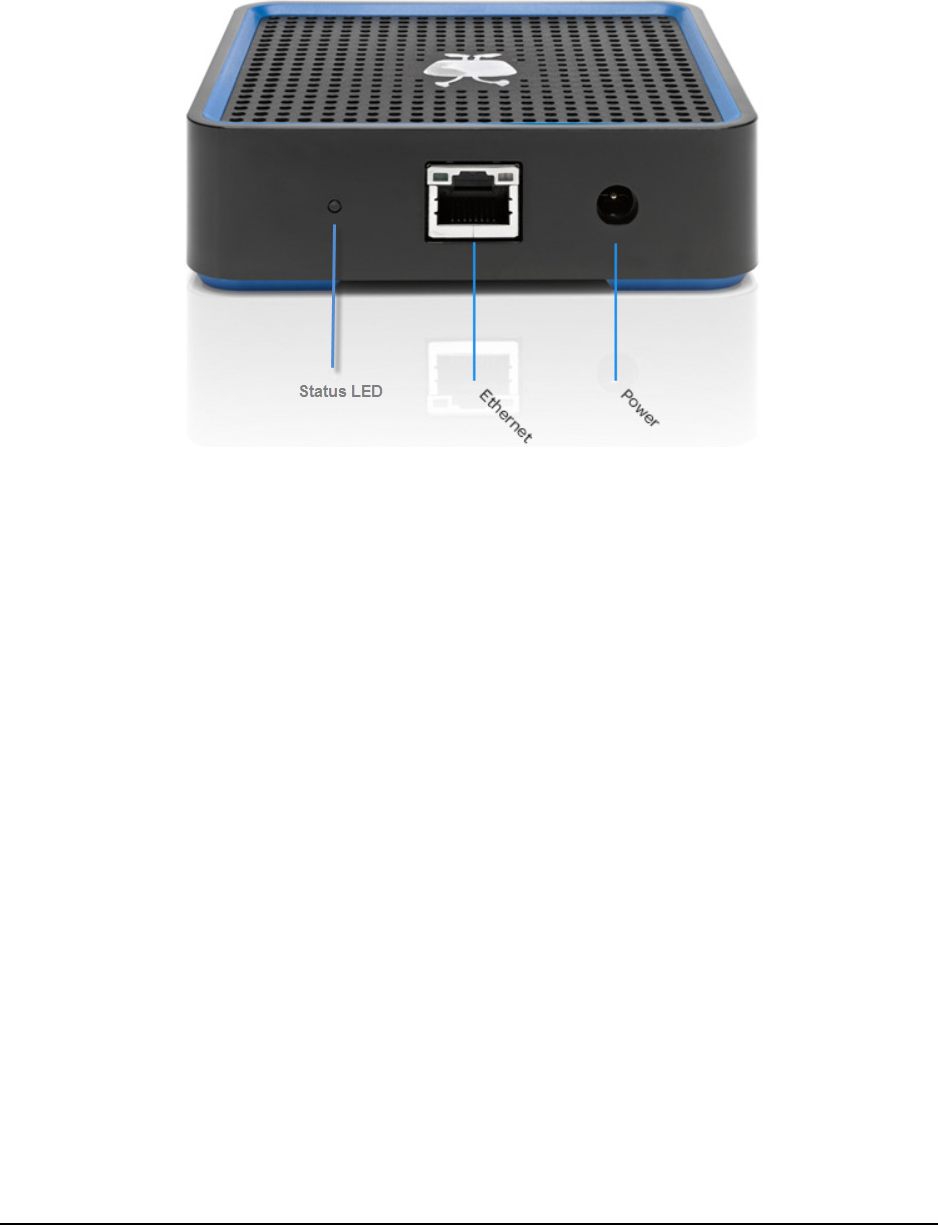
Back panel
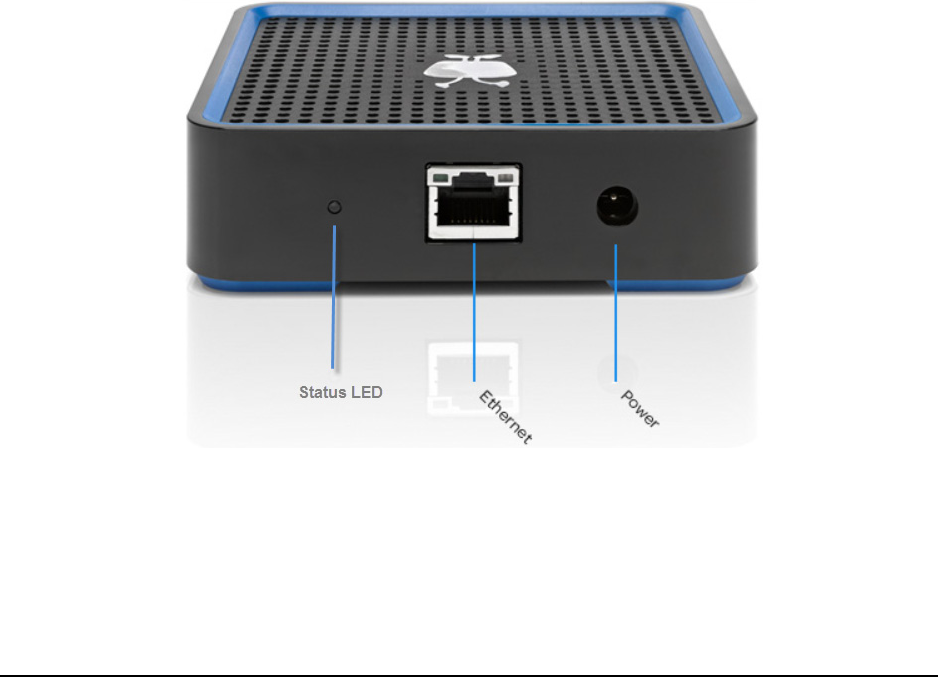
The TiVo Stream back panel includes:
-Power/status (main) LED
-Gigabit Ethernet connector with link activity and link status LEDs
-12V DC power supply
Figure 3–2: TiVo Stream back panel

Device specifications
TiVo Warehouse Staging Guide for MSOs • TiVo® Proprietary and Confidential 15
Ethernet link LEDs
The two LEDs on the Ethernet connection are standard Ethernet link activity and link status LEDs.
Table 3–1 describes the LED states.
Status LED
The third and main LED on the back of TiVo Stream, which can be either amber or white, indicates the
overall status of the device, as described in Table 3–2.
It usually takes three minutes to power up TiVo Stream. It might take longer if a critical software
update is needed, which typically occurs only the first time TiVo Stream is set up. All other software
updates occur late at night when TiVo Stream is idle.
The TiVo Stream status LED goes through the following sequence during a normal power up process:
Solid Amber > Flashing White > Solid White
After TiVo Stream downloads the new software, if the TiVo App is in the TiVo Stream Guided Setup,
TiVo Stream automatically restarts, which takes a few minutes.
Table 3–1: Ethernet link LED states
Ethernet LED LED state Description
Left
(link activity)
•Off
• Flashing green
• No link activity
• Flashing green on packet RX (receive) and TX (transmit)
Right
(link status)
•Off
• Green
•Yellow
•No link
• Megabit half/full duplex
• Gigabit half/full duplex
Table 3–2: States indicated by TiVo Stream status LED
Status LED state Description
Off No power. TiVo Stream is off.
Solid amber TiVo Stream has powered up.
Flashing amber TiVo Stream is applying a firmware update.
Flashing white TiVo Stream is powering up.
Solid white TiVo Stream is up and ready. DHCP lease and the IP address are obtained,
connected, and discoverable.

Staging TiVo Stream devices
16 Chapter 3 — Staging TiVo Stream
The TiVo Stream status LED goes through the following sequence as TiVo Stream powers on and
installs the new software:
Off > Solid Amber > Flashing White > Flashing Amber > Off > Solid Amber >
Flashing White > Solid White
With the additional phases, the time required for initial setup is longer than three minutes.
Staging TiVo Stream devices
1. Verify that each TiVo Stream has gone through a serviceReset API call and is in
service state 22.
Follow the instructions for doing the Service Reset that the MSO has provided.
2. For each TiVo Stream, make the following connections in this order:
a. Connect an Ethernet cable to the Ethernet port on each TiVo Stream.
b. Connect the TiVo-supplied 12V DC power adapter to the 12V DC power receptacle on
each TiVo Stream.
Note: Due to fire hazard, do not use any other type of power adapter as the output amps
vary by device.
c. Allow three minutes for all TiVo Stream devices to completely power up. The status
LED flashes white.
3. After powering on, TiVo Stream devices automatically perform the following tasks:
a. Running Factory Reset.
Each TiVo Stream is checked for the latest version of TiVo client software. If it is not
current, the latest software is installed onto each TiVo Stream.
Whether or not new software is installed, the Factory Reset clears any previous
subscriber data by reimaging the user database partitions. This process takes about 15
minutes, during which TiVo Stream devices might be restarted.
During this step, the status LED displays alternating amber and white.
b. Verifying completion of staging.
After completing these steps, the status LED displays flashing amber, which indicates
that the staging process was successful.
4. Starting with the power adapter, unplug all connections to each TiVo Stream.
Each TiVo Stream is now ready to be installed at a subscriber site.

Troubleshooting TiVo Stream staging issues
TiVo Warehouse Staging Guide for MSOs • TiVo® Proprietary and Confidential 17
TiVo Stream LED staging behavior
During the staging process, the status LED patterns indicate the staging status.
Troubleshooting TiVo Stream staging issues
This section presents the following issues indicated by the LED patterns displayed by the status LED
on the TiVo Stream back panel:
-All LEDs are off on page 17
-Solid amber (for 20 minutes or more) on page 17
-Rapidly flashing amber on page 18
-Flashing amber for brief period on page 18
-Flashing white (for 20 minutes or more) on page 18
All LEDs are off
Indicates a power failure.
Solution
1. Try powering on twice.
2. If the device still fails to power up, request an RMA for TiVo Stream.
Solid amber (for 20 minutes or more)
Indicates a staging failure.
Solution
Restart the staging process.
Table 3–3: TiVo Stream status LED staging behavior
Status LED state Description
Flashing white This status LED pattern persists until a Dynamic Host Configuration Protocol
(DHCP) server is discovered, an IP address is provided, and the TiVo Network
Time Protocol (NTP) server has been contacted.
Solid amber There is an error and staging has failed.
Alternating white and amber Staging is progressing.
Flashing amber Staging is successful.

Troubleshooting TiVo Stream staging issues
18 Chapter 3 — Staging TiVo Stream
Rapidly flashing amber
Disaster detected—thermal shutdown is indicated.
Solution
Immediately unplug TiVo Stream, let it cool down, and then plug it back in.
Flashing amber for brief period
This might indicate that TiVo Stream is performing a subscriber software installation. However, this
can only occur in one of the following cases:
-The device is not in service state 22.
-The device is running TiVo Stream software earlier than v1.1 or 19.1.1
Flashing white (for 20 minutes or more)
There might be an issue with the network connectivity of the staging rack (LAN or WAN).

TiVo Warehouse Staging Guide for MSOs • TiVo® Proprietary and Confidential 19
4
Troubleshooting Auto-Staging
Issues
This chapter describes situations that commonly occur during the Auto-Staging process, and provides
information on resolving the issues.
-Returned TiVo device displays Welcome screen with U.S. and Canada options on page 19
-Returned TiVo device displays TiVo Central screen on page 19
-Front panel LEDs display failure pattern on page 20
-Device fails automatic TiVo Service call on page 20
-After Clear & Delete Everything, Auto-Staging does not start on page 20
Note: The staging mode flag is not cleared until the entire process successfully completes. If the
Auto-Staging process fails at any point, you can power cycle the device to repeat Auto-
Staging.
Returned TiVo device displays Welcome screen with
U.S. and Canada options
If a returned TiVo device going through warehouse staging displays the Welcome screen that presents
options for the United States and Canada, Auto-Staging has failed.
Solution
1. Verify network connectivity.
2. If the network is up and running, ensure that serviceReset and msoServiceId are set
on the device.
3. If the issue persists, follow standard TiVo escalation procedures.
Returned TiVo device displays TiVo Central screen
If a returned TiVo device going through warehouse staging displays the TiVo Central screen, Auto-
Staging has failed.
Solution
1. Verify network connectivity.
2. If the network is up and running, ensure that serviceReset and msoServiceId are set
on the device.
3. If the issue persists, follow standard TiVo escalation procedures.

Front panel LEDs display failure pattern
20 Chapter 4 — Troubleshooting Auto-Staging Issues
Front panel LEDs display failure pattern
During the Auto-Staging process, the TiVo device’s front panel LEDs display the platform-specific
pattern that indicates staging failure.
Solution
1. Verify network connectivity.
2. Connect the TV output to the failed device, and then follow the on-screen instructions.
Device fails automatic TiVo Service call
The device fails the automatic TiVo Service call during the final portion of Auto-Staging (indicated
when TiVo device displays the Welcome screen).
Solution
1. Verify network connectivity.
2. Connect the TV output to the failed device, and then follow the on-screen instructions.
After Clear & Delete Everything, Auto-Staging does not
start
After the Clear & Delete Everything process completes, the TiVo device should start the Auto-
Staging process.
If Auto-Staging does not start, the device automatically goes through a Clear & Delete Everything
process again. This process can take up to a half hour or more, depending on how much recorded
content was on the device.
Solution
As the device goes through the Clear & Delete Everything process, verify the network connection to
help ensure that the next attempt to complete warehouse staging will succeed.
While the Clear & Delete Everything process is running, do the following:
1. Verify the network connection.
2. Verify that each TiVo device has gone through a serviceReset API call and is in service
state 22.
3. Set the msoServiceId, siteID, and tier values by using a deviceInfoStore API call
on the TiVo Service Number (TSN).
4. Wait 1 minute for those pieces of information to fully process in the TiVo system.

After Clear & Delete Everything, Auto-Staging does not start
TiVo Warehouse Staging Guide for MSOs • TiVo® Proprietary and Confidential 21
5. Power cycle the device to initiate staging. Do this either after the Clear & Delete
Everything process has completed, or after 15 minutes has elapsed since completing
Steps 2 and 3.

22 Chapter 4 — Troubleshooting Auto-Staging Issues

TiVo Warehouse Staging Guide for MSOs • TiVo® Proprietary and Confidential 23
A
LED Staging Behavior for TiVo
Devices
The following front panel LED staging behavior applies to all TiVo devices except for TiVo Stream.
1. At the start of the staging process, each platform goes through its flashing pattern. The
TiVo device’s previous contents are removed (for example, all recordings), and the device
is configured for software. When the removal process and software download are
complete, the TiVo device restarts and installs the new software.
2. During the restart and installation process, solid power lights appear as the device is
installing the downloaded software.
3. After the software installation is complete, the device automatically initiates its first call to
the TiVo Service to download its activation information, MSO branding, and headend
information specific to the msoServiceId.
During this first TiVo Service call, the TiVo device LED resumes flashing as it does during
the first step of staging (the removal process and software download stage).
4. After this automatic TiVo Service call, the staging of the device is complete.
The following sections provide a summary of the LED behavior during the staging process for each
device and explains any action you need to take.
-TiVo T6 DVR LED staging behavior on page 24
-TiVo Roamio DVR LED staging behavior on page 25
-TiVo-Pace MG1 DVR LED staging behavior on page 26
-TiVo Premiere Q DVR LED staging behavior on page 29
-TiVo Preview LED staging behavior on page 30
-TiVo-Evolution IP Hybrid set-top box LED staging behavior on page 31
-TiVo Mini LED staging behavior on page 32
-TiVo-Pace Mi3 LED staging behavior on page 33
See Appendix B, Ports and Connections for TiVo Devices for information about the back panels of the
TiVo devices.
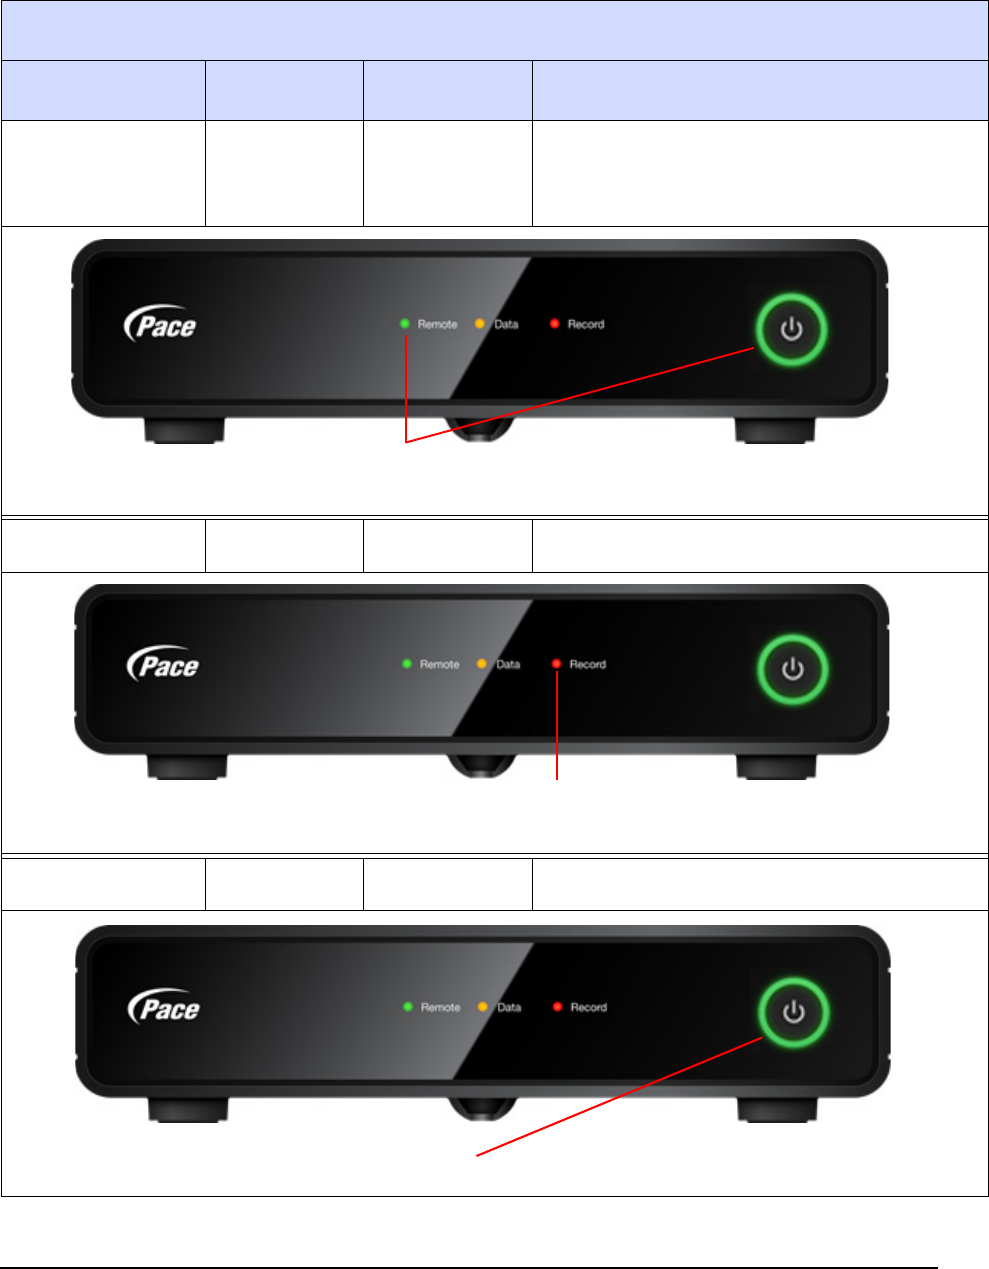
TiVo T6 DVR LED staging behavior
24 Appendix A — LED Staging Behavior for TiVo Devices
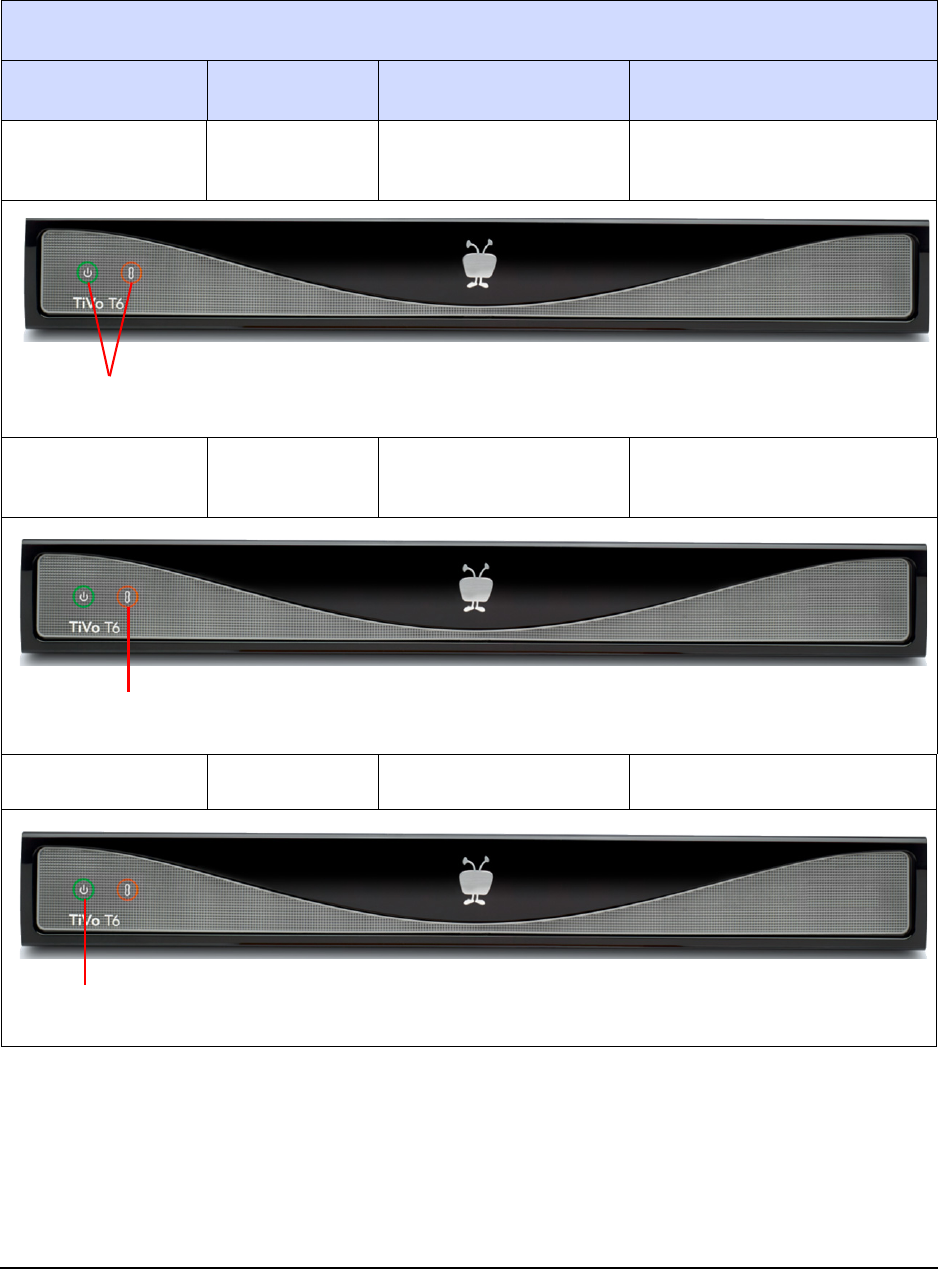
TiVo T6 DVR LED staging behavior
TiVo T6 DVR
Staging state LED lights LED behavior Action required
Staging in process Green & amber Alternating green and
amber
No action required.
Staging error Amber only Flashing Plug in the HDMI cable and
follow the prompts.
Staging complete Green only Flashing No action required.
Flashing green and amber alternately
Flashing amber only
Flashing green only
TiVo Roamio DVR LED staging behavior
TiVo Warehouse Staging Guide for MSOs • TiVo® Proprietary and Confidential 25
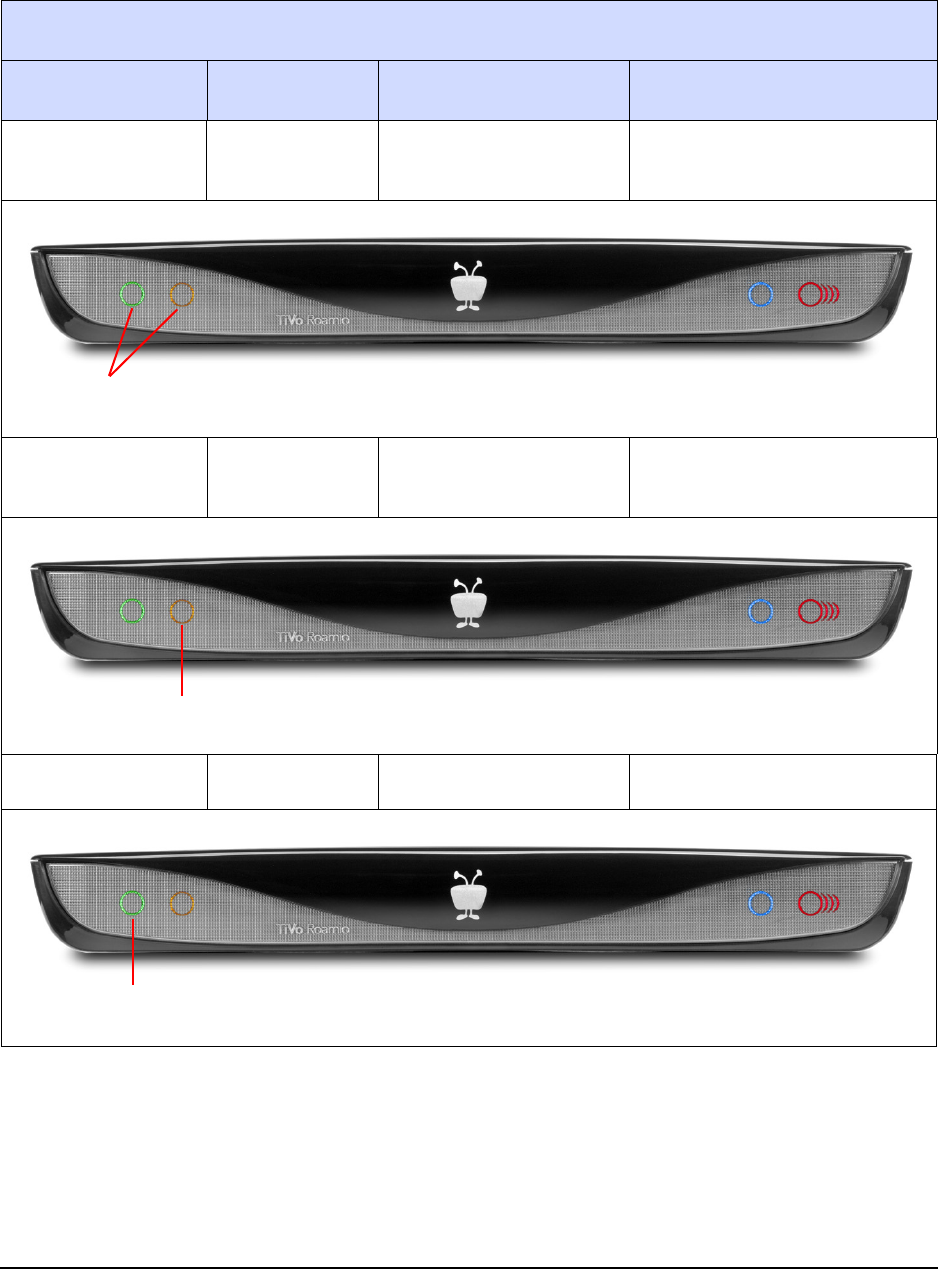
TiVo Roamio DVR LED staging behavior
TiVo Roamio DVR
Staging state LED lights LED behavior Action required
Staging in process Green & amber Alternating green and
amber
No action required.
Staging error Amber only Flashing Plug in the HDMI cable and
follow the prompts.
Staging complete Green only Flashing No action required.
Flashing green and amber alternately
Flashing amber only
Flashing green only
TiVo-Pace MG1 DVR LED staging behavior
26 Appendix A — LED Staging Behavior for TiVo Devices
TiVo-Pace MG1 DVR LED staging behavior
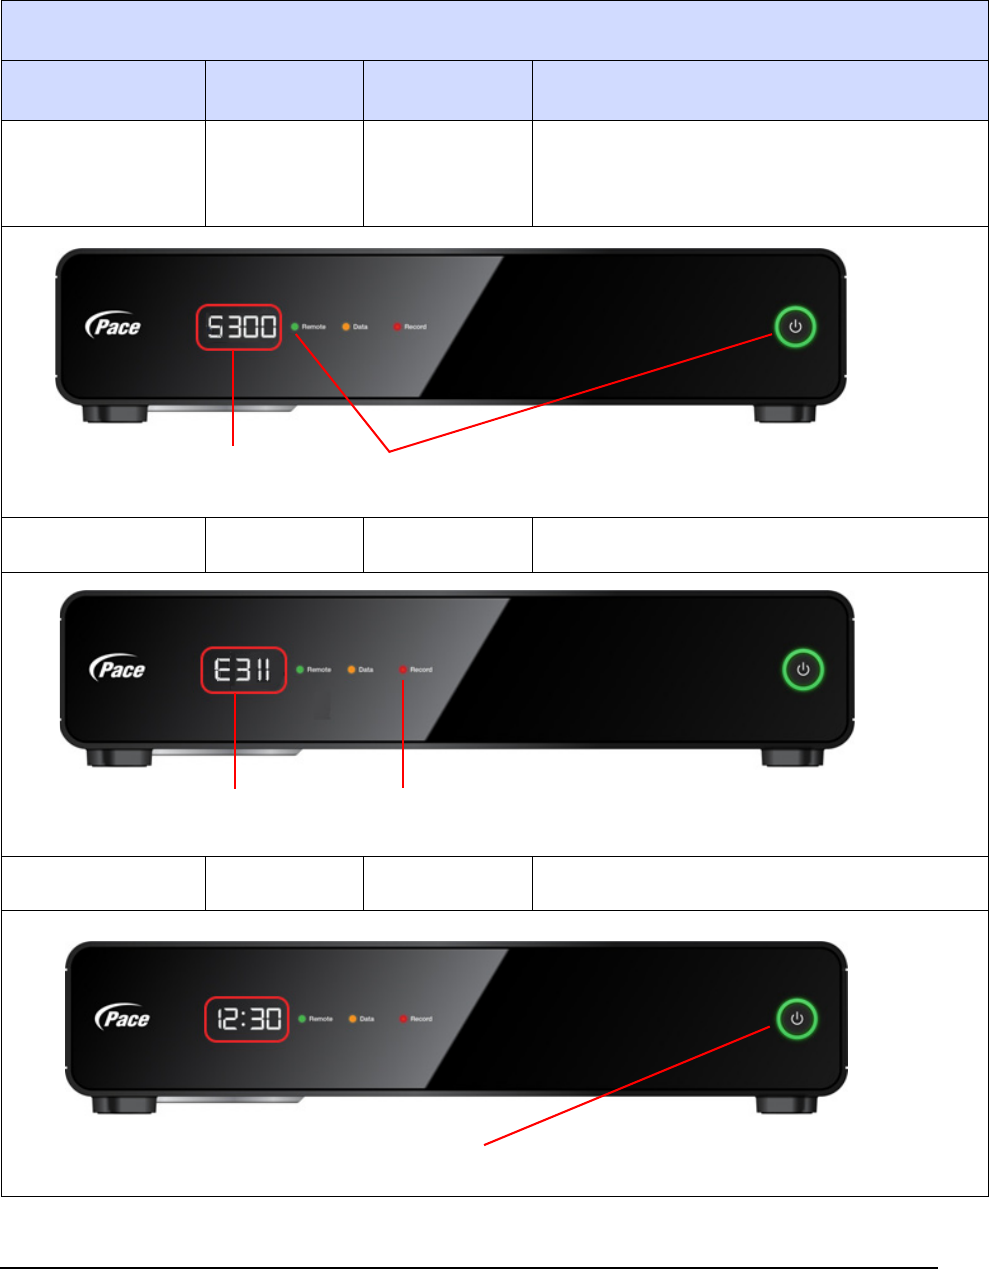
TiVo-Pace MG1 DVR
Staging state LED lights LED behavior Action required
Staging in
process
Green Alternating
green
No action required. During the staging process, the
Power LED flashes green and the remote LED
flashes green.
Staging error Red only Flashing Plug in the HDMI cable and follow the prompts.
Staging complete Green only Flashing No action required.
Flashing alternately
S300 state code indicates that
staging is in progress.
Flashing red only
E311 error code indicates a
failure while downloading software.
Flashing green only
Current time displays when
staging is complete.

TiVo-Pace MG1 DVR LED staging behavior
TiVo Warehouse Staging Guide for MSOs • TiVo® Proprietary and Confidential 27
TiVo-Pace MG1 DVR seven-segment status and error display
During normal operation, the seven-segment display on the front panel of the TiVo MG1 DVR
displays the current time. During staging, however, the seven-segment display provides status and
error codes.
The clock can be enabled or disabled. From TiVo Central, choose Settings > Displays > Lights on
the Front of the DVR. The clock display is independent and separate from the LED lights selection.
During Auto-Staging, the seven-segment LED displays the following:
-An SXXX code indicates the current state.
-An EXXX code indicates an error.
For example, if the device was previously in S320 (MFS reimaging) and an incorrect hash was
detected on the downloaded file, the error code would be E322.
TiVo-Pace MG1 DVR Auto-Staging states
-S300—Auto-Staging started
Displayed until factoryResetInstructions is received.
-S310—Software/kernel installation
-S320—MFS reimaging
-S400—Retrieving unguidedSetupInstructions
TiVo-Pace MG1 DVR staging error codes
-EXX1—Download error
-EXX2—Bad hash detected
-EXX3—Unspecified error during hash checking
-EXX4—Boot parameter error
-EXX8—Unspecified error while closing the file pipeline
-EXX9—Unspecified error.
Auto-Staging is terminating and the device is placed in a bricked state. Power cycle the
TiVo-Pace MG1 DVR (see Table A–1).

TiVo-Pace MG1 DVR LED staging behavior
28 Appendix A — LED Staging Behavior for TiVo Devices
TiVo-Pace MG1 DVR staging errors
Table A–1: TiVo-Pace MG1 DVR staging errors
State Error Description
S300 Auto-Staging has started. This status is displayed until the device has received
factoryResetInstructions.
E309 An unspecified error occurred while retrieving the Auto-Staging instructions from the
service. Auto-Staging is terminated, and the device continues to start normally.
S310 Software/kernel install
E311 Failure occurred while downloading the software.
E312 The software and/or kernel images that were downloaded did not have the correct
hash.
E313 An unspecified software error occurred while checking the hash of the software or
kernel images.
E314 An error in setting the boot parameters occurred after downloading the software and
kernel images.
E318 An unspecified file pipeline error occurred while downloading the software and/or
kernel images.
E319 An unspecified error occurred while downloading or installing the software and/or
kernel images. The DVR is currently in a bricked state.
S320 MFS reimaging
E321 Failure occurred while downloading the software.
E322 The MFS images downloaded did not have the correct hash.
E323 An unspecified software error occurred while checking the hash of the MFS images.
E328 An unspecified file pipeline error occurred while downloading the MFS images.
E329 An unspecified error occurred while downloading or installing the software and/or
kernel. The DVR is currently in a bricked state.
S400 Downloading Unguided Setup Instruction
No errors are reported on the display. If there is an issue, the device continues to
start normally.
TiVo Premiere Q DVR LED staging behavior
TiVo Warehouse Staging Guide for MSOs • TiVo® Proprietary and Confidential 29
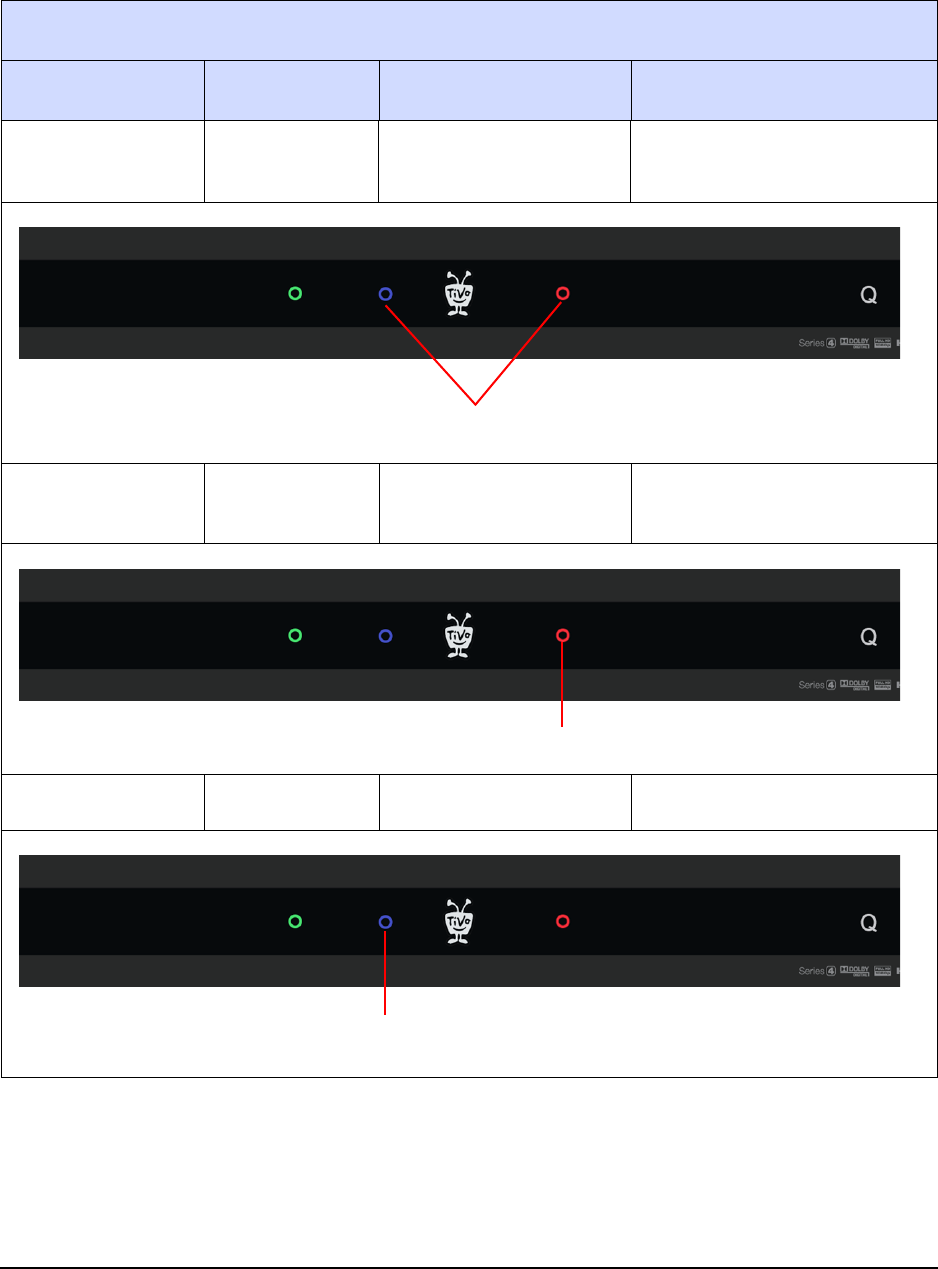
TiVo Premiere Q DVR LED staging behavior
TiVo Premiere Q DVR
Staging state LED lights LED behavior Action required
Staging in
process
Blue & red Alternating blue and red No action required.
Staging error Red only Flashing Plug in the HDMI cable and
follow the prompts.
Staging complete Blue only Flashing No action required.
Flashing alternately
Flashing red only
Flashing blue only
TiVo Preview LED staging behavior
30 Appendix A — LED Staging Behavior for TiVo Devices
TiVo Preview LED staging behavior
TiVo Preview
Staging state LED lights LED behavior Action required
Staging in process Status LED Alternating yellow and
green
No action required.
Staging error Status LED Flashing yellow Plug in the HDMI cable and
follow the prompts.
Staging complete Status LED Flashing green No action required.
Flashing alternately
Flashing yellow only
Flashing green only
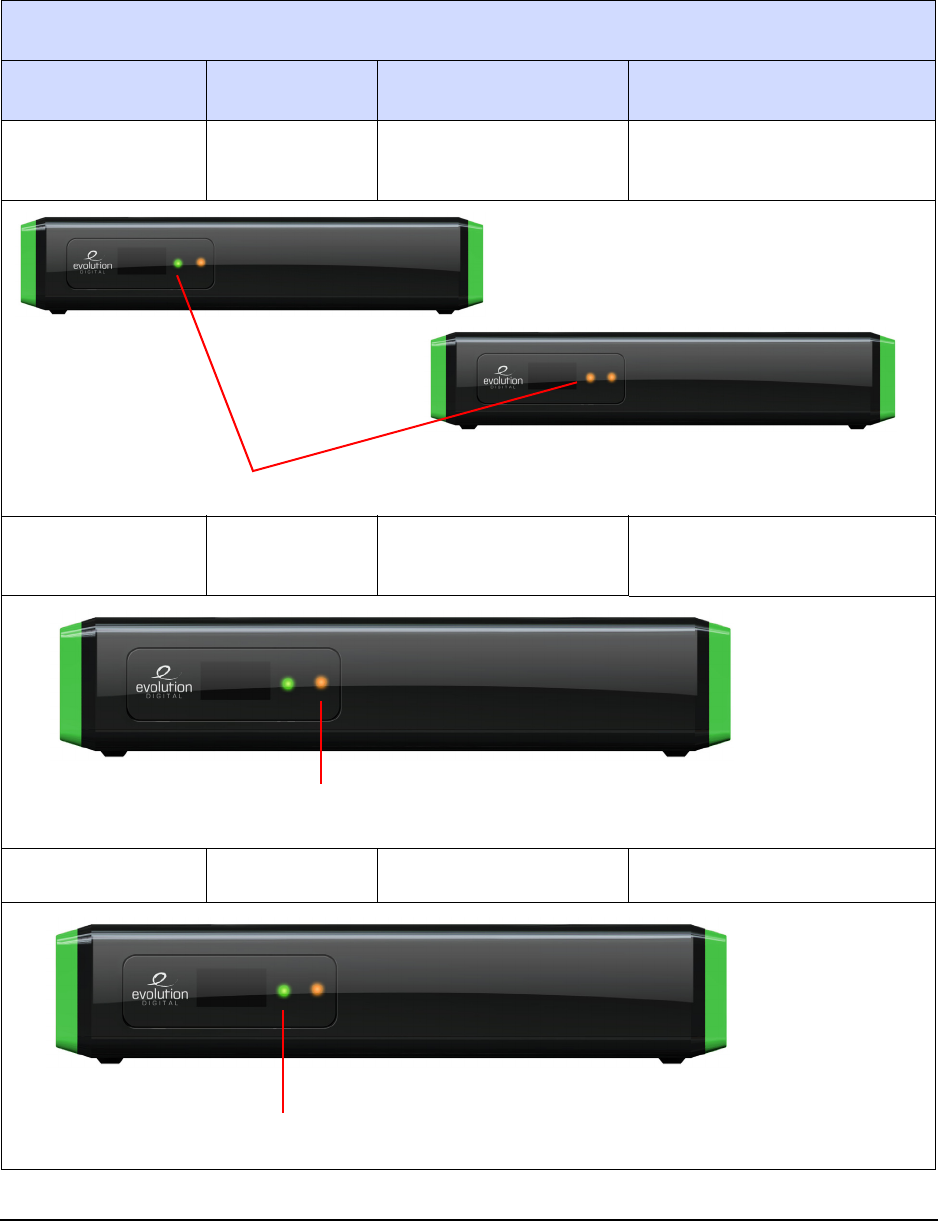
TiVo-Evolution IP Hybrid set-top box LED staging behavior
TiVo Warehouse Staging Guide for MSOs • TiVo® Proprietary and Confidential 31
TiVo-Evolution IP Hybrid set-top box LED staging
behavior
TiVo Preview
Staging state LED lights LED behavior Action required
Staging in process Status LED Alternating green and
amber
No action required.
Staging error Status LED Flashing amber Plug in the HDMI cable and
follow the prompts.
Staging complete Status LED Flashing green No action required.
Flashing alternately
Flashing amber only
Flashing green only
TiVo Mini LED staging behavior
32 Appendix A — LED Staging Behavior for TiVo Devices
TiVo Mini LED staging behavior
TiVo Mini
Staging state LED lights LED behavior Action required
Staging in process Status LED Alternating amber
and white
No action required.
Staging error Status LED Flashing amber Plug in the HDMI cable and
follow the prompts.
Staging complete Status LED Flashing white No action required.
Flashing alternately
amber and white
Flashing amber
Flashing white
TiVo-Pace Mi3 LED staging behavior
TiVo Warehouse Staging Guide for MSOs • TiVo® Proprietary and Confidential 33
TiVo-Pace Mi3 LED staging behavior
TiVo-Pace Mi3
Staging state LED lights LED behavior Action required
Staging in
process
Green Alternating
green
No action required. During the staging process, the
Power LED flashes green and the remote LED
flashes green.
Staging error Red only Flashing Plug in the HDMI cable and follow the prompts.
Staging complete Green only Flashing No action required.
Flashing alternately
Flashing red only
Flashing green only

34 Appendix A — LED Staging Behavior for TiVo Devices

TiVo Warehouse Staging Guide for MSOs • TiVo® Proprietary and Confidential 35
Ports and Connections for TiVo
Devices
This appendix shows the ports and connections on the back panels of the TiVo devices that you might
be installing at a subscriber’s site.
-TiVo T6 DVR back panel on page 36
-TiVo Roamio DVR back panel on page 37
-TiVo-Pace MG1 DVR back panel on page 38
-TiVo Premiere Q DVR back panel on page 39
-TiVo Preview back panel on page 40
-TiVo-Evolution IP Hybrid set-top box back panel on page 41
-TiVo Mini back panel on page 42
-TiVo-Pace Mi3 back panel on page 43
-TiVo Stream back panel on page 44
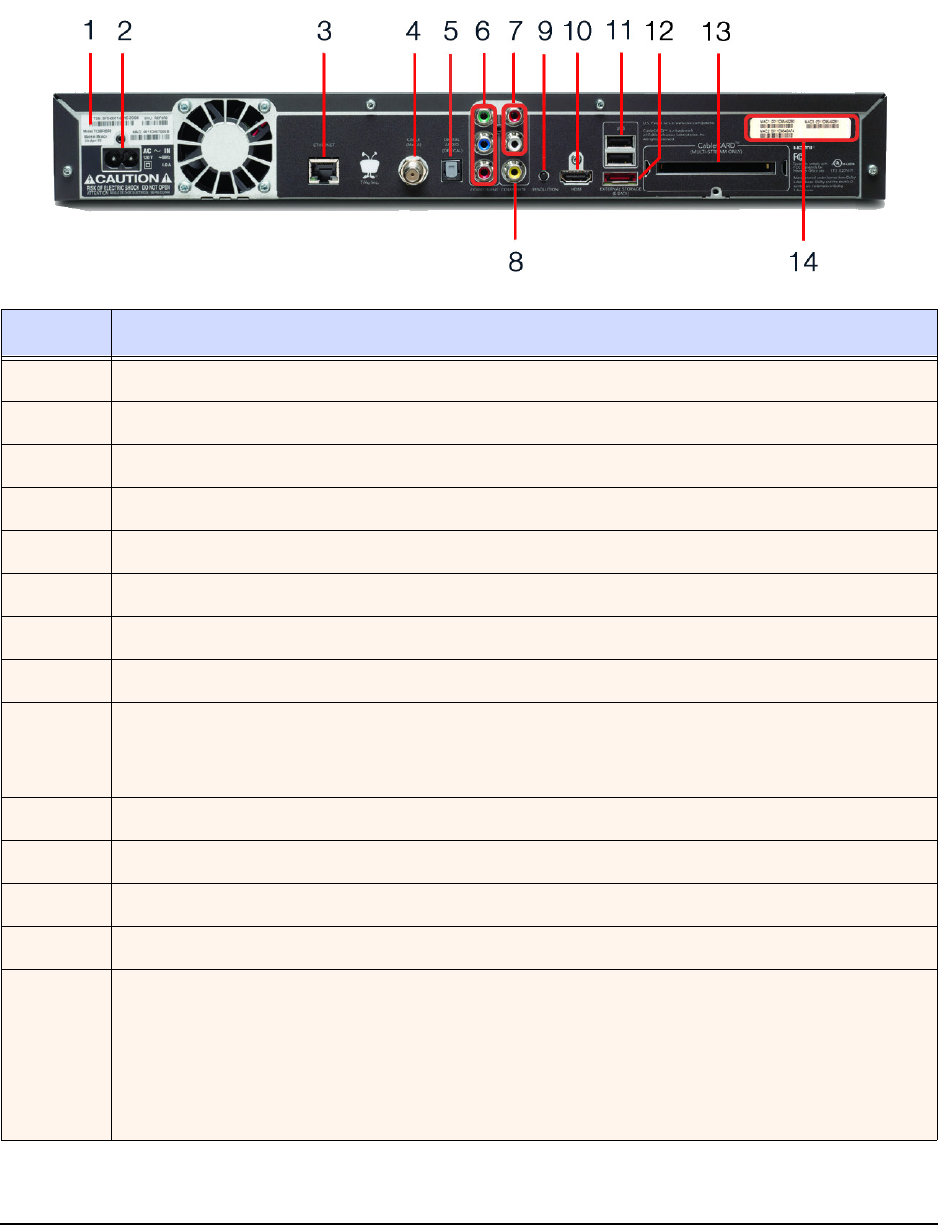
TiVo T6 DVR back panel
36 Appendix B — Ports and Connections for TiVo Devices
TiVo T6 DVR back panel
This section details the location of the items on the back panel of the TiVo T6 DVR.
Number Item
1TiVo Service Number (TSN)
2Power connector: 110V AC
3Ethernet 10/100/1000 Base-T
4Digital Cable/MoCA coaxial input (QAM) jack
5Optical digital audio output
6Component RCA output (green)
7Analog audio output (red, white)
8Composite A/V output (yellow)
9Resolution button—If the screen is black and the TiVo menus are inaccessible, press the button to
change the video output format. The available formats are: 480i / 480p / 720p / 1080i / 1080p /
1080p24 / 1080p60 passthrough.
10 HDMI 1.4b output
11 USB 2.0 (two ports)
12 eSATA port for the DVR expander
13 CableCARD (M-Card) slot
14 MAC Address Label, containing:
• Ethernet/MoCA interface
• Built-in transcoder (TiVo Stream)
Note: If the subscriber’s router is using MAC address filtering, the MSO must add both TiVo
T6 DVR MAC addresses to the MAC address filter to control access.
TiVo Roamio DVR back panel
TiVo Warehouse Staging Guide for MSOs • TiVo® Proprietary and Confidential 37
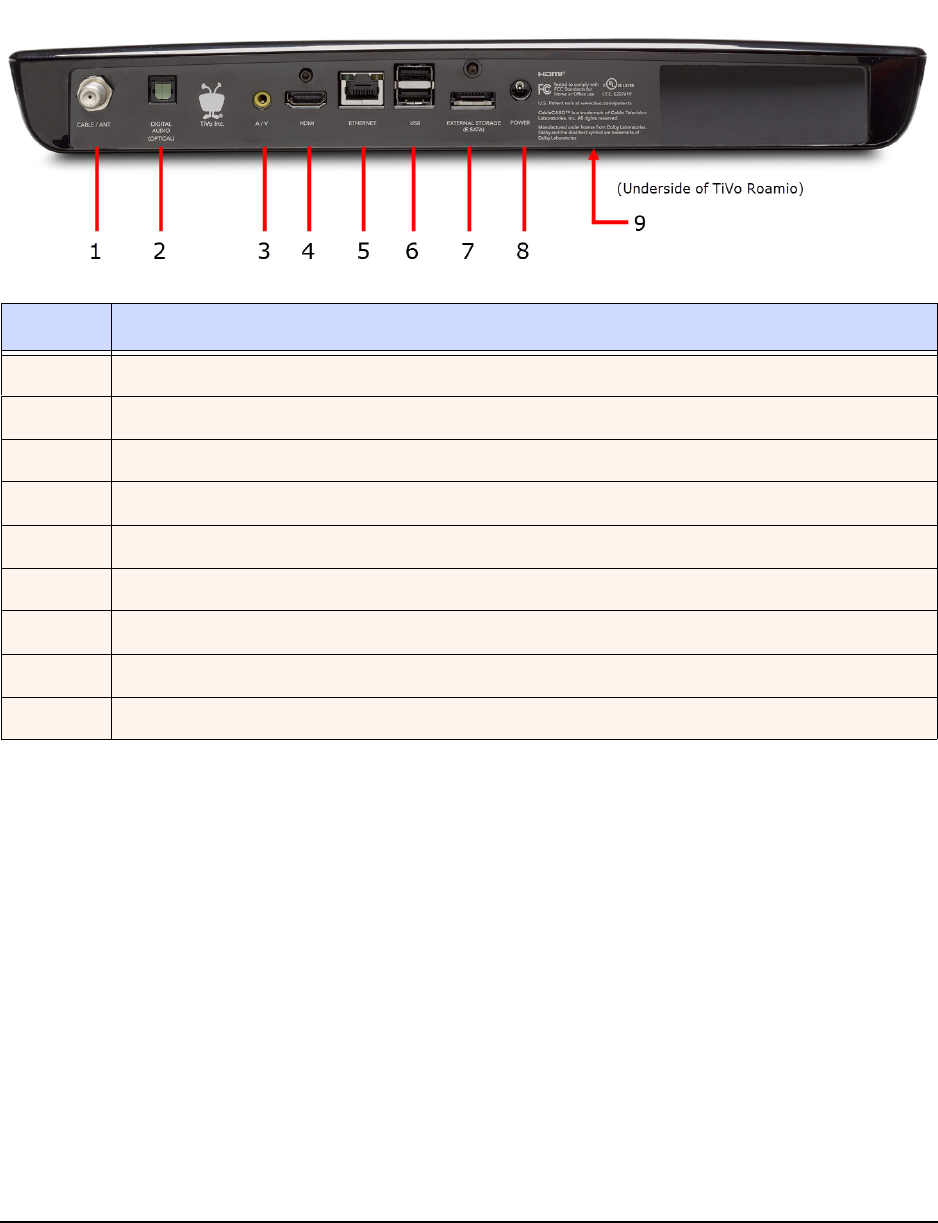
TiVo Roamio DVR back panel
This section details the location of the items on the back panel of the TiVo Roamio DVR.
Number Item
1Cable/antenna coaxial input
2Optical digital audio output
3Composite A/V output (yellow)
4HDMI 1.4b output
5Ethernet 10/100 Mbps
6USB 2.0 (two ports)
7eSATA port for the DVR expander
8Power connector: 12V DC
9CableCARD (M-Card) slot
TiVo-Pace MG1 DVR back panel
38 Appendix B — Ports and Connections for TiVo Devices
TiVo-Pace MG1 DVR back panel
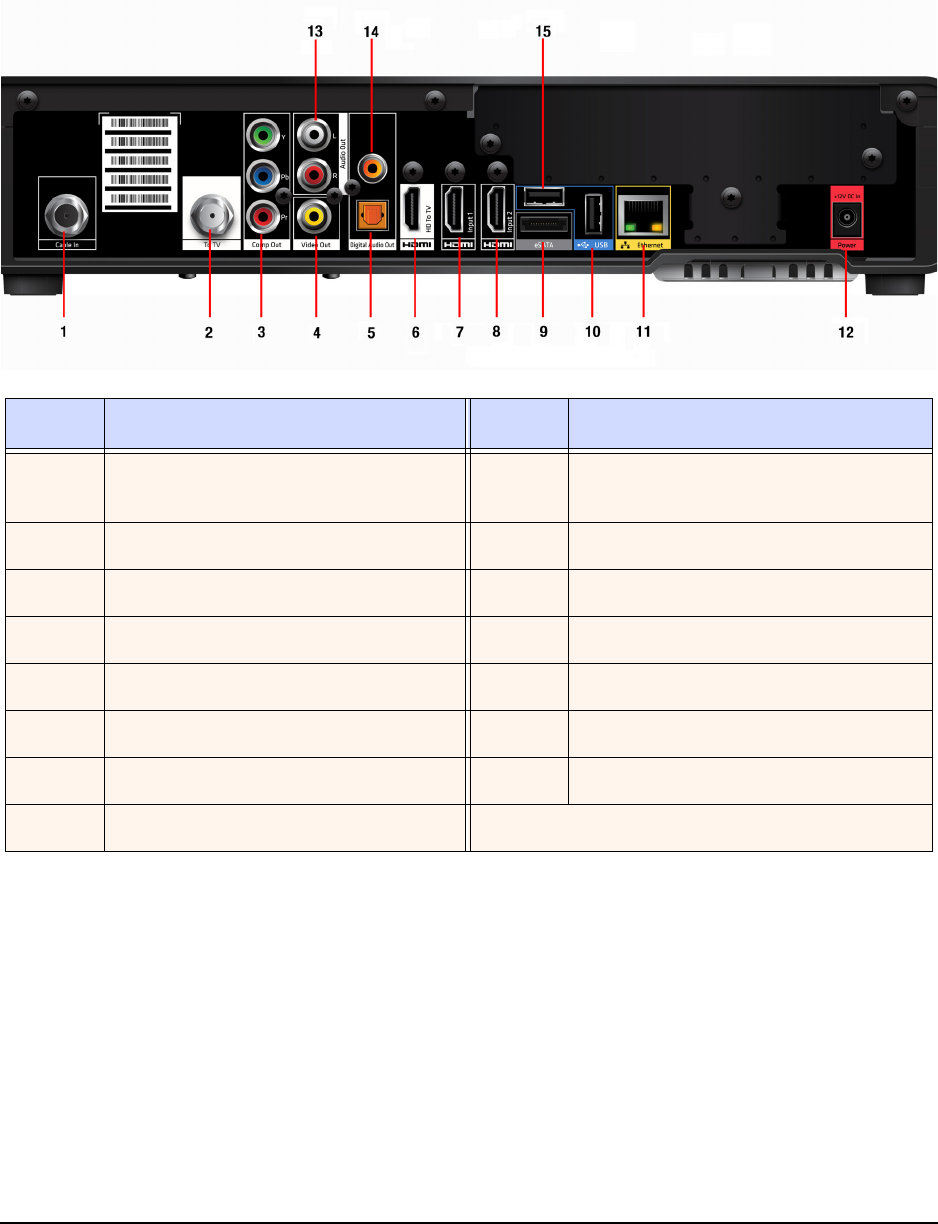
This section details the location of the items on the back panel of the TiVo-Pace MG1 DVR.
Number Item Number Item
1Digital Cable/MoCA coaxial input (QAM)
jack
9eSATA port (external HDD support)
2To TV 10 USB 2.0 port
3Component RCA output (green) 11 10/100 Ethernet
4Composite A/V output (yellow) 12 Power connector: 12V DC input
5Optical digital audio output 13 Analog audio output (red, white)
6HDMI 1.4: HD To TV 14 Coaxial Digital audio output
7HDMI 1.4: input 1 (not enabled) 15 USB 2.0 port
8HDMI 1.4: input 2 (not enabled)
TiVo Premiere Q DVR back panel
TiVo Warehouse Staging Guide for MSOs • TiVo® Proprietary and Confidential 39
TiVo Premiere Q DVR back panel
This section details the location of the items on the back panel of the TiVo Premiere Q DVR.
Number Item Number Item
1Power connector: 110V AC 6Optical digital audio output
2CableCARD (M-Card) slot 7HDMI port
3External storage (eSATA) 810/100/1000 Mbps Ethernet
4Component RCA output (green) 9USB 2.0 (two ports)
5Composite A/V output (yellow) 10 Digital Cable/MoCA coaxial input (QAM)
jack
TiVo Preview back panel
40 Appendix B — Ports and Connections for TiVo Devices
TiVo Preview back panel
This section details the location of the items on the back panel of TiVo Preview.
.2
1
Number Item Details
1USB Two external USB 2.0 ports for TiVo wireless network and Bluetooth
adapters.
2HDMI port Connects to a TV, A/V receiver, or home theater system. HDMI
provides a pure digital connection for HD video and digital audio in
one cable.
3Composite ports Analog audio output (red, white).
4Composite A/V output (yellow).
5Resolution button If the screen is black and the TiVo menus are inaccessible, press
the button to change the video output format. The available formats
are: 480i / 480p / 720p / 1080i / 1080p.
6Power connector (12V DC) Connects to A/C power.
7Ethernet 10/100 Base-T
jack
Connects TiVo Preview to your home network by using an Ethernet
cable.
8Component ports Component (RGB) video output.
9CableCARD (M-Card) slot Supports a single M-Card CableCARD; S-Cards are not supported.
10 Digital Cable/MoCA coaxial
input (QAM) jack
In a MoCA home network, connects TiVo Preview to your home
network. Connect the coaxial RF cable coming from the wall to this
jack.
TiVo-Evolution IP Hybrid set-top box back panel
TiVo Warehouse Staging Guide for MSOs • TiVo® Proprietary and Confidential 41
TiVo-Evolution IP Hybrid set-top box back panel
This section details the location of the items on the back panel of the TiVo-Evolution IP Hybrid set-top
box.
.2
1
Number Item
1Digital Cable/MoCA coaxial input (QAM) jack
2Composite A/V output (yellow)
3Analog audio output (white)
4Analog audio output (red)
5S/PDIF optical digital audio output
6USB 2.0 port
7HDMI 1.4a output
8Ethernet 10/100 Mbps
9Power connector: 5V DC input
TiVo Mini back panel
42 Appendix B — Ports and Connections for TiVo Devices
TiVo Mini back panel
This section details the location of the items on the back panel of TiVo Mini.
2
1
Number Item Details
1MoCA coaxial input jack In a MoCA home network, connects TiVo Mini to your home
network. Connect the coaxial cable coming from the wall to
this jack.
2Component RCA output (green) Connects to a TV or A/V system. Component video provides
a high-definition (HD) picture using a component video
cable.
3Composite A/V output (yellow) Connects to a TV or A/V system. Composite video provides
very good standard-definition (SD) picture quality. It does
not provide HD video.
4HDMI port Connects to a TV, A/V receiver, or home theater. The HDMI
port provides a pure digital connection for HD video and
digital audio all in one cable.
5Ethernet jack Connects a TiVo Mini to your home network using an
Ethernet cable.
6USB Reserved for future use.
7Power connector (12V DC) Connects to A/C power.
123 4 5 67
TiVo-Pace Mi3 back panel
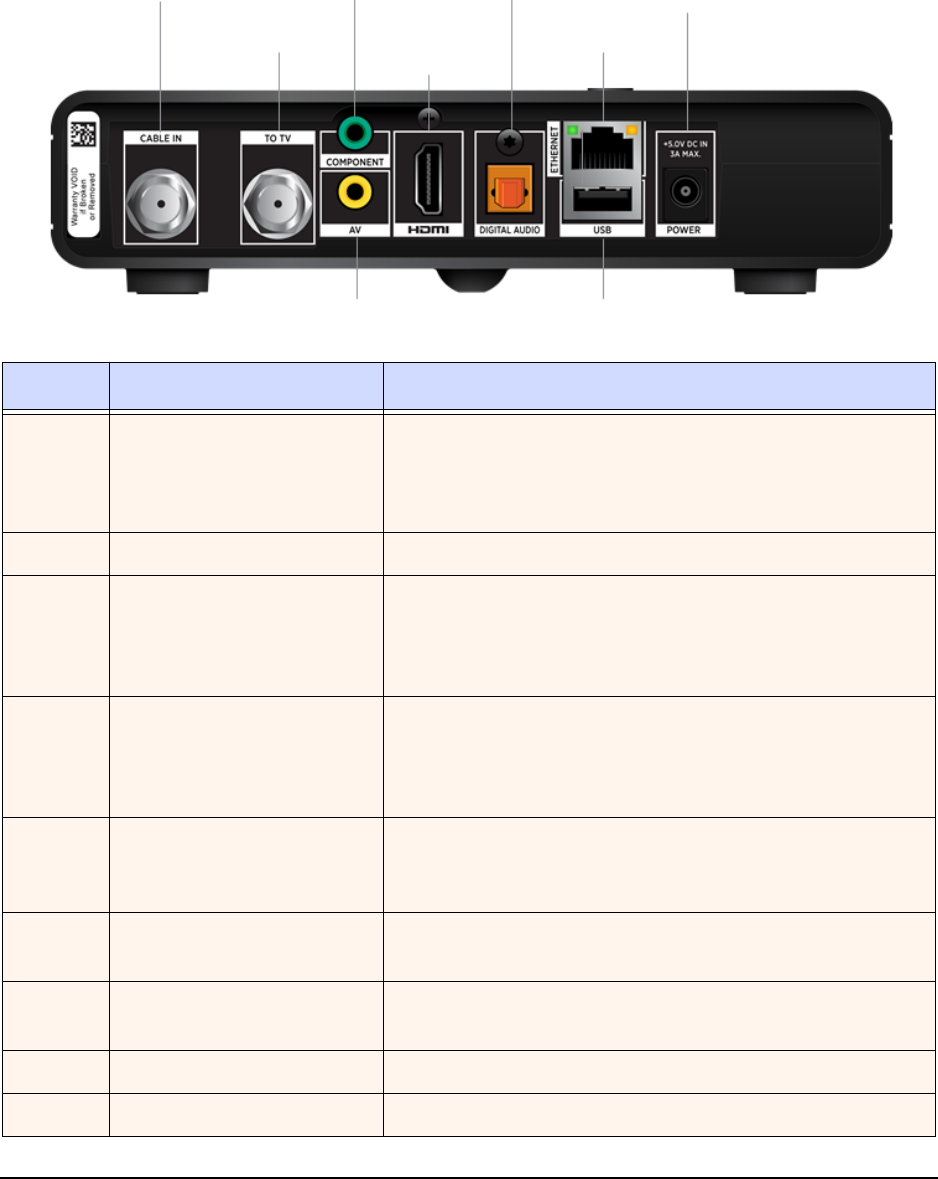
TiVo Warehouse Staging Guide for MSOs • TiVo® Proprietary and Confidential 43
TiVo-Pace Mi3 back panel
This section details the location of the items on the back panel of TiVo-Pace Mi3.
2
1
Number Item Details
1Coaxial input jack The Cable In connector is designed to connect the TiVo-Pace Mi3
to your cable network. Connect the coaxial cable coming from
the wall to this jack. You must not connect any other equipment,
such as a VCR, to this input.
2To TV Coaxial RF cable output to TV.
3Component RCA output
(green)
Connects to a TV or A/V system. Component video provides a
high-definition (HD) picture using a component video cable. If
your HDTV does not have an HDMI connector, but has component
video (YPbPr) inputs, connect your HDTV here.
4Composite A/V output (yellow) Connects to a TV or A/V system. Composite video provides very
good standard-definition (SD) picture quality. It does not provide
HD video. Connect to the composite video and analog audio
inputs on your SDTV.
5HDMI port Connects to a TV, A/V receiver, or home theater. The HDMI port
provides a pure digital connection for HD video and digital audio
all in one cable. Connect to the HDMI input on your TV.
6Optical digital audio output S/PDIF output. Connect to the optical digital audio equipment,
such as an audio decoder or home theater receiver.
7Ethernet jack Connects a TiVo Mini to your home network using an Ethernet
cable.
8USB Reserved for future use.
9Power connector (5V DC) Connects to A/C power.
1
2
3
4
5
6
7
8
9
TiVo Stream back panel
44 Appendix B — Ports and Connections for TiVo Devices
TiVo Stream back panel
This section details the location of the items on the back panel of TiVo Stream.
The TiVo Stream back panel includes:
-Power/status (main) LED
-Gigabit Ethernet connector with link activity and link status LEDs
-12V DC power supply
