Warmup Trade Brochure
User Manual: Warmup-Trade-Brochure of /wp-content/uploads
Open the PDF directly: View PDF ![]() .
.
Page Count: 100

The world’s best-selling floor heating brand™
Electric and hydronic heating portfolio
4iE SMART WIFI
THERMOSTAT
For central and underoor heating
The right temperature. The best tari.
Eortlessly.
*Visit www.warmup.co.uk for more details
3 YEAR
LIMITED
WARRANTY
3 YEAR
LIMITED
WARRANTY
*

Table of Contents
Warmup Electric Floor and Wall Heating Page
System Summary Guide 3
Warmup’s Unique Product Advantage and the Best Warranties,
Installation Guarantee and Accreditations 4 -5
About Warmup and our Services 6 - 7
World Leading Research and Development 8
Benets of Underoor Heating 9
Warmup Cement Coated Tough Insulation Boards 10 - 13
Heating Systems 14 - 29
Warmup Insulated Underlay/Dual Overlay 30 - 33
Warmup Electric In-Wall Heating Panel 34 - 35
4 Easy Steps to Calculate your Underoor Heating Requirements 53
Thermostats Page
Warmup 4iE Smart WiFi Thermostat 36 - 39
Warmup 3iE Energy-Monitor Thermostat 40 - 43
Warmup Tempo Digital Programmable Thermostat 44 - 45
Accessories Page
Warmup Mirror Demisters 46 - 47
Warmup Electric Towel Rails 48 - 49
Outdoor Heating Solutions Page
Snow Melting Cables 50
Self-Regulating Cable 51
Patio Heaters 52
Warmup Hydronic Underoor Heating Page
Warmup Hydronic Underoor Heating Systems - Introduction 54 - 55
Warmup HydroPack Installation Kit 56 - 59
Hydronic Systems - Screed and Concrete Floors 60 - 69
Hydronic Systems - Timber, Suspended and Batten Floors 70 - 77
Hydronic Systems - Total-16 Low Prole System 78 - 79
Warmup Dual Overlay Concrete 80 - 81
Thermostats and Controls 82 - 84
Warmup HydroPack, Thermostats and Controls 85 - 90
Fixings and Ancillary Products 90 - 94
Manifolds, Ancillaries and Fittings 95
Pipes 96
Projects Department: A Dedicated Service 97 - 99
2Call us now 0845 345 2288 or visit www.warmup.co.uk
Exceptional Manufacturer of the Year
London Passport to Export Awards
FS 586320
2Call us now 0845 345 2288 or visit www.warmup.co.uk

Loose
Wire
Sticky
Mat
150
Watt
Sticky
Mat
200
Watt
Inscreed
Cable
Foil
Heater
Warmup
Hydronic
Products
Page
Number 14 18 18 22 26 54
Tile & Stone
Hardwood
Laminate
Carpet
Vinyl
FLOORING TYPE
Warmup Electric Products
System Summary Guide
Whatever the oor nish or suboor construction, Warmup has
the right underoor heating solution to match your specic needs.
Use the table below to nd out which products best suit your oor
type. Contact us on 0845 345 2288 should you require further
information.
3
Call us on 0845 345 2288
to discover how we can help or
chat with us online at
www.warmup.co.uk
Warmup is fully tested and compatible
for use with wood oors and vinyl
including leading brands like:
The world’s best-selling oor heating brand 3
The world’s best-selling oor heating brand

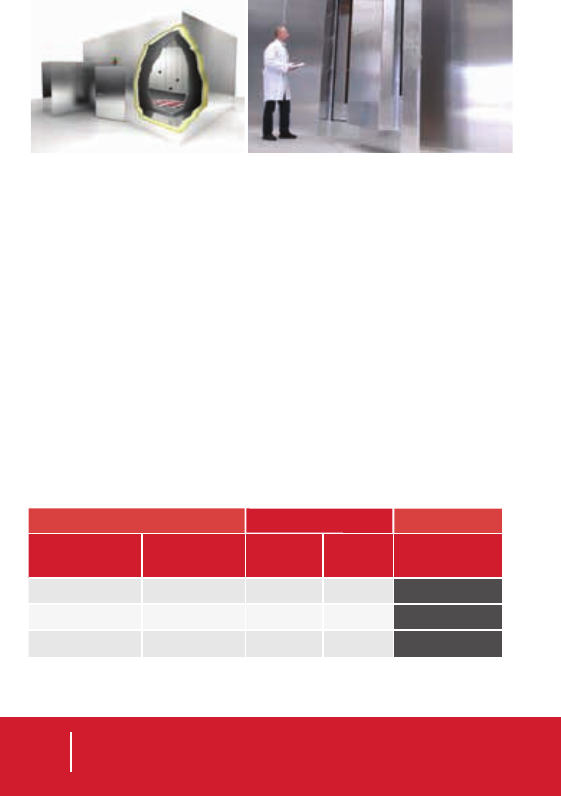
Warmup’s Unique Product Advantage
Hydronic
Warmup oers you a complete bespoke solution
Warmup hydronic heating systems come fully designed and
supplied with a full set of high quality components and controls
ready for installation. Systems are available in a number of
congurations and components guaranteed to perfectly match
your project and budget.
Warmup systems come with a choice of 3 pipe types; PEX-A,
PE-RT and PE-RT/AL/PE-RT. This choice guarantees that
you have the best possible system, tailored to your specic
installation and budget.
Warmup PEX-A hydronic pipe carries a Lifetime Warranty for
greater peace of mind. All other pipes carry a 50 year Warranty.
Electric
Warmup oers the thinnest dual-uoropolymer coated
multi-strand heating wire (less than 1.8mm in diameter)
on the market - to enable you to oer your customers the very
best solution. Further, it will not raise oor levels and is BEAB
approved, meeting the highest safety standards. Best of all, it is
quick and easy to install. 1
2
3
4
5
1. Outer Insulation: advanced uoropolymer
2. Diameter 1.8mm
3. Earth Braid
4. Inner Insulation: advanced uoropolymer
5. Multi-strand twin conductors/heating element
4Call us now 0845 345 2288 or visit www.warmup.co.uk

The Best Warranties, Installation
Guarantee and Accreditations
If you accidentally damage the heating system during
installation, return it to Warmup and we will replace it with
another heater of the same make and model FREE!
(See www.warmup.co.uk for full details)
Rest assured, you are installing the very best. Warmup is
the only underoor heating company whose products are
European compliant, CE marked and accredited by all these
independent institutions. In addition, we are members of
BEAMA, CIBSE, Constructionline, RIBA, and the TTA.
17th Edition Approved. All Warmup products comply with
17th Edition of the IET Electrical Requirements BS7671:2012
LIFETIME
LIMITED
WARRANTY
LIFETIME
LIMITED
WARRANTY
Warmup Loose Wire, Matting, StickyMat
and PEX-A Systems carry a Lifetime
Warranty for greater peace of mind.
A Lifetime Warranty upgrade is
available on the 4iE Smart WiFi
Thermostat, 3iE Energy-Monitor
Thermostat and Tempo Digital
Programmable Thermostat.
FS 586320
5
The world’s best-selling oor heating brand

About Warmup
Warmup is a certied ISO 9001:2008 UK based manufacturing Plc
creating and delivering underoor heating solutions (electric,
hydronic and hybrid - a mixture of both). We have sold in excess of
2 million systems in more than 60 countries in over 21 years of
trading. We have subsidiary operations in 11 countries and licensed
trading partners in the other countries.
The combination of Warmup’s heating wire with uoropolymer
coatings (on the inner wires and the outer protective jacket), our
4iE Smart WiFi Thermostat, 3iE Energy-Monitor Thermostat and
Tempo Digital Programmable Thermostat are patented, trade mark
protected, designed and owned by the world’s best selling brand.
We began as, and remain, a knowledge and research driven UK
business, making proprietary, world-leading products.
Warmup has a tradition for quality and innovation. We constantly
update and add to our product range to deliver the absolute best
products.
Warmup is the only underoor heating company whose products
are European compliant, CE marked and accredited by more
independent institutions than anyone else in the industry, giving
you and your customers security and peace of mind.
Our Services
We are with you every step of the way. Since 1994, Warmup has
provided trade professionals with outstanding services and quality
products through leading retailers, wholesalers and builder
merchants. This includes:
Unique Online “Quick Quote” Service
Let us save you time by calculating the right product, price and size
required for your project. All you need to do is visit our website,
enter a few project details for a no-obligation “Quick Quote”. You
will receive a quotation estimate within a few minutes. Should you
require a more detailed quotation, you can submit your drawings or
plans to www.warmup.co.uk or via fax on 0845 345 2299.
Technical Helpline
We are the only company who oers a technical helpline 24/7/365.
If you have a question or an installation problem, our experienced
Technical Team are available to support you - call 0845 345 2288.
We also oer online ‘live’ chat and a host of installation tutorials -
www.warmup.co.uk
Exceptional Manufacturer of the Year
London Passport to Export Awards
FS 586320
6Call us now 0845 345 2288 or visit www.warmup.co.uk

Repair Kits
Minor damage (i.e. nicking the electric wire with a trowel),
discovered before the oor is laid, can easily be repaired on-site.
Call 0845 345 2288 to obtain an easy-to-t repair kit, via next-day
delivery (or keep a few extra available).
Running Cost Information
To get an accurate idea of typical running costs of a Warmup System,
see the table below.
Rapid Delivery
If you need products quickly, ask your supplier to place your order
by 2pm, Monday-Friday and we will ship it the same day for next-
working-day delivery (allow 2-3 days for Scotland and the Channel
Islands). Warmup is fully stocked and available from leading retailers
and trade outlets, throughout the UK.
Warmup Service Engineers
Should your customer’s heating system become damaged after
installation, we oer a team of experienced service engineers, who will
identify and correct the damage. Call Warmup on 0845 345 2288 to
arrange an appointment.
Quotation & Layout Service
Warmup oers a FREE CAD drawing and quotation service to all
customers, regardless of project size. All you need to do is fax your
drawing to 0845 345 2299, email uk@warmup.com or visit www.
warmup.co.uk to access our quotation facility and Warmup will do the
rest.
Training
Warmup provides group training sessions for any sized project, held
at our Head Oce in London. Let our trained professionals show you
how quick and easy it is to install Warmup with no need for specialist
trades. It’s FREE - why not upgrade your skills and stand out from your
competitors? Call 0845 345 2288 or email training@warmup.com for
details.
2m24m25m210m215m225m2
1 hr 2.36p 4.72p 5.90p 11.81p 17.71p 29.52p
2 hrs 4.30p 8.61p 10.76p 21.52p 32.28p 53.81p
3 hrs 6.25p 12.49p 15.62p 31.23p 46.85p 78.08p
4 hrs 8.10p 16.20p 20.26p 40.51p 60.77p 101.28p
5 hrs 10.13p 20.26p 25.32p 50.64p 75.96p 126.60p
6 hrs 11.94p 23.89p 29.86 59.72p 89.59p 149.31p
7 hrs 13.93p 27.85 34.82p 69.63p 104.45p 174.08p
8 hrs 15.83p 31.66p 39.57p 79.15p 118 .72p 197.87p
Financial gures in £’pence
Notice: Any unauthorised replication of this material, including running cost data,
will constitute an infringement of copyright.
7
The world’s best-selling oor heating brand
World Leading Research & Development
By continually investing in research and development, Warmup
is able to foresee and respond to upcoming industry trends and
technological developments. This guarantees you fast access to
the latest innovations when it comes to underoor heating design,
energy eciency and reducing CO emissions.
Warmup Monitored Family Homes Programme
In support of our EN442-2 Research Centre in Germany, we operate
a number of Family Monitored Houses in addition to the BRE
(Building Research Establishment) Renewable House.
This initiative grew out of the need to better predict the future
energy running costs of houses using Warmup underoor heating
systems. Information is gathered every few minutes from many tiny
sensors.
These sensors are strategically placed in each zone to compare
oor, wire/water and outside temperatures and often other
readings like humidity and radiant temperature. This allows a
detailed view of the amount of energy actually needed to create
ideal living conditions.
This can be compared with test facility results and in particular,
what may have been predicted by SAP (Standard Assessment
Procedure) calculations, which are central to the perceived energy
performance and eciency of a dwelling.
This information allows us to answer questions from ‘How much
will it cost to run Warmup in my new house?’ to ‘How much will I
save using Warmup underoor heating rather than radiators in my
home?’
How much does underoor heating cost to heat my room?
ROOM TYPE HEATED
AREA AM PM WINTER
COST*
Bathroom 4m2hrs 1hr £24.26
Kitchen 5m1hr 2hrs £30.33
Lounge 15m0hrs 3hrs £85.27
RUNNING TIME
*Assumptions: 12.66p/kWh - system on 6 months (182 days) per year. System installed on 10mm
Warmup Insulation Board. **Avg. running cost after initial heat-up period = 0.85p/m²/hr.
For more details visit www.warmup.co.uk
Bi-climatic chamber in Warmup’s Research Centre in Germany
8Call us now 0845 345 2288 or visit www.warmup.co.uk

Benets of Underoor Heating
Floor heating is simply the only way to create the ideal comfort
zone in a family room to balance oor and air temperature.
Suitable for every type of project - new-build, refurbishments
and renovations.
Appropriate for use under a wide range of oor nishes - stone,
tile, wood, carpet and vinyl.
Warmup is fully tested and compatible for use with Karndean and
Amtico.
With its low operating temperature, warmth is evenly spread across
the whole oor area, with no cold spots, heating from the oor
upwards without creating a stuy atmosphere.
Energy eciency - underoor heating gives the user control,
provides rapid heat-up and high eciency heating. It requires
signicantly less energy as you are not heating the ceiling area and
it enables the temperature to be accurately controlled as needed,
allowing end users to heat the room(s) they want, with no energy
wasted.
Temperature control in each zone - comprehensive range of
thermostats, including the 4iE Smart WiFi Thermostat, allows
the end user to choose the temperature levels they require, with
programmable settings (heat on/o) to match their lifestyle.
Cost savings - because underoor heating uses a lower
temperature than standard radiators, heating costs are reduced and
savings can be achieved by at least 10% on utility bills.
Design freedom - underoor heating means no bulky radiators to
take up valuable wall and oor space.
Safety - delivers a family-friendly and safe environment. No low
level hot surfaces or hard metal edges that come with a radiator
system, creating a potentially unsafe and dangerous environment
for small children, the elderly or people at risk.
No maintenance - there is no maintenance required for electric
underoor heating and little or no maintenance required on our
hydronic systems.
Hydronic underoor heating can be linked to most heat
sources, giving total exibility - allowing for best energy savings
as new energy ecient heat generators become available, now and
in the future.
Radiator Warmup
oor
heating
9
The world’s best-selling oor heating brand

Insulation boards prevent heat loss to the suboor - a warm oor
can be achieved in as little as 20 minutes compared to over 2 hours
with no insulation (see the heat-up chart on page 12 for more
details).
Cement Coated
Tough Insulation Boards
Insulate and waterproof in one easy step with
Warmup Insulation Boards. Made from extruded
polystyrene and faced with 0.5mm glassbre mesh
reinforced polymer-modied cement mortar, they
have a high thermal insulation property for energy
eciency and an added benet of sound proong.
The boards can be used on walls or oors and are
ideal for applications such as dry lining, insulating
and waterproong in areas such as wetrooms,
bathrooms and kitchens.
Features Technical Data
Easy to cut and shape around fixtures with
a knife or saw
Board size:
1,250mm(L) x 600mm(W)
Comes in a range of thicknesses to suit floor
and wall applications. Can be fixed to solid
or stud walls
Thickness:
6mm, 10mm, 20mm, 30mm, 40mm,
50mm
Holds wall tiles up to 62kg/m² and floor
tiles up to 30 tonnes/m²
Composition:
Extruded polystyrene, each side faced
with a nominal 0.5mm thick glassfibre
mesh reinforced polymer-modified
cement mortar
Joints must be sealed to make them
waterproof
R Value:
(6mm) 0.16; (10mm) 0.28;
(20mm) 0.58; (30mm) 0.88;
(40mm) 1.20; (50mm) 1.50
High thermal insulation, resisting heat
loss and increasing the heating system’s
efficiency Class “0” / “B1” fire rated
Impact sound reduction dl =21 No primer required when used in conjunc-
tion with underfloor heating
Ready for tile/plaster – no additional prep
work needed European compliant and CE marked
Excellent as internal wall insulation
especially when compared to standard
cement building boards and plaster boards Conforms to Building Regulations Part L
10 Call us now 0845 345 2288 or visit www.warmup.co.uk

Accessories Items Required Price
(Excl 20% VAT)
Glassfibre tape - prevents movement
and covers the joints between boards
One roll per 25
boards £3.33
WIBS40MM Wooden Screws - 40mm
100 per pack to fix
approximately 5
boards
£3.33
WIBW36MM Penny Washers - 36mm
diameter
50 per pack to fix
approximately
2 boards
£4.99
Price Guide
*Standard board thickness = 10mm
Area
Covered
No. of
Boards
Req.
6mm 10mm* 20mm 30mm 40mm 50mm
1m22 £34.16 £34.16 £46.66 £58.32 £66.66 £83.32
2m23 £51.24 £51.24 £69.99 £87.48 £99.99 £124.98
3m25 £85.40 £85.40 £116.65 £145.80 £166.65 £208.30
4m26 £102.48 £102.48 £139.98 £174.96 £199.98 £249.96
5m27 £119.56 £119.56 £163.31 £204.12 £233.31 £291.62
6m29 £153.72 £153.72 £209.97 £262.44 £299.97 £374.94
7m210 £170.80 £170.80 £233.30 £291.60 £333.30 £416.60
8m211 £187.88 £187.88 £256.63 £320.76 £366.63 £458.26
9m213 £222.04 £222.04 £303.29 £379.08 £433.29 £541.58
10m214 £239.12 £239.12 £326.62 £408.24 £466.62 £583.24
11m215 £256.20 £256.20 £349.95 £437.40 £499.95 £624.90
12m217 £290.36 £290.36 £396.61 £495.72 £566.61 £708.22
13m218 £307.44 £307.44 £419.94 £524.88 £599.94 £749.88
14m220 £341.60 £341.60 £466.60 £583.20 £666.60 £833.20
15m221 £358.68 £358.68 £489.93 £612.36 £699.93 £874.86
16m222 £375.76 £375.76 £513.26 £641.52 £733.26 £916.52
17m224 £409.92 £409.92 £559.92 £699.84 £799.92 £999.84
18m225 £427.00 £427.00 £583.25 £729.00 £833.25 £1,041.50
19m226 £444.08 £444.08 £606.58 £758.16 £866.58 £1,083.16
20m228 £478.24 £478.24 £653.24 £816.48 £933.24 £1,166.48
Price (Excl 20% VAT)
Installation video for Warmup Insulation Boards.
Always refer to the installation manual prior to commencing your project.
11
The world’s best-selling oor heating brand
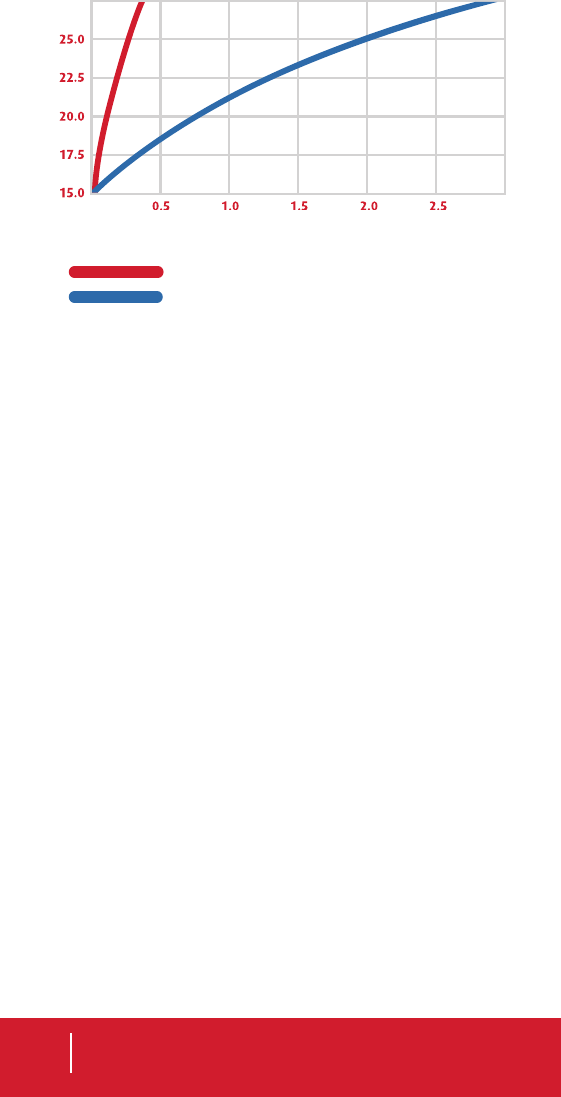
In testing, heat-up time was cut from over 2 and a half hours to just
20 minutes. This data applies to Warmup heating products only.
* Assumes a system running twice a day for 2 hours on a concrete suboor
** Source: Warmup tests performed to EN442-2 standards
Time in hours
Temperature
With insulation board
Without insulation board
Heat-Up Chart
Installation Guide
(Refer to installation manual for complete instructions)
Installation onto concrete oors
Lay the boards on a concrete base and stagger the joints. Fix the
boards to the concrete base with a suitable exible tile adhesive.
Once the adhesive hardens, tape the joints with glassbre tape.
Installation onto wooden oors (Contact us on 0845 345 2288
to receive a copy of our technical guide for wood ooring
or visit www.warmup.co.uk).
On a wooden suboor, lay the boards and stagger the joints.
Fix with a suitable exible tile adhesive. When the adhesive has
set but not necessarily dried, x the boards with a screw xing and
washer at 200mm spacings. Ensure the screw head is ush with the
surface. Reinforce the joints with glassbre tape.
Installation onto walls
Fix the lightweight boards to any suitable framework, such as
wood or brick. They are strong, holding a tile weight of 62kg/m²
(double that of plasterboard). Boards can easily be cut with a knife
or sawed, to work around objects. Use 8 galvanised screws per m²
at a minimum of 30mm from edges. Tighten screws until washers
bite the board surface, then level the washer with a rubber mallet.
Cover joints with self adhesive glassbre tape embedded in a layer
of exible tile adhesive.
12 Call us now 0845 345 2288 or visit www.warmup.co.uk

Frequently Asked Questions
Where can I use it?
Floors: Warmup Insulation Boards can be used as a structural tile
backer board on the oor, withstanding a load of 30 tonnes/sqm
and are ideal for use with underoor heating. We recommend a
minimum thickness of 6mm on a concrete suboor and 10mm on
a wooden suboor for oor stability. They oer the added benet
of high sound proong properties, which is ideal for rooms above
ground level.
Walls: As wall tile backer boards, tiles can be xed directly onto the
surface without prior preparation. When the joints are sealed it is
totally waterproof, oering an ideal solution for use in bathrooms,
shower rooms, wetrooms and kitchens.
What is it made from?
Warmup Insulation Boards are made of waterproof extruded
polystyrene and have a glassbre mesh embedded on each face,
onto a cement polymer adhesive. The boards are fully waterproof,
preventing any water to pass through them in the way expanded
polystyrene boards do. They are lightweight, easy to cut with a
knife and install onto any surface. Being free of harmful asbestos,
they pose no health or safety risks and are unaected by the freeze/
thaw cycle.
What is an R Value?
The R value is a measure of thermal resistance used in the
construction industry. The higher the R value the better an insulator
(e.g. 10mm Warmup Insulation Boards have an R value of 0.28
m²K/W and the 20mm Warmup Insulation Boards have an R value of
0.58 m²K/W). All buildings should strive for the highest possible R
values to reduce the amount of energy used.
Why do you recommend insulation boards on a concrete base?
Insulation boards can save up to 50% on running costs because
they are a highly ecient thermal barrier to cold rising from the
suboor. By reecting the heat upwards into the oor instead of
losing heat to the suboor, the oor will be warm in approximately
20 minutes after the system comes on. Without insulation boards
it could take several hours. This is important for energy eciency
for today’s energy-conscious consumers. See the heat up chart
example on page 12 for more details.
13
The world’s best-selling oor heating brand

Warmup Loose Wire System
Warmup Loose Wire System uses an ultra-thin
dual-core heating wire that is exible, easy
to install and will not raise oor levels. Ideal
for more irregular shaped areas for precise
installation.
Features Technical Data
Ultra-thin dual-core heating element
will not raise floor levels Operating voltage: 230V: 50Hz
The thinnest dual-fluoropolymer
coated heating wire (less than 1.8mm
diameter)
Cable thickness: 1.8mm
BEAB approved heating element
meets the highest safety standards Average output rating: 150 W/m2
Quick installation – Single connection
lead for fewer steps
Inner/Outer wire insulation:
Advanced fluoropolymer
Single 3m long ‘cold tail’ connection
lead
Approvals: BEAB
European compliant and CE marked
Lifetime Warranty & SafetyNet™
Installation Guarantee
1
2
3
4
5
6
1. Floor Covering
2. Flexible Adhesive
3. Warmup Loose Wire
4. Warmup Insulation Board
5. Warmup Tape
6. Flexible Adhesive
7. Suboor
LIFETIME
LIMITED
WARRANTY
LIFETIME
LIMITED
WARRANTY
7
14 Call us now 0845 345 2288 or visit www.warmup.co.uk

Price Guide
Area Heated Heaters Wattage Amps
Price
(Excl 20%
VAT )
1.5 to 2.4m2DWS300 300W 1.30A £101.66
2.5 to 3.4m2DWS400 400W 1.80A £120.83
3.5 to 4.4m2DWS600 600W 2.61A £177.49
4.5 to 5.9m2DWS800 800W 3.48A £229.16
6.0 to 6.9m2DWS600 + DWS400 1000W 4.41A £298.32
7.0 to 8.4m2 2 x DWS600 1200W 5.22A £354.98
8.5 to 9.9m2DWS800 +DWS600 1400W 6.09A £406.65
10 to 11.4m22 x DWS800 1600W 6.96A £458.32
11.5 to 12.9m2DWS800 + DWS600
+DWS400 1800W 7.89A £527.48
13.0 to 14.4m2 2 x DWS800 +
DWS400 2000W 8.76A £579.15
14.5 to 15.9m22 x DWS800 +
DWS600 2200W 9.57A £635.81
16.0 to 17.4m23 x DWS800 2400W 10.43A £687.48
17.5 to 18.9m22 x DWS800 +
DWS600 + DWS400
2600W 11.37A £756.64
19.0 to 20.4m23 x DWS800 +
DWS400 2800W 12.24A £808.31
20.5 to 21.9m23 x DWS800 +
DWS600 3000W 13.04A £864.97
22.0 to 25m24 x DWS800 3200W 13.91A £916.64
*Prices above DO NOT include a Warmup thermostat. (See pages 36 - 45 for details).
Installation video for Warmup Loose Wire System.
Always refer to the installation manual prior to commencing your project.
15
The world’s best-selling oor heating brand

Installation Guide
(Refer to installation manual for complete instructions)
Ensure the suboor is smooth, clean and dry. We recommend you
install Warmup Insulation Boards for energy eciency, but if you do
not, paint the oor with the Warmup primer and allow to dry. Mark
the perimeter and heater spacings on the oor using the sizing
guide at the back of the installation manual.
Laying the Loose Wire System
Tape the joint to the start point on the oor and lay out the wire
in parallel lines with U-shape returns. Tape and secure the heating
wire to the oor with the adhesive tape provided. Ensure an even
coverage with a minimum of 50mm spacing. Once completed, tape
down the entire length of the heating wire.
Connecting to the power supply
NOTE: All electrical connections must be performed by a certied
electrician.
Chisel out channels for the power supply cable and oor sensor
probe and secure with xing tape. Wire the thermostat, following
the instructions provided.
Completing the job
Apply a full bed of exible tile adhesive over the taped wire and tile
as normal, taking care not to damage or dislodge the heating wire.
Grout the oor as soon as possible and allow the adhesive to fully
dry before switching on the heater. 1
2
3
4
5
1. Outer Insulation: advanced uoropolymer
2. Diameter 1.8mm
3. Earth Braid
4. Inner Insulation: advanced uoropolymer
5. Multi-strand twin conductors heating element
16 Call us now 0845 345 2288 or visit www.warmup.co.uk

Frequently Asked Questions
Can I use the Warmup Loose Wire System as a primary heat
source?
If your room is well insulated and complies with modern insulation
levels you should be able to use Warmup as the sole heat source.
However, if your house is an older property with lower insulation
properties it is likely that an additional heat source may be
required. Heat loss calculations can be carried out by a builder,
architect or heating engineer.
What type of ooring can I use over the Loose Wire System?
The Loose Wire System is specically designed for use under tiles
and natural stone. Consult the chart on page 3 - Warmup has a
range of heating systems for virtually any oor nish.
What can I do if the heater is too big for my area?
Warmup Loose Wire gives you the exibility to alter the wire
spacing. The spacings between each run of heating element can be
brought down to a minimum of 50mm and a maximum of 100mm.
NOTE: The heating wire cannot be shortened or cut at any
stage. The correct size heater should be purchased for the oor
area to be heated (e.g. the net heated area after all xed units have
been subtracted). If in doubt, call 0845 345 2288 and let our trained
sta advise you.
Should I use primer with the Loose Wire System?
If the heating element is being laid directly onto a plywood or
concrete suboor, use the primer supplied. Leave to dry for 2 ~ 3
hours until tacky, then lay the heating element. If an insulated or
standard tile backer board is being used, no primer is needed. We
recommend you use Warmup Insulation Boards.
How long after installation can I turn the heaters on?
The exible tile adhesive must be fully dried before the underoor
heating can be turned on. Allow a minimum of 7 ~ 10 days. Turning
the system on too early can force the exible tile adhesive to dry
too quickly, causing it to crack.
17
The world’s best-selling oor heating brand

1
2
3
45
6
Features Technical Data
The thinnest dual-fluoropolymer
coated heating wire (less than 1.8mm
diameter)
Operating voltage: 230V: 50Hz
StickyMat with pressure sensitive
adhesive, for the fastest and most
secure installation
Width: 500mm (0.5 metre)
Can be repositioned easily without
losing adhesion Mat thickness: 3mm
The pressure sensitive adhesive ensures
that no wire or mesh is raised when
tiling or covering with a self-levelling
compound
Inner/Outer wire insulation:
advanced fluoropolymer
Output rating: 150W/m2 and 200W/m2
Single 3m long ‘cold tail’ connection
lead
Approvals: BEAB
European compliant and CE marked
Lifetime Warranty & SafetyNet™
Installation Guarantee
Warmup StickyMat underoor heating system is
suitable for all projects: new-build, retrots and
refurbishments. The StickyMat System consists
of a thin loose wire evenly spaced and taped to a
glassbre mesh with pressure sensitive adhesive,
reducing installation time by 35%, for the fastest
and most secure installation method of electric
underoor heating.
1. Floor Covering
2. Flexible Adhesive
3. Warmup StickyMat
4. Warmup Insulation Board
5. Flexible Adhesive
6. Suboor
LIFETIME
LIMITED
WARRANTY
LIFETIME
LIMITED
WARRANTY
Warmup 150W & 200W/m2
StickyMat System
NEW! NEW! NEW!
18 Call us now 0845 345 2288 or visit www.warmup.co.uk

Price Guide for 150W/m2 Underoor Heating StickyMat
Price Guide for 200W/m2 Underoor Heating StickyMat
*Prices above DO NOT include a Warmup thermostat. (See pages 36 - 45 for details).
*Prices above DO NOT include a Warmup thermostat. (See pages 36 - 45 for details).
Area Heated Heaters Wattage Amps Price
(Excl 20% VAT)
1m2SPM1 150W 0.65A £ 82.25
1.5m2SPM1.5 225W 0.98A £ 104.12
2m2SPM2 300W 1.30A £ 118.11
2.5m2SPM2.5 375W 1.63A £ 145.00
3m2SPM3 450W 1.96A £ 167.99
3.5m2SPM3.5 525W 2.28A £ 189.00
4m2SPM4 600W 2.61A £ 209.12
4.5m2SPM4.5 675W 2.93A £ 230.00
5m2SPM5 750W 3.26A £ 254.61
6m2SPM6 900W 3.91A £ 300.12
7m2SPM7 1050W 4.57A £ 345.62
8m2SPM8 1200W 5.22A £ 377.12
9m2SPM9 1350W 5.87A £ 409.49
10m2SPM10 1500W 6.52A £ 440.99
11m2SPM11 1650W 7.17A £ 468.12
12m2SPM12 1800W 7.83A £ 510.00
15m2SPM15 2250W 9.78A £ 641.37
Area Heated Heaters Wattage Amps Price
(Excl 20% VAT)
0.5m22SPM0.5 100W 0.44A £ 54.24
1m22SPM1 200W 0.87A £ 90.99
1.5m22SPM1.5 300W 1.30A £ 113.75
2m22SPM2 400W 1.74A £ 126.87
2.5m22SPM2.5 500W 2.17A £ 155.00
3m22SPM3 600W 2.61A £ 182.00
3.5m22SPM3.5 700W 3.04A £ 205.00
4m22SPM4 800W 3.48A £ 227.49
4.5m22SPM4.5 900W 3.91A £ 247.50
5m22SPM5 1000W 4.35A £ 272.99
6m22SPM6 1200W 5.22A £ 322.86
7m22SPM7 1400W 6.09A £ 372.74
8m22SPM8 1600W 6.96A £ 409.49
9m22SPM9 1800W 7.83A £ 440.99
10m22SPM10 2000W 8.70A £ 472.49
Price Guide
19
The world’s best-selling oor heating brand

Installation Guide
(Refer to installation manual for complete instructions)
Make a oor plan of your oor area by measuring your room and
then subtract any xtures (such as baths and cupboards). Ensure
you have the correct size mat for your oor area.
Laying the Matting System
Roll out the mesh, wire face up. At the end of the run, cut the mat
(not the wire), turn the mat through 90º or 180º and continue
laying the mat. When the area is covered, adjust the mats until the
loops are of equal distance apart. Ax the mat to the oor using
its self-adhesive mesh, or using the double sided tape on the mat.
Lay the temperature probe from the thermostat at equal distance
between two of the cable loops and attach to the oor surface.
Connecting to the power supply
NOTE: All electrical connections must be performed by a certied
electrician.
Install an RCD fused spur to power the thermostat and the matting
system heating element network.
Take the unheated power supply cable from the end of the matting
system, which should be positioned near the thermostat. Make
sure all the connections have been made to the power supply. Turn
the heater(s) on to ensure they are heating up (no more than 10
minutes).
Completing the job
Either lay a thin, self-levelling screed over the mat and leave it to
dry before laying tiles or trowel a full bed of exible tile adhesive
directly over the mat and lay the oor tiles.
1
2
3
4
5
1. Glassbre Mesh with pressure sensitive adhesive
2. Outer Insulation: advanced uoropolymer
3. Earth Braid
4. Inner Insulation: advanced uoropolymer
5. Heating Element Strand
MAT: with pressure sensitive adhesive
Fastest and most secure installation
Use less self-levelling compound and
tile adhesive
Can be repositioned easily without
losing adhesion
20 Call us now 0845 345 2288 or visit www.warmup.co.uk

Frequently Asked Questions
Can I use the Warmup StickyMat System as a primary heat
source?
If your room is well insulated and complies with modern insulation
levels you should be able to use Warmup as the sole heat source.
However if your house is an older property with low insulation
properties it is likely that an additional heat source may be
required. Heat loss calculations can be carried out by a builder,
architect or heating engineer.
What type of ooring can I use over the StickyMat System?
The StickyMat System is specically designed for use under tiles
and natural stone. For other oor nishes please see our full range
of products on page 3. If you wish to use other oor coverings
please contact our Technical Team on 0845 345 2288.
Can the StickyMat System be cut?
In order to t the mat into a specic area, it may be necessary to
cut and turn the glassbre mesh. Care must be taken not to cut
or damage the heating wire. The heating wire / heating mat
cannot be shortened – the correct size heater must be installed on
available oor space.
Can the oor probe / power supply cables be extended?
Both these wires can be extended up to 50 metres – please consult
a qualied electrician for advice on extending the cable.
How long must I wait after installation before turning the
system on?
The underoor heating cannot be turned on until the exible
tile adhesive is fully dried. Please allow a minimum of 7 - 10 days.
Turning the system on too early can force the exible tile adhesive
to dry too quickly, causing it to crack.
Installation video for Warmup StickyMat System.
Always refer to the installation manual prior to commencing your project.
21
The world’s best-selling oor heating brand

Warmup Inscreed Cable System
Warmup Inscreed Cable System is excellent for
installation within screeded oors of any size.
Once installed, the heated screed can be covered
with any ooring.
* Insulation must be either foil faced or concrete faced and
suitable for use with electric underfloor heating
1
1
2
2
3
3
4
4
5
6
56
If the concrete slab is more
or equal to 100mm and
insulated, you must install
insulation before laying the
heater.
If the concrete slab is more
or equal to 100mm and
insulated, you must install
insulation before laying the
heater.
1. Floor Covering
2. Screed (min 50mm)
3. Inscreed Heater
4. Metal Fixing Bands
5. Insulation*
6. Suboor
1. Floor Covering
2. Screed (min 50mm)
3. Inscreed Heater
4. Metal Fixing Bands
5. Concrete Slab
6. Insulation*
7. Suboor
Option 2:
Wire laid directly
on concrete slab
For use where the
concrete base is less
than 100mm thick or
insulated
Option 1:
Wire laid directly
on insulation*
For use where the
concrete base is
thicker than 100mm
or uninsulated
7
22 Call us now 0845 345 2288 or visit www.warmup.co.uk

Price Guide
Features Technical Data
Tough – 6mm thick heating cable is
protected by multiple layers of metal
shielding and insulation
Operating voltage: 230V: 50Hz
Floor covering can be changed
without risk of damage to the heater Output rating: 100 to 210W/m²
Heating element meets the highest
safety standards
Single 2.5m long ‘cold tail’
connection lead
Grounding braid makes it safe for wet
rooms European compliant and CE marked
Versatile - compatible with all floor
finishes
10-Year Warranty & SafetyNet™
Installation Guarantee
Suitable for new-build
*Prices above DO NOT include a Warmup thermostat. (See pages 36 - 45 for details).
Coverage
at
100W/m2
Coverage
at
150W/m2
Coverage
at
210W/m2
Heaters Heater
Length Wattage Amps
Price
(Excl
20% VAT)
1.8m21.2m20.9m2WIS180 9.0 180W 0.8A £43.33
2.8m21.9m21.4m2WIS280 14.0 280W 1.2A £60.83
3.9m22.6m22.0m2WIS390 19.5 390W 1.7A £69.16
5.0m23.3m22.5m2WIS500 25.0 500W 2.2A £82.49
6.5m24.3m23.3m2WIS650 32.5 650W 2.8A £99.16
7.6m25.1m23.8m2WIS760 38.0 760W 3.3A £104.16
10.0m26.7m25.0m2WIS1000 50.0 1000W 4.3A £125.83
12.0m28.0m26.0m2WIS1200 60.0 1200W 5.2A £147.49
14.6m29.7m27.3m2WIS1460 73.0 1460W 6.3A £173.33
15.5m210.3m27.8m2WIS1550 77.5 1550W 6.7A £177.49
17.7m211.8m28.9m2WIS1770 88.5 1770W 7.7A £190.83
20.7m213.8m210.4m2WIS2070 103.5 2070W 9.0A £207.49
26.0m217.3m213.0m2WIS2600 130.0 2600W 11.3A £250.83
31.4m220.9m215.7m2WIS3140 157.0 3140W 13.7A £289.99
33.7m222.5m216.9m2WIS3370 168.5 3370W 14.7A £307.49
Accessories Price (Excl 20% VAT)
Metal Fixing Bands - 25m £41.00
Fixing Tape - 50m £8.33
For more information about this product and
installation videos scan the code.
Always refer to the installation manual prior to
commencing your project.
23
The world’s best-selling oor heating brand

Installation Guide
(Refer to installation manual for
complete instructions)
Draw up a oor plan to determine the
placement of the thermostat, heating
cable and the sensor probe.
Laying the Inscreed Cable System
The metal xing strips should be laid out perpendicular to the
heating element runs. Secure these xing strips on the insulation or
concrete oor using xing nails or adhesive.
The xing strips should be evenly spread across the oor at
intervals of 0.75 meters and placed so as to leave a 100mm border
all the way around the room.
The heating cables should then be laid up and down the room and
clipped into the xing strip. Please check the sizing guide at the
back of the installation manual to determine the cable spacing. To
ensure an evenly heated oor, the cables should be spaced evenly
at all times.
1
2
3
4
5
1. Outer Insulation: PVC
2. Diameter 6mm
3. Earth Braid
4. Inner Insulation: advanced uoropolymer
5. Heating Element Strand
Connecting to the power supply
The heating cable cold tail should be connected to the thermostat
by a certied electrician. The heating cables should be tested again
BEFORE screeding.
Completing the job
Once laid, the heating cables must be covered with a minimum
thickness of 50mm screed.
Install the Warmup thermostat and oor probe in one of the
following ways:
1. Placed directly in the top 10mm of screed covering the heating wire
2. Placed into a channel cut out of the surface of the screed
3. Placed in a exible conduit in the top 10mm of screed
24 Call us now 0845 345 2288 or visit www.warmup.co.uk

Frequently Asked Questions
Can the Inscreed Cable System be shortened?
Never shorten the Inscreed Cable. You must ensure that the
correct size is installed into the area. We have a large range of sizes
to choose from.
How thick is the screed used with the system?
The Warmup Inscreed Cable is designed to be placed within a
screed of at least 50mm in thickness. The exact oor build up
depends on the insulation materials in the suboor - please see the
installation manual for full details.
Can the Inscreed Cable System be laid directly onto insulation
material? (i.e. single pour)
Yes, if you use cement-faced or foil-faced insulation boards suitable
for electric underoor heating such as the Warmup Insulation
Boards.
When can I turn my heating on?
The heating should not be activated until the screed has fully cured
(approximately 7-28 days).
Where should I place the oor probe?
The oor probe should be located at the surface of the screed
layer below the oor covering (top 10mm of screed). It can also be
cemented into a channel cut out of the surface of the screed.
25
The world’s best-selling oor heating brand

1
2
3
4
1. Floor Covering
2. Warmup Foil Heater
3. Insulated Underlay
4. Suboor
Warmup Foil Heater System
The Warmup Foil Heater is a streamlined electric
radiant oor heater designed for use with
carpet, vinyl, wood and other oating oors.
We recommend using the Warmup Insulated
Underlay and Dual Overlay Systems (See pages
30 - 33) for maximum eciency.* Warmup has
successfully completed controlled tests with
Amtico and Karndean ooring.
*excludes bathrooms; cannot steam clean carpets
Features Technical Data
Installed directly under floor finish;
no self-levelling required
Construction: Wire with advanced
fluoropolymer insulation, encased in
aluminium foil
Fully earthed flat aluminium foil will
not raise floor levels Operating voltage: 230V: 50Hz
Wire based system can be adapted to
fit around objects Output rating: 140W/m2
Great for heating under floating floors
such as laminate and hardwood Mat width: 0.5m
Mat length: min 3m, max 24m
Heating cable spacing: 50mm
Cold lead length: 3m
Approvals: BEAB
European compliant and CE marked
15-Year Warranty & SafetyNet™
Installation Guarantee
NOTE: Must be used with Warmup Dual Overlay (See pages 32 - 33) when laying vinyl or carpet.
NOTE: Always check compatibility of ooring with electric underoor heating.
15 YEAR
LIMITED
WARRANTY
15 YEAR
LIMITED
WARRANTY
Contact
Warmup
to receive our
technical guide
for wood
oors
NOTE: MUST be used with the Warmup Insulated Underlay (See pages 30 - 31).
26 Call us now 0845 345 2288 or visit www.warmup.co.uk

Price Guide
* Prices above DO NOT include a Warmup thermostat. (See pages 36 - 45 for details).
MUST be used with the Warmup Insulated Underlay (See pages 30 - 31). If you are laying a vinyl
or carpet (excludes bathrooms) the Warmup Dual Overlay MUST be used (See pages 32 - 33).
A maximum of 25m² of heating can be used with one thermostat.
Installation Guide
(Refer to installation manual for complete instructions)
Warmup’s foil heating mats are available in several convenient
sizes. Use larger mats as much as possible and smaller mats as gap
llers. Ideally, the combination should cover 80% of your oor area.
Exclude permanent or static xtures from your calculations.
Laying the Foil Heater System
Lay the heating mats on top of the insulation, leaving a gap of
around 50mm from the wall to the heating mats and a gap of about
10mm between each mat. Stretch and secure the mats to the oor
with the aluminium tape provided. Additional duct tape can be
used where required.
Place the mat’s electrical supply cables towards the junction box,
ensuring they do not cross each other. Create a slight groove in the
insulation under the joint to ensure that the heating mat lays at.
Area Heated Heaters Wattage Amps Price
(Excl 20% VAT)
1 WLFH-140W/140 140W 0.61A £60.83
1.5 WLFH-140W/210 210W 0.91A £73.33
2 WLFH-140W/280 280W 1.22A £91.66
3WLFH-140W/420 420W 1.83A £138.33
4WLFH-140W/560 560W 2.43A £173.33
5WLFH-140W/700 700W 3.04A £212.49
6WLFH-140W/840 840W 3.65A £250.83
7WLFH-140W/980 980W 4.26A £289.99
8WLFH-140W/1120 1120W 4.87A £329.16
9 WLFH-140W/1260 1260W 5.48A £372.49
10 WLFH-140W/1400 1400W 6.09A £411.66
12 WLFH-140W/1680 1680W 7.30A £493.33
For more information about this product and
Installation videos scan the code.
Always refer to the installation manual prior to
commencing your project.
27
The world’s best-selling oor heating brand

Connecting to the power supply
NOTE: All electrical connections must be performed by a certied
electrician.
Completing the job
Create a groove in the suboor to accommodate the oor probe.
Connect the oor temperature sensor to the thermostat through
a conduit and install between two heating wire runs on the mat.
The probe wire must NEVER touch or be crossed by the heating
element.
Frequently Asked Questions
What types of ooring can be used?
The Foil Heaters can be used under carpet, vinyl, wood or oating
oorings provided they are no thicker than 18mm and can
withstand up to 27C of heat. Check with the manufacturer to
ensure it is suitable for use with electric underoor heating.
Can the Foil Heaters be cut and turned?
You can cut and turn the foil casing to suit the shape of the room,
but NEVER cut the wire. Once the aluminium foil has been cut
and the mat has been re-positioned, use the aluminium foil tape
provided to cover any exposed wire and link the two pieces of the
mat. Please see the installation manual for full details and diagrams.
When can I turn my Foil System on?
Once the nished oor has been laid, wired up and tested, the
system can be switched on immediately.
Which insulation materials should be used?
We recommend Warmup’s own brand Insulation Underlay be used
with Warmup Foil Heaters. If you are installing a soft ooring such
as vinyl or carpet, use the Warmup Dual Overlay to protect the foil
heating wire from heels and heavy load points.
1
2
3
1. Aluminium Foil Earth
2. Wire Insulation: advanced uoropolymer
3. Multi-strand twin conductors heating element
28 Call us now 0845 345 2288 or visit www.warmup.co.uk

View or Download our specialist
Wood Guide at
www.warmup.co.uk or call
0845 345 2288 to receive a copy
29
The world’s best-selling oor heating brand

Warmup Insulated Underlay
Warmup Insulated Underlay is a thin
polystyrene insulation barrier with eective
acoustic properties to reduce contact noise. It
sits between the cold suboor and Warmup’s
Foil Heater, reecting heat upwards, making
the heating system even more ecient. The foil
backing acts as a moisture barrier.
Features Technical Data
Resists heat loss and increases the
heating systems efficiency
Roll Size:
1200mm (W); 2.5sqm, 5sqm,
10sqm and 25sqm
Extremely effective for reducing
contact noise
Thickness:
6mm
Very thin at only 6mm in depth
Composition:
Top Layer: Grooved polystyrene
Bottom layer: Silver foil with
adhesive overlap
Lightweight and easy to install R Value:
0.19 m²K/W
Foil backing acts as a moisture barrier
Contact sound reduction: 25dB
∆Lw when used in conjunction with
the Warmup Dual Overlay System.
Recommended for use with the Warmup Dual Overlay System
1. Floor Covering
2. Warmup Foil Heater
3. Warmup Insulated Underlay
4. Suboor
4
32
1
Scan the code for more information
about this product.
Always refer to the installation manual
prior to commencing your project.
30 Call us now 0845 345 2288 or visit www.warmup.co.uk

Installation Guide
(Refer to installation manual for complete instructions)
Install the Insulation Underlay with the silver foil facing down onto
a clean and dry oor. After tting the rst row, roll the next section
of underlay. Remove the protective lm from the self-adhesive
overlap and stick both rows together, creating a damp proof barrier.
Stagger subsequent rows until the whole oor area is covered.
Frequently Asked Questions
What is it made from?
The top layer of the underlay is comprised of a 6mm grooved
lightweight polystyrene (which oers added acoustic properties
by reducing contact noise) and a bottom layer of silver foil which
has an adhesive overlap to join subsequent rolls. The underlay has
a sound reduction of 25dB Lw when used in conjunction with
Warmup Dual Overlay (See pages 32 - 33). In the case of oating
substrate systems, the sound reduction of the nished oor
covering will always depend on the impact sound reduction of the
existing substrate.
What is an R Value?
The R value is a measure of thermal resistance used in the
construction industry. A rating of 0.19 represents a low level of
insulation for energy eciency.
Can I use this under tiles and stone?
No. It is designed for installation with the Foil Heater when installed
under soft and resilient oor coverings such as wood, carpet, vinyl
and linoleum. When your nish needs to be xed down (glued)
such as carpet, then a combination of the Insulated Underlay,
Foil Heater and Dual Overlay should be used. Warmup’s Insulated
Underlay has been specially developed as part of a complete stable
overlay system with the Dual Overlay to protect the heating wire
from sharp heels and heavy point loads. The combined thickness
of the Warmup Dual Overlay and the Warmup Insulated Underlay is
13mm.
Area Covered Insulated Underlay
System Code Price (Excl 20% VAT)
2.5m2WIU2.5 £24.98
5.0m2WIU5.0 £47.49
10.0m2WIU10.0 £91.66
25.0m2WIU25.0 £216.66
In the case of oating substrate systems the sound reduction of the nished oor covering will
always depend on the impact sound reduction of the existing substrate.
Price Guide
31
The world’s best-selling oor heating brand

Warmup Dual Overlay
Warmup Dual Overlay is a free-oating suboor,
oering a smooth and seamless nish for carpet, vinyl
and linoleum. The two layers protect the heating wire
from sharp or heavy point loads and provides even
heat distribution. Installation is dry, clean and quick.
Both the Insulated Underlay and Dual Overlay are
designed to work together with Warmup Foil Heaters
(See pages 26 - 33).
Features Technical Data
Consists of a base board (3mm deep)
and top board (4mm deep) with a
contact adhesive to bond them
together
Contents:
4 base and 4 top boards (covers
2.88m²)
Provides a stable subfloor on which a
variety of floor coverings can be laid
Size:
1200mm (W) x 600mm (L)
Very thin at only 7mm in depth
Thickness:
Base board - 3mm
Top board - 4mm
Protects electric heating wire from
damage if flooring is not laid
immediately
Composition:
MDF fitted with an interactive
adhesive
Installation is quick, easy and dry - no
need for self-levelling Density (kg/m³): 770
Provides even heat distribution Bending strength kg/cm²: >40
Humidity (%): 4-10
Thermal R value (m²K/W): 0.047
Fire Class, DIN4102: B2
1. Floor Covering
2. Warmup Dual Overlay-Top
3. Warmup Dual Overlay-Base Board
4. Warmup Foil Heater
5. Warmup Insulated Underlay
6. Suboor
56
4
3
2
1
NOTE: Always check compatibility of ooring
with electric underoor heating.
32 Call us now 0845 345 2288 or visit www.warmup.co.uk

Price Guide
Installation Guide
(Refer to installation manual for complete instructions)
The Warmup Dual Overlay is comprised of a 3mm deep base board
and 4mm deep top board. The bottom and top layers are laid out
with staggered joints and arranged so that the top boards overlap
the joints in the base boards. The Warmup Foil Heating System lays
between the Underlay and Dual Overlay System. This method of
installation provides a stable surface for the oor nish to rest on
and avoid any joints showing through the nal oor nish. Finally,
the oor nish can either be glued to the boards as a nal layer or
simply laid freely upon them.
Frequently Asked Questions
Is the Dual Overlay xed to the suboor?
The Warmup Dual Overlay is a oating suboor - it is not xed to
the oor below. It is comprised of a 3mm deep base board and a
4mm deep top board. Both boards have contact adhesive, bonding
them together to make one solid suboor, to which a variety of
oor coverings may be xed. It provides a smooth and seamless
suboor making it suitable for soft and resilient oor coverings
such as carpet, vinyl and linoleum. The combined thickness of the
Underlay and Dual Overlay is 13mm.
How is it sold?
Each pack contains: 4 base boards & 4 top boards and covers
2.88m² of ooring.
Can I use other Warmup Heaters with the Underlay/ Dual
Overlay?
The Warmup Underlay / Dual Overlay systems are designed to work
specically with Warmup Foil Heaters only.
Please Note:
* Cannot be used in wet areas such as bathrooms.
**It is strongly recommended to dry clean carpet ooring laid on
Dual Overlay. Do not steam clean, as this can cause moisture to get
into the wood and joints and show through the ooring over time.
Price (Excl 20% VAT)
WDO - Dual Overlay System (covers 2.88m2) £69.16/pk
Scan the code for more information
about this product.
Always refer to the installation manual
prior to commencing your project.
33
The world’s best-selling oor heating brand

150W & 200W/m2 Electric In-Wall
Heating Panel
In-Wall Heating Panels are perfect if you wish to
extend the luxury of the oor heating to the walls,
ideal if you wish to heat a small area of the wall or
for whole room heating; this is particularly suitable
in dwellings where heat loss and poor insulation is
an issue.
The In-Wall Heater Panels, suitable for use behind
tiles or natural stone are available in two wattages,
150W/m2 & 200W/m2, oering you a choice to
add additional heat with the 200W/m² which is
particularly suitable for high heat loss rooms.
For more information on the application of the
In-Wall Heater Panels or to receive a quotation
please contact our Projects Division on 0845 034
8270 or visit our website www.warmup.co.uk
Features Technical Data
The thinnest dual-fluoropolymer coated
heating wire (less than 1.8mm diameter) Operating Voltage: 230V: 50Hz
Toughest wire - multi-strand core,
double-insulated using advanced
fluoropolymers (ECTFE).
Width: 500mm (0.5 metre)
Sturdy glassfibre mesh for extra
durability. IP Rating: IPX7
High quality double-sided tape, for easier
installation.
Output Rating:
150W/m² and 200W/m²
Protection Class: I
CE Marked
Lifetime Warranty and SafetyNet™
Installation Guarantee
Scan the code for more
information about this
product.
Always refer to the
installation manual prior to
commencing your project.
NEW! NEW! NEW!
34 Call us now 0845 345 2288 or visit www.warmup.co.uk

35
The world’s best-selling oor heating brand

*Visit www.warmup.co.uk for more details
4iE SMART WIFI
THERMOSTAT
For central and underoor heating
High quality design and dependable engineering,
personalised for you
The 4iE is designed to look great in contemporary and traditionally
styled homes. Available in Onyx Black and Bright Porcelain, with
angled chrome edges to reect wall colours.
Personalise your 4iE with custom photo backgrounds and a range
of textured skins including brushed metal and natural wood
eects. Use the large display to check the weather forecast and
trac delays for your journey before you leave home.
The right temperature. The best tari.
Eortlessly.
NEW! NEW! NEW!
36 Call us now 0845 345 2288 or visit www.warmup.co.uk

Always at the right temperature, home or away
The 4iE does not require programming, it works with your
smartphone to ensure your home is always at the temperature
you want, just as you arrive and using more ecient
temperatures when you’re away.
If you want to use a conventional program or just want to make
a quick change, the MyWarmup app is simple and easy to use.
The most ecient settings for your home
The 4iE learns how you use your heating and the unique way
your home responds to changes in temperature to calculate
more ecient settings.
You will get tips with advice on comfortable temperatures that
use less energy and the optimal times to turn the heating o
early and still stay warm, saving up to 25% on your heating use.
Automatically on the best energy tari, year after year
The 4iE can nd you lower energy taris and automatically
switch to the best deal. According to the Department of Energy
& Climate Change, switching energy tari can save on average
£210 per year.
You can choose to let the 4iE switch for you automatically when
a better deal is available or see the results and easily switch
yourself.
By working with families across
Europe and our research facilities
in Germany and the UK during
the last 20 years, we have found
the most ecient ways to control
heating in real homes.
*Visit www.warmup.co.uk for more details
3 YEAR
LIMITED
WARRANTY
3 YEAR
LIMITED
WARRANTY
*
37
The world’s best-selling oor heating brand

Code Description Price (Excl. 20%
VAT )
4iE™ OB Onyx Black Smart WiFi Thermostat £166.66
4iE™ BP Bright Porcelain Smart WiFi Thermostat £166.66
Technical Data
Dimensions: (H/W/D): 90 x 120 x 18mm (from wall)
Sensors: Air and floor/ambient
Installation depth: 35mm back box
IP rating: IP33
3-Year Warranty with option to upgrade to Lifetime Warranty
Approvals: BEAB
CE Marked and European compliant
Sensor Type: NTC 10K 3m Long (can be extended to 50m)
Size of Display: 3.5”
Compatibility: Ideal for Electric and Hydronic underfloor heating up to 16A.
Combi and System boilers with switch live (230VAC) input
Er-P Class: IV
Self guiding screw terminals
prevent driver skipping
Easy to install and set up
Free installer training classes
The 4iE uses a standard 35mm deep back box to house
connections behind its stylish facia. It is installed just like a
traditional three-wire thermostat and therefore easily replaces
existing controls – including covering xing holes from old
thermostats without the need for additional plates.
Two piece design and wireless
software updates to reduce
call-backs
Easy to setup WiFi
38 Call us now 0845 345 2288 or visit www.warmup.co.uk

Frequently Asked Questions
How do I connect the 4iE to my internet?
The 4iE connects to WiFi just like a smartphone or laptop.
Simply nd your WiFi network in the 4iE menu and enter your
password using the onscreen keyboard.
Once connected you need to create your MyWarmup account.
Go to my.warmup.com and register. From there you can add the
4iE to your account using the unique code displayed on the 4iE.
Which heating systems can the 4iE control?
The 4iE can control Warmup’s electric and hydronic underoor
heating as well as central heating (combi and system boilers).
Central heating and hydronic underoor heating systems are
controlled using a ‘switch live’ wire.
Warmup recommends that you check with your heating
system manufacturer or installer to nd out if your system can
be controlled by a ‘switch live’ wire. The 4iE should always be
installed by a certied professional.
Data Protection
MyWarmup uses the same web security as online banking
and each communication between your 4iE and MyWarmup is
protected using the same encryption the intelligence services
use for classied documents.
Warmup backs-up and stores all data safely encrypted to
protect it, with rewalls and electronic surveillance in place.
To ensure your system is safe, Warmup recommends your WiFi
network is password protected and you do not share your
log-in details with anyone. Warmup will never ask you for your
password.
View the installation video for the Warmup 4iE Smart WiFi Thermostat
Always refer to the installation manual prior to commencing your project.
39
The world’s best-selling oor heating brand

Warmup 3iE™ Energy-Monitor
Thermostat
Designed by Warmup, the unique and exclusive
3iE™ Energy-Monitor Thermostat was the rst
programmable thermostat to come with Active
Energy Management™ prompting users to save
up to 10% on energy bills.
Features Technical Data
Active Energy Management™
prompts users to save up to 10% on
utility bills
Output relay: 16A, 3,600W
Easy-to-use interface eliminates
complicated manuals Temperature range: 0 / +50 °C
Unrivalled accurate floor temperature
control of +/- 0.5°C, significantly
reduces energy wastage
Programming function: 10 events
and 10 temperatures / day
10 programmable periods per day
for efficient energy use Sensor type: NTC, 3m long
Designed and available exclusively
from Warmup
Dimensions: (H/W/D):
90mm x 113mm x 19mm (flush fit)
Graphs show exact heating costs for
underfloor heating Size of display: 2.4”
Stylish colours to suit any decor Installation depth: 30mm
IP rating: IP20/IP32 (with optional
gasket)
Approvals: BEAB
European compliant and CE marked
3-Year Warranty with option to
upgrade to Lifetime Warranty
Er-P Class: IV
3 YEAR
LIMITED
WARRANTY
3 YEAR
LIMITED
WARRANTY
40 Call us now 0845 345 2288 or visit www.warmup.co.uk

Code Description Price (Excl 20%
VAT )
3iE™ PB Piano Black Programmable Thermostat £120.83
3iE™ CC Classic Cream Programmable Thermostat £120.83
3iE™ SG Silver Grey Programmable Thermostat £129.99
3iE™ LG Leaf Green Programmable Thermostat £129.99
3iE™ MB Madison Blue Programmable Thermostat £129.99
3iE™ DP Deep Pink Programmable Thermostat £129.99
3iE™ WB Warm Berry Programmable Thermostat £129.99
Price Guide
Installation video for Warmup 3iE energy-monitor thermostat.
Always refer to the installation manual prior to commencing your project.
The world’s rst fully interactive, touch technology,
energy-monitor thermostat features an easy-to-use interface,
eliminating complicated instruction manuals. The display shows
recorded energy consumption usage, so that users know the exact
underoor heating costs. Up to 10 programmable periods can be
set each day to maximise energy eciency.
Innovative
First thermostat with a 2.4” full colour screen and integrated touch
technology - patents pending.
Beautifully crafted fashion colour fascias with chrome edging are
perfectly in tune with the modern home environment.
Interactive
Clear graphical display makes any adjustment quick and easy.
Choose the display style that suits you best – wide choice of screen
themes.
41
The world’s best-selling oor heating brand

Intelligent
Proportional Adaptive Function ensures the room does not
over-heat, reducing wasted energy whilst also protecting the
components inside. The Early Start algorithm learns how long it
takes to warm the room and activates the heating so it’s up to
temperature at the right time.
Energy Ecient
Unrivalled accurate oor temperature control means no wasted
energy - reducing the costs associated with over-heating.
Graphical energy monitor shows exactly how much energy is being
used and when.
AEM™ prompts you to choose the best and most ecient
temperature for each room, maximising energy eciency.
Installation
The 3iE™ Energy-Monitor Thermostat should be installed by a
certied electrician only, using Warmup’s installation instructions.
42 Call us now 0845 345 2288 or visit www.warmup.co.uk

Frequently Asked Questions
What is Active Energy Management?
The 3iE Energy-Monitor Thermostat has a unique feature called
Active Energy Management. It displays graphs of the users
recorded energy consumption. By following the on-screen
prompts, users can save up to 10% on utility bills by choosing the
best and most ecient temperature for each room.
How many sensor settings does the 3iE have?
Warmup’s 3iE oers a choice of three (3) sensor settings: air,
external and oor.
This provides unrivalled accurate oor temperature control to
maximise energy eciency.
Can more than one heater be controlled via the same
thermostat?
Yes. Each thermostat can take up to 16 amps – please note that
the heaters should be wired in parallel only at the thermostat
or junction box. A maximum of two (2) heaters can be wired
directly into the back of the thermostat. If more than two (2)
heaters are used (combined load of less than 16 amps) they must
be wired into a junction box, which connects to the thermostat.
For more than 16 amps a contactor and an RC unit are used in the
circuit. Please consult a certied electrician or Warmup’s Technical
Team on: 0845 345 2288 for advice on this type of installation.
43
The world’s best-selling oor heating brand

Tempo Digital Programmable
Thermostat
The Tempo thermostat enables end users to
choose the time as easily as they would with a
watch or clock and quickly set their programs
– heat on when they want it and o when they
don’t need it.
Features Technical Data
Stylish and contemporary design Input voltage: 230V +/- 15% at 50Hz
Clear screen displaying program
details Max output: 16A
Easy control with dial and sliders Dimensions: (H/W/D):
90 x 113 x 23mm (flush fit)
Suitable with all Warmup electric and
hydronic underfloor heating systems Screen size: 45 x 50mm
Available in Porcelain White and
Piano Black Sensors: Floor/air
Perfect for the whole house with the
exception of the bathroom Programming: 7-day, 1 day, 5/2 day
Battery backup: 3 months (CR2032
battery provided)
IP rating: IP20
Approvals: BEAB
European compliant and CE marked
3-Year Warranty with option to
upgrade to Lifetime Warranty
Er-P Class: IV
MSTAT Manual
Thermostat
RCD/Fused Spur
30mA
Residual Current
Device
Fused Spur
Also available
Porcelain White
Piano Black
3 YEAR
LIMITED
WARRANTY
3 YEAR
LIMITED
WARRANTY
Suitable with
Warmup’s electric
underfloor heating
systems only
44 Call us now 0845 345 2288 or visit www.warmup.co.uk

Tempo in each zone provides the following:
BETTER easy-to-use interface and intuitive design
FASTER set-up takes just minutes to get right the rst time
SMARTER control of energy costs
With Tempo, end users can simply program their settings to suit
individual requirements, warmer when they are at home, lower
when they are away or asleep.
It will help avoid wasting energy and achieve savings on utility bills.
Its Proportional Adaptive Function ensures the room does not
over-heat, reducing wasted energy whilst also protecting the
components inside. The Early Start algorithm learns how long it
takes to warm the room and activates the heating so it’s up to
temperature at the right time.
Frequently Asked Questions
What is the dierence between Tempo and the 3iE
Energy-Monitor Thermostat?
The main dierence is the 3iE’s energy-monitoring function. The
monitor tracks your exact usage and based on your fuel rates,
displays your underoor heating costs. Through the Active Energy
Management, it gives users suggestions to lower usage and fuel
costs without sacricing comfort.
How does it work?
The sliding lever on the right-hand side takes you through the four
(4) easy program steps to set the day, time and heat periods you
desire. Turn the dial to increase or decrease the settings and then
press to secure that setting. The sliding lever at the bottom allows
you to select between manual, automatic, frost-protection or o
modes.
Price Guide
Programmable Thermostat Price (Excl 20% VAT)
Tempo - Piano Black Programmable
Thermostat £83.33
Tempo - Porcelain White Programmable
Thermostat £83.33
Manual Thermostats Price (Excl 20% VAT)
MSTAT - White Manual Thermostat £60.83
Accessories Price (Excl 20% VAT)
RCD/Fused Spur - 30mA Residual Current
Device £41.66
45
The world’s best-selling oor heating brand

Features Technical Data
Flat film does not take up space IP57 Rated
Self-adhesive for convenient
installation directly onto the back
of the mirror
Suitable for zones 1 & 2 according
to BS7671:2012
Resistant to moisture, vibration,
shock, dust and ageing Operating voltage: 230V: 50Hz
Connects to existing room light
circuit for automatic operation
when light is switched on
1m cold tail
Suitable with most types of
mirrors, existing or newly installed Double insulated
Can be used in combination for
large mirrors
No transformers or thermostats
necessary
European compliant and CE marked
1-Year Warranty
Mirror Demisters
Mirrors are revealing while they brighten the
most ordinary bathroom. However, steamed up
bathroom mirrors can present a challenge to
homeowners. Not any longer, thanks to Warmup
Mirror Demisters - a safe and easy way to remove
steam from bathroom mirrors.
46 Call us now 0845 345 2288 or visit www.warmup.co.uk

Installation Guide
(Refer to installation manual for complete instructions)
The Mirror Demisters are self-adhesive and must be mounted
directly onto the reverse side of the mirror or onto a sound surface
which is in direct contact with the mirror. No other adhesives
should be used.
The Mirror Demisters should be connected by a certied electrician.
Frequently Asked Questions
Do the Mirror Demisters come in dierent sizes?
The Mirror Demisters come in round, square and rectangular sizes.
Installation is as simple as exposing the self-adhesive backing and
sticking directly onto the back of the mirror.
What if my mirror is a dierent size?
The Demisters can be combined for larger mirrors. However, you
must leave a minimum of 5mm between each Demister.
You must also leave a minimum of 10mm around the edges to
ensure the Demisters t.
How safe are they in the bathroom?
The Mirror Demisters have an IP57 rating and are suitable for zones
1 and 2 according to BS7671:2012, making them safe for bathrooms.
The Demister can either be connected directly to a switched light
circuit, designed to activate the Demister when the light is switched
on or via a separate switch connected to the main lighting circuit.
Price Guide
Size & Description Wattage Price (Excl 20% VAT)
WMD1 - 400mm x 450mm 18W £47.49
WMD2 - 600mm circular 55W £64.99
WMD3 - 290mm x 290mm 27W £34.99
WMD4 - 600mm x 1100mm 132W £90.83
Scan the code for more information
about this product.
Always refer to the installation manual
prior to commencing your project.
47
The world’s best-selling oor heating brand

Electric Towel Rails
When it comes to luxury, nothing beats the comfort
of a soft, warm towel. Warmup heated Towel Rails
not only bring comfort, they also help to heat a
bathroom.
Committed to innovation, whilst at the same time
being energy ecient, Warmup’s range of traditional
and contemporary Towel Rails oer a solution to
cater for all preferences, lifestyles and budget.
Features Technical Data HTR
680x450
HTR
800x600
HTR
800x600C
Sleek contemporary design Concealed Wiring
Adaptor available
Even heat all at once and
energy efficient Number of Bars 6 7 7
Discreet with concealed cable
kit Height mm 680 800 800
Versatile and easily installed
into new or existing homes Width mm 450 600 600
Fixing accessories kit, including
a diamond drill bit (for tiles),
for installation convenience
Depth mm 120 120 150
European compliant and CE
marked BTU output 188 341 341
5-Year Warranty Wattage 55 100 100
Amps @ 230Vac 0.23 0.43 0.43
IP Rating IP34 IP34 IP34
HTR 680x450 HTR 800x600 HTR 800x600-curved
Model
48 Call us now 0845 345 2288 or visit www.warmup.co.uk

Price Guide
Size & Description Price (Excl 20% VAT)
HTR 680 x 450 £187.49
HTR 800 x 600 £233.33
HTR 800 x 600 - Curved bars £266.66
Concealed Wiring Adaptor £9.99
Installation Guide
(Refer to installation manual for complete instructions)
The Towel Rails can be mounted by holding the Towel Rail in the
desired position on the wall. Mark the position on the wall, remove
the Towel Rail and drill holes into the tile/wall. Screw wall anchors
into position, ax the Towel Rail onto the anchors and tighten with
an allen key. Feed or recess power cables to point of connection.
The Towel Rail must be wired by a certied electrician.
Frequently Asked Questions
What material are the Towel Rails made from?
Warmup heated Towel Rails are made from the highest quality
stainless steel.
Do I need any special tools?
The kit comes complete with xing accessories, including a
diamond drill attachment for tiles for installation convenience.
What can I x the Towel Rail onto?
The Towel Rail is designed to be xed through wall cladding into
solid wall framing, solid cement or masonry walls. Plasterboard
toggles, at least 3mm diameter, may be used for two of the
towel rail xings.
Scan the code for more information
about this product.
Always refer to the installation manual
prior to commencing your project.
49
The world’s best-selling oor heating brand

For Commercial and Residential use
Warmup oers a range of solutions, whether commercial
walkways, loading docks and ramps or residential driveways
and stairs.
Snow Melting Cables
The resistance-heating element has a single end connection
and is completely grounded and safe. The 25W/m cable is ideal
for outdoor areas in concrete, under pavers or asphalt.
The Snowmelt Cable is available in 2 dierent versions to suit
concrete/slab and asphalt and oers a 10 year warranty.
For more information on the systems available or
application of Snowmelt, please contact our Sales Support
Team on 0845 345 2288 or visit www.warmup.co.uk
Outdoor Heating Solutions
When it comes to safety in winter, every precaution
should be taken. Using Warmup’s outdoor heating
solutions mean dangerous ice and snow
build-up is reduced in concrete, paved or asphalt
areas minimising the risk of accidents.
Concrete
Applications
Asphalt
Applications
Scan the code for more information
about this product.
Always refer to the installation manual
prior to commencing your project.
50 Call us now 0845 345 2288 or visit www.warmup.co.uk

Self-Regulating Cable
During the winter months when the temperature drops
and the snow fall increases, roofs and gutters are aected.
Warmup’s Self-Regulating Cable is perfect to protect pipes from
freezing and gutters, roofs and downspouts from dangerous
accumulation of ice and snow.
One of the unique dierences between the Self-Regulating
Cable and traditional heating cables is that the Self-Regulating
Cable can be cut to the exact length required without damaging
the heating properties of the cable.
Once the cable is in operation, it de-ices roofs and gutters from
snow build-up by responding to the ambient temperatures –
the heating output increasing, the colder the weather.
This ambient response function provides an energy ecient
solution as it only increases its heating output when needed
and achieves freeze protection by creating clear drain paths
required for melted snow and ice to ow freely, avoiding the
adverse results of winter.
For more information on the application of the
Self-Regulating Cable, please contact our Sales Support
Team on 0845 345 2288 or visit www.warmup.co.uk
Scan the code for more information
about this product.
Always refer to the installation manual
prior to commencing your project.
51
The world’s best-selling oor heating brand

Heaters can be xed or you can purchase a tripod to
give exibility to move the heater
Heats-up in seconds, provides coverage of c.10m2
Cost eective - 5 times CHEAPER to run than an
equivalent gas heater
Heaters are water-resistant
Guaranteed for 5,000 hours of usage
No need to rell
Patio Heaters
Warmup patio heaters are the perfect choice
for outdoors in courtyards, conservatories
and gardens.
Code Description Price (Excl 20% VAT)
WPH – 1760 Patio Heater £166.66
WPH-TP Patio Heater Tripod £104.17
WPH – TPB Tripod Bracket £35.00
Price Guide Warmup Patio
heater with tripod
Scan the code for more
information about this
product.
Always refer to the
installation manual prior to
commencing your project.
Warmup patio heaters emit radiant heating to warm
an area up to 10m2
52 Call us now 0845 345 2288 or visit www.warmup.co.uk

To calculate the underoor heating system(s) you require for
your room(s), you need to determine the working oor space
available to you. This is essentially the total amount of oor
space less the area taken up by any xed objects, i.e. kitchen
units, bath etc. as you do not place your cable/mat in these
areas. You only need to heat the area you will be walking on.
We would recommend that you allow a 5 centimetres (2
inch) gap between the walls and the area where you intend
to install the heating system.
Step 1 - Work out the total oor area. If the overall room is
rectangle in shape, say 4m by 3m – all you need to do is multiply
both numbers – which gives you 12 sqm.
Step 2 - Work out how much of the oor space is taken up
by xed objects, i.e., in your kitchen – start with the big items
and nish with small items. For example, assume you have
kitchen oor units 600mm in depth x 3m long; a free standing
fridge, 600mm x 600mm. You need to calculate these areas i.e,
0.6m x 3.0m = 1.8sqm and 0.6m x 0.6m = 1.2sqm = Total area
3.0sqm.
Step 3 - From Step 1 and Step 2 you now know the amount of
xed space: Step 1: 12 sqm Step 2 = 3 sqm
Step 4 - Now calculate the amount of free oor space for your
Warmup cable or mat:
Floor space = 12 sqm – 3 sqm = 9 sqm. Therefore, 9sqm is
what you require from your chosen Warmup system.
4 Easy Steps to Calculate your
Underoor Heating Requirements
for Electric Systems
53
The world’s best-selling oor heating brand

54 Call us now 0845 345 2288 or visit www.warmup.co.uk
Warmup oers you a complete bespoke solution
Warmup hydronic heating systems come designed and supplied
with a full set of high quality components and controls ready for
installation. Systems are available in a number of congurations
and components guaranteed to perfectly match your project and
budget.
Warmup systems come with a choice of 3 pipe types; PEX-A, PE-RT
and PE-RT/AL/PE-RT. This choice guarantees that you have the best
possible system, tailored to your specic installation and budget.
Warmup PEX-A hydronic pipe carries a Lifetime Warranty for
greater peace of mind. All other pipes carry a 50 year Warranty.
Warmup
Hydronic
Underoor
Heating Systems
Flooring
Types
Screed and
Concrete Floors
Timber Suspended
and Batten Floors Total-16
Page Number 60 - 69 70 - 77 78 - 79
Tile & Stone
Hardwood
Carpet
Laminate
Vinyl
Our unique SafetyNet™ Installation Guarantee means that should
you accidentally damage the pipe on site, Warmup will exchange
it free of charge.
LIFETIME
LIMITED
WARRANTY
LIFETIME
LIMITED
WARRANTY

55
The world’s best-selling oor heating brand

56 Call us now 0845 345 2288 or visit www.warmup.co.uk
Warmup
HydroPack
Installation Kit
HydroPack is an easy-to-specify kit that comes with everything you
need to install hydronic underoor heating. It is the ideal solution
for small projects of 22m2 or less (additional products available for
larger rooms), providing a maximum heat output of up to 3kW. The
kit includes the Warmup 3iE thermostat, the PE-RT pipe plus all the
components necessary to complete a successful underoor heating
installation in a few hours.
HydroPack allows you to quickly purchase and install a hydronic
system without the need to purchase each component separately.
All the components are compatible and from a single source,
packaged in one convenient kit for fast and easy installation.
You will need to ensure that the heat source has the sucient
capacity to supply sucient energy for the HydroPack and other
system requirements.
Features
Compact and lightweight modular installation kit, designed to be connected
onto existing pipework
Everything you need in one handy kit for quick and easy installation
All components are compatible and from a single source for reliability
Ideal solution for small projects of 22m2 or less, providing a maximum heat
output up to 3kW
Carries a comprehensive warranty of fifty (50) years on the pipe. You also get
Warmup’s unique SafetyNet™ Installation Guarantee – this means should you
accidentally damage the pipe on-site, Warmup will replace it free of charge

57
The world’s best-selling oor heating brand
HydroPack Kit Contents
The HydroPack installation kit is made up of
16mmx120m PE-RT pipe
Single room “A” rated energy ecient circulating pump/
mixer control unit
Compression ttings x 2
3iE™ Energy-Monitor Thermostat
Pipe clips x 600
Pipe cutter
Installation instructions
HydroPack – 22m2 UFH system
Installation & User Guide
Ideal for conservatories & extensions
Pump/mixing unit
Technical Specication
Compact bolt-on unit provides quick and easy installation
Easy to set-up with an adjustable temperature range of 35 oC to 65 oC
Delivers controlled mixed temperature water to the underfloor heating system
with heat output of up to 3kW
Controls flow temperature to +/-2 oC with changing boiler flow and return
temperature
Maximum Static Pressure: 10 bar
Maximum Temperature: 90 °C
Adjustable Control Range: 35 - 65 °C
Factory Pre-set: 35 °C (Minimum setting)
Fail Safe Feature

58 Call us now 0845 345 2288 or visit www.warmup.co.uk
Installation Guide
(Refer to installation manual for complete instructions)
Before commencing installation, ensure the insulation is laid on a
clean and level suboor. A perimeter strip or edge insulation will
need to be laid around the perimeter of the room. The insulation
should conform to building regulations or practices and laid as per
manufacturers instructions.
The compact control and pump unit should be wall mounted in
a vertical position on a suitable wall. Choose a suitable & solid
mounting location, ensuring adequate clearance for primary and
underoor heating pipework and accessibility of the control unit.
Begin to unwrap and uncoil the pipe from the inside centre of the
coil, cut the end o with the cutters to leave a neat square cut, but
leaving a rounded pipe (i.e. not compressed). Once the pipe has
gone through the compression tting, insert the pipe into the ow
from the mixer pump assembly for the underoor heating. Refer to
installation instructions.
Once connected, begin laying the pipework around the room using
the preferred pipe pattern (see examples below). Take care to turn
the coil of pipe as you uncoil it to relieve tension and staple the pipe
using the pipe clips provided into the insulation. An allowance of 5
clips per linear metre of pipe has been included. However less clips
may be required on the straight runs and more required on the loops.
Serpentine pipe layout
(for odd shaped or
specic-heat areas, i.e.
to concentrate ow near
windows or doors)
Spiral pipe layout
(for rectangular
shaped rooms where
even spread of heat is
required)

59
The world’s best-selling oor heating brand
Once the pipework has been laid, work out where to cut the pipe
for the nal connections to the pump/mixer kit. Insert into the nal
compression tting and connect to the pump/mixer valve. Tighten
the compression ttings.
First the pipework will need to be lled and ushed with fresh cold
water from the mains supply. Connect your hose to the ow side of
the mixing valve that will be connected to the main ow from the
heating system. Connect a hose to the return side of the mixing
valve, that will ow back to the heat source for reheating. Place the
mains water supply and ush through with the mains water until no
air bubbles can be seen in the discharge of water.
Using a pressure testing kit (available for hire from your local plant/
test hire or purchase from your local plumbers merchant), connect
to the red valve and open. Build the pressure up to 6 Bar and hold
for 1 hour. Once the test is complete then the system needs to be
left under pressure during the screeding process. At least 2 Bar
pressure is recommended for the process. This way if the pipework
is damaged a leak and drop in pressure will be shown, then
remedial repair work can take place as required.
Once the system has been installed and pressure tested it should be
protected by laying the oor screed as soon as possible.
Completing the job
If using a standard sand/cement screed, a thickness of between
65mm & 75mm on top of the insulation is recommended. The
screed & screeding works must comply with current Building
Regulations and attention must be paid to the curing times. Under
no circumstances should the underoor heating system be used
to force curing of the screed. The mixing valve on the control pack
should be set to the minimum temperature when commissioning
commences after the screed has cured as per manufacturers
instructions. Run with the heat on continuously for 3 days, after
this a steady increase of 2 - 3°C per day can be adopted up to the
desired working temperature. Then run for a further 4 days at
this temperature. Ensure relative humidity of the screed is correct
before laying oor nishes.
1
2
3
4
56
7
1. Floor Covering
2. Screed
3. Warmup Pipe
4. Warmup Clip
5. Warmup Clypso insulation
6. Suboor with built in DPM
7. Perimeter insulation

60 Call us now 0845 345 2288 or visit www.warmup.co.uk
The Clypso System uses plastic clips to secure the underoor
heating pipe to laminated insulation panels. The panels are
constructed from either PIR (polyisocyanurate) or expanded
polystyrene insulation with a fabric reinforced foil laminated to
their surface. The foil on each panel comes with two aps, for
taping to the adjoining panel, thereby increasing water resistance
and separating the insulation layer from the wet screed.
The laminated foil is printed with a grid pattern to make consistent
pipe-spacing easier for the installer, especially when required to
work around obstacles or a spiral installation pattern.
Insulation must comply with Building Regulations in force at the
time of approval and BS/EN1264.
The Clypso System is suitable for almost any oor nish and in
particular where the ooring (wood, carpet or vinyl) may be
replaced from time to time.
Warmup Clypso
System
Screed and Concrete Floors
Insulation Features
The insulation is lined in 50mm grids to assist the installer in quickly placing the
pipes in the correct design format and helps speed-up the installation process
Insulation fabric reinforced foil layer is woven to deliver extra security for
retention of the pipe. This also makes it easier to install and provides additional
protection against damage to the pipe prior to screed being laid
Various compressive strengths are available, which safely allows the floor build-
up to take imposed loads without damaging the integrity of the floor
When PEX-A
Pipe is used
Other pipes carry
50 year warranty
LIFETIME
LIMITED
WARRANTY
LIFETIME
LIMITED
WARRANTY

61
The world’s best-selling oor heating brand
Installation Guide
(Refer to installation manual for complete instructions)
Make a layout plan of your oor area by measuring your room and
then subtract any xtures (such as baths and cupboards).
Ensure the installation area is dry and sealed to the elements and
that you have a level oor surface. If installation is to take place onto a
concrete base, install Warmup’s polyethylene damp proof membrane
and assess whether supplementary insulation is required before
installing a perimeter insulation to prevent heat loss, allowing for some
suboor expansion due to temperature changes. Although insulation
is an integral part of the Clypso System, it may not fully comply with
Building Regulations for new-build projects; additional insulation may
be required, depending on the existing suboor construction.
The Clypso Insulation panels are then installed, covering the entire
oor area providing an insulated surface for pipe installation. Once the
Insulation panels are in place and the overlapping foil is taped down,
the Warmup pipe circuits can be installed using a purpose-built clip
gun and Warmup clips.
The pipe is then xed into place on the Clypso Insulation panels
according to a predesigned pattern.
Before the screed is poured, attach the pipe to the manifold and
pressure test to ensure the system is sound. The system should be left
under pressure until the ooring process is complete.
Completing the job
Once the system has been tested, the screed should be laid over the
system as soon as possible to prevent damage to the pipe and to
allow the drying process to begin. The screed must be allowed to dry
naturally until full strength is reached before turning on the underoor
heating, unless the screed manufacturer’s instructions say otherwise.
The heating system is then turned on, gradually increasing the
temperature of the oor over a number of days until the desired
temperature is reached. Turning on the system too early or too high
will dry the screed too quickly, damaging the screed. Underoor
heating and screed commissioning must take place as per
manufacturer’s instructions and British Standards.
1
2
3
4
56
7
1. Floor Covering
2. Screed
3. Warmup Pipe
4. Warmup Clip
5. Warmup Clypso insulation
6. Suboor with built in DPM
7. Perimeter insulation

62 Call us now 0845 345 2288 or visit www.warmup.co.uk
The Metro Rail System uses pre-moulded retention clips. The rail is
located on top of the insulation layer and is separated by a plastic
membrane. The Metro Rail System allows pipes to be spaced as
close as 50mm. The system holds the pipework in place until the
screed is applied.
It is suitable for almost any oor nish and in particular where the
ooring (wood, carpet or vinyl) may be replaced from time to time.
Installation Guide
(Refer to installation manual for complete instructions)
Make a layout plan of your oor area by measuring your room and
then subtract any xtures (such as baths and cupboards).
Ensure the installation area is dry and sealed to the elements
and that you have a level oor surface. If installation is to take
place onto a concrete base, install Warmup’s polyethylene damp
proof membrane and assess whether supplementary insulation is
Warmup Metro
Rail System
Screed and Concrete Floors
Features
Designed to allow quick and easy installation - the rail provides guidance on
how to install the pipework quickly and at the correct design spacing levels
Holds the pipe at the correct level prior to screeding to ensure there are no hot
spots
When PEX-A
Pipe is used
Other pipes carry
50 year warranty
LIFETIME
LIMITED
WARRANTY
LIFETIME
LIMITED
WARRANTY

63
The world’s best-selling oor heating brand
required before installing a perimeter insulation to prevent heat
loss, allowing for some suboor expansion due to temperature
changes. Although insulation is an integral part of the Metro Rail
System, it may not fully comply with Building Regulations for new-
build projects; additional insulation may be required, depending on
the existing suboor construction.
The Insulation panels are then laid and xed to the suboor
throughout the room and covered with a plastic membrane before
installing the Metro Rail system on top. The Metro Rails are held in
place using either an adhesive backing or by integrated xing pins,
depending on the insulation system used.
When the Metro Rail system is rmly xed in place the pipe is then
laid according to a predesigned pattern.
Once installed, attach the pipe to the manifold and pressure test
to ensure the system is sound. The system should be left under
pressure until the ooring process is complete.
Completing the job
Once the system has been tested, the screed should be laid over
the system as soon as possible to prevent damage to the pipe and
to allow the drying process to begin. The screed must be allowed
to dry naturally until full strength is reached before turning on the
underoor heating, unless the screed manufacturer’s instructions
say otherwise.
The heating system is then turned on, gradually increasing the
temperature of the oor over a number of days until the desired
temperature is reached. Turning on the system too early or too high
will dry the screed too quickly, damaging the screed. Underoor
heating and screed commissioning must take place as per
manufacturer’s instructions and British Standards.
1
2
34
5
6
7
8
1. Floor Covering
2. Screed
3. Warmup Pipe
4. Warmup Metro Rail
5. Plastic Membrane
6. Insulation
7. Suboor with built in DPM
8. Perimeter Insulation

64 Call us now 0845 345 2288 or visit www.warmup.co.uk
The Tella Grid System uses a wire grid to which the underoor
heating pipework is attached using Warmup plastic cable ties.
The wire grid is typically used to add structural support to the
suboor where extra strength is required due to high oor loadings.
The Tella Grid System is suitable for almost any oor nish and
in particular where the ooring (wood, carpet or vinyl) may be
replaced from time to time.
Installation Guide
(Refer to installation manual for complete instructions)
Make a layout plan of your oor area by measuring your room and
then subtract any xtures (such as baths and cupboards).
Ensure the installation area is dry and sealed to the elements
and that you have a level oor surface. If installation is to take
place onto a concrete base, install Warmup’s polyethylene damp
proof membrane and assess whether supplementary insulation is
required before installing a perimeter insulation to prevent heat
Warmup Tella Grid
System
Screed and Concrete Floors
Features
Wire grid provides best solution when a structural screed is required,
particularly for heavy and high loads
Grid protects the integrity of the insulation from damage until the structural
screed is laid
When PEX-A
Pipe is used
Other pipes carry
50 year warranty
LIFETIME
LIMITED
WARRANTY
LIFETIME
LIMITED
WARRANTY

65
The world’s best-selling oor heating brand
loss, allowing for some suboor expansion due to temperature
changes. Warmup insulation panels are an integral part of the Tella
Grid System, however, for new-build projects, additional insulation
may be required to comply with building regulations, depending
on the existing suboor construction.
The Insulation boards are then laid and xed to the suboor
throughout the room and covered with a plastic membrane before
installing the Tella Grid.
Warmup’s heating pipe is then laid out according to a predesigned
pattern until your desired heated area is covered. The pipe should
then be secured to the Tella Grid with plastic cable ties.
Then attach the pipe to the ow connection on the manifold and
pressure test to ensure the system is sound. The system should be
left under pressure until screeded.
Completing the job
Once the system has been tested, the screed should be laid over
the system as soon as possible to prevent damage to the pipe and
to allow the drying process to begin. The screed must be allowed
to dry naturally until full strength is reached before turning on the
underoor heating, unless the screed manufacturer’s instructions
say otherwise.
The heating system is then turned on, gradually increasing the
temperature of the oor over a number of days until the desired
temperature is reached. Turning on the system too early or too high
will dry the screed too quickly, damaging the screed. Underoor
heating and screed commissioning must take place as per
manufacturer’s instructions and British Standards.
1
2
3
8
54
6
7
1. Floor Covering
2. Screed
3. Warmup Pipe
4. Plastic Cable Tie
5. Warmup Wire Grid
6. Warmup Insulation
7. Suboor with built in DPM
8. Perimeter Insulation

66 Call us now 0845 345 2288 or visit www.warmup.co.uk
The Nexxa Panel System is used primarily where there are oor
build-up issues to deal with. It can substantially reduce the overall
build-up of the oor structure.
Warmup system plates are interlocking vacuum formed sheets of
plastic, incorporating pipe-locating castles. Sheets are laid over
the sub oor and thermally insulated within the castellations and
10mm as a base. Additional insulation may be required to meet
the Building Regulations. The edges are over-lapped by 75mm
inter-locking them to form a continuous layer.
The Nexxa Panel System is suitable for almost any oor nish and
in particular where the ooring (wood, carpet or vinyl) may be
replaced from time to time.
Installation Guide
(Refer to installation manual for complete instructions)
Make a layout plan of your oor area by measuring your room and
then subtract any xtures (such as baths and cupboards).
Warmup Nexxa
Panel System
Screed and Concrete Floors
Features
Nexxa panel being of a low build up of just 30mm including the 20mm
castellation is ideal for refurbishments or new build where a low build up floor
is required
Retains pipework prior to screeding
Self-retaining system, no clips required
When PEX-A
Pipe is used
Other pipes carry
50 year warranty
LIFETIME
LIMITED
WARRANTY
LIFETIME
LIMITED
WARRANTY

67
The world’s best-selling oor heating brand
Ensure the installation area is dry and sealed to the elements
and that you have a level oor surface. If installation is to take
place onto a concrete base, install Warmup’s polyethylene damp
proof membrane and assess whether supplementary insulation is
required before installing a perimeter insulation to prevent heat
loss, allowing for some suboor expansion due to temperature
changes. Although insulation is an integral part of the Nexxa Panel
System it may not fully comply with Building Regulations for new-
build projects; additional insulation may be required, depending on
the existing suboor construction.
The Nexxa Panels should be laid to have the edges overlapping by
75mm and interlocking with each new panel, creating a continuous
layer.
Warmup’s heating pipe is then laid out according to a predesigned
pattern, ensuring that the pipe is rmly clipped down in each panel.
Once installed, attach the pipe to the manifold and pressure test
to ensure the system is sound. The system should be left under
pressure until the ooring process is complete.
Completing the job
Once the system has been tested, the screed should be laid over
the system as soon as possible to prevent damage to the pipe and
to allow the drying process to begin. The screed must be allowed
to dry naturally until full strength is reached before turning on the
underoor heating, unless the screed manufacturer’s instructions
say otherwise.
The heating system is then turned on, gradually increasing the
temperature of the oor over a number of days until the desired
temperature is reached. Turning on the system too early or too high
will dry the screed too quickly, damaging the screed. Underoor
heating and screed commissioning must take place as per
manufacturer’s instructions and British Standards.
1
2
3
4
56
7
1. Floor Covering
2. Screed
3. Warmup Pipe
4. Warmup Nexxa Panel
5. Warmup Insulation
6. Suboor with built in DPM
7. Perimeter Insulation

68 Call us now 0845 345 2288 or visit www.warmup.co.uk
The Forte Grid System is designed for installation into load-bearing
structural oors.
The Forte Grid System incorporates wire grids to which the
underoor heating pipework is attached using cable ties.
The Forte Grid System is either located within a concrete or
structural screed, but is suitable for almost any oor nish, in
particular where the ooring is for a commercial application, such
as epoxy paint or resin.
Installation Guide
(Refer to installation manual for complete instructions)
Make a layout plan of your oor area by measuring your room and
then subtract any xtures (such as baths and cupboards).
Ensure the installation area is dry and sealed to the elements
and that you have a level oor surface. If installation is to take
place onto a concrete base, install Warmup’s polyethylene damp
proof membrane and assess whether supplementary insulation is
required before installing a perimeter insulation to prevent heat
loss, allowing for some suboor expansion due to temperature
Warmup Forte
Grid System
Screed and Concrete Floors
Features
Pipework is fastened to the reinforced bars without impacting the integrity of
the floor
To ensure the most heat responsive floor, the pipe can be installed in the
centre of the concrete zone
When PEX-A
Pipe is used
Other pipes carry
50 year warranty
LIFETIME
LIMITED
WARRANTY
LIFETIME
LIMITED
WARRANTY

69
The world’s best-selling oor heating brand
changes. Warmup insulation panels are an integral part of the Tella
Grid System, however, for new-build projects, additional insulation
may be required to comply with building regulations, depending
on the existing suboor construction.
The Insulation boards are then laid over a compacted level bed of
hardcore and xed to the suboor throughout the room before
being covered with a plastic membrane.
The Forte Grids are then laid over the plastic membrane.
Warmup’s heating pipe is then laid out according to a predesigned
pattern, with the pipe being secured to the Forte Grid with plastic
cable ties.
In some cases, an additional structural reinforcement grid can be
added above the pipe for additional strength. This additional grid
will normally be laid on castles to ensure the mesh is at the correct
height ready for the screeding process.
Once installed, attach the pipe to the manifold and pressure test
to ensure the system is sound. The system should be left under
pressure until the ooring process is complete.
Completing the job
Once the system has been tested, the screed should be laid over
the system as soon as possible to prevent damage to the pipe and
to allow the drying process to begin. The screed must be allowed
to dry naturally until full strength is reached before turning on the
underoor heating, unless the screed manufacturer’s instructions
say otherwise.
The heating system is then turned on, gradually increasing the
temperature of the oor over a number of days until the desired
temperature is reached. Turning on the system too early or too high
will dry the screed too quickly, damaging the screed. Underoor
heating and screed commissioning must take place as per
manufacturer’s instructions and British Standards.
1
2
3
45
6
7
1. Floor Covering
2. Concrete
3. Warmup Forte Grid
4. Plastic Membrane
5. Warmup Insulation
6. Suboor with built in DPM
7. Perimeter Insulation

70 Call us now 0845 345 2288 or visit www.warmup.co.uk
The Econna Joisted Floor System is a composite wood load bearing
slotted 22mm oor with return ends.
It is designed to t on top of standard wood joists of 400mm to
600mm c/c max. This replaces the standard board in the oor
construction.
The Econna Joisted Floor System is suitable for almost any oor
nish, in particular where the ooring (wood, carpet or vinyl) may
be replaced from time to time.
Installation Guide
(Refer to installation manual for complete instructions)
Make a layout plan of your oor area by measuring your room and
then subtract any xtures (such as baths and cupboards).
Before commencing installation, assess whether supplementary
insulation is required. Although insulation is an integral part of the
Econna System it may not fully comply with Building Regulations
Warmup Econna
Joisted Floor
System
Timber Suspended and
Batten Floors
Features
Pipe is built into the structural floor, allowing faster heat-up response times
No screeding required
When PEX-A
Pipe is used
Other pipes carry
50 year warranty
LIFETIME
LIMITED
WARRANTY
LIFETIME
LIMITED
WARRANTY

71
The world’s best-selling oor heating brand
for new-build projects; additional insulation may be required,
depending on the existing suboor construction.
Rigid insulation of the required depth is placed between the joists
before laying the Econna routed ooring layer. The Econna routed
ooring layer is then screwed to the joists avoiding the pre-routed
groves.
Warmup aluminium diusion plates are then laid on top of the
Econna routed ooring layer in the straight grooves only, leaving
the return grooves bare.
The Warmup Pipe is then tted into the Diusion Plate and Econna
Routed groves according to a predesigned pattern.
Once installed, attach the pipe to the manifold and pressure test
to ensure the system is sound. The system should be left under
pressure until the ooring process is complete.
Completing the job
Once the system has been tested, the nal ooring should be laid
over the system as soon as possible to prevent damage to the pipe.
The heating system is then turned on, gradually increasing the
temperature of the oor over a number of days until the desired
temperature is reached. Turning on the system too early or too high
will damage the ooring.
Design parameters should not be exceeded and specic
manufacturer’s information should be adhered to.
1
2
3
4
5
6
1. Timber Floor Covering (18mm minimum)
2. Optional Thin Wood Floor Underlay
3. Warmup Diusion Plate
4. Warmup Pipe
5. Warmup Econna Routed Flooring
6. Joists
7. Insulation
7

72 Call us now 0845 345 2288 or visit www.warmup.co.uk
The Silva Joisted Floor System is installed in many refurbishment
projects.
Joists traditionally tend to be installed at 400mm centres. However,
Warmup can supply a more bespoke system to suit individual
properties with varying joist centres as required.
The Silva Joisted Floor System is suitable for almost any oor nish,
in particular where the ooring is wood or engineered wood.
Installation Guide
(Refer to installation manual for complete instructions)
Make a layout plan of your oor area by measuring your room and
then subtract any xtures (such as baths and cupboards).
The Clypso insulation for the Silva Joisted Floor system is installed
between the existing joists using battens or noggins to hold the
insulation in place. The Clypso insulation should be tted tight to
the joists without any gaps and should cover the entire oor area,
Warmup Silva
Joisted Floor
System
Timber Suspended and
Batten Floors
Features
Suitable for use under existing wooden floors
System installed between floor joists
Does not impact on floor heights
Lightweight screed provides fast heat-up response times
When PEX-A
Pipe is used
Other pipes carry
50 year warranty
LIFETIME
LIMITED
WARRANTY
LIFETIME
LIMITED
WARRANTY

73
The world’s best-selling oor heating brand
providing an insulated surface for pipe installation. Any holes or
gaps that cannot be covered by the insulating panels should be
lled using expanding foam.
The height of the Clypso Insulation panels should be set so that
the top of the panels are in accordance with the system design,
allowing for proper coverage of the pipe by the lightweight screed
and to nish level with the joists.
In order to feed the pipe across a joist, a notch is cut into the top of
the joist.
Once the Clypso Insulation panels are in place, the pipe circuits can
be installed according to a predesigned pattern using a purpose-
built clip gun and Warmup clips.
Before the screed is poured, the Warmup pipe is attached to
the manifold and pressure tested to ensure the system is sound.
The system is then left under pressure until the ooring process is
complete.
Completing the job
Once the system has been tested, the screed should be laid over
the system as soon as possible to prevent damage to the pipe and
to allow the drying process to begin.
The screed should be level with the top of the joists and must
be allowed to dry naturally until full strength is reached before
installing the oor covering.
The heating system is then turned on, gradually increasing the
temperature of the oor over a number of days until the desired
temperature is reached. Turning on the system too early or too high
will dry the screed too quickly, damaging the screed. Underoor
heating and screed commissioning must take place as per
manufacturer’s instructions and British Standards.
1
23
4
5
6
1. Floor Covering
2. Lightweight Screed
3. Joists
4. Warmup Pipe
5. Warmup Clip
6. Insulation with membrane

74 Call us now 0845 345 2288 or visit www.warmup.co.uk
The Tectora Joisted Batten Floor System is particularly suitable
where there is a sprung/cradled battened oor or oor joists. It can
be used in battened installations over a concrete suboor, variable
height oor battens are employed to create a void of between 50
to 100mm.
The batons can be sprung or on cradles to create an acoustic oor.
For this installation, a diusion plate system is generally used if
standard installation types are not suitable.
For installing as a joisted system, the rigid insulation is placed
between the joists to support the diusion plates, as they span the
joists.
The Tectora Joisted Batten Floor System is suitable for almost any
oor nish, in particular wood or engineered wood.
Warmup Tectora
Joisted Batten
Floor System
Timber Suspended and
Batten Floors
Features
Diffusion plates spread heat efficiently without increasing floor build-up
System promotes fast heat-up response times
No screeding required
When PEX-A
Pipe is used
Other pipes carry
50 year warranty
LIFETIME
LIMITED
WARRANTY
LIFETIME
LIMITED
WARRANTY

75
The world’s best-selling oor heating brand
Installation Guide
(Refer to installation manual for complete instructions)
Make a layout plan of your oor area by measuring your room and
then subtract any xtures (such as baths and cupboards).
Required battens to support the insulation will need to be designed
and installed by the ooring contractor and co-ordinated with the
installer of the Tectora System.
Ensure the installation area is dry and sealed to the elements and
that you have a level oor surface. If installation is to take place onto a
concrete base, install Warmup’s polyethylene damp proof membrane.
You should assess whether supplementary insulation is required
before installing a perimeter insulation to prevent heat loss, allowing
for some suboor expansion due to temperature changes. Although
insulation is an integral part of the Tectora System it may not fully
comply with Building Regulations for new-build projects; additional
insulation may be required, depending on the existing suboor
construction.
Rigid insulation of the required depth is placed between the
preinstalled battens before xing the Tectora diusion plates to the
battens with screws.
The Warmup pipe is then tted into the Tectora diusion plates groove
according to a predesigned pattern.
Once installed, attach the pipe to the manifold and pressure test to
ensure the system is sound. The system should be left under pressure
until the ooring process is complete.
Completing the job
Once the system has been tested, the nal ooring should be laid over
the system as soon as possible to prevent damage to the pipe.
The heating system is then turned on, gradually increasing the
temperature of the oor over a number of days until the desired
temperature is reached. Turning on the system too early or too high
will damage the ooring.
Design parameters should not be exceeded and specic
manufacturer’s information should be adhered to.
1
2
3
4
5
6
1. Floor Covering
2. Battens
3. Warmup Tectora Diusion Plates
4. Warmup Pipe
5. Warmup Insulation
6. Suboor with built in DPM

76 Call us now 0845 345 2288 or visit www.warmup.co.uk
The Contura Floating Floor System (combines preformed insulation
and diusion plates) is used where heating is installed onto a
concrete or solid wooden suboor but where a dry nish is used in
place of a standard screed covering.
This system typically has a lower wattage per square metre output
(75w/m²) compared to traditional screeded oors.
It is used primarily in new build on upper oors where insulation
levels are higher, lowering the heat requirements.
It is suitable in refurbishment projects where suciently increased
levels of insulation is applied. It can be installed under almost any
oor nish, in particular engineered wood and composite laminate
wood.
Warmup Contura
Floating Floor
System
Timber Suspended and
Batten Floors
Features
Comprehensive choice of board strengths and thickness available to match
individual requirements
Overlay system requires no screeding
System promotes fast heat-up response times
When PEX-A
Pipe is used
Other pipes carry
50 year warranty
LIFETIME
LIMITED
WARRANTY
LIFETIME
LIMITED
WARRANTY

77
The world’s best-selling oor heating brand
Installation Guide
(Refer to installation manual for complete instructions)
Make a layout plan of your oor area by measuring your room and
then subtract any xtures (such as baths and cupboards).
Ensure the installation area is dry and sealed to the elements
and that you have a level oor surface. As the Contura Floating
Floor System is installed directly onto a concrete base, install
Warmup’s polyethylene damp proof membrane, assess whether
supplementary insulation is required. Insulation is an integral part
of the Contura System, but may not fully comply with Building
Regulations for new-build projects; additional insulation may be
required, depending on the existing suboor construction.
Lay the Contura Insulation directly onto the concrete suboor
before tting Warmup’s diusion plates in the straight groves of the
insulation only, leaving the return grooves clear.
Carefully insert the Warmup pipe into the pre-moulded Contura
grooves according to a predesigned pattern until your desired
heated area is covered.
Once installed, attach the pipe to the manifold and pressure test
to ensure the system is sound. The system should be left under
pressure until the ooring process is complete.
Completing the job
Once the system has been tested, the nal ooring should be laid
over the system as soon as possible to prevent damage to the pipe.
The heating system is then turned on, gradually increasing the
temperature of the oor over a number of days until the desired
temperature is reached. Turning on the system too early or too high
will damage the ooring.
Design parameters should not be exceeded. Manufacturer’s
instructions must be followed.
1
2
3
4
5
1. Floor Covering
2. Warmup Diusion Plate
3. Warmup Pipe
4. Warmup Contoured Insulation
5. Suboor with built in DPM

78 Call us now 0845 345 2288 or visit www.warmup.co.uk
Total-16 is a low build (16mm), no screed required, lightweight
yet heavy-duty hydronic insulation system with inbuilt diusion
plate.
The system is designed for use with Warmup’s 12mm PEX-A pipe,
which is inserted into the insulation boards. Warmup’s 12mm
PEX-A pipe is at the heart of the low prole system because it
is strong, exible and kink resistant and it comes with our best
warranty and guarantee.
With Total-16’s build-up of only 16mm and the straight boards
supplied with integrated aluminium heat diuser plates, the
installation time is signicantly reduced. This makes Total-16
ideal for new-build and refurbishment projects where oor
height is at a premium and installation speed is of the essence.
Total-16 is installed onto either concrete or wooden sub-oors
and can be used under almost any oor nish, including solid
and engineered wood, ceramic, stone oors as well as vinyl and
carpet.
Total-16 is comprised of straight boards, with integrated
aluminium plates, multi-feed boards and return boards. These
boards are made of a high density EPS and can support 40
tonnes/m2.
Warmup Total-16
Low Prole System
Insulation
Features Specication
Suitable for almost any floor finish,
including tiles
Thermal conductivity:
0.034 W/mK @ 10° C
Ultra low weight - only 1.7 Kg for the
straight, multi-feed and return boards
Compressive strength: 400kPa
(40 tonnes/m²)
Ultra low height - only 16mm Thermal output: Up to 111 W/m²
Aluminium heat diffusion plates are
pre-installed, reducing installation time
Straight boards are moulded at
150mm pipe centres
Can be supplied with or without return
ends
LIFETIME
LIMITED
WARRANTY
LIFETIME
LIMITED
WARRANTY
NEW! NEW! NEW!

79
The world’s best-selling oor heating brand
Installation Guide
(Refer to installation manual for complete instructions)
Make a layout plan of your oor area by measuring your room and
then subtract any xtures (such as baths and cupboards).
Before commencing installation, assess whether supplementary
insulation is required. Insulation is an integral part of the Warmup
Total-16, but may not fully comply with Building Regulations for
new-build projects.
Ensure the installation area is dry, level and sealed from the
elements. In most cases Total-16 can be laid as a oating oor, but
for tiled ooring or vinyl ooring in wet areas, the Total-16 boards
must be xed to the suboor using Seal Adhesive or Glue (see p89).
When tiling on Total-16, the boards and aluminium plates must be
primed using Warmup’s WHS-X-Primer. For heavy footfall areas,
tiling directly onto the Total-16 boards is not recommended.
1
2
34
5
1. Floor Covering
2. Diusion Plate (part of Total-16)
3. Warmup Total-16 Insulation
4. Warmup 12mm PEX-A Pipe
5. Suboor with built in DPM
12 mm. 16 mm.
Lay the Total-16 low prole system to match the layout plan.
Carefully insert the PEX-A 12mm pipe into the pre-moulded
groves until your desired heated area is covered.
Then attach the 12mm PEX-A pipe to the ow connection on the
manifold - use the Warmup pipe bend support (WHS-P-BEND12)
to hold the pipe at a 90° angle. Following a single meander
pattern, install the pipe in the boards by pushing into the
grooves of the heat diuser plates. Finally, x another pipe bend
support to the return pipe and connect to the manifold.

80 Call us now 0845 345 2288 or visit www.warmup.co.uk
Warmup Dual
Overlay Concrete
Dual Overlay Concrete is a fast track oor preparation system for
use as a screed replacement system which can be installed over
the Econna, Contura and Total-16 hydronic systems. It is suitable
for installation under many oor coverings such as tiles, wood and
resilient oors.
Installation is quick, clean and dry making it an easier option for
installers. The low heat resistance allows heat to pass through
the oor nish without any reduction to the eciency, evenly
distributing the heat and alleviating any hot spots.
Dual Overlay Concrete consists of a base and top board. Both
boards are provided with contact adhesive, bonding them together
to make one solid suboor.
Technical Data
Size 1,200mm x 600mm
Thickness 2 x 6mm
Composition
Cement, Silica (quartz), Cellulose
and filling material, fitted with an
interactive adhesive
Weight per panel (kg) 7.5
Weight per m² (kg) 21
Tog 0.4
Thermal Rm value (m².K.W.-1) 0.038
Fire Class EN 13501: 2007 B
Features
Provides a stable subfloor on which a variety of floor coverings can be laid
Suitable for our Econna & Contura hydronic underfloor heating systems
Installation is quick and easy
Provides even heat distribution
..s1
Screed Replacement Board

81
The world’s best-selling oor heating brand
(Refer to installation manual for complete instructions)
The Warmup Dual Overlay is comprised of a 6mm deep cement
bottom board and 6mm deep cement top board. The bottom and
top layers are laid out with staggered joints and arranged so that
the top boards overlap the joints in the base boards. The Warmup
Hydronic Heating System lays below a decoupling layer and the
Dual Overlay Concrete System. This method of installation provides
a stable surface for the oor nish to rest on and avoid any joints
showing through the nal oor nish. Finally, the oor nish can
either be glued to the boards as a nal layer or simply laid freely
upon them.
Floor Cutaway - Based on Econna Installation
Dual Overlay Concrete with Resilient Floor
1. Resilient Floor Covering
2. Thinset bre-reinforced screed
3. Dual Over Lay Concrete Boards
4. Warmup Pipe
5. Perimeter Strip
6. Decoupling Layer
7. Econna Underoor Heating System
Dual Overlay Concrete with Tiled Floor
1. Tiled oor
2. Flexible tile adhesive with
glassbre mesh
3. Dual Over Lay Concrete Boards
4. Warmup Pipe
5. Perimeter Strip
6. Decoupling Layer
7. Econna Underoor Heating System
Installation Guide
1. Floating Wood Floor (18mm maximum)
2. Optional Thin Wood Floor Underlay
3. Dual Over Lay Concrete Boards
4. Warmup Pipe
5. Perimeter Strip
6. Decoupling Layer
7. Econna Underoor Heating System
Dual Overlay Concrete with Floating Wood Floor
1. Glued Wood Floor
2. Fixed 8mm Chipboard Layer
3. Dual Over Lay Concrete Boards
4. Warmup Pipe
5. Perimeter Strip
6. Decoupling Layer
7. Econna Underoor Heating System
Dual Overlay Concrete with Glued Wood Floor

82 Call us now 0845 345 2288 or visit www.warmup.co.uk
Warmup Thermostats
4iE ENERGYMONITOR THERMOSTAT
CODE DESCRIPTION RRP
(Excl. VAT)
PACK
QTY
4iE™ OB Onyx Black Programmable Thermostat £166.66 1
4iE™ BP Bright Porcelain Programmable
Thermostat £166.66 1
3iE ENERGYMONITOR THERMOSTAT
CODE DESCRIPTION RRP
(Excl. VAT)
PACK
QTY
3iE™ PB Piano Black Programmable Thermostat £120.83 1
3iE™ CC Classic Cream Programmable Thermostat £120.83 1
3iE™ SG Silver Grey Programmable Thermostat £129.99 1
3iE™ LG Leaf Green Programmable Thermostat £129.99 1
3iE™ MB Madison Blue Programmable
Thermostat £129.99 1
3iE™ DP Deep Pink Programmable Thermostat £129.99 1
3iE™ WB Warm Berry Programmable Thermostat £129.99 1
TEMPO DIGITAL PROGRAMMABLE THERMOSTAT
CODE DESCRIPTION RRP
(Excl. VAT)
PACK
QTY
ELT PB Tempo - Piano Black £83.33 1
ELT PW Tempo - Porcelain White £83.33 1
Warmup HydroPack
CODE DESCRIPTION RRP
(Excl. VAT)
PACK
QTY
WHS-HYDRO
PACK-22
HydroPack Installation Kit for
projects up to 22m² £715.24 1
WARMUP HYDROPACK INSTALLATION KIT
CODE DESCRIPTION RRP
(Excl. VAT)
PACK
QTY
WHS-M-S-
RM01
A Rated Single Room / Zone Manifold
with Pump / Mixing unit £535.71 1
A RATED SINGLE ROOM / ZONE MANIFOLD WITH PUMP /
MIXING UNIT
Price Guide

83
The world’s best-selling oor heating brand
J Range Thermostats & Controls
For Heating & Cooling
CODE DESCRIPTION RRP
(Excl. VAT)
PACK
QTY
WHS-J-SWC 240v Standard Master wiring centre £291.79 1
240V STANDARD MASTER WIRING CENTRE
CODE DESCRIPTION RRP
(Excl. VAT)
PACK
QTY
WHS-J-EK
Extension kit to connect Cat5e
cabling to
wiring centres
£26.55 1
EXTENSION KIT TO CONNECT CAT5E CABLING TO WIRING
CENTRES
CODE DESCRIPTION RRP
(Excl. VAT)
PACK
QTY
WHS-J-SEN-H Humidity sensor for hydronic
systems £159.14 1
HUMIDITY SENSOR FOR HYDRONIC SYSTEMS
CODE DESCRIPTION RRP
(Excl. VAT)
PACK
QTY
WHS-J-
SWITCH
Heating/cooling switch for hydronic
systems £195.74 1
HEATING/COOLING SWITCH FOR HYDRONIC SYSTEMS
CODE DESCRIPTION RRP
(Excl. VAT)
PACK
QTY
WHS-J-
BMSDWC
240v BMS Digital master wiring
centre £867.29 1
WHS-J-DWC 240v Digital master wiring centre £722.74 1
240V BMS DIGITAL MASTER WIRING CENTRE
CODE DESCRIPTION RRP
(Excl. VAT)
PACK
QTY
WHS-J-SEN-A Standard ambient dial sensor £65.30 1
STANDARD AMBIENT DIAL SENSOR
Warmup HydroPack
CODE DESCRIPTION RRP
(Excl. VAT)
PACK
QTY
WHS-J-4ET 4 event timer thermostat £185.63 1
4EVENT TIMER THERMOSTAT

84 Call us now 0845 345 2288 or visit www.warmup.co.uk
CODE DESCRIPTION RRP
(Excl. VAT)
PACK
QTY
WHS-S-SLV4Z 230V 4 zone slave unit for hydronic
systems £48.36 1
CODE DESCRIPTION RRP
(Excl. VAT)
PACK
QTY
WHS-S-SLV6Z 230V 6 zone slave unit for hydronic
systems £55.79 1
230V 4 ZONE SLAVE UNIT FOR HYDRONIC SYSTEMS
230V 6 ZONE SLAVE UNIT FOR HYDRONIC SYSTEMS
CODE DESCRIPTION RRP
(Excl. VAT)
PACK
QTY
WHS-S-230TP 230v Tamperproof room thermostat
for hydronic systems £34.39 1
CODE DESCRIPTION RRP
(Excl. VAT)
PACK
QTY
WHS-S-SEN Wet Area Box & 3metre class 2
sensor 10k £9.29 1
230V TAMPERPROOF ROOM THERMOSTAT FOR HYDRONIC
WET AREA BOX & 3METRE CLASS 2 SENSOR 10K
CODE DESCRIPTION RRP
(Excl. VAT)
PACK
QTY
WHS-S-
TIMER230
230v Plug-in timer for hydronic
systems £79.86 1
230V PLUGIN TIMER FOR HYDRONIC SYSTEMS
CODE DESCRIPTION RRP
(Excl. VAT)
PACK
QTY
WHS-C-
B-D230
Digital room thermostat for hydronic
systems £50.89 1
CODE DESCRIPTION RRP
(Excl. VAT)
PACK
QTY
WHS-C-
B-M230
230v Dual temp thermostat for
hydronic systems £33.07 1
CODE DESCRIPTION RRP
(Excl. VAT)
PACK
QTY
WHS-C-B-
MASTER01
230v Master wiring box 4 zone for
hydronic systems £64.86 1
S Range Thermostats & Controls
DIGITAL ROOM THERMOSTAT FOR HYDRONIC SYSTEMS
230V DUAL TEMP THERMOSTAT FOR HYDRONIC SYSTEMS
230V MASTER WIRING BOX 4 ZONE FOR HYDRONIC SYSTEMS

85
The world’s best-selling oor heating brand
CODE DESCRIPTION RRP
(Excl. VAT)
PACK
QTY
WHS-
CL-B07025
Clypso 25mm thickness gridded insulation
board, EPS 070, 2.4m x 1.2m (pack of 12) £134.14 12
WHS-
CL-B07050
Clypso 50mm thickness gridded insulation
board, EPS 070, 2.4m x 1.2m (pack of 6) £99.64 6
WHS-
CL-B07075
Clypso 75mm thickness gridded insulation
board, EPS 070, 2.4m x 1.2m (pack of 4) £88.29 4
WHS-
CL-B07100
Clypso 100mm thickness gridded
insulation board, EPS 070, 2.4m x 1.2m
(pack of 3)
£82.50 3
WHS-
CL-B10025
Clypso 25mm thickness gridded insulation
board, EPS 100, 2.4m x 1.2m (pack of 12) £177.43 12
WHS-
CL-B10050
Clypso 50mm thickness gridded insulation
board, EPS 100, 2.4m x 1.2m (pack of 6) £143.36 6
WHS-
CL-B10075
Clypso 75mm thickness gridded insulation
board, EPS 100, 2.4m x 1.2m (pack of 4) £131.86 4
WHS-
CL-B10100
Clypso 100mm thickness gridded
insulation board, EPS 100, 2.4m x 1.2m
(pack of 3)
£126.11 3
WHS-
CL-B07025+
Clypso 25mm thickness gridded insulation
board, EPS 070, 2.4m x 1.2m Premium
range (pack of 12)
£210.43 12
WHS-
CL-B07050+
Clypso 50mm thickness gridded insulation
board, EPS 070, 2.4m x 1.2m Premium
range (pack of 6)
£175.93 6
WHS-
CL-B07075+
Clypso 75mm thickness gridded insulation
board, EPS 070, 2.4m x 1.2m Premium
range (pack of 4)
£164.57 4
WHS-
CL-B07100+
Clypso 100mm thickness gridded
insulation board, EPS 070, 2.4m x 1.2m
Premium range (pack of 3)
£158.79 3
WHS-
CL-B10025+
Clypso 25mm thickness gridded insulation
board, EPS 100, 2.4m x 1.2m Premium
range (pack of 12)
£274.71 12
WHS-
CL-B10050+
Clypso 50mm thickness gridded insulation
board, EPS 100, 2.4m x 1.2m Premium
range (pack of 6)
£240.21 6
WHS-
CL-B10075+
Clypso 75mm thickness gridded insulation
board, EPS 100, 2.4m x 1.2m Premium
range (pack of 4)
£228.86 4
WHS-
CL-B10100+
Clypso 100mm thickness gridded
insulation board, EPS 100, 2.4m x 1.2m
Premium range (pack of 3)
£223.07 3
Insulation & Routed Boards
CLYPSO INSULATION BOARD SYSTEMS
Due to the nature of all insulation products, specic availability
and shipping terms may apply.
Please contact us on 0845 034 8270 to conrm.

86 Call us now 0845 345 2288 or visit www.warmup.co.uk
CODE DESCRIPTION RRP
(Excl. VAT)
PACK
QTY
WHS-
MT-B07025
Metro/General 25mm thickness
insulation board, EPS 070, 2.4m x
1.2m (pack of 12)
£65.57 12
WHS-
MT-B07050
Metro/General 50mm thickness
insulation board, EPS 070, 2.4m x
1.2m (pack of 6)
£65.36 6
WHS-
MT-B07075
Metro/General 75mm thickness
insulation board, EPS 070, 2.4m x
1.2m (pack of 4)
£65.43 4
WHS-
MT-B07100
Metro/General 100mm thickness
insulation board, EPS 070, 2.4m x
1.2m (pack of 3)
£65.36 3
WHS-
MT-B07025+
Metro/General 25mm thickness in-
sulation board, EPS 070, 2.4m x 1.2m
Premium range (pack of 12)
£141.86 12
WHS-
MT-B07050+
Metro/General 50mm thickness in-
sulation board, EPS 070, 2.4m x 1.2m
Premium range (pack of 6)
£141.64 6
WHS-
MT-B07075+
Metro/General 75mm thickness in-
sulation board, EPS 070, 2.4m x 1.2m
Premium range (pack of 4)
£141.71 4
WHS-
MT-B07100+
Metro/General 100mm thickness
insulation board, EPS 070, 2.4m x
1.2m Premium range (pack of 3)
£141.64 3
WHS-
MT-B10025
Metro/General 25mm thickness
insulation board, EPS 100, 2.4m x
1.2m (pack of 12)
£108.86 12
WHS-
MT-B10050
Metro/General 50mm thickness
insulation board, EPS 100, 2.4m x
1.2m (pack of 6)
£109.07 6
WHS-
MT-B10075
Metro/General 75mm thickness
insulation board, EPS 100, 2.4m x
1.2m (pack of 4)
£109.00 4
WHS-
MT-B10100
Metro/General 100mm thickness
insulation board, EPS 100, 2.4m x
1.2m (pack of 3)
£108.96 3
WHS-
MT-B10025+
Metro/General 25mm thickness in-
sulation board, EPS 100, 2.4m x 1.2m
Premium range (pack of 12)
£206.14 12
WHS-
MT-B10050+
Metro/General 50mm thickness in-
sulation board, EPS 100, 2.4m x 1.2m
Premium range (pack of 6)
£205.93 6
WHS-
MT-B10075+
Metro/General 75mm thickness in-
sulation board, EPS 100, 2.4m x 1.2m
Premium range (pack of 4)
£206.00 4
WHS-
MT-B10100+
Metro/General 100mm thickness
insulation board, EPS 100, 2.4m x
1.2m Premium range (pack of 3)
£205.93 3
METRO / GENERAL INSULATION BOARD
NEXXA CASTELLATED SYSTEM
CODE DESCRIPTION RRP
(Excl. VAT)
PACK
QTY
WHS-TL-
ALU10
Nexxa System plate with 10mm
Insulation £14.00 1

87
The world’s best-selling oor heating brand
CODE DESCRIPTION RRP
(Excl. VAT)
PACK
QTY
WHS-CL-RB25 Clypso 25mm Insulation Gridded
PIR board £52.79 1
WHS-CL-RB40 Clypso 40mm Insulation Gridded
PIR board £66.21 1
WHS-CL-RB50 Clypso 50mm Insulation Gridded
PIR board £77.89 1
WHS-CL-RB60 Clypso 60mm Insulation Gridded
PIR board £86.07 1
WHS-CL-RB75 Clypso 75mm Insulation Gridded
PIR Board £100.00 1
CLYPSO INSULATION GRIDDED BOARD
CODE DESCRIPTION RRP
(Excl. VAT)
PACK
QTY
WHS-MT-
INS25
Metro/General 25mm Insulation PIR
- 2.4 x 1.2m £36.36 1
WHS-MT-
INS30
Metro/General 30mm Insulation PIR
- 2.4 x 1.2m £41.07 1
WHS-MT-
INS35
Metro/General 35mm Insulation PIR
- 2.4 x 1.2m £43.46 1
WHS-MT-
INS40
Metro/General 40mm Insulation PIR
- 2.4 x 1.2m £47.07 1
WHS-MT-
INS45
Metro/General 45mm Insulation PIR
- 2.4 x 1.2m £53.00 1
WHS-MT-
INS50
Metro/General 50mm Insulation PIR
- 2.4 x 1.2m £57.71 1
WHS-MT-
INS60
Metro/General 60mm Insulation PIR
- 2.4 x 1.2m £68.93 1
WHS-MT-
INS65
Metro/General 65mm Insulation PIR
- 2.4 x 1.2m £74.64 1
WHS-MT-
INS70
Metro/General 70mm Insulation PIR
- 2.4 x 1.2m £80.79 1
WHS-MT-
INS75
Metro/General 75mm Insulation PIR
- 2.4 x 1.2m £81.61 1
WHS-MT-
INS80
Metro/General 80mm Insulation PIR
- 2.4 x 1.2m £87.71 1
WHS-MT-
INS90
Metro/General 90mm Insulation PIR
- 2.4 x 1.2m £98.07 1
WHS-MT-
INS100
Metro/General 100mm Insulation
PIR - 2.4 x 1.2m £108.50 1
METRO / GENERAL INSULATION PIR

88 Call us now 0845 345 2288 or visit www.warmup.co.uk
CODE DESCRIPTION RRP
(Excl. VAT)
PACK
QTY
WHS-TOTAL16-
BOARD
Total-16 Moulded Straight Board
including Aluminium plate for
Pex-A 12mm pipes.
600 x 1200 x 16mm
£39.99 1
TOTAL16 LOW PROFILE SYSTEM
CODE DESCRIPTION RRP
(Excl. VAT)
PACK
QTY
WHS-TOTAL16-
RETURN
Total-16 Moulded Return Board
for Pex-A 12mm pipes.
300 x 600 x 16mm
£6.66 1
CODE DESCRIPTION RRP
(Excl. VAT)
PACK
QTY
WHS-TOTAL16-
FEED
Total-16 Moulded Feeding Board
for Pex-A 12mm Pipes.
300 x 600 x 16mm
£6.66 1
CODE DESCRIPTION RRP
(Excl. VAT)
PACK
QTY
WHS-P-PEXA-
12 X 70
Pipes Range - Pipe Pex-A
12mm x 2mm. Sold in lengths
of 70m
£133.67 1
WHS-P-PEXA-
12 X140
Pipes Range - Pipe Pex-A
12mm x 2mm. Sold in lengths
of 140m
£267.84 1
CODE DESCRIPTION RRP
(Excl. VAT)
PACK
QTY
WHS-X-Glue 10 Litre Water-based glue £105.93 1
WATER BASED GLUE
CODE DESCRIPTION RRP
(Excl. VAT)
PACK
QTY
WHS-P-
CONNECT12 12mm x 2mm eurocone connectors £5 1
EUROCONE CONNECTORS
PIPE BEND SUPPORT FOR HYDRONIC SYSTEMS
CODE DESCRIPTION RRP
(Excl. VAT)
PACK
QTY
WHS-P-
BEND12 Pipe bend support for 12mm pipes £2 1
CODE DESCRIPTION RRP
(Excl. VAT)
PACK
QTY
WDOC Dual Overlay Concrete System
(covers 0.72m²)£32 1
DUAL OVERLAY CONCRETE
89
The world’s best-selling oor heating brand
CODE DESCRIPTION RRP
(Excl. VAT)
PACK
QTY
WHS-
CO-P2030
Contura Floating 30mm Panel -
200mm Centres With Returns -
150 Grade
£16.36 1
WHS-
CO-P2040
Contura Floating 40mm Panel -
200mm Centres With Returns -
150 Grade
£21.79 1
WHS-
CO-P2050
Contura Floating 50mm Panel -
200mm Centres With Returns -
150 Grade
£27.25 1
WHS-
CO-P2060
Contura Floating 60mm Panel -
200mm Centres With Returns -
150 Grade
£26.14 1
WHS-
CO-P2070
Contura Floating 70mm Panel -
200mm Centres With Returns -
150 Grade
£30.50 1
WHS-
CO-P2080
Contura Floating 80mm Panel -
200mm Centres With Returns -
150 Grade
£34.86 1
WHS-
CO-P2090
Contura Floating 90mm Panel -
200mm Centres With Returns -
150 Grade
£39.25 1
WHS-
CO-P2100
Contura Floating 100mm Panel -
200mm Centres With Returns -
150 Grade
£43.61 1
CONTURA FLOATING PANEL WITH RETURNS
ECONNA OVER JOIST FLOATING PANEL
CODE DESCRIPTION RRP
(Excl. VAT)
PACK
QTY
WHS-EC-
CB22A
Econna Over Joist straight contour
board - 600x1800x22 £38.86 1
WHS-EC-
CB22AE
Econna Over Joist turn - 800 x 595
x 22mm £22.36 1
5 LITRES OF FIX BINDER
CODE DESCRIPTION RRP
(Excl. VAT)
PACK
QTY
WHS-X-BIND 5 litres of fix binder £62.21 1
3 LITRES OF START PRIMER
CODE DESCRIPTION RRP
(Excl.VAT)
PACK
QTY
WHS-X-
PRIMER 3 litres of start primer £62.21 1
20KG PACK OF SEAL ADHESIVE
CODE DESCRIPTION RRP
(Excl. VAT)
PACK
QTY
WHS-X-
SEAL25 20kg pack of seal adhesive £69.11 1

90 Call us now 0845 345 2288 or visit www.warmup.co.uk
CODE DESCRIPTION RRP
(Excl. VAT)
PACK
QTY
WHS-CL-FIXER Tacker gun to be used with tacker
clips) £223.21 1
CODE DESCRIPTION RRP
(Excl. VAT)
PACK
QTY
WHS-P-CUT25 Pipe Cutters up to 25mm pipe
diameter £7.11 1
CODE DESCRIPTION RRP
(Excl. VAT)
PACK
QTY
WHS-P-CUT36 Pipe cutters up to 36mm pipe
diameter £10.39 1
CODE DESCRIPTION RRP
(Excl. VAT)
PACK
QTY
WHS-P-
DECOILER Pipe decoiler £314.79 1
CODE DESCRIPTION RRP
(Excl. VAT)
PACK
QTY
WHS-P-FORM Calibration tool £1.88 1
Fixing & Ancillaries
TACKER GUN TO BE USED WITH TACKER CLIPS
PIPE CUTTERS UP TO 25MM PIPE DIAMETER
PIPE CUTTERS UP TO 36MM PIPE DIAMETER
PIPE DECOILER
CALIBRATION TOOL
CODE DESCRIPTION RRP
(Excl. VAT)
PACK
QTY
WHS-TE-
ALUDP1
Diffusion plate 390 x 1000 x 0.5mm
two groove plates (16mm pipe) £8.75 1
WHS-TE-
ALUDP2
Diffusion plate 390 x 1000 x 0.6mm
two groove plates (16mm pipe) £10.36 1
WHS-TE-
ALUDP3
Diffusion plate 390 x 1000 x 0.7mm
two groove plates (16mm pipe) £11.79 1
CODE DESCRIPTION RRP
(Excl. VAT)
PACK
QTY
WHS-TE-
ALUDP4
Diffusion plate 190 x 1000 x 0.6mm
plates (16mm pipe) £4.68 1
WHS-TE-
ALUDP5
Diffusion plate 190 x 1000 x 0.7mm
plates (16mm pipe) £5.43 1
Aluminium Diuser Plates
DIFFUSION PLATE 390 X 1000 X 0.5 / 0.6 / 0.7 MM
TWO GROOVE PLATES 16MM PIPE
DIFFUSION PLATE 190 X 1000 X 0.6 / 0.7 MM PLATES
16MM PIPE

91
The world’s best-selling oor heating brand
PIPE BEND SUPPORT FOR HYDRONIC SYSTEMS
45/100MM SINGLE CLIPS 100 PER BAG
FOR HYDRONIC SYSTEMS
25MM PIPE CONDUIT PROTECTION 50M
CODE DESCRIPTION RRP
(Excl. VAT)
PACK
QTY
WHS-CL-P45 45mm single clips (100 per bag) for
hydronic systems £4.93 100
WHS-CL-P65 65mm single clips (100 per bag) for
hydronic systems £6.71 100
CODE DESCRIPTION RRP
(Excl. VAT)
PACK
QTY
WHS-CL-
CONDUIT
25mm pipe conduit protection 50m
for hydronic systems £70.71 1
CODE DESCRIPTION RRP
(Excl. VAT)
PACK
QTY
WHS-P-BEND Pipe bend support for hydronic
systems £1.48 1
40 & 60MM CLYPSO CLIPS FOR HYDRONIC SYSTEMS
TIES FOR MESH SYSTEM TO HOLD PIPE TO MESH CABLE TIES
CLIPRAIL FOR HYDRONIC SYSTEMS SOLD PER UNIT
CODE DESCRIPTION RRP
(Excl. VAT)
PACK
QTY
WHS-FO-TIE Ties for Mesh system to hold pipe to
mesh (cable ties) - 100/bag £1.39 100
CODE DESCRIPTION RRP
(Excl. VAT)
PACK
QTY
WHS-MT-
RAIL01
Cliprail for hydronic systems (sold
per unit) £2.03 1
CODE DESCRIPTION RRP
(Excl. VAT)
PACK
QTY
WHS-CL-T40 40mm tacker clips (300 per box) £16.86 300
WHS-CL-T60 60mm Clypso clips (300 per box) for
hydronic systems £10.46 300
NAIL CLIP 16MM FOR JOISTS 100 PER BOX
PERIMETER STRIP FOR HYDRONIC SYSTEMS
CODE DESCRIPTION RRP
(Excl. VAT)
PACK
QTY
WHS-SI-N16 Nail clip 16mm for joists (100 per
box) £9.39 100
CODE DESCRIPTION RRP
(Excl. VAT)
PACK
QTY
WHS-X-
EDGE50
Perimeter strip for hydronic systems
(8mm x 150mm x 50m) £35.71 1

92 Call us now 0845 345 2288 or visit www.warmup.co.uk
Steel Manifolds / Ancillaries
STEEL MANIFOLD WITH VALVES AND END SETS
CODE DESCRIPTION RRP
(Excl. VAT)
PACK
QTY
WHS-M-S-02 2 circuit stainless steel manifold
with ball valves and end sets £128.93 1
WHS-M-S-03 3 circuit stainless steel manifold
with ball valves and end sets £150.89 1
WHS-M-S-04 4 circuit stainless steel manifold
with ball valves and end sets £171.14 1
WHS-M-S-05 5 circuit stainless steel manifold
with ball valves and end sets £192.18 1
WHS-M-S-06 6 circuit stainless steel manifold
with ball valves and end sets £215.18 1
WHS-M-S-07 7 circuit stainless steel manifold
with ball valves and end sets £236.11 1
WHS-M-S-08 8 circuit stainless steel manifold
with ball valves and end sets £257.14 1
WHS-M-S-09 9 circuit stainless steel manifold
with ball valves and end sets £285.25 1
WHS-M-S-10 10 circuit stainless steel manifold
with ball valves and end sets £301.32 1
WHS-M-S-11 11 circuit stainless steel manifold
with ball valves and end sets £319.79 1
WHS-M-S-12 12 circuit stainless steel manifold
with ball valves and end sets £343.57 1
CABINETS
CODE DESCRIPTION RRP
(Excl. VAT)
PACK
QTY
WHS-
Cabinet400 Manifold Cabinet 400/640/130mm £69.88 1
WHS-
Cabinet450 Manifold Cabinet 450/640/130mm £71.76 1
WHS-
Cabinet530 Manifold Cabinet 530/640/130mm £79.26 1
WHS-
Cabinet680 Manifold Cabinet 680/640/130mm £91.58 1
WHS-
Cabinet830 Manifold Cabinet 830/640/130mm £104.32 1
WHS-
Cabinet1030 Manifold Cabinet 1030/640/130mm £116.64 1
WHS-
Cabinet1130 Manifold Cabinet 1130/640/130mm £124.97 1
POLYTHENE DPM FOR HYDRONIC SYSTEMS
CODE DESCRIPTION RRP
(Excl. VAT)
PACK
QTY
WHS-X-
POL500 Polythene dpm 500g (4m x 50m) £68.57 1
WHS-X-
POL1200 Polythene dpm 1200g (4m x 25m) £81.61 1

93
The world’s best-selling oor heating brand
CODE DESCRIPTION RRP
(Excl. VAT)
PACK
QTY
WHS-M-B-
VENT Auto Air Vent for Hydronic System £6.07 1
AUTO AIR VENT
CODE DESCRIPTION RRP
(Excl. VAT)
PACK
QTY
WHS-M-S-
RM02
A Rated Manifold Pack / Zone Mani-
fold with Pump / Mixing unit £428.57 1
A RATED MANIFOLD PACK /
ZONE MANIFOLD WITH PUMP / MIXING UNIT
CODE DESCRIPTION RRP
(Excl. VAT)
PACK
QTY
WHS-M-S-
FLOW
Replacement flowmeter for stainless
steel manifold £7.50 1
CODE DESCRIPTION RRP
(Excl. VAT)
PACK
QTY
WHS-M-S-
FLOWB
Pressure Gauge with Bush for use
with WHS-M-S-PUMP £12.14 1
REPLACEMENT FLOWMETER FOR STAINLESS STEEL MANIFOLD
PRESSURE GAUGE WITH BUSH FOR USE WITH WHSMSPUMP
Brass Manifolds & Ancillaries
BRASS MANIFOLD
CODE DESCRIPTION RRP
(Excl. VAT)
PACK
QTY
WHS-C-D-
CCT02 2 zone brass manifold £86.36 1
WHS-C-D-
CCT03 3 zone brass manifold £107.68 1
WHS-C-D-
CCT04 4 zone brass manifold £123.29 1
WHS-C-D-
CCT05 5 zone brass manifold £147.54 1
WHS-C-D-
CCT06 6 zone brass manifold £167.07 1
WHS-C-D-
CCT07 7 zone brass manifold £186.75 1
WHS-C-D-
CCT08 8 zone brass manifold £209.71 1
WHS-C-D-
CCT09 9 zone brass manifold £244.00 1
WHS-C-D-
CCT10 10 zone brass manifold £276.07 1
WHS-C-D-
CCT11 11 zone brass manifold £300.57 1
WHS-C-D-
CCT12 12 zone brass manifold £315.39 1

94 Call us now 0845 345 2288 or visit www.warmup.co.uk
CODE DESCRIPTION RRP EXC
VAT
PACK
QTY
WHS – PUMP
“A” RATED “A” rated grundfos pump £302.00 1
CODE DESCRIPTION RRP
(Excl. VAT)
PACK
QTY
WHS – PUMP
“A” RATED “A” rated pump £232.14 1
“A” RATED GRUNDFOS PUMP
QUATTRO END SET FOR HYDRONIC SYSTEMS
CODE DESCRIPTION RRP
(Excl. VAT)
PACK
QTY
WHS-M-B-
ENDSET Quattro end set for hydronic systems £29.29 1
CODE DESCRIPTION RRP
(Excl. VAT)
PACK
QTY
WHS-M-B-
PUMP “A”
Rated (New)
A Rated Isotherm pump/mixer kit £536.14 1
CODE DESCRIPTION RRP
(Excl. VAT)
PACK
QTY
WHS-M-B-
VALVE Ball valve set 1” for hydronic systems £28.64 1
CODE DESCRIPTION RRP
(Excl. VAT)
PACK
QTY
WHS-M-B-
VALVE-T
Manifold ball valve set with ther-
mometers for hydronic systems £59.29 1
A RATED ISOTHERM PUMP/MIXER KIT
BALL VALVE SET 1” FOR HYDRONIC SYSTEMS
MANIFOLD BALL VALVE SET WITH THERMOMETERS
CODE DESCRIPTION RRP
(Excl. VAT)
PACK
QTY
WHS-M-B-
CAP
Blanking cap for Stainless Steel mani-
folds. Closes off individual circuits £1.79 1
BLANKING CAP FOR CLOSING OFF A MANIFOLD
QUATTRO END SET WITH MANUAL VENT AND MANOMETER
MANIFOLD EXTENSION KIT
CODE DESCRIPTION RRP
(Excl. VAT)
PACK
QTY
WHS-M-B-
ENDSETVENT
Quattro End set with manual vent
and manometer £72.36 1
CODE DESCRIPTION RRP
(Excl. VAT)
PACK
QTY
WHS-M-B-EXT Manifold extension kit £74.57 1
REPLACEMENT FLOWMETER FOR BRASS MANIFOLD
CODE DESCRIPTION RRP
(Excl. VAT)
PACK
QTY
WHS-M-B-
FLOW
Replacement flowmeter for brass
manifold £11.61 1

95
The world’s best-selling oor heating brand
230 V / 24 V ACTUATOR FOR HYDRONIC SYSTEMS
230V ACTUATOR WITH LED
22MM 2 PORT VALVE FOR ZONING
OF MANIFOLDS AND HEATING SYSTEMS
REPAIR CONNECTORS
THREADED SOCKET MALE
MONOBLOCCOS CONNECTOR
MONOBLOCCOS 16/12MM PIPE ADAPTER
CODE DESCRIPTION RRP
(Excl. VAT)
PACK
QTY
WHS-S-230AC 230v Actuator for hydronic systems £19.89 1
WHS-S-24AC 24v actuator for hydronic systems £23.54 1
CODE DESCRIPTION RRP
(Excl. VAT)
PACK
QTY
WHS-C-D-CCT-
230ACL 230V Actuator with LED £25.21 1
CODE DESCRIPTION RRP
(Excl. VAT)
PACK
QTY
WHS – ZONE
VALVE 2 PORT
22mm 2 port valve for zoning of
manifolds and heating systems £62.50 1
CODE DESCRIPTION RRP
(Excl. VAT)
PACK
QTY
WHS-P-
24x19
connector
monobloccos connector £2.36 1
Manifold Ancillaries & Fittings
CODE DESCRIPTION RRP
(Excl. VAT)
PACK
QTY
WHS-P-16 x
2Monoblocco monobloccos 16mm pipe adapter £4.33 1
WHS-P-12 x
2Monoblocco Monobloccos 12mm Pipe Adapter £4.86 1
CODE DESCRIPTION RRP
(Excl. VAT)
PACK
QTY
WHS-P-RC16 16 x 2mm repair connector £6.50 1
WHS-P-RC20 20 x 2mm repair connector £6.50 1
CODE DESCRIPTION RRP
(Excl. VAT)
PACK
QTY
WHS-P-
SOCKET Threaded socket (male) £10.11 1
EUROCONE CONNECTORS
CODE DESCRIPTION RRP
(Excl. VAT)
PACK
QTY
WHS-P-
CONNECT
16mm x 2mm eurocone connectors
for hydronic systems £2.50 1

96 Call us now 0845 345 2288 or visit www.warmup.co.uk
Pipes
WARMUP PERT PIPE 16MM X 2MM
WARMUP PEXA PIPE 16MM X 2MM
CODE DESCRIPTION RRP
(Excl. VAT)
PACK
QTY
WHS-P-PEXA-25 PEX-A 16mm x 2mm x 25m £32.61 1
WHS-P-PEXA-50 PEX-A 16mm x 2mm x 50m £65.22 1
WHS-P-PEXA-60 PEX-A 16mm x 2mm x 60m £78.27 1
WHS-P-PEXA70 PEX-A 16mm x 2mm x 70m £91.31 1
WHS-P-PEXA-80 PEX-A 16mm x 2mm x 80m £104.36 1
WHS-P-PEXA-90 PEX-A 16mm x 2mm x 90m £117.40 1
WHS-P-PEXA-100 PEX-A 16mm x 2mm x 100m £130.45 1
WHS-P-PEXA-110 PEX-A 16mm x 2mm x 110m £143.49 1
WHS-P-PEXA120 PEX-A 16mm x 2mm x 120m £156.54 1
WHS-P-PEXA200 PEX-A 16mm x 2mm x 200m £382.44 1
WHS-P-PEXA-300 PEX-A 16mm x 2mm x 300m £573.48 1
WHS-P-PEXA-500 PEX-A 16mm x 2mm x 500m £652.23 1
CODE DESCRIPTION RRP
(Excl. VAT)
PACK
QTY
WHS-P-PERT-25 PE-RT 16mm x 2mm x 25m £23.68 1
WHS-P-PERT-50 PE-RT 16mm x 2mm x 50m £47.37 1
WHS-P-PERT-60 PE-RT 16mm x 2mm x 60m £56.84 1
WHS-P-PERT-70 PE-RT 16mm x 2mm x 70m £66.31 1
WHS-P-PERT-80 PE-RT 16mm x 2mm x 80m £75.79 1
WHS-P-PERT-90 PE-RT 16mm x 2mm x 90m £85.26 1
WHS-P-PERT-100 PE-RT 16mm x 2mm x 100m £94.73 1
WHS-P-PERT-110 PE-RT 16mm x 2mm x 110m £104.21 1
WHS-P-PERT-120 PE-RT 16mm x 2mm x 125m £113.68 1
WHS-P-PERT-300 PE-RT 16mm x 2mm x 300m £305.63 1
WHS-P-PERT-500 PE-RT 16mm x 2mm x 500m £473.66 1
WARMUP PERT/AL/PERT 16MM X 2MM
CODE DESCRIPTION RRP
(Excl. VAT)
PACK
QTY
WHS-P-ALPERT-100 ALPERT 16mm x 2mm, 100m £153.60 1
WHS-P-ALPERT-200 ALPERT 16mm x 2mm, 200m £307.14 1
WHS-P-ALPERT-500 ALPERT 16mm x 2mm, 500m £767.86 1

97
The world’s best-selling oor heating brand
Projects Department: A Dedicated
Service
Warmup oers a dedicated team of Project Managers to help
you throughout each stage of your project by allocating a
dedicated Project Manager to support you from specifying and
tting, through to pre and post-installation.
Our Approach
• Upon receipt of your instructions and/or plans you will be
assigned a dedicated in-house Project Manager
• Your Project Manager will contact you to review your
project to ensure we have a complete understanding of
your needs and the issues aecting your project
• Upon receipt of all relevant project information including
details of oor build up and nal oor surface, a quotation
will be turned around within 24 hours. Complex projects
will take longer
• Where appropriate we will provide advice, guidance and
support both on and o-site where potential risks can be
identied and prevented
• Provide the highest quality of products and services that
is tailored to meet your specic requirements, adhering to
best practice at the right price and at the right time

98 Call us now 0845 034 8270 or visit www.warmup.co.uk
Design Process
Warmup products and solutions adhere to industry standards,
government legislation and Building Regulations. The project
team, led by your dedicated Project Manager, will always
recommend the best underoor heating solution for your
project, mindful of the need to keep to your specication, time
schedule and budget.
Warmup will provide complete layouts to ensure there is a
precise installation and zone control to the required area.
Our products can be included from the RIBA Stage C – Concept
Design. It is at this stage that the Warmup project design
team incorporates the development of the general layout, the
external envelope and the principals from the project brief.
Outline costs can be provided at this stage for project budgets.
As the project develops into Stage D, the Detailed Design,
Warmup products, technical and specic design details can be
incorporated. Working in collaboration with you, we will ensure
co-ordination with the layouts and any integrated interior
designs.
Warmup provides quality products and services
and will:
• Only promise what we can deliver
• Deliver on what we promise
• Always remember that the products and services oered
and installed by Warmup stand for quality
We are committed to providing an excellent level
of service and aim to deliver this by:
• Focusing on your needs when recommending solutions,
planning and delivering services
• Applying the same standard of customer care to all
our customers, whilst recognising that customers have
individual needs
The following standards indicate the minimum
level of service customers can expect when
dealing with Warmup
• Requests for quotations will be sent an automatic
response acknowledging your request
• We will give you the name of the dedicated Project
Manager who has been assigned your enquiry and we will
give you an indication of when you can expect to receive
a response

99
The world’s best-selling oor heating brand
• Should you request us to contact you via telephone, we will
agree with you the best time to do so
Every Warmup quotation will include a detailed
summary of the project in which we will break
down:
• The total gross and heated areas
• The total heat load and amperage required
• A detailed list of the items required with relevant technical
data supported by illustrations of every item specied,
including the controls and details of the supporting
Guarantees and Warranties
Once we have been awarded the contract and/or purchase order,
your dedicated Project Manager will continue to work closely
with you to see your project through to a successful conclusion.
Technical Support
We will support you pre and post sales/installation by oering
you telephone support.
We oer online ‘live’ chat between 08.00 and 17.30 hrs Monday
to Friday. This is in addition to installation manuals and access to
online tutorial videos.
We oer a SafetyNetTM Installation Guarantee. Should you (or
your installer) accidentally damage a heating system (wire or
pipe) during installation, we will replace it free of charge.
If a oor(s) is damaged post installation (i.e. by drilling through a
pipe or wire), we oer a dedicated team of service engineers.
For more information or to submit plans please
call: 0845 034 8270, email: projects@warmup.com,
fax: 0845 345 2299 or visit www.warmup.co.uk.

Electric and hydronic heating portfolio
Total-16
Low Profile System
Hydronic Insulation System
The WARMUP word and associated logos are trade marks.
©Warmup plc 2015 Reg’d. TM Nos. 1257724, 4409934, 4409926, 5265707. E & OE
v07-09/2015
Warmup Plc
702 & 704 Tudor Estate
Abbey Road
London, NW10 7UW
T: 0845 345 2288
E : uk@warmup.com
E: dispatch@warmup.com
F: 0845 345 2299
W: www.warmup.co.uk
Please scan the QR code
for more information
“ideal for new-build and refurbishment projects
where floor height is at a premium”
The world’s best-selling floor heating brand™
Over 2 million installations in
more than 60 countries
