Word Press Site Launch Guide Git And Database Import 2018
User Manual:
Open the PDF directly: View PDF ![]() .
.
Page Count: 9

WORDPRESS SITE LAUNCH
GIT & DATABASE IMPORT EDITION
STEP 1: SETUP A WORDPRESS INSTALLATION
We recommend using WPEngine* to host your site as it supports Git Push to deploy,
transferable installs, and staging sites, which we’ll utilize for this site launch. But you’re
welcome to choose another hosting provider!
If this is your first time setting up a WPEngine* account, there are two great ways you can get a discount: get 20%
off your first payment with the coupon wpe20off (so you get the biggest discount buying an annual plan) or try the
coupon artofblog to get $25 off each of your first 3 payments (so the biggest discount is on a monthly plan).
*Disclosure: Skillcrush receives a small amount of compensation from anyone who uses the link above to purchase
WPEngine hosting. However, we recommend WPEngine because it’s what we personally use and enjoy!
If you already have a WPEngine account, make use of their transferable installs to set up a
new site! They are free and you can have as many as you like. They are terrific for class
projects or putting together a site for a client to review before going live. More info here!
If you are not using WPEngine for hosting, check to see if your host offers demo sites or
transferable installs and follow their setup instructions. You may also be able to set up
another site as a subdomain if demo sites are not offered, but you'll want to work with
your host's customer service to be sure you've set it up correctly.
WORDPRESS SITE LAUNCH GUIDE GIT & DATABASE IMPORT EDITION

Regardless of where you decide to host your site, you should be able to follow along with
the key steps in this guide. You'll just need to tailor some of the instructions to your
particular platform.
If you are using WPEngine, move to Step 2.
If you are using another host, once you have an installation up, see Step 3 if you can
use Git to deploy, or transfer your files via FTP as we did in 103 and move to Step 6
to import your database.
STEP 2: CREATE A STAGING SITE
Log into my.wpengine.com using the email address and password you used when you
created your account and then click on Installs at the top.
Your install is listed on the left with a bunch of options.
In this left column you will see an option to go to your site’s admin. Click that and then
login using your WPEngine username and the same password you created when you set
up your account.
In the admin, towards the top of the left menu area there is a new option: WPEngine.
Click on it!
WORDPRESS SITE LAUNCH GUIDE GIT & DATABASE IMPORT EDITION
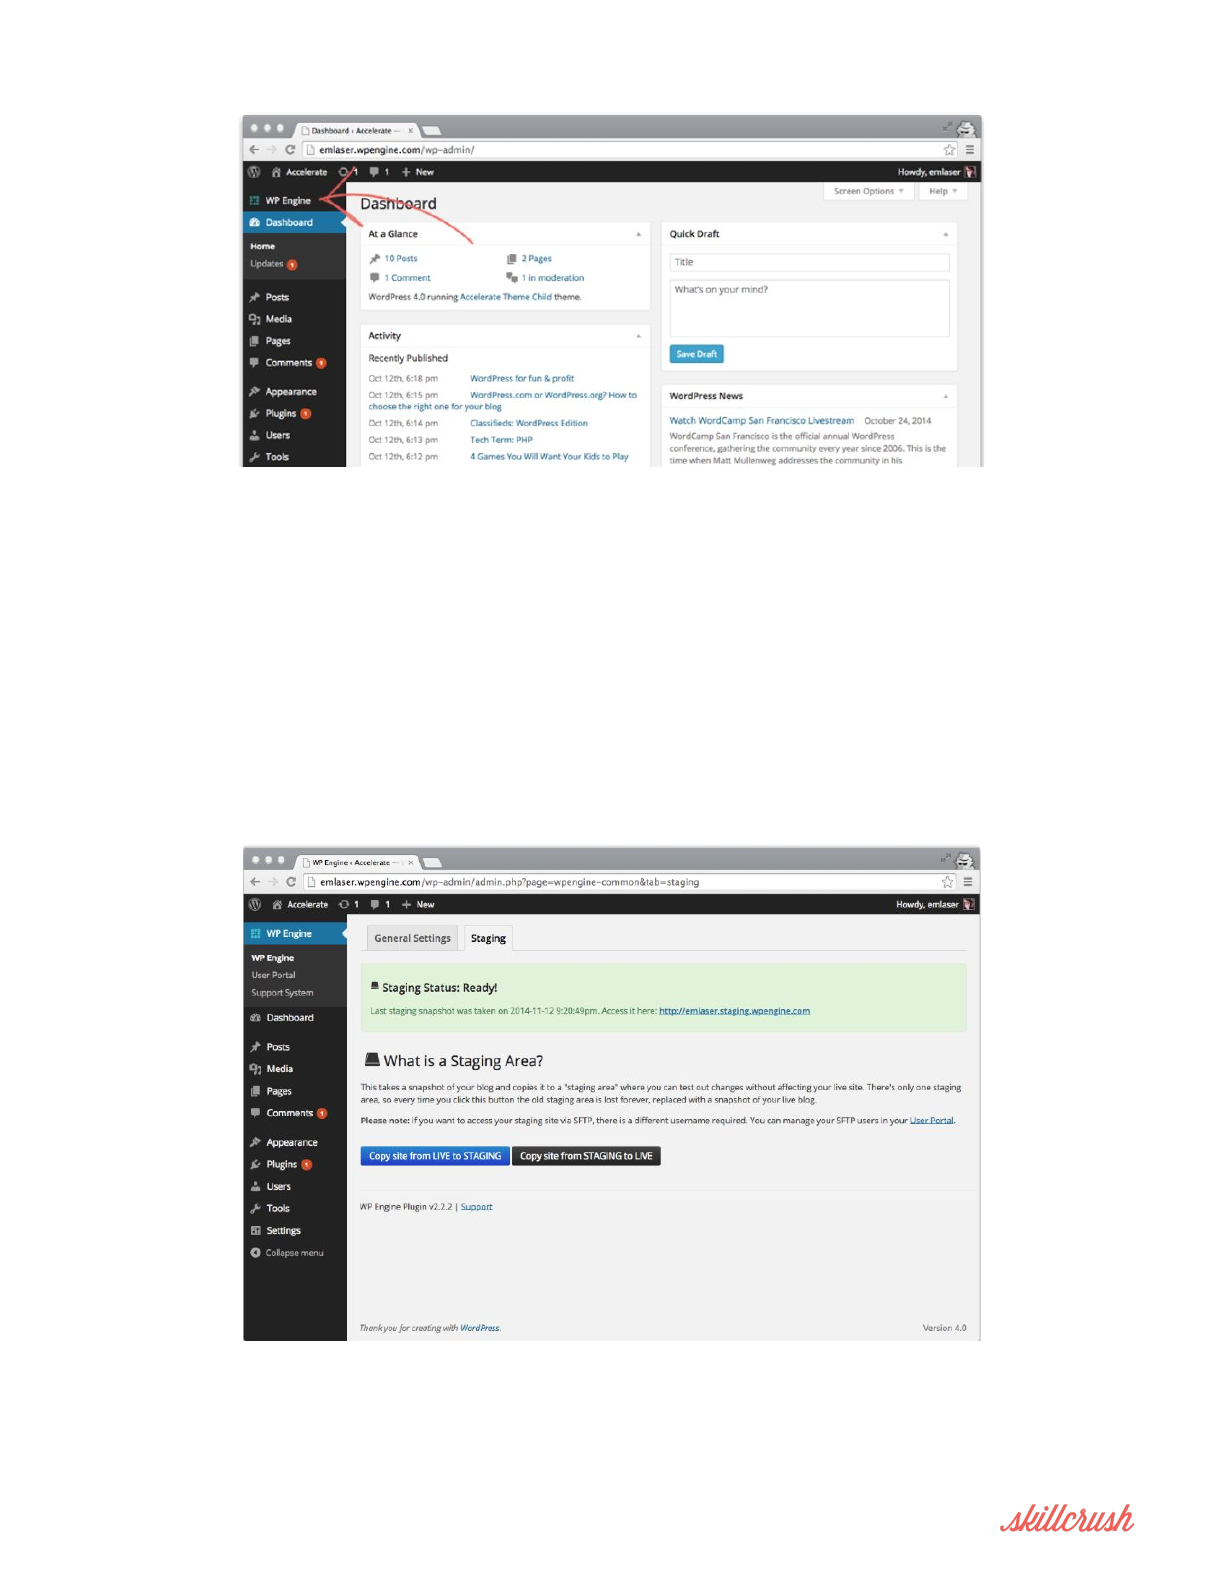
Select the Staging tab.
Click the blue Copy site from LIVE to STAGING button.
Let the process run. You can click the Staging tab again to refresh the page - you’ll see a
big green “Staging status: Ready!” message at the top when your staging site is all set.
The URL for your staging site is http://your_installation_name.staging.wpengine.com.
WORDPRESS SITE LAUNCH GUIDE GIT & DATABASE IMPORT EDITION
STEP 3: GIVE WPENGINE YOUR SSH KEY
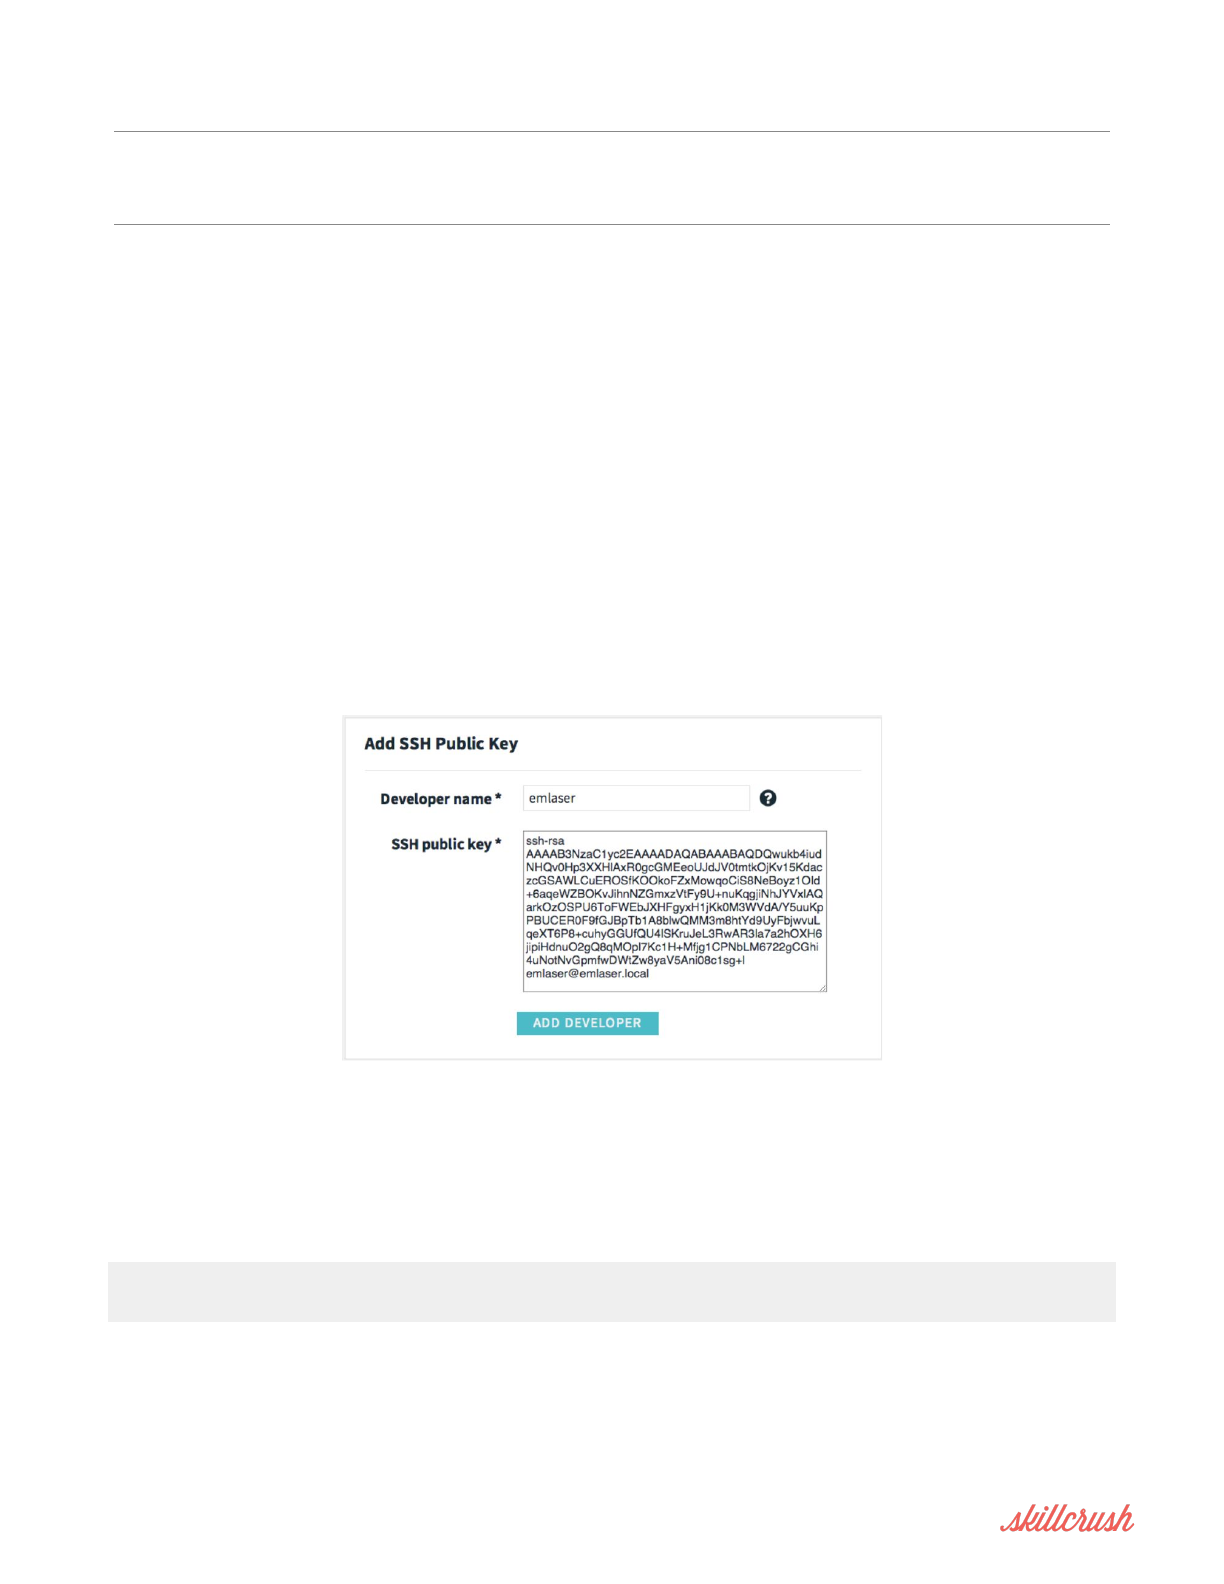
In your WPEngine dashboard, click into Git Push. This is where you will add your SSH key.
On the next page, name your key in the Developer name field.
Then, locally, navigate to your .ssh folder and open your public SSH key. This will be the
id_dsa.pub or id_rsa.pub file.
Copy your entire public SSH key and paste it into the SSH public key field.
Click Add Developer.
This can take upwards of 10 minutes to be fully set up.
To test that it is working, run the following command in your terminal:
ssh git@git.wpengine.com info
If you see a hello message and a list of connected repositories, you are good to go!
WORDPRESS SITE LAUNCH GUIDE GIT & DATABASE IMPORT EDITION

STEP 4: HOOK YOUR LOCAL REPO TO WPENGINE
When WPEngine created a default WordPress site for you, they also created a Git repo.
You now need to add that Git repo as a remote in your local site folder.
For this you will use the git remote add command:
git remote add staging git@git.wpengine.com:staging/<yourusername>.git
The first thing after git remote add is the name of your remote, the one you will use when
you push your changes to your WPEngine staging site.
The second thing is the location, namely the Git repository that WPEngine set up for you
automatically.
STEP 5: PUSH TO STAGING
Now it’s time to push to staging. This is almost exactly like pushing up to your GitHub
repo, except you need to specify a different location.
This location is your Git repo with WPEngine.
git push staging master
WORDPRESS SITE LAUNCH GUIDE GIT & DATABASE IMPORT EDITION
STEP 6: IMPORT YOUR DATA
In 103, you exported your data and then imported it on your live site via the Importer
plugin, but that method doesn’t transfer settings. If you transfer the content via a
database export and import, it will also transfer all settings in addition to data.
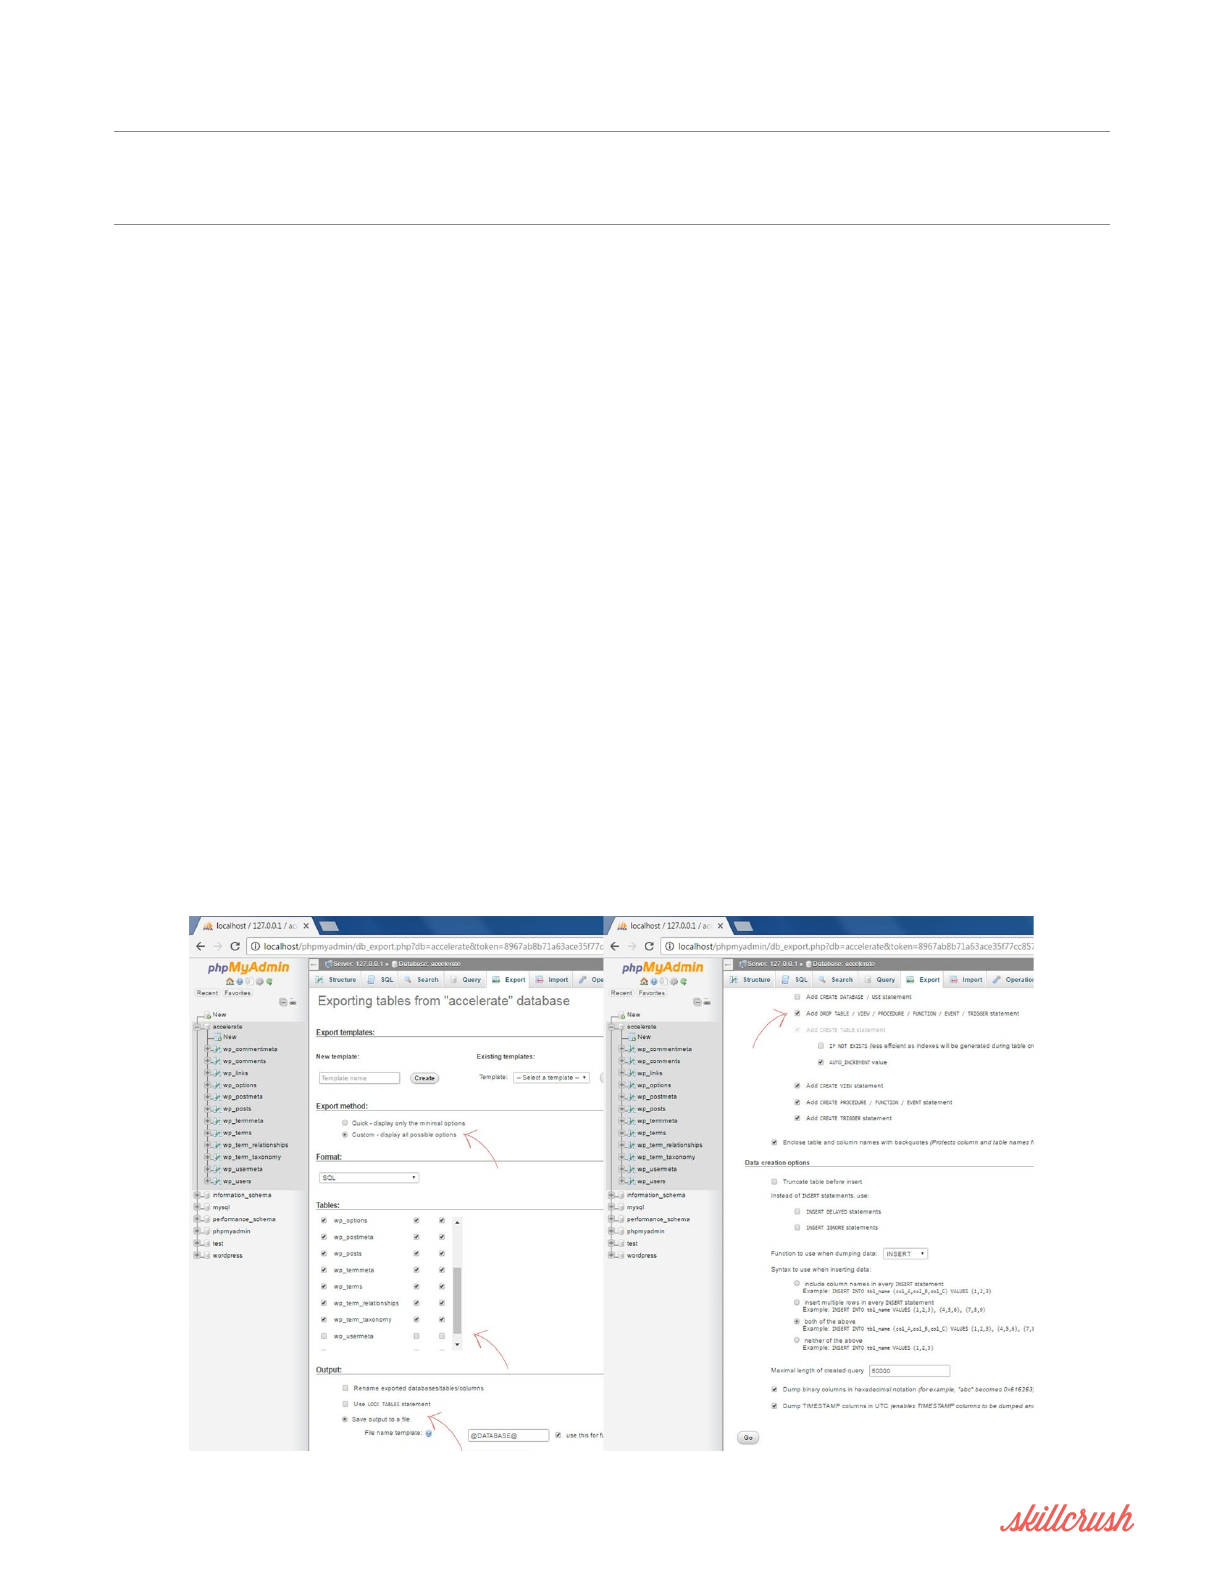
First go to the phpMyAdmin for your local site and export your data.
●Make sure to select the “custom” radio button.
●In the box with all the tables, deselect the wp_users and wp_usermeta tables. This is
so you won’t overwrite your staging site’s login credentials with your local info.
Leave the rest selected.
●Select “Save output to a file.”
●Then, scroll down and click the checkbox next to “Add Drop Table.”
And finally, scroll down to the bottom and hit “Go.”
WORDPRESS SITE LAUNCH GUIDE GIT & DATABASE IMPORT EDITION
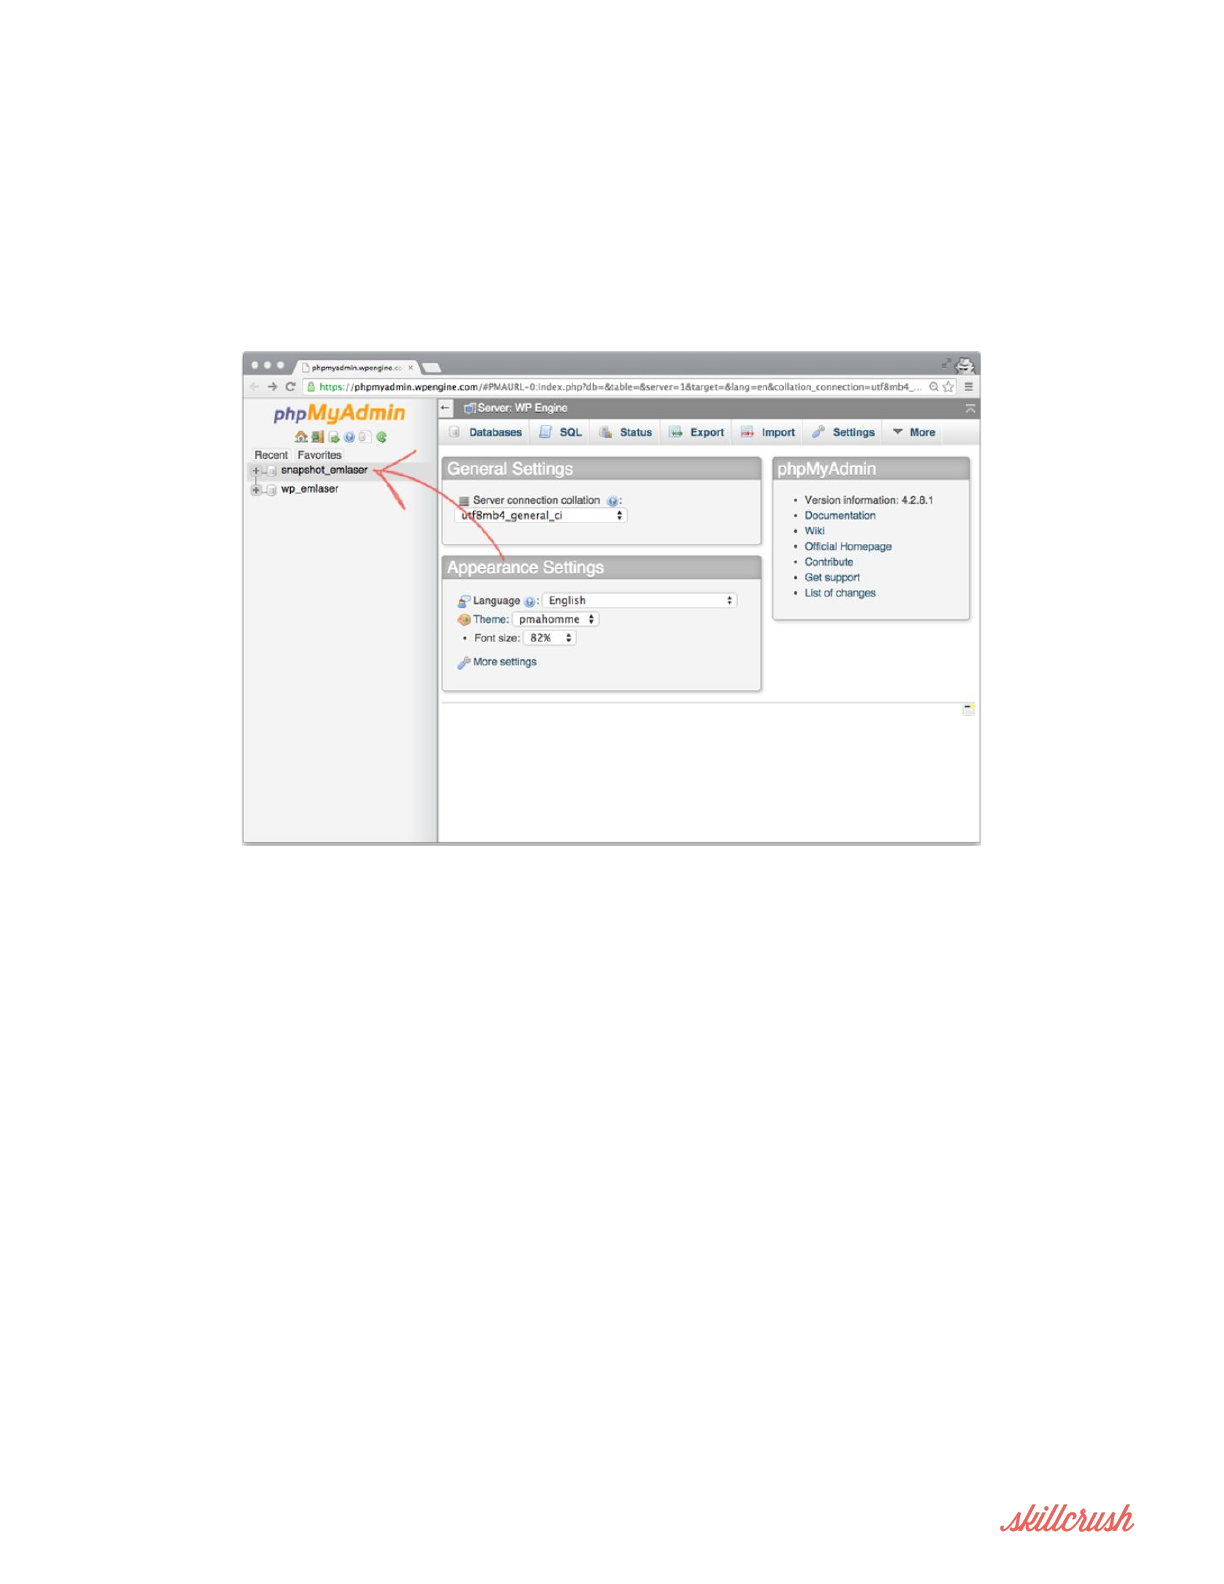
When the export is done, go into phpMyAdmin on your staging site install (or live site, if
you host does not offer staging sites) and click on the appropriate database. If you are
using a WPEngine staging site, you’d want to click on the
snapshot_<your_installation_name> database in the left column.
●Select the Import Tab, choose your sql file and click the “Go” button.
●Now, open the wp_options table.
●Update the siteurl and home fields of your wp_options table to contain the url of
your new staging install. For a WPEngine staging site it would look like:
http://your_installation_name.staging.wpengine.com.
Now visit your staging site and you should see your fully set up site!
WORDPRESS SITE LAUNCH GUIDE GIT & DATABASE IMPORT EDITION
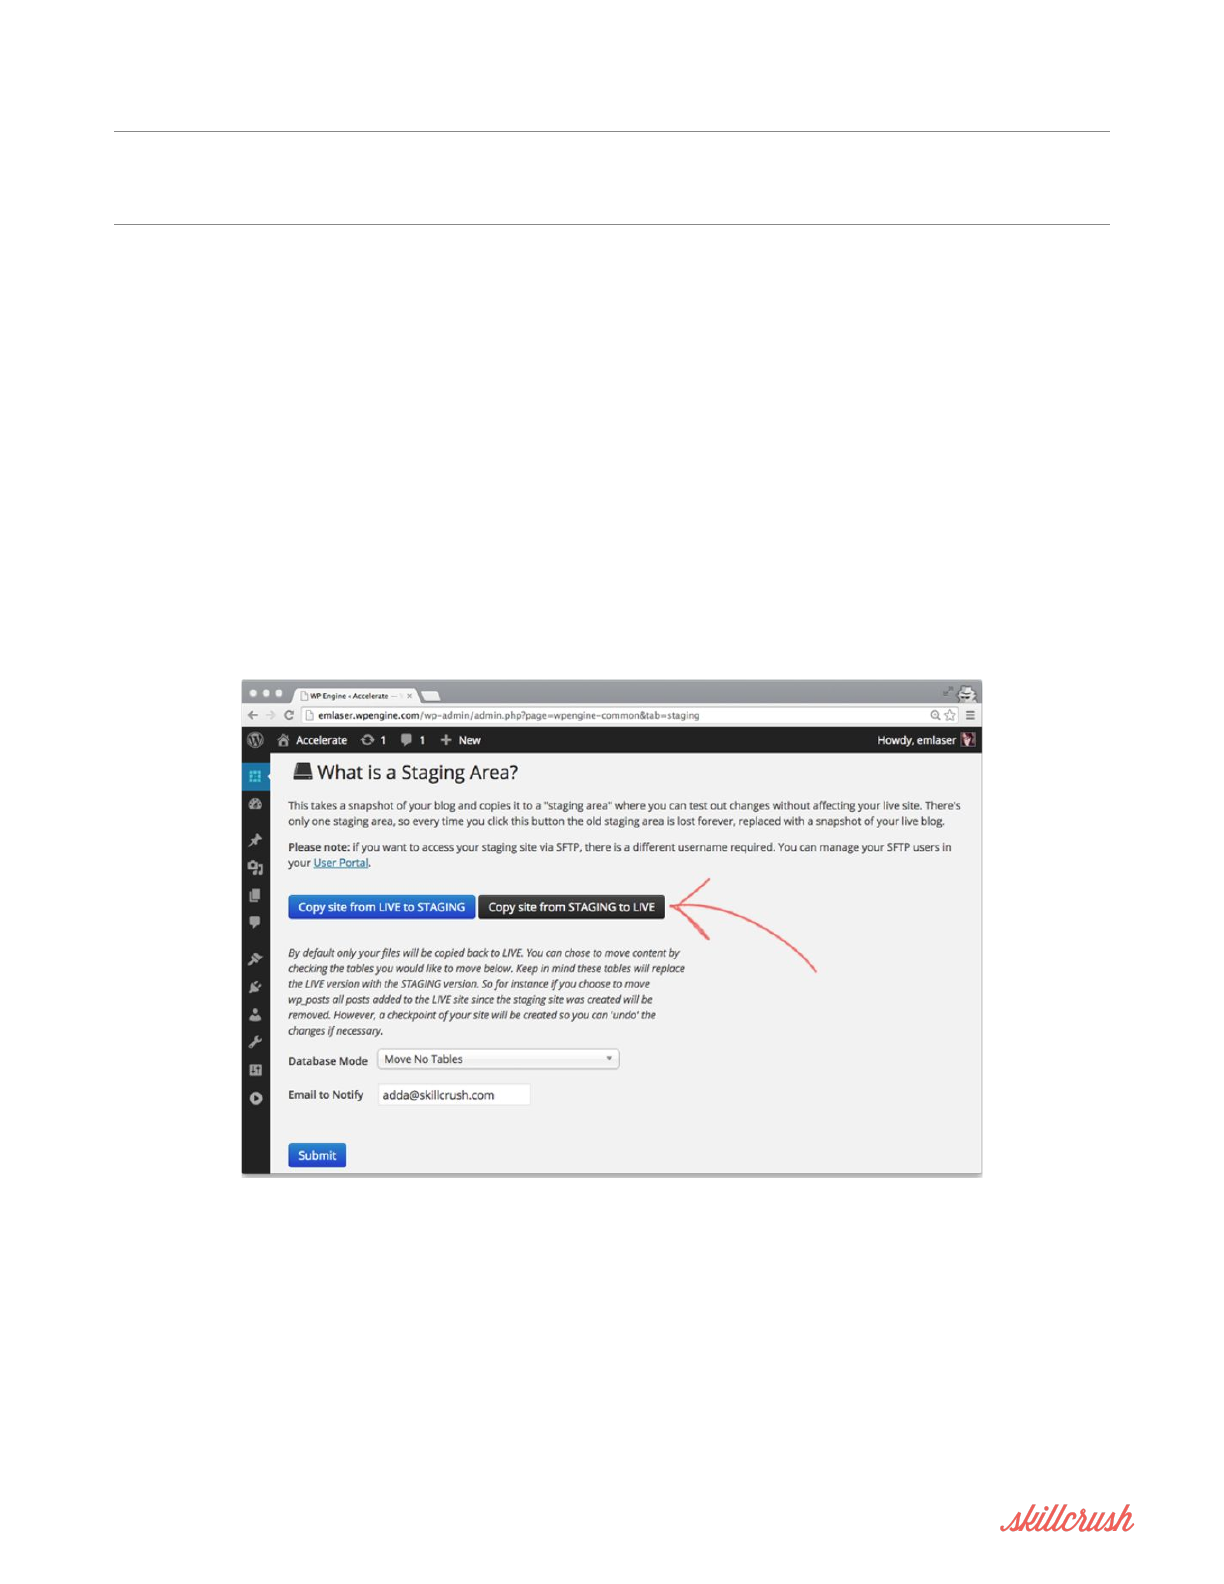
STEP 7: DEPLOY TO YOUR LIVE SITE
If you have deployed to a WPEngine staging site, in your live site’s admin
(http://your_installation_name.wpengine.com/wp-admin), go to the WPEngine menu item
again.
On the Staging tab, you should see two buttons: Copy site from LIVE to STAGING and Copy
site from STAGING to LIVE.
Click the black Copy site from STAGING to LIVE button.
Change the Database Mode drop down to Move All Tables.
Let the deploy run. The screen will tell you when it’s done and you’ll also receive an email
to Email to Notify address. Then refresh your live site!
WORDPRESS SITE LAUNCH GUIDE GIT & DATABASE IMPORT EDITION

HOW TO KEEP DEPLOYING
●Make changes locally
●Push to GitHub as a backup
●Push to staging (if available through your host)
●Make any necessary changes in the staging database
●Review your changes on staging
●Make fixes
●Get client approval
●Copy the staging site to the live site
●Make any necessary changes in the live database
WORDPRESS SITE LAUNCH GUIDE GIT & DATABASE IMPORT EDITION
