WordPress Word Press The Missing Manual (2nd Ed.) [Mac Donald 2014 07 12]
User Manual: manual pdf -FilePursuit
Open the PDF directly: View PDF ![]() .
.
Page Count: 613 [warning: Documents this large are best viewed by clicking the View PDF Link!]
- The Missing Credits
- Introduction
- Part One: Starting Out with WordPress
- Part Two: Building a WordPress Blog
- Part Three: Supercharging Your Blog
- Part Four: From Blog to Website
- Part Five: Appendixes
- Index

WordPress
Matthew MacDonald
Beijing | Cambridge | Farnham | Köln | Sebastopol | Tokyo
The book that should have been in the box®
WordPress: The Missing Manual
by Matthew MacDonald
Copyright © 2014 Matthew MacDonald. All rights reserved.
Printed in the United States of America.
Published by O’Reilly Media, Inc.,
1005 Gravenstein Highway North, Sebastopol, CA 95472.
O’Reilly books may be purchased for educational, business, or sales promotional use.
Online editions are also available for most titles (
http://safaribooksonline.com
). For
more information, contact our corporate/institutional sales department: (800) 998-
9938 or
corporate@oreilly.com
.
July 2014: First Edition.
Revision History for the First Edition:
2014-06-17 First release
2014-07-25 Second release
See
http://oreilly.com/catalog/errata.csp?isbn=9781449341909
for release details.
The Missing Manual is a registered trademark of O’Reilly Media, Inc. The Missing
Manual logo, and “The book that should have been in the box” are trademarks of
O’Reilly Media, Inc. Many of the designations used by manufacturers and sellers to
distinguish their products are claimed as trademarks. Where those designations
appear in this book, and O’Reilly Media is aware of a trademark claim, the
designations are capitalized.
While every precaution has been taken in the preparation of this book, the publisher
assumes no responsibility for errors or omissions, or for damages resulting from the
use of the information contained in it.
ISBN-13: 978-1-449-34190-9
[LSI]

III
Contents
The Missing Credits ....................................... vii
Introduction ............................................... ix
About This Book ....................................................x
About the Outline ..................................................xii
About the Online Resources ........................................ xiii
Using Code Examples ............................................. xiv
Safari® Books Online .............................................. xiv
Part One: Starting Out with WordPress
CHAPTER 1:
The WordPress Landscape ................................. 3
How WordPress Works ..............................................4
What You Can Build with WordPress ..................................7
WordPress Hosting ................................................17
CHAPTER 2:
Signing Up with WordPress.com .......................... 23
Choosing a Web Address ...........................................24
Creating Your WordPress.com Account ...............................26
Managing Your New Site ............................................34
Exploring the WordPress.com Community ............................38
Visiting the WordPress.com Store. . . . . . . . . . . . . . . . . . . . . . . . . . . . . . . . . . . .42
CHAPTER 3:
Installing WordPress on Your Web Host .................. 49
Preparing for WordPress. . . . . . . . . . . . . . . . . . . . . . . . . . . . . . . . . . . . . . . . . . . .49
Installing WordPress with an Autoinstaller ............................55
Installing WordPress by Hand .......................................69
Keeping WordPress Up to Date ......................................79
Par t Two: Building a WordPress Blog
CHAPTER 4:
Creating Posts ............................................ 85
Introducing the Dashboard ..........................................85
Adding Your First Post .............................................94
Organizing Your Posts .............................................106

CONTENTS
IV
How to Get High-Quality Web Addresses .............................115
Dashboard Tricks to Save Time and Eort ...........................123
CHAPTER 5:
Choosing and Polishing Your Theme ......................131
How Themes Work ................................................132
Choosing a New Theme ............................................136
Tweaking Your Theme .............................................144
Customizing Your Widgets .........................................154
Mobile Themes ...................................................168
CHAPTER 6:
Jazzing Up Your Posts ....................................171
Making Fancier Posts ...............................................171
Adding Pictures ..................................................180
Featured Images ..................................................190
Showing Part of a Post ............................................195
Post Formats .....................................................202
CHAPTER 7:
Adding Pages and Menus ................................207
Creating Pages .................................................. 208
Viewing Pages .....................................................211
Custom Menus ....................................................218
Changing Your Home Page .........................................228
Page Templates ...................................................233
CHAPTER 8:
Comments: Letting Your Readers Talk Back .............. 239
Allowing or Forbidding Comments ................................. 240
The Life Cycle of a Comment .......................................242
The Ongoing Conversation .........................................253
Making Comments More Personal ...................................262
Stamping Out Comment Spam .....................................273
Part Three: Supercharging Your Blog
CHAPTER 9:
Getting New Features with Plug-Ins ..................... 285
Managing Plug-Ins ................................................286
The Jetpack Plug-In ...............................................297
Adding Mobile Support ............................................307
Backing Up a WordPress Site ........................................311
Better Performance with Caching ...................................316

CONTENTS V
CHAPTER 10:
Adding Picture Galleries, Video, and Music .............. 323
Understanding Embeds and Shortcodes .............................323
Showing Groups of Pictures ....................................... 330
Embedding a Video . . . . . . . . . . . . . . . . . . . . . . . . . . . . . . . . . . . . . . . . . . . . . . 349
Playing Audio Files ............................................... 360
CHAPTER 11:
Collaborating with Multiple Authors .....................369
Adding People to Your Site ........................................369
Working with Authors .............................................378
Building a Private Community ..................................... 394
Creating a Network of Sites ........................................399
CHAPTER 12:
Attracting a Crowd ........................................411
Encouraging Your Readers to Share .................................412
Keeping Readers in the Loop .......................................423
Managing Your Site’s Feed .........................................433
Search Engine Optimization ........................................437
WordPress Site Statistics ......................................... 444
Part Four: From Blog to Website
CHAPTER 13:
Editing Themes: The Key to Customizing Your Site....... 453
The Goal: More Flexible Blogs and Sites ............................ 454
Taking Control of Your Theme ......................................459
Protecting Yourself with a Child Theme ..............................462
Editing the Styles in Your Theme .................................. 468
Editing the Code in Your Theme ................................... 485
CHAPTER 14:
Building an Advanced WordPress Site ...................505
Planning Your Site ............................................... 505
Adding New Types of Posts ........................................510
Creating Custom Category Pages ...................................519
Building a Better Home Page .......................................527
Making a Smarter Product Page ....................................534
Adding eCommerce ...............................................542
Part Five: Appendixes
APPENDIX A:
Migrating from WordPress.com .......................... 553
Before You Begin .................................................554
Transferring Your Data ............................................554
Cleaning Up Your New Site ........................................ 560

CONTENTS
VI
APPENDIX B:
Securing a Self-Hosted Site .............................. 563
1. Crash-Proof Your Site with Backups .............................. 564
2. Change Your Posting Account ................................... 564
3. Be Cautious When Extending Your Site ............................565
4. Prevent Password-Guessing Attacks ............................ 566
5. Hide Passwords with SSL ........................................568
APPENDIX C:
Useful Websites .......................................... 571
Chapter Links. . . . . . . . . . . . . . . . . . . . . . . . . . . . . . . . . . . . . . . . . . . . . . . . . . . . . 571
Index..................................................... 581

THE MISSING CREDITS VII
The Missing Credits
ABOUT THE AUTHOR
Matthew MacDonald is a science and technology writer with well
over a dozen books to his name. Web novices can tiptoe out onto
the Internet with him in
Creating a Website: The Missing Manual
.
HTML fans can learn about the cutting edge of web design in
HTML5:
The Missing Manual
. And human beings of all description can dis-
cover just how strange they really are in the quirky handbooks
Your
Brain: The Missing Manual
and
Your Body: The Missing Manual
.
ABOUT THE CREATIVE TEAM
Peter McKie (editor) lives in New York City and, in his spare time, archives material
chronicling the history of his summer community. Email:
pmckie@oreilly.com
.
Melanie Yarbrough (production editor) lives and works in Cambridge, MA, where
she writes and bakes whatever she can dream up. Email:
myarbrough@oreilly.com
.
Ron Strauss (indexer) specializes in the indexing of information technology publica-
tions of all kinds. Ron is also an accomplished classical violist and lives in Northern
California with his wife and fellow indexer, Annie, and his miniature pinscher, Kanga.
Email:
rstrauss@mchsi.com
.
Julie Van Keuren (proofreader) quit her newspaper job in 2006 to move to Montana
and live the freelancing dream. She and her husband (who is living the novel-writing
dream) have two hungry teenage sons. Email:
little_media@yahoo.com
.
Sallie Goetsch (technical reviewer) (rhymes with “sketch”) hand-coded her first
website in HTML in 1995, but hasn’t looked back since discovering WordPress in
2005. She works as an independent consultant and organizes the East Bay WordPress
Meetup in Oakland, California. You can reach her at
www.wpfangirl.com
.
ACKNOWLEDGMENTS
No author could complete a book without a small army of helpful individuals. I’m
deeply indebted to the whole Missing Manual team, including expert tech reviewer
Sallie Goetsch, my editor Peter McKie, and numerous others who’ve toiled behind
the scenes indexing pages, drawing figures, and proofreading the final copy.
Finally, for the parts of my life that exist outside this book, I’d like to thank all my
family members. They include my parents, Nora and Paul; my extended parents, Razia
and Hamid; my wife, Faria; and my daughters, Maya and Brenna. Thanks, everyone!

THE MISSING CREDITS
VIII
THE MISSING MANUAL SERIES
Missing Manuals are witty, superbly written guides to computer products that don’t
come with printed manuals (which is just about all of them). Each book features a
handcrafted index.
Recent and upcoming titles include:
WordPress: The Missing Manual, Second Edition
by Matthew MacDonald
iPhoto: The Missing Manual
by David Pogue and Lesa Snider
iWork: The Missing Manual
by Jessica Thornsby and Josh Clark
Switching to the Mac: The Missing Manual, Mavericks Edition
by David Pogue
OS X Mavericks: The Missing Manual
by David Pogue
HTML5: The Missing Manual, Second Edition
by Matthew MacDonald
Dreamweaver CC: The Missing Manual
by David Sawyer McFarland and Chris Grover
Windows 8.1: The Missing Manual
by David Pogue
iPad: the Missing Manual, Sixth Edition
by J.D. Biersdorfer
Quickbooks 2014: The Missing Manual
by Bonnie Biafore
iPhone: the Missing Manual, Seventh Edition
by David Pogue
Photoshop Elements 12: The Missing Manual
by Barbara Brundage
Galaxy S4: The Missing Manual
by Preston Gralla
Photoshop CC: The Missing Manual
by Lesa Snider
Oce 2013: The Missing Manual
by Nancy Connor and Matthew MacDonald
Excel 2013: The Missing Manual
by Matthew MacDonald
Microsoft Project 2013: The Missing Manual
by Bonnie Biafore
Access 2013: The Missing Manual
by Matthew MacDonald
For a full list of all Missing Manuals in print, go to
www.missingmanuals.com/
library.html
.

IX
Throughout history, people have searched for new places to vent their opinions,
sell their products, and just chat it up. The World Wide Web is the culmination
of this trend—the best and biggest soapbox, marketplace, and meeting spot
ever created.
But there’s a problem. If you want people to take your website seriously, you need
first-rate content, a dash of good style, and the
behind-the-scenes technology
that
ties everything together. The first two items require some hard work. But the third
element—the industrial-strength web plumbing that powers a good site—is a lot
trickier to build on your own. Overlook that, and you’ve got a broken mess of pages
that even your mom can’t love.
This is where the ridiculously popular web publishing tool called WordPress comes
in. WordPress makes you a basic deal: You write the content, and WordPress takes
care of the rest.
The services that WordPress provides are no small potatoes. First, WordPress puts
every page of your content into a nicely formatted, consistent layout. It provides the
links and menus that help your visitors get around, and a search box that lets people
dig through your archives. WordPress also lets your readers add comments using
their Facebook or Twitter identities, so they don’t need to create a new account on
your site. And if you add a few community-created plug-ins (from the vast library of
more than 30,000), there’s no limit to the challenges you can tackle. Selling products?
Check. Setting up a membership site? No problem. Building forums and collaborative
workspaces? There’s a plug-in for that, too. And while it’s true that WordPress isn’t
the best tool for
every
type of website, it’s also true that wherever you find a gap
in the WordPress framework, you’ll find some sort of plug-in that attempts to fill it.
Introduction

WORDPRESS: THE MISSING MANUAL
X
ABOUT THIS
BOOK
WordPress is stunningly popular, too—it’s responsible for more than one-fifth of
the world’s websites, according to the web statistics company W3Techs (see
http://
tinyurl.com/3438rb6
). It’s 10 times more popular than its closest competitors, site-
building tools like Joomla and Drupal. And month after month, WordPress’s share of
the Web continues to inch upward. In short, when you create your own WordPress
site, you’ll be in good company.
About This Book
This book provides a thorough, soup-to-nuts look at WordPress. You’ll learn every-
thing you need to know, including how to create, manage, maintain, and extend a
WordPress site.
NOTE Notice that we haven’t yet used the word
blog
. Although WordPress is the world’s premiere blogging
tool, it’s also a great way to create other types of websites, like those that promote products, people, or things
(say, your hipster harmonica band), sites that share stuff (for example, a family travelogue), and even sites that
let people get together and collaborate (say, a short-story writing club for vampire fans). And if you’re not quite
sure whether the site you have in mind is a good fit for WordPress, the discussion on page 7 will help you decide.
What You Need to Know
If you’re planning to make the world’s most awesome blog, you don’t need a stitch
of experience. Chapters 1 through 12 will tell you everything you need to know.
However, you will come across some examples of posts and pages that feature
HTML
(the language of the Web), and any HTML knowledge you already have will
pay o handsomely.
If you’re planning to create a website that
isn’t
a blog (like a catalog of products
for your handmade jewelry business), you need to step up your game. You’ll still
start with the WordPress basics in Chapters 1 through 12, but you’ll also need to
learn the advanced customization skills you’ll find in Chapters 13 and 14. How much
customization you do depends on the type of site you plan to build and whether
you can find a theme that already does most of the work for you. But sooner or
later, you’ll probably decide to crack open one of the WordPress template files that
controls your site and edit it.
When you do that, you’ll encounter two more web standards:
CSS,
the style sheet
language that helps lay out and format your site; and
PHP,
the web programming
language upon which WordPress is built. But don’t panic—we’ll go gently and intro-
duce the essentials from the ground up. You won’t learn enough to write your own
custom web apps, but you
will
pick up the skills you need to customize a WordPress
theme so you can build the kind of site you want.

XI
ABOUT THIS
BOOK
Your Computer
WordPress has no special hardware requirements. As long as you have an Internet
connection and a web browser, you’re good to go. Because WordPress (and its
design tools) live on the Web, you can use a computer running Windows, Mac OS,
Linux, or something more exotic; it really doesn’t matter. In fact, WordPress even
gives you tools for quick-and-convenient blog posting through a smartphone or
tablet computer (see page 130 for the scoop).
Hosting WordPress
To let other people visit your WordPress site on the Internet, you need the help of
a
web hosting
company. Web hosts oer the powerful, web-connected computers
that run your site (and the websites of many other people). Without a host to store
your site, no one will be able to see your handiwork.
WordPress site-builders have two choices of web host:
• WordPress.com. The WordPress.com hosting service is free, and it’s run by
some of the same people who developed the WordPress software, so you’re
in good hands.
• A third-party web host. You can install WordPress on almost any web host.
While this approach isn’t free, it gives you more features and control. It’s called
self-hosting.
Page 17 has much more about the dierences between these two approaches. But
that’s for the future. For now, all you need to know is that you can use the informa-
tion in this book no matter which approach you use. Chapter 2 explains how to sign
up with WordPress.com, Chapter 3 details self-hosting, and the chapters that follow
try to pay as little attention to your hosting decision as possible.
That said, it’s worth noting that you’ll come across some features, particularly later
in the book, that work only with self-hosted installations. Examples include sites that
use plug-ins and those that need heavy customization. But, happily, the features
that
do
work on both WordPress.com-hosted sites and self-hosted sites work in
almost exactly the same way.
About→These→Arrows
Throughout this book, and throughout the Missing Manual series, you’ll find sen-
tences like this one: “Choose Appearance→Themes in the dashboard menu.” That’s
shorthand for a longer series of instructions that go something like this: “Go to the
dashboard in WordPress, click the Appearance menu item, and then click the Themes
entry underneath.” Our shorthand system keeps things snappier than these long,
drawn-out instructions.

WORDPRESS: THE MISSING MANUAL
XII
ABOUT THE
OUTLINE
About the Outline
This book is divided into five parts, each with several chapters:
• Part 1, Starting Out with WordPress. In this part of the book, you’ll start plan-
ning your path to WordPress web domination. In Chapter 1, you’ll plan the type
of website you want, decide how to host it, and think hard about its
domain
name,
the unique address that visitors type in to find your site on the Web.
Then you’ll see how to get a basic blog up and running, either on WordPress.
com (Chapter 2) or on your self-hosted site (Chapter 3).
• Part 2, Building a WordPress Blog. This part explains everything you need to
know to create a respectable blog. You’ll learn how to add posts (Chapter 4),
pick a stylish theme (Chapter 5), make your posts look fancy (Chapter 6), add
pages and menus (Chapter 7), and manage comments (Chapter 8).
NOTE Even if you plan something more exotic than JAWB (Just Another WordPress Blog), don’t skip Part 2.
The key skills you’ll learn here also underpin custom sites, like the kind you’ll learn to build in Part 4 of the book.
• Part 3, Supercharging Your Blog. If all you want is a simple, classy blog, you
can stop now—your job is done. But if you hope to add more glam to your site,
this part will help you out. First, you’ll learn that plug-ins can add thousands of
new features to self-hosted sites (Chapter 9). Next, you’ll see how to put video,
music, and photo galleries on any WordPress site (Chapter 10). You’ll also learn
how to collaborate with a whole group of authors (Chapter 11), and how to at-
tract boatloads of visitors (Chapter 12).
• Part 4, From Blog to Website. In this part, you’ll take your WordPress skills
beyond the blog and learn to craft a custom website. First, you’ll crack open
a WordPress theme and learn to change the way your site works by adding,
inserting, or modifying the CSS styles and PHP commands embedded inside the
theme (Chapter 13). Next, in Chapter 14, you’ll apply this knowledge to create a
WordPress product-catalog site that doesn’t look anything like a typical blog.
• Part 5, Appendixes. At the end of this book, you’ll find three appendixes. The
first (Appendix A: “Migrating from WordPress.com”) explains how to take a
website you created on the free WordPress.com hosting service and move it
to another web host to get more features. The second (Appendix B: “Securing
a Self-Hosted Site”) explains the security basics you need to harden your site
against attackers. The third (Appendix C: “Useful Websites”) lists some useful
web links culled from the chapters in this book. Don’t worry—you don’t need to
type these into your browser by hand. It’s all waiting for you on the Missing CD
page for this book at
http://www.oreilly.com/pub/missingmanuals/wpmm2e
.

XIII
ABOUT THE
ONLINE
RESOURCES
About the Online Resources
As the owner of a Missing Manual, you’ve got more than just a book to read. Online,
you’ll find example files as well as tips, articles, and maybe even a video or two.
You can also communicate with the Missing Manual team and tell us what you love
(or hate) about the book. Head over to
www.missingmanuals.com,
or go directly to
one of the following sections.
Web Links
Often, this book will point you to a place on the Web. It might be to learn more
about a specialized WordPress feature, or to get background information on another
topic, or to download a super-cool plug-in. To save your fingers from the wear and
tear of typing in all these long web addresses, you can visit the clickable list of links
on the Missing CD page at
http://www.oreilly.com/pub/missingmanuals/wpmm2e.
Living Examples
This book is packed full of examples. But unlike many other types of computer books,
we don’t encourage you to try to download them to your own computer. That’s be-
cause once you place WordPress files on a local computer, they lose their magic. In
fact, without the WordPress software running on a web server, your website loses
all its abilities. You won’t be able to try out even a single page.
To get around this limitation, many of the finished examples from this book are
available for you to play around with at
http://prosetech.com/wordpress.
Although
you won’t be able to actually take charge of the example site (modify it, manage
comments, or do any other sort of administrative task), you can take a peek and
see what it looks like. This is a handy way to witness some features that are hard
to experience in print—say, playing an embedded video or reviewing pictures in an
image gallery.
Registration
If you register this book at oreilly.com, you’ll be eligible for special oers—like dis-
counts on future editions of
WordPress: The Missing Manual.
If you buy the ebook
from
www.oreilly.com
and register your purchase, you get free lifetime updates for
this edition of the ebook; we’ll notify you by email when updates become available.
Registering takes only a few clicks. Type
www.oreilly.com/register
into your browser
to hop directly to the Registration page.
Feedback
Got questions? Need more information? Fancy yourself a book reviewer? On our
Feedback page, you can get expert answers to questions that come to you while
reading, share your thoughts on this Missing Manual, and find groups for folks who
share your interest in creating their own sites. To have your say, go to
www.miss-
ingmanuals.com/feedback.

WORDPRESS: THE MISSING MANUAL
xiv
USING CODE
EXAMPLES
Errata
To keep this book as up to date and accurate as possible, each time we print more
copies, we’ll make any confirmed corrections you suggest. We also note such changes
on the book’s website, so you can mark important corrections in your own copy of
the book, if you like. Go to
http://tinyurl.com/7mujhnx
to report an error and view
existing corrections.
Using Code Examples
In general, you may use the code in this book in your programs and documentation.
You don’t need to contact us for permission unless you’re reproducing a significant
portion of the code. For example, writing a program that uses several chunks of code
from this book does not require permission. Selling or distributing a CD of examples
from O’Reilly books does require permission. Answering a question by citing this
book and quoting example code does not require permission. Incorporating a sig-
nificant amount of example code from this book into your product’s documentation
does require permission.
We appreciate, but do not require, attribution. An attribution usually includes the
source book’s title, author, publisher, and ISBN. For example: “
WordPress: The
Missing Manual, Second Edition
by Matthew MacDonald (O’Reilly). Copyright 2014,
978-1-4493-4190-9.”
If you feel your use of code examples falls outside fair use or the permission given
above, feel free to contact us at
permissions@oreilly.com
.
Safari® Books Online
Safari® Books Online is an on-demand digital library that lets you search over 7,500
technology books and videos.
With a subscription, you can read any page and watch any video from our library. You
can access new titles before they’re available in print. And you can copy and paste
code samples, organize your favorites, download chapters, bookmark key sections,
create notes, print out pages, and benefit from tons of other timesaving features.
O’Reilly Media has uploaded this book to the Safari Books Online service. To have
full digital access to this book and others on similar topics from O’Reilly and other
publishers, sign up for free at
http://safaribooksonline.com
.


3
CHAPTER
1
Since you picked up this book, it's likely that you already know at least a bit
about WordPress. You probably realize that it's a brilliant tool for creating a
huge variety of websites, from gossipy blogs to serious business sites. However,
you might be a bit fuzzy on the rest of the equation—how WordPress actually works
its magic, and how you can use WordPress to achieve your own website vision.
In this chapter, you'll get acquainted with life the WordPress way. First, you'll take a
peek at the inner machinery that makes WordPress tick. If you're not already clear
on why WordPress is so wonderful—and how it's going to save you days of work,
years of programming experience, and a headful of gray hairs—this discussion will
fill you in.
Next, you'll consider the types of sites you can build with WordPress, and how much
work they need. As you'll see, WordPress began life as a blogging website, but has
since mutated into a flexible, easy-to-use tool for creating virtually any sort of site.
Finally, you'll face your first WordPress decision: choosing a home for your Word-
Press site. You'll discover you have two options. You can use WordPress's free host-
ing service (called
WordPress.com
), or you can install the WordPress software on
another web host, for a monthly fee. Both approaches work, but the choice to use
WordPress.com imposes a few limitations you should understand before you decide.
The WordPress
Landscape
WORDPRESS: THE MISSING MANUAL
4
HOW
WORDPRESS
WORKS
How WordPress Works
You probably already realize that WordPress isn't just a tool to build web pages.
After all, anybody can create a web page—you just need to know a bit about HTML
(the language that web pages are written in) and a bit about CSS (the language that
formats web pages so they look beautiful). It also helps to have a first-class web
page editor like Adobe Dreamweaver at your fingertips. Meet these requirements,
and you'll be able to build a
static
website—one that looks nice enough, but doesn't
actually
do
anything (Figure 1-1).
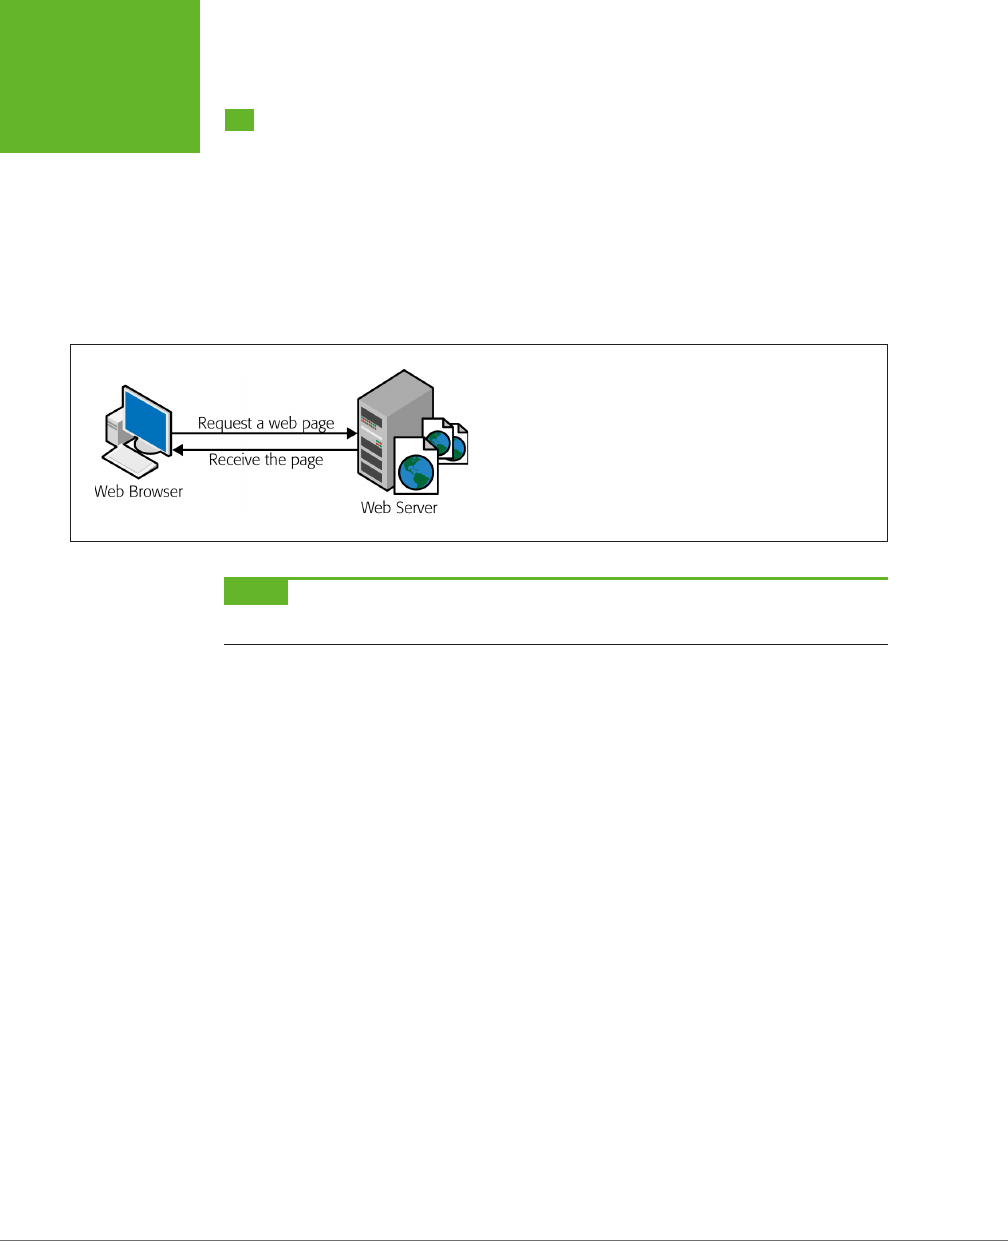
FIGURE 1-1
In an old-fashioned website, a web designer creates a bunch of HTML
files and drops them into a folder on a web server. When someone
visits one of those pages, his browser renders that same HTML file as
a web page. WordPress works a little differently—it builds its pages
in real time, as you'll see next.
NOTE Just in case your webmaster skills are a bit rusty, remember that a
web server
is the high-powered
computer that runs your website (and, usually, hundreds of other people's websites, too).
With WordPress, you strike up a dierent sort of partnership. Instead of creating a
web page, you give WordPress your raw content—that's the text and pictures you
want published as an article, a product listing, a blog post, or some other type of
content. Then, when a visitor surfs to your site, WordPress assembles that content
as a made-to-measure web page.
Because WordPress is a
dynamic
environment—it creates web pages on the fly—it
provides some useful interactive features. For example, when visitors arrive at a
WordPress blog, they can browse through the content in dierent ways—looking
for posts from a certain month, for example, or on a certain topic, or tagged with a
certain keyword. Although this seems simple enough, it requires a live program that
runs on a web server and assembles the relevant content in real time. For example, if
a visitor searches a blog for the words “tripe soup,” WordPress needs to find all the
appropriate posts, stitch them together into a web page, and then send the result
back to your visitor's web browser. More impressively, WordPress lets visitors write
comments and leave other types of feedback, all of which become part of the site's
ongoing conversation.
WordPress Behind the Scenes
In a very real sense, WordPress is the brain behind your website. When someone
visits a WordPress-powered site, the WordPress software gets busy, and—in the
blink of an eye—it delivers a hot-o-the-server, fresh new web page to your visitor.
CHAPTER 1: THE WORDPRESS LANDSCAPE 5
HOW
WORDPRESS
WORKS
Two crucial ingredients allow WordPress to work the way it does:
• A database. This is an industrial-strength storage system that sits on a web server;
think of it as a giant, electronic filing cabinet where you can search and retrieve
bits of content. In a WordPress website, the database stores all the content for its
pages, along with category and tag labels for those pages, and all the comments
that people have added. WordPress uses the MySQL database engine, because
it's a high-quality, free, open-source product, much like WordPress itself.
• Programming code. When someone requests a page on a WordPress site, the
web server loads up a template and runs some code. It's the code that does
all the real work—fetching information from dierent parts of the database,
assembling it into a cohesive page, and so on.
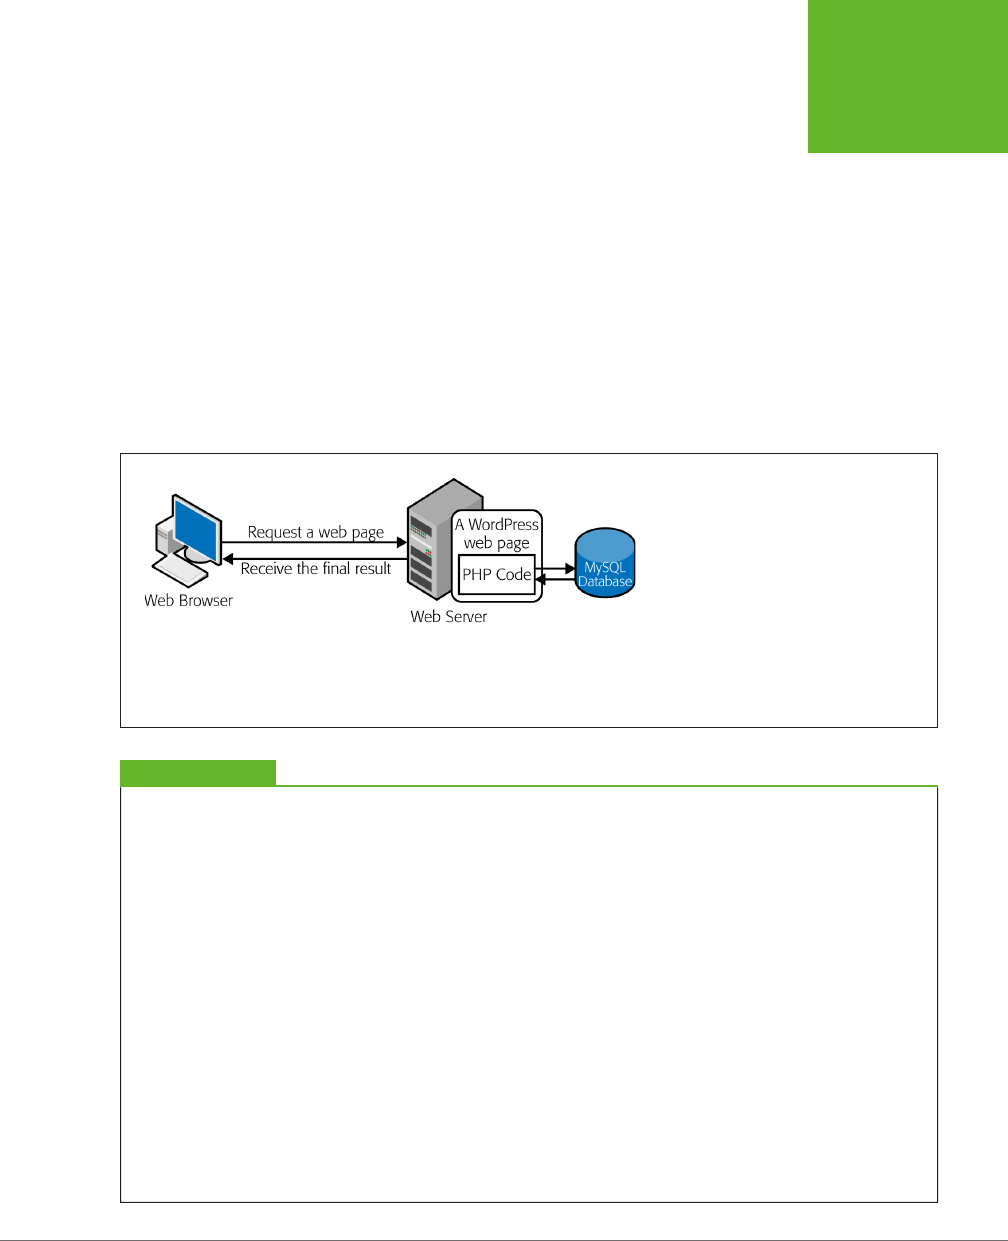
Figure 1-2 shows how these two pieces come together.
FIGURE 1-2
When a browser sends a request to a dynamic
website, that request kicks off some program-
ming code that runs on the site's server. In
the case of WordPress, that code is known as
PHP, and it spends most of its time pulling
information out of a database (for example,
retrieving product info that a visitor wants to
see). The PHP then inserts the information into
a regular-seeming HTML page, which it sends
back to the browser.
UP TO SPEED
The Evolution of Dynamic Sites
Dynamic websites are nothing new; they existed long before
WordPress hit the scene. In fact, modern, successful websites
are almost always dynamic, and almost all of them use
databases and programming code behind the scenes. The
difference is who's in charge. If you don't use WordPress (or a
site-building tool like it), it's up to you to write the code that
powers your site. Some web developers do exactly that, but
they generally work with a whole team of experienced coders.
But if you use WordPress to build your site, you don't need to
touch a line of code or worry about defining a single database
table. Instead, you supply the content and WordPress takes
care of everything from storing it in a database to inserting it
into a web page when it's needed.
Even if you
do
have mad coding skills, WordPress remains a
great choice for site development. That's because using Word-
Press is a lot easier than writing your own software. It's also a
lot more reliable and a lot safer, because every line of logic has
been tested by a legion of genius-level computer nerds—and
it's been firing away for years on millions of WordPress sites.
Of course, if you know your way around PHP, the programming
language that runs WordPress, you'll have a head start when
it comes to tweaking certain aspects of your site's behavior,
as you'll see in Chapter 13.
In short, the revolutionary part of WordPress isn't that it lets
you build dynamic websites. It's that WordPress pairs its smarts
with site-creation and site-maintenance tools that ordinary
people can use.
WORDPRESS: THE MISSING MANUAL
6
HOW
WORDPRESS
WORKS
WordPress Themes
There's one more guiding principle that shapes WordPress—its built-in
flexibility.
WordPress wants to adapt itself to whatever design you have in mind, and it achieves
that through a feature called
themes.
Basically, themes let WordPress separate your content (which it stores in a database)
from the layout and formatting details of your site (which it stores in a theme). Thanks
to this system, you can tweak the theme's settings—or even swap in a whole new
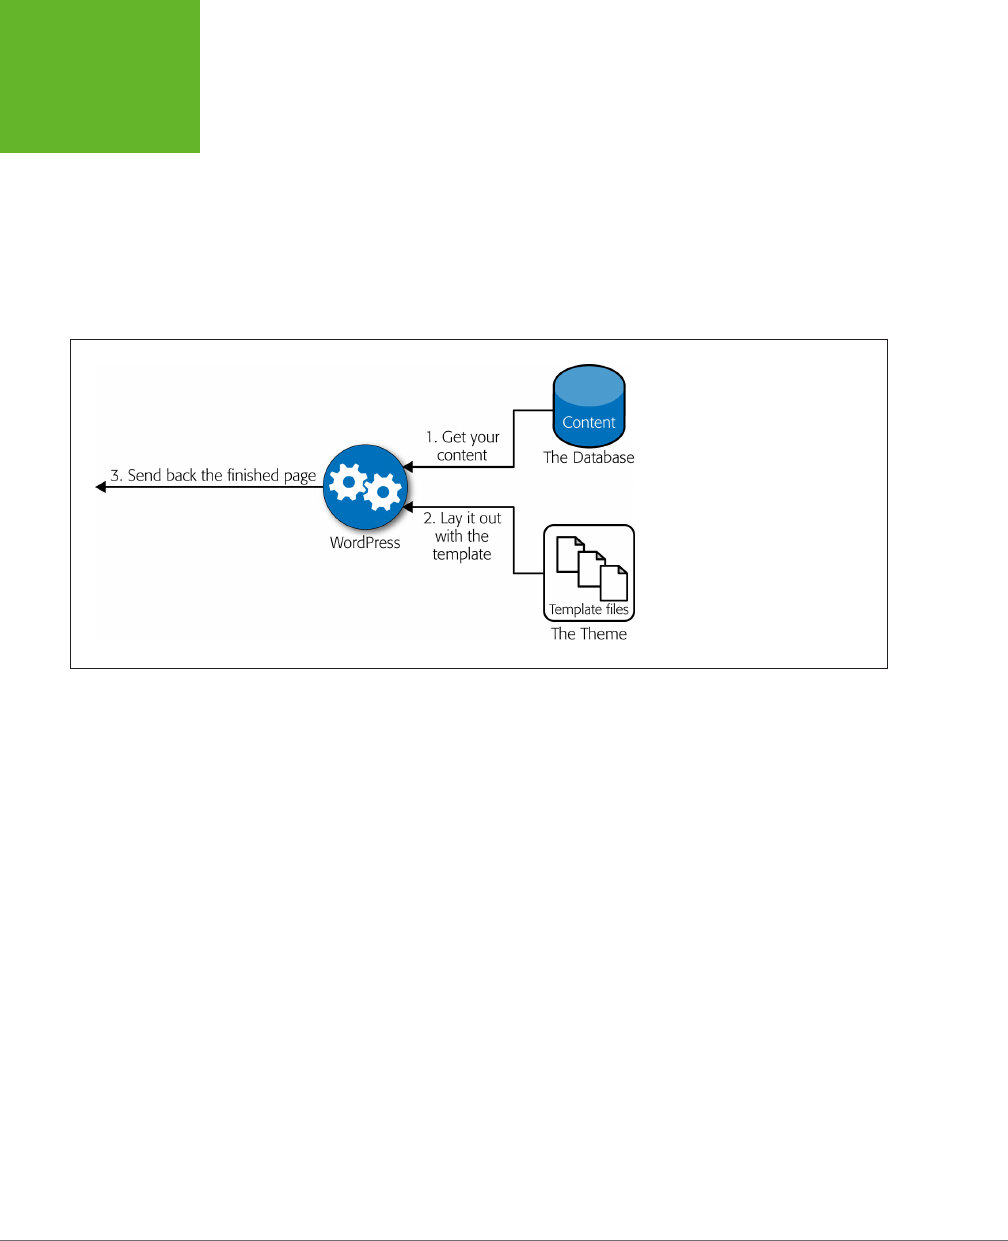
theme—without disturbing any of your content. Figure 1-3 shows how this works.
FIGURE 1-3
When you visit a page from a Word-
Press site, WordPress combines the
content (which it stores in a database)
with formatting instructions (which
are stored in the theme's template
files). The end result is a complete
web page you see in your browser.
If you're still not quite sure how WordPress helps you with themes, consider an
example. Imagine Jan decides to create a website so he can show o his custom
cake designs. He decides to do the work himself, so he not only has to supply the
content (the pictures and descriptions of his cakes), but he also has to format each
page the same way, because each page has two parts—a description of the cake
and a picture of it—and he wants his pages to be consistent. But, as so often hap-
pens, a week after he releases his site, Jan realizes it could be better. He decides to
revamp his web pages with a fresh, new color scheme and add a calorie-counting
calculator in the sidebar.
Applying these changes to a non-WordPress website is no small amount of work.
It involves changing the website's style sheet (which is relatively easy) and modify-
ing every single cake page, being careful to make
exactly the same change
on each
(which is much more tedious). If Jan is lucky, he'll own a design tool that has its own
template feature (like Dreamweaver), which will save editing time. However, he'll still
need to rebuild his entire website and upload all the new web pages.

CHAPTER 1: THE WORDPRESS LANDSCAPE 7
WHAT YOU CAN
BUILD WITH
WORDPRESS
With WordPress, these problems disappear. To get new formatting, you tweak your
theme's style settings, using either WordPress's control panel (called the
dashboard
),
or by editing the styles by hand. To add the calorie counter, for example, you simply
drop it into your theme's layout (and, yes, WordPress
does
have a calorie-counting
plug-in). And that's it. You don't need to rebuild or regenerate anything, go through
dozens of pages by hand, or check each page to try to figure out which detail you
missed when you copied HTML from one page to another.
What You Can Build with WordPress
There are many flavors of website, and many ways to create them. But if you want
something reasonably sophisticated and you don't have a crack team of web pro-
grammers to make that happen, WordPress is almost always a great choice.
That said, some types of WordPress websites require more work than others. For
example, if you want to create an ecommerce site complete with a shopping cart
and checkout process, you need to ditch WordPress or rely heavily on someone
else's WordPress plug-ins. That doesn't necessarily make WordPress a poor choice
for ecommerce sites, but it does present an extra challenge. (In Chapter 14, you'll
take a closer look at what it takes to build a basic v site that uses a plug-in to go
beyond WordPress's standard features.)
In the following sections, you'll see some examples of WordPress in action. You'll
consider the types of sites that use WordPress most easily and most commonly. Along
the way, you should get a feel for how WordPress suits your very own website-to-be.
Blogs
As you probably know, a blog is a wildly popular type of site that consists of sepa-
rate, dated entries called
posts
(see Figure 1-4). Good blogs reflect the author's
personality, and are informal and overflowing with content.
When you write a blog, you invite readers to see the world from your viewpoint,
whether the subject is work, art, politics, technology, or your personal experience.
Blogs are sometimes described as online journals, but most blogs are closer to old-
school newspaper editorials or magazine commentary. That's because a journal
writer is usually talking to himself, while a half-decent blogger unabashedly ad-
dresses the reader.
WORDPRESS: THE MISSING MANUAL
8
WHAT YOU CAN
BUILD WITH
WORDPRESS
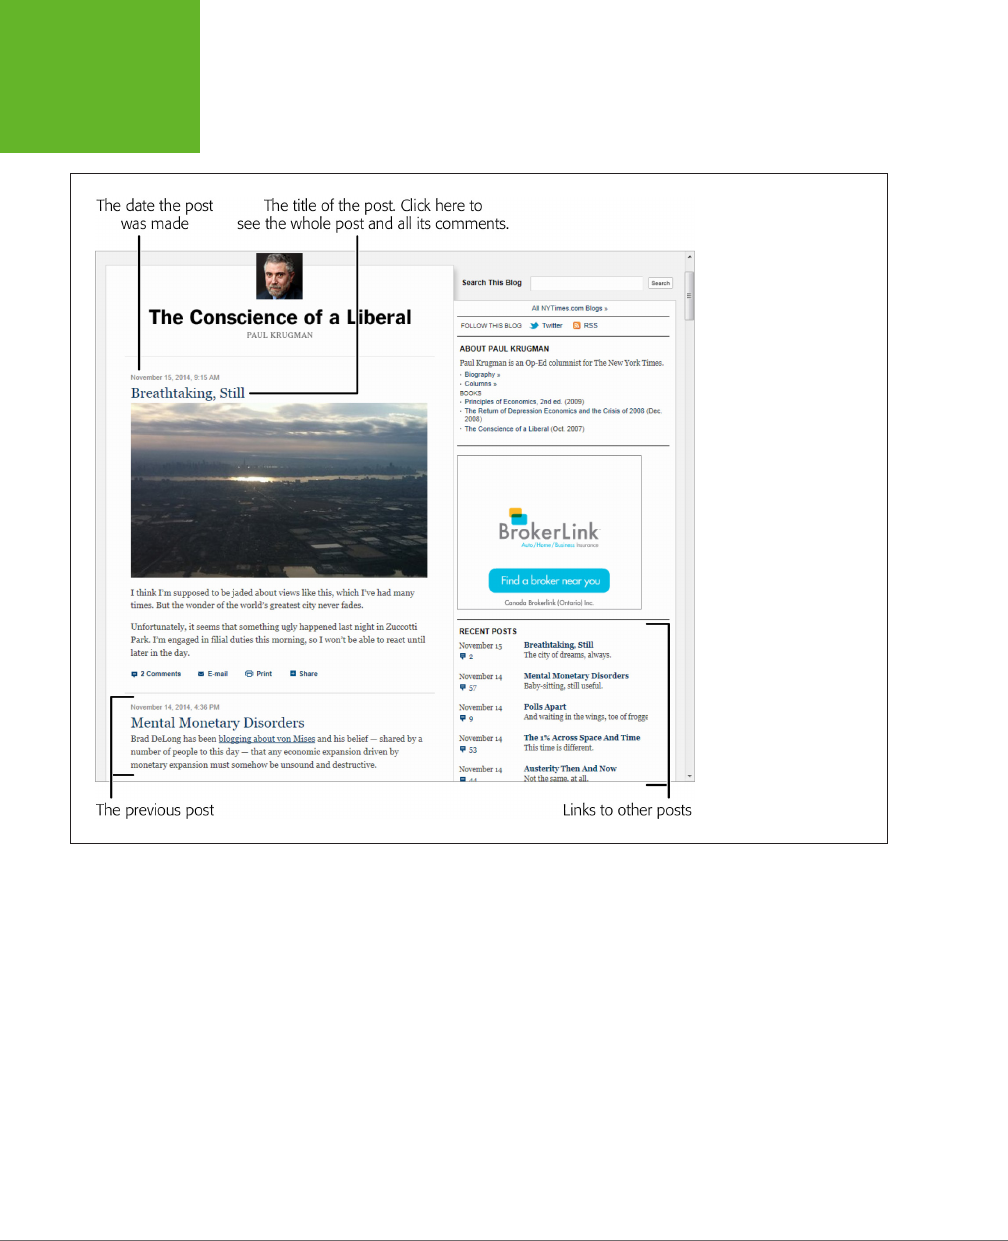
FIGURE 1-4
Paul Krugman of the New
York Times writes this tra-
ditional blog. Here's what
you see when you arrive
at
http://krugman.blogs.
nytimes.com
. Scroll down
and you see a dozen or so
of his most recent posts.
Blogs exhibit a few common characteristics. These details aren’t mandatory, but
most blogs share them.
• A personal, conversational tone. Usually, you write blogs in the first person
(“
I
bought an Hermès Birkin bag today” or “Readers emailed
me
to point out
an error in yesterday’s post”). Even if you blog on a serious topic—you might
be a high-powered executive promoting your company, for example—the style
remains informal. This gives blogs an immediacy and connection to your read-
ers that they love.

CHAPTER 1: THE WORDPRESS LANDSCAPE 9
WHAT YOU CAN
BUILD WITH
WORDPRESS
• Dated entries. Usually, blog posts appear in reverse-chronological order, so the
most recent post takes center stage. Often, readers can browse archives of old
posts by day, month, or year (see “Recent Posts” in Figure 1-4). This emphasis
on dates makes blogs seem current and relevant, assuming you post regularly.
But miss a few months, and your neglected blog will seem old, stale, and seri-
ously out of touch—and even faithful readers will drift away.
• Interaction through comments. Blogs aren’t just written in a conversational
way, they also “feel” like a conversation. Loyal readers add their feedback to
your thoughts, usually in the form of comments appended to the end of your
post (but sometimes through a ratings system or an online poll). Think of it this
way: Your post gets people interested, but their comments get them
invested,
which makes them much more likely to come back and check out new posts.
FREQUENTLY ASKED QUESTION
Who's Blogging?
Technorati, a popular blog search engine, maintains a list of
the most popular blogs at
http://technorati.com/blogs/top100
and compiles statistics about the blog universe. The last time it
asked bloggers why they blog, it found the following:
• 60 percent of bloggers write for the sense of personal
satisfaction they get by sharing their worldview with
readers.
• 18 percent of people blog professionally. They're
compensated for their work, although for many it's a
supplementary source of income, not their livelihood.
Professional bloggers may be part time or full time, and
they usually blog about technology or their own musings.
• 13 percent of bloggers are considered entrepreneurs. Their
goals are similar to those of corporate bloggers (see the
next item), but they blog for a company they own.
• 8 percent of bloggers work for and write under the
imprimatur of a company. They generally talk about
business or technology, and their goals are to share
expertise, to gain professional recognition, and to lure
new clients.
Equally interesting is the question of what bloggers blog about.
The answer is
everything,
from travel and music to finance and
real estate, from parenting and relationships to celebrities and
current events. To dig deeper, check out Technorati's Digital
Influencer's Report from 2013 at
http://bit.ly/1fSbmAT
. (Quick
takeaway: 64 percent of the bloggers surveyed are making
money, but for 80 percent of them, the financial rewards total
less than $10,000 per year.)
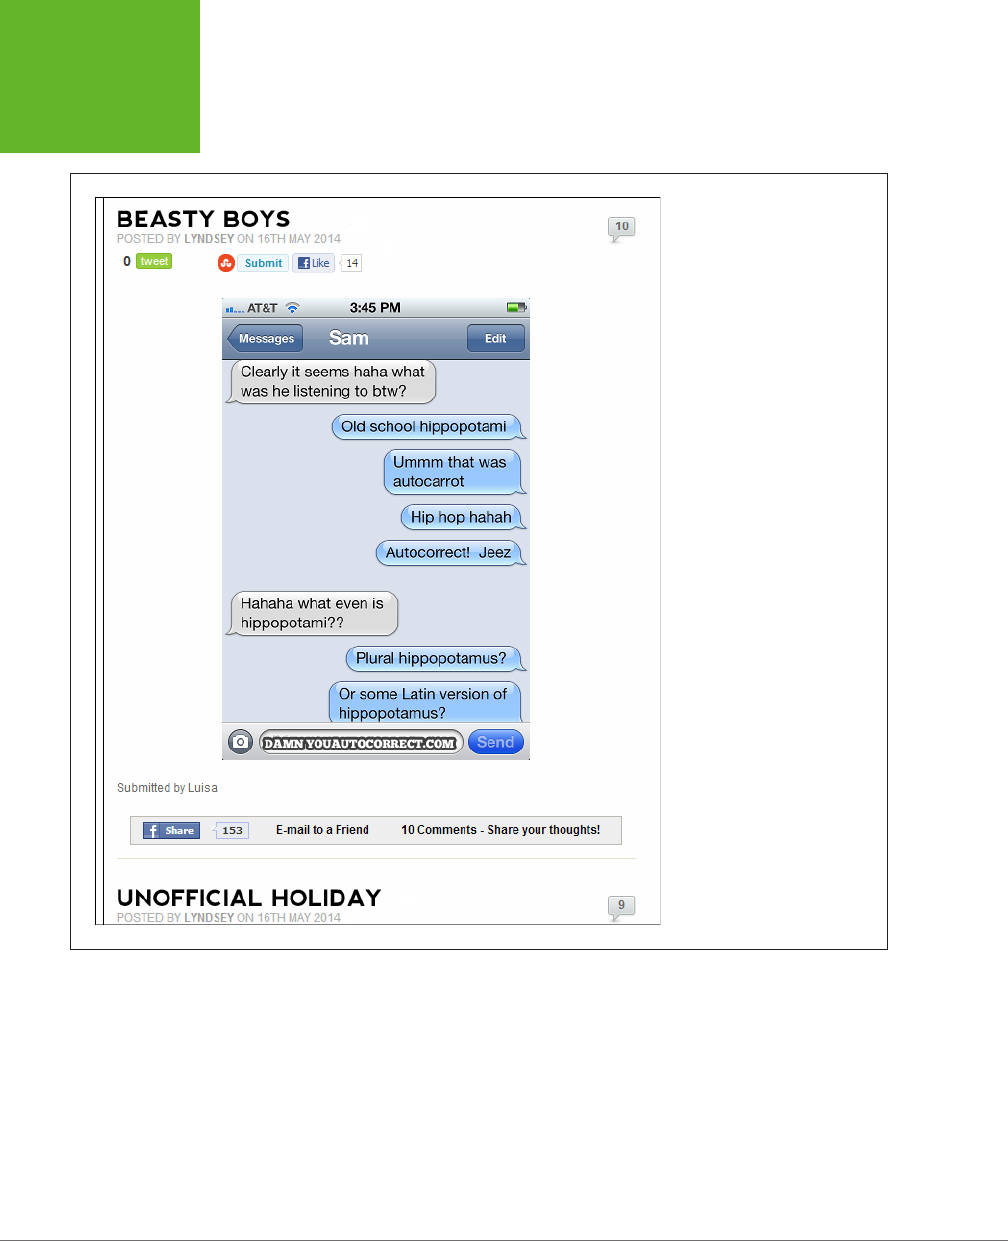
Some sites take the basic structure of a blog and apply it to dierent types of con-
tent. One popular example is the
photo blog,
which ditches text in favor of pictures
(see Figure 1-5). Similarly, you can find plenty of video blogs that feature a video
clip in every post.
WORDPRESS: THE MISSING MANUAL
10
WHAT YOU CAN
BUILD WITH
WORDPRESS
FIGURE 1-5
You can put photo blogs to a
variety of uses—everything from
serious photography to lowbrow
fun. Examples of the latter
include sites like
http://failblog.
org
and, shown here,
http://
damnyouautocorrect.com
, where
each page is a screen capture
from an iPhone conversation
gone horribly wrong.
In recent years, people have become increasingly interested in super-lightweight
blogs and blog-like tools. Examples include the micro-posts on Tumblr, the short
messages on Twitter, and the pictures on Instagram and Pinterest. As you'll see in this
book, you can create a basic microblog with WordPress, too. However, WordPress
makes the most sense when you want to create something a little less casual and a
little more permanent. For example, a collection of random selfies makes sense on
Instagram, but a series of lovingly arranged, captioned photographs documenting
your trip to Iceland fits nicely into a WordPress site that uses a photo theme.

CHAPTER 1: THE WORDPRESS LANDSCAPE 11
WHAT YOU CAN
BUILD WITH
WORDPRESS
Blogging with WordPress is a slam-dunk. After all, WordPress was created as a
blogging tool (in 2003), and has since exploded into the most popular blogging
software on the planet. In fact, if you plan to create a blog, there's really no good
reason
not
to use WordPress. Although there are several other blogging platforms
out there, and they all work reasonably well, none of them has the near-fanatical
WordPress community behind it, which is responsible for thousands of themes and
plug-ins, and might even help you solve hosting and configuration problems (just
ask your questions in the forums at
http://wordpress.org/support
).
UP TO SPEED
Creating a Modern Blog
Perhaps the idea of writing a blog seems a bit boring to you.
If so, you're probably locked into an old-fashioned idea about
what a blog
is.
Today's blogs aren't glorified online diaries. In fact, the
best way to create an
un
successful blog is to chronicle your
meandering, unfiltered thoughts on everything from the Tea
Party to toe jam. Even your friends won't want to sift through
that. Instead, follow these tips to make your blog truly legit:
• Pick a topic and focus relentlessly. People will seek out
your blog if it's based on a shared interest or experience.
For example, create a blog about your dining experiences
around town, and foodies will flock to your pages. Talk
up the challenges of taking care of a baby, and other new
parents will come by and commiserate. If you're having
trouble deciding exactly what you want to accomplish
with your blog and what topics are truly blog-worthy,
WordPress has a great reference with blog brainstorming
tips at
http://learn.wordpress.com/get-focused
.
• Add a clever title. Once you choose your topic, give your
blog a name that reinforces it, which will also help you stay
on topic. Paul Krugman, for example, calls his blog The
Conscience of a Liberal (Figure 1-4), despite the fact that
his name is well-recognized among his target audience.
• Find a new perspective. It's a rule of the Web that
everything has been blogged before, so find a unique
angle from which to attack your topic. For example, when
Scott Schuman began his now blazingly popular blog The
Sartorialist (
www.thesartorialist.com
), he didn't just slap
together an ordinary fashion blog. Instead, he created a
unique commentary on real-life fashion by using pictures
he snapped strolling the streets of New York.
• Don't be afraid to specialize. You won't pique anyone's
interest with yet another movie review site called My
Favorite Movies. But throw a different spin on the subject
with a blog that finds film flaws (In Search of Movie
Mistakes) or combines your experience from your day job
as a high-school science teacher (The Physics of Vampire
Movies), and you just might attract a crowd.
• Don't forget pictures, audio, and video. Bloggers
shouldn't restrict themselves to text. At a bare minimum,
blogs need pictures, diagrams, comics, or some other
visual element to capture the reader's eye. Even better,
you can weave in audio or video clips of performances,
interviews, tutorials, or related material. They don't
even need to be your own work—for example, if you're
discussing the avant-garde classical composer György
Ligeti, it's worth the extra five minutes to dig up a
performance on YouTube and embed that into your post.
(You'll learn how to do that in Chapter 10.)
WORDPRESS: THE MISSING MANUAL
12
WHAT YOU CAN
BUILD WITH
WORDPRESS
Other Types of WordPress Sites
Blogs are fantastic, exciting things, but they're not for everyone, even if you have
a streamlined tool like WordPress at your disposal. The good news is that, because
of its inherent flexibility, WordPress makes an excellent program for building other
kinds of websites, too. In fact, as long as you're willing to do a little theme custom-
ization, you can convert your WordPress pages into something that doesn't look
one whit like a traditional blog. The following sections show you some of the types
of sites you can create.
STORIES AND ARTICLES
WordPress makes a great home for personal, blog-style writing, but it's an equally
good way to showcase the more polished writing of a news site, web magazine,
short-story collection, scholarly textbook, and so on. WordPress also allows multiple
authors to work together, each adding content and managing the site (as you'll
discover in Chapter 11).
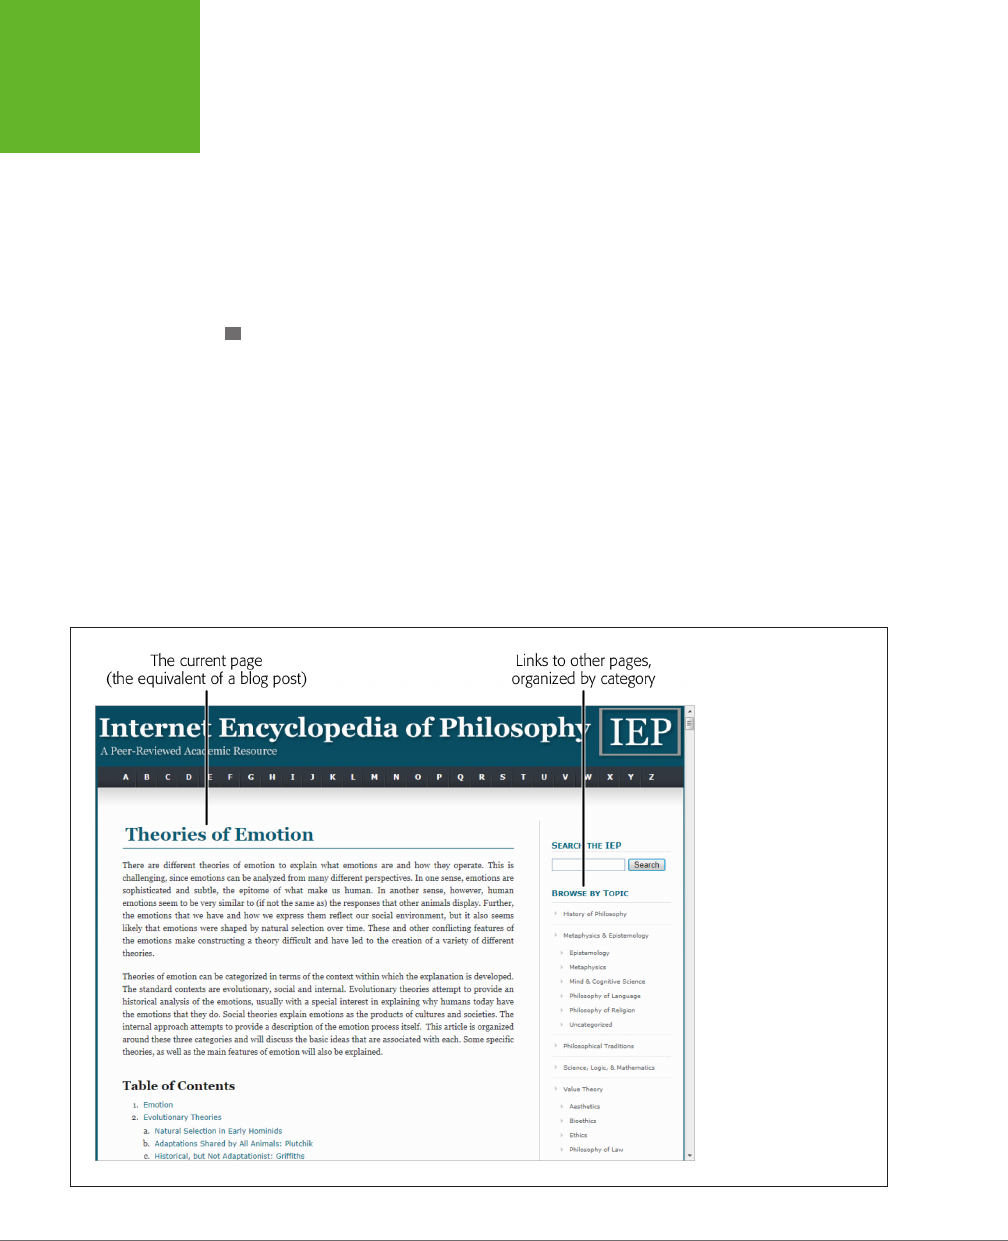
Consider, for example, the Internet Encyclopedia of Philosophy shown in Figure
1-6 (and located at
www.iep.utm.edu
). It's a sprawling catalog of philosophy topics
amassed from about 300 authors and maintained by 25 editors, all with heavyweight
academic credentials. Created in 1995, the site moved to WordPress in 2009 to make
everyone's life a whole lot easier.
FIGURE 1-6
Although WordPress
powers this website, you'll
see few of the hallmarks
of a traditional blog. The
“posts” are actually long,
subdivided articles, with-
out dates or comments.

CHAPTER 1: THE WORDPRESS LANDSCAPE 13
WHAT YOU CAN
BUILD WITH
WORDPRESS
The Internet Encyclopedia of Philosophy is an interesting example for the sheer
number and size of the articles it hosts. However, you'll also find WordPress at work
in massive news sites, including TechCrunch, TMZ, Salon, Boing Boing, ThinkProgress,
and the CNN site Political Ticker.
GEM IN THE ROUGH
How to Find Out if a Website Uses WordPress
There are plenty of websites built with WordPress, even if it's
not always apparent. So what can you do if you simply
must
know whether your favorite site is one of them?
You could ask the website administrator, but if you're in a
hurry, there are two easier ways. The first is the quick-and-
dirty approach: Right-click the page in your browser, choose
View Source to bring up the page's raw HTML, and then hit
Ctrl+F to launch your browser's search feature. Hunt for text
starting with “wp-”. If you find
wp-content
or
wp-includes
somewhere in the mass of markup, you're almost certainly
looking at a WordPress site.
Another approach is to use a browser plug-in, called a
sniffer,
that analyzes the markup. The advantage of this approach is
that most sniffers detect other types of web-creation tools and
programming platforms, so if the site isn’t based on WordPress,
you might still find out a bit more about how it works. One of
the most popular sniffers is Wappalyzer (
http://wappalyzer.
com
), which works with the Firefox and Chrome browsers.
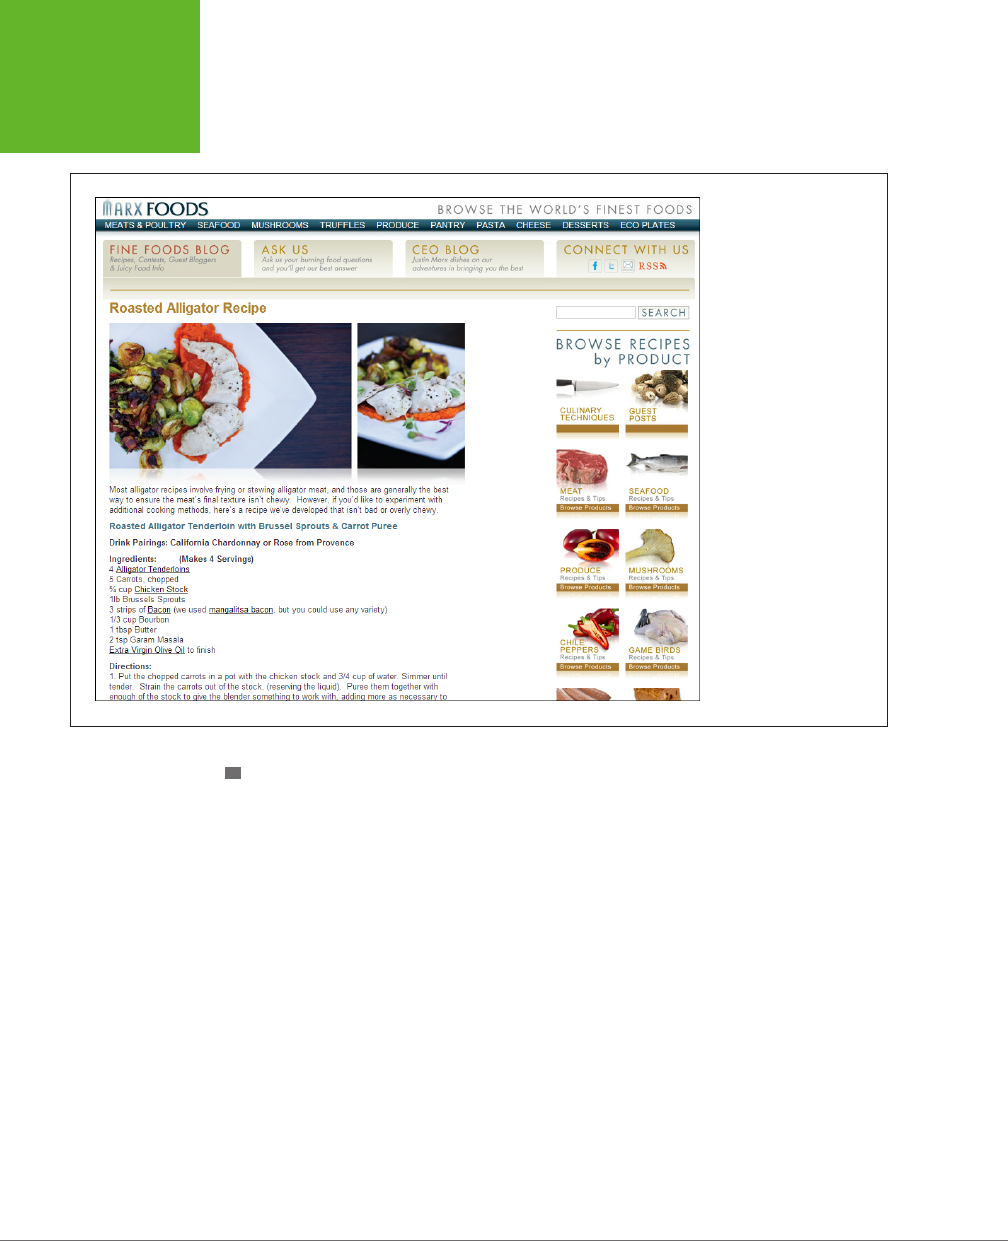
CATALOGS
WordPress is particularly well suited to websites stued full of organized content.
For example, think of a website that has a huge archive of ready-to-make recipes
(Figure 1-7). Or consider a site that collects classified ads, movie critiques, restaurant
reviews, or custom products.
NOTE The dividing line between blogs and catalogs can be a fine one. For example, you can find plenty
of cooking-themed WordPress sites that sort recipes by category and by date in a blog-style listing. However,
most catalog sites go beyond the blog in some way, and require the advanced theme customization skills you’ll
develop in Part 4 of this book.
Because WordPress relies on a database, it’s a wizard at organizing massive amounts
of content. In a properly designed catalog site, people can find a review, product,
or whatever else they want in a number of ways, such as searching by keyword or
browsing by category.
WORDPRESS: THE MISSING MANUAL
14
WHAT YOU CAN
BUILD WITH
WORDPRESS
FIGURE 1-7
This WordPress site
features a huge catalog of
recipes and articles that
have cooking tips. What
makes the site distinctly
different from a blog is
the fact that it doesn't
organize recipes by date,
displayed one by one in
reverse-chronological
order. Instead, it orders
them in common-sense
categories, like Meat,
Seafood, and Mushrooms.
BUSINESS SITES
WordPress isn’t just a great tool for self-expression, it’s also an excellent way to do
business. The only challenge is deciding exactly
how
you want to use WordPress
to help you out.
The first, and simplest, option is to take your existing business website and augment
it with WordPress. For example, the Ford Motor Co. uses WordPress for its news site
http://social.ford.com
, which invites customers to post feedback and share the hype
about new vehicles on Facebook and Twitter. But if you head to Ford’s main site,
www.ford.com
, and you search for a local dealer or ask for a price quote, you’ll be
entirely WordPress-free. These parts of Ford’s site rely on custom web applications,
which Ford’s web developers created.

CHAPTER 1: THE WORDPRESS LANDSCAPE 15
WHAT YOU CAN
BUILD WITH
WORDPRESS
Other companies
do
use WordPress to take charge of their entire websites. Usually,
they’re smaller sites, and often the goal is simply to promote a business and share
its latest news. For example, you could use WordPress to advertise the key details
about your new restaurant, including its location, menu, and recent reviews. Or
imagine you need more detailed information for a tourist attraction, like the detailed
website for Perth Zoo (Figure 1-8).
FIGURE 1-8
The Perth Zoo website has
it all—detailed menus, in-
formation about animals,
a review of the zoo's
policies, and up-to-date
news. But there's a catch:
To make this website look
as beautiful as it does,
the designers needed
to combine WordPress
knowledge with some
traditional web design
skills (including a good
knowledge of HTML and
CSS).

WORDPRESS: THE MISSING MANUAL
16
WHAT YOU CAN
BUILD WITH
WORDPRESS
UP TO SPEED
What Makes a Catalog Site
Catalog sites are also known by many other names. Some
people describe them as content-based sites; others call them
CMS sites (for “content management system,” because they
manage reams of information). No matter what you call them,
the sites share a few key characteristics:
• They include a large volume of content. If you want to
create a recipe site with just four recipes, it probably
wouldn't be worth the WordPress treatment.
• The content can be divided into separate pages. With
a blog, the “pages” are actually blog posts. In a recipe
site, each page is a recipe. (And in the Encyclopedia of
Philosophy shown on page 12, each page is a lengthy
scholarly article.)
• Each page consists of text, images, and/or video. Usually,
pages are stuffed with text. Often, they're enriched with
pictures and video. That's where WordPress shines. It's
less adept at displaying reams of numeric data, like the
last 12 years' worth of sales at your chain of mattress
superstores.
• Visitors browse the content by category. You categorize
pages by their subject matter. Visitors use those
categories to find exactly what they want—like a recipe
for a specific ingredient. Often, guests get to what they
want by clicking through a slick, multilayered menu.
These criteria encompass a surprisingly huge range of modern-
day websites. Examples include event listings for festivals, a
portfolio of your work, a list of products you sell, and so on.
Pretty much everywhere there's a mass of text or pictures that
needs to be categorized and presented to the world, WordPress
is there, making itself useful.
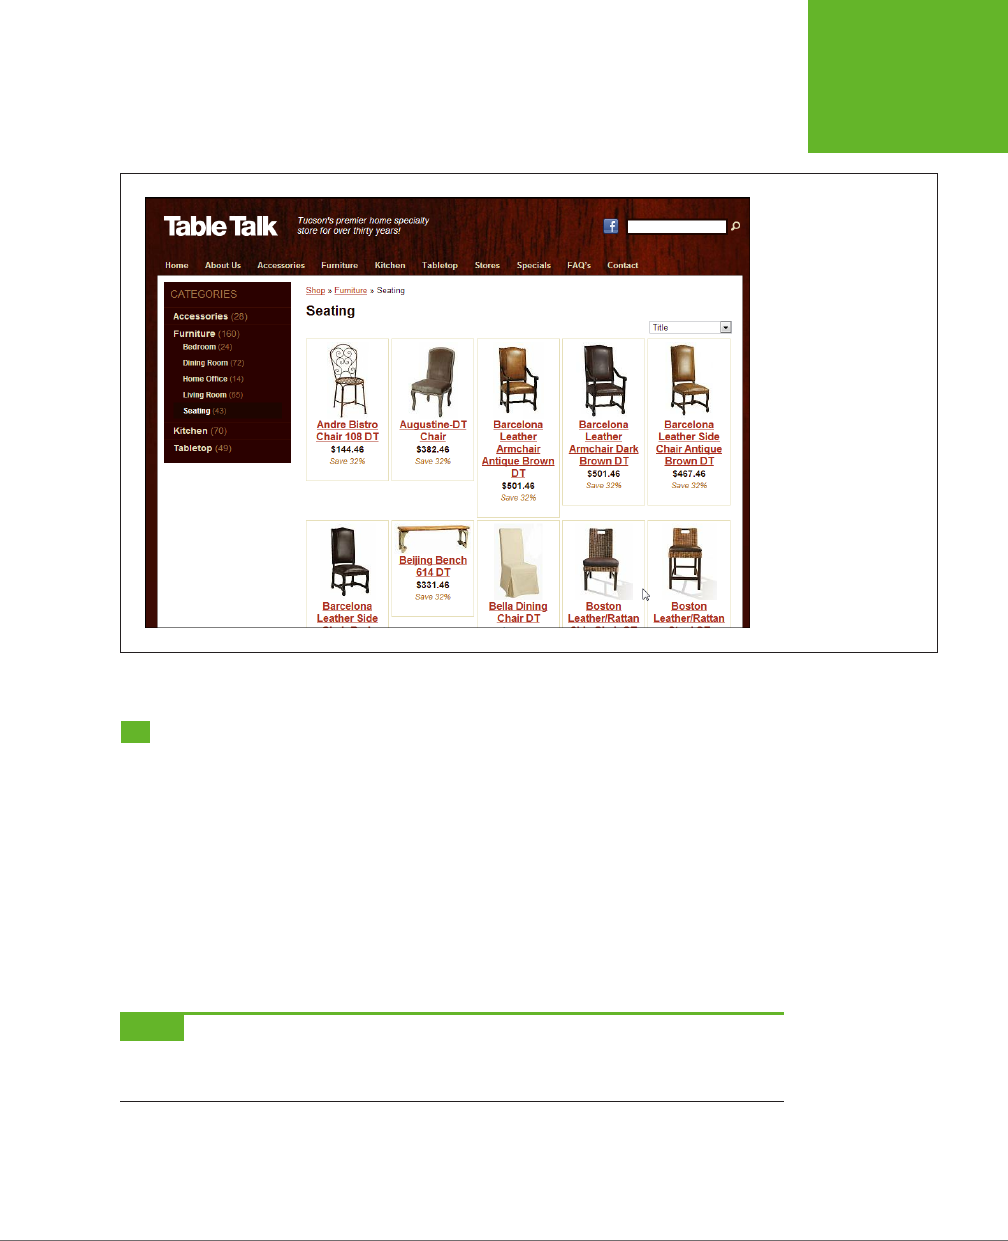
A greater challenge is when a business doesn't just want to advertise or inform with
its website, but it also wants to
do
business over the Web. For example, imagine
you create a site for your family-run furniture store, like the one shown in Figure
1-9. You don't just want to advertise the pieces you oer; you want to take orders
for them, too, complete with all the trappings typical of an ecommerce website
(such as a shopping cart, a checkout page, email confirmation, and so on). In this
situation, you need to go beyond WordPress's native features and add a plug-in to
handle the checkout process.
For some small businesses, an ecommerce plug-in oers a practical solution. But for
many others, this approach just isn’t flexible enough. Instead, most ecommerce sites
need a custom-tailored transaction-processing system that integrates with other
parts of their business (like their inventory records or their customer database). This
functionality is beyond the scope of WordPress and its plug-ins.
TIP To see more examples of what you can do with WordPress, including plenty of business sites, visit the
WordPress showcase at
http://wordpress.org/showcase
.
CHAPTER 1: THE WORDPRESS LANDSCAPE 17
WORDPRESS
HOSTING
FIGURE 1-9
On this furniture website,
you can view the chairs
for sale, their prices, and
their dimensions. All this
is possible with Word-
Press's standard features
and a heavily customized
theme. But if you want
to allow online ordering,
you need to use a plug-in
from a third party.
WordPress Hosting
If you've reached this point, it's safe to say you're on board with WordPress. Now
you need to decide exactly where you'll put your WordPress site.
The simplest (and cheapest) option is to sign up for the free WordPress.com service,
which is run by the fine folks at Automattic (founded by a guy named Matt Mul-
lenweg, hence the “matt” in the company name). The deal is simple: They give your
website a home, some exposure, and a free web address that ends in
.wordpress.
com
(although you can buy a custom domain name if you want), and you accept a
few limitations—most notably, your website can't show ads or use other people's
plug-ins, and you can't edit your theme by hand.
NOTE The people at Automattic are also largely responsible for (but not completely in control of) the de-
velopment of the WordPress software. That's because Automattic employs many of WordPress's lead developers.
However, WordPress is still a community-driven, open-source project.
Your other hosting option is to install WordPress on your web host's server and
build your site there. The drawback here is that you need to pay your web host.
And although you won't be on the hook for much coin—good plans run just a few

WORDPRESS: THE MISSING MANUAL
18
WORDPRESS
HOSTING
dollars a month—you still need to open your wallet. Generally, WordPressers call
this approach
self-hosting,
even though someone else actually does the hosting. In
other words, you're not running a web server in your basement; you're contracting
with a web hosting company for some space on
its
servers.
NOTE Although the WordPress nomenclature is a bit confusing, the real story is simple.
WordPress
is the
software that powers all WordPress sites. (Sometimes, people call the software
WordPress.org
, because that's
the web address where you download the program.) On the other hand,
WordPress.com
is a free web hosting
service that uses the WordPress software. So no matter where you decide to host your site—through WordPress.
com or on your own web host—you'll be using the WordPress software.
Choosing Where to Host Your Site
If WordPress.com is so eager to give you a free, reliable web host, why
wouldn't
you
use it? Here are a few good reasons to consider self-hosting instead:
• You want to create a site that isn't a blog. In this chapter, you've seen plenty
of examples of websites, from webzines to recipe catalogs to slick business
sites. Many of those sites are more dicult to create with WordPress.com (if
not impossible). That's because WordPress.com prevents you from editing the
code in your theme, or from using a theme that isn't in WordPress.com's pre-
approved list of about 200 themes.
• You already have a website. With most third-party web hosts, you won't have
to pay extra to add a WordPress site. And if you already have a web presence,
it makes sense to capitalize on the
domain name
(that's your web address, like
www.PajamaDjs.com
) and the web space you already have.
• You want complete control over your site's appearance. If you're the sort of
person who can't sleep at night unless you get the chance to tweak every last
WordPress setting, you definitely want the free rein of a self-hosted site. With
it, you can choose from thousands of site-enhancing plug-ins and a universe
of custom themes.
• You want to make money advertising. Ordinarily, WordPress.com doesn't
allow its sites to display ads or to participate in aliate programs (where you
send trac to a retailer, who shares any resulting revenue with you). However,
WordPress.com is in the midst of a pilot program called WordAds, which allows
a limited type of advertising, provided your site is accepted into the program.
You can learn more and apply at
http://wordpress.com/apply-for-wordads
.
NOTE Even though you can't run standard ads on WordPress.com, you can still make money there. WordPress.
com is perfectly fine with a website that promotes a particular product or business, includes a PayPal-powered
Donate button, or advertises your own personal fee-based services.

CHAPTER 1: THE WORDPRESS LANDSCAPE 19
WORDPRESS
HOSTING
• You don't want your readers to see ads, ever. WordPress.com is a bit sneaky
in this regard. In some cases, it will insert an ad into one of your pages. This
usually happens when someone stumbles across your site from a search engine.
It doesn't happen if a visitor surfs from one WordPress.com site to another, or
if a visitor is logged in with a WordPress.com account. For these reasons, you
might never notice the ads that other people could see. If this behavior bothers
you, you can remove the ads from your site, but you need to pay WordPress.
com a yearly fee (currently, $30 per year).
NOTE WordPress.com isn't necessarily as free as you think. In addition to paying for ad-free pages, you
can opt (and pay) for a personalized web address, the ability to edit the fonts in your theme, and extra space for
big files and hosted video. You can get information about all these upgrades at
http://support.wordpress.com/
upgrades
. It's worth noting that self-hosters get virtually all these features through their own web hosts, so if
you plan to buy several upgrades, you should at least consider getting your own web host instead—it may end
up costing you less.
In general, self-hosting is a slightly more powerful and more expensive strategy than
hosting with WordPress.com. But there are reasons why people actually prefer to
use WordPress.com rather than self-host:
• No-headache maintenance. If WordPress.com hosts your site, all the website
maintenance is taken care of. You don't need to think about installing patches
or WordPress updates, or making backups of your site.
• Better discoverability. If your site is on WordPress.com, people can stumble
across it in two ways. First, they can browse the giant index of popular subject
tags at
http://wordpress.com/tags
, and pick one you use in your posts. Second,
if you write a particularly popular post, your site may appear in the “Blog of the
Day” list that WordPress.com features prominently on its front page (
http://
wordpress.com
), and attract a click-storm of new trac.
• Reliability. It's not hard to find a good web host that has solid WordPress sup-
port. That said, no one serves as many WordPress sites as WordPress.com—it
uses over 1,000 web servers to hand out
billions
of WordPress pages every
month. That means that if a page on your WordPress site suddenly goes viral
with a burst of popularity, WordPress.com will handle the challenge, while a
less able web-hosting service could buckle.

WORDPRESS: THE MISSING MANUAL
20
WORDPRESS
HOSTING
WORD TO THE WISE
What WordPress.com Won't Allow
It probably comes as little surprise that there are some types
of websites that WordPress.com doesn't welcome. Here are
the problem areas:
• Spam. If you create a website for the sole purpose of
attracting clicks for another site, artificially inflating
another site's Google search ranking with spurious links,
promoting “get rich quick” schemes, or showing ads,
WordPress will wipe it off the Web in minutes.
• Copyright violation. If you create a site that includes
content owned by someone else and you don't have
permission to use it, WordPress has the power to yank
your site. Copyright (and other) complaints are made at
http://wordpress.com/complaints
.
• Masquerading. It's not acceptable to create a blog where
you pretend to be someone else.
• Threats or criminality. If your blog threatens another
real-life person, incites violence, or promotes an
illegal scheme, you obviously aren't a nice person, and
WordPress won't want you.
You'll notice that there's one oft-censored site type missing
from this list: namely, those that include sex, erotica, or por-
nography. It turns out that WordPress.com is mostly OK with
that, but it will slap “mature” blogs with an adults-only warn-
ing, and it won't include them in its home page or tag directory.
WordPress.com Sites vs. Self-Hosted Sites
Struggling to keep all the details about WordPress.com and WordPress.org in mind
at once? Table 1-1 summarizes the key dierences. Remember that the WordPress
program is packed with functionality, and the table leaves out the long list of fea-
tures that work equally well in WordPress.com and on self-hosted WordPress sites.
TABLE 1-1
Comparing WordPress.com and self-hosted sites
YOU WANT TO… WITH WORDPRESS.COM WITH A SELF-HOSTED SITE
Pay as little as possible. The starting cost is free, but
various enhancements cost
money.
You pay the cost of web
hosting. That's typically $5
to $10 per month, unless
your site is wildly popular, in
which case you need to pay
your host double or more to
get a plan that ensures good
performance during times of
high traffic (see the box on
page 51).
Forget all about web server
maintenance.
Yes. No, you need to back up
your content regularly, and
update plug-ins and themes
with new versions (but
fortunately both jobs are
pretty easy).

CHAPTER 1: THE WORDPRESS LANDSCAPE 21
WORDPRESS
HOSTING
YOU WANT TO… WITH WORDPRESS.COM WITH A SELF-HOSTED SITE
Use a custom website
address (like
www.myName.
com
).
Yes, but it requires an
upgrade ($18 to $25 per
year).
Yes, but you must buy it
through your web host or a
domain registrar.
Get good-looking, ready-
made themes.
Yes, you can choose from
about 200 themes (and the
list is growing).
Yes, you can choose from
more than 2,000 free themes
(and the list is growing).
Change the layout of your
theme and add new widgets.
Yes (although you're
limited to the widgets that
WordPress.com approves).
Yes (and you can get
more widgets by installing
plug-ins).
Edit the styles (fonts and
formatting) in your theme.
Yes, but it requires an
upgrade ($30 per year).
Yes.
Change the code in your
theme files.
No. Yes.
Create a non-blog site. Yes, if you can find a suitable
theme, but there are many
limitations.
Yes.
Show pictures and videos. Yes, but it costs extra if you
want to host the video files
on your website, instead
of through a service like
YouTube or Vimeo.
Yes, but you'll probably still
need a hosting service like
YouTube or Vimeo for your
videos.
Make money with ads. No, unless you're accepted
into WordPress's WordAds
program (which has its own
restrictions).
Yes.
Keep ads off your site. Yes, but it requires an
upgrade ($30 per year).
Yes (there are no ads, unless
you put them there).
Let multiple people post on
the same site.
Yes. Yes.
Create multiple sites. Yes (but if you buy any
upgrades, you need to buy
them separately for each
site).
Yes.
Create a multisite network
that allows other people to
create their own personal
sub-sites.
No. Yes.
Use WordPress plug-ins to
get even more features.
No. Yes, you can choose from
a staggeringly large and
ever-expanding collection of
about 30,000 plug-ins.
Get help with your problems. Yes, through the forums at
http://forums.wordpress.com.
Yes, through the forums
at
http://wordpress.org/
support.

WORDPRESS: THE MISSING MANUAL
22
WORDPRESS
HOSTING
Overall, the best advice is this: If you're a keen WordPress fan with a bit of curiosity,
a smattering of computer experience, and a willingness to experiment (and if you've
picked up this book, you almost certainly fit that description), you'll be happiest
self-hosting WordPress.
However, if you don't have a web host and you're a bit overwhelmed, it's a perfectly
good idea to
start
with WordPress.com. You can always migrate to a self-hosted
WordPress site later on, and Appendix A, “Migrating from WordPress.com,” de-
scribes exactly how to do that. The only recommendation with this strategy is that
you buy your own domain name from the get-go, as described on page 24. That
way, should you move to a self-hosted WordPress site, you can keep the address
you used when you were at WordPress.com, and you won't lose the audience you
spent so long building up.
UP TO SPEED
Managed Hosting
There is one other, relatively new type of WordPress hosting
that's geared to less experienced site developers who don't
want to mess with WordPress administration, but want more
features and flexibility than WordPress.com offers. It's called
managed hosting.
If you sign up for a managed hosting plan, your web hosting
company provides you with a domain name and some web
hosting space, just like you'd get with a self-hosted site. How-
ever, managed hosting companies also add WordPress-specific
services like automatic updates, daily backups, caching, and
site recovery (repairing your site after a spammer hijacks it).
You might even get tools to promote your site and a techy sup-
port person to install your plug-ins for you. Plans for small- to
medium-sized sites start at around $30 per month, but heavily
trafficked sites can pay hundreds of dollars a month.
You can learn more about managed hosting by checking out
some of the web hosts that provide it, such as WP Engine
(
http://wpengine.com
) and Synthesis (
http://websynthesis.
com
).

23
CHAPTER
2
In Chapter 1, you took a big-picture look at WordPress and the sites it can build.
Now you’re ready to partner with WordPress and start building your own web
masterpiece.
But not so fast. Before you can create even a single WordPress-powered page, you
need to decide where to
put
it, and, as you found out in Chapter 1, WordPress gives
you two perfectly good choices:
• The WordPress.com hosting service. This is a wonderfully free and supremely
convenient service for web authors who want to build an ordinary blog and can
live with a few limitations.
• Self-hosting. This option requires you to set up WordPress on your own web
host, which is a little bit more work (but still not much hassle). Self-hosted sites
are more powerful and flexible than WordPress.com-hosted sites—they let you
show ads, use plug-ins, and create completely customized pages that go far
beyond ordinary blogs.
In this chapter, you’ll get started with the first choice: using WordPress.com. But
if you’d prefer to give self-hosting a whirl, skip this chapter and jump straight to
Chapter 3. No matter which route you take, the paths converge in Chapter 4, where
you’ll begin adding content, refining your site, and developing the skills of a true
WordPress wizard.
Signing Up with
WordPress.com

WORDPRESS: THE MISSING MANUAL
24
CHOOSING A
WEB ADDRESS
TIP If you’re still divided between the convenience of WordPress.com and the flexibility of a self-hosted
site, you can review the key differences on page 20. Or you can leave both doors open: Start with a WordPress.
com website and buy a domain name (your own custom web address), as described in this chapter. That way,
you can switch to a self-hosted site in the future if you outgrow WordPress.com.
Choosing a Web Address
As you already know, a web address is a short bit of text, like
www.SuperStyleFreak.
com
, that someone types into a browser to get to your site.
The most essential part of a web address is the
domain name
(often shortened to
just
domain
), which points to the web server where your website exists. For example,
consider the website address
http://WineSnobs.com/exotic-cocktails
. The first part
of the address,
http://
, indicates that the URL points to a location on the Internet,
which uses a networking technology called HTTP. The second part of the address,
WineSnobs.com
, is the domain name. And the last part,
/exotic-cocktails
, points to
a specific page on the
WineSnobs.com
domain. Clearly, the domain is the most im-
portant part of the equation, because it identifies the central hub for all your pages.
Before you sign up with WordPress.com, you need to give some serious thought
to the domain name you want to use. That’s because WordPress.com gives you a
choice: You can buy your own domain name, or you can use a WordPress.com freebie.
Here’s the catch: If you get a free domain name from WordPress.com, it will have
.wordpress.com
appended to the end of it. That means you’ll end up with an address
like
WineSnobs.wordpress.com
. But if you pay WordPress.com a small yearly fee of
about $18, you can buy a custom domain name that doesn’t have this limitation—say,
WineSnobs.com
. And while there’s nothing wrong with a web address that ends
in
.wordpress.com
, a custom domain name can be beneficial for several reasons:
• Names matter. A catchy web address is easier for visitors to remember, and
a clever name can attract more visitors to your site. If you’re willing to buy a
custom domain name, you’ll have more naming choices, and your web address
will probably be shorter and snappier.
• You may not want to advertise WordPress. In some circles, using WordPress
is a badge of honor. But in other fields, it could make your site seem less pro-
fessional. For example,
victoriassecret.wordpress.com
doesn’t leave quite the
same impression as the real site address.
• Custom domain names are more portable. This is usually the most important
consideration. If you go with a free name and decide later to move your Word-
Press site to a dierent host, you’ll need to change your domain name. (For
example, you might go from
WineSnobs.wordpress.com
to
www.WineSnobs.
com
, assuming
www.WineSnobs.com
is even available when you make the
move.) Changing your domain name risks severing the relationships you built up
through your original
.wordpress.com
address. It also breaks any links on other

CHAPTER 2: SIGNING UP WITH WORDPRESS.COM 25
CHOOSING A
WEB ADDRESS
sites that point to your site, and it confuses the visitors who have bookmarked
your old site. And if all that’s not bad enough, you’ll lose the hard-earned Google
search ranking that helps your site show up in web searches, too.
When you’re just starting out, it’s easy to underestimate the likelihood of migrating
to a custom web host and the headache of changing your domain name. But life
happens, people change, and many die-hard WordPress.com bloggers eventually
move to a do-it-yourself web host so they have more flexibility in what they can
do on their site. For all these reasons, we strongly suggest that you buy a custom
domain name for your WordPress.com blog at the outset. If you do, you’ll be able
to keep your domain name forever, even if you switch to a dierent web host. You’ll
simply need to transfer your domain to your new host (as explained in Appendix A).
NOTE Keep in mind that using a custom domain name or a domain name that you own doesn’t avoid any
of the other limitations that hosting with WordPress.com imposes (see page 20). For example, you still won’t be
allowed to place ads on your site or to use plug-ins.
Before you continue, take a moment to determine your domain name strategy. If
you’re a technophobic sort and you positively, absolutely don’t plan to move to a
self-hosted site—ever—you can choose a good
.wordpress.com
address and forget
about the rest. However, paying a little extra for a custom domain name is almost
always worth the trouble. Think of it as a bit of added insurance for whatever the
future might hold.
Assuming you do want a custom domain name for your WordPress site, you can get
one in two ways. The most common method is to buy your domain name when you
sign up with WordPress.com, as you’ll learn to do in the next section. At the time
of this writing, WordPress.com charges $18 per year for most custom domains but
increases the price for some specialty domains (for example,
.me
and
.co
domains
cost $25 per year).
Another option is to use a domain name that you’ve already bought from a domain
registrar. For example, you might have registered a domain name in the past, just
to make sure no one else got hold of it. Or you might have bought a domain when
you signed up to host your site with another company. For instance, if you bought
the domain
SuperStyleFreak.com
a few months back, you can ask WordPress.com
to use this web address when you create your blog. If you opt for this arrangement,
you need to pay your original web host to maintain the domain registration (which
typically costs about $10 a year) and you need to pay WordPress.com to use the
domain (currently $13 per year). You also need to perform a bit of extra setup after
you sign up with WordPress.com. The whole process is described on page 44.
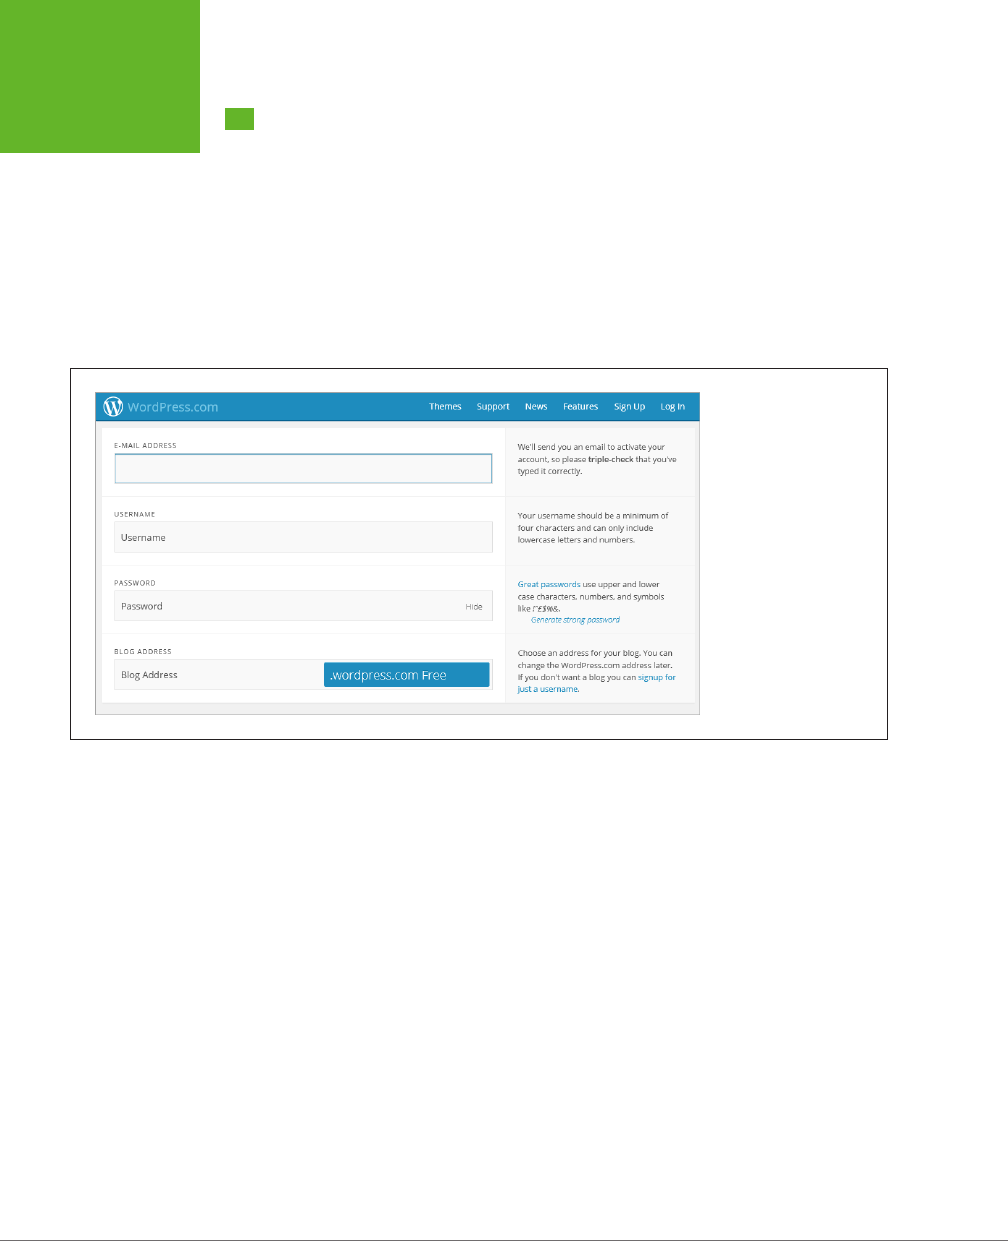
WORDPRESS: THE MISSING MANUAL
26
CREATING
YOUR
WORDPRESS.
COM ACCOUNT
Creating Your WordPress.com Account
Once you’ve got a basic idea about the identity of your blog and you’ve picked
some potential names for the website address, you’re ready to create your site. The
following steps take you through the process:
1. In your browser, travel to
http://wordpress.com
, and click the “Sign up
now” link. (Or, for a shortcut, head straight to the sign-up page at
http://
wordpress.com/signup
.)
The all-in-one sign-up form appears (Figure 2-1).
FIGURE 2-1
If you’ve ever stumbled
through eight pages of
forms to buy something
online, you’ll appreciate
WordPress.com’s single-
page signup. You need to
supply just four critical
pieces of information: a
website address and your
user name, password, and
email address.
2. Fill in your email address.
WordPress uses your email address to send its activation message when you
finish signing up. If you don’t enter a valid email address, you won’t be able to
activate your account and start blogging.
3. Choose a user name.
You use your user name and password to log into WordPress when you want to
add new posts or manage your site. Sometimes, WordPressers use part of their
blog name for the user name (for example, if your blog address is
lazyfather.
wordpress.com
, your user name might be
lazyfather
).
WordPress has some rules about user names. You need at least four characters,
which can use a combination of numbers and lowercase letters only. If someone
already has the user name you want, a brief message appears under the user
name box stating, “Sorry, that user name already exists!” It’s up to you to pick
something unique before you continue.

CHAPTER 2: SIGNING UP WITH WORDPRESS.COM 27
CREATING
YOUR
WORDPRESS.
COM ACCOUNT
NOTE Not only does your user name become part of the login process, it’s also the name WordPress uses
as your
display name,
which is the name that appears at the end of your blog posts and in the comments you
leave (among other places). However, you can easily change your display name to something more suitable, as
described on page 374.
4. Choose a password.
Take the time to pick a password that’s dierent from the passwords you use on
other sites, not found in the dictionary, and dicult to guess. If you’re not sure
how to do that—or why you should bother—check out the box below.
WORD TO THE WISE
A WordPress Password Is More Than a Formality
WordPress websites are commonly attacked by hackers looking
to steal traffic or to stuff in some highly objectionable ads.
The best way to avoid this danger is with a strong password.
With enough tries, web evildoers can guess any password
using an automated program. But most human WordPress
hackers look for common words and patterns. If you use
your first name (
ashley
), a string of close-together letters on
the keyboard (
qwerty, qazwsx
), or a single word with a few
number-fied or symbol-fied characters (like
passw0rd
and
pa$$word
), be afraid. These passwords aren’t just a little bit
insecure, they regularly make the list of the world’s 25
most
stolen
passwords. (For the complete list of bad passwords,
check out
http://onforb.es/v2rdOb
.)
That doesn’t mean you need a string of complete gibberish to
protect your site. Instead, you can deter casual hackers (who
are responsible for almost all WordPress attacks) by taking
a reasonably unique piece of information and scrambling it
lightly. For example, you can use a favorite musician (
HERBee-
HANcock88
), a movie title (
dr.strangel*ve
), or a short sentence
with some vowels missing (
IThinkThrforIM
).
It’s acceptable to write your password down on paper and
tuck it in a desk drawer—after all, you’re not worried about
family members or office colleagues, you’re concerned with
international spammers, who certainly won’t walk into your
office and rifle through your belongings. (However, it’s still a
bad idea to put your password in an email or text message.)
5. Type the website address you want into the Blog Address box.
If you want to use a free
.wordpress.com
domain, type in the first part of the
name (for example, “RebelPastryChef” for the domain
RebelPastryChef.word-
press.com
). Your address needs to have at least four characters.
If you want to buy a custom domain, which gives you the flexibility to move
to a self-hosted site later, click the drop-down arrow to the right side of the
Blog Address box. Then pick the
top-level domain
—that’s the final part of your
domain name after the period, such as
.me, .com, .net
, or
.org.
Once you do
that, type in the first part of the domain name, like “RebelPastryChef” to get
the domain name
RebelPastryChef.me
. (As you probably already know, capi-
talization is unimportant in a domain name, so there’s no dierence between
RebelPastryChef.me
and
REBELpastrychef.ME
, for instance.)
As explained earlier, if you already own a custom domain name, you can use
that for your new WordPress blog. To make this work, you need to go through
a process called
mapping.
The first step is to pick an ordinary
.wordpress.com

WORDPRESS: THE MISSING MANUAL
28
CREATING
YOUR
WORDPRESS.
COM ACCOUNT
website address. You then associate this to your custom domain name after you
finish the sign-up process, by visiting the WordPress.com store and following
the steps on page 44. In this situation, the
.wordpress.com
website address
that you pick isn’t terribly important, but you may as well try to get one that’s
similar to your domain name.
NOTE For almost all websites, the
www
prefix is an acceptable but optional part of the domain name.
In other words,
RebelPastryChef.me
and
www.RebelPastryChef.me
are equivalent. Some people think that it’s
simpler, cleaner, and more modern to leave out the extra letters at the beginning, and WordPress.com agrees. As
a result, if you register a domain through WordPress.com, the
www
prefix never appears. If you insist on typing
the
www
part into a browser, you’ll get to the right site, but WordPress will strip the prefix out of the browser’s
address bar (changing
www.RebelPastryChef.me
to
RebelPastryChef.me
, for example).
WORD TO THE WISE
Domain Name Frustration
The only disadvantage to buying your own domain name is
that it can be hard to find one that’s both good and available.
You may think that most of the best
.wordpress.com
addresses
have been snapped up already, but that’s nothing compared
with the competition for top-level
.com
domains. So while it’s
easy enough to decide to buy your own domain name (which
is always a good idea), it’s a bit harder to actually find one.
Here are some tips that can help:
Incorporate your business name. Domains that are just
combinations of popular words ending in
.com
(like
Delicious-
Chocolate.com, ThoroughbredHorses.com
) are almost certainly
taken. Mix it up with your business name (
DelilasChocolates.
com, AcmeThroughbredHorses.com
), and you stand a much
better chance.
Think quirky. If you’re creating a new blog, you can afford to
try out unusual-yet-catchy word combinations that capture
the spirit of your writing but have been overlooked by the
rapacious domain name sharks. Possibilities include
ThatThin-
gIsWeird.com, WhyCantISpell.com
, and
DieAutoTuneDie.com
.
They may be a bit odd and a bit long, but they’re catchy choices,
for the right site.
Settle for a less common top-level domain. The top-level
domain is the final few letters of a domain name, after the
last period. The most popular top-level domain is
.com
, but
it’s also the most competitive. You’ll find many more options if
you’re willing to settle for
.org
(which was originally intended
for noncommercial websites but no longer has any restriction),
.net
, or the relatively new and catchy
.me
. For example, at the
time of this writing,
wickedcode.com
is taken, but
wickedcode.
me
is available. But be careful—the last thing you want is a
potential visitor accidentally adding
.com
to the end of your
address and ending up at your competitor’s site.
6. Wait while WordPress checks to see if your domain name is available.
A few seconds later, it reports the answer (Figure 2-2). If your first choice isn’t
free, try a variation or change the top-level domain using the drop-down list on
the right. Finding a good domain name requires equal parts eort, creativity,
and compromise.
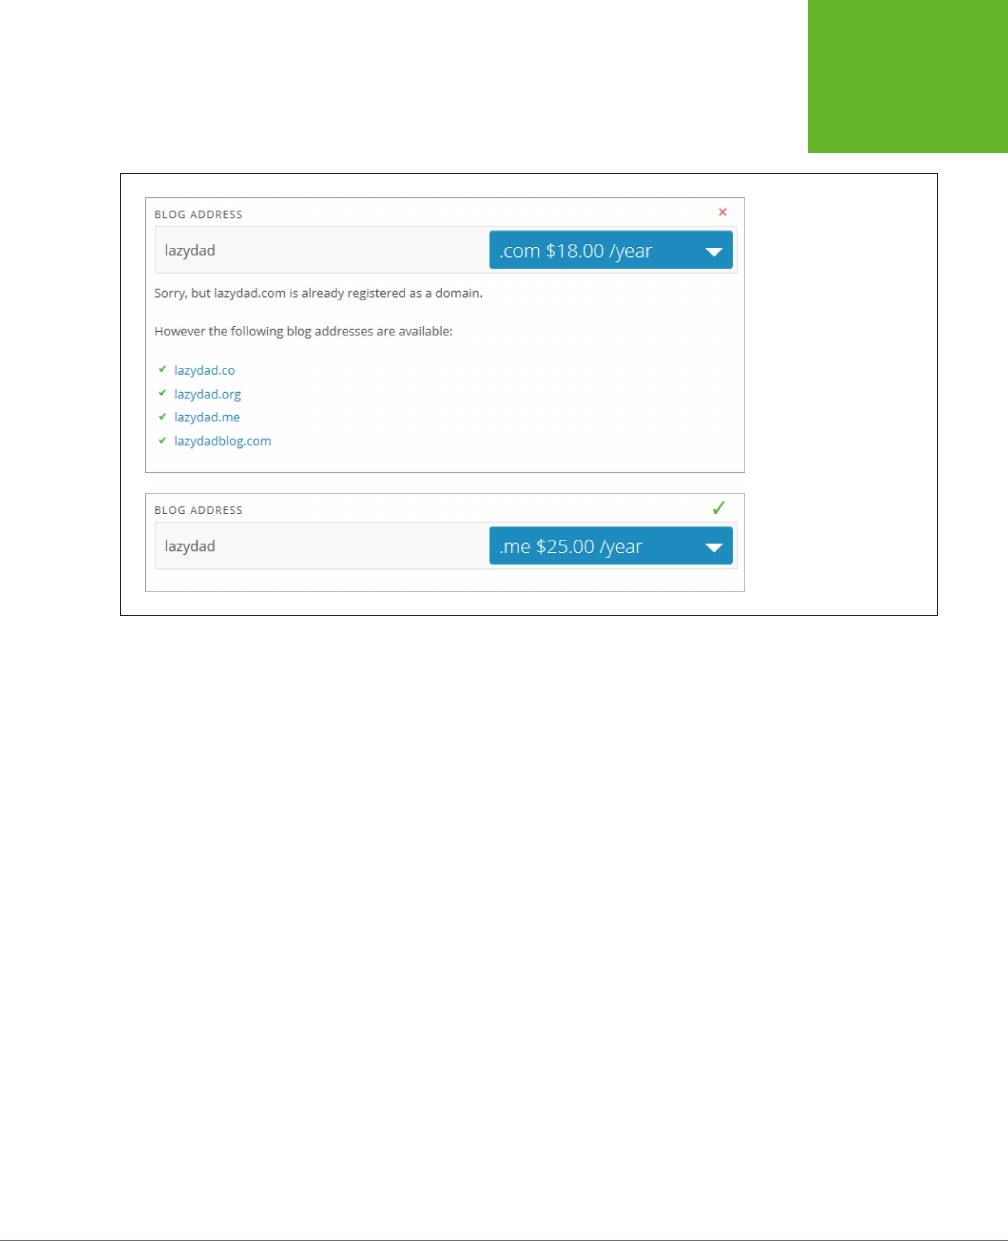
CHAPTER 2: SIGNING UP WITH WORDPRESS.COM 29
CREATING
YOUR
WORDPRESS.
COM ACCOUNT
FIGURE 2-2
Top: Money can’t buy you
lazydad.com; it’s already
in someone else’s hands.
Below the gentle rejection,
WordPress suggests some
names that aren’t taken,
like
lazy-father.com
(with
a hyphen).
Bottom: Change the
top-level domain to .me,
and you get happier news:
your site can still grab the
domain lazydad.me.
7. Scroll down to the table at the bottom of the page, which describes the
dierent types of WordPress.com accounts (Figure 2-3).
WordPress.com gives you the choice of three account types:
• WordPress.com Beginner. This gets you a free WordPress.com blog, with
all the essential features. If you’re not sure which account to choose, this
one is the best starting point. If you still need a bit more, you can buy indi-
vidual upgrades (like the highly recommended Custom Domain upgrade,
for a reasonable $18 a year).
• WordPress.com Premium. Formerly called the WordPress Value Bundle,
this option includes the same world-class free blogging engine as the
WordPress.com Beginner account and a handful of small upgrades. While
several of these enhancements are worthwhile, the overall package doesn’t
quite justify its $99 price tag for most people (see the box on page 33 for
a more detailed analysis).
• WordPress.com Business. This choice has the same features as a Word-
Press.com Premium account, with a few more frills thrown into the mix, like
the ability to get live chat technical support. Unfortunately, you’ll pay for
these modest improvements with a hefty $299 a year fee.
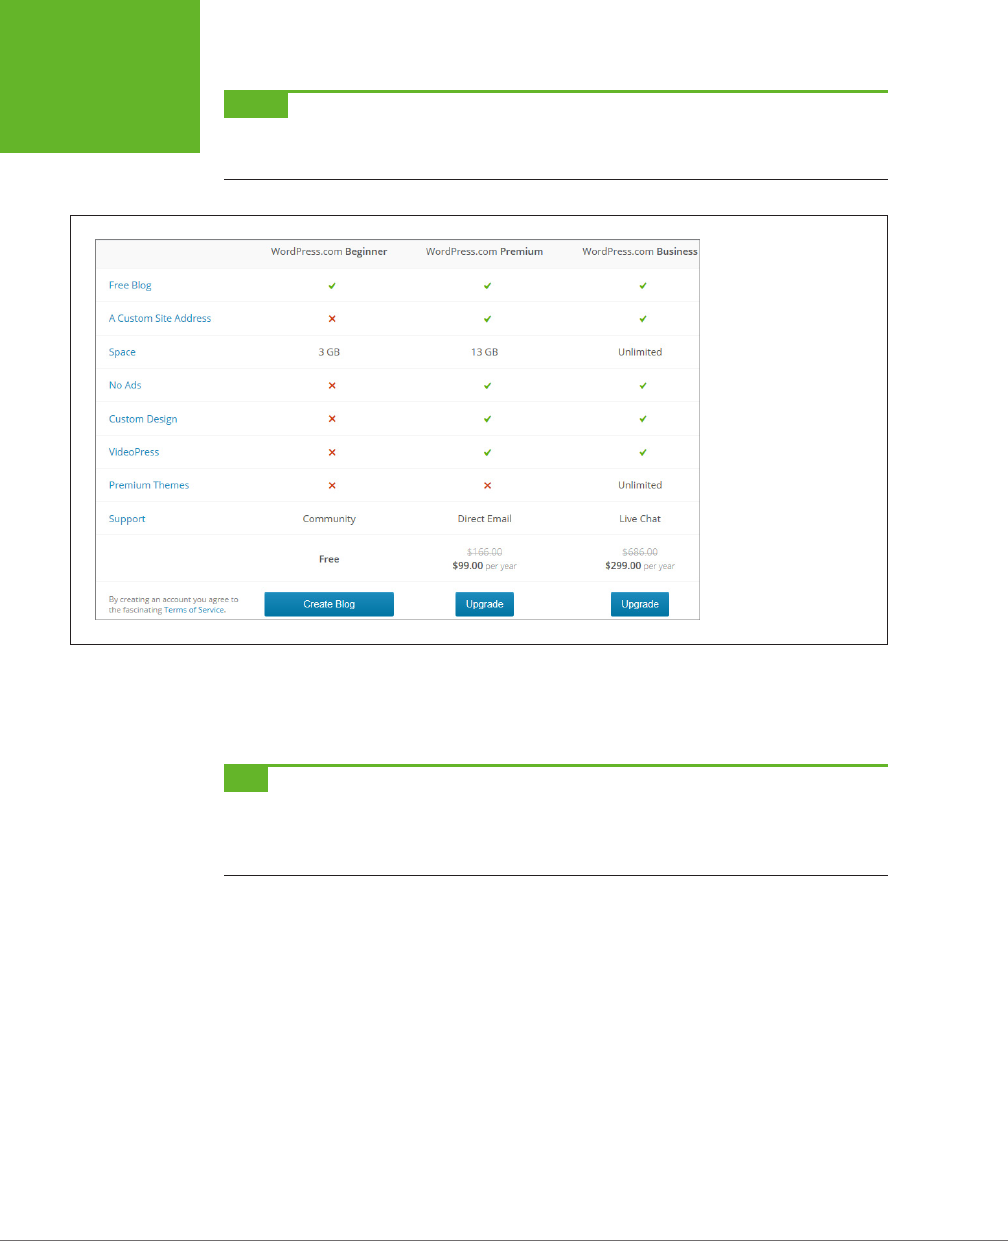
WORDPRESS: THE MISSING MANUAL
30
CREATING
YOUR
WORDPRESS.
COM ACCOUNT
NOTE Businesses don’t need a Business account. WordPress.com has the same rules for all account types,
and these rules let you describe and promote your business on your blog. However, if you’re trying to make money
by showing ads, you’ll run afoul of the WordPress.com rules no matter which account type you choose.
FIGURE 2-3
WordPress’s Premium
and Business accounts
bundle together several
upgrades, each of which
is available separately for
a modest yearly fee, into
an even cheaper package.
The only catch is that
you probably don’t need
all the upgrades these
bundles include.
8. Click the Create Blog button. Or if you’re buying one of the two enhanced
types of WordPress.com accounts, click the corresponding Upgrade but-
ton instead.
TIP WordPress is flexible. You can start with a WordPress.com Beginner account and upgrade to an enhanced
account later (for the same price as WordPress offers at signup). Or, you can buy a WordPress.com Beginner ac-
count and add just the individual services you need, whenever you need them. You make these purchases in the
WordPress.com store, as outlined on page 42.
The initial stage of your account setup is complete. What WordPress does next
depends on whether you chose to buy a domain name.
9. If you chose a free
.wordpress.com
domain in step 5, WordPress invites you
to do a bit of blog customization (Figure 2-4).
To help you get a jump-start on your blog, WordPress leads you through a series
of pages that request more information. Although this step is optional, you can
save time later by supplying three key details now: the title you want to use for
your blog, a descriptive tagline that will be displayed just under your title, and
a theme that will set the visual style of your entire site.

CHAPTER 2: SIGNING UP WITH WORDPRESS.COM 31
CREATING
YOUR
WORDPRESS.
COM ACCOUNT
FIGURE 2-4
The more information
you provide now, the
less customization you’ll
need to do later. As you
step through this series of
pages, WordPress collects
the title and tagline for
your blog (shown here),
lets you pick the theme
you want, and invites you
to spread the word on
Facebook and Twitter.
TIP The best starting theme for learning WordPress is the clean and streamlined Twenty Twelve theme. It
starts simple and has room for plenty of customization. It’s also the theme you see in the first examples of this
book. (Don’t be put off by the out-of-date sounding name, which simply reflects when WordPress first released
the theme. Twenty Twelve remains a popular classic to this day.)
10. If you picked a custom domain name (in step 5), WordPress ends the sign-
up process by presenting you with a domain registration form (Figure 2-5).
Fill in your contact details and click Register Domain.
This registration information includes your name, postal address, and email
address. WordPress submits this information, on your behalf, to the Domain
Name System (DNS)—a key part of Internet bookkeeping that tracks who owns
each piece of web real estate.
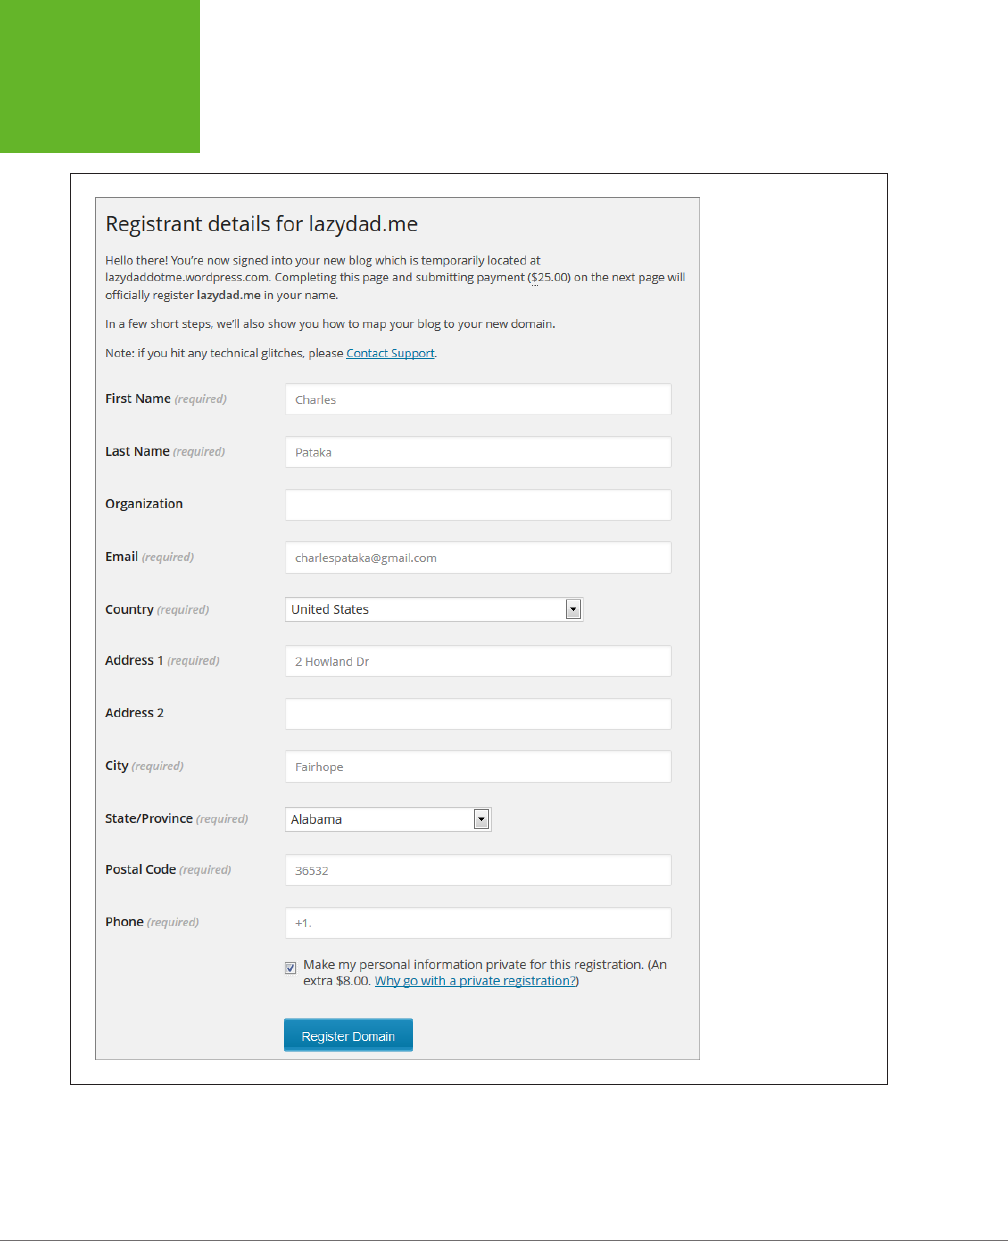
WORDPRESS: THE MISSING MANUAL
32
CREATING
YOUR
WORDPRESS.
COM ACCOUNT
FIGURE 2-5
Here’s the information
you need to register
lazyfather.net. Use the
checkbox at the bottom
of the screen to keep this
information hidden from
spammers’ prying eyes,
a good use of the $8 it
costs.

CHAPTER 2: SIGNING UP WITH WORDPRESS.COM 33
CREATING
YOUR
WORDPRESS.
COM ACCOUNT
FREQUENTLY ASKED QUESTION
Premium and Business Accounts
Should I pay for an upgraded WordPress.com account with
more features?
Just before you sign up, WordPress.com attempts to seduce
you with its Premium and Business accounts. These bundles
combine several WordPress upgrades, each of which normally
costs a yearly fee, into a slightly cheaper package.
But before you plunk down any cash, you need to review
whether these bundles are worthwhile. The most popular
package, WordPress.com Premium, combines five upgrades
and adds email tech support. One upgrade is the highly rec-
ommended custom domain option (normally $18/year). Two
more upgrades are good, but not essential, enhancements.
They include the Custom Design upgrade, which gives you the
ability to edit the styles in your chosen theme (page 457) and
the No Ads upgrade, which prevents WordPress from showing
any advertisements on your site. (Even without the No Ads
upgrade, your visitors may not see ads, because WordPress
uses them only occasionally and never shows them to people
logged into WordPress.com.) Altogether, these improvements
total about $78 a year, if you were to purchase them separately.
The final two upgrades included with WordPress.com Premium
are additional space (for hosting very big files) and VideoPress
support (for video files). These upgrades may appeal to you
if you plan to show videos on your site, but most people find
it cheaper and easier to host videos using a free service like
YouTube, by simply embedding a YouTube video window on
their WordPress pages (see page 350 to learn how). VideoPress
is a more specialized option that may appear if you plan to show
content that isn’t suitable for YouTube—for example, videos
that run longer than YouTube’s 15-minute limit, or videos that
visitors can download. You’ll learn more about VideoPress on
page 358. If you don’t need these features, the $100-a-year
cost isn’t much of a bargain.
The WordPress.com Business account has the same features
as a WordPress.com Premium account, with even more space,
the ability to get live chat technical support, and unlimited
premium themes. Most premium themes run between $20
and $80, so the WordPress.com Business account may make
sense if you plan to create several sites, or if you just want to
experiment with many theme options. That said, WordPress.
com has a solid selection of free themes, so it’s worth waiting
to see if these can satisfy your site before you shell out the
pricey $300-a-year fee.
Domain name registration is public, which means that anyone with an Internet
connection can look up your domain and find out that you own it. (Interested
parties also get your phone number and email address.) Usually, this isn’t a
problem, but it does provide an opening for spammers to hassle you. If you
don’t want your public details exposed,
don’t
try to fake them with incorrect
information. Instead, tick the box that says “Make my personal information
private for this registration.” It costs an extra $8, but it gives you guaranteed
anonymity—at least until you start posting.
Finally, WordPress asks you to pay up. Fill out your payment information and click
the “Purchase and Register Domain” button. WordPress will email you a receipt.

WORDPRESS: THE MISSING MANUAL
34
MANAGING
YOUR NEW
SITE
TIP WordPress doesn’t provide an email service. So if you buy the domain
lazyfather.net
, you can’t get email
at
joe@lazyfather.net
. However, WordPress does let you
forward
email from your custom domain to another
email address. For example, it can automatically redirect mail sent to the custom domain
joe@lazyfather.net
to
a personal account like
joe_symes23@gmail.com
. If you want to use WordPress.com’s redirection service, you
can find instructions at
http://support.wordpress.com/email-forwarding
.
11. Check your email for an activation message from WordPress. The message
includes a button named Confirm Email Address or Log In. Click the button
to activate your site.
Clicking the button launches your web browser and sends you to
http://word-
press.com
, the central administration station for all the blogs you create with
WordPress.com. You’ll learn your way around in the next section.
Managing Your New Site
Once you complete the sign-up process and activate your account, you’re ready to
do just about everything else.
The easiest starting point is the
http://wordpress.com
home page, where you can
read other people’s blogs and manage your own. Once you get there, type in the
user name and password you picked when you signed up, and then click Sign In.
You’ll find yourself in WordPress.com’s central hub (Figure 2-6).
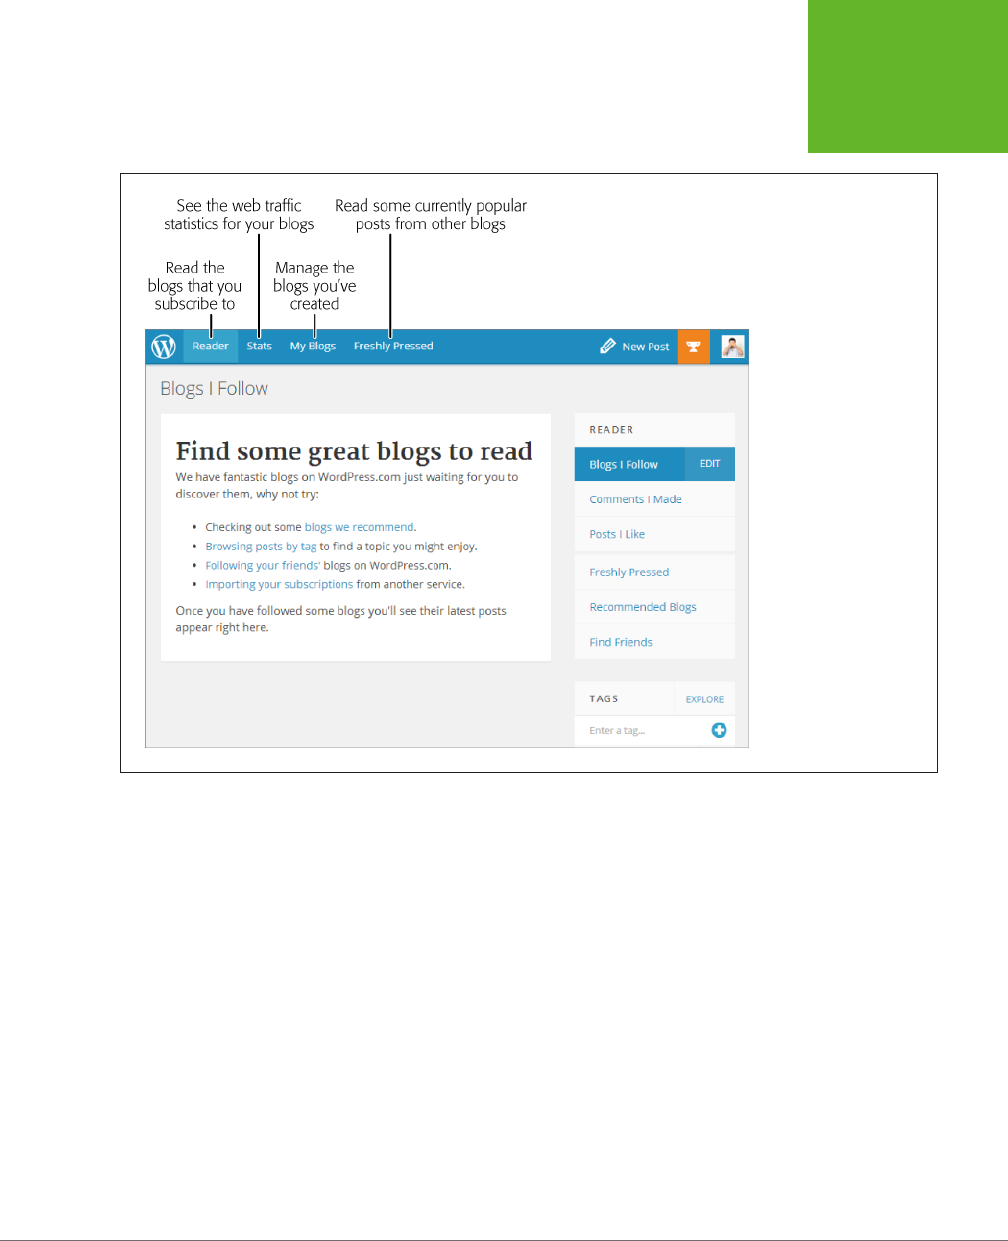
CHAPTER 2: SIGNING UP WITH WORDPRESS.COM 35
MANAGING
YOUR NEW
SITE
FIGURE 2-6
The
http://wordpress.
com
website provides a
central hub for following
the WordPress.com com-
munity and working on
your own blogs. The site
has four main areas, and
you move from section to
section using the buttons
at the top of the page.
Initially, WordPress starts you at the Reader page, where you can keep track of your
favorite blogs and hunt for new ones (page 39). But the best jumping-o point for
a newly minted WordPress.com administrator like yourself is the My Blogs page.
There, you’ll see a list of all the blogs you’ve created so far, which at this point is just
one (Figure 2-7). Next to each blog are a set of handy management links, as well as
a shortcut for adding a new post to your blog.
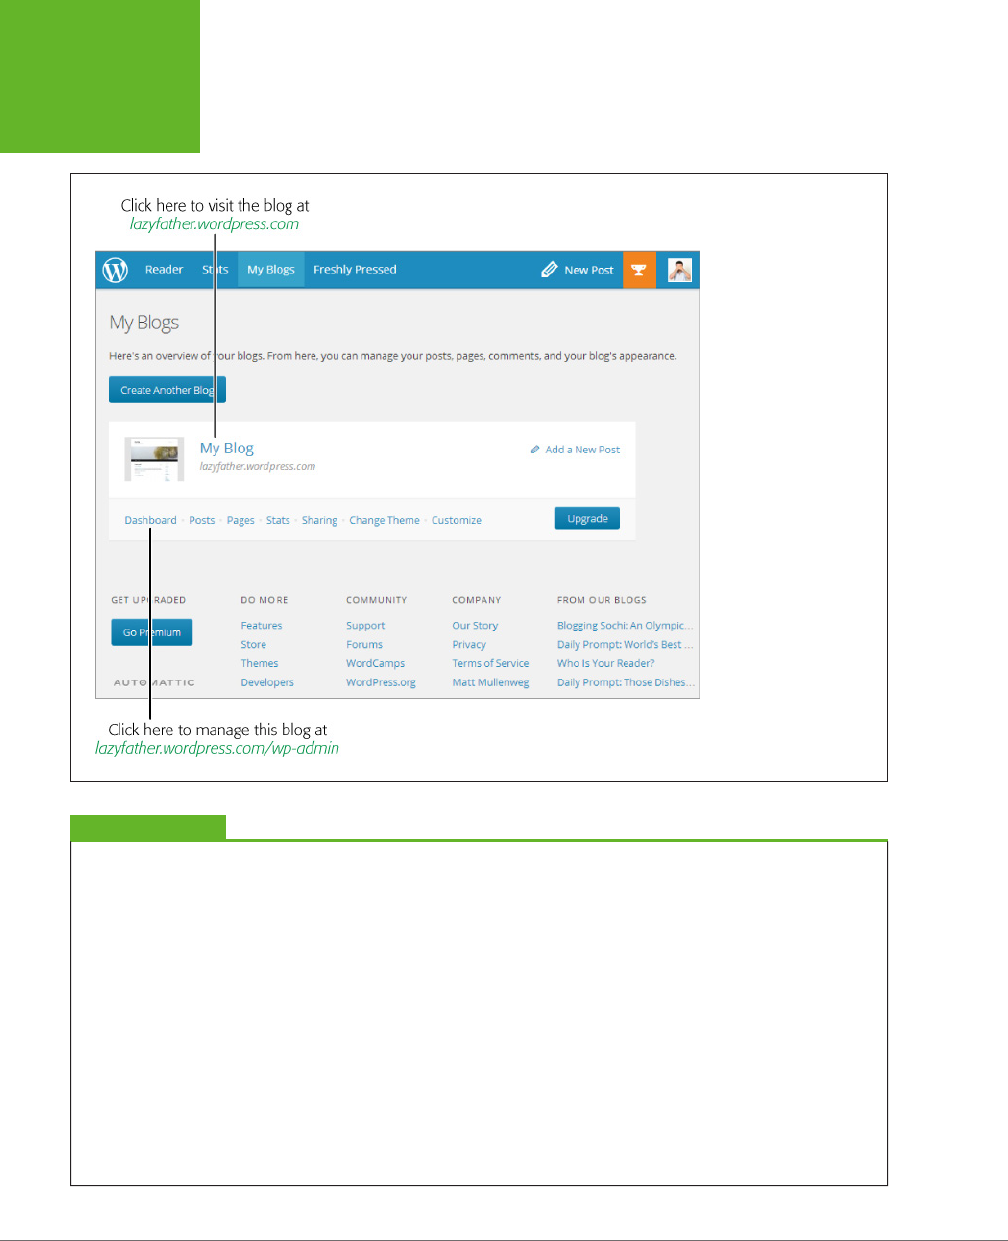
WORDPRESS: THE MISSING MANUAL
36
MANAGING
YOUR NEW
SITE
FIGURE 2-7
Right now, you’ve created
just one WordPress.com
blog. In this example,
it’s named My Blog and
it lives at the WordPress.
com address
lazyfather.
wordpress.com
.
UP TO SPEED
Adding More Sites
There’s no need to limit yourself to a single WordPress.com
site. In fact, every WordPress.com user is allowed to create an
unlimited
number of sites.
To add a new site, you use the My Blogs page, which lists all
the WordPress sites you created so far. To add a new one, click
the Create a New Blog button. You’ll have to supply the same
information you entered when you created your first blog,
including a website address (a free
.wordpress.com
domain or
a custom domain you purchase) and a blog name. You won’t
need to supply a new user name or password, because you
already have a WordPress.com account.
If you’ve invested in some WordPress.com upgrades, adding
sites can get expensive. That’s because you need to buy each
upgrade
separately
for every site that uses it. So if you create
two sites and you want to fine-tune the CSS style rules for
each, you need to buy two Custom Design upgrades for a total
of $60 per year.
You can’t delete any of your WordPress.com sites from the
My Blogs tab. Instead, you need to visit the dashboard, the
administrative hub you’ll explore in Chapter 4. Once you’re in
the dashboard, you can remove the current site by choosing
Tools→Delete Site from the left-side menu.
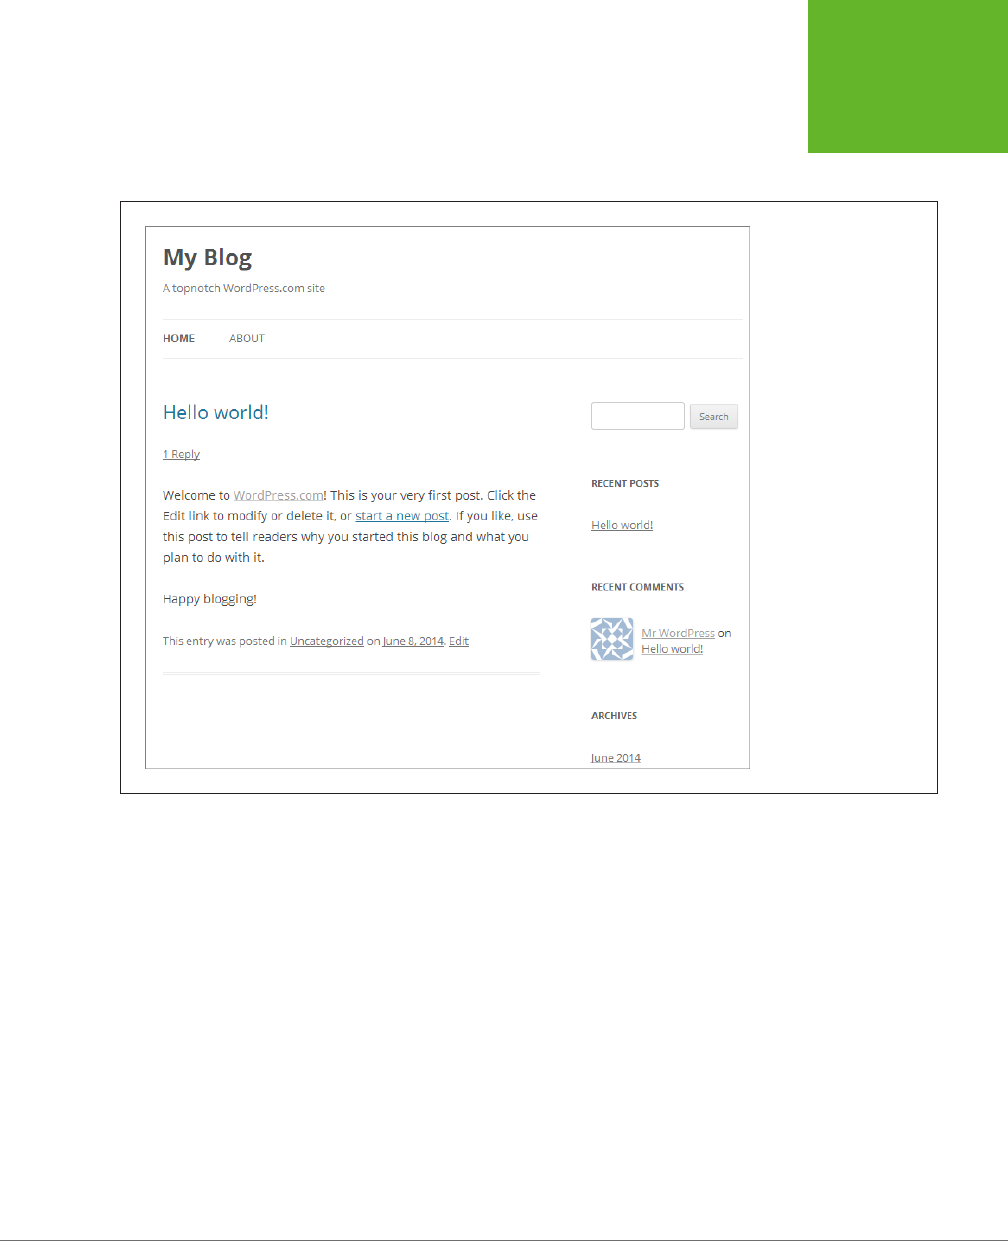
CHAPTER 2: SIGNING UP WITH WORDPRESS.COM 37
MANAGING
YOUR NEW
SITE
To visit your newly created WordPress.com blog, click its name on the My Blogs
page. WordPress opens a new browser tab to show you the current state of your
mostly blank site (Figure 2-8).
FIGURE 2-8
When you create a new
site, WordPress.com adds
a single dummy post with
some basic instructions
in it. Although it doesn’t
look like much, this
shell of a site has all the
infrastructure you need to
build a genuinely useful
WordPress site, which
you’ll learn to do starting
in Chapter 4.
When you visit your site, take a moment to review the URL that appears in the
browser’s address box. If you chose to go with a free
.wordpress.com
domain (like
lazyfather.wordpress.com
), this is the address you’ll see there. If you purchased a
custom domain, your new domain won’t be working just yet, but WordPress.com will
assign you a similar temporary
.wordpress.com
domain. For example, if you bought
mysticalpeanuts.net, WordPress.com will start your site out at
mysticalpeanuts.
wordpress.com
(or, if that’s not available, it adds the top-level domain into the name
to come up with a slightly more awkward version of the address, like
mysticalpea-
nutsdotcom.wordpress.com
).
Most of the work you’ll perform with your WordPress site takes place at the dash-
board, an administrative web interface that you can use to add posts, configure styles
and settings, and much more (see Figure 2-9). To get there, click the Dashboard
link that appears under your site on the My Blogs page. Incidentally, almost all the
other links there also take you to the dashboard; they simply navigate to a specific
section of it. For example, if you click Posts you’ll wind up at the Posts section of
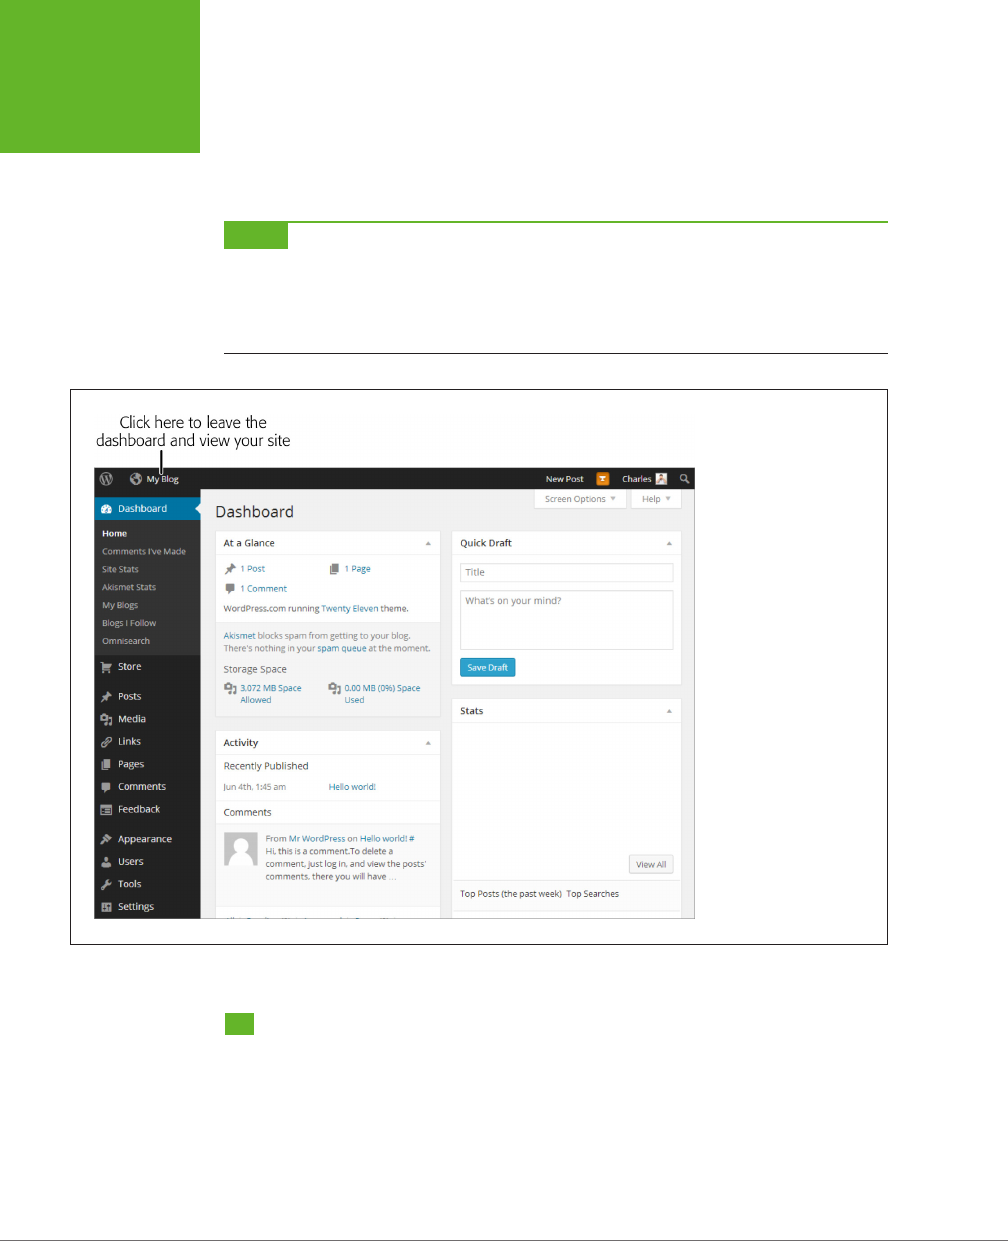
WORDPRESS: THE MISSING MANUAL
38
EXPLORING
THE
WORDPRESS.
COM
COMMUNITY
the dashboard, which you’ll study in detail in Chapter 4. The only exception is the
Stats link, which shows you the visitor trac and other statistics for your WordPress.
com sites (just as if you clicked the Stats link at the top of the page, just between
Reader and My Blogs).
NOTE You’ve just learned the simplest way to visit the dashboard for your site: Log into WordPress.com,
click My Blogs, and then click the Dashboard link. However, there’s a shortcut that lets you jump straight to the
dashboard without going through WordPress.com. Just type in the web address for your blog, with
/wp-admin
added at the end. For example, to manage
lazyfather.wordpress.com,
you’d go to
lazyfather.wordpress.com/wp-
admin
. (WordPress will ask you to sign in with your user name and password if you aren’t already logged in.)
FIGURE 2-9
In the dashboard view,
a menu of commands
runs down the left side
of the screen, arranged in
groups. You use the dif-
ferent parts of this menu
to accomplish different
tasks, from creating new
posts to reviewing spam
comments. You’ll spend
plenty of time touring the
dashboard in the chapters
to come.
Exploring the WordPress.com Community
Once you have your very own WordPress site, you’re also a member of the WordPress.
com
community.
Warm and fuzzy feelings aside, the connections and exposure you
get through the community can have real benefits, particularly if your WordPress.
com site is a straight-up, traditional blog. These benefits include the following:

CHAPTER 2: SIGNING UP WITH WORDPRESS.COM 39
EXPLORING
THE
WORDPRESS.
COM
COMMUNITY
• Ideas. No site exists in a vacuum, especially not a blog. By looking at other
people’s work, you can tune in to a powerful source of inspiration for both content
and style. On the
content
side, you can discover trending topics and popular
subjects (using the Freshly Pressed tab and Popular Topics link described in the
next section, for example). Then, you can join in on the conversation by giving
your own spin on hot topics on your blog. On the
style
side, you can see how
other people polish themes and perfect their layouts, and you can use that
insight to improve your own site.
• Promotion. As in the real world, one of the most successful ways to make friends,
attract attention, or score a new job is by networking with other, like-minded
people. When you find other blogs that tackle the same issues as yours, you
can exchange links and create a blogroll that connects their sites to yours (page
228). Or you can increase your exposure by commenting on someone else’s
posts (on their blog) or publishing a full reply post (on your blog). Eventually,
these practices can attract many more visitors to your site.
With that in mind, you’re ready to survey the field. Start at the WordPress.com front
page (
http://wordpress.com
). If you aren’t already logged in, fill in your user name
and password and then click Sign In.
You start at the Reader page. However, unless you’ve already subscribed to some-
one else’s blog, you won’t see any content there. Instead, you have to search for
what you want.
There are several ways to track down WordPress.com content that might interest you:
• Browse the recommended blogs. On the Reader page, click the “blogs we
recommend” link that appears in the first bullet point. You can then click a cat-
egory that interests you (like Popular Culture & Entertainment or Photography
to see a short list with some of the best blogs on the subject. Click a blog’s
name to view it in a separate tab. WordPress.com is willing to recommend only
a very small set of blogs, so this approach won’t get you very deep into the
WordPress.com community.
• Read the Freshly Pressed page. The best place to get a sense of the chatter
on WordPress.com is the Freshly Pressed page. It shows a cross-section of the
day’s most attention-grabbing posts (Figure 2-10). Click a post that interests
you to read the full article and continue on to the blog that hosts it.
• Hunt for interesting posts by keyword. When WordPress bloggers create
a new post, they add a few descriptive words, called
tags,
to classify it. Tags
give you a way to home in on posts that interest you (as you’ll see on page 114,
when you start posting). Tags also give you a way to find blogs that discuss
your favorite topics. Begin by looking at the Tags box in the right-side column
of the Reader page. Click one of the tag words, or type in a subject of your own
in the search box to find more blogs.
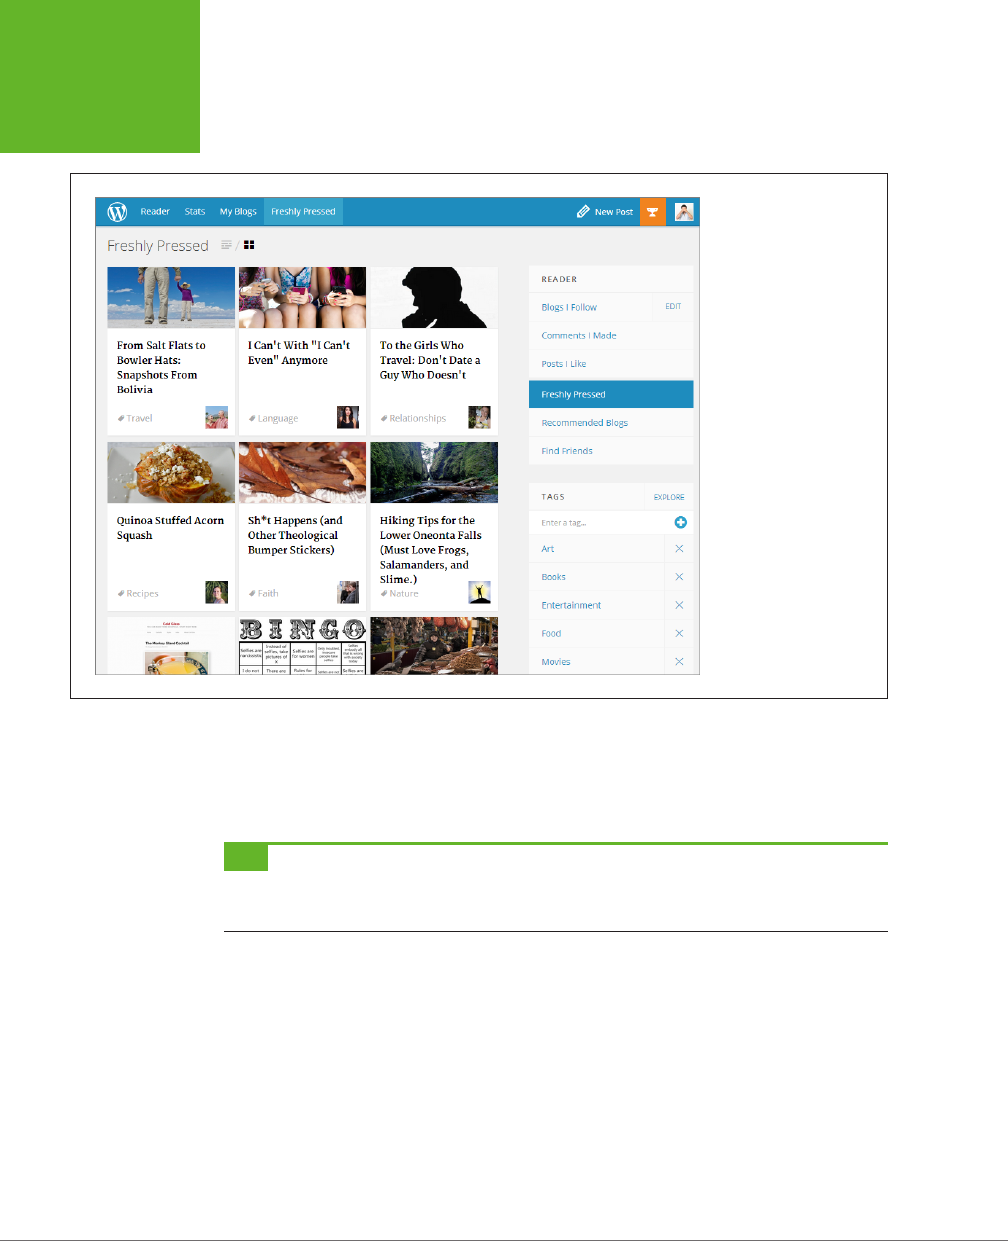
WORDPRESS: THE MISSING MANUAL
40
EXPLORING
THE
WORDPRESS.
COM
COMMUNITY
FIGURE 2-10
WordPress’s ever-
changing Freshly Pressed
list shows popular, recent
posts. If you see a post
that piques your interest,
click its title. You could
also click the tag word to
search for more posts on
the same subject.
• Go tag surfing. You can browse some of the posts that use the most popular
tags by clicking the Explore link in the top-right corner of the Tags box. When
you do, WordPress shows a display that shows hot tags, sized to reflect their
current popularity (Figure 2-11).
TIP When you browse through WordPress.com, you don’t see the many sites created with WordPress software
but hosted on sites other than WordPress.com. Although there’s no central repository of self-hosted WordPress
sites, you can browse a showcase with some examples at
http://wordpress.org/showcase
.
When you browse a WordPress.com blog (and you’re signed in under your Word-
Press.com account), a black toolbar appears at the top of the page (Figure 2-12).
On the left side is the name of the blog you’re currently viewing and two important
buttons: Follow and Like. If you like the post you’re reading, you can click the Like
button (which adds it to a list of your favorite posts). Or, if you decide the content
is so good that you want to come back to this site and read more, you can click the
Follow button (which adds the site to your personal watch list of blogs).

CHAPTER 2: SIGNING UP WITH WORDPRESS.COM 41
EXPLORING
THE
WORDPRESS.
COM
COMMUNITY
FIGURE 2-11
This grouping of tags
shows the most popular
topics of the moment. The
bigger tags (like Music
and News) have more
recent posts. Click a tag
that interests you to see a
list of recent posts on that
subject.
FIGURE 2-12
The WordPress toolbar
takes only a few pixels of
space, but it’s stocked with
useful commands. Hover
over the WordPress icon
on the left, and you’ll see
a menu that lets you jump
to different parts of the
WordPress.com site. Hover
over your user name on
the right, and you’ll see
a menu that lets you edit
your profile, manage your
blogs, and sign out. Or,
use the Favorite and Like
buttons to track interesting
content.
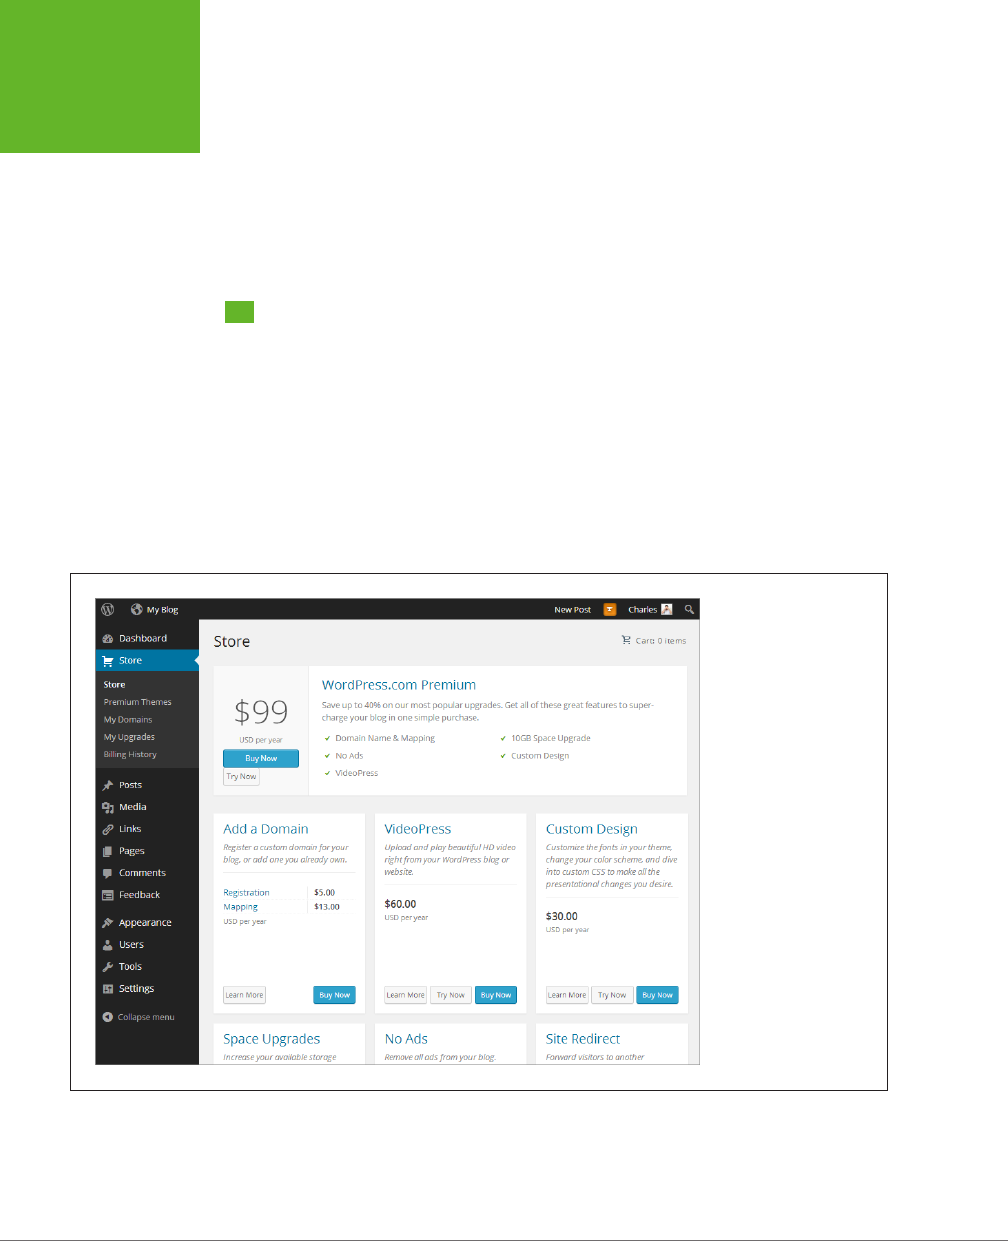
WORDPRESS: THE MISSING MANUAL
42
VISITING THE
WORDPRESS.
COM STORE
Usually, you’ll choose to click Like on a post if you want to refer to it later—perhaps
to follow an ongoing conversation in the Comments section. You’ll choose Follow to
keep watching the blog for new content. To review your liked posts and read your
followed blogs, return to
http://wordpress.com
and click the Reader tab. Now you’ll
see the most recent posts from all the sites you follow, amalgamated into a single
reverse-chronological list.
Visiting the WordPress.com Store
As you’ve already seen, when you sign up with WordPress, you can buy a custom
domain name or a Premium account bundle. But what happens if you want to start
simple (and cheap) but add more features in the future? The answer is the Word-
Press.com store, which is just a click away on the dashboard. It oers a long list of
blog enhancements, each for a small yearly fee.
Getting to the store is easy. Once you load up the dashboard, click the Store link
in the menu on the left. WordPress shows you the long list of upgrades it oers
(Figure 2-13).
FIGURE 2-13
To add an upgrade to
your site, click the Buy
Now button underneath
it. Some options provide
a Try Now button, which
lets you use the upgrade
for free for two weeks,
and then charges you
automatically. Either way,
you’ll need to fill in your
payment information (us-
ing a credit card, a PayPal
account, or a digital wal-
let of Bitcoins).
In the following sections, you’ll see how to use the store to deal with two more com-
plex setup scenarios. First you’ll learn how to buy a custom domain for an existing
WordPress.com site. Next you’ll see how to take a domain you already own and use
it with an existing WordPress.com site.
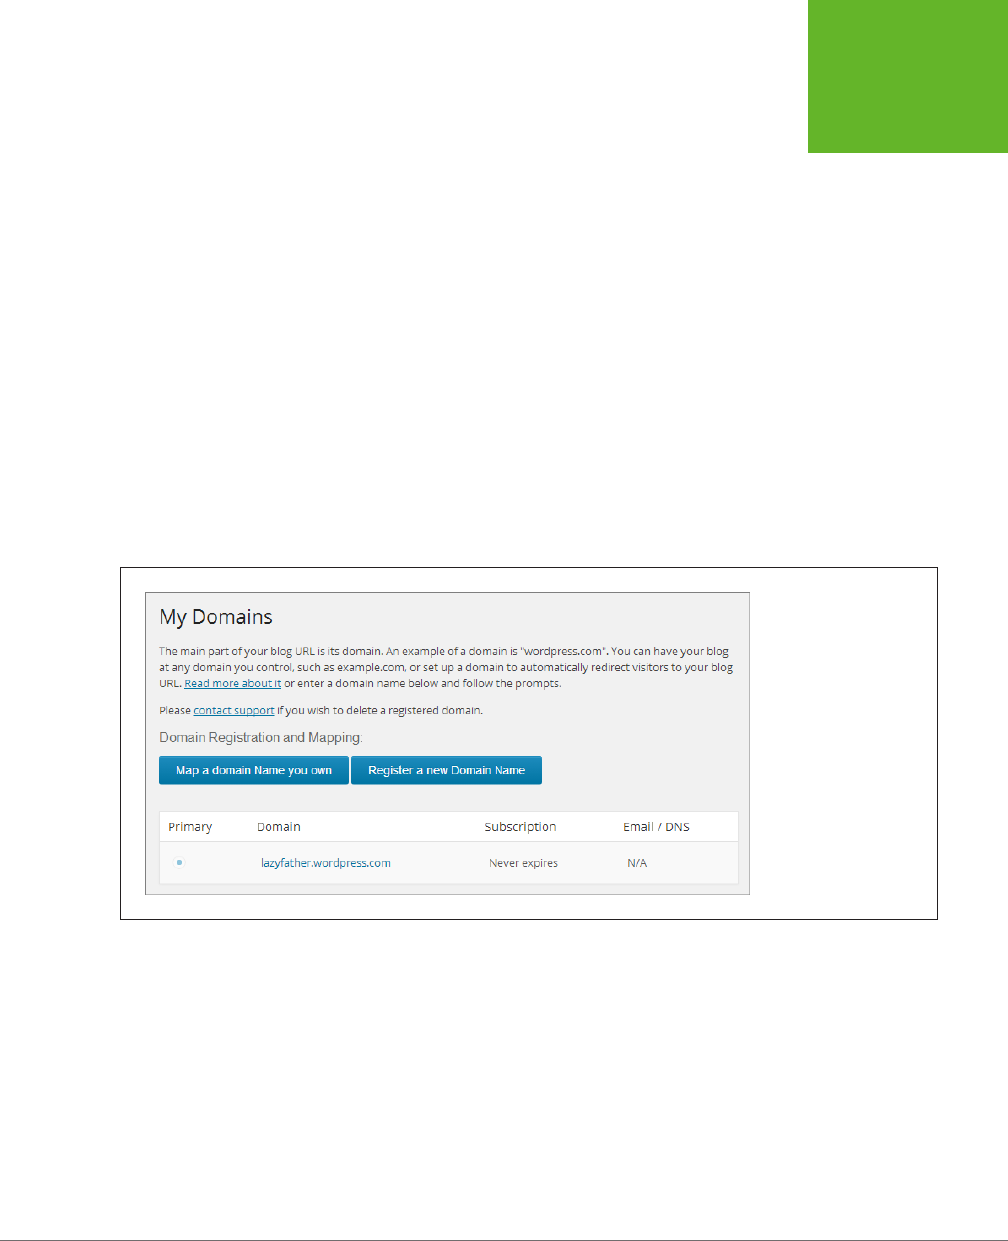
CHAPTER 2: SIGNING UP WITH WORDPRESS.COM 43
VISITING THE
WORDPRESS.
COM STORE
Buying a Domain after Signup
Imagine you build a thriving blog using a free
.wordpress.com
address (say,
Hel-
loPickles.wordpress.com
), but then decide you really want a custom domain name
(like
HelloPickles.net
). Using the store, you can buy one for your existing blog, so
you don’t need to create a whole new blog under a new name. Here’s how:
1. Go to the dashboard.
You can get there by visiting the My Blogs page and clicking the Dashboard link,
or go there directly using your blog address and tacking
/wp-admin
onto the end.
2. Click Store in the menu on the left.
WordPress shows a list of all the upgrades you can buy.
3. In the “Add a Domain” box, click Buy Now.
WordPress displays a list of all the domains your site currently uses. Unless
you already bought a custom domain name through WordPress.com, the list
includes just one address: the
.wordpress.com
address you picked when you
created your site (Figure 2-14).
FIGURE 2-14
Currently, this site uses
the free domain lazyfa-
ther.wordress.com.
4. Click the “Register a new Domain Name” button.
This tells WordPress you want to look for a new address.
5. Type the domain you want into the domain search box, and then click Go.
WordPress checks to see if the domain you want is available. If it isn’t, try typ-
ing something else.
6. If the domain is available, click Register Now to make it yours.
WordPress brings you to the standard domain registration page, where you fill
in your personal details (as you saw back in Figure 2-5).

WORDPRESS: THE MISSING MANUAL
44
VISITING THE
WORDPRESS.
COM STORE
7. When you finish, click Register Domain and follow the instructions to pay.
When you add a custom domain name, WordPress won’t leave your current
audience in the cold. Instead, it’s smart enough to reroute people visiting
your old
.wordpress.com
address to your new domain. That means that if you
started with
HelloPickles.wordpress.com
, and you then buy the custom domain
HelloPickles.net
, WordPress will automatically redirect people who type in
Hel-
loPickles.wordpress.com
to your blog’s new domain,
HelloPickles.net
, just as
you would want. (Really, there’s no dierence between the two addresses. They
are simply two names that point to the same site—your blog.)
TIP Buying a custom domain for an already-created site is a useful technique if you think that you could
be outgrowing WordPress.com, and you want to prepare your site for a possible move to self-hosting. Because
WordPress automatically redirects visitors from your old
.wordpress.com
domain to your new custom domain, it
gives everyone a chance to get used to your new address. And when you do decide to move, you can take your
new domain with you (page 561).
Using a Domain Name You Already Own
Life is easiest if you buy your custom domain name from WordPress.com, but some-
times that isn’t possible. For example, you might have already bought the domain
name from a domain registrar. (You may have even bought it years ago.) Because
it isn’t currently possible to transfer a domain you own from another web host to
WordPress.com, you need to use another trick, called
mapping.
Technically, mapping is a technique that, in this case, connects your custom domain
name to your WordPress.com blog. That way, when someone types in the custom
domain name (say
HelloPickles.net
), that person ends up at your WordPress.com
blog. And if that person types in your former
.wordpress.com
address (say,
HelloPick-
les.wordpress.com
), they’re redirected to your custom domain, which is what you
want. It’s exactly as if you had bought the custom domain name from WordPress.
com when you signed up.
Mapping is relatively easy, but it’s not free. WordPress charges a mapping fee (cur-
rently $13 a year), which you pay in addition to the annual fee you pay to keep the
domain name registered through your original domain registrar.
Mapping requires you to complete two setup operations: one with the web host that
registered the domain name, and one with WordPress. But before you get started
with either operation, you need to decide exactly how you want to link your custom
domain name with your WordPress site. You have two options:
• Use your whole domain. For example, you might create a blog at
www.
WineSnobs.com
. If you map this address to a WordPress.com address, you
need to keep your entire website on WordPress.com. This makes sense if you
purchased a domain name from another company but you haven’t actually
bought any web
space
from that company.

CHAPTER 2: SIGNING UP WITH WORDPRESS.COM 45
VISITING THE
WORDPRESS.
COM STORE
• Use a subdomain. Technically, a subdomain takes your domain name (say,
www.WineSnobs.com
), removes the optional
www
part, and adds a dierent
prefix (like
blog.WineSnobs.com
). The goal is to create a separate web address
for your WordPress site, so you can put something else at your main domain
name (in this case,
www.WineSnobs.com
). Of course, your main site won’t be
a WordPress site, and you’ll need to pay your web host for some web space.
NOTE If all this talk about subdomains sounds familiar, it’s because the WordPress.com service uses
subdomains itself to give everyone a unique spot on the
wordpress.com
server. For example, add the prefix
GettingBloggedDown and you get the subdomain
GettingBloggedDown.wordpress.com
.
There’s also a third option—use a
subdirectory
in your domain (for example,
www.
WineSnobs.com/blog
)—but WordPress.com doesn’t currently support that tech-
nique.
Before you can map your domain, you have to do a little extra configuration with
your web host. These setup steps dier depending on whether you want to map the
full domain name or you want to map just a subdomain, so follow the instructions
in the appropriate section below.
MAPPING AN ENTIRE DOMAIN NAME
If you’re mapping an entire domain name, you have to change your web domain’s
name servers.
These are the high-powered computers that direct trac on the In-
ternet, and that tell browsers where to go to find your site. Right now, your domain
name uses the name servers at the company that registered your domain name, or
at your original web host (not WordPress.com). You need to change that so your
domain uses the WordPress.com name servers.
Making the change is simple enough—it usually involves changing just two pieces
of text—the
name server addresses.
However, you may need to dig around on your
web host’s administration page before you find exactly where these settings are
(they’re usually in a section called “Domain Name Servers” or “DNS Settings”). If in
doubt, contact your web host.
For example, if you’re using the web host
www.brinkster.com,
the name servers
would be set to this:
NS1.BRINKSTER.COM
NS2.BRINKSTER.COM
No matter what web host you’re currently using, you must change the name serv-
ers to this:
NS1.WORDPRESS.COM
NS2.WORDPRESS.COM
NS1 and NS2 are the two computers that direct your visitors to the WordPress.com
site they want to read.

WORDPRESS: THE MISSING MANUAL
46
VISITING THE
WORDPRESS.
COM STORE
TIP Does your domain registrar provide an email address that you want to keep using? For example, maybe
you want WordPress.com to put a blog on
www.WineSnobs.com
, which you originally registered with the well-
known web hosting company GoDaddy, but you still want to receive email at
rachel@WineSnobs.com
. To pull
this off, you need to carry out the extra configuration step covered at
http://tinyurl.com/ext-email
.
MAPPING A SUBDOMAIN
If you’re mapping a subdomain, you need a slightly dierent configuration. Instead
of changing your name servers, you must add a
CNAME record.
Although it sounds
intimidatingly techy, all a CNAME record does is redirect trac from your subdomain
to your WordPress.com blog.
Every web host has a dierent process for defining a CNAME record, but it usually
involves logging in, heading to an administration section with a name like “DNS
Management” or “Name Server Management,” and then adding the CNAME record.
Each record requires two pieces of information. The first is the subdomain prefix
(for example, that’s
blog
if you’re creating the subdomain
blog.WineSnobs.com
).
The second is your current WordPress.com address, like
WineSnobs.wordpress.com
,
which is often called the
destination.
NOTE If you can’t find or figure out your web host’s domain management tools, make time for a quick
support call. Changing name servers and adding subdomains are two common tasks that domain registrars and
web hosts deal with every day.
FINISHING THE JOB: SETTING UP THE WORDPRESS.COM MAPPING
Name server changes require time to take eect. Once you make your changes, the
settings need to be spread to various trac-directing computers across the Internet.
It will take at least 24 hours, and possibly two or three days, before the change takes
eect and you can tell WordPress.com to start using your domain. Unfortunately,
there’s no high-tech way to monitor the process.
Once your name server changes have taken eect, you can add the domain by fol-
lowing the next set of steps. If you’re not sure whether you’ve waited long enough,
don’t worry—there’s no harm in trying. If the name server changes haven’t taken
eect, WordPress will let you know when you get to step 4 below, and you’ll need
to try again later.
1. Go to the dashboard.
You can get there by visiting the My Blogs page and clicking the Dashboard link,
or go there directly by appending
/wp-admin
to the end of your blog address.
2. Click Store in the menu on the left.
WordPress shows a list of all the upgrades you can buy.
3. In the “Add a Domain” box, click Buy Now.
WordPress shows a list of all the domains your site currently uses.

CHAPTER 2: SIGNING UP WITH WORDPRESS.COM 47
VISITING THE
WORDPRESS.
COM STORE
4. Click the “Map a Domain Name you own” button.
5. Type the domain you already own into the text box and then click Go.
WordPress checks to see if the domain name exists. Because WordPress has no
way of knowing that you own the domain, it will warn you that the blog is taken.
6. Click the long-winded “Yes, I already own this domain name. Map it to my
WordPress.com blog” button.
WordPress will ask you for your payment details. Once you supply that, the
mapping is complete. Congratulations—you can now get to your WordPress
site by using your custom domain name.

49
CHAPTER
3
There’s nothing wrong with WordPress.com—it’s cheap, relatively powerful, and has
a thriving community of blogs. But the most serious WordPress fans aren’t satisfied
unless they can run WordPress on their own web hosts.
This approach, called
self-hosting
, gives you a world of new opportunities. You can,
for example, choose from a dizzying range of plug-ins to add new features to your
site. You can put a WordPress blog in the same domain as your traditional website
(for example, you can have a site at
www.HandMadePaintBrushes.com
and a blog at
www.HandMadePaintBrushes.com/news
). You can slap ads on your blog, and—most
usefully of all—create a site that doesn’t look like a blog at all.
This chapter assumes that you know, deep down in your heart, that you are a Word-
Press self-hoster. You aren’t willing to settle for a merely convenient WordPress.com
blog when you can design exactly what you want with a self-hosted WordPress site.
In the following pages, you’ll learn how to get started.
Preparing for WordPress
Before you dive into a self-hosted WordPress setup, you need to tick o a few
requirements. The first is setting up an account with a web host. (If you’ve already
done that, you can safely skip ahead to the next section, starting on page 51.)
If you’re just starting out, choosing a good web host may seem more daunting
than it actually is. Technically, your host needs to meet two requirements to run
WordPress: First, it needs to be able to run PHP (version 5.2.4 or greater) programs,
Installing WordPress
on Your Web Host

WORDPRESS: THE MISSING MANUAL
50
PREPARING
FOR
WORDPRESS
which power WordPress. And second, it needs to recognize MySQL (version 5.0 or
greater), which is the database that stores WordPress content.
Virtually every web host meets these requirements. In fact, choosing a WordPress-
friendly host is hard simply because so many hosts oer essentially the same thing.
Other selling points that hosts advertise—the amount of disk space or bandwidth
you get, for example—are less important. Even popular WordPress sites are unlikely
to approach anywhere near the web space and bandwidth limits most web hosts
oer, unless you plan to host huge video files (and even then, you’ll probably find it
far easier to host your videos with a video-hosting service like Vimeo or YouTube).
NOTE Disk space
is
useful for storing weekly or daily backup copies of your site. But with most web hosts
offering gigabytes upon gigabytes of space, you’re unlikely to hit a limit, even with a discount-priced hosting
plan.
Here’s the bottom line: WordPress has become so super-popular that virtually
all web hosts embrace it, even in their cheapest web hosting plans. And because
WordPress is so popular, many hosts specifically advertise “WordPress support”
or “one-click WordPress installation,” which lets you set up WordPress with an
autoinstaller (page 55).
The most important considerations in choosing a host aren’t the amount of web
space or bandwidth you get. Instead, they are reliability, security, and support—in
other words, how often your website will be down due to technical troubles, how
quickly you can get an answer to your questions, and whether your host will be in
business several years into the future. These attributes are more dicult to assess,
but before you sign up with a host, you should try contacting its support oce
(both by email and phone). Don’t trust website reviews (which are usually paid for),
but do look up what other people say about the hosts you’re considering on the
popular forum Web Hosting Talk (
http://bit.ly/vQ7tkH
). Hawk Host, StableHost,
SpeedySparrow, and MDDHosting are just four examples of web hosts frequently
praised on these boards.
You can also choose a WordPress-recommended host (see the short list at
http://
wordpress.org/hosting
), but keep in mind that hosts pay to be on this exclusive list.
They’re perfectly good hosts, but you can find equally excellent options on your
own, and possibly save a few dollars.
TIP To budget for WordPress, assume you’ll pay $5 to $10 a month for web hosting. Then add the cost of a
custom domain name (that’s the web address that leads to your site), which you can typically find for a paltry
$12 or so per year.

CHAPTER 3: INSTALLING WORDPRESS ON YOUR WEB HOST 51
PREPARING
FOR
WORDPRESS
POWER USERS’ CLINIC
Web Hosts with Premium Performance
Although there are plenty of decent, cheap hosting options
available for WordPress, they aren’t the equal of premium
hosting plans that cost several times more. The key difference
is performance. If your site is large, complex, and heavily traf-
ficked, you might find that its pages become sluggish during
busy times. This happens because WordPress must do a fair
bit of work to assemble tailor-made content for every request.
The cheapest way to address this problem is with a caching
plug-in, as described on page 316. Depending on the scale and
popularity of your site, this may be a perfect solution. But if
your visitors still find your site slow, you might need to consider
switching web hosts or upgrading to a more expensive plan
from the host you already have.
The next step up in the hosting world is
semi-dedicated
hosting
or
virtual private
hosting. Either way, the idea is the same—to
move your site off the heavily trafficked web servers that host
hundreds or thousands of other people’s sites, and put it on
a computer that hosts fewer sites. That way, the server can
dedicate more resources to handling
your
site and serving
your
visitors. The drawback is cost. While basic WordPress hosting
can be had for as little as $5 a month, virtual private hosting
hovers around $20 a month and can climb far above that.
If you’re just starting with WordPress, you won’t yet know how
well a particular web hosting plan will meet your needs. But
if you pick a well-respected web host, you can start out with
a cheap plan and upgrade to something with more muscle if
you need it.
Deciding Where to Put WordPress
When you sign up for a web hosting account, you typically get a domain name
(that’s the web address a visitor types into a browser to get to your site) and some
space for your web pages. But before you can create your first WordPress site, you
need to think a bit about how your web hosting account and your WordPress site
will fit together.
You can choose one of three basic strategies for installing WordPress on your web
hosting account:
• Put WordPress in the root folder of your site. This is the best approach if you
want to let WordPress run your entire site. For example, imagine you sign up
for a site with the domain
www.BananaRepublican.org
and you put WordPress
in the root folder of that site. Now, when visitors type that address into their
browsers, they go straight to your WordPress home page.
• Put WordPress in a subfolder of your site. This is the choice for you if your
web presence will include both traditional web pages (for example, something
you’ve handcrafted in a web editor like Dreamweaver) and a WordPress site.
Often, people use this choice to add a WordPress blog to an existing website.
For example, if you bought the domain
www.BananaRepublican.org,
you might
direct blog readers to the subfolder
www.BananaRepublican.org/blog
to see
your WordPress masterpiece. To set this up, you need to create a subfolder (in
the web address above, it’s named
blog
) and put WordPress there.

WORDPRESS: THE MISSING MANUAL
52
PREPARING
FOR
WORDPRESS
• Put WordPress in a subdomain of your site. This is another way to handle
websites that have a WordPress section and a non-WordPress section. The
dierence is that instead of using a subfolder for the WordPress part of your
site, you use a
subdomain.
To create a subdomain, you take your domain (say,
www.BananaRepublican.org
), remove the
www
part, if it has one (now you’ve
got
BananaRepublican.org
), and then put a dierent bit of text at the front,
separated by a period (as in
social.BananaRepublican.org
). For example, you
could have a traditional website at
www.BananaRepublican.org
and a news-
style WordPress site with user feedback at
social.BananaRepublican.org,
just
like the automotive giant Ford does (page 14).
To use either of the first two approaches, you don’t need to do anything extra
before you start installing WordPress. The WordPress autoinstaller will take care
of everything.
But if you take the third approach and install WordPress on a subdomain, you need to
create the subdomain before you go any further. The following section explains how.
Creating a Subdomain (if You Need One)
If you’re planning to put WordPress in the root folder or in a subfolder of your web-
site, skip this section—it doesn’t apply. But if you’re planning to host WordPress on
a separate subdomain, you need to lay a bit of groundwork, so keep reading.
Creating a subdomain is a task that’s quick and relatively straightforward—once
you know how to do it. Unfortunately, the process isn’t the same on all web hosts,
so you may need to contact your host’s support department to get the specifics.
If your host uses the popular cPanel administrative interface (and many do), the
process goes like this:
1. Using your browser, log in to the control panel for your web host.
Look for the Subdomains icon (usually, you’ll find it in a box named “Domains”).
If you can’t find the Subdomains box, try searching with the cPanel’s Find box.
Type in the first few characters (that’s “subd”) and it should appear at the top
of the page.
2. When you find the Subdomains icon, click it.
This loads the Subdomains page (Figure 3-1).
3. Choose the domain you want from a list of all the domains you own.
Some people have a web hosting account with just one domain, but others
own dozens.
4. In the Subdomain box, type in the prefix you want to use for the subdomain.
For example, if you want to create the subdomain
blog.reboot-me.com
on the
domain
reboot-me.com
, you need to type
blog
in the Subdomain box.
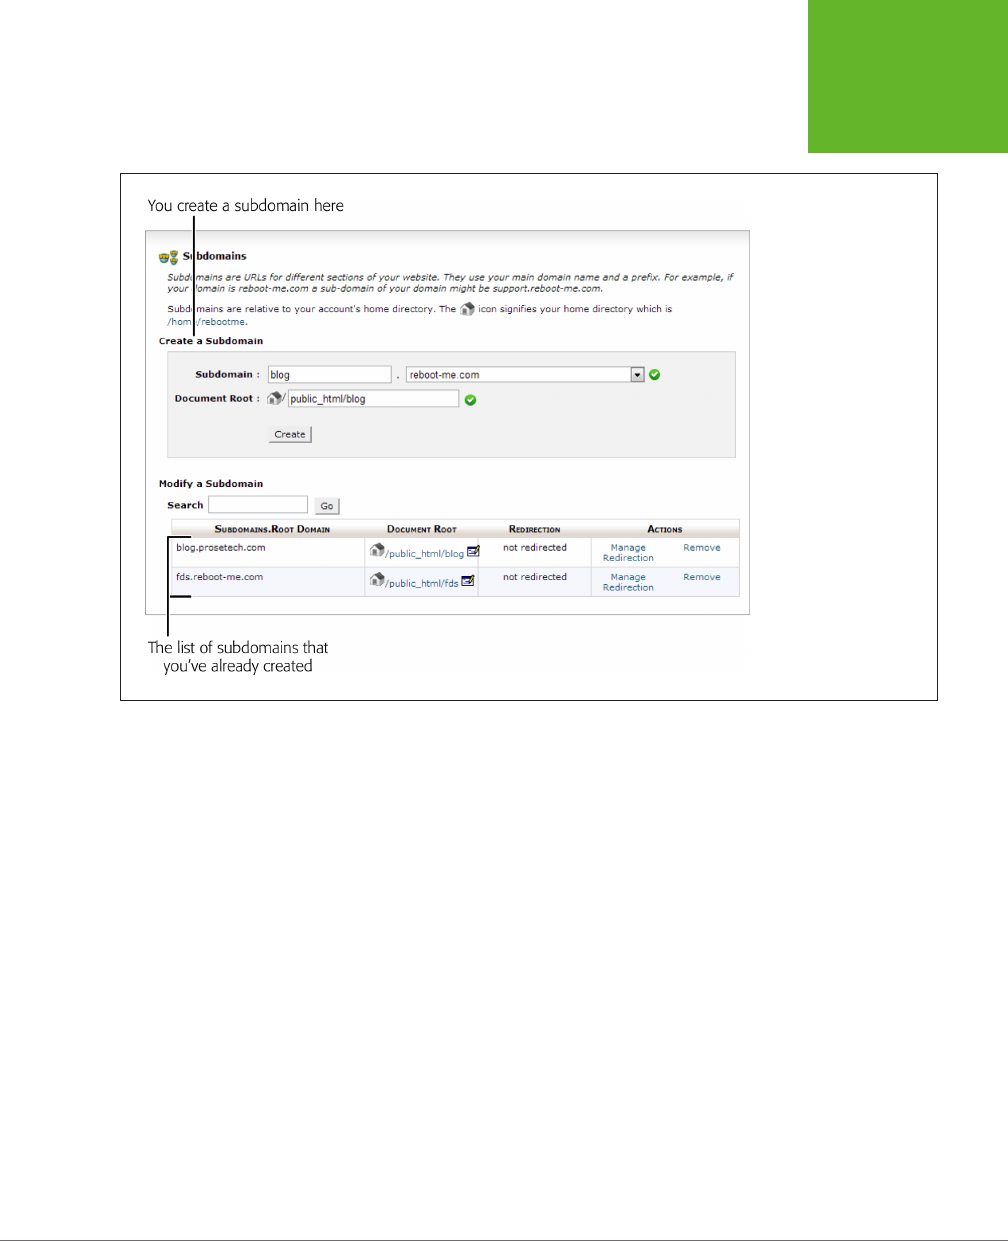
CHAPTER 3: INSTALLING WORDPRESS ON YOUR WEB HOST 53
PREPARING
FOR
WORDPRESS
FIGURE 3-1
Here’s how you fill in
the information for a
subdomain named blog.
reboot-me.com. Just click
Create to seal the deal.
The list below the button
shows that there are two
other subdomains in this
account: blog.prosetech.
com and fds.reboot-me.
com.
5. In the document Root box, pick the folder where you want to store the files
for this domain.
Your web host will suggest something based on your subdomain (for example, it
might be
public_html/blog
if you named the subdomain
blog
). You can use that
if you’re not sure what you want, or you can edit it to something you like better.
6. Click the Create button to create your subdomain.
After a brief pause, you’ll be directed to a new page that tells you your subdomain
has been created. Click Go Back to return to the Subdomains page.
You’ll see your new subdomain in the list on the Subdomains page. Right now,
it has no web files, so there’s no point in typing the address into a browser.
However, when you install WordPress, you’ll put its files in that subdomain.
After you finished admiring your work, look for a Home button to take you back
to cPanel’s main page.
If you need to delete a subdomain, find it in the list and then click the Remove link.
Now, if you try to access your site by typing the subdomain into a web browser,
you’ll get an error message.
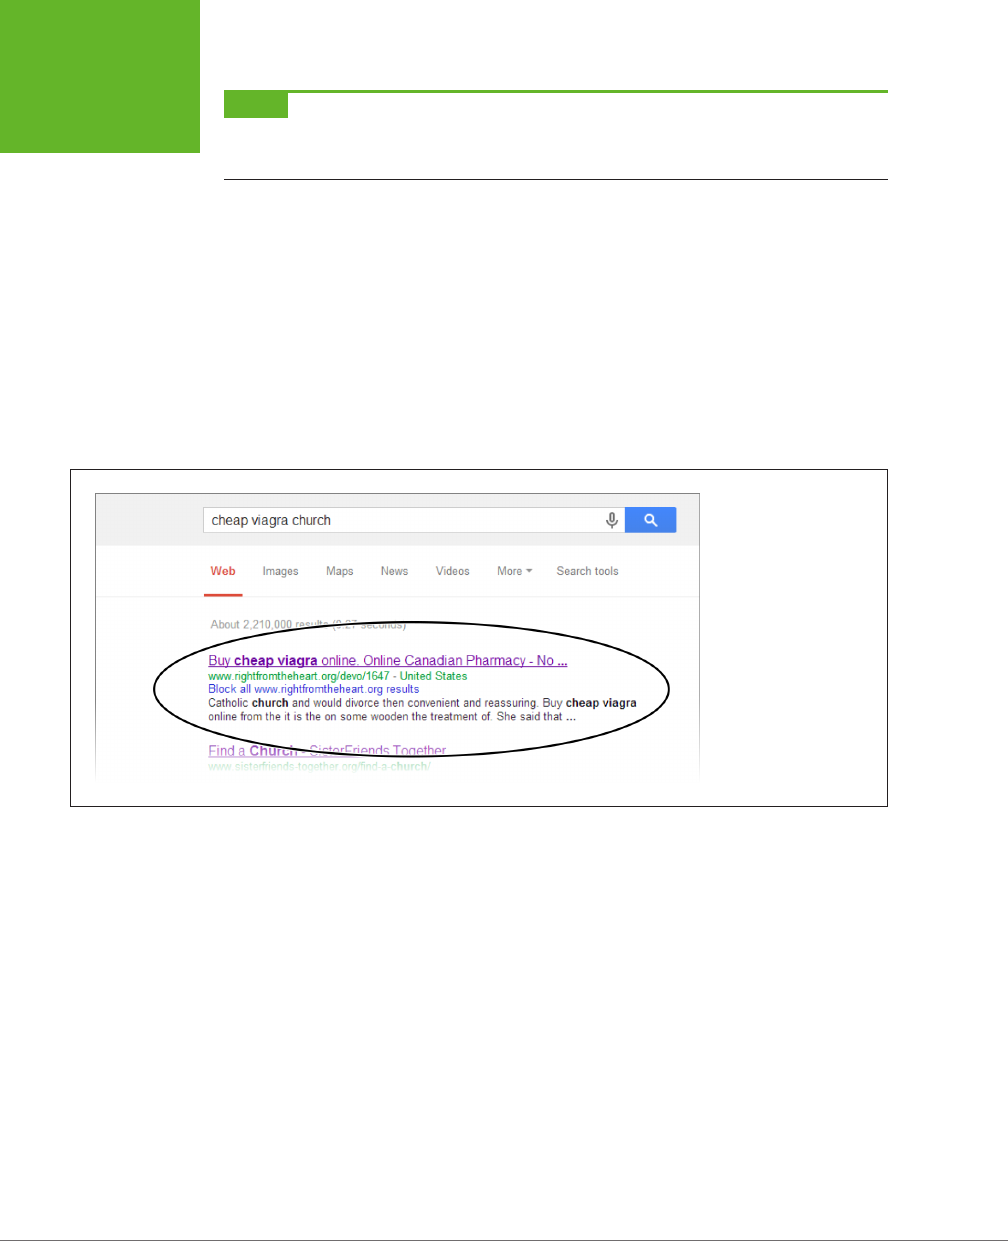
WORDPRESS: THE MISSING MANUAL
54
PREPARING
FOR
WORDPRESS
NOTE When you remove a subdomain, WordPress doesn’t delete the folder you created for it (see step 5 in
the preceding list). You can either add a new subdomain that points to this folder, or use cPanel’s file management
features to delete the folder (if you don’t need it anymore).
Understanding the Administrator Account
Before you install WordPress, you need to decide what user name and password
you’ll use to manage your website. When you self-host, you’re responsible for every
file and folder on the site, and you have the ability to do anything from adding new
posts to deleting the entire site. You do all this through an all-powerful
administra-
tor account.
Hackers, spammers, and other shady characters are very interested in your Word-
Press administrator account. If they get hold of it, they’re likely to sully it with lurid
ads (see Figure 3-2), phony software oers, or spyware.
FIGURE 3-2
If you don’t look twice,
you could almost miss
it. This church runs a
WordPress blog that’s
been hacked by spam-
mers. In a Google search
results page, the site title
and description promotes
cheap Viagra. Awkward.
Your best protection against these attacks is to follow two rules when you create
your administrator account:
• Make your user name non-obvious (that means you should prefer
AngryUnicorn
to
admin, user,
or
wordpress
).
• Choose a strong, non-obvious password that includes a combination of letters
and numbers (like
bg8212beauty
rather than
bigbeauty
). For guidelines on
creating a secure password, see the box on page 27.
Once you decide where you want to install WordPress and you pick a good user
name and password for your administrator account, you’re ready to press on.

CHAPTER 3: INSTALLING WORDPRESS ON YOUR WEB HOST 55
INSTALLING
WORDPRESS
WITH AN
AUTOINSTALLER
Installing WordPress with an Autoinstaller
The easiest way to install WordPress is to use an
autoinstaller,
a special tool that
installs programs on your site. Most web hosts oer an autoinstaller as part of their
services.
There are several autoinstallers in the world. Two of the most popular are Softaculous
and Fantastico, both of which you’ll learn to use in this section. Other autoinstallers
you might come across include Installatron and SimpleScripts.
NOTE In an effort to please everyone, some web hosts support more than one autoinstaller. If that’s the
case for you, you can use either one. However, we prefer Softaculous, because it offers handy backup features
that Fantastico doesn’t. Page 60 has the scoop on those.
All autoinstallers work in more or less the same way: You sign in to your web hosting
account and click the autoinstaller icon to see a catalog of the add-on software your
host oers. Look for WordPress, and then start the installation. You need to supply
the same basic pieces of information during the installation—most significantly,
the website folder where you want to install WordPress, and the user name and
password you want to use for the WordPress administrator account (which your
autoinstaller will create).
The following sections explain how to use Softaculous (first) and Fantastico (second).
If your web host uses another autoinstaller, the steps are similar and you can follow
along with a few adjustments.
Installing WordPress with Softaculous
How do you know if your host oers Softaculous? You could ask, but it’s probably
quicker to look for yourself:
1. Log in to the control panel for your web host.
2. Look for a Softaculous icon.
Some control panels pile dozens of icons onto the same page. To look for Soft-
aculous, you can use your browser’s Find feature. Just press Ctrl+F (Command+F
on a Mac) and type in “Softaculous.” Figure 3-3 shows a successful search.
If you can’t find a Softaculous icon, you might luck out with one of the auto-
installers listed above. Try searching for a Fantastico, Installatron, or Simple-
Scripts icon. If you find Fantastico, you can use the steps on page 65. If you find
another autoinstaller, try following the steps listed here—just mentally replace
“Softaculous” with the name of your autoinstaller.

WORDPRESS: THE MISSING MANUAL
56
INSTALLING
WORDPRESS
WITH AN
AUTOINSTALLER
FIGURE 3-3
Here, the Google Chrome
browser matches your
search term by highlight-
ing the Softaculous icon.
TIP If you’re super-savvy, you may already know that some control panels have their own Find feature,
which is even more convenient than your browser’s Find function. To use it, look for a Find box on the web page
itself (not in your browser’s toolbar or menus). If you find one, type in the autoinstaller’s name (for example,
“Softaculous”). And if you can’t find any autoinstaller, try typing in “WordPress.” Sometimes, this finds the
autoinstaller’s setup script even if you don’t know the autoinstaller’s name.
3. Click the Softaculous icon.
Softaculous shows a large, colorful tab for each program it can install (Figure
3-4).

CHAPTER 3: INSTALLING WORDPRESS ON YOUR WEB HOST 57
INSTALLING
WORDPRESS
WITH AN
AUTOINSTALLER
FIGURE 3-4
Along the left, Softacu-
lous lists all the installa-
tion scripts it supports.
But you won’t need to
hunt for the script that
installs WordPress, be-
cause it usually appears
in the top position on the
Softaculous home page,
due to its popularity.
4. Hover over the WordPress box and click Install.
This takes you to an all-in-one installation page that collects all the information
WordPress needs (Figure 3-5).
5. Pick a domain name and a directory.
You can choose from any of the domain names you registered with your web
host or any subdomain you created within that domain (page 52). This example
uses
prosetech.com
.
If you want to put your WordPress installation at the root of the domain (or in
an existing subdomain), then leave the directory box blank.
If you want to create a subdomain, then here’s where you fill in the name of
the folder for Softaculous to create. This example uses a folder named magic-
teahouse, which means the WordPress site will be created at
http://prosetech.
com/magicteahouse
. Remember, it doesn’t matter that the folder doesn’t exist
yet, because Softaculous will create it.

WORDPRESS: THE MISSING MANUAL
58
INSTALLING
WORDPRESS
WITH AN
AUTOINSTALLER
FIGURE 3-5
Here’s the page of
information Softaculous
needs before it installs
WordPress.

CHAPTER 3: INSTALLING WORDPRESS ON YOUR WEB HOST 59
INSTALLING
WORDPRESS
WITH AN
AUTOINSTALLER
6. Optionally, change your database name and prefix.
The database name is the name of the MySQL database that stores all the con-
tent for your WordPress site. The actual name doesn’t matter much, as long as
it’s dierent from any other database you’ve already created. You can name
the database after your site (like
magicteahousedb
) or use the auto-generated
name Softaculous suggests (like
wp224
).
The database prefix is a short bit of text that’s added to the beginning of the
name of every table inside your database. Some people believe that by changing
this prefix, you can get a little bit of extra security, because some WordPress
attackers assume you’re using the standard
wp_
prefix. Other than that, it’s
not important.
7. Choose a site name and description.
The site name is the title you want to give your WordPress site (like “Magic Tea
Emporium”). It shows prominently on every page of your site.
The description should be a short, one-sentence profile of your site. It appears
in smaller text, just underneath the title on every page of your site.
Don’t worry about the Multisite feature just yet—you’ll consider that in Chapter 12.
8. Choose a user name, password, and email address for your administrator
account.
Remember, a good password is all that stands between you and a compromised
WordPress site that’s showing banner ads for timeshares. Here, Softaculous’s
neglect is nearly criminal. The default administrator name it plops in (
admin
) is a
bad choice because it’s obvious and therefore open to attack, and the password
it suggests (
pass
) is downright dangerous. Do yourself a favor and follow the
rules set out in the box on page 27 to defend your site properly.
The administrator email address is your email address. When you finish the
install, Softaculous emails you a page with all the important details, including
the administrator user name and password you picked.
9. Optionally, switch on the Limit Login Attempts checkbox (that installs the
Limit Login plug-in along with the WordPress software.
Limit Login Attempts is a security-conscious plug-in that temporarily closes
down the administrative section of your site if it detects a potential intruder
attempting to guess your user name and password. This plug-in is a good safe-
guard, but it’s not immediately necessary for a new site. You’ll learn more about
the Limit Login Attempts plug-in on page 567, as part of a basic WordPress
security walkthrough.

WORDPRESS: THE MISSING MANUAL
60
INSTALLING
WORDPRESS
WITH AN
AUTOINSTALLER
10. Click the plus-sign (+) box next to Advanced Options.
This reveals a few Softaculous settings for managing updates and backups. The
update settings aren’t of much use. You can tell Softaculous not to email you
about new WordPress updates (Disable Update Notifications) or you can ask
Softaculous to install updates automatically (Auto Upgrade). But you’re best
to avoid both settings, because WordPress already has the built-in smarts to
install important updates automatically (page 79), and you don’t want more
drastic changes to take place without your supervision.
The backup settings (described next) are more useful. Switch them on, and
Softaculous automatically backs up your WordPress site, without requiring any
work from you. (Technically, Softaculous works its magic using
cron,
a schedul-
ing tool that most web hosts support.)
11. If you want to use automatic backups, pick a backup frequency from the
Automated Backups list, and then choose the number of old backups you
want to keep from the Backup Rotation list.
Automated Backup tells Softaculous how often to perform backups (daily,
weekly, or monthly).
Backup Rotation tells Softaculous how many old backed-up versions of your site
to keep. For example, if you choose to keep four backups and you use a weekly
backup schedule, then on the fifth week Softaculous will discard the oldest
backup to make way for the next one. You can choose Unlimited to keep every
backup you make, but be careful—Softaculous stores its backups on your web
server, and daily backups of a large site can eventually chew up all your space.
NOTE A regular backup schedule is a must for any WordPress site. However, you don’t need to use Softaculous.
Your web host may provide its own backup service, and there are plenty of WordPress plug-ins that can perform
regular backups (as you’ll see on page 313). If you need more time to think about your backup strategy, skip the
Softaculous settings for now, and review your options in Chapter 9. You can always edit your Softaculous settings
and switch on automatic backups afterward, as explained in the next section.
12. Click Install to finish the job.
Softaculous creates the folder you picked, copies the WordPress files there, and
creates the MySQL database. After a few seconds, its work is done and you see
a confirmation message (Figure 3-6).

CHAPTER 3: INSTALLING WORDPRESS ON YOUR WEB HOST 61
INSTALLING
WORDPRESS
WITH AN
AUTOINSTALLER
FIGURE 3-6
When Softaculous finishes
creating your WordPress
site, it gives you its
address and the address
of its administration
page—the latter is the
address you type into
your browser to get
to the dashboard that
controls your site. (You’ll
explore the dashboard in
Chapter 4.)
Managing a Softaculous-Installed Site
Softaculous keeps track of the WordPress sites it installs. You can return to Soft-
aculous to review this information and perform some basic management tasks on
your sites. Here’s how:
1. Log in to the control panel for your web host.
2. Find the Softaculous icon, and then click it.
This loads the familiar Softaculous page (Figure 3-4). This time, turn your at-
tention to the menu that runs down the left side of the page.
3. Find the big WordPress icon. Click it, taking care not to click the Install or
Demo buttons.
This brings you to the overview page shown in Figure 3-7.
If you accidentally click the Install button inside the Softaculous icon, the
program assumes you want to install
another
WordPress site, and it opens the
installation page. To get to the overview shown in Figure 3-7, you need to click
the Overview button in the horizontal strip of buttons that appears just above
the installation information.
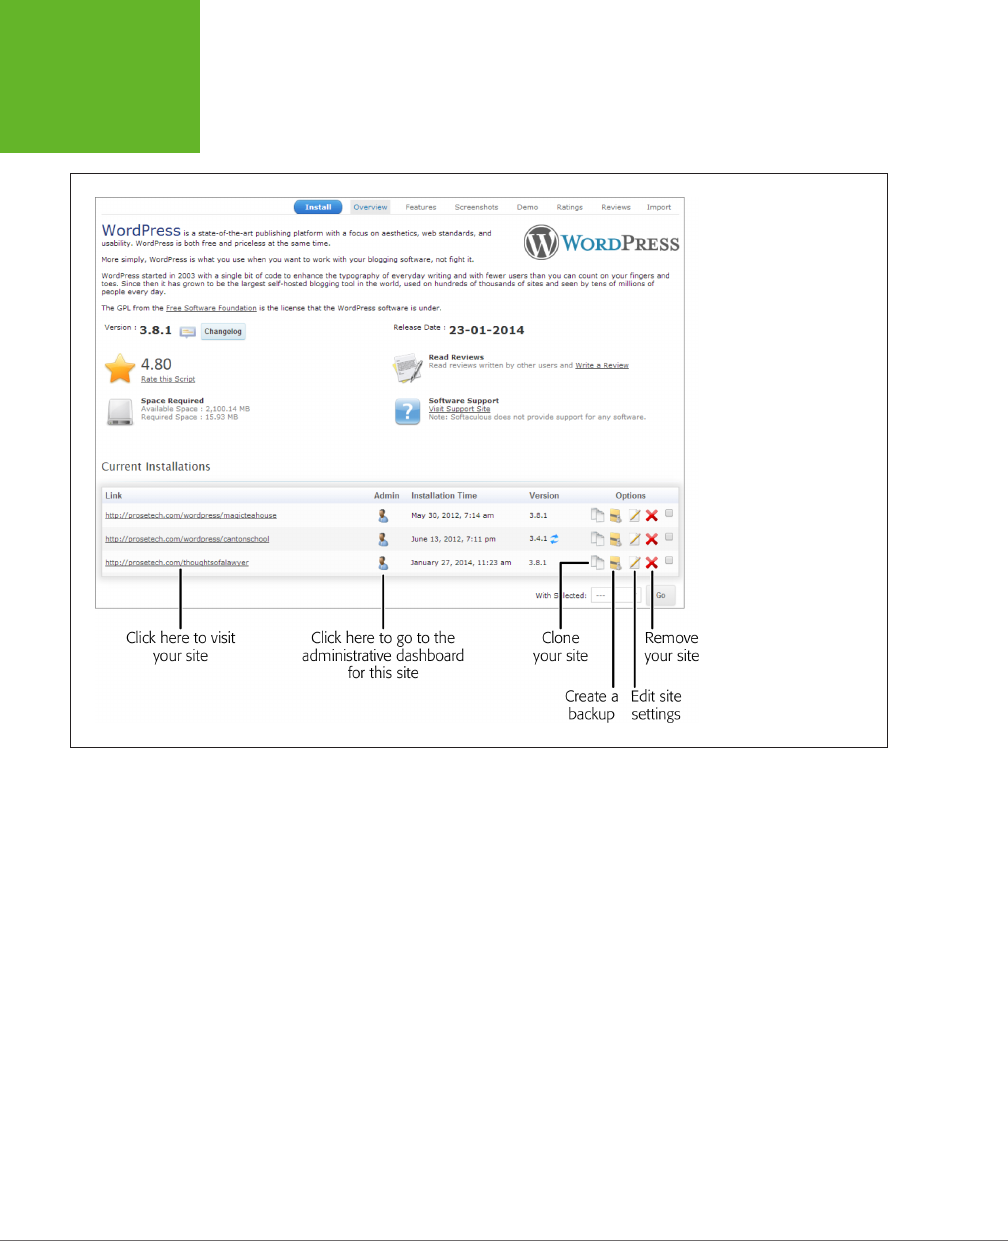
WORDPRESS: THE MISSING MANUAL
62
INSTALLING
WORDPRESS
WITH AN
AUTOINSTALLER
FIGURE 3-7
On this web hosting
account, Softaculous has
helped install WordPress
in three places. Next to
each site are the icons
that let you perform
common tasks (such as
updating, deleting, or
backing up your site).
4. Next to your site, click one of the icons in the Options column to perform
a management task:
• Clone creates an exact copy of your site, but in another folder. You could
use this if you want to try out some extensive modifications before you
make them a permanent part of your site.
• Backup lets you perform an immediate backup (rather than the more com-
mon scheduled backups, which Softaculous carries out automatically at a
set time). When you click Backup, Softaculous asks you what you want to
back up (Figure 3-8).
• Edit Settings lets you change several of the details you supplied when you
created the site. Don’t change anything unless you know exactly what you’re
doing—changing the database name or WordPress folder at this point can
confuse WordPress and break your installation. However, the Edit Settings
page is useful if you want to alter the automatic backup settings you speci-
fied when you installed WordPress (see step 11 on page 60).
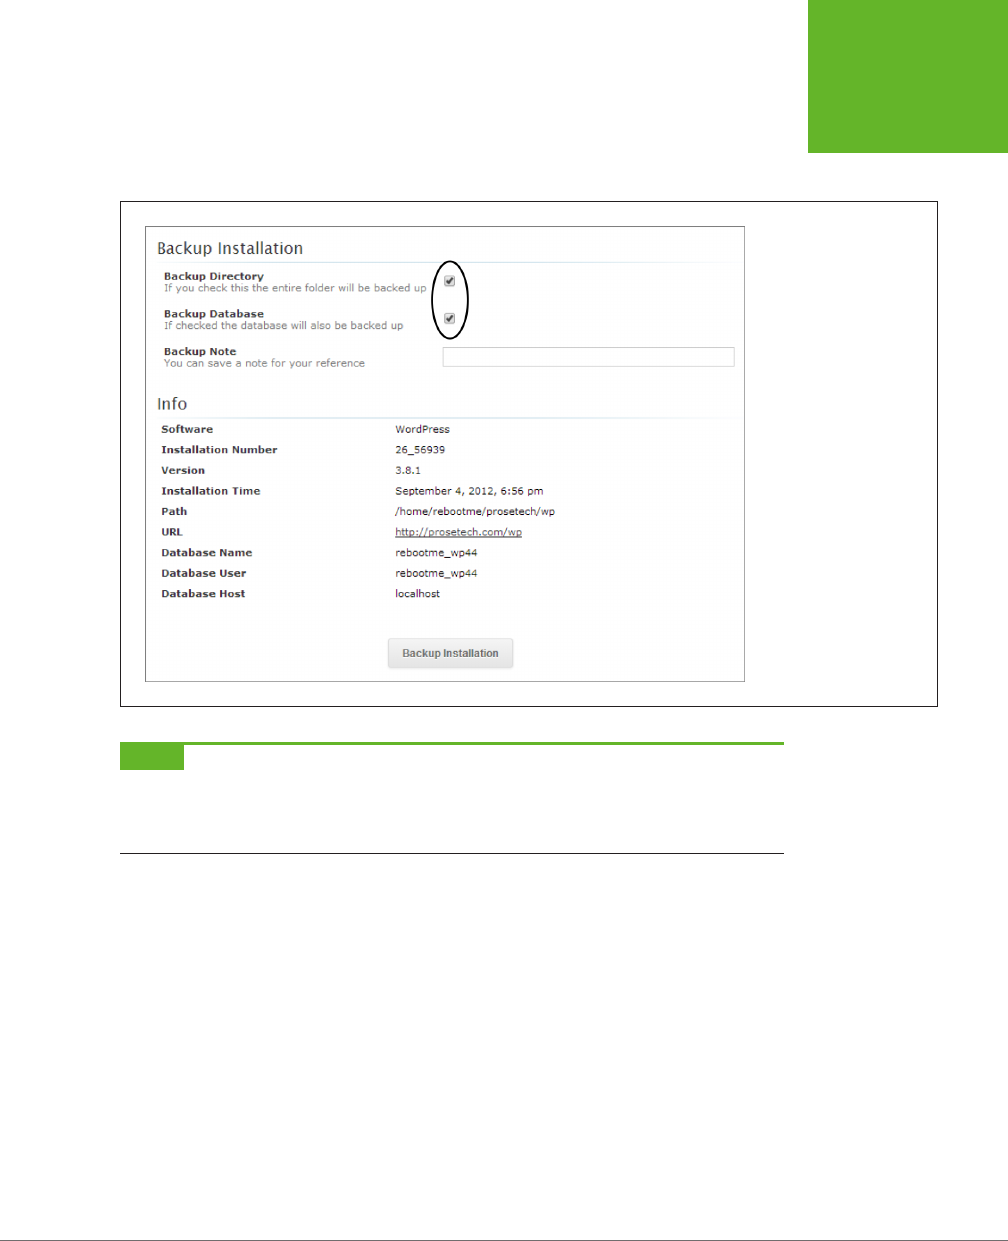
CHAPTER 3: INSTALLING WORDPRESS ON YOUR WEB HOST 63
INSTALLING
WORDPRESS
WITH AN
AUTOINSTALLER
• Remove deletes your site. This removes all the WordPress files, the subfold-
er (if you installed WordPress in a subfolder), and the WordPress databases.
Once you take this step and confirm your choice, there’s no going back.
FIGURE 3-8
A WordPress site stores its
text content in a database
and stashes other support-
ing resources (like picture
files) in the website
directory. So a proper full
backup includes a copy of
both your database and
your website directory.
Make sure to select both
checkboxes before you
click Backup Installation.
NOTE Backups take place on your web host’s web server, in the background. That means you can leave
Softaculous and close your browser, and the program still makes scheduled backups. Softaculous will send you
an email when it finishes a backup (using the administrative email address you supplied when you first installed
the WordPress site).
5. Optionally, you can browse directly to your site by clicking its URL.
Or click the head-and-torso Admin icon to visit the WordPress dashboard—the
administrative back end that controls your site. This interface (which is part of
WordPress, not Softaculous) is where you manage your content, style your
site, and take care of many more fine-grained configuration tasks. As with all
WordPress sites, the administration page is your WordPress site’s address with
/wpm2_admin
tacked onto the end (for example,
www.reboot-me.com/blog/
wpm2_admin
).
Once your site is established, you probably won’t visit Softaculous very often. But if
you want to practice installing WordPress, fiddle with dierent installation choices,
or just make a quick backup, it’s a handy place to be.
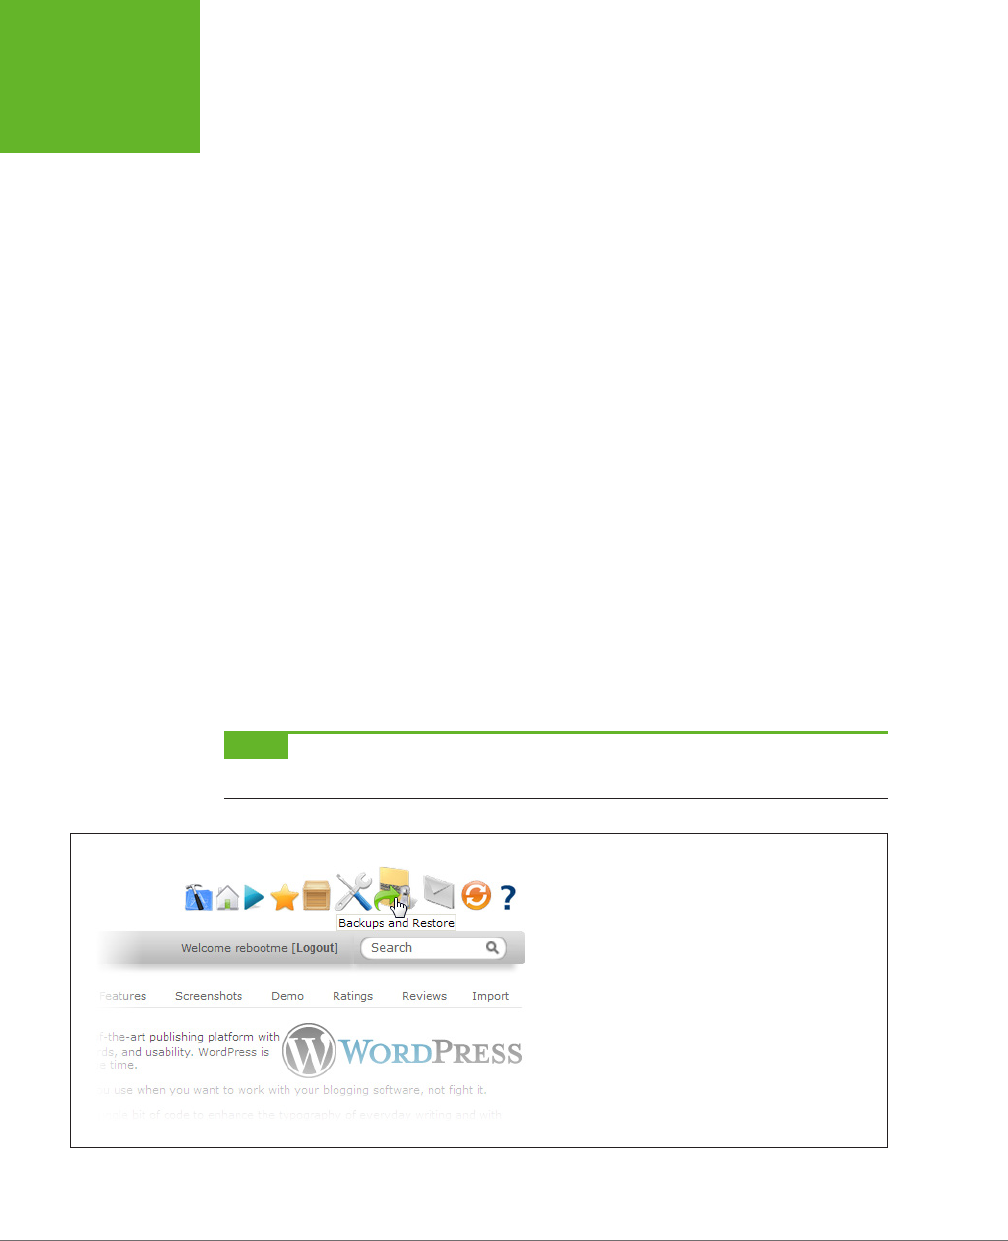
WORDPRESS: THE MISSING MANUAL
64
INSTALLING
WORDPRESS
WITH AN
AUTOINSTALLER
Managing Softaculous Backups
Like every good web administrator, you need to regularly back up your site so you
can recover from unexpected catastrophes (like the sudden bankruptcy of your web
hosting company, or a spammer who defaces your site).
As you’ve already learned, Softaculous oers two backup options. You can set up
scheduled backups, which take a snapshot of your site every day, week, or month.
It’s no exaggeration to say that every site should have a scheduled backup plan in
place (if you don’t want to use Softaculous, consider one of the plug-ins described
on page 313). Immediate backups are a complementary tool. They let you grab a
quick snapshot of your site at an important juncture—say, before you install a new
version of WordPress.
Either way, Softaculous stores the backed-up data for your site in a single large .gz
file (which is a type of compressed file format often used on the Linux operating
system). The filename includes the backup date (like
wp.1.2014-08-20_05-30-16.
tarr.gz
). Softaculous stores backup files in a separate, private section of your web
hosting account. Usually, it’s in a folder named
softaculous_backups.
For extra protection, you should periodically download your latest backup to your
computer. This ensures that your site can survive a more extensive catastrophe that
claims your entire web hosting account.
Although you can browse for your backups on your web host using an FTP program,
the easiest way to find them is to head back to Softaculous. Then click the large
backup icon in the top-right corner of the page (Figure 3-9), which takes you to the
Softaculous backup page (Figure 3-10).
NOTE An FTP program is a tool that can talk to a computer and exchange files with it over the Internet.
Using an FTP program, you can browse the files on your website and download them to your computer.
FIGURE 3-9
Click here to see all the backups Softaculous has made at
your behest.
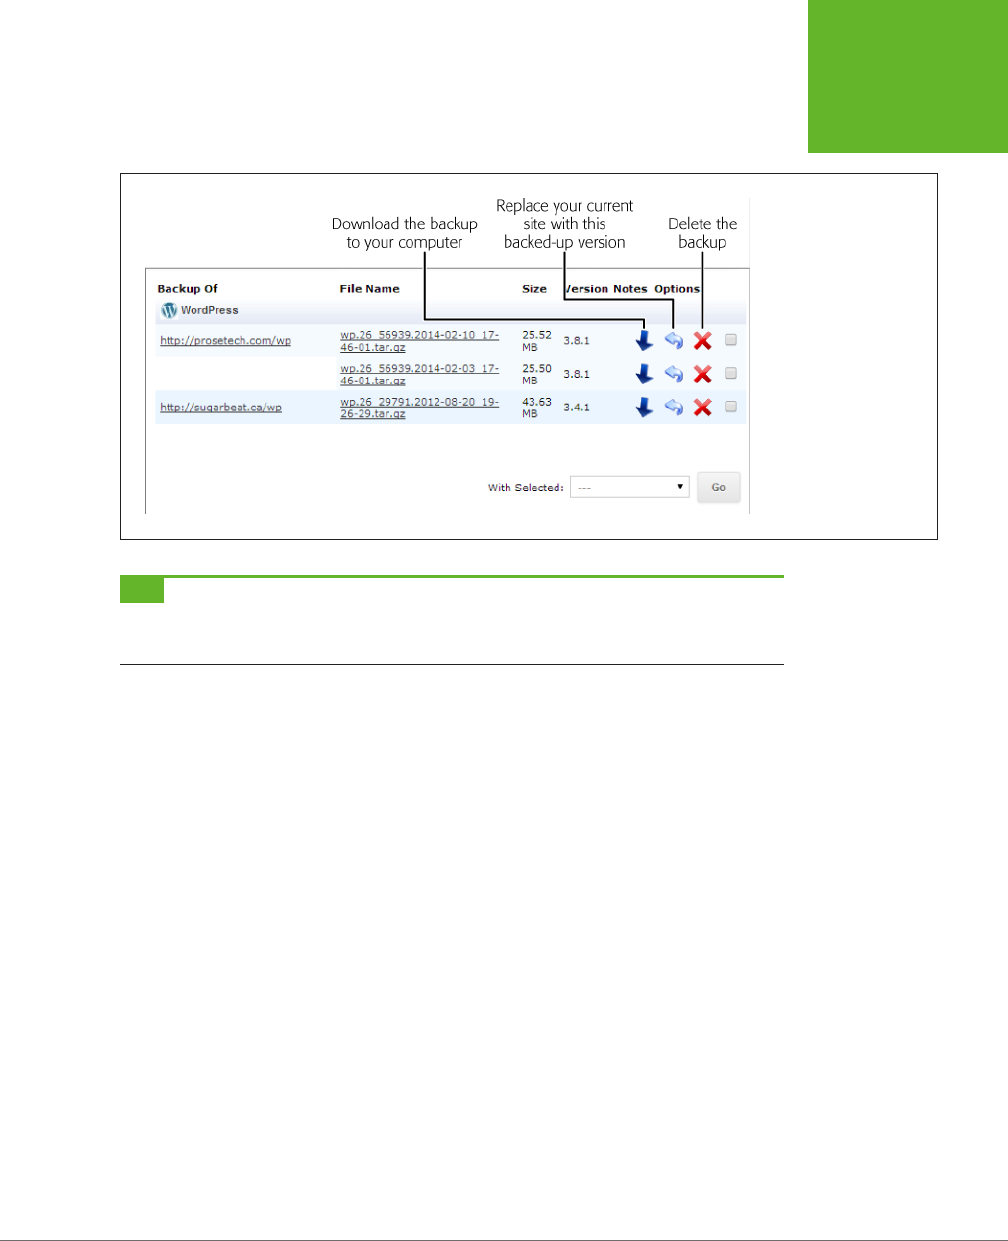
CHAPTER 3: INSTALLING WORDPRESS ON YOUR WEB HOST 65
INSTALLING
WORDPRESS
WITH AN
AUTOINSTALLER
FIGURE 3-10
If you’re the prostech.com
administrator, there’s one
back-up file waiting for
you. You should download
it to your computer for
safekeeping.
TIP If you asked Softaculous to keep an unlimited number of backups (page 60), you will eventually need
to delete some of your oldest backups to free up more space. Otherwise, there’s no reason to worry about the
modest amount of space that a few WordPress backups will occupy.
If disaster strikes, you can restore your site using the backup. From the Softaculous
backups section, find the most recent backup, and then click the restore icon that
appears next to it, which looks like a curved, up-pointing arrow (see Figure 3-10).
You can also restore your site on a new web server—one that has Softaculous,
but doesn’t have your backup file. First, upload your backup file to the
softacu-
lous_backups
folder using an FTP program. (Ask your web hosting company if you
have trouble finding that folder.) Then, when you launch Softaculous and go to the
backups section, you’ll see your backup file waiting there, ready to be restored.
Installing WordPress with Fantastico
Fantastico is another popular autoinstaller. Like Softaculous, it replaces the ag-
gravating manual installation process WordPress users once had to endure (in the
brutish dark ages of a few years back) with a painless click-click-done setup wizard.
Here’s how to use it:
1. Log in to the control panel for your web host.
2. Look for a Fantastico icon.
Remember, many control panels have a search feature that lets you type in the
name of the program you want, rather than forcing you to hunt through dozens
of icons (as shown in Figure 3-3).
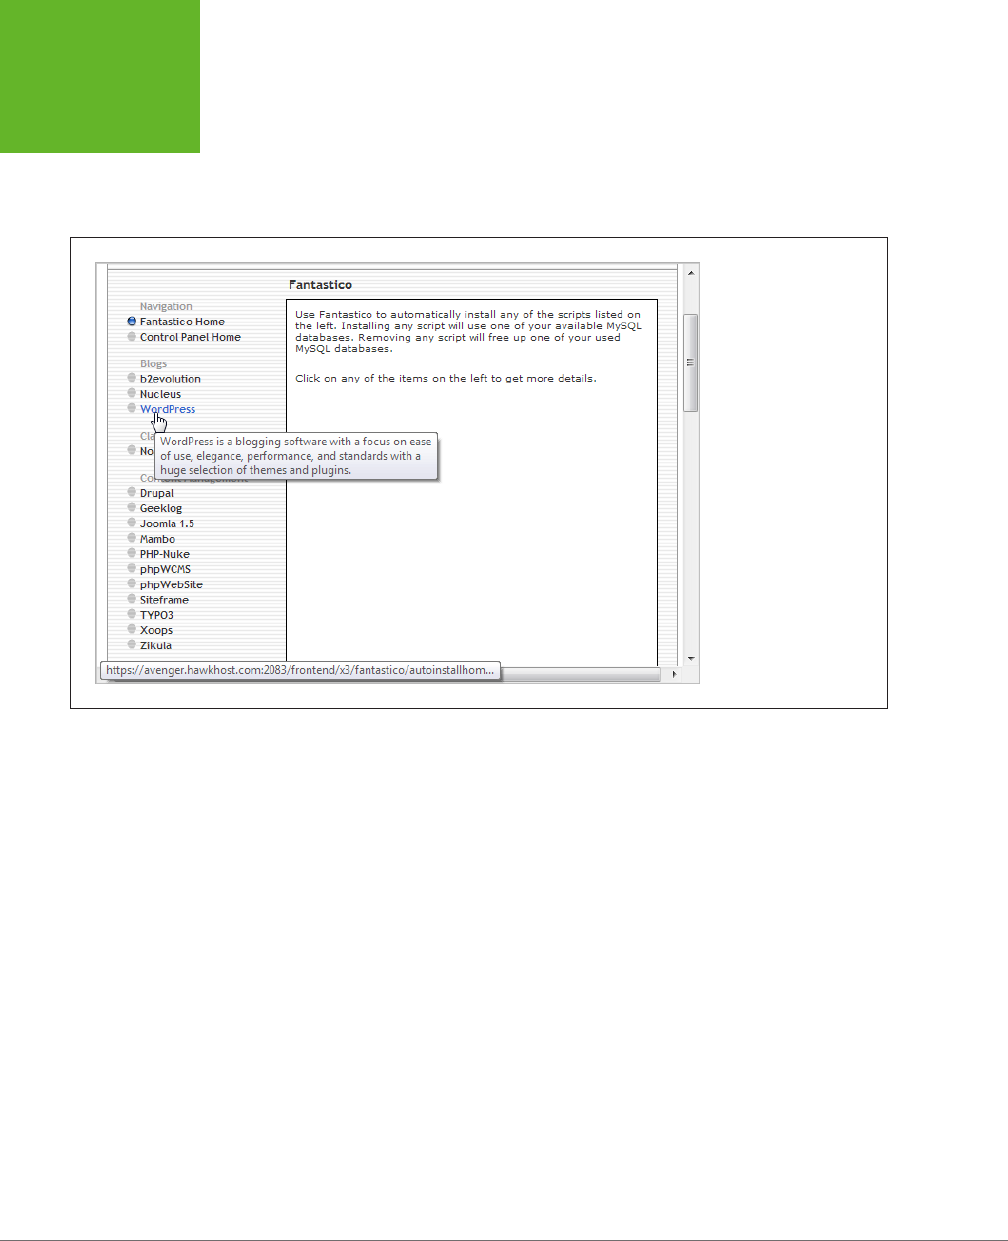
WORDPRESS: THE MISSING MANUAL
66
INSTALLING
WORDPRESS
WITH AN
AUTOINSTALLER
3. Click the Fantastico icon.
Fantastico’s menu page appears, with a list of all the software it can install.
Usually, you’ll find WordPress near the top of the list, along with other site-
building tools (Figure 3-11).
FIGURE 3-11
WordPress is just one of
many programs an auto-
installer like Fantastico
can install.
4. Click WordPress.
Fantastico displays basic information about WordPress, including the version
you’re about to install and the space it will take up. Autoinstallers always use
the latest stable version of WordPress, so you don’t need to worry about these
details.
5. Click the New Installation link.
Now Fantastico starts a three-step installation process.
6. Pick a domain name and a directory (Figure 3-12).
This is where you decide where to put WordPress and all its files. As you learned
earlier (page 51), you have three basic options:
Make WordPress run your entire website, you must install it in the root folder
of your web hosting account. To do that, choose the domain name you registered
for your website (in the first box) and leave the directory box blank.
Install WordPress in a subfolder, choose your domain name in the first box,
and then fill in the name of the subfolder. The example in Figure 3-12 uses the
domain
reboot-me.com
and a folder named
blog.
Remember, the autoinstaller
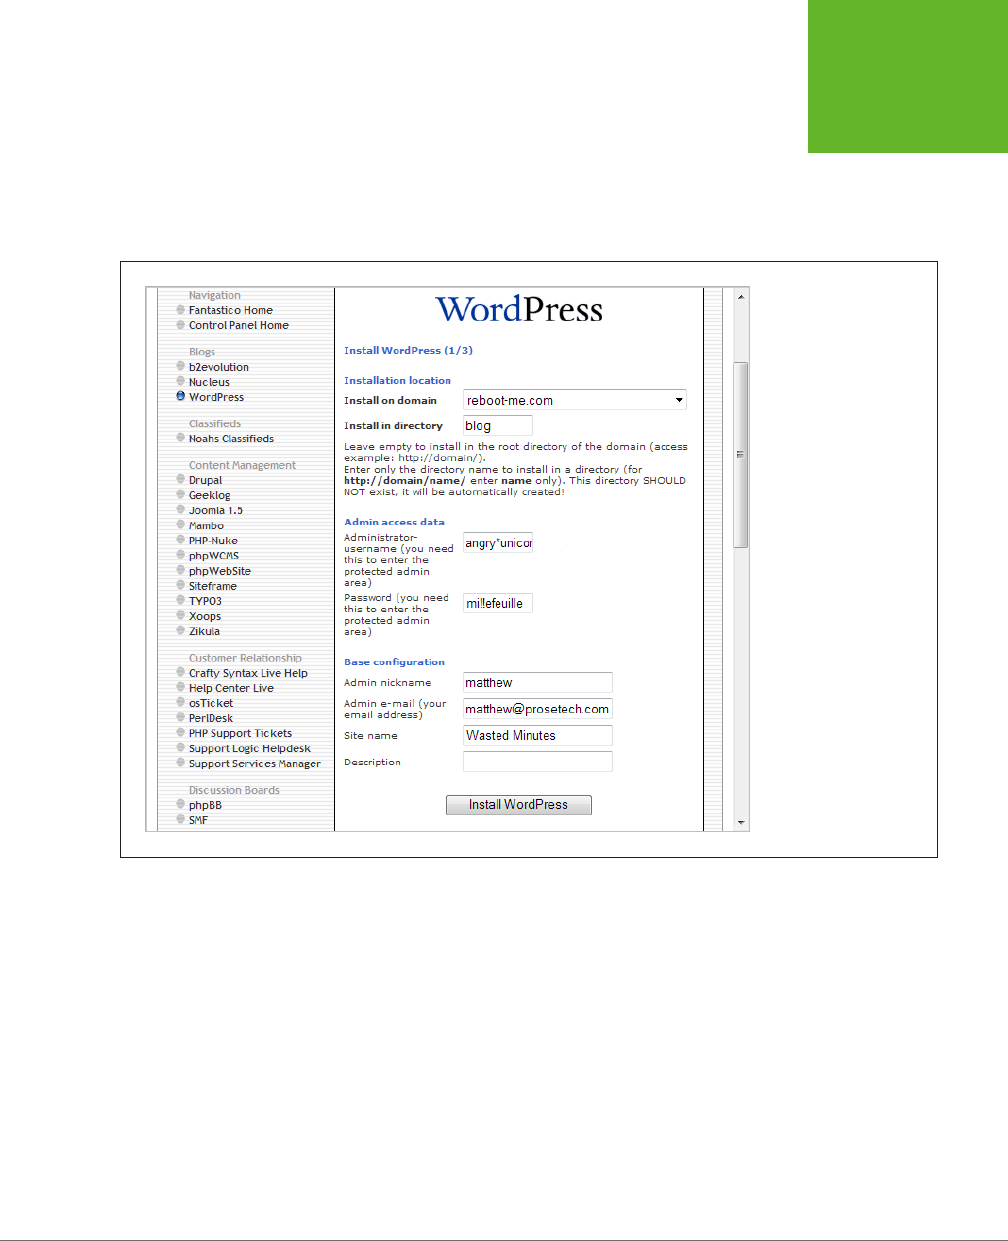
CHAPTER 3: INSTALLING WORDPRESS ON YOUR WEB HOST 67
INSTALLING
WORDPRESS
WITH AN
AUTOINSTALLER
will automatically create the folder you specify here. (And if there’s already a
WordPress site in that folder, you’ll overwrite the old site with the new one.)
Install WordPress in a subdomain, you must have already created the sub-
domain (by following the steps on page 52). If you have, you can choose the
subdomain name from the first box, and leave the directory box blank.
FIGURE 3-12
Fantastico lets you fill in
all the key details about
your WordPress site-to-be
on a single page.
7. Choose a user name and password for your administrator account.
Pick a name that’s not obvious and a password that’s dicult to crack (page
27). Doing otherwise invites spammers to hijack your blog.
8. Fill in the remaining details in the “Base configuration” section.
The administrator nickname is the name that WordPress displays at the end of
all the posts and comments you write. You can change it later if you like.
The administrator email address is
your
email address, which becomes part of
your WordPress user profile. It’s also the email address you’ll use for adminis-
tration—for example, if you forget your administrator password and you need
WordPress to email you a password reset link.
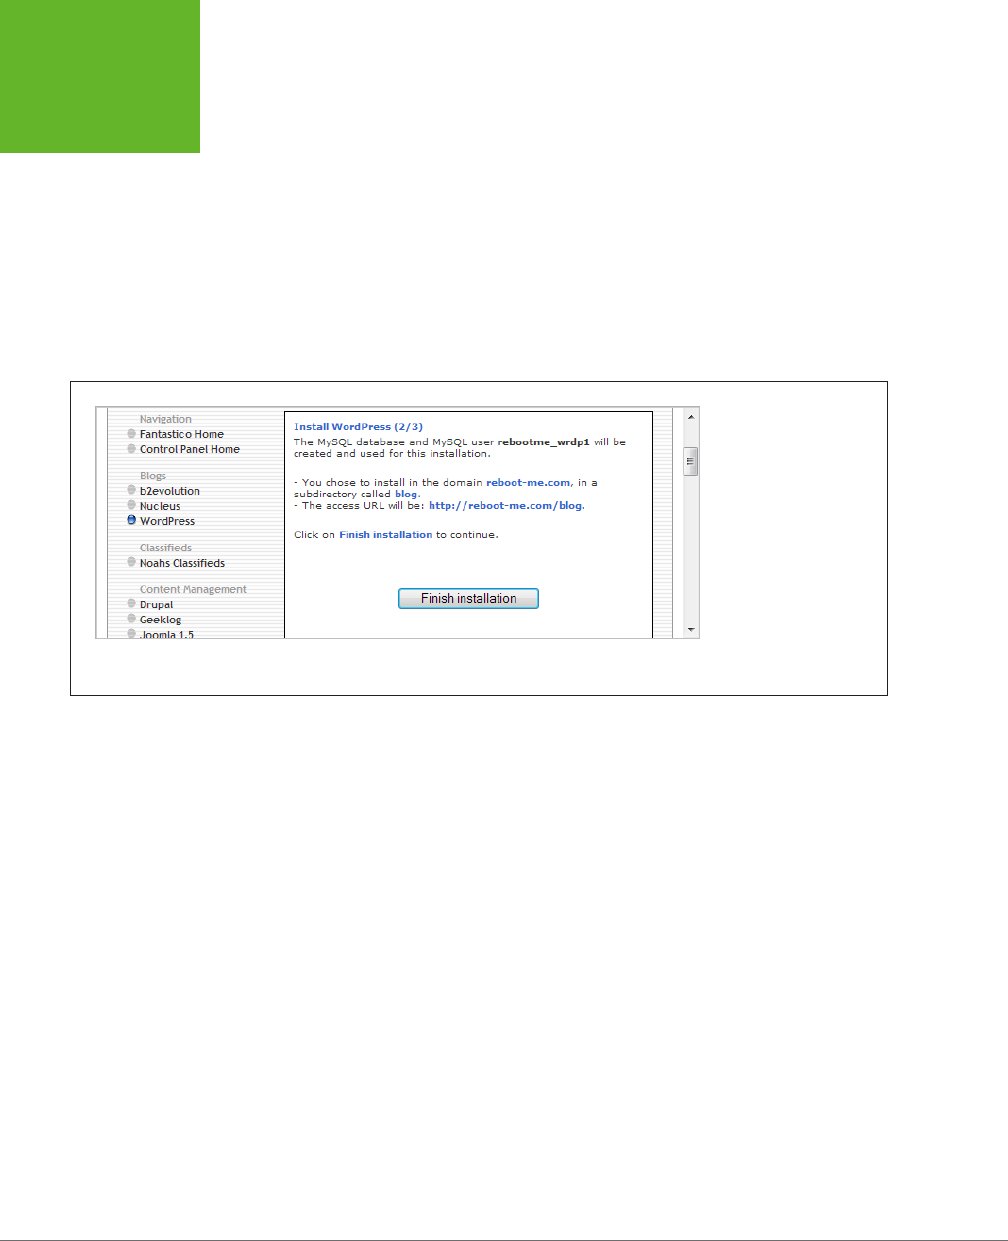
WORDPRESS: THE MISSING MANUAL
68
INSTALLING
WORDPRESS
WITH AN
AUTOINSTALLER
The site name is the title you want to give to your WordPress site (“Wasted
Minutes” per Figure 3-12). It shows prominently on every page of your site.
The description is a short, one-sentence summary of your site. WordPress
displays it in smaller text just underneath the title on every page of your site.
9. Click the Install WordPress button.
The next screen summarizes the information you just typed in (Figure 3-13).
For example, it displays the exact location of your new site and the name of the
MySQL database that will hold all its content. You might want to double-check
this info for accuracy, and then write down the details for safekeeping.
FIGURE 3-13
Here, Fantastico tells you
what it’s about to do. To
hold all the data for this
WordPress site, Fantastico
will create a MySQL data-
base named
rebootme_
wrdp1
(the name is based
on the domain name
www.reboot-me.com
),
and it will create the
site at
www.reboot-me.
com/blog
.
10. Click “Finish installation” to move to the final step.
Now Fantastico does its job—creating the folder you picked (in this case,
blog
),
copying the WordPress files to it, and creating the MySQL database. When it
finishes, you’ll see a confirmation message. It reminds you of the administrator
user name and password you supplied, and lists the administration URL—the
address you type into your browser to get to the dashboard that controls your
site. As with all WordPress sites, the administration page is your WordPress
site’s address with
/wpm2_admin
tacked onto the end (for example,
www.
reboot-me.com/blog/wpm2_admin
).
You can return to Fantastico to manage your WordPress installations anytime. How-
ever, Fantastico doesn’t have the management features of Softaculous. Fantastico
oers no way to modify, clone, or back up an existing WordPress site. Instead, it
provides two links for each WordPress site you install: “Visit site” (which takes you
there) and Remove (which deletes the site permanently).

CHAPTER 3: INSTALLING WORDPRESS ON YOUR WEB HOST 69
INSTALLING
WORDPRESS
BY HAND
UP TO SPEED
Multiply the Fun with Multiple WordPress Sites
Most of the time, you’ll install WordPress once. But you don’t
need to stop there. You can create multiple WordPress websites
that live side-by-side, sharing your web hosting account.
The most logical way to do this is to buy additional web do-
mains. For example, when you first sign up with a web hosting
company, you might buy the domain
www.patricks-tattoos.
com
to advertise your tattoo parlor. You would then install
WordPress in the root folder on that domain. Sometime later,
you might buy a second domain,
www.patrickmahoney.me
,
through the same web hosting account. Now you can install
WordPress for that domain, too. (It’s easy—as you’ll see when
you install WordPress, it asks you what domain you want
to use.) By the end of this process, you’ll have two distinct
WordPress websites, two yearly domain name charges, but
only one monthly web hosting fee.
Interestingly, you don’t actually need to have two domains to
have two WordPress sites. You could install separate WordPress
sites in separate folders on the
same
domain. For example,
you could have a WordPress site at
www.patrickmahoney.
me/blog
and another at
www.patrickmahoney.me/tattoos
.
This is a relatively uncommon setup (unless you’re creating a
bunch of WordPress test sites, like we do for this book at
http://
prosetech.com/wordpress
). However, it is possible, and there’s
no limit. That means no one is stopping you if you decide to
create several dozen WordPress websites, all on the same
domain. But if that’s what you want, you should consider the
WordPress multisite feature, which lets you set up a network of
WordPress sites that share a common home but have separate
settings (and can even be run by different people). Page 399
explains how that feature works.
Installing WordPress by Hand
If you don’t have the help of an autoinstaller like Fantastico or Softaculous, don’t
panic. Before these tools were widespread, WordPress was known for a relatively
easy installation process. In fact, WordPress promoted it—heavily—as the “famous
5-minute install.” And while that’s wildly optimistic (unless you’re a seasoned web-
master, it’ll take far longer), WordPress is still known for being easier to set up than
most other blog software and content-management systems.
Here’s an overview of what you need to do to get WordPress up and running the
old-fashioned way:
1. Create a MySQL database for WordPress to use.
2. Upload the WordPress files to your web host.
3. Run the installation script to get everything set up.
In the following sections, you’ll tackle each of these tasks.
NOTE Before you go down the WordPress self-installation route, make sure that it’s truly necessary. The
overwhelming majority of web hosts now provide some sort of WordPress installation feature that you can use
instead. And although installing WordPress by hand isn’t a Mensa-level challenge, it’s an unnecessary slog if your
web host provides an easier approach.
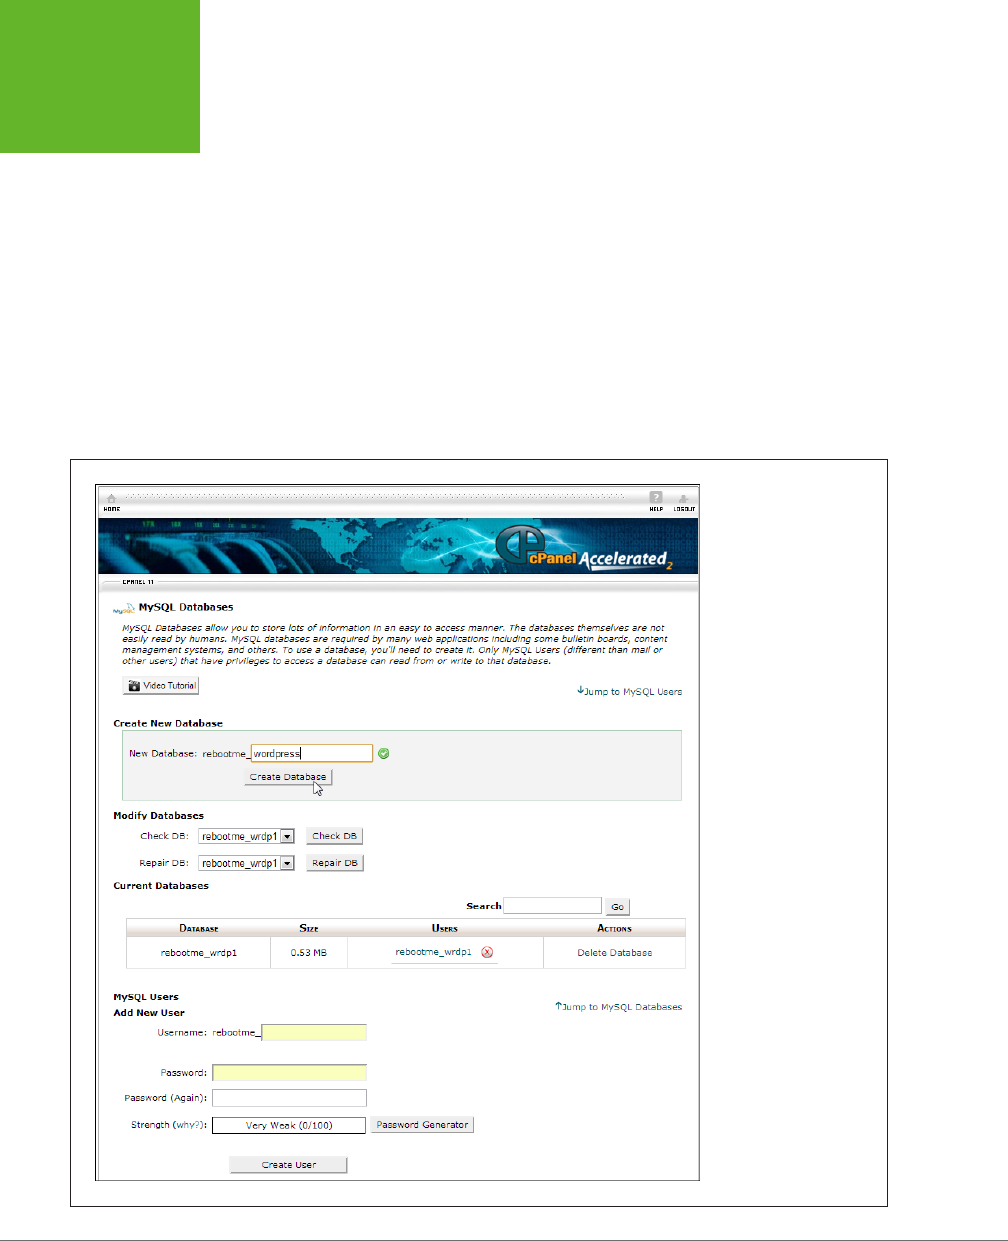
WORDPRESS: THE MISSING MANUAL
70
INSTALLING
WORDPRESS
BY HAND
Creating a MySQL Database
As you learned on page 5, WordPress stores all the details of your website—from
your posts to your comments—in a database. MySQL is the name of the database
software that manages your WordPress content, storing and fetching it. In fact, be-
fore you can install WordPress, you need to have a blank MySQL database waiting
for it. Here’s how to create one:
1. Use your browser to log in to the control panel for your web host.
2. Look for an icon that has something to do with databases or MySQL. Ex-
amples include “MySQL Administration,” “MySQL Databases,” or “Database
Manager.” When you find it, click it.
You’ll see a new page with information about all the MySQL databases currently
stored on your site, if any. Figure 3-14 shows an example.
FIGURE 3-14
If your web host uses the
cPanel interface, you’ll
manage databases on a
page like this. It’s divided
into several sections. For
a WordPress installation,
the three important ones
are Create New Database
(shown here at the top),
Add New User (near the
bottom), and, not shown,
Add User to Database (it’s
all the way at the bottom
of the page).

CHAPTER 3: INSTALLING WORDPRESS ON YOUR WEB HOST 71
INSTALLING
WORDPRESS
BY HAND
3. Create a new database.
You need to choose an appropriate name for your database. It should consist of
lowercase letters and numbers, with no special characters in it. In Figure 3-14,
you’re about to create a new database named
wordpress
(one named
wrdp1
already exists).
The
full
database name has two parts: the site login (the user name you use
to log into your web hosting account) and the database name you picked. For
example, the full names for the databases in Figure 3-14 are
rebootme_word-
press
and
rebootme_wrdp1.
TIP Make a note of the full two-part name of the database (like
rebootme_wordpress
), because you’ll need
to tell WordPress about it when you install WordPress.
Once you type in a name, click a button that’s named something like Create
Database or New. If your web host runs the standardized cPanel control panel,
the next step is to click the Go Back button to return to the database manage-
ment page. (If your host uses a dierent control panel, look for similarly named
commands.)
4. Add a new database user.
Right now, no one has control over your database. To be able to use it, you
need to appoint yourself its administrator by creating an administrator account.
You do that by adding a new user (you) and giving yourself across-the-board
permission to manage the database. That way, you can log into the database
and have free rein to store and retrieve information.
To add a new user in cPanel, scroll down the page to the Add New User section
and type in a user name and password for yourself. Click the Create User button
to make it ocial. Then click Go Back to return to the database management
page.
5. Register your user name with the database.
Although it may sound strange, you, as the new database user, can’t do any-
thing yet, because you haven’t given yourself permission to use the database.
To fix this, you need to give yourself access to the WordPress database you
created in step 3.
In a cPanel control panel, scroll to the bottom of the page, to the “Add User to
Database” section, which contains two drop-down lists. In the first one, pick
the user name you just added; in the second, pick the name of the database
you created. Then click Add to seal the deal.
This is also the point where you tell the database exactly what this user is allowed
to do. Because you’re the uber-powerful database administrator, this account
should be able to do everything, from adding and deleting tables of information
to searching and changing the data inside them. To make that happen, pick All
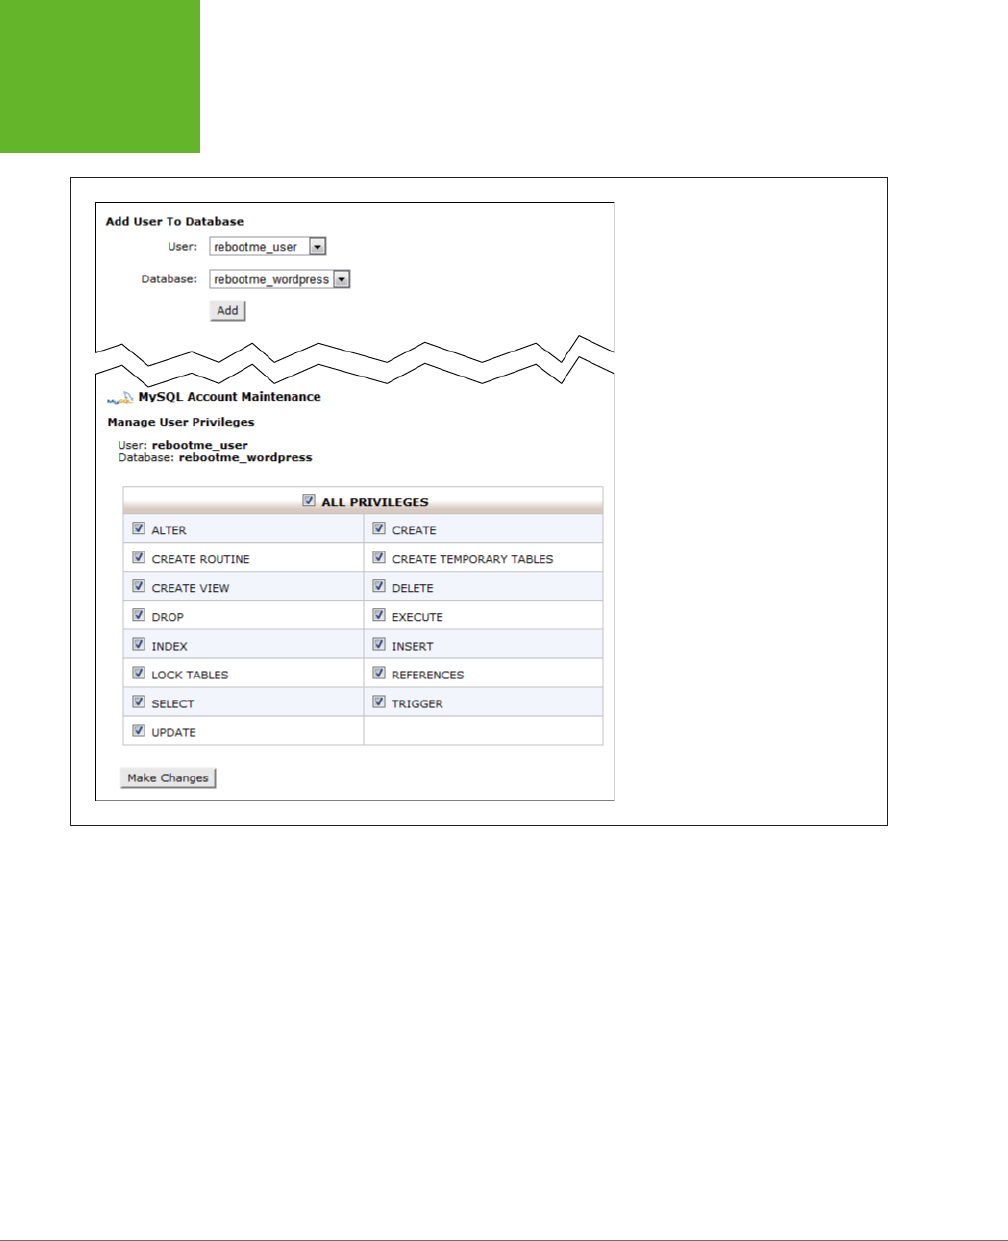
WORDPRESS: THE MISSING MANUAL
72
INSTALLING
WORDPRESS
BY HAND
Privileges and then click Make Changes (Figure 3-15). Now you can have your
way with your brand-new database.
FIGURE 3-15
Here, the user
rebootme_user
is linked to
the
rebootme_wordpress
database (top).
After clicking Add, you need to set the
user’s security privileges. Checking the
topmost All Privileges box is a quick way
to check all the boxes.
Uploading the WordPress Files
Now you have a perfectly configured MySQL database waiting for someone to come
along and use it. But before you can get WordPress up and running, you need to
transfer the program to your website. This is a two-step process: First you download
the latest version of WordPress, and then you upload it to your site. Here’s how:
1. In your browser, go to
http://wordpress.org/download
, and then click the
Download WordPress button.
This downloads the latest version of WordPress as a compressed ZIP file, which
virtually all computers support. (If you look closely, you’ll see an alternate link for
downloading WordPress as a compressed .tar.gz file, but you don’t need that.)

CHAPTER 3: INSTALLING WORDPRESS ON YOUR WEB HOST 73
INSTALLING
WORDPRESS
BY HAND
2. Inside the ZIP file is a folder named “wordpress.” You need to extract that
folder to a convenient place on your hard drive, like the desktop.
For example, on a Windows computer you can drag the
wordpress
folder out
of the ZIP file and onto the desktop, automatically unzipping its contents in
the process. (You don’t need much free space. Altogether, the WordPress files
take up only a few megabytes of storage.) On Mac OS X, double-click the ZIP
file to extract its contents.
Using either method, you end up with a folder named
wordpress
, which will
have several subfolders and several dozen files in it, but you don’t need to
worry about those.
NOTE No matter where you put the
wordpress
folder, it will be a temporary storage location. After all, the
WordPress files can’t do much trapped on your computer. Your ultimate goal is to upload all these files to your web
host, where they can work their magic. Once you do that, you can delete the WordPress files from your desktop.
3. Figure out the FTP address you need to use.
You could ask your web host, but the address is almost always
ftp://
followed
by your domain name, as in
ftp://reboot-me.com
. The initial
ftp://
is critical—it
indicates that you’re making a connection for transferring files, not visiting a
website (in which case you’d use an address starting with
http://
).
4. Load your FTP program and navigate to your site.
FTP is a standard that lets computers pass files from one to the other. You’ll
use it to upload the WordPress files to your website.
In the old days of the Web, uploaders used specialized FTP programs to transfer
files. Many people still use dedicated FTP programs, and you can, too. However,
the latest versions of Windows and Mac OS X have built-in FTP functionality, so
you don’t need a separate program.
NOTE Depending on your web host, you may be able to upload files from your browser using your site’s
control panel. However, browser-based file management is usually awkward and can trigger a triple-Tylenol
headache if you need to upload a large batch of files, like the contents of the
wordpress
folder and its subfolders.
FTP is easier.
To open an FTP connection in any modern version of Windows, start by firing
up the Windows Explorer file manager. (Right-click the Start button, and click
a menu command that has a name like Open Windows Explorer.) Then, type
the FTP address into the Windows Explorer address bar.
To open an FTP connection in Mac OS X, start out at the desktop and hit
Command+K to launch the Connect to Server window. Then, type in the FTP
address and click Connect.

WORDPRESS: THE MISSING MANUAL
74
INSTALLING
WORDPRESS
BY HAND
5. When your FTP program asks, enter your user name and password in the
boxes provided.
This is the same user name and password you use to connect to your host’s
control panel to manage your website.
NOTE Having trouble keeping track of all the different login identities you need to self-host WordPress? There
are three altogether: one for your web host’s control panel, one for your database, and one for your WordPress
administrator account.
Once you log in through the FTP panel, you’ll see your site’s folders and files—the
ones on your web server—listed; you can copy, delete, rename, and move them
in much the same way you can for local folders and files.
6. Browse to the root folder of your website.
This is the heart of your site—the place people go when they type in your web
address. It may be a folder named
public_html
or
webroot.
Or, you may start
o in the right place when you log in. If you already have a traditional website
on your domain, you’ll know you’re in the root folder when you see your web
pages there. And if you’re still in doubt, it may be worth a quick call to your web
host’s support center to make sure you’re in the right spot.
7. Open another file-browsing window to view the
wordpress
folder on your
computer.
This is the place where you unzipped the WordPress files in step 2.
8. Copy the files from the
wordpress
folder to your website.
There are two ways to do this. If you want WordPress to take over your entire
site (see page 55), you must select all the files in the
wordpress
folder (including
subfolders). Then, copy all these files over to your root web folder. This is the
strategy to use if you want people to go straight to your WordPress content
when they type in your domain name (like
www.reboot-me.com
).
NOTE If you’re putting WordPress in your root web folder, make sure you don’t have another default page
there. A
default page
is the page your website sends to a visitor when he types in your domain name (for example,
www.reboot-me.com
) rather than specifying a site page (like
www.reboot-me.com/mypage.html
). WordPress has
its own default page,
index.php
, but you don’t want another default page trying to take over. Possible default
pages include anything that starts with “index” (
index.html, index.shtml, index.html
) and “default” (
default.
asp, default.aspx
).
If you want to create a subfolder on your website for WordPress, you follow a
slightly dierent procedure. First, rename the
wordpress
folder on your computer
to the name of the folder you want to create on your website. For example, if
you want to create a subfolder named
blog,
rename the
wordpress
folder
blog
.
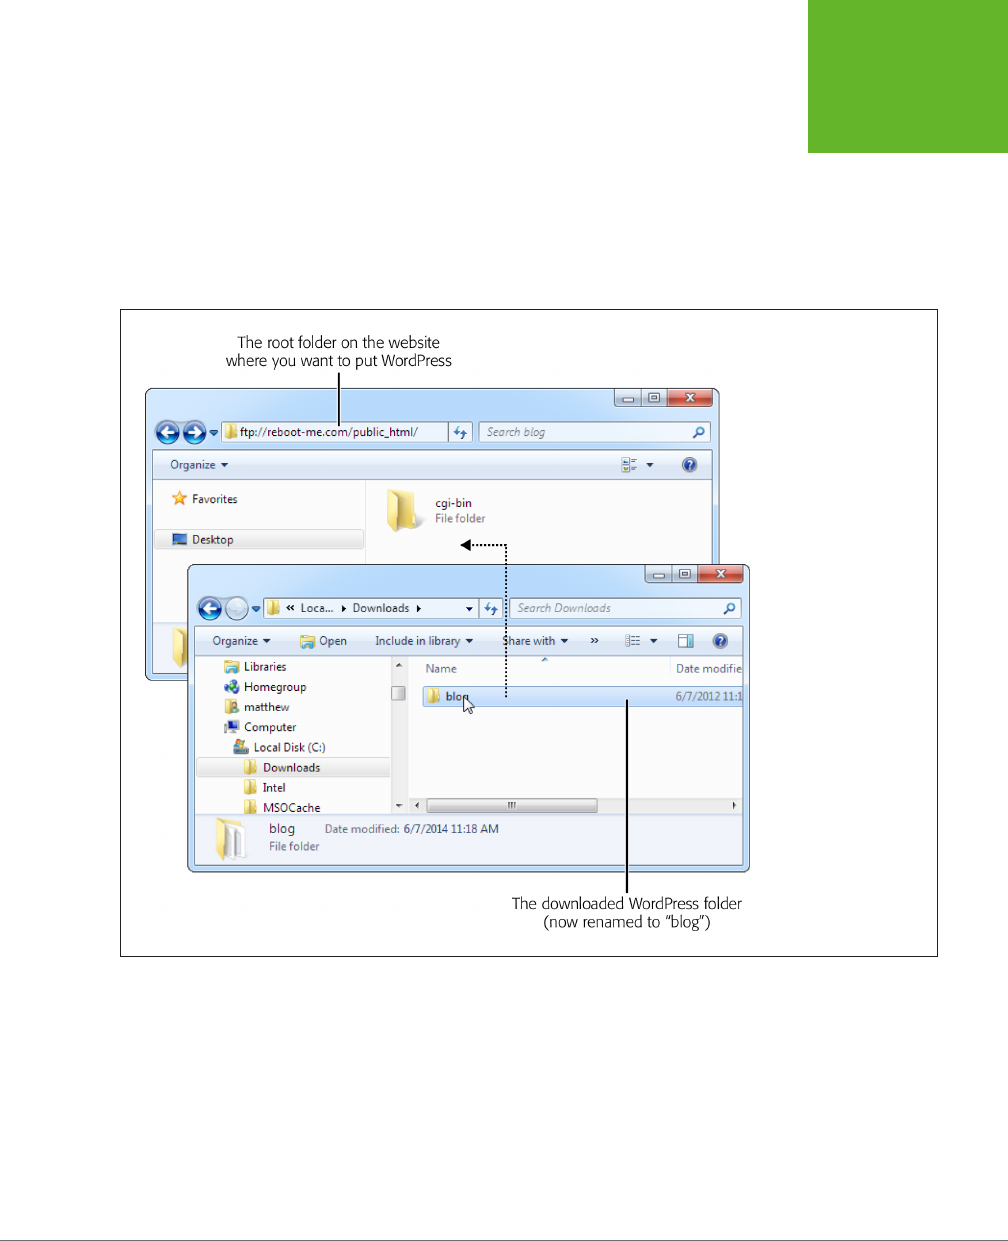
CHAPTER 3: INSTALLING WORDPRESS ON YOUR WEB HOST 75
INSTALLING
WORDPRESS
BY HAND
Now you need to select and copy a single item—the blog folder that holds all
the WordPress files.
Either way, you upload the files in the same way you copy them on your com-
puter. For example, you can drag the selected files from your computer and
drop them on the FTP window (Figure 3-16). Or you can copy the selected
files (that’s Ctrl+C on Windows and Command+C on a Mac), switch to the FTP
window, and then paste them (with Ctrl+V or Command+V).
FIGURE 3-16
Here, the folder named
“blog” sits on your
desktop and contains all
the WordPress files (bot-
tom image). A quick drag
of the mouse transfers
WordPress to your
website (top image).
At this point, all the WordPress scripts and templates should be on your web server,
although they aren’t actually switched on yet. Before you continue to the final step,
it’s a good idea to make sure you uploaded the software successfully. To do that,
try requesting WordPress’s
readme.html
file, which should be in the folder you just
uploaded. For example, if you put WordPress at
www.reboot-me.com/blog
you can
request
www.reboot-me.com/blog/readme.html
. When you do, you’ll see a Word-
Press page with some very basic information about the setup process. If you get a
“webpage not found” error, you’ve accidentally uploaded your files to a dierent
location, so you need to take some time to sort it all out.

WORDPRESS: THE MISSING MANUAL
76
INSTALLING
WORDPRESS
BY HAND
Running the Install Script
This is the final set of steps. Think of it as
activating
the WordPress site you just
created.
1. To start the installation, type the web address where you installed Word-
Press into your browser, and then add
/wpm2_admin/install.php
to the end.
So if you installed WordPress at
www.reboot-me.com/blog
, you would request
www.reboot-me.com/blog/wpm2_admin/install.php
. At this point, WordPress
warns you that it can’t find a configuration file (Figure 3-17). Don’t worry; you’ll
create one.
FIGURE 3-17
There’s no configuration
file for WordPress, so you
need to create one and
provide all the configura-
tion details.
2. Click “Create a Configuration File.”
On the next page, WordPress reminds you about the information you’ll need to
complete this process (that’s the database details from the previous section).
3. Once you work up your confidence, click the “Let’s go” button.
WordPress displays a page requesting your database information (Figure 3-18).
4. Fill in your database details.
First, you need to supply the database name (which you created on page 70),
and the user name and password for the database administrator (which you
picked on page 71).
You also need to supply the location of the database. Ordinarily, that’s
localhost
,
which indicates that the database is on the same server as the WordPress instal-
lation file, which is almost always what you want. (If not, you need to contact
your web host to get the correct database location.)
Lastly, you need to pick a table prefix—a few characters that WordPress will
add to the name of every table it creates in the database. The standard prefix,
wp_
, is perfectly fine, but you may get marginally better security by choosing
something less common.
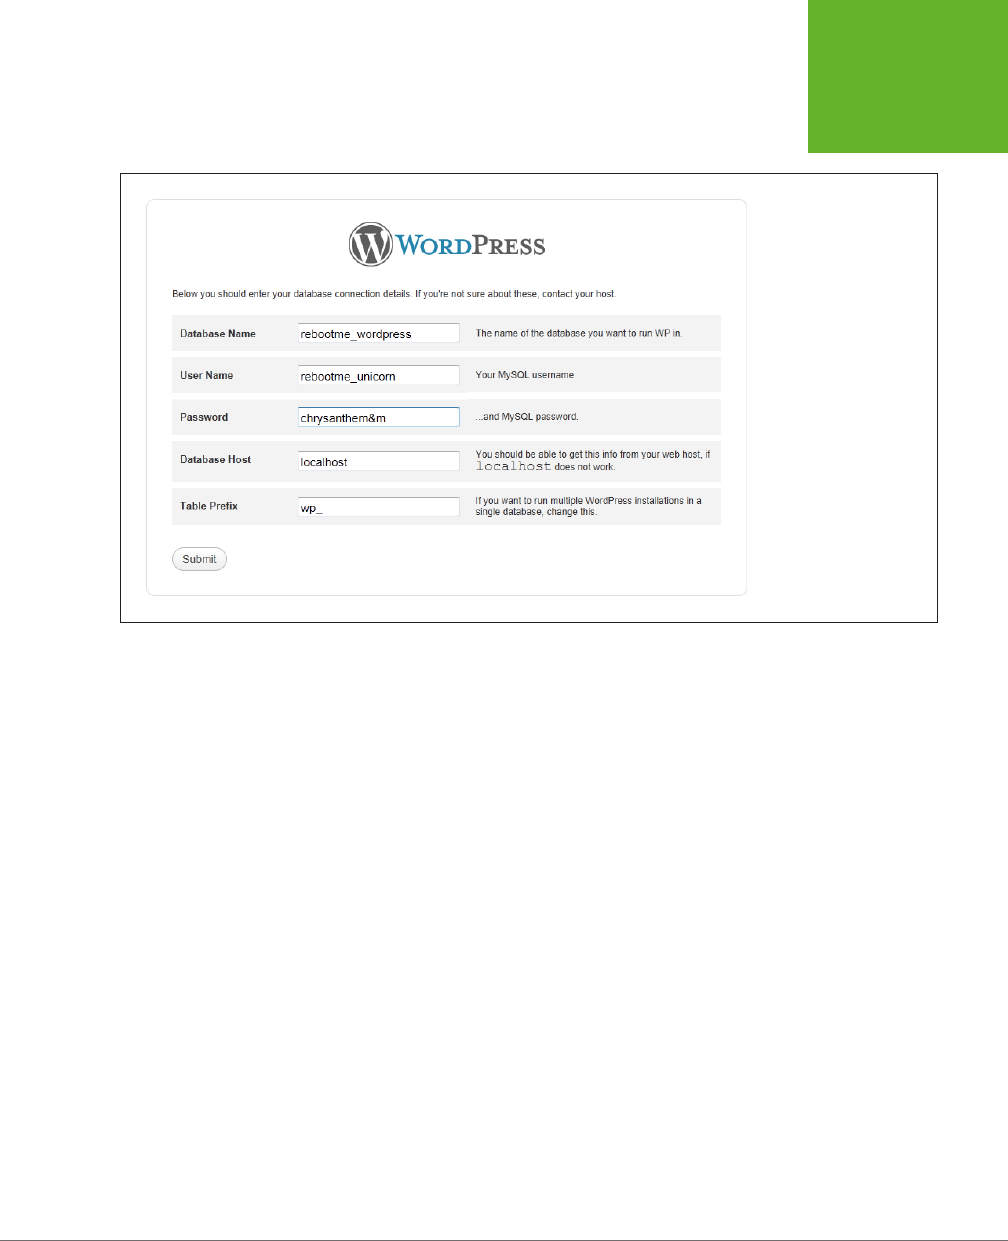
CHAPTER 3: INSTALLING WORDPRESS ON YOUR WEB HOST 77
INSTALLING
WORDPRESS
BY HAND
FIGURE 3-18
WordPress needs to know
where your database is,
and what user name and
password it should use
to access it. You need to
fill in the information
for Database Name, User
Name, and Password. You
can leave the other set-
tings (Database Host and
Table Prefix) with their
standard values.
5. Once you enter all these details, click Submit.
If WordPress manages to contact your database, it gives you a virtual thumbs-
up and oers to start the installation.
6. Click “Run the install” to start the WordPress installation.
The next page collects some essential information about your WordPress site.
7. Fill in your site’s particulars (Figure 3-19).
The site title is the heading that crowns your WordPress site.
The user name and password are what you use to log in to the WordPress
dashboard, configure things, and write new posts. Choose a not-so-obvious
user name and a crack-resistant password (page 27).
The email address you type in will appear in your WordPress profile, and Word-
Press uses it if you forget your password and need to reset it.
Leave the “Allow my site to appear in search engines” checkbox turned on,
unless you’re trying to keep a low profile. (But keep in mind that even if your
site isn’t listed in a Google search, there are still plenty of ways for people to
stumble across it. The only way to keep out strangers is to create a private site,
as discussed on page 397.)
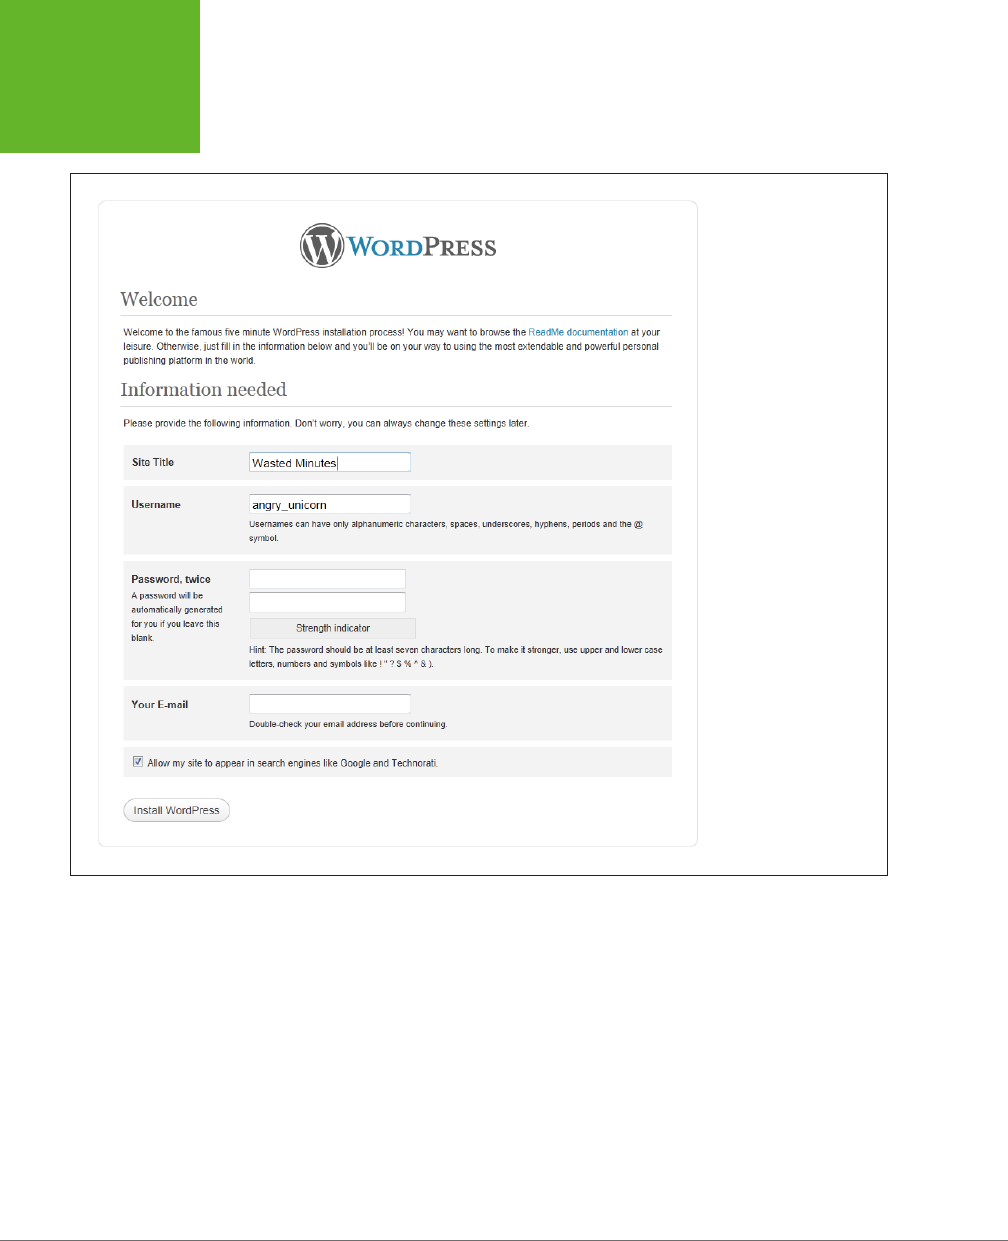
WORDPRESS: THE MISSING MANUAL
78
INSTALLING
WORDPRESS
BY HAND
FIGURE 3-19
This WordPress site is
named Wasted Minutes.
The administrator’s user
name, angry_unicorn, is
far less predictable than
common (but less secure)
choices like admin, user,
wp, wp_admin, and
so on.
8. Click Install WordPress to finish the job.
This is the point where the WordPress installation script really gets to work,
configuring your database and loading it up with its first bits of WordPress con-
tent. When the process is finished, you’ll see a confirmation page (Figure 3-20).
Before you close the page, why not visit your site and verify that it’s working?
As always, you can add
/wpm2_admin
to the end of your site address to get
to the administration dashboard.
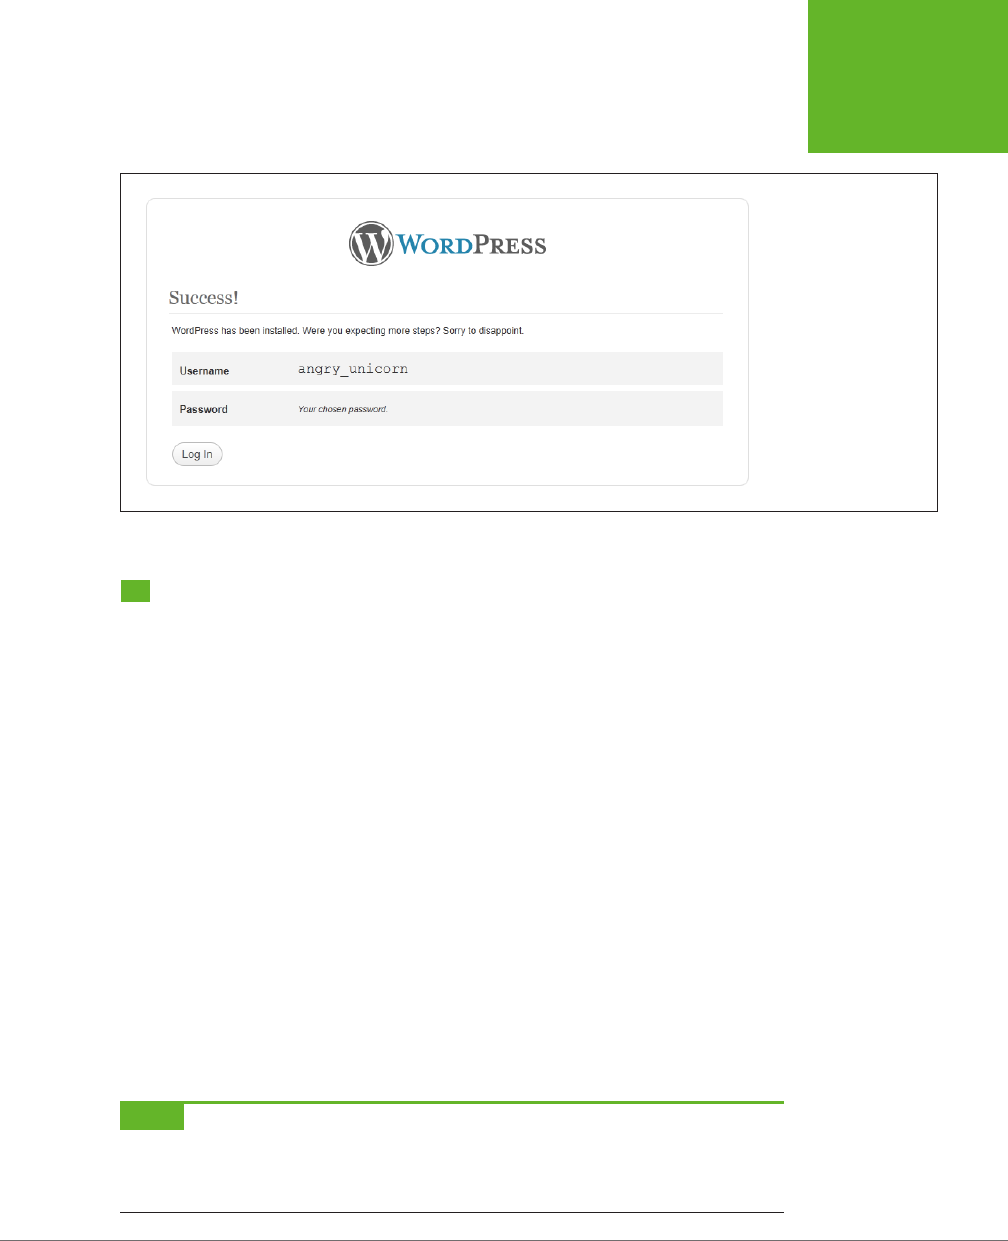
CHAPTER 3: INSTALLING WORDPRESS ON YOUR WEB HOST 79
KEEPING
WORDPRESS
UP TO DATE
FIGURE 3-20
WordPress has finished
installing your site. This
confirmation screen
reminds you of the user
name you picked as
the administrator, but
it doesn’t repeat your
password. Click Log In to
go to the dashboard and
start managing your site.
Keeping WordPress Up to Date
No WordPress website should be left unprotected. If your site doesn’t have the lat-
est WordPress updates, it can become a target for hackers and spammers looking
to show their ads or otherwise tamper with your site.
Fortunately, WordPress’s creators are aware of the threat that outdated software
can pose, and they designed the program for quick and painless upgrades. Word-
Press installs minor updates automatically, and it’s quick to notify you about major
updates so you can install them yourself. The following sections explain how these
two updating mechanisms work.
Minor Updates
Since version 3.7, WordPress has included an autoupdate feature that downloads
and installs new security patches as soon as they become available. So if you install
WordPress 4.0 and the folks at WordPress.org release version 4.0.1, your site will
grab the new fix and update itself automatically.
The autoupdate feature is a fantastic safety net for every WordPress site. However,
it has an intentional limitation. It performs only
minor
updates, which are usually
security enhancements or bug fixes. It doesn’t attempt to install major releases—you
need to do that yourself.
NOTE To spot the difference between a minor update and a major one, you need to look at the WordPress
version number. Major releases change one of the first two digits in the version number (for example, 4.
0
.8 to
4.
1
.0 is a major update). Minor releases change the minor version number, which is the digit after the second
decimal point (for example, 4.0.
8
to 4.0.
9
).
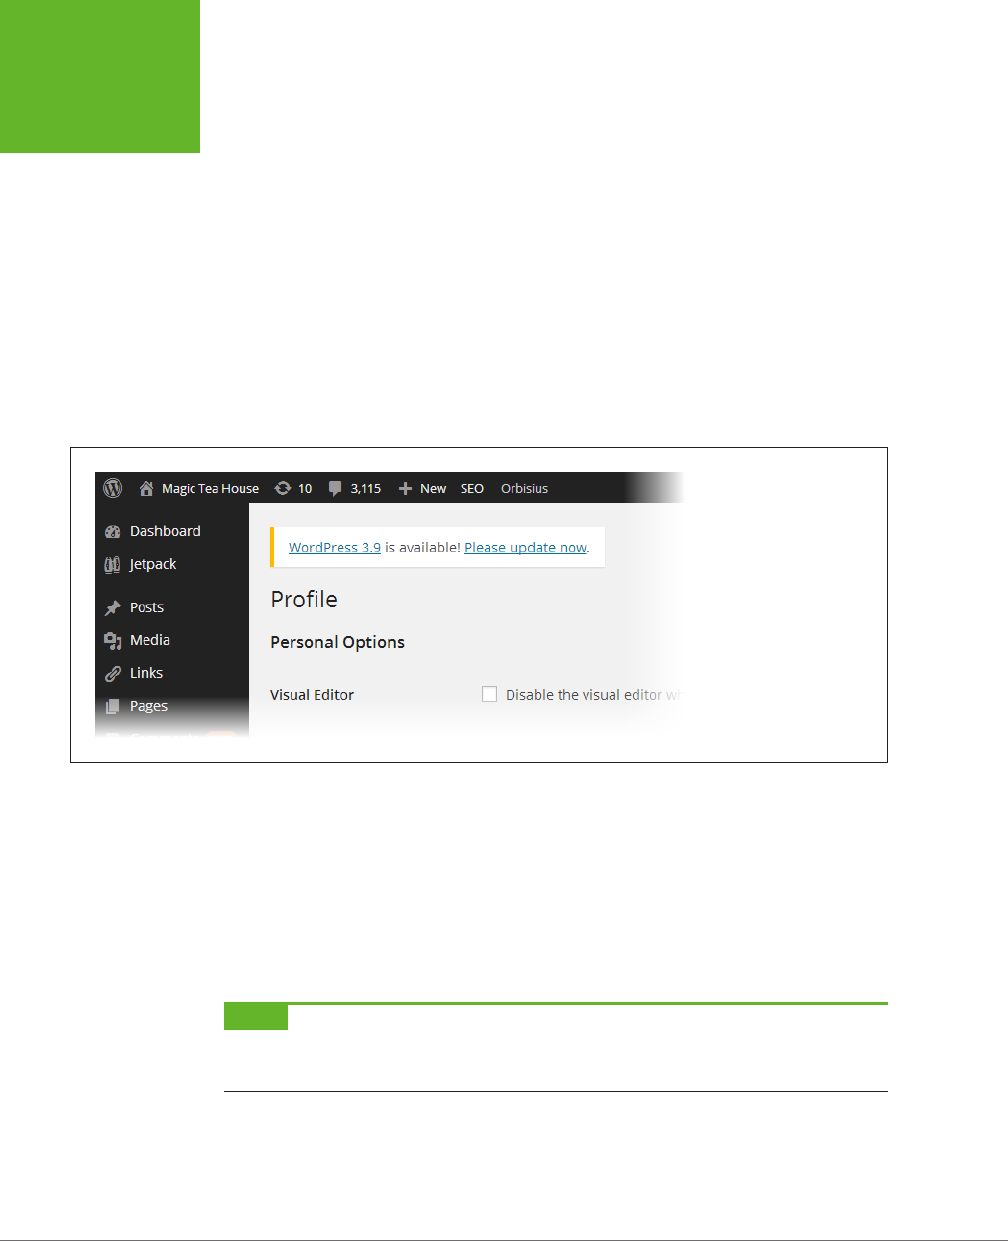
WORDPRESS: THE MISSING MANUAL
80
KEEPING
WORDPRESS
UP TO DATE
Major Updates
A major update is a WordPress release that adds new features. Typically, WordPress
puts out a major release every four months. You can find a list of recent and upcom-
ing major releases at
http://wordpress.org/news/category/releases
.
You don’t need to go out of your way to keep track of WordPress releases. Whenever
you travel to the dashboard—the administrative interface described in the next chap-
ter—WordPress checks for new versions of the program and lets you know if it finds one.
To get to the dashboard, take your WordPress site address (like
http://prosetech.
com/magicteahouse
and add
/wpm2_admin
to the end (as in
http://prosetech.com/
magicteahouse/wpm2_admin
). Initially, you start at the dashboard home page. If
WordPress detects that there’s a newer version available, it tries to grab your atten-
tion by adding a notification box to the top of this page (Figure 3-21).
FIGURE 3-21
There’s a new version of
WordPress available, and
your site isn’t using it. To
get the latest new features,
click the “Please update
now” link. This takes you to
the Updates section of the
dashboard (Figure 3-22).
The Updates page is an all-in-one glance at everything that’s potentially old and out
of date on your site, including two types of WordPress extensions that you’ll learn
about later in this book: themes and plug-ins. Usually, the Updates page simply tells
you that all is well. But when updates are available, you’ll see something else. First,
WordPress adds a black number-in-a-circle icon to the Updates command in the
dashboard menu. The actual number reflects the number of website components
that need updating. In Figure 3-22 that number is 3, because you need to update
WordPress and two themes.
NOTE Themes and plug-ins are two ways you can enhance and extend your site. But if they contain flaws,
hackers can use those flaws to attack your site. You’ll learn more about themes in Chapter 5 and plug-ins in
Chapter 9.
To install an update, use the buttons on the Updates page. If there’s a new WordPress
update, then click the Update WordPress button. If there’s a newer theme or plug-
in, then turn on the checkbox next to that theme or plug-in, and then click Update
Themes or Update Plugins.
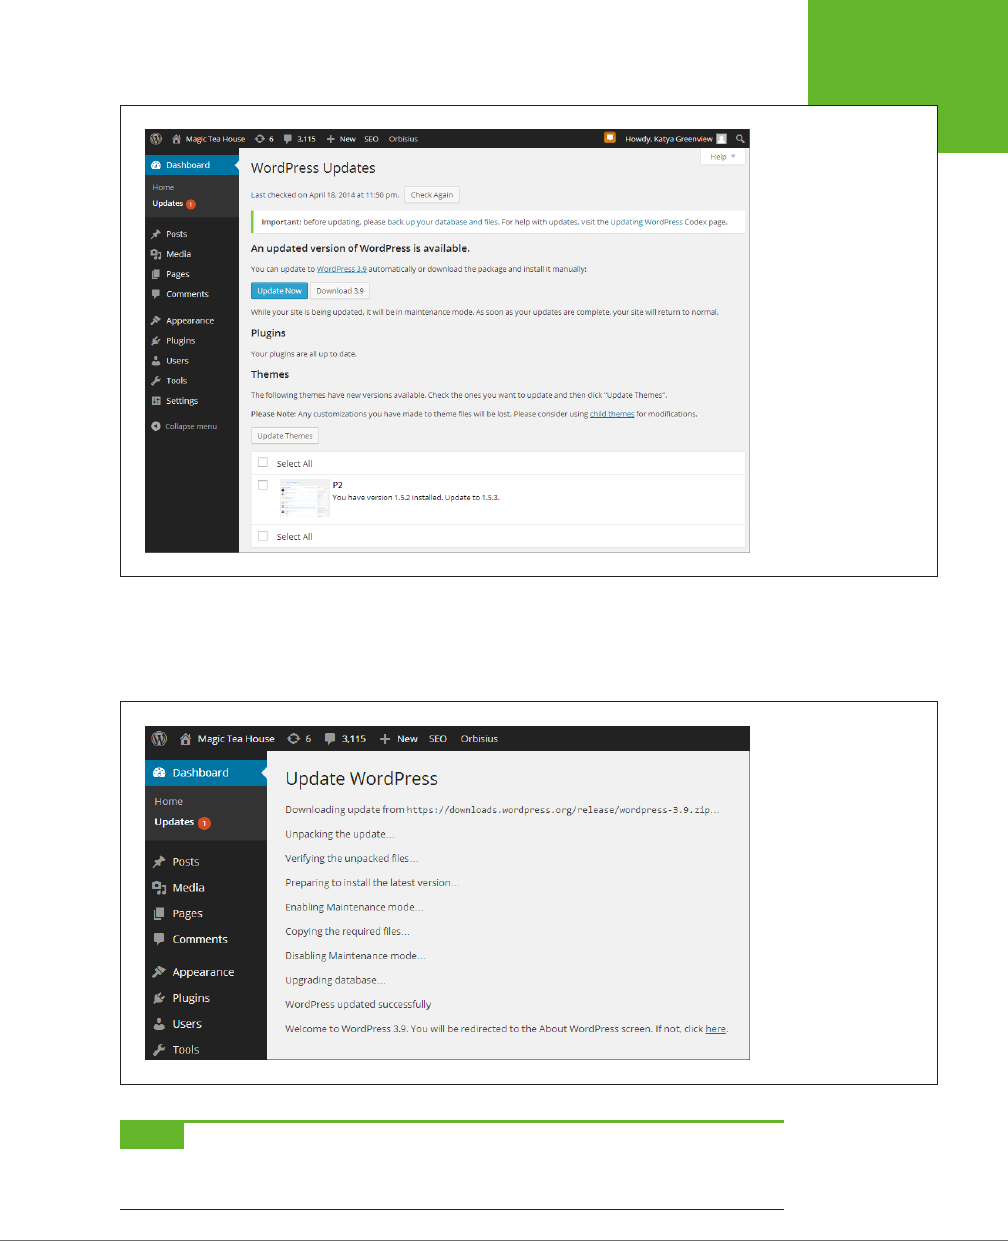
CHAPTER 3: INSTALLING WORDPRESS ON YOUR WEB HOST 81
KEEPING
WORDPRESS
UP TO DATE
FIGURE 3-22
The Update page explains
that two components
need updating: the Word-
Press software and the P2
theme you installed on
your site.
WordPress updates are impressively easy. There’s no need to enter more information
or suer through a long wait. Instead, you’ll see a brief summary that tells you what
happened (Figure 3-23). Your site will carry on functioning exactly as it did before.
FIGURE 3-23
Breathe easy: WordPress
is up to date once more.
NOTE Despite the rapid pace of new releases, WordPress’s essential details rarely change. New versions
may add new frills and change WordPress’s administrative tools, but they don’t alter the fundamental way that
WordPress works.


85
CHAPTER
4
Now that you’ve signed up for a WordPress.com account (Chapter 2), or in-
stalled the WordPress software on your web host (Chapter 3), you’re ready
to get started publishing on the Web. In this chapter, you’ll go to your fledg-
ling WordPress site and start posting
content,
which can be anything from bracing
political commentary to cheap celebrity gossip. Along the way, you’ll learn several
key WordPress concepts.
First, you’ll get comfortable in WordPress’s
dashboard
—the administrative cockpit
from which you pilot your site. Using the dashboard, you’ll create, edit, and delete
posts, all without touching a single HTML tag (unless you really want to).
Next, you’ll learn how to classify your posts by using categories and tags, so you can
group them in meaningful ways. WordPress calls this art of organization
taxonomy,
and if you do it right, it gives your readers a painless way to find the content they want.
You’ll also take a hard look at the web address (URL) that WordPress generates for
every new post. You’ll learn how to take control of your URLs, making sure they’re
meaningful, memorable, and accessible to search engines. You’ll also learn how to
shorten the web address of any post, which is handy if you need to wedge a link
to your post into a small place (like a Twitter message, Facebook post, or a bit of
bathroom grati).
Introducing the Dashboard
The dashboard is the nerve center of WordPress administration. When you want to
add a new post, tweak your site’s theme, or review other people’s comments, this
is the place to go.
Creating Posts
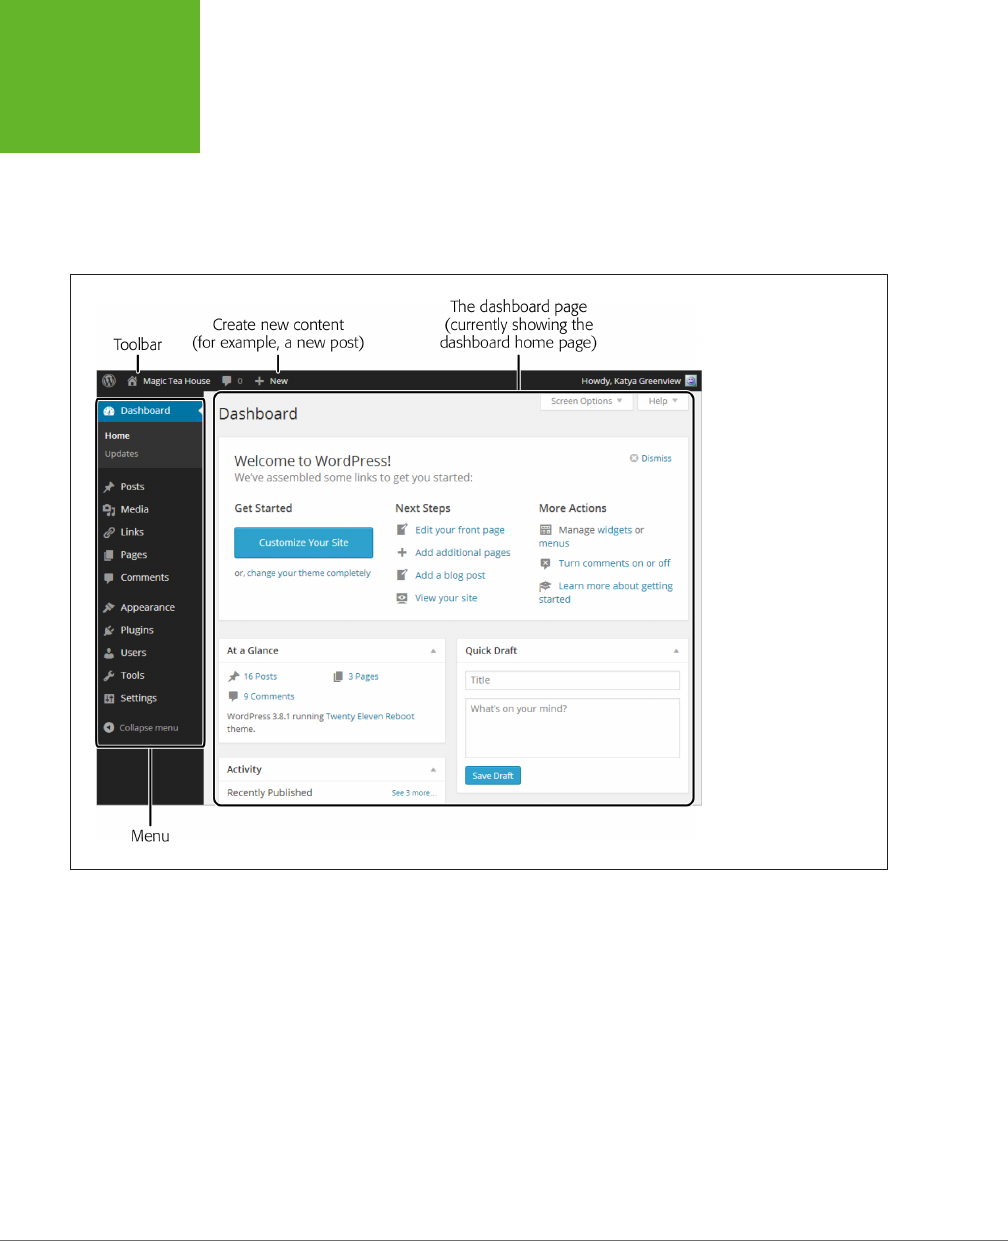
WORDPRESS: THE MISSING MANUAL
86
INTRODUCING
THE
DASHBOARD
The easiest way to get to the dashboard is to take your WordPress website address
and add
/wp-admin
(short for “WordPress administration”) to the end of it. For
example, if you host your site at
http://magicteahouse.net
, you can reach the site’s
dashboard at
http://magicteahouse.net/wp-admin
. When you do, WordPress asks
for your user name and password. Once you supply them, you’ll see a page like the
one in Figure 4-1.
FIGURE 4-1
Getting your bearings in
the dashboard is easy
enough. At the top is a
thin toolbar with some
handy shortcuts—for
example, if you point to
“+ New” without clicking,
a menu pops up with
commands for quickly
creating new posts and
other types of content.
Along the left edge of
the dashboard is the
all-important WordPress
menu—a strip of com-
mands that let you move
to different parts of the
dashboard so you can
use different WordPress
features.
When you finish working at the dashboard, it’s a good idea to log out. That way,
you don’t need to worry about a smart-alecky friend hijacking your site and adding
humiliating posts or pictures while you’re away from your computer. To log out, click
your user name in the top-right corner of the toolbar, and then click Log Out (on a
self-hosted site) or Sign Out (on a WordPress.com site).
There’s another way to go backstage with your site. When WordPress creates a new
site, it adds a small section of timesaving links named “Meta.” The exact location of
this section depends on the theme your site uses, but you’ll usually find it at the bot-
tom of a sidebar on the left or right side of your home page (Figure 4-2). Inside the
Meta section, you can click the “Log in” link to go directly to the dashboard. (If you’re
already logged in, you’ll see a Site Admin link instead, which does the same thing.)
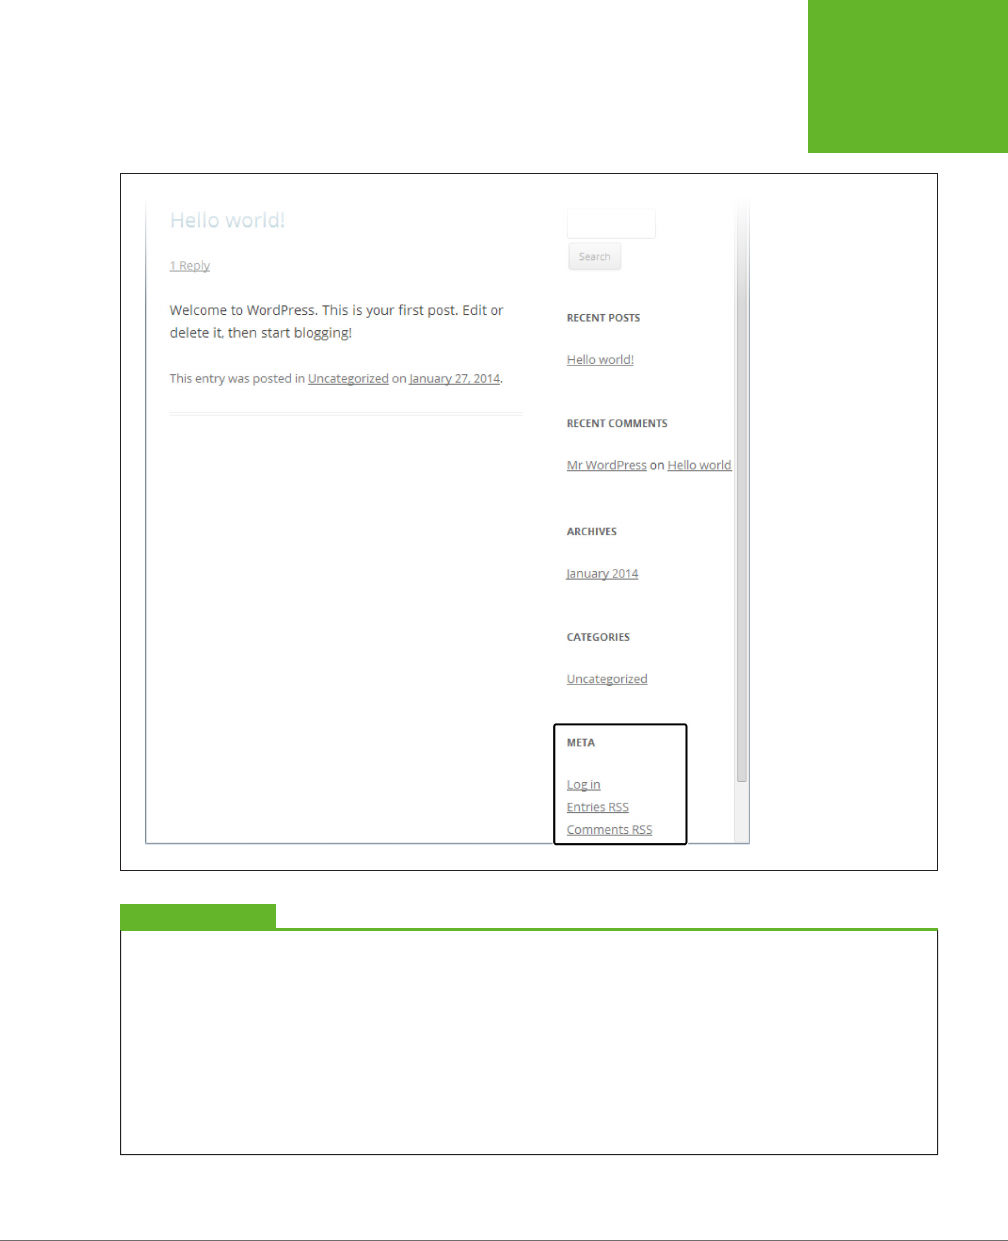
CHAPTER 4: CREATING POSTS 87
INTRODUCING
THE
DASHBOARD
FIGURE 4-2
The Meta section of your
home page has links
that can take you to the
dashboard, show you
the feeds that publish
your content (page 433),
and transport you to the
WordPress.org site. It’s a
holdover from the earliest
days of WordPress.
UP TO SPEED
The Dashboard in WordPress.com
Self-hosted sites and WordPress.com sites share a very similar
dashboard. Most of the commands (in the menu on the left) are
identical. In the rare cases that they aren’t, this book makes a
note of the discrepancy.
The toolbar at the top of the dashboard is less consistent.
WordPress.com sites have a set of shortcuts similar to what’s
in Figure 4-1, but in a subtly different arrangement from a
self-hosted WordPress installation. This isn’t a problem either,
because the toolbar simply duplicates some of the features
already in the WordPress menu. It’s up to you to discover
these shortcuts and decide whether you want to use them
from the toolbar at all.
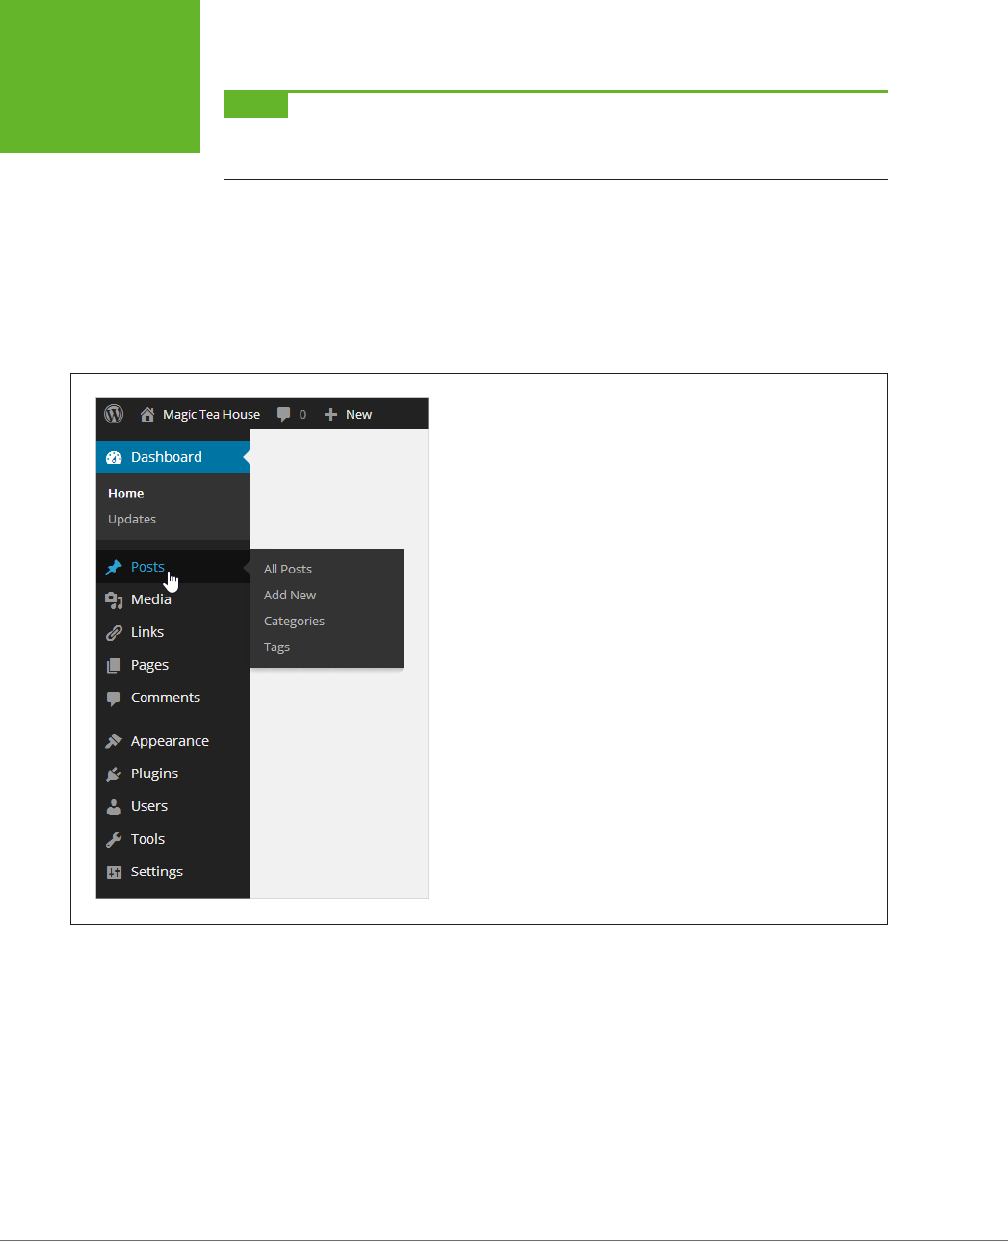
WORDPRESS: THE MISSING MANUAL
88
INTRODUCING
THE
DASHBOARD
NOTE Although the Meta section is helpful when you first start out, you definitely don’t want these ad-
ministrative links in a finished site. Page 157 explains how to remove them, once you’re accustomed to breezing
in and out of the dashboard on your own.
The Menu
To browse around the dashboard, you use the menu—the panel that runs down the left
side of the dashboard. It has a link to every administrative feature WordPress oers.
WordPress groups the menu commands into submenus. To see a submenu, hover
over one of the menu headings (like “Posts”) and it pops open (Figure 4-3).
FIGURE 4-3
WordPress’s menu packs a lot of features into a small strip of web
page real estate. Initially, all you see are first-level menu headings.
But point to one of the items without clicking, and WordPress opens
a submenu. (The exception is the Comments heading, which doesn’t
have a submenu. You just click it to review comments.)
When you click a menu command, the rest of the dashboard changes to reflect the
task you picked. For example, say you choose Posts→Add New. (In other words,
you mouse over to the left-side menu, hover over “Posts” until its submenu appears,
and then click the “Add New” command.) Now, the dashboard shows an HTML-savvy
editor where you can write your post.
You can also click a menu heading directly (for example, “Posts”). If you do, you go
to the first item in the corresponding submenu, as shown in Figure 4-4.
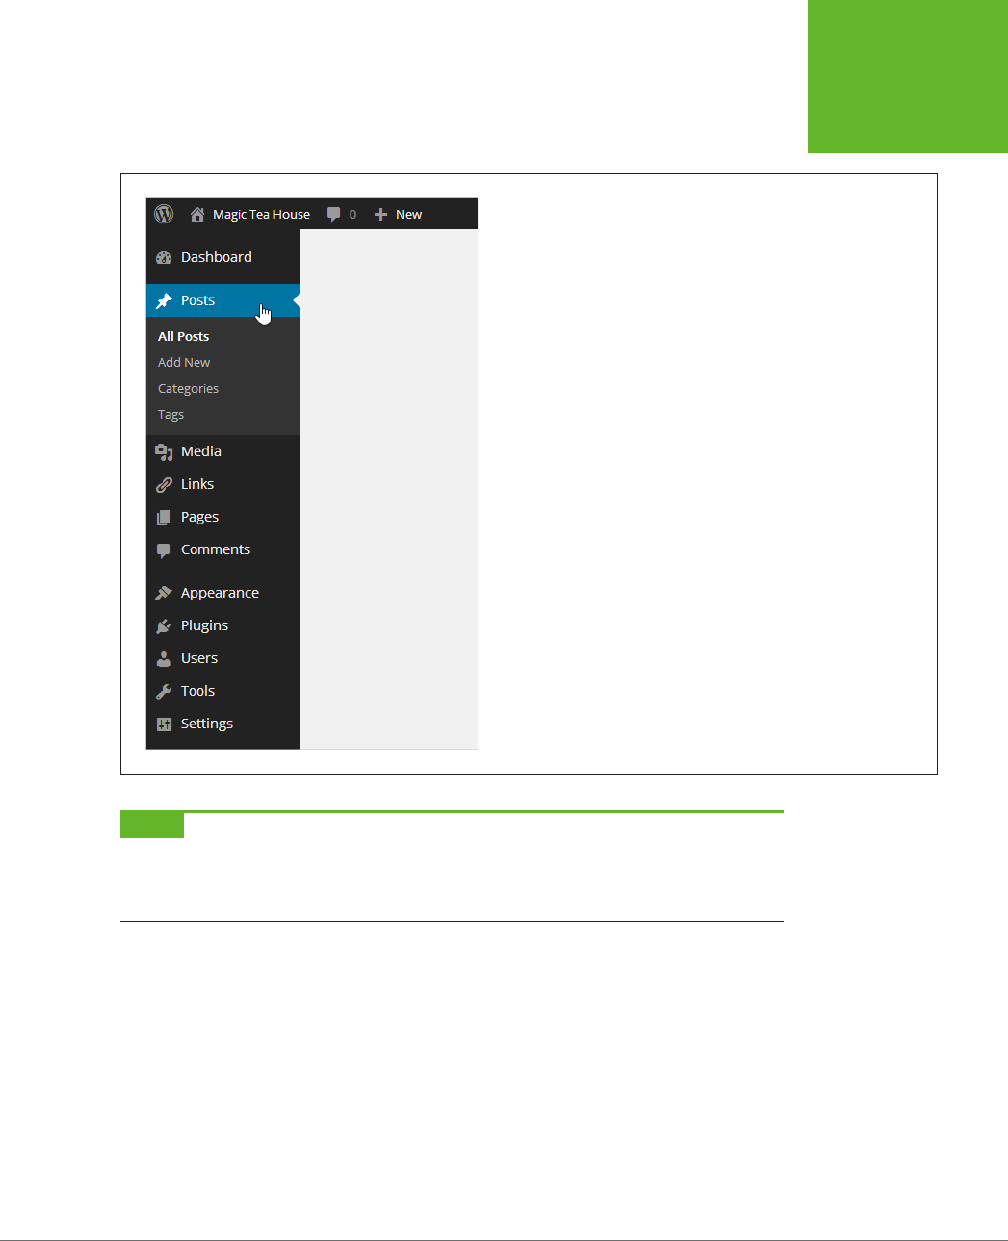
CHAPTER 4: CREATING POSTS 89
INTRODUCING
THE
DASHBOARD
FIGURE 4-4
If you click the heading Posts, you actually go to the submenu item
Posts→All Posts. And if you lose your bearings in the dashboard, just
look for the bold text in the menu to find out where you are. In this
example, that’s All Posts.
NOTE If you resize your web browser window to be very narrow, the menu shrinks itself to free up more
space, removing the menu names (like Posts, Media, and Links), and leaving just the tiny menu icons. Hover over
one of these icons, and the submenu appears, but with a helpful difference: Now WordPress displays the menu
name as a title at the top.
The Home Page
Your starting place in the dashboard is a densely packed home page. You can get
back to this page at any time by choosing Dashboard→Home from the menu.
If you just created a new self-hosted WordPress site, you’ll see a welcome box filling
the top part of the dashboard (Figure 4-5). It provides links that lead to some of
the more important parts of the dashboard, where you can edit settings and add
new posts.
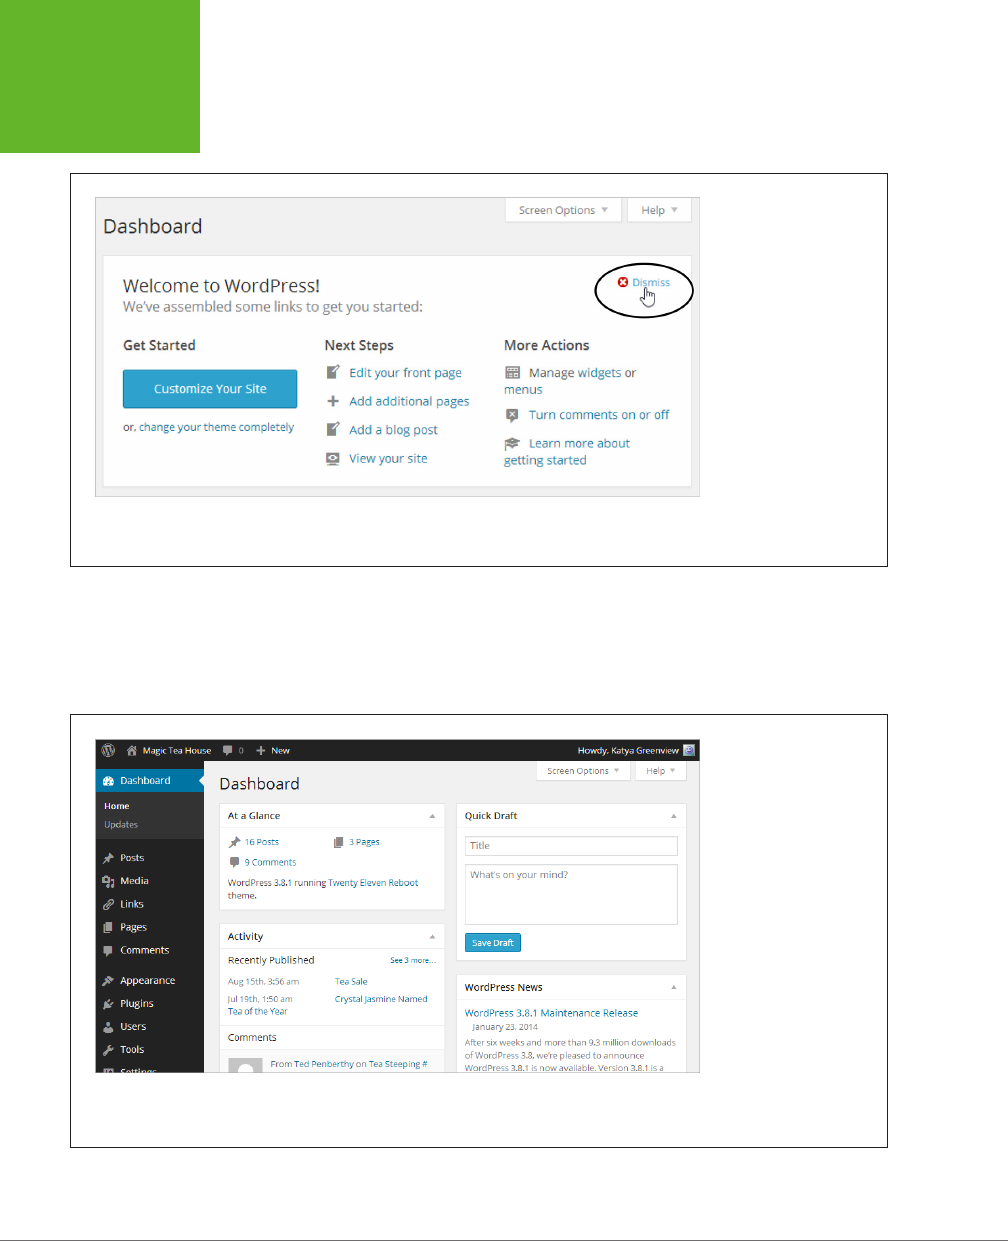
WORDPRESS: THE MISSING MANUAL
90
INTRODUCING
THE
DASHBOARD
FIGURE 4-5
Although the links in the
welcome box work per-
fectly well, it’s probably
a better idea to get used
to finding what you need
on the dashboard. Before
you continue, scroll
down past the welcome
box or click the Dismiss
link to remove the box
altogether, so you can
see the rest of the home
page. (If you want it back
later on, use the Screen
Options button described
on page 124.)
The dashboard home page may seem like a slightly overwhelming starting point,
because it’s crowded with boxes. Each one handles a separate task, as detailed in
Figure 4-6. Sometimes, you’ll also see boxes with important news (for example, an
announcement about an update to the WordPress software).
FIGURE 4-6
At the top of the dash-
board home page, the “At
a Glance” box displays
your site’s vital signs—in-
cluding how many posts,
pages, and comments
it has. To the right is a
Quick Draft box that lets
you create a new post in
a hurry. Below that, you’ll
find boxes with informa-
tion about recent posts
(articles you’ve written),
recent comments (that
other people have left in
response to your posts),
and links to WordPress
news.
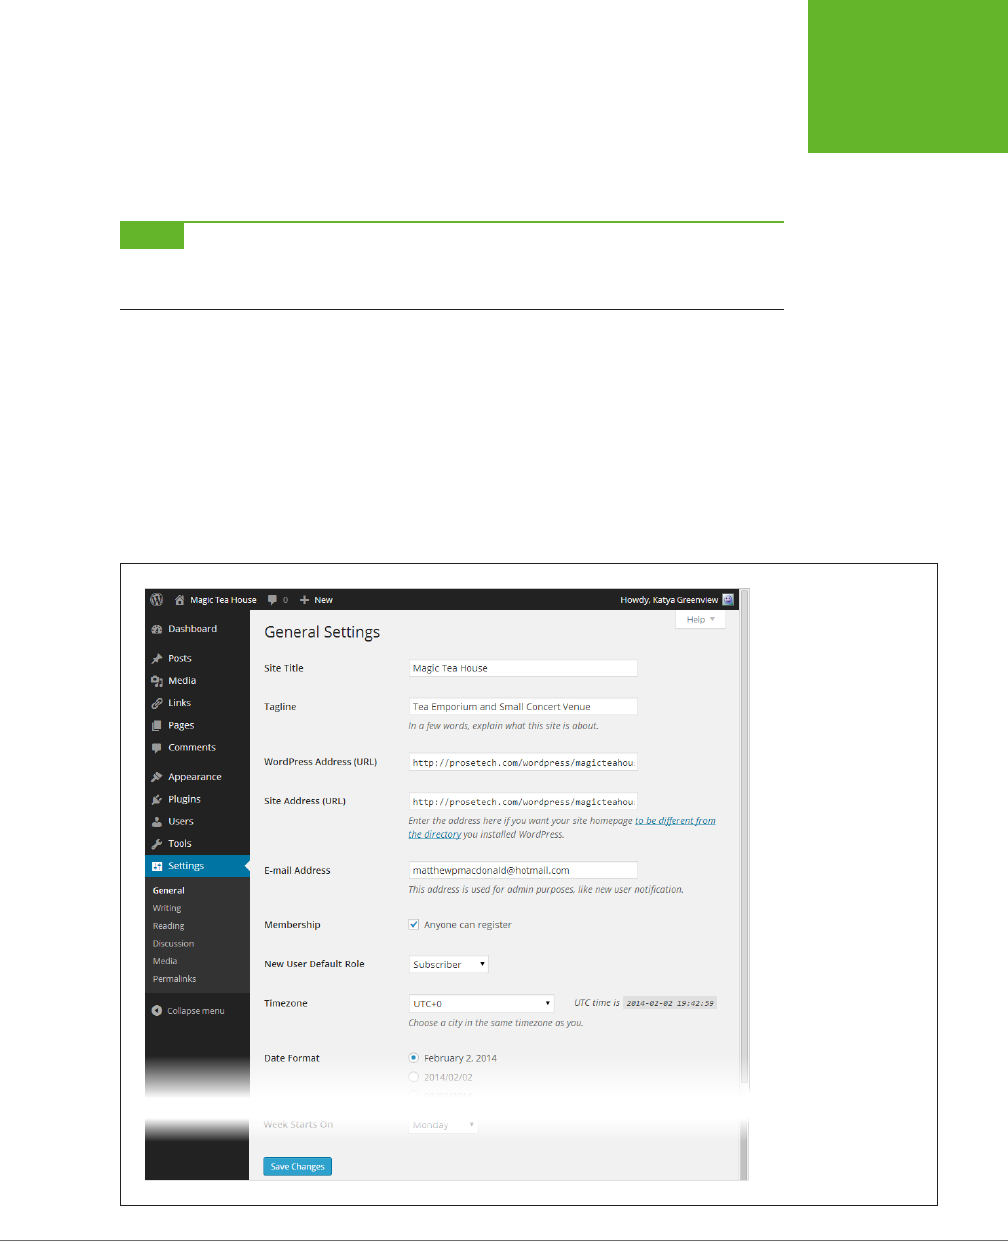
CHAPTER 4: CREATING POSTS 91
INTRODUCING
THE
DASHBOARD
Don’t be surprised to find that your brand-new WordPress site has some content
in it. WordPress starts o every new site with one blog post, one page, and one
comment, all of which are dutifully recorded in the Right Now box. Once you learn
to create your own posts, you’ll see how to delete these initial examples (page 104).
NOTE WordPress continually evolves. When you use the latest and greatest version, you may find that minor
details have changed, such as the exact wording of links or the placement of boxes. But don’t let these details
throw you, because the underlying WordPress concepts and procedures have been surprisingly steady for years.
Dashboard Practice: Changing Basic Settings
Now that you understand how the dashboard works, why not try out a basic task?
The following steps show you how to change a few useful WordPress settings, which
are worth reviewing before you start posting. And, best of all, they’ll help you get
used to clicking your way through the dashboard menu to find what you need.
1. In the dashboard menu, choose SettingsÆGeneral.
The rest of the dashboard loads up a page of tweakable settings (Figure 4-7).
FIGURE 4-7
Point to the dashboard’s
Settings menu item
without clicking to reveal
a submenu, and then click
General. That brings you
to the page of options
shown here (partially,
with some options
omitted).
WORDPRESS: THE MISSING MANUAL
92
INTRODUCING
THE
DASHBOARD
2. If you like, change some settings.
Here are some suggestions:
Site Title and Tagline. In a basic WordPress site, every page has a header
section at the top. WordPress puts the site title and tagline there (Figure 4-8).
The site title also shows up at the top of the browser window (or tab), and, if
a visitor decides to bookmark your site, the browser uses the site title as the
bookmark text. You shouldn’t change these details often, so it’s worthwhile to
double-check that you’ve got a clear title and catchy tagline right now.
Timezone. This tells WordPress where you are, globally speaking. (For example,
UTC-5 is the time zone for New York.) If WordPress doesn’t have the right time
zone, it will give posts and comments the wrong timestamp. For example, it
might tell the world that a comment you left at 8:49 PM was actually recorded
at 3:49 AM. If you’re not sure what your time zone oset is, don’t worry, because
WordPress provides a list of cities. Pick the city you live in, or another city in
the same time zone, and WordPress sets the oset to match.
Date Format and Time Format. Ordinarily, WordPress displays the date for
every post you add and the time for every comment made. These settings
control how WordPress displays the date and time. For example, if you want
dates to be short—like “2014/12/18” rather than “December 18, 2014”—the Date
Format setting is the one to tweak.
Week Starts On. This tells WordPress what day it should consider the first day
of the week in your country (typically, that’s Saturday, Sunday, or Monday).
This setting changes the way WordPress groups posts into weeks and the way
it displays events in calendars.
FIGURE 4-8
A WordPress header includes
the site’s title and tagline.
The title (Magic Tea House)
appears in a large font. The
tagline, a one-sentence
description (Tea Emporium
and Small Concert Venue), sits
underneath.
3. Click Save Changes to make your changes ocial.
WordPress takes a fraction of a second to save your changes and then shows
a “Settings saved” message at the top of the page. You can now move to a
dierent part of the dashboard.

CHAPTER 4: CREATING POSTS 93
INTRODUCING
THE
DASHBOARD
NOTE There are plenty more WordPress settings to play around with in the Settings submenu. As you explore
various WordPress features in this book, you’ll return to these settings to customize them.
One More Task: Choosing a Starter Theme
Every WordPress site has a theme that sets its layout and visual style. As you begin
to refine your site, you’ll take a closer look at themes, starting in Chapter 5. But be-
fore you even get to that point, you need to pick a good starter theme for your site.
WordPress includes a few themes with every new installation. Somewhat awkwardly,
it names each theme after the year it released the theme. At the time of this writing,
a WordPress installation includes the Twenty Twelve, Twenty Thirteen, and Twenty
Fourteen themes.
It’s natural to assume that the best theme is the latest one, and that later themes
should replace earlier ones in new sites. However, the creators of WordPress actually
take a dierent approach. They aim to have each new theme showcase a popular
style, while admitting that no single theme will suit everyone. The Twenty Fourteen
theme, for example, is a dark, slick, image-heavy production that suits online maga-
zines and photo blogs. By comparison, Twenty Twelve is a clean, streamlined theme
that’s perfect for a basic blog or a solid foundation for more ambitious customizations.
You can learn the fundamentals of WordPress using any theme. However, you’ll have
an easier start using a clean and simple one like Twenty Twelve rather than a heavy
one like Twenty Fourteen. (You’ll also have an easier time following along with the
examples in this chapter, which use Twenty Twelve.)
To start yourself out right, here’s how to change your site’s theme to Twenty Twelve:
1. In the dashboard, click AppearanceÆThemes.
If you’re working with a self-hosted site, you’ll see a small gallery of preinstalled
themes.
If you’re working with a WordPress.com site, you’ll see a much larger gallery
with all the themes you can choose.
2. In the “Search themes” text box on the right, type “twenty twelve.”
As you type, WordPress filters the list of themes to show those that match your
search text (Figure 4-9).
3. Hover over the Twenty Twelve box and click Activate.
WordPress applies this theme to your site immediately. Click your site name
(near the top-left corner of the page) to view your site and see the results.

WORDPRESS: THE MISSING MANUAL
94
ADDING YOUR
FIRST POST
FIGURE 4-9
When you finish typing
in the search box, you’ll
see a single entry for the
Twenty Twelve theme.
Adding Your First Post
Comfortable yet? As you’ve seen, the WordPress dashboard gives you a set of rela-
tively simple and anxiety-free tools to manage your website. In fact, a good part of
the reason why WordPress is so popular is because it’s so easy to take care of. (And
as any pet owner knows, the most exotic animal in the world isn’t worth owning if
it won’t stop peeing on the floor.)
But to really get going with your website, you need to put some content on it. So
it makes perfect sense that one of the first dashboard tasks that every WordPress
administrator learns is
posting.
Creating a New Post
To create a new post, follow these steps:
1. In the dashboard menu, choose PostsÆAdd New.
The Add New Post page appears, complete with a big fat box where you can
type in your content (Figure 4-10).
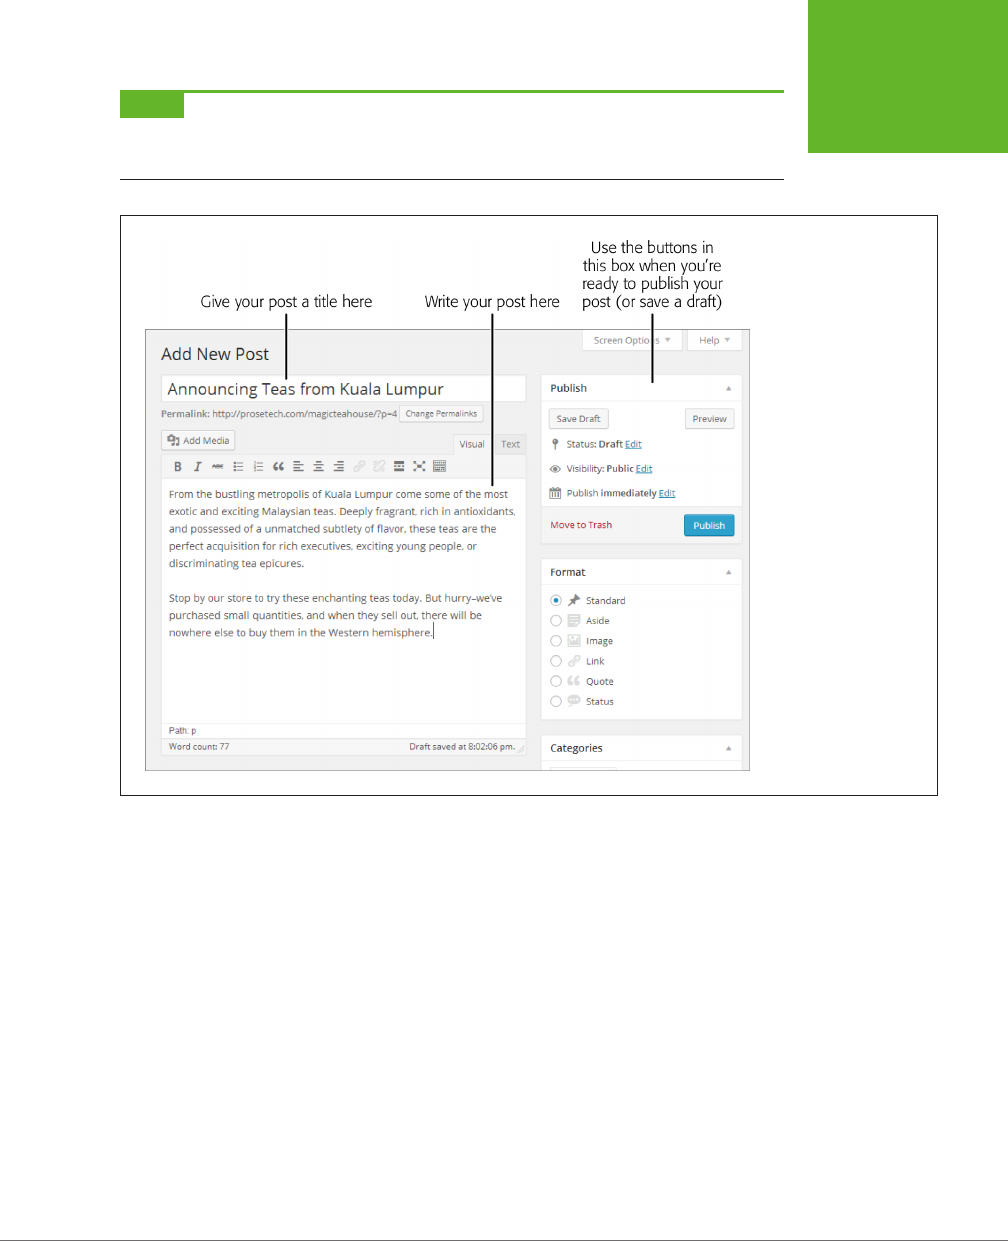
CHAPTER 4: CREATING POSTS 95
ADDING YOUR
FIRST POST
NOTE Figure 4-10 is cropped so that it doesn’t show the dashboard menu on the left. Rest assured that the
dashboard menu
is
there. We’ve trimmed this detail on many of the pictures in this book so you can focus on the
task at hand (and so we don’t need to make our pictures micro-small).
FIGURE 4-10
The minimum ingredients
for any post are a descrip-
tive title and a block of
text. To the right is the
all-important Publish box,
which holds buttons that
let you preview a post,
publish it, or save it as a
draft for later.
You can save time by using the toolbar at the top of the WordPress screen. If
you run WordPress on your own web host, click New→Post. If you signed up
with WordPress.com, click the WordPress “W” icon (in the left-hand corner)
and then click New Post.
2. Start by typing a post title into the blank box at the top of the page (right
under Edit Post).
A good post title clearly announces what you’re going to discuss. Often, visitors
will come across your post title before getting to your post text. For example,
they might see the title in a list of posts or on a search engine results page. A
good title communicates your subject and entices the reader to continue on
to the post. A lousy title might be cute, clever, or funny, but fail to reflect what
the post is about.
Here are some good post titles: “Obama Struggles in Recent Poll,” “Mad Men Is
Ocially O the Rails,” and “My Attempt to Make a Chocolate-Bacon Soué.”

WORDPRESS: THE MISSING MANUAL
96
ADDING YOUR
FIRST POST
And here are weaker titles for exactly the same content: “Polls, Polls, and More
Polls,” “Mad Men Recap,” and “My Latest Kitchen Experiment.”
3. Click in the big box under the post title (or just press the Tab key). Now type
in the content for your post (Figure 4-10).
A basic blog post consists of one or more paragraphs. After each paragraph,
press the Enter key (once) to start the next paragraph. WordPress automatically
adds a bit of white space between paragraphs, so they don’t feel too crowded.
Resist the urge to sign your name at the end, because WordPress automatically
adds this information to the post.
TIP Paragraphs and line breaks give your web page two different looks. When you start a new paragraph
by pressing Enter, WordPress includes some extra blank space between paragraphs. When you add a
line break,
the adjacent lines remain relatively close together. (For example, you’d use line breaks to separate lines in a
mailing address or a poem.) When you want a line break instead of a new paragraph (to avoid getting the space
between paragraphs), hold down the Shift key while you press Enter.
If you want fancier formatting for your post, the toolbar that sits above the
content box lets you add lists, subheadings, pictures, and more. You’ll take a
closer look at these features on page 172.
NOTE Don’t worry if you’re not yet feeling inspired. It’s exceptionally easy to delete blog posts, so you can
add a simple post just for practice and then remove it later (see page 104).
4. Double-check your post.
A post with typographic errors or clumsy spelling mistakes is as embarrassing
as a pair of pants with a faulty elastic band. Before you inadvertently reveal
yourself to the world, it’s a good idea to double-check your writing.
If you use a browser with a built-in spell checker, which includes Internet Ex-
plorer 10 and any modern version of Firefox and Chrome, you get automatic
spell checking. You’ll see red squiggly lines under your mistakes, and you can
right-click misspelled words to choose the right spelling from a pop-up menu.
5. When you finish writing and editing, click Preview.
Your post preview opens in a new browser tab or new browser window. It
shows you a perfect rendition of what the post will look like on your site, with
the current theme.

CHAPTER 4: CREATING POSTS 97
ADDING YOUR
FIRST POST
NOTE In some cases, your browser may block the preview because this feature uses a pop-up window. If
your browser displays a warning message and no preview window, you may need to lower your browser’s pop-up
security settings. Although every browser is different, you usually accomplish that by clicking the pop-up warning
icon and choosing an “Allow pop-ups” option.
6. If you like what you saw in the preview window, click Publish.
In a self-hosted site, a message box will appear at the top of the page, confirming
that your post has been published. In a WordPress.com site, a side panel pops
into view, with a message that tells you how many posts you’ve written to date.
The moment you publish a post, it becomes live on your site and visible to the
world. WordPress.com shows you the results right away; if you run a self-hosted
WordPress site, you need to click the “View post” link to see the published post
(Figure 4-11).
If you’re not quite done but you need to take a break, click Save Draft in-
stead of Publish. WordPress holds onto your post so you can edit and publish
it later. Returning to a draft is easy—in the dashboard home page (that’s
Dashboard→Home), find the Recent Drafts box and click your post in the list
to resume editing it. Afterward, you can continue postponing the moment of
publication (click Save Draft again), you can publish it like a normal post (click
Publish), or you can discard it altogether (click Move to Trash).
UP TO SPEED
Why Your Post Might Look a Little Dierent
If you try out these steps on your own WordPress site (and you
should), you might not get exactly the same page as shown
in Figure 4-11. For example, the date information, the author
byline, and the link that lets you jump to the previous post
may be positioned in different spots or have slightly different
wording. If you created your site on WordPress.com, you’ll get
social media sharing buttons at the bottom of your post, which
make it easier for your readers to talk about you on Facebook
and Twitter. And there are other differences in the formatting
and arrangement of your site, if you care to dig around.
You might assume that these alterations represent feature
differences—for example, things that WordPress.com sites
can do that self-hosted WordPress sites can’t. But that isn’t the
case. Instead, this variability is the result of different themes,
plug-ins, and WordPress settings.
The best advice is this: Don’t get hung up on these differences.
Right now, the content of your site is in your hands, but the
other details (like the placement of the sidebar and the font
used for the post text) are beyond your control. In Chapter 5,
when you learn how to change to a new theme or customize
a current one, these differences will begin to evaporate. And
by the time you reach the end of Part 2 in this book, you’ll be
able to customize a self-hosted WordPress site or a WordPress.
com site to look the way you want it to.

WORDPRESS: THE MISSING MANUAL
98
ADDING YOUR
FIRST POST
FIGURE 4-11
Here’s the finished post,
transplanted into the
stock layout of your
WordPress site. The two
circled sections represent
the content you con-
tributed. WordPress has
added plenty of details,
like the category and date
information below your
post. You’ll learn to take
charge of these details in
this chapter and the next.
Browsing Your Posts
Adding a single post is easy. But to get a feel for what a real, thriving blog looks like,
you need to add several new posts. When you do, you’ll find that WordPress arranges
your posts in the traditional way: one after the other, in reverse-chronological order.
To take a look, head to the home page of your blog (Figure 4-12). To get there, just
enter your WordPress site address, without any extra information tacked onto the
end. Or, if you’re currently viewing a post, click the Home button in the menu bar
(just under the header section and the stock picture).
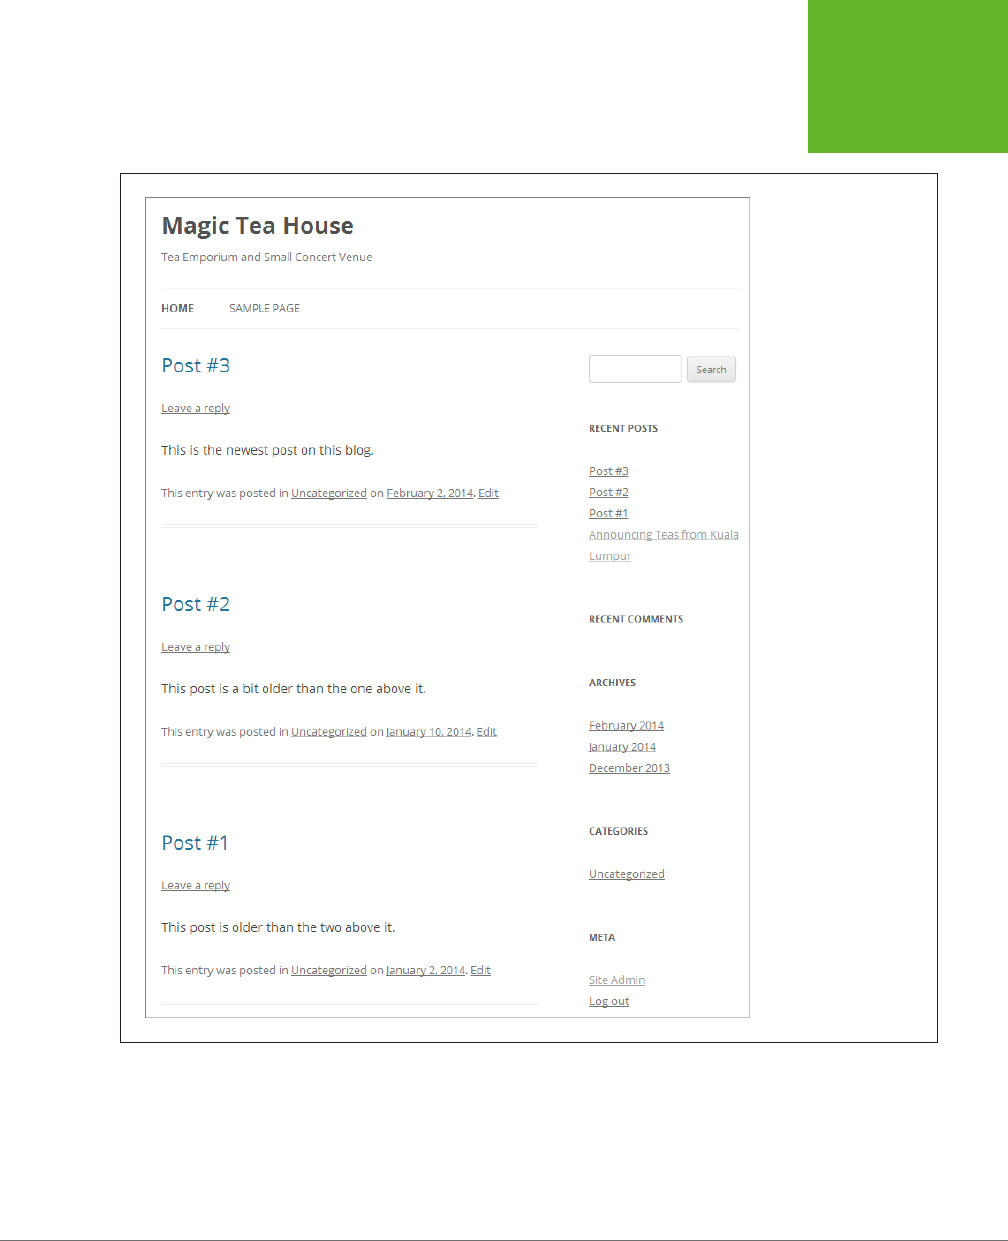
CHAPTER 4: CREATING POSTS 99
ADDING YOUR
FIRST POST
FIGURE 4-12
When you visit the home
page of a blog, you start
out with a reverse-chron-
ological view that puts
the most recent post first.
If you don’t like to scroll,
the sidebar on the right
gives you several other
ways to browse posts.
The number of posts you see on the home page depends on your WordPress set-
tings. Ordinarily, you get a batch of 10 posts at a time. If you scroll to the bottom
of the home page, you can click the “Older posts” link to load up the next 10. If you
want to show more or fewer posts at once, choose Settings→Reading and change
the “Blog pages show at most” setting to the number you want.

WORDPRESS: THE MISSING MANUAL
100
ADDING YOUR
FIRST POST
WordPress.com sites include an infinite scroll feature. When it’s switched on, you
won’t see the “Older posts” link. Instead, WordPress loads new posts as you scroll
down, creating an ever-expanding page (until you reach the very first post on the
site). To turn this feature o, choose Settings→Reading and then turn o the check-
box next to “Scroll infinitely.”
You don’t need to read every post in a WordPress site from newest to oldest. Instead,
you can use one of the many other ways WordPress gives you to browse posts:
• By most recent. The Recent Posts list lets you quickly jump to one of the five
most recently created posts. It’s the first set of links in the sidebar on the right.
• By month. Using the Archives list, you can see a month’s worth of posts. For
example, click “June 2014” to see all the posts published that month, in reverse-
chronological order. Some WordPress blogs also include a calendar for post
browsing, but if you want that you’ll need to add it yourself (see page 164 to
learn how).
• By category or tag. Later in this chapter, you’ll learn how to place your posts
in categories and add descriptive tags. Once you take these steps, you’ll have
another way to hunt through your content, using either the Categories list in
the sidebar or the category and tag links that WordPress adds to the end of
every post.
• By author. If your site has posts written by more than one person, WordPress
automatically adds a link with the author name at the bottom of every post.
Click that link and you’ll see all the posts that person has created for this site, in
reverse-chronological order (as always). You can’t use this feature just yet, but
it comes in handy when you create a blog that has multiple authors, as you’ll
learn to do in Chapter 11.
• Using a search. To search a blog, type a keyword or two into the search box,
which appears at the top right of your site, and then press Enter. WordPress
searches the title and body of each post and shows you a list of matching posts.
Delayed Publishing
Sometimes, you might decide your post is ready to go, but you want to wait a little
before putting it on the Web. For example, you might want your post to coincide
with an event or product announcement. Or maybe you want your post to appear
at a certain time of day, rather than the 2:00 a.m. time you wrote it. Or maybe you
simply want to add a bit of a buer in case you get new information or have a last-
minute change of heart.

CHAPTER 4: CREATING POSTS 101
ADDING YOUR
FIRST POST
FREQUENTLY ASKED QUESTION
How Do I Change My Home Page?
I don’t like the look of my home page. Is there anything I can
do to change it?
The home page is the first thing visitors see on your website. For
that reason, it’s no surprise that it’s one of the things WordPress
authors want to tweak first. Here are some of your options:
• Change the number of posts. Want to see more (or
fewer) than 10 posts at a time? On the dashboard,
choose SettingsÆReading. In the “Blog pages show at
most” box, type in a different number, and then click
Save Changes.
• Show post summaries. Ordinarily, WordPress shows
the entire post on the home page. If you like to write
thorough, detailed posts with plenty of text and pictures
(or if you’re just incurably long-winded), you would
probably prefer to show a brief summary instead. You’ll
learn how to pull off this trick on page 198.
• Show a static page. If you’d rather show a custom home
page that you’ve designed, instead of a list of recent
posts, you need to create a
static page
. You’ll learn how
to do that—and use it for your home page—in Chapter 7.
These are just a few examples. As you read this book, many
more options will open up. For example, in Chapter 10 you’ll
learn how to create a home page that uses image thumbnails
(page 343). And when you consider the advanced theme-
editing techniques in Chapter 14, you’ll see how to create a
home page that displays a list of categorized links to just the
posts you want.
In all these situations, you can choose to save your post as a draft (click Save Draft)
and publish it later. That gives you complete control over when the post appears,
but it also forces you to make a return trip to your computer. A dierent approach
is to use
delayed publishing,
which allows you to specify a future publication time.
Before that time arrives, you may return and edit your post (or even cancel it). But
if you do nothing, the post will magically appear, at exactly the time you specified.
To use delayed publishing, follow these steps:
1. Before you start, make sure WordPress has the right time settings (page 92).
If WordPress thinks you’re in a dierent time zone, its clock won’t match yours,
and when you tell it to publish a post at a certain time, it will actually appear a
few hours before or after you expect.
2. To write your post, choose PostsÆAdd New in the dashboard.
Write your post in the usual way.
3. In the Publish box, click the Edit link next to “Publish immediately.”
A new group of settings drops into view (Figure 4-13).
4. Use the provided boxes to pick a forthcoming date and the exact time when
the post should go live.
Here, WordPress uses a 24-hour clock, so put in 14:00 for 2:00 p.m.
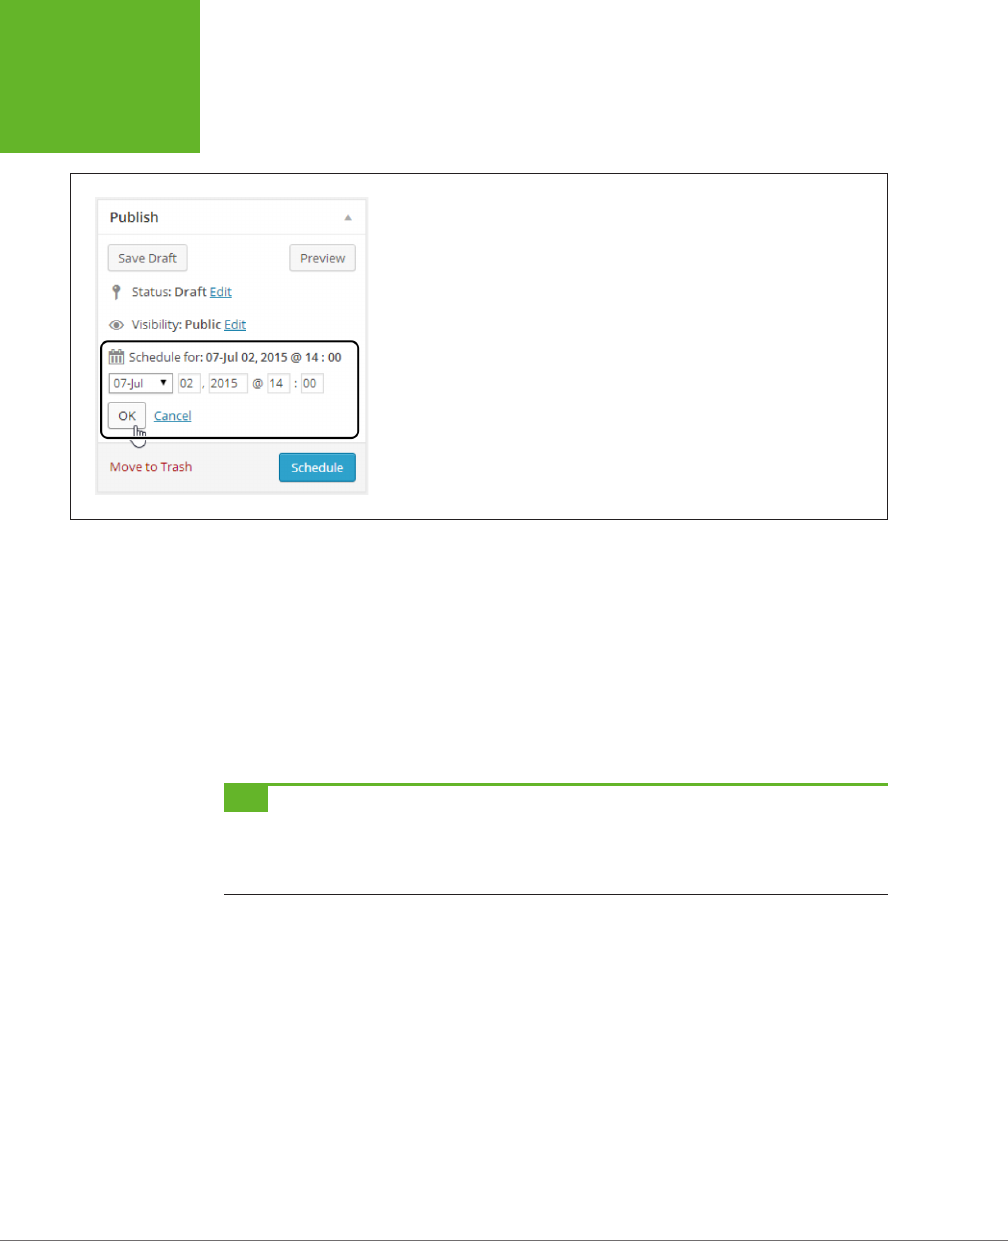
WORDPRESS: THE MISSING MANUAL
102
ADDING YOUR
FIRST POST
FIGURE 4-13
WordPress lets you schedule content for future publication down to
the minute.
5. Click OK to apply your changes.
At this point, the Publish button turns into a Schedule button.
6. Click the Schedule button to commit to publishing the post.
WordPress will wait until the time you specify, and then publish your work.
If you decide you don’t actually want to publish the post at the time you set,
you can edit the post (as described on page 102) and put the scheduled time
to a very distant future date. Or you can delete the post altogether (page 103).
TIP You can use the same technique to create a post with an
older
publication date. To do that, just type in
a date and time that falls in the past. Although this trick is less useful than delayed publishing (because no one
wants to make her content look old), it’s occasionally useful. For example, it’s handy if you publish several posts
at the same time and you want to change their order or spread them out.
Editing a Post
Many people assume that posting on a blog is like sending an email message: You
compose your thoughts, write your content as best you can, and then send it out
to meet the world. But the truth is that you can tinker with your posts long after
you publish them.
WordPress gives you two easy ways to edit a post. If you’re logged in as the site
administrator and you’re viewing a post, you’ll see an Edit button or an Edit link
somewhere on the page (its exact position depends on your theme). Click that link,
and WordPress takes you to the Edit Post page, which looks almost identical to the
Add New Post page. In fact, the only dierence is that the Publish button has been
renamed “Update.” Using the Edit Post page, you can change any detail you want,
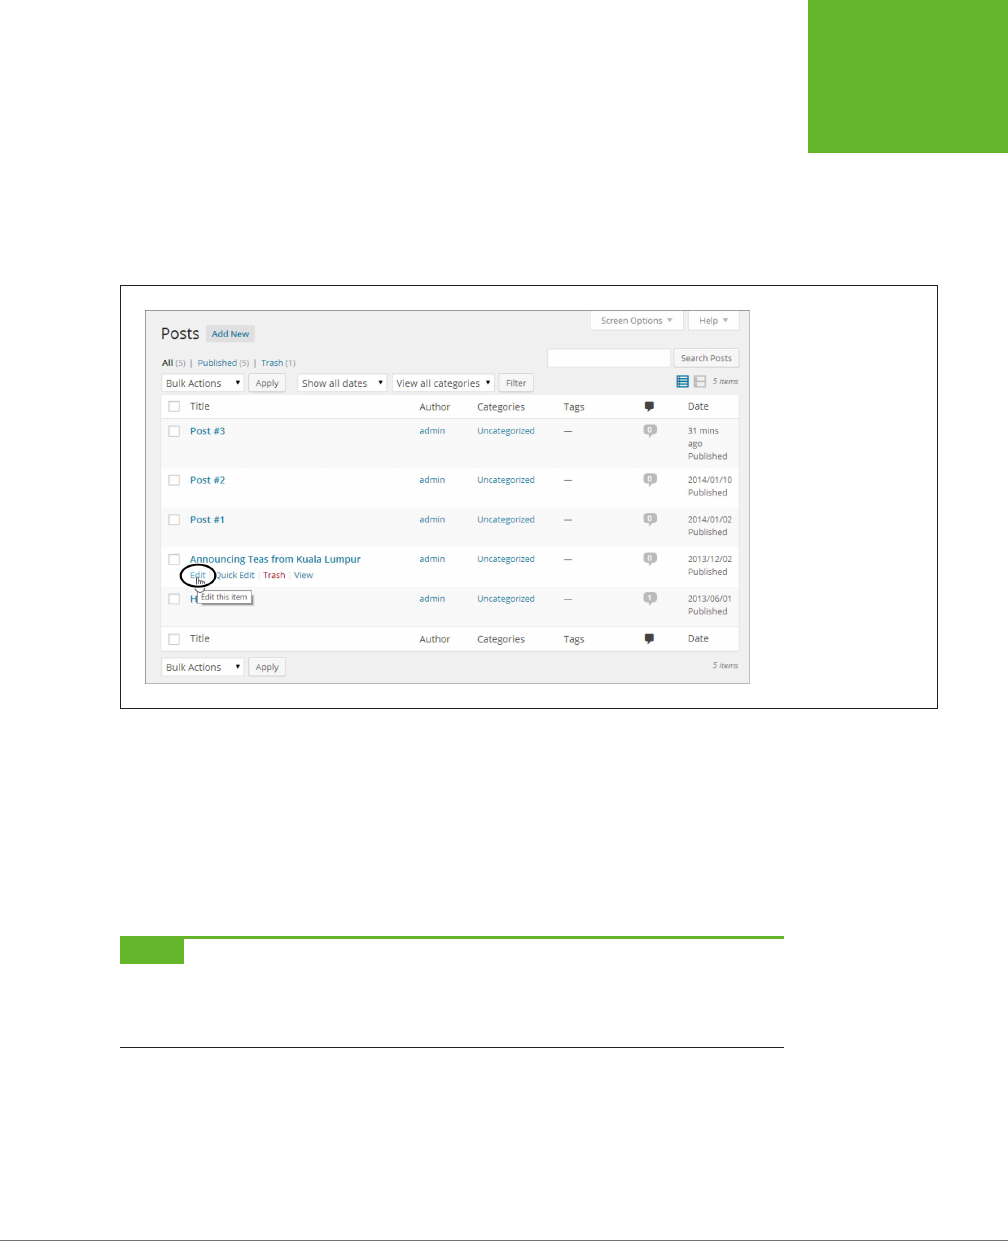
CHAPTER 4: CREATING POSTS 103
ADDING YOUR
FIRST POST
from correcting a single typo to replacing the entire post. When you finish making
changes, click the Update button to commit your edit.
Another way to pick a post for editing is to use the dashboard. First, choose Posts→All
Posts, which shows you a list of all the posts you’ve published (Figure 4-14). Find
the post you want to edit, hover over it, and then click the Edit link to get to the Edit
Post page, where you can make your changes.
FIGURE 4-14
The Posts page lists
your posts in reverse-
chronological order,
starting with the most
recent, and including any
drafts. When you point to
a post (without clicking),
you see links that let
you edit, delete, or view
the post.
Along with the Edit link, the Posts page includes a Quick Edit link. Unlike Edit, Quick
Edit keeps you on the Posts page but pops open a panel that lets you edit some of
the post details. For example, you can use Quick Edit to change a post’s title, but
you can’t use it to change the actual text.
Being able to edit in WordPress is a nearly essential feature. Eventually, even the
best site will get something wrong. There’s no shame in opening up an old post to
correct an error, clean up a typing mistake, or even scrub out a bad joke.
NOTE Unlike some blogging and content management systems, WordPress doesn’t display any sort of
timestamp or message about when you last edited a post. If you want that, you’ll need to add it as part of your
edit. For example, you might tack an italicized paragraph onto the bottom of a post that says, “This post edited
to include the full list of names” or “Updated on January 25th with the latest survey numbers.”
Deleting a Post
As you’ve just seen, you can edit anything you’ve ever written on your WordPress
website, at any time, without leaving any obvious fingerprints. You can even remove
posts altogether.
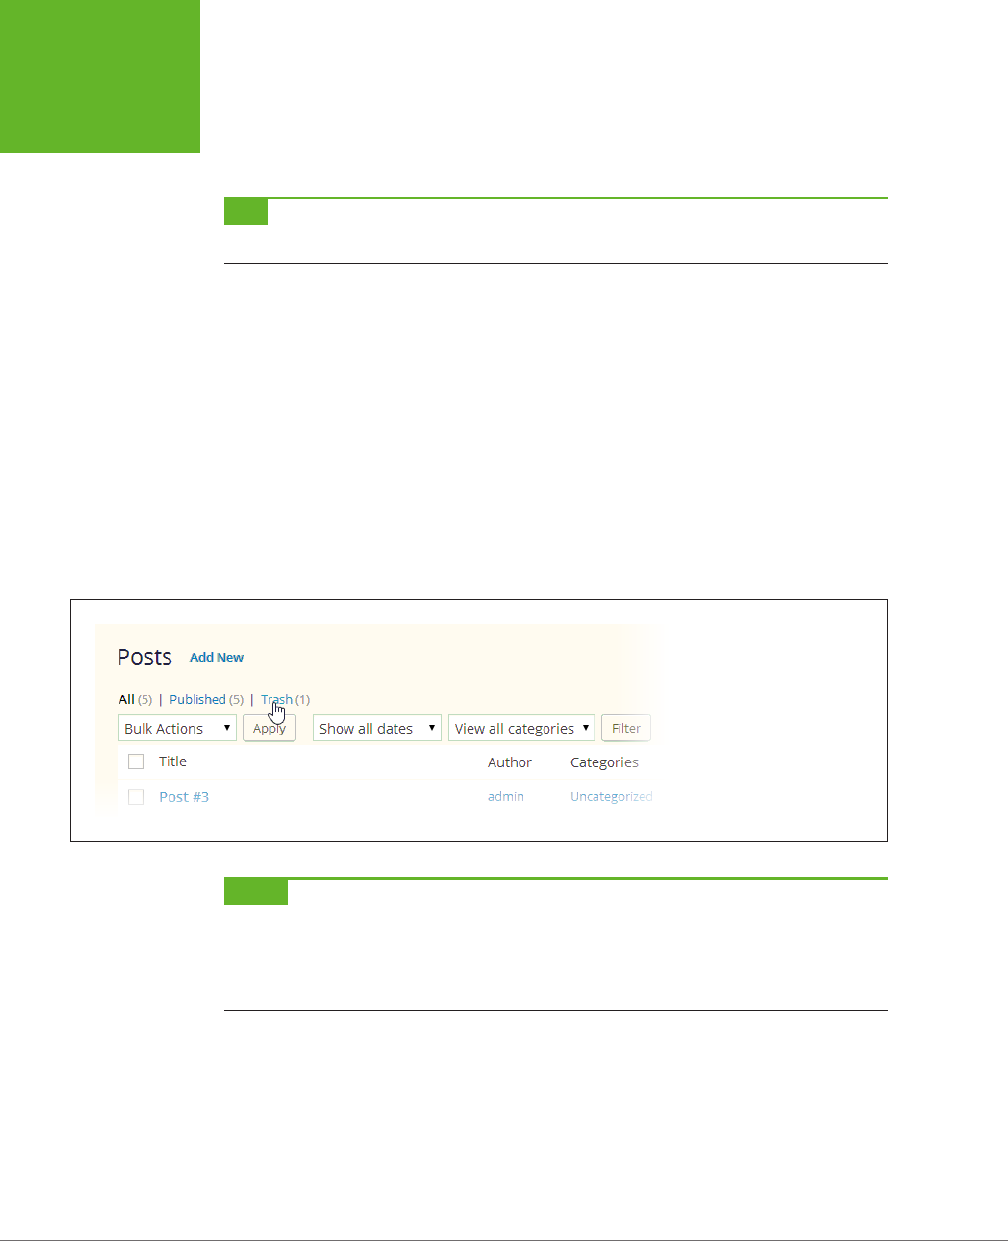
WORDPRESS: THE MISSING MANUAL
104
ADDING YOUR
FIRST POST
The trick to deleting posts is to use the Posts page (Figure 4-14). Point to the post
you want to vaporize, and then click Trash. Or, on the Edit Post page, click the “Move
to Trash” link that appears in the Publish box.
TIP Now that you know how to remove a post, try out your new skill with the “Hello world!” example post
that WordPress adds to every new blog. There’s really no reason to keep it.
Trashed posts aren’t completely gone. If you discover you removed a post that you
actually want, don’t panic. WordPress gives you two ways to get your post back.
If you realize your mistake immediately after you trash the post, look for the message
“Item moved to Trash. Undo.” It appears in a box at the top of the Posts page. Click
the Undo link, and your post returns immediately to both the Posts list and your site.
If you want to restore a slightly older trashed post, you need to dive into the Trash.
Fortunately, it’s easy (and not at all messy). First, click Posts→All Posts to get to the
Posts page. Then click the Trash link that appears just above the list of posts (Figure
4-15). You’ll see every post that’s currently in the trash. Find the one you want, hover
over it, and then click Restore to resurrect it (or click Delete Permanently to make
sure no one will find it again, ever).
FIGURE 4-15
Three links at the top of the list
of posts let you choose what
content you see: All (every
published post and draft),
Published (only published
posts), and Trash (posts you
deleted).
NOTE Of course, removing posts from your blog and scrubbing content from the Web are two vastly different
things. For example, if you post something impolite about your boss and remove it a month later, the content
can live on in the cache that search engines keep and in Internet archival sites like the Wayback Machine (
http://
web.archive.org
). So always think before you post, because WordPress doesn’t include tools to reclaim your job
or repair your online reputation.
Creating a Sticky Post
As you know, WordPress orders posts by date on the home page, with the most
recent post occupying the top spot. But you might create an important post that
you want to feature at the top of the list, regardless of its date. For example, you
might write up a bulletin that announces that your business is temporarily closing for
renovations, or answers frequently asked questions (“No, there are no more seatings

CHAPTER 4: CREATING POSTS 105
ADDING YOUR
FIRST POST
available for this Sunday’s Lobster Fest”). To keep your post at the top of the list so
it can catch your readers’ eyes, you need to turn it into a
sticky post.
NOTE WordPress displays all your sticky posts before all your normal posts. If you have more than one
sticky post, it lists the most recent one first.
You can designate a post as sticky when you first write it (on the Add New Post page)
or when you edit it later (on the Edit Post page). Either way, you use the Publish
box. Next to the label “Visibility: Public,” click Edit. A few more options will drop
into view (including the private post options you’ll explore on page 395). To make
your post sticky, turn on the checkbox next to “Stick this post to the front page,”
and then click Publish or Update to confirm your changes.
The only caveat with sticky posts is that they stay sticky forever—or until you “unstick”
them. The quickest way to do that is to choose Posts→All Posts, find the sticky post
in the list, and then click the Quick Edit link underneath it. Turn o the “Make this
post sticky” checkbox and then click Update.
UP TO SPEED
The Path to Blogging Success
There’s no secret trick to building a successful blog. Whether
you’re recording your thoughts or promoting a business, you
should follow a few basic guidelines:
• Make sure your content is worth reading. As the oft-
reported slogan states,
content is king.
The best way to
attract new readers, lure them in for repeat visits, and
inspire them to tell their friends about you, is to write
something worth reading. If you’re creating a topical
blog (say, putting your thoughts down about politics,
literature, or gourmet marshmallows), your content needs
to be genuinely
interesting.
If you’re creating a business
blog (for example, promoting your indie record store or
selling your real estate services), it helps to have content
that’s truly
useful
(say, “How to Clean Old Records” or “The
Best Chicago Neighborhoods to Buy In”).
• Add new content regularly. Nothing kills a site like stale
content. Blogs are particularly susceptible to this problem
because posts are listed in chronological order, and each
post prominently displays the date you wrote it (unless
you remove the dates by editing your theme files; see
Chapter 13).
• Keep your content organized. Even the best content can
get buried in the dozens (or hundreds) of posts you’ll
write. Readers can browse through your monthly archives
or search for keywords in a post, but neither approach is
convenient. Instead, a good blog is ruthlessly arranged
using
categories
and
tags
for the posts (see the next
section).

WORDPRESS: THE MISSING MANUAL
106
ORGANIZING
YOUR POSTS
Organizing Your Posts
WordPress gives you two complementary tools for organizing your posts:
categories
and
tags.
Both work by grouping related posts together. In the following sections,
you’ll learn how to use them eectively.
Understanding Categories
A category is a short text description that describes the topic of a group of posts.
For example, the Magic Tea House uses categories like
Tea
(posts about teas for
sale),
Events
(posts about concert events at the tea house), and
News
(posts about
other developments, like renovations or updated business hours).
Categories are really just text labels, and you can pick any category names you
want. For example, the categories Tea, Events, and News could just as easily have
been named Teas for Sale, Concerts, and Miscellaneous, without changing the way
the categories work.
In a respectable WordPress site, every post has a category. (If you don’t assign
a category, WordPress automatically puts your post in a category named Uncat-
egorized, which presents a bit of a logical paradox.) Most of the time, posts should
have just one category. Putting a post in more than one category is a quick way to
clutter up the structure of your site, and confuse anyone who’s browsing your posts
one category at a time.
TIP A good rule of thumb is this: Give every post exactly one category. If you want to add more informa-
tion to make it easier for people to find posts that are related to each other, add tags (page 114). (The exception
is if you use multiple categories to “flag” posts for special features. For example, you’ll see a theme trick on
page 192 that uses a category to denote featured posts. In this sort of example, some posts may appear in two
categories—one “real” category used for classification and browsing, and another category you use to tap into
the special feature.)
You don’t need to create all your categories at once. Instead, you can add them
as needed (for example, when you create a new post that needs a new category).
Of course, you’ll have an easier time organizing your site if you identify your main
categories early on.
It’s up to you to decide how to categorize posts and how many categories you want.
For example, the Magic Tea House site could just as easily have divided the same
posts into more categories, or into dierent criteria, as shown in Figure 4-16. The
box on page 109 has some tips for choosing good categories.
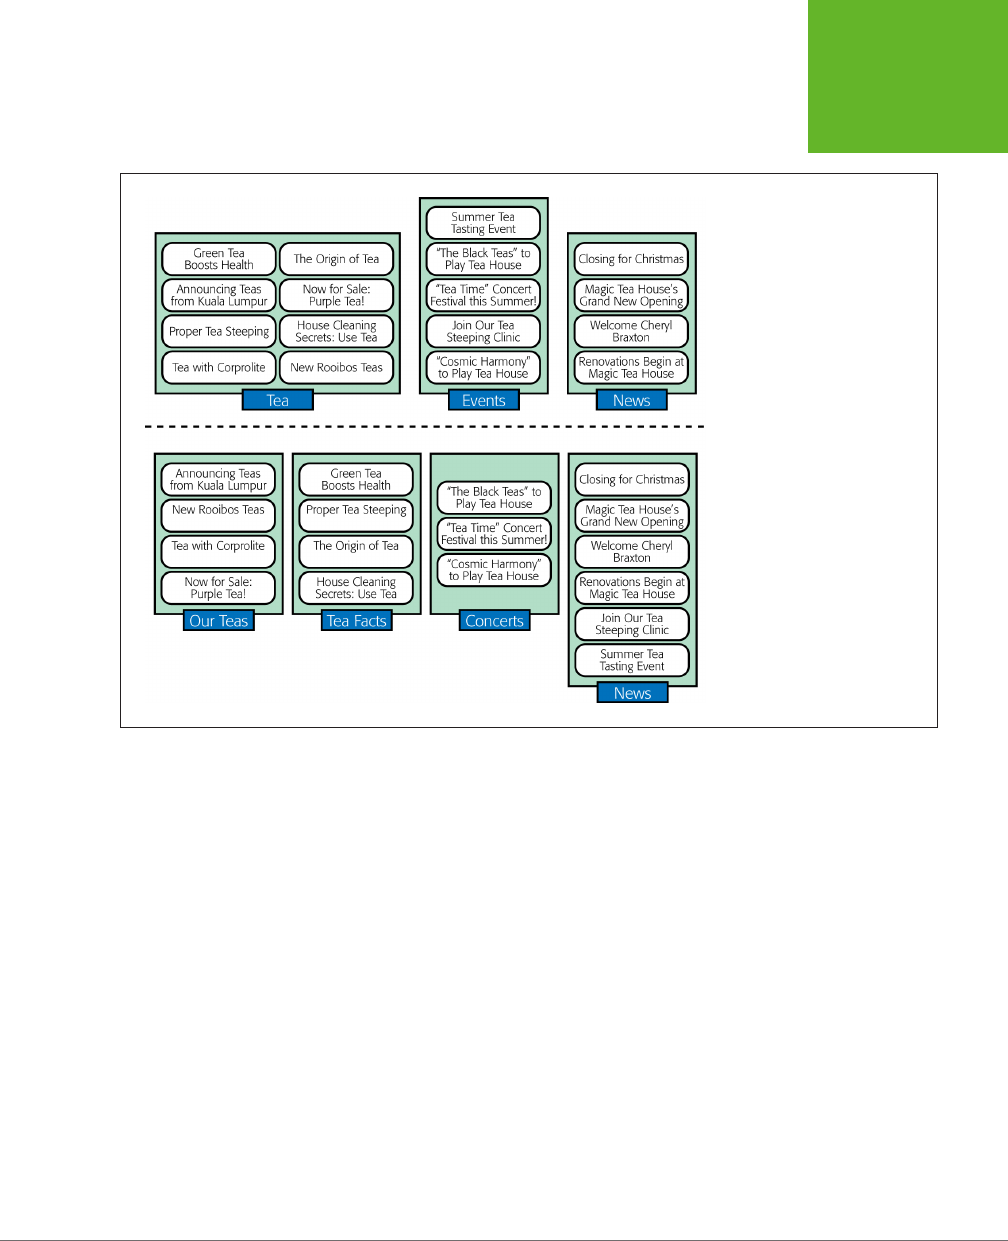
CHAPTER 4: CREATING POSTS 107
ORGANIZING
YOUR POSTS
FIGURE 4-16
Here are two ways to organize the
same 17 posts. Neither is necessar-
ily better than the other, but the
grouping on the bottom makes
it easier to promote the teas that
the Magic Tea House sells. It also
assumes the site will feature
regular articles about teas, and
that concerts are a common type
of event. If that’s not the case,
it’s probably not worth having
separate categories named Tea
Facts and Concerts.
Categorizing Posts
You can easily assign a category to a post when you first add the post. Here’s how:
1. Choose PostsÆAdd New to start a new post.
Or you can start editing an existing post (page 102) and then change its cat-
egory. The Add New Post and Edit Post pages work the same way, so it’s easy.
2. Look for the Categories box.
You’ll find it near the bottom-right corner of the page, under the Publish and
Format boxes (Figure 4-17).
If the category you want exists, skip to step 5.
If your post needs a new category, one that you haven’t created yet, continue
on to step 3.
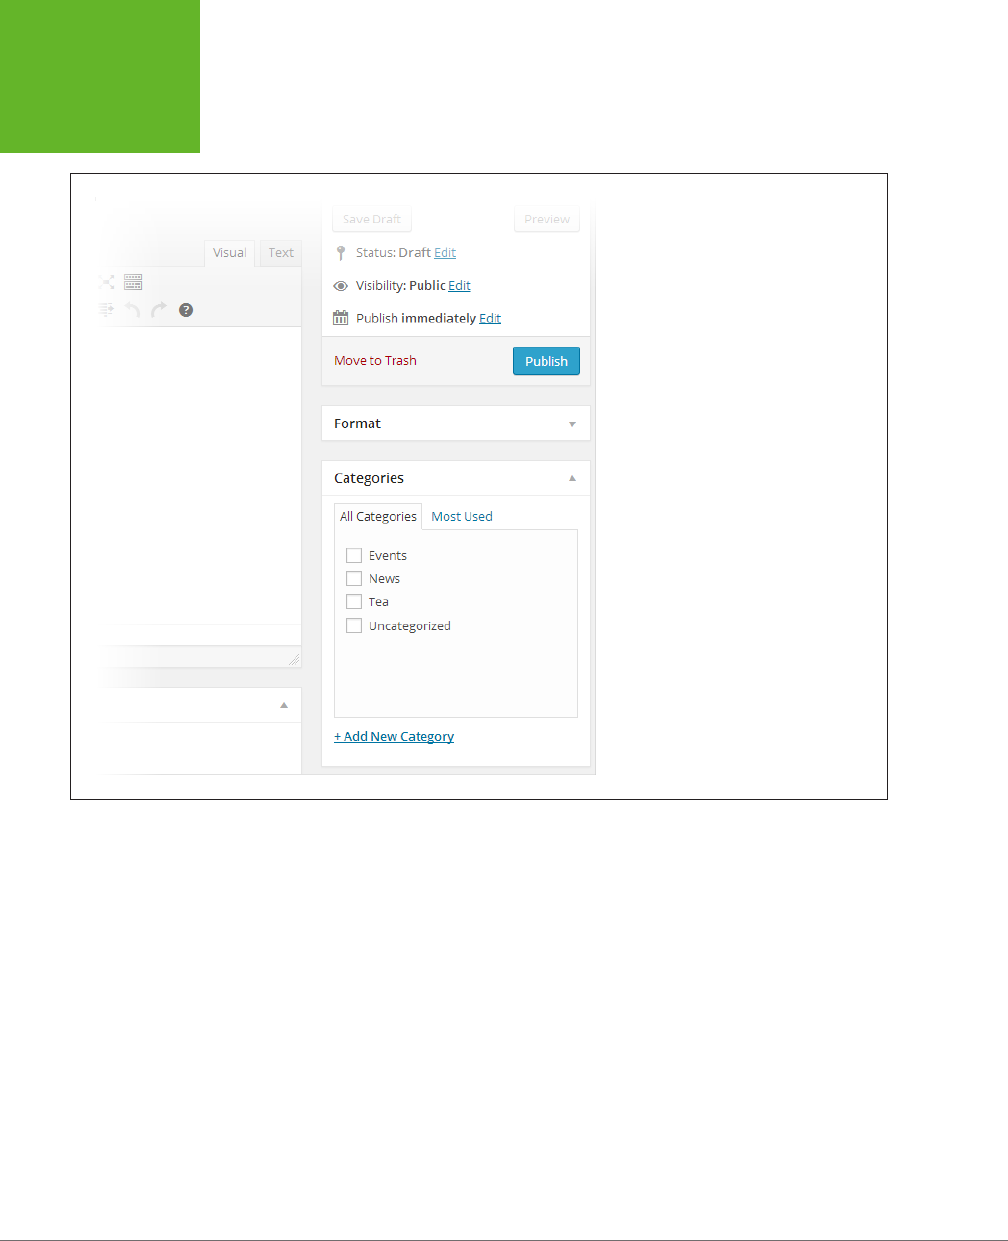
WORDPRESS: THE MISSING MANUAL
108
ORGANIZING
YOUR POSTS
FIGURE 4-17
The Categories box has two tabs. The one you
usually see, All Categories, lists all your post
categories in alphabetical order. If you’ve cre-
ated quite a few categories, you might find it
faster to choose one from the Most Used tab,
which lists the categories you use most often.
3. At the bottom of the Categories box, click Add New Category.
This expands the Categories box so you can enter category information.
4. Enter the category name in the box underneath the Add New Category link,
and then click Add New Category.
Don’t worry about the Parent Category box underneath—you’ll learn to use that
on page 110, when you create subcategories.
Once you add your category, it appears in the Categories box.
5. Find the category you want to use in the list, and then turn on the checkbox
next to it.
When you add a new category, WordPress automatically turns on its checkbox,
because it assumes this is the category you want to assign to your post. If it
isn’t, simply turn o the checkbox and pick something else.

CHAPTER 4: CREATING POSTS 109
ORGANIZING
YOUR POSTS
You can add a post to more than one category, but it’s best not to unless you’re
a pro. Doing so is likely to mask a poor choice of categories, and it makes it hard
to change your categories later on.
6. Carry on editing your post.
That’s it. When you publish your post, WordPress assigns it the category you
chose (Figure 4-18). If you didn’t choose any category, WordPress automatically
puts it in a category named (paradoxically) Uncategorized.
TIP Ordinarily, the category named Uncategorized is WordPress’s
default category
—that means WordPress
uses it for new posts unless you specify otherwise. However, you can tell WordPress to use a different default
category. Simply choose Settings→Writing and pick one of your categories in the Default Post Category list.
UP TO SPEED
How to Choose Good Categories
To choose the right categories, you need to imagine your site,
up and running, several months down the road. What posts
does it have? How do people find the content they want? If
you can answer these questions, you’re well on the way to
choosing the best categories.
First, you need to choose categories that distribute your posts
well.
If a single category has 90 percent of your posts, you
probably need new—or different—categories. Similarly, if a
category accounts for less than 2 percent of your posts, you
may have too many categories. (Although there are excep-
tions—perhaps you plan to write more on that topic later, or
you want to separate a very small section of special-interest
posts from the rest of your content.)
You may also want to factor in the sheer number of posts you
plan to write. If your site is big and you post often, you may
want to consider more categories. For example, assuming the
Magic Tea House has a couple of dozen posts, a category split
like this works fine: Tea (70 percent), Concerts (20 percent),
News (10 percent). But if you have hundreds of posts, you’ll
probably want to subdivide the big Tea group into smaller
groups.
It also makes sense to create categories that highlight the
content you want to promote. For example, if you’re creating
a site for a furniture store, you’ll probably create categories
based on your products (Couches, Sofas, Dining Room Tables,
and so on). Similarly, the Magic Tea House can split its Tea
category into Our Teas and Tea Facts to better highlight the
teas it sells (Figure 4-16).
Finally, it’s important to consider how your readers will want
to browse your information. If you’re a lifestyle coach writ-
ing articles about personal health, you might decide to add
categories like Good Diet, Strength Training, and Weight Loss,
because you assume that your readers will zero in on one of
these subjects and eagerly devour all the content there. Be
careful that you don’t split post categories too small, however,
because readers could miss content they might otherwise
enjoy. For example, if you have both a Good Diet Tips and
Superfoods category, a reader might explore one category
without noticing the similar content in the other. This is a
good place to apply the size rule again—if you can’t stuff both
categories full of good content, consider collapsing them into
one group or using subcategories (page 110).
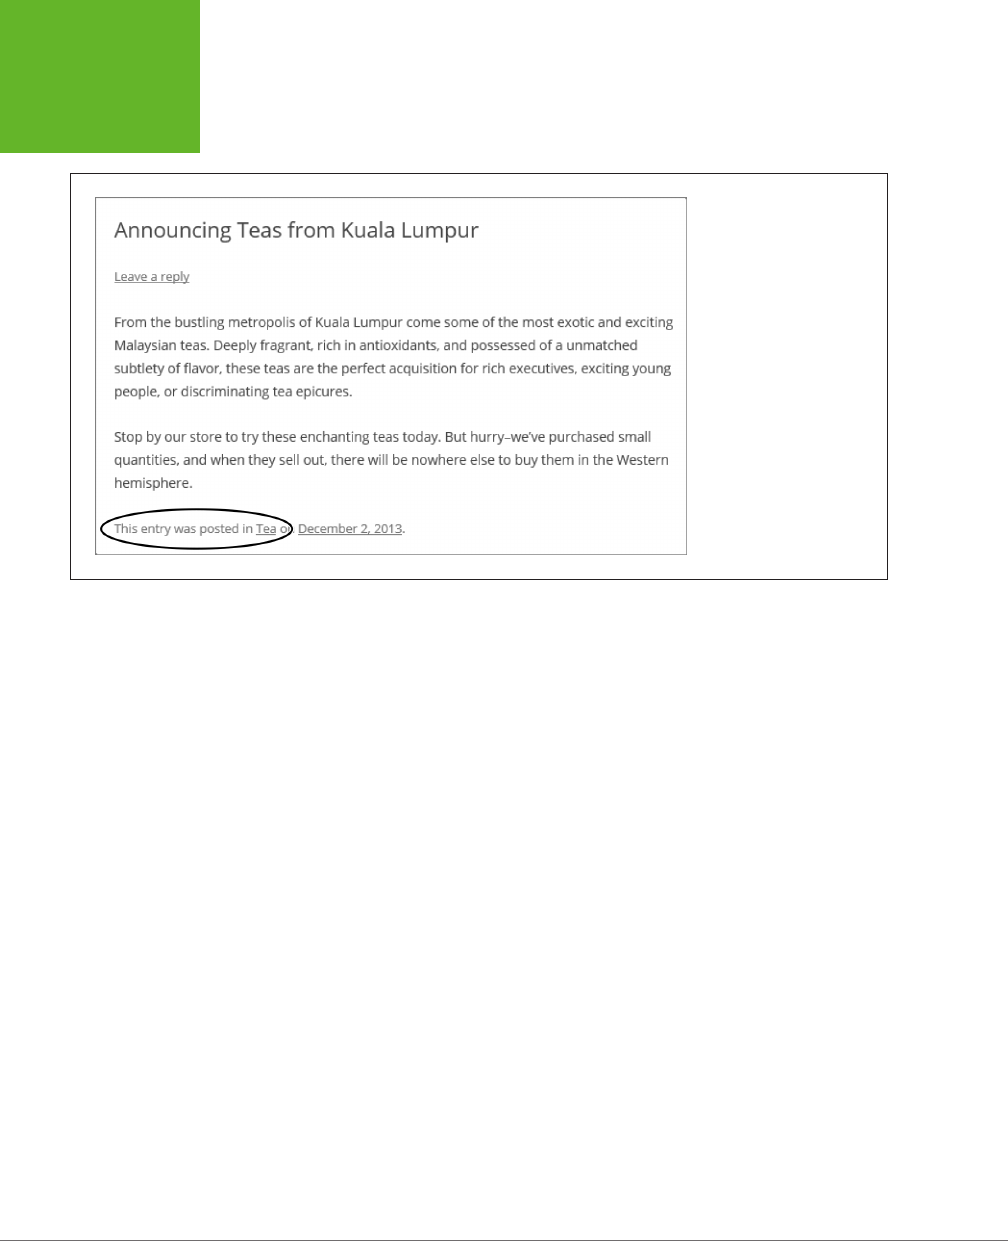
WORDPRESS: THE MISSING MANUAL
110
ORGANIZING
YOUR POSTS
FIGURE 4-18
This post is in the Tea
category. Click the link (the
word “Tea,” under the post),
and you’ll see all the posts
in that category.
Using Subcategories
If you have a huge site with plenty of posts and no shortage of categories, you may
find that you can organize your content better with
subcategories.
The idea behind subcategories is to take a large category and split it into two or
more smaller groups. However, rather than make these new categories completely
separate, WordPress keeps them as subcategories of the original category, which
it calls the
parent category.
For example, the Magic Tea House site could make Tea
a parent category and create subcategories named Black Tea, Green Tea, Rooibos,
and Herbal Tea.
Done right, subcategories have two potential benefits:
• You can show a category tree. A category tree shows the hierarchy of your
categories. In a complex site with lots of categories, most readers find that this
makes it easier to browse the categories and understand how the topics you
cover are related. You’ll learn how to build a category tree in just a moment.
• Visitors can browse posts by subcategory or parent category. That means
that people using the Magic Tea House site can see all the tea posts at once
(by browsing the Tea category) or they can drill down to the subcategory of
tea that interests them the most.
You can create subcategories using the Categories box—in fact, it’s just as easy as
creating ordinary categories (Figure 4-19). The only requirement is that you create
the parent category first. Then enter the subcategory name, pick the parent category
in the Parent Category list, and then click Add New Category.
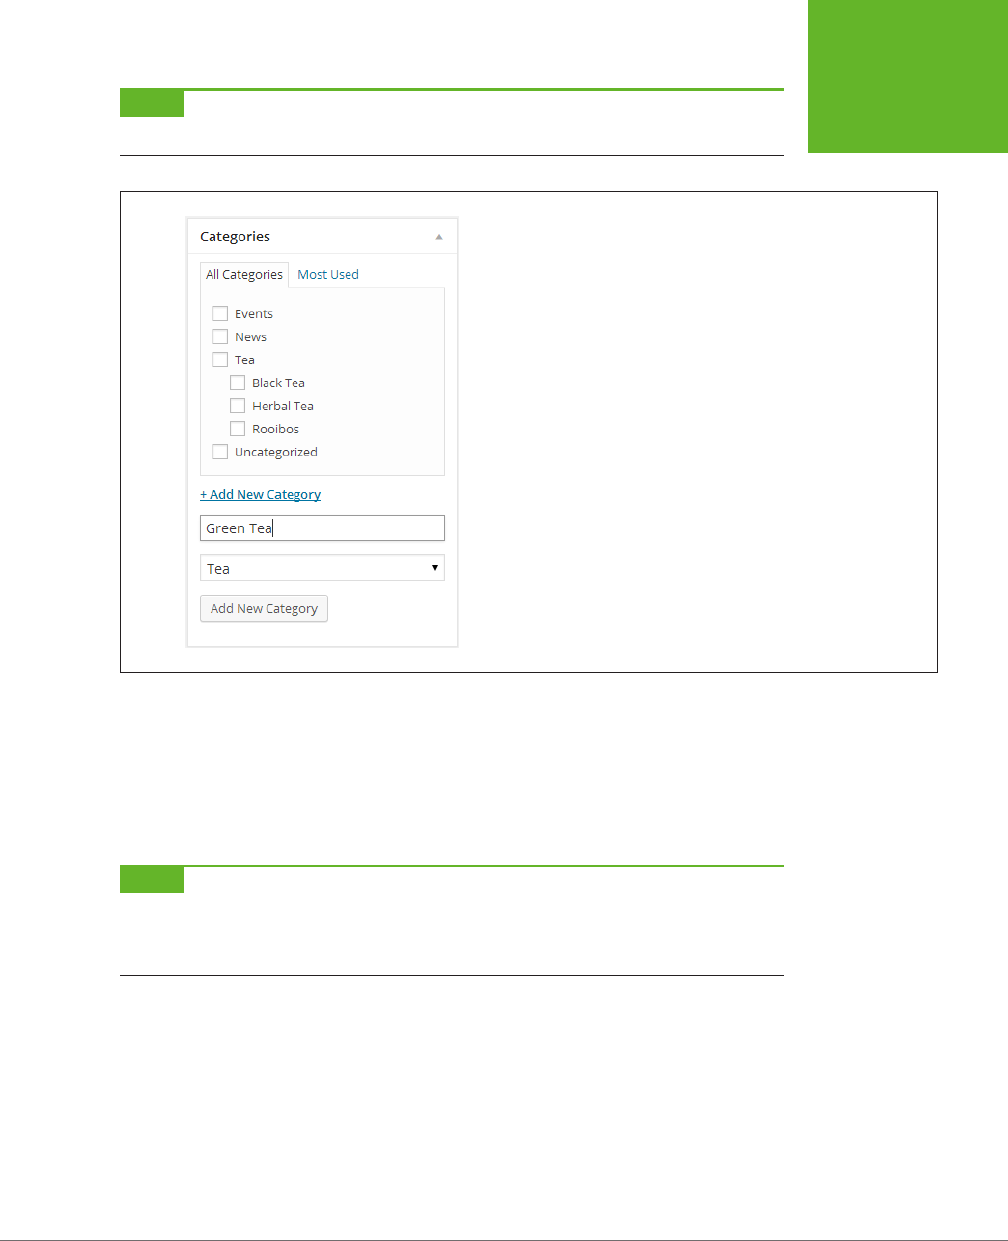
CHAPTER 4: CREATING POSTS 111
ORGANIZING
YOUR POSTS
NOTE Yes, you can create subcategories inside of subcategories. But doing so can complicate life and make
it more difficult to fit a proper category tree in your sidebar. If possible, stick with one level of subcategories.
FIGURE 4-19
To add a post subcategory, you need to supply one extra piece of infor-
mation: the parent category, which you select from a drop-down list.
WordPress displays categories hierarchically in the Categories box. That means that
you’ll see your subcategories (like Green Tea) displayed underneath the parent cat-
egory (Tea). However, there’s an exception—when you first add a new subcategory,
WordPress puts it at the top of the list, and it stays there until you refresh the page
or add a new category. Don’t let this quirk worry you; your new category is still
properly attached to its parent.
NOTE When you assign post to a subcategory, make sure you pick the subcategory only,
not
the parent
category. That means that if you want to add a post about green tea, you should turn on the checkbox next to
the Green Tea box, but
not
the Tea box. Because Tea is the parent category, people who browse the Tea category
will automatically see your Green Tea posts.
When you start adding subcategories to your site, you’ll probably be disappointed
by how they appear in the Categories list, the category-browsing links that appear
in the sidebar alongside your posts. The standard list of categories is a flat, one-
dimensional list in alphabetical order. You can’t see the relationships between parent
categories and subcategories (Figure 4-20, left).
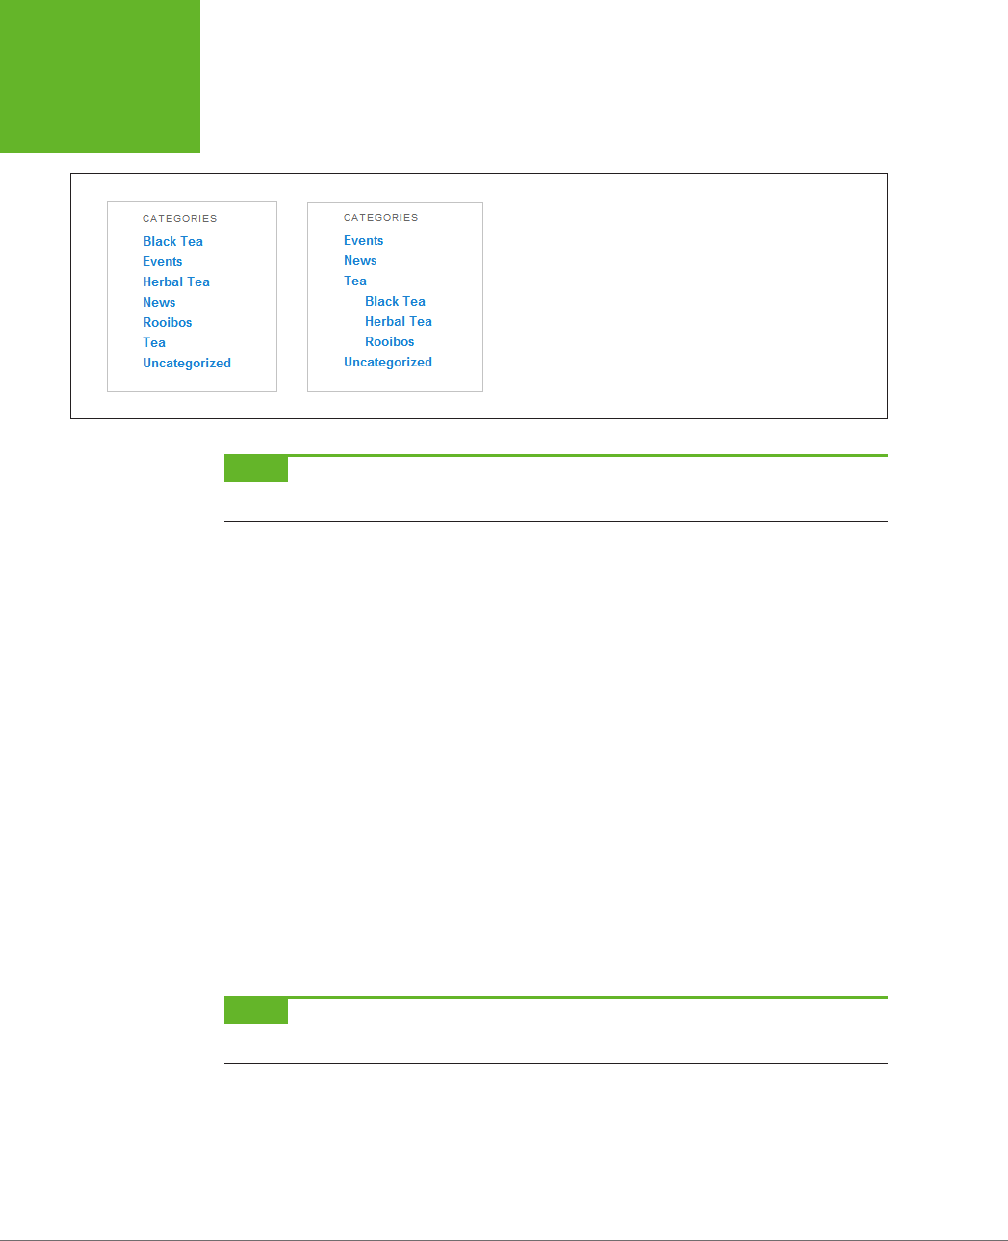
WORDPRESS: THE MISSING MANUAL
112
ORGANIZING
YOUR POSTS
FIGURE 4-20
Ordinarily, the Categories list ignores subgroups (left). But fear
not: With a simple configuration change you can get a more
readable tree (right).
NOTE The Categories list shows only the categories you currently use. So if you create a new category but
don’t assign it to a post, you won’t see it in the Categories list.
Fortunately, it’s easy to change the standard list of categories into a tree of catego-
ries, by borrowing a theme-altering trick you’ll explore in more detail in the next
chapter. Technically, the Categories list is known as a
widget.
Like all widgets, it can
be moved, removed, and reconfigured. Here’s how:
1. On the dashboard, choose AppearanceÆWidgets.
The Widgets page shows you all the individual ingredients that WordPress puts
into the sidebar on your site.
2. In the Main Sidebar box, find the Categories widget.
This is the widget that creates the list of categories that appears next to your
posts.
3. Click the down-pointing arrow on the right side of the widget.
This expands the Categories widget, so you can see its settings.
4. Turn on the checkbox in the “Show hierarchy” settings and then click Save.
Now return to your site and admire the result (Figure 4-20, right).
NOTE No matter what setting you tweak, WordPress always orders categories alphabetically. If you want
to put a specific category on top, you need to put in some extra work and create a menu (page 218).
Managing Categories
As you’ve seen, you can create a category whenever you need one, right from the
Add New Post or Edit Post page. However, the WordPress dashboard also includes
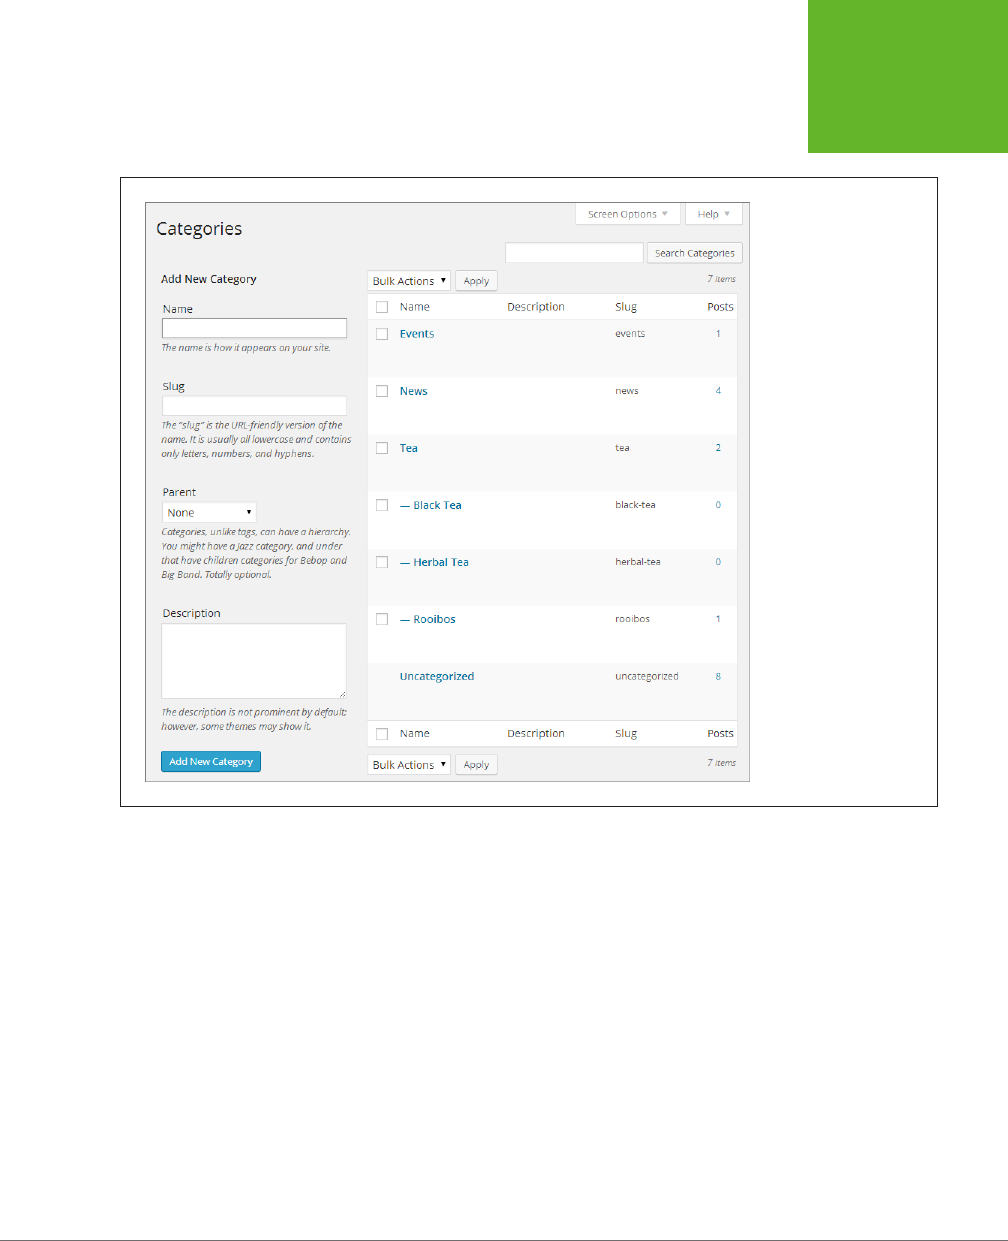
CHAPTER 4: CREATING POSTS 113
ORGANIZING
YOUR POSTS
a page for managing categories. To get there, choose Posts→Categories, and you’ll
see a split page that lets you add to or edit your categories (Figure 4-21).
FIGURE 4-21
The Categories page
includes a section on
the left for adding new
categories and a detailed
list of all your categories
on the right. The catego-
ries list works in much
the same way as the list
of posts on the Posts
page. Point to a category
without clicking, and you
get the chance to edit or
delete it.
The Categories page lets you perform a few tasks that aren’t possible from the
lowly Categories box:
• Delete categories you don’t use. When you take this step, WordPress reas-
signs any posts in the category to the default category, which is Uncategorized
(unless you changed the default in the SettingsÆWriting page).
• Edit a category. For example, you might want to take an existing category and
rename it, or make it a subcategory by giving it a parent.
• Enter extra category information. You already know that every category
has a name and, optionally, a parent. In addition, categories have room for
two pieces of information that you haven’t used yet: a slug and a description.
The
slug
is a simplified version of the category name that appears in the web
address when you use pretty permalinks (page 115). The
description
explains
what the category is all about. Some themes display category descriptions in
their category-browsing pages.

WORDPRESS: THE MISSING MANUAL
114
ORGANIZING
YOUR POSTS
Understanding Tags
Like categories, tags are text labels that add bits of information to a post. But unlike
categories, a post can (and should) have multiple tags. For that reason, the process of
applying tags is less strict than the process of putting your post in the right category.
Tags are often more specific than categories. For example, if you write a review of
a movie, you might use Movie Reviews as your category and the movie and direc-
tor’s name as tags.
Follow these guidelines when you use tags:
• Don’t over-tag. Instead, choose the best five to 10 tags for your content. If you
use WordPress.com and you create a post with 15 tags or more, it’s much less
likely to appear in the WordPress.com tag cloud (page 41), which means new
visitors are less likely to stumble across your blog.
• Keep your tags short and precise. Pick “Grateful Dead” over “Grateful Dead
Concerts.”
• Reuse your tags on dierent posts. Once you pick a good tag, put it to work
wherever it applies. After all, tags are designed to help people find related
posts. And never create a similarly named tag for the same topic. For example,
if you decide to add the tag “New York Condos,” and then you use the tags “NY
Condos” and “Condo Market,” you’ve created three completely separate tags
that won’t share the same posts.
• Consider using popular tags. If you’re on WordPress.com, check out popularly
used tags (page 39) and consider using them in your posts, when they apply.
If you’re trying to attract search engine trac, you might consider using hot
search keywords for your tags (page 448).
• Don’t duplicate your category with a tag of the same name. That’s because
WordPress treats categories and tags in a similar way, as bits of information
that describe a post. Duplicating a category with a tag is just a waste of a tag.
TIP Here’s some advice to help you get straight about categories and tags. Think of the category as the
fundamental grouping
that tells WordPress how a post fits into the structure of your site. Think of a tag as a
searching convenience
that helps readers hunt for content or find a related post.
Tagging Posts
Adding a tag to a post is even easier than assigning it to a category. When you cre-
ate a post (in the Add New Post page) or edit a post (in the Edit Post page), look
for the Tags box, which appears just under the Categories box.
The Tags box gives you three ways to add tags:
• Type a tag into the text box, and then click the Add button. Repeat.
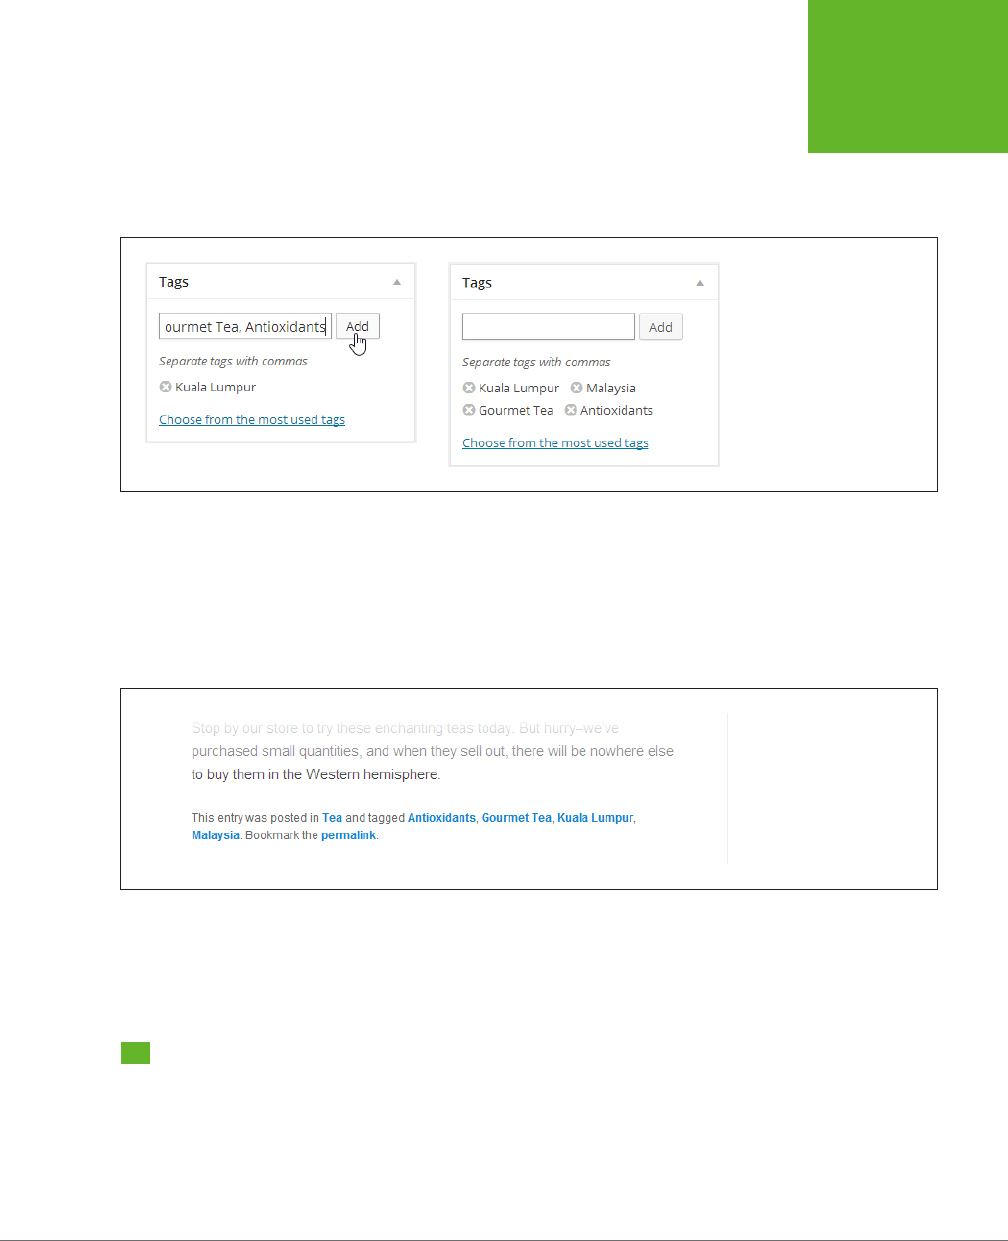
CHAPTER 4: CREATING POSTS 115
HOW TO
GET HIGH-
QUALITY WEB
ADDRESSES
• Type all your tags into the text box at once. Make sure you place a comma
between each tag, as shown in Figure 4-22.
• Click the “Choose from the most used tags” link and pick from the tags you
used for other posts.
FIGURE 4-22
Left: Right now, this post has
one tag, Kuala Lumpur. It’s
about to get three more.
Right: Now the post has four
tags. If you change your mind,
you can remove a tag by click-
ing the
°
icon that appears
next to it.
When you publish a post, the byline will list the post’s category and all its tags (Fig-
ure 4-23). You can follow these links to browse similarly tagged posts. Many blogs
also use a
tag cloud,
a cluster of tag links, sized in proportion to how often you use
them (in other words, in proportion to how many posts feature that tag). The default
WordPress site layout doesn’t use a tag cloud, but you can add one easily using the
Tag Cloud widget. You learn how on page 165.
FIGURE 4-23
The exact look of a post byline
depends on your theme, but
most list the categories and
tags you added to a post.
As with categories, tags have their own management page, which you can see by
choosing Posts→Tags. There you can add tags, remove tags, and edit the tag slugs,
which appear in the web addresses when you use pretty permalinks (page 117).
How to Get High-Quality Web Addresses
Every post you put on a WordPress site has its own unique web address, or URL. So
far, you haven’t really thought about what those URLs look like. After all, nobody
needs
to type in a web address to read a post. Instead, people can simply visit the
front page of your site and click through to whatever content interests them.

WORDPRESS: THE MISSING MANUAL
116
HOW TO
GET HIGH-
QUALITY WEB
ADDRESSES
However, seasoned web designers know that web addresses matter—not just for the
front page of your site, but for each distinct bit of content. One reason is that search
engines pay attention to the keywords in a URL, so they treat something like
http://
wastedminutes.com/best_time_wasters
dierently from
http://wastedminutes.com/
post/viewer.php?postid=3980&cat=83
. All other factors being equal, if someone
searches for “time wasters” in Google, the search engine is more likely to suggest
the first page than the second.
Another important detail is the
lifetime
of your URLs. Ideally, a good web address
never changes. Think of an address as a contract between you and your readers.
The promise is that if they bookmark a post, the web address will still work when
they return to read it, even months or years later (assuming your entire site hasn’t
gone belly-up in the interim). WordPress takes this principle to heart. In fact, it calls
the unique web address that’s assigned to every post a
permalink,
emphasizing its
permanent nature.
As you’ll soon see, WordPress will happily give your posts meaningful web addresses
that last forever, but you might need to help it out a bit. Before you can do that, you
need to understand a bit more about how the WordPress permalink system works.
The details dier depending on whether you’re using WordPress.com or you’ve
installed WordPress on your web host. The following sections lay out the essentials.
Permalinks in WordPress.com
On a WordPress.com site, permalinks always follow this structure:
http://site/year/month/day/post-name
For example, if you create a blog named
lazyfather.wordpress.com
on November
27, 2014, WordPress will automatically create a post named “Hello world!” that has
a permalink like this:
http://lazyfather.wordpress.com/2014/11/27/hello-world
The year, month, and day numbers are set when you create the post. The last
part—the post name—is based on the title of the post. WordPress changes spaces
to hyphens and ignores funky characters (like @, #, and $). If you create two posts
with the same name on the same day, WordPress adds a number to the end of the
second post title. (If you create a post with the same name but on a dierent day,
no problem, because the first part of the web address is already dierent.)
WordPress’s URL-generating strategy is a pretty good starting point. However, you
can change the address for any post when you create it. This is a great feature if you
think your post title is ridiculously long or if you have an idea for an address that’s
more likely to net you some serious search engine trac. Page 119 explains how to
change a post’s permalink.

CHAPTER 4: CREATING POSTS 117
HOW TO
GET HIGH-
QUALITY WEB
ADDRESSES
Permalinks on a Self-Hosted Site
Here’s the good news: If you use the self-hosted version of WordPress, you can
choose the permalink style. And here’s the bad news: If you don’t change it yourself,
you’ll be stuck with distinctly old-fashioned web addresses.
With the default permalink style, WordPress creates short but rather cryptic web
addresses that use the post ID. They follow this structure:
http://site/?p=id
For example, if you create a WordPress blog at
lazyfather.com/blog
, the first “Hello
world!” post gets a permalink like this:
http://lazyfather.com/blog/?p=1
The
post ID
is a unique, sequential number that WordPress gives to every new post.
So it’s no surprise that the first post has a post ID of 1.
This permalink style is short, but it has no other benefits. The permalinks are mean-
ingless to other people and search engines, because it’s impossible to tell what a
given post is about. Can you tell the dierence between
http://lazyfather.com/
blog/?p=13
(a post about cute family pets) and
http://lazyfather.com/blog/?p=26
(a post about the coming Mayan apocalypse)? The post ID is essentially a secret
code that doesn’t mean anything to anyone except the web server database that
holds the collection of correspondingly numbered posts.
Even if you love the convenience of short web addresses (and who doesn’t?), you
almost certainly want to use a more descriptive permalink style. Fortunately, Word-
Press makes it easy. Just follow these steps:
1. In the dashboard, choose SettingsÆPermalinks.
The Permalinks Setting page appears.
2. Choose a new permalink style.
Your choices are listed under Common Settings:
• Default. This is the WordPress.org standard: brief but obscure permalinks
that use the post ID, like
http://magicteahouse.net/?p=13
.
• Day and name. This style is the same as the WordPress.com standard.
Permalinks include several pieces of information, including the year, month,
and date, separated by slashes. At the end is the much more descriptive
post name (a simplified version of the post title), as in
http://magicteahouse.
net/2014/07/28/announcing-teas-from-kuala-lumpur
.
• Month and name. This style is similar to “Day and name,” except that it
leaves out the date number, giving you a slightly more concise permalink,
like
http://magicteahouse.net/2014/07/announcing-teas-from-kuala-
lumpur
.

WORDPRESS: THE MISSING MANUAL
118
HOW TO
GET HIGH-
QUALITY WEB
ADDRESSES
• Numeric. This is a nicer looking version of the default style. It uses the
post ID, but without including the
?p=
characters. Instead, it adds the text
/archives
, as in
http://magicteahouse.net/archives/13
. However, this type
of permalink is still as clear as mud.
• Post name. This style omits all the date information, using just the post
name, as in
http://magicteahouse.net/announcing-teas-from-kuala-lumpur
.
The advantages of this system are that the permalinks it creates are concise
and easy to remember and understand. They don’t emphasize the date
the content was created, which is important if you have timeless content
that you want to refer to months or years later. One disadvantage is that if
you give more than one post the same name, WordPress needs to tack a
number onto the end of the permalink to make it unique.
• Custom structure. This is an advanced option that lets you tell WordPress
exactly how it should cook up permalinks. The most common reason to
use a custom structure is because you want the post category to appear
in your permalink (as explained in the box on page 119).
TIP If you don’t want to emphasize dates and you’re willing to put in a bit of extra work to avoid duplicate
titles, the “Post name” style is a great choice. If you’re concerned about clashing titles, “Month and name” is
safer, and if you want to emphasize the exact date of your posts—for example, if you write time-sensitive or
news-like content—“Day and name” is a good choice.
UP TO SPEED
Understanding Permalink Codes
When you choose a permalink style other than Default, you’ll
notice that WordPress automatically inserts the matching codes
in the “Custom structure” box. For example, if you choose “Day
and name,” these codes appear:
%year%/%monthnum%/%day%/%postname%
Think of this as a recipe that tells WordPress how to build the
permalink. Each code (that’s the bit of text between percentage
signs, like
%year%
and
%monthnum%
) corresponds to a piece
of information that WordPress will stick into the web address.
In this example, four codes are separated by three slashes.
When WordPress uses this format, it starts with the site address
(as always) and then adds the requested pieces of informa-
tion, one by one. First it replaces the %year% code with the
four-digit year number:
http://magicteahouse.net/2014/%monthnum%/%
day%/%postname%
Then it replaces the %monthnum% code with the two-digit
month number:
http://magicteahouse.net/
2014/07/%day%/%postname%
It carries on until the permalink is complete:
http://magicteahouse.net/2014/07/28/
the-origin-of-tea
You don’t need to understand WordPress’s permalink codes in
order to use different permalink styles. However, you do need
to understand them if you want to create your own recipe for
generating permalinks, as described in the box on page 119.

CHAPTER 4: CREATING POSTS 119
HOW TO
GET HIGH-
QUALITY WEB
ADDRESSES
3. Click Save Changes.
WordPress applies the permalink change to your entire site. That means that
WordPress updates any posts you already published to the new style. If you’re
switching from the standard style to another style, this never causes a problem,
because the ID-based links continue to work. (That’s because no matter what
permalink style you use, WordPress continues to give each post a unique post
ID, which it stores in its database.) However, if you switch to a second perma-
link style (for example, “Day and name”) and then to a third style (say, “Month
and name”), the outlook isn’t so rosy. Anyone who bookmarked a “Day and
name”–style URL will find that it no longer works.
TIP If you want to tweak the way your WordPress site generates permalinks (and if you’re using the
self-hosted version of WordPress, you almost certainly do), it’s best to make that change as soon as possible.
Otherwise, changing the permalink style can break the web addresses for old posts, frustrating readers who have
bookmarked them. Think twice before tampering with the URL structure of an established site.
POWER USERS’ CLINIC
Create Permalinks That Include the Category
If you’re ambitious, you can make deeper customizations to
the way WordPress generates post permalinks. To do that, you
need to choose the Custom Structure permalink type, and then
fill in your permalink “recipe” with the right codes.
WordPress recognizes 10 codes. More than half are date-related:
%year%, %monthnum%, %day%, %hour%, %minute%, and
%second%. Additionally, there’s a code for the category slug
(%category%) and the author (%author%). Finally, every per-
malink must end with either the numeric post ID (represented
by %post_id%) or post name (%postname%), because this is
the unique detail that identifies the post.
Often, WordPress gurus use a custom permalink structure that
adds category information. They do so because they feel that
the permalinks are aesthetically nicer—in other words, clearer
or more meaningful—or because they think that this increases
the chance that search engines will match their post with a
related search query.
Here’s an example of a custom permalink structure that creates
category-specific permalinks:
%category%/%postname%
Now WordPress creates permalinks that include the category
name (in this case, Tea) and the post name (The Origin of
Tea), like this:
http://magicteahouse.net/tea/the-origin-
of-tea
This type of URL doesn’t work well if you assigned some of your
posts more than one category. In such a case, WordPress picks
one of the categories to use in the web address, somewhat un-
predictably. (Technically, WordPress uses the category that has
the lower category ID, which is whichever one you created first.)
Changing a Post’s Permalink
Most WordPress fans prefer pretty permalinks— web addresses that include the
post title. If you use WordPress.com, your posts always use pretty permalinks. If
you use a self-hosted WordPress site, you get pretty permalinks in every permalink
style except Default and Numeric.
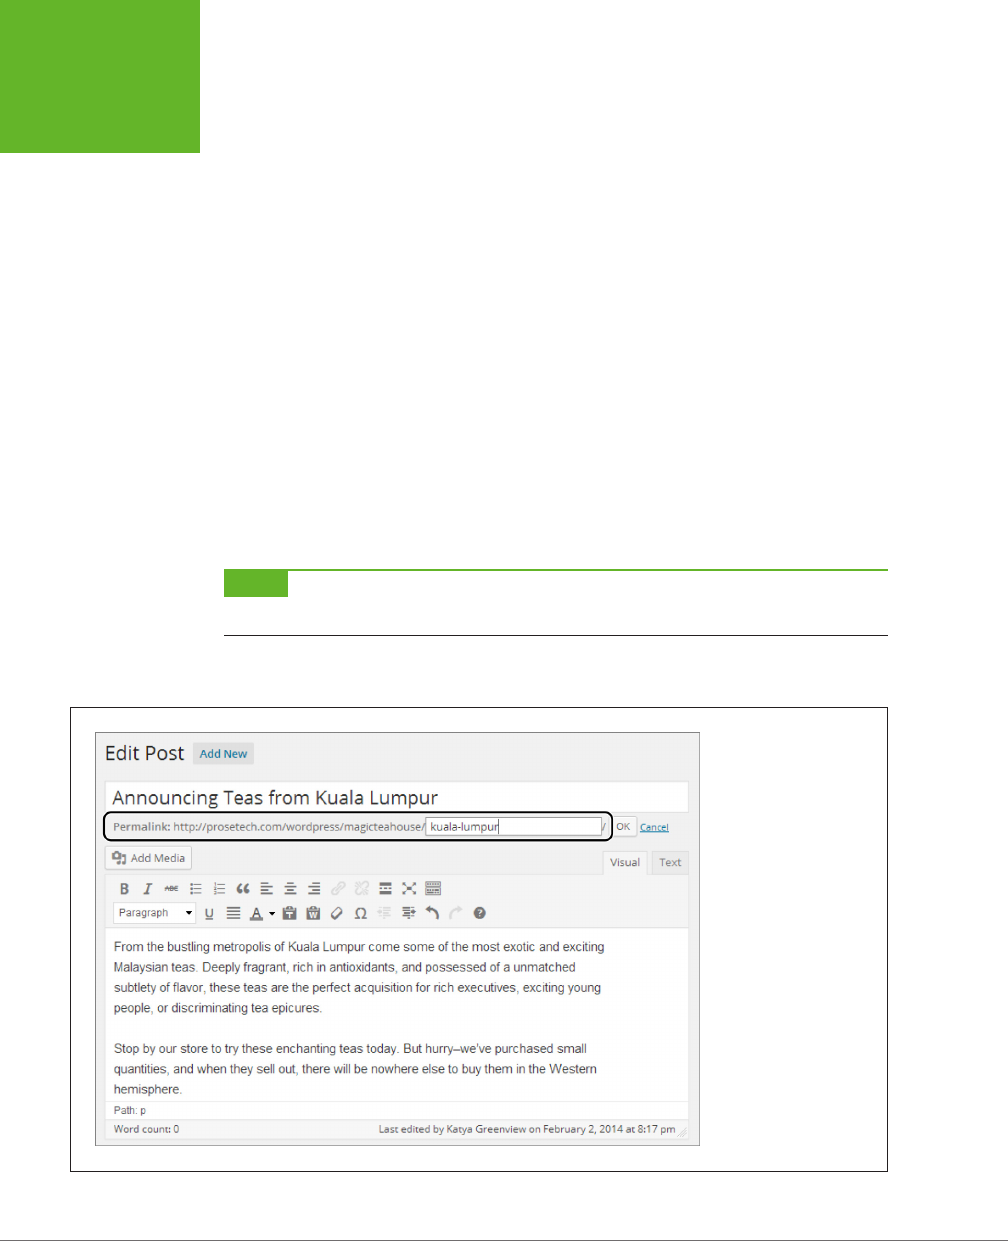
WORDPRESS: THE MISSING MANUAL
120
HOW TO
GET HIGH-
QUALITY WEB
ADDRESSES
However, pretty permalinks aren’t always as pretty as they should be. The problem
is that a post title doesn’t necessarily fit well into a web address. Often, it’s overly
long or includes special characters. In this situation, you can help WordPress out
by explicitly editing the
slug
—the version of the post name that WordPress uses in
your permalinks.
You can change the slug when you add or edit a post. Here’s how:
1. Find the permalink line, which appears just under the post title text box.
WordPress creates the slug automatically, once you type in the post title and
start entering the post content. After that point, the slug doesn’t change, even
if you edit the title, unless you edit it explicitly.
2. Click the Edit button next to the permalink line (Figure 4-24).
WordPress converts the portion of the permalink that holds the slug into a text
box. You can then edit to your heart’s content, so long as you stay away from
spaces and special characters, which aren’t allowed in URLs. The best perma-
links are short, specific, and unlikely to be duplicated by other posts. (Although
WordPress is smart enough to refuse to use a slug you assigned to another post.)
NOTE If you see a Change Permalinks button next to the permalink where the Edit button should be, you
don’t have pretty permalinks turned on. To fix the problem, follow the steps on page 117.
3. Click OK to make your change ocial.
FIGURE 4-24
Here, you’re cutting
the unwieldy slug
“announcing-teas-from-
kuala-lumpur” down
to size.

CHAPTER 4: CREATING POSTS 121
HOW TO
GET HIGH-
QUALITY WEB
ADDRESSES
NOTE WordPress is very conscientious about dealing with old permalinks. If visitors try to find a post using
an old permalink that has since changed, WordPress automatically forwards them to the right post and correct
web address. This trick makes sure that old bookmarks and search engines that link to your site keep working.
Getting a Shorter Version of Your Web Address
Pretty permalinks are memorable and, if you don’t include the date information,
fairly simple. However, they can still be inconveniently long for certain situations.
Sometimes, you might need a shorter address that points to a post—one that’s easier
to jot down or fit in the confines of a Twitter message. And although you can cut a
permalink down to size when you create a post, it still might not be short enough.
WordPress is ready to help. It gives you two ways to reach every post you create: a
permalink (like the ones you’ve been using so far), and a leaner URL called a
short-
link.
Shortlinks work just as well as permalinks, and you can use both types of link
at once, depending on what you need, without confusing WordPress.
Shortlinks look dierent depending on whether you’re using a self-hosted WordPress
site or WordPress.com. In a self-hosted site, the shortlink uses the Default permalink
style. It’s your site address, with the numeric post ID:
http://magicteahouse.net/?p=13
WordPress.com takes a dierent approach. It uses its own URL-shortening service,
called WP.me, to ensure that you get a micro web address like this:
http://wp.me/p21m89-1a
Even though it points to what seems like a completely dierent website, this shortlink
redirects visitors to the right blog post on the right WordPress.com site. Best of all,
the entire shortlink requires a mere 22 characters, which is just about as short as
they come.
WordPress doesn’t oer the shortlink option until you publish your post. In fact, to
get it, you need to start editing your post (page 102). Once you’re there, click the Get
Shortlink button that appears in the permalink line (or just underneath it, depending
on how much room WordPress has). WordPress pops open a new window with the
shortlink for your post (Figure 4-25).
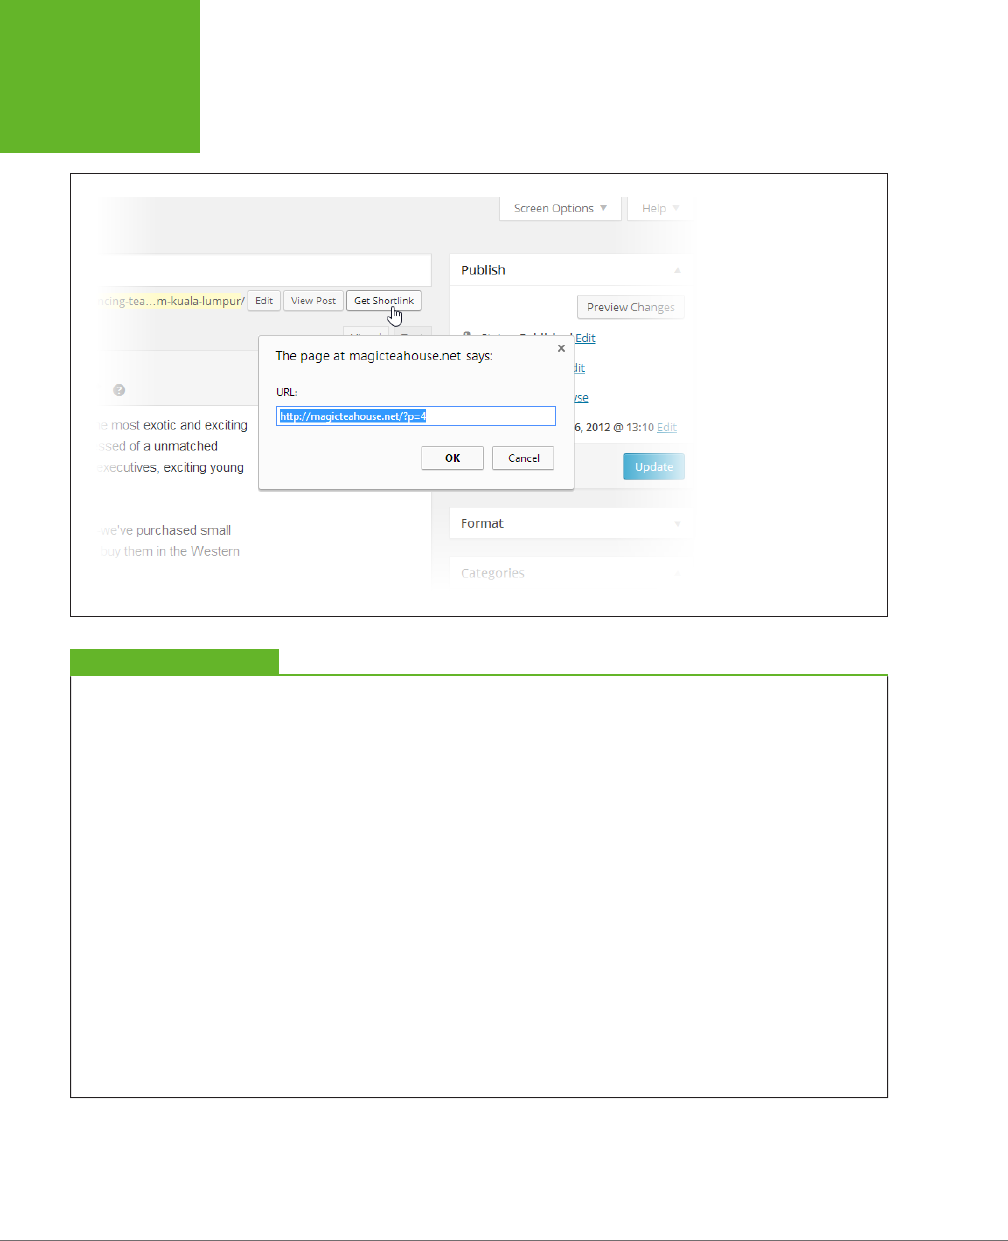
WORDPRESS: THE MISSING MANUAL
122
HOW TO
GET HIGH-
QUALITY WEB
ADDRESSES
FIGURE 4-25
Here’s the post’s short-
link, ready for copying.
GEM IN THE ROUGH
Making Your Shortlinks Even Smaller
If you have a self-hosted WordPress site, the shortlink
might not be as short as you want. It works great if you use
WordPress to run your entire site and you have a nice, short
domain name. But if you have a long domain name with your
WordPress content in a subfolder, you end up with a not-so-
short shortlink, like this:
http://prosetech.com/wordpress/magicteahouse/?p=4
It might occur to you to use the WP.me service to get an
even shorter web address, but unfortunately it’s limited to
WordPress.com sites. However, there are other URL-shortening
services that will take your address and spit out a tinier
version. Popular shortener sites include
http://bit.ly
(which
Twitter uses for automatic URL-shrinking),
http://tinyurl.com
,
and
http://tiny.cc
.
For example, if you plug your web address into bit.ly, you get
a new one, like this:
http://bit.ly/LejGs9
Weighing in at a mere 20 characters, this address is even
shorter than the ones WP.me creates. If someone types that URL
into a browser, they’ll go first to the bit.ly web server, which
will quickly redirect the browser to the original web address.
The end result is that your post appears almost immediately.
Using any of these URL-shortening services is easy. Just go to
the website, paste in your web address—either the permalink
or shortlink, it doesn’t matter—and then copy the new con-
densed address.

CHAPTER 4: CREATING POSTS 123
DASHBOARD
TRICKS TO
SAVE TIME AND
EFFORT
Browsing Categories and Tags Using a Web Address
Earlier, you saw how the Categories widget lets you retrieve a list of posts for any
category. For example, click the Herbal Tea link and—presto!—you see the posts
about brewing your favorite dried leaves.
WordPress works this category-browsing magic using a specific form of web address.
If you understand it, then you can use category web addresses yourself, wherever
you need them. First, you start with the site address:
http://magicteahouse.net
Then, you add
/category/
to the end of the address, like this:
http://magicteahouse.net/category/
Finally, you add the bit that identifies the category you want to use. If you use the
default permalink style on a self-hosted site, you get awkward category web ad-
dresses that incorporate the category ID:
http://magicteahouse.net/category/?cat=6
But if you use pretty permalinks, life is much better. Then, instead of embedding
the category ID, category web addresses use the much more readable category
slug,
like this:
http://magicteahouse.net/category/herbal-tea
WordPress cooks up the slug based on your category name, using the same process
it follows to pick the slug for a new post. First, WordPress replaces every uppercase
letter with a lowercase one. Next, it replaces spaces with hyphens (-). Lastly, it strips
out forbidden special characters, if you used them. As a result, the category Herbal
Tea gets the slug
herbal-tea
.
Remember, you can modify the slug for every category using the Categories page
(page 113). For example, you can shorten the address shown above by replacing
herbal-tea
with the simpler slug
herbal.
Tags work the same way as categories, except the
/category/
portion of the web
address becomes
/tag/.
So, to browse the posts that use a specific tag, you need
an address like this:
http://magicteahouse.net/tags/kuala-lumpur
You can tweak tag slugs in the Tags page. However, it’s far less common to tailor
tag slugs than it is to edit post and category slugs.
Dashboard Tricks to Save Time and Eort
As you’ve learned, the dashboard is the key to unlocking your WordPress site. So
far you’ve used it to work with posts: creating them, changing them, and deleting
them. You also managed categories and tags, and tweaked a variety of WordPress

WORDPRESS: THE MISSING MANUAL
124
DASHBOARD
TRICKS TO
SAVE TIME AND
EFFORT
settings. But you’re far from exhausting the dashboard—in fact, you’ll spend the
better part of this book exploring its nooks and crannies.
Now, here are a few tips that can improve your dashboard skills. You’ll learn to cus-
tomize the dashboard display, get help, and work with lists—basics that will prepare
you for the administrative tasks to come.
POWER USERS’ CLINIC
Being in Two Places at Once
One potential problem with the dashboard is that it lets you
view only one page at a time. This limitation can become
awkward in some situations. For example, imagine you’re in
the middle of creating a post when you decide you want to
review a setting somewhere else in the dashboard. You
could
save the post as a draft, jump to the settings page, and then
return to continue with your post. And, for many people, this
approach works just fine. But if you’re the sort of power user
who’s comfortable with browser shortcuts, there’s another
approach that may appeal: opening more than one browser
page at a time, with each positioned on a different part of
the dashboard.
It all works through the magic of the Ctrl-click—a nifty browser
trick where you hold down the Ctrl key (Command on a Mac)
while clicking a link. In modern browsers, this causes the target
of the link to open in a new tab. This trick doesn’t work with
all websites, particularly those that use JavaScript routines in
the place of ordinary links. But in the WordPress dashboard,
it flows without a hitch.
For example, imagine you’re at the Add New Post page and
you want to review your post display settings. To open the set-
tings page in a new tab, hover over Settings in the dashboard
menu and Ctrl-click the Reading link. Keep in mind, however,
that if you change something in one tab that affects another,
you might not see the results of your change right away. For
example, if you add a category on the Categories page while
the Add New Post page is open, you won’t see it in the Add
New Post page unless you refresh the page. (But don’t forget
to click Save Draft first if you want to keep your post!)
Customizing a Dashboard Page
When you navigate to a dashboard page, you don’t always see all the settings you
can adjust. WordPress tries hard to oer you real power and flexibility without
overloading your brain with features and settings.
However, you’ll sometimes need to adjust one of WordPress’s hidden settings. (Or
you’ll want to hide some of the settings WordPress
does
show, just to clear away the
visual clutter.) Either way, the secret is the Screen Options button, which controls
exactly what WordPress displays on the page.
If you haven’t noticed the Screen Options button yet, that’s because it’s carefully
tucked away in the top-left corner of the dashboard (circled in Figure 4-26). How-
ever, you’ll see it on nearly every dashboard page. When you click Screen Options,
a new panel pops into existence at the top of the page (Figure 4-27). To collapse
the panel, click the Screen Options button again.
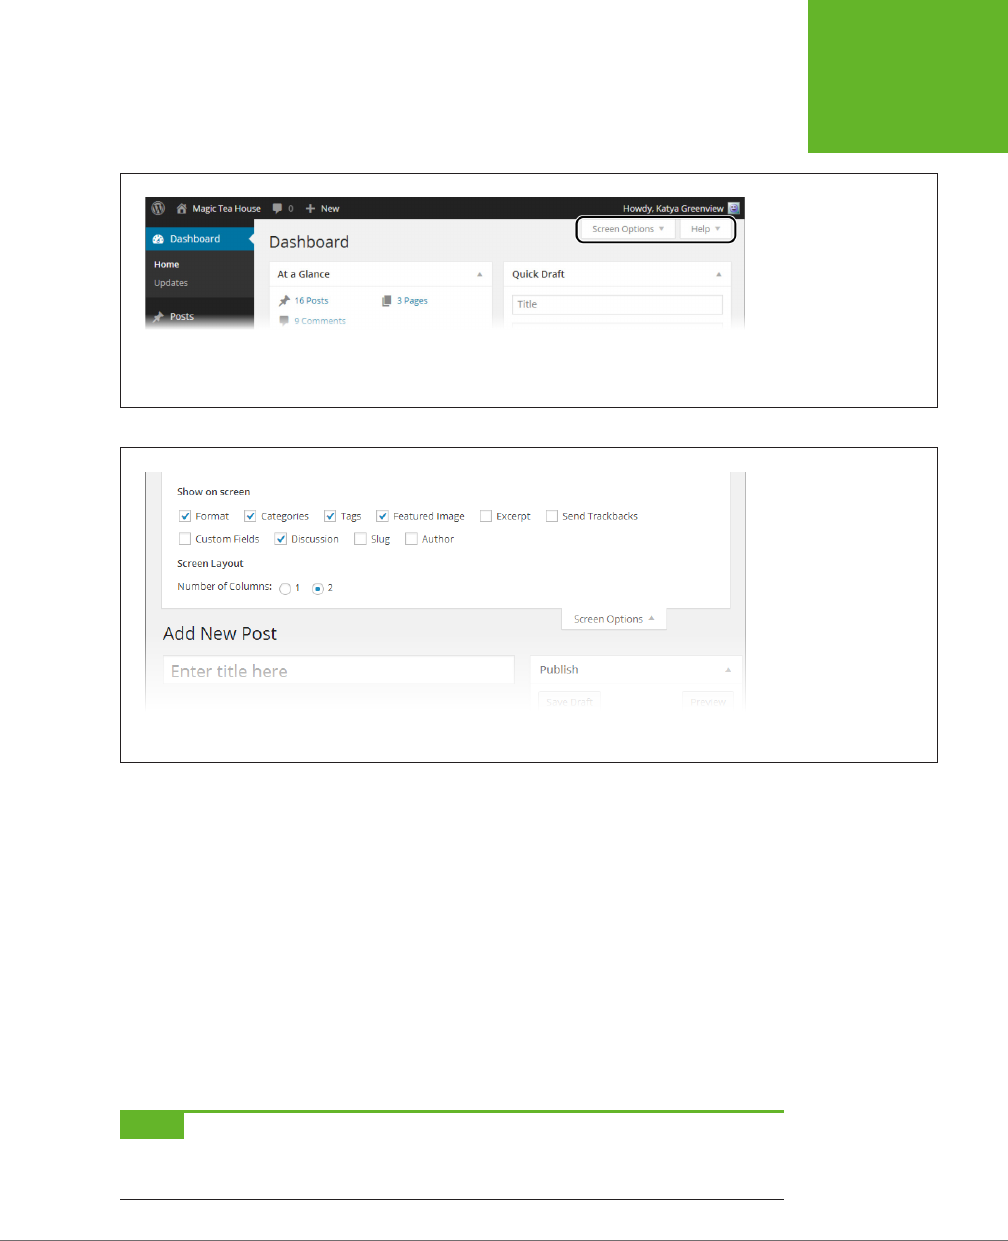
CHAPTER 4: CREATING POSTS 125
DASHBOARD
TRICKS TO
SAVE TIME AND
EFFORT
FIGURE 4-26
Almost every dashboard
page sports the Screen
Options and Help buttons
shown here. They’re
the key to unearthing
WordPress’s hidden
options—and figuring out
how they work.
FIGURE 4-27
Here are the screen op-
tions for the Add New Post
page. Using them, you
can manage two things:
the controls WordPress
displays on the page
(using the checkboxes
under “Show on screen”),
and the way WordPress
presents those controls
(using the settings under
Screen Layout).
To understand how the Screen Options box works, you need to understand that
every checkbox in it corresponds to a gray panel that WordPress can either show
or hide. For example, in Figure 4-28, the Format, Categories, Tags, and Featured
Image checkboxes are turned on, and so the Format, Categories, Tags, and Featured
Image panels appear on the page. (So does the Publish panel, which doesn’t have a
corresponding checkbox, because WordPress won’t let you hide it.)
But the Screen Options box in Figure 4-28 also includes several
unchecked
boxes,
such as Excerpt, Send Trackbacks, Custom Fields, and so on. Many of these corre-
spond to panels with less commonly adjusted settings. They’re hidden (by default),
because WordPress assumes you don’t need them and don’t want to be distracted
with more details. But if you turn on one (or more) of these checkboxes, the cor-
responding panels appear on the page.
NOTE As you work through this book, you’ll find that you sometimes do need to dip into the screen options
to display panels that WordPress ordinarily hides. Now that you know how the Screen Options button works, you’ll
be ready.
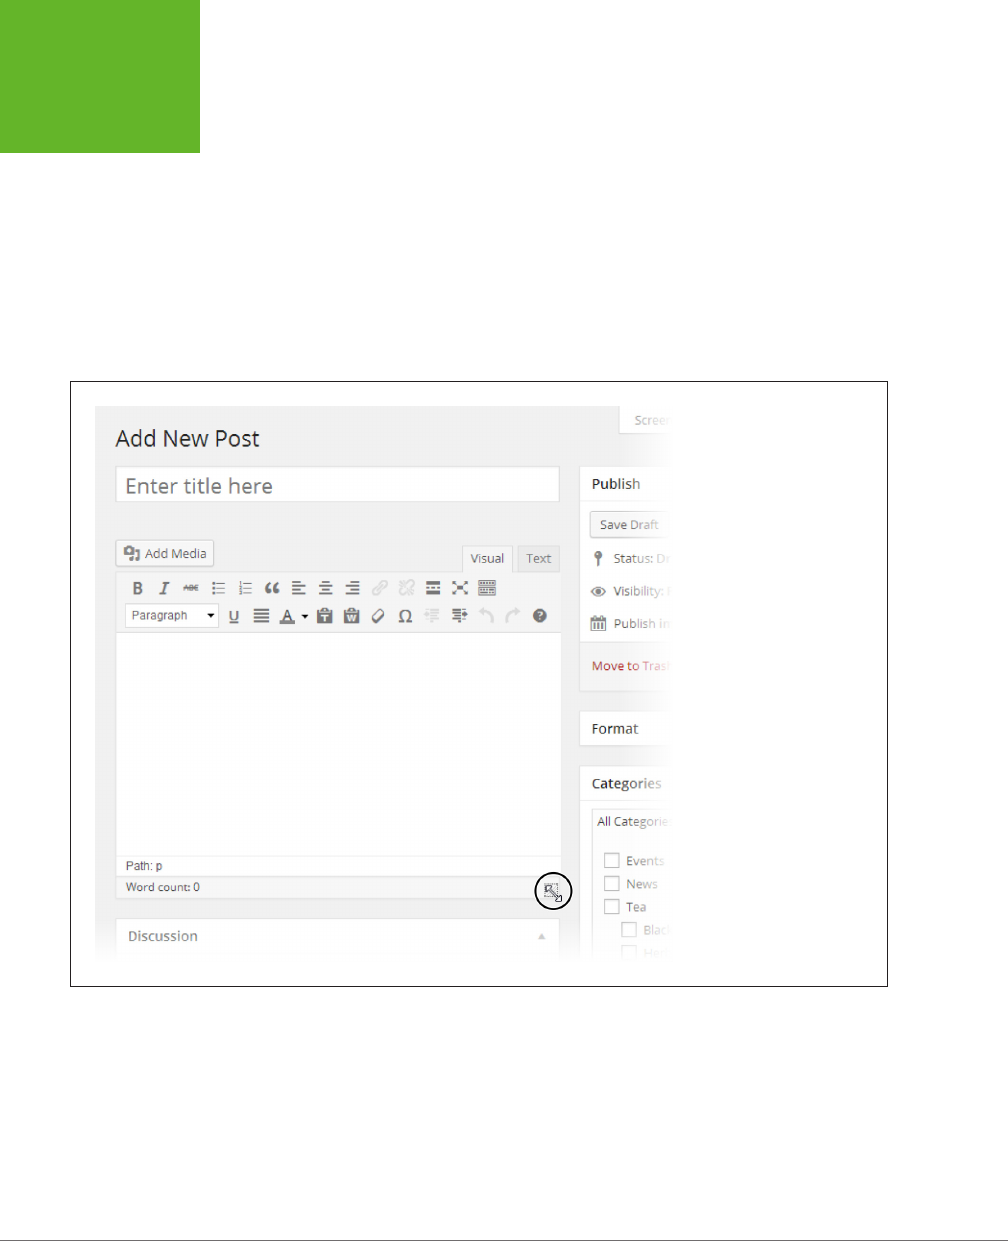
WORDPRESS: THE MISSING MANUAL
126
DASHBOARD
TRICKS TO
SAVE TIME AND
EFFORT
Not only can you show and hide the panels in a dashboard page, but you can also
move them around. Just click a title at the top of the panel (like “Categories”) and
drag it to a new place on the page. WordPress automatically rearranges the other
panels to make room. This is a great way to make sure that the options you use most
often are right at your fingertips. (Watch out, though: If you click the title of a panel
and
don’t
drag it somewhere else, WordPress collapses that panel so that only the
title remains visible. Click the title again to expand it.)
Finally, there’s one really useful dashboard customization trick that can help when
you create or edit a huge post. If you click the bottom-right corner of the post edi-
tor and drag down (Figure 4-28), you can make the editing box as big as you want.
FIGURE 4-28
Need more space to edit a long
post without scrolling? Click
here and drag down.
Getting Help
Soon you’ll be a WordPress administration guru. But in the meantime, you’ll oc-
casionally face perplexing settings in the WordPress dashboard. The Help button
isn’t perfect, but it can be useful sometimes.
You’ll find the Help button right next to the Screen Options button, in the top-right
corner of nearly every dashboard page. When you click it, a small panel with help
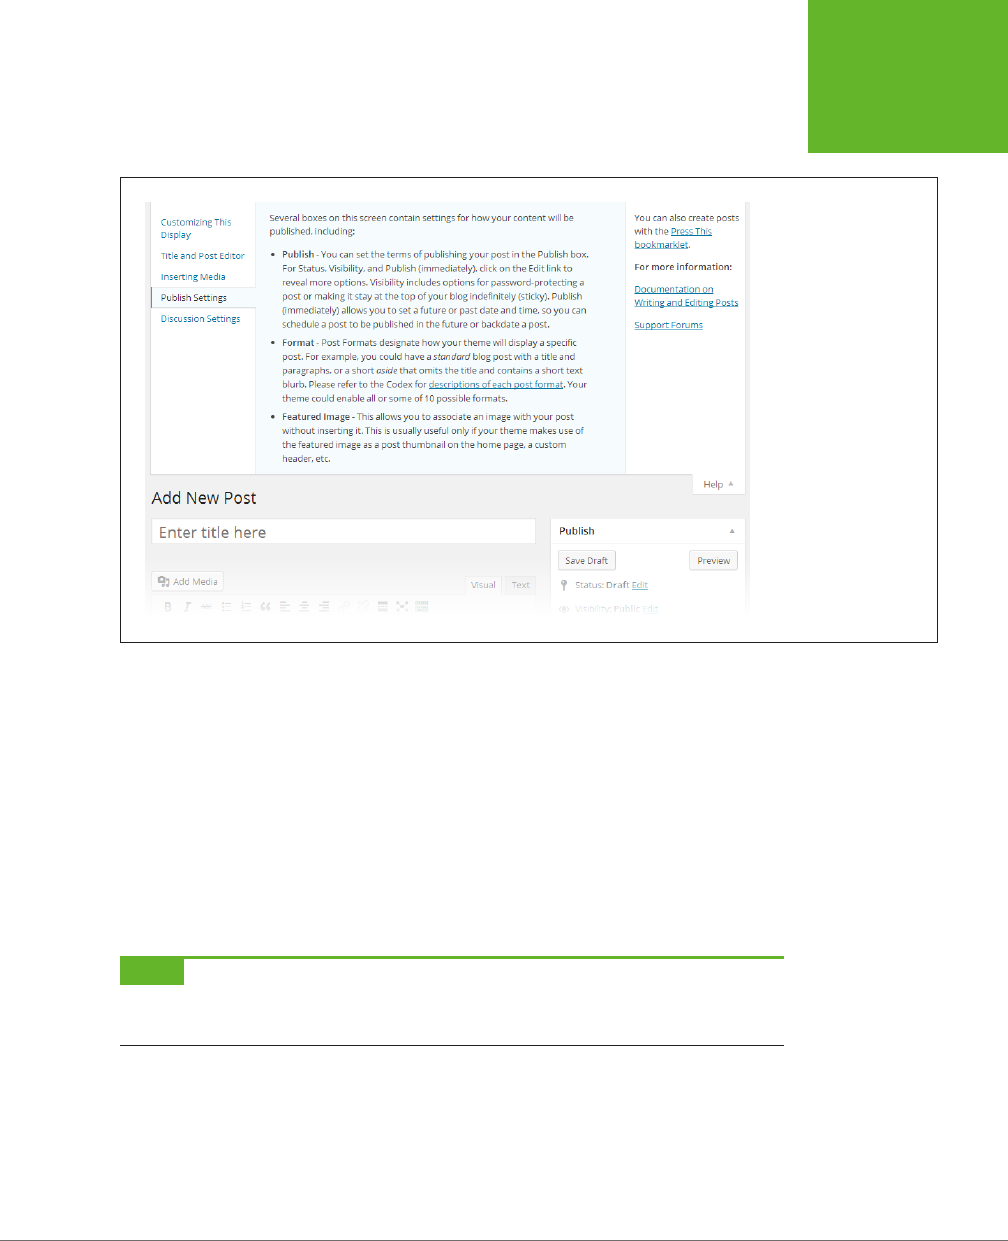
CHAPTER 4: CREATING POSTS 127
DASHBOARD
TRICKS TO
SAVE TIME AND
EFFORT
information drops into view. To collapse the panel, click the Help button again. Figure
4-29 shows the help for the Add New Post page.
FIGURE 4-29
WordPress’s help box
is packed with terse
but potentially helpful
information. Click a
link on the left side to
choose your topic. (This
example shows Publish
Settings.) On the right are
additional links that can
take you to WordPress’s
official documenta-
tion (be warned, it’s
sometimes out of date)
or the forums (where you
can ask friendly strangers
for help).
Taking Charge of the List of Posts
You’ve already seen the Posts page, which lists the posts on your site. However, as
your site grows larger, it becomes increasingly dicult to manage everything on
one page, and in a single table. To get control of your posts, you need to develop
your searching and filtering skills.
First, it’s important to realize that the Posts page doesn’t list everything at once.
Instead, it shows up to 20 posts at a time—to get more, you need to click the arrow
buttons that show up in the bottom-right corner of the list. Or you can adjust the
20-post limit: just click the Screen Options button, change the number in the Posts
box, and then click Apply.
NOTE If you allow more posts on your Posts page, you’ll get a slower-to-load page and a longer list to
scroll through. Of course, there’s nothing wrong with bumping up the limit for certain tasks (say, to 100), and
then changing it back when you finish.
Changing the number of posts is one way to fit more posts into your list, but it isn’t
much help if you want to home in on a specific batch of posts that might be scat-
tered throughout your site. In this situation, WordPress has another set of tools to
help you out: its filtering controls. Using the drop-down lists at the top of the table
of posts (Figure 4-30), you can choose to show only posts that were made during
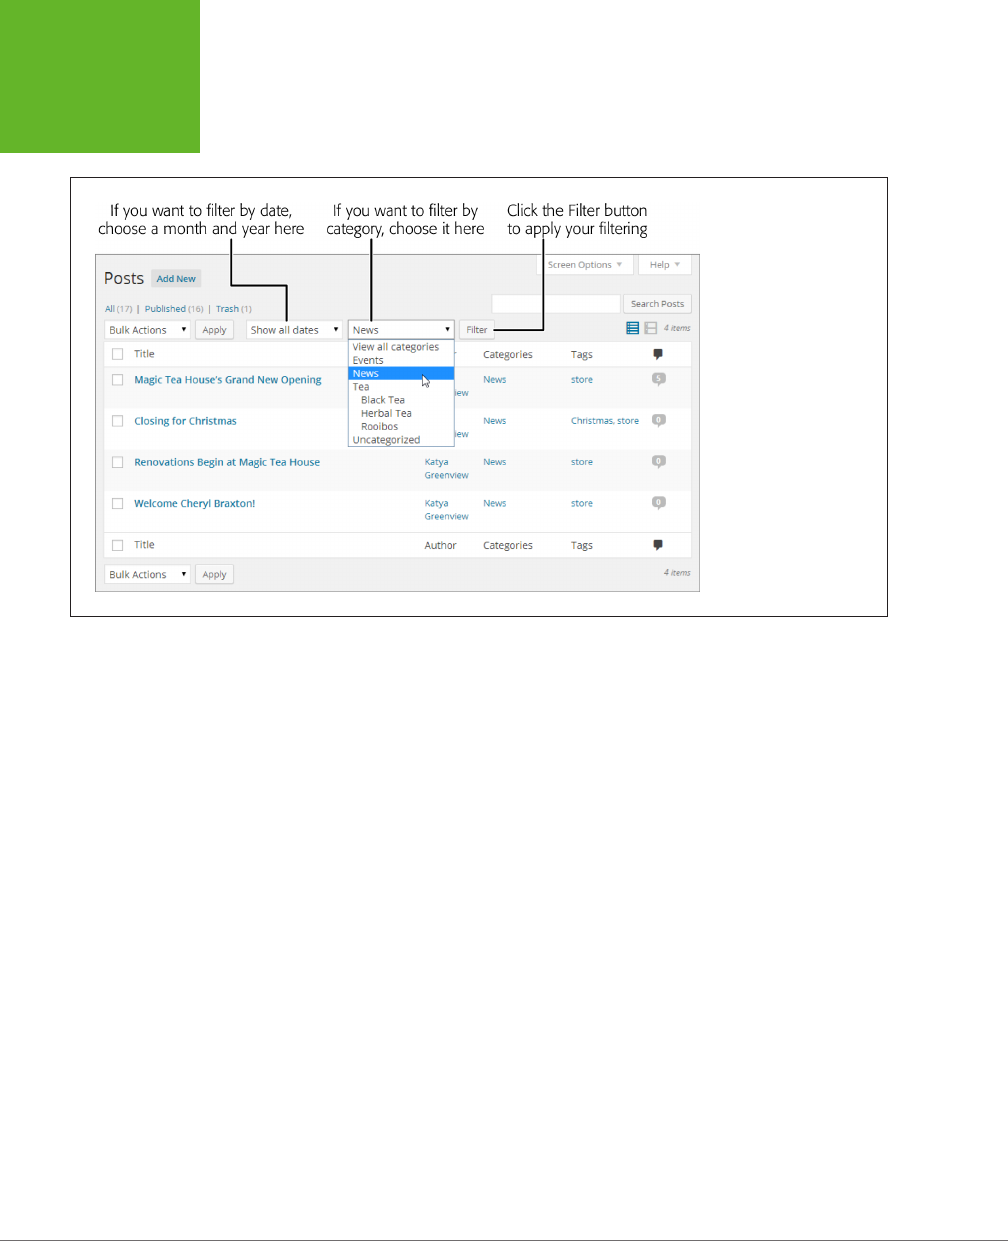
WORDPRESS: THE MISSING MANUAL
128
DASHBOARD
TRICKS TO
SAVE TIME AND
EFFORT
a specific month (for example, “June 2014”) or that belong to a specific category
(say, “Green Tea”).
FIGURE 4-30
To filter a list of posts,
choose a specific month
or category (or both), and
then click Filter. Here, the
list shows the posts in the
News category.
Ordinarily, WordPress displays posts in the same reverse-chronological order that
they appear on your site. But you can change that by clicking one of the column
headings. Click Title to sort alphabetically by headline, or Author to sort alphabeti-
cally by writer. If you click the column heading a second time, WordPress
reverses
the sort order. So if you sort a list of posts by Title, clicking Title a second time
shows the posts in reverse-alphabetical order. And if you sort posts by Date, so
that the newest posts appear first, clicking Date again displays the posts with the
oldest ones on top.
The last trick that the Posts window oers is the search box in the top-right corner,
above the posts list. You can search for all the posts that have specific keywords in
their titles or text. For example, to show posts that talk about veal broth, you would
type in
“veal broth”
(using quotation marks if you want to turn both words into a
single search term), and then click Search Posts.
Performing Bulk Actions
So far, you’ve worked on one post at a time. If you plan to change a post’s title or
edit its text, this is the only way to go. But if you want to manipulate several posts
in the same way—for example, change their category, add a keyword, or delete
them—the Add Posts page lets you carry out your work in bulk.

CHAPTER 4: CREATING POSTS 129
DASHBOARD
TRICKS TO
SAVE TIME AND
EFFORT
The easiest bulk action is deleting. To send a batch of posts to the trash, follow
these simple steps:
1. Choose PostsÆAll Posts on the dashboard.
That takes you to the familiar All Posts page.
2. Find the posts you want.
If you don’t see all the posts you want to remove, then use the search or filtering
techniques described on page 128.
3. Turn on the checkbox next to each post you want to remove.
4. In the Bulk Actions list, choose Move to Trash.
The Bulk Actions list appears in two places: just above the list of posts and just
underneath it. That way, it’s easily accessible no matter where you are.
5. Click Apply.
WordPress moves all the selected posts to the trash.
You can also use a bulk action to make certain post changes. For example, you can
add tags to your post, change the author, or simultaneously publish a group of drafts.
The steps are similar but slightly more involved. Here’s what to do:
1. Choose PostsÆAll Posts on the dashboard.
2. Find the posts you want (search or filter the posts if needed).
3. Turn on the checkbox next to each post you want to edit.
4. In the Bulk Actions list, choose Edit and then click Apply.
WordPress opens a panel at the top of the post list with editing options (Figure
4-31).
5. Manipulate the details you want to change.
Using the Bulk Edit panel, you can add tags (type them in) or apply a category.
However, you can’t remove tags or
change
the category. That means that if
you apply a new category, your posts will actually have two categories, which
probably isn’t what you want. (Sadly, you have to remove the category you
don’t want individually, post by post.)
The Bulk Edit panel also lets you change the post’s author (if your site has more
than one), its status (for example, turning a draft into a published post), and a
few other settings that you’ll explore in the coming chapters.
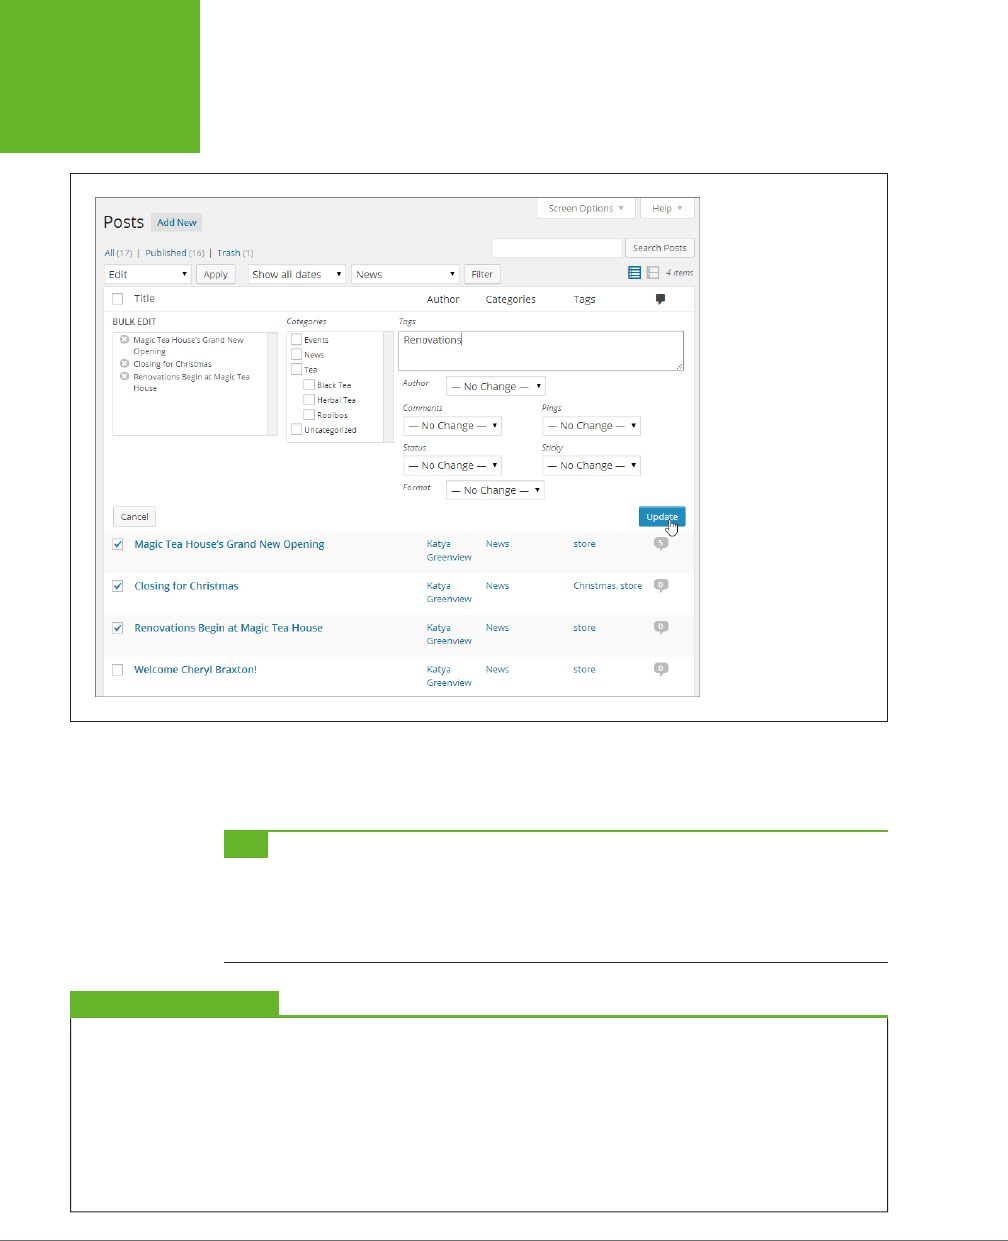
WORDPRESS: THE MISSING MANUAL
130
DASHBOARD
TRICKS TO
SAVE TIME AND
EFFORT
FIGURE 4-31
The Bulk Edit panel lists
posts you’re editing en
masse (in this example,
there are three), and pro-
vides a limited number
of editing options. Here,
you’re adding a new tag
to the three posts.
6. Click Update in the Bulk Edit panel.
Or back out by clicking Cancel.
TIP Here’s a dashboard double-trick that combines filtering and bulk actions. Say you decide to change all
the posts in a category. First choose the category in the filter list (above the list of posts) and then click Filter.
You’ll see a list that includes only the posts in that category. To select all these posts, turn on the checkbox that
appears in the top-left corner of the post list, next to the word “Title.” Now you can pick your universal action
from the Bulk Actions box and carry on.
GEM IN THE ROUGH
Posting with Your Phone or Tablet
The dashboard is stocked full of power-user tools. But it’s
impossible to beat the convenience of posting far from your
computer, wherever you are, using a few swipes and taps on
your favorite mobile device. In the past, developers created
plug-ins that made mobile posting possible. Today, WordPress
itself has taken over that role, and it offers an impressive range
of free mobile apps at
http://wordpress.org/mobile
. You’ll find
apps that work with iPads, iPhones, Android devices, BlackBer-
ries, Windows phones, and more. All the apps are polished,
professional, and free.

131
CHAPTER
5
Using the skills you picked up in the previous chapters, you can create a Word-
Press site and stu it full of posts. However, your site will still come up short
in the looks department. That’s because every new WordPress site starts out
looking a little drab, and pretty much the same as everyone else’s freshly created
WordPress site. If that sounds colossally boring to you, keep reading, because this
chapter shows how to inject some serious style into your site.
The key to a good-looking WordPress site is the
theme
you use. Essentially, a theme
is a set of files that control how WordPress arranges and styles your content, trans-
forming it from raw text in a database into beautiful web pages. You can think of a
theme as a
visual blueprint
for your content. Themes tell WordPress how to lay out
the components of your site, what colors and fonts to use, and how to integrate
pictures and other graphical details.
Every WordPress site starts out with a standard theme. Right now, yours uses the
straightforward Twenty Twelve theme (assuming you followed the instructions on
page 93). In this chapter, you’ll learn how to enhance the Twenty Twelve theme or
pick a stylish new one from the hundreds that WordPress oers. You’ll also see how
to choose sidebar widgets and arrange them on your site. Master these skills, and
you can transform your site from standard-issue plainness to eye-popping pizzazz.
Choosing and Polishing
Your Theme

WORDPRESS: THE MISSING MANUAL
132
HOW THEMES
WORK
How Themes Work
One of WordPress’s most impressive tricks is the way it generates web pages
dy-
namically,
by pulling content out of a database and assembling it into just the right
web page. Themes are the key to this process.
In an old-fashioned website, you format pages before you upload them to your web
server. If you want your site to look dierent in any respect, you have to update your
pages and re-upload the whole site. But in a WordPress site, your content and your
formatting information are separate, with your theme handling the formatting. As
a result, you can change the way WordPress styles your pages by editing or chang-
ing your theme, without needing to touch the content. The next time someone
requests a page, WordPress grabs the usual content and quietly applies the latest
formatting instructions.
So how does a theme work its content-formatting magic? Technically, a theme is a
package of files. Most of them are
templates
that set out the structure of your pages.
For example, the template file
header.php
determines how the header at the top
of every page on your site looks (see Figure 5-1), and the template file
single.php
assembles the content for a single post.
Each template includes a mixture of HTML markup and PHP code. (If you’re fuzzy
on these web basics, know that HTML is the language in which all web pages are
written, and PHP is one of many web programming languages you can use to create
dynamic content.) You won’t actually touch the template files in this chapter, but
you’ll learn how to edit them later, in Chapter 13.
Along with your template files, WordPress uses a style sheet, named
style.css,
that
supplies formatting information for virtually every heading, paragraph, and font on
your site. This style sheet uses the CSS (Cascading Style Sheets) standard, and it
formats WordPress pages in the same way that a style sheet formats almost every
page you come across on the Web today. There’s no special WordPress magic here,
but you can edit your theme’s style sheet to add special eects, like fancy fonts
(page 481).
The WordPress “Year” Themes
Every new WordPress site starts out with a default theme. Odds are it’s a
year theme,
one of a few standard themes ocially sanctioned by the team of WordPress devel-
opers. We call them year themes because WordPress releases them annually and
names them after the year in which they appear. The first year theme was named
Twenty Ten. It was followed by the Twenty Eleven theme, the Twenty Twelve theme,
and so on (see Table 5-1 for the full list). The fine folks at WordPress plan to continue
this release pattern for the foreseeable future.
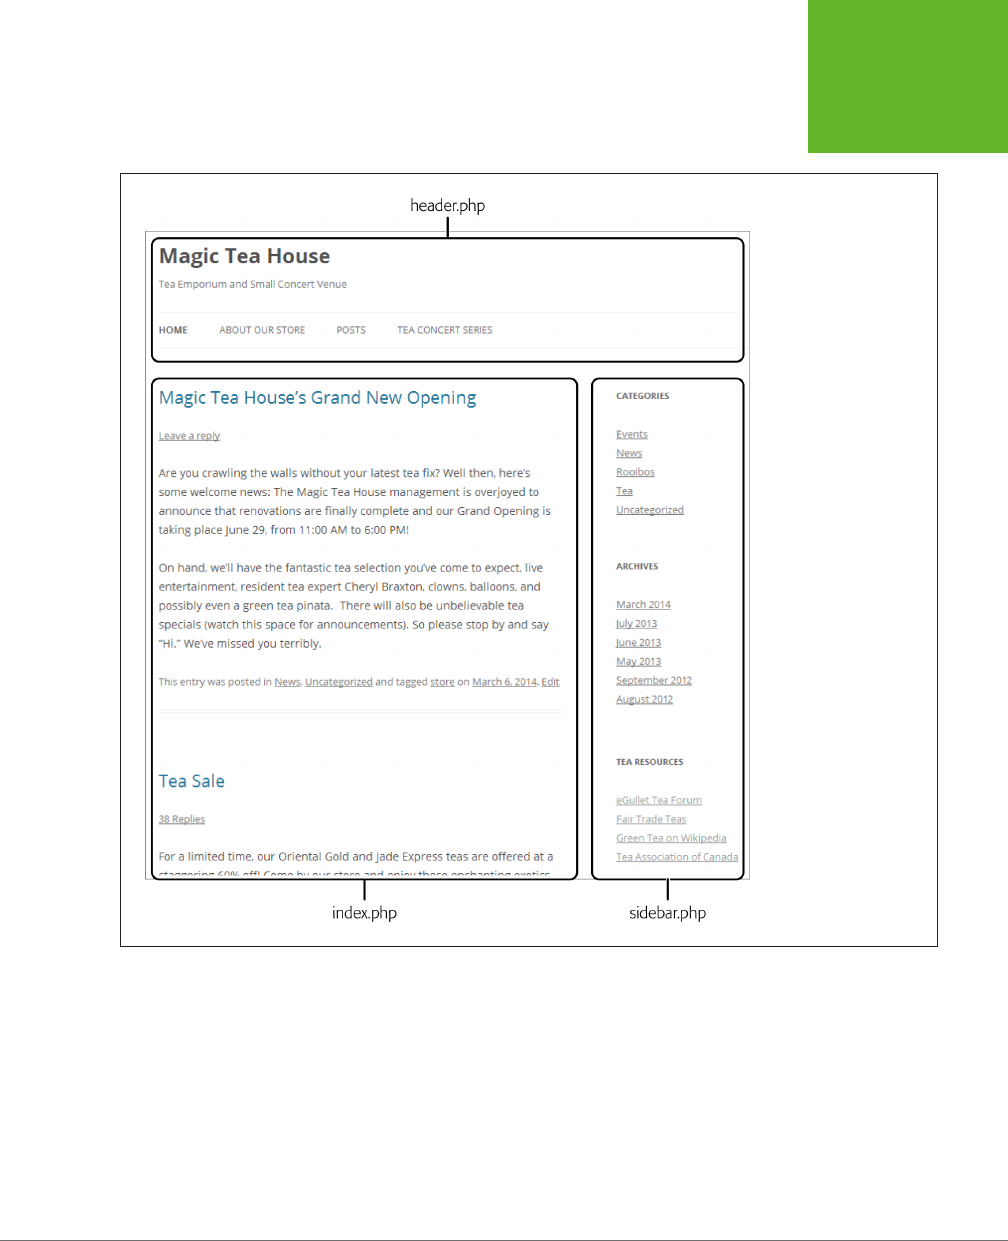
CHAPTER 5: CHOOSING AND POLISHING YOUR THEME 133
HOW THEMES
WORK
FIGURE 5-1
Each WordPress site uses
a single theme, and each
theme includes a pile
of interrelated template
files that control different
parts of your site.

WORDPRESS: THE MISSING MANUAL
134
HOW THEMES
WORK
TABLE 5-1
The WordPress year themes
THEME WHAT IT LOOKS LIKE
Twenty Ten Provides a slightly old-style blog look, with
a traditional arrangement: header and menu
at the top, list of posts underneath, and a
sidebar on the right side. Colors and fonts
start out plain and simple.
Twenty Eleven Provides a similar layout to Twenty Ten, but
adds a few Zen touches: bigger image head-
ers, bigger text, and
much
more whitespace.
(But mind the gap—some WordPress fans
don’t like Twenty Eleven’s extra padding.)
Twenty Twelve Offers a clean, refined theme with great
typography and a streamlined layout. Some
will find it bland, but its elegant design
touches have kept it popular to this day. It
also has particularly good support for mobile
devices (as you’ll see on page 168).
Twenty Thirteen Features snazzy text, generous whitespace
that recalls Twenty Eleven, and an Arizona-
esque red-orange color scheme. The
WordPress team was aiming for a colorful,
fun look, but some people find this theme a
bit
too
distinctive for their sites.
Twenty Fourteen Provides a modern black-and-white theme
with unarguable good looks. However, its
stark and serious look doesn’t suit everyone.
Consider this theme if your site is heavy on
photography.
The year themes are also called the
default themes,
because most sites start out
using one of them. If you run a self-hosted WordPress site, it comes with the most
recent year themes preinstalled (currently, that’s Twenty Twelve, Twenty Thirteen,
and Twenty Fourteen). If you host your site with WordPress.com, you get easy ac-
cess to all the year themes.
NOTE At the time of this writing, all new self-hosted WordPress sites start out using Twenty Fourteen, a
magazine-style theme with a heavy black frame. It feels slick, serious, and dark, and it’s best suited to photo
sites and news magazines, rather than traditional blogs. For that reason, you switched your site to the simpler
Twenty Twelve theme on page 93 to practice posting.

CHAPTER 5: CHOOSING AND POLISHING YOUR THEME 135
HOW THEMES
WORK
UP TO SPEED
What’s in a Name: The Year Themes
The year themes often confuse WordPress newcomers. The
naming system seems to imply that older year themes are
out of date, and that newer year themes are their natural
successors. But that’s not true.
First, it’s important to understand that each year theme is a
new creation. For example, the Twenty Fourteen theme was
adapted from an existing community theme called Further that
was initially built by Takashi Irie, while the Twenty Thirteen was
designed in-house by the WordPress experts at Automattic.
The two themes are entirely different and independent; Twenty
Thirteen didn’t evolve into Twenty Fourteen.
Similarly, newer year themes don’t replace older ones. Word-
Press clearly states that the goal of each year theme is to be
different, thought-provoking, and useful. The goal is
not
to
provide a single all-purpose theme that satisfies everyone.
That’s why the appearance of Twenty Thirteen is radically
different from Twenty Fourteen, and why many WordPress
gurus still rely on older classics like Twenty Twelve to get the
balance of features and style they want. (That said, the two
oldest year themes, Twenty Ten and Twenty Eleven, don’t work
as seamlessly with mobile devices. To save yourself some work,
pick a later year theme instead.)
When WordPress releases Twenty Fifteen, it will offer yet
another new style that doesn’t replace the themes that have
gone before. This change won’t affect you, however, because
you’re about to learn how to make any theme work for you—
and how to find even more specialized themes in WordPress’s
expansive theme catalog.
Making Your Theme Suit Your Site
Now that you have a basic idea of how themes work, you’re ready to start improving
the look of your site. There are several paths you can take to change the appear-
ance of your theme, depending on how dramatic your alterations are. Your choices
include these:
• Changing to a dierent theme. To give your site a dramatic face-lift, you can
pick a completely dierent theme. With that single step, you get new fonts,
colors and graphics, a new layout, and—sometimes—new features. WordPress.
com users have over 250 themes to pick from, while WordPress self-hosters
can choose from thousands more.
• Tweaking your theme settings. WordPress gives you a number of useful ways to
personalize your theme. The options depend on the theme, but you can usually
alter a theme’s color scheme, change the header picture, and shift the layout.
• Customizing your widgets. Most WordPress themes include one or more
sections you can customize, like a sidebar you can stock with various links. The
sections in the sidebar are called
widgets,
and you can change them, rearrange
them, and add new ones.
• Editing your theme. Advanced WordPress fans can crack open their theme
files, work on the code with some help from this book, and make more sub-
stantial changes. The simplest modification is to fine-tune the CSS styles that
format your pages. More ambitious theme hackers can change virtually every
detail of their sites.
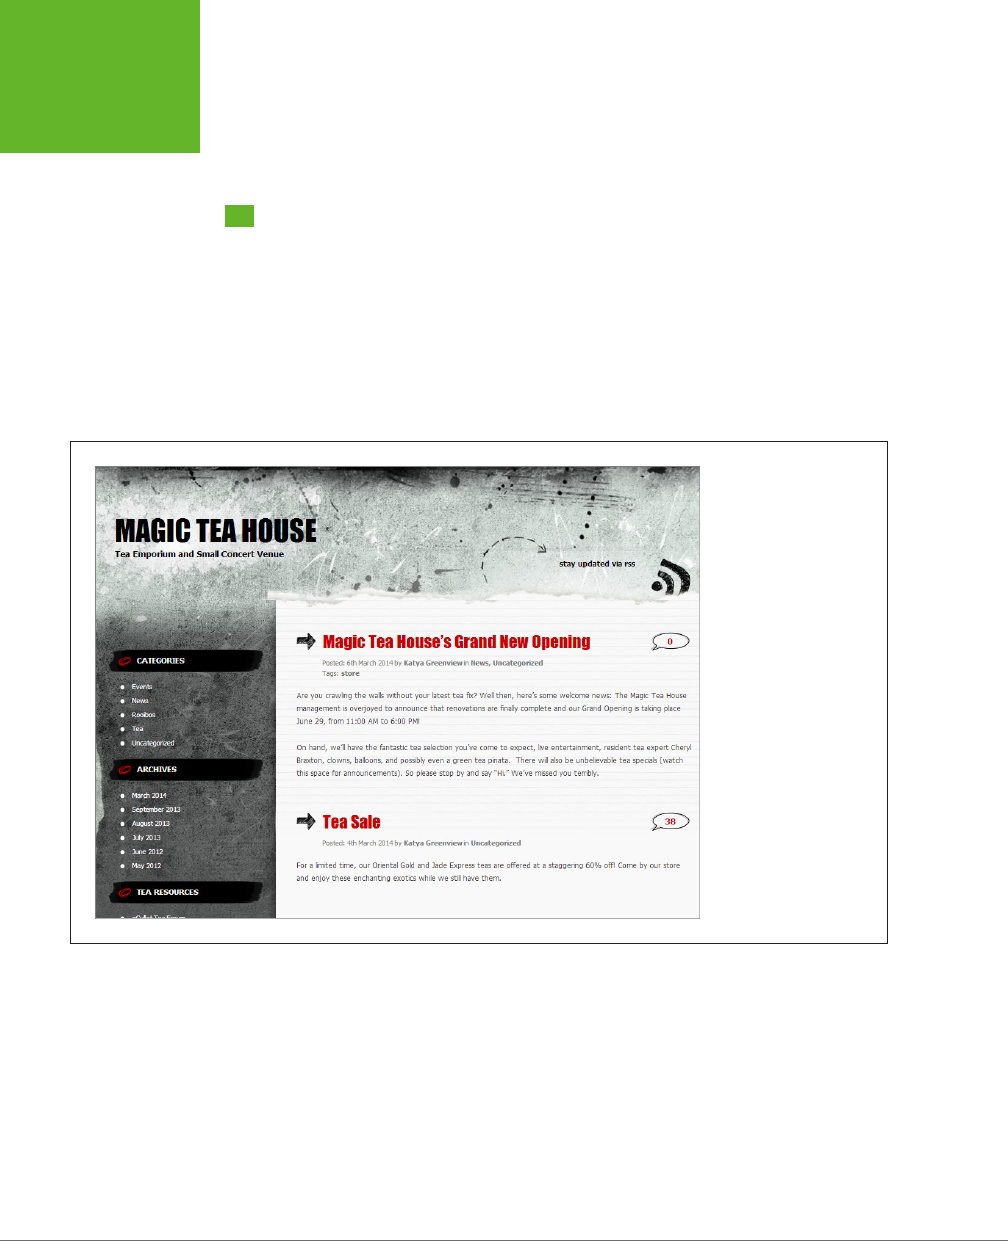
WORDPRESS: THE MISSING MANUAL
136
CHOOSING A
NEW THEME
In the rest of this chapter, you’ll tackle all these tasks except the last (hardcore theme
editing), which you’ll study in Part 4 of this book.
Choosing a New Theme
Choosing a theme is the Big Choice you make about your site’s visual appearance.
Themes determine a number of important design details—for example, the way
WordPress uses graphics, fonts, and color across your pages, and the overall layout
of your header, sidebar, and footer. It also determines the way WordPress presents
key ingredients, like the date of a post, the post’s category and tag information, and
the links that guests use to browse through your archives. An ambitious WordPress
theme can rework almost every visual detail of your site (Figure 5-2).
FIGURE 5-2
The Greyzed theme
creates a grungy effect
that looks like lined paper
on stone. Every design
detail—from the look of
the menu to the widget
titles—differs from a
plain-vanilla WordPress
site.
WordPress tailors some themes for specific types of content. You can find custom
themes for travel blogs, photo blogs, and magazine-style news blogs. There are even
themes that lean heavily toward specific topics, including one for coordinating and
celebrating a wedding (called Forever) and one that looks like the old-school Mac
desktop (called Retro MacOS). Figure 5-3 shows the latter.
Themes also influence the way your site works, in ways subtle and profound. For
example, some themes tile your posts instead of putting them in a top-to-bottom
list (which is great if you want your site to show a portfolio of work rather than a list
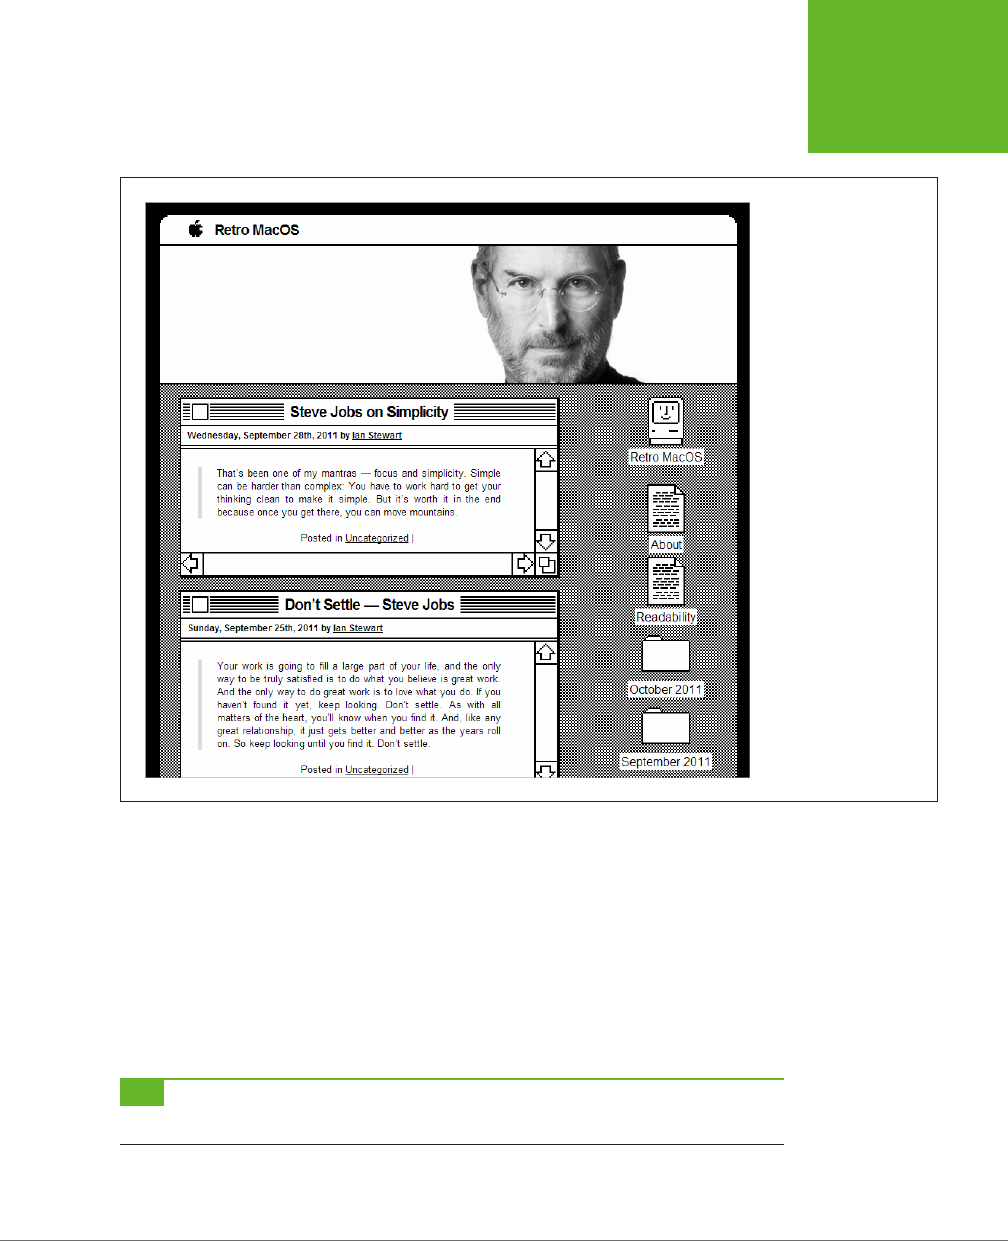
CHAPTER 5: CHOOSING AND POLISHING YOUR THEME 137
CHOOSING A
NEW THEME
of articles, as demonstrated on page 343). Or your theme may include a fancy frill,
like a slideshow of featured posts (page 192).
FIGURE 5-3
A theme for old-school
Mac aficionados may be
a bit excessive for an
ordinary site. But the
theme is put to good
effect on this Mac-centric
sample site.
Even if you’re happy with the standard WordPress theme, it’s worth trying out a few
others, just to open your mind to new possibilities. As you’ll see, although changing
a theme has a profound eect on the way your site looks, doing so is almost eort-
less. And most themes are free, so there’s no harm in exploring.
The only limitation with WordPress themes is that somewhere in cyberspace, there
are sure to be plenty of other websites using the same theme as you. This isn’t a
huge problem, provided that you’re willing to customize your site in little ways—for
example, by choosing a suitable header picture, as described in this chapter. (It’s
also true that no matter what your site looks like, its content makes it unique.)
TIP However, if you’re a style-conscious site designer who wants a distinctive theme, you run a self-hosted
site, and you aren’t put off by a bit of hard work, you can customize any theme. Chapter 13 explains how.
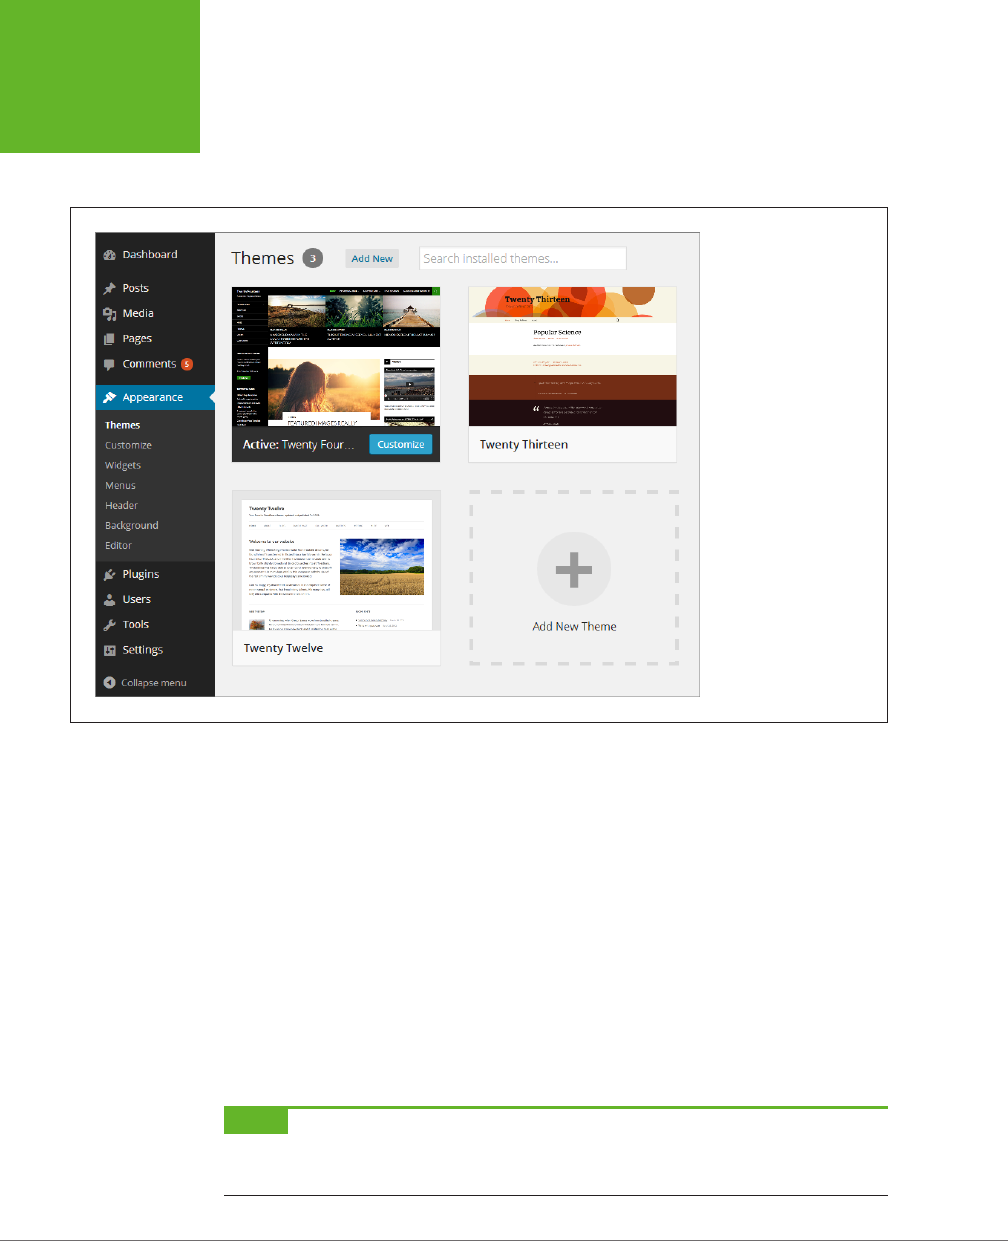
WORDPRESS: THE MISSING MANUAL
138
CHOOSING A
NEW THEME
Visiting the Theme Gallery
To change your theme, visit the Themes page (Figure 5-4) by choosing
Appearance→Themes in the dashboard.
FIGURE 5-4
On the Themes page,
WordPress displays all
the themes currently
installed on your site.
In this freshly created
self-hosted WordPress
site, you start with three
choices. The first theme
in the gallery (here,
that’s Twenty Fourteen)
is the one that your site
currently uses.
The theme gallery looks slightly dierent for WordPress.com sites than it does for
self-hosted sites. If you use WordPress.com as your host, the gallery includes every
supported theme, more than 250 at the time of this writing. Some themes come
with a price tag, in which case you’ll see a Purchase link with a dollar figure—usually
between $50 and $100.
If you run a self-hosted WordPress site, you’ll find the theme gallery fairly sparse.
A standard WordPress installation includes the latest year themes (currently, that’s
Twenty Twelve, Twenty Thirteen, and Twenty Fourteen), and nothing else. You need
to add any other theme you want to use. Fortunately, there’s no reason to fear this
process—new themes take up very little space, installing them takes mere seconds,
and you can do it all without leaving the dashboard.
The following sections explain the theme-changing steps you need to follow, de-
pending on how you host your site.
NOTE Some web hosts preinstall extra WordPress themes. If you use one of these hosts, your theme gallery
won’t start out quite as empty as just described. However, you’ll probably still need to install new themes to find
the one you
really
want.
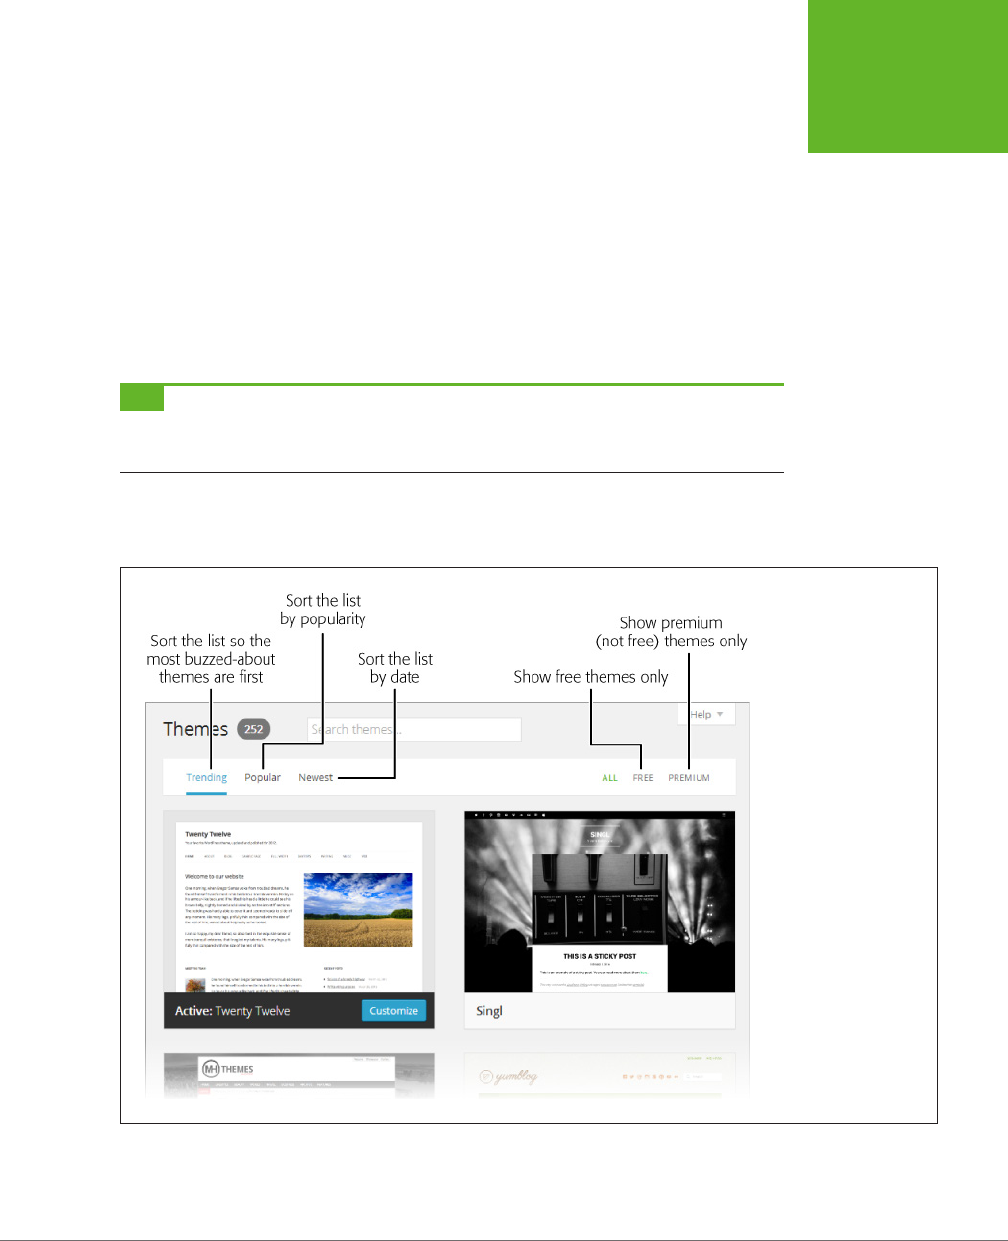
CHAPTER 5: CHOOSING AND POLISHING YOUR THEME 139
CHOOSING A
NEW THEME
Activating a Theme in WordPress.com
In WordPress.com, the Themes page is a crowded place. At the top of the list is
the theme your site currently uses. After that are
all
the themes that WordPress.
com oers.
Roughly two-thirds of the themes on WordPress.com are free. The others—recogniz-
able by the green price tag circles next to their names—are premium themes that
require a one-time fee. The average premium theme costs around $70, although
they range from $18 to $125. Once you buy a theme, it’s yours forever—or at least as
long as you keep the site. But if you want to use the same premium theme on more
than one WordPress.com site, then you need to buy a separate copy for each site.
TIP If you want the freedom to experiment with multiple premium themes, consider buying the Unlimited
Premium Themes upgrade (available from the dashboard’s Store menu). It costs a reasonable $120, although you
need to pay that fee every year.
If you’re interested in free themes only, click the Free link at the top-right corner of
the theme gallery (Figure 5-5).
FIGURE 5-5
WordPress.com lets you
sort the theme gallery so
the theme you want is
more likely to turn up at
the top, or filter it so you
see just free themes or
just premium themes.
You can choose how WordPress sorts the themes list by clicking one of the three
links in the top-left corner. Ordinarily, it sorts the list in
trending
order, which puts

WORDPRESS: THE MISSING MANUAL
140
CHOOSING A
NEW THEME
new, hot standouts at the top of the list. Alternatively, you can sort by popularity,
but be warned that this list is skewed to long-lived themes, like Twenty Eleven, found
on legions of old blogs. Finally, you can sort by date to spot just the newest themes,
which is handy for keeping up with the latest additions to the gallery.
The most useful theme-hunting tool is the search box just above the gallery. If you
remember a theme you browsed before, or you have a theme characteristic in mind
(say, “minimalistic” or “dark”), you can type that in. WordPress.com filters the list
as you type.
When you find a promising theme, point to it without clicking your mouse. You’ll
see several buttons (Figure 5-6):
• Theme Details displays basic information about the theme, including a brief
description and a link to the person or company that created it.
• Preview opens a preview window that shows your site dressed in this theme.
It’s called a
live
preview because you can treat it exactly as you would a real
site—clicking links, browsing content, and feeling your way around. Usually,
the live preview is enough for you to decide whether you really do want the
theme you’re checking out. Click Cancel when you finish, or Activate to apply
the theme to your site.
• Activate reconfigures your site to use this theme. The changeover happens
instantaneously.
• Purchase replaces the Activate button for premium themes. Clicking this button
starts the checkout process. Once you cough up the fee, WordPress activates
the theme.
FIGURE 5-6
Point to a theme’s thumbnail, and you see these
three buttons.
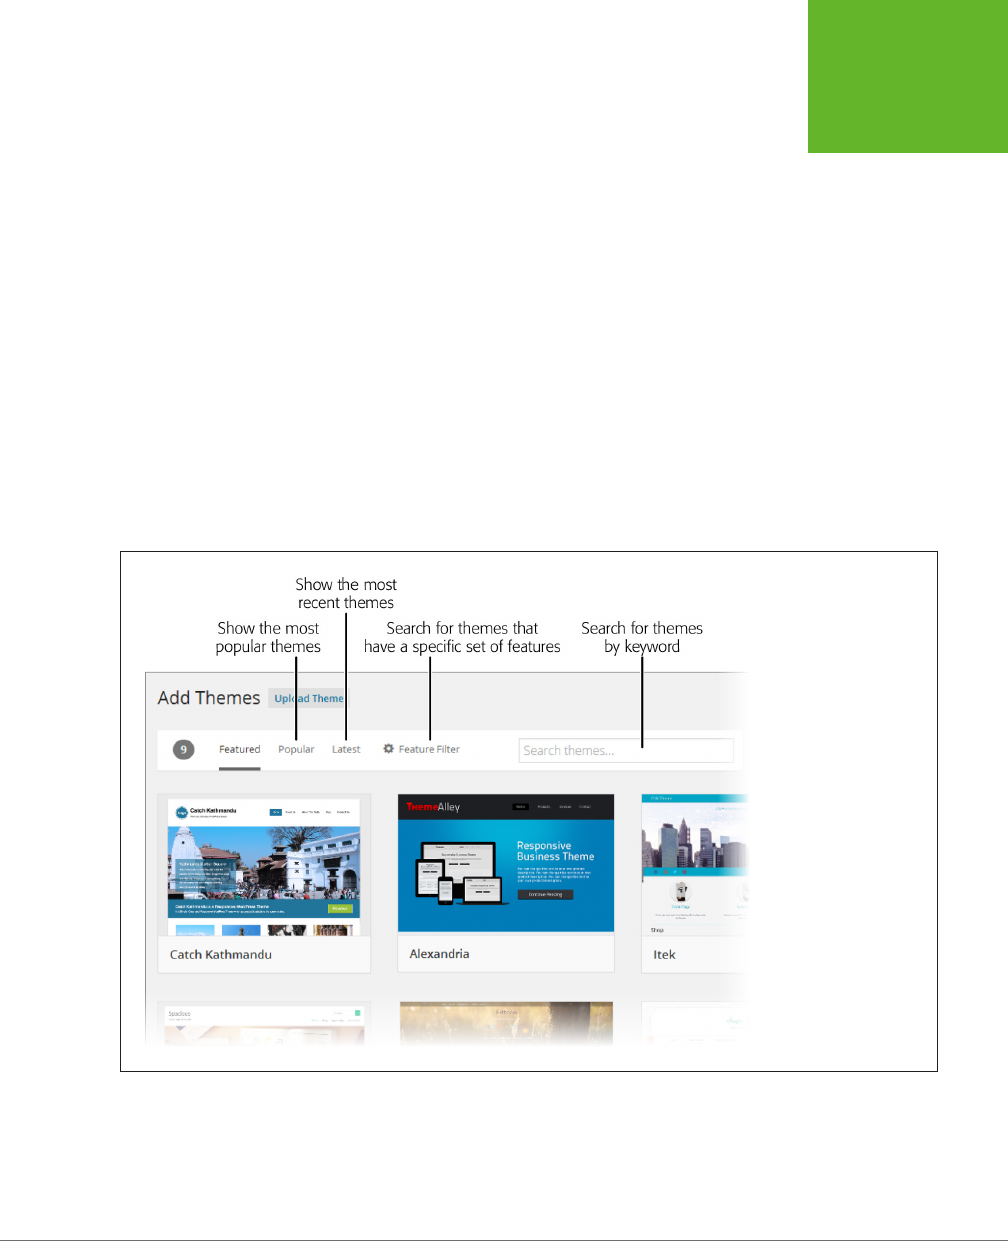
CHAPTER 5: CHOOSING AND POLISHING YOUR THEME 141
CHOOSING A
NEW THEME
Don’t be shy—you can activate one theme, and then another, and then another, until
you find the right one for your website. When you pick a new theme, WordPress may
prompt you to start customizing it with the theme customizer (page 152). However,
it’s generally easier to customize your theme using the group of pages under the
dashboard’s Appearance menu, because the options there are more comprehensive.
You’ll start customizing your theme on page 145.
Installing a Theme on a Self-Hosted Site
Before you can switch to a new theme on a self-hosted WordPress site, you need to
install the theme itself. To see the themes you can add, click the Add New button
next to the Themes heading at the top of the Themes page. This takes you to the
Add Themes page, where you can browse WordPress’s theme repository to find
exactly what you want (Figure 5-7).
Initially, the Add Themes page shows you a list of
featured
themes, which are new
and particularly noteworthy designs that the folks at WordPress think might interest
you. If they don’t, you can browse the most popular themes (click Popular) or the
most recent ones (click Latest).
FIGURE 5-7
The Add Themes page
crams several theme-
finding tools into one
place. When you first
arrive, you see a gallery
of featured themes, like
this one.
Browsing is fine, but the most powerful way to hunt down new themes is with a
search. The Add Themes page gives you two ways to do that: by keyword and by
feature.
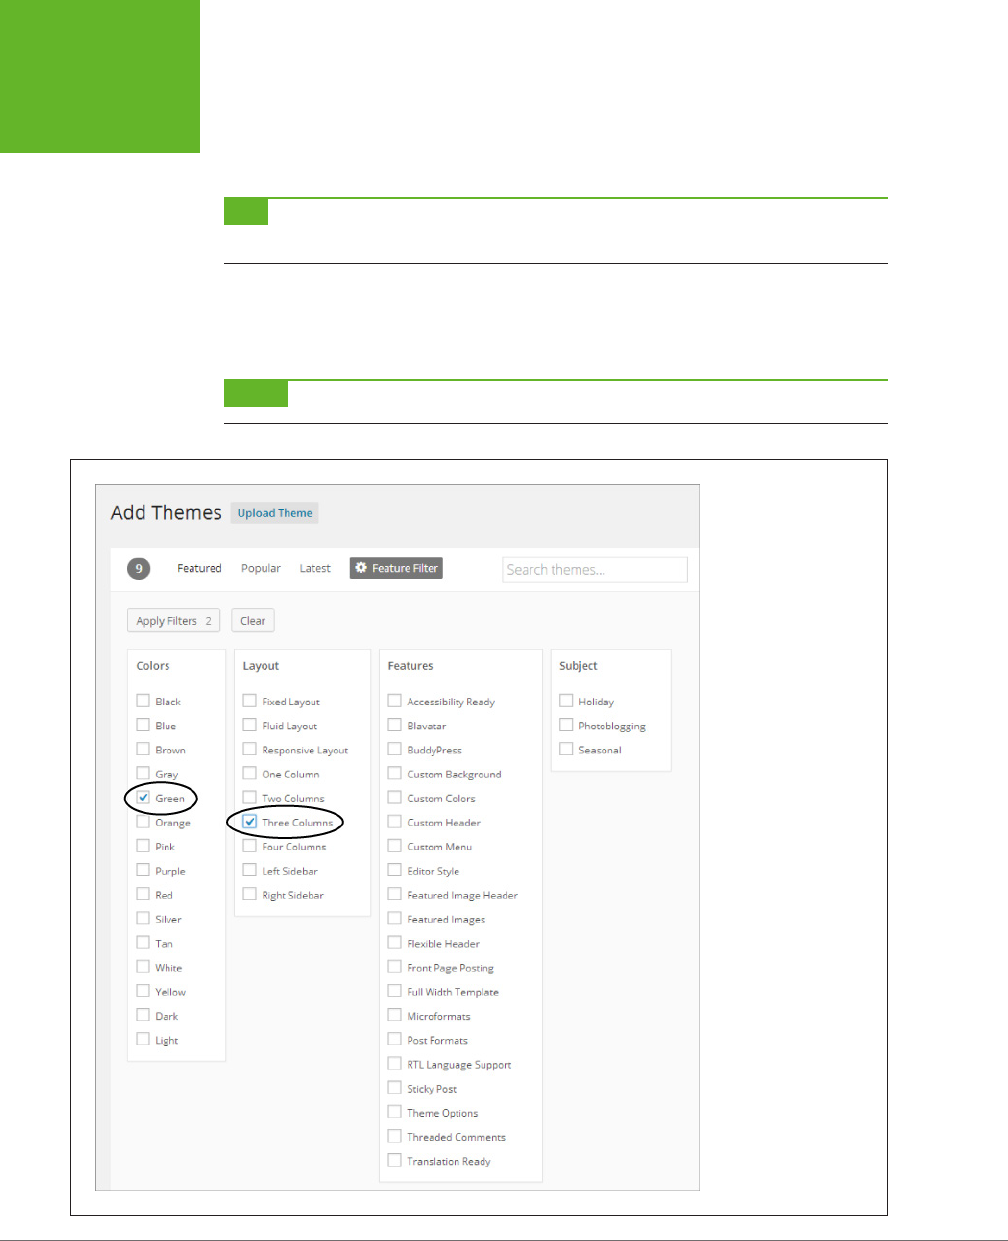
WORDPRESS: THE MISSING MANUAL
142
CHOOSING A
NEW THEME
To search by keyword (for example, “magazine” or “industrial” or “professional”),
type the word in the search box and then click Search. WordPress shows you themes
that have that search term in their names or descriptions.
TIP Here’s a trick to see even more themes: Leave the search box empty, and then press the Enter key. You’ll
get a list of well over 1,000 themes.
To search by feature, click Feature Filter. WordPress displays a long list of checkboxes,
representing dierent features and theme characteristics (Figure 5-8). Turn on the
checkboxes for the features you want, and then click Apply Filters.
NOTE You can’t search by keyword and filter by feature at the same time.
FIGURE 5-8
The Feature Filter helps
you find themes that
meet specific criteria. This
search will find themes
that feature the color
green and use a three-
column layout. (More than
50 do.)
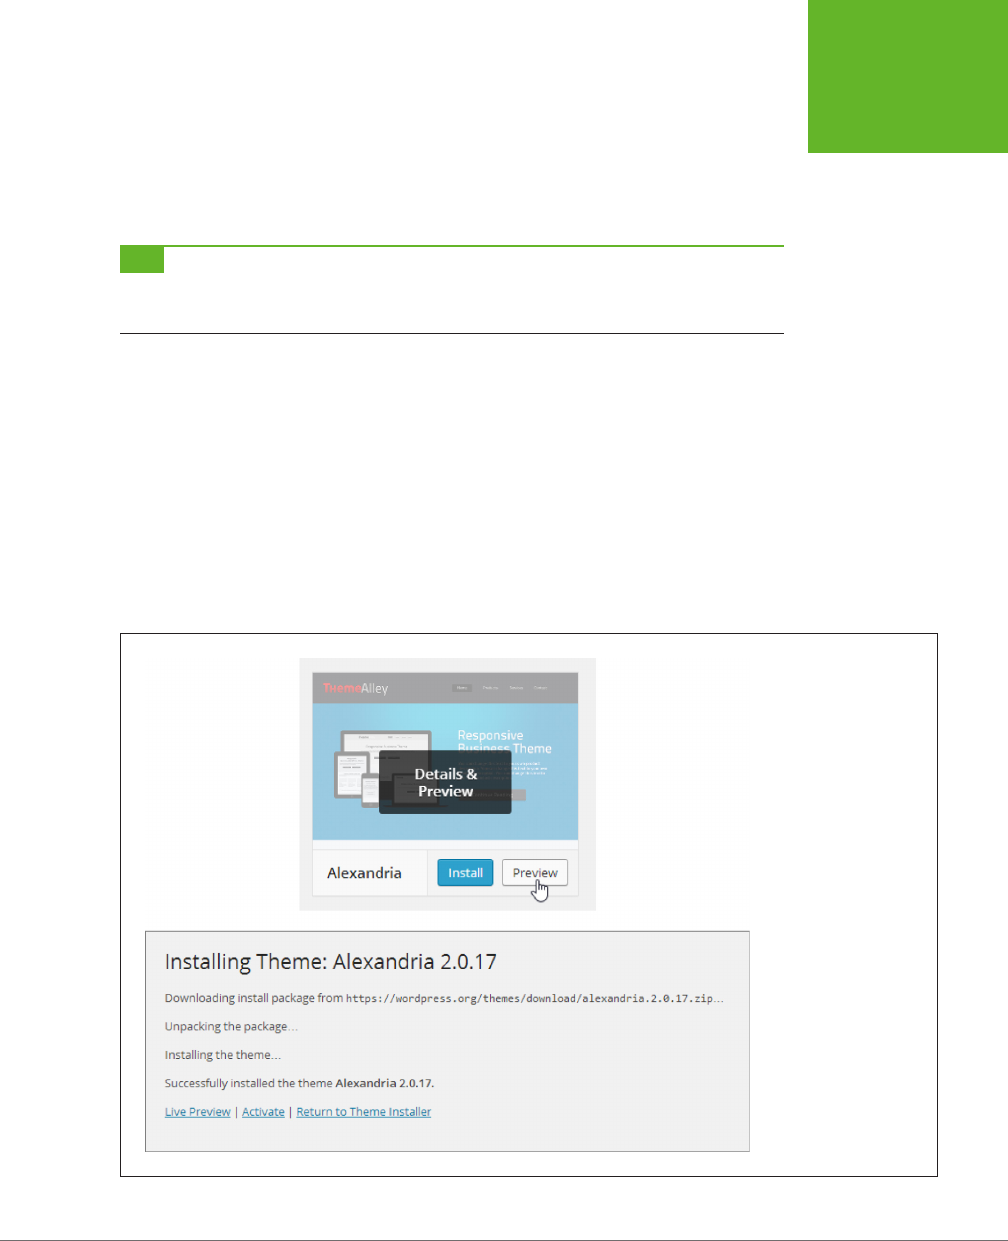
CHAPTER 5: CHOOSING AND POLISHING YOUR THEME 143
CHOOSING A
NEW THEME
No matter how you find a theme, you install them all the same way. First, point to
your new theme without clicking the mouse. The Install and Preview buttons appear
(Figure 5-9, top). Click Preview to see a sample site that uses the theme, and to read
a brief description of the theme and the person or company that created it. Click
Install to copy the theme to your website so it’s ready to use.
TIP Don’t be afraid to install a theme that you might not want to use—all the themes in the WordPress reposi-
tory are guaranteed to be safe and spyware-free. And don’t worry about downloading too many themes—not
only are they tiny, but you can easily delete those you don’t want.
Once WordPress installs a theme, it gives you three choices (Figure 5-9, bottom):
• Live Preview. This opens a window showing you what your site would look
like if WordPress applied the chosen theme. Think of it as a test drive for a
prospective theme. You can read posts, search your site, and click your way
around your content, secure in the knowledge that you haven’t changed the
real, live version of your site.
• Activate. Click this to start using the theme.
• Return to Theme Installer. This takes you back to the Add Themes page (Figure
5-7), where you can search for another theme.
FIGURE 5-9
Top: When you’re ready
to take a closer look at
a theme, point to it and
click Preview.
Bottom: WordPress has
finished installing the
latest version of the
Alexandria theme on your
site. Click Activate to start
using it.

WORDPRESS: THE MISSING MANUAL
144
TWEAKING
YOUR THEME
To see all the themes you’ve installed on your site so far, choose Appearance→Themes.
This returns you to the theme gallery. To take a closer look at a theme, point to it.
If you point to the theme you currently use, you’ll see a Customize button, which
launches the theme customizer (page 152). If you point to one of the other themes,
you’ll see two familiar buttons: Live Preview, which lets you test drive the theme;
and Activate, which applies it to your site.
Once you activate a theme, the best way to get familiar with it is to poke around.
Try adding a post, viewing it, and browsing the list of posts on the home page, just
as you did in Chapter 4. Check out the way your theme formats the home page and
presents individual posts.
Once you familiarize yourself with your new theme, you’ll want to check out its op-
tions and consider tweaking it. That’s the task you’ll tackle next.
NOTE There’s one other way to add a theme: by uploading it from your computer to your site, using the
Upload button on the Add New themes page. You’ll use this option only if you find a theme on another site, buy
a premium theme from a third-party company, or build the theme yourself.
UP TO SPEED
The Proper Care of Your Themes
When you install a theme on a self-hosted site, you get the
current version of the theme. If the theme creator releases a
new version later, your site sticks with the old version.
That makes some sense, because WordPress has no way to be
sure that the new version of the theme won’t make drastic
changes that break your site. But this design also raises the
risk that you might ignore an important security update for
one of your themes, thereby exposing your site to an attack.
(Remember, themes contain templates, and templates contain
PHP code, so themes can create security vulnerabilities.)
To minimize your risk, check regularly for theme updates. Go
to Dashboard→Updates and look at the Themes section. If a
theme has been updated, WordPress lists it here, and compares
the version number of your copy with the version number of
the latest release. If your site has multiple themes installed,
WordPress shows the updates for
all
of them—it makes no
difference whether you currently use the theme or not. To
protect yourself, download all the available updates. To do
that, turn on the checkbox next to each update and then click
Update Themes.
Finally, if you install a theme, try it out, and decide you aren’t
ever likely to use it, it’s a good idea to delete it. Even if a theme
isn’t active, its template files are accessible on your site, al-
lowing attackers to exploit any security flaws the templates
may have. This isn’t a common method of attack, but it has
happened to unsuspecting site owners before.
Tweaking Your Theme
The first step in getting the look you want is choosing the right theme, but your
site-styling doesn’t end there.
Every theme lets you customize it. In fact, you
need
to customize your theme to
make sure it meshes perfectly with your site. Your page’s header image is a perfect

CHAPTER 5: CHOOSING AND POLISHING YOUR THEME 145
TWEAKING
YOUR THEME
example—if your theme includes one, you’ll almost certainly want to replace the stock
image with a picture that better represents your site. Other basic theme-preparation
tasks include shuing around your widgets and setting up your menus. You handle
all these tasks in the pages of the Appearance menu.
Customizing the Header
When a visitor arrives at your site, the first thing she sees is the eye-catching header
at the top of your home page. Right now, that’s a problem, because the standard
header screams “Generic WordPress Site!” It’s for amateurs only.
Dierent themes may have slightly dierent header settings, but here are the details
you can usually change:
• The header text
• The color of the header text
• The header image
The header text includes the title and tagline you specified when you created your
site. WordPress stores this information as part of your site settings, and you can
modify it using the Site Title and Tagline boxes at Settings→General.
Most themes also let you pick the color of your header text. Usually, it starts out
black. (Twenty Fourteen is a notable exception, because it uses white text on a
black background.) To pick a dierent color, go to the Custom Header page at
Appearance→Header and look for the Text Color setting. Click the Select Color but-
ton next to it to open a miniature color picker and choose the exact shade you want.
NOTE At this point, it may occur to you that there are many other ways you might want to adjust your site’s
header. For example, you might want to change the size of the text or pick a fancier font. But making these types
of changes is an advanced operation. If you have a self-hosted site, you need to modify the CSS style rules that
control your theme. You’ll learn how to do that in Chapter 13. And if you have a WordPress.com site, you need
to buy the Custom Design upgrade (for $30 per year) to even be allowed to make this sort of formatting change
(see page 457).
Many themes let you use a picture in your header. Depending on the theme, the
header text may be displayed above the image, beneath the image, or on top of it
(or you may choose to hide the header text altogether). Deciding whether you want
to use an image is the most important decision you’ll make while customizing your
header. Figure 5-10 shows how the Twenty Twelve theme deals with header images.
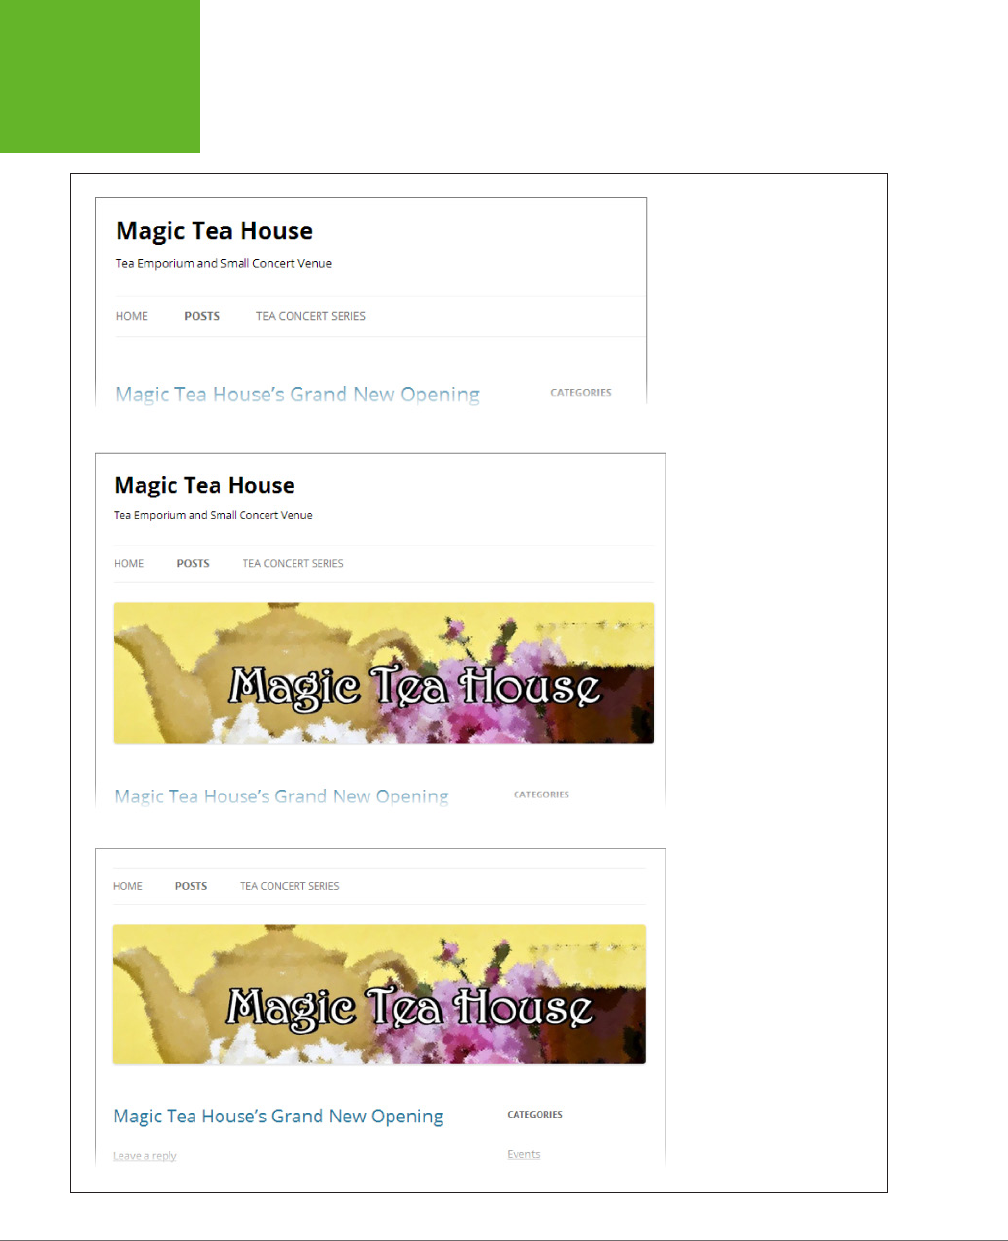
WORDPRESS: THE MISSING MANUAL
146
TWEAKING
YOUR THEME
FIGURE 5-10
Top: The Magic Tea House is a bit
plain with a text-only header.
Middle: Every theme makes its
own decision about where to
place the header image. If you
add an image to the Twenty
Twelve theme, it turns up
underneath the menu.
Bottom: Hiding the header text
results in a much cleaner look.
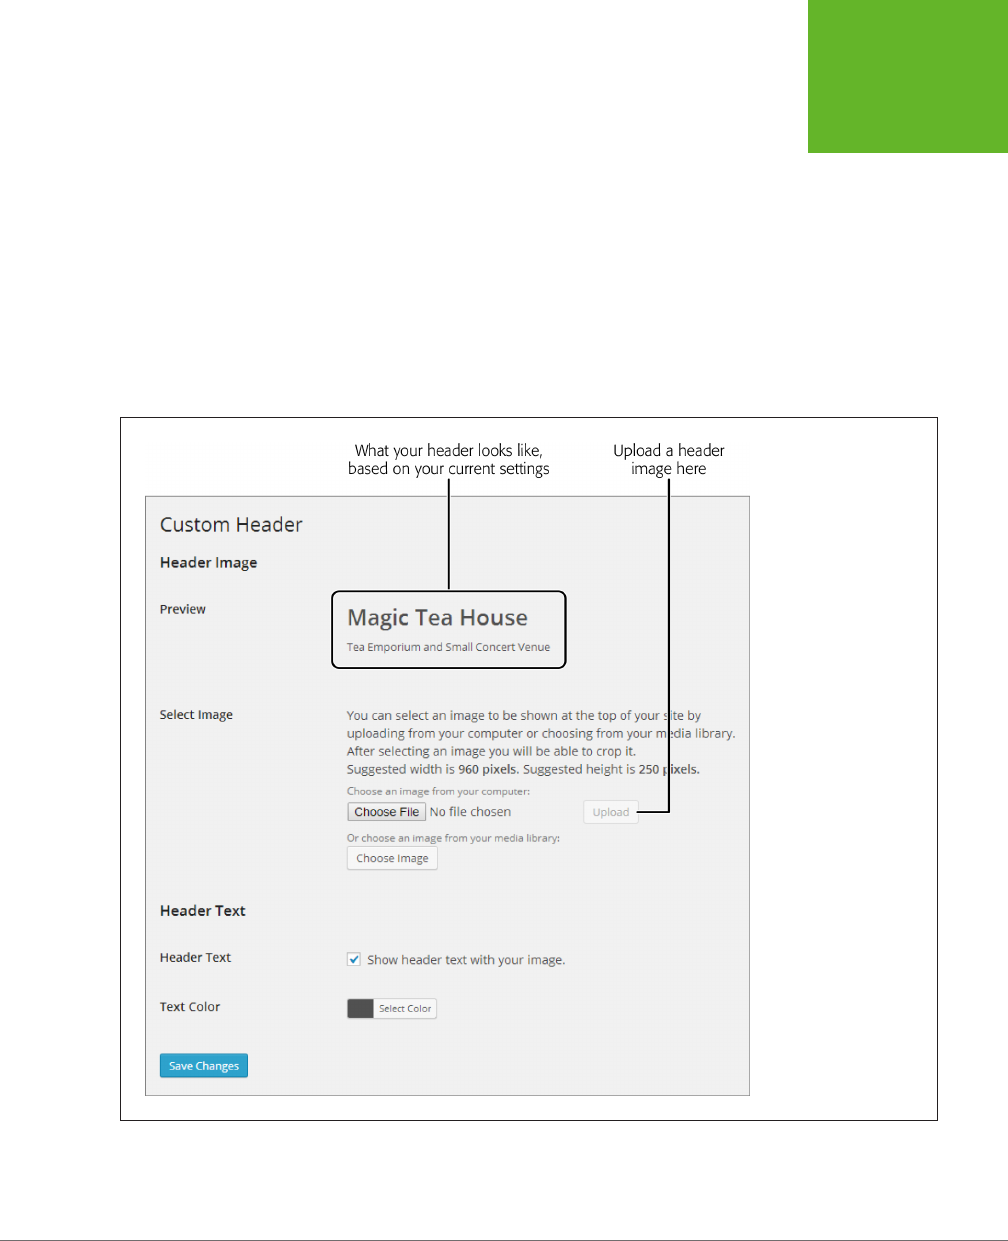
CHAPTER 5: CHOOSING AND POLISHING YOUR THEME 147
TWEAKING
YOUR THEME
Here’s how to upload a new header picture for the standard WordPress theme:
1. Choose AppearanceÆHeader.
The Custom Header page opens.
2. Prepare your picture.
Before you upload a new picture, look carefully at the information on the Cus-
tom Header page (Figure 5-11). It usually tells you how big your picture should
be. Because the theme’s layout dictates the size of the header, each theme has
dierent size specifications. For example, Twenty Twelve needs a header 960
pixels wide and 250 pixels high, while Twenty Fourteen expects a wider and
shorter image (1260 × 240 pixels).
FIGURE 5-11
The Custom Header page
gives you options that
let you add a picture and
hide your header text.

WORDPRESS: THE MISSING MANUAL
148
TWEAKING
YOUR THEME
If possible, you should resize or crop your picture to those specs, using an image-
editing program before you upload it. That way, you’ll get exactly the image
you want. If your image doesn’t match the dimensions your theme expects,
WordPress may crop or resize it.
TIP Need a good picture but lack the photographic or illustrative skills to make one? Don’t do a Google
image search—you’re highly likely to end up stealing someone else’s copyrighted work. Instead, try a free stock
photography site like Stock.xchng (
www.sxc.hu
). It offers a vast collection of member-submitted pictures, most
of which are free for other people to use. (In fact, stock.xchng was the source of the sunny yellow teapot picture
that graces the Magic Tea House site in Figure 5-10.)
3. In the Select Image section, click the Browse or Choose File button (the
exact wording depends on the Internet browser you’re using).
In the window that opens, find the header picture on your computer, and then
select it.
4. Click Upload to upload the picture to your WordPress site.
If your picture doesn’t fit the required dimensions, WordPress may ask you
to crop it down (Figure 5-12). This works well if your picture is just a little too
tall or wide, but it can cause problems in other situations. For example, if your
picture isn’t wide
enough,
WordPress enlarges the whole thing to fit and then
asks you to crop o a significant portion of the top and bottom. You end up with
the worst of both worlds: an image of lower quality (because WordPress had
to scale it up) and one missing part of the picture (because you had to crop it).
FIGURE 5-12
To crop a picture, drag the
highlight rectangle until
you frame the image the
way you want it. Here,
the picture is a bit too
tall—by positioning the
highlight rectangle in
the middle, WordPress
will trim out part of the
top and bottom. When
you finish, click “Crop
and Publish.” Or, click
“Skip Cropping, Publish
Image as Is” if you want
to ignore your theme’s
recommendations and
use an oddly sized header
that may not fit nicely
into your layout.

CHAPTER 5: CHOOSING AND POLISHING YOUR THEME 149
TWEAKING
YOUR THEME
5. Consider removing the header text by turning o the setting “Show header
text with your image.”
In some themes, the header text meshes neatly with the header image. For
example, Twenty Thirteen superimposes the header text on the header image.
In other themes (like Twenty Twelve), the text and picture are separate. For a
slicker look, you may choose to use a header image that includes stylized text,
and ditch the theme’s standard header text. The result is shown in Figure 5-10
(bottom).
Incidentally, if you decide to go the other way, you can remove the picture you
added by clicking the Remove Header button. And if you’re a truly odd duck,
you can remove both the header picture and the header text, but that will make
your site look just plain weird.
6. Click Save Changes.
If you add or remove a header image, you don’t need to click this easily over-
looked button at the bottom of the Custom Header page, because WordPress
incorporates the change right away. But if you change one of the other header
settings, such as the “Show header text with your image” option, click Save
Changes to make it permanent.
GEM IN THE ROUGH
Random Header Pictures
Some themes have the ability to perform a curious header-
switching trick. First, they let you upload multiple pictures.
Then they randomly choose a different picture for the header
on each page. All the standard year themes provide this fea-
ture, from Twenty Eleven on.
To try this out, start by uploading more than one picture on the
Custom Header page. (Just repeat the steps that start on page
147.) If your theme doesn’t display multiple header images, it
will simply toss out the old picture when you add a new one.
But if your theme
does
allow multiple images, it will keep track
of each picture you add, and you’ll see a thumbnail for each
in the Uploaded Images section of the Custom Header page.
You can choose to show a picture you uploaded by selecting
it in the Uploaded Images section. But if you’re after a more
exotic effect, choose the Random option. Now start browsing
the posts on your site. As you click from page to page, you see
the header change from one picture to another. Eventually,
WordPress will cycle through all your images.
The only catch is that once you upload a header image, you
can’t remove it from the Custom Header page. If you decide
that you don’t want WordPress to include one of your uploaded
pictures in its lineup of random headers, you need to delete
the image using the media library. First, click Media in the
dashboard menu. That brings you to the media library, where
you’ll see a list of all the images you uploaded to your site
(including any pictures you placed in your posts). You can rec-
ognize the header pictures that the current WordPress theme
uses, because they have the text “Header Image” after their
filenames. Point to the header you don’t want, and then click
Delete Permanently to banish it from your site. (Page 186 has
plenty more about the media library feature.)
Some folks love the changing-picture trick. For example, it’s a
great way to showcase a number of different and delectable
dishes on a food blog. However, most people prefer to pick a
single header and stick with it. That gives the site a clearer
identity and helps visitors remember your site.

WORDPRESS: THE MISSING MANUAL
150
TWEAKING
YOUR THEME
Changing the Background
Many themes let you change the background of your pages. You can find these
options in the Custom Background page by choosing Appearance→Background.
Most themes give you two background-altering choices:
• Add a background image. Most themes
tile
the background image (that means
they repeat the image endlessly, from top to bottom and left to right, filling your
visitor’s browser window). For that reason, you need a picture that looks good
when it’s jammed edge-to-edge against another copy of itself. Small pictures
called
textures
work well for this task, and you can find them online, but the
eect is distinctly old-fashioned.
• Change the background color. This is the most commonly tweaked background
setting. You can use it to make the page background blend in more smoothly
with the background of your header image.
“Background color” doesn’t always mean what you expect. For example, in the
Twenty Twelve theme, the background color shows up only on the outer edges
of your page, not behind your posts. To change the color behind the text in your
posts, you need to tweak the theme styles, as explained in Chapter 13. Figure 5-13
shows the dierence.
FIGURE 5-13
Ordinarily, the Twenty
Twelve theme centers
content horizontally in
the browser window
and pads the edges with
white space. But here the
background color is set
to match the yellow from
the header image. The
color behind the posts
remains white, ensuring
easy reading.

CHAPTER 5: CHOOSING AND POLISHING YOUR THEME 151
TWEAKING
YOUR THEME
To change the background color the standard WordPress theme uses, you can type
in an HTML color code (like
#e7df84
, suitable for web nerds), or you can use the
groovy built-in color picker (Figure 5-14).
FIGURE 5-14
To pick a background
color for the Twenty
Eleven theme, click
Select Color to open
the color picker shown
here. Although it’s a bit
hard to see in black and
white, getting the exact
shade you want from the
color picker is a two-step
process. First, you select
a color by dragging the
ring on the left, and then
you set the shade of that
color using the slider on
the right.
TIP If it’s hard to see the differences between the examples in the black-and-white pages of this book, check
out the Magic Tea House sample site at
http://prosetech.com/wordpress
.

WORDPRESS: THE MISSING MANUAL
152
TWEAKING
YOUR THEME
Other Theme Options
Some themes include additional options, which you can find in the Appearance menu
in the dashboard. For example, if you install the Greyzed theme, you’ll get a new
page of options by choosing Appearance→Greyzed Options. If you use the aging
Twenty Eleven theme, you can view its settings by choosing Appearance→Theme
Options. But the later year themes, such as Twenty Twelve and Twenty Fourteen,
don’t include any extra options.
If a theme does include a page of additional settings, here’s what you’re likely to find:
• Options that change one of the design elements on the home page. For example,
if your theme includes a picture slider—a nifty feature that cycles through some
of your post’s pictures—you might be able to tweak how it chooses those pic-
tures, how many pictures it shows, or how it transitions from one image to the
next. Page 192 has more about sliders.
• The ability to switch between two or three preset color schemes. For example,
Twenty Eleven has its usual light, airy color scheme as well as a white-on-black
variant for darker, moodier people.
• The ability to switch between dierent basic layouts. For example, Twenty
Eleven lets you put the sidebar to the left of your posts (instead of keeping it
in its usual spot on the right), or take it away altogether.
NOTE Themes are complex creations, and it takes a bit of fiddling before you have a good idea of which
theme suits your site best. You’ll see plenty of examples in the following chapters that show you how to capitalize
on the features found in different themes.
FREQUENTLY ASKED QUESTION
Themes with Missing Pictures
I picked a theme that has plenty of pictures on the home
page, but right now, all the picture boxes are empty. How
do I fill them?
Many of the most attractive themes use a visually rich style
that incorporates plenty of pictures. Some themes include a
slider that shows pictures from different posts. Others turn
the post list into a grid of post titles and picture thumbnails.
But before you can use this type of feature, you need to learn
more about how WordPress works with pictures.
Although WordPress has a variety of features that use pictures
(all of which are described in the next chapter), most graphi-
cally rich themes rely on
featured images.
A featured image is
a picture that represents a specific post, but doesn’t necessarily
appear
in
the post. Page 190 explains featured images, shows
you how to link them to posts, and explores several themes
that use them to create eye-catching home pages.
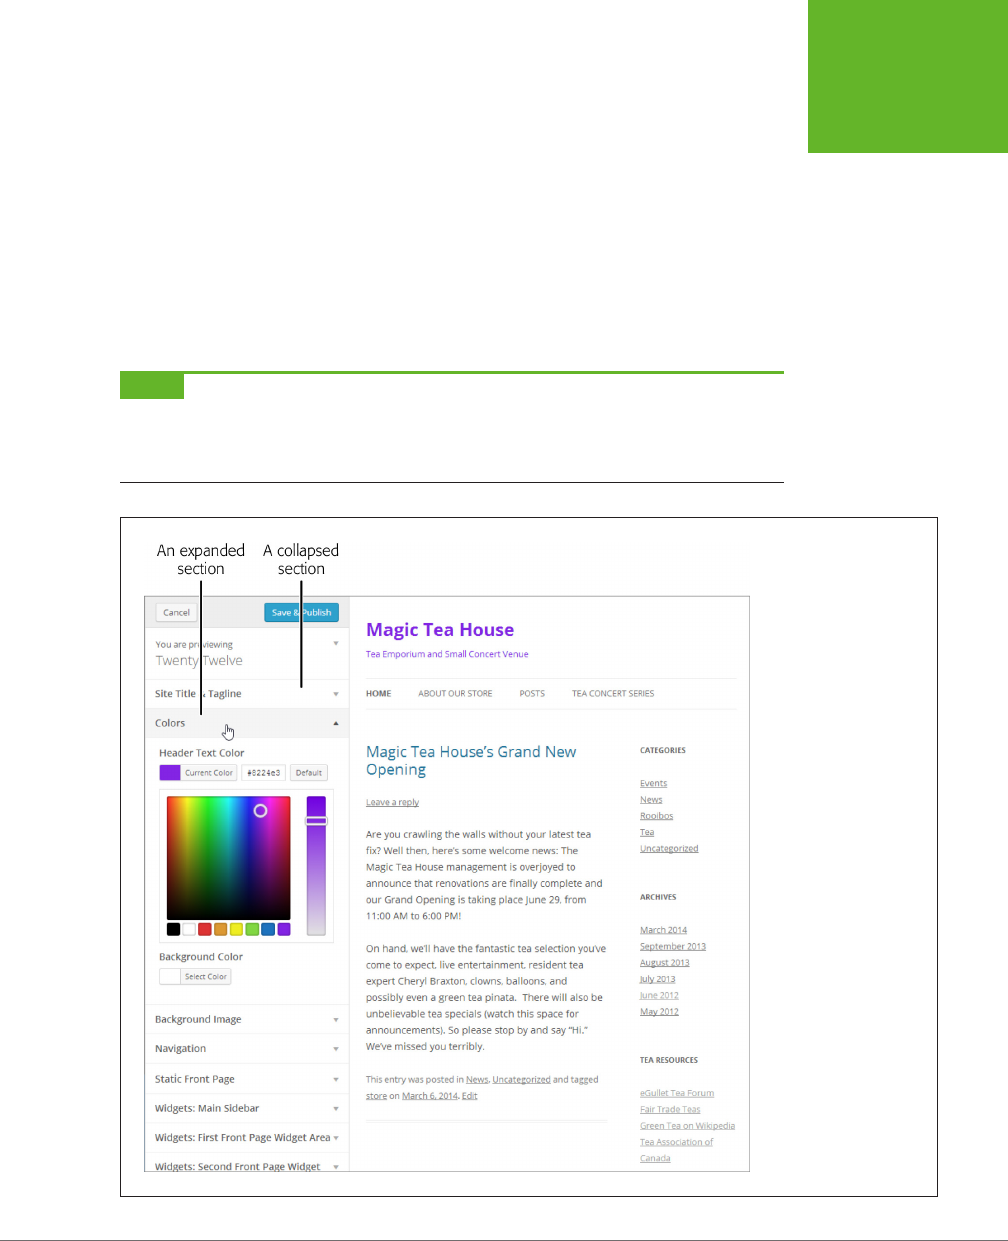
CHAPTER 5: CHOOSING AND POLISHING YOUR THEME 153
TWEAKING
YOUR THEME
The Theme Customizer
If you’re tired of jumping from one page to the next using the Appearance menu,
you may be interested in the
theme customizer,
a dashboard tool that lets you
quickly configure a new theme. The theme customizer uses a multi-tabbed page that
combines many of the settings and options scattered throughout the Appearance
menu. To open the customizer, choose Appearance→Customize. Or, when viewing
the theme gallery (Appearance→Theme), point to the current theme and click the
Customize button. Either way, WordPress displays a live preview of your site with
a sidebar of theme-customization options. Figure 5-15 shows the Twenty Twelve
theme under the microscope in the theme customizer.
NOTE The theme customizer doesn’t always look as it does in Figure 5-15. Some themes offer fewer customiz-
able sections, and WordPress.com sites put the sidebar on the right side of the page instead of the left. However,
the basic concept remains the same: You configure common theme settings while watching a constantly updated
preview of your work.
FIGURE 5-15
To modify your theme
using WordPress’s theme
customizer, click a section
on the left to open it and
adjust the settings (like
those for Colors, shown
here). Make your changes
and watch the preview
unfold on the right. If you
like the result, click Save
& Publish at the top of the
panel. If you don’t, pick
something else, or click
Cancel to back out of all
your changes.

WORDPRESS: THE MISSING MANUAL
154
CUSTOMIZING
YOUR WIDGETS
There’s a lot packed into the customizer’s tabs. But, oddly enough, some important
details are inexplicably absent. It’s not that you can’t set them—you can, if you use
the dierent pages in the Appearance menu—but for some reason they escape the
customizer’s notice. For that reason, you might be decidedly cool on the theme
customizer. It’s a useful place to
start
customizing, but it’s not a reliable long-term
partner.
NOTE The theme customizer may also include two tabs that you won’t consider in this chapter. Those are
Navigation (where you pick a menu to display on your site) and Static Front Page (where you can choose a custom
home page for your site). To use either of these features, you first need to study the pages feature, which you’ll
master in Chapter 7.
Customizing Your Widgets
By the time you pick a theme, fix up your header, and adjust your theme settings,
your site is starting to look more respectable. But you’re not done tweaking yet.
Although your theme may look a whole lot nicer, there’s still one area that most
WordPress site creators will want to change: the sidebar.
The sidebar is a terrifically useful place to put links, like the ones that let your visitors
browse your archives. It’s filled with something WordPress calls
widgets.
A widget is
simply a block of useful content (like a list of links) that you can stu into a sidebar
or put somewhere else in your site (Figure 5-16). Here’s the neat part: WordPress
widgets work with any theme.
NOTE Technically, the theme you choose provides one or more areas (like a sidebar and a footer) for widgets.
It’s up to you to choose
what
widgets go in those areas, and to configure the widgets you add.

CHAPTER 5: CHOOSING AND POLISHING YOUR THEME 155
CUSTOMIZING
YOUR WIDGETS
FIGURE 5-16
Widgets are like building
blocks for your website. In
a freshly created site, you
start with the six widgets
shown here.
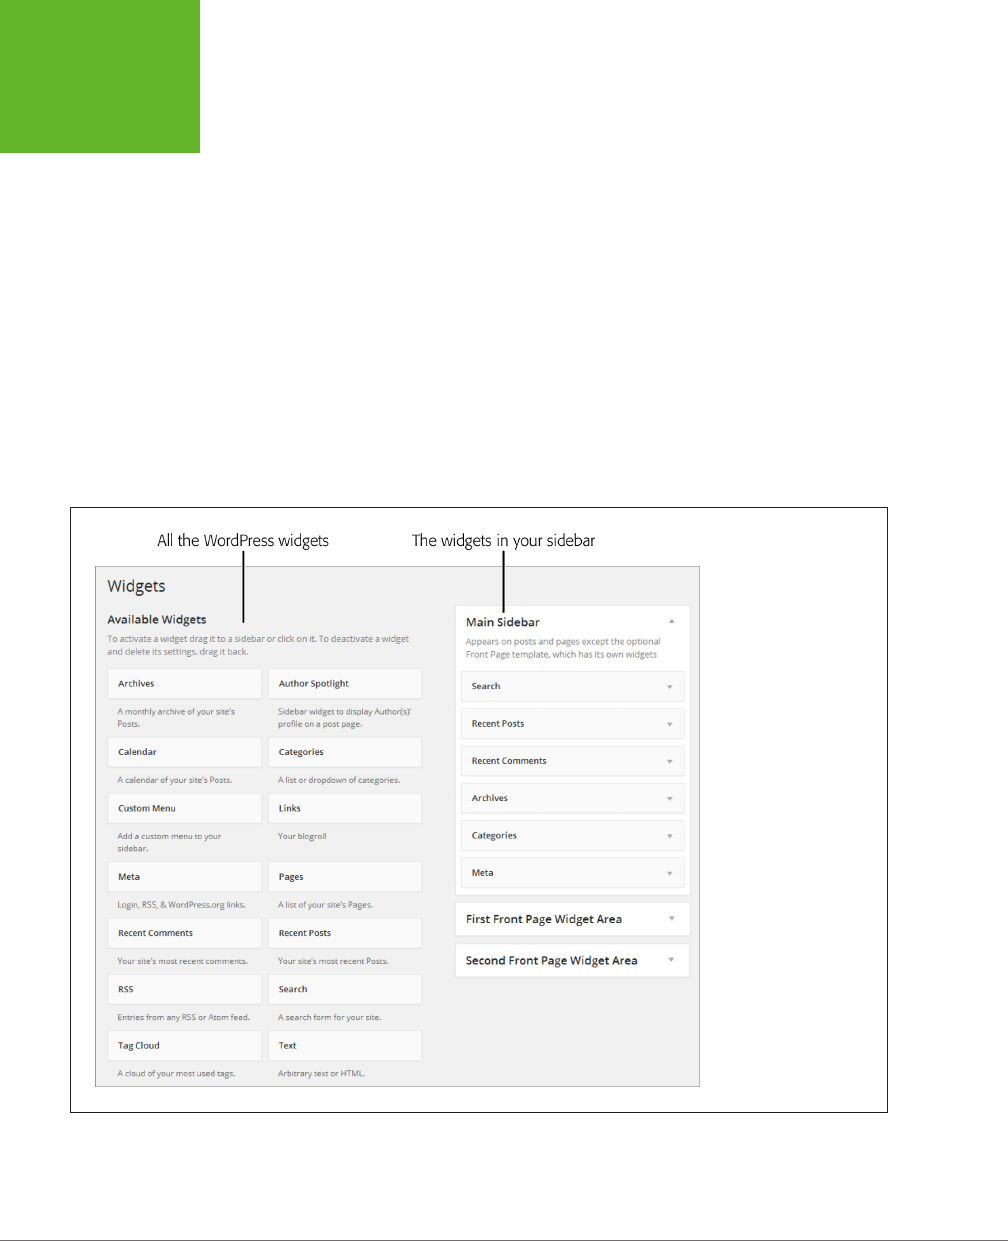
WORDPRESS: THE MISSING MANUAL
156
CUSTOMIZING
YOUR WIDGETS
Positioning Your Widgets
To see all the widgets you can use, choose Appearance→Widgets to open the
densely packed Widgets page, which is a bit confusing because it shows you two
things at once:
• All the widgets WordPress has to oer. In the big box on the left, under Avail-
able Widgets, is a long list of all of WordPress’s widgets, including those you’re
using and those you aren’t, in alphabetical order.
• The widgets you’re currently using. On the right, below headings like Sidebar
and Footer Area, WordPress lists the widgets currently active on your site. It
arranges them in individual boxes (based on what part of the site they occupy)
and lists them in the order they actually appear.
Each theme dictates where you can place widgets. If you’re using the Twenty Twelve
theme on a newly created WordPress site, you start with a Widgets page that looks
like the one in Figure 5-17.
FIGURE 5-17
The Twenty Twelve theme
has just three locations
for widgets: a sidebar
and two front page areas.
You can use the latter
two areas only when you
create a new home page
using the Front Page
template (page 235).
Right now, the sidebar
is the only section that
actually has any widgets
in it. As you can see, the
six widget boxes shown
here correspond to the six
widgets shown in Figure
5-16.

CHAPTER 5: CHOOSING AND POLISHING YOUR THEME 157
CUSTOMIZING
YOUR WIDGETS
NOTE Different themes may position their widget sidebars in different places. For example, the Twenty
Twelve theme’s sidebar sits alongside the post listing on the home page and on the individual post pages. By
comparison, the Twenty Eleven theme’s sidebar appears on the main page but not on individual post pages.
You might see other variations, too—for example, you could have a sidebar that appears on every page, but a
widget-capable footer that appears on only the home page. It all depends on the theme you use.
The easiest thing you can do on the Widgets page is
move
a widget. That’s as simple
as dragging the widget to a new spot. Why not try relocating the search box to the
bottom of the sidebar? There’s no need to click any button to save your changes—as
soon as you drop the widget in its new position, WordPress makes the change and
you can view your site to check out the eect.
The next-easiest widget-customization task is
deleting
a widget. To do that, grab
hold of your widget and drag it over to the big Available Widgets box on the left.
When you drop the widget there, WordPress removes it from your site.
TIP Congratulations, you’ve now graduated to the second level of WordPress mastery! It’s time to delete
the Meta widget from the main sidebar. Although its login and site administration links are convenient for
you,
they look unprofessional to your readers. In the future, you’ll need to type in your dashboard’s address (just add
/wp-admin
to the end of your website address) or bookmark the dashboard in your web browser.
Next, you can try
adding
a widget by dragging it from the Available Widgets box
and dropping it on one of the widget areas, like the sidebar. (You’ll learn what all
these widgets actually do starting on page 162.)
As you get a bit more ambitious, you may want to try moving widgets from one area
to another. For example, if you use the Twenty Twelve theme, you can drag a widget
from the Main Sidebar area to the First Front Page widget area. Unfortunately, you
won’t be able the see the change immediately, because the First Front Page widget
area doesn’t appear on your site unless you create a static front page (a technique
you’ll practice on page 231). But if you experiment with a dierent theme, you’ll often
find many more widget areas to play with. For example, the Twenty Thirteen theme
provides a Main widget area that appears in the footer of your site, and a Secondary
widget area that appears as a sidebar on the right (Figure 5-18).

WORDPRESS: THE MISSING MANUAL
158
CUSTOMIZING
YOUR WIDGETS
FIGURE 5-18
The Twenty Thirteen
theme puts two distinct
widget areas to good use
on the same page. Each
area currently holds two
widgets. Some themes
use dramatically different
formatting in different
widget areas, as is the
case with Twenty Thirteen.
When you drag a widget over a new widget area, WordPress expands the area so
you can see any widgets currently there. Then, you simply drop the widget into the
appropriate place, as shown in Figure 5-19. To peek into a collapsed widget area with-
out dragging a widget onto it, click the down-pointing arrow in its top-right corner.
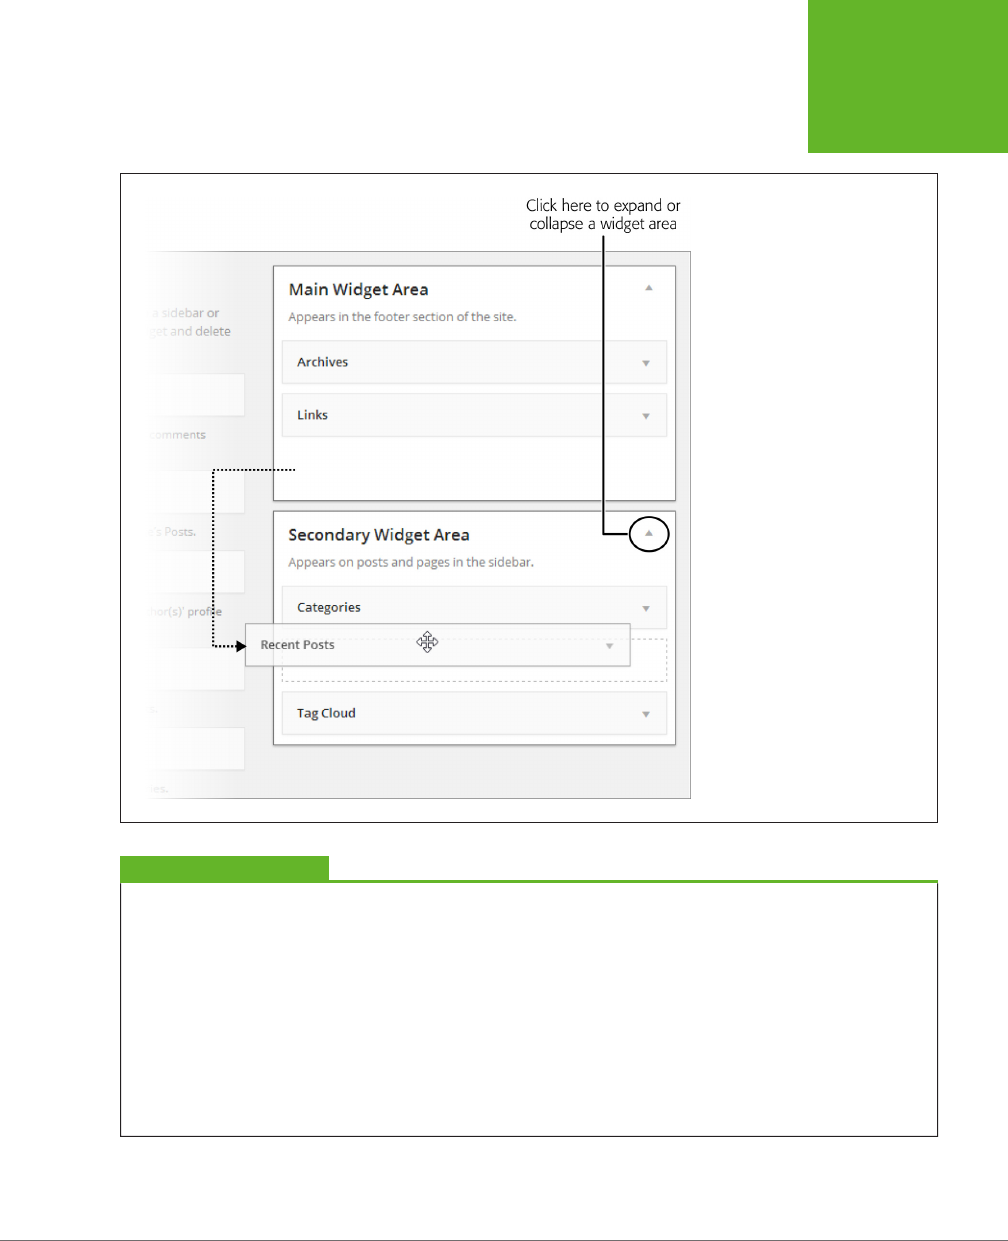
CHAPTER 5: CHOOSING AND POLISHING YOUR THEME 159
CUSTOMIZING
YOUR WIDGETS
FIGURE 5-19
Here, you’re moving the Recent
Posts widget from the Main widget
area (which creates the footer for
the Twenty Thirteen theme) to the
Secondary widget area (which cre-
ates the sidebar).
GEM IN THE ROUGH
When Adding Widgets is a Drag
Tired of dragging all your widgets into place? WordPress offers
another way to add widgets:
1. First find the widget you want in the Available Widgets
box, and then click it once.
2. WordPress opens a list of widget areas below the widget
you picked. Choose the area you want (for example,
“Main Sidebar”).
3. Click Add Widget to place the widget.
This widget-adding technique requires several clicks, but you
might find it more convenient if you have piles of widgets
to sort through and lots of widget areas to put them in. To
make your life even easier, add the widgets in the order you
want them to appear, so you don’t need to rearrange them
afterward.

WORDPRESS: THE MISSING MANUAL
160
CUSTOMIZING
YOUR WIDGETS
Other themes may oer additional widget areas, like two sidebars, one on either side
of the main content area. Some themes oer multiple footer areas, which is perfect
for creating
fat footers
chock-full of links, ads, or pictures. The Twenty Eleven theme
has no fewer than
three
footer areas for widgets. Although this seems confusing, it
really isn’t—you simply use what you need. If you want a simple footer, use Footer
Area One and ignore the others. If you want a two-column footer, which splits the
footer area into columns, use Footer Area One and Footer Area Two. And if you want
a pumped-up three-column footer, you know what to do: Put widgets in Footer Area
One, Footer Area Two, and Footer Area Three.
Table 5-2 describes how the year themes stack up, widget-wise.
TABLE 5-2
Widget areas in the WordPress year themes
THEME WIDGET AREA DESCRIPTION
Twenty Eleven Main Sidebar Sidebar on the right
Showcase Sidebar Sidebar on a page that uses the
Showcase template (page 236)
Footer Area One
Footer Area Two
Footer Area Three
First, second, and third columns
of the footer
Twenty Twelve Main Sidebar Sidebar on the right
First Front Page
Second Front Page
Left and right column of a static
page that uses the Front Page
template (page 235)
Twenty Thirteen Main The footer
Secondary Sidebar on the right
Twenty Fourteen Primary Sidebar Sidebar on the left, with a black
background
Content Sidebar Sidebar on the right, with a white
background
Footer The footer
Changing Widget Settings
Widgets are surprisingly useful things. They let readers find recent posts, browse
through your archives, and keep track of recent comments. As you refine your site,
you won’t be happy just shuing them around. You’ll also want to configure the
way they work.
Every widget provides a few settings you can adjust. To see them, expand the wid-
get by clicking the down-pointing arrow in its right corner. Change the settings you
want, and then click the Save button to make the changes permanent. Figure 5-20
shows the settings for the Recent Posts and Categories widgets.
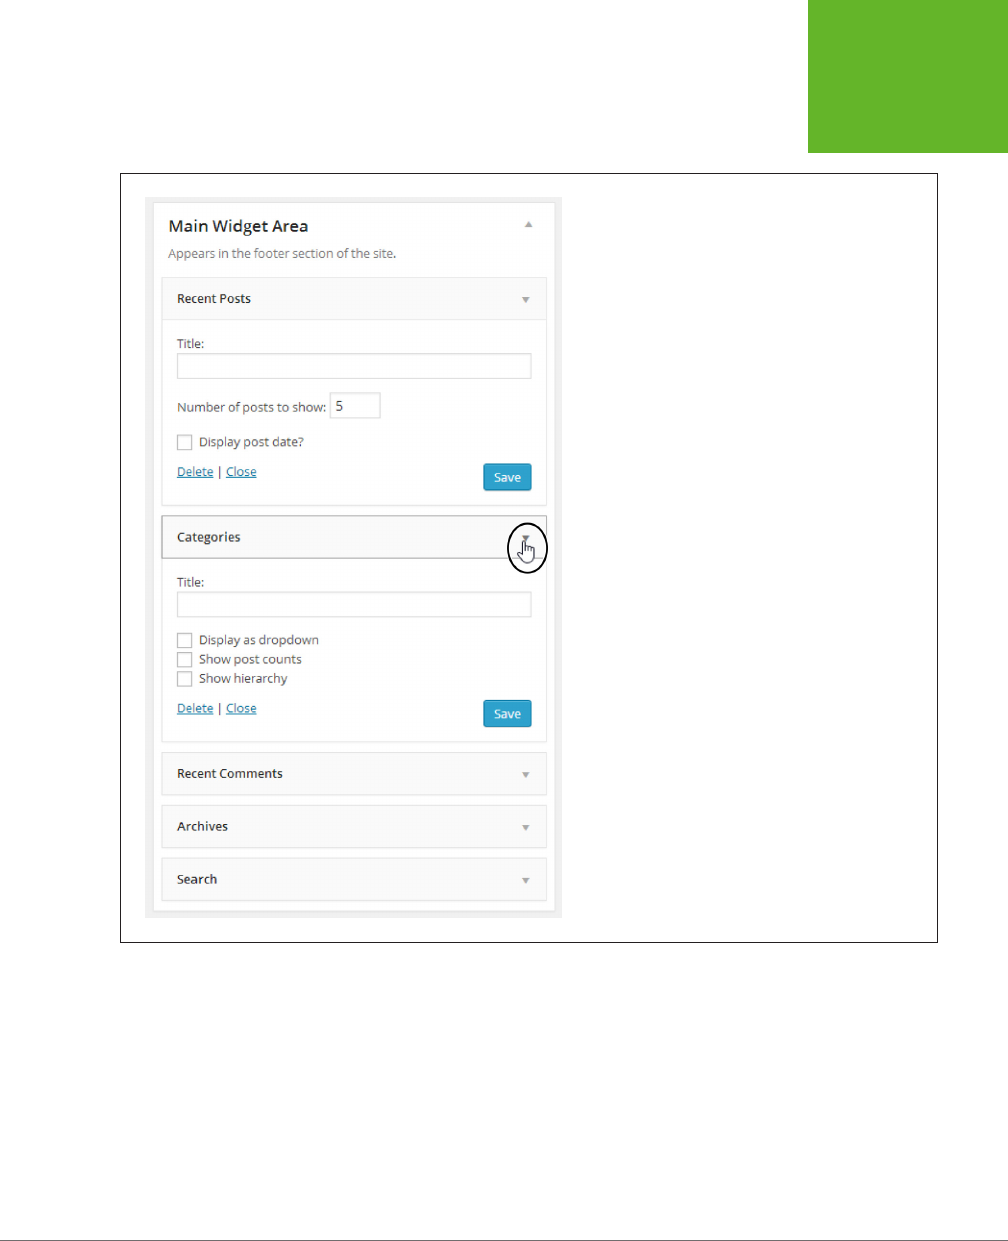
CHAPTER 5: CHOOSING AND POLISHING YOUR THEME 161
CUSTOMIZING
YOUR WIDGETS
FIGURE 5-20
You can change the Recent Posts widget to show as many
posts as you want (not just the latest five). The Categories
box gives you three special options. “Display as dropdown”
compresses the category into a drop-down list box, which
saves space but forces people to click the box open. “Show
post counts” shows the number of posts in a category in
parentheses after the category name. And “Show hierarchy”
displays the category tree, which is especially handy if you
use subcategories, as described on page 110.
Even if a widget provides no other settings, it always includes a Title text box, which
you can use to replace the widget’s standard headline—for example “Hot News!”
instead of “Recent Posts” or “What People Are Saying” instead of “Recent Com-
ments.” If you leave the Title box blank, the widget uses its default title.
When you add a new widget, it starts out with its standard settings. In some cases,
you might want to remove a widget from your site without throwing away its set-
tings—for example you may be planning to add it back later on. WordPress has a
special Inactive Widgets box designed for exactly this situation. To remove a widget
but keep its settings, drag the widget into the Inactive Widgets box instead of the

WORDPRESS: THE MISSING MANUAL
162
CUSTOMIZING
YOUR WIDGETS
Available Widgets box. (If you don’t see the Inactive Widgets box, scroll down—it’s
right underneath the Available Widgets box.)
The Basic Widgets
You are now the master of your widgets. Before you go any further, take a closer
look at exactly what WordPress’s widgets can do for you.
Table 5-3 describes the WordPress widgets you’ll see in a freshly installed, self-
hosted WordPress site. In Chapter 9, you’ll learn how to expand your widget col-
lection with plug-ins.
TABLE 5-3
WordPress widgets
WIDGET NAME DESCRIPTION
FOR MORE
INFORMATION…
Archives Shows links that let readers
browse a month of posts at a
time. You can convert it to a
drop-down box and display
the number of posts in each
month.
—
Calendar Shows a miniature calendar
that lets guests find posts on
specific dates.
See page 164.
Categories Shows links that let readers
browse all the posts in a
category. You can convert
it to a drop-down box and
display the number of posts
in each category.
Categories are explained on
page 106.
Custom Menu Shows a menu of pages or
other links that you create
using WordPress’s menu
feature.
Menus are explained in
Chapter 7.
Meta Shows administrative links
(for example, a “Log in”
link that takes you to the
dashboard). Once you’re
ready to go live with your
site, you should delete the
Meta widget.
See page 87.
Pages Shows links to the static
pages you pick. (Static
pages act like ordinary web
pages, not posts. You can
add them to your website to
provide extra information or
resources.)
Static pages are explained in
Chapter 7.

CHAPTER 5: CHOOSING AND POLISHING YOUR THEME 163
CUSTOMIZING
YOUR WIDGETS
WIDGET NAME DESCRIPTION
FOR MORE
INFORMATION…
Recent Comments Shows the most recent
comments left on any of
your posts. You can choose
how many comments
WordPress displays (the
standard is five).
Comments are explained in
Chapter 8.
Recent Posts Shows links that let readers
jump to one of your most
recent posts. You can choose
how many posts WordPress
displays (the standard is
five).
—
RSS Shows links extracted from
an RSS feed (for example,
the posts from another
person’s blog).
See page 433.
Search Shows a box that lets visitors
search your posts. You might
want to remove this from
the sidebar if your theme
includes it somewhere else
on the home page (as the
home page in Figure 5-1
does).
—
Tag Cloud Shows the tags your blogs
use most often, sized
according to their popularity.
Readers can click a tag to
see the posts that use it.
See page 165.
Text Shows a block of text or
HTML. You can put whatever
content you want here,
which makes it an all-
purpose display tool for
small bits of information.
See page 166.
Ephemera Shows the titles of posts that
use the Aside, Link, Status,
or Quote format. Unlike all
the other widgets, this is a
theme-specific widget that
only some themes include
(such as Twenty Fourteen
and Twenty Eleven).
See page 205.
You’re already well acquainted with the basic set of widgets that every blog begins
with: Search, Archives, Recent Posts, Categories, Recent Comments, and Meta. In
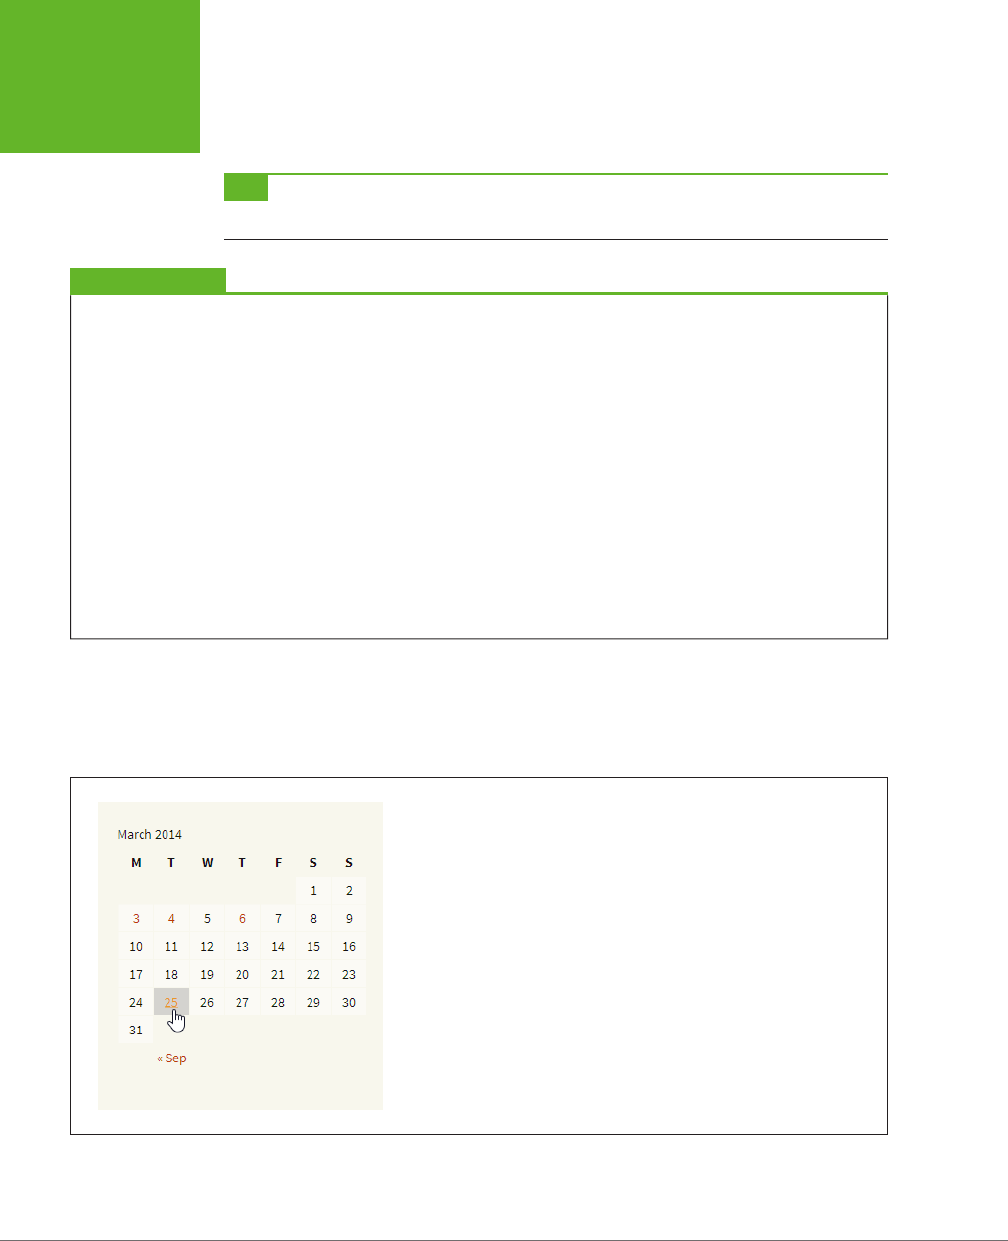
WORDPRESS: THE MISSING MANUAL
164
CUSTOMIZING
YOUR WIDGETS
the following sections, you’ll tour a few more widgets you might consider adding
to your site.
TIP You can add the same widget more than once. For example, you can add two Custom Menu widgets to
your page, give each one a different title, and use each one to show a separate set of links.
UP TO SPEED
I Have Even More Widgets!
The list of widgets in Table 5-3 includes all those that a
self-hosted WordPress site starts with. But if your site is on
WordPress.com, you’ll find the Widgets page stocked with a
number of preinstalled extras, including widgets that let you
share posts with nifty web services like Facebook, Twitter,
Flickr, Goodreads, and Delicious. So what’s up?
The discrepancy reflects the way WordPress handles plug-ins.
If your site is on WordPress.com, you can’t install plug-ins, so
you’re limited to whatever Automattic offers in the Widgets
window. For that reason, the company tries extra hard to
include a broad set of useful widgets for everyone.
Self-hosted WordPress sites start out with fewer widgets, but
you can add more—in fact, as many as you want—through
plug-ins. You can start by adding all the WordPress.com
widgets to your site with the Jetpack plug-in (page 297). You’ll
learn to use these more exotic widgets throughout this book.
Finally, it’s worth noting that some themes come with their
own specialized widgets. Usually, you can recognize them by
the fact that the widget name starts with the theme name,
like Twenty Fourteen Ephemera (which is included with the
Twenty Fourteen theme).
The Calendar Widget
The Calendar widget gives readers a dierent way to browse your site—by finding
posts published on a specific day (Figure 5-21). It’s most commonly used in blogs.
FIGURE 5-21
In the month of March, four days have at least one post—the 3rd, 4th,
6th, and 25th. Click the date to see the corresponding posts.
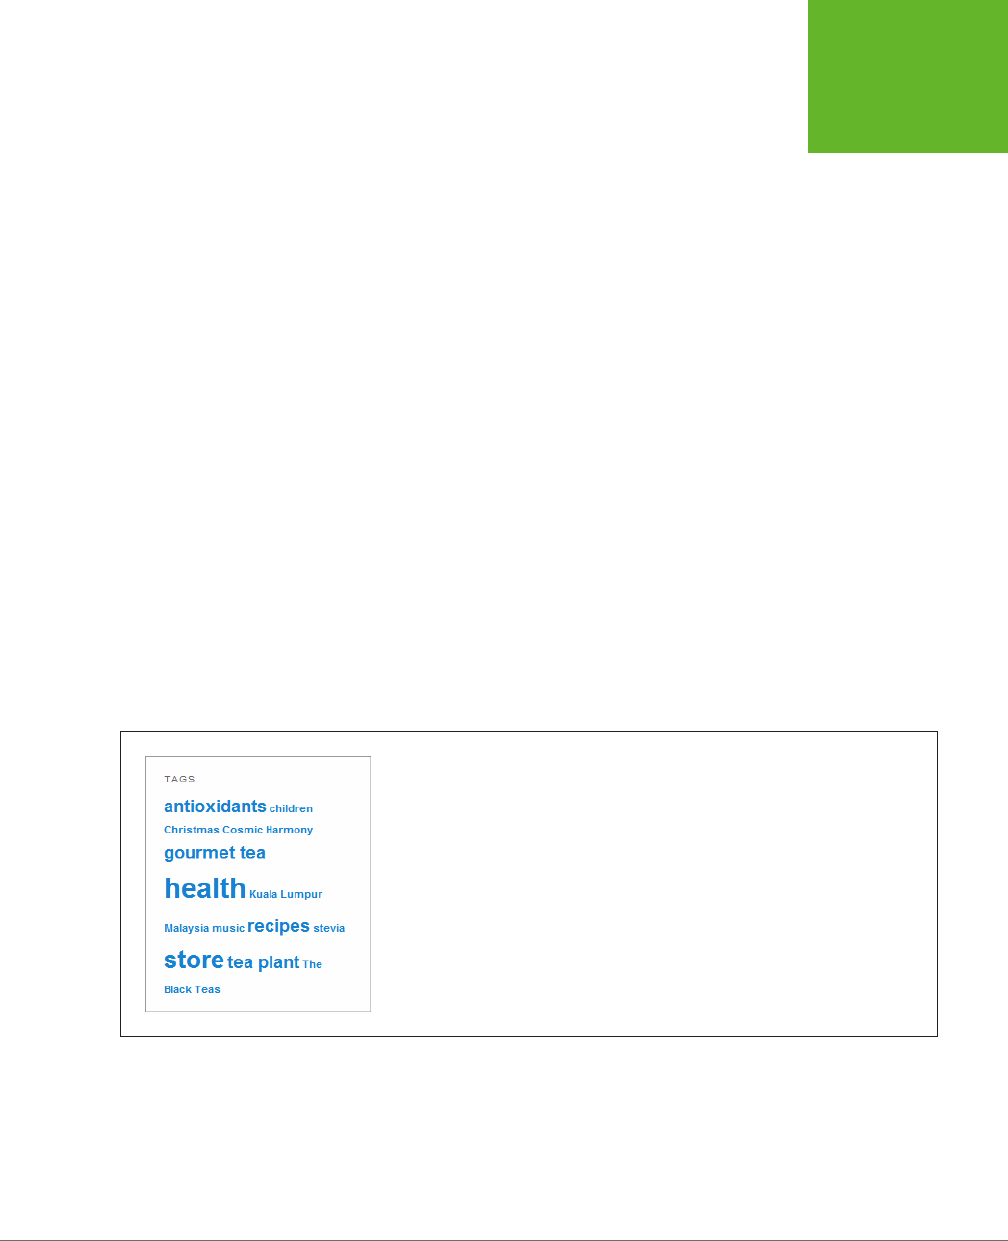
CHAPTER 5: CHOOSING AND POLISHING YOUR THEME 165
CUSTOMIZING
YOUR WIDGETS
The Calendar widget used to be a staple of every blog. These days, it’s far less
popular. The problem is that unless you blog several times a week, the calendar
looks sparse and makes your blog feel half-empty. Also, it emphasizes the current
month of posts while neglecting other months. Most readers won’t bother clicking
their way through month after month to hunt for posts.
You probably won’t use the Calendar unless your posts are particularly time-sen-
sitive and you want to emphasize their dates. (For example, the Calendar widget
might make sense if you’re chronicling a 30-day weight-loss marathon.) If you use
the Calendar widget, you probably won’t use the similarly date-focused Archives
widget, or you’ll at least place it far away, at the other end of your sidebar or in
another widget area.
The Tag Cloud Widget
You’ve already seen how the Categories widget lets visitors browse through the
posts in any category. The Tag Cloud widget is similar in that it lets readers see
posts that use a specific tag.
There’s a dierence, however. While categories are well-defined and neatly orga-
nized, the typical WordPress site uses a jumble of overlapping keywords. Also, the
total number of categories you use will probably be small, while the number of tags
could be quite large. For these reasons, it makes sense to display tags dierently
from categories. Categories make sense in a list or tree. Tags work better in a
cloud,
which shows the most popular tags sorted alphabetically and sized proportionately.
That means that tags attached to a lot of posts show up in bigger text, while less-
frequently used tags are smaller (Figure 5-22).
FIGURE 5-22
This tag cloud shows that “health” is the most frequently used tag,
with “store” close behind. As with categories, clicking a tag shows all
the posts that use it.
There’s no secret to using the Tag Cloud widget. Just drag it into an area of your
theme, and see what tags it highlights. The tag cloud might also tell
you
something
about your site—for example, what topics keep coming up across all your posts.

WORDPRESS: THE MISSING MANUAL
166
CUSTOMIZING
YOUR WIDGETS
NOTE If clouds work so well for tags, it might occur to you that they could also suit categories, especially
in sites that have a large number of categories, loosely arranged, and with no subcategories. Happily, a category
cloud is easy to create. If you use WordPress.com, the handy Category Cloud widget does the job. If you self-host,
you’ll notice an extra setting in the Tag Cloud widget: a list called Taxonomy. To create your category cloud, change
the Taxonomy setting from Tags to Categories.
FREQUENTLY ASKED QUESTION
Taming the Tag Cloud
What do I do if my tag cloud shows too many tags? Or not
enough? Or makes the text too big?
The Tag Cloud widget is surprisingly uncustomizable. If you use
fewer than 45 tags, it shows every one of them (although it
ignores any tags you added to the Posts→Tags list but haven’t
yet used in a post.) If you use more than 45 tags, the Tag Cloud
widget shows the 45 most popular.
Occasionally, people want a tag cloud with more tags. But
usually they have the opposite concern and want a smaller
tag cloud that’s slim enough to fit into a sidebar without
crowding out other widgets. If you want to tweak a tag cloud
on a WordPress.com site, you’re out of luck. But if you run a
self-hosted site, there are options. One solution is to crack open
your template files. That’s because the behind-the-scenes code
(the PHP function that creates the cloud) is actually very flex-
ible. It lets you set upper and lower tag limits, and set upper
and lower boundaries for the text size. You can get the full
details from WordPress’s function reference at
http://tinyurl.
com/wptagcloud
. (However, this information won’t be much
help until you learn how to dig into your WordPress theme files
to change your code, a topic explored in Chapter 13.) Another
solution is to search for a plug-in that lets you pick the tag
options and then generates a customized tag cloud. You’ll learn
how to find and install plug-ins in Chapter 9.
The Text Widget
The Text widget is simple but surprisingly flexible. You can use it anywhere you want
to wedge in a bit of fixed content. For example, you can use it in a sidebar, to add
a paragraph about yourself or your site. Or you can put it in your footer with some
copyright information or a legal disclaimer.
However, the Text widget becomes much more interesting if you stick some markup
in it. Since it recognizes HTML markup, you can stu in lists, links, pictures, and more.
(In fact, WordPress self-hosters often use the Text widget to stu in a video or an
image, as explained on page 188.) Figure 5-23 shows two uses of the Text widget.
Using the Text widget is easy. First, drag it onto your page (as with any other wid-
get). When you expand it, you get a nice big, multiple-line text box. If all you want
is ordinary text, just fill in a title and type in your text underneath. Make sure you
also turn on the “Automatically add paragraphs” checkbox. That way, wherever you
separate the text (by pressing the Enter key), WordPress inserts an HTML line break
element (that’s <br>) that, in turn, inserts the space you want.
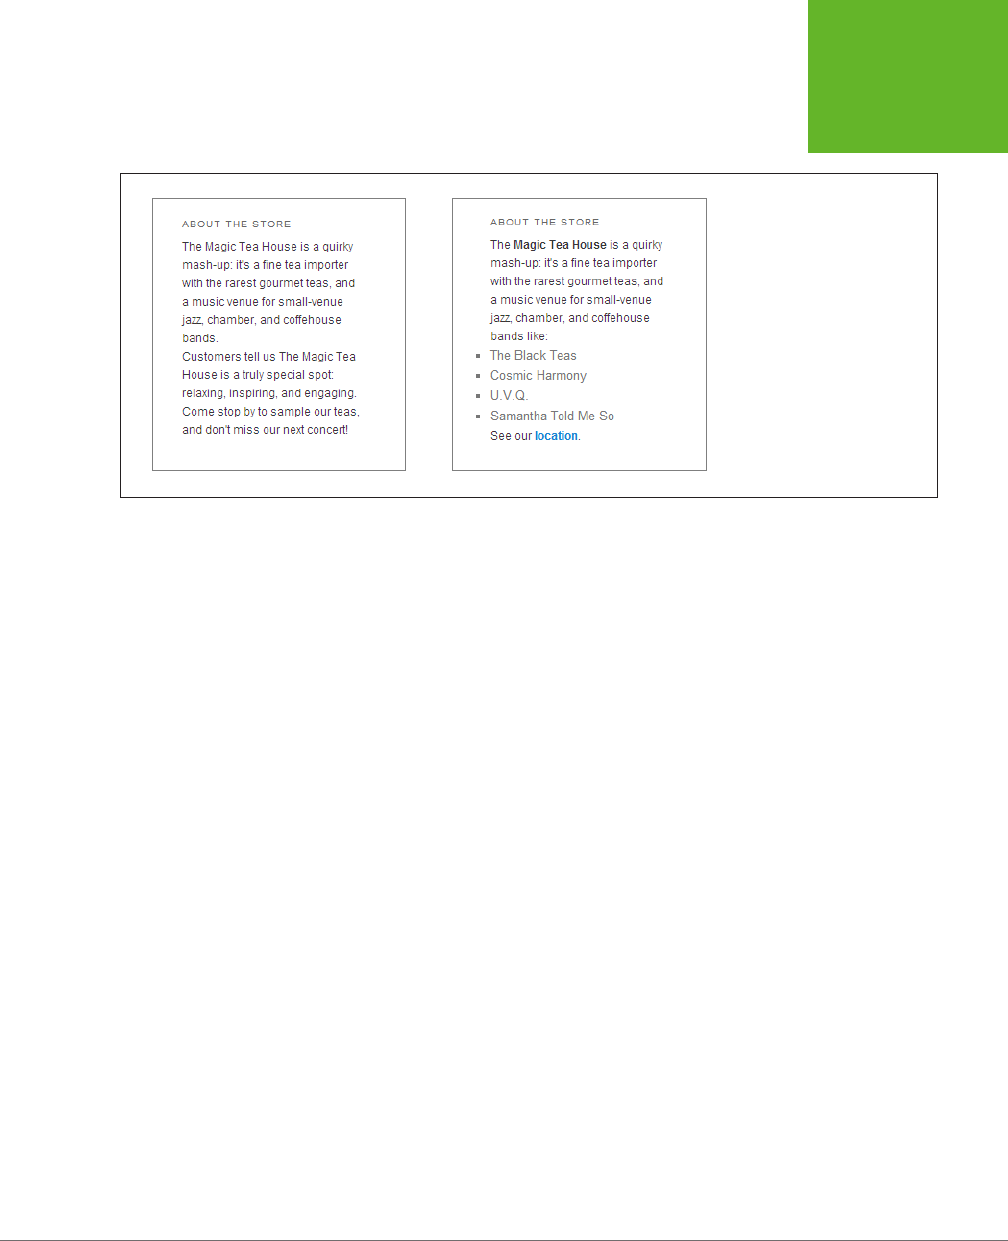
CHAPTER 5: CHOOSING AND POLISHING YOUR THEME 167
CUSTOMIZING
YOUR WIDGETS
FIGURE 5-23
Left: At its simplest, the Text
widget displays a title (formatted
according to the theme you’re us-
ing) with one or more paragraphs
of text underneath.
Right: Add some HTML, and the
Text widget looks a whole lot
fancier.
It’s almost as easy to put HTML in the Text widget. First, turn o the “Automatically
add paragraphs” settings. Then, type in your content, with the exact HTML tags you
want. Here’s an example that puts a word in bold type:
The following word will be <b>bold</b> on the page.
And here’s the HTML-formatted text from Figure 5-23 (right):
The <b>Magic Tea House</b> is a quirky mash-up: it's a fine tea importer with
the rarest gourmet teas, and a music venue for small-venue jazz, chamber, and
coffeehouse bands like:
<ul>
<li>The Black Teas</li>
<li>Cosmic Harmony</li>
<li>U.V.Q.</li>
<li>Samantha Told Me So</li>
</ul>
See our <a href="http://tinyurl.com/cyboj83">location</a>.
If your HTML skills are a bit sketchy, you can copy markup from an HTML editor into
the Text widget. Before you do, make sure you look over the markup and strip out
any unnecessary details, like inline styles. That gives it a better chance of blending
into your site without disrupting the rest of your WordPress page.

WORDPRESS: THE MISSING MANUAL
168
MOBILE
THEMES
Mobile Themes
If you build a website today, it’s a safe bet that some of your visitors will browse your
pages using smartphones, tablets, and other mobile devices. Unfortunately, pages
that look good in a desktop or laptop browser aren’t so swell on smaller screens.
The problem is space—namely, how to adapt your pages when there’s not nearly as
much room to work with. If you’re using an intelligent, mobile-aware theme, it can
adapt itself to work in cramped spaces. It can rearrange your content, simplify your
site’s layout, and increase the size of your text (Figure 5-24). This design philosophy is
sometimes called
responsive design
because it
responds
to the needs of the viewer.
FIGURE 5-24
Left: The Twenty Twelve
theme recasts itself for
people with mobile de-
vices. It shows your blog
postings on a large, read-
able page, using a single
column. To save space, it
squashes the menu down
to a single button (click it,
and the full menu drops
into view).
Right: The Twenty Twelve
theme still displays your
widgets, like Recent Posts
and Recent Comments,
but it bumps them to the
bottom of the page, below
the list of posts.
Themes that aren’t mobile aware (meaning they don’t distinguish between desktop
computers and web-enabled devices), don’t make any eort to tailor your pages for
tiny screens. The result is a postage-stamp-sized page that’s dicult to navigate
and read (Figure 5-25).
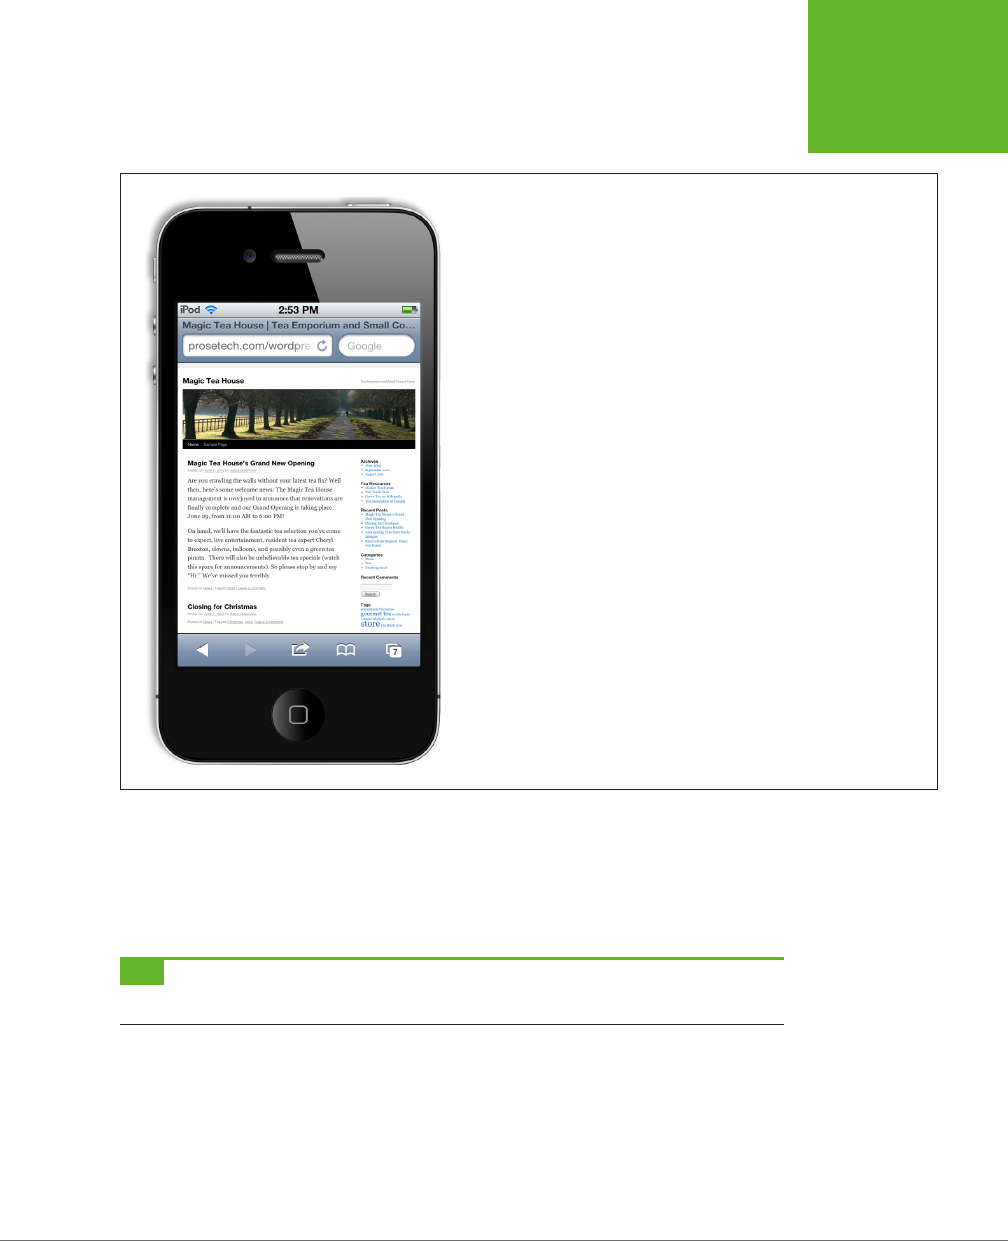
CHAPTER 5: CHOOSING AND POLISHING YOUR THEME 169
MOBILE
THEMES
FIGURE 5-25
The aging Twenty Ten theme doesn’t attempt to accommodate smart-
phones. Browse a site that uses the theme, and you get the familiar
bird’s–eye view of the page. Navigating this site requires plenty of
zooming in and out.
The easiest way to make your site look good on mobile displays is to pick a theme
that reconfigures your content for mobile devices. All the year themes from Twenty
Eleven on do. When WordPress detects a visitor using a mobile device, the theme
automatically substitutes a dierent layout—one that’s both simpler and carefully
rearranged.
TIP You can search for themes that have built-in mobile support using the Feature Filter. Just find the Layout
section and turn on the Responsive Layout checkbox before you search.
If your theme doesn’t recognize mobile devices, all is not lost. If you have a self-
hosted WordPress site, you can use a mobile-aware plug-in. One is WPtouch (
http://
tinyurl.com/wptouch
), which identifies smartphones and other mobile devices, and
makes sure they get a simplified theme that better suits their capabilities (and looks
pretty slick, too). You haven’t yet learned how to use plug-ins, but you’ll consider
WPtouch when you do, on page 307.

WORDPRESS: THE MISSING MANUAL
170
MOBILE
THEMES
NOTE Even if your theme does recognize mobile devices, you may still opt for the expanded features of a
mobile plug-in. In the WordPress year themes, the mobile version looks nice but still makes some questionable
design decisions. For example, they retain your sidebar widgets in an unwieldy list after your post. Similarly, the
home page still includes the full content of each post, which creates a seemingly endless page. (Surely shortened
excerpts are more convenient, and easier on the ever-scrolling index finger.) If you want to customize the mobile
appearance of your self-hosted WordPress site, a plug-in like WPtouch is the perfect tool (page 307).
If your site is on WordPress.com, you can’t use a mobile plug-in. However, WordPress.
com provides a similar but simpler set of built-in features. If your theme doesn’t
have mobile smarts, you can ask WordPress to swap in its own basic mobile theme.
Choose Appearance→Mobile, and next to “Enable mobile theme,” click Yes.
On the same page, you’ll find a few more options to configure your site for mobile
devices. Most usefully, you can use the “Show excerpts on front page” setting to
use a post’s excerpt (page 198) instead of its full text in the post list on the home
page. Although WordPress.com doesn’t give you nearly as much control as a mobile
plug-in like WPtouch, it’s enough to let you keep your favorite theme, even if it isn’t
mobile-aware.

171
CHAPTER
6
You know what an ordinary WordPress post looks like—it starts with a title,
followed by one or more paragraphs of text. And there’s nothing wrong with
that. Providing that you pick the right theme, your WordPress site can look
surprisingly hip, even if it holds nothing more than plain text.
However, there are plenty of types of sites that need more from a post. For example,
if you’re posting news articles, you certainly want to add pictures. And if you’re writ-
ing long posts (on anything from business analytics to relationship advice), you’ll
improve your audience’s reading experience if you use subheadings to structure
your thoughts. To add details like these, along with lists, links, and the other ac-
couterments of a web page, you need to take charge of WordPress’s post editor,
which you’ll do in this chapter.
Fancy posts aren’t just about formatting—they’re also about
features.
For example,
you can use specialized tags to show just a portion of a post on your home page
(rather than the whole thing), giving you a ridiculously useful way to promote many
posts in a small space. Or you can use images from your posts to create a slideshow
that, say, promotes your top posts on the home page. In this chapter, you’ll use all
these techniques to improve the aesthetics and showcase the richness of your site.
Making Fancier Posts
You’ve seen plenty of WordPress posts so far, but none are likely to impress your
web designer friends. Fortunately, you don’t need to stick with the plain and ordinary.
WordPress is packed with tools that can help you create epically formatted posts.
Jazzing Up Your Posts
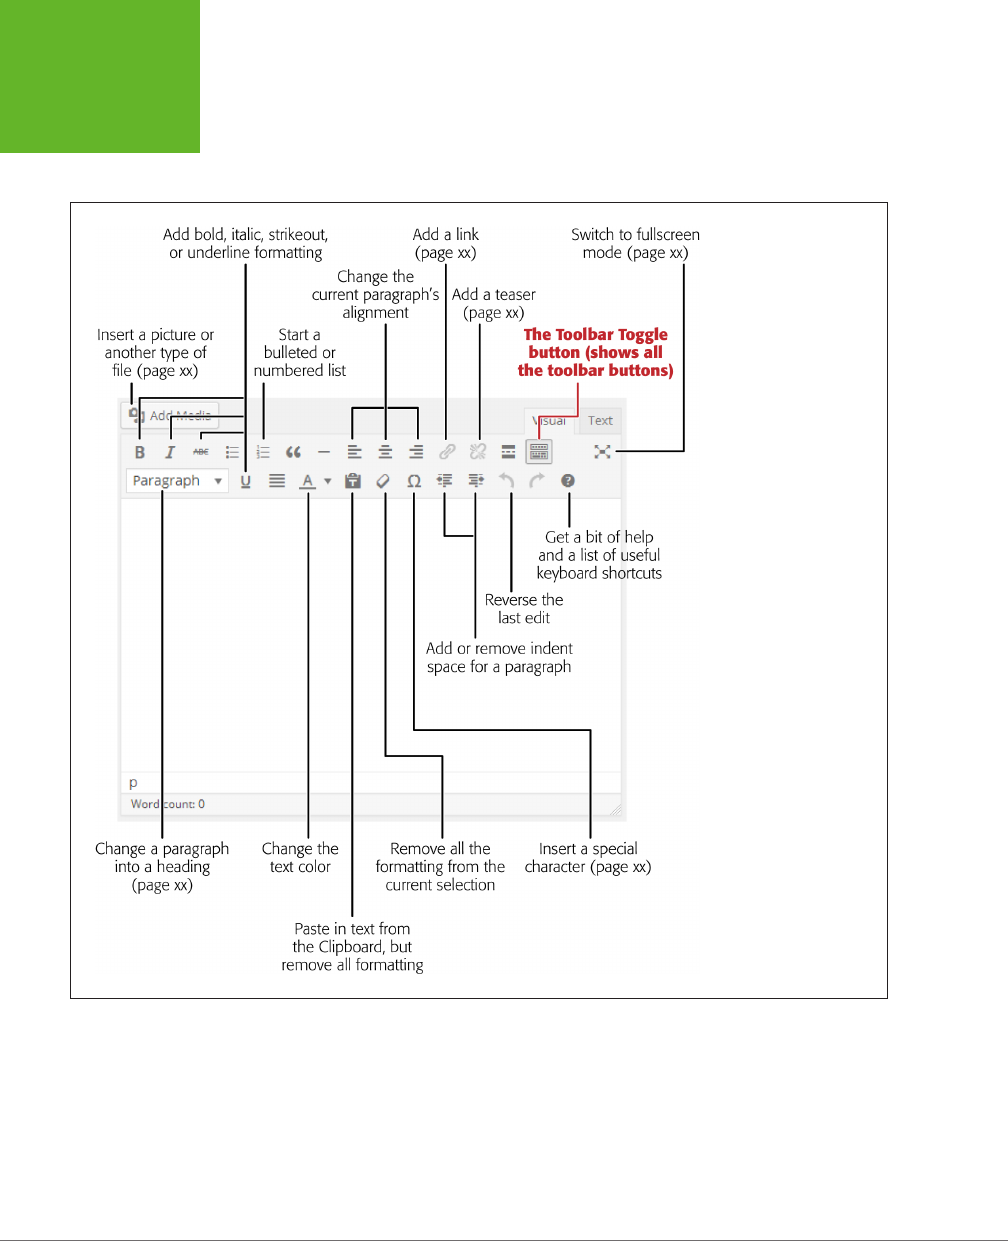
WORDPRESS: THE MISSING MANUAL
172
MAKING
FANCIER POSTS
The easiest way to start styling your posts is to start with a new one (to do that,
choose Posts→Add New, as usual). Then look at the toolbar that sits at the top of
the editing box—it’s stocked with useful formatting commands (Figure 6-1).
FIGURE 6-1
If your toolbar has just
a single line, start by
finding the Toolbar Toggle
button (top row, far right)
and click it. That expands
the toolbar to its full
two lines of commands,
shown here.
Even though WordPress creates your posts using web-friendly HTML markup, the
toolbar buttons work in almost the same way they do in a word processor, complete
with a basic Undo feature. It’s like having a miniature Microsoft Word in your browser.
You can format your posts two ways. One is to select the bit of text that needs for-
matting and then click the corresponding toolbar button. You might, for example,
select a single word and add bold formatting by clicking the B button. Another
approach is to use the toolbar buttons to turn a feature on or o (which computer

CHAPTER 6: JAZZING UP YOUR POSTS 173
MAKING
FANCIER POSTS
nerds call
toggling
) as you write. For example, you could click the I button to turn on
italic formatting, type something, and then click the I button again to turn o italics.
TIP If you want to start a new line of text without starting a whole new paragraph, press Shift+Enter at the
end of the preceding line (instead of hitting just the Enter key). Why? If you click just Enter, WordPress thinks
you want to start a new paragraph and adds extra space just before the beginning of that paragraph. When you
use Shift+Enter, WordPress doesn’t add the extra space.
The following sections explain a few of the finer points of post formatting. You’ll see
the proper way to work with headings, add links and special characters, and unlock
even more capabilities by editing your post’s HTML.
GEM IN THE ROUGH
Get More Space to Work
Need more space to write and review your content? You can
make the post box a bit bigger by tweaking WordPress’s set-
tings. Choose Settings→Writing, look for the “Size of the post
box” setting, and increase the number of lines (the standard is
20). Or you can expand the content box by clicking the bottom-
right corner and dragging it down, as shown on page 126.
If you’re craving even more screen real estate, check out the
toolbar’s full-screen mode button (Figure 6-1). WordPress calls
this mode (and labels the button that triggers it)
Distraction
Free Writing.
Click it, and WordPress resizes the post title
and post content boxes to fill a larger portion of the page,
temporarily hiding the other parts of the Add New Post page,
including the toolbar and the dashboard menu. If you need a
toolbar button, move your mouse (without clicking) near the
top of the page to make the toolbar reappear. When you finish
writing, you can get back to the normal Add New Post page by
pointing to the top of the page to show the toolbar, and then
clicking “Exit fullscreen.”
Technically, WordPress’s full-screen view doesn’t occupy the
full screen—it’s more like full
browser
view. But you can go
beyond that limit by switching your browser to
its
full-screen
view. On most browsers, you do that by pressing F11 (press it
again to return the browser window to its normal state). With
your browser in full-screen mode, its window fills the entire
screen (sans toolbars), and WordPress can claim virtually all
of it to display your post.
There’s one quirk, however: No matter how big you make your
browser window, WordPress limits the width of the editing box,
for two reasons. First, it’s awkward to read and edit long lines
of text. Second, most WordPress templates limit the width of
posts to ensure readability. As a result, an unnaturally wide ed-
iting window would give you a false sense of the post’s layout.
Using Subheadings
Every blog post starts with a heading—the title of your post, which sits above the
post content. But if you’re writing a long post, it’s a good idea to subdivide your
writing into smaller units using subheadings.
To create a subheading, use the drop-down Format menu on the far left of the second
row of the toolbar (Figure 6-2). Usually, the menu displays the word “Paragraph,”
which tells you that WordPress is styling the current text as an ordinary paragraph.
But you can choose three sizes of heading from the menu, too.
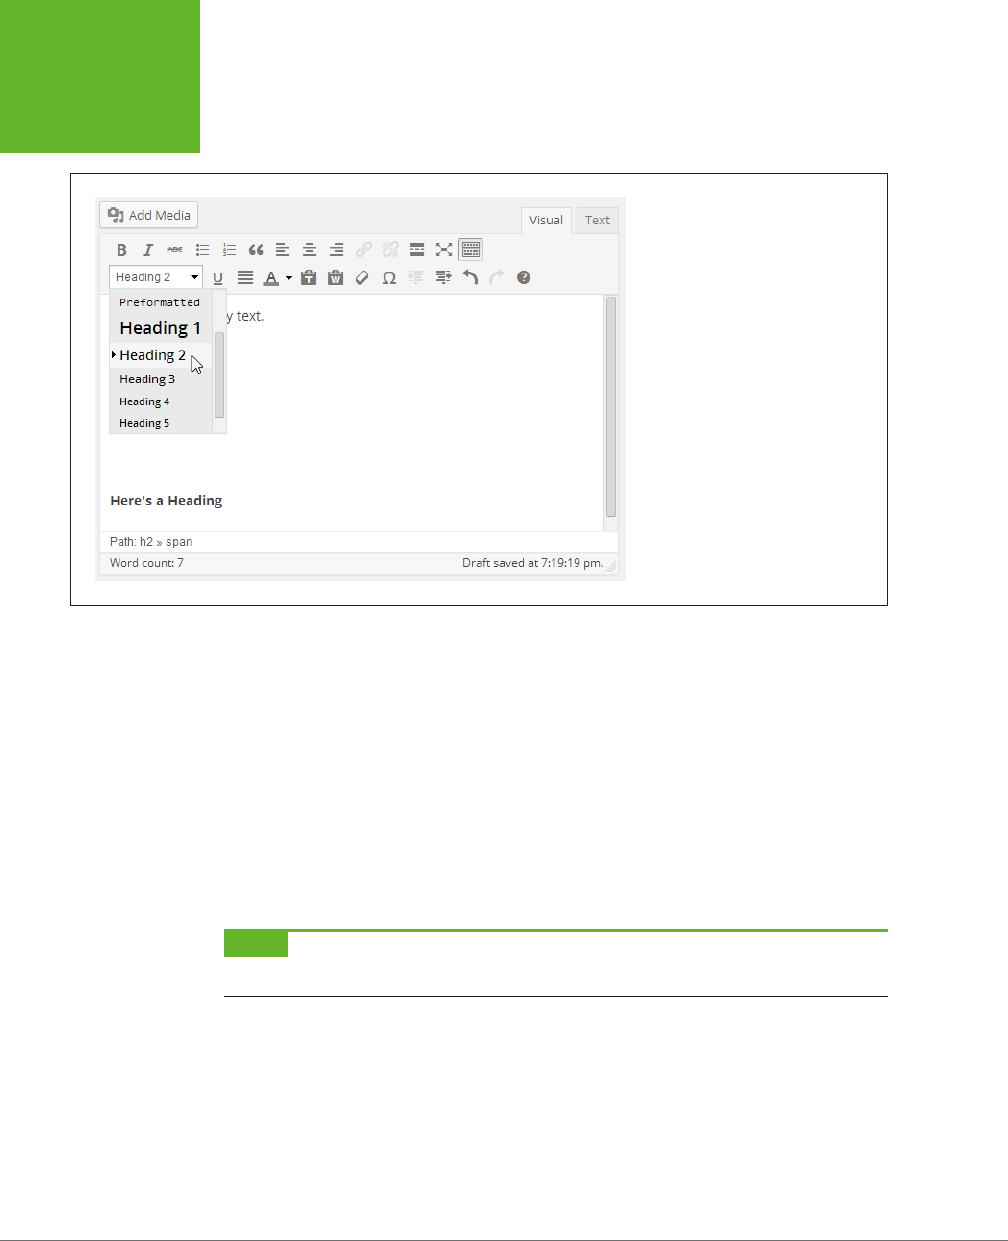
WORDPRESS: THE MISSING MANUAL
174
MAKING
FANCIER POSTS
FIGURE 6-2
The Format drop-down list offers six
levels of heading. Choose one, and
you’ll be rewarded with bigger, bolder
text. If you know even a little about
HTML, you won’t be surprised to learn
that a level-1 heading uses the <h1>
element, a level-2 heading uses <h2>,
and so on.
The heading level you use depends, at least in part, on your theme. Here are some
guidelines:
• Don’t use level-1 headings inside your posts, because they’ll clash with the main
post title or the website title, confusing search engines and assistive devices
like screen readers.
• If you use a modern theme, use level-2 headings to subdivide a post. This is the
right approach for the standard year themes, from Twenty Eleven on.
• If you use an older theme, you may need to use level-2 or level-3 headings when
subdividing a post. First, try level-2 headings. If they appear in the published
page with the same type size as the post title, use level-3 headings instead.
NOTE The size, typeface, and exact appearance of a heading depend on your theme. You won’t see exactly
what your heading looks like until you preview or publish your page.
Showing a Code Listing
You may notice that the Format list has more than just headings in it. It also includes
the Paragraph, Address, and Preformatted formats, which map to the HTML elements
<p>, <address>, and <pre>, respectively.
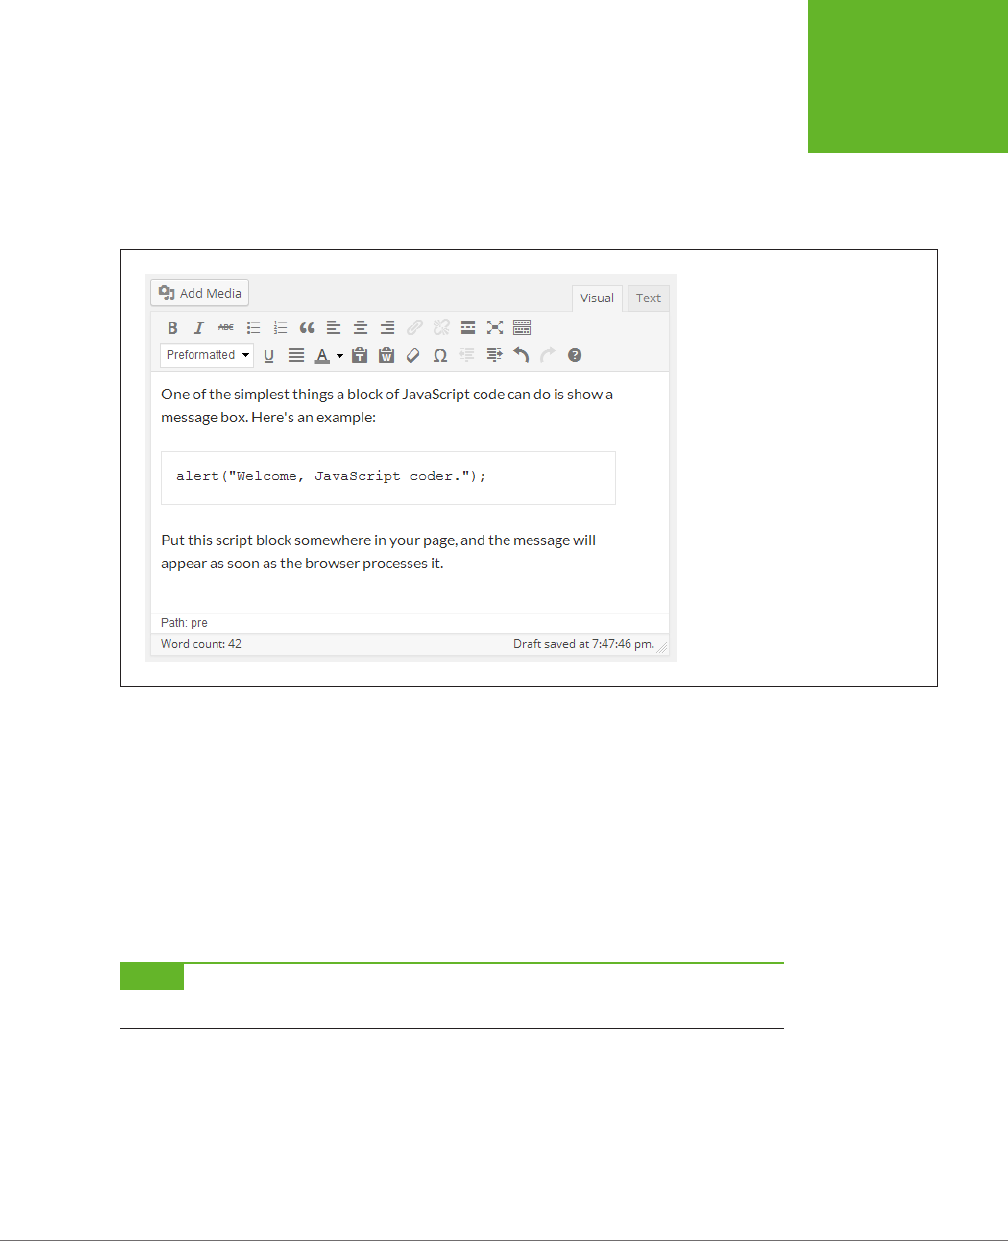
CHAPTER 6: JAZZING UP YOUR POSTS 175
MAKING
FANCIER POSTS
WordPress uses the <p> element to style ordinary paragraphs, and you’ve already
seen plenty of those. The <address> element is meant for contact information about
who wrote the page, but it’s rarely used. But the <pre> element is more useful—it
displays text in a fixed-width font, which is ideal for listing programming code or
simulating computer output (Figure 6-3).
FIGURE 6-3
In some themes, WordPress formats the
text of a <pre> element using a gray
background or gray outline (the latter
shown here for the “alert” line in the
Twenty Twelve theme). That visually
separates the <pre>-formatted text
from the rest of the content on the
page. (Remember to use Shift+Enter
to add line breaks between each line
of code, rather than just Enter, which
would add extra spacing and start a
new paragraph.)
Adding Links
The Web wouldn’t amount to much without links, those blue underlined bits of text
that let you jump from one web page to another. You can easily add links to a post.
For example, imagine you have this sentence:
This story was reported in The New York Times.
To turn “The New York Times” into a link, select the text, and then click the Insert
Link button in the toolbar. A window appears where you can either supply a full
website address or link to one of your own posts (Figure 6-4).
NOTE If you want to link to a file—for example, a document that your guest can download or a picture she
can view—you need to store that file in WordPress’s media library. You’ll get the full details on page 186.
To remove a link, click anywhere inside the link text and then click the Remove Link
button (which is right next to the Insert Link button in the toolbar).

WORDPRESS: THE MISSING MANUAL
176
MAKING
FANCIER POSTS
FIGURE 6-4
To add a link to a post, you need to supply
the URL (the website address) and a Title
(the text that appears in a tooltip when
a visitor points to the link). Alternatively,
you can search for a post on your own site
and insert a link to it. Either way, clicking
Add Link seals the deal.
Inserting Special Characters
Special characters are usually defined as characters you don’t see on your everyday
keyboard. For example, if you use a standard U.S. keyboard, special characters
include things like accented letters and typographic symbols.
WordPress lets you drop in one of a small set of special characters using the Insert
Custom Character command. Click it, and a window appears with a grid of unusual
characters. Point to one to get a close-up look at it, and then click it to close the
window and insert the character into your post (see Figure 6-5).
You may not need all the special characters you think you do. WordPress automati-
cally substitutes special characters for some character combinations. For example, if
you type two dashes (--) between words, WordPress turns them into a seamless
en
dash
(–) when you publish the post. Three dashes in a row creates a slightly longer
em dash
(—). Similarly, WordPress turns ordinary straight quotes ("") into typo-
graphically correct quotation marks (“”). It works the same magic with apostrophes.
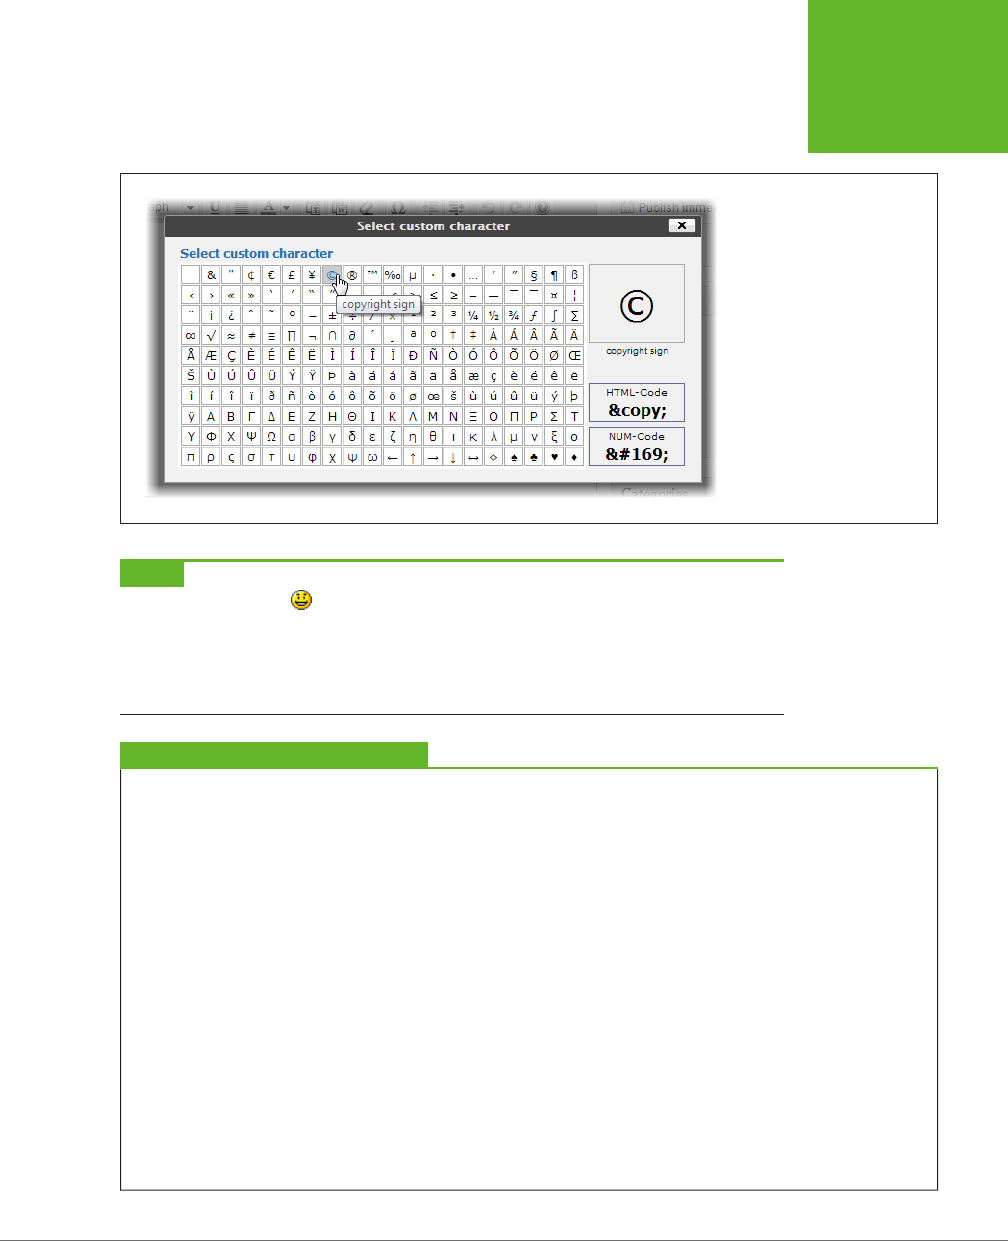
CHAPTER 6: JAZZING UP YOUR POSTS 177
MAKING
FANCIER POSTS
FIGURE 6-5
Here, you’re about to insert the
copyright symbol into a post.
NOTE The oddest special characters you can use with WordPress are smilies, character combinations like :)
that turn into emoticons like . WordPress performs this substitution automatically, and you can find out what
smilies you can use (and the characters you need to type to trigger them) at
http://tinyurl.com/using-smilies
.
On the other hand, if the smilies feature is running amok and changing character sequences you don’t want it to,
choose Settings→Writing and turn off the checkbox next to “Convert emoticons like :-) and :-P to graphics on
display.”
FREQUENTLY ASKED QUESTION
Formatting Your Text
How can I adjust typefaces and font sizes?
WordPress’s post editor lets you structure your content (for
example, put it into lists and headings), add more content (like
pictures), and apply certain types of formatting (like boldface
and italics). However, there are plenty of formatting details
that aren’t under your control. The size and typeface of your
fonts is one of them.
This might seem like an awkward limitation, but it’s actually
a wise design decision on the part of the people who created
WordPress. If WordPress gave you free rein to change fonts, you
could easily end up with messy markup and posts that didn’t
match each other. Even worse, if you switch to a new theme,
you’re stuck with your old fonts, even though they might no
longer suit your new look.
Fortunately, there’s a more structured way to change the ap-
pearance of your text. Once you’re certain you have the right
theme for your website, you can modify its styles. For example,
by changing the style rules, you can change the font, color,
and size of your text, and you can either make these changes
to all your content, or to just specific elements (like all level-3
headings inside a post).
Modifying styles is a great way to personalize a theme, and
you’ll learn how to do that in Chapter 13. However, there’s one
caveat—if you use WordPress.com to host your site, you need
to buy the Custom Design upgrade to edit your styles (page
457). Self-hosted WordPress sites don’t have this restriction.

WORDPRESS: THE MISSING MANUAL
178
MAKING
FANCIER POSTS
Using the HTML View
All the toolbar buttons you studied so far work by inserting the right HTML into your
posts, behind the scenes. But if you’ve got a bit of web design experience, you don’t
need to rely on the buttons. Using WordPress’s HTML view, you can directly edit your
post’s HTML markup. You won’t be limited by the buttons in the toolbar—instead,
you can enter any HTML element you want.
To switch to HTML view, click the Text tab that sits just above the post content box,
on the right (Figure 6-6). To go back to the visual editor, click the Visual tab. In fact,
there’s no reason you can’t spend time in both places. For example, you might write
your post in the visual editor and then switch to HTML view to inspect the markup.
HTML view gives you a slightly dierent toolbar. It still has the useful “full screen”
button, but most of the other shortcuts, which insert various HTML tags, aren’t much
help—if you’re savvy enough to prefer the HTML view, then you probably want to
type in your markup by hand.
FIGURE 6-6
Here’s the same docu-
ment—with a heading
and a list—shown in both
the visual editor (left)
and the HTML editor
(right).
If you’re a seasoned web designer, you might feel that WordPress’s HTML editor isn’t
up to snu. Full HTML editing programs like Adobe Dreamweaver are packed with
little frills that can make editing easier—for example, they automatically add closing
tags to HTML elements and suggest possible tag names as you type. (HTML editors
also have more powerful layout and styling features, but those features make more
sense when you’re designing the look and layout of an entire site, not just adding
a bit of content to a post.)
Most WordPress developers don’t need the full features of a program like Dream-
weaver. But there are exceptions. If you write long, complex posts—for example, the
articles you saw in the Internet Encyclopedia of Philosophy (page 12)—you probably
don’t want to do all your editing in a web page window. Hardcore HTML lovers who
find themselves in this situation can write posts in an HTML editor like Dreamweaver,
copy the markup, and then paste it into WordPress’s Text content box. But don’t
try this unless you really understand your markup. You don’t want to transfer a

CHAPTER 6: JAZZING UP YOUR POSTS 179
MAKING
FANCIER POSTS
whack of formatting details to your WordPress post, like a <span> element that has
hardcoded font settings. If you do, you’ll introduce some serious issues, including
inconsistencies between posts and problems changing themes.
Getting a Better Post Editor
Most WordPress fans do their work directly in their web browsers, using the Word-
Press editor. But if you’re working with long documents and you’re missing your
favorite conveniences, you have other options.
One is to upgrade your WordPress editor. This approach makes sense if you’re happy
creating your posts in the familiar Add New Post web page but don’t feel like you’re
getting enough help from WordPress. Using a plug-in, you can swap in an editor
that has a bit more muscle. (Of course, you’ll need a self-hosted WordPress site to
change your editor, because WordPress.com doesn’t let you add plug-ins.)
You can search for a pumped-up post editor on the WordPress plug-in page (
http://
wordpress.org/plugins
), as explained in Chapter 9. Plenty of them oer advanced
features like search-and-replace, style-based editing, and support for creating tables.
One of the most popular is TinyMCE. Check it out at
http://tinyurl.com/tinyeditor
and learn about installing plug-ins on page 287.
Another solution is to do your post-writing work in another program. You’ve already
learned that you can paste in pure HTML using the WordPress editor’s HTML view
(page 178), but this technique is a bit touchy—paste in the wrong markup and you
can scramble your site. A better approach is to use a program that lets you compose
rich content, and then posts that content to your site safely and cleanly, without an
awkward cut-and-paste step.
On a Windows computer, you can use Microsoft’s free Windows Live Writer to
compose properly formatted posts on your desktop, even if you don’t have an
Internet connection. When you’re ready, a single click publishes the posts on your
blog. Windows Live Writer is available free at
http://tinyurl.com/win-essentials.
Mac
fiends can find similar blog-writing tools, including the popular—but, sadly, not free
(it’s $40)—MarsEdit (
www.red-sweater.com/marsedit
).
NOTE WordPress has a list of even more desktop post editors for Windows, Mac OS, and Linux at
http://
tinyurl.com/blog-client
. Most offer handy formatting features, and all of them let you compose your work offline.
Finally, Microsoft Word lovers can use their favorite word processor to write Word-
Press posts using the little-known “Blog post” template. Word asks for your site’s
URL, user name, and password, after which it lets you create new posts and edit
old ones, all from the comfort of the Word window.
TIP Although it’s tempting to do your WordPress work in Word, with its silky smooth formatting features and
AutoCorrect, the free Windows Live Writer program is still a better choice. That’s because Windows Live Writer
offers a few key features that Word omits, like the ability to schedule a post for future publication (page 100),
add tags, and edit your post’s slug (page 120).

WORDPRESS: THE MISSING MANUAL
180
ADDING
PICTURES
Adding Pictures
You’ve now toured many of the post-enhancing features the Add New Post page
oers. But there are several frills you haven’t yet touched. The most obvious is
adding graphics.
Virtually every good WordPress site can be made better with pictures. WordPress
gives you several ways to do that, from the obvious (plopping them into your posts,
alongside your text) to the more interesting (using them to build photoblogs, create
slideshows, and advertise new posts on your home page). In the following sections,
you’ll learn how to take advantage of these slick picture tricks.
Putting Pictures in a Post
The most obvious place for a picture is in a post, right along with your content.
WordPress makes it easy to insert pictures as you create a post (on the Add New
Post page) or edit one (on the Edit Post page). In fact, you can put as many images
as you want into any post.
1. In a post’s edit box, click the spot where you want to add a picture.
It doesn’t matter whether you use the visual editor (the Visual tab) or the HTML
editor (the Text tab). If you use the visual editor, you’ll see every picture you
insert right next to your post text. If you use the HTML editor, you’ll see the
raw HTML markup for each picture. This markup includes an <img> element
for the picture, wrapped in an <a> anchor element that turns the picture into a
link so readers can click it to see the full-size image, and possibly some other
elements, like a title or a caption.
2. Just above the box where you type in your content, click the Add Media
button.
The Insert Media window appears (Figure 6-7). It gives you three ways to find
a picture: You can upload a file from your computer (using the Upload Files
tab), use a file you already uploaded to WordPress’s media library (using the
Media Library tab), or grab a file that’s stored on another website (by clicking
the “Insert from URL” link on the left).
In this example, you want to stick to the Upload Files tab. Grabbing pictures
from other websites (using “Insert from URL”) might be worthwhile if you
store graphics on another part of your site. But if it’s someone else’s site, don’t
chance it—the risk that the picture is copyrighted, or that the webmaster could
change or move it to a new address, is too great. The Media Library tab is also
useful, but only after you build up a collection of pictures. You’ll take a look at
it on page 186.
NOTE The Insert Media window also has links for creating a picture gallery (page 330) and setting your
post’s featured image (page 190). WordPress.com users will see even more links, for adding tweets and YouTube
videos. Ignore all these details for now—you’ll revisit them soon enough.
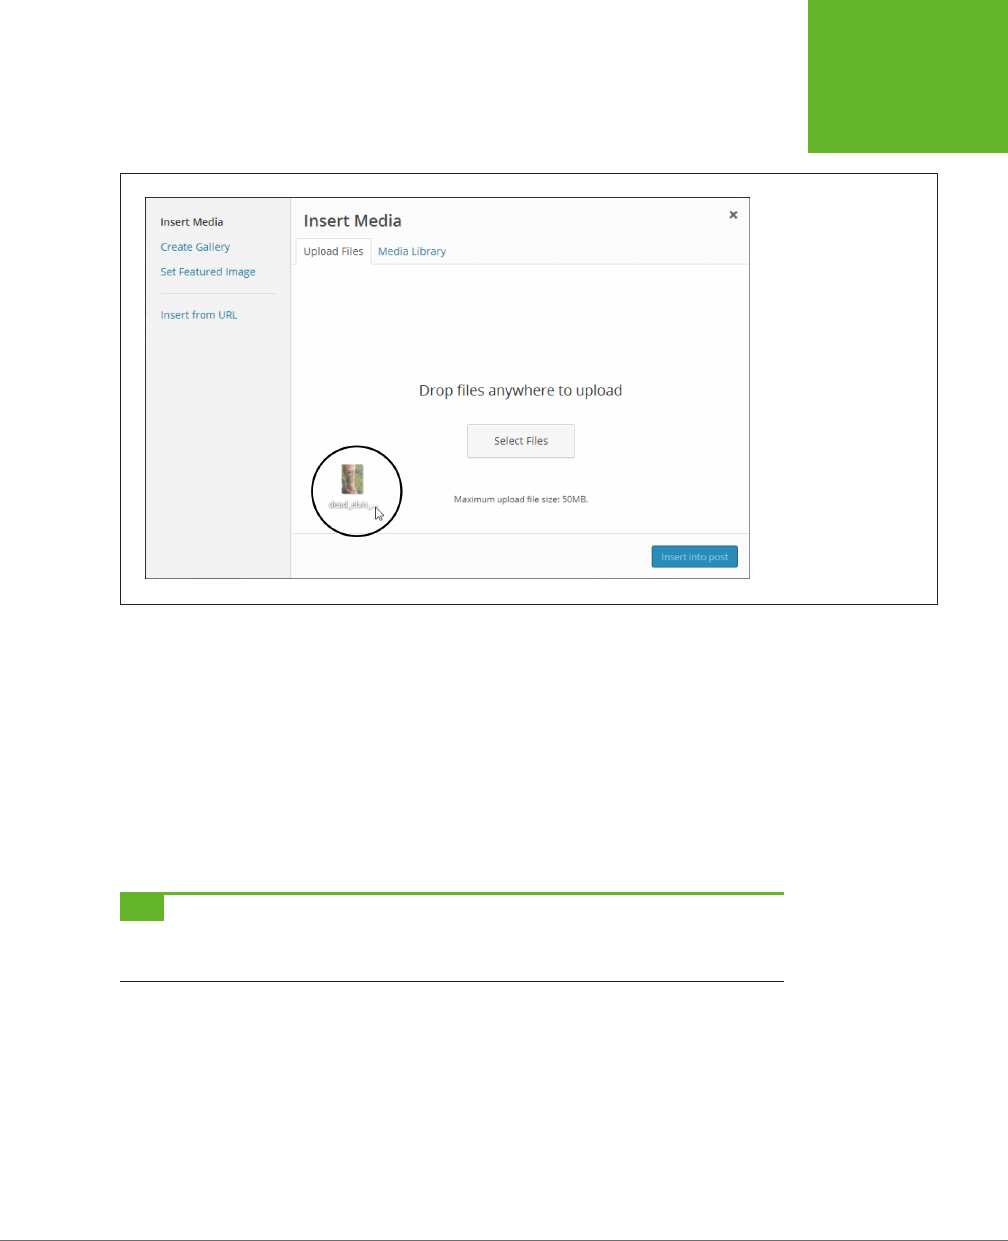
CHAPTER 6: JAZZING UP YOUR POSTS 181
ADDING
PICTURES
FIGURE 6-7
Using the Upload Files
tab, you can insert one or
more pictures from your
computer into a post.
First, drag a picture into
the Insert Media box.
Once you release the
image, WordPress begins
uploading it.
3. Pick the files you want to upload.
WordPress gives you two options. The quickest approach is to drag files from
an open file browser window (like Windows Explorer or the Mac’s Finder) and
drop them in the Insert Media window box. You can drag as many files as you
want, either all at once or one at a time, and you can keep dropping in new files
before WordPress finishes uploading the old ones.
Your other option is to pick your files from a standard dialog box. To do that,
click the Select Files button, browse to the right folder, and then pick what
you want. Ctrl-click (Command-click on a Mac) to select multiple files at once.
TIP If your files are
really
big, uploading just isn’t practical (and it might fail halfway through). For example,
it’s probably a bad idea to upload files straight from your 22-megapixel digital camera. To save time, scale it
down in an image-editing program first.
Once you upload your files, WordPress switches to the Media Library tab, which
lists all the images you ever added to your site. It puts new pictures at the top
of the list.
If your files are particularly large (or your web connection is particularly slow),
you’ll see a progress bar ticking along, tracking the upload progress of each
file. When WordPress finishes an upload, it replaces the progress bar with a
thumbnail of your image. On the right, a pile of text boxes asks you for all kinds
of information about your picture (see Figure 6-8).
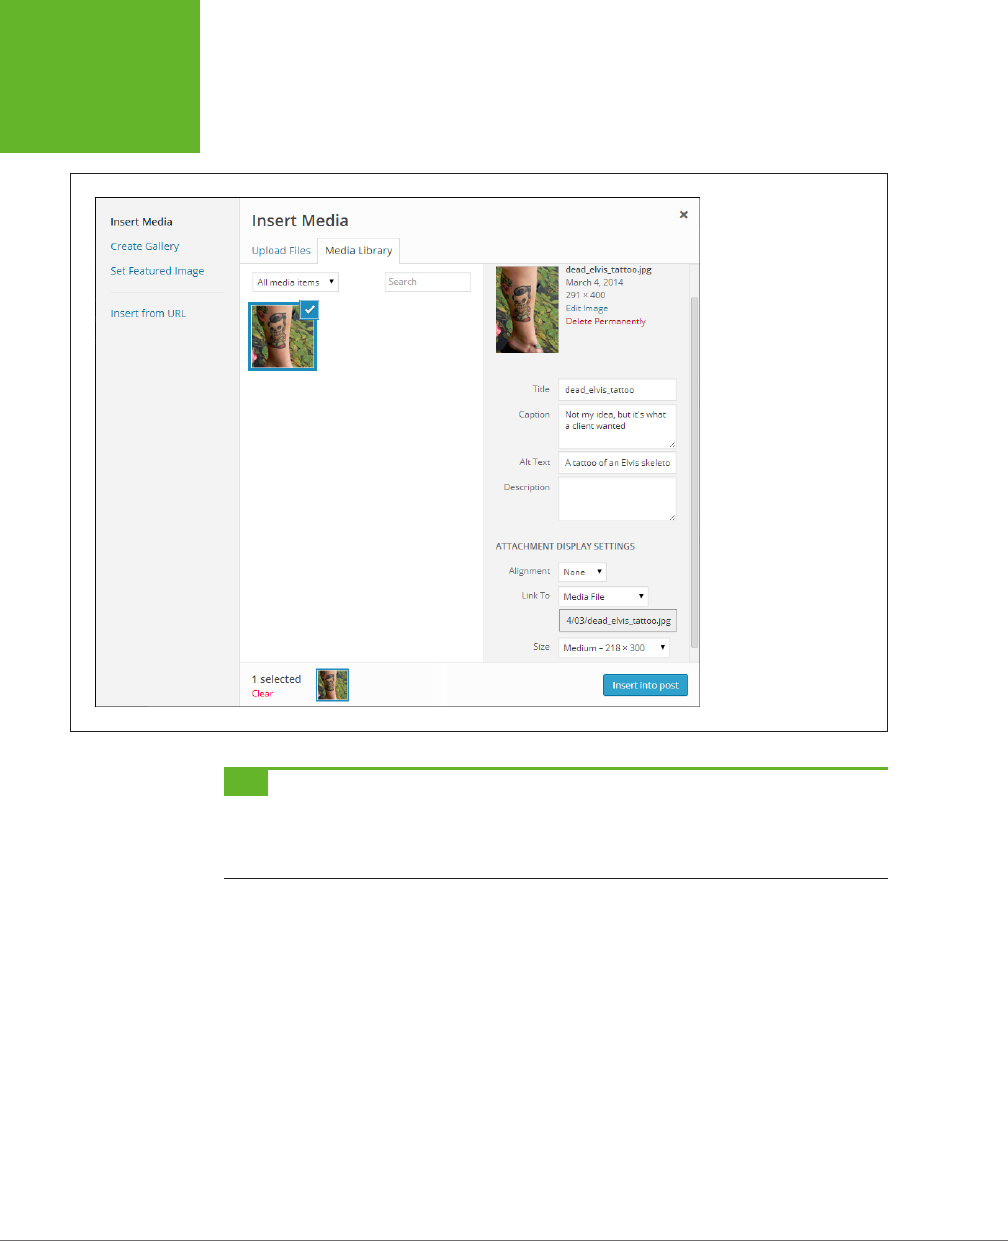
WORDPRESS: THE MISSING MANUAL
182
ADDING
PICTURES
FIGURE 6-8
Here, WordPress has just
finished uploading the
file dead_elvis_tattoo.
jpg. Currently, it’s the
only file in this site’s
Media Library. Before you
insert it into your post,
you need to enter a bit of
information.
TIP If you plan to upload your picture using the drag-and-drop approach, here’s a valuable shortcut. Instead
of clicking the Add Media button to get started, just drag the picture right onto the post editor in the Add New
Post page. WordPress will open the Insert Media window, take you to the Media Library tab, and start uploading
your picture. You can then carry on with step 4.
4. Scroll down and fill in the information for your picture. WordPress asks for
the following:
• Title is the text that appears in a tooltip when someone points to a picture.
• Caption adds an optional caption that appears on the page near your pic-
ture. Dierent themes handle captions dierently, but they usually place
them under your picture, as in Figure 6-9. Captions can include HTML tags
(for example, <b> for bold formatting), but you need to add them yourself.
• Alt Text is the alternate text sent to assistive devices (like screen readers)
to help people with disabilities interpret pictures they can’t see.

CHAPTER 6: JAZZING UP YOUR POSTS 183
ADDING
PICTURES
• Description is a longer, more detailed explanation of the picture. You can
use it for your records, or you might decide to display it on your page—but
you need to find a theme that shows image descriptions (most don’t) or edit
your theme by hand (Chapter 13). If you don’t plan to use the description,
you can leave this box empty.
• Alignment determines where a picture appears relative to its text. If you
choose None, the picture stands on its own, wherever you inserted it.
Paragraphs may appear before it or after it, but the post content won’t
flow on either side of the picture. If you choose Left or Right, WordPress
puts the picture on one side of the page and lets text flow around the other
side (see Figure 6-9).
TIP If your text narrates your pictures, you probably want to choose None for the alignment so you can posi-
tion the pictures exactly where you want them. Examples include food blogs with pictures of meals, travelogues
with pictures of tourist sites, and home renovation stories with a photo journal of the step-by-step process. On
the other hand, if you have a rich layout that’s more like a glossy magazine, you might decide to use Left or Right
for your picture alignment.
• Link To is the web address where WordPress sends visitors if they click
your pic. Usually, this setting is set to Media File and if someone clicks your
picture, the browser displays the full-size picture file without any headers,
sidebars, captions, or extra content. Alternatively, you can choose Attach-
ment Page, which tells WordPress to take readers to something called,
sensibly enough, an
attachment page,
which features the full-sized version
of your picture and a section for reader comments. Or you can send read-
ers to a web address—select Custom URL from the Link To menu and then
type in the address you want. Finally, you can tell WordPress to not make
the picture clickable at all (select None).
• Size tells WordPress how big the picture should be in your post. You can
choose Full Size to use the original dimensions of the uploaded file, or you
can use one of the scaled-down versions of your picture, which WordPress
creates automatically when you upload a file. You’ll notice that WordPress
maintains the relative proportions of your picture—it never squashes a
picture more width-wise than it does height-wise. (Remember that readers
can click a scaled-down picture to see the full-size image, unless you set
the Link To setting to Custom URL or None.)
NOTE In addition to storing the original file you upload, WordPress creates three extra versions of every
picture: a 150 × 150 pixel thumbnail, a 300 × 300 medium-size image, and a 1024 × 1024 large-size pic. You
can change these defaults in the Settings→Media section of the dashboard, under the “Image sizes” heading.
However, the changes affect only new pictures, not the ones you’ve already uploaded.
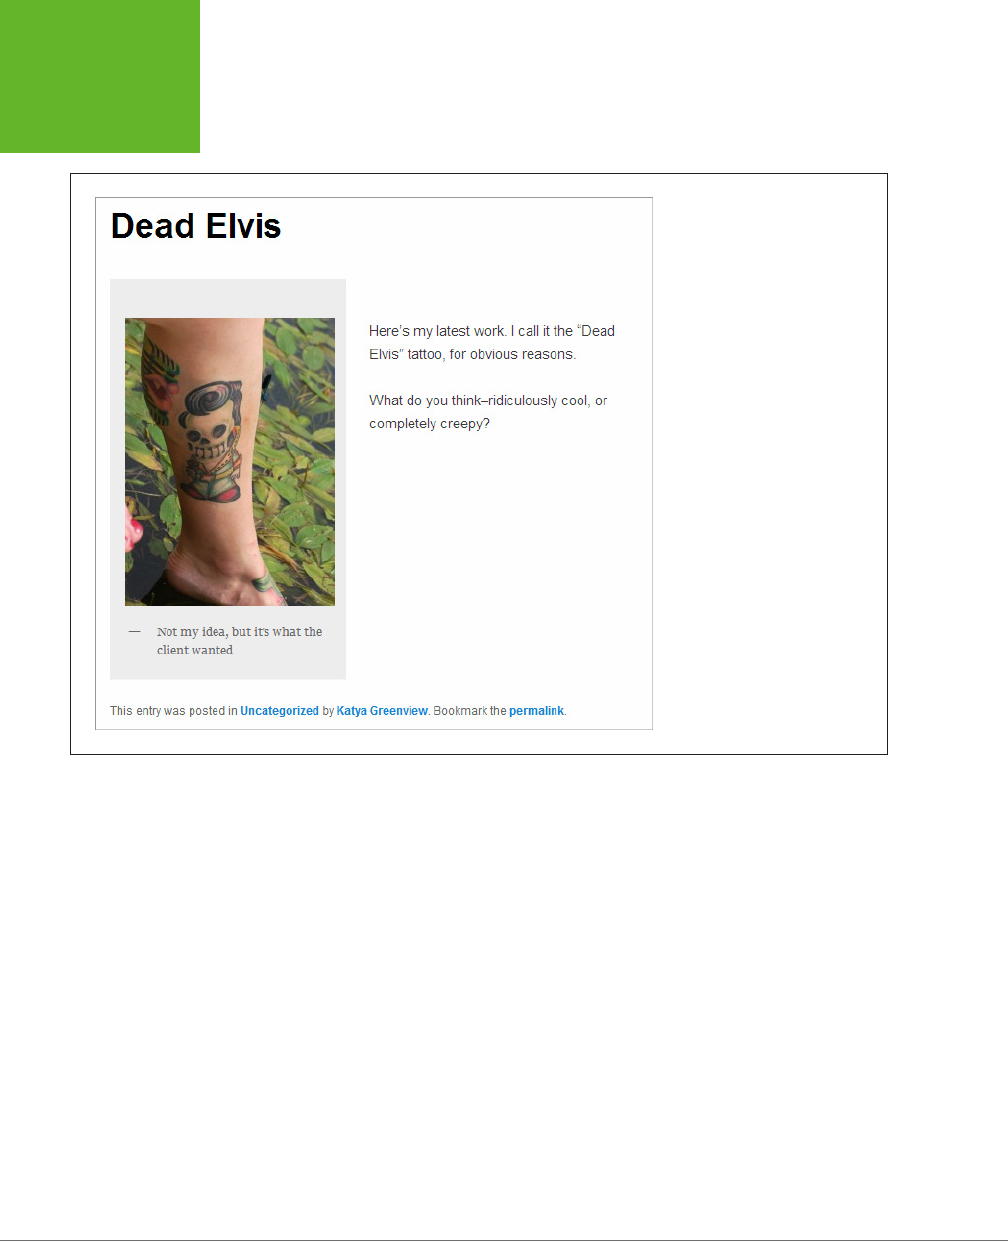
WORDPRESS: THE MISSING MANUAL
184
ADDING
PICTURES
FIGURE 6-9
This theme aligns images on the
left, which means the text in the
post flows down the right side of
the image.
5. Optionally, you can edit your picture by clicking the Edit Image link, which
appears just above all the text boxes. Click Save when you finish.
When you edit a picture, WordPress opens the Edit Image box (Figure 6-10).
There, you can make a few simple changes.
Most usefully, you can
crop
your picture. To do that, drag a rectangle around
the region you want to keep and then click the Crop button, which appears in
the small strip of buttons above your picture. This is the most common type
of picture edit.
You can also scale your picture down, reducing its size. To do so, type in either
a new width or a new height in the Scale Image section on the right, using pixels
as the unit of measure. WordPress adjusts the other dimension proportionally,
ensuring that you don’t distort the picture. Then click Scale to apply the change.
Finally, you can also flip or rotate your picture by clicking the corresponding
button above the picture.
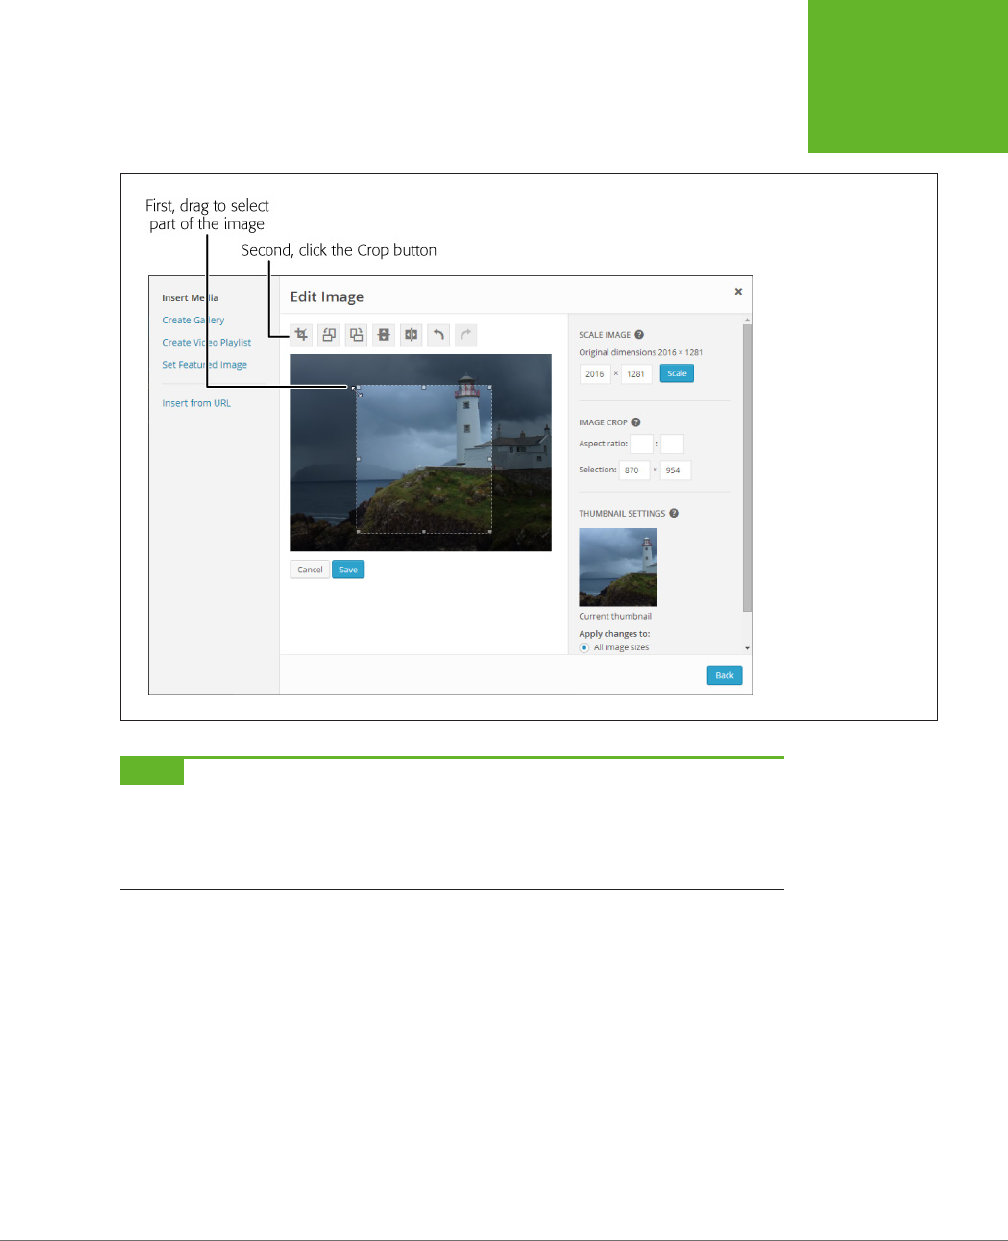
CHAPTER 6: JAZZING UP YOUR POSTS 185
ADDING
PICTURES
FIGURE 6-10
As you drag your mouse
over a portion of your
picture, the Image Crop
section (right) shows the
exact size (in pixels) of
your selection.
NOTE When you edit a picture, WordPress actually creates a new file. If you look at the picture’s URL,
you’ll notice that WordPress appends a number to the end of the filename, so
dead_elvis_tattoo.jpg
becomes
dead_elvis_tattoo1339626522667.jpg,
for example. There are two reasons for this sleight of hand. First, it prevents
problems if one of your posts needs to use the original version of the picture. Second, it lets you get your original
picture back later if you ever need it. To do that, edit the image, and then click Restore Original Image.
6. Click the “Insert into post” button in the Insert Media window to add the
picture to your post.
When you insert a picture, you’ll see it in the visual editor. If you chose left or
right alignment, you can type your text around the side of the picture. If you
chose None or Center for the alignment, you can type text only above and
below the image.
To tweak your picture, first click it to select it. Two small icons appear in the
picture’s top-left corner. Click the “X” icon to remove the picture from your post.
Click the pencil icon to open an Image Details box that lets you alter the picture
(using all the same tools available when you first insert a picture).

WORDPRESS: THE MISSING MANUAL
186
ADDING
PICTURES
NOTE If you delete a picture from your post, it still exists on your WordPress site. This might be what you
want (for example, it lets you use the picture in another post), or it might be a problem (if you’re worrying about
someone stumbling across an embarrassing incident you made the mistake of photographing). To wipe a picture
off your site, you need to use the media library, as described in the next section.
GEM IN THE ROUGH
Attaching Other Files to Your Post
Pictures aren’t the only type of file you can put in a post. Word-
Press.com lets you embed a number of other types of docu-
ment, including PDFs, Word documents, Excel spreadsheets,
and PowerPoint presentations. In a self-hosted site, you face
no restrictions, so you can upload any type of file you want.
The difference is what happens
after
you upload the file. Un-
like a picture, you won’t see the content from other types of
documents in your post. Instead, WordPress adds an ordinary
link that points to the uploaded file. If a reader clicks the link,
the browser may display the document or offer to download
it—what it does depends on whether the browser has an add-in
that can display that type of file. For example, many browsers
have add-ins that display PDF documents.
Viewing the Media Library
When you upload a picture, WordPress stores it in the
wp-content/uploads
folder of
your site. For example, if you upload a picture named
face_photo.jpg
to the Magic
Tea House site in January 2014, WordPress stores it at
http://magicteahouse.net/
wp-content/uploads/2014/01/face_photo.jpg
. Behind the scenes, WordPress also
creates large, medium, and thumbnail-sized copies of your picture with names like
face_photo_300x200.jpg
, and stores them in the same folder. That way, WordPress
doesn't waste bandwidth sending a full-sized picture if a post needs to display just
a tiny thumbnail.
WordPress might store more files than you think. In addition to all the pictures you
insert into posts, all the featured images you use, and any custom header or back-
ground images you add to your theme, WordPress stores files that you attach to your
posts here, too, like PDFs, Word documents, and spreadsheets. Furthermore, if you
change a picture (using the basic cropping, resizing, and rotating tools described on
page 184), WordPress stores a new, separate version of the picture as well.
WordPress calls this repository, which holds your pictures and files, the
media library.
To see the current contents of your site’s media library, choose Media→Library
(Figure 6-11).
There are two reasons you might want to use the media library: to remove files you
don’t need anymore, and to upload files you want to use in the future.
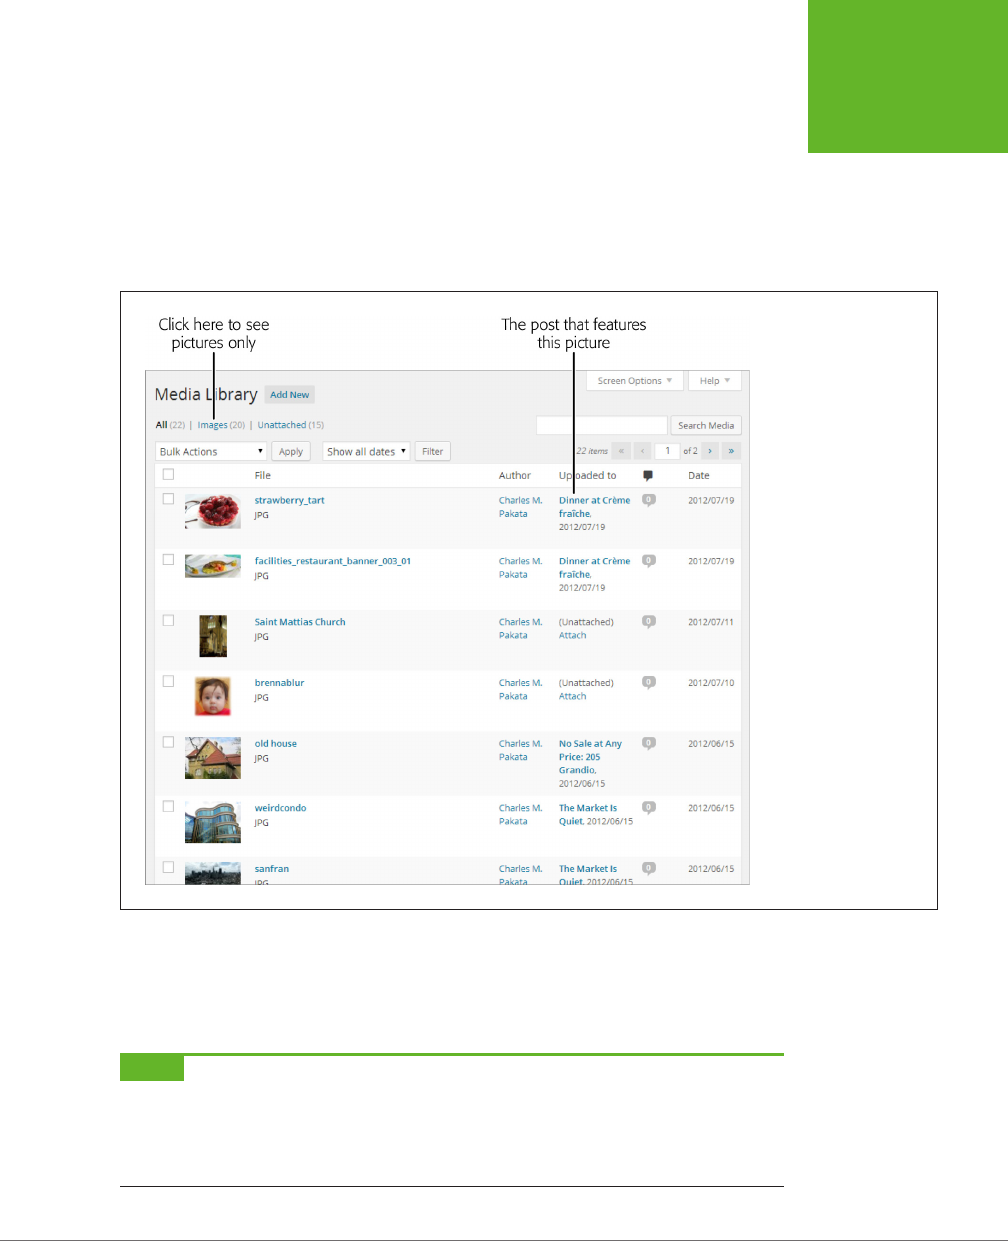
CHAPTER 6: JAZZING UP YOUR POSTS 187
ADDING
PICTURES
Deleting Pictures from the Media Library
You might choose to delete a media file as part of your basic website housekeeping.
After all, why keep a file you’re not using, especially if it’s distracting you from the
files you really
do
want?
To delete a media file, point to its filename and then click the Delete Permanently
link that appears underneath.
FIGURE 6-11
WordPress’s media library
lists all the files you’ve
uploaded. The “Uploaded
to” column indicates
whether you used a file in
a post (and, if you have,
which post features it).
For example, the owner
of this site used the
first picture in this list
(strawberry_tart.jpg) in
the post “Dinner at Crème
fraîche.”
If you delete a picture that other posts are using, you have a small problem. Now
when someone reads the post, they’ll see the broken-picture-link icon, the universal
browser sign that something is missing. Correcting this problem is easy (just edit
the post to delete the picture box), but it’s up to you to find the post.
NOTE WordPress doesn’t let you
replace
a picture that’s in the media library. Even if you upload a picture
that has the same name as one already in your library, WordPress puts it in a different subfolder or gives it a
slightly different filename. The same thing happens if you edit a picture that’s already in the media library. This
system prevents a number of seriously frustrating problems, but it also means that there’s no way to update the
picture in a post without editing the post.

WORDPRESS: THE MISSING MANUAL
188
ADDING
PICTURES
Adding Pictures to the Media Library
You might choose to add an image to your library to prepare for future posts. Maybe
you have a batch of pictures that detail a home renovation project, and you plan
to write about the process on your blog, “Home Sweet Home.” However, you don’t
want to start writing those posts yet. To make sure the pictures are ready when you
need them, you can upload them straight to the media library, and then use them
later. Here’s what to do:
1. Choose MediaÆAdd New.
This takes you to the Upload New Media page, which is strikingly similar to the
Insert Media window you used earlier.
2. Add your files.
You upload media files by dragging them onto the “Drop files here” box or by
clicking the Select Files button.
3. Optionally, fill in the information for each picture.
Fill in the picture details (like the title and caption) and edit the image (say,
cropping it or flipping it). When you actually insert the image into a post, you
still have the chance to enter new information or re-edit the picture. But if you
get some of the preliminary details down when you upload the picture, you’ll
save some time when you insert it.
GEM IN THE ROUGH
Using the Media Library to Put a Picture in Your Sidebar
As you already know, the media library stores all the pictures
you use in your posts. You can also use it to store files you want
to use in some other way. For example, you can link to one of
your media files from an ordinary web page on a traditional,
non-WordPress website. All you need to do is take note of
the file’s URL. (To get that, choose Media→Library to visit
the media library, and then click the file you’re interested in.
WordPress displays the file’s location in the File URL text box.)
You can use the same trick to inject an image into the Text
widget (page 166), that all-purpose tool for showing scraps
of content outside your posts. As you learned in Chapter 5,
the Text widget accepts almost any HTML you can throw at it.
So if you know you have a picture in the media file with the
URL
http://magicteahouse.net/wp-content/uploads/2014/06/
dead_elvis_tattoo.jpg
, you can stick in an <img> tag like this:
<p>I'm a <b>hotshot tattoo artist</b>
living in the Bay Area. My work pushes the
bounds of taste and decency, just like you
know you want.</p>
<img src="http://magicteahouse.net/wp-
content/uploads/2014/06/dead_elvis_tattoo.
jpg">
If you’ve been around the web block, you probably know that
it’s better to trim the picture link down to just
/wp-content/
uploads/2014/06/dead_elvis_tattoo.jpg
. It’s on the same site
as the rest of your WordPress content, so there’s no need to
include the domain name.
Either way, Figure 6-12 shows the result.
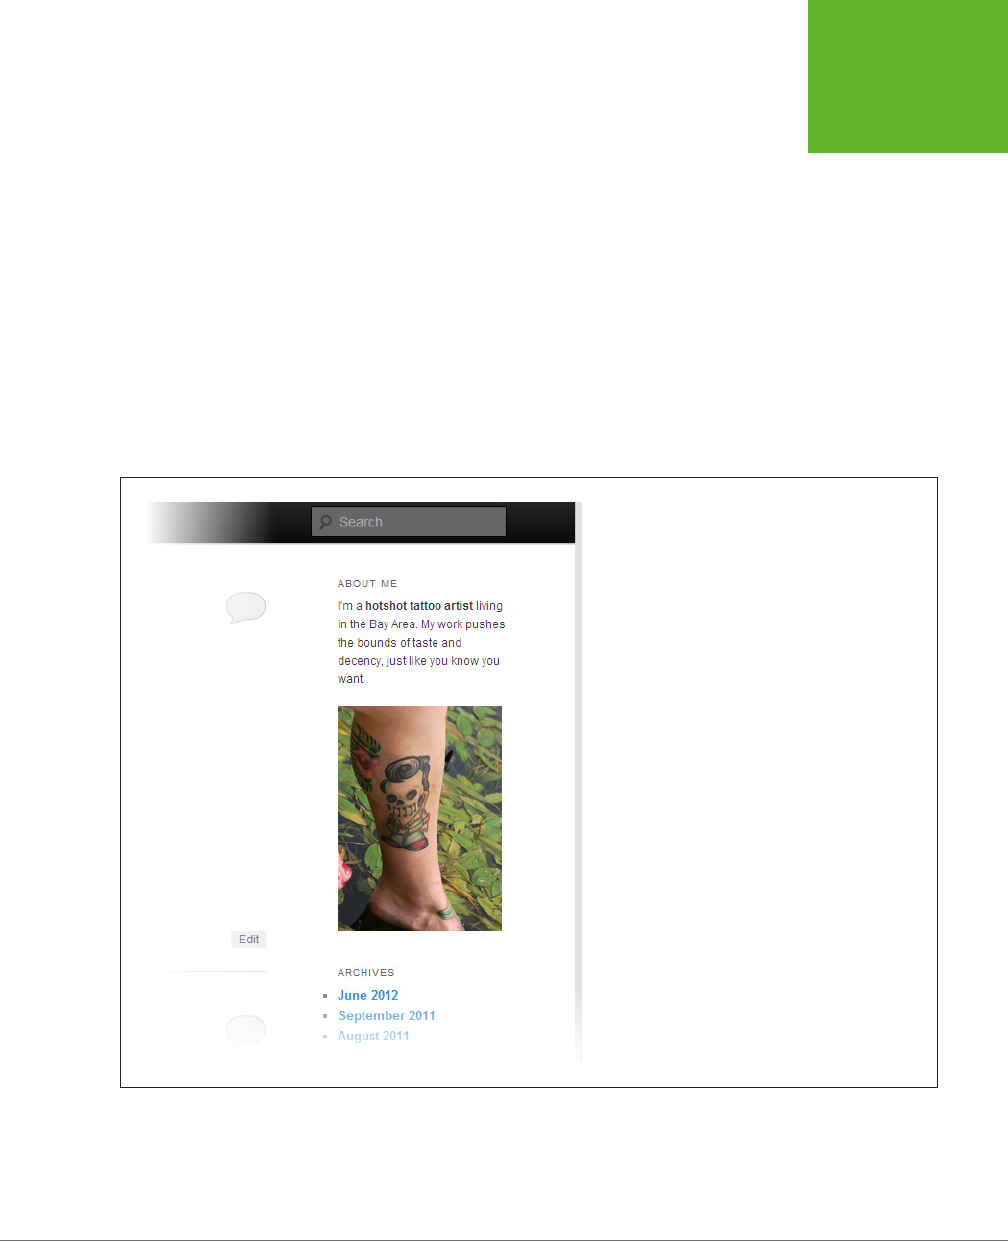
CHAPTER 6: JAZZING UP YOUR POSTS 189
ADDING
PICTURES
To insert a picture from the media library into a post, use the same Add Media button
you learned about earlier. Here’s what to do as you create or edit a post:
1. Move to the place in the post where you want to insert the picture, and then
click Add Media.
2. Instead of adding a new file, click the Media Library tab to see what you’ve
got.
You see a list of thumbnail images, one for each picture in your library.
3. Find the picture you want, and then click it.
You see the familiar picture thumbnail and picture details.
4. Change the text and edit the image, if necessary.
5. When you’re ready to add the picture, click “Insert into post.”
FIGURE 6-12
With the help of the media library, you can mix text and
pictures in WordPress’s Text widget.
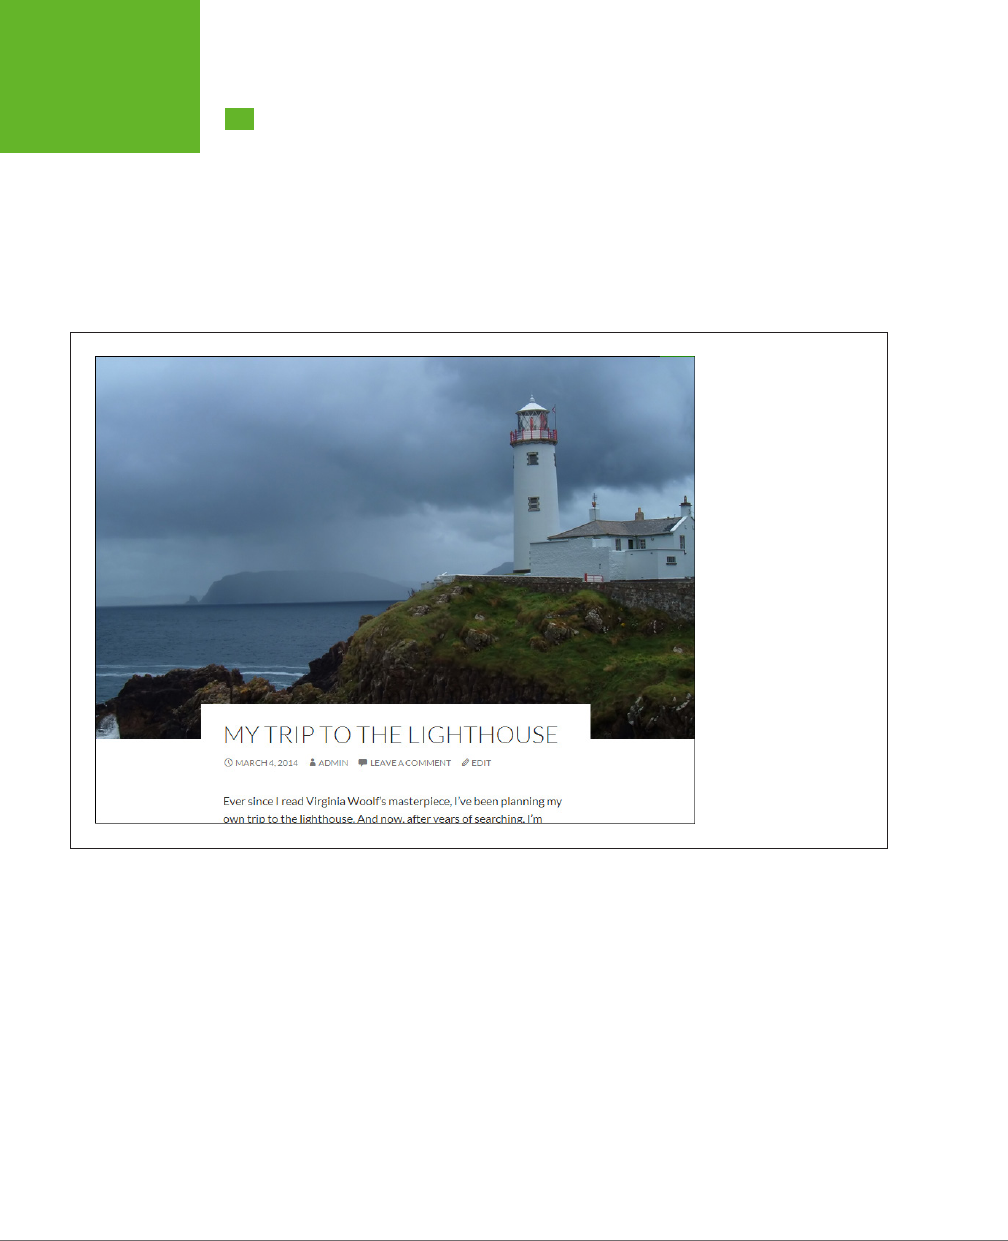
WORDPRESS: THE MISSING MANUAL
190
FEATURED
IMAGES
Featured Images
Instead of simply including a picture in a post, you can designate it as a
featured
image.
A featured image represents a post, but it doesn’t actually show up as part
of the post content. Instead, its role varies depending on the theme you use.
Some themes ignore featured images altogether. But many others place featured
images at the top of the corresponding post, near the title area. Examples include
Twenty Twelve, Twenty Thirteen, and Twenty Fourteen (as shown in Figure 6-13).
FIGURE 6-13
The simplest way a theme
can use a featured image
is to place it at the top of
a post. Twenty Fourteen
does this, but it positions
the post title so it slightly
overlaps the picture, mak-
ing the image recede into
the background.
Some themes exploit featured images in clever ways. For example, the Twenty Eleven
theme temporarily swaps in the picture for the name of your site when you view a
post with a featured image (Figure 6-14).
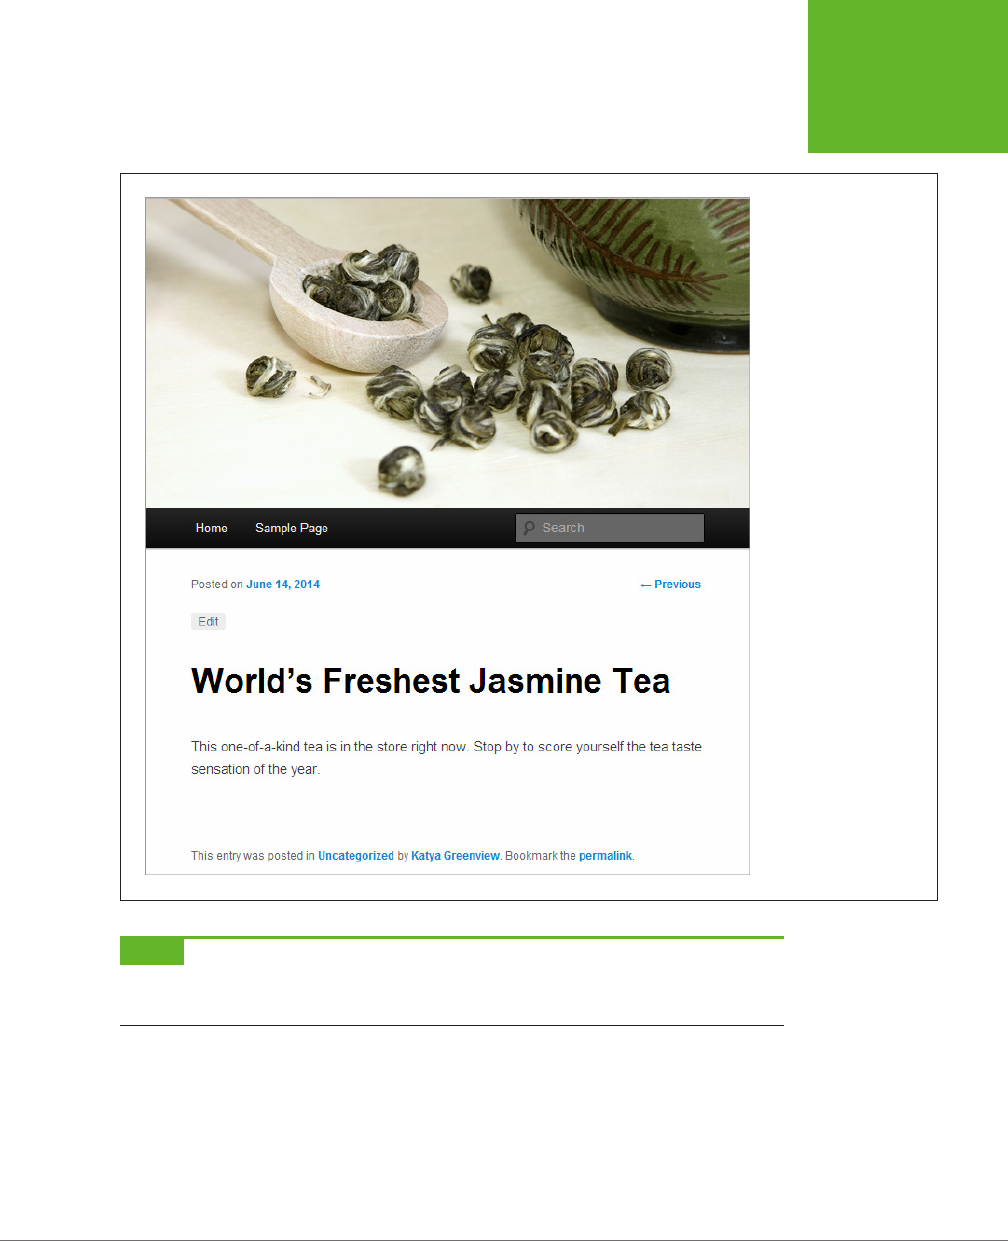
CHAPTER 6: JAZZING UP YOUR POSTS 191
FEATURED
IMAGES
FIGURE 6-14
When you read this post,
the featured image (some
tea leaf buds) temporarily
replaces the site header.
This works even though
the picture doesn’t actu-
ally appear anywhere in
the post.
NOTE Twenty Eleven’s header-replacement trick works only if the featured image is at least as big as the
header image. If your featured image isn’t as wide, WordPress won’t display it at all on the single-post page,
nor will it explain the image’s perplexing absence.
More ambitious themes use featured images to promote posts—for example, to
highlight them in some sort of scrolling banner or gallery. Depending on the theme,
this detail might be a built-in part of the home page, or it might rely on a theme-
specific widget.
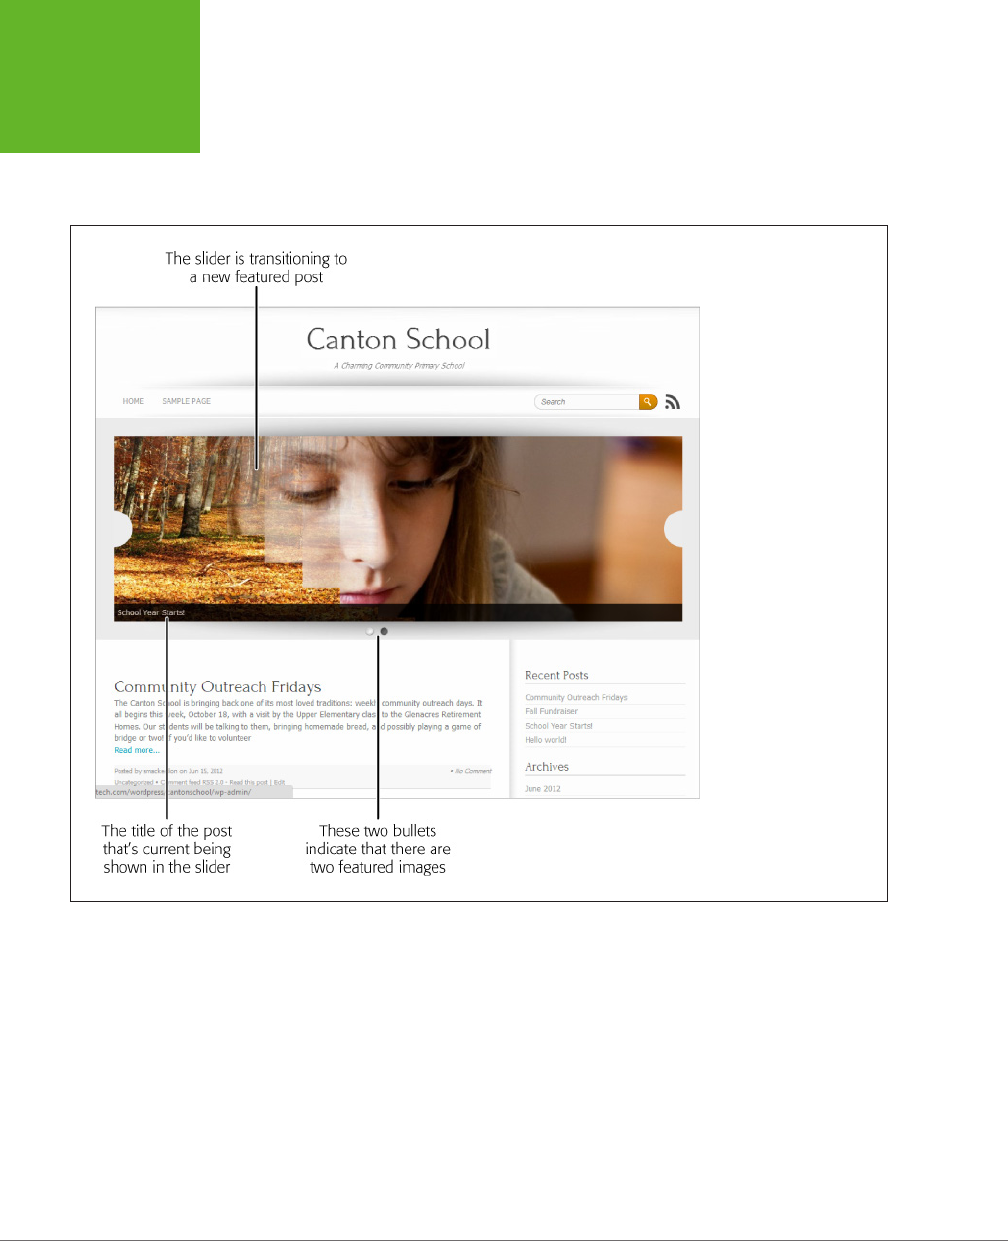
WORDPRESS: THE MISSING MANUAL
192
FEATURED
IMAGES
Figure 6-15 shows the free Brightpage theme, which is available to self-hosted
WordPress sites. It displays a featured-image slideshow on the home page. This
slideshow automatically grabs all the posts in the category named Featured (which
you must create) and displays the featured images for each post, one after the other.
FIGURE 6-15
The Brightpage theme
uses a slider—a graphical
banner that displays the
featured images from
your most timely or
important posts. Each
image appears for about
5 seconds, and then the
slider changes to the
next image using a slick
transition effect (a fade,
a blend, or a slide, which
gives the slider its name).
Visitors can click the
featured image to view
the corresponding post,
or scroll down the page to
see more posts.
The nice thing about Brightpage is that it makes it easy for you, the site designer,
to choose what posts get featured treatment. When you create a new post that
you want to appear in the slider, assign it to the Featured category (in addition to
whatever more meaningful category you already use). After some time passes and
you decide that the post is no longer important, go to the Edit Post page and remove
it from the Featured category.
The Twenty Fourteen theme has a similar trick in store. Like Brightpage, it examines
a group of posts you pick, retrieves their featured images, and uses them on the
home page. The dierence is in the details. While Brightpage asks you to identify
the posts you want to use by creating a category named Featured, Twenty Four-
teen expects you to use a
tag
named Featured. And while Brightpage uses a slider,
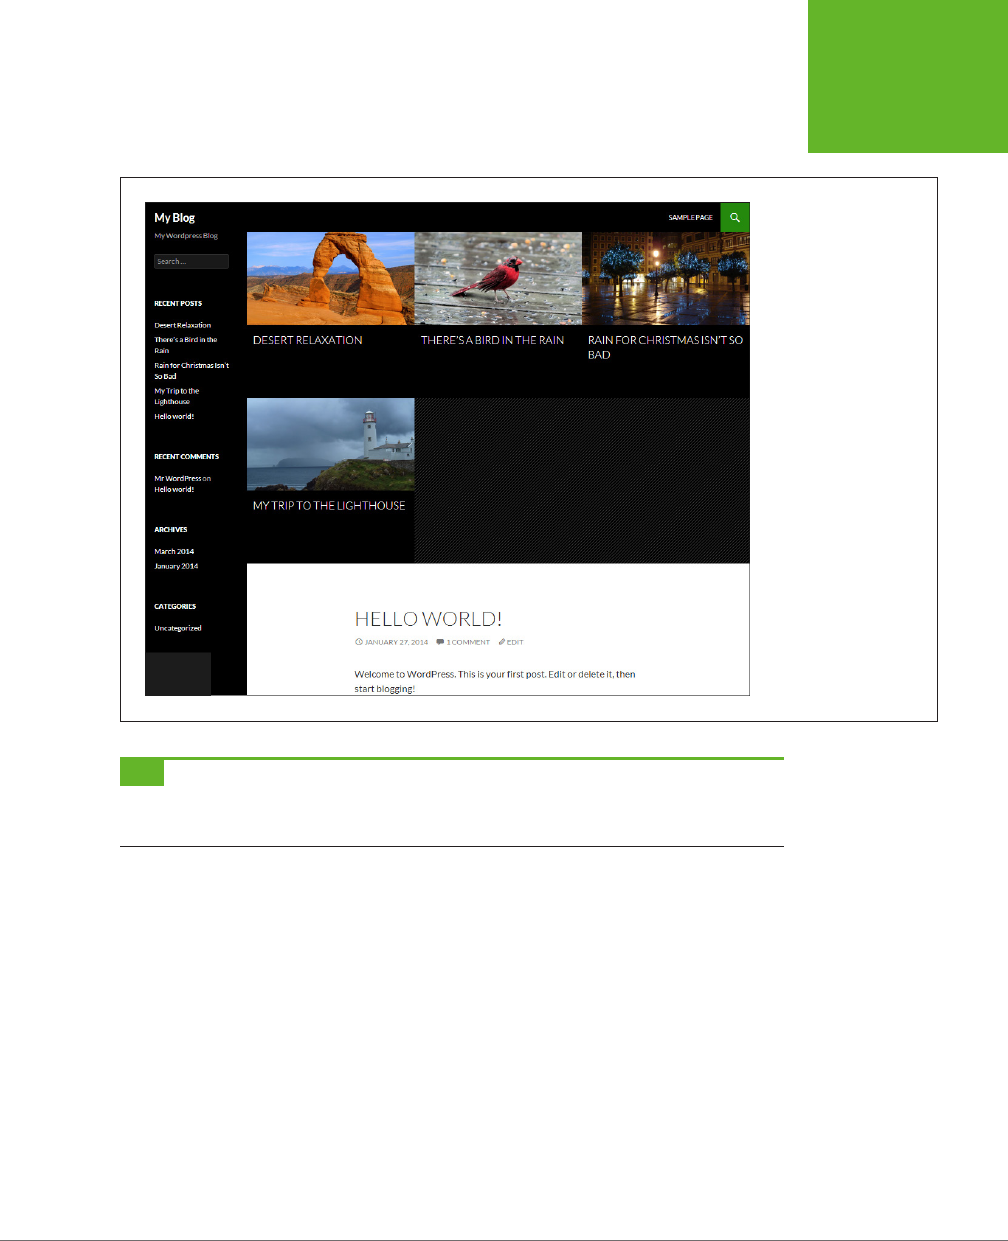
CHAPTER 6: JAZZING UP YOUR POSTS 193
FEATURED
IMAGES
Twenty Fourteen gives you the choice of a slider or a slick grid view, the latter being
the standard setting (Figure 6-16).
FIGURE 6-16
If you have posts that
use the Featured tag,
Twenty Fourteen removes
them from the post list
and puts them and their
images in a grid at the
top of your home page.
Readers can then click
an image to read the
corresponding post.
TIP To configure how Twenty Fourteen uses featured images, start by choosing Appearance→Customize
(to customize the theme) and then click the Featured Content section. There, you can choose between a grid and
a slider, and rename the Featured tag to something else.
Assigning a Featured Image to a Post
Each post can have just one featured image. To assign a featured image, you need
to be in the Add New Post or Edit Post page. Then follow these steps:
1. Click the Add Media button.
This opens the Insert Media window you saw earlier (Figure 6-7).
2. Click the Set Featured Image link on the left.
3. If the picture you want to use isn’t already in the media library, upload it now.
You can upload your featured image by dragging it onto the Insert Media win-
dow, or by clicking Select Files and browsing for it.
If your picture is already in the Media Library, click the Media Library tab and
then click the picture to select it.

WORDPRESS: THE MISSING MANUAL
194
FEATURED
IMAGES
4. Add the image information.
These details include the title, alternate text for screen readers, the caption,
and the description. How much of this information WordPress uses in your post
depends on the theme you chose, but it’s worth supplying the info just in case.
5. Click Edit Image, take a moment to scale and crop your picture, and then
click Save to make your changes permanent.
When you insert a standard image into a post, you get the chance to size it. But
when you use a featured image, you don’t have this control. If you upload a big
picture, it’s possible that your theme will automatically crop out a large part of
it. (The Brightpage theme does this, for example.) To prevent this, you need to
scale the picture down before you upload it, using an image editor like Photo-
shop Elements, Windows Photo Gallery, Picasa, or the Mac’s Preview program.
To find the right dimensions, you need to experiment or scour your theme’s
documentation. (Self-hosters, search for your theme at
http://wordpress.
org/themes
, and then click your way through to the “Theme Homepage” link.
WordPress.com users, search for your theme at
http://theme.wordpress.com
.)
6. Click the “Set featured image” button in the bottom-right corner.
This adds the featured image and closes the Insert Media window so you
can continue writing your post. Remember, you won’t see the picture appear
alongside your text.
If you decide at some point that you don’t want this picture as your post’s
featured image, find the Featured Image box in the bottom-right corner of the
page (it shows a scaled-down preview of your pic) and then click “Remove
featured image.”
7. Publish your post (or update it, if you already published it).
Remember, some themes don’t use featured images at all. If you use such a
theme, you may not even know that your post has a featured image, because
your theme never displays it.
NOTE Featured posts are interesting because they rely on the interplay between WordPress features and
theme features. WordPress defines the concept of the feature (in this case, featured images), and the theme
decides how to exploit that concept, opening a wide, uncharted territory of possibilities. The same idea underpins
many other WordPress features. For example, later in this chapter you’ll see how WordPress defines the concepts
of post excerpts (page 202) and post formats (page 198), but allows themes to use them in a variety of clever
ways.

CHAPTER 6: JAZZING UP YOUR POSTS 195
SHOWING PART
OF A POST
UP TO SPEED
Learning to Use Featured Images with Your Theme
As the discussion in this chapter shows, different themes use
featured images in similar but subtly different ways. To get the
result you want, you need to make sure you’re using featured
images in the right way.
For example, you may need to flag featured-image posts with a
specific category name or tag name, or you may need to make
them sticky (page 104). Picture size is another important con-
sideration. Twenty Fourteen recommends that your featured
images be 672 pixels wide and 1038 pixels wide, which lets them
expand to their full size when displayed behind a post or in the
slider. Other themes have their own strict size requirements.
Violate them, and your pictures may be stretched, squashed,
or cropped to fit the theme.
Unfortunately, the dashboard doesn’t have a standard way
to make this information available. It’s up to you to review
the documentation for your theme. A good place to start is
by searching for your theme in WordPress’s theme library
(
http://wordpress.org/themes
for self-hosters or
http://theme.
wordpress.com
for WordPress.com users). You can then follow
the Theme Homepage link to find out what the developer has to
say about the theme, or click the Support tab to browse other
people’s questions and answers. For more information about
the theme library, see Chapter 5.
Showing Part of a Post
At the heart of every WordPress blog is a home page, and at the heart of every
home page is a reverse-chronological list of posts. This list serves a vital purpose,
showing a snapshot of current content so readers can tell, at a glance, what’s going
down on your site.
However, the home pages you’ve seen so far have had one potential problem—they’re
long, sometimes awkwardly so. Having multiple posts fused together into one long
page is a great convenience for new visitors who want to read your content from
end to end, but it’s not so helpful for return visitors who want to survey your new
content and decide where to dive in.
Fortunately, WordPress has a handy solution. You can decide to show only the first
part of each post, called a
teaser,
on your home page, which your visitor can click
to read the standalone post.
One advantage to this approach is that you can pack quite a few teasers into your
home page and keep them close together, no matter how long the posts really are.
You can also put posts into tighter layouts—for example, creating a site that looks
more like the front page of a newspaper. Another advantage is that it encourages
readers to click through to the post, where they’ll also see the post comments and
get the opportunity to join in the discussion.
However, trimming down posts introduces two possible disadvantages. First, there’s
the extra link readers need to follow to read a full post. If someone wants to read
several posts in a row, this extra step can add up to a lot more clicking. Second, you
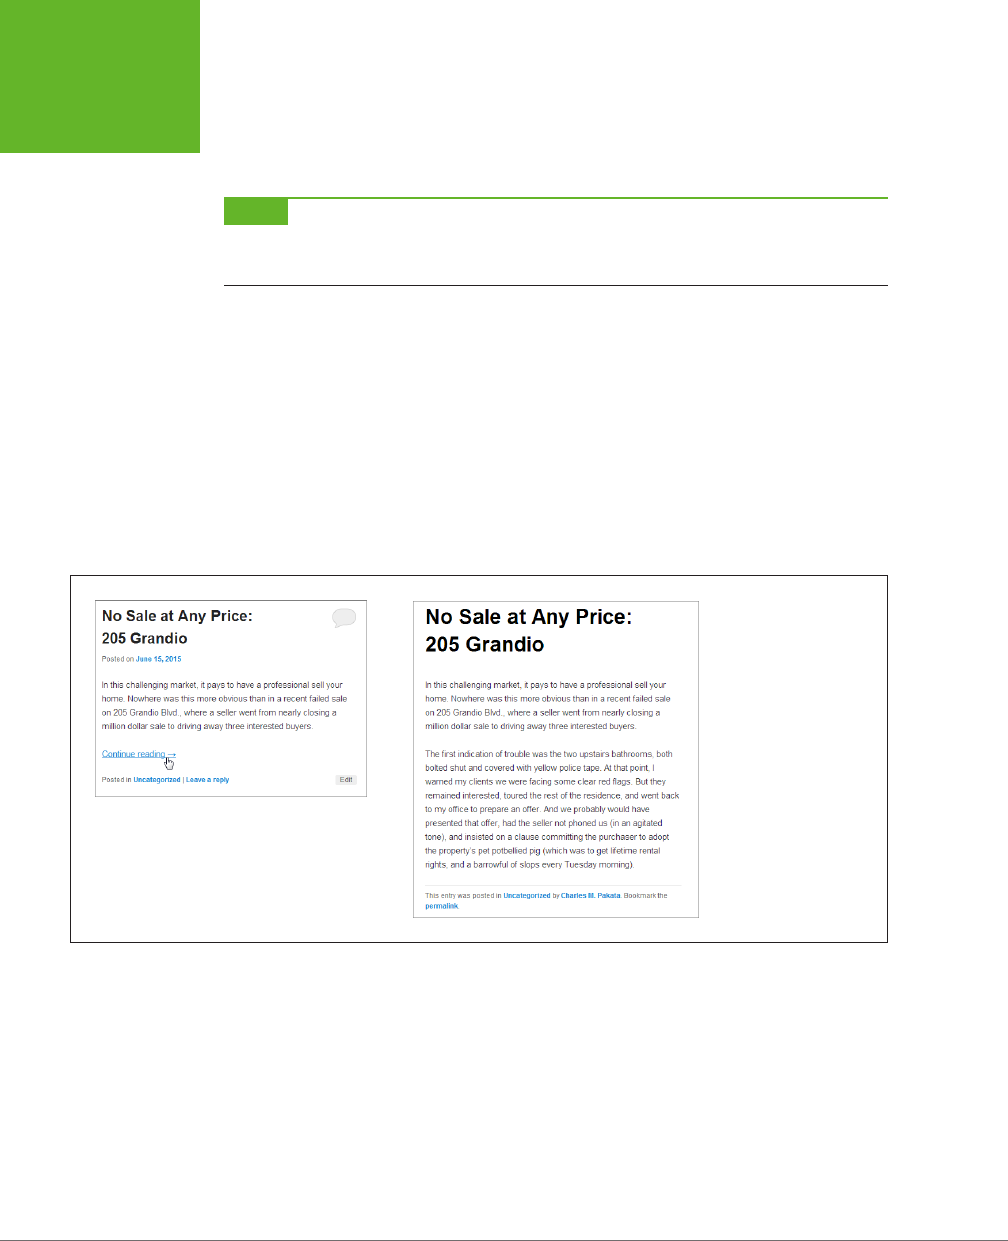
WORDPRESS: THE MISSING MANUAL
196
SHOWING PART
OF A POST
need to explicitly tell WordPress what part of a post belongs on the home page. It’s
an easy job, but you need to do it for
each post
you create. If you’ve already written
a few posts, you need to update them.
NOTE As a general rule, informal, conversational blogs work well with the standard one-post-after-another
stream that WordPress displays on the home page. But WordPress sites that have more detailed article-like posts,
use multiple sections, or feature multiple authors, often work better with a tighter, leaner style that uses teasers.
In the following section, you’ll learn how to use teasers instead of full posts. You’ll
also consider two related features: breaking posts into multiple pages and using
post excerpts.
Displaying Teasers Using the “More” Quicktag
The best way to cut a post down to size is with a special WordPress code called the
More quicktag.
You place the More quicktag at the spot where you want to divide
a post. The content that falls before the tag becomes the teaser, which WordPress
displays on the home page (Figure 6-17, left). If a reader clicks through to the post
page, he sees the entire post (Figure 6-17, right).
FIGURE 6-17
When you use the More
quicktag in a post, only
part of the post appears
on the home page (left).
Click the “Continue
reading” link to get the
whole post in a new page
(right).
To insert the More quicktag in the visual editor, go to the spot in your post where
you want to put the tag, and then click the Insert Read More Tag button. You’ll see
a light-gray dividing line (Figure 6-18).
You can also add the More quicktag in the HTML editor. You could click the button
labeled “more,” but it’s just as easy to type in the tag yourself, wherever you want it:
<!--more-->
HTML nerds will recognize that the More quicktag looks exactly like an HTML com-
ment—the sort of thing you might put in your markup to leave notes to yourself.
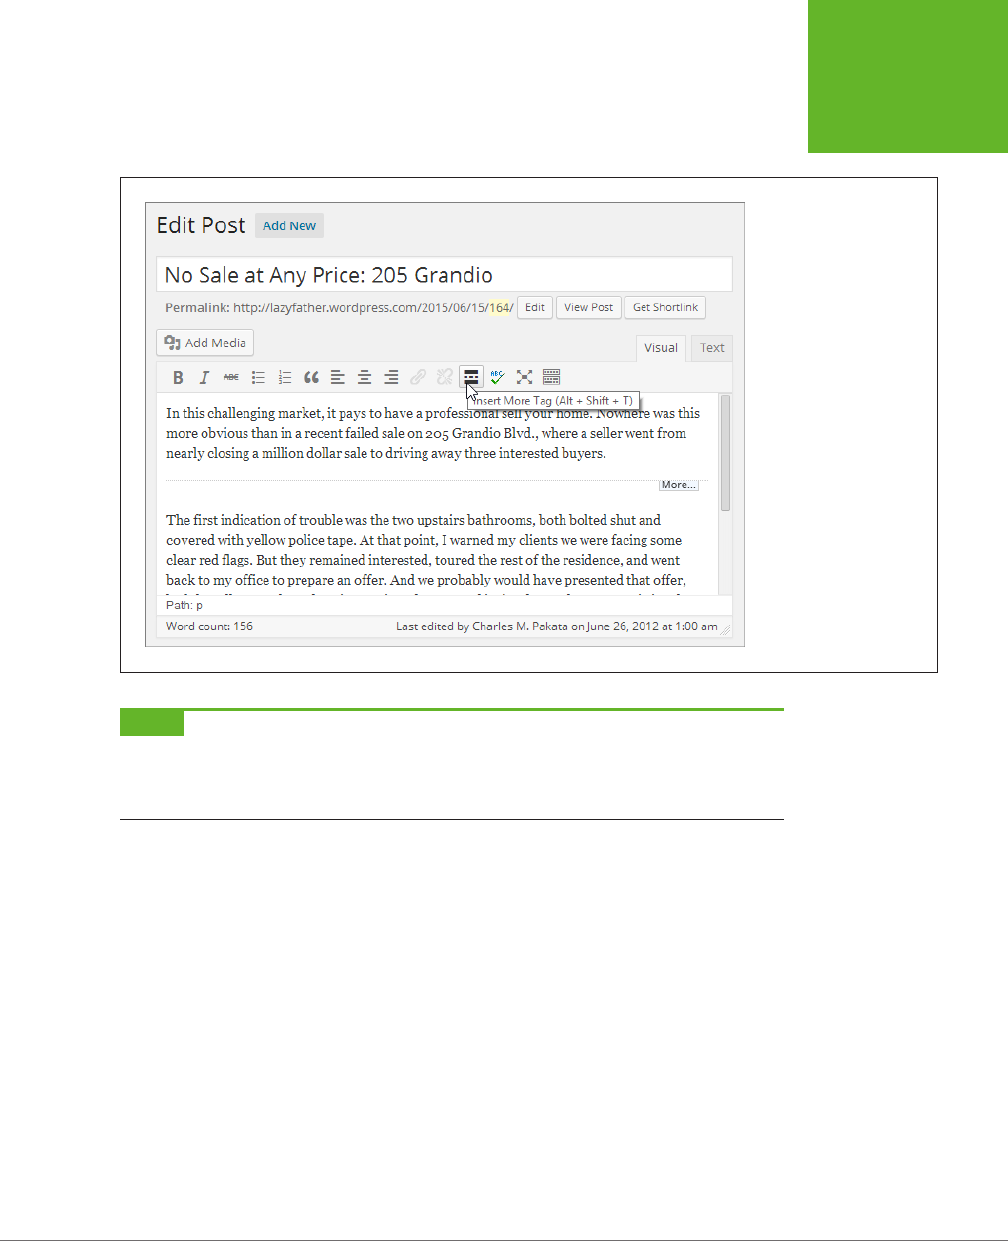
CHAPTER 6: JAZZING UP YOUR POSTS 197
SHOWING PART
OF A POST
Browsers ignore HTML comments, and WordPress borrows this system to sneak in
some of its own special codes.
FIGURE 6-18
When you edit a page, the
More quicktag looks like
a horizontal line between
paragraphs.
NOTE WordPress uses the More quicktag whenever your site displays more than one post at a time. The
home page is the most obvious example, but you’ll also see multiple posts when you browse by category, date,
or keyword. In these situations, the More quicktag serves the same purpose—it trims long posts down to more
manageable teasers.
There’s one more trick you can do with the More tag. In the previous example, a
“Continue reading” link led from the teaser to the full post. The theme determines
the link’s wording, but you can substitute your own text. To do that, you need to
edit your post in HTML view, and then stick the link text in the middle of the More
tag, exactly as shown here:
<!--more Tell me more-->
If you want to change the link text for every teaser, editing your theme is far more
ecient than editing individual posts (see Part 4 to learn how to edit your theme).
Dividing a Post into Multiple Pages
The More quicktag lets you split a post into two pieces: the teaser, and the rest of
the content. Alternatively, you can split a page into as many sections as you want
using the lesser-known
Nextpage quicktag.
When you do, WordPress adds a set of
navigation links to the bottom of the post (Figure 6-19).
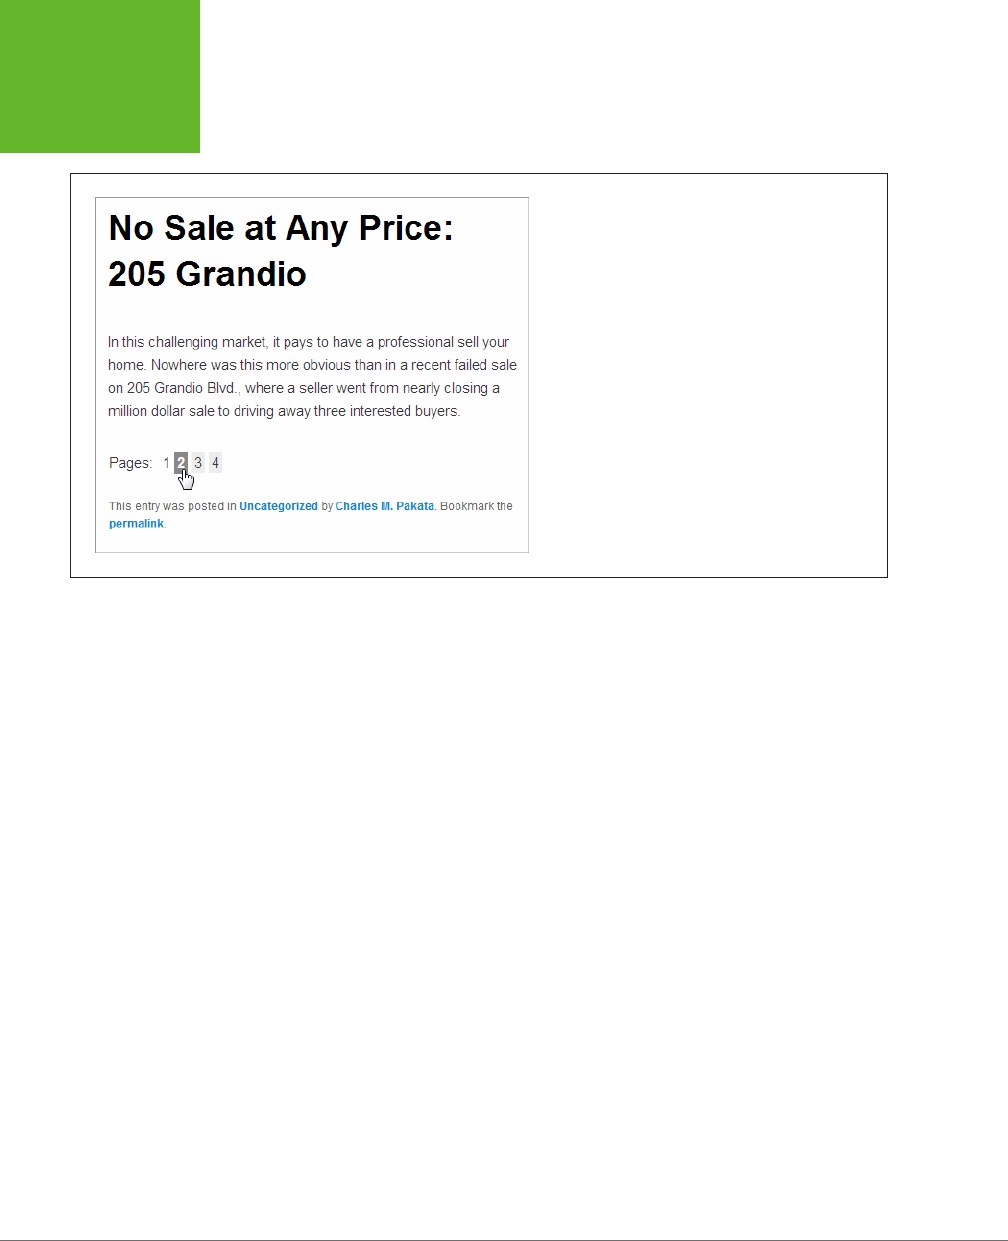
WORDPRESS: THE MISSING MANUAL
198
SHOWING PART
OF A POST
FIGURE 6-19
These page-navigation links are a great way to split a
long article into more manageable pieces. But use it spar-
ingly—readers will resent being forced to click without a
very good reason.
To insert the Nextpage quicktag, switch to the HTML view (click the Text tab) and
then add this code where you want to start a new page:
<!--nextpage-->
The Nextpage quicktag shows up in the visual editor, as a gray line with the words
“Next Page” above it. You can’t customize the Nextpage quicktag, but you can cre-
ate custom page links if you’re willing to edit your theme files, as described in Part
4. The trick is to master WordPress’s wp_link_pages() function, which is described
at
http://tinyurl.com/wplinkpages
.
You can use the More and Nextpage quicktags in the same post. However, it’s gener-
ally a bad idea, because the page-navigation links will appear under the post teaser on
the home page. This is likely to strike your readers as plain odd or utterly confusing.
Summarizing Posts with Excerpts
There’s another way to shorten posts on the home page: by using WordPress’s
ex-
cerpts
feature. Ordinarily, an excerpt is the first 50 or so words in a post (the exact
number depends on the theme).
Before you can really understand excerpts, you need to know how WordPress uses
them. The answer isn’t straightforward, because it depends on your theme. Some
older themes may avoid excerpts altogether, while others use them prominently
(as you’ll see shortly). But most themes use excerpts in at least one place: on the
search results page. To take a look for yourself, type something into the search box
and then press Enter (Figure 6-20).
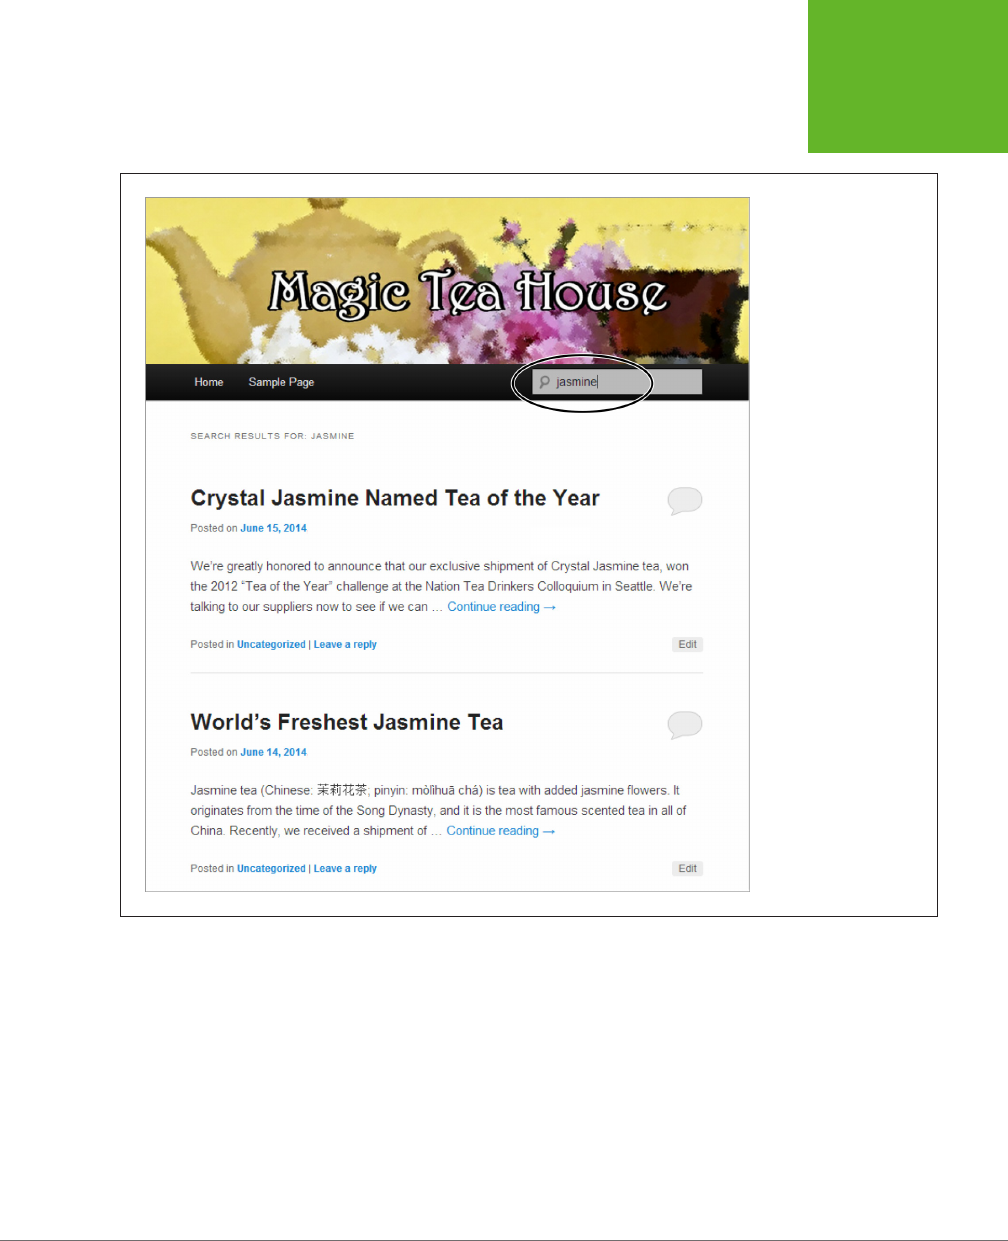
CHAPTER 6: JAZZING UP YOUR POSTS 199
SHOWING PART
OF A POST
FIGURE 6-20
When you search posts,
WordPress doesn’t
display full posts on the
results screen. Instead, it
automatically strips out
and displays just the first
55 words. That way, you
can see a page of search
results without needing
to scroll all day.
So far, excerpts seem straightforward and automatic (and they are). However, the
first few sentences of a post aren’t always a good reflection of its content. For that
reason, you may want to write your own excerpt—in other words, explicitly provide
a brief summary of the content in a post. You can do that from the Add New Post
or Edit Post pages. First, choose Screen Options in the upper-right corner, and then
turn on the checkbox next to Excerpt. A new box appears where you can write a
custom description of your post.

WORDPRESS: THE MISSING MANUAL
200
SHOWING PART
OF A POST
NOTE Things can get a bit confusing if you use excerpts
and
teasers. In that case, WordPress uses an excerpt
if the post has one, a teaser if the post uses the More quicktag, or the first 55 words in the post if it has neither
an excerpt nor a teaser.
UP TO SPEED
Writing Good Excerpts
The best thing about excerpts is that they don’t need to be
directly linked to the text in your post. But don’t abuse your
freedom—to write a good, genuinely useful excerpt, you need
to follow a few rules:
• Keep it brief. Usually, when a visitor searches your site,
WordPress finds several matching posts. By keeping
your excerpts short (around the 55-word mark, just like
WordPress does), you keep the search results short, which
makes them easier to read.
• Summarize the content of the page. The goal of an excerpt
is to give someone enough information to decide if she
wants to click a link to read the full post. An excerpt isn’t
a place to promote yourself or make flowery comments.
Instead, try to clearly and honestly describe what’s in
the post.
• Don’t repeat the post title. If you want to make sure every
word counts, don’t waste time repeating what’s clearly
visible in the title.
Using Excerpts on Your Home Page
At this point, you might think that it’s not worth the trouble to write excerpts for
all your posts. And you could be right, if you use a standard theme and you don’t
think that your visitors are going to be searching for posts. However, there’s another
factor to consider: Some themes use excerpts for other purposes.
For example, many themes use excerpts as the display text for posts on the home
page. This way, the excerpt acts a bit like a teaser. The dierence is that the standard
WordPress teaser comes from the first part of a post, but you control the wording
in an excerpt.
The Brightpage theme described earlier (page 192) uses this system. If you provide
an excerpt for a post, that’s what shows up on your home page, not the post content.
The Oxygen theme, available for both WordPress.com and self-hosted sites, does
the same thing, as you can see in Figure 6-21.
NOTE None of the year themes like Twenty Twelve make much use of the excerpts feature. They use them
in searches (as shown in Figure 6-20), but not on the home page.
If you switch to a theme that makes heavy use of excerpts, you might find the sum-
mary so valuable that you want all your posts to use them, even the ones you've
already created. WordPress has some plug-ins that can help. For example, the Excerpt
Editor (
http://tinyurl.com/csudedx
) can give you a summary for every existing post,
without you having to edit each one individually.
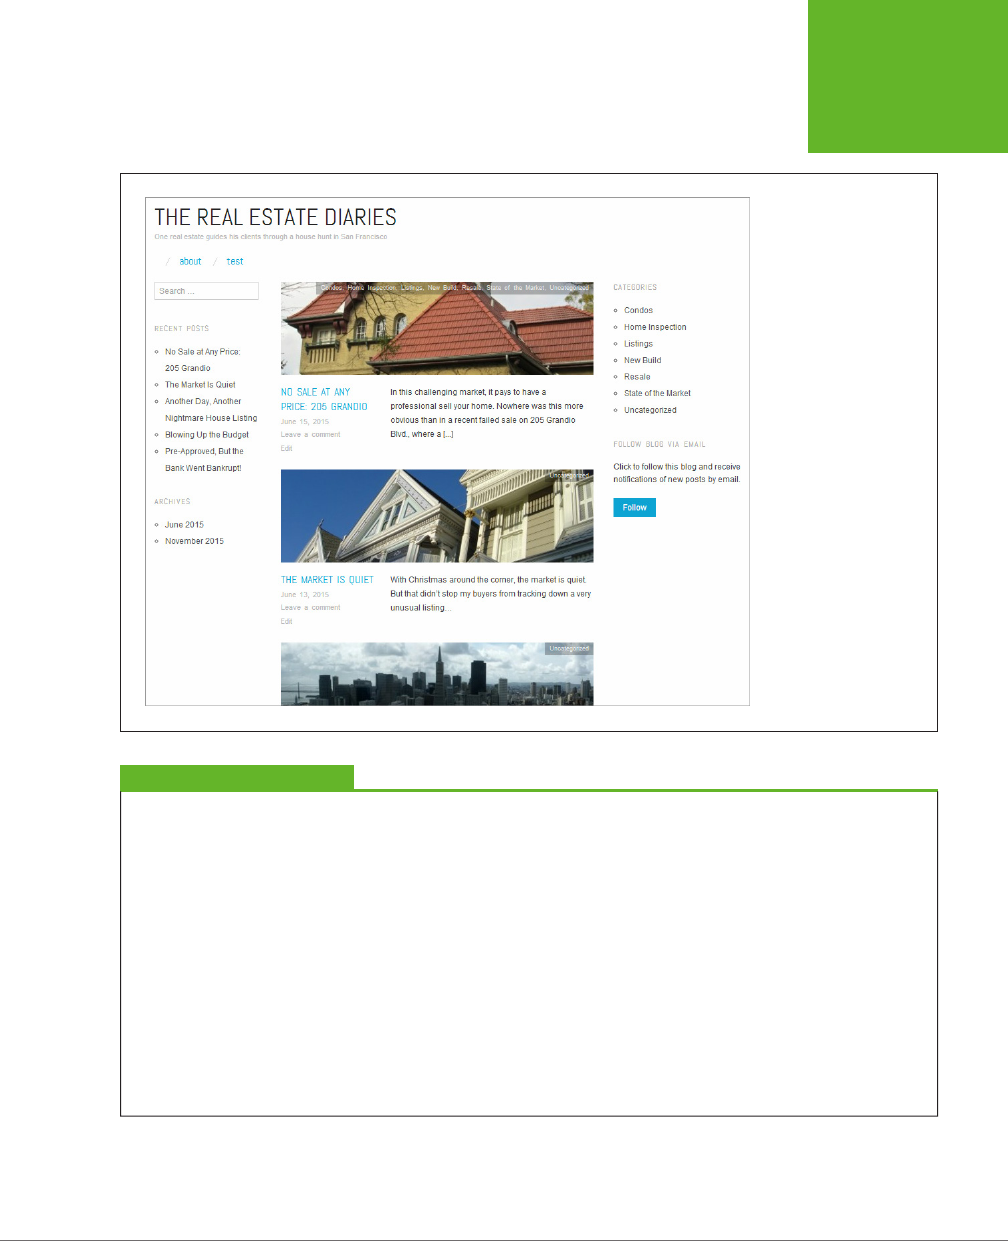
CHAPTER 6: JAZZING UP YOUR POSTS 201
SHOWING PART
OF A POST
FIGURE 6-21
The Oxygen theme
displays the excerpt text
and featured image for
each post, instead of the
post content. If the post
doesn’t have a featured
image, it grabs the first
picture from the post
and displays that. (And if
the post doesn’t use any
pictures at all, the theme
simply shows an empty
gray box.) This creates
a clean, polished home
page that has the feel of
a professional news site.
POWER USERS’ CLINIC
Changing from Full-Post Displays to Summaries
If you create a self-hosted site, you can make any theme display
excerpts or full posts. But, first, you need to learn the basics of
WordPress theme files and the WordPress loop, topics covered
in Chapters 13 and 14.
Once you know your way around a WordPress theme and the
PHP code inside, you’re ready to make this relatively straight-
forward edit. Usually, you need to edit your
index.php
file,
which creates the post listing on the home page of your site.
To get the display style you want, your code needs to use
the right WordPress function. If you use a function named
the_content()
, your page will show the full content of each
post (or the teaser, if you use the More quicktag described on
page 196). But if you use a function named
the_excerpt()
,
your home page displays the post summary only. Usually, you
can switch between the two display modes by modifying the
line of code that has the function in it.
If you want a bit more technical information, check out the
WordPress function reference at
http://tinyurl.com/the-
excerpt
.

WORDPRESS: THE MISSING MANUAL
202
POST FORMATS
Post Formats
As you learned in Chapter 5, your choice of theme determines the basic appearance
of every post on your site. Once you pick a theme, you can relax knowing that all
your posts get the same font, color scheme, and spacing. Consistency reigns.
But some themes oer an underused feature called
post formats,
which display dif-
ferent types of posts in dierent ways. On paper, post formats sound pretty nifty.
The idea is that you pick a format for each type of post you write, and your theme
uses slightly dierent styling for each of those post types.
The problem is that WordPress limits themes to a small set of ocially sanctioned
formats. They’re mainly useful if you want to create a casual blog (sometimes called
a
microblog
), where you throw together pictures, video clips, and post fragments,
without worrying too much about organizing your content. In this scenario, post
formats provide a structure that can help tame the chaos of your posts. But if you
want to create your own post format to distinguish a group of posts that are par-
ticularly important to your site, you’re out of luck.
NOTE Ambitious WordPress developers often complain that post formats don’t let them do what they re-
ally want to do: create their own post groupings and apply different formatting to each group. For example, you
might want to take posts in a certain category and alter their formatting to make them stand out. (Imagine, for
example, a news site that uses a bolder background to highlight violent crimes.) This technique is possible—and
useful—but it’s not easy. You need to do all the work yourself, by adding style rules and code to your theme.
(You can find an example starting on page 495.) And you need to have a self-hosted site to use this technique,
because WordPress.com doesn’t allow theme editing.
UP TO SPEED
Understanding Microblogs
Microblogs
focus on small bits of content: news headlines, in-
teresting links, personal status updates, random thoughts, and
stream-of-consciousness chatter. They tend to be less formal,
more personal, and more conversational than posts—almost
like a cross between traditional blogs and old-school messag-
ing systems like email and chat. Microblogs also mix different
types of content, like audio, video, and images. In fact, some
microblogs are built entirely out of pictures or video clips.
The kings of microblogging are Twitter and Tumblr, but
WordPress fans can join in, too. However, WordPress’s vaunted
flexibility might overcomplicate your efforts. Because Word-
Press allows short, microblog-style posts
and
longer, more
traditional entries, it’s easy to drown out the small stuff. You
may also find that WordPress’s other features—categories,
tags, the media library, and so on—overcomplicate your
microblogging efforts.
Applying a Post Format
If your theme supports post formats, you’ll see a Format box in the Add New Post
and Edit Post pages. There, you’ll find a list of all the formats you can use with the
theme. You can pick any of them for a post, but if you don’t make a choice, your
post sticks with Standard.

CHAPTER 6: JAZZING UP YOUR POSTS 203
POST FORMATS
Table 6-1 lists all the post formats that WordPress allows. Themes can pick and
choose which of them they allow.
Table 6-1. The standard post formats
POST FORMAT TYPE OF CONTENT
Standard Standard, ordinary posts. Every post starts
out using the Standard format.
Aside A short snippet of text that doesn’t add up to
a full post. Casual bloggers can use the Aside
format to blurt out a quick thought, in much
the same way that you might use a text
message or a tweet on Twitter. Most themes
don’t display a title for asides.
Status A short update about what you’re doing
right now (“Chillin’ with my Missin’ Manual,
about to build a brilliant WordPress site”).
Similar to the status update feature on
virtually every social media site. Most themes
don’t display a title for status updates.
Link A link to another website, with little or no
extra text. Most themes don’t display a title
for links.
Quote A short snippet of text that quotes some
words of wisdom you want to share. Most
themes don’t display a title for quotes.
Image A post that contains a picture you uploaded.
Gallery A post that contains a picture gallery, like the
kind you’ll create on page 330.
Audio A post that contains an audio recording.
Video A post that contains a video file.
Chat A snippet of a memorable conversation,
offline or online. Usually looks like this:
Joe: dude, why u ignorin me?
Ben: im learnin some wordpress, bro
You see these formats at work in the year themes (page 132), from Twenty Eleven
on. Each theme has its own way of styling the formats. Often, you’ll be hard-pressed
to spot the minor changes between an ordinary post and one with a format applied.
In many cases, the only dierence you’ll notice is the lack of a title for many formats
(like asides and status updates) and the addition of a small icon. The Twenty Thir-
teen theme applies the most dramatic post format styles, with background colors
(Figure 6-22).
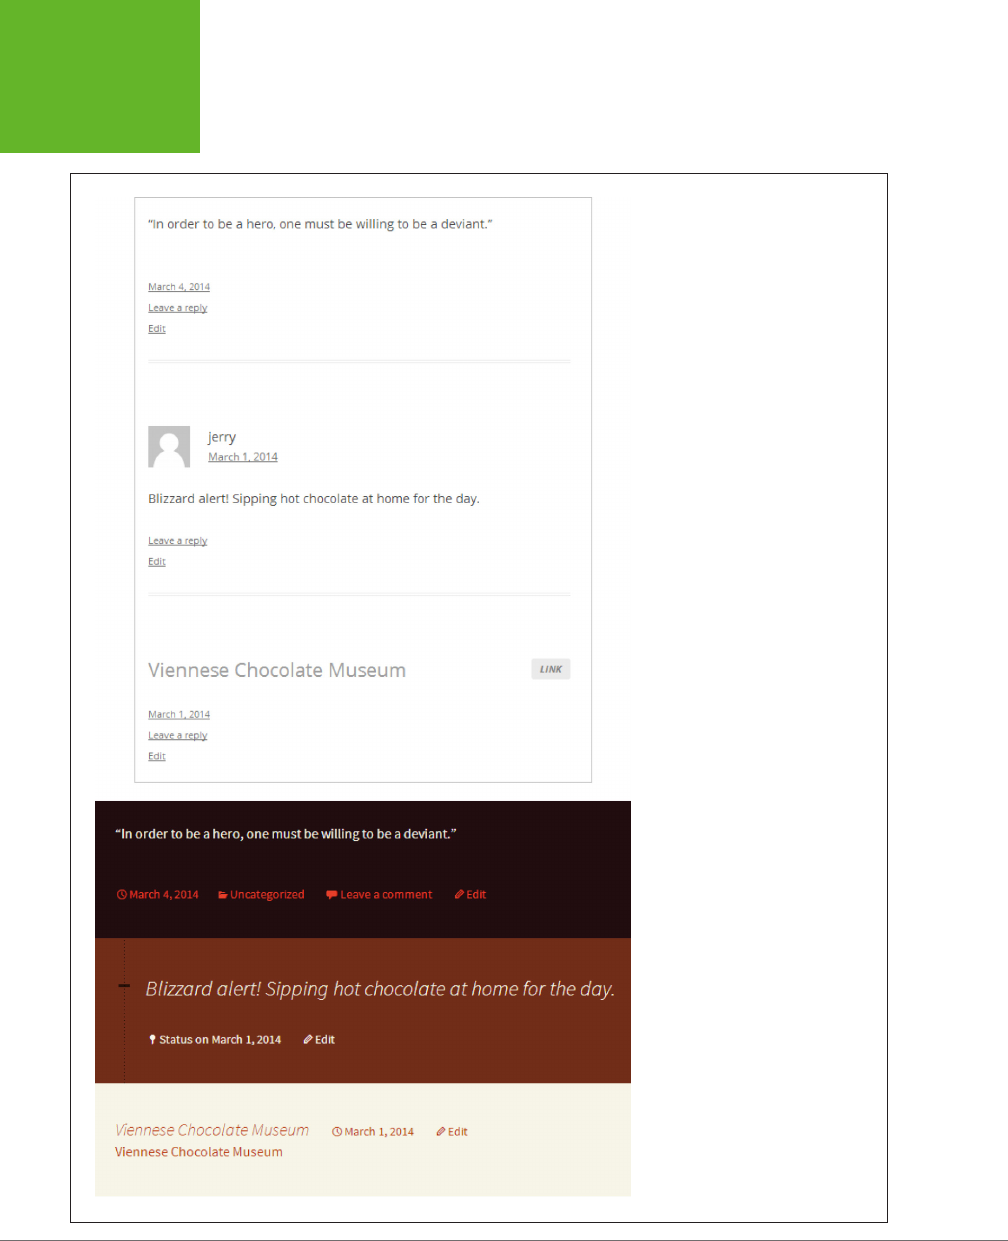
WORDPRESS: THE MISSING MANUAL
204
POST FORMATS
FIGURE 6-22
Here are three posts using different
post formats: a quote, a status update,
and a clickable link. The Twenty Twelve
theme (top) barely distinguishes
between the three posts, while Twenty
Thirteen (bottom) gets more colorful.

CHAPTER 6: JAZZING UP YOUR POSTS 205
POST FORMATS
To get a better sense of what your theme’s post formats look like, create some test
posts and look at them on the home page.
The Ephemera Widget
Some themes include a specialized widget to work with post formats. The most
common example is the
ephemera
widget. Twenty Eleven and Twenty Fourteen both
include one, named Twenty Eleven Ephemera and Twenty Fourteen Ephemera. The
other year themes don’t include the ephemera widget at all.
As the name suggests, the ephemera widget is all about fleeting scraps of content
that are useful for a short period of time, like asides, quotes, and status updates. The
ephemera widget gathers these bits of microblog content and displays them in a
small, self-contained strip that you can pop into a sidebar (Figure 6-23). The idea is
to call attention to smaller scraps of information that might otherwise be swallowed
up in the clutter of your blog.
FIGURE 6-23
Here, the Twenty Fourteen ephemera widget shows the three most
recent quotes you posted to your blog.

WORDPRESS: THE MISSING MANUAL
206
POST FORMATS
To use the ephemera widget, choose Appearance→Widgets to visit the widget-
designing section of the dashboard. Then, drag the widget to the spot on the page
where you want it. Finally, customize it by supplying these three details:
• A title that will appear above the widget.
• The type of posts you want to show. You can choose any post format. However,
the ephemera widget shows the full content of each post, so you’ll probably want
to pick a short, microblog-style post format like Aside, Status, Quote, or Link.
• Choose the number of posts that should appear in the widget. The Twenty
Fourteen standard is two.
TIP You can add more than one ephemera widget if you want to show different post formats. For example,
one widget could show a list of links, a second could list status updates, and a third could show your most recent
asides.
All in all, the ephemera widget oers an interesting way to extract bits of content
from a loosely structured blog. However, most serious bloggers are better served
by using Twitter for microblogging and integrating a Twitter feed into their sidebars,
as described on page 430.

207
CHAPTER
7
In previous chapters, you focused most of your attention on WordPress
posts
—the
blocks of dated, categorized content at the heart of most WordPress blogs. But
WordPress has another, complementary way to showcase content, called
pages.
Unlike posts, pages aren’t dated, categorized, or tagged. They exist independently
of posts. The easiest way to understand the role of WordPress pages is to think of
them as ordinary web pages, like the kind you might compose in an HTML editor.
You’re likely to use pages for two reasons. First, even in a traditional blog, you may
want to keep some content around permanently, rather than throw it into your
ever-advancing sequence of posts. For example, personal blogs often include a
page named About Me, where you provide biographical information. You don’t
want to tie this page to a specific date—you want it easily accessible all the time.
Similarly, businesses might use pages to provide contact information, a map, or a
list of frequently asked questions. You can even create a fine-tuned home page to
greet your visitors, instead of using the default reverse-chronological list of posts.
Another reason to use pages is to build simple sites that don’t feel like blogs. Some
people call these sites
brochure sites,
and the description isn’t entirely complimen-
tary. That’s because brochure sites present a collection of fixed information, while
blogs feel live and interactive. However, there’s a wide range of possibility between
these two extremes. For example, if you create a site for your small business, you
might use pages to display the core content of your site (information about your com-
pany, your policies, the brands you carry, and so on), while adding a blog-powered
section of posts for news and promotions. Is this a blog, a brochure-site, or some-
thing in between? No matter the answer, it’s a great solution for plenty of people.
Adding Pages
and Menus
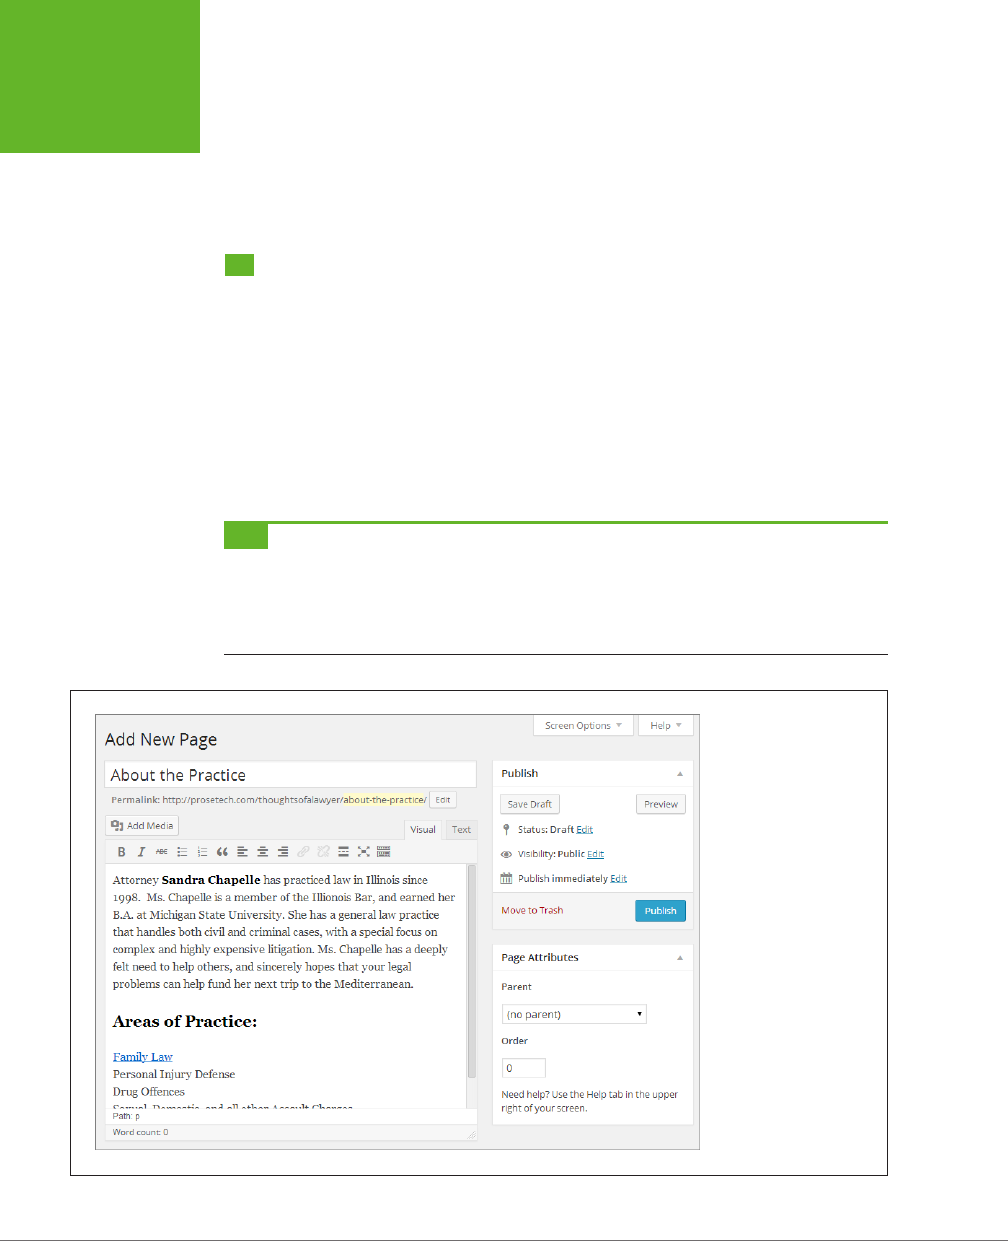
WORDPRESS: THE MISSING MANUAL
208
CREATING
PAGES
In this chapter, you’ll learn to use pages to either supplement your blog or to cre-
ate a brochure-style site. You’ll also learn to manage page navigation with menus,
so your visitors can find the content they want. Lastly, you’ll consider some of the
innovative ways that dierent themes exploit the pages feature.
Creating Pages
Although pages behave dierently from posts, the process of creating and manag-
ing them is similar. Just as you work with posts in the dashboard’s Posts menu, so
you work with pages in the Pages menu.
Here’s how to create a new page:
1. Choose PagesÆAdd New.
This takes you to a screen named Add New Page (Figure 7-1), which resembles
a slightly simpler version of the Add New Post page.
TIP If your site is on WordPress.com, you can take advantage of another path to page creation—the Copy Page
shortcut, which creates a new page based on an old one. Choose Pages→Copy a Page (instead of Pages→Add
New), find the page you want to duplicate in the resulting list of pages, and then click the Copy button next to it.
You’ll still end up at the Add New Page screen, but you start out with an exact duplicate of the page you picked,
which you can modify to suit your needs.
FIGURE 7-1
The form you use to
create pages is similar to
the one for creating posts.
Both let you include pic-
tures, fancy HTML markup,
and featured images. But
pages don’t let you add
the classification details,
like category and tag in-
formation, that posts do,
which is why you don’t
see those options here.

CHAPTER 7: ADDING PAGES AND MENUS 209
CREATING
PAGES
2. Give the page a title and some content.
You’ll see the same content-editing box you use to create posts, with the same
two tabs. Choose the Visual tab to see the formatted text for your page, more
or less the way it will appear on your site. Choose the Text tab to see the un-
derlying HTML markup.
For now, don’t worry about the Page Attributes box—you’ll learn about the
options there a bit later.
3. Finally, click Publish to make the page live on your site.
Or choose one of the other options in the Publish box. Just as with posts, you can
save a page as a draft (page 97) or schedule it for future publication (page 100).
When you publish a page, a “Page published” message appears at the top of
the page, confirming that it’s up and open to the public. Now is a good time to
click the “View page” link to take a look (Figure 7-2).
NOTE Pages don’t have categories and tags, they aren’t listed in chronological order, and you can’t browse
them by date. However, they still have some WordPress smarts. Most notably, they get their formatting instruc-
tions from WordPress themes, just like every other part of your site. In most themes, a basic page looks a lot like
a basic post—for example, both use the same fonts for their title and text.
FREQUENTLY ASKED QUESTION
Understanding Pages
Why do some people call pages “static pages”?
Although WordPress calls this feature
pages,
many webheads
find that confusing. After all, isn’t a page anything you view on
the Web with a browser? And don’t posts appear in web pages?
For these reasons, WordPress experts—and WordPress itself,
sometimes—often use a different term. They call WordPress
pages
static pages.
Sadly, this term is almost as confusing.
It stems from the old days of the Web, when designers dis-
tinguished between dynamic pages that could do incredible
feats with the help of code, and static pages that showed fixed,
unchanging content. That fits with the way most people use
WordPress pages—they create them, fill them with content,
and then publish them.
However, WordPress pages aren’t really static—they
do
change.
Flip your blog over to a different theme, and all your posts
and
pages update seamlessly to match the new style. That’s
because WordPress stores all the content for your pages—as
well as the content for the rest of your site, including posts—in
its database. And, finally, a static page changes anytime you
decide to edit it.
If you’re still confused, here’s the bottom line: A WordPress
site can hold both posts and pages, and you create, format,
and manage them in much the same way. The key difference
is that WordPress automatically dates, orders, and groups
posts. WordPress also puts them on the home page and
assumes that people will want to read them from newest to
oldest. From WordPress’s point of view, posts are the lead
actors on your site, while pages are supporting characters.
But you’re not bound by that narrow definition of a site, as
you’ll see on page 228.
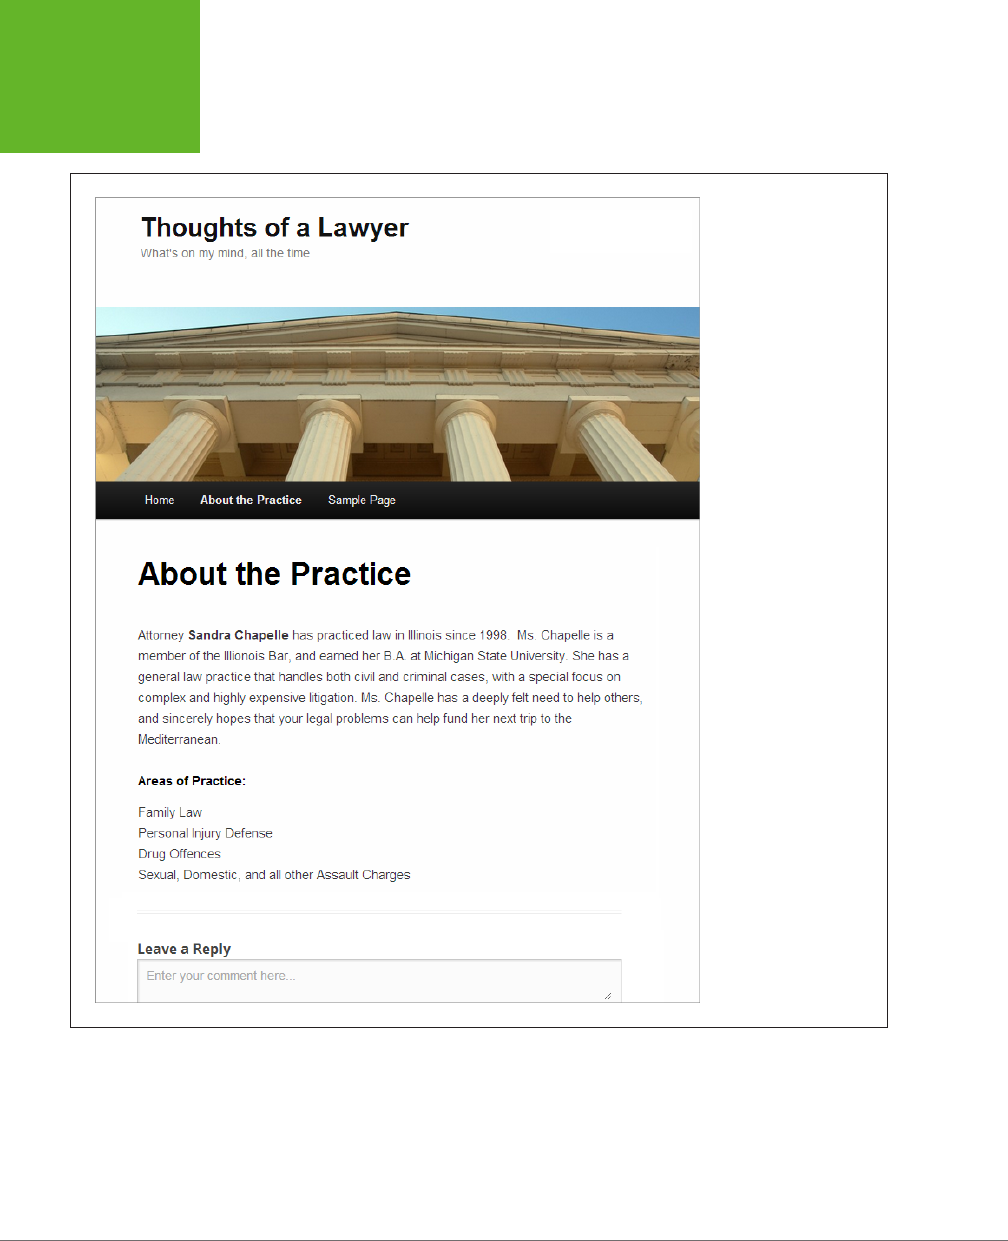
WORDPRESS: THE MISSING MANUAL
210
CREATING
PAGES
FIGURE 7-2
A page in WordPress
looks suspiciously like a
post. If you keep Word-
Press’s standard settings,
your page even has room
for comments, which
you’ll learn to use in
Chapter 8. (You can also
turn comments off for
your pages, as explained
on page 230.)
To review a list of the pages on your site, choose Pages→All Pages. You see a fa-
miliar table of pages, which works the same way as WordPress’s list of posts and
media files. Point to a page title, and you have the choice to view the page, edit
it, or delete it (see Figure 7-3). And if you’re working with piles of pages, you can
use the same bulk actions you use with posts to delete or change a whole group of
pages in one step.

CHAPTER 7: ADDING PAGES AND MENUS 211
VIEWING
PAGES
FIGURE 7-3
Every WordPress site
starts with a sample page
called, rather unimagina-
tively, Sample Page. Now
is a good time to delete
it. Just point to the title
and then click Trash.
Viewing Pages
You can probably think of a couple of pages that would improve your site. If nothing
else, you could add an About Me page with your biographical information in it. But
a key question remains: How do your guests visit pages?
Like posts, every page gets a unique web address (URL), called a permalink. The
permalink appears under the page’s title box as soon as you start entering the page
content. WordPress uses the same rules to create page permalinks as it does to cre-
ate post permalinks (as explained on page 116), and you can edit the permalink for
any page (page 119). But the important detail is that you can find a page by typing
its address into your browser.
Of course, your readers aren’t likely to type in any URL other than the address for
your home page, so you need to provide links so visitors can get to your pages.
One way to do this is by putting links in posts and pages so you can connect them
together. For example, you could add a link to the page shown in Figure 7-2 that
takes readers to a new page when they click “Family Law” (Figure 7-4).
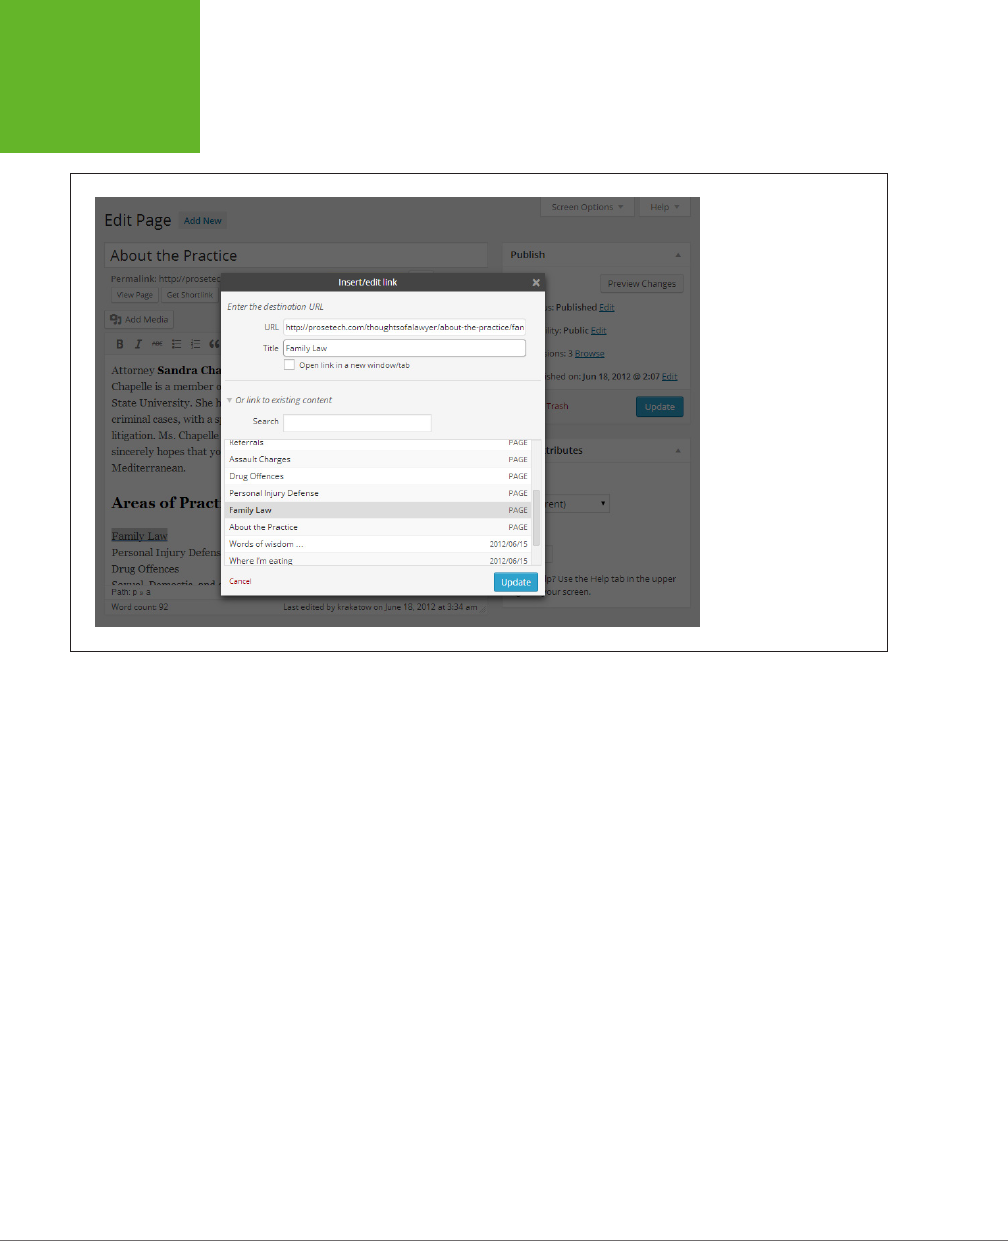
WORDPRESS: THE MISSING MANUAL
212
VIEWING
PAGES
FIGURE 7-4
Clicking the Family Law
link takes readers to
the Family Law page.
Making this happen is
easy. You simply edit
the “About the Practice”
page, use the trusty Add
Link toolbar button, and
then find the Family Law
page in the list of existing
content.
Links are a decent way to join related posts and pages, but they aren’t much help if
a guest wants to
browse
the pages on your site. That’s not a problem with posts—if
your visitors want to read posts, they can browse them easily on the home page,
starting with the most recent one and moving back in time. Or they can browse posts
in a specific category or with a specific tag (page 123). But WordPress doesn’t put
pages in chronological order, feature them on the home page, or give them category
or tag information. Visitors
can
find pages through a keyword search (by typing
something into the search box and then pressing the Enter key), because searches
scan the content in both posts and pages. But guessing at keywords is a clumsy
way to find a page, and it’s no substitute for a more convenient navigation system.
Fortunately, WordPress has several better, ready-made solutions to help visitors
find your pages:
• The Pages widget. Add this to your page, and visitors will always see a list of
all your pages, in the order you want. This widget works best if you want to
highlight all (or almost all) of your pages.
• An automatic menu. Many themes automatically put all your pages in a menu
on the home page. The only problem is that this auto-generated menu includes
every
page in your site. If that results in an overly cluttered or disorganized
menu, you’ll prefer the next option.
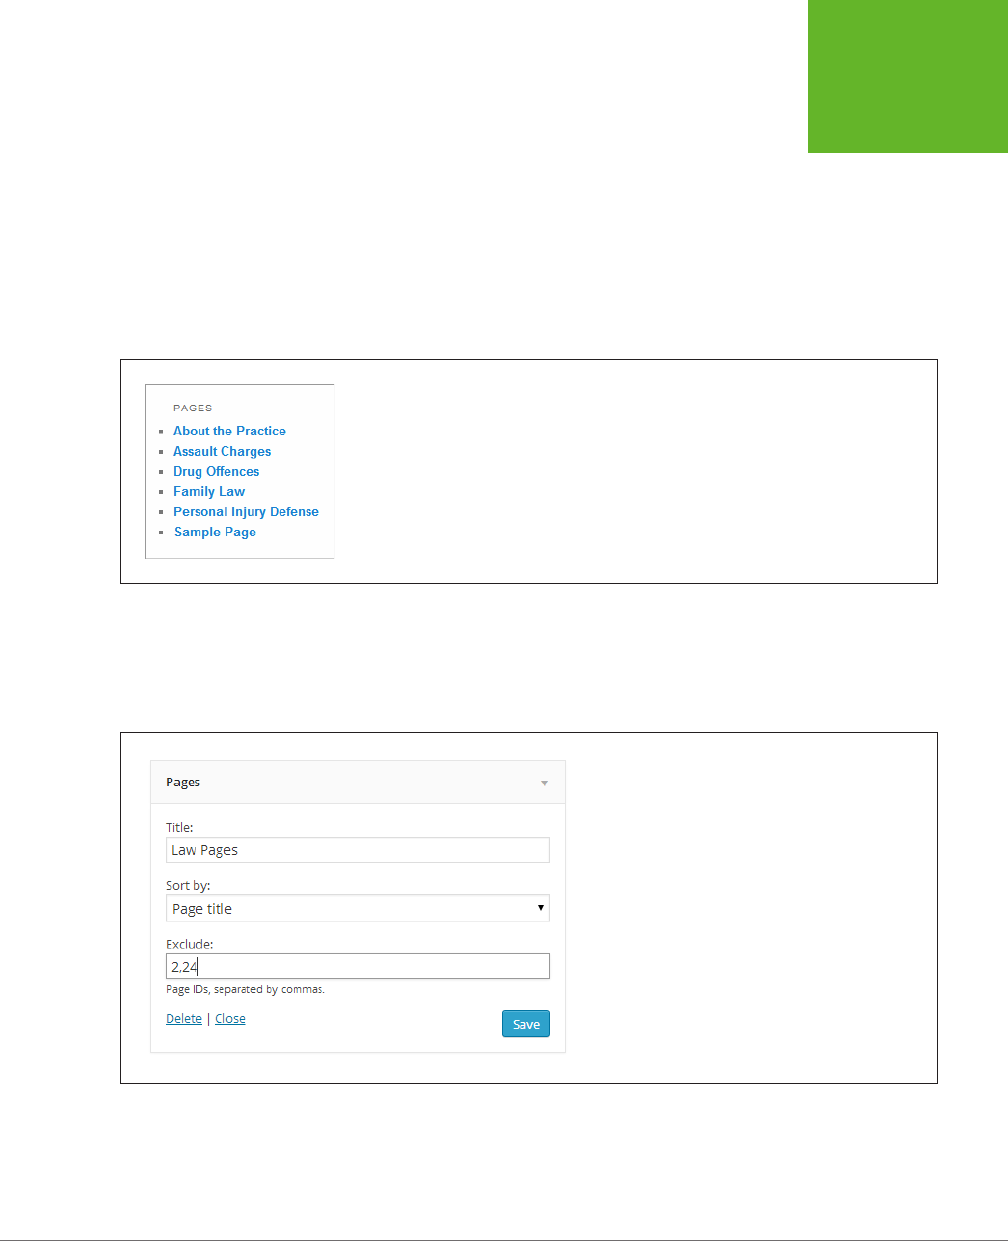
CHAPTER 7: ADDING PAGES AND MENUS 213
VIEWING
PAGES
• A custom menu. You pick the pages you want to showcase and arrange them
just so. You then display the menu somewhere prominent on your home page
(often where the automatic menu used to go). Most people take this route.
You’ll explore all these options in the following sections.
Showing Pages in the Pages Widget
The Pages widget displays a simple list of links (Figure 7-5). Like any other wid-
get, you can place it anywhere on your home page, such as in a sidebar. Choose
Appearance→Widgets and then drag the widget where you want it.
FIGURE 7-5
The Pages widget displays all the pages you create. Visitors can click a
link to visit a page.
You may want to use the Pages widget to show just some of your pages. To do that,
you need to explicitly indicate what pages you
don’t
want to show. Each page has
a unique ID number, and you indicate the pages you want to exclude by creating a
comma-separated list of ID numbers in the Exclude box (Figure 7-6).
FIGURE 7-6
This Pages widget is configured to show every page except
numbers 2 and 24.
The slightly tricky part is figuring out the page’s ID number. If you run a self-hosted
blog and you haven’t changed WordPress’s permalink style (page 117), the ID appears
right in the URL. But if you use WordPress.com or you switched to more readable

WORDPRESS: THE MISSING MANUAL
214
VIEWING
PAGES
title-based permalinks, you need to take a dierent tack. First, go to Pages→All
Pages to see all the pages in your site. Then point to the title of the page you want
to exclude. The page’s URL appears in your browser’s toolbar, in this format:
http://prosetech.com/thoughtsofalawyer/wp-admin/post.php?post=24&action=edit
In this example, the page ID is 24. (Don’t be confused that the URL actually calls the
page a post—it’s an old but harmless WordPress quirk.)
TIP If you have trouble seeing a page’s permalink in your browser, try copying the address. Right-click
the page title and choose a command with a name like Copy Shortcut or Copy Link Address (the exact wording
depends on your browser). You can paste the link into a text editor like Notepad and find the page ID there.
WORD TO THE WISE
Use the Exclude Box Sparingly
It might occur to you that you could add several Pages widgets
to different parts of your home page, each of which shows a
different subset of pages. That’s an interesting idea, but a bad
one, because of the way the exclusion list works.
If you use the Pages widget to create three page lists, for ex-
ample, every time you add a new page that you want to leave
off the lists, you need to add the page to the exclusion list of
each menu. That extra work can cause a serious headache. To
avoid this, use the Pages widget only when you want to show
most or all of your pages. If you want to show a smaller group
of just a few pages, create a custom menu and show it with the
Custom Menu widget, as explained on page 228.
The Pages widget also lets you sort your list of pages. You set the sort order using
the drop-down list in the “Sort by” box. Ordinarily, the order is “Page title,” which
means that WordPress organizes your pages alphabetically by title. Alternatively, you
can choose “Page ID,” and WordPress lists pages from oldest to newest (because
newer pages always get higher ID numbers). Lastly, you can choose “Page order,”
which lets
you
pick the order, as you’ll see on page 216.
Showing Pages in a Menu
Most themes start out with a menu. In fact, menus are considered so important to
the average WordPress site that most themes don’t let you remove the menu (at
least not without resorting to the style editing tricks covered in Chapter 13).
Unlike desktop programs, which typically have strict, consistent rules about where
menus go and what they look like, menus on the Web take many forms. The only
consistent rule is that every menu is a set of links arranged as headings and sub-
headings. In WordPress, the way a menu looks is completely in the hands of your
theme. For that reason, WordPress puts the menu management command in the
dashboard’s Appearances menu, alongside the controls for other theme features.
Many themes put a site’s main links in a traditional menu bar, which it arranges
horizontally near the top of each page. In the Twenty Twelve theme, for example,
the menu sits above the list of posts (Figure 7-7). Other themes arrange the menu
vertically and place it on the side, like WordPress’s dashboard menu.
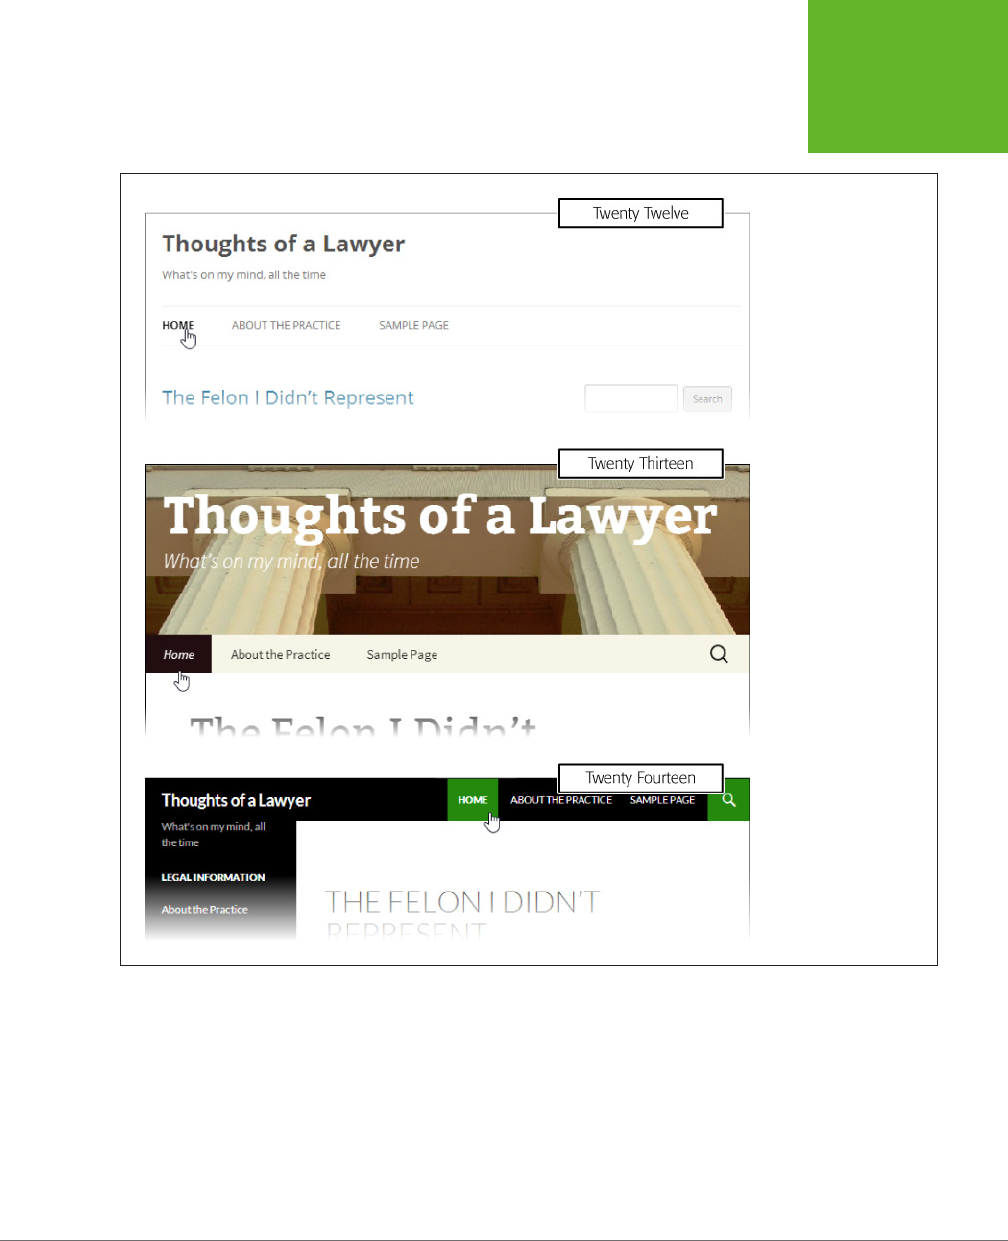
CHAPTER 7: ADDING PAGES AND MENUS 215
VIEWING
PAGES
FIGURE 7-7
Every theme has its own
distinct way of styling
the main menu. Here
are three examples from
WordPress’s standard
year themes.
When you create a new WordPress site, it starts out with an
automatic menu,
so
named because WordPress creates it automatically. At first, the menu holds just
two commands: a Home button that goes to your home page, and a Sample Page
button that opens the WordPress sample page (unless you took our earlier advice
and deleted it). But every time you add a new page, like the “About the Practice”
page shown earlier, WordPress adds a matching link in the menu. It keeps the links
ordered alphabetically by page name.

WORDPRESS: THE MISSING MANUAL
216
VIEWING
PAGES
You can exert more control over how your theme arranges the page links in a menu,
in one of two ways: You can use the ordering and grouping features described next,
or you can create a custom menu (page 218). The ordering and grouping approach
works best if you just want to adjust the position of a few commands in the automatic
menu but you’re happy letting WordPress run the show. By comparison, custom
menus take slightly more work but pay o with far more flexibility and extra features.
Ordering Pages
Often, when you display a list of pages, you want to dictate which ones show up
first and which ones are last. You can do this by typing in a number for the Order
setting, which appears in the Page Attributes box when you create (or edit) a page.
The Order setting aects the order of your pages in two situations: when you display
pages in an automatic menu and when you display them in the Pages widget with
the “Sort by” box set to “Page order.”
Ordinarily, WordPress sets the order number of every page to 0. Technically, that
means that each page is tied for first position, and the page order setting has no
eect. But if you want to set the order (say you want “Our Story” followed by “Our
Location” followed by “Contact Us”), you’d assign these pages steadily increasing
page-order numbers (say, 0, 1, and 2). The actual numbers don’t really matter—the
important thing is how they
compare.
WordPress always displays larger-numbered
pages toward the bottom of the list or on the right end of a horizontal menu, with
smaller-numbered pages closer to the top of a list or to the left of a menu bar. If two
or more pages have the same order value, WordPress orders them alphabetically.
TIP If you rearrange a bunch of pages, you need to change their page-order values. The easiest way to do
that is to go to the Pages list (choose Pages→All Pages), point to a post, and click the Quick Edit link. This way,
you can quickly modify some page information, including the order, without opening the whole page for editing.
There’s another way to group pages: You can designate some as
child
pages that
belong to a specific
parent
page. (You may have used this type of organization
before, to create subcategories for your posts, as described on page 110.) To cre-
ate this hierarchy, you set the Parent setting in the Pages Attribute box when you
create or edit the page.
For example, you could edit the Family Law page and change the Parent list box
from “(no parent)” to “About the Practice.” Now, Family Law is a subpage in the
“About the Practice” group.
To better understand the eect of ordering and grouping, imagine you have these
pages:
PAGE TITLE ORDER PARENT
About the Practice 0 -
Assault Charges 3 About the Practice

CHAPTER 7: ADDING PAGES AND MENUS 217
VIEWING
PAGES
PAGE TITLE ORDER PARENT
Drug Offenses 2 About the Practice
Family Law 0 About the Practice
Personal Injury Defense 1 About the Practice
Legal Disclaimers 1 -
Referrals 0 -
The order settings create the nicely styled menu and nested list shown in Figure 7-8.
The menu displays subsidiary pages in submenus, while the Pages widget slightly
indents nested pages.
FIGURE 7-8
This site lists its pages in
two places. At the top is
the familiar menu bar,
now with a submenu. On
the right side, the Pages
widget shows the same
collection of pages, but
sorted by title.
Life can get a bit confusing when you order and group pages. Just remember that
when WordPress orders pages, it compares only the pages at the same level. For
example, you can use the page order to adjust the position of the Assault Charges,
Drug Oenses, Family Law, and Personal Injury Defense pages with respect to one
another. However, WordPress won’t compare the order values of the Family Law
and Legal Disclaimers pages, because they aren’t at the same level and won’t ever
be shown next to each other.

WORDPRESS: THE MISSING MANUAL
218
CUSTOM
MENUS
NOTE If you use post names in your permalinks (page 116), child pages get their own permalink. It includes
two posts titles: the name of the child page itself and the name of the parent page. For example, if the child page
“Family Law” has the parent “About the Practice,” the full permalink might be something like
http://thoughtso
falawyer.net/about-the-practice/family-law.
Custom Menus
WordPress’s ordering and grouping features give you enough flexibility to create a
good-looking, well-ordered menu. However, there are a few good reasons why most
WordPress developers eventually decide to build a custom menu:
• To get more types of menu items. An automatic menu includes links to your
pages, and that’s it. But a custom menu can include other types of links—for
example, ones that lead to a particular post, a whole category of posts, or even
another website.
• To hide pages. An automatic menu always includes
all
your pages. This might
not be a problem for a relatively new WordPress site, but as your site grows,
you’ll probably add more and more pages and use them for dierent types of
information. Eventually, you’ll create pages that you don’t want to include in
your main menu (for example, you might want to add a page that readers can
visit only by clicking a link in a post). The only way to hide a page from a menu
is to abandon the automatic menu and build a custom menu.
• To have multiple menus. Some themes support more than one home page
menu. However, a site can have only one automatic menu. To take advantage
of the multiple-menu feature, you need to create additional menus as custom
menus.
• Because sometimes automatic menus are hard. To get an automatic menu
to look the way you want it to, you need to think carefully about the order and
parent settings. If you have dozens of pages, this sort of planning can twist
your brain into a pretzel. If you build a custom menu, you can drag and drop
your way to a good-looking menu. It still takes time and work, but it requires a
lot less planning and thinking.
Building a Custom Menu
When you’re ready to replace your theme’s automatic menu with a menu of your
own creation, here are the steps to follow:
1. Choose AppearanceÆMenus.
This brings you to the sophisticated menu editor (Figure 7-9).
2. Click the “create a new menu” link at the top of the page to create a new,
blank menu.
The next step is to give your menu a name.
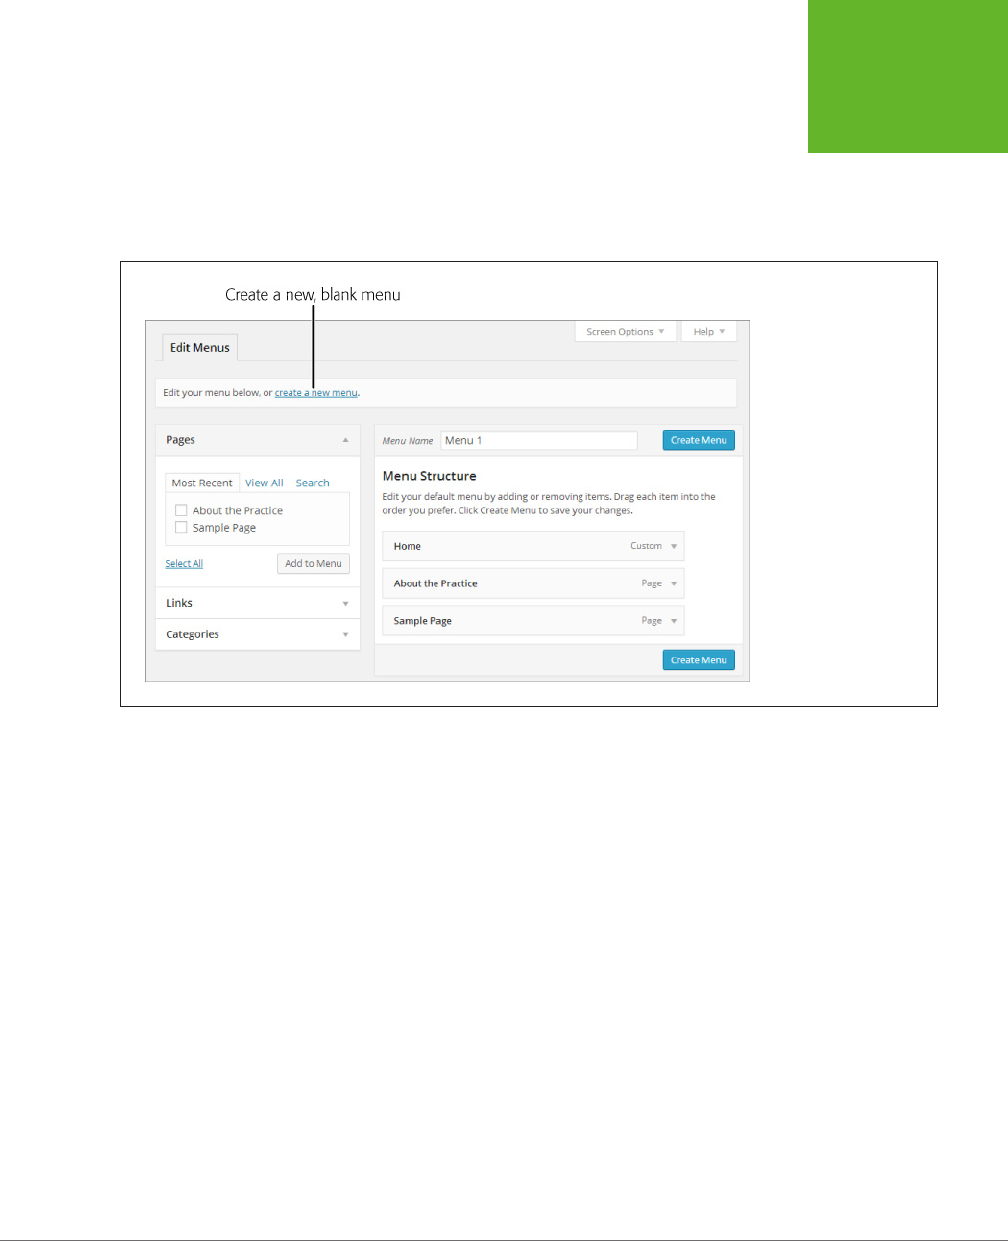
CHAPTER 7: ADDING PAGES AND MENUS 219
CUSTOM
MENUS
3. Enter a name for your menu in the Menu Name box.
The name uniquely identifies the menu. Normally, you name the menu after its
function (Main Menu, Navigation Menu, Page Menu, and so on). You shouldn’t
name it based on its position (as in Top Menu Bar), because that detail may
change if you switch themes.
FIGURE 7-9
Depending on your
theme, the menu editor
may start out blank, or it
may show you the com-
mands that are currently
part of the automatic
menu, as it does here.
Either way, you need to
create a menu of your
own before you can take
control of its contents.
4. Click the Create Menu button.
WordPress stores the menu as part of your site, so you can edit it anytime. Now
you’re ready to fill it up with useful commands (Figure 7-10).
5. Decide whether you want to add a page, link, or category to your menu.
If necessary, click the heading to expand the Pages, Links, or Categories
section (Figure 7-11).
A
page
is, obviously, a link to one of the pages you created.
A
link
goes to some location on the Web, either on your site or another site. For
example, you could create a custom link that points to a specific post (using its
permalink), a Wikipedia page, a friend’s blog, or something else.
A
category
is a link to a page that displays all the posts in a given category
(in reverse-chronological order). It has the same eect as clicking a link in the
Categories widget (page 112).
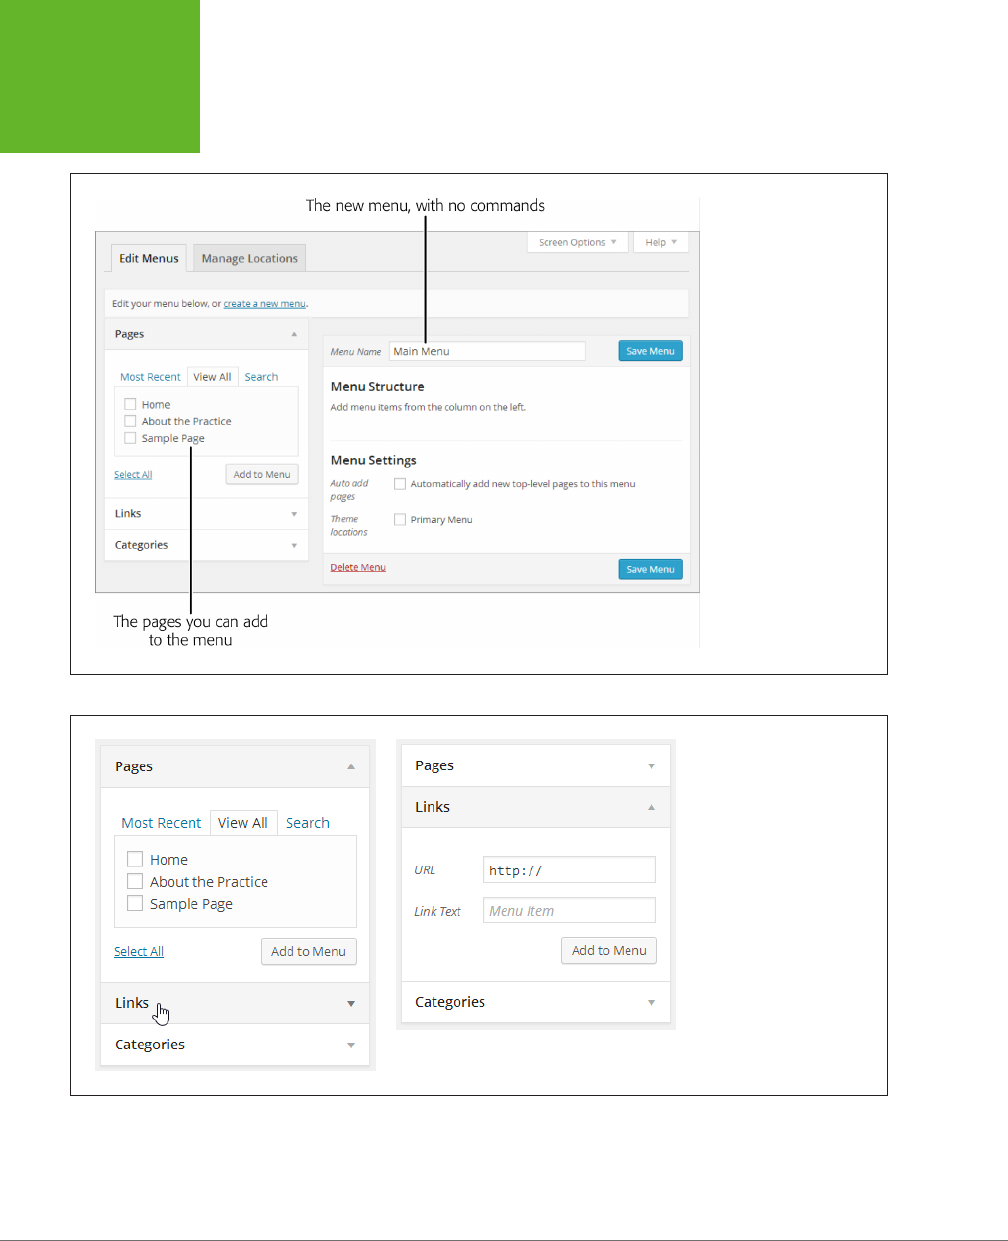
WORDPRESS: THE MISSING MANUAL
220
CUSTOM
MENUS
FIGURE 7-10
The left side of the
menu editor has three
sections (Pages, Links,
and Categories) that let
you add various links to
your menu. Right now,
the Pages section is
expanded.
FIGURE 7-11
You can set options for only
one menu section at a time.
You choose which one by
clicking the heading. For
example, if you want to add
a link but the Pages box is
expanded (left), click the Links
heading to open the Links box
(right).

CHAPTER 7: ADDING PAGES AND MENUS 221
CUSTOM
MENUS
6. Enter the information for your menu item.
If you’re adding a page, click the checkbox for the page you want to add. You
can tick several checkboxes to add a whole group of pages at once. The Pages
box lets you choose your pages from three dierent tabs. Use Most Recent
to choose from the newest pages you created, View All to browse through all
your pages, and Search to find a page by name (which is useful if your site has
dozens or more pages).
If you’re adding a link, fill in the address in the URL box and specify the link
text in the Link Text box.
If you’re adding a category, click the checkbox for the category you want.
Adding a category is similar to adding a page—you can browse a list of your
categories, choose from your most frequently used categories, or search for
the category you want by name, depending on what tab you pick. You can also
add multiple categories at once by ticking multiple boxes.
TIP It makes sense to add a link named “Home” or “Posts” to most new menus. That way, your guests always
have a way to get back to your home page. To create a home page link, choose the View All tab in the Pages box,
turn on the checkbox next to Home, and then continue with the next step.
GEM IN THE ROUGH
Getting Even More Menu Links
The menu editor makes it easy to link to another page on your
site, to a category of posts, or to another website entirely. But
you can get even more menu-creating options if you click the
Screen Options button (found in the top-right corner of the
page) and turn on the Posts and Tags checkboxes.
If you do, you’ll get three more boxes for adding menu items.
The Posts box shows a list of all your posts, letting you add
a link to a specific post without needing to remember the
permalink. The Tags box is similar to the Category box—it lets
your visitors browse all the posts that have a specific tag. And
the Format box lets you add links to different post formats
(page 202), if you use the formats in your blog. For example,
you can add a link that lets readers view all the Aside posts
or all the Quote posts.
7. Once you make a choice, click the “Add to Menu” button.
Your new item appears in the menu section on the right.
8. Optionally, customize the label and tooltip (title) of your menu item.
When you first add an item, it shows up as a collapsed gray box. To change
the options for that item, click the down-pointing arrow on the right side of the
box. This expands the box so you can see (and edit) all the settings for that
item (Figure 7-12).
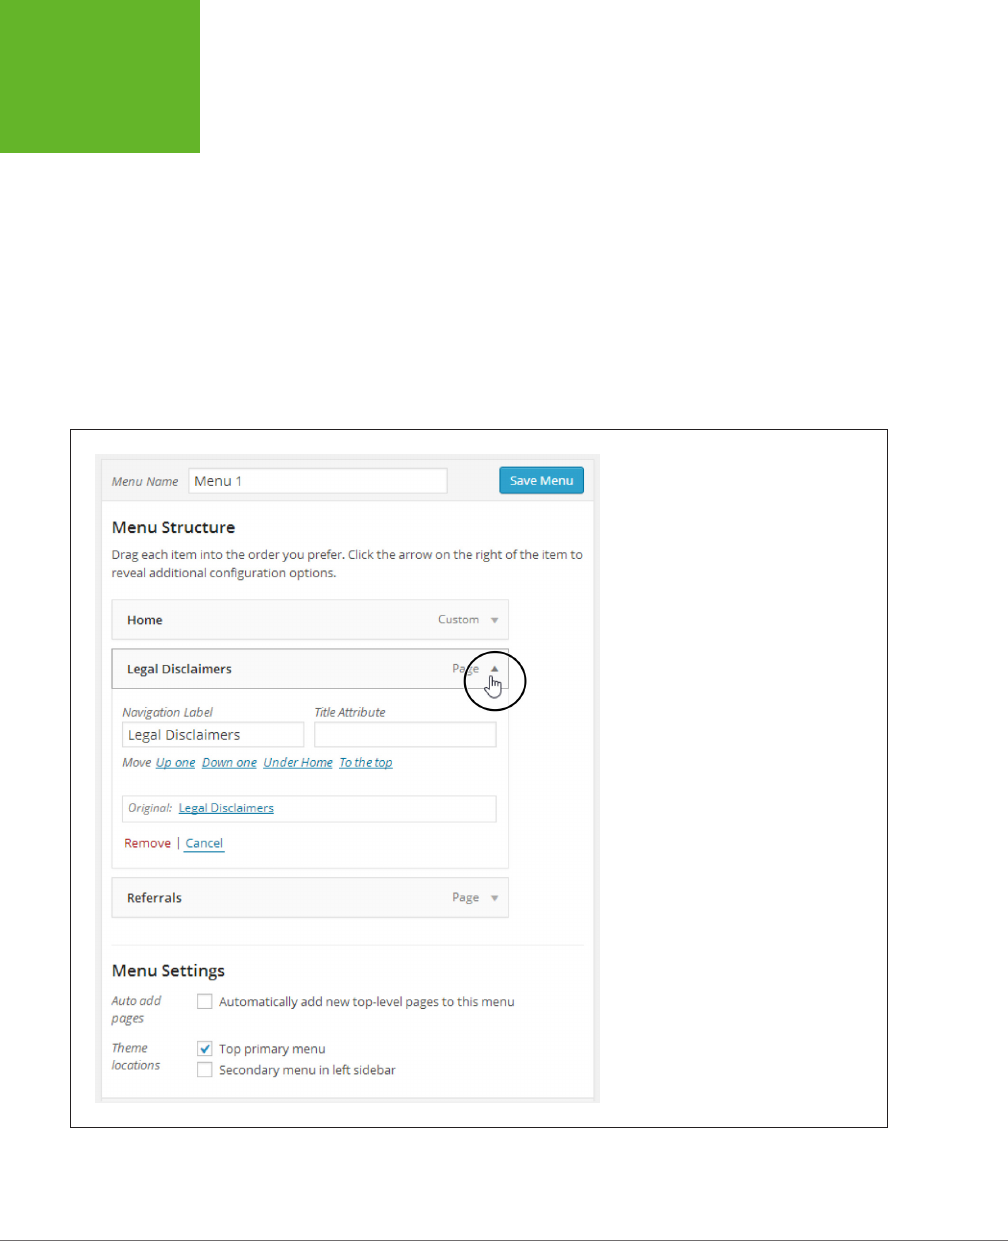
WORDPRESS: THE MISSING MANUAL
222
CUSTOM
MENUS
Here are the settings you can change:
• Navigation Label, which is the link text that appears in the menu. If you
add a page or a category, the navigation label is the name of that page or
category, which keeps things simple. But you might want to edit the text
if it’s too long to fit comfortably in your menu.
• Title Attribute, which sets the tooltip that pops up when someone points
to a menu item. Usually, the title attribute is blank, and the tooltip displays
the name of the menu item. But you could get fancy and use the Title at-
tribute to supply a more detailed description.
• Remove, which does the obvious: deleting a menu item you don’t want
anymore.
FIGURE 7-12
In the menu editor, WordPress represents
each menu item with a separate gray box.
To see the settings for an item, you must ex-
pand this box by clicking the down-pointing
arrow in its right corner. In this example,
the menu includes three links (Home, Legal
Disclaimers, and Referrals), but only one
(Legal Disclaimers) is expanded.

CHAPTER 7: ADDING PAGES AND MENUS 223
CUSTOM
MENUS
9. Return to step 5 to add another item to your menu, and repeat these steps
until you stock your menu with all the items you want.
WordPress adds items to the menu in the order
you
add them. So the items
you add first appear on the left of a horizontal menu, or at the top of a vertical
menu. However, don’t worry about the order yet, because you’ll learn how to
move everything around in the next step.
10. Now it’s time to arrange your menu items. Drag them around to position
them and group them into submenus.
Unlike automatic menus, custom menus don’t pay attention to your pages’
order or parent settings. This is good for flexibility (because it means you can
arrange the same commands in dierent menus in dierent ways), but it also
means you need to do a little more work when you create the menu.
Fortunately, arranging menu items is easy. To move an item from one place to
another, simply drag it, just as you move widgets in the Widgets page. WordPress
displays items in top-to-bottom order, so if you use a horizontal menu (as the
WordPress standard theme does), the topmost item is on the left, followed by
the next menu item, and so on.
Creating submenus is just as convenient, once you know the trick. First, ar-
range your menu items so that the child items (the items you want to appear
in the submenu) appear immediately after the parent menu item. Then, drag
the child menu item slightly to the right, so that it looks like it’s indented one
level. Figure 7-13 shows what the result should look like, and Figure 7-14 shows
the formatted WordPress page.
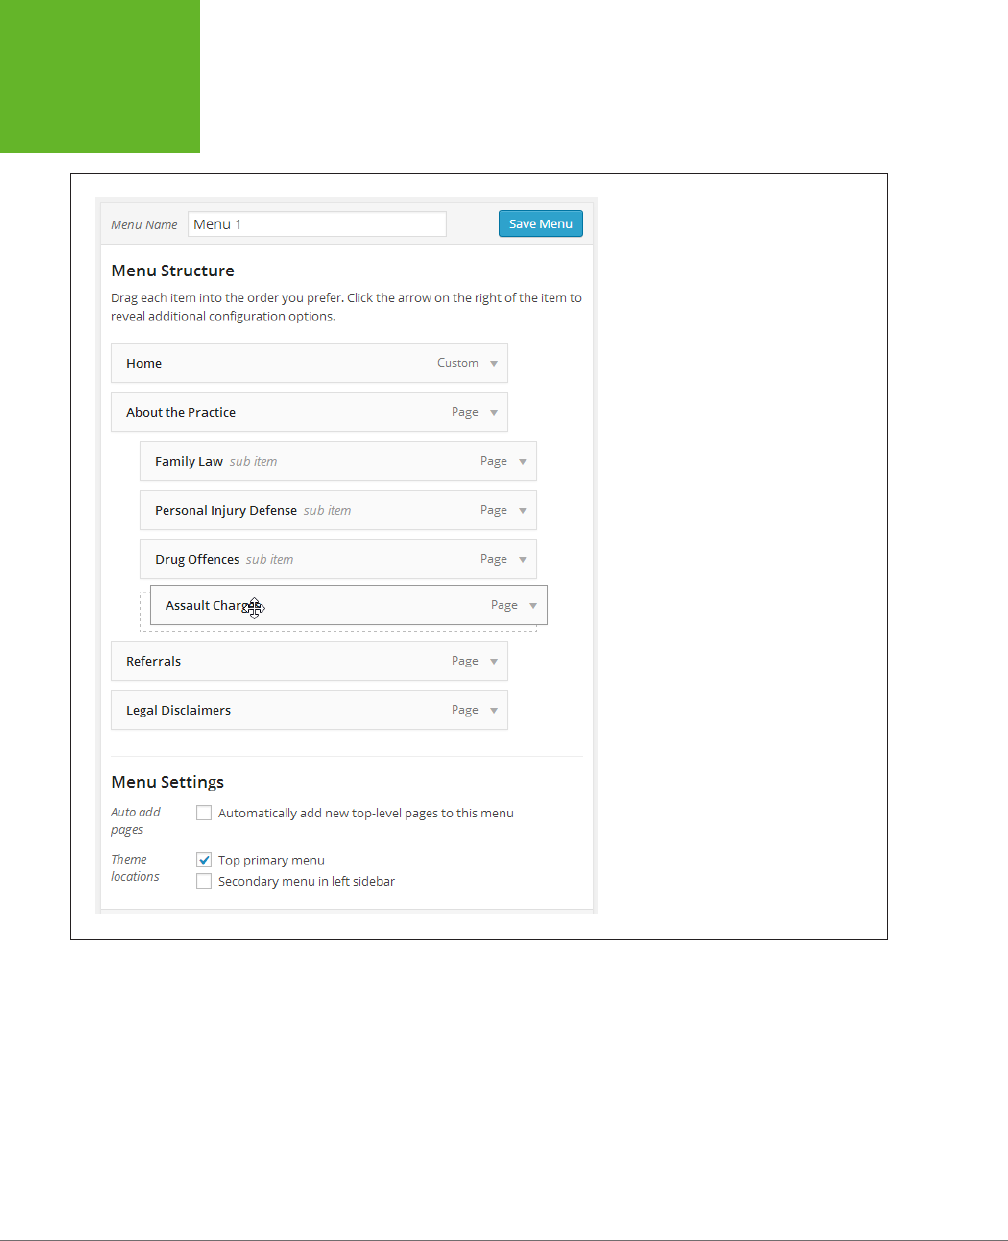
WORDPRESS: THE MISSING MANUAL
224
CUSTOM
MENUS
FIGURE 7-13
By dragging the Assault Charges page
slightly to the right, it becomes a submenu
item under the “About the Practice” page,
along with several other pages. Figure 7-14
shows the result.
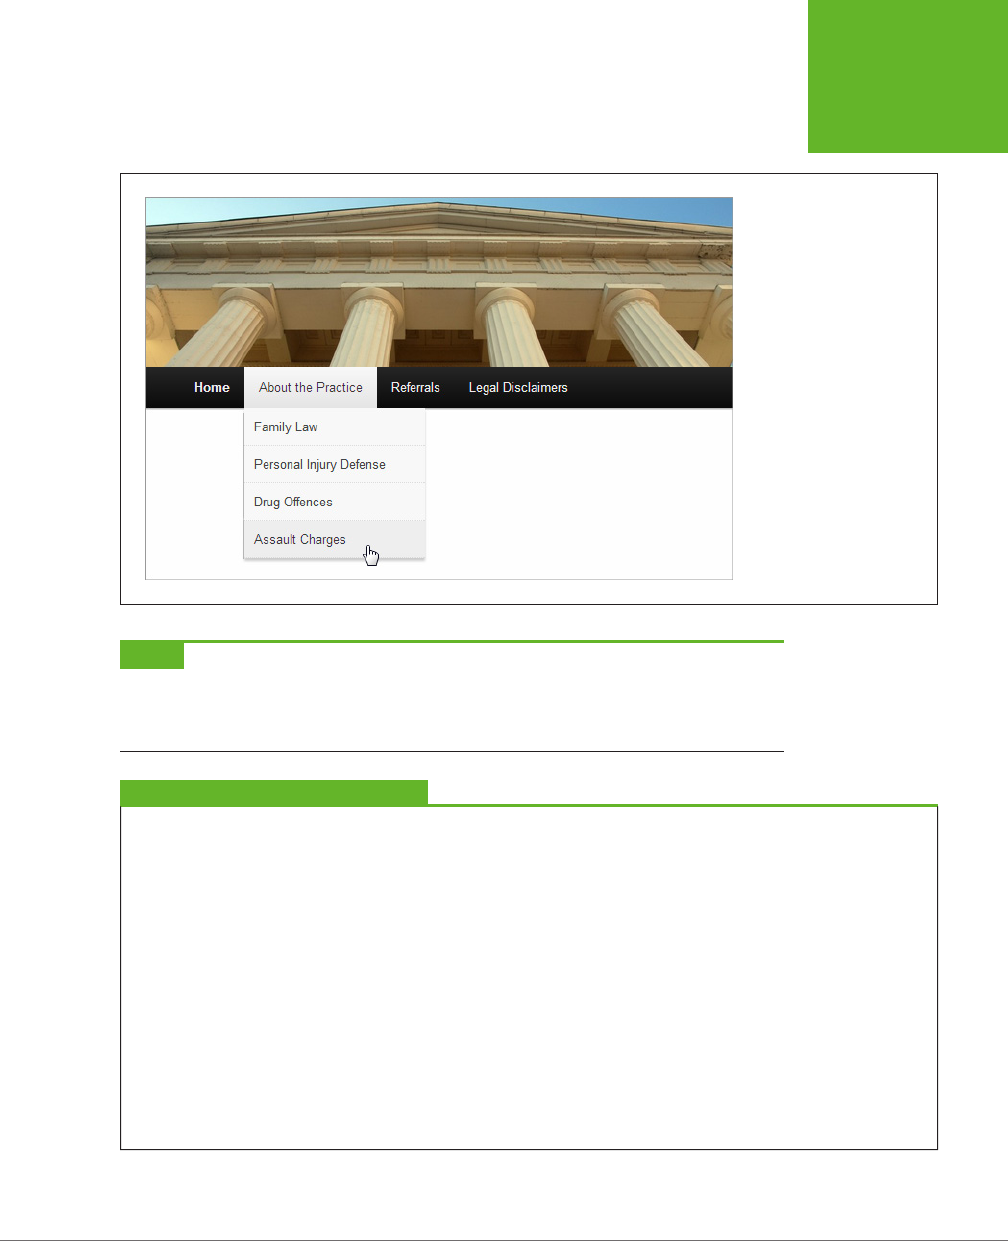
CHAPTER 7: ADDING PAGES AND MENUS 225
CUSTOM
MENUS
FIGURE 7-14
Now the “About the Practice”
page has a submenu.
NOTE You can easily create multilayered menus (menus with submenus inside of submenus). All you do is
keep dragging items a bit more to the right. However, most well-designed WordPress sites stop at one level of
submenus. Otherwise, guests may find it awkward to dig through all the layers without accidentally moving the
mouse off the menu.
FREQUENTLY ASKED QUESTION
Creating a Menu Item That Does Nothing
Can I make a submenu heading that visitors can’t click?
WordPress menus work a little differently from the menus
in traditional desktop computer programs. When you have a
submenu in a desktop program, you click the parent menu item
to open the submenu, and then you click one of the items inside
the submenu. But in WordPress, you just point to the parent
menu item to open it. The parent item is still a real menu item
that leads somewhere—if you click it, you go to a new page,
category, or custom URL. For example, in Figure 7-14 you can
point to “About the Practice” to open its submenu, or you can
click the title to go to the About the Practice page.
But perhaps this isn’t the behavior you want. For example, you
might want the “About the Practice” menu item to be a non-
clickable heading, which exists solely to house the submenu
underneath. To create an unlinked heading, add a new com-
mand from the Links box, set the label to “About the Practice,”
and then set the URL to
#
(the number sign character—that’s
all). To browsers, the # symbol represents the current page, so if
you click the menu item (“About the Practice” in this example),
you won’t go anywhere. In fact, you won’t even see the page
flicker, which is exactly what you want.

WORDPRESS: THE MISSING MANUAL
226
CUSTOM
MENUS
11. Optionally, you can turn on the “Automatically add new top-level pages”
setting.
If you do, every time you create a new page, WordPress automatically tacks it
on to the end of your custom menu. This is similar to the way an automatic menu
works, although you can edit your custom menu any time to move newly added
items to a better place. Most WordPress experts avoid this setting, because they
prefer to control what gets into their menu and where it goes.
12. Turn on one of the “Theme location” checkboxes at the bottom of the menu
box.
Some themes let you decide where on a page your menu goes. For example,
the Twenty Fourteen theme lets you put your menu at the top of the page
(choose the “Top primary menu” checkbox) or the side (choose “Secondary
menu in left sidebar”).
Many themes have just one location for menus, however. If that’s the case for
your theme, you’ll see a single checkbox with a label like Primary Menu. Even
though you have no real choice about where to put the menu, you still need to
turn on the checkbox to add the menu to your site.
13. Click Save Menu to make your changes permanent.
Once you save your menu, you can try it out on your site’s home page.
Multiple Menus
Many themes support more than one menu. Consider, for example, the Oxygen
theme you tried out in Chapter 6 (Figure 7-15). It allows no fewer than three menus.
The primary menu appears under the page header, the secondary one shows up in
the left-hand sidebar, and the tertiary menu appears below that, in the footer sec-
tion. You can imagine using these menus for distinctly dierent tasks—using the
top menu to navigate the whole site, for example, the side menu to drill into specific
posts or categories, and the bottom menu to link to other sites with related content.
NOTE You don’t
need
to use all the menus a theme provides. Initially, WordPress creates an automatic menu
and uses it as the theme’s primary menu. Any additional menus start off hidden, and appear only if you attach
custom menus to them.
To use the Oxygen theme’s three menus, you need to create three custom menus.
Repeat the process described in the previous section three times, clicking the “cre-
ate a new menu” link to add each additional menu.
Once you have more than one menu, WordPress adds a menu list to the top of the
menu editor. Using it, you can choose which menu you want to see and edit (Figure
7-16).
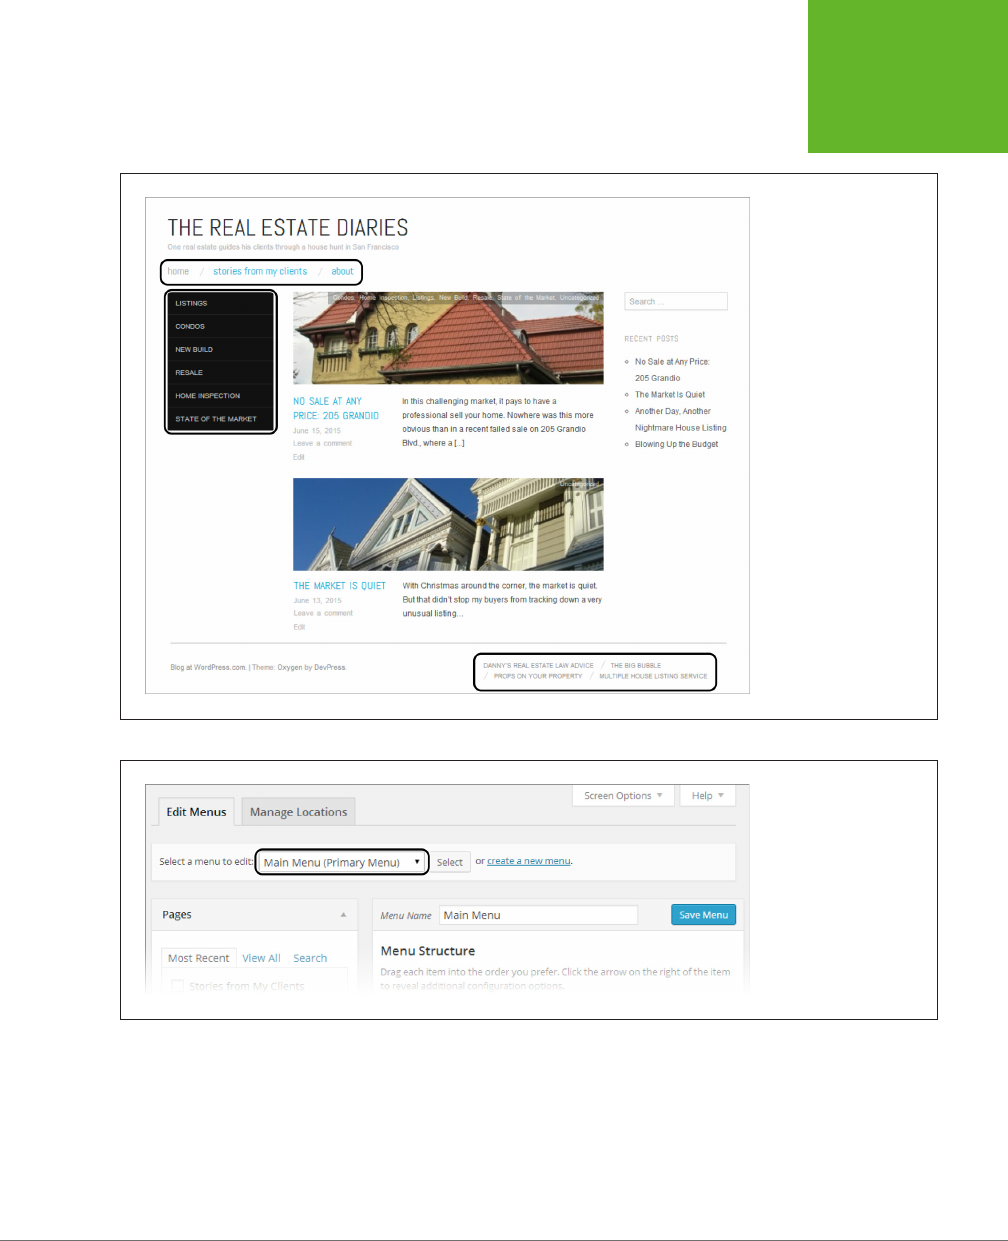
CHAPTER 7: ADDING PAGES AND MENUS 227
CUSTOM
MENUS
FIGURE 7-15
One page, three menus.
All of them support
pop-up submenus (not
shown).
FIGURE 7-16
The menu editor forces
you to edit one menu at
a time. You choose the
menu from the “Select
a menu to edit” list and
click Select to open it.
Once you create your custom menus, you need to put each one in the appropriate
location in your theme. You do that using the checkboxes in the “Theme locations”
section, under each menu. But if you have trouble remembering which menu goes
where, you have another choice. Click the Manage Locations tab to see a list of all
the menu placeholders in your theme. Next to each is a drop-down list of the menus

WORDPRESS: THE MISSING MANUAL
228
CHANGING
YOUR HOME
PAGE
you created. You can specify a menu for each area and then click Save Changes to
make your changes permanent in a single step.
The Custom Menu Widget
There’s one more way to display a custom menu: in the Custom Menu widget.
Now that you’ve played with menus in depth, the Custom Menu widget won’t im-
press you much. To use it, drag it onto your page (say, in a sidebar), give it a title
(optional), and then pick the menu it should show. The Custom Menu widget shows
a bulleted list of links, using nested bullets for submenu items. In fact, the Custom
Menu widget looks a lot like the Pages widget, shown in Figure 7-8.
The advantage of the Custom Menu widget is that it’s more flexible than the Pages
widget. The Pages widget shows all (or almost all) of your pages, but the Custom
Menu widget shows just the pages you want and can optionally include other cat-
egory links and links to other websites, provided that you add them to your custom
menu.
TIP One nifty way to use the Custom Menu widget is to create a
blogroll
—a list of blogs you recommend,
blogs by people you know, or sites that have content similar to yours. For example, a cooking blog might have a
blogroll with other food-related blogs in it. All you need is a new menu (you can name it “Blogroll”), which you
can then fill with links.
Changing Your Home Page
Right now, your WordPress site has a home page dominated by a familiar feature:
the reverse-chronological list of your posts. Visitors can use your site’s navigation
menu to travel somewhere else, but they always begin with your posts.
This setup is perfectly reasonable—after all, your posts typically contain the newest,
most relevant content, so it’s a good idea to showcase them up front. However, this
design doesn’t fit all sites. If the list of posts is less important on your site, or if you
want to show some sort of welcome message, or if you just want to direct trac (in
other words, give readers the option of reading posts or going elsewhere on your
site), it makes sense to start by showing a page instead of a post.
In the following sections, you’ll find out how. First, you’ll use one of your custom-
created pages as your site’s home page, all in the interest of building a brochure
site. Next, you’ll see how to get the best of both worlds: a fixed home page with
the content you want
and
a list of posts, tucked away in another place on your site.
Creating a Brochure Site
The simplest way to change your home page is to ditch the post system altogether,
using pages instead of posts throughout your site. The resulting all-pages site is
sometimes called a
brochure site,
because it resembles the sort of informational
pamphlet you might pick up in a store (Figure 7-17).
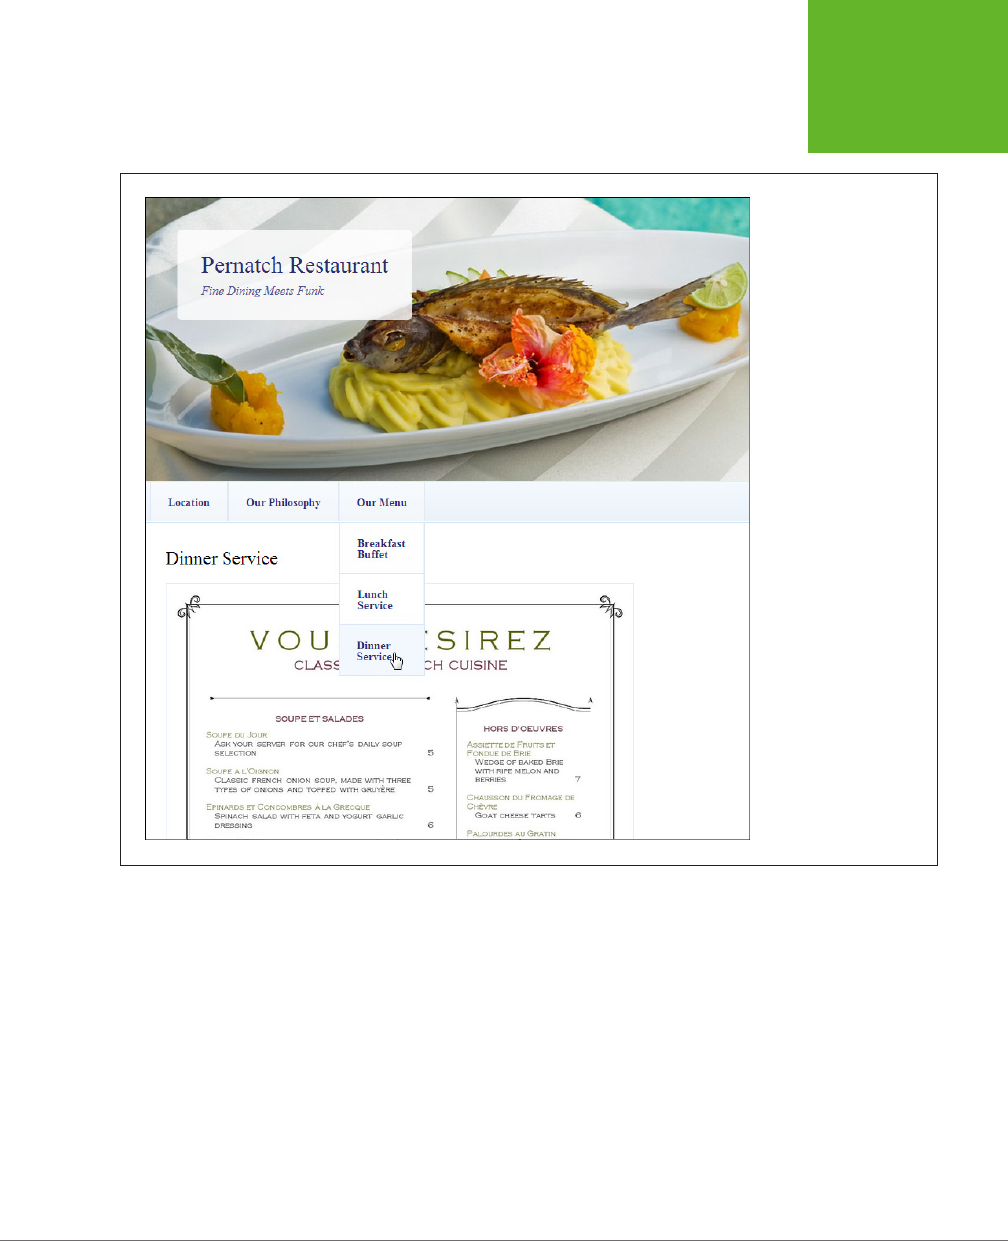
CHAPTER 7: ADDING PAGES AND MENUS 229
CHANGING
YOUR HOME
PAGE
FIGURE 7-17
This restaurant website is
a collection of WordPress
pages, including those
labeled Location, Our Phi-
losophy, and Our Menu.
Unlike posts, pages aren’t
related in any obvious
way, nor are they dated,
categorized, or tagged.
To create a brochure site, you follow some simple principles:
• Build a site that consists entirely of pages, each one hand-crafted by you.
• Add these pages to a custom menu, and arrange the pages the way you want.
• When visitors arrive at your site, the first thing they see is one of your pages
and a navigation menu.
You already know how to perform each of these tasks, except the last one (changing
the home page). That’s what you’ll learn next.

WORDPRESS: THE MISSING MANUAL
230
CHANGING
YOUR HOME
PAGE
UP TO SPEED
Should You Build a Brochure Site?
A brochure site may make sense if you’re building a small site
with very simple content. The restaurant site in Figure 7-17 is
one example.
But if you’re trying to decide between a brochure site and a
post-based site, consider two questions. First, would your site
be more attractive to readers if you included posts? Even the
bare-bones restaurant site might be more interesting with
posts that chronicle restaurant news, menu experiments,
and special events. Not only that, but the fact that posts are
frequent, dated, and personal makes the site more vibrant. In
addition, if you want to get people talking on your site—for
example, posting comments about recent meals or sending in
requests and off-the-wall recipe ideas—you’ll have more luck
if you include posts. Think of it this way: A brochure site feels
like a statement, while a blog feels like a constantly unfolding
conversation.
Then again, you may decide that a brochure site is exactly
what you want. Maybe you really don’t have time to spend
updating and maintaining a site, so you simply want a place
to publish some basic information on the Web and leave it at
that. You can still take advantage of several of WordPress’s
best features, like themes, which ensure that your pages look
consistent. You’ll also get WordPress’s help if you want to track
visitors (page 444), add sharing buttons (page 412), or add any
one of a number of features described in this book.
The key step in building a brochure site is changing your home page, replacing the
traditional list of posts with a page of your own devising. So your first step is to create
a substitute home page, using the familiar dashboard command Pages→Add New.
You might want to make a few changes to the home page, since it serves as the
welcome mat to your site. For example, you may want to include navigation links
in the home-page text that take visitors straight to important content. However,
that’s not necessary. As long as your theme includes a menu, visitors can use it to
click through to more content.
You may also want to tweak the comment settings for your custom home page. By
default, all pages, just like all posts, allow comments. But it seems a bit unstructured
to let people comment directly on the home page of your website. Fortunately, it’s
easy enough to turn comments o for any page. First, use the Screen Options but-
ton (page 124) to open the Discussion box, and then turn o the “Allow comments”
checkbox.
Once you create your new, replacement home page, follow these steps:
1. Choose SettingsÆReading.
2. In the “Front page displays” setting, choose “A static page” (rather than
“Your latest posts”).
3. In the “Front page” list underneath, pick the page you want as your new
home page.

CHAPTER 7: ADDING PAGES AND MENUS 231
CHANGING
YOUR HOME
PAGE
4. Click Save Changes at the bottom of the page.
Now, when you surf to your site’s home page, WordPress automatically serves up the
page you picked (although the URL won’t change in the browser’s address bar—it’s
still the home page of your site). Similarly, when you click Home in the menu, you
return to your custom home page.
TIP If you use a custom page for your home page, you may want to jazz it up with a few more navigational
features. Many themes provide page templates that can help you out by adding a widget-stocked sidebar beside
your page content, for example. You’ll learn more on page 233.
Creating a Custom Entry Page
Even if you want to change your home page, you might not want to ditch the post
system. In such a case, use a static home page (called a welcome page), and include
a full complement of posts on another page.
The trick to doing this is specifying a URL for the page that displays your posts.
Here’s where things get slightly bizarre. To get the URL for your posts, you create
yet another page. This page is just a placeholder—its sole purpose is to provide the
web address for the posts page. You don’t actually need to put any content on this
page, because WordPress automatically creates the list of posts.
Here’s the process:
1. Decide on a URL for the posts section of your site.
For example, if your home page is at
http://magicteahouse.net
, you might put
the posts at
http://magicteahouse.net/posts
or
http://magicteahouse.net/blog
.
NOTE If you use the self-hosted version of WordPress, you need to make sure you changed your site’s
permalink setting to use post titles rather than post IDs (page 117). Otherwise, the link to your placeholder page
will use the post’s ID, not its name. This is terribly confusing—it means you’ll end up with a permalink with a
name like
http://magicteahouse.net/?p=583
that actually shows your list of posts.
2. Create a page with a name that matches the URL you want.
For example, you can create a page named
posts
or
blog.
3. Optionally, add some content.
You don’t need any content (and you probably don’t want any, either). But if
you do add an introductory paragraph or two, WordPress displays it just above
the list of posts.
Don’t put any content in this page—think of it as a placeholder for your old
home page.

WORDPRESS: THE MISSING MANUAL
232
CHANGING
YOUR HOME
PAGE
4. Publish your page.
Your placeholder page is ready. Now all you need to do is change your site
settings.
5. Choose SettingsÆReading.
Here, you specify your custom home page and your new posts page.
6. If you haven’t already set a custom home page, do that now.
In the “Front page displays” setting, choose “A static page” (rather than “Your
latest posts”). In the “Front page” list underneath, pick the page you want to
use for your new home page.
7. In the “Posts page” list, pick the page you created in step 2.
This step tells WordPress to start using your placeholder page to show the list
of posts.
8. Click Save Changes at the bottom of the page.
Now visitors can see your old home page—the list of posts—using the URL for
the placeholder page you created in step 2. So if you created a page named
Posts, when you request that page (say,
http://magicteahouse.net/posts
), you
see your list of posts. But if someone requests the home page (
http://magic-
teahouse.net
), they’ll see the custom home page you picked in step 5 instead
of the list of posts.
9. Optionally, edit your menu and add a new menu item for your new posts
page.
Even though you created a posts page, that doesn’t mean your visitors know
about it. They need a way to get there, and the best option is a link in your site’s
menu. Creating that is easy—you simply add a new menu item that points to
your placeholder page (Figure 7-18).
In some cases, you may decide not to lump all your posts together in a single reverse-
chronological stream. In that case, you don’t need to create the placeholder page.
Instead, you can add category links to your menu so that visitors browse all the
posts that fall into a particular category.
This is a great approach, but it may become less practical if you have a lot of cat-
egories, because you don’t want to burden your site with a crowded, clumsy menu.
One solution—provided you have a self-hosted site—is to customize your home page
with the theme-editing tricks described in Chapter 14. For example, page 527 shows
a site that uses custom themes to create a hand-tailored home page with links that
let you browse dierent categories.
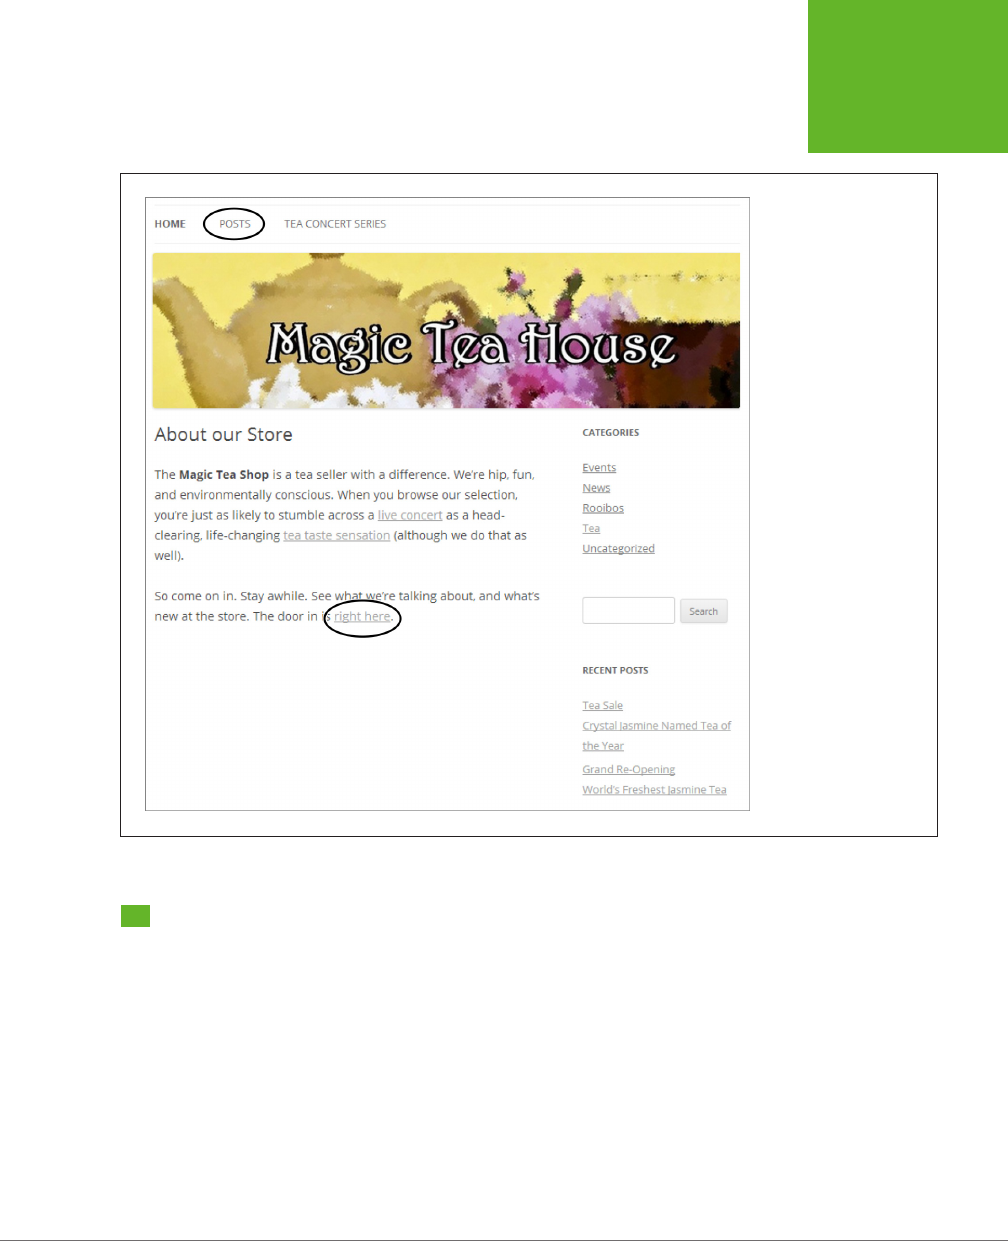
CHAPTER 7: ADDING PAGES AND MENUS 233
PAGE
TEMPLATES
FIGURE 7-18
Here’s the new home
page for the Magic Tea
House. You can continue
on to the site by using
the text-based links on
this page, or by using
the menu above the
header image. The Posts
link takes you to the
posts page, which looks
the same as the old Tea
House home page.
Page Templates
In Chapter 6, you learned about the underused post format feature (page 202),
which applies dierent styles to dierent types of posts. Pages have an analogous
feature called
page templates,
which change the way pages look.
Like post formats, page templates are an optional part of a WordPress theme. Your
theme may include multiple page templates or none at all. For example, the Twenty
Eleven, Twenty Twelve, and Twenty Fourteen themes all include a smattering of
page templates, while Twenty Thirteen is unique in oering none. Table 7-1 shows
the details.
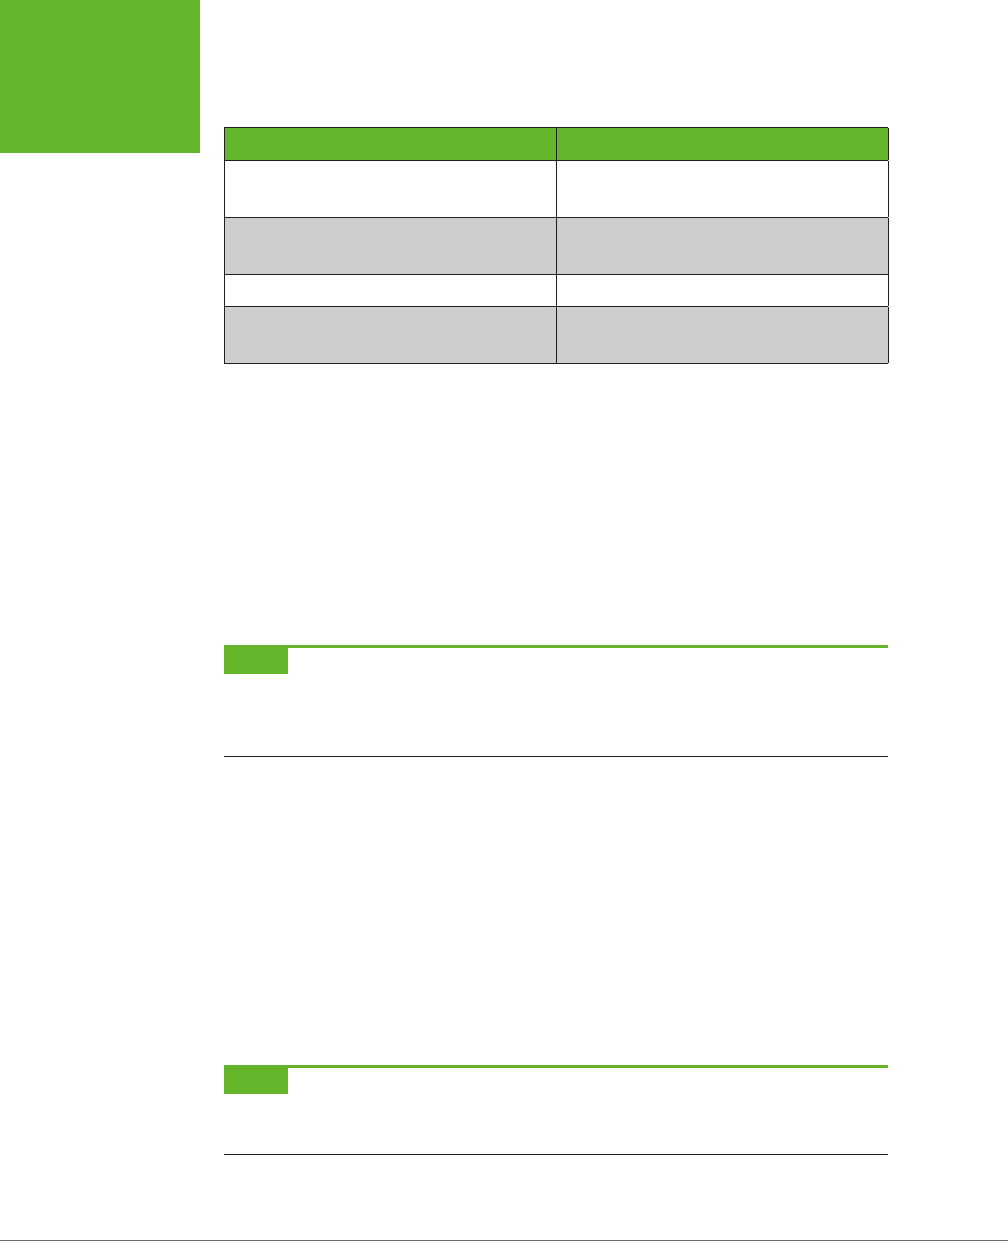
WORDPRESS: THE MISSING MANUAL
234
PAGE
TEMPLATES
TABLE 7-1
Page templates in the year themes
THEME ADDITIONAL PAGE TEMPLATES
Twenty Eleven Sidebar Template
Showcase Template
Twenty Twelve Full-width Page Template, No Sidebar
Front Page Template
Twenty Thirteen (None)
Twenty Fourteen Contributor Page
Full Width Page
When you create a new page, WordPress assumes that you want to use the standard
template. But switching to something else is easy. When you create or edit a page,
choose the template you want from the Template list in the Page Attributes box.
The page template feature faces the same challenge as the post format feature:
Because a theme is designed to suit a variety of sites, and because there’s no way
for a theme to understand the fine details of your site, it can’t provide templates
tailored to your content. The WordPress year themes use page templates for two
basic purposes: to control the appearance of your site’s sidebar, and to create im-
proved home pages. The following sections explain how to do both.
NOTE There’s one page template you won’t consider in this chapter: the Contributor Page template included
with the Twenty Fourteen theme. It’s an unusual but innovative page that automatically gathers and displays
author information in a site that has multiple contributors. You’ll try it out when you consider WordPress col-
laboration on page 391.
Pages With or Without Sidebars
With some themes, your site’s sidebar appears on every page, just as it appears
next to every post. With other themes, WordPress displays pages
without
the side-
bar. No approach suits everyone, and page templates let you change your theme’s
built-in preference.
For example, if you use the Twenty Twelve theme, ordinary pages always get a
sidebar. But if you assign a page Twenty Twelve’s “Full-width Page Template, No
Sidebar” template, that page will appear sidebar-free, with extra space for your
content. Similarly, the pages in Twenty Eleven start out with no sidebar, but switch-
ing to the Sidebar template changes that.
NOTE If you start adding sidebars to your pages, be consistent. For example, if you decide not to show
sidebars on, say, pages with pictures or photo galleries, make sure the other pages on your site follow suit.
Otherwise, your visitors may feel that your site is unpredictable or poorly organized.
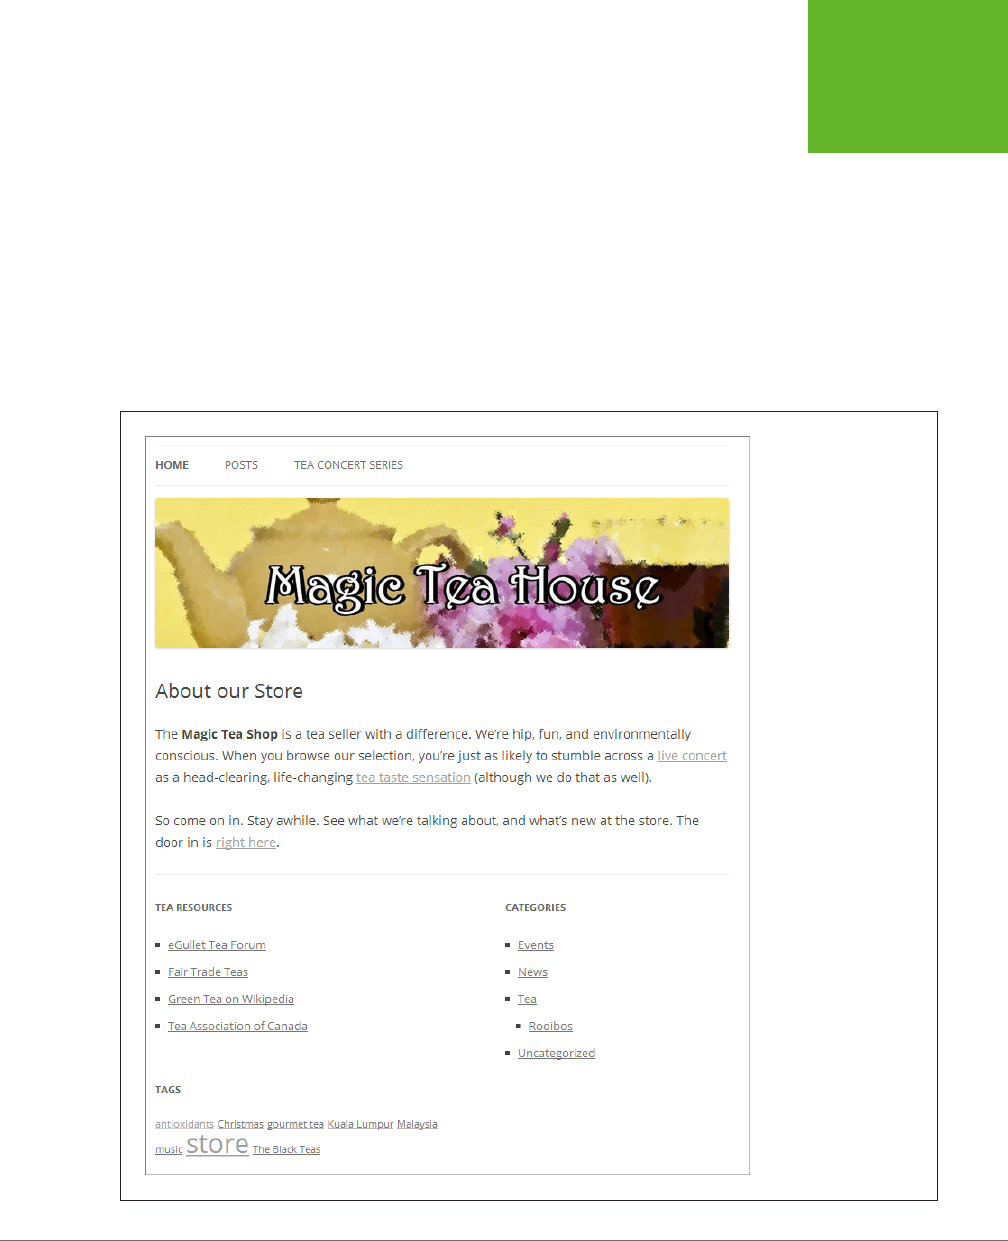
CHAPTER 7: ADDING PAGES AND MENUS 235
PAGE
TEMPLATES
Better Home Pages
Another reason that themes use page templates is to create souped-up home pages.
These specialized pages include a spot for your static content, just like any other
page, along with some extras. The extras can include more widget areas, featured
image sliders, and a customized post list. The goal is to give you a way to create a
more attractive entryway to your site.
The Twenty Twelve theme includes a Front Page template that serves this purpose. It
lets you add one or two columns of widgets below the page content. These widgets
appear on the front page only (Figure 7-19). Your site’s standard sidebar widgets,
which appear on the other posts and pages in your site, don’t appear on pages that
use the Front Page template.
FIGURE 7-19
This version of the Magic
Tea House home page
uses the Front Page
template on the Twenty
Twelve theme, which
gives the page a two-
column footer of sidebar
widgets.
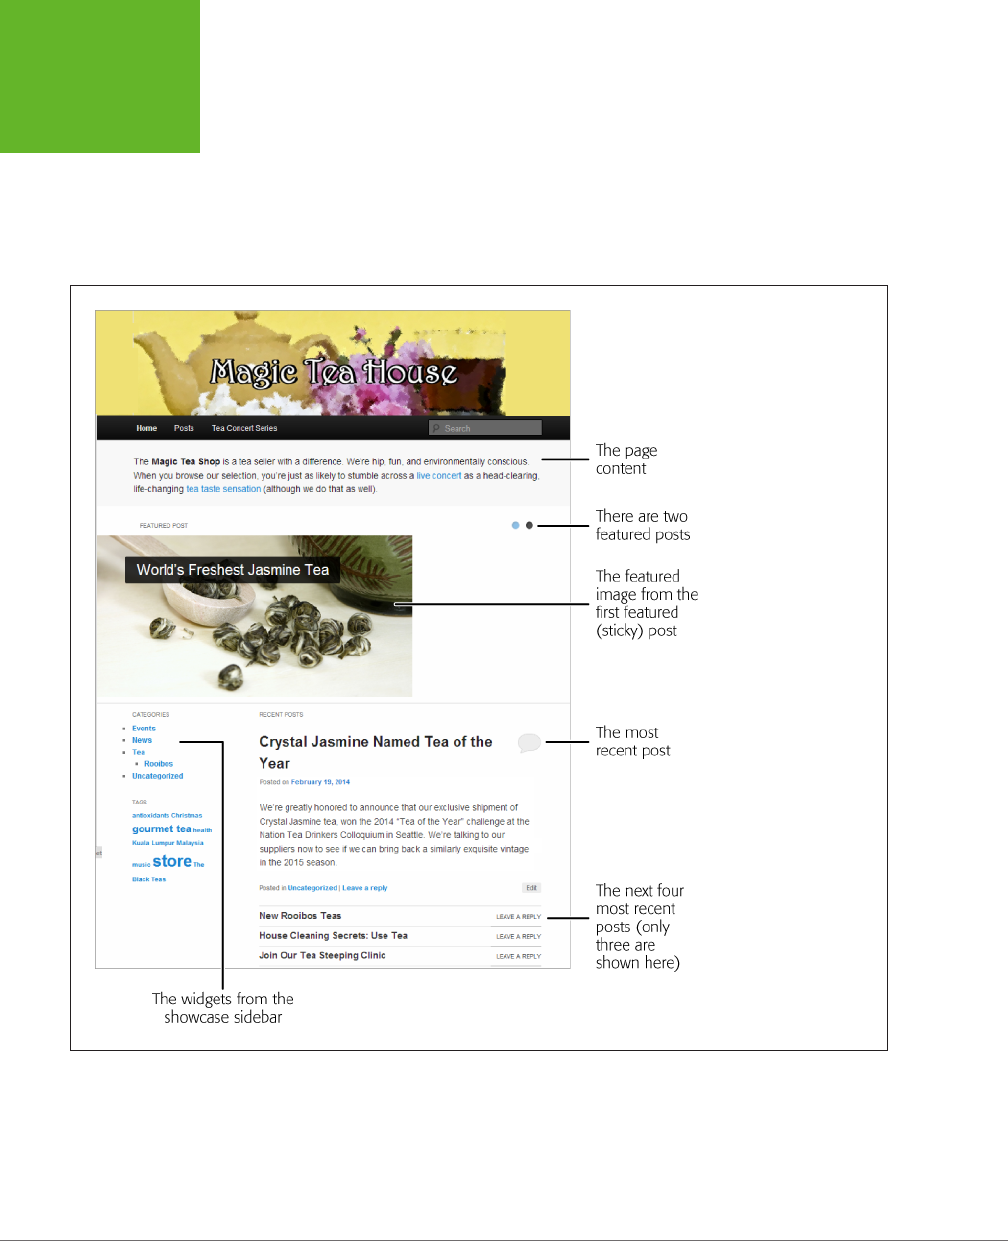
WORDPRESS: THE MISSING MANUAL
236
PAGE
TEMPLATES
You choose your front-page widgets using the familiar Appearance→Widgets sec-
tion of the dashboard. Just drag the widgets to the theme’s First Front Page widget
area and the Second Front Page widget area.
The Twenty Eleven theme takes the concept a bit further with its Showcase template
(Figure 7-20). It combines page content (which appears at the top), a group of fea-
tured posts (underneath), and a list of recent posts (at the bottom).
FIGURE 7-20
The showcase page in
the Twenty Eleven theme
fuses together your
page content, a gallery
of featured posts, a list
of recent posts, and a
showcase sidebar.
There’s no magic to creating a showcase page. You create a page, add the content
you want, and then choose Showcase Template from the Template list. Finally, you
publish your page. When someone requests a page that uses the showcase template,
WordPress goes to work.

CHAPTER 7: ADDING PAGES AND MENUS 237
PAGE
TEMPLATES
Here’s how WordPress assembles a showcase page for the Twenty Eleven theme:
• First, it takes your sticky posts (page 104), and adds them to the Featured
Post gallery. To include a picture alongside a featured post, make sure you set
a featured image (page 190).
• Underneath the Featured Post gallery, WordPress shows the content for the
most recent non-sticky post. If you want WordPress to show only a portion of
the most recent post, you need to use the More quicktag (page 196).
• Underneath that, WordPress lists the titles of the next four most recent posts
(not including sticky posts). To view one, your guest must click its title.
• WordPress adds a sidebar to the left side of the page, next to the list of your
most recent posts. However, this isn’t the standard sidebar you see on your
normal home page (and all the pages that use the sidebar template). Instead,
it’s called the showcase sidebar, and it appears on showcase pages only. To fill
it with widgets, choose AppearanceÆWidgets, and then drag the widgets you
want to the Showcase Sidebar area.
It might occur to you that you like the showcase page, but you want to take the
idea further. For example, maybe you want to control what posts appear in the list
of recent posts, or you want to create several showcase pages that highlight dier-
ent categories of posts, like the sections of a newspaper. Unfortunately, showcase
pages don’t give you this flexibility. However, you can begin building a system like
this if you’re running a self-hosted WordPress site and you’re not afraid to get your
hands dirty. You’ll start exploring that option in Chapter 14.

239
CHAPTER
8
In the chapters you’ve read up to this point, you learned to create the two most
essential ingredients of any WordPress site, posts and pages. They’re the
vehicles
for your content—the way you’ll reach friends, potential customers, or hordes of
devoted readers.
Still left to explore is the WordPress commenting system, which is a keenly important
part of almost every WordPress site, whether it’s a chatty blog or a buttoned-up
business website. Used properly, comments can change your site from a one-way
lecture to a back-and-forth conversation with your readers or customers. Com-
menting isn’t just a fun way to make friends—it’s also a serious tool for promoting
your work, getting more trac, turning casual browsers into repeat visitors, and
even making money.
In this chapter, you’ll learn how to manage comments on your site. You can banish
oensive ones, insert yourself into the discussion, and even tweak the way WordPress
displays comments by formatting them to make them more readable and adding
author pictures. Once you understand the basics of comment management, you’ll
be ready to confront one of the single biggest hassles that every WordPress site
faces:
comment spam
—the messages that dubious marketers and scammers slap
across every site they can find. You’ll learn strategies for preventing spam without
aggravating your readers, and you’ll take a side trip to explore the spam-crushing
Akismet plug-in.
NOTE This chapter points out a few optional plug-ins that self-hosting WordPressers can use to fill in the
gaps in WordPress’s commenting features. However, you’ll probably want to wait until you read Chapter 9, which
explains how to manage plug-ins, before you try any of them out on your site.
Comments: Letting Your
Readers Talk Back

WORDPRESS: THE MISSING MANUAL
240
ALLOWING OR
FORBIDDING
COMMENTS
UP TO SPEED
Why Your WordPress Site Needs a Community
Once upon a time, people thought comments belonged only
in personal blogs and discussion forums. Serious-minded web
publishers ignored them. Small business avoided them—after
all, if people really needed to get help or make their opinions
known—well, that’s what email was for, right?
Today, the website landscape has changed dramatically. Web
commenting is an essential ingredient for sites small and
large, fun and serious, casual and moneymaking. Here’s what
a comments section can do for you:
• Attract new visitors. New visitors immediately notice
whether a website has a thriving conversation going on
or just a single lonely comment. They use that to evaluate
how popular a website is. It’s crowd mentality, working
for you—if new visitors see that other people find a topic
interesting, they’re more likely to dive in to check out your
content for themselves.
• Build buzz. If you’ve taken to the Web to promote
something—whether it’s a new restaurant, a book, a
community service, or whatever—you can only do so
much to persuade people. But if you get your fans talking
to other people, the effect is exponential. Comments help
you spread the word, getting your readers to talk up your
products or services. And once they’re talking on your
blog, it’s just a short hop away for other bloggers to post
about you on
their
blogs.
• Build loyalty. A good discussion helps make a site
sticky
—
in other words, it encourages people to return. Put another
way, people may come to your site for the content, but
they stay for the comments.
• Encourage readers to help other readers. Often, readers
will want to respond to your content with their own
comments or questions. If you ask them to do that by
email and your site is popular, you readers will easily
overwhelm you. But with comments, your audience
can discuss among themselves, with you tossing in the
occasional follow-up comment for all to see. The end result
is that your site still has that personal touch, even when
it’s big and massively popular.
Allowing or Forbidding Comments
If you haven’t changed WordPress’s factory settings, all your posts and pages already
support comments. You’ve probably already noticed that when you view an indi-
vidual post or page, there’s a large “Leave a Reply” section just below your content.
But it doesn’t always make sense to allow comments on everything you publish.
Many static pages don’t lend themselves to discussion. You probably won’t get a
great conversation going on an About Us or Our Location page, for example, so it
makes sense to disable comments for these pages and let people have their say
somewhere else.
Posts usually allow comments, but you might want to disable them if you write on
a contentious subject that’s likely to attract an avalanche of inflammatory, insulting,
aggressive, or racially charged feedback. News sites sometimes disable comments
to avoid legal liability (for libelous comments someone posts, for example, or for
trade secrets someone reveals). Allowing comments on posts or pages isn’t an
all-or-nothing decision—you can pick and choose what content allows comments.
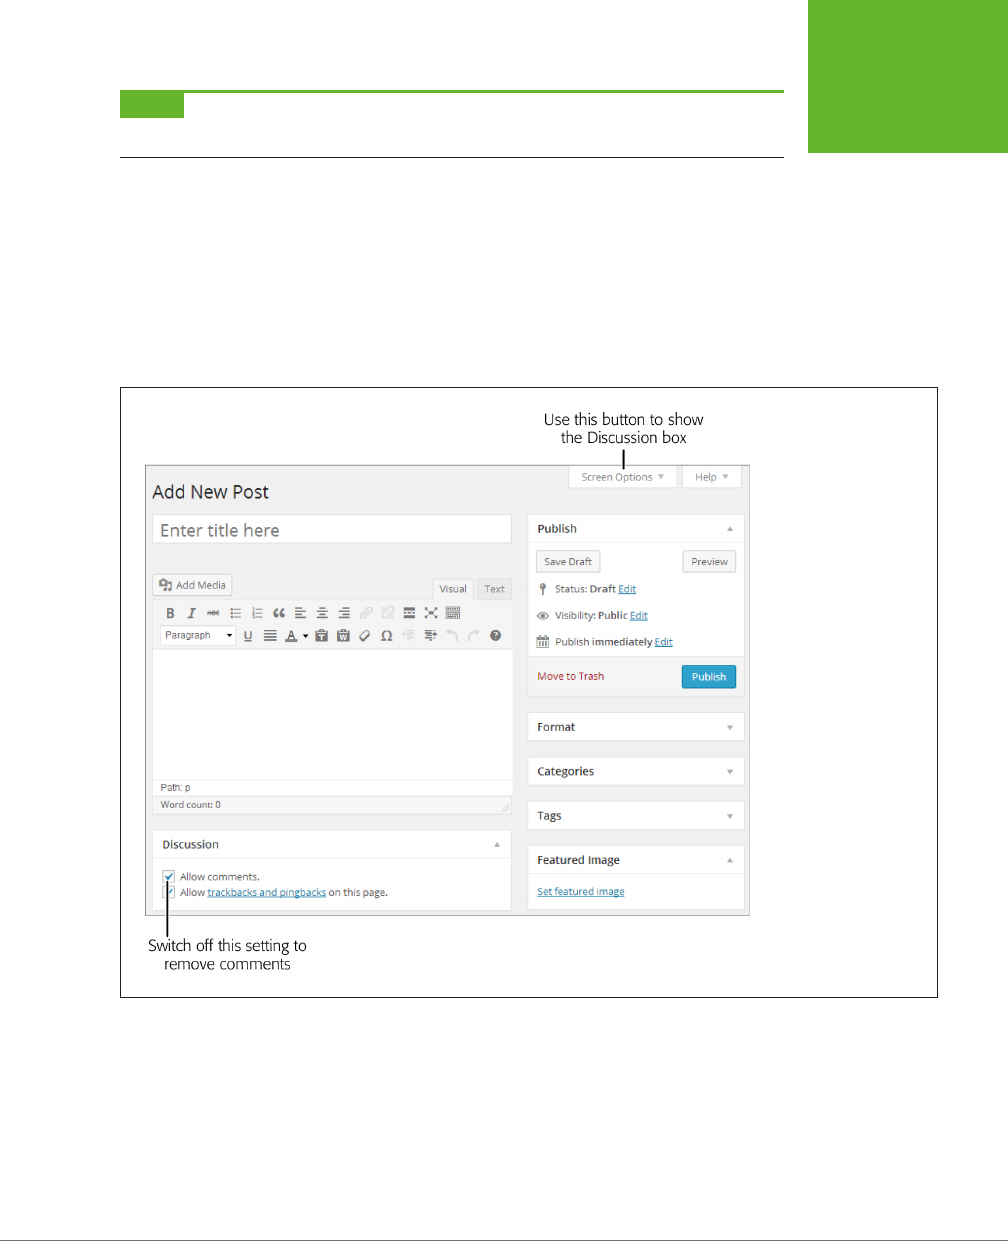
CHAPTER 8: COMMENTS: LETTING YOUR READERS TALK BACK 241
ALLOWING OR
FORBIDDING
COMMENTS
NOTE Comments apply equally to posts and pages. For convenience, most of the discussion in this chapter
refers to posts, but everything you’ll learn applies equally to pages.
Changing Comment Settings for a Post
You can turn o comments for an individual post or page by changing the comment
settings when you create or edit that post or page. However, WordPress usually
hides the settings. To see them, you need to click the Screen Options button in
the top-right corner of the Add New Post or Edit Post page, and then turn on the
checkmark next to Discussion. This adds a Discussion box to your post-in-progress,
which oers just two settings (Figure 8-1).
FIGURE 8-1
You can opt out of com-
ments for a single post
or page by turning off
the “Allow comments”
checkbox. You can also
disable trackbacks and
pingbacks, which you’ll
consider on page 260.
If you have a pile of posts that allow comments and you want to remove the com-
ment feature from all of them, WordPress makes it easy by letting you edit posts in
bulk. Here’s how to do that:
1. Choose PostsÆAll Posts.
WordPress lists all your posts.
2. Turn on the checkbox next to each post you want to change.

WORDPRESS: THE MISSING MANUAL
242
THE LIFE
CYCLE OF A
COMMENT
3. Choose Edit from the Bulk Actions drop-down list, and then click Apply.
The edit panel appears at the top of the post list, with a number of settings you
can change (see page 129).
4. In the Comments drop-down list, pick “Do not allow,” and then click Update.
You can use the same trick to turn commenting back on and to change the
comment settings on your pages.
Changing the Default Comment Settings Site-Wide
To create a site that’s mostly or entirely comment-free, you probably don’t want to
fiddle with the Discussion settings for every post. Instead, you should create a uni-
versal setting that applies to all new posts and pages. Choose Settings→Discussion
on the dashboard, and then turn o the checkmarks next to “Allow link notifications
from other blogs (pingbacks and trackbacks)” and “Allow people to post comments
on new articles.” Then scroll down to the bottom of the page and click Save Changes.
Now all new posts and pages will be comment-free. You can add the comment feature
back to specific posts or pages by turning on “Allow comments” in the Discussion
box, as shown back in Figure 8-1.
There are many more options in the Settings→Discussion page that change the way
comments work. You’ll learn to use them in the rest of this chapter.
The Life Cycle of a Comment
The easiest way to understand how WordPress comments work is to follow one
from its creation to the moment it appears on your site and starts a conversation.
Depending on how you configure your site, comments travel one of two routes:
• The slow lane. In this scenario, anyone can leave a comment, but you need to
approve it before it appears on the post. You can grant an exemption for re-
peat commenters, but most people will find that the conversation slows down
significantly, no matter how quickly you review new comments.
• The fast lane. Here, each comment appears on your site as soon as someone
leaves it. However, unless you want your website drowned in thousands of
spam messages, you need to use some sort of spam-fighting tool with this
option—usually, it’s an automated program that detects and quarantines
suspicious-looking messages.
For most sites, the second choice is the best approach, because it allows discussions
to unfold quickly, spontaneously, and with the least possible extra work on your part.
But this solution introduces more risk, because even the best spam-catcher will miss
some junk, or allow messages that aren’t spam but are just plain oensive. For that
reason, WordPress starts your site out on the safer slow lane instead.

CHAPTER 8: COMMENTS: LETTING YOUR READERS TALK BACK 243
THE LIFE
CYCLE OF A
COMMENT
In this chapter, you’ll consider both routes. First, you’ll learn the slow-lane approach.
Then, when you’re ready to step up your game with more powerful spam-fighting
tools, you’ll consider the fast-lane approach.
Leaving a Comment
Leaving a comment is easy, which is the point—the more convenient it is to join the
conversation, the more likely your visitors are to weigh in.
Assuming you haven’t tweaked any of WordPress’s comment settings, visitors need
to supply two pieces of information before they can make their thoughts known:
their name and their email address. They can optionally include a website address,
too (Figure 8-2).
NOTE If you’re logged into your website as the administrator, you won’t see the commenting layout shown
in Figure 8-2. Instead, you’ll see just the box for comment text, because WordPress already knows who you are.
This won’t help you understand what life is like for ordinary readers, however, so before you go any further, log
out (click “Log out” above the comment box) or go to the page from another computer or browser. Then your
site will treat you like a stranger, and you’ll see the same commenting boxes your visitors see.
Here’s what WordPress does with the information it gets from commenters:
• Name. It displays the commenter’s name prominently above her comment,
thereby identifying her to other readers.
• Email address. WordPress doesn’t display this publicly, so commenters don’t
need to worry about spam. In fact, WordPress won’t stop visitors from inventing
imaginary email addresses (although it will prevent them from typing in gibber-
ish that obviously doesn’t make sense). WordPress won’t even send would-be
commenters one of those pesky “Confirm this is your address” email messages.
However, email addresses are important if you want to display a tiny picture of
each commenter next to each comment (see page 263 for details).
• Comment text. This is the meat of the comment (Figure 8-2).
• Website. If your commenter includes this detail, WordPress turns the com-
menter’s name, which appears above posts, into a link. Other readers can click
it to travel to the commenter’s site.
To see how comments work, try typing in one of your own. First, make sure you aren’t
logged in as the administrator (if you are, you’ll bypass the moderation process de-
scribed below, because WordPress figures you’ll always allow your own comments).
Assuming you’re logged out and you see the text boxes shown in Figure 8-2, type
in a comment and then click Post Comment.
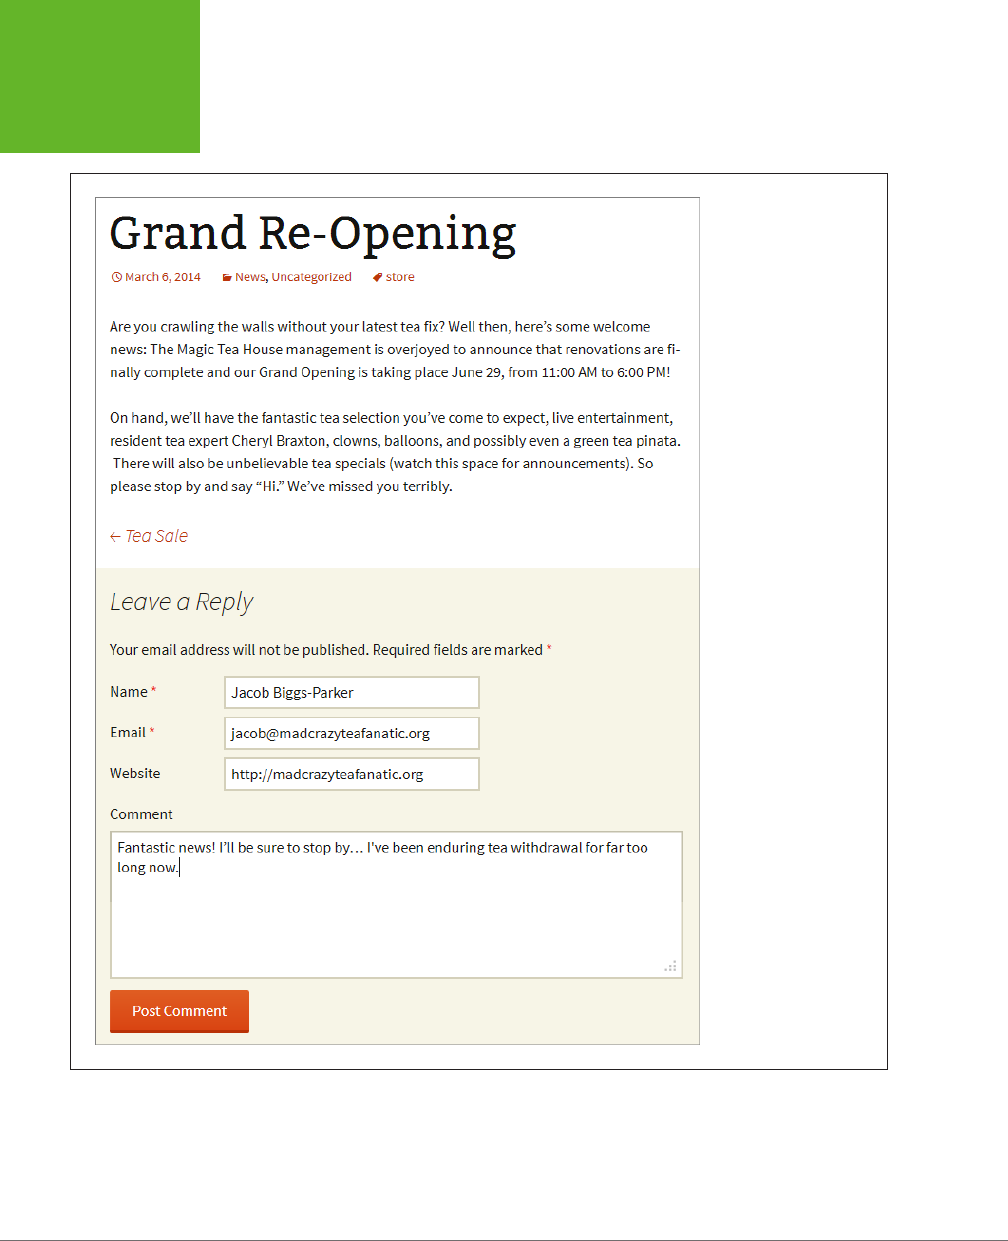
WORDPRESS: THE MISSING MANUAL
244
THE LIFE
CYCLE OF A
COMMENT
FIGURE 8-2
Ordinarily, a commenter
needs to include his name
and email address (al-
though WordPress doesn’t
verify either). Optionally,
commenters can include a
website address or leave
this box blank.
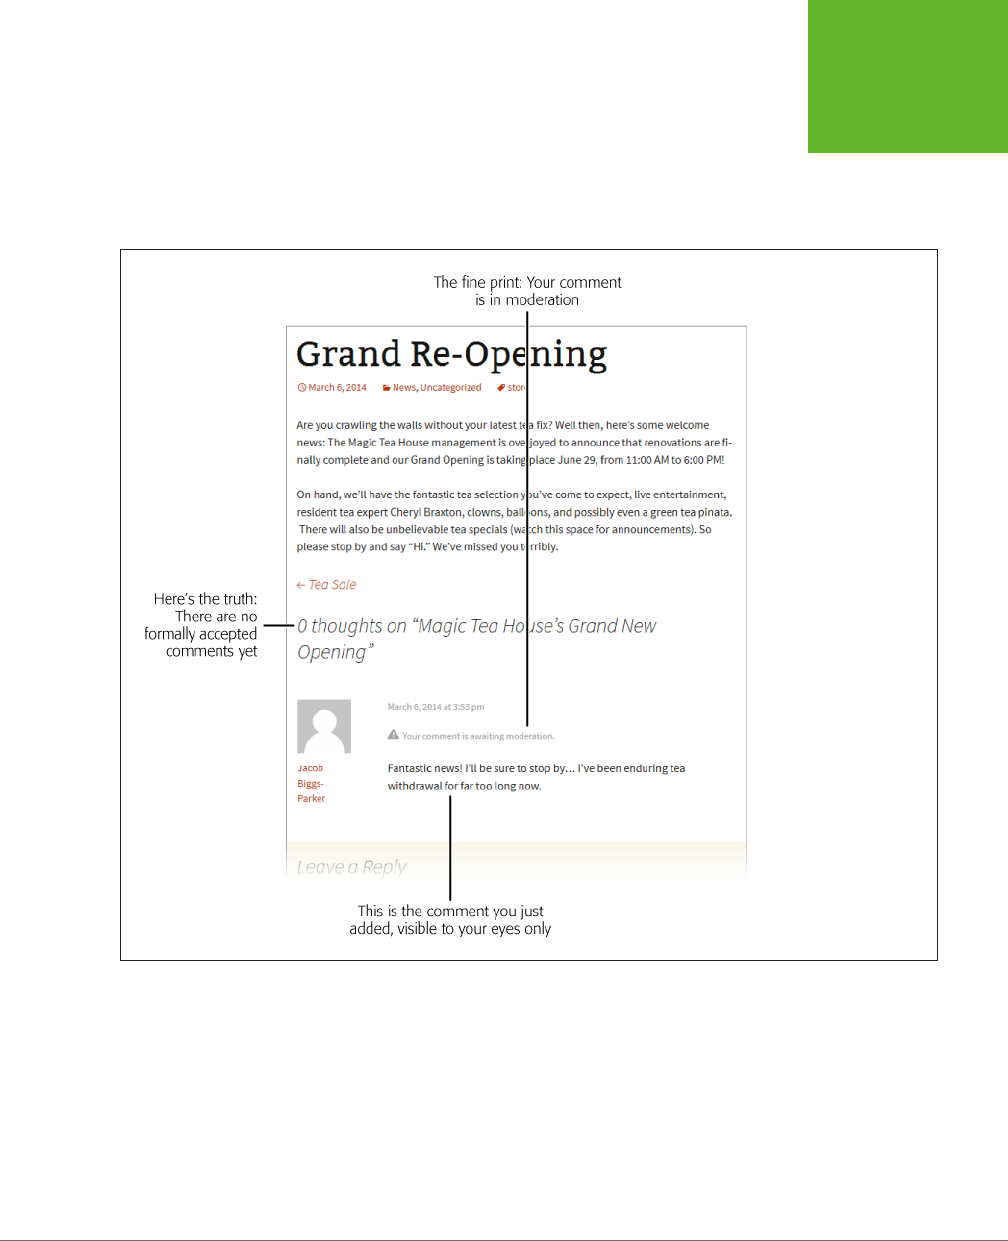
CHAPTER 8: COMMENTS: LETTING YOUR READERS TALK BACK 245
THE LIFE
CYCLE OF A
COMMENT
Now, WordPress plays a slight trick on you. When you submit a comment, WordPress
immediately adds it below your post (Figure 8-3), making it look as though your
comment has been published. But in reality, when you use the slow-lane comment-
ing route, no one can see the comment until the site owner (that’s you) reviews it
and formally approves it. This process is called
moderation.
FIGURE 8-3
Here’s what your upcom-
ing comment will look
like when it’s published.
Right now, no one can see
it but you.

WORDPRESS: THE MISSING MANUAL
246
THE LIFE
CYCLE OF A
COMMENT
GEM IN THE ROUGH
Comments That Use HTML
Most people who comment on a post or page will type in
one or more paragraphs of ordinary text. However, craftier
commenters may include a few HTML tags to format their
comments.
For example, you can use the <b> and <i> elements to bold and
italicize text. Type this:
I’m <i>really</i> annoyed.
and your comment will look like this:
I’m
really
annoyed.
You can also add headlines, line breaks, bulleted and numbered
lists, and even tables. You could use the <a> element to create
a link, but that’s not necessary—if you type in text that starts
with
www.
or
http://,
WordPress automatically converts it to
a clickable link.
Now that you know you can use HTML in a comment, the
next question is,
should
you? Most site owners don’t mind
the odd bit of bold or italic formatting, but they may trash
messages that include shamelessly self-promotional links or
ones that attempt to steal focus from the conversation with
wild formatting—it’s like an attention-starved kid throwing a
grocery-store tantrum.
You can edit comments that use HTML inappropriately, but
that takes time and effort. As a safeguard, some site owners
don’t allow HTML elements at all. If you run a self-hosted site,
you can ban HTML by creating a custom theme, an advanced
task detailed in Chapter 13. Once you do, you need to edit
its
functions.php
file (page 500) and add these instructions
anywhere after the first line (which holds the
<?php
marker
that starts the code block):
add_filter( 'comment_text',
'wp_filter_nohtml_kses' );
add_filter( 'comment_text_rss',
'wp_filter_nohtml_kses' );
add_filter( 'comment_excerpt',
'wp_filter_nohtml_kses' );
Now WordPress strips out any HTML tags from comments and
disables the linking capability of web addresses.
Moderating Comments Through Email
When a comment awaits moderation, the discussion on your site stalls. WordPress
takes two steps to notify you of waiting comments:
• It sends you an email message, with information about the new comment (and
the links you need to manage it).
• It adds an eye-catching number-in-a-circle icon to the Comments button on
your dashboard menu, where you can manage all your comments.
These two actions underlie the two ways you moderate WordPress comments: either
by email or through your site’s dashboard. First, you’ll consider the email approach.
Email moderation is, for practical purposes, an option only for a small site that
receives a relatively small number of comments. If you’re the sort of person who
carries around a web-connected device (like a smartphone) everywhere you go,
email moderation gives you a convenient way to approve or discard comments mere
minutes after they’re made (Figure 8-4).
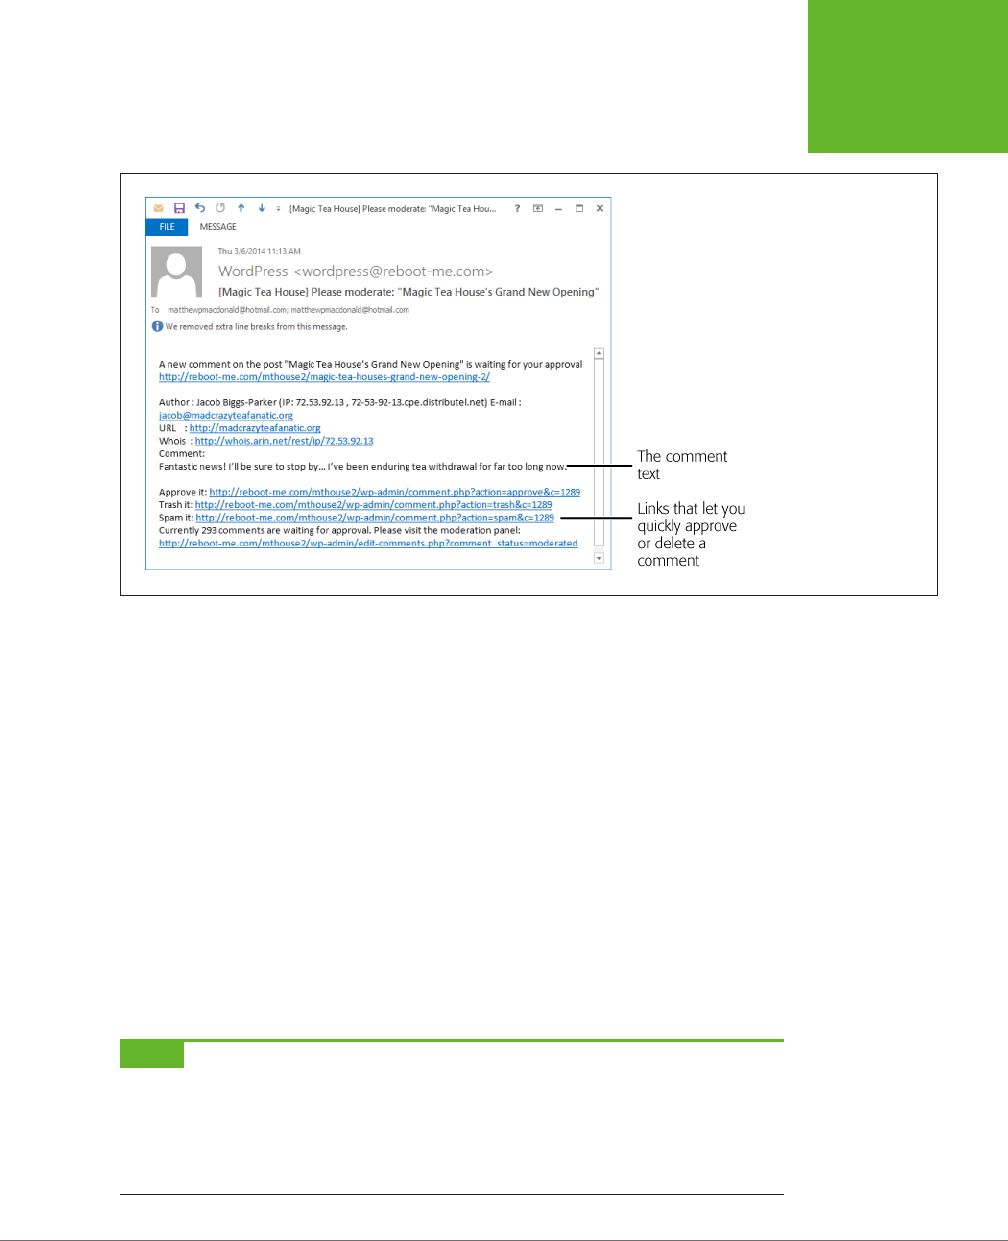
CHAPTER 8: COMMENTS: LETTING YOUR READERS TALK BACK 247
THE LIFE
CYCLE OF A
COMMENT
FIGURE 8-4
The email message Word-
Press sends notifying you
of a comment includes all
the information the com-
menter supplied. It ends
with several links. Depend-
ing on which you choose,
you can approve the
comment (which publishes
it), trash it (which simply
deletes it), or report it as
spam (which deletes it
and notifies WordPress, so
the same user can’t put
his spam message all over
everyone else’s blog).
Email moderation is a great idea, but it’s increasingly impractical for the websites
of today. The problem is comment spam—advertisements for Viagra and Cialis,
porn, shady discount deals, and so on. If you use email moderation, you’ll receive
an ever-increasing load of notifications as a host of black-hat characters try to insert
their junk onto your pages. Not only is it dicult to manage the sheer number of
messages you get, it’s often dicult to quickly verify that a message is legitimate,
because spammers try to make their comments sound real. Often, the only way to
confirm that a comment is bogus is to visit the commenter’s site, where you usually
find ads unrelated to anything in the comment. If you plan to review comments on
a mobile device, this extra step is neither quick nor convenient.
For these reasons, few people use email moderation to manage comments. You can
try it, and it may work wonderfully at first, but you’ll probably need to abandon it as
more and more spammers discover your site, or you’ll need to supplement it with
one of the antispam plug-ins you’ll learn about on page 276. That way, your plug-in
can take care of the massive amounts of obvious spam, while you concentrate on
moderating the comments that make it past the spam filter.
NOTE Don’t fall into the trap of thinking that you’re safe because your audience is small. Most spammers
don’t target WordPress sites by popularity. Instead, they try to spread their junk everywhere they can. And their
site-discovering techniques are surprisingly sophisticated. Even if you haven’t told anyone about your site and
you’ve configured it so it’s hidden from search engines, you’ll
still
get spam comments, usually within days of
the site’s creation. But here’s the happy news: Any plug-in that blocks automated spam should reduce comment
moderation to a manageable task.

WORDPRESS: THE MISSING MANUAL
248
THE LIFE
CYCLE OF A
COMMENT
WordPress comes with email moderation turned on. If you decide you don’t want
to be notified because you’re receiving too many spam messages, you can easily
switch it o. Choose Settings→Discussion, find the “Email me whenever” section,
and clear the checkmarks next to “Anyone posts a comment” and “A comment is
held for moderation.”
FREQUENTLY ASKED QUESTION
Where Are My Emails?
I have the comment notification settings switched on, but I’m
not getting any emails.
Ironically, email programs often misinterpret the notifica-
tions that WordPress sends as junk mail. The problem is that
the messages contain quite a few links, which is a red flag
suggesting spam. To find your missing messages, check your
junk mail folder.
To avoid having your comment notifications identified as junk
mail, tell your email program to always trust the address that
sends them. The sending address is
wordpress
followed by
your website domain, as in
wordpress@magicteahouse.net
.
Moderating Comments from the Dashboard
The other way to moderate comments is through the dashboard. The disadvantage
here is that you need to open a browser, visit your site, and log in. The advantage is
that you’ll see all your site’s comments in one place, and you can accept or discard
them en masse.
If you have comments awaiting moderation, you’ll see a black circle-with-a-number
icon in the dashboard menu. This circle looks like the one that notifies you of Word-
Press and plug-in updates (page 81), except that it appears over the Comments menu
and indicates the number of unreviewed comments you have (Figure 8-5). If you go
to the dashboard’s home page (Dashboard→Home), you’ll also see the most recent
comments in the Recent Comments box.
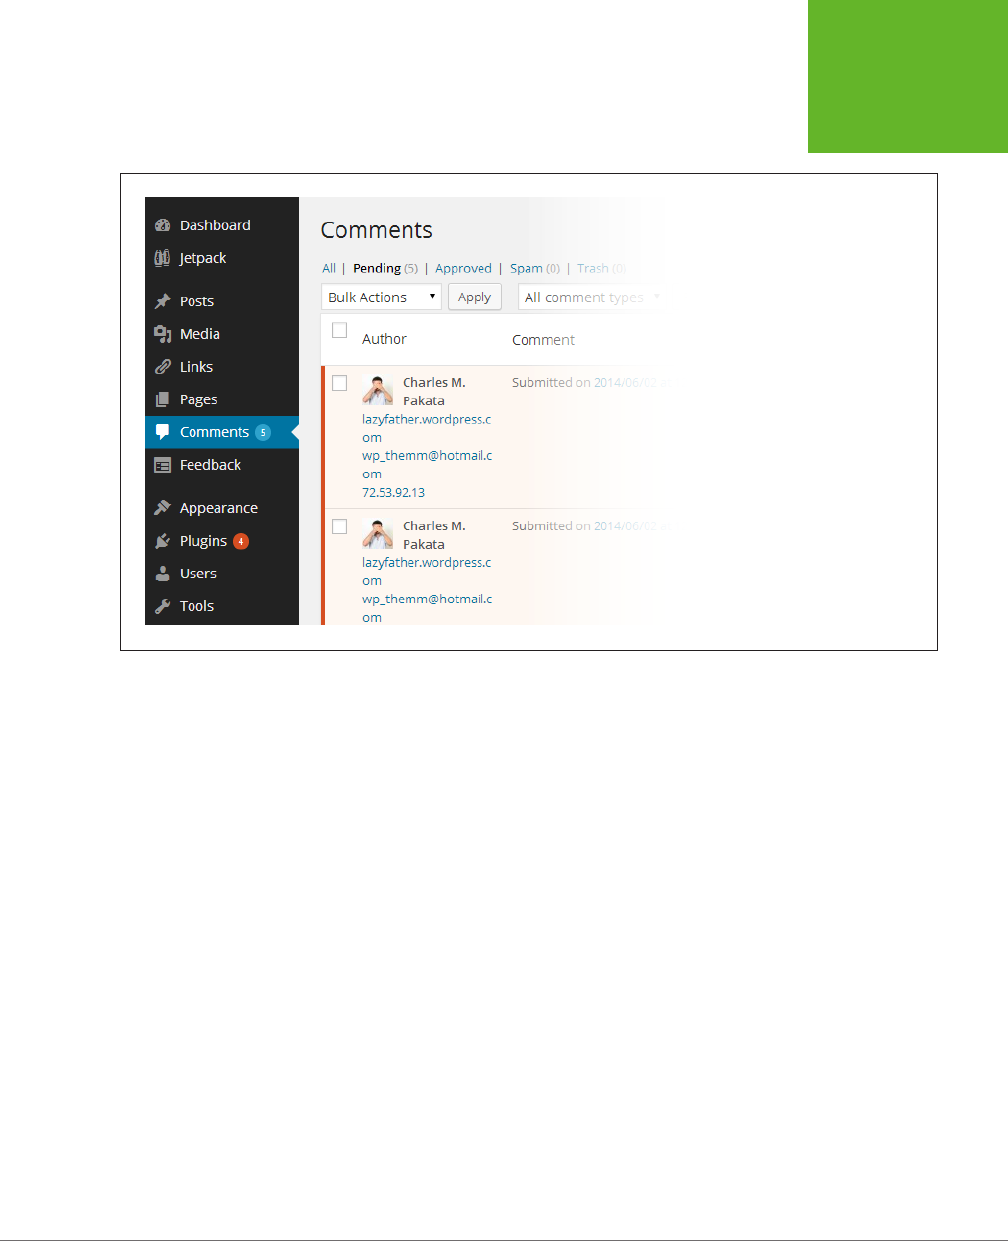
CHAPTER 8: COMMENTS: LETTING YOUR READERS TALK BACK 249
THE LIFE
CYCLE OF A
COMMENT
FIGURE 8-5
WordPress wants you to know that
five comments await your attention.
To review comments, click Comments in the dashboard menu. Initially, you see a
list of all the comments left on all the posts and pages of your site, ordered from
newest to oldest. Click the Pending link above the comment list to focus on just the
comments you need to review (Figure 8-6).
Here’s what to do once you examine a comment:
• If it’s spam, click the Spam link. Do
not
click Trash. Yes, both links remove the
comment from your list, but only Spam reports the spammer to WordPress,
which can help intercept the spam before it hits other sites.
• If it’s a valid comment, click Approve to publish it. If the same person returns
and posts another comment using the same email address, WordPress lets it
through automatically, no moderation required. (This works because WordPress
automatically turns on the “Comment author must have a previously approved
comment” setting.)
• If it’s a valid comment that you don’t want to allow, click Trash. For example, if
someone read your post and replied in an abusive manner, you don’t need to
publish her comment—it’s up to you.
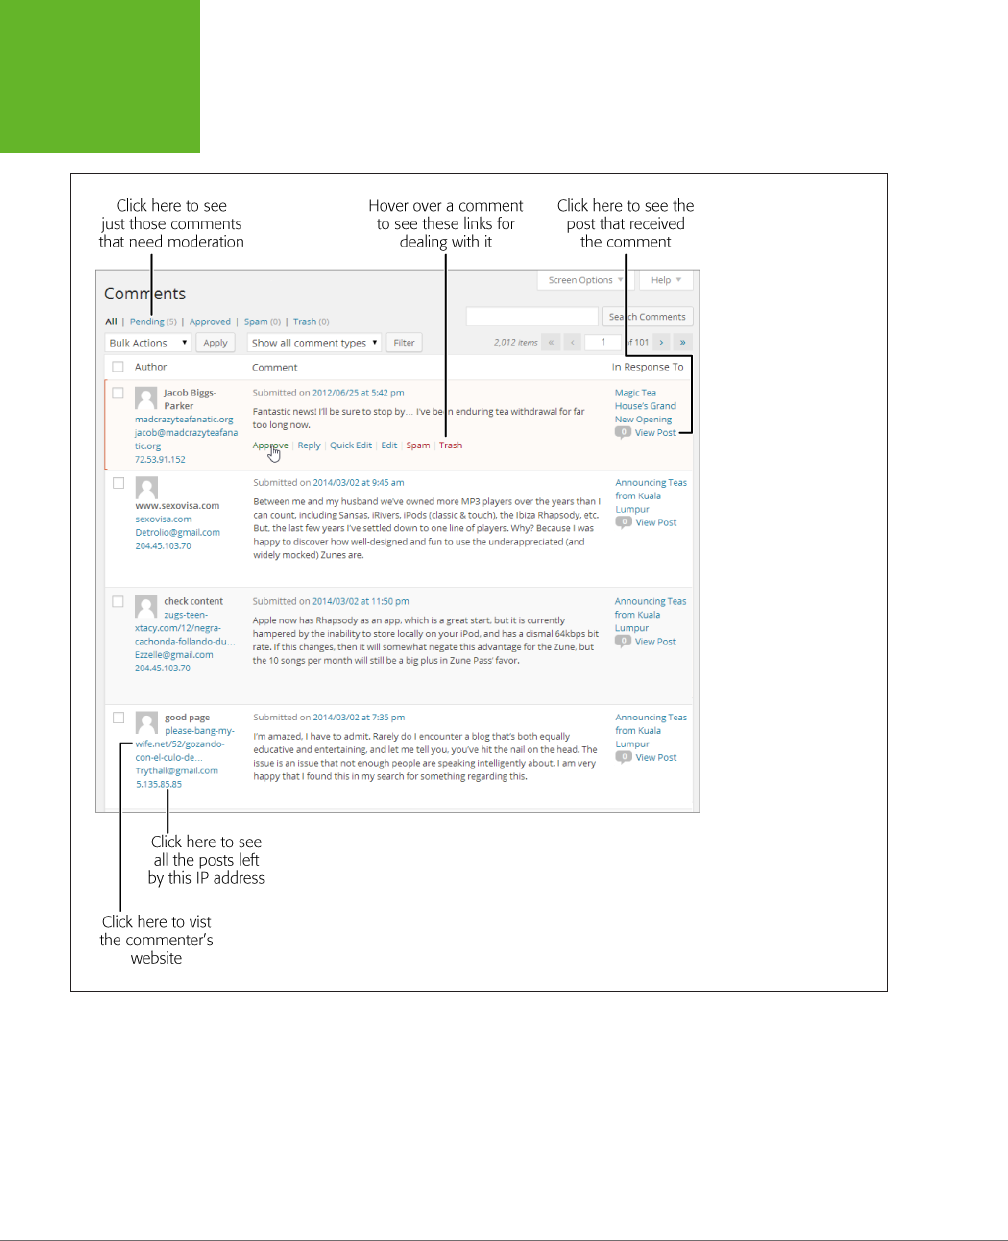
WORDPRESS: THE MISSING MANUAL
250
THE LIFE
CYCLE OF A
COMMENT
FIGURE 8-6
The comment list is
packed with information.
On the left are two useful
links to help you evaluate
whether a comment is
legit. Underneath the
comment are the links
that let you approve or
delete it.
You don’t need to deal with comments one at a time. You can use a handy bulk ac-
tion to deal with multiple comments at once. This is particularly useful if you need
to clear out a batch of suspicious-looking junk.
To deal with a group of comments, start by adding a checkmark to each one you
want to process. Then pick a comment-handling action from the Bulk Actions drop-
down list. Your options include Approve, Unapprove, Move to Trash, and Mark as
Spam. Finally, click Apply to carry out your action.

CHAPTER 8: COMMENTS: LETTING YOUR READERS TALK BACK 251
THE LIFE
CYCLE OF A
COMMENT
UP TO SPEED
Evaluating Comments
When you review comments, your goal is to separate the
well-meaning ones from the offensive ones (which you may
not want to allow) and to delete spam (which you definitely
don’t want). Be careful, because spammers are often crafty
enough to add a seemingly appropriate comment that actu-
ally links to a spam site. They may identify keywords in your
posts and cobble them together in their comments. They may
report imaginary errors in your blog, claiming links don’t work
or pictures don’t load. Often, they’ll throw in some flattery in
a desperate attempt to get approved.
For example, in Figure 8-6, the last three comments are real
spam comments, received on the actual Magic Tea House
sample site. The second and third comments were posted
together, and they appear to strike up a fictitious conversation.
But the clues abound that something isn’t right. The comments
discuss a product that hasn’t existed in years (Microsoft’s Zune
player) and has nothing to do with the post topic (teas from
Kuala Lumpur). The fourth comment is a more typical example
of spam: vague but effusive praise for the site that always
manages to avoid stating anything specific.
The acid test for spam is to view the commenter’s website. To
do that, click the corresponding link (to the left of the com-
ment in the comment list). Sometimes just looking at the URL
is enough. In Figure 8-6, a careful examination exposes at least
two of the spam comments as come-ons for X-rated websites.
Once you identify one spam message, you may be able to detect
others sent from the same spammer by using the message’s
IP address (a numeric code that uniquely identifies web-
connected computers). For example, in Figure 8-6 two spam
messages come from the same IP address (204.45.103.70).
WordPress even gives you a shortcut—click the IP address,
and it shows you only the comments that originated from that
address. You can then flag them all as spam in a single bulk
action (see page 128).
TIP Remember, if you accidentally put a comment you want in the Spam or Trash bin, you can get it out if
you act fast. Click the Spam or Trash link above the comments list to see a list of removed comments, which you
can then restore.
Moderating Comments for a Specific Post
The Comments page is the only place where you can see all the comments on your
site in one list. But the Comments page isn’t always the most convenient place to
review comments, particularly if you have hundreds to look through.
WordPress gives you another option: You can review just the comments that relate
to a specific post. To do that, edit the post and scroll down to the Comments box
at the bottom of the Edit Post page. There, WordPress displays a list of the post’s
comments, along with links that let you approve, trash, or edit each one.
Lastly, if you’re logged in to your site, you can deal with comments without even
skipping back to the dashboard. When you read the comments section after a post,
you’ll see an edit link next to each comment (Figure 8-7). Click that, and you’ll get
the chance to modify or remove that comment. This approach takes a few more
clicks, and it works only on comments you’ve already approved. (Comments you
haven’t approved don’t show up on the post page.) However, if you use automatic
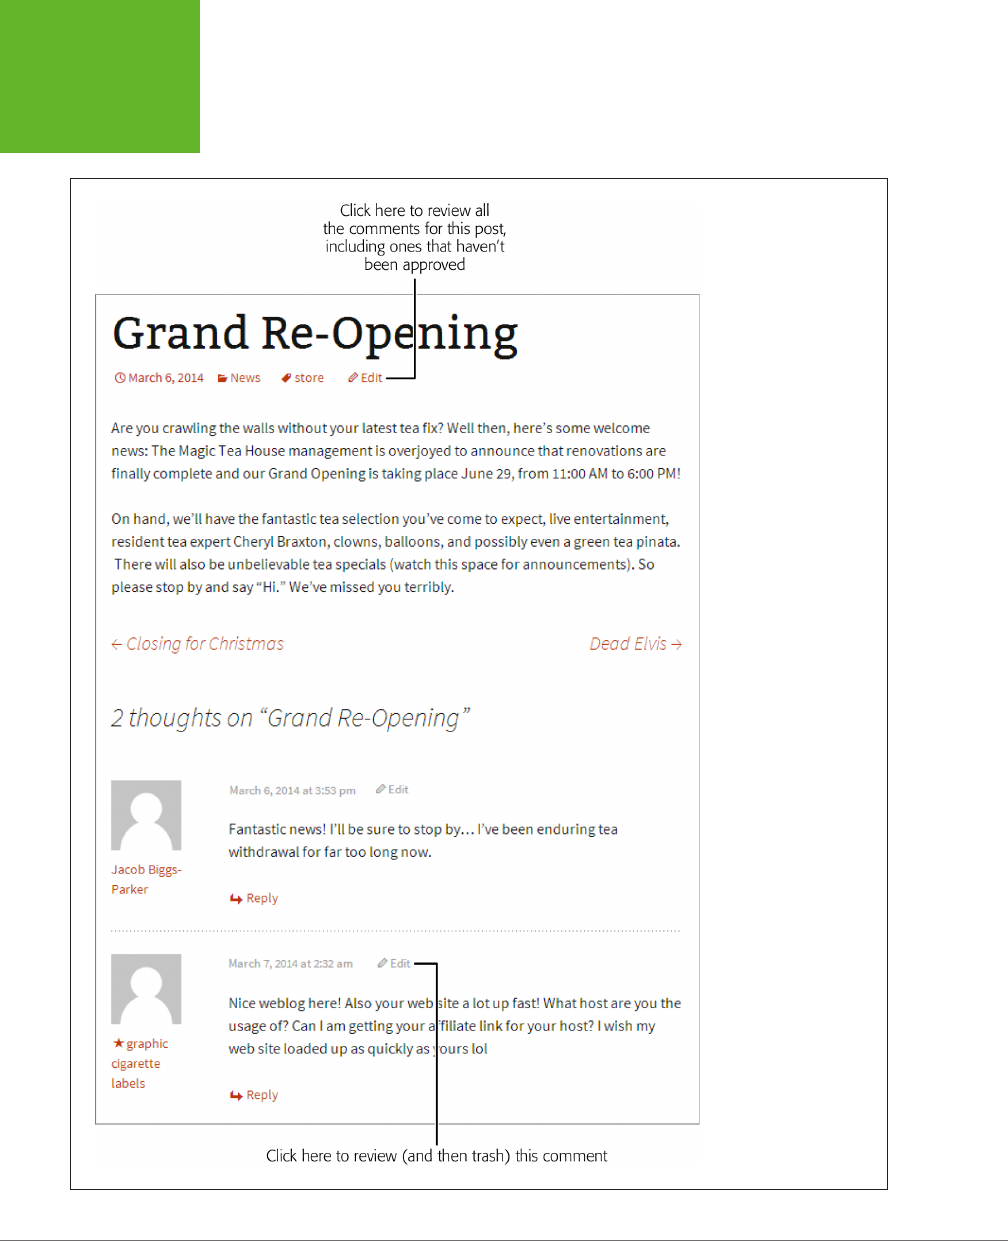
WORDPRESS: THE MISSING MANUAL
252
THE LIFE
CYCLE OF A
COMMENT
post approval with a spam plug-in, as you’ll learn to do on page 275, this is a quick
way to deal with the errant bit of spam you find slipping through your filters.
FIGURE 8-7
If you spot spam on a
post, you can deal with
it in situ, no dashboard
required.

CHAPTER 8: COMMENTS: LETTING YOUR READERS TALK BACK 253
THE ONGOING
CONVERSATION
Sanitizing Comments
By now, you’re well acquainted with your role as supreme comment commander.
Only you can decide which comments live to see the light of day, and which ones
are banished to the trash or spam folders.
WordPress gives you one more power over comments that may surprise you. You
can crack open any comment and edit it, exactly as though it were your own content.
That means you can delete text, insert new bits, change the formatting, and even
add HTML tags. You can do this by clicking the Edit link under the comment, which
switches to a new page named Edit Comment, or you can edit it more eciently by
clicking the Quick Edit link, which opens a comment-editing text box right inside
the list of comments.
You might use this ability to remove something objectionable from a comment
before you allow it, such as profanity or o-site links. However, few site administra-
tors have the time to personally review their readers’ comments. Instead, they get
WordPress to do the dirty work.
One way to do that is to use the Comment Moderation box. Choose Settings→Discussion
and fill the box with words you don’t want to allow (one per line). If a comment uses
a restricted word, WordPress adds it to the list of comments that need your review,
even if you approved an earlier comment from the same person, and even if you
disabled moderation (page 275). However, mind the fact that WordPress checks not
only whole words, but
within
words as well, so if you disallow
ass,
WordPress won’t
allow jack
ass
or
Ass
yria. If you want to be even stricter, you can use the Comment
Blacklist box instead of the Comment Moderation box. You again provide a list of
oensive words, but this time WordPress sends oending comments straight to
your spam folder.
If you run a self-hosted site, you can use a gentler approach, one that
replaces
objectionable words but still allows the comment. For example, the WP Content
Filter plug-in (
http://tinyurl.com/wpcontentfilter
) changes words you don’t want
(like jackass) with an appropriately blanked-out substitution (like j******, j*****s or
*******). Of course, crafty commenters will get around these limitations by adding
spaces and dashes (jack a s s), replacing letters with similar-looking numbers or
special characters (jacka55), or just using creative misspellings (jackahss). So if you
have a real problem with inappropriate comments and you can’t tolerate them even
temporarily (in other words, before you have the chance to find and remove them),
then you need to keep using strict moderation on your site so you get the chance
to review every comment before it’s published.
The Ongoing Conversation
You’ve now seen how a single, lonely comment finds its way onto a WordPress post
or page. On a healthy site, this small step is just the start of a long conversation. As
readers stop by, more and more will add their own thoughts. And before long, some
people will stop replying to your content and start replying to each other.

WORDPRESS: THE MISSING MANUAL
254
THE ONGOING
CONVERSATION
WordPress keeps track of all this in its
comment stream,
which is similar to the
stream of posts that occupies your site’s home page. WordPress sandwiches the
comment stream between your content (the text of your post or page), which sits
at the top, and the “Leave a Reply” box, which sits at the bottom. Unlike the post
stream, the comment stream starts with older comments, followed by newer ones.
This arrangement makes it easy to follow an unfolding conversation, where new
comments refer to earlier ones.
TIP If you have lots of comments and want to emphasize the newest ones, you can flip the order, so that
the newest comments appear first. Choose Settings→Discussion, find the setting that says “Comments should
be displayed with the older comments at the top of each page,” and pick “newer” instead of “older.”
Threaded Comments
The most interesting part of the comment stream is the way it
threads
comments—
it orders the comments that visitors post in reply to other comments. When new
visitors read your post and join the conversation, they have two options: They can
reply directly to your post by scrolling to the “Leave a Reply” section at the bottom
of the page, or they can reply to one of the existing comments by clicking the Reply
button (or link) next to the comment.
When a guest comments on another comment, WordPress puts the reply under-
neath the original note, indented slightly to show the relationship. Figure 8-8 shows
how one of the standard WordPress themes (in this case, Twenty Thirteen) handles
threaded comments.
TIP WordPress has a handy shortcut that lets you, the site owner, join a conversation straight from the
dashboard. When reviewing a comment on the Dashboard→Comments page, click the Reply link, fill in some
text, and then click the Reply button (or “Reply and Approve” if you’re responding to a comment you haven’t
approved yet).
If several people reply to the same comment, WordPress arranges the replies under-
neath the comment and indents them, either from oldest to newest (the standard)
or newest to oldest (if you changed the discussion settings as described in the Tip
at the top of this page).
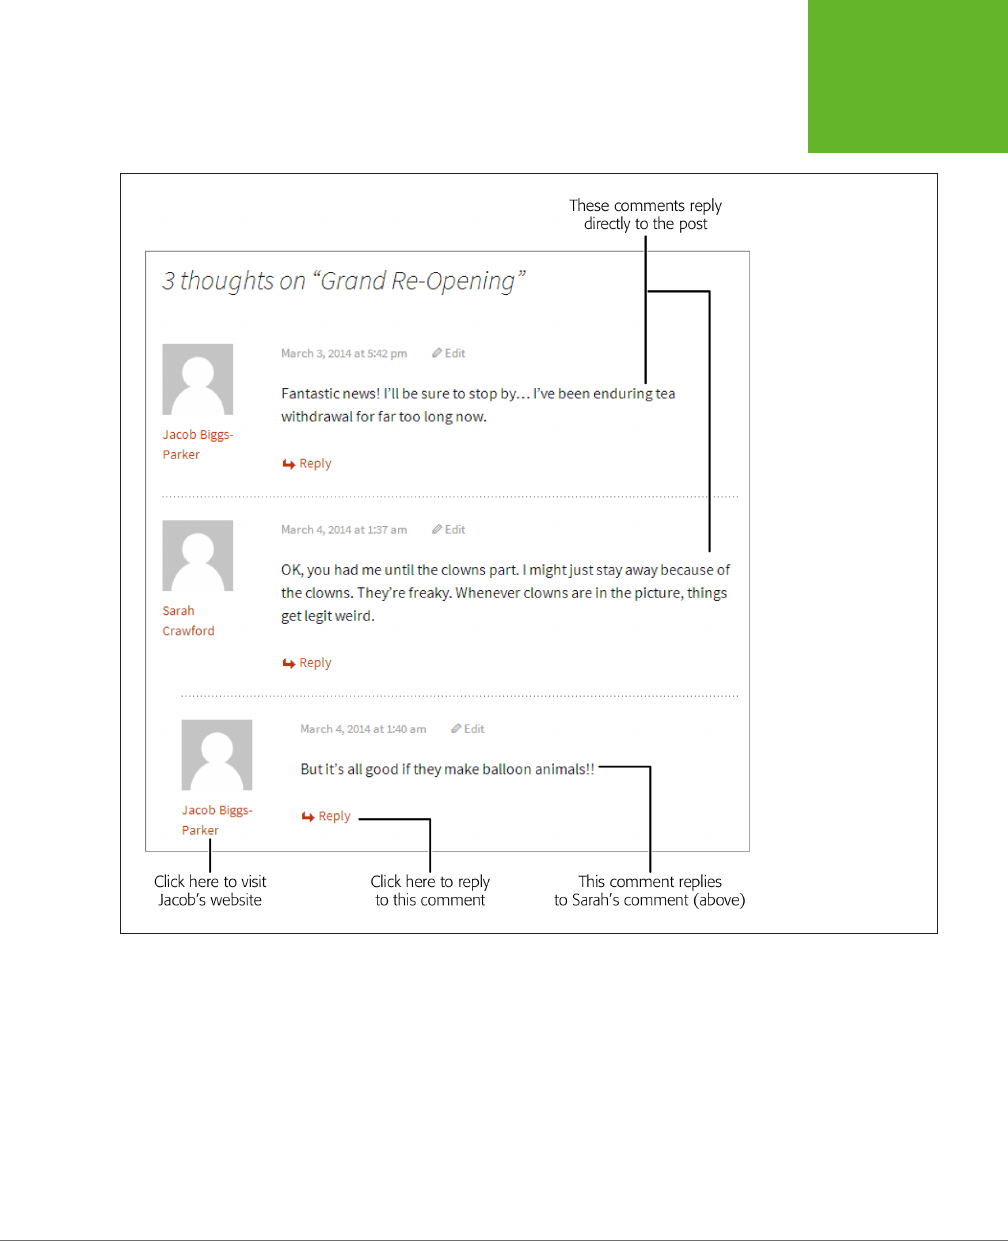
CHAPTER 8: COMMENTS: LETTING YOUR READERS TALK BACK 255
THE ONGOING
CONVERSATION
FIGURE 8-8
The Twenty Thirteen
theme highlights a com-
ment reply by indenting
it under the original com-
ment. Some themes go
further and corral related
comments using a box or
shaded background.
Comment replies can go several layers deep. For example, if Sarah replies to your
post, Jacob can reply to Sarah’s comment, Sergio can reply to Jacob’s comment,
and then Sarah can reply to Sergio’s reply, creating four layers of stacked comments
(Figure 8-9).
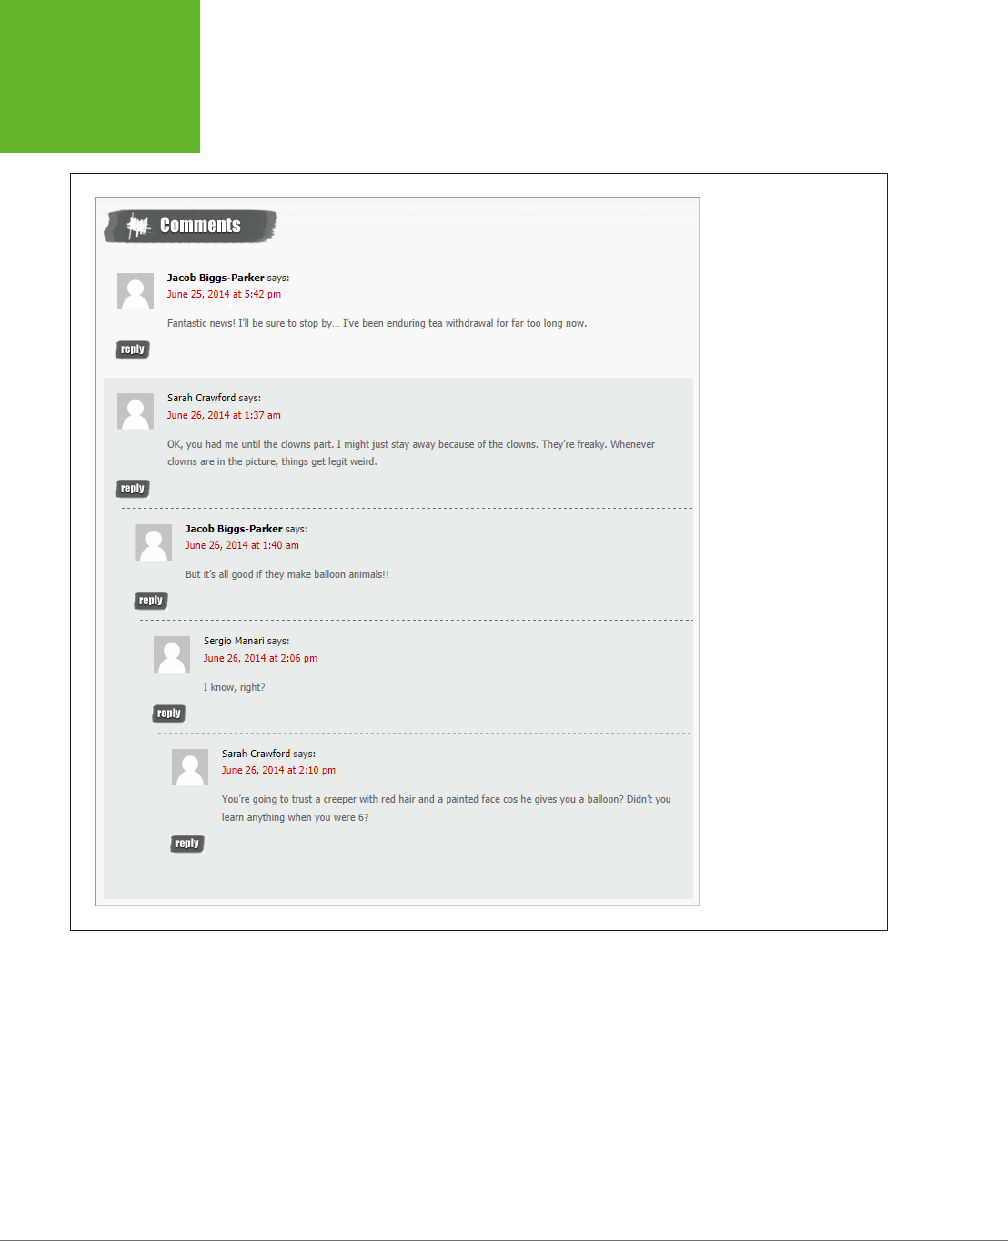
WORDPRESS: THE MISSING MANUAL
256
THE ONGOING
CONVERSATION
FIGURE 8-9
If you expect to get
piles of comments, the
WordPress year themes
might not be the best
choice for you. They tend
to spread comments out
with plenty of whitespace
in between, which makes
for more visitor scrolling.
Many other themes
pack comments tightly
together, like the Greyzed
theme shown here.
WordPress allows this replying-to-replies madness to continue only so far; once you
get five levels of comments, it no longer displays the Reply button. This prevents
the conversation from becoming dizzyingly self-referential, and it stops the ever-
increasing indenting from messing with your site’s layout. However, you can reduce
or increase this cap (the maximum is 10 levels) by choosing Settings→Discussion,
finding the setting “Enable threaded (nested) comments 5 levels deep,” and then
picking a dierent number. Or turn o the checkmark for this setting to switch
threaded comments o altogether, which keeps your conversations super-simple,
but looks more than a bit old-fashioned.

CHAPTER 8: COMMENTS: LETTING YOUR READERS TALK BACK 257
THE ONGOING
CONVERSATION
WORD TO THE WISE
Author Comments
Don’t forget to add your voice to the discussion. Authors who
never take the time to directly engage their readers lose their
readers’ interest—quickly.
Of course, it’s also possible to have too much of a good thing,
and authors who reply to every comment will seem desperate
(at best) or intrusive (at worst). They’ll suffocate a conversation
like a micro-managing boss. The best guideline is to step in
periodically, answering obvious questions and giving credit to
good feedback (while ignoring or deleting the obvious junk).
Do that, and your readers will see that your comments section
is well cared for. They’ll know that you read your feedback, and
they’ll be more likely to join in.
WordPress makes site owners’ comments stick out from those
of the riffraff so your readers can easily spot your contributions.
The way it does so depends on the theme, but most change
the background color behind your comment. If you run a self-
hosted blog, or if you bought the Custom Design upgrade for
your WordPress.com site, you can make your replies even
more obvious. The trick is to tweak the formatting that the
bypostauthor
style applies. Page 479 explains how.
Paged Comments
WordPress provides a comment-organizing feature called
paging
that divides masses
of comments into separate pages. The advantage is that you split awkwardly long
discussions into more manageable (and readable) chunks. The disadvantage is that
readers need to click more links to follow a long discussion.
To use pages, choose Settings→Discussion and then turn on the checkbox next to
“Break comments into pages.” You can type in the number of comments you want
included on each page (the factory setting is 50).
You can also choose the page that readers begin on—the standard setting is “last,”
which means that new readers will start on the last page of comments first, seeing
the most recent chunk of the conversation before they see older exchanges. But
the overall eect is a bit weird, because the very latest comment appears at the
bottom
of the first page. What you probably want is the latest comment to appear
at the
top
of that page. To get this eect—paged comments, with the most recent
comment at the top of the list on the first page—change “last” to “first” (so the set-
ting says “and the first page displayed by default”) and change “older” to “newer”
(so the setting says “Comments should be displayed with the newer comments at
the top of each page”).
Advertising a Post’s Comments
As you’ve seen, comments appear right underneath the post they refer to. They don’t
appear at all in the reverse-chronological list of posts that acts as the home page
for most WordPress sites. You can think of it this way: Each post is like a separate
room at a party, with its own conversation. The same guests can wander between
rooms and join dierent conversations, but the conversation from one room doesn’t
intrude on the conversation in the next.
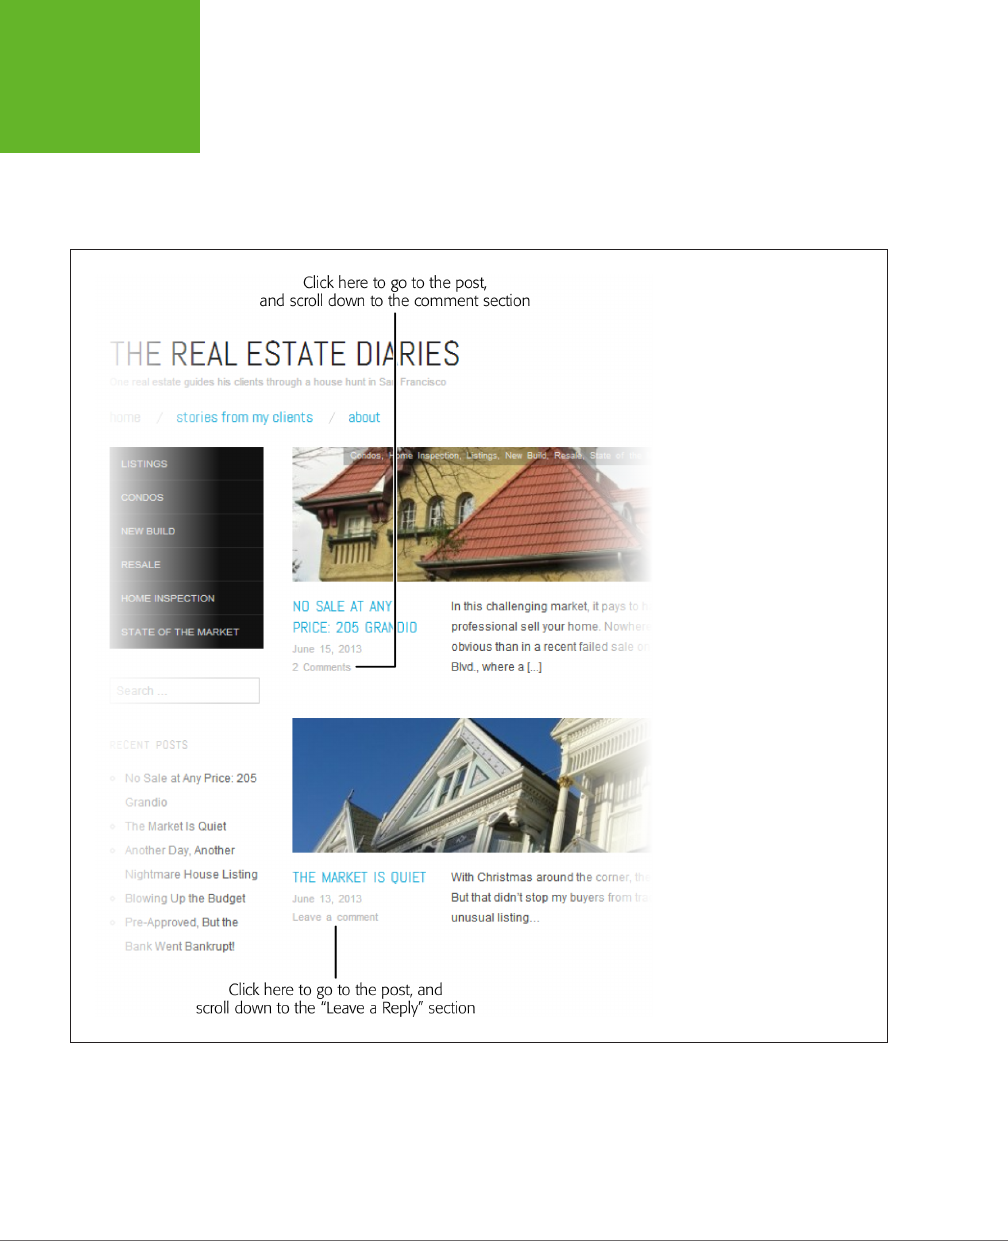
WORDPRESS: THE MISSING MANUAL
258
THE ONGOING
CONVERSATION
However, WordPress does attempt to alert readers to the
presence
of comments
in the post list, if not their content. If a post has at least one comment, WordPress
shows the comment
count
next to that post. If a post doesn’t have any comments,
WordPress displays a “Leave a comment” link. Technically, your site theme controls
this detail, but most are fairly consistent in this practice (Figure 8-10).
FIGURE 8-10
Most themes show you how
many comments a post has. If a
post doesn’t have any, readers
are invited to add the first one,
although the exact wording of
this link differs from one theme
to another.
Here’s another way to highlight comments on your home page: Use the Recent
Comments widget, which highlights the most recent comments made on
any
post
or page (Figure 8-11). When you add this widget (in the Appearance→Widgets
section of the dashboard), you can choose the number of recent comments it lists.
The standard setting is 5.

CHAPTER 8: COMMENTS: LETTING YOUR READERS TALK BACK 259
THE ONGOING
CONVERSATION
TIP If you want a better Recent Comments widget, there are plenty of plug-ins that fill the gap. Most excerpt
the first part of the comment and display it right inside the widget to give readers a taste of the conversation
(and to encourage them to join in). See, for example, the Better WordPress Recent Comments plug-in (
http://
tinyurl.com/wprecentcomments
).
FIGURE 8-11
The Recent Comments widget tells you who’s commenting on what
post. However, it doesn’t show you any of the comment content, which
is a shame. Readers can click a comment link to see both the comment
and the corresponding post.
Comment Ratings
You’ve no doubt seen sites that let readers rate each other’s comments, often by
clicking a tiny thumbs-up or thumbs-down icon (Figure 8-12). It’s one more form of
audience participation.
FIGURE 8-12
Here, Lisa Chang’s
comment gets three
thumbs-up votes and
one thumbs-down vote.
Keep in mind, however,
that comment votes are a
quick-and-dirty feedback
tool. There are several
ways for people to cheat
the system and trick their
browsers into letting
them vote more than
once.

WORDPRESS: THE MISSING MANUAL
260
THE ONGOING
CONVERSATION
Bloggers and other web authors are divided over the value of comment ratings. On
the upside, they encourage readers to get involved, and let people feel like they’re
taking part in a discussion even if they don’t write a comment. On the downside,
comment ratings have a nasty habit of turning discussions into arguments. If you’re
dealing with a contentious subject, readers may simply scan the list of comments to
vote up the ones they agree with and vote down the ones they don’t. (Some sites
try to reduce the negativity by replacing comment voting with a Like button that
allows readers to vote for comments but not against them. But even this type of
rating encourages readers to gang up with the people who share their opinions.)
Philosophical questions aside, it’s fairly easy to add comment ratings to your site if
it’s running on WordPress.com. In the dashboard, choose Settings→Ratings, click
the Comments tab, and then turn on the “Enable for comments” checkbox. You can
position the voting icons above the comments (as in Figure 8-12) or below them.
When you finish, click Save Changes.
Unfortunately, self-hosted WordPress sites don’t get the comment rating feature.
The solution is to install a comment voting plug-in, like Polldaddy (
http://tinyurl.
com/wp-polls
). But first you need to learn a bit more about plug-ins, as detailed
in Chapter 9.
Linkbacks
There’s one type of comment you haven’t seen yet: the
linkback,
a short, auto-
matically generated comment that lets you know when somebody is talking about
your post. Figure 8-13 shows what a linkback looks like—but be warned, it’s not
particularly pretty.
NOTE Linkbacks
are
comments. They appear in the comment list and need your approval before WordPress
publishes them, just as any other comment does.
The neat thing about linkback comments is that WordPress creates them
automati-
cally.
Here’s how the linkback in Figure 8-13 came to be:
1. First, you published the “Community Outreach Fridays” post on the Canton
School site.
2. Then, the Time for Diane site created the “Fun at Glenacres Retirement” post.
Although it isn’t shown in Figure 8-13, that post included a link to your “Com-
munity Outreach Fridays” post.
3. When the Time for Diane site published the “Fun at Glenacres Retirement”
post, the site sent a notification to the Canton School site, saying “Hey, I linked
to you” in computer language. (The person who wrote the “Fun at Glenacres
Retirement” post doesn’t need to take any action, and probably doesn’t even
know that a notification is being sent.)
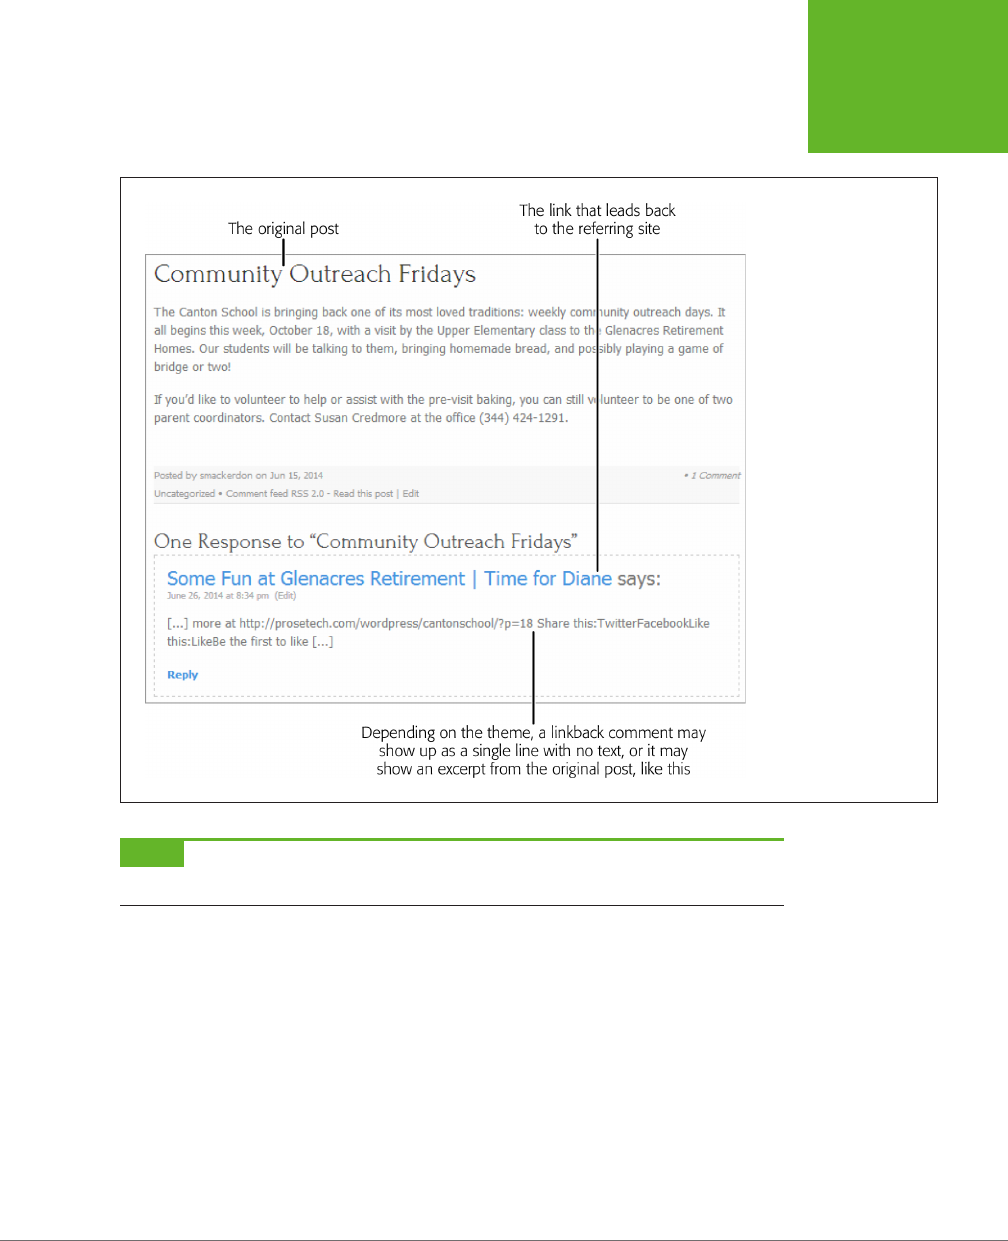
CHAPTER 8: COMMENTS: LETTING YOUR READERS TALK BACK 261
THE ONGOING
CONVERSATION
4. On the Canton School site, WordPress springs into action, adding the linkback
comment shown in Figure 8-13.
FIGURE 8-13
If you allow linkbacks on
your site, this is the poten-
tial result. You write a post
(in this example, that’s
“Community Outreach
Fridays”). Someone else
writes a post that links to
your post (that’s “Some
Fun at Glenacres Retire-
ment),” and WordPress
adds the comment shown
here as a way of letting
the whole world know
that someone is talking
about you.
NOTE Linkbacks aren’t a WordPress-only feature. Many web publishing platforms support them, and virtually
all blogs can send linkback notifications and add linkback comments.
The purpose of linkbacks is twofold. First, they show your readers that people are
seeing and discussing your content, which makes it seem more popular and more
relevant. Second, it provides your readers with a link to the post that mentioned
your post. That means readers on your site (say, Canton School) can click a linkback
comment to head to the referring post on the other site (Time for Diane). In an ideal
world, this is a great way to network with like-minded sites.
In the not-so-distant past, a certain faction of bloggers cared dearly about linkbacks
and saw them as an important community-building tool. Nowadays, popular opinion
has shifted. Here are some reasons why you might not want to allow linkbacks:

WORDPRESS: THE MISSING MANUAL
262
MAKING
COMMENTS
MORE
PERSONAL
• Clutter. Extra comments, no matter how brief, can end up crowding out real
conversation. Some themes (like Bueno) separate linkbacks from the main com-
ment stream, but most mix them together. If you have a popular topic that gets
plenty of mention on other sites, your linkbacks can split up the more interesting
human feedback and push it out of sight.
• Why risk spam? More comments equals more spam, and shady advertisers
can send linkbacks to your site just as often as they send other types of com-
ment spam.
• Links are a good way to reward your commenters. If someone writes a good
comment, they can include a link in their comment text (“I was frustrated with
the stains my kids left on everything, so I wrote a post with my favorite stain
tips in it. Check it out at
http://helpfatheroftwelve.com
.”). And if the commenter
included his website address in the Leave a Reply form (page 244), WordPress
automatically turns his user name at the top of the comment into a clickable
link. With all this intra-post linking going on, why reward someone who hasn’t
even bothered to comment on your site with a linkback?
NOTE In short, most people find that linkbacks aren’t worth the trouble. To disable them, choose
Settings→Discussion and remove the checkmark next to the setting “Allow link notifications from other blogs
(pingbacks and trackbacks).” Technically, WordPress supports two linkback mechanisms: pingbacks and trackbacks.
The technical details about how pingbacks and trackbacks send their messages aren’t terribly interesting. The
important thing is that if you allow linkbacks (and, unless you change the factory settings, your site does), you
may start getting comments like the one in Figure 8-13.
Optionally, you can clear the checkmark next to the setting “Attempt to notify any
blogs linked to from the article.” When this setting is on and you write a post that
links to another post on someone else’s site, WordPress automatically sends a notifi-
cation to that site, and its administrator can choose whether to display the linkback.
NOTE Oddly enough, if you have the “Attempt to notify any blogs linked to from the article” setting switched
on, WordPress notifies even
your own
site if you create a post that includes a link to one of your other posts. It
creates a linkback comment in the initial post that points to the referring post, just as though the posts were on
two different sites. (Of course, you’re free to delete this comment if it bothers you.)
Making Comments More Personal
On a really good website, you won’t feel like you’re debating current aairs with
anonymous_guy_65. Instead, you’ll have the sense that you’re talking to an actual
person, someone who exists in the real world, beyond the pixels on your computer
screen.
Often, all you need to do to personalize comments is include a few small details in
the right places. One key enhancement is including a user-supplied profile picture
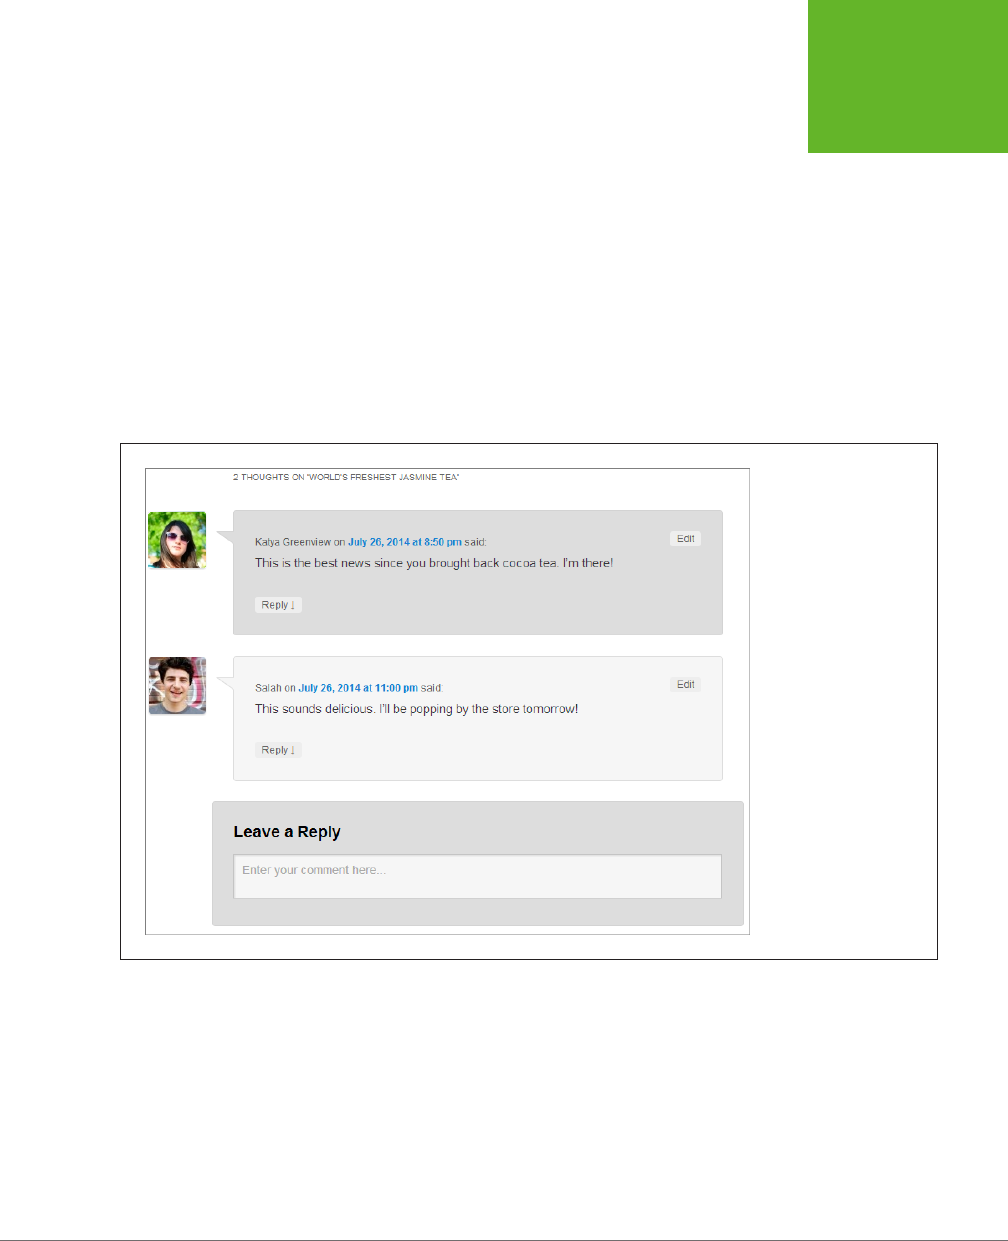
CHAPTER 8: COMMENTS: LETTING YOUR READERS TALK BACK 263
MAKING
COMMENTS
MORE
PERSONAL
with that person’s comment. WordPress gives you two ways to do that—you can get
pictures from its excellent Gravatar service, or you can take them from a person’s
Facebook or Twitter account. The following sections show you how to do both.
The Gravatar Service
To give comments a personal touch, you can display a tiny picture next to each
person’s thoughts. This picture, called an
avatar,
could be an actual photograph of
the person or something quirkier, like a mythical creature or cartoon character the
person has chosen to represent her. The idea is that the avatar helps your guests
see, at a glance, which comments belong to the same person, and it just might give
them a taste of the author’s personality (Figure 8-14). Avatars also add a visual
complement to web discussions, making a page of comments seem just a bit more
like a real conversation.
FIGURE 8-14
Each of these users has
an avatar—a thumbnail-
sized picture—next to her
comment.
WordPress uses an avatar service called Gravatar, which is short for “globally recog-
nized avatar.” The idea is that ordinary people can use Gravatar to set up an avatar
and include some basic personal information. They can then use that image and
profile info on sites throughout the Web. Originally, Gravatar was a small service
cooked up by a single person, but these days Automattic runs the service, making
it freely available to virtually any blogging platform or website-building framework.
(A Gravatar-supplied avatar goes by the name
gravatar.
)

WORDPRESS: THE MISSING MANUAL
264
MAKING
COMMENTS
MORE
PERSONAL
You don’t need to take any special steps to enable avatars; WordPress uses them
automatically. As you already know, every would-be commenter has to enter an email
address. When he does, WordPress contacts the Gravatar service and asks if it has
a picture aliated with that address. If it does, WordPress displays the picture next
to the comment. If it doesn’t, WordPress shows a featureless gray silhouette instead.
UP TO SPEED
Why Gravatars Make Good Sense
The obvious limitation to gravatars is that you won’t see
personalized images unless your readers sign up with the
Gravatar service. And unless your visitors are web nerds, they
probably haven’t signed up yet—in fact, they probably haven’t
even heard of Gravatar.
However, this dilemma isn’t as bad as it seems, for the fol-
lowing reasons:
• Gravatars are optional. Some people use them, others
don’t. There’s no downside to allowing gravatars on your
site. And if someone notices that another commenter gets
a personalized picture, that person just might ask about
how to get the same feature.
• Gravatars can be auto-generated. As page 267 explains,
you can replace the boring gray silhouettes for non-
Gravatar users with an auto-generated gravatar. The
neat thing about auto-generated gravatars is that they’re
unique
and
consistent, which means they can help people
identify comments left by the same person.
• Gravatar can coexist with Facebook and Twitter pictures.
As you’ll learn on page 270, you can get comment pictures
from Facebook and Twitter accounts. In this case, Gravatar
is just one more picture-gathering option that works in
harmony with the others.
• Gravatars have WordPress.com support. WordPress.
com users are more likely to have gravatars than other
people, because the Gravatar service is integrated with
the WordPress.com profile feature. If you’re a WordPress.
com fan, choose UsersÆMy Profile from the dashboard
to set your gravatar quickly and painlessly.
• You can remind your readers to get a gravatar. If you run
a self-hosted site, you can edit the
comments.php
file
in your theme (page 487) to add a reminder, like a link
that says “Sign up for a Gravatar and get a personalized
picture next to your comment.” Just don’t expect that
many people will follow your recommendation.
Signing Up with Gravatar
If
you
aren’t a Gravatar fan yet, here’s how you sign up:
1. Go to
http://gravatar.com
and click the Create Your Own Gravatar button.
The sign-up page appears.
2. If you already have a WordPress.com account, you can use that with Gra-
vatar. Click “I already have a WordPress.com account.”
You’ll need to fill in your email address and password, and click Authorize to
link everything up. Then skip to step 4.

CHAPTER 8: COMMENTS: LETTING YOUR READERS TALK BACK 265
MAKING
COMMENTS
MORE
PERSONAL
3. If you don’t have a WordPress.com account, you can sign up now. Fill in
your email address, pick a user name and a password, and then click the
“Sign up” button.
When you get the confirmation email, click the activation link inside to complete
the signup.
4. If you haven’t already done so, sign in to Gravatar with your email address
and password.
You arrive at the Manage Gravatars page, which informs you that you don’t yet
have any images associated with your account.
5. Click the “Add one” link.
Gravatar gives you a number of ways to find an image. You can upload it from
your computer’s hard drive (the first, and most common, option), snag it from
a website, or snap a new one with a webcam (assuming you have one).
6. Click the appropriate button for your image (for example, “My computer’s
hard drive”) and follow the instructions to find and crop your picture.
Gravatars are square. You can use an image as big as 512 × 512 pixels, and
Gravatar will shrink it down to a thumbnail-size tile and display it next to each
comment you leave.
7. Choose a rating for your Gravatar (see Figure 8-15).
Ordinarily, WordPress sites show only gravatars that have a G rating. If you want
to tolerate more friskiness on your site, go to Settings→Discussion. Scroll to
the Avatars section and ratchet up the Maximum Rating setting to PG, R, or X.
TIP Are you concerned about inappropriate gravatars? You can disable gravatars altogether from the
Settings→Discussion page. In the Avatars section, turn on the “Don’t show Avatars” radio button.
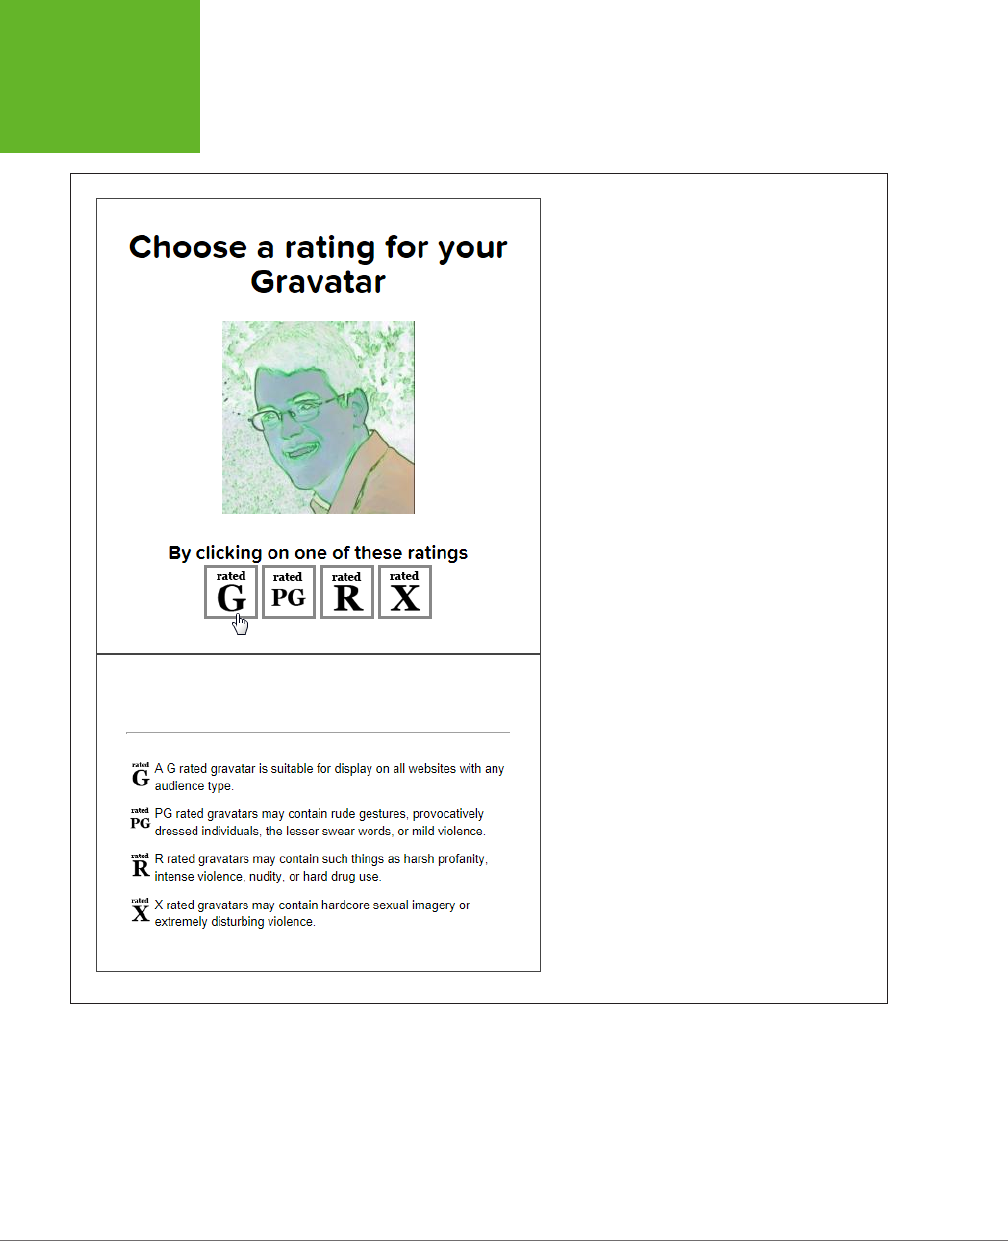
WORDPRESS: THE MISSING MANUAL
266
MAKING
COMMENTS
MORE
PERSONAL
FIGURE 8-15
Some sites may not display gravatars that are mildly
naughty (PG), violent or sexually explicitly (R), or
over-the-top disturbing (X). It’s up to you to pick the
rating that represents your image best, but if you use
an ordinary headshot, G is the right choice.
8. Now Gravatar associates your avatar with your email address.
All new comments you leave will include your new picture, and comments you
already left will get it, too (assuming you haven’t changed your email address
since you posted the comment). If, in the future, you decide you want a dierent
picture, log back into Gravatar and upload a new one.
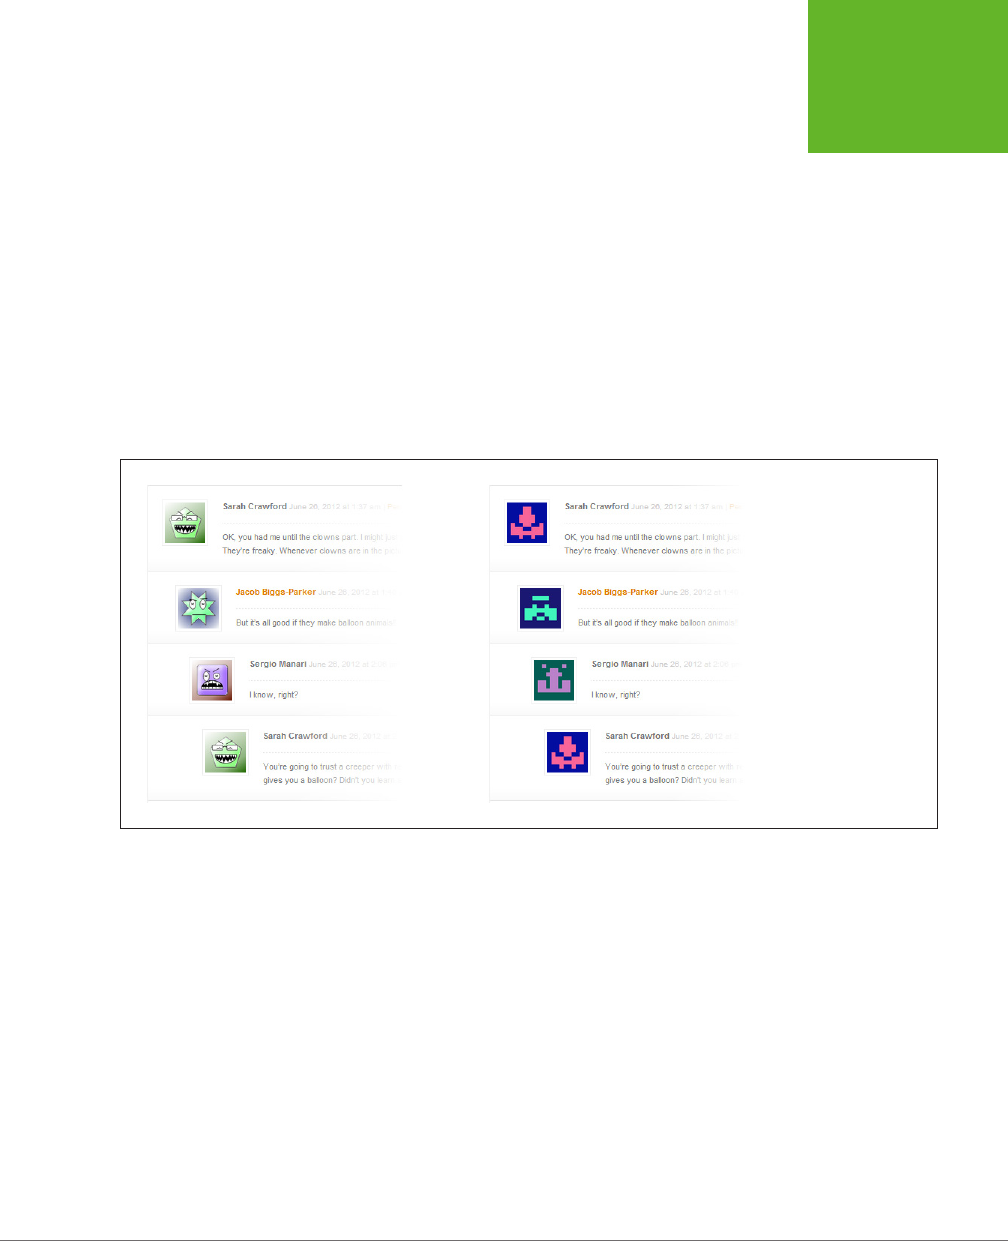
CHAPTER 8: COMMENTS: LETTING YOUR READERS TALK BACK 267
MAKING
COMMENTS
MORE
PERSONAL
Changing the “Mystery Man” Gravatar
Ordinarily, if a commenter doesn’t have a gravatar, WordPress displays the infamous
gray silhouette that it calls Mystery Man. You can replace Mystery Man with one of
several other pictures from the Settings→Discussion page. Scroll down to the Avatars
section and change the Default Avatar option.
The alternate possibilities include no image at all (select Blank from the Default
Avatar list) or a stock Gravatar logo (select Gravatar Logo). More interestingly, you
can give mystery commenters a tailor-made, unique gravatar (for your site only).
WordPress creates it by taking your guest’s email address, using it to generate some
semi-random computer gibberish, and then translating that into a specific type of
picture. You can choose from four auto-generated gravatar types: Identicon (geomet-
ric patterns), Wavatar (cartoon-like faces), MonsterID (whimsical monster drawings),
and Retro (video-game-style pixelated icons). Figure 8-16 shows two examples.
FIGURE 8-16
Algorithmically generated
gravatars add some fun
to your site, even if your
readers don’t have real
profile pictures. Here are
two examples: Wavatar
(left) and Retro (right).
Notice that Sarah Craw-
ford’s gravatar remains
consistent for both her
comments.
Gravatar Hovercards
The tiny comment pictures that Gravatar provides add a personal touch to your
comments section, but the service can provide more than just pictures. It can also
smuggle in a bit of personal information about each commenter. This information
shows up as a
hovercard
—a small box that pops up when someone points to an
avatar (Figure 8-17).
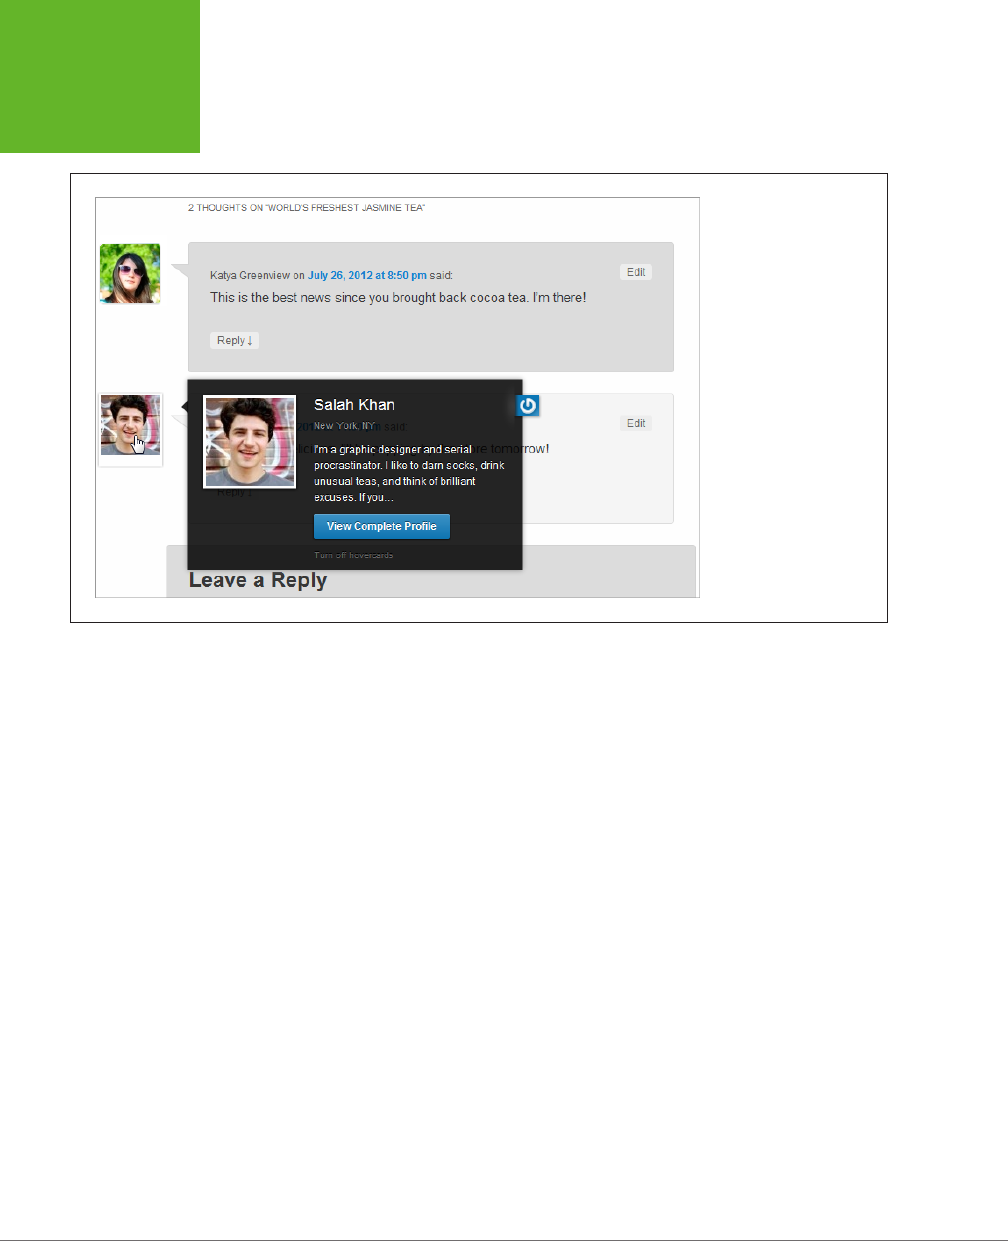
WORDPRESS: THE MISSING MANUAL
268
MAKING
COMMENTS
MORE
PERSONAL
FIGURE 8-17
A hovercard is like a
virtual business card. It
displays your personal
information, no matter
what Gravatar-enabled
site you visit. (If you’re
curious about what hap-
pens when you click View
Complete Profile, jump
ahead to Figure 8-19.)
But there’s a catch: Hovercards appear only if your site runs on WordPress.com, or
if you’re a self-hoster using Jetpack (the ridiculously useful free plug-in you’ll learn
to install on page 297). If you meet one of these requirements, your comments
probably display hovercards already. To check, choose Settings→Discussion, scroll
down to the Avatars section, and make sure the checkbox next to “View people’s
profiles when you mouse over their Gravatars” is turned on. (If you run a self-hosted
site but don’t have Jetpack installed, you won’t see this setting and you won’t be
able to use hovercards.)
Hovercards are a small but nice feature. They help readers learn a little bit about
your commenters. You might assume that the hovercard details are part of your
visitor’s WordPress profile, but they’re not. (In fact, hovercards work even if guests
don’t have a WordPress account.) Instead, hovercards get their information from
the profile that Gravatar users optionally set up.
This design is both good and bad. The advantage is that it makes hovercard infor-
mation portable—it travels with the avatar, no matter what Gravatar-enabled site
you visit (even if the site
doesn’t
run WordPress). The disadvantage is that if your
readers don’t bother to fill out the profile information, hovercards won’t appear at
all (Figure 8-18).
To make sure
your
hovercard looks good, you need to fill in the profile information,
too. Visit the Gravatar site (
http://gravatar.com
), click the My Account button, and
then choose Edit My Profile. There’s plenty of information you can fill in, but the

CHAPTER 8: COMMENTS: LETTING YOUR READERS TALK BACK 269
MAKING
COMMENTS
MORE
PERSONAL
details that appear on the hovercard are your full name (Display Name), where
you live (Location), and a short blurb that describes yourself (About Me), which
the hovercard truncates after the first couple of sentences. When you finish, click
Save Profile to store your information with your Gravatar, allowing it to appear on
hovercard-supporting sites everywhere.
FIGURE 8-18
Hovercards are a whole
lot less impressive when
visitors don’t bother to
fill out their Gravatar
profiles.
GEM IN THE ROUGH
Gravatar Verified Services
As you’ve seen, the Gravatar service is more than just a way
to display your picture on different websites. It’s also a way
for you to store a mini-profile with a bio, some basic personal
details, and links to all the Gravatar-enabled websites you use.
This last part is one of Gravatar’s niftier features. It lets you
add links in your Gravatar profile that point to other social
websites or blogging services you belong to. For example, you
can add links to your Facebook or Twitter accounts. Or you can
include a link to your photos on Flickr, your videos on YouTube
or Vimeo, your blog on WordPress (or Blogger, or Tumblr), and
your accounts on many other social sites.
When you first sign up with Gravatar, it doesn’t include any
of these links. You need to add them by editing your Gravatar
profile from the Verified Services section. Choose a service from
the list (like Facebook), and then click Add. Gravatar asks you
to sign in to set up the link. (This is why Gravatar calls them
verified
services—it doesn’t actually add the link unless you
verify that it truly belongs to you.)
In the past, when you added a verified service, Gravatar
included a tiny icon for it in your hovercard (which was quite
cool and very convenient). Sadly, Gravatar no longer takes this
step, possibly to prevent spammers from abusing hovercards.
However, verified service links still appear in a clearly visible
place on the Gravatar profile page (Figure 8-19). To see them,
click the View Complete Profile button that appears in every
hovercard (Figure 8-17).
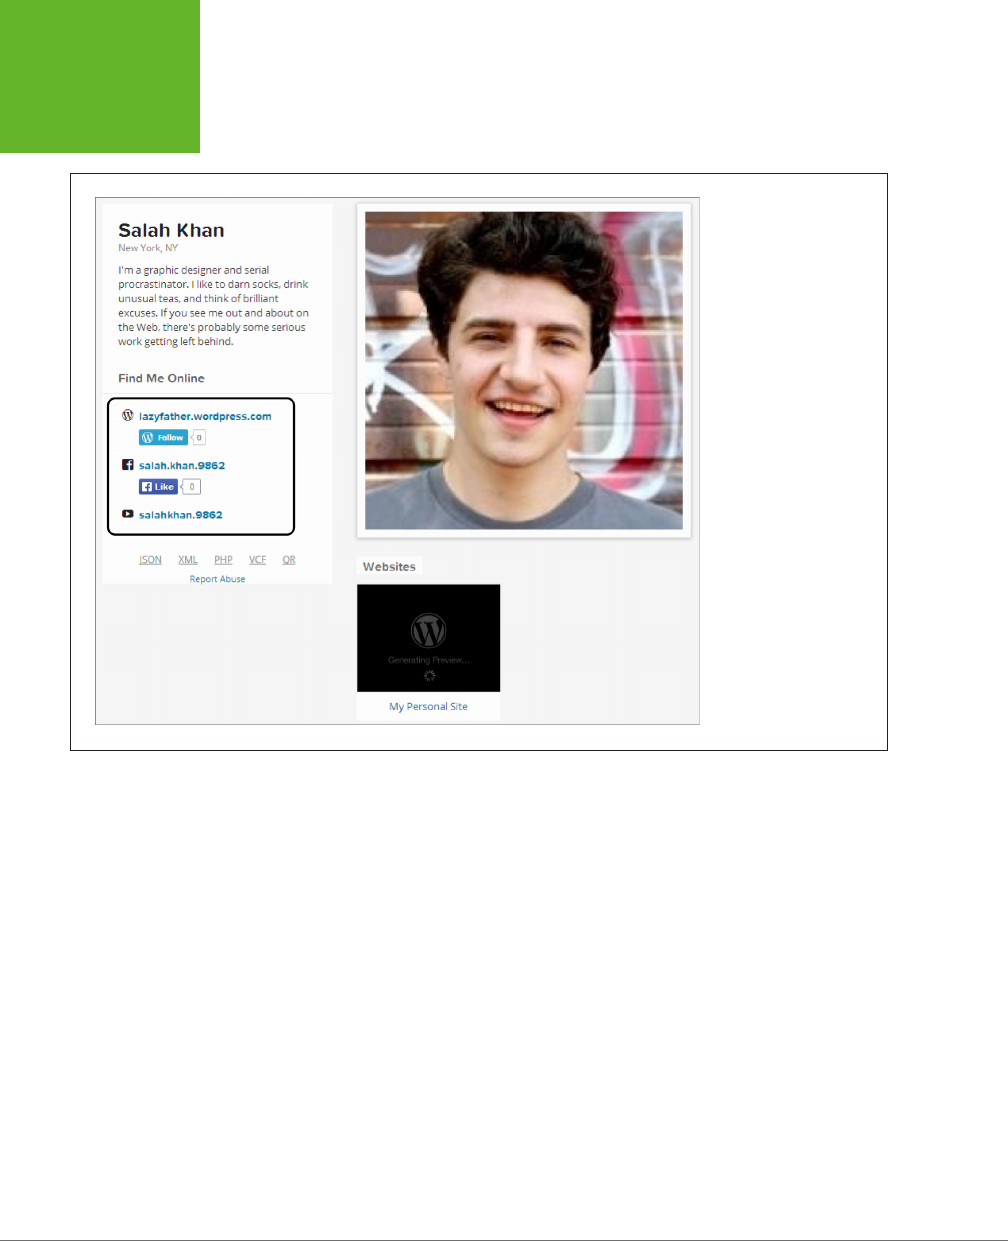
WORDPRESS: THE MISSING MANUAL
270
MAKING
COMMENTS
MORE
PERSONAL
FIGURE 8-19
Salah Khan has three
verified services with
Gravatar: a WordPress.
com blog, a Facebook
account, and a YouTube
account.
Facebook and Twitter Comments
Gravatars are a great idea, but they might not be practical for your site because
people might not bother to use them (or they might not even realize
how
to use
them). No matter—you can give visitors other comment options. For example, you
can let them log into your site using their Facebook or Twitter credentials, and then
post a comment. In such a case, WordPress grabs your guest’s Facebook or Twitter
profile picture and displays it next to that person’s comments (Figure 8-20).
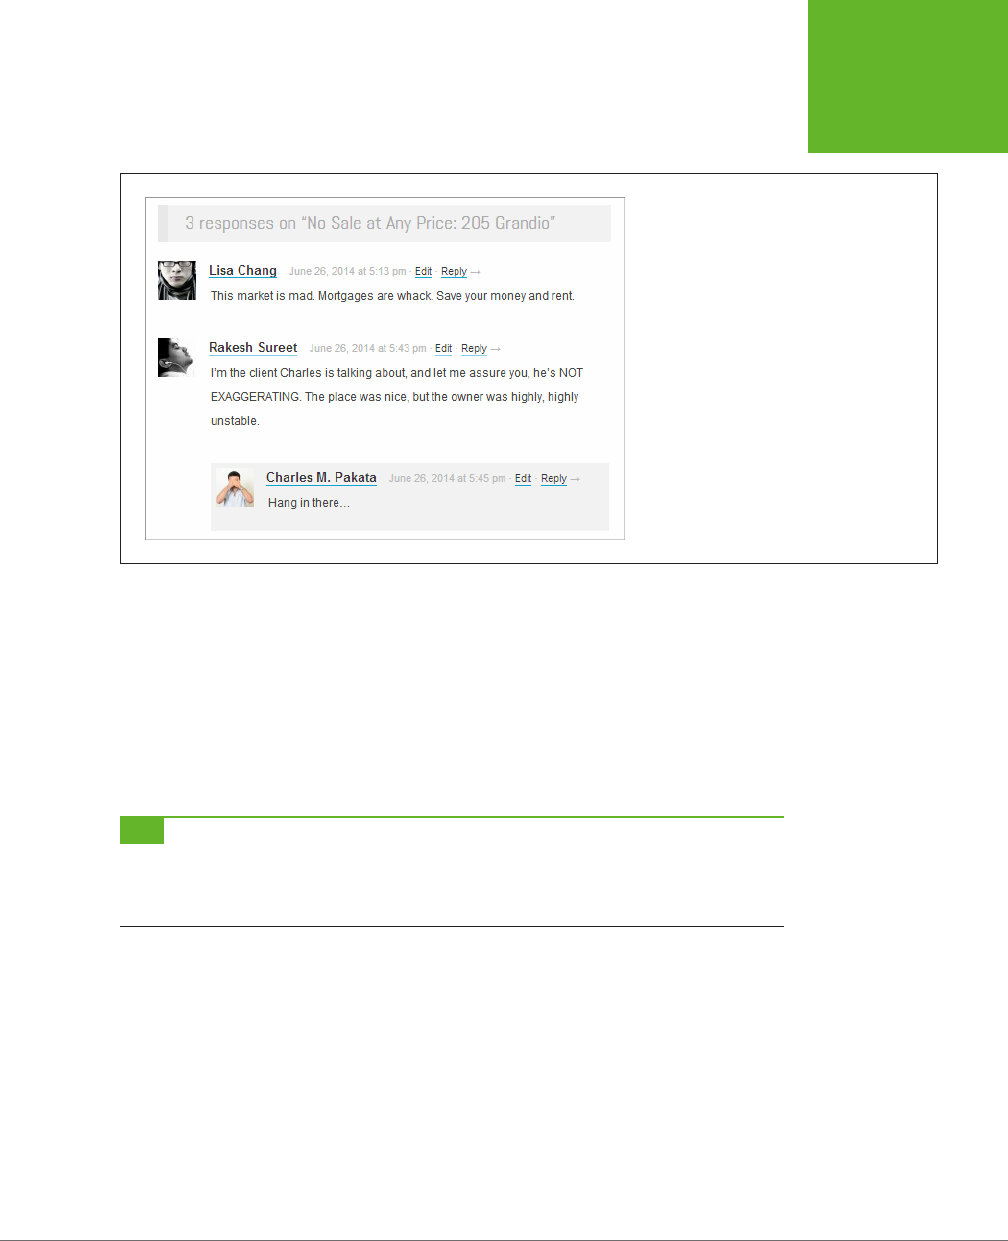
CHAPTER 8: COMMENTS: LETTING YOUR READERS TALK BACK 271
MAKING
COMMENTS
MORE
PERSONAL
FIGURE 8-20
In this example, Charles Pakata is a WordPress.
com user who has signed up with the Gravatar
service. But Lisa and Rakesh are Facebook users.
As long as they log into Facebook, WordPress
uses their Facebook profile pictures, without
forcing them to sign up with Gravatar or take any
extra steps.
If your site runs on WordPress.com, you already have the Facebook and Twitter
sign-in feature, and there’s no way to switch it o.
If you run a self-hosted blog, the best way to get Facebook and Twitter comments
is with the Jetpack plug-in (page 297). However, you won’t be able to see the com-
ments until you explicitly enable them. To do that, click Jetpack in the dashboard
menu. Look for the box named “Jetpack Comments,” and then click the Activate
button inside (Figure 8-21). Incidentally, this setting isn’t just for Facebook and
Twitter users—it also lets anyone with a Google+ or WordPress.com account join in.
TIP You might find that once you enable Jetpack comments, your comment section gets a new background
that doesn’t blend in with the rest of your page. To fix this, choose Settings→Discussion, scroll down to the
Jetpack Comments section, and try different options under Color Scheme. You can pick Light, Dark, or Transparent;
finding the best fit is a trial-and-error process.
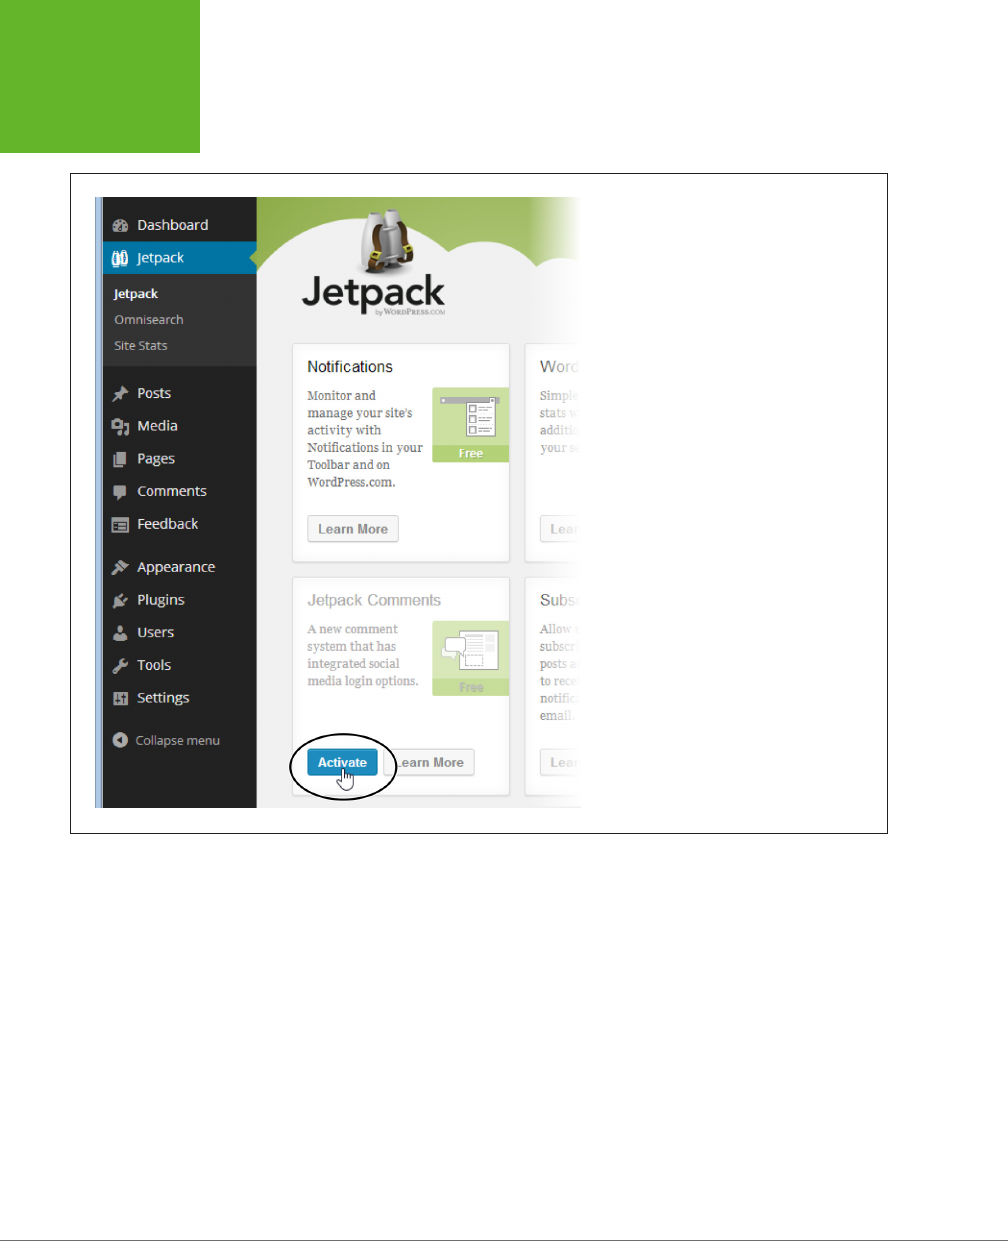
WORDPRESS: THE MISSING MANUAL
272
MAKING
COMMENTS
MORE
PERSONAL
FIGURE 8-21
A self-hosted site doesn’t get Jetpack comments
unless you install the plug-in and specifically
opt in by clicking the Activate button shown
here. To turn Jetpack comments off, you need
to return to this box, click Learn More, and then
click Deactivate.
Some people turn on Facebook and Twitter comments and enable the “Users
must be registered and logged in to comment” setting (which you can find at
Settings→Discussion). This creates a site that
requires
commenters to provide a social
identity. When a site owner takes this step, he’s usually thinking something like this:
“I’ve been flexible, and now I want something in return. I’ve given my readers
several good options for establishing their identity (Facebook, Twitter, Google+,
and WordPress.com). By making them use one, I can lock out spammers and force
people to bring their virtual identities to my site.”
Think carefully before you take this step. First, it only partly protects your site against
spam, because many spambots have fake Facebook identities. Second, it guarantees
that you’ll scare away at least some potential commenters, including those who don’t
have a social media account, those who can’t be bothered to log in, and those who
don’t want to reveal their social identities to you.

CHAPTER 8: COMMENTS: LETTING YOUR READERS TALK BACK 273
STAMPING
OUT COMMENT
SPAM
Stamping Out Comment Spam
So far, you’ve focused on the comments that are
supposed
to be on your site—the
ones your visitors leave in response to your posts. Up to now, this discussion has
skirted a disquieting fact: On the average WordPress site, spam comments outweigh
legit comments by a factor of 10 to 1. And spammers don’t discriminate—they don’t
attempt to chase the most popular blogs or the ones that cover their favorite topics.
Instead, they spew their dreck everywhere.
Understanding Spam
You’re no doubt familiar with the idea of email spam—trashy chain letters and
hoaxes that try to get you to download malware or send your banking information
to a Nigerian gentleman with a cash flow problem. Blog spam is a dierent creature
altogether. While email spam tries to lure you in, blog spam tries to slip right past
you. That’s because blog spammers aren’t after you—they’re targeting your
read-
ers.
The goal is for them to sneak their advertisements onto your site, where they
can attract the attention of people who already trust your blog. Every bit of blog
spam is trying to lure a reader to travel to the spammer’s site, either by clicking the
commenter’s name or a link in the comment text.
In the past, spammers were crude and their messages easy to identify. Today,
they’re trickier than ever. They attempt to disguise themselves as actual readers to
fool you into allowing their comment (with its link to their site). Or they pretend to
sell real products (which they never deliver). And spammers hire low-paid workers
to hand-write spam messages and circumvent safeguards against spambots, like
Captchas (page 280).
Some WordPressers tell horror stories of receiving hundreds or thousands of spam
messages a day. The problem is severe enough that, if you’re not careful, you can
wind up spending more time dealing with spam than managing the rest of your site.
Fortunately, you can use the tools and strategies discussed below to fight back.
UP TO SPEED
Caught in the Wild
Spammers take great care to make their messages look as
natural as possible. The spammer’s payload is a link, which
is submitted with the comment and hidden behind the com-
menter’s name.
Here are some of the spam messages that we caught on this
book’s example sites. Would any have fooled you?
“Glad to know about something like this.”
“Perhaps this is one of the most interesting blogs that i have
ever seen. interesting article, funny comment. keep it up!”
“i was exactly talking about this with a friend yesterday, and
now i found about it in your blog. this is awesome.”
“Could you tell me when you’re going to update your posts?”
“I’ve also been thinking the identical thing myself lately. Grate-
ful to see another person on the same wavelength! Nice article.”
“We’re a bunch of volunteers and opening a brand new scheme
in our community. Your site offered us with valuable info to
paintings on. You have done an impressive job and our whole
community can be grateful to you.”

WORDPRESS: THE MISSING MANUAL
274
STAMPING
OUT COMMENT
SPAM
Spam-Fighting Strategies
You can defend against spam in several ways:
• Forbidding all comments. This is obviously a drastic, ironclad approach. To
disable comments, you turn o the “Allow people to post comments on new
articles” checkbox on the SettingsÆDiscussion page. But be warned that if you
do, you’ll sacrifice the lively conversation your visitors expect.
Verdict:
An extreme solution. The cure is worse than the disease.
• Using moderation. This is the default WordPress approach, and it’s the one
you learned about in this chapter. The problem is that you just can’t keep
moderating a site that’s growing in size and popularity—it becomes too labor-
intensive. It also has a distinct drawback: It forces commenters to wait before
their comment appears on your site, by which point they may have lost interest
in the conversation.
Verdict:
Not practical in the long term, unless you combine it with a spam-
catching tool (like Akismet, which you’ll meet in a moment).
• Forcing commenters to log in (for self-hosted sites only). To use this ap-
proach, you need to add each visitor’s ID to your WordPress site, or create some
way for them to register on your site themselves. This approach definitely isn’t
suitable for the average public blog. However, it may work if you have a small,
captive audience—for example, if you’re building a site for family members only,
or for a team of coworkers.
Verdict:
For special cases only. You’ll learn about multiuser blogs in Chapter 11.
• Making commenters log in, but allowing third-party log-ins. A third-party
login verifies your guests through an authentication service—typically one
provided by WordPress.com, Facebook, or Twitter. This requirement may work,
because many people already have Facebook or Twitter accounts that they don’t
mind using (whereas they definitely won’t bother creating a new account just to
leave a single comment). Still, forcing logins may drive away as many as half of
your would-be commenters. And it’s still not truly spam-proof, because clever
spam-bots can create Facebook accounts, just like real people can.
Verdict:
A good idea, but not a complete spam-fighting solution.
• Using Akismet or another spam-catching plug-in. Many WordPress adminis-
trators swear that their lives would not be livable without the automatic spam-
detecting feature of Akismet. It isn’t perfect—some site owners complain that
legitimate comments get trashed, and they need to spend serious time fishing
them out of the spam bucket—but it usually gives the best spam protection with
the minimum amount of disruption to the commenting process.
Verdict:
The best compromise. It’s also essential if you turn o moderation.

CHAPTER 8: COMMENTS: LETTING YOUR READERS TALK BACK 275
STAMPING
OUT COMMENT
SPAM
The pros and cons of managing comments by moderation versus spam-fighting are
a lot to digest, even for seasoned webheads. But the evidence is clear: Most Word-
Press pros eventually start using a spam-catching tool. They may use it in addition
to moderation, or—more likely—instead of it.
NOTE If you don’t have a spam filter,
you
are the spam filter. And given that an ordinary WordPress site
can attract dozens of spam messages a day, you don’t want to play that role.
If you’re ready to ditch comment moderation in favor of a livelier, more responsive,
and less controlled discussion, choose Settings→Discussion and turn o the check-
boxes next to these settings: “An administrator must always approve the comment”
and “Comment author must have a previously approved comment.” Then click Save
Changes at the bottom of the page.
Now continue to the next section to make sure you have a proper spam-blocker in
place.
POWER USERS’ CLINIC
WordPress’s Other Spam-Catching Options
WordPress has a few built-in spam-fighting options on the
Settings→Discussion page. In the past, they were a practical
line of defense that could intercept and stop a lot of junk com-
ments. Unfortunately, spamming evolved in the intervening
years, and now these settings are only occasionally useful.
They include:
• “Hold a comment in the queue if it contains 2 or more
links.” Use this setting to catch posts that have a huge
number of links. The problem is that spammers are on to
this restriction, so they’ve toned down their links to make
their spam look more like real comments.
• The Comment Moderation and Comment Blacklist boxes.
Try these boxes, described earlier (page 253), as a way
to keep out offensive text. They also double as a way
to catch spam. However, don’t rush to put in obvious
spammy keywords, because you’ll just end up doing a
clumsier version of what Akismet already does. Instead,
consider using these boxes if you have a spam problem
that’s specific to your site—for example, a certain keyword
that keeps coming up when spammers target your posts.
• “Automatically close comments on articles older than
14 days.” Unless you set it, this option isn’t switched on.
However, it’s a potentially useful way to stop spammers
from targeting old posts, where the conversation has
long since died down. And you don’t need to stick to
the suggested 14 days. You can type in any number,
even making the lockout period start a year after you
publish a post.
Understanding Akismet
Akismet is one of many spam-fighting plug-ins developers created for WordPress.
However, it has a special distinction: Automattic, the same folks who built WordPress,
makes it. It’s also the only spam-blocking tool with which WordPress.com blogs work.
Akismet works by intercepting each new comment. It sends the details of that com-
ment (including its text and the commenter’s website, email, and IP addresses) to
one of Akismet’s web servers. There, the server analyzes it, using some crafty code

WORDPRESS: THE MISSING MANUAL
276
STAMPING
OUT COMMENT
SPAM
and a secret spam-fighting database, to attempt to determine whether it’s legiti-
mate. Any one of a number of details can betray a spam message, including links to
known spam sites, a known spammer IP address, phrases commonly found in spam
messages (“free Viagra” for instance), and so on. Akismet quickly makes its decision
and reports back to your website. Your site then either publishes the comment or
puts it in the Spam folder, depending on Akismet’s judgment.
WordPress experts report that Akismet’s success rate hovers at around 97 percent.
Usually, when Akismet errs, it does so by flagging a safe comment as spam (rather
than allowing real spam through). However, Akismet’s success depends on the site
and the timing. When spammers adjust their tactics, it may take Akismet a little
time to catch up, during which its accuracy will drop.
Akismet is free, mostly. Personal sites pay nothing (unless you volunteer a small
donation). However, small businesses and money-making blogs are expected to
contribute $5 per month. Large publishers that want to spam-proof multiple sites
are asked for $50 a month.
NOTE Akismet uses an honor system, and there are plenty of sites that earn a bit of money but don’t pay
the Akismet fee. If you want a totally free business-friendly solution for a self-hosted site, you need to find a
different plug-in. Several good alternatives are described in the box below.
FREQUENTLY ASKED QUESTION
Akismet Alternatives
I need a spam-catching tool, but I don’t want Akismet. Are
there other options?
If you run a self-hosted WordPress site, there’s no shortage
of spam-fighting plug-ins. Unlike Akismet, many are free for
almost everyone. (Some plug-in developers collect donations,
charge for only the highest-traffic sites, or make extra money
charging support fees to big companies. Others do it simply
for the prestige.)
Two caveats apply. First, if you plan to use Jetpack’s social
commenting feature (page 270), which lets visitors comment
using their Facebook and Twitter identities, your options are
limited. Currently, Akismet is the only spam fighter that works
with these identities.
Second, it’s impossible to know which anti-spam tool is the best
for your site—you need to try them out yourself. Anti-spam
developers and spammers are locked in an ever-escalating
arms race. The spam blocker that works perfectly this week
might falter the next week when clever spammers work around
its detection rules.
Three good Akismet alternatives include:
• Anti-spam (
http://tinyurl.com/wp-anti-spam
)
• Antispam Bee (
http://antispambee.com
)
• AVH First Defense Against Spam (
http://tinyurl.com/
avhspam
)
To try one of these out, install it using WordPress’s plug-in
feature. But before you do, skip ahead to the basics of plug-in
management described in Chapter 9.

CHAPTER 8: COMMENTS: LETTING YOUR READERS TALK BACK 277
STAMPING
OUT COMMENT
SPAM
Installing Akismet
If your site is on WordPress.com, you’re already using Akismet, and there’s no way
to turn it o. As soon as you turn o comment moderation, you leave the entire
process in Akismet’s hands. (Skip ahead to the next section to learn more about
that.) If you have a self-hosted site, there’s a little more to Akismet’s setup. The
plug-in is so valuable that Automattic bundles a copy with every WordPress site.
However, it isn’t activated, which means it’s just an idle file sitting on your web
server. To make Akismet spring to life, you need to sign up for an Akismet key and
activate the plug-in. Here’s how:
1. First, you need an
Akismet key.
To get that, head to
http://akismet.com/
wordpress.
You can think of the Akismet key as a license to use Akismet on your site.
2. Click “Get An Akismet API Key.”
The sign-up page appears.
3. If you already have a WordPress.com account, you can use that login in-
formation with Akismet. Click “I already have a WordPress.com account.”
You’ll need to fill in your email address and password, and click Authorize to
link everything up. Then skip to step 5.
NOTE Remember, if you use any of the other services Automattic provides, such as Gravatar for comment
pictures (page 263) or the Jetpack plug-in (page 297), then you already have a WordPress.com account linked to
your email address.
4. If you don’t have a WordPress.com account, you can sign up now. Fill in
your email address, pick a user name and a password, and then click the
“Sign up” button.
When you get the confirmation email, click the activation link inside to complete
the signup.
5. If you haven’t already done so, sign in to Akismet with your email address
and password.
Before Akismet will give you a key, it checks to see if you’re willing to pay for
the privilege.
Akismet shows three sign-up options (Figure 8-22), depending on the type of
site you have. It may also oer you the chance to buy Akismet in a bundle with
VaultPress, a WordPress backup tool described on page 312.
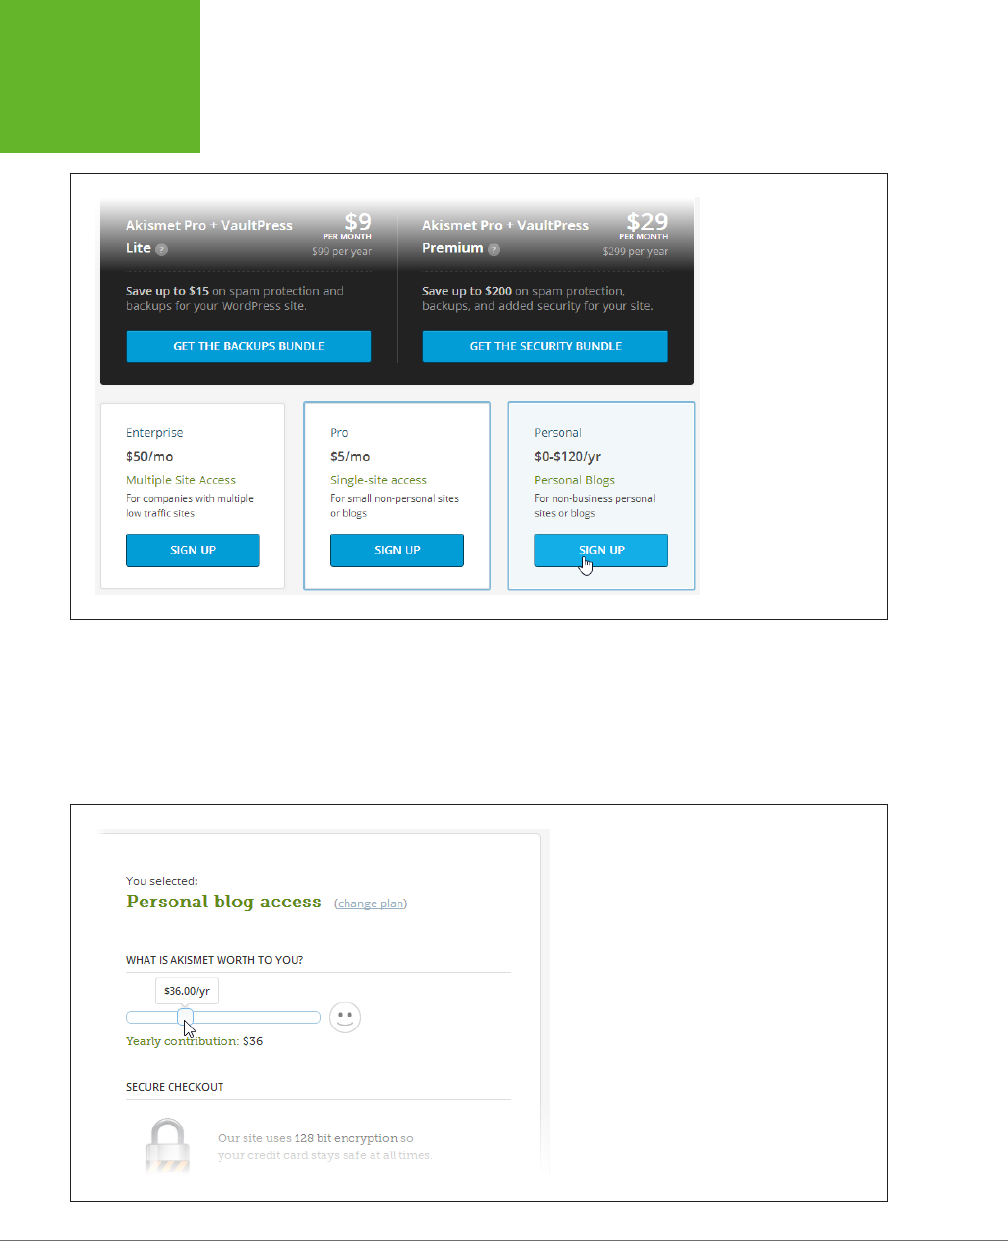
WORDPRESS: THE MISSING MANUAL
278
STAMPING
OUT COMMENT
SPAM
FIGURE 8-22
If you run a small, not-
for-profit site or personal
blog, you can click Sign
Up in the Personal box
without guilt. If you have
a more serious site, your
conscience compels you
to click Sign Up in the
Pro box.
6. Click the appropriate Sign Up button.
If you picked the personal plan, Akismet still asks for a donation (Figure 8-23).
You choose an amount using a slider below the question “What is Akismet
worth to you?” (In fairness to freeloaders everywhere, it’s dicult to answer
this question
before
you actually start using Akismet.)
FIGURE 8-23
Akismet asks for a donation of $36 a year. Drag the
slider either way to change the amount you’re willing
to pay. Go all the way to the left and your voluntary
contribution declines to nothing, and the credit card
options disappear.
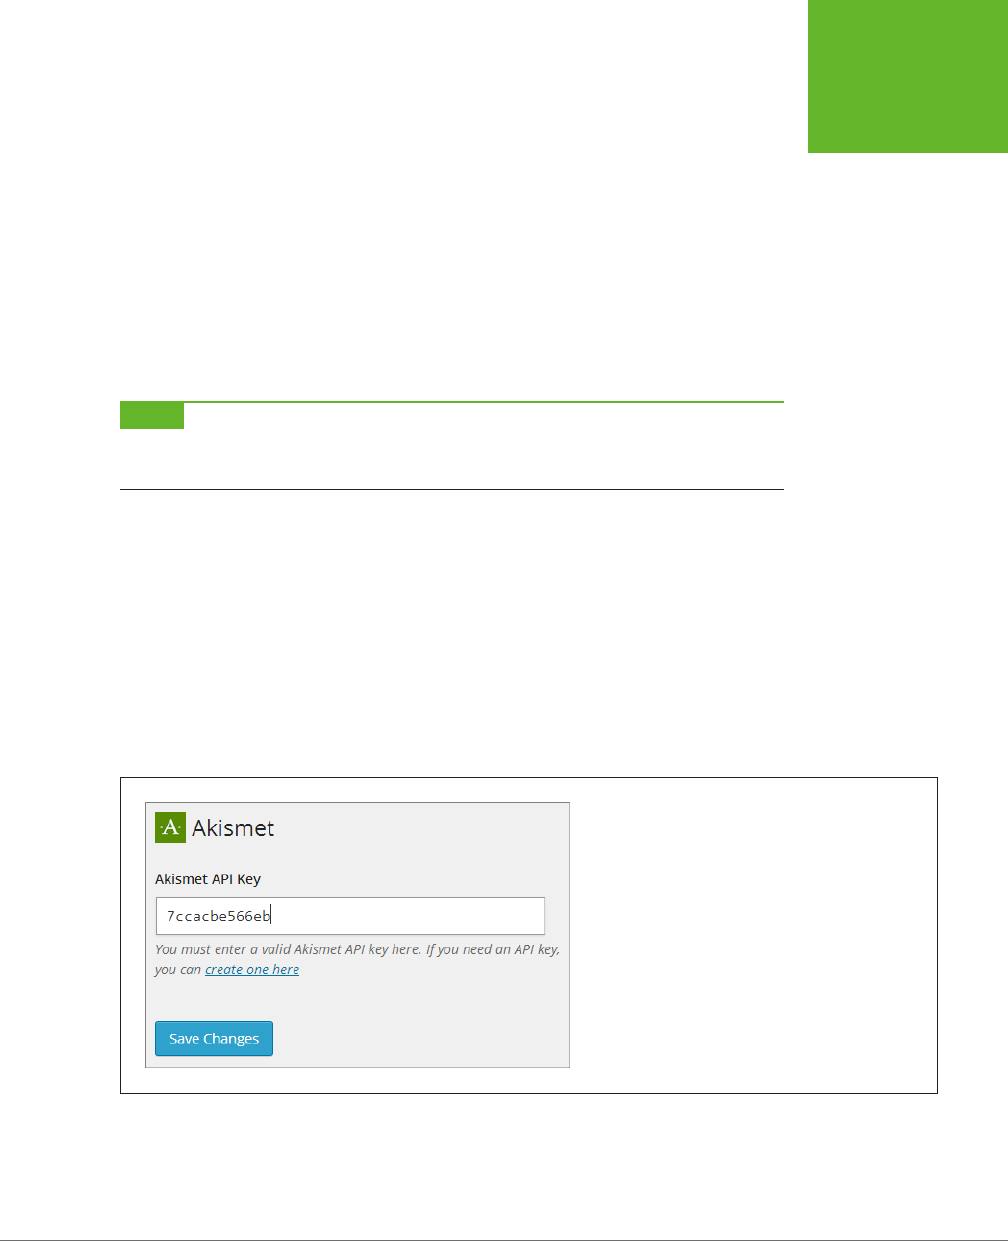
CHAPTER 8: COMMENTS: LETTING YOUR READERS TALK BACK 279
STAMPING
OUT COMMENT
SPAM
7. Fill in your name and click Continue.
If you elected to pay for Akismet, you need to enter your credit card or PayPal
information as well.
8. Shortly thereafter, you’ll receive an email message with your Akismet key
in it.
It’s a funny-looking code, like 0286f4c389b2. Make note of it, because you’ll
need it in a few steps.
9. Return to your site’s dashboard, and then choose PluginsÆInstalled Plugins.
You’ll see a list of plug-ins, with Akismet at the top.
NOTE You’ll learn far more about plug-ins, including how to manage them and how to find more, in the
next chapter. But for now, these steps walk you through the very simple process of activating the Akismet plug-in
you already have.
10. Point (without clicking) to Akismet, and click the Activate link that appears.
At this point, WordPress shows a message at the top of the Plugins page with
an activation button.
11. Click the “Activate your Akismet account” button and then click the “I
already have a key” link.
This brings you to the page where you enter your Akismet key.
12. Copy the key from your email message and then paste it into the text box
(Figure 8-24).
FIGURE 8-24
Before Akismet can start catching spam, it needs your API
key, which looks like the series of letters and numbers
shown here.

WORDPRESS: THE MISSING MANUAL
280
STAMPING
OUT COMMENT
SPAM
13. Click Save Changes.
Akismet displays a message that confirms that everything worked out and your
setup is complete. It also displays two optional settings that you can tweak:
• “Auto-delete spam submitted on posts more than a month old” tells
Akismet to periodically delete old messages in your spam folder, whether
you reviewed them or not. This is generally a good idea, because it prevents
your site from collecting thousands of spam comments that will swell up
your WordPress database to an ungainly size. (The box on page 282 has
more about the problem.)
• “Show the number of comments you’ve approved beside each comment
author” tells Akismet to add an extra piece of information to the com-
ments list in the dashboard. This is a count with the number of comments
you previously approved from each would-be commenter. Presumably, if
you’ve approved plenty of messages from the same person, you can trust
their newest contributions.
To revise these settings later, head to the Plugins→Akismet section of the
dashboard.
Using Akismet
Akismet integrates so seamlessly into WordPress’s comment system that you might
not even realize it’s there. It takes over the comments list, automatically moving
suspicious comments to the spam folder and publishing everything else.
To give Akismet a very simple test, sign out of your site, and then try adding a few
comments. If you enter ordinary text, the comment should sail through without a
hiccup. But type in something like “Viagra! Cialis!!” and Akismet will quietly dispose
of your comment.
Just because you disabled moderation and started using Akismet doesn’t mean your
comment-reviewing days are over. Once your site is up and running with Akismet,
you should start making regular trips to the Comments section of the dashboard.
Only now, instead of reviewing pending comments that haven’t been published, you
should click the Spam link and check for any valid comments that were accidentally
removed. If you find one, point to it and click the Not Spam link. If you find several,
you can restore them all with a bulk action—first, turn on the checkboxes next to
the comments, pick Not Spam from the Bulk Actions list, and then click Apply. You’ll
soon get a feeling for how often you need to check for stray messages.

CHAPTER 8: COMMENTS: LETTING YOUR READERS TALK BACK 281
STAMPING
OUT COMMENT
SPAM
Fighting Spam with CAPTCHA
Some WordPress administrators find that a traditional spam-analysis tool like Akis-
met isn’t enough to stop the inevitable avalanche of spam. Others find that Akismet
consistently flags good comments as spam, creating a dierent sort of comment-
moderation headache. If you’re in the first camp, you might want to supplement
Akismet with something else. If you’re in the second camp, you might want to try
switching Akismet o and plugging the hole with a dierent tool.
Either way, one good candidate is a Captcha (which computer nerds translate into
the phrase “Completely Automated Public Turing test to tell Computers and Humans
Apart”). The idea behind Captcha technology is to force commenters to do something
that automated spam-bots can’t, at least not easily. If you’ve ever registered with
a site that asks you to retype a set of fuzzy letters or distorted words, you’ve seen
Captcha in action. Facebook, Hotmail, and Gmail all use it, for example.
The problem with Captchas is twofold. First, there’s no Captcha that’s too hard for
some spambot to crack. Second, there’s no Captcha that’s so easy that it won’t annoy
your readers, at least a little. But if you use an easy, unobtrusive Captcha, you just
might be able to reduce spam to more manageable proportions, without annoying
your visitors too much. (Hint: You don’t want to use the fuzzy letter system.)
To add a Captcha, you need to be running a self-hosted WordPress site, and you
need to add a plug-in. If you search the WordPress plug-in repository, you’ll find
dozens. Here are three worth considering:
• Growmap Anti-Spambot (
http://tinyurl.com/growmapspam
). This is almost
the simplest Captcha you can use. It simply asks the commenter to check a
checkbox. Thus, it annoys almost no one but still trips up the majority of auto-
mated spam-bots.
• CAPTCHA (
http://tinyurl.com/wp-captcha
). This generically named plug-in lets
you use simple math questions, like “seven + 1.” Yes, shockingly enough, some
would-be commenters will still manage to get these questions wrong. However,
it won’t drive visitors away as quickly as a fuzzy-word-reading test.
• Anti-CAPTCHA (
http://tinyurl.com/wp-anticaptcha
). This plug-in performs
an invisible test. Essentially, it asks a guest’s web browser to run a snippet of
JavaScript. That snippet then sets a hidden value in the web page. Automated
spam-bots usually ignore JavaScript code, so they won’t be able to set the hid-
den value that Anti-CAPTCHA looks for, and thus they’ll fail the test. Overall,
this plug-in catches the least amount of spam, but it presents no inconvenience
to your readers.
Remember, CAPTCHA isn’t foolproof. It won’t stop human spammers (who typically
account for less than 10 percent of all spam), and it won’t stop the sneakiest spam-
bots. However, it can reduce the total amount of spam enough to improve your life.

WORDPRESS: THE MISSING MANUAL
282
STAMPING
OUT COMMENT
SPAM
TROUBLESHOOTING MOMENT
What to Do When Your Blog is Buried in Pending Comments
Spammy comments are a danger to any blog. If visitors find
your site choked with spam, they’re far less likely to keep
reading or make a return visit.
But even if spam comments aren’t approved, they can still
pose a problem for your site. First, they clog your Comments
page in the dashboard, making it harder for you to find the
real comments. And because WordPress stores them in its
database, they can bloat it with meaningless content, wast-
ing space on your web host and making it more difficult and
time-consuming to back up your site.
The solution seems obvious—just delete all the spam—but it’s
not always so easy. If your site has the misfortune to fall victim
to an automated spam-spewing tool, you can find yourself with
thousands or even
hundreds of thousands
of spam comments
in short order. (It’s happened to us.) So what’s a WordPress
administrator to do?
If you use a spam-catching plug-in like Akismet, spam com-
ments end up in the spam folder. The good news is that you can
clean out all your spam with just a few clicks. In the dashboard
menu, click Comments, and then click the Spam link at the top
of the list. Finally, click the Empty Spam button. (Even better,
get your spam catcher to automatically clean out old spam, as
explained on page 280.)
If you’re not using a spam-catching plug-in, you’ve got a bigger
problem on your hands. That’s because the spam comments
will be pending comments, and the dashboard doesn’t provide
a way to delete a huge number of pending comments at once.
Even bulk actions can act on no more than a single page of
comments at a time. At that rate, deleting thousands of spam
comments is a several-day affair.
There are two solutions. First, you can use a plug-in that
removes all pending comments, such as WP-Optimize (
http://
tinyurl.com/wp-opti
). Or, if you’re a tech savvy person who’s
not intimidated by the idea of diving into your WordPress
database and fiddling around, you can use a tool like php-
MyAdmin to peer into your database and remove the junk. To
get started in this endeavor, read the walkthrough at
http://
tinyurl.com/deletepen2
.


285
CHAPTER
9
WordPress oers an impressive set of built-in features. In the previous
chapters, you used them to write posts and pages, and to glam up your
site. But serious WordPress fans have a way to get even more from the
program—or, technically, about 30,000 ways to get more, because that’s how many
free WordPress
plug-ins
you can use to supercharge your site.
Before you go any further, be aware of one critical point: WordPress plug-ins work
on self-hosted WordPress sites
only.
If you use WordPress.com, you’re not allowed
to install even a single plug-in. This restriction isn’t as bad as it seems, however,
because WordPress.com already oers a number of extra features and preinstalled
plug-ins, as chosen by the fine people at Automattic. For example, WordPress.
com sites come with social media sharing buttons for Facebook and Twitter, while
self-hosted WordPress sites need a plug-in to do the same thing. So even though
WordPress.com users can’t pack on new features, they do start o slightly ahead.
If you’re a WordPress.com site builder, you don’t need to go any further in this chap-
ter. Skip ahead to Chapter 10 to keep using what you’ve got. But if you’re running a
self-hosted WordPress site, you need to know how to add plug-ins to make your site
truly great. This chapter shows you how to find, evaluate, and install plug-ins, and
then tweak their settings. You’ll also explore several of WordPress’s most popular
and practical plug-ins, including:
• Jetpack. Automattic created this plug-in to give WordPress self-hosters most
of the features available to WordPress.com sites, all in one easy step.
• WPtouch. This plug-in gives your site a mobile-friendly face-lift, so it looks
great on smart devices, like iPhones and iPads.
Getting New Features
with Plug-Ins
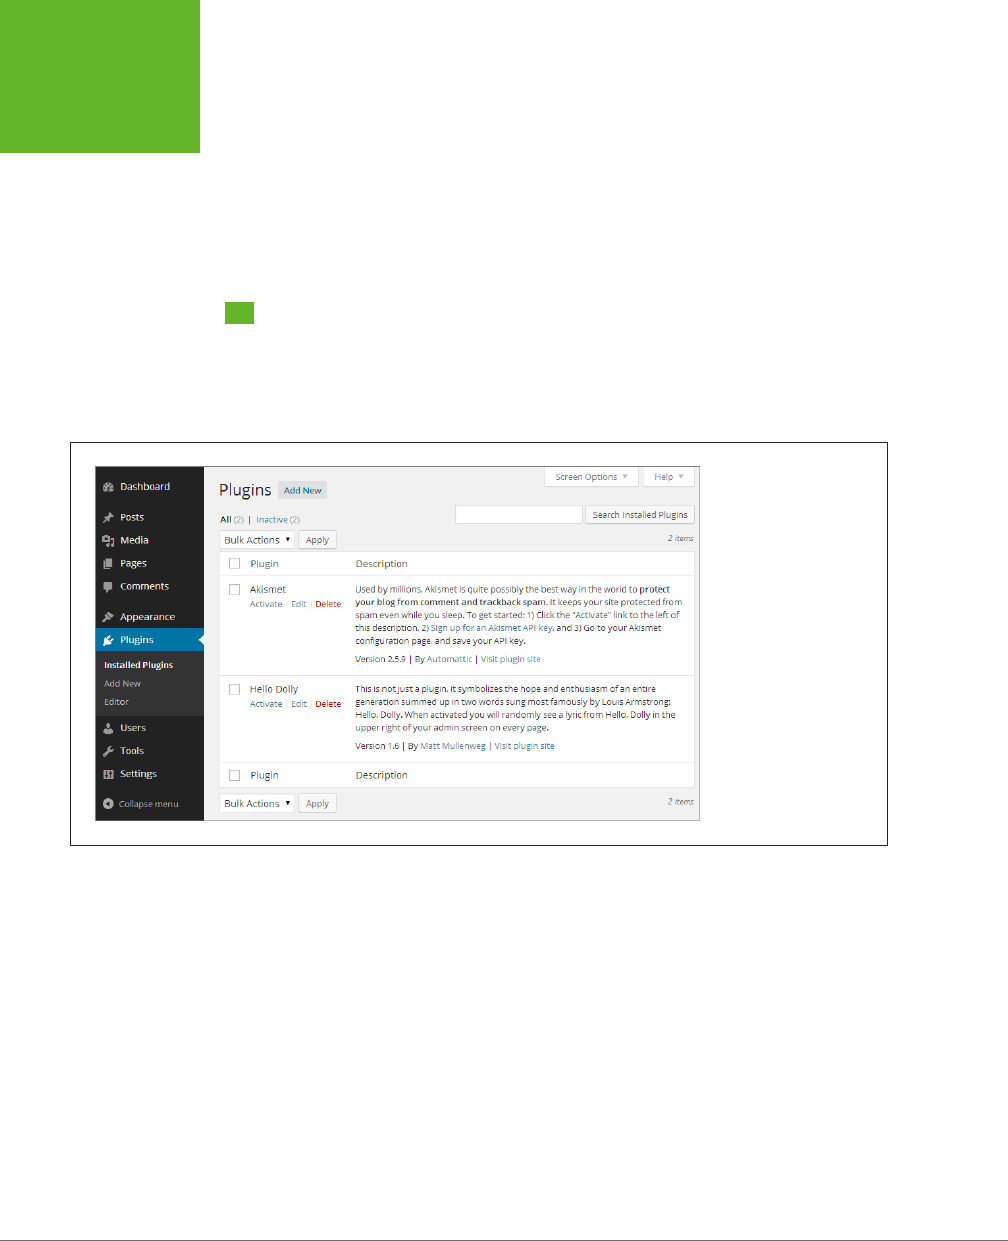
WORDPRESS: THE MISSING MANUAL
286
MANAGING
PLUG-INS
• Online Backup for WordPress. Use this plug-in to help crash-proof your site.
• WP Super Cache. This popular plug-in uses clever caching tricks to boost the
speed of heavily tracked pages.
You’ll see plenty more plug-ins in the following chapters, where you’ll use them to
solve problems, fill gaps, and add all sorts of frills.
Managing Plug-Ins
WordPress reserves a section of the dashboard for plug-ins: the predictably named
Plugins menu. You get started by choosing Plugins→Installed Plugins to see a list
of all the plug-ins installed on your website (Figure 9-1).
FIGURE 9-1
WordPress installations
usually include these two
plug-ins. The Akismet
tool helps you catch
comment spam (page
273), while the Hello
Dolly plug-in doesn’t do
much, other than let you
test the plug-in system
(page 293).
Usually, the self-hosted version of WordPress comes with two plug-ins that are
installed but not active. That means the plug-ins are sitting on your website, ready
to be called into service, but that they’re not actually doing anything yet. (It’s the
same as when you install a theme but don’t activate it.) Some web hosts may top
you up with a few extra plug-ins for security’s sake (such as the Limit Login Attempts
plug-in discussed on page 567). But to get the really good stu, you need to install
plug-ins on your own.
How Plug-Ins Work
Technically, a plug-in is a small program written in the same programming language
(PHP) that runs the entire WordPress system.

CHAPTER 9: GETTING NEW FEATURES WITH PLUG-INS 287
MANAGING
PLUG-INS
Plug-ins work by inserting themselves into various WordPress operations. For
example, before WordPress displays a post, it checks to see if you installed any
plug-ins related to displaying posts. If you did, WordPress calls them into action.
This sort of check is called a
hook,
and WordPress has a long list of hooks that
launch plug-ins. A WordPress page can also use a special code, called a
template
tag,
to ask a plug-in to insert something in a specific place on a page. Either way, the
interaction between a WordPress site and its plug-ins happens behind the scenes,
without your intervention.
Building plug-ins is a fairly ambitious task, because it requires programming skills
and an intimate knowledge of the way WordPress works. Fortunately, there are
plenty of good plug-ins you can use without writing a stitch of code. Most WordPress
site owners spend a good deal of time picking the right plug-ins for their sites and
tweaking them just so. Very few write their own.
NOTE To learn more about creating plug-ins, you probably want to finish this book first, paying particular
attention to Part 4, where you’ll take a peek at the PHP programming that holds WordPress together. Then you
can continue with the somewhat terse WordPress plug-in documentation at
http://tinyurl.com/write-plugin
.
Searching for a Plug-In
The process of installing plug-ins is simply the process of copying the plug-in files
to your site’s plug-in directory, which WordPress names
/wp-content/plugins.
For
example, if you put WordPress on your site at
http://pancakesforever.com/news
, the
plug-in folder is
http://pancakesforever.com/news/wp-content/plugins.
Of course,
you don’t need to worry about the exact location of the plug-in directory, because
WordPress always puts plug-ins in the right place.
To install a plug-in, choose Plugins→Add New, which takes you to the Install Plugins
page. Five links at the top of the page let you decide how to find the mini-program
you want. These are your options:
• Search. If you can think of a keyword for the sort of WordPress plug-in you
want (for example, “mobile” or “Twitter”), you can probably find it through a
search. Type one or more keywords in the search box, and then click Search
Plugins (as shown in Figure 9-2). Or click one of the links in the “Popular tags”
section underneath, which displays the most common search keywords. Either
way, WordPress scans its massive plug-in directory for matches.
NOTE Don’t get confused by the fact that WordPress uses “plug-in directory” to refer to two things. First,
there’s your website’s plug-in directory, which is the folder on your web server where WordPress stores the
plug-in files for your website. Second, there’s the official WordPress plug-in directory, which is the giant catalog
of thousands of plug-ins you can download and install on your site.

WORDPRESS: THE MISSING MANUAL
288
MANAGING
PLUG-INS
• Upload. If you already downloaded a plug-in to your computer, all you need to
do to use it is transfer it to your website. To do that, click the Upload link, browse
to your plug-in ZIP file, and then choose Install Now. You use this technique if
you create your own plug-in, or if you acquire a plug-in from somewhere other
than WordPress’s plug-in directory (for example, if you bought a commercial
plug-in from a third party).
• Featured, Popular, or Newest. All these links let you
browse
the WordPress
plug-in directory, which can help you discover plug-ins you might not know
about. “Featured” shows useful plug-ins that WordPress has chosen to highlight,
“Popular” includes the most downloaded plug-ins (ones that other people use),
and “Newest” focuses on plug-ins that have been available for just a few days.
• Favorites. This link shows any plug-ins you previously flagged as your personal
favorites. This is a handy feature if you like to browse plug-ins in WordPress’s
plug-in directory (
http://wordpress.org/plugins
), and install them later using
your site’s trusty dashboard. To get WordPress.org to store your favorites, you
need to register first, which you can do by clicking the Register link on the plug-
in repository (it appears next to the user name and password boxes).
FIGURE 9-2
The Install Plugins page
has five links to help
you find plug-ins. In this
example, you’re about
to search for plug-ins
that have the keyword
“jetpack” in their name or
description.
The WordPress plug-in directory, with its staggering collection of more than 30,000
mini-programs, is the place most WordPress experts look for plug-ins first. If you
search for plug-ins, WordPress shows you a list of programs that match your key-
words (Figure 9-3). If you browse by category, like Featured or Newest, WordPress
lists relevant plug-ins.
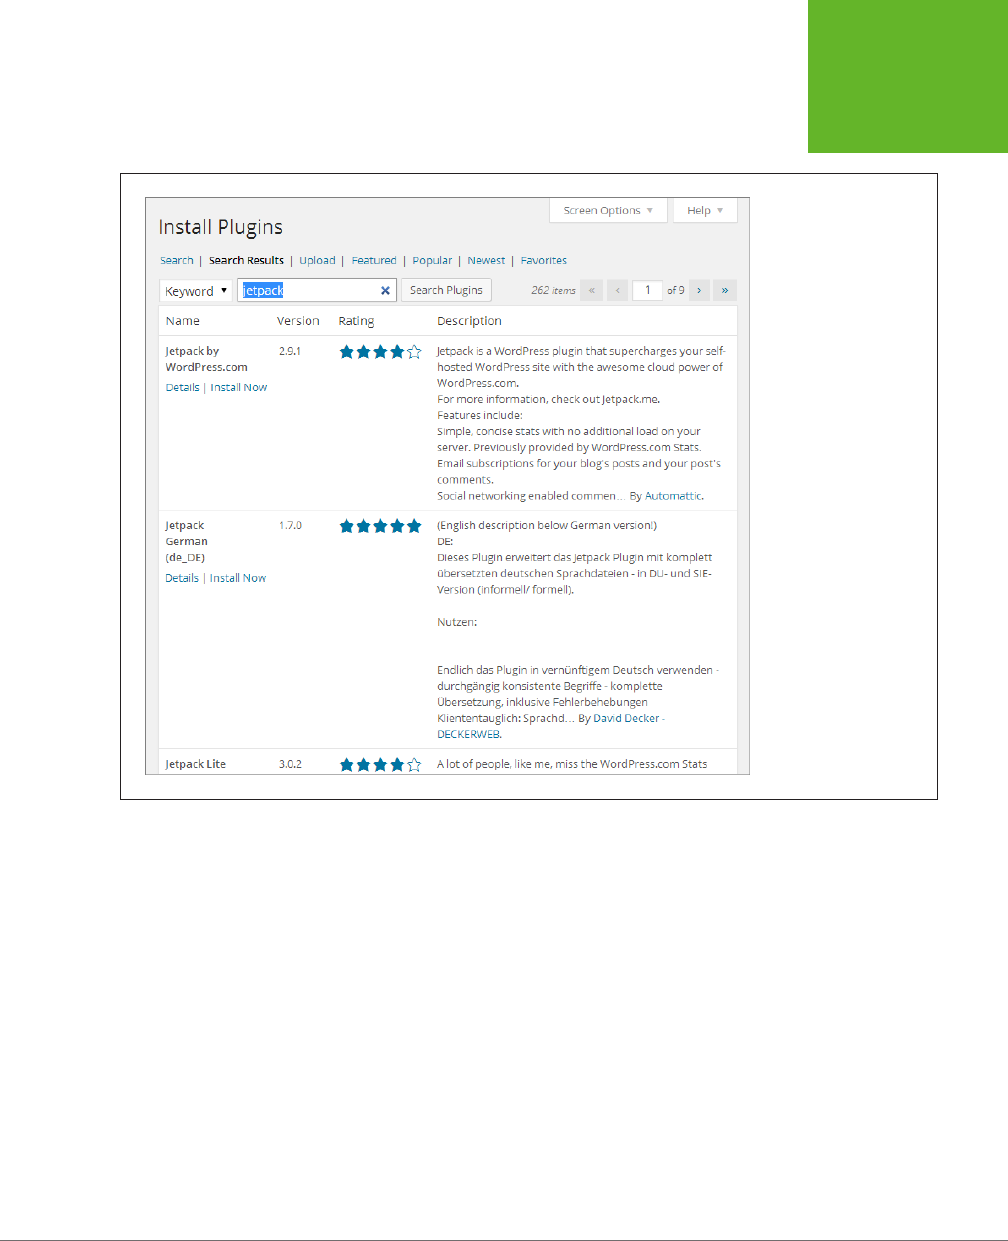
CHAPTER 9: GETTING NEW FEATURES WITH PLUG-INS 289
MANAGING
PLUG-INS
FIGURE 9-3
WordPress found 262
plug-ins that use the
word “jetpack.” The first
is the official Jetpack
plug-in, which adds
WordPress.com features
to self-hosted sites (as
described on page 297).
The next step is to determine if you actually want to install the plug-in you found.
Before you decide, it’s worth clicking the Details link that appears under the plug-
in name. That opens a window with extra information about the plug-in, including
a more detailed list of its features, the current version number, the person who
created it, its compatibility with dierent versions of WordPress, and the plug-in’s
rating (Figure 9-4).
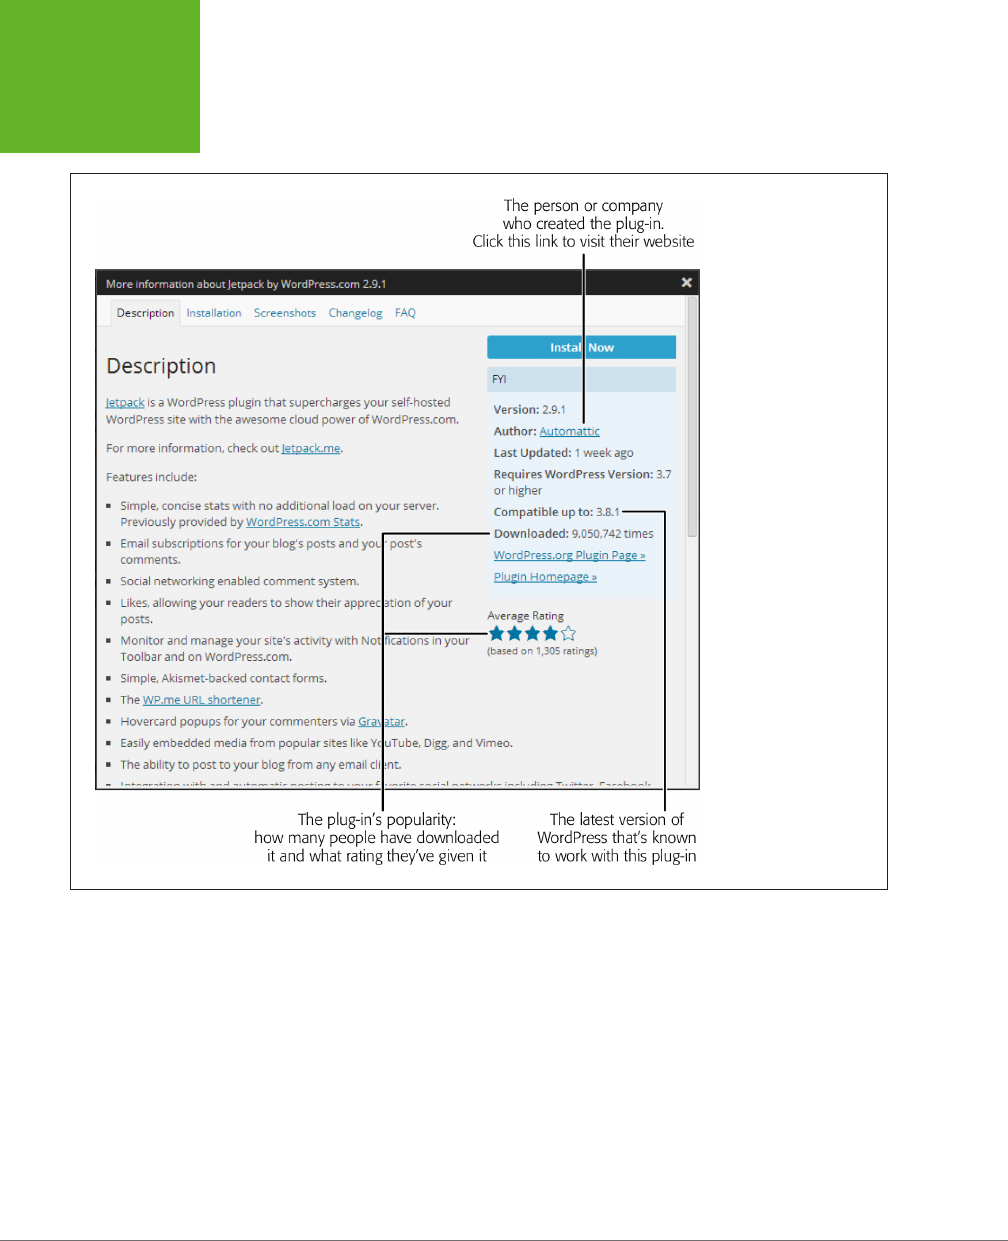
WORDPRESS: THE MISSING MANUAL
290
MANAGING
PLUG-INS
FIGURE 9-4
The Jetpack plug-in is
up to date (it was last
updated a week ago) and
consistently popular (with
a staggering 9 million
downloads so far).
The most important information about a plug-in is its WordPress compatibility, which
you determine by looking at three of the plug-in’s characteristics:
• Requires WordPress Version. This tells you the minimum version of WordPress
you need on your site to use this plug-in. Because you’re a security-conscious
webmaster who always makes sure your site runs the latest WordPress updates,
this part isn’t so important.

CHAPTER 9: GETTING NEW FEATURES WITH PLUG-INS 291
MANAGING
PLUG-INS
• Compatible up to. This tells you the
latest
version of WordPress that the plug-in
works with. Sometimes, people create plug-ins, maintain them for a while, and
then abandon them. The result is that the old plug-ins keep kicking around the
WordPress plug-in directory, even though they’re of no use to sites that use
newer editions of WordPress. By checking the “Compatible up to” information,
you can avoid these clunkers.
NOTE The “Compatible up to” information reflects only the latest version of WordPress that the plug-in
creator has
tested.
It’s not unusual for plug-ins to be slightly behind the times. For example, if WordPress 4.1 has
just been released, a plug-in might claim support for up to WordPress 4.0 only. In this case, the plug-in is still
likely to work on a WordPress 4.1 site.
• Last Updated. You may want to check this date as you try to avoid old and
out-of-date plug-ins. Although old plug-ins sometimes keep working, it’s best
to stick with plug-ins that have been updated within the last year (at least).
Regular maintenance also increases the chances that a plug-in is getting new
features and fixes, which are two more attributes that make it a good candidate
for your site.
If you’re still not satisfied, you can click one of the other tabs in the “More informa-
tion” window to get still more information about your plug-in. Initially, you start at
the Description tab (Figure 9-4), but you may want to check out other tabs, too:
Screenshots to get a feel for what the plug-in looks like, Changelog to see what
changes or fixes have recently been made, and FAQ to read the answers to common
webmaster questions.
You may also want to look for information about the plug-in on the author’s page
or website. You’ll often find the author’s blog, other plug-ins the author maintains,
and some additional support information. To see, make sure you’re on the Descrip-
tion tab and then click the author’s name (which appears as a link in the information
box, as shown in Figure 9-4).
TIP Finding a good plug-in requires a bit of detective work. If you find a few plug-ins that seem to offer the
feature you need, compare them to see which has the highest number of downloads, the best star rating, and
the most recent updates.

WORDPRESS: THE MISSING MANUAL
292
MANAGING
PLUG-INS
POWER USERS’ CLINIC
WordPress Isn’t the Last Word on Plug-Ins
The WordPress plug-in directory is the first and best place to
look for plug-ins. It gives you thousands to choose from, and
you can be reasonably certain they’re safe and stable. And
they’ll always be free. (The most obvious disadvantage is that
the WordPress plug-in repository is crowded with a number of
out-of-date plug-ins, so you need to get good at sniffing out
and avoiding these dead ends.)
However, there are also a number of companies that
sell
plug-
ins. These for-pay plug-ins are sometimes called
premium
plug-ins,
and they don’t appear in the WordPress plug-in
directory. Instead, you find them though a Google search,
a friend who’s in the know, a premium plug-in repository,
or one of the many “Top WordPress Plug-In” articles. The
problem with a premium plug-in (besides the fact that it costs
money) is that you need to carefully scope out the company
that makes it to make sure you aren’t paying for a mediocre
product or, even worse, a bit of malicious spamware that will
compromise your site.
In this book, you’ll stick to using free plug-ins from the
WordPress directory. However, if you need something more
(for example, if you’re a professional WordPress site designer
who’s creating sites for other companies), you’ll eventually
want to check out the high-end plug-in market. You can get
more information from an advanced WordPress and web design
site like Smashing Magazine (
http://wp.smashingmagazine.
com
) or by browsing a premium plug-in site like WPMU DEV
(
http://premium.wpmudev.org
) or CodeCanyon (
http://co-
decanyon.net
). But remember, even though premium plug-ins
cost money, they aren’t necessarily better. Some of the best
plug-ins in the industry are built by open-source developers
and companies with WordPress-related businesses, and they
don’t ask for anything more than an optional donation.
Installing a Plug-In
If you decide to go ahead with a particular plug-in, installing it is simple. Just click
the Install Now link, which appears next to each plug-in in your search results (Figure
9-3) and in the “More information” window (Figure 9-4). When WordPress prompts
you to confirm your installation, click OK.
Typically, the installation takes just a matter of seconds. WordPress gives you
minimal feedback as it grabs the plug-in’s ZIP file, pulls all the plug-in files out of
it, and transfers them to an ad hoc folder it creates on your website (Figure 9-5).
For example, if you install Jetpack on the WordPress site
http://magicteahouse.
net
, WordPress creates the folder
http://magicteahouse.net/wp-content/plugins/
jetpack
for the plug-in files.
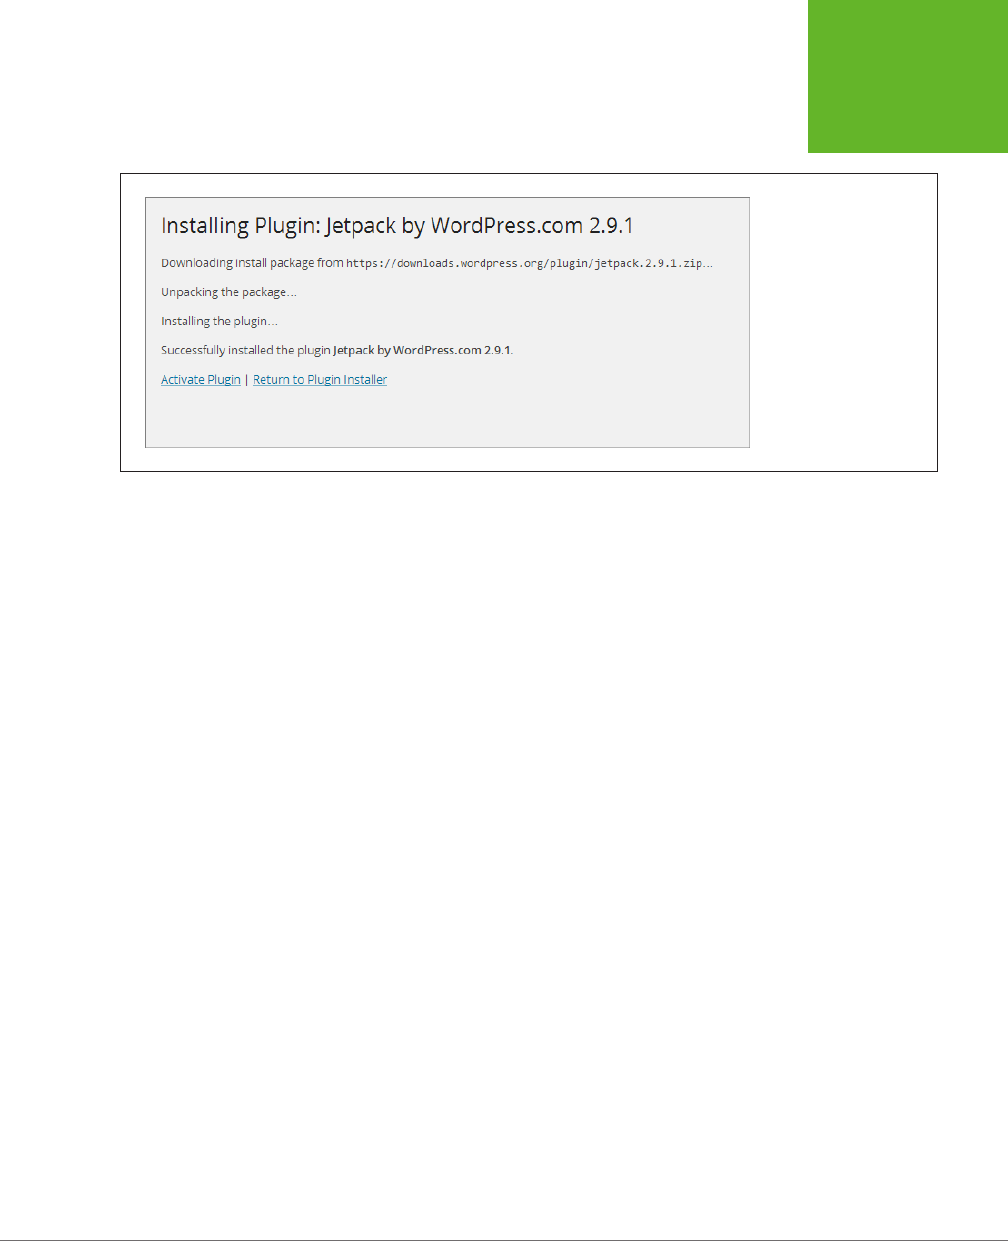
CHAPTER 9: GETTING NEW FEATURES WITH PLUG-INS 293
MANAGING
PLUG-INS
FIGURE 9-5
This is what you see
when you install Jetpack.
To start using it, click
Activate Plugin. To search
for another plug-in,
choose Return to Plugin
Installer.
Activating a Plug-In
Plug-ins are like themes—you can install as many as you want, but they have no
eect until you turn them on. One way to activate a plug-in is to click the Activate
Plugin link that appears when you first install the mini-program (Figure 9-5). But if
you want to activate a plug-in you already installed, go to Plugins→Installed Plugins
to see a list of available programs. Then click the Activate link under the name of
the plug-in you want to use. (If the plug-in is already active, you’ll see a Deactivate
link instead—click it to switch o the plug-in.)
You can’t always tell what a newly activated plug-in is up to. Often, there’ll be evi-
dence that a plug-in is active somewhere in the dashboard, but every plug-in works
dierently. Some provide a new page of options in the dashboard menu, others add
new widgets, some change the Add New Post or Edit Post pages, and some simply
start doing their work quietly in the background.
In a newly created WordPress site, you start with two inactive plug-ins, as you saw
back in Figure 9-1. To practice plug-in activation without risking anything on your
site, you can activate the harmless (but also useless) Hello Dolly sample plug-in.
When you switch it on, it adds a random lyric from Louis Armstrong’s song “Hello,
Dolly” to the top of every dashboard page (Figure 9-6).
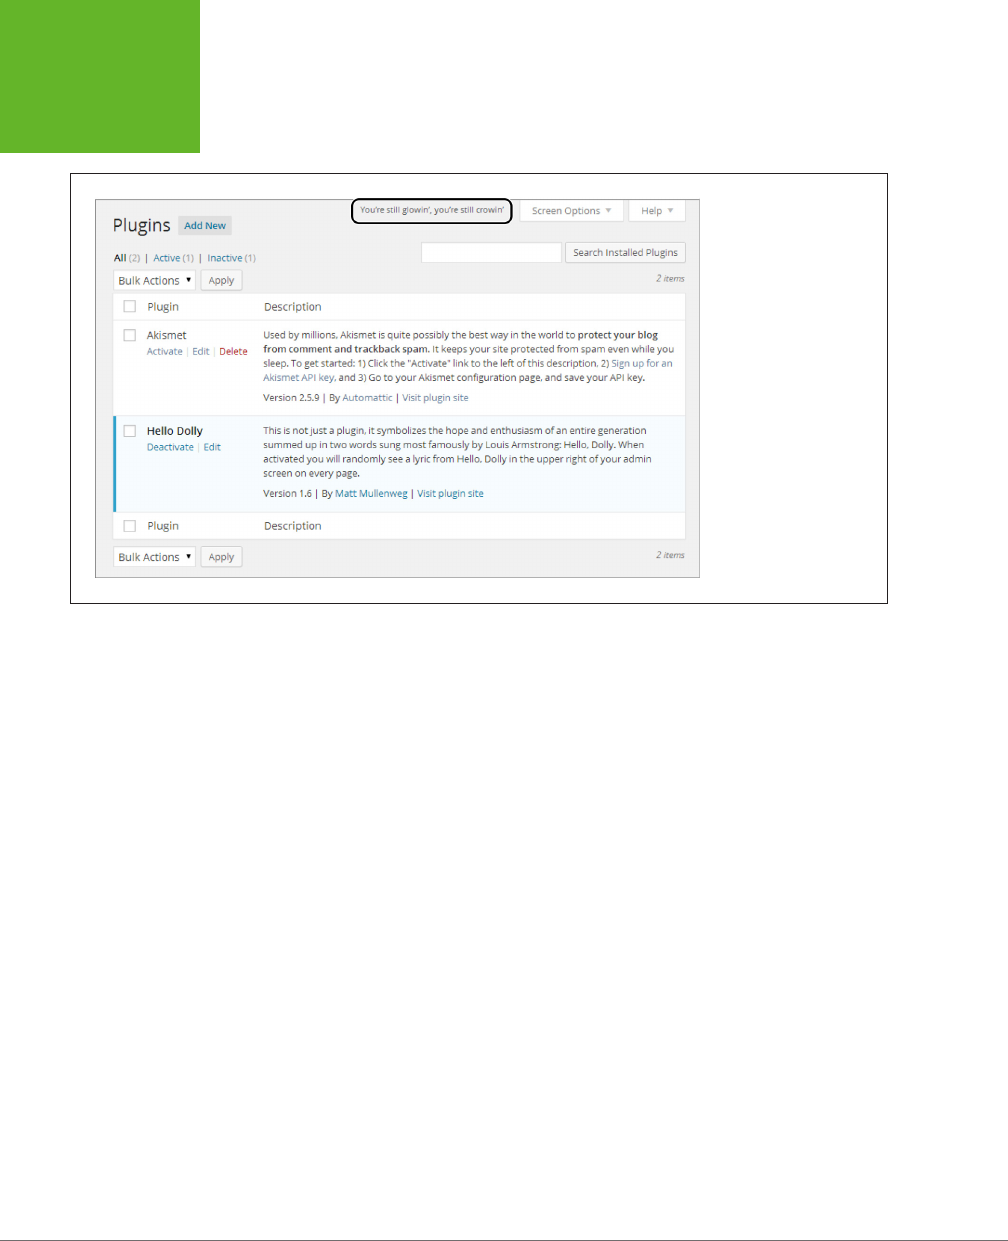
WORDPRESS: THE MISSING MANUAL
294
MANAGING
PLUG-INS
FIGURE 9-6
The Hello Dolly plug-in
adds song lyrics to every
dashboard page, which
is just enough to let you
know that the plug-in is
active. However, it’s safe
to assume that no one
uses Hello Dolly for long
on a real website.
The Hello Dolly plug-in needs no configuration. However, many plug-ins have their
own page (or pages) of settings that you can adjust. Confusingly, dierent plug-ins
put their settings in dierent places. Here are the three places to look:
• The top-level items in the dashboard menu. Some plug-ins add an entirely
new item to the dashboard menu. For example, if you install Jetpack, you see
a Jetpack menu item near the top of the dashboard, just above the Posts menu
(Figure 9-7). This is the most common place for plug-in settings, especially if the
plug-in oers plenty of options. But there’s no surefire way to know where your
plug-in’s link will appear. Some plug-ins put it near the top of the dashboard
menu (as does Jetpack), while others put it at the bottom (WPtouch).
• The Settings menu. Some plug-ins add a secondary menu under the Settings
menu. For example, to configure the Limit Login Attempts plug-in, you choose
SettingsÆLimit Login Attempts. Plug-ins are most likely to use this approach
when they have a small group of settings that fit on a single page. (Although
some plug-ins use tabs to cram a surprisingly large pile of settings into that one
page.) You may even find a rogue plug-in that stashes itself in the Tools menu.
• The Plugins page. As you know, WordPress lists every plug-in you install on
the Plugins page. Underneath each plug-in are links that let you activate, de-
activate, edit, and delete the plug-in. Some plug-ins add an additional Settings
link that you can click to review and edit the plug-in’s options. Depending on
the plug-in, this link may provide the only way to configure the plug-in, or it
may duplicate a top-level menu heading or a command in the Settings menu.
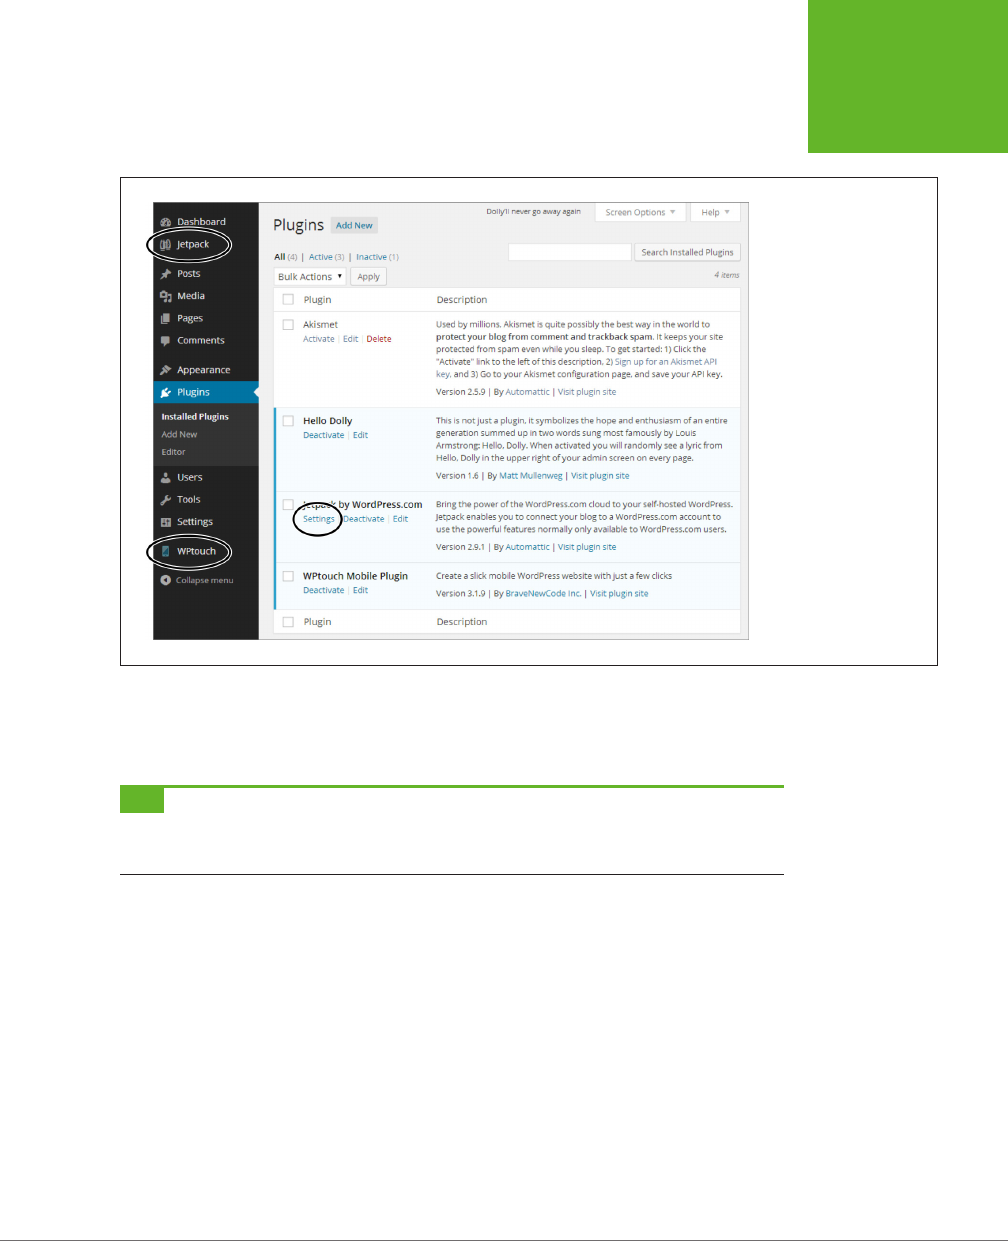
CHAPTER 9: GETTING NEW FEATURES WITH PLUG-INS 295
MANAGING
PLUG-INS
For example, clicking the Settings link under the Jetpack plug-in has the same
eect as clicking the Jetpack menu item (Figure 9-7).
FIGURE 9-7
This site has three active
plug-ins (highlighted).
The Hello Dolly plug-in
has no additional settings,
but both the Jetpack and
WPtouch plug-ins do,
and you can get to them
through dashboard menu
headings (circled on the
left). Jetpack also includes
a Settings link on the
Plugins page.
As you can see, dierent plug-ins often work in ways that are
similar,
but not the same.
For that reason, you need to learn the way each plug-in works individually. In the
remainder of this chapter, you’ll take a close look at several prime plug-in examples.
TIP You don’t need to keep plug-ins you don’t use. If you decide to trash a particular plug-in, choose
Plugins→Installed Plugins to call up the plug-in list, click Deactivate to switch a plug-in off (if it’s currently
active), and then click Delete to remove it entirely.

WORDPRESS: THE MISSING MANUAL
296
MANAGING
PLUG-INS
UP TO SPEED
Why You Don’t Want Too Many Plug-Ins
When new WordPress users discover plug-ins, their first
instinct is to load as much free goodness as they can onto
their sites. After all, if one plug-in is great, two dozen must
be mind-blowingly fantastic.
Before you get carried away, it’s worth pointing out the many
reasons you
don’t
want to install every plug-in you find:
• Performance. As you already learned, plug-ins use PHP
code to carry out their tasks. The more plug-ins you
activate, the more work you’re asking WordPress to
do. Eventually, this work might add up to enough of an
overhead that it begins to slow down your site. The plug-
ins that do the most work (and are thus the most likely to
hinder site performance) include those that back up your
site, log your traffic, search for broken links, and perform
search-engine optimization.
• Maintenance. The more plug-ins you have, the more
plug-ins you need to configure and update (when new
versions come out). It’s a relatively small job, but pile
on the plug-ins and you might find yourself with some
extra work.
• Security. Plug-ins can have security holes, especially if
they’re poorly designed or out of date. More plug-ins
can mean more risk.
• Compatibility. Sometimes, one plug-in can mess up
another. If your site uses a huge thicket of plug-ins, it’s
difficult to track down which one is at fault. You need to
resort to disabling all your plug-ins and then re-enabling
them one at a time, until the problem recurs.
• Obsolescence. Often, plug-ins are developed by helpful
people in the WordPress community who need a given
feature and are ready to share their work. But there’s a
downside to this development model—it makes it more
likely for an author to stop developing a plug-in (for
example, when he doesn’t need it anymore or when he
just doesn’t have the time). Eventually, a new version of
WordPress may break an old plug-in you depend on, and
you need to scramble to find a substitute.
The best way to avoid problems like these is to use popular,
regularly updated plug-ins, make sure they’re always up to
date, and keep the number of plug-ins you use small.
Keeping Your Plug-Ins Up to Date
Every time you install a plug-in, you extend WordPress’s features. If one of your
plug-ins has a security vulnerability, it creates a chink in your website’s armor that
exposes you to legions of cyber-attackers.
To avoid security problems, stick with well-used and well-loved plug-ins—those that
have stood the test of time, are in widespread use, and are still regularly revised. And
just as it’s important to keep WordPress secure and up to date, it’s also important
to make sure you have the latest, most reliable versions of all your plug-ins.
Although WordPress can keep itself up to date, it’s up to you to keep your plug-ins
current. The quickest way to spot an out-of-date plug-in is to look at the Plugins
heading in the dashboard menu. If WordPress notices that there’s a new version
of one or more of your plug-ins, it shows a number in a circle indicating how many
updates await you. For example, if updates are available for three of your plug-ins,
you see the number 3 in a circle (Figure 9-8, top). This happens regardless of whether
your out-of-date plug-ins are active.
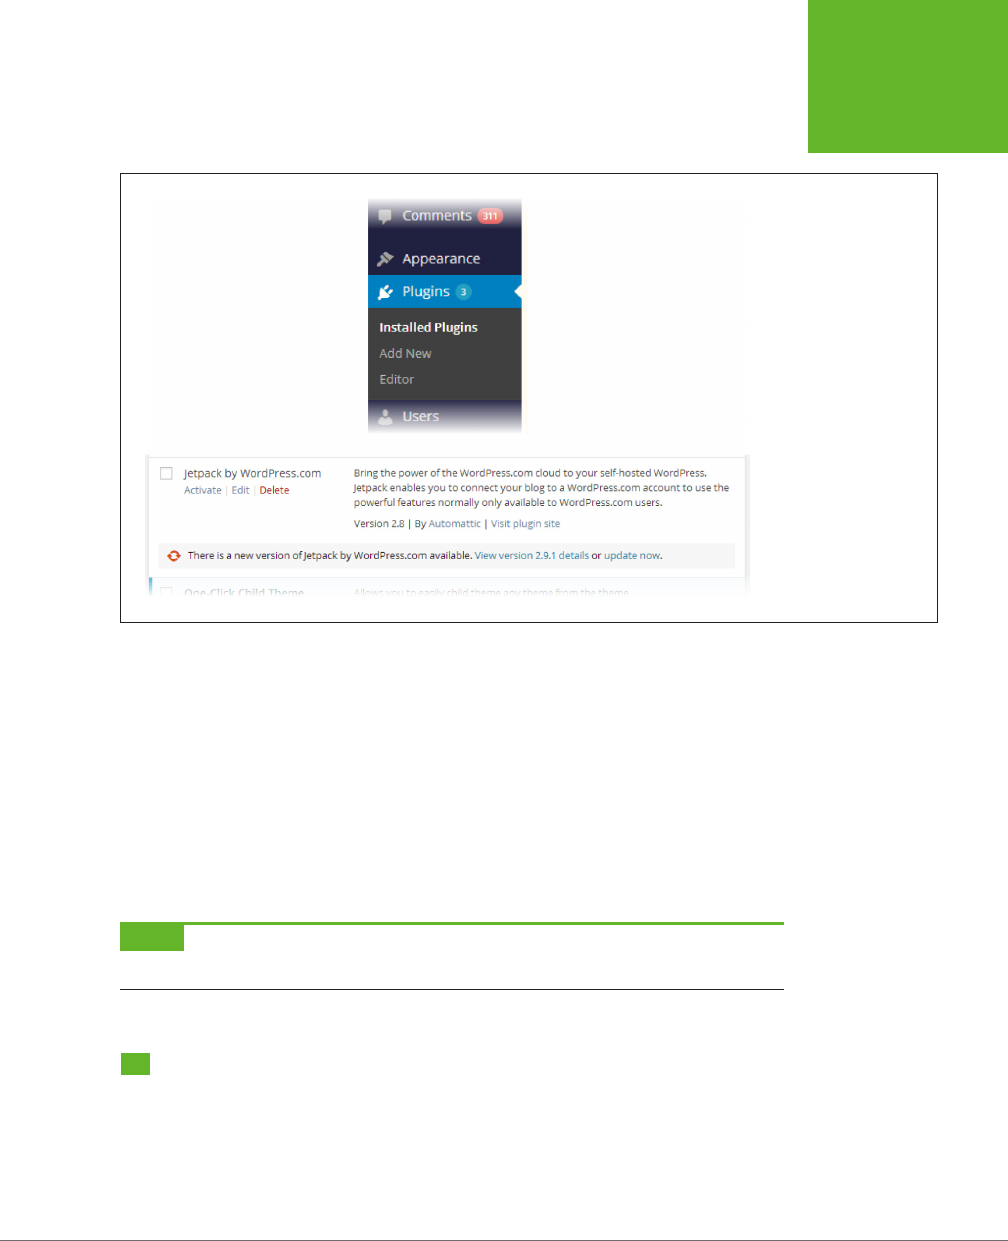
CHAPTER 9: GETTING NEW FEATURES WITH PLUG-INS 297
THE JETPACK
PLUG-IN
FIGURE 9-8
Top: WordPress wants
you to know that your
site has three out-of-date
plug-ins.
Bottom: When WordPress
finds an update for a
plug-in, it displays an
“update now” link under
it on the Plugins page.
You should always update your plug-ins as soon as possible. In fact, if you see the
number-in-a-circle, you should probably stop what you’re doing and install the new
plug-ins straightaway. Typically, updates take just a few seconds, so you won’t be
stalled for long.
There are two easy ways to update a plug-in. You can do so from the Plugins page
by clicking the “update now” link under the plug-in (Figure 9-8, bottom). Or, you can
update numerous plug-ins at once using the Updates page (Dashboard→Updates),
which lists all the out-of-date themes and plug-ins on your site. Check the box next
to each plug-in you want to update and then click Update Plugins. Blink twice, and
WordPress will let you know that everything is up to date.
NOTE You must keep
all
your plug-ins up to date, even those that aren’t currently active. That’s because
hackers can still access the inactive plug-ins on your site and exploit any security flaws they contain.
The Jetpack Plug-In
As you already know, WordPress.com sites don’t let you install plug-ins. But to keep
people happy, Automattic adds extra frills with its own, carefully tested plug-ins.
Every WordPress.com site gets these extras, and as a result, a stock WordPress.
com site actually has
more
features than a newly installed self-hosted site. (But

WORDPRESS: THE MISSING MANUAL
298
THE JETPACK
PLUG-IN
now that you know how to browse the plug-in directory, with its thousands of site
enhancements, you can get your revenge pretty easily.)
If you don’t want to track down dozens of plug-ins, but you do want a simple way
to get the same features that WordPress.com sites have, there’s a simple, all-in-one
solution. It’s Jetpack, a plug-in developed by the folks who built WordPress.com,
and equipped with almost all the same great features.
To learn about Jetpack’s features, visit
http://jetpack.me
. Highlights include a picture
carousel (covered on page 333), contact forms (page 301), enhanced comments
(Chapter 8), Twitter and Facebook sharing (Chapter 12), and statistics about the
people who visit your site (Chapter 12).
NOTE The Jetpack plug-in is a useful way to get a pile of handy features in one package. You’ll use it on and
off throughout this book. However, many WordPress experts avoid Jetpack’s cornucopia of plug-ins, preferring to
pick and choose plug-ins that provide just the features they need. For example, they may use separate plug-ins
for Facebook buttons, website statistics, and contact forms, rather than try to get them all through Jetpack. This
is a bit more work, but it’s really up to you to decide what works best for your site.
Signing Up with WordPress.com
You already know how to install the Jetpack plug-in—just search the plug-in direc-
tory for “jetpack” and click the Install Now link.
However, Jetpack has one additional (and slightly irritating) setup requirement. To
use it, you need a WordPress.com user ID and password, even though you don’t
plan to host any sites on WordPress.com.
After you activate Jetpack, the plug-in notifies you about this extra requirement with
a message above the plug-in list. Here’s how to get Jetpack to recognize your single-
purpose WordPress.com account and get the plug-in working on your hosted site:
1. Click the “Connect to WordPress.com” button to set up the connection.
The Jetpack plug-in takes you to
http://jetpack.wordpress.com
and invites you
to fill in your WordPress.com user name and password.
If you’ve ever created a site with WordPress.com, you already have these de-
tails—you don’t need to create a new account, because you can use the same
one for as many Jetpack-enabled websites as you want. To finish the setup
process, enter your information and click Authorize Jetpack.
If you’ve never used WordPress.com before, now is the time to create an ac-
count. Continue to the next step.
2. Click the “Need an account” link.
You see the standard WordPress.com sign-up page. The dierence is that now
WordPress.com assumes you want an account only, not a WordPress.com site. (If
for some reason you
do
want a WordPress.com site, you could create it later, or you
can click the “Sign up for a blog, too” link to get it as part of the sign-up process.)
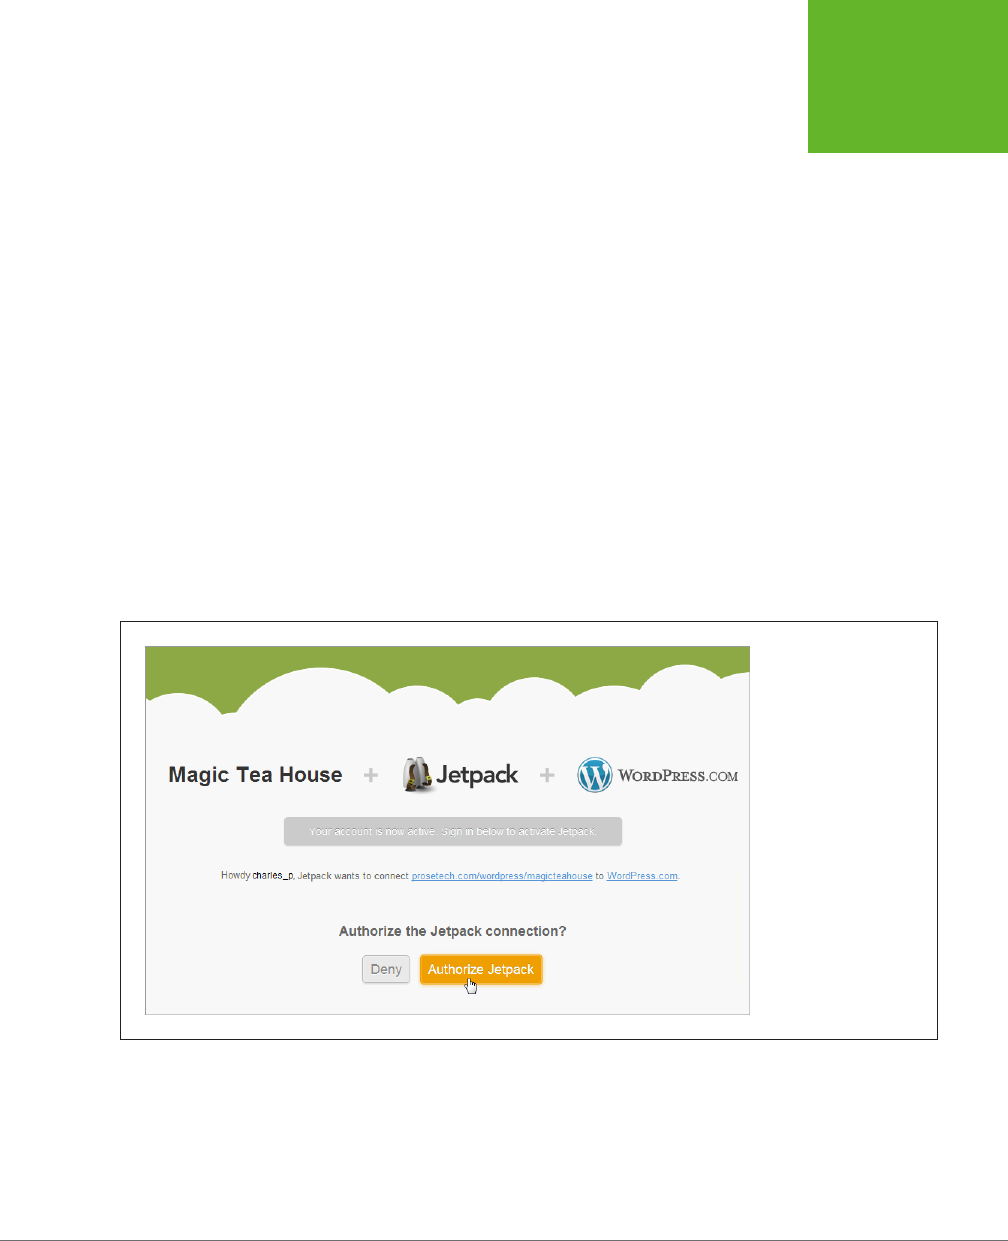
CHAPTER 9: GETTING NEW FEATURES WITH PLUG-INS 299
THE JETPACK
PLUG-IN
3. Type in a user name, password, and email address.
Your user name can be any combination of letters and numbers, so long as there
isn’t another WordPress.com member already using it.
Your password can be anything, but you should definitely make it dierent
from the password you use for your self-hosted site or for your web host’s
administrative interface.
Your email address is an essential detail, because WordPress.com sends you an
activation email. If you don’t get it, you can’t activate your account.
4. Click the “Sign up” button.
Now you need to wait for the activation email message.
5. When the email arrives, click the activation link inside.
That brings you back to the Jetpack page, and the link logs you into your Word-
Press.com account automatically (Figure 9-9).
6. Click Authorize Jetpack.
WordPress brings you back to your self-hosted site, where Jetpack is now
running.
FIGURE 9-9
Before WordPress
activates Jetpack, it asks
if you want to use your
WordPress.com user
account (in this example,
that’s charles_p’s ac-
count) to activate Jetpack
on this site (Magic Tea
House).
Some of Jetpack’s features need to be switched on before they become operational.
To activate them (and to review everything Jetpack oers), choose Jetpack in the
dashboard menu.
You’ll see many of Jetpack’s features in later chapters. In the following sections,
you’ll try out three to get a taste of what the plug-in can do.

WORDPRESS: THE MISSING MANUAL
300
THE JETPACK
PLUG-IN
Using the Image Widget
You may remember from Chapter 6 that you can use the Text widget to display a
picture in your site’s sidebar, using a tiny bit of HTML. The trick is to put an <img>
element that points to your picture inside the Text widget (page 188).
WordPress.com users have an easier (albeit less flexible) tool: the Image widget.
And now that you signed up with Jetpack, you’ve got the same advantage. Here’s
how to put the Image widget to use:
1. Choose AppearanceÆWidgets.
This takes you to the familiar Widgets page in the dashboard. There you see a
few new widgets that have Jetpack in the name, including one called “Image
(Jetpack).”
2. Drag the Image widget to one of the widget areas on the right.
When you drop the widget into place, it expands to show a number of text
boxes where you can fill in important details (Figure 9-10).
3. Fill in the information for your widget.
Obviously, the most important detail is the image URL—the location of the image
you want to show. Usually, this is a file you uploaded to your site’s media library.
If you don’t remember the address, you need to browse the Media→Library
section of the dashboard, as explained on page 186.
Along with the image URL, you can choose a title for the widget, give the picture
a caption and alternate text, and turn it into a link that takes viewers to a web
address you specify. You can also set a display size. If you don’t, WordPress
displays the image as close as possible to its full, natural size, without exceeding
the space available in the sidebar (or whatever widget area you placed it in).
4. Click Save.
Now the widget appears on your site, showing the image you picked.
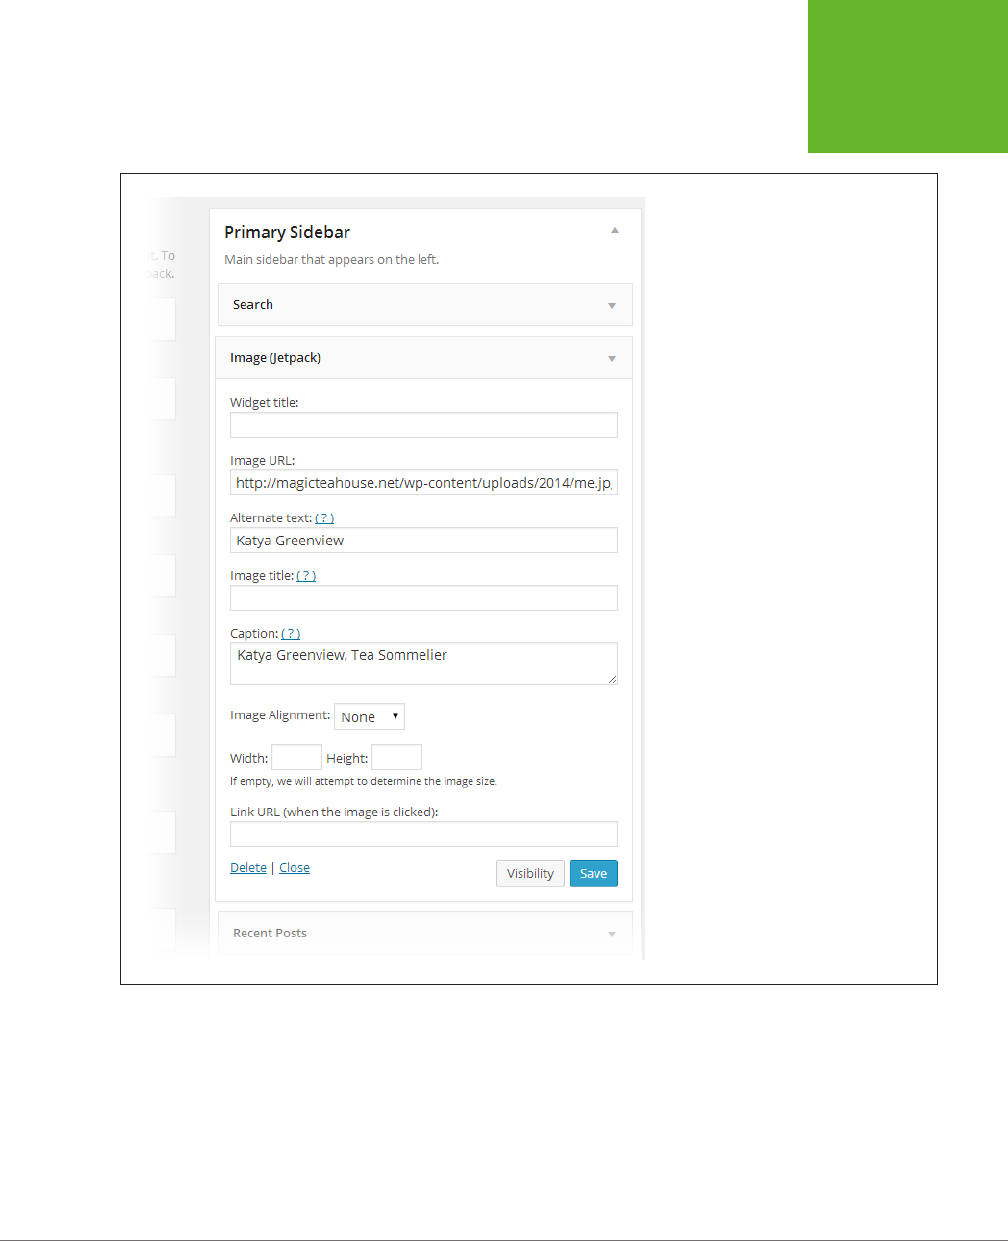
CHAPTER 9: GETTING NEW FEATURES WITH PLUG-INS 301
THE JETPACK
PLUG-IN
FIGURE 9-10
You can add the Jetpack Image widget to
your site’s sidebar, just as you can add
WordPress’s standard widgets.
Adding a Contact Form
The Image widget is far from an essential tool, but it
is
a real convenience, as are
many of Jetpack’s features. However, Jetpack also includes some features that would
be significantly more work to duplicate on your own. One is its contact form, which
lets you solicit readers for any sort of information you want (Figure 9-11).
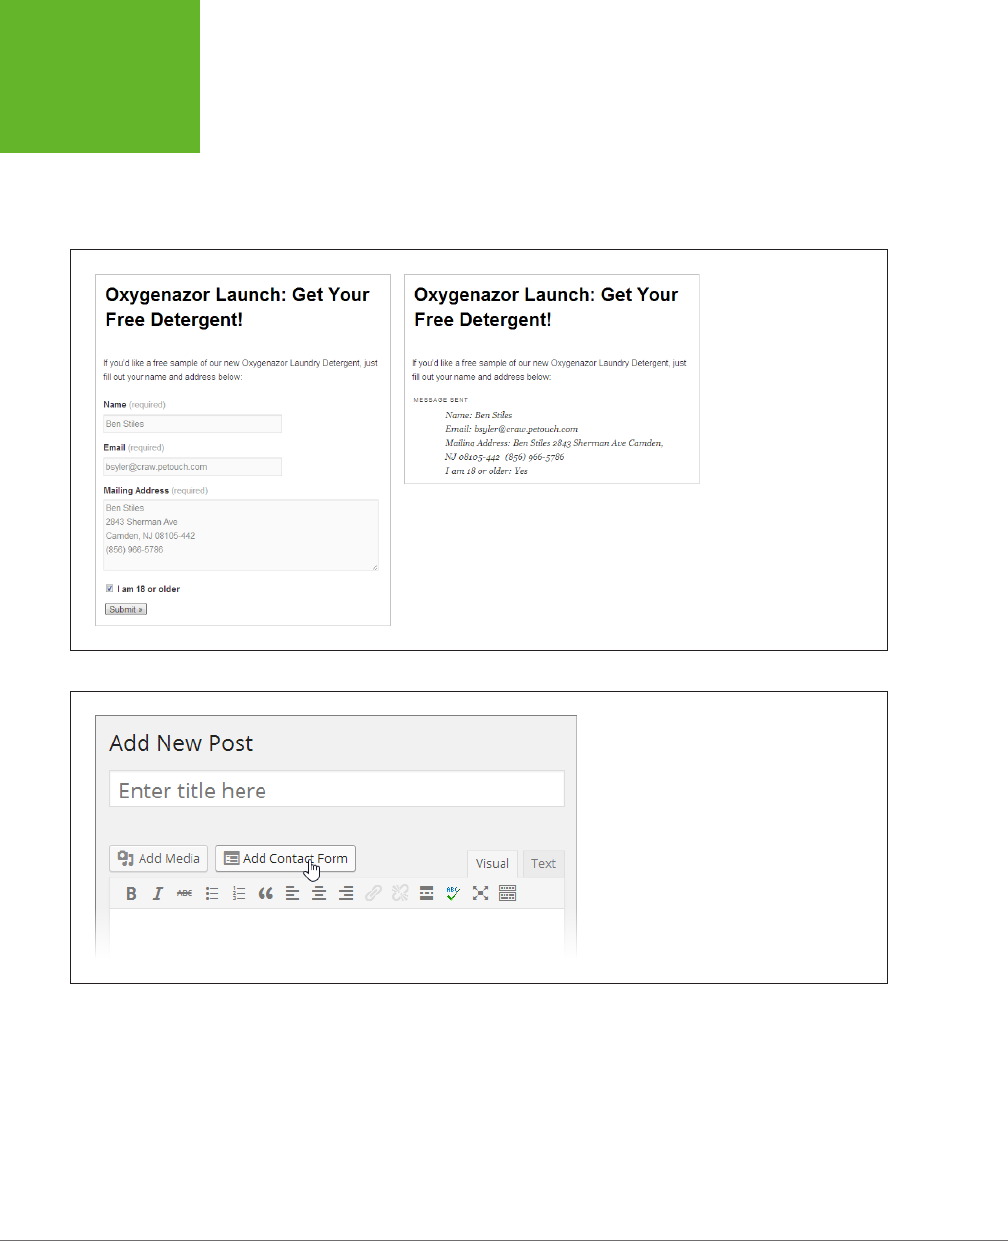
WORDPRESS: THE MISSING MANUAL
302
THE JETPACK
PLUG-IN
Often, you use contact forms to collect names, email addresses, postal addresses,
or support questions. However, Jetpack is clever enough to let you build your own
form, which you can edit to collect whatever information you want. To get started,
you create a new post, and then click Add Contact Form (Figure 9-12) above the
content box, to the right of the Add Media button.
FIGURE 9-11
The idea behind a contact
form is to solicit informa-
tion from your guests. A
reader fills in these blank
text boxes (left), and then
submits the form (right).
WordPress collects the
information, and passes it
along to you in an email.
FIGURE 9-12
If you wonder why you haven’t noticed the Add
Contact Form button before, it’s because you
didn’t have it until you installed Jetpack. Clicking
the button adds a contact form to any post.
Once you click Add Contact Form, the “Add a custom form” window opens (Figure
9-13) so you can design your survey. The window asks you to add “fields,” which
is just a geeky way of saying that you need to specify the way a visitor can enter
information, such as through a text box or drop-down list (see the box on page 304
for a detailed explanation).
Here’s what you can do in the form builder:
• Remove a field. Click the minus sign (-) on the right side of the field to delete it.
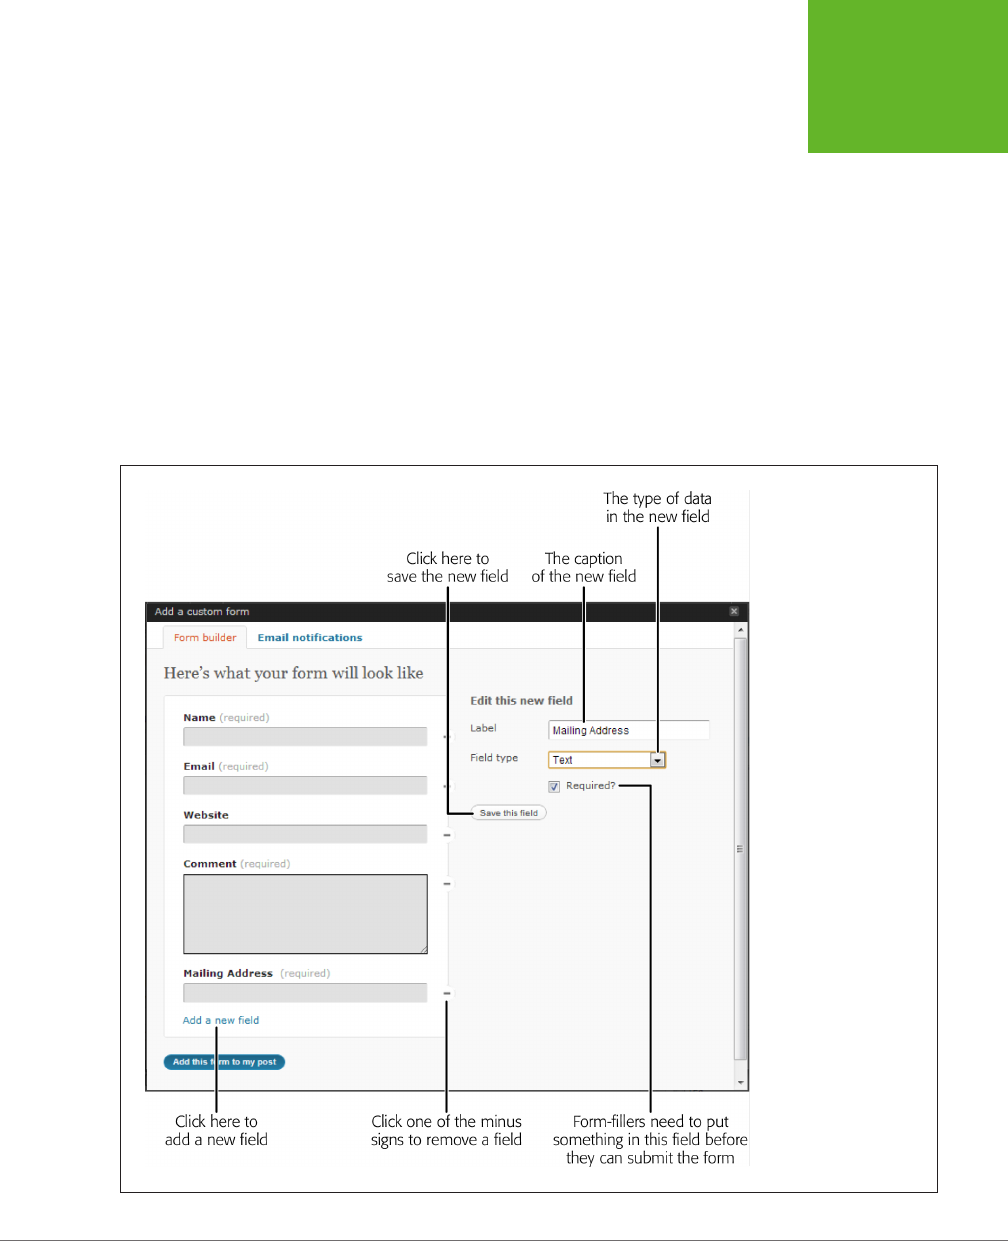
CHAPTER 9: GETTING NEW FEATURES WITH PLUG-INS 303
THE JETPACK
PLUG-IN
• Add a new field. Click “Add a new field” and then enter the field information.
Every field needs a label (the text above the field) and a “Field type” (the way
the field collects information). Use Text for an ordinary single-line text box and
Textarea for a big, multiline box, or pick one of the more specialized field types
described in the box on page 304. Optionally, turn on the Required checkbox
to force readers to complete a field before they can submit the form. When you
finish, click “Save this field.”
• Rearrange your fields. Point to the field you want to move until a “move” link
appears in the top-right corner. Click the link and then drag the field up or down.
(You can’t put fields side by side.)
• Change your email settings. Ordinarily, WordPress sends the data from the
form a visitor submits to your administrator email. If you want to use a dierent
email account, click the “Email notifications” tab and fill in the new address.
FIGURE 9-13
When you create a new
form, Jetpack starts you
out with four “fields,”
in this case text boxes
(Name, Email, Website,
and Comment). You can
remove the fields you
don’t want and add new
ones. Here, you added a
field for a postal address.

WORDPRESS: THE MISSING MANUAL
304
THE JETPACK
PLUG-IN
UP TO SPEED
Contact Form Field Types
WordPress’s contact form lets you choose from a small set of
field types
—the means by which you collect information. Here
are your choices:
• Text. This is your standard-issue single-line text box.
• Textarea. This is a bigger text box that can hold whole
paragraphs of information. Once you add a textarea box,
you can drag the bottom-right corner to make it as big
as you want.
• Checkbox. This is a way to let guests turn options on or off.
• Drop down. This is a list of values (which you specify) that
you stuff into a drop-down list. The person filling out the
form picks a single value from the list.
• Radio. This is a list of values like the “Drop down” box, but
the form-filler sees all his choices at once (they’re listed
on the page). He clicks a small circle next to the option he
wants. Usually, you use this field to list just a few choices,
and use “Drop down” for a long list of options.
• Email, Name, and Website. These field types look like
ordinary text boxes, but WordPress is smart enough to
automatically fill in the current guest’s email address
and name if it knows those details (for example, if the
person recently left a comment on your site). WordPress
also performs some basic error checking to catch bad
email addresses.
When you finish perfecting your form, click “Add this form to my post” at the bot-
tom of the window. Jetpack inserts a series of strange-looking codes into your post,
wrapped in square brackets (Figure 9-14).
TIP You can edit a post’s form by clicking Add Contact Form while you edit the post, which loads the form
builder with the form, just as you left it.
When someone submits a contact form, WordPress sends you an email. That person
can fill out the form more than once (in which case WordPress sends you multiple
messages). If you’re tired of juggling the notification emails, WordPress lets you
review all the responses in a single place, the dashboard. Click Feedback in the
dashboard menu to see a list of form submissions, arranged just like the dashboard’s
comment list.
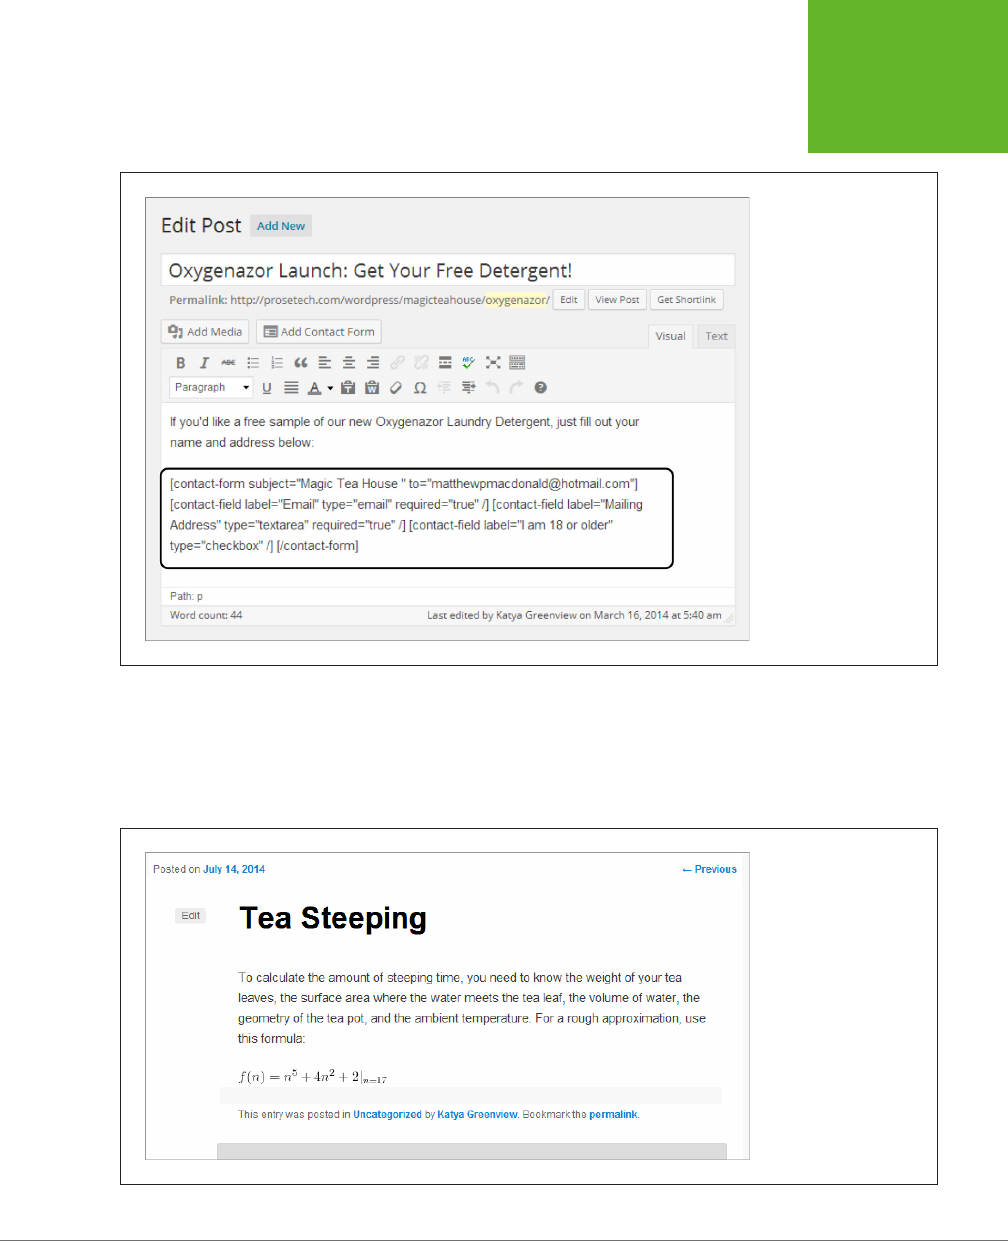
CHAPTER 9: GETTING NEW FEATURES WITH PLUG-INS 305
THE JETPACK
PLUG-IN
FIGURE 9-14
To create a contact form,
Jetpack uses shortcodes,
a WordPress feature you’ll
learn about on page
323. However, you don’t
need to pay them any
attention—as long as you
leave them alone, your
form will appear in the
published post just the
way you want it. (Adding
content above or below
the form code, however, is
perfectly acceptable.)
Adding a Mathematical Equation
The creators of WordPress also included some more specialized, quirkier plug-ins.
One intriguing example is the mathematic equation feature demonstrated in Figure
9-15, which is the last Jetpack feature you’ll look at in this chapter.
FIGURE 9-15
This page mixes ordinary
content with a properly
formatted mathematical
equation.

WORDPRESS: THE MISSING MANUAL
306
THE JETPACK
PLUG-IN
To create an equation with Jetpack, you use the LaTeX typesetting language, a
standard in the technical publishing industry. For example, you write the equation
in Figure 9-15 like this in LaTeX:
f(n) = n^5 + 4n^2 + 2 |_{n=17}
LaTeX isn’t a kind of HTML markup, and browsers don’t know anything about it. To
turn a LaTeX expression into a formatted equation for your web page, you need a
translation program. A variety of JavaScript libraries can do the job, with varying
degrees of success, but if you use Jetpack, you don’t need to worry about another
plug-in. Instead, you slip your LaTeX expression between two special codes: [latex]
and [/latex].
For example, to create the post shown in Figure 9-15, you type the equation right
into the post editor, as shown here:
To calculate the amount of steeping time, you need to know the weight of your
tea leaves, the surface area where the water meets the tea leaf, the volume
of water, the geometry of the tea pot, and the ambient temperature. For a
rough approximation, use this formula:
[latex]f(n) = n^5 + 4n^2 + 2 |_{n=17}[/latex]
When WordPress processes this page, the Jetpack plug-in notices the [latex] code,
and interprets the content inside as a LaTeX expression. It replaces the expression’s
text with a series of stitched-together image files. The result is a properly formatted
equation that any mathematician can understand (and any browser can display).
NOTE Technically, the [latex] and [/latex] syntax is part of a WordPress
shortcode
—a way of getting Word-
Press to insert special content using an instruction in square brackets. WordPress recognizes a few shortcodes
automatically, and plug-ins can add their own. You’ll learn more about shortcodes in Chapter 10.
Of course, you can’t take advantage of Jetpack’s LaTeX wizardry unless you know a
bit about the LaTeX standard (or you have a prewritten equation in LaTeX format).
To learn more, start with the general tutorial at
http://tinyurl.com/latexmath
. If you
find writing your own LaTeX expressions daunting, you can get some help from the
LaTeX equation generator at
http://tinyurl.com/latexequation
. It lets you build a
LaTeX expression by clicking your way through a mess of buttons. Finally, you can
review WordPress’s documentation for the LaTeX feature at
http://support.word-
press.com/latex
, which covers a few extra, WordPress-specific details (for example,
it explains how to change the size of the generated equation, and how to adjust its
background color if you want it to stand out on your page).
The next time you’ll use Jetpack is in Chapter 10, to give your site a photo carousel
or slideshow. But now it’s time to review some other useful plug-ins.

CHAPTER 9: GETTING NEW FEATURES WITH PLUG-INS 307
ADDING
MOBILE
SUPPORT
Adding Mobile Support
In Chapter 5, you considered a thorny question—what does your carefully crafted
WordPress site look like if someone views it on a mobile device, like a smartphone
or tablet?
For self-hosted sites, the answer all depends on the theme you choose. If you use a
mobile-aware theme (sometimes called a
responsive
theme), your site automatically
adjusts its design when it detects a mobile device, substituting a simpler, stream-
lined layout that fits on the smaller display. The standard year themes, from Twenty
Eleven on, are all mobile-aware.
If your theme doesn’t have these built-in smarts, you get a result that’s much less
ideal. When people visit your site with a mobile device, they see the normal, full-size
layout, which means they need to zoom and scroll around it awkwardly. The eect
is a minor inconvenience on a midsized device like an iPad, but a serious aggrava-
tion on a small device like an iPhone. Readers may find that reading your site isn’t
worth the finger cramps.
The solution is a plug-in that adds mobile support without disrupting your chosen
theme. Several popular plug-ins handle the task, and they all work the same way, by
swapping in a dierent theme when they detect a mobile device. The best plug-ins
are smart enough to tailor the substitute theme for specific devices, so iPad owners
see something a bit dierent from iPhone owners, for example.
TIP Even if you
do
use a mobile-aware theme, you might still decide to use a mobile plug-in if the mobile
representation of your site isn’t what you want. Maybe the mobile face of your site is too plain, performs slug-
gishly, or wastes too much space with a long post list. Perhaps the menus and widgets you chose for the desktop
version don’t make sense in the cramped window of a smartphone, no matter how they’re arranged. Good mobile
plug-ins give you a range of ways to tailor the appearance of your site on mobile devices. For example, you can
change the menus, substitute a different home page, and even swap in smaller image files.
WPtouch, a wildly popular WordPress plug-in with millions of downloads to its
name, lets you create a distinct mobile face for your site. You can find it at
http://
tinyurl.com/wptouch
.
UP TO SPEED
Using the Plug-In Links in This Book
In this chapter (and throughout this book), you’ll frequently
come across links to useful WordPress plug-ins. These links
take you to WordPress’s plug-in directory, at
http://wordpress.
org/plugins
. There, you get extensive information about the
plug-in, including how it works, the number of times it’s been
downloaded, its star rating, and its compatibility informa-
tion (just as you can in the plug-in details window shown in
Figure 9-4).
You can download a plug-in from the directory, presumably
so you can upload it to your site later, from the Plugins→Add
New page. But you don’t need to go through this two-step
download-and-then-upload process. To install a plug-in
discussed in this book, log in to your site’s dashboard, search
for the plug-in by name, and then click the Install button to
transfer it in one step.
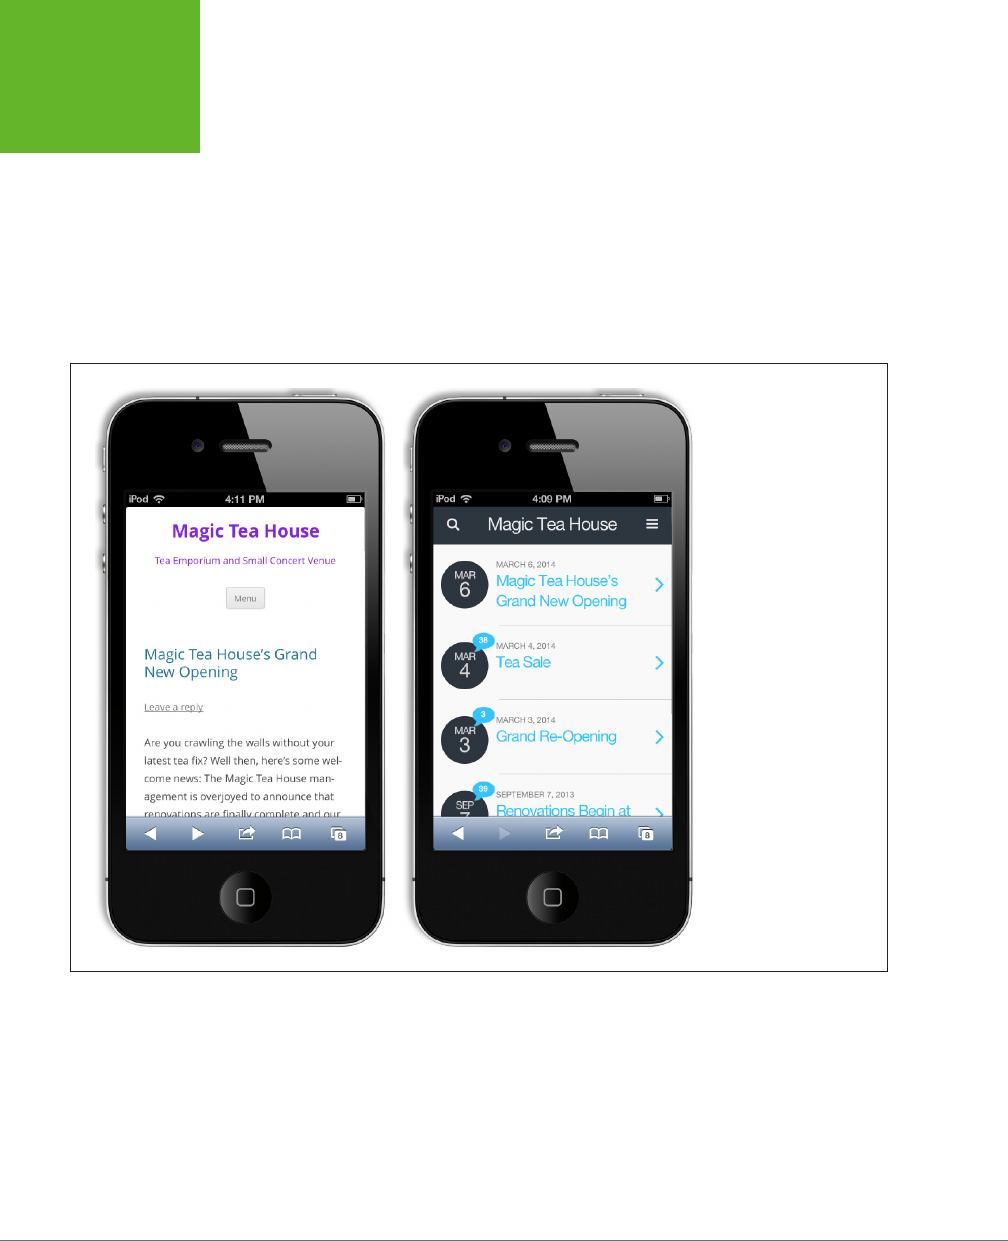
WORDPRESS: THE MISSING MANUAL
308
ADDING
MOBILE
SUPPORT
The WPtouch Mobile Theme
WPtouch recognizes a range of smartphones and touch devices, including Apple
products (that’s the iPhone, iPad, and iPod Touch), devices running the Google
Android operating system, BlackBerry devices, and even old-school Palm gadgets.
When one of these devices hits up your site, WPtouch steps in and displays your
content using its slick mobile theme. It doesn’t matter whether your original site
theme is mobile-aware or not. WPtouch bypasses it completely.
Once you install and activate WPtouch, you’re ready to try it out. Figure 9-16 shows
what happens when a guest visits a WPtouch-enabled site with an iPhone.
FIGURE 9-16
Left: Although Twenty
Twelve is a responsive
theme, it’s not a perfect
match for mobile devices.
For one thing, the post
list on the home page
includes the whole text of
every post, which makes
for a lot of scrolling.
Right: WPtouch’s mobile
theme keeps the list of
posts simple, highlight-
ing the title, date, and
number of comments, but
leaving the content out.
The WPtouch mobile theme (Figure 9-17) departs from the average WordPress
theme in several important ways:
• WPtouch ignores widgets when it creates a mobile version of your site.
This is quite dierent from the mobile version of the year themes, like Twenty
Twelve. They retain all your widgets but place them before or after the main
content. This ensures that the mobile view doesn’t sacrifice anything important
from the desktop site, but it also creates a long and somewhat unwieldy page.
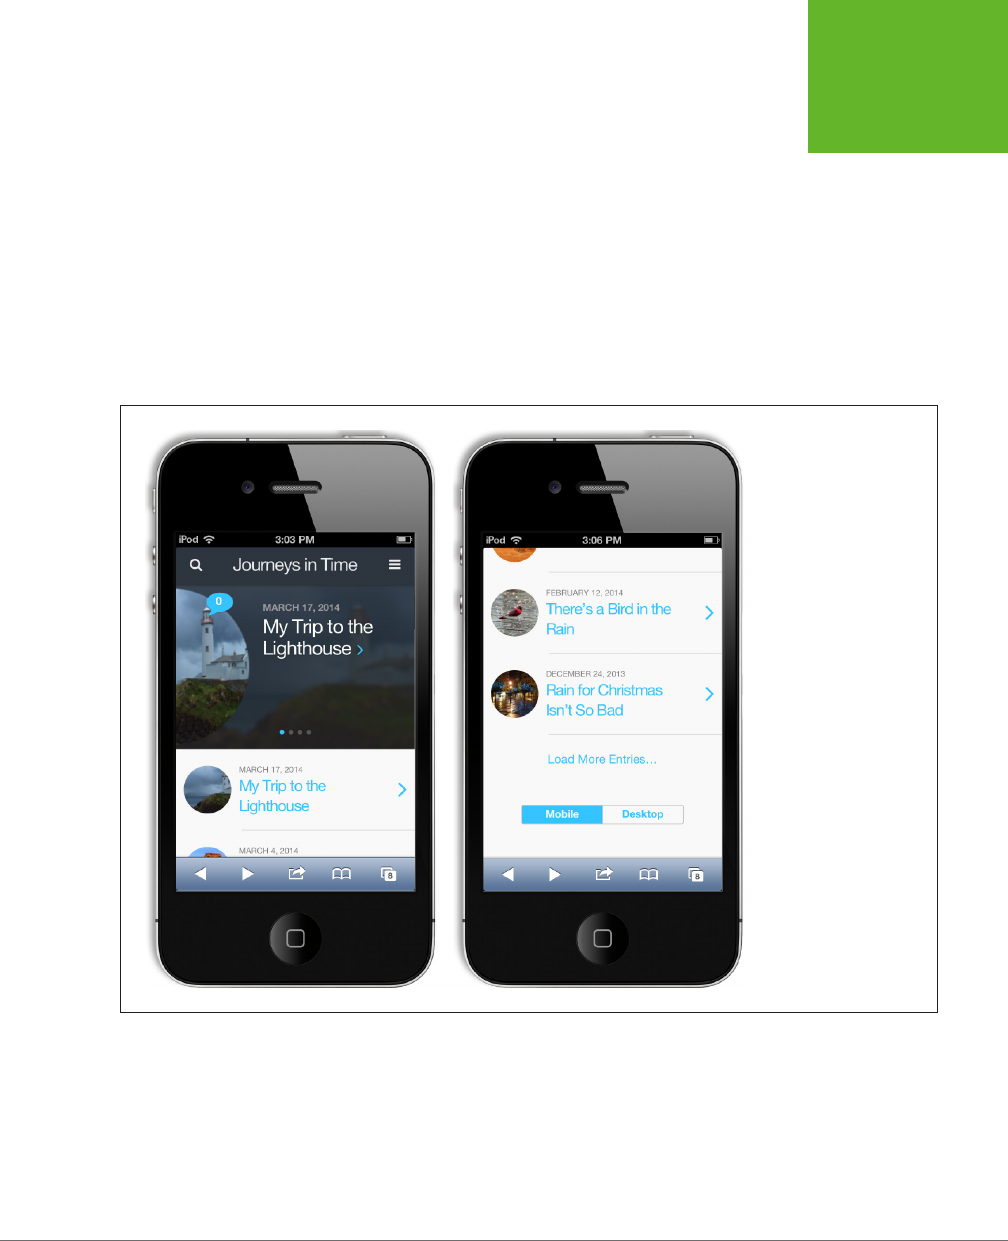
CHAPTER 9: GETTING NEW FEATURES WITH PLUG-INS 309
ADDING
MOBILE
SUPPORT
• WPtouch doesn’t display any content in post listings. Instead, it simply shows
the title, date, and number of comments for each post. Mobile surfers need to
tap a title to read the post. Once again, this diers from the year themes like
Twenty Twelve, which list all the content and force mobile readers to scroll the
day away. (Incidentally, you can tweak the way WPtouch shows posts using
post excerpts, as described on page 198.)
• WPtouch doesn’t load all your posts at once. Instead, the page ends with a
Load More Entries link. Click it, and the page fetches a new batch of posts and
adds them to the bottom of the page. The page uses clever JavaScript code to
stu in just the new content without refreshing the whole page (Figure 9-17,
right).
FIGURE 9-17
Left: If you use featured
images, WPtouch shows
them off in a slider at the
top of the home page (to
switch the slider off, see
page 311). It also displays
the images in a circle next
to each post.
Right: Scroll to the bot-
tom of the screen and you
see a link to load more
posts, along with a button
named Desktop that lets
you turn the WPtouch
mobile theme off. Click
the button, and WPtouch
refreshes the page, hand-
ing control back to your
site’s original theme.
Configuring WPtouch
The WPtouch mobile theme overrides your standard theme completely. That means
that even if your current theme has its own mobile-specific version, WPtouch replaces
it. (If you
do
want to use the mobile version of your theme, deactivate the WPtouch
plug-in on the Plugins page.)
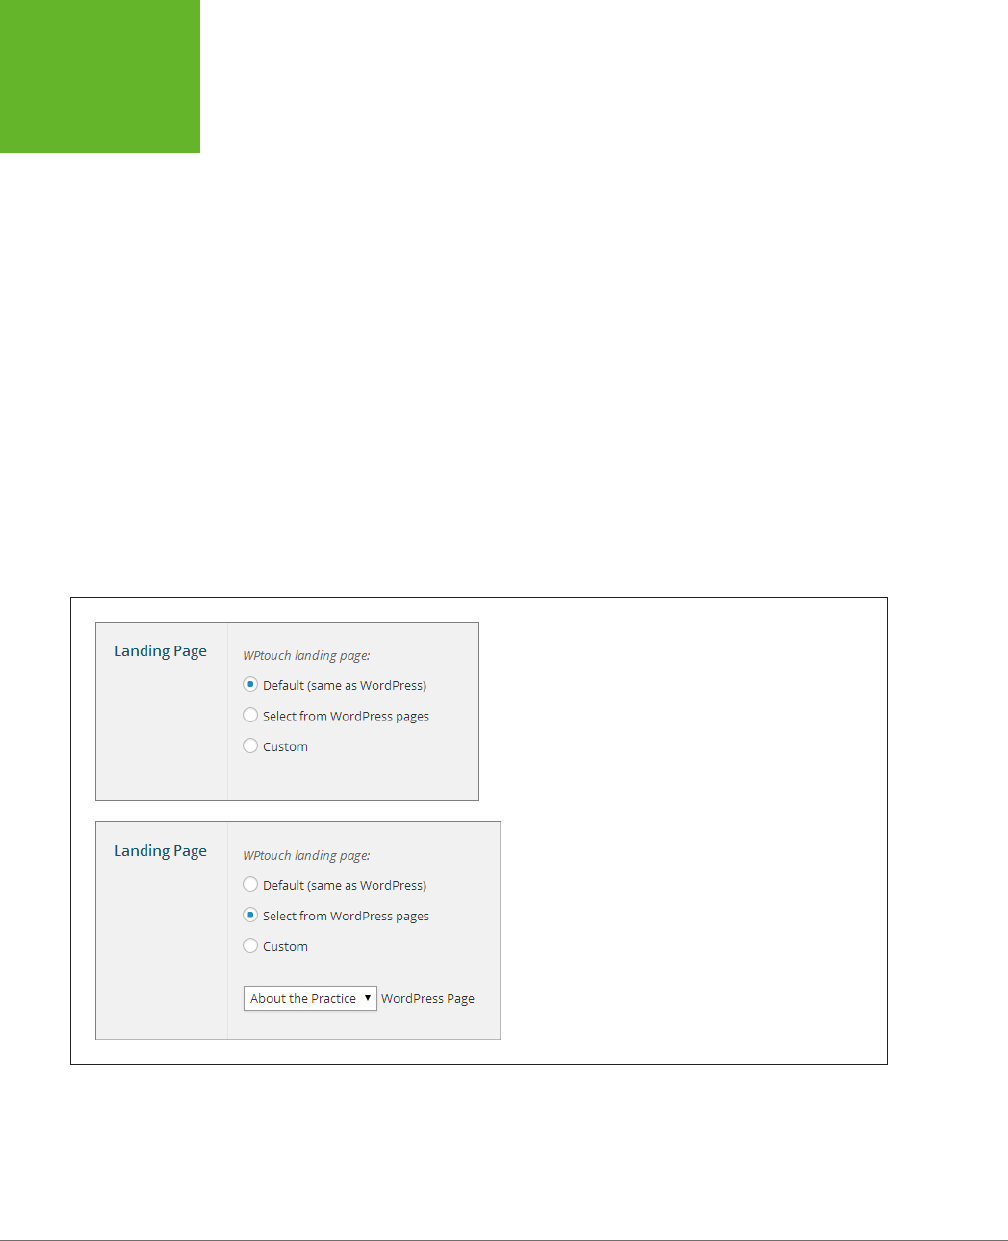
WORDPRESS: THE MISSING MANUAL
310
ADDING
MOBILE
SUPPORT
That said, WPtouch does give you some leeway to customize the way it looks. To
review your options, browse through the many pages in the WPtouch menu. For
example, the WPtouch→Core Settings page includes these gems:
• Site Title. Remember, WPtouch displays the title of your site but no header
picture. If you want to change the site title that appears in the mobile theme
without changing the site title for everyone else, you do that here. This is handy
if you need to shorten a long title so it fits comfortably on smaller screens.
• Landing Page. Ordinarily, WPtouch respects your WordPress settings, meaning
that visitors start at the list of posts on your home page or on a static page,
depending on your “Front page displays” setting (page 230). But you might
decide that mobile viewers should start somewhere other than that. Maybe
you want them to bypass the ordinary home page because it’s too long and
bloated with graphics. Or you want them to start with a page that provides links
to specific posts (Figure 9-18).
• Preview Theme. Click this button to open a tiny browser window with a pre-
view of your site. Here’s the clever part: The preview window shows the mobile
version of your site, which saves you the trouble of breaking out your iPhone
to check out every change you make.
FIGURE 9-18
Top: Right now, the WPtouch home page uses WordPress’s
“Front page displays” setting to decide what to put on the main
page of your mobile site.
Bottom: If that’s not what you want, choose “Select from Word-
Press pages” and pick a different front page for the mobile
version of your site.
WPtouch has many more options in the WPtouch→Theme Settings page. Here are
a just a few of the most noteworthy:
• Number of posts in post listings. This determines how many posts appear on
the home page before the Load More Entries link. It also sets the number of

CHAPTER 9: GETTING NEW FEATURES WITH PLUG-INS 311
BACKING UP A
WORDPRESS
SITE
listings in the category-browsing and tag-browsing pages (page 123), if you
use them.
• Excluded categories and excluded tags. Perhaps there are some posts on your
site that aren’t appropriate for mobile viewing or aren’t likely to interest mobile
users. As long as these posts belong to a specific category or have a specific
tag, you can tuck them out of sight. Excluded posts won’t appear in the mobile
site’s home page, in search results, or in category-browsing or tag-browsing
pages. To exclude a category or tag, you need to enter its ID, which you can find
in the PostsÆCategories or PostsÆTags section of the dashboard. (To exclude
several categories or tags, write the whole list in the text box, separating each
ID with a comma.)
• Show post categories and tags and Show post author. As you saw in Figure
9-16, WPtouch shows just a few essential details in its post list: title, date, and
number of comments. Tick these checkboxes, and WPtouch adds the category,
tag, and author information as well.
• Enabled featured slider. Turn this option o to hide the featured image slider.
Or tweak the settings underneath to control what pictures the slider shows and
change whether the slider “slides” (cycles through its pictures) automatically.
You can play with plenty of other WPtouch settings. Dig around a bit, and you
can change WPtouch’s color scheme or WPtouch’s mobile theme. Or visit the
WPtouch→Menus page to modify the mobile version of your menus and give each
menu item an eye-catching icon, which you choose from a gallery of ready-made
pictures.
Clearly, WPtouch oers far more flexibility than you get with the average mobile-
friendly theme. By comparison, the WordPress year themes don’t let you change
any
aspect of their mobile appearance.
Some WordPress developers are even more ambitious. They like the basic WPtouch
theme but feel it’s a bit generic. They want to add touches of style and distinguish
their site from competitors’. If you fall into that camp, the free version of WPtouch
won’t completely satisfy you. However, the creators of WPtouch sell an enhanced
version named WPtouch Pro. It oers more ready-made themes, more extensive
theme customization, and with a pile of extra features (see
http://tinyurl.com/
wptouchpro
). Currently, WPtouch Pro costs $49 for a single website, $99 for five.
Although you certainly don’t need the Pro version, it’s money well spent if you ex-
pect that a large portion of your audience will visit your site using a mobile device.
Backing Up a WordPress Site
It’s easy to be casual about the safety of the files on your website. After all, even small
web hosting companies take reliability seriously. They use systems that have a high
level of
redundancy
—web servers with multiple hard drives, for example, and groups
of computers that work together so that a hardware failure in one won’t sideline

WORDPRESS: THE MISSING MANUAL
312
BACKING UP A
WORDPRESS
SITE
an entire website. Many web hosts also perform some sort of backup, copying the
files they host to a storage location so they can recover them after catastrophes,
like floods and fires.
But these measures, no matter how well-intentioned, aren’t enough to protect your
WordPress site. Unless you do your own backups, your site is exposed to serious
risks that your web hosting company can’t prevent. For example, an attacker could
break into your administrator account and sneak some advertising or malware into
your site. In some cases, these attacks are stealthy enough that you won’t notice
any eect for weeks. By that point, the only backup your web host still has may be
a copy of the infected site, making it useless and forcing you to rebuild from scratch.
Other problems can occur, too. The Web has plenty of backup horror stories, includ-
ing cases where a host’s backups go mysteriously missing, or an unexpected event
puts a web host out of business, taking its websites with it.
To give your site a better chance of weathering crises like these, you need an inde-
pendent backup solution. You have two choices:
• You can use an automated backup service that visits your site every day and
transfers its content to another set of servers elsewhere in the world.
• You can do the work yourself, periodically downloading your content to your
own personal computer for safekeeping.
In the following sections, you’ll consider both approaches.
Using an Automated Backup Service
This approach is the most convenient. Once you sign up with the right company, the
process happens automatically, without another thought from you. The premiere
example for WordPress is VaultPress (
http://vaultpress.com
), a backup service run
by Automattic that stores every post, page, comment, and setting change from the
moment you sign up. VaultPress gives you the ability to roll back to any point in the
past if disaster strikes.
Automated backup services have a significant drawback—they aren’t free, and what
you pay for backups can easily outweigh your hosting fee. The basic VaultPress
package costs $15 per month, and its no-frills competitor blogValue, which stores
just 30 days’ worth of backups, charges $10 per month.
If you have the money to sign up with an automated service, and you’re willing to
pay to save a little time and a few headaches, check out VaultPress. It comes as
part of Jetpack, although it’s not activated. To use it, you need to sign up at
http://
vaultpress.com/jetpack
.
If you’re willing to take a slightly more hands-on approach, consider BackupBuddy
(
http://ithemes.com/purchase/backupbuddy
). You can get a license for up to two
sites for $80 per year, or a license for up to 10 business sites for $100 per year. How-
ever, BackupBuddy isn’t in the storage business, it’s just the tool that schedules and
performs your backups. To use it, you need an account with a web storage service,
so BackupBuddy has somewhere to store the backups it creates. BackupBuddy

CHAPTER 9: GETTING NEW FEATURES WITH PLUG-INS 313
BACKING UP A
WORDPRESS
SITE
supports several such services, including Dropbox (
www.dropbox.com
), which is
free for the first 2 GB of storage; Google Drive (
http://drive.google.com
), which is
free for the first 15 GB; and Amazon S3 (
http://aws.amazon.com/s3
), which costs
pennies per gigabyte. So if you have a modest-sized site (one that doesn’t include
a library of 5,000 pictures or massive video files) and you don’t mind juggling a
storage account, BackupBuddy is a reasonable compromise.
Backing Up with a Plug-In
If VaultPress is too pricey and you don’t want to fiddle with BackupBuddy, you need
to take charge of backups on your own. Fortunately, plenty of free plug-ins can help
you out. But before you get started with any of them, you need to understand one
key fact. Every WordPress site needs
two
types of backup:
• A backup of your database. As you learned in Chapter 1, WordPress stores
every post, page, comment, and stitch of content in a database on your web
server. This is the most important part of your site, because without content
all you have is an empty shell.
• A backup of your files. These files include the contents of your media library,
including every picture and resource you uploaded to your WordPress site, the
theme files that tell WordPress how to lay out your content, and any plug-ins
you installed.
NOTE You back up theme files for two reasons. First, as you become a more advanced WordPress designer,
you may begin customizing the themes (as explained in Part 4). Second, it’s always possible that the particular
version of a theme you’re using will disappear from the Web, making it difficult to restore an old copy of a
backed-up site.
If you’re handy with an FTP program, you can back up your files anytime. All you do
is browse to your web hosting account and copy the contents of your WordPress
folder to your computer. If you use Windows, this is as simple as firing up Windows
Explorer, pointing it to your web host’s FTP site, logging in, and dragging the folder
you want (the one with your WordPress site in it) onto your desktop.
However, even if you copy every file you see, you still won’t get the contents of your
WordPress database, which is the heart of your WordPress site. To get that, you
need a tool that can access the database, extract its contents, and put it in a file.
(This tool also needs to be able to do the reverse, copying the data from a backup
file into a new database, in case you need to re-create your site.) Unless you’re a
MySQL guru, your best bet is to use a WordPress plug-in to help you out.
Many WordPress plug-ins concentrate on backing up a site’s database. They leave
you to figure out an approach to copy the actual files on your site. Plug-ins that work
this way include the popular WP-DB-Backup (
http://tinyurl.com/wp-db-backup
)
and WP-DBManager (
http://tinyurl.com/wp-dbmanager
).

WORDPRESS: THE MISSING MANUAL
314
BACKING UP A
WORDPRESS
SITE
However, there are a few plug-ins that back up your site’s database
and
its files. Two
good examples are BackWPup (
http://tinyurl.com/backwpup
) and Online Backup for
WordPress (
http://tinyurl.com/wponlineb
), the plug-in described in the next section.
WARNING There’s no perfect backup tool for everyone. (That’s why this book discusses so many backup
plug-ins.) Every plug-in provides a different set of options, and some have strange quirks or don’t work well with
certain web hosts. For example, your web host may restrict PHP email to fight spammers. If your backup tool
works by sending backed-up data to an email account, it might not be able to finish its work. Backup tools also
differ in their ability to deal with unexpected errors, like corrupted data or databases that appear to be locked.
For all these reasons, you need to test whatever backup plug-in you pick, and regularly check to make sure it’s
backing up your site.
The Online Backup for WordPress Plug-In
Online Backup for WordPress gives you two ways to back up your site:
• Manually. You perform a complete backup via the dashboard, and then down-
load the backed-up data in one big ZIP file.
• Scheduled. You schedule a backup to run at certain times (for example, every
night at midnight) and then have the backed-up ZIP file emailed to an account
you specify. If you choose this route, you may as well create a dedicated Gmail
account (at
http://mail.google.com
) for your back-up emails. With 15 GB of
free storage, Gmail lets you stash quite a few backups without paying a penny.
The first thing you should do once you install Online Backup for WordPress is try a
manual backup. That way, you’ll know if the plug-in works properly, and you’ll have
at least one complete backup of your website to start you o. Here’s how:
1. Choose Online Backup from the dashboard menu.
This brings you to the control panel for Online Backup for WordPress, where
you can start a manual backup, schedule a backup, or change back-up settings.
2. Click the Backup link at the top.
Choose what you want to back up (Figure 9-19).
3. Make sure you turn on both the Database and Filesystem checkboxes.
That way, you’ll back up the contents of your database
and
all the files on your
website, packaged up in a single ZIP file.
4. Choose Local for the backup type.
Your other options are sending backups to the WordPress Vault or to an email
address.
The WordPress Vault is a service oered by BackupTechnology, the creators
of the Online Backup for WordPress plug-in. The catch is that the Vault grants
you just 100 MB of space—to get more, you need to pay.
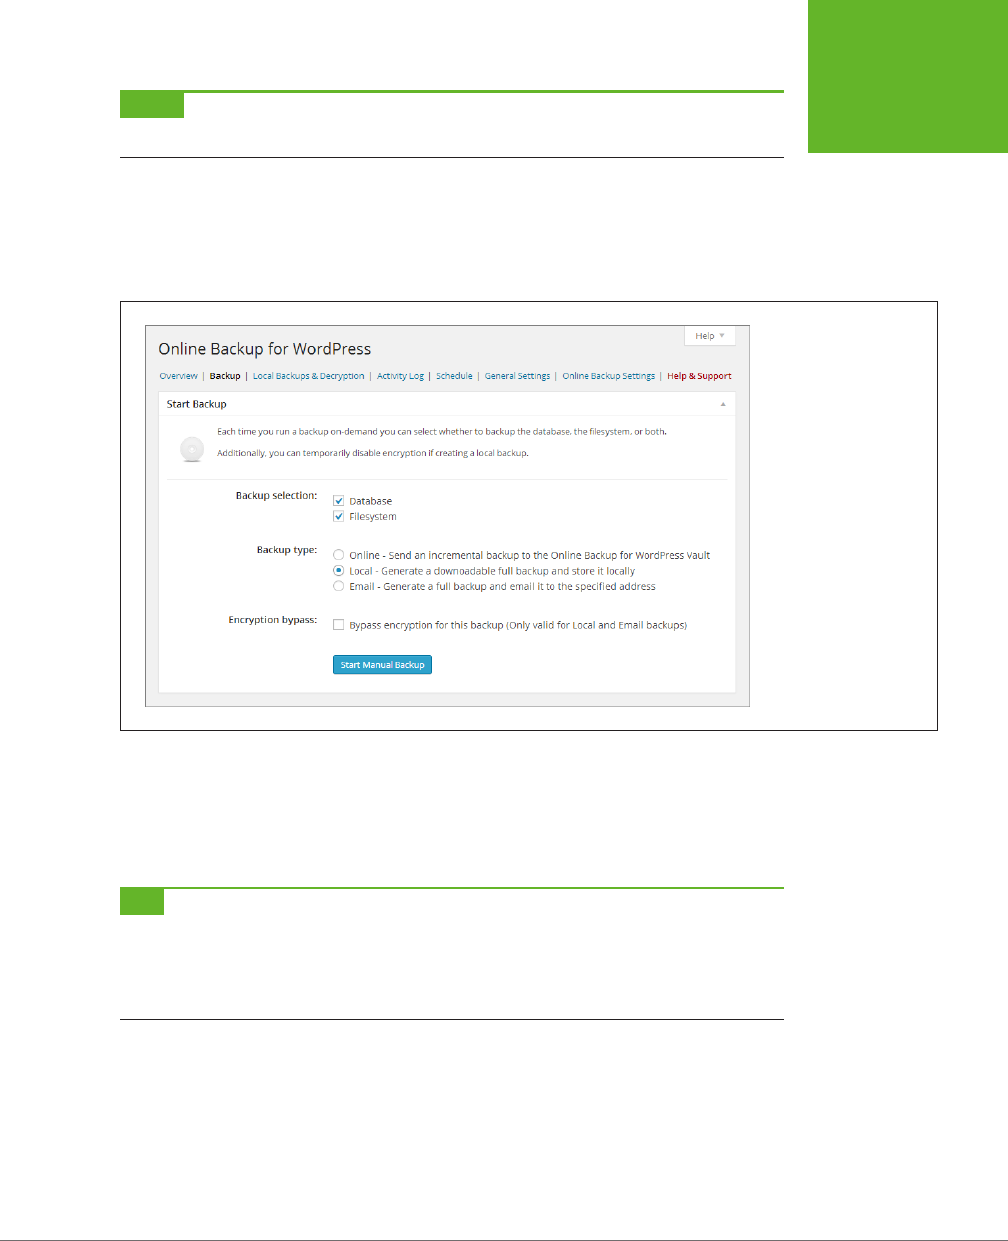
CHAPTER 9: GETTING NEW FEATURES WITH PLUG-INS 315
BACKING UP A
WORDPRESS
SITE
NOTE If you want to use the WordPress Vault, you first need to sign up. You can get the process started by
clicking the Online Backup Settings link.
The email option tells WordPress to send the backed-up data to the email ad-
dress you supply. This option is more useful when you use scheduled backups,
but you might use it with a manual backup if you’re backing up a huge site and
you don’t want to stick around, waiting for the process to finish.
FIGURE 9-19
A manual backup lets you
create an image of your
entire website.
5. Click Start Manual Backup.
The Online Backup for WordPress plug-in starts gathering your website data
and archiving it into a single compressed file, which it puts in a temporary loca-
tion on your web server. While it works, you see a progress bar ticking away.
TIP You don’t need to stay and supervise the backup—if you navigate to a different part of the dashboard,
or log out of the dashboard altogether, the backup process continues. However, if you leave, you need to return
eventually to download the final result—the file with your backup in it. When you’re ready, choose Online Backup
from the dashboard menu and click the Local Backups & Decryption link, which shows you a list of all the backups
Online Backup has stored on your web server.
When Online Backup for WordPress finishes the backup, it displays a new but-
ton, named Download (Figure 9-20).
6. Click Download.
Your browser may start downloading the file immediately, or it may first ask
you where you want to store the backup and what you want to name it. The
download process may take some time, depending on your Internet connection
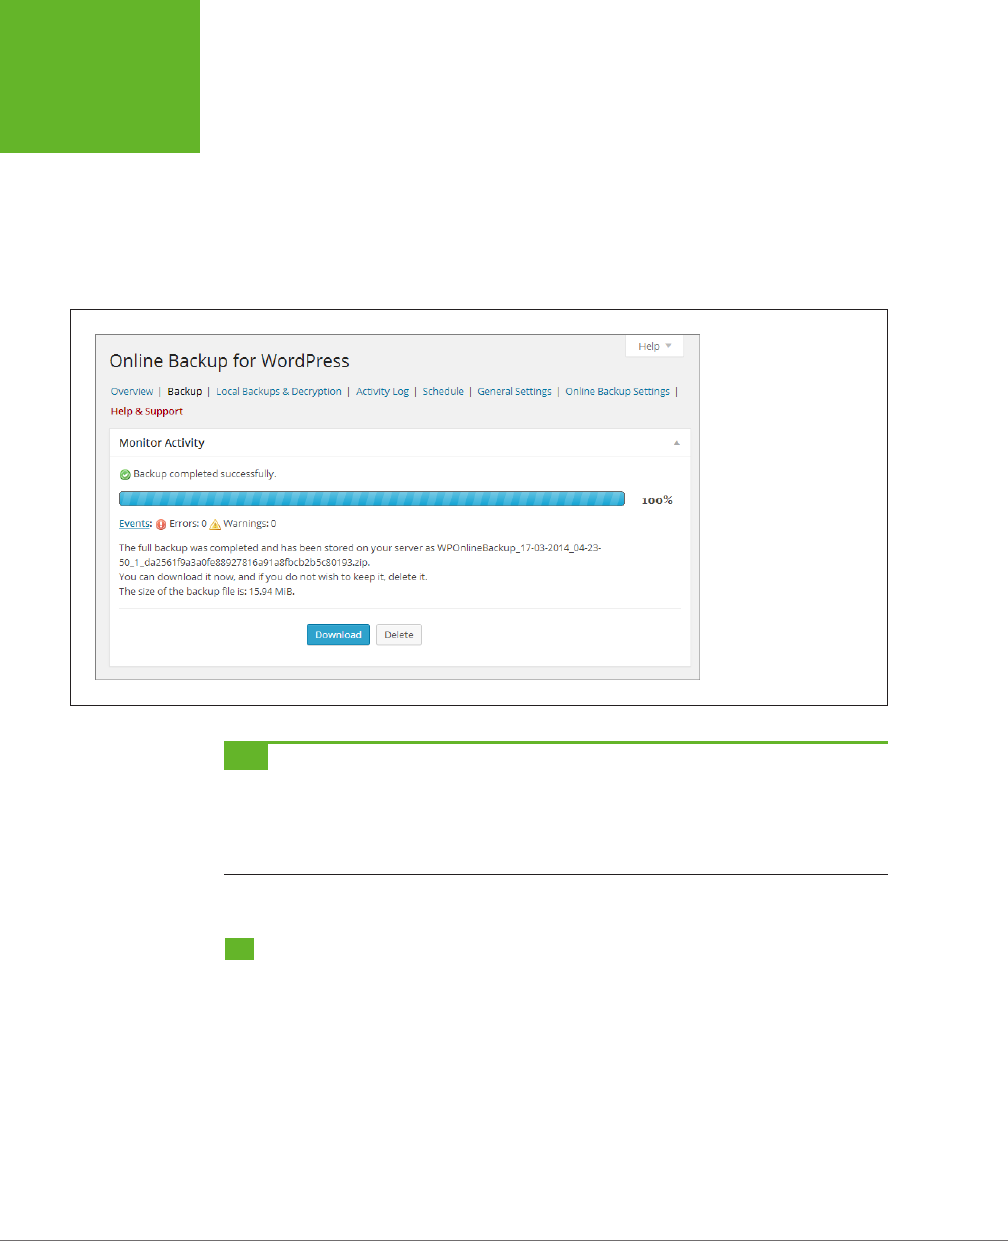
WORDPRESS: THE MISSING MANUAL
316
BETTER
PERFORMANCE
WITH CACHING
and the size of your site. Once you have the backup file safe and sound on your
computer, your work is done.
If you need to reclaim space on your web server, you can delete the backup
(once you copy it to a safe place) by clicking Delete. However, unless your site
is gargantuan, there’s no reason to worry. The next time you perform a full
backup, the Online Backup for WordPress plug-in overwrites your old backup
with the new one.
FIGURE 9-20
This website has a recent
backup, which is stored
on the web server in a
single file that’s roughly
16 MB. You can download
this file or delete it.
To see all the backups
that Online Backup has
created, click the Local
Backups & Decryption link
at the top of the page.
TIP It’s a good idea to peek inside the backup file to make sure it has everything it should. (Remember,
it’s just an ordinary ZIP file that you can view on your computer.) Inside, you’ll find two folders. The Database
folder includes a file that has the SQL instructions needed to rebuild your database and fill it with your data. The
FileSystem folder holds all the folders and files from your website, exactly as if you’d downloaded them from
your web host over FTP.
Better Performance with Caching
As you learned at the very beginning of this book, WordPress websites are powered
by code. When a visitor arrives at one of your pages, the WordPress code grabs the
necessary information out of your database, assembles it into a page, and sends
the final HTML back to your guest’s browser. This process is so fast that ordinary
people will be blissfully unaware of all the work that takes place behind the scenes.
However, even the fastest web server can’t do all that work (run code, call the data-
base, and build a web page) instantaneously. When someone requests a WordPress
page, it takes a few fractions of a second longer to create it than it would to send
an ordinary HTML file. Normally, this dierence isn’t noticeable. But if a huge crowd

CHAPTER 9: GETTING NEW FEATURES WITH PLUG-INS 317
BETTER
PERFORMANCE
WITH CACHING
of hits your site at the same time, the WordPress engine will slow down slightly,
making your entire website feel just a bit laggy.
POWER USERS’ CLINIC
Scheduling Regular Backups
You can do a perfectly good job of disaster-proofing your
site with manual backups. The problem is that it’s up to you
to start every backup, download the final product, and keep
your backed-up files somewhere smart. As time passes, you
might find yourself forgetting to make backups, leaving your
website at risk.
The solution is to tell your plug-in to do the backup work for
you, at regularly scheduled intervals. For Online Backup for
WordPress, you do this by choosing Online Backup from the
dashboard menu and then clicking the Schedule link (at the
top, just under the “Online Backup for WordPress” title). You
can ask it to perform weekly, daily, twice-a-day, four-times-a-
day, or hourly backups (which is probably excessive, and may
earn you the ire of your web hosting company). You can then
choose the type of backup—either an incremental backup that
grabs the changed files only and stores them in the WordPress
Online Vault, or a full backup that sends the results to an email
address you supply. When you finish, click Apply Schedule.
You can keep an eye on your scheduled backups by clicking the
Overview link (at the top). There, you’ll see basic information
about when the last backup took place, whether it succeeded,
how big the backup file was, and when the next backup will
occur. You can get a more detailed summary of recent backup
activity by clicking the Activity Log link, which is handy if you
need to track down a mysterious error that interrupted one of
your scheduled backups.
Finally, if you decide to send regular backups by email or store
them on the WordPress Online Vault, it’s a good idea to encrypt
them to make sure that Internet eavesdroppers can’t peek at
your data. To do that, click the General Settings link, pick a type
of encryption (the recommended AES128 algorithm is fine),
and then type in an
encryption key.
This is a password used to
encrypt your data, without which you can’t decrypt it. Writing
this password down on paper is a very good idea, because it’s
rather frustrating to have a crashed WordPress website and a
full backup that you can’t open.
However, there’s a trick called
caching
that will satisfy even the most performance-
obsessed WordPresser. The basic idea is this: The first time someone requests a
page on your site, WordPress goes to work, running its code and generating the
page dynamically. But once it delivers the page, the plug-in stores the result as an
ordinary HTML file on your web server. Now here’s the ingenious part: The next time
a visitor asks for the same page, the caching plug-in sends back the previously gen-
erated HTML, sidestepping the usual page-generating process and saving valuable
microseconds (Figure 9-21). This shortcut works no matter how many people visit
your site—as long as the plug-in has an ordinary HTML copy of the finished page,
it uses that instead of creating a new copy all over again. Caching plug-ins can use
other tactics, too, such as caching just part of the content, compressing the cached
data, and discarding cached copies after a certain amount of time.
NOTE Caching takes extra space on your website, because it stores extra HTML files. However, these files
are rarely big enough to worry about. Caching plug-ins don’t attempt to cache your site’s pictures (or the other
resources you uploaded to the media library).

WORDPRESS: THE MISSING MANUAL
318
BETTER
PERFORMANCE
WITH CACHING
FIGURE 9-21
The idea behind caching is to gener-
ate a page once and reuse it for as
many people as possible. That’s
because sending back an already-
generated page is always faster than
building a new one (and less work
for the web server, too).
There are several caching plug-ins in the WordPress directory, but by far the most
popular is WP Super Cache (
http://tinyurl.com/wpsupercache
). To use it, install the
plug-in, activate it in the usual way, and
then
turn on caching. To perform this last
step, choose Settings→WP Super Cache, click the Caching On option at the top of
the page, and then click the Update Status button (Figure 9-22).
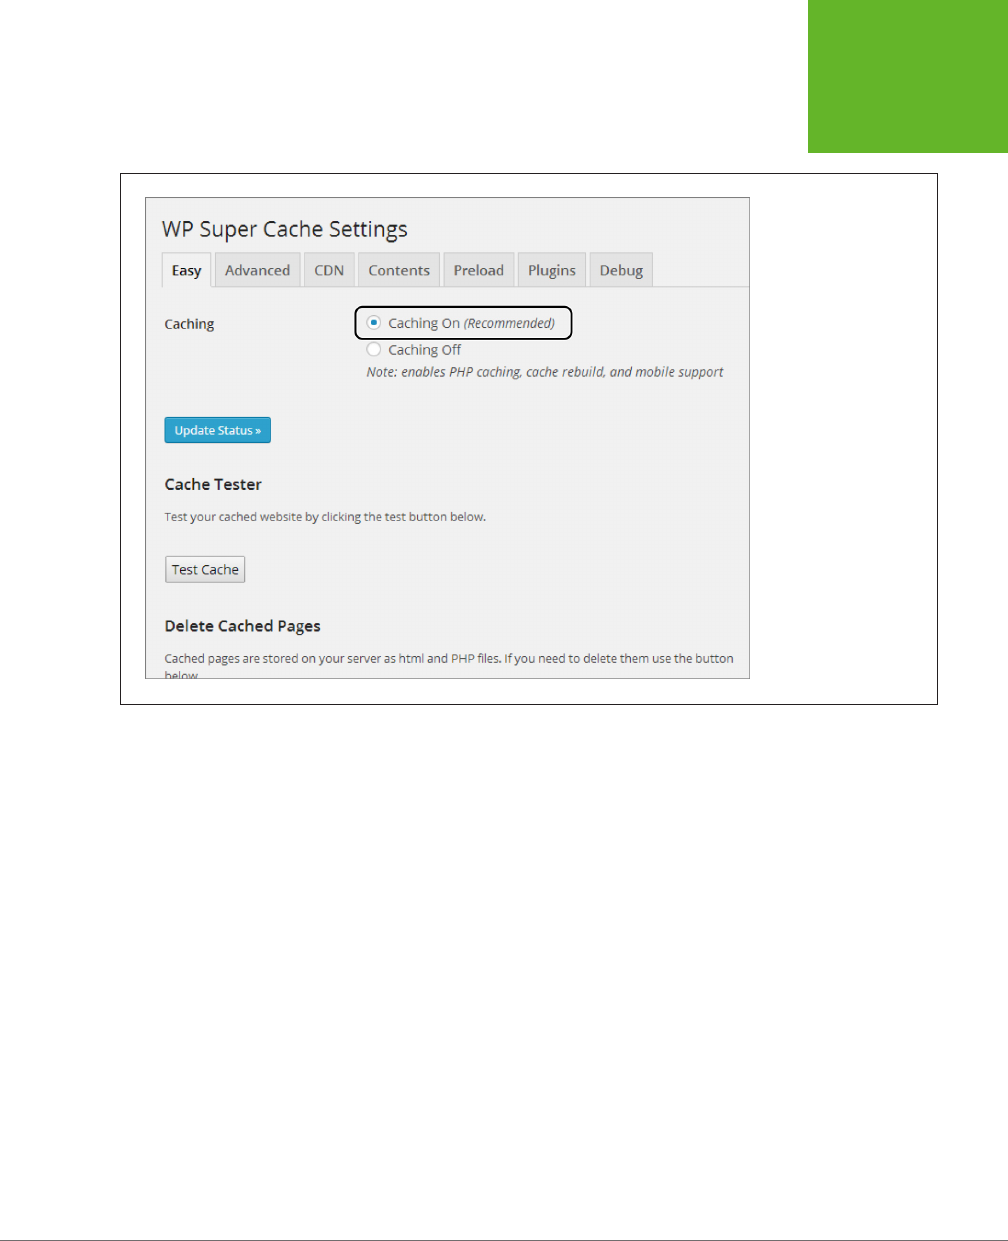
CHAPTER 9: GETTING NEW FEATURES WITH PLUG-INS 319
BETTER
PERFORMANCE
WITH CACHING
FIGURE 9-22
WP Super Cache packs
in a pile of settings, but
the most important is the
Caching On option shown
here—unless you turn
it on, WP Super Cache
sits idle.
To confirm that WP Super Cache is working, open a new browser window and look
at a couple of posts. Then, return to the WP Super Cache settings and click the
Contents tab. Finally, click the “Regenerate cache stats” link. WP Super Cache will
report how many cached files it created (Figure 9-23). Even though these pages
don’t look any dierent in a browser, WordPress sends them to your visitors more
quickly, bypassing most of the processing the WordPress engine ordinarily does.
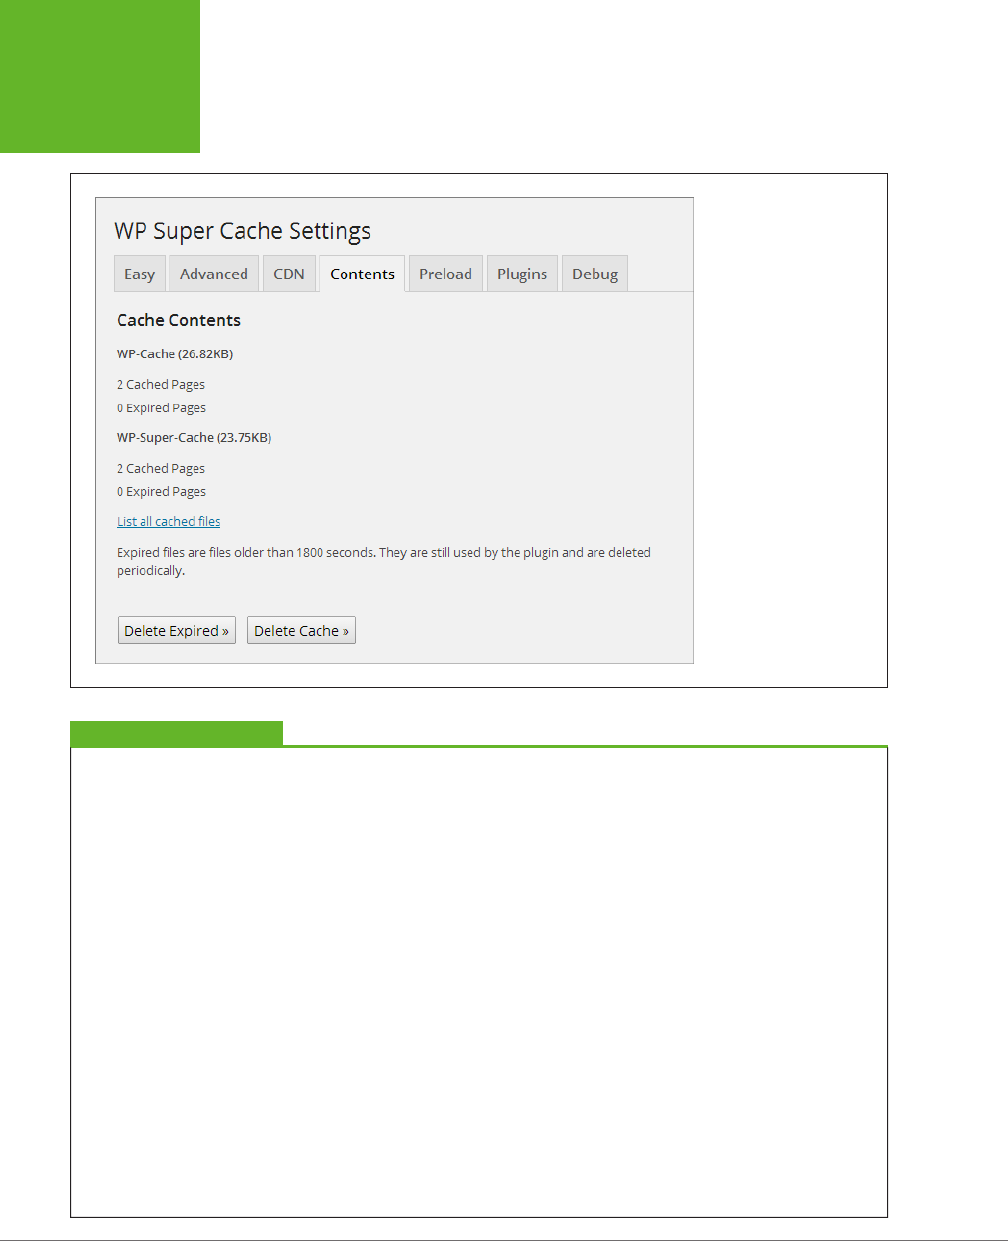
WORDPRESS: THE MISSING MANUAL
320
BETTER
PERFORMANCE
WITH CACHING
FIGURE 9-23
This site currently has four
cached pages. To see them,
click the “List all cached
files” link. You can also use
the Delete Cache button to
discard every cached page,
which is important when
you test WP Super Cache or
if you change the design of
your site.
WORD TO THE WISE
WP Super Cache’s Eect on Other Plug-ins
Caching changes the way your website works, and it can have
unexpected side effects on other plug-ins. Here are some tips
to help you steer clear of plug-in conflicts:
• Check the documentation for your plug-ins. WP Super
Cache is popular enough that other plug-in creators often
test their plug-ins with it. To see if the plug-ins you use
need special settings to get along with WP Super Cache,
look up the plug-in in WordPress’s plug-in directory
(
http://wordpress.org/plugins
) and check the FAQ tab.
• Visit the Plugins tab in the WP Super Cache Settings.
There are a few plug-ins that get special attention from
WP Super Cache. If you have one of them, you can tell
WP Super Cache to change the way the cache works
to avoid disrupting the other plug-in. To do that, go to
SettingsÆWP Super Cache, click the Plugins tab, find
your plug-in, and then click the Enabled option next to
it. (The WPtouch plug-in you used earlier in this chapter
is in this list, for instance.)
• Delay caching until you’re ready to go live. Switching on
caching is the very last thing you should do with your
WordPress site, after you polish your theme, tweak your
layout, and start using your site for real.
• Learn to troubleshoot. If something goes wrong, you need
to be ready to track it down. Usually, the most recently
activated plug-in is the culprit—try disabling it and seeing
if your site returns to normal. If that doesn’t work, you
need to deactivate every plug-in, and then activate them
one at a time, testing your site after each step. Also, be
on the lookout for theme vs. plug-in conflicts, which are
less common but occasionally occur. If you change your
theme and part of your site stops working, switch off
all your plug-ins and then activate them one at a time.

CHAPTER 9: GETTING NEW FEATURES WITH PLUG-INS 321
BETTER
PERFORMANCE
WITH CACHING
You’ll notice that the cached pages appear in two lists in Figure 9-23, representing
two slightly dierent types of caching. WP Super Cache automatically chooses the
type of caching that makes sense for your page. For example, if you visit your site
as a logged-in user, the plug-in uses less powerful WP Cache caching instead of WP
Super Cache caching. But you don’t need to worry about these technical details,
because WP Super Cache makes sure your pages are as fast as possible—which is
always faster than they would be without caching.
NOTE WP Super Cache is smart enough to know when it needs to regenerate the cached copy of a page,
most of the time. For example, if you update a post or a visitor leaves a new comment, WP Super Cache takes
notice and regenerates the page. However, WP Super Cache doesn’t pay attention to site design changes, so it
won’t notice if you change the theme or rearrange your widgets. In this situation, you need to manually clear
the cache to make sure your visitors see the latest version of your site. To do that, use the Delete Cache button
shown in Figure 9-23.
Once you verify that your site still works properly, you’re ready to adjust a few
WP Super Cache settings. Click the Advanced tab and look for settings that have
“(Recommended)” next to them, in italics. This indicates a setting that improves
the way WP Super Cache works for most people, but may cause problems in rare
situations (and, for that reason, may be initially switched o). One example is the
“Compress pages so they’re served more quickly to visitors” setting, which improves
performance for most people but causes trouble with some web hosts that don’t
support compression properly. You can try turning this setting on, but leave the other,
more advanced options alone, unless you really think you know what you’re doing.

WORDPRESS: THE MISSING MANUAL
322
BETTER
PERFORMANCE
WITH CACHING
PLUG-IN POWER
Even More WordPress Plug-Ins
In this chapter, you considered several of the most useful
Word-Press plug-ins. However, in a directory of thousands,
it’s no surprise that there are many more worth considering.
You’ll learn about some of these plug-ins in the following
chapters (and some you’ll need to discover on your own). Here’s
a list of some of the most popular:
• Akismet. This spam-fighting tool is the only plug-in that
ships preinstalled (but not activated) with WordPress.
You learned about it in Chapter 8.
• WordPress SEO by Yoast. Search-engine optimization
(SEO) is the art of attracting the attention of web search
engines like Google, so you can lure new visitors to your
site. SEO plug-ins are among the most popular in the
WordPress plug-in directory, and WordPress SEO by
Yoast is an all-in-one package by one of the most renown
developers in the WordPress community. You’ll take a
closer look at it on page 441.
• WordPress Importer. Moving your WordPress site from
one web host to another? The WordPress Importer handles
the job with relatively few speed bumps. (In Appendix A,
“Migrating from WordPress.com,” you’ll use WordPress
Importer to migrate from WordPress.com to a self-hosted
site.) Automattic developed WordPress Importer.
• TinyMCE Advanced. You learned about this slick editor,
suitable for beefing up your post-writing powers, on
page 179.
• WooCommerce. If you want to sell products on your site,
complete with a professional shopping cart and checkout
process, this could be the plug-in for you. Although you
won’t use it in this book, you’ll try out a simpler shopping
cart plug-in on page 545.
• BuddyPress. If your website is bringing together a
tightly knit community—for example, the students of
a school, the employees of a business, or the members
of a sports team, you can use BuddyPress to add instant
social networking features to your site. Users get profiles,
the ability to message one another, add photos, create
content, and talk together in groups. To learn more, visit
http://buddypress.org
.
• WP-Optimize. This tool cleans up the junk that’s often
left cluttering your database. It can remove unapproved
junk comments (page 282), old post revisions (page 387),
and other unnecessary data that can expand the size
of your database, slowing down your site and bloating
your backups.
• Limit Login Attempts. This plug-in helps defend your site
against hackers who use brute-force password-guessing
attacks. You’ll learn more on page 567.

323
CHAPTER
10
By now, you know that the simplest way to enhance any WordPress post is to
toss in a picture or two. The Web is a visual medium, and a bit of eye candy is
essential for capturing (and keeping) your readers’ attention.
But modern websites rarely stop with ordinary pictures. Today’s Web is splattered
with rich media, including video clips, webcasts, podcasts, slideshows, and song
players. In traditional websites, these ingredients can require hefty chunks of HTML
and JavaScript code. But WordPress makes it easy to add media, thanks to two slick
features you’re about to meet: automatic embeds and shortcodes.
In this chapter, you’ll use all the tools WordPress provides to add rich media to
your site. First, you’ll supercharge your pictures by replacing ordinary images with
slideshows and galleries, and you’ll learn how to transform your entire site into a
photoblog or portfolio. Next, you’ll see how to embed a video window in a post,
and how to host your video files on YouTube or your own web server. Lastly, you’ll
get readers jammin’ with audio tracks, playlists, and podcasts.
Understanding Embeds and Shortcodes
You’ll rely on two WordPress features throughout this chapter. They’re called em-
beds and shortcodes. Both serve the same purpose: They let you slip special types
of content (like slideshows and videos) into your posts and pages without forcing
you to type in a bunch of JavaScript code or HTML markup. Instead, when you use
embeds and shortcodes, you ask WordPress to fill in the necessary details for you.
Adding Picture Galleries,
Video, and Music

WORDPRESS: THE MISSING MANUAL
324
UNDERSTANDING
EMBEDS AND
SHORTCODES
If you use the free WordPress.com hosting service, embeds and shortcodes aren’t
just about convenience—they’re the only way to embed media. That’s because
WordPress.com prevents you from adding JavaScript code to your posts or using
HTML’s media-embedding <iframe> element in them. This basic precaution defends
Automattic’s web servers against a variety of sneaky attacks. But without these tools,
there’s no do-it-yourself way to integrate rich media from other websites, like You-
Tube for video or Flickr for photos. Thankfully, embeds and shortcodes fill the gap.
Automatic Embeds
One of the shortcuts, called an
automatic embed,
takes web addresses that point to
certain media files and replaces the URL with the media file itself—in other words, it
automatically embeds the real media instead of just displaying a link pointing to it.
For example, imagine you type in this URL of a photo in someone’s Flickr stream:
http://www.flickr.com/photos/82337026@N02/7544952876/in/photostream
In the WordPress post editor, this web address looks ordinary enough (Figure 10-1).
FIGURE 10-1
When you create a post
(or page) that includes
embedded media, there’s
no sign that WordPress
will replace the auto-
embed code with content.
All you see is an ordinary
web address.
But WordPress works a bit of magic when you publish the page. At that point, it
realizes that your URL points to a Flickr picture. Instead of showing a boring link,
WordPress grabs the corresponding picture from the Flickr site and embeds it in
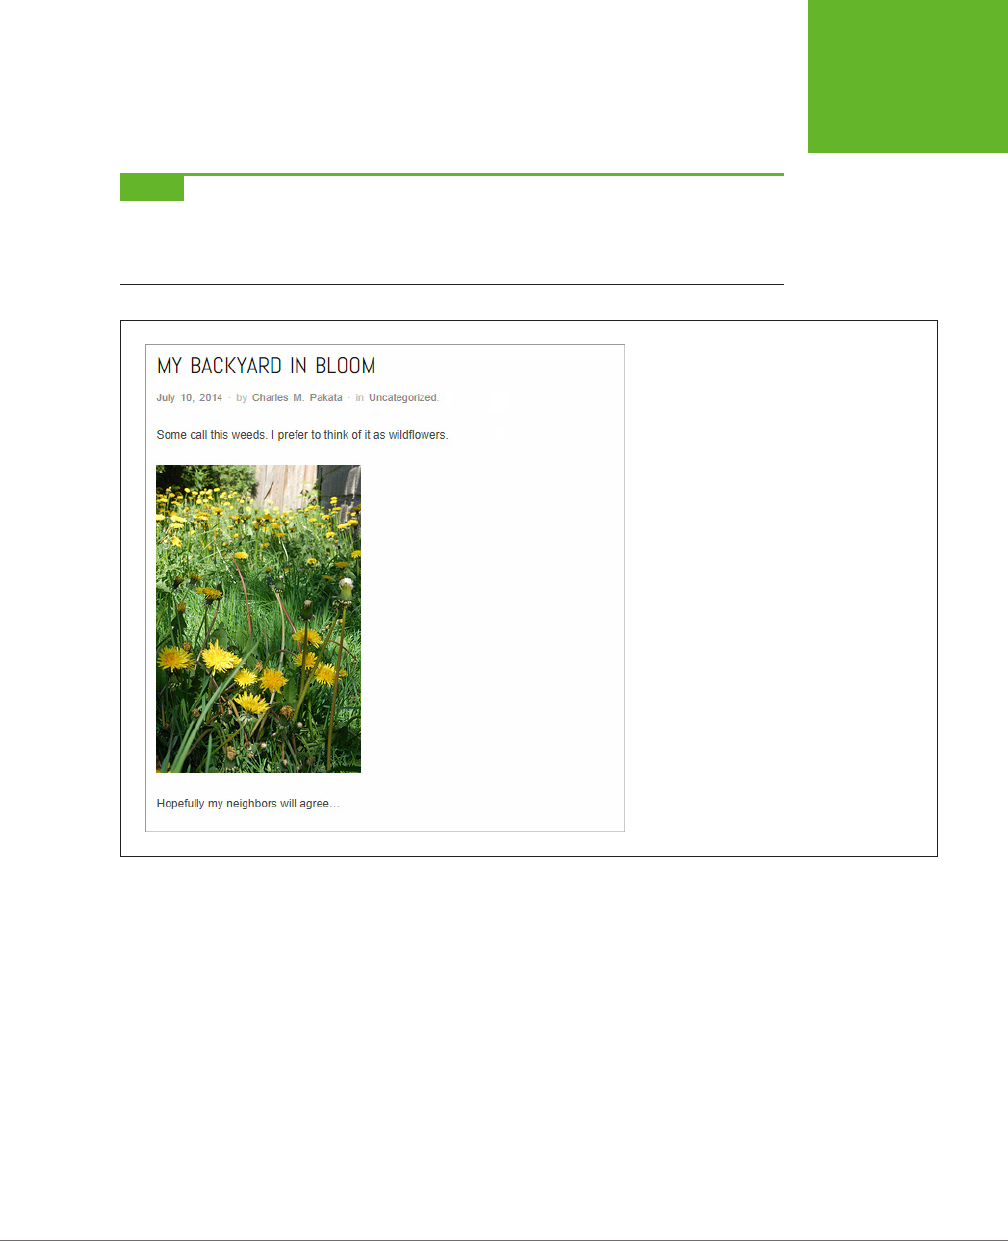
CHAPTER 10: ADDING PICTURE GALLERIES, VIDEO, AND MUSIC 325
UNDERSTANDING
EMBEDS AND
SHORTCODES
your post (Figure 10-2). (Of course, if it isn’t your Flickr picture, you’re duty-bound
to ask the owner for permission before you stu it into your site.)
NOTE Flickr, for those who haven’t come across it yet, is a website that lets you store and share photos. With
tens of millions of users (and billions of pictures), Flickr is the world’s most popular picture-hosting service. It’s
also a thriving online community, with groups that attract professional photographers, hobbyists, and ordinary
people who just want to show off their snapshots. You can learn more at
www.flickr.com
.
FIGURE 10-2
When you view the published page (or preview
a draft of it), WordPress pulls a clever sleight
of hand: It turns the address that pointed to a
Flickr picture into a preview of the picture itself.
Even better, it makes the preview a link. Click
it, and you end up on the corresponding Flickr
page, where you can see the full-size picture,
along with a description, additional details, and
comments.
For automatic embeds to work, you need to meet several criteria:
• The URL must be on a separate line. Don’t crowd it up next to your text. As
you can see in Figure 10-1, the URL stands alone, with paragraphs of text above
and below it. It’s also important to make sure the URL doesn’t have any hidden
formatting tags—if you’re not absolutely sure, take a look at the HTML in the
Text tab and remove anything that doesn’t belong, like the <span>, <em>, and
<strong> tags.
• The URL can’t be formatted as a link. When you paste a website address into
the WordPress editor, WordPress may format that address as a real, clickable
link (that is, it may wrap your web address in an <a> anchor element). Here’s
the problem: Links show up in the final post as, well, links. WordPress doesn’t
swap in rich content in their place. If the URL appears blue in the post editor

WORDPRESS: THE MISSING MANUAL
326
UNDERSTANDING
EMBEDS AND
SHORTCODES
(and the address becomes underlined when you move your mouse over it), then
WordPress formatted the address as a link. To turn it into plain text, select it
and then click Unlink in the toolbar. Now the address turns into ordinary black
text, which lets WordPress perform the URL-to-embedded-content switcheroo
when it displays the page.
• WordPress must recognize the site. WordPress auto-embeds content from
a select group of sites that share pictures, videos, music, and slideshows. It
does the same for a few other specialized services, like Twitter and Polldaddy.
For the full list of well over 20 sites, see
http://codex.wordpress.org/Embeds
.
Flickr is one of the best-known photo-sharing sites, but WordPress recognizes sev-
eral others, including Instagram, Imgur, SmugMug, and Photobucket. However, it
conspicuously fails to recognize URLs from other image-hosting services, such as
Google’s Picasa. To show a picture from a Picasa web album, you need to upload
a copy of the picture to your site (awkward), provide a clickable link that takes the
reader there (clumsy), or use a plug-in that displays Picasa pics (for self-hosters only).
WordPress constantly revises and expands its list of auto-embeds, so its recognition
of other services will grow—slowly.
The [embed] Shortcode
Some WordPress aficionados write auto-embedded URLs dierently from the earlier
example. They add a special code before and after the URL, like this:
[embed]http://www.flickr.com/photos/...[/embed]
Here, the web address is the same, but it has an [embed] code at the beginning of
the URL and a matching [/embed] code at the end. This line of code produces the
same eect as in the previous example—WordPress replaces the URL with the ap-
propriate embedded content, provided that it recognizes the URL.
The main reason you’d use the [embed] code is because it gives you the option to
add two extra details: the
height
and
width
attributes. These attributes set the size
of the embedded content. For example, here’s how you might tell WordPress you
want your embedded picture to be 200 pixels wide and 300 pixels tall:
[embed width="200" height="300"]http://www.flickr.com/photos/...[/embed]
The height and width attributes don’t always give you the eect you expect. It’s best
to think of them as
requests
—requests that WordPress honors according to its own
intricate (and slightly obscure) sizing rules. Here’s a rundown of what takes place:
• If you don’t specify any size information, WordPress allows the embedded
content to grow until it reaches its full size or hits the boundaries of your layout.
For example, if you embed post content inside a 600-pixel-wide column, your
embedded picture will grow to be 600 pixels wide (and however tall it needs
to be to preserve the picture’s proper shape).

CHAPTER 10: ADDING PICTURE GALLERIES, VIDEO, AND MUSIC 327
UNDERSTANDING
EMBEDS AND
SHORTCODES
• If you specify the width and height attributes, you override WordPress’s ordinary
behavior. For example, you can specify a size to shrink a tall-and-skinny photo
that would otherwise grow bigger than you want it to be. And if the media
sharing site you use automatically shrinks your content, you may be able to use
the width and height attributes to force it bigger. (See the box on this page for
a full discussion of this often-perplexing issue.)
• You can use either the width or height attribute on its own. For example, you can
scale down a piece of content using a smaller width and let WordPress choose
the height automatically to match the original aspect ratio.
• WordPress doesn’t let you stretch embedded content out of shape. For example,
if you assign a height and width to a picture that don’t match its aspect ratio,
WordPress follows the most restrictive dimension and sizes the other to match.
• Dierent themes and plug-ins can tinker with the style rules that size the ele-
ments in your layout, including embedded content. Unfortunately, the interplay
between the embedded content, WordPress, and your theme is complex.
Sometimes, despite your best eorts, embedded content will refuse your
resizing demands.
FREQUENTLY ASKED QUESTION
Sizing Quirks with Embedded Content
I embedded a Flickr picture, but it turned out way smaller
than I expected!
Some media services replace the full-size content you think
you’re embedding with a smaller-size version that they think
will better suit your site. This sleight of hand has a point—it’s
done to save bandwidth and reduce the time it takes your
page to load. For example, Flickr pictures can be quite big. By
handing you a smaller thumbnail (typically, a picture that’s
just 320 pixels wide), Flickr saves you from wasting pixels and
time. However, that also means the picture that appears in
your web page may be smaller than you expect.
You can solve this problem, to a certain extent, using the
[embed] code with the width attribute. But there’s a catch.
The width attribute has no effect unless you use a size that’s
big enough to force Flickr to give you a bigger thumbnail. For
a standard picture in portrait orientation, that width needs to
be 700 pixels or more.
[embed width="700"]...[/embed]
This is somewhat counterintuitive, because many themes have
less than 700 pixels of width to accommodate your picture.
Twenty Twelve, for instance, has a column width of 625 pixels.
However, this attribute still has the desired effect. It forces
Flickr to return a larger-sized thumbnail, which your theme
then scales down slightly to fit your layout.
Besides being confusing, this process leaves some notable
gaps. What if you want a picture that’s wider than 320 pixels
but narrower than 625 pixels? Or what if you want a picture
to grow beyond the size of your layout? There’s no easy fix
for these issues without getting your hands dirty. If you have
a self-hosted site, you can avoid the auto-embed feature
altogether, and copy the raw HTML markup that media sharing
services like Flickr provide. Just remember to paste the markup
in the Text tab (page 178), not the Visual tab. Or, for more
control—and much more complexity—you can muck around
with the CSS style rules that control the layout of your site
(Chapter 13). Both approaches can create problems that are
more aggravating than minor size issues. For most folks, the
best choice is to accept the quirks of the auto-embed feature
and let WordPress handle the heavy lifting.

WORDPRESS: THE MISSING MANUAL
328
UNDERSTANDING
EMBEDS AND
SHORTCODES
More Shortcodes
Shortcodes
are special instructions you put in your post or page. Like an auto-
embedded URL, a shortcode tells WordPress to insert something in the current
location. But auto-embeds are limited to a relatively small set of known websites,
while shortcodes let you add a much broader range of media.
To use a shortcode, you put a predetermined code inside square brackets. For ex-
ample, the following shortcode takes all the pictures attached to a post and combines
them into a picture gallery:
An image gallery will show up here:
[gallery]
You’ll take a much closer look at galleries in the next section. For now, the important
thing to understand is that, when you add a shortcode to a page or post, WordPress
inserts something out of the ordinary.
Shortcodes always have the same syntax—each one consists of a bit of text wrapped
in square brackets. In fact, the [embed] instruction you learned about in the previous
section is actually a shortcode that tells WordPress to examine a web address and
embed the appropriate content.
NOTE You can type shortcodes into the visual editor (the Visual tab) or the HTML editor (the Text tab). Either
way, WordPress recognizes the code by its square brackets.
The truly neat part about shortcodes is that they’re
extensible.
If you’re ambitious
and you run a self-hosted WordPress site, you can create your own shortcodes
(technically, it’s all about editing the
functions.php
file, as described on page 500).
Even better, a clever plug-in developer can create shortcodes that let you display
additional types of content, including contact forms, documents, maps, charts, ads,
a view counter, and a PayPal donation link.
If you run a self-hosted WordPress site, you start with the shortcodes listed in Table
10-1.
TABLE 10-1
The basic WordPress shortcodes
SHORTCODE DESCRIPTION
[embed] Wraps any embeddable URL that WordPress
recognizes. You could use this shortcode
for clarity, but you usually use it to size your
embedded content, by adding the height and
width attributes.
[gallery] Creates a picture gallery or slideshow.
Described on page 330.
[audio] Shows an audio playback bar for an audio
file (page 360).

CHAPTER 10: ADDING PICTURE GALLERIES, VIDEO, AND MUSIC 329
UNDERSTANDING
EMBEDS AND
SHORTCODES
SHORTCODE DESCRIPTION
[video] Shows a video playback window for a video
file (page 356).
[caption] Displays a text caption for a figure.
WordPress uses it when you insert a
captioned picture (page 182).
[playlist] Creates a simple playlist of audio or video
files (page 362).
If you use WordPress.com, you can tap many more shortcodes. You can use all the
shortcodes listed in Table 10-1 with the exception of [video], because WordPress.
com uses [wpvideo] instead (as page 359 explains). WordPress.com also includes
a few dozen completely
new
shortcodes. This is handy, because WordPress.com
doesn’t allow plug-ins, so you can’t add any shortcodes beyond those you start with.
Many of WordPress.com’s extra shortcodes duplicate the features WordPress
provides through automatic embeds. For example, you can insert a picture from
Instagram using the image’s URL (thanks to WordPress’s auto-embed feature) on
a WordPress.com site or a self-hosted site. But on a WordPress.com site, you have
the additional option of using the [instagram] shortcode. Either way, the result is
the same.
But some of WordPress.com’s extra shortcodes embrace services that automatic
embedding doesn’t. For example, if you stumble across a fascinating TED Talks video
(from the thousands at
www.ted.com
), you can use the [ted] shortcode to embed
the talk in one of your posts. All you need to do is reference its ID number, like this:
[ted id=1458]
For the full list of WordPress.com-supported shortcodes, along with an example of
how to use each one, visit
http://support.wordpress.com/shortcodes
.
TIP If you run a self-hosted site, you can add the extra shortcodes that WordPress.com sites get by installing
the handy Jetpack plug-in (page 297).

WORDPRESS: THE MISSING MANUAL
330
SHOWING
GROUPS OF
PICTURES
FREQUENTLY ASKED QUESTION
Shortcodes and Sidebars
Can I use a shortcode or an auto-embedded URL in a sidebar
widget?
Ordinarily, WordPress doesn’t check sidebar text for auto-
embed URLs and shortcodes. For example, if you add a Text
widget (page 166) and put a Flickr URL in it, that URL will appear
in your sidebar as ordinary text, not as an image preview.
If you use WordPress.com, you need to live with this restriction.
If you’re on a self-hosted site, there’s a fairly easy workaround,
but you need to be familiar with theme editing, an advanced
topic explored in Part 4.
The solution is to add two commands (shown on page 500) to
a file called
functions.php.
These commands tell WordPress to
process widget text in the same way that it processes the text
in a post or page—in other words, to check for auto-embedded
URLs and shortcodes. Using this technique, you can put tiny
videos, slideshows, galleries, and more in your sidebar without
relying on a specialized widget.
Showing Groups of Pictures
Individual images are an important part of most posts and pages. As you already
know, there’s no limit to the number of pictures you can include in a single post—you
simply need to arrange your text around them in the best way possible.
But this approach isn’t ideal for posts where you want the pictures as the focal
point (for example, a travelogue of your trip through Nepal) or where pictures are
the
whole
point (for example, an amateur photographer’s snaps on a photoblog). In
both cases, you need to tame your piles of pictures and present them in a way that
lets visitors browse them at their leisure. In the following sections, you’ll consider a
range of options for posts like these, starting with WordPress’s basic gallery feature.
Creating a Gallery
A gallery displays a set of thumbnail images on a page so it’s easy for visitors to
scan them (Figure 10-3). To take a closer look at a pic, all you need to do is click a
thumbnail.
When you click a picture in a gallery, you probably expect to see a larger version of
the image. But WordPress does something a little dierent, and its exact behavior
depends on how you host your site.
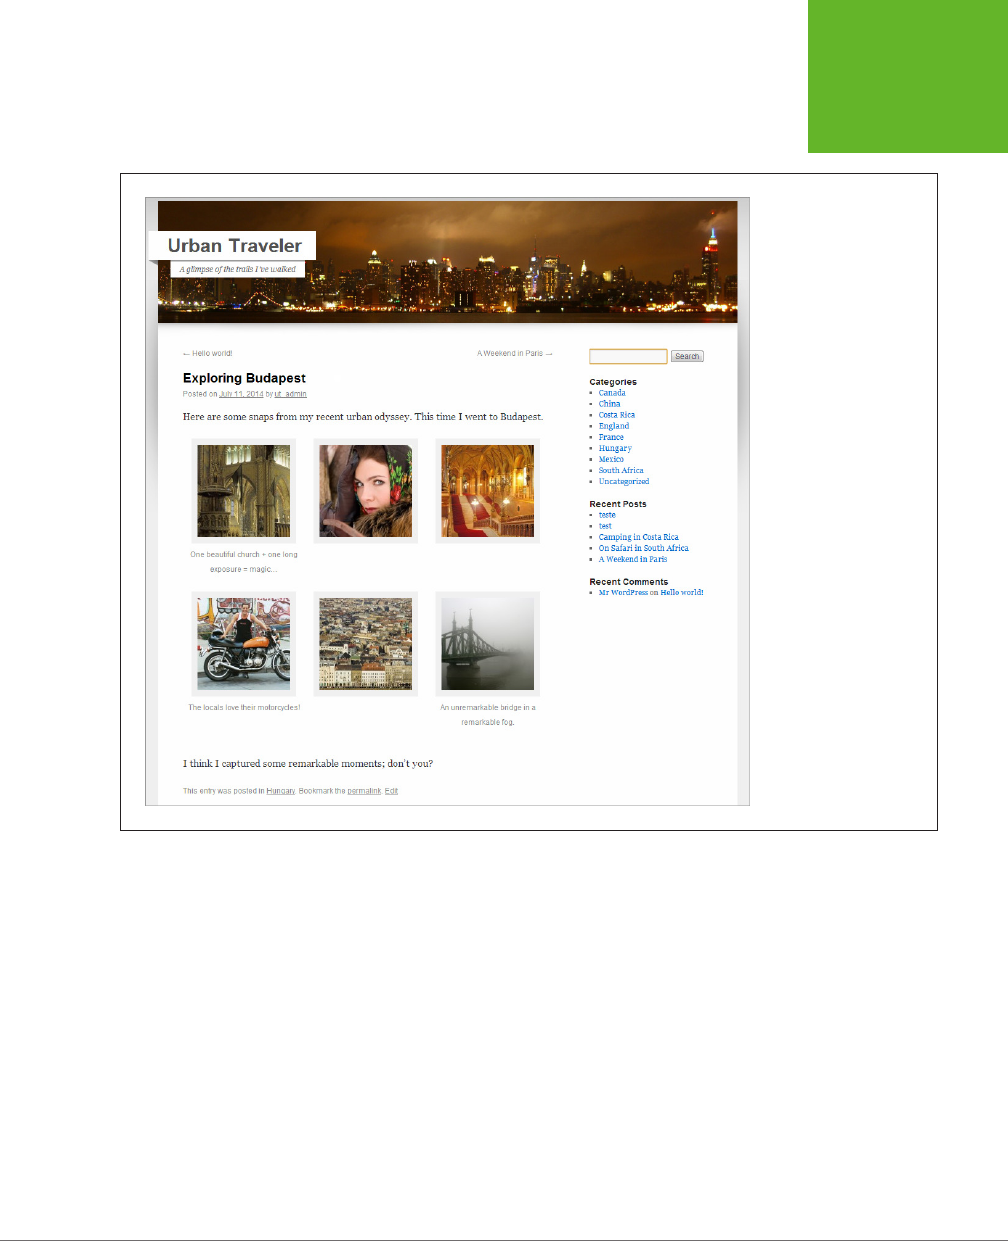
CHAPTER 10: ADDING PICTURE GALLERIES, VIDEO, AND MUSIC 331
SHOWING
GROUPS OF
PICTURES
FIGURE 10-3
WordPress’s gallery
feature crops your
pictures and arranges
them in a series of rows.
If you wrote captions
for the images, they
appear underneath the
thumbnails.
If you run a self-hosted site, WordPress launches what it calls an
attachment page,
which displays the larger-size picture along with its description (if you included it)
and a place for comments (Figure 10-4).

WORDPRESS: THE MISSING MANUAL
332
SHOWING
GROUPS OF
PICTURES
FIGURE 10-4
WordPress’s attachment
page, which looks like
a simple version of a
single-post page, comes
complete with an area for
comments.
WordPress.com is a bit fancier—it includes the picture in a photo carousel, and
viewers can step from one picture to the next (or former) by clicking the arrows on
either side of the image (Figure 10-5).
TIP A photo carousel dramatically showcases your pictures without taking the reader away from your post.
Self-hosted sites can get this feature by installing the Jetpack plug-in (page 297). However, some WordPressers
have found that the photo carousel doesn’t work with certain theme/browser/plug-in combinations. So if you
install Jetpack but you still see ordinary attachment pages instead of the photo carousel, you probably ran into
one of these conflicts.
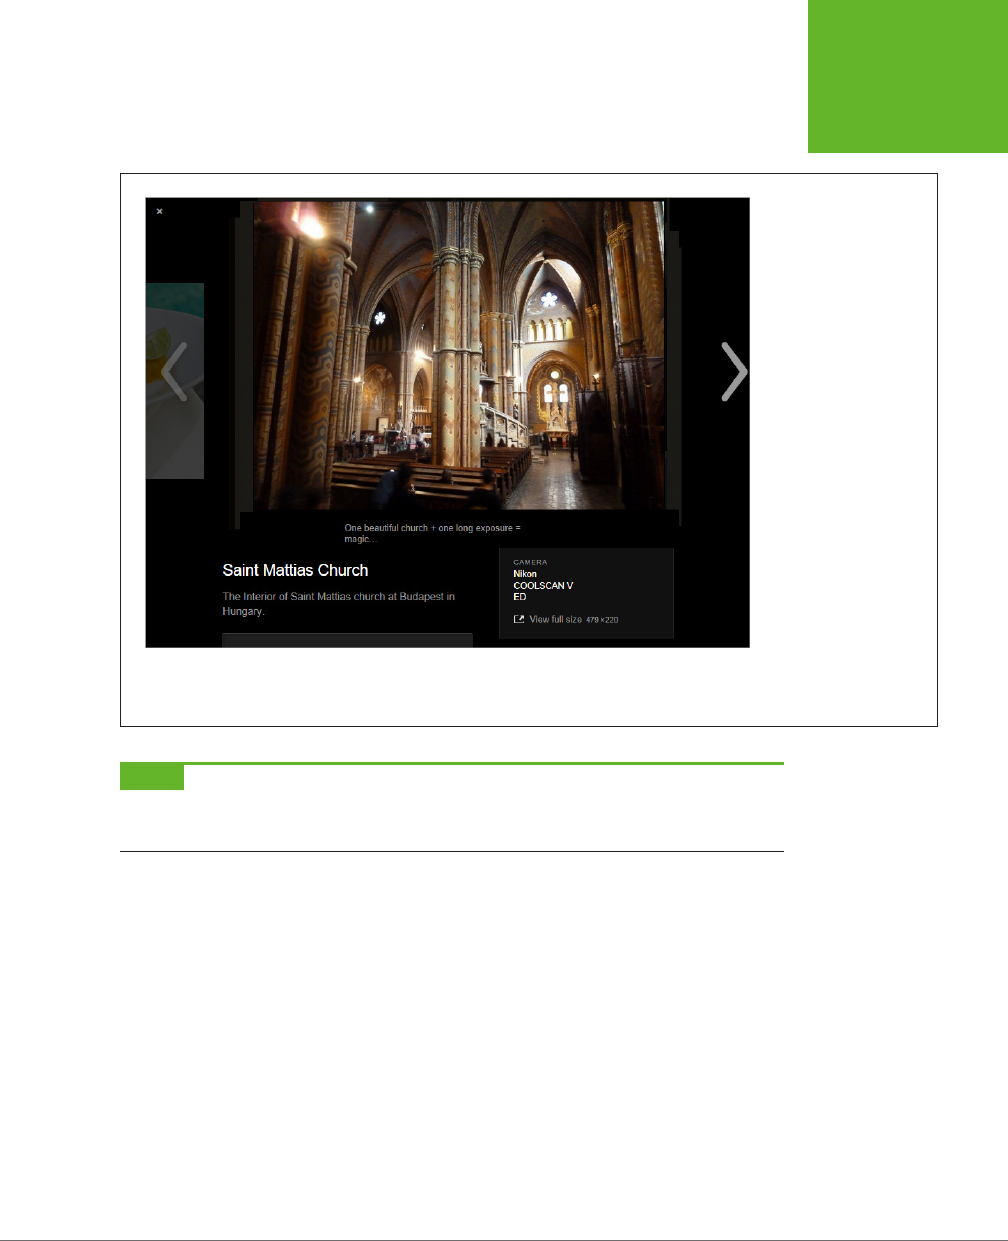
CHAPTER 10: ADDING PICTURE GALLERIES, VIDEO, AND MUSIC 333
SHOWING
GROUPS OF
PICTURES
FIGURE 10-5
When a WordPress.com
visitor clicks a thumbnail
image, WordPress
launches a photo carousel
instead of a simple
attachment page. It
has most of the same
information as an attach-
ment page, including a
comments section (not
shown). It also displays
each picture’s EXIF data
if the file includes it.
(EXIF data is information
that digital cameras and
photo-editing software
add to a photo file. For
example, it may record
the type of camera that
took the picture, the
global coordinates where
the picture was taken, the
time it was taken, and the
camera settings used.)
NOTE You can turn off the WordPress.com photo carousel, in which case viewers see an attachment page
when they click a picture. To do that, choose Settings→Media from the dashboard menu, turn off the “Display
images in full-size carousel slideshow” checkbox, and then click Save Changes.
Now that you know what a gallery looks like, you’re ready to add one of your own.
Follow these steps:
1. Create a new post or edit an existing one.
Or create or edit a page; either way, the gallery-adding process is the same.
2. Click the Add Media button just above the edit box.
This is the same link you use to add single pictures. When you click it, the Insert
Media window opens.
3. Upload the pictures you want in your gallery.
As you already know, you can upload files from your computer in two ways.
One option is to drag them from your file browser (Windows Explorer or the
Mac Finder) and drop them onto the page. The other is to click Select Files,
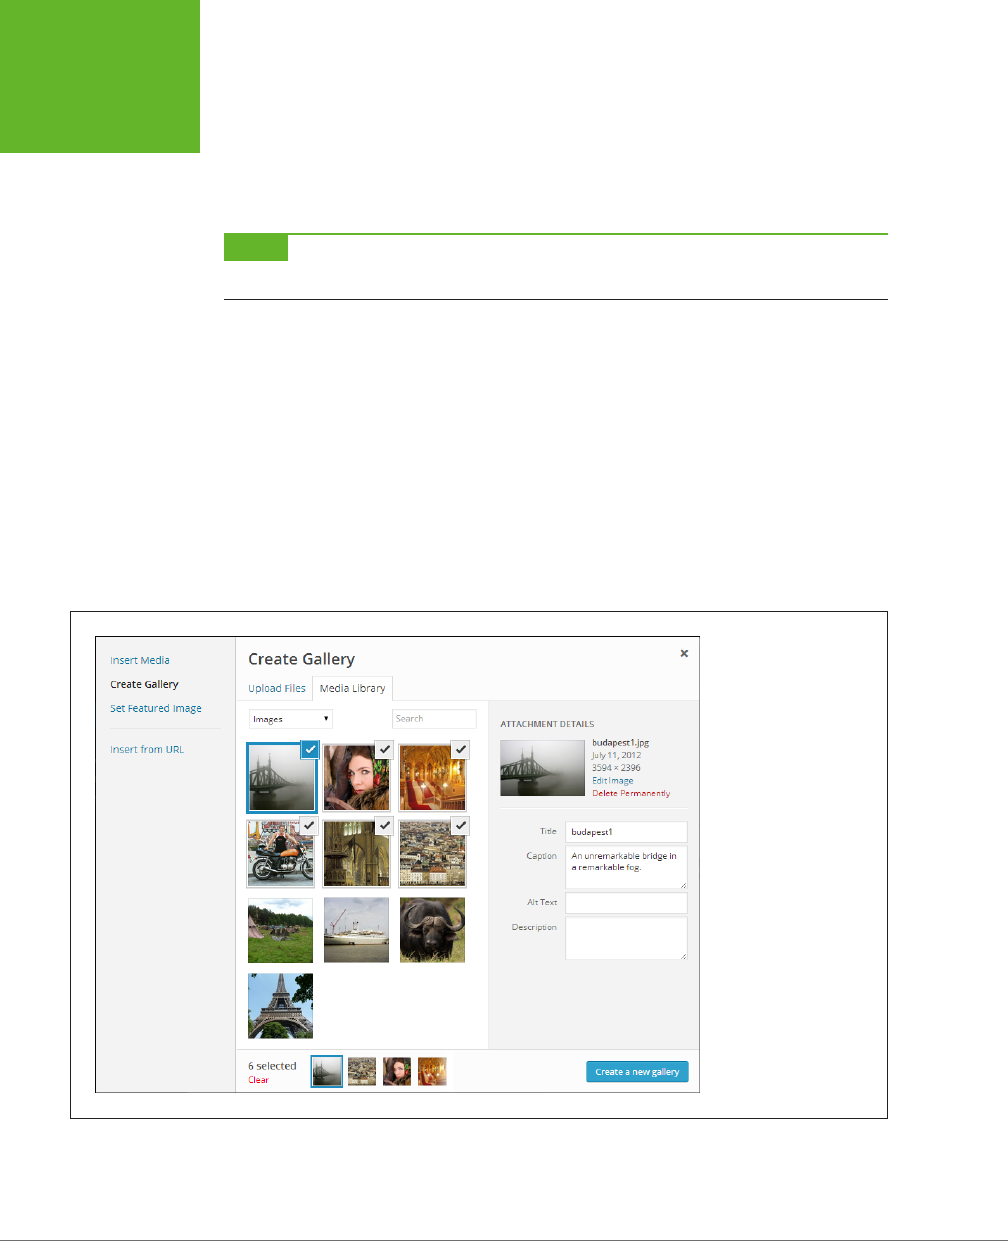
WORDPRESS: THE MISSING MANUAL
334
SHOWING
GROUPS OF
PICTURES
browse for the pics, and then choose Open. Either way, WordPress uploads the
pictures to your site’s media library (page 186).
If you already have the pictures in your media library, you don’t need to upload
anything. Skip ahead to the next step.
NOTE You can use a combination of existing pictures (ones you already uploaded to your media library)
and new ones. Just upload the new pictures and then skip ahead to the next step.
4. Once you upload the files, click the Create Gallery link on the left.
WordPress switches to the Media Library tab and shows you a grid of all the
pictures you’ve ever uploaded. If you’ve got a thriving site that’s been around
for a while, the list may be quite long. However, WordPress automatically se-
lects the pictures you uploaded in step 3 and puts them at the top of your list
(Figure 10-6). If these are all the pictures you need, you’re ready to carry on
to the next step.
To add another picture to the gallery, click it. (Repeat this step to select as many
pictures as you want.) To remove a picture, deselect it by clicking the checkmark
in the top-right corner of the thumbnail.
FIGURE 10-6
WordPress denotes
selected pictures with
checkmarks. Here, the
selected pictures are
the six photos you just
uploaded.
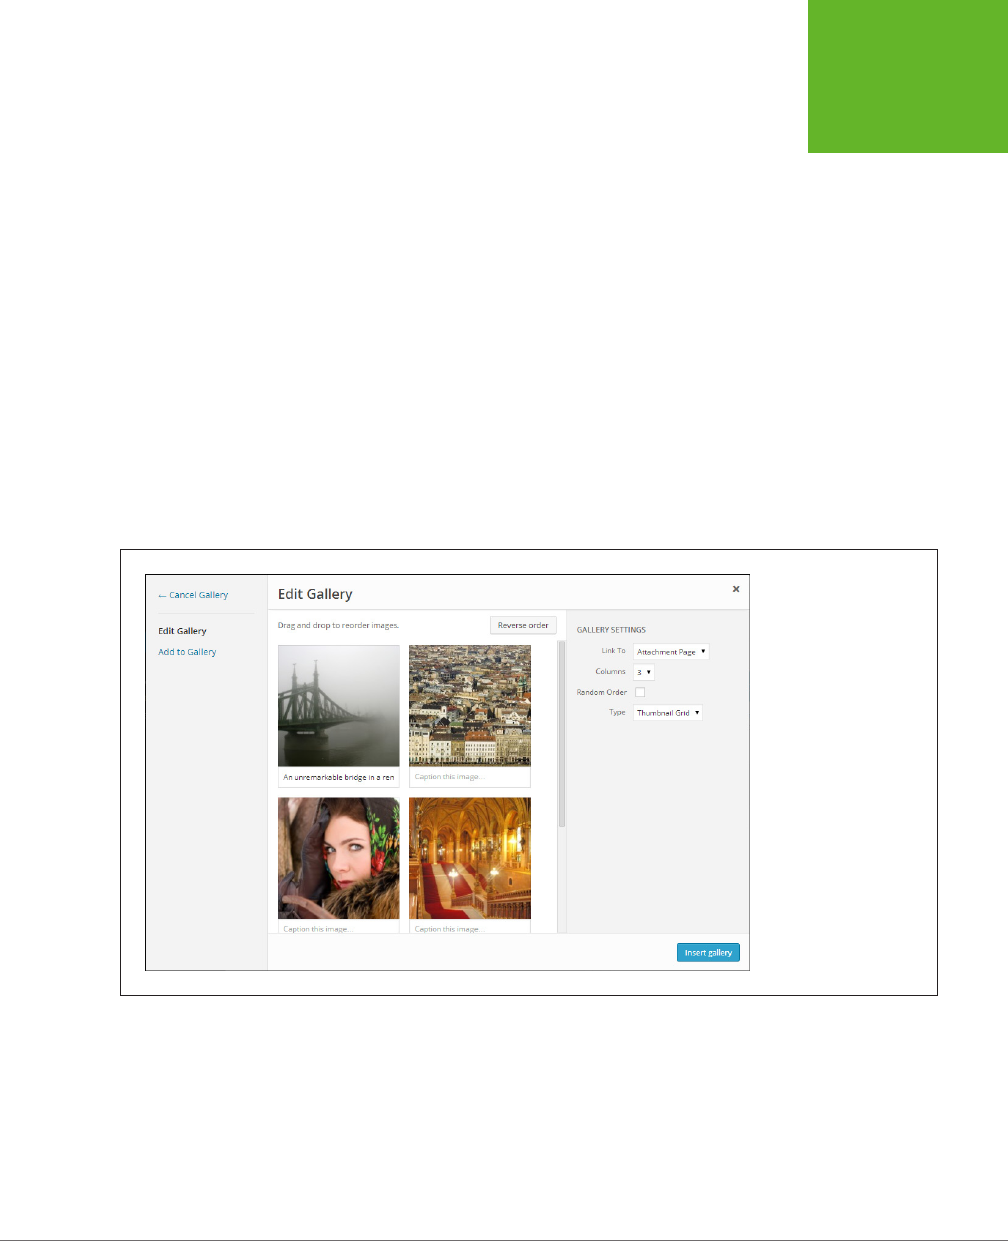
CHAPTER 10: ADDING PICTURE GALLERIES, VIDEO, AND MUSIC 335
SHOWING
GROUPS OF
PICTURES
5. Enter a description for each picture.
This is the same process you follow when you insert a single picture. Click each
picture, one after the other, and then fill in the boxes on the right:
• Title. This is the text that pops up when someone points to the picture.
• Caption. This is a bit of optional text that, if you provide it, shows up under
the picture.
• Alternate Text. Use this box to describe the picture so that accessibility
tools like screen readers can “speak” the text. Alternate text also helps
search engines understand what a picture shows.
• Description. This box contains additional text that appears on the picture’s
attachment page (Figure 10-4) or in a photo carousel.
6. Once you add descriptive information for all your pictures, click “Create a
new gallery” at the bottom right.
WordPress displays the pictures you picked in your gallery (Figure 10-7).
FIGURE 10-7
Here are the selected
pictures, with captions,
as they’ll appear in your
gallery.
7. Drag your pictures into the order you want.
The WordPress gallery displays pictures in the order you picked them. That
means the picture you picked first is the first one in the gallery. To rearrange
them, simply drag the one you want to move to a new place.
To reverse your picture order, so the first picture becomes the last, the second
picture becomes the second to last, and so on, click “Reverse order.”

WORDPRESS: THE MISSING MANUAL
336
SHOWING
GROUPS OF
PICTURES
If you prefer to let WordPress mix up your pictures every time someone views
the gallery, turn on the Random Order checkbox, which appears on the right.
8. Tweak your gallery settings (in the Gallery Settings section on the right).
WordPress gives you several options for fine-tuning your gallery. They include:
• Link To. This determines what page appears when someone clicks a
thumbnail in the gallery. Ordinarily, this is the attachment page (choose
Attachment Page to make it so), but you can keep things simple by show-
ing the full-size image on its own, with no extra information (choose Media
File). Or you can turn o links altogether (choose None).
NOTE If you use the photo carousel feature (page 333), WordPress ignores the Link To setting. Instead, it
shows a photo carousel when a visitor clicks a picture.
• Columns. Ordinarily, a gallery row displays three thumbnails per line (see
Figure 10-3). But some themes can accommodate more mini-pics. If that’s
the case for you, choose a dierent number here. But be warned: If your
layout column isn’t wide enough for your pictures, WordPress breaks up the
pics unevenly. For example, if you pick five gallery columns but your layout
only has space for three pictures, WordPress splits each row of five into a
row of three, followed by a row of two, creating a distracting zigzag eect.
• Random Order. Switch on this checkbox to ignore the order your pictures
have right now, and arrange them randomly each time someone views
the page.
• Type. This setting lets you change an ordinary gallery into a slideshow (pick
Slideshow instead of Thumbnail Grid). However, this setting appears only
on WordPress.com sites or self-hosted sites that use the Jetpack plug-in.
On WordPress.com sites (or Jetpack sites that have the Tiled Galleries fea-
ture activated), the Type list includes three more exotic choices. Tiled Mosaic
packs the pictures tightly together in a jigsaw of squares and rectangles
(rather than spacing them out in the standard, neatly separated squares).
Square Tiles crops each thumbnail down to a perfect square, trimming o
the edges if needed. Circles crops each thumbnail into a circle. The best
way to get a sense for these fancy gallery types is to try them out.
9. Click “Insert gallery” at the bottom right.
This adds the gallery to your post (Figure 10-8). You can now publish your post.
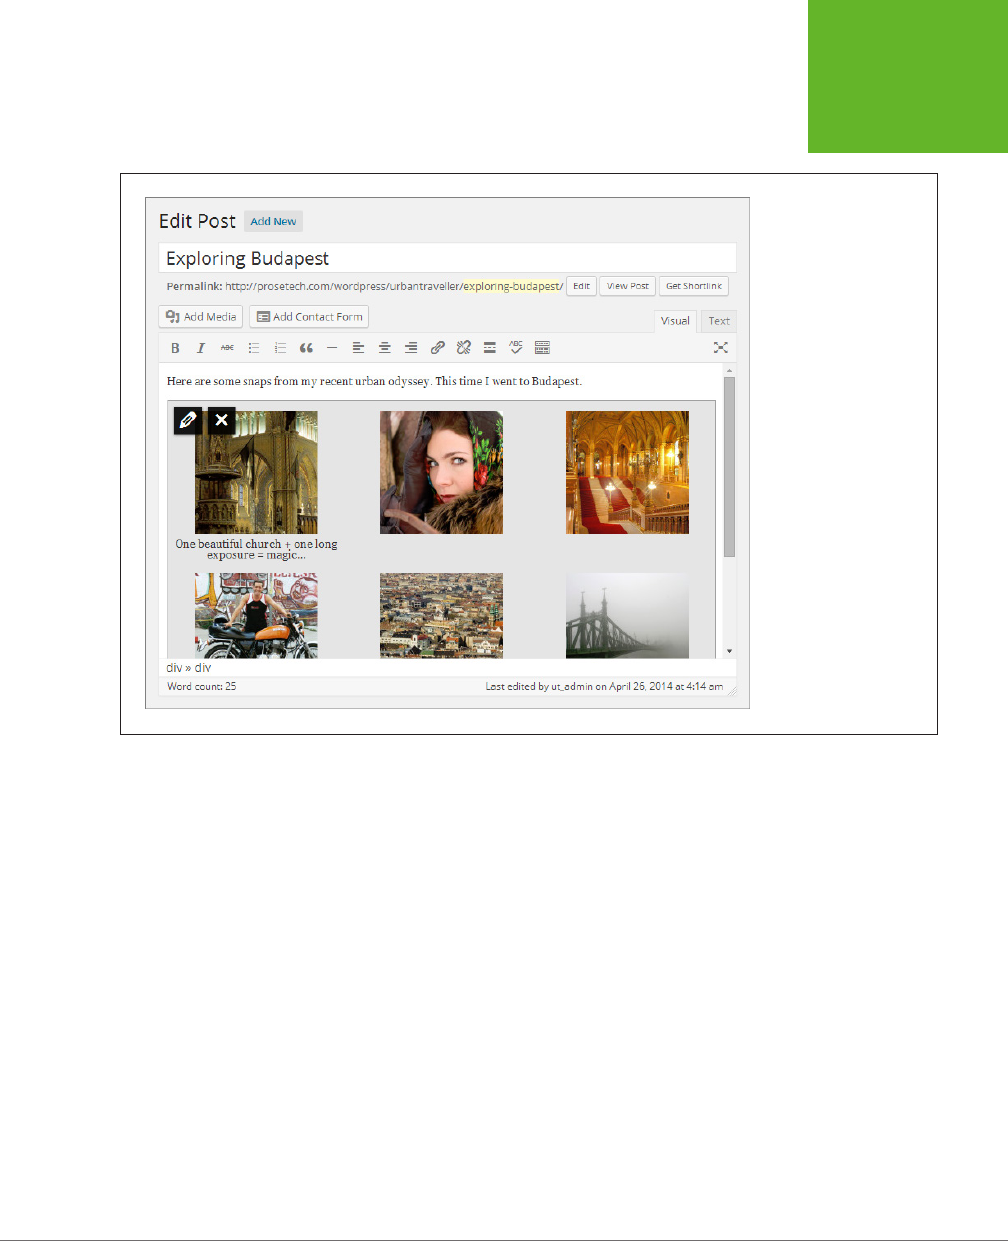
CHAPTER 10: ADDING PICTURE GALLERIES, VIDEO, AND MUSIC 337
SHOWING
GROUPS OF
PICTURES
FIGURE 10-8
There’s no need to
preview your post to
check out your new gal-
lery. WordPress provides
a faithful depiction of the
gallery in the Visual tab
of the post editor.
If you click the Text tab to switch to HTML view, you see that your post now contains
a [gallery] shortcode that looks something like this:
[gallery ids="341,185,342,340,246,339"]
There’s an ID number for each picture in your gallery. In the example above, the first
picture in the gallery has the ID number 341, the second one has the ID 185, and so
on. You can find the matching pictures in the media library.
The HTML view of your gallery-enriched post is more notable for what it
doesn’t
contain. There are no image tags, links, or other HTML wizardry. Instead, WordPress
examines the [gallery] shortcode and then creates the gallery on the fly every time
someone requests the page.
Editing a Gallery
To alter a gallery, edit your post and, in the visual editor, click the gallery to select
it. Two icons appear in the top-left corner of the gallery: a pencil and a large X.

WORDPRESS: THE MISSING MANUAL
338
SHOWING
GROUPS OF
PICTURES
Click the X if you want to delete your gallery. Click the pencil and you wind up on
the Edit Gallery page shown in Figure 10-7. There, you can do any of the following:
• Edit gallery settings. These settings appear in the Gallery Settings box on
the right.
• Rearrange the order of your pictures. Drag them into the order you want, just
as you did when you first created the gallery.
• Edit picture information. Select a picture and edit the information that appears
in the text boxes on the right.
• Delete pictures. Point to the picture, and then click the X that appears in the
top-right corner.
• Add new pictures. Click “Add to Gallery” on the left. Now you can pick more
images from the media library or drag one or more new pictures onto the page
to upload them.
To make your changes permanent, click “Update gallery” when you finish.
FREQUENTLY ASKED QUESTION
Changing the Thumbnails That Appear in a Gallery
Is there any way to change the way WordPress displays my
thumbnails?
You’re bound to encounter this at some point: Your thumbnails
are too small. Or too big. Or you don’t want them square-
shaped. What to do?
Ordinarily, WordPress creates square thumbnails, measuring
150 pixels wide by 150 pixels tall. If your picture isn’t a perfect
square, WordPress crops off the edges to
make
it a square.
There are two ways to change the size and shape of your
thumbnails. The first is to edit the [gallery] shortcode in HTML
view (using the Text tab), and add the
size
attribute, which can
take one of several values. The default is
thumbnail,
but your
other choices are
medium
or
large,
which tell WordPress to get
medium-sized (300 × 300 pixels) or large-sized (1024 × 1024
pixels) versions of your picture and display them instead. In
both cases, WordPress sizes the picture proportionally, rather
than cropping it into a square.
This raises an excellent question: How does WordPress decide
how big to make your thumbnails in the first place, not to men-
tion the medium- and large-sized versions of your pictures?
The answer leads to the second way to change your gallery
thumbnails—by changing the settings in the Settings→Media
section of the dashboard. There you see settings that let you
tweak the standard thumbnail size (150 × 150), as well as the
maximum dimensions for medium-size pictures and large
ones. On a self-hosted site, you’ll also find a setting named
“Crop thumbnail to exact dimensions.” Turn off the checkbox
and WordPress proportionally sizes your thumbnails to match
the dimensions of the actual picture, rather than cropping it
into a square (see Figure 10-9).
One caveat applies when you change these settings: WordPress
creates the thumbnails when you upload your pictures, so
the galleries you created so far will continue using the old
thumbnails (unless you re-upload the pictures and re-create
the gallery). If you run a self-hosted WordPress site, you can fix
this problem using the Regenerate Thumbnails plug-in (
http://
tinyurl.com/rthumb
). Once you install and activate it, you can
create new thumbnails by visiting the media library (choose
Media→Library). Turn on the checkbox next to all the pictures
you want to change, and then choose Regenerate Thumbnails
in the Bulk Action list. Finally, click Apply to re-create the
thumbnails for those pictures.
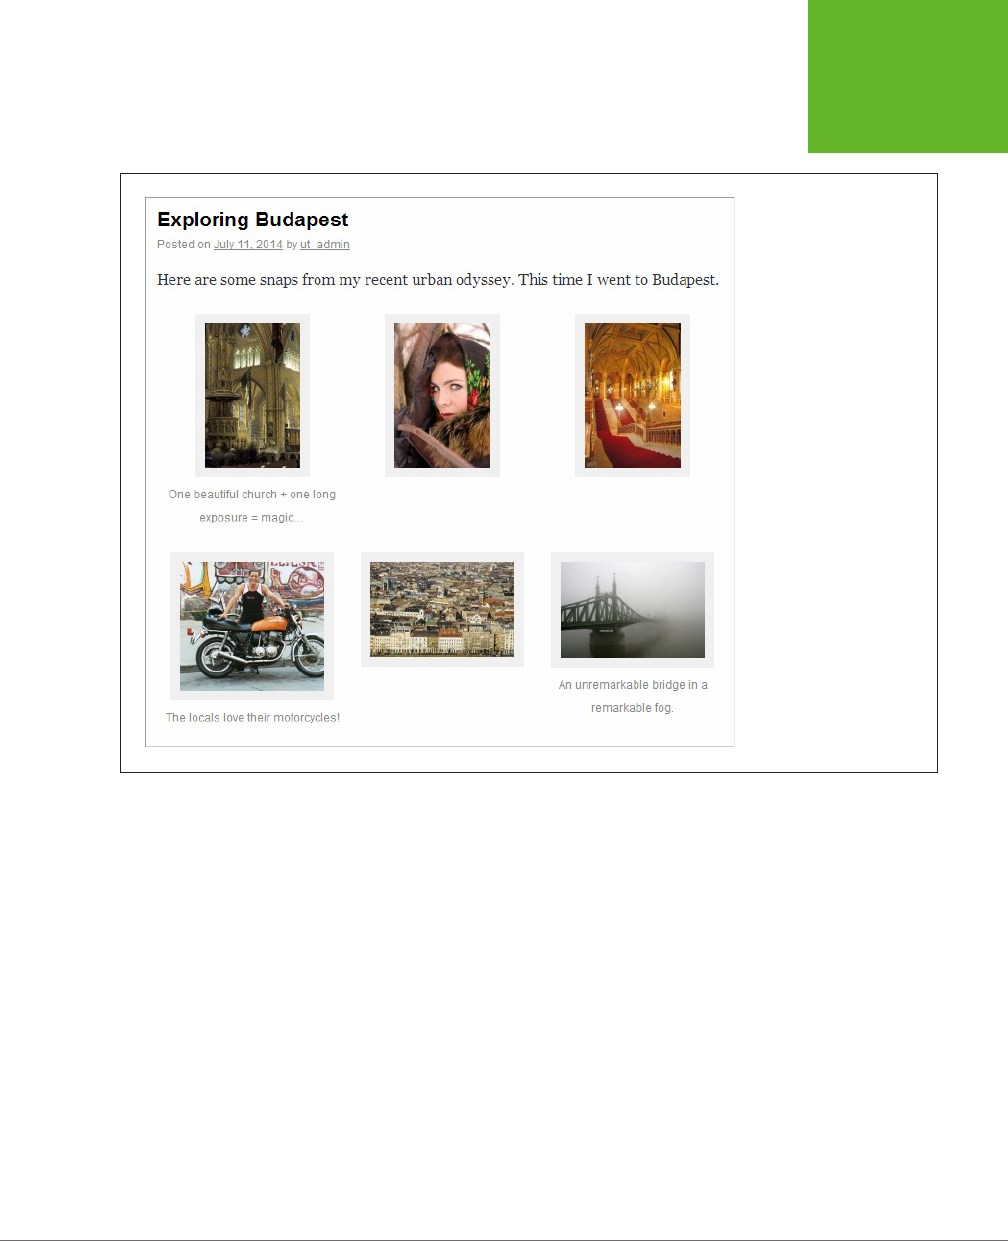
CHAPTER 10: ADDING PICTURE GALLERIES, VIDEO, AND MUSIC 339
SHOWING
GROUPS OF
PICTURES
FIGURE 10-9
Here, WordPress has propor-
tionally sized the thumb-
nails. If a picture is tall and
skinny, WordPress makes it
150 pixels tall and as wide
as necessary. If a picture is
short and wide, WordPress
makes it 150 pixels wide
and as tall as necessary. (Of
course, you can adjust these
size maximums on the Media
Settings page.)
Creating a Slideshow
A slideshow is similar to a gallery in that it gives you an elegant way to deal with a
group of related pictures. But where a gallery shows a group of photos all at once,
a slideshow displays your pictures one at a time, typically framed by a small box
(Figure 10-10).
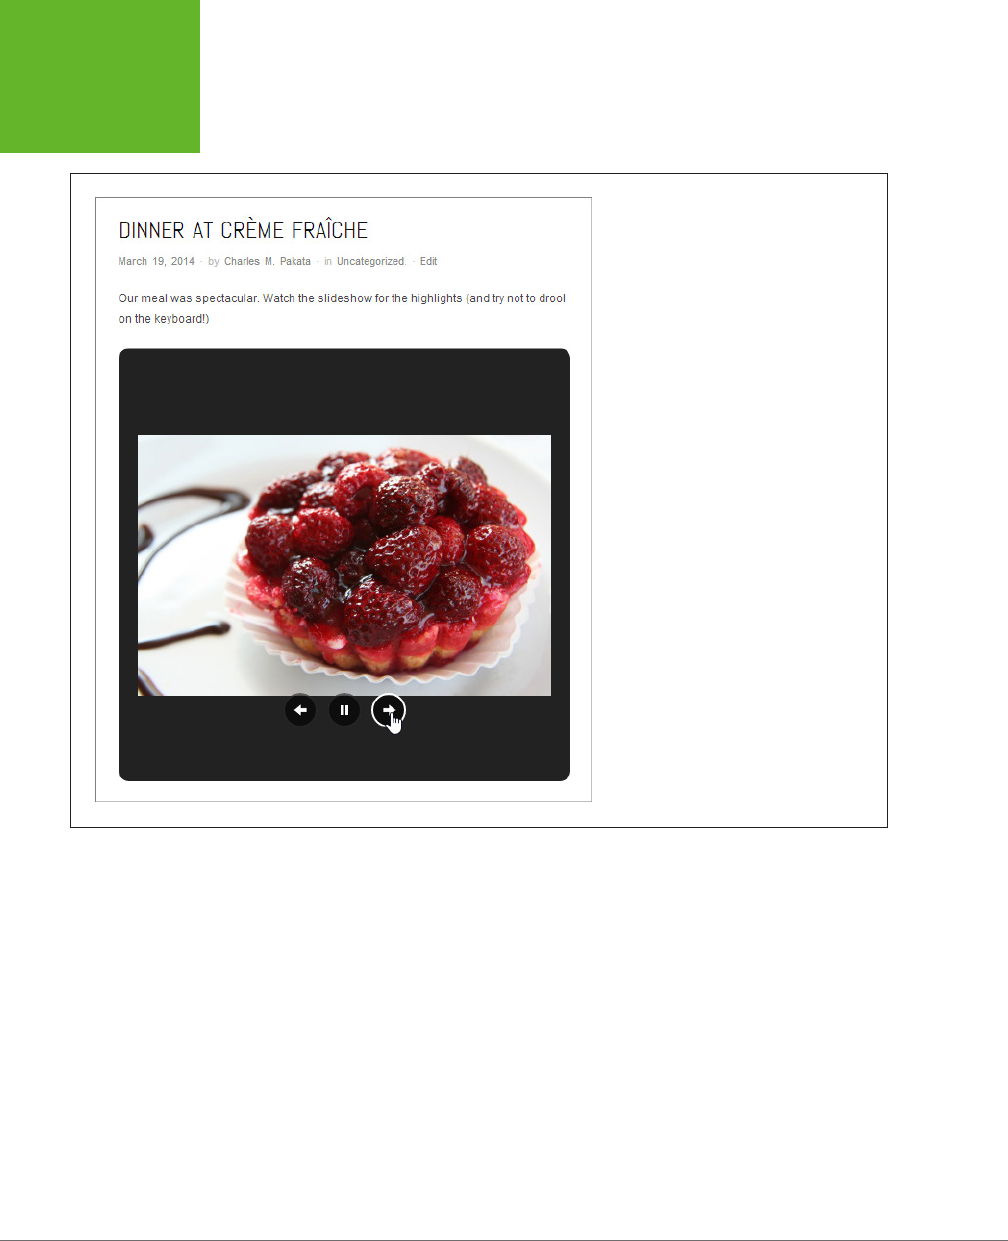
WORDPRESS: THE MISSING MANUAL
340
SHOWING
GROUPS OF
PICTURES
FIGURE 10-10
When you visit a page that contains a slide-
show, you see a box with your image against
a black background. WordPress holds on each
pic for about 4 seconds. Although you can’t
change the speed of the slideshow, viewers
can use the pause button to halt it and the
arrow buttons to move through the pictures at
their own pace.
If you use WordPress.com, it’s easy to add a basic slideshow. In fact, you follow the
same process you followed to create a gallery, with one exception: In the second-
to-last step (that’s step 8, on page 336), you change the Type from Thumbnail Grid
to Slideshow. You can transform an existing gallery into a slideshow the same way.
Once upon a time, WordPress.com used a separate [slideshow] shortcode for
slideshows. Although this shortcode still works, WordPress doesn’t use it anymore.
Instead, it tweaks the gallery shortcode by adding a type attribute. If you switch to
the HTML view of your post after you add a slideshow, you see something like this:
[gallery type="slideshow" ids="341,185,342,340,246,339"]
Freshly installed self-hosted WordPress sites don’t oer slideshows. You can add
the type attribute to the [gallery] shortcode, but it won’t have any eect. However,
slideshow support is just a plug-in away if you add Jetpack.
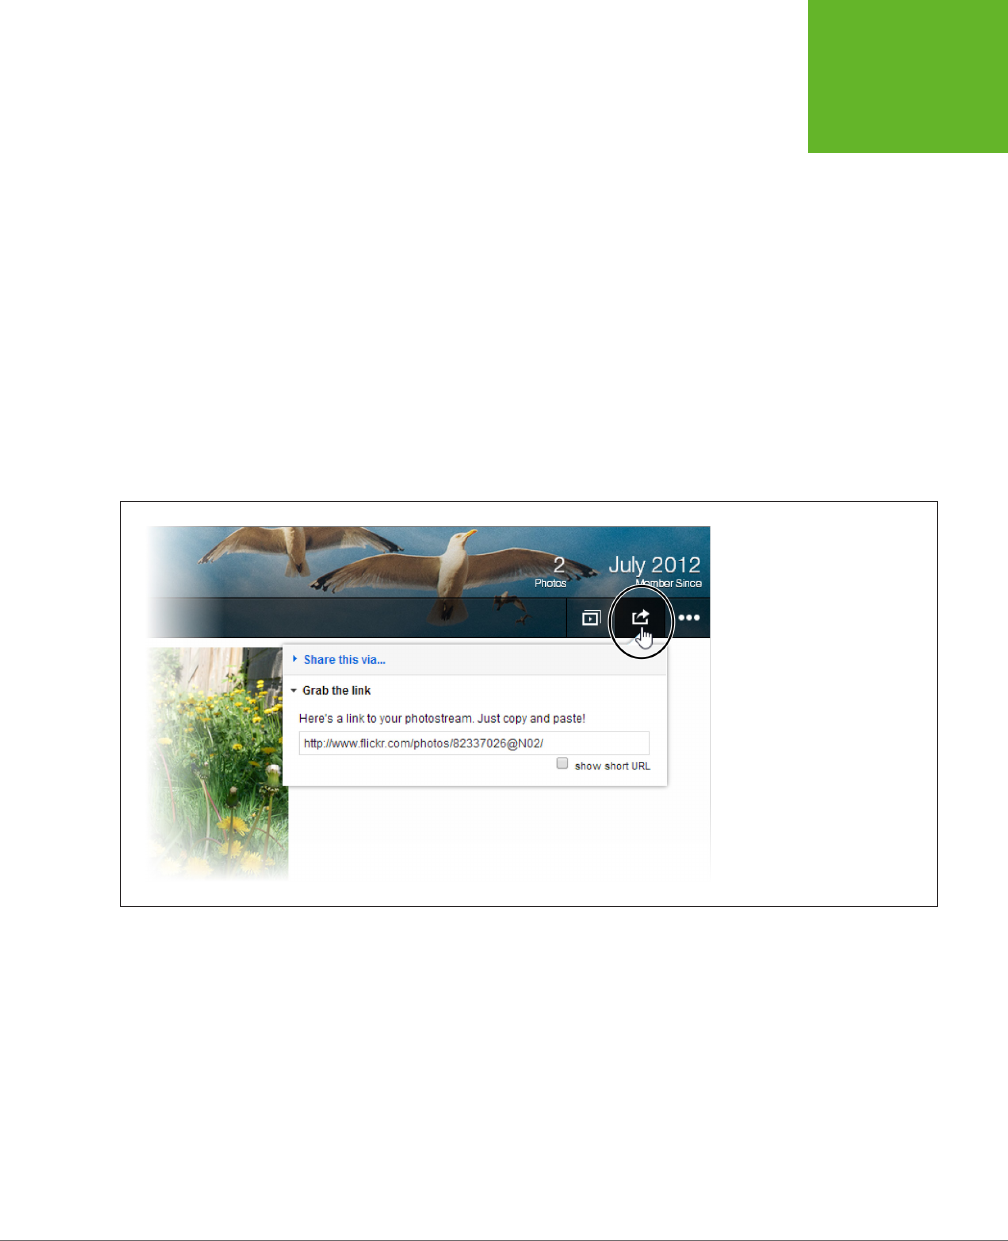
CHAPTER 10: ADDING PICTURE GALLERIES, VIDEO, AND MUSIC 341
SHOWING
GROUPS OF
PICTURES
To create an even better slideshow, you need to go beyond WordPress and its plug-
ins. Flickr oers the gold standard for slideshows, and if you have a Flickr account,
you can drop a Flickr slideshow into any WordPress post or page. All you need is
the right web address.
The easiest way to create a Flickr slideshow is to get a link for your entire photo
stream (all the pictures you uploaded to Flickr, in other words). To do that, click your
photo stream, click the tiny sharing button near the top-right corner of the page
(Figure 10-11), and then choose “Grab the link.” You’ll see a link like this:
http://www.flickr.com/photos/82337026@N02/
To convert this to a slideshow link, add the text
/show
to the end of your web ad-
dress, like this:
http://www.flickr.com/photos/82337026@N02/show/
Using this web address, you see a slideshow that steps through all your Flickr pictures.
FIGURE 10-11
Flickr makes it easy to turn your
photo stream into a slideshow.
Click the sharing button (circled)
and then select “Grab the link.”
Next, you need to copy this address into a post or page, on its own line. Lastly, publish
your page. Through the magic of auto-embedding, WordPress recognizes your slide-
show URL and embeds a small version of the slideshow in your post (Figure 10-12).
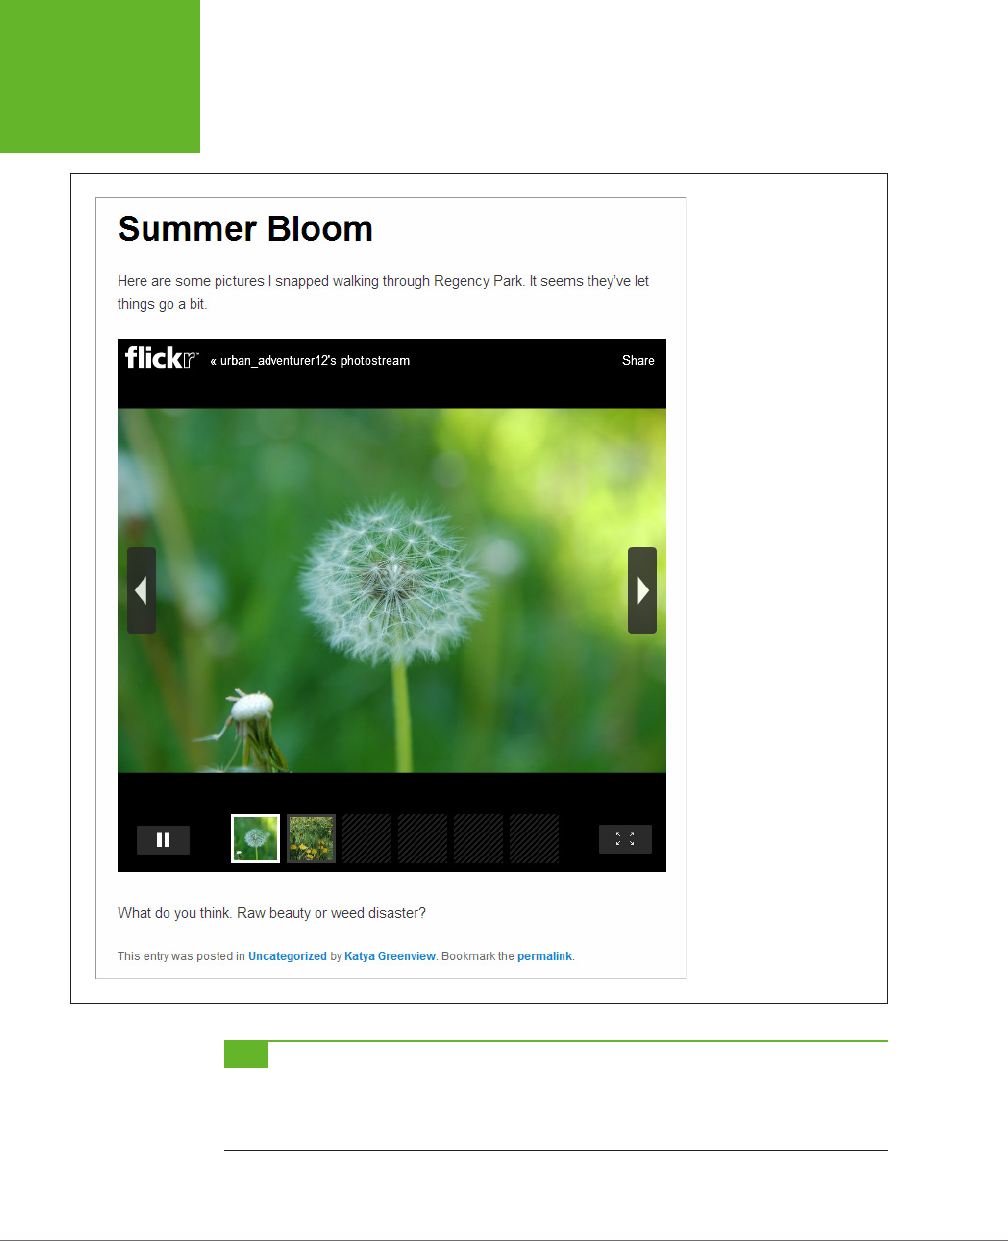
WORDPRESS: THE MISSING MANUAL
342
SHOWING
GROUPS OF
PICTURES
FIGURE 10-12
This post includes a Flickr
slideshow. Readers can
browse the pictures by click-
ing a thumbnail, using the
arrow buttons, or just letting
the show unfold.
TIP If you’re a Flickr expert, you know that you can make a
photo set
that includes just some of your pictures.
Conceptually, a photo set is like an album of shots you select and arrange in any order, which makes it more suit-
able for a slideshow. Once you create a photo set (which takes just a few drags and drops using Flickr’s Organizr
tool), you can click the familiar Slideshow button to get a URL for it.

CHAPTER 10: ADDING PICTURE GALLERIES, VIDEO, AND MUSIC 343
SHOWING
GROUPS OF
PICTURES
GEM IN THE ROUGH
Using a Slideshow from Another Site
Some websites have perfectly good slideshow features, but
they don’t offer the super-cool convenience of WordPress
auto-embedding. Examples include Picasa, Photobucket, and
SmugMug. In the future, WordPress may offer better integra-
tion with these services, but for now self-hosters have two
good options.
The first is to use a plug-in that supports your favorite photo
site. One good example is Photonic (
http://tinyurl.com/wp-
photonic
), which lets you display galleries and slideshows
from Flickr, SmugMug, Picasa, and 500px.
The second option is to add your slideshow the old-fashioned
way, using HTML. The basic idea is this: You ask your picture-
sharing service to give you the HTML markup you need for an
embedded slideshow. Usually, this is a block of cryptic code
that starts with an <object> or <iframe> element. The details
don’t matter, because you don’t need to actually understand
this markup. You simply need to copy and paste it.
The exact steps depend on the photo site you use. Usually, the
first step is to click a button named Share or Embed. You may
need to specify a few details, like the size of your slideshow
window, before the site generates the HTML you need. Once you
finish, select and then copy the HTML, switch your post to HTML
view, and then paste in the markup. But be warned—if you
switch back to the visual editor, it may disrupt your new code.
Themes That Make the Most of Pictures
Some sites are all about pictures and little else. For example, you might create a
photoblog to showcase your nature photography. You could use the techniques
you learned above to add galleries and slideshows, but the results won’t be ideal.
Standard WordPress themes split up your pictures, making it impossible for visitors
to browse your portfolio from beginning to end. And, worse, ordinary WordPress
themes deemphasize pictures, hiding them deep in your site, behind a wall of posts.
The solution is to find a picture-centric theme, one that puts the focus on your
pictures, without letting text, menus, and needless clicking get in the way. Happily,
you can build specialized, picture-heavy sites like this in WordPress. All you need is
a photoblog or
portfolio
theme.
There are several good options in the WordPress.com theme gallery, and many
more in the much larger theme collection for self-hosted sites. Either way, you can
dig up good candidates by searching for words like “photo,” “photoblog,” “picture,”
and “portfolio.”
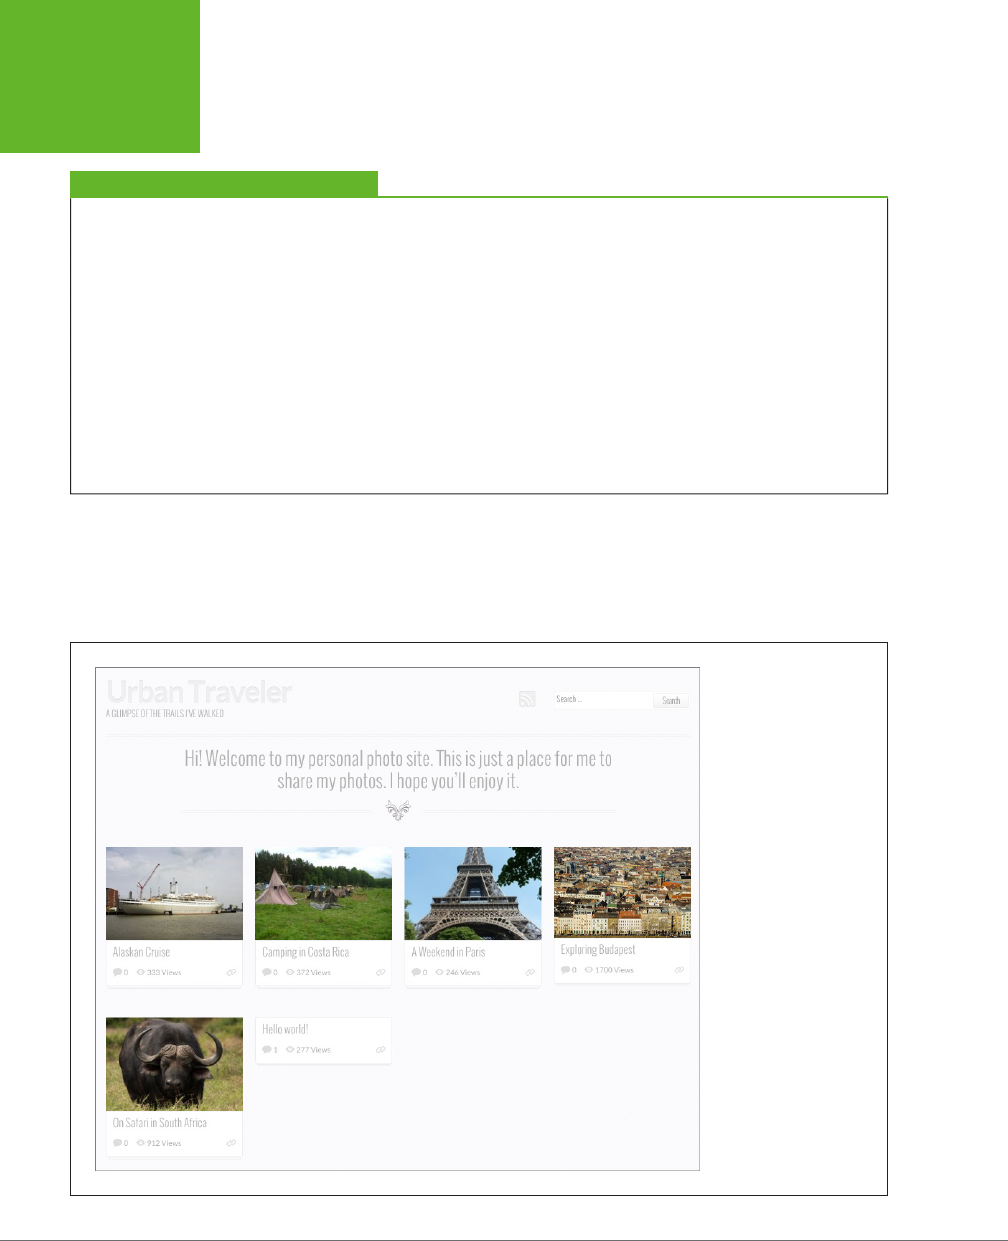
WORDPRESS: THE MISSING MANUAL
344
SHOWING
GROUPS OF
PICTURES
FREQUENTLY ASKED QUESTION
Comparing Photoblogs and Portfolios
Photoblogs and portfolios both feature pictures. What’s the
difference?
There’s a considerable overlap between photoblogs and
portfolio sites, and it’s worth checking out both options if you
want to build a site that emphasizes images. That said, there’s
a subtle distinction between these two theme types.
Usually, photoblogs show off your photography skills and the
snapshots you took. Like ordinary blogs, photoblogs arrange
posts in a chronological sequence to tell a story. For example,
your photoblog might show the pictures from your recent trip,
the sights you saw on a morning stroll, or the food you ate at
a favorite restaurant.
By comparison, portfolio sites are subject-based. That subject
could be portraits, architecture, fashion, or something entirely
different. Often, portfolio sites are intended to showcase some-
thing, like the works you’ve created or the products you sell.
Dates are optional and sometimes unimportant.
Every photoblog and portfolio theme works a bit dierently, but most share some
key features. First, the home page likely displays the
pictures
in your posts rather
than the posts themselves. Figure 10-13 shows an example from Foto, a photography
theme for self-hosted sites.
FIGURE 10-13
Instead of an ordinary
list of posts for its home
page, the Foto theme
creates a tiled display
of images. It also adds
a neat animated effect:
When you move your
mouse over a picture, the
image expands slightly.
You can then click the
enlarged tile to read the
full post.

CHAPTER 10: ADDING PICTURE GALLERIES, VIDEO, AND MUSIC 345
SHOWING
GROUPS OF
PICTURES
The Foto theme requires that you set a featured image for each of your posts (page
190). If you don’t, that post’s home-page tile will be blank. Many photoblog and
portfolio themes work this way, so if you don’t see the pictures you expect after
you switch themes, you most likely haven’t specified featured images for your posts.
Other themes aren’t as picky, and grab the first picture in a post, no matter what it is.
One example is the self-hosted theme PinBlack. Like Foto, PinBlack creates a home
page of tiled pictures. Unlike Foto, PinBlack uses any post picture it can get. If you
try out PinBlack, you’ll notice other, more subtle dierences as well. For example,
its home page feels a bit more serious and businesslike, with a sleek gray-and-black
color scheme with lime accents. (PinBlack is the starting point for the custom theme
that powers the furniture store example developed in Chapter 14.)
Often, photoblog and portfolio themes assume that, for each of your posts, you’ll
include just a single picture. They give special attention to this picture (which may
be the featured image or just the first image in the post) by making it larger than
normal and placing it at the top of the post.
Photoblog and portfolio themes often include Back and Forward buttons that let
readers move from one post to another, without making an interim stop at the
home page and selecting from the full list of posts. This way, readers can browse
your pictures and posts just as though they were scanning an image gallery, even
if the pics appear in separate posts. Figure 10-14 shows how the back and forward
buttons work with the Foto theme.
NOTE When a picture appears in a lightbox, it floats over the web page, with the content behind it dimmed.
This is the same effect you get when you view one of the pictures in a photo carousel, as described earlier. To
douse the lightbox, click the X in the top-right corner of the picture box.
WordPress.com also includes attractive photoblog and portfolio themes. One notable
example is the Duotone theme, which is designed to be a simple but beautiful way
to showcase your photography.
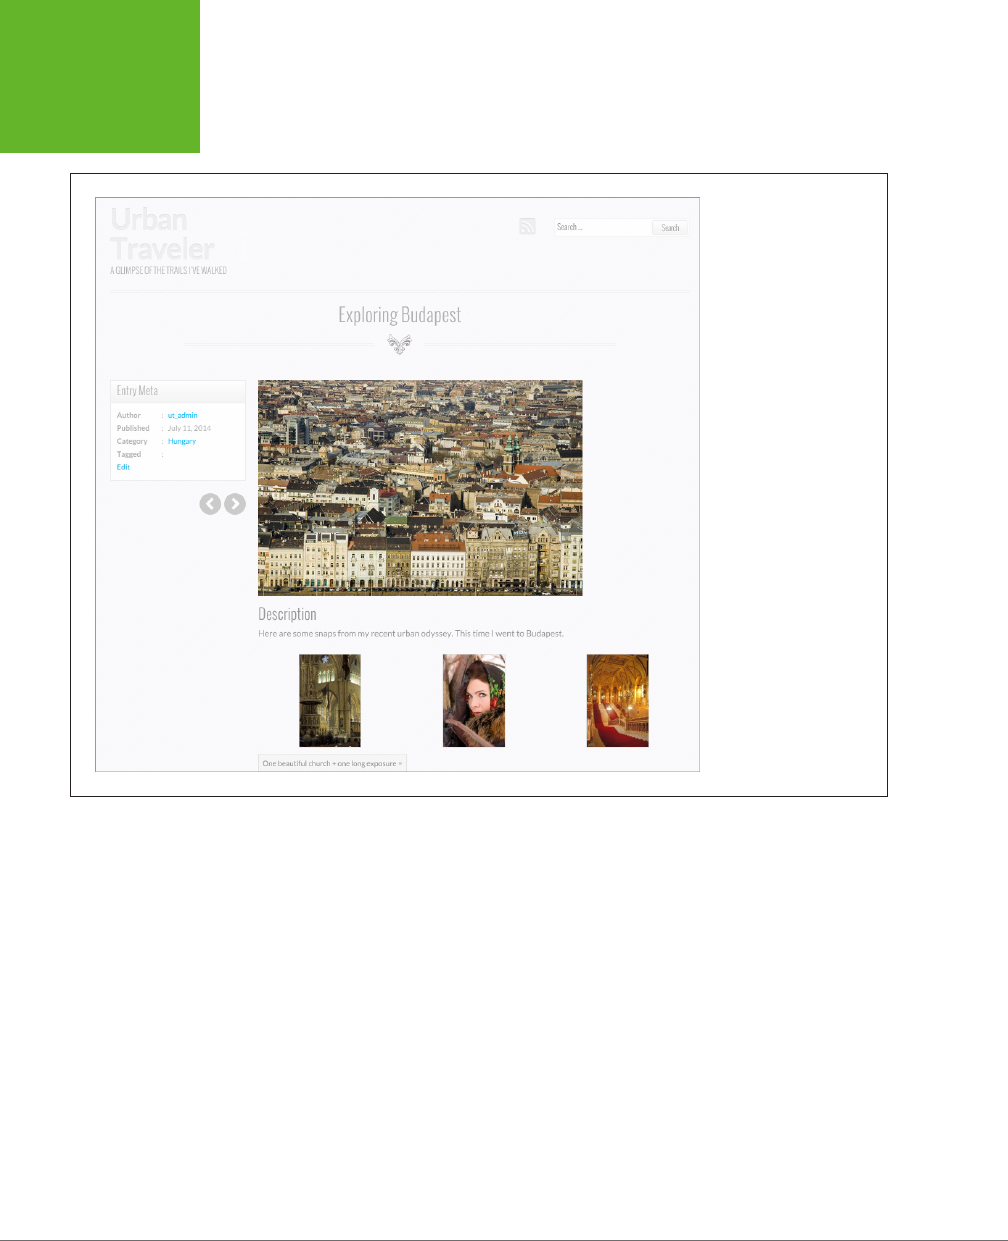
WORDPRESS: THE MISSING MANUAL
346
SHOWING
GROUPS OF
PICTURES
FIGURE 10-14
The Foto theme is
designed for picture
browsing. You use the
arrow buttons to move
from one post to another.
If you click the featured
image, it expands into a
lightbox, dimming the
content behind it.
Duotone doesn’t include a picture-tile home page. Instead, it takes viewers straight
into picture-browsing mode. Guests begin with a picture from your most recent post
and use the arrow buttons to step from one post to the next, just as visitors do with
the Foto theme (Figure 10-15). The Duotone theme also has an unusual frill—every
time a visitor moves to a new post, the theme picks a color from that post’s picture
and uses it as the background color.
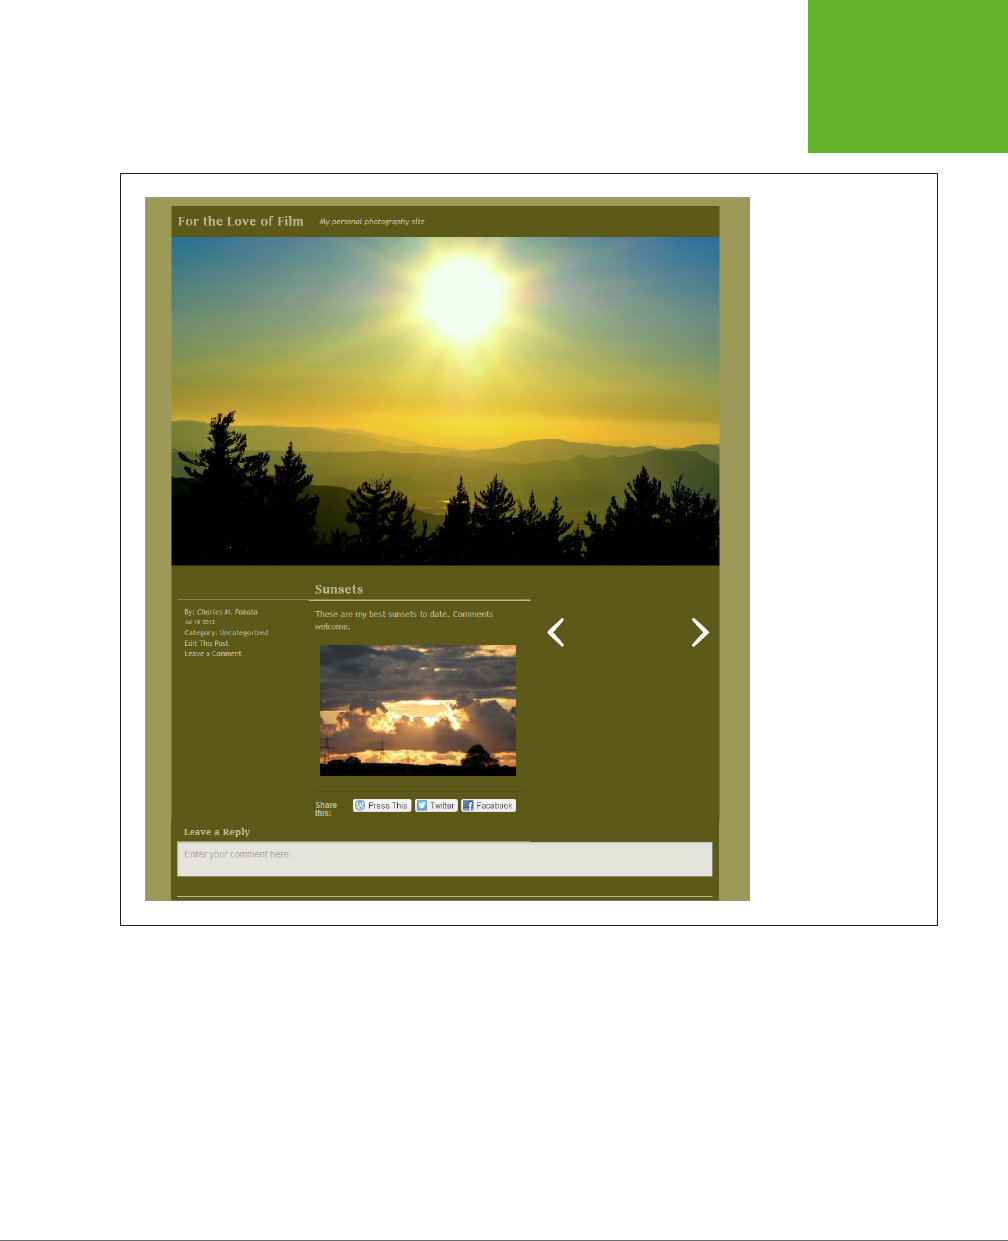
CHAPTER 10: ADDING PICTURE GALLERIES, VIDEO, AND MUSIC 347
SHOWING
GROUPS OF
PICTURES
FIGURE 10-15
The Duotone theme takes
the first picture from a
post, moves it above the
post title, and enlarges it
as much as possible. If a
post has more than one
picture, the other pictures
remain in their original
location in the post.
WordPress.com also includes portfolio themes. One is the professionally polished
Imbalance 2. Much like Foto, Imbalance 2 creates a tiled display of featured images,
but it also includes an excerpt from each post, as you can see in Figure 10-16.
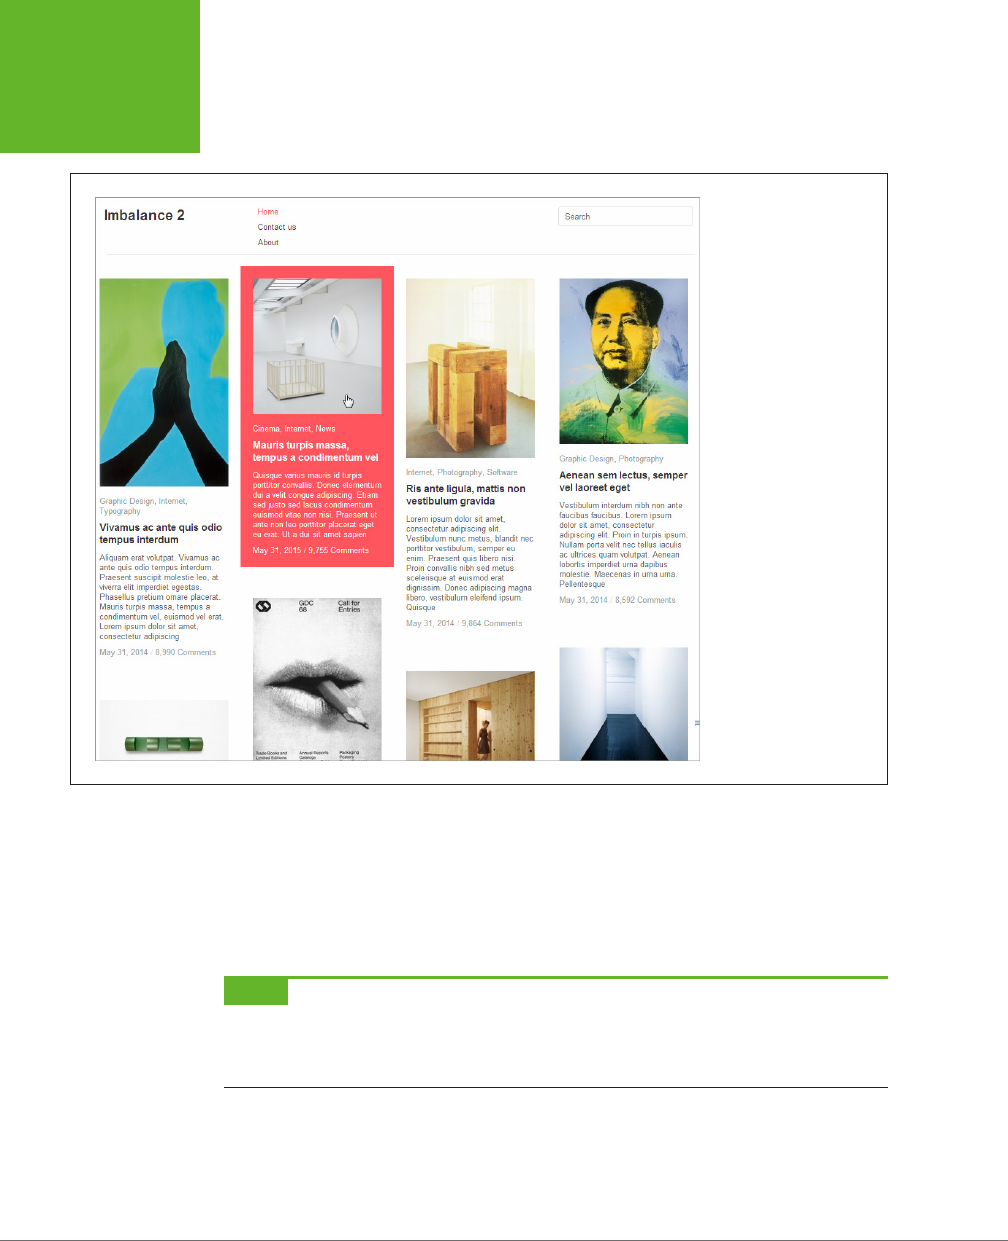
WORDPRESS: THE MISSING MANUAL
348
SHOWING
GROUPS OF
PICTURES
FIGURE 10-16
This demo site for the
Imbalance 2 theme
demonstrates its remark-
able layout. It accepts
and neatly arranges
irregularly sized tiles
made up of featured im-
ages (page 190) and post
excerpts (page 198) into
a seamless grid. If you
move your mouse over a
tile, the theme highlights
it with an arresting
orange background.
Finally, it’s worth noting that some themes, while not all-out photoblogs or portfolio
sites, oer some enhanced picture features. For example, many themes place a strip
of pictures from recent posts across the home page. Sometimes they animate the
strip, so that the pictures slide by or blend into each other, one after the other. The
most obvious example is Twenty Fourteen, but you can also see this feature in the
Canton School example (page 192).
NOTE At first glance, Twenty Fourteen can be mistaken for a photoblog, especially if you use the grid of
pictures on the home page. However, there are clear differences. Once you scroll past the picture grid or slider,
you find an ordinary list of posts, just as you do on all the standard year themes. And Twenty Fourteen doesn’t
provide arrows to let you step from post to post, which are a hallmark of many photoblogs.

CHAPTER 10: ADDING PICTURE GALLERIES, VIDEO, AND MUSIC 349
EMBEDDING A
VIDEO
Embedding a Video
Now that you’ve jazzed up your site with pictures, it’s time for something even more
ambitious: video.
There are two reasons you might put a video playback window in a post (or page).
First, you may want to use someone else’s video to add a little something extra to
your content (which is the ordinary text in your post). For example, if you comment
on a local protest concert, your post will be more interesting if you include a clip of
the event. Similarly, if you review a new movie, you might include its trailer. If you
talk about a trip to Egypt, you might want to take visitors inside the pyramids. In all
these examples, the video adds a bit of context to your post.
The other possibility is that the video may actually
be
your content. For example, you
might use video to show your band’s latest live performance, a bike-repair tutorial
you filmed in your garage, or a blistering web rant about the ever-dwindling size of
a Pringles can. In all these cases, you create the video and then use your WordPress
site to share it with a larger audience.
TIP Depending on the type of site you create, your written content doesn’t need to be
about
the video—in-
stead, the video could add supplementary information or a bit of visual distraction. For example, you may talk
about your favorite coffee blend and add a video that shows the grueling coffee harvest in Indonesia. Used care-
fully and sparingly, video accompaniment can enhance your posts in the same way a whimsical picture cribbed
from a free photo service can.
To present someone else’s video on your site, find the movie on a video-sharing site
and copy the address. Most of the time, that video-sharing site will be YouTube, the
wildly popular hub that rarely drops out of the top three world’s most visited websites.
And if you want to show your
own
videos, you’ll probably
still
turn to a video-hosting
service like YouTube because the alternative—uploading your video files straight to
your web server—has some significant drawbacks. Here are some of the reasons
you should strongly consider a video-hosting service:
• Bandwidth. Video files are large—vastly bigger than any other sort of content
you can put on a site, even truckloads of pictures. And although you probably
have room for your video files on your web server, you might not have the band-
width allotment you need to play back the videos for all your visitors, especially
if your website picks up some buzz and has a hot month. The result could be
extra charges or even a crashed website that refuses to respond to anyone.
NOTE Bandwidth allotment refers to how much web traffic your site host allows. Hosts may limit bandwidth
so that an extremely busy site—one with lots of visitors stopping by or downloading files—doesn’t affect the
performance of other sites the service hosts.

WORDPRESS: THE MISSING MANUAL
350
EMBEDDING A
VIDEO
• Encoding. Usually, the kind of file you create when you record a video diers
from the kind you need when you want to share it online. When recording, you
need a high-quality format that stands up well to editing. But when viewing a
video over the Web, you need a heavily compressed, streamlined format that
ensures smooth, stutter-free playback. Sadly, the process of converting your
video files to a web-friendly format is time-consuming, and it often requires
some technical knowledge.
• Compatibility. In today’s world, there’s no single web-friendly video format that
accommodates the variety of web browsers, devices (computers, tablets, and
mobile phones), and web connections (fast and slow) out there. Video services
like YouTube solve this problem by encoding the same video file multiple times,
so that there’s a version that works well for everyone. You can do the same on
your own, but without a pricey professional tool, you’re in for hours of tedium.
For all these reasons, it rarely makes sense to go it alone with video files, even if
you produce them yourself. Instead, pick a good video service and park your files
there. In the following section, you’ll start with YouTube.
UP TO SPEED
The Dangers of Using Other People’s Video
The risk of embedding other people’s videos is that the video
hosting service may take the videos down, often because of
copyright issues, and they’ll disappear from your site, too. This
is a particularly acute danger for videos that include content
owned by someone other than the uploader. Examples include
scenes from television shows and fan-made music videos.
Usually, WordPress authors don’t worry about this problem—if
a video goes dead, they edit their posts after the fact. To avoid
potential problems from the get-go, stay away from clips that
are obviously cribbed from someone else’s content, especially
if they’re recent. For example, a video that shows a segment
from last night’s
Saturday Night Live
broadcast is clearly at
risk of being taken down. A decades-old bootleg recording of
a Grateful Dead concert is probably safe.
Showing a YouTube Video
Hosting a YouTube video in WordPress is ridiculously easy. All you need is the video’s
web address.
To get it, start by visiting the video page on YouTube. (If you’re one of the six people
who haven’t yet visited YouTube, start at
www.youtube.com
.) If you haven’t already
found the video you want, you can spend some time searching around.
When you find the right video, click the Share link under the video window. A panel
of information pops open, including a text box with the URL you need (Figure 10-17).
The URL will look something like this:
http://youtu.be/OxKKr0Qrcjg
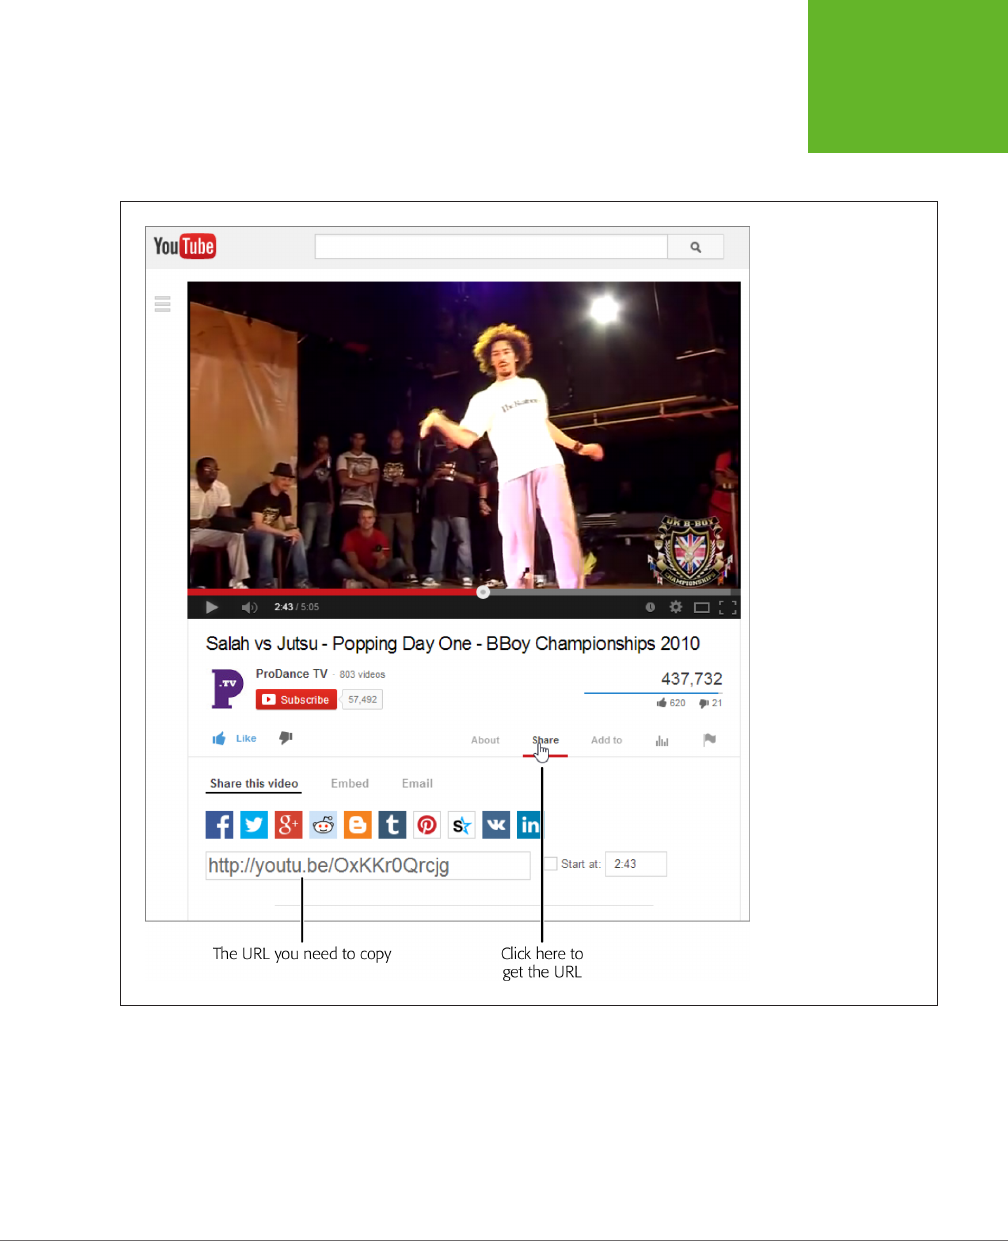
CHAPTER 10: ADDING PICTURE GALLERIES, VIDEO, AND MUSIC 351
EMBEDDING A
VIDEO
The first part,
youtu.be,
is a more compact form of the video’s full web address
(which starts with
www.youtube.com/watch?v=
). The string of letters and numbers
after it uniquely identifies the video you want.
FIGURE 10-17
When you click Share,
a box opens, with the
URL you need already
selected. Press Ctrl+C to
copy it.
The next step is even easier. Paste the video URL into your WordPress post, on a
separate line, in the location where you want the video to appear, like this:
If you consider yourself a fan of popping and locking (and I do), the
World Classic is an event you cannot miss.
http://youtu.be/OxKKr0Qrcjg
Here, Jutsu breaks out some sick moves against the battle-master Salah ...
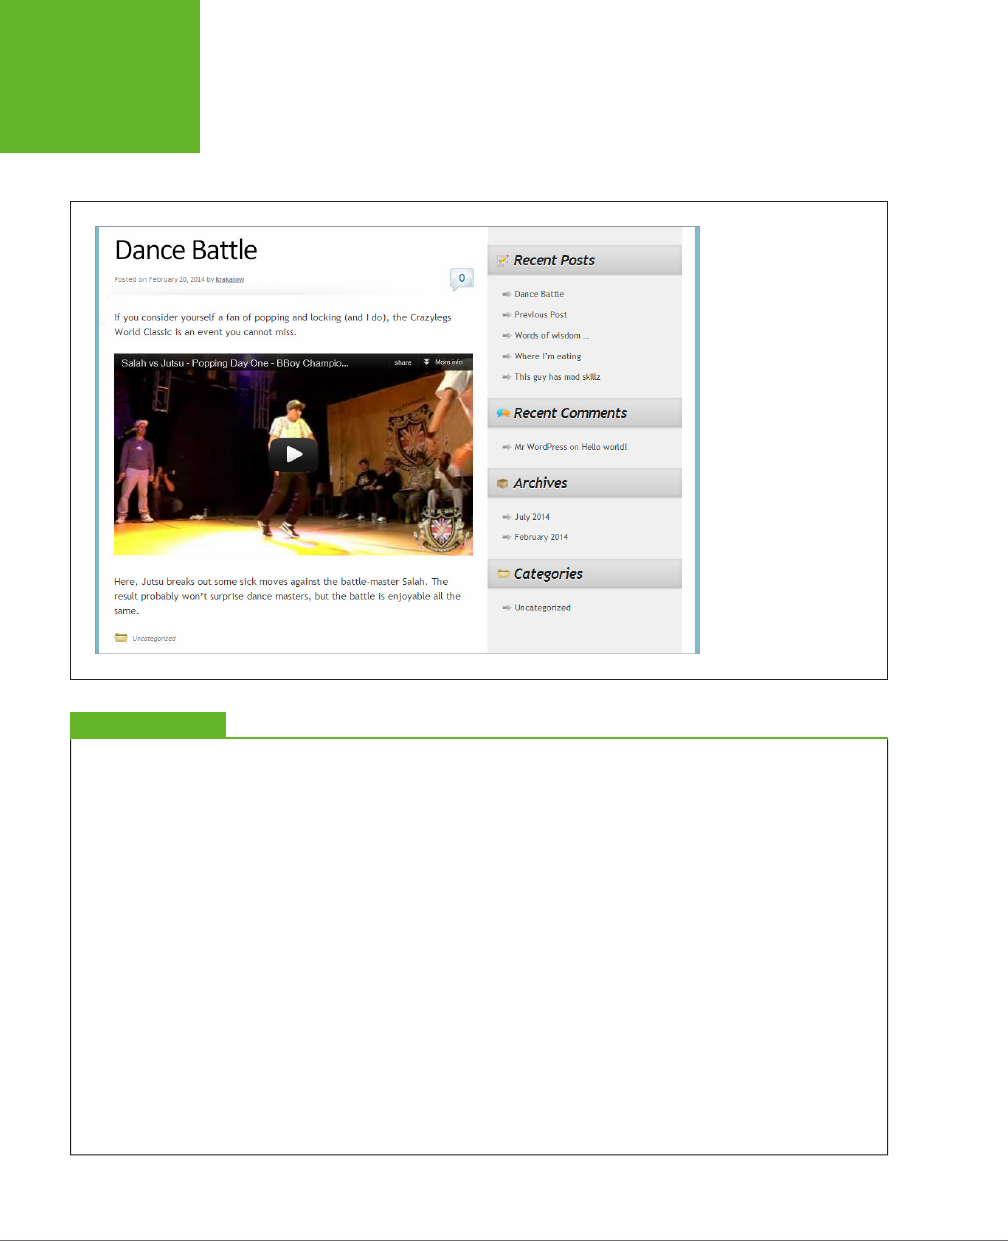
WORDPRESS: THE MISSING MANUAL
352
EMBEDDING A
VIDEO
Now publish your post. You’ll be rewarded with another transformation, courtesy of
WordPress’s auto-embed feature. This time the URL turns into an embedded video
window (Figure 10-18).
FIGURE 10-18
The main difference
between visiting a video
on YouTube and seeing it
in a post is that videos in
posts don’t start playing
automatically. You
need to click the video
window to get things
started. Also, the ancillary
information that appears
on the YouTube page,
such as the description of
the video and the viewer
comments, doesn’t ap-
pear in the embedded
video window.
UP TO SPEED
Uploading Your Videos to YouTube
The process of playing your own videos through YouTube
is essentially the same as the one for showcasing someone
else’s. The only difference is that you begin by signing up
with YouTube (if you don’t already have an account) and then
uploading your video. The steps are fairly straightforward—
click the Upload link at the top of the home page, next to the
YouTube search box, and then follow the instructions YouTube
gives you. Make sure you designate your video as
public,
which
means that it appears in YouTube’s search results. If you don’t
use this setting, you won’t be able to embed your video in a
WordPress post. Other settings (for example, whether you
allow comments and ratings) have no effect on whether you
can embed the video.
For best results, YouTube recommends that you upload the
highest quality video file you have, even if that file is ri-
diculously big. YouTube will encode it in a more compressed,
web-friendly format, while preserving as much of the quality
as possible. And if the quality of your video is good enough,
YouTube will offer high-speed viewers the option to watch it
in high-definition format, using the H.264 standard.
Uploading videos takes a while, because the files are huge
and transferring all that data takes time, even on the fastest
network connection. YouTube also needs to process your video,
although its industrial-strength servers can do most of that as
you upload it. When you get the video live on YouTube, click
Share to get the URL you need for your WordPress post, which
you can paste alongside your content, exactly as you did before.

CHAPTER 10: ADDING PICTURE GALLERIES, VIDEO, AND MUSIC 353
EMBEDDING A
VIDEO
Configuring the YouTube Video Window
If the embedded window looks the way you want it to, there’s no need to do anything
else. But if you want to tweak its size, you can.
The easiest way to do that is by using the height and width attributes of the [embed]
shortcode, as you did earlier. Here’s an example that caps the video window at 300
pixels wide, rather than letting it grow to fit the column it’s in (Figure 10-19):
[embed width="300"]http://youtu.be/OxKKr0Qrcjg[/embed]
This straightforward approach doesn’t always work. Certain themes and plug-ins
accidentally disrupt the sizing process, leaving you with full-sized YouTube videos.
To narrow down the cause of the problem, try disabling all your plug-ins one by
one, and then re-enabling them individually until you find the misbehaving plug-in.
If that doesn’t help, you can also try previewing your post with a dierent theme.
NOTE The shape of the video window depends on the video itself. YouTube won’t stretch a video out of its
normal proportions. For that reason, you should probably specify just the width or height of your video, but not
both. If you do use both, your video window will get the dimensions you specify, but YouTube will pad the video
with blank space to avoid stretching it.
Once you switch to the [embed] shortcode, you’re free to make a few other refine-
ments. The trick is to tack extra pieces of information to the end of the YouTube
URL. However, there’s a catch. This technique works on WordPress.com sites and
on self-hosted sites that use the Jetpack plug-in. But if you try it on a self-hosted
site that doesn’t use Jetpack, the altered URL will confuse the embedding processes
and you’ll wind up with an ordinary link instead of a video window.
There are three details you can change by editing the URL. First, adding
&rel=0
to
the end of the URL hides YouTube’s “related videos” teaser, which usually plays after
your video. Web authors use this feature to make sure their readers won’t catch
sight of someone else’s content, become distracted, and then surf away to watch
more videos or visit a dierent site. Here’s an example:
[embed]http://youtu.be/OxKKr0Qrcjg&rel=0[/embed]
You can also set where playback should start and where it should end by adding
&start
and
&end
to the URL, along with a number of seconds. For example, this video
player hides related videos, starts playback at the 1-minute mark (when the viewer
presses the Play button), and pauses it at the 2-minute mark:
[embed]http://youtu.be/OxKKr0Qrcjg&rel=0&start=60&end=120[/embed]
Finally, it’s worth noting that you can do the same thing using a slightly dierent
syntax with the [youtube] shortcode:
[youtube=http://youtu.be/OxKKr0Qrcjg&rel=0&start=60&end=120]
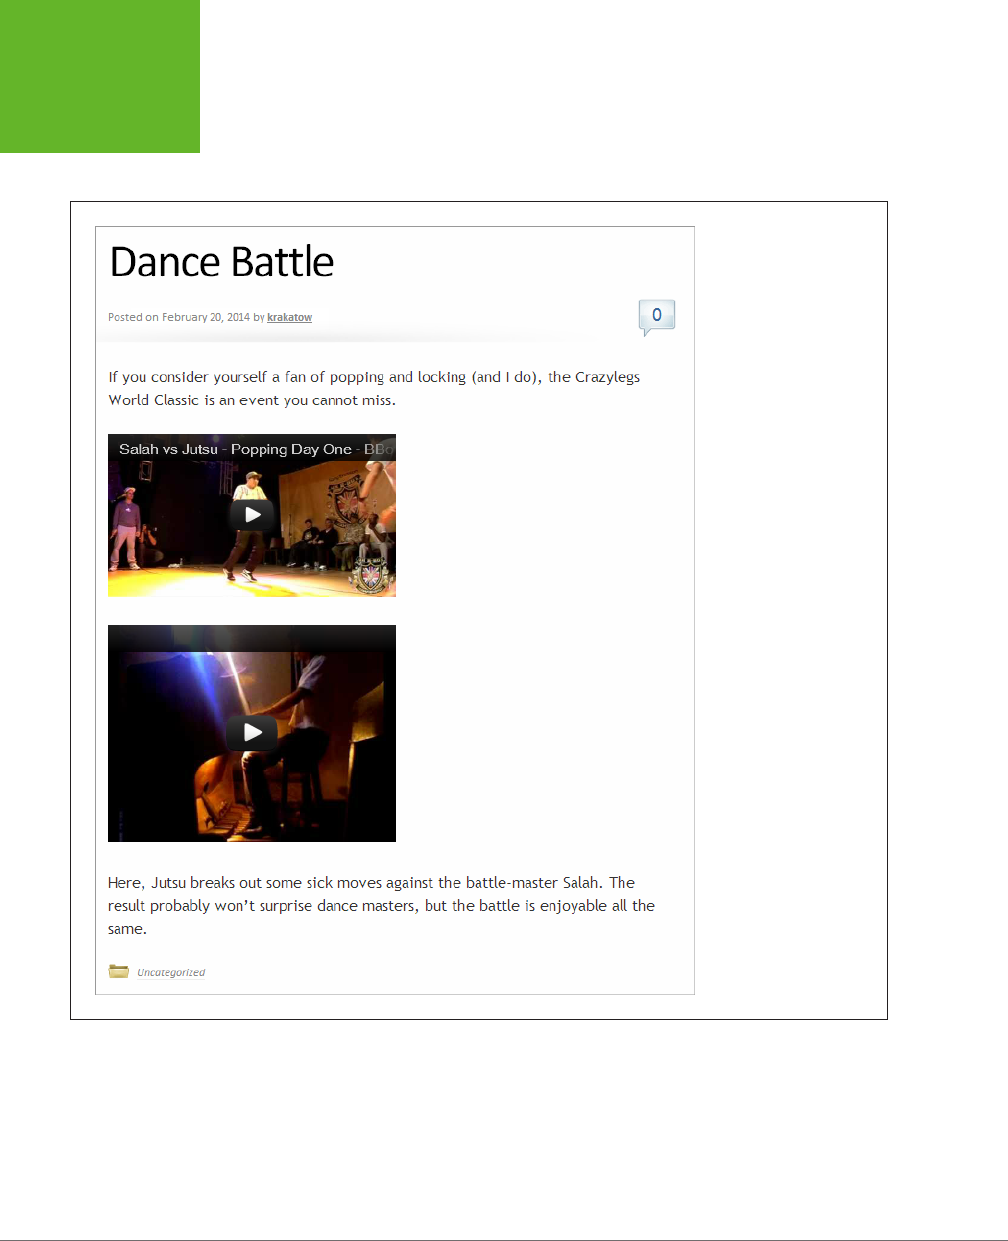
WORDPRESS: THE MISSING MANUAL
354
EMBEDDING A
VIDEO
In the old days of WordPress (a couple of years ago), the [youtube] shortcode was
mandatory, so it persists as a popular technique. But once again, your site needs to
be on WordPress.com, or it needs the help of the Jetpack plug-in.
FIGURE 10-19
You can control the size
of your embedded video
window. That can come in
handy if you want to in-
clude more than one video
on a page. By specifying
small video windows, you
can focus readers’ atten-
tion on your post rather
than distract them with a
large video.
Showing Videos from Other Video Services
Although YouTube is the most popular video service, it’s not the only game in town.
Happily, WordPress’s auto-embed feature lets you play video from a range of other
media sites, including:

CHAPTER 10: ADDING PICTURE GALLERIES, VIDEO, AND MUSIC 355
EMBEDDING A
VIDEO
• Hulu
• Dailymotion
• Vimeo
• Viddler
• blip.tv
• Funny or Die
• Qik
• Flickr (for videos as well as pictures)
• Revision3
• WordPress.tv
As with YouTube, you simply supply a web address that points to a video on one of
these sites, and WordPress does the rest.
Additionally, if you use WordPress.com or you installed Jetpack, you can use the
following shortcodes to embed even more types of video:
• [cnnmoney-video] for videos from CNNMoney
• [kickstarter] for videos from Kickstarter
• [ted] for TED Talks videos
• [twitchtv] for videos from Twitch.tv
• [ustream] for videos from Ustream.TV
• [vine] for a Vine video
• [videolog] for videos from Videolog.tv
• [archiveorg] for a video from The Internet Archive
The list of eligible sites is ever-growing, so don’t be surprised to find additional
services listed when you check WordPress’s ocial list of auto-embeds (
http://
codex.wordpress.org/Embeds
) and shortcodes (
http://support.wordpress.com/
shortcodes
).
When you embed video, WordPress configures the size of the playback window to
suit the content and to fit in your post area. However, in some situations, you might
want to tweak the size to get it just right. If you use one of the video types from the
first list, you can control the size of the video player by wrapping your URL in the
[embed] shortcode and then adding the height and width attributes. If you use one of
the more specialized shortcodes in the second list, you probably need to add similar
height and width attributes to that shortcode. Here’s where things get a bit tricky,
because many shortcodes have similar but maddeningly dierent syntax. To see
exactly how to format a specific shortcode, check out the WordPress documentation

WORDPRESS: THE MISSING MANUAL
356
EMBEDDING A
VIDEO
at
http://support.wordpress.com/shortcodes
, and click the Full Instructions link next
to the shortcode you plan to use.
Showing a Video from Your Media Library
Although a free video-hosting service meets most people’s needs most of the time,
self-hosted WordPress sites can host their own videos. The basic approach is pure
simplicity:
1. Click Add Media above the post editor.
This opens the familiar Insert Media window, which you used to add pictures
and picture galleries earlier.
2. Drag your video file onto the Insert Media page.
Not any format will work. And, confusingly enough, there are more video for-
mats than Ben & Jerry’s ice cream flavors. For best results, you should use a
video file encoded with the high-quality, wildly popular H.264 video codec, and
stored in the MP4 container format. If your file has the extension .mp4, you’re
o to a good start.
TIP If you don’t have an MP4 video file on hand, think carefully before you continue. If you upload a different
video format, your video player may not work on certain browsers, on mobile devices, or on anything, actually. To
straighten out the format of your video files, consider a good video converter like the free Miro Video Converter
(downloadable from
www.mirovideoconverter.com
), which can convert almost anything to MP4 format.
Depending on the size of your video, you may have a bit of a wait. Grab a cup
of coee.
3. In the “Embed or Link” setting (on the right), pick Embed Media Player.
Your other option is to add an ordinary link that points to the media file.
4. Click “Insert into post.”
WordPress slots your video in using the [video] shortcode.
At the end of this process, expect to see something like this:
[video width="704" height="400" mp4="http://magicteahouse.net/brewing.mp4"]
Here, the [video] shortcode specifies the size of the video window (based on the
dimensions of your video file) and identifies the video file stored on your site. When
you publish your post, the shortcode creates a video window similar to the one you
got with YouTube.
Although the process seems easy, plenty of caveats apply. First, it’s up to you to
make sure that you have the not-inconsiderable space to store the video file, and
the monthly bandwidth to show it to all of your viewers.
It’s also up to you to make sure you use a video file format that most browsers can
play back. The previous example uses the most popular standard: an .mp4 video

CHAPTER 10: ADDING PICTURE GALLERIES, VIDEO, AND MUSIC 357
EMBEDDING A
VIDEO
file. Most browsers can play it, but there are plenty of exceptions, including the
Opera browser and old versions of Internet Explorer. Fortunately, WordPress relies
on the nearly miraculous powers of a JavaScript tool called MediaElement.js (
http://
mediaelementjs.com
). It rounds out most browser issues by intelligently switching to
other players, like Flash or Silverlight, when a browser can’t play the file you supply.
Thanks to MediaElement.js, the [video] shortcode shown above works reliably on
almost as many computers as the YouTube shortcode (although it won’t work so
nicely on mobile devices, because there’s no slimmed-down, low-bandwidth mobile
version, like the sort that YouTube creates).
You have another option, but it’s impractical unless you’re ready to sacrifice your
social life and spend hours of extra video-encoding time. Obsessive web developers
can resolve format issues by providing fallback video files—multiple copies of the
same movie in dierent formats. You can then specify a range of formats that the
[video] shortcode can use. Here’s an example that supplies a standard MP4 video
but adds fallback videos for the free WebM codec and for the Flash (.flv) player:
[video width="704" height="400" mp4="http://magicteahouse.net/brewing.mp4"
webm="http://magicteahouse.net/brewing.webm"
flv="http://magicteahouse.net/brewing.flv"]
If you find yourself in the dicult position of running into the limitations of YouTube,
but not wanting to face the headaches of do-it-yourself video hosting with the [video]
shortcode, there’s one more option. You can sign up with another video hosting
service—one that may not be free, but will provide more features and control than
YouTube does. The next section has the details.
Premium Video Hosting
As you learned earlier, it’s generally a bad idea to host videos on your own website,
unless you’re a web development god with a clear plan. But there may be times
when a free video-hosting site won’t suit your needs. Here are some of the problems
you might encounter hosting your files on a free service:
• Privacy. Free video services make your videos visible to the entire world. If
you have a video with sensitive material in it, or one you want to sell to a group
of subscribers, you won’t want it on a free video service where it’s exposed to
prying eyes.
• Ads. Video sharing services may try to profit from your free account by includ-
ing ads. They use two basic strategies: playing a television-commercial-style
ad before your video starts playing, or superimposing an irritating banner over
your video while it plays. YouTube’s advertising policy is good—it won’t show
ads unless you give it permission to (usually in a misguided attempt to make a
buck) or you post someone else’s copyrighted content and
they
ask YouTube
to slap on an ad (in which case they collect the money).
• Content restrictions. Free video services won’t allow certain types of con-
tent. YouTube’s content policy is fairly liberal, allowing everything short of
hate speech, pornography, and bomb-making tutorials. That said, videos are

WORDPRESS: THE MISSING MANUAL
358
EMBEDDING A
VIDEO
sometimes removed for disputable reasons, and popular videos are occasionally
poached by trac-seeking video thieves, who post their own copies and try to
trick YouTube into removing the original, legitimate videos.
NOTE There was a time when YouTube capped videos to a modest 15 minutes, and video-makers flocked
to premium video services to get more time. But these days, YouTube will let you upload multi-hour videos as
long as you verify your account by mobile phone. The process for doing this is described at
http://tinyurl.com/
long-vids
.
To escape these restrictions, you need to pay for a video hosting package. For
example, the popular video site Vimeo (
http://vimeo.com
) oers free basic host-
ing and a more flexible premium service that costs $60 per year. The latter oers
unlimited bandwidth, no length restriction, and the option to limit your videos to
specific people, who must sign in to see them. Vimeo is particularly generous with
storage space, letting premium members upload 5 GB of video per week. It also
gives viewers high-quality streaming right out of the box. To get the same quality
on YouTube, a viewer needs to click the gear icon in the bottom-right corner of the
video window and manually pick a higher resolution.
WordPress also oers its own video hosting service called VideoPress. Like Vimeo,
VideoPress oers unrestricted bandwidth and lets you upload large files. It also
integrates well with WordPress.com, giving you the option to limit video viewing to
your site’s registered users. (You’ll learn how to create private sites with registered
users in Chapter 11.) VideoPress is particularly well suited to WordPress.com sites,
because it’s integrated into the WordPress.com hosting service, and only a simple
upgrade away. However, it’s far stingier with space than Vimeo. You start with a
paltry 3 GB of storage, and if you need more, you need to pay a yearly fee, which
rings up at about $20 per 10 GB.
To sign up for VideoPress, you buy the VideoPress upgrade. Click Store in the dash-
board, look for the VideoPress box, and then click “Buy now.” Or consider buying a
Premium account, which is described in the box on page 33.
Once you sign up for VideoPress, you upload videos by clicking Add Media above the
post editor box. Uploading a video is more or less the same as uploading a picture,
except that you can specify a few more details, such as a rating (from a family-friendly
G
to an explicit
X-18
) and a thumbnail (the still image the video box displays before
the video starts playing). The upload process also takes quite a bit longer.
NOTE If you have high-quality HD video, you may need to use a video tool to re-encode it to a leaner, more
heavily compressed format before uploading it. Otherwise, you’ll be stuck with a gigantic file on your WordPress.
com site, eating up valuable space. (This is different from the process you follow when you upload a video to
YouTube, which takes any file you can throw at it and doesn’t complain about space.) You may also experience
technical troubles if you upload huge files. Although VideoPress officially supports files of up to 1.4 GB, gargantuan
uploads can fail, sometimes after hours of waiting.

CHAPTER 10: ADDING PICTURE GALLERIES, VIDEO, AND MUSIC 359
EMBEDDING A
VIDEO
GEM IN THE ROUGH
A Better Choice: The WordPress.com Premium Account
Instead of buying the WordPress.com VideoPress upgrade (cur-
rently $60 per year), you can sign up for a Premium account,
which offers VideoPress and several other useful extras, for
$99 per year. These extras include a free domain name, no
ads, and the Custom Design upgrade for tweaking the styles
in your theme (page 457).
Most important of all, the value bundle includes a storage
upgrade from 3 GB to 13 GB. This is a big deal, because even
though VideoPress offers unlimited bandwidth (meaning it
won’t charge you for web traffic, no matter how many times
people watch your videos), it doesn’t offer unlimited storage.
And while 3 GB is more than enough to swallow all the pictures
you can throw at a site, it may not accommodate the videos you
want to upload. For comparison purposes, a feature-length HD
movie takes about 4 GB of space if it’s compressed (slimmed
down in size). Raw HD video out of a camcorder is less com-
pressed, and it can chew up 4 GB in 30 minutes or less. The
space upgrade is also important if you want to include an audio
player (page 360), because WordPress.com won’t allow you to
upload audio files unless you buy at least one storage upgrade.
If you need even more space for giant videos, you can buy
separate upgrades. However, more space doesn’t come cheap.
Currently, it costs roughly $20 per year for each extra 10 GB
of space.
When you finish uploading a video, you can add it to your post using the trusty “Insert
into Post” button. This embeds a VideoPress shortcode that looks something like this:
[wpvideo MTFnELOW]
The result is a VideoPress window that looks a lot like a YouTube video player.
FREQUENTLY ASKED QUESTION
VideoPress and Self-Hosted Sites
I need a premium video host, but I’m not using WordPress.
com. Should I consider VideoPress?
If you run a self-hosted WordPress site, you can sign up for
VideoPress, but it’s probably not the best video-hosting
package for you. That’s because it uses an awkward hosting
model that forces you to get a WordPress.com account and use
it to store your videos. VideoPress is also relatively expensive,
because you need to pay extra to get additional space (and
given the size of video files, you’ll probably need more space).
If you’re still interested in trying out VideoPress, go to
http://
videopress.com
. Enter the address of your WordPress site
into the “Get started–enter your blog address” text box, and
then click Next. VideoPress walks you through a somewhat
convoluted process that involves creating a WordPress.com
account and paying the $60 fee (or more if you also need a
space upgrade). When you finish, you should activate Vid-
eoPress through the Jetpack plug-in, which lets you use the
[wpvideo] shortcode in your posts. To do so, click Jetpack in
the dashboard menu, scroll down to the VideoPress box, and
click the Activate button.)

WORDPRESS: THE MISSING MANUAL
360
PLAYING AUDIO
FILES
Playing Audio Files
Sometimes, you’ll want to let readers play an audio clip (or several) without using a
full-blown video window. An obvious example is if you’re a music artist promoting
your work. However, audio files are equally well suited to the spoken word, whether
that’s an interview, talk show, sermon, audio book, or motivational lecture. Audio
files are particularly useful if you want to join the Web’s thriving community of
podcasters
—sites that provide downloadable, long audio files that users can listen
to on the go (for example, on their iPods or smartphones).
You might expect that adding audio to your WordPress site is easier than adding
video. After all, audio files are smaller and simpler than video files. But you’ll face
many of the same issues. In the following sections, you’ll consider three strategies
for getting audio into a web page.
Adding a Basic Audio Player
The simplest approach to hosting audio is to upload the file to your website. You
can then provide a link that readers can use to download the file or (even better)
a tiny audio player that lets them listen without leaving your site (Figure 10-20).
Before you get started, you need to upload your audio file. Ideally, you’ll upload
an MP3 file to ensure that it plays on most browsers. Technically, Internet Explorer,
Safari, and Google Chrome play MP3 files, but Firefox and Opera don’t. However,
most websites get by using the Flash player to fill the gap. Essentially, the process
works like this:
• If the browser you use recognizes both MP3 files and HTML5 markup, WordPress
creates an HTML5 <audio> element that points to your MP3 file. The browser
then creates a miniature audio player, like the ones shown in Figure 10-20.
• If a browser doesn’t play these two standard file types, WordPress uses a small
Flash program that creates a tiny audio player. The end result is the same—your
guests see a simple music player.
• In the unlikely event that a browser can’t meet either of these requirements,
WordPress swaps in an ordinary HTML link. Guests click the link to download
the audio file, where they can play it using a desktop music player.
The Flash fallback solution is a good one, but it’s a bit too messy to implement
on your own. Fortunately, WordPress does all the work for you with the [audio]
shortcode, which is every bit as straightforward as it should be. You simply add an
attribute named
src
that points to your audio file. Here’s an example that launches
an MP3 file on another web server:
[audio src="http://wpcom.files.wordpress.com/2007/01/mattmullenweg-interview.mp3"]
You can also use the [audio] shortcode to play music files stored on your own website.
But before you go any further, there’s a significant catch that applies if WordPress.com
hosts your site. Unless you buy a space upgrade or have a Premium account (page
359), WordPress.com won’t let you upload
any
audio files, even if you have plenty of
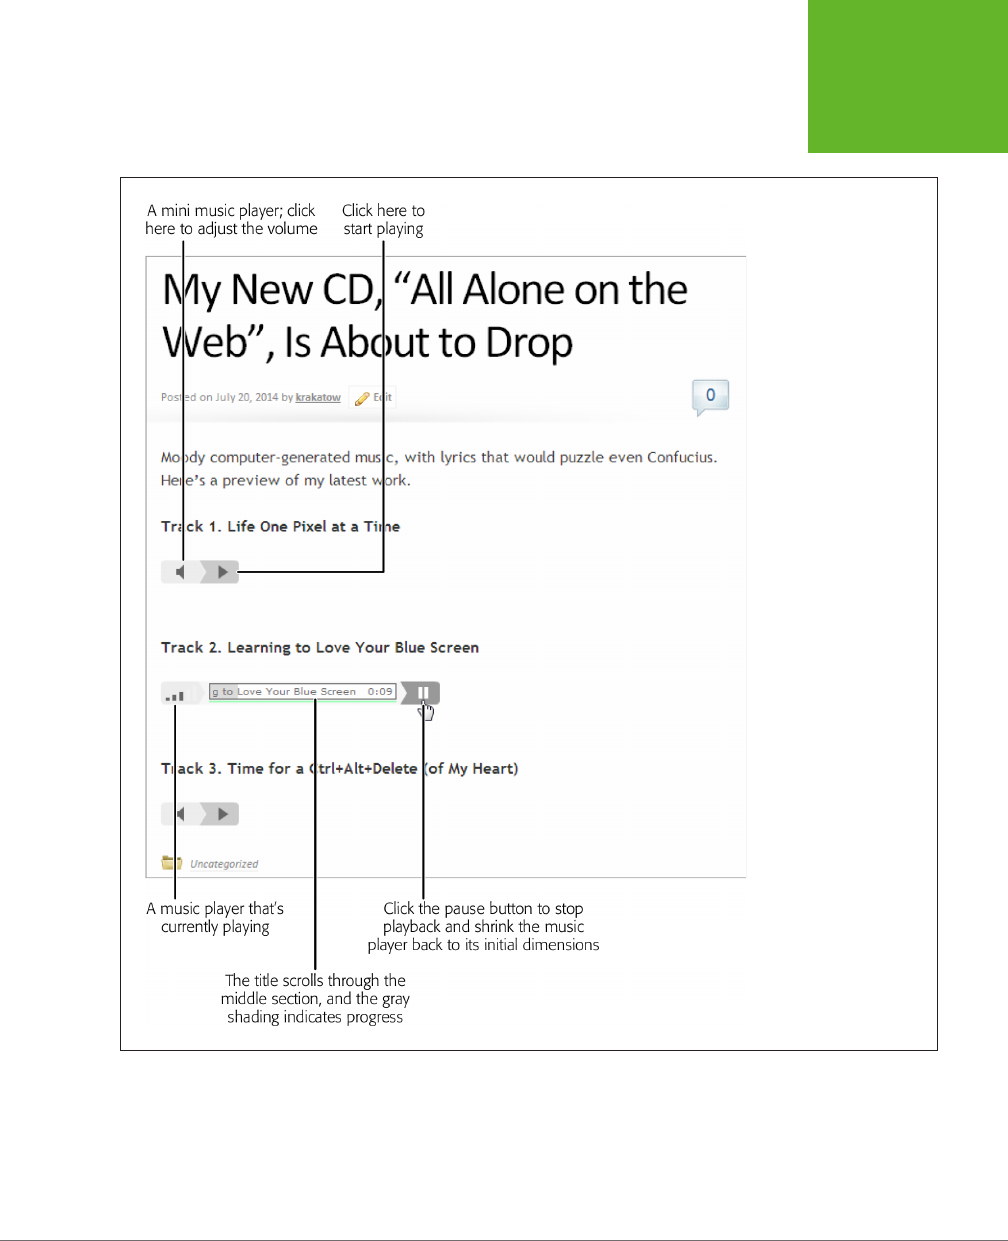
CHAPTER 10: ADDING PICTURE GALLERIES, VIDEO, AND MUSIC 361
PLAYING AUDIO
FILES
space left in your initial 3 GB storage allotment. Instead, you can play only audio files
stored on other sites.
FIGURE 10-20
This page contains three
mini music players. The
one in the middle is cur-
rently playing a file.
Depending on what you’re trying to accomplish, this limit might be a minor inconve-
nience or completely unworkable. If it’s the latter, you have two options. You can buy
a space upgrade for as little as $20 a year (click the Store menu in the dashboard to
sign up), or you can use a music hosting service, as covered on page 364.

WORDPRESS: THE MISSING MANUAL
362
PLAYING AUDIO
FILES
To play an audio file directly from your site, you need to upload it to the media library
and then embed it with the [audio] shortcode. Here’s how:
1. First, click Add Media above the post editor.
This is the same link you used to upload a picture.
2. In the Insert Media window, pick your audio file.
Now wait for it to upload.
NOTE If you try this on a WordPress.com site that doesn’t have the space upgrade, nothing will happen,
so don’t waste your time.
3. When you finish uploading the track, fill in its title.
The music player displays the title while the track plays (Figure 10-20). If you
don’t supply a title, the player lists it as Track 1.
4. In the “Embed or Link” setting (on the right), pick Embed Media Player.
Your other option is to add an ordinary link to your audio file, which isn’t what
you want.
5. Click “Insert into post.”
Now WordPress adds the [audio] shortcode.
6. Publish your post.
You’re rewarded with a tiny music player. You can repeat this process to add as
many music players as you want to the same page.
Adding a Playlist
You can use the [audio] shortcode to add as many audio playback bars as you want.
Figure 10-20, for instance, has three. But if you want to give your visitor the chance
to peruse a group of related tracks—like a concert of songs performed by your trom-
bone quartet—there’s a better way. You can group your tracks together in a
playlist.
A playlist is a list of audio or video files with a single playback bar or video window
(see Figure 10-21). Your visitor can click a specific track to play it, or let the playlist
move automatically from one file to the next.
Here’s how to add an audio playlist (see the Note below for video playlists):
1. Click Add Media.
2. Drag your audio files onto the Insert Media window,
You can skip this step if you already uploaded all the files you need.
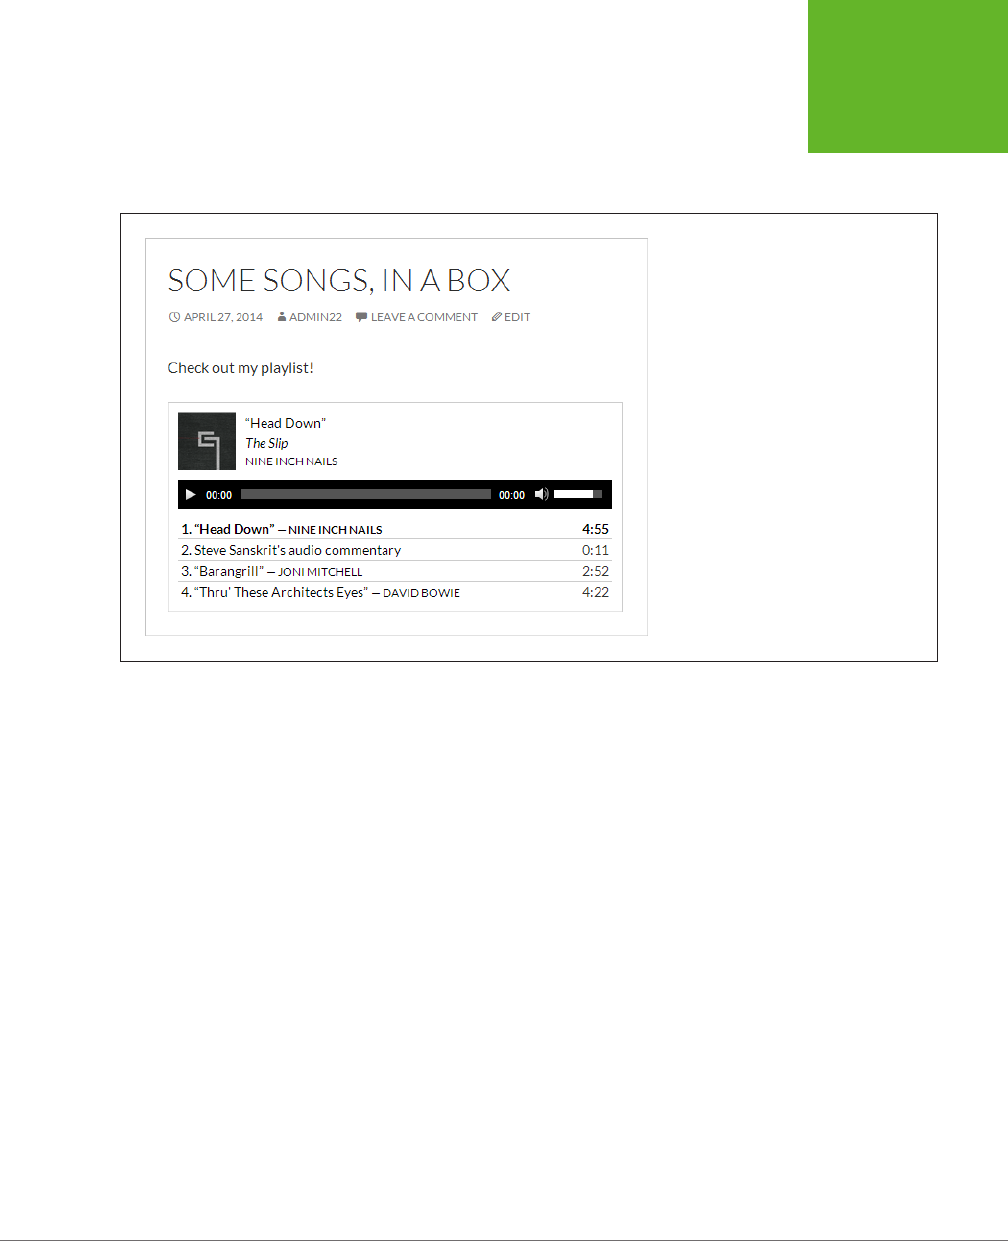
CHAPTER 10: ADDING PICTURE GALLERIES, VIDEO, AND MUSIC 363
PLAYING AUDIO
FILES
3. Once you’ve uploaded all your files, click Create Audio Playlist on the left.
The Create Audio Playlist command appears in the Insert Media window only
if you have at least one audio file in your site’s media library.
FIGURE 10-21
This playlist includes four tracks. If you press
play and don’t intervene, the playlist will
cycle through the songs continuously.
4. Click each track you want to use in your playlist, and fill in its details on
the right.
Every audio file in the playlist accepts three pieces of information:
• Title. The track title shows up in the playlist, and in the playback box when
WordPress starts playing the track. WordPress figures out the title by read-
ing the track’s
metadata
—the tiny bits of information stored in the audio
file that identify the artist, song title, album, and more. But if the title isn’t
quite right, you can edit it.
• Caption. The caption is an optional bit of information. Initially, it starts out
blank. However, if you supply a caption, WordPress shows it in the playlist
instead
of the title and author information. (For example, in Figure 10-21, the
second track has a caption and the other three do not.) Even if you write a
caption, the playback box still shows the title and author information when
it starts playing the track.
• Description. WordPress also gets this information from the metadata
in the audio file, if it’s available. The description is a short bit of text that
provides extra information, like this: “Head Down from The Slip by Nine
Inch Nails. Released: 2008. Track 6 of 10.” Currently, the playlist feature
doesn’t use the description.

WORDPRESS: THE MISSING MANUAL
364
PLAYING AUDIO
FILES
5. Click the “Create a new playlist” button.
This adds the tracks you picked to your fledgling playlist.
6. Configure your playlist.
Configuring a playlist is much like configuring a picture gallery. You can drag
your tracks around to change their order, and on the right, you can alter a few
basic settings:
• Show Tracklist. If you clear this checkbox, you’ll get a music player that
shows the track it’s currently playing but doesn’t show the full playlist un-
derneath. That means the listener can’t skip to a specific song.
• Show Artist Name in Tracklist. If you clear this checkbox, each entry in
the playlist will show the track’s title, instead of the title and author. This
setting has no eect on tracks that have a caption.
• Show Images. If set (which is the original setting), WordPress will contact
a music database on the Web and fetch the appropriate album cover for
your track. It then displays that tiny thumbnail image in the playback box
when it plays the track (as in Figure 10-21). Obviously, this option works
only for professionally released work. (And don’t forget to get the copyright
holder’s permission before you put her work on your site.)
7. Click “Insert audio playlist.”
WordPress adds the [playlist] shortcode to your post.
8. Publish your post.
The payo is a simple but eective playlist, live in your post.
NOTE You can create a vdeo playlist in much the same way as an audio playlist. The difference is that you
upload video files instead of audio files, and you click a link named Create Video Playlist instead of Create Audio
Playlist. The finished result is a bit different, too—it looks like a standard video window with a playlist attached
underneath.
Using a Music-Sharing Service
If you’re serious about sharing a set of audio tracks—for example, you’re a band
trying to popularize your work—your best bet is to sign up with a serious music-
sharing service.
The first advantage is that a good music service increases the exposure of your audio
tracks. Casual music browsers may stumble across your work, similar artists may
link to it, and just about anyone can add a comment or click Like, which boosts your
buzz. The second advantage is that you get a number of extras, like the ability to
provide music in dierent formats for dierent browsers (without resorting to Flash),
and a sleek jukebox-style player that seamlessly plays a whole set of your songs.
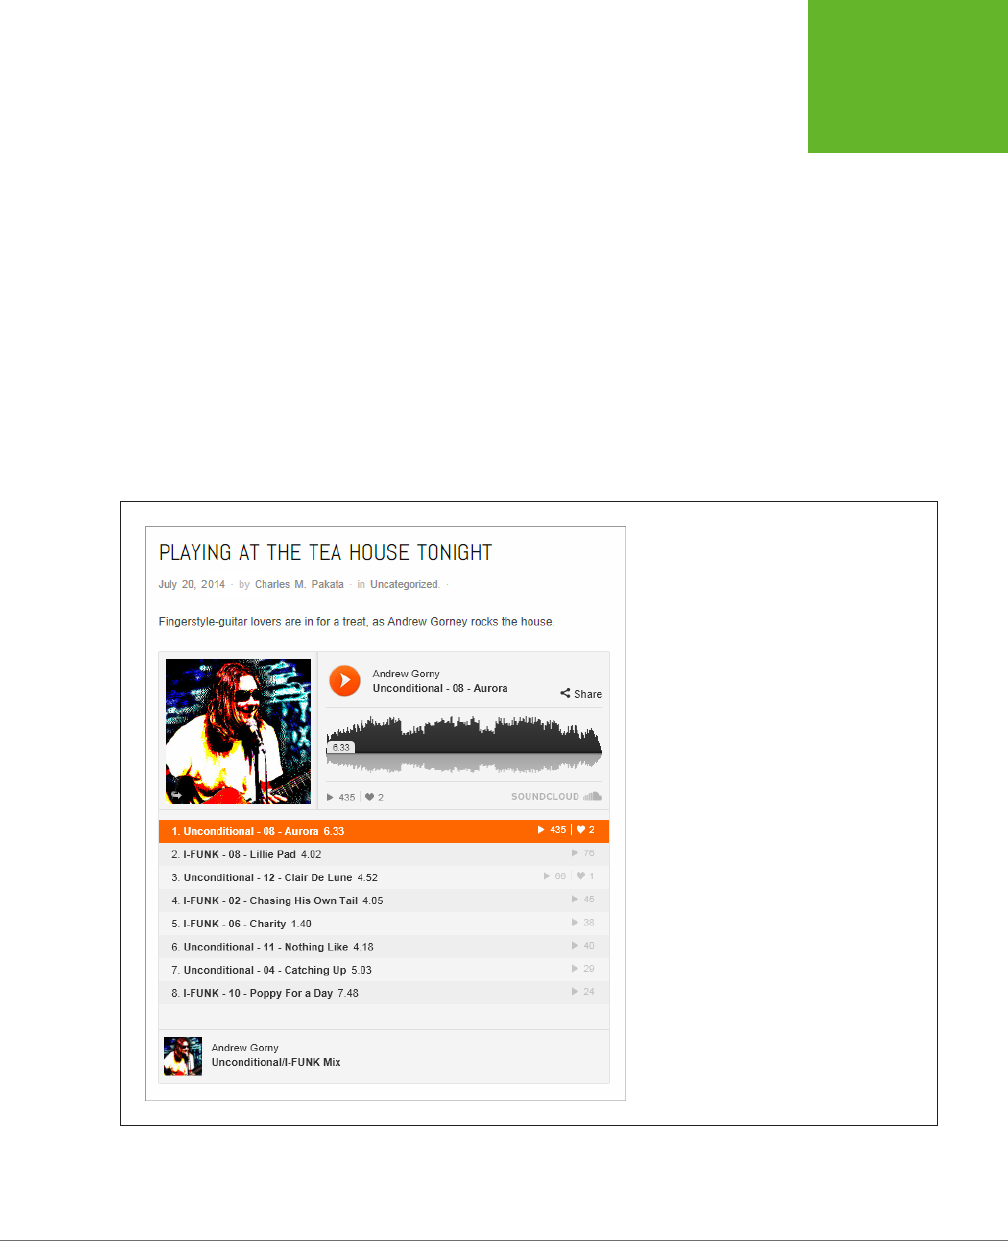
CHAPTER 10: ADDING PICTURE GALLERIES, VIDEO, AND MUSIC 365
PLAYING AUDIO
FILES
WordPress has built-in support for the following music-sharing services through its
auto-embed feature:
• SoundCloud
• Spotify
• Rdio
If you have a WordPress.com site or a self-hosted site with the Jetpack plug-in, you
get two extra services courtesy of shortcodes:
• [bandcamp] for audio on Bandcamp
• [8tracks] for audio on 8tracks
Once again, the shortcode syntax varies subtly for each service, so you need to get
the exact details at
http://support.wordpress.com/shortcodes
. Figure 10-22 shows
a site that uses SoundCloud.
FIGURE 10-22
SoundCloud is more refined than just about any
other plug-in-powered music player. It includes
the artist’s profile picture, a list of tracks, and a
waveform of the song currently playing.
SoundCloud oers a sweet deal: no charge for the first 120 minutes of audio you
upload, and a polished music player that makes almost any music look good. If you

WORDPRESS: THE MISSING MANUAL
366
PLAYING AUDIO
FILES
need more storage, you have to pay a yearly fee. (Currently, that’s $55 a year for
240 minutes, or $135 per year for unlimited uploads.) If you plan to sell your music,
a service like Bandcamp may make more sense—it gives you unlimited room to store
audio but takes a percentage of your sales, if anyone buys your tracks.
To sign up with SoundCloud, start at
http://soundcloud.com
, click Sign Up, and follow
the instructions. Once you upload some audio files, you can start embedding them
in your WordPress posts. SoundCloud gives you the option of a single-track music
player, or you can assemble a group of tracks into a playlist (as in Figure 10-22).
To embed your SoundCloud content in a WordPress post, browse to the song or
playlist you want to use, and then copy the URL out of the address bar. Here’s the
URL that creates the music player in Figure 10-22:
https://soundcloud.com/andrewgorny/sets/ag-com-splash
If you want to adjust the size of the SoundCloud player, use the [embed] shortcode
with the height and width attributes.
Podcasting
So far, you’ve seen how to let viewers play individual audio tracks or a playlist with
a bunch of music on it.
Podcasting
is a similar, but slightly dierent, way to present
audio. It gives readers the choice of listening to audio files the normal way (in their
browsers by clicking the Play button) or downloading the audio files so they can
put them on a mobile device.
The central idea with podcasting is that you prepare content that busy people will
listen to on the go. Usually, the content is long—30 minutes to an hour is common
for podcasts. If your audio file is only a couple of minutes long, it’s not worth a visi-
tor’s trouble to download it and transfer it to a mobile device.
Podcast creators also tend to organize podcasts in groups—for example, they make
each audio file an episode in a series, and release them at regular intervals (say,
weekly). Good examples of podcasts include a web talk show with commentary
and interviews, a motivational lecture, a spoken chapter from an audio book, or a
45-minute techno mix for a workout session.
NOTE The word
podcasting
is a mash-up of
pod
and
broadcast
—
pod
because this form of audio file distri-
bution first gained popularity with the iPod music player, and
broadcasting
because a podcast creator provides
easily accessible, regularly released audio “shows,” a concept that’s a bit like television broadcasting.
CREATING PODCAST-FRIENDLY AUDIO
You don’t need any special technique to upload a podcast audio file. You can simply
create a post and add an ordinary link to the file. If you want to get a bit fancier, you
can use the audio player feature described on page 360. That way, visitors can play
the audio in their browsers if they haven’t caught the podcast bug.
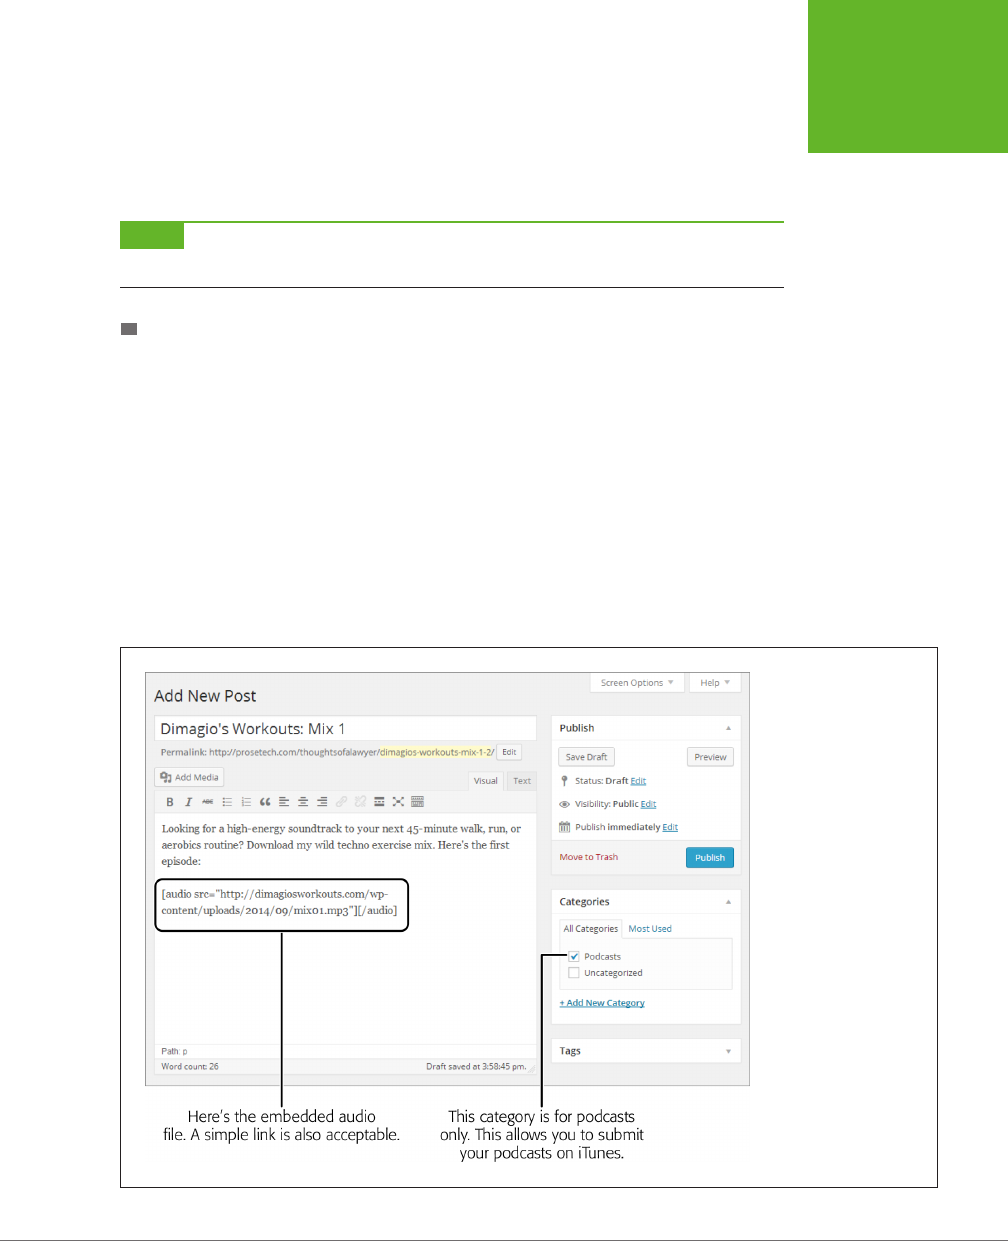
CHAPTER 10: ADDING PICTURE GALLERIES, VIDEO, AND MUSIC 367
PLAYING AUDIO
FILES
You should save podcast audio as MP3 files, because a range of mobile devices can
play back that format. You can also create podcast
video
files, but that process is a
bit more complicated. You first need to make sure the video is in MP4 format, then
you have to upload it to a host, and finally you need to link to it from your post.
NOTE If you want to use a video file for podcasting
and
embed it so guests can play it directly inside their
browsers, you need the help of a high-caliber podcasting plug-in, as explained in the box on page 368.
GETTING YOUR PODCAST FEED
Although podcast audio is the same as normal audio, there’s a slight dierence
in the way you
present
podcasts. For readers to find your podcasts quickly and
download new episodes easily, you need a way to separate these audio files from
the rest of your site.
To do that, you create a dedicated category for posts that contain podcasts. You
can give this category a name like “Podcasts” or “Lectures” or “Audio Book.” Then,
when you create a new post that has an audio file in it and you want to include
that audio as part of your podcast, assign the post your podcast-specific category
(Figure 10-23). Depending on the structure of your site (and the way you let viewers
browse it), you may decide to set two categories—one to identify the type of post
(say, “Sports”), and one to flag the post as a podcast (“Podcasts”).
FIGURE 10-23
This post has the two key
ingredients that make it
a podcast—embedded
audio and a podcast-
specific category.

WORDPRESS: THE MISSING MANUAL
368
PLAYING AUDIO
FILES
You group audio files into a single podcast category so you can generate a
feed
for
that category. As you’ll learn on page 433, a feed is a sort of index to your content.
In the case of podcasting, your feed tells other programs and websites where to
get the podcast files on your site. It also lets you notify visitors when you publish a
new file—say, if they subscribe to your podcast in iTunes.
NOTE iTunes is one of the favorite tools for podcast-lovers. If your site offers podcasts and you’d like to use
them to attract new visitors (and why wouldn’t you?), you need to submit some podcast information to iTunes.
You can get the feed for a category using a URL with this syntax:
http://[Site]/category/[CategoryName]/feed
So if you have a site named
http://dimagiosworkouts.com
, you can get a feed for
the Podcasts category like this:
http://dimagiosworkouts.com/category/podcasts/feed
This is a valuable link—it’s the piece of information you need to supply to iTunes to
register your podcast.
To register with iTunes, start by reviewing Apple’s instructions at
http://tinyurl.com/
podcastspecs
. First, read the “Testing Your Feed” section, which explains how to
make sure your feed includes the podcast files you expect, and that the feed works.
Then, follow up with the instructions in the “Submitting Your Podcast to the iTunes
Store” section to learn how to ocially tell iTunes about your feed, and make it vis-
ible to a podcast-hungry audience of millions.
PLUG-IN POWER
Better Podcasting with a Plug-In
Podcasting with WordPress is easy. All you need is the right
type of audio file (MP3) and a post category just for podcasts.
However, if you’re a power podcaster—meaning you plan to
invest serious effort in making podcasting a part of your web
presence—it’s worth considering a plug-in that can make
your life easier. The most popular podcasting plug-in for self-
hosted WordPress sites is Blubrry PowerPress (
http://tinyurl.
com/wp-podcast
).
Among PowerPress’s most useful features is its tight integra-
tion with iTunes. PowerPress can optimize your feeds for iTunes,
submit your feed to iTunes, and even help you manage your
iTunes cover art. PowerPress is also invaluable if you want to
forge into the world of video podcasting, because it lets you
embed your video content in your page, using a JavaScript-
based video player. (That way, visitors have the choice of
downloading your podcast for a mobile device, as usual, or
playing it right in their browser, as they would with a YouTube
video.) PowerPress also offers statistics that help you gauge
the popularity of your podcasts and an optional paid hosting
plan for audio and video files.

369
CHAPTER
11
When you first create a WordPress site, it’s a solo aair. You choose your
site’s theme, write every post and page, and put every widget in place.
Your readers can add comments, but you’re in charge of starting every
conversation.
You might like this arrangement (and if so, that’s fine), but WordPress also makes
it possible for you to have friends, colleagues, family members, and even complete
strangers contribute to your site. You can, for example, create a site where several
people post content, or you could be more selective, letting some people write
content and others review and edit it. You can also implement an approval system
to check the work of contributors before it goes live, and you can even create an
entirely private site that only the people you approve can view.
In this chapter, you’ll learn how to enable all these features by registering new
people—not new
visitors,
but new WordPress
users
who have special privileges on
your site. You’ll also consider WordPress’s more ambitious multisite feature that’s
open to self-hosters only. With a multisite network, you can let other people create
their own sites on
your
web server. For example, big companies can use the multisite
feature to give each employee a personal blog. Essentially, the multisite feature lets
a whole family of WordPress sites exist side by side, on the same domain.
Adding People to Your Site
A new WordPress website starts with only one member: you. You assume the role
of administrator, which means you can do anything from write a post to vaporize
the entire site. Eventually, you may decide to make room for company. Usually, you
Collaborating with
Multiple Authors

WORDPRESS: THE MISSING MANUAL
370
ADDING
PEOPLE TO
YOUR SITE
make that decision because you want to work with co-authors, who will write posts
for your site.
Before you add someone to your site, though, you need to decide what privileges
that person will have. WordPress recognizes five roles, listed here in order of most
to least powerful:
• Administrator. Administrators can do absolutely everything. For example, if
you add a friend as an administrator to your site, he can remove you, delete
all your posts, and switch your site to a Hawaiian beach theme. WordPress
strongly recommends that every site have just one administrator, to prevent
power struggles.
• Editor. Editors have full control over all posts and pages. They can create their
own posts, and they can edit or delete any post, even ones they didn’t create.
Editors can also manage post categories and tags, upload files, and moderate
comments. They can’t change site settings, tweak the site’s layout and theme,
or manage users.
• Author. Authors have control over their own posts
only.
They can create new
ones and upload pictures, and they can edit or delete their posts anytime.
Everyone else’s content is o limits.
• Contributor. Contributors are a more limited form of author. They can create
draft posts, but they can’t actually publish them. Instead, contributors submit
their work for review, and an editor or administrator approves and publishes it.
Sadly, contributors can’t upload pictures, even for their own posts.
• Follower or Subscriber. These people can read posts and add comments. Word-
Press.com calls them followers, while WordPress.org calls them subscribers. If
you run a WordPress.com site, it automatically notifies your followers about
newly posted content (perhaps by email, depending on their personal prefer-
ences). If you run a self-hosted site, your subscribers won’t get any notifications,
but they can opt in to an email subscription service (page 425).
Now that you know what roles WordPress recognizes, you’re ready to start creating
new user accounts. There’s one wrinkle, however. The steps you take for a self-hosted
site are significantly dierent from the ones for a WordPress.com site. If you’re a
self-hoster, continue reading. If you’re a WordPress.com fan, skip ahead to “Inviting
People to Join a WordPress.com Site” on page 375.
NOTE In WordPress lingo, all of these different types of people—administrators, editors, authors, contributors,
and so on—are
users.
Technically, a user is any person who has an account on your site. This account identifies
the person and determines what he’s allowed to do. Everyone else is an ordinary, anonymous visitor.

CHAPTER 11: COLLABORATING WITH MULTIPLE AUTHORS 371
ADDING
PEOPLE TO
YOUR SITE
FREQUENTLY ASKED QUESTION
The Role of a Subscriber
Why would I add subscribers? Can’t everyone read my posts
and make comments?
Ordinarily, there are no limits to who can read posts and write
comments. In that way, subscribers are no different from
regular, unregistered guests. Yes, subscribers may get email
notifications about your content (if your site is hosted on Word-
Press.com, or if you added the right plug-in to a WordPress.
org site). But they certainly won’t get any extra privileges.
However, the situation changes in these special cases:
• If you create a private site (page 397), every reader needs
a subscriber account. Without one, they won’t be able to
see anything on your site.
• If you restrict comments with the “Users must be
registered and logged in to comment” setting on a self-
hosted site, and you don’t allow Facebook or Twitter logins
(page 270), only subscribers can leave comments. This is
a pretty severe restriction, and few sites use it.
• If you add a social plug-in like BuddyPress (
http://
buddypress.org
), you want to give accounts to as many
people as possible in the hope that they exploit the plug-
in’s enhanced features, like sharing content with friends
and chatting in discussion groups. That’ll make your site
feel more like a community.
Adding New People to a Self-Hosted Site
Using the dashboard, you can register new users, one at a time. You supply a few
key details (like a user name, password, and email address), and let your users take
it from there.
Here’s what to do:
1. Choose Users→Add New.
The Add New User page opens (Figure 11-1).
2. Choose a good user name for the person you’re inviting.
The best approach is to use a consistent system you can apply to everyone you
add. For example, you might choose to combine a person’s first and last name,
separated by an underscore (like
sam_picheski
).
3. Type in the person’s email address.
WordPress uses that address to send the person important notifications, includ-
ing password resets.
4. Optionally, specify the person’s first name, last name, and website.
These are three descriptive details that become part of the person’s profile.
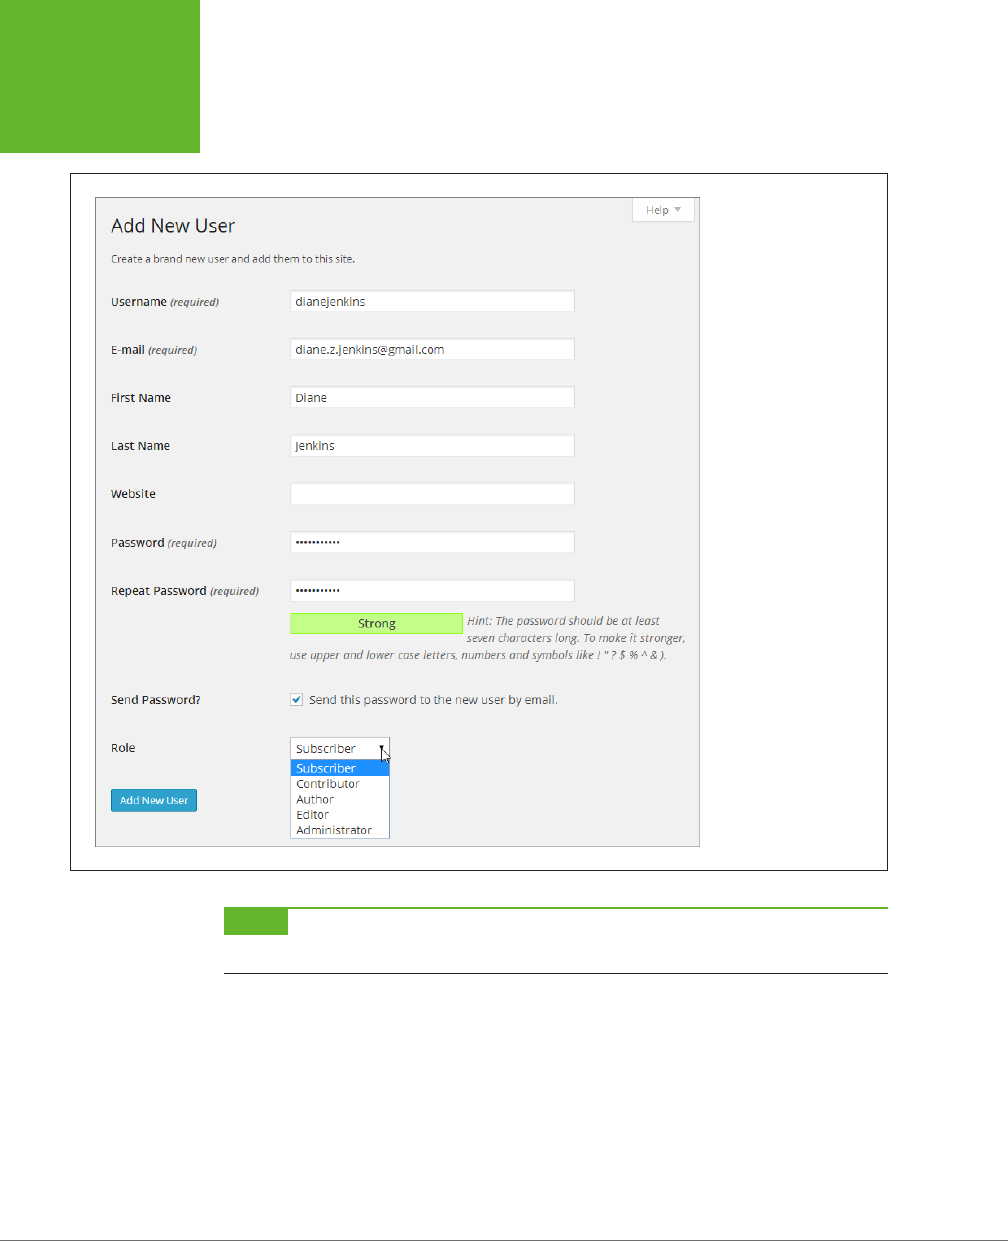
WORDPRESS: THE MISSING MANUAL
372
ADDING
PEOPLE TO
YOUR SITE
FIGURE 11-1
There’s nothing mysteri-
ous about the Add New
User page. Here, the site’s
administrator has typed
in the sign-up informa-
tion for a person with the
user name dianejenkins
and is specifying her site
privileges using the Role
drop-down list.
NOTE The emails WordPress sends often end up in an email account’s junk folder, because they contain links.
You may need to tell new users to check their junk mail to find the messages with their WordPress credentials.
5. Type in a strong password. (See the box on page 27 for tips.)
When you create a new account, you
must
supply a password—WordPress
doesn’t let people pick their passwords the first time they log in. However, if
you check “Send this password to the new user by email,” WordPress emails
the person her user name and password, along with a link to your site’s login
page (Figure 11-2). (And even if you don’t ask, WordPress sends you, the ad-
ministrator, an email with a record of the new user’s name and email address.)
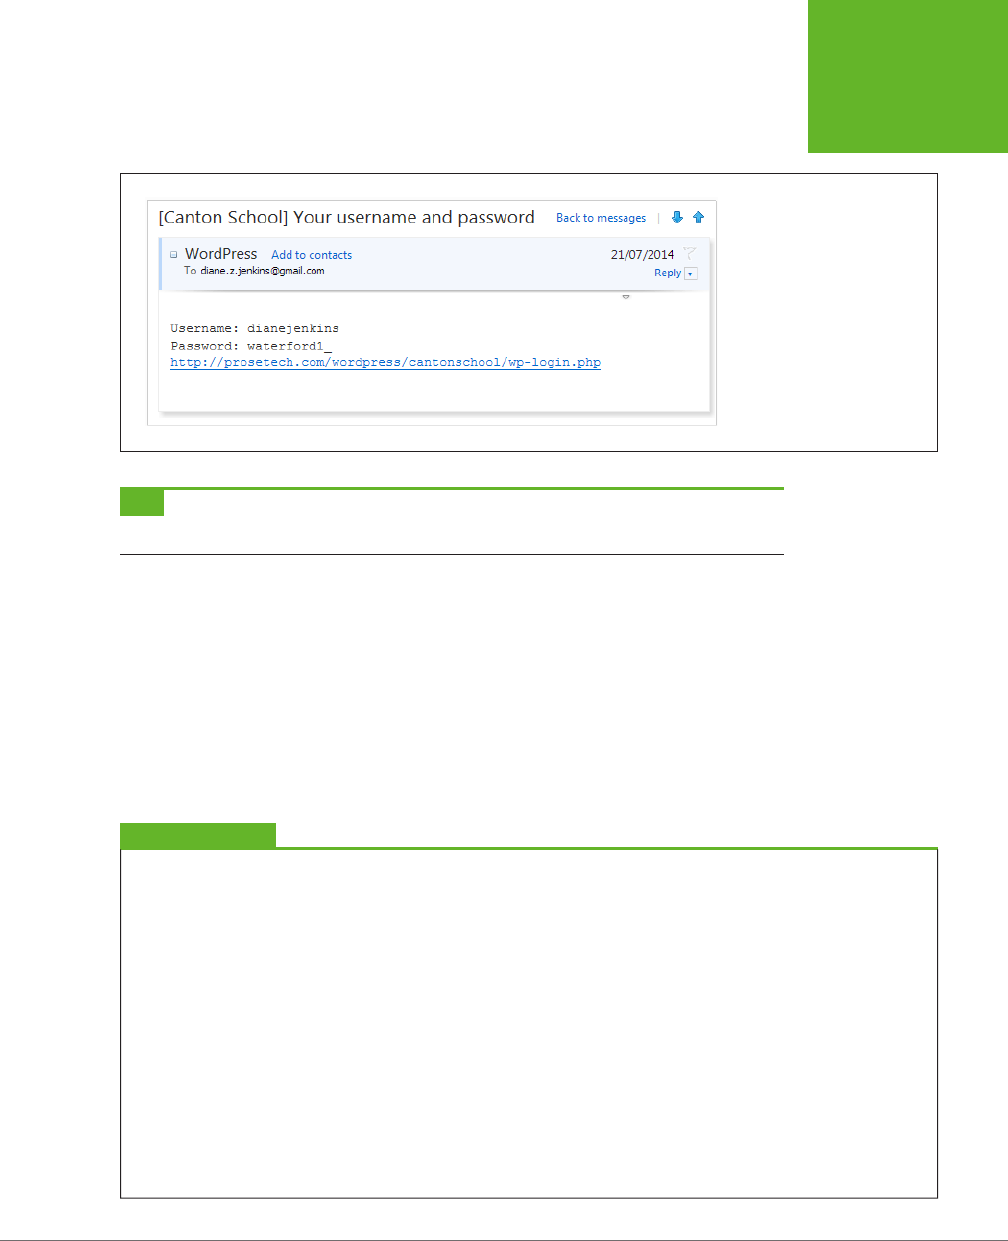
CHAPTER 11: COLLABORATING WITH MULTIPLE AUTHORS 373
ADDING
PEOPLE TO
YOUR SITE
FIGURE 11-2
Here’s the message WordPress
sends to newly registered
guests if you select “Send
this password to the new user
by email.” Sadly, WordPress
doesn’t let you add a custom
welcome message or any extra
information.
TIP If a frustrated user arrives at your site but doesn’t know his password, he can click “Lost your password?”
on the login page. WordPress emails him a link that lets him pick a new password.
6. Pick a role from the drop-down list.
You can use any of the roles described on page 370.
7. Click Add New User.
WordPress creates the account, sends a notification email (if you chose the
“Send this password…” option), and takes you to the Users→All Users section
of the dashboard. There, you can review a list of everyone you ever added to
your site. Point to a user name, and you see two straightforward links—use Edit
to change the person’s account info and Delete to remove the account.
UP TO SPEED
Helping Your Peeps Log In
To log into your site, users need to request the
login
page. That
means that if your site is at
http://cantonschool.org
, they need
to visit
http://cantonschool.org/login
. Alternatively, people
can go straight to the dashboard by requesting the
wp-admin
page (as in
http://cantonschool.org/wp-admin
). In that case,
WordPress asks them to log in before they can continue.
If you have a lot of users who haven’t used WordPress before,
you may need to help them find the login or dashboard page.
Here are two good options:
• You can create your own welcome email message that
contains a link to the login page, and send it to everyone.
Use your favorite email program or get the Email Users
plug-in (
http://tinyurl.com/emailusers
), which lets you
send a mass email to all your users at once. This plug-in
is a big help if you don’t have their email addresses handy.
• You can add a link that goes to your login page. Put that
link in the main site menu, or add the link to a sidebar
using a Text widget (page 166) or a Custom Menu widget
(page 228). Make sure you give your link some descriptive
text that clearly explains why the person needs to log
in, like “Log in to write your own posts” or “Log in as a
contributor.”

WORDPRESS: THE MISSING MANUAL
374
ADDING
PEOPLE TO
YOUR SITE
You might want to add one other detail when you add a new user: changing the
name WordPress displays when that person contributes content.
When your site has a single author (you), there’s no reason to attach the author’s
name to every post. But once you have multiple people contributing to your site,
it’s important to distinguish one author’s work from another’s. The standard year
themes (like Twenty Twelve) handle this gracefully: As soon as your site publishes
posts from more than one person, it modifies the text it adds to every post to include
author information, like this:
This entry was posted in Uncategorized by mpm_site_admin. Bookmark the
permalink.
Ordinarily, WordPress identifies a post author by his user name, which often makes
for a lousy byline. Fortunately, you can choose something more meaningful and
readable (both for you and your visitors). Here’s how:
1. Choose Users→All Users.
WordPress opens the Users page and lists everyone your site recognizes.
2. Point to the user name of the person whose info you want to change, and
then click Edit.
The person’s profile page opens, where you see all her settings. You can tweak
her personal preferences, like the dashboard’s color scheme and proofreading
settings, but you probably won’t worry about these details—instead, you’ll let
invited people configure their own profiles. But the person’s nickname aects
the readability of the site for all your visitors, so it’s worth getting it right.
3. Choose an option from the “Display name publicly as” list.
For example, you can replace the WordPress user name from the previous ex-
ample (
dianejenkins
) with the first name only (Diane), the last name (Jenkins),
or a combination of the two (Diane Jenkins).
If you don’t see an option you like, type the name you want into the Nickname
box, exactly as you want it to appear (for example, “Di Jenkins,” “Miss J,” or
“Super Shorty”). WordPress adds the new nickname to the entries in the “Dis-
play name publicly as” list. To use it in place of her registered name, choose it.
4. Click Update Profile.
Your change is ocial.

CHAPTER 11: COLLABORATING WITH MULTIPLE AUTHORS 375
ADDING
PEOPLE TO
YOUR SITE
NOTE You can change an author’s name anytime. The change affects all the posts the person has writ-
ten—the next time you view a post, you see the new name in the byline. This is one of the benefits of dynamic
websites like the ones you create with WordPress—they’re intelligent enough to keep everything up to date.
Inviting People to Join a WordPress.com Site
Before you can register someone as a user on your WordPress.com site, that person
must have a WordPress.com account. Some people may already have one (they
might, for example, have their own site or they may be following someone else’s
blog). Non-WordPressers need to sign up, and they need to do it themselves—you
can’t create a WordPress.com account for someone else.
Instead, your job is to
invite
people to become users. For example, imagine you invite
two friends, Cathy and Sanjeev. Cathy already has a WordPress.com account, which
means that all she needs to do is accept your invitation. WordPress then authorizes
her to read, edit, or manage your site (depending on the role you grant her). On the
other hand, Sanjeev doesn’t have a WordPress.com account, so WordPress asks
him to create one. Once he does, Sanjeev can accept your invitation and become a
contributor, just like Cathy.
You can invite one person or several at a time. The only rule is that if you create an
invitation for several people, all those people must have the same role. That means
you can invite a batch of followers all at once, or a group of contributors, but not a
mix of the two.
To create an invitation, follow these steps:
1. Choose Users→Invite New in the dashboard.
2. Enter a list of email addresses, one for each person you want to invite,
separated by commas (Figure 11-3).
If you invite someone who already has a WordPress.com account, you can sup-
ply his WordPress.com user name instead of his email address (either way, the
invitation reads the same).
3. Choose a role from the Role drop-down list.
You can specify any of the roles described on page 370.

WORDPRESS: THE MISSING MANUAL
376
ADDING
PEOPLE TO
YOUR SITE
FIGURE 11-3
WordPress will send
this invitation to three
people, offering them the
chance to become site
contributors.
4. In the Message box, type a short invitation.
For example, if you’re inviting contributors, you might write “Come share your
stories on my blog.” This note becomes part of the welcome message WordPress
sends to each person on your list (Figure 11-4).
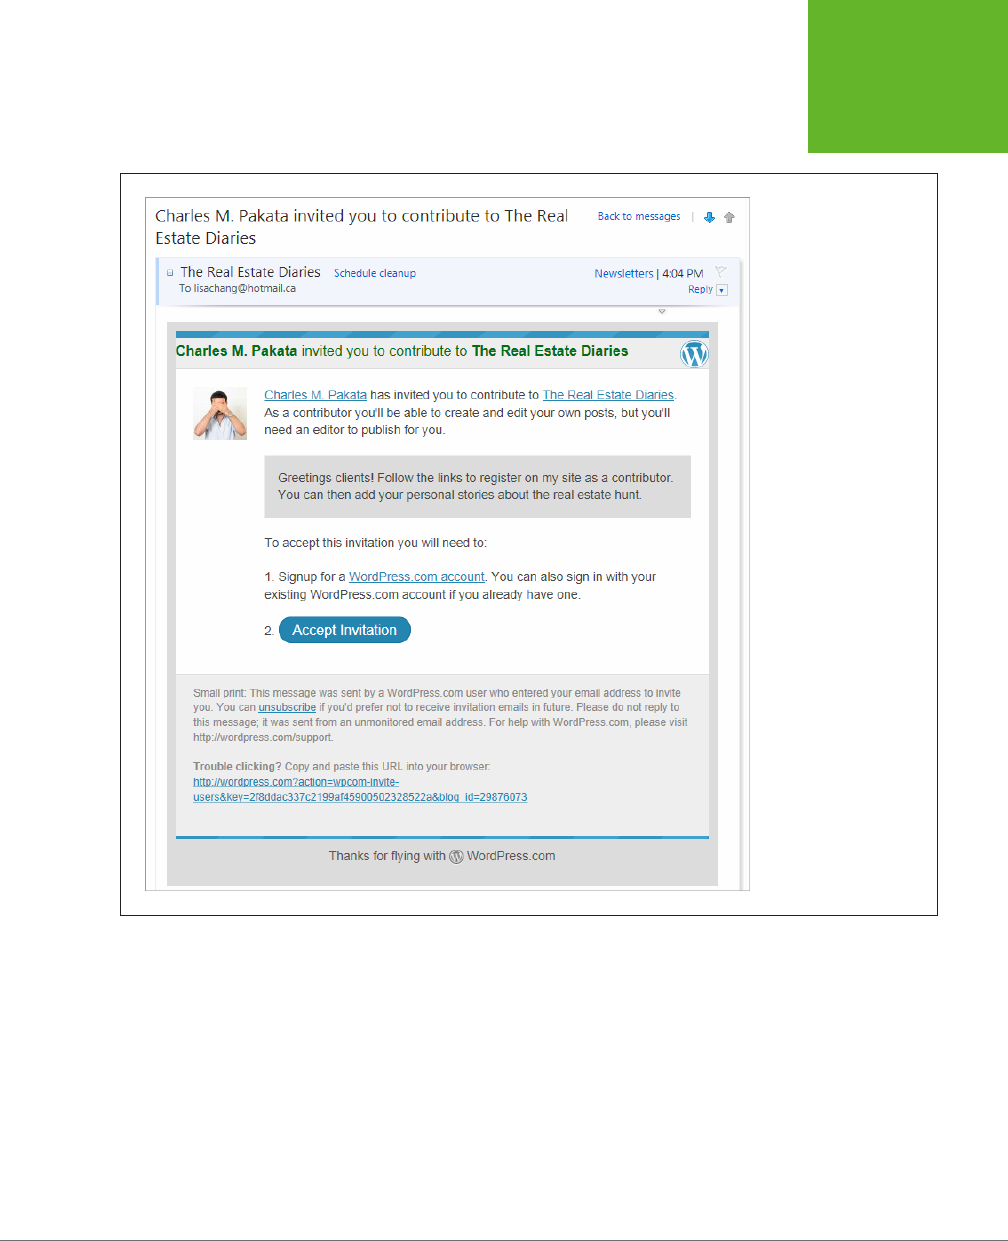
CHAPTER 11: COLLABORATING WITH MULTIPLE AUTHORS 377
ADDING
PEOPLE TO
YOUR SITE
FIGURE 11-4
Here, site owner Charles
Pakata invites Lisa Chang
to contribute to his
WordPress site, “The Real
Estate Diaries.” If Chang
clicks Accept Invitation,
WordPress prompts
her to sign in with her
WordPress.com account
(or to create an account
if she doesn’t have one).
She can then accept the
invitation and become a
contributor.
5. Click Send Invitation.
WordPress sends the invitation into cyberspace.
Below your message, on the same “Invite New Users” page, WordPress keeps
track of whom you invited and how they responded (Figure 11-5). It keeps the
records until you delete them (more about that in a moment).
If you think a previously invited person missed your email, you can ask Word-
Press to send it again by clicking Resend. If you want to revoke an invitation
that hasn’t been accepted, click Delete. Now, if that person clicks the activation
link in the invitation message, WordPress displays an error message.
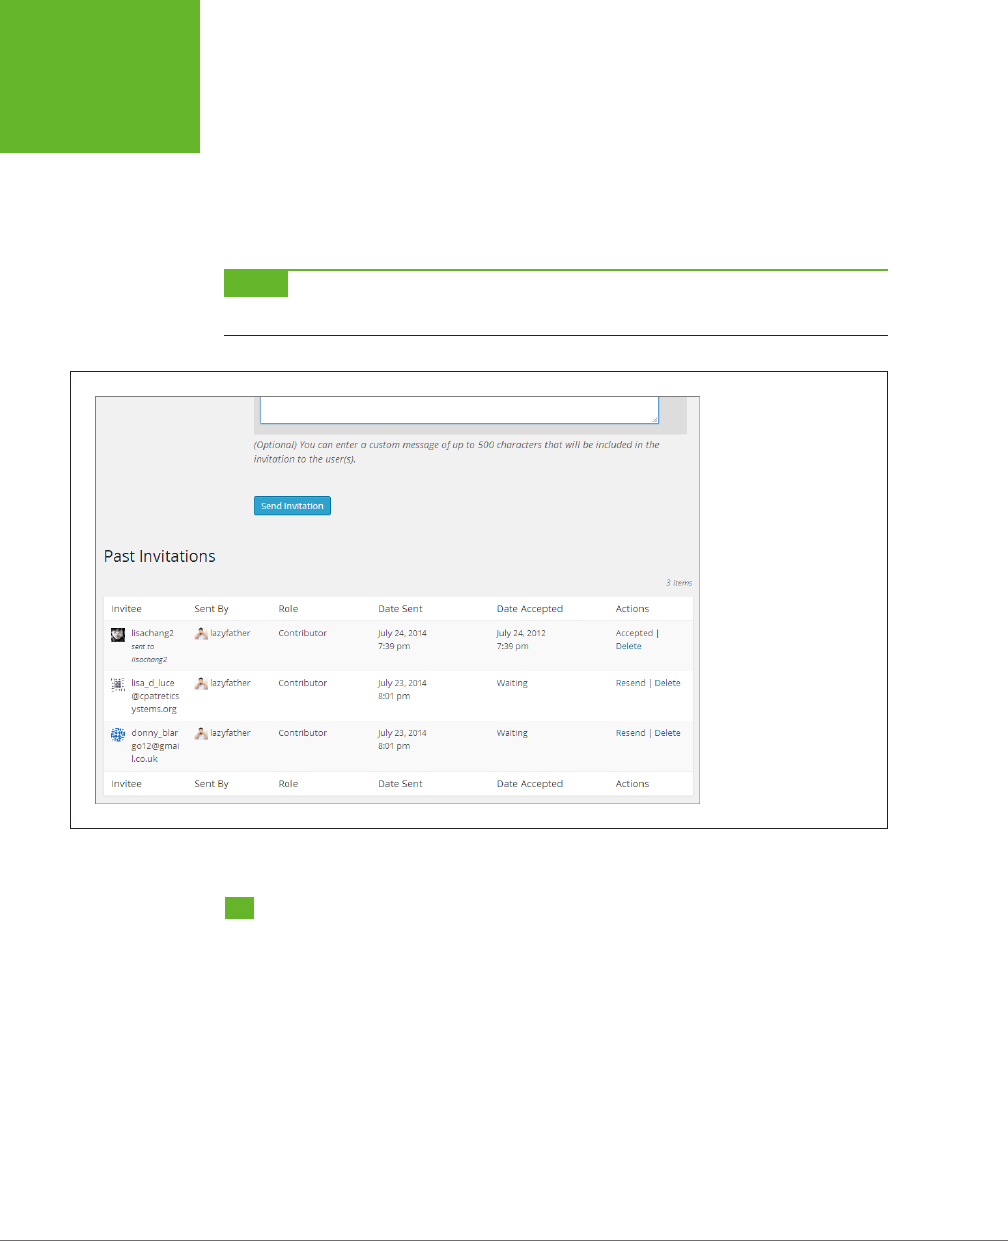
WORDPRESS: THE MISSING MANUAL
378
WORKING
WITH AUTHORS
Once someone accepts your invitation, you may choose to remove the record
of the invitation (click Delete) so you can focus on the people who haven’t
responded. Deleting an invitation for a registered user has no eect on that
person—he remains registered on your site. (If you decide that you
do
want to
take down an existing user, you need to go to the Users→All Users section of
the dashboard and click Remove next to the persona non grata.)
NOTE The Users→All Users page shows all the administrators, editors, authors, and contributors you’ve
signed up. It doesn’t include mere followers, because they have no special powers on your site.
FIGURE 11-5
Lazyfather invited three
people to join his site.
One has accepted, while
the other two have yet to
respond.
Working with Authors
The most common reason to add new users to your WordPress site is to get more
content from more people. After all, new and interesting content is the lifeblood
of any site, and by recruiting others to help you write it, you increase the odds that
your site will grow and flourish.
As you already learned, all but one type of WordPress user (followers for Word-
Press.com sites, subscribers for self-hosted sites) can write posts. Whether you’re
an administrator, editor, author, or contributor, the first step is the same: To write a
post, you have to log in to the dashboard.
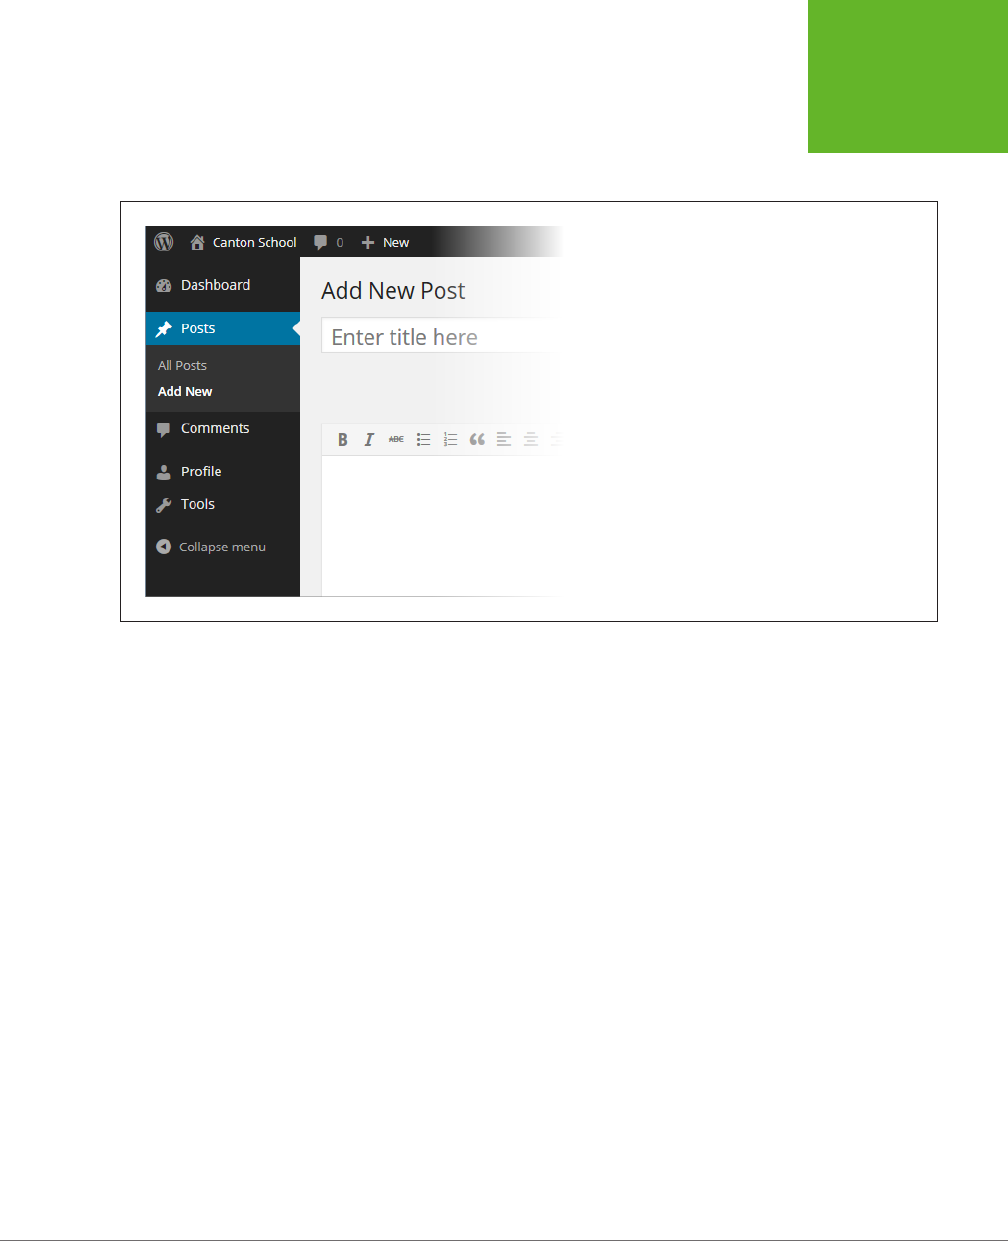
CHAPTER 11: COLLABORATING WITH MULTIPLE AUTHORS 379
WORKING
WITH AUTHORS
WordPress tailors the dashboard to the person’s role, so that each person sees only
the menu commands he can use. For example, if you log in as a contributor, you see
the stripped-down dashboard in Figure 11-6.
FIGURE 11-6
Different people see different versions of the WordPress
dashboard. In this example, a contributor has logged into
the Canton School site. This dashboard has commands for
creating posts, reading comments (but not moderating
them), and changing the contributor’s profile. It doesn’t
offer commands for changing the site’s theme, its widgets,
or its settings.
If you run a site on WordPress.com, every type of user can log in and see the dash-
board, except followers. Why leave out followers? On WordPress.com, a person’s
profile isn’t tied to your site—it’s actually part of that person’s WordPress.com ac-
count. For that reason, there’s no need for followers to use your site’s dashboard
to change their profiles.
If you run a self-hosted site, every type of user can log in to the dashboard, although
subscribers get just one option—the Profile command that lets them change their
preferences and personal information.
Either way, the only type of user who can see the full, unrestricted version of the
dashboard is an administrator—and, ideally, that’s just you.
The Post Approval Process for Contributors
Administrators, editors, and authors can add posts and pages to your site in the usual
way. When they finish writing, they simply click Publish to make their content go live.
As you know, contributors have more limited powers. They can create posts but
not publish them, which gives you a broad safety net—there’s no chance that bad
content can get on your site, because you get to review it first. When contributors
create posts, they have two options: They can save the post as a draft so they can
return to it and edit it later, or they can submit it for review (Figure 11-7).
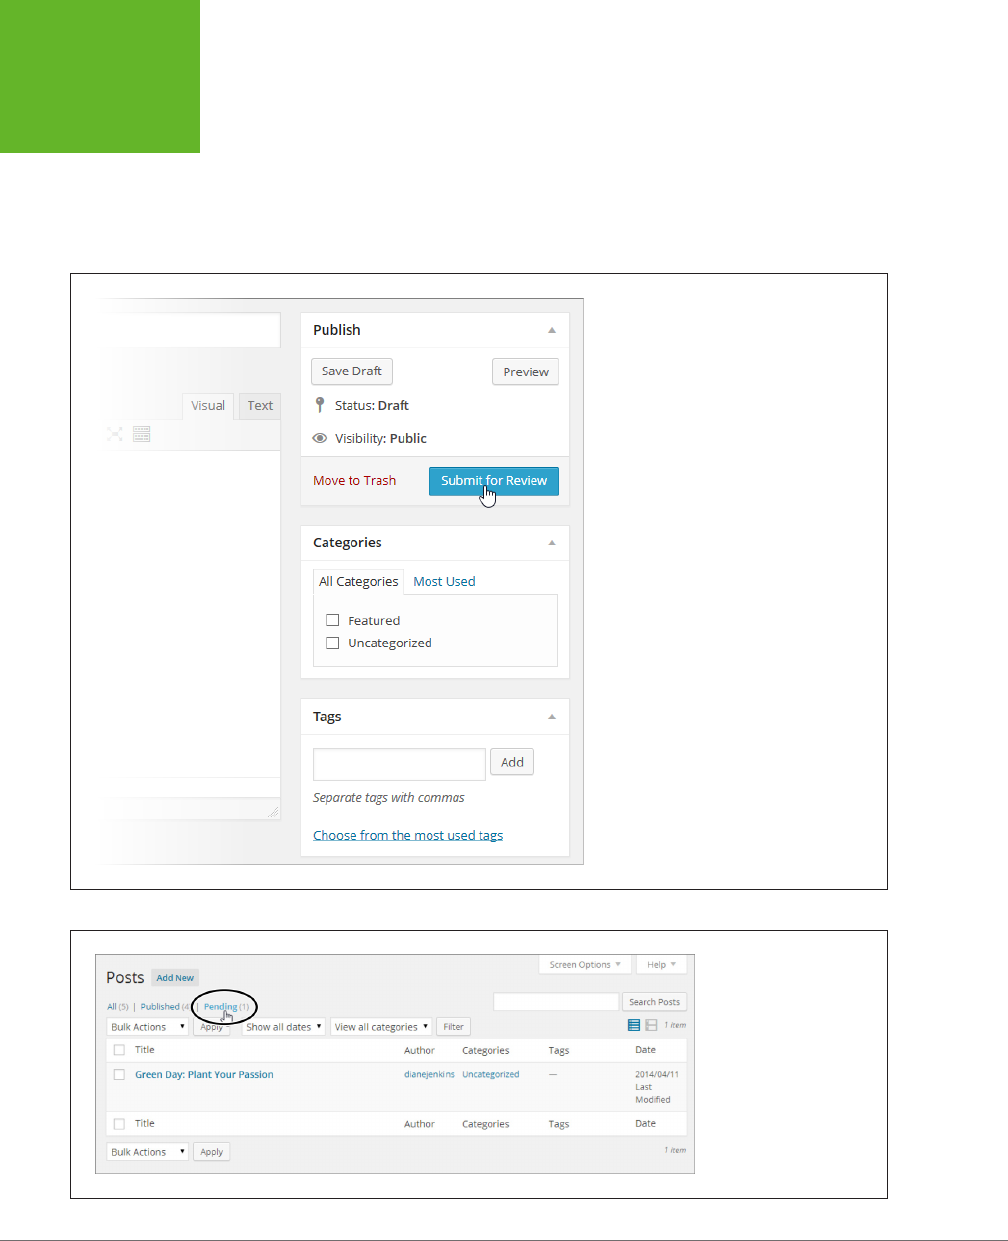
WORDPRESS: THE MISSING MANUAL
380
WORKING
WITH AUTHORS
When a contributor submits a post this way, WordPress assigns it a special status,
called
pending.
A pending post won’t appear on your site until an editor or admin-
istrator approves it. Here’s how you do that:
1. In the dashboard, choose Posts→All Posts.
2. Click the Pending link (Figure 11-8).
FIGURE 11-7
When a contributor logs in to your site, Word-
Press changes the familiar Publish button to a
“Submit for Review” button.
FIGURE 11-8
When a contributor
submits a post for review,
it becomes a pending post.

CHAPTER 11: COLLABORATING WITH MULTIPLE AUTHORS 381
WORKING
WITH AUTHORS
3. If you see a pending post you want to review, click its title.
WordPress opens the post in the Edit Post window. Make any changes you want,
from minor corrections to adding completely new content.
4. If the post is ready for prime time, click Publish.
This is the same way you publish your own posts. In this case, however, the newly
published post will have the original author’s byline, even if you edited the post.
If you make changes to a post but you’re not quite ready to publish it, click “Save
as Pending” to store the edited version. You might do this to add questions or com-
ments to the author’s work, for example. You can wrap your comments in square
brackets [like this]. Then the post author can make changes and re-submit the post.
NOTE Don’t be confused by the way WordPress uses the term “author.” Even though WordPress has a
specific type of user called
author,
WordPress experts often use the same term to refer to anyone who writes a
post on a WordPress site. Thus, administrators, authors, editors, and contributors can all act as post authors.
PLUG-IN POWER
Better Workflow for Reviewing Posts
WordPress gives you the basic procedures you need to get
multiple contributors working together on the same site, but
the process has a few rough edges.
The problem is the
workflow
—the way a task passes from one
person to another. Right now, it’s up to editors or administra-
tors to go looking for pending posts. WordPress makes no
effort to notify you that there’s content waiting for review.
Similarly, if an administrator edits a post but decides it needs
more work, there’s no easy way to let the contributor know
that you need a rewrite. And when you
do
publish a pending
post, WordPress once again fails to notify the original author.
WordPress’s creators are aware of these gaps, and they may
fix them in future versions of the program. But because the
contributor feature is a bit of a specialized tool, those fixes are
low on the list of WordPress priorities.
However, if you run a self-hosted site and want to implement
a better system, there’s a plug-in that can change everything.
It’s called Edit Flow (
http://tinyurl.com/editflow
) and it adds
the structure you need to manage a multistage review process,
including:
• Custom status notices. Instead of designating a post
as Pending or Published, you can give it a status that
reflects its stage in your organization’s workflow. For
example, if you run a news site, you might want posts to
go from “Pitched” to “Assigned” to “Pending Review” to
“Published.” Edit Flow can help manage that sequence.
• Editorial comments. Edit Flow lets people attach brief
notes to a post as it whizzes back and forth between
them (as in “I love your post, but can you expand on
paragraph 3?”)
• Email notifications. Edit Flow can send notifications at key
points in the review process—when authors submit new
posts for review, when an editor publishes a post, when
an editor places a comment on a post asking for changes,
and so on. On a bustling site, these emails keep the post
review process running quickly and efficiently.
• Calendar. If you want to make long-term content plans
to ensure that there’s always something new on your
site, the Edit Flow calendar can help you plan authors’
contributions.
Although Edit Flow is stuffed full of features, they’re arranged
in a logical way, and you can find helpful information at
http://
editflow.org
. If you need to coordinate the publishing efforts
of a small or midsized group of people, don’t be afraid to give
it a whirl.
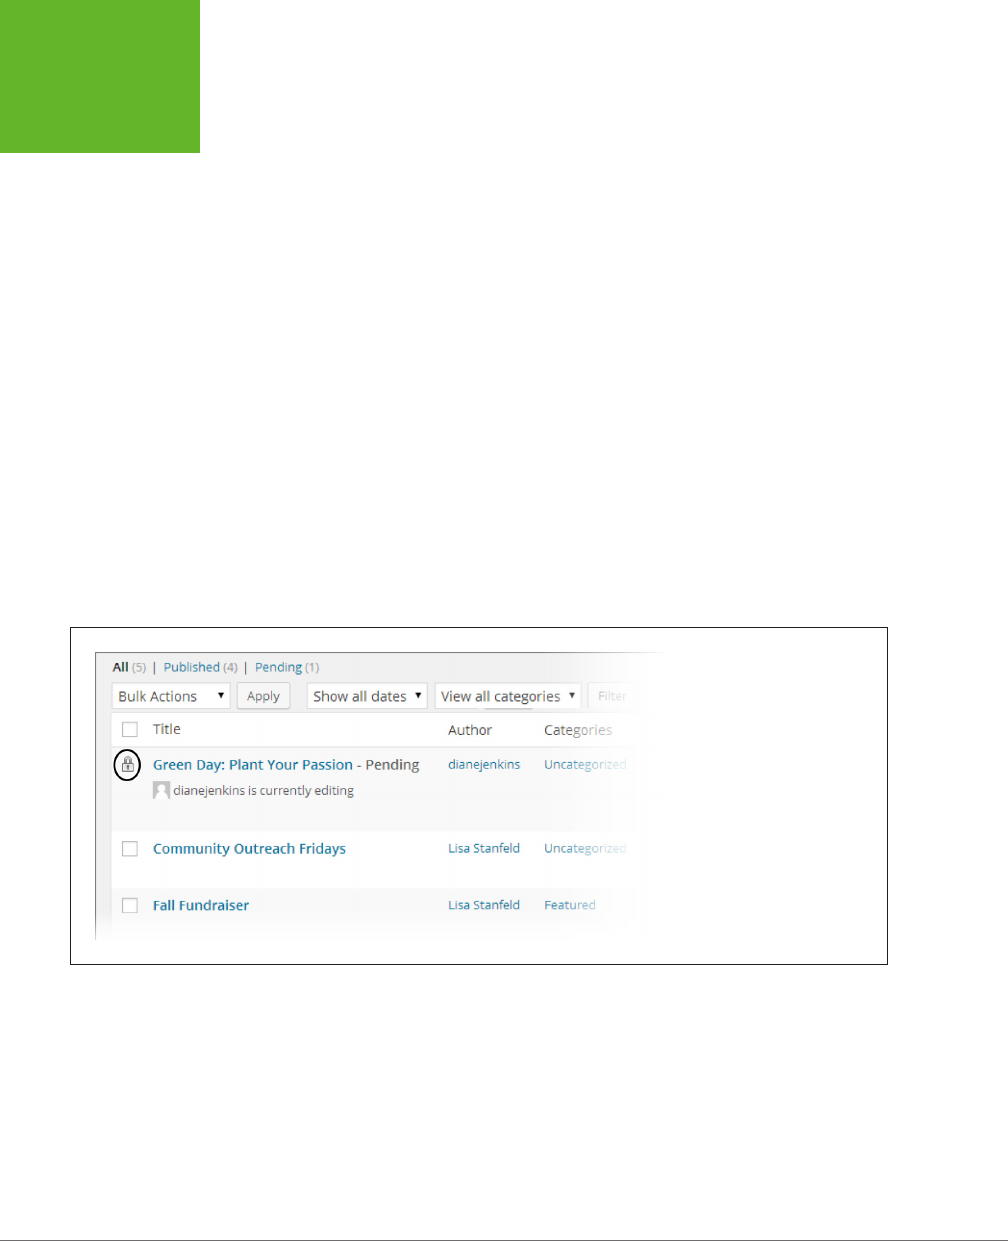
WORDPRESS: THE MISSING MANUAL
382
WORKING
WITH AUTHORS
Post Locking
As you already know, authors and contributors are limited to editing their own work.
But editors and administrators have more sweeping powers; they can dip into any
page or post and make changes.
This setup creates the possibility of conflicts. An editor could start editing a post
that a contributor is still writing. Or two editors could attempt to revise the same
work at the same time. WordPress doesn’t have any post collaboration features—
instead, only one person at a time can revise a post and save changes. To prevent
one person’s edits from wiping out another person’s work, WordPress uses a simple
post locking
system.
Here’s an example of how it works. If Diane starts editing a post, WordPress takes
note. Every 15 seconds, it sends a message from Diane’s browser to the server,
which essentially says, “I’m still working!” (This message is part of an internal sys-
tem called the Heartbeat API.) If Diane stops editing—say, she saves her work and
navigates to another page, or she just closes the browser window without a second
thought—the messages stop and WordPress realizes (within 15 seconds or so) that
Diane has stopped working.
When you look at the posts on the All Posts page, WordPress shows you which ones
are currently being edited (Figure 11-9).
FIGURE 11-9
WordPress adds a lock icon next
to every post being edited.
Here, WordPress makes it clear
that
dianejenkins
is at work on
the first post in the list.
Life gets more interesting when someone else joins the editing party. For example,
consider what happens if Lisa attempts to edit the post Diane is working on. Word-
Press notices the conflict the moment Lisa picks up the post, and shows a warning
message (Figure 11-10, top). Now it’s up to Lisa to decide whether she wants to wait
for Diane to finish (by clicking “Go back”) or push her out of the way and take over
(by clicking “Take over”; see Figure 11-10, bottom).
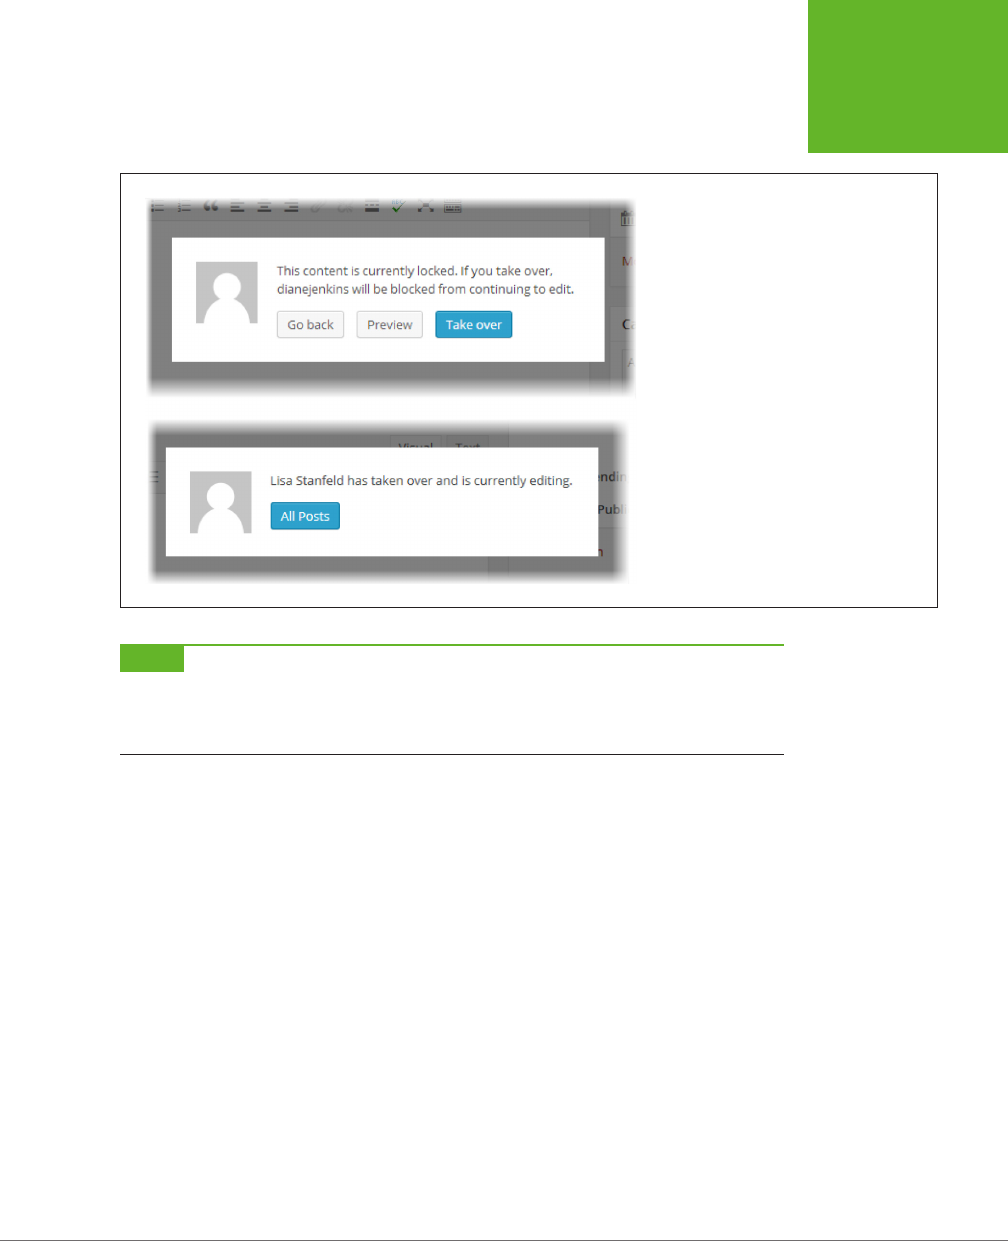
CHAPTER 11: COLLABORATING WITH MULTIPLE AUTHORS 383
WORKING
WITH AUTHORS
FIGURE 11-10
Top: Lisa tried to edit a post that Diane is edit-
ing. Now she has a choice.
Bottom: If Lisa clicks “Take over,” WordPress
boots Diane out of the editing window with
this message.
NOTE When it comes to taking over a post, everyone is created equal. For example, if Lisa wants to take
over the post that Diane is editing, it doesn’t matter if Diane is an administrator or a lowly contributor. Nor does
it matter who created the post. As long as Lisa is allowed to edit the post, she’ll be able to wrest control from
anyone who’s currently working on it.
Diane has no chance to stop Lisa’s post takeover. Once it happens, her editing ses-
sion ends. All she can do is click “All Posts” to return to the post list. However, once
Diane is back at the post list, nothing stops her from editing the same post
again.
If she does, she’ll see the same warning message that Lisa saw, informing her that
someone else is working on the post. If she forges ahead, Lisa will be kicked out of
her editing session.
Of course, the point of the post locking system isn’t for editors and authors to be-
come locked in a series of dueling edits. Instead, it’s for times when someone still
has a post open but probably isn’t editing it anymore. For example, if Diane starts
revising a post but walks away from her computer for lunch, Lisa can still get some
work done by assuming control of Diane’s work in progress.
Revision Tracking
WordPress has another tool that can help you manage successive edits. It’s called
revision tracking
, and it saves old versions of every post. You can step through a
post’s edit history to see who changed a post, when the edit took place, and exactly
what that person changed.

WORDPRESS: THE MISSING MANUAL
384
WORKING
WITH AUTHORS
NOTE Revision tracking is particularly useful on sites that have multiple authors. (And it’s a life-saver
when an overeager author overwrites another person’s work.) However, revision tracking works just as well on
single-author sites, where it lets you review your own edits.
You don’t need to turn on revision tracking—it’s always at work. Every time someone
saves a post as a draft, publishes it, or updates it, WordPress takes a snapshot of
the post’s content and adds it to the revision history. WordPress may also take a
snapshot of a post-in-progress as you edit it, but it won’t keep more than one copy
of your post in this state. After all, you wouldn’t want to clutter your revision list
with thousands of in-progress autosaves.
To see the edit history of a post, find the post in the All Posts page, and then click
Edit. WordPress displays the revision history in two places (Figure 11-11):
• The Publish box. Look here to find the number of revisions WordPress stored.
Click Browse to review these snapshots in the Compare Revisions page.
• The Revisions box. Check here to see a list of snapshots, from most recent to
oldest. To inspect a revision, click the timestamp next to it.
NOTE If you don’t see the Revisions box, click Screen Options in the top-right corner of the page, and then
add a checkmark next to the Revisions option.
FREQUENTLY ASKED QUESTION
Co-Authoring Posts
What if several people edit the same post? Can they all be
credited as authors?
Revision tracking is neat, but your readers don’t see any of that
information. All they see is the name of the post author—the
person who initially created the post. Even when someone
else edits a post, it remains the property of the initial author.
An editor or administrator can edit a post and attribute it to
someone else, but you can’t credit two people as authors of
the same post—unless you run a self-hosted site and you’re
willing to fiddle with your theme, as explained next.
To create true co-authored posts, you need to take two steps.
First, you need to add the Co-Authors Plus plug-in (
http://
tinyurl.com/co-authors-plus
), which lets you designate mul-
tiple authors for any post or page. Second—and this is the hard
part—you have to get your posts and pages to actually display
the names of the authors who worked on them. To make that
possible, you need to edit your theme, as the Co-Authors Plus
plug-in explains (see
http://tinyurl.com/ccr7896
).
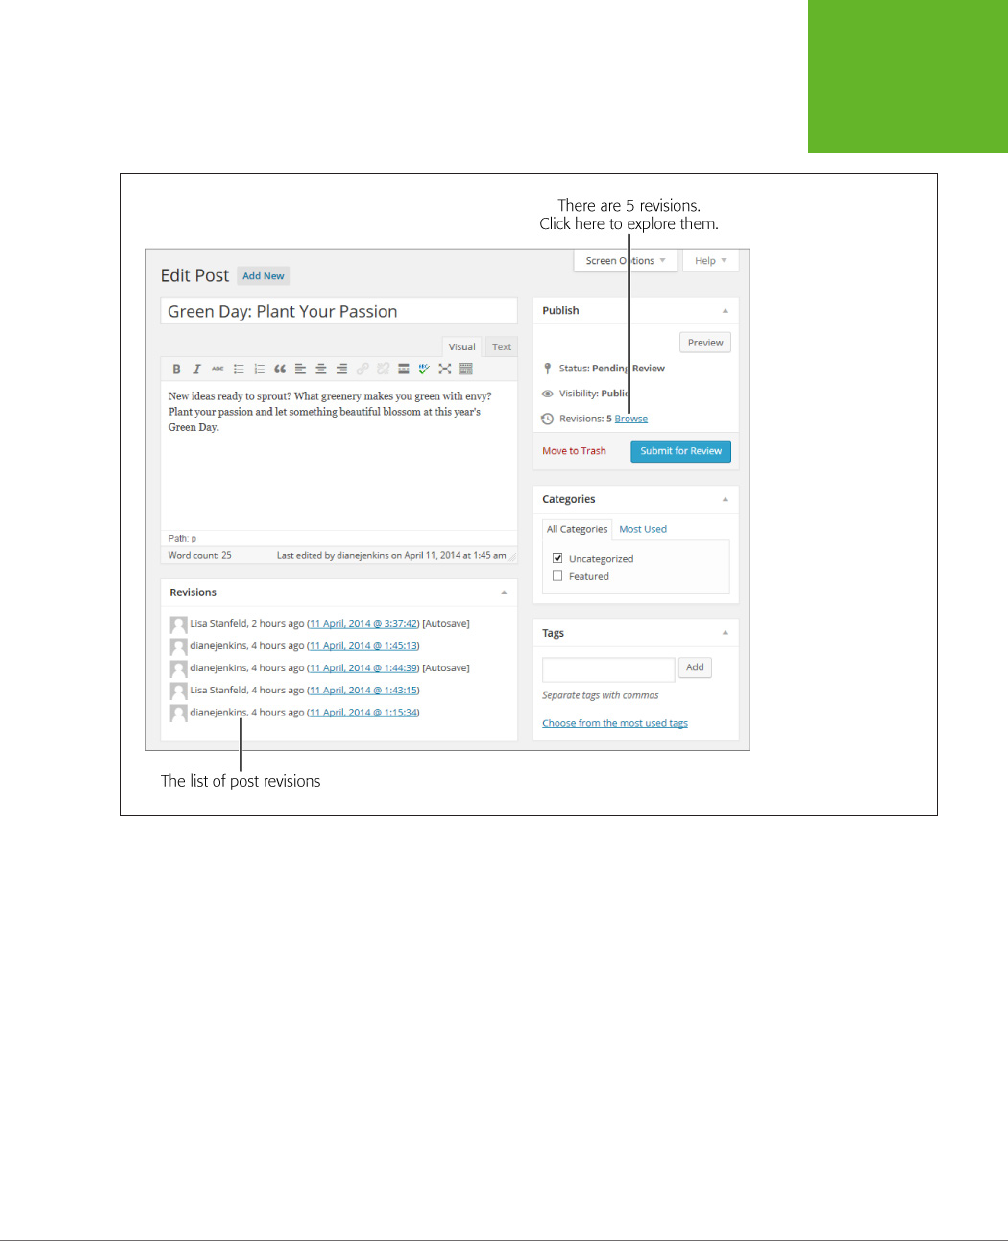
CHAPTER 11: COLLABORATING WITH MULTIPLE AUTHORS 385
WORKING
WITH AUTHORS
FIGURE 11-11
This post has been edited
five times. In the Revi-
sions box, WordPress tells
you when each revision
was made, and who
made it.
The easiest way to study the changes made to a post is to click the Browse link,
which appears in the Publish box next to the Revisions count. WordPress takes you
to the Compare Revisions page (Figure 11-12). Initially, it compares the dierences
between the current version of a post (shown in green on the right) and the previ-
ously saved version (shown in red on the left).
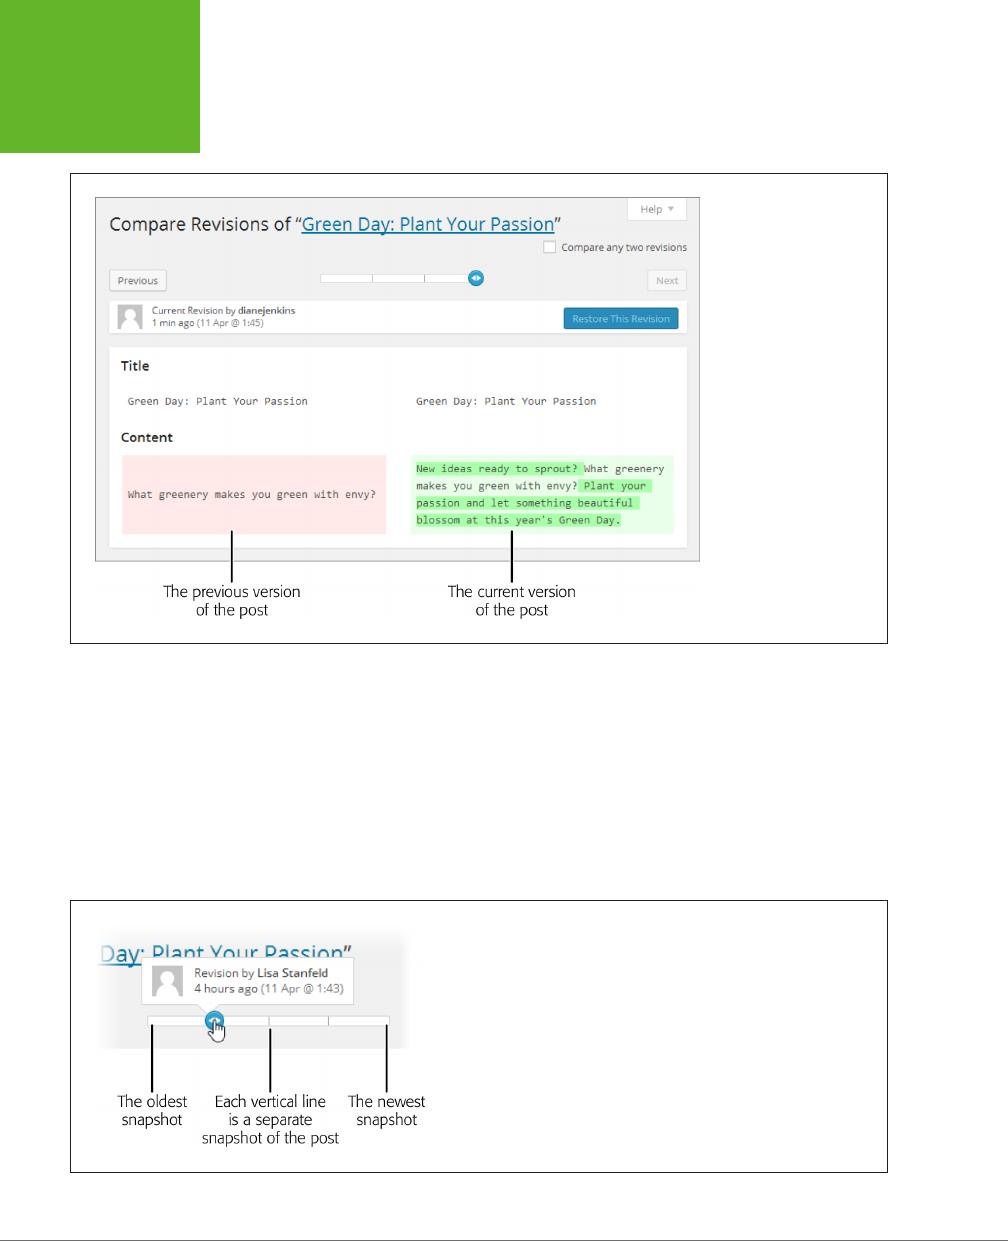
WORDPRESS: THE MISSING MANUAL
386
WORKING
WITH AUTHORS
FIGURE 11-12
On the right, WordPress
highlights the newly
added bits of text. On the
left, you see the previous
version of the post, which
included just one of the
three sentences it holds
now.
Once at the Compare Revisions page, you can dig deeper into the post’s edit history.
First, grab hold of the circle that sits in the small slider near the top of the page.
To see an older snapshot, drag the circle to the left. For example, if you drag the
circle one notch left, WordPress compares the previous version of the post (which
it shows on the right) to the version it saved just before that (which it shows on the
left). Keep dragging and you’ll go further and further back in time (Figure 11-13).
Alternatively, you can use the buttons on either side of the slider button. Click Previ-
ous to go one step backward in time and Next to go one step forward.
FIGURE 11-13
Every vertical line indicates a version of your post. Here, you posi-
tioned the circle over the second-oldest revision.

CHAPTER 11: COLLABORATING WITH MULTIPLE AUTHORS 387
WORKING
WITH AUTHORS
To revert to an older version of a post, drag the slider back until the version you want
appears on the right, in green. Then, click Restore This Revision, which appears just
above the snapshot’s content.
When you drag the circle, WordPress compares two successive versions of a post
(the one you pick, and the one just before that). But WordPress also allows curious
administrators to perform an in-depth comparison that puts
any
two versions of a
post under the microscope. For example, you could compare the oldest version of
a post with the newest.
To do that, turn on the “Compare any two revisions” checkbox in the top-right corner
of the page. Two circles appear in the slider, representing the two posts you want
to compare. Drag the two circles to the two snapshots you want to examine, and
WordPress compares their content underneath.
Revision tracking has one drawback. Keeping extra versions of all your posts takes
space. If you host your site on WordPress.com, this isn’t a problem, because your
revision history tops out at 25 snapshots per post. After this point, WordPress tosses
out the oldest snapshot every time it takes a new one. But on a self-hosted site, there’s
no limit. If you’re an obsessive sort who revises the same post over and over, your
revision history can balloon into hundreds of snapshots per post. Even if you have
room for all these revisions (which you almost certainly do), it’s never a good idea
to waste space in your WordPress database. An unnecessarily big database makes
backups slower and can even slow down the overall performance of your pages.
Unfortunately, there’s no way to delete old revisions using the dashboard. Instead,
you need a plug-in to clear out the bloat. Numerous plug-ins can do the job, but
WP-Optimize (
http://tinyurl.com/wp-opti
) is a popular, versatile choice. It clears
several types of old data out of your database, including old post revisions, old
drafts, and unapproved comments.
Alternatively, you can tell WordPress to save fewer snapshots. For example, you
could set WordPress to store a maximum of five revisions for each post. You can do
that with a plug-in (try the straightforward Revision Control, at
http://tinyurl.com/
rev-control
), or you can edit the
wp-config.php
configuration file using the process
described on page 570.
If you decide to edit the
wp-config.php
file, you need to add a line like this to the
end of the file in your website folder:
define('WP_POST_REVISIONS', 5);.
This tells WordPress to store a maximum of five revisions per post. However, you
can replace the 5 with whatever number you want. Or you can tell WordPress to
never store
any
revisions by substituting this line of code:
define('WP_POST_REVISIONS', false );
Now you’ll never have to worry about database bloat from old revisions, but you’ll
also lose the safety net that lets you recover content if you accidentally erase or
mangle it.
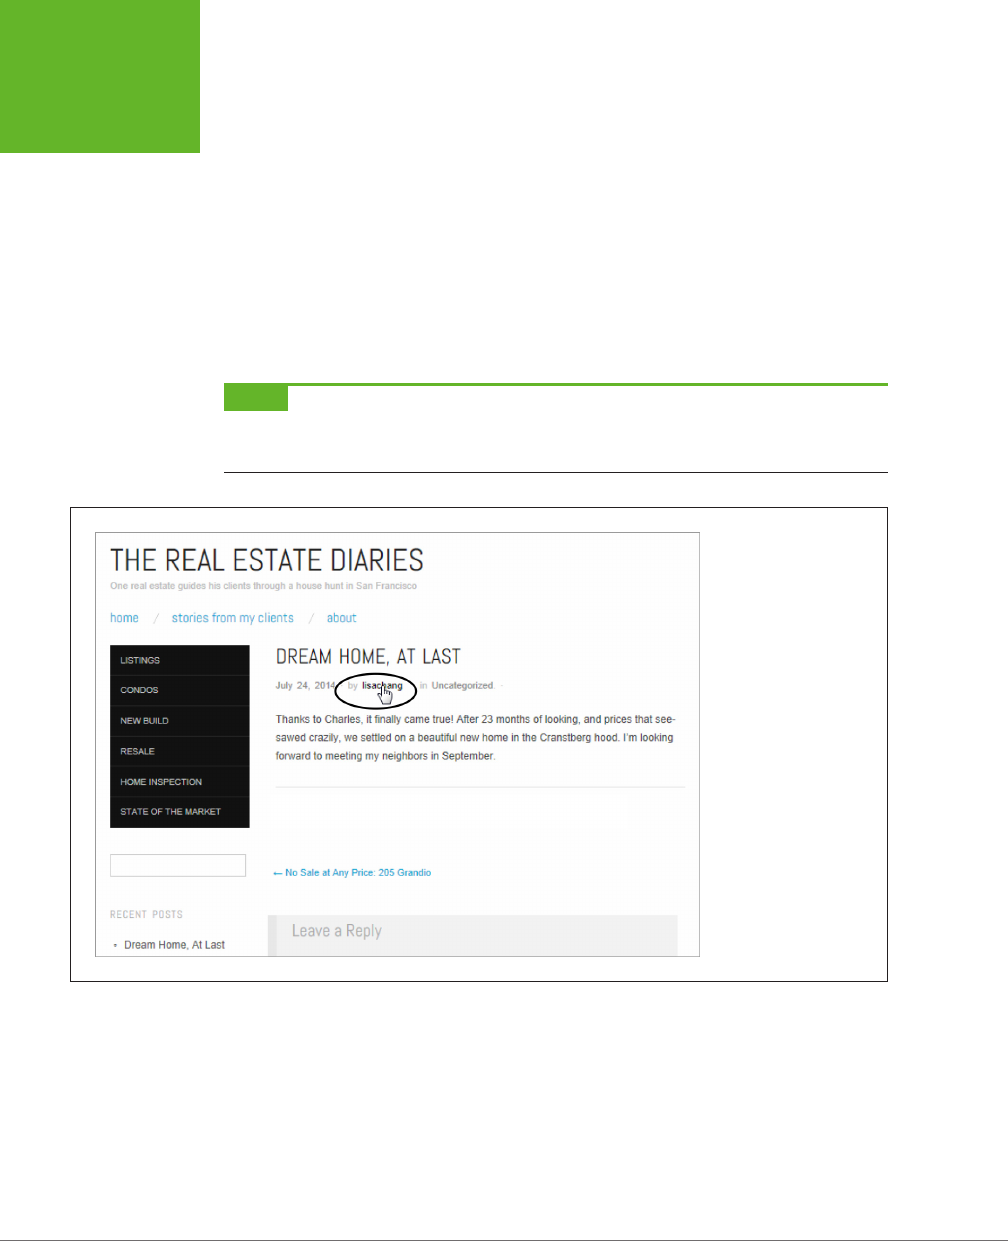
WORDPRESS: THE MISSING MANUAL
388
WORKING
WITH AUTHORS
Browsing an Author’s Posts
Once you’ve added a few authors to your site and figured out a way for them to
work without stepping on each other’s toes, it’s worth thinking about what your
multi-authored site looks like to visitors. How can they browse the work of specific
authors, or find out more about the writers they like best?
The first issue—reading the work of a specific author—is the easiest to resolve. Just
as you can view all the posts in a particular category or all the posts that have the
same tag, so you can browse all the posts by a specific author. The easiest way to
do that is to click the author’s name, which appears just before or after the post
content, depending on the theme (Figure 11-14).
NOTE The name WordPress uses to sign posts is the author’s
display name,
which might be the person’s
WordPress user name (the standard setting), her full first and last name, or a nickname. Users can configure their
display names by editing their profile settings (Users→My Profile).
FIGURE 11-14
By clicking an author’s
name (in this case,
lisachang), you can dig
up all the posts that the
author wrote.
WordPress uses special web addresses to make it easy to browse posts by author.
For example, if you click
lisachang,
WordPress adds
/author/lisachang
to the end
of the site address, like this:
http://therealestatediaries.com/author/lisachang
This is essentially the same way that category web addresses work (page 123).
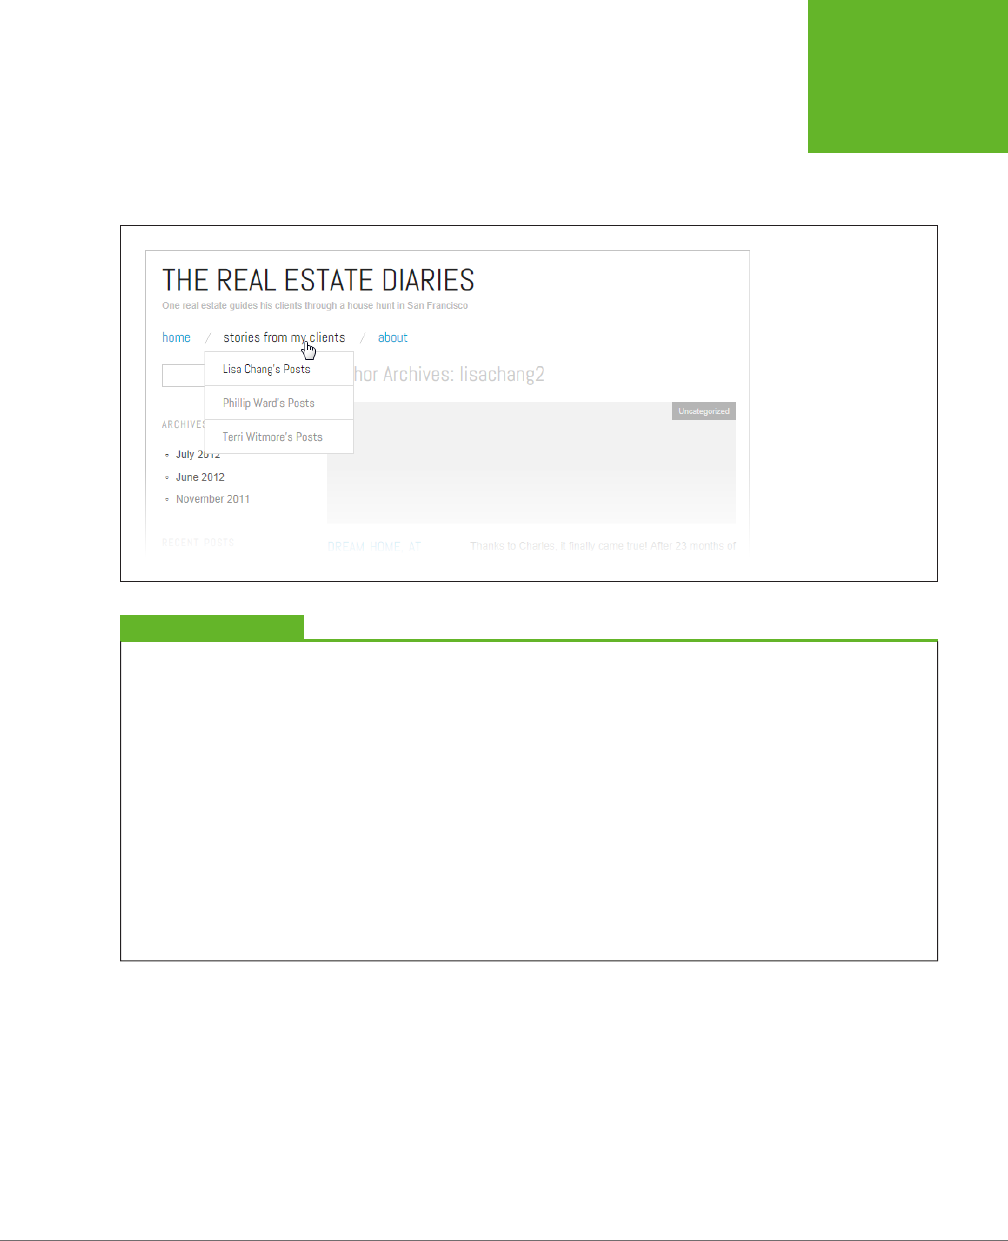
CHAPTER 11: COLLABORATING WITH MULTIPLE AUTHORS 389
WORKING
WITH AUTHORS
Now that you know how to get the posts for a specific author, you can make it easier
for visitors to get them as well. For example, you could create a menu that has a link
for each author, and then display that menu in the main navigation area of your site
(Figure 11-15), or in a sidebar, with the help of the Custom Menu widget (page 228).
FIGURE 11-15
This menu includes a link
to each author’s posts,
making it easy for readers
to browse content by
author.
PLUG-IN POWER
More Ways to Browse Authors
The custom menu approach gives you a great way to create
author post links. But if you’re building a self-hosted site,
you may want to check out one of the many author-browsing
plug-ins, which give you more display options and may save
a bit of effort.
The Authors Widget (
http://tinyurl.com/authorswidget
) is a
basic but effective example. It offers two display options. The
first is a list that’s not much different from what you get with
the Custom Menu widget, just slightly more convenient, and
it gives you the option to show the post count next to each
author’s name. The second display setting is an author
cloud
that works like the Tag Cloud widget (page 165), creating a
jumbled mass of author links, with the most prolific authors’
names the biggest.
The Author Avatars List plug-in (
http://tinyurl.com/authoravatars
)
is one of many author-browsing widgets that use avatars, the tiny
headshots that you can pair up with any email account (page 263).
As with the more pedestrian author list, you can click an author
headshot to start browsing the author’s posts.
Adding Author Information
Ordinarily, WordPress keeps author information to a minimum. Even though it stores
a few key details in each user’s profile—including a basic “Biographical info” box—
none of these details show up in a post. All your readers see is the author’s name.
In some cases, you might prefer to showcase your author. For example, you might
want to add a more detailed byline or include a brief bio that highlights the author’s
achievements. The low-tech solution is to add this information to the bottom of
the post (consider setting it in
italics
to make it stand apart from the rest of the
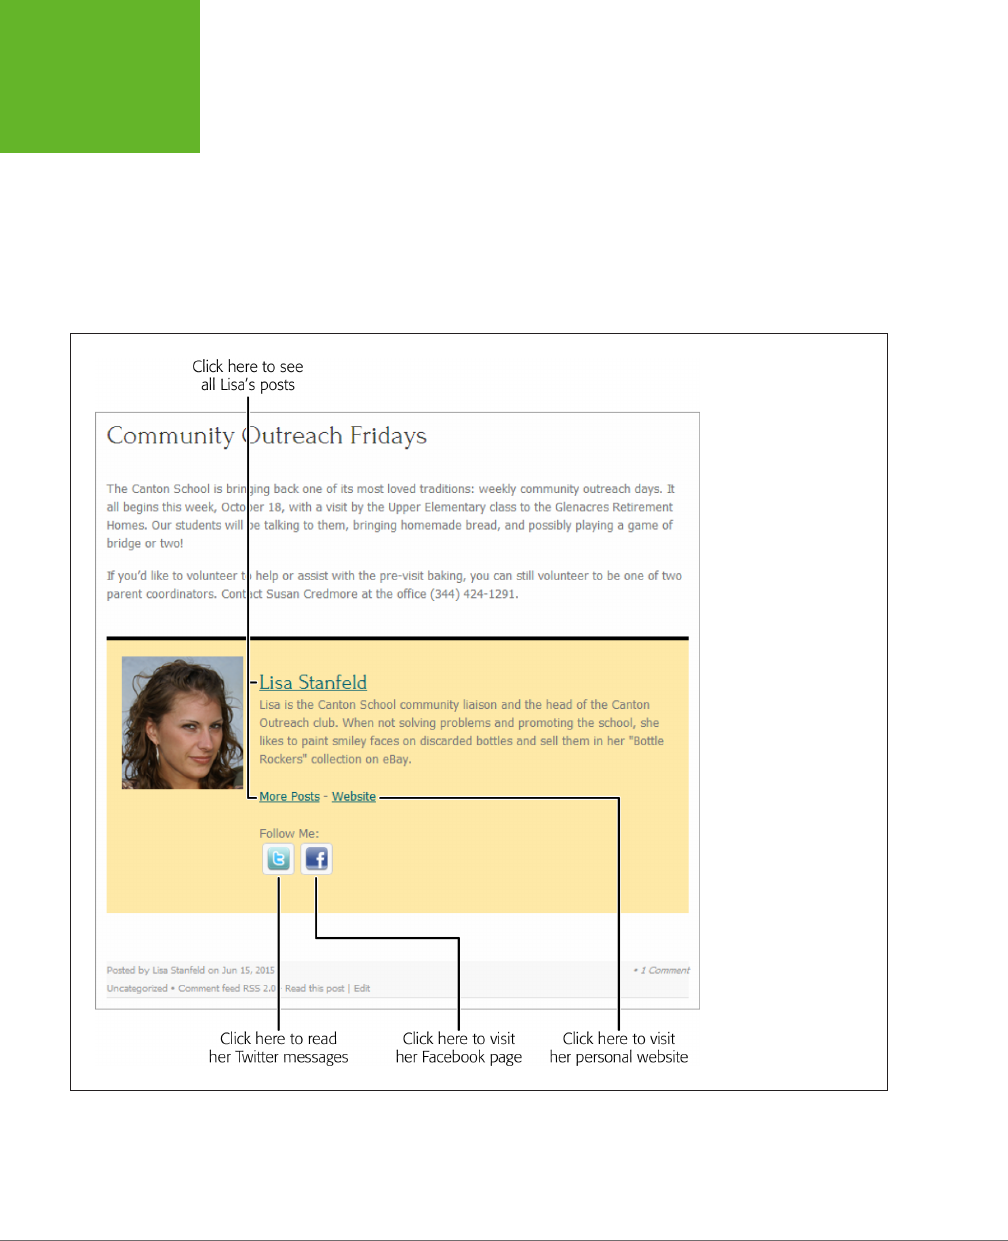
WORDPRESS: THE MISSING MANUAL
390
WORKING
WITH AUTHORS
content). But if you run a self-hosted site, this is one more challenge you can tackle
with the right plug-in.
The WordPress plug-in repository is overflowing with author info widgets and bio
boxes. One decent starting point is the WP About Author plug-in (
http://tinyurl.
com/wp-about-author
), which automatically adds an author box to the bottom of
every post. It also adds several new text boxes to every user’s profile, where authors
can enter links to sites where they have public pages (like Facebook, Twitter, and
Pinterest). The author’s bio will then include these links (Figure 11-16).
FIGURE 11-16
The WP About Author
plug-in creates an author
box that includes a bio
and picture (from the
Gravatar service described
on page 263). The box
also includes links to
other sites, if the author
supplies them. In this
example, Lisa Stanfeld
added her personal web-
site, Facebook page, and
Twitter feed to her profile,
so the WP About Author
plug-in creates links for
all three sites.
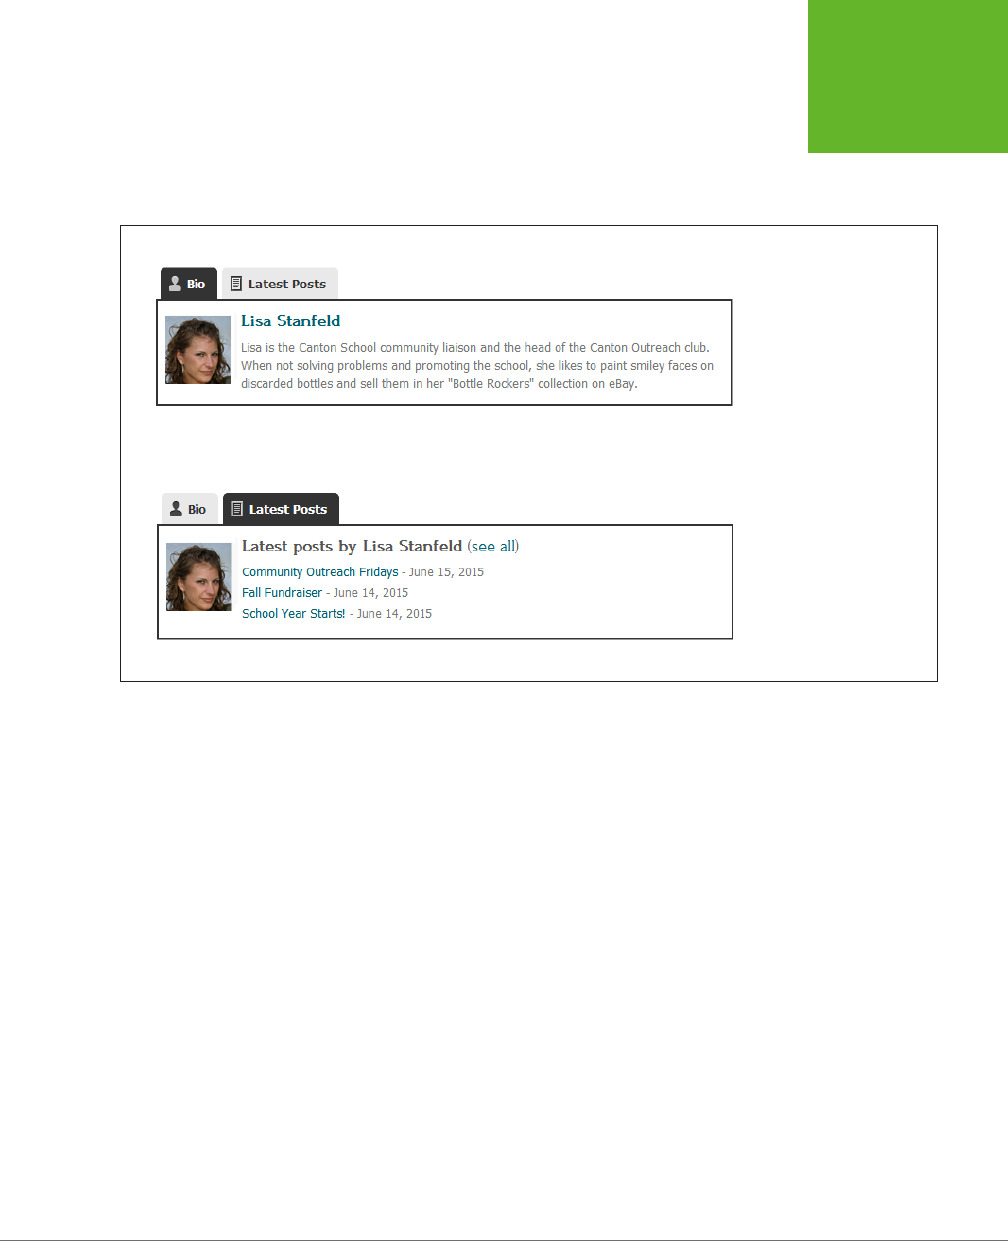
CHAPTER 11: COLLABORATING WITH MULTIPLE AUTHORS 391
WORKING
WITH AUTHORS
Another good author footer plug-in is the Fancier Author Box by ThematoSoup
(
http://tinyurl.com/authorbox
). It uses a slightly smaller version of the author picture,
fewer links, and a neato two-tab view that lets you see the author’s recent posts
without leaving the current page (Figure 11-17).
FIGURE 11-17
If you use the Fancier
Author Box plug-in, you
get two tabs of author
information at the bottom
of every post. The first
has the author’s bio (top),
while the second lists
the author’s most recent
posts (bottom).
Alternatively, you can use one of several plug-ins that puts author information into
a widget. That way, you can take the author details out of a post and tuck them into
a sidebar. One such plug-in is Author Spotlight (
http://tinyurl.com/authorspot
). Of
course, this idea works only if your theme includes a sidebar in its single-post view.
Most themes do, but the older Twenty Eleven theme limits its sidebar to the main
post list, so author box widgets aren’t much use.
Finally, some themes include a ready-made author information page that you can
drop into your site. Twenty Fourteen is an example—it includes a contributor page
that shows information for every author (Figure 11-18).
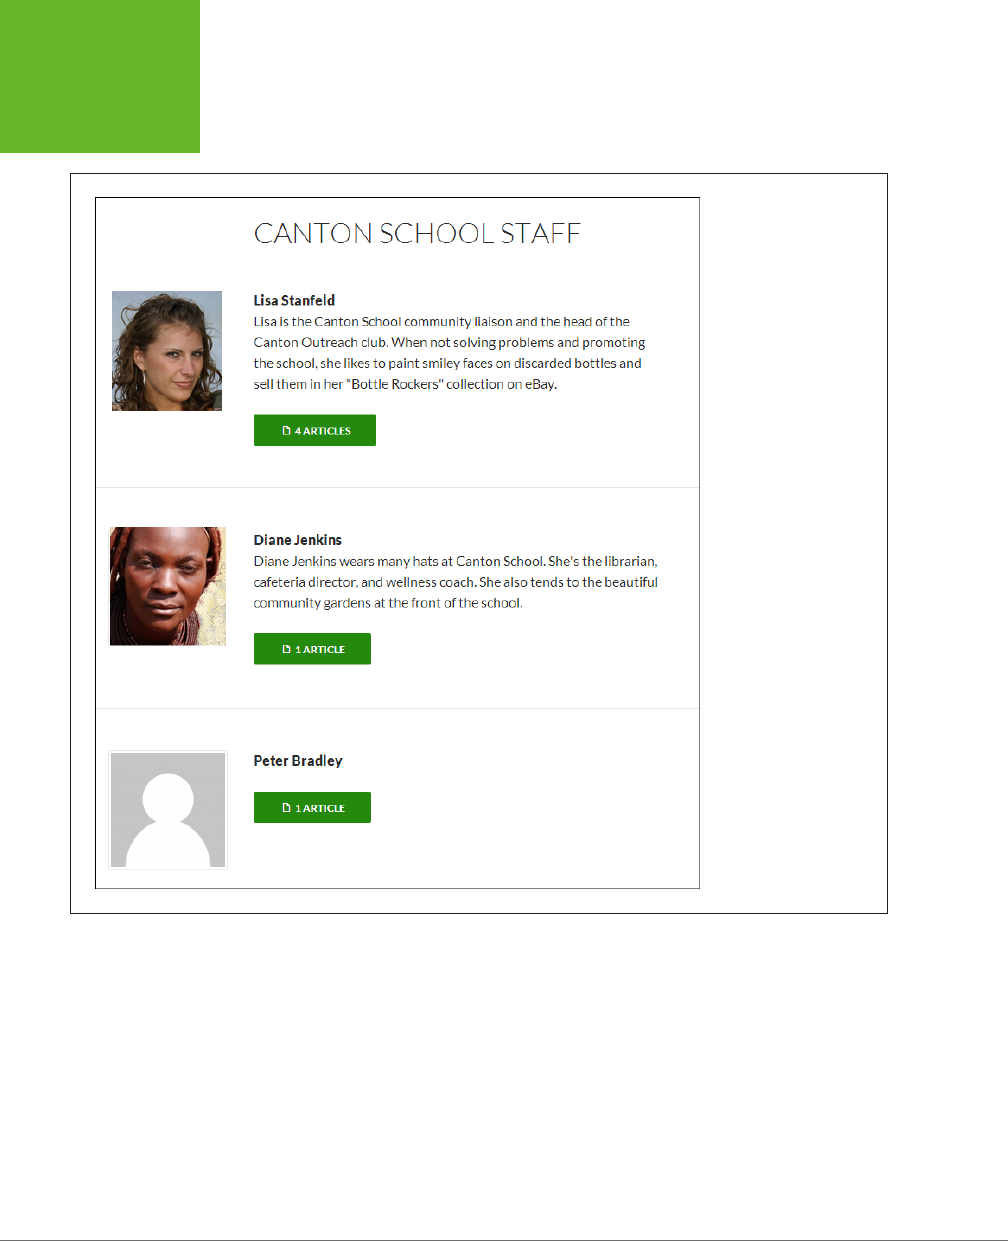
WORDPRESS: THE MISSING MANUAL
392
WORKING
WITH AUTHORS
FIGURE 11-18
As long as you have at
least one published post,
the Twenty Fourteen
theme adds you to
the contributor page,
complete with a brief
bio, a picture, and a post-
browsing button.
Here’s how to create a contributor page if your site uses Twenty Fourteen:
1. In the dashboard, choose Pages→Add New.
Type in a title for your contributor page. The example in Figure 11-18 uses the
title “Canton School Sta.”
Don’t bother typing in any page content, because none of it will appear in the
contributor page.
2. In the Page Attributes box, change the Template setting to Contributor Page.
WordPress infuses the Contributor Page template with the magic code you need.
It prepares a list of all your site’s authors and builds a page that describes them.

CHAPTER 11: COLLABORATING WITH MULTIPLE AUTHORS 393
WORKING
WITH AUTHORS
3. Optionally, alter the permalink for your page (page 119).
For example, you might want to use a short, meaningful address like
http://
cantonschool.org/sta
.
If you don’t see the permalink (and the Edit button) under the page title, click
in the empty content box underneath. That makes WordPress save a draft of
your page, which forces it to create the permalink.
4. Click Publish to add the contributor page to your site.
The contributor page uses a few key details for each author. If you run a self-
hosted site, it’s up to you (and your authors) to make sure this information is
available, or you’ll end up with a distinctly drab contributor page.
Here’s what each author needs:
• A proper display name. You specify that using the “Display name publicly
as” setting (page 374).
• A descriptive biography. You enter this in the Biographical Info box when
you edit a user’s profile (page 374). In Figure 11-18, Peter Bradley lacks a
biography.
• A Gravatar picture. If you want a cute head-and-shoulders shot to appear
next to your author details, you need the help of WordPress’s Gravatar
service, which attaches a personal picture to any email address. Page 263
explains how to set it up.
Removing Authors (and Other Users)
As your site evolves, the group of people you work with may change. You already
know how to
add
users, but at some point you may decide to
remove
one. To do
that, you first need to view your site’s user list by choosing Users→All Users.
If your site is on WordPress.com, the list includes all the administrators, editors,
authors, and contributors registered on your site (it doesn’t include followers). To
remove someone, point to the person’s user name and then click Remove. That
person’s WordPress.com account remains intact, but she no longer has privileges
on your site. If you remove a person who’s published posts on your site, the posts
will remain (although you can delete them by going to the Posts→All Posts list).
If you run a self-hosted site, the user list includes everyone who can publish on your
site. Unlike a WordPress.com site, you don’t merely remove authors, you
delete
them by clicking the Delete link. Deleting someone’s account is a fairly drastic step,
because it completely wipes the traces of that person o your site. WordPress will
ask you what to do with any posts that belong to the newly deleted author (Figure
11-19). You can either delete her posts or assign them to another person.
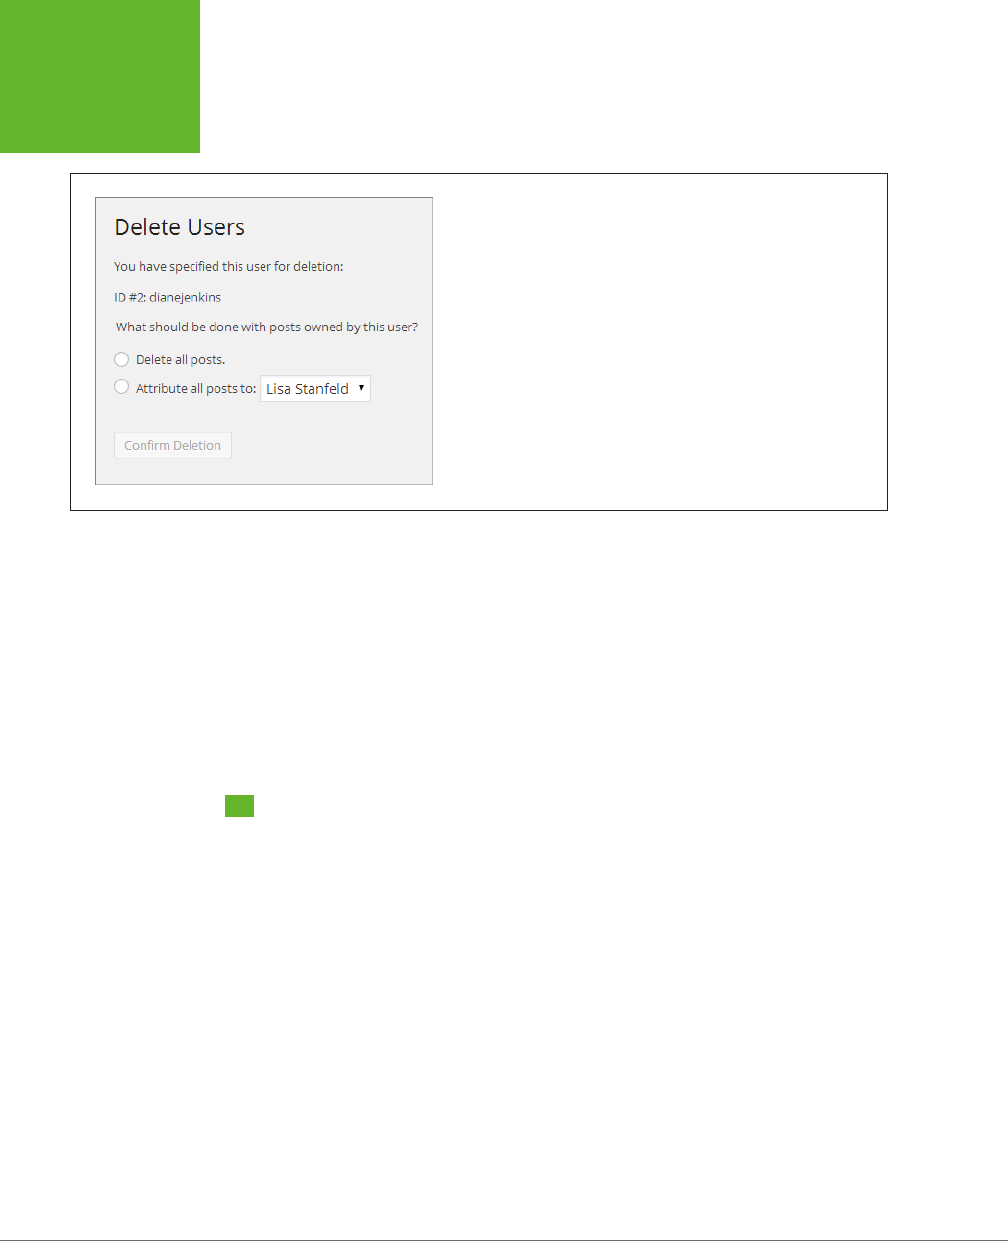
WORDPRESS: THE MISSING MANUAL
394
BUILDING
A PRIVATE
COMMUNITY
FIGURE 11-19
When you delete an author from a self-hosted site, WordPress asks you
what to do with her posts. (If you have a last-minute change of heart,
click somewhere else in the dashboard, and WordPress abandons the
delete operation.)
If you don’t want to take such a drastic step, you can
demote
a user, so that he remains
on your site but has fewer privileges. For example, you could change a contributor
to an ordinary subscriber. That way, his existing posts will remain on your site, but
he won’t be able to create any new ones. And if, sometime in the future, you decide
to reenlist this person’s help, you can simply change his status from subscriber back
to contributor.
To change a role, find the person in the user list and click Edit. Then pick a new role
from the Role list and click Update User.
Building a Private Community
So far, you’ve used WordPress’s user registration features to open up your site to new
contributors. Ironically, those same features are also an eective way to close the
door to strangers. For example, you can prevent unregistered guests from reading
certain posts, or even stop them from seeing any content at all.
Before you build a private site, however, make sure you have enough interested
members. Transforming an ordinary site into a members-only hideout is a sure way
to scare o 99.9 percent of your visitors. However, a private site makes sense if you
already have a locked-in group of members. Your site might be the online home
for a group of related people in the real world—for example, a team of researchers
planning a new product, or a local self-help group for cancer survivors. But if you
hope that people will stumble across your site and ask to sign up, you’re in for some
long and lonely nights.
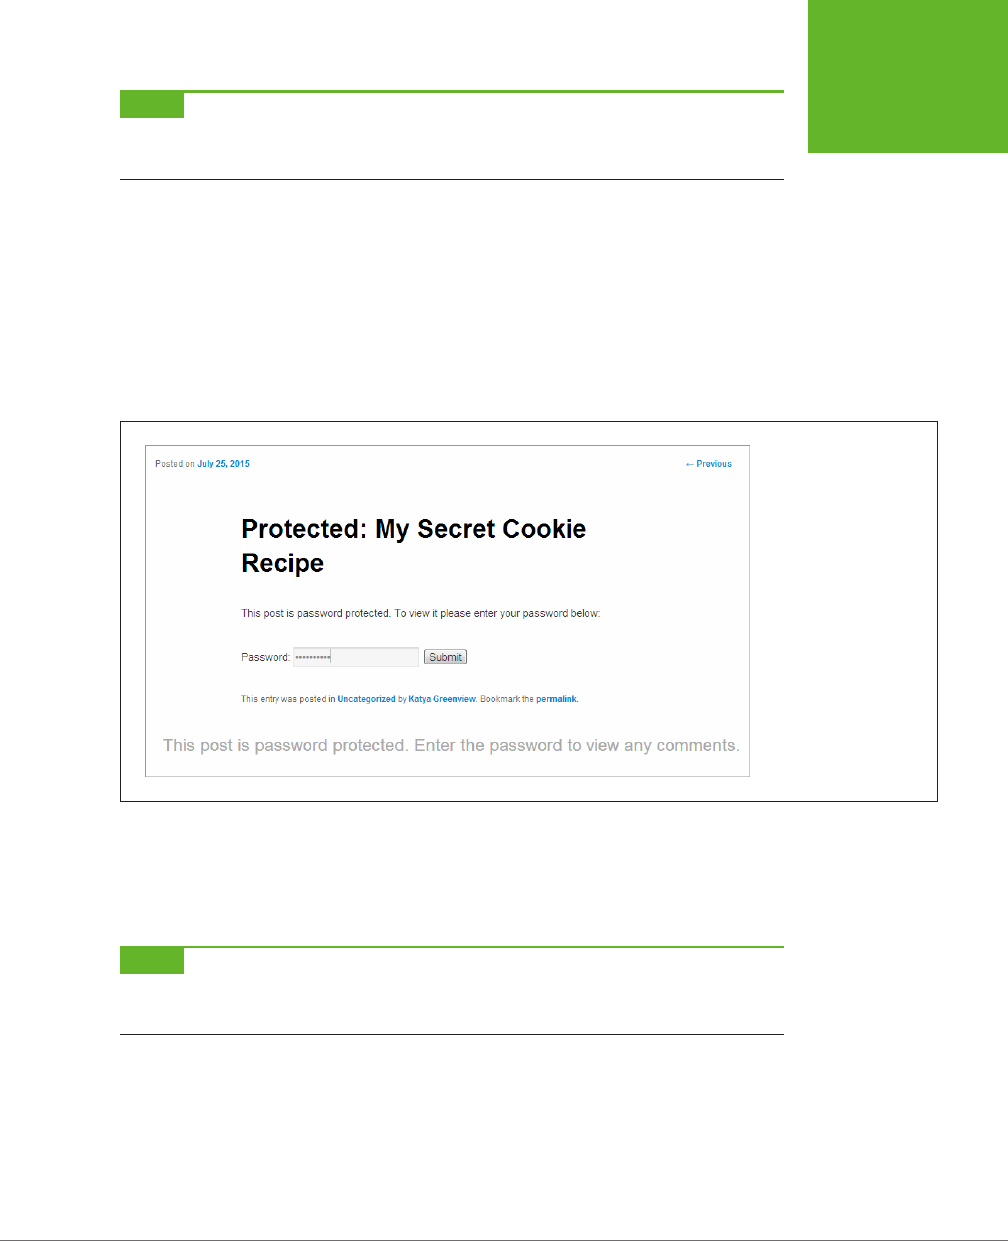
CHAPTER 11: COLLABORATING WITH MULTIPLE AUTHORS 395
BUILDING
A PRIVATE
COMMUNITY
NOTE The goals of a private site are very different from the goals of the average public site. A public site
aims to attract new faces, gain buzz, and grow ever more popular. A private site is less ambitious—it allows certain
types of discussions or collaboration in a quiet space.
Hiding and Locking Posts
You don’t need to make your site entirely private; WordPress gives you two ways
to protect individual posts, so the wrong people can’t read them.
The first technique is
password protection.
The idea is simple—when you create
a post, you pick a password that potential readers need to know. When someone
tries to read the post, WordPress refuses to display it until the reader supplies the
right password (Figure 11-20).
FIGURE 11-20
WordPress adds the text
“Protected” to the title of
every password-protected
post. To read the post,
you need to type in the
correct password.
The nice part about password protection is that it’s straightforward: You either know
the password or you don’t, and the password is all you need—protected posts don’t
require that a reader be registered with the site. Of course, administrators and edi-
tors can edit any post, so password protection doesn’t aect them.
NOTE Use password-protected posts sparingly. If your site includes a mix of public and password-protected
posts, frustrated readers are likely to give up on you altogether. Password-protected posts make sense if your
site isn’t really on the Web, but hosted on an organization’s internal network (a.k.a. an intranet).
WordPress’s second post-protection technique is
private posts,
which are hidden
from everyone except logged-in administrators and editors. When other people visit
the site, WordPress scrubs every trace of your private posts. They won’t appear in
the post list, show up in searches, or appear when you browse by category, tag,
date, or author.

WORDPRESS: THE MISSING MANUAL
396
BUILDING
A PRIVATE
COMMUNITY
To see your options, click the Edit link next to a post’s Visibility setting (see Figure 11-21).
FIGURE 11-21
You can choose from three Visibility options for
posts: Public (the standard), Password protected
(the post’s title is visible to everyone, but only
people with the right password can read the
content), or Private (the title, post, and comments
are hidden from everyone except editors and
administrators). Once you choose, click OK.
You can also add a password to a private post or make it private using the familiar
Publish box, which appears in the Add New Post and the Edit Post pages.
PLUG-IN POWER
Creating More Specific Privacy Rules
The problem with private posts is that they’re
too
private.
You need to be an editor or administrator to view them, and
that may be more power than you want to give other people.
If you’re developing a self-hosted site, a good plug-in can
provide a solution. One is Page Security by Contexture (
http://
tinyurl.com/page-security-c
). It lets you create groups of users
and then give them permission to read specific posts or pages.
For example, you could create a group called Managers, add
several people to that group, and then give the entire group
permission to read your “Tax Evasion Secrets” post.
Be careful about going too far with the Page Security plug-
in, however. If you need to set security rules for dozens of
pages, WordPress might not be the right tool for the job—you
might be better off with a content management system like
SharePoint or Alfresco. And although Page Security does a
good job of grafting on some basic security features, things
can get messy, and there’s no guarantee that the complex
security rules you set up now will continue to work in future
versions of WordPress.
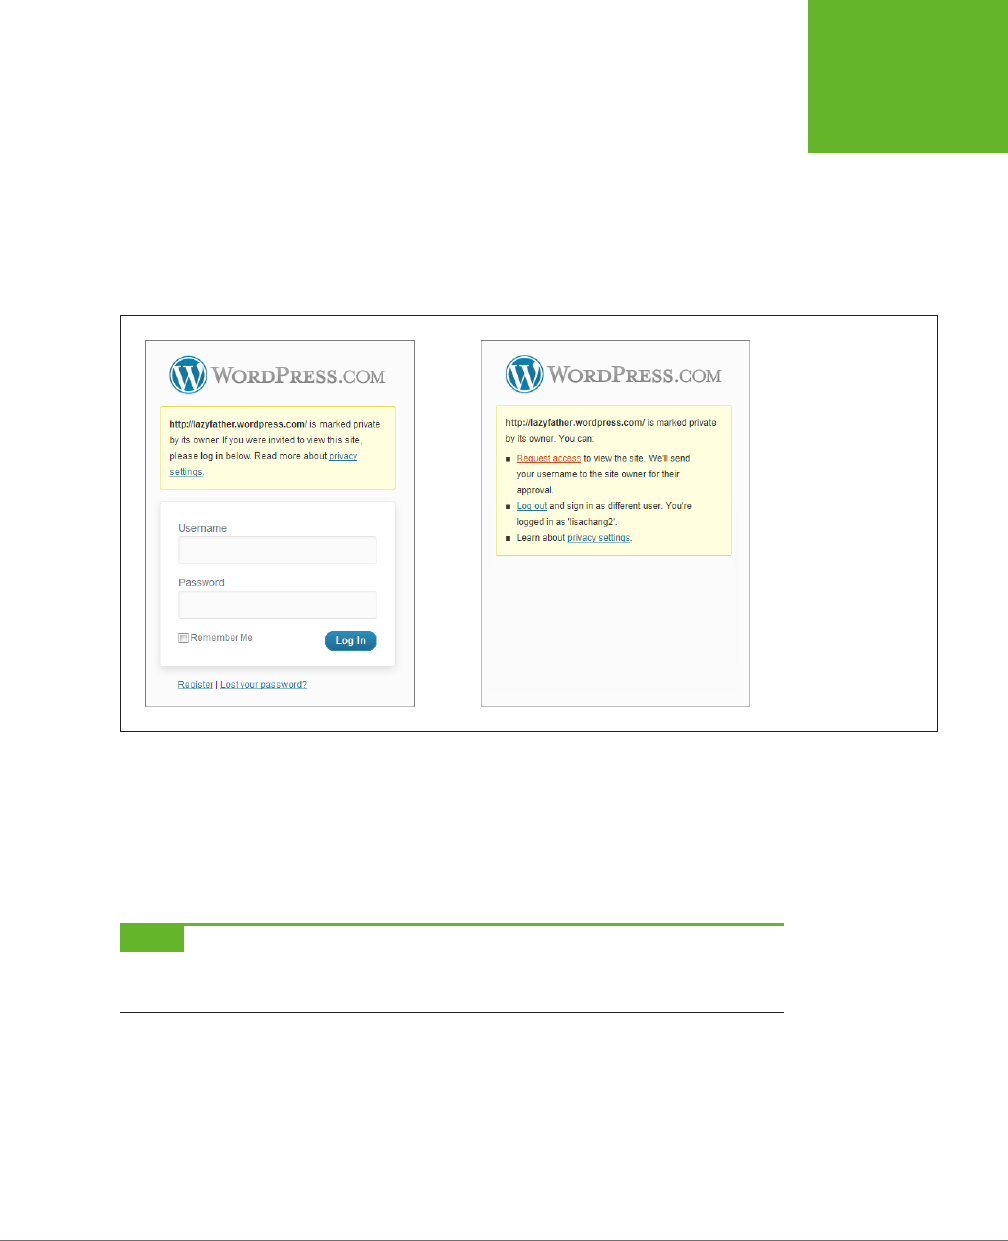
CHAPTER 11: COLLABORATING WITH MULTIPLE AUTHORS 397
BUILDING
A PRIVATE
COMMUNITY
Creating a Private Site
A completely private site is one that forces visitors to log in to view
anything.
If they
don’t sign in, they can’t read a single post or page.
You can turn a WordPress.com site into a private site by flipping a single setting.
Choose Settings→Privacy, turn on the “I would like my site to be private, visible
only to users I choose” checkbox, and then click Save Changes. Now visitors will
encounter the WordPress login page, no matter what they try to read (Figure 11-22).
FIGURE 11-22
Left: WordPress asks
visitors who try to view a
private site to log in.
Right: This is what a
visitor sees if he’s logged
in to WordPress.com, but
not registered on your
private site. Clicking “Re-
quest access” sends an
email to the site owner,
who decides whether or
not to add the hopeful
new guest.
Oddly enough, self-hosted sites lack the private site feature that WordPress.com
oers. However, several simple plug-ins can fill the gap. One is Page Restrict (
http://
tinyurl.com/page-restrict
), which lets you prevent people from accessing specific
pages—or your entire site—until they log in. Page Restrict also lets you pick a suit-
able message that explains the issue to anonymous visitors, such as “This content
is private. To view it, you must log in.”
NOTE You’ve reached the end of the line for WordPress.com sites in this chapter. The following sections
cover a few more plug-ins and features that self-hosters can use. So if you run a WordPress.com site, you may as
well skip ahead to the next chapter).
Letting People Register Themselves on a Self-Hosted Site
If WordPress hosts your site, WordPress.com is in charge of registering your users.
But if you run a self-hosted site, you’re in control, and that gives you a unique ability.
If you’re feeling a bit daring, you can open the floodgates to your site and let your
readers register themselves.

WORDPRESS: THE MISSING MANUAL
398
BUILDING
A PRIVATE
COMMUNITY
This strategy might seem a bit dangerous—and if you don’t think it through, it is.
Giving random web visitors extra powers on your site is an extreme step for even the
most trusting person. However, there are several scenarios where self-registration
makes a lot of sense. Here are the most common:
• You’re creating a private blog and you want to prohibit anonymous contributors,
but you don’t want to make your restrictions onerous—you simply want to deter
spammers and other rira. Often, the process of signing up is enough to keep
out these troublemakers. And if you let readers sign themselves up, you save
yourself the task of doing so, and save visitors the need to wait for your approval.
• You’re creating a site that welcomes community contributors. You’re ready
to let anyone sign up as a contributor, but you want to approve their content
before it gets published (page 379). Be aware, however, that this is no small
task—reviewing other people’s content and sning out spam makes comment
moderation seem like a day at the spa.
• You’ve restricted comments to people who have registered and logged in to the
site (page 272), but you’re willing to let people comment if they go through the
trouble of creating an account. Sometimes, site owners take this step to lock out
spammers, and typically it works well, although it also drives away legitimate
commenters who can’t be bothered signing up. In most cases, it’s better to
allow Facebook and Twitter authentication (page 270), and to use Akismet to
fight spam (page 275).
• Your WordPress site isn’t really on the Web; it’s on the internal network of a
business or organization. Thus, you can assume that the people who reach your
site are relatively trustworthy. (Of course, you still shouldn’t grant them any privi-
leges more powerful than a contributor account without your personal review.)
Flipping on the self-registration feature takes just a few seconds. In the dashboard,
choose Settings→General. Add a checkmark next to “Anyone can register,” choose
a role in the New User Default Role box below, and then click Save Changes.
WARNING You should set the role for new users to subscriber or contributor—subscriber to welcome new
readers to a private blog, and contributor to let potential authors sign themselves up. Never allow new people
to sign themselves up as authors or editors, unless you want spammers to paste their ads all over your site.
When you turn on self-registration, WordPress adds an extra link to the login page
(Figure 11-23).
If you allow self-registration on a public website, you’ll eventually have spammers
creating accounts. Usually, the oender is an automated computer program called
a
spambot.
It searches the Web for WordPress sites and attempts to sign up on
every one it finds, in the hope that the site will grant the spambot author or editor
permissions. If a site is unwise enough to do so, the spambot immediately gets to
work spewing spam into new posts. As long as you limit new users to the role of
contributor or (powerless) subscriber, the spambot won’t be able to do anything.
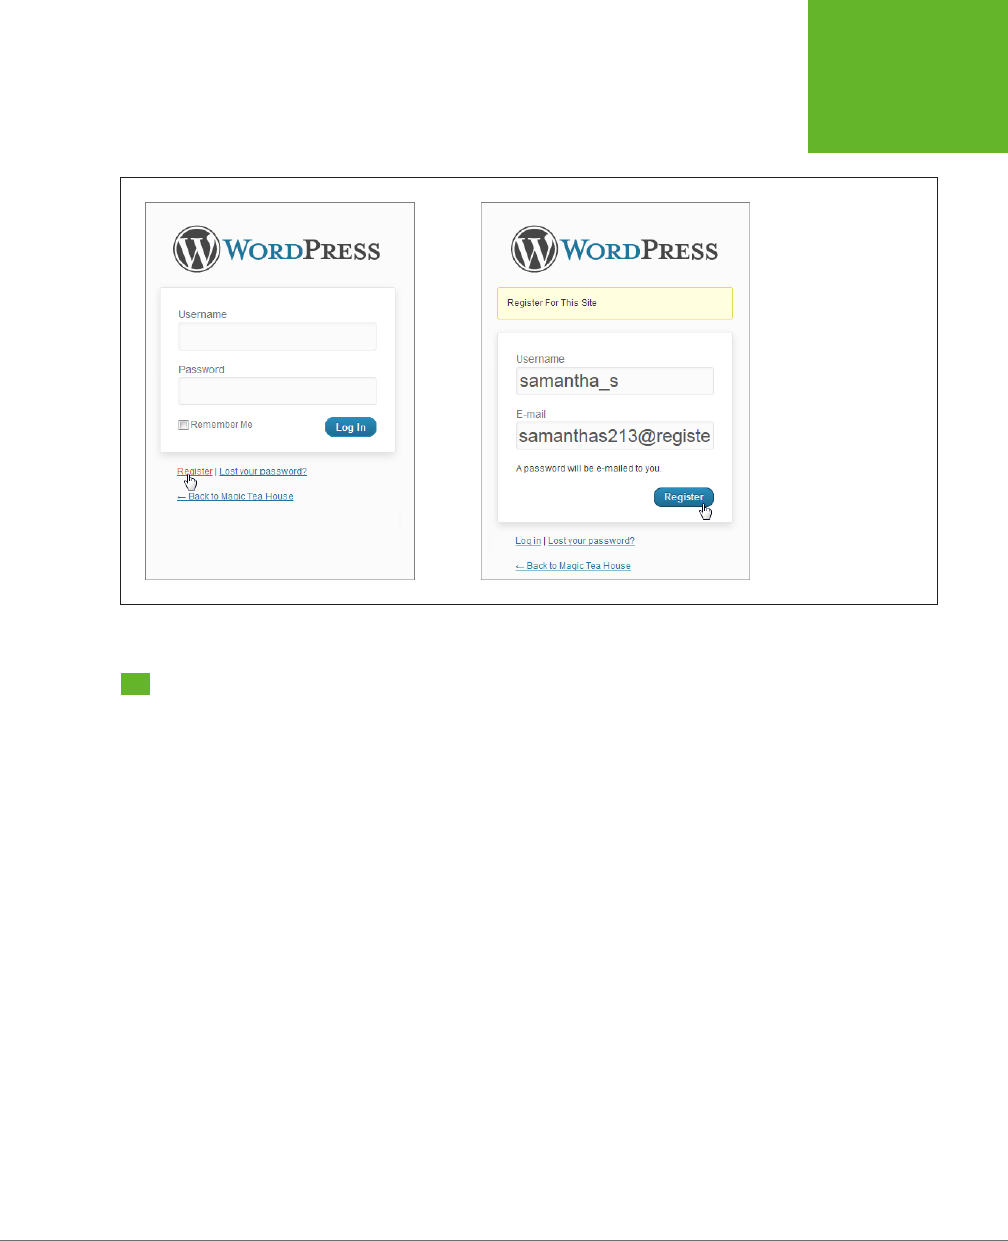
CHAPTER 11: COLLABORATING WITH MULTIPLE AUTHORS 399
CREATING A
NETWORK OF
SITES
(To make sure your site is clean, periodically review your user list and delete bad
accounts.)
FIGURE 11-23
This blog lets people
register themselves. They
simply click the Register
link (left), enter an email
address and password
(right), and then wait for
an activation link to arrive
by email.
Creating a Network of Sites
So far, you’ve learned how to transform your site from a lonely one-man-band to a
collaborative workspace full of authors, editors, and contributors. This transforma-
tion keeps you in control of your site but allows new recruits so you can expand your
content, extend your reach, and attract new visitors.
Now you’ll take a step in a dierent direction. Instead of looking at adding multiple
people to a crowded site, you’ll see how to create multiple WordPress
sites
that coex-
ist on the same web server. Think of it as a way to empower your users to do even
more. Now, each author gets a separate site, complete with its own web address,
dashboard, theme, and reverse-chronological list of posts. Your web server hosts
all these sites alongside your own, much like children living in their parent’s home.
For example, say you create a WordPress multisite network at
http://EvilCompany
OfDoom.com
. An employee named Gareth Keenan might create a site at
http://
EvilCompanyOfDoom.com/garethkeenan
. Similarly, another employee might add
a site at
http://EvilCompanyOfDoom.com/dawntinsley
. Of course, you don’t need
to create sites based on individual people—you can just as easily create sites that
represent departments, teams, clubs, or any other group of people who need to
blog together.

WORDPRESS: THE MISSING MANUAL
400
CREATING A
NETWORK OF
SITES
NOTE The multisite feature works well if you have a community of people who need to work independently,
keep their content separate from everyone else’s, and have complete control over the way their content is organized
and presented. For example, the Canton School site might use the multisite feature to give each teacher her own
site. Teachers could then use their sites to post assignments and answer student questions. The multisite feature
isn’t very useful if you want people to team up on the same project, share ideas, or blog together—in all these
cases, a single site with multiple users makes more sense.
The multisite feature is particularly convenient when it comes to administration.
When you build a network of sites, you become its
network administrator
—a special
sort of administrator with sweeping powers over all the sites in the network. Using
these powers, you can choose what themes your users can install and what plug-
ins they use. And when a new version of WordPress comes out, you can update all
the sites in a single step.
UP TO SPEED
Multisites in Action
To really understand the multisite feature, it helps to check out
some websites that already use it. Here are some examples:
• Reuters Blogs (
http://blogs.reuters.com
). The multisite
feature is a great way to handle columnists in a news
site. On Reuters, each columnist gets a separate blog that
uses the same distinctive theme. But because each site is
separate, columnists can create their own categories and
tags, and moderate their own comments.
• Harvard Law School (
http://blogs.law.harvard.edu
).
Harvard Law offers a free WordPress site to anyone in
the Harvard University community. They can even sign
themselves up and create a site immediately, as long as
they have an email address that ends with
harvard.edu
.
• Adobe Blogs (
http://blogs.adobe.com
). Here, different
teams of Adobe employees blog about their projects. This
example is particularly interesting because it combines
the multisite
and
multiuser features. For example, if
you check out just one site, the Adobe Digital Media
Blog (
http://blogs.adobe.com/digitalmedia
), you find a
number of Adobe experts weighing in.
• Best Buy Stores (
http://stores.bestbuy.com
). The
omnipresent electronics store isn’t known for website
innovation, but it makes good use of WordPress, giving
each store its own WordPress site. For example, visit
http://stores.bestbuy.com/577
to see the latest news for
the Best Buy in Fairless Hills, Pennsylvania.
• WordPress.com. The largest and most impressive example
of a WordPress multisite network is WordPress.com, the
free blogging hub for several hundred thousand people.
If the multisite feature works for a network this popular
and this big, it’s a safe bet that it will serve the needs of
your community, too.
Before going any further, be aware of one thing: Building a network of sites is sig-
nificantly more complex than adding people to an existing one. Expect to spend
more time feeling your way around and relearning how to configure sites and users.
Furthermore, be careful with the plug-ins you use, because some won’t work in a
multisite network.
By the end of this chapter, you’ll know how to set up a network of sites, add sites,
and perform the basic configuration that holds it all together. However, there are
significant aspects of the multisite feature that are outside the scope of this book,
like using it with subdomains (see the following Note).
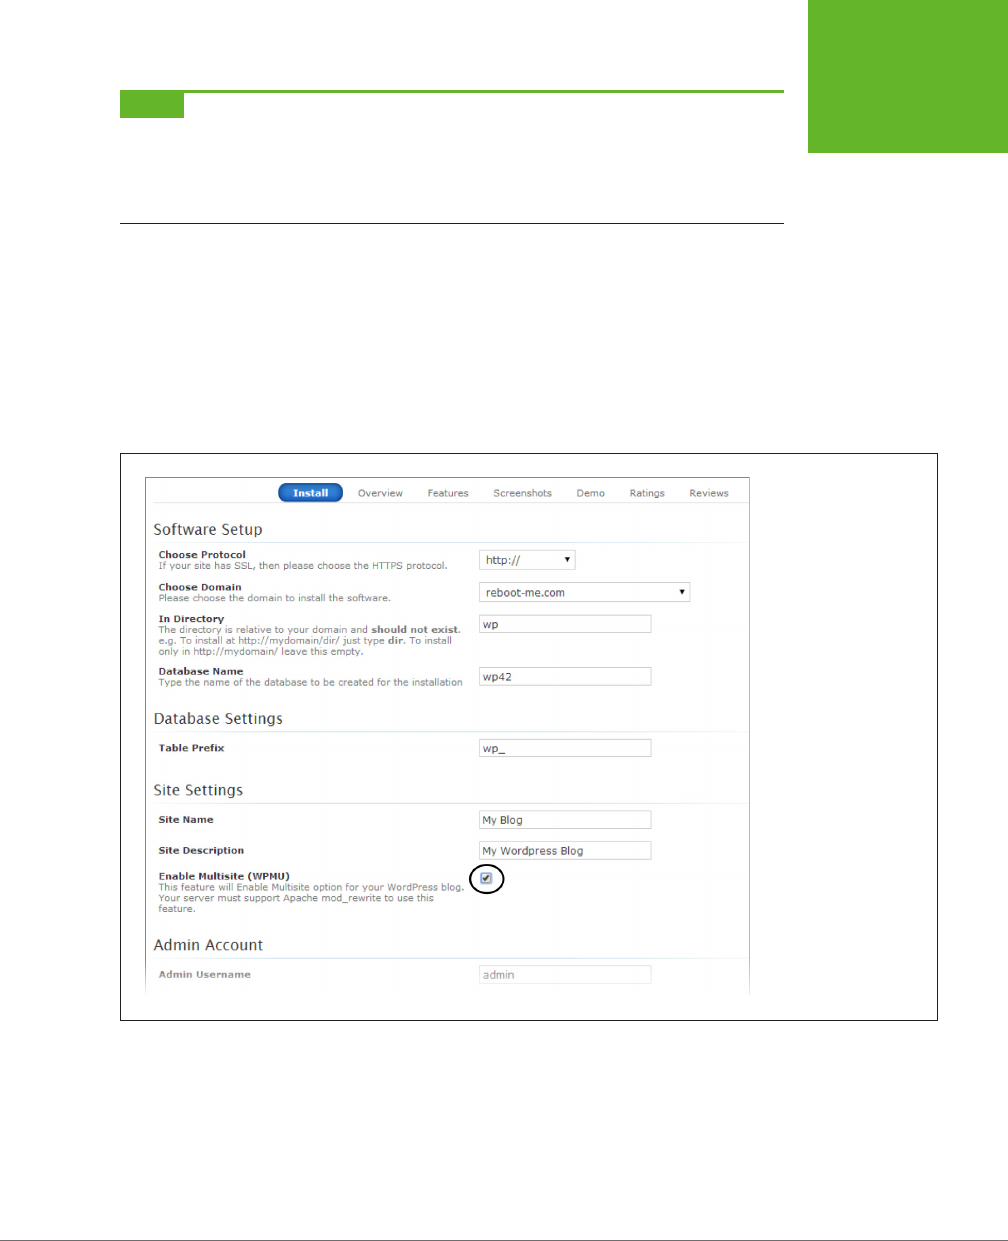
CHAPTER 11: COLLABORATING WITH MULTIPLE AUTHORS 401
CREATING A
NETWORK OF
SITES
NOTE There are two ways to create addresses for the sites in a network. You can give each site its own
subfolder (as in
http://OrilliaBaseballTeams.com/madcats
), or you can give each site its own subdomain (as in
http://madcats.OrilliaBaseballTeams.com
). The latter is the way WordPress.com works. It’s slightly more compli-
cated, because it requires some additional settings on your web host. In this chapter, you’ll stick to the subfolder
approach.
Creating a New Multisite Network from Scratch
The easiest way to create a multisite network is to create a new WordPress site from
scratch, using an autoinstaller that supports the multisite feature. For example, if you
use Softaculous, the installation process is almost exactly the same as the one you
used in Chapter 3 (page 55). The dierence is that somewhere in your autoinstaller,
you need to find a setting named something like “Enable Multisite” and switch it
on (Figure 11-24).
FIGURE 11-24
To tell Softaculous to cre-
ate a multisite network,
turn on the corresponding
checkbox (circled). In this
example, you’re creating
the network in the root
folder of the reboot-me.
com domain.
Once you install your site, you can go straight to the dashboard and look around. Skip
ahead to the section “Your Multisite Network: A First Look” on the following page.
If you don’t have an autoinstaller that supports the multisite feature, you’ll need to
install a normal WordPress site first and then go through the somewhat awkward
conversion process outlined in the next section.

WORDPRESS: THE MISSING MANUAL
402
CREATING A
NETWORK OF
SITES
Converting an Existing Site to a Multisite Network
Converting an existing WordPress site into a multisite network is trickier than creating
a new network from scratch. If you use subfolders (rather than subdomains) in your
network, the conversion process will break any links within posts (see the Note near
the bottom of this page to learn why). For that reason, it’s best to convert a newly
created WordPress site, rather than one you’ve been using (and that other people
have been reading) for some time.
But if you know how to use an FTP program and you’re undaunted by the challenge,
it
is
possible to transition from an ordinary site to a multisite network. WordPress has
the full and rather technical step-by-step instructions at
http://tinyurl.com/2835suo.
The process involves modifying two files in your site—
wp-config.php
and
.htac-
cess
—and changing a few related settings in the dashboard. But because you can’t
directly edit the files on your site, you need to download them to your computer
(that’s where the FTP program comes in), make your changes in a text editor, and
then upload the new, modified files. If you’ve never fiddled with a WordPress instal-
lation before, it’s a bit tedious.
WARNING Make sure you really want a multisite network before you forge ahead, because there’s no
easy way to change a multisite network back to a single site after you make the jump.
Your Multisite Network: A First Look
When you create a multisite network, WordPress starts you out with a single home
site in the root of the installation folder. For example, if you install a multisite network
at
http://prosetech.com
, the first site is at
http://prosetech.com
. This is exactly the
same as when you create a standalone site. When you create
additional
sites, how-
ever, WordPress places them in subfolders. So if you add a site named teamseven,
WordPress creates it at
http://prosetech.com/teamseven
. (You might think that it
makes more sense to write TeamSeven rather than teamseven, but to WordPress
it’s all the same. No matter what capitalization you use, WordPress shows the site
name in lowercase letters when you manage it in the dashboard.)
NOTE If you’re using subfolders (not subdomains) to arrange your multisite network, you’ll find one quirk
in WordPress’s naming system. When you view a post or page on your home site, WordPress adds
/blog
to the
address. For example, WordPress puts a post that would ordinarily be found at
http://prosetech.com/2014/06/
peanut-butter-prices-spike
at
http://prosetech.com/blog/2014/06/peanut-butter-prices-spike
. This slightly
awkward system makes sure that WordPress can’t confuse your home site blog with another site in the network,
because it doesn’t allow any other site to use the name
blog.
When you finish creating your multisite network, you find yourself at the dashboard
of your home site. But if you attempt to augment your site’s features, you’ll find a new
restriction. Even though you can activate an existing plug-in or theme, WordPress
won’t let you install new ones. On a fresh WordPress install, you’ll probably get just
a single theme (Twenty Fourteen) and two basic plug-ins (the essential Akismet
spam-catcher, and the pointless Hello Dolly example).
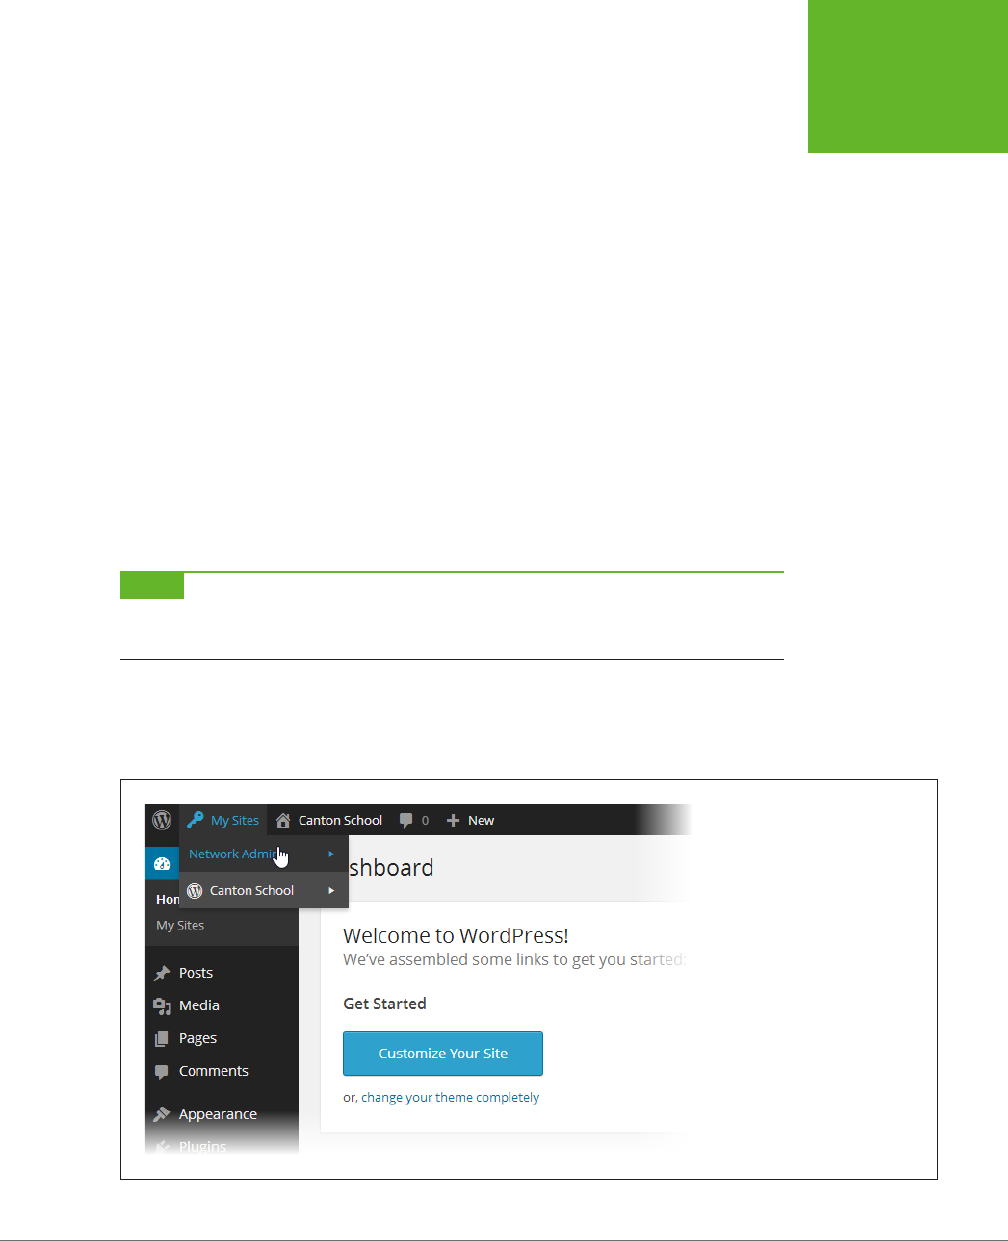
CHAPTER 11: COLLABORATING WITH MULTIPLE AUTHORS 403
CREATING A
NETWORK OF
SITES
If you haven’t already guessed, your home site has these new and slightly unwel-
come limitations because it’s now part of your multisite network. These rules can
be frustrating, but they have sound logic behind them. First, the theme limitations
guarantee that your sites share a consistent look. Second, the theme and plug-in
restrictions act as safeguards that prevent inexperienced users from uploading
spam-filled extensions, which could compromise your entire network.
That said, you’ll probably want to tweak these restrictions to make them better suit
your site. For example, you may want the sites on your network to use a dierent
standard theme, or you may want to allow site creators to choose from a small group
of approved themes. You might also have trusted plug-ins that you want to run on
everyone’s site. You’ll learn how to make these changes shortly. But first, you need
to understand how to add new sites to your network.
Adding a Site to Your Network
To add a site, you need to enter network administration mode. This is a step that only
you, the network administrator, can take. Other administrators on your network will
be able to manage their own sites, but they won’t be able to change the network
settings—or even look at them.
NOTE In WordPress parlance, a
network administrator
(also known as a
super admin
) is the person who
manages a multisite network and has full power over all the sites inside. A
site administrator
oversees a single
site—the site you create for him.
To start managing the network, point to the My Sites menu, which sits to the right
of the navigation bar (that’s the black bar that stretches across the top of the page).
Then click Network Admin (Figure 11-25).
FIGURE 11-25
The My Sites drop-down menu lists
all the sites you own in a network
and, most importantly, the Network
Admin command that lets you enter
network administrator mode.

WORDPRESS: THE MISSING MANUAL
404
CREATING A
NETWORK OF
SITES
In network administration mode, the dashboard changes. Because you’re no longer
managing a specific site, the Posts, Pages, Comments, Links, and Media menus all
disappear. In their place is a smaller set of commands for managing sites, users,
themes, plug-ins, network settings, and updates.
TIP You can go straight to the network administration page by adding
/wp-admin/network
to the end of
your home site address, as in
http://prosetech.com/wp-admin/network
.
Once in network administration mode, you can create a new site:
1. Choose Sites→Add New from the dashboard.
The Add New Site page opens (Figure 11-26).
FIGURE 11-26
WordPress knows that a
network administrator may
need to create dozens of sites.
To keep your life simple, it asks
for just three pieces of informa-
tion: the site address, the site
title, and the email address of
the person who will become
the site’s administrator. Here,
WordPress will create the new
site at
http://prosetech.com/
teamseven
.
2. Type the site’s folder name in the Site Address box.
WordPress adds the folder name to the address of your multisite network. For
example, if you use the folder name drjanespears and your multisite network is
at
http://StMarciMarguerettaDoctors.org
, the new site has the address
http://
StMarciMarguerettaDoctors.org/drjanespears
.
3. Give the site a title.
The site administrator can change this later.
4. Supply the email address of the person who will own the site.
That person will become the site’s administrator.

CHAPTER 11: COLLABORATING WITH MULTIPLE AUTHORS 405
CREATING A
NETWORK OF
SITES
Adding people to a multiuser network is dierent from adding people to a
standalone site in one important respect: You don’t need to pick the password
for new users. WordPress knows you’re busy, and it generates a random pass-
word and emails it to the new administrator.
5. Click Add Site.
WordPress creates the site and adds two links to the top of the Add New Site
page: Visit Dashboard (which takes you to the new site’s dashboard) and Edit
Site (which lets you change the site’s settings). The dashboard is in its familiar
place—just add
/wp-admin
to the end of the site address to go straight to its
front door.
Ideally, you won’t need to visit the new site’s dashboard, because the newly
christened administrator will take it from there.
TIP If, sometime later, you need to delete a site, modify it, or assign it to a new administrator, start at the
list of sites in the Sites→Add Sites section of the network administration dashboard.
GEM IN THE ROUGH
Letting People Create Their Own Sites
Ordinarily, it’s up to you to create every site in a multisite
network. WordPress helps you out by automatically creating
an account for the new administrator, so you can create a site
in one step instead of two. But if you have dozens or even
hundreds of users who want sites, manually creating each
one is tedious. WordPress gives you another option—you can
choose to let people create their own sites.
This isn’t quite as crazy as it sounds. As long as you don’t
let people create their own accounts, WordPress allows only
registered users to start site-building. If you’re crafty, you can
use a WordPress plug-in like Add Multiple Users (
http://tinyurl.
com/add-multiple
) to create accounts automatically, based on
a list of email addresses in a text file or spreadsheet. Then you
can let people build the sites they need on their own. (There’s
no restriction on the number of sites, so if someone can create
one, she can also create 12. If you notice a power-drunk author
creating too many sites, you need to step in, delete some, and
send the miscreant a stern email.)
To allow people to create their own sites, choose Settings→
Network Settings in the network administration dashboard.
Then, next to “Allow new registrations,” choose “Logged in
users may register new sites.” Make sure “Send the network
admin an email notification every time someone registers a
site or user account” is also turned on so WordPress notifies
you about newly created sites. Finally, click Save Changes at
the bottom of the page.
New users might not realize that they’re allowed to create sites.
WordPress won’t tell them unless they ask for the sign-up page,
by requesting
wp-signup.php
in the root site (as in
http://
prosetech.com/wp-signup.php
). Figure 11-27 shows the page.
Understanding How Users Work in a Multisite Network
You can create as many sites as you want in a multisite network. In each site, you
can add as many users as you need.
Sometimes, the same person needs to work on more than one site. For example,
one person might need to contribute to dierent blogs maintained by dierent

WORDPRESS: THE MISSING MANUAL
406
CREATING A
NETWORK OF
SITES
people. Or an administrator who manages one site in a network might also want to
contribute to another.
To understand how to deal with this, you need to realize that a multisite network
maintains a master list of all the users who belong to
any
site in the network. Each of
those people has subscriber privileges on every site. (As you learned on page 370,
subscribers are the lowest class of WordPress user—they can’t do anything more
than read posts and write comments.)
FIGURE 11-27
To create a new site, a logged-in user
needs to supply the site folder name
and the site’s title on the sign-up
page, and then click the big Create Site
button. The sign-up text shown here
is WordPress boilerplate. Once you
learn how to edit a theme (Chapter 13),
you’ll be able to customize this text.
In addition, you can give people special privileges for specific sites. For example,
you might make someone an administrator on one blog and an author on another.
In this case, there’s still just one record for that user, but now it’s registered with
two dierent sets of capabilities on two dierent sites.
NOTE Happily, WordPress makes people log in only once. When visitors move from one site to another in
the same network, WordPress remembers who they are and determines what privileges they should have on
each site.
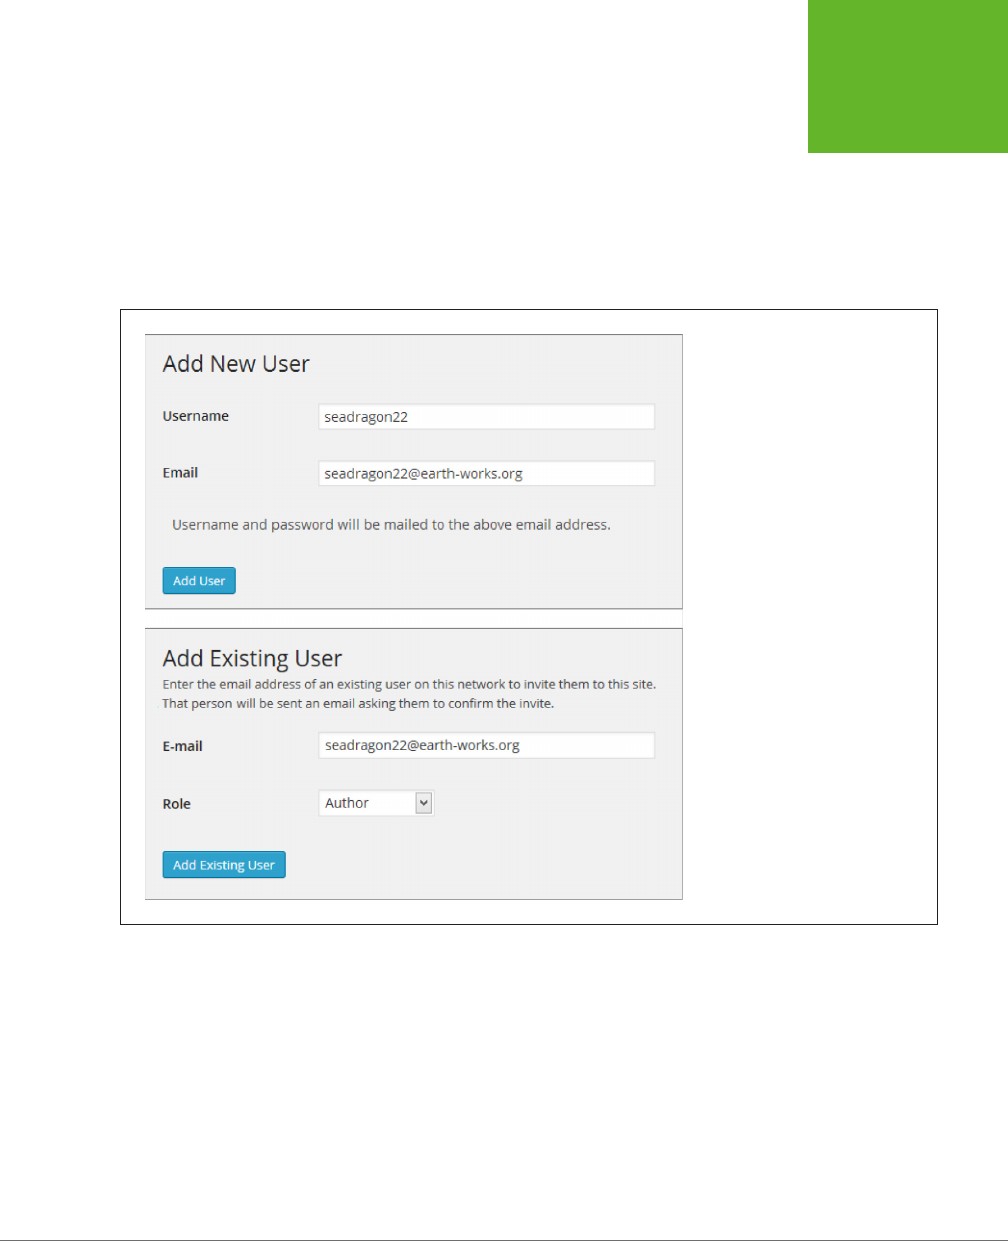
CHAPTER 11: COLLABORATING WITH MULTIPLE AUTHORS 407
CREATING A
NETWORK OF
SITES
If you choose Users→Add New on the network administration dashboard, you can
add people to the master list (Figure 11-28, top). But WordPress won’t give new us-
ers any special privileges for any site.
Life is dierent for ordinary site administrators. Consider what happens if an adminis-
trator named Suzy logs into her dashboard. When she chooses Users→Add New, she’s
not given the option to create an account for someone else. Instead, she can invite
an existing user to take on a more powerful role on
her
site (Figure 11-28, bottom).
FIGURE 11-28
Ordinarily, only network administra-
tors can create new accounts (top)
while site administrators can register
existing users on their sites, and as-
sign them the appropriate WordPress
role (bottom).
One potential problem with the user registration system is that it can create a lot of
extra work. For example, if a site administrator needs to add someone new, he needs
to ask you, the network administrator, to create the account first. To circumvent this
restriction, go to Settings→Network Settings, choose “Allow site administrators to
add new users to their site,” and then click Save Changes. Now site administrators
can add new people to the master list.
Another problem occurs if one person contributes to several sites. In that case,
someone needs to visit each dashboard and invite the user separately to each site.
If you’re not the sort of person who likes to spend all weekend tweaking WordPress
settings, you may want to enlist the help of a plug-in like Multisite User Management

WORDPRESS: THE MISSING MANUAL
408
CREATING A
NETWORK OF
SITES
(
http://tinyurl.com/multisite-um
). It lets you set a
default role
for each site in a mul-
tisite network. Then, when you create a new user, she’s automatically registered on
each site with the default role you chose.
Rolling Out Updates
One advantage of a multisite network is that it streamlines certain management
tasks. For example, you can update WordPress on all the sites in your network in a
single operation from the network administration page.
To get started, choose Updates→Available Updates from the network administration
dashboard. You’ll see, at a glance, what themes, plug-ins, and WordPress system
updates are available. If you’re not up to date, start by installing your updates on
this page.
When you update themes or plug-ins, the changes take eect on all the sites in your
network immediately. That’s because a multisite network stores only a single copy
of each theme and each plug-in.
When you install a new version of WordPress, you need to take one more step.
Choose Updates→Update Network, and then click the Update Network button to
upgrade all your sites at once.
Adding Themes and Plug-Ins
In an ordinary WordPress website, the site administrator controls the themes and
plug-ins the site uses. But in a multisite network, this approach would be too risky,
because a single malicious plug-in could steal sensitive data from any site in the
network, or wipe out the database of your entire network.
Instead, multisite networks use a more disciplined system. You, the network admin-
istrator, can pick the themes and plug-ins you want to allow. Site administrators can
then choose from the options you set.
A typical multisite installation begins with a few standard themes (such as Twenty
Twelve, Twenty Thirteen, and Twenty Fourteen), but only one of them is network
enabled (Twenty Fourteen). That means Twenty Fourteen is the only theme the sites
in your network can use. In fact, site administrators can’t see the other themes at all.
To add a new theme and make it accessible to the sites in your network, follow
these steps:
1. Choose Themes→Add New, and search for the themes you want.
If you need a refresher, page 138 has the full story on theme searches.
To activate a standard year theme already on your network (but not enabled),
such as Twenty Thirteen, jump straight to step 3.
2. When you find a suitable theme, click Install Now.
This downloads the theme to your multisite network but doesn’t actually make
it available to any sites.
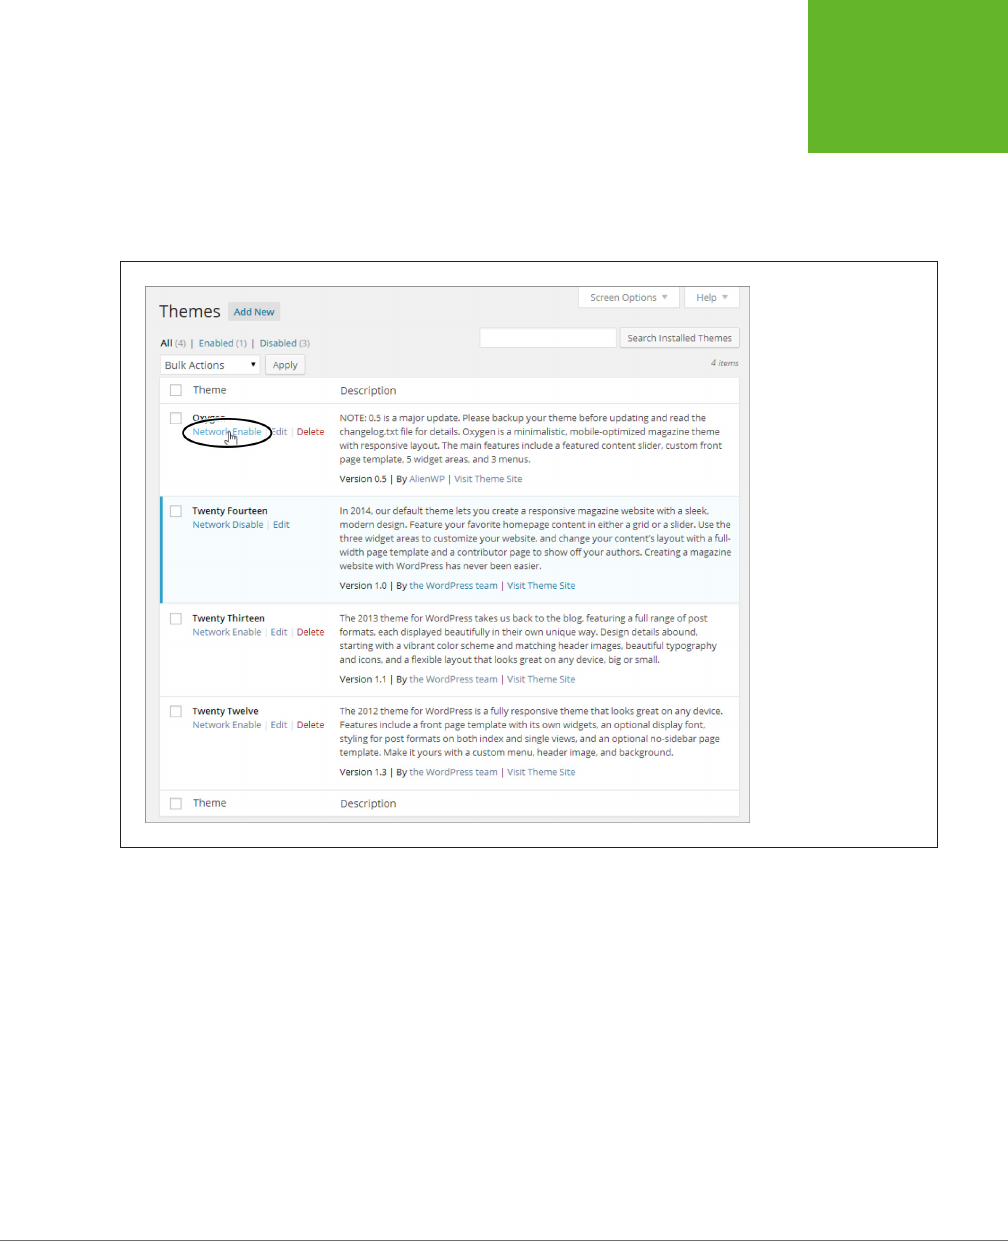
CHAPTER 11: COLLABORATING WITH MULTIPLE AUTHORS 409
CREATING A
NETWORK OF
SITES
3. Click Network Enable.
The Network Enable link takes the place of the Activate link you see when you
install a theme on an ordinary, standalone WordPress website. You can click
Network Enable immediately after you install a theme, or you can view all your
themes (Figure 11-29) and then click Network Enable next to the ones you want.
FIGURE 11-29
When you click Network
Enable below a theme
title, WordPress makes
that theme available
to all the sites in your
network.
You can also enable a theme for some sites but not others, although it’s awkward.
First, make sure your theme isn’t network-activated. Then choose Sites→All Sites
and click the Edit link under the site where you want to apply the theme. When the
Edit Site page appears, click the Themes tab. In the list of disabled themes, click
Enable next to the ones you want to add.
The process for installing plug-ins is similar but subtly dierent. First, choose
Plugins→Add New and then search for the plug-in you want. When you find it, click
Install Now. Now you have a choice:
• Make the plug-in optional (don’t do anything). Once you install a plug-in,
WordPress makes it available to every site administrator in your network. Each
administrator can log in, visit the Plugins section of the dashboard, and choose
what plug-ins to activate.

WORDPRESS: THE MISSING MANUAL
410
CREATING A
NETWORK OF
SITES
• Activate the plug-in for every site. To do this, click the Network Activate link.
When you network activate a plug-in, that plug-in automatically runs on every
site in your network. However, site administrators won’t see the plug-in the
Plugins section of the dashboard, and they won’t be able to deactivate it. That’s
your job (click Network Deactivate to switch o a network activated plug-in).
Not all plug-ins work properly when network-activated, so it’s worth contacting the
plug-in maker to ask, or testing a new plug-in the first time you network activate it.
GEM IN THE ROUGH
Setting a Storage Limit
Themes and plug-ins aren’t the only restrictions that come into
play on a multisite network. You can also set storage limits to
restrict how many pictures, documents, and other files people
can upload to their sites. These settings prevent space hoggers
from swallowing gigabytes of hosting room, leaving your web
server starved for space.
Ordinarily, your network has no site restrictions. To put
one into effect, choose Settings→Network Settings on the
network administration dashboard. Scroll down to the “Site
upload space” heading and switch on “Limit total size of files
uploaded.” That caps the amount of space for posts, pages,
pictures, and uploaded files on a site to 100 MB. However,
you can type in whatever maximum you want. You can also
change the “Max upload file size” to set the maximum size of
an individual file (usually 1.5 MB).
Site administrators can use a dashboard to keep an eye on the
size of their sites. Choose Dashboard→Home, and look at the
“At a Glance” box. At the bottom, you find the key details: the
maximum size allotment, the current size of the site, and the
percentage of space used so far.

411
CHAPTER
12
Now that you know how to build a fantastic WordPress site, you need to show
it o to the world. That means you need to spend some serious time
promot-
ing
your site.
Web promotion can be grueling work, and many WordPressers would rather avoid
the subject altogether. Not only does it take a significant amount of eort, but the
benefits aren’t always clear, and you often need to pursue a promotional strategy
without knowing how well it’ll work. The best approach is to make web promotion
as easy and natural as possible. That means weaving it into your daily routine and
integrating it into the way your website works. It also means using honest promotional
strategies rather than search engine ploys and other trickery. Follow the guidelines
here, and you’ll still have plenty of time to pursue your real job—publishing fabulous
content.
In this chapter, you’ll learn a common-sense approach to web promotion. You begin
with the best type of advertising a site can have, word-of-mouth recommendations.
That doesn’t mean waiting for your site to crop up in casual conversation. Instead,
it involves learning how to help your readers rate, “Like,” and tweet your content
through social media services such as Facebook and Twitter.
Next, you’ll help existing readers bond with your site. You’ll notify them when you
publish new posts and alert them when their comments receive a reply. Done right,
these steps build long-term relationships with your fans and increase the number
of repeat visitors.
After that, you’ll consider a few basics of SEO (search engine optimization). You’ll
learn how to use plug-ins to make your site more Google-friendly, so web searchers
Attracting a Crowd

WORDPRESS: THE MISSING MANUAL
412
ENCOURAGING
YOUR READERS
TO SHARE
can stumble across your site while hunting for content. Finally, you’ll take a look at
web statistics so you can assess how well your promotional strategies are working.
Encouraging Your Readers to Share
There’s a gaping chasm of dierence between commercial promotion and personal
recommendations. If you can get your readers to share your posts and recommend
your site to friends, you’ll accomplish far more than the average ad campaign.
Usually, sharing means enlisting the help of Facebook and Twitter, two social sites
that are all about exchanging information, from gossipy chitchat to breaking news.
With the right WordPress settings and widgets, you can make it easy for your visi-
tors to recommend your site to their friends and followers.
NOTE Most of the features in this chapter require WordPress.com or the Jetpack plug-in for self-hosted
sites. So if you’re building a WordPress.org site, now is a good time to get Jetpack up and running, if you haven’t
already; page 297 explains how.
UP TO SPEED
Facebook and Twitter: A Refresher
Without doubt, Facebook and Twitter are the kingpins of the
social Web. It’s unlikely that either service needs an introduc-
tion, but if you’ve spent the last several years asleep in a cave,
here’s what you need to know:
• Facebook (
www.facebook.com
) is a social hub where you
keep up with your friends and report the goings-on in
your life (usually by uploading pictures and writing short,
semi-public posts). Facebook is also a great place for
musicians, artists, local businesses, and big companies.
They can interact with customers and fans through a
Facebook Page,
a special promotional tool you’ll consider
on page 420.
• Twitter (
http://twitter.com
) is a service for sending micro-
sized messages out to the world, for anyone who wants
to read them (by signing up to become your “follower”).
For example, the people following your messages might
include friends, colleagues, or rabid fans.
The two sites are complementary—some people favor one
over the other, while many use both. The important detail
for a website builder like yourself is this: Out of all the people
visiting your site, a significant portion will have a Facebook
or Twitter account. So far, your website has ignored this fact.
But WordPress helps you put social media to good use with
features like enhanced comments (page 270), sharing (page
412), and publicity (page 427).
How Sharing Buttons Work
Sharing is often an impulsive act. You stumble across a site, it catches your easily
distracted mind for a few seconds, and you pass the word out to a few choice friends.
You’re more likely to share a site if the process is quick and easy—for example, if the
site provides a handy link that does the bulk of the job for you. If a guest has to fire
up her email program or log in to another site (like Facebook or Twitter), she might
just defer the task for another time—and then forget about it altogether.
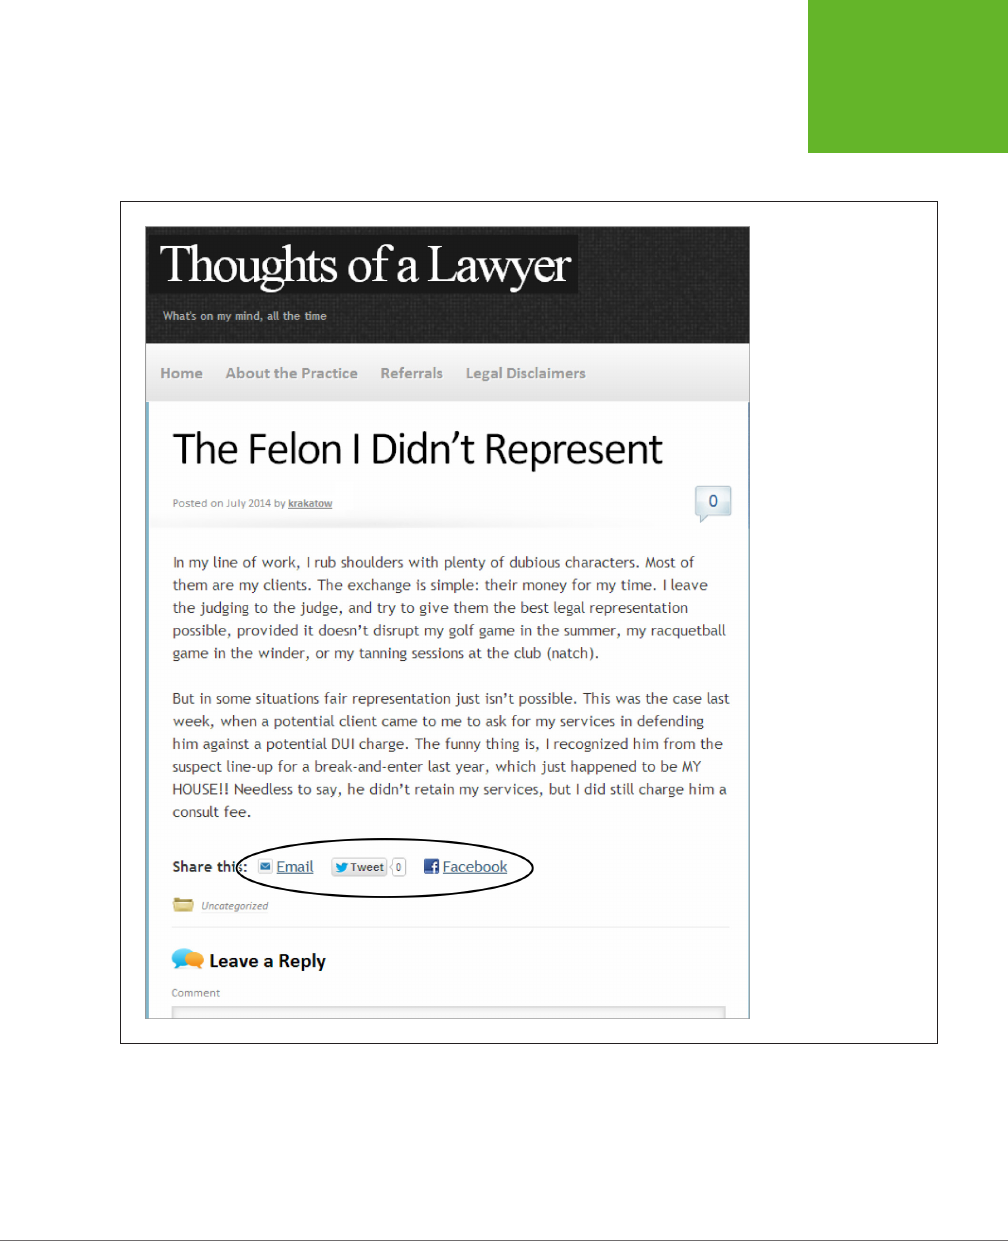
CHAPTER 12: ATTRACTING A CROWD 413
ENCOURAGING
YOUR READERS
TO SHARE
The best way to make sharing easy, quick, and convenient is to add buttons that
reduce the task to a couple of mouse clicks (Figure 12-1). That way, your readers can
share your site before they move on to their next distraction.
FIGURE 12-1
This site has three sharing
buttons, which appear
after the post and just
before the comments sec-
tion. Readers can share a
link to this post by email,
Twitter, or Facebook.
Email sharing is great for guests who may not use social media. Best of all, it works
even if your visitor doesn’t have an email program handy, because WordPress sends
the message on your guest’s behalf.
To share a post by email, a visitor starts by clicking the Email link. A box drops down
so he can type in the recipient’s email address, his name, and his email address. Once
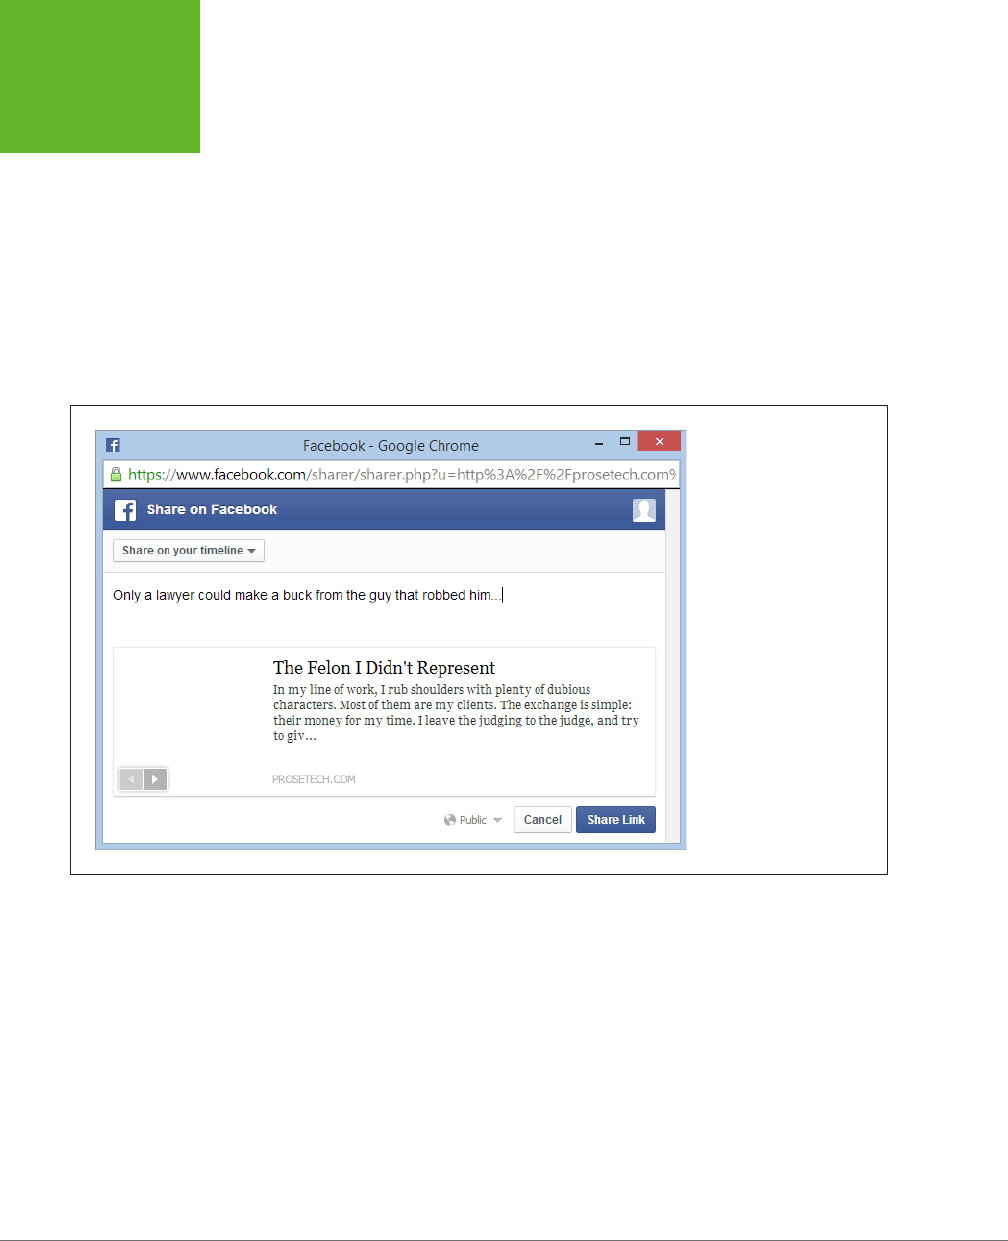
WORDPRESS: THE MISSING MANUAL
414
ENCOURAGING
YOUR READERS
TO SHARE
he fills in those details and clicks Send Email, WordPress delivers a short message
that looks something like this:
Jason Minegra (
jackerspan4evs@gmail.com
) thinks you may be interested in the
following post:
The Felon I Didn’t Represent
http://thoughtsofalawyer.net/the-felon-i-didnt-represent/
Facebook sharing is another good option, simply because of Facebook’s mind-
boggling popularity. When a guest clicks the Facebook button, WordPress takes
her to the Facebook site, where she can share the link and post an excerpt on her
timeline (Figure 12-2).
FIGURE 12-2
Two mouse clicks and an
optional comment are all it
takes to share a post with
your Facebook friends.
Twitter sharing is a great way to get the word out into the ever-chattering Twitter-
verse. Serious Twitter fans are always looking for small tidbits of interesting material,
and your Tweet button will be a hard temptation for them to resist. When a guest
clicks it, WordPress pops up a new browser window, asking the tweeter to log in to
Twitter and oering to send the link to his followers.
Adding Sharing Buttons
To add sharing buttons to posts or pages, your site needs to run on WordPress.
com or use a plug-in. In this chapter, you’ll stick to the familiar Jetpack plug-in,
which adds the same sharing buttons as WordPress.com. To get started, choose
Settings→Sharing to go to the Sharing Settings page. There, you choose the buttons
you want to add to your site and decide where they appear.
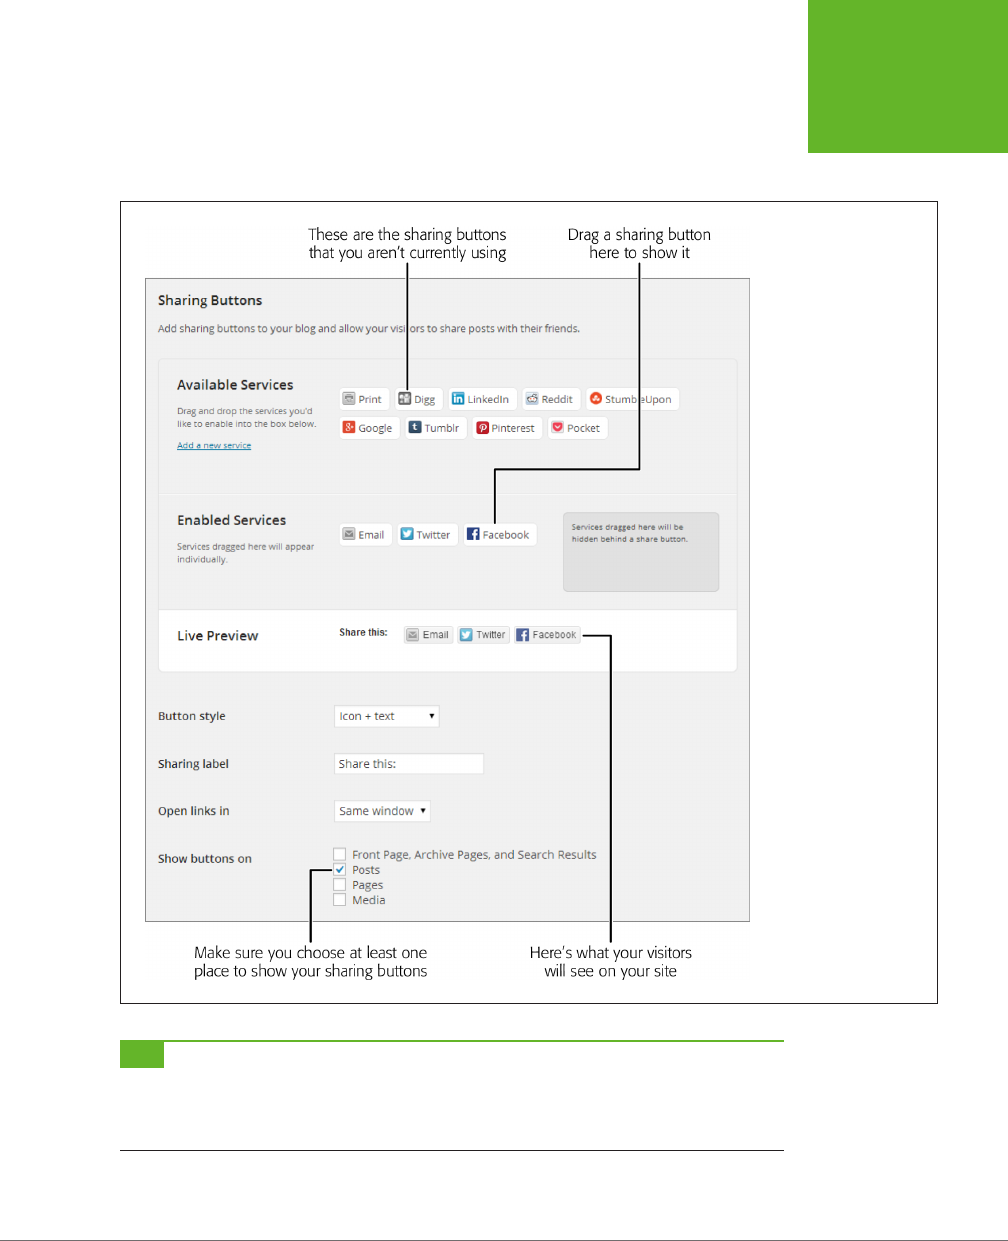
CHAPTER 12: ATTRACTING A CROWD 415
ENCOURAGING
YOUR READERS
TO SHARE
WordPress divides the Sharing Settings page into several sections. In the Available
Services area, it displays a long list of sharing buttons. To add one to your site, drag
it to the Enabled Services section of a post or page (Figure 12-3).
FIGURE 12-3
Adding sharing buttons
is a lot like arranging
widgets. You pick the
ones you want (by
dragging them into the
Enabled Services section)
and arrange them in the
order you like. Below that,
the Live Preview section
shows you exactly what
the buttons will look like
on your site.
TIP Email, Facebook, and Twitter aren’t your only sharing options, but they’re three of the best. Another
good choice is the Print button, which gives people an easy way to print out your post and take it to their friends
on foot. But the best advice for sharing buttons is to use just a few of the most useful ones (ideally, cap it at four
or five). Too many buttons can overwhelm your readers and make you look needy.

WORDPRESS: THE MISSING MANUAL
416
ENCOURAGING
YOUR READERS
TO SHARE
Once you pick your sharing buttons, you need to tell WordPress where to display
them—on your home page, on posts, and so on. You do that by turning on the
checkboxes next to the places listed under “Show sharing buttons on.” Here are
your options:
• Posts. This adds the sharing buttons to single-post pages—the ones with your
post content and comments section. You definitely want sharing buttons here.
• Pages. This adds sharing buttons to each static page (for example, the About
Me page you may have on your site). Static pages usually show content that
doesn’t change often and isn’t as newsworthy as your posts, so you might not
want sharing buttons on these pages.
• Front Page, Archive Page, and Search Results. This adds sharing buttons
after each post, when it appears in a list of posts—for example, on your site’s
front page or in a page of search results. You might choose to put sharing but-
tons here if your home page shows complete posts rather than just excerpts. In
that case, it’s reasonable to assume that some visitors will do all their reading
on your home page, without clicking through to the single-post page. But if
your home page displays excerpts, you definitely don’t want sharing buttons,
because it’ll seem wildly presumptuous to ask your readers to share posts they
haven’t even read.
NOTE It’s unfortunate that WordPress combines the Front Page, Archive Page, and Search Results options
into a single setting. When you perform a search, you never see more than an excerpt of a post, so it doesn’t
make sense to have sharing buttons in search results, even if you do want sharing buttons on your front page.
Sadly, WordPress won’t let you make this distinction.
• Media. This adds sharing buttons to attachment pages, which display media
files. For example, readers can get to this page by clicking a picture in a gallery
(page 322). It’s not terribly important to add sharing buttons here, because
most of your readers won’t go to these pages or spend much time on them.
Once you pick your sharing buttons and choose where they’ll appear, click Save
Changes. You can now browse to your site and give them a whirl.
More Ways to Customize Your Sharing Buttons
WordPress gives you a surprising degree of control over your sharing buttons. Under
the Live Preview section, you’ll find several options:
• Button style. Ordinarily, this is set to “Icon + text.” Choose “Text only” to
remove the tiny pictures from your sharing buttons, or use “Icon only” if you
want tiny picture buttons with no text (which makes the buttons more dicult
for people to understand but does save space). The “Ocial buttons” option is
a bit weirder—it uses the style conventions of the appropriate service (in other
words, the Facebook button has the visual styling set by Facebook, the Twitter
button has the look designed by Twitter, and so on). The drawback is that you
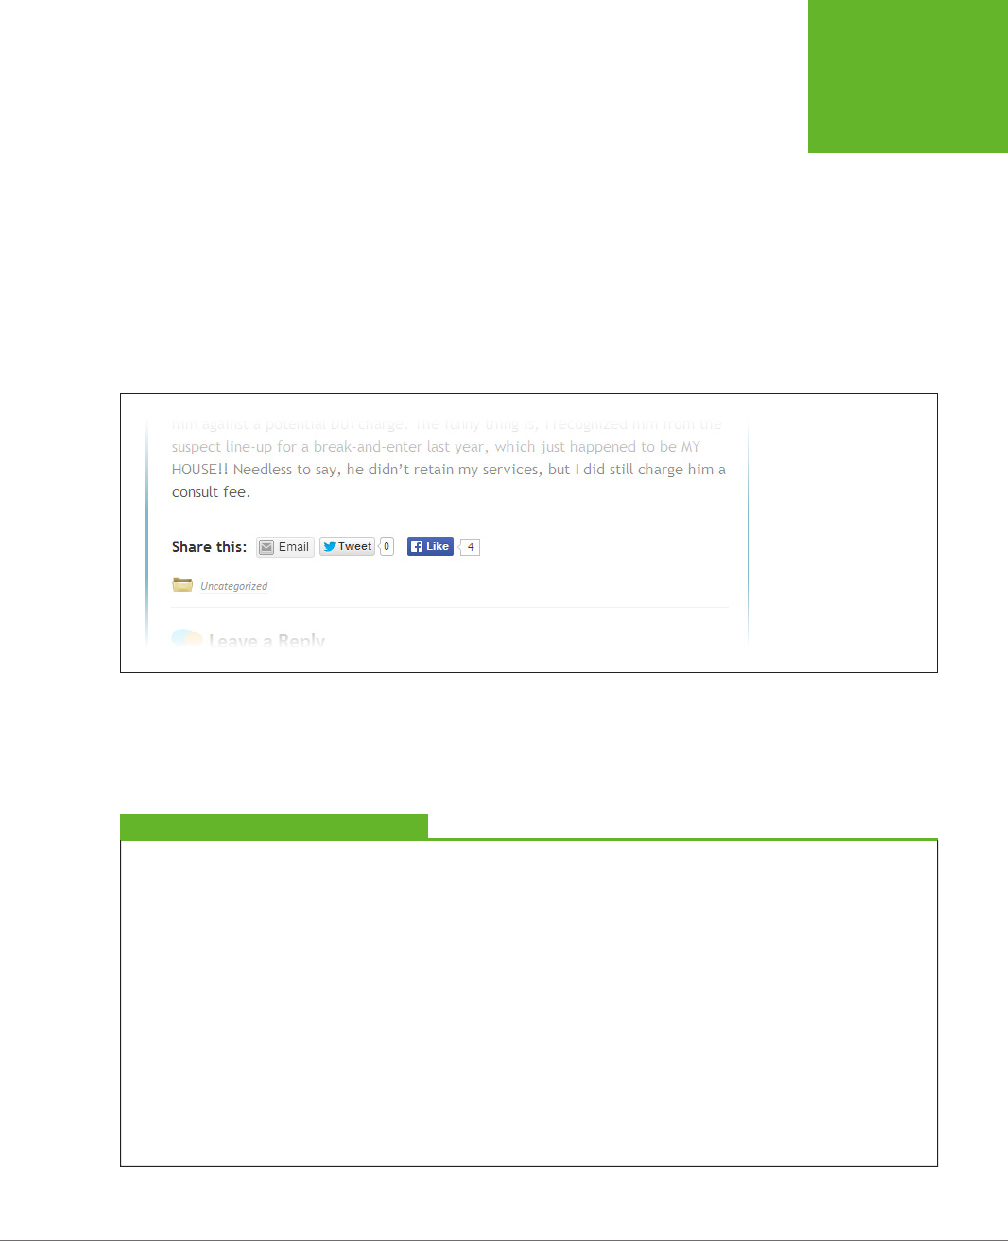
CHAPTER 12: ATTRACTING A CROWD 417
ENCOURAGING
YOUR READERS
TO SHARE
end up with a mishmash of subtly dierent fonts, colors, and spacing in your
sharing buttons (see Figure 12-4).
• Sharing label. This is the text that appears just before your sharing buttons.
The standard is “Share this:” but if you want to write “Spread the word!” no
one’s going to stop you.
• Open links in. Some sharing buttons take your readers to another site. For ex-
ample, the standard Facebook button takes guests to Facebook and asks for a
comment (Figure 12-2). Ordinarily, this means your visitor leaves your site. But
if you choose “New window” for the “Open links in” option (Figure 12-3), the
browser opens a new window when a visitor clicks a sharing button.
FIGURE 12-4
When someone on
Facebook clicks the Like
button under a post,
the post’s Like count
increases. In this example,
four Facebook users
enjoyed this post.
If you have a self-hosted site, you’ll see the option “Disable CSS and JS.” If you
select this, it’s up to you to supply the styles and JavaScript code that makes the
sharing buttons work (so don’t). It’s intended for hardcore webheads who need to
customize everything.
FREQUENTLY ASKED QUESTION
Selectively Hiding Sharing Buttons
I don’t want all my posts and pages to be the same. Can I show
sharing buttons on some but not all posts and pages?
Yes.
To understand how, you need to understand that WordPress
displays sharing buttons only if your site meets two criteria.
First, in the “Show sharing buttons on” section, you must
turn on the Posts checkbox. Second, when you create or edit a
post, you need to check “Show sharing buttons on this post.”
WordPress automatically adds the checkmark for every new
post, but you can change that.
Consider an example. Imagine you have a site with 36 posts and
you want to allow sharing on all but three. First make sure you
have the Posts checkbox at Settings→Sharing turned on. Then,
turn off the “Show sharing buttons on this post” checkbox for
the three posts that
shouldn’t
have sharing buttons.
The same technique works for pages, except that WordPress
pays attention to the Pages checkbox rather than the Posts
checkbox on the Settings→Sharing page.

WORDPRESS: THE MISSING MANUAL
418
ENCOURAGING
YOUR READERS
TO SHARE
If you host your site on WordPress.com, you see an additional option that lets you turn
WordPress.com “Likes” on or o. You’ll learn more about that feature on page 421.
There’s one quirk in the way the Facebook button functions. Ordinarily, clicking the
Facebook button shares a post by inviting you to publicize it on your timeline. But
when you switch on the “Ocial buttons” option, the Facebook button becomes a
Like button, which simply collects your vote of approval and counts the number of
Likes the page has (Figure 12-4).
NOTE “Liking” isn’t quite the same thing as sharing. For example, if Victor Gonzales shares a post (using
the standard Facebook button), he gets the chance to add a comment on his Facebook timeline. If he “Likes” a
post (using the Like button), Facebook makes a note of the action but doesn’t ask Victor to supply a comment.
In both cases, Victor’s friends will see a link to the post in their News Feeds, along with an excerpt.
The Sharing Settings page has one more nifty feature you haven’t used: a pop-up
panel you can add to a post that reveals additional sharing buttons. If you feel com-
pelled to stu your page with a large number of sharing buttons, you can hide some
of the less important ones in this panel. That way, they’ll be tucked out of sight until a
visitor clicks the “+ Share” button, which WordPress adds automatically (Figure 12-5).
FIGURE 12-5
This site crams in nine
sharing buttons. However,
the less commonly used
ones start off hidden.
When someone clicks “+
Share,” the additional
options appear in the
drop-down panel shown
here.

CHAPTER 12: ATTRACTING A CROWD 419
ENCOURAGING
YOUR READERS
TO SHARE
Letting People Like Your Site
As you’ve seen, visitors can use the Facebook button to share and “Like” your posts.
But you might prefer to let Facebookers show their appreciation for your site as a
whole, using the sort of Like box shown in Figure 12-6.
FIGURE 12-6
This Facebook Like box sits in a post’s
sidebar. It lets visitors “Like” your
entire site. It also counts up the
total number of Likes you have and
displays profile pics of your most
recent Facebook fans.
There are two good reasons to create a site-wide Like box:
• It advertises your
whole
site on Facebook, not just one post. As a result, it’s
more likely to get people interested in your content.
• It centralizes voting in one place. If your site doesn’t attract huge amounts of
trac, your posts may accumulate only a few Likes. But if you include a single
Like button for your entire site, your Like count will probably reach a larger,
more respectable-looking number.
There’s one extra hassle with the Like button: To let people “Like” your site, you
need to create a
Facebook Page
for it.

WORDPRESS: THE MISSING MANUAL
420
ENCOURAGING
YOUR READERS
TO SHARE
A Facebook Page is a public meeting spot you create on Facebook. You use it to
promote something—say, a company, a cause, a product, a television show, or a
band. You might already have a Facebook Page to promote your business or your-
self (for example, musicians, comedians, and journalists often do). Any Facebook
member can create one.
A Facebook Page is similar to a personal Facebook profile, but it’s better suited to
promotion. That’s because anyone can visit a Facebook Page and read its content,
even if they aren’t Facebook friends with the page owner, or don’t even have a Face-
book account. Those who do have accounts can do the usual Facebook things—click
Like to follow the page, post on the page’s timeline, and join in any of its discussions.
Generally, a personal Facebook profile is better suited to keeping up with friends
or networking with business contacts, while a Facebook Page oers a better way
to promote yourself, your business, or your cause to masses of people you don’t
know. If you don’t have a Facebook Page and you aren’t sure how to create one,
see the box on page 421.
Once you create a Facebook Page, it’s easy to add a Facebook Like box to your site.
Once again, your site needs to run on WordPress.com, or you need the Jetpack
plug-in. If it meets either of these requirements, follow these steps:
1. Choose AppearanceÆWidgets.
The familiar Widgets page opens.
2. Drag the Facebook Like box into one of the widget areas.
Ideally, you should add the widget to your home page (with its list of posts),
and
to your single-post pages. Some themes (like Twenty Eleven) don’t include
a sidebar on the single-post page. That means you need to put the Like box
somewhere else, such as in the footer area.
3. Type in the Facebook Page web address.
The easiest way to do that is to visit your page through Facebook and then copy
the address from your browser’s address bar.
4. Optionally, configure the other settings for the Facebook Like box.
Like any widget, you can give the Facebook Like box a title, but that’s really
not necessary. You can also set its width, change its color scheme, and choose
whether you want to display your fans’ faces (as in Figure 12-6), the latest posts
from your page’s news stream, or the latest posts from its timeline. If you opt
out of all these options, you get a very compact box that includes a Like button,
the number of Likes you’ve received, and a tiny thumbnail of the profile picture
from your Facebook Page.
5. Click Save.
This adds the Like box widget to your page.
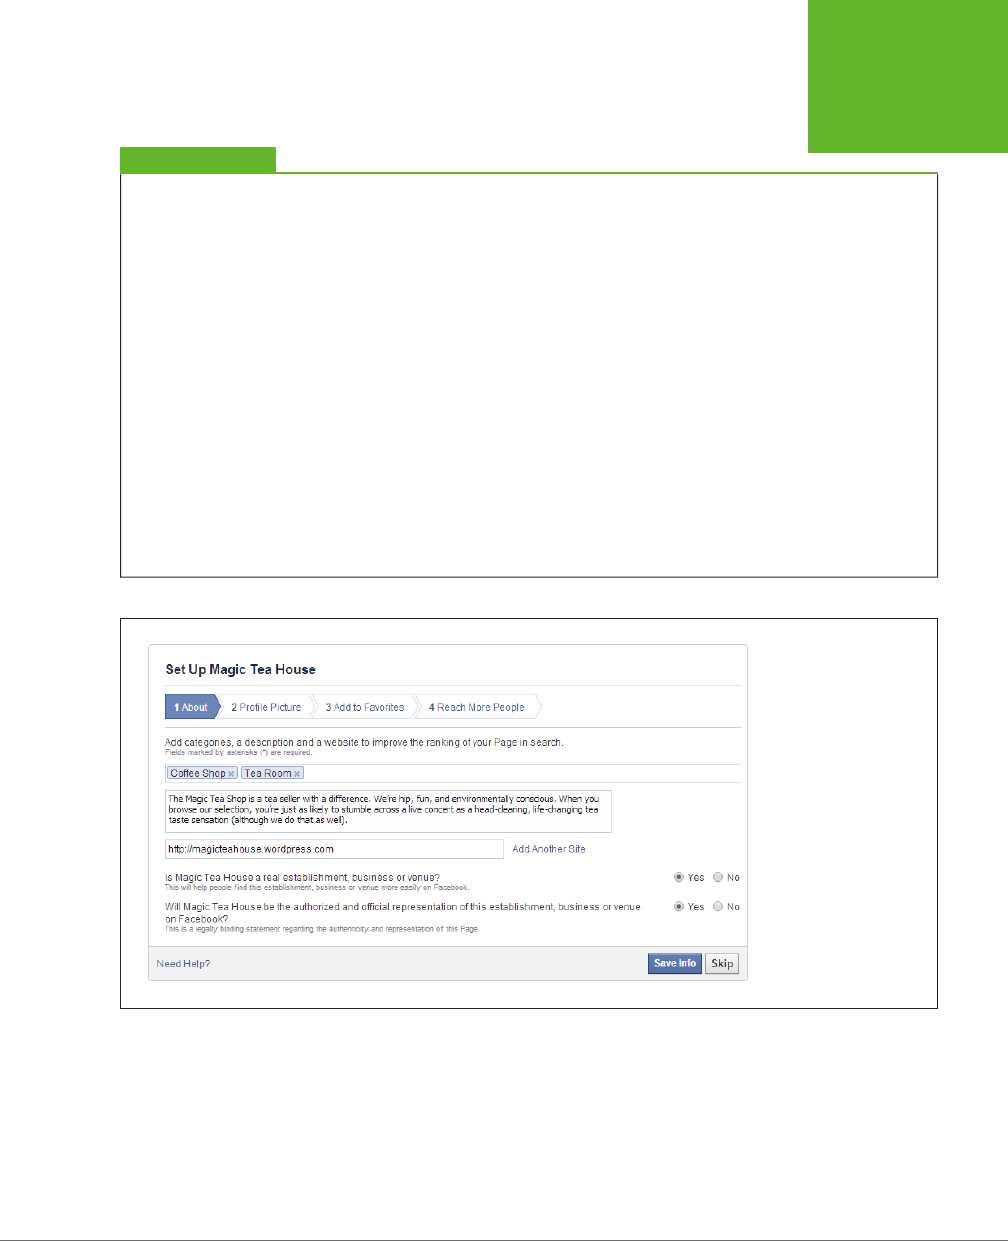
CHAPTER 12: ATTRACTING A CROWD 421
ENCOURAGING
YOUR READERS
TO SHARE
UP TO SPEED
Creating a Facebook Page
To create a Facebook Page, go to
www.facebook.com/pages/
create.php
. You start by clicking the button that best represents
the type of page you want—for example, you can create one
for a local business, a big company, a band, a product, a public
figure, or a cause. Depending on the button you click, Facebook
asks you for more information, like your name and address.
Once you fill that in, you click Get Started.
You now need to either sign in to your Facebook account or
create a new one. It’s easy—all you need is an email address,
a password, and a birth date.
When you finish signing in or registering, Facebook asks for a
few final ingredients (Figure 12-7):
• A description. This is a few sentences that describe you
or your business. It shows up on your Facebook Page, so
make sure your description is fun and engaging.
• A link to another site. This part is optional, but it makes
sense to supply a link to your WordPress site here.
• A profile picture for your page. You can upload it from your
computer or grab it off your WordPress site, if you have
a link. Facebook pictures are square-shaped, so don’t try
to use your WordPress site header picture.
Click Save Info, and Facebook creates your page. Make note
of its web address, which appears in your browser’s address
bar—you need to copy it into the Facebook Like box widget to
set up the link in WordPress.
FIGURE 12-7
This is the description for
the Magic Tea House’s
Facebook Page.

WORDPRESS: THE MISSING MANUAL
422
ENCOURAGING
YOUR READERS
TO SHARE
Using WordPress.com Ratings
WordPress.com oers another rating system you can use. It’s called WordPress.com
Likes.
Ordinarily, WordPress turns WordPress.com Likes on, and a Like button appears in
every post, just after the sharing buttons. It works just like the Facebook Like button,
but only registered WordPress.com members can use it. (WordPress asks everyone
else to sign up when they click it.)
WordPress.com tracks all the posts a person likes, just as it tracks the sites he follows
(page 40). WordPress visitors can review their favorite pages in their account—to do
that, they visit
http://wordpress.com
, log in, click the Reader tab, and then choose
Posts I Like (on the right).
TIP If you don’t want to use WordPress.com Likes, you can turn them off site-wide at Settings→Sharing.
You can also switch them off when you create or edit an individual post, by unchecking “Show likes on this post”
in the Likes and Shares box.
WordPress.com Likes are a good way to engage the very active community of
WordPress.com bloggers. Some people get quite fanatical about them. They also
work with two nifty widgets:
• Top Posts & Pages. This widget shows the hottest pages on your site, based
on either the number of times guests have viewed them or the number of
times visitors have liked them. It’s a great way to highlight popular content.
But don’t confuse the Top Posts & Pages widget with the similarly named Top
Rated widget. The latter is for Polldaddy ratings, an alternative ranking system
described in the box on page 423.
• Posts I Like. This widget shows the posts on any WordPress.com site that
you
like. Similarly, if someone uses this widget on her WordPress.com site and then
“Likes” one of your pages, a link shows up on her site, inviting readers to check
out your content. That makes it a great way to lure new readers.

CHAPTER 12: ATTRACTING A CROWD 423
KEEPING
READERS IN
THE LOOP
GEM IN THE ROUGH
Yet Another Ratings System
If you use WordPress.com, you can be forgiven for getting con-
fused by the panoply of rating options available. You already
know how to integrate Facebook sharing and WordPress.com
Likes. In addition to those options, you can use the Polldaddy
rating system on WordPress.com sites. (Self-hosters can get
a plug-in that offers the same features at
http://tinyurl.com/
wp-polls
. However, it’s a bit finicky, and it forces you to sign
up for a free Polldaddy account.)
Initially, WordPress has Polldaddy ratings turned off. To add
them to posts, pages, or comments, go to the Ratings→All
Ratings section of the dashboard. There you can position the
ratings section above or below your content. When you apply
the ratings to posts and pages, readers can rate a post from
one star (very poor) to five stars (excellent). When you add
the rating system to comments, visitors choose from simple
thumbs-up and thumbs-down buttons. Self-hosters who use
the Polldaddy widget get a rating system called Top Rated;
it lets guests link to your top posts, pages, or comments,
depending on the options you pick.
It doesn’t really make sense to use both WordPress.com Likes
and Polldaddy ratings. There’s only so much feedback you can
request before your readers get tapped out. Both systems have
advantages. WordPress.com Likes requires guests to sign in
but provide extra features—namely, it lets people log in to
the WordPress.com home page and see all the posts they’ve
“Liked.” But Polldaddy ratings are more inclusive, because they
let everyone participate, no login required. They also include
a reporting feature that lets web authors review their most
popular posts (to see it, choose Feedback→Ratings). You may
need to play with both systems before you decide which one
better suits your site.
Finally, it’s worth noting that even if you choose WordPress.com
Likes for your posts, you might still decide to use Polldaddy to
let readers rate comments (page 259), because you can’t add
WordPress.com Likes to the comments section.
Keeping Readers in the Loop
The best sites are
sticky
—they don’t just attract new visitors; they encourage repeat
visits.
To make a site sticky, you need to build a relationship between your site and your
readers. You want to make sure that even when your readers leave, they can’t forget
about your site, because they’re still linked to its ongoing conversation. One way to
do that is to notify readers about posts that might interest them. Another strategy
is to tell readers when someone replies to one of their comments. Both techniques
use email messages to lure visitors back to your site.
If your site is on WordPress.com or you installed Jetpack on a self-hosted site, you
automatically get a convenient opt-in system for email notifications. It starts with
two checkboxes that appear in the “Leave a Reply” section (Figure 12-8).
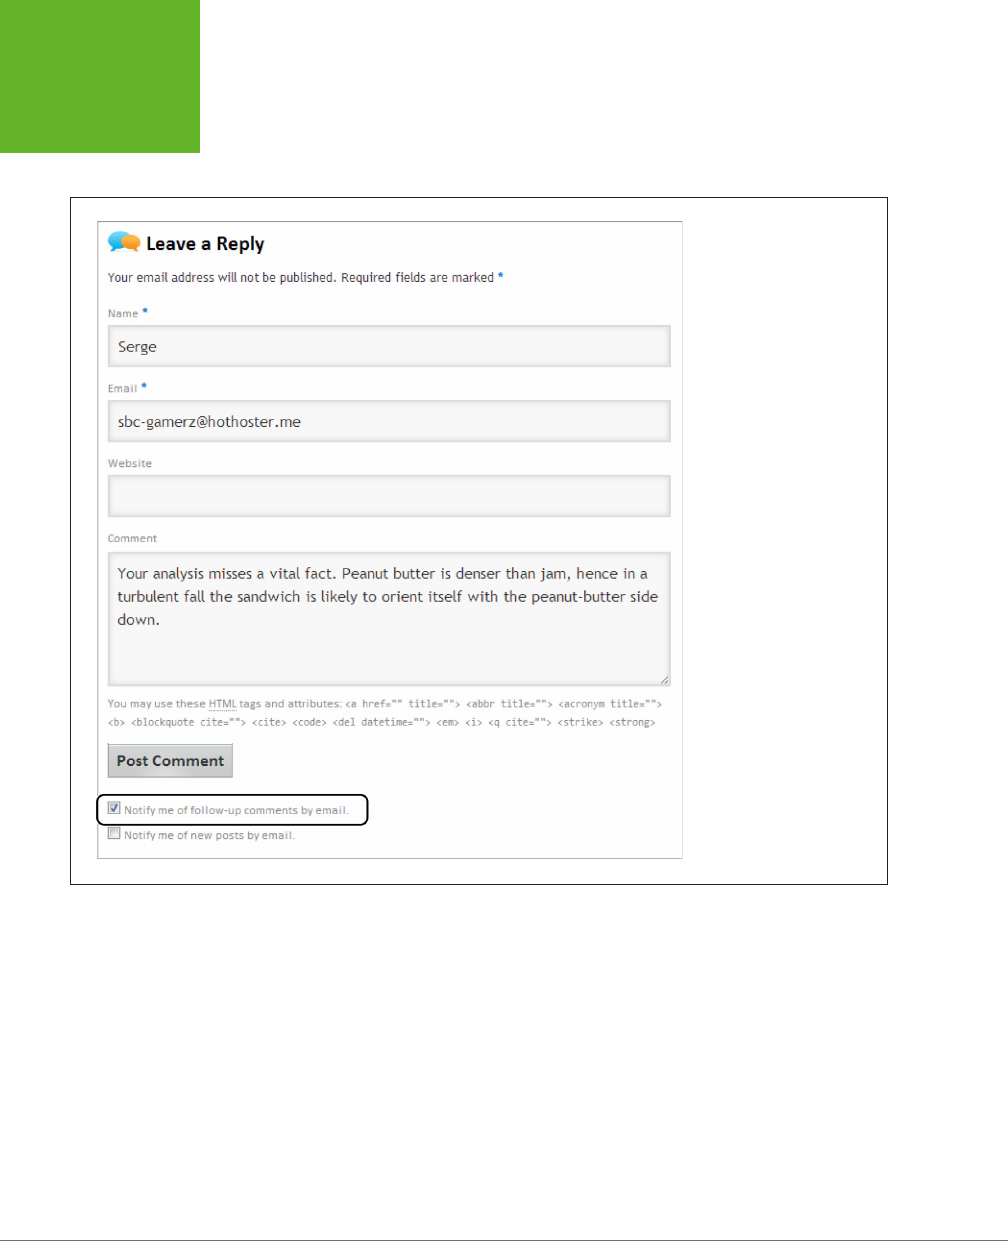
WORDPRESS: THE MISSING MANUAL
424
KEEPING
READERS IN
THE LOOP
FIGURE 12-8
After Serge enters his email
address and writes his
comment, he can sign up
for WordPress notifications.
WordPress lets him know
when someone replies to his
comments (so he can remain
part of the conversation),
or when you publish a new
post (if he really loves your
content).
You can hide the post notification and comment options. Go to Settings→Discussion
and then uncheck “Show a ‘follow comments’ option in the comment form” and
“Show a ‘follow blog’ option in the comment form.” But there’s really no reason to do
that, unless you use a plug-in that adds similar options somewhere else on your site.

CHAPTER 12: ATTRACTING A CROWD 425
KEEPING
READERS IN
THE LOOP
UP TO SPEED
Taking Care of Your Peeps
Even on sites with thousands of comments, most readers keep
quiet. Whether that’s due to laziness, indifference, or the fear
of being ignored, the average reader won’t leave a comment.
So when someone does speak up, you need to do your best to
keep him in the discussion.
One way to do that is with the comment-tracking option you
just read about (see Figure 12-8). You can also reward com-
menters and stoke the conversation several more ways:
• Comment on your commenter’s sites. You already know
that, every once in a while, you need to step into a
discussion with your own comment. Visitors like to see you
involved because it shows you read their opinions just as
they read yours. However, if you see a particularly good
comment, you can take this interaction a little further.
Follow the commenter’s website link. If the commenter
has a blog, stick around, read a bit, and add a comment
to one of
his
posts. Comments are a two-way street, and
the more you participate with others, the more likely it
is that a reader will keep coming back.
• Thank commenters. Not every time—maybe just once. If
you notice a new commenter with some useful feedback,
add a follow-up comment that thanks her for her input. If
you want to get fancier, you can use a plug-in like Thank
Me Later (
http://tinyurl.com/wp-thank
) to send an email
message to first-time commenters, telling them you
appreciate the feedback. (But be warned, you need to
tweak this plug-in carefully to make sure you don’t send
out too many emails and annoy both your commenters
and your web hosting company.)
• Ask for comments. Sometimes, non-commenters just
need a little push. To encourage them to step up, end your
post with a leading question, like “What do you think?
Was this decision fair?” or an invitation, like “Let us know
your best dating disaster story.”
Signing Up Subscribers
Although it makes sense to put the comment notification checkbox in the comments
area of your posts, that spot isn’t a good place for the checkbox that lets readers
subscribe to your posts. Ideally, you’ll put a prominent subscription option after
every one of your posts
and
on your home page.
There’s another problem with the standard post notification checkbox. To sign up
for notifications, a reader needs to leave a comment. Not only is this requirement a
bit confusing (readers might not realize they need to write a comment, tick the site-
subscription checkbox, and
then
click Post Comment), it’s also unnecessarily limiting.
Fortunately, WordPress oers a better option, with a subscription widget that can
sign up new followers any time. If you use WordPress.com, the widget is called Fol-
low Blog. If you use Jetpack, it’s called Blog Subscriptions. They’re virtually identical,
the only dierence being that the WordPress.com version recognizes WordPress.
com users and lets you address them with a customized message.
NOTE WordPress.com site owners get one other feature: They can adjust the frequency of their outgoing
emails so readers get notified only once a day at most, or just once a week.
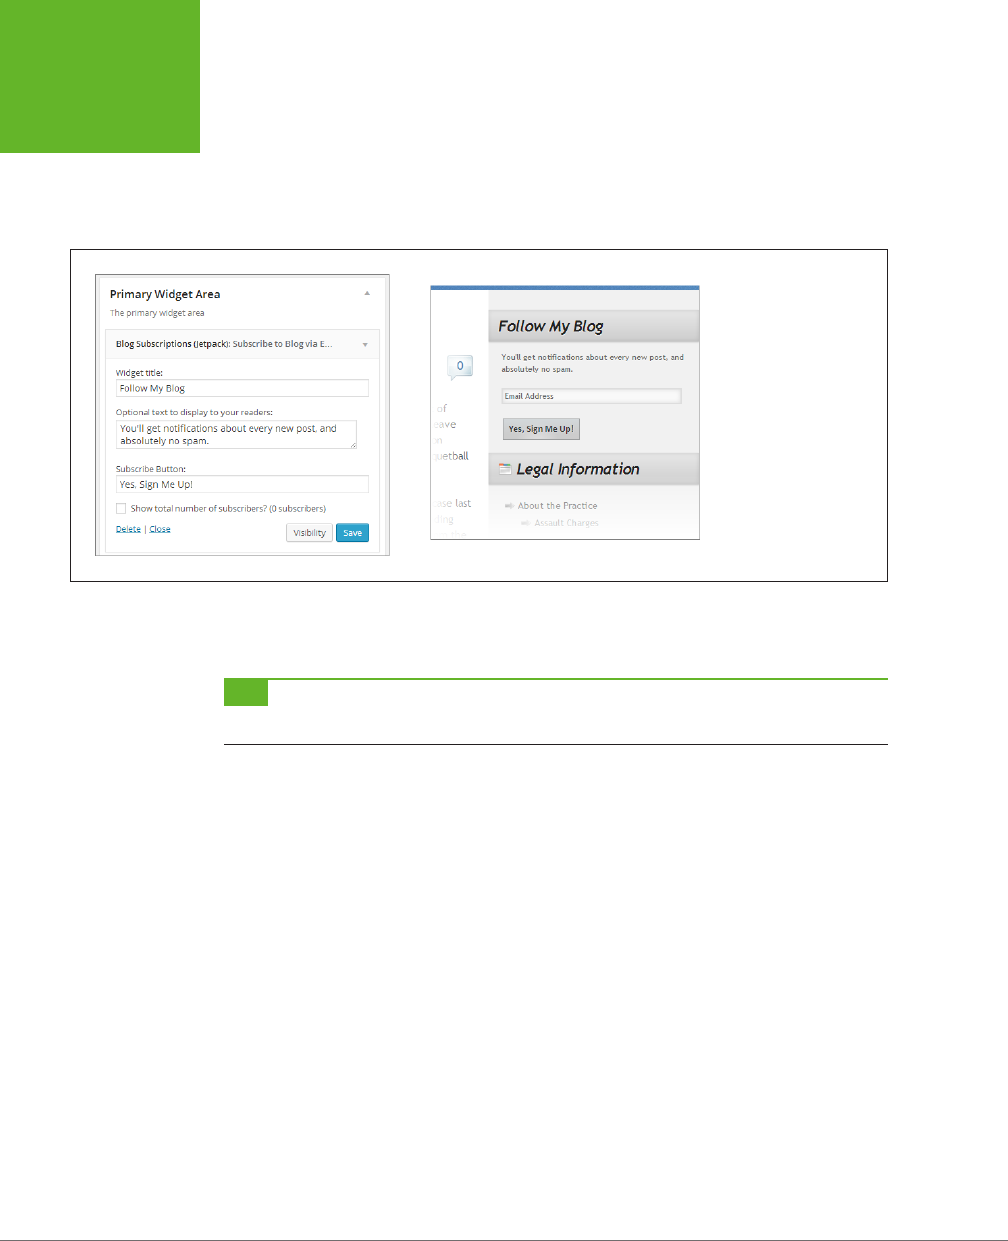
WORDPRESS: THE MISSING MANUAL
426
KEEPING
READERS IN
THE LOOP
To use the subscription widget, choose Appearance→Themes, and then drag the
plug-in onto one of your site’s widget areas. You can then customize several bits of
information, including the widget title, the text that invites readers to sign up, and
the text on the Subscribe button (Figure 12-9). (For best results, keep the text in
the widget brief.)
FIGURE 12-9
If you configure the
subscription widget like
the one on the left, your
readers see a subscription
box like the one on the
right.
You can also choose to show the total number of subscribers, in which case the
subscription box adds a line like “Join 4 other followers.”
TIP It’s a good idea to include the subscription widget in two places: your home page sidebar and the footer
area of each post, with a message like “Liked this article? Subscribe to get lots more.”
Emailing Subscribers
Occasionally, you might want to reach out to your followers and send them an email
that doesn’t correspond to a post. For example, you might oer a special promo-
tion or solicit feedback on a website change. If you decide to take this step, tread
carefully—if you harass readers with frequent or unwanted emails, they’ll feel like
they’re being spammed.
If you decide to go ahead and email your followers, you first need to get their email
addresses. Here’s how:
• If you use WordPress.com, visit the WordPress.com home page (
http://word
press.com
), log in, and choose the Stats tab. Scroll down to the “Totals, Follow-
ers & Shares” box. Under the heading “Followers,” WordPress counts up the
total number of people subscribing to posts and comments. Click the Blog link
to get their email addresses.

CHAPTER 12: ATTRACTING A CROWD 427
KEEPING
READERS IN
THE LOOP
• If you use Jetpack on a self-hosted site, choose JetpackÆSite Stats and scroll
down to the Subscription box. You see the total number of people subscribed
to your blog (and those who are registered to receive replies to a particular
comment). Click the Blog link next to the number to see the full list of email
addresses.
PLUG-IN POWER
Even Better Email Subscription Services
Jetpack gives self-hosters a solid, straightforward subscription
package. The WordPress.com servers handle all the user track-
ing and emailing, making your life easy. But Jetpack doesn’t
include any settings that let you customize the way it handles
subscriptions. More advanced email and newsletter plug-ins
(some of which will cost you a bit of cash) offer more features.
One example is the popular Subscribe2 plug-in (
http://tinyurl.
com/wp-sub2
). It adds the following useful features:
• Digests. Instead of sending readers an email after you
publish every new post, Subscribe2 lets you send a single
email, periodically, that announces several new posts at
once. Subscribe2 calls this message a
digest.
For example,
you might choose to send subscribers a weekly digest
summarizing the past seven days’ posts.
• Excluded categories and post types. Perhaps you don’t
want to send notifications for every new post. Subscribe2
lets you exclude certain categories or post types (like
asides and quotes) from notification emails.
• User-managed subscriptions. If you’re willing to let
readers sign up as subscribers on your site (page 370),
they can manage their own subscriptions. For example,
they can subscribe to just the post categories that interest
them, and pick the most convenient digest option.
Publicizing Your Posts on Social Media
As you’ve seen, one good way to get the word out about your site is to get your
readers talking and sharing on social media sites. But you don’t need to wait for
them to do the work for you—if you have a Facebook or Twitter account, you can
use it yourself to announce new content.
This technique is often called
publicizing,
and it’s not quite the same as the social
sharing you learned about earlier. Sharing is when a visitor introduces new people
to your content. Publicizing is when
you
tell readers about new content. The dier-
ence is that the people you tell probably already know about your site. Your goal is
to get them interested enough to come back.
Publicizing is an increasingly important way to reach your readers. Twitter fanatics
may pay more attention to tweets than they do to email messages. Facebook fans
who won’t bother to sign up for an email subscription might not mind liking your
Facebook Page and getting notifications from you in their News Feeds. For these
reasons, many WordPressers choose to publicize their posts.
WordPress.com sites get a built-in Publicize feature, and self-hosters can use the
Jetpack plug-in. Either way, you need to connect your site to the social media ac-
count (or accounts) you want to use. To do that, choose Settings→Sharing and then
click Connect next to the appropriate social media icon (Figure 12-10).
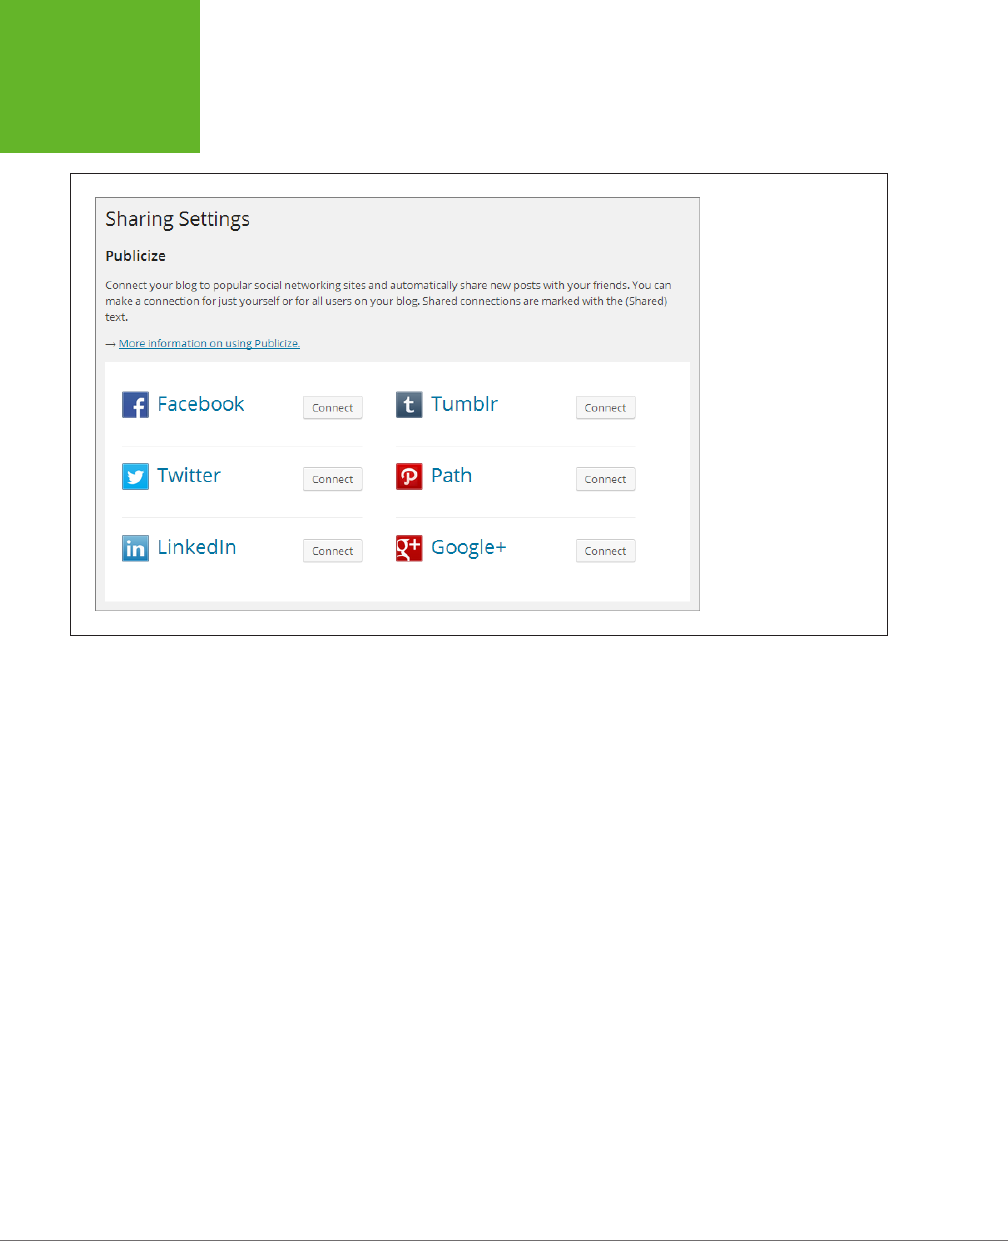
WORDPRESS: THE MISSING MANUAL
428
KEEPING
READERS IN
THE LOOP
FIGURE 12-10
The WordPress.com Publi-
cize feature lets you post
to services like Facebook,
Twitter, LinkedIn, Tumblr,
and Yahoo Updates. Once
you pick a service, you
need to log in to your
social media account to
complete the connection.
The Publicize feature springs into action every time you publish a new post. However,
WordPress lets you control the process using the Publish box.
Once you write a post, look in the Publish box. Next to the word “Publicize,” you
see a list of the services you can use to publicize your post. Click the Edit link, and
more options appear (Figure 12-11). You can choose to tout your post on only some
services, or none at all. You can also edit the message that WordPress sends out to
announce the new post. Ordinarily, WordPress uses the post title for the message,
but you can substitute more descriptive text.
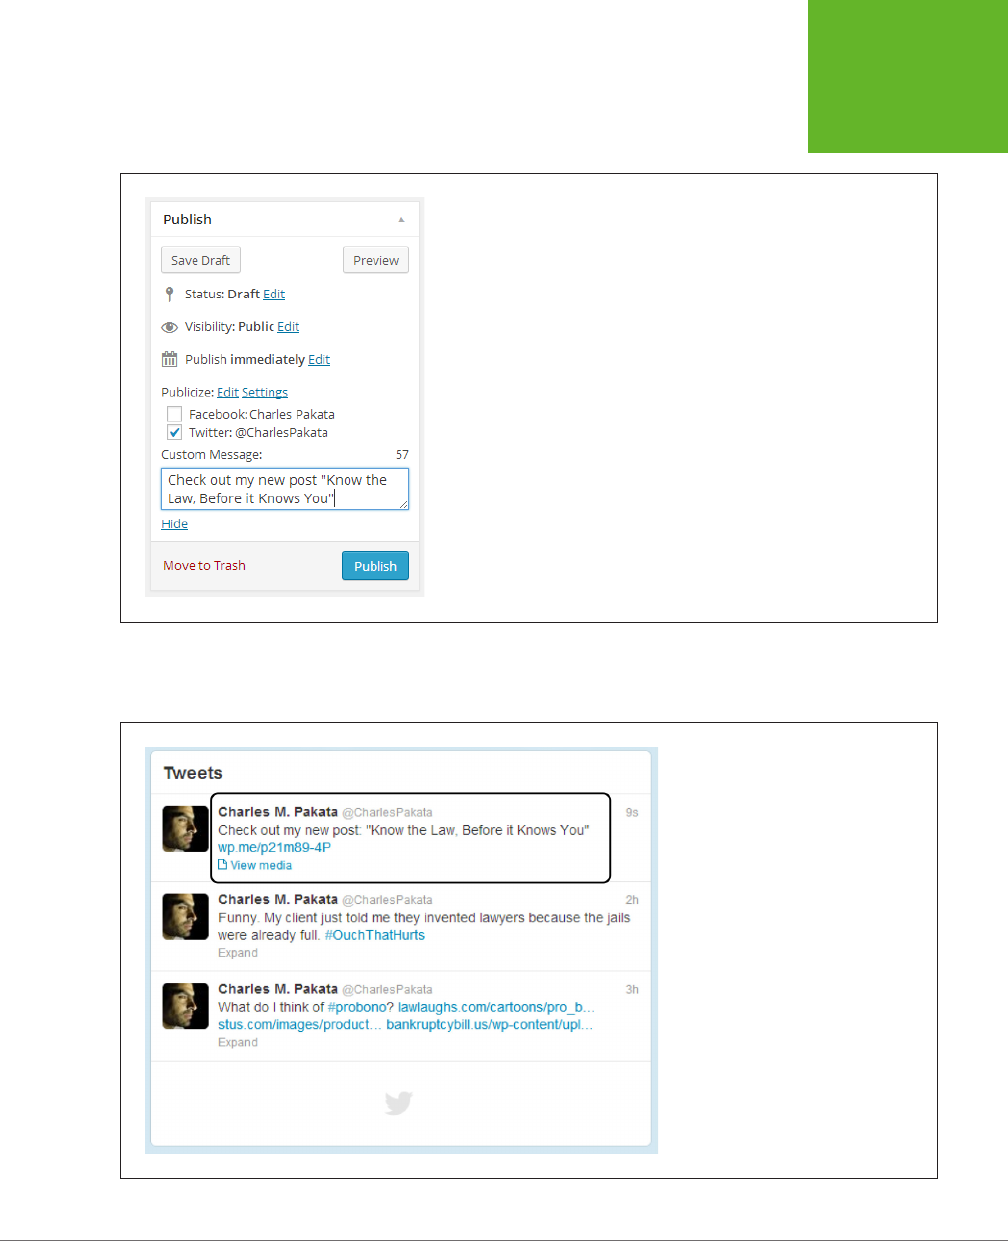
CHAPTER 12: ATTRACTING A CROWD 429
KEEPING
READERS IN
THE LOOP
FIGURE 12-11
When Charles Pakata publishes this post, WordPress will publicize it on
Twitter, but not on Facebook.
If Charles Pakata publicizes the post in Figure 12-11 to Twitter, his followers will see
the tweet shown in Figure 12-12.
FIGURE 12-12
The tweet WordPress sends includes
Pakata’s custom message and a link to his
full post.

WORDPRESS: THE MISSING MANUAL
430
KEEPING
READERS IN
THE LOOP
Sharing Your Tweets on Your Site
You already learned how to encourage people to tweet about your site, but the
integration between WordPress and Twitter runs deeper than that. If you’re a Twitter-
holic, WordPress has a nifty way to integrate
your
Twitter feed into your own site.
Before you dive into this feature, it’s worth taking a moment to ask why you’d use
it and how it fits into your site’s promotional plans. There are several good reasons
to use it:
• To oer extra content. If you’re an avid Twitterer, you can stu your feed with
news, tiny tips, and micro observations related to your site. Those details might
be interesting to your readers even if they aren’t worth a full post.
• To make your site feel alive. Having a Twitter feed can make your site seem
more current and dynamic—provided that you tweet regularly.
• To attract new followers. If you display your Twitter feed on your site, there’s
a chance that some of your readers will decide to follow your feed. If they do,
you’ll have another way to reach them. This is particularly useful if you use Twitter
to announce your blog posts using WordPress’s Publicize feature (page 427).
To display a Twitter feed on your site, you need the Twitter Timeline widget. Word-
Press.com sites automatically oer it, but self-hosters need the trusty Jetpack plug-in.
To use the Twitter Timeline widget, you follow an unusual two-part setup process.
First, you head to the ocial Twitter website, where you create a customized widget
that has the exact look you want. Then, you go to your trusty WordPress dashboard
and link your site to the widget you just built. (This system is made more confusing
by the fact that Twitter and WordPress use the word
widget
for two slightly dierent
things. You already know that a WordPress widget is a chunk of intelligent content
that you insert into your site. A Twitter widget is a customized view of a Twitter feed
that you can show on any site.)
Here’s a walkthrough of the process:
1. Go to the Twitter site (
http://twitter.com
) and log in with your email ad-
dress and password.
Now you’re on the Twitter home page, where you see recent tweets from the
people you follow.
2. In the top-right corner of the page, click the gear icon (“Settings and help”)
and then choose Settings.
The settings page lets you configure a great number of details about how
Twitter works.
3. In the panel on the left, click Widgets.
You see a list of all the Twitter widgets you’ve created. (Chances are, that will
be exactly none.)
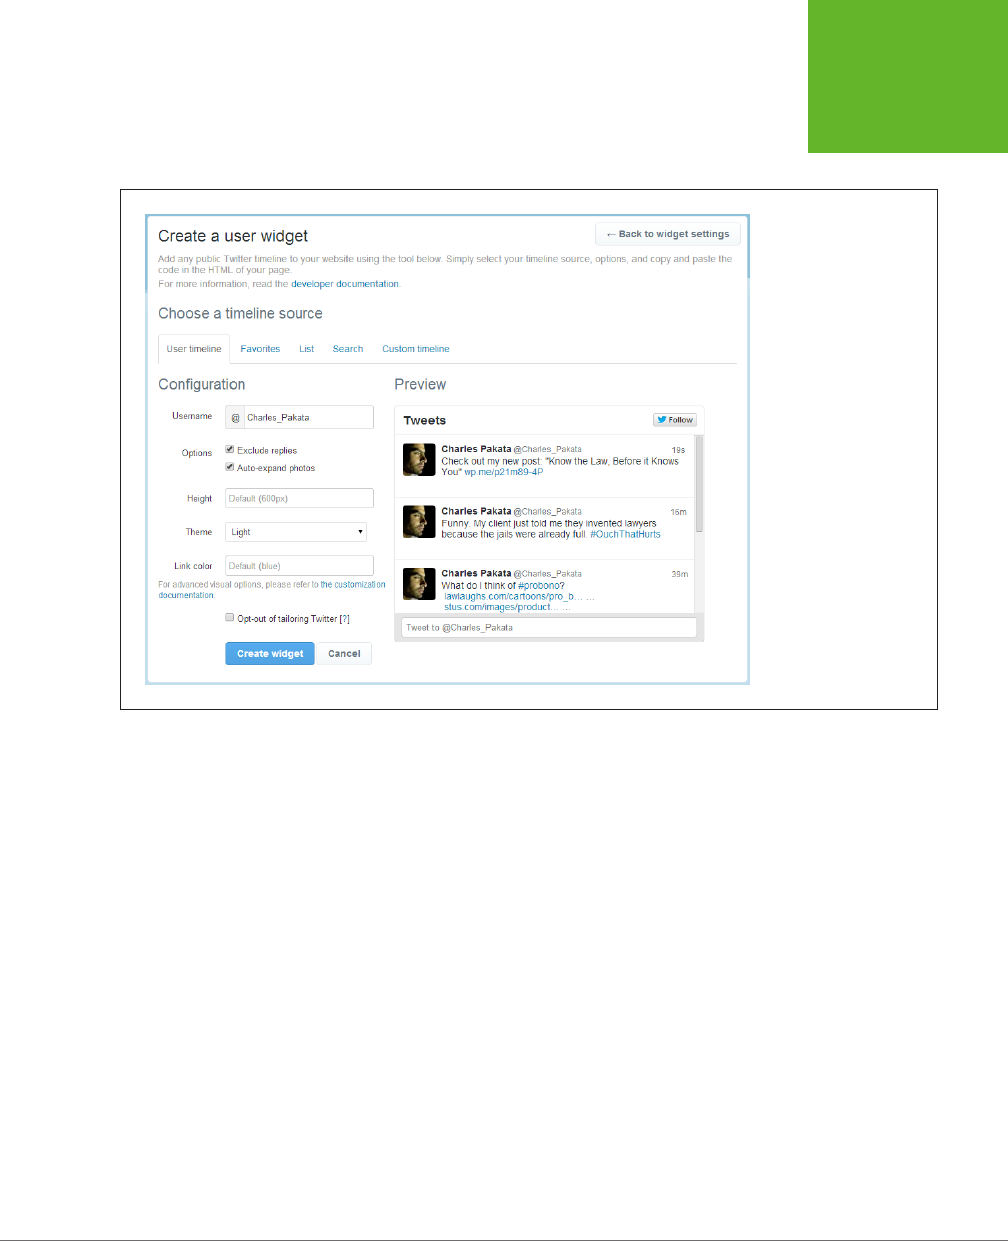
CHAPTER 12: ATTRACTING A CROWD 431
KEEPING
READERS IN
THE LOOP
4. To create your first widget, click Create New.
Twitter takes you to the widget-creation page shown in Figure 12-13.
FIGURE 12-13
As you configure your
timeline (on the left),
Twitter shows a preview
of what it will look like
(on the right).
5. Configure your widget.
You don’t need to change anything if you don’t want to. Twitter automatically
creates a timeline that shows just your tweets. However, here are some details
you might want to change:
• Exclude replies hides a tweet if it’s just a reply to someone else’s tweet
(which readers can find confusing because they’re out of context).
• Auto-expand photos displays the pictures you link to in your tweets right
in your timeline (no extra click required).
• Height sets the vertical size of the timeline, and therefore determines how
many tweets readers can see at once. Choose a height that fits nicely into
your sidebar alongside your post content and leave room for any other
widgets you need. Don’t worry about the width of the timeline, because
you set that when you add the Twitter Timeline widget to your site.
• Theme lets you change the color scheme from light (the standard) to
dark. The dark option blends in better on dark backgrounds, like the black
background featured in the Twenty Fourteen theme.

WORDPRESS: THE MISSING MANUAL
432
KEEPING
READERS IN
THE LOOP
Alternatively, you can create a dierent type of Twitter timeline by picking a
dierent tab (just under “Choose a timeline source.” Ordinarily, Twitter assumes
you want the “User timeline” option, which shows all your tweets. Alternatively,
you can show favorite tweets, tweets from a list you created, tweets that match
a search keyword (for example, tweets about you or your business), or tweets
from a custom timeline you created. Twitter provides plenty of information
about these more exotic choices.
6. When you finish, click Create Widget.
You can always return to Twitter and modify the widget later (or create a new
one).
7. Now copy the widget ID, which you can find in the web address.
Take a look at the address that appears when you view or edit your widget. It
will look something like this:
https://twitter.com/settings/widgets/456104541360881667/edit?focus_textarea=1
The only important detail is the long numeric code that follows the
/widget/
text. That’s the widget ID, which WordPress needs in order to show your widget.
In the example above, the ID is 456104541360881667. Select it and copy it to
the clipboard by pressing Ctrl+C (Command+C on a Mac)
8. Return to the WordPress dashboard and choose AppearanceÆWidgets.
The familiar Widgets page appears.
9. Drag the Twitter Timeline widget into a widget area, and then configure it.
To properly configure the Twitter Timeline widget, you need to supply the widget
ID you copied in step 7 (put it in the Widget ID box). You should also set a value
for the width that’s narrow enough so that the widget fits in the available space.
10. Click Save to finalize your changes.
Figure 12-14 shows the final result.
NOTE WordPress.com truly loves Twitter. Although the Twitter widget may be the only tool you need,
WordPress.com sites can get additional Twitter integration by using two shortcodes (page 323) that put Twitter
content inside a post. The [tweet] shortcode lets you show a single tweet, and customize its appearance (learn
about it at
http://tinyurl.com/cwfa77u
). The [twitter-follow] shortcode lets you add a Follow button anywhere
you need it (
http://tinyurl.com/cn29khu
). Jetpack doesn’t offer these features, so self-hosters will need to choose
from one of the many available Twitter plug-ins to get the same feature.

CHAPTER 12: ATTRACTING A CROWD 433
MANAGING
YOUR SITE’S
FEED
FIGURE 12-14
If you configure the Twit-
ter widget like the one
on the left, your readers
will see a Twitter feed
like the one on the right.
In the feed, each tweet
becomes a link that, if
clicked, takes readers to
Twitter to read the whole
conversation.
Managing Your Site’s Feed
A
feed
is a computer-generated document that lists your recent posts, and the con-
tent they contain, in a computer-friendly format. Feeds are a cool and slightly geeky
tool that people use to keep up with their favorite sites. The essential idea is that a
site—say, a WordPress blog—provides a feed of recent posts. People who read that
blog can use another program—a browser or a feed reader—to
subscribe
to the feed.
Here’s the neat part. Once you subscribe to a feed, your browser or feed reader
automatically checks the sites you signed up with for new content. That saves you
from visiting the same site 47 times a day, or digging through an endless stream of
spammy notification messages in your email inbox. Best of all, one feed-reading
program tracks as many sites as you want.
NOTE Feeds have been around a long time—they’re far older than social networking sites like Twitter. The
advantage to them is that the feed-reading program does all the work—you don’t need to check sites for new
posts, read your emails, or click a link in a tweet. However, feeds today are a niche feature. The average person
doesn’t use them (or even know they exist), but plenty of computer geeks can’t live without them.
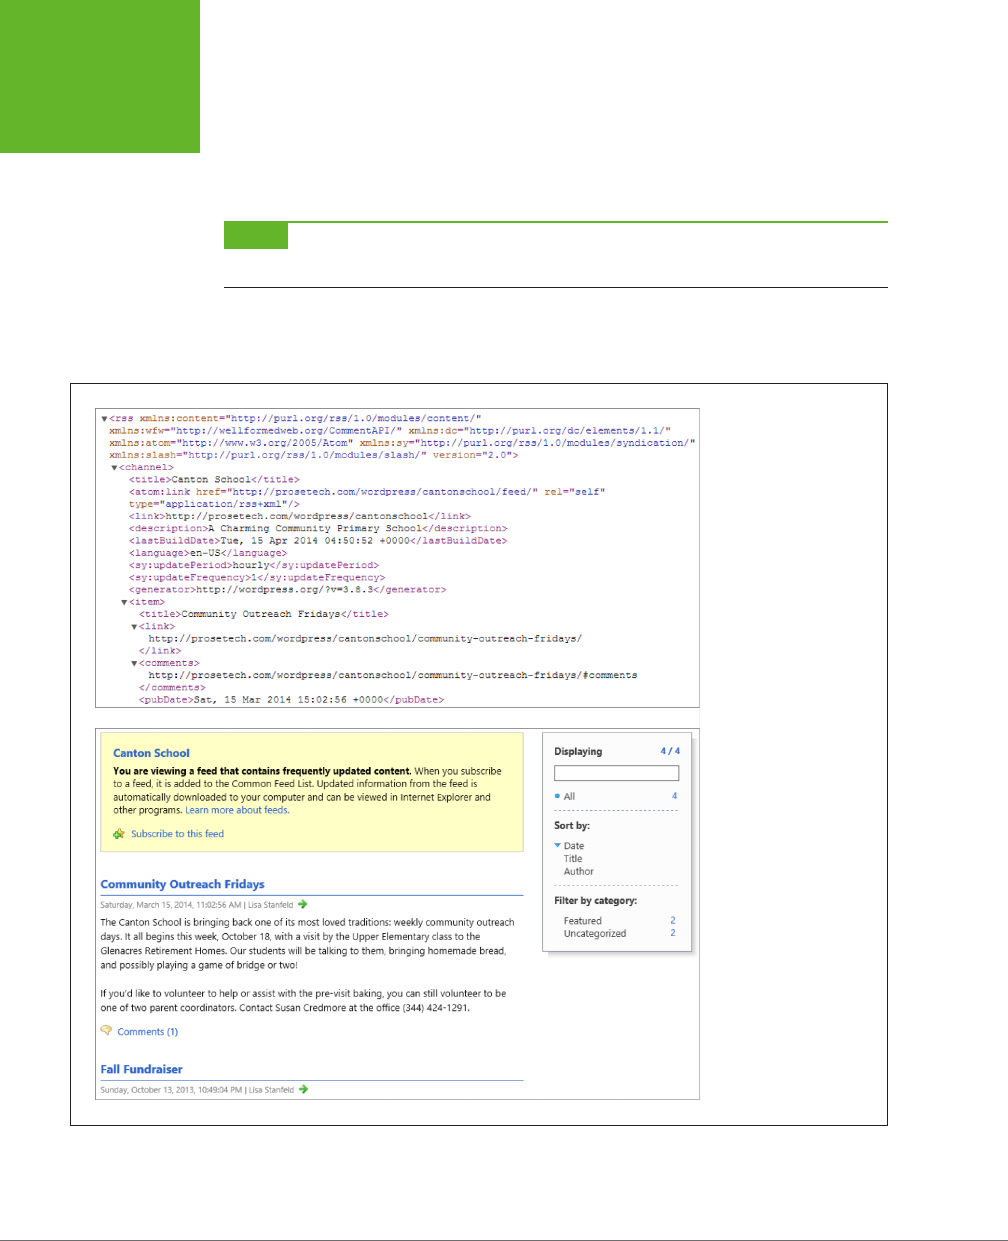
WORDPRESS: THE MISSING MANUAL
434
MANAGING
YOUR SITE’S
FEED
All WordPress sites automatically support feeds. In fact, you can take a look at the
feed
your
site sends out by adding
/feed
to the end of your website address. So if
you have a WordPress site at
http://lazyfather.wordpress.com
, you can see its feed
by requesting
http://lazyfather.wordpress.com/feed
.
NOTE On a self-hosted site, the
/feed
syntax works only if you use post titles in your permalinks, which you
definitely should (page 116). Otherwise, you’ll need to replace
/feed
with the more convoluted code
/?feed=rss2.
Depending on the browser you use, you might see the raw feed document when you
request it, or you might see a lightly formatted feed (Figure 12-15).
FIGURE 12-15
Top: Behind the scenes,
a feed is a long and
technical-looking
document written in a
computer language called
XML. Here’s a very small
portion of it.
Bottom: When you view a
feed in Internet Explorer,
it automatically creates
a page like this, based
on the information in
the feed.
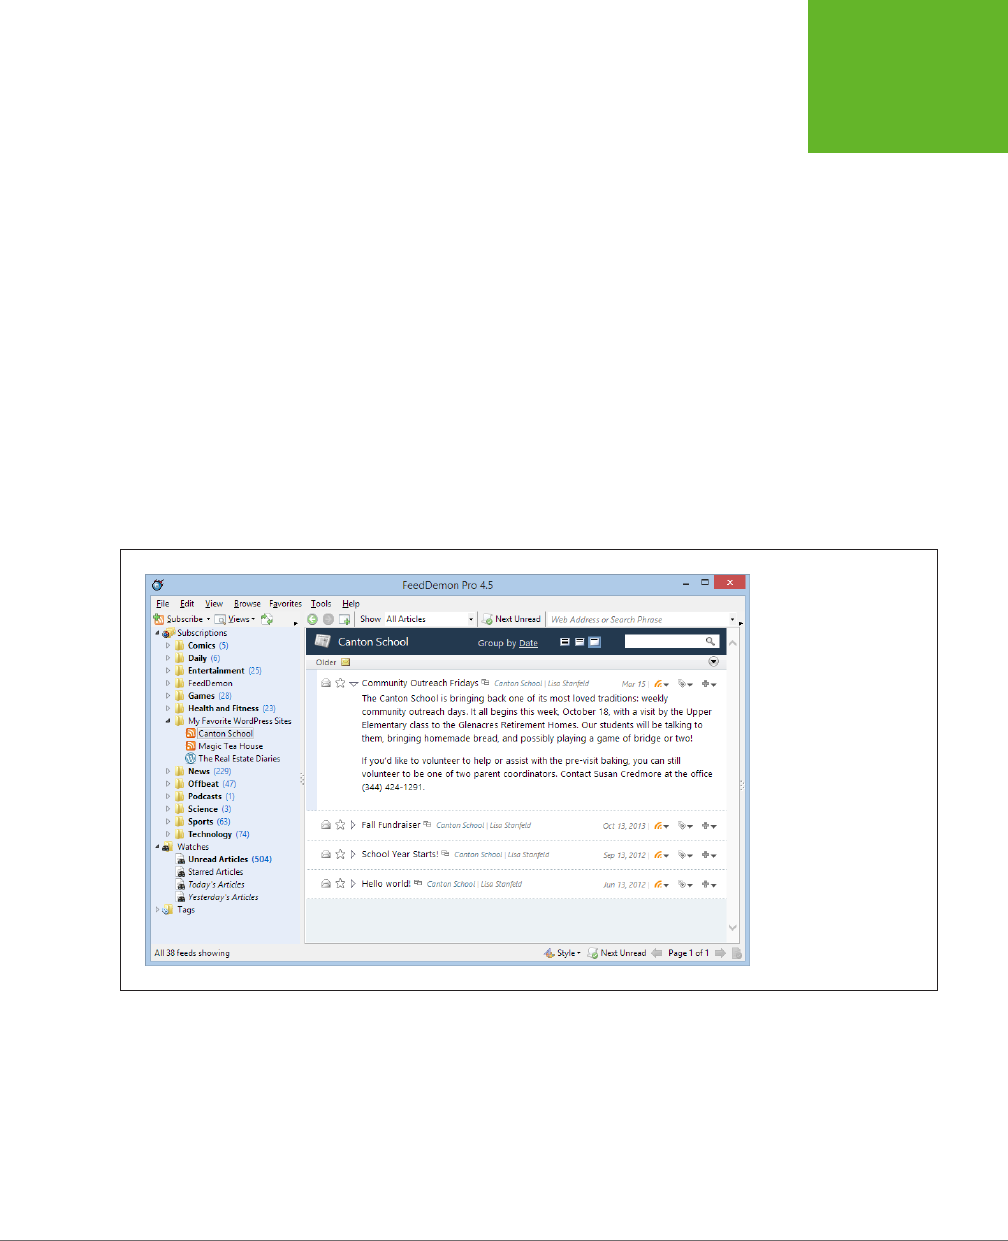
CHAPTER 12: ATTRACTING A CROWD 435
MANAGING
YOUR SITE’S
FEED
Most browsers provide some sort of feed-reading feature. For example, Internet
Explorer keeps a list of the feeds you bookmark in the Feeds tab of the Favorites
panel. Point to one of these links, and it automatically tells you how many new posts
have been published since your last visit. Firefox has a slightly dierent feature—
subscribe to a feed and it adds a
live bookmark
that automatically collects every
new post behind the scenes. Google Chrome works similar magic with a tiny icon
in the search box that, when you click it, pops open a list of new posts (however,
you have to install a small browser extension to activate it; find it at
http://tinyurl.
com/28q8dth
). Safari is the lone holdout, with no built-in feed reader.
To make reviewing feeds truly convenient, you can use a specialized feed-reading
program (or a feed-reading app, if you want to check feeds on a smartphone or
tablet). Good options include FeedDemon (
www.feeddemon.com
, Figure 12-16) for
Windows and NetNewsWire (
http://netnewswireapp.com
) for Mac addicts. Tablet
lovers can use feed-reading apps like Flipboard (
http://flipboard.com
) and feedly
(
www.feedly.com
) to stay current. All these programs let you read posts right inside
your feed reader, without making a separate trip to the website that publishes the
feed.
FIGURE 12-16
In a feed-reading pro-
gram, you see all the new
posts for all the sites you
follow. With FeedDemon,
it’s like checking your
inbox for new email.
Getting Customized Feeds
Adding
/feed
to the end of a site address gets you the standard feed, the one with
all the site’s posts. But you can filter a feed if you tweak the web address slightly.
For example, you can get a feed that provides all the posts in a specific category,
like this:
http://www.magicteahouse.net/category/green-tea/feed

WORDPRESS: THE MISSING MANUAL
436
MANAGING
YOUR SITE’S
FEED
Or all the posts with a certain tag:
http://www.magicteahouse.net/tag/promotions/feed
Or all the posts by a specific author:
http://www.magicteahouse.net/author/katya_g/feed
But the most interesting type of feed just might be the one that grabs the comments
from a post (on crystal jasmine tea in this example):
http://www.magicteahouse.net/crystal-jasmine-named-tea-of-the-year/feed
Or the comments from your entire site:
http://www.magicteahouse.net/comments/feed
Try plugging all these variations into a feed reader to see what posts show up. Or
check out the WordPress feed documentation at
http://tinyurl.com/64lmdo
to
learn about a few more exotic feed filters, such as the ones that exclude a specific
category or tag, and those that return all the posts that match a search keyword.
Using a Feed Widget
Here’s a universal truth of the web publishing world: Even if your site supports a
feed, visitors aren’t likely to subscribe to it unless you display a big, fat Feed button.
Some themes automatically include one. Usually, it looks like an orange-colored
square with radiating semi-circles that suggest transmission (see Figure 12-17). If
your theme doesn’t oer a Feed button—and the standard WordPress year themes
don’t—you can add one using the RSS Links widget, which is available to all Word-
Press.com sites and included with Jetpack. (If you’re wondering, RSS is the name
of the standard that feeds must follow.)
FIGURE 12-17
When you add a Feed button to your site, it tells readers they can
easily keep up with your posts. Clicking the button launches your feed
document, although this isn’t much help unless you click that button in
a feed-supporting browser, or copy the link to a genuine feed reader,
like FeedDemon.
When you add the RSS Links widget, you need to choose whether to include a link
for the posts feed, the comments feed, or both. If you want a more specialized feed,
like one for a specific category, you need to create the link yourself and put it in the
Text widget (page 166).

CHAPTER 12: ATTRACTING A CROWD 437
SEARCH
ENGINE
OPTIMIZATION
You also need to choose the format for the feed button (text only, image only, or
image and text). If you use an image, you need to specify its size and color. Once
you finalize these details, you’ll be rewarded with a button like the medium-sized
text-and-image link shown in Figure 12-17.
NOTE Don’t confuse the RSS Links widget with the similarly named but completely different RSS widget.
The RSS Links widget provides links to your feeds. The RSS widget looks at someone
else’s
feed, finds the most
recent entries, and displays links for them on your site. In other words, the RSS Links widget tells visitors that your
website provides feeds. The RSS widget lets you display links on your site that lead to someone else’s content.
Search Engine Optimization
As you’ve seen, you have an exhaustive range of options for getting the word out
about your site. You can share your posts, publicize them, use email notifications,
and tweet the heck out of everything. All these techniques share something in com-
mon—each one is a type of
social networking,
where you use connections to people
you already know to reach out just a bit further.
There’s another way to get people to your site, but it’s more dicult and less fun.
You can try to attract complete strangers when they run a web search for content
related to your site. To perform this trick, you need to understand
search engine
optimization
(SEO), which is the sometimes cryptic art of getting web search engines
like Google to notice you.
The goal is to make your site appear in a highly ranked position for certain searches.
For example, if your WordPress site covers dog breeding, you’d like web searchers
to find your site when they type
dog breeding
into Google. The challenge is that
for any given search, your site competes with millions of others that share the same
search keywords. If Google prefers those sites, your site will be pushed farther down
in the search results, until even the most enthusiastic searcher won’t spot you. And
if searchers can’t find you on Google, you lose a valuable way to attract fresh faces
to your site.
Next, you’ll learn a bit more about how search engines like Google work, and you’ll
consider how you can help your site rise up the rankings of a web search.
NOTE In the following sections, you spend a fair bit of time learning about Google. Although Google isn’t
the only search engine on the block, it’s far and away the most popular, with a staggering 80 percent (or more)
of worldwide web-search traffic. For that reason, it makes sense to consider Google first, even though most of the
search engine optimization techniques you’ll see in this chapter apply to all the major search engines, including
Bing, Yahoo, and even Baidu, the kingpin of web search in China.

WORDPRESS: THE MISSING MANUAL
438
SEARCH
ENGINE
OPTIMIZATION
PageRank: Scoring Your Site
To help your site get noticed, you need to understand how Google runs a web search.
Imagine you type
dog breeding
into the Google search page. First, Google peers
into its gargantuan catalog of sites, looking for pages that use those keywords.
Google prefers pages that include the keywords “dog breeding” more than once,
and pages that put them in important places (like headings and page titles). Of
course, Google is also on the lookout for sites that try to game the system, so a
page that’s filled with keyword lists and repetitive text is likely to get ignored at
best, and blacklisted at worst.
Even with these requirements, a typical Google search turns up hundreds of thou-
sands (or even millions) of matching pages. To decide how it should order these
pages in its search results, Google uses a top-secret formula called
PageRank.
PageRank determines the value of your site by the community of websites that
link to it. Although the full PageRank recipe is incredibly convoluted (and entirely
secret), its basic workings are well known:
• The more sites that link to you, the better.
• A link from a better, more popular site (a site with a high PageRank) is more
valuable than a link from a less popular site.
• A link from a more selective site is better than a link from a less selective site.
That’s because the more outgoing links a site has, the less each link is worth. So
if someone links to your site and just a handful of others, that link is valuable. If
someone links to your site and
hundreds
of other sites, the link’s value is diluted.
FINDING YOUR PAGERANK
Because of the power of PageRank scores, it’s no surprise that web authors want
to know how their pages are doing. But Google won’t give out the real PageRank
of a web page, even to its owner.
That said, Google does allow website owners to see a
simplified
version of their
PageRank score, which gives you a general idea of your site’s performance. The
simplified PageRank is based on the real thing, but Google updates it just twice a
year, and it provides only a value from 1 to 10. (All things being equal, a website rated
10 will turn up much higher in search results than a page ranked 1.)
There are two ways to find your website’s simplified PageRank. If you use the Google
Chrome browser, you can add a handy browser plug-in to do the job (get it at
http://
tinyurl.com/pr-extension
). Another approach is to use an unocial PageRank-
checking website, like
www.prchecker.info
(Figure 12-18).
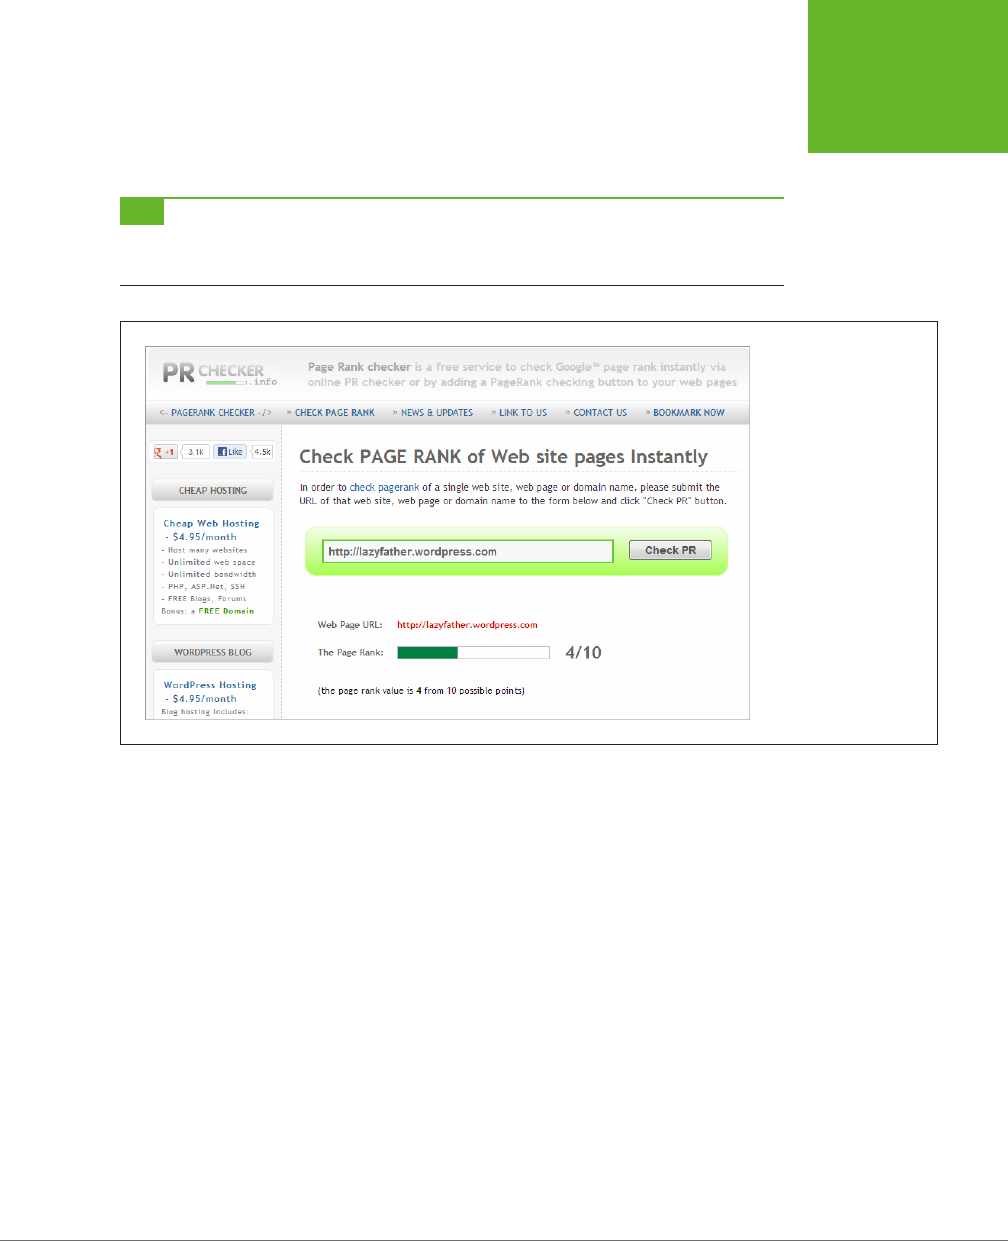
CHAPTER 12: ATTRACTING A CROWD 439
SEARCH
ENGINE
OPTIMIZATION
The simplified PageRank score isn’t always accurate. If you submit a site that’s very
new, or hasn’t yet established itself on the Web (in other words, few people are
visiting it and no one’s linking to it), you may not get a PageRank value at all.
TIP Don’t worry too much about your exact PageRank. Instead, use it as a tool to gauge how your website
improves or declines over time. For example, if your home page scored a PageRank of 4 last year but a 6 this
year, your promotion is clearly on the right path.
FIGURE 12-18
To see the PageRank for
your home page, type
in your site’s address
and then click Check PR.
Here,
http://lazyfather.
wordpress.com
scores
a middle-of-the-road 4
out of 10.
Making Your Site Google-Friendly
You can’t trick Google into loving your site, and there’s no secret technique to vault
your site to the top of the search page rankings. However, you can give your site
the best possible odds by following some good habits. These practices help search
engines find their way around your posts, understand your content, and recognize
that you’re a real site with good content, not a sneaky spammer trying to cheat the
system.

WORDPRESS: THE MISSING MANUAL
440
SEARCH
ENGINE
OPTIMIZATION
UP TO SPEED
Getting More Links
The cornerstone of search-engine ranking is links—the more
people connect to you, the greater your web prestige and the
more trustworthy your site seems to Google. Here are some
tips any WordPresser can use to build up her links:
• Look for sites that are receptive to your content. To get
more links, you need to reach out and interact with other
websites. Offer to guest-blog on a like-minded site, join a
community group, or sign up with free website directories
that include your type of business. Or, if your site has a
broader reach, search for your topic in Google Blogsearch
(
http://blogsearch.google.com
) to find similar sites.
• Keep sharing. The social sharing techniques you learned
about in the first part of this chapter are doubly important
for PageRank. Although tweets and Likes aren’t as
powerful as website links, Google still counts them in your
favor when respected people talk about your content on
social media sites.
• Add o-site links (that point to you). You don’t need to
wait for other people to notice your content. It’s perfectly
acceptable to post a good comment on someone else’s
blog, with a link that references something you wrote.
Or post in a forum, making sure your signature includes
your name
and
a link to your site. The trick is to find sites
and forums that share the same interests as your site. For
example, if you’re an artisanal cheese maker in Chicago,
it makes sense to chat with people running organic food
cooperatives. But be careful. There’s a thin line between
spreading the word about your fantastic content and
spamming other people. So don’t post on a forum or
someone else’s site unless you can say something truly
insightful or genuinely helpful. If you’re not sure whether
to post, ask yourself this question: “If this were my site,
would I appreciate this comment?”
• Research your competitors’ links. If you find out where
other people are getting their links from, you may be able
to get links from the same sites. Google has a nifty feature
that can help, called
link.
To try it out, go to the Google
search page and type in a full website address, with
link:
in front of it. Google will then find other pages that lead to
the web address you asked about. For example, searching
for
link:www.magicteahouse.net
shows you all the sites
that link to the home page on
www.magicteahouse.net
.
Here are some guidelines to SEO that don’t require special plug-ins or custom coding:
• Choose the right permalink style. Every WordPress post and page gets its own
permalink. If you create a self-hosted site, your permalinks should include the
post title, because the search engine pays special attention to the words in your
web address. (Page 117 explains how to change your permalink.) If WordPress.
com hosts your site, you already have the right permalink style.
• Edit your permalinks. When you first create a post, you have the chance to
edit its permalink. At this point, you can improve it by removing unimportant
words (like “a”, “and,” and “the”). Or, if you use a cute, jokey title for your post,
you can replace it in the permalink with something more topical that includes
the keywords you expect web searchers to use. For example, if you write a post
about your favorite cookware titled “Out of the Frying Pan and Into the Fire,”
you ordinarily get a permalink like this:
http://triplegoldcookwarereview.com/
out-of-the-frying-pan-and-into-the-fire
. If you remove some words, you can
shorten it to
http://triplegoldcookwarereview.com/out-of-frying-pan-into-fire
.

CHAPTER 12: ATTRACTING A CROWD 441
SEARCH
ENGINE
OPTIMIZATION
And if you substitute a more descriptive title, you might choose
http://triple-
goldcookwarereview.com/calphalon-fry-pan-review
.
• Use tags. Google pays close attention to the tags you assign to a post. If they
match a web searcher’s keywords, your post has a better chance of showing
up in search results. When choosing tags, pick just a few, and make sure they
clearly describe your topic and correspond to terms someone might search for
(say, “artisanal cheese,” “organic,” and “local food”). Some search-obsessed
bloggers scour Google statistics to find the best keywords to use in attracting
web searchers, and use those as their tags in new posts. However, that’s too
much work for all but the most fanatical SEO addicts.
• Optimize your images. Google and other search engines let people search for
pictures. When someone searches for an image, Google attempts to match the
search keywords with the words that appear near the picture on a web page,
and with the alternate text that describes the picture. That means people are
more likely to find your pictures if you supply all the details the Insert Media
window asks for, including a title, alternate text, a caption, and a description
(page 182). Remember to use descriptive, searchable keywords when you do.
GEM IN THE ROUGH
Hiding from Search Engines
You don’t
have
to let search engines find you. If you want to
keep a low profile, choose Settings→Privacy, and then turn
on the radio button beside “Ask search engines not to index
this site.” That way, your website won’t appear in most search
engine listings.
People will still be able to find you if they click a link that
leads to your site, or if they know your site address. For that
reason, you shouldn’t rely on this trick to conceal yourself if
you’re doing something dubious or risky—say, planning a bank
robbery or cursing your employer. In cases where you need
utmost privacy, you can use WordPress’s private site feature
(page 397), or just keep yourself off the Web.
Boosting SEO with a Plug-In
If you run a self-hosted site, you can make it even more attractive to Google and
other search engines by using an SEO plug-in. But be warned, most SEO plug-ins
are an extreme case of overkill for the casual WordPress site-builder. Prepare to be
swamped by pages of options and search settings.
If you search WordPress’s plug-in repository for “SEO,” you discover quite a few
popular plug-ins. One of the best is WordPress SEO by Yoast (
http://tinyurl.com/
seo-yoast
). Its creator is WordPress über-guru Joost de Valk, who also blogs some
useful (but somewhat technical) SEO articles at
http://yoast.com/cat/seo
.
Once you install and activate WordPress SEO, you see a new SEO menu in your
dashboard, packed with a dizzying array of options. You can ignore most of them,
unless you want to change the way the plug-in works. The following sections explain
two useful features you can tap into right away.
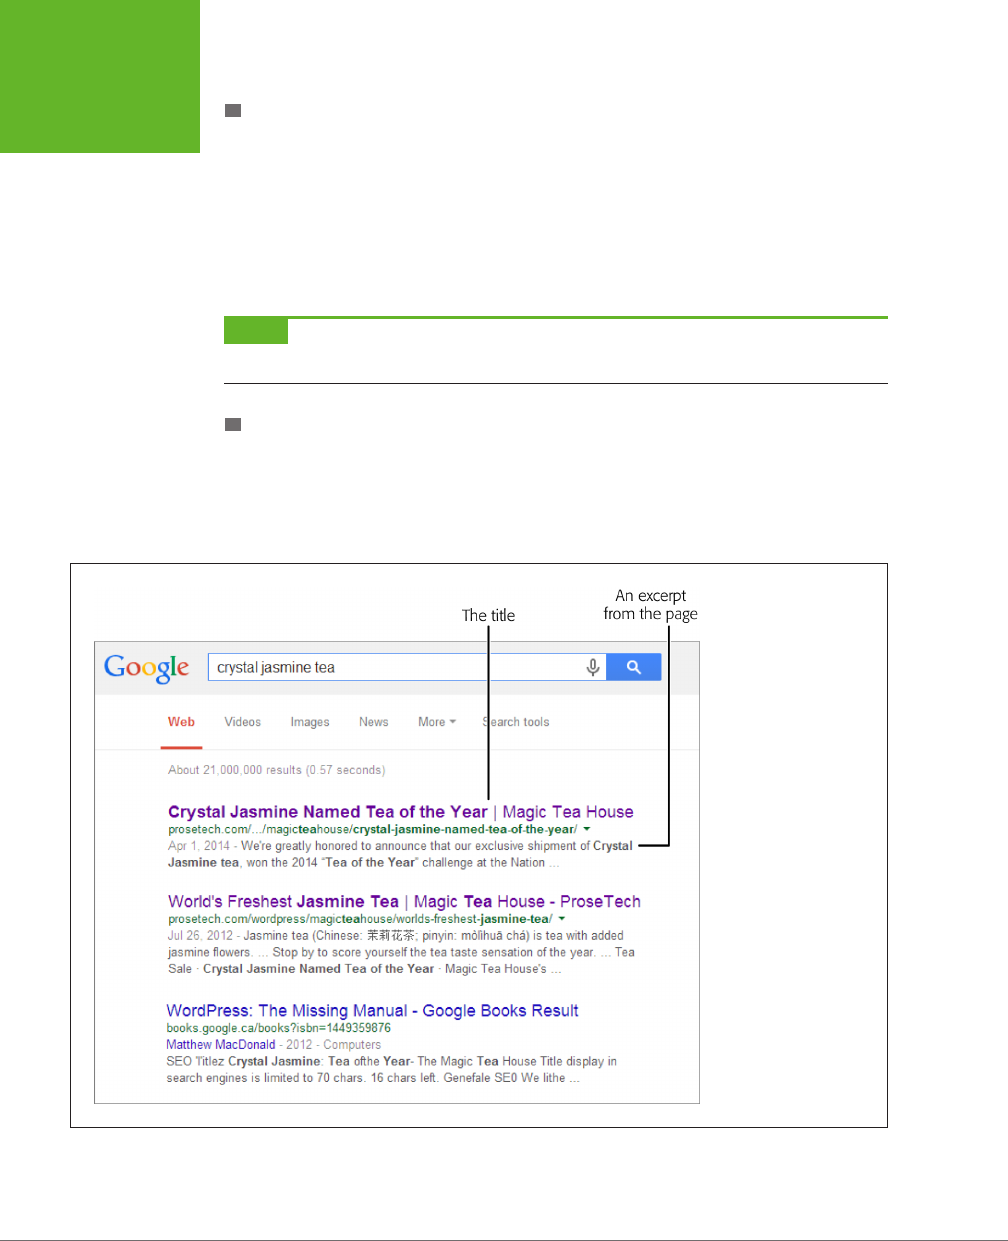
WORDPRESS: THE MISSING MANUAL
442
SEARCH
ENGINE
OPTIMIZATION
CREATING AN XML SITEMAP
After installing the SEO plug-in, your site gets one immediate benefit: an
XML
sitemap.
This is a document that tells Google where your content resides on your
site. It ensures that all your posts get indexed, even if your home page doesn’t link
to them. Although you don’t need to give your XML sitemap another thought, you
can take a look at it by choosing SEO→XML Sitemaps and then clicking the XML
Sitemap button. Needless to say, WordPress SEO updates your sitemap every time
you publish a new post or page.
NOTE The XML sitemap feature works only if you use descriptive permalinks that include post names (as
explained on page 116). If you use the stock ID-based permalinks, the plug-in won’t create an XML sitemap.
TWEAKING TITLES AND DESCRIPTIONS
The WordPress SEO plug-in also gives you control over two important details: the
title and description (known to web nerds as the
meta description
) of each post or
page. These details are useful—even to SEO newbies—because Google displays them
when it lists a page from your site in its search results. Figure 12-19 shows an example.
FIGURE 12-19
Google displays the
title of a relevant web
page with every search
result—technically, that’s
the content in the HTML
<title> tag. Below that, it
includes an excerpt from
the page (as shown here)
or the meta description
(if the description is
available and it matches
the search keywords).

CHAPTER 12: ATTRACTING A CROWD 443
SEARCH
ENGINE
OPTIMIZATION
The title and description are also important because Google gives more weight to
keywords in those places than keywords in your content. In other words, if someone
searches for “dog breeding” and you have those words in your title, you can beat
an equally ranked page that doesn’t.
Ordinarily, the WordPress SEO plug-in creates a good title for a post, based on a
title-generating formula in the SEO→Titles & Metas section. This formula puts your
post name first, followed by your site name, like this for the “crystal jasmine” post:
Crystal Jasmine Named Tea of the Year - Magic Tea House
However, you can customize the title before you publish the post using the Word-
Press SEO by Yoast box, which appears on the Add New Post page (Figure 12-20).
For example, it’s a good idea to shorten overly long post titles, and to replace cutesy
titles with ones that clearly describe your content. You can also use the WordPress
SEO box to type in a meta description.
FIGURE 12-20
In this example, the post
has a new title and a
meta description. The
WordPress SEO by Yoast
plug-in previews what
the page will look like in
a Google search result.
Compare it with the
original version in Figure
12-19.
The WordPress SEO by Yoast box also lets you run a pretend Google search so you
can see how your newly chosen title and description work. To do that, type the search
keyword you want to test in the Focus Keyword box. Figure 12-21 shows an example.
TIP For even more ways to optimize your site for search engines using the WordPress SEO by Yoast plug-in,
check out the detailed tutorial at
http://tinyurl.com/seo-yoast2
.
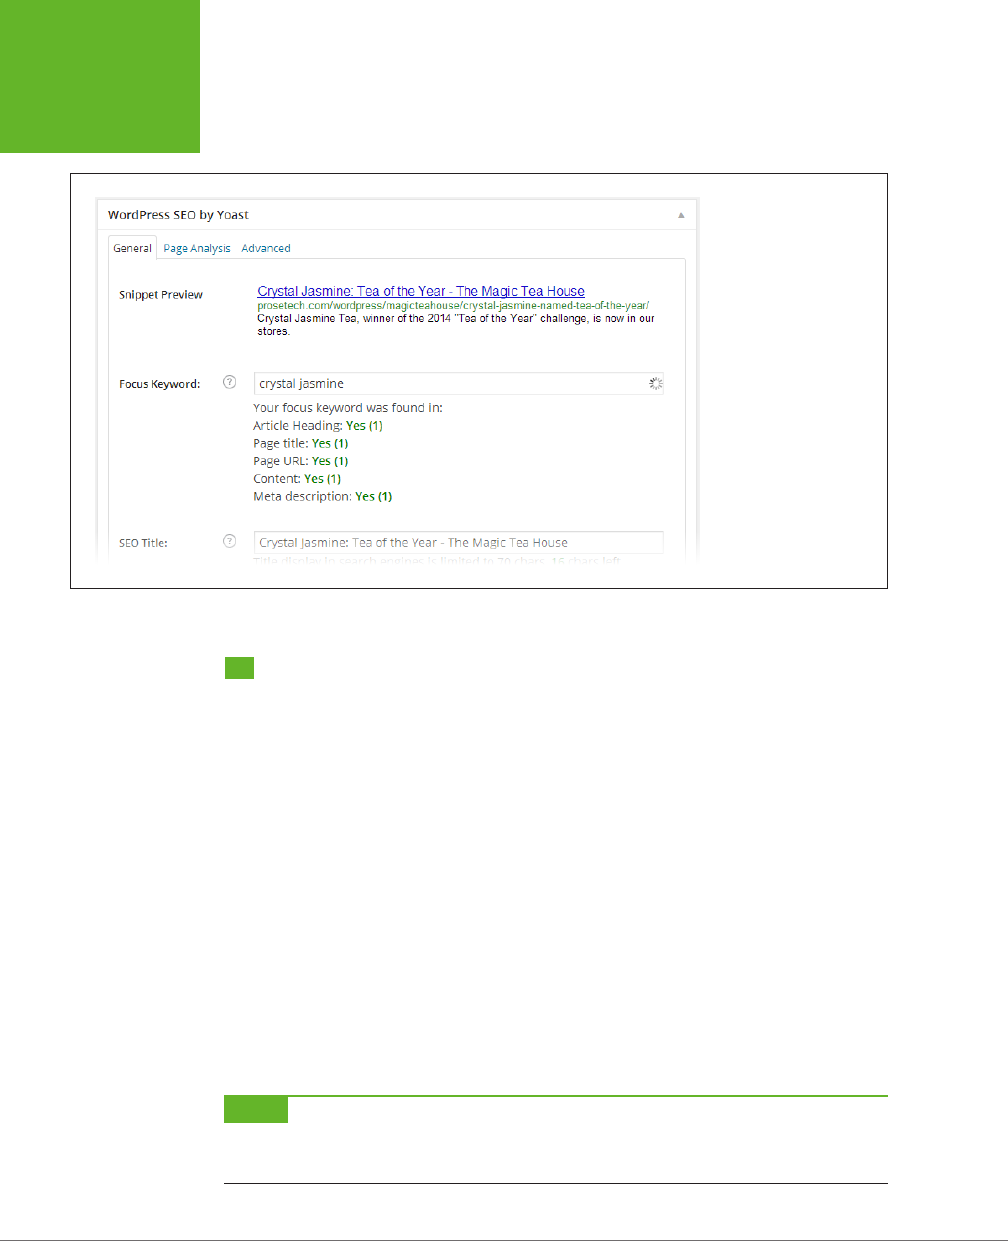
WORDPRESS: THE MISSING MANUAL
444
WORDPRESS
SITE
STATISTICS
FIGURE 12-21
Because you included
the keywords “crystal
jasmine” in the heading
of your post, the title of
your page, the permalink,
the actual post content,
and your meta descrip-
tion for the page, you
increase the odds that
a visitor searching for
these words will find your
page. Of course, all these
efforts are for naught
if you haven’t written a
decent post.
WordPress Site Statistics
Once you have some solid promotion tactics in place, you need to evaluate how well
they perform. There’s no point in pursuing a failed strategy for months, when you
should be investing more eort in a technique that actually
works.
The best way
to assess your site’s performance, and see how it changes over time, is to collect
website statistics.
There are a number of popular statistics packages that work with WordPress, and
a range of plug-ins that automatically add tracking code to your site. In this sec-
tion, you’ll focus on WordPress’s own statistics-collection service, which it oers
to all WordPress.com sites and which is available to self-hosted sites through the
Jetpack plug-in.
Viewing Your Statistics
The best place to view your site statistics is on the WordPress.com home page. Go
to
http://wordpress.com
, log in, and click the Stats tab. If you have more than one
site, you need to pick from the drop-down list in the top-right corner (Figure 12-22).
NOTE Jetpack users can see the same statistics by choosing Jetpack→Site Stats in the dashboard. However,
WordPress encourages everyone to view statistics on the WordPress.com home page, and it may remove the
statistics link from the dashboard in the future.
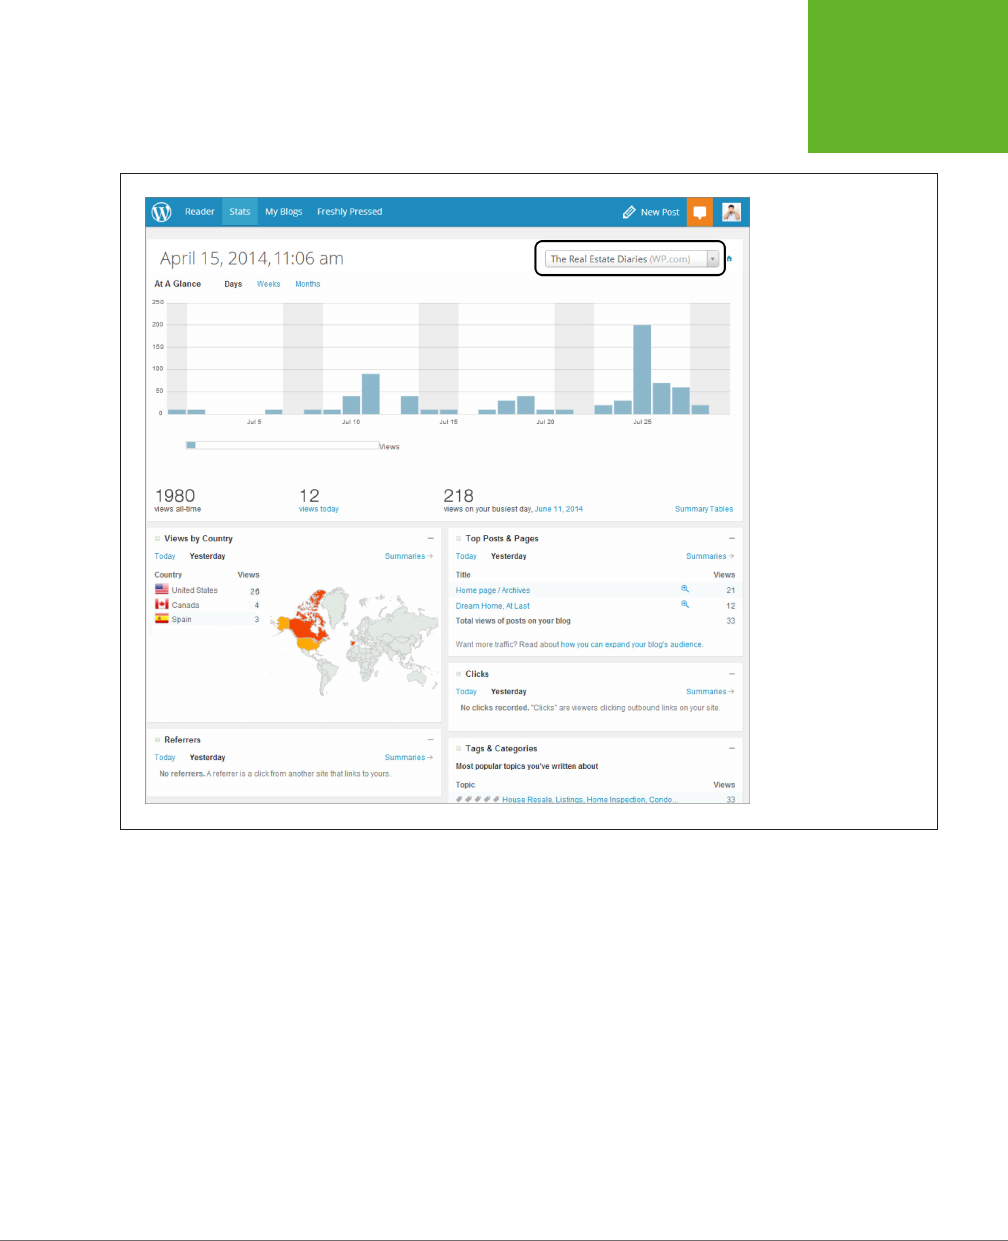
CHAPTER 12: ATTRACTING A CROWD 445
WORDPRESS
SITE
STATISTICS
FIGURE 12-22
There’s a lot of informa-
tion jockeying for your
attention on the Stats tab.
Here are the details for
The Real Estate Diaries
site.
The obvious question is now that you have all this raw data, what can you do with
it? Ideally, you’ll use site statistics to focus on your strengths, improve your site, and
keep your visitors happy. You should resist the temptation to use it as a source of
endlessly fascinating trivia. If you spend the afternoon counting how many visitors
hit your site from Bulgaria, you’re wasting time that could be better spent writing
brilliant content.
The following sections present four basic strategies that can help you find useful
information in your statistics, and use that insight to improve your site without
wasting hours of your time.
Strategy 1. Find Out What Your Readers Like
If you know what you’re doing right, you can do a lot more of it. For example, if
you write a blog with scathing political commentary, and your readers flock to any
article that mentions gun control, you might want to continue exploring the issue in
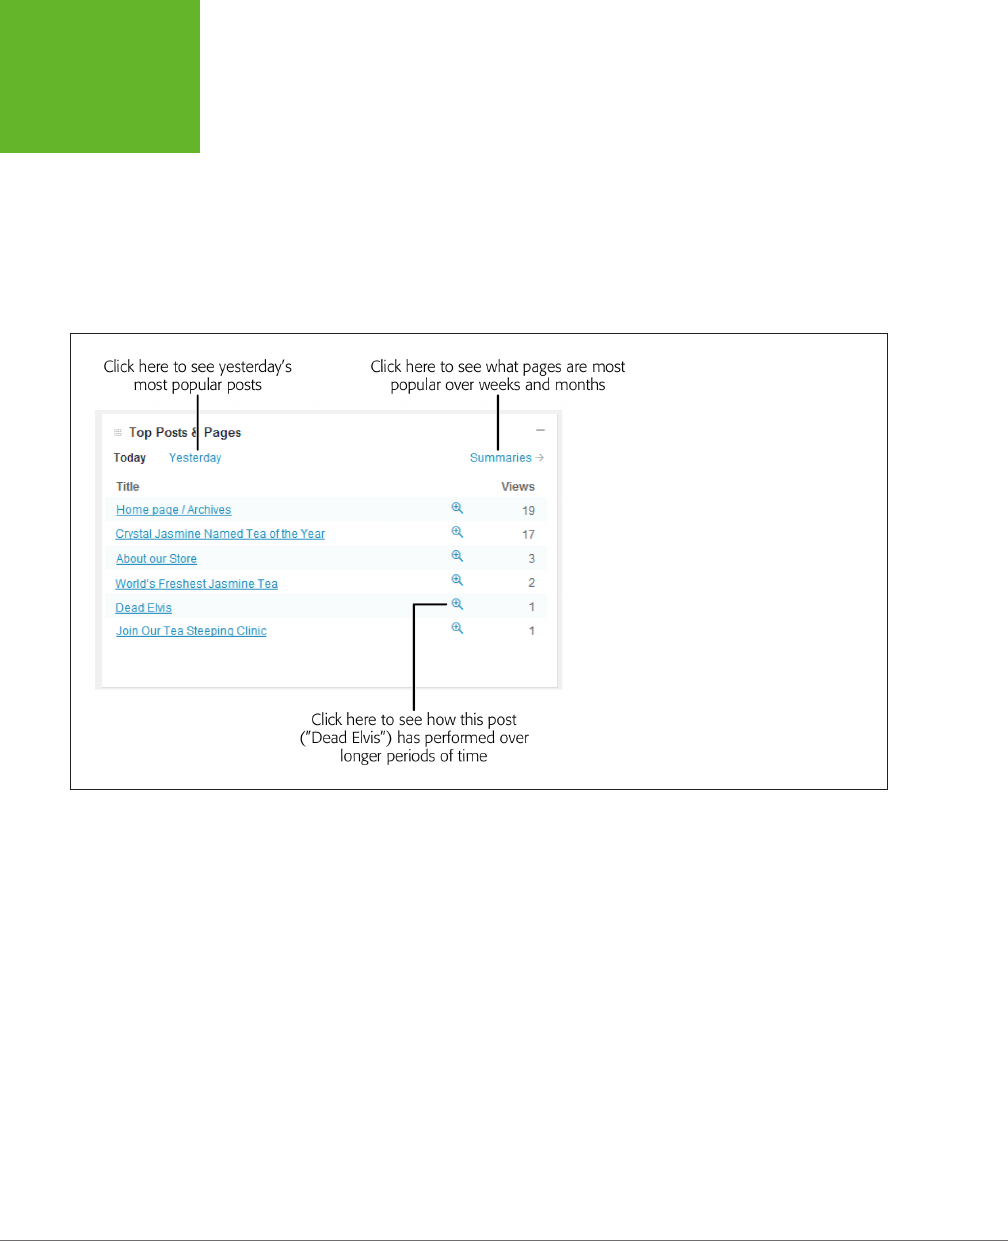
WORDPRESS: THE MISSING MANUAL
446
WORDPRESS
SITE
STATISTICS
future posts. (Or, to put it less charitably, you might decide to milk the topic for all
the pageviews you can get before your readers get bored.)
To make decisions like that, you need to know what content gets the most attention.
A Facebook Like button (page 419), a WordPress.com Like button (page 421), or
Polldaddy ratings (page 423) may help you spot popular posts, but a more thorough
way to measure success is to look at your trac. On the Stats page, focus on the
Top Posts & Pages box, which shows you the most read posts and pages over the
past couple of days (Figure 12-23).
FIGURE 12-23
The Top Posts & Pages box ranks the
most popular parts of your site over a
single day (either today or yesterday,
depending on which link you click). In
this example, the most popular page,
“Home page,” is the list of posts that
visitors see when they first arrive.
The Top Posts & Pages box gives you a snapshot of the current activity on your site,
but to make real conclusions about what content stirs your readers’ hearts, you
need to take a long-term perspective. To do that, click the Summaries link. Now
WordPress lets you compare your top pages over the past week, month, quarter,
year, or all time. Just keep in mind that bigger timeframes are often biased toward
older articles, because they’ve been around the longest.
If you analyze a site on WordPress.com, you can also check out the Tags & Categories
section. It shows you the categories and tags that draw the most interest. You can
form two conclusions from this box: Popular categories may reflect content your
readers want to keep reading, and popular tags may indicate keywords that align
with popular search terms (see Strategy 3 on page 448).

CHAPTER 12: ATTRACTING A CROWD 447
WORDPRESS
SITE
STATISTICS
Strategy 2. Who’s Giving You the Love?
There are three ways a visitor can arrive at your site:
• By typing your address into his browser (or by using a bookmark, which is the
same thing).
• By following a link from another site that points to you.
• By performing a search and following a link in the search results page.
The first type of visitor already knows about you. There’s not much you can do to
improve on that.
The second and third types of visitor are more dicult to predict. You need to track
them so you can optimize your web promotion strategies. In this section, you focus
on the second type of guest. These people arrive at your site from another website,
otherwise known as a
referrer.
If you followed the link-building strategies laid out on page 440, the social sharing
tips from page 414, and the publicizing techniques described on page 427, you’ve
created many dierent routes that a reader can take to get to your site. But which
are heavily traveled and which are overgrown and abandoned? To find out, you need
to check the Referrers box, which ranks the sites where people come from, in order
of most to least popular (Figure 12-24).
FIGURE 12-24
Use the Referrers box to see where your visitors
come from. It shows you the referring sites from a
single day. You can click a specific referrer to get
more information, or you can click Summaries to
examine your top referrers over longer periods of
time.
Once you know your top referrers, you can adjust your promotional strategies. For
example, you may want to stop spending time and eort promoting your site in places
that don’t generate trac. Similarly, you might want to spend more eort cultivating
your top referrers to ensure you keep a steady stream of visitors coming to your site.
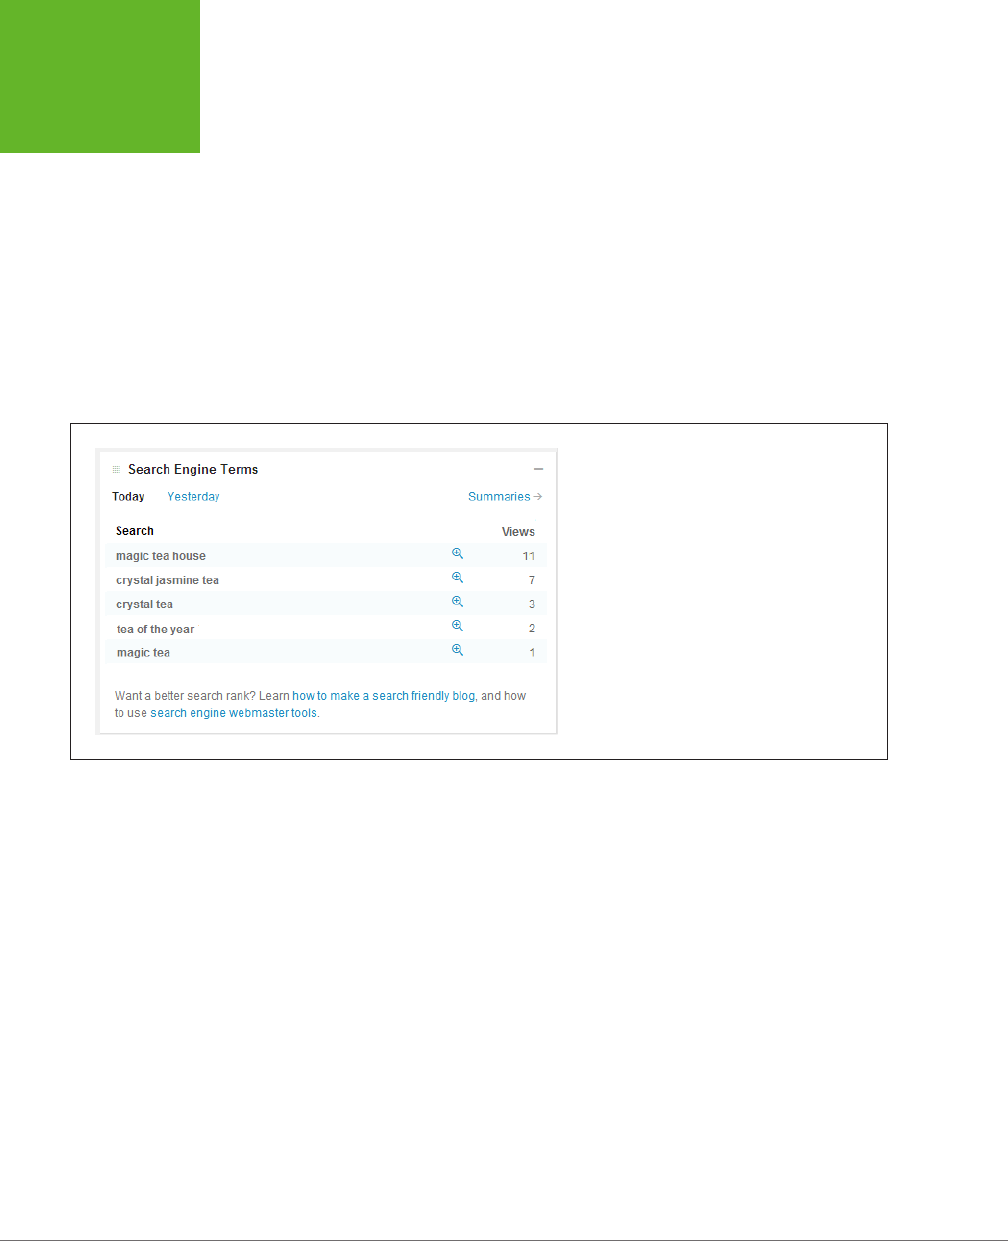
WORDPRESS: THE MISSING MANUAL
448
WORDPRESS
SITE
STATISTICS
Strategy 3. Play Well with Search Engines
In any given minute, Google handles well over a million search queries. If you’re
lucky, a tiny slice of those searchers will end up at your site.
Webmasters pay special attention to visitors who arrive through search engines.
Usually, these are new people who haven’t read your content before, which makes
them exactly the sort of people you need to attract. But it’s not enough to know that
visitors arrive through a search engine. You need to understand what
brought
them
to your site, and to understand that, you need to know what they were searching for.
The Search Engine Terms box can help you find out (Figure 12-25). It lists the top
queries that led visitors to your site for a single day (or, if you click Summaries, over
a longer period of time).
FIGURE 12-25
Here are the keywords that led searchers to the
Magic Tea House. Notice that you may not see the
common, short keywords that you expect (like
“tea,” by itself). That’s because the more general a
keyword is, the more sites there are competing for
that keyword, and the less likely it is that a searcher
will spot your site.
If you use SEO to find what you think are the best keywords for tags, titles, and
descriptions (see, for example, page 443), the Search Engine Terms box helps you
determine if your eorts are paying o. And even if you don’t, it gives you insight
into hot topics that attract new readers—and which you might want to focus on in
the future.
Strategy 4. Meet Your Top Commenters
If WordPress.com hosts your site, you can tap one more set of useful statistics. Take
a look in the Comments box to see which of your visitors left the greatest number
of comments and which posts stirred the most conversation (Figure 12-26).

CHAPTER 12: ATTRACTING A CROWD 449
WORDPRESS
SITE
STATISTICS
FIGURE 12-26
Comments are the lifeblood of a WordPress site.
A site with a thriving Comments section is more
likely to attract new visitors and to keep existing
ones. By examining the Comments box, you can
see who deserves the most credit for keeping your
conversations alive.
The most interesting information is the top commenters. These people are particularly
valuable, because their input can start discussions and keep the conversation going.
Once you identify your top commenters in the past week or month, you can try to
strengthen your (and therefore your site’s) relationship with them. Make an extra
eort to reply to their comments and questions, and consider making a visit to their
blog, and commenting on their posts. If they stick around, you might even oer them
the chance to write a guest post for your site, or to become a contributor.


453
CHAPTER
13
As you’ve traveled through this book, you’ve taken a look at every significant
feature that WordPress oers and used those capabilities to build a variety
of sites. However, you’ve always played by the rules, picking themes from
the theme gallery, installing plug-ins from the plug-in directory, and sticking to the
safety of the WordPress dashboard. But there’s a whole other world of possibilities
for those who can color outside the lines.
The key to unlocking more flexibility and building a truly unique WordPress site is
to create your own theme. As you know, a theme is a mash-up of HTML markup,
formatting rules, and PHP code. Ordinarily, WordPress hides these details from you—
the people who create the themes and plug-ins your site uses handle all this, while
you focus on writing fab content and adjusting settings in the dashboard. But if you
decide to cut loose and become a theme customizer (or even a theme
creator
), you
step into a dierent world. Be forewarned: This world can seem dizzyingly complex.
But you don’t need to understand every detail. Instead, you simply need to find the
parts of a theme you want to change, and work on those.
In this chapter, you’ll start your journey by taking a close look at how themes work,
and you’ll learn how to make small alterations that can have big eects. First, you’ll
try modifying styles. Then, you’ll crack open a theme’s template files to change the
code inside. All this is preparation for the next chapter, where you’ll build a new
theme for a completely customized website.
Editing Themes: The Key
to Customizing Your Site

WORDPRESS: THE MISSING MANUAL
454
THE GOAL:
MORE
FLEXIBLE
BLOGS AND
SITES
The Goal: More Flexible Blogs and Sites
Before you begin fiddling with themes, you need to have a clear idea of
why
you’d
want to do so. In other words, what do you hope to gain by changing a theme that
you can’t get by using a good, preexisting theme with just the right combination of
WordPress settings and plug-ins?
There are several good answers:
• To get something
exactly
the way you want it
• To make your site unique
• To create a site that doesn’t look “bloggy” (see the next section)
Custom themes are the key to unlocking WordPress and to building any sort of
website you can imagine. Your task might not be easy, but custom themes make
it
possible
.
NOTE Often, WordPressers first delve into a theme to make a tiny alteration. But they rarely stop there.
The ability to transform a site, often by changing just a single style rule or modifying a single line of code, is
addictive. If you catch the bug, you’ll want to customize every theme you touch, and you won’t be able to rest
until you get exactly what you want for your site.
WordPress Sites That Aren’t Blogs
One reason to customize a theme is to create a site that looks and feels less like a
blog (see the box on page 456). Most WordPress sites have some characteristics
that make them feel more bloggish and less like the sort of complex, traditional
websites that rule the world of business and ecommerce. For example, WordPress
sites usually display dated posts in reverse-chronological order. But what if you want
to build a product showcase where the posts are actually product profiles, and you
don’t want those profiles to include any date information at all?
Another limitation is the fact that WordPress treats all posts the same way. But what
if you want to create an e-magazine with a custom-made home page for each news
category you cover (Sports, Current Aairs, Lifestyle, and so on)? You can’t make
those kinds of changes unless you’re willing to step away from WordPress’s blog
origins and customize your theme. Do that, and you can build a WordPress site that
behaves like almost any other type of site you see on the Web.
But before you get there, you need to learn a bit more about the way WordPress
themes work—and lucky for you, that’s the point of this chapter. Figure 13-1 shows the
final goal—a completely customized website, which you’ll learn to build in Chapter 14.
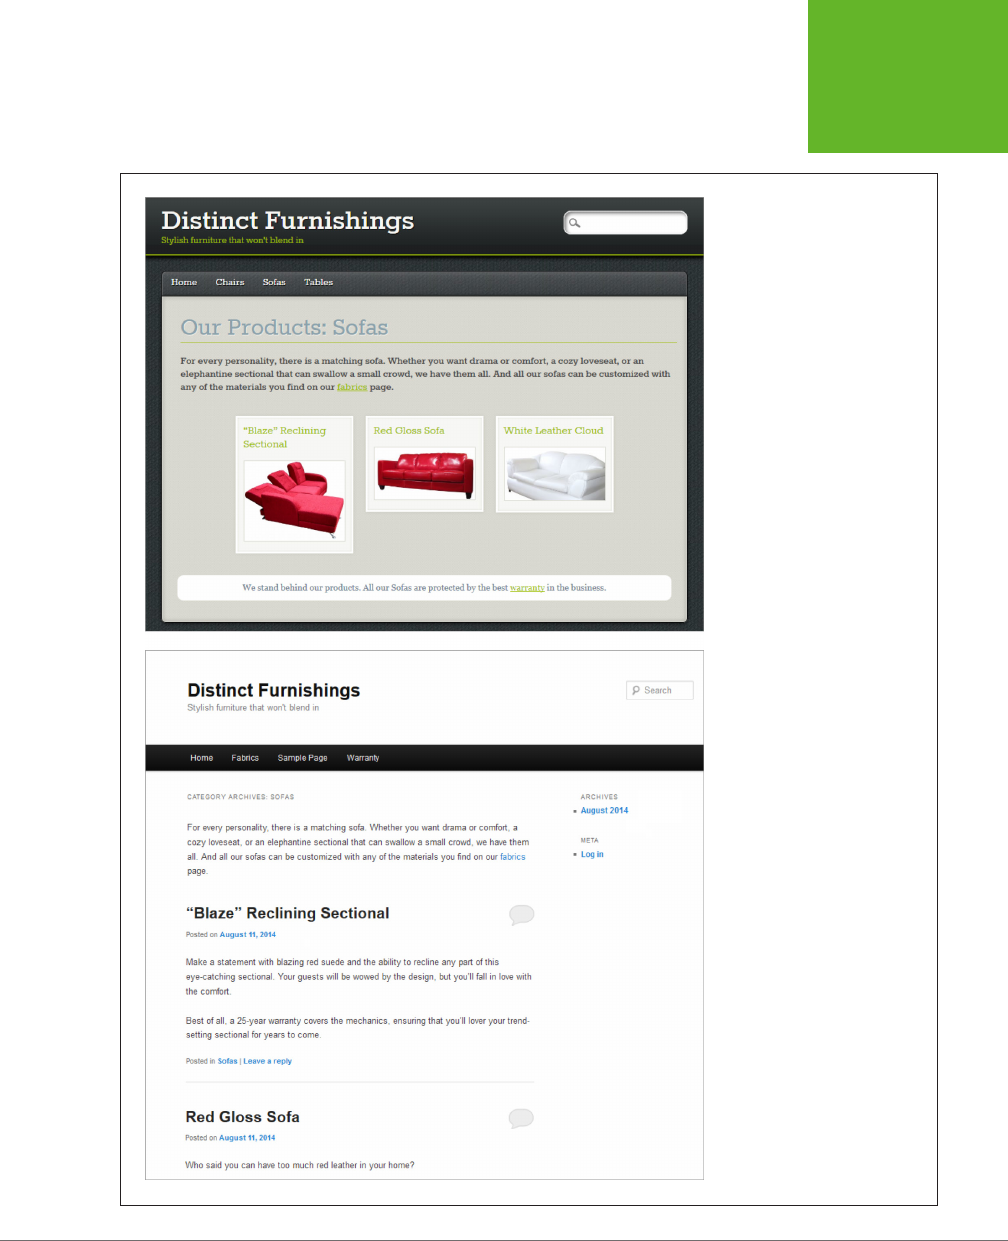
CHAPTER 13: EDITING THEMES: THE KEY TO CUSTOMIZING YOUR SITE 455
THE GOAL:
MORE
FLEXIBLE
BLOGS AND
SITES
FIGURE 13-1
Top: Not many clues tell you that
WordPress’s blogging engine pow-
ers this ecommerce store.
Bottom: Here’s the same site,
without a custom theme. It still
functions (more or less), but it
feels like a blog.

WORDPRESS: THE MISSING MANUAL
456
THE GOAL:
MORE
FLEXIBLE
BLOGS AND
SITES
UP TO SPEED
When Is a Blog Not a Blog?
Originally, WordPress was designed to be the world’s best tool
for building a blog. To most people, the word “blog” (short for
web log
) meant a personal journal made up of dated posts.
No sooner were blogs created than the definition of what a blog
could do started to expand. Bloggers began creating more topi-
cal blogs—ones that provided political commentary, chronicled
cooking exploits, or deconstructed popular television shows.
For the most part, blogs were still intensely personal, but they
were no longer restricted to people’s personal lives.
Since then, the definition of
blog
has continued its aggressive
expansion. Today, blogs aren’t necessarily written by a single
person in the first-person voice. They include sites that were
never described as blogs before—for example, magazine-like
news sites and picture-focused photoblogs or portfolio sites.
Businesses often create “bloggy” sites rather than traditional
websites, especially if they want to build social buzz or em-
phasize news and events. (For example, that hot restaurant
setting up shop down the street might feel, legitimately so,
that a blog is a better way to get people talking than a boring
brochure site.)
This discussion raises an important question: When do blogs
stop being blogs? Most often, you’ll recognize a blog because
it contains dated entries you can read (usually) in reverse-
chronological order, and browse by category or tag. However,
depending on the theme you pick and the content you use,
these blog-like characteristics can be deemphasized to the
point where many people won’t consider your blog a blog
at all. Throughout this book, you’ve seen several examples
of “blogs” that stretch the definition of the word this way,
such as the Canton School site (page 192) and the Pernatch
Restaurant site (page 229).
NOTE If you’re curious to get more ideas for non-bloggish sites that WordPress can create, visit the gallery
of examples at
http://tinyurl.com/9dvpn3y
.
Getting Ready
Before you can move from WordPress-the-blogging-platform to WordPress-the-
site-design-tool, you need to satisfy a few conditions.
First, you need to have a self-hosted WordPress site. WordPress.com doesn’t give
you the ability to edit themes, although it does provide a few carefully limited
theme-customization features, which are outlined in the box on page 457. Handy
as these are, they don’t measure up to the power and flexibility of self-hosted sites,
where you can customize absolutely
anything
—as long as you’re prepared to do a
little detective work to figure out what you need to change.
Second, you need to be ready to crack open the template files that run the Word-
Press show. To understand what’s inside, you should be familiar with the basics of
HTML markup—comfortable enough to find your way through the tangle of angle
brackets and elements that live in every web page. It also helps to know some CSS
(that’s the Cascading Style Sheets standard that formats every modern web page).
If you don’t, you’ll still be able to feel your way around with the introduction you’ll
get in this chapter, but be prepared for a steep learning curve.

CHAPTER 13: EDITING THEMES: THE KEY TO CUSTOMIZING YOUR SITE 457
THE GOAL:
MORE
FLEXIBLE
BLOGS AND
SITES
If your web skills aren’t quite up to snu, here are some good resources that can
help perk them up:
• If you’ve never edited a web page before, or you need to brush up on your HTML
skills, consider
Creating a Website: The Missing Manual
(O’Reilly) which covers
HTML and CSS standards (and plenty more). Or you can read a barebones HTML
tutorial at
http://tinyurl.com/4mwq8
.
• To learn about CSS only, consider
CSS3: The Missing Manual
(O’Reilly). Or you
can try an online CSS tutorial at
http://tinyurl.com/mlqk7
.
NOTE You don’t need to understand
everything
about HTML and CSS to change a WordPress theme. You
can often Google your way to the style rule or PHP code you need to implement a feature you want. You can then
copy and paste that code into the right theme file, without worrying about any other details.
UP TO SPEED
What About WordPress.com?
Self-hosted sites give you free rein to customize your theme,
using all the techniques you’ll study in this chapter and
the next. However, people with WordPress.com sites aren’t
completely left out. If you buy the Custom Design upgrade
(or you have a Premium account, as described on page 359),
WordPress.com gives you a set of useful but more modest
theme-editing features.
To see these features, choose Appearance→Custom Design in
the dashboard menu. It’s worth noting that you can
preview
the
features, even if you haven’t bought the Custom Design upgrade.
While you won’t be able to make any changes to your site, you
will be able to take a look at the options WordPress.com offers
and get a sense of how much control you have over your site’s
appearance.
If you plan to make straightforward changes to your site’s color
scheme or fonts, the Custom Design upgrade shines. That’s
because it lets you point and click your way through recom-
mended color palettes and popular web fonts, making these
types of adjustments utterly painless. But if you want to adjust
other details, like the size of the sidebar or the placement of
the header, you need to write your own style rules. Click CSS on
the Custom Design page to get started (Figure 13-2).
With the help of the Custom Design upgrade, you can make
most of the style tweaks discussed in the first part of this
chapter (starting on page 474). However, you definitely won’t
be able to edit template files, change the PHP code, or build a
complex, custom site like the one demonstrated in Chapter 14.
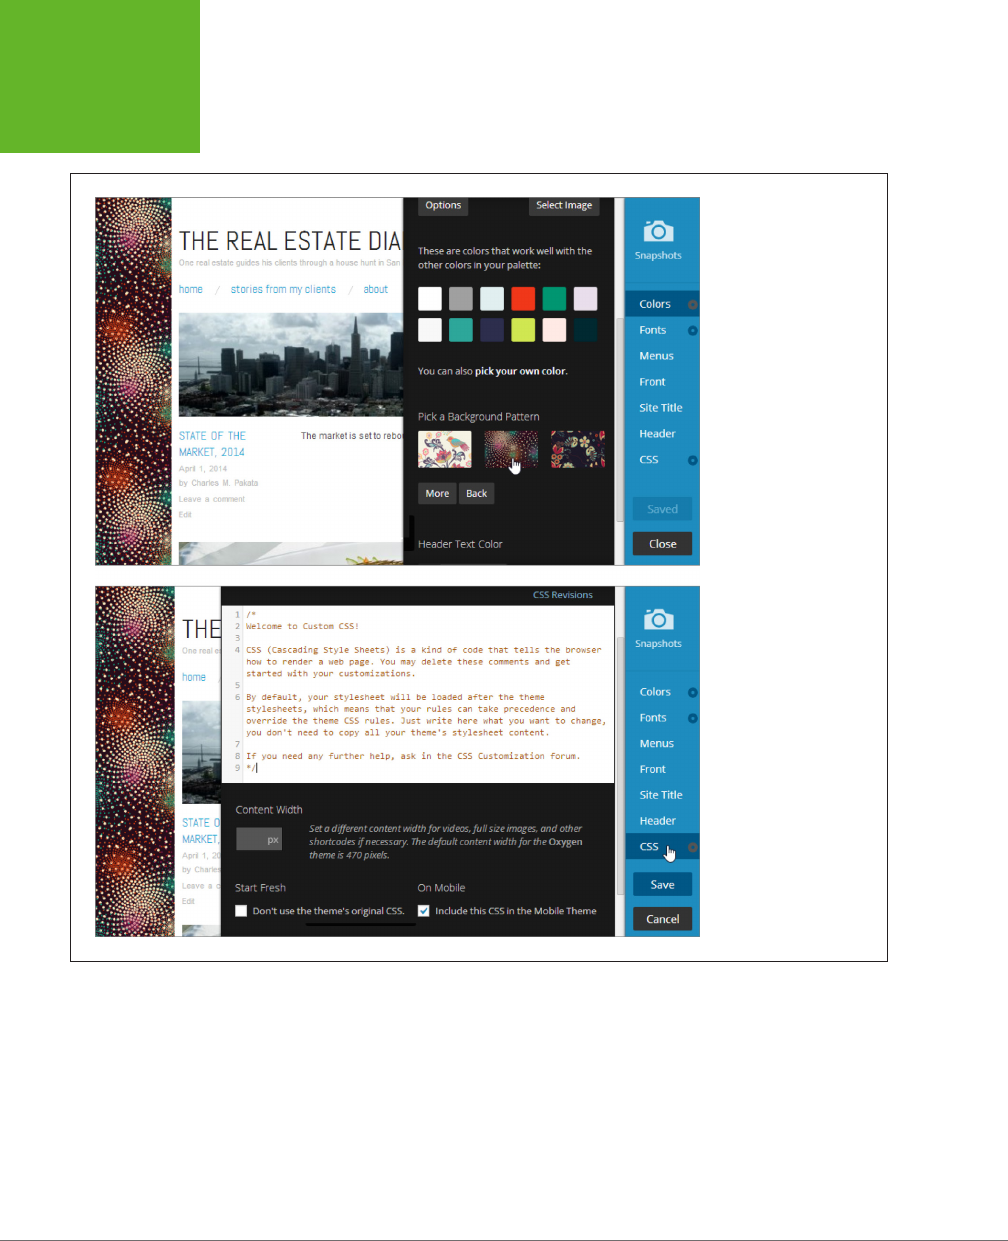
WORDPRESS: THE MISSING MANUAL
458
THE GOAL:
MORE
FLEXIBLE
BLOGS AND
SITES
FIGURE 13-2
Top: WordPress.com’s
Custom Design upgrade
lets you easily change
your site’s colors and
fonts and apply a new
background (like the
multicolored star field
shown here).
Bottom: Choose CSS in the
righthand menu and you
can make more drastic
changes, but you need to
know how to write a good
CSS style rule and what
site element to target.
You’ll learn to do that
starting on page 479.

CHAPTER 13: EDITING THEMES: THE KEY TO CUSTOMIZING YOUR SITE 459
TAKING
CONTROL OF
YOUR THEME
Taking Control of Your Theme
Before you can create a brilliantly customized WordPress theme, you need to know
a bit more about how themes work behind the scenes.
When you first met themes in Chapter 5, you discovered that every theme consists
of a combination of files. These files work together to create all the pages on your
WordPress site, and they fall into three basic categories:
• Style sheets. These files contain style rules that format dierent parts of your
site, such as headlines, sidebar headings, and links. They use the much-loved
CSS standard, which will be familiar to anyone who’s dabbled in web design.
• Templates. These files contain a mix of ordinary HTML and PHP code. Each
template is responsible for a dierent part of your site—for example, there’s
a template for the list of recent posts, the page header, the footer, the single-
post view, and so on.
• Resources. These are other files that your theme’s templates might use, often
to add a bit of pizzazz. Examples include image files, like the one Greyzed used
to create its dirty stone background (page 136), and JavaScript code, like the
stu the Brightpage theme used to run its featured image slideshow (page 192).
At a bare minimum, every theme needs two files: a single style sheet named
style.
css,
which sets the colors, layout, and fonts for your entire site, and a template named
index.php,
which creates the list of posts on your home page. Most themes have a
few more style sheets and many more templates, but you’ll get to that in a moment.
How WordPress Stores Themes
On your WordPress site, the
wp-content/themes
folder holds all your themes. For
example, if your website address is
http://magicteahouse.net
, the Twenty Twelve
theme will be in the following folder:
http://magicteahouse.net/wp-content/themes/twentytwelve
Each theme you install gets its own subfolder. So if you install seven themes on your
website, you’ll see seven subfolders in the
wp-content/themes
folder, even though
you use only one theme at a time.
All of a theme’s style sheets and template files reside inside the theme’s folder (Figure
13-3). Most themes also have subfolders. For example, they might tuck JavaScript
files into a subfolder named
js
and image files into a subfolder named
images.
You
don’t need to worry about these details as long as you remember that themes are
a package of files and subfolders you need to keep together in order for your site
to function properly.

WORDPRESS: THE MISSING MANUAL
460
TAKING
CONTROL OF
YOUR THEME
FIGURE 13-3
Here’s a look inside the
Twenty Twelve theme
folder on your web server,
opened in Windows
Explorer through an
FTP connection. If
you’re handy with an
FTP program, you can
add and remove theme
folders without firing up
WordPress’s dashboard.
Style.css: How a Theme Identifies Itself
The
style.css
file is the starting point for every theme. In most themes, it’s a huge
file packed with formatting instructions. For example, the Twenty Twelve theme’s
style.css
file weighs in with nearly
2,000
lines of formatting magic.
The
style.css
file defines a few essential pieces of information about the style itself,
using a
theme header
at the beginning of the file. Here’s a slightly shortened ver-
sion of the header that starts the Twenty Twelve
style.css
file. Each distinct bit of
information is highlighted in bold:
/*
Theme Name: Twenty Twelve
Theme URI: http://wordpress.org/themes/twentytwelve
Author: the WordPress team
Author URI: http://wordpress.org/
Description: The 2012 theme for WordPress is a fully responsive theme ...
Version: 1.3
License: GNU General Public License v2 or later
License URI: http://www.gnu.org/licenses/gpl-2.0.html
Tags: light, gray, white, one-column, two-columns, right-sidebar, fluid-lay-
out,
...
*/
WordPress brackets the header with two special character sequences: It starts with
/* and ends with */, the CSS comment markers. As a result, browsers don’t pay any
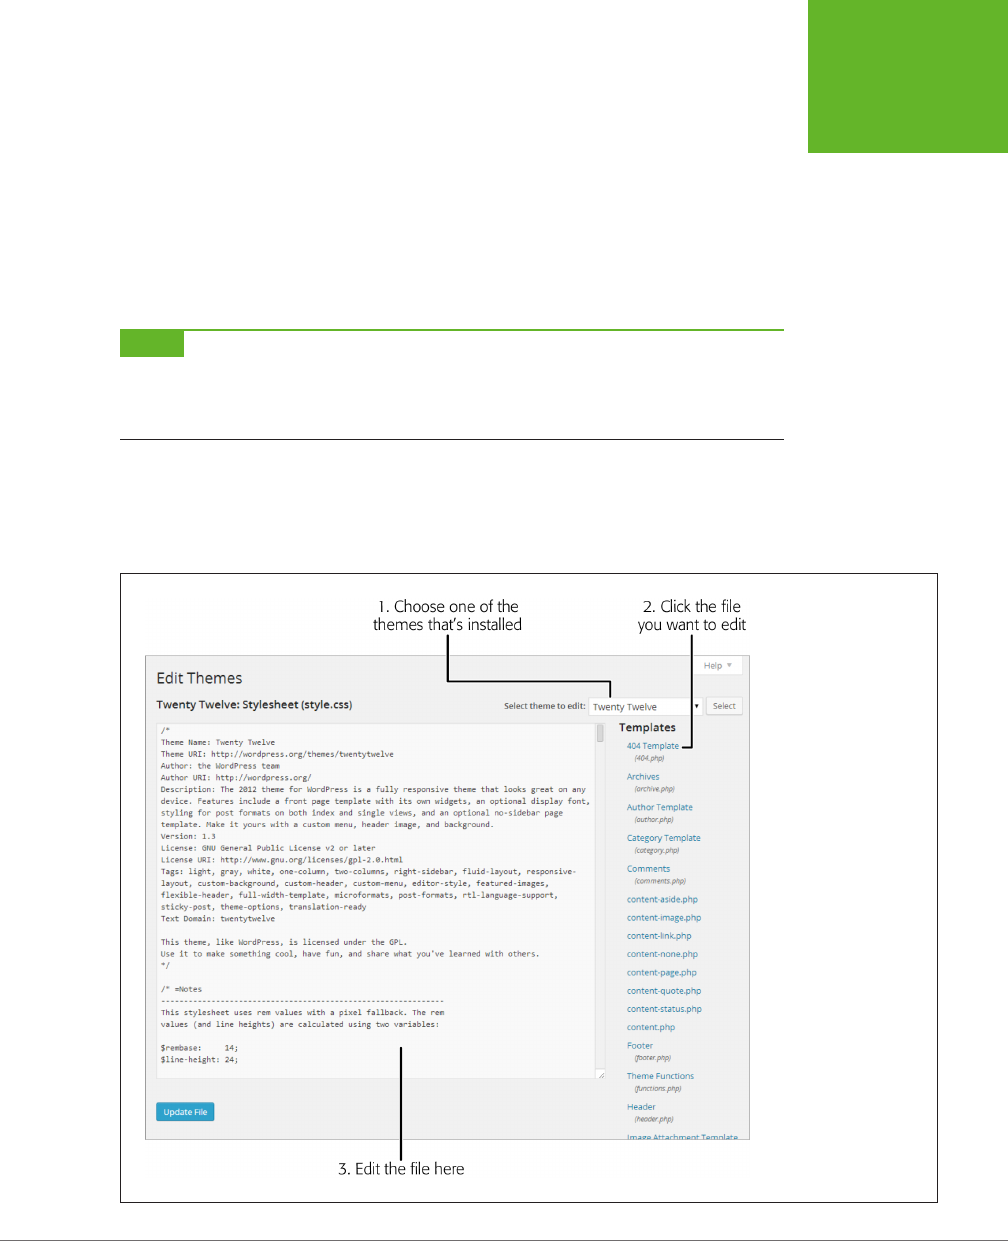
CHAPTER 13: EDITING THEMES: THE KEY TO CUSTOMIZING YOUR SITE 461
TAKING
CONTROL OF
YOUR THEME
attention to the header. But WordPress checks it and extracts the key details. It uses
this information for the theme description you see in the Add Themes page (page
141). It also tracks the version number and checks the theme URL for new versions.
(Although it says “URI” in the theme file, a URI is the same as a URL when you deal
with content on the Web, as in the case of themes.)
If your theme lacks these details, WordPress won’t recognize that it’s a theme. It
won’t show it in the Appearance→Themes section of the dashboard, and it won’t
let you activate it on your site.
NOTE Many themes include style sheets beyond
style.css.
However, these style sheets add extra features or
handle special cases—for example, they provide alternate color schemes, deal with old browsers, handle languages
that write text from right to left, and format the content in the editing box on the Add New Post page so that it
provides the most realistic preview possible.
The Theme Editor
To edit a theme, choose Appearance→Editor in the dashboard. This takes you to the
Edit Themes page, with your theme’s main style sheet,
styles.css,
open (Figure 13-4).
FIGURE 13-4
When you visit the Edit
Themes page, WordPress
automatically opens and
displays your theme’s
style.css
file because it’s
the one people edit most
often. But you can peek
at any other theme file by
clicking the correspond-
ing link on the right.
Templates appear first in
the list, followed by style
sheets (not shown here).
The editor doesn’t display
a theme’s resource files.

WORDPRESS: THE MISSING MANUAL
462
PROTECTING
YOURSELF
WITH A CHILD
THEME
WordPress splits the Edit Themes page into two parts. On the left is a giant text
box where you edit your theme, one file at a time. On the right is a sidebar that lists
all the files in your theme.
Once you finish editing a file in your theme, click Update File to save your changes.
You can then choose a dierent file to edit.
If you want to make extensive changes to a theme, you might not want to do all the
work in the cramped environment of the dashboard. You might prefer to download
your theme files and edit them oine, using a more powerful program. Some web
editing programs, like Dreamweaver, even have built-in theme-editing features for
WordPress.
One way to do this is to pick the file you want to edit, copy its content, and paste it
into a text editor (like Notepad on Windows PCs or TextEdit on Macs). Then, after
you make your changes, copy the edited content back into the editing box on the
Edit Themes page. But if you’re going to edit multiple files, it’s easier to download
the whole theme folder. To do that, browse to your website with an FTP program (as
shown in Figure 13-3) and then drag the theme folder to your computer’s desktop.
When you finish making changes, delete the original folder from your website and
then upload the updated folder from your desktop computer to your site.
WARNING The theme editor can be an unforgiving tool. WordPress does not store past versions of your
theme files, so once you save an edit, there’s no way to restore your site to its previous state. (You can reapply
the original theme from the Themes page, but that wipes out all your theme-editing changes.) To make sure you
don’t run into trouble, get into the habit of making basic, bare-minimum backups. Before you make a big change
to a theme file, copy all the content from the editing box in the Edit Themes page, and paste it into a blank text
file on your computer.
Protecting Yourself with a Child Theme
Before you start mucking around with one of your themes, you should think about the
long-term eects. Someday, probably not long from today, the person who created
the theme you’re editing will release a new and improved version that you’ll want
to use on your site. Here’s the problem: If you install a theme update, you wipe out
all the edits you made to your theme files. Editing themes is enough work without
having to do it over and over again.
Fortunately, there’s a solution. You can create a
child theme,
which takes the current
theme as a starting point and lets you slap your customizations on top of it. You
don’t change the original theme (known as the
parent theme
) at all. Instead, you
selectively edit the templates and style sheets and save those altered files in the
child theme folder. These new files override the same-named templates and style
sheets in the parent theme, so you get the features you want in your site. And when
you update the
parent
theme at some future date, your customizations stay in place,
because WordPress stores the child theme as a separate group of files.

CHAPTER 13: EDITING THEMES: THE KEY TO CUSTOMIZING YOUR SITE 463
PROTECTING
YOURSELF
WITH A CHILD
THEME
When you customize a theme, you should
always
start by creating a child theme.
It’s the safest approach, and the only way to guarantee that your work will survive
future changes.
However, if you want to create a completely
new
theme (rather than customize an
existing one), you need a dierent approach. You might still use an existing theme
as a starting point for your work, but there’s no need to create a child theme. Your
changes will be so significant that future updates and fixes won’t be relevant to
your tricked-out theme.
All the examples in this chapter use child themes. Creating a complete theme on
your own is a significant undertaking for even the best propeller heads among us,
although you’ll get an introduction to the practice in Chapter 14.
Creating a Child Theme
To create a child theme, start by adding a new theme folder in the
wp-content/
themes
section of your website. Name the folder whatever you want. However, un-
like a normal theme folder, you don’t need to fill this folder with files. All you need
to do is put a new
style.css
file inside the folder—one that links itself to the parent
theme via the theme header.
If this sounds like a slightly intimidating challenge, don’t worry. Rather than go
through the hassle of creating the folder for your child theme and creating the
style.
css
file with the right header, you can use a tiny plug-in, called One-Click Child Theme
(
http://tinyurl.com/child-theme
), to help you out. Here’s what to do:
1. Install and activate the One-Click Child Theme plug-in.
Choose Plugins→Add New, and search for it by name.
TIP WordPress has several similar plug-ins that can help you create child themes. To see them all (and
possibly choose a different one), search the plug-in repository for “child theme.”
2. Activate the theme you want to customize.
The One-Click Child Theme plug-in assumes you want to create a child
theme for the currently active theme on your site. If that’s not the case, go to
Appearance→Themes and activate the right theme before you continue.
3. Choose AppearanceÆChild Theme.
This is a new menu command, courtesy of the One-Click Child Theme plug-in.
It opens the Create a Child Theme page (Figure 13-5).
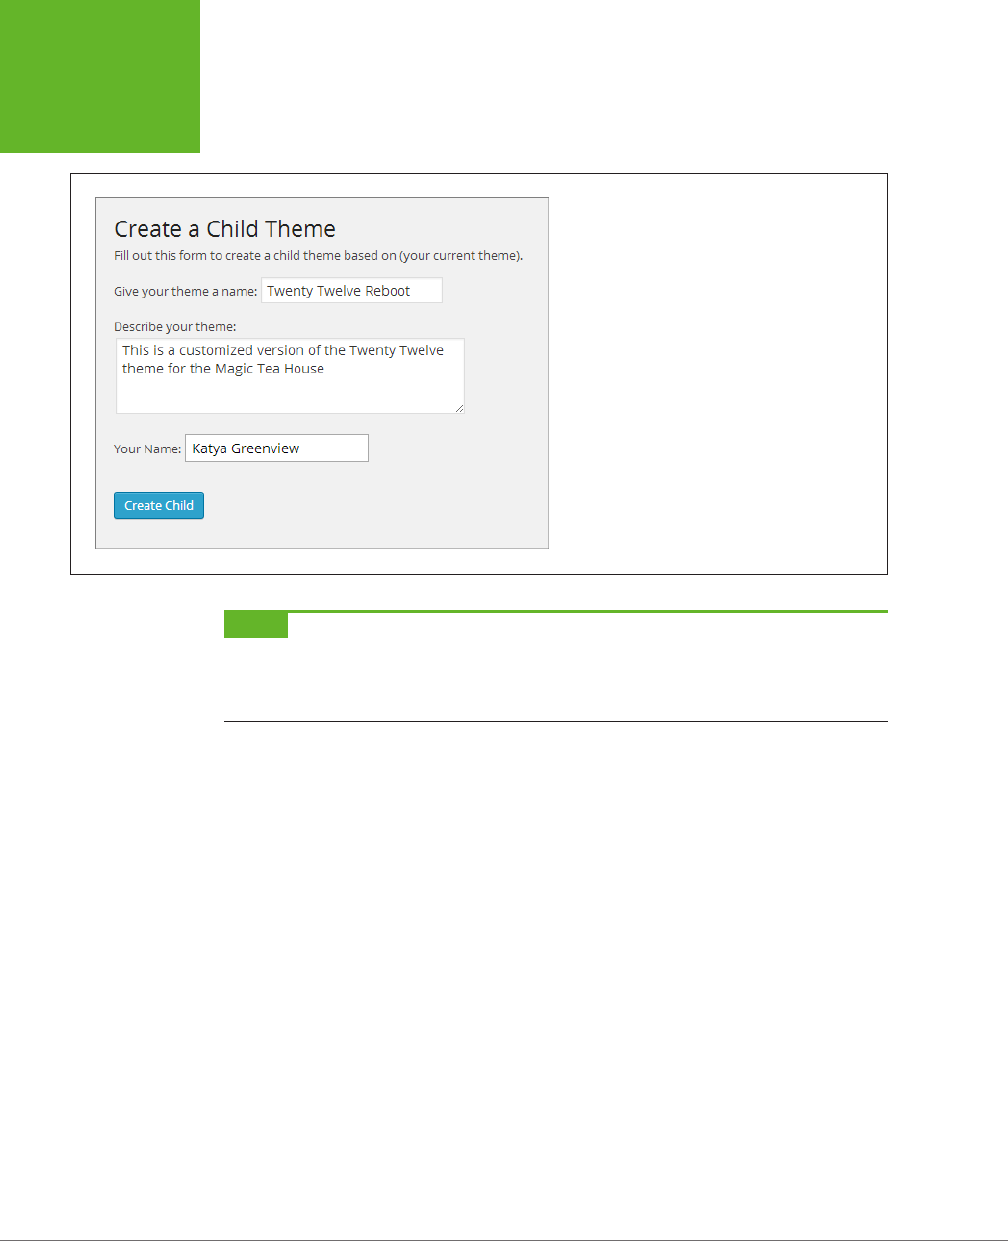
WORDPRESS: THE MISSING MANUAL
464
PROTECTING
YOURSELF
WITH A CHILD
THEME
FIGURE 13-5
You need to provide only a few pieces of information
to create a child theme. Here, you’re about to create a
child theme named “Twenty Twelve Reboot.”
NOTE To follow along with the examples in this chapter, use the Twenty Twelve theme. It’s a good start-
ing point for theme-customization practice because it’s clean, straightforward, and adaptable. If you decide to
start with a different theme, all the concepts described in this chapter still apply, but the exact class names and
formatting details will vary.
4. Supply a name for the theme, a brief description, and your name.
The One-Click Child Theme plug-in puts these details in the header of the
style.
css
file. It uses your name as the theme’s author.
5. Click Create Child.
The One-Click Child Theme plug-in creates the child theme folder on your web
server and creates a new
style.css
file inside it. It then activates the child theme
on your site.
In this example, the theme is named Twenty Twelve Reboot, so the newly cre-
ated folder will be named
twenty-twelve-reboot.
6. To verify that your child theme is working, choose AppearanceÆThemes.
You’ll see your new child theme at the top of the page (Figure 13-6).
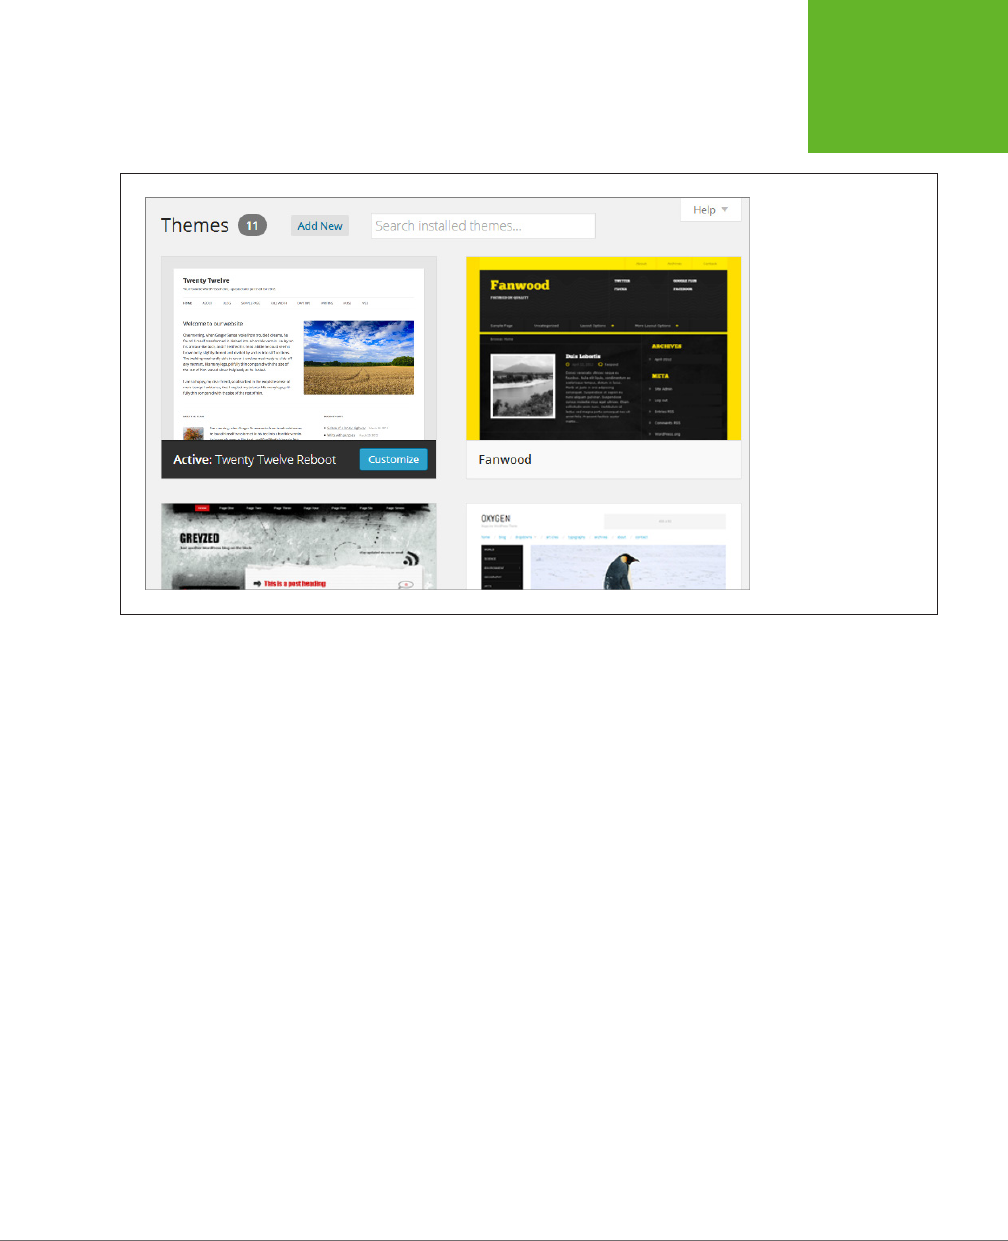
CHAPTER 13: EDITING THEMES: THE KEY TO CUSTOMIZING YOUR SITE 465
PROTECTING
YOURSELF
WITH A CHILD
THEME
FIGURE 13-6
Right now, the Twenty
Twelve Reboot child
theme is identical to its
parent theme, Twenty
Twelve. The One-Click
Child Theme Plug-In
even gives it the same
thumbnail picture.
7. Optionally, deactivate the One-Click Child Theme plug-in.
Unless you plan to create another new child theme, you don’t need to keep
One-Click Child Theme active. Head to the plug-in page (click Plugins) and use
the Deactivate link to switch it o.
How Child Themes Work
If you check out the newly created folder for your child theme, you’ll find that it holds
just three files. The first is the all-important
style.css.
The second is a supplementary
style sheet for right-to-left languages, named
rtl.css.
The third is an image named
screenshot.png
that WordPress copied from the parent theme; it uses that image
as the thumbnail on the Themes page (Figure 13-6).
To start editing your child theme, choose Appearance→Editor. Start with the
style.
css
file (Figure 13-7), as you do when you edit a normal theme.
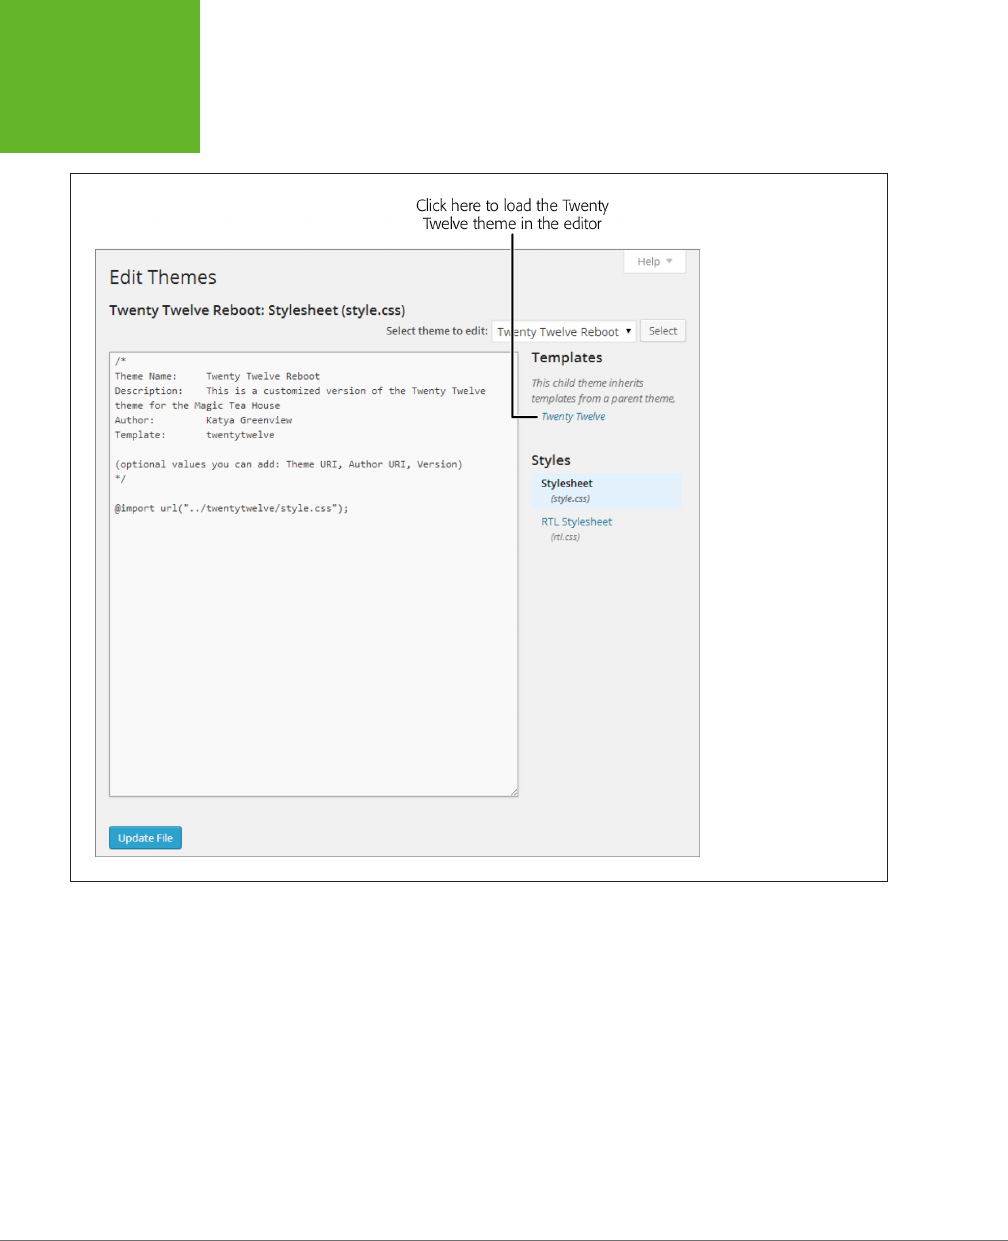
WORDPRESS: THE MISSING MANUAL
466
PROTECTING
YOURSELF
WITH A CHILD
THEME
FIGURE 13-7
A child theme starts life
as little more than a
stripped-down style.css
file that refers back to its
parent theme. As you edit
the child theme, you’ll
need to visit the parent
theme frequently (click
the link shown here)
because it’s the starting
point for many of your
changes.
The key to a child theme is its
style.css
style sheet. Unlike the
style.css
file in the
parent theme,
style.css
in the child theme contains just a few lines of text. Here’s
the complete
style.css
file in the Twenty Twelve Reboot theme:
/*
Theme Name: Twenty Twelve Reboot
Description: This is a customized version of the Twenty Twelve Theme for the
Magic Tea House.
Author: Katya Greenview
Template: twentytwelve
*/
@import url("../twentytwelve/style.css");

CHAPTER 13: EDITING THEMES: THE KEY TO CUSTOMIZING YOUR SITE 467
PROTECTING
YOURSELF
WITH A CHILD
THEME
You’ve already seen the first three details (theme name, description, and author).
However, the template setting is new—it points to the parent theme’s folder. When
WordPress sees this setting, it knows to look in a folder named
twentytwelve
(in the
themes section of your site). When it does, it finds the files for the familiar Twenty
Twelve theme.
Unlike the original version of the
style.css
file in the Twenty Twelve theme, the child
theme contains just a single line after the header. This line grabs all the styles from
the Twenty Twelve theme and applies them to the child theme:
@import url("../twentytwelve/style.css");
If you’re foolish enough to delete this line, your site will lose all the styles from the
parent theme. (You can try it out; just remember to add the @import statement
back when you finish.) Suddenly, all your text will switch to the generic Times New
Roman font, your nicely formatted headings will disappear, and the layout of your
headers, footers, and sidebar will get scrambled together in a mess.
TIP Child themes are a great way to customize your site permanently, but they’re also a handy tool for
temporarily
changing your formatting. For example, if you’re running the Magic Tea House site, you might decide
to hold a special winter promotion. During this promotion, you plan to make sweeping changes to your site’s
color scheme. If you use a child theme to redecorate, you can quickly go back to your original theme when the
promotion ends—just choose Appearance→Themes and activate the parent theme.
GEM IN THE ROUGH
Adding Styles with Jetpack: Another Approach
A child theme is the tried-and-true method for safely custom-
izing a theme, but if you use Jetpack—the handy plug-in that
aims to give self-hosters the features of WordPress.com—you
have another option.
Recent versions of Jetpack include a CSS-editing feature that
acts like the Custom Design upgrade in WordPress.com. Its
chief advantage is that it lets you add to your site’s style rules
without modifying your theme’s style sheet, so there’s no need
to create a child theme. But this simplicity comes at a price: It
limits your power and flexibility. Although this feature is good
enough for the style refinements you’ll see in the next section,
it doesn’t let you safely edit templates—a key feature you’ll tap
in the latter half of this chapter and in Chapter 14.
To use Jetpack’s CSS editing feature, choose Appearance→Edit
CSS. You’ll see an editing box that looks strikingly similar to
the one you use when editing a style sheet in a child theme.
As with a child theme, the style rules you add here override
those in your original theme. Unlike a child theme, you won’t
see the @import statement, because Jetpack automatically
merges the original styles with your customizations.
When you add custom styles with Jetpack, your styles aren’t
stored in a file; they’re stored in your site’s database. This
can cause a few quirks—for example, you lose the styles you
edited if you disable Jetpack (remember to copy your custom
styles from the editor and paste them into a text file first).
And every time you switch themes, Jetpack wipes the slate
clean and deletes your custom styles. However, Jetpack also
includes a handy revision tracker that works just like the post
revision system (page 338), and “remembers” your 25 most
recent theme revisions. If you make a big editing mistake, or
if you switch themes and want to get your old work back, click
the revision you want in the CSS Revisions box.
Overall, Jetpack is a worthy tool for minor theme changes if
you already use the plug-in. But if you’re more ambitious and
you might be editing a template or two in the future, a child
theme is the only way to go.

WORDPRESS: THE MISSING MANUAL
468
EDITING THE
STYLES IN
YOUR THEME
Editing the Styles in Your Theme
There are a number of reasons you might crack open your theme’s styles and make
changes:
• Unique-ify your theme. You might change your theme to make sure your site
doesn’t have the same look as other sites that share that theme. After all, there
are only so many themes, and if you pick a good one, it’s a safe bet that you’re
following in the footsteps of thousands of other webmasters.
• Branding. Perhaps you need your theme to match the ocial corporate colors
of your business. Or you might want it to more closely resemble another website,
run by the same business, that doesn’t use WordPress.
• Highlight certain design elements. By changing a theme, you can emphasize
details that are important to you. For example, you may want to use a style that
makes author comments stand out (page 496).
To make changes to any theme, you follow two steps. First, you create a child
theme (page 462), and then you add one or more style rules to the
style.css
file in
that theme. These rules selectively override the original theme, letting you change
whatever you don’t like. Some of the details you alter include colors, fonts, spacing,
and borders. You can also hide design elements you don’t want to see.
However, making these changes isn’t quite as easy as it sounds. To cook up the right
style rule, you need to know a bit more about the CSS standard and the styles your
theme uses. Every theme is slightly dierent, but most include a gargantuan
style.
css
file stued full of formatting instructions. Finding the exact detail you want to
override may take some digging. In the next section, you’ll take your first look at
the sort of instructions the
style.css
file contains.
NOTE If you’re already well versed in the CSS standard, you can skip the next section and continue on to
the one after that, “Changing the Twenty Twelve Theme,” on page 474.
Taking a Look at the Style Rules in Your Theme
Reading the average
style.css
file is not for the faint of heart. As explained earlier,
the typical theme includes hundreds or thousands of formatting instructions. Un-
derstanding any one of them isn’t too dicult, but finding the exact one you want
can be a challenge.

CHAPTER 13: EDITING THEMES: THE KEY TO CUSTOMIZING YOUR SITE 469
EDITING THE
STYLES IN
YOUR THEME
FREQUENTLY ASKED QUESTION
Find Your Style Sheet in WordPress.com
I bought the Custom Design upgrade so I can add my own styles,
but where can I find the rules from the original style sheet?
To create your own styles, you need to understand the styles
that are already at work on your site. Unfortunately, WordPress.
com hides your theme’s style sheet, even after you buy the
Custom Design upgrade. Why? In the past, when this style sheet
was more visible, WordPress.com users kept making the same
mistake: They’d copy the whole thing into the CSS editor and
then make their changes. (Of course
you
know better, and you’ll
only put
changed
styles into the CSS editor.)
So how do you find your site’s style sheet, so you can study it
and figure out what you want to change? It’s a bit tricky, but
here’s how to dig it up:
1. Click AppearanceÆCustom Design. Then click CSS. This
takes you to the CSS editor where you enter your custom
styles.
2. Click CSS Revisions, just above the post editor. This shows
the CSS editor with your customized CSS file, as before,
but now with more options.
3. In the Publish box, next to the Mode option, click Edit.
You’ll see two options that control how WordPress.com
uses your styles.
4. Look at the “Replace theme’s CSS” option, but don’t turn
it on. (In fact, there’s almost never a good reason to use
this setting.) Instead, notice how part of the option—the
words “theme’s CSS”—is a link. Click that link, and you
see the full style sheet for your theme, nicely formatted
so you can read it in your browser.
DECODING A BASIC STYLE RULE
The first step to understanding CSS styles is to take a look at a few rules and get
familiar with their syntax.
Every style sheet is a long list of rules, and every rule follows the same format,
which looks like this:
selector {
property: value;
property: value;
}
Here’s what each part means:
• The selector identifies the type of content you want to format. A browser hunts
down all the elements on a web page that match that selector. There are many
ways to write a selector, but one of the simplest (shown next) is to identify the
elements you want to format by their element name. For example, you could
write a selector that picks out all the level-1 headings on a page.
• The property identifies the type of formatting you want to apply. Here’s where
you choose whether you want to change colors, fonts, alignment, or something
else. You can have as many property settings as you want in a rule—the example
above has two.
• The value sets a value for the property. For example, if your property is
color,
the value could be light blue or queasy green.

WORDPRESS: THE MISSING MANUAL
470
EDITING THE
STYLES IN
YOUR THEME
Now here’s a sample rule, of the sort you’ll find in a theme like Twenty Twelve:
body {
background: #fff;
line-height: 1;
}
This tells a browser to find the web page’s <body> element, which wraps all the
content on the page. The browser applies two formatting instructions to the ele-
ment. First, it changes the background color. (You’ll be excused for not knowing that
#f
is an HTML color code that means white.) Second, it sets the line spacing to a
normal value of 1. (A higher value would add more space between each line of text.)
You need several skills to decode a style rule like this. First, you need to know the
basics of HTML, so you can understand what the <body> element is and what it does
in a web page. Second, you need to know what style properties are available for you
to tweak. Style rules let you change color, typeface, borders, size, positioning, and
alignment. To understand the sample rule shown above, you need to know that CSS
defines a background property that lets you change the color behind an element.
Third, you need to know what values are appropriate for a property—for example,
you set a page’s background color using an HTML color code. (In the case of colors,
you can pick the color you want and get its HTML color code from a color-picking
site like
www.colorpicker.com
.)
TIP You can get style sheet help from a book like
CSS3: The Missing Manual
(O’Reilly). Or, if all you need is an
overview of the style properties you can change and their acceptable values, check out the style sheet reference
at
http://tinyurl.com/bz5tcp
.
MULTIPLE RULES AND MEDIA QUERIES
Sometimes, a style sheet contains multiple rules for the same element. In such a
situation, the browser combines all the property settings into one super-rule. For
example, you can break the style sheet rule you just saw into two pieces, like this:
body {
background: #e6e6e6;
}
body {
line-height: 1;
}
In this case, the eect is the same. Big style sheets may use this approach to break
down complex rules and better organize them.
Some style sheets include
media queries
—one or more blocks of conditional rules
that spring into action when certain browser conditions are met. You can recognize
a media query by the fact that it starts with the code @media. Here’s an example:

CHAPTER 13: EDITING THEMES: THE KEY TO CUSTOMIZING YOUR SITE 471
EDITING THE
STYLES IN
YOUR THEME
@media screen and (min-width: 960px) {
/* Conditional styles go in here.
}
This translates into the following instruction: “If this page is currently being displayed
on a screen (not sent to a printer or some other device), and the width of the page
is at least 960 pixels, then run the following styles.” Older themes don’t use media
queries, but mobile-aware themes rely on this technique to change your layout for
dierent devices, like smartphones (page 168).
All the WordPress year themes, from Twenty Twelve on, use media queries. In fact,
if you dig through the Twenty Twelve style sheet, you’ll find no fewer than
three
style rules that target the <body> element—two that are always in eect, and one
that conditionally changes the background color from white to gray:
@media screen and (min-width: 960px) {
body {
background-color: #e6e6e6;
}
}
If you wonder why Twenty Twelve uses this color-changing trick, visit a site that
uses the theme and shrink your browser window. In a wide window, the conditional
rule applies a gray outline around the content (which always appears on a white
background). But if you shrink the window, that gray edge disappears.
CLASS AND ID SELECTORS
The style sheet rules above target the <body> element. This type of rule is called
an
element rule,
because it applies to a specific element on a page. For example, if
you write a rule that formats <h1> headings, every first-level heading on the page
gets the same formatting.
CSS supports other types of selectors, and WordPress themes use them heavily.
One of the most popular is the
class selector,
which starts with a period, like this:
.entry-header {
margin-bottom: 24px;
}
This rule formats any element that has a class named
entry-header
applied to it. If
you look at the HTML markup for one of your posts, you’ll find an element tagged
with the entry-header class, like this:
<header class="entry-header">
<h1 class="entry-title">Magic Tea House's Grand New Opening</h1>

WORDPRESS: THE MISSING MANUAL
472
EDITING THE
STYLES IN
YOUR THEME
<div class="comments-link">
<a href="http://magicteahouse.net/grand-new-opening/#respond"
title="Comment on Magic Tea House's Grand New Opening">
<span class="leave-reply">Leave a reply</span>
</a>
</div>
</header>
Here, the theme uses the entry-header class to wrap the header section of each post,
which includes the post title and the “Leave a reply” comments link.
It’s important to realize that the word “entry-header” doesn’t mean anything special
to WordPress or to a browser. It’s simply a naming convention the Twenty Twelve
theme uses (as do many other themes).
NOTE Sometimes, you’ll see a CSS rule that combines element selectors and class selectors. So the selector
h1.entry-title
refers to any level-1 heading that uses the entry-title class.
There’s one more selector that’s similar to class selectors, called an
ID selector.
It
starts with a
#
character. Here’s an example that uses an ID named colophon:
#colophon {
}
NOTE In Twenty Twelve, a
colophon
is the footer at the very bottom of each page of your site. Ordinarily,
it contains the text “Proudly powered by WordPress.”
Here’s the snippet of HTML that gets its formatting from this rule:
<footer id="colophon" role="contentinfo">
<div class="site-info">
<a href="http://wordpress.org/"
title="Semantic Personal Publishing Platform">
Proudly powered by WordPress</a>
</div>
</footer>
The dierence between class selectors and ID selectors is that a class selector can
format a number of elements (provided they all have the same class applied to them),
while an ID selector targets just a single HTML element (because two elements can’t
have the same ID). A WordPress page will have only one colophon, so it makes sense
to use an ID selector for it, even though a class selector would work just as well.
NOTE Some style sheets use ID selectors heavily, while others do all their work with class selectors. It’s
really a matter of preference. You simply need to follow the convention your theme uses.

CHAPTER 13: EDITING THEMES: THE KEY TO CUSTOMIZING YOUR SITE 473
EDITING THE
STYLES IN
YOUR THEME
This is where things can get a bit head-spinny. Understanding the syntax of CSS
is one thing, but editing the styles in a theme means knowing which class and ID
names that theme uses, and what elements are associated with those names. You’ll
get some pointers on page 479.
COMBINING SELECTORS
You can
combine
selectors to create even more powerful formatting rules, so long
as you separate them with a comma. WordPress then applies the style rule to any
element that matches any
one
of the selectors.
Here’s an example that changes the alignment of three HTML elements—the <cap-
tion> element used with figures and the <th> and <td> elements used with tables.
caption, th, td {
text-align: left;
}
You can also create more complex rules that match elements
inside
other elements.
This is called a
contextual selector,
and you build one by combining two ordinary
selectors, separated by a space. Here’s an example:
.comment-content h1 {
...
}
This selector matches every <h1> element inside the element with the class name
comment-content.
It formats the heading of every comment, while ignoring the <h1>
elements that appear elsewhere on the page.
WordPress loves contextual selectors—in fact, most of the Twenty Twelve theme’s
style rules use contextual selectors. If you haven’t seen them before, they may take
some time to decipher. Just remember that a browser works on the selectors one
at a time. It starts by finding an element that matches the first selector, and then
it looks inside that element to match the second selector (and if the rule includes
another selector, the browser searches inside
that
element, too).
Here’s another example to practice your CSS-decoding skills:
.entry-header .entry-title {
font-size: 20px;
line-height: 1.2;
}
Got it? This selector looks for an element with the class name
.entry-title
inside an
element with the class name
.entry-header.
The end result is a rule that targets the
title in the post header. The creators of the Twenty Twelve theme could have written
a simplified rule that applies to the entry-title class, no matter where it appears, but
they chose to be more specific.
Sometimes there are good reasons for being more specific and writing contextual
selectors. For example, the creators of Twenty Twelve might want to show the post

WORDPRESS: THE MISSING MANUAL
474
EDITING THE
STYLES IN
YOUR THEME
title in dierent places, without using the same formatting. In other cases, theme
designers use a contextual selector to indicate the relationship of classes and the
structure of the site. (For example, the
.entry-header .entry-title
rule tells you that
this theme puts entry titles inside an entry header.) To you, it shouldn’t matter. In
most cases, when you want to modify your theme’s CSS, you find the style rule that
controls the detail you want to change and you copy the selector
exactly.
UP TO SPEED
Pixels and Rems: Two Ways to Measure the Same Thing
The style sheet rules you see in this chapter are slightly
simplified from the versions you’ll find in the Twenty Twelve
theme. Oddly enough, Twenty Twelve sets dimensions
twice,
using two different units of measure. First, it uses pixels, and
then it sets the same amount of margin space using a curious
unit called
rems:
font-size: 20px;
font-size: 1.25rem;
Browsers that understand rems pay attention to the second
line. Browsers that don’t (old versions of Internet Explorer)
use the first line. Either way, the result is equivalent and the
element looks the same in the page.
Of course, this practice raises two clear questions: What’s
the difference between a pixel and a rem, and why would
you prefer one over the other? The short answer is that it’s
a historical quirk fuelled by browser behaviors of the past.
Today, the choice between pixels and rems is really a matter of
personal preference. But if you want to know the nitty-gritty,
keep reading.
The most obvious difference between the two units of measure
is that the scale is different. A single rem adds up to 14 pixels,
which is the type size of normal text. So if you set a width of
300 pixels, you’d use 21.43 rems to match. Beyond that, the
situation gets murky. In the recent past, rems were special
because they were a
relative
unit of measurement. Web pages
that used them could scale themselves to suit a browser’s text
size setting, satisfying visually impaired people and fitting into
the small screens of mobile devices. By comparison, pixels
were bad, because they trapped pages in fixed layouts that
couldn’t adapt to different situations. Today, these problems
are resolved, and browsers can scale pages that use pixel sizes
in much the same way they scale pages that use rems. In fact,
the year themes that came after Twenty Twelve, like Twenty
Fourteen, have switched back to using pixels only.
Changing the Twenty Twelve Theme
The Twenty Twelve theme is filled with styles, and you can override any of them. For
example, say you decide that you don’t want the standard menu bar to appear on
your site. The menu isn’t a widget; it’s a built-in part of the Twenty Twelve theme.
But here’s where your child theme and CSS knowledge pay o, because you can
hide the menu by using the right style rule.
To do that, choose Appearance→Editor to start editing the
style.css
file in your child
theme (Figure 13-8). Then add this rule:
.main-navigation {
display: none;
}

CHAPTER 13: EDITING THEMES: THE KEY TO CUSTOMIZING YOUR SITE 475
EDITING THE
STYLES IN
YOUR THEME
This works because the
.main-navigation
class is attached to a <nav> element that
holds the menu for your site. The
display: none
instruction tells browsers to collapse
this element, and its contents, into nothingness.
NOTE When you add a style rule to a child theme, it
overrides
any conflicting rule in the parent theme,
but it allows style settings that don’t conflict. For example, if you change the
color
of your post title in the child
theme, that won’t affect the
font
the parent theme applies to the title.
FIGURE 13-8
Here’s the style.css file
from Twenty Twelve Re-
boot, the Twenty Twelve
child theme. The style
rules you place here over-
ride the parent theme’s
formatting instructions
for same-named classes
and IDs. Right now,
Reboot adds just a single
style rule (circled).
If you’re comfortable with CSS (or you’re using one of the CSS resources mentioned
on page 457), you’ll have no trouble understanding the
display
property. However,
you might have more trouble finding the ID and class names of the elements you
want to change. Table 13-1 provides a cheat sheet to some of the key elements in
the Twenty Twelve theme.

WORDPRESS: THE MISSING MANUAL
476
EDITING THE
STYLES IN
YOUR THEME
TABLE 13-1
Class Names in the Twenty Twelve Theme
STYLE SELECTOR CORRESPONDS TO…
.site-header The header section at the top of every page;
it includes the site title, site description,
navigation menu, and header image.
.site-header img Just the header image. Use this class to
change the header’s size or position.
.site-title The site title in the header (for example,
“Magic Tea House”).
.site-description The byline that appears under the site title in
the header (for example, “Tea Emporium and
Small Concert Venue”).
.site All the content in the page, including the
header and footer. The style for this class
sets the maximum width of the site layout
(currently, that’s 960 pixels).
.widget-area The right sidebar that holds all the widgets.
The style for this class allocates 26 percent
of the available width to the sidebar, and the
content area gets the remaining space.
.front-widgets The bottom sidebar on the front page, when
you use the Front Page template (page 235).
.widget Any widget in a widget area.
.widget-title The optional title that appears above a
widget.
.nav-menu The navigation menu at the top of each
page.
.nav-menu li An individual entry in the navigation menu.
.colophon The footer area on every page, starting with
the solid horizontal line that separates the
footer from the main content area.
.entry-title The title of any post. Post titles appear in
several places (including the home page, the
single-post page, and the search page). You
probably don’t want to format titles all the
same way, so you need to combine a class
name with another selector, as shown in the
next three examples.
.blog .entry-title The title of any post in the main list of posts.
.single .entry-title The title of any post on a single-post page.
.template-front-page .entry-title The title of any post on a showcase page.

CHAPTER 13: EDITING THEMES: THE KEY TO CUSTOMIZING YOUR SITE 477
EDITING THE
STYLES IN
YOUR THEME
STYLE SELECTOR CORRESPONDS TO…
.entry-content The content in the post. As with the entry-
title class, this applies to the post content no
matter where it appears, unless you combine
this selector with another one.
.entry-meta The information about the post, which
appears before it (for example, “Posted on
January 14, 2014” and after it (“This entry
was posted in News by Katya Greenview on
March 16, 2014.”)
.comments-area The comments area after a post.
.comment-meta The byline for a comment, such as “Salah on
April 26, 2014 at 11:00 pm said:”
.comment-content The comment text, after the byline.
.commentlist li.bypostauthor A comment left by you (the author of the
post).
.commentlist li.byuser A comment left by someone other than you.
.logged-in A class added if the current visitor is logged
in as a website user (page 370). For example,
you can use the selector
.logged-in body
to
change the formatting of the <body> ele-
ment for people you know.
Although Table 13-1 is tailored to the Twenty Twelve theme, many other WordPress
themes follow a similar structure. The standard year themes (such as Twenty Thirteen
and Twenty Fourteen) are particularly consistent. And WordPress itself is responsible
for adding class names like
.blog,
.single,
and
.logged-in
to the <body> element to
flag key details about the current state of a page. However, other themes are free
to change many of these details in ways both subtle and maddening. For most class
names, there are no guarantees, so every theme customization task must begin with
a process of exploration.
Once you get the right class or ID name, you can target the exact visual ingredient
you want to alter. For example, to change the font, color, and size of the text in a
blog post in a single-post page, you can add a style rule like this:
.entry-content {
font-family: "Times New Roman";
color: red;
font-size: 21px;
}
Type it into the editor (Appearance→Editor), hit Update File, and refresh the website
to see the change (Figure 13-9).
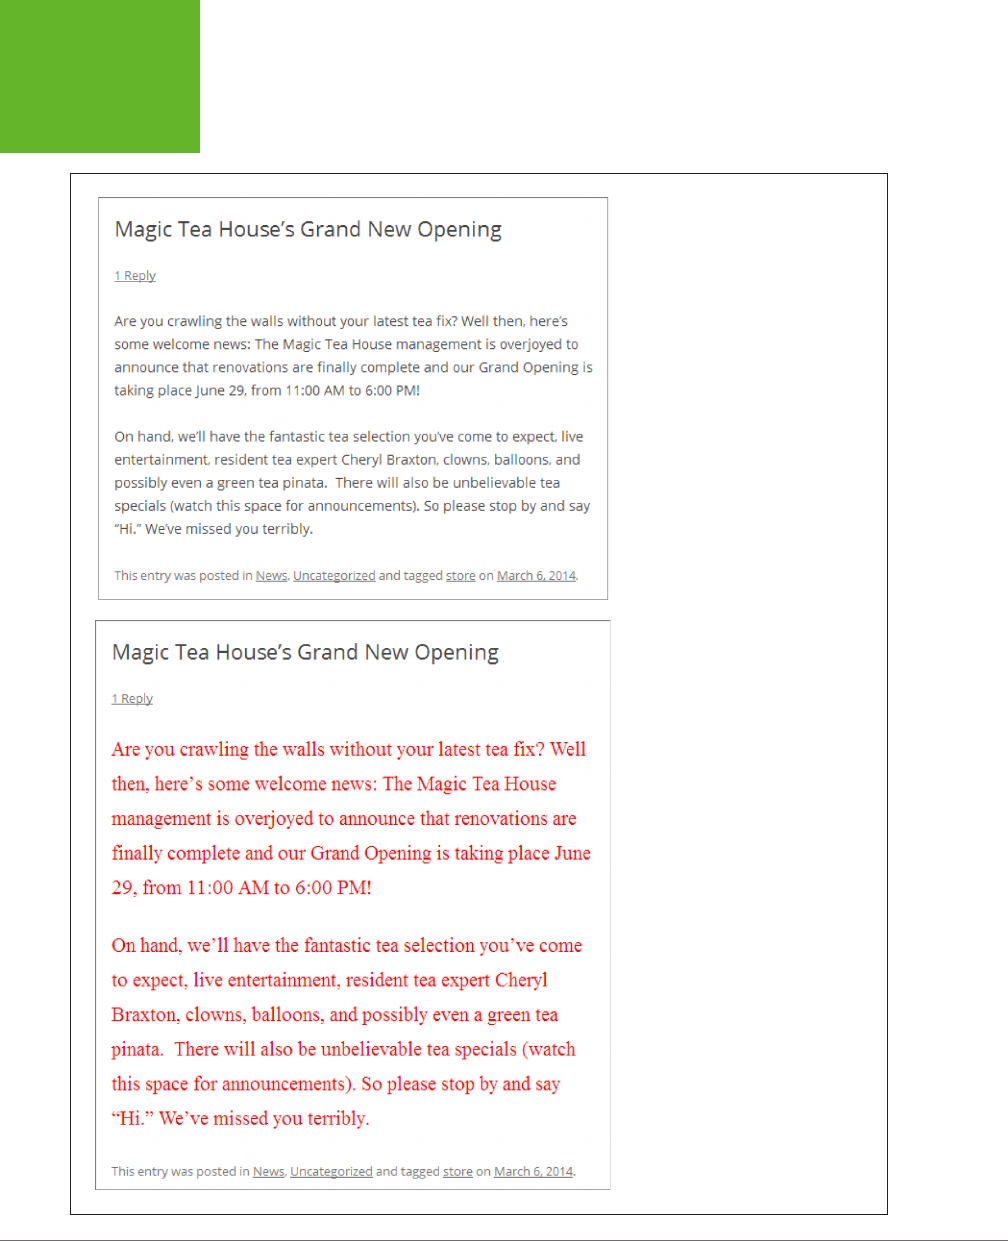
WORDPRESS: THE MISSING MANUAL
478
EDITING THE
STYLES IN
YOUR THEME
FIGURE 13-9
Top: The ordinary face of Twenty Twelve.
Bottom: This revamped post, with its large
red-lettered text, doesn’t exactly look
better, but it does look different.

CHAPTER 13: EDITING THEMES: THE KEY TO CUSTOMIZING YOUR SITE 479
EDITING THE
STYLES IN
YOUR THEME
It’s a simple recipe: Find the class name or ID name for the element you want change,
add some style properties, and your page gets an instant makeover.
Here’s another example that makes your comments ridiculously obvious, with a
yellow background, bold text, and a gray border:
.commentlist li.bypostauthor {
background-color: LightYellow;
font-weight: bold;
border: 1px solid gray;
}
In this case, it isn’t enough to just use the
.bypostauthor
selector on its own. That’s
because the
style.css
file in the original Twenty Twelve theme uses a more specific
version of
.bypostauthor.
CSS won’t allow a more general selector (like
.bypost-
author
) to override a more specific one (like
.commentlist li.bypostauthor
) if their
properties conflict. For that reason, you need to use the longer selector
.commentlist
li.bypostauthor
in your child theme if you want the theme to apply your new rule.
Puzzling Out the Styles in a Theme
Half the battle in editing
style.css
is figuring out how to write your selector. Often,
you won’t know the class or ID name of the page element you want to change, so
you need to do a bit of detective work.
The best starting point is to scour the HTML that WordPress creates for your page.
You can do this in any browser by visiting the page, right-clicking it, and choosing
a command with a name like “View Source.” This shows you the complete HTML
markup, and you need to search for the piece of content you want to change. To get
started, hit Ctrl+F (Command+F on Macs), and type in a bit of the text that’s near
the part of the page you want to change. For example, to change the comments
section, you might search for “Leave a Reply” to jump to the heading that starts o
the section. Many browsers make this process easier with a feature for homing in
on the HTML in a specific part of a page (Figure 13-10).
Once you find the right place—roughly—the real hunt begins. Look at the elements
just before your content, and check the
class
and
id
attributes for names you rec-
ognize, or that seem obvious. Pay special attention to the <div> element, which
HTML pages use to group blocks of content, like sidebars, posts, menus, headers,
and footers. You’ll often find one <div> nested inside another, which lets the theme
apply a layered tapestry of style settings (which is great for flexibility, but not so
good when you’re trying to understand exactly what rule is responsible for a specific
formatting detail).
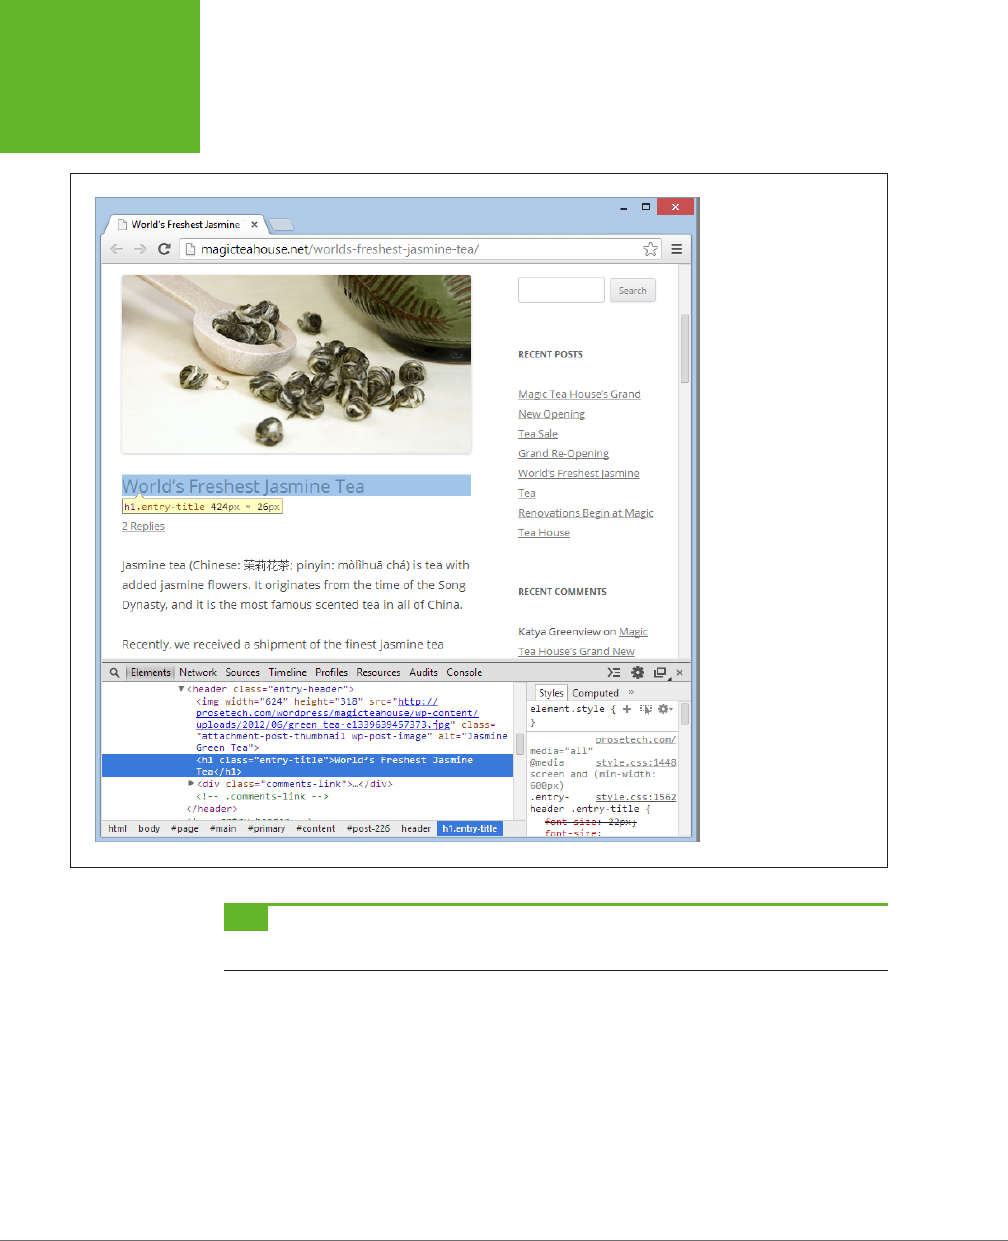
WORDPRESS: THE MISSING MANUAL
480
EDITING THE
STYLES IN
YOUR THEME
FIGURE 13-10
In the Firefox and Google
Chrome browsers, there’s
an easy way to find the
class name of an element
without searching
through all the HTML on a
page. Just right-click the
part of the page you want
to examine and choose
“Inspect element.” A
panel opens with the
corresponding bit of HTML
markup selected. That
quickly tells you that
the post title is an <h1>
element with the class
name entry-title (but
you already knew that).
In Internet Explorer, you
need to first press F12
to open the Developer
Tools panel. Then choose
Find→“Select element
by click” at the top of the
panel and click the part
of the page you want to
examine.
TIP WordPress.com has a few helpful videos that show how to pinpoint individual elements in a web page,
using different web browsers. You can watch these micro-overviews at
http://tinyurl.com/css-inspection
.
Once you have a potential class or ID name, it’s time to experiment. Pop open the
theme editor and add a new style rule that targets the section you identified. Do
something obvious first, like changing the background color with the
background-
color
property. That way, you can check your site and immediately determine if you
found the right element.

CHAPTER 13: EDITING THEMES: THE KEY TO CUSTOMIZING YOUR SITE 481
EDITING THE
STYLES IN
YOUR THEME
Using Fancy Fonts
One of the most common reasons to edit the styles in a template is to change an
element’s font. In fact, it’s often the case that all you need to do to turn a popular
theme into something uniquely yours is to change some of the typefaces.
Originally, HTML pages were limited to a set of
web-safe fonts.
These are the type-
faces every web surfer has seen, including stalwarts like Times New Roman, Arial,
and Verdana. But web design has taken great strides forward in recent years with a
CSS feature called
embedded fonts.
Essentially, embedded fonts let you use almost
any typeface you want on your web pages—you just need to upload the font to your
web server in the right format.
The embedded fonts feature has a few quirks. First, it doesn’t work with older brows-
ers, so you need to make sure your pages look respectable even if your visitor’s
browser can’t load the embedded fonts. Second, although every modern browser
supports embedded fonts, they don’t all understand the same font files. For that
reason, web designers often have to upload several copies of the fonts they want to
use, each one in a dierent format. And, third, the CSS rule you write to use embed-
ded fonts is a bit convoluted, which can make for a few unnecessary headaches.
Happily, you can sidestep all these problems by using a web font service like Google
Web Fonts. There, you can pick from a huge gallery of attractive typefaces. When you
find a font you want, Google spits out the CSS style rule for you. Best of all, Google
hosts
the font files on its high-powered web servers, in all the required formats, so
you don’t need to upload anything to your site.
TIP If you want to learn everything there is to know about web fonts, including how to host them on your
website, write the CSS rules yourself, and web-ify your own fonts, check out
HTML5: The Missing Manual
(O’Reilly),
which has a section all about embedded fonts.
To use a Google font on a WordPress site, follow these steps:
1. Go to
www.google.com/fonts.
Google displays a long list of fonts (Figure 13-11). At the time of this writing,
there were well over 500 typefaces to choose from.
2. When you see a font you like, click the “Pop out” button to take a closer look.
Google opens a font preview page that shows the font at dierent sizes.
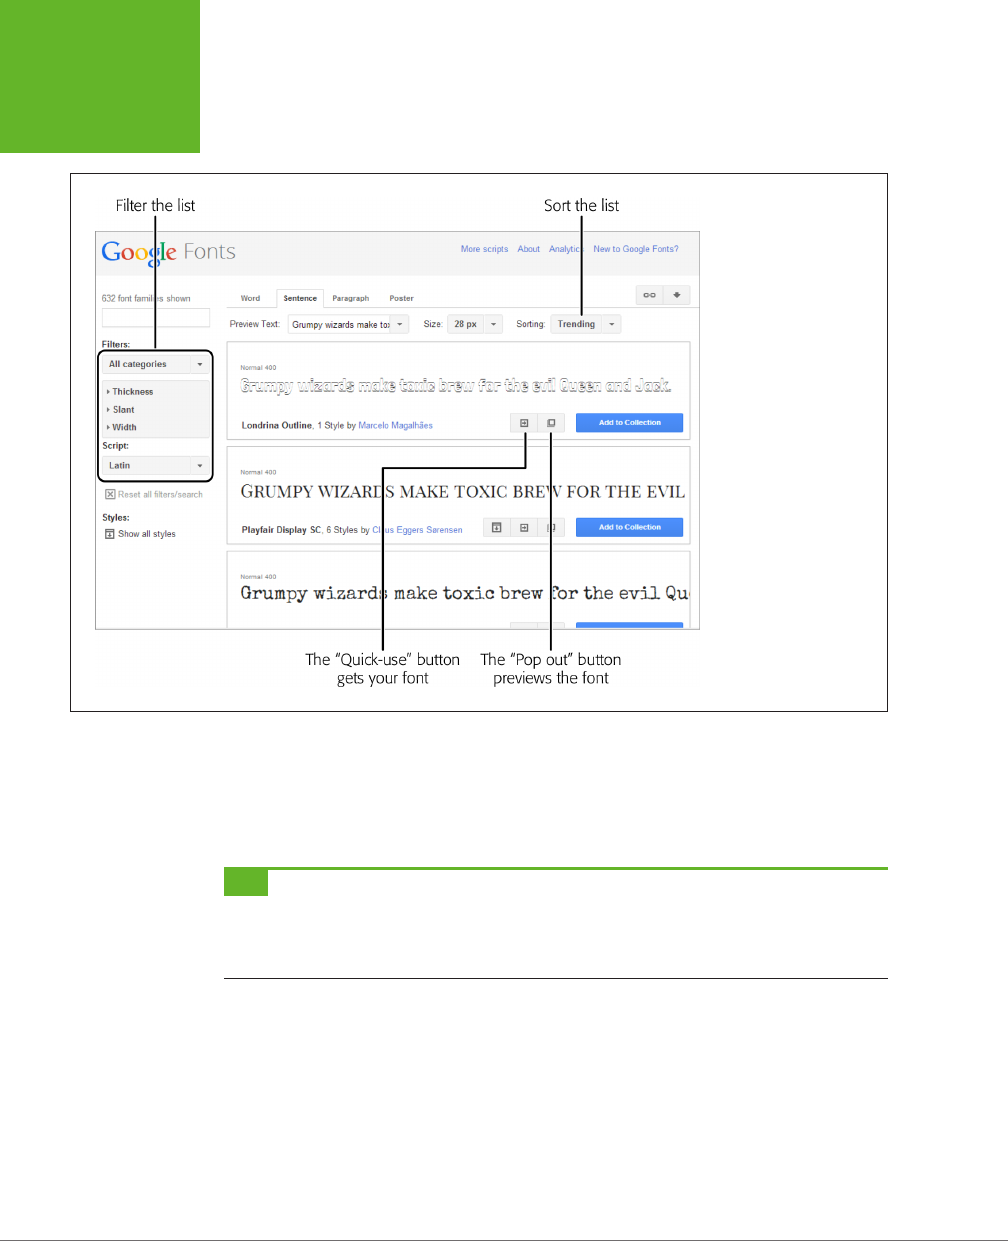
WORDPRESS: THE MISSING MANUAL
482
EDITING THE
STYLES IN
YOUR THEME
FIGURE 13-11
To find just the right
typeface for your site,
you can sort and filter
Google’s font list. For
example, you can see
the most popular fonts
first, and you can filter
for just serif, sans-serif,
or handwritten (cursive)
fonts.
3. If you like the font, click the “Quick use” button.
Google shows you a page with information on how to use the font. It consists
of a style sheet link (which you must add to your web page) and an example of
a style sheet rule that uses the font.
TIP Google also lets you choose your favorite fonts from its site and put them in a personalized collection. If
you do, Google gives you a few added features, like the ability to download a copy of the font to install on your
computer for print work. Google also remembers the fonts you store in your collection when you return to the
Google Web Fonts site.
4. Scroll down the page until you find the blue set of tabs with the caption “Add
this code your website” (Figure 13-12). Click the @import tab.
Google has created a ready-made style sheet for every font on its site. To use
the font, you need to link that style sheet to your web page, or import Google’s
style sheet into
your
style sheet (that’s the
style.css
file in the child theme). With
WordPress, the second approach is easier.
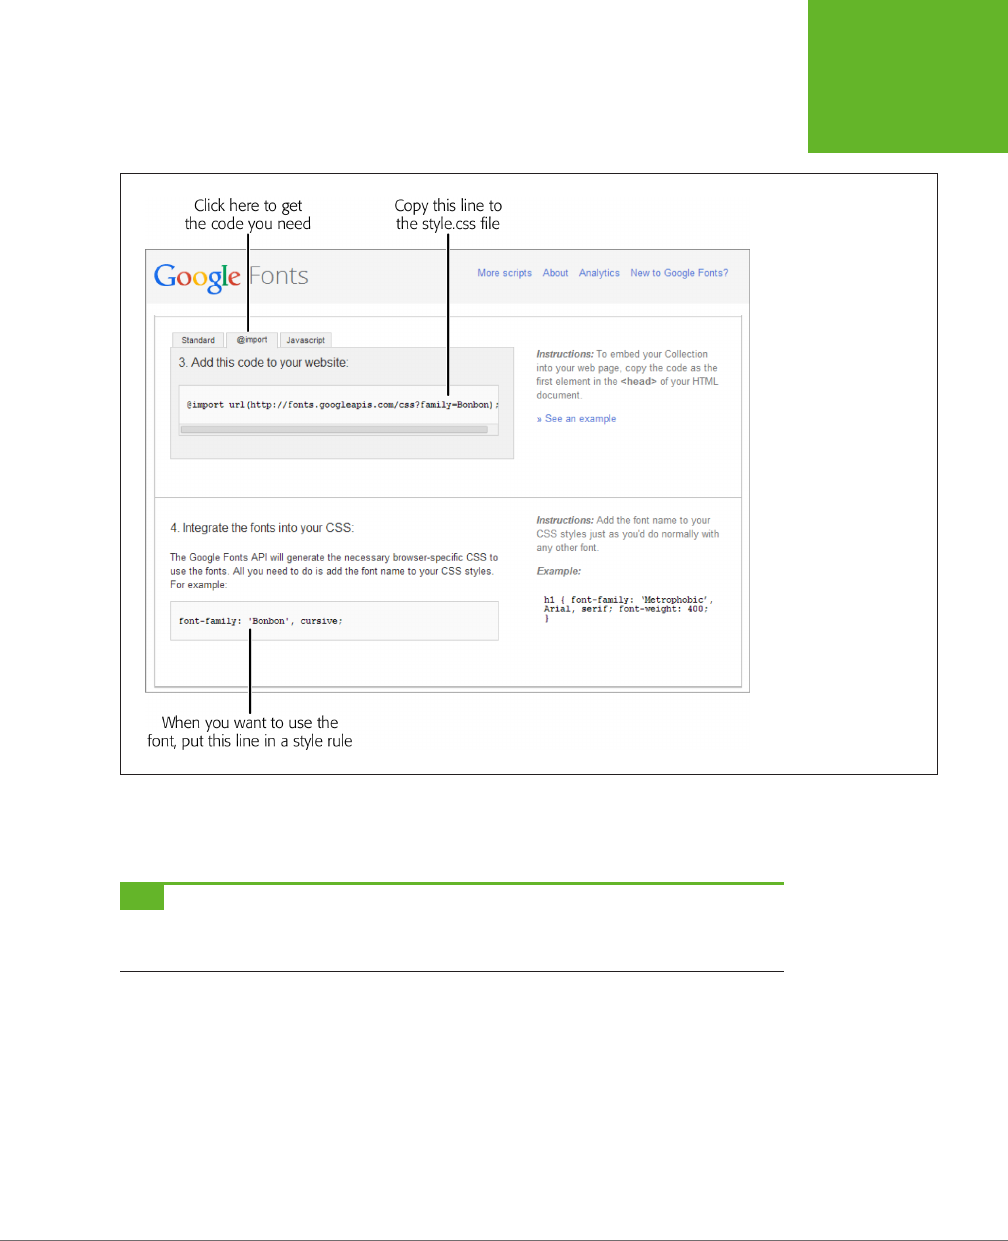
CHAPTER 13: EDITING THEMES: THE KEY TO CUSTOMIZING YOUR SITE 483
EDITING THE
STYLES IN
YOUR THEME
FIGURE 13-12
Google gives you the code
you need to add a font to
your child theme’s
style.
css
file.
5. Copy the @import line and then paste it into your
style.css
file.
Put it right after the @import line for the standard Twenty Twelve styles.
TIP If you use several embedded fonts, you can add more than one @import command. However, there’s
a slightly more efficient approach—if you create a font collection, Google gives you a single @import line that
grants you use of all the fonts you picked.
6. Create a style that uses the font.
Once you import the Google style sheet, you can use your new font, by name,
wherever you want. Just set the
font-family
property, as you would with a nor-
mal web-safe font. But remember to add a true web-safe font name after it as
a fallback, in case you’re dealing with an old-school browser that can’t display
embedded fonts or can’t download the font file.
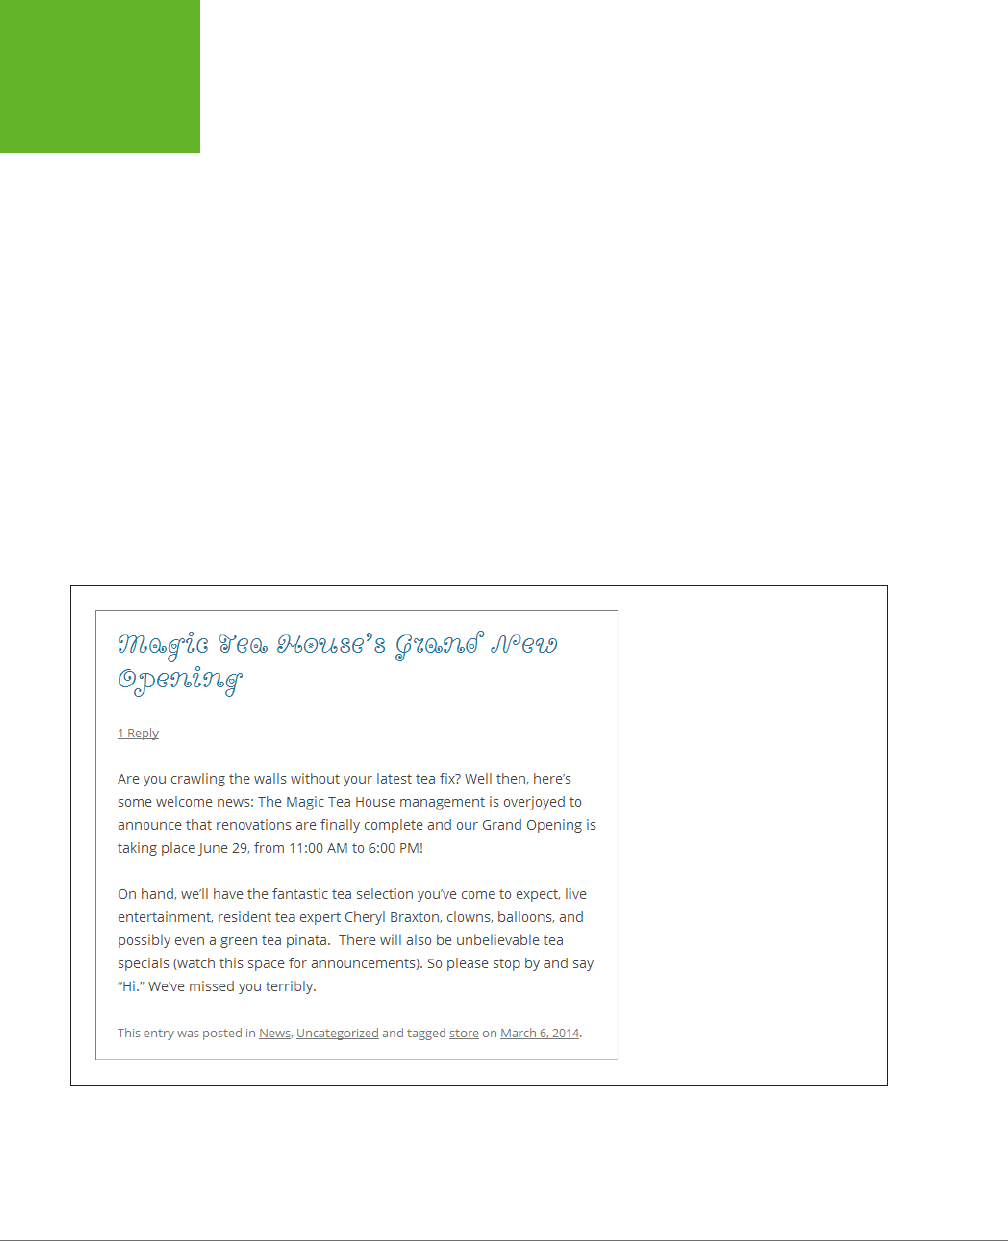
WORDPRESS: THE MISSING MANUAL
484
EDITING THE
STYLES IN
YOUR THEME
Here’s a complete
style.css
file that uses this technique. The newly added parts
are highlighted in bold.
/*
Theme Name: Twenty Twelve Reboot
Description: This is a customized version of the Twenty Twelve Theme for the
Magic Tea House.
Author: Katya Greenview
Template: twentytwelve
*/
@import url("../twentytwelve/style.css");
@import url(http://fonts.googleapis.com/css?family=Bonbon);
.entry-header .entry-title {
font-family: 'Bonbon', 'Times New Roman';
font-size: 30px;
}
Figure 13-13 shows this font in action in a post.
FIGURE 13-13
The Bonbon font is perhaps not the best
for this site, but it’s impossible to deny
that it makes for eye-catching post titles.

CHAPTER 13: EDITING THEMES: THE KEY TO CUSTOMIZING YOUR SITE 485
EDITING THE
CODE IN YOUR
THEME
Editing the Code in Your Theme
When you want to customize the appearance of a theme, the first place you should
look is the
style.css
file. But if you need to make more dramatic changes—for ex-
ample, revamp the layout, change the information in the post list, or add new widget
areas—you have to go further. Your next step is to consider the theme’s
template files.
A typical theme uses anywhere from a dozen to 50 templates. If you crack one
open, you see a combination of HTML markup and PHP code. The PHP code is the
magic ingredient—it triggers the specific WordPress actions that pull your content
out of the database. Before WordPress sends a page to a visitor, it runs all the PHP
code inside it.
Writing this code is a task that’s well beyond the average WordPress website owner.
But that’s not a problem, because you don’t need to write the code yourself, even
if you’re building a completely new theme. Instead, you take a ready-made page
template that contains all the basic code and
edit
that file to your liking. Here are
two ways you can do that:
• Change the HTML markup. Maybe you don’t need to change the code in the
template file at all. You might just need to modify the HTML that wraps around
it. After all, it’s the HTML (in conjunction with the style sheet) that determines
how your content looks and where it appears.
• Modify the PHP code. You start with a template full of working code. Often, you
can carefully modify this code, using the WordPress documentation, to change
the way it works. For example, imagine you want the list of posts on the home
page to show fewer posts, include just post titles or images instead of content,
or show posts from a specific category. You can do all this by adjusting the code
that’s already in the home page template.
Of course, the more thoroughly you want to edit the PHP, the more you need to learn.
Eventually, you might pick up enough skills to be an accomplished PHP tweaker.
UP TO SPEED
Learning PHP
The actual syntax of the PHP language is beyond the scope of
this book. If you want to develop ninja programming skills,
there are plenty of great resources for learning PHP, whether
you have a programming background or are just starting out.
Don’t rush off just yet, however, because while learning PHP
will definitely help you customize a WordPress theme, it may
not help you as much as you expect.
Learning to customize a WordPress template is partially about
learning PHP (because it helps to understand basic language
details like loops, conditional logic, and functions). But it’s
mostly
about learning to use WordPress’s functions in PHP
code (see the Note on page 493 for more about WordPress
functions). For that reason, you’ll probably get more practical
value out of studying WordPress functions than learning the
entire language, unless you plan to someday write dynamic
web pages of your own.
To get started with WordPress functions, check out the function
reference at
http://tinyurl.com/func-ref
. To learn more about
PHP, start with the absolute basics with the tutorial at
http://
tinyurl.com/ctzya55
.

WORDPRESS: THE MISSING MANUAL
486
EDITING THE
CODE IN YOUR
THEME
Introducing the Template Files
Every theme uses a slightly dierent assortment of templates. The WordPress staple
Twenty Twelve uses a fairly typical set of about 30 templates.
You can recognize a template by the fact that its filename ends with
.php.
Although
template files hold a mix of HTML and PHP, the
.php
extension tells WordPress that
there’s code inside that the WordPress engine needs to run before it sends the final
page to a browser.
Even though a template is just a mix of HTML and PHP, understanding where it fits
into your site can be a bit of a challenge. That’s because every page WordPress
stitches together uses several template files.
For example, imagine you click through to a single post. WordPress has a template,
called
single.php,
that creates the page on the fly. However,
single.php
needs help
from a host of other templates. First, it inserts the contents of the
header.php
template, which sits at the top of every page in a WordPress site. The
header.php
file takes care of basics, like linking to the style sheet, registering some scripts,
and showing the header section, complete with the top-level menu. (Some themes
farm out the menu-creation work to yet another template file, but Twenty Twelve
doesn’t go that far.)
Next, the
single.php
file adds the Previous and Next navigation links to the post,
and then calls out to another template to display the actual post. If it’s a regular
post, it uses
content.php,
but the Twenty Twelve theme has a number of specialized
alternatives for dierent post formats. For example, an “aside” post (page 203) uses
the
content-aside.php
template, a “status” post uses
content-status.php,
and so on.
Finally, the
single.php
template ends by calling three more templates into action. The
comments.php
template creates the comments section, the
sidebar.php
template
adds the widgets on the right, and the
footer.php
template ends the page.
If you’re going cross-eyed trying to follow this template assortment, Figure 13-14
shows how it all breaks down.
At first glance, this system seems just a bit bonkers. How better to complicate life
than to split the code for a single page into a handful of template files that need to
work together? But in typical WordPress fashion, the design is actually pretty bril-
liant. It means that a theme designer can create a single template file that governs
a repeating site element—like a header—and use it everywhere, without needing to
worry about duplicating eort or being inconsistent.
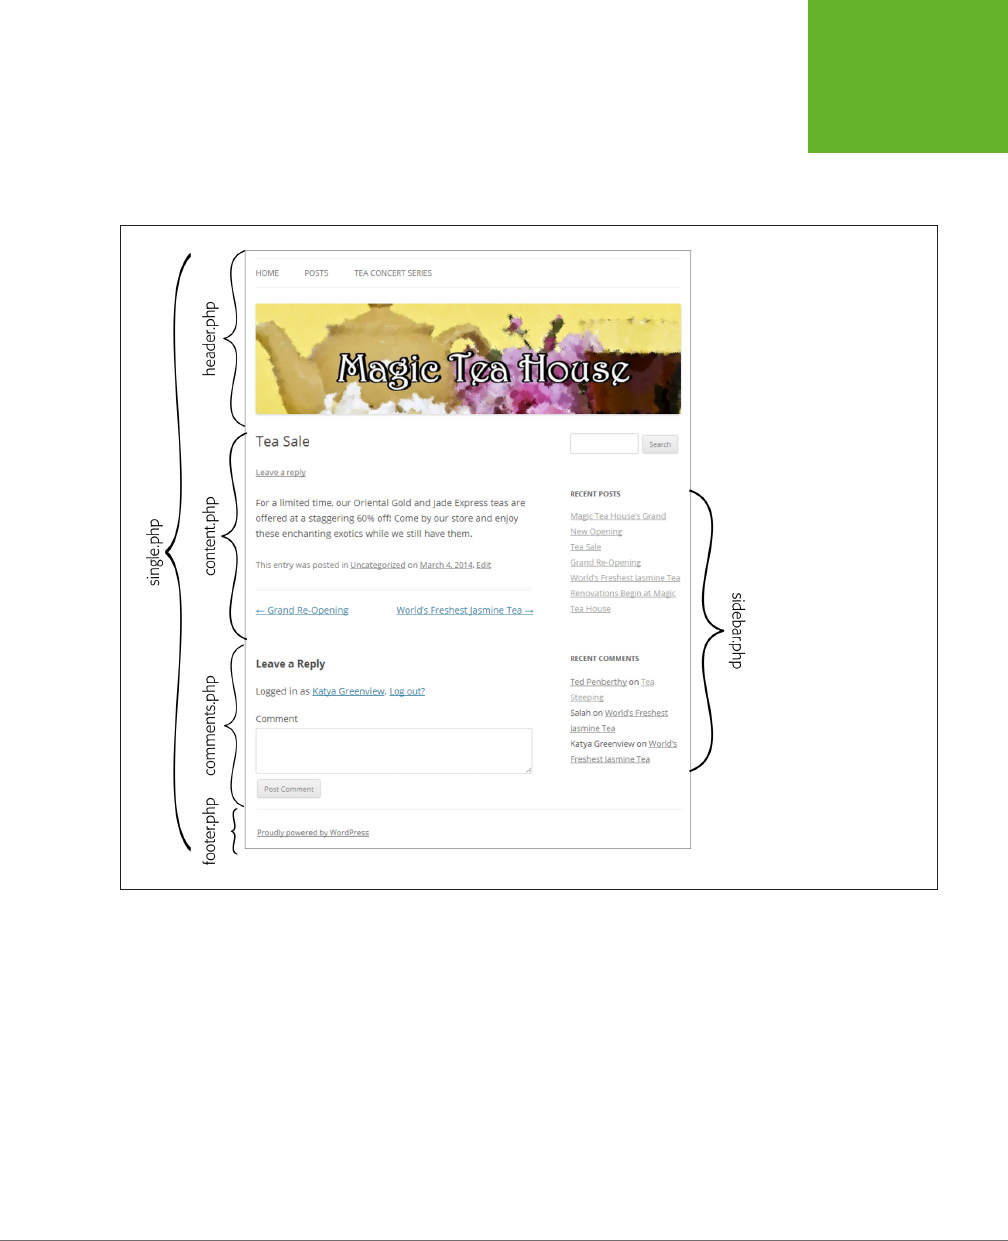
CHAPTER 13: EDITING THEMES: THE KEY TO CUSTOMIZING YOUR SITE 487
EDITING THE
CODE IN YOUR
THEME
When you edit theme styles, your first challenge is finding the right style rule to
change. When you edit
templates,
the first challenge is finding the right template
file to modify. Table 13-2 can help you get started. It describes the fundamental
templates that almost every theme, including Twenty Twelve, uses.
FIGURE 13-14
When you view a single
post, the single.php tem-
plate is in charge. It calls
for help from several other
templates.
Keep in mind, however, that themes commonly add extra templates to create the
formats for dierent types of posts and pages, and to handle special formatting (for
example, to create dierent layouts that move the sidebar around). You may also
decide to add extra templates of your own (for example, to change the way your
site presents specific categories or authors, a technique you’ll see in Chapter 14).

WORDPRESS: THE MISSING MANUAL
488
EDITING THE
CODE IN YOUR
THEME
TABLE 13-2
Essential WordPress templates
TEMPLATE FILE DESCRIPTION
index.php This is a theme’s main template, and the only one
that’s absolutely required. WordPress uses it if
there’s no other, more specific template to use.
Most themes use
index.php
to display a list of
posts on the home page.
header.php Displays the banner that appears across the
top of every page. Often,
header.php
includes a
navigation menu.
footer.php Displays the footer that stretches across the
bottom of every page.
sidebar.php Shows the sidebar widget area. Twenty Twelve
also has a more specialized
sidebar-front.php
template that creates the footer area for pages
that use the Front Page template.
single.php Displays a single post.
page.php Shows a static page. Themes often have addi-
tional page templates that let you create different
“flavors” of pages (page 233). For example,
Twenty Twelve adds a
full-width.php
template
that creates a page that doesn’t include a sidebar
and a
front-page.php
template that includes a
two-column widget area in the footer.
content.php Displays the content of a post or page. Some
themes create many different content templates,
for different types of posts and pages. Twenty
Twelve, for instance, has eight content templates.
An ordinary post uses
content.php,
a page uses
content-page.php,
and special post formats
(page 202) use a corresponding template (for
example, asides use
content-aside.php
).
comments.php Displays the comments section after a post or
page.
image.php Shows the attachment page for images—what
you see when you click a picture in a post, if
you’ve set the Link To setting (page 336) to
Attachment Page.
archive.php Lists posts when you browse by author, category,
tag, or date. Or you can use one of the four more
specific templates listed next.
category.php Lists posts when you browse a category. You can
also create templates that target specific catego-
ries, like
category-tea.php
for a category with
“tea” as its simplified name (page 123).
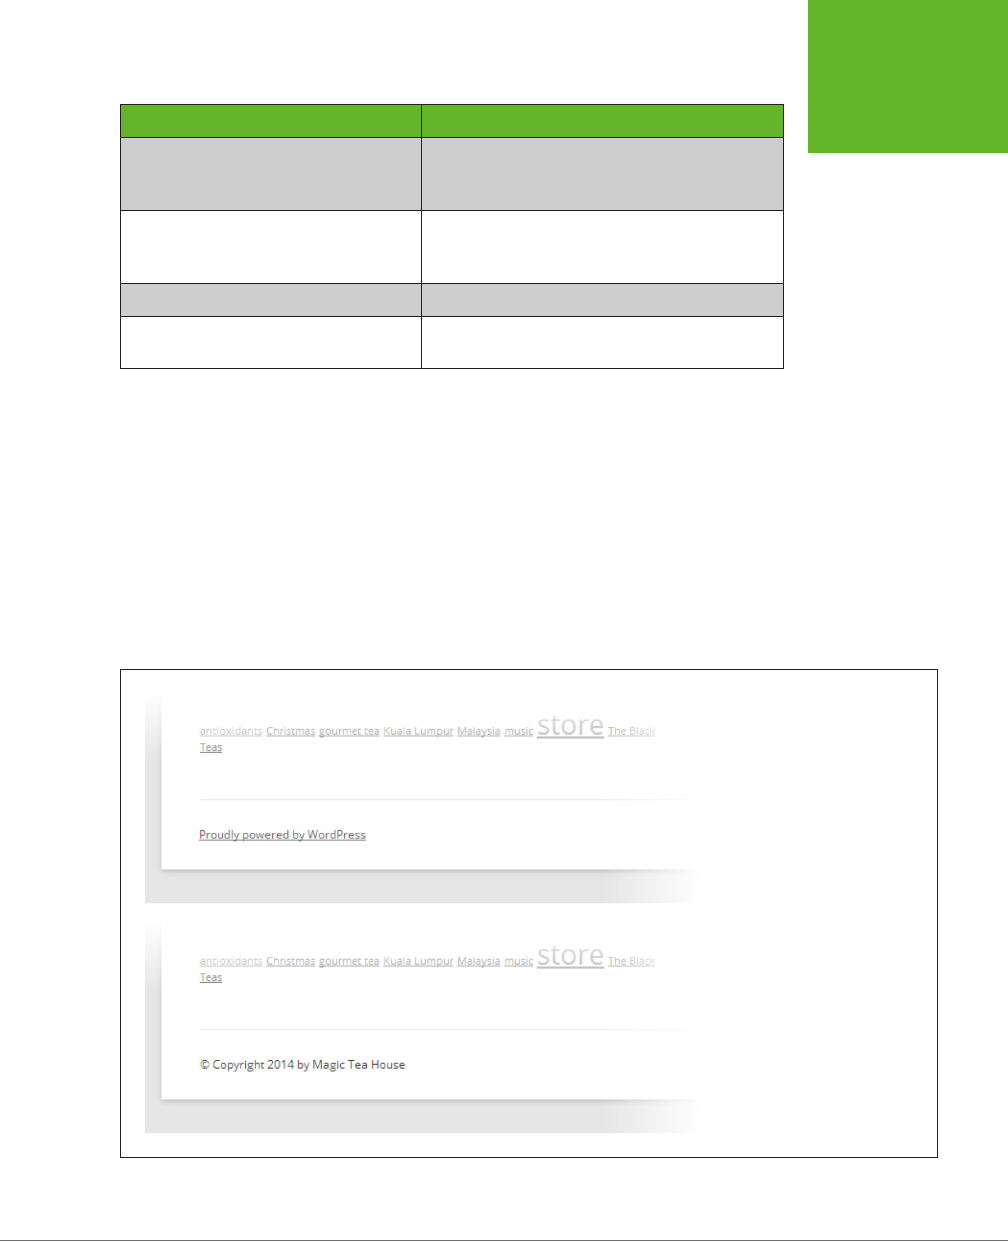
CHAPTER 13: EDITING THEMES: THE KEY TO CUSTOMIZING YOUR SITE 489
EDITING THE
CODE IN YOUR
THEME
TEMPLATE FILE DESCRIPTION
tag.php Lists posts when you browse by tag. You can also
create templates that target specific tags, like
tag-promotion.php.
author.php Lists posts when you browse by author. You can
also create templates that target specific authors,
like
author-grabinksy.php.
search.php Lists posts after you execute a search.
404.php Displays an error message when the requested
post or page can’t be found.
A Basic Editing Example
By this point, you’ve digested a fair bit of WordPress theory. It’s time to capitalize
on that by editing a template file.
You’ll begin with an example that seems simple enough. You want to remove the
“Proudly powered by WordPress” message that appears at the bottom of every
page on your site, just under the footer widgets (Figure 13-15). (It’s not that you’re
embarrassed by WordPress. You just can’t help but notice that none of the other
big-gun WordPress sites have this message slapped on their pages. Sometimes,
being professional means being discreet.)
FIGURE 13-15
Top: The way the Twenty Twelve
footer looks ordinarily.
Bottom: The footer after you
customize it.

WORDPRESS: THE MISSING MANUAL
490
EDITING THE
CODE IN YOUR
THEME
STEP 1. FIND THE TEMPLATE FILE
Start by examining the list of templates in Table 13-2. In this case, the
footer.php
file is the obvious candidate. It creates the entire footer section, widgets and all,
for every page.
STEP 2. CREATE A COPY OF THE TEMPLATE FILE
Once again, you need to start with a child theme (page 462). If you don’t, you can
still customize the footer, but your hard-won changes will vaporize the moment you
install a theme update.
Here’s where things get a bit more awkward. As you know, WordPress templates are
really a collection of many template files. To change a template, you need to figure
out the changes you want to make to your pages, and then find the template file
responsible for that part of the page (
single.php, comment.php,
and so on). Then
you add a new version of that template file to the child theme. That new template
will override the one in the parent theme.
You do this by copying the template file you want to edit from the parent theme to
your child theme and then making your changes. In this example, that means you
need to copy the
footer.php
file in the
twentytwelve
folder and paste it into the
twenty-twelve-reboot
folder.
Unfortunately, the dashboard doesn’t have any tools to help you copy a template.
The quickest and most straightforward solution is to use an FTP tool. First, copy the
file (say,
footer.php
) from the parent theme folder (
twentytwelve
) to your computer.
Second, copy that file from your computer to the child theme folder (
twenty-twelve-
reboot
). Job done. You can now choose Appearance→Editor and start modifying
the newly copied template.
If you don’t feel comfortable doing that, it’s plug-in time. This time, the solution is
the Orbisius Child Theme Creator (
http://tinyurl.com/orb-theme
), which creates
child themes and helps you create and copy templates. Install it, activate it, and then
choose Appearance→Orbisius Theme Editor. You see a two-part page that lets you
view and edit two themes side by side (Figure 13-16).
Orbisius doesn’t let you copy a template file directly, but it does something almost
as good: It lets you create a new blank template file in your child theme, and then
copy the content of the parent’s template into that new file. Here’s how:
1. In the Theme #1 box, pick your child theme, if it isn’t already selected.
2. Underneath the editing box on the left, click New File.
A few more options drop into view.
3. In the New File text box, type the exact name of the template you want to
create (such as
footer.php
), and then click the Save button underneath.
This creates a new template file in your child theme and loads it up in the editing
box on the left. However, there’s nothing in the file yet.
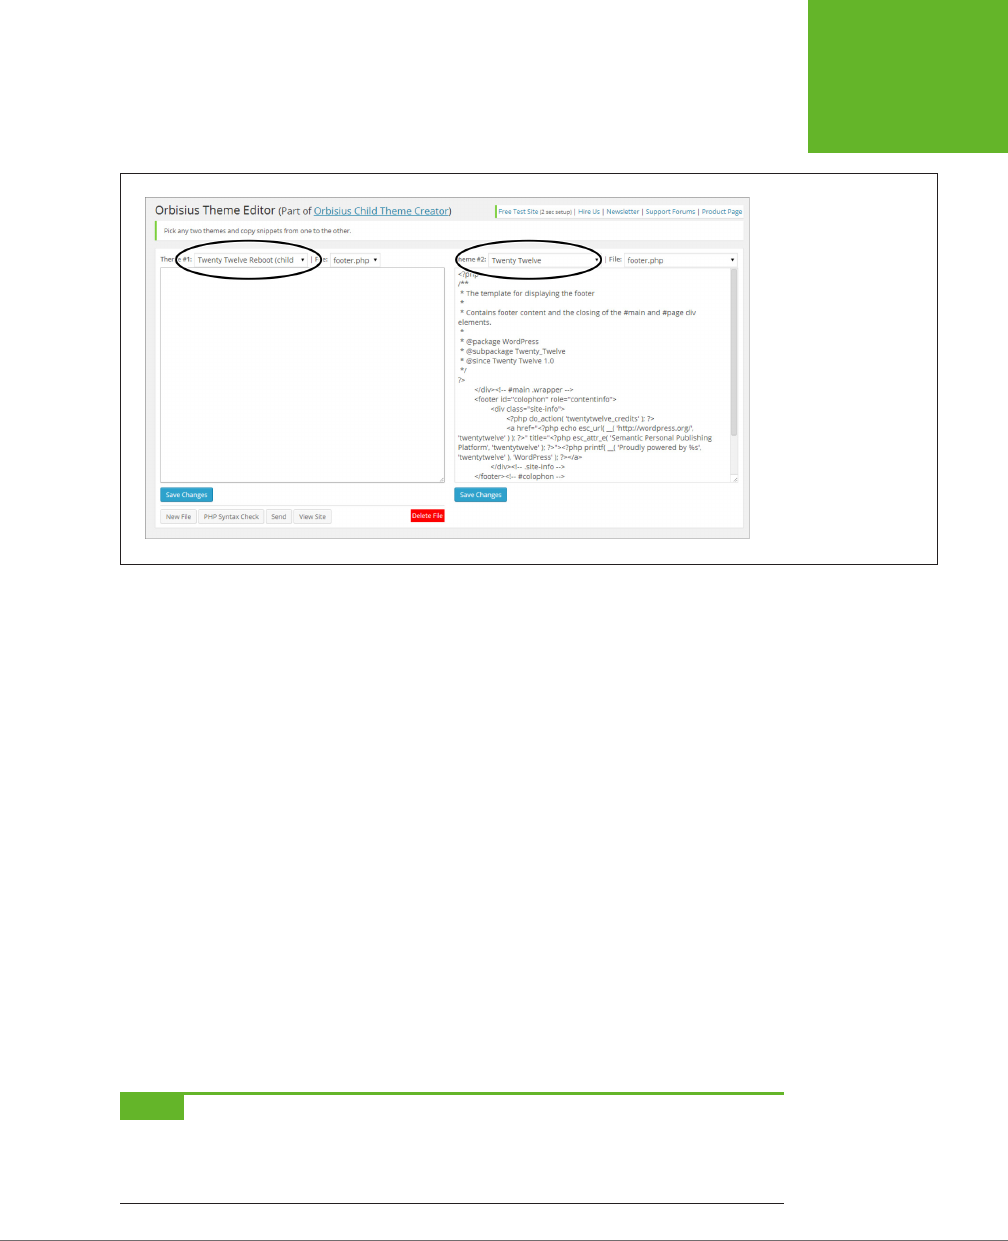
CHAPTER 13: EDITING THEMES: THE KEY TO CUSTOMIZING YOUR SITE 491
EDITING THE
CODE IN YOUR
THEME
FIGURE 13-16
Using the Orbisius Theme
Editor plug-in, you can
compare any two themes
by picking from the
Theme #1 and Theme #2
lists. However, it makes
the most sense to load up
your current child theme
on the left (which Orbisius
does automatically) and
choose the parent theme
on the right.
4. In the Theme #2 box, pick your parent theme. Then, in the adjacent File box,
pick the name of the template you want to copy.
In this case, that’s
footer.php.
When you pick a file, you see the content of the
template in the editing box underneath.
5. Copy the template markup from the old template file (on the right) to the
new template file (on the left).
To do this, select the full text of the markup in the original template file on the
right (in this case, that’s
footer.php
). Click at the very beginning of the file and
then press Ctrl+A (Command+A on a Mac) to select all the content. Then press
Ctrl+C (Command+C on a Mac) to copy the content. Lastly, click in the blank edit-
ing box on the left, and then press Ctrl+V (Command+V on a Mac) to paste it in.
6. Click Save Changes underneath the editing box on the left.
Now the new template in your child theme has the same content as the original
template in the parent theme. This is the best starting point for your changes.
From this point on, it makes no dierence whether you edit the new template
file in the Orbisius page or in the Edit Themes page (which you open by choos-
ing Appearance→Editor).
NOTE The child theme’s version of a template completely overrides the parent theme’s copy of the template.
In this example, that means WordPress ignores the original version of the
footer.php
file, which is in the original
theme folder (
twentytwelve
). You can refer to it anytime to check the code or copy important bits, but WordPress
won’t run the code anymore.

WORDPRESS: THE MISSING MANUAL
492
EDITING THE
CODE IN YOUR
THEME
STEP 3. EXAMINE THE TEMPLATE FILE
Footer.php
is one of WordPress’s simpler template files. But even simple templates
have a fair bit of boilerplate to wade through.
In this section, you’ll look at the entire contents of
footer.php.
You don’t always need
to take this step, but it’s good practice when you’re just starting out and trying to
make sense of WordPress’s template system.
If you’ve written web pages before, you probably know that programming code,
like JavaScript, needs to be carefully separated from the HTML on the page. The
same is true for PHP, although it has its own special syntax. Every time a block of
PHP code appears, it starts with this:
<?php
Similarly, the following character sequence marks the end of a block of PHP code:
?>
You can see this system at work at the very beginning of every template file, where
there’s a block of PHP that has no real code at all, just a long comment. The comment
lists some basic information about the template. Here’s what you see in
footer.php:
<?php
/**
* The template for displaying the footer.
*
* Contains footer content and the closing of the #main and #page div ele-
ments.
*
* @package WordPress
* @subpackage Twenty_Twelve
* @since Twenty Twelve 1.0
*/
?>
The next line is a puzzling bit of HTML that looks like this:
</div><!-- #main .wrapper -->
Even seasoned HTML veterans will be a bit thrown o here. The </div> tag closes
a <div> element. But you haven’t seen an opening <div> tag, so this code snippet
seems a bit strange.
It makes more sense when you remember the way WordPress stitches together a
page, as shown in Figure 13-14. The <div> element
was
opened, but it happened when
WordPress processed an earlier template file (
header.php
). The HTML comment in
the line above (<!--#main .wrapper -->) is WordPress’s way of reminding you that
the </div> in that line is the closing element for a <div> that has the ID
main
and
the class
.wrapper.
In other words, it’s the closing element for the <div> that holds
the main content of the page.

CHAPTER 13: EDITING THEMES: THE KEY TO CUSTOMIZING YOUR SITE 493
EDITING THE
CODE IN YOUR
THEME
The next line of HTML is easier to interpret. It identifies the beginning of the footer
content. This section has the ID
colophon,
which you might remember from Table 13-1.
<footer id="colophon" role="contentinfo">
The next line starts a new <div> element and gives it the ID
site-info.
The creators of
the Twenty Twelve theme chose that name because this is the section of the page
that indicates some basic information about how the site was created (in other
words, “Proudly powered by WordPress”).
<div id="site-info">
The next bit is another block of PHP code, but it’s compressed into a single line:
<?php do_action( 'twentytwelve_credits' ); ?>
The do_action() function is a WordPress feature found throughout its template
files. It’s a notification mechanism—it signals when something is about to happen
(for example, that the page credits are about to be shown). Hardcore WordPress
developers can write instructions that react to one of these notifications, but the
do_action() function is no help in your mission to change the footer.
NOTE A
function
is a block of programming code stored somewhere other than the page it appears on.
WordPress is full of useful functions, and
do_action()
is one of many. To browse the full catalog of functions
and find out what they do, visit
http://tinyurl.com/func-ref
.
The section that appears after the do_action() function is the part of the footer
template you’ve been looking for. It’s a link that displays the “Proudly powered”
message:
<a href=
"<?php echo esc_url( __( 'http://wordpress.org/', 'twentytwelve' ) ); ?>"
title= "<?php esc_attr_e( 'Semantic Personal Publishing Platform',
'twentytwelve'); ?>" rel="generator">
<?php printf( __( 'Proudly powered by %s', 'twentytwelve' ),
'WordPress'); ?>
</a>
The markup looks a bit complicated, because there are three PHP code statements
embedded inside the <a> element. The first one generates the actual link address,
the second one generates the title, and the third one generates the text inside the
<a> element. You don’t need to understand exactly how these statements work to
realize that this is the part you want to change. But first, scan through the rest of
the footer template to make sure you understand what’s going on.
It’s pretty straightforward. First,
footer.php
closes the <div> and <footer> elements.
Then it closes another <div> that represents the entire page.
</div><!-- .site-info -->
</footer><!-- #colophon -->
</div><!-- #page -->

WORDPRESS: THE MISSING MANUAL
494
EDITING THE
CODE IN YOUR
THEME
Next, the footer template triggers WordPress’s wp_footer() function.
<?php wp_footer(); ?>
This is a bit of WordPress infrastructure. Many plug-ins wait for this call and then
do something important. Removing this line can cause those plug-ins to break, so
it’s best to leave it in, even though it isn’t doing anything right now.
Finally, the template closes the <body> and <html> elements, proving that you
have really and truly reached the end of the page. WordPress won’t call any more
templates into action, or add any more content after this point.
</body>
</html>
STEP 4. MAKE YOUR CHANGE
Now you’ve found the culprit—the piece of the WordPress template you want to
change. In this example, it’s a single <a> element.
You could delete the <a> element completely, or you can replace it with some text
of your own, like this:
© Copyright 2014 Magic Tea House
The © is a
character entity,
an HTML code that inserts a special character—in
this case, a copyright symbol.
If you consider yourself a bit of a PHP whiz, you can get fancier in your footer. For
example, instead of sticking in the current year for the copyright notice, you could
ask PHP to
do that for you.
First, you need to explicitly tell WordPress that you need PHP’s help. You do that by
adding the <?php and ?> character sequences. You’ll put your code inside.
© Copyright <?php [ Your code goes here. ] ?> by Magic Tea House
Next, you need a PHP command. In this case, it’s the trusty echo command, which
means (in PHP language) “take the result of the next statement, and spit it out onto
the page.”
© Copyright <?php echo ?> by Magic Tea House
But what exactly do you want to spit out? That’s the current date, which you can fetch
with the help of a function built into the PHP language, called date(). Unsurprisingly,
the date() function displays the current date. But by supplying the capital letter
Y,
you tell the date() function that you’re interested only in getting the current year.
© Copyright <?php echo date('Y'); ?> by Magic Tea House
Like every line of PHP code, you indicate the end of a statement by adding a semi-
colon at the end (;)
This completes the example, and drives home a clear point: Even the most straight-
forward theme-editing tasks require a bit of slogging.

CHAPTER 13: EDITING THEMES: THE KEY TO CUSTOMIZING YOUR SITE 495
EDITING THE
CODE IN YOUR
THEME
TIP Since the changes you need to make to the
footer.php
template are relatively small in this example, it’s
easy enough to do all your editing in the dashboard. For more significant changes, you may want to copy the
theme file to a text editor on your computer, work with it there, and then copy it back to the Edit Themes page
when you finish. And if you decide to edit a theme on your computer, it’s worth considering a text editor that has
a few more frills. For example, Windows users can grab the free Notepad++ program (
http://notepad-plus-plus.
org
), which uses color-coded text to distinguish the different ingredients in PHP code.
FREQUENTLY ASKED QUESTION
Updating a Child Theme
What happens when I update a theme that uses customized
templates?
Child templates don’t work in exactly the same as child styles.
Child styles extend style rules already put in place by the parent
theme. Even if the parent gets a new, updated
style.css
file,
the child styles remain, and WordPress applies them on top
of the parent styles.
But page templates don’t extend parent templates, they
re-
place
them. As soon as you add
footer.php
to your child theme,
WordPress starts ignoring the
footer.php
in the original theme.
That means that if you update the parent theme and change
the original
footer.php
file, no one really notices.
This is probably the safest way to handle theme updates,
because there really isn’t a way that WordPress could combine
two versions of a template. However, it means that if you
plan to customize all the templates in a theme, you probably
shouldn’t create a child theme. Instead, you may as well build
a completely separate theme of your own.
Delving into the Loop
WordPress experts talk in hushed tones about “the loop,” which is the heart of
WordPress. Its job is to fetch content from your website’s database, one piece at a
time, until it reaches the post limit (that’s the “Blog pages show at most” option in
the Settings→Reading section of the dashboard).
The loop appears in many templates. WordPress uses it to create the main list of
posts on the home page (
index.php
), the list of results after a search (
search.php
),
and the list of articles you see when you browse by category, tag, author, or date
(
category.php, tag.php, author.php,
and
date.php,
or
archive.php
when one of
the former is missing). The loop even appears on Twenty Twelve’s showcase page
(
showcase.php
), twice—first to grab the featured posts that it puts up top, and again
to grab the recent posts that it shows underneath. (Showcase pages are explained
on page 236.)
In the following example, you’ll take a look at the loop in the
index.php
file and
change the way it works by adding a new feature: the ability to highlight recent
posts (Figure 13-17).
STEP 1. PREPARE THE TEMPLATE FILE
Your first task is to prepare your template. You can copy the
index.php
file into your
child theme folder using an FTP program, or you can use the Orbisius Child Theme
Creator plug-in to copy it for you.

WORDPRESS: THE MISSING MANUAL
496
EDITING THE
CODE IN YOUR
THEME
FIGURE 13-17
This page gives the
“Tea Sale” post, which
was published today,
preferential treatment—it
gets a bigger headline,
a border, and a yellow
background. Tomorrow,
the post will revert to its
normal look.
STEP 2. EXAMINE THE TEMPLATE FILE
The next step is to dig through
index.php
to get a handle on what’s going on and
what area you need to change. Overall,
index.php
has this structure:
<?php get_header(); ?>
<div id="primary">
<div id="content" role="main">
[ The stuff for displaying posts goes here. ]

CHAPTER 13: EDITING THEMES: THE KEY TO CUSTOMIZING YOUR SITE 497
EDITING THE
CODE IN YOUR
THEME
</div><!-- #content -->
</div><!-- #primary -->
<?php get_sidebar(); ?>
<?php get_footer(); ?>
This boils the template down to its essentials. As you can see, the template calls
other templates to create the page’s header, sidebar, and footer. In the middle of
this action are two <div> elements, and inside them is the heart of the
index.php
template and the loop. This is the part you’ll focus on.
The first ingredient here, inside the <div> elements, is a block of
conditional logic
—
code that tests a condition, and takes dierent actions depending on whether that
condition is true or false. Essentially, the template here uses PHP to ask a question:
Are there any posts?
Here’s how the template structures the conditional logic:
<?php if ( have_posts() ) : ?>
[ If there are posts, you end up here. ]
<?php else : ?>
[ If there are no posts, this section shows the "sorry" message.]
<?php endif; ?>
The have_posts() function gets the answer to the question, “Are there any posts?”
If there are, the condition is true, and the first section springs into action. That’s the
part you’re interested in. (If there aren’t any posts, the condition is false, and you can
let the template handle it in the usual fashion, by showing an apologetic message.)
So what takes place inside the first section, which runs as long as your site has at
least one post? The code starts by adding a navigation link, if necessary. This is the
link that appears before the post list and lets visitors step forward to newer posts.
(If your guest is already viewing the most recent post, this link doesn’t show up.)
Then the code triggers the loop (shown here in bold), and ends by inserting another
navigation link—the one that lets readers step back to see older posts.
<?php twentytwelve_content_nav( 'nav-above' ); ?>
<?php while ( have_posts() ) : the_post(); ?>
<?php get_template_part( 'content', get_post_format() ); ?>
<?php endwhile; ?>
<?php twentytwelve_content_nav( 'nav-below' ); ?>
The actual loop comes down to just three lines. The while and endwhile commands
delineate the start and end of the loop. As long as you have posts, the loop keeps

WORDPRESS: THE MISSING MANUAL
498
EDITING THE
CODE IN YOUR
THEME
running. Every time it runs, it grabs a post, using the WordPress function the_post(),
and feeds it to the single line of code inside. This code is less exciting—it simply farms
out the work of displaying the post to one of the content templates you learned
about earlier, using the get_template_part() function.
Although the code doesn’t seem that exciting right now, there’s a lot you can do
if you wedge yourself inside the loop, between the while and endwhile lines. Cur-
rently, there’s just a single line of code there, but you can expand it to suit your
needs. For example, before the code calls get_template_part() to display a post,
you can run some extra code that does something more clever, like change the
post’s formatting based on one of the post details. Examples include making the
post look dierent based on its category, author, or publication date. The latter is
what this example does.
STEP 3. ADD NEW CODE
The final step is to add the code that checks the post’s date and decides whether or
not to highlight it. Here it is, inside the loop you saw earlier. The new code is boldfaced:
<?php while ( have_posts() ) : the_post(); ?>
<?php
$postdate = get_the_date('Y-m-d');
$currentdate =
date('Y-m-d',mktime(0,0,0,date('m'),date('d'),date('Y')));
if ($postdate == $currentdate) {
echo '<div class="newpost">';
} else {
echo '<div>';
}
?>
<?php get_template_part( 'content', get_post_format() ); ?>
</div>
<?php endwhile; ?>
To understand what’s taking place, you need to examine the code one line at a time.
First, it uses a WordPress function named get_the_date(), which returns the date
the current post was published.
$postdate = get_the_time('Y-m-d');
WordPress takes the result from get_the_date() and puts it into a variable (a stor-
age slot in memory) named $postdate. That way, the code can use the date stored
there at a later time, when the function compares dates.

CHAPTER 13: EDITING THEMES: THE KEY TO CUSTOMIZING YOUR SITE 499
EDITING THE
CODE IN YOUR
THEME
NOTE It doesn’t matter what you call your variables, as long as you’re consistent. (So you can’t call the
variable
$postdate
in one place and
$date_of_post
in another, because you’ll end up creating two separate
variables.) However, your variable names must start with the dollar sign (
$
), which has the side effect of making
them easily recognizable.
The next line of code creates a second variable, named $currentdate. It stores the
current date, as retrieved by the PHP date() function, which you saw earlier (page
494). Only now the date is returned in a slightly dierent format, so it matches up
with the publication date format WordPress uses with posts.
$currentdate = date('Y-m-d');
The moment of drama occurs next. An if statement compares the two variables (in
this case, the two dates) to see if the current date matches the publication date (in
other words, to see if the post was published today). If the answer is yes, then the
code adds a new <div> element, with the class name
newpost.
if ($postdate == $currentdate) {
echo '<div class="newpost">';
If the answer is no, then the code adds a <div> that doesn’t use any class name.
} else {
echo '<div>';
}
?>
Either way, the code tacks on the closing </div> element at the end of this block of
content, after it inserts the post content into the page.
<?php get_template_part( 'content', get_post_format() ); ?>
</div>
NOTE This code may seem slightly magical, because it relies on a tight combination of PHP commands
and WordPress functions that you haven’t seen before. Obviously, you wouldn’t be able to cook up this sort of
code on your own. However, you
will
be able to grab this sort of code from one of the many WordPress recipe
sites (page 503), and insert it into your templates when you need it. And the more you do that, the easier it’ll
be to recognize the code you want to change, and the more comfortable you’ll be adjusting that code to solve a
problem.
STEP 4. ADD A NEW STYLE
Right now, the revised template doesn’t have much of an eect. All it does is add a
<div> element around the post content. However, this <div> gives you a new way to
apply a customized style. You do that by creating a style rule for the
newpost
class.
Here are the style rules that create the eect shown in Figure 13-17. The first rule
adds the border, spacing, and background color around the post. The second rule
targets the link in the heading, which holds the post title, and gives it large red text.

WORDPRESS: THE MISSING MANUAL
500
EDITING THE
CODE IN YOUR
THEME
.newpost {
padding: 8px;
border: 2px solid darkgray;
border-radius: 10px;
background-color: lightyellow;
margin-bottom: 50px;
}
.newpost h1 a {
font-size: 2.5em;
color: red;
}
This two-part approach—using the PHP code to add a style, and then defining the
style—is a common technique in theme customization. It gives you the most flex-
ibility, because you can change the formatting anytime, without editing the template
and wading through the PHP again.
Extending WordPress with Functions.php
Some WordPress themes contain one PHP file that isn’t a template, named
functions.
php.
Experienced theme designers place important parts of their code here, and
then call that code from their template files when they need it. WordPress gurus also
use the
functions.php
file to add other features, like new shortcodes and widgets,
so they don’t need to create a complete plug-in.
All these tasks are advanced operations, best kept to WordPress gurus. However,
even people with no PHP experience can use the
functions.php
file to unlock extra
WordPress features. Usually, you do that by copying a few lines of code you read
about online (or in a book), and pasting them into the
functions.php
file in the
theme editor.
For example, in Chapter 10, you used WordPress’s auto-embed feature to turn cer-
tain types of website addresses into embedded objects, like Flickr slideshows and
YouTube videos. Normally, WordPress turns o this handy feature in widget areas,
like the sidebar. But those in the know can enable shortcodes and embeds in widget
areas with just a couple of lines in the
functions.php
file. Figure 13-18 shows the result.
The
functions.php
file works a bit dierently from the template files you’ve learned
about so far. The key quirk is that the
functions.php
file in your child theme
extends
the
functions.php
file in your parent theme; it doesn’t replace it. For that reason, you
can’t simply copy the
functions.php
file from your parent theme to your child theme.
You need to create a new, empty text file on your computer, change its name to
functions.php,
and then upload that new
functions.php
file to your child theme folder.
If you use the Orbisius Child Theme Creator plug-in, your job is easy. Follow the
process described on page 490 to create a new, blank
functions.php
file, but don’t
copy any content to that file.
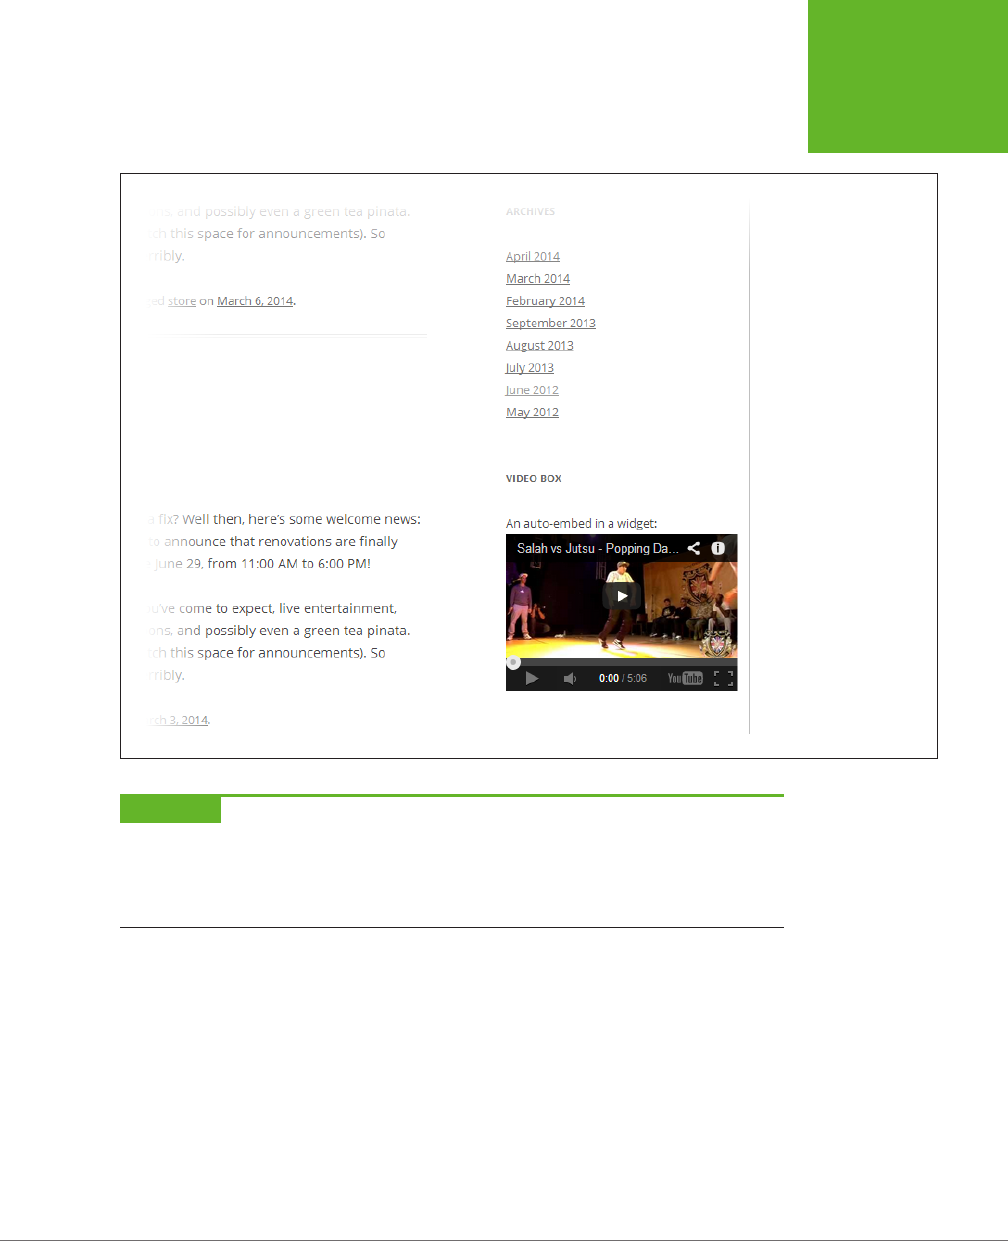
CHAPTER 13: EDITING THEMES: THE KEY TO CUSTOMIZING YOUR SITE 501
EDITING THE
CODE IN YOUR
THEME
FIGURE 13-18
This sidebar holds a
miniature YouTube video,
courtesy of the Text wid-
get and the auto-embed
feature.
WARNING If you accidentally copy the
functions.php
file from your parent theme to your child theme,
your site will stop working. That’s because
functions.php
is full of important routines that Twenty Twelve uses,
and having two copies of this code is enough to blow WordPress’s mind. The only fix (if you disregard this warning
and put the full
functions.php
file in your child theme folder) is to log in to your site with an FTP program and
delete the copied
functions.php
file.
Once you add the blank
functions.php
file to your site, you can edit it in the Edit
Theme page, as you can any other theme file. To enable widget-embedding, as
shown in Figure 13-18, you need to add these lines:
<?php
add_filter( 'widget_text', array( $wp_embed, 'run_shortcode' ), 8);
add_filter( 'widget_text', array( $wp_embed, 'autoembed'), 8 );
?>
Now you can put an auto-embed URL in a Text widget, just as you can in a post
(Figure 13-19).
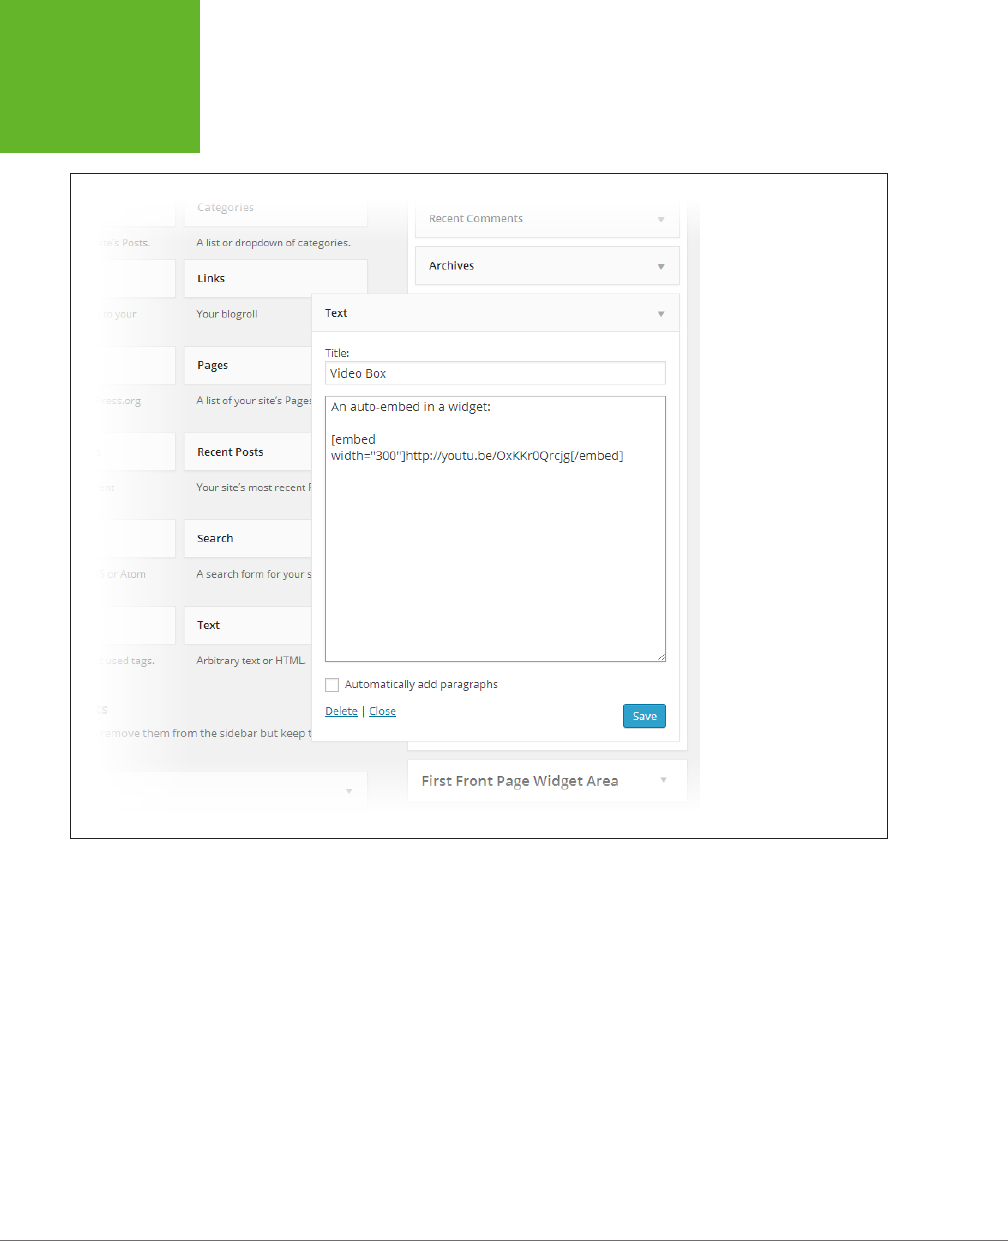
WORDPRESS: THE MISSING MANUAL
502
EDITING THE
CODE IN YOUR
THEME
FIGURE 13-19
Thanks to WordPress’s
auto-embed feature,
which you’ve now
enabled for widgets, this
URL will turn into a tiny
video box. Note that it
uses the width attribute
to shrink the box down
to 300 pixels wide, so it
fits comfortably in the
sidebar.

CHAPTER 13: EDITING THEMES: THE KEY TO CUSTOMIZING YOUR SITE 503
EDITING THE
CODE IN YOUR
THEME
POWER USERS’ CLINIC
Learning More About Theme Customization
This chapter offers a glimpse of the styles, templates, and PHP
code that underpins WordPress. Even if you don’t understand
how it all works (and most people don’t), you still know enough
to start making template changes. You may need trial-and-
error experimentation to get the result you want, and you may
need to search for other people’s hacks and tricks to help you
out (Google is your friend). But as long as you’re not afraid to
open a template file, look inside, and make changes, you have
the potential to change anything.
In the next chapter, you’ll methodically explore a complete
end-to-end site example. In the meantime, it’s worth point-
ing out some resources you can use to develop your theme-
tweaking skills:
• Template recipes. You can practice a grab bag of simple
theme tricks at
http://tinyurl.com/templatetrix
. They’re
divided into short, practical chunks. The more you try
out, the more comfortable you’ll become navigating
the tangled maze of templates that constitute a theme.
• Blogs by WordPress pros. Lorelle van Fossen (
http://
lorelle.wordpress.com
) has acres of practical content
about customizing WordPress sites, including many
adventures in theme customization.
• Smashing Magazine. If you’re looking to get more serious,
Smashing Magazine (
http://wp.smashingmagazine.com
)
has hardcore articles about every aspect of WordPress site
development. They often go far beyond ordinary features
and deep into theme customization.
• Theme frameworks. Theme frameworks extend the core
WordPress code with new features. The cost is extra
complexity, although you won’t need to fiddle with low-
level details and PHP code anymore. Popular examples
include Thematic (
http://tinyurl.com/themat
), which
is free, and Genesis (
http://tinyurl.com/gen-theme
),
which isn’t.

505
CHAPTER
14
In the previous chapter, you learned how to stretch WordPress’s capabilities by
editing your theme files. You saw how a few small changes, like adding a style rule
or changing a section of PHP code, let you customize details that would ordinarily
be out of reach.
Tinkering with your WordPress theme is a great way to make a number of small but
genuinely useful tweaks to your site. But once you start poking around the inner
workings of a theme, you open the door to a more ambitious endeavor: reworking
the entire theme to create a completely customized site.
In this chapter, you’ll learn how to modify a theme by creating a showcase site for
the furniture company Distinct Furnishings. You’ll see how to create a browsable
product catalog, with custom post types and custom category pages. You’ll even get
a taste of ecommerce with a simple, yet functional, shopping cart powered by PayPal.
NOTE The theme customizing you’ll do in this chapter is just a first step in a long journey, but it’s a valuable
one even if you choose not to design your own theme from scratch. That’s because the more you know about the
inner workings of WordPress, the better you can evaluate themes you might want to use, and the more successful
you’ll be if you decide to customize a theme.
Planning Your Site
The first step to building an advanced, customized site is to get out a notepad and
start planning. Before you set fingers to keyboard, you should ask (and answer) a
few questions:
Building an Advanced
WordPress Site

WORDPRESS: THE MISSING MANUAL
506
PLANNING
YOUR SITE
• What type of content will your site feature?
• How will your content be arranged, and how will visitors browse your site?
• Will your content use posts or pages or both?
• Do you need to create separate types of posts for dierent content?
It’s important to think about these questions early on, because you need to consider
how you want visitors to interact with your site. And that, in turn, determines the
kind of changes you need to make to your theme. In the case of Distinct Furnish-
ings, for example, the site’s job is to display information about the dierent pieces
of furniture the company sells. Visitors will arrive at the site and browse through
the items that interest them. Essentially, the Distinct Furnishings site is a
product
catalog,
which is a common type of advanced WordPress site.
Picking a Theme
Every WordPress theme has similar underpinnings, but no two themes are quite the
same. If you start out editing a theme that isn’t well suited to your site, you’ll create
extra work for yourself. So before you commit to a theme, make sure you’ve got the
best, most workable one for your needs.
There are many ways to pick a good theme for customization:
• Some WordPressers pick one they understand (like Twenty Twelve) and use
that in all their customization projects.
• Some web designers pick a theme that’s as close as possible to the final result
they want. This means they have much less customization to do, but it also forces
them to spend time learning the subtly dierent workings of a new template.
• Some WordPress pros use a heavily stripped-down theme, which provides very
little beyond the core WordPress code. This way, they don’t need to worry about
removing built-in features and embellishments they don’t want, but it also means
they need to supply the majority of the markup and styles that format the site,
which takes time and requires some serious web design skills.
• Some WordPressers favor theme frameworks, which are simple, foundational
themes designed for other developers to extend. The drawback is choice and
complexity: There are many theme frameworks to choose from, and they all
have their own subtly dierent structure. (To learn more, read what WordPress
has to say at
http://tinyurl.com/theme-f
.)
The Distinct Furnishings site follows the second approach. It uses the PinBlack
theme (
http://tinyurl.com/pinblack
), which already has most of the right layout and
formatting in place (Figure 14-1).
Before you go any further, you need to decide whether you want to work on a child
theme (page 462) or the original theme files. As you learned in Chapter 13, child
themes are always the right choice when you make cosmetic changes to a theme
you love. They’re also a good idea if you plan to make targeted changes to specific
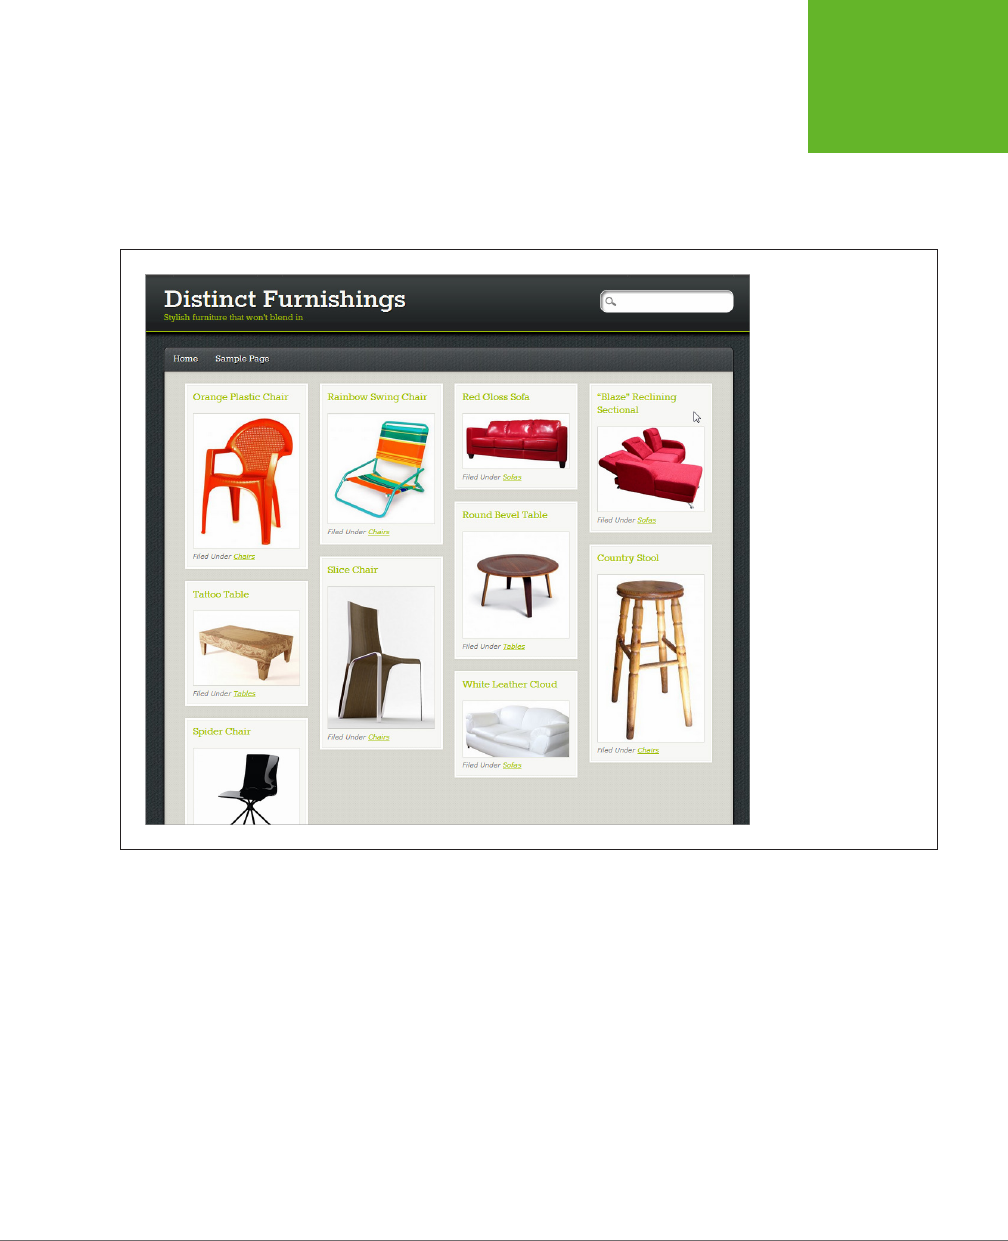
CHAPTER 14: BUILDING AN ADVANCED WORDPRESS SITE 507
PLANNING
YOUR SITE
aspects of a theme, while leaving the rest of it alone. But if you plan to make extensive
changes that will require you to modify most of the template files in a theme, a child
theme doesn’t make as much sense. Since you’ll override almost all the functional-
ity in the original template, there’s little reason to use a child theme that retains its
relationship with its parent.
FIGURE 14-1
PinBlack is a portfolio
theme that arranges
posts in a grid of packed-
together tiles. Each one
includes the title of the
post (that’s the product
name in this case), its
featured image, and its
category (“Filed Under”).
This makes PinBlack an
almost perfect theme for
browsing products, except
that it orders the posts
based on their publication
date.
Once again, there’s no clear-cut answer for all situations. It depends on how complex
a theme you start with, and how heavily you plan on customizing it.
• If you decide to create a child theme that
extends
an original theme, follow the
instructions on page 463.
• If you decide to create a completely new theme that
replaces
the original theme,
continue reading the next section. This is the approach the Distinct Furnishings
example follows with the PinBlack theme.
Creating a Custom Copy of a Theme
In theory, you can edit any theme in the dashboard without taking any special steps.
But doing so is risky. Eventually, the creator of the original theme will distribute an

WORDPRESS: THE MISSING MANUAL
508
PLANNING
YOUR SITE
update, and it’s all too easy to accidentally install the update and wipe out all your
carefully crafted customizations.
To protect yourself, create a copy of the theme that WordPress won’t ever try to
update. Here’s how:
1. Download the theme files to your computer.
You can do this two ways. One is to use an FTP program and drag the appro-
priate theme folder (say,
pinblack
) from your site’s
/wp-content/themes
folder
to your computer.
The other option is to visit the WordPress themes directory at
http://wordpress.
org/themes
. Search for the theme you’re using, view it, and then click Download.
WordPress stores the theme files in a ZIP file. Double-click the ZIP filename to
peek inside, find the theme folder, and copy that folder to your computer (say,
the desktop) so you can edit the files it contains.
2. Open the theme’s
style.css
file in a text editor.
Usually, that means Notepad on a Windows computer and TextEdit on a Mac.
At the top of the file, you see the header comment with its basic information
about the theme.
3. Change the theme name.
For example, where it says this:
Theme Name: PinBlack
Change it to:
Theme Name: PinBlack_Custom
This is the name WordPress will use in the dashboard for the copied theme.
NOTE PinBlack_Custom is a good theme name, because it clearly communicates that this is a customized
version of the original PinBlack theme. PinBlack2 would be a bad choice, because the person who created PinBlack
might use that name to denote a significant revamp of the original theme.
4. Remove the theme URL.
That’s the line that starts with “Theme URI.” Find it and delete it. This severs the
link between your theme and the original one, ensuring that any theme update
won’t overwrite your customized files.
5. Rename the theme folder to match the theme name.
For example, if you used the name PinBlack_Custom, you might rename the
theme folder
pinblackcustom.
It doesn’t really matter what name you use, as
long as you change the folder name from the original (
pinblack
) in some way.
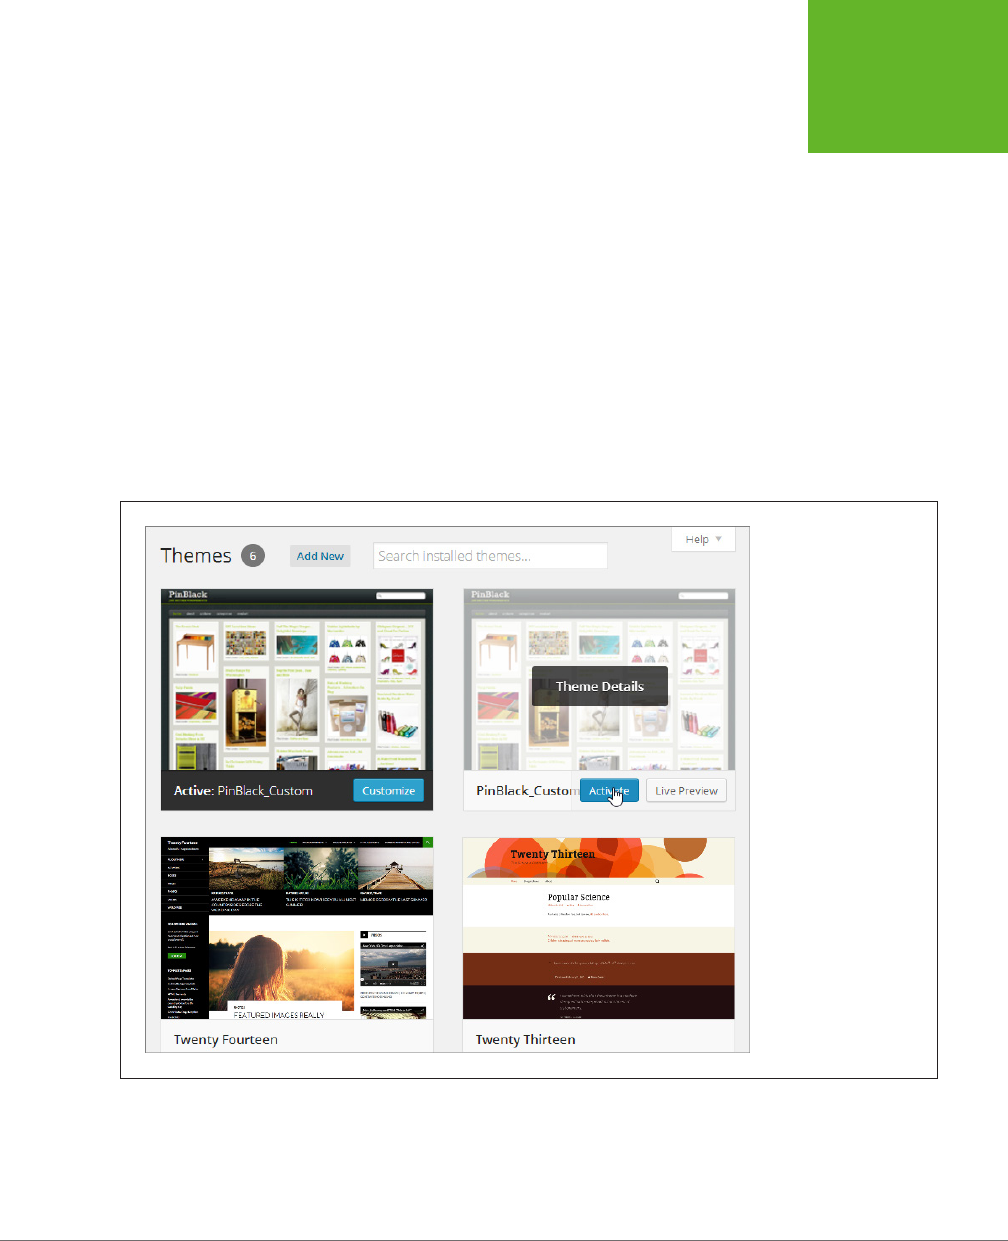
CHAPTER 14: BUILDING AN ADVANCED WORDPRESS SITE 509
PLANNING
YOUR SITE
6. Upload the new theme to your site.
You can do this two ways, too. The most direct is with an FTP program, where
you drag the new theme folder (say,
pinblackcustom
) from your computer to
your site’s
/wp-content/themes
area.
The other option is to ZIP up your theme folder, and then upload it using the
dashboard. Once you create the ZIP file, choose Appearance→Themes, click
the Install Themes tab, and then click Upload. Select your ZIP file (click Browse
or Choose File—the button’s name depends on your browser), and then send it
o to your site (click Install Now).
Either way, once you upload the custom version of your theme, you can start
using it.
7. Choose AppearanceÆThemes, point to your theme, and then click Activate.
Figure 14-2 shows the PinBlack_Custom theme being activated.
FIGURE 14-2
The only difference
between a copy of a
theme and a child theme
is the information in the
header of each one’s
style.css
file. In a child
theme, the style header
includes a reference that
links the child theme to
the parent theme. But a
theme copy is completely
self-sufficient; it has its
own version of every
template, style sheet, and
resource file, and no link
to the original theme.

WORDPRESS: THE MISSING MANUAL
510
ADDING NEW
TYPES OF
POSTS
GEM IN THE ROUGH
Avoid Confusion with a Test Site
It may take some time to transform your new site from a
few good ideas into a final, polished product. This raises a
risk—while you’re hard at work, your half-finished, slightly
broken site will be on the Web, visible to potential visitors and
slightly embarrassing.
If you’re creating a brand-new site where none existed before,
this might not be an issue. Because no one knows about your
site, there won’t be many people stopping by (and anyone
who stumbles across your work by chance won’t expect much).
But if you’re replacing an old, traditional-style website with
a new WordPress site, you’ll want to avoid the potential risk
of a work in progress.
One way to do this is to create your website in a subfolder on
your web server, and then transfer it to the real location once
you finish it. For example, say you own the domain
super-chic.
com.
You could create your new website in a subfolder (page
51), like
super-chic.com/v1.
Then, when your site is ready to
go, you change the configuration of your root site (
super-chic.
com
) so that it actually uses the files from
super-chic.com/v1
.
WordPress has the instructions to make this sort of change-
over at
http://tinyurl.com/89wochm,
but here’s a slightly
compressed overview:
1. Go to the SettingsÆGeneral section of the dashboard in
your test site, and change the “Site Address (URL)” setting
to the root of your website. For example, you would
replace
http://super-chic.com/v1
with
http://super-chic.
com.
(But don’t change the “WordPress Address (URL)”
setting.)
2. Using an FTP program, copy the
index.php
and
.htaccess
files from the test site folder (in this example, that’s
v1
)
to your computer.
3. Edit the
index.php
file (the copy you downloaded to
your computer) using a text editor. Find the command
that says
require('./wp-blog-header.php')
and insert your folder name before the filename, like
this:
require('./v1/wp-blog-header.php')
.
4. Upload the modified
index.php
file and the untouched
.htaccess
file to the root folder of your website.
5. If your website’s root folder has any other default pages
that it might show instead of
index.php
(like
index.htm
),
rename or remove them now.
That’s it—your test site is now live. Don’t forget to delete any
posts or pages you created for testing purposes.
Adding New Types of Posts
Throughout this book, you’ve relied on two basic WordPress ingredients: posts and
pages. But WordPress has a semi-secret superpower: It can manage other types of
content, provided you define them first. These are called
custom post types.
Consider the Distinct Furnishings site. Its goal is to present a product catalog that
describes the items that it oers for sale. You
could
put each furniture item into an
ordinary post, but that approach could get messy, especially if you want your site
to feature ordinary news-style postings as well as product postings.
A better system is to create a custom post type called
product
that’s tailored to the
furniture items you want to show. Using this post type, you can create a separate
product post
for each piece of furniture in the catalog.

CHAPTER 14: BUILDING AN ADVANCED WORDPRESS SITE 511
ADDING NEW
TYPES OF
POSTS
Product posts (or any type of custom post) are a lot like ordinary posts, except that
they come with extra features. For example, you can choose to put your product
posts in a separate section of your website, organize them in a dierent way, and
attach dierent bits of information to them. Custom post types are also a linchpin of
professional ecommerce plug-ins and themes, as you’ll learn at the end of this chapter.
NOTE Custom post types are the gateway between an ordinary blog and a true
content-management system
(CMS)—in other words, they let you create a site that can display any type of content you create.
Here’s the catch: Creating a custom post type is a bit of work. Not only do you need
to define a custom post type (using code or a plug-in), you also need to alter your
theme to use it. In fact, without these changes, your custom post type won’t appear
on your site at all.
In the following sections, you’ll consider two ways to create a custom post type for
products. First, you’ll consider the raw code approach, which requires nothing more
than the WordPress dashboard and a bit of bravery. Then, you’ll pick up a plug-in
that can do the same job more eciently.
Defining a Custom Post Type in Code
To create a custom post type, you begin by choosing a name for it. This name should
be short, with all lowercase letters and no fancy characters. (Hyphens are techni-
cally allowed, but can cause various annoyances, so avoid them.) Examples of good
post type names include
review, recipe, book, employee, exhibit, article,
and so on.
Distinct Furnishings uses a custom post type named
product.
Someday in the future, WordPress may oer a dashboard menu for creating custom
post types, but today it asks you to do the work the hard way, by running a snippet
of code. You add this code to your theme’s
functions.php
file—the all-purpose theme
extender you use to unlock new features (page 500).
To edit
functions.php
, choose Appearance→Editor in the dashboard, and then click
the “Theme Functions (functions.php)” link on the right. Scroll down past all the
code that’s already there. You can add your code at the end.
TIP If you’re working with a child theme, you won’t already have a
functions.php
file, but you can make
one (page 490). Once you create a new, blank
functions.php
file, write
<?php
on the first line to begin a block
of PHP code. Then add the code that registers your custom post type underneath.
The easiest way to register a custom post type is to copy a ready-made block of code
and change the details to suit your post type. Here’s an example that you can paste
straight into the
functions.php
file on your site, provided you edit the details in bold:
function create_product_post_type() {
$labels = array(
'name' => 'Products',

WORDPRESS: THE MISSING MANUAL
512
ADDING NEW
TYPES OF
POSTS
'singular_name' => 'Product'
);
$args = array(
'labels' => $labels,
'public' => true,
'supports' => array( 'title', 'editor', 'thumbnail', 'excerpt' ),
'taxonomies' => array( 'category' ) );
register_post_type( 'product', $args );
}
add_action( 'init', 'create_product_post_type' );
TIP Many parts of this chapter introduce useful snippets of code that you can adapt for your own site.
Rather than type this code in by hand, you can download these excerpts from the Missing CD page for this book
(
http://www.oreilly.com/pub/missingmanuals/wpmm2e
). You can then modify them and paste them into your
own template files. And if you want to browse the example site from this chapter, visit
http://prosetech.com/
wordpress
.
This code has two pieces. First, it includes a custom function named create_prod-
uct_post_type(), which defines the custom post type. Then, it uses the add_action()
function to tell WordPress to run the create_product_post_type()function when
it initializes the theme. This makes sure that your site starts out with your custom
post type, ready to go.
NOTE The name you use for your custom-type-creating function is unimportant, as long as you’re clear,
consistent, and you don’t use the name of an existing function. The name
create_product_post_type()
makes sense in this example, because it registers a new custom post type named
product.
If you created a custom
post type for movie reviews, for example, you might choose to name the function
create_review_post_
type()
, but this detail doesn’t change the way the code works.
Inside the create_product_post_type() function is the meat of the code: the in-
structions that determine the key details for your new post type. When registering a
custom post type, you have the chance to specify an avalanche of settings, including
many minor details. The current example includes just the essentials:
• Name and singular name. These are the descriptive titles that appear in the
dashboard, as you’ll see on page 516. Choose names that match your post type.
In the Distinct Furnishings example, the custom post type is
product,
so it makes
sense to use the singular name Product and the plural name Products. (But it’s
not always as straightforward as adding an “s.” For example, if you have a custom
product type called
story,
you’d want to use the titles “Story” and “Stories.”)
• Public. If a post type is public, it appears in the dashboard, allowing you to
manage all the posts of that type. In the case of Distinct Furnishings, that means
you can log in to the dashboard and create new products or edit existing ones,
as you’ll see shortly. Private post types are hidden from view and managed with

CHAPTER 14: BUILDING AN ADVANCED WORDPRESS SITE 513
ADDING NEW
TYPES OF
POSTS
code. (For example, plug-ins sometimes use private post types for their own
information-storing purposes.)
• Supports. A custom post type can use some or all of the features of ordinary
posts and pages. You get the features you want by including them in a list. In
this example,
products
support featured images and excerpts, but not revision-
tracking or comments. For the list of features from which you can choose, go
to
http://tinyurl.com/reg-cpt
.
• Taxonomies. As you learned earlier in this book, a taxonomy is a way of or-
ganizing posts. In this example, the new product post type uses the standard
category organization system, as do posts. The product post type doesn’t elect
to use tags—although it could, if you replaced ('category') with ('category',
'post_tag'). But the most powerful (and complex) approach is to create
your
own
taxonomy. You’ll dip your feet into those waters on page 542.
Finally, the register_post_type() function is the part that works the magic, creat-
ing the custom post type according to the recipe you provide. When registering a
custom post type, you need to provide the all-lowercase name you picked, which
is the key bit of information that identifies your type.
Once you add this code to the
functions.php
file, it’s time to see if you successfully
created the post type. Click the Update File button to store your changes, and then
refresh your browser. Assuming all is well, your new post type will appear in the
dashboard menu (Figure 14-3).
UP TO SPEED
Creating a Custom Post Type That Suits Your Site
The Distinct Furnishings example uses a custom post type
named
product
because each post represents a piece of fur-
niture. However, you could just as easily create a custom post
type to represent something else, like movie reviews, how-to
articles, celebrity biographies, employee resumés, recipes, or
any other kind of content (so long as it’s made up of text and
pictures). For example, here’s how you might alter the code you
just saw to define a custom post type for restaurant reviews:
function create_review_post_type() {
$labels = array(
'name' => 'Reviews',
'singular_name' => 'Review'
);
$args = array(
'labels' => $labels,
'public' => true,
'supports' => array( 'title', 'edi-
tor',
'thumbnail', 'excerpt'),
'taxonomies' => array( 'category' )
);
register_post_type( 'review', $args );
}
add_action( 'init',
'create_review_post_type' );
There are many more details you can configure in your custom
post type. For example, you can tweak the text that appears
in various places in the dashboard when you add or edit posts
that use your custom post type. For more information, refer
to the function reference at
http://tinyurl.com/reg-cpt
, or try
out a custom post type plug-in, which lays out all the possible
options (page 518).
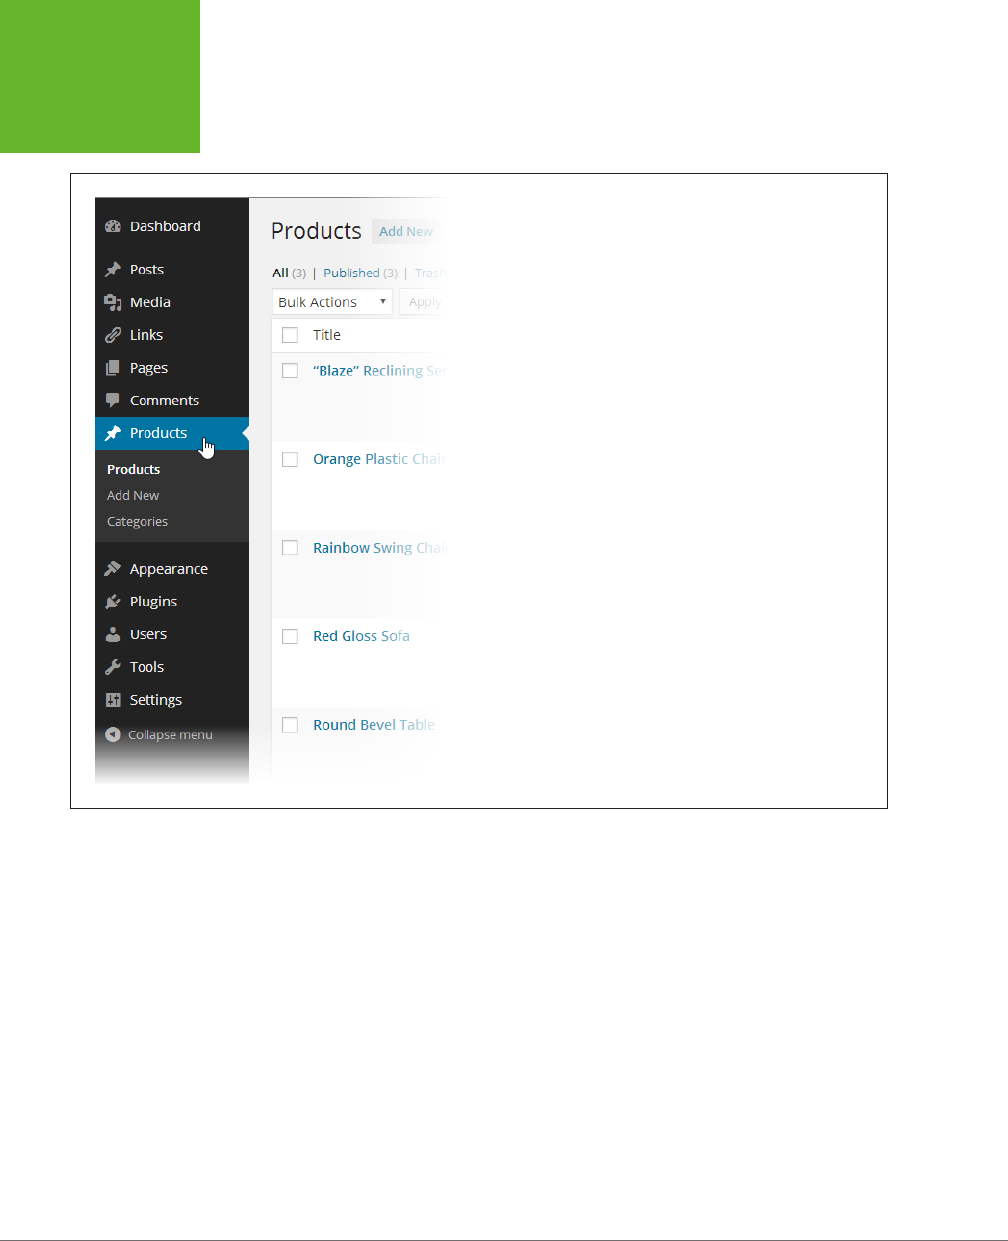
WORDPRESS: THE MISSING MANUAL
514
ADDING NEW
TYPES OF
POSTS
FIGURE 14-3
Every custom post type gets a separate slot in your dashboard menu.
In this example, you can click Products to create a new product post or
to review the ones you’ve published.
There’s one more task to carry out before you continue. Because of a quirk in the
way WordPress handles permalinks, you need to force it to refresh its permalink
settings when you create a custom post type. If you don’t, WordPress may fail to
show posts that use your custom post type. To fix this problem, follow these steps:
1. Choose Settings→Permalinks in the dashboard.
2. Make sure you’re using one of the pretty permalink settings, such as “Post
name” (page 117).
3. Click Save Changes, even if you haven’t changed anything.
Now you’re ready to start adding content to your site.
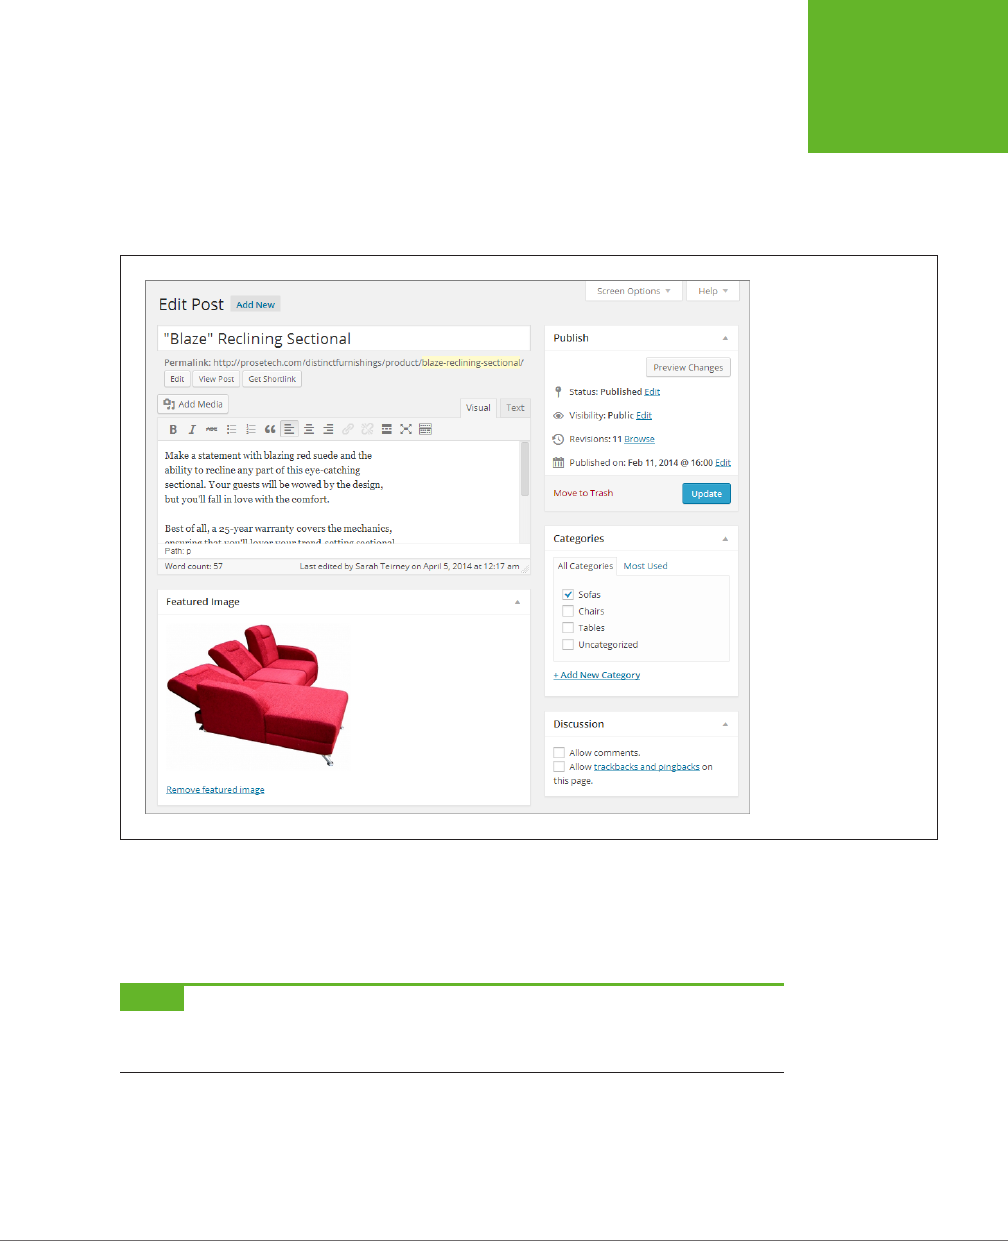
CHAPTER 14: BUILDING AN ADVANCED WORDPRESS SITE 515
ADDING NEW
TYPES OF
POSTS
Creating Sample Content
Now that you have a custom post type, you’re ready to put it to use by creating some
sample posts. Adding a post that uses a custom post type is the same as adding an
ordinary post, but instead of choosing Posts→Add New, you choose Products→Add
New (Figure 14-4).
FIGURE 14-4
To create a product
post for the Distinct
Furnishings site, you need
to provide the product
name (which is really the
post title), the product
description (the post con-
tent), a featured image,
and a category choice.
If you create a post type
that lacks certain features
(for example, one that
doesn’t support featured
images or category clas-
sification), you won’t see
those boxes here.
Just like an ordinary post, your new product post gets its own page and permalink.
And just like an ordinary post, you click Preview to take a look at the work in progress
and Publish to add it to your site. When you finish, choose Products→Products to
look at a list of all the products you added (Figure 14-5).
NOTE Keen eyes will notice that the permalink for a custom post type includes the name of the custom
post type. For example, if you create a product named Country Stool, WordPress gives it a permalink like
http://
distinctfurnishings.net/
product
/country-stool
.
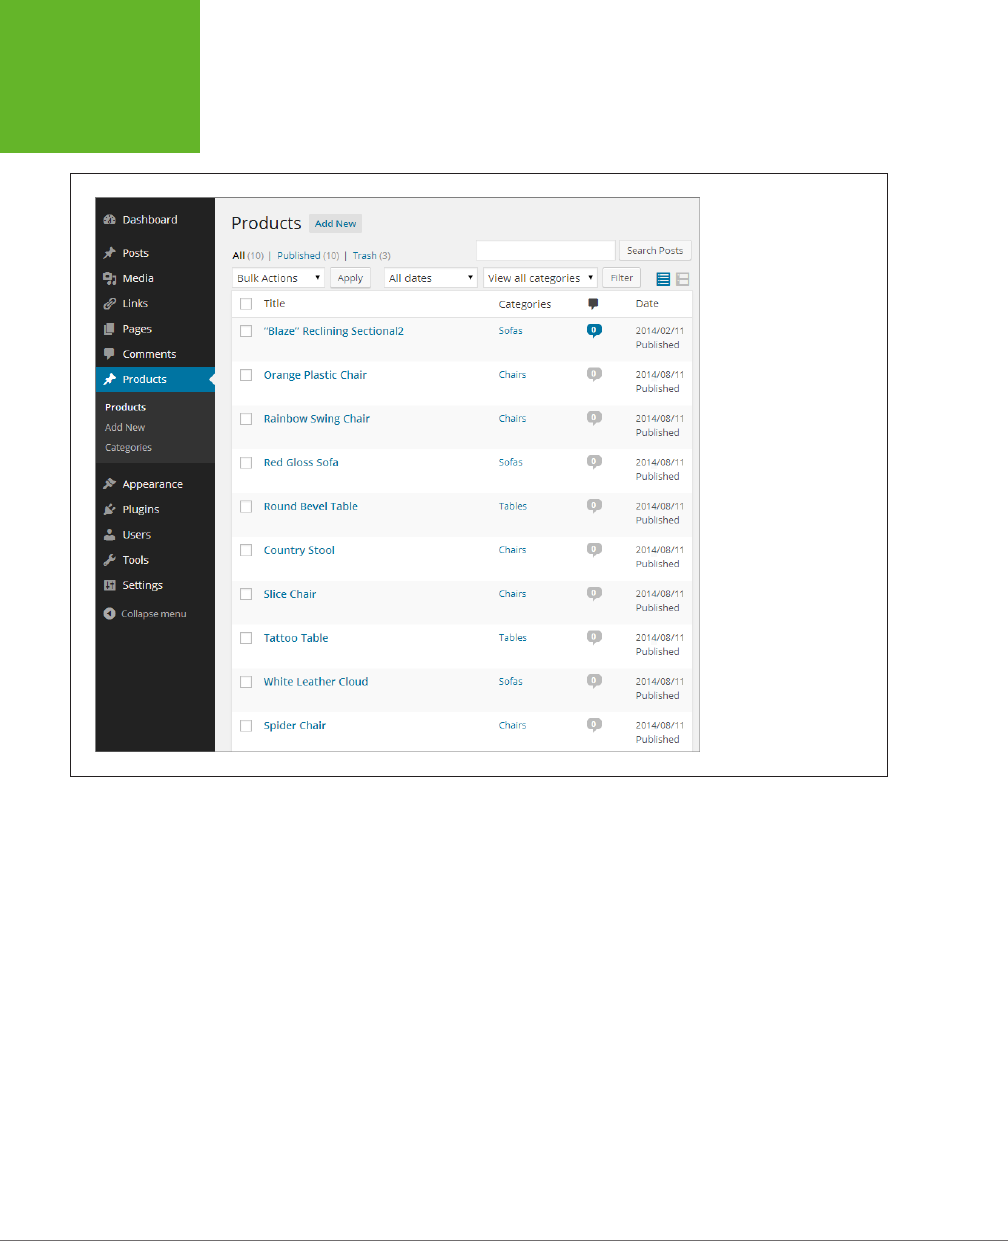
WORDPRESS: THE MISSING MANUAL
516
ADDING NEW
TYPES OF
POSTS
FIGURE 14-5
Here’s a fully stocked
product catalog for
Distinct Furnishings.
Although it looks like the
list of posts you get when
you choose Posts→All
Posts, it’s actually a
completely separate list.
Making Your Custom Post Type Appear on Your Site
So far, life with custom post types is good. In the Distinct Furnishings site, you can
easily review your products and add new ones. But dig a little deeper, and you’ll find
a glaring problem. Although you can visit each product post using its permalink (for
example,
http://distinctfurnishings.net/product/red-gloss-sofa
to take a look at the
Red Gloss Sofa), your products won’t appear in any of WordPress’s
archive pages.
These include the pages that display a list of posts by author, category, tag, or date,
and the home page that shows the reverse-chronological listing of all your posts.
In other words, if you hit up the home page, you’ll find it empty. And if you visit a
category page like
http://distinctfurnishings.net/sofas,
you won’t see the products
you put in the Sofas category.

CHAPTER 14: BUILDING AN ADVANCED WORDPRESS SITE 517
ADDING NEW
TYPES OF
POSTS
FREQUENTLY ASKED QUESTION
Editing Custom Post Types
I created a custom post type and added some posts that use
it. Now I want to change the custom post type. Is that safe?
You can return to your
functions.php
file and edit your custom
post type any time, without causing a problem. For example,
you can change the labels that appear in the dashboard,
the features that your custom post type supports, and the
taxonomies it uses.
You might, for instance, create a custom post type for products
that doesn’t support categories, then add some product posts,
and then decide that you actually
do
want to use categories. No
problem—just change the code in
functions.php.
When you go
back and edit one of your product posts, the category-picking
box will magically appear.
If you want to remove a custom post type, you can delete
the block of code that creates it in
functions.php.
However,
you should delete the posts that
use
your custom post type
first. Otherwise, those posts will continue to live, zombie-like,
even though you can’t see or manage them in the dashboard.
There’s one detail that you should probably never change once
you create a custom post type: its lowercase name. This is the
detail you supply as the first argument you pass to the
reg-
ister_post_type()
function. If you change the name,
WordPress assumes you removed the old custom post type
and you’re adding a new one. As a result, any posts that use
the old custom post type will disappear from the dashboard,
which obviously isn’t what you want.
There are two ways to fix this. The most versatile approach (and the one preferred
by WordPress experts), is to create your own archive pages that use custom queries
to pull out the product posts you want, in the order you want them. You’ll learn how
to do that later in this chapter (starting on page 519). But in the meantime, you can
use a simpler solution: Tell WordPress to always include your custom post type in
all its archive pages. You do that by revisiting the
functions.php
file and adding one
more block of ready-to-roll code:
function add_product_to_archives( $wp_query ) {
$types_array = array( 'post', 'product' );
if( is_archive() && empty( $query->query_vars['suppress_filters'] ) ) {
set_query_var( 'post_type', $types_array );
}
}
add_action('pre_get_posts', 'add_product_to_archives');
This code tells WordPress to include product posts in all its archive pages. (If you
created a dierent custom post type, substitute its name instead of
product
in the
code above.)
Now if you visit the Distinct Furnishings home page, you’ll see a list of all its products,
just like the one shown in Figure 14-1. (Of course, the arrangement of these products
needs a bit of work to look good, but that’s a task you’ll tackle on page 527.)

WORDPRESS: THE MISSING MANUAL
518
ADDING NEW
TYPES OF
POSTS
Defining a Custom Post Type with a Plug-In
Creating a custom post type with code really isn’t that bad. As long as you have
the right code in hand, it’s a simple case of copy, paste, and edit. However, even
WordPress gurus get tired of writing code—and exasperated by the way minor typos
can cause big-time headaches.
The problem gets worse if you get more ambitious and decide to add custom tax-
onomies to your site. As described in the box on page 542, custom taxonomies let
you attach extra bits of information to your custom post types. For example, Distinct
Furnishings might use custom taxonomies to add color, style, and price information
to its products. The problem is that every custom taxonomy needs to be registered
in code, much like every post type, and that adds up to a tedious afternoon.
For all these reasons, most WordPress developers use some sort of plug-in to cre-
ate custom post types. Two of the best and most popular are Custom Post Type
UI (
http://tinyurl.com/cust-pt-ui
) and Types (
http://wordpress.org/plugins/types
).
Both work the same way: They add tools to the dashboard that let you define new
posts types and new taxonomies, no coding required.
For example, if you install and activate the Custom Post Type UI, you can follow
these steps to create a custom post type:
1. Choose CPT UI→Add New in the dashboard menu.
This brings you to a management page where you can create a new custom post
type (using the boxes on the left) or a new taxonomy (on the right).
2. Fill in three key details: the name of your custom type, the plural and singular
labels, and an optional description (Figure 14-6).
3. Click Advanced Options.
You’ll see a whack of extra settings (all of which are explained, somewhat tersely,
in the function reference at
http://tinyurl.com/reg-cpt
).
4. In the Supports section, select the features you want with your custom
post type.
To duplicate the code-only example you saw earlier, you need to tick the Title,
Editor, Featured Image, and Excerpt checkboxes.
5. In the Built-in Taxonomies section, add a checkmark next to Categories if
you want your custom post type to use categories.
You can also switch on the Tags checkbox to use tags with your custom post type.
6. Click Create Custom Post Type.
The Custom Post Type UI plug-in creates the code that builds your custom post
type. You’ll see it in the dashboard menu, exactly as if you added the necessary
code to the
functions.php
file.
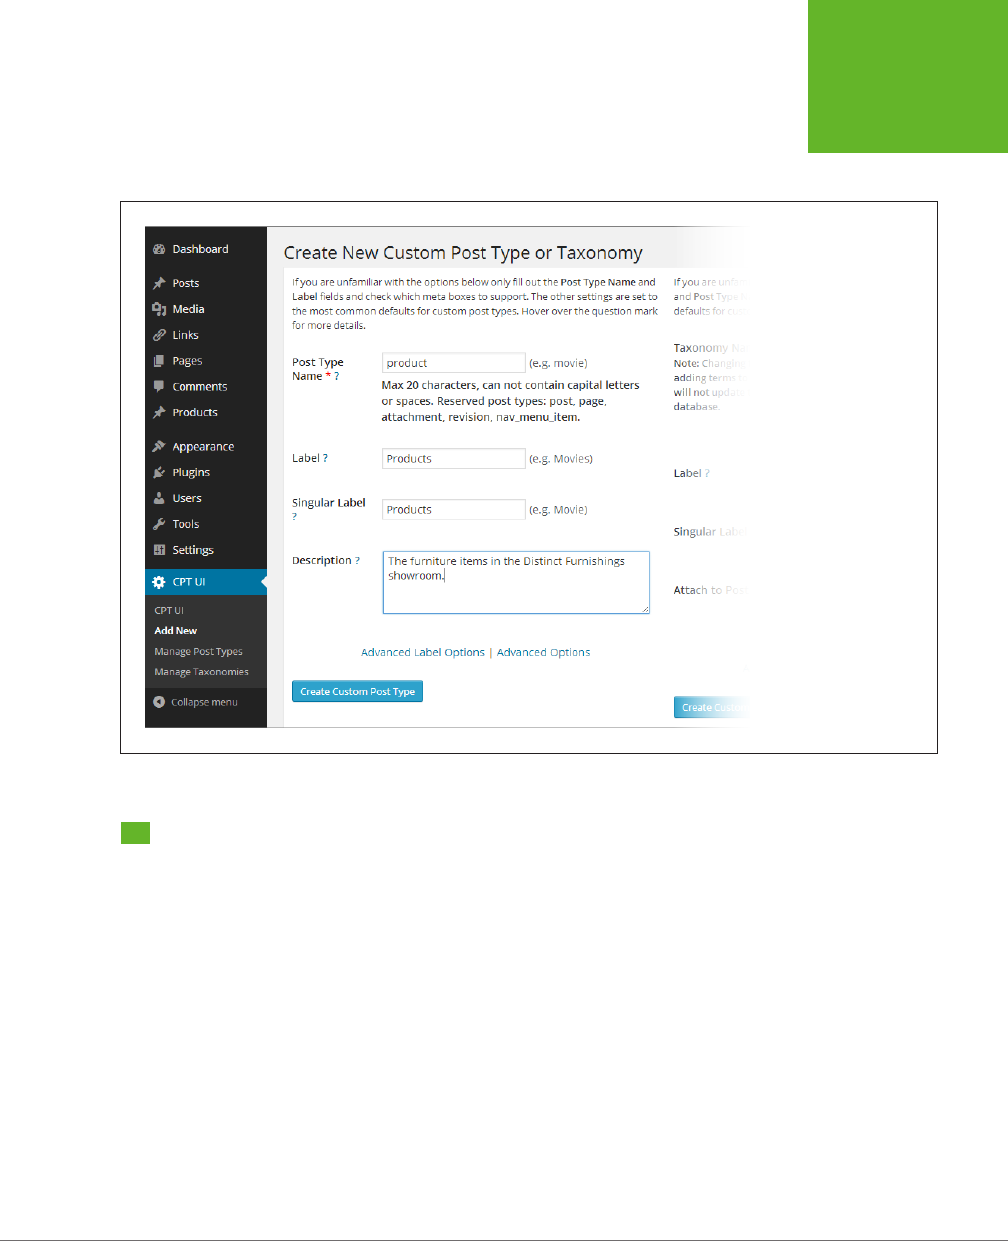
CHAPTER 14: BUILDING AN ADVANCED WORDPRESS SITE 519
CREATING
CUSTOM
CATEGORY
PAGES
To modify your new custom post type, you need to use the plug-in. Choose
CPT UI→Manage Post Types to see all the post types you created, and to edit
or delete any of them.
FIGURE 14-6
The Custom Post Type UI
plug-in asks you to fill
in the details for your
custom post type so that
it can create the code
you need.
Creating Custom Category Pages
Now that you’ve picked a theme, created a custom post type, and added a bit of
sample content, you’re ready to start reengineering your site. Your goal is to remove
the “bloggish” details that don’t really fit, and make your site feel like a fine-tuned
custom creation.
The first challenge is to give your visitors a decent way to browse Distinct Furnish-
ing’s products. Right now, WordPress sorts the products the same way that it sorts
posts—in reverse-chronological order, based on the date you published the post.
While that makes sense for a blog, a news website, and many other types of sites, it
isn’t terribly useful in a product catalog. Visitors who arrive at Distinct Furnishings
probably won’t want to see every item crowded into a somewhat disordered single
page of tiles (Figure 14-1). Instead, they’ll want to focus on the
type
of furniture they
need—like a sofa, chair, or table.
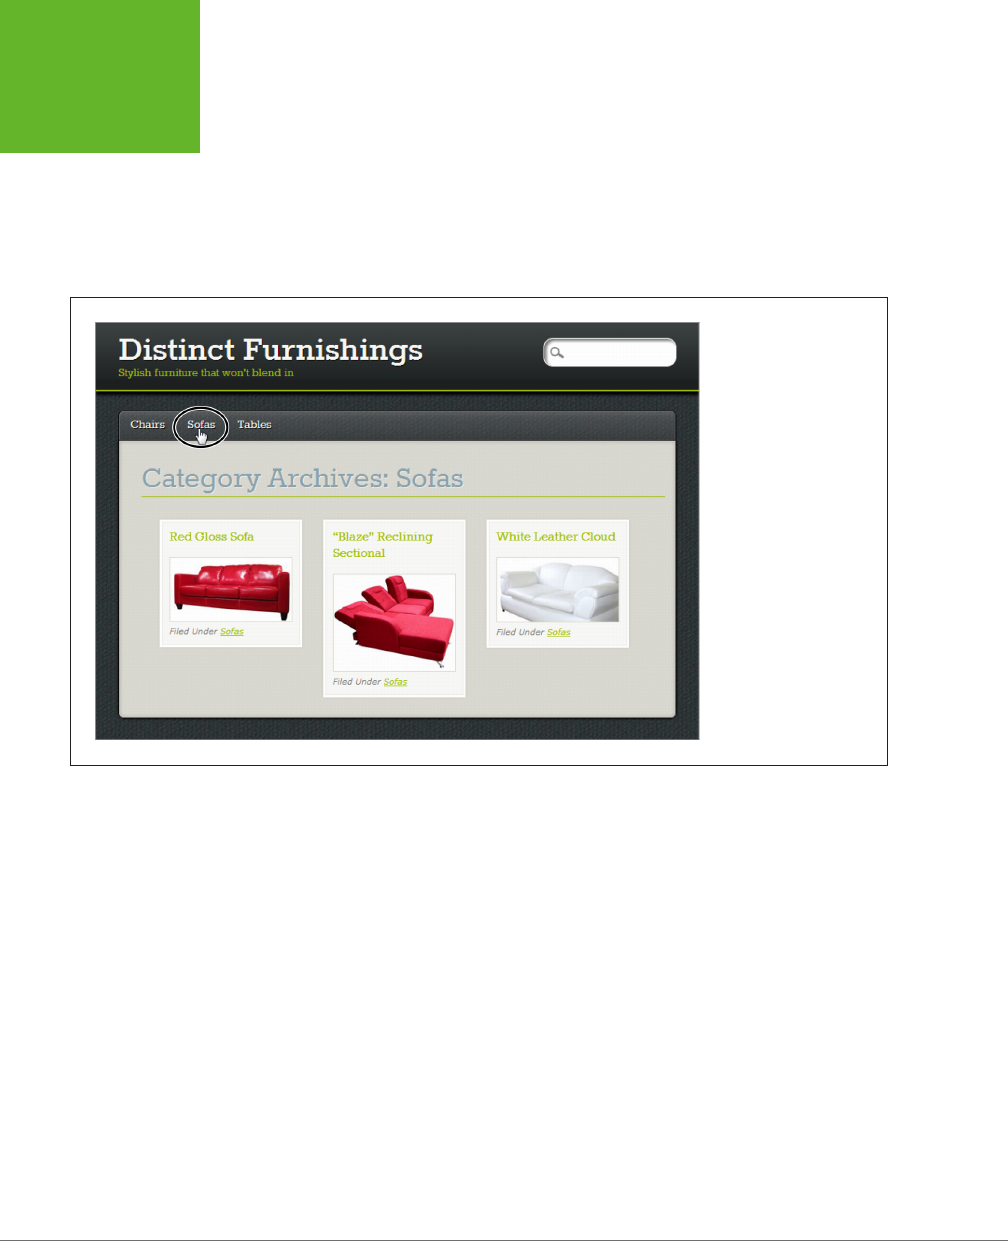
WORDPRESS: THE MISSING MANUAL
520
CREATING
CUSTOM
CATEGORY
PAGES
This is clearly a job for the WordPress category system. As you already know, you can
browse posts by category by putting the category name in the web address, like this:
http://distinctfurnishings.net/sofas
Of course, you won’t expect your visitors to type this address on their own. Instead,
you’ll supply the links in a post or page, in the Categories widget, or in a menu. Menus
are the most common way that visitors navigate sites (Figure 14-7).
FIGURE 14-7
The easiest way to orga-
nize a product catalog
is to create links that let
your visitors focus on one
category of product at
a time.
The menu approach is probably the best browsing experience you can create without
editing your theme. However, it’s not perfect. It has several shortcomings:
• You can’t display dierent categories of products in dierent ways. For ex-
ample, you might want the sofa-browsing page to look dierent from the
tables-browsing page.
• You can’t display additional information about a category.
• You can’t control the order of products
within
a category—WordPress still puts
them in reverse-chronological order by publication date.
However, you
can
control all these options by customizing the category page tem-
plate (also known as a
category archive page
), which creates the page shown in Figure
14-7. For example, when you visit a web address like
http://distinctfurnishings.net/
sofas
, the category page grabs the products in the Sofas category and displays them.
The stock category page does a decent enough job, but you can do better by edit-
ing your theme. Figure 14-8 shows a revamped version of the category page that
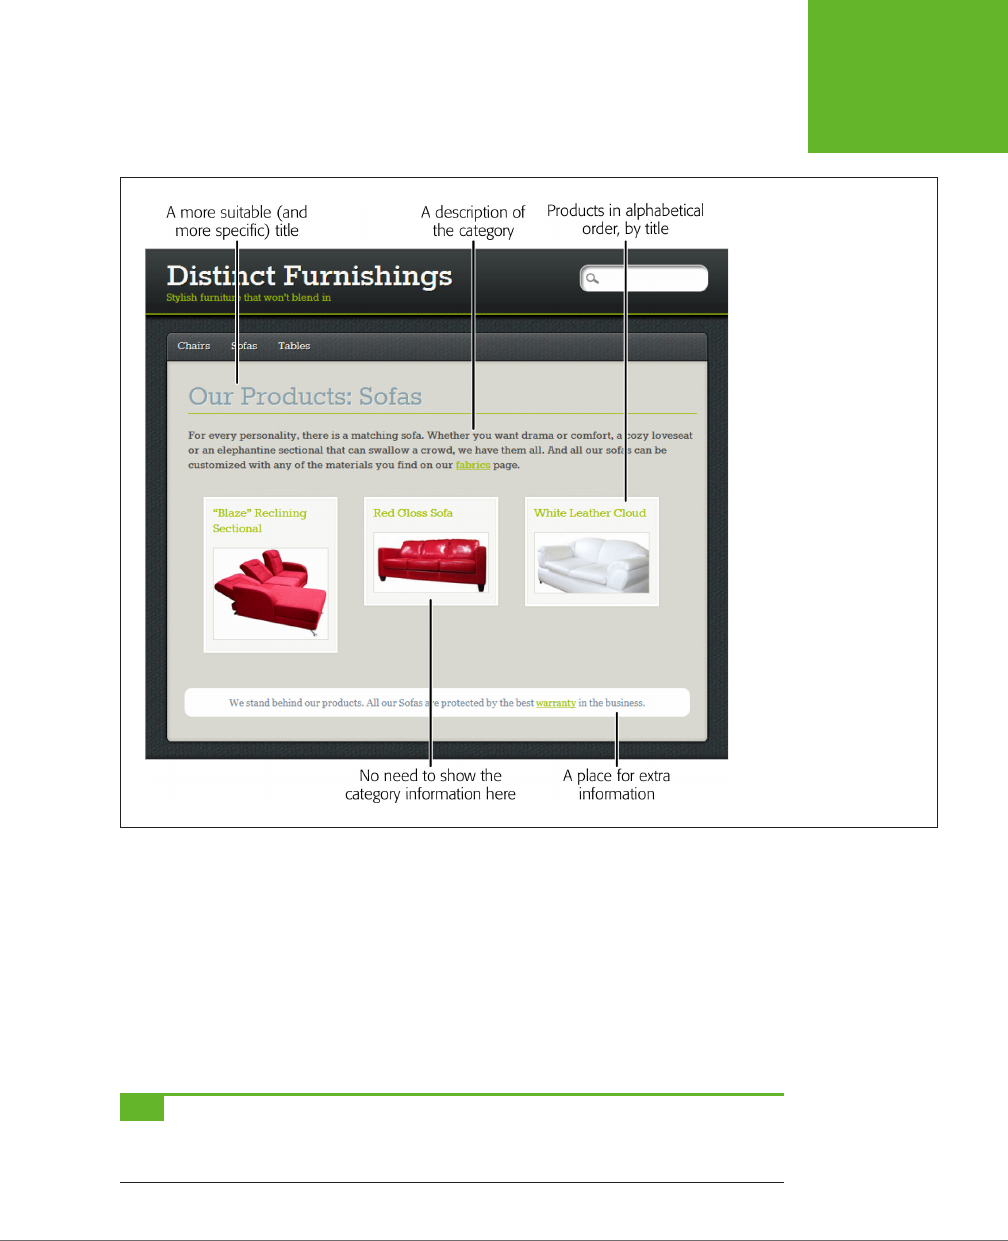
CHAPTER 14: BUILDING AN ADVANCED WORDPRESS SITE 521
CREATING
CUSTOM
CATEGORY
PAGES
adds a number of refinements. In the following sections, you’ll learn how to make
these improvements.
FIGURE 14-8
With a bit of theme editing,
you can polish PinBlack’s
category pages.
Adding a Category Description
The first and easiest change you can make to the category page template is adding
a category description. Many themes, including PinBlack, automatically display the
category description on the category page. You don’t even need to edit your theme.
When you first create a category, it doesn’t have a description, but you can easily
add one to the category record. Start by choosing Posts→Categories to see a list
of all your categories, and then click the Edit link under the category you want to
edit. Then type the category description in the Description box.
TIP Although the Description box doesn’t give you the editing conveniences you get when editing a post or
a page, you can still type in any HTML you want. For example you can insert <img> elements that show pictures,
<a> elements that create links, and formatted <div> elements that use classes from the
style.css
file.

WORDPRESS: THE MISSING MANUAL
522
CREATING
CUSTOM
CATEGORY
PAGES
Here’s the description for the Sofas category shown in Figure 14-8:
For every personality, there's a matching sofa. Whether you want drama
or comfort, a cozy loveseat, or an elephantine sectional that can swallow
a small crowd, we have them all. And all our sofas can be customized
with any of the materials you find on our
<a href="http://distinctfurnishings.net/fabrics">fabrics</a> page.
When you finish editing the category description, click Update to save your changes.
Finding the Right Template File
To add more information to the category page, or to change any other detail (or if
your theme doesn’t include category descriptions to begin with), you need to edit
the theme’s template files. But first, you have to find the right files.
When WordPress assembles a page, it prefers to use a specific template (say, one
designed for browsing categories) rather than a more general one (one designed for
browsing any group of posts, for example). To pick a category template, WordPress
goes through this list, from top to bottom, and stops when it finds a match:
1. category-slug.php
This is the template for a specific category. For example, if you browse the Sofas
category, the slug-specific template that WordPress uses is
category-sofas.php
.
2. category-ID.php
This template also displays category pages, but it specifies the category using
the category ID. For example, if the Sofas category has an ID of 4, the template
file is
category-4.php
. You can get the category ID by editing the category re-
cord and looking carefully at the web address in your browser. But instead of
going to that trouble, use the category-
slug
naming system instead—it’s easier
to understand and has the same eect as the older category-
ID
approach.
3. category.php
This is the standard template for category pages that don’t have specialized
formatting. If you haven’t customized your theme, this is probably the template
doing the work displaying category pages.
4. archive.php
This is a more general template that lets you browse by category, tag, author,
or date when you don’t have a more specific template doing the work.
5. index.php
This is your home page, and the final fallback if every other template file is
missing.
Almost no theme uses either of the first two types of template (
category-slug.php
and
category-ID.php
) out of the box. That’s because these templates are for you,

CHAPTER 14: BUILDING AN ADVANCED WORDPRESS SITE 523
CREATING
CUSTOM
CATEGORY
PAGES
the website creator, so you can add category-specific formatting wherever you need
it, to suit the types of posts you want to put on your site.
Most themes include a
category.php
page, but a few don’t, relying on
archive.php
instead. In such a case, the
archive.php
template may include complex instructions
that display dierent text or formatting depending on whether your visitor browses
by category, tag, author, or date.
PinBlack includes the
category.php
file, so this is the one you want to edit. Choose
Appearance→Editor and click the “Category Template (category.php)” link to get
started. Inside, you find several dozen pages of interwoven HTML markup and PHP
code. The overall pattern will be familiar from the previous chapter (page 486).
First, a get_header() instruction starts the page and inserts the header, then the
loop displays all your posts, and finally a get_footer()instruction adds the footer
and ends the document.
TIP Before you edit these templates, it’s a good idea to make a backup copy of each. The easiest way to
do that is to launch an FTP program and drag the templates to your computer to download them. A backup is
important because you might decide later that you need to display some posts in a more typical single-post page.
If so, you’ll have a copy of the unedited template ready to roll. Keeping a backup is also a good idea in case you
get carried away with your template surgery and accidentally lobotomize your page.
Changing a Category Page’s Title
Once you crack open the category template, there’s nothing you can’t change. The
first target is the title of the page. Most themes use something generic, if they use
a title at all.
The PinBlack theme shows a heading with text like this: “Category Archives: So-
fas” (Figure 14-7). To quickly home in on this part of the template, press Ctrl+F
(Command+F on a Mac) and type in “category archive.” That takes you to a part of
the template that looks like this:
<h1 class="archive-title">
<?php
printf( __( 'Category Archives: %s', 'pinblack' ), '<span>' .
single_cat_title( '', false ) . '</span>' );
?>
</h1>
It may take a second to puzzle out this markup, because it relies on some hardwork-
ing PHP code. The printf() function inserts some formatted text into the current
page. Here’s where things get a bit tricky. The printf() function actually stitches
together several pieces of text, using single quotation marks to demarcate each
piece of text and periods to link the pieces together. The result is a bit of HTML that
looks like this, which the template spits out onto the page (Figure 14-7):
Category Archives: <span>Sofas</span>

WORDPRESS: THE MISSING MANUAL
524
CREATING
CUSTOM
CATEGORY
PAGES
The words “Category Archives” sound a bit jargony—imagine you’re browsing a list
of bestsellers on Amazon.com and see “Category Archives: Bestsellers” at the top
of the page instead of the more recognizable “Recent Bestsellers.”
To replace this heading with the more suitable text shown in Figure 14-8, make this
simple edit:
<h1 class="archive-title">
<?php
printf( __( 'Our Products: %s', 'pinblack' ), '<span>' .
single_cat_title( '', false ) . '</span>' );
?>
</h1>
As always when you edit a template, click Update to save your changes and then
take a look at your site to see the change.
Adding Extra Information
One of the most common ways to soup up a category page is to add extra bits of
useful information. You know how to add a category description (page 113), which
the category page includes automatically. But when you edit the template, you can
add content elsewhere on the page. One example is the white, rounded box at the
bottom of Figure 14-8, which provides a reassuring message about the furniture
warranty, and a link to the relevant page.
To add this sort of detail, you need to find the right spot in the template and insert
your own HTML. For example, to place something at the end of a page, you need
to scroll down until you’re nearly at the end of the template, where you find a line
like this:
</div> <!-- end #content -->
This is the closing </div> tag, which ends the content section of the page. After this
line, the template adds the final footer.
To add more content, you need to add a section before the closing </div> tag. Here’s
the markup that creates the white box in the Distinct Furnishings example:
<div id="WarrantyBox">
We stand behind our products. All our
<?php single_cat_title(); ?> are protected by the best
<a href="http://distinctfurnishings.net/warranty">warranty</a>
in the business.
</div>
</div> <!-- end #content -->
Notice that the new content doesn’t include the word “Sofas.” That’s because you
want the template to work for
all
your categories, so you use the single_cat_title()
function to grab the name of the current category. The category page uses the same
trick to add the category name to the title of the category page, as you saw earlier.

CHAPTER 14: BUILDING AN ADVANCED WORDPRESS SITE 525
CREATING
CUSTOM
CATEGORY
PAGES
NOTE This code assumes there’s a page with warranty information at
http://distinctfurnishings.net/warranty
.
You can create this page the usual way, using the Pages→Add New command.
There’s another important detail in this example—the box applies custom formatting
using the technique you saw in Chapter 13. First, you make sure your new content
has a unique ID (if it occurs just once on the page) or a unique class name (if it oc-
curs multiple times). In the Distinct Furnishings example, the new section has the
ID
WarrantyBox.
But the exact ID name doesn’t matter, as long as you add a cor-
responding style rule in the
style.css
file (page 460).
Here’s the style rule that makes the warranty box look pretty by setting the colors,
spacing, and border:
#WarrantyBox {
color: #708090;
background: white;
margin: 25px;
padding: 10px;
text-align: center;
border-radius: 10px;
}
TIP As you start adding new rules to your
style.css
file, make sure you keep them all in one place, either at
the beginning or the end of the file. That way you won’t mix up the new and old rules, and forget what formatting
you added and what formatting is part of the original theme.
Reordering Posts
By now, you’re well aware of WordPress’s fascination with fresh content. Whenever
you have a list of posts, WordPress puts the newest ones first, leaving the older entries
to languish at the end. This makes sense for a series of news bulletins, but it’s less
helpful for a product catalog. To fix the problem, you need to tweak the loop in the
category page. (The loop is the crucial bit of code that creates the list of posts in a
WordPress site. You first considered it on page 495, where you learned to highlight
new posts. Now you’ll modify it to put posts in a dierent order.)
The first step is to find out where the loop begins. In most well-designed themes—
including Twenty Eleven and PinBlack—a comment clearly signals its start. It looks
like this:
<?php /* Start the Loop */ ?>
To change the order of posts, you need to act here, before the loop pulls any posts
out of the database. The easiest way to do that is with a handy WordPress function
called query_posts(), which changes the query that an archive page uses to get its
posts. (A
query
is a database operation that fetches a group of records that meet
the criteria you specify.)

WORDPRESS: THE MISSING MANUAL
526
CREATING
CUSTOM
CATEGORY
PAGES
Before you look at the solution for reordering posts, it helps to consider the simplest
operation query_posts()can perform. It looks like this:
<?php
$posts = query_posts( $query_string );
?>
<?php /* Start the Loop */ ?>
This code takes the query that WordPress wants to run, which is stored in the
$query_string variable, hands it to the query_posts() function, and stus the
result (the group of matching posts) into the $posts variable. That creates the
plain-vanilla version of the category page, with all the posts you normally get, in
the order you expect.
To get a dierent result, you need to stick some extra text onto the end of the query
command in the $query_string variable. For example, to sort posts by their titles
in alphabetical order, you modify $query_string like this:
<?php
$posts = query_posts( $query_string . '&orderby=title&order=asc' );
?>
<?php /* Start the Loop */ ?>
Here, it helps to understand the SQL language that databases love, because that’s
what $query_string uses. But even if you’re not a database god, you can decipher
the query command above. The
&orderby=title
portion tells WordPress “and by the
way, sort the posts by title.” The
&order=asc
portion adds “and when you do that
sort, use ascending alphabetical order, just like a dictionary does.” Together, these
two instructions override the reverse-chronological order that WordPress would
otherwise apply.
This is just one way to edit the loop that creates a post list. You’ll see a similar but
slightly dierent example later in this chapter. In the meantime, you can explore the
query_post() function in more detail in WordPress’s function reference at
http://
tinyurl.com/yhjtze5
.
Removing Post Footers
The final detail to adjust on your catalog page is the footer that appears under every
product tile. It displays the category information (for example, “Filed Under Sofas”).
Because you put every product in Distinct Furnishings into a single category, and
because all the posts on a category page share the same category, this information
doesn’t help anyone.
To remove it, look for and delete this markup:
<footer>
<p class=”cat”><?php _e(“Filed Under”, ‘pinblack’); ?>
<?php the_category(‘, ‘); ?>

CHAPTER 14: BUILDING AN ADVANCED WORDPRESS SITE 527
BUILDING A
BETTER HOME
PAGE
</p>
</footer> <!-- end article footer -->
GEM IN THE ROUGH
Dierent Category Pages for Dierent Categories
In some situations, you might decide to have significantly
different content on your category pages, depending on the
category. In that case, you need to create more than one copy
of your category template, using names like
category-sofas.
php, category-tables.php,
and
category-chairs.php.
This ap-
proach obviously requires more work, so don’t go down this
road unless it clearly benefits your site.
One type of site that frequently needs category-specific pages
is a news site structured like an online magazine. In a site like
that, it’s often important to emphasize the difference between
topics, and to give each category a distinct, compelling identity.
For example, if you create an online magazine that includes
posts in the categories Politics, Sports, and Lifestyle, you may
want to give each category a slightly different style. And if you
have multiple contributors, you may want give each columnist
his own author page, by augmenting the
authors.php
template
with author-specific templates like
author-rami.php, author-
grabinsky.php,
and so on.
In a product catalog site like Distinct Furnishings, category-
specific formatting is less useful. That’s because the goal of the
site is to help visitors browse the product selection as quickly
as possible, so they can find the items that interest them.
And to do that, it helps to minimize the differences between
categories and keep your formatting and layout consistent.
Building a Better Home Page
The Distinct Furnishings site now has a first-rate browsing system, which lets poten-
tial customers hunt through the product catalog one category at a time. However,
new visitors still arrive at the standard home page, which features every product
in one big jumble.
The easiest way to fix this is to add a static page and set it as the home page for
the site. This new home page can provide a welcome message and invite visitors to
dig into the content by oering a navigation menu. If this solution suits your needs,
follow the instructions on page 218. You don’t need to customize a template, or
look at any PHP code.
But the home page also presents an opportunity to do more. Instead of using a
plain page, you can add links that take visitors straight to specific products. You
could type in an <a> element with the exact web address for each one, but that’s
not flexible, and it forces you to make frequent page edits to keep your home page
current. A more ambitious approach is to use some clever PHP to create links that
appear on your home page
automatically.
Figure 14-9 shows this technique in action. Here, the home page includes a welcome
message and links to every product category, sorted by title.
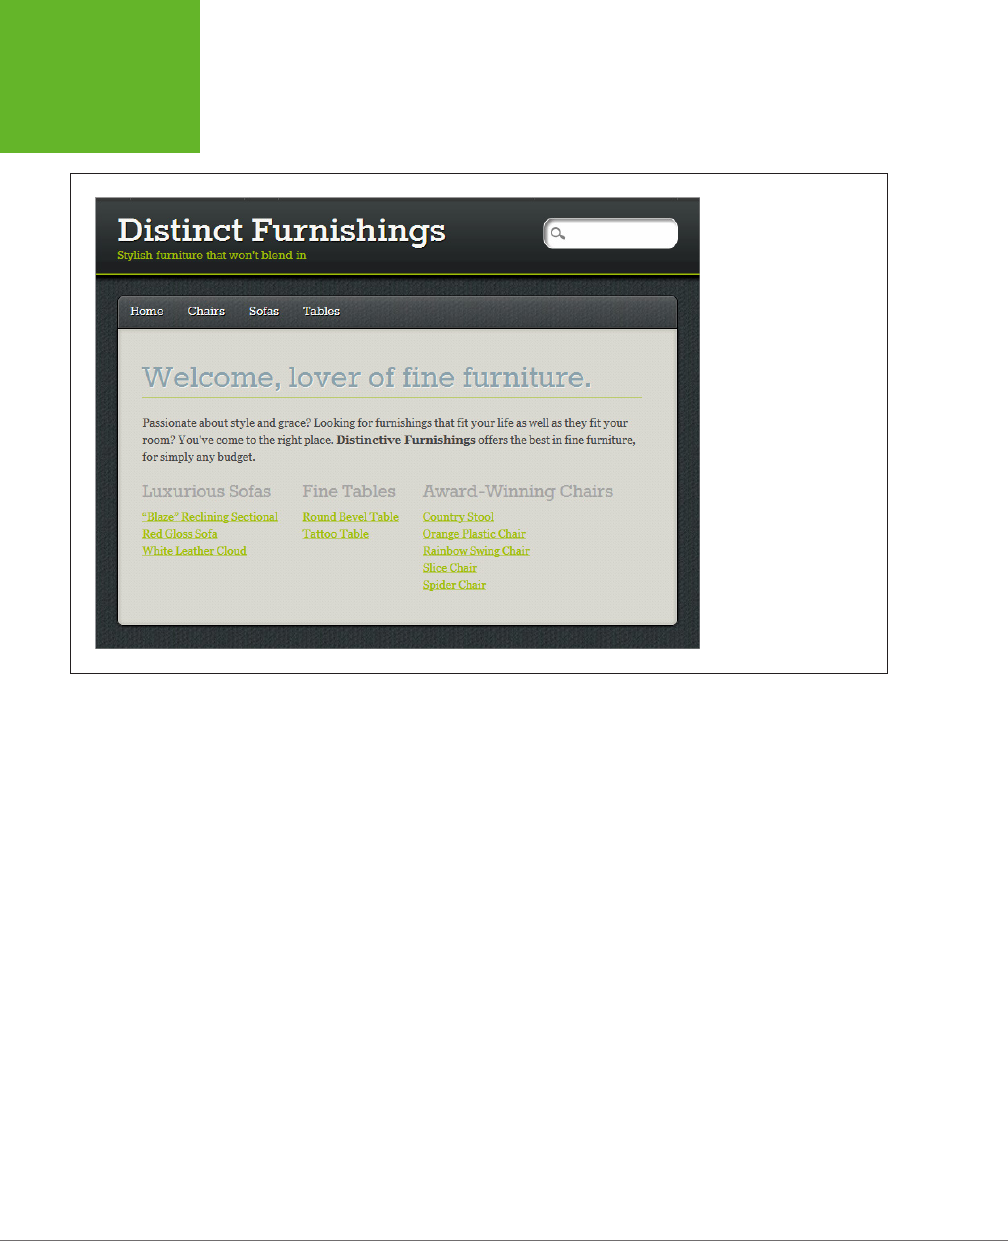
WORDPRESS: THE MISSING MANUAL
528
BUILDING A
BETTER HOME
PAGE
FIGURE 14-9
The links in this custom
home page give readers
a bird’s-eye view of the
products Distinct Furnish-
ings offers. Because the
content is brief and well-
organized, the links don’t
become overwhelming.
Creating a page like this is easier than it appears. It’s a technique worth learning
even if you don’t want the exact result shown in Figure 14-9, because you can eas-
ily adapt it to display other product links—for example, for featured products, new
products, or products on sale (see the box on page 535).
The following sections show you how to create a custom home page like this one.
Cleaning Out the Template
The first step in creating this sort of custom home page is to find the template you
want and prepare it for editing. In virtually all modern themes, the
index.php
template
is the one you want. It creates a home page with the standard list of posts. (The
only exception is if your theme has a
home.php
file—if it does, edit that template
instead.) To get started, choose Appearance→Editor and then pick “Main Index
Template (index.php).”
In many ways, the
index.php
template is like the
category.php
template you con-
sidered in the first part of this chapter. The heart of both is a loop that extracts and
displays posts. The most significant dierence is that
category.php
uses a narrower
query that includes the posts in just a single category.
You could keep the standard loop in the
index.php
template and simply change the
way it displays each post. You’ve seen examples that use this technique to highlight

CHAPTER 14: BUILDING AN ADVANCED WORDPRESS SITE 529
BUILDING A
BETTER HOME
PAGE
new posts (page 495) and change the post order (page 525). But Figure 14-9 makes
a more radical change—it grabs several separate post lists, by category, and then
displays them. The easiest way to make this happen is to remove the existing loop
entirely and add all new code. In most themes, that means deleting everything
inside the content <div>.
In the PinBlack theme, deleting the loop leaves you with this exceedingly simple
skeleton:
<?php get_header(); ?>
<div id="content" class="clearfix">
</div> <!-- end #content -->
<?php get_footer(); ?>
All this template does is add a header and footer to a page. In between is a great
big empty section where you can slot in your own content.
NOTE Remember, the header template (
header.php
) isn’t just a header—it has the HTML markup that begins
each page, which includes the title, style sheet links, background, and menu. Similarly, the footer template (
footer.
php
) includes the HTML that ends every page. So even in a simple stripped-down template like the one shown
above, your site ends up with a fully formatted home page, albeit one that doesn’t have any content in it.
Adding Text
Now that you’ve removed everything you don’t need from the home page, you can
start adding the content you
do
want to the
index.php
template. First, start with
the plain text and HTML. Wrap it in a <div> so you can apply style sheet format-
ting. In the Distinct Furnishings page, the main section is in a <div> that has the ID
WelcomePageMain.
Inside is a heading and a single paragraph of text:
<?php get_header(); ?>
<div id="content" class="clearfix">
<div id="WelcomePageMain">
<h1 class="archive-title">Welcome, lover of fine furniture.</h1>
<p>Passionate about style and grace? Looking for furnishings that
fit your life as well as they fit your room? You've come to the right place.
<b>Distinct Furnishings</b> offers the best in fine furniture, for simply
any budget.</p>
</div>
</div> <!-- end #content -->
<?php get_footer(); ?>

WORDPRESS: THE MISSING MANUAL
530
BUILDING A
BETTER HOME
PAGE
The specific ID you use isn’t important, as long as it doesn’t clash with the names in
your theme’s
style.css
file, and as long as you create a matching rule in your style
sheet. In the Distinct Furnishings example, the style sheet rule adds some margin
space around the main content area, so it isn’t smushed up against the edges:
#WelcomePageMain {
margin: 30px;
}
You can also use existing styles where appropriate—in this example, the <h1> heading
uses the ready-made
archive-title
class, the same one that formats the title in the
category page. (Keen eyes may have noticed this detail when editing the category
page on page 523.) Every theme uses dierent class names, and if you can’t find
the class name that adds the formatting you want, you need to create a new style
rule and add the formatting on your own.
Creating the Links
The next step is more interesting. Immediately after the introductory text on Distinct
Furnishing’s home page, you want to create three sections, each with a heading and
a list of links. You can decide exactly how you structure this markup—and if you’re
an HTML whiz, you may already have a plan. The Distinct Furnishings example places
each column of links in a separate <div> element, as explained in the box below.
UP TO SPEED
The Multiple-Column Eect
There are several ways to create the multicolumn layout shown
in Figure 14-9. Possible approaches include using the <table>
element or putting each column in a separate <div>, which is
what the Distinct Furnishings example does.
The trick to the <div> approach is to use a CSS feature called
floating layout.
This technique is commonly used with im-
ages, because it lets you put a picture on one side of a page
while the rest of the content (the text) flows around it. The
same technique lets you create multiple columns, by floating
each column to the left side of your page. That way, the first
column goes hard up against the left side of the page, the
second column goes right up against the right edge of the first
column, the third column goes up against the second column,
and so on. If the browser runs out of width, it bumps the next
column farther down the page, starting again on the left side.
To put this effect into practice, you need a style rule that sets
the
float
property. Here’s an example that uses the class name
FloatingColumn:
.FloatingColumn {
float: left;
margin-right: 30px;
margin-bottom: 30px;
}
You can then create a <div> for each column, and use the same
style rule for each one:
<div class="FloatingColumn">
...
</div>
This is a standard technique in the stylesheet world, and it
works in WordPress as well as it does in any other website. If
you want to polish your CSS skills, consider a good book like
CSS3: The Missing Manual
(O’Reilly).

CHAPTER 14: BUILDING AN ADVANCED WORDPRESS SITE 531
BUILDING A
BETTER HOME
PAGE
Here’s how the first column starts:
<div class="FloatingColumn">
<h2>Luxurious Sofas</h2>
Next, you add the links that belong in this category. The best way to do that is through
the miraculously useful WordPress function called get_posts().
UP TO SPEED
Comparing get_posts() and query_posts()
The
get_posts()
function is similar to the
query_
posts()
function you learned about on page 525. The
difference is where and when you use them.
The
get_posts()
function lets you grab a bunch of
posts (and all their information) whenever you need it.
Database nerds call such an operation
querying.
You can use
get_posts()
anytime, in any template. However, the
get_posts()
function takes more work than the
query_
posts()
function. That’s because
get_posts()
requires
that you write the code that examines each post, pulls out the
information you want, and displays it on the page.
The
query_posts()
function does a similar job, but it’s
designed to work with the loop code already in your archive
page. That means you can use
query_posts()
to change the
query that an archive page uses, while keeping everything else
the same. If this approach works (as it did with the category
page example on page 526), it’s less work.
In the Distinct Furnishings home page, you removed the
original loop, and you need to execute several queries to get
several separate lists of results (one for each category). For
both of these reasons, you need to accept the extra work and
use the
get_posts()
function.
If you’ve never written a computer program before (and we assume you haven’t),
using get_posts() is a sizeable task. Not only do you need to create the database
query that gets your posts, but you also need to write the code that looks at each
post and extracts the information you want displayed on the home page. Fortunately,
you don’t need to do this from scratch. You can start with one of the chunks of code
from WordPress’s function reference for get_posts() at
http://tinyurl.com/23km6q5
.
There, you’ll see code that displays post titles, displays posts in random order, and
gets the posts that belong to a specific category. You can copy one of these examples
into the
index.php
page to try it out. Or start with this very basic code:
<?php
global $post;
$args = array( [ Your search and sort criteria go here. ] );
$myposts = get_posts( $args );
foreach( $myposts as $post ) :
setup_postdata($post); ?>
[ This is where you display the post data you want. ]
<?php endforeach; ?>
This is an all-purpose function that handles any post-querying task. All you need to
do is replace the two square-bracketed sections with the right details. (If you want

WORDPRESS: THE MISSING MANUAL
532
BUILDING A
BETTER HOME
PAGE
to use this code in your own templates, you can get it as a text file on the Missing
CD page at
http://www.oreilly.com/pub/missingmanuals/wpmm2e
.)
The first detail you need to supply is the $args variable. It holds all the criteria and
settings that WordPress uses to query the database. There are plenty of options you
can stu into $args, and WordPress has the full list at
http://tinyurl.com/yhjtze5
.
But in this example, the $args variable has just three settings. Taken together, they
tell WordPress to get the product posts from a specific category and sort them by
post title (that’s the product name) in ascending alphabetical order:
$args = array( 'post_type' => 'product', 'category' => 4,
'orderby' => 'title', 'order' => 'asc' );
This query grabs the posts in the Luxurious Sofas category, because that category
has the ID of 4.
TIP To find the ID for your categories, go to the Posts→Categories section and edit the category. Then
examine your browser’s address bar for the
tag_ID
code:
http://distinctfurnishings.net/wp-admin/edit-tags.php?action=edit&taxonomy=cat
egory&tag_ID=4&post_type=post
In this example, the category ID is 4.
The next detail you need to supply is the HTML markup you want to add to the page.
WordPress copies your content to the page multiple times, once for each post it
finds. This is more or less the same way the standard loop works.
In your HTML markup, you use WordPress’s oddly named “the_” functions to get
information about each post. For example, to get the post title, you use the_title(),
like so:
foreach( $myposts as $post ) :
setup_postdata($post); ?>
<?php the_title(); ?>
<br />
<?php endforeach; ?>
This inserts a list of post titles into the page. After each title, the <br /> element
adds a new line. The result is something like this:
“Blaze” Reclining Sectional
Red Gloss Sofa
White Leather Cloud
The example in Figure 14-9 is a bit more practical. It creates a link (an <a> element)
for each post. The post title becomes the link’s label. The target of the link is the
post web address. To get the title of the post, you use the function the_title(),

CHAPTER 14: BUILDING AN ADVANCED WORDPRESS SITE 533
BUILDING A
BETTER HOME
PAGE
which you just saw. To get the post address, you use the function the_permalink().
Here’s how the code fits into the markup:
<a href="<?php the_permalink(); ?>"><?php the_title(); ?></a>
</br>
UP TO SPEED
Extracting Information from a Post
The Distinct Furnishings example uses two well-worn
WordPress functions to get information about each post:
the_title()
and
the_permalink()
. But WordPress
has many more useful functions that let you extract even
more information from a post. You can determine the post’s
ID, publication date, publication time, category, and tag using
the functions
the_ID()
,
the_date()
,
the_time()
,
the_category()
, and
the_tags()
.
There are also some WordPress information-extracting
functions that, for historical reasons, start with “get_the_”
instead of “the_”. These include
get_the_title()
,
get_the_excerpt()
,
get_the_post_thumbnail()
,
get_the_author()
, and
get_the_content()
.
All these functions are terrifically useful in different loop-
customization scenarios. For example, the PinBlack theme’s
tile-based display relies on
get_the_post_thumbnail()
to grab the featured image for every post. It then inserts that
image into a fluid, style-based layout.
Some of the “get_the” functions also work in other places in
a template file, outside the loop. For example, you can use
get_the_title()
to retrieve the title of any post, as long
as you provide the post ID. (Page 550 has an example that
uses this technique.)
WordPress describes all these information-gathering functions
on its function reference page at
http://tinyurl.com/func-ref
.
Because the functions aren’t always consistent, you should
always start by reading the function reference before you use
a new function.
Just to make sure you haven’t lost your place, here’s the complete markup that
creates the list of products in the Luxurious Sofas category. The customized details
are in bold.
<div class="FloatingColumn">
<h2>Luxurious Sofas</h2>
<?php
global $post;
$args = array('post_type' => 'product', 'category' => 4,
'orderby' => 'title', 'order' => 'asc' );
$myposts = get_posts( $args );
foreach( $myposts as $post ) :
setup_postdata($post); ?>
<a href="<?php the_permalink(); ?>"><?php the_title(); ?></a>
<br />
<?php endforeach; ?>
</div>
To create the other two columns (Fine Tables and Award-Winning Chairs), copy
the section shown above (once for each column), and adjust the heading and the
category ID accordingly.

WORDPRESS: THE MISSING MANUAL
534
MAKING A
SMARTER
PRODUCT PAGE
Here’s the result:
<div class="FloatingColumn">
<h2>Fine Tables</h2>
<?php
global $post;
$args = array('post_type' => 'product', 'category' => 5,
'orderby' => 'title', 'order' => 'asc' );
$myposts = get_posts( $args );
foreach( $myposts as $post ) :
setup_postdata($post); ?>
<a href="<?php the_permalink(); ?>"><?php the_title(); ?></a>
<br />
<?php endforeach; ?>
</div>
<div class="FloatingColumn">
<h2>Award-Winning Chairs</h2>
<?php
global $post;
$args = array('post_type' => 'product', 'category' => 3,
'orderby' => 'title', 'order' => 'asc' );
$myposts = get_posts( $args );
foreach( $myposts as $post ) :
setup_postdata($post); ?>
<a href="<?php the_permalink(); ?>"><?php the_title(); ?></a>
<br />
<?php endforeach; ?>
</div>
The result is a page that looks up posts from three dierent categories and combines
them into a compact, perfectly organized set of links.
Making a Smarter Product Page
The changes you’ve made so far have transformed the Distinct Furnishings site into
a sleek, browsable product catalog, with no trace of its WordPress blog roots—at
least, not until you click a product. Once you do, you see the standard post-viewing
page that includes plenty of unnecessary information, like the author name and
publication date, and a sidebar of mostly useless widgets (Figure 14-10).
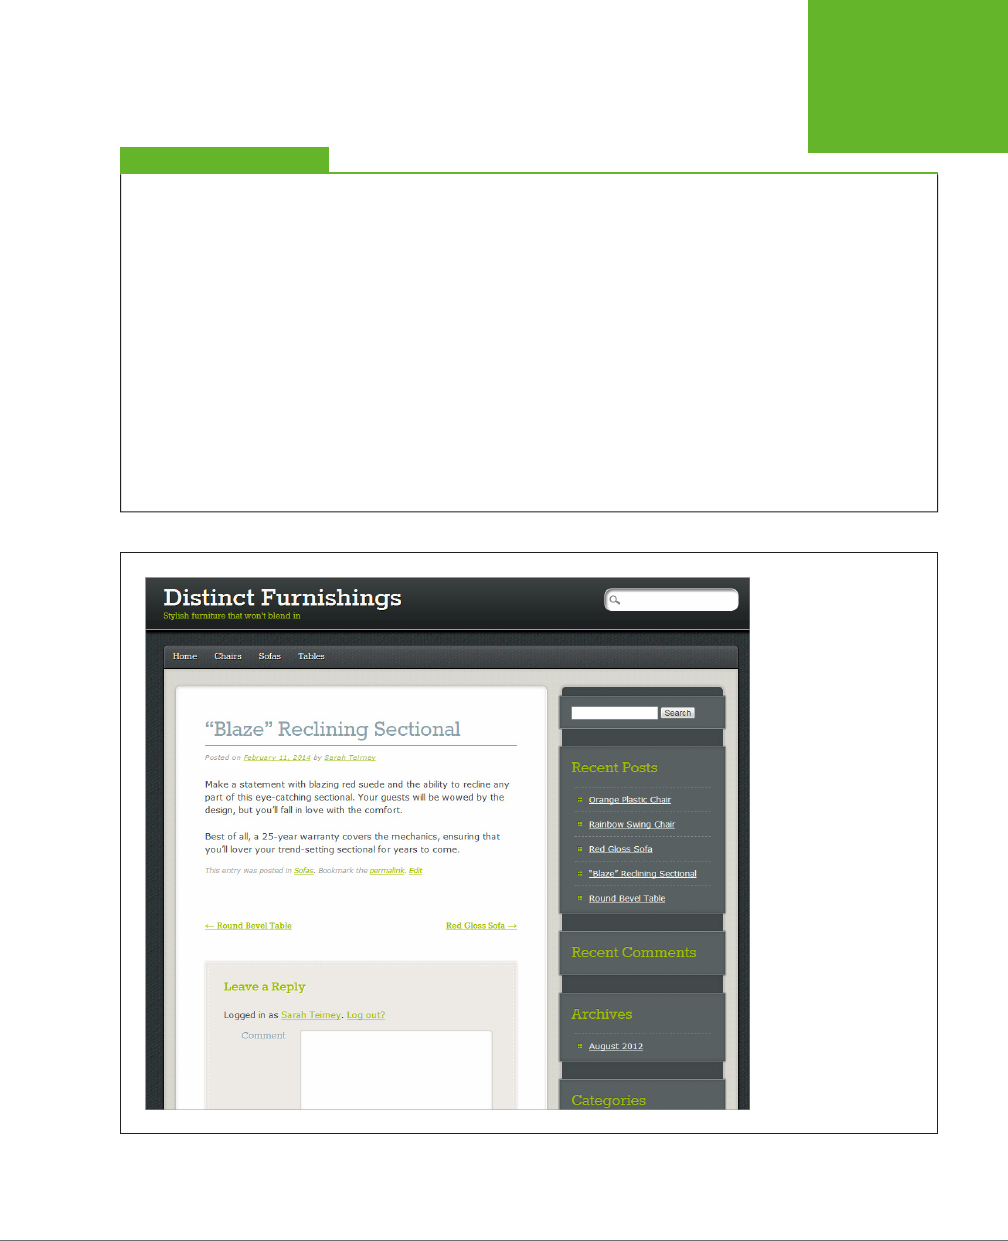
CHAPTER 14: BUILDING AN ADVANCED WORDPRESS SITE 535
MAKING A
SMARTER
PRODUCT PAGE
GEM IN THE ROUGH
Highlighting Products on Sale
In the current example, the Distinct Furnishings site uses three
loops and offers a link to every product in its catalog. This
works well in a site that has a few dozen products, but it’s not
practical in one that has hundreds.
Of course, there’s no need to fetch posts from every category.
Instead, you can highlight just
some
of your posts. Using this
technique, you can create even more interesting home pages,
such as ones that highlight recently added products, clearance
products, or new promotions. The only challenge is writing a
query that gets the posts you want.
The easiest approach is to create an
additional
category and
apply it to the items you want to highlight. For example, you
could create a category named Featured. Then, if you have a
loveseat that warrants special attention, you assign it two cat-
egories: Sofas and Featured. Because it’s in the Sofas category,
visitors will find it when they click Sofas in the navigation menu.
And because it’s in the Featured category, your home page
can retrieve it with a category-specific query and display it
prominently. (Just remember not to add the Featured category
to your menu, because having the same set of products appear
in more than one place can confuse visitors.)
FIGURE 14-10
On close inspection, the
product pages on the
Distinct Furnishings site
still look a lot like blog
posts.

WORDPRESS: THE MISSING MANUAL
536
MAKING A
SMARTER
PRODUCT PAGE
Fortunately, it isn’t hard to change the product posts. Once again, the task involves
editing a template, but with significantly less work this time. You don’t need to tamper
with loop code or change your query. In fact, most of the work involves removing
post details that don’t apply to your product listings.
Figure 14-11 shows the goal: a cleaned-up post that showcases the current product.
FIGURE 14-11
The new product page
takes away as much as it
adds. The only detail you
might still want to add is
an image gallery (page
330) with high-resolution
pictures that show the
product from different
vantage points.
Cleaning Out the Templates
To change the way WordPress displays your posts, you need to work with two
template files. As you may remember from Chapter 13,
single.php
creates the single-
post view for every post and page. However, it gets help from another template,
depending on the type of content it’s displaying. In the case of an ordinary post,

CHAPTER 14: BUILDING AN ADVANCED WORDPRESS SITE 537
MAKING A
SMARTER
PRODUCT PAGE
single.php
asks
content-single.php
to do the real work of showing the post content
(page 486 explains the process).
Although you could do all your work by editing these two files, that’s not the best
approach. That’s because changing
single.php
and
content-single.php
changes the
appearance of
all
your posts, including product posts and regular posts (and any
other custom post types you choose to create). A better solution is to create new ver-
sions of
single.php
and
content-single.php
that are tailored for displaying products.
WordPress makes this job surprisingly easy. In fact, when it displays a post that uses
a custom post type, it checks the theme to see if there’s a specialized template that
can help out. It does this by looking for a file that has a name in this form:
single-
[type]
.php
For example, when you view a product in the Distinct Furnishings site, WordPress
looks for a template named
single-product.php.
Unless you created this file, it won’t
exist, and WordPress will fall back on the standard
single.php
template. But now that
you understand how WordPress selects the single-post template, you can create
new, more specialized templates.
CREATING SINGLE-PRODUCT.PHP
The easiest way to get started is to create a copy of
single.php,
and name that copy
single-product.php.
You can do that using an FTP program—just copy
single.php
to
your computer, rename it, and then upload it back to the theme directory.
Once you create
single-product.php
, you can edit it. As usual, you can choose
Appearance→Editor and do all your editing in the dashboard.
Your first task is to remove the navigation links that let readers step from one post
to another. They don’t make sense when you profile products, because the links
are based on the publication date, which is an arbitrary order for furniture items.
The navigation links appear inside the loop, just before the comment section. In the
PinBlack theme, you need to find and remove this line:
<?php pinblack_content_nav( 'nav-below' ); ?>
Your second task is to modify the line just above that one, which loads the content
template:
<?php get_template_part( 'content', 'single' ); ?>
When WordPress processes this instruction, it injects the content and runs the code
from the
content-single.php
template. But that’s a problem, because you need a
type-specific version of the content template—one that WordPress will use for
product posts
only.
Although WordPress does look for a type-specific version of your single-post tem-
plate (like
single-product.php
), it won’t look for a type-specific version of the
content
template. Instead, it’s up to you to change the get_template_part() function to tell
WordPress what template to use.

WORDPRESS: THE MISSING MANUAL
538
MAKING A
SMARTER
PRODUCT PAGE
Here’s an example:
<?php get_template_part( 'content', 'single-product' ); ?>
This tells WordPress to load up a template named
content-single-product.php,
and
use that for the post content.
If you’ve gotten lost in the morass of templates, here’s a quick review of what hap-
pens on the Distinct Furnishings site:
• When WordPress displays an ordinary post, it uses the
single.php
template,
which, in turn, tells WordPress to use the
content-single.php
to show the post
content.
• When WordPress displays a product post, it finds the
single-product.php
tem-
plate, which tells WordPress to use the
content-single-product.php
to show
the post content.
CREATING CONTENT-SINGLE-PRODUCT.PHP
It’s up to you to create the
content-single-product.php
file. The best starting point
is to make a copy of
content-single.php,
and change its name to
content-single-
product.php.
Now you’re ready to edit
content-single-product.php.
Here, you want to remove two
sections. First, find the section just under the post title, which displays the publica-
tion author and date. It looks like this:
<div class="entry-meta">
<?php pinblack_posted_on(); ?>
</div>
Remove it completely.
Next, find the section that adds the category and tag information after the post con-
tent. The PinBlack theme wraps this section in a massive <footer> element. You can
delete the whole thing, from the opening <footer> tag to the closing one (</footer>).
NOTE Now that you’ve gone through the heavy lifting—creating a custom post type and giving it its own
pair of templates—you’re ready to enjoy the rewards. Your site now has the flexibility to separate different types
of content and deal with it in different ways. For example, if you add a news post, you’ll get the familiar date,
author information, and previous and next links. Add a product, and none of these unnecessary details will ap-
pear. In the rest of this chapter, you’ll see how to add even more product-specific details to your product pages,
like prices and shopping cart buttons.

CHAPTER 14: BUILDING AN ADVANCED WORDPRESS SITE 539
MAKING A
SMARTER
PRODUCT PAGE
Custom Fields: Adding Extra Pieces of Information to a Post
As you probably know, WordPress stores the information for every post in a sepa-
rate record in a database on your website. That record includes obvious details like
the post title and post content, along with a slew of extra info about the author, the
publication date, the last modified date, the excerpt, and so on. (Database geeks
can get the full, behind-the-scenes details at
http://tinyurl.com/3a88qt
.)
The product posts don’t include price information, and why would they? Price is
one of many additional possible details that apply only to certain sites in certain
scenarios. Of course, you’re free to put the price information in the post content, but
that’s a bit sloppy. There’s no way to make sure that every post puts its price in the
same place and formats it the same way. There’s also no guarantee that every post
includes a price, and there’s no easy way to extract it if you need it (for example, if
you want to create a query that pulls out posts in a certain price range).
You’re probably prepared to live with this limitation, but WordPress has a surpris-
ingly flexible feature that can help. It’s called
custom fields,
and it lets you bolt extra
pieces of information onto any post.
Here’s how:
1. Start editing one of your product posts.
The quickest approach is to choose Posts→All Posts, and then click the Edit
link under the first post in the list.
2. Click the Screen Options button in the top-right corner of the Edit Post page,
and then turn on the checkmark next to Custom Fields.
If you haven’t used any custom fields on your site, the Custom Fields box is
tucked away out of site (Figure 14-12). But once you change the screen options,
it appears under the editor box that holds the post content.
FIGURE 14-12
A custom field consists of two
pieces of information. First, you
need to supply a name that
describes the field (like “Price”).
Second, you need to add a value
for the field (like “1499.99” here).
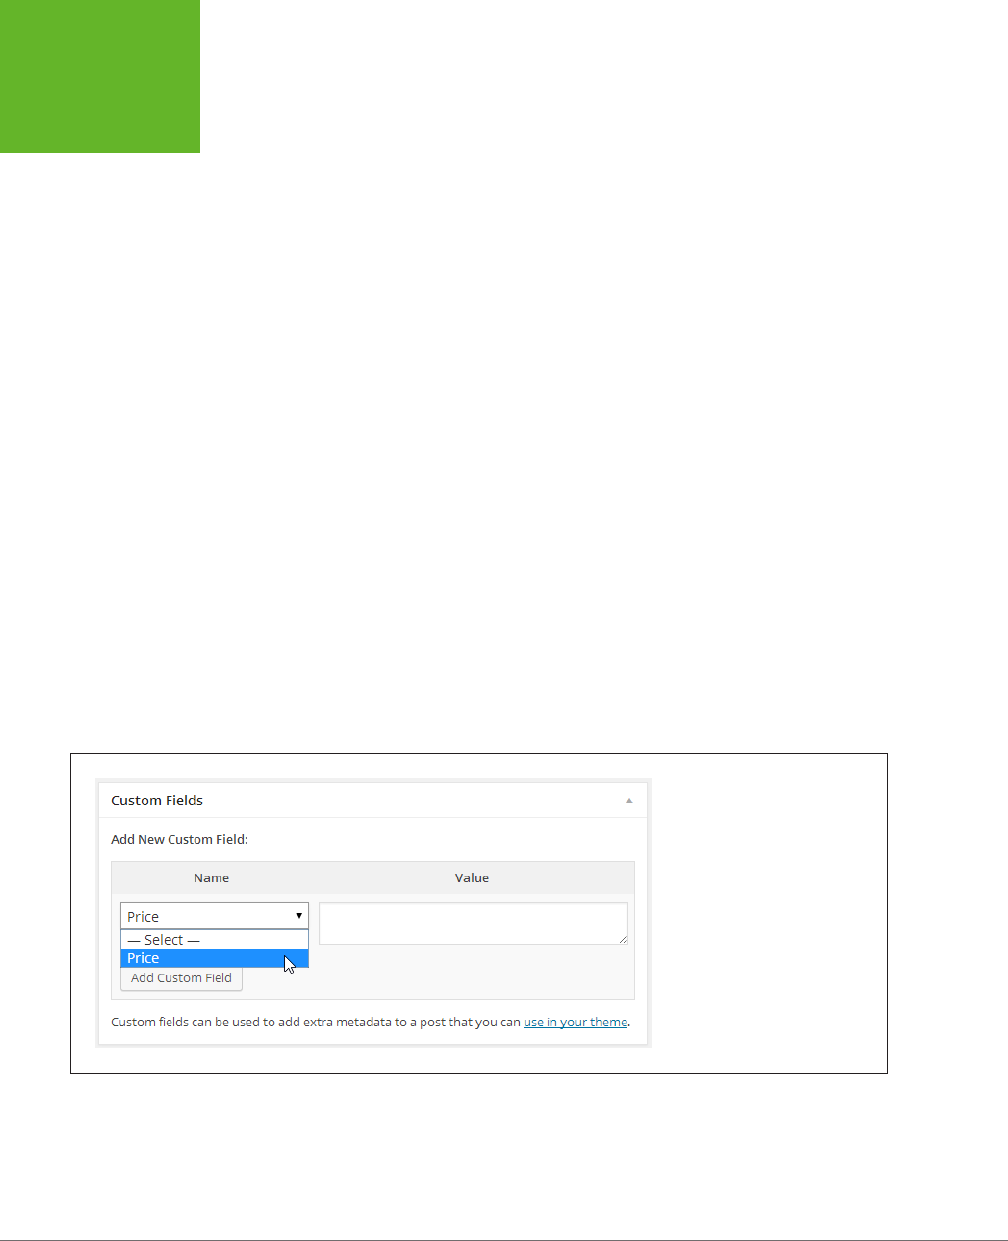
WORDPRESS: THE MISSING MANUAL
540
MAKING A
SMARTER
PRODUCT PAGE
3. In the Custom Fields box, fill in a name for your custom field.
In the Distinct Furnishings example, that name is
Price.
If you see the word “—Select—” in the Name box, your theme already has one
or more custom fields that it uses for its own purposes. To add a new field, you
must first click the “Enter new” link. That clears the text box so you can type
in a name.
4. Type in a value for your custom field.
The value applies to this particular post. For example, if you add a custom field
named Price, the custom field value is the price of the current product (say,
1499.99
). Enter the number only—don’t include a currency symbol, a “thousands”
comma, or any additional text.
5. Click Add Custom Field.
6. Click Update to save the changed version of your post.
You’re done. WordPress creates a new custom field for your posts and attaches
the value you supplied to the current post.
Next you need to set the price for every other product. You already created the
custom field you need, but you need to supply the correct value for each product.
7. Choose PostsÆAll Posts to see your list of posts, and then click Edit under
the post you want to change.
8. In the Custom Fields section, select “Price” from the Name box (Figure
14-13).
FIGURE 14-13
Once you add a custom field,
WordPress makes it available to
every other post. All you need to
do is select it and fill in suitable
values.

CHAPTER 14: BUILDING AN ADVANCED WORDPRESS SITE 541
MAKING A
SMARTER
PRODUCT PAGE
NOTE You may find entries that you didn’t create in the custom field list. That’s because a WordPress theme,
plug-in, or feature has added it. (For example, if you add a video file to a post, your site gets a new
enclosure
custom field.) These fields aren’t meant for your use, and you can safely ignore them.
9. Type in the appropriate price in the Value box, and then click Add Custom
Field.
10. Click Update to save the post.
11. If you have posts left to edit, return to step 7.
Continue editing posts until you assign a price to each one.
Creating a custom field doesn’t change what your posts look like. In fact, WordPress
carries on exactly as it did before, displaying the post content and ignoring the extra
information. To change this state of aairs, you need to extract the information from
your custom field and show it in the right place.
The most straightforward way to do so is to edit the
content-single-product.php
template, fetch the price information, and show it somewhere on the page. To do
this, you use the get_post_meta() function, like so:
<?php echo get_post_meta( get_the_ID(), 'Price', true ); ?>
The echo command takes the price information that the get_post_meta() function
provides and copies it into the page.
The revised post page in Distinct Furnishings (Figure 14-11) uses this approach. It
styles the price using the <div> element, like this:
<div class="Price">
Price: $
<?php echo get_post_meta( get_the_ID(), 'Price', true ); ?>
</div>
The only step left is to add a style rule for the Price class in the
style.css
file. This
lets you apply the formatting you need to your custom field.

WORDPRESS: THE MISSING MANUAL
542
ADDING
ECOMMERCE
POWER USERS’ CLINIC
Classifying Your Posts with Custom Taxonomies
Custom fields let you attach additional information to any
post, which is ridiculously useful. However, WordPress has
another post-extending trick that’s more specialized but also
more powerful. It’s called
custom taxonomies,
and it lets you
create a completely new classification system for your posts.
To understand custom taxonomies, it helps to remember the
two staples of post organization: categories and tags. These
are examples of taxonomies—ways to organize posts. But with
a
custom
taxonomy, you set up other ways to group posts.
For example, the Distinct Furnishings site might add a
taxonomy called Color. You could then create a list of color
choices, including Black, White, Red, and so on. When you
create a product post, you would pick one of these colors, and
visitors could browse products by color (to check out all the
red furniture, for example). Other possible taxonomies Distinct
Furnishings might use include Size (Full, Luxurious, Apartment-
Sized) and Material (Fabric, Leather, and so on). As with custom
fields, custom taxonomies let you add extra information. The
difference is that custom taxonomies are
browsable.
For a small or medium-sized product catalog, custom taxono-
mies add extra work with no obvious benefit. But if you have a
gargantuan catalog, they can give visitors more flexible ways
to look around and find what they want.
Unlike custom fields, the WordPress dashboard won’t help you
add a custom taxonomy. To do that, you need to run some code
(which is ugly) or use a plug-in (which is much nicer). There
are many plug-ins that can help you out, including the two
custom-post-type creators described earlier: Custom Post
Type UI (
http://tinyurl.com/cust-pt-ui
) and Types (
http://
wordpress.org/plugins/types
). Of course, you also need to
extend the single-post template to show the information from
your custom taxonomy.
For a more detailed overview of custom taxonomies, with
examples, you can read a tutorial on the subject at
http://
tinyurl.com/8slqbkn
.
Adding eCommerce
A product catalog is a great way to advertise your wares to the world. But some
sites go further by giving visitors the ability to
buy
products.
eCommerce isn’t suited for every site. For example, a furniture store like Distinct
Furnishings might prefer to let salespeople handle all the selling in person. If your
business has items that are dicult to ship, available to local buyers only, or one of
a kind (for example, individual items in an antique warehouse), you might make a
sensible decision to pass on any type of ecommerce.
Of course, there are even more sites that
will
want to take advantage of ecommerce.
Some will need to ship items (for example, a shop that sells handcrafted jewelry),
while others will be able to deliver the goods right away (like an indie band that lets
purchasers download high-quality audio tracks). And although ecommerce features
aren’t a part of the WordPress software, they’re available through a wide range
of plug-ins. In the rest of this chapter, you’ll consider one that lets you integrate a
PayPal shopping cart into your site.

CHAPTER 14: BUILDING AN ADVANCED WORDPRESS SITE 543
ADDING
ECOMMERCE
PLUG-IN POWER
The Many Ways to Make Money
Shopping carts are only one way that your site can start making
bank. Here are three more money-earning methods, along with
the plug-ins that will help you implement them.
• Donations. Begging for coin is awkward, but it may work.
If your site offers genuinely useful advice, you can ask for
tips with something like this: “Like what you read? Buy
me a coffee!” If you’re writing in support of a charitable
cause or if your writing entails danger or significant
sacrifice, you can ask for support, as in “Donate today
to support independent journalism.” Whatever the case,
the easiest approach is to set up a PayPal account and
add the PayPal Donations plug-in (
http://tinyurl.com/
paypal-d
) to your site.
• Advertising. If you get masses of traffic reading the
posts on your site, you might be able to accumulate some
click-through money with the right advertising program.
One popular choice is Google AdSense (
www.google.com/
adsense
), which automatically shows ads that match the
content on your site and pays you every time someone
clicks one of them.
• Subscription services. This is probably one of the hardest
ways to make money, because potential customers need
to be completely convinced of the value of your content
before they sign up to read it. Subscription services are
also quite complex because you need to register every
reader. But if your site offers one-of-a-kind information
that has real value to other people, it’s an option worth
exploring. The powerful subscription plug-in s2Member
(
http://tinyurl.com/s2member
) can help you get started.
Signing Up with PayPal
PayPal strikes a simple but compelling deal: You tell it the name and price of your
product, and it gives you a shopping cart that you can drop into your website, with
little (if any) customization.
When a customer buys one of your products, PayPal handles the checkout process
and then notifies you by email. At this point, you need to deliver the goods (for
example, by shipping them out or sending them electronically). Shortly after the
transaction, the money appears in your PayPal account. You can then transfer it to
a bank account or use it to buy stu on other PayPal-equipped websites.
You might already have a PayPal account, but odds are it’s a personal one—suitable
for buying other people’s goods but not much else. Before you can set up a PayPal
shopping cart, you need a premier or business account (see the box on the next page).
NOTE All PayPal accounts are free to set up. PayPal makes its money on the commission it takes when you
make a sale, as detailed below.

WORDPRESS: THE MISSING MANUAL
544
ADDING
ECOMMERCE
UP TO SPEED
The Three Types of PayPal Account
The first decision you need to make when you sign up with
PayPal is the kind of account that’s right for you. PayPal gives
you three options:
• Personal account. This type of account lets you use PayPal
to buy items on sites like eBay. You can also
accept
money
transfers from other PayPal members without having
to pay any fees. However, there’s a significant catch—
personal accounts can’t accept credit card payments, so
they won’t work on an ecommerce site.
• Premier account. This type of account gives you an easy
way to run a small business. You can still make payments
to others, and you can accept any type of payment that
PayPal accepts, including both credit and debit cards.
However, PayPal charges you for every payment you
receive, an amount that varies by sales volume but ranges
from 1.9 percent to 2.9 percent of the payment’s total value
(with a minimum fee of 30 cents). That means that on a
$25 sale, PayPal takes about $1 off the top. If you accept
payments in another currency, you surrender an extra 2.5
percent. To get the full scoop on fees and to see the most
current rates, refer to
www.paypal.com/fees
.
• Business account. This type of account has the same
features and fees as a premier account, with two key
differences: First, it lets you do business under your
business name (instead of your personal name). And
second, it supports multiple users. For that reason, a
business account is the best choice if you have a large
business with employees who need to access your PayPal
account to help manage your site and its finances.
If you already have a personal PayPal account, you can upgrade to a premier or
business account quickly by visiting
www.paypal.com/upgrade
. If you don’t have
an account, you need to sign up for one by following these steps:
1. Head to the PayPal website (
www.paypal.com
) and click the Sign Up link.
PayPal’s Sign Up page opens.
2. Choose your country and language.
3. Choose the type of account you want to create (Personal, Premier, or Busi-
ness), and then click Get Started in the corresponding box.
PayPal takes you to a new page to fill in your account information.
4. Enter your email address, choose a password, and then fill in your personal
details.
PayPal wants your name, address, and phone number.
Make sure you create a complex password—you don’t want a malicious hacker
guessing it and using your PayPal account to go on an electronic buying binge.
If you create a business account, you have two pages of information to fill out.
The extra information includes the type of business you run, the business name,
and the business address.

CHAPTER 14: BUILDING AN ADVANCED WORDPRESS SITE 545
ADDING
ECOMMERCE
5. Finally, click “Agree and Create Account” to complete the process.
PayPal sends you an email confirmation immediately. Once you click the link
in the message, it activates your account, and you can create your first PayPal
shopping cart.
Installing a Shopping Cart Plug-In
PayPal has a shopping cart feature that lets you put a cart on
any
website. If you’re
building a traditional site, you need to use the PayPal site to create a form, which you
can then cut and paste into a web page. But if you’re building a WordPress website,
the job gets significantly easier, because you can install a plug-in that does all the
form-generating work for you.
There’s no shortage of PayPal-powered shopping cart plug-ins. Overall, they fall
into two categories:
• Simple PayPal shopping carts. These no-nonsense plug-ins give you the
quickest way to add a no-frills PayPal shopping cart to your site. One popular
example is the WordPress Simple PayPal Shopping Cart (
http://tinyurl.com/
paypal-c
). This is the type of plug-in you’ll consider in this chapter.
• Advanced ecommerce frameworks. The best examples are the wildly popular
plug-ins WooCommerce (
http://tinyurl.com/woo-com
) and WP ecommerce
(
http://tinyurl.com/wp-ecom
). Both let you build a customized shopping cart
and checkout page, using the payment gateway that you choose (such as PayPal
or Google Checkout). And both define a custom post type for products, which is
packed with useful product details. Serious sellers with lots of products almost
always go this route.
In this section, you’ll use the WordPress Simple PayPal Shopping Cart plug-in. To
get started, choose Plugins→Add New, and search for “simple paypal.” When you
find the plug-in, install and activate it.
To configure the plug-in, choose Settings→WP Shopping Cart. At a minimum, you
need to enter your PayPal email address at the top of the Settings form. The other
details are optional; they let you customize the text in the shopping cart pages, the
default currency, shipping costs, the threshold for free shipping, and the web address
the customer goes to after making a purchase, among other details.
Adding the Shopping Cart
PayPal doesn’t care about the details of your products. All it needs to know is the
name of your product and its price. With these two pieces of information, you can
create an “Add to Cart” button, and PayPal takes it from there.
The WordPress Simple PayPal Shopping Cart plug-in adds a shortcode (page 323)
that makes it easy to create an “Add to Cart” button. The shortcode looks like this:
[wp_cart:ProductName:price:Price:end]
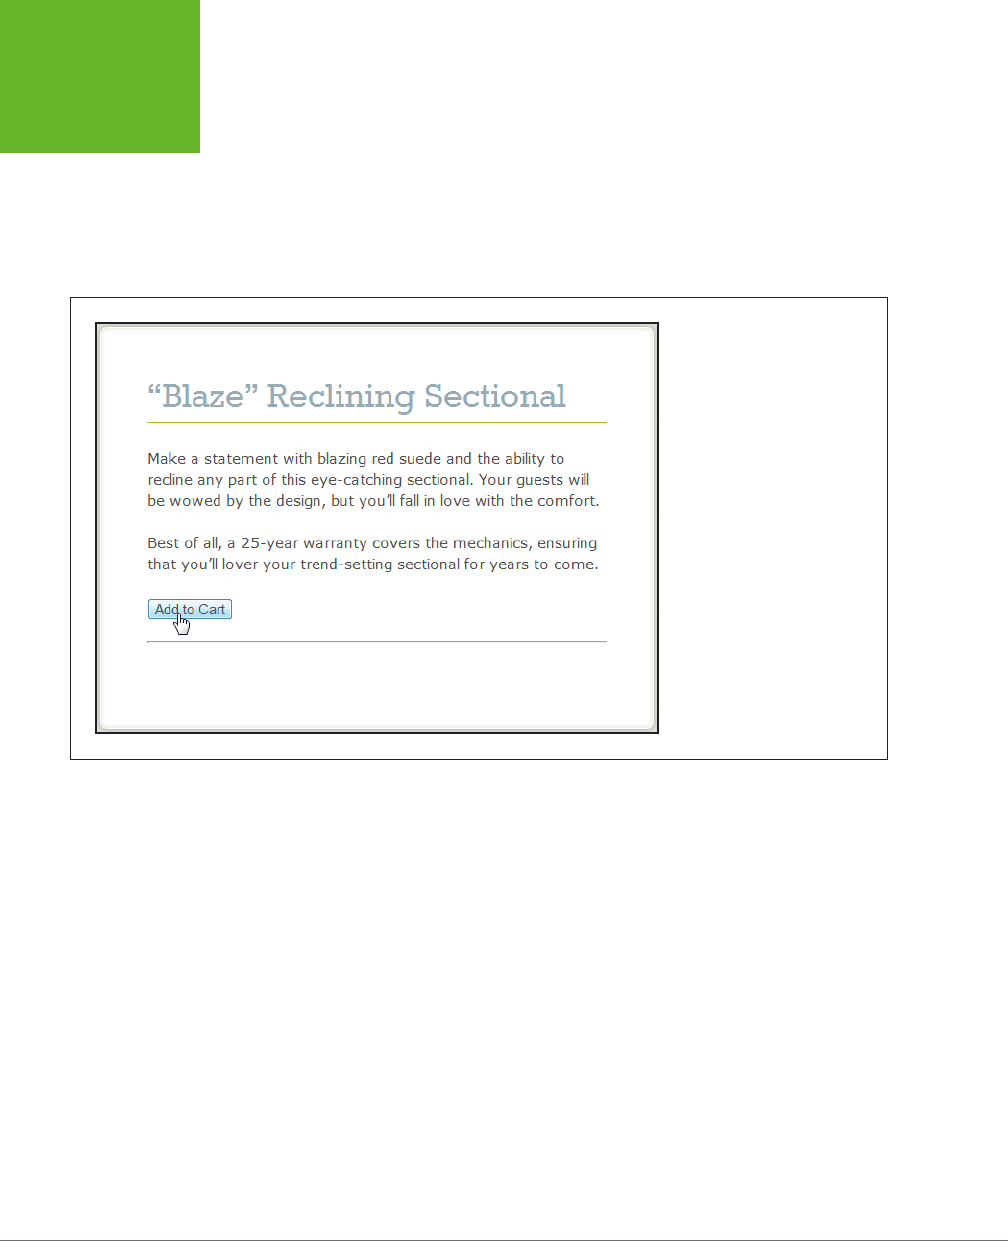
WORDPRESS: THE MISSING MANUAL
546
ADDING
ECOMMERCE
So if you want to sell the Blaze Reclining Sectional for $2,499.99, you need to edit
the post for the Blaze Reclining Sectional and add the shortcode to the end of the
post, after your content. Here’s what the shortcode should look like:
[wp_cart:Blaze Reclining Sectional:price:2499.99:end]
Now, when you view this product, the shortcode turns into an “Add to Cart” button
(Figure 14-14).
FIGURE 14-14
Although you can’t tell by looking
at it, you customized this button
so that one click adds the Blaze
Reclining Sectional sofa to a
PayPal shopping cart.
You can click the “Add to Cart” button, but you won’t know what’s going into your
shopping cart (and you won’t be able to complete your purchase). To properly test
the button, you need a way to display the contents of the cart. The WordPress Simple
PayPal Shopping Cart plug-in gives you two options: adding another shortcode to
your product posts, or using a widget.
Using the shortcode approach, you can create a shopping cart that appears at the
bottom of the post. To try this out, begin by editing a product post (say, the Blaze
Reclining Sectional). Scroll to the bottom, after the shortcode that creates the “Add
to Cart” button, and add this shortcode:
[show_wp_shopping_cart]
Now update the product post and take a look. The first time you view the product,
you’ll see the “Add to Cart” button, same as before. But once you click it, the shop-
ping cart becomes visible underneath (Figure 14-15). Click “Check out with PayPal,”
fill in some credit card details, and voilà!—your first ecommerce sale.
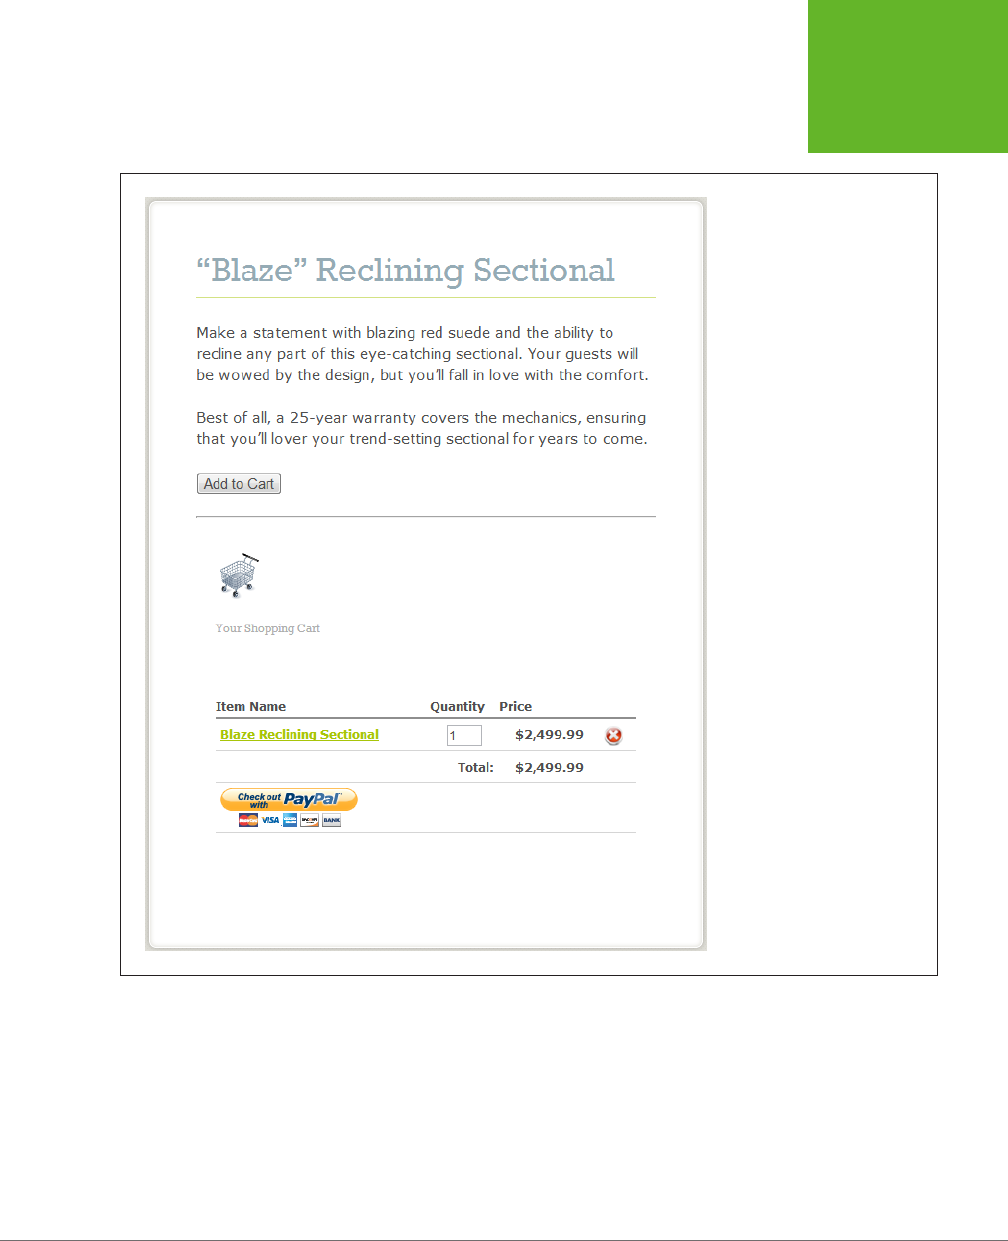
CHAPTER 14: BUILDING AN ADVANCED WORDPRESS SITE 547
ADDING
ECOMMERCE
FIGURE 14-15
If your visitor’s shopping cart is
empty, WordPress doesn’t display
it on the page. But once your
guest clicks “Add to Cart,” he’ll
see something like this.
The only problem with the shopping cart shortcode is that you need to add it to
every
product post. That’s understandable in the case of the “Add to Cart” short-
code, because every product has a dierent price. But it’s needless extra work for
the shopping cart.
There are two solutions that can save you the eort. One is to add the shopping cart
shortcode to a template file (as explained in the next section). A simpler approach
is to use the handy shopping cart widget described next.

WORDPRESS: THE MISSING MANUAL
548
ADDING
ECOMMERCE
To use the shopping card widget, choose Appearance→Widgets. Then, drag the WP
PayPal Shopping Cart widget to the right place in your template. (Common choices
include a sidebar or a footer.) Figure 14-16 shows the shopping cart in a sidebar.
FIGURE 14-16
The sidebar is a great place to put your shopping cart
(as long as it fits). That way, it remains visible but
doesn’t look like part of a post.
TIP To tweak the formatting around the shopping cart (for example, to change its margins, background color,
or border), write a style rule that targets the
shopping_cart
class.
The shopping cart follows your visitors around your site. They can visit several prod-
uct pages and add several items to their carts before checking out. When a visitor
clicks “Check out with PayPal,” the PayPal service takes over, asking for a shipping
address and credit card information. At the end of the checkout process, you get
an email that confirms the purchase.
TIP Make sure your customers leave with a good feeling. After someone places an order, take her to a thank-
you page. All you need to do is create this page (like any other WordPress page), and then type the page’s web
address into the “Return URL” box in the Settings→WP Shopping Cart page.

CHAPTER 14: BUILDING AN ADVANCED WORDPRESS SITE 549
ADDING
ECOMMERCE
Putting the Shopping Cart in Your Template
The Distinct Furnishings shopping cart does its job. Visitors can choose items, place
simple orders, and—most importantly—send money your way. However, you can
improve the way the shopping cart fits in with your site.
Right now, the Simple PayPal Shopping Cart plug-in forces you to do some serious
extra work, especially if you have a large catalog of products. After all, you need
to edit
every
product post to add an “Add to Cart” button and, optionally, to add
the shopping cart. You also need to enter the price for each product
twice:
once
as a custom field, so it appears on the page (page 539), and once in the shortcode
for the “Add to Cart” button. This is a hazardous approach because, later on, it’s all
too easy to change a price in one place without updating the other. Make a minor
mistake, and you can end up with products that are listed at one price but sell at
their old price, creating a discount program you definitely didn’t anticipate.
Happily, there’s a solution. You can take details like the shopping cart and the “Add to
Cart” button and add them to the product post template (
single-product.php
)—the
same file you customized on page 537. This technique saves time and avoids the
problem of inconsistent prices.
However, this approach isn’t as convenient as you might expect. Based on the
template-editing experience you picked up in this chapter, you probably assume
that the solution is to edit the
single-product.php
template file and put the handy
Simple PayPal Shopping Cart shortcodes there. But that presents a problem. Most
of the time, WordPress ignores shortcodes that appear in template files. That means
you’ll end up with useless bits of text in your site (like “[show_wp_shopping_cart]”)
instead of the shopping cart features you really want.
Sometimes, there are workarounds. For example, you can try WordPress’s do_short-
code() function, which searches for the code attached to a shortcode and attempts
to execute it. But do_shortcode() is slow, and it doesn’t always work, depending
on the plug-in. A better option is to find the actual plug-in function that does the
work and use
it.
To do that, you could look through the complete plug-in code (browse it at
Plugins→Editor), but that’s a hit-or-miss eort that requires a ninja-level understand-
ing of WordPress code. A better choice is to check your plug-in’s documentation or
support forum. If you trawl the forum for the Simple PayPal Shopping Cart (
http://
tinyurl.com/spp-forum
), you’ll dig up two plug-in-provided functions that can help.
First, you can use print_wp_shopping_cart() to display the shopping cart wherever
you want it:
<?php
echo print_wp_shopping_cart();
?>
Here, the trusty echo command grabs the cart and inserts it into the page.

WORDPRESS: THE MISSING MANUAL
550
ADDING
ECOMMERCE
Second, you can use print_wp_cart_button_for_product() to create an “Add to
Cart” button. This option is slightly more involved, because you need to supply two
key product details: the product name and price. You can grab the product name
from the post title, and you can get the price from the custom field. Here’s the code
that does the job:
<?php
$productname = get_the_title();
$price = get_post_meta( get_the_ID(), 'Price', true );
echo print_wp_cart_button_for_product($productname, $price);
?>
Add both of these code snippets to the right place in the
single-product.php
template
file, and you end up with a streamlined shopping cart that appears exactly where
you want it, and an “Add to Cart” button that works for every item.
POWER USERS’ CLINIC
Professional eCommerce Frameworks
If your goal is to build a professional ecommerce storefront,
you’ll need all the hardcore features described in this chapter,
including custom post types, custom templates, custom fields,
and custom taxonomies. However, you don’t need to do all the
work yourself. There are a dizzying number of ecommerce
plug-ins that can extend an ordinary WordPress site with the
bells, whistles, and low-level plumbing you need to sell large
volumes of products. Many of these work with a ready-made
theme so that you don’t need to fiddle with templates.
You’ve already heard about the two most popular ecommerce
plug-ins (WooCommerce and WP eCommerce), but you can find
plenty more at
http://wordpress.org/plugins
, including Cart66,
iThemes Exchange, TheCartPress, Jigoshop, and DukaPress. All
are free, but you usually need to pay to get all the premium
features you really need. You’ll also be in for a steep learning
curve, because even though you’ll avoid some of the grunt work
you saw in this chapter, you’ll spend just as much time learning
to customize the plug-ins’ panoply of options and settings to
suit your needs. For a good overview of the issues that face
any WordPress site owner who wants to add ecommerce, you
can read a free ebook on the subject at
http://tinyurl.com/
wpe-ebook
. To get started with the leading WooCommerce
plug-in, you can visit its voluminous documentation center at
http://tinyurl.com/woo-doc
.


553
APPENDIX
A
WordPress.com is a great place to start your WordPress venture, and many fans
stay there forever. But there are several reasons to strike out on your own and set up
a self-hosted WordPress site. Most commonly, it’s because you want to customize
your site beyond what WordPress.com allows.
Here are the two features that can compel otherwise happy WordPress.com users
to move on:
• Themes. WordPress.com site owners can choose from a collection of barely 200
themes, while self-hosters get to pick from well over 1,000 themes in the Word-
Press theme repository (and still more if you’re willing to trawl the Web). More
important, self-hosters can
modify
themes without restriction, which lets you
do everything from swapping in your favorite Google font for headlines (page
481) to redesigning the site so that it works like a product catalog (Chapter 14).
• Plug-ins. You can’t add plug-ins to a WordPress.com site. You’re limited to a very
small set of preinstalled plug-ins, chosen by Automattic. But on a self-hosted
site, you have your choice of thousands of plug-ins that can extend your site
with useful features, like better search optimization (page 441), new tools for
multiauthor collaboration (page 381), and money-making options like ads and
donation buttons (page 543).
Making the jump from WordPress.com to a self-hosted site can be awkward, but it’s
nothing you can’t handle. Happily, WordPress has an import/export tool that does
most of the work. In this appendix, you’ll learn how to make the shift and deal with
some of the inevitable hiccups.
Migrating from
WordPress.com

WORDPRESS: THE MISSING MANUAL
554
BEFORE YOU
BEGIN
Before You Begin
Before you do anything, it helps to have an overview of the migration process. You
need to complete several steps, in this order:
1. Sign up for a new site with a web host (for a monthly or annual fee).
This is also the point where you register a custom domain name (like
www.
supernovatattooparlor.com
) if you don’t already own one. If you bought a
domain name through WordPress.com, don’t worry—you can have it point to
your new site when you finish the transfer process, as explained on page 561.
2. Install a fresh copy of WordPress on your new site.
Unfortunately, you can’t move a complete WordPress site as is. You need to
start with a basic blank shell of a site and then load it up with the data from
your old site.
3. Export the data from your old site.
You download this data to your computer as a single, compact file.
4. Import the data into your new site.
In this step, you add the downloaded content from step 3 to the empty Word-
Press site on your web host.
5. Configure and clean up your new site.
This is the part where you fiddle with your theme and install Jetpack, all in an
attempt to make your new site function as much as possible like the old one.
6. Reroute your web visitors from the old WordPress.com site to your new
self-hosted site.
This is optional, but you don’t want visitors going to an out-of-date copy of
your site, missing your new posts. Ideally, visitors will be seamlessly redirected
to your new site, without needing to click a link or type in a new web address.
The first two steps are covered in Chapter 3. Make sure you complete them before
you continue any further in this appendix, because there’s no use trying to transfer a
WordPress.com site if you don’t have a self-hosted site ready and waiting to receive
it. The rest of this appendix covers everything else you need to do, beginning with
step 3 above.
Transferring Your Data
Assuming you signed up with a web host and installed WordPress on your new
site, the next step is to copy all the information from your WordPress.com site. That
includes the posts and pages you wrote, the menus you created, and all the com-
ments your readers submitted.

APPENDIX A: MIGRATING FROM WORDPRESS.COM 555
TRANSFERRING
YOUR DATA
Transferring this data takes two steps. First, you download it from your WordPress.com
site to your computer. Then, you upload it from your computer to your new site.
GEM IN THE ROUGH
Guided Transfers
If this transition sounds like altogether too much work—or
the thought of configuring anything to do with web hosting is
enough to wake you, screaming, in the middle of the night—
there’s an easier option. You can pay WordPress.com to perform
a
guided transfer,
in which a nerd-for-hire at Automattic sets up
your domain, transfers your site, and configures a few plug-ins
that make the site run more like a standard WordPress.com site.
Unfortunately, there are two significant caveats: You need to
cough up a one-time fee of $129, and you need to use one of
WordPress’s recommended web hosts. To learn more, read up
at
http://tinyurl.com/guidedtransfer.
To sign up, visit the Store
section of the dashboard for your site, find the Guided Transfer
box, and then click Buy Now.
Exporting Your Data from WordPress.com
Here’s how to get information out of your original WordPress.com site:
1. Log in to your WordPress.com site’s dashboard and choose ToolsÆExport.
The Export page opens, which gives you the option to export your data (de-
scribed here) or to opt for the guided transfer process (described in the box
above).
2. Click Export.
Now WordPress.com asks what data you want to extract (Figure A-1).
3. Choose “All content.”
If you want to create a significantly dierent site from your current one, you
may want to bring over just some data; if so, choose one of the other options.
Usually, though, you want to export everything.
4. Click Download Export File.
Depending on your web browser, you may be asked for a filename, or it may
automatically save the exported file in your Downloads folder. The file will have
a name like this:
therealestatediaries.wordpress.2015-01-17.xml
The first part is the name of your WordPress.com site (
therealestatediaries
), the
second part is the date you performed the export (January 17, 2015), and the
final part is the file extension that indicates it’s an XML file, which is a format
computers often use to store structured data.

WORDPRESS: THE MISSING MANUAL
556
TRANSFERRING
YOUR DATA
FIGURE A-1
WordPress.com’s “All
content” option exports
every exportable piece of
site data: posts, pages,
and comments.
FREQUENTLY ASKED QUESTION
Where Are the Pictures?
My site uses plenty of pictures, but they aren’t in the export
file. Where are they?
WordPress doesn’t attempt to put pictures and other post
attachments in the export file. If it did, the export file could
easily balloon to a gargantuan size. Instead, WordPress adds
a
link
for each picture that belongs to an exported post or
page. When you import your WordPress.com site to your new
self-hosted site, the import tool processes these links, fetching
the associated file from your old site and copying it to your
new one. Problem solved!
Importing Your Data into a Self-Hosted Site
Although the exported file doesn’t look like much, it holds the nucleus of your site—
the raw text of every post you’ve ever written. To add it to your new site, you need
an import operation, as described in the following steps:
1. Log in to the dashboard of your new site, and choose ToolsÆImport.
WordPress lists the sites from which it can import data, including Blogger,
LiveJournal, Movable Type, Tumblr, and several more.
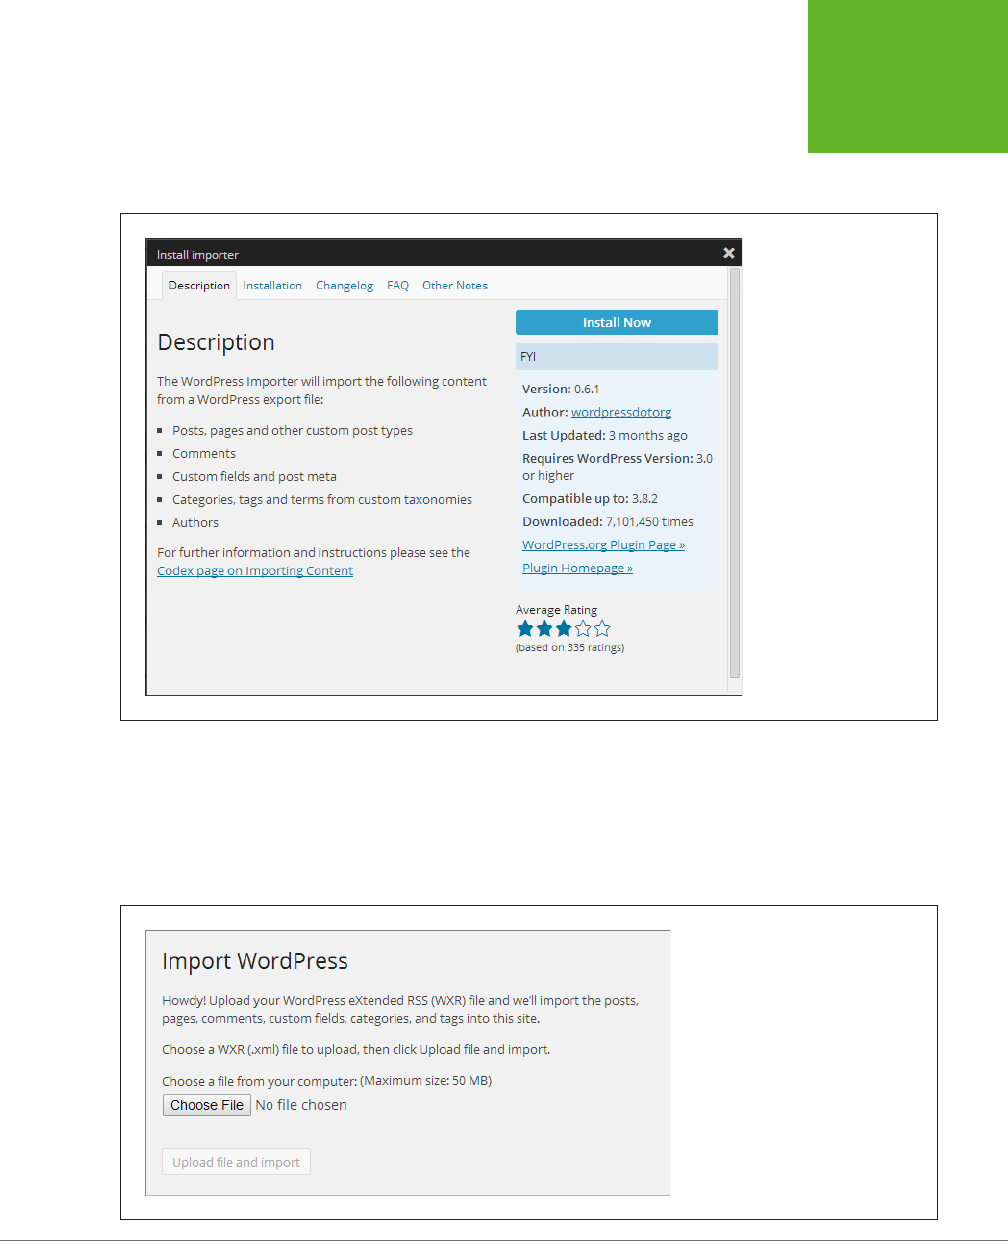
APPENDIX A: MIGRATING FROM WORDPRESS.COM 557
TRANSFERRING
YOUR DATA
2. Click the WordPress link to import the data you exported from your Word-
Press.com site.
The “Install importer” window opens (Figure A-2).
FIGURE A-2
WordPress self-hosters
need to install the Importer
plug-in before they can
suck in any data. The first
time you try to import
something, you see this
window, which describes
the plug-in and lets you
install it.
3. Click Install Now.
WordPress installs the plug-in in a fraction of second.
4. Click the “Activate Plugin & Run Importer” link to start the import process.
The Import WordPress window appears (Figure A-3).
FIGURE A-3
Now you’re ready to pick the file that has
the exported data.

WORDPRESS: THE MISSING MANUAL
558
TRANSFERRING
YOUR DATA
5. Click Browse or Choose File (the exact name of the button depends on your
browser). When the file selection window opens, browse to the exported
XML file and select it.
That’s the file you created in the previous section, like
therealestatediaries.
wordpress.2015-01-17.xml.
6. Click “Upload file and import.”
If your export file is large, it’ll take a while for your browser to transfer it to
your WordPress site. When it finishes, WordPress shows you a few more op-
tions (Figure A-4).
7. Optionally, you can change the author information for your posts.
Ordinarily, WordPress creates a new user for every author it finds in the export
file. In the example in Figure A-4, WordPress will create a new user account
for Charles M. Pakata and another one for lisachang2. When the WordPress
importer adds a user, it keeps the original user name, display name, and email
address. However, each author from the old site becomes a
subscriber
in the
new site. (As you may remember from page 370, subscribers are severely lim-
ited in what they can do—they can add comments, but not create new posts
or make changes to the site). Of course, you can change someone’s role after
you import your old site from the Users→All Users section of the dashboard.
If you want to import your author information but give the authors new user
names, type the name you want in the “create new user with login name” text
box. For example, if you prefer to use the user name lisachang on the new site
for the user formerly known as lisachang2, now is the time to make that change.
In some cases, you might want to assign imported posts to an author who
already exists on your site. In this case, choose the author’s name from the
“assign posts to an existing user” list. It doesn’t matter whether the author has
the same user name on both your old and new sites; you still need to pick that
name from the list to link up your imported posts.
NOTE If you have the same user account on your new site and your old site, but you don’t bother to pick
the author from the “assign posts” list, you’ll run into a strange problem. Say, for example, that you’re importing
the user lisachang2 (and her posts) into a site that already has a lisachang2 user account. Unfortunately, the
WordPress importer doesn’t know that these two accounts are meant to represent the same person, so it won’t
create a new user account for lisachang2, nor will it assign her any posts. Instead, it will assign the posts that
belong to lisachang2 to the currently logged-in person who is running the WordPress importer tool (that’s you),
which probably isn’t what you want.
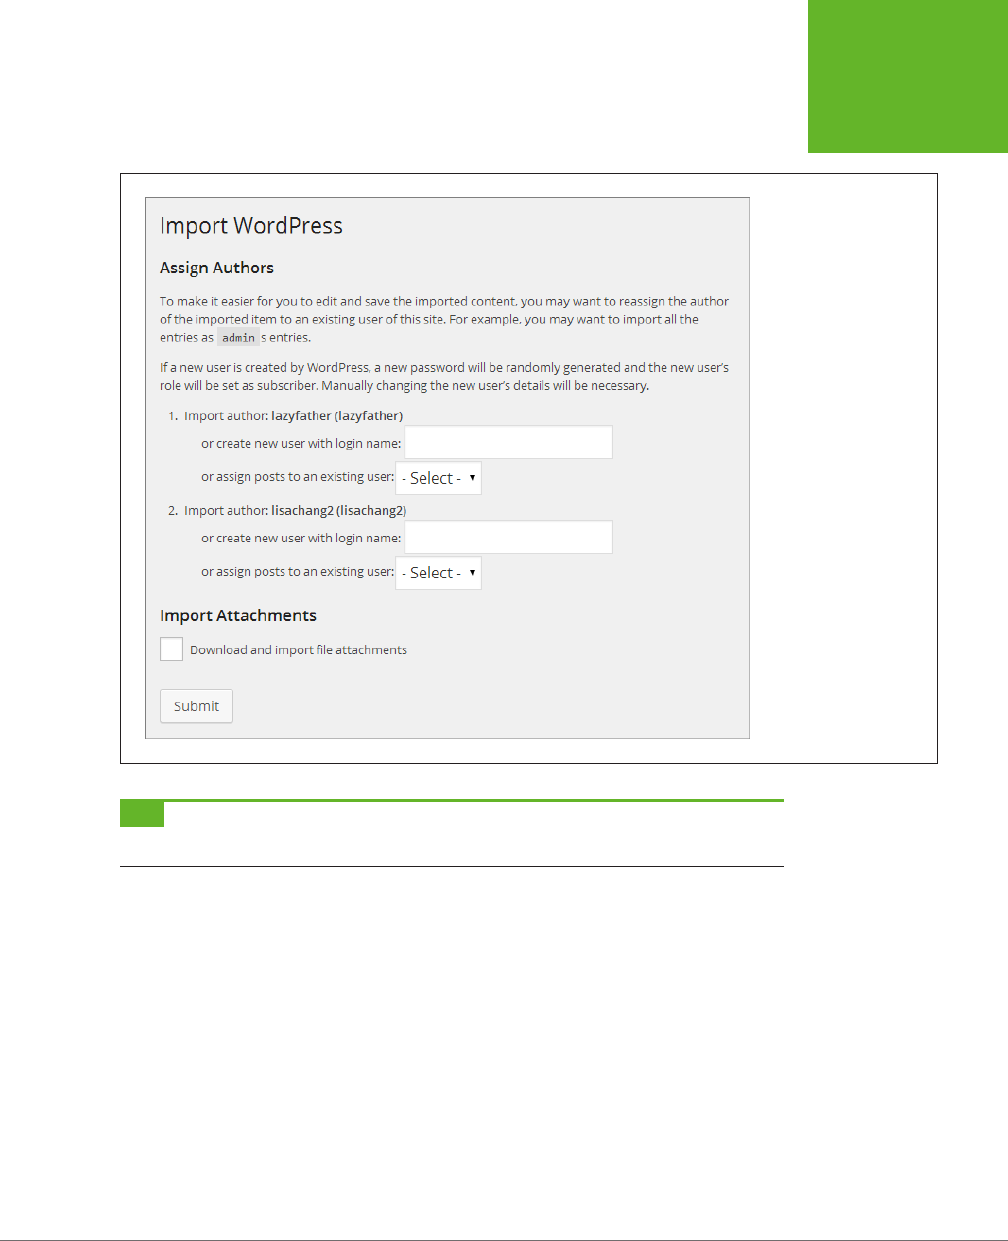
APPENDIX A: MIGRATING FROM WORDPRESS.COM 559
TRANSFERRING
YOUR DATA
FIGURE A-4
In this example, the
imported posts have two
authors. You can choose
to transfer this author
information to your new
site or assign the posts to
different authors.
TIP If you’re the only author on your site, you should assign all the posts you import to your administrator
account on the new WordPress site—that’s the account you use to log in to the dashboard and write new posts.
8. Check the box next to “Download and import file attachments.”
This way, the WordPress importer copies all your old pictures and other media
files from your old site to the new one. However, the copy process doesn’t
include videos—if you’ve got any, WordPress.com’s VideoPress hosts them,
and you need the Jetpack plug-in to display them on your new site (page 297).
9. Click Submit.
WordPress gets to work updating your site. If it needs to transfer a large number
of pictures, it may take a bit of time before it finishes.

WORDPRESS: THE MISSING MANUAL
560
CLEANING UP
YOUR NEW
SITE
Cleaning Up Your New Site
Congratulations, your website is now under new management! As a self-hosted
WordPress site owner, you’re in complete control of every setting, plug-in, and line
of code in your theme.
However, life isn’t perfect yet. Right now, your new site probably doesn’t look a lot
like your old site. Even though you have the same data, your new site sports the
default theme (currently, that’s Twenty Fourteen). And its features and permalinks
don’t quite match what you used in the old WordPress.com world, either. Read on
to find out how to get your site closer to its previous incarnation.
Migrating Your Theme
Unfortunately, you can’t transfer a WordPress.com theme to a self-hosted site.
However, most WordPress.com themes are also available to self-hosters. To
check for your favorite theme, look in the WordPress theme repository. Choose
Appearance→Themes, click the Install Themes tab, and then search for your theme
by name.
If you can’t find the theme in the WordPress theme directory, you may be able to
hunt it down online. Go to a web search engine like Google and search for the exact
theme name, followed by the word “wordpress.” For example, the slick Imbalance2
theme is included with WordPress.com, but it’s not in the self-hosters’ theme direc-
tory. But if you search for “imbalance2 wordpress,” you’ll stumble across the freely
downloadable theme files at
http://wpshower.com/themes/imbalance-2.
Unfortunately, if you purchased a premium WordPress.com theme, you can’t port
it over to your self-hosted site. However, you may be able to buy a second copy for
your new site (usually for the same price). To look into this option, follow these steps:
1. Go to the WordPress.com theme gallery at
http://theme.wordpress.com.
2. Search for your theme, and then click it to see a page with more theme
information.
3. Scroll down until you see the “Stats & Info” section at the bottom of the
right-hand sidebar.
4. Look for a “More themes by” link, and then click it.
This takes you to a page with information about the theme creator. Look for a
link to the theme creator’s site, and click that.
5. Finally, browse through the theme creator’s site.
Hopefully, you’ll find a self-hosted version of the theme you want, which you
can buy and download. You can then add the theme to your site by visiting the
Add Themes page and clicking the Upload Theme button (page 141).
If you’re unlucky, you might not be able to find a version of your theme for your
self-hosted site. In that case, you need to start over by choosing a new theme and

APPENDIX A: MIGRATING FROM WORDPRESS.COM 561
CLEANING UP
YOUR NEW
SITE
customizing it to get the look you want. Chapter 5 has plenty of information that
can help you find a good theme.
Even if you do find the theme you want, you may need to redo some of the ba-
sic customization you did before, when your site was running on WordPress.
com. For example, you probably need to resubmit your site header (choose
Appearance→Header) and add the widgets you want to the appropriate widget areas
(Appearance→Widgets). And even though WordPress transfers your old menus,
you need to reattach them to the right part of your theme (Appearance→Menus).
Missing WordPress.com Features
Although self-hosted sites and WordPress.com sites have most of the same features,
they’re not identical. The chief culprit is WordPress.com’s built-in plug-ins, which
provide features like slideshows, Facebook comments, web statistics, and shar-
ing buttons. Throughout this book, we note what plug-ins you need to duplicate
WordPress.com features. The best way to fill most of the gaps at once is to install
the Jetpack plug-in. In fact, Automattic created Jetpack to help level the playing
field between WordPress.com sites and self-hosted sites. You can learn more about
it on page 297.
Permalinks
Every new self-hosted WordPress site starts out using ID-based permalinks. That
means that when you click through to a specific post, you get sent to a page with
a web address like this:
http://therealestatediaries.net/?p=299
By contrast, WordPress.com uses a permalink style that avoids IDs, instead combin-
ing the date and the post names to create links. They look like this:
http://therealestatediaries.wordpress.com/2014/07/30/know-the-law-before-it-
knows-you
As a result, when you transfer posts to your new site, they won’t have the same
permalinks. You can easily fix this inconsistency. Choose Settings→Permalinks and
pick a new permalink style. Page 117 describes the options for self-hosted sites, but
if you choose “Day and name,” you get the same web addresses that WordPress.
com uses. Click Save Changes to make your selection permanent, and all your posts
will automatically use the style you picked.
Redirecting Your Website Address
The last thing you want is to have two copies of your site on the Web. Not only will
this thoroughly confuse visitors, but it’ll also bae search engines. You need a single
identity and a single web address for your site.
The exact steps you follow depend on your original website address—that’s the
one you used with WordPress.com. If you bought a custom domain name when
you originally signed up with WordPress.com, read the next section (“Keeping

WORDPRESS: THE MISSING MANUAL
562
CLEANING UP
YOUR NEW
SITE
Your Custom Domain”). If your old site used a
.wordpress.com
address, jump to the
second section (“Moving from .wordpress.com”).
KEEPING YOUR CUSTOM DOMAIN
If you followed the good advice in Chapter 2 and bought a custom domain name
when you first signed up with WordPress.com, the transfer process is easy. You can
keep the same domain for your new site.
If you bought the custom name through a domain registrar, you already know what
to do—log in to your account and point your domain to the new site (see page 45).
If you bought the custom name through WordPress.com, you have two choices:
• Transfer your domain from WordPress.com to your new web host.
• Keep it registered with WordPress.com but point it to your new site.
Both options have the same eect. The only dierence is who charges you the yearly
domain registration fee (either your web host or Automattic, the people who run
WordPress.com). You might choose to transfer your domain if your web host charges
you less, or if it oers a free domain with your website package.
No matter which option you choose, you need to configure your WordPress.com do-
main. To do that, log in to your old WordPress.com site and go to the Store→Domains
section of the dashboard. Then follow the instructions at
http://tinyurl.com/8ese4cp
.
MOVING FROM .WORDPRESS.COM
If your original site uses a
.wordpress.com
domain, you need to redirect guests to
your new domain. Your best bet is to buy the Site Redirect upgrade, which costs
$13 per year. To get it, log into your old WordPress.com site, visit the Store section,
find the Site Upgrade box, and then click Buy Now. Tell WordPress.com about your
new site, and it handles the redirection automatically, serving out a special sort of
notice called an HTTP 301 code, which clearly tells search engines that you’ve moved
to a new home (so they can update your listing).
In a year or so, when your readers (and the search engines of the world) have gotten
used to your new address, you can cancel the upgrade and delete your WordPress.
com site using the Tools→Delete Blog command in the dashboard.
NOTE Instead of buying the Site Redirect upgrade, you
could
try to redirect traffic on your own. The basic
technique is to change the home page on your old site to a static page that has a message explaining that you
moved your site, along with a link to your new home. But this technique is fraught with problems, because read-
ers may enter your site through bookmarks and miss your message, and search engines will continue funneling
people to the wrong site (because it will have a higher ranking than your new site). So don’t do this unless your
site has virtually no readers or search engine traffic to worry about.

563
APPENDIX
B
As you know, WordPress is one of the world’s most popular site-building tools.
Thanks to its popularity, it attracts plenty of attention—and not all of it is good.
The uncomfortable truth is that the Internet is swarming with nefarious people
who would love to get their hands on your site. The good news is that these enemies
aren’t the sort of computer super-geniuses you see in movies, using semi-magical
powers to hack into government sites faster than you can make a slice of toast.
Instead, they’re the sort of rira you find loitering in the bushes near an empty
house, or lurking around parked cars in an alleyway. They’re looking for low-hanging
fruit—easy crimes of opportunity that become possible when someone leaves a
door unlocked, forgets to close a window, or just plain stops paying attention. In
the WordPress world, slip-ups like these occur when you forget to install a plug-in
update, say, or fail to conceal your password. These attackers aren’t out to steal your
stu—usually, they just want to pull your site into their spam network by planting
garish ads, dummy links, and other sorts of garbage.
Fortunately, you don’t need to make your WordPress site bulletproof; you just need
to close the gaps and avoid the mistakes that allow 99 percent of the attacks. Do
that, and hackers will move on from your site and find other places to cause trouble.
In this brief appendix, you’ll learn the five best security practices you can use to
harden your site. Implement these techniques, and you’re sure to sleep soundly.
NOTE Don’t underestimate the threat of a WordPress attack. Even though your site may not be large enough
to attract a hacker’s personal attention, hackers run automated tools that can launch attacks against thousands
of WordPress sites at a time.
Securing a
Self-Hosted Site

WORDPRESS: THE MISSING MANUAL
564
1. CRASH-
PROOF YOUR
SITE WITH
BACKUPS
1. Crash-Proof Your Site with Backups
If you take only one piece of advice from this appendix, it should be this: Back up
your site regularly. It won’t prevent an attack, but it will let you recover from almost
any catastrophe.
To keep your site safe, you need to create a proper backup schedule. You can’t just
make an occasional backup whenever the thought crosses your mind. The ideal
frequency depends on how often you add new content, the cost of recreating lost
content, and the size of your site. A weekly backup is good—it ensures that you’ll
never lose more than seven days’ worth of work. For frequently updated sites, a
daily backup is better, because it limits your losses to a day or two.
You also need to think about how many old backups you save. Your goal is to keep
enough to make sure you have a good copy of your site even if you don’t notice an
attack immediately after it occurs. For example, if a hacker sneaks into your site
and adds some subtle spam, you might not notice it for a couple of weeks. If you
use a rolling backup strategy that keeps site snapshots from the last seven days,
you’ll be left with a week’s worth of spam-compromised backups, and no good copy
of your site. One way to avoid this problem is to combine a frequent, automated
rolling backup (for example, 10 daily backups) with a less-frequent manual backup
(every month or so).
Finally, you should think about where you
store
your backups. Usually, you put them
in a private area on your website. But for the absolute best protection, you should
download the occasional backup to your computer, so you have something to fall
back on if a severe attack scrambles your entire hosting account.
If you installed your WordPress site with Softaculous, you’ve got easy access to the
excellent backup feature described on page 60. If not, you can get a WordPress
plug-in to do the same job, as described on page 313.
2. Change Your Posting Account
When you install a new WordPress site, you start with a single account. This is an
all-purpose administrator account that can do everything from writing posts to
switching themes and installing plug-ins. This is exactly the sort of access a hacker
would like to have, and every time you log into your site, you increase the chance that
someone might steal your login details—whether that’s by snooping through network
trac or looking over your shoulder. And once hackers have those credentials, they
can take complete control of your site, and even lock
you
out.
A safer strategy is to do all your posting using a more limited user account. That way,
if a shady character gets your password, she can write posts (which you can easily
delete after the fact), but she won’t be able to wreak real damage (like poisoning
your plug-ins with malware). The only disadvantage to this approach is that you
need to juggle two login credentials. Most of the time, you’ll use the more limited

APPENDIX B: SECURING A SELF-HOSTED SITE 565
3. BE
CAUTIOUS
WHEN
EXTENDING
YOUR SITE
account to work with content. But if you want to reconfigure your site, you need to
switch to the administrator account.
Putting this approach into practice is easy, provided that you rely on the user man-
agement skills you picked up in Chapter 11. Here’s what to do:
1. In the dashboard, choose UsersÆAdd New.
Fill in the key details for your new account.
At a minimum, you need a user name, email address, and password. You can use
the same email address as your administrator account, but you must choose a
distinct user name (and you should definitely pick a dierent password). If you
need some good password advice, see page 27.
2. In the Role list, choose Editor.
An editor can do all the daily tasks necessary for a WordPress site. Editors
have full control over every page and post, and they can moderate comments.
However, they can’t change themes, plug-ins, and configuration of the site. This
gives your site a wide margin of safety.
Alternatively, you can use the author role. The disadvantage is that you need to
log in with dierent credentials to create pages or moderate comments. Page
370 details the dierent roles for a WordPress site.
3. Click Add New User.
This creates the user account. You can now log out of the dashboard and log
back in as an editor.
Ideally, you should also make sure WordPress doesn’t display your user name as
a byline, where a hacker’s screen scraping tool might grab it. (And besides, user
names look ugly in posts.) To change how your name appears on the site, log in, visit
Users→Your Profile, and choose a dierent name in the “Display name publicly as”
setting. If you don’t see the exact name you want, type it into the Nickname box.
WordPress automatically copies your nickname into the “Display name publicly as”
list, where you can then select it.
NOTE One last thing: Your admin account should never be named “admin”; that’s just too obvious. You
already learned to avoid this rookie mistake when you installed your site, but if you failed to heed this good
advice, you can fix the problem after the fact. Just create a new user that has the administrator role, log in under
those new credentials, and then delete the original admin account.
3. Be Cautious When Extending Your Site
One of the great advantages of WordPress is its extensibility, which lets you change
your site’s style and bolt on new features with themes and plug-ins. However, every
theme and plug-in contains bits of PHP code that attackers can exploit. Most won’t

WORDPRESS: THE MISSING MANUAL
566
4. PREVENT
PASSWORD-
GUESSING
ATTACKS
bother (they’d rather use attacks that target every WordPress site, rather than hunt
for sites with specific plug-ins). But some hackers are more devious. They create
themes and plug-ins that
contain
spamware, and then attempt to get you to install
them. If you do, there’s no need for a spammer to hack your site, because you just
invited him in.
To steer clear of this danger, you need to stick to the ocial repositories for your
plug-ins and themes. For example, you probably won’t go wrong on the ocial
WordPress site, with its thousands of themes (
http://wordpress.org/themes
) and
tens of thousands of plug-ins (
http://wordpress.org/plugins
). Most of the themes
and plug-in links in this book are taken from WordPress repositories, although there
are a few from other highly trustworthy sources. However, if you venture further
afield, be careful. If you Google “free WordPress themes,” you’re almost certain to
stumble across seemingly innocent oerings that have malware embedded in their
code. So if you find an interesting theme or plug-in but have even a faint doubt
about its provenance, stay safe and don’t install it.
Even respectable extensions from honest developers can have unexpected security
vulnerabilities. Remember, all themes and plug-ins contain PHP code, which means
there’s always a possible security flaw lurking in your files that’s waiting to be ex-
ploited. The more plug-ins and themes you have, the greater the risk you run. To
keep the odds in your favor, use a small set of plug-ins—only ones that have proved
to be truly valuable to your site. Always update your themes and plug-ins in the
Dashboard→Updates page to make sure you’re protected should hackers discover a
new security exploit. And remember to delete themes and plug-ins you don’t intend
to use. As long as they’re installed on your site, an attacker can exploit them, even
if you haven’t made them active.
NOTE Several years ago, a number of WordPress site-builders ran into trouble thanks to an error in an
image resizing script (called TimThumb), which turned up in a few dozen themes. Many site owners had one of
the affected themes, and some assumed they were safe because the themes were inactive. But that wasn’t the
case—the attackers were still able to use the inactive theme files to launch attacks and take over sites. The only
defense was to upgrade or delete the flawed themes.
4. Prevent Password-Guessing Attacks
When you created your site, you learned about the dangers of bad passwords (page
27). But even the best passwords are just a combination of a letters, numbers, and a
few other characters, which means they can all be guessed—eventually. To help with
the guesswork, hackers use automated tools that attempt to log in to WordPress
sites thousands of times a minute. Often, these tools use a long list of words and
names, into which they substitute numbers and special characters.
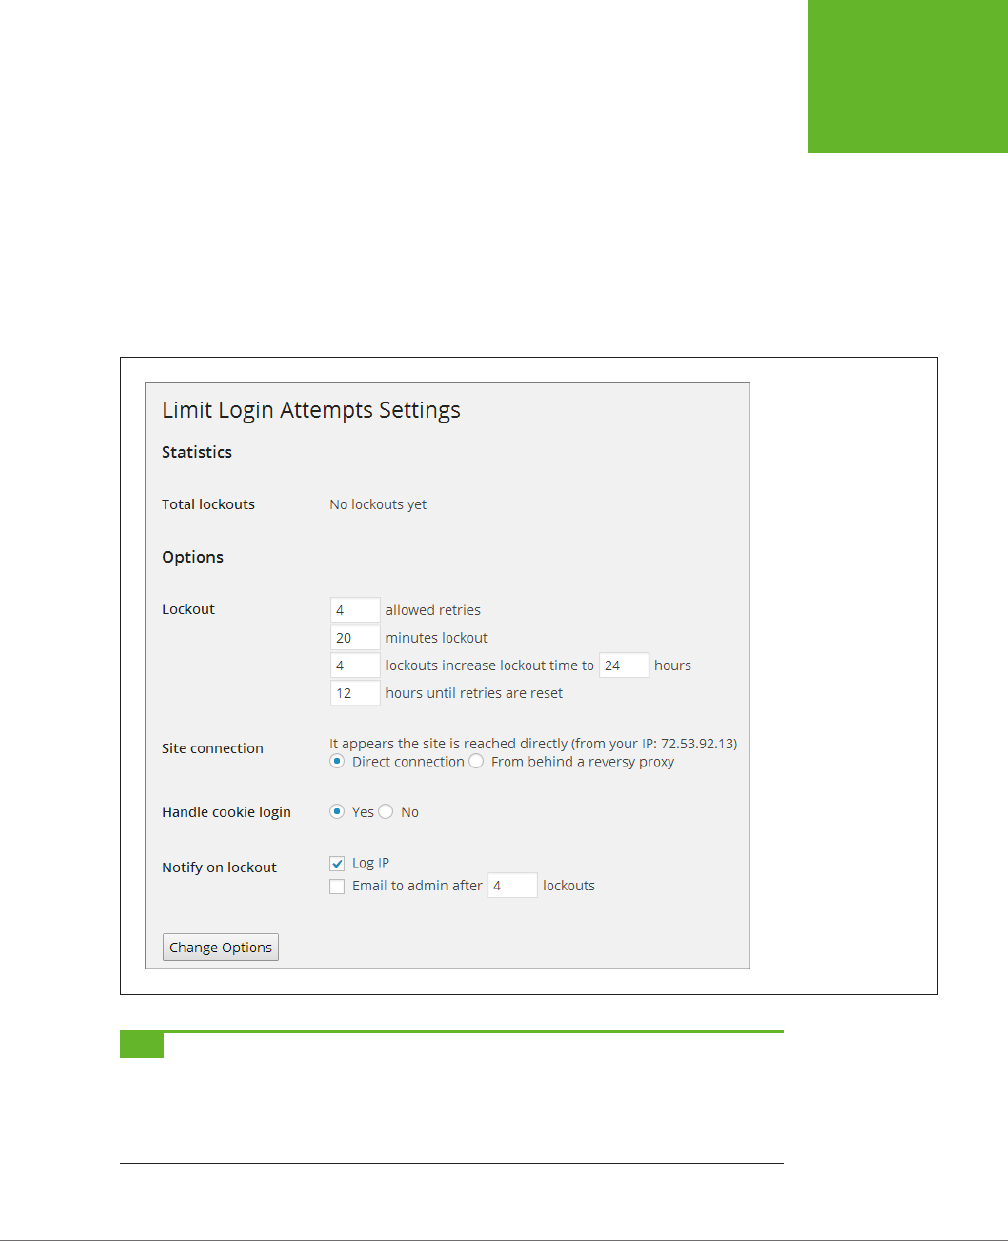
APPENDIX B: SECURING A SELF-HOSTED SITE 567
4. PREVENT
PASSWORD-
GUESSING
ATTACKS
Although password-guessing hacks aren’t the most common type of attack, they’re
surprisingly easy to defend against. The Limit Login Attempts plug-in (
http://tinyurl.
com/limit-login-a
) is the perfect tool. It notices suspicious activity—repeated failed
login attempts—and temporarily locks up your account. This frustrates attackers and
ties up their automated password-guessing tools, making it virtually impossible for
them to gain access to your site by brute force.
To use the Limit Login Attempts plug-in, just install and activate it. You don’t need
to perform any further customization. However, if you choose Settings→Limit Login
Attempts, you can control how the lockout feature works (Figure B-1)
FIGURE B-1
The Limit Login Attempts
plug-in lets you set how
many consecutive failed
logins you allow before
the lockout applies (four
is typical), how long the
lockout should last (20
minutes to start), and
whether the plug-in
should notify you (by
email) about the at-
tempted incursion.
TIP An alternate choice is the excellent (and very popular) Wordfence plug-in (
http://tinyurl.com/w-fence
).
It provides a comprehensive suite of security features, including a configurable login lockout that works like Limit
Login Attempts. Although it’s overkill for most small sites, Wordfence boasts some truly impressive features,
including the ability to scan your WordPress files looking for malware, and real-time monitoring that checks your
site for signs of an attack.
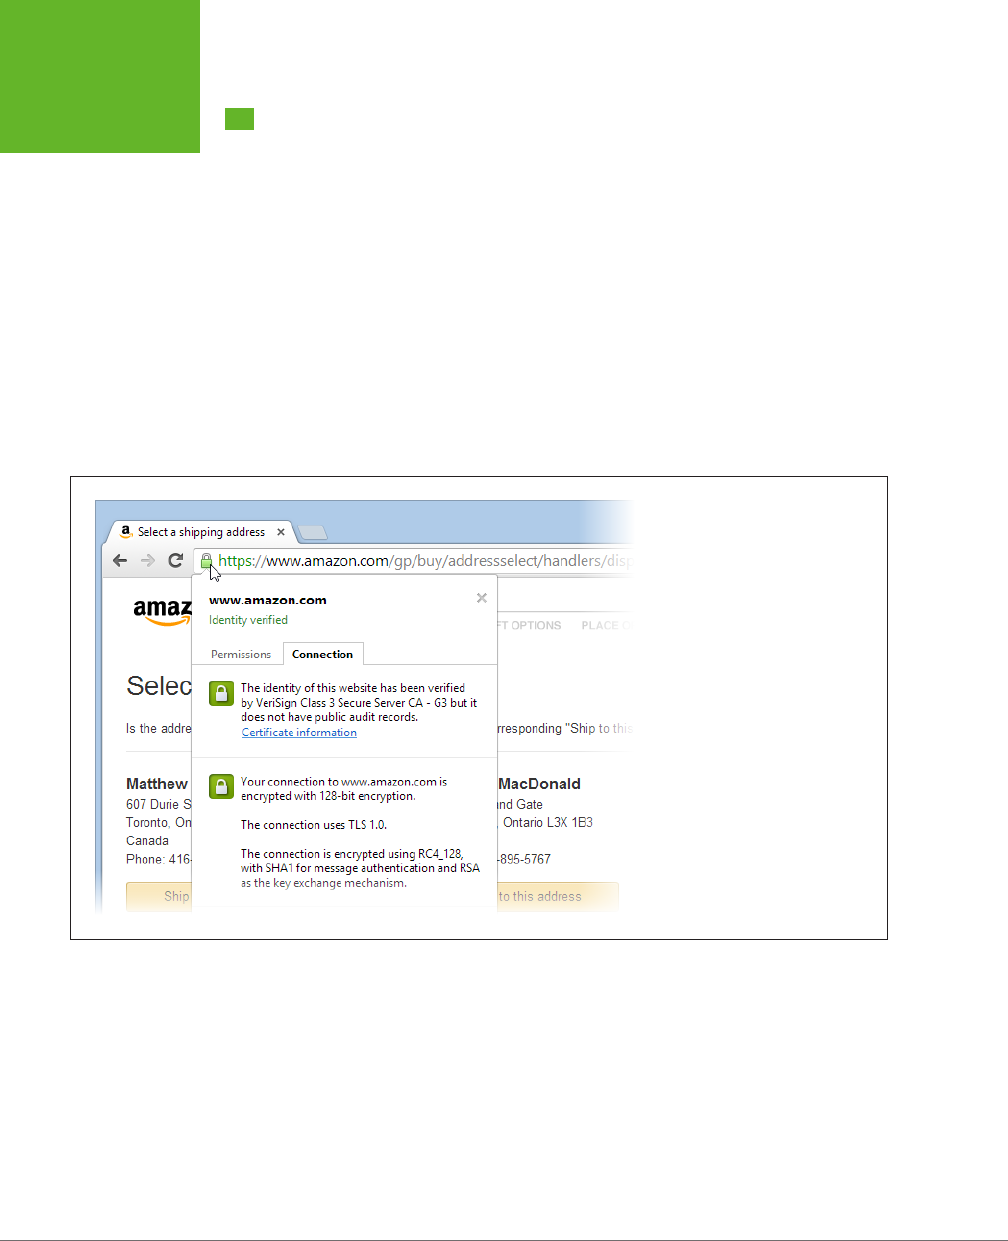
WORDPRESS: THE MISSING MANUAL
568
5. HIDE
PASSWORDS
WITH SSL
5. Hide Passwords with SSL
SSL (Secure Sockets Layer) is an Internet standard that
encrypts
information before
it’s sent to a website. For example, when you make a purchase at Amazon, SSL
encrypts your credit card details. The recipient of your message (Amazon) has no
trouble decoding your secret message (the credit card number) and processing
your payment. If Internet eavesdroppers intercept your message, they’ll find just a
chunk of impenetrably scrambled data.
Wherever there’s ecommerce, and whenever you need to log in to a secure site
(from Facebook to Gmail), SSL is at work. Browsers let you know when you’re visit-
ing a secure site by displaying a tiny padlock in the address bar (Figure B-2), but if
you’re in doubt, just look at the web address. If it starts with
https://
, your data is
being encrypted; if it starts with
ht tp://,
your information is travelling free and clear
over the Internet.
FIGURE B-2
Here, the padlock vouches for
Amazon’s security. Click it and you
get a pop-up balloon that describes
your secure connection and identifies
Amazon’s security certificate and the
authority that issued it (VeriSign).
When you’re not using SSL, hackers have the opportunity to steal your data. All they
need to do is watch the trac as it flows over one of the network devices between
your computer and the website you’re talking to. (If you’re curious to learn more,
the detailed walkthrough at
http://tinyurl.com/steal-pass
explains how a password
can get stolen from an unsuspecting WordPress administrator.)
It comes as a great surprise to many WordPress fans to learn that a newly installed
self-hosted WordPress site doesn’t use SSL. As a result, every time you log into the
dashboard, your user name and password are exposed. A potential thief doesn’t
need any special coding skills to steal your credentials, just good timing.

APPENDIX B: SECURING A SELF-HOSTED SITE 569
5. HIDE
PASSWORDS
WITH SSL
Although this vulnerability is disappointing, it’s not WordPress’s fault. In order to
participate in an SSL-encrypted conversation, a website, like your newly launched
WordPress site, needs to be able to prove its identity. And a site can do that only
with a
digital certificate
—an electronic document from a trusted third party (known
as a
certificate authority
) that vouches for the site’s identity.
For example, Amazon can accept your securely encrypted credit card details only
because another organization has certified the Amazon site’s authenticity. Its digital
certificate verifies that the
www.amazon.com
domain name truly belongs to Ama-
zon. In other words, if you see a web address starting with
https://www.amazon.
com
in your browser, you can be confident that you have a secure connection to
the Amazon site, not another web server that’s attempting to impersonate it. If you
want to have a secure conversation with your website, it needs a similar certificate.
Think of the digital certificate as a license to use SSL.
UP TO SPEED
How Does a Certificate Authority Decide to Trust a Website?
Obviously, there are massive numbers of websites with certifi-
cates, and in most cases the certificate authority doesn’t know
much about them beyond their business name and address.
And in recent years, certificate authorities have begun issuing
cheaper certificates that simply guarantee that the certificate
holder owns a certain domain. They don’t attempt to prove that
there is a real person or business operating under that name.
However, the clever part about certificates is that they’re
revocable.
If it turns out that a business is defrauding people,
misrepresenting itself, or engaged in spamware or illegal
activity, the certificate authority can cancel the certificate im-
mediately, rendering it useless. It’s much the same as a driver’s
license—although the license itself can’t guarantee safe driv-
ing, a serious enough offense will lead to a suspended license.
The easiest way to get a certificate is to purchase it through your web hosting
company. Typically, the cheapest type of certificate (called “domain-verified only”)
requires an annual fee that falls between $50 and $150 per year, depending on your
web host. To buy a certificate, contact your web host and file a certificate request.
Once your host certifies your site, you can log in to the dashboard with a secure
connection—just modify your web address so that it starts with
https://
. You should
see the comforting padlock icon in your browser’s address bar.
Even after you get a certificate, your site will still let people log in with normal,
unencrypted connections. If they do, their passwords are just as vulnerable as they
were before. To protect your site, you should
force
everyone (including yourself) to
use SSL. In other words, you should tell WordPress to always demand an encrypted
SSL connection for the dashboard. To do that, you need to change your site’s
wp-
config.php
file.
You can do that two ways. Lazy administrators can use the WordPress HTTPS plug-in
(
http://tinyurl.com/wp-https
). But if you’re comfortable using a text editor and an
FTP program, you can make the change by hand:

WORDPRESS: THE MISSING MANUAL
570
5. HIDE
PASSWORDS
WITH SSL
1. Using an FTP program, download the
wp-config.php
file.
You find it in the root folder of your WordPress site.
2. Open the file you just downloaded in a text editor, and edit it.
Look for this comment:
/* That's all, stop editing! Happy blogging. */
Immediately before that comment, add this line (Figure B-3):
define('FORCE_SSL_ADMIN', true);
This tells WordPress that someone can manage your site only if she uses an
SSL connection.
FIGURE B-3
Here’s the single line
you need to add to your
wp-config.php
file to
enforce an SSL connec-
tion, assuming your site
has a digital certificate.
Although some content
appears after the “stop
editing” comment, your
SSL code should not.
NOTE Don’t be intimidated if your site’s version of the
wp-config.php
file doesn’t look as tidy as the one
in Figure B-3. The line breaks are optional, and some web hosts strip them out automatically, creating a more
cluttered (but equally functional) configuration file. Just ignore the mess and add the SSL line above the “stop
editing” comment.
3. Save your changes, and upload the new version of
wp-config.php
back to
its original place.
Your FTP program will ask if you want to overwrite the old copy, which you do.
Now if you attempt to log in using an unsecured
http://
connection, WordPress
redirects you to the same page using the proper
https://
encrypted connection.
This means there’s no longer a way for passwords to slip out into the open during
the login process.

571
APPENDIX
C
Throughout this book, you learned about a number of great websites where you can
get valuable information or download WordPress plug-ins. Odds are you'll want
to revisit some of those sites. To save you the eort of leafing through hundreds
of pages to find the link you want, this appendix provides the links, grouped by chapter.
If just the thought of typing in these links gives you carpal tunnel syndrome, you
can use the online version of this appendix, located on the
WordPress: The Missing
Manual, Second Edition
Missing CD page at
http://www.oreilly.com/pub/missing-
manuals/wpmm2e
. That way, once you find a site you want to visit, you're just a
click away.
Chapter Links
The following tables list the links found in each chapter. Each table lists the links in
the same order they appear in the text.
INTRODUCTION
DESCRIPTION URL
WordPress usage statistics
http://tinyurl.com/3438rb6
Missing CD page for this book
http://www.oreilly.com/pub/missingmanuals/
wpmm2e
Try-out site for this book
http://prosetech.com/wordpress
Register this book
www.oreilly.com/register
Useful Websites
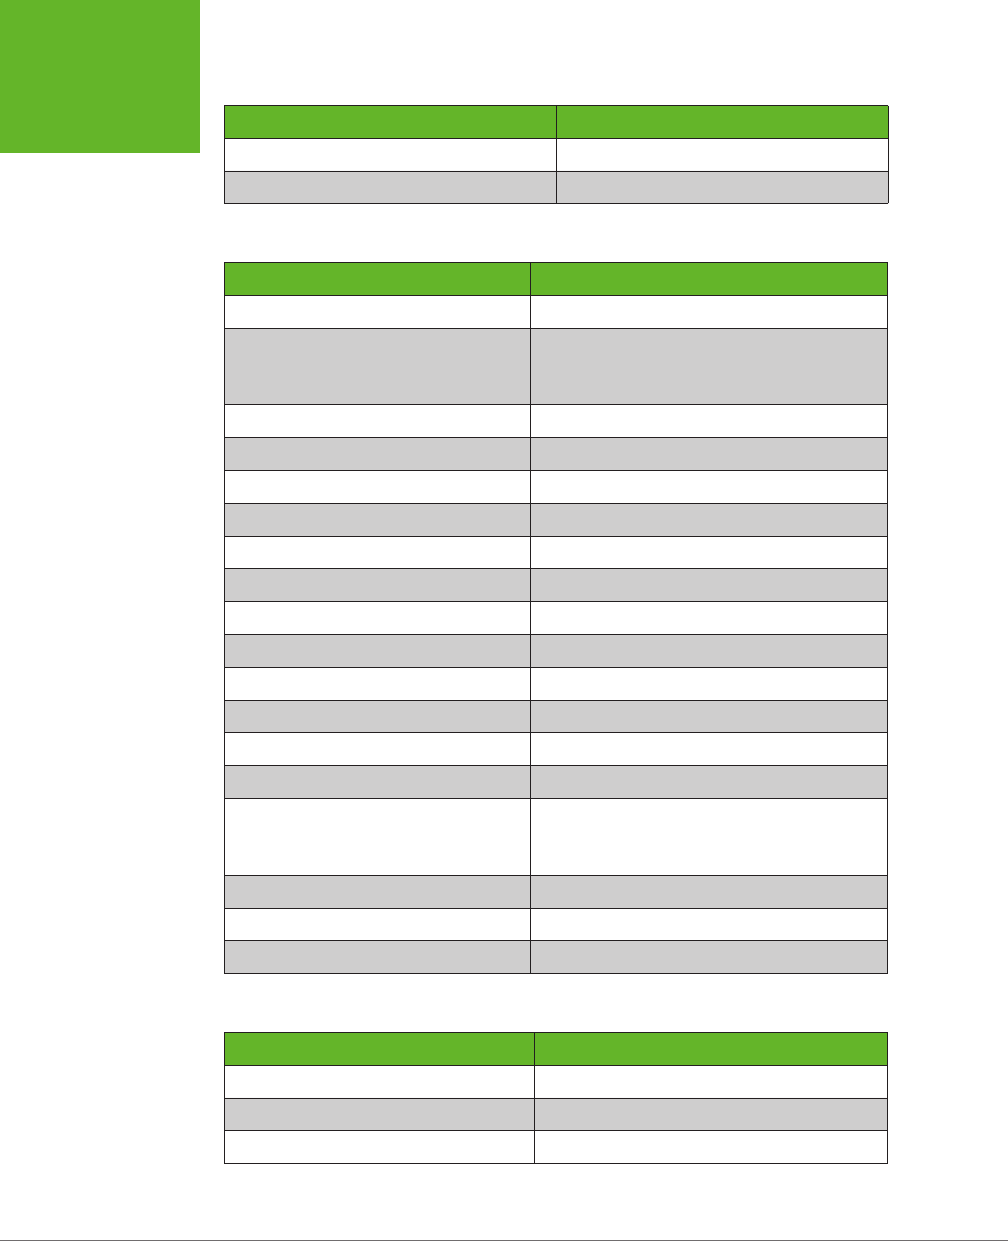
WORDPRESS: THE MISSING MANUAL
572
CHAPTER
LINKS
DESCRIPTION URL
The Missing Manuals feedback page
www.missingmanuals.com/feedback
Submit errata for this book
http://tinyurl.com/7mujhnx
CHAPTER 1
The WordPress Landscape
DESCRIPTION URL
Paul Krugman's blog
http://krugman.blogs.nytimes.com
Technorati
http://technorati.com/blogs/top100
(top 100
blogs)
http://bit.ly/1fSbmAT
(Digital Influencer's report)
FAIL Blog
http://failblog.org
Damn You Autocorrect!
http://damnyouautocorrect.com
How to plan your blog
http://learn.wordpress.com/get-focused
The Sartorialist blog
www.thesartorialist.com
The Internet Encyclopedia of Philosophy
www.iep.utm.edu
Wappalyzer
http://wappalyzer.com
WordPress-powered Ford site
http://social.ford.com
Examples of self-hosted WordPress sites
http://wordpress.org/showcase
WordPress.com WordAds
http://wordpress.com/apply-for-wordads
WordPress.com upgrades
http://support.wordpress.com/upgrades
WordPress.com popular subjects
http://wordpress.com/tags
WordPress.com complaints
http://wordpress.com/complaints
WordPress support forums
http://wordpress.org/support
(self-hosted sites)
http://forums.wordpress.com
(WordPress.com
sites)
WordPress.com VIP hosting
http://vip.wordpress.com
WP Engine
http://wpengine.com
Synthesis
http://websynthesis.com
CHAPTER 2
Signing Up with WordPress.com
DESCRIPTION URL
WordPress.com sign-up page
http://wordpress.com/signup
Worst passwords
http://onforb.es/v2rdOb
Forward email from a custom domain
http://support.wordpress.com/email-forwarding
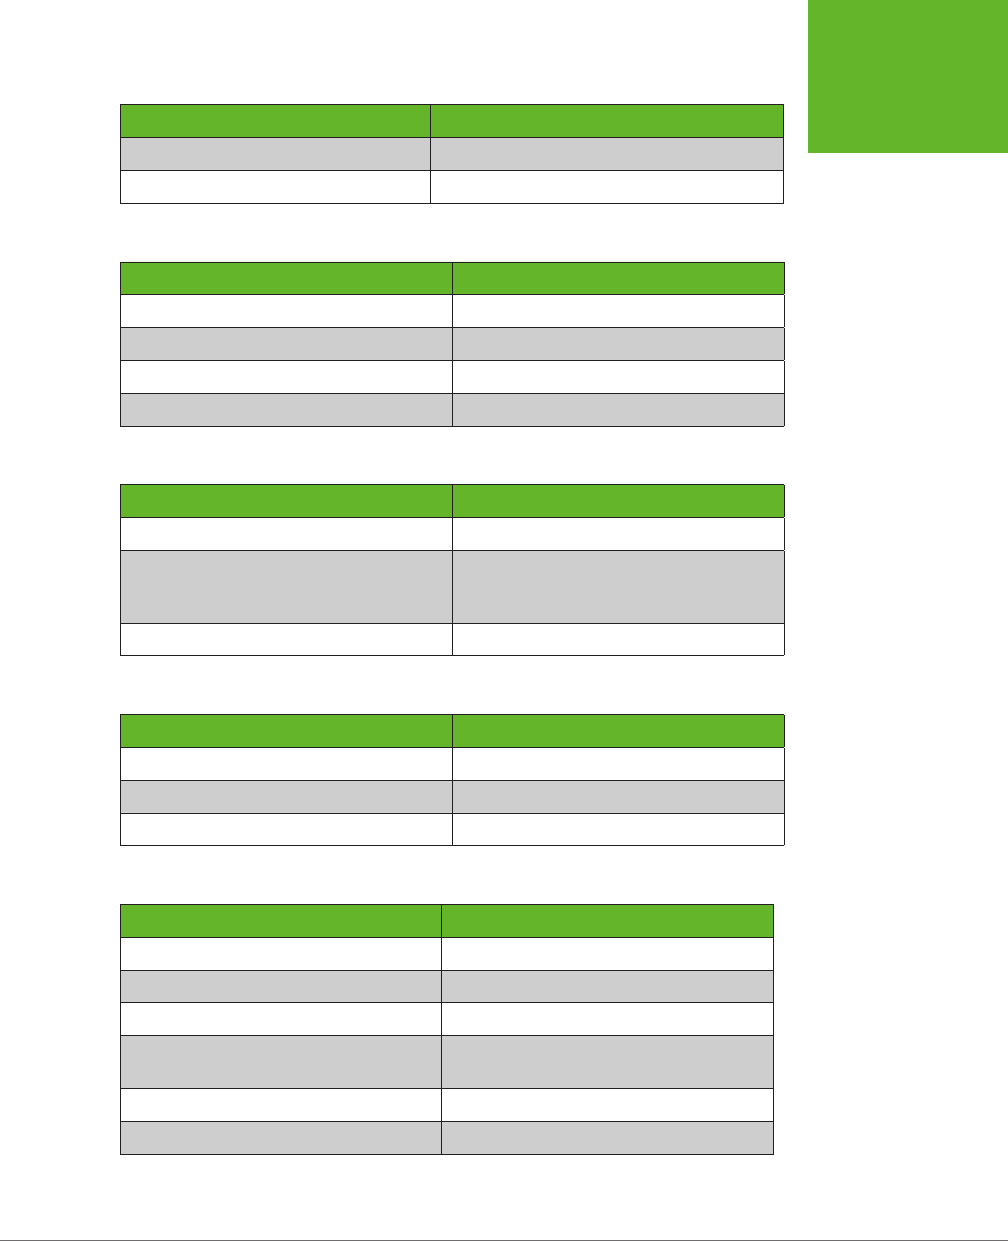
APPENDIX C: USEFUL WEBSITES 573
CHAPTER
LINKS
DESCRIPTION URL
Examples of self-hosted WordPress sites
http://wordpress.org/showcase
Use external email with a custom domain
http://tinyurl.com/ext-email
CHAPTER 3
Installing WordPress on Your Web Host
DESCRIPTION URL
Web Hosting Talk forum
http://bit.ly/vQ7tkH
WordPress-recommended hosts
http://wordpress.org/hosting
WordPress software (to download)
http://wordpress.org/download
List of WordPress releases
http://wordpress.org/news/category/releases
CHAPTER 4
Creating Posts
DESCRIPTION URL
Wayback Machine
http://web.archive.org
URL shortening services
http://bit.ly
http://tinyurl.com
http://tiny.cc
WordPress mobile apps
http://wordpress.org/mobile
CHAPTER 5
Choosing and Polishing Your WordPress Theme
DESCRIPTION URL
Stock.xchng
www.sxc.hu
WordPress reference for wp_tag_cloud()
http://tinyurl.com/wptagcloud
WPtouch (plug-in)
http://tinyurl.com/wptouch
CHAPTER 6
Jazzing Up Your Posts
DESCRIPTION URL
WordPress reference for smilies
http://tinyurl.com/using-smilies
WordPress plug-ins
http://wordpress.org/plugins
TinyMCE (plug-in)
http://tinyurl.com/tinyeditor
Windows Live Writer (desktop post editor
for Windows)
http://tinyurl.com/win-essentials
Mars Edit (desktop post editor for Mac OS)
www.red-sweater.com/marsedit
List of desktop post editors
http://tinyurl.com/blog-client
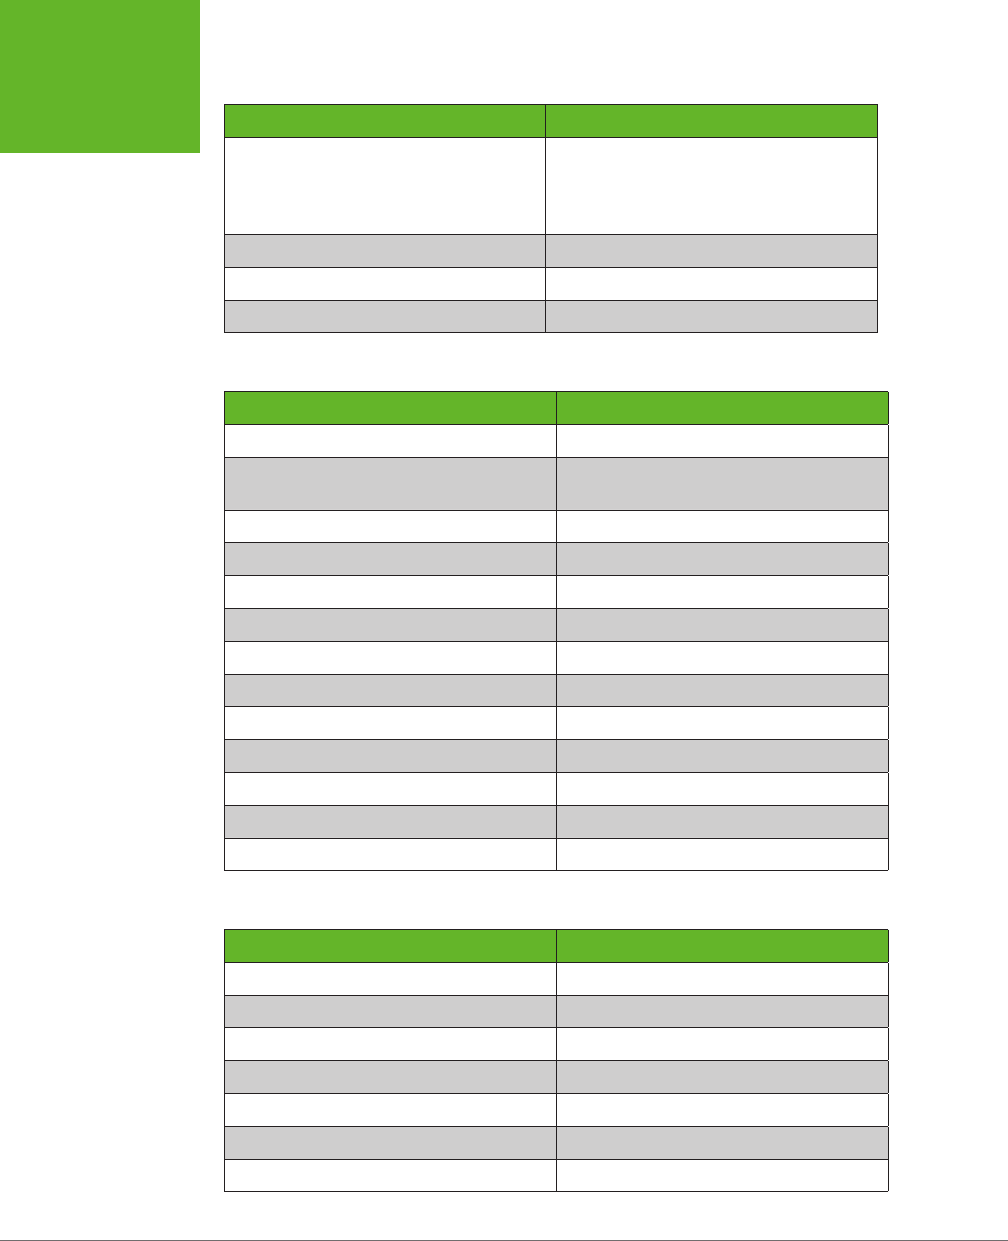
WORDPRESS: THE MISSING MANUAL
574
CHAPTER
LINKS
DESCRIPTION URL
WordPress themes
http://wordpress.org/themes
(self-hosted
sites)
http://theme.wordpress.com
(WordPress.com
sites)
WordPress reference for wp_link_pages()
http://tinyurl.com/wplinkpages
Excerpt Editor (plug-in)
http://tinyurl.com/csudedx
WordPress reference for the_excerpt()
http://tinyurl.com/the-excerpt
CHAPTER 8
Comments: Letting Your Readers Talk Back
DESCRIPTION URL
WP Content Filter (plug-in)
http://tinyurl.com/wpcontentfilter
Better WordPress Recent Comments
(plug-in)
http://tinyurl.com/wprecentcomments
Polldaddy (plug-in)
http://tinyurl.com/wp-polls
Gravatar
http://gravatar.com
Anti-spam (plug-in)
http://tinyurl.com/wp-anti-spam
Antispam Bee (plug-in)
http://antispambee.com
AVH First Defense Against Spam (plug-in)
http://tinyurl.com/avhspam
Akismet
http://akismet.com/wordpress
Growmap Anti Spambot (plug-in)
http://tinyurl.com/growmapspam
Captcha (plug-in)
http://tinyurl.com/wp-captcha
Anti-Captcha (plug-in)
http://tinyurl.com/wp-anticaptcha
WP-Optimize (plug-in)
http://tinyurl.com/wp-opti
Batch delete comments with phpMyAdmin
http://tinyurl.com/deletepen2
CHAPTER 9
Getting New Features with Plug-Ins
DESCRIPTION URL
How to write a plug-in
http://tinyurl.com/write-plugin
WordPress plug-ins
http://wordpress.org/plugins
Smashing Magazine
http://wp.smashingmagazine.com
WPMU DEV
http://premium.wpmudev.org
CodeCanyon
http://codecanyon.net
WordPress plug-in directory
http://wordpress.org/plugins
Jetpack
http://jetpack.me
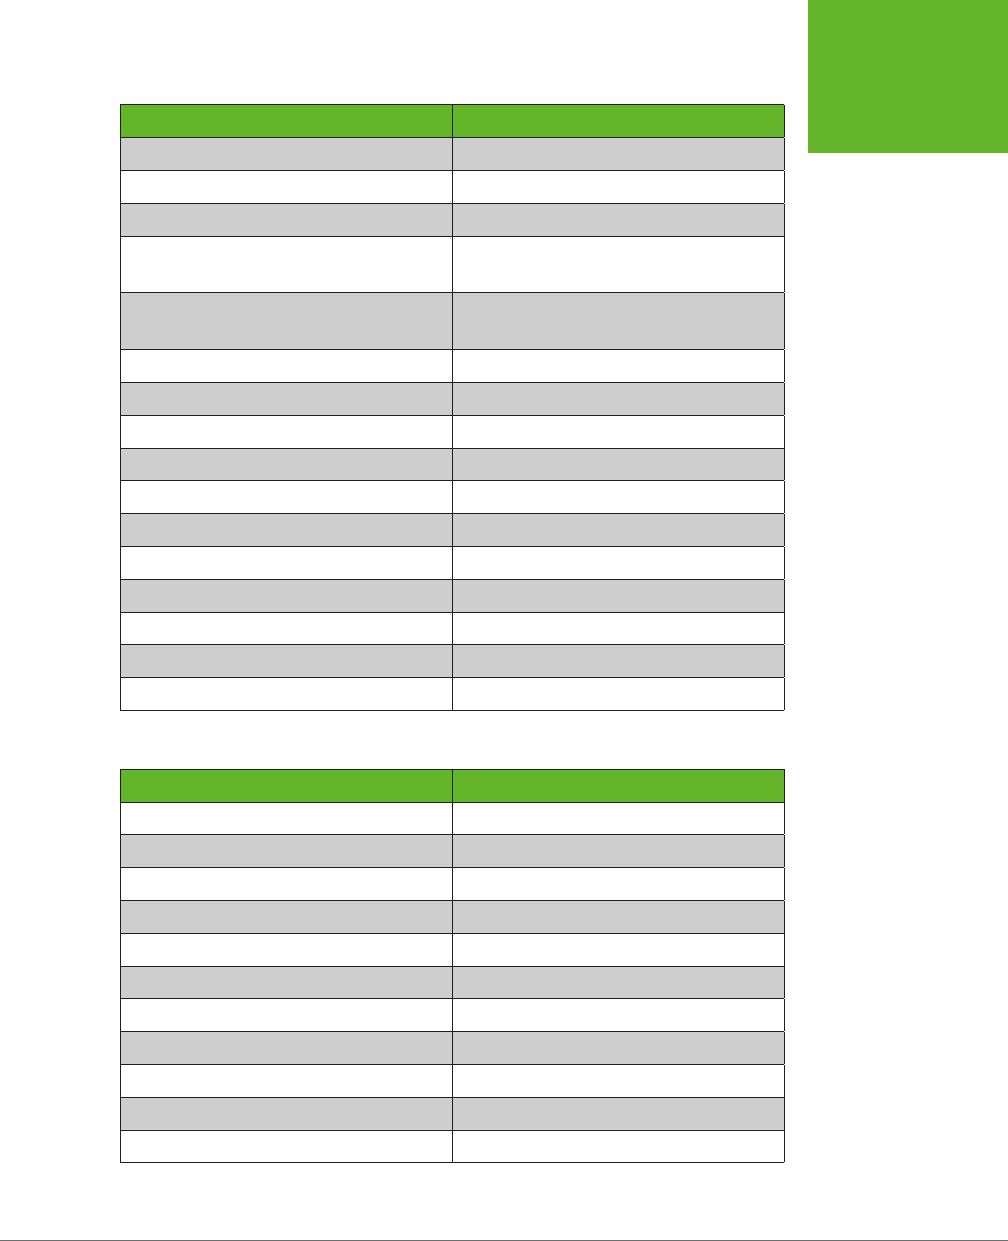
APPENDIX C: USEFUL WEBSITES 575
CHAPTER
LINKS
DESCRIPTION URL
LaTeX tutorial
http://tinyurl.com/latexmath
LaTeX equation generator
http://tinyurl.com/latexequation
WordPress documentation for LaTeX
http://support.wordpress.com/latex
WPtouch (plug-in)
http://tinyurl.com/wptouch
http://tinyurl.com/wptouchpro
(Pro version)
VaultPress
http://vaultpress.com
http://vaultpress.com/jetpack
(sign-up page)
BackupBuddy (plug-in)
http://ithemes.com/purchase/backupbuddy
Dropbox
www.dropbox.com
Google Drive
http://drive.google.com
Amazon S3
http://aws.amazon.com/s3
WP-DB-Backup (plug-in)
http://tinyurl.com/wp-db-backup
WP-DBManager (plug-in)
http://tinyurl.com/wp-dbmanager
BackWPup (plug-in)
http://tinyurl.com/backwpup
Online Backup for WordPress (plug-in)
http://tinyurl.com/wponlineb
Gmail
http://mail.google.com
WP Super Cache (plug-in)
http://tinyurl.com/wpsupercache
BuddyPress (plug-in)
http://buddypress.org
CHAPTER 10
Adding Picture Galleries, Video, and Music
DESCRIPTION URL
Flickr
www.flickr.com
WordPress embeds
http://codex.wordpress.org/Embeds
WordPress.com shortcodes
http://support.wordpress.com/shortcodes
TED Talks videos
www.ted.com
Regenerate Thumbnails (plug-in)
http://tinyurl.com/rthumb
Photonic (plug-in)
http://tinyurl.com/wp-photonic
YouTube
www.youtube.com
How to remove YouTube's length limit
http://tinyurl.com/long-vids
Miro Video Converter
www.mirovideoconverter.com
The MediaElement.js library
http://mediaelementjs.com
Vimeo
http://vimeo.com
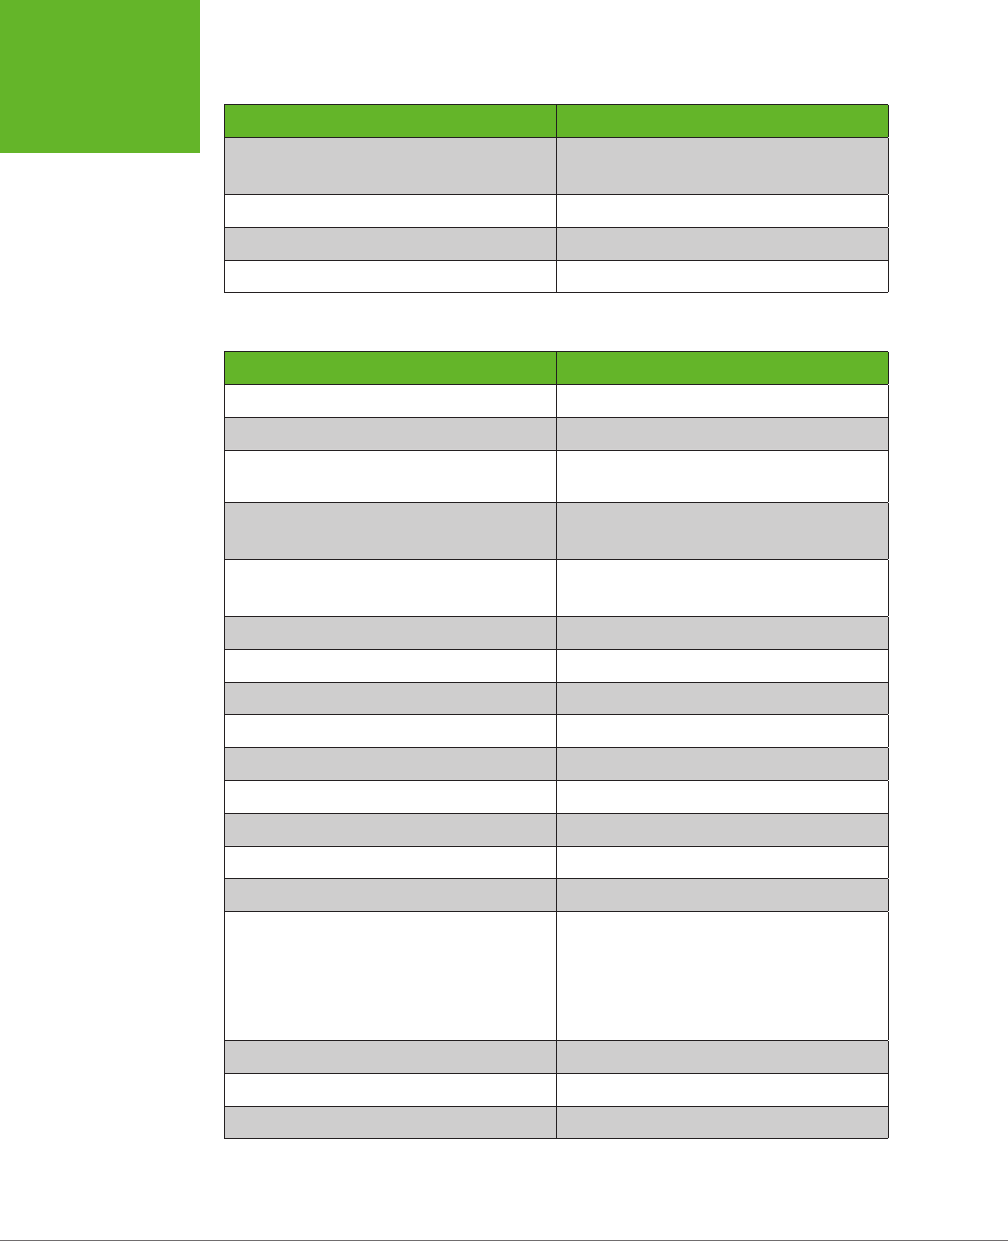
WORDPRESS: THE MISSING MANUAL
576
CHAPTER
LINKS
DESCRIPTION URL
VideoPress
http://videopress.com
http://tinyurl.com/vidpress
(plug-in)
SoundCloud
http://soundcloud.com
How to submit podcasts to iTunes
http://tinyurl.com/podcastspecs
Blubrry PowerPress (plug-in)
http://tinyurl.com/wp-podcast
CHAPTER 11
Collaborating with Multiple Authors
DESCRIPTION URL
BuddyPress (plug-in)
http://buddypress.org
Email Users (plug-in)
http://tinyurl.com/emailusers
Blogs you own or write for on WordPress.
com
http://wordpress.com/my-blogs
Edit Flow (plug-in)
http://tinyurl.com/editflow
http://editflow.org
(documentation)
Co-Authors Plus (plug-in)
http://tinyurl.com/co-authors-plus
http://tinyurl.com/ccr7896
(theme changes)
WP-Optimize (plug-in)
http://tinyurl.com/wp-opti
Revision Control (plug-in)
http://tinyurl.com/rev-control
Authors Widget (plug-in)
http://tinyurl.com/authorswidget
Author Avatars List (plug-in)
http://tinyurl.com/authoravatars
WP About Author (plug-in)
http://tinyurl.com/wp-about-author
Fancier Author Box (plug-in)
http://tinyurl.com/authorbox
Author Spotlight (plug-in)
http://tinyurl.com/authorspot
Page Security (plug-in)
http://tinyurl.com/page-security-c
Page Restrict (plug-in)
http://tinyurl.com/page-restrict
Examples of multisite networks
http://blogs.reuters.com
http://blogs.law.harvard.edu
http://blogs.adobe.com
http://stores.bestbuy.com
http://wordpress.com
How to convert a site to a multisite network
http://tinyurl.com/2835suo
Add Multiple Users (plug-in)
http://tinyurl.com/add-multiple
Multisite User Management (plug-in)
http://tinyurl.com/multisite-um

APPENDIX C: USEFUL WEBSITES 577
CHAPTER
LINKS
CHAPTER 12
Attracting a Crowd
DESCRIPTION URL
Facebook
www.facebook.com
Twitter
http://twitter.com
Create a Facebook Page
www.facebook.com/pages/create.php
Polldaddy (plug-in)
http://tinyurl.com/wp-polls
Thank Me Later (plug-in)
http://tinyurl.com/wp-thank
Subscribe2 (plug-in)
http://tinyurl.com/wp-sub2
How to use the [tweet] shortcode
http://tinyurl.com/cwfa77u
How to use the [twitter-follow] shortcode
http://tinyurl.com/cn29khu
Chrome extension for feeds
http://tinyurl.com/28q8dth
FeedDemon
www.feeddemon.com
NetNewsWire
http://netnewswireapp.com
Flipboard
http://flipboard.com
feedly
www.feedly.com
WordPress feed reference
http://tinyurl.com/64lmdo
PageRank for Chrome
http://tinyurl.com/pr-extension
Check PageRank online
www.prchecker.info
Google Blogsearch
http://blogsearch.google.com
WordPress SEO by Yoast
http://tinyurl.com/seo-yoast
(plug-in)
http://tinyurl.com/seo-yoast2
(tutorial)
SEO articles by Yoast
http://yoast.com/cat/seo
CHAPTER 13
Editing Themes: The Key to Customizing Your Site
DESCRIPTION URL
Gallery of non-blog WordPress sites
http://tinyurl.com/9dvpn3y
HTML tutorial
http://tinyurl.com/4mwq8
CSS tutorial
http://tinyurl.com/mlqk7
One-Click Child Theme (plug-in)
http://tinyurl.com/child-theme
HTML color codes
www.colorpicker.com
CSS property reference
http://tinyurl.com/bz5tcp
How to examine elements and CSS with a
browser
http://tinyurl.com/css-inspection
Google Web Fonts
www.google.com/fonts
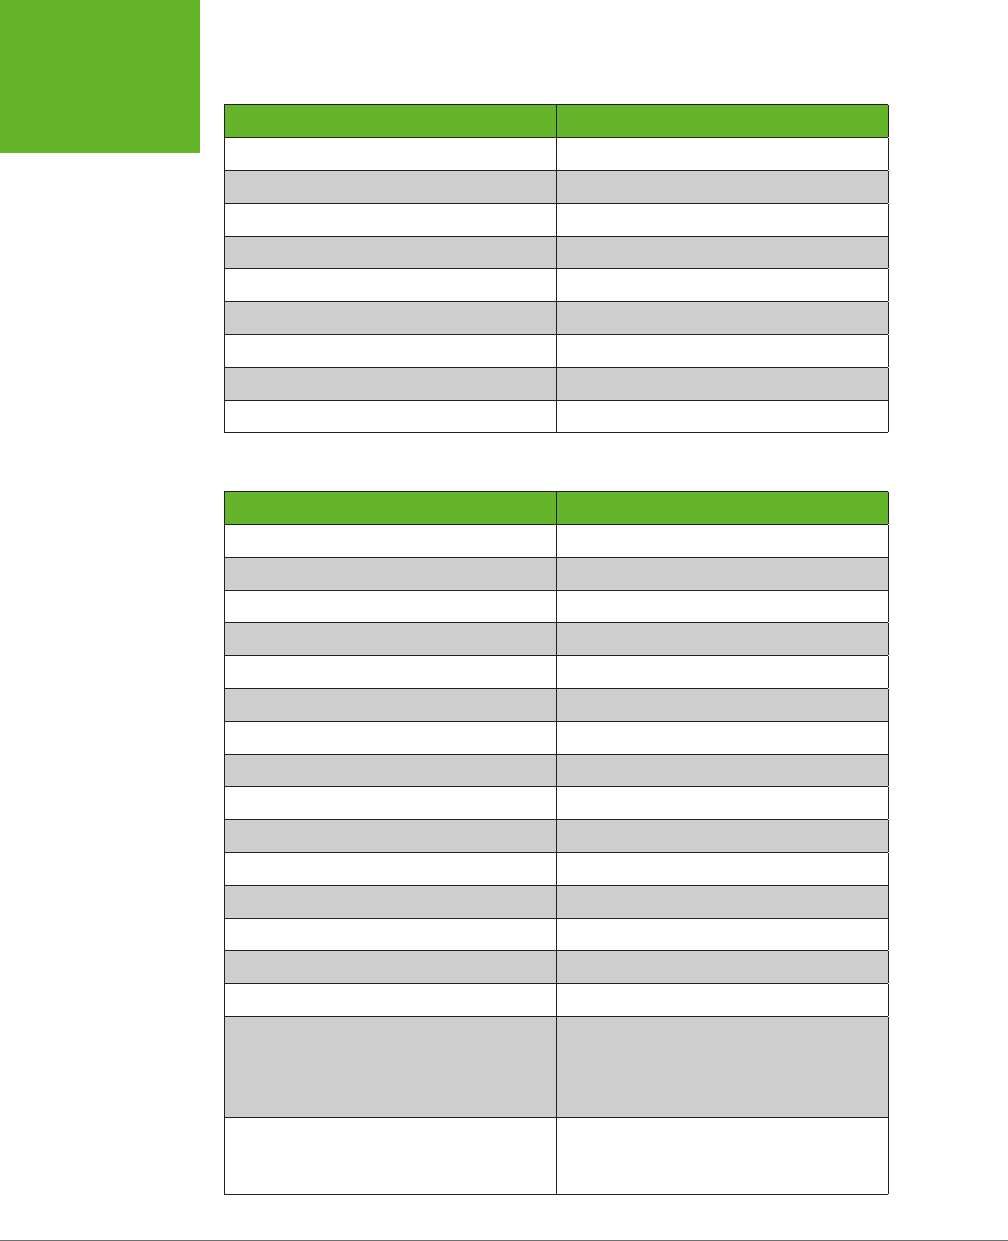
WORDPRESS: THE MISSING MANUAL
578
CHAPTER
LINKS
DESCRIPTION URL
WordPress function reference
http://tinyurl.com/func-ref
Basic PHP tutorial
http://tinyurl.com/ctzya55
Orbisius Child Theme Creator (plug-in)
http://tinyurl.com/orb-theme
Notepad++
http://notepad-plus-plus.org
Template customization recipes
http://tinyurl.com/templatetrix
Blog with WordPress tips
http://lorelle.wordpress.com
Smashing Magazine
http://wp.smashingmagazine.com
Thematic
http://tinyurl.com/themat
Genesis
http://tinyurl.com/gen-theme
CHAPTER 14
Building an Advanced WordPress Site
DESCRIPTION URL
Understanding theme frameworks
http://tinyurl.com/theme-f
PinBlack theme
http://tinyurl.com/pinblack
WordPress theme directory
http://wordpress.org/themes
How to create a test site
http://tinyurl.com/89wochm
Registering custom post types
http://tinyurl.com/reg-cpt
Custom Post Type UI (plug-in)
http://tinyurl.com/cust-pt-ui
Types (plug-in)
http://wordpress.org/plugins/types
WordPress reference for query_posts()
http://tinyurl.com/yhjtze5
WordPress reference for get_posts()
http://tinyurl.com/23km6q5
WordPress function reference
http://tinyurl.com/func-ref
WordPress database reference
http://tinyurl.com/3a88qt
Article about custom taxonomies
http://tinyurl.com/8slqbkn
PayPal Donations (plug-in)
http://tinyurl.com/paypal-d
Google AdSense
www.google.com/adsense
s2Member (plug-in)
http://tinyurl.com/s2member
PayPal
www.paypal.com
www.paypal.com/fees
(fee information)
www.paypal.com/upgrade
(upgrade your
account)
WordPress Simple PayPal Shopping Cart
(plug-in)
http://tinyurl.com/paypal-c
http://tinyurl.com/spp-forum
(support
forum)
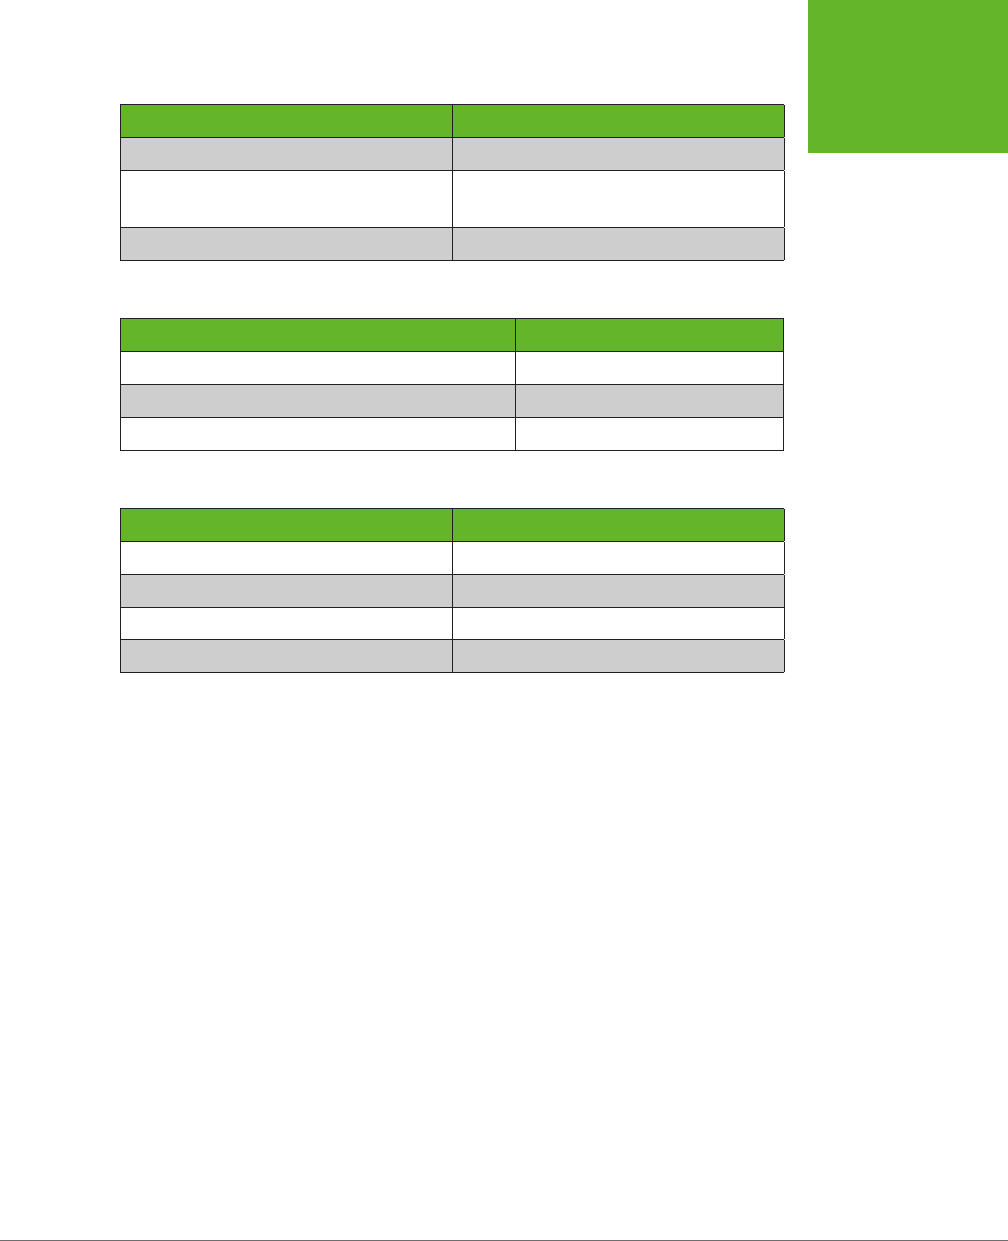
APPENDIX C: USEFUL WEBSITES 579
CHAPTER
LINKS
DESCRIPTION URL
WP eCommerce (plug-in)
http://tinyurl.com/wp-ecom
WooCommerce
http://tinyurl.com/woo-com
(plug-in)
http://tinyurl.com/woo-doc
(documentation)
Free
WordPress & eCommerce
ebook
http://tinyurl.com/wpe-ebook
APPENDIX A
Migrating from WordPress.com
DESCRIPTION URL
How to buy a guided transfer
http://tinyurl.com/guidedtransfer
WordPress.com theme gallery
http://theme.wordpress.com
How to manage your custom WordPress.com domain
http://tinyurl.com/8ese4cp
APPENDIX B
Securing a Self-Hosted Site
DESCRIPTION URL
Limit Login Attempts (plug-in)
http://tinyurl.com/limit-login-a
Wordfence (plug-in)
http://tinyurl.com/w-fence
How attackers steal WordPress passwords
http://tinyurl.com/steal-pass
WordPress HTTPS SSL (plug-in)
http://tinyurl.com/wp-https

581
articles/stories sites in WordPress,
12–13
attachment pages, 183, 331
audio clips
basic audio player, 360–363
music-sharing services, 364–365
overview, 360
playlists, 362–364
podcasting, 366–368
authors
accounts, 370
adding information about, 389–393
Author Avatars List plug-in, 389
Author Spotlight plug-in, 391
Authors Widget, 389
comments, 257
general use of “author”, 381
removing, 393–394
autoinstallers for WordPress, 55
automated backup services, 312
automatic embeds, 324–327
automatic menus, 215
Automattic developers, 17
avatars (pictures), 263–264
B
backgrounds, changing theme,
150–152
backing up
with automated backup services, 312
BackupBuddy, 312
BackWPup plug-in, 314
Online Backup for WordPress plug-
in, 314–318
Index
A
<address> element (posts), 175
accounts
administrator, 54–55, 370
author, 370
Business, 29–31
contributor, 370, 379–381
editor, 370
PayPal, 544
user.
See
user (author) accounts
WordPress.com, 26–34
activating plug-ins, 293–295
Add Multiple Users plug-in, 405
addresses, web, 24–25
administrators
accounts, 54–55, 370
network, 400, 403, 407
site, 403, 407
advertising (ecommerce), 543
Akismet plug-in
basics, 275–276
installing, 277–281
using, 280
Appearance menu (dashboard),
152–153
archive pages
category, 520
including custom post types in,
516–517
archive.php template, 523
archive-title class, 530
$args variable, 532–533

INDEX
582
BANDWIDTH
Orbisius Child Theme Creator plug-in,
490
vs. theme copies, 509
updating, 495
class selectors (CSS), 471–472
CNAME records, 46–47
code listings (posts), 174–175
codes, permalink, 118
color picker, 151–152
comment-content class (CSS), 473
comments
advantages of, 240
alerting to comments in post
streams, 257–259
allowing/forbidding, 240–241
author, 257
changing settings for posts, 241–242
comment stream, 254
enabling with Jetpack plug-in,
271–272
evaluating, 251
Facebook/Twitter, 270–271
Gravatar service.
See
Gravatar
service
identifying top commenters, 448–
449
linkback, 260–262
moderating
from dashboard, 248–251
for specific posts, 251–252
through email, 246–248
overview, 239
paging, 257
process for leaving, 243–246
rating, 259–260
sanitizing, 253
settings, 230
site-wide default settings, 242
slow lane/fast lane routes, 242–243
threaded, 254–256
tracking, 425
using HTML in, 246
comment spam
Akismet plug-in.
See
Akismet plug-in
basics, 273
Captcha for fighting, 281–282
plug-ins for fighting, 276
removing pending, 282
strategies for fighting, 274–275
typical messages, 273
WordPress options for fighting, 275
overview, 311–312
with plug-ins, 313–315
scheduling regular backups, 317
with Softaculous, 60, 62–65
bandwidth, 349
Beginner accounts (WordPress.com),
29
Better WordPress Recent Comments
plug-in, 259
blogrolls, 228
blogs
basics, 7–11
Blog post template (Microsoft Word),
179
characteristics of, 456
searching, 39–41
tips for successful, 105
Blubrry PowerPress plug-in, 368
Brightpage theme, 192, 200
brochure sites, 207, 228–231
browsing
author’s posts, 388–390
categories/tags using web addresses,
123–124
posts, 98–100
Business accounts, 29–31
business sites, WordPress, 14–16
buttons, sharing.
See
sharing buttons
C
caching plug-ins, 316–320
Calendar widget, 164–165
CAPTCHA technology, 281–282
catalog sites, WordPress, 13–14
categories (posts)
basics, 106–110
browsing using web addresses,
123–124
Category Cloud widget, 166
custom category pages.
See
custom
category pages
including in permalinks, 119
managing, 112–113
certificate authorities, 569
character entities (HTML), 494
child/parent pages, 216–217
child themes
creating, 462–466
One-Click Child Theme plug-in,
463–465

INDEX 583
DASHBOARD
theme customizer, 153–155
theme headers, 145–150
customizing themes
child themes, 462–466
Custom Design upgrade, 457–458
Distinct Furnishings.
See
Distinct
Furnishings project
editing code in.
See
editing theme
code
editing styles in.
See
editing theme
styles
files necessary for, 459
for less blog-like websites, 454–456
online resources for, 503
overview, 453–454
preparation for, 456–458
storing themes, 459–460
style.css style sheet, 460–461, 466
theme editor, 461–463
custom menus
adding items with menu editor, 221
building, 218–227
creating unlinked headings, 225
Custom Menu widget, 228
multiple menus, 226–228
overview, 218
submenus, 223–225
custom post types
creating sample content, 515–517
Custom Post Type UI plug-in,
518–520
defining
in code, 511–515
with plug-ins, 518–520
for specific sites, 513
editing, 517
including in archives pages, 516–517
overview, 510–511
custom taxonomies, 542
D
dashboard
accessing from My Blogs page, 43
changing basic settings, 91–93
choosing starter themes, 93–95
customizing pages on, 124–126
Help button, 126–127
home page, 89–91, 101
managing list of posts, 127–128
menu, 88–90
community, WordPress.com, 38–41
compatibility of video formats, 350
conditional logic code, 497
contact forms (Jetpack), 301–305
the_content() function, 201
content-management system (CMS),
511
content-single-product.php template,
538, 541
contextual selectors (CSS), 473–474
contributors
accounts, 370, 379–381
creating pages for, 392–393
cPanel
file management, 54
interface, 70
Creating a Website: The Missing
Manual (O’Reilly), 457
cropping
pictures, 184–185
theme header images, 148
CSS (Cascading Style Sheets).
See
also
selectors (CSS); style sheets
CSS3: The Missing Manual (O’Reilly),
457
editing with Jetpack plug-in, 467
tutorial, 457
custom category pages
adding extra information to, 524–525
category descriptions, 521–522
changing page titles, 523–524
creating category-specific content,
527
finding right template file, 522–523
overview, 519–521
removing post footers, 526
reordering posts, 525–526
Custom Design upgrade, 33, 457–458
custom fields, 539–542
custom home pages
brochure sites, 228–231
overview, 228
page templates for, 235–238
welcome page, 231–233
customizing
Custom Structure permalink type, 119
domain names, 25, 27–28, 44–45
feeds, 435–436
pages on dashboard, 124–126
sharing buttons, 416–418

INDEX
584
DATA
Distraction Free Writing mode, 173
DNS (Domain Name System), 31, 45
do_action() function (WordPress),
493–494
domain names
basics, 24–25
buying, 43–45
custom, 27–28
mapping, 27, 44–46
donations (ecommerce), 543
do_shortcode() function, 549
Dreamweaver, Adobe, 178
DropBox, 313
Duotone theme, 345–346
dynamic websites, 5
E
echo command, 494, 541, 549
ecommerce (Distinct Furnishings)
adding shopping cart, 545–548
installing shopping cart plug-ins, 545
money-making methods, 543
placing shopping cart in single-
product.php template, 549–550
signing up with PayPal, 543–545
Edit Flow plug-in, 381
Edit Image link (pictures), 184
editing
custom post types, 517
index.php template, 528–529
MarsEdit post editor, 179
permalinks, 440
picture galleries, 337–339
pictures, 184–185
posts, 102–103, 179–180
themes.
See
customizing themes
editing theme code
extending WordPress with functions.
php, 500–502
loops, 495–500
overview, 485–486
PHP language, 485
template files
basics, 486–490
editing example, 489–495
updating child themes, 495
editing theme styles
changing Twenty Twelve theme,
474–479
examining style rules, 468–473
figuring out style elements, 479–481
moderating comments from, 248–251
new user access to, 379
opening multiple pages on, 124
overview, 37–38, 85–88
performing bulk actions on, 128–130
in WordPress.com sites, 87
data
exporting from WordPress.com,
555–557
importing into self-hosted sites,
556–559
databases
MySQL, 70–73
WordPress, 5
date() function (PHP), 494
date/time format settings, 92
decoding style rules (CSS), 469–470
default themes, 134
delayed publishing (posts), 100–101
deleting
authors/users, 393–394
images with media library, 149
links, 175
multiple posts, 129–130
pictures from media library, 187–188
pictures from posts, 186
plug-ins, 295
post footers, 526
posts, 103
subdomains, 54
widgets, 157
WordPress.com sites, 562
demoting users, 394
descriptions, category (posts),
521–522
digital certificates, 569
display names, 27, 388
Distinct Furnishings project
adding custom post types.
See
custom post types
creating custom category pages.
See
custom category pages
creating custom copy of theme,
507–509
creating test site, 510
home page.
See
home page (Distinct
Furnishings)
planning site, 505–506
product pages.
See
product pages
(Distinct Furnishings)
theme selection, 506–508

INDEX 585
GOOGLE
filtering
combining with bulk actions, 130
list of posts, 128
Firefox feed-reader, 435
Flickr, 325, 341–343
Flipboard app, 435
floating layouts (CSS), 530
float property (style rules), 530
Follow buttons (posts), 40
fonts
Google, 481–484
web-safe, 481
footer.php template, 529
footers (themes), 160–161
Ford Motor Co. site, 14–15
formats
Format drop-down list, 174
post, 202–206
formatting posts.
See
posts,
formatting
Foto theme, 345–346
frameworks, theme, 506
Freshly Pressed page (WordPress.
com), 39–40
Front Page template (Twenty Twelve
theme), 235–236
FTP programs, 64, 73, 313
functions
functions.php file, 330, 500–502, 511,
517
“get_the” functions (WordPress), 533
online catalog of (WordPress), 493
WordPress reference, 526
G
galleries, picture
changing thumbnail displays in,
338–339
creating, 330–337
editing, 337–339
photoblog/portfolio themes,
343–348
slideshows, 339–343
“get_the” functions (WordPress), 533
get_post_meta() function, 541
get_posts() function, 531
Google
AdSense, 543
Blogsearch, 440
creating Google-friendly sites,
439–440
reasons for, 468–469
using Google fonts, 481–484
editor accounts, 370
element rules (CSS), 471
email
directing, 46
emailing subscribers, 426–427
moderating comments through,
246–248
redirecting, 34
embedded fonts, 481
embeds
automatic, 324–327
[embed] shortcode, 326–327
overview, 323–324
sizing quirks with, 327
emoticons, 177
encoding videos, 350
entry-header class (CSS), 471, 473
ephemera widgets, 205–206
excerpts
the_excerpt() function, 201
summarizing posts with, 198–200
using on home page, 200–201
Exclude box (Pages widget), 213–214
exporting data from WordPress.com,
555–557
F
Facebook
comments, 270–271
overview, 412
Pages, 420–421
Fancier Author Box plug-in, 391–392
Fantastico, 65–68
fat footers (themes), 160
featured images
assigning to posts, 193–194
basics, 190–194
definition of, 152
using with themes, 195
featured themes, 141
Feature Filter (themes), 142, 169
FeedDemon program, 435
feedly app, 435
feeds
Firefox feed-reader, 435
fundamentals of, 433–437
Google Chrome feed-reader, 435
podcast, 368

INDEX
586
GRAVATAR
SERVICE
tutorial, 457
using in comments, 246
view (posts), 178–179
HTTPS plug-in, WordPress, 569
I
ID selectors (CSS), 471–472
IDs, post, 117–118
Image widget (Jetpack), 300–302
Imbalance 2 theme, 347–348
importing data into self-hosted sites,
556–559
index.php template, 201, 528–529
Insert Media window, 180–181
installing
Akismet plug-in, 277–281
plug-ins, 287–288, 292–293
shopping cart plug-ins, 545
themes on self-hosted sites, 141–144
themes/plug-ins on multisite
networks, 408–410
installing WordPress on web hosting
accounts
with autoinstallers, 55
with Fantastico, 65–67
by hand
creating MySQL database, 70–73
overview, 69–70
running install script, 76–79
uploading WordPress files, 72–75
multiple sites, 69
overview, 51–52
with Softaculous.
See
Softaculous
Internet Encyclopedia of Philosophy,
12
inviting WordPress.com site users,
375–378
iTunes, 368
J
Jetpack plug-in
adding styles with, 467
contact forms, 301–305
enabling comments with, 271–272
Image widget, 300–302
mathematical equations, 305–307
for migrated sites, 561
overview, 297–298
signing up with WordPress.com,
298–299
Drive, 313
Google Chrome feed-reader, 435
Web Fonts, 481–484
Gravatar service
hovercards, 267–269
overview, 263–264
reasons for using, 264
replacing Mystery Man default, 267
signing up, 264–266
verified services, 269
Greyzed theme, 136
H
have_posts() function (PHP), 497
headers, theme
customizing, 145–150
defining styles of, 460
header.php template, 529
height attribute (embedded content),
326–327
Hello Dolly plug-in, 294
Help button (dashboard), 126–127
hiding
and locking posts (private sites),
395–396
passwords with SSL, 568–570
from search engines, 441
sharing buttons, 417
home page
changing look of, 101
customizing.
See
custom home pages
overview, 89–91
setting number of posts on, 99
using excerpts on, 200–201
home page (Distinct Furnishings)
adding text, 529–530
creating links, 530–535
editing index.php template, 528–529
highlighting special categories on,
535
home.php file, 528
multiple-column eect, 530
overview, 527–528
hooks (plug-ins), 287
hovercards (Gravatar service),
267–269
HTML
editor (posts), 180
HTML5: The Missing Manual
(O’Reilly), 481

INDEX 587
MUSIC-
SHARING
SERVICES
meta descriptions, 442–443
Meta section (home page), 86–87
microblogs, 202–203
Microsoft Word, 179
migrating from WordPress.com
adjusting permalink styles, 561
exporting data from WordPress.com,
555–557
guided transfers, 555
importing data into self-hosted sites,
556–559
Jetpack plug-in for missing features,
561
preparation for, 554
reasons for, 553
redirecting website addresses,
561–562
themes, 560–561
minor updates (WordPress), 79
Miro Video Converter, 356
mobile apps, 130
mobile-aware themes, 307
mobile support plug-ins, 307–312
mobile themes, 168–170
moderating comments
from dashboard, 248–251
via email, 246–248
for specific posts, 251–252
in WordPress, 245
More quicktag, 196–198
multilayered menus, 225
multiple-column eect (Distinct
Furnishings home page), 530
multiple menus (themes), 226–228
multiple style rules (CSS), 470
multisite networks
adding sites to, 403–406
adding themes/plug-ins to, 408–410
converting existing sites to, 402–403
creating from scratch, 401–402
examples of, 400
home site limitations, 402–403
Multisite User Management plug-in,
407
overview, 399–401
storage limits on, 410
updating, 408
user-created sites in, 405
user participation in, 405–407
music-sharing services, 364–365
K
keyboard shortcuts
line breaks, 96
opening multiple browser pages, 124
themes listing, 142
keywords for SEO, 448
L
LaTex standard, 306
Like boxes, 419–422
Like buttons, 40
Likes, WordPress.com, 422–424
Limit Login Attempts
plug-in, 567
setting, 59
line breaks vs. paragraphs, 96
linkback comments, 260–262
links
adding to posts, 175–176
creating on home page (Distinct
Furnishings), 530–535
to WordPress sites, 440
locking/hiding posts (private sites),
395–396
loops (theme code), 495–500, 525
M
major updates (WordPress), 80–82
managed hosting, 22
Manage Locations tab (menus), 227
mapping domain names, 27, 44–46
MarsEdit post editor, 179
mathematical equations (Jetpack),
305–307
MediaElement.js, 357
media library
accessing from dashboard, 149
adding pictures to, 188–189
deleting pictures from, 187–188
showing videos from, 356–357
tab, 180, 182
viewing, 186–187
media queries (style sheets), 470
menus
custom.
See
custom menus
dashboard, 88–90
multilayered, 225
multiple, 226–228
showing pages in, 214–216
metadata (audio files), 363

INDEX
588
MY BLOGS
PAGE
(WORDPRESS.
COM)
pending posts, 380–381
permalinks
adjusting styles for migrated sites,
561
changing post’s, 119–120
codes, 118
of custom post types, 515
editing, 440
including categories in, 119
refreshing settings, 514
on self-hosted sites, 117–119
in WordPress.com, 116–117
Perth Zoo website, 15
photoblog/portfolio themes, 343–348
photo blogs, 9
photo carousels, 332–333, 336
Photonic plug-in, 343
photo-sharing sites, 326
PHP code, 492–493
PHP language, 485
phpMyAdmin tool (spam), 282
pictures
adding to media library, 188–189
adding to posts, 180–186
cropping, 184
deleting from media library, 187–188
exporting from WordPress.com, 556
featured images.
See
featured
images
showing groups of.
See
galleries,
picture
in theme headers, 145–151
themes with missing, 152
PinBlack theme, 345, 506–507
pixels and rems, 474
playlists
audio, 362–364
video, 364
plug-ins
activating, 293–295
adding to multisite networks,
408–410
Add Multiple Users, 405
Author Avatars List, 389
Author Spotlight, 391
backing up with, 313–315
basics, 286–287
Blubrry PowerPress, 368
boosting SEO with, 441–444
caching, 316–320
My Blogs page (WordPress.com),
36–37
MySQL database, 70–73
N
name server addresses, 45
Navigation Label setting (menus), 222
NetNewsWire program, 435
network administrators, 400, 403,
407
Nextpage quicktag, 197–198
No Ads upgrade (WordPress), 33
O
One-Click Child Theme plug-in,
463–465
Online Backup for WordPress plug-in,
314–317
Orbisius Child Theme Creator plug-in,
490
ordering pages, 216–217
Oxygen theme, 200–201
P
<p> element (posts), 175
PageRank scoring, 438–440
pages
creating, 208–211
finding, 211–212
ordering, 216–217
overview, 207–208
Page Restrict plug-in, 397
Page Security plug-in, 396
Pages widget, 213–215
page templates, 233–237
showing in menus, 214–216
paging comments, 257
parent categories (posts), 110
parent/child pages, 216–217
parent themes, 462
passwords
administrator accounts, 54
hiding with SSL, 568–570
new user accounts, 372
preventing guessing attacks,
566–568
private sites, 395–396
WordPress websites, 27
PayPal
PayPal Donations plug-in, 543
signing up with, 543–545

INDEX 589
POSTS
posts
adding information with custom
fields, 539–542
adding pictures to, 180–186
alerting to comments in post
streams, 257–259
approving for contributors, 379–381
assigning featured images to, 193–194
attaching files to, 186
browsing, 98–100
browsing author’s, 388–390
categories, 106–110, 112–113
changing comment settings for,
241–242
changing from full-post displays to
summaries, 201
classifying with custom taxonomies,
542
co-authoring, 384
creating new, 94–98
custom post types.
See
custom post
types
dashboard access for writing,
378–379
delayed publishing of, 100–101
deleting, 103
deleting multiple, 129–130
dividing into multiple pages, 197–198
editing, 102–103
extracting information from, 533
hiding/locking (private sites),
395–396
managing list of, 127–128
media library
adding pictures to, 188–189
deleting pictures from, 187–188
viewing, 186–187
from mobile devices, 130
moderating comments for specific,
251–252
pending, 380–381
performing bulk actions on, 129–130
post IDs, 117–118
post-locking system, 382–384
publicizing on social media, 427–429
querying, 531
reordering, 525–526
revision-tracking, 383–388
searching, 39–41, 128
sorting, 128
Co-Authors Plus, 384
Custom Post Type UI, 518–520
defining custom post types with,
518–520
disadvantages of too many, 296
eCommerce, 550
Edit Flow, 381
Fancier Author Box, 391–392
installing, 292–293
Jetpack.
See
Jetpack plug-in
Limit Login Attempts, 567
for mobile support, 307–312
Multisite User Management, 407
One-Click Child Theme, 463–465
Online Backup for WordPress,
314–317
Orbisius Child Theme Creator, 490
overview, 285–286
Page Restrict, 397
Page Security, 396
PayPal Donations, 543
Photonic, 343
premium, 292
Revision Control, 387
s2Member, 543
searching for, 287–291
shopping cart, 545
Subscribe2, 427
Thank Me Later, 425
Types, 518
updating, 296–297
WooCommerce, 545
Wordfence, 567
WordPress HTTPS, 569
WordPress plug-in directory, 292
WordPress SEO, 441–444
WordPress Simple PayPal Shopping
Cart, 545
WP About Author, 390
WP eCommerce, 545
WP-Optimize, 387
podcasters, 360
podcasting, 366–368
Polldaddy
plug-in, 260
ratings, 423
portfolio/photoblog themes, 343–348
positioning widgets, 156–160

INDEX
590
POSTS,
FORMATTING
Q
query_posts() function, 526, 531
Quick Draft box (home page), 90
R
random header pictures (themes), 149
rating comments, 259–260
ratings
Polldaddy, 423
WordPress.com, 422–424
Reader page (WordPress.com), 35–36
Recent Comments widget, 258–259
Recent Posts widget, 161
redirecting
email, 34
website addresses, 561–562
referrer websites, 447
registration
registering domain names, 31–33
self-registration on self-hosted sites,
397–399
rems and pixels, 474
reordering posts, 525–526
Responsive Layout checkbox, 169
Retro MacOS theme, 136–137
Revision Control plug-in, 387
revision tracking (posts), 383–388
RSS Links widget, 436
RSS widget, 437
rtl.css style sheet, 465
rules, style (CSS), 468–473
S
s2Member plug-in, 543
Sample Page, WordPress, 211
sanitizing comments, 253
Save Draft option (posts), 97
Schedule button (delayed publishing),
102
Screen Options button, 124–125, 221
screenshot.png image file, 465
script, install (WordPress), 76–79
Scroll infinitely setting, 99–100
search engine optimization (SEO)
boosting with plug-ins, 441–444
creating Google-friendly sites,
439–440
getting more links, 440
hiding from search engines, 441
overview, 437
sticky, 104
subcategories, 110–113
summarizing with excerpts, 198–200
tags, 114–115
teasers, 195–198
titles/descriptions of, 442–445
variations in appearance of, 97
workflow for reviewing, 381
posts, formatting
editing posts, 179–180
HTML view, 178–179
increasing work space, 173
inserting special characters, 176–177
links, 175–176
overview, 171–173
post formats, 202–206
showing code listings, 174–175
subheadings, 173–174
text, 177
PowerPress plug-in, 368
<pre> element (posts), 175
Premium account (WordPress.com),
29–31, 359
premium hosting plans, 51
premium plug-ins, 292
premium video hosting, 357–359
Print button, 415
printf() function, 523
print_wp_cart_button_for_product()
function, 550
print_wp_shopping_cart() function,
549
private sites
creating, 397
hiding/locking posts, 395–396
overview, 394
private posts, 395–396
self-registration on self-hosted sites,
397–399
product pages (Distinct Furnishings)
adding information with custom
fields, 539–542
creating single-product.php and
content-single-product.php
templates, 536–538
custom taxonomies, 542
overview, 534–535
promotion, web.
See
web promotion
publicizing posts on social media,
427–429

INDEX 591
STATIC PAGES
overview, 323–324
shopping cart, 546–547
sidebars and, 330
[tweet], 432
short-inks (URLs), 121–122
Showcase template, 236–238
sidebars
pages with/without (templates),
234–235
shortcodes and, 330
single.php template, 486–487
single-product.php template (Distinct
Furnishings)
creating, 537–538
placing shopping cart in, 549–550
site administrators, 403, 407
Site Redirect upgrade, 562
site titles setting, 92
sizing YouTube video windows,
353–355
slideshows, 339–343
smilies, 177
social networking strategies
comment tracking, 425
Facebook/Twitter overview, 412
feeds, 433–437
Like boxes, 419–422
overview, 412
publicizing posts on social media,
427–429
sharing buttons.
See
sharing buttons
sharing tweets on sites, 430–433
sticky sites, 423–424
subscribers
emailing, 426–427
signing up, 425–426
WordPress.com ratings, 422–424
Softaculous
creating multisite networks with,
401–402
installing WordPress with, 55–61
managing backups with, 64–66
managing installed sites with, 61–63
sorting posts, 128
SoundCloud, 365
spambots, 398
spam, comment.
See
comment spam
special characters (posts), 176–177
SSL (Secure Sockets Layer), 568–570
static pages, 101, 209
PageRank scoring, 438–440
Search Engine Terms box, 448
searching
blogs, 100
for plug-ins, 287
posts, 128
themes, 140–142, 169, 194
WordPress.com content, 39–41
security.
See also
passwords
Limit Login Attempts setting, 59
securing self-hosted sites, 563–570
selectors (CSS)
class and ID, 471–472
combining, 473–474
contextual, 473–474
self-hosted sites
administrator account, 54–55
choosing web hosts, 49–51
creating user accounts for, 371–375
importing data into, 556–559
installing themes on, 141–144
installing WordPress on.
See
installing WordPress on web
hosting accounts
network of sites.
See
multisite
networks
overview, 49
permalinks on, 117–119
securing, 563–570
self-registration on, 397–399
on separate subdomains, 52–54
updating WordPress on, 79–82
WordPress.com vs. self-hosting,
20–22
semi-dedicated hosting, 51
settings, changing with dashboard,
91–93
sharing buttons
adding, 414–416
basics, 412–414
customizing, 416–418
selectively hiding, 417
shopping carts
adding to Distinct Furnishings site,
545–548
plug-ins, 545
shortcodes
[audio], 360
basics, 328–330
[embed], 326–327

INDEX
592
STATISTICS
(WORDPRESS
SITES)
taxonomies, 166, 513, 542
teasers (posts), 195–198, 200
Technorati blog search engine, 9
templates
basics, 486–490
category page, 520
editing example, 489–495
finding category, 522–523
functions.php, 500–502
page, 233–237
template tags (plug-ins), 287
theme, 132
text
adding to index.php template,
529–530
formatting (posts), 177
Text widget, 166–167
textures (pictures), 150
Thank Me Later plug-in, 425
the_content() function, 201
the_excerpt() function, 201
themes
activating in WordPress.com, 139–141
adding to multisite networks,
408–410
backing up, 313
basics, 132–134
changing appearances of, 135
changing backgrounds of, 150–152
choosing, 136–137
choosing starter, 93–95
customizing.
See
customizing themes
customizing headers, 145–150
installing on self-hosted sites, 141–144
migrating from WordPress.com,
560–561
missing pictures in, 152
mobile, 168–170
mobile-aware, 307
options (Appearance menu), 152–153
overview, 6–7, 131
photoblog/portfolio, 343–348
searching, 194
theme customizer, 153–155
theme frameworks, 506
theme gallery, 138
updating, 144
using featured images with, 195
widgets and.
See
widgets
statistics (WordPress sites), 444–449
Stats link, 38–39
sticky posts, 104
sticky sites, 423–424
Stock.xchng, 148
store, WordPress.com, 42–47
stories/articles sites in WordPress,
12–13
storing
limits on multisite networks, 410
themes, 459–460
streams, comment, 254
style.css file
adding new rules to, 525
in child themes, 466–467
overview, 132
theme identification with, 460–461
style rules
examining, 468–473
pixels and rems, 474
style sheets
definition of, 459
editing with Jetpack plug-in, 467
finding in WordPress.com, 469
subcategories (posts), 110–113
subdirectories (domains), 45
subdomains
creating for self-hosting, 52–54
mapping, 46–48
in WordPress.com, 45–46
subheadings (posts), 173–174
submenus, 223–225
subscribers
emailing, 426–427
overview, 370–371
signing up, 425–426
Subscribe2 plug-in, 427
subscription services (ecommerce),
543
T
Tag Cloud widget, 165–166
taglines setting, 92
tags
browsing using web addresses,
123–124
finding posts with, 39–40
guidelines for using, 114–115
SEO and, 441
template (plug-ins), 287

INDEX 593
WEB
ADDRESSES
upgrades, WordPress, 33
Upload button (themes), 144
Upload Files tab (pictures), 180–181
URL-shortening services, 122
user (author) accounts
adding author information, 389–393
browsing author’s posts, 388–390
changing user profiles, 374–375
co-authoring posts, 384
creating for self-hosted sites, 371–375
dashboard access for writing posts,
378–379
invitations to WordPress.com sites,
375–378
overview, 369–370
post approval for contributors,
379–381
post-locking system, 382–384
private sites.
See
private sites
removing authors/users, 393–394
revision-tracking, 383–388
types of, 370
user participation in multisite
networks, 405–407
V
VaultPress, 312
video embedding
basics, 349–350
configuring YouTube video windows,
353–355
from various video services, 354–355
hosting YouTube videos, 350–352
from media library, 356–358
playlists, 364
premium video hosting, 357–359
uploading videos to YouTube, 352
using other people’s videos, 350
VideoPress hosting, 358–360
Vimeo, 358
virtual private hosting, 51
visual editor (posts), 180
W
Wayback Machine, 104
web addresses
basics, 115
browsing categories/tags using,
123–124
changing post’s permalink, 119–120
WPtouch mobile, 308–312
year themes, 132–134
threaded comments, 254–256
thumbnails (gallery displays), 338–
339
time zone setting, 92
TinyMCE post editor, 179
Title Attribute setting (menus), 222
titles/descriptions of posts/pages,
442–445
toggling formatting (posts), 173
toolbar
Toolbar Toggle button (posts), 172
WordPress, 41
top-level domains, 27
Top Posts & Pages box (Stats page),
446
[tweet] shortcode, 432
Twenty Fourteen theme
creating contributor pages in,
392–393
default on new self-hosted sites, 134
featured images in, 192–193
vs. photoblogs, 348
Twenty Ten theme, 169
Twenty Thirteen theme
commenting format in, 255
widgets in, 158
Twenty Twelve theme
changing site themes to, 93–94
editing, 474–479
starting with, 31
widgets in, 156
Twitter
comments, 270–271
overview, 412
sharing tweets on sites, 430–433
Timeline widget, 430–433
[tweet] shortcode, 432
Types plug-in, 518
U
Uncategorized as default category
(posts), 109
updating
child themes, 495
multisite networks, 408
plug-ins, 296–297
themes, 144
WordPress, 79–82

INDEX
594
WEB HOSTING
Page Restrict plug-in, 397
Page Security plug-in, 396
PayPal Donations plug-in, 543
pending spam comments removal
plug-ins, 282
PinBlack theme, 506
Polldaddy plug-in, 260
Revision Control plug-in, 387
s2Member plug-in, 543
shopping cart plug-ins, 545
spam-fighting plug-ins, 276
stock photography, 148
Subscribe2 plug-in, 427
Thank Me Later plug-in, 425
Types plug-in, 518
Windows Live Writer, 179
Wordfence plug-in, 567
WordPress, 18
WordPress HTTPS plug-in, 569
WordPress plug-ins, 179
WordPress SEO plug-in, 441
WordPress themes directory, 508
WP About Author plug-in, 390
WP-Optimize plug-in, 387
WPtouch plug-in, 169, 307
websites for further information
$args variable options, 532
auto-embed sites, 326
blog tips, 11
copyright complaints, 20
CSS tutorial, 457
custom post types, 513
database records, 539
desktop post editors, 179
email directing, 46
Facebook, 412
Facebook Pages, creating, 421
Flickr, 325
Ford Motor Co., 14
Google AdSense, 543
Google Blogsearch, 440
Gravatar site, 268
HTML tutorial, 457
Internet Encyclopedia of Philosophy,
12
LaTeX standard, 306
list of auto-embeds, 355
Magic Tea House site, 151
multisite networks, 402
Perth Zoo website, 15
choosing, 24–25
getting shorter versions of, 121–123
permalinks in self-hosted sites, 117–119
permalinks in WordPress.com, 116–117
web hosting
basics, xi, 17–18
choosing web hosts, 18–20, 49–51
managed, 22
semi-dedicated, 51
WordPress.com vs. self-hosted sites,
20–22
web promotion
search engine optimization (SEO).
See
search engine optimization
(SEO)
social networking strategies.
See
social networking strategies
sticky sites, 423–424
using website statistics, 444–449
web-safe fonts, 481
websites
links referenced by chapter, 571–580
statistics for WordPress, 444–449
websites for downloading
Add Multiple Users plug-in, 405
Author Avatars List plug-in, 389
Author Spotlight plug-in, 391
Authors Widget, 389
BackupBuddy, 312
backup plug-ins, 314
Better WordPress Recent Comments
plug-in, 259
CAPTCHA plug-ins, 281
Co-Authors Plus plug-in, 384
Custom Post Type UI plug-in, 518
eCommerce plug-ins, 550
Edit Flow plug-in, 381
Excerpt Editor plug-in, 200
Fancier Author Box plug-in, 391–392
feed-reading programs/apps, 435
Jetpack plug-in, 298
Limit Login Attempts plug-in, 567
MarsEdit, 179
Miro Video Converter, 356
mobile apps, 130
Multisite User Management plug-in,
407
One-Click Child Theme plug-in,
463–465
Orbisius Child Theme Creator plug-in,
490

INDEX 595
WORDPRESS
changing settings of, 160–161
Custom Menu, 228
deleting, 157
embedding, 501
ephemera, 205–206
Image (Jetpack), 300–302
overview, 154–155
Pages, 213–215
positioning, 156–160
preinstalled and beyond, 164
Recent Comments, 258–259
RSS Links, 436
Tag Cloud, 165–166
Text, 166–167
Twitter Timeline, 430–433
WP PayPal Shopping Cart, 548
width attribute (embedded content),
326–327
Windows Live Writer, 179
WooCommerce plug-in, 545
WordAds, 18
Wordfence plug-in, 567
WordPress
autoinstallers for, 55
backing up.
See
backing up
basics, 4–5
creating blogs with, 7–11
creating business sites with, 14–16
creating catalogs with, 13–14
creating stories/articles with, 12–13
dashboard, 37–38
dynamic websites and, 5
extending with functions.php,
500–502
forums, 11
function reference, 201, 526
functions, 493
HTTPS plug-in, 569
installing on web hosting accounts.
See
installing WordPress on web
hosting accounts
plug-in directory, 307
SEO plug-in, 441–444
showcase, 16
Simple PayPal Shopping Cart plug-in,
545
site statistics, 444–449
themes, 6–7
themes directory, 508
toolbar, 41
pinpointing individual elements in
web pages, 480
plug-in directory, 288
plug-in documentation, 287
podcasts, registering with iTunes,
368
redirecting email, 34
self-hosted sites showcase, 40
SEO articles, 441
shortcodes, 355
smilies/emoticons, 177
SoundCloud, 366
style sheet reference, 470
Technorati blog search engine, 9
test site to live site changeover, 510
theme customization, 503
theme frameworks, 506
theme library, 195
[tweet] shortcode, 432
Twitter, 412
uploading long YouTube videos, 358
URL-shortening services, 122
VaultPress, 312
VideoPress, 359
Wayback Machine, 104
web hosts, 50
WordAds, 18
WordPress, 3
WordPress accounts sign-up, 26
WordPress.com-supported
shortcodes, 329
WordPress.com, upgrading, 19
WordPress forums, 11
WordPress function reference, 201,
526
WordPress functions, 493
WordPress gallery of examples, 456
WordPress hosting, 18
WordPress releases, 80
WordPress SEO plug-in tutorial, 443
WordPress showcase, 16
wp_link_pages() function, 198
Week Starts On setting, 92
welcome pages, 231–233
while/endwhile commands (PHP), 497
widgets
Authors, 389
basic WordPress, 162–164
Calendar, 164–165
Categories list, 112–113

INDEX
596
WORDPRESS.
COM
X
XML sitemaps, 442
Y
year themes
basics, 132–134
page templates in, 233
YouTube
configuring video windows, 353–355
hosting videos from, 350–352
uploading videos to, 352
types of sites built with, 7
updating, 79–82
upgrades, 33
Value Bundle, 29
Vault, 314
View Source tip, 13
WordPress.com
accounts, creating, 26–34
activating themes in, 139–141
adding additional sites, 36
browsing blogs, 40
central hub, 35
community, 38–41
Custom Design upgrade, 457–458
finding style sheets in, 469
home page, 34
inviting new users, 375–378
Jetpack signup with, 298–299
migrating from.
See
migrating from
WordPress.com
My Blogs page, 36–37
permalinks in, 116–117
Polldaddy rating system on, 423
Premium account, 359
ratings, 422–424
Reader page, 35–36
searching content, 39–41
vs. self-hosted sites, 20–22
store, 42–47
workflow for post reviews, 381
WP About Author plug-in, 390
wp-config.php file, 387, 569
wp-content/themes folder, 459
WP-DB-Backup plug-in, 313
WP eCommerce plug-in, 545
wp_link_pages() function, 198
WP-Optimize plug-in, 282, 387
WP PayPal Shopping Cart widget, 548
WP Super Cache plug-in, 318–321
WPtouch mobile theme, 308–312
WPtouch plug-in, 169

Don’t miss a thing!
Sign up for the free Missing
Manual email announcement
list at missingmanuals.com.
We’ll let you know when we
release new titles, make
free sample chapters available,
and update the features and
articles on the Missing Manual
website.
WordPress
T
H
E
M
I
S
S
I
N
G
C
D
There’s no
CD with this book;
you just saved $5.00.
Instead, every single Web address, practice file, and
piece of downloadable software mentioned in this
book is available at missingmanuals.com
(click the Missing CD icon).
There you’ll find a tidy list of links,
organized by chapter.
