Table Of Contents Cades User Guide
User Manual:
Open the PDF directly: View PDF ![]() .
.
Page Count: 207 [warning: Documents this large are best viewed by clicking the View PDF Link!]
- Introduction
- Table of Contents
- Support
- Access CADES Externally
- CADES Team
- CADES Acknowledgement
- Glossary
- Launch a VM Instance: Quick-Start
- SHPC Condos: Quick-Start
- Getting Started with OpenStack
- Launch a VM Instance
- Access VM Instances
- Manage Your VM Instances
- Overview - CADES Cloud Information
- Additional OpenStack Resources
- Overview
- Hardware
- Storage
- Software
- How to Use
- Launch a Docker Container
- Launch Shiny within Docker
- Eclipse in CADES HPC
- Allinea DDT in CADES HPC
- Moving Data
- Globus Data Transfer Tool
- Scality Object Storage User Guide
- Ways to Contribute
- CADES Authoring Guide
- CADES Cloud User Policy

1.1
1.2
1.3
1.4
1.5
1.6
1.7
2.1
2.2
3.1
3.1.1
3.1.2
3.1.3
3.1.4
3.2
3.2.1
3.2.2
3.2.3
3.2.4
3.3
3.3.1
3.3.2
3.3.3
3.3.4
3.4
3.4.1
3.4.2
3.4.3
3.4.4
TableofContents
CADESSupport
Introduction
TableofContents
Support
AccessCADESExternally
CADESTeam
CADESAcknowledgement
Glossary
Quick-StartGuides
LaunchaVMInstance:Quick-Start
SHPCCondos:Quick-Start
CADESCloudUserGuide
GettingStartedwithOpenStack
RequestYourCloudAllocation
ManageYourCloudAllocation
OpenStackProjectQuota
OpenStackHelp
LaunchaVMInstance
LogIn&NametheVM
ConfiguretheVM
Networks&Security
KeyPairUse
AccessVMInstances
AccessYourVMInstanceUsingSSH
AccessYourVMInstanceUsingPuTTY(Windows)
AccessYourVMInstanceUsingHorizon
AddMoreUserstoYourVMInstance
ManageYourVMInstances
DeleteaVMInstancefromYourProject
DeleteaVolumefromYourProject
ResizeaVMInstance
AddaVolumetoaVMInstance
1

3.4.5
3.4.6
3.4.6.1
3.4.6.2
3.4.6.3
3.5
3.5.1
3.5.2
3.5.3
3.6
3.6.1
3.6.2
3.6.3
3.6.4
3.6.4.1
3.6.4.2
4.1
4.2
4.3
4.4
4.4.1
4.4.2
4.4.3
4.4.4
4.4.5
4.4.6
4.5
4.5.1
4.5.2
4.5.3
4.5.4
5.1
5.1.1
5.2
5.3
CreateaSnapshot
OpenStackSecurityGroups
ModifytheDefaultSecurityGroup
CreateanewSecurityGroup
SecurityGroupCIDRExamples
Overview-CADESCloudInformation
AvailableVMImages&Configurations
Software&Hardware
Network&Storage
AdditionalOpenStackResources
RequestFirewallException
RunaSimpleWebServer
SSL-Let'sEncrypt
InstallCPUID
CPUIDHypervisorCodes
CPUIDInstanceCodes
SHPCCondosUserGuide
Overview
Hardware
Storage
Software
SchedulingJobs
BashEnvironmentCustomization
Modules
Compilers
CondoWorkflows
CrystalWorkflow
HowtoUse
Prerequisites
RequestAccesstoanAllocation
AccessyourAllocation
ExecuteaJob
UserContributedTutorials
Note:Communitycontributedcontent
notofficiallysupportedbyCADES.
LaunchaDockerContainer
LaunchShinywithinDocker
2

5.4
5.5
6.1
6.1.1
6.2
6.2.1
6.2.2
6.2.3
6.3
6.3.1
6.3.2
7.1
7.1.1
7.1.2
7.2
8.1
EclipseinCADESHPC
AllineaDDTinCADESHPC
DataTransfer&Storage
MovingData
GraphicalClientSFTP
GlobusDataTransferTool
GlobusEndpoints
GlobusTransfers&More
GlobusCommandLineInterface
ScalityObjectStorageUserGuide
ScalityAdvancedUsage
ScalityinaPythonVirtualEnvironment
ContributingtoDocumentation
WaystoContribute
ContributewithGit
GitintheCommandLine
CADESAuthoringGuide
CADESPolicies
CADESCloudUserPolicy
3
CADES→UserDocumentation
CADESUserDocumentation
OakRidgeNationalLaboratory's(ORNL)ComputeandDataEnvironmentforScience(CADES)providesanintegrated
computinginfrastructuretodeliverdatasciencesolutionsandworkflowstoORNLpersonnel.CADESprovidesdedicated
computingresourcesthroughourSHPC(ScalableHighPerformanceComputing)Condoallocationsandcustomizable
SoftwareasaService(SaaS)throughourBirthrightCloudsolution.
ThisdiversecomputinganddataecosystemisbolsteredbyaCADESsupportteamthatemploysexpertsmatrixedfromdifferent
ORNLresearchdirectivestoprovidefocused,expertsupportforauser'sscientificcomputingneeds.
FeaturesofthisGuide
Thenavigationpanelontheleftprovidesyouwithabirds-eyeviewofthecontentofthesepages.
GitBooksearchatthetopoftheleft-handsideallowsyoutolistonlycontentthatmatchesyourkeywords.
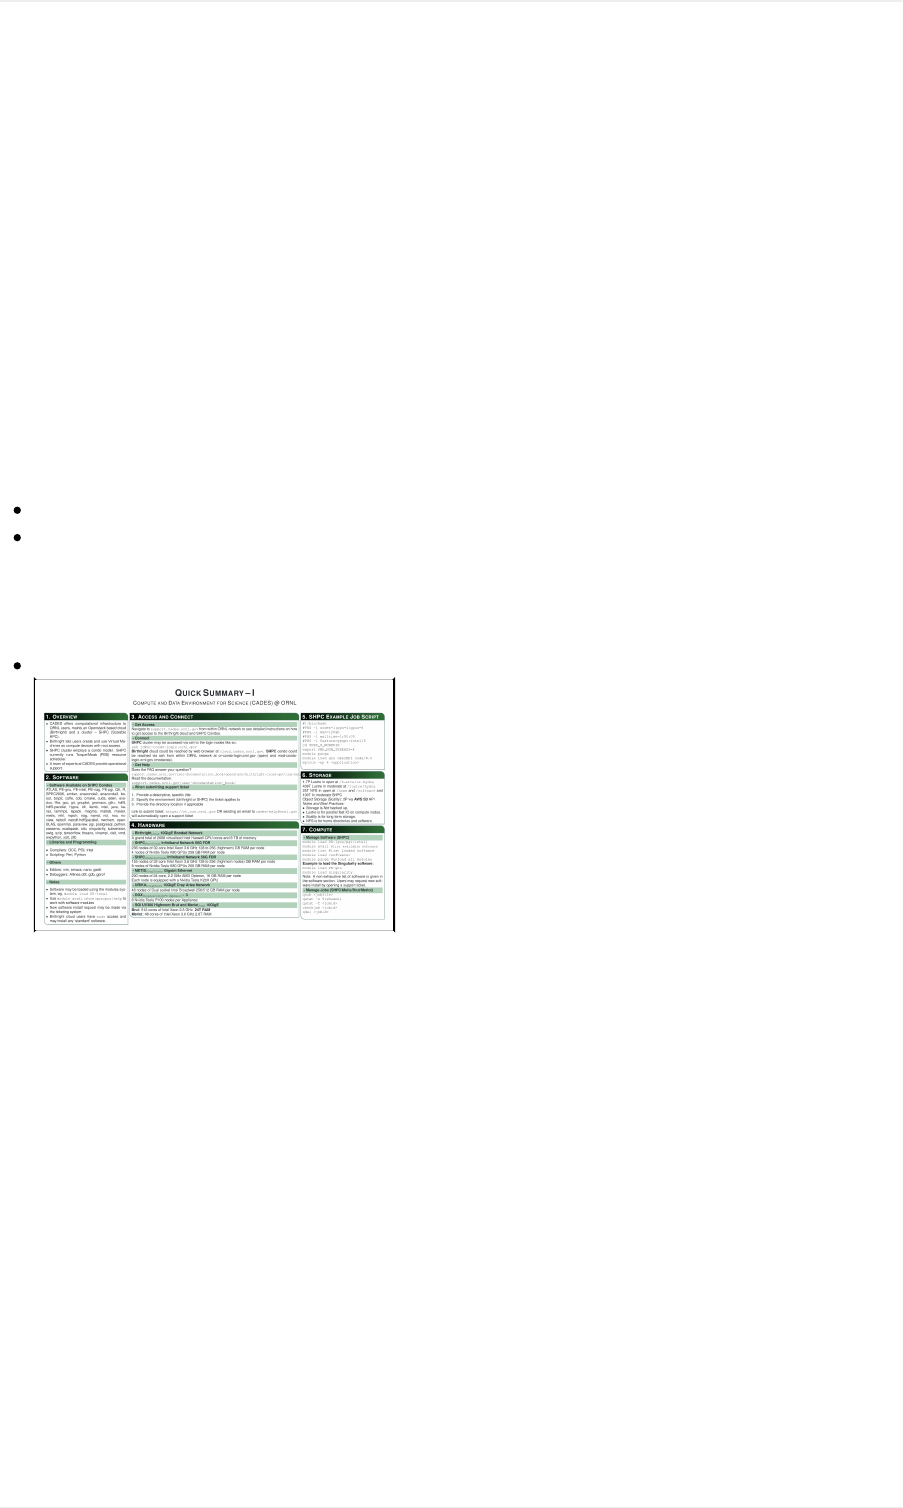
CADESQuickSummary(CheatSheetinpdfformat)
DownloadCADESQuickSummaryCheatSheet
Introduction
4
CADESUserDocumentationTableofContents
CADESSupport
TableofContents
Support
AccessCADESExternally
CADESTeam
CADESAcknowledgement
Glossary
Quick-StartGuides
LaunchaVMInstance:Quick-Start
SHPCCondos:Quick-Start
CADESCloudUserGuide
GettingStartedwithOpenStack
RequestYourCloudAllocation
ManageYourCloudAllocation
OpenStackProjectQuota
OpenStackHelp
LaunchaVMInstance
LogIn&NametheVM
ConfiguretheVM
Networks&Security
KeyPairUse
AccessVMInstances
AccessYourVMInstanceUsingSSH
AccessYourVMInstanceUsingPuTTY(Windows)
AccessYourVMInstanceUsingHorizon
AddMoreUserstoYourVMInstance
ManageYourVMInstances
DeleteaVMInstancefromYourProject
DeleteaVolumefromYourProject
ResizeaVMInstance
AddaVolumetoaVMInstance
CreateaSnapshot
OpenStackSecurityGroups
ModifytheDefaultSecurityGroup
CreateanewSecurityGroup
SecurityGroupCIDRExamples
Overview-CADESCloudInformation
AvailableVMImages&Configurations
Software&Hardware
Network&Storage
TableofContents
5
AdditionalOpenStackResources
RequestFirewallException
RunaSimpleWebServer
SSL-Let'sEncrypt
InstallCPUID
CPUIDHypervisorCodes
CPUIDInstanceCodes
SHPCCondosUserGuide
Overview
Hardware
Storage
Software
SchedulingJobs
BashEnvironmentCustomization
Modules
Compilers
CondoWorkflows
CrystalWorkflow
HowtoUse
Prerequisites
RequestAccesstoanAllocation
AccessyourAllocation
ExecuteaJob
UserContributedTutorials
Note:Communitycontributedcontent
notofficiallysupportedbyCADES.
LaunchaDockerContainer
LaunchShinywithinDocker
EclipseinCADESHPC
AllineaDDTinCADESHPC
DataTransfer&Storage
MovingData
GraphicalClientSFTP
GlobusDataTransferTool
GlobusEndpoints
GlobusTransfers&More
GlobusCommandLineInterface
ScalityObjectStorageUserGuide
ScalityAdvancedUsage
ScalityinaPythonVirtualEnvironment
ContributingtoDocumentation
TableofContents
6


CADES→UserDocumentation→Support
GettingHelp
WithinthisdocumentationtheCADESteamandusercommunityhaveassembledgettingstartedguides,aglossary,anduser-
createdtutorialstohelpyouuseresourceswithinourenvironments.
Sometimes,though,docsarenotenough.Ifyouhavequestionsnotansweredhere,orwouldliketoopenatroubleticket,please
contacttheCADESteamdirectlyatcades-help@ornl.gov.
Youmayalsojoinusathttp://cades.slack.comwherebothCADESoperationsandcommunitymemberssharetipsandcanwork
moreinteractivelytogether.
Contributing
Ifyouwouldliketoaddyourowntutorialstothissite,correcterrors,orexpandandclarifycontent,yourcontributionsare
welcome.Pleaseseeourcontributingguide.
Support
8
CADES→UserDocumentation→ExternalAccess
ExternallyAccessingCADESResources
YoumayfindthatyouneedaccesstointernalresourcesatORNLorCADESwhenyouareoff-site.Thisguideisintendedto
provideguidanceonhowtoaccesssomeofthemostcommonresourcesthatourresearchersneed.
Note:ORNLVPNserviceisonlyavailabletothoseusingORNL-ownedhardware.
Ifyouneedassistance,youcanemailtheCADESteamorjoinourSlackcommunity(availableexternally).
CADESExternalLoginNode
CADESmaintainsanexternalloginnodecades-extlogin1.ornl.gov.
NewUsers:Tologintothisnode,youmustbegrantedaccessviatheXCAMSportal.
IfyouarenotsureifyoualreadyhaveaXCAMSaccount,visitthissiteandusethe"Forgotyourusername?"and"Forgotyour
password?"linkstoinvestigate.Ifyoufindthatyouhaveanaccount,butneedaccesstotheCADES-miscresource,emailus.
TologintotheexternalaccessnodeuseyourXCAMSIDtoSSH:
sshxcams@cades-extlogin1.ornl.gov
Fromhereyoucanaccessinternalresources,including:
OpenStackHorizonWebInterface
CADESSHPCCondos
ORNLInternalWebsites
UserDocumentation:acopyofCADESuserdocumentationisregularlysavedtotmp/cades-user-guide.pdf
AccessingtheOpenStackHorizonWebInterface
ToviewtheOpenStackHorizonWebInterfaceyoumayuseSSHportforwarding(replaceuserwithyouruserIDandenteryour
passwordwhenprompted):
ssh-L9000:cloud.cades.ornl.gov:80user@cades-extlogin1.ornl.gov
Thenviewinyourbrowser:http://localhost:9000
AccessingtheCADESSHPCCluster
OpenProtectionZone
1. AfterloggingintotheCADESexternalloginnode,executesshxcams@or-condo-login.ornl.gov.
Replacexcamswiththeusernameyouregisteredabove.
2. Whenprompted,enteryourXCAMSpassword.
ModerateProtectionZone
1. AfterloggingintotheCADESexternalloginnode,executesshucams@mod-condo-login.ornl.gov.
ReplaceucamswithyourORNLUCAMSID.
AccessCADESExternally
9

2. Whenprompted,enteryourUCAMSpassword.
AccessingORNLInternalWebsites
ToviewinternalORNLwebsitesyoumayuseSSHportforwarding(replaceuserwithyouruserIDandenteryourpassword
whenprompted):
ssh-L9000:portal.ornl.gov:80user@cades-extlogin1.ornl.gov
Thenviewinyourbrowser:http://localhost:9000
AccessCADESExternally
10

CADES→UserDocumentation→CADESTeam
Howcanwehelpyou?
CADESstaffisreadytoassistyou.Chooseoneofthetwoways:
Sendanemailtocades-help@ornl.gov.
JoinourSlackchannelathttps://cades.slack.com/signup.
Weareledby:
CADESDirectorArjunShankarshankarm@ornl.gov
CADESLeaderBrianZacharyzacharybs@ornl.gov
CADESTeam
11

CADES→UserDocumentation→CADESAcknowledgement
AcknowledgmentsinScientificPublicationsandPresentations
PleaseacknowledgeinyourpublicationstheroleCADESfacilitiesplayedinyourresearch.Alertingourcommunicationsstaff
whenapaperisacceptedisalsoappreciated.
Sampleacknowledgement:
ThisresearchusedresourcesoftheComputeandDataEnvironmentforScience(CADES)attheOakRidgeNational
Laboratory,whichissupportedbytheOfficeofScienceoftheU.S.DepartmentofEnergyunderContractNo.DE-AC05-
00OR22725"
Youmayuseanyvariationonthistheme,callingoutspecificsimulationsorportionsoftheresearchthatusedCADESresources,
orcitingspecificresourcesused.
However,thecrucialelementstoincludeare:
Thespelledoutcentername(it'sokaytoincludetheacronym,too):ComputeandDataEnvironmentforScience(CADES)
OfficeofScienceandU.S.DepartmentofEnergy
ContractNo.DE-AC05-00OR22725
Weappreciateyourconscientiousnessinthismatter.Acknowledgementandpre-publicationnotificationhelpsCADES
communicatetheimportanceofitsroleinsciencetooursponsors,helpingassurethecontinuedavailabilityofthisvaluable
resource.
CADESAcknowledgement
12

CADES→UserDocumentation→Glossary
Glossary
Thedefinitionsbelowarerelatedtothisdocumentandareprovidedforquickreference.Amorecompletelistofdefinitionscanbe
foundintheofficialOpenStackdocumentation.
Bash
AUNIXshellusedforenteringcommand-lineexecutions.IncludedwithmostLinuxdistributionsandmacOS.IncludesSSH
capability.
Horizon
AwebGUIfrontendforOpenStackthatisaccessedviahttps://cloud.cades.ornl.gov.
Hypervisor
Alsoknownasavirtualmachinemonitor,ahypervisorissoftware/hardwarethatcreates,runs,andmanagesvirtualmachines.
Instance
AvirtualmachinesetupthroughOpenStack.See"VirtualMachine".
OpenStack
Acloudoperatingsystemthatcontrolslargepoolsofcompute,storage,andnetworkingresourcesthroughoutadatacenter.
Project
Thebaseunitof"ownership"inOpenStack.AllresourcesinOpenStackshouldbeownedbyaspecificproject.InOpenStack
Identity,aprojectmustbeownedbyaspecificdomain.
Tenant
AlegacyOpenStacktermfor"Project"thatisstillusedintheHorizonwebGUI.
VirtualMachine
Anoperatingsysteminstancethatrunsontopofahypervisor.Multiplevirtualmachines(VM)canrunatthesametimeonthe
samephysicalhost.
Glossary
13

Glossary
14
CADES→UserDocumentation→CADESCloudUserGuide→LaunchaVMInstance
CADESCloud
OakRidgeNationalLaboratory’s(ORNL’s)ComputeandDataEnvironmentforScience(CADES)provideseligiblecustomers
withanOpenStackcloudcomputingsolutionwithcustomizablevirtualmachines(VM).Thisresource,called"CADESCloud,”
enablescustomersinscienceandtechnologydirectoratestoleverageself-serviceportalstorapidlyrequesttheseVMsfor
production,testing,anddevelopment.TheseCADEScloudservicesareavailableatnocosttoORNLresearchers.
LaunchaVM:Quick-Start
CreatingandlaunchingaVMInstanceisoneofthefirststepstoutilizingyourcloudallocation.WhenlaunchingaVM,youwill
chooseanameforyourInstance,whichnetworkitwillutilize(internalorexternal),whichoperatingsystemyouwouldliketorun
(CentOSorUbuntu),andwhichVMflavor(sizeandspecifications)youneedforyourapplication.
Thefollowingismeanttobeusedasaminimum-detailquickguidetolaunchingaVM.Youmayfind,attheendoftheprocess,
thattheVMyouhavecreatedisn'tquiterightforyourneeds.ThegreatthingaboutusingtheseOpenStackVMsisthatyoucan
deleteitandstartoversothatyoumaychangethespecifications.
Beforeyoubegin,haveyourequestedyourCADESCloudallocation?
AnactivationnoticewillbedispatchedtoyourORNLemailaddresswhenyourresourcesarereadyforuse.
Navigatetothewebinterfaceathttps://cloud.cades.ornl.gov/.
LoginwithyourUCAMScredentials.
Domain:ornl
UserName:Yourthree-letterUCAMSID
Password:YourUCAMSpassword
NavigatetoProject→Compute→Instances.
ClicktheLaunchInstancebutton,andfillouteachsectionoftheresultingdialog(showninthenextsections).
Whatfollowsisaseriesoftabs(alongtheleftoftheHorizon"LaunchInstance"dialogscreen).Fillouttheinformationasit
pertainstoeachtab.Youmaymovefreelybetweentabswithoutlosingprogress.
DetailsTab
InstanceName–Thisnamecancontainupto15alphanumericcharactersandahyphen.Nospecialcharactersare
permitted,andthehostnamesarecasesensitive.
AvailabilityZone–"nova"isthedefaultzone.
Count–Thenumberofinstancestostartupatonce.IfcreatingmultipleInstances,theInstancenameswillbe
numerated(instance-1,instance-2,instance-3,andsoon).
SourceTab
SelectBootSource–SetthistoImage
CreateNewVolume–Twooptions:
Yes:ThiscreatesavirtualdiskonCADES'scentralstorage(recommended).Thistypeofstorageisreferredtoas
a"cindervolume."
No:Avirtualdiskiscreatedonahypervisor;thisdiskisnotpersistentwhentheVMisdeleted.Thistypeof
storageisreferredtoasan"ephemeralvolume."Thesizeofthevolumecanbeincreased,bymigratingtheinstance
toalargerflavorsize,whichcanbedoneyourselfwithoutCADESassistance.
DeleteVolumeonInstanceDelete–SettoNoifdatashouldpersistbetweenInstancerestarts.
VolumeSize–Mustbegreaterthanorequaltotheflavorsizeandfitwithinyourallocationquota.
LaunchaVMInstance:Quick-Start
15

Increasingthesizeofarootvolumelaterwillrequire emailingCADESsupport.
Note:Itisrecommendedtosizetherootvolumeappropriatetoyourneeds,keepinginmindthatsmallrootvolumes
aretypicallyused.Additionalvolumes(fordata,logs,etc.)canbeattachedtoaninstance,detachedandattachedtoa
newVM,etc.AbestpracticerecommendationisforrootvolumestocontainonlytheOS.
DeviceName–Thisshouldalmostalwaysbethedefault,vda.
Choosefromtheavailableoptionsbyclickingthe+nexttothedesiredimage.
FlavorTab
ChoosetheflavorwhichprovidesthedesiredCPUandmemoryandclick+toaddittoyourallocation.
NetworksTab
Chooseoneoftworoutablenetworkconfigurations,andclick+toaddittoyourallocation.
general_extnetwork1,128.219.184.0/21-AvailablefromoutsideORNL.However,outward-facingservices
(e.g.,SSH,webserver)willrequireORNLfirewallexceptions).
general_intnetwork1,172.22.0.0/20-InternaltoORNL.
NetworkPortsTab
Nouserinputrequired.Skipthistab.
SecurityGroupsTab
NouserinputrequiredforstandardSSHaccess.Skipthistab.
KeyPairTab
Ifyouskipthisstep,theinstancewillnotallowyoutologin!See hereformoreinformation.
Note:BeforedecidingbetweenOption1orOption2,youshouldcheckyourlocalmachineforanexistingkeypair
(instructions).
Option1:Createanewkeypairforthisinstance.
Clickthe+CreateKeyPairbutton.
Enteranameforyournewkeypairintheresultingdialog.
ClickCreateKeyPairtoassociatethisnewkeypairtoyourInstance.
Theprivatekeywillbedownloadedtoyourlocalmachineasa.pemfile.
Onyourlocalmachine,placethe.pemfileinthe~/.ssh/directory(instructions).
Option2:UseavailablekeypairforthisInstance.
Choosethedesiredkeypair,andclick+toassociateitwithyourVMInstance.
ConfigurationTab
Nouserinputrequired.Skipthistab.
MetadataTab
Nouserinputrequired.Skipthistab.
ClickLaunchInstancewhenyouhavecompletedallrequiredsections.
Congratulations!Anewinstancewillbelaunched.Oncefullyprovisioned,thestatuswillchangeto"Running,"andyoucan
accessyourVMInstanceusingSSH(instructions).
GettingHelp
Ifatanypointyoufeelstuckandneedsomehelpfiguringoutyournextmove,pleasecontacttheCADESsupportteamatcades-
help@ornl.govorjoinourSlackchannelathttps://cades.slack.com/signup.
MoreDetailsAboutLaunchingaVM
1. LogintoHorizon,nameyourVM
2. Chooseaflavor,image,andbootsource
3. Setupasecuritygroup
LaunchaVMInstance:Quick-Start
16


CADES→UserDocumentation→SHPCCondosUserGuide→SHPCCondos:Quick-Start
CADESSHPCCondos
TheCADESScalableHPC(SHPC)CondosconsistoftwoHPCclusters:oneintheORNLModerateprotectionzone(CADES
Mod)andoneintheORNLOpenprotectionzone(CADESOpen).Theprotectionzonescontainandcontrolboththesoftware
baseandthedataproducedonthosesystems.
ThissectionoutlinesthemostbasicproceduresforprocuringandusingaCADESSHPCCondoallocation.
Step1:RequestYourSHPCCondoAllocation
YoucanrequestaCADESSHPCCondoallocationbyclickingontheappropriateXCAMSregistrationlinkforyourgroup.Ifyou
donotseeyourgrouplisted,pleasecontacttheCADESteam.
TheXCAMSregistrationprocesswillaskyoutoacknowledgetheXCAMSUserAgreementandregisteryourUCAMSwithan
LDAPgrouporcreateanewXCAMSuserIDandtheregisteritwithanLDAPgroup.Usethestepsbelowtoenteryourrequest.
1. NavigatetotheappropriateXCAMSregistrationlinkforyourgroup.
2. Enteryouremailaddress(yourORNLaddressifavailable)andclickContinue.
3. ReviewtheXCAMSuseragreement,andselectAgree.
4. EnteryourUCAMSID(oranewXCAMSusername).
5. EnteryourUCAMSpassword(oranewXCAMSpassword).
6. ClickSubmittocompletetheXCAMSrequest.
Whenyourresourcesarereadyforuse,anactivationnoticewillbedispatchedtotheemailaddressenteredabove.This
processcantakeupto24hourstocomplete.
Step2:AccessYourSHPCCondoAllocation
Onceyourrequestforresourceshasbeenapproved,youcanaccesstheSHPCCondologinnodesusingSSH.OpenandModerate
protectionzoneseachhavetheirownloginnode.Choosetheloginnodeforyourprotectionzone.Seebelow.
OpenProtectionZone
1. OpenaBashterminal(orPuTTYforWindowsusers).
2. Executesshxcams@or-condo-login.ornl.gov.
Replace"xcams"withtheusernameyouregisteredabove.
3. Whenprompted,enteryourXCAMSpassword.
ModerateProtectionZone
1. OpenaBashterminal(orPuTTYforWindowsusers).
2. Executesshucams@mod-condo-login.ornl.gov.
Replace"ucams"withyourORNLUCAMSID.
3. Whenprompted,enteryourUCAMSpassword.
Step3:ExecuteaJobonYourSHPCAllocation
SHPCCondos:Quick-Start
18

Nowthatyouhaveaccesstoyourallocationthroughtheloginnode,itistimetodosomework.Thetutoriallinkedbelow,
intendedforuserswhoarenewtotheCADESSHPCCondoenvironment,outlinesthebasicstepstosettingupandexecutinga
jobontheSHPCCondocomputenodes.
Howto: ExecuteaJobonYourSHCPCondoAllocation
Note:Donotexecutejobsontheloginnodes;onlyusetheloginnodestoaccessyourcomputenodes.Processor-intensive,
memory-intensive,orotherwisedisruptiveprocessesrunningonloginnodeswillbekilledwithoutwarning.
GettingHelp
Ifatanypointyoufeelstuckandneedsomehelpfiguringoutyournextmove,pleasecontacttheCADESsupportteamatcades-
help@ornl.govorjoinourSlackchannelathttps://cades.slack.com/signup.
SHPCCondos:Quick-Start
19

CADES→UserDocumentation→CADESCloudUserGuide→GettingStarted
GettingStartedwithyourCADESCloudResources
UsingCADESOpenStackresourcesismeanttobeasstraightforwardaspossibletogetusersupandrunningquickly.Thisguide
provideswalk-throughsguidesanddetailedinformationforyoutogetthemostoutoftheseresources.
WhatisOpenStack?WhataretheCADESCloudResources?
Thisguideincludesseveralsectionsthatactbothasastep-by-stepguideandaquickreference.
Inthisandthefollowingsections,youwilldiscoverhowto:
1. RequestandManageyourCloudAllocation
2. LaunchaVirtualMachine(VM)
3. AccessaVM
4. ManageaVM
5. LearnaboutAdditionalResources
Beforeyoubegin,besureyoumeettheprerequisitesbelow.
Prerequisites
ToproperlyutilizeyourCADESCloudallocation,youwillneedacoupleofutilitiesloadedonyourlocalmachine.Theseutilities
arefreeandwidelyusedforthistypeofapplication.
Required:SSHclient
Recommended:Bashterminal
Note:CADESdoesnotprovidesupportforgettingtheseutilitiesupandrunningonyourpersonalcomputer.
MacOSandLinux
BothmacOSandLinuxdistributionsincludesaBashterminalandanSSHclientbydefault.Noadditionalsoftwareshouldbe
requiredtoaccessyourVMInstance.
WindowsUsers
ClickforDetails
NextSteps
BeforeyoucanusetheCADESCloudresources,youwillneedtorequestacloudallocation.Afteryourrequesthasbeen
approved,youcanmanageyourresourcesandlaunchaVM.
LookingforMoreInformation?
OverviewofCADESCloudResources
GettingStartedwithOpenStack
20

GettingStartedwithOpenStack
21

CADES→UserDocumentation→BirthrightCloudUserGuide→GettingStarted→RequestCloudAllocation
RequestYourBirthrightCloudAllocation
AnymemberofascienceandtechnologydirectoratecanrequestaBirthrightCloudallocation.Thisiscurrentlyanautomated
processthattakes1–2hourstocomplete.Usethestepsbelowtoenteryourrequest.
1. NavigatetoORNL'sXCAMSportal.Theprecedinglinkwillprefillarequestfor"CADESBirthrightCloud"resources.
2. EnsureyourUCAMSIDisselected.
3. Enterareasonfortherequest(e.g.,"IneedaBirthrightCloudallocation.").
4. ClickNexttocompletetheXCAMSrequest.
AnactivationnoticewillbedispatchedtoyourORNLemailaddresswhenyourresourcesarereadyforuse.
ImportantNotesforRequestingYourBirthrightCloudAllocation
Owingtoresourceconstraints,wearecurrentlythrottlingaccesstoBirthrightCloudallocations.Ifduringregistrationyouget
anerrorthatthegroupisfull,pleasecontacttheCADESteam.
Theregistrationprocesscantake1–2hours.Ifafter2hoursyouareunabletologin,pleasecontacttheCADESteamand
includethefollowinginformationinyouremail:
UCAMSID
Contactinformation
Approximatetimeofyourregistrationattempt
RequestYourCloudAllocation
22
CADES→UserDocumentation→BirthrightCloudUserGuide→GettingStarted→ManageCloudAllocation
ManageYourBirthrightCloudAllocation
Onceyourrequestforresourceshasbeenapproved,youcanmanageyourallocationusingOpenStack'sweb-basedHorizonGUI.
1. NavigatetotheHorizonwebinterfaceathttps://cloud.cades.ornl.gov/.
2. LoginwithyourUCAMScredentials.
Domain:ornl
UserName:UCAMSID
Password:UCAMSpassword
3. SelectProjectfromthetopleftmenutoviewavailableresources.
Fromhereyoucaneasilymanageyourallocationthroughavarietyoftoolsthatenableyouto:
ViewYourOpenStackProjectQuota
ManageVMInstances
ManageOpenStackSecurityGroups
ConfigureSSHAccesstoVMInstances
ManageYourCloudAllocation
23
CADES→UserDocumentation→BirthrightCloudUserGuide→GettingStarted→ProjectQuota
YourOpenStackProjectQuota
EachCADESBirthrightCloudallocationcreatesa"Project".EachProjectinCADEShasapresetresourcequotathatcanbe
leveragedattheuser'sdiscretion.
RequestMoreResources
Ifauserrequiresmoreresourcesfortheirallocation,heorshecansubmitaproposaltotheCADESResourceUtilizationCouncil
(RUC)torequestaquotaincrease.Thisproposalshoulddescribetheresourcesdesired(RAM,CPUs,storage,etc.)andthe
scientificgoalandmeritoftheworkbeingperformedusingtheCADESBirthrightCloudallocation.Theserequestsforincreased
resources,subjecttoreview,shouldbedirectedtotheCADESteam.
ViewYourProjectQuota
1. NavigatetotheHorizonwebinterfaceathttps://cloud.cades.ornl.gov/.
2. LoginwithyourUCAMScredentials.
Domain:ornl
UserName:Yourthree-letterUCAMSID
Password:YourUCAMSpassword
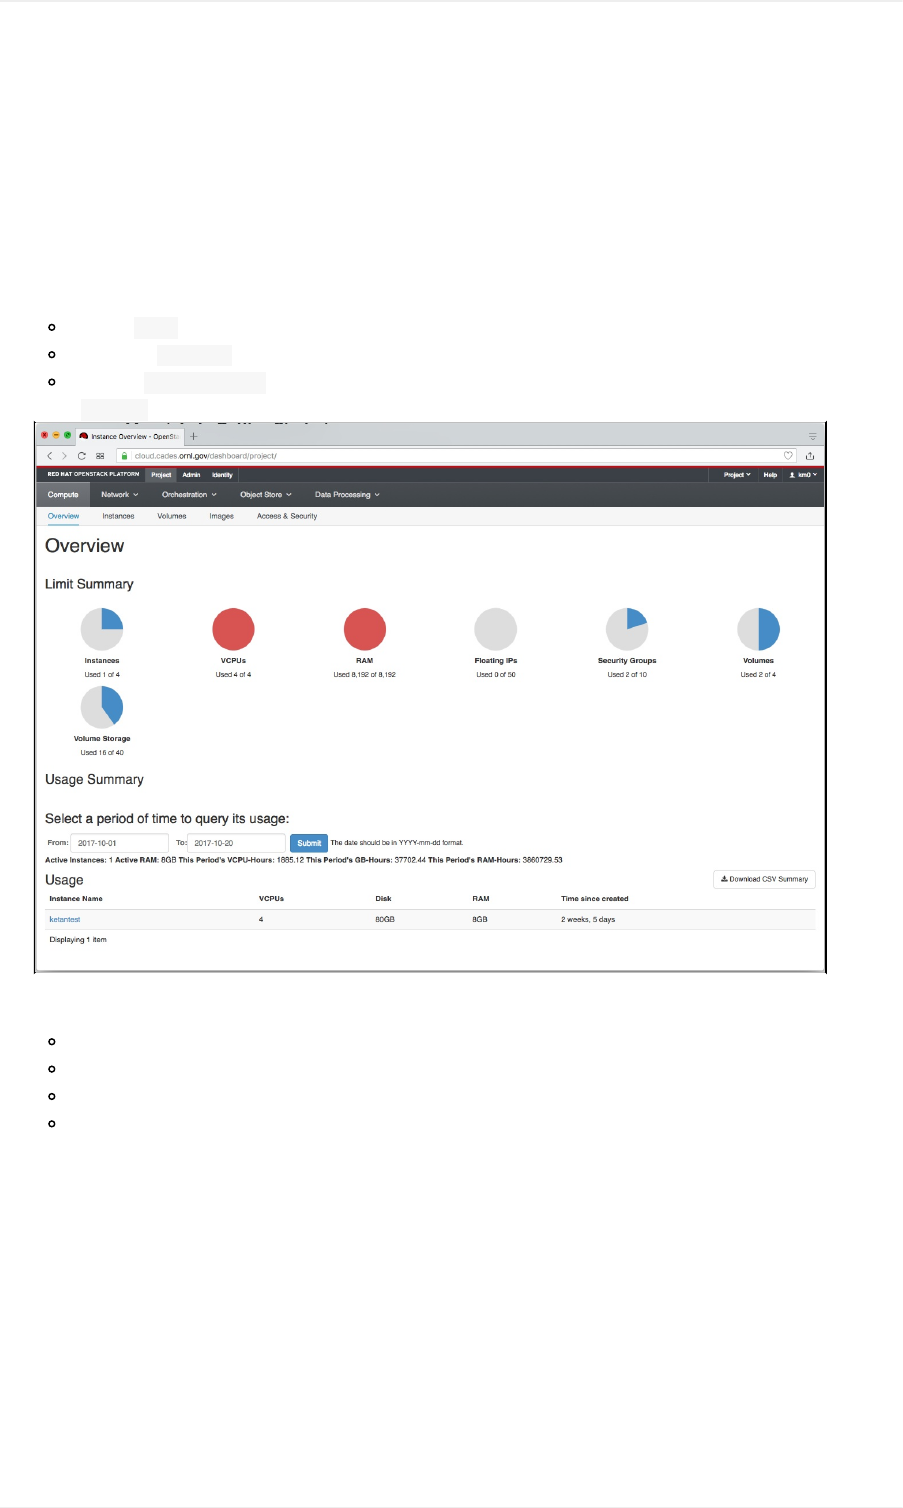
3. NavigatetoProject→Overview.
InthisOverviewyoucanseeyourresourceallocation,including:
Instances–ThenumberofVMsyoucanrunatonce.
VCPUS–ThenumberofCPUcoresyoucanuseacrossallofyourVMs.
RAM–ThetotalamountofRAMyoucanuseacrossallofyourVMs.
FloatingIPs–COMINGSOON–IPaddressesthatyoucanattachandmovebetweenInstances.Theseaddressesarein
additiontotheIP(s)alreadyallocatedtoyourInstance.
SecurityGroups–BlocksoffirewallrulesthatyoucanattachtoanInstance.AllgroupsstartwithadefaultSecurityGroup
thatcontainsabasicconfigurationtogetstarted.Youcanusethis"default"grouporyoucancreateyourowngroup.Check
outtheSecurityGroupssectionformoreinformation.
Volumes–Thesearethenumberofblock-storagevolumesthatyoucancreate.Youcanattachanynumberofvolumestoan
Instance.ThesearealsothepreferredmethodofstorageintheBirthrightcloudenvironment.
VolumeStorage–ThisisthetotalstorageavailabletothevolumesinyourProject.
OnceanInstanceislaunched,theresourceutilizationappearsatthebottomofOverviewscreen,undertheUsagesection.
OpenStackProjectQuota
24
CADES→UserDocumentation→BirthrightCloudUserGuide→GettingStarted→GettingHelp
GettingHelp
InadditiontoOpenStack'sdocumentation,theCADESteamhasassembledalistoffrequentlyaskedquestions,aglossary,and
detailedinformationtohelpyougetmovingonyourOpenStackProject.
Ifyouhavequestionsthatwerenotansweredintheresourceslistedhereorwouldliketoopenatroubleticket,pleasecontactthe
CADESteamdirectlyatcades-help@ornl.gov.
IfyouhavequestionsaboutgettingyourSAFERfirewallrulesinplace,emailtheSAFERteamdirectlyat
opsapprovers@ornl.gov.
GeneralOpenStackUsageQuestions
TheOpenStackcommunityhasextensivedocumentation,ageneralmailinglist,andamechanismforaskinggeneralOpenStack
usagequestions.Theseresourcescanbeindispensablefornewusers,andtheCADESsupportteamrecommendsthatnewusers
leveragetheOpenStackdocumentationandothersupportfeaturesforgeneralOpenStackquestions.
Information Description
OpenStack
documentation
OpenStackmaintainssignificantdocumentationforgeneralOpenStackusage.Theusermanuals
coverOpenStack'sfunctionalityindepth,althoughnotallofthefeatureslistedintheir
documentationareavailablefromCADES.
ask.openstack.org Generalend-userresourcewithquestionsandanswers.
OpenStack
mailinglist Generalquestionsmailinglist,OpenStackoperationsmailinglist,andadevelopermailinglist.
FrequentlyAskedQuestions
WhocanrequestaCADESBirthrightCloudallocation?CanIhaveone?
AnymemberofascienceandtechnologydirectoratecanrequestaBirthrightCloudallocation.SeelistofORNL's
technicalorganizations.
WhatkindofusersupportdoesCADESprovideforBirthrightCloudallocations?
TheCADESteamcanprovidesupportforissuesinOpenStackandcanhelpausergetstartedwiththeirallocation—up
toandincludingloadingandlaunchingaVMInstancefromoneoftheCADES-providedimages.Onceauserbegins
addingsoftwareandconfiguringtheoperatingsystemontheirVM,theyaremore-or-lessresponsibleforanyissuesthat
mightpresentthemselvesintheVM.
DoesCADESprovidebackupsorsupportforbackingupmyVMInstance(s)?
Inshort,no.CADESdoesnotprovidebackupsofauser'sVMInstancesanddoesnotcurrentlysupportthis
functionality.ThereareseveralmethodsausercouldleveragetobackuptheoperatingsystemrunningontheVM,but
anysuchmethodmustcomplywithORNL'sbestpractices,andthisbackupstrategyistheuser'sresponsibilityandis
beyondthescopeofthisuserguide.
CanIhavemyinstanceIPsbesequential?
Owingtothedynamicnatureofacloudenvironmentthisisnotpossible.Werecommendusing/etc/hosts,Netreg
(DNS),oranothermechanismtoaccomplishhost-to-hostcommunication.
HowdoIgetaccesstoLustreonmyinstance?
OpenStackHelp
25

Lustreaccessiscurrentlyprovidedonacase-by-casebasis.ContacttheCADESteamifyouwishtoaddLustretoyour
Project.
WhatORNLfilesystemscanImountwithinmyBirthrightCloudInstance?
Thetargetfilesystemmustbe"openscience."Nomoderate/confidentialfilesystemsortheirrespectivedatacanor
shouldbemountedwithinyourVMInstance.
OpenStackHelp
26

CADES→UserDocumentation→CADESCloudUserGuide→LaunchaVMInstance
LaunchaVM:At-A-Glance
CreatingandlaunchingaVMInstanceisoneofthefirststepstoutilizingyourCADESCloudallocation.WhenlaunchingaVM,
youwillchooseanameforyourInstance,whichnetworkitwillutilize(internalorexternal),whichoperatingsystemyouwould
liketorun(CentOSorUbuntu),andwhichVMflavoryouneedforyourapplication.
Note:WhenlaunchinganewVMInstance,beawarethatyourVMInstancenamemayalsoserveasyourDNShostname.This
namecancontainupto20alphanumericcharactersandahyphen.Nospecialcharactersarepermitted,andthehostnamesarecase
sensitive.Forexample,good:my-instance-server,nogood:my_instance&server.SeeRFC952andRFC1123for
moreinformation.
IfyouwouldliketohaveaDNShostnameforyourinstance,pleasesubmitatickettocades-help@ornl.govwiththeInstance
NameandtheOpenStackProjectID.
Prerequisites
YouwillneedtohaveaCADESCloudallocationbeforeyoucanlaunchyourVMInstanceusingthewebGUI.Thelinkbelow
willshowyouhowtorequestyourCADESCloudallocation.
Howto: RequestYourCADESCloudAllocation
TherearethreeprimarystepstocompletetohaveafunctioningVMInstance.Thesestepsareoutlinedbelow.Aftereachsectiona
linkisprovidedwhereyoucanfindmoreinformationandin-depthdescriptionsabouttheconfigurationoptions.
1. LogintoHorizon,nameyourVM.
2. Chooseaflavor,image,andbootsource.
3. Setupasecuritygroup.
4. ConfigureakeypairforaccessingtheVM.
LaunchaVMInstance
27

CADES→UserDocumentation→CADESCloudUserGuide→LaunchaVMInstance→Login&Setup
LaunchaVM:LogIn&Naming
Onceyoureceivetheemailnotificationthatyourresourcesareavailable,youcanlogintotheHorizonwebinterfaceandget
started.
LogIntoHorizon
Navigatetothewebinterfaceathttps://cloud.cades.ornl.gov/.
LoginwithyourUCAMScredentials.
Domain:ornl
UserName:Yourthree-letterUCAMSID
Password:YourUCAMSpassword
YoucannowlaunchanewVMInstancefromwithinthewebinterface.
LaunchanInstance
1. NavigatetoProject→Compute→Instances.
2. ClicktheLaunchInstancebutton,andfillouteachsectionoftheresultingdialog.
DetailsTab–FillouttherequiredfieldsfortheDetailssection.
InstanceName–Theinstancenamecancontainupto20alphanumericcharactersandahyphen.Nospecialcharactersare
permitted,andthehostnamesarecasesensitive.Forexample,good:my-instance,nogood:my_instance&server.
SeeRFC952andRFC1123formoreinformation.
Note:WhenlaunchinganewVMInstance,beawarethatyourVMInstancenamemayalsoserveasyourDNShostname.
IfyouwishforaDNSrecordtobecreated,matchingtheinstancenameyoucreate,emailthenameoftheinstancetocades-
help@ornl.govwiththesubject"RequestDNSNameCreationforVM."
AvailabilityZone–"nova"isthedefaultzone.DonotchangeunlessinstructedtodosobyaCADESadministrator.
Count–Thenumberofinstancestostartupatonce.IfusingmultipleInstances,theInstancenameswillbenumerated
(instance-1,instance-2,instance-3,andsoon).
LogIn&NametheVM
28
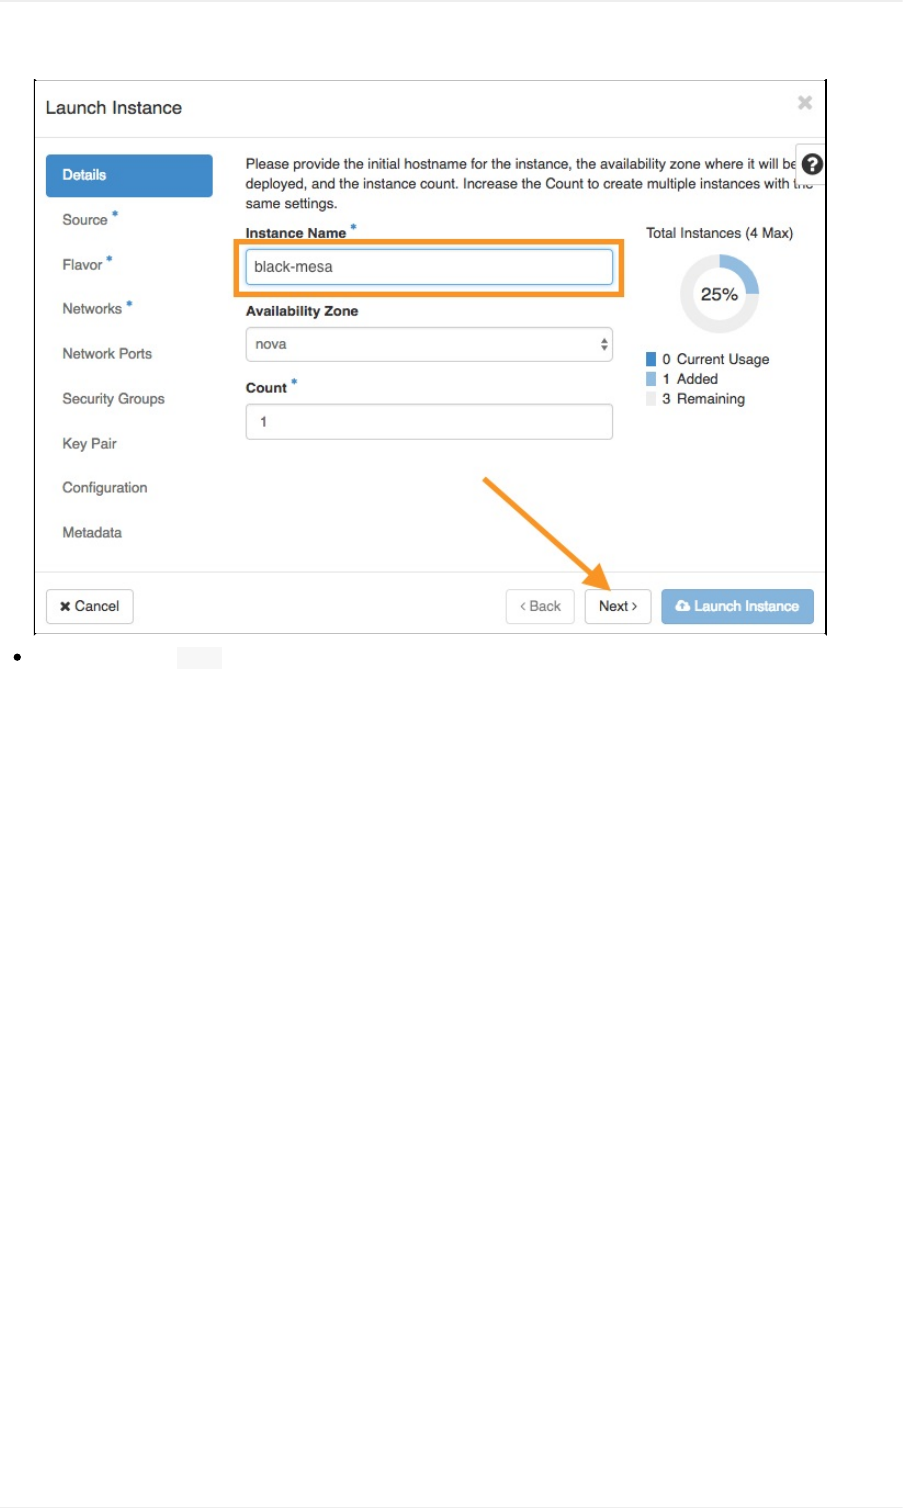
Oncefinished,clickNexttoproceedtothenexttab.
LogIn&NametheVM
29
CADES→UserDocumentation→CADESCloudUserGuide→LaunchaVM→ConfigureFlavor&Image
LaunchaVMInstance:FlavorandImage
Onthenexttwotabs,youwillchoosethestoragetypeandsize,andtheoperatingsystemimage.
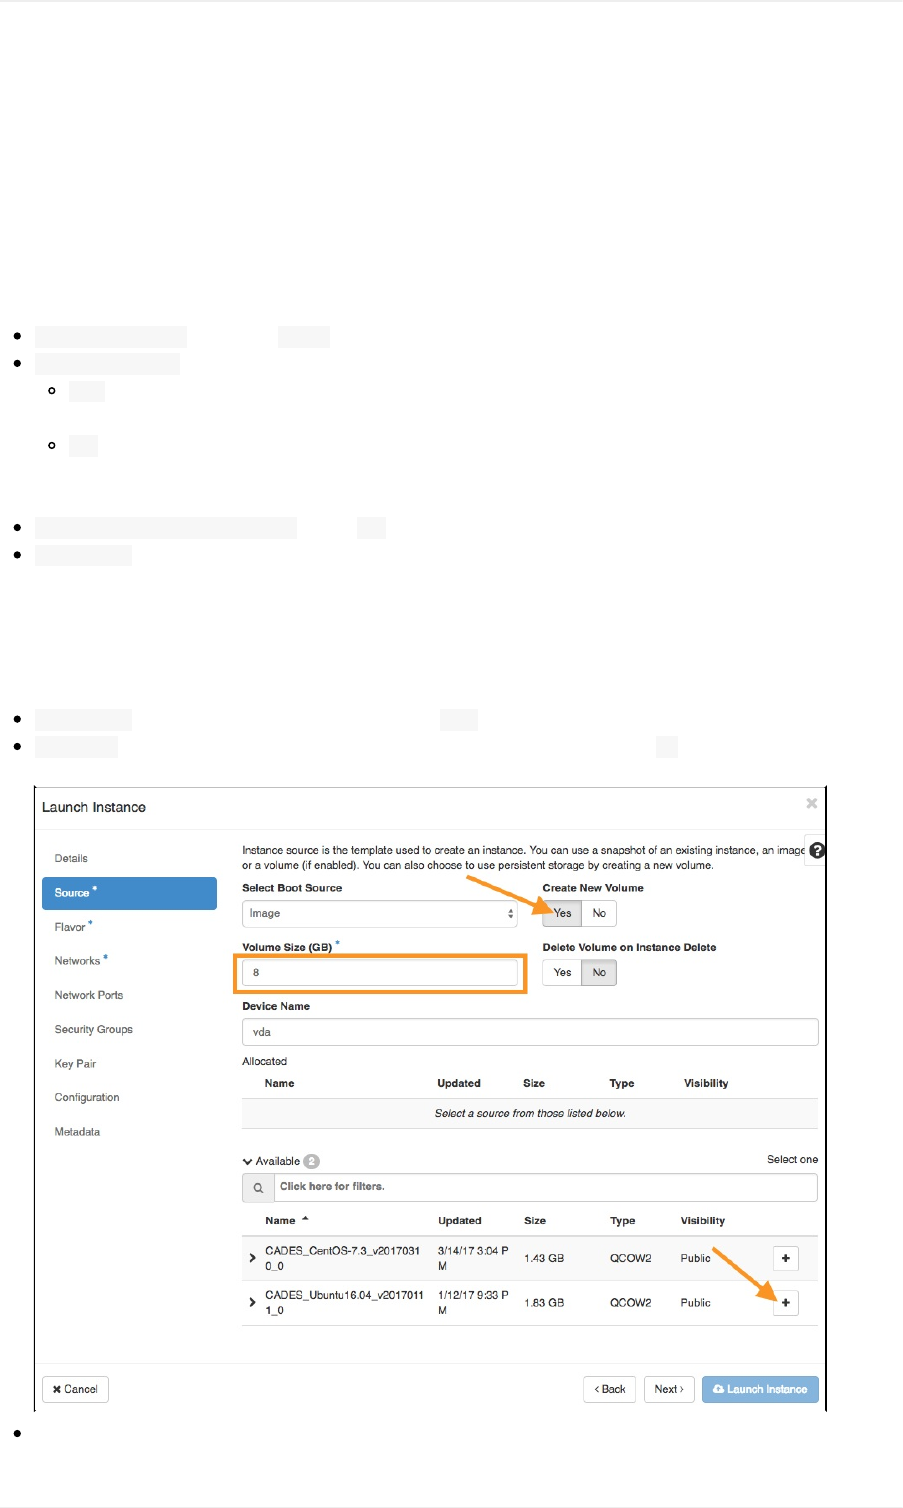
SourceTab–FillouttherequiredfieldsfortheSourcetab.
SelectBootSource–SetthistoImage
CreateNewVolume–Twooptions:
Yes:ThiscreatesavirtualdiskonCADES'scentralstorage(recommended).Thistypeofstorageisreferredtoasa
"cindervolume."
No:Avirtualdiskiscreatedonahypervisor;thisdiskisnotpersistentwhentheVMisdeleted.Thistypeofstorageis
referredtoasan"ephemeralvolume."Thesizeofthevolumecanbeincreased,bymigratingtheinstancetoalarger
flavorsize,whichcanbedoneyourselfwithoutCADESassistance.
DeleteVolumeonInstanceDelete–SettoNoifdatashouldpersistbetweenInstancerestarts.
VolumeSize–Mustbegreaterthanorequaltotheflavorsizeandfitwithinyourallocationquota.
Increasingthesizeofarootvolumelaterwillrequire emailingCADESsupport.
Note:Itisrecommendedtosizetherootvolumeappropriatetoyourneeds,keepinginmindthatsmallrootvolumesare
typicallyused.Additionalvolumes(fordata,logs,etc.)canbeattachedtoaninstance,detachedandattachedtoanewVM,
etc.YoumayalsoconsiderattachingsharedNFSstorageratherthanaddinglargevolumestoeachVM(emailcades-
help@ornl.gov).AbestpracticerecommendationisforrootvolumestocontainonlytheOS.
DeviceName–Thisshouldalmostalwaysbethedefault,vda.
Available–Listofavailableimages.Choosefromtheavailableoptionsbyclickingthe+nexttothedesiredimage.
We'rechoosingtheUbuntuimageforthisexample.
Uponselectinganimage,itwillmovefromtheAvailablelisttotheAllocatedlist.
ConfiguretheVM
30
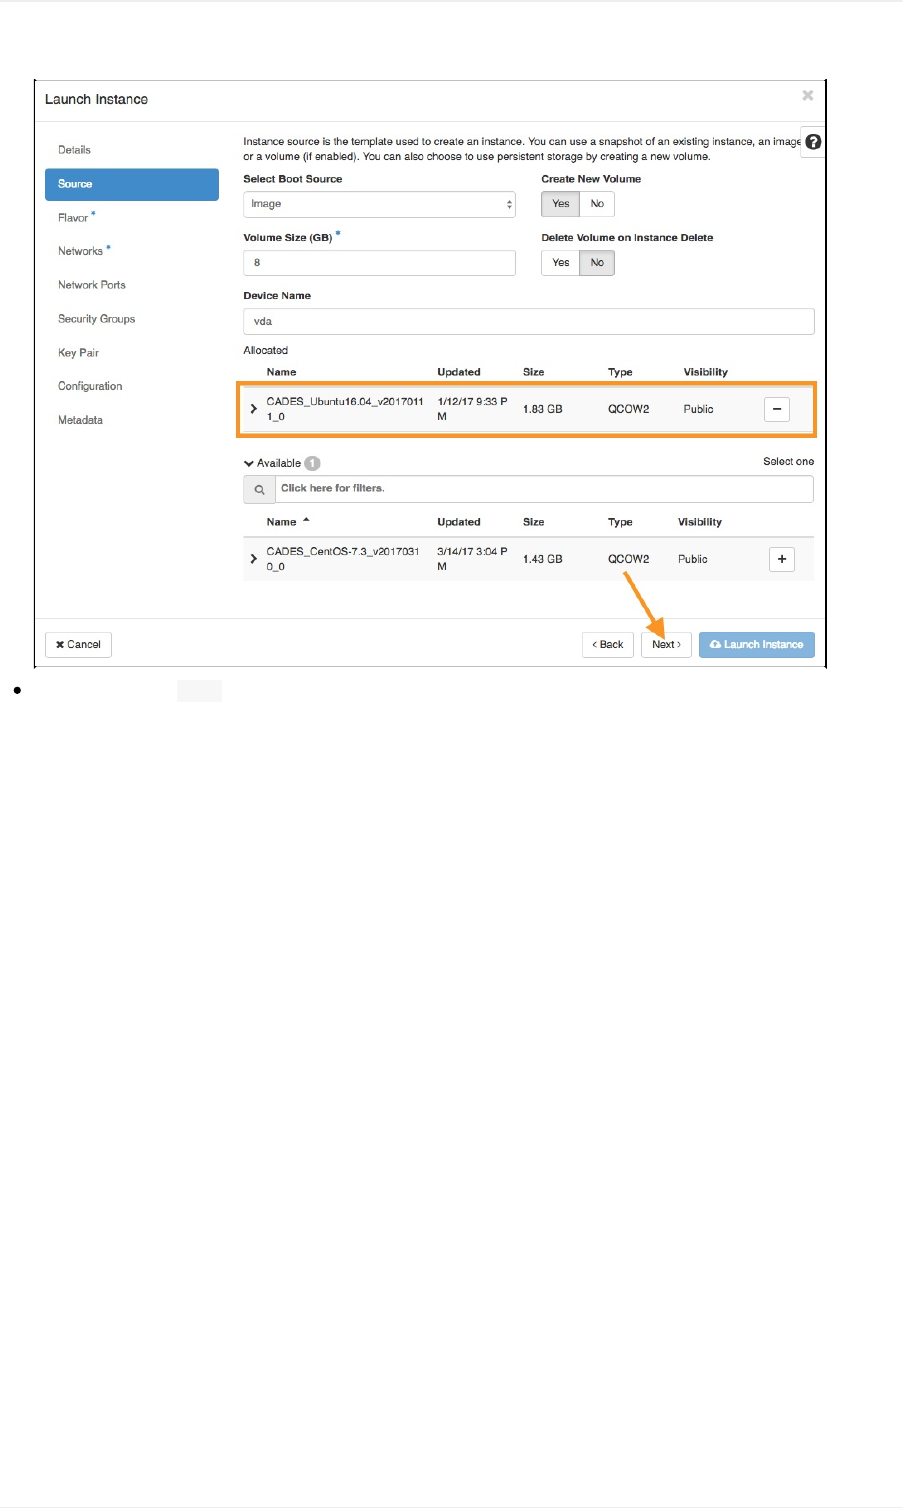
Oncefinished,clickNexttoproceedtothenextsection.
FlavorTab–ChooseanimageflavorforyourVMInstance.
ConfiguretheVM
31
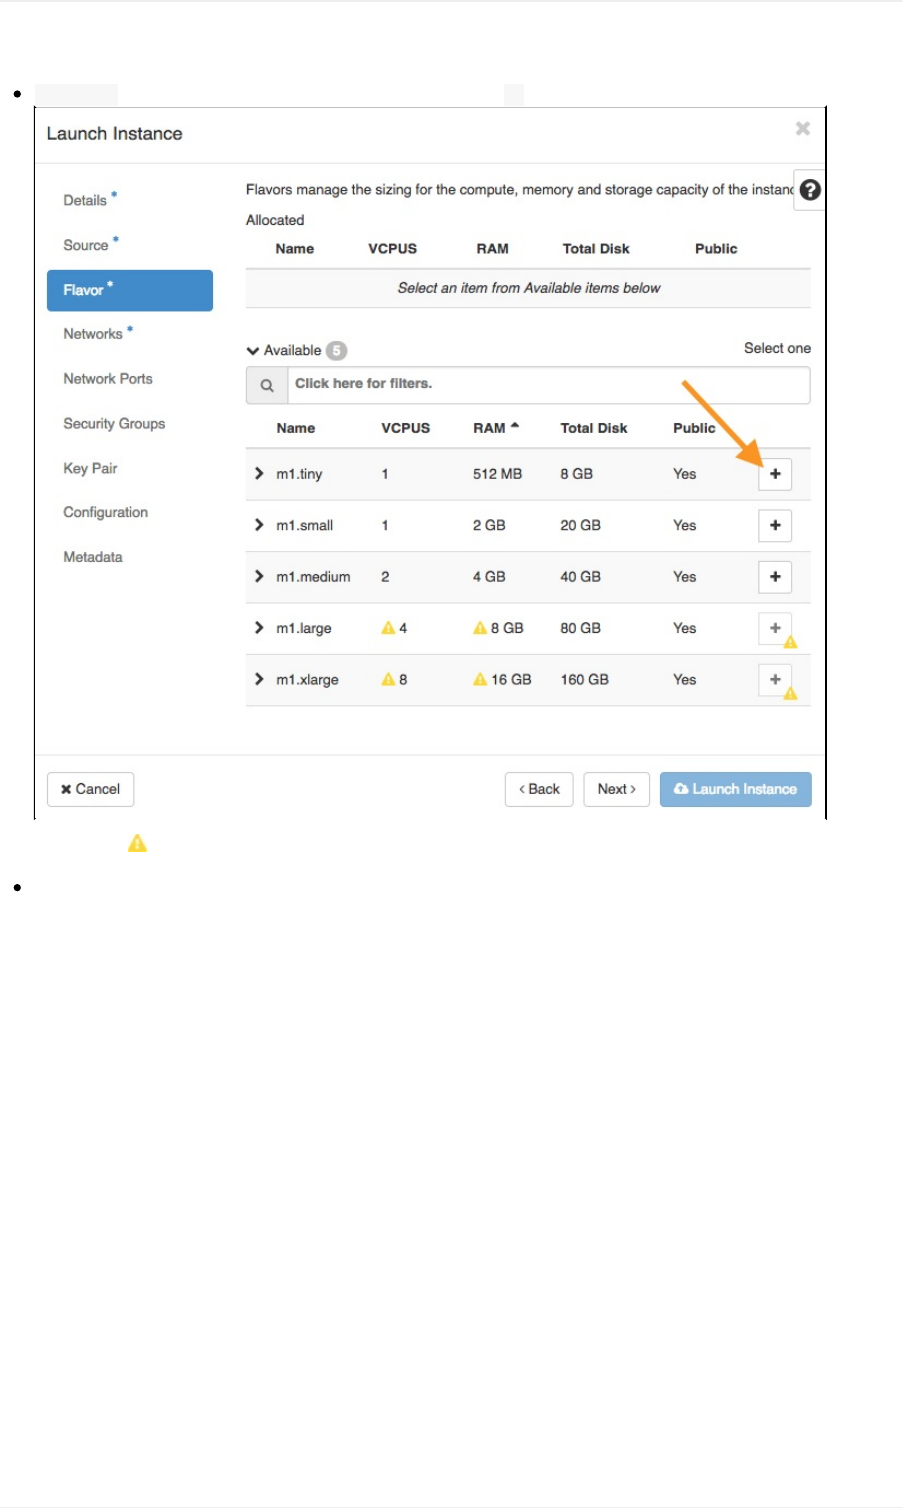
Available–Listofavailableimages.Chooseanimage,andclick+toaddittoyourallocation.
Note:The indicatesthatyourquotahasinadequateresourcesfortheimage.
Uponselection,thechosenimagewillmovetotheAllocatedlist.
ConfiguretheVM
32
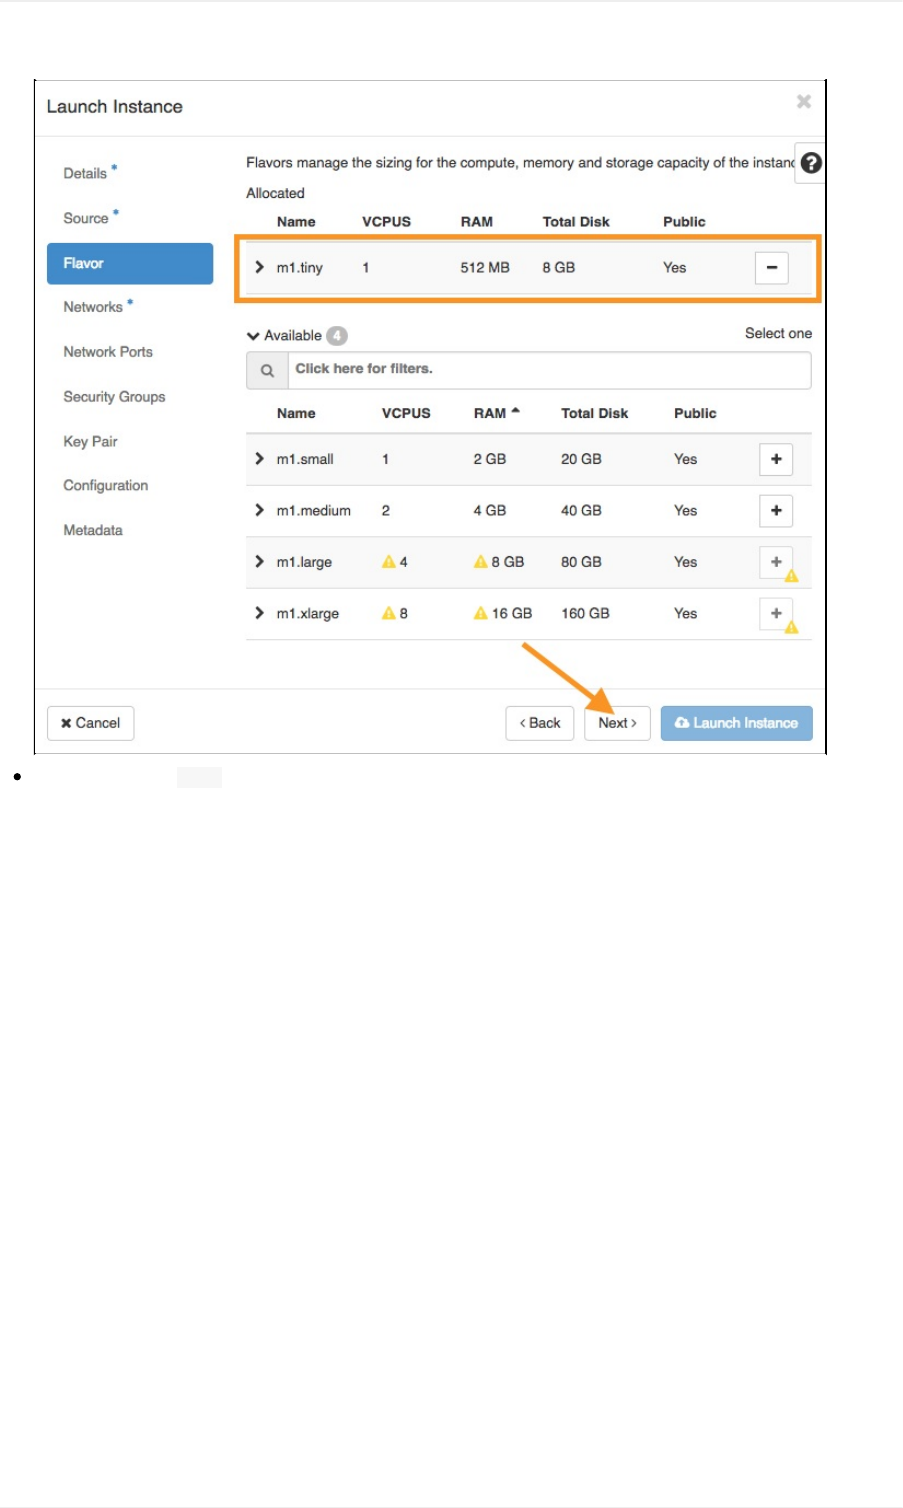
Oncefinished,clickNexttoproceedtothenextsection.
ConfiguretheVM
33

CADES→UserDocumentation→CADESCloudUserGuide→LaunchaVMInstance→Security
LaunchaVM:NetworksandSecurity
NetworksTab–ChooseanetworkforyourVMInstance.
Note:ContacttheCADESteamifyourequiremorethanoneIPfromeachNetwork.Additionally,ifyourneedsarenotmetby
followingthisguide,feelfreetoemailtheCADESteamtodiscussoptions.
Available–Listofavailablenetworks.Chooseoneoftworoutablenetworkconfigurations,andclick+toaddittoyour
allocation.
general_extnetwork1,128.219.184.0/21-AvailablefromoutsideORNL.However,outward-facingservices(e.g.,
SSH,webserver)willrequireORNLfirewallexceptions(instructions).
general_intnetwork1,172.22.0.0/20-InternaltoORNL.
Note:IfyouwishtorunservicesonyourVMInstancethatshouldbeavailableoutsideofORNL'snetwork,ensure
thatyouselecttheExternalNetworkoptionwhensettingupyourVMInstanceandthatyoualsoaddaruletoyour
SecurityGroupforthatparticularservice.
Forthisexample,wewillchoosetheexternalnetwork(general_extnetwork1).
Allocated–Uponselection,thechosennetworkwillmovetotheAllocatedlist.
Networks&Security
34
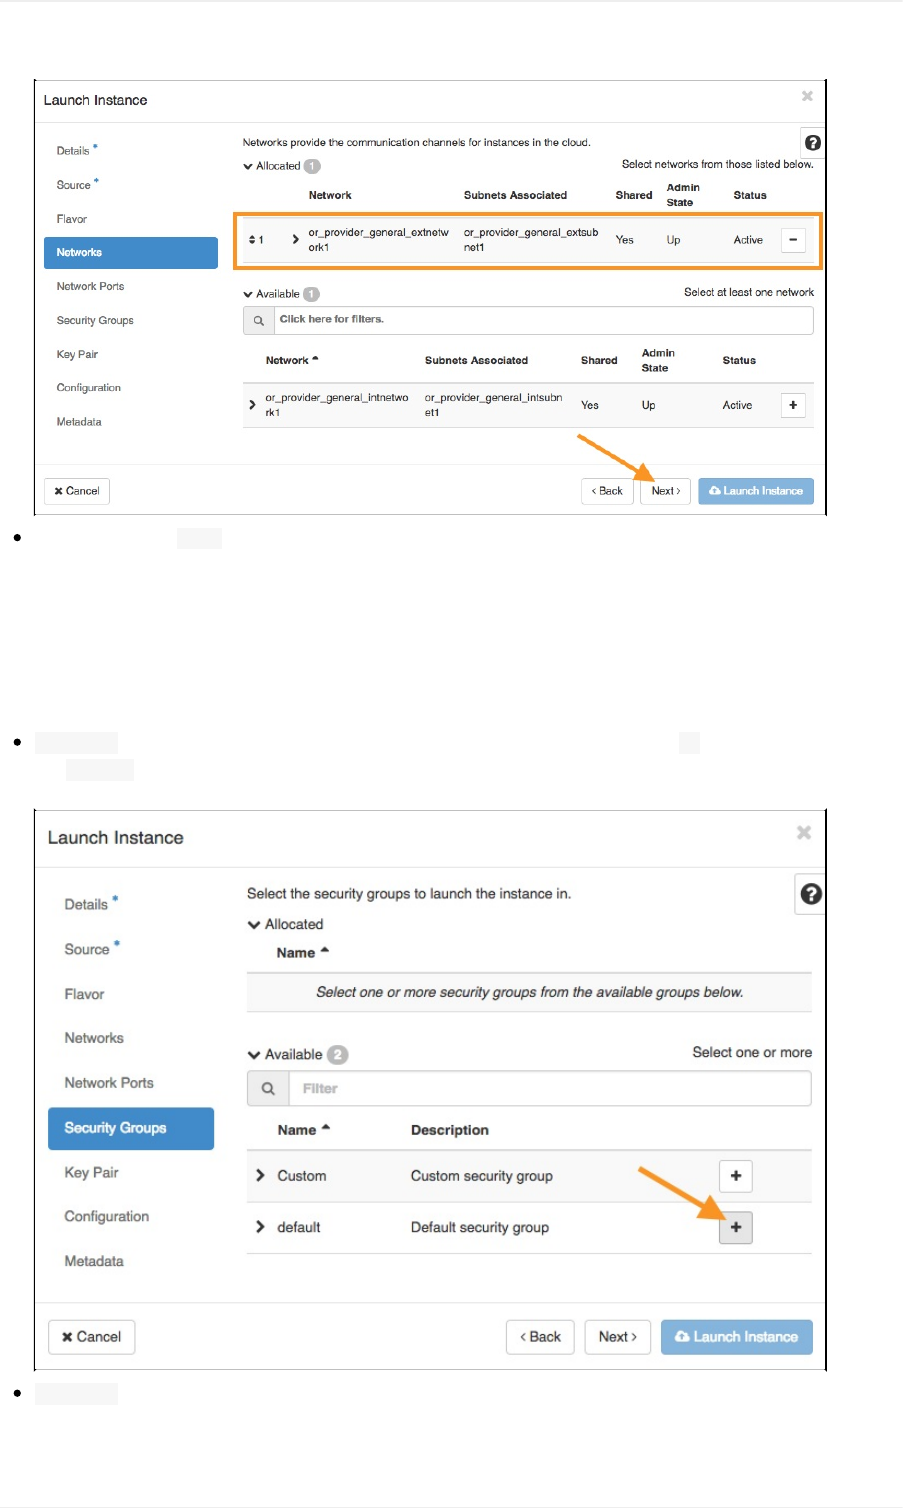
Oncefinished,clickNexttoproceedtothenextsection.
NetworkPortsTab–Nouserinputrequired.Skipthisstep.
SecurityGroupsTab-ChooseasecuritygroupforyourVMInstance.
Note:SkippingthisstepwillmakeyourVMInstanceunreachable!SeeadditionaldocumentationonSecurityGroups.
Available–Listofavailablesecuritygroups.ChoosethedesiredSecuritygroup,andclick+toaddittoyourallocation.
ThedefaultSecurityGroup,usedforthisexample,hasthebasicservicesyouneedtogetstarted.Userscanalsocreate
theirowncustomSecurityGroups.
Allocated–Uponselection,thechosenSecurityGroup(s)willmovetotheAllocatedlist.
Networks&Security
35
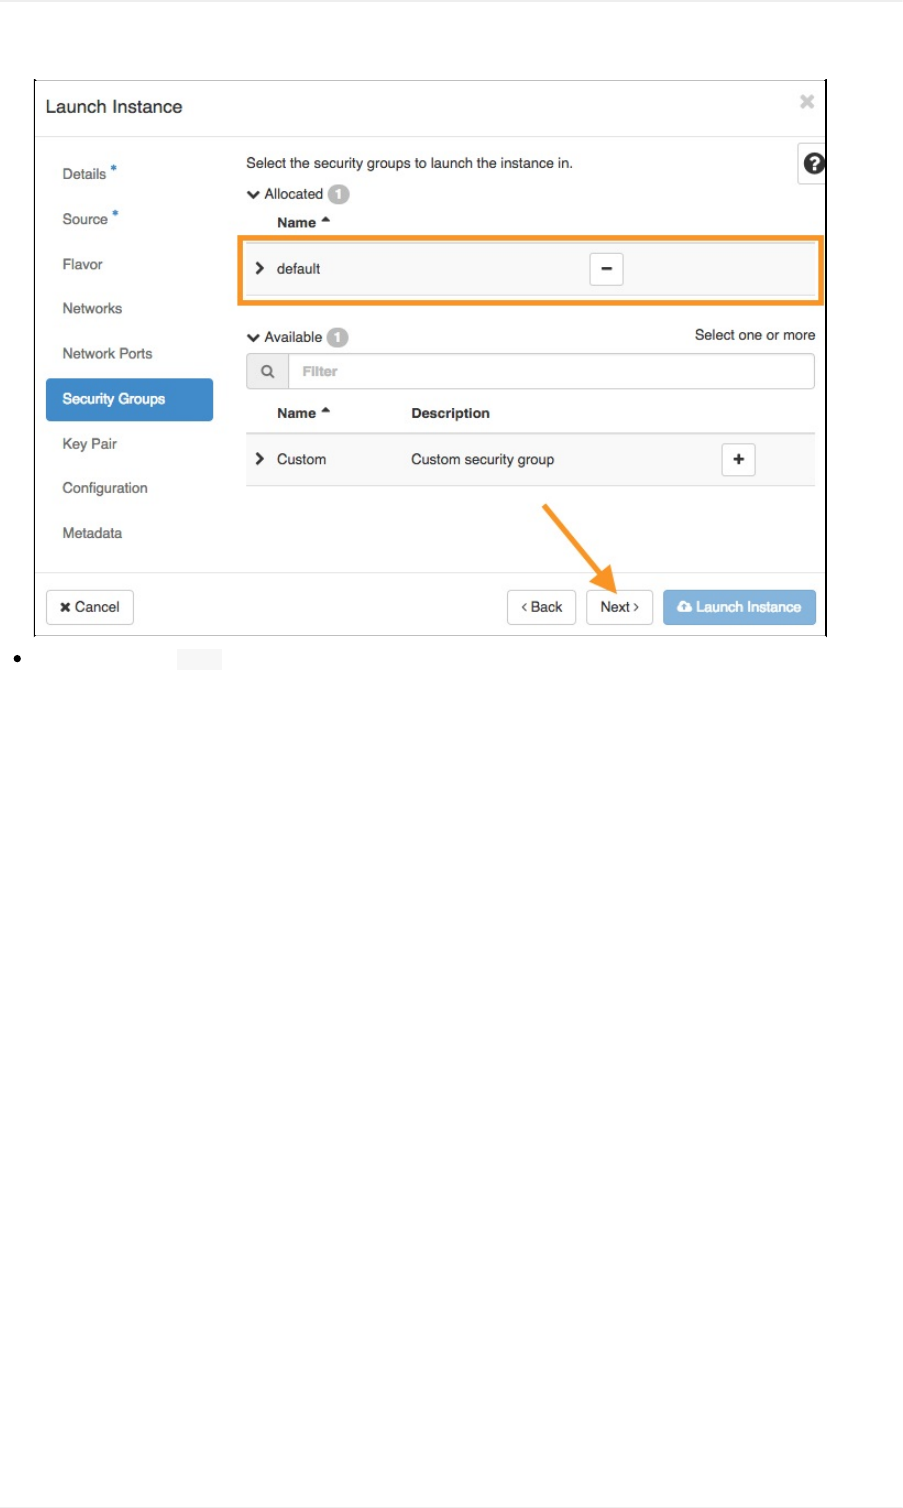
Oncefinished,clickNexttoproceedtothenextsection.
Networks&Security
36
CADES→UserDocumentation→CADESCloudUserGuide→LaunchaVMInstance→SSHKeys
LaunchaVM:KeyPairUse
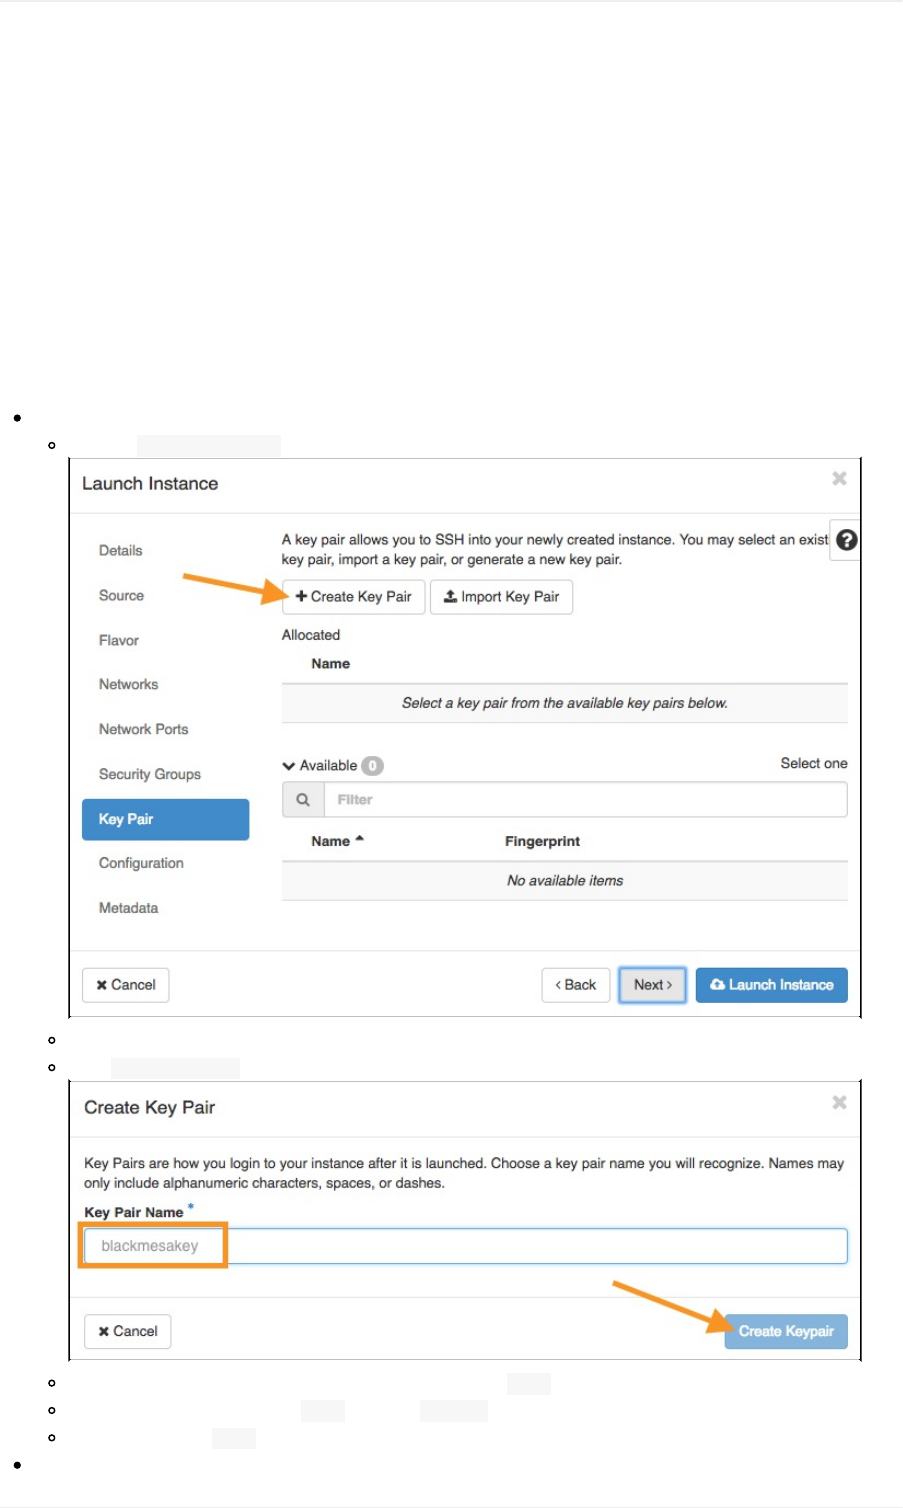
KeyPairTab–AnSSHkeypairisrequiredtoaccessyourVMInstance.
YoucancreateanewkeypairforthisInstance(Option1)orchooseakeypairfromtheAvailablelist(Option2).
Note:Beforedeciding,youshouldcheckyourlocalmachineforanexistingkeypair(instructions).Ifyouskipthisstep,the
instancewillnotallowyoutologin!
SeetheAccessyourVMInstanceUsingSSHdocumentationformoreinformation.
Option1:Createanewkeypairforthisinstance.
Clickthe+CreateKeyPairbutton.
Enteranameforyournewkeypairintheresultingdialog.
ClickCreateKeyPairtoassociatethisnewkeypairtoyourInstance.
Theprivatekeywillbedownloadedtoyourlocalmachineasa.pemfile.
Onyourlocalmachine,placethe.pemfileinthe~/.ssh/directory(instructions).
Oncefinished,clickNexttoproceedtothenexttab.
Option2:UseavailablekeypairforthisInstance.
KeyPairUse
37
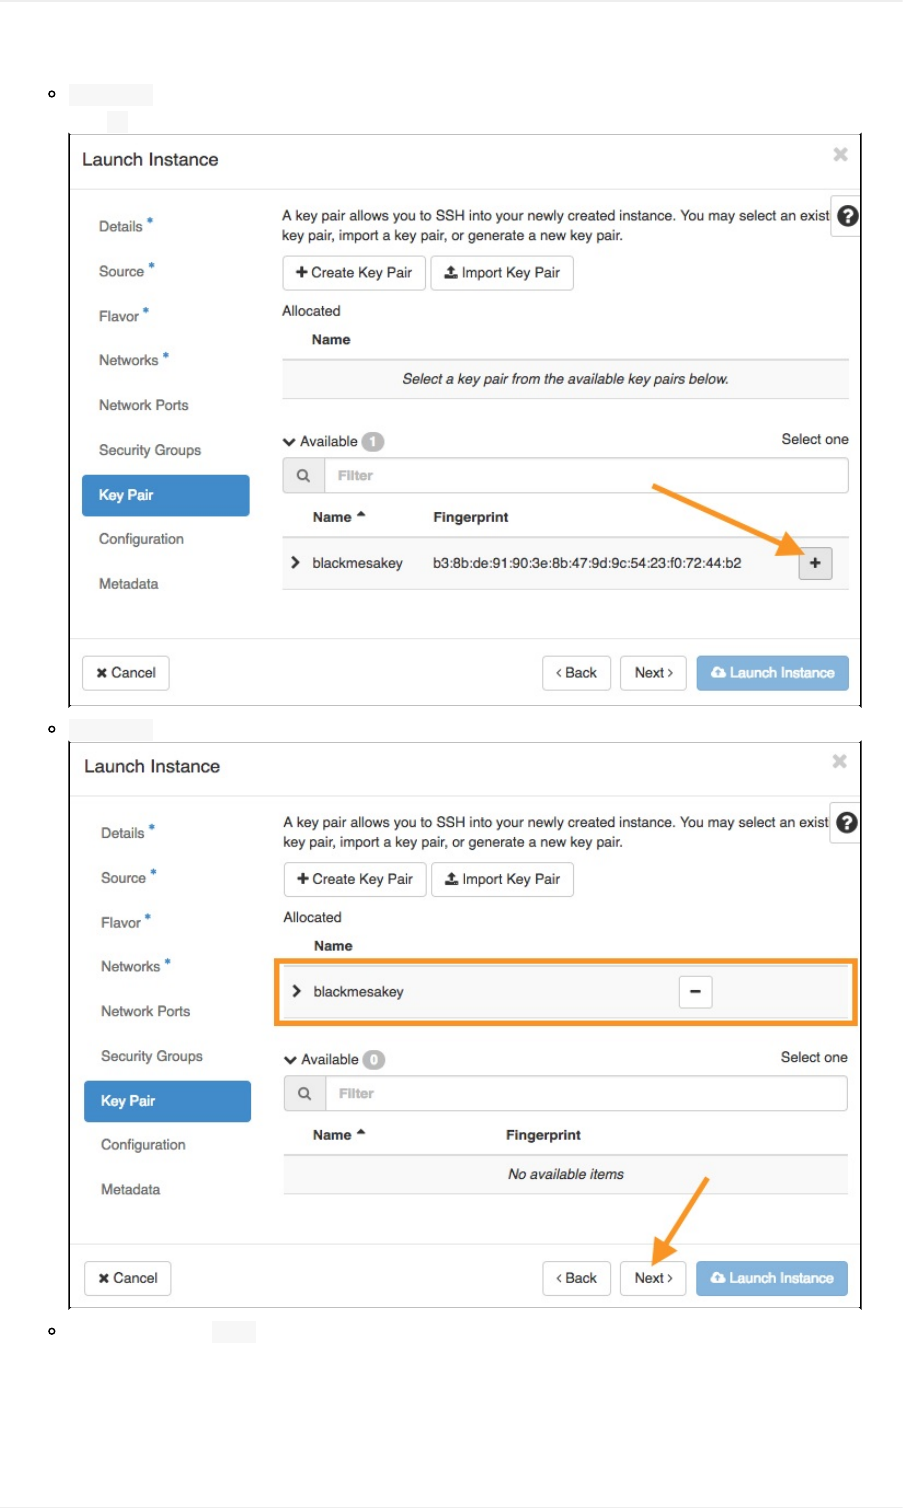
Available–Listofavailablekeypairsthatwerepreviouslygeneratedorimported.Choosethedesiredkeypair,and
click+toassociateitwithyourVMInstance.
Allocated–Uponselection,thechosenkeypairwillmovetotheAllocatedlist.
Oncefinished,clickNexttoproceedtothenexttab.
ConfigurationTab–Thissectionisnotrequiredfordeploymentandisnotcurrently
supportedbytheCADESteam.
KeyPairUse
38

MetadataTab–Nouserinputrequired.Skipthisstep.
ClickLaunchInstancewhenyouhavecompletedallrequiredsections.Congratulations!Anewinstancewillbelaunched.Once
fullyprovisioned,thestatuswillchangeto"Running,"andyoucanaccessyourVMInstanceusingSSH(instructions).
KeyPairUse
39

CADES→UserDocumentation→CADESCloudUserGuide→AccessVMInstances
AccessVMInstancesRunninginOpenStack
ThereareseveralwaysyoucanaccessyourVMInstances.
1. ThebestwaytoaccessyourVMInstanceisthroughanSSHconnection.
IfyouuseWindows:AccessYourVMInstanceUsingPuTTY
2. YoucanalsoaccesstheVMInstance'sterminalusingHorizon.
ButyoumustfirstcreateanewuserforthispurposeusingSSH.
Note:UCAMScredentialsandSSHkeypairsareunrelated,unconnectedauthenticationmethods.Auserwillonlybeprompted
foraUCAMSusernameandpasswordwhenheorshelogsintoHorizon.AllotherauthenticationreliesonSSHkeypairsor,in
thecaseofcreatingyourownnon-UCAMSusers,agenericuser-createdpassword.
Note:TousetheHorizonconsole,youmustfirstaddauserandpasswordtotheInstance'soperatingsystem(viaSSH)to
enableaccesstotheVMwithoutanSSHkey.
AccessVMInstances
40

CADES→UserDocumentation→CADESCloudUserGuide→AccessYourVMInstance→AccessYourVMInstanceUsing
SSH
AccessYourVMInstanceUsingSSH
OnceyouhavecreatedaVMInstanceusingHorizon,youcanaccessthisVMInstancethroughasecureshell(SSH)usinganSSH
keypair.ThefollowingtutorialwillwalkyouthroughconnectingtoyourVMInstancethroughSSHusingLinuxormacOS.
Ifyouhaveseveralusersthatrequireaccesstoasingleinstance,youmayrequesttheyextractandprovideyouwiththeirpublic
key,whichyoumayaddtoyourinstance's/home/cades/.ssh/authorized_keysfile.Doingsograntsaccess,astheusercades,
tothatinstance.Ifdesired,youmaycreatespecificlocalaccounts,withlimitedsudoroles,etc.ratherthanusethecadesuser
account.
WindowsuserswillhavetoinstallanSSHclientontheirmachine,andtheCADESteamrecommendsPuTTYforthispurpose.
TheCADESteamhascompiledaseparatetutorialforWindows/PuTTYusers,linkedbelow.
Howto: AccessVMInstancesUsingPuTTY(Windows)
IfyouwouldliketoaccessyourVMInstanceoverSSHfromoutsideoftheORNLnetwork,youmustfirstcreateafirewall
(SAFER)exception.Alllocal(withintheORNLnetwork)SSHconnectionsarepermittedbydefault.RequestaSAFERexception
withsource'VISITORS'andyourVM(s)asdestination.
TableofContents
AddSSHKeystoanInstance
CheckforExistingKeyPairs
GenerateaNewKeyPair
ImportExistingKey
ConnecttoYourVMInstanceUsingSSH
FindYourInstance'sIP
ConnecttoYourInstance
ExtractPublicKey
RelatedTutorials
AddSSHKeystoanInstance
Thefirststeptoaddingakeypairisactuallytocheckforexistingkeypairsonyourlocalmachine.Ifnokeypairsexist,thenyou
cangenerateanewkeyintheHorizonwebGUI.
Ifyoudohaveanexistingkeypaironyourmachine,thenyoucanimportthepublickeyusingtheHorizonwebGUI.
Alternatively,youcancreateanew(additional)keyforyourInstanceanduseaconfigfiletomanageyourSSHcredentials.
CheckforExistingKeyPairs
1. OpenaBashterminal.
2. Executels-al~/.ssh.
3. Checktheresultsofthedirectorylisting.
Ifthedirectorylistingisemptyorthedirectoryisnotfound,thenyoudonothaveanexistingSSHkeyandyoushouldfollowthe
procedureoutlinedinGenerateaNewKeyPair.
AccessYourVMInstanceUsingSSH
41
Ifthedirectorycontainsoneofthefileslistedbelow,thenyoudohaveanexistingSSHkey,andyoucanimportthepublickey
intoyourInstanceusingtheHorizonWebGUIbyfollowingtheprocedureoutlinedinImportExistingKey.
id_rsa.pub
d_dsa.pub
id_ecdsa.pub
id_ed25519.pub
GenerateaNewKeyPair
Generatethekeys
1. NavigatetotheHorizonwebinterfaceathttps://cloud.cades.ornl.gov/.
2. LoginwithyourUCAMScredentials.
Domain:ornl
UserName:Yourthree-letterUCAMSID
Password:YourUCAMSpassword
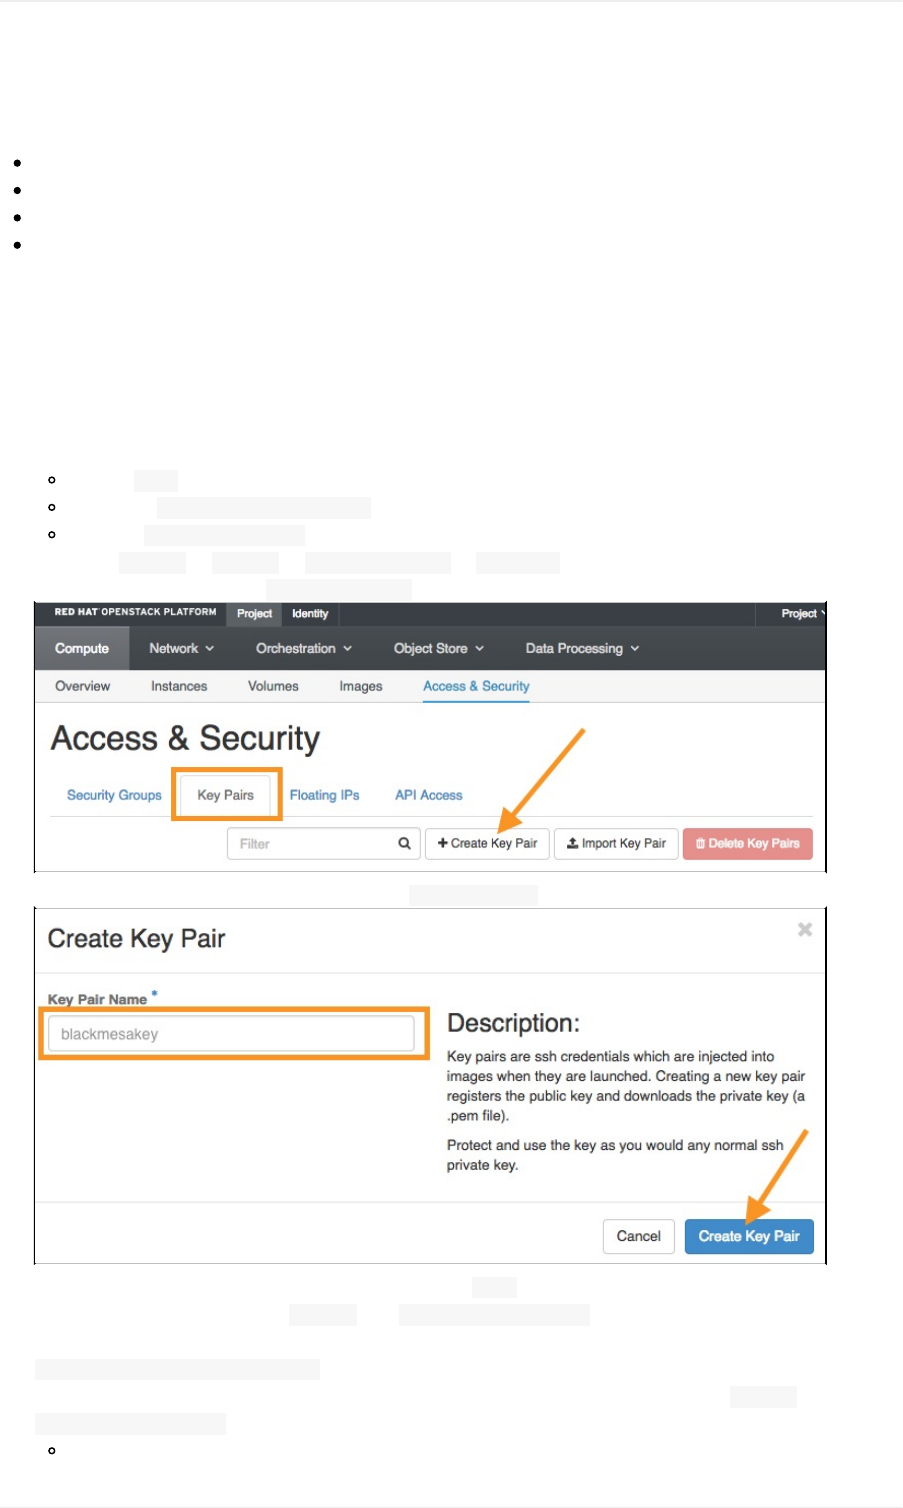
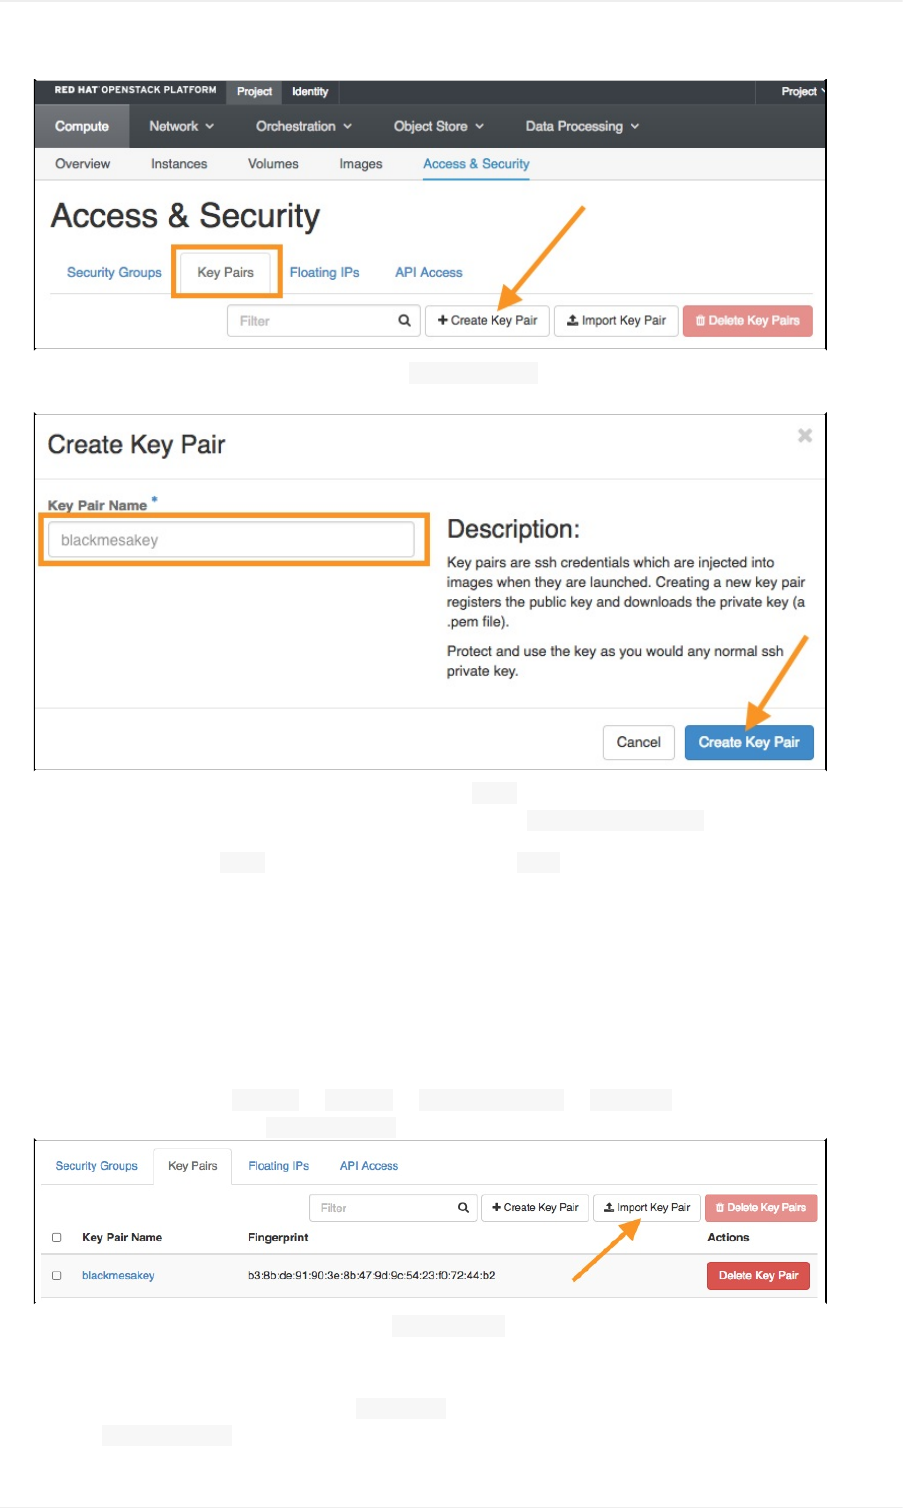
3. NavigatetoProject→Compute→Access&Security→KeyPairs.
4. IntheKeyPairsscreen,clickthe+CreateNewPairbutton.
5. Intheresultingdialog,nameyourKeyPair,andclickCreateKeyPairwhenyou'refinished.
6. Theprivatekeywillbedownloadedtoyourlocalmachineasa.pemfile.ThepublickeywillbestoredinOpenStack.
7. Placethedownloadedprivatekeyin~/.ssh/,e.g.,~/.ssh/blackmesakey.pem.
8. Securetheprivatekeybysettingthepermissionsto600inaBashterminal.
$chmod600~/.ssh/blackmesakey.pem.
9. Copy(fromHorizon[OptionA])orgenerate(Bashterminal[OptionB])thepublickeyandplacein~/.ssh/,e.g.,
~/.ssh/blackmesakey.pub.
CopypublickeyfromHorizon(OptionA)
AccessYourVMInstanceUsingSSH
42
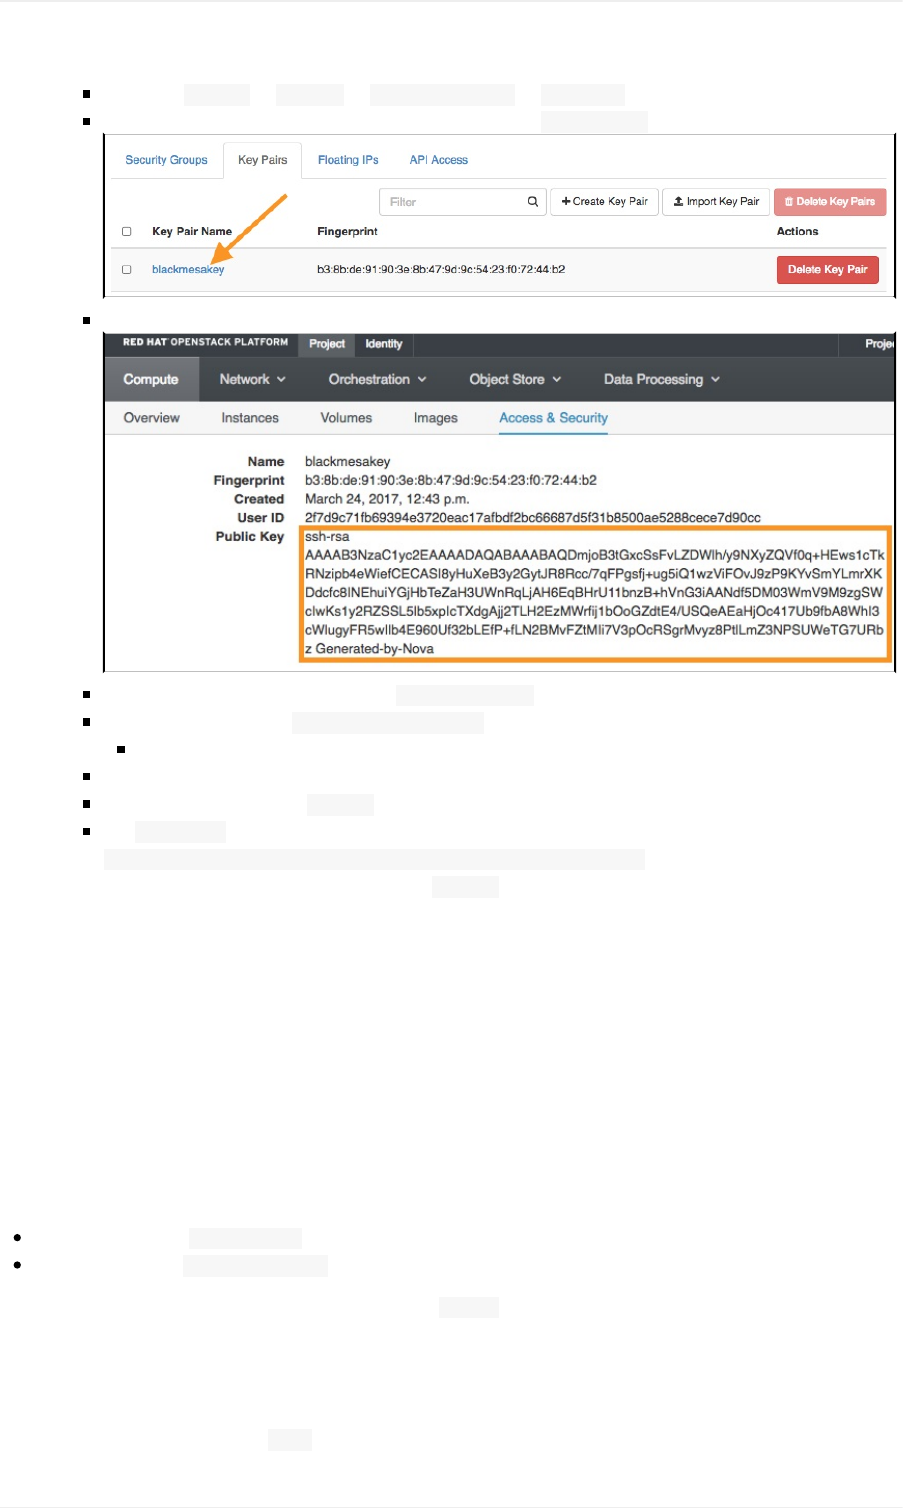
NavigatetoProject→Compute→Access&Security→KeyPairs
IntheKeyPairsscreen,clickontheKeyPairyoujustcreated(blackmesakey).
Intheresultingscreen,copytheentirepublickey(outlinedinorangebelow).
Usingatexteditor,createanewfile(e.g.,blackmesakey.pub)andpastethepublickeyintothisfile.
Save/movethisnewfileto~/.ssh/blackmesakey.pub.
GeneratepublickeyusingaBashterminal(OptionB)
OpenaBashterminal.
Ensureyourprivatekeyisin~/.ssh/.
Usessh-keygentogenerateyourpublickey:
$ssh-keygen-y-f~/.ssh/blackmesakey.pem>~/.ssh/blackmesakey.pub.
10. Ensurethatbothyourpublicandyourprivatekeysarein~/.ssh/.
Note:Havingcompletedtheprocedureabove,youcannowconnecttoyourInstanceviaSSHusingalong-formlogin
(instructions)oryoucantakethesenewlygeneratedkeysandplacetheminyourlocalsystem'sdefaultfiles(instructions).
Placekeysonlocalmachine
IfyouprefertoleavetheKeyPairasitis—asdocumentedabove—youcanskipthefollowingstepsandusealong-formSSH
loginthatspecifiesthepublickey'slocationandfilenameforeachloginattempt.Clickhereforinstructions.
However,ifyouwishtologinwithoutspecifyingthekeylocationwitheachauthenticationattempt,youcanputyourpublicand
privatekeysintheirdefaultlocationonyourlocalsystem.
KeylocationsforLinuxandmacOS:
Privatekeyshouldbe~/.ssh/id_rsa.
Publickeyshouldbe~/.ssh/id_rsa.pub.
Note:Sincewearegeneratingnewkeys,thesefiles(andthe/.ssh/directory)maynotexistonyourlocalmachine.
PlacethePrivatekey
1. Createanewfileusingatexteditor.
2. Copyyourprivatekeyfromyour.pemfileandpasteitintothisnewfile.
AccessYourVMInstanceUsingSSH
43
3. Savethenewfileasid_rsaandplaceitin~/.ssh/.
Createthe/.ssh/directorywithin~/ifnecessary.
4. Setpermissionsonthisnewfileusing$chmod600~/.ssh/id_rsa.
PlacePublickey
1. Createanewfileusingatexteditor.
2. CopyyourpublickeyfromtheHorizonwebGUI(instructions).
3. Savethenewfileasid_rsa.pubandplaceitin~/.ssh/.
ImportExistingKey
IfyouhaveanexistingkeypairthatyouwouldliketoalsouseforyourOpenStackProject,thenyoucanimportthepublickey
usingtheHorizonwebGUI.
1. NavigatetotheHorizonwebinterfaceathttps://cloud.cades.ornl.gov/.
2. LoginwithyourUCAMScredentials.
Domain:ornl
UserName:Yourthree-letterUCAMSID
Password:YourUCAMSpassword
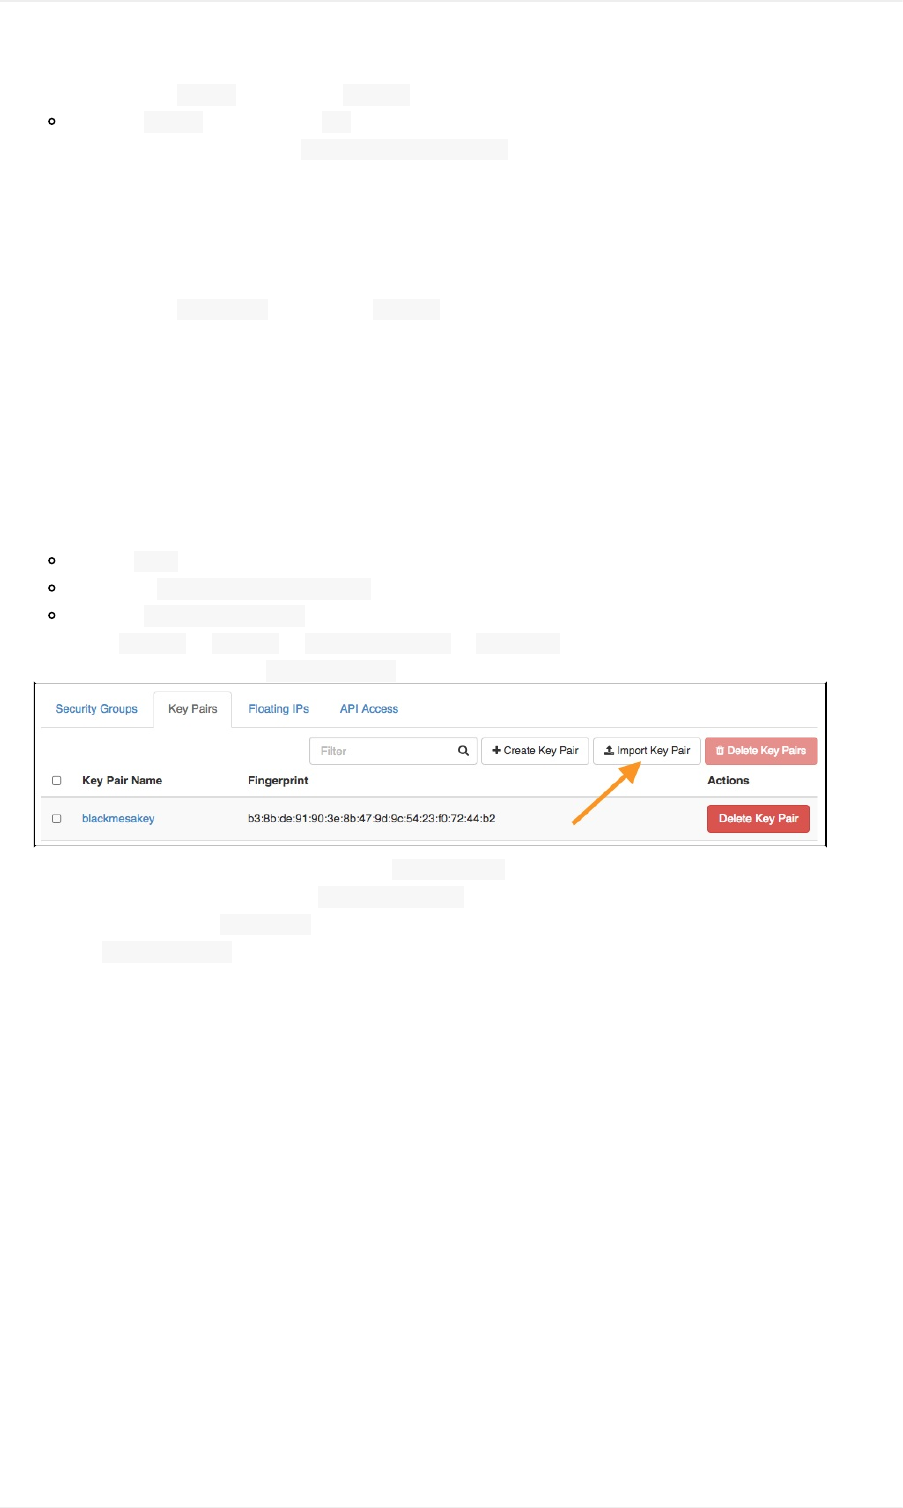
3. NavigatetoProject→Compute→Access&Security→KeyPairs.
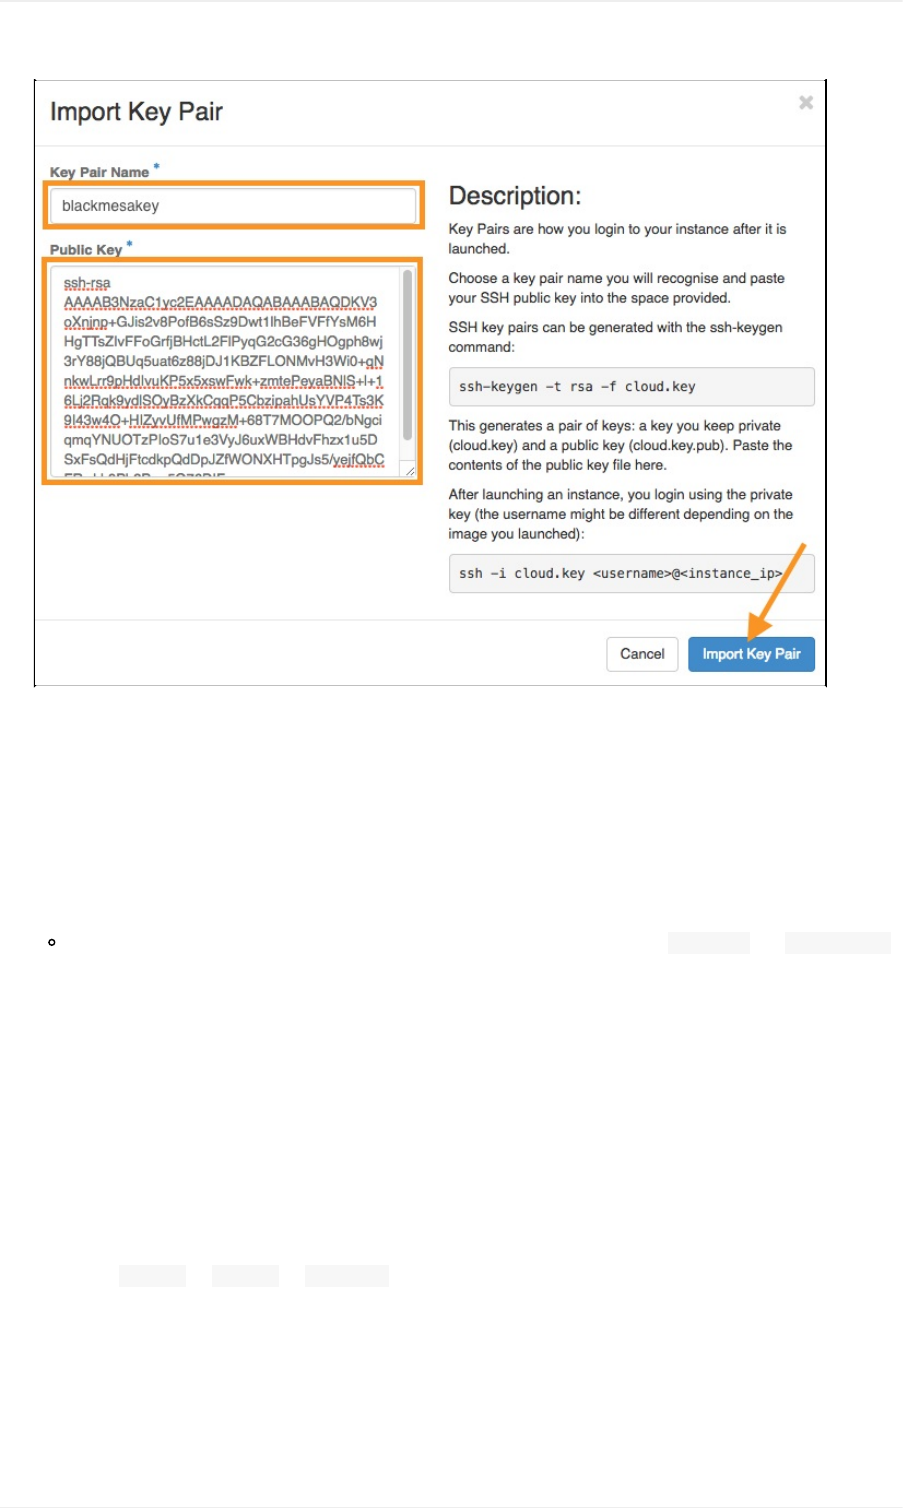
4. IntheKeyPairsscreen,clicktheImportKeyPairbutton.
5. Intheresultingdialog,enterakeypairnameintheKeyPairNamefield.
6. Copyyourpublickeyfromthefile(e.g.,~/.ssh/id_rsa.pub)onyourlocalmachine.
7. PastethepublickeyinthePublicKeytextbox.
8. ClicktheImportKeyPairbutton.
AccessYourVMInstanceUsingSSH
44
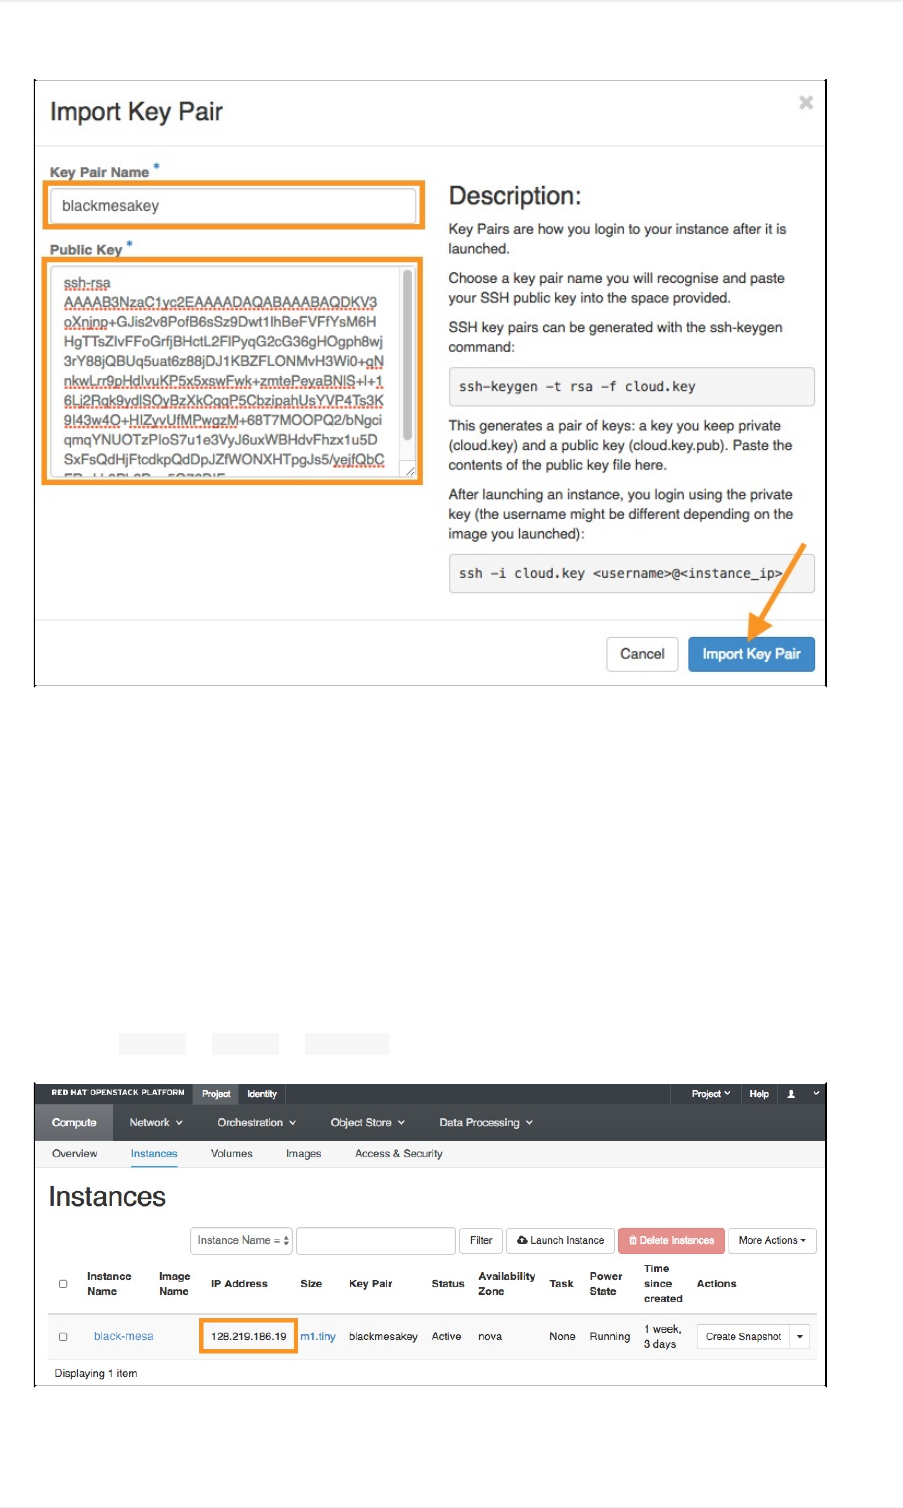
9. ConfirmyournewlyimportedkeyappearsintheKeyPairlist.
ConnecttoYourVMInstanceUsingSSH
AllVMInstanceshaveSSHaccessenabledbydefault.Useyourkeypairandtheusername"cades"forauthentication.SSHto
yourInstanceusingtheKeyPairyouconfiguredabove.
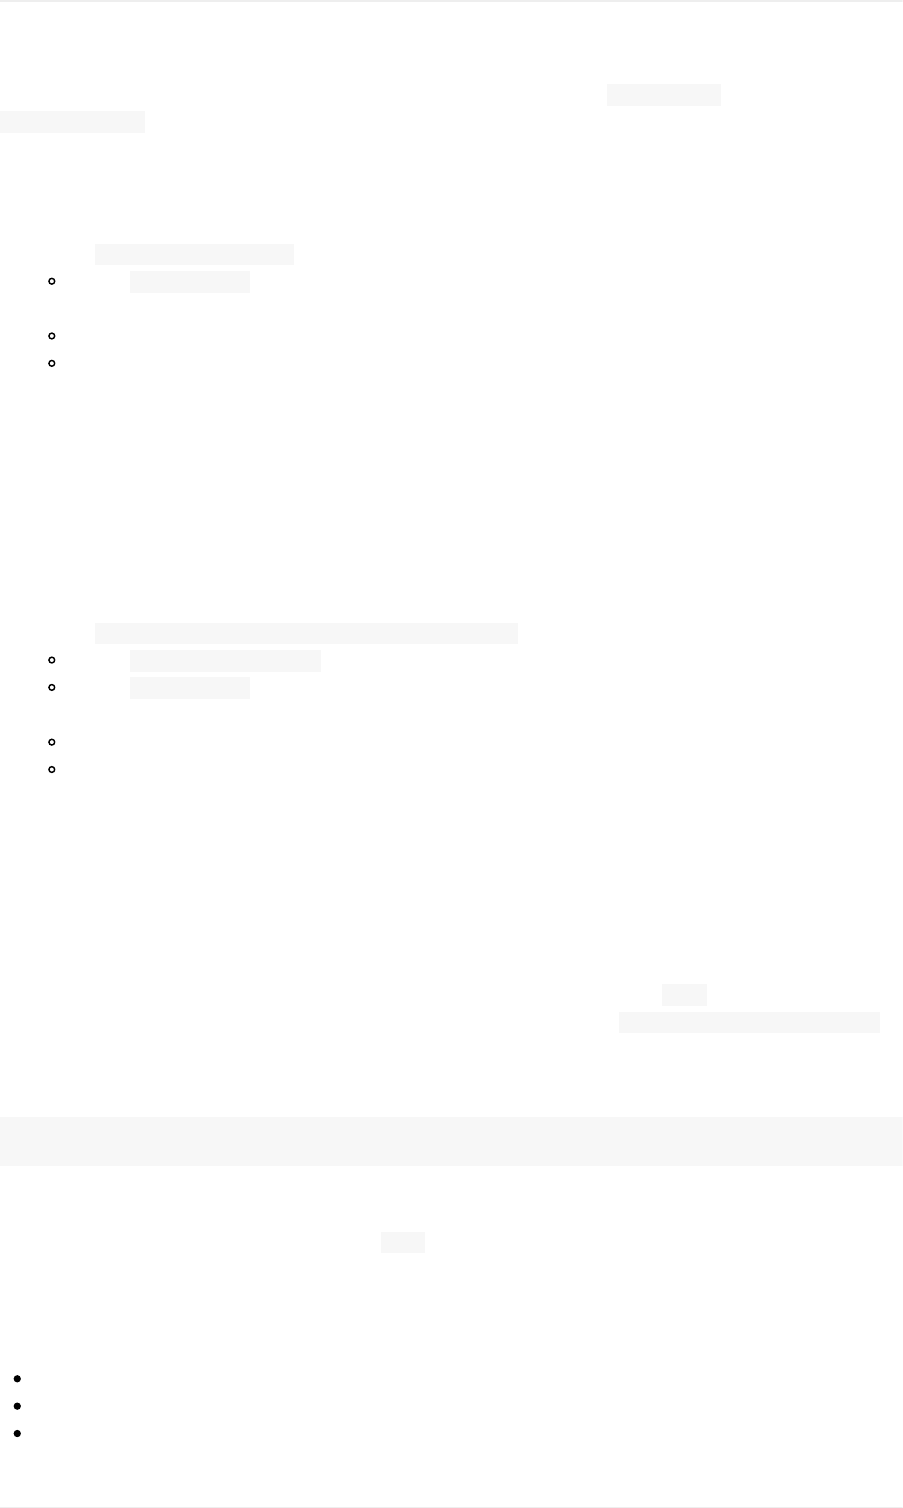
FindYourInstance'sIP
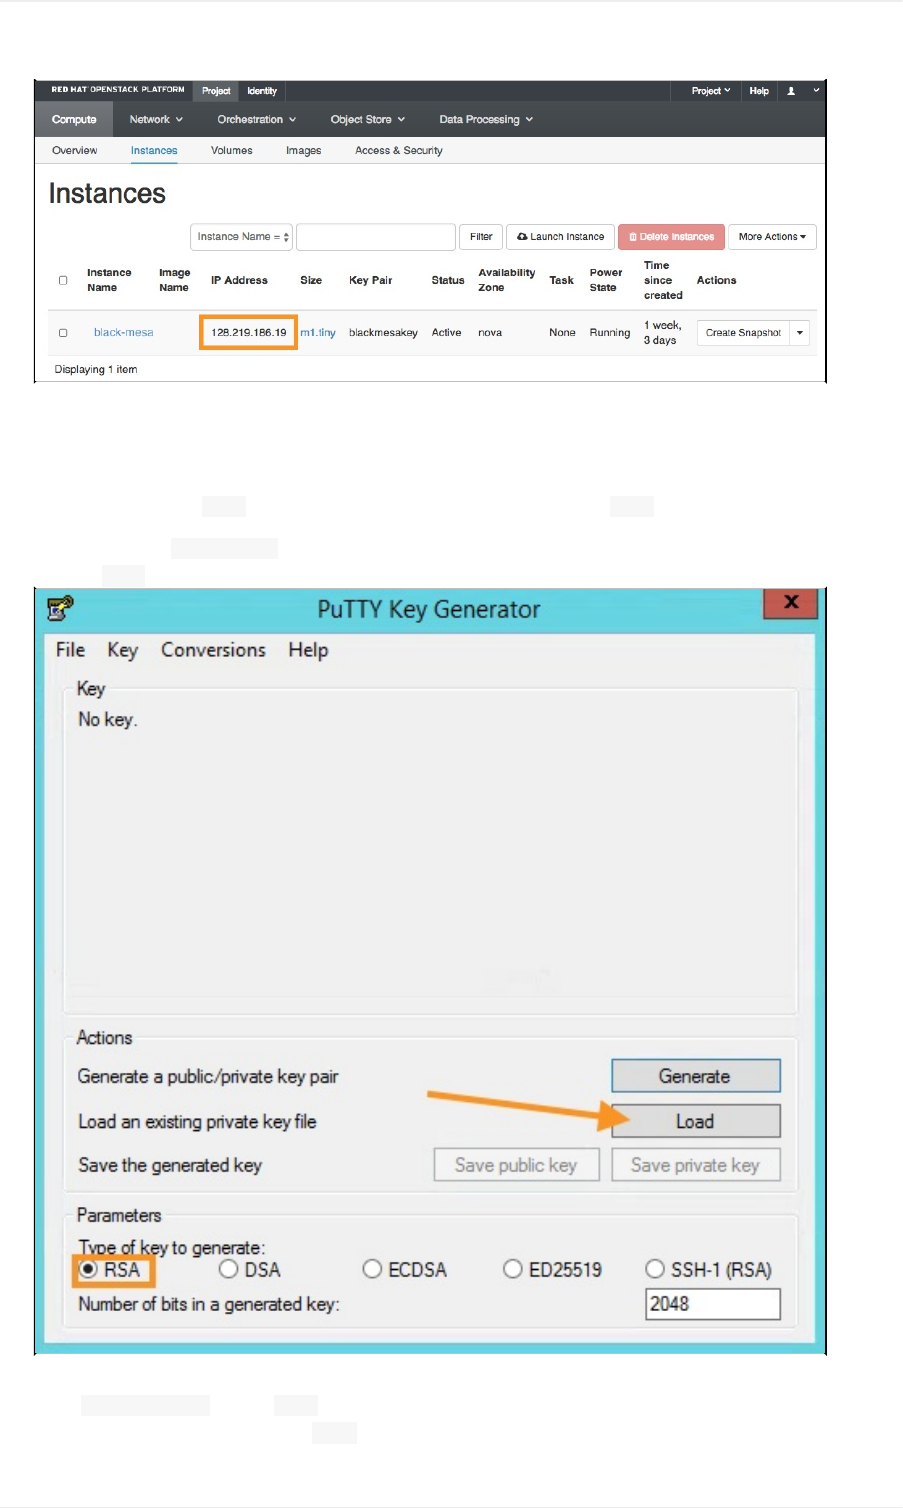
TheIPaddressofyourVMinstanceisshownintheInstancestabintheHorizonwebGUI.
1. NavigatetoProject→Compute→Instances.
2. FromtheInstancesscreen,youcancopytheIPaddressforthedesiredVMInstance.
ConnecttoYourInstance
AccessYourVMInstanceUsingSSH
45
OnceyouhavedeterminedtheIPaddressofyourVMInstanceandplacedyourkeysin~/.ssh/id_rsaand
~/.ssh/id_rsa.pub,youcanconnectusingasimpleSSHcommandwhere"cades"isalwaystheuser.
Standardlogin
1. OpenaBashterminal.
2. Executesshcades@128.219.186.19.
Replace128.219.186.19withtheIPaddressofyourownInstance.
3. YoushouldnowbeconnectedtoyourVMInstanceviaSSH.
UsetheBashterminaltoinstallyoursoftware-stackandperformwork.
YoucanalsoaddusercredentialstoyourVMInstancetograntaccesstootherusers.
Note:InanewlycreatedInstance,"cades"istheonlyusernamethatwillcorrectlyauthenticateoverSSH(usinganSSHkey
pair).Ausercanaddmoreusers,andaddpublickeysforeach,onceloggedinas"cades"(instructions).
Long-formlogin
Ifyouprefertospecifyyourkeylocationduringlogin(e.g.,youdownloadedyourkeyfromtheHorizonwebGUI),youcanusea
long-formSSHlogin.
1. OpenaBashterminal.
2. Execute$ssh-i~/.ssh/blackmesakey.pemcades@128.219.186.19.
Replace~/.ssh/blackmesakey.pemwiththefilepathofyourkey.
Replace128.219.186.19withtheIPaddressofyourownInstance.
3. YoushouldnowbeconnectedtoyourVMInstanceviaSSH.
UsetheBashterminaltoinstallyoursoftware-stackandperformwork.
YoucanalsoaddusercredentialstoyourVMInstancetograntaccesstootherusers.
Note:InanewlycreatedInstance,"cades"istheonlyusernamethatwillcorrectlyauthenticateoverSSH(usinganSSHkey
pair).Ausercanaddmoreusers,andaddpublickeysforeach,onceloggedinas"cades"(instructions).
ExtractPublicKey
Ifyouhaveseveralusers,youcanshareyourpublickeywiththem.Newusersmustloginusingtheusername'cades'togain
accesstotheinstance,oryoucancreateanotheruseraccountforthem.Onceauserextractsthe.pubfiletheycansafelyshare
withanotherOpenStackuser.Thereceivingusercanaddthatpublickeytotheinstance's/home/cades/.ssh/authorized_keys
file.
Toextractthepublickeyfromtheprivatekey:
opensslrsa-inprivkey.pem-pubout>key.pub
Inthisway,throughexchangingpublickeys,userscancontrolwhohasSSHaccesstotheirinstances.
Usersshouldrefrainfrominsecurelysendingsomeone.pemfilesastheycontainsbothpublicandprivatekeys.
RelatedTutorials
AddMoreUserstoVMInstances
AccessVMInstancesUsingPuTTY(Windows)
AccessYourVMInstancesUsingHorizon
AccessYourVMInstanceUsingSSH
46

AccessYourVMInstanceUsingSSH
47

CADES→UserDocumentation→CADESCloudUserGuide→AccessYourVMInstance→AccessYourVMInstanceUsing
PuTTY(Windows)
AccessYourVMInstanceUsingPuTTY(Windows)
OnceyouhavecreatedaVMInstanceusingHorizon,youcanaccessthisVMInstancethroughasecureshell(SSH)usinganSSH
keypair.ForWindowsusers,theCADESteamrecommendsPuTTY.ThePuTTYMSIinstalleralsoincludesPuTTYGen,which
allowsyoutoconverta.pemprivatekeyfiletoa.ppkPuTTYkeyfile.
IfyouwouldliketoaccessyourVMInstanceoverSSHfromoutsideoftheORNLnetwork,youmustfirstcreateafirewall
(SAFER)exceptionforthispurpose.Alllocal(withintheORNLnetwork)SSHconnectionsarepermittedbydefault.
TableofContents
AddSSHKeystoaVMInstance
GenerateaNewKeyPair
ImportanExistingKey
DownloadandInstallPuTTY
ConnecttoYourVMInstanceUsingPuTTY
FindYourInstance'sIP
ConnecttoYourInstance
RelatedTutorials
AddSSHKeystoaVMInstance
IfyoudonothaveanyexistingSSHkeypairs,oryouwishtogenerateanewkeypairforyourVMInstance,thenyoushoulduse
theHorizonwebGUItogenerateanewSSHkeypair(Option1).Ifyoudohaveanexistingkeypaironyourmachine,thenyou
canimportthepublickeyusingtheHorizonwebGUI(Option2).
Ineithercase,youwillneedtologintotheHorizonwebGUItoassociateyourSSHkeywithyourVMInstance(s).
LogintoHorizon
1. NavigatetotheHorizonwebinterfaceathttps://cloud.cades.ornl.gov/.
2. LoginwithyourUCAMScredentials.
Domain:ornl
UserName:Yourthree-letterUCAMSID
Password:YourUCAMSpassword
Option1:GenerateaNewKeyPair
1. WithinHorizon,navigatetoProject→Compute→Access&Security→KeyPairs.
2. IntheKeyPairsscreen,clickthe+CreateNewPairbutton.
AccessYourVMInstanceUsingPuTTY(Windows)
48
3. Intheresultingdialog,nameyourKeyPair,andclickCreateKeyPairwhenyou'refinished.Wewentwith
blackmesakeyinthisexample.
4. Theprivatekeywillbedownloadedtoyourlocalmachineasa.pemfile.ThepublickeywillbestoredinOpenStack.
5. Placethedownloadedprivatekeyinadirectoryofyourchoosing,e.g.,C:\Users\Username\SSH.
Note:Theprivatekeyisina.pemformatandhastobeconvertedtoa.ppkfileusingPuTTYGen.
Havingcompletedtheprocedureabove,youcannowconnecttoyourInstanceusingPuTTY.
Option2:ImportanExistingKey
IfyouhaveanexistingkeypairthatyouwouldliketoalsouseforyourOpenStackProject,thenyoucanimportthepublickey
usingtheHorizonwebGUI.
1. WithinHorizon,navigatetoProject→Compute→Access&Security→KeyPairs.
2. IntheKeyPairsscreen,clicktheImportKeyPairbutton.
3. Intheresultingdialog,enterakeypairnameintheKeyPairNamefield.
4. Onyourlocalmachine,locateyourpublickeyfileandopenitwithatexteditor.
5. Copythekeytoyourclipboardusingthetexteditor.
6. BackinHorizon,pastethepublickeyintothePublicKeytextbox.
7. ClicktheImportKeyPairbutton.
AccessYourVMInstanceUsingPuTTY(Windows)
49
8. ConfirmyournewlyimportedkeyappearsintheKeyPairlist.
Havingcompletedtheprocedureabove,youcannowconnecttoyourInstanceusingPuTTY.
DownloadandInstallPuTTY
1. NavitagetotheofficialPuTTYdownloadpage.
2. DownloadtheappropriateMSIfileforyourWindowssystem(32bitor64bit).
Alternatively,ifyoudon'twantto"install"PuTTYonyoursystem,youcandownloadputty.exeandputtygen.exe
fromthe"Alternativebinaryfiles"listandexecutethemasneeded.
3. RunthePuTTYMSIinstaller.Notethedestinationdirectory.
4. ConfirminstallationofPuTTYexecutables.
ConnecttoYourVMInstanceUsingPuTTY
FindYourInstance'sIP
TheIPaddressofyourVMinstanceisshownintheInstancestabintheHorizonwebGUI.
1. NavigatetoProject→Compute→Instances.
2. FromtheInstancesscreen,youcancopytheIPaddressforthedesiredVMInstance.
AccessYourVMInstanceUsingPuTTY(Windows)
50
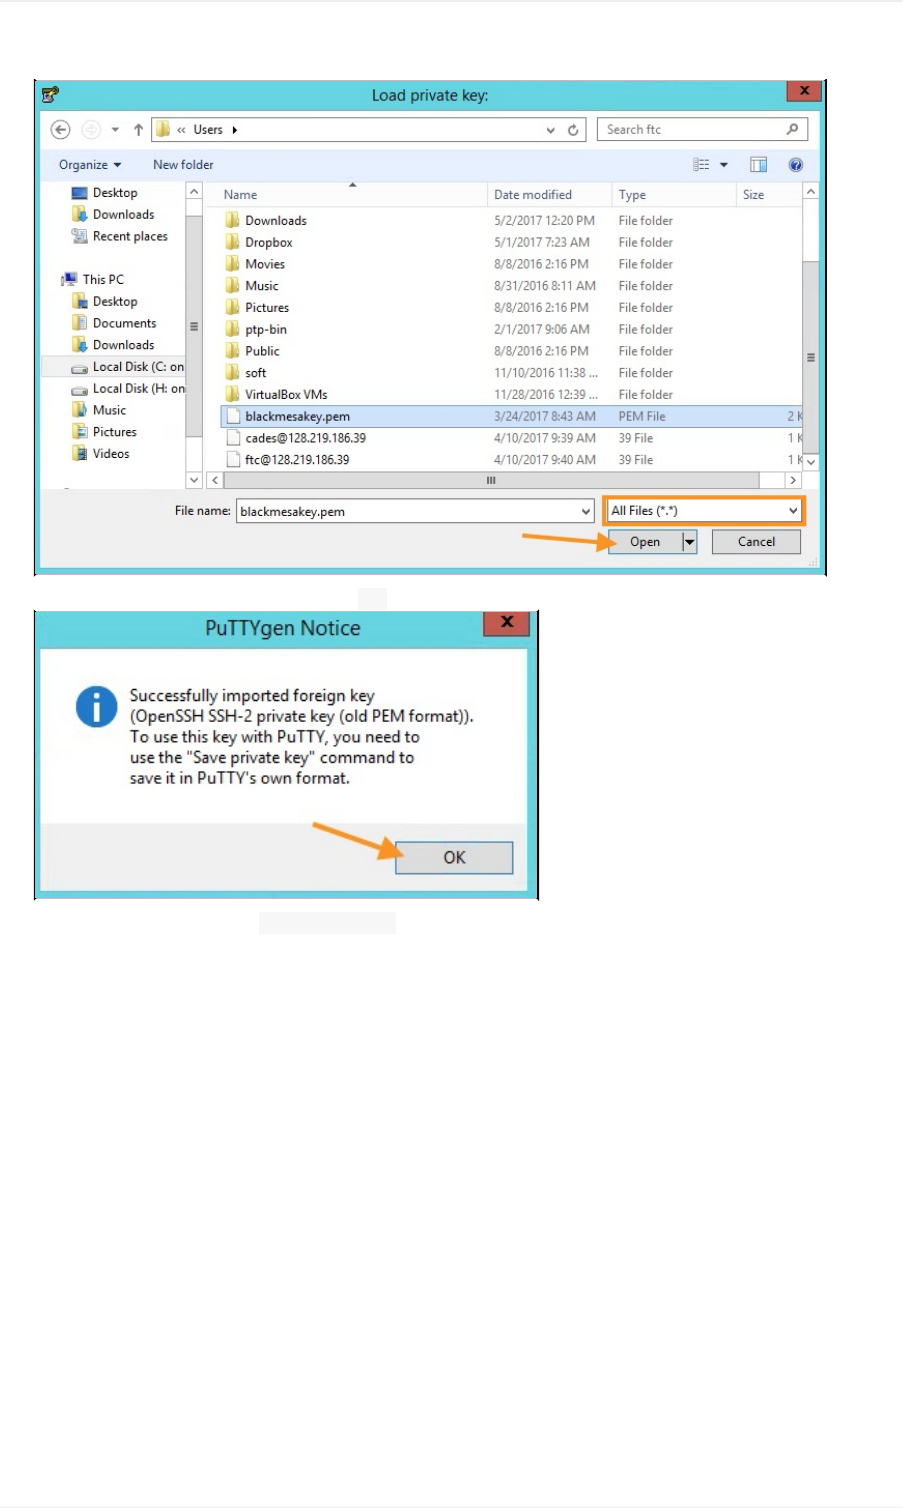
ConvertYourPrivateKeytoPuTTYFormat
Ifyougeneratedakeyinthe.pemfileformat,thenyouneedtoconvertthatkeytothe.ppkformatusingPuTTYGen.
1. LocateandexecutePuTTYGen.exe.
2. ClicktheLoadbutton.
3. Intheresultingdialog,navigatetothelocationofyourkeyfile.
4. SelectAllFiles(*.*)toshow.pemfilesinthedialog.
5. SelecttheappropriatekeyfileandclickOpen.
AccessYourVMInstanceUsingPuTTY(Windows)
51
6. Whenpromptedbythesuccessmessage,clickOK.
7. SavetheloadedkeybyclickingSaveprivatekey.
AccessYourVMInstanceUsingPuTTY(Windows)
52
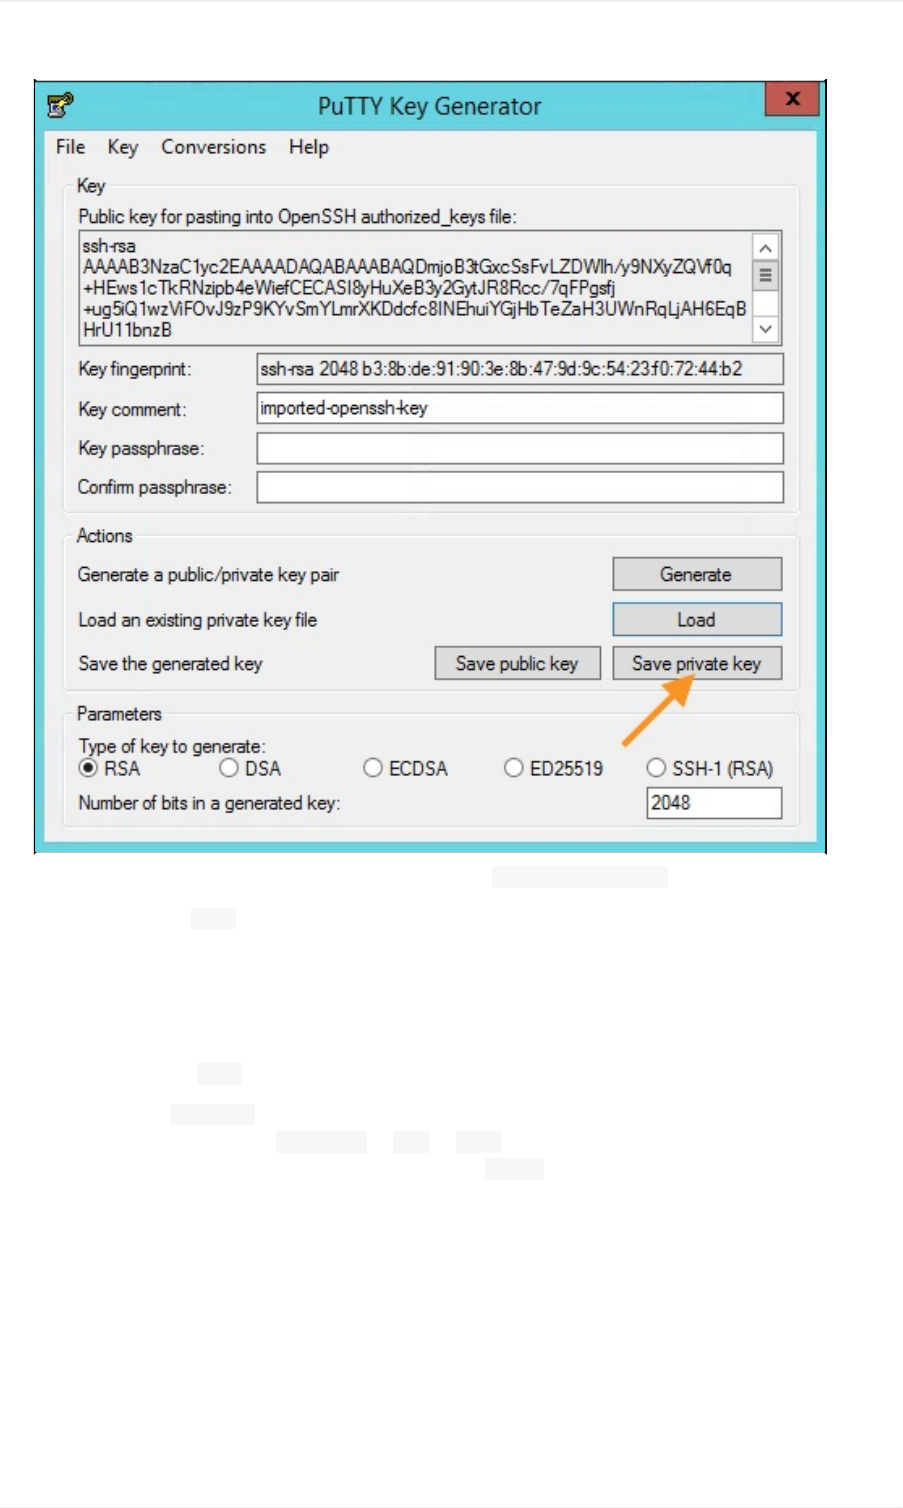
8. Usingtheresultingdialog,savethekeyinanintuitiveplace(e.g.,C:\Users\Username\SSH).
Yourkeyisnowsavedasa.ppkfilethatcanbeloadeddirectlyintoPuTTY,andwecannowusePuTTYtoconnecttoyourVM
Instance,withoutapassword,usingthe"cades"username.
ConnecttoYourInstance
Firstwe'regoingtoloadthe.ppkkeyfileintoPuTTY.
1. LocateandexecutePuTTY.exe.
2. InPuTTY'snavigationpane,gotoConnection→SSH→Auth.
3. Inthe"OptionsforcontrollingSSHauthentication"screen,clickBrowse.
AccessYourVMInstanceUsingPuTTY(Windows)
53
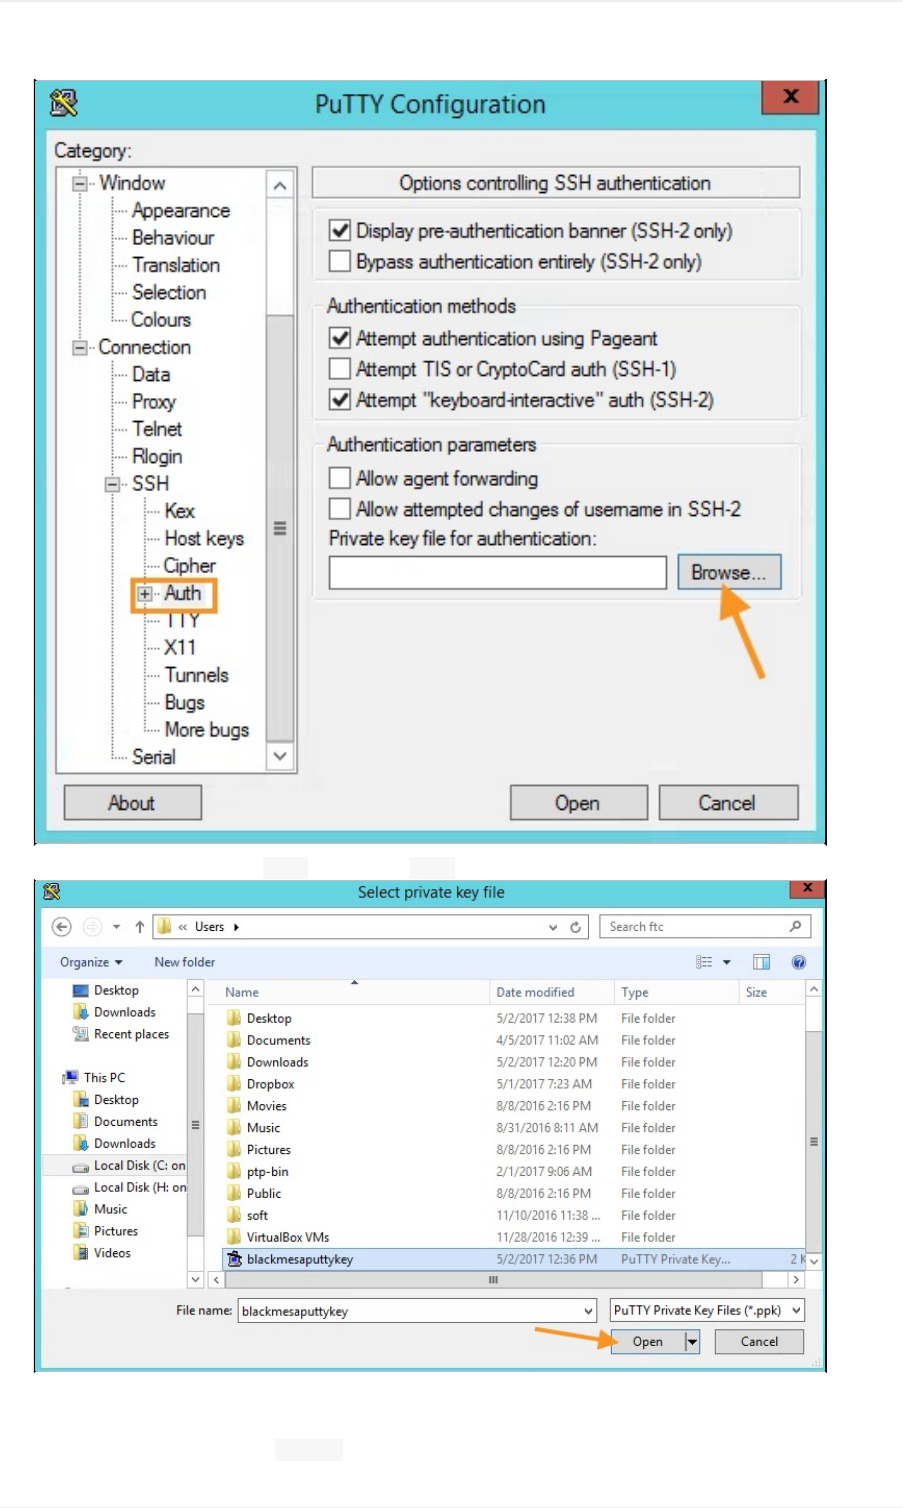
4. Intheresultingdialog,findyour.ppkfile,andclickOpen.
YourkeyfileisnowloadedintoPuTTY.Next,weneedtoaddyourhostinformation.
1. InPuTTY'snavigationpane,clickSession.
AccessYourVMInstanceUsingPuTTY(Windows)
54
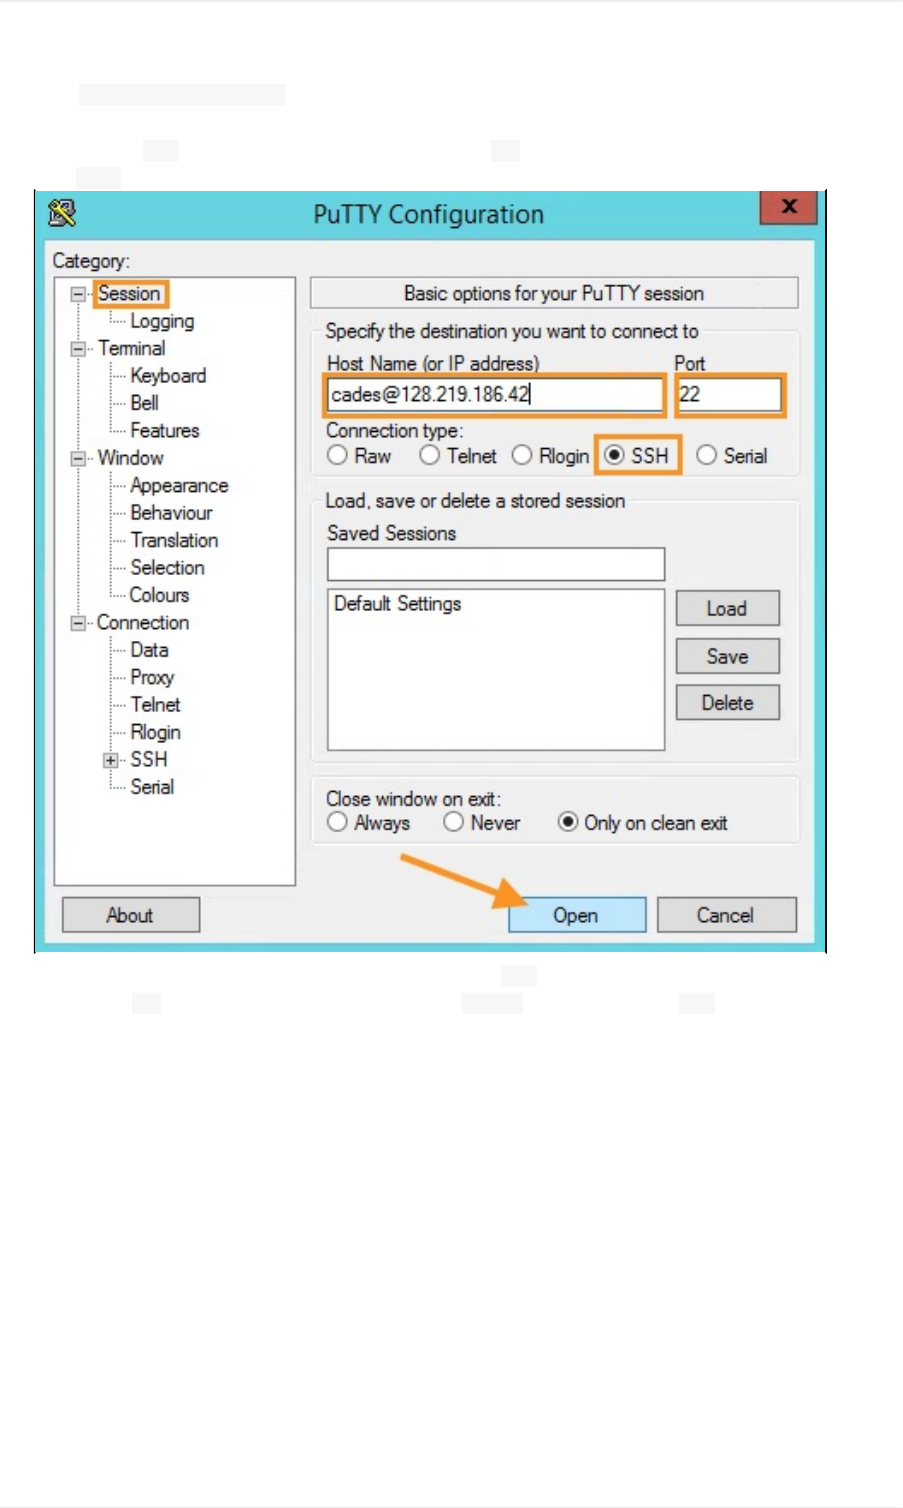
2. IntheHostName(orIPaddress)field,entertheIPaddressofyourVMInstanceprecededby"cades"(e.g.,
cades@128.219.186.42).
3. EnsurethattheSSHradiobuttonisselectedandtheportissetto22.
4. ClickOpentoconnecttoyourVMInstanceusingSSH.
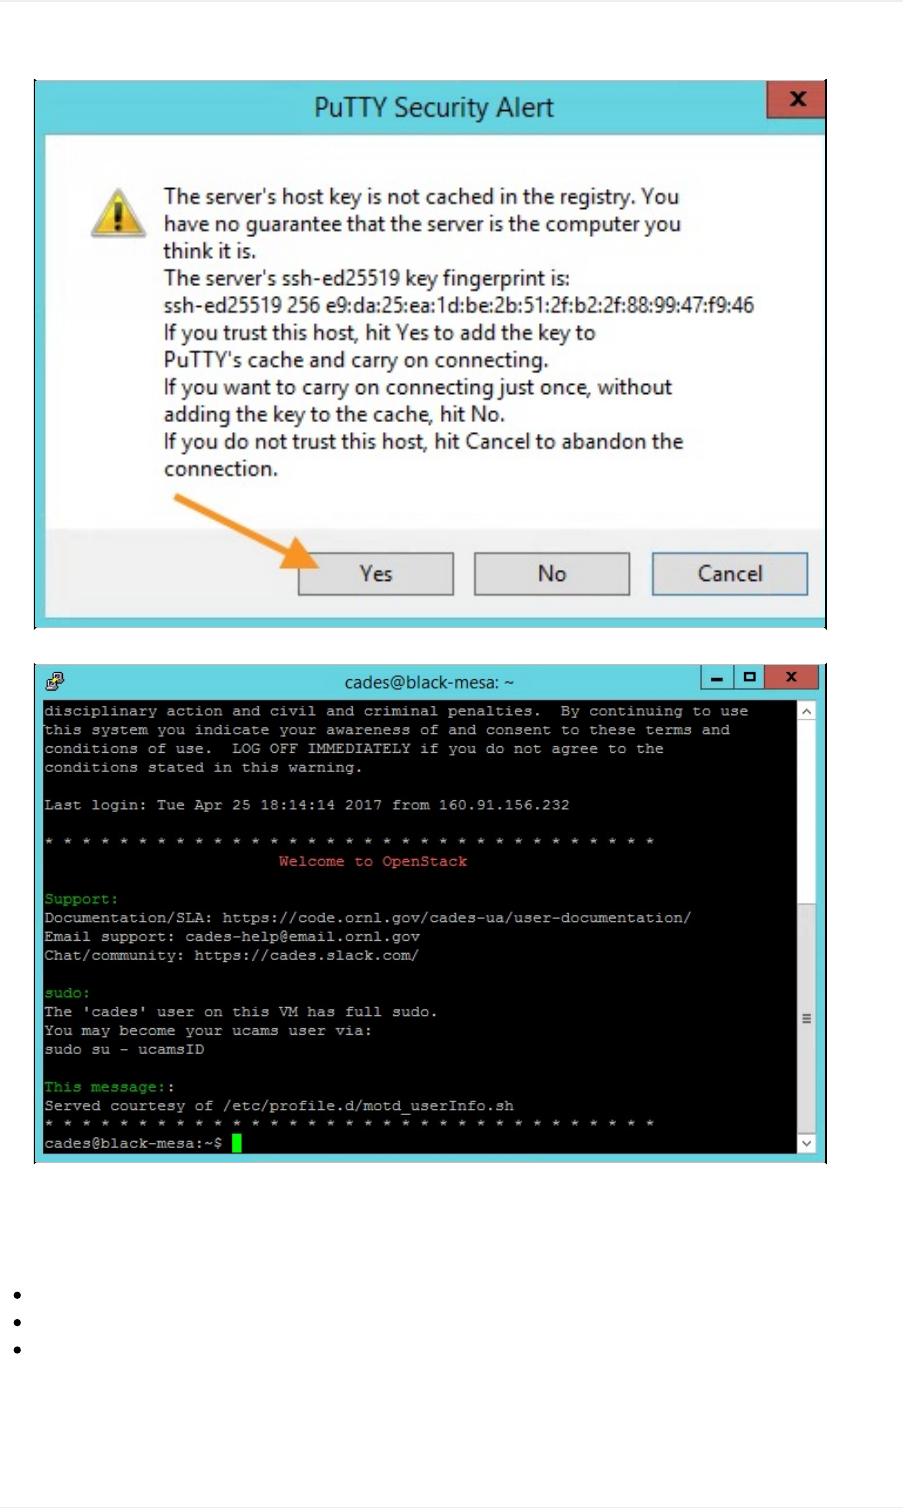
5. Ifprompted,youcanchoosetocachetheserver'sfingerprint(clickYes),nottocachetheserver'sfingerprintforthis
session(clickNo),ortorejecttheconnectionoutright(clickCancel).We'regoingtoclickYes.
AccessYourVMInstanceUsingPuTTY(Windows)
55

AccessYourVMInstanceUsingPuTTY(Windows)
57

CADES→UserDocumentation→CADESCloudUserGuide→AccessYourVMInstance→AccessYourVMInstanceUsing
Horizon
AccessYourVMInstanceUsingHorizon
TheHorizonwebGUIalsohasabuilt-inconsolefromwhichyoucanaccessyourVMInstanceonceyouhaveaddedageneric
useroverSSH.Notethatthisisnotthepreferredmethod,andthattheCADESteamrecommendsusingthetraditionalSSH
connectionforaccessingyourVMInstance.
Prerequisites
TheHorizonconsoleusesasimpleusername/passwordauthenticationmodel,andcannotleverageSSHkeypairsfor
authentication.Thismeansthatyoucannotusetheconsolewiththe"cades"usernameoryourUCAMScredentials.
Asaresult,toaccessyourVMInstanceusingtheHorizonconsole,youmustfirstuseSSHtocreateanon-UCAMSuser.More
infooncreatingusersisavailablehere.
LogintoHorizon
1. NavigatetotheHorizonwebinterfaceathttps://cloud.cades.ornl.gov/.
2. LoginwithyourUCAMScredentials.
Domain:ornl
UserName:Yourthree-letterUCAMSID
Password:YourUCAMSpassword
WecannowuseHorizontoaccessyourVMInstancesusingtheConsoleoption.
LaunchConsole
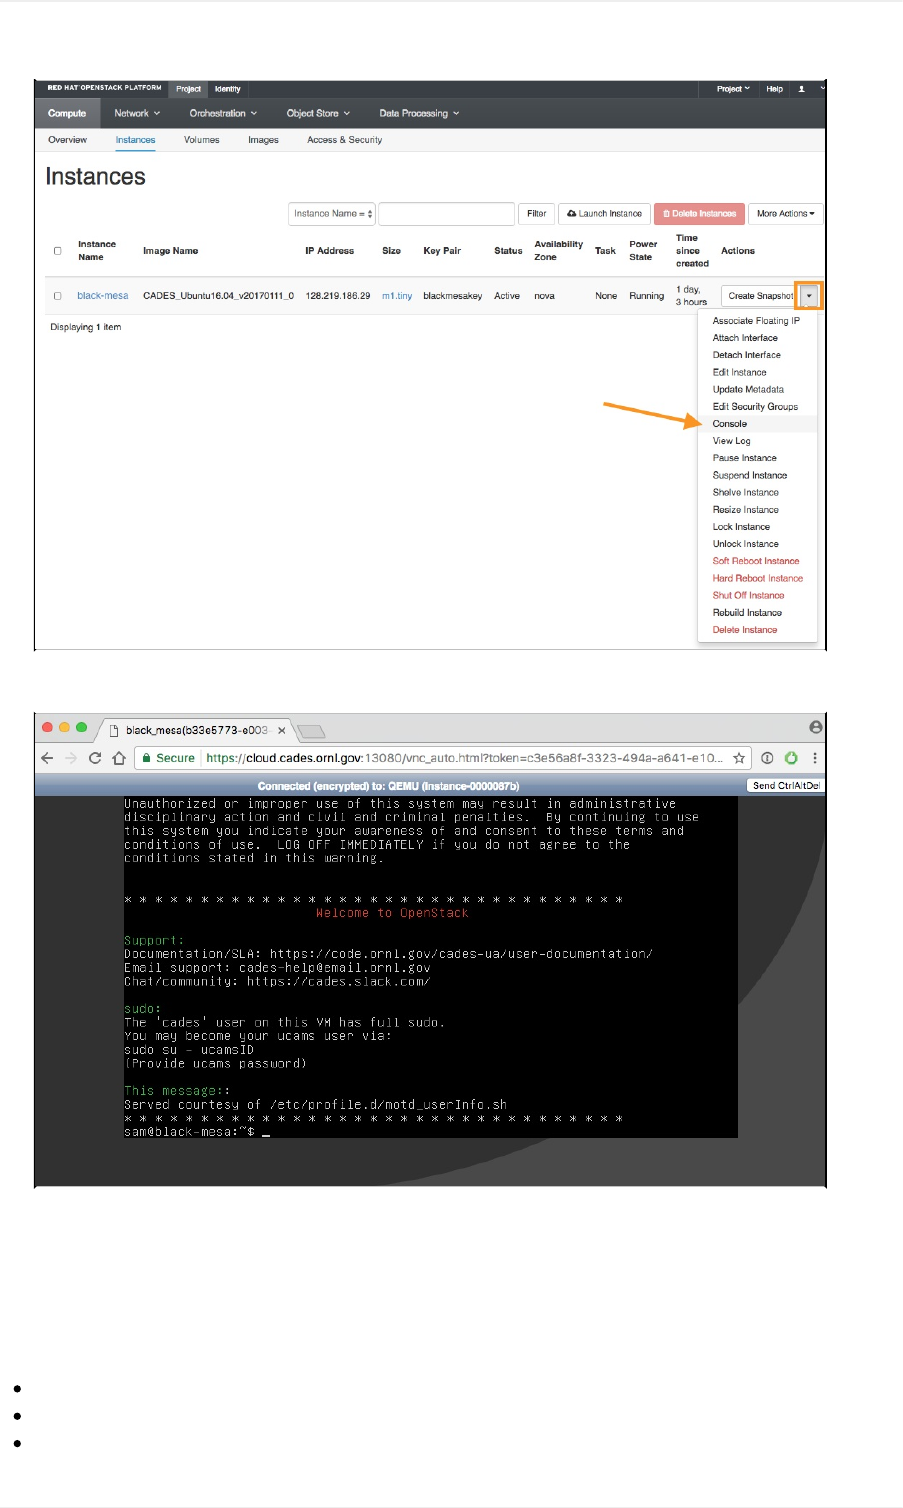
1. NavigatetoProject→Compute→Instances.
2. Clickthedrop-downmenuoftheInstanceyouwouldliketoaccess.
3. SelectConsolefromtheresultingmenu.
AccessYourVMInstanceUsingHorizon
58
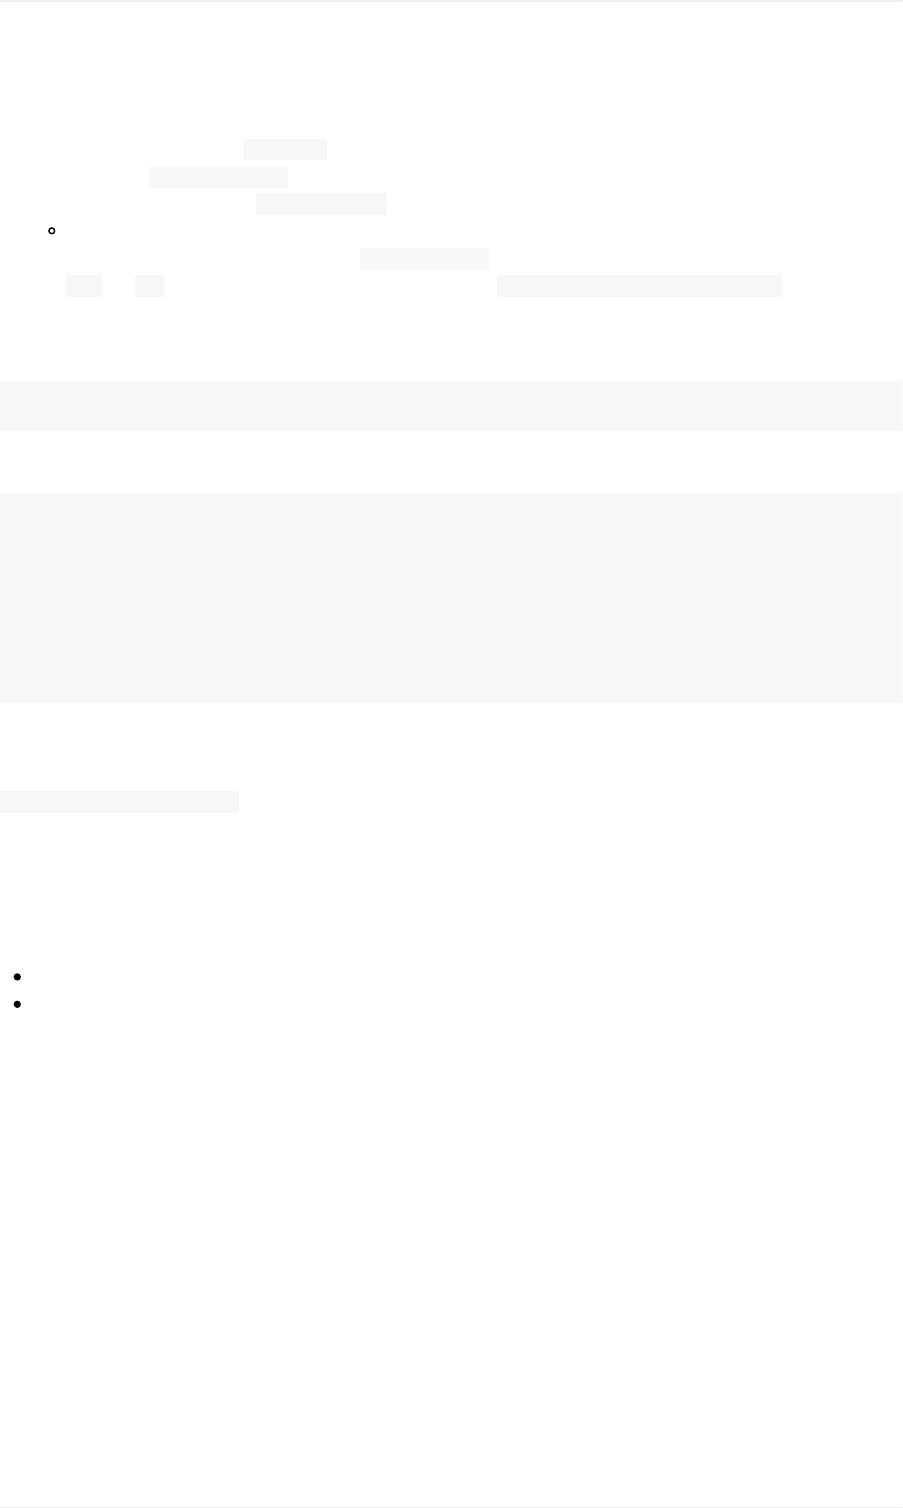
4. Intheconsole,inputyourusercredentials.
5. Uponsuccessfullogin,youcanexecutecommandsonyourVMInstance.
Note:TousetheHorizonconsole,youmustfirstaddauserandpasswordtotheInstance'soperatingsystem(viaSSH)to
enableaccesstotheVMwithoutanSSHkey.
RelatedTutorials
AddMoreUserstoVMInstances
AccessYourVMInstancesUsingSSH
AccessYourVMInstancesUsingPuTTY(Windows)
AccessYourVMInstanceUsingHorizon
59

AccessYourVMInstanceUsingHorizon
60

CADES→UserDocumentation→CADESCloudUserGuide→AccessYourVMInstance→AddMoreUserstoYourVM
Instance
AddMoreUserstoYourVMInstance
OnceyouhavegainedSSHaccesstoyourInstance(as"cades"),additionaluserscanbecreatedthroughtheBashterminal.The
CADESOpenStackInstancesleverageORNL'sUCAMSsystemtoenablecustomerstocreateUCAMSusersandhomeareason
theirInstances.ThefollowingprocedureswillenableyoutocreateanewuseronyourVMInstanceandgrantaccessusingSSH
keypairs.
AddaUCAMSUser
BecauseyourInstancecanaccessORNL'sUCAMSsystem,youcaneasilyaddaUCAMSusertoyourInstance.Youcanstart
withyourownUCAMSIDtoverifyfunctionalityandthenmoveontoaddingtheUCAMSIDsofyourcollaborators(usingtheir
publicSSHkeysthattheymustprovidetoyou).
1. OpenaBashterminal.
2. Uploadacopyofyour(oryourcollaborator's)publickey(blackmesakey.pubinthiscase),$scp
~/.ssh/blackmesakey.pubcades@128.219.186.39:/home/cades.Replace128.219.186.39withtheIPaddressofyour
Instance.
3. UsingSSH,logintoyourVMInstanceas"cades".
4. Onceloggedin,becomeroot,$sudo-s.
5. CreatethehomedirectoryfortheUCAMSID,$su-UCAMS.Replace"UCAMS"withthedesiredUCAMSID.
6. Usecatand>>tocopythecontentsofyourpublicSSHkeyto/home/UCAMS/.ssh/authorized_keys.
SSHcommandsfortheaboveprocedureareprovidedbelow.First:
$scp~/.ssh/blackmesakey.pubcades@128.219.186.39:/home/cades
Then:
$sshcades@128.219.186.39
$sudo-s
$su-UCAMS
$cat/home/cades/blackmesakey.pub>>/home/UCAMS/.ssh/authorized_keys
Properlyconfigured,youcannowaccessyourVMInstanceoverSSHusingyourUCAMSID(insteadof"cades").Executethe
commandshownbelow(replace"UCAMS"withyourownUCAMSID).
$sshUCAMS@128.219.186.39
Note:YouwillnotbepromptedforyourUCAMSpassword.ThisprocessusesSSHkeypairsforauthentication.
AddaNon-UCAMSUser
Insomecases,itmaybeusefultohaveagenericuser(notaffiliatedwithUCAMS)onyourVMInstance.Thefollowing
procedureoutlineshowtocreatesuchauser.
1. OpenaBashterminal.
2. Uploadacopyofyour(oryourcollaborator's)publickey(blackmesakey.pubinthiscase),$scp
~/.ssh/blackmesakey.pubcades@128.219.186.39:/home/cades.Replace128.219.186.39withtheIPaddressofyour
AddMoreUserstoYourVMInstance
61
Instance.
3. UsingSSH,logintoyourVMInstanceas"cades".
4. Onceloggedin,becomeroot,$sudo-s.
5. Addanewuser,useraddUSERNAME.
6. Createapasswordforthisuser,passwdUSERNAME.
Enterdesiredpassword.Reenterpasswordtoconfirm.
7. Createthehomedirectoryforthegenericuser,$su-USERNAME.Replace"USERNAME"withthedesiredusername.
8. Usecatand>>tocopythecontentsofyourpublicSSHkeyto/home/USERNAME/.ssh/authorized_keys.Replace
"USERNAME"withthedesiredusername.
SSHcommandsfortheaboveprocedureareprovidedbelow.First:
$scp~/.ssh/blackmesakey.pubcades@128.219.186.39:/home/cades
Then(replacing"USERNAME"withyourdesiredusername):
$sshcades@128.219.186.39
$sudo-s
$useraddUSERNAME
$passwdUSERNAME
$su-USERNAME
$exit
$sudo-s
$cat/home/cades/blackmesakey.pub>>/home/USERNAME/.ssh/authorized_keys
Properlyconfigured,youcannowaccessyourVMInstanceoverSSHusingyournewlycreatedusername(insteadof"cades").
Executethecommandshownbelow(replace"USERNAME"withyournewusername).
$sshUSERNAME@128.219.186.39
SeetheAccessYourVMInstancedocumentationforinstructionsonhowtouseSSHandHorizontoaccessyourInstance.
RelatedTutorials
AccessYourVMInstancesUsingSSH
AccessYourVMInstancesUsingHorizon
AddMoreUserstoYourVMInstance
62

CADES→UserDocumentation→CADESCloudUserGuide→ManageYourVMInstances
ManageYourVMInstances
TheHorizonwebGUIenablesuserstoviewandmanagetheirVMInstancesdirectlyfromawebbrowser.Usingthefollowing
procedure,userscanmanageexistinginstancesandcreatenewonesthroughtheInstancesmanagementscreen.
1. NavigatetotheHorizonwebinterfaceathttps://cloud.cades.ornl.gov/.
2. LoginwithyourUCAMScredentials.
Domain:ornl
UserName:UCAMSID
Password:UCAMSpassword
3. ClickontheProjecttabonthetopleft.
4. SelecttheComputesubtab.
5. Finally,clickontheInstancessubtab.
FromtheInstancesscreen,youcan:
LaunchanewVMInstancefromanImage
DeleteoldVMInstances
DeleteaVolume
ResizeaVM
CreateaSnapshot
ModifySecurityGroups
ManageYourVMInstances
63
CADES→UserDocumentation→CADESCloudUserGuide→ManageVMInstances→DeleteaVMInstance
DeleteaVMInstancefromyourProject
AtsomepointyoumaywishtodeleteaVMInstancefromyourproject.Thiscanhelpauserfreeupspaceinhisorherallocation
orclearoutoldInstancesthathaveoutlivedtheirusefulness.DeletingaVMInstanceisasimpleprocess,outlinedinthe
procedurebelow.
LogintoHorizon
1. NavigatetotheHorizonwebinterfaceathttps://cloud.cades.ornl.gov/.
2. LoginwithyourUCAMScredentials.
Domain:ornl
UserName:Yourthree-letterUCAMSID
Password:YourUCAMSpassword
Fromhere,youcanmanageyourVMInstance(s)fromwithinHorizon.
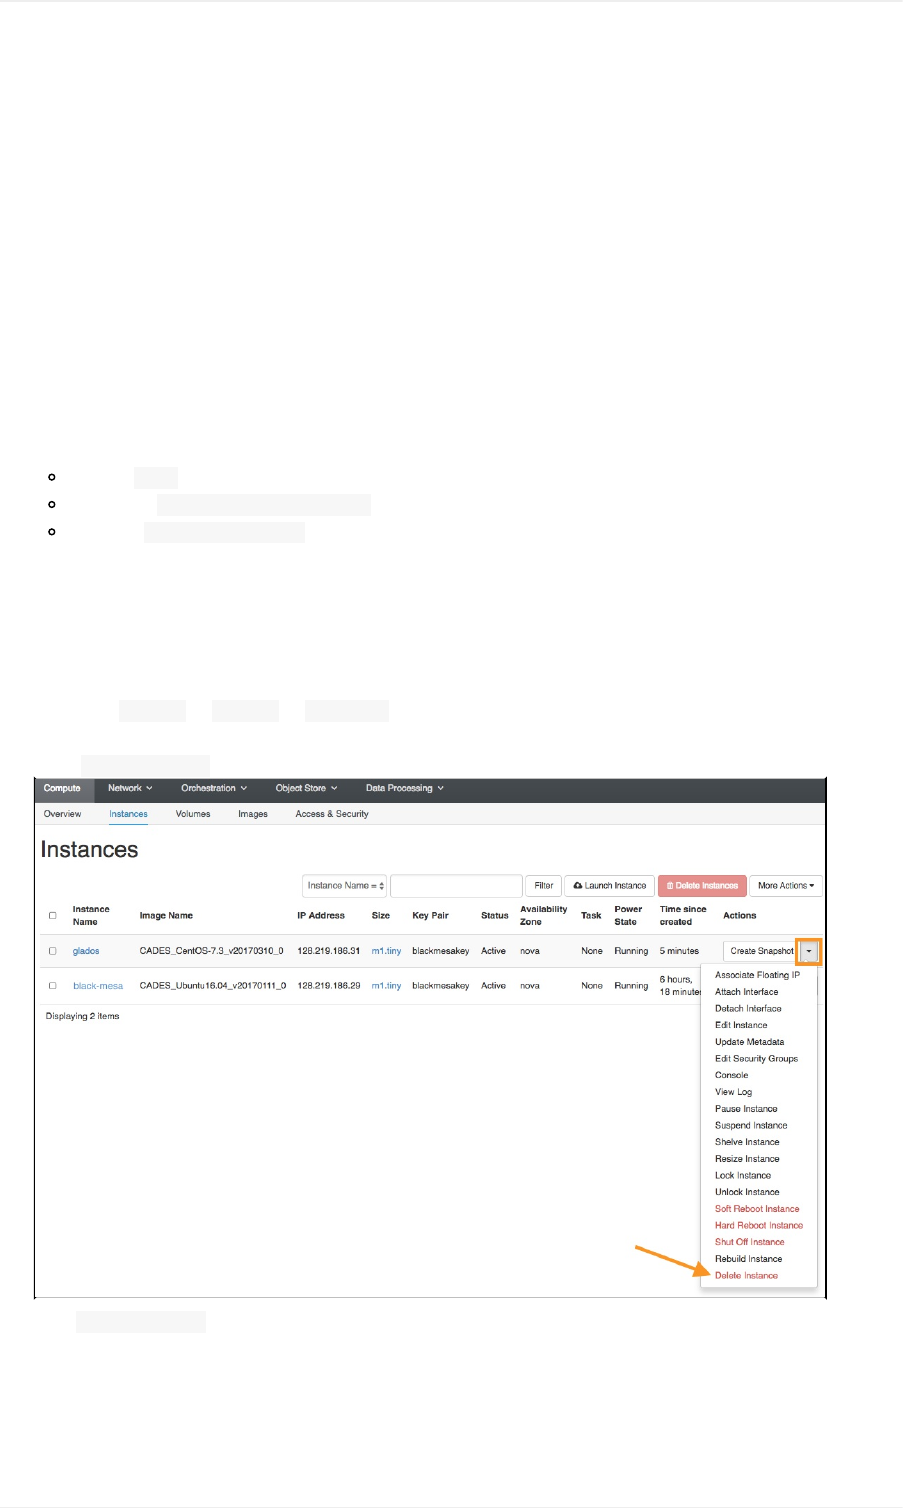
DeleteanInstance
1. NavigatetoProject→Compute→Instances.
2. Clickthedrop-downmenuoftheInstanceyouwishtodelete.
3. SelectDeleteInstancefromtheresultingmenu.
4. ClickDeleteInstanceinthedialog.
5. ConfirmthattheInstanceisscheduledfordeletion.
Note:DeletingaVMInstancedoesnotdeletethevolumeassociatedwiththeInstance.Toremoveboth,youmustfollowthe
DeleteaVMInstanceprocedureandtheDeleteaVolumeprocedure.
DeleteaVMInstancefromYourProject
64

CADES→UserDocumentation→CADESCloudUserGuide→ManageVMInstances→DeleteaVolume
DeleteaVolumefromYourProject
IfyoudecidetodeleteaVMInstance,youmaystillhaveitsassociatedVolumeleftbehind(i.e.,DeleteVolumeonInstance
DeletewassettoNowhenyoulaunchedtheInstance).UsethefollowingprocedureifyouwishtodeleteaVolume.
LogintoHorizon
1. NavigatetotheHorizonwebinterfaceathttps://cloud.cades.ornl.gov/.
2. LoginwithyourUCAMScredentials.
Domain:ornl
UserName:Yourthree-letterUCAMSID
Password:YourUCAMSpassword
Fromhere,youcandeletetheVolumefromyourProject.
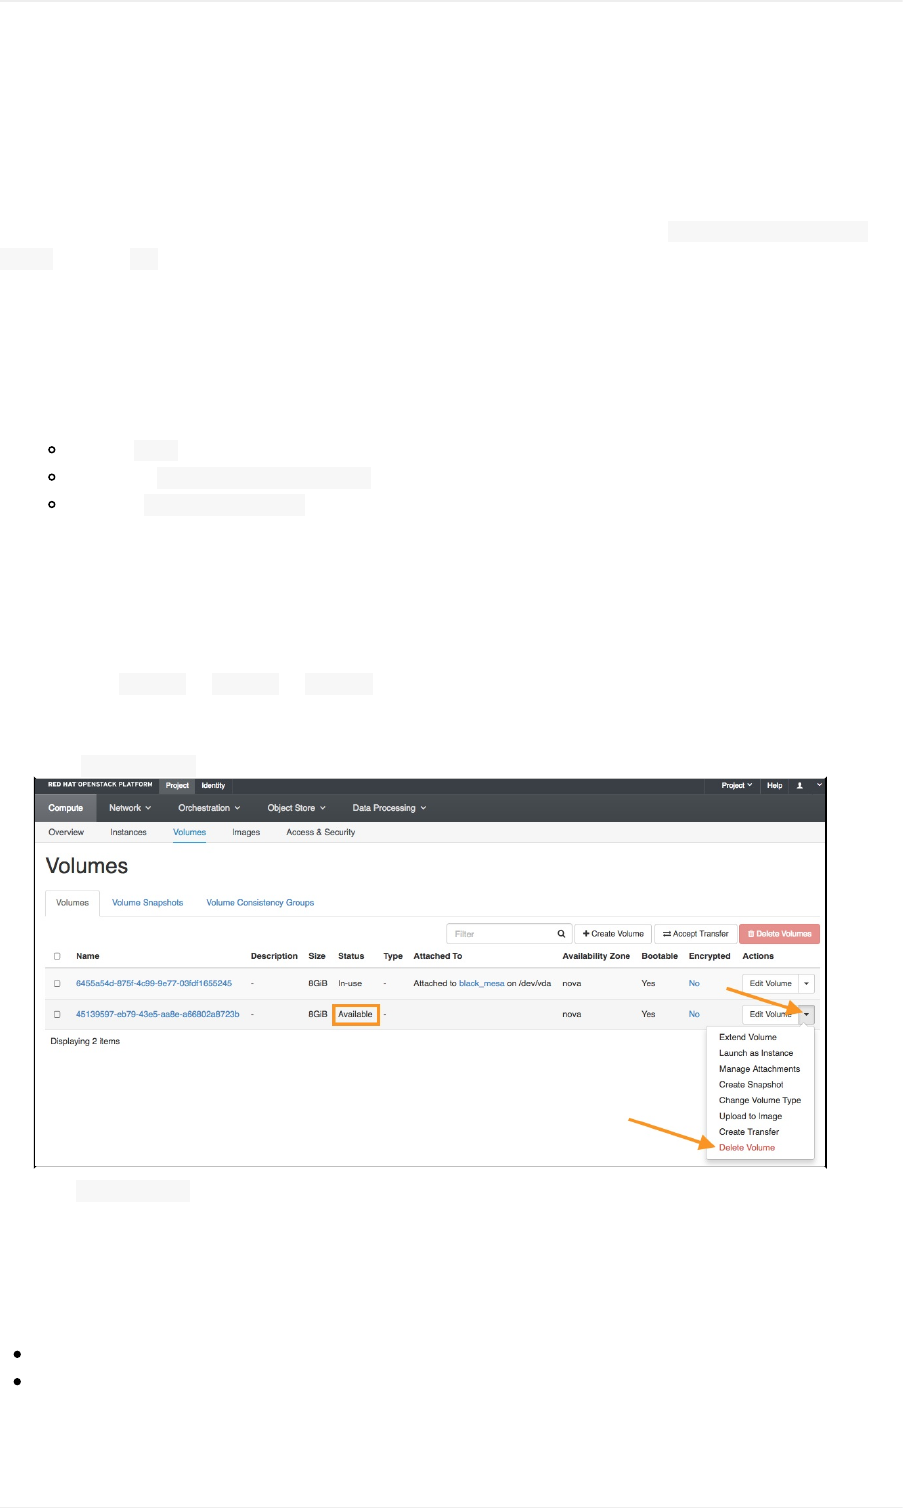
DeleteaVolume
1. NavigatetoProject→Compute→Volumes.
2. IntheVolumesscreen,ensurethattheVolumeisnotinusebyanyVMInstance.
3. Clickthedrop-downmenuofthevolumeyouwishtodelete.
4. SelectDeleteVolumefromtheresultingmenu.
5. ClickDeleteVolumeintheresultingdialog.
6. ConfirmthattheVolumeisnolongerlistedintheVolumesscreen.
RelatedTutorials
DeleteaVMInstance
LaunchaVMInstance
DeleteaVolumefromYourProject
66

DeleteaVolumefromYourProject
67

CADES→UserDocumentation→CADESCloudUserGuide→ManageYourVMInstances→ResizeaVMInstance
ResizeanExistingVMInstance
SometimesusersmaywishtoaddCPUorMemoryresourcestoanexistingVMinstance.Thiscanbeaccomplishedeasily
throughtheHorizoninterface:
1. NavigatetoyourInstancesListathttps://cloud.cades.ornl.gov/dashboard/project/instances/.
2. UnderActionsontheright-handside,selectResizeInstancefortheinstanceyouwishtoresize.
3. YouwillbepromptedtoselectanewFlavor.
4. AslongasthenewflavorfitsinyourAllocation,clickResizeinthebottomrightcornerandyourinstancewillbegin
resizing.
5. Yourinstancewillrebootintothenewflavor.Oncethisiscomplete,clickConfirmResizeorMigration.
Atthispoint,yourinstancewillbeupandrunningatthesizeyouselected.
Increasingthesizeofarootvolume mayrequireemailingCADESsupport.Thismightapplytoyourvolumeifyoudidnot
selectanephemeralvolume.
ResizeaVMInstance
68

CADES→UserDocumentation→CADESCloudUserGuide→ManageYourVMInstances→AddaVolumetoaVM
Instance
AddaVolumetoanExistingVMInstance
1. NavigatetoyourVolumesListathttps://cloud.cades.ornl.gov/dashboard/project/volumes/.
2. AtthetoprightclickonCreateVolume.
3. Fillinthefollowingfields:
Name:userchoice
Description:optionalandcanbeleftblank
Source:Nosource,emptyvolume(thisisdefault)
Type:Netapp(thisisdefault)
Size:Sizeyouneeduptoyourquota,whichisdisplayedontheright
AvailabilityZone:nova(thisisdefault)
4. ClickCreateVolume.
5. Oncecreatedusethedropdown()ontherightofthevolumeyoujustcreatedandchoose ManageAttachments.
6. Selecttheinstancefromthedropdowntowhichyouwouldliketoattachyournewvolume.
7. Next,thevolumewillhavetobepartitioned,formatted,andmounted.Tobegin,SSHintoyourVM.
8. Checkthatthevolumewasassignedbylistingtheavailabledisks:typelsblk.Youshouldseeanewdiskwiththeallotted
storageamountinthelistedoutput.Exampleoutputisshownbelow.
NAMEMAJ:MINRMSIZEROTYPEMOUNTPOINT
vda253:008G0disk
└─vda1253:108G0part/
vdb253:1608G0disk
Inthiscase,thediskvdaistheoriginaldiskthathasapartitionnamedvda1.Youmaywanttocreateapartitionin
vdb(optional).
9. Optional:Tocreatepartitionofthenewdisk,typesudofdisk/dev/vdb.Thiscommandexpectsyoutoenteradditional
information.
Tocreateanewpartition,enternthenpressEnter.
Choosepforprimaryoreforanextendedpartition.Usually,youwillchooseethenpressEnter.
Thenexttwopromptsrequestspaceallocations.Intypicalsituations,pressEnteronthesetwopromptstoselectthe
defaults.Ifyouwouldlikemoreinformationaboutyouroptions,checkthe"SIZES"sectioninthefdiskmanualbytyping
manfdisk.
TypewandthenpressEntertowriteyourchangesandrebootthesystem.
Youwillbereturnedtoyourbashprompt.
Tocheckthatthepartitionwascreatedcorrectly,typelsblkandyoushouldseethenewpartitionlabelledvdb1(in
thisexamplecase).
NAMEMAJ:MINRMSIZEROTYPEMOUNTPOINT
vda253:008G0disk
└─vda1253:108G0part/
vdb253:1608G0disk
└─vdb1253:1708G0part
10. Next,thenewvolume/partitionmustbeformatted.Typesudomkfs.ext4/dev/vdb1.
Note:OpenStackand/orfdiskmayimpartadefaultfilesystemtypeonthenewvolume.Inthiscase,youwillbeasked
ifyouwouldliketoproceedwiththeformattingalthoughanexistingpartitiontableexists.Ifyouchoosetoproceedby
typingy,youwillrewritethepartition.DONOTPROCEEDifthispartitioncontainsdatathatyouneedtokeep!
11. Tochecktheformatting,typelsblk-f.Youshouldseethatthevdb1entryhastheext4filesystemtype.
12. Tomountthevolumeforuse,youneedtocreatethemountpoint.Forexample:mkdirvolume.
AddaVolumetoaVMInstance
69

13. Then,tomountthevolumetothenewly-createdmountpoint,typesudomount/dev/vdb1/./volume.
14. Lastly,tocheckthemountpoint.typelsblk-fandyoushouldseevdbismountedatthelocationyouchose:
/home/cades/volume.
15. ToavoidhavingtomountthevolumeeverytimeyoubootyourVMInstance,youmaysetupautomountingbyviewingthe
contentsof/etc/fstab.
Typesudonano/etc/fstab.
Checkforanexistinglineofcode:
/dev/vdb/dataautodefaults,nobootwait02
Ifitisnotpresent,addit.Saveyourchanges.
16. Thenewstoragevolumeisreadytouse.
AddaVolumetoaVMInstance
70
CADES→UserDocumentation→CADESCloudUserGuide→ManageVMInstances→CreateaSnapshot
CreateaSnapshotofaVMInstance
AVMsnapshotisaninstantaneousduplicateofaninstance.Asnapshotofaninstancecanbeusedtoback-updata,tocreatea
restorepoint,orasthebasisofaninstanceandbootedupatalatertime.AsnapshotcanbebootedasanewVMInstanceand
containsanimageofthestateofthefilesystematthemomentthatthesnapshotistaken.
LogintoHorizon
1. NavigatetotheHorizonwebinterfaceathttps://cloud.cades.ornl.gov/.
2. LoginwithyourUCAMScredentials.
Domain:ornl
UserName:Yourthree-letterUCAMSID
Password:YourUCAMSpassword
Fromhere,youcanmanageyourVMInstance(s)fromwithinHorizon.
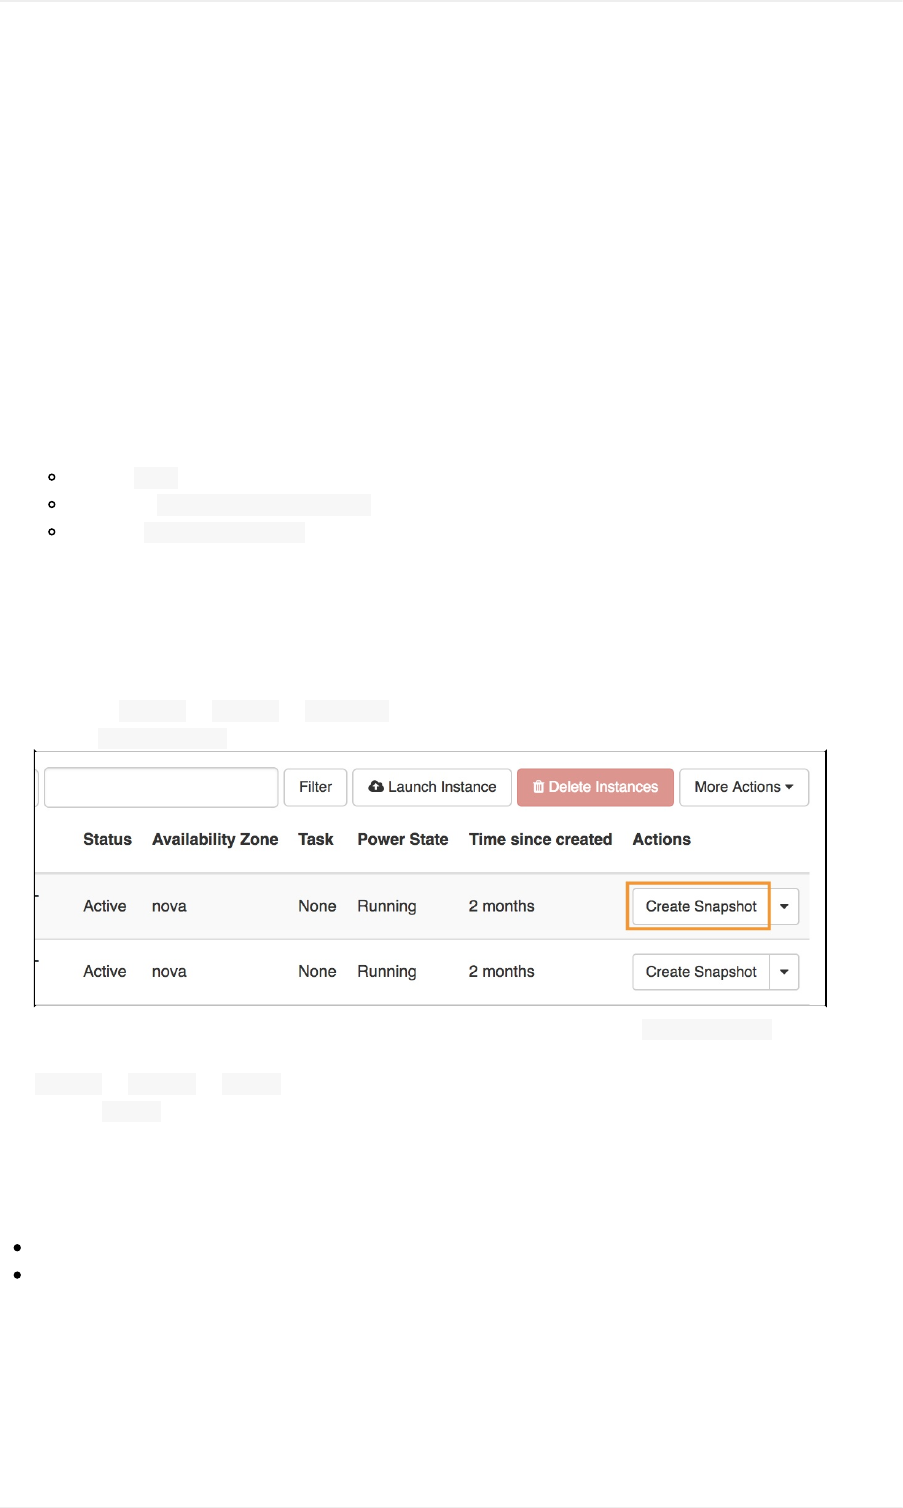
CreateaSnapshot
1. NavigatetoProject→Compute→Instances.
2. ClickonCreateSnapshotfortheInstance.
3. Inthewindowthatappears,chooseadescriptivenameforyoursnapshotandthenclickCreateSnapshot.
4. Oncethesnapshotiscreated,alistofsnapshotwillappear.YoucanlaternavigatetothislistbynavigatingtoNavigateto
Project→Compute→Images.
5. FromtheImagesscreenyoucanlaunch,edit,ordeletethesnapshot.
RelatedTutorials
DeleteaVMInstance
LaunchaVMInstance
CreateaSnapshot
71
CADES→UserDocumentation→CADESCloudUserGuide→ManageYourVMInstances→OpenStackSecurityGroups
OpenStackSecurityGroups
Attheircore,theOpenStackSecurityGroupsareiptable-basedfirewallsbuiltaroundanInstanceatthehypervisorlevel.The
SecurityGroupscanbeusedinconjunctionwiththeOS-levelfirewalls(e.g.,FirewallD,iptables)butdonotoverlapwiththem
(seeImportantNotes).
ImportantNotesforOpenStackSecurityGroups
IPV6isnotcurrentlysupportedinOpenStack.
ChangestoSecurityGroupstakeeffectimmediately.
UnlikenormalLinuxfirewallrules,theruleorderdoesnotmatterinOpenStackSecurityGroups.
Bydefault,allInstanceswithinthesameProjectcancommunicatewitheachother.
Using160.91.8.218:6556toaccessORNL'sCheck_MKserviceisallowedbutnotenabledbydefault.Formonitoringof
uptimeandbasicmetrics,pleasecontacttheCADESteamforassistance.
NofirewallisenabledintheCADES-providedoperatingsystem(OS)images.Instead,werelyontheOpenStackSecurity
Groups.TheuserisresponsibleforenablingandconfiguringextraOS–levelfirewallrulesasdesired.
User-addedfirewallandiptablerulessupersederulessetinOpenStackSecurityGroups.Forexample,ingressaccessenabled
byaruleintheOpenStackSecurityGroupthatareotherwiseblockedattheOSlevelusingthefirewalloriptableswillbe
ineffective,andthattrafficwillstillbeblocked.
Bydefault,allnewlycreatedSecurityGroupsallowalloutboundIPV4andIPV6(enabledbutnotfunctional).Bydefault,no
inboundtrafficisallowed.
TheCADESteamrecommendsthatusersleaveexistingSecurityGrouprulesinplaceasmanyoftheserulesareusedbythe
CADESsupportteam(e.g.,formonitoringandmetrics).
OpenStackSecurityGroups
72
CADES→UserDocumentation→CADESCloudUserGuide→ManageYourVMInstances→OpenStackSecurityGroups→
ModifySecurityGroups
ModifytheDefaultSecurityGroup
1. NavigatetotheHorizonwebinterfaceathttps://cloud.cades.ornl.gov/.
2. LoginwithyourUCAMScredentials.
Domain:ornl
UserName:Yourthree-letterUCAMSID
Password:YourUCAMSpassword
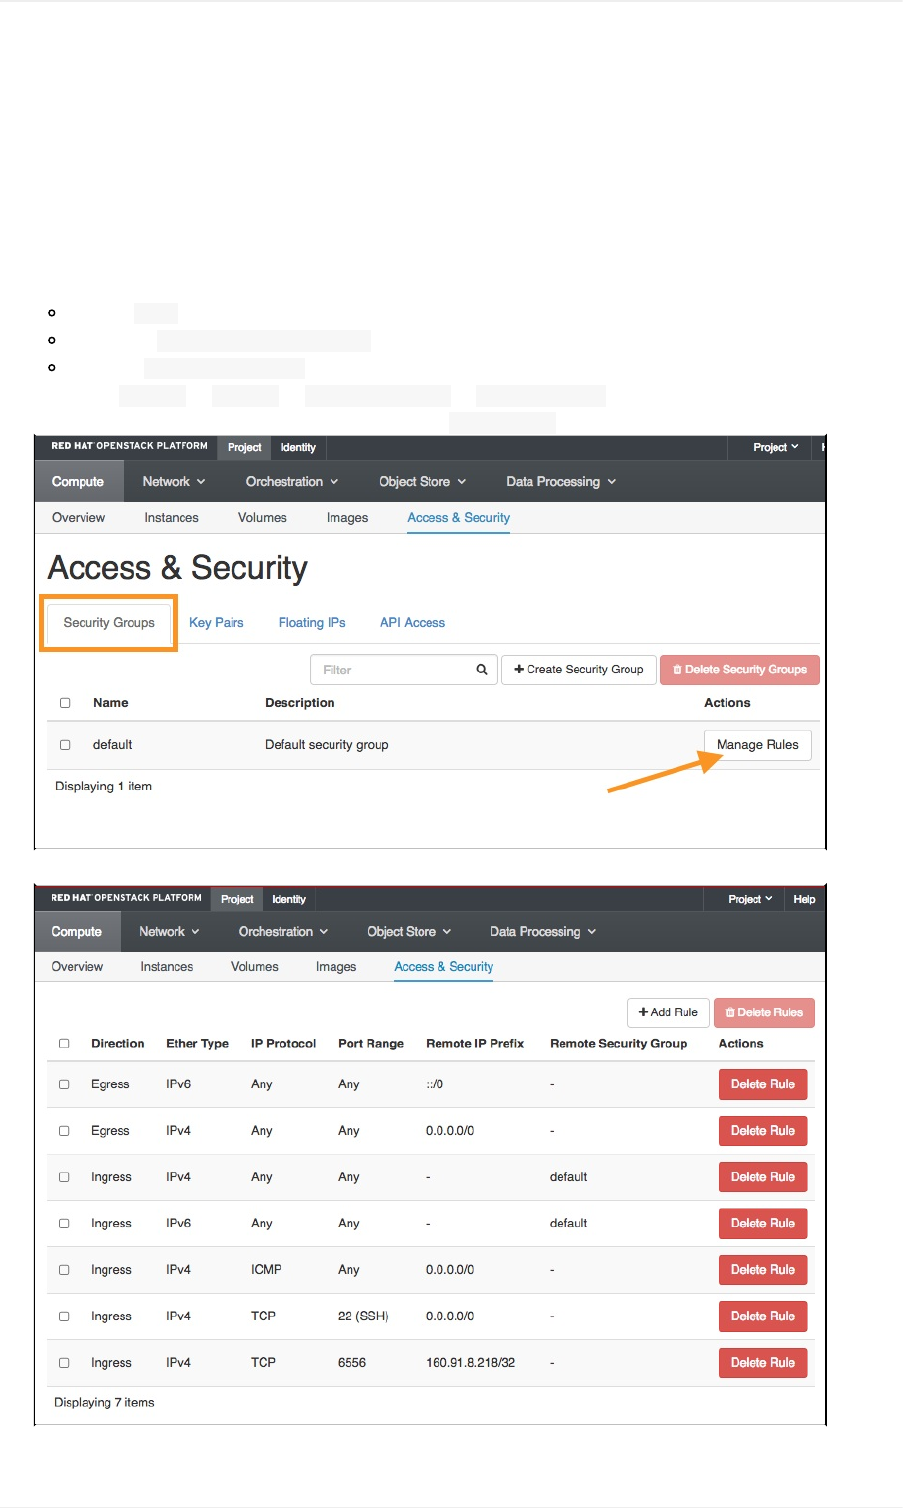
3. NavigatetoProject→Compute→Access&Security→SecurityGroups.
4. Onthisscreen,lookfortherowlabeled"default."ClicktheManageRulesbutton.
Fromhereyoucancreateanewruleorremoverules.
ModifytheDefaultSecurityGroup
73
CreateaNewRule
YoucanaddanewruletoyourSecurityGroupusingthebuilt-inrulesprovidedinOpenStackoryoucancreateyourowncustom
rule.
CreateaRuleUsingtheBuilt-inRules
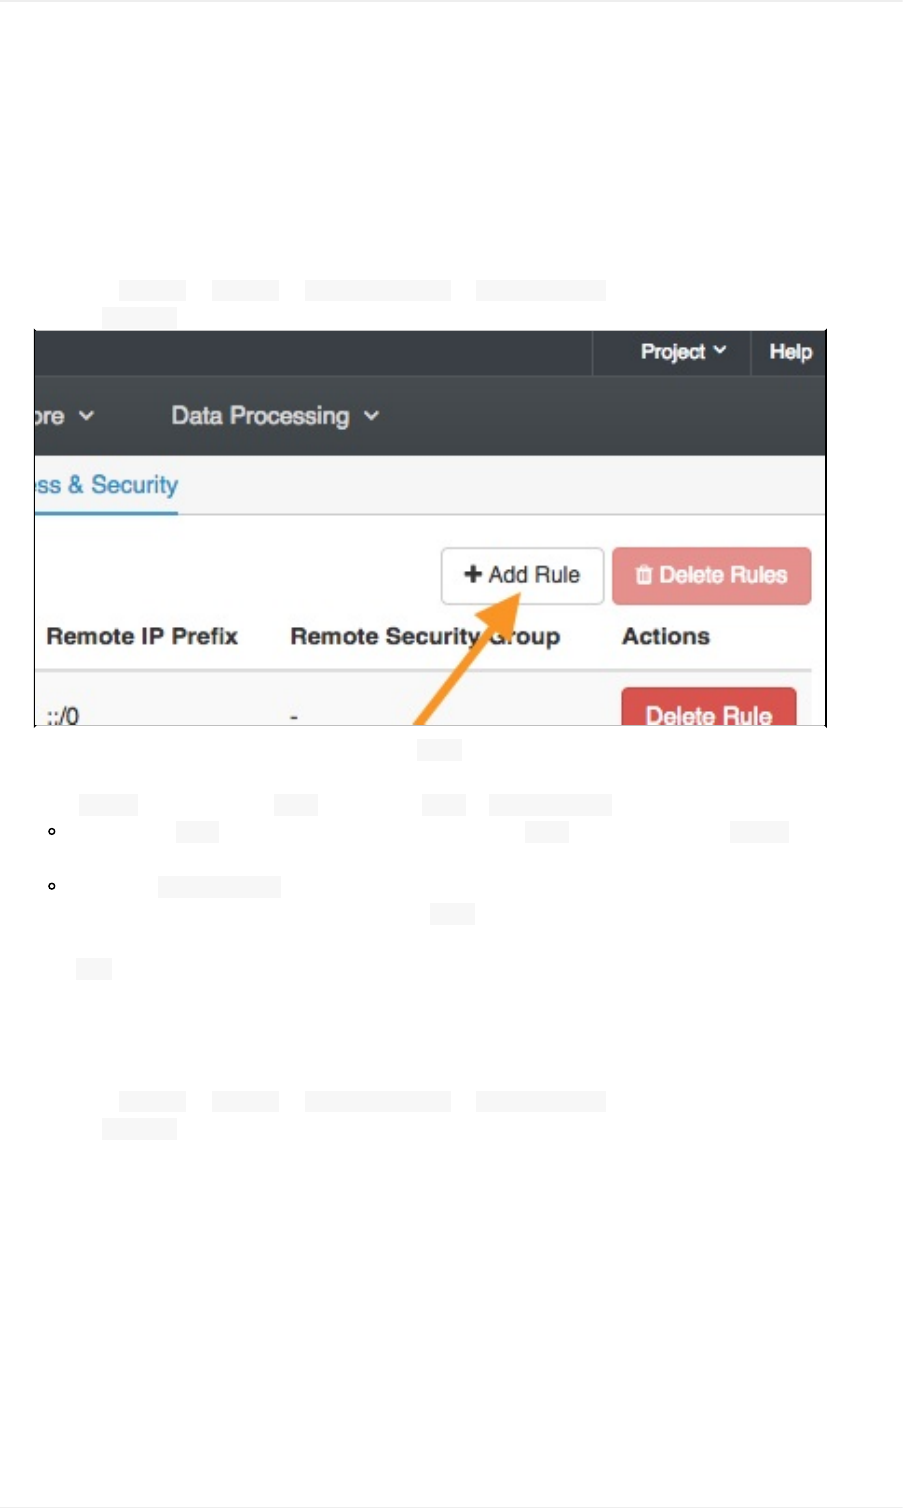
1. NavigatetoProject→Compute→Access&Security→SecurityGroups.
2. ClicktheAddRulebutton.
3. Intheresultingdialog,clickthedrop-downfieldunderRule.
4. Choosearulefromthelistthatfitsyourneeds(DNS,HTTP,HTTPS,etc.).
5. IntheRemoteboxdirectlyunderRule,chooseeitherCIDRorSecurityGroup.
IfyouselectedCIDR,enterthedesiredinter-domainrangeintheCIDRboxdirectlyundertheRemotebox.See
CIDRexamples.
IfyouselectSecurityGroup,chooseasecuritygroupsharedbytheInstance(s)withwhichyouwishtocommunicate.
YoucanalsodothisviatheirIPaddressesusingtheCIDRoption.
Note:thisoptiononlyallowsaccesstotheInstanceswithinthatsecuritygroup.ThisdiffersfromCIDR.
6. ClickAddatthebottomofthedialogboxtoimplementyourrule.
7. ConfirmthenewruleisdisplayedintheManageRulesscreen.
CreateaCustomRule
1. NavigatetoProject→Compute→Access&Security→SecurityGroups.
2. ClicktheAddRulebutton.
ModifytheDefaultSecurityGroup
74
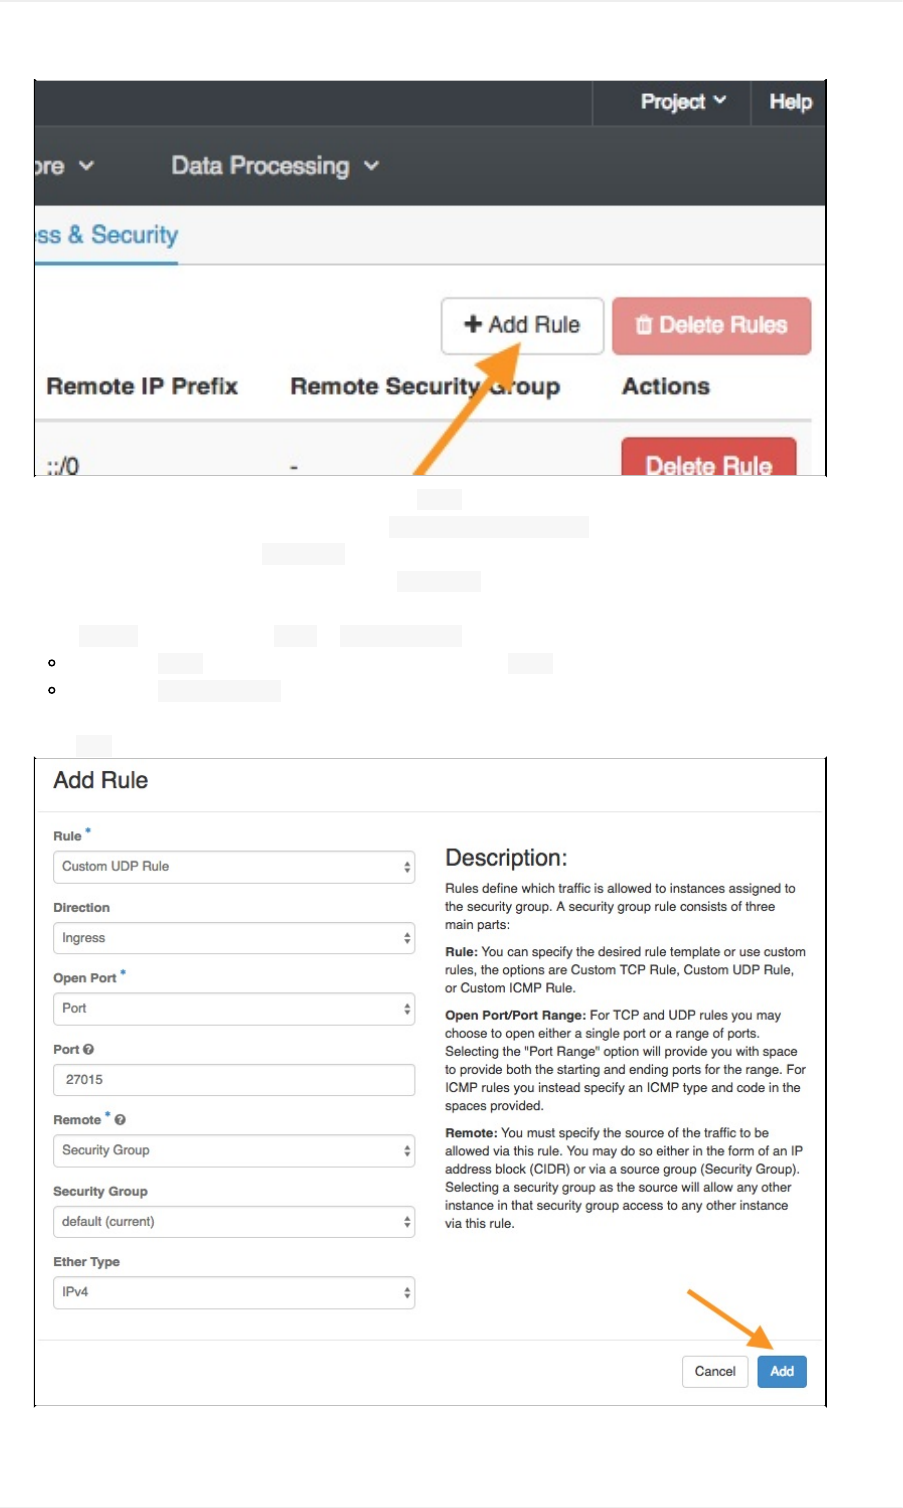
3. Intheresultingdialog,clickthedrop-downfieldunderRule.
4. Choosetheruletypefromthedrop-downlist(e.g.,CustomTCP|ICMP|UDPRule).
5. SetthepreferreddirectionintheDirectionfield(i.e.,IngressorEgress).
6. ChooseeitherasingleportorarangeofportsintheOpenPortsection.
7. Entertheportorportrangeintherespectivefield.
8. IntheRemotebox,chooseeitherCIDRorSecurityGroup.
IfyouselectCIDR,enterthedesiredinter-domainrangeintheCIDRfield.SeeCIDRexamples.
IfyouselectSecurityGroup,chooseasecuritygroupsharedbytheInstance(s)withwhichyouwishtocommunicate.
Note:ThisoptiononlyallowsaccesstotheInstanceswithinthatsecuritygroup.ThisdiffersfromCIDR.
9. ClickAddatthebottomofthedialogboxtoimplementyourcustomrule.
10. ConfirmyournewcustomruleisdisplayedintheManageRulesscreen.
ModifytheDefaultSecurityGroup
75
RemoveRules
Removeanexistingrule
1. NavigatetoProject→Compute→Access&Security→SecurityGroups.
2. Selecttherulethatyouwouldliketoremove.
3. ClicktheDeleteRulebuttononthefarrightoftheselectedrule.
4. Confirmdeletionoftherule.
Removemultiplerules
1. NavigatetoProject→Compute→Access&Security→SecurityGroups.
2. Togglethecheckboxnexttoeachruleyouwouldliketoremove.
3. ClicktheDeleteRulesbuttoninthetop-rightcorneroftheManageRulesscreen.
4. Confirmdeletionoftherules.
RenameaSecurityGroup
Note:Youcannotrenamethedefaultsecuritygroup.
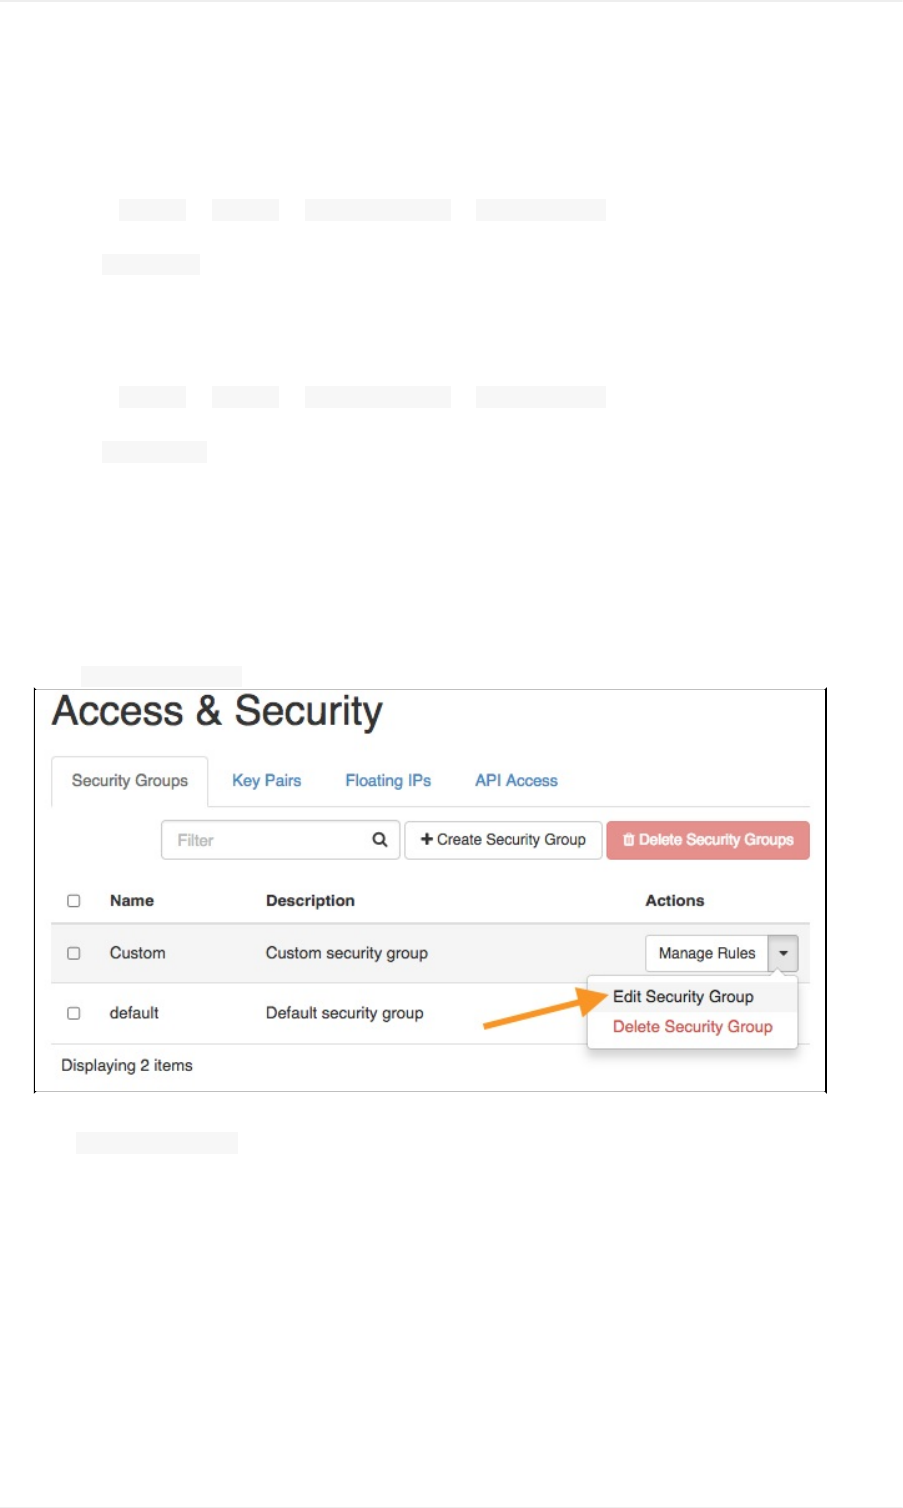
1. IntheSecurityGroupstable,selectthedrop-downmenuonthefarrightoftherow.
2. SelectEditSecurityGroup.
3. Intheresultingdialog,youcanmodifythenameanddescriptionoftheuser-addedSecurityGroup.
4. ClickEditSecurityGrouptosaveyourchanges.
ModifytheDefaultSecurityGroup
76
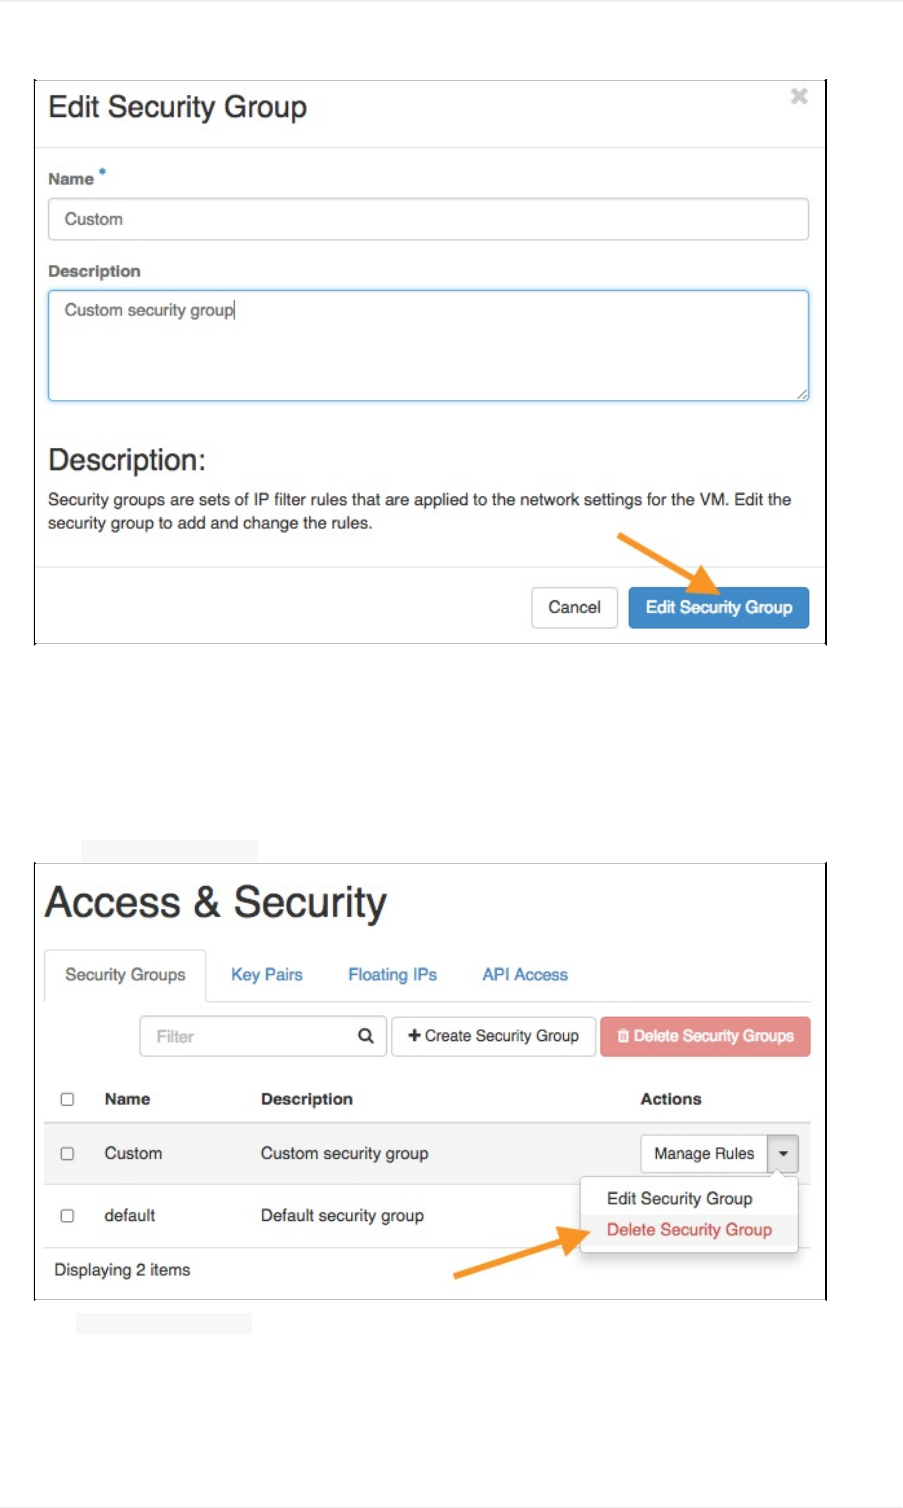
5. ConfirmyourchangesintheSecurityGroupstable.
DeleteaSecurityGroup
1. IntheSecurityGroupstable,findtheSecurityGroupyouwishtodelete,andselectthedrop-downmenuonthefarrightof
itsrow.
2. SelectDeleteSecurityGroup.
3. ClickDeleteSecurityGroupintheresultingdialog.
ModifytheDefaultSecurityGroup
77
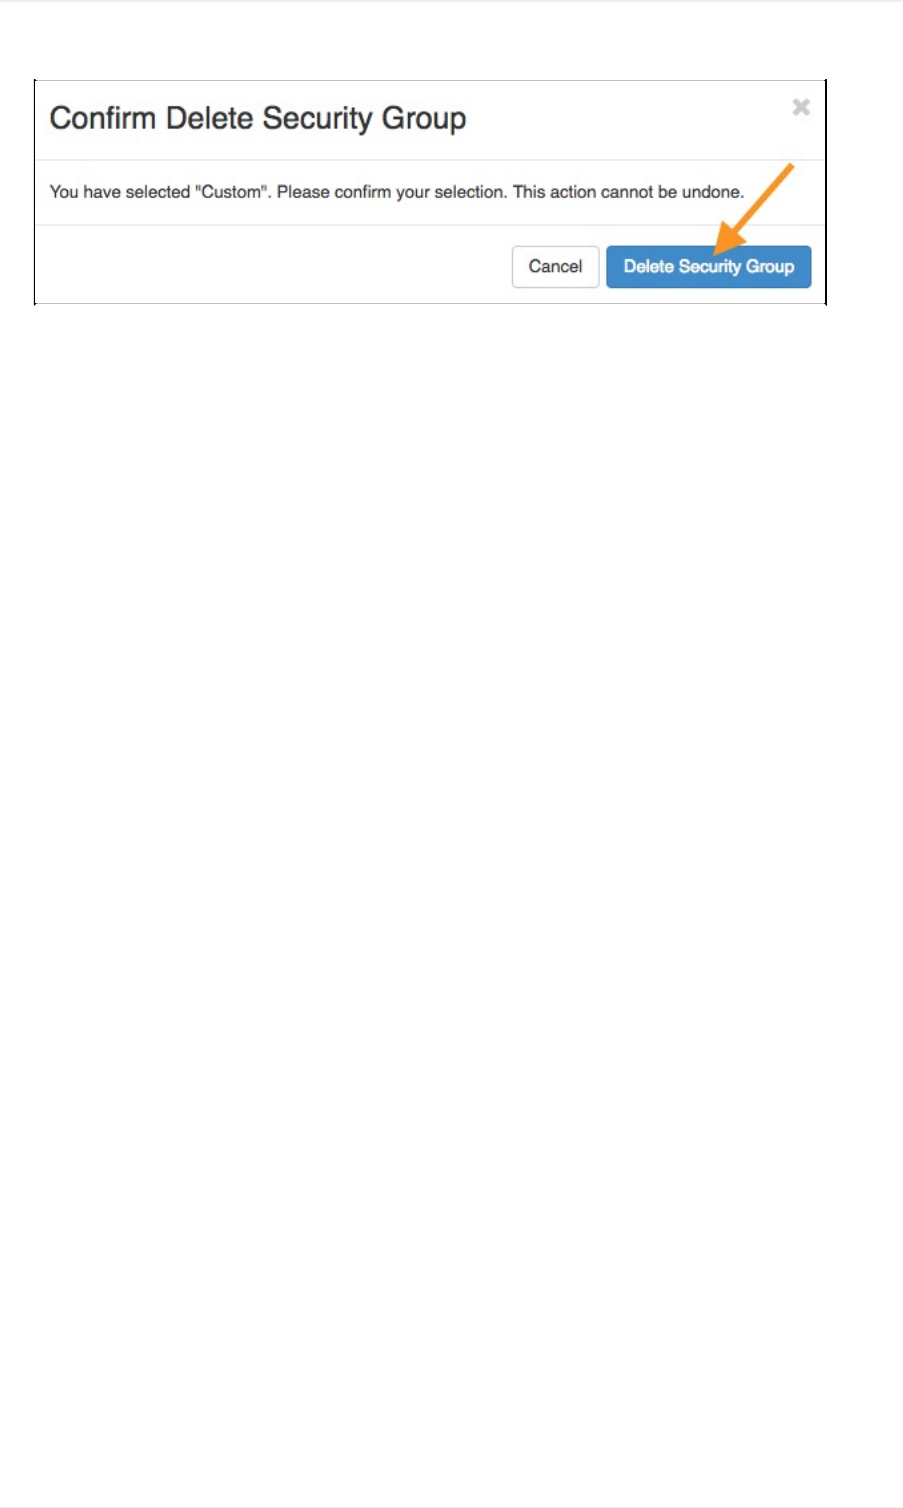
4. ConfirmdeletionoftheSecurityGroup.
ModifytheDefaultSecurityGroup
78
CADES→UserDocumentation→CADESCloudUserGuide→ManageYourVMInstances→OpenStackSecurityGroups→
CreateNewSecurityGroups
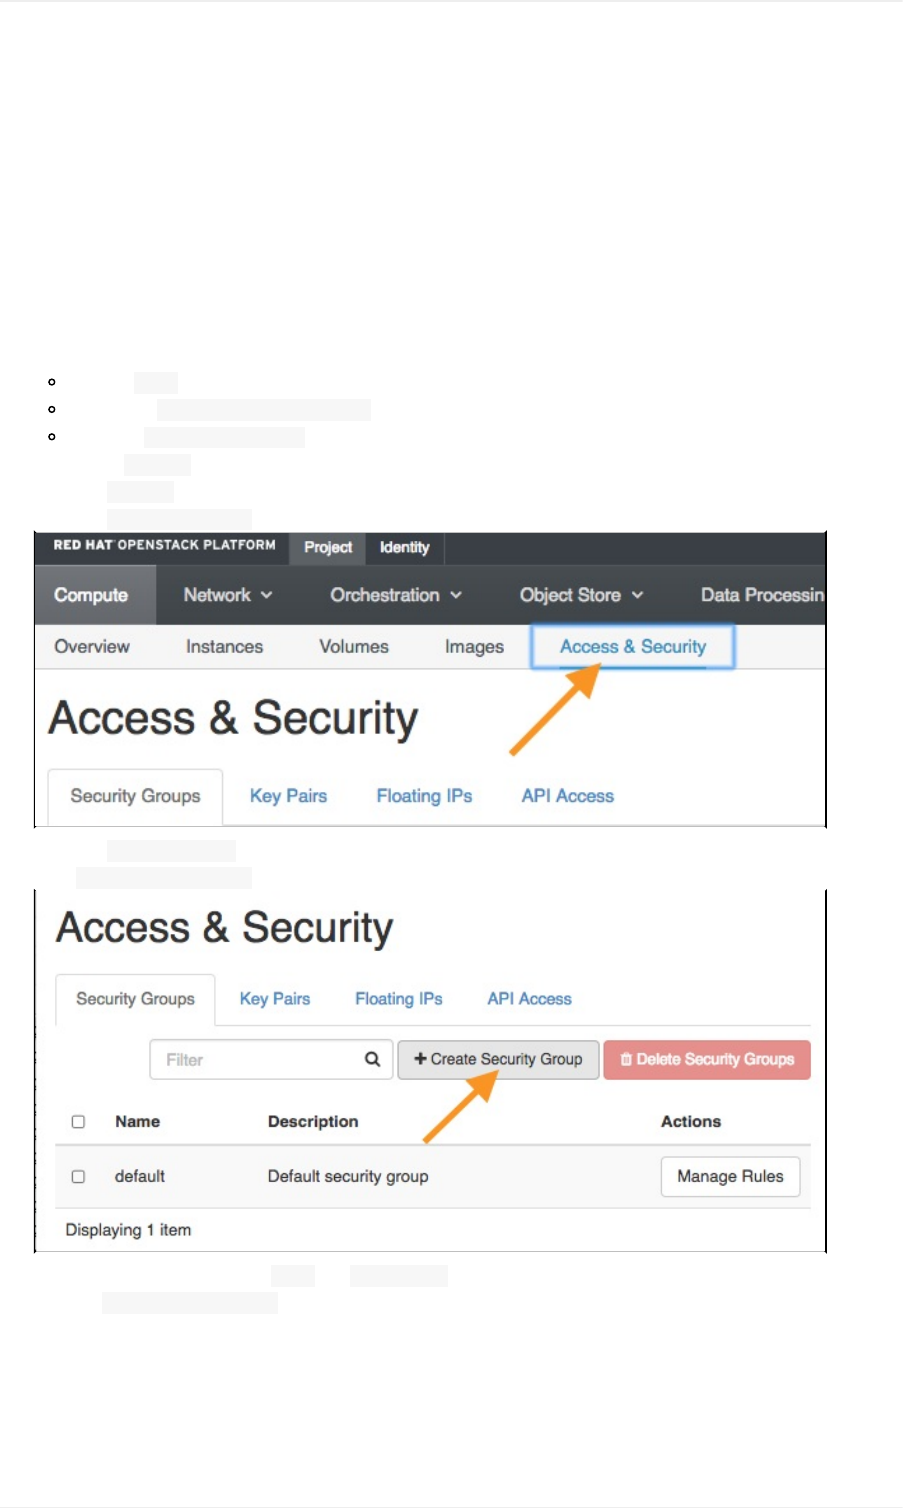
CreateaNewSecurityGroup
Note:Bydefault,allnewlycreatedSecurityGroupsallowalloutboundIPV4andIPV6(enabledbutnotfunctional).By
default,noinboundtrafficisallowed.
1. NavigatetotheHorizonwebinterfaceathttps://cloud.cades.ornl.gov/.
2. LoginwithyourUCAMScredentials.
Domain:ornl
UserName:Yourthree-letterUCAMSID
Password:YourUCAMSpassword
3. ClickontheProjecttabonthetopleft.
4. SelecttheComputesubtab.
5. SelecttheAccess&Securitysubtab.
6. SelecttheSecurityGroupssubtabtoviewatable/listoftheSecurityGroups.
7. ClickCreateSecurityGroupatthetoprightoftheSecurityGroupstable.
8. Intheresultingdialog,fillouttheNameandDescription(optional)fields.
9. ClicktheCreateSecurityGroupbuttontocompletethecreationofthenewSecurityGroup.
CreateanewSecurityGroup
79
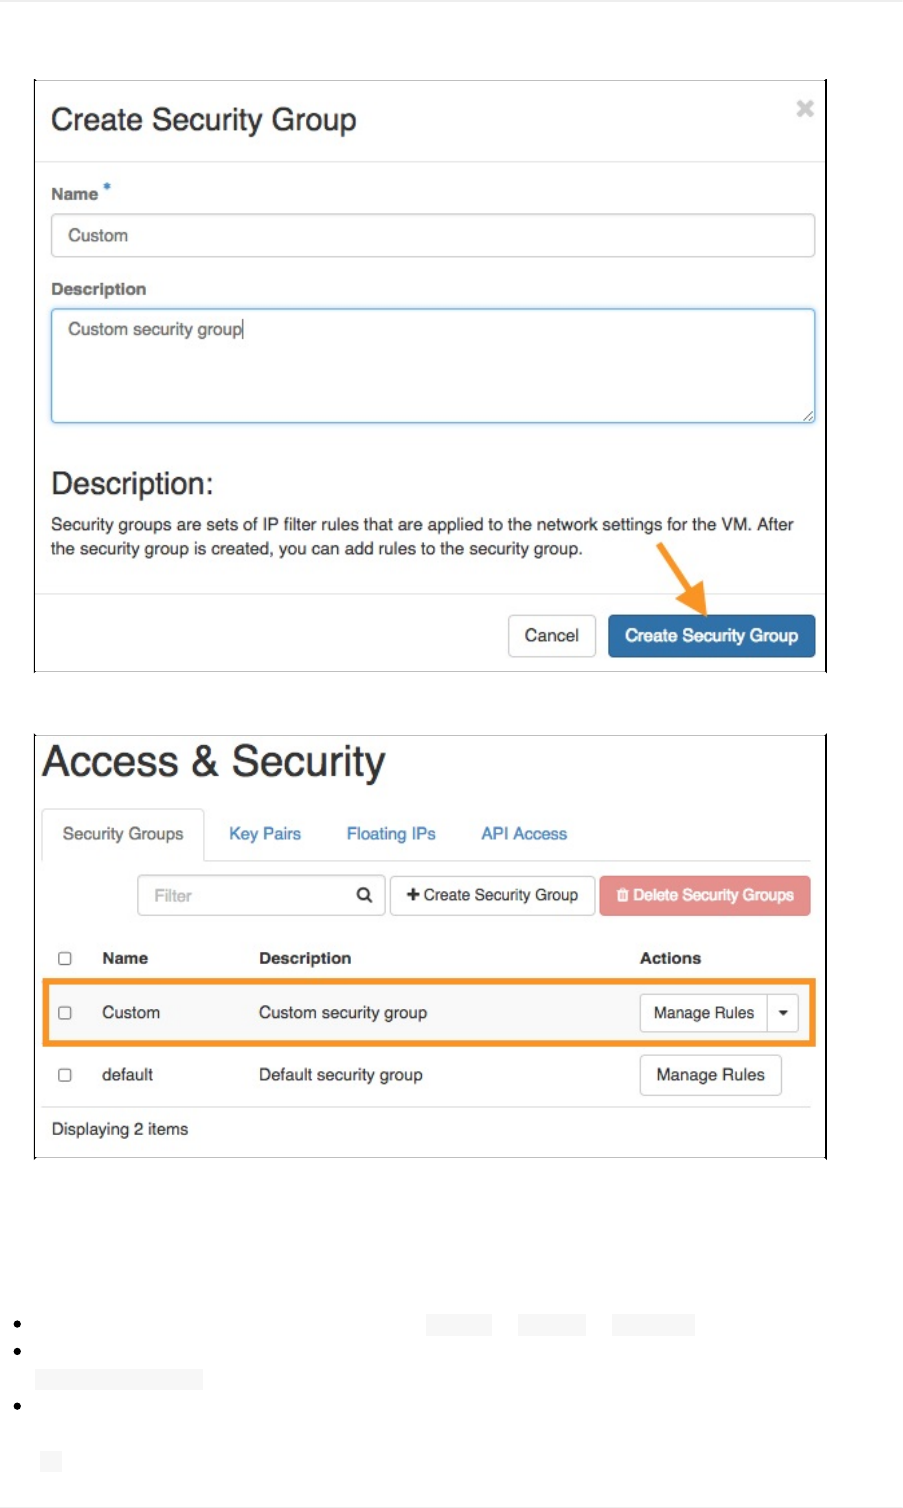
YournewSecurityGroupshouldnowbeavailableintheSecurityGroupstable.
Note:TheSecurityGroupmustbeaddedtotheInstancetotakeeffect.Seebelow.
AddaSecurityGrouptoyourInstance
ToaddthenewSecurityGrouptoyourVM,navigatetoProject→Compute→Instances
Clickonthedrop-down()menutotherightoftheinstancetowhichyouwouldliketoattachthenewrule,thenselect
Editsecuritygroups.
Ontheleftsideoftheresultingwindowarealloftheavailablesecuritygroups.Ontherightisalistofthesecuritygroups
thatareattachedtoyourinstance.Findthesecuritygroupontheleftthatyouwouldliketoaddtoyourinstanceandclick
(+).
CreateanewSecurityGroup
80

ClickSave.
JustasyoucanwiththedefaultSecurityGroup,youcancreateandmanagerulesforuser-createdSecurityGroupsfromthe
ManageRulesscreen.
CreateanewSecurityGroup
81

CADES→UserDocumentation→CADESCloudUserGuide→ManageYourVMInstances→OpenStackSecurityGroups→
CIDRSecurityExamples
SecurityGroupCIDRExamples
WhenaddinganewruletoaSecurityGroup,youcanalsospecifyCIDRconfigurationsforeachrule.Someexamplesare
providedbelow.
0.0.0.0/0–ThisCIDRconfigurationleavestrafficopentotheworld.However,otherfirewallsbetweentheCIDRandthe
remotemachinecanstillblocktraffic.
216.37.64.68/32–ThisCIDRconfigurationonlyallows216.37.64.68accesstotheselectedport(s).The/32isusedto
specifytrafficforonlytheprecedingIPaddress.
192.168.1.0/24–ThisCIDRconfigurationallowsallIPsbetween192.168.1.1and192.168.1.254accesstotheselected
port(s).The/24isusedtospecifythistrafficrange.
SecurityGroupCIDRExamples
82
CADES→UserDocumentation→CADESCloudUserGuide
CADESCloudUserGuide
CADES(ComputeandDataEnvironmentforScience)provideseligiblecustomerswithanOpenStack-basedcloudcomputing
solutionwithcustomizableVirtualMachines(VM).Thisresource,called"CADESCloud",enablescustomersinscienceand
technologydirectoratestoleverageself-serviceportalstorapidlyrequestVMsforproduction,testing,anddevelopment.This
documentationwillwalkyouthroughhowtoconfigureanduseyourCADESCloudallocation.TheCADESCloudallocationsare
intendedandconfiguredtobeintegratedwithintheORNLnetwork.
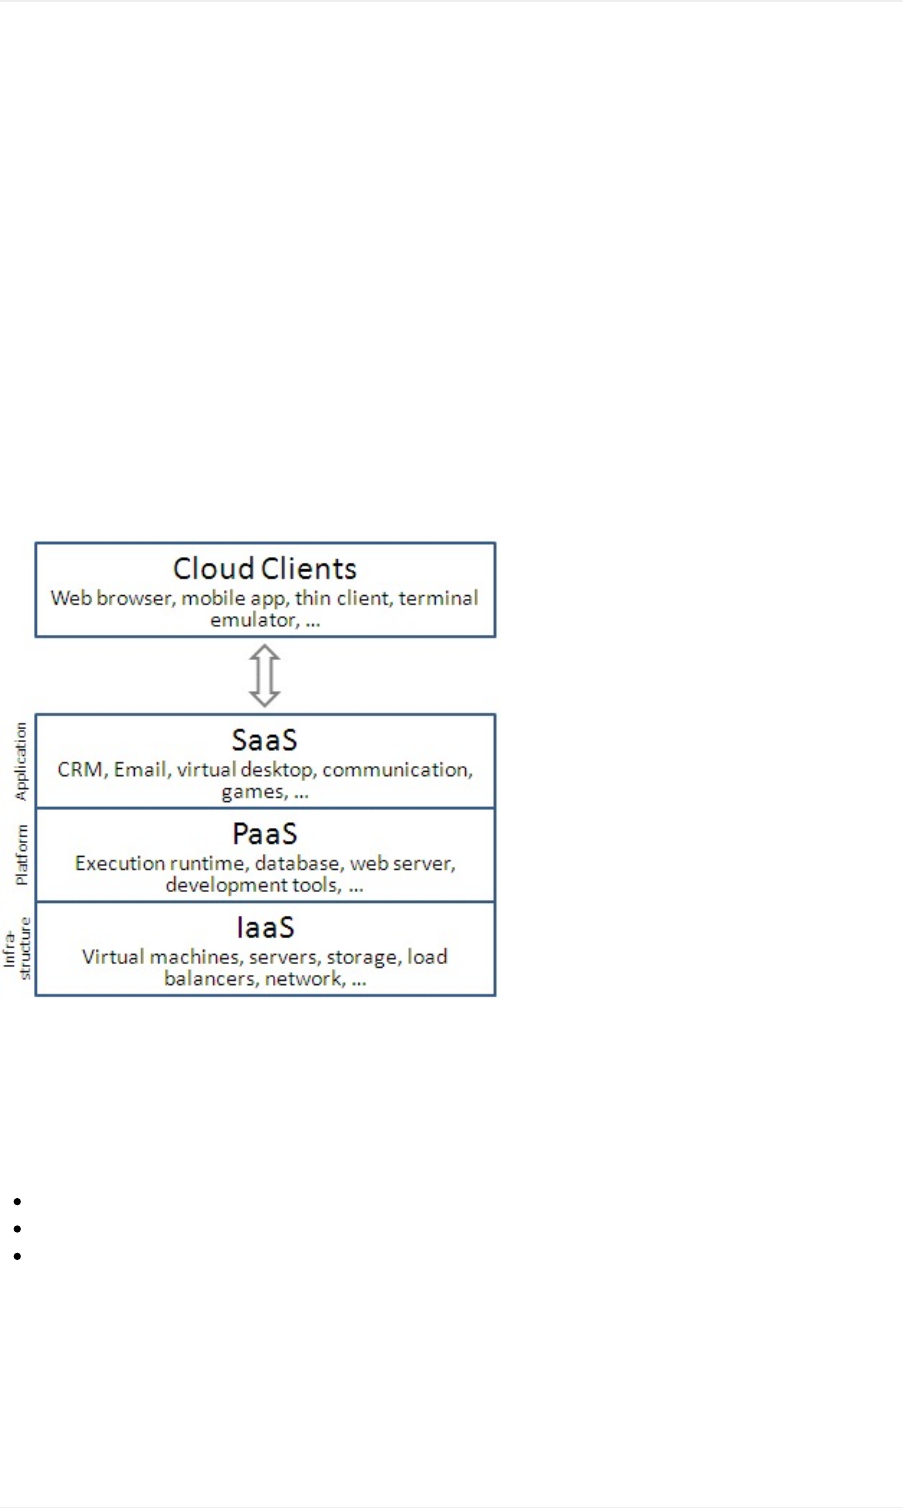
Whatiscloudcomputing?
Cloudcomputingprovidesanefficientpoolofon-demand,self-managedvirtualinfrastructure,consumedasaservice.
Asshowninthefigurebelow,classiccloudclientsinteractwiththreelayersinthecloudenvironment.
First,theSoftwareasaService(SaaS)layerthatpresentssoftwaretoolsandframeworkssuchasemails,enterprisesystemsto
users.Second,thePlatformasaService(PaaS)thatpresentstheruntimeservicessuchaswebservers,programmingenvironment
etc.touser.Third,theInfrastructureasaService(IaaS)layerthatprovideshardwareandfirmwaresuchasstorage,driversand
loadbalancerstousers.
TheCADESCloudallocationsprovide:
SelfService–ThroughtheHorizonwebinterface,userscancreate,manage,anddeleteVMs.
Portable–OperationscanbeperformedusinganylocalORNLsystemthatprovidesaBashterminalandSSHfunctionality.
Elasticity–UserscancreateVMsondemandanddeletethemwhentheyarenolongerdesired.
WhatisOpenStack?
OpenStackisanopen-sourcecloudcomputingsoftwareframeworkthatallowsadministrators(theCADESteam)tocreate
individual"Project"allocationsfortheircustomers.Thecustomers/userscanthenfilltheseProjectallocationswiththeirown
VMswithoutfurtherinterventionfromCADESadministrators—atrueself-serviceimplementation.
Overview-CADESCloudInformation
83

Overview-CADESCloudInformation
84
CADES→UserDocumentation→CADESCloudUserGuide→AvailableVMImages
AvailableVMImagesandConfigurations
TheCADESOpenStackallocationscanuseeitherCADES-providedimagesoruser-addedimagesfortheVMInstances.
However,forfullcompatibilityandbestreliability,westronglyrecommendthatcustomersuseoneoftheCADESimages.
CADESImages
TheCADESteamcurrentlyprovidestwoLinuximagesforuseinOpenStack.
CentOS7.x
Ubuntu16.04LTS
FeaturesofCADESImages
CADESimageshavebeenpreconfiguredwiththefollowingfeaturesandmodifications.
Thedefaultuserhasbeenchangedto"cades"andgivenfullsudoprivileges.
Ausernamed"cades-ops"hasbeenaddedtoensurethattheCADESteamhasadequateaccesstoprovidesupport.
LimitedLightweightDirectoryAccessProtocol(LDAP)functionalityhasbeenaddedtoenabletheuseofUCAMSIDsafter
theinitialkey-basedauthenticationasthe"cades"user.ToaddyourUCAMSID,simplyexecutesudosu-YOUR_UCAMS_ID
intheterminal.
Youwillnotbepromptedforapassword.
Alocalhomedirectorywillbecreatedforyouruser.
ClickhereformoredetailedinstructionsforaddingUCAMSuserstoyourInstance.
Yum/AptreposandtheNetworkTimeProtocol(NTP)havebeenconfiguredtouselocalORNLresources.
Theminimumdisksizerequiredforeachimageis8GB.
NamingSchemeforCADESImages
TheCADESnamingschemeisbasedaroundaCADES_$OSRELEASE_v$BUILDDATE_$RELEASEformatting.The$RELEASEfieldis
alwaysasingledigit,witha1indicatingaproductionversionofanimageanda0indicatingadevelopmentversionofthe
image.
UserImages
Whileyoucanrunuser-providedimagesinOpenStack,theCADESteamstronglyrecommendsthatcustomersuseCADES-
providedimagesforbestreliabilityandintegrationintheORNLenvironment.CADESwillnotprovidesupportforuser-
providedimages.IfyoustillwanttorunacustomcloudimagepleasecontacttheCADESteamforyourrequest.
ImportantNotesforAvailableVMImages
Onceanimageislaunchedasavolume,theimageisnolongertiedtothevolume.Ifthebaseimageisupdated,thoseupdates
wouldnotpropagatetotheInstanceandviceversa.
AvailableVMInstanceFlavors
AvailableVMImages&Configurations
85

CADES→UserDocumentation→CADESCloudUserGuide→Software&Hardware
Software&HardwareDetails
SoftwareStack
Hostoperatingsystem:RedHatOpenStackPlatform9
AvailableVMoperatingsystems:CentOS7.xandUbuntu16.04LTS
HardwareConfiguration
RAMInformation
Make:Samsung
Model:M393A2G40DB0-CPB
Speed:DDR42133
Errorcorrection:RegisteredECC
CPUInformation
ThefollowingCPUsareusedinthe"nova"and"Lustre-OpenStack"AvailabilityZones.
Make:Intel
Model:XeonE5-2698v3
Speed:2.30GHzbaseclock,3.60GHzTurboBoostclock
Instructionset(VMInstances):CPUIDInstanceCodes
Instructionset(Hypervisors):CPUIDHypervisorCodes
DetailedCPUinformationisalsoavailablethroughCPUID.
Howto: InstallCPUID
CPULayout
Software&Hardware
87
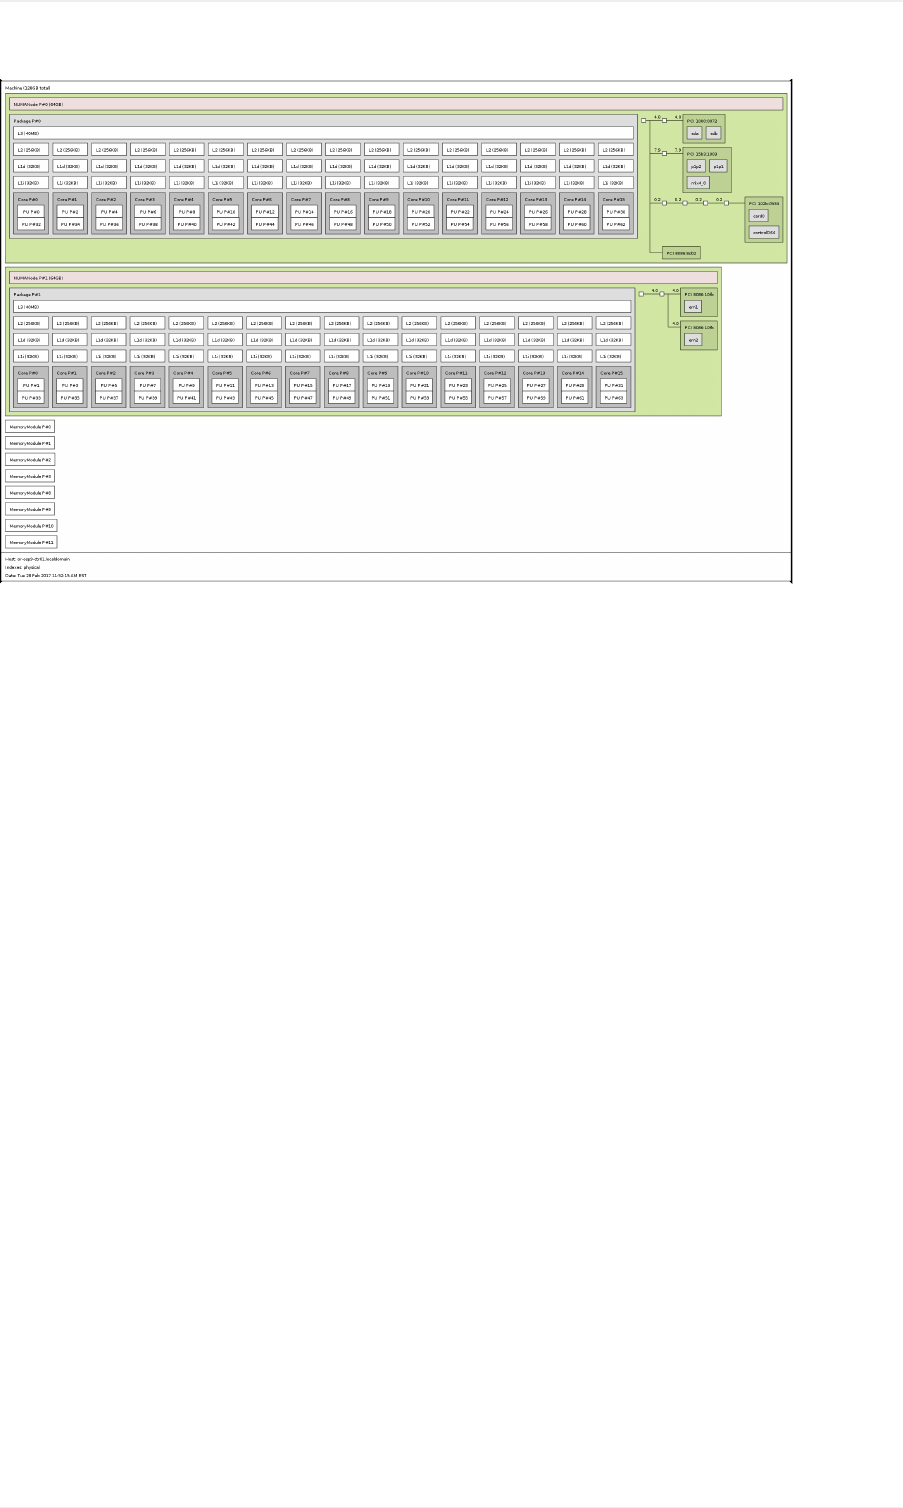
Software&Hardware
88
CADES→UserDocumentation→CADESCloudUserGuide→Network&Storage
NetworkandStorageDetails
NetworkConfiguration
TheCADESCloudallocationsconsistoftwoprimarynetworkenvironmentsorsubnets—anexternalsubnetandaninternal
subnet—describedbelow.WhileeithersubnetcanbeusedforaVMInstance,onlyoneIPaddresscanbeallocatedtoeach
subnetperVMInstance.
Note:IfyouwishtorunservicesonyourVMInstancethatshouldbeavailableoutsideofORNL'snetwork,ensurethatyou
selecttheExternalNetworkoptionwhensettingupyourVMInstanceandthatyoualsoaddaruletoyourSecurityGroupforthat
particularservice.
ExternalNetwork
general_extnetwork1:128.219.184.0/21.
RequiredforservicestobeavailableoutsideofORNL'snetwork.
Outward-facingservices(e.g.,awebserver)willrequireORNLfirewallexceptions(instructions).
Routedtomost"open"networksatORNL.
Outboundaccessisallowedperexistingopenresearchfirewallexceptions.
InternalNetwork
general_intnetwork1=172.22.0.0/20.
ServiceswillnotbeavailableoutsideofORNL'snetwork.
Outward-facingservices(e.g.,awebserver)willonlybeavailablefromwithinORNL.
Routedtomost"open"networksatORNL.
Outboundaccessisallowedthroughexistingopenresearchfirewallexceptions.
ImportantNotesforOpenStackNetworkDesign
IPV6isnotcurrentlysupported.
Inallcases,accessingaVMInstanceviaSSHfromoutsideofORNL'snetworkrequiresaSAFERexceptiontoallow
inboundtrafficonport22(SSH).
SSHaccessfromaninstancetoadestinationoutsideofORNL'snetworkmayroutethroughtheORNLSSHproxyservice
(instructions),ortheusercanrequestanoutboundexceptionusingSAFER.
IfyouwishtorunservicesonyourVMInstancethatshouldbeavailableoutsideofORNL'snetwork,ensurethatyoualso
selecttheExternalNetworkoptionwhensettingupyourVMInstance.
StorageConfiguration
NFS–CADESProjectsuseaNetworkFileSystem(NFS).
Lustre–Lustreallocationsareavailableuponrequest.
Note:Nomoderate/confidentialdatashouldbemountedorcopiedtoyourCADESCloudVMInstance.CADESCloudVM
Instancesareforopenscience.
Network&Storage
89

Network&Storage
90

CADES→UserDocumentation→CADESCloudUserGuide→AdditionalCloudResources
AdditionalResources
TherearesometopicsthatareoptionalandtheiruseisbasedonhowyouchosetouseyourCADESVMs.
Inthissectionyoucan:
RequestFirewallException
RunaSimpleWebServer
SSL-Let'sEncrypt
InstallCPUID
CPUIDHypervisorCodes
CPUIDInstanceCodes
Also,youcanperusetheUser-ContributedTutorialsectionwhichcurrentlycoversthefollowingtopics:
LaunchaDockerContainer
LaunchShinywithinDocker
EclipseinCADESHPC
AllineaDDTinCADESHPC
Note:ContentcontributedbythecommunityisnotsupportedbyCADES.
Ifthereissomethingmissing,pleaseemailCADEStoletusknow.Youcanalsohelpusbycontributingyourowncontent.Seethe
Contributingsectionformoreinformation.
AdditionalOpenStackResources
91
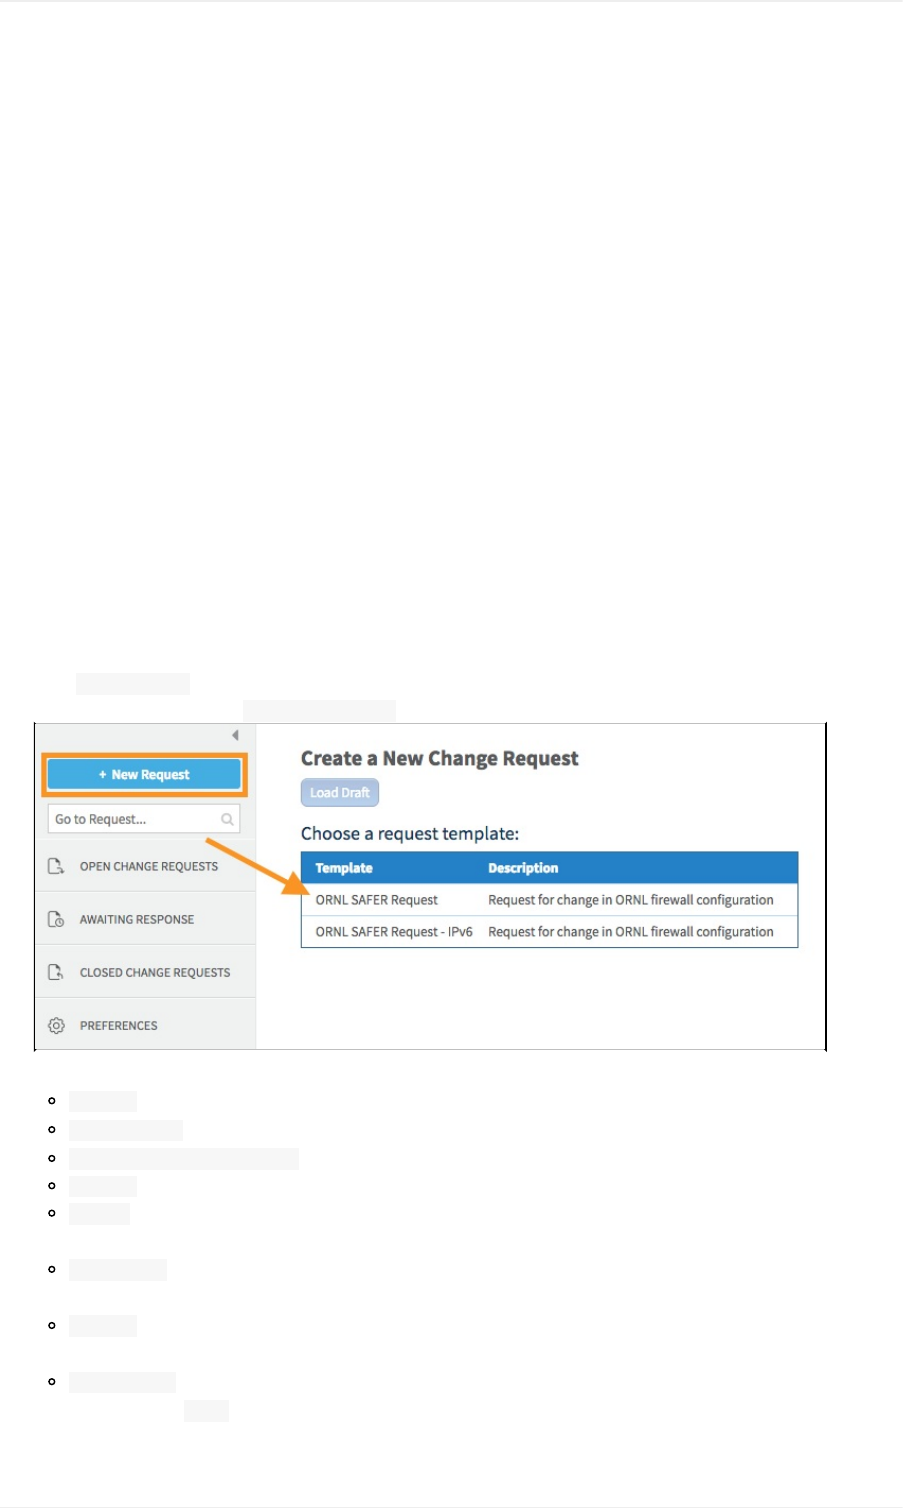
CADES→UserDocumentation→CADESCloudUserGuide→AdditionalCloudResources→ORNLFirewallConfiguration
ORNLFirewallConfiguration(SAFER)
Insomecases,acustomermaywanttorunaserviceontheirVMInstancethatshouldbeavailableoutsideofORNL'snetwork
(e.g.,SSH,webserver,GitLabservice,Docker),whichrequiresanexceptioninORNL'sfirewall.Theprocedurebelowwillshow
howtosetupafirewallexceptionforaservicerunningonyourVMInstance.
IfyouhavefurtherquestionsaboutgettingyourORNL(SAFER)firewallrulesinplace,e-mailtheSAFERteamdirectlyat
security@ornl.gov.
IfyouwishtorunservicesonyourVMInstancethatshouldbeavailableoutsideofORNL'snetwork,ensurethatyouselectthe
ExternalNetworkoptionwhensettingupyourVMInstanceandthatyoualsoaddaruletoyourSecurityGroupforthatparticular
service.ReadmoreabouttheCADESCloudnetworkdesignhere.
RequestaFirewallException
Forthepurposesofthisprocedure,wewillsetupanexceptionforawebserverrunningonport80.
1. Navigatetohttps://safer.ornl.gov.
2. LogintotheSAFERinterfaceusingyourUCAMScredentials.
3. Click+NewRequestatthetopleftofthescreen.
4. Ontheresultingpage,chooseORNLSAFERRequest.
5. Intheresultingrequestdialog,weneedtofilloutthefollowingfields:
Subject–Asimplesubjectwilldo.We'regoingwithVMwebserver.
Authorization–SettoNone.
ChangeRequestJustification–Providethereasonforyourfirewallexception.
Expires–Leavethisblanktomakethisexceptionindefinite.Otherwise,chooseadatefortheexceptiontoexpire.
Source–ThesourceIPorIPrange(withCIDRnotationifrange)oftheserverforwhichyouwouldliketomakean
exception.We'regoingtousethesingleIPaddressofourVMInstance,128.219.186.29.
Destination–Forthisexample,we'regoingtomakethesourceandthedestinationthesameIPaddress,
128.219.186.29.
Service–Thiscanbeformattedusingtheprotocol/port(e.g.,TCP/80)oryoucanchoosefromalistofcommon
multi-portservicesinthedrop-downmenu.We'reusingTCP/80.
ServiceName–User-definednameoftherule.We'recallingoursblackmesa_web.
6. Oncefilledout,clickNexttosubmityourrequest.
RequestFirewallException
92
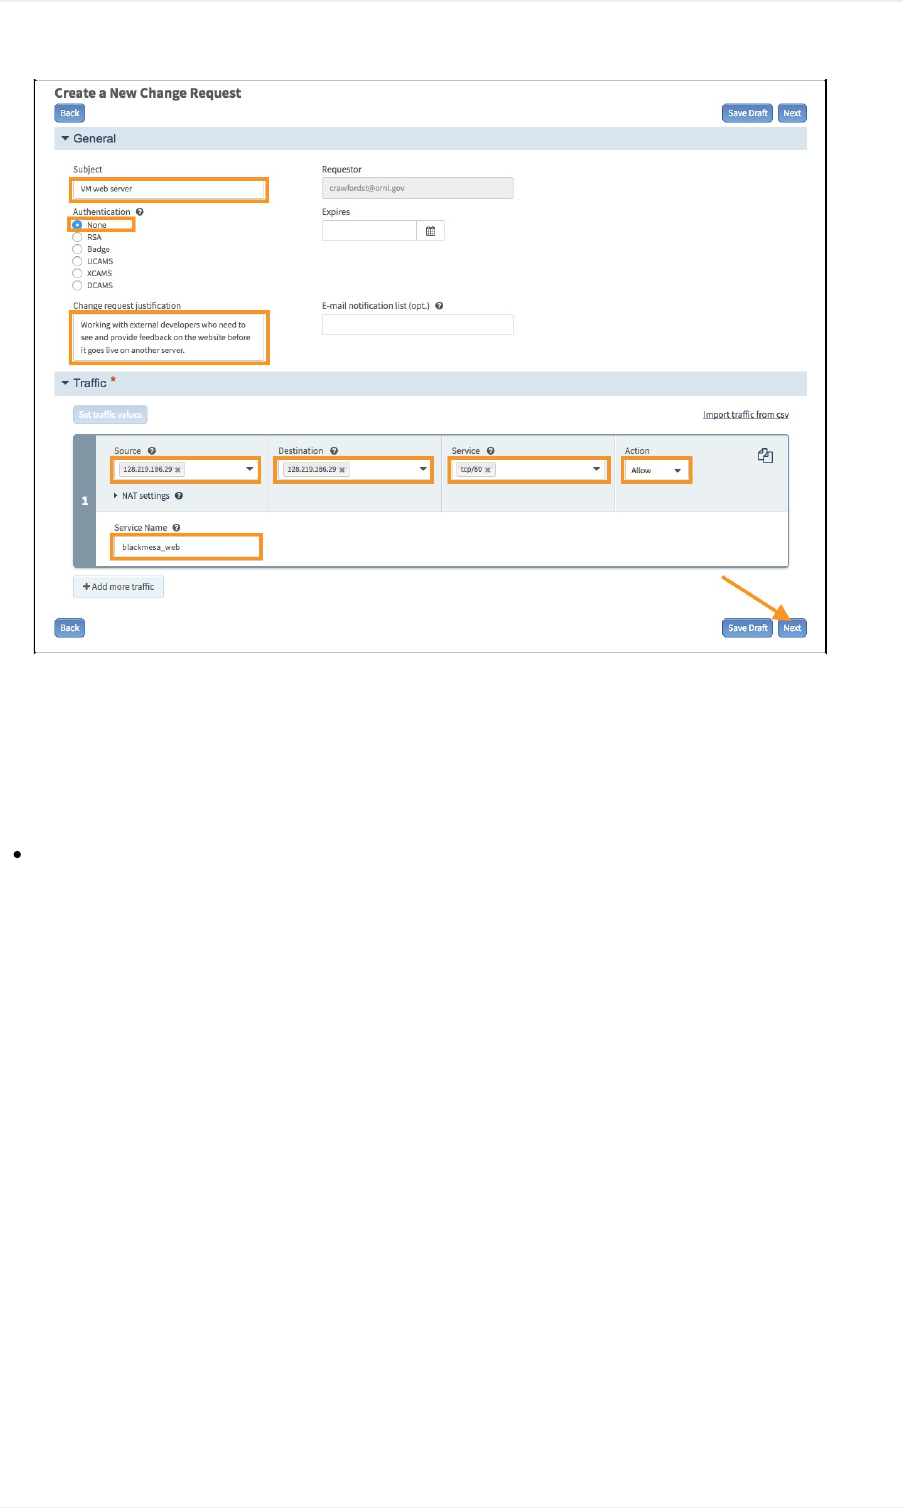
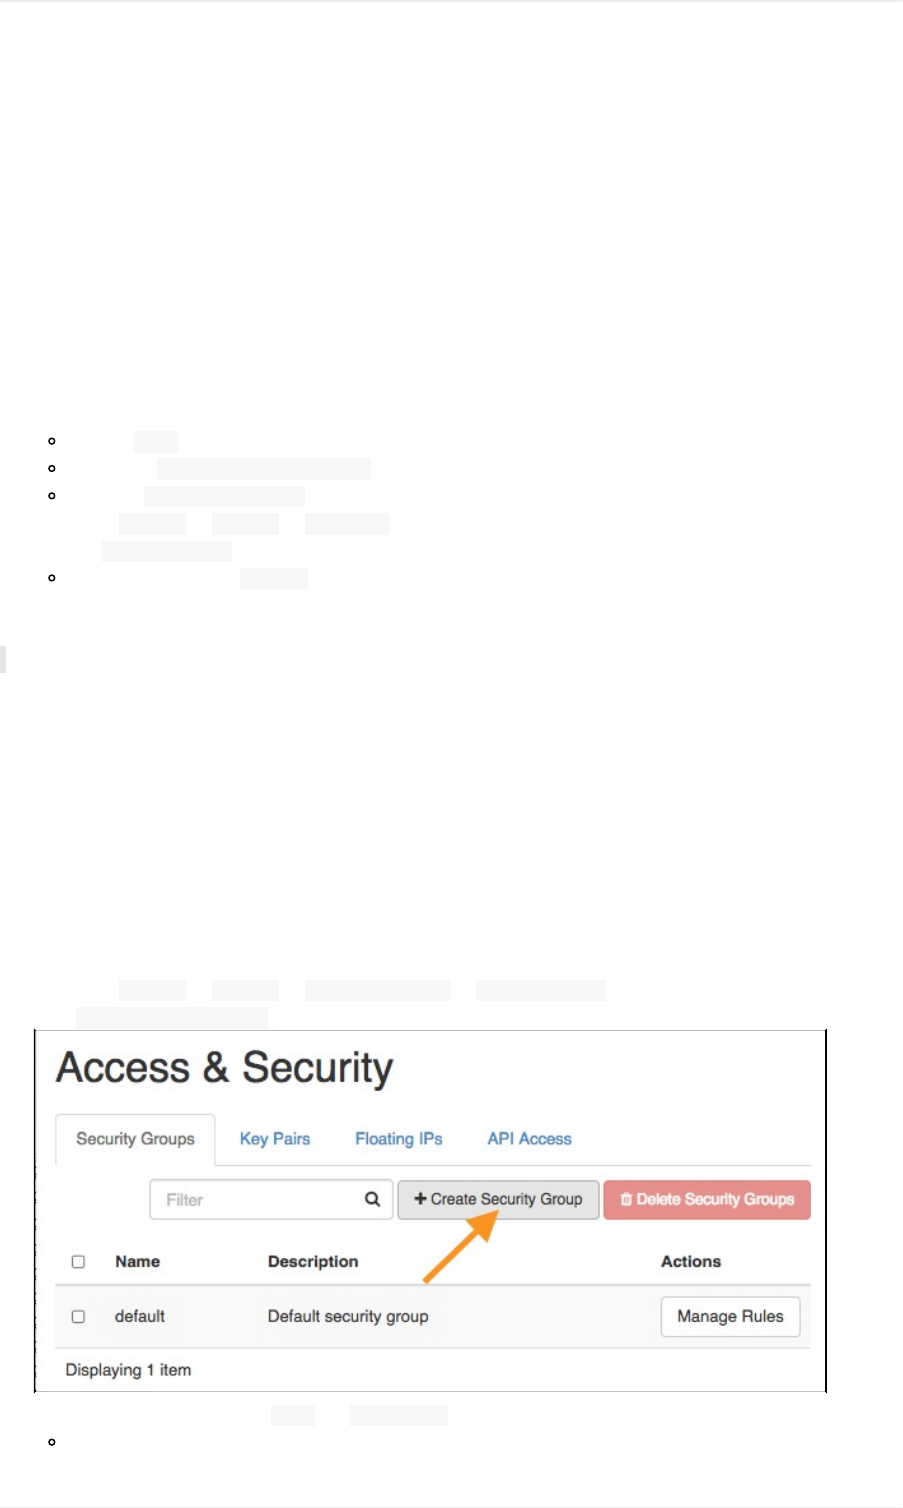
CADES→UserDocumentation→CADESCloudUserGuide→AdditionalCloudResources→RunaSimpleWebServer
RunaSimpleWebServer
ThefollowingdocumentationwillshowyouhowtolaunchanInstanceusingthedefaultSecurityGroup.Oncerunning,wewill
enableabasicHTTPserviceonport80byaddinganadditionalSecurityGroup.
LaunchanInstanceUsingHorizon
1. NavigatetotheHorizonwebinterfaceathttps://cloud.cades.ornl.gov/.
2. LoginwithyourUCAMScredentials.
Domain:ornl
UserName:Yourthree-letterUCAMSID
Password:YourUCAMSpassword
3. NavigatetoProject→Compute→Instances.
4. ClicktheLaunchInstancebutton,andcompletethelaunchinstancewizard.
ForthisexerciseusetheDefaultsecuritygroup.
IfyouhaveneverlaunchedaVMInstancebefore,checkoutthetutoriallinkedbelowbeforeproceeding.
Howto: LaunchaVMInstancefromanImage
AddRuleforTCPTraffic
OncewehaveourVMInstanceupandrunning,weneedtomakesurethattheInstancecanreceiveincomingtrafficonport80.
We'llcreateacustomSecurityGroup,addtherequiredruleforHTTPtraffictoournew(orexisting)SecurityGroup,andassign
thatSecurityGrouptoourVMInstance.
IfyourequireHTTPSsupportonport443,seeourSSL-Let'sEncryptdocumentation.
CreateCustomSecurityGroup
1. NavigatetoProject→Compute→Access&Security→SecurityGroups.
2. Click+CreateSecurityGroupatthetoprightoftheSecurityGroupstable.
3. Intheresultingdialog,fillouttheNameandDescription(optional)fields.
We'reusinghttp-serverforthisexample.
RunaSimpleWebServer
94
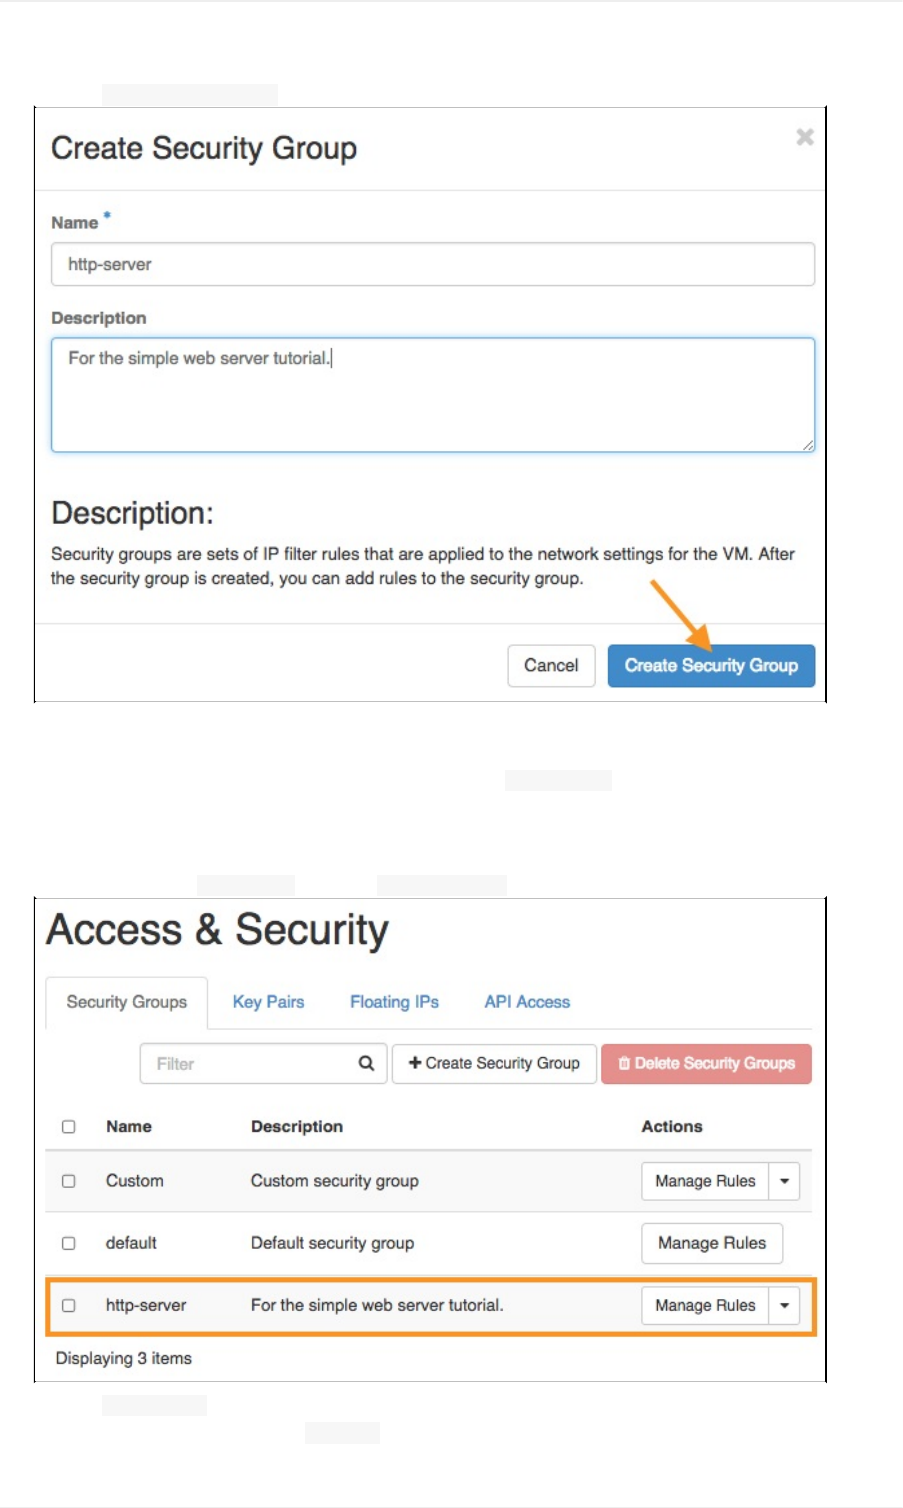
4. ClicktheCreateSecurityGroupbutton.
YournewSecurityGroupshouldnowbeavailableintheSecurityGroupstable.
Alternatively,youcanmodifyanexistinggroupusingthecorrespondingManageRulesbutton.
AddRuletoCustomSecurityGroup
1. Findthenewlycreatedhttp-serverruleontheSecurityGroupstab.
2. ClicktheManageRulesbutton.
3. OntheManageRulesscreen,clicktheAddRulebutton.
RunaSimpleWebServer
95
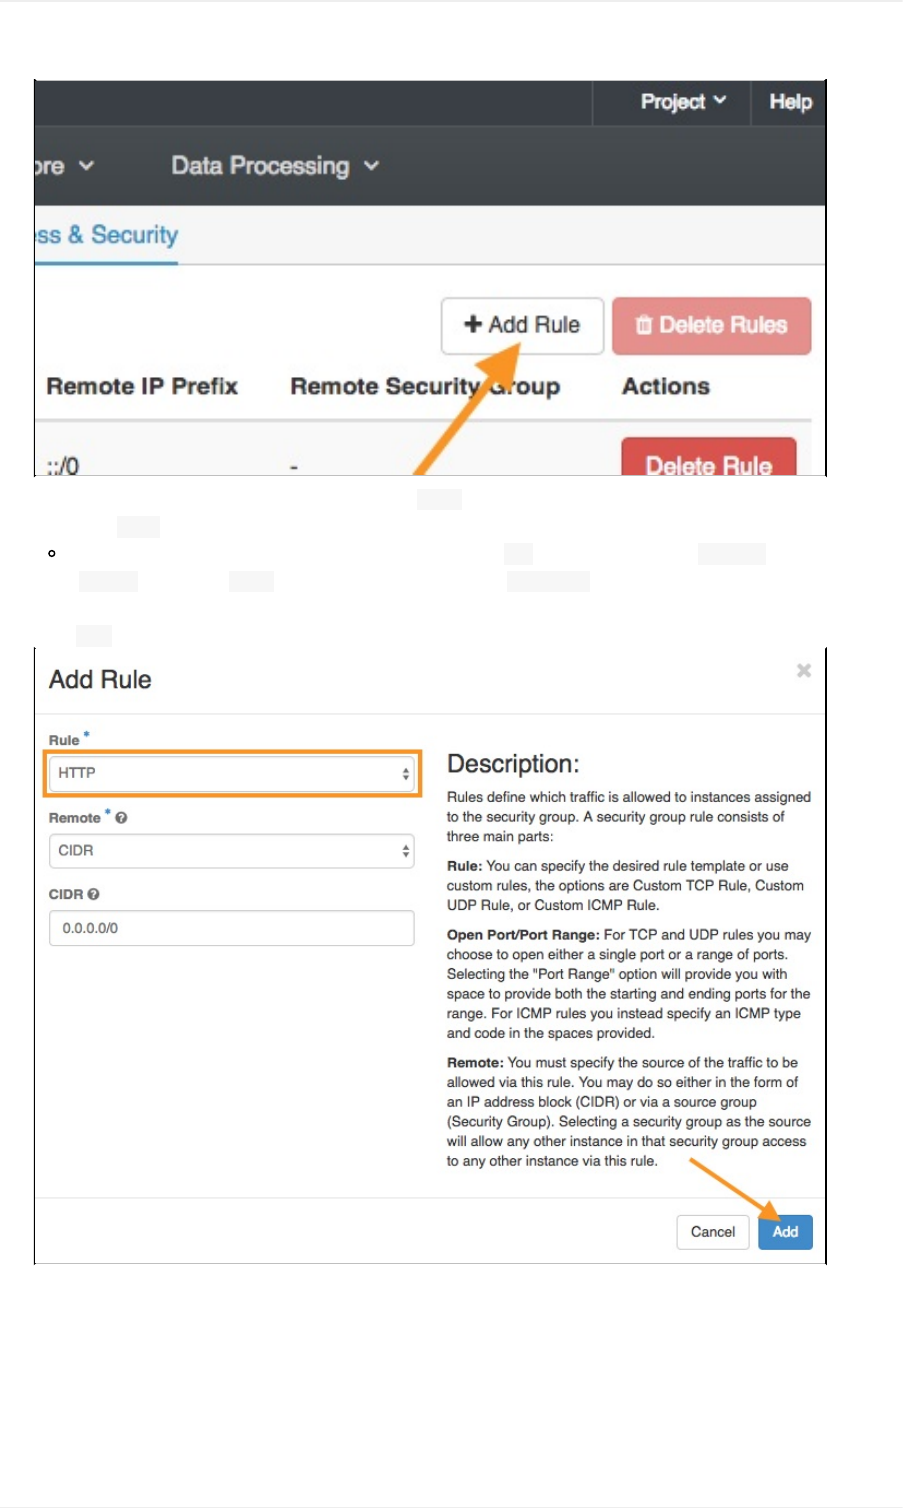
4. Intheresultingdialog,clickthedrop-downfieldunderRule.
5. ChoosetheHTTPruletemplatefromthedrop-downlist.
ChoosingtheHTTPtemplatewillautomaticallysettheportto80andsetthedirectiontoIngress.
6. IntheRemotebox,chooseCIDR(preferred)andleavethefieldas0.0.0.0/0orenterthedesiredinter-domainrange.
SeeCIDRexamplesformoreinformation.
7. ClickAddatthebottomofthedialogboxtoimplementyourcustomrule.
8. ConfirmyournewcustomruleisdisplayedintheManageRulesscreen.
RunaSimpleWebServer
96
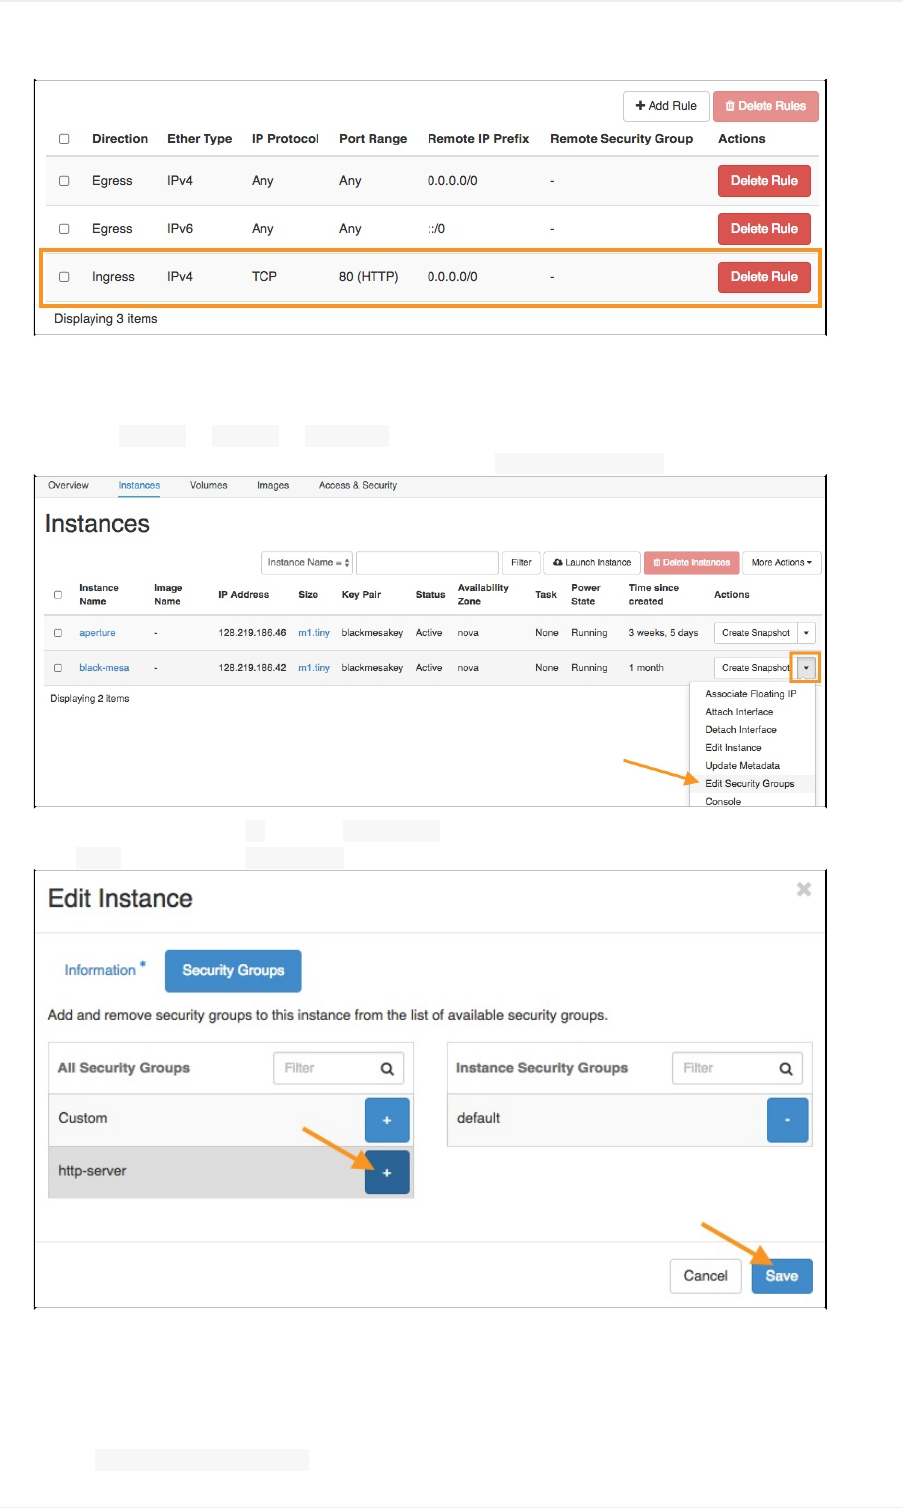
AddNewSecurityGrouptoYourVMInstance
1. NavigatetoProject→Compute→Instances,andfindtheInstanceonwhichyouwouldliketorunyourHTTPserver.
2. Clickthedrop-downmenuonyourInstance'slisting,andselect EditSecurityGroupsfromtheresultingmenu.
3. Intheresultingwindow,click+toaddthehttp-serversecuritygrouptoyourVMInstance.
4. ClickSavetoassociateyourhttp-serversecuritygroupwithyourInstance.
ConnecttoYourInstanceUsingSSH
1. OpenaBashterminal.
2. Execute$sshcades@128.219.186.42.
RunaSimpleWebServer
97
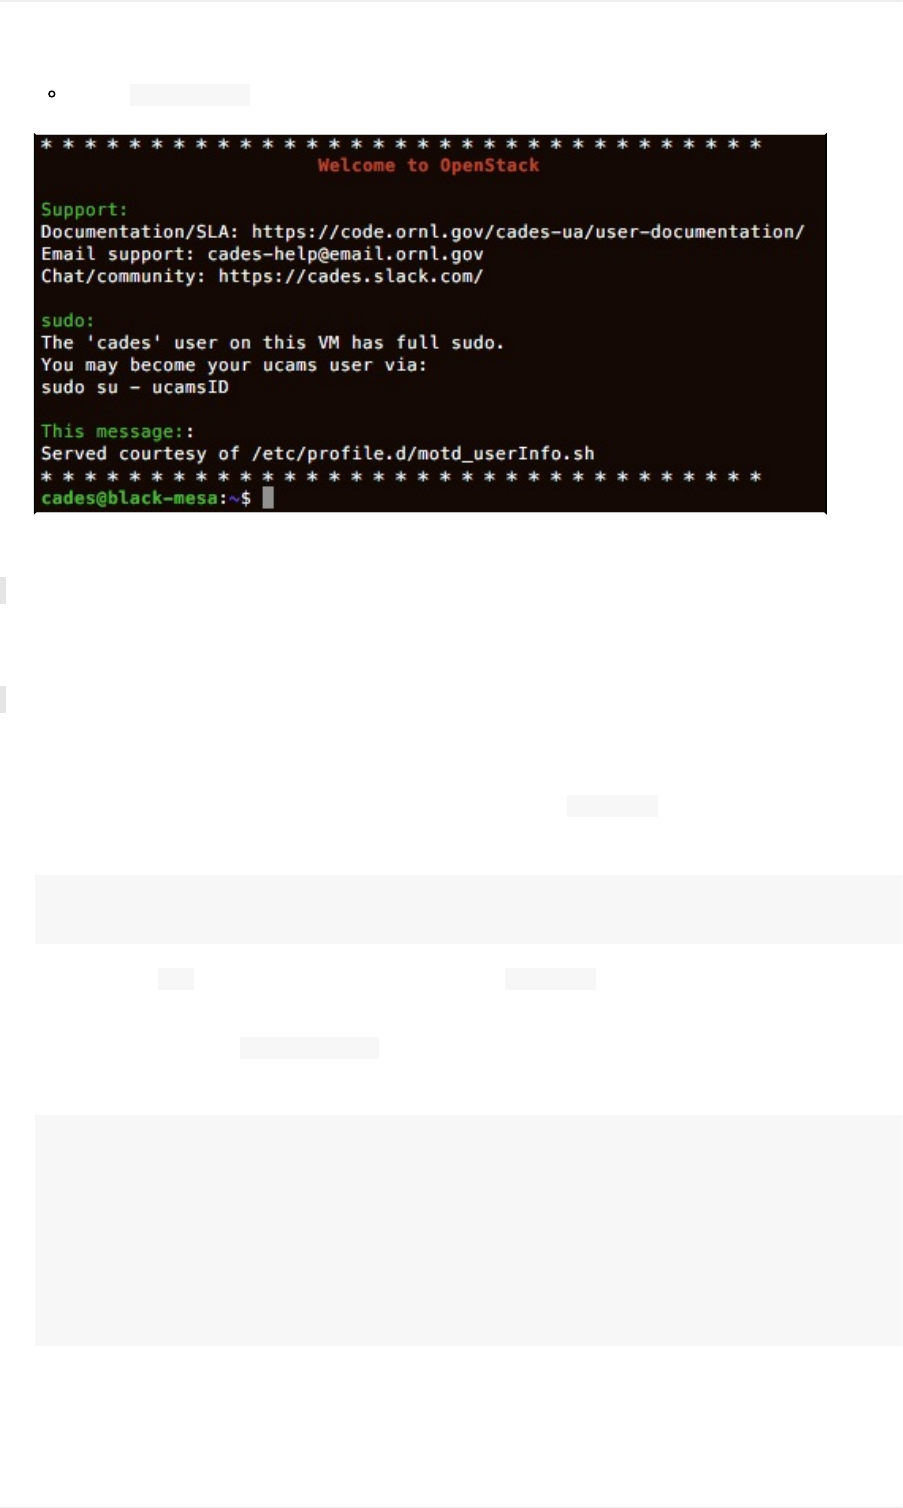
Replace128.219.186.42withtheIPaddressofyourownInstance.
3. YoushouldnowbeconnectedtoyourVMInstanceviaSSH.
FormoredetailedinformationonconnectingtoyourVMInstanceusingSSH,pleaseseetheSSHtutorials,linkedbelow.
Howto: AccessYourVMInstanceUsingSSH
ForWindowsusers,wehavedevelopedaseparatetutorialthatwalksyouthroughconnectingtoyourVMInstanceusingPuTTY's
SSHclient.
Howto: AccessYourVMInstanceUsingPuTTY(Windows)
SetupYourWebServer
Forthewebserver,weneedtocreateawebdirectoryandpopulateitwithabasicindex.htmlpage.
1. ExecutethefollowingintheVM'sBashterminal.
$mkdirwww
$cdwww
Thiswillcreateawwwdirectory.Next,weneedtoopenanewfile(index.html)intheVIMtexteditorandpopulateit
withsomebasicHTMLmarkup.
2. IntheBashterminal,execute$vimindex.htmltocreatethenewfileandopenitinVIM.
3. OnceinVIM,addthefollowinglinestoyourfile.
<html>
<head>
<title>
Helloworld!
</title>
</head>
<body>
<h1>Helloworld!</h1>
</body>
</html>
RunaSimpleWebServer
98
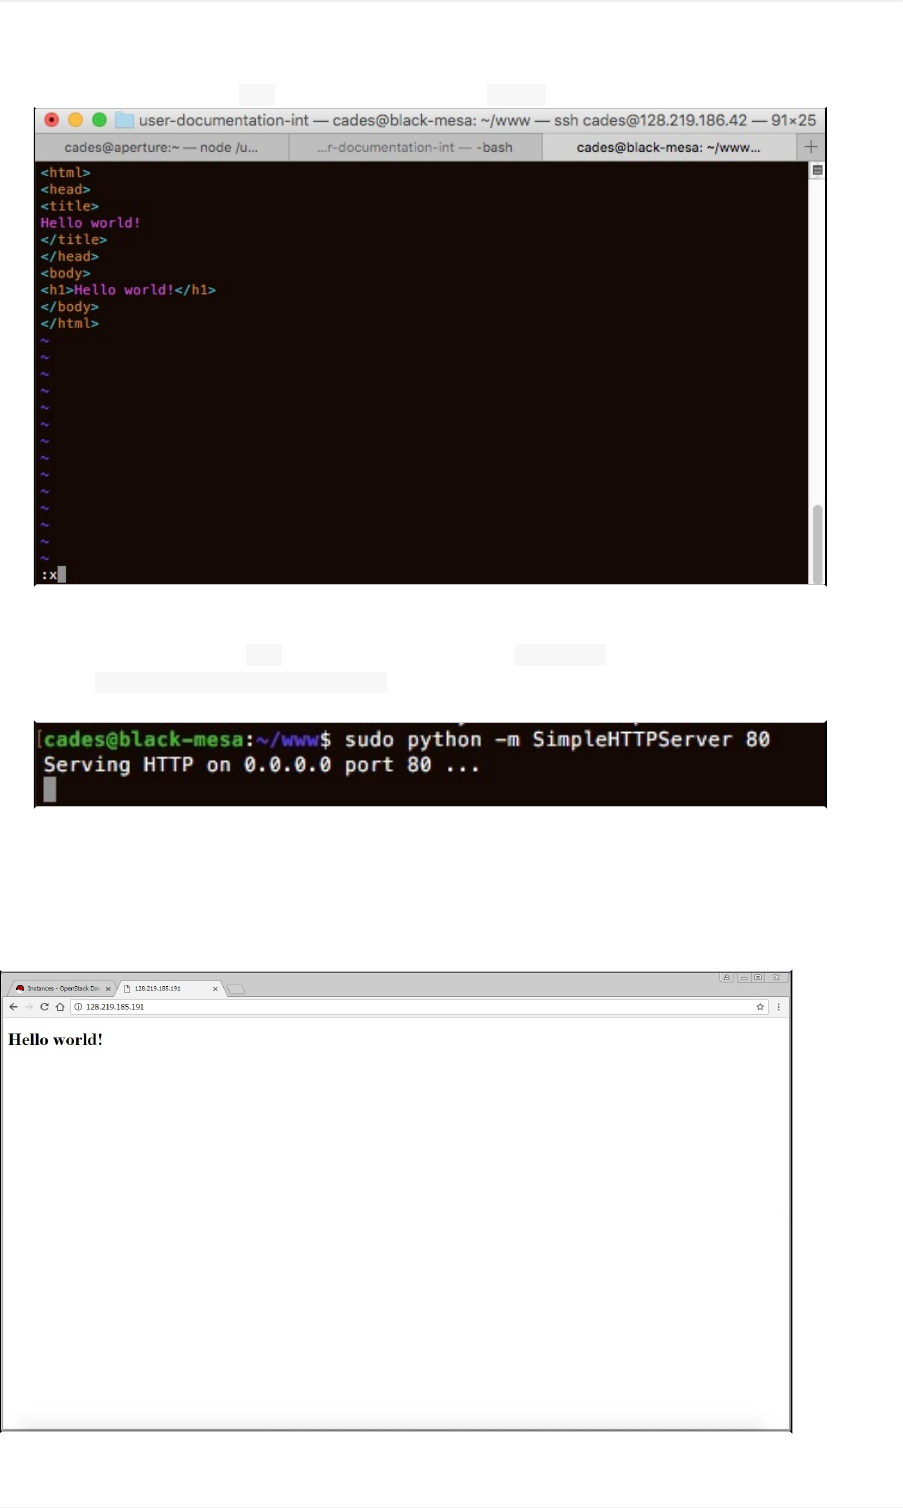
4. Saveyournewfile:presstheEsckey,type:x,andthenhittheReturnkey.
Nowthatwehaveourfilesinplace,wecanstartasimplewebserverusingPython.
1. Ensurethatyouarestillinthewwwdirectorywhereyouplacedyourindex.htmlfile.
2. Execute$sudopython-mSimpleHTTPServer80inyourVM'sBashterminal.Amessagewillconfirmthattheserveris
running.
TesttheWebServer
Youshouldnowbeabletoaccessyour"helloworld"pagefromawebbrowserbyenteringtheIPaddressofyourinstanceasthe
URL.
RunaSimpleWebServer
99

Troubleshooting
IfyougetanerrorwhenattemptingtonavigatetoyourInstance'sIPusingabrowser,ensurethat:
YouusedtheexternalnetworkoptionwhenyouconfiguredyourInstance.
YouarewithintheORNLnetworkoryouhaveaddedaSAFERfirewallexceptionforyourVMInstance'sIPaddressonPort
80(orwhateverportyouspecifiedinthePythoncommand).
YouhaveaRuleinyourSecurityGroupthatgrantsaccesstoyourVMInstanceonPort80(orwhateverportyouspecifiedin
thePythoncommand).
YourPythonserverisactiveonyourVMInstance.
DoYouNeedHTTPS?
SSL-Let'sEncrypt
RelatedTutorials
LaunchaVMInstance
AccessVMInstanceUsingSSH
RunaSimpleWebServer
100

CADES→UserDocumentation→CADESCloudUserGuide→AdditionalCloudResources→SSL-Let'sEncrypt
AddingaSecurityCertificatetoYourWebsite
ObtainingasecuritycertificatefromaCertificateAuthorityenablesyoutousehttpsonyourwebsitehostedbyCADES.Utilizing
httpsmaintainstheconfidentialityofthetransferredinformationbyusingasetofencryptionkeys.Additionally,thisdocument
willcoverrequirementsforFirewallexceptions,cipherspecifications,andHSTSpreloadingconditions.
Caveat:AutoSSLCreationforCADESVMs
InordertoexpediteORNL'srequiredcompliancewithDHSBOD18-01asmanysitesaspossiblewereautomaticallyadjustedto
defaultingtoHTTPSwithaLet'sEncryptcertificate.
DirectiveOverview
PursuanttoDHSBOD18-01allfederalwebsitesmustbemigratedtoHTTPS.Theprescribedimplementationpatternisas
follows
RedirectHTTPtraffictoHTTPSvia301MovedPermanently
HTTPSshouldbeconfiguredwithatrustedTLScertificate
Allofthefollowingshouldbedisallowed:
SSLv2
SSLv3
RC4,DES,and3DESciphers
HSTSheadersetwithmax-ageequalto1year.
TableofContents
Prerequisites
Part1:ModifyingtheOpenStackHorizonSecurityGroup
AddRuleforSecuredTCPTraffic
IncludenewruleinyourInstance'sSecurityGroup
Part2:ObtainingtheSecurityCertificateforyourSite
AccessingyourVMviaSSH
UsingCertbot'sautomatedclient(UbuntuorCentOS)
SettingUpAutorenewal
Part3:UpdatingFirewallException
Requestingnewfirewallexception
Part4:ConfiguringyourWebserver
Part5:CertificateAuto-Renewal
SSL-Let'sEncrypt
101

Prerequisites
AwebsitehostedbyCADESresources
BashaccesstotheVMhostingthesite
Enablevirtualhostsinyourapacheconfigfileandensurethedefaultsiteisservedasavirtualhost.
CentOSApacheVirtualHostConfiguration
UbuntuApacheVirtualHostConfiguration
Part1:ModifyingtheOpenStackHorizonSecurityGroup
ViewtheInstanceUsingHorizon
1. NavigatetotheHorizonwebinterfaceathttps://cloud.cades.ornl.gov/.
2. LoginwithyourUCAMScredentials.
Domain:ornl
UserName:Yourthree-letterUCAMSID
Password:YourUCAMSpassword
3. NavigatetoProject→Compute→Instances.
4. Clickontheexistinginstancethathostsyourwebserverifyou'dliketoreviewthesettings.
IfyouhaveneverlaunchedaVMInstancebefore,checkoutthetutoriallinkedbelowbeforeproceeding.
Howto: LaunchaVMInstance
AddRuleforSecuredTCPTraffic
Whenyouoriginallysetupyourwebserver,thesettingsallowedincomingtrafficonport80.Nowweneedtoallowsecuretraffic.
Thenwe'llmakesuretheruleisproperlyassignedtoyourInstance.
1. NavigatetoProject→Compute→Access&Security→SecurityGroups.
2. FindtheexistingSecurityGroupthatcontainsyourhttpaccessrulesandclickManageRulesontherightsideofthescreen.
3. Intheresultingwindow,click+AddRule.
4. Intheresultingdialog,clickthedrop-downfieldunderRule.
5. ChoosetheHTTPSruletemplatefromthedrop-downlist.
ChoosingtheHTTPStemplatewillautomaticallysettheportto443andsetthedirectiontoIngress.
6. IntheRemotebox,chooseCIDR(preferred)andleavethefieldas0.0.0.0/0orenterthedesiredinter-domainrange.
SeeCIDRexamplesformoreinformation.
7. ClickAddatthebottomofthedialogboxtoimplementyourcustomrule.
8. ConfirmyournewcustomruleisdisplayedintheManageRulesscreen.
Moreinfo: SecurityGroups
AddRuletotheInstance'sSecurityGroup
1. NavigatetoProject→Compute→Instances.
2. Ontheright,clickthedownarrow()nextto CreateSnapshot.
3. SelectManageSecurityGroups.
4. Clickthe+nexttoyournewHTTPSruletoaddittoyourInstance.
SSL-Let'sEncrypt
102
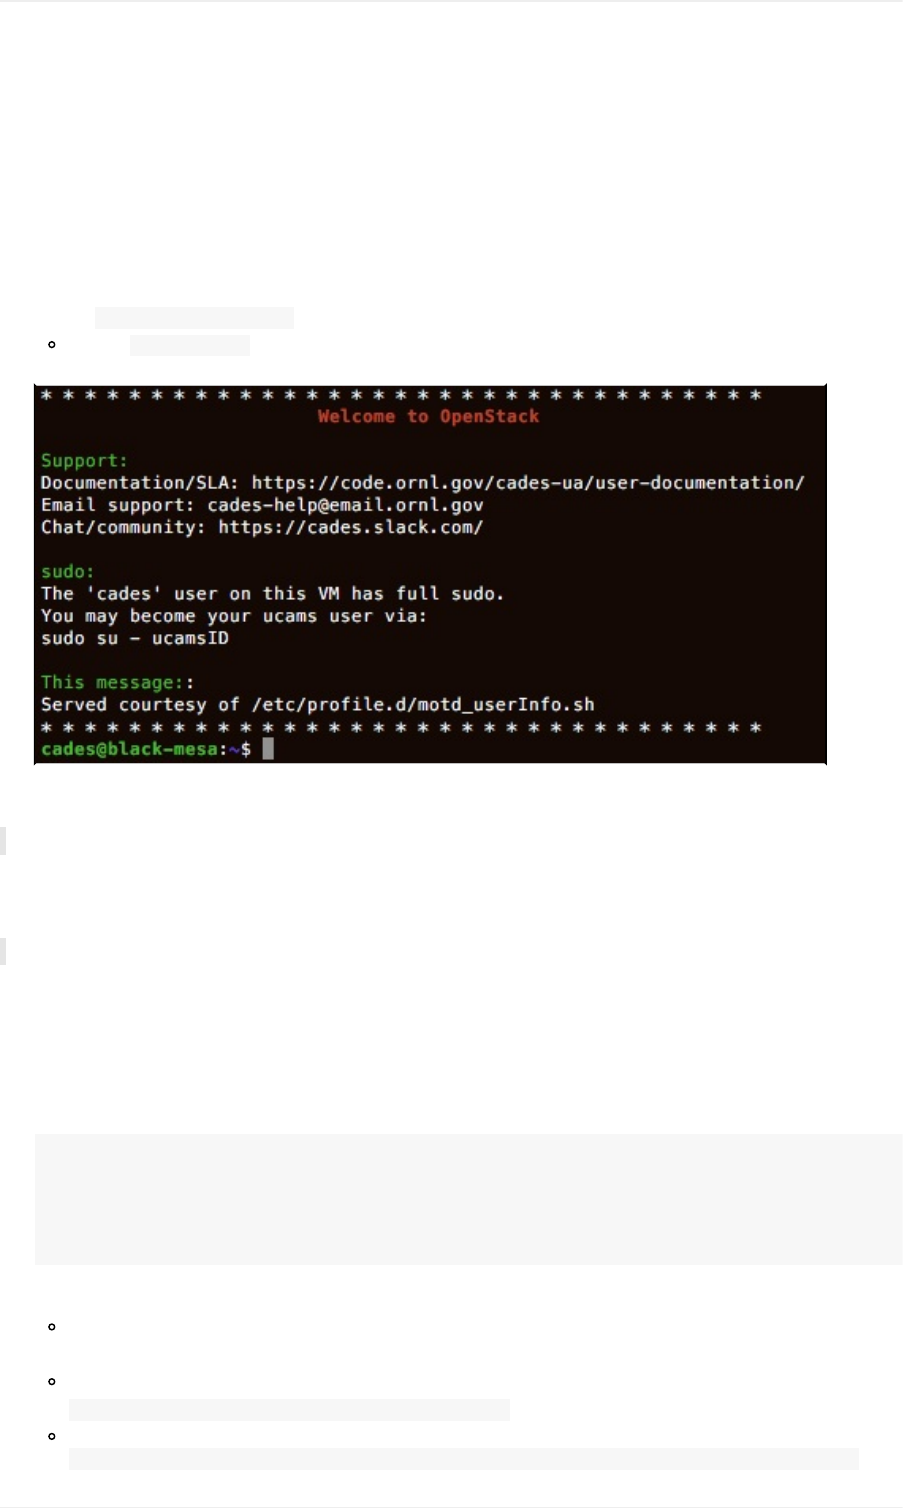
Part2:ObtainingtheSecurityCertificateforyourSite
TheprocessofobtainingtheSSLcertificateisautomatedviathecommandlineusingLet'sEncryptandCertbot.
AccessyourVMviassh.
1. OpenaBashterminal.
2. Executesshcades@128.219.186.42.
Replace128.219.186.42withtheIPaddressofyourownInstance.
3. YoushouldnowbeconnectedtoyourVMInstanceviaSSH.
FormoredetailedinformationonconnectingtoyourVMInstanceusingSSH,pleaseseetheSSHtutorials,linkedbelow.
Howto: AccessYourVMInstanceUsingSSH
ForWindowsusers,wehavedevelopedaseparatetutorialthatwalksyouthroughconnectingtoyourVMInstanceusingPuTTY's
SSHclient.
Howto: AccessYourVMInstanceUsingPuTTY(Windows)
InstallingCertbotforUbuntu(seebelowforCentOS)
CertbotisanautomatedclientthatobtainsandimplementsSSLcertificatesforyourwebsite.
1. ObtainthenecessaryCertbotpackages.
sudoapt-getupdate
sudoapt-getinstallsoftware-properties-common
sudoadd-apt-repositoryppa:certbot/certbot
sudoapt-getupdate
sudoapt-getinstallpython-certbot-apache
2. UseCertbot'sApachepluginstoautomatethecertificateprocess.
Therearetwooptions.OptionAshouldbeusedifcannotstopandrestartyourwebserver.OptionBshouldbeusedif
youcanstartandstopyourwebserver.Ifyouarenotsure,chooseOptionA.
OptionA
sudocertbot--authenticatorwebroot--installerapache
OptionB
sudocertbot--authenticatorstandalone--installerapache--pre-hook"apachectl-kstop"--post-hook
SSL-Let'sEncrypt
103
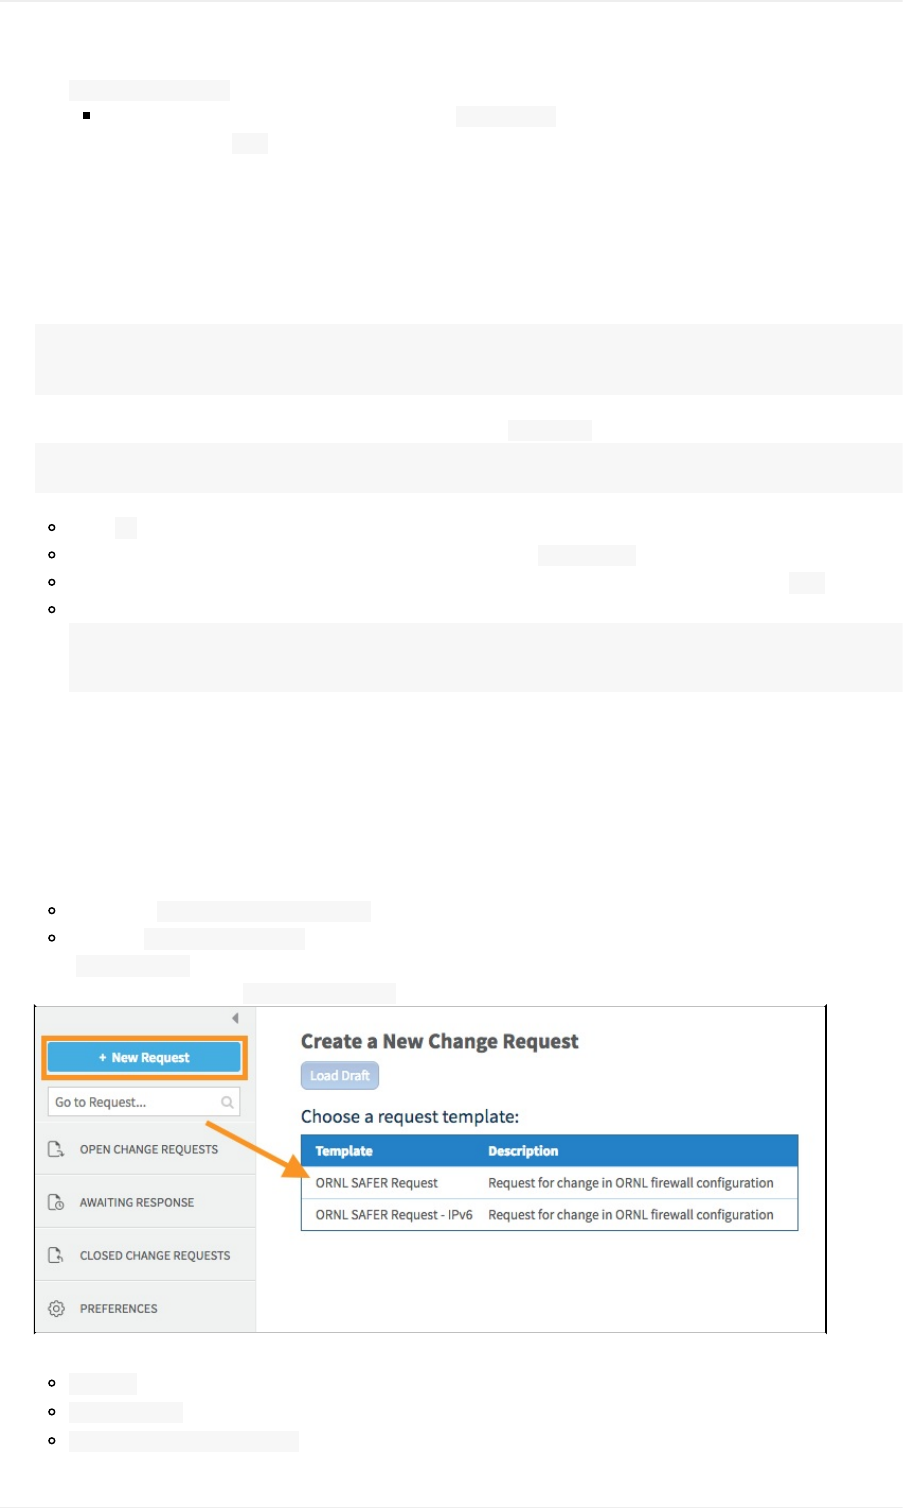
"apachectl-kstart"
Youwillbeaskedtoenteryourdomainname(e.g.example.com)andyourwebroot(thefolderwhereyour
websitelives,e.g.www).
InstallingCertbotforCentOS(seeaboveforUbuntu)
CertbotisanautomatedclientthatobtainsandimplementsSSLcertificatesforyourwebsite.
1. ObtainthenecessaryCertbotpackages.
wgethttps://dl.eff.org/certbot-auto
chmoda+xcertbot-auto
2. UseCertbot'spluginstoautomatethecertificateprocess.(Fillinthe/path/to/withyourspecificpath.)
sudo./path/to/certbot-autocertonly
Select2whenpromptedtoplaceCertbot'sfilesinthewebrootdirectory.
Pleasealsoprovideyouremailaddressandyourdomainname,e.g.example.com.
Next,you'llbeaskedtoprovidethewebrootforyourdomain(thefolderwhereyourwebsitelives),e.g.www.
Thenextcommandwillstopandrestartyourserver.Pleasebeawareofthetemporaryserviceinterruption.
sudocertbot--authenticatorstandalone--installerapache--pre-hook"apachectl-kstop"--post-hook
"apachectl-kstart"
Part3:UpdatingFirewallException(forExternal-Facing
Sites)
1. Navigatetohttps://safer.ornl.gov.
2. LogintotheSAFERinterfaceusingyourUCAMScredentials.
UserName:Yourthree-letterUCAMSID
Password:YourUCAMSpassword
3. Click+NewRequestatthetopleftofthescreen.
4. Ontheresultingpage,chooseORNLSAFERRequest.
5. Intheresultingrequestdialog,weneedtofilloutthefollowingfields:
Subject–Asimplesubjectwilldo.We'regoingwithVMwebserver.
Authorization–SettoNone.
ChangeRequestJustification–Providethereasonforyourfirewallexception.
SSL-Let'sEncrypt
104

Expires–Leavethisblanktomakethisexceptionindefinite.Otherwise,chooseadatefortheexceptiontoexpire.
Source–ThesourceIPorIPrange(withCIDRnotationifrange)oftheserverforwhichyouwouldliketomakean
exception.We'regoingtousethesingleIPaddressofourVMInstance,128.219.186.29.
Destination–Forthisexample,we'regoingtomakethesourceandthedestinationthesameIPaddress,
128.219.186.29.
Service–Thiscanbeformattedusingtheprotocol/port(e.g.,TCP/443)oryoucanchoosefromalistofcommon
multi-portservicesinthedrop-downmenu.PleaseuseTCP/443asthesecuretrafficport.
ServiceName–User-definednameoftherule.We'recallingoursblackmesa_web.
6. Oncefilledout,clickNexttosubmityourrequest.
Youwillreceiveane-mailconfirmationofyourrequest.Youcanalsoviewthestatusofyourexceptionrequestatanytimeby
loggingintotheSAFERinterface.
Part4:Webserverconfiguration
Yourwebserverwillneedtobeconfiguredtodothefollowing:
RedirectHTTPtraffictoHTTPS
SetuptheHSTSheaderandpreloadingforexternal-facingsites(seeORNLdocumentation)
UsetheTLScertificatedesignatedforyoursite
Allowonlyapprovedciphers(seeORNLdocumentation)
Theexactdetailswillvarybetweendifferentwebandapplicationservers,butMozillaprovidesasimpleinteractivetoolthatcan
helpyougetstarted:
https://mozilla.github.io/server-side-tls/ssl-config-generator/
Part5:CertificateAuto-Renewal
SSL-Let'sEncrypt
105

Usingasimplescriptwecanautomatethecertificaterenewalprocess.Althoughthiscertificatelastsfor90days,runningthis
cronjoboftenwillensureyourcertificatestaysuptodate.
@weeklypython-c'importrandom;importtime;time.sleep(random.random()*3600)'&&certbotrenew
Ifyoufindthatyouneedmoreguidancesettingupautomaticrenewal,youcanvisitthissite.
SSL-Let'sEncrypt
106

CADES→UserDocumentation→CADESCloudUserGuide→AdditionalCloudResources→InstallCPUID
InstallCPUID
InstallingCPUIDonyourVMInstanceisafairlysimpletask.OnceconnectedtoyourInstanceusingSSH,usetheBashterminal
toinstallandrunCPUID.BelowyouwillfindaprocedureforeachCADES-providedoperatingsystem.
Prerequisites
ToinstallCPUIDonyourVMInstance,youmustfirsthaveaccesstoyourInstancethroughSSH(instructions).
Ubuntu
1. UpdateUbuntu.
$sudoapt-getupdate
2. InstallCPUIDusingthepackagemanager.
$sudoapt-getinstallcpuid
3. CPUIDisnowinstalled.TorunCPUID,executethefollowing.
$cpuid
CentOS
1. UpdateCentOS.
$sudoyumcheck-update
2. InstallCPUIDusingthepackagemanager.
$sudoyuminstallcpuid
3. Whenprompted,confirmthatyouwishtoinstallCPUID.$Isthisok[y/d/N]:y
4. CPUIDisnowinstalled.TorunCPUID,executethefollowing.
$cpuid
InstallCPUID
107

SupportedCPUIDCodes
CPUIDCodessupportedbyHypervisorCPU(NotallinBirthright)
fpu:OnboardFPU(floatingpointsupport)
eagerfpu:NonlazyFPUrestore
vme:Virtual8086modeenhancements
de:DebuggingExtensions(CR4.DE)
smx:Safermode:TXT(TPMsupport)
pse:PageSizeExtensions(4MBmemorypages)
tsc:TimeStampCounter(RDTSC)
constant_tsc:TSCticksataconstantrate
nonstop_tsc:TSCdoesnotstopinCstates
ptsc:performancetime-stampcounter
msr:Model-SpecificRegisters(RDMSR,WRMSR)
nodeid_msr:NodeIdMSR
pae:PhysicalAddressExtensions(supportformorethan4GBofRAM)
mce:MachineCheckException
cx8:CMPXCHG8instruction(64-bitcompare-and-swap)
apic:OnboardAPIC
x2apic:x2APIC
extapic:ExtendedAPICspace
sep:SYSENTER/SYSEXIT
mtrr:MemoryTypeRangeRegisters
k6_mtrr:AMDK6nonstandardMTRRs
pge:PageGlobalEnable(globalbitinPDEsandPTEs)
mca:MachineCheckArchitecture
smca:ScalableMCA
cmov:CMOVinstructions(conditionalmove)(alsoFCMOV)
pat:PageAttributeTable
pse36:36-bitPSEs(hugepages)
clflush:CacheLineFlushinstruction
dts:DebugStore(bufferfordebuggingandprofilinginstructions)
acpi:ACPIviaMSR(temperaturemonitoringandclockspeedmodulation)
mmx:MultimediaExtensions
cxmmx:CyrixMMXextensions
fxsr:FXSAVE/FXRSTOR,CR4.OSFXSR
sse:IntelSSEvectorinstructions
misalignsse:indicatesifageneral-protectionexception(#GP)isgeneratedwhensomelegacySSEinstructionsoperate
onunaligneddata.AlsodependsonCR0andAlignmentCheckingbit
sse2:SSE2
ss:CPUselfsnoop
ht:Hyper-Threading
tm:Automaticclockcontrol(ThermalMonitor)
rtm:RestrictedTransactionalMemory
pbe:PendingBreakEnable(PBE#pin)wakeupsupport
syscall:SYSCALL(FastSystemCall)andSYSRET(ReturnFromFastSystemCall)
nx:ExecuteDisable
pdpe1gb:OneGBpages(allowshugepagesz=1G)
rdtscp:ReadTime-StampCounterandProcessorID
CPUIDHypervisorCodes
108
lm:LongMode(x86-64:amd64,alsoknownasIntel64,i.e.64-bitcapable)
lahf_lm:LoadAHfromFlags(LAHF)andStoreAHintoFlags(SAHF)inlongmode
constant_tsc:TSCticksataconstantrate
arch_perfmon:IntelArchitecturalPerfMon
pebs:Precise-EventBasedSampling
bts:BranchTraceStore
rep_good:repmicrocodeworkswell
nopl:TheNOPL(0F1F)instructions
xtopology:cputopologyenumextensions
nonstop_tsc:TSCdoesnotstopinCstates
aperfmperf:APERFMPERF
eagerfpu:NonlazyFPUrestore
pni:SSE-3(“PrescottNewInstructions”)
pclmulqdq:PerformaCarry-LessMultiplicationofQuadwordinstruction—acceleratorforGCM)
dtes64:64-bitDebugStore
monitor:Monitor/Mwaitsupport(IntelSSE3supplements)
ds_cpl:CPLQual.DebugStore
vmx:Hardwarevirtualization:IntelVMX
smx:Safermode:TXT(TPMsupport)
est:EnhancedSpeedStep
tm2:ThermalMonitor2
ssse3:SupplementalSSE-3
fma:Fusedmultiply-add
cx16:CMPXCHG16B
xtpr:SendTaskPriorityMessages
pdcm:PerformanceCapabilities
pcid:ProcessContextIdentifiers
invpcid:InvalidateProcessorContextID
dca:DirectCacheAccess
sse4_1:SSE-4.1
sse4_2:SSE-4.2
x2apic:x2APIC
movbe:MoveDataAfterSwappingBytesinstruction
popcnt:ReturntheCountofNumberofBitsSetto1instruction(Hammingweight,i.e.bitcount)
tsc_deadline_timer:Tscdeadlinetimer
xsave:SaveProcessorExtendedStates:alsoprovidesXGETBY,XRSTOR,XSETBY
avx:AdvancedVectorExtensions
f16c:16-bitfpconversions(CVT16)
rdrand:ReadRandomNumberfromhardwarerandomnumbergeneratorinstruction
lahf_lm:LoadAHfromFlags(LAHF)andStoreAHintoFlags(SAHF)inlongmode
abm:AdvancedBitManipulation
ida:IntelDynamicAcceleration
arat:AlwaysRunningAPICTimer
epb:IA32_ENERGY_PERF_BIASsupport
pln:IntelPowerLimitNotification
pts:IntelPackageThermalStatus
tpr_shadow:IntelTPRShadow
vnmi:IntelVirtualNMI
flexpriority:IntelFlexPriority
ept:IntelExtendedPageTable
vpid:IntelVirtualProcessorID
CPUIDHypervisorCodes
109

fsgsbase:{RD/WR}{FS/GS}BASEinstructions
tsc_adjust:TSCadjustmentMSR
bmi1:1stgroupbitmanipulationextensions
avx2:AVX2instructions
smep:SupervisorModeExecutionProtection
bmi2:2ndgroupbitmanipulationextensions
erms:EnhancedREPMOVSB/STOSB
invpcid:InvalidateProcessorContextID
cqm:CacheQoSMonitoring
xsaveopt:OptimizedXSAVE
cqm_llc:LLCQoS
cqm_occup_llc:LLCoccupancymonitoring
CPUIDHypervisorCodes
110
SupportedCPUIDInstructionSetCodes
CPUIDInstructionSetCodesSupportedbyVMInstances
fpu:OnboardFPU(floatingpointsupport)
eagerfpu:NonlazyFPUrestore
vme:Virtual8086modeenhancements
de:DebuggingExtensions(CR4.DE)
smx:Safermode:TXT(TPMsupport)
pse:PageSizeExtensions(4MBmemorypages)
tsc:TimeStampCounter(RDTSC)
constant_tsc:TSCticksataconstantrate
nonstop_tsc:TSCdoesnotstopinCstates
ptsc:performancetime-stampcounter
msr:Model-SpecificRegisters(RDMSR,WRMSR)
nodeid_msr:NodeIdMSR
pae:PhysicalAddressExtensions(supportformorethan4GBofRAM)
mce:MachineCheckException
cx8:CMPXCHG8instruction(64-bitcompare-and-swap)
apic:OnboardAPIC
x2apic:x2APIC
extapic:ExtendedAPICspace
sep:SYSENTER/SYSEXIT
mtrr:MemoryTypeRangeRegisters
k6_mtrr:AMDK6nonstandardMTRRs
pge:PageGlobalEnable(globalbitinPDEsandPTEs)
mca:MachineCheckArchitecture
smca:ScalableMCA
cmov:CMOVinstructions(conditionalmove)(alsoFCMOV)
pat:PageAttributeTable
pse36:36-bitPSEs(hugepages)
clflush:CacheLineFlushinstruction
mmx:MultimediaExtensions
cxmmx:CyrixMMXextensions
fxsr:FXSAVE/FXRSTOR,CR4.OSFXSR
sse:IntelSSEvectorinstructions
misalignsse:indicatesifageneral-protectionexception(#GP)isgeneratedwhensomelegacySSEinstructionsoperate
onunaligneddata.AlsodependsonCR0andAlignmentCheckingbit
sse2:SSE2
ss:CPUselfsnoop
syscall:SYSCALL(FastSystemCall)andSYSRET(ReturnFromFastSystemCall)
nx:ExecuteDisable
pdpe1gb:OneGBpages(allowshugepagesz=1G)
rdtscp:ReadTime-StampCounterandProcessorID
lm:LongMode(x86-64:amd64,alsoknownasIntel64,i.e.64-bitcapable)
lahf_lm:LoadAHfromFlags(LAHF)andStoreAHintoFlags(SAHF)inlongmode
constant_tsc:TSCticksataconstantrate
rep_good:repmicrocodeworkswell
nopl:TheNOPL(0F1F)instructions
eagerfpu:NonlazyFPUrestore
CPUIDInstanceCodes
111
pni:SSE-3(“PrescottNewInstructions”)
pclmulqdq:PerformaCarry-LessMultiplicationofQuadwordinstruction—acceleratorforGCM)
ssse3:SupplementalSSE-3
fma:Fusedmultiply-add
cx16:CMPXCHG16B
pcid:ProcessContextIdentifiers
invpcid:InvalidateProcessorContextID
sse4_1:SSE-4.1
sse4_2:SSE-4.2
x2apic:x2APIC
movbe:MoveDataAfterSwappingBytesinstruction
popcnt:ReturntheCountofNumberofBitsSetto1instruction(Hammingweight,i.e.bitcount)
tsc_deadline_timer:Tscdeadlinetimer
xsave:SaveProcessorExtendedStates:alsoprovidesXGETBY,XRSTOR,XSETBY
avx:AdvancedVectorExtensions
f16c:16-bitfpconversions(CVT16)
rdrand:ReadRandomNumberfromhardwarerandomnumbergeneratorinstruction
hypervisor:Runningonahypervisor
lahf_lm:LoadAHfromFlags(LAHF)andStoreAHintoFlags(SAHF)inlongmode
abm:AdvancedBitManipulation
fsgsbase:{RD/WR}{FS/GS}BASEinstructions
bmi1:1stgroupbitmanipulationextensions
avx2:AVX2instructions
smep:SupervisorModeExecutionProtection
bmi2:2ndgroupbitmanipulationextensions
erms:EnhancedREPMOVSB/STOSB
invpcid:InvalidateProcessorContextID
xsaveopt:OptimizedXSAVE
CPUIDInstanceCodes
112

CADES→UserDocumentation→SHPCCondoUserGuide→Overview
OverviewofSHPCCondos
TheCADESScalableHPC(SHPC)CondosconsistoftwoHPCclusters:oneintheORNLModerateprotectionzone(CADES
Mod)andoneintheORNLOpenprotectionzone(CADESOpen).
TogetstartedusingtheSHPCCondo,checkfirsttoseeifyouarereadybylookingovertheprerequisites.Then,learnhowto
requestaccess.Finally,youarereadytoaccessyourCondoallocation.
ThelistofcurrentgroupsaccordingtodivisionsatORNLcanbefoundhere.
Overview
113

CADES→UserDocumentation→SHPCCondoUserGuide→HardwareConfiguration
SHPCCondoHardwareConfiguration
TheSHPCisacommodityclusterthatcontainsasetofMPPs(MassiveParallelProcessors).
AprocessorinthisclusteriscommonlyreferredtoasanodeandhasitsownCPU,memory,andI/Osubsystemandiscapableof
communicatingwithothernodes.
NodeInformation
Make:Cray
Model:CS400
RAMInformation
Speed:DDR42133
Errorcorrection:RegisteredECC
Capacity:128–256GBpernode(GPUnodesandhighmemorynodeshave256GBofRAM)
CPUInformation
Make:Intel
Model:XeonE5-2698v3
Speed:2.30GHzbaseclock,3.60GHzTurboBoostclock
Capacity:2CPUspernode
CPUlayout:Clicktoseeimage.
GPUInformation
Make:NVIDIA
Model:TeslaK80(2GK210GPUsoneachK80)
Speed:560MHzbaseclock
VRAM:24GBofGDDR5
Errorcorrection:RegisteredECC
Capacity:2TeslaK80spernode,2GK210GPUsperK80(4totalGK210GPUspernode)
Hardware
114

CADES→UserDocumentation→SHPCCondoUserGuide→StorageConfiguration
SHPCCondoStorageConfiguration
Lustre
Lustreisanon-premises,highperformance,parallelfilesystemthatutilizetechnologiessuchaskey,value,andsetofattributesto
computedatainthefollowingenvironments:
OpenLustre:
1.7PBoftemporarycomputationalstorage
Yourtemporarylocalstorageislocatedat:/lustre/or-hydra/group/xcams
Replacegroupwithyourgroupname,andxcamswithyourXCAMS/UCAMSID.
ModerateLustre:
400TBoftemporarycomputationalstorage
Yourtemporarylocalstorageislocatedat:/lustre/hydra/group/ucams
Replacegroupwithyourgroupname,anducamswithyourXCAMS/UCAMSID.
Note:Alldataisautomaticallypurgedevery2weeks.
NFS
NFS(NetworkFileSystem)isaservicethatallowsshareddirectoriesandfileswithothersoveranetwork.Home,software,and
projectdirectorieshavebeensetuponNFSandarepermanentlyavailablethroughthenetwork.
OpenNFS:
Eachuserisautomaticallygiven20GBofpermanentNFSstorage.
ModerateNFS:
Eachuserisautomaticallygiven20GBofpermanentNFSstorage.
Note:Ifyourneedsdifferfromwhatislistedhere,besuretocontactustodiscussoptions.
Storage
115

CADES→UserDocumentation→SHPCCondoUserGuide→Software
SHPCCondoSoftwareConfiguration
Inthissection,wediscusstheSHPCCondossoftwareconfiguration.OursoftwareenvironmentusesLinuxenvironmentmodules
toperformthisconfiguration.Thesoftwaremodulesavailabletousersalsocontainpreconfiguredcompilertoolchains,or
programmingenvironmentswhichincludeparallelcompilerwrappersandassociatedMPIstacks.Therearealsoworkflowtools
thatmayhelpwithyourapplicationsaswell.
JobScheduler
SHPCutilizesTorque/Moabasaresourcemanagertoschedulejobs,whereMoabisusedasanexternalschedulerforthePBS
resourcemanagementsystemincludingjobqueuesandthecomputeresources.
Thejobschedulersupportsamaximumwalltimeof48hours.Ifyouneedmoretimetorunajob,please contactus.
Modules
SHPChasmorethanonehundredsoftwarepackagesinstalled.OursoftwareenvironmentusesLinux(CentOS7.x)environment
modulestomanageversionsanddependenciesofsoftwarepackages.Whenyouloadamodule,itsetstheenvironmentvariables
necessaryforrunningyourprogram.
Modules:Localrepository
Bydefaultthelocalrepositoryisusedasasourceofsoftwareinstallations.Tolistavailablemodules,typemoduleavail.To
loadamodule,usemoduleloadmodule_name.Similarly,unloadmodulesbytypingmoduleunloadmodule_name.
Modules:CVMFS-basedrepository
ACVMFS(CernVirtualFileSystem)-basedrepositoryisavailableforusethathasseveralsoftwarepackagesavailableforuse.To
usetheCVMFS-basedrepositoryrunthefollowingcommandsfromyourloginnode:
source/software/dev_tools/swtree/cs400/modulefiles/switch-modules.sh
switch_modulesoasis
Afterenteringtheabovecommandsthenewrepositoryshouldbeactiveandthecommandbelowwilllistthesoftwareavailable
foruse:
moduleavail
Similarlyswitch_moduleslocalwillbringbackthelocalmodulestouse.
AdditionalinformationonSHPCmodulesmaybefoundhere.
CompilerToolChains
Dependingontheapplication/codeyouareworkingon,youmightchooseaspecificcompilertoachievethebestperformanceof
yourprograms.CompilertoolchainssuchasGNU,Intel,PGIandNAGarealreadyinstalledtoworkwithotherlibraries.Seehere
formoreinformationonSHPCcompilers
Software
116


CADES→UserDocumentation→SHPCCondoUserGuide→Software→SchedulingJobs
SchedulingJobs
SHPCutilizesTorque/Moabtomanagejobsthatuserssubmittovariousqueuesonacomputersystem.Eachqueuerepresentsa
groupofresourceswithattributesnecessaryforthequeue'sjobs.YoucanseethelistofqueuesthatSHPChasbytypingqstat-
q.batchisthedefaultqueue.
Note:Donotrunjobsontheloginnodes.Alljobslaunchedfromthosenodeswillbeterminatedwithoutnotice.
Listingjobs
Tolistalljobs:
qstat
Torefinethelistofjobstoonlythosesubmittedbyauser:
qstat-uUID
Tofurtherrefinethelistofjobs,thefollowingcommandwilllistjobssubmittedbyauserandwhicharerunning.
qstat-uUID-s-r
Toobtainthestatusofajob,runthefollowingcommandusingthejob'sIDnumber(thisisprovidedattimeofjobsubmission).
qstat-fjob_ID
Youcanalsousecheckjobjob_IDtoshowthecurrentstatusofthejob.
Submittingajob
Tosubmitajob,usetheqsubcommand,followedbythenameofyoursubmissionfile.AJobIDwillbeprovided.Youmay
wanttomakenoteoftheIDforlateruse.
qsubyour_script
Deletingajob
Note:Beawarethatdeletingajobcannotbeundone.DoublecheckthejobIDbeforedeletingajob.
Userscandeletetheirjobsbytypingthefollowingcommand.
qdeljob_ID
Todeleteallthejobsofauser:
qdel$(qselect-uUID)
SchedulingJobs
118


CADES→UserDocumentation→SHPCCondoUserGuide→Software→EnvironmentCustomization
CustomizingYourEnvironmentinSHPC
TheSHPCenvironmentmaybecustomizedtosuityourneeds.
Project-SpecificEnvironmentVariables
Someprojectshaveenvironmentmodulesthatwillpreparetheenvironmentwiththespecificneedsoftheproject.Tolistthe
availableprojectmodules,typemoduleavail.Atthetopoftheoutputisasectiontitled/software/tools/modules.The
environmentmodulesbeginwithenv/.Toloadoneoftheseenvironments:
moduleloadenv/cades-bsd
BashEnvironmentCustomization
120
CADES→UserDocumentation→SHPCCondoUserGuide→Software→Modules
Modules
Modulesareautilitywhichallowuserstoloadandmanageapplicationsandtheirversions.Themodulesofsoftwarepackages
allowyoutodynamicallymodifyyouruserenvironmentbyusing“modulefiles.”Eachmodulefilecontainstheinformation
neededtoconfiguretheshellforanapplication.Afterthemodulesoftwarepackageisinitialized,theenvironmentcanbemodified
onaper-modulebasisusingthemodulecommand,whichinterpretsmodulefiles.Typically,modulefilesinstructthemodule
commandtochangeorsetshellenvironmentvariablessuchasPATH,MANPATH,andothers.Themodulefilescanbesharedby
manyusersonasystem.
Note:Somemodulescannotbeusedsimultaneously,suchasanIntelcompilerandaGNUcompiler(informationon
compilers).Ifyouattempttoloadamodulethatisincompatiblewithacurrently-loadedmodule,youwillbepromptedofthe
conflict.Toavoidtheerror,youmayhavetounloadorswitchmodules.
SummaryofModuleCommands
Command Description
modulelist
Listsmodulescurrentlyloadedinauser'senvironment.
Amoduleisconsideredloadedwhenitsassociatedmodulefilehasbeenexecuted
andtheuser'senvironmentcontainsthechangesfromthemodulefile.
moduleavail Listsallavailablemodulesonasystem.
moduleshow Showsenvironmentchangesthatwillbemadebyloadingagivenmodule.
moduleload Loadsamodule.
moduleunload Unloadsamodule.
modulehelp Showshelpforamodule.
moduleswap Swapsacurrentlyloadedmoduleforanunloadedmodule.
AvailableModules
Toseealistofavailablemodules,type
moduleavail
Note:Ifyouneedamodulethatisnotavailable,pleasecontactus.
Youcancheckfortheexistenceofamoduleanditsversionsusingmoduleavail<module-name>.
$moduleavailcuda
-----------------/software/dev_tools/swtree/cs400/modulefiles-----------------
cuda/6.5cuda/7.5(default)cuda/8.0
WorkingwithModules
Whenyouloadamodule,yourenvironmentismodifiedtouseaspecificsoftwarepackage.Toloadamodule:
Modules
121
moduleloadvmd
Toverifyyourmodulehasloaded,youcantypemodulelist.
Todisplayinformationabouttheattributesofthemodulesuchasthesizeofthemodule,thecompilerorthesourcefromwhich
themodulewascreated,etc.,usethefollowingcommand:
moduledisplayyour_module
RemovingandSwitchingModules
Unloadingamodulewillavoidconflictand/ormessagesoffailureduetodifferentversionsordependencies.
moduleunloadPE-gnu/1.0
Switchingbetweendifferentmoduleversionscanaccomplishthetaskofhavingtoload,unloadandloadmodulesinmultiple
steps.Inthefollowingexample,cuda/7.5iscurrentlyloaded.Afterrunningthecommand,cuda/7.5isunloadedand
cuda/8.0isloaded.
moduleswitchcuda/7.5cuda/8.0
Youcanunloadallthemodulesonyourenvironment,byexecutingthemodulepurgecommand:
modulepurge
RelatedInformation
EnvironmentCustomization
Modules
122
CADES→UserDocumentation→SHPCCondoUserGuide→Software→Compilers
CompilerToolchainsonSHPCCondos
SHPCsupportsfourprogrammingenvironment(PE)modulestoeasilyswitchbetweencompilers.Eachprogramming
environmentcontainsthefullsetofcompatiblecompilersandlibraries.
Thesecompilersare:GNUCollectionCompiler(GCC),theIntelcompiler,ThePortlandGroup(PGI),andtheNumerical
AlgorithmsGroup(NAG).
Note:YoucannotusemorethanonePE-moduleatthesametime.Forexample,ifyouareworkingwithGNUandthenyou
decidetoworkwiththeIntelcompiler,firstunloadthePE-gnumoduleandthenloadPE-intel.
TheGNUCompilerSuite
ToloadtheGNUmodule:
moduleloadPE-gnu
Youcancheckwhichmodulesareloadedinyoursystembytyping:
$modulelist
CurrentlyLoadedModulefiles:
1)gcc/5.3.02)openmpi/1.10.33)xalt/0.7.54)PE-gnu/1.0
Todisplayinformationaboutthemodule,suchasthesize,thecompiler,orthesourcefromwhichthemodulewascreated,etc.,
usethefollowingcommand:
$moduledisplayPE-gnu
-------------------------------------------------------------------
/software/dev_tools/swtree/cs400/modulefiles/PE-gnu/1.0:
module-whatisPE-gnudefinestheenvironmentneededtobuild
applicationsusingGNUcompilersuitesonthissystem.
conflictPE-gnuPE-intelPE-pgi
setenvPE_NAMEGNU
setenvPE_CCmpicc
setenvPE_CXXmpic++
setenvPE_FORTRANmpif90
prepend-pathPATH/software/dev_tools/swtree/cs400_centos7.2_pe2016-08/PE/1.0/noarch/bin
moduleloadxalt
-------------------------------------------------------------------
YoucanswitchbetweenthetwoversionsofPE-gnuv1.0andPE-gnuv2.0:
$moduleswitchPE-gnu/1.0PE-gnu/2.0
$modulelist
CurrentlyLoadedModulefiles:
1)gcc/5.3.02)openmpi/2.1.13)PE-gnu/2.04)xalt/0.7.5
TheIntelCompilerSuite
Ifyouareworkingwithanothermodule,firstyouneedtounloadit.
Compilers
123

moduleloadPE-intel
Youcanseewhatthemoduleprovideswiththecommandsmodulelistandmoduledisplay.
$modulelist
CurrentlyLoadedModulefiles:
1)intel/16.0.12)openmpi/1.10.33)xalt/0.7.54)PE-intel/1.0
moduledisplayPE-intel
-------------------------------------------------------------------
/software/dev_tools/swtree/cs400/modulefiles/PE-intel/1.0:
module-whatisPE-inteldefinestheenvironmentneededtobuild
applicationsusingIntelcompilersuitesonthissystem.
conflictPE-gnuPE-intelPE-pgi
setenvPE_NAMEINTEL
setenvPE_CCmpicc
setenvPE_CXXmpic++
setenvPE_FORTRANmpif90
prepend-pathPATH/software/dev_tools/swtree/cs400_centos7.2_pe2016-08/PE/1.0/noarch/bin
moduleloadxalt
-------------------------------------------------------------------
ThePortlandGroupCompilerSuite
Ifyouareworkingwithanothermodule,firstyouneedtounloadit.
moduleloadPE-pgi
Youcanseewhatdoesthemoduleprovideswiththecommandsmodulelistandmoduledisplay.
$modulelist
CurrentlyLoadedModulefiles:
1)pgi/15.7.02)openmpi/1.10.33)xalt/0.7.54)PE-pgi/1.0
$moduledisplayPE-pgi
-------------------------------------------------------------------
/software/dev_tools/swtree/cs400/modulefiles/PE-pgi/1.0:
module-whatisPE-pgidefinestheenvironmentneededtobuild
applicationsusingPGIcompilersuitesonthissystem.
conflictPE-gnuPE-intelPE-pgi
setenvPE_NAMEPGI
setenvPE_CCmpicc
setenvPE_CXXmpic++
setenvPE_FORTRANmpif90
prepend-pathPATH/software/dev_tools/swtree/cs400_centos7.2_pe2016-08/PE/1.0/noarch/bin
moduleloadxalt
-------------------------------------------------------------------
TheNumericalAlgorithmGroupCompilerSuite
Ifyouareworkingwithanothermodule,firstyouneedtounloadit.
Compilers
124
moduleloadPE-nag
Youcanseewhatthemoduleprovideswiththecommandsmodulelistandmoduledisplay.
$modulelist
CurrentlyLoadedModulefiles:
1)nag/6.02)mpich/3.23)xalt/0.7.54)PE-nag/1.0
$moduledisplayPE-nag
-------------------------------------------------------------------
/software/dev_tools/swtree/cs400/modulefiles/PE-nag/1.0:
module-whatisPE-nagdefinestheenvironmentneededtobuild
applicationsusingNAGFortrancompileronthissystem.
conflictPE-gnuPE-intelPE-pgi
setenvPE_NAMENAG
setenvPE_CCmpicc
setenvPE_CXXmpic++
setenvPE_FORTRANmpif90
prepend-pathPATH/software/dev_tools/swtree/cs400_centos7.2_pe2016-08/PE/1.0/noarch/bin
moduleloadxalt
-------------------------------------------------------------------
RelatedInformation
EnvironmentCustomization
Modules
Compilers
125

CADES→UserDocumentation→SHPCCondoUserGuide→Software→CondoWorkflows
RunningScientificComputationalWorkflows
Overview
Workflowsofferbenefitsofautomationandefficientorchestration(eg.dataparallelexecution)ofmulti-stagecomputation.
Furthermore,theyarepowerfulreproducibilityandportabilitytoolsforscienceandengineeringapplications.
Typically,aworkflowiswritteninahighlevellanguagethatisofferedandunderstoodbyaworkflowmanagementsoftwareor
simplyaworkflowtool.
WorkflowtoolsavailableonCondos
WecurrentlyoffersupportforthefollowingworkflowtoolsonSHPC:
1. Nextflow
2. Makeflow
3. Swift
Abriefdescriptionabouteachoftheaforementionedworkflowtoolsisprovidedbelow:
Nextflow
NextflowisafavoredworkflowtoolamongSingularitycontainerusers.Similarly,itispopularamongusersfromtheBiosciences
domain.
Makeflow
TheMakeflowworkflowsystemusesaMakefilelikelanguagetodefineworkflowsthatmaybedeployedandexecutedover
clustersandclouds.
Swift
SwiftusesaC-likesyntaxtodefineworkflows.Swiftiscapableofstitchingcomputationalstepsdefinedintheworkflowasatrue
HPCworkflowthatusestheMessagePassingParadigmofparallelcomputationusingtheMPIlibrariesanditsownloadbalancer.
Note:WhileNextflowandMakeflowrequireadditionalconfigurationifyouwishtorunthemoncomputenodes,Swift
canrundirectlyoncomputenodesbysimplypluggingitintoajobdefinitionscriptjustlikeanyotherMPIapplication.
ExampleWorkflows
HelloWorld
Nextflow
#!/usr/bin/envnextflow
params.str='Helloworld!'
processsplitLetters{
output:
file'chunk_*'intolettersmodeflatten
"""
CondoWorkflows
126
printf'${params.str}'|split-b6-chunk_
"""
}
processconvertToUpper{
input:
filexfromletters
output:
stdoutresult
"""
cat$x|tr'[a-z]''[A-Z]'
"""
}
result.subscribe{
printlnit.trim()
}
Savetheabovecodeinafile,eg.hello.nf.Toruntheworkflowonopencondologinnode,dothefollowing:
$modulepurge
$moduleloadPE-gnu
$moduleloadjava/1.8.0_131
$moduleloadnextflow
$nextflowrunhello.nf
Youshouldseeoutputsimilartothefollowing:
NEXTFLOW~version0.27.6
Launching`nextflow_example.nf`[insane_meucci]-revision:5319db7b93
[warmup]executor>local
[f9/cb98ba]Submittedprocess>splitLetters
[94/6ed3f3]Submittedprocess>convertToUpper(1)
[cb/506a85]Submittedprocess>convertToUpper(2)
HELLO
WORLD!
Makeflow
A"HelloWorld"inMakeflowwouldlooksomethinglikeso:
ECHO=/bin/echo
hello.txt:
$ECHO'HelloWorld!'>hello.txt
Savetheabovecodeinafile,sayhello.mkfandrunitontheopencondolikeso:
$moduleloadPE-gnu
$moduleloadcctools/6.2.7
$makeflowhello.mkf
Ifallgoeswell,theoutputshouldlooklikeso:
parsinghello.mkf...
localresources:32cores,128833MBmemory,6893119MBdisk
maxrunninglocaljobs:32
CondoWorkflows
127
checkinghello.mkfforconsistency...
hello.mkfhas1rules.
recoveringfromlogfilehello.mkf.makeflowlog...
makeflow:hello.txtisreportedasexisting,butdoesnotexist.
startingworkflow....
submittingjob:/bin/echo''HelloWorld!''>hello.txt
submittedjob123822
job123822completed
nothinglefttodo.
Andyoushouldseeanewfilecalledhello.txtinyourcurrentworkingdirectory.
Swift
ASwiftHelloWorldworkflowlookslikeso:
importio;
printf("Helloworld");
Swiftusestwostepstoworkflowexecution:compileandrun.
Loadtheswiftmoduleoncondolikeso:
$modulepurge
$moduleloadPE-gnu
$moduleloadjava/1.8.0_131mpich/3.2
$moduleloadswift
Compileandruntheworkflowlikeso:
$stchello.swift
TheabovestepwillproduceaTCLfilecalledhello.tic.RuntheTCLfilelikeso:
turbine-n2hello.tic
Ifallgoeswell,youshouldseethefollowingoutput:
Helloworld
Generalremarks
1. Notethattheaboveworkflowswillrunonloginnodes.Inorderforthemtorunovercomputenodes,moreconfigurationis
needed.
2. NotethatNextflowexpectsabsolutepathsfordataandexecutablessinceitworksinitsowntempdirectory.Pleaseadjust
thepathstowhereyouchoosetoruntheworkflow.
Wheretogofromhere?
UsetheCrystalWorkflowwiththeseworkflowtools.
CometalktousatCADESifyouthinkoneormoreofyourapplicationswillbenefitwiththehelpoftheaforementioned
workflowtools.
CondoWorkflows
128

CondoWorkflows
129
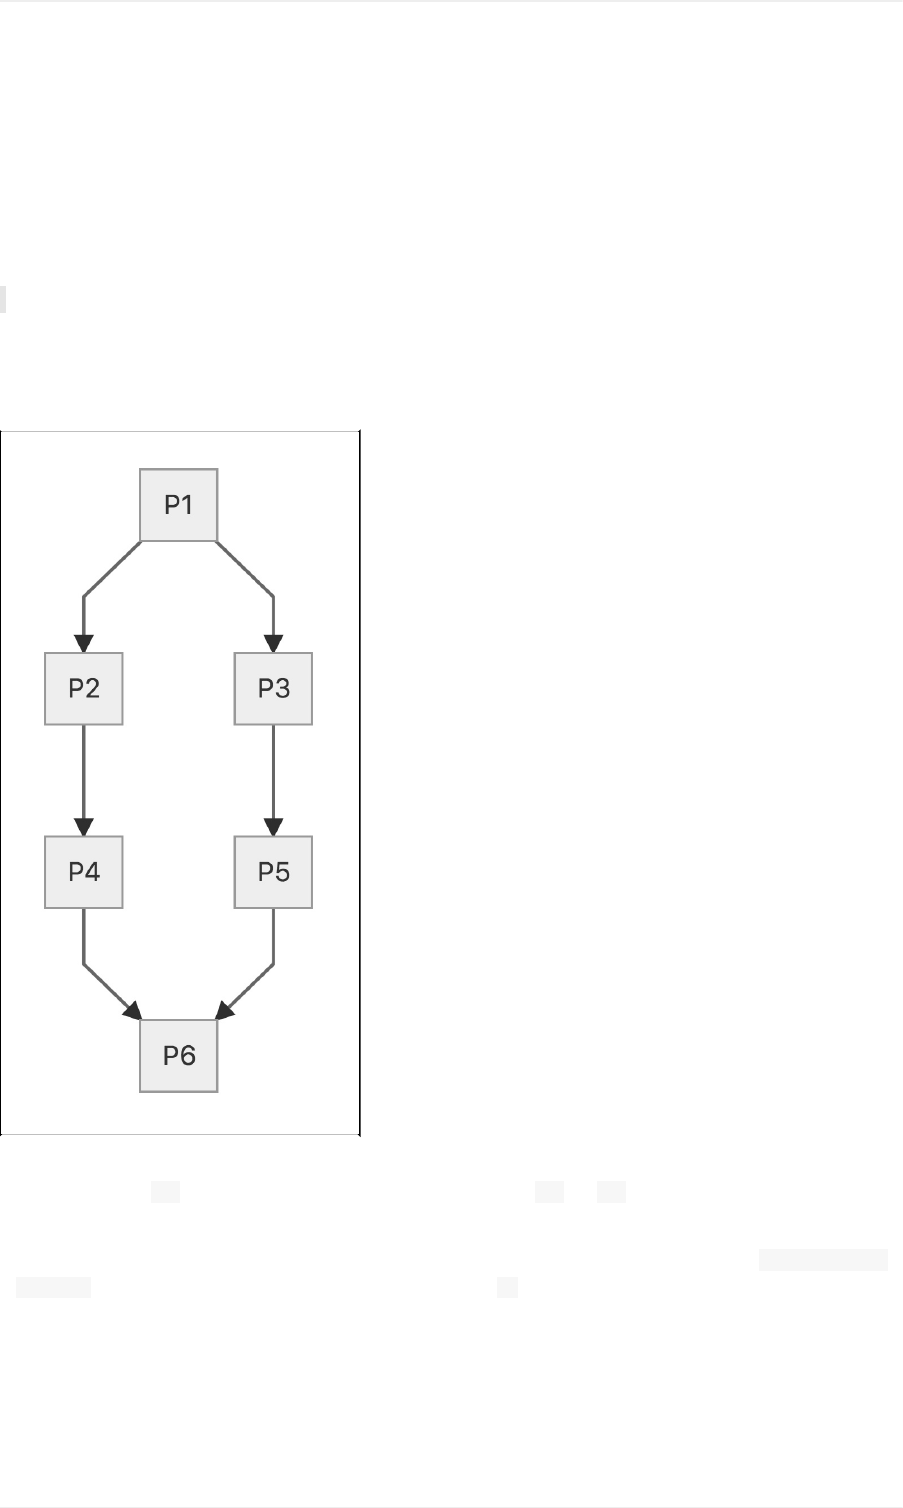
CADES→UserDocumentation→SHPCCondoUserGuide→Software→CondoWorkflows→CrystalWorkflows
CrystalWorkflow
CrystalFlowisahypotheticalworkflowwithlow-mediumcomplexitythatadequatelyillustratesthebenefitsandcharacteristicsof
scientificcomputationalworkflows.
Note:Thecode,executables,andtestdataforthecrystalworkflowisavailableonORNL'spublicGitLab.
AbouttheCrystalWorkflow
Theworkflowisacrystalshapedgraphasshowninthefigurebelow.
Intheaboveworkflow,eachoftheboxesrepresentprocessandarrowsrepresentthedependencybetweenconnectedprocesses.
Forexample,processP1producesadatafilethatisconsumedbyprocessesP2andP3.
Eachofthe6processesofthisworkflowareimplementedinCandbash.Eithermaybeusedintheworkflowsshownbelow.The
initialinputfileispre-prepared.ThecodeanddatafortheseworkflowsareavailableonopenSHPCcondoat/software/T/B/D.
AMakefilewillbuildtheCexecutablesfoundinthedirectorynamedc.Thefollowingsectionsshowhowthisworkflowmay
beorchestratedusingeachofthethreeworkflowmanagementtools.
Nextflow
ThefollowingcodesnippetshowshowtheaboveworkflowwouldbeexpressedinNextflow.
CrystalWorkflow
130

#!/usr/bin/envnextflow
in1=file('/home/km0/crystalworkflow/shell/inputs/in1.txt')
processp1{
input:
filein1
output:
file'out1.txt'intoout1
"""
~/crystalworkflow/shell/p1/p1.sh$in1'out1.txt'
"""
}
processp2{
input:
fileout1
output:
file'out2.txt'intoout2
"""
~/crystalworkflow/shell/p2/p2.sh$out1'out2.txt'
"""
}
processp3{
input:
fileout1
output:
file'out3.txt'intoout3
"""
~/crystalworkflow/shell/p3/p3.sh$out1'out3.txt'
"""
}
processp4{
input:
fileout2
output:
file'out4.txt'intoout4
"""
~/crystalworkflow/shell/p4/p4.sh$out2'out4.txt'
"""
}
processp5{
input:
fileout3
output:
file'out5.txt'intoout5
"""
~/crystalworkflow/shell/p5/p5.sh$out3'out5.txt'
"""
}
processp6{
input:
fileout4
fileout5
output:
file'out6.txt'intoout6
"""
~/crystalworkflow/shell/p6/p6.sh$out4$out5'out6.txt'
"""
}
Assumingtheaboveworkflowissavedinafilenamedcrystal.nf,itcouldberunasfollows:
$modulepurge
$moduleloadPE-gnu
CrystalWorkflow
131

$moduleloadjava/1.8.0_131
$moduleloadnextflow
$
$nextflowruncrystal.nf
NEXTFLOW~version0.27.6
Launching`crystal.nf`[thirsty_allen]-revision:e3b42d107d
[warmup]executor>local
[db/d513da]Submittedprocess>p1
[89/e16494]Submittedprocess>p2
[c3/9d4ddd]Submittedprocess>p3
[0d/5406b9]Submittedprocess>p4
[cf/4b94bb]Submittedprocess>p5
[c2/3bae00]Submittedprocess>p6
Makeflow
ThefollowingcodesnippetshowshowthecrystalworkflowwouldbeimplementedusingMakeflow.
P1=../shell/p1/p1.sh
P2=../shell/p2/p2.sh
P3=../shell/p3/p3.sh
P4=../shell/p4/p4.sh
P5=../shell/p5/p5.sh
P6=../shell/p6/p6.sh
../shell/p1/out1.txt:
$P1../shell/inputs/in1.txt../shell/p1/out1.txt
../shell/p2/out2.txt:
$P2../shell/p1/out1.txt../shell/p2/out2.txt
../shell/p3/out3.txt:
$P3../shell/p1/out1.txt../shell/p3/out3.txt
../shell/p4/out4.txt:
$P4../shell/p2/out2.txt../shell/p4/out4.txt
../shell/p5/out5.txt:
$P5../shell/p3/out3.txt../shell/p5/out5.txt
../shell/outputs/out6.txt:
$P6../shell/p4/out4.txt../shell/p5/out5.txt../shell/outputs/out6.txt
Assumingtheaboveworkflowissavedinafilenamedcrystal.mkf,itcouldbeexecutedlikeso:
$modulepurge
$moduleloadPE-gnu
$moduleloadcctools/6.2.7
$makeflowcrystal.mkf
parsingcrystal.mkf...
localresources:32cores,128833MBmemory,6593404MBdisk
maxrunninglocaljobs:32
checkingcrystal.mkfforconsistency...
crystal.mkfhas6rules.
startingworkflow....
submittingjob:../shell/p6/p6.sh../shell/p4/out4.txt../shell/p5/out5.txt../shell/outputs/out6.txt
submittedjob37132
submittingjob:../shell/p5/p5.sh../shell/p3/out3.txt../shell/p5/out5.txt
submittedjob37133
submittingjob:../shell/p4/p4.sh../shell/p2/out2.txt../shell/p4/out4.txt
submittedjob37134
submittingjob:../shell/p3/p3.sh../shell/p1/out1.txt../shell/p3/out3.txt
submittedjob37135
submittingjob:../shell/p2/p2.sh../shell/p1/out1.txt../shell/p2/out2.txt
submittedjob37136
submittingjob:../shell/p1/p1.sh../shell/inputs/in1.txt../shell/p1/out1.txt
submittedjob37137
cat:../shell/p3/out3.txt:Nosuchfileordirectory
p3completed.
CrystalWorkflow
132

p5completed.
p4completed.
job37135completed
p1completed.
p2completed.
job37134completed
job37133completed
job37136completed
job37137completed
p6completed.
job37132completed
nothinglefttodo.
Swift
ThefollowingcodesnippetshowstheSwiftimplementationofthecrystalworkflow.NotethattheSwiftimplementationinvokes
theCversionofexecutablesbutitcanequallyinvokethebashversion.
importio;
app(fileout)p1(fileinp){"../c/p1/p1"inpout}
app(fileout)p2(fileinp){"../c/p2/p2"inpout}
app(fileout)p3(fileinp){"../c/p3/p3"inpout}
app(fileout)p4(fileinp){"../c/p4/p4"inpout}
app(fileout)p5(fileinp){"../c/p5/p5"inpout}
app(fileout)p6(fileinp1,fileinp2){"../c/p6/p6"inp1inp2out}
filein1=input("../c/inputs/in1.txt");
fileout1<"../c/p1/out1.txt">=p1(in1);
fileout2<"../c/p2/out2.txt">=p2(out1);
fileout3<"../c/p3/out3.txt">=p3(out1);
fileout4<"../c/p4/out4.txt">=p4(out2);
fileout5<"../c/p5/out5.txt">=p5(out3);
fileout6<"../c/outputs/out6.txt">=p6(out4,out5);
Assumingtheaboveprogramissavedinafilecalledcrystal.swift,itmayberunonOpenSHPClikeso:
$modulepurge
$moduleloadPE-gnu
$moduleloadjava/1.8.0_131mpich/3.2
$moduleloadswift
$stccrystal.swift
$turbine-n2crystal.tic
../c/p1/out1.txt
../c/p3/out3.txt
../c/p2/out2.txt
../c/p5/out5.txt
../c/p4/out4.txt
../c/outputs/out6.txt
CrystalWorkflow
133

CrystalWorkflow
134

CADES→UserDocumentation→SHPCCondoUserGuide→HowtoUse
HowtoUsetheSHPCCondo
ThissectionwillwalkyouthroughtheprimarystepsthatarerequiredtogetyoustartedusingtheSHPCresources.If,atanytime,
youhavetrouble,donothesitatetoreachouttousviaemail.
Prerequisites
RequestCredentialsforanAllocation
AccesstoyourAllocation
ExecuteaJobonanAllocation
HowtoUse
135
CADES→UserDocumentation→SHPCCondoUserGuide→HowtoUse→Prerequisites
Prerequisites
ToproperlyutilizeSHPCCondos,youwillneedacoupleofutilitiesloadedonyourlocalmachine.Theseutilitiesarefreeand
widelyusedforthistypeofapplication.
Required:SSHclient
Recommended:Bashterminal
Note:CADESdoesnotprovidesupportforgettingtheseutilitiesupandrunningonyourpersonalcomputer.
MacOSandLinux
BothmacOSandLinuxdistributionsincludesaBashterminalandanSSHclientbydefault.Noadditionalsoftwareshouldbe
requiredtoaccessSHPCCondos.
WindowsUsers
WindowsdoesnothaveanativeSSHclientoranativeBashterminal.Afewsolutionsarelinkedbelow.
Option1:PuTTY-SSHclientandBashenvironmentforWindows.
Option2:GitBash–PartoftheGitforWindowsenvironmentincludesGitBash,whichprovidesalightweightsshclient.
Option3:Cygwin–IfyouwishtohaveBash-stylefunctionsonyourWindowsmachine,thenyoushouldconsiderinstalling
Cygwin,whichportsthePortableOperatingSystemInterface(POSIX)systemcallsandenvironmenttoWindows.
Prerequisites
136
CADES→UserDocumentation→SHPCCondoUserGuide→HowtoUse→RequestAccesstoanAllocation
RequestAccessforSHPCCondoAllocation
Youcanself-requestaccesswiththeprocedurebelow.Ifyouareunsurewhichgrouptorequest,orotherwiseneedassistance,
pleasecontactus.
1. Usetheappropriategrouplinkbelowandenteryouremailaddress(yourORNLaddress,ifavailable)andclick
Continue.
2. ReviewtheXCAMSuseragreement,andselectAgree.
3. EnteryourUCAMSID(oranewXCAMSusername).
4. EnteryourUCAMSpassword(oranewXCAMSpassword).
5. ClickSubmittocompletetheXCAMSrequest.
6. Theactivationnoticewillbedispatchedtotheemailaddressenteredabove.Thisprocesscantakeupto24hourstocomplete.
SHPCCondoGroups
ToaccessSHPCCondos,userswillneedtobeaddedintoanappropriategroup.Findyourgroupinthetablebelow,andclickon
therespectiveUCAMS/XCAMSregistrationURL,asoutlinedintheinstructionsabove.NSEDaccessexistsintheModerate
ProtectionZone.
DivisionName DivisionApprover PBSDirectives
ComputingandComputational
SciencesDirectorate(CCSD)
JaysonHines
(hinesjb@ornl.gov)
#PBS-Wgroup_list=cades-ccsd
#PBS-Accsd
SpallationNeutron
Source(SNS)
A.J.(Timmy)Ramirez-Cuesta
(ramirezcueaj@ornl.gov)
#PBS-Wgroup_list=cades-virtues
#PBS-Asns
CenterforNanophaseMaterials
Sciences(CNMS)
BobbySumpter
(sumpterbg@ornl.gov)
#PBS-Wgroup_list=cades-cnms
#PBS-Acnms
ClimateChangeScience
Institute(CCSI)
DaliWang
(wangd@ornl.gov)
#PBS-Wgroup_list=cades-ccsi
#PBS-Accsi
EnergyDissipationto
DefectEvolution(EDDE)
MalcolmStocks
(stocksgm@ornl.gov)
#PBS-Wgroup_list=cades-edde
#PBS-Aedde
BiosciencesDivision(BSD) BobCottingham
(cottinghamrw@ornl.gov)
#PBS-Wgroup_list=cades-bsd
#PBS-Absd
NuclearScienceandEngineering
Directorate(NSED)
Also,pleasesendanemail
tonotifytheCADESteam.
JeffBanta
(bantajp@ornl.gov)
#PBS-Wgroup_list=cades-nsed
#PBS-Ansed
Note:Ifyoudonotseeyourgrouplisted,pleasecontacttheCADESteamandinclude:
Subject:HelpwithSHPCCondoRegistration
Emailbody:UCAMSIDorXCAMSID,contactinformation,reasonforrequestinganSHPCCondoallocation,andthe
nameofyourdirectorateanddivision.
RequestAccesstoanAllocation
137

CADES→UserDocumentation→SHPCCondoUserGuide→HowtoUse→AccessYourAllocation
AccessYourSHPCCondoAllocation
Afteryouraccessrequesthasbeenapprovedandyouhaveinstalledtheprerequisites,youcanlogintotheOpenProtectionZone
ortheModerateProtectionZone.
OpenProtectionZone
1. OpenaBashterminal(orseehereifyouneedmorehelp).
2. Executesshucams@or-condo-login.ornl.gov.ReplaceucamswithyourUCAMS/XCAMSID.
3. Whenprompted,enteryourpassword.
ModerateProtectionZone
1. OpenaBashterminal(orseehereifyouneedmorehelp).
2. Executesshucams@mod-condo-login.ornl.gov.ReplaceucamswithyourUCAMS/XCAMSID.
3. Whenprompted,enteryourpassword.
Bydefault,/homedirectoriesshouldbeautomaticallycreatedforyouwhenloggingintoSHPCCondos.
Youcanrunthefollowingcommandonyourterminaltoseeyourfiles:
#ls-lhtr/home/user
total20K
drwxr-xr-x2userusers4Apr612:11Test1
-rw-r--r--1userusers982Apr612:11setup.py
-rw-r--r--1userusers1.5KApr612:11readme.txt
-rw-r--r--1userusers77Apr612:11paralleltestpy2.py
Replacetheword userwithyourUCAMS/XCAMSID.
Thels-lhtr/home/usercommandwillshowthewholelistanddetailsofthefilesthatauserhas.
AccessyourAllocation
138
CADES→UserDocumentation→SHPCCondoUserGuide→ExecuteaJob
ExecuteaJobonYourSHCPCondoAllocation
ThetutorialbelowshowsyouhowtorunWesKendall'sbasic"helloworld"program,writteninC,usingthemessagepassing
interface(MPI)toscaleacrosstheSHPCCondocomputenodes[1].ThistutorialisintendedforuserswhoarenewtotheSHPC
Condoenvironmentandleveragesaportablebatchsystem(PBS)scriptandaCsourcecode.
Note:Donotexecutejobsontheloginnodes;onlyusetheloginnodestoaccessyourcomputenodes.Processor-intensive,
memory-intensive,orotherwisedisruptiveprocessesrunningonloginnodeswillbekilledwithoutwarning.
Prerequisites
Accesstotheloginnode(XCAMS/UCAMSauthorization).
APBSscriptthatspecifiesyourconditions/variablesandcallsthebinary/scriptyouwouldliketoexecuteonthecompute
nodes.
ABinaryfile,source,orscriptfortheproblemthatyouwouldliketorunonthecomputenodes.
Files
ThestepsbelowwalkyouthroughbuildingaPBSscriptandcompilingaCbinaryfromsource.However,ifyouwishto
downloadthefilesusedinthistotutorialfilesdirectly,youcandosousingthelinksbelow.
hello-world.pbs–PBSscriptusedforthehelloworldbatchjob
MyMPIhw.c–helloworldCsourcecode
hello-world–helloworldCbinary(alreadycompiled)
Step1:ConnecttoYourAllocation
OpenandModerateprotectionzoneseachhavetheirownloginnode.Choosetheloginnodeforyourprotectionzone.
Note:TheOpenprotectionzonecanbeaccessedeitherusingeitherXCAMSorUCAMScredentials.However,theModerate
protectionzonerequiresanORNLUCAMSID.
OpenProtectionZone
1. OpenaBashterminal(orPuTTYforWindowsusers).
2. Executesshxcams@or-condo-login.ornl.gov.
Replace"xcams"withyourXCAMSorUCAMSID.
3. Whenprompted,enteryourXCAMSorUCAMSpassword.
ModerateProtectionZone
1. OpenaBashterminal(orPuTTYforWindowsusers).
2. Executesshucams@mod-condo-login.ornl.gov.
Replace"ucams"withyourUCAMSID.
ExecuteaJob
139

3. Whenprompted,enteryourUCAMSpassword.
Onceyouhaveconnectedtotheloginnode,youcanproceedtoStep2andbeginassemblingyourPBSscript.
Step2:CreateYourPBSScript
BelowisthePBSscriptweareusingtorunanMPI"helloworld"programasabatchjob.PBSscriptsusevariablestospecify
thingslikethenumberofnodes/coresusedtoexecuteyourjob,estimatedwalltimeforyourjob,andwhichcomputeresourcesto
use(e.g.,GPUvs.CPU).ThesectionsbelowfeatureanexamplePBSscriptforSHPCCondoresources,showyouhowto
create/saveyourownPBSscript,andshowyouhowstorethePBSscriptonanSHPCCondofilesystem.
CheckouttheofficialTorquedocumentationforacompletelistofPBSvariables.
ExamplePBSscript
HereisanexamplePBSscriptforrunningabatchjobonaSHPCCondoallocation.Webreakdowneachcommandinthesection
below.
#!/bin/bash
#PBS-NMyMPIhw
#PBS-MYourEmailHere@ornl.gov
#PBS-lnodes=1:ppn=16
#PBS-lwalltime=0:00:2:0
#PBS-Wgroup_list=cades-birthright
#PBS-Abirthright
#PBS-lqos=std
#PBS-qgpu
modulepurge
moduleloadPE-gnu
modulelist
cd$PBS_O_WORKDIR
pwd
mpirunhello-world
Downloadthisscript(withexplanatorycomments)here.
PBSScriptBreakdown
Here,webreakdowntheessentialelementsoftheabovePBSscript.
First,we'regoingtosetthescripttype:Bash.
#!/bin/bash
Next,youneedtosetthejobname.Makeitshortandsimplebecauseyouroutputfileswillsharethisname.We'regoingwith
MyMPIhw.
#PBS-NMyMPIhw
Youcanaddyouremailaddressifyouwouldlikeerrorstobeemailedtoyoudirectly.
#PBS-MYourEmail@ornl.gov
ExecuteaJob
140

Setyournodespec,includingthenumberofnodesandprocessorspernodethatyouwanttousetorunyourjob.Inthiscase,
we'reusingonenodeand16corespernode.
#PBS-lnodes=1:ppn=16
TellPBStheanticipatedruntimeforyourjob,wherewalltime=HH:MM:S.Theexamplebelowhasthewalltimesetto2minutes.
#PBS-lwalltime=0:00:2:0
SpecifyyourLDAPgroup.ThefulllistofSHPCCondoLDAPgroupsishere.We'reusingcades-birthrightinthiscase.
#PBS-Wgroup_list=cades-birthright
Youalsoneedtospecifyyouraccounttype.We'realsousingbirthrightinthiscase.
#PBS-Abirthright
Nowwecansetthequalityofservice(QOS).Wecansetthistoburstorstd.
Burstjobsallowausertoleveragemorenodes/cores/GPUsthanmaybeintheirformalallocation.However,inexchangeforthis
"resourceburst"flexibility,yourburstjobmaybepreemptediftherightfulownerofthoseresourcesneedsthemtocompletehis
orherownjobs.
Inmostcases,auserwillsimplyrunajobwiththeQOSsettostd.
#PBS-lqos=std
AllSHPCCondonodeshaveGPUs.SincethisexampleusesaSHPCallocation,we'regoingtospecifytheuseofGPUs.
#PBS-qgpu
Nextweneedtoloadthemodulesrequiredforexecutingourbatchjob.Firstthingwe'lldoisclearanymodulescurrentlyloaded
thatmightresultinaconflict.
modulepurge
Withacleanslate,wecannowloadourprogrammingenvironmentusingmoduleload.Forthisparticularexample,allweneed
isthePE-gnumodule,whichloadsOpenMPI,GCC,andXALT.
moduleloadPE-gnu
Thenextlineconfirmsthemodulesthatwereloaded.
modulelist
Withourenvironmentloaded,thePBSscriptnowsetstheworkingpath.Inthisexample,ourbinarywillbelaunchedfromthe
samedirectoryasourPBSscript.Theresultsfromthebinarywillalsobeplacedhere.
cd$PBS_O_WORKDIR
Confirmscurrentworkingdirectory.
ExecuteaJob
141

pwd
Finally,thelastlineofthePBSscriptcallsMPItorunourhello-worldbinary.Youcanreplace"hello-world"withthefilename
ofwhateverbinaryyouwishtoexecuteonthecomputenodes.
mpirunhello-world
Procedure
Nowthatwe'vecoveredthebasicsofaPBSscriptinthecontextofanSHPCCondo,let'stalkaboutactuallycreatingandusing
thescriptonyourallocation.
WhencreatingandeditingyourPBSscript,youhavetwobasicoptions.Option1:CreateandedityourPBSscriptonyourlocal
machineanduploadittotheLustrepathusingsecurecopy(scp).Option2:CreateandedityourPBSscriptdirectlyonthe
computenode(fromLustrestorage)usingVi.
Option1:CreatePBSLocallyandUploadtoLustreStorage
1. Usingyourfavoritetexteditor,createyourPBSscriptonyourlocalmachineordownloadthepre-madeexamplescript.
2. UsethescpcommandtocopyyourPBSscriptfromthesourcemachinetotheSHPCfilesystem(Lustrestorageinthe
Openprotectionzoneinthiscase).
scp/path/to/hello-world.pbsxcams@or-condo-login.ornl.gov:/lustre/or-hydra/cades-birthright/xcams/hello-wo
rld.pbs
Replace"/path/to/hello-world.pbs"withthepathofyourscript,andreplace"xcams"withyourXCAMS/UCAMSID.
YoumaybepromptedforyourXCAMS/UCAMSpasswordifyouhavenotcopiedyourpublicSSHkeytotheloginnode.
WiththePBSscriptinplace,youcannowmoveontocompilingyourhelloworldCcode.
Option2:CreateYourPBSScriptDirectlyontheComputeNode
1. Fromtheloginnode,changeyourworkingdirectorytothedesiredfilesystem.We'regoingtouseourLustreallocationfor
thisexample.
cd/lustre/or-hydra/cades-birthright/ucams
Replace"ucams"withyourownUCAMS/XCAMSuserID.
2. UseVitocreateandedityourPBSscript.
vihello-world.pbs
3. CreateyourPBSscriptwithinViorpastethecontentsofyourPBSscriptintoVi.
4. Whenfinished,hitEsconyourkeyboardtoexittheinputmode.
5. Enter:x!intoVi'scommandline,andpressReturntosaveyourfileandreturntotheBashshell.
WiththePBSscriptinplace,youcannowmoveontocompilingyourhelloworldCcode.
ExecuteaJob
142

Step3:CompiletheCProgramfromSource
BelowisWesKendall'ssimple"helloworld"CprogramthatutilizesMPItorunthejobinparallel[1].Wewillneedtocompile
thissourcecodeononeofthecomputenodes(youcanalsodownloadthecompiledbinarybelowifyouprefer).
MPIHelloWorldSourceCode
#include<mpi.h>
#include<stdio.h>
intmain(intargc,char**argv){
//InitializetheMPIenvironment.
MPI_Init(NULL,NULL);
//Getthenumberofprocesses.
intworld_size;
MPI_Comm_size(MPI_COMM_WORLD,&world_size);
//Gettherankoftheprocess.
intworld_rank;
MPI_Comm_rank(MPI_COMM_WORLD,&world_rank);
//Getthenameoftheprocessor.
charprocessor_name[MPI_MAX_PROCESSOR_NAME];
intname_len;
MPI_Get_processor_name(processor_name,&name_len);
//Printoffahelloworldmessage.
printf("Helloworldfromprocessor%s,rank%d"
"outof%dprocessors\n",
processor_name,world_rank,world_size);
//FinalizetheMPIenvironment.
MPI_Finalize();
}
Downloadthissourcehere.
Downloadthecompiledbinaryhere.
Procedure
Whencreatingandeditingyourhello-world.csourcecode,youhavetwobasicoptions.Option1:Createandedityoursource
codeonyourlocalmachineanduploadittotheLustrepathusingsecurecopy(scp).Compilethebinaryonthecomputenode.
Option2:Createandedityoursourcecodedirectlyonthecomputenode(fromLustrestorage)usingVi.Compilethebinaryon
thecomputenode.
Option1:CreateSourceCodeLocallyandUploadtoLustreStorage
1. Usingyourfavoritetexteditor,createandedityourhello-world.csourcecodeonyourlocalmachineordownloadthepre-
madesourcehere.
2. Usethescpcommandtocopyyourhello-world.csourcecodefromyourlocalmachinetotheSHPCfilesystem(Lustre
storageintheOpenprotectionzoneinthiscase).
scp/path/to/hello-world.cxcams@or-condo-login.ornl.gov:/lustre/or-hydra/cades-birthright/xcams/hello-worl
d.c`
Replace"/path/to/hello-world.c"withthepathofyoursourcecode,andreplace"xcams"withyourXCAMS/UCAMSID.
YoumaybepromptedforyourXCAMS/UCAMSpasswordifyouhavenotcopiedyourpublicSSHkeytotheloginnode.
3. LoadtheMPIcompilerusingthePE-gnumodule.
ExecuteaJob
143
moduleloadPE-gnu
4. CompiletheCsourceintoabinary.
mpicc-ohello-worldhello-world.c
5. Usels-altoverifythepresenceofthehello-worldbinaryinyourworkingdirectory.
WiththeCcodecompiledintoabinary(hello-world),wecannowscheduleandrunthejobonourcomputenodes.
Option2:CreateandEditSourceCodeDirectlyonComputeNode
1. Ensurethatyouarestillinyourworkingdirectory(/lustre/or-hydra/cades-birthright/ucams)usingpwd.
2. UseVi(vi)tocreateyourCsourcefilewithinyourworkingdirectory.
vihello-world.c
3. PastethehelloworldCcodeintoVi.
HitEsconyourkeyboardtoexittheinputmode.
Enter:setpasteintoVi'scommandline,andpressReturntoenterpastemode.
PastetheCcodeintoVi.
4. Whenfinished,hitEsconyourkeyboardtoexitthepaste/inputmode.
5. Enter:x!intoVi'scommandline,andpressReturntosaveyourfileandreturntotheBashshell.
YounowhaveaCsourcefilethatyoucancompile.
6. LoadtheMPIcompilerusingthePE-gnumodule.
moduleloadPE-gnu
7. CompiletheCsourceintoabinary.
mpicc-ohello-worldhello-world.c
8. Usels-altoverifythepresenceofthehello-worldbinaryinyourworkingdirectory.
WiththeCcodecompiledintoabinary(hello-world),wecannowscheduleandrunthejobonourcomputenodes.
Step4:RuntheJob
1. Beforeproceeding,ensurethatyouarestillinyourworkingdirectory(usingpwd)andthatyoustillhavethePE-gnu
moduleloaded(usingmodulelist).
Weneedtobeinthesamepath/directoryasourPBSscriptandourCbinary.Usels-altoconfirmtheirpresence.
PE-gnualsoloadsOpenMPI,GCC,andXALT.Usemodulelisttoconfirmtheirpresence.Ifnecessary,usemodule
loadPE-gnutoreloadthemodule(s).
2. Useqsubtoscheduleyourbatchjobinthequeue.
qsubhello-world.pbs
ThiscommandwillautomaticallyqueueyourjobusingTorqueandproduceasix-digitjobnumber(shownbelow).
ExecuteaJob
144

143295.or-condo-pbs01
Youcancheckthestatusofyourjobatanytimewiththecheckjobcommand.
checkjob143295
Youcanalsostopyourjobatanytimewiththeqdelcommand.
qdel143295
3. Viewyourresults.
Onceyourjobcompletes,Torquewillproducetwooutput/datafiles.Theseoutput/datafiles,unlessotherwisespecifiedinthe
PBSscript,areplacedinthesamepathasyourbinary.
Onefile(myscript.ojobnumber)containstheresultsofthebinaryyoujustexecuted,andtheother(myscript.ejobnumber)
containsanyerrorsthatoccurredduringexecution.
Replace"myscript"withthenameofyourscriptand"jobnumber"withyourjobnumber.
Youcanviewthecontentsofthesefilesusingthemorecommandfollowedbythefilename.
moreMyMPIhw.o143295
Youroutputshouldlooksomethinglikethis,withonelineperprocessorcore(16inthiscase):
Helloworldfromprocessoror-condo-c136.ornl.gov,rank3outof16processors
Helloworldfromprocessoror-condo-c136.ornl.gov,rank4outof16processors
Helloworldfromprocessoror-condo-c136.ornl.gov,rank6outof16processors
Helloworldfromprocessoror-condo-c136.ornl.gov,rank11outof16processors
Helloworldfromprocessoror-condo-c136.ornl.gov,rank7outof16processors
Helloworldfromprocessoror-condo-c136.ornl.gov,rank14outof16processors
Helloworldfromprocessoror-condo-c136.ornl.gov,rank2outof16processors
Helloworldfromprocessoror-condo-c136.ornl.gov,rank5outof16processors
Helloworldfromprocessoror-condo-c136.ornl.gov,rank8outof16processors
Helloworldfromprocessoror-condo-c136.ornl.gov,rank9outof16processors
Helloworldfromprocessoror-condo-c136.ornl.gov,rank10outof16processors
Helloworldfromprocessoror-condo-c136.ornl.gov,rank12outof16processors
Helloworldfromprocessoror-condo-c136.ornl.gov,rank13outof16processors
Helloworldfromprocessoror-condo-c136.ornl.gov,rank15outof16processors
Helloworldfromprocessoror-condo-c136.ornl.gov,rank0outof16processors
Helloworldfromprocessoror-condo-c136.ornl.gov,rank1outof16processors
4. Downloadyourresults(usingthescpcommandoranSFTPclient)ormovethemtopersistentstorage.
WorksCited
1. WesKendall,"MPIHelloWorld,"MPITutorial,accessedJune14,2017,http://mpitutorial.com/tutorials/mpi-hello-world/.
ExecuteaJob
145
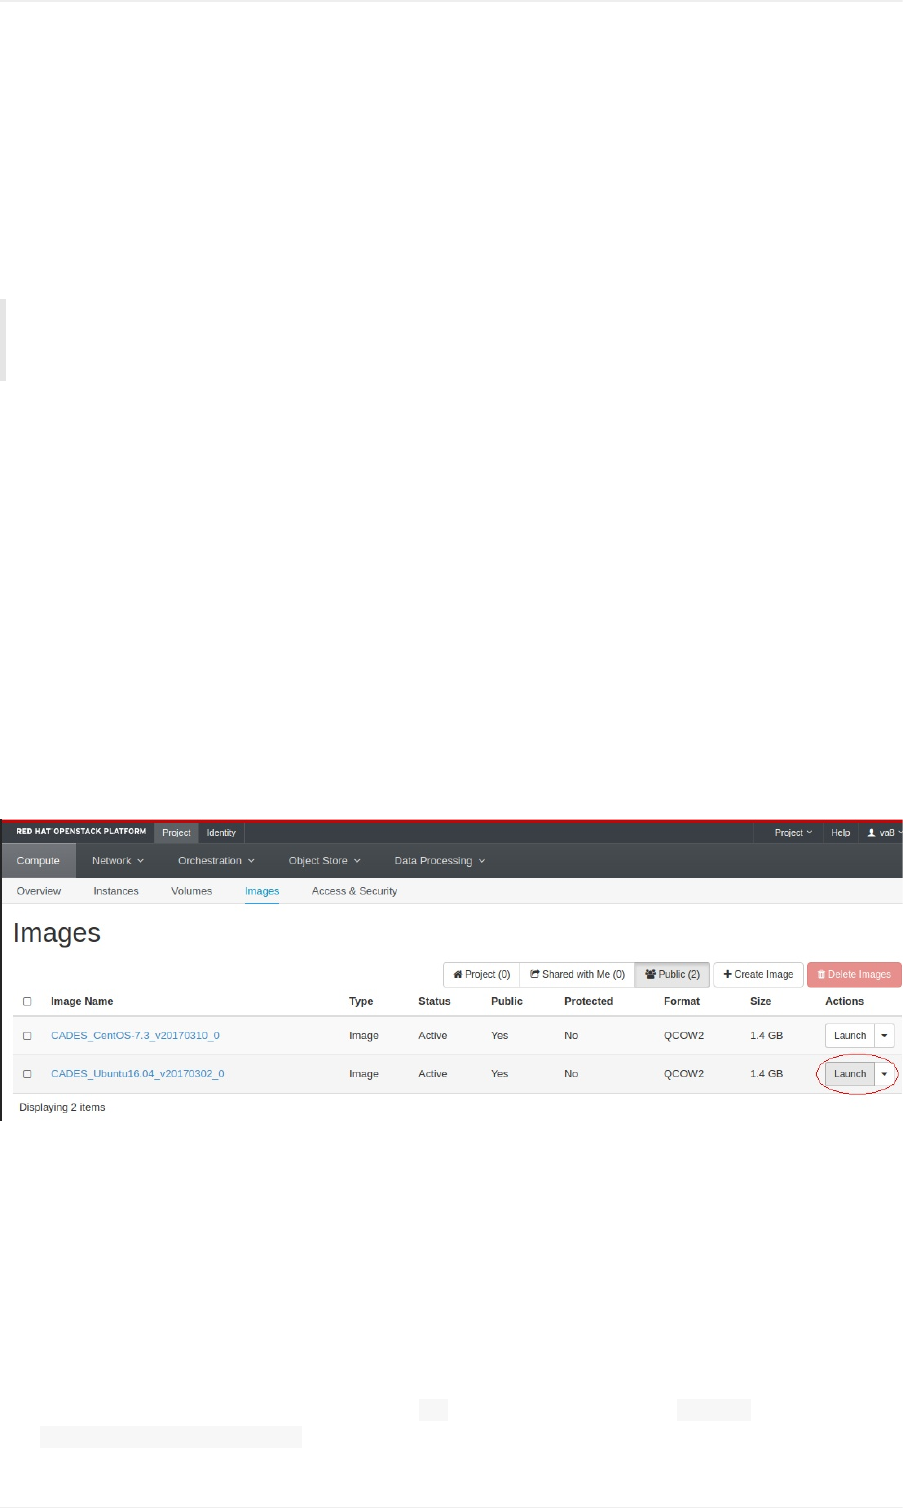
CADES→UserDocumentation→User-ProvidedTutorialsforCADESCloud→LaunchaDockerContainer
TutorialcontributedbyDrewSchmidt.Note:User-providedtutorialsarenotsupportedbyCADES.
Background
Dockerisacontainerarchitectureandecosystem.Alinux.comarticlenicelysummarizesDockerasfollows:
DockerisatoolthatcanpackageanapplicationanditsdependenciesinavirtualcontainerthatcanrunonanyLinux
server.Thishelpsenableflexibilityandportabilityonwheretheapplicationcanrun,whetheronpremises,publiccloud,
privatecloud,baremetal,etc.
Containershavesomewhatsimilargoalstoavirtualmachine(vm).However,aDockercontainerisnotavm.Youareprobably
awarethatvm'shavesomeperformanceoverheadcomparedtorunningthingsnatively.However,itisworthnotingthatthe
applicationsthatruninsideofDockercontainersactuallyrunnatively.YourDockercontainerssharethekernelwiththeirhost
operatingsystem.Sothereisnodoubleoverheadinrunningacontainerinsideourvm.However,westillsuffersomeperformance
penaltybyhavingvirtualizedinthefirstplace.
ManyoftheapplicationsyouwillbeinterestedindeployingarealreadyconfiguredforveryeasyusewithDocker.Youcanfind
publicrepositoriesofmanyofyourfavoriteapplicationssetuponDockerHub.
FirstSteps
WewillassumethatyouarealreadyreasonablyfamiliarwiththeCADESCloudsystem.Ifnot,considerreadingtheuser
documentation.Makesureyoureadthesectiontitled:LaunchaVMInstancefromanImage
However,yougetthere,launchanUbuntu16.04vm.
Fornow,youcankeepthesetupverybasic,justfollowingtheinstructionsoutlinedinthe"LaunchaVMInstance"pagelinked
above.
Youmayeventuallybeinterestedinmorecomplicatedconfigurations.Forexample,youmayneedtomodifythesecuritygroup
details(say,forexample,youwanttorunadockercontainerthatrunsawebserver).Fornow,wewillignorethosedetails.
However,weprovideamorecomplicatedexampleinourShinytutorial.
InstallDocker
Next,youneedtosshtoyournewvm.Inamedmyinstancet1,sowhenIlogin,itshowsmeascades@t1.Yourpromtwill
showcades@whatever-you-named-your-vm.
LaunchaDockerContainer
146
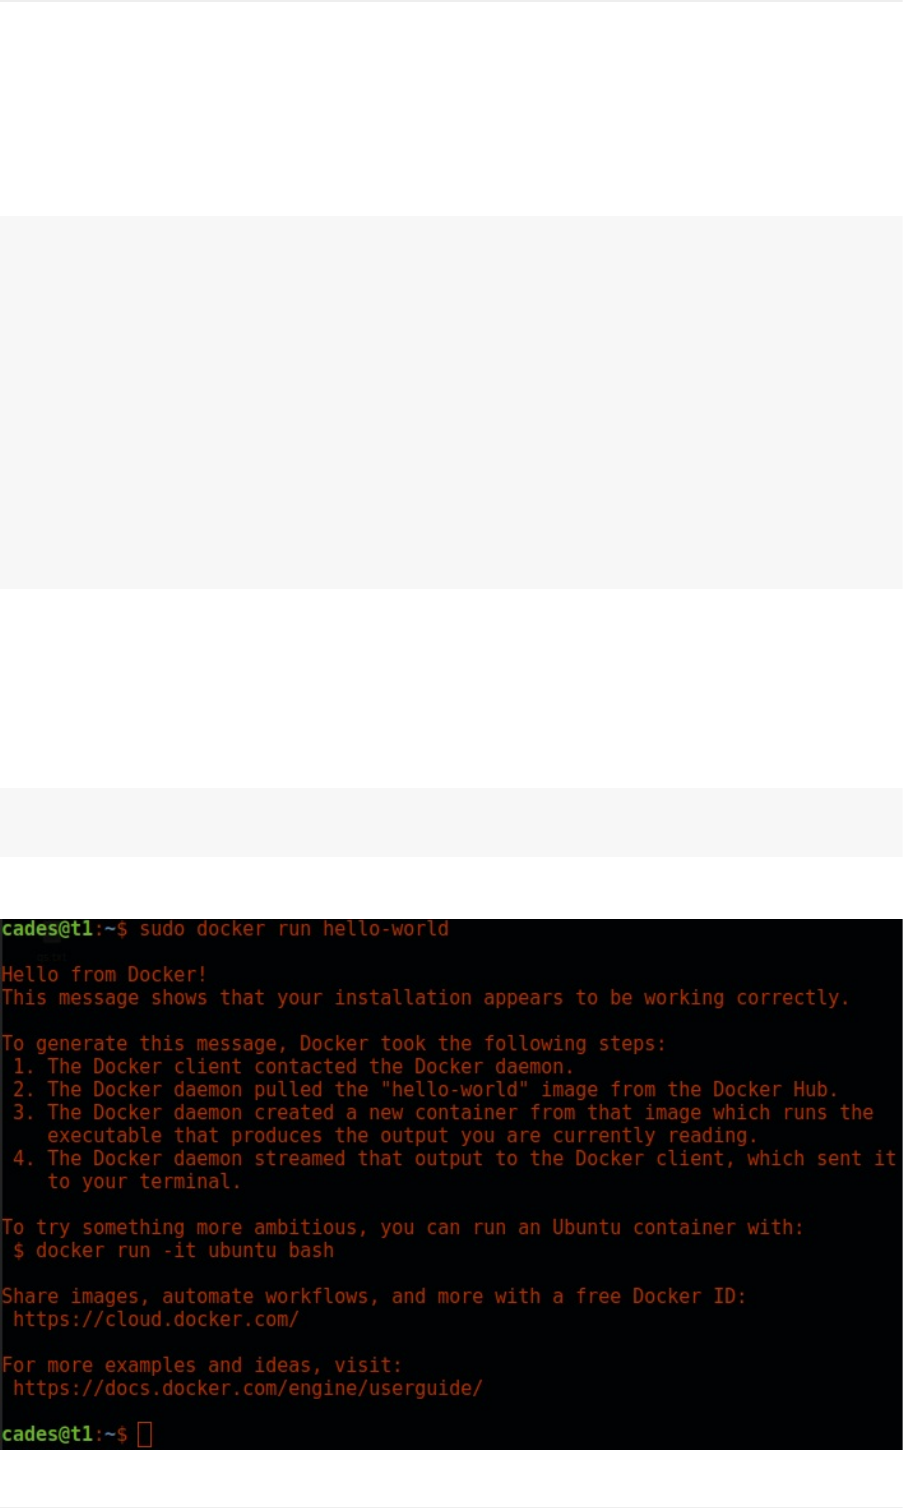
Havingloggedin,it'stimetoinstallDocker.TheofficialDockerdocumentationprovidesalotofusefulinformationtothisend.
Belowwesummarizeonlythestepsoutlinedinthatarticle.Ifyouwishtounderstandanindividualsteporifsomethinggoes
wrong,pleaserefertothearticle.
Otherwise,run:
sudoapt-getinstall\
apt-transport-https\
ca-certificates\
curl\
software-properties-common
curl-fsSLhttps://download.docker.com/linux/ubuntu/gpg|sudoapt-keyadd-
sudoapt-keyfingerprint0EBFCD88
sudoadd-apt-repository\
"deb[arch=amd64]https://download.docker.com/linux/ubuntu\
$(lsb_release-cs)\
stable"
sudoapt-getupdate
sudoapt-getinstall-ydockerdocker.io
Andifalliswell,youshouldhaveDockerinstalledonyourvm.
RunaTestContainer
Whilestillssh'dtoyourCADESCloudvm,youcantestthatyoursetupisworkingcorrectlybyrunning:
sudodockerpullhello-world
sudodockerrunhello-world
Ifallgoeswell,youwillhaveasmall"helloworld"-likeoutputandreturntoyourterminal,andshouldlooksomethinglikethis:
LaunchaDockerContainer
147

That'sit!
LaunchaDockerContainer
148

CADES→UserDocumentation→User-ProvidedTutorialsforBirthrightCloud→LaunchShinywithinDocker
TutorialcontributedbyDrewSchmidt.Note:User-providedtutorialsarenotsupportedbyCADES.
Background
ShinyisawebappframeworkforthestatisticalprogramminglanguageR.Andwhilethatmightsoundcrazy,itactuallyworks
verywell!
Shinyisgenerallyprettyeasytodeveloplocally,butdeployingitinShinyServercanbeabitofaheadacheifyougoaboutitthe
wrongway.Thisguideshouldhelpmaketheprocessaspainlessaspossible.
FirstSteps
Forsimplicity,wewillbeusingShinyinsideofaDockercontainer.Sinceshinyisawebapp,thatmightleadyoutothinkthis
processisgoingtobeconsiderablymorecomplicatedthanrunningitnatively.However,Icanassureyouthatthisisnotthecase,
particularlysincetheRockerProjecthashandledmostoftheconfigurationdetailsforus.Theyprovideashinycontaineralready
setupforbusiness.However,ifyouwishtoinstallShinyservernativelyforsomereason,thenyouwillfindsomeusefuldetailsin
theirDockerfile.
SothefirststepistosetupanUbuntu16.04vmontheBirthrightCloudwithDockerconfigured.SeetheDockertutorialtolearn
howtosetupDocker.
OpenPort(s)
SinceShinyisawebapp,weneedtoopensomeportsonthevmsothatwecanaccessitfromalaptop.Wealsohavetodo
somethingsimilarfortheDockercontainersoitcancommunicatewiththevm,butthatisactuallymucheasier(andexplainedin
thenextsection).
Wewillbeusingport80.Ifyouneedtoopenanotherport,youcan,butit'snotassimplebecauseport80isapre-configuredrule
setforyou.TheRunaSimpleWebServerguidefromtheofficialBirthrightClouddocumentationisquitehelpfulhere.
ThecondensedversionisyouwanttonavigatetoAccess&Securityand:
1. clickCreateSecurityGroupandgiveitaname(Icalledmineshiny)
2. clickManageRules
3. clickAddRule
4. selecthttp(thiswillopenport80;ifyouwantanotherport,setupacustomtcprule)
5. navigatetoyourinstance(undertheInstancestab)
6. clickthetrianglebuttonnexttoCreateSnapshot,selectEditSecurityGroups
7. addyournewsecuritygroupbyclickingtheblue"plus"button
Thatmaysoundlikealotorfeelabitoverwhelming,butit'snotsobad.Giveitatry!
RunanExistingShinyContainer
Example1:k-meansDemo
LaunchShinywithinDocker
149
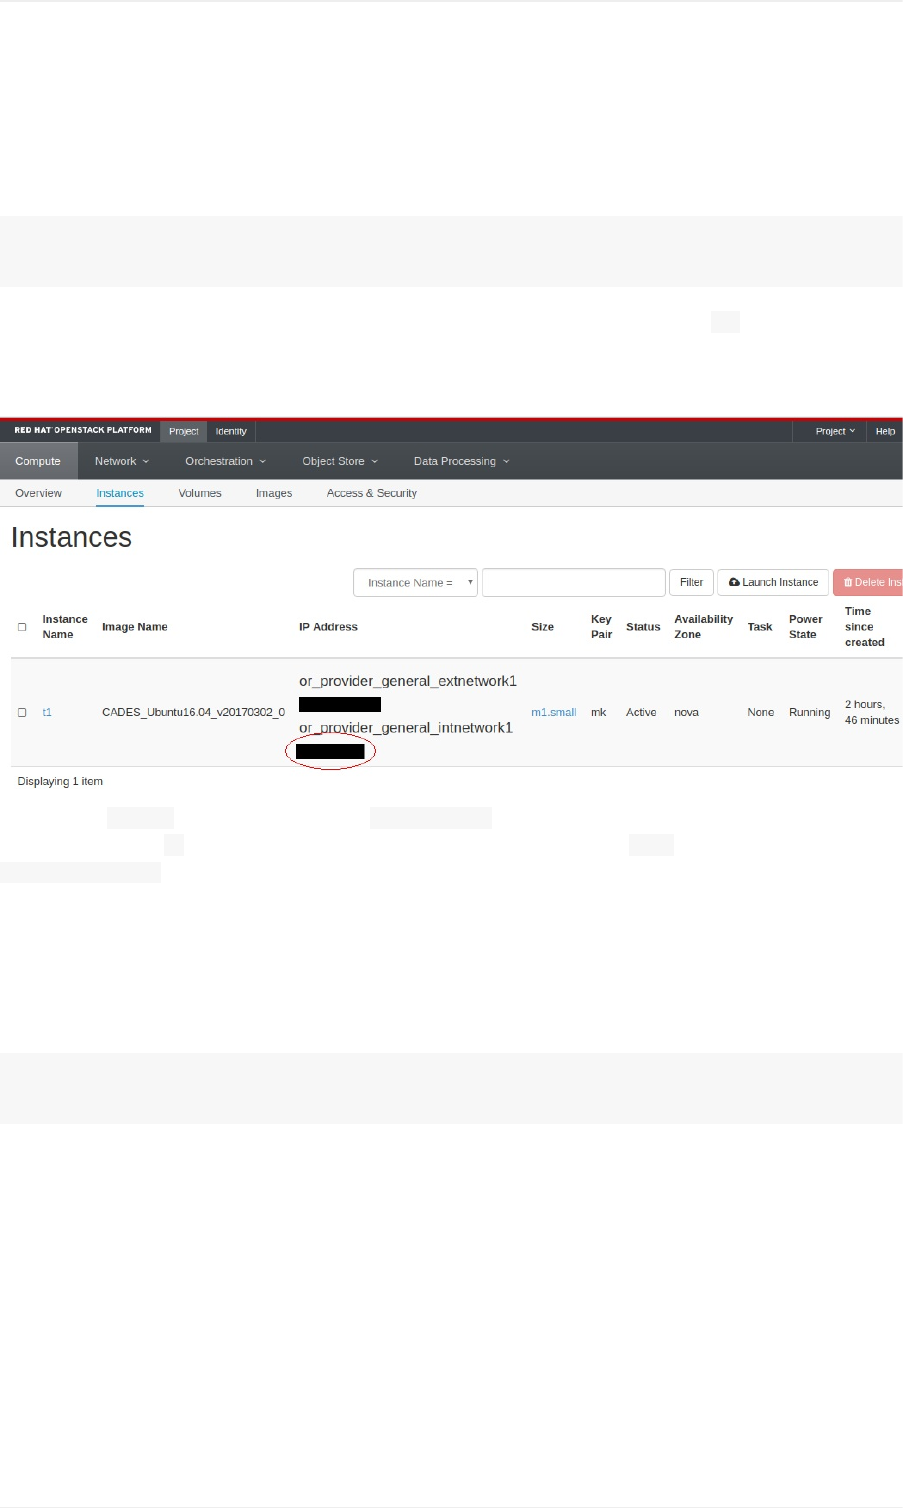
Ok,we'refinallyreadytostarttalkingShiny.Assumingyou'vegotyourvmwithDockerrunning,we'llfirstrunsomeexample
(alreadyconfiguredandbuilt)apps.
Thefirstisasimpledemonstrationofk-means,andisanofficialShinyGalleryexample.ItisalreadysetuponDockerHub,so
standingthisupisabreeze.Simplysshtoyourvmandrun:
sudodockerpullwrathematics/shinykmeans
sudodockerrun-i-t-p80:3838wrathematics/shinykmeans
Ifyouchoseaportotherthan80whensettingupthesecuritygroups,thenyouwillneedtochangethe80aboveaccordingly.
NowjustpointyourwebbrowsertotheIPofyourvm,whichyoucanfindfromtheCompute->InstancetabontheBirthright
Clouddashboard.Examplescreenshotbelow(withactualIPaddressesmasked)
Soifyouripis1.2.3.4,thenyoujustneedtogotohttp://1.2.3.4.Ifyouchosetouseaportotherthan80,thenyouwill
needtoappendacolon:andthatporttotheendofyouripaddress.Soifyouchoseport5555,thenyouwouldgoto
http://1.2.3.4:5555.
Example2:PlotBuilder
SomethingthatshowsoffthepowerofRandShinyabitmoreistheapp"ggplotwithyourdata".Foryourconvenience,thistoohas
beensetuponDockerHub,andissimilarlyeasytouse:
sudodockerpullwrathematics/ggplotwithyourdata-docker
sudodockerrun-i-t-p80:3838wrathematics/ggplotwithyourdata-docker
Asbefore,justpointyourwebbrowsertoyourvm'surlandyou'regoodtogo.
DeployingYourOwnShinyApp
Fortunatelyorunfortunately(dependingonyourperspective),thisisthemosttrickypart.Intruth,thisgoesabitbeyondthescope
ofthisdocument.Onlyyoureallyknowthedependenciesofyourapp,sowecan'ttellyouexactlywhattodo.
Butwecangivesomegeneraladvice:
1. YouwillneedtocreateyourownDockerfile.Thisguideisalsonottherightplacetolearnallaboutthevariousoptionsof
Dockerfiles;thisis.However,generallyspeaking,aDockerfileisnotthatfarremovedfromashellscript.Soknowinghowto
buildtheappnativelyisimportant(andreally,nodifferent)inunderstandinghowtogetittobuildinthecontainer.
LaunchShinywithinDocker
150

2. SeehowthingsaredoneonexistingDockerfileconfigurations.Thek-meansconfigurationisavailablehereandtheplotone
here.Thesehavebeendeliberatelykeptfairlysimple.
3. InstallingRpackagesfromsourceisoftenmuchharderandalwaysmuchmoretimeconsumingthaninstallingbinary
packages.Whenyouruninstall.packages()ordevtools::install_github()orthelike,youareinstallingasource
package.However,therearemanybinarypackagesavailableinapt.Thesepackagesallhavetheprefixr-cran-,soyou
shouldcheckwhatisavailablebeforegoingtheinstall.packages()route.However,sometimesther-cran-packages
areoutofdate,socheckbeforeyouinstall.
4. YoucanrunmultipleappsinthesameDockercontainer.Youjustplaceeachoneinitsownsubdirectoryof/srv/shiny-
server.Soifyouhaveappsfooandbarthatyouwanttohostinthesamecontainer(saytheyhaveverysimilar
dependencies),youwouldputthemin/srv/shiny-server/foo/and/srv/shiny-server/bar.Thenyouwouldviewthem
athttp://1.2.3.4/fooandhttp://1.2.3.4/bar(replacethefakeipwithyourrealoneofcourse!).
5. FortroubleshootingShinyServerproblems,seetheShinyServerOpenSourceAdministrator'sGuide.
LaunchShinywithinDocker
151
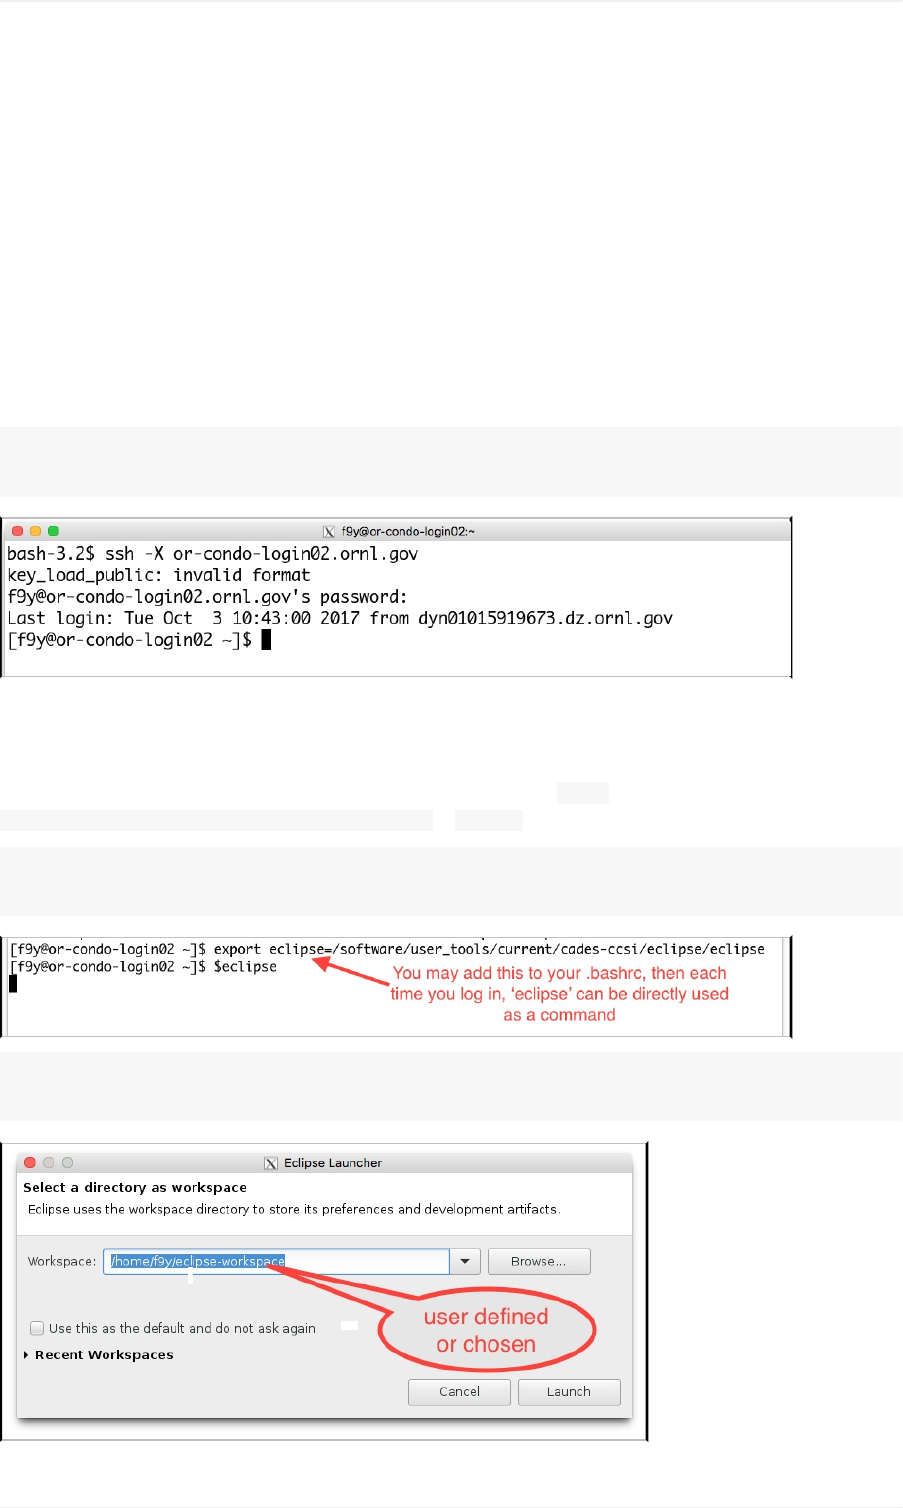
CADES→UserDocumentation→User-ProvidedTutorialsforBirthrightCloud→UsingEclipseIDE
TutorialcontributedbyFengmingYuan.Note:User-providedtutorialsarenotsupportedbyCADES.
UsingtheEclipseIDE
NOTE:Hereisanexampleofcreatenewfortranproject,e.g.PFLOTRAN
STEP1.LogintoCADES
byX-windowsfromyourlocalterminal(e.g.XQuartzonMacOSX,orCygwin-XonWindowsOS).
ssh-Xor-condo-login02.ornl.gov
(inputucams/xcamsidandpwd)
STEP2.STARTeclipse
(note:youmaycreatealink,suchasoptionalcommandinthefollowing,oraddexport
eclipse=/software/user_tools/current/cades-ccsi/eclipsein.bashrc)
$exporteclipse=/software/user_tools/current/cades-ccsi/eclipse
(note:thisisoptional,otherwise,youcandirectlystarttheprogram)
$eclipse
#(thiswillstartECLIPSEinGUIshowninyourdesktop/laptop)
EclipseinCADESHPC
152
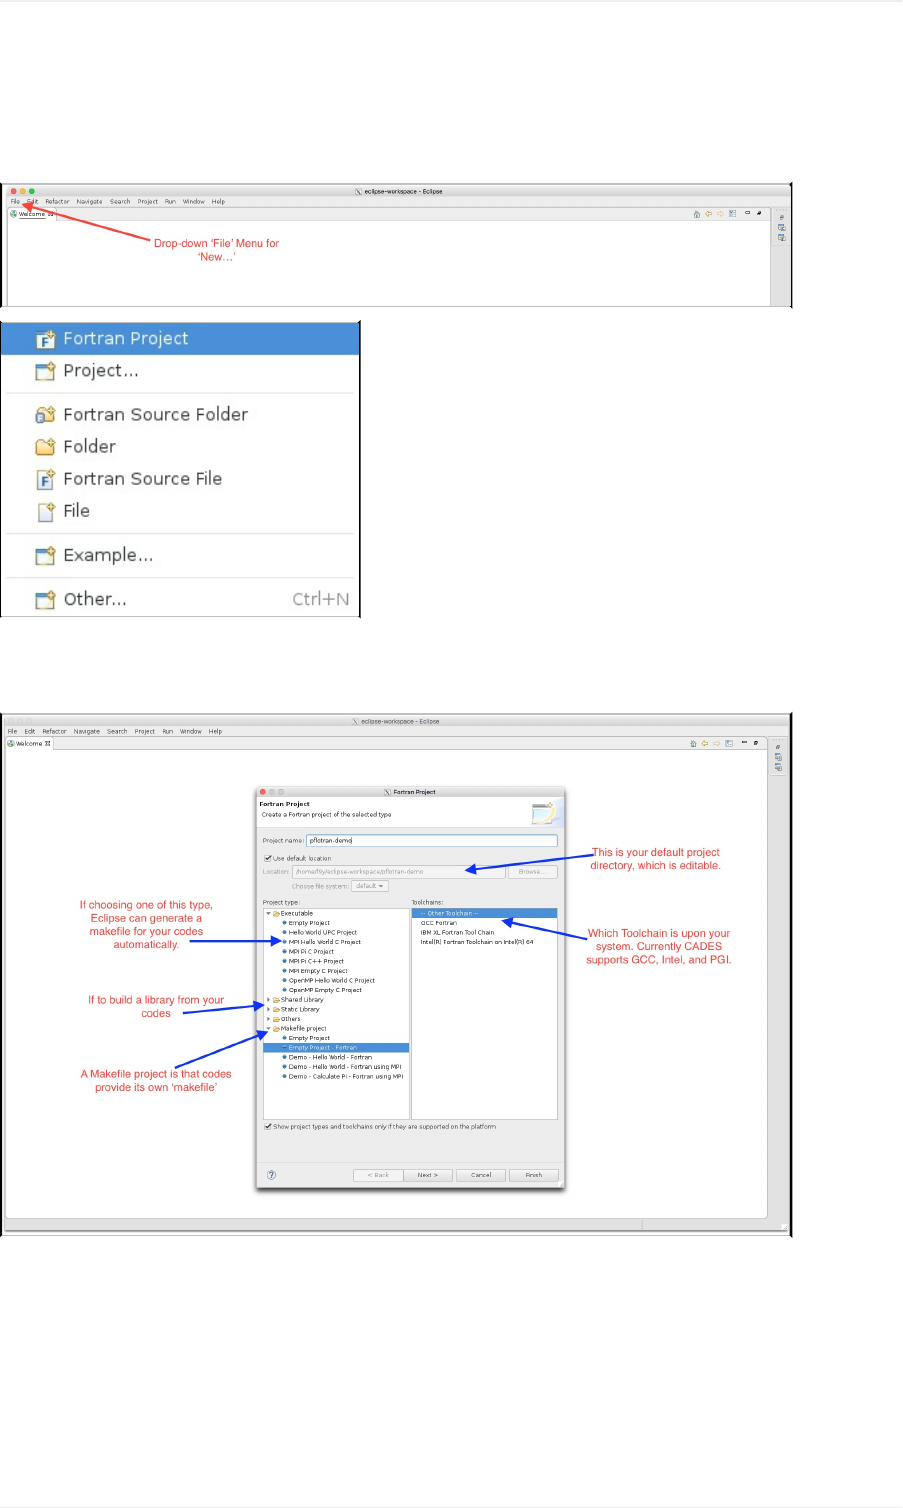
STEP3.Createaproject
WELCOMEpage(iffirsttime)&FILEDROP-DOWNmenu:
NEW...PROJECTconfiguration:
GENERICInterface/windowsofECLIPSE:
(noteonhowtoadd/createsourcecodes)
EclipseinCADESHPC
153
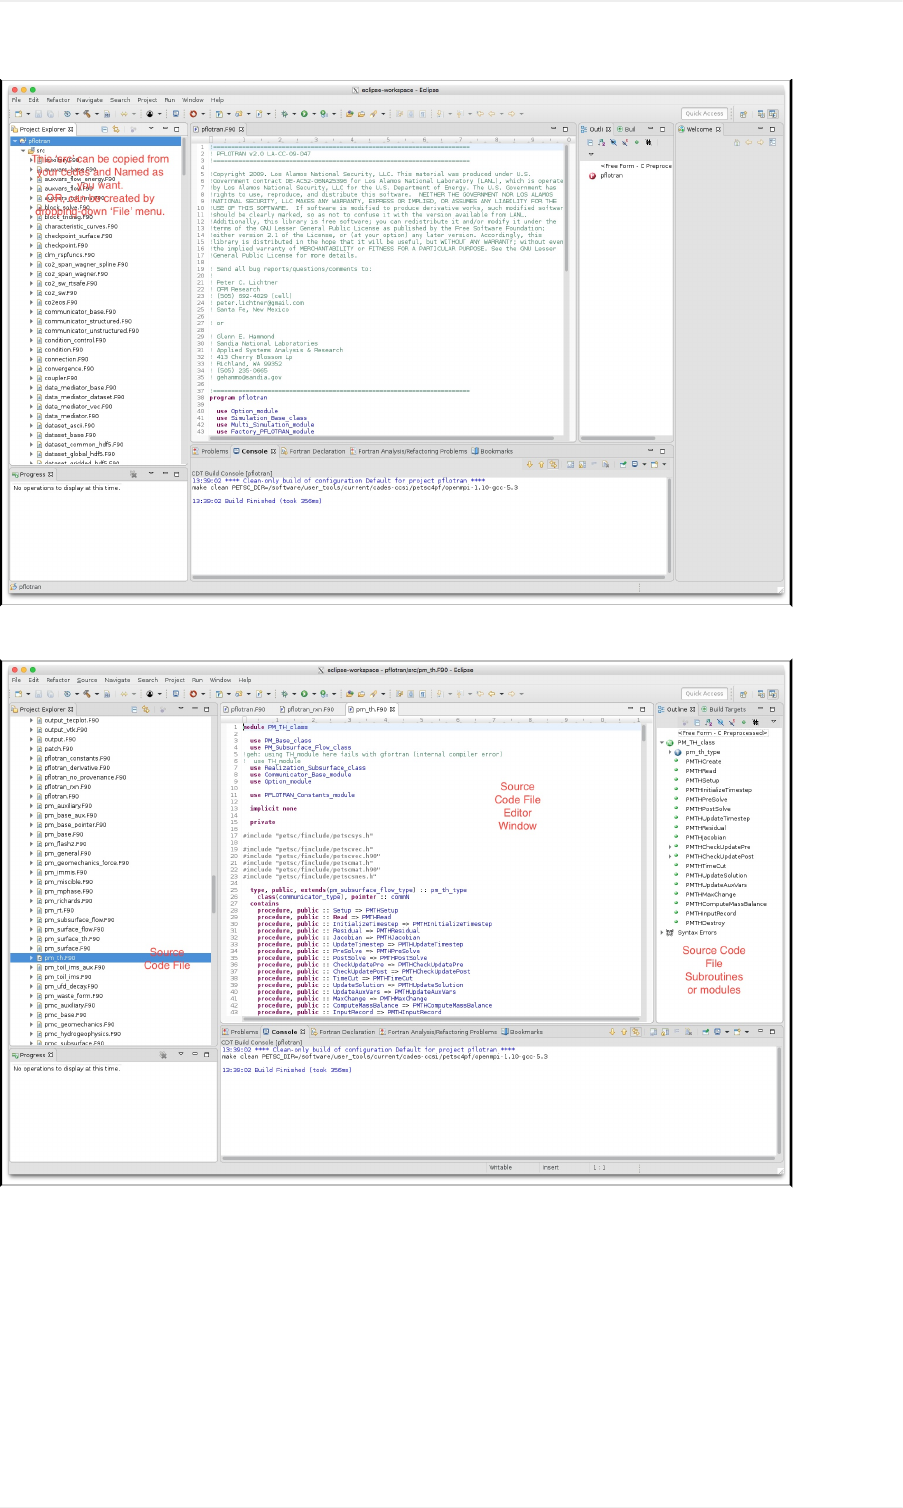
MOREonwindows...
STEP4.Buildproject
4.1ProjectPropertiesEditing
Right-clickontheProjectin'ProjectExplorer'window...
EclipseinCADESHPC
154
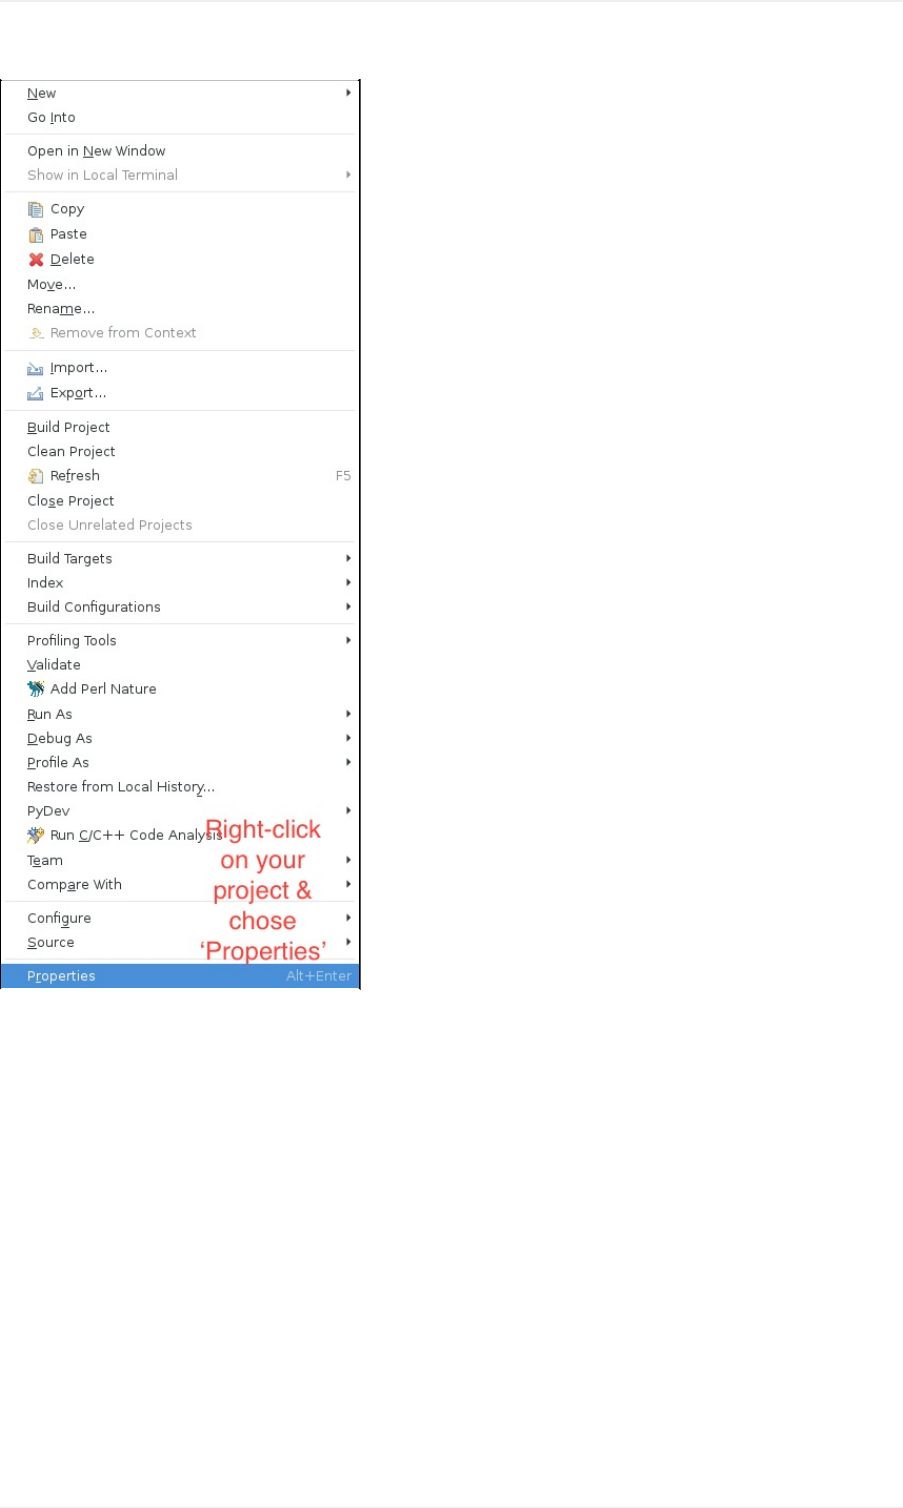
4.2Buildingsettings
EditingaswhatyouNEEDED...e.g.BuildDirectory(NOTE:youmaybrowseyourfilesystem)
EclipseinCADESHPC
155
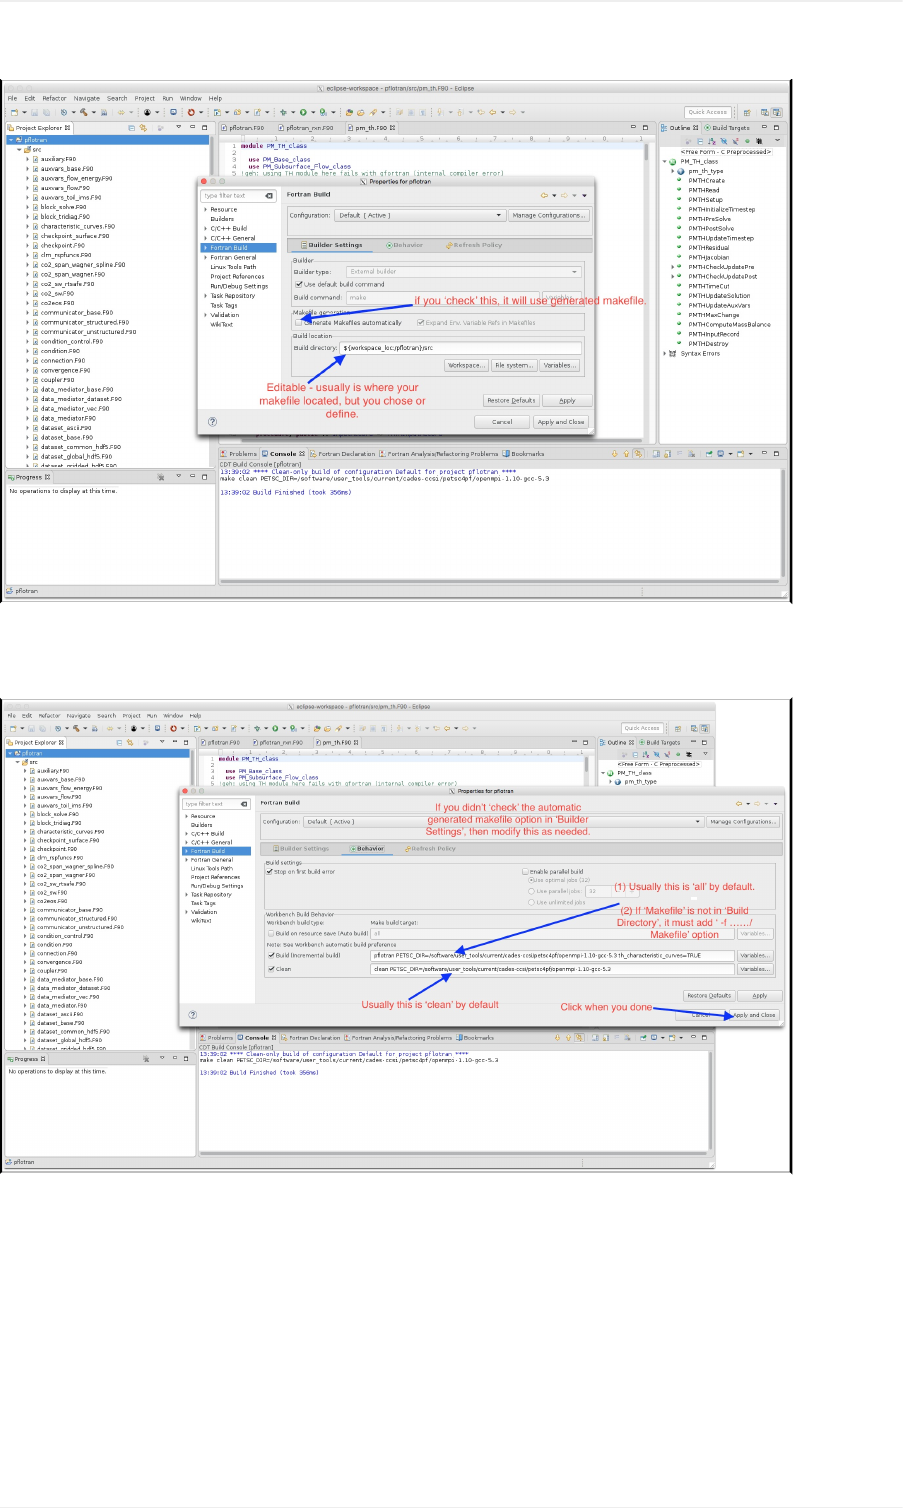
4.3Buildingbehaviorediting
AGAIN,asNEEDED.
4.4Cleanup(previous)build(OPTIONAL)
IFyouwouldliketo,cleanpreviousbuildofproject,byRight-clickproject,followedbyclickingon'CleanProject'
EclipseinCADESHPC
156
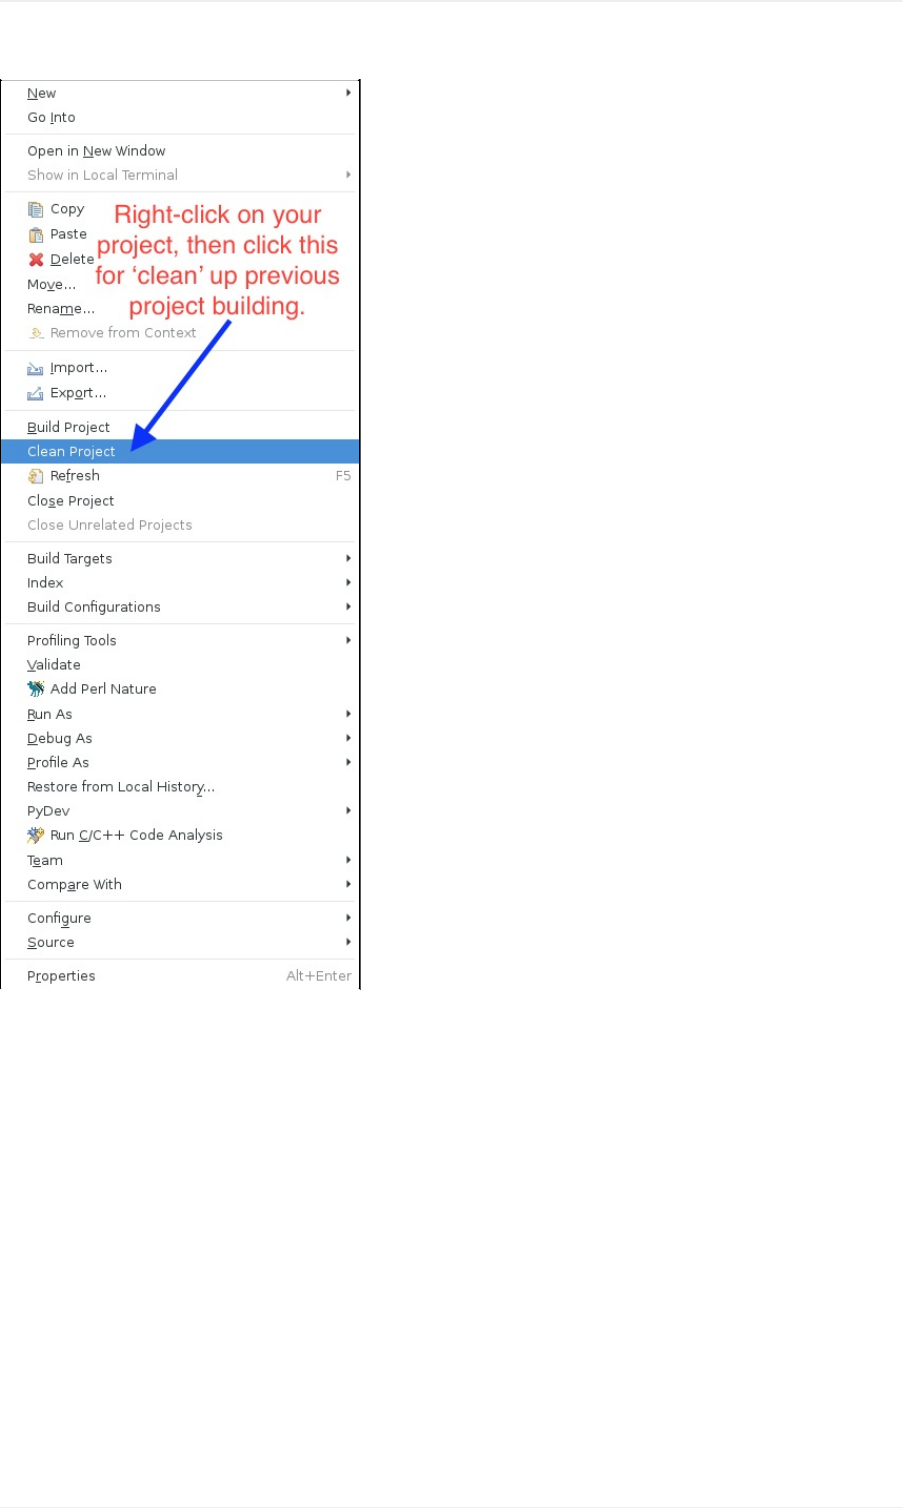
4.5Buildyourproject
Right-clickonyourproject,thenclickon'BuildProject'
EclipseinCADESHPC
157
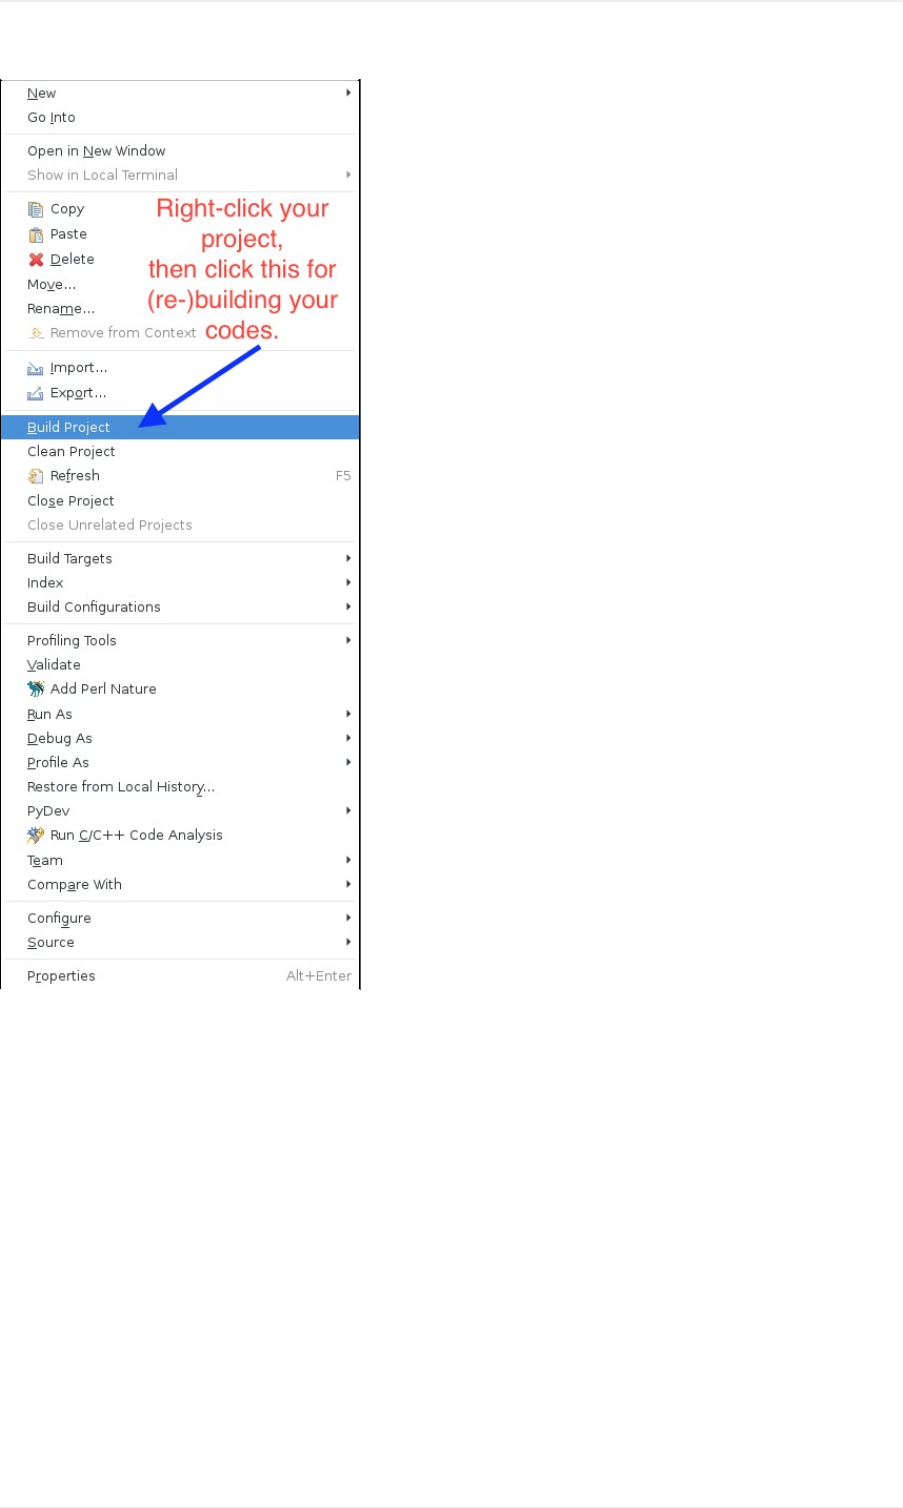
Buildingprogress......
EclipseinCADESHPC
158
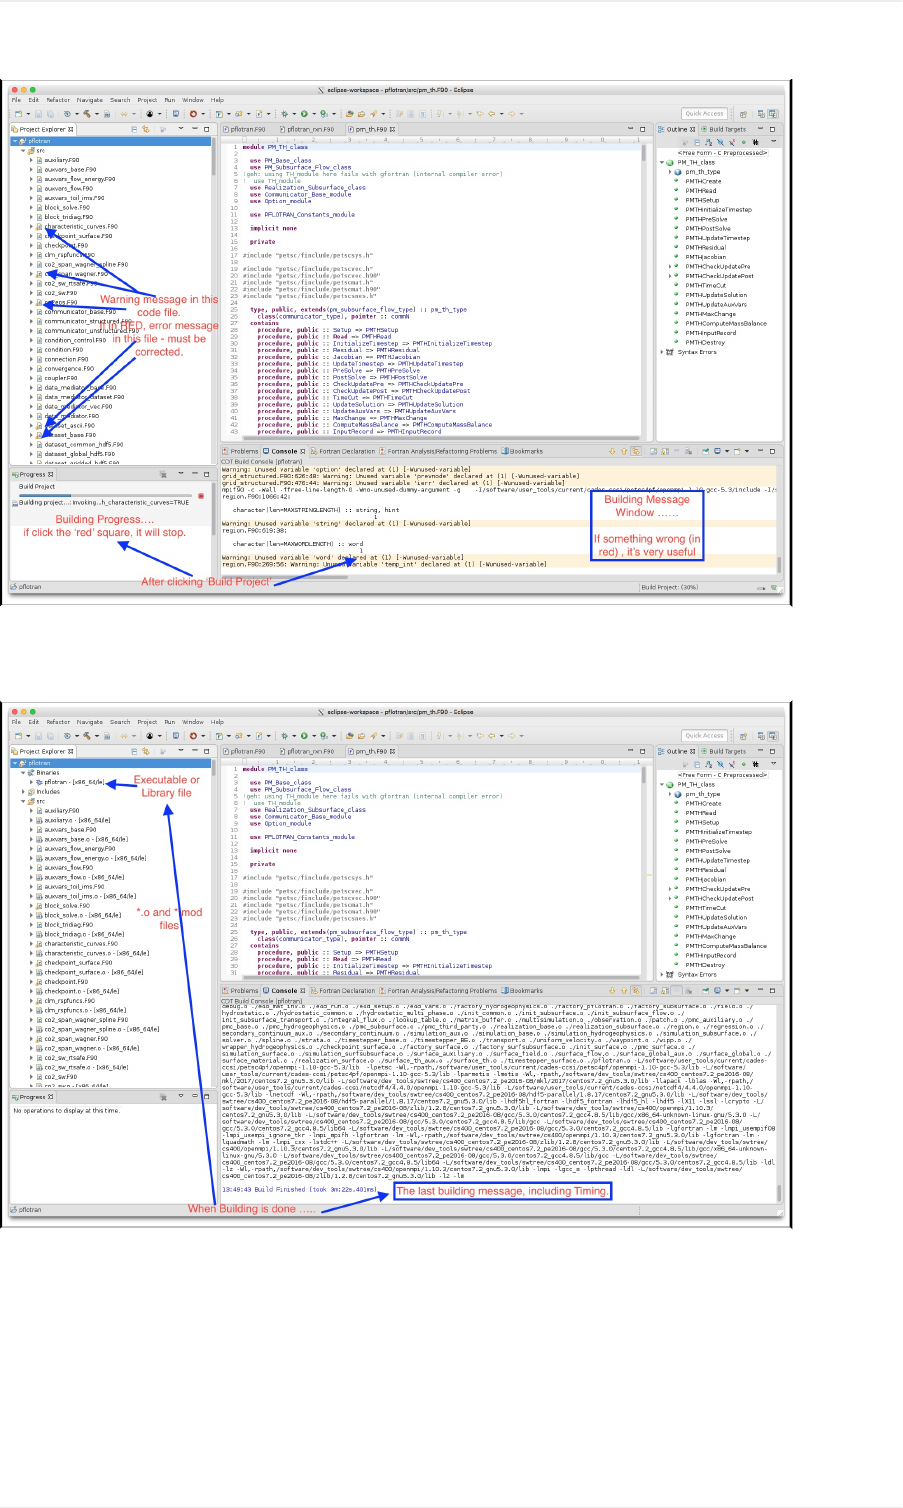
AfterBuildingSuccessfully.
IFNOT,clickingthe'error'codefileandeditinginthe'editorwindow'
STEP5.Runproject
(NOTE:it'sNOTallowedtodirectlyrunaprogramfromtheloginnodeonCADES!)
Runyourexecutablesinterminal,OR,includeyourbuiltlibrary(asUSUALLYyoudo)
EclipseinCADESHPC
159

EclipseinCADESHPC
160
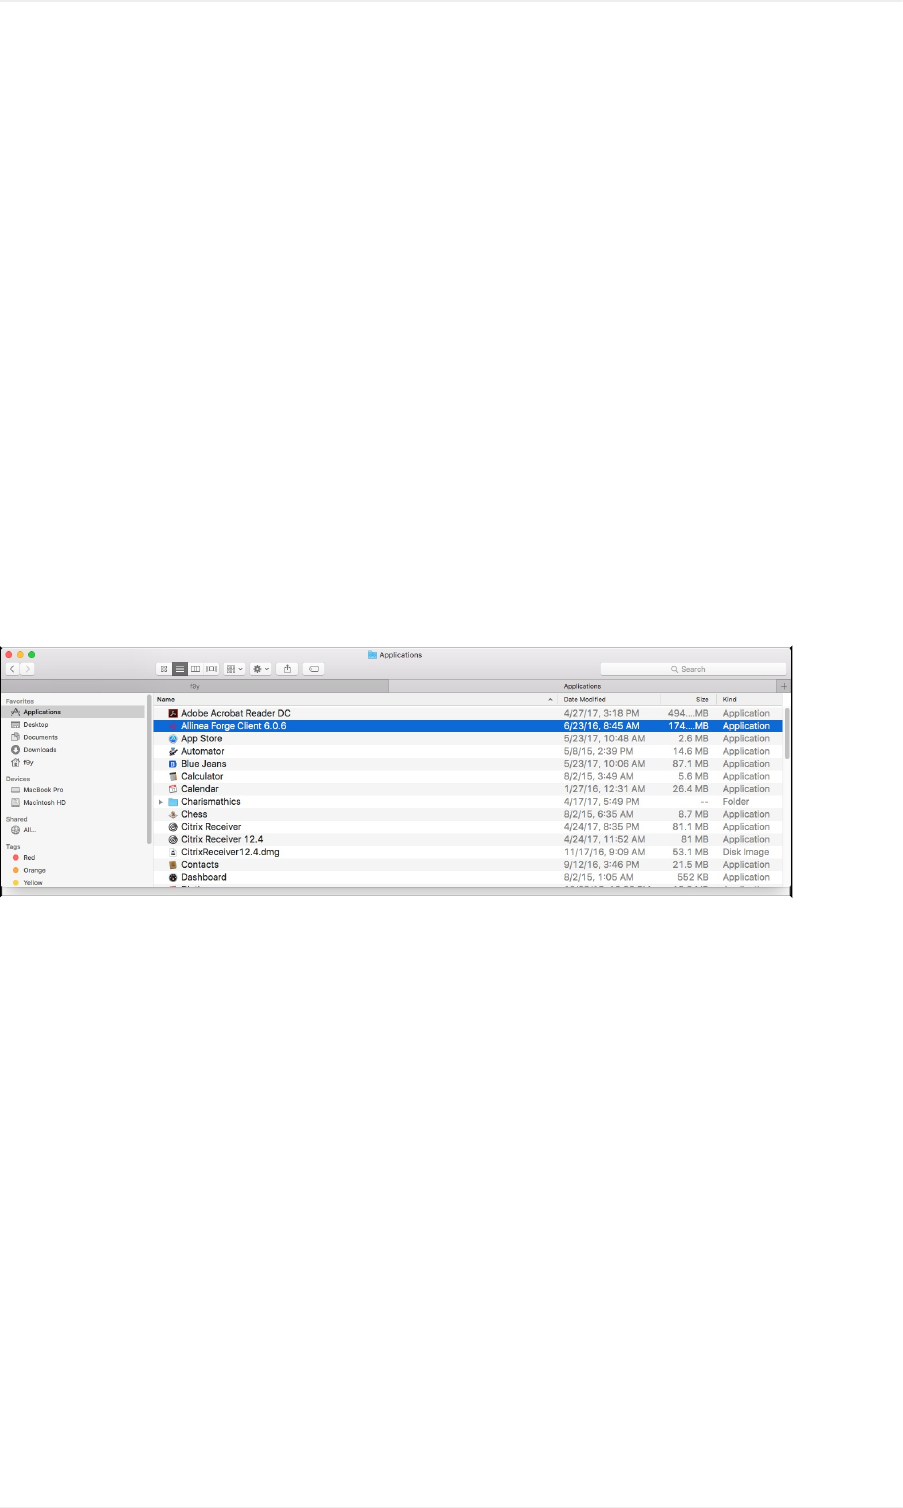
CADES→UserDocumentation→User-ProvidedTutorialsforCADESCloud→UsingAllineaDDT
TutorialcontributedbyFengmingYuan.Note:User-providedtutorialsarenotsupportedbyCADES.
AllineaForge/DDTClient
I.AllineaDDTClient
TheClientsoftwareisfreefrom:https://www.allinea.com/products/forge/download#remote-client.
TheversionformatchingwithCADES’server-endis6.0.6(Currently).
II.ConfigurationofRemoteServer
Currently,CADEShas2versionsofAllineaDDT/Forge,thefollowingistestedwithv.6.0.6
II-1.StartAllineaForgeClientlocally
AllineaForge/DDTClientapplicationinstalled......
Onyourscreen.......
AllineaDDTinCADESHPC
161
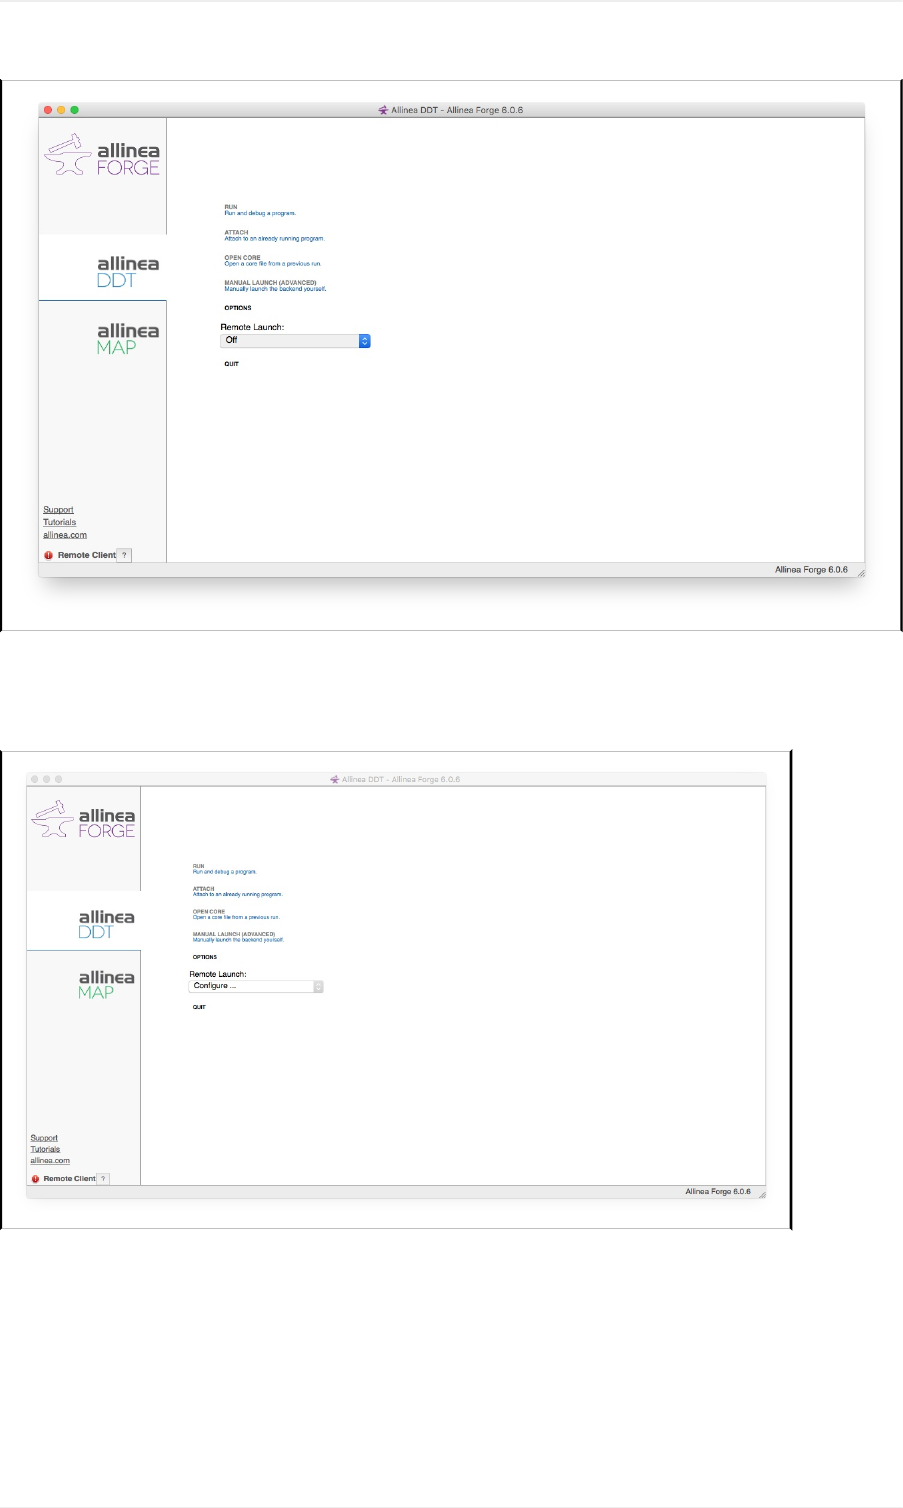
II-2.ConfigureRemoteLaunching
Drop-downconfigure......
AddorModify......
AllineaDDTinCADESHPC
162
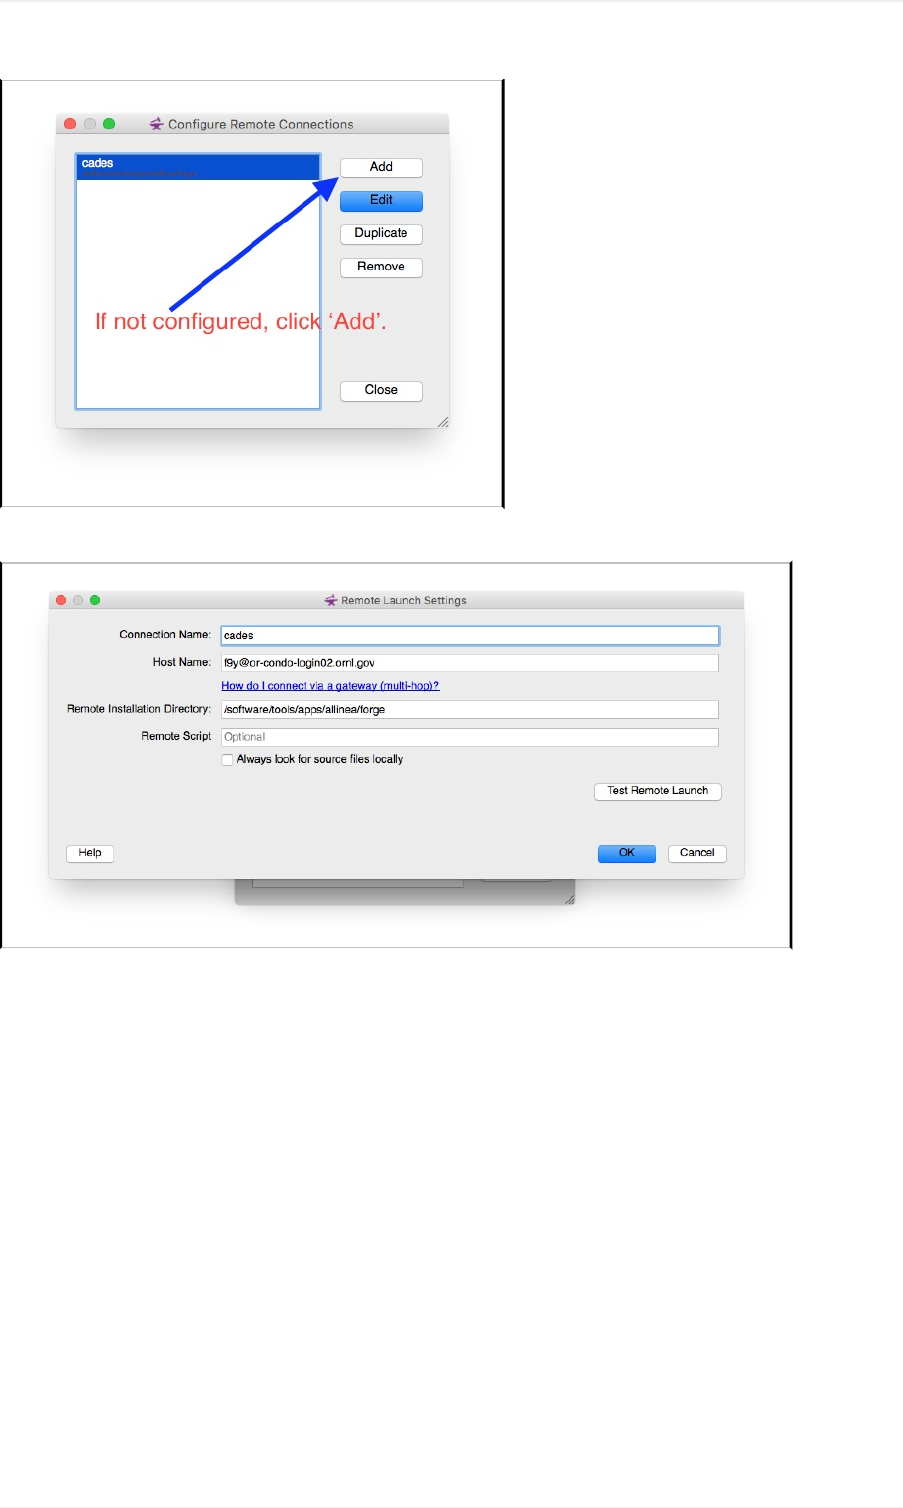
RemoteLaunchSettings......
AND,......
AllineaDDTinCADESHPC
163

II-3.DDTtemplateonCADES
YouhavetoconfigureaDDTtemplatefile,tobeusedbyAllineaForgeClient,asfollowing:
e.g.,hereafilenamedasddt_template.qtf,whichMUSTbeputinyourhomedirectory.
#
#Name:GenericTorque
#
#WARNING:IfyouinstallanewversionofAllineaForgetothesame
#directoryasthisinstallation,thenthisfilewillbeoverwritten.
#Ifyoucustomizethisscriptatall,pleaserenameit.
#
#submit:qsub
#display:qstat
#jobregexp:(.+)
#cancel:qdelJOB_ID_TAG
#shownum_nodes:yes
#
#WALL_CLOCK_LIMIT_TAG:{type=text,label="WallClockLimit",default="00:30:00",mask="09:09:09"}
#QUEUE_TAG:{type=text,label="Queue",default=debug}
##AllineaForgewillgenerateasubmissionscriptfromthisby
##replacingthesetags:
##TAGNAME|DESCRIPTION|EXAMPLE
##---------------------------------------------------------------------------
##PROGRAM_TAG|targetpathandfilename|/users/ned/a.out
##PROGRAM_ARGUMENTS_TAG|argumentstotargetprogram|-myargmyval
##NUM_PROCS_TAG|totalnumberofprocesses|16
##NUM_NODES_TAG|numberofcomputenodes|8
##PROCS_PER_NODE_TAG|processespernode|2
##NUM_THREADS_TAG|OpenMPthreadsperproc|4
##DDT_DEBUGGER_ARGUMENTS_TAG|argumentstobepassedtoddt-debugger
##MPIRUN_TAG|nameofmpirunexecutable|mpirun
##AUTO_MPI_ARGUMENTS_TAG|mpirunarguments|-np4
##EXTRA_MPI_ARGUMENTS_TAG|extrampirunarguments|-xFAST=1
#!/bin/bash
#PBS-S/bin/bash
#PBS-mae
#PBS-joe
#PBS-Myuanf@ornl.gov
#PBS-Nacme_debug
AllineaDDTinCADESHPC
164
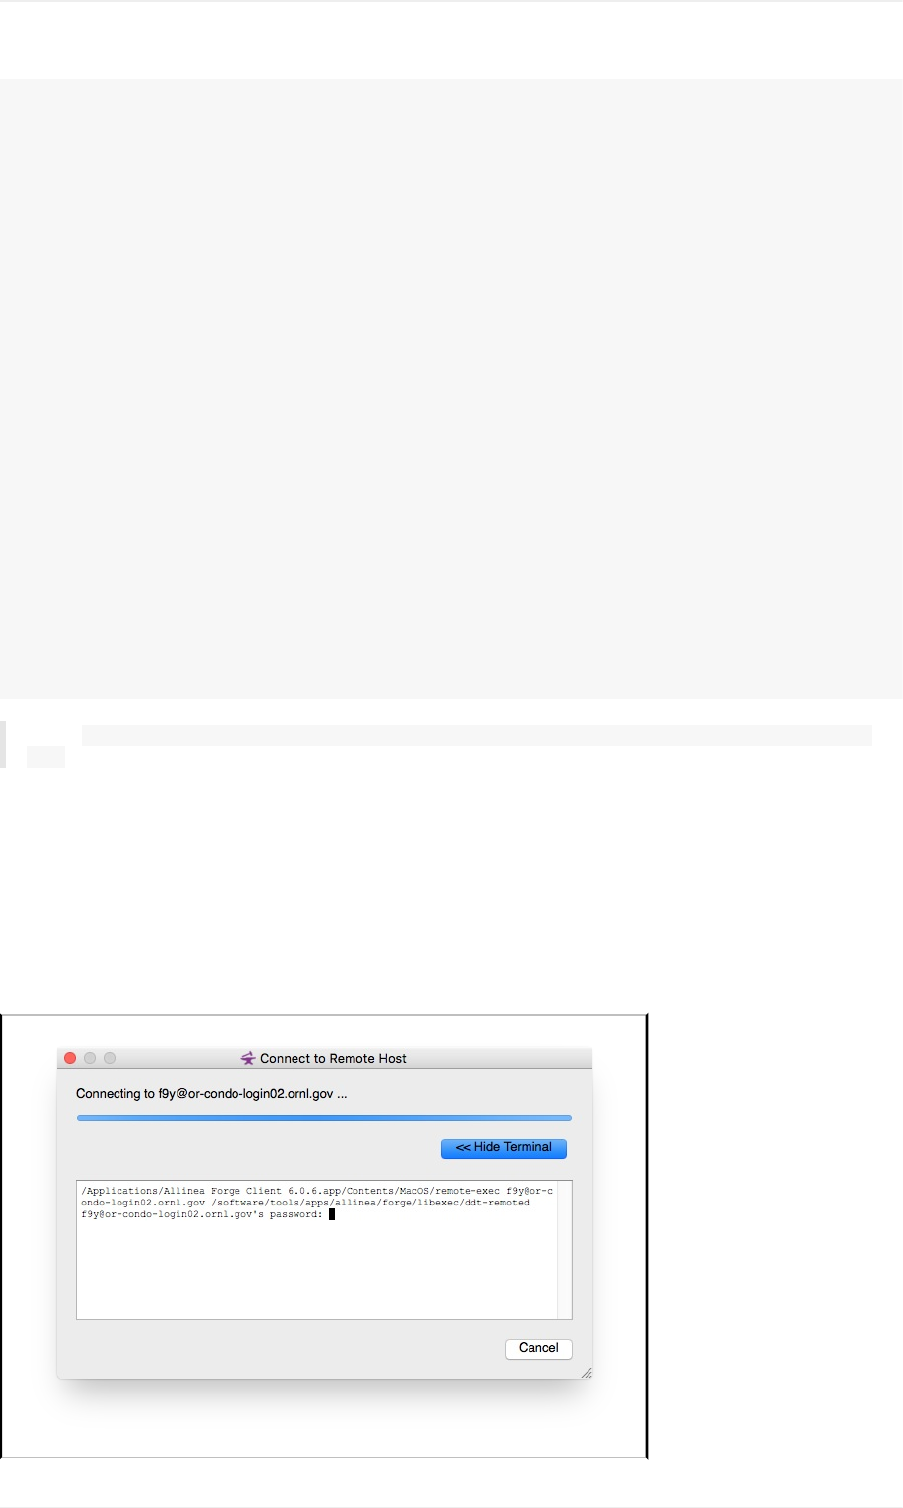
#####PBS-qQUEUE_TAG
#PBS-qbatch
#PBS-lnodes=NUM_NODES_TAG:ppn=PROCS_PER_NODE_TAG
#PBS-lwalltime=WALL_CLOCK_LIMIT_TAG
#PBS-Wgroup_list=cades-ccsi
#PBS-Accsi
#PBS-lqos=std
#PBS-lnaccesspolicy=singlejob
exportOMP_NUM_THREADS=1
#PBS-V
#PBS-oPROGRAM_TAG-ddt.output
#PBS-ePROGRAM_TAG-ddt.error
##Thefollowinglinewilluseexactlythesamedefaultsettingsthat
##AllineaForgeusestolaunchwithoutthequeue.
moduleloadenv/cades-ccsi
moduleloadvasp
AUTO_LAUNCH_TAG
##Replacetheaboveformorecomplexsituations-suchasforpassingunusual
##parameterstompirun,likemachinefilesorprocessespernode--belowis
##anexample.
##
##iftest"MPI_TAG"="mpich1standard";then
##MPIRUN_TAG-tv-npNUM_PROCS_TAGPROGRAM_TAGPROGRAM_ARGUMENTS_TAG
##else
##iftestDEBUG_STARTER_TAG-eq1;then
##DDT_CLIENT_TAGMPIRUN_TAG-npNUM_PROCS_TAG-machinefile$PBS_NODELISTPROGRAM_TAGPROGRAM_ARGUMENTS_TAG
##else
##MPIRUN_TAG-npNUM_PROCS_TAG-machinefile$PBS_NODELISTDDT_DEBUGGER_TAGPROGRAM_ARGUMENTS_TAG
##fi
##fi
NOTE:(1)PleasemodifyuserinformationandothersasNEEDED;(2)TIP:#or##impliescomments,EXCEPTfor
#PBS
III.Step-by-StepInstructiononDebugging
III-1.Start'Runanddebugaprogram'
While'RemoteLaunch:cades'ischosen,click"Runanddebugaprogram"under"RUN"......
AllineaDDTinCADESHPC
165
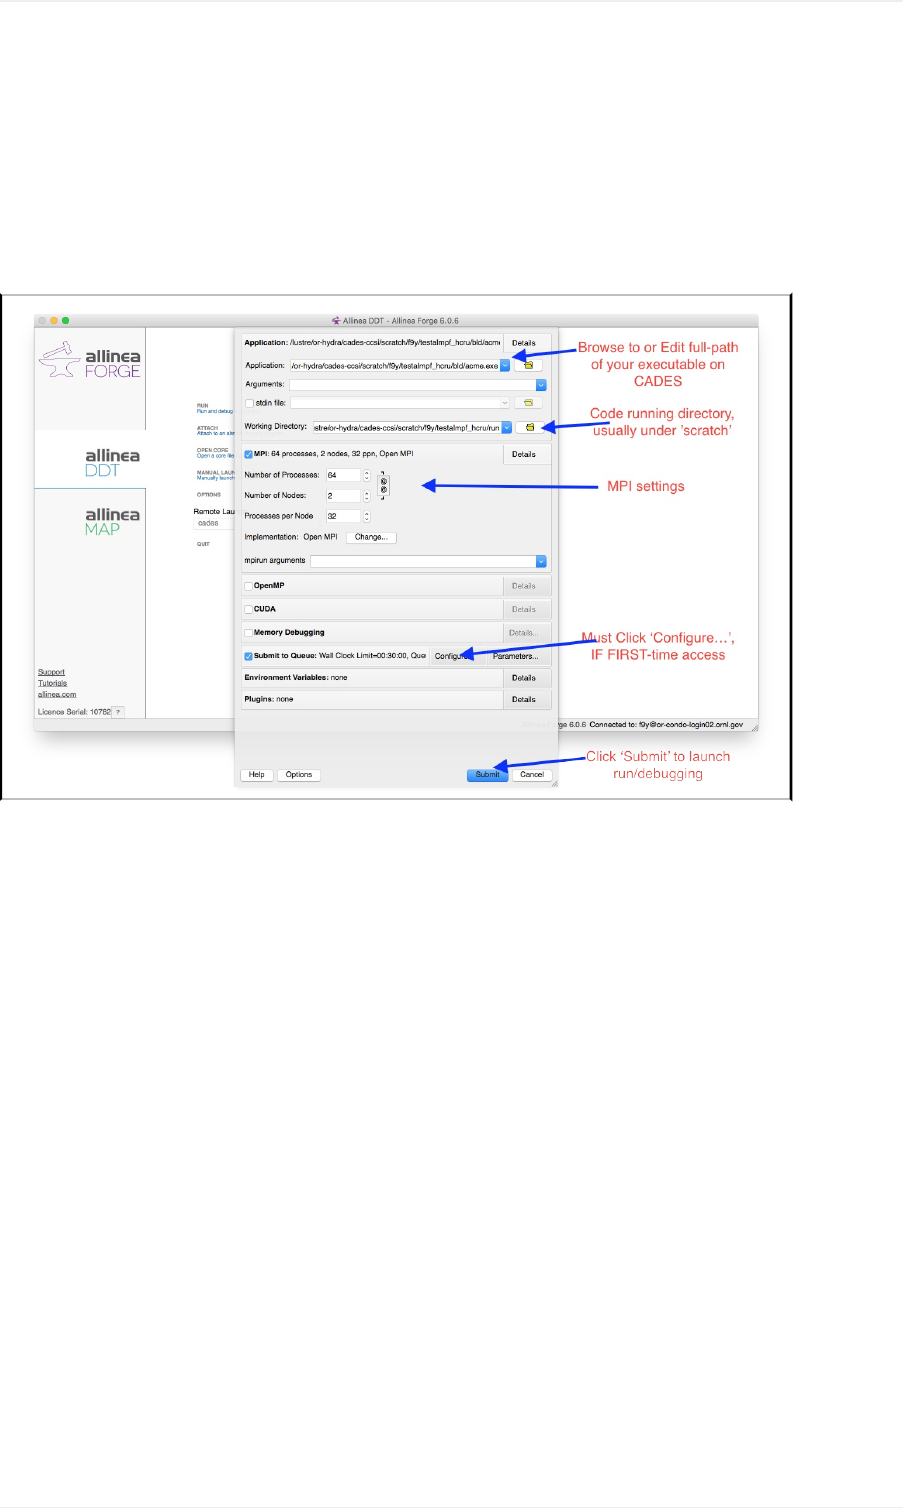
inputyourpwd,andENTER......
III-2.ConfigureAllineaDDTjob-submissiontoCADES
AftersuccessfullyconnectingtoCADES,thefollowingwillpopup.THEN,youmayaddoreditajob-submission
configuration
IMPORTANT:ifthisisyourfirsttimetoaccessCADESforsubmittingajobtorun&debug,youMUSTClick
'Configure...'under'SubmittoQueque'.Andthenaddtheabovetemplate*.qtffile(inyourhomedirectory)andother
settings,ASFollowing:.......
AllineaDDTinCADESHPC
166
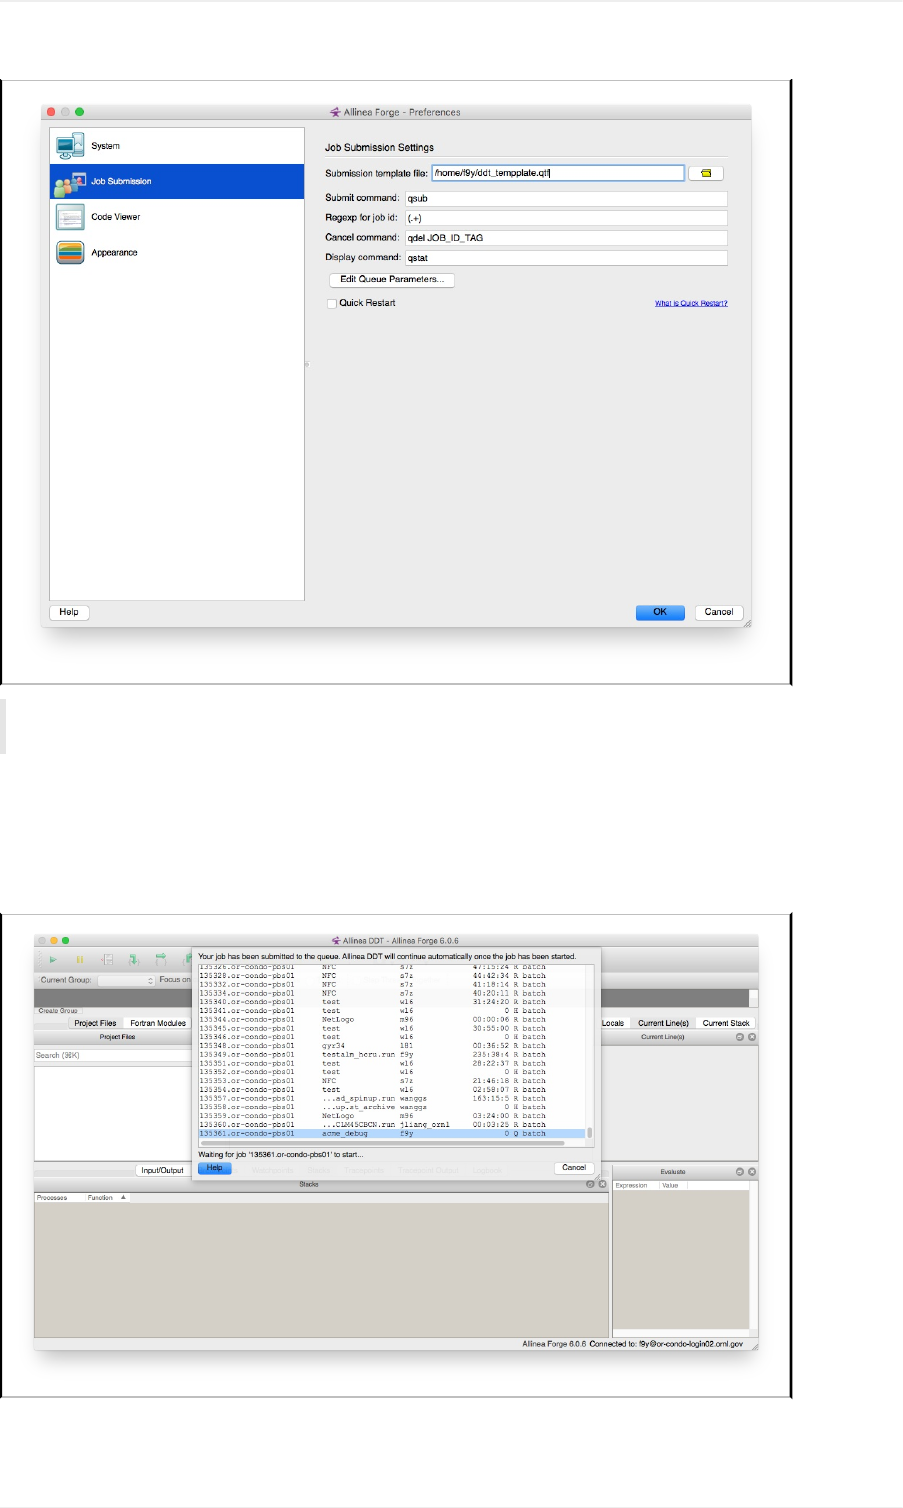
NOTE:This'configuration'Windowalsocanbeusedtoconfigureothersettings,asSHOWN.Youmaywanttohavesome
inspectionsbyclickingeachone*
III-3.SubmitjobandRun
AFTERclicking'SUBMIT'button......
ONCEyourjobstatusisas"R",WINDOWwillbeswitchingandshowingas......(OTHERWISE,theabovewindowwould
behangingon)
AllineaDDTinCADESHPC
167
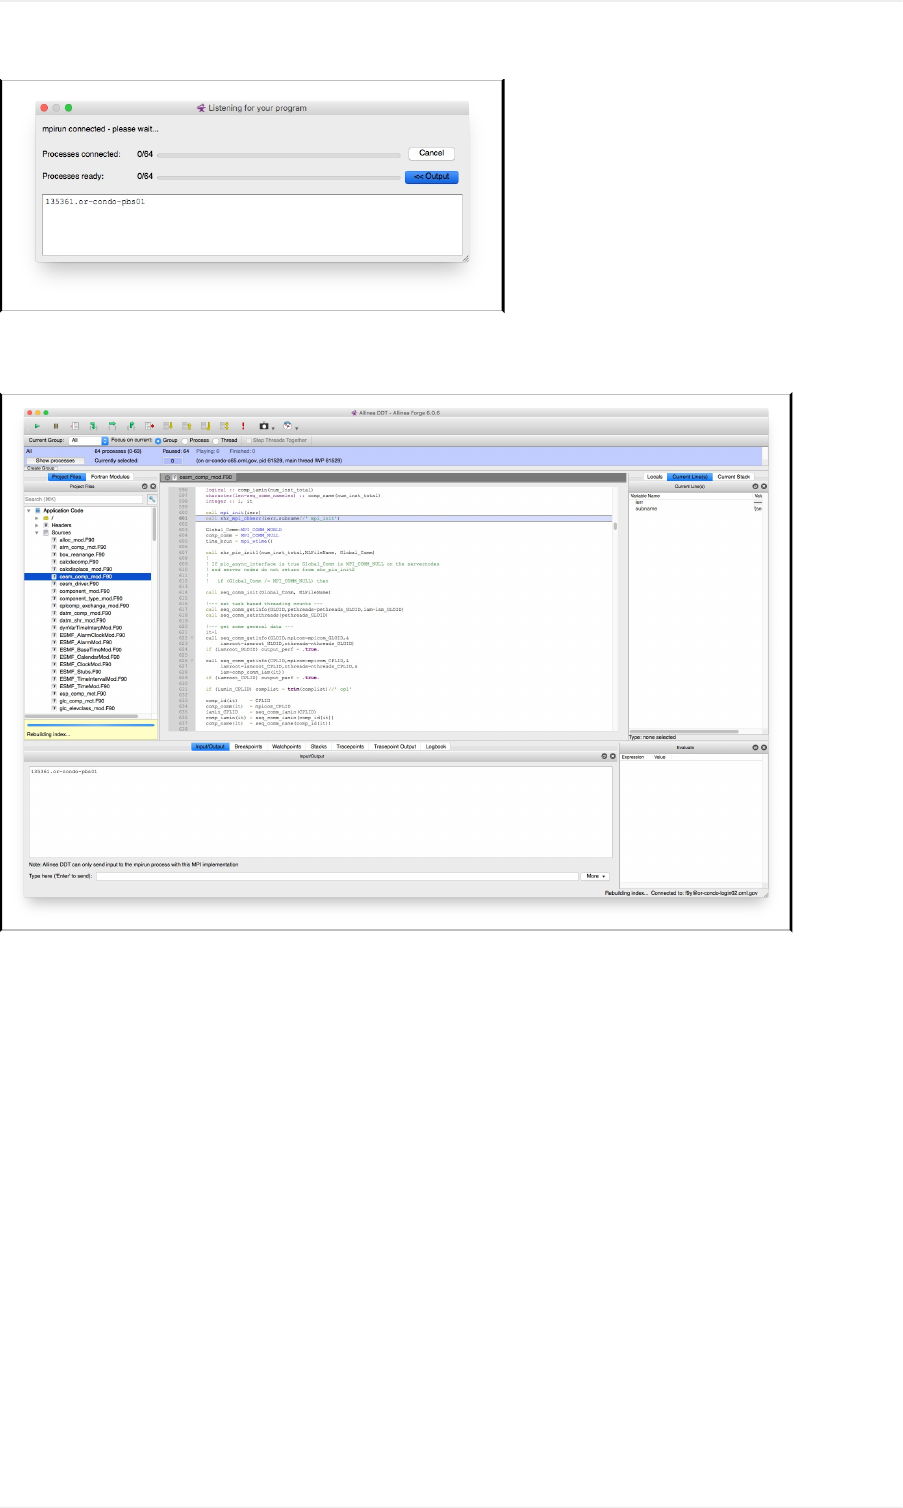
WHENallrequestedProcesses(e.g.here64/64)connectedandready,thewindowwillbechangingintotherun/debug
viewsasFOLLOWING,andPAUSEatthemainprogramentrypoint(usually)......
III-4.DebugTheProgram
PAUSEatBreakpoint(s)
AllineaDDTinCADESHPC
168
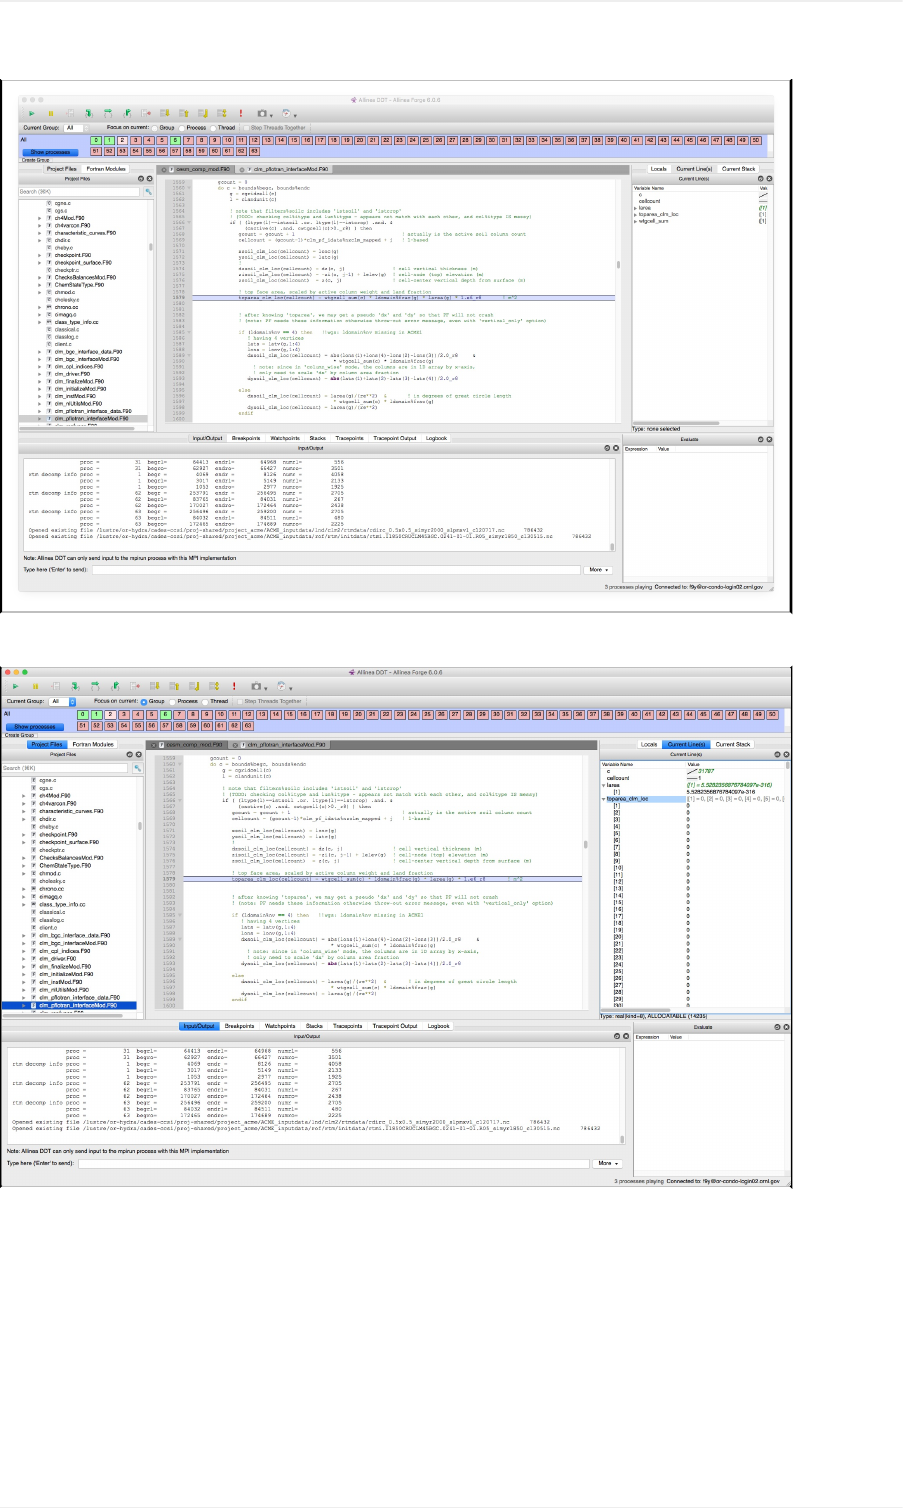
CHECKvariables:currentlineorlocalsforcurrentsubroutine,ORdowhatyouwant......
HITaBUG,......(NOTSOFUN?)
AllineaDDTinCADESHPC
169
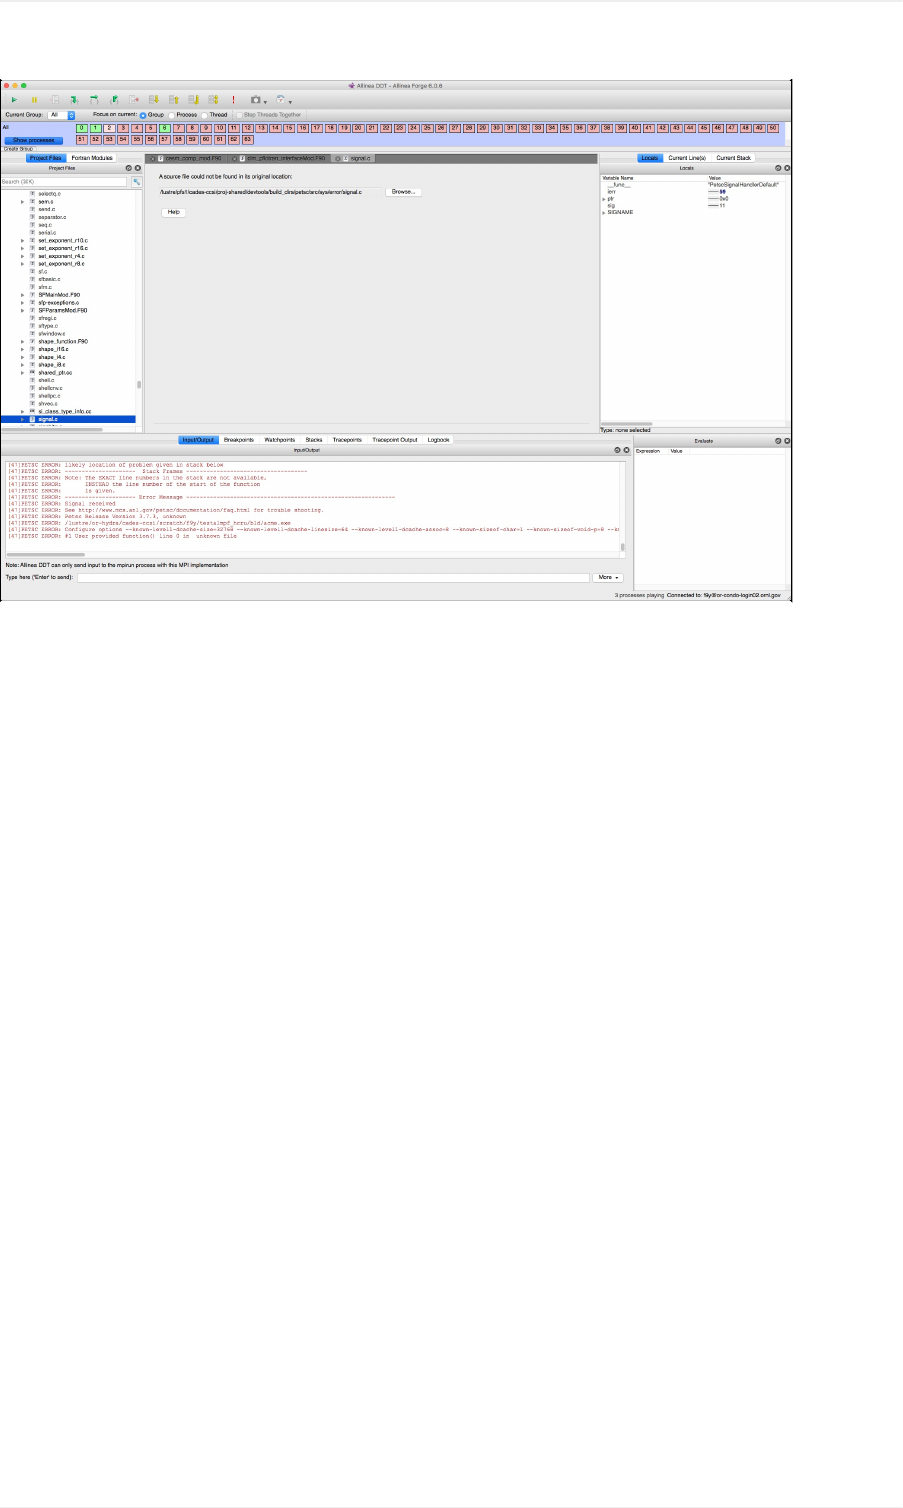
AllineaDDTinCADESHPC
170

CADES→UserDocumentation→MovingData
MovingData
CADESDataTransferNodes(DTNs)allowforspeedymovementoflargedatasetsintoandoutofORNL'snetwork.Thereare
severaltransfertool/protocoloptionstochoosefromtofityourneeds.
1. Globushasawebinterfaceorcommandlinetoolsthatyoucanusetotransferdatabetweenyourpersonalendpointsor
securelyshareaccesstoyourdata.ThisisthepreferredmethodoftransferforCADES.
2. Securecopy(scp)viathecommandlinetoandfromstoragelocations,includinglocalcomputers.
scpusername@remote-host1.gov:/path/to/directory/example.txtusername@remote-host2.gov:/path/to/directory/
3. Secure(orSSH)filetransferprotocol(SFTP)canbeusedtotransferfilesbetweentworemotestoragelocations(similarto
scp)butalsoallowstheusertolistdirectoriesandseecontent.YoucanuseSFTPaslongasyouhaveSSHaccesstothat
host.
sftpusername@remote_hostname_or_IP
4. Graphicalclients(SFTP)willallowyoutouseagraphicaluserinterfacewithdrag-and-dropcapabilities.CADESmaintains
documentationforCyberDuckandWinSCP.
ForLinuxusers,thereisnoclearrecommendationforSFTPclients.NoonefreeclientsupportsallofCADESstorage
servicesandbehavesconsistently.However,CloudExplorersupportsallofCADESservicesandtypicallybehaves
predictablyonLinuxsystems.Seehereforahow-toguideusingCloudExplorerandScality.
5. rsyncorrclone(supportss3)areothercommandlineutilitiesthatmaysuityourdatatransferneeds.Atthistime,CADES
doesnotoffersupportforthesetools.
MovingData
171
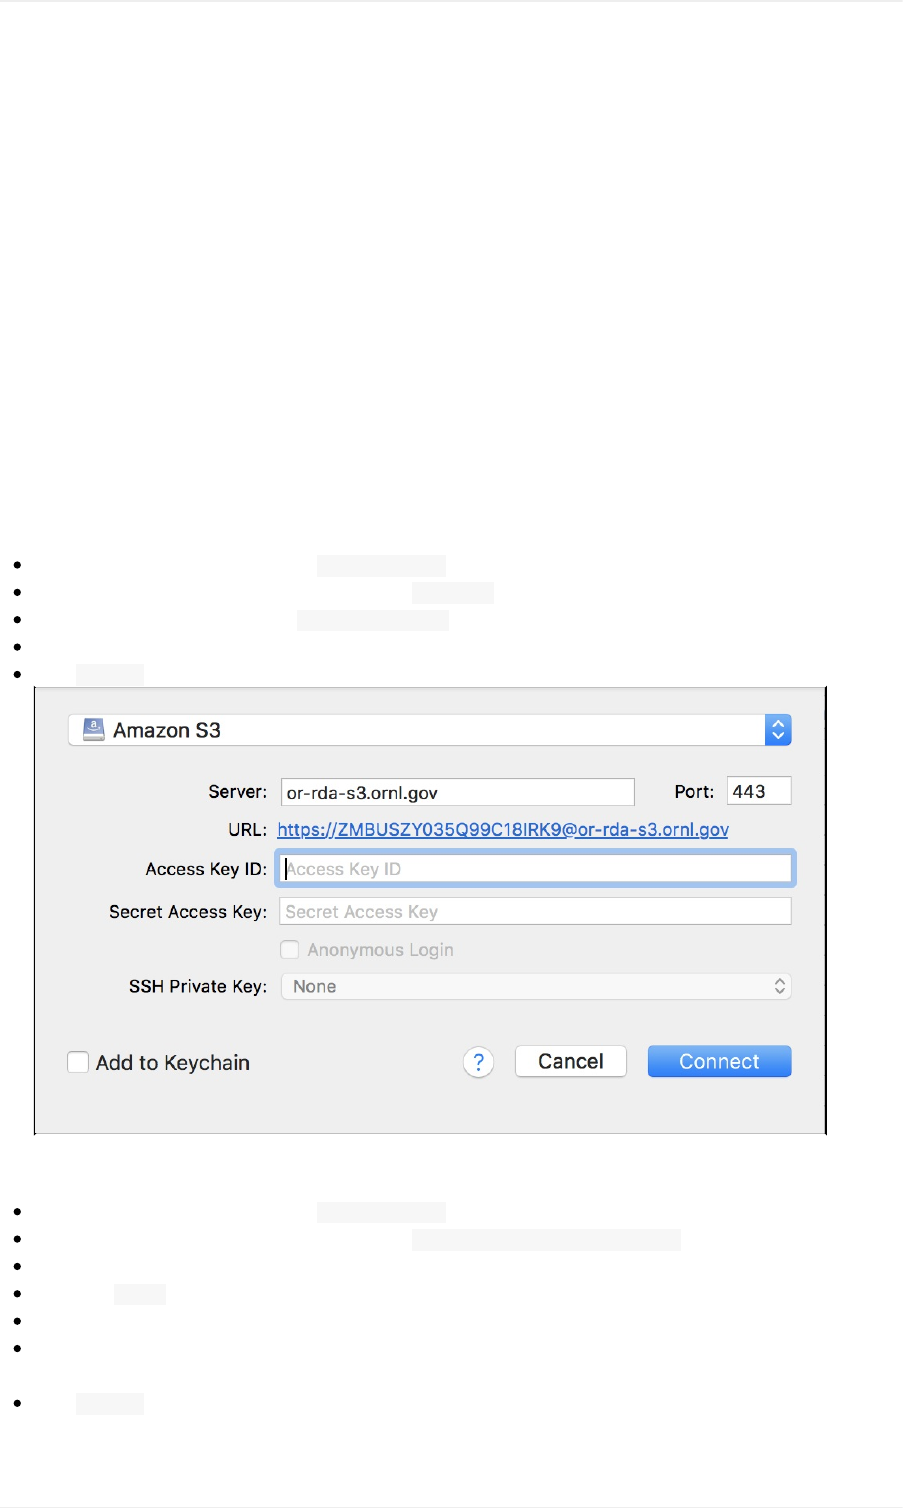
CADES→UserDocumentation→GraphicalClientFileTransfer(SFTP)
TransferringFiles(SFTP)withaGraphicalClient
Graphicalfiletransferclientscanbeusedtomovedatabetweenyourlocalmachineandremotestoragelocations.Onceyouinstall
theclientonyourcomputerandsetuptheremoteconnection,youmaymovefoldersandfilesbetweenyourcomputerandthe
remotestorageusingadrag-and-dropmethod.
Note:ItisimpracticaltomaintaindocumentationoneverystoragesystemthatCADESoffers.Theseexamplesarechosentobe
representativeofourservices.Ifyouneedhelpconnectingtoadifferentstorageservice,pleaseemailCADES.
CyberDuck(macOSandWindows)
DownloadCyberduckhereandruntheinstallation.
AWSS3-Scality
Tosetupanewconnection,clickontheOpenConnectionbuttoninthetopleftofthewindow.
Inthedropdownmenuoftheresultingwindow,selectAmazonS3.
ForScality,changetheserverfieldtoor-rda-s3.ornl.gov.
PasteyourAccessKeyIDandSecretAccessKeythatwasgeneratedwhenyousignedupfortheAWSS3service.
ClickConnect.
OpenStackVirtualMachine
Tosetupanewconnection,clickontheOpenConnectionbuttoninthetopleftofthewindow.
Inthedropdownmenuoftheresultingwindow,selectSFTP(SSHFileTransferProtocol).
Server:theIPaddressofyourvirtualmachine
Username:cades
Password:leaveblank
SelectyourSSHkeyfromthedropdownmenu.BesuretochoosetheSSHkeythatallowsyoutoaccessyourOpenStack
virtualmachine.
ClickConnect.
GraphicalClientSFTP
172
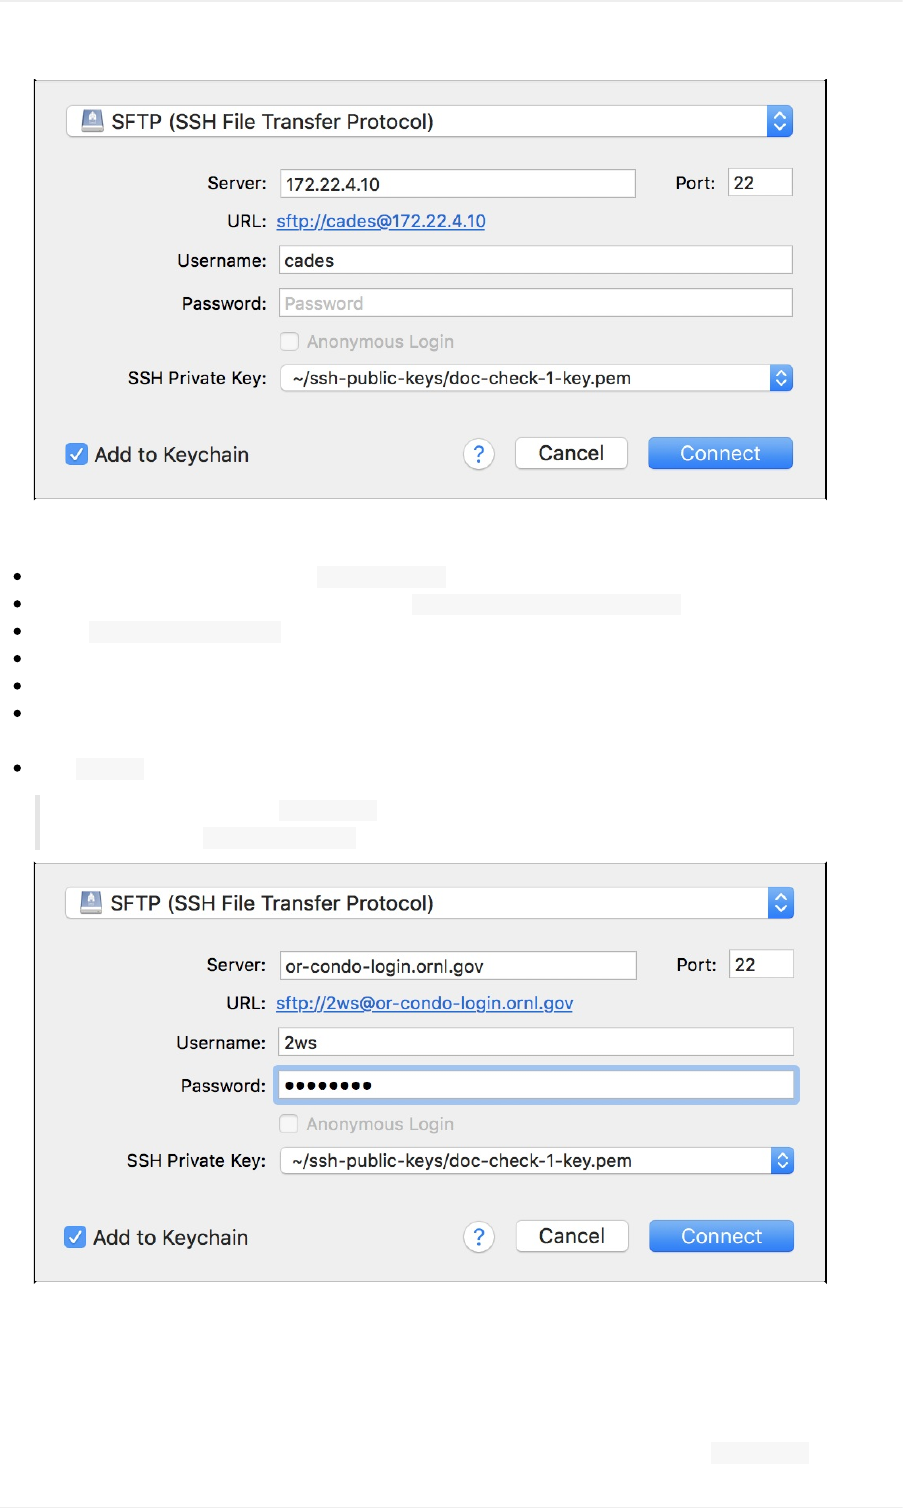
CADESORCondoSHPC,NFS,andLustre
Tosetupanewconnection,clickontheOpenConnectionbuttoninthetopleftofthewindow.
Inthedropdownmenuoftheresultingwindow,selectSFTP(SSHFileTransferProtocol).
Server:or-condo-login-ornl.gov
Username:yourUCAMSID(UID)
Password:yourUCAMSpassword
SelectyourSSHkeyfromthedropdownmenu.BesuretochoosetheSSHkeythatallowsyoutoaccesstheCADESOR
SHPCCondologinnode.
ClickConnect.
NFSuserhomedirectorypath:~/home/UID/
Lustrestoragepath:~/lustre/or-hydra/
WinSCP(Windows)
DownloadWinSCPhereandruntheinstallation.
:bangbang:IncaseswhereanSSHkeyisrequiredforaccess,youmuststorethepathtothekeyinWinSCPforeachconnection.
Tostorethekey,entertheconnectioninformationthatyouwillfindinthestepsbelow.Then,clicktheAdvanced...button.
GraphicalClientSFTP
173
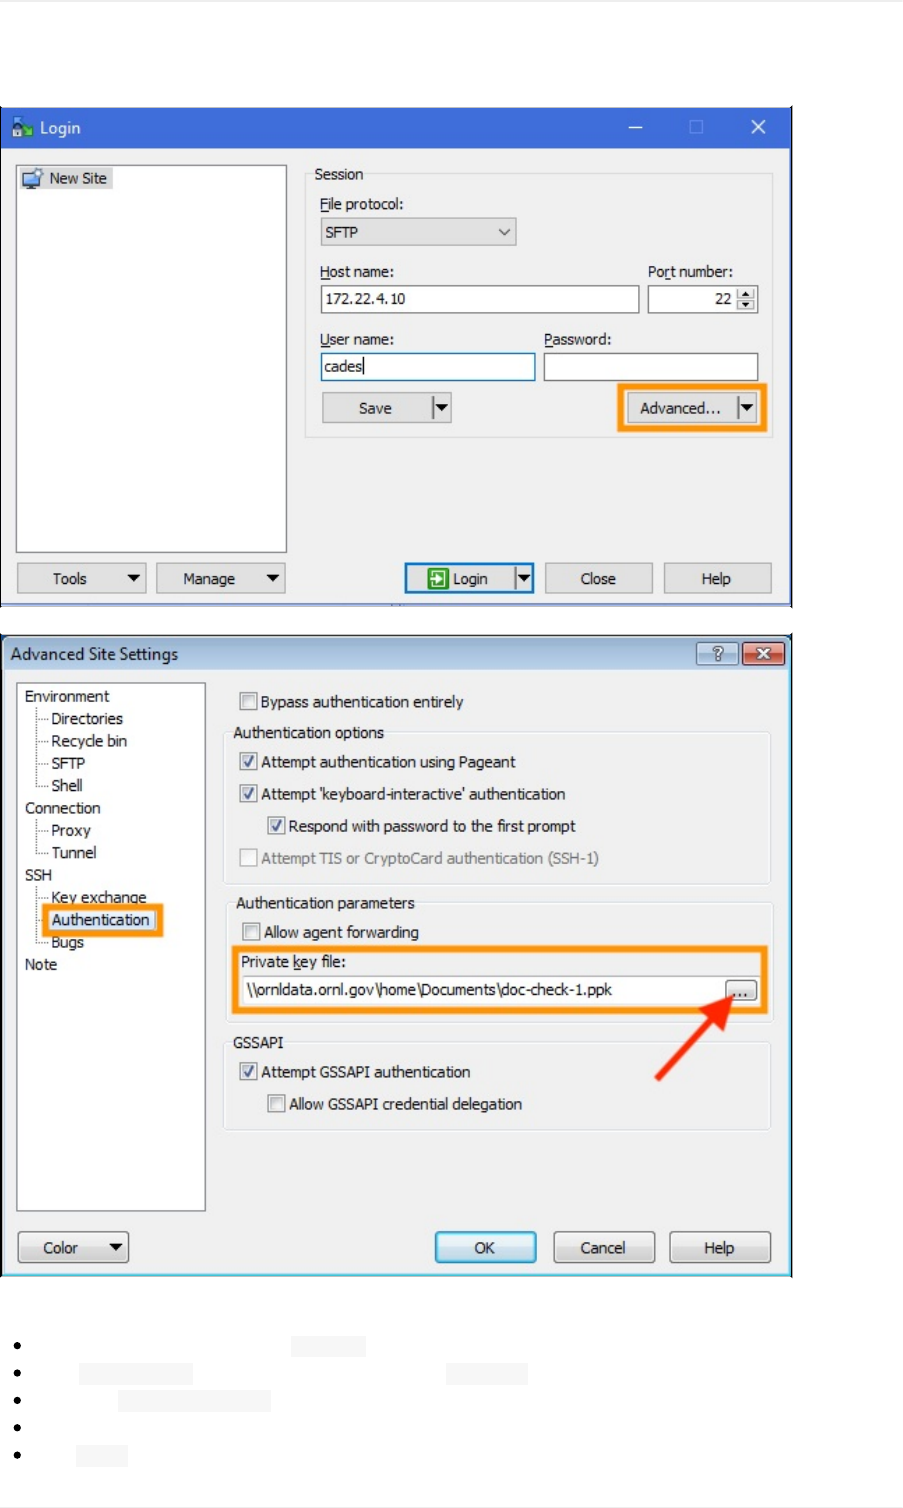
ProvidethepathtoyourSSHprivatekey.
AWSS3-Scality
Tosetupanewconnection,clickonNewSiteinthetopleftofthewindow.
IntheFileprotocoldropdownmenuontheright,selectAmazonS3.
Hostname:or-rda-s3.ornl.gov
PasteyourAccessKeyIDandSecretAccessKeythatwasgeneratedwhenyousignedupfortheAWSS3service.
ClickLogin.
GraphicalClientSFTP
174
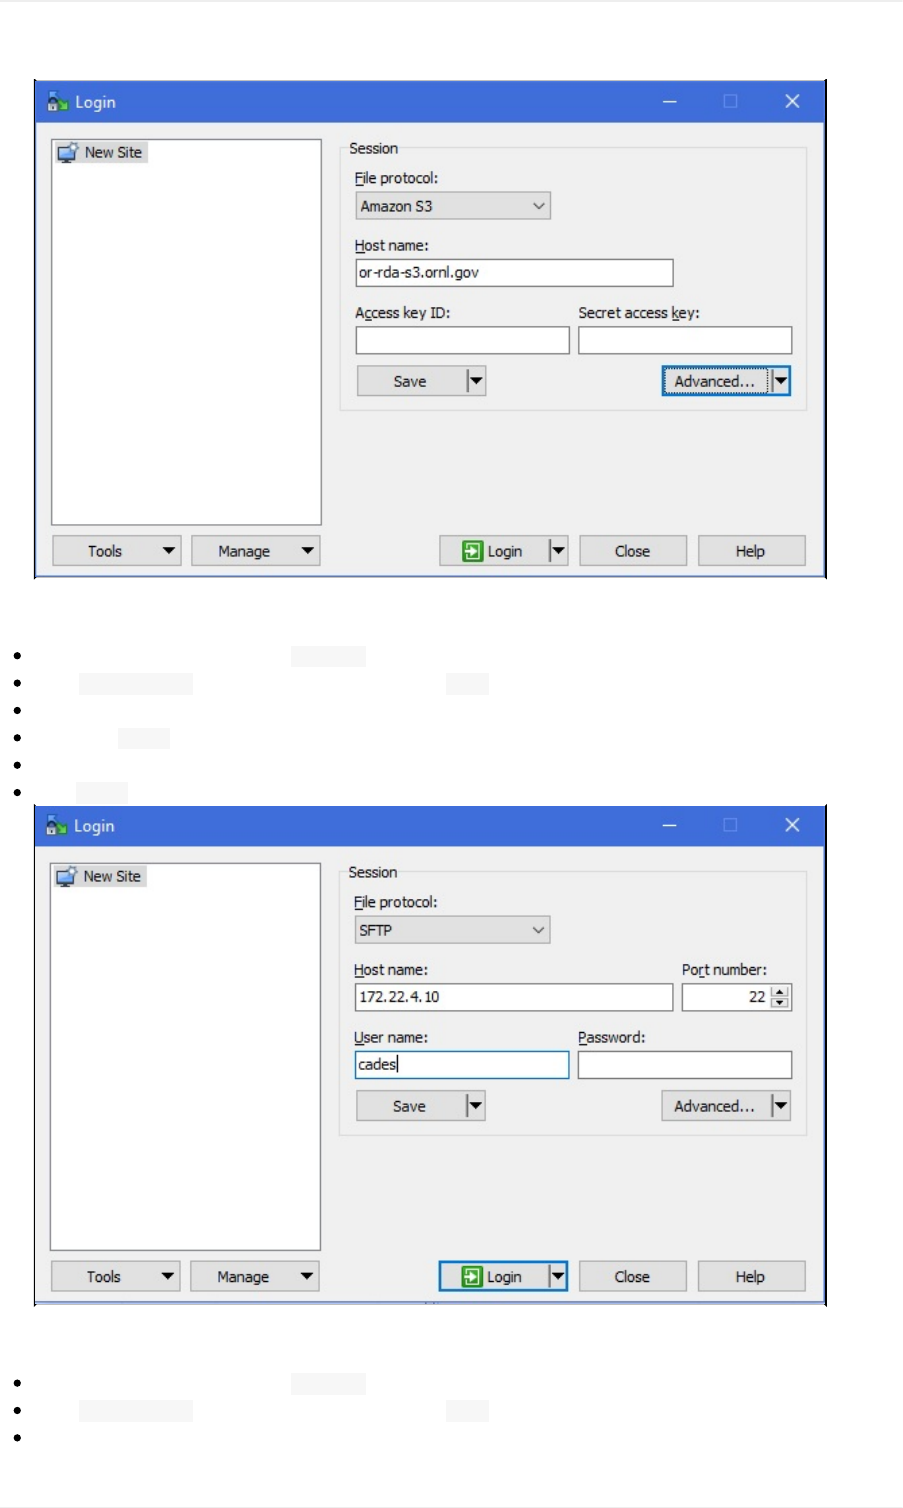
OpenStackVirtualMachine
Tosetupanewconnection,clickonNewSiteinthetopleftofthewindow.
IntheFileprotocoldropdownmenuontheright,selectSFTP.
Hostname:theIPaddressofyourvirtualmachine
Username:cades
Password:leaveblank
ClickLogin.
CADESORCondoSHPC,NFS,andLustre
Tosetupanewconnection,clickonNewSiteinthetopleftofthewindow.
IntheFileprotocoldropdownmenuontheright,selectSFTP.
Hostname:theIPaddressofyourvirtualmachine
GraphicalClientSFTP
175
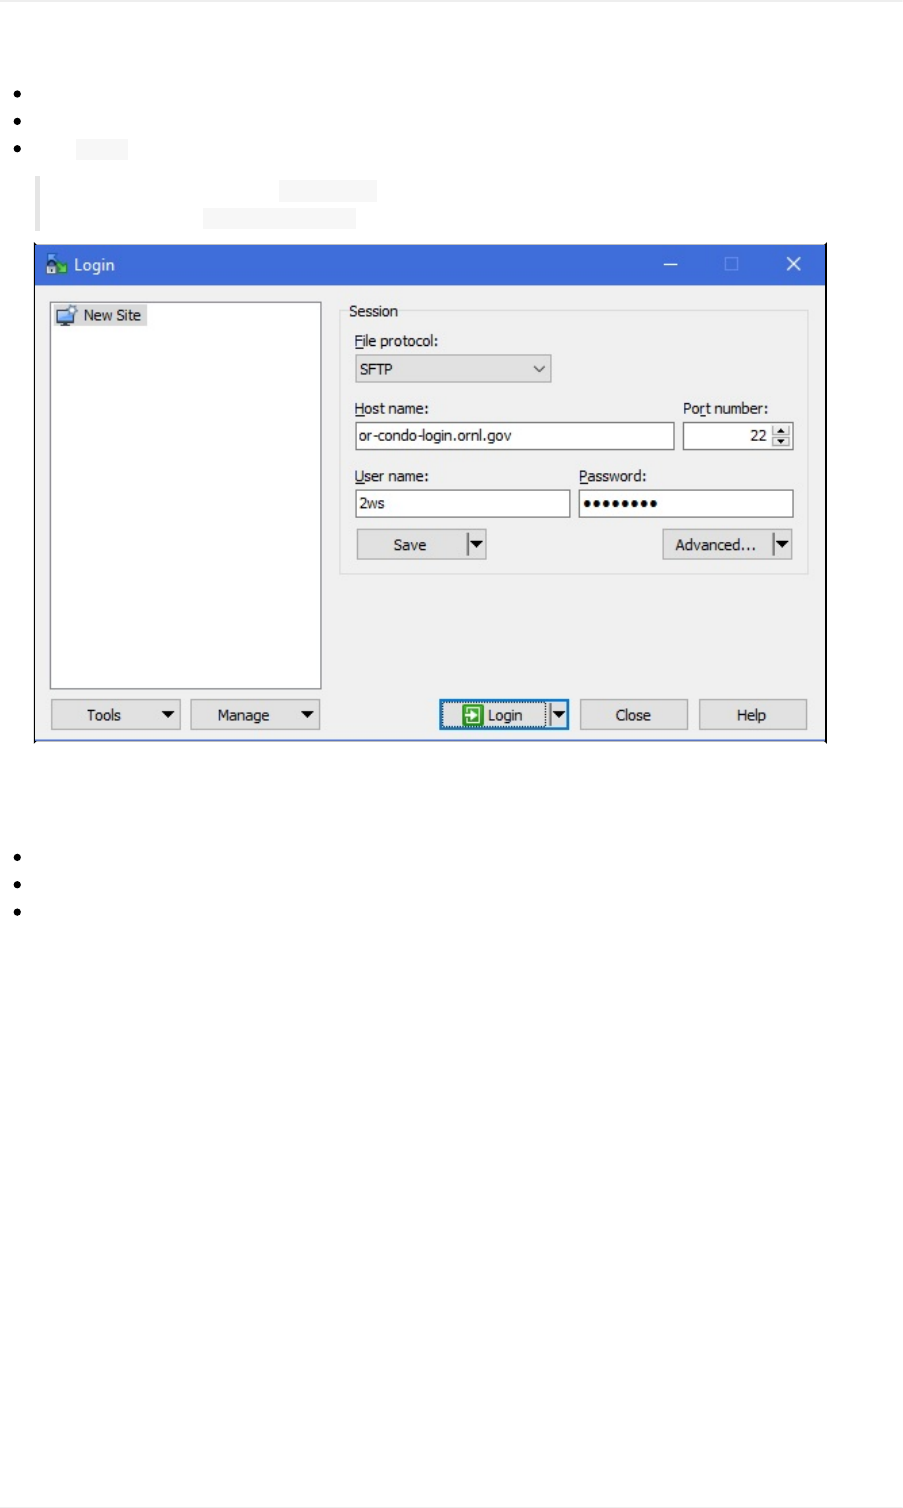

CADES→UserDocumentation→GlobusOverview
GlobusOverview
Globusisapowerfuldatatransfertoolthathasawiderangeofsupportforpopularstoragesystemsandasimplegraphicaluser
interface.UsingGlobusisaseasyas1,2,3:
1. Set-upyourGlobusAccount
2. FindorSet-upEndpoints
3. TransferyourFiles&More
GettingStartedandSigningIn
Globusisprimarilyusedviaitswebinterface,thoughitispossibletodownloadapersonalclientorusecommandlinetools.
1. NavigatetotheGlobuswebsite(https://www.globus.org/)andclickLogin.
2. SelectyourorganizationOakRidgeNationalLaboratoriesfromthedrop-downmenuandselectContinue.
3. UseyourUCAMSusernameandpasswordtologin.
IfyouhaveanexistingGlobusaccount,youmaychoosetolinkthematthistime,orskiptothenextstep,byclicking
Nothanks,continue.
4. AccepttheuseragreementandContinue.ThenextscreenwithaskyoutoAllowpermissions.
ForalistofcommonEndpointsorifyou'dliketolearnhowtouseGlobusEndpoints,clickhereforourguide.
Note:IfyoucannotlogintotheDTN,butcantootherCADESsystems(liketheloginnodes),youraccountmayhavebeen
temporarilyblockedontheDTN.Thisoccurs,forexample,upontoomanyfailedpasswordattempts.Ifso,emailCADES.
GlobusDataTransferTool
177
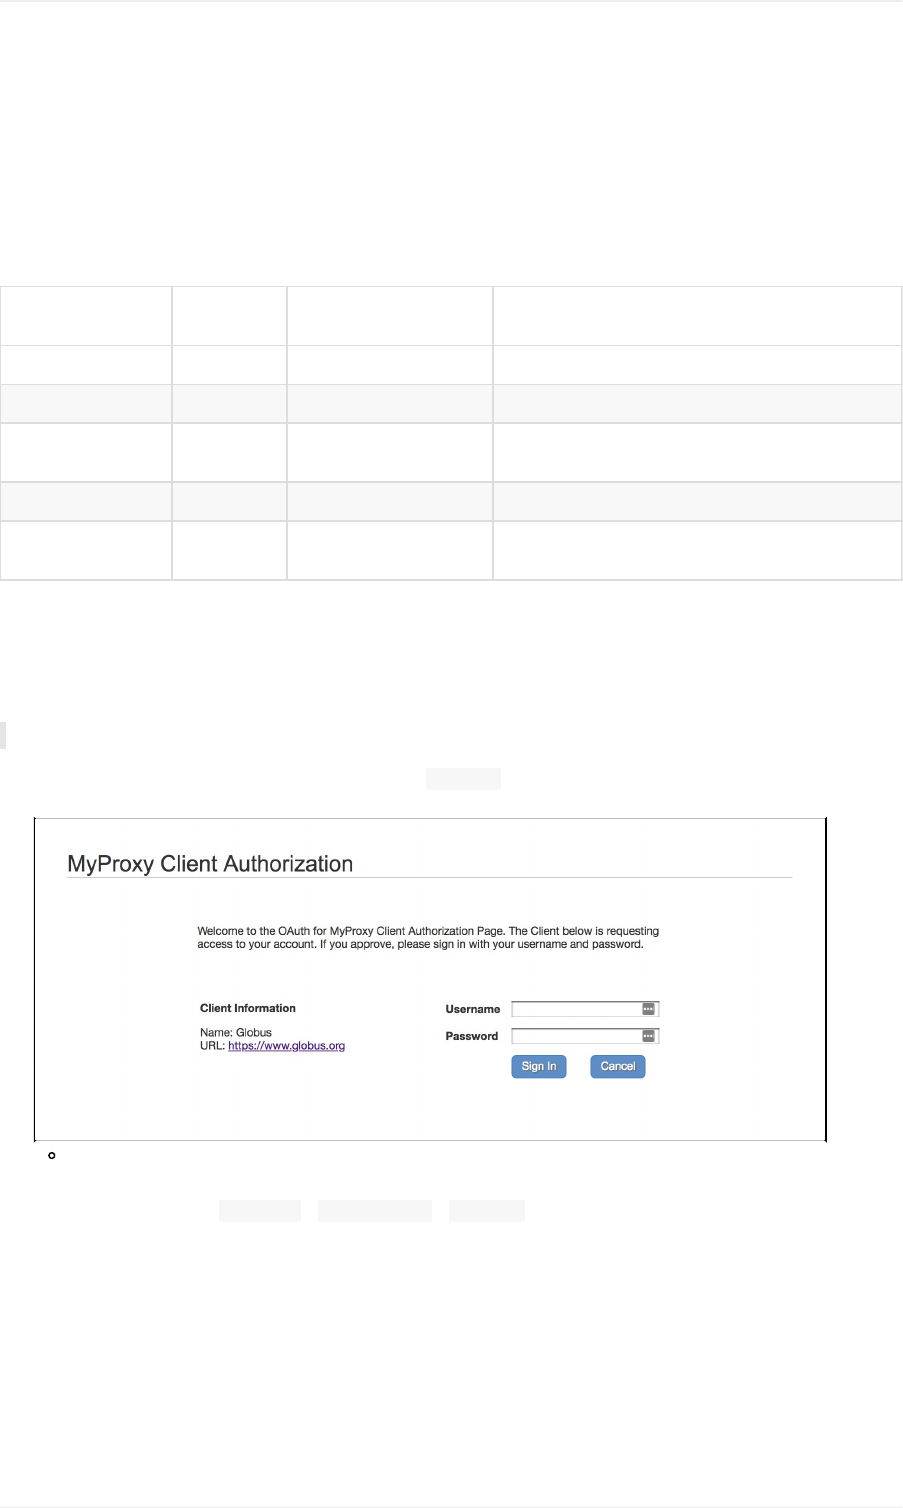
CADES→UserDocumentation→GlobusOverview→GlobusEndpoints
GlobusEndpoints
GlobusEndpointsarestoragesystemstowhichyouhaveaccess.OnceanEndpointislocatedorcreatedGlobussavesthelocation
foryousoyoudonotneedtorepeatedlysearchtypepaths.
EndpointSearch
Term(s)
Storage
System Path Description
CADESOR NFS /~/ CADESopenresearch,userhomedirectory
CADESOR NFS /data/ CADESopenresearch,NFSprojectdirectories
CADESOR Lustre /lustre/or-hydra/ CADESopenresearch,projectdirectories.High-
performance,temporarystorage.
NCCSOpenDTN Lustre Seehere RequiresNCCSOpen(XCAMS)account
OLCFATLAS OLCF
DTN /path/to/project/file/data OLCF-managedNFSandLustrestoragesystem.
Note:Ifyou'rehavingtroublefindinganexistingEndpoint,emailtheCADESteam.
SettingUpEndpoints
Note:AWSS3ScalitystorageisnotyetsupportedonGlobus,butwillbeinthefuture.
1. ClickintheEndpointboxontheleftsideandsearchforCADES-OR(CADESOpenResearch).
2. YouwillberedirectedtoenteryourUCAMScredentials.
AuthenticatingtheEndpointwithyourcredentialsisknownasEndpointActivationandcanbedonewhenaddingand
usinganEndpointforthefirsttime,orcanbecompletedbynavigatingtothe"ManageEndpoints"screenasshownin
thefollowingimage(Endpoints→EndpointList→activate).
GlobusEndpoints
178
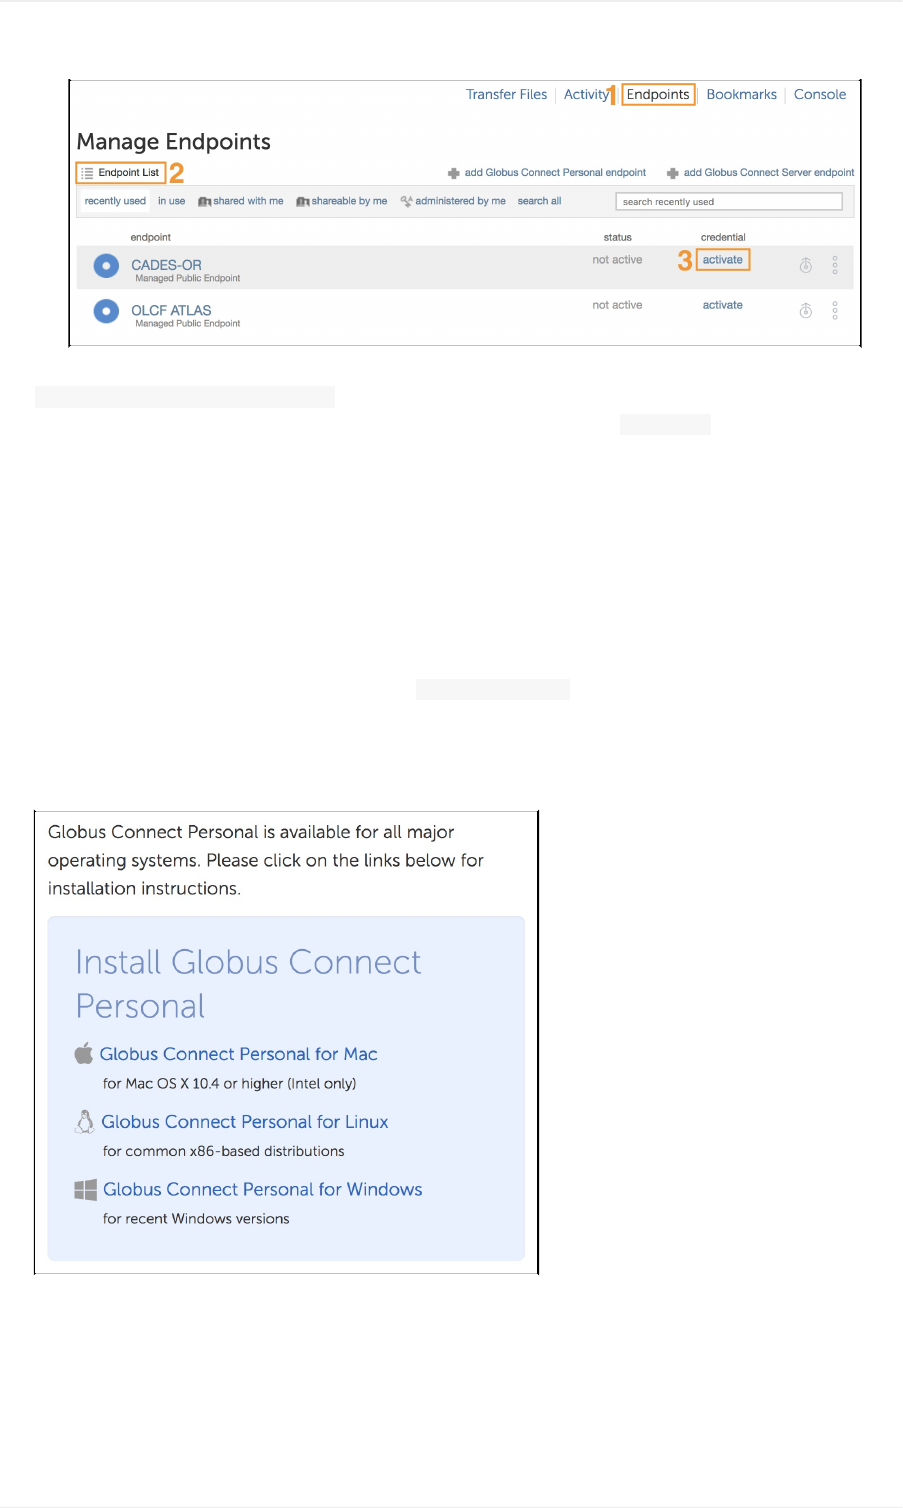
3. Oncetheendpointissetyoucanmodifythepathtopointtoyourfile/data.Inthisexample,wewillconnecttoLustrestorage:
lustre/or-hydra/cades-ops/proj-shared
4. Ontherightside,settheendpoint.WewilluseOLCFTitan'sfilesystem.SearchforOLCFATLAS.
5. Again,youmayadjustthepath.Yourhomedirectoryisdefault.
CreatinganEndpointonyourPersonalorWorkComputer
ItiseasytouseyourpersonalorworkcomputerasaGlobusEndpoint.Followtheinstructionsbelow.
Note:YoumayneedtocreateafirewallexceptionfortheGlobusPersonalClient.Forconfigurationinstructions,pleaseconsult
thedetailsontheGlobussite.
1. ChooseadescriptivenameforyourendpointandclickGenerateSetupKey.
2. CopytheSetupKey.Youwillpastethisintothesoftwareduringsetup.
3. NavigatetotheGlobusPersonalConnectwebpagetodownloadtheclientontoyourpersonal(orORNL-owned)computer.
4. Clickonthenameofyouroperatingsystemtoobtaindetailedinstructionsforinstallingtheclientandsettingupthe
Endpoint.
5. Oncetheclientisinstalled,launchtheprogram.Youwillbepromptedtopasteyoursetupkey. Note:TheGlobusPersonal
EndpointClientmayproduceerrorsifyouareconnectedtotheORNLnetworkviaVPN.
6. NowyoumayusetheGlobuswebinterfaceorthecommandlineinterfacetosearchforyournewendpointusingthename
youprovidedinstep1.
GlobusEndpoints
179

GlobusEndpoints
180
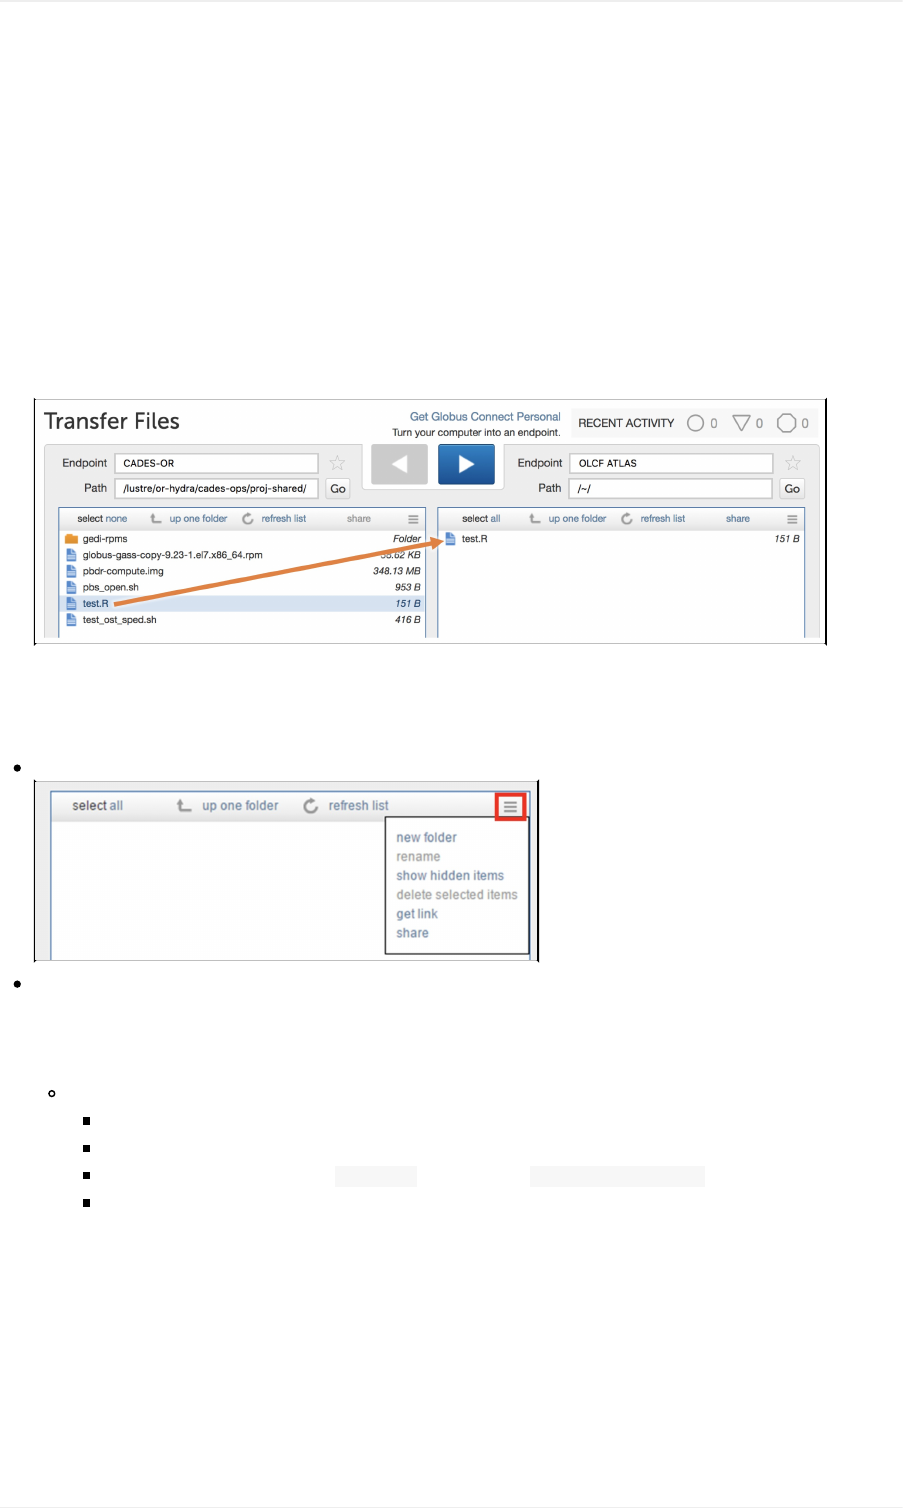
CADES→UserDocumentation→GlobusOverview→GlobusEndpoints
GlobusTransfers&More
GlobusFileTransfers
1. Findtheendpoints(ontheleftandrightofthescreen)youwishtouseaccordingtotheendpointsinstructions.
2. Modifythepathstothedatayouwishtotransfer.Forthisexample,wewillmoveafilefromCADESLustrestoragetoOLCF
Atlas.
3. Clickanddragfiles/foldersbetweenthetwohalvesofthescreen.
AdditionalFeatures
CreateaFolder:Globusalsosupportsthecreationoffoldersfromwithinthebrowserinterface.
SharingEndpoints:YoucanshareendpointswithanyonewhohasaGlobusaccount.Ifyouaresharingfromamanaged
endpoint(i.e.CADESOR)heorshewillalsoneedtohavethepropercredentialstoaccessthatresource.
Note:SharedendpointscanonlybecreatedonpersonalendpointsifyouhaveasubscriptionservicethroughGlobus.On
CADESresources,sharedendpointsmayberequestedbyemailingCADES.
Sharingapersonalendpoint:
Navigatetotheendpointlistthatisadministeredbyyourself:here.
Clickontheendpointyouwouldliketomanage.
Ontheresultingscreen,clicktheMySharestab.Thenclick+AddSharedEndpoint.
Fillouttherequiredinformation,asshownbelow.
GlobusTransfers&More
181
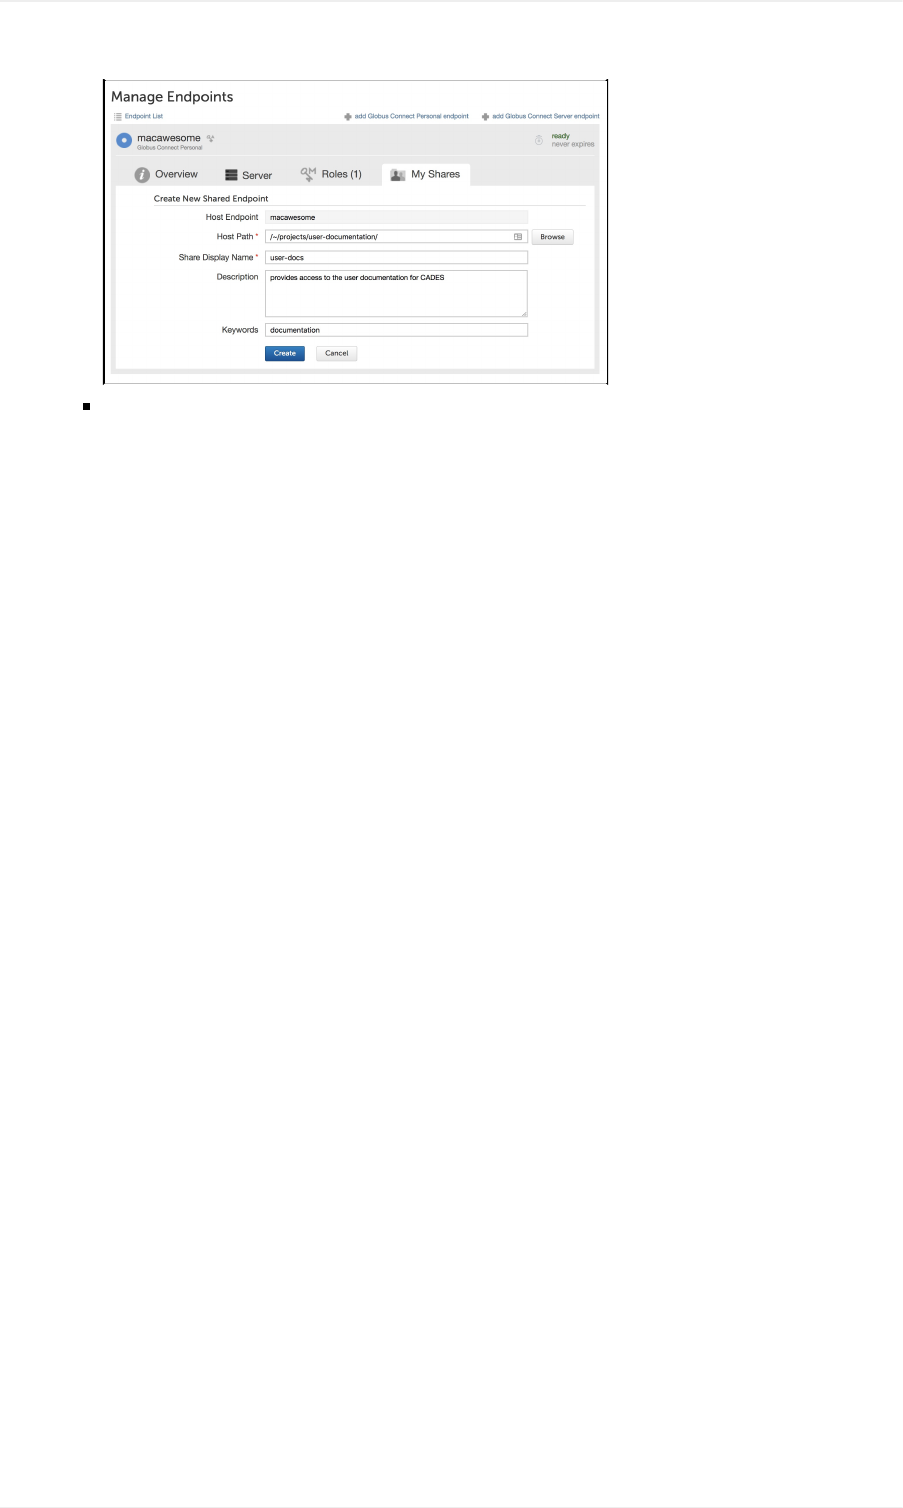

CADES→UserDocumentation→GlobusOverview→GlobusCommandLineInterface
GlobusCommandLineInterface(CLI)
IfyouwishtoutilizetheGlobustransfertoolsfromthecommandline,youcandownloadtheGlobusCommandLineInterface
(CLI).ItisavailableasaPythonpackage.
InstallingtheRequiredTools
SincethetoolisaPythonpackage,youwillneedPythoninstalled,aswellasthepipinstaller.
Ubuntu:
sudoapt-getinstallpython
sudoapt-getinstallpython-pip
exportPATH="~/.local/bin:$PATH"
echo'exportPATH="~/.local/bin:$PATH"'>>"$HOME/.bashrc"
CentOS:
sudoyuminstallpython
sudoyuminstallpython-pip
exportPATH="~/.local/bin:$PATH"
echo'exportPATH="~/.local/bin:$PATH"'>>"$HOME/.bashrc"
macOS:
sudoeasy_installpython
sudoeasy_installpip
exportPATH="~/.local/bin:$PATH"
echo'exportPATH="~/.local/bin:$PATH"'>>"$HOME/.bashrc"
SomeversionsofPythonwillnotbeinstalledin~/.local.Ifyouhavetroublegettingglobuscommandstoexecute,try
thefollowingcommandstochangethepath:
GLOBUS_CLI_INSTALL_DIR="$(python-c'importsite;print(site.USER_BASE)')/bin"
echo"GLOBUS_CLI_INSTALL_DIR=$GLOBUS_CLI_INSTALL_DIR"
exportPATH="$GLOBUS_CLI_INSTALL_DIR:$PATH"
echo'exportPATH="'"$GLOBUS_CLI_INSTALL_DIR"':$PATH"'>>"$HOME/.bashrc"
Windows:
TheWindowspackagemanager"Chocolatey"isrecommendedforinstallation.SeehereforChocolateyinstallation
instructions.
ToinstallPythonandpip,seehere.
AllOperatingSystems:
ToinstalltheGlobusCLI,usethefollowingcommand:pipinstall--upgrade--userglobus-cli.
Optional:ifyouwishtousetheGlobusCLIfromwithinapythonvirtualenvironment,seeinstructionshere.Otherwise,youmay
continueusingthisguide.
Tostart,youwillneedtologintoGlobus:globuslogin.Followtheinstructionstogetloggedin.Abrowserwindowmay
appear.Tomakesurethatyourloginwassuccessful,typeglobusget-identities'go@globusid.org'.Asuccessfuloutputwill
looksomethinglikethis:c698d42e-d274-11e5-bf75-1fc5bf53bb56.
GlobusCommandLineInterface
183
GlobusCLIBasics
EndpointSearch
$globusendpointsearch'CADESOR'
ID|Owner|DisplayName
------------------------------------|---------------------|--------------
57230a10-7ba2-11e7-8c3b-22000b9923ef|cades@globusid.org|CADES-OR
EndpointManagement
UsevariablesforendpointIDs:EndpointIDsarecumbersome.Youcannotrenamethem,butyoucanstorethemas
variables.Forexample:
epCADESOR=57230a10-7ba2-11e7-8c3b-22000b9923ef
Nowyoucanusethevariabletodisplayinformationandmanagefiles(withtruncatedoutput):
$globusendpointshow$epCADESOR
DisplayName:CADES-OR
ID:57230a10-7ba2-11e7-8c3b-22000b9923ef
Owner:cades@globusid.org
Activated:True
Shareable:True
Department:CADES
Organization:OakRidgeNationalLab
Department:CADES
Visibility:True
DefaultDirectory:/~/
ForceEncryption:False
ManagedEndpoint:True
Makeadirectory:
globusmkdir$epCADESOR:~/example_dir
Listthecontentsofadirectory:
$globusls$epCADESOR:~/
example_dir/
cades-user-guide.pdf
hello-world.c
hello-world.pbs
Filetransferbetweenendpoints:
First,searchforasecondendpoint.ThensetthatendpointasaBashvariable.
$globusendpointsearch'OLCFATLAS'
ID|Owner|DisplayName
------------------------------------|-----------------|------------
ef1a9560-7ca1-11e5-992c-22000b96db58|olcf@globusid.org|OLCFATLAS
$epATLAS=ef1a9560-7ca1-11e5-992c-22000b96db58
Makeasinglefiletransfer.
globustransfer$epCADESOR:/cades-user-guide.pdf$epATLAS:~/cades-user-guide.pdf\
--label"user-guide"
Makeabatchtransfer.
$globustransfer$epCADESOR:/example_dir/$epATLAS:~/\
--batch--label"CADESBatch"<in.txt
GlobusCommandLineInterface
184


CADES→UserDocumentation→ScalityStorage
ScalityUserGuide
Glossary
AWS-AmazonWebService
S3-SimpleStorageService.Amazon'sobjectstorageserviceand,moregenerally,theprotocolituses.
Scality-Anon-premises,objectstorageasaservice,dataarchivingsolutionavailabletoCADESusers.Thisenvironmentuses
thesameawscommandsandS3protocolasinteractingwithAmazon'sS3service.Themechanicsofstoringandretrievingdata
intoeitherAmazonorScalityarefunctionallyquitesimilar.
TableofContents
1. GettingStarted
2. BasicOperations
3. MovingFileswithaGraphicalSFTPClient
1.GettingStarted
RequestingAccess
InternalORNL(UCAMS)usersmayself-requestaccesstotheobjectstorageresourcehere.
Requestsarenormallyapprovedwithin24hoursafterwhichyoumaylogintoreceiveyouraccesstoken.
External(XCAMS)userswithoutanexistingaccountmaycreateonehere.
OutsideuserswhoalreadyhaveanXCAMSaccountshouldemailcades-help@ornl.govandrequestaccesstotheobject
storageresource.
UserswhohaveforgottentheirXCAMSuserIDorpasswordmayrecoverthemhere.
Requiredsoftware
TheAWSCommandLinetoolisusedforinteractionwiththestorageservice,andcanbescriptedforautomatedworkflows.
InstallingtheAWSCLIissummarizedbelow,andyoumayconsulttheofficialAWSCLIinstallguide.
CADESSHPCUsers
Theawsclientisprovidedviaasoftwaremodule,thoughyoumayinstallalocalversioninyourhomedirectoryifyouwish.
FromtheSPHCloginnodes:
-bash-4.2$moduleloadpython/3.6.1
-bash-4.2$aws--version
aws-cli/1.14.14Python/3.6.1Linux/3.10.0-327.4.4.el7.x86_64botocore/1.8.18
WindowsUsers
Downloadfromhttps://aws.amazon.com/cli/.
OSXUsers
SeeAWSmacOSinstructions.
ScalityObjectStorageUserGuide
186
Linux/OpenStackUsers
Youmayencounterissuesifawscliandtheawscli-plugin-endpointareinstalledfromdifferentsourcese.g.onefromyour
distribution'spackagemanager(aptoryum)andonefrompip.Installingbothviapipusuallyallowsthemtowork
togetherwell.
Note:ItisrecommendedtoinstallthecomponentsinaPythonvirtualenvironment,theinstructionsforwhichareavailable
here.
Ifyouwishtoinstallsystem-wide(asroot)youmaydosowithpipvia:
sudopipinstallawscli
sudopipinstallawscli-plugin-endpoint
#EndpointPlugin
sudopipinstallawscli-plugin-endpoint
#or
#pipinstallawscli-plugin-endpoint--user
LoggingIn
LogintotheScalityauthenticationendpointhere.
AdropdownpresentsoptionsforeachCADESgroupofwhichyouareamember
Forpersonalaccess:Choosescalityiamuser
Forproject(shared)access:Choosetheappropriategroup
AuthTokens
Youmustloginandacquireanauthenticationtokentointeractwiththestorageenvironment.Thetokenmaybeusedfor
interactiveorautomatedworkflowsuntilitexpires,atwhichpointitmustberenewed.
Youmayhaveseveralactivetokens,foraccessingbucketsownedbydifferentprojects,etc.andswitchbetweenthemviathe--
profileoption(below).
Retrievingthetokenandplacingitintoyourenvironmentcurrentlyrequiresafewsteps.Progressisbeingmadeonascripted
methodtoautomatethesesteps.
Edityour~/.aws/credentialsfile(orrunawsconfigureandpastetheappropriatevaluesintotheprompts)tocreate:
[default]
aws_access_key_id=<accessKeyfromJSONstring>
aws_secret_access_key=<secretKeyValuefromJSONstring>
Defaultregionname=<leaveblankorus-east-1>
Defaultoutputformat=<leaveblankortextorjson>
Re-authenticating/TokenExpiry
YourAWS-CLI(commandlineinterface)toolshouldbeabletoconnecttothelocalScalityS3instanceuntiltheexpirationtime
listedintheJSONstring.
Whentheaccesskeyshaveexpiredtheawscommandswillproduceanerrormessagesimilartotheonebelow.Simplylogin
againandrunawsconfigureagain.
Anerroroccurred(InvalidAccessKeyId)whencallingtheListBucketsoperation:TheAWSaccesskeyIdyouprovid
eddoesnotexistinourrecords.
ScalityObjectStorageUserGuide
187

InitialProfileConfiguration
Theawscommandsneedtoknowwhichendpointtogoto.BydefaulttheexternalAmazonS3serviceisassumed,sowewill
changethistousetheon-premisesstorageinstead.
Setthedefaultendpointbyrunningthebelowcommandfortheconfigurationprofilethatyouaregoingtouse,whichistypically
default.
awsconfiguresetplugins.endpointawscli_plugin_endpoint
awsconfigure--profiledefaultsets3.endpoint_urlhttp://or-rda-s3.ornl.gov
awsconfigure--profiledefaultsets3api.endpoint_urlhttp://or-rda-s3.ornl.gov
Note:Thefirstcommandenablesthe"endpoint"plugin,whichallowseasyswitchingbetweeninteractingwithmultipleinternal
(Scality)identitiesorexternal(AWS)accountsbypassinga--profileargument.Your~/.aws/configand
~/.aws/credentialsmusthaveprofilesandcredentialsdefinedforeachidentity.
Furtherinformationonconfiguringmultiplenamedprofiles:
https://docs.aws.amazon.com/cli/latest/userguide/cli-multiple-profiles.html
https://github.com/wbinglee/awscli-plugin-endpoint
2.BasicOperations
IntegratedUserManual
TheAWS-CLItoolhashelptextintegratedintoit.Toinvokethis,useawshelp.Togetdetailedhelpaboutsupportedfeatures,
buildyourcommandlineandpost-pendhelptothecommand.AsanexampleifyouwanthelpwiththeS3copycommand,
type:
awss3cphelp
GeneralFormat
AswearedealingwiththeS3servicewewillalmostalwaysbespecifyingoneoftwocommandstorun:awss3orawss3api.
CreateaNewBucket
BucketsarestorageareassimilartoUnixvolumesorWindowsdrives.Witheverys3commandabucketmustbespecified.
Createanewbucketforyourselforsharedproject.Donotusespecialcharacters,otherthandashesorunderscores.
Note:ToprovidesharedaccesstoothermembersofspecificCADESgroups,ensureyoucreatethebucketusingthe
authenticationtokenappropriateforthatgroup.Tocreateauser-privatebucketusetheauthenticationtokenprovidedwhen
selectingscalityiamuser.Seesection1forinformationonobtainingmultipletokens.
awss3mbs3://myproject
ListingS3Buckets
Usethes3apicommandwithlist-bucketstodisplaybucketsvisibletoyou:
awss3apilist-buckets
ScalityObjectStorageUserGuide
188

Exampleoutput:InthisexampletheimportantstringtonoteistheassociationwithBuckets→Name:
{
"Buckets":[
{
"Name":"eos",
"CreationDate":"2017-08-23T21:58:17.405Z"
}
],
"Owner":{
"DisplayName":"ornl.gov",
"ID":"463e4bdd134ec2543672faef1066710cc90be348a18af455456518ec1dfd0818"
}
}
CopyingFilesIntoandOutofS3
CopyingfilesintoS3isverysimilartocopyingfilesontheUnixcommandlineorSCP.Theawscommandisused,alongwith
theendpointspecification,bothcommontoalloperations.
WespecifytheS3serviceandthatwewanttocopyfiles.Thedirectioncaneitherbelocal→S3orS3→localfilesystem,simply
byreversingtheorder.
awss3cp<localfilename>s3://<bucket>/<remotefilename>
Example:
awss3cplargefiles3://cades-8d73a078-94c6-4a73-a668-345fc6ee8618/largefile
Optionallyadding--profilemaybeusedtospecifythenamedprofileandmatchingcredentialstobeused.
SyncingFiles
TheS3serviceprovidesacapabilitysimilartothatofthersynccommand.Similartothecopycommandthedirectionof
synchronizationcanbeeithertoS3orfromS3.The<localdirectory>canberelativeorabsolute.Thisissignificantlyfasterif
youhaveamoderatenumberoffiles.
awss3sync<localdirectory>s3://<bucket>/directory
Example:
aws--quiets3sync/home/xok/project/S3/scality_s3/benchmark/larges3://cades-8d73a078-94c6-4a73-a668-345fc6ee
8618/large
Whenthesyncoperationisusedalineisupdatedwiththecurrentcommandstatistics.Aboveweseetheoptionalparameter--
quiet.Thissuppressestheupdatestatisticsoutput.Thisisusefulwhencapturingcommandoutputastheprogressbarnormally
fillslogfileswithalargeamountofunintelligibleoutput.
RemovingFiles
Removingasinglefile:
awss3rms3://<bucket>/<filename>
ScalityObjectStorageUserGuide
189

Example:
awss3rms3://cades-8d73a078-94c6-4a73-a668-345fc6ee8618/largefile
Removingadirectory
Withtheadditionofthe--recursiveoptionanentiredirectorycanberemoved.Example:
awss3rm--recursives3://cades-8d73a078-94c6-4a73-a668-345fc6ee8618/large_directory
ListFiles
Tolistthefilesinabucket,type:
awss3ls<bucket>
Example:
awss3lscades-8d73a078-94c6-4a73-a668-345fc6ee8618
3.MovingFileswithaGraphicalSFTPClient
CADESmaintainsdocumentationforCyberDuckandWinSCPclients.Seehere.
ScalityObjectStorageUserGuide
190

CADES→UserDocumentation→ScalityStorage→ScalityAdvancedUsage
AdvancedScalityOperations&FAQ
1.AdvancedOperations
WritingDataDirectlyFromanApplication
IfyourapplicationwouldbespedupbyskippingwritingdatatodiskandinsteadwritingdirectlytoS3thisispossibleinasizable
numberofprogramminglanguages.OfrelevancetoscientificcomputingaretheC++,Python,andJavaSDKs.Foracompletelist
pleaseseetheAWSToolspage(https://aws.amazon.com/tools/).WehavetestedthePythoninterfaceandhavefoundittobe
highlyperformant.ExamplePythonscriptthatputsthecontentsofthedatastringintoafilecalled‘test.txt’.Thisworksfor
serializableobjects.
#!/usr/bin/envpython
importboto3
s3=boto3.resource('s3')
data='ThisissometestdatainastringforS3'
s3.Bucket('cades-8d73a078-94c6-4a73-a668-345fc6ee8618').put_object(Key='test.txt',Body=data)
2.FAQ
ConnectionHangs
Checkthateitherthedefaults3urlhasbeenset(seeGettingStartedsection)orthatthebelowoptionisaddedtotheaws
command:
--endpoint-url=http://or-rda-s3.ornl.gov
Example:
aws--endpoint-url=http://or-rda-s3.ornl.govs3lscades-8d73a078-94c6-4a73-a668-345fc6ee8618
InvalidAccessKeyIdError
Ifyourcommandorprogramexitswiththebelowerror,itmeansthatitiseithertimetoupdateyourcredentialsorthattheywere
notaddedtothe~/.aws/credentialsfilecorrectly.
Anerroroccurred(InvalidAccessKeyId)whencallingthePutObjectoperation:TheAWSAccessKeyIdyouprovided
doesnotexistinourrecords.
awscli_plugin_endpoint
Ifyouseetheerror:
ModuleNotFoundError:Nomodulenamed'awscli_plugin_endpoint'
Youneedtorunthefollowingcommand:
ScalityAdvancedUsage
191

moduleloadpython
ScalityAdvancedUsage
192

CADES→UserDocumentation→ScalityStorage→ScalityinaPythonVirtualEnvironment
SettingupaPythonVirtualEnvironment
Virtualenvironmentsareprimarilyusefulformomentswhenyouneedtoreconfigureorinstallsoftwarebutneedtobemindfulof
theinfluenceonotherprogramsandsettings.
1. Installthevirtualenvironment:sudoapt-getpython-virtualenvorsudoyumpython-virtualenv
2. Tellyoursystemwheretostoretheenvironment:virtualenv$HOME/myEnv
3. Activatetheenvironment:source$HOME/myEnv/bin/activate
Useyourenvironmentasyounormallywoulduseyoursystem.
Whenyouaredone,typeexittoclosetheenvironment.
ScalityinaPythonVirtualEnvironment
193

CADES→UserDocumentation→Contributing
WaystoContribute
Wouldyouliketomakethingsbetter?Thereareafewwaysyoucancontributetoimprovingourdocumentationandaddinguser-
createdtutorialsorcontent.
1. Emailyoursuggestionstotheteammailto:cades-help@ornl.gov
2. JoinourcommunityonSlack!It'sfriendly.http://cades.slack.com
3. Wanttochangethings?Feelingadventurous?Wanttogitsavvy?
Seeinstructionsforourgitworkflowtobranchourdocumentationrepositoryandhackaway.Yougotthis.
4. We'vemadenoteofafewthingstokeepinmindwhilecreatingusercontent.Youcanfindtheminourauthoringguide.
WaystoContribute
194

CADES→UserDocumentation→Contributing→GitWorkflow
RecommendedWorkflowforGitandAtom
GitLabisapopularplatformtosharecode,storesoftwaresolutions,andhostdocumentation.
ORNLprovidestwoGitLabservershttps://code.ornl.govandhttps://code-int.ornl.gov,thelaterbeingaccessibleonlyinsideof
ORNL.
AccesstoGitLabrepositoriesiscontrolledbyprojectowners.Youmayloginandcreateyourownprojectsandrepositories,and
sharethemwithothers.
Whiletherearemanytexteditorstochoosefrom,Atomisrecommendedduetoitsabilitytobecustomizedandintegratedwith
GitLab/Git.
InstallAtom:https://atom.io/
WouldyouprefernottouseAtom?Hereisgitdocumentationforgitinthecommandline.
CADESUserDocumentation
DocumentationpublishedtoCADESusersisavailablewithinGitlabathttps://code-int.ornl.gov/cades-ops/user-documentation
andusersareencouragedtocontributetoimprovingthematerial,orprovidingusercreatedtutorialstosharewiththecommunity.
ConfiguringAtomandGit
Atomhasseveralpackageswhichenhancetheuserexperienceandsomeofthemyou'llneedfortheworkflow.Thepackagescan
beinstalledbyenteringtheSettingsscreenandchoosingInstall.Therearethousandsofpackages,sotrysomeoutandhave
fun.
1. NecessaryPackages:
git-plus(integratesGit)
todo-show(providesvisualsforTODOandFIXMEtags)
2. OptionalbutRecommendedPackages:
linter(aidsincodevalidation,willalsoneedlinterpackageforeachlanguage)
minimap(displaysthumbnailversionofdocumentalongwithyourlocationwithinit)
git-checkout(allowscheckingoutremotebrancheswithinAtom)
3. NowthatAtomisset-up,you'llneedtomakesureGitknowswhoyouare.You'llonlyneedtocompletethisstepifyou've
neverusedGitonyourmachinebefore.
4. Openaterminalwindow.
5. IfyouneedtoinstallGit,seeherefordetailedinstructionsforpopularoperatingsystems.
6. ToconfigureGit,inputyourusernameandemailasbelow:
gitconfig--globaluser.name"ab1"(3-letterUCAMSusername)
gitconfig--globaluser.email"nameab@ornl.gov"(ORNLemail)
ConnectingAtomtoaRepository
1. NavigatetotheGitLabrepositoryinyourwebbrowser.Forthisexample,we'llusetheuser-documentationrepository.
CopytheSSHaddresstoyourmachine'sclipboard.
ContributewithGit
195
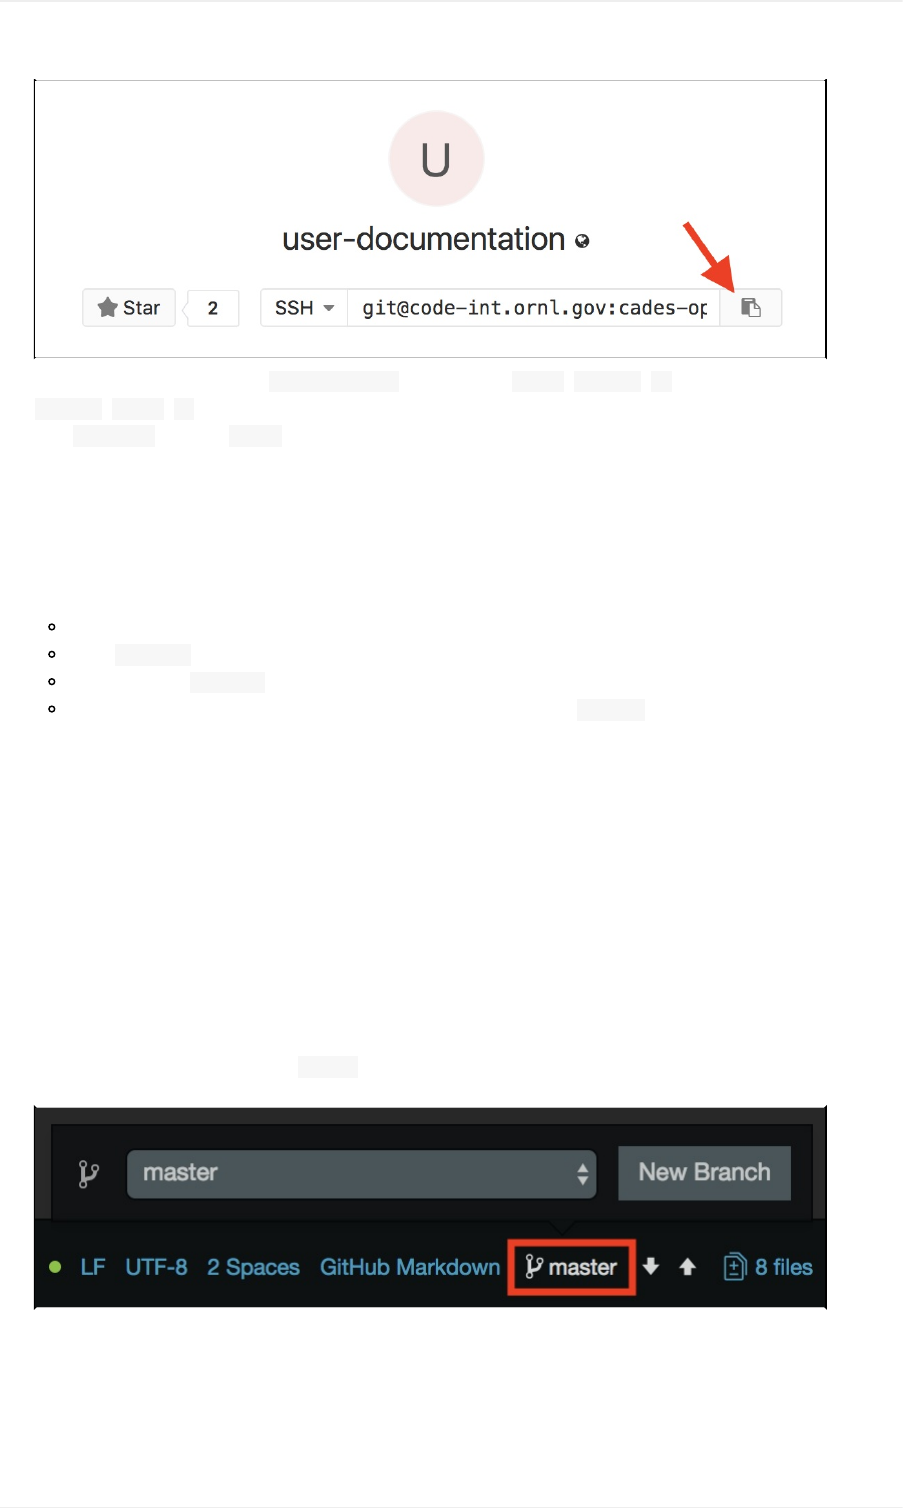
2. Now,backinsideAtom,opentheCommandPalette.OnMac,pressshift+command+p.InWindows/Linux,press
control+shift+p.
3. Typegitcloneandpressenter.
4. Pastethesshaddressintheresultingwindow.Youmayalsomodifythelocationofthelocalfolder.
5. Waitfortherepositorytoclone.
6. Nowyoucanseethefileshavepopulatedintothefolderyouspecified.Thesefilesrepresentalocalcopy,towhichyouwill
makechanges.
7. BeforeyouleaveGitLab'swebpage,consideraddingyoursshkeytoyourprofilesoyouwillnotbepromptedforcredentials
aftereverycommit.ToaddyourpublicsshkeytoGitLab:
Clickonyouruserimageinthetop-rightoftheGitLabwindow.
SelectSettings.
Ontheleft,clicksshkeys.
Pasteyourpublicsshkeyinthebox,provideatitle,andsavebyclickingAddkey.
Note:Youhavenowcheckedoutthemasterbranchoftheremoterepository.Youmaylackpermissiontopushyourchangesto
master,ormaywishnottodoso.
WorkingfromBranches
Atthispointyoulikelyeitherwanttocreateanewbranchandaddyourcontributionsthere,orcheckoutadifferentbranchyouor
someoneelsehasalreadycreated.Eachoftheseoptionsareshownnext.Unlessyouhavereasonotherwiseyoushouldchooseone
ofthese,ratherthanattemptingtoworkfromthemasterbranch.
CreateaNewBranch
1. Createagitbranchbyclickingonthemasterbuttononthebottom-rightoftheAtomwindow.Namethebranchsomething
descriptive.
CheckoutanExistingBranch
Wewillneedthenameoftheremotebranchwewishtoworkon
1. TheGitLabprojectpagedisplaysadroplistwiththenameofavailablebranches.
ContributewithGit
196
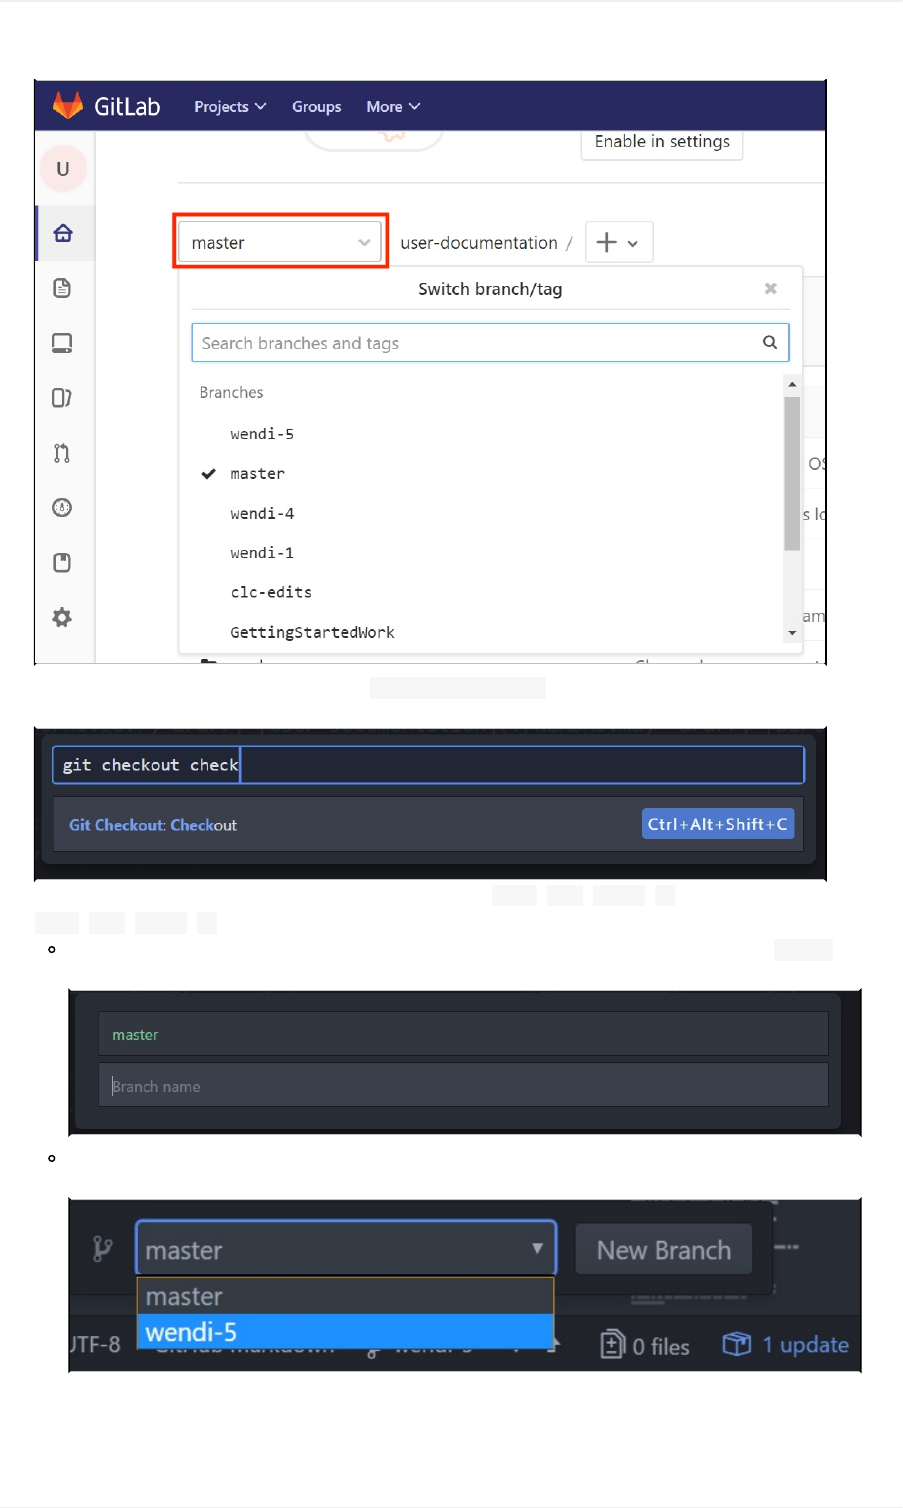
2. OpentheAtomcommandpaletteandsearchforgitcheckoutcheckout(requiresgitcheckoutpluginhavingbeen
installed).
Youmayalsoopenthecheckoutdialogdirectlyusingthehotkeysctrl+alt+shift+c(or
ctrl+opt+shift+conMac).
Thecheckoutdialogisalistofbranchestocheckoutorswitchto.Usingthearrowkeys,highlightthecustomentry
andhitenter.Nowtypeinthenameoftheremotebranchname.YoumayfindthisinGitLab.
Anoticewilldisplayifthecheckoutwassuccessful.Youmaythenswitchbetweenbranchesusingthebranchselectorin
thebottom-righttoolbar.
Note:IfcheckingoutaremotebranchwithinAtomusingthe'gitcheckout'plugin,ensureyoureadthedirectionscarefully.Do
notclickonthe'custom'branch,usethearrowkeysandhitenterandthensupplythenameoftheremotebranchyouwishto
checkout.Lastly,ifyoumakeamistakewhiletypinginthebranchname,youwillendupcreatinganewbranchwiththetypo.Be
ContributewithGit
197

suretocorrectlytypethebranchname.
CommandLineBranching
RatherthanusingusingthecheckoutdialogsinAtom,youmayalsolistandcheckoutremotebranchesusingthegitcommand
linetools.
Listremotebranches:
$gitbranch-r
origin/GettingStartedWork
origin/HEAD->origin/master
origin/master
origin/wendi-5
origin/user-contributions
Checkoutaremotebranchfromthecommandline.gitcheckout--trackorigin/wendi-5afterwhichyoumayselectthe
branchwithinAtom.
GitLabGUIEditing
Youdon'thavetouseAtomforediting.YoucanhittheeditbuttoninGitLabandeditdirectly,andpreviewbeforecommitting.
Notethatonlyrepositoryownerscaneditdirectlythisway-otherwiseyoucancreateabranchandedityourbranchdirectly.
UploadingYourChanges
1. Makechangestothefilesasneeded.
2. YoucanopentheGitwindowbypressing^+(.Hereyouviewunstagedandstagedchanges.
Unstagedmeansthefilesarenotreadytobecommitted.
Stagedmeansthefilesarereadytobecommitted.
3. Stageallofthefilesthatyou'dliketocommittothebranch.Thisisaccomplishedbyselectingthe+symbolnexttoeach
file.Alternatively,onthetop-rightoftheGitwindow,thereisaStageAllbutton.
4. CommityourchangeseitherwithintheGitwindow,orbyenteringgitcommitinAtom'scommandpalette.Enteracommit
messagethatwillhelpyouandothersunderstandwhatchangesweremade.ThenclickCommit.
5. PushchangestoGitLabbytypinggitpushinthecommandpalette,orusingAtom'sup/downGitarrowslocatedonthe
bottom-rightofthewindow.
Note:Ifyougetanerroraftertypinggitpushthatsays"Noupstreambranch"openyourterminalandnavigatetothelocal
copyoftherepository.Thentypegitpush--set-upstreamoriginname_of_branch.Fromthenonyoushouldbeabletouse
thecommandpalettetotypegitpushorusetheup/downarrowsonthebottom-rightofthewindow.
CreatingaMergeRequest
Mergingyourbranchintothemasterbranch,therebymakesyourchangesappearinthefinalversionofthefiles.
YoucansendamergerequestusingtheGitLabGUI.
1. FromtheleftmenupanelinGitlab,selectMergeRequestthenthegreenNewmergerequestbutton.
2. Selectyourbranchinthe"SourceBranch"side.
Targetbranchwillbemaster
Clickcomparebranches.
3. Onthenextscreentheonlythingneededissimply:
Assignto:<ProjectOwner,etc.>
ContributewithGit
198

ClickSubmitmergerequest
PreviewingChanges
Whenyoupushabranch,yourchangeswillgetbuiltina"ReviewEnvironment"athttp://user-documentation-
stf011.granite.ccs.ornl.gov/_review/andwillallowyoutoclickonthenameofyourbranch.
AlinktothisreviewenvironmentwillbeavailableonthePullRequestpagethatiscreatedforyourbranch.Thiswillallowusto
takeaquickglanceatchangesbeforewemergethemintoproduction.
Note:Previewsitesareaprototypeintheworkflow.Thisfeaturemaynotalwaysworkandisofferedasanunsupported
convenience.
ContributewithGit
199

CADES→UserDocumentation→Contributing→GitintheCommandLine
GitWorkflowfromtheCommandLine
Therearemanyreasonsonewouldprefertoworkfromthecommandline.Regardlessofyourreasons,hereishowtocontribute
totheCADESdocumentationusingonlycommandlinetools.
ThisguideisadaptedfromGitLab'sdocumentation.
Itisassumedthatusersofthisguideunderstandbasicgit/versioncontrolprinciples.Toreadmore,visitthispage.
InstallGitandSet-up
1. First,checktoseeifgitisinstalled.
git--version
Toinstalland/orupdategitusingyourpackagemanager:
CentOS,RedHat:
sudoyuminstallgit
sudoyumupdategit
Debian,Ubuntu:
sudoapt-getinstallgit
sudoapt-getupdategit
MacOS,useHomebrew:
/usr/bin/ruby-e"$(curl-fsSLhttps://raw.githubusercontent.com/Homebrew/install/master/install)"
brewinstallgit
brewupgradegit
Windows:downloadGitforWindowsandinstallit.
2. Set-upgitwithyouraccesscredentialstoGitLabwiththefollowingcommands:
gitconfig--globaluser.name"your_username"
gitconfig--globaluser.email"your_email_address@example.com"
Youcanreviewtheinformationthatyouenteredduringset-up:gitconfig--global--list
3. (Optional)Priortocloningtherepository,consideraddingyoursshkeytoyourGitLabprofilesoyouwillnotbeprompted
forcredentialsaftereverycommit.ToaddyourpublicsshkeytoGitLab:
Clickonyouruserimageinthetop-rightoftheGitLabwindow.
SelectSettings.
Ontheleft,clicksshkeys.
Pasteyourpublicsshkeyinthebox,provideatitle,andsavebyclickingAddkey.
UsingRepositoriesandBranches
1. Cloneanexistingrepository.
gitclonegit@code-int.ornl.gov:cades-ops/user-documentation.git
GitintheCommandLine
200

Ifyouhavealreadyclonedtherepositorybutarereturningtoyourlocalversionafterawhile,you'llwanttomakesure
yourlocalfilesareuptodatewiththebranch.Youcanpullupdatesfrommasterorfrombranch_name.
gitpulloriginbranch_name
2. You'rereadytomakeeditsusingyourfavoritetexteditor.Youwillneedtocreateanewbranchorcheckoutanexisting
branchthatwilllaterbemergedintothemasterbranch.Whennamingbranches,trytochosesomethingdescriptive.
Tocreateabranch:gitcheckout-bbranch_name
Tolistexistingbranches:gitbranch-r
Tocheckoutanexistingbranch:gitcheckout--trackorigin/branch_nameorgitcheckoutbranch_name
Note:Youmayonlyhaveonebranchcheckedoutatatime.
3. Whenyouaresatisfiedwithyourchanges,committhemtoyourbranchbyaddingandcommittingthechanges.
gitadd--all
gitcommit-m"descriptivetextaboutyourchanges"
4. Aftercommittingtheedits,you'llwanttopushthechangestoGitLab.Ifthefollowingproducesanerror,seebelowthecode
snippetforcommonsolutions.Thestructureofthiscommandisgitpush<remote><branch>.
gitpush
Upstreamerror:gitpush--set-upstreamoriginbranch_nameorgitpush-uoriginbranch_name
CreatingaMergeRequest
Atthistime,GitLabdoesnotnativelysupportsubmissionsformergerequestsviathecommandline.
YoucansendamergerequestusingtheGitLabGUI.
1. FromtheleftmenupanelinGitlab,selectMergeRequestthenthegreenNewmergerequestbutton.
2. Selectyourbranchinthe"SourceBranch"side.
Targetbranchwillbemaster
Clickcomparebranches.
3. Onthenextscreentheonlythingneededissimply:
Assignto:<ProjectOwner,etc.>
ClickSubmitmergerequest
GitintheCommandLine
201
CADES→UserDocumentation→Contribute→AuthoringGuide
AuthoringGuideforCADES
Perhapsyou'vegotsomehow-todocumentstuckedawayinfoldersthatyou'dliketosharewiththeCADEScommunity.Or
maybeyou'vediscoveredawayofdoingthingsthatwouldbenefitotherusers.
YoucansubmityouruserguidesforpublicationwithintheCADESdocumentationsite!Seethecontributingpageforinstructions.
We'veassembledherethefundamentalauthoringguidelinesforCADESuserdocumentation.
DocumentandContentPreferences
Documentsshouldbecreatedusingmarkdown.
OakRidgeNationalLaboratory(ORNL)usestheChicagoManualofStyle(CMOS)asabasicstyleguide.
Definethefirstinstanceofeveryacronymineachdocument.Ensurethatthelongformisnotrepeatedafteritisdefined.
Buttonsandlinksthattheusershould"click"shouldgoincode.Forexample,"Next,clicktheManageRulesbutton."
Put📝infrontofNOTES.Renders:
Use▾forthose"carrot"drop-downmenus.Renders:
Forheadings:onlyusetitlecaseforthefirstthreeheadinglevels,#,##,and###.Theremainingheaderlevelsshould
besentencecase.
PicturesandImages
Screenshotsandimagescannotberesizedusingmarkdown.Therefore,weembed.htmlthatwillberenderedwhenwepublish
thetutorialtothedocumentationsite.
Imagesandscreenshotsarestoredinafolder./screenshots/.
Filesshouldbenameddescriptively.Forexample,usenamessuchasadding-IP-address.pnginsteadofimage03.png.
Toremainconsistentwithotherimagesintutorials,pleaseusethefollowing.htmlcodetoresize,addaborder,andopenin
anewbrowsertabwhenclicked.Notethatyou'llneedtochangethefilenametwiceinthefollowingcode.
<atarget="_new"href="screenshots/ssh_import_pub_key.png"><imgsrc="screenshots/ssh_import_pub_key.png"st
yle="border-style:ridge;border-color:#bfbfbf;border-width:1px;width:550px;"/></a>
OtherConsiderations
Haveyouredactedsensitiveinformationfromtextandimages?
Haveyouremovedinformationthatisprotectedbycopyright?
Areyouusingaspecificversionofyoursoftwareandhaveyouincludedinthedocumentation?
RelatedTopics
UsingaGitWorkflowforcreatingusercontent.
CADESAuthoringGuide
202

CADESAuthoringGuide
203

CADES→UserDocumentation→BirthrightCloudUserPolicy
BirthrightCloudUserPolicy
OakRidgeNationalLaboratory's(ORNL)ComputeandDataEnvironmentforScience(CADES)nowprovideseligiblecustomers
withanOpenStackcloudcomputingsolutionwithcustomizablevirtualmachines(VM).Thisnewresource,called"Birthright
Cloud,"enablescustomersinscienceandtechnologydirectoratestoleverageself-serviceportalstorapidlyrequesttheseVMsfor
production,testing,anddevelopment.
Cloudcomputingprovidesanefficientpoolingofon-demand,self-managedvirtualinfrastructure,consumedasaservice.The
OpenStackplatformusedhereisanopen-sourcecloudcomputingsoftwaresolutionthatallowsthecreationofindividual
"Project"allocationsforeachuser.UserscanthenfilltheseProjectallocationswiththeirownVMswithoutfurtherintervention
fromCADESadministrators—atrueself-serviceimplementation.
TheCADESOpenStackBirthrightCloudallocationsprovide:
SelfService–ThroughtheHorizonwebinterface,userscancreate,manage,anddeleteVMs.
Portability–OperationscanbeperformedusinganylocalsystemthatprovidesaBashterminalandSSHfunctionality.
Elasticity–UserscancreateVMsondemandanddeletethemwhentheyarenolongerneeded.
Disclaimers
Ifaconceptorfeatureisnotexplicitlydescribedwithinthispolicy,thenitisnotexplicitlysupportedbytheCADESteam.
Theonlyofficialcopyofthisdocumentisthisonlineelectronicversionfoundonhttp://support.cades.ornl.gov.
Thispolicyissubjecttochange.
AcceptableUse
Computers,software,andcommunicationssystemsprovidedbyCADESaretobeusedforworkassociatedwith,andwithinthe
scopeof,anapprovedproject.TheuseofCADESresourcesforpersonalornon-work-relatedactivitiesisstrictlyprohibited.All
computers,networks,email,andstoragesystemsarepropertyoftheUSGovernment.Anymisuseorunauthorizedaccessis
prohibitedandissubjecttocriminalandcivilpenalties.CADESsystemsareprovidedtouserswithoutanywarranty.CADESwill
notbeheldliableintheeventofanysystemfailureordatalossorcorruptionforanyreason,including,butnotlimitedto:
negligence,maliciousaction,accidentalloss,softwareerrors,hardwarefailures,networklosses,orinadequateconfigurationof
anycomputingresourceorancillarysystem.
UserResponsibilities
AllBirthrightCloudusersmustcomplywithORNLsecurityrulesandwiththefollowing:
AlloperatingsystempatchesmustbeappliedaccordingtoORNLpatchingrequirements.
Ifuser-sourcedsoftwareimagesareuploaded,theuserisresponsibleforkeepingacopyoftheimageincaseofaccidental
deletionorcorruption.
Nomoderate/confidentialdatashouldbemountedorcopiedtotheVMs.Openscienceonly.
VMsshouldberemovedfromyourOpenStackProjectwhentheyarenolongerneeded.
VMoperatingsystemsmustbeupdatedormigratedbeforetheyreachanend-of-lifedevelopmentstatus.
CADESCloudUserPolicy
204

ApplicationforResources
BirthrightCloudallocationsareavailabletoORNLresearchandtechnicalstaff,byrequest,throughCADES.Therequestismade
throughtheORNLXCAMSportalandrequiresyourUCAMSID.Anactivationnoticewillbesentwhenyourresourcesareready
foruse.CADESreservestherighttothrottleaccesstoBirthrightCloudallocationsasresourceconstraintsrequire.
Howto: RequestYourCADESBirthrightCloudAllocation
AuthenticationandAuthorization
UserscanaccesstheirBirthrightCloudallocationusingaweb-basedGUIcalled"Horizon.”SeetheBirthrightClouduserguide
fordetails.
Howto: ManageYourOpenStackProjectinHorizon
Usersareprohibitedfromchangingorcircumventingaccesscontrolstoallowthemselvesorotherstoperformactionsoutsideof
theirauthorizedprivileges.Intheeventthatanaccountiscompromised,usersmustnotifytheCADESsupportteam(cades-
help@ornl.gov)immediately.
UsersshouldalsopromptlyinformtheCADESsupportteam(cades-help@ornl.gov)ofanychangesintheircontactinformation
(email,phone,affiliation,etc.).
TheCADESteamreservestherighttoterminateaccountsifanytermsofthispolicyareviolated.
Note:DONOTshareyourcredentials,passwords,privatekeys,orcertificates,withanyone.
AccountAccessMaintenance
ORNLstaffwhohavebeengrantedaBirthrightCloudallocationhaveindefiniteaccesstotheseresourcesforthedurationoftheir
timeatORNLand/orforaslongastheseresourcesaremadeavailablethroughCADES.
Asunderlyingtechnologiesandplatformschange,usersmayberequiredtoperformaccountaccessmaintenanceasneeded.
AccessattheEndofaProject
WhenauserleavesORNL,theirBirthrightCloudallocationwillcloseout,whichresultsintheterminationofaccountaccessand
deletionofanyremainingVMsrunningintheirallocation.Theusershouldmoveorsaveanydatathatheorshewishestokeep
beforeleavingORNL.
ComputingPolicy
CADESprovidespublicVMimagesforBirthrightCloudcustomers.Theseimageshavebeencustomizedforbetterintegration
intoboththeORNLenvironmentaswellastheuser'sscientificworkflow,andaretheonlyimagesfullysupportedbyCADES.
CADESwillnotprovidesupportforuser-providedimages.Ifyoustillwanttorunacustomcloudimage,orifyouwouldliketo
inquireaboutmigratinganimagefromanexistingVMresource,pleasecontacttheCADESsupportteam(cades-help@ornl.gov)
foryourrequest.
BecauseofthehighlyheterogeneoushardwarearchitectureofCADESresources(intermsofprocessors,networkinterconnects,
anddisktechnologies),andthefactthatsomeoftheseresourcesaresharedormaybeovercommitted,CADESprovidesno
guaranteedminimumperformancelevel.However,ifyourapplicationrequiresacertainlevelofperformancethatyouhavenot
CADESCloudUserPolicy
205

beenabletoobtainusingyourBirthrightCloudallocation,pleasecontacttheCADESsupportteam(cades-help@ornl.gov)for
assistance.
StoragePolicy
TheBirthrightCloudallocations,likeothercloudsolutionsavailableonthemarket,provideafungibleresourcethatissubjectto
certainreliabilityconstraints.Valuabledatashouldbestoredonasecondarystoragesolution,notexclusivelyonauser’s
BirthrightCloudVMInstance.
Nomoderate/confidentialdatashouldbemountedorcopiedtoyourBirthrightCloudVMInstance.BirthrightCloudVM
Instancesareforopenscience.
StorageAllocation
Frominception,eachBirthrightCloudallocationhasasetstoragequota.CADESreservestherighttochangethisstoragequotaat
anytime.SeetheBirthrightCloudUserDocumentationfordetails.
Ifauserrequiresmorestoragefortheirallocation,heorshecansubmitaproposaltotheCADESResourceUtilizationCouncilto
requestastoragequotaincrease.Thisproposalshoulddescribetheamountofstoragedesiredandthescientificgoalandmeritof
theworkbeingperformedusingtheCADESBirthrightCloudallocation.Theserequestswillbereviewedbythecouncilona
case-by-casebasis.
DataRetention
WhenaprojectendsandaBirthrightCloudallocationisclosedout,accountaccessisterminated,andanyremainingVMsand
theirassociateddataaredeleted.Usersareresponsibleformovingorsavinganydatathattheywouldliketokeepbeforetheir
projectendsandtheirallocationisclosedout.
Backups
TheBirthrightCloudallocations,likeothercloudsolutionsavailableonthemarket,provideafungibleresourcethatissubjectto
certainreliabilityconstraints.Valuabledatashouldbestoredonasecondarystoragesolution,notexclusivelyonauser’s
BirthrightCloudVMInstance.
Atthistime,therearenoCADES-supportedprovisionsforautomaticbackupsoftheVMsortheirdata.Theuserisresponsiblefor
backingupdataandinstancestotheirdesiredsecondarystoragesolution.
PurgePolicyorQuota
Frominception,eachBirthrightCloudallocationhasasetquota,andCADESreservestherighttochangethisstoragequotaat
anytime.SeetheBirthrightClouduserdocumentationfordetails.
Howto: ViewyourOpenStackProjectQuota
Ifauserrequiresmoreresourcesfortheirallocation,heorshecansubmitaproposaltotheCADESResourceUtilizationCouncil
torequestaquotaincrease.Thisproposalshoulddescribetheresourcesdesired(RAM,CPUs,storage)andthescientificgoaland
meritoftheworkbeingperformedusingtheCADESBirthrightCloudallocation.Theserequestswillbereviewedonacase-by-
casebasis.
CADESCloudUserPolicy
206

SpecialRequestsandPolicyExemptions
UserscanrequestpolicyexemptionsbycontactingtheCADESsupportteam(cades-help@ornl.gov).Requestsaresubjectto
reviewbytheCADESResourceUtilizationCouncil.
AcknowledgingCADES
ThefollowingacknowledgmentshouldbeincludedinpublicationsandpresentationsthatcontainworkperformedusingCADES
resources.
ThisresearchusedresourcesoftheComputeandDataEnvironmentforScience(CADES)attheOakRidgeNational
Laboratory,whichissupportedbytheOfficeofScienceoftheU.S.DepartmentofEnergyunderContractNo.DE-AC05-
00OR22725.
CADESCloudUserPolicy
207
