CI2+ Operation Manual Steinberger CI2 Plus Ci2plus (English) A0 En Om
Steinberger CI2 Plus ci2plus (English) Operation Manual a0 ci2plus_en_om_a0 Steinberger - CI2 Plus - ci2plus (English) Operation Manual a0
Steinberger CI2 Plus ci2plus (English) Operation Manual a0 ci2plus_en_om_a0 Steinberger - CI2 Plus - ci2plus (English) Operation Manual a0
User Manual: Steinberger CI2 Plus ci2plus (English) Operation Manual a0 Steinberger - CI2 Plus - ci2plus (English) Operation Manual a0
Open the PDF directly: View PDF ![]() .
.
Page Count: 32
EN
DE
FR
ES
JA
USB AUDIO INTERFACE
IT
2CI2+ Operation Manual
1. IMPORTANT NOTICE:
DO NOT MODIFY THIS UNIT!
This product, when installed as indicated in the
instructions contained in this manual, meets FCC
requirements. Modifications not expressly
approved by Yamaha may void your authority,
granted by the FCC, to use the product.
2. IMPORTANT: When connecting this product to
accessories and/or another product use only high
quality shielded cables. Cable/s supplied with this
product MUST be used. Follow all installation
instructions. Failure to follow instructions could void
your FCC authorization to use this product in the
USA.
3. NOTE: This product has been tested and found to
comply with the requirements listed in FCC Regula-
tions, Part 15 for Class “B” digital devices. Compli-
ance with these requirements provides a
reasonable level of assurance that your use of this
product in a residential environment will not result
in harmful interference with other electronic
devices. This equipment generates/uses radio fre-
quencies and, if not installed and used according to
the instructions found in the users manual, may
cause interference harmful to the operation of other
electronic devices. Compliance with FCC regula-
tions does not guarantee that interference will not
occur in all installations. If this product is found to
be the source of interference, which can be deter-
mined by turning the unit “OFF” and “ON”, please
try to eliminate the problem by using one of the fol-
lowing measures:
Relocate either this product or the device that is
being affected by the interference.
Utilize power outlets that are on different branch
(circuit breaker or fuse) circuits or install AC line fil-
ter/s.
In the case of radio or TV interference, relocate/
reorient the antenna. If the antenna lead-in is 300
ohm ribbon lead, change the lead-in to co-axial
type cable.
If these corrective measures do not produce satis-
factory results, please contact the local retailer
authorized to distribute this type of product. If you
can not locate the appropriate retailer, please con-
tact Yamaha Corporation of America, Electronic
Service Division, 6600 Orangethorpe Ave, Buena
Park, CA90620
The above statements apply ONLY to those prod-
ucts distributed by Yamaha Corporation of America
or its subsidiaries.
* This applies only to products distributed by YAMAHA CORPORATION OF AMERICA. (class B)
FCC INFORMATION (U.S.A.)
* This applies only to products distributed by YAMAHA CORPORATION OF AMERICA.
COMPLIANCE INFORMATION STATEMENT
(DECLARATION OF CONFORMITY PROCEDURE)
Responsible Party : Yamaha Corporation of America
Address : 6600 Orangethorpe Ave., Buena Park, Calif. 90620
Telephone : 714-522-9011
Type of Equipment : USB AUDIO INTERFACE
Model Name : CI2+
This device complies with Part 15 of the FCC Rules.
Operation is subject to the following two conditions:
1) this device may not cause harmful interference, and
2) this device must accept any interference received including interference that may cause undesired opera-
tion.
See user manual instructions if interference to radio reception is suspected.
(FCC DoC)
CI2+ Operation Manual 3
English
PRECAUTIONS
PLEASE READ CAREFULLY BEFORE PROCEEDING
* Please keep this manual in a safe place for future reference.
WARNING
Always follow the basic precautions listed below to avoid the possibility of serious injury or even death
from electrical shock, short-circuiting, damages, fire or other hazards. These precautions include, but
are not limited to, the following:
• Do not open the device or attempt to disassemble the
internal parts or modify them in any way. The device
contains no user-serviceable parts. If it should appear to
be malfunctioning, discontinue use immediately and have
it inspected by qualified Yamaha service personnel.
• Do not expose the device to rain, use it near water or in
damp or wet conditions, or place containers on it
containing liquids which might spill into any openings. If
any liquid such as water seeps into the device, unplug the
USB cable from this device immediately. Then have the
device inspected by qualified Yamaha service personnel.
• Never insert or remove a USB cable with wet hands.
• Do not put burning items, such as candles, on the unit.
A burning item may fall over and cause a fire.
CAUTION
Always follow the basic precautions listed below to avoid the possibility of physical injury to you or
others, or damage to the device or other property. These precautions include, but are not limited to, the
following:
• Do not expose the device to excessive dust or vibrations,
or extreme cold or heat (such as in direct sunlight, near a
heater, or in a car during the day) to prevent the possibility
of panel disfiguration or damage to the internal
components.
• Do not use the device in the vicinity of a TV, radio, stereo
equipment, mobile phone, or other electric devices.
Otherwise, the device, TV, or radio may generate noise.
• Do not place the device in an unstable position where it
might accidentally fall over.
• Before moving the device, remove all connected cables.
• Before connecting the device to other electronic
components, turn off the power for all components. Before
turning the power on or off for all components, set all
volume levels to minimum. Also, be sure to set the
volumes of all components at their minimum levels and
gradually raise the volume controls while playing the
device to set the desired listening level.
• When cleaning the device, use a soft, dry cloth. Do not use
paint thinners, solvents, cleaning fluids, or chemical-
impregnated wiping cloths.
Do not open
Water warning
Fire warning
Location
Connections
Maintenance
(3)-13 1/2

4CI2+ Operation Manual
English
• When turning on the AC power in your audio system,
always turn on monitor speakers LAST, to avoid speaker
damage. When turning the power off, monitor speakers
should be turned off FIRST for the same reason.
• Do not insert a finger or hand in any gaps on the device.
• Never insert or drop paper, metallic, or other objects into
the gaps on the panel. If this happens, unplug the USB
cable from this device immediately. Then have the device
inspected by qualified Yamaha service personnel.
• Do not place vinyl, plastic or rubber objects on the device,
since this might discolor the panel.
• Do not rest your weight on, or place heavy objects on the
device, and do not use excessive force on the buttons,
switches or connectors.
• Do not use the instrument/device or headphones for a long
period of time at a high or uncomfortable volume level,
since this can cause permanent hearing loss. If you
experience any hearing loss or ringing in the ears, consult
a physician.
Always unplug the USB cable from a computer or turn off the computer to turn off the device when the device is not in use.
NOTICE
• This manual is the exclusive copyrights of Yamaha
Corporation.
• Use of the software and this manual is governed by the
license agreement which the purchaser fully agrees to
upon breaking the seal of the software packaging. (Please
read carefully the Software Licensing Agreement at the end
of this manual before installing the application.)
• Copying of the software or reproduction of this manual in
whole or in part by any means is expressly forbidden
without the written consent of the manufacturer.
• Yamaha Corporation makes no representations or
warranties with regard to the use of the software and
documentation and cannot be held responsible for the
results of the use of this manual and the software.
• Future upgrades of application and system software and
any changes in specifications and functions will be
announced separately.
• The screen displays as illustrated in this manual are for
instructional purposes, and may appear somewhat
different from the screens which appear on your computer.
• Steinberg and Cubase are the registered trademarks of
Steinberg Media Technologies GmbH.
• This product incorporates and bundles computer
programs and contents in which Steinberg Media
Technologies GmbH and Yamaha Corporation owns
copyrights or with respect to which it has license to use
others’ copyrights. Such copyrighted materials include,
without limitation, all computer software, style files, MIDI
files, WAVE data, musical scores and sound recordings.
Any unauthorized use of such programs and contents
outside of personal use is not permitted under relevant
laws. Any violation of copyright has legal consequences.
DON’T MAKE, DISTRIBUTE OR USE ILLEGAL COPIES.
• Copying of the commercially available musical data
including but not limited to MIDI data and/or audio data is
strictly prohibited except for your personal use.
• Windows is a registered trademark of Microsoft®
Corporation in the United States and other countries.
• Apple, Mac and Macintosh are trademarks of Apple Inc.,
registered in the U.S. and other countries.
• The company names and product names in this manual are
the trademarks or registered trademarks of their respective
companies.
Handling caution
Yamaha cannot be held responsible for damage caused by improper use or modifications to the device, or data that is lost or
destroyed.
(3)-13 2/2

CI2+ Operation Manual 5
English
Contents
Contents
Introduction .........................................................................6
Features ................................................................................................................................6
Package Contents ........................................................................................................7
About the Included Disks .......................................................................................7
About the power supply ...........................................................................................8
The Controls and Connectors ........................................9
Front Panel .........................................................................................................................9
Rear Panel .....................................................................................................................13
Software Installation ..................................................... 14
Installing Cubase Essential ...............................................................................14
Installing TOOLS for CI2 .....................................................................................15
Connecting to an External Device ............................. 18
Connection Examples ............................................................................................18
Options ...............................................................................................................................18
Try it out ............................................................................ 19
Preparing for using the CI2+ with Cubase .........................................19
Recording .........................................................................................................................20
Editing .................................................................................................................................22
Troubleshooting .............................................................. 23
Uninstalling the TOOLS for CI2 .................................. 25
Appendix ........................................................................... 26
Input and Output Specifications ...................................................................26
General Specifications ..........................................................................................26
License Agreement for TOOLS for CI2 .................................................27

6CI2+ Operation Manual
Introduction
English
Introduction
Thank you for your purchase of the USB AUDIO INTERFACE CI2+. Using Cubase, the CI2+ is a
highly intuitive, indispensable aid in recording, editing and sound shaping. Simply connect the CI2+
to your computer via USB, and you’ve got a comprehensive control center and seamless environment
for complete music production with Cubase.
Please read the Operation Manual (this book) so that you can take full advantage of its superlative
features and enjoy trouble-free operation for years to come. Also keep it in a safe place for future
reference.
Features
USB bus-powered
The CI2+ can be simply connected to a USB
terminal on your computer and can operate on
USB bus power.
Phantom power (+48V) can be
used
Phantom power can be supplied to two analog
input jacks (XLR type).
Compatible with Core Audio
(Mac OS X) and ASIO/WDM
(Windows)
Using with a Core Audio/ASIO compatible DAW
software application such as Cubase helps to
reduce latency (sound delay).
Cubase Essential DAW
Software Supplied
Cubase Essential software, included in this
package, offers versatile, high-performance
hard-disk recording capability.
Quick access to Cubase with
the Browse mode
The Browse mode helps to create new projects
and new tracks quickly on Cubase.
Quick recording with the
Interactive Recording function
With the [ACTION PAD] button (or an optional
Yamaha FC5 foot switch as an alternative), you
can use the Interactive Recording function on
Cubase. The Interactive Recording function pro-
vides easy and quick recording.
Controlling Cubase
The AI KNOB can control a desired parameter
within the principal window and plug-in software
on Cubase, specified via the mouse pointer.
Also, the [PLAY/STOP] button, [REC] button,
[PREVIOUS] button, and [NEXT] button can
control the transport functions such as Play and
Record on Cubase.
CI2+ Operation Manual 7
Introduction
English
Package Contents
The CI2+ package contains the following items.
After opening the CI2+ package, make sure
that it includes all of the items listed below.
•CI2+
• CI2+ Operation Manual (this book)
• TOOLS for CI2 CD-ROM
• Cubase Essential DVD-ROM
• USB-eLicenser (USB protection device)
• ESSENTIAL PRODUCT LICENSE INFORMA-
TION card
•USB cable
• Ferrite core
NOTE
The manual of Cubase Essential is a PDF file which
can be opened from the [Help] menu on Cubase. To
view PDF files, you need to install Adobe Reader on
your computer. You can download the latest version of
Adobe Reader at the following website.
http://www.adobe.com/products/reader/
Precautions about the USB-
eLicenser and the ESSENTIAL
PRODUCT LICENSE
INFORMATION card
CAUTION
• The USB-eLicenser or the unused activation code
on the ESSENTIAL PRODUCT LICENSE INFORMA-
TION card represent the software application li-
cense. Losing the unused activation code or the
USB-eLicenser once activated can be the same as
losing your software product.
• If the “USB-eLicenser” and “ESSENTIAL PRODUCT
LICENSE INFORMATION card” are lost or stolen,
Steinberg Media Technologies GmbH and Yamaha
Corporation cannot reissue them. In this case, you
will need to purchase the product again.
About the Included Disks
Disk Contents
Each of the included disks contains the follow-
ing software (driver).
TOOLS for CI2 CD-ROM
• TOOLS for CI2
Cubase Essential DVD-ROM
• Cubase Essential
Special Notices
CAUTION
• Steinberg and Yamaha make no representations or
warranties with regard to any problems while at-
tempting to copy the disks or software and cannot
be held responsible for the results of attempts to
copy the data.
• These disks are NOT for audio/visual purposes.
Do not attempt to play the disks on a CD/DVD
player. Doing so may result in irreparable damage
to your audio CD/DVD player.
IMPORTANT
• Before breaking the seal of TOOLS for CI2 disk
package, please read carefully the Software Li-
cense Agreement on page 27 of this manual. By
opening this disk package, you indicate your
agreement with the use terms of the software and
concurrence with the Software License Agreement.
• The software (Yamaha Steinberg USB Driver,
Steinberg CI2 Extension) included in the TOOLS
for CI2 and the copyrights thereof are under exclu-
sive ownership by Yamaha.
• The software included in the Cubase Essential
DVD-ROM and the copyrights thereof are under ex-
clusive ownership by Steinberg Media Technolo-
gies GmbH.
• Copying/reproduction of the software in whole or
in part by any means is expressly forbidden with-
out the written consent of the manufacturer.
• For the latest information of the software con-
tained in the accessory disk, please see the site
below:
Future upgrades of application and system soft-
ware and any changes in specifications announced
separately on the website.
http://service.steinberg.de/goto.nsf/show/
supportupdates_ci2plus_gb
8CI2+ Operation Manual
Introduction
English
System Requirements for
Software
The system requirements below are necessary
for installing software included in the accessory
disks (TOOLS for CI2 and Cubase Essential).
Windows
*Cubase Essential runs as a 32-bit application on Windows
Vista 64-bit and Windows 7 64-bit.
Mac OS X
NOTE
• A DVD drive is required for installation.
• Note that the system requirements may be slightly
different from those described above depending on
the particular operating system.
• Downloading the license of Cubase Essential re-
quires an Internet connection.
• The audio input and output functions of the CI2+
also work properly on Mac OS X 10.4.11. Install
TOOLS for CI2 to use the functions.
About the power supply
Power supply
The power of the CI2+ is supplied only from the
computer via a USB cable. A power cable is not
necessary.
Precautions when using the USB
terminal
Be sure to observe the following points when
connecting to the computer’s USB interface.
Failing to do so may result in the computer
freezing or shutting down, as well as corruption
or even loss of data. If the device or computer
does freeze, restart the application or computer.
NOTICE
• Be sure to wake the computer from sleep/sus-
pended/standby mode before making a connection
to the computer’s USB terminal.
• Always quit all applications running on the com-
puter before connecting or disconnecting the USB
cable.
• When connecting or disconnecting the USB cable,
be sure to set the MASTER control to the mini-
mum.
• Wait at least 6 seconds between connecting or dis-
connecting the USB cable.
NOTE
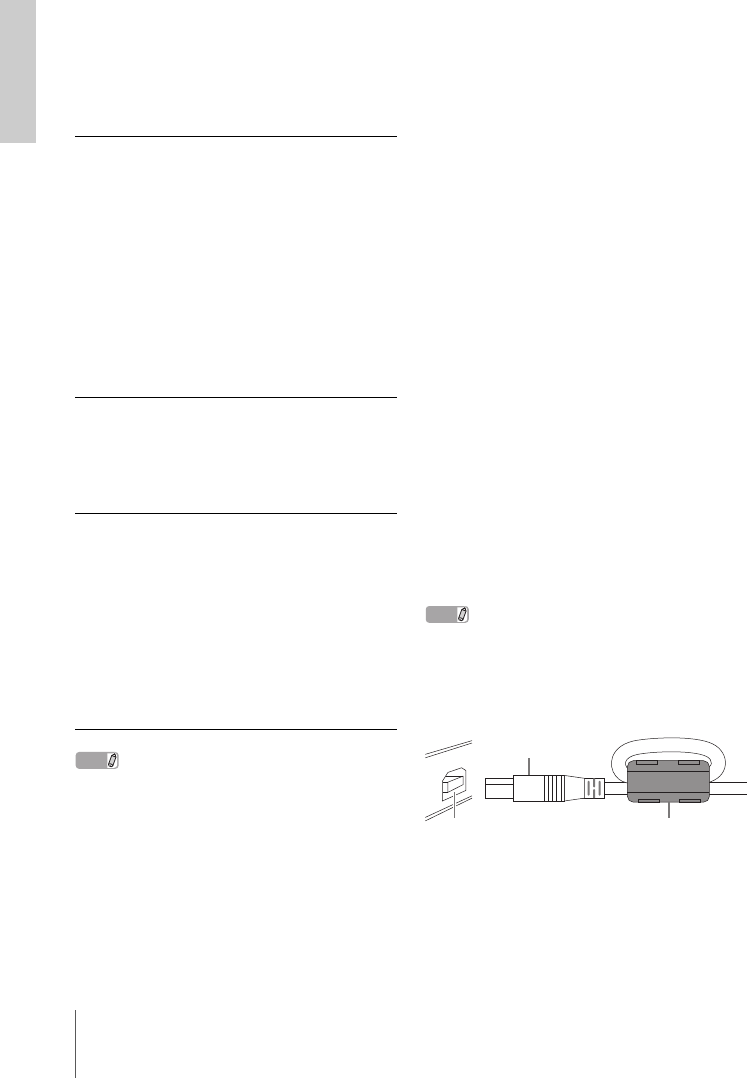
To prevent electromagnetic interference, fasten the
ferrite core to the USB cable near the USB terminal on
the CI2+.
OS: Windows XP Professional (SP3)/
Windows XP Home Edition (SP3)/
Windows Vista (SP1 or later,
32-bit/64-bit*)/
Windows 7 (32-bit/64-bit*)
CPU: 2GHz or more (dual core CPU rec-
ommended)
Memory: 1GB or more
Display Resolution: 1280 x 800 — full color
Interface: Equipped with a USB terminal
Hard Disk: Free disk space of 4GB or more;
high-speed hard disk
OS:
Mac OS X 10.5.5 or later/
Mac OS X 10.6.x
CPU: PowerPC G5 (Intel Core Duo CPU
recommended)
Memory: 1GB or more
Display Resolution: 1280 x 800 — full color
Interface: Equipped with a USB terminal
Hard Disk: Free disk space of 4GB or more;
high-speed hard disk
Ferrite coreUSB terminal
on the CI2+
USB cable
CI2+ Operation Manual 9
The Controls and Connectors
English
The Controls and Connectors
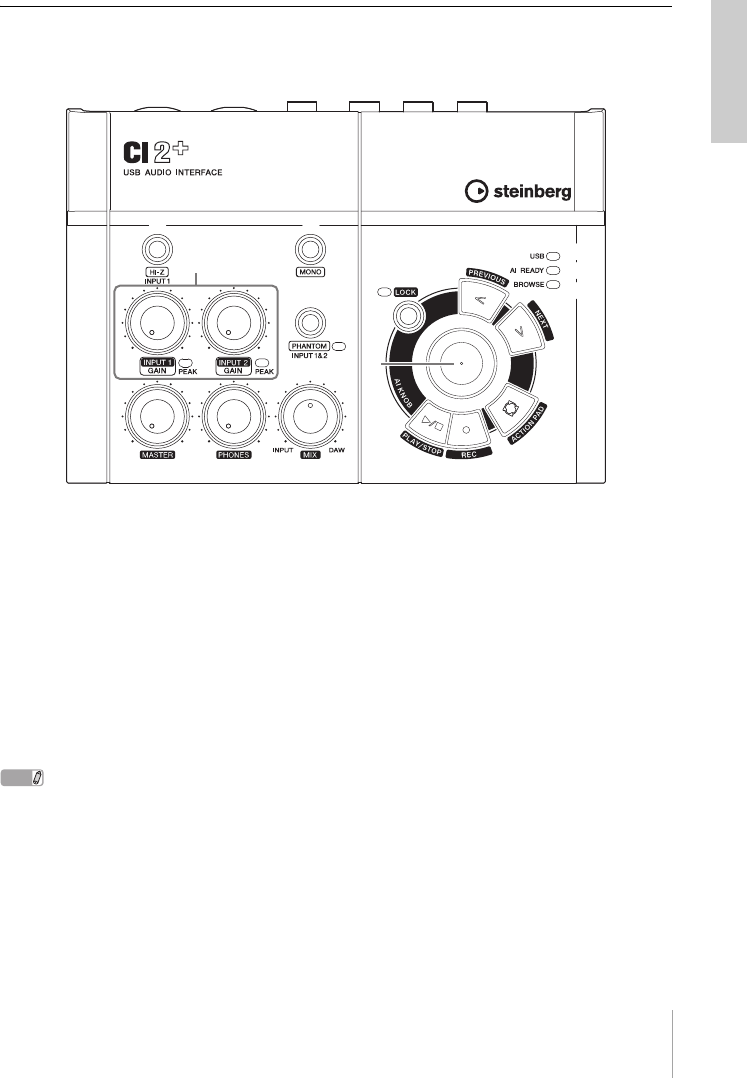
Front Panel
Mixer section
1[HI-Z INPUT 1] button
This button switches the HI-Z on (O)/off (N)
for the analog input jack 1. When directly con-
necting an electric guitar or electric bass that
has passive pickups and no built-in preamp to
the analog input jack 1, turn the [HI-Z] button
on.
NOTE
• Use an unbalanced phone cable when you connect
an electric guitar or electric bass and turn the [HI-Z]
button on. If you use a balanced cable or an XLR
cable in such a case, this device will not work cor-
rectly.
• If no device is connected to analog input jack 1, turn
this button off. Otherwise noise may occur.
2[MONO] button
This button allows analog input jacks 1 and 2 to
be used either as separate mono channels or as
a stereo pair. When the button is on (O), analog
input jacks 1 and 2 function as independent
mono channels feeding both the L and R LINE
OUT jacks. It is used to monitor the sound of
the microphone or guitar connected to the ana-
log input jack 1 in the center of the monitor
speakers. When the button is off (N), analog in-
put jack 1 and 2 function as a stereo pair: the
analog input jack 1 signal feeds the L LINE
OUT jack and the analog input jack 2 signal
feeds the R LINE OUT jack. Switching this but-
ton on/off does not affect the signal sent to the
computer.
%
^
&
$#
@
3
4
567
21
8
9)
!
Mixer section AI KNOB section

10 CI2+ Operation Manual
The Controls and Connectors
English
3INPUT 1/2 GAIN controls/PEAK
Indicator
Adjusts the input signal level. The signal that
has passed through the GAIN control will be
sent to the computer. To achieve the best bal-
ance of the recording level between S/N ratio
and dynamic range, adjust the level so that the
PEAK Indicator lights only occasionally and
briefly on the highest input transients.
4[PHANTOM INPUT 1&2] button/
Indicator
This button switches the phantom power
(+48V) on (O)/off (N). If you turn the button
on, the CI2+ supplies phantom power to the an-
alog input jack 1 and 2 (XLR-type). The indica-
tor lights when the button is turned on. Turn this
button on when using a phantom-powered con-
denser microphone.
CAUTION
• Make sure that phantom power is turned OFF un-
less it is needed.
• When turning phantom power ON, make sure that
no equipment other than phantom-powered de-
vices such as condenser microphones are con-
nected. Devices other than condenser
microphones may be damaged if connected to the
phantom power supply. Note, however, that the
switch may be left on when connecting to balanced
dynamic microphones. When connecting an unbal-
anced device to the analog input jacks (1/4" phone
type) and phantom power is turned on, hum or
noise may result; this is not a malfunction or fail-
ure in the device.
• Do not connect or disconnect a device while phan-
tom power is applied. Doing so can damage the
connected device and/or the unit itself.
• To protect your speaker system, leave the monitor
speakers (powered speakers) turned off when
switching the phantom power on/off. It’s also a
good idea turn all master control and output vol-
ume controls down to minimum. Neglect of these
precautions may result in large noise bursts that
may damage your equipment, your ears, or both.
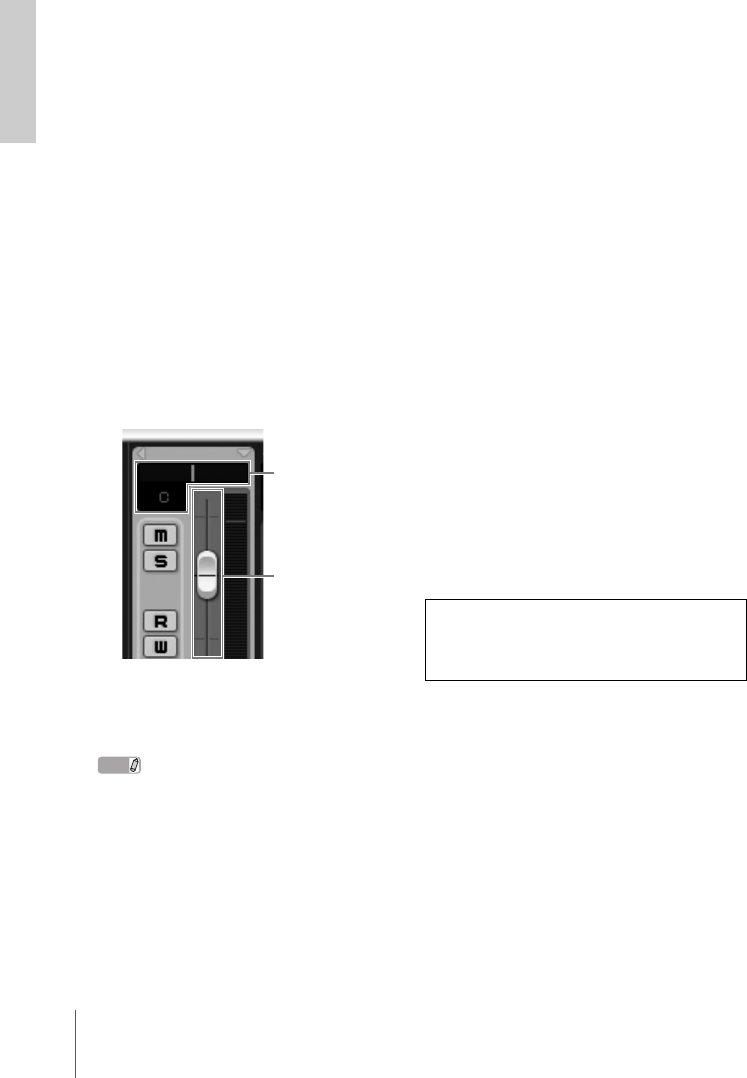
5MASTER control
Adjusts the signal level sent to the LINE OUT
jacks. This allows you to adjust the overall vol-
ume without changing the relative volume bal-
ance among the channels. This control does not
affect the signal sent to the computer.
6PHONES control
Adjusts the signal level sent to the PHONES
jack, since this output signal is not affected by
the MASTER control.
7MIX control (INPUT—DAW)
Adjusts the signal level balance between the
signal from the analog input jacks and the sig-
nal from an application software, such as DAW.
This control does not affect the signal sent to
the computer.
AI KNOB section
The functions of the AI KNOB section differ ac-
cording to the mode, Normal or Browse. Normal
mode is the conventional mode. When a window
such as Browse Sounds window in Cubase is
opened, the mode changes to the Browse mode
automatically. In Browse mode, you can use the
button 8 AI KNOB, 9 [LOCK] button, ) [PRE-
VIOUS] button, ! [NEXT] button, and @ [AC-
TION PAD] button to navigate through Cubase
windows, e.g. the Browse Sounds dialog. Below
are the explanations of the function in Normal
mode. Refer to “The functions of AI KNOB sec-
tion in the Normal mode and the Browse mode”
on page 12 for explanations of the function in
the Browse mode.
8AI KNOB
Turning the AI KNOB
This multi-function knob can control a desired
parameter within the principal window and plug-
in software in Cubase, specified via the mouse
pointer.
Pressing the AI KNOB
Opens certain windows in Cubase, such as the
Browse Sounds window (at which the mode
changes to the Browse mode automatically).
For details, refer to the following table.

CI2+ Operation Manual 11
The Controls and Connectors
English
9 [LOCK] button/Indicator
You can “lock” the parameter to be edited via
the AI KNOB by turning this button on. When
you locate the mouse pointer to the desired pa-
rameter then turn the [LOCK] button on, the AI
KNOB will control the “locked” parameter re-
gardless of the mouse pointer’s position. The
[LOCK] indicator lights while the parameter is
locked. By turning the [LOCK] button off, you
can unlock the parameter to be edited and the
AI KNOB can then be used to edit another pa-
rameter to which the mouse pointer is located.
) [PREVIOUS] button
Moves the project cursor on Cubase to the pre-
vious marker position. Holding down this button
starts fast rewind. Pressing the [PREVIOUS]
button and [NEXT] button simultaneously turns
on or off the Cycle function on Cubase.
! [NEXT] button
Moves the project cursor on Cubase to the next
marker position. Holding down this button starts
fast forward. Pressing the [PREVIOUS] button
and [NEXT] button simultaneously turns on or
off the Cycle function on Cubase.
@ [ACTION PAD] button
This button is used for an Interactive Recording
function on Cubase. When this button is
pressed, the Interactive Recording panel is
shown. If the display is already shown, pressing
the button performs the registered functions in
order. Two to six functions can be registered on
the Interactive Recording panel.
# [REC] button
Starts recording on Cubase.
$ [PLAY/STOP] button
Alternately executes Play or Stop on Cubase.
Double-clicking this button returns the project
cursor on Cubase to the start position.
% USB Indicator
This indicator shows the communication state of
CI2+ and computer. The indicator lights when
the CI2+ is connected to the computer via a
USB cable and communication with the com-
puter is enabled.
^ AI READY Indicator
This indicator shows the communication state of
CI2+ and Cubase. The indicator lights when the
Link functions are available.
IMPORTANT
To use the Link function between the CI2+ and
Cubase, you will need to install Cubase/Cubase
Essential version 5.1.1 or higher. For details, refer to
the following website.
http://service.steinberg.de/goto.nsf/show/
supportupdates_ci2plus_gb
& BROWSE Indicator
This indicator lights when a window in Cubase
is opened, such as the Browse Sounds. The in-
dicator lights in the Browse mode. It does not
light in the Normal mode.
The status of Cubase Window to be opened
Project has not been opened
yet
Project Assistant
Project is opened Browse Sounds window
Opening an active VST/VSTi
plug-in window
Search & Viewer
Opening an Interactive Re-
cording panel
Preset pop-up list
12 CI2+ Operation Manual
The Controls and Connectors
English
The functions of AI KNOB section in the Normal mode and the Browse mode
NOTE
The [REC] button and [PLAY/STOP] button have the same functions both in the Normal mode and the Browse
mode.
Normal mode BROWSE off Browse mode BROWSE on
Turning the AI KNOB This multi-function knob can control a de-
sired parameter within the principal window
and plug-in software in Cubase, specified via
the mouse pointer.
Moves the cursor. Turning the AI KNOB
while holding down the [ACTION PAD] but-
ton lets you move the cursor to the next col-
umn (only for window having two or more
columns).
Pressing the AI KNOB Opens certain windows in Cubase, such as
the Browse Sounds window (while entering
Browse mode in this case). See page 10 for
details.
Turns the selected item on/off (only for win-
dow in which two or more items can be se-
lected) or sets the selected item.
Pressing the [LOCK]
button
You can “lock” the parameter to be edited via
the AI KNOB by turning this button on. See
page 11 for details.
Cancels the selected item and closes the
window (returns to Normal mode). Holding
down for two seconds or longer cancels all of
the selected items (only for window in which
two or more items can be selected).
Pressing the [ACTION
PAD] button (pressing
the foot switch)
This button is used for an Interactive Record-
ing function on Cubase. See page 11 for de-
tails.
Moves the cursor to the next column (only for
window having two or more columns).
Pressing the [PREVI-
OUS] button
Moves the project cursor on Cubase to the
previous marker position. See page 11 for
details.
Moves the cursor to the previous column
(only for windows having two or more col-
umns).
Pressing the [NEXT]
button
Moves the project cursor on Cubase to the
next marker position. See page 11 for de-
tails.
Moves the cursor to the next column (only for
windows having two or more columns).
CI2+ Operation Manual 13
The Controls and Connectors
English
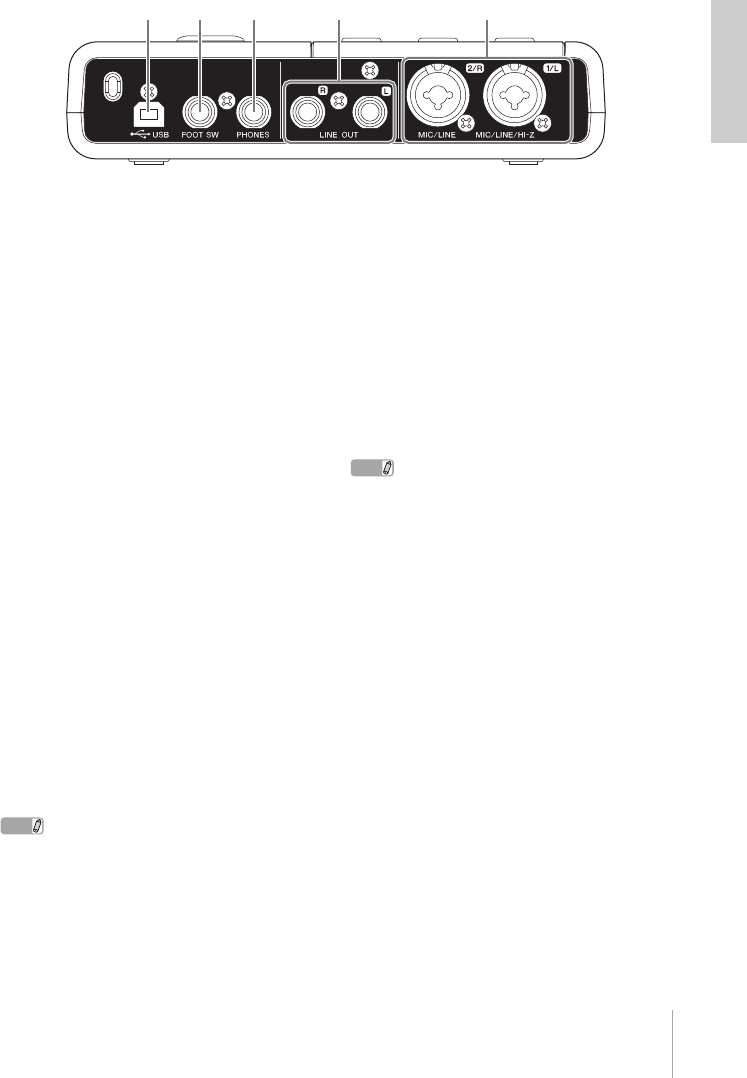
Rear Panel
1USB terminal
This terminal is used to connect the CI2+ and
the computer by using the included USB cable.
2FOOT SW jack
Connect an optional Yamaha FC5 foot switch to
this jack. The connected foot switch operates
the same as the [ACTION PAD] button.
3 PHONES jack
A pair of headphones can be plugged in here.
This jack outputs the mixed signal from the ana-
log input jacks and the signal from a DAW or
other audio software. The output level can be
adjusted using the PHONES control. This out-
put signal is not affected by the MASTER con-
trol.
4LINE OUT jacks L/R
These jacks would typically be connected to
monitor speakers (powered speakers). These
jacks output the mixed signal from the analog
input jacks and the signal from a DAW or other
audio software. The output level can be ad-
justed using the MASTER control.
NOTE
The volume balance between the analog input signal
and the application software like DAW output signal
can be adjusted using the MIX control.
5MIC/LINE/HI-Z jack 1/L
(analog input jack 1)/
MIC/LINE jack 2/R
(analog input jack 2)
Microphones and instruments such as guitars
can be connected here using XLR or phone
jack cables. The signal received by these jacks
is sent to the LINE OUT jacks and computer.
NOTE
You can directly connect an electric guitar or electric
bass without the need for a separate DI box or amp
simulator to analog input jack 1. In this case, turn on
(O) the [HI-Z] button on the front panel. Make sure to
use an unbalanced phone cable when you connect an
electric guitar or electric bass. If you use a balanced
cable, it will not work correctly.
3 4 5
2
1

14 CI2+ Operation Manual
Software Installation
English
Software Installation
To use the CI2+ you must first install the software on the computer. This section explains the soft-
ware installation. Install Cubase Essential before you install TOOLS for CI2.
NOTE
• Before installing the software, confirm the “System Requirements for Software” on page 8. The latest informa-
tion (e.g. OS compatibility, software update, etc.) is available on the following Steinberg website.
http://www.steinberg.net/en/support.html
• If you have already installed a version of Cubase that is compatible with operation with the CI2+ (page 11), the
instructions on installing Cubase Essential described below are not necessary. Jump to the next section “Install-
ing TOOLS for CI2.”
Installing Cubase Essential
To install Cubase Essential, there are three
steps:
• Software installation
• License download (Activation)
• User registration and product registration
NOTE
• The “License download” and “User registration and
product registration” requires an Internet connec-
tion.
• Registered customers enjoy various support ser-
vices such as technical support or upgrade.
Software Installation
Install the software using the Cubase Essential
DVD-ROM. Follow the instructions below.
1. Start the computer and log on to the Ad-
ministrator account.
2. Insert the Cubase Essential DVD-ROM
into the DVD-ROM drive.
3. When the “WELCOME TO CUBASE ES-
SENTIAL” window appears, click the cor-
responding national flag icon to choose
your preferred language.
NOTE
If this window does not appear automatically, open
the DVD-ROM then double-click the file “Cubase
Essential Start Center.”
4. Click “Install CUBASE ESSENTIAL.”
5. Follow the onscreen instructions to in-
stall the software.
License download (Activation)
Download the software license using the USB-
eLicenser and ESSENTIAL PRODUCT LI-
CENSE INFORMATION card from the Internet.
Follow the instructions below.
6. Connect the USB-eLicenser to a USB
terminal of your computer.
If the “Found New Hardware Wizard” window
appears, select “Install the software auto-
matically” to install the driver.
7. Start the “eLicenser Control Center” as
follows.
(Windows)
Select [Start] [All Programs]
[eLicenser] [eLicenser Control Center].
(Mac OS X)
Select [Macintosh HD] [Applications]
[eLicenser Control Center].
8. Click [Enter Activation Code].
9. Enter the Activation Code described on
the ESSENTIAL PRODUCT LICENSE IN-
FORMATION card.
10. Download the license by following the
on-screen instructions.
CI2+ Operation Manual 15
Software Installation
English
User registration and product
registration
Register your personal information and products
on “MySteinberg” in the Steinberg website. See
the following website for details.
https://www.steinberg.net/en/mysteinberg.html
The installation for Cubase Essential is now
complete.
Installing TOOLS for CI2
TOOLS for CI2 consists of two software
components: Yamaha Steinberg USB Driver and
Steinberg CI2 Extension. Yamaha Steinberg
USB Driver enables communication between
the CI2+ and your computer. Using Steinberg
CI2 Extension, you can link the CI2+ with a
Cubase version which supports the Link
functions between both of them (page 11). The
TOOLS for CI2 Installer installs these two
software components. Follow the instructions
below to install the components.
Windows: ......................................... page 15
Mac OS X: ....................................... page 17
Windows
Preparing to install 1
1. Disconnect all the devices other than
the mouse and keyboard from the com-
puter.
2. Start the computer and log on to the Ad-
ministrator account.
Exit any open applications and close all open
windows.
Preparing to install 2
(Windows XP only)
For Windows Vista/Windows 7 users, this set-
ting is not necessary. Go on to step 6.
3. Select [Start] ( [Settings] ) [Control
Panel], click “Switch to Classic View” in
the upper left of the window.
NOTE
After completing the installation, make sure to re-
store the original settings if necessary.
4. Go to [System] [Hardware] [Driver
Signing] [Driver Signing Options], and
select the radio button to the left of “Ig-
nore – Install the software anyway and
don’t ask for my approval” and click
[OK].
NOTE
After completing the installation, make sure to re-
store the original settings if necessary.
5. Close the System Properties window by
clicking the [OK] button or the Close
button ( [X] ) to close the Control Panel.

16 CI2+ Operation Manual
Software Installation
English
Software Installation
6. Insert the TOOLS for CI2 CD-ROM into
the CD-ROM drive.
7. Open the CD-ROM, then double-click
the file “setup.exe.”
A “Welcome to the InstallShield Wizard for
TOOLS for CI2” window appears.
(Windows Vista/Windows 7) If the “User Ac-
count Control” window appears, click [Continue]
or [Yes].
8. Click [Next] to start the installation.
To cancel the installation, click [Cancel].
9. When a message appears indicating that
the software has been installed, click
[Finish].
10. When a window appears requiring you to
restart your computer, follow the on-
screen instructions to restart the com-
puter.
11. Connect the CI2+ directly to the com-
puter (without using a hub) by using the
included USB cable.
Initial settings of driver
(Windows XP only)
For Windows Vista/Windows 7 users, the initial
settings of the driver are set automatically. Go
on to step 15.
12. The “Found New Hardware Wizard” win-
dow appears.
Some computers may take a while to display
the window.
A dialog box may appear asking you whether
you wish to connect to Windows Update. In this
case, select the radio button to the left of “Not
at this time,” then click [Next].
13. Select the radio button next to “Install
the software automatically” then click
[Next].
If a message “The software you are installing
has not passed Windows Logo Testing” ap-
pears, click [Continue Anyway]. You do not
need to abort the installation.
14. When a message appears indicating that
the installation has been completed,
click [Finish].
Confirming the installation
15. Select [Control Panel] from the Start
menu.
16. Open the Device Manager window as
follows.
(Windows Vista/Windows 7)
Select [Hardware and Sound], then click [De-
vice Manager].
If the “User Account Control” window appears,
click [Continue] or [Yes]..
(Windows XP)
Double-click on the System icon to call up the
System Properties window, then select the
Hardware tab and click [Device Manager].
17. Click on the [+] mark or [>] mark next to
“Sound, video and game controllers,”
and confirm that “Steinberg CI2+” is
listed.
The installation is now complete.
CI2+ Operation Manual 17
Software Installation
English
Mac OS X
Software Installation
1. Disconnect all the devices other than
the mouse and keyboard from the com-
puter.
2. Insert the TOOLS for CI2 CD-ROM into
the CD-ROM drive of your computer.
3. Open the CD-ROM, then double-click
the file “TOOLS for CI2.mpkg.”
4. A dialog box appears asking if you want
to install the software. Click [Continue].
The “Welcome to the TOOLS for CI2 Installer”
window appears.
5. Click [Continue].
The “Installation Type” window appears.
6. Click [Install].
The “Authenticate” window appears.
7. Enter the Administrator name and the
password, then click [OK].
A message appears prompting you to restart
the computer after the installation.
8. Click [Continue Installation]
The “Install” window appears indicating the in-
stallation progress. When the installation is
complete, the “Summary” window appears.
9. Click [Restart] to restart the computer.
10. Connect the CI2+ directly to the com-
puter (without using a hub) by using the
included USB cable.
Confirming the installation
(Mac OS X 10.5)
For Mac OS X 10.6 users, go on to step 13.
11. From the hard disk to which the OS is
installed (usually Macintosh HD), click
[Applications][Utilities], then double-
click [Audio MIDI Setup].
The “Audio MIDI Setup” window appears.
12. Click [Audio Devices], then select
“Steinberg CI2+” from the pull-down
menu in [Properties For].
The current audio settings are shown in the
[Audio input] and [Audio Output] fields.
NOTE
By selecting “Steinberg CI2+” for [Default Output]
in System Settings, you can output audio signals of
the system sounds and audio player software (e.g.,
iTunes, etc.) from the CI2+.
The installation is now complete.
Confirming the installation
(Mac OS X 10.6)
13. From the hard disk to which the OS is
installed (usually Macintosh HD), click
[Applications][Utilities], then double-
click [Audio MIDI Setup].
The “Audio Devices” window appears.
14. Select “Steinberg CI2+” from the list of
audio devices.
The current audio settings are shown in the
right side of the window.
NOTE
By selecting “using this device for sound output” in
the Action menu at the left bottom of the window,
you can output audio signals of audio player
software (e.g., iTunes, etc.) from the CI2+.
The installation is now complete.

18 CI2+ Operation Manual
Connecting to an External Device
English
Connecting to an External Device
Connection Examples
Options
Foot switch
A Yamaha FC5 foot switch can be connected to
the FOOT SW jack. The connected foot switch
operates the same as the [ACTION PAD] button.
Microphone stand adaptor
A Yamaha BMS-10A microphone stand adaptor
can be attached to the underside of the CI2+.
The CI2+ attached with the microphone stand
adaptor can then be used with a conventional
microphone stand.
Headphones
Computer
Powered monitor speakers Electric guitar
FC5 Microphone
FC5
BMS-10A

CI2+ Operation Manual 19
Try it out
English
Try it out
This section provides information on how to record and edit with Cubase. While going through this
section you might find it useful to also refer to the “Controls and Functions” section, as well as the
PDF documentation supplied with Cubase Essential (Getting Started and Operation Manual, opened
from the “Help” menu).
Preparing for using the
CI2+ with Cubase
You can make the configuration as follows.
1. Make sure that all applications have
been quit.
2. Connect the CI2+ and USB-eLicenser to
the computer.
IMPORTANT
• (Windows only) Make sure to use the same USB
terminal as the one used in the installation
procedure when you connect the CI2+ and USB-
eLicenser to the computer again. If you connect
them to a different USB terminal, you will have to
install the driver again.
• You need to connect the USB-eLicenser to the
computer while running Cubase.
3. Start Cubase on your computer.
If the following dialog box is displayed while
Cubase is starting, click [Yes].
4. When the “Project Assistant” window is
displayed, move the cursor to “Record-
ing” by turning the AI KNOB, then press
the [ACTION PAD] button.
NOTE
Pressing the [ACTION PAD] button moves the fo-
cus which can be operated by the AI KNOB to the
next column or pane.
5. Move the cursor to the desired project
template by turning the AI KNOB, then
press the AI KNOB.
A project window will appear.
NOTE
If you selected the “Prompt for project location” in
the Project Assistant window, the “Set Project
Folder” window will appear. Select a project folder
by using the mouse, then click [OK].
6. In case the “Missing Ports” window ap-
pears. Select the port for each “Mapped
Ports” and enter a checkmark for “Map
Always,” then click [OK].
NOTE
If you enter a checkmark for “Map Always,” the “Miss-
ing Ports” window will not appear from the next time.
Preparation for using the CI2+ with Cubase is
now complete.
20 CI2+ Operation Manual
Try it out
English
Recording
You can record your performance to Cubase
with the Interactive Recording function by fol-
lowing the instructions below. To operate the In-
teractive Recording function, use the [ACTION
PAD] button.
NOTE
• Interactive Recording function works optimally when
“Tapemachine Style” is selected in the “Auto
Monitoring” setting in Cubase. Open the Cubase
menu [File (Windows) or Cubase Essential (Mac)]
[Preference] [VST], then set the “Tapemachine
Style” to “Auto Monitoring.”
• The connected optional Yamaha FC5 foot switch
operates the same as the [ACTION PAD] button.
1. Connect external devices such as micro-
phones and instruments to analog input
jacks.
CAUTION
Before connecting external devices such as micro-
phones and instruments, set the volume of external
devices and monitor speakers (powered speakers) to
the minimum. We also recommend that you set the
MASTER control to the minimum and turn off (N)
both the [HI-Z INPUT 1] button and [PHANTOM INPUT
1&2] button, to avoid risk of loud noises that could
cause hearing loss or device damage.
2. Click in the track list (the area in which
the track names are displayed) to select
a track to record on.
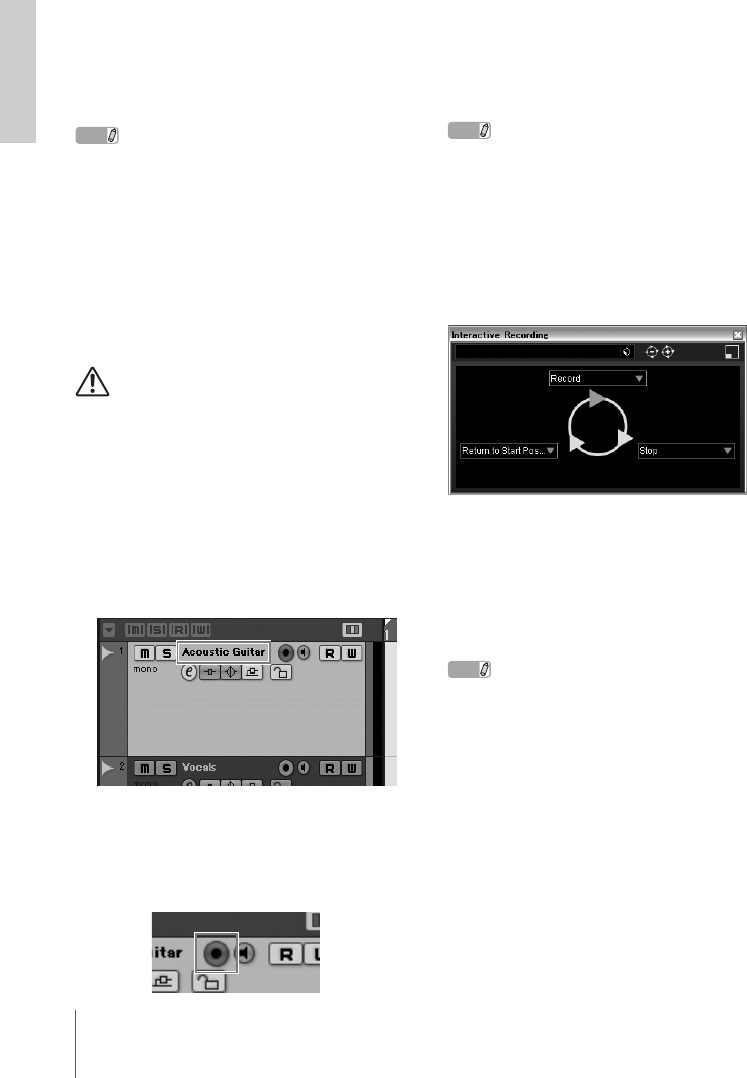
3. Make sure the [Record Enable] button
for the track to be recorded is turned on.
If the [Record Enable] button is off, click it to
turn it on.
4.
Play the instrument, and adjust the re-
cording level with the CI2+ GAIN controls.
To achieve the best balance of the recording
level between S/N ratio and dynamic range, ad-
just the level so that the PEAK Indicator lights
only occasionally and briefly on the highest in-
put transients.
NOTE
• If the Clipping Indicator in the Transport panel
on Cubase lights, lower the CI2+ GAIN controls.
• The MIX control let you adjust the signal level
balance between the signal from the analog in-
put jacks and the signal from Cubase.
5. Press the [ACTION PAD] button to open
the Interactive Recording panel.
6. Press the [ACTION PAD] button to start
recording.
Recording will begin since “Record” has been
executed on the Interactive Recording panel.
7. Play the instrument.
NOTE
• You can abort the Interactive Recording func-
tion and close the Interactive Recording panel
by pressing the [LOCK] button.
• You can return to step 6 to abort and retry the
recording by holding down the [LOCK] button
for two seconds or longer.
CI2+ Operation Manual 21
Try it out
English
8. When you finish recording the track,
press the [ACTION PAD] button to stop
recording.
Recording will stop since “Stop” has been exe-
cuted on the Interactive Recording panel.
9. Press the [ACTION PAD] button to return
the project cursor to the start position.
The project cursor will return to start position
since “Return to Start Position” has been exe-
cuted on the Interactive Recording panel.
To hear playback of the track you have just re-
corded, click the Transport panel [Play] button.
Recording operation is now complete.
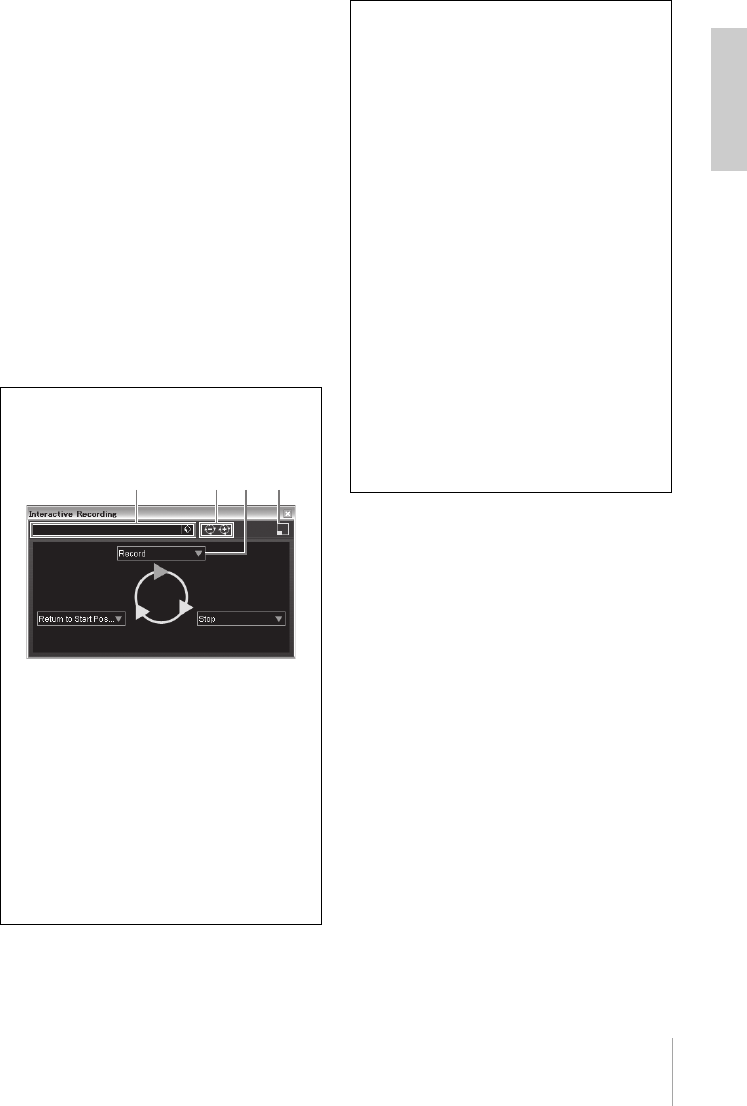
TIP
You can also operate in the Interactive Re-
cording panel as shown below.
1Saves and loads the sequence of
actions.
2Increases and decreases the number of
actions. The available number of actions
is two through six.
3Changes the action to another action.
4Switches the panel to the small
Interactive Recording panel. In the small
panel, you can only load the sequence of
actions.
1234
TIP
Setting the audio driver buffer size
Noise produced when using audio applications
such as DAW software may affect audio re-
cording and/or playback. In most cases, you
can solve these problems by adjusting the au-
dio driver buffer size (the size of memory used
to temporarily hold data to avoid intermittent
playback). The buffer size can usually be ad-
justed via the audio driver setup window in the
application. (When using ASIO compatible soft-
ware for Windows, the buffer size can be ad-
justed in the ASIO Buffer Size parameter via
the Control Panel of the Yamaha Steinberg
USB Driver.) While the higher buffer size re-
duces load to the computer CPU but produces
latency (time lag) during recording/playback,
the smaller buffer size may result in noise or
the sound cutting off. Make sure to set the buf-
fer size to an appropriate value depending on
the performance of your computer, the number
of audio/MIDI tracks being recorded/played
back on the DAW software, the number of
plug-in software, and so on.
22 CI2+ Operation Manual
Try it out
English
Editing
You can edit parameters in the project with the
AI KNOB and [LOCK] button by following the
instructions.
AI KNOB
This multi-function knob can control a desired
parameter within the principal window and plug-
in software on Cubase, specified via the mouse
pointer. In the following examples, we’ll control
the volume and panning parameter of the audio
track on the mixer window.
1. Click [Mixer] from the [Devices] menu.
Mixer window will appear.
2. Locate the mouse pointer to the volume
or panning parameter of the audio track
on the mixer window.
3. Turn the AI KNOB
The AI KNOB will control the parameter on
which the mouse pointer is located.
NOTE
The assignable parameters to the AI KNOB are pa-
rameters that can be automated within the princi-
pal window and plug-in software on Cubase. Plug-
in software compatible with the AI KNOB are the
VST 3 plug-ins included with Cubase (as of Febru-
ary 2010). For the latest information about com-
patible plug-in software, refer to the following URL:
http://service.steinberg.de/goto.nsf/show/
supportupdates_ci2plus_gb
[LOCK] button
The [LOCK] button can “lock” the parameter to
be edited via the AI KNOB. You can lock the
volume parameter to the AI KNOB as follows.
1. Locate the mouse pointer to the volume
parameter then turn on the [LOCK] but-
ton.
[LOCK] indicator will light.
2. Move the mouse pointer to the other lo-
cation.
3. Turn the AI KNOB
The AI KNOB will control the volume parameter
regardless of the mouse pointer’s position.
By turning the [LOCK] button off, you can un-
lock the parameter to be edited and the AI
KNOB can then be used to edit another param-
eter to which the mouse pointer is located.
Continue to edit other parameters in the same
way.
Editing operation is now complete.
panning
volume
For more information on this product, please
visit the following Steinberg website:
http://www.steinberg.net/

CI2+ Operation Manual 23
Troubleshooting
English
Troubleshooting
The power of the device does not turn on.
• Make sure that the CI2+ is properly con-
nected to the computer via a USB cable.
The USB bus-power is necessary to use the CI2+.
• Confirm whether or not a proper USB ca-
ble is used.
If the USB cable is broken or damaged, have the
USB cable replaced with a known working one.
Use a USB cable no longer than 1.5 meters.
• Connect the CI2+ to a computer without a
USB hub.
No sound.
• Make sure that the MASTER/PHONES/
MIX controls are set properly.
• Are your speaker cables connected properly?
Refer to “Connection Examples” on page 18.
• Are your speaker cables shorted?
• Are the volume controls of your sources,
audio devices, applications software,
computer operating system, etc., set at
appropriate levels?
• (Windows only) Is the output of your com-
puter operating system muted?
• Do you have several applications running
at the same time?
Be sure to quit all applications you are not using.
• Is the “ASIO Driver” setting on Cubase set
properly?
Make sure that the “Yamaha Steinberg USB
ASIO (Windows)” or “Steinberg CI2+ (Mac)” is
selected on the “ASIO Driver” in the “VST Audio
System” window (called up via [Device Setup…]
under the [Devices] menu).
Noise occurs, or the sound is
intermittent or distorted.
• Is the PEAK indicator flashing red?
You might have to lower GAIN control level to
avoid distortion.
• Does your computer satisfy the system
requirements?
Refer to “System Requirements” on page 8.
• Is the buffer size setting of the Yamaha
Steinberg USB Driver set properly?
Refer to the “Setting the audio driver buffer size”
on page 21.
• Are any other applications, device drivers,
or USB devices (scanners, printers, etc.)
running at the same time?
Be sure to quit all applications you are not using.
• Are you playing back a large number of
audio tracks?
The number of tracks you can play at the same
time will depend on the performance of the com-
puter you are using. You may experience inter-
mittent playback if you exceed your computer's
capabilities.
• Are you recording or playing long continu-
ous sections of audio?
The audio data processing capabilities of your
computer will depend on a number of factors in-
cluding CPU speed and access to external de-
vices.
• Is the network adaptor running?
Disable the suspected network adaptor. Some
network adaptors can cause noise.

24 CI2+ Operation Manual
Troubleshooting
English
Cubase does not recognize the CI2+.
• Make sure that the CI2+ is properly con-
nected to the computer via a USB cable.
• Confirm whether or not a proper USB ca-
ble is used.
If the USB cable is broken or damaged, have the
USB cable replaced with a known working one.
Use a USB cable no longer than 1.5 meters.
• Confirm whether or not the CI2+ is con-
nected to the computer before starting
Cubase.
• Confirm whether or not the “Yamaha
Steinberg USB Driver” and “Steinberg CI2
Extension” have been installed.
If not, install them.
• Confirm whether or not a version of
Cubase that is compatible with operation
with the CI2+ (page 11) has already been
installed.
• Make sure that CI2+ is selected as the
port setting on Cubase.
The port is described in the Device Setup window
(called up via [Device Setup...] under the [Devices]
menu) when selecting “Steinberg CI2+” under
“Remote Devices” in the Devices box.
• Make sure that there is no check mark in
“In ‘All MIDI Inputs’” for CI2+ MIDI port on
the “MIDI Port Setup” window (called up
via [Device Setup…] under the [Devices]
menu.)
• Are you connecting the Steinberg CC121
and the CI2+ simultaneously with one
computer?
If you are connecting the Steinberg CC121 and
the CI2+ simultaneously with one computer, the
AI KNOB and [LOCK] button on the CI2+ cannot
be used.
Computer does not recognize the
USB-eLicenser properly.
• Connect the USB-eLicenser to a com-
puter without a USB hub.
• Make sure that the latest version of the
software for the USB-eLicenser has been
installed.
If it is not the case, download it from the following
website and install it.
http://www.elicenser.net/en

CI2+ Operation Manual 25
Uninstalling the TOOLS for CI2
English
Uninstalling the TOOLS for CI2
To uninstall TOOLS for CI2, you must remove the following two software components.
• Yamaha Steinberg USB Driver
• Steinberg CI2 Extension
Windows
1. Disconnect all other USB devices except
mouse and keyboard from the com-
puter.
2. Log on to the Administrator account.
Exit any open applications and close all open
windows.
3. Open the window for the uninstall oper-
ation as follows.
(Windows Vista/Windows 7)
From the Start menu, select [Control Panel]
[Uninstall a Program] to call up the “Uninstall or
change a program” panel.
(Windows XP)
From the Start menu, select ([Settings] )
[Control Panel] [Add or Remove Programs]
to display the Add or Remove Programs panel.
Click “Change or Remove Programs” located in
the upper left.
4. Select “Yamaha Steinberg USB Driver,”
”Steinberg CI2 Extension” from the list.
5. Uninstall them as follows.
(Windows Vista/Windows 7)
Click the [Uninstall]/[Uninstall/Change].
If the “User Account Control” window appears,
click [Continue] or [Yes].
Follow the on-screen instructions to remove the
software.
(Windows XP)
Click [Change/Remove]/[Remove].
Follow the on-screen instructions to remove the
software.
Mac OS X
Removing Yamaha Steinberg USB Driver
Remove the following folders and files from the
boot disk (usually Macintosh HD).
/System/Library/Extensions
YamahaSteinbergUSBAudio.kext
/Application/Yamaha/USBDriver/
Yamaha Steinberg USB Control Panel.app
/Library/PreferencePanes/
Yamaha Steinberg USB.prefPane
/Library/Preferences/
com.yamaha.YamahaSteinbergUSBDriver.plist
/Library/Audio/MIDI Drivers/
YamahaSteinbergUSBMIDI.plugin
/Library/Audio/MIDI Devices/Yamaha/Images/
USB_1500.tiff
USB_1502.tiff
/Library/Receipts/
YamahaSteinbergUSBAudioDriver.pkg
YamahaSteinbergUSBControlPanel.pkg
YamahaSteinbergUSBDriverplist.pkg
YamahaSteinbergUSBMIDIPlugIn.pkg
YamahaSteinbergUSBMIDIIcon.pkg
YamahaSteinbergUSBPrefPane.pkg
Removing Steinberg CI2 Extension
Remove the following folders and files from the
boot disk (usually Macintosh HD).
/Library/Application Support/Steinberg/Compo-
nents/
ci2_extension_u.bundle
/Library/Application Support/Yamaha/
InteractiveRecording
/Library/Receipts/
Steinberg CI2 Extension.pkg
26 CI2+ Operation Manual
Appendix
English
Appendix
Input and Output Specifications
General Specifications
Specifications and descriptions in this manual are for information purposes only. Steinberg/Yamaha Corp. reserves
the right to change or modify products or specifications at any time without prior notice. Since specifications, equip-
ment or options may not be the same in every locale, please check with your Steinberg/Yamaha dealer.
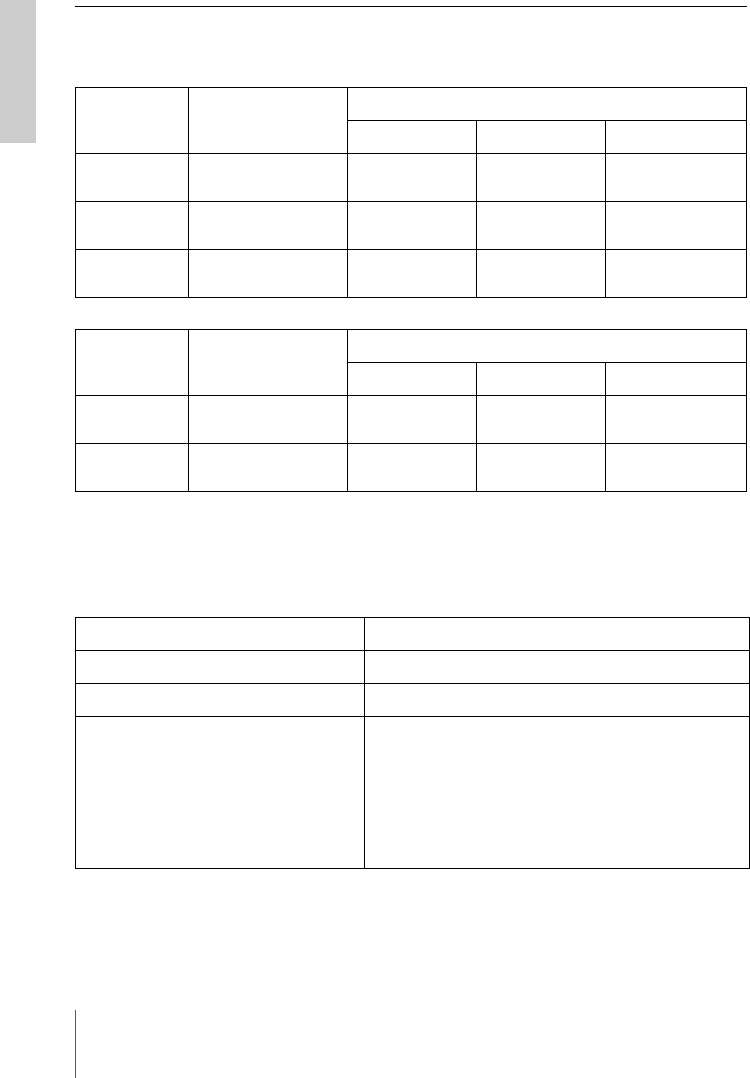
Analog Input Type
Input Level
Nominal Level Maximum Level Input Impedance
MIC 1/L, 2/R XLR type, balanced
+48V Phantom powered -60dBu — -16dBu -6dBu 3kΩ
HI-Z 1/L Phone type,
unbalanced -44dBu — 0dBu +10dBu 500kΩ
LINE 1/L, 2/R TRS phone type,
balanced -34dBu — +10dBu +20dBu 62kΩ
Analog Output Type
Output Level
Nominal Level Maximum Level Input Impedance
LINE OUT L, R TRS phone type,
impedance balanced +4dBu +10dBu 10kΩ
PHONES TRS phone type,
stereo 3.6mW 6.0mW 40Ω
USB terminal USB1.1, 44.1/48 kHz, 24 bit, bus-powered
Dimensions (W x H x D) W190 x H45.4 x D134.5 mm
Net Weight 701 g
Included Accessories • Operation Manual
• TOOLS for CI2 CD-ROM
• Cubase Essential DVD-ROM
• USB-eLicenser
• ESSENTIAL PRODUCT LICENSE INFORMATION card
•USB cable
• Ferrite core

CI2+ Operation Manual 27
English
License Agreement for TOOLS for CI2
ATTENTION
SOFTWARE LICENSE AGREEMENT
PLEASE READ THIS SOFTWARE LICENSE AGREE-
MENT (“AGREEMENT”) CAREFULLY BEFORE US-
ING THIS SOFTWARE. YOU ARE ONLY PERMITTED
TO USE THIS SOFTWARE PURSUANT TO THE
TERMS AND CONDITIONS OF THIS AGREEMENT.
THIS AGREEMENT IS BETWEEN YOU (AS AN INDI-
VIDUAL OR LEGAL ENTITY) AND YAMAHA CORPO-
RATION (“YAMAHA”). BY BREAKING THE SEAL OF
THIS PACKAGE YOU ARE AGREEING TO BE
BOUND BY THE TERMS OF THIS LICENSE. IF YOU
DO NOT AGREE WITH THE TERMS, DO NOT IN-
STALL, COPY, OR OTHERWISE USE THIS SOFT-
WARE.
1. GRANT OF LICENSE AND COPYRIGHT
Yamaha hereby grants you the right to use one copy of
the software program(s) and data (“SOFTWARE”)
accompanying this Agreement. The term SOFTWARE
shall encompass any updates to the accompanying
software and data. The SOFTWARE is owned by Yamaha
and/or Yamaha’s licensor(s), and is protected by relevant
copyright laws and all applicable treaty provisions. While
you are entitled to claim ownership of the data created
with the use of SOFTWARE, the SOFTWARE will
continue to be protected under relevant copyrights.
•You may use the SOFTWARE on a single com-
puter.
•You may make one copy of the SOFTWARE in
machine-readable form for backup purposes only, if
the SOFTWARE is on media where such backup
copy is permitted. On the backup copy, you must re-
produce Yamaha’s copyright notice and any other
proprietary legends that were on the original copy of
the SOFTWARE.
•You may permanently transfer to a third party all
your rights in the SOFTWARE, provided that you do
not retain any copies and the recipient reads and
agrees to the terms of this Agreement.
2. RESTRICTIONS
•You may not engage in reverse engineering, dis-
assembly, decompilation or otherwise deriving a
source code form of the SOFTWARE by any
method whatsoever.
•You may not reproduce, modify, change, rent,
lease, or distribute the SOFTWARE in whole or in
part, or create derivative works of the SOFTWARE.
•You may not electronically transmit the SOFT-
WARE from one computer to another or share the
SOFTWARE in a network with other computers.
•You may not use the SOFTWARE to distribute il-
legal data or data that violates public policy.
•You may not initiate services based on the use of
the SOFTWARE without permission by Yamaha
Corporation.
Copyrighted data, including but not limited to MIDI data
for songs, obtained by means of the SOFTWARE, are
subject to the following restrictions which you must ob-
serve.
• Data received by means of the SOFTWARE may not
be used for any commercial purposes without per-
mission of the copyright owner.
• Data received by means of the SOFTWARE may not
be duplicated, transferred, or distributed, or played
back or performed for listeners in public without
permission of the copyright owner.
• The encryption of data received by means of the
SOFTWARE may not be removed nor may the elec-
tronic watermark be modified without permission of
the copyright owner.
3. TERMINATION
This Agreement becomes effective on the day that you
receive the SOFTWARE and remains effective until
terminated. If any copyright law or provisions of this
Agreement is violated, the Agreement shall terminate
automatically and immediately without notice from
Yamaha. Upon such termination, you must immediately
destroy the licensed SOFTWARE, any accompanying
written documents and all copies thereof.
4. LIMITED WARRANTY ON MEDIA
As to SOFTWARE sold on tangible media, Yamaha war-
rants that the tangible media on which the SOFTWARE
is recorded will be free from defects in materials and
workmanship under normal use for a period of fourteen
(14) days from the date of receipt, as evidenced by a
copy of the receipt. Yamaha’s entire liability and your ex-
clusive remedy will be replacement of the defective me-
dia if it is returned to Yamaha or an authorized Yamaha
dealer within fourteen days with a copy of the receipt.
Yamaha is not responsible for replacing media damaged
by accident, abuse or misapplication. TO THE FULLEST
EXTENT PERMITTED BY LAW, YAMAHA EXPRESSLY
DISCLAIMS ANY IMPLIED WARRANTIES ON THE
TANGIBLE MEDIA, INCLUDING THE IMPLIED WAR-
RANTIES OF MERCHANTABILITY AND FITNESS FOR
A PARTICULAR PURPOSE.

28 CI2+ Operation Manual
English
5. DISCLAIMER OF WARRANTY ON SOFTWARE
You expressly acknowledge and agree that use of the
SOFTWARE is at your sole risk. The SOFTWARE and
related documentation are provided “AS IS” and
without warranty of any kind. NOTWITHSTANDING
ANY OTHER PROVISION OF THIS AGREEMENT,
YAMAHA EXPRESSLY DISCLAIMS ALL WARRAN-
TIES AS TO THE SOFTWARE, EXPRESS, AND IM-
PLIED, INCLUDING BUT NOT LIMITED TO THE
IMPLIED WARRANTIES OF MERCHANTABILITY, FIT-
NESS FOR A PARTICULAR PURPOSE AND NON-IN-
FRINGEMENT OF THIRD PARTY RIGHTS.
SPECIFICALLY, BUT WITHOUT LIMITING THE
FOREGOING, YAMAHA DOES NOT WARRANT THAT
THE SOFTWARE WILL MEET YOUR REQUIRE-
MENTS, THAT THE OPERATION OF THE SOFT-
WARE WILL BE UNINTERRUPTED OR ERROR-
FREE, OR THAT DEFECTS IN THE SOFTWARE WILL
BE CORRECTED.
6. LIMITATION OF LIABILITY
YAMAHA’S ENTIRE OBLIGATION HEREUNDER
SHALL BE TO PERMIT USE OF THE SOFTWARE UN-
DER THE TERMS HEREOF. IN NO EVENT SHALL
YAMAHA BE LIABLE TO YOU OR ANY OTHER PER-
SON FOR ANY DAMAGES, INCLUDING, WITHOUT
LIMITATION, ANY DIRECT, INDIRECT, INCIDENTAL
OR CONSEQUENTIAL DAMAGES, EXPENSES, LOST
PROFITS, LOST DATA OR OTHER DAMAGES ARIS-
ING OUT OF THE USE, MISUSE OR INABILITY TO
USE THE SOFTWARE, EVEN IF YAMAHA OR AN AU-
THORIZED DEALER HAS BEEN ADVISED OF THE
POSSIBILITY OF SUCH DAMAGES. In no event shall
Yamaha’s total liability to you for all damages, losses
and causes of action (whether in contract, tort or other-
wise) exceed the amount paid for the SOFTWARE.
7. THIRD PARTY SOFTWARE
Third party software and data (“THIRD PARTY SOFT-
WARE”) may be attached to the SOFTWARE. If, in the
written materials or the electronic data accompanying
the Software, Yamaha identifies any software and data
as THIRD PARTY SOFTWARE, you acknowledge and
agree that you must abide by the provisions of any
Agreement provided with the THIRD PARTY SOFT-
WARE and that the party providing the THIRD PARTY
SOFTWARE is responsible for any warranty or liability
related to or arising from the THIRD PARTY SOFT-
WARE. Yamaha is not responsible in any way for the
THIRD PARTY SOFTWARE or your use thereof.
• Yamaha provides no express warranties as to the
THIRD PARTY SOFTWARE. IN ADDITION,
YAMAHA EXPRESSLY DISCLAIMS ALL IMPLIED
WARRANTIES, INCLUDING BUT NOT LIMITED TO
THE IMPLIED WARRANTIES OF
MERCHANTABILITY AND FITNESS FOR A
PARTICULAR PURPOSE, as to the THIRD PARTY
SOFTWARE.
• Yamaha shall not provide you with any service or
maintenance as to the THIRD PARTY SOFTWARE.
• Yamaha is not liable to you or any other person for
any damages, including, without limitation, any di-
rect, indirect, incidental or consequential damages,
expenses, lost profits, lost data or other damages
arising out of the use, misuse or inability to use the
THIRD PARTY SOFTWARE.
8. GENERAL
This Agreement shall be interpreted according to and
governed by Japanese law without reference to princi-
ples of conflict of laws. Any dispute or procedure shall
be heard before the Tokyo District Court in Japan. If
for any reason a court of competent jurisdiction finds
any portion of this Agreement to be unenforceable, the
remainder of this Agreement shall continue in full force
and effect.
9. COMPLETE AGREEMENT
This Agreement constitutes the entire agreement be-
tween the parties with respect to use of the SOFT-
WARE and any accompanying written materials and
supersedes all prior or contemporaneous understand-
ings or agreements, written or oral, regarding the sub-
ject matter of this Agreement. No amendment or
revision of this Agreement will be binding unless in
writing and signed by a fully authorized representative
of Yamaha.
EnglishDeutschFrançaisEspañolItaliano
Information for Users on Collection and Disposal of Old Equipment
This symbol on the products, packaging, and/or accompanying documents means that used electrical and electronic products
should not be mixed with general household waste.
For proper treatment, recovery and recycling of old products, please take them to applicable collection points, in accordance with
your national legislation and the Directives 2002/96/EC.
By disposing of these products correctly, you will help to save valuable resources and prevent any potential negative effects on
human health and the environment which could otherwise arise from inappropriate waste handling.
For more information about collection and recycling of old products, please contact your local municipality, your waste disposal
service or the point of sale where you purchased the items.
[For business users in the European Union]
If you wish to discard electrical and electronic equipment, please contact your dealer or supplier for further information.
[Information on Disposal in other Countries outside the European Union]
This symbol is only valid in the European Union. If you wish to discard these items, please contact your local authorities or dealer and ask for the
correct method of disposal.
Verbraucherinformation zur Sammlung und Entsorgung alter Elektrogeräte
Befindet sich dieses Symbol auf den Produkten, der Verpackung und/oder beiliegenden Unterlagen, so sollten benutzte
elektrische Geräte nicht mit dem normalen Haushaltsabfall entsorgt werden.
In Übereinstimmung mit Ihren nationalen Bestimmungen und den Richtlinien 2002/96/EC, bringen Sie alte Geräte bitte zur
fachgerechten Entsorgung, Wiederaufbereitung und Wiederverwendung zu den entsprechenden Sammelstellen.
Durch die fachgerechte Entsorgung der Elektrogeräte helfen Sie, wertvolle Ressourcen zu schützen und verhindern mögliche
negative Auswirkungen auf die menschliche Gesundheit und die Umwelt, die andernfalls durch unsachgerechte Müllentsorgung
auftreten könnten.
Für weitere Informationen zum Sammeln und Wiederaufbereiten alter Elektrogeräte, kontaktieren Sie bitte Ihre örtliche Stadt- oder
Gemeindeverwaltung, Ihren Abfallentsorgungsdienst oder die Verkaufsstelle der Artikel.
[Information für geschäftliche Anwender in der Europäischen Union]
Wenn Sie Elektrogeräte ausrangieren möchten, kontaktieren Sie bitte Ihren Händler oder Zulieferer für weitere Informationen.
[Entsorgungsinformation für Länder außerhalb der Europäischen Union]
Dieses Symbol gilt nur innerhalb der Europäischen Union. Wenn Sie solche Artikel ausrangieren möchten, kontaktieren Sie bitte Ihre örtlichen
Behörden oder Ihren Händler und fragen Sie nach der sachgerechten Entsorgungsmethode.
Information concernant la Collecte et le Traitement des déchets d’équipements électriques et
électroniques.
Le symbole sur les produits, l'emballage et/ou les documents joints signifie que les produits électriques ou électroniques usagés
ne doivent pas être mélangés avec les déchets domestiques habituels.
Pour un traitement, une récupération et un recyclage appropriés des déchets d’équipements électriques et électroniques, veuillez
les déposer aux points de collecte prévus à cet effet, conformément à la réglementation nationale et aux Directives 2002/96/EC.
En vous débarrassant correctement des déchets d’équipements électriques et électroniques, vous contribuerez à la sauvegarde
de précieuses ressources et à la prévention de potentiels effets négatifs sur la santé humaine qui pourraient advenir lors d'un
traitement inapproprié des déchets.
Pour plus d'informations à propos de la collecte et du recyclage des déchets d’équipements électriques et électroniques, veuillez
contacter votre municipalité, votre service de traitement des déchets ou le point de vente où vous avez acheté les produits.
[Pour les professionnels dans l'Union Européenne]
Si vous souhaitez vous débarrasser des déchets d’équipements électriques et électroniques veuillez contacter votre vendeur ou fournisseur pour
plus d'informations.
[Information sur le traitement dans d'autres pays en dehors de l'Union Européenne]
Ce symbole est seulement valables dans l'Union Européenne. Si vous souhaitez vous débarrasser de déchets d’équipements électriques et
électroniques, veuillez contacter les autorités locales ou votre fournisseur et demander la méthode de traitement appropriée.
Información para Usuarios sobre Recolección y Disposición de Equipamiento Viejo
Este símbolo en los productos, embalaje, y/o documentación que se acompañe significa que los productos electrónicos y
eléctricos usados no deben ser mezclados con desechos hogareños corrientes.
Para el tratamiento, recuperación y reciclado apropiado de los productos viejos, por favor llévelos a puntos de recolección
aplicables, de acuerdo a su legislación nacional y las directivas 2002/96/EC.
Al disponer de estos productos correctamente, ayudará a ahorrar recursos valiosos y a prevenir cualquier potencial efecto
negativo sobre la salud humana y el medio ambiente, el cual podría surgir de un inapropiado manejo de los desechos.
Para mayor información sobre recolección y reciclado de productos viejos, por favor contacte a su municipio local, su servicio de
gestión de residuos o el punto de venta en el cual usted adquirió los artículos.
[Para usuarios de negocios en la Unión Europea]
Si usted desea deshacerse de equipamiento eléctrico y electrónico, por favor contacte a su vendedor o proveedor para mayor información.
[Información sobre la Disposición en otros países fuera de la Unión Europea]
Este símbolo sólo es válidos en la Unión Europea. Si desea deshacerse de estos artículos, por favor contacte a sus autoridades locales y
pregunte por el método correcto de disposición.

English Deutsch Français Español Italiano
(weee_eu)
Informazioni per gli utenti sulla raccolta e lo smaltimento di vecchia attrezzatura
Questo simbolo sui prodotti, sull’imballaggio, e/o sui documenti che li accompagnano significa che i prodotti elettriche e
elettroniche non dovrebbero essere mischiati con i rifiuti domestici generici.
Per il trattamento, recupero e riciclaggio appropriati di vecchi prodotti, li porti, prego, ai punti di raccolta appropriati, in accordo con
la Sua legislazione nazionale e le direttive 2002/96/CE.
Smaltendo correttamente questi prodotti, Lei aiuterà a salvare risorse preziose e a prevenire alcuni potenziali effetti negativi sulla
salute umana e l’ambiente, che altrimenti potrebbero sorgere dal trattamento improprio dei rifiuti.
Per ulteriori informazioni sulla raccolta e il riciclaggio di vecchi prodotti, prego contatti la Sua amministrazione comunale locale, il
Suo servizio di smaltimento dei rifiuti o il punto vendita dove Lei ha acquistato gli articoli.
[Per utenti imprenditori dell’Unione europea]
Se Lei desidera disfarsi di attrezzatura elettrica ed elettronica, prego contatti il Suo rivenditore o fornitore per ulteriori informazioni.
[Informazioni sullo smaltimento negli altri Paesi al di fuori dell’Unione europea]
Questo simbolo è validi solamente nell’Unione europea. Se Lei desidera disfarsi di questi articoli, prego contatti le Sue autorità locali o il
rivenditore e richieda la corretta modalità di smaltimento.
►Warranty Terms and Conditions
available as printed PDF file at
www.steinberg.net/warranty
The Warranty Terms and Conditions available as printed PDF file at www.steinberg.net/warranty apply only for
countries of the European Economic Area (EEA) and Switzerland.
►Gewährleistungsbestimmungen
finden Sie als druckbare PDF Datei unter
www.steinberg.de/warranty
Die Gewährleistungsbestimmungen in Schriftform sind als PDF-Datei unter www.steinberg.de/warranty
erhältlich und gelten nur für den Europäischen Wirtschaftsraum (EWR) und die Schweiz.
►Les conditions de garantie
se trouvent dans le document PDF
imprimable sous
www.steinberg.net/warranty
Les conditions de garantie disponibles au format PDF à la page www.steinberg.net/warranty s’appliquent
uniquement aux pays de l’Espace économique européen (EEE) et à la Suisse.
►Las condiciones de garantía
se encuentran en el documento PDF en
www.steinberg.net/warranty
Los términos y condiciones de la garantía como archivo PDF para su impresión en www.steinberg.net/
warranty sólo están disponible en países del Espacio Económico Europeo (EEE) y Suiza.
►Termini e Condizioni di Garanzia
disponibili su file PDF stampabile
all’indirizzo web
www.steinberg.net/warranty
I termini e le condizioni della garanzia, disponibili in formato PDF all’indirizzo www.steinberg.net/warranty, sono
validi soltanto per I paesi dell’Area Economica Europea (EEA) e per la Svizzera.

For details of products, please contact your nearest Steinberg
representative or the authorized distributor listed below.
Pour plus de détails sur les produits, veuillez-vous adresser à
Steinberg ou au distributeur le plus proche de vous figurant dans
la liste suivante.
Die Einzelheiten zu Produkten sind bei Ihrer unten aufgeführten
Niederlassung und bei Steinberg Vertragshändlern in den
jeweiligen Bestimmungsländern erhältlich.
Para detalles sobre productos, contacte su tienda Steinberg más
cercana o el distribuidor autorizado que se lista debajo.
CANADA
Yamaha Canada Music Ltd.
135 Milner Avenue, Scarborough, Ontario, M1S 3R1, Canada
Tel: 416-298-1311
U.S.A.
Steinberg North America, c/o Yamaha Corporation of
America
6600 Orangethorpe Ave., Buena Park, Calif. 90620, U.S.A.
Tel: 714-522-9011
MEXICO
Yamaha de México S.A. de C.V.
Calz. Javier Rojo Gómez #1149, Col. Guadalupe del Moral C.P.
09300, México, D.F., México
Tel: 55-5804-0600
BRAZIL
Yamaha Musical do Brasil Ltda.
Rua Joaquim Floriano, 913 - 4' andar, Itaim Bibi, CEP 04534-013
Sao Paulo, SP. BRAZIL
Tel: 011-3704-1377
ARGENTINA
Yamaha Music Latin America, S.A. Sucursal de Argentina
Viamonte 1145 Piso2-B 1053, Buenos Aires, Argentina
Tel: 1-4371-7021
PANAMA AND OTHER LATIN AMERICAN COUNTRIES/
CARIBBEAN COUNTRIES
Yamaha Music Latin America, S.A.
Torre Banco General, Piso 7, Urbanización Marbella, Calle 47 y,
Aquilino de la Guardia, Ciudad de Panamá, Panamá
Tel: +507-269-5311
Steinberg Media Technologies GmbH
Neuer Hoeltigbaum 22-32, 22143 Hamburg, Germany
Tel: +49-(0)40-210 35 0
Yamaha Corporation,
Asia-Pacific Music Marketing Group
Nakazawa-cho 10-1, Naka-ku, Hamamatsu, Japan 430-8650
Tel: +81-53-460-2312
Yamaha Music Gulf FZE
LOB 16-513, P.O.Box 17328, Jubel Ali, Dubai, United Arab Emirates
Tel: +971-4-881-5868
THE PEOPLE’S REPUBLIC OF CHINA
Yamaha Music & Electronics (China) Co.,Ltd.
2F, Yunhedasha, 1818 Xinzha-lu, Jingan-qu, Shanghai, China
Tel: 021-6247-2211
INDONESIA
PT. Yamaha Music Indonesia (Distributor) PT. Nusantik
Gedung Yamaha Music Center, Jalan Jend. Gatot Subroto Kav. 4,
Jakarta 12930, Indonesia
Tel: 21-520-2577
JAPAN
Yamaha Corporation, Steinberg Information Center
Nakazawa-cho 10-1, Naka-ku, Hamamatsu, Japan 430-8650
Tel: +81-53-460-5270
KOREA
Yamaha Music Korea Ltd.
8F, 9F, Dongsung Bldg. 158-9 Samsung-Dong, Kangnam-Gu,
Seoul, Korea
Tel: 080-004-0022
MALAYSIA
Yamaha Music Malaysia, Sdn., Bhd.
Lot 8, Jalan Perbandaran, 47301 Kelana Jaya, Petaling Jaya,
Selangor, Malaysia
Tel: 3-78030900
SINGAPORE
Yamaha Music Asia Pte., Ltd.
#03-11 A-Z Building 140 Paya Lebor Road, Singapore 409015
Tel: 747-4374
TAIWAN
Yamaha KHS Music Co., Ltd.
3F, #6, Sec.2, Nan Jing E. Rd. Taipei. Taiwan 104, R.O.C.
Tel: 02-2511-8688
THAILAND
Siam Music Yamaha Co., Ltd.
4, 6, 15 and 16th floor, Siam Motors Building, 891/1 Rama 1 Road,
Wangmai, Pathumwan, Bangkok 10330, Thailand
Tel: 02-215-2626
OTHER ASIAN COUNTRIES
Yamaha Corporation,
Asia-Pacific Music Marketing Group
Nakazawa-cho 10-1, Naka-ku, Hamamatsu, Japan 430-8650
Tel: +81-53-460-2317
AUSTRALIA
Yamaha Music Australia Pty. Ltd.
Level 1, 99 Queensbridge Street, Southbank, Victoria 3006, Australia
Tel: 3-9693-5111
NEW ZEALAND
Music Works LTD
P.O.BOX 6246 Wellesley, Auckland 4680, New Zealand
Tel: 9-634-0099
COUNTRIES AND TRUST TERRITORIES IN PACIFIC
OCEAN
Yamaha Corporation,
Asia-Pacific Music Marketing Group
Nakazawa-cho 10-1, Naka-ku, Hamamatsu, Japan 430-8650
Tel: +81-53-460-2312
HEAD OFFICE Steinberg Media Technologies GmbH
Neuer Hoeltigbaum 22-32, 22143 Hamburg, Germany
Tel: +49-(0)40-210 35 0
ST01
NORTH AMERICA
CENTRAL & SOUTH AMERICA
EUROPE
AFRICA
MIDDLE EAST
ASIA
OCEANIA

Steinberg Web Site
http://www.steinberg.net
U.R.G., Pro Audio & Digital Musical Instrument Division, Yamaha Corporation
© 2010 Yamaha Corporation
WU10640 002MWAP?.?-01A0
