P24957 E26_installation E26 Installation
User Manual: e26_installation Eaton Cutler-Hammer Stacklight ation - AutomationDirect
Open the PDF directly: View PDF ![]() .
.
Page Count: 4
Effective November 2010
Supersedes August 1999
INSTALLATION INSTRUCTIONS
P24957
E26 Stacklight
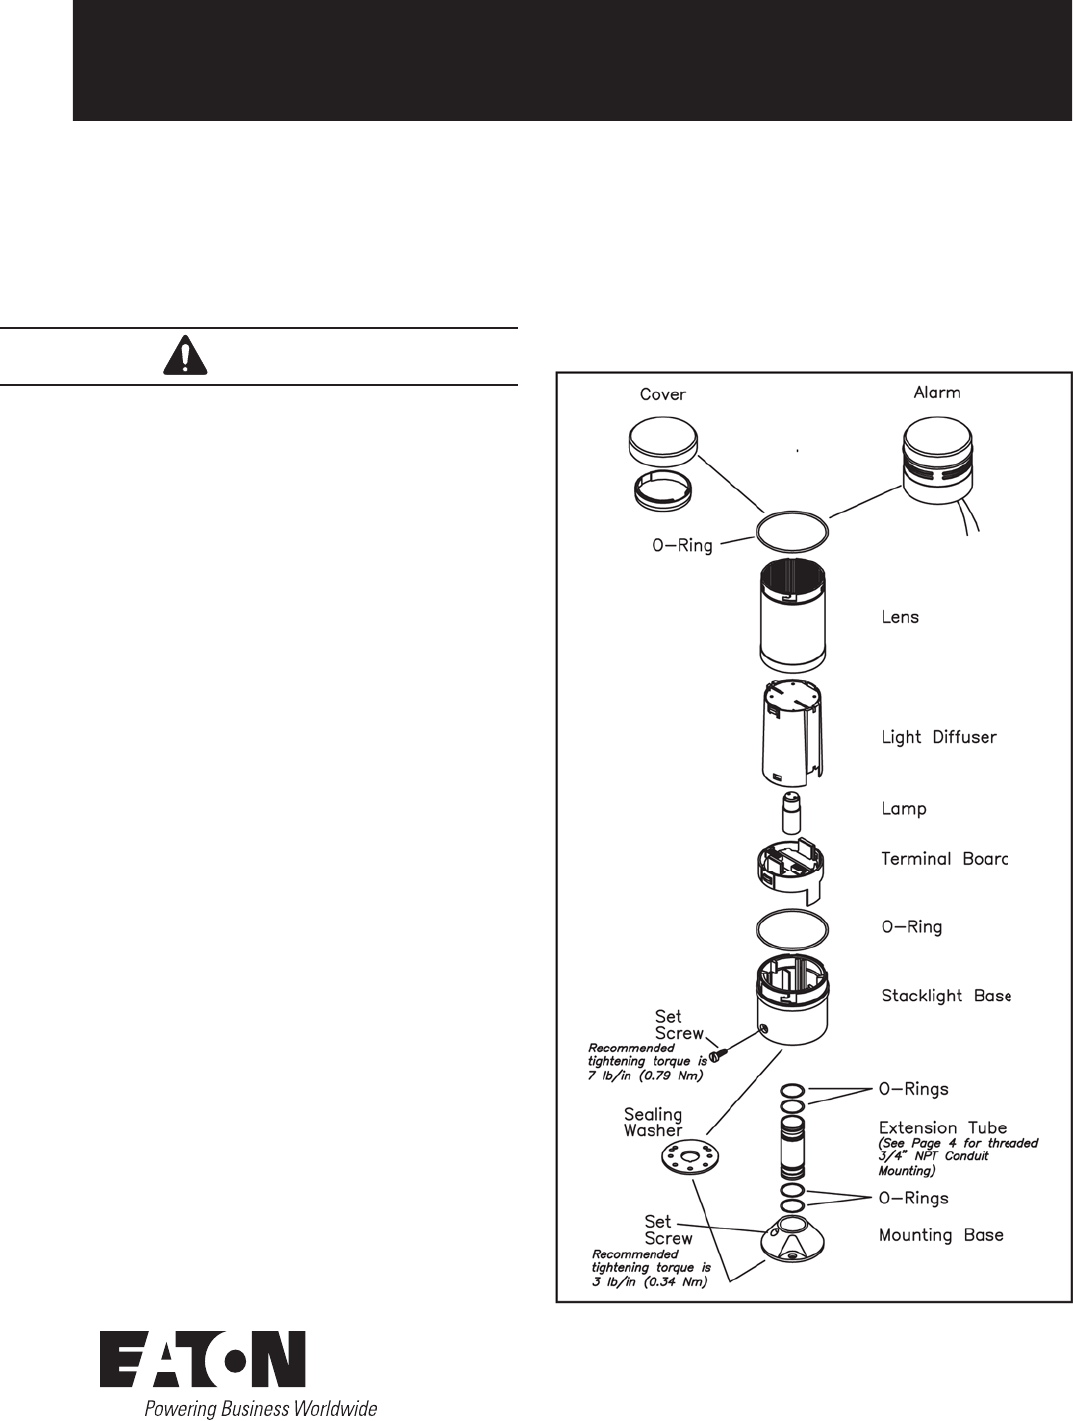
The E26 Stacklight provides a visual and/or audible status
indication. Plug-in light modules consist of a lens with a diffuser
for steady of ashing incandescent lamps or LEDs. Up to six color
modules provide signals with 360 degree visibility. Flashing xenon
tube lights and audible alarms are available.
REMOVE POWER BEFORE DISASSEMBLING THE STACKLIGHT
OR CHANGING LAMPS. THESE IN S TRUC TIONS MUST BE
READ AND CLEARLY UN DER S TOOD BEFORE INSTALLING OR
OPERATING THIS EQUIPMENT. THIS EQUIPMENT IS TO BE IN-
STALLED AND SERVICED BY A TRAINED ELE C T RI CIAN.
Mount the stacklight in the vertical position on a at horizontal
surface.
Speci cations
Lamp Type - BA15d. 6 watts maximum
(See page 5 for C-H lamp replacement catalog num bers)
Operating Temperature Range -
-20oC to 60oC (-4oF to 140oF)
Operating Humidity - 95% @ 40oC (104oF)
Storage Temperature - -40oC to 80oC (-40oF to 176oF)
IEC Ratings
Compliance - IEC60947-5-1, EN60947-5-1
Degree of Protection against Electrical Contact for
Stack light - IP2X
Degree of Protection against Electrical Contact for
Alarm Unit - IP0X
Rated Insulation Voltage (Ui) - 690V
Rated Operational Votlage (Ie) - 250 max
Rated impulse withstand voltage (Uimp) - 1.5Kv
Shock Resistance (IEC 68-2-27) -
Without vibration damper tted - 11ms, 15g
With vibration damper tted - 18ms, 30g
Vibration (IEC 68-2-6) -
Without vibration damper tted -
10 sweeps, 10-50Hxz, 2g
With vibration damper tted -
10 sweeps, 10-150Hz, 10g
Bump (IEC 68-2-29) -
Without vibration damper tted -
6ms du ra tion, 1000 bumps, 15g
With vibration damper tted -
6ms du ra tion, 1000 bumps, 25g
Fig. 1 Typical Stacklight Assembly (Exploded View)
Mounting and NEMA - IEC Enclosure Type Ratings
Base Mounting - For use on a at surface of Type 1, 4, 4X, and
13 enclosures (IP65).
Threaded 3/4” Conduit Mounting - Use with a Myers ST-2 or
ST-2CP hub, or suitable enclosure with threaded 3/4” NPT con-
duit entrance for Type 1, 4, 4X, and 13 enclosure ratings (IP65).
Alarm Unit - Enclosure Type 1 (IP20).
WARNING

2
INSTALLATION INSTRUCTIONS P24957
Effective November 2010
E26 Stacklight
EATON CORPORATION www.eaton.com
Field Wiring
Remove the Terminal Board for Wiring
Squeeze the locking clips one side at a time and pull up on the
terminal board to disengage the locking tabs from the cutouts in
the stacklight base. Repeat this procedure for the other locking
clip. Lift the terminal board out of the stacklight base.
Connect Field Wiring to Terminal Blocks
Connect eld wiring per diagrams below. Terminals accept wire
sizes 14AWG - 30AWG (2.5 sq mm - 0.05 sq mm) for single con-
ductors and 18AWG to 26AWG (0.75 sq mm - 0.14 sq mm) for
two conductors. Do not mix solid and stranded wire in the same
terminal. Recommended tight en ing torque is 4.4 lb/in to 5.3 lb/
in (0.5Nm to 0.6 Nm). After wiring is complete, proceed to “As-
sembly” on Page 3.
Fig. 2 ???
Use with incandescent lamps, convvtinuous LEDs,
ashing LEDs, alarm units, and xenon ashing units.
Continuous lights may be combined with ashing lights according to the wiring diagrams above.
Use with incandescent lamps only, up to maximum number per table
Fig. 3 Standard Boase (Continuous Lights) Fig. 4 Flashing Base
Use with incandescent lamps, convvtinuous LEDs,
ashi
ng
LEDs, alarm units, and xenon ashin
g u
nits
.
Use with incandescent la
mps
on
ly,
up
to maximum number
pe
r tabl
e
3
INSTALLATION INSTRUCTIONS P24957
Effective November 2010
E26 Stacklight
EATON CORPORATION www.eaton.com
Assembly
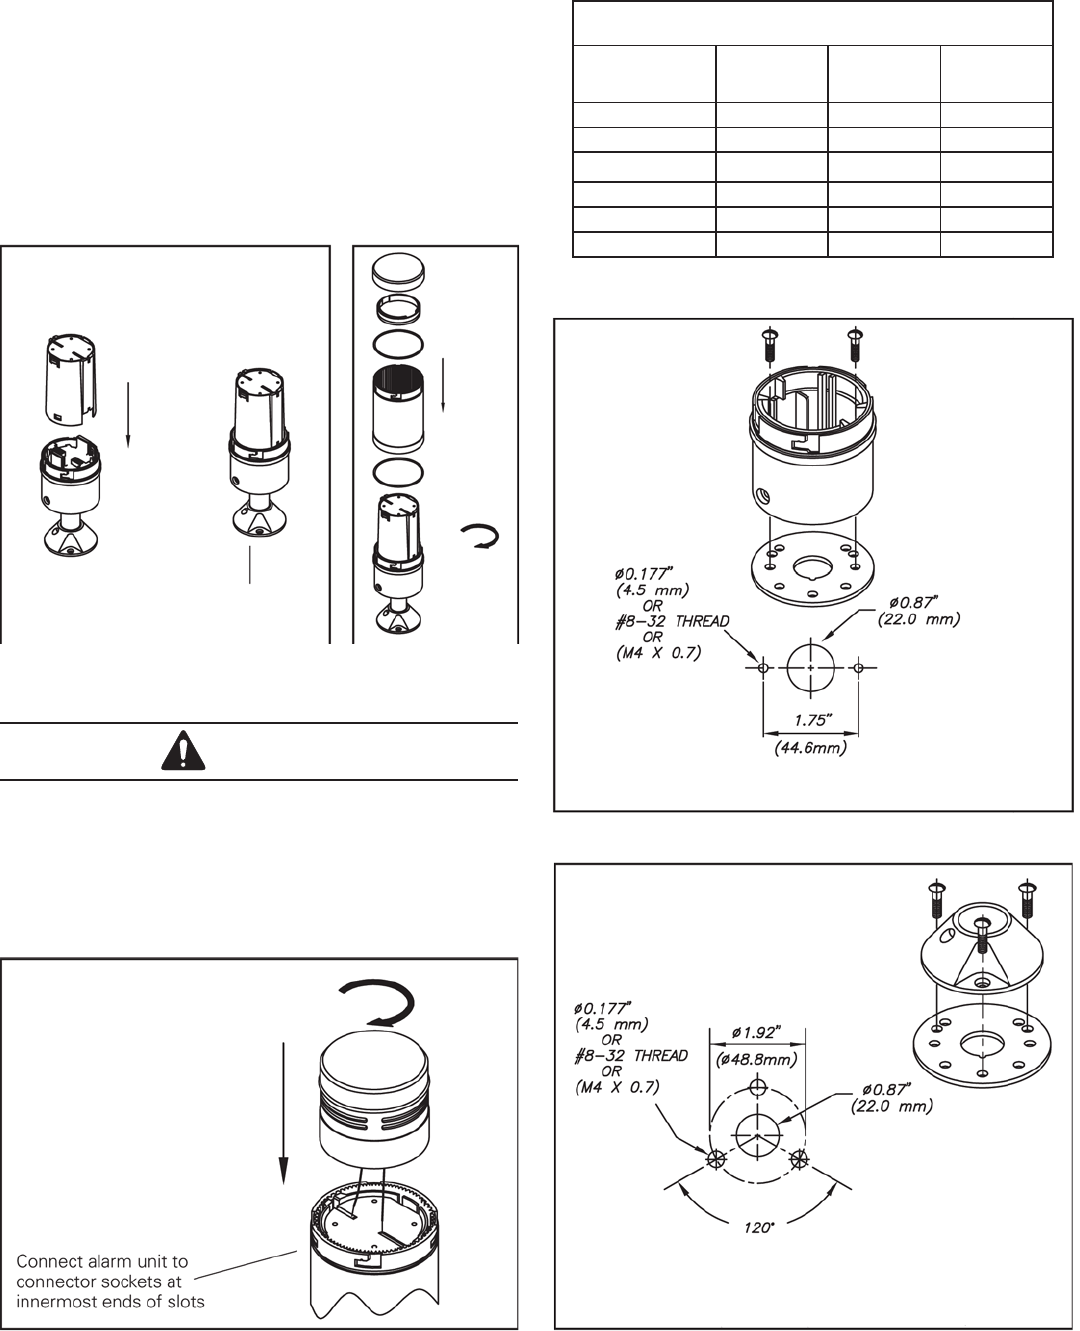
After wiring is complete, assemble light diffusers. While observ-
ing the orientation of the two guides, plug the light diffuser into
the terminal connections in the stacklight base or previous dif-
fuser. See Fig. 4.
Assemble lenses and cover by turning clockwise to engage the
bayonets in the stacklight base or previous lens. See Fig. 5.
TURN OFF POWER BEFORE INSTALLING ALARM
If an audible alarm is to be installed, connect the two leads from
the alarm to the terminal connections at the innermost points on
the connectors as shown in Fig. 6.
Fig. 6 Installing Alarm Unit
Guide
Fig. 5
Fig. 4
WARNING
* Alarm must be the Top Module.
Fig. 7 Mounting Dimensions for Stacklight Base
Fig. 7 Mounting Dimensions for Mounting Base
Drill 2 holes in stacklight base to 0.165” (4.2mm). Mount stacklight
with #8-32 (M4) screws. Tighten to torque of 7 lb/in (0.79 Nm).
Without Vibration Damper: Mount stacklight with #8-32 (M4) screws.
Tighten to torque of 7 lb/in (0.79 Nm).
With Vibration Damper: Discard sealing washer. Mount stacklight with
#8-32 (M4 screws). Tighten to torque of 6 lb/in (0.68 Nm).
MAXIMUM COMBINATIONS OF
STACKLIGHT MODULES
Incandescent
or LED
Modules
Xenon
Modules
Alarm
Modules*
Maximum
Numbr of
Modules
6----6
5--16
4 1 -- 5
3115
2 2 -- 4
1214
D
r
ill
2
h
o
l
es
i
n stac
kligh
t
b
ase to 0.165
”
(
4.2mm
)
.
M
ount stac
kligh
t
with #8-32 (M4) screws. Ti
g
hten to torque of 7 lb/in (0.79 Nm).
INSTALLATION INSTRUCTIONS P24957
Effective November 2010
E26 Stacklight
Eaton Corporation
Electrical Group
1000 Cherrington Parkway
Moon Township, PA 15108
United States
877-ETN-CARE (877-386-2273)
Eaton.com
© 2008 Eaton Corporation
All Rights Reserved
Printed in USA
Publication No. P24957 / 001
November 2010
PowerChain Management is a registered
trademark of Eaton Corporation.
All other trademarks are property of their
respective owners.
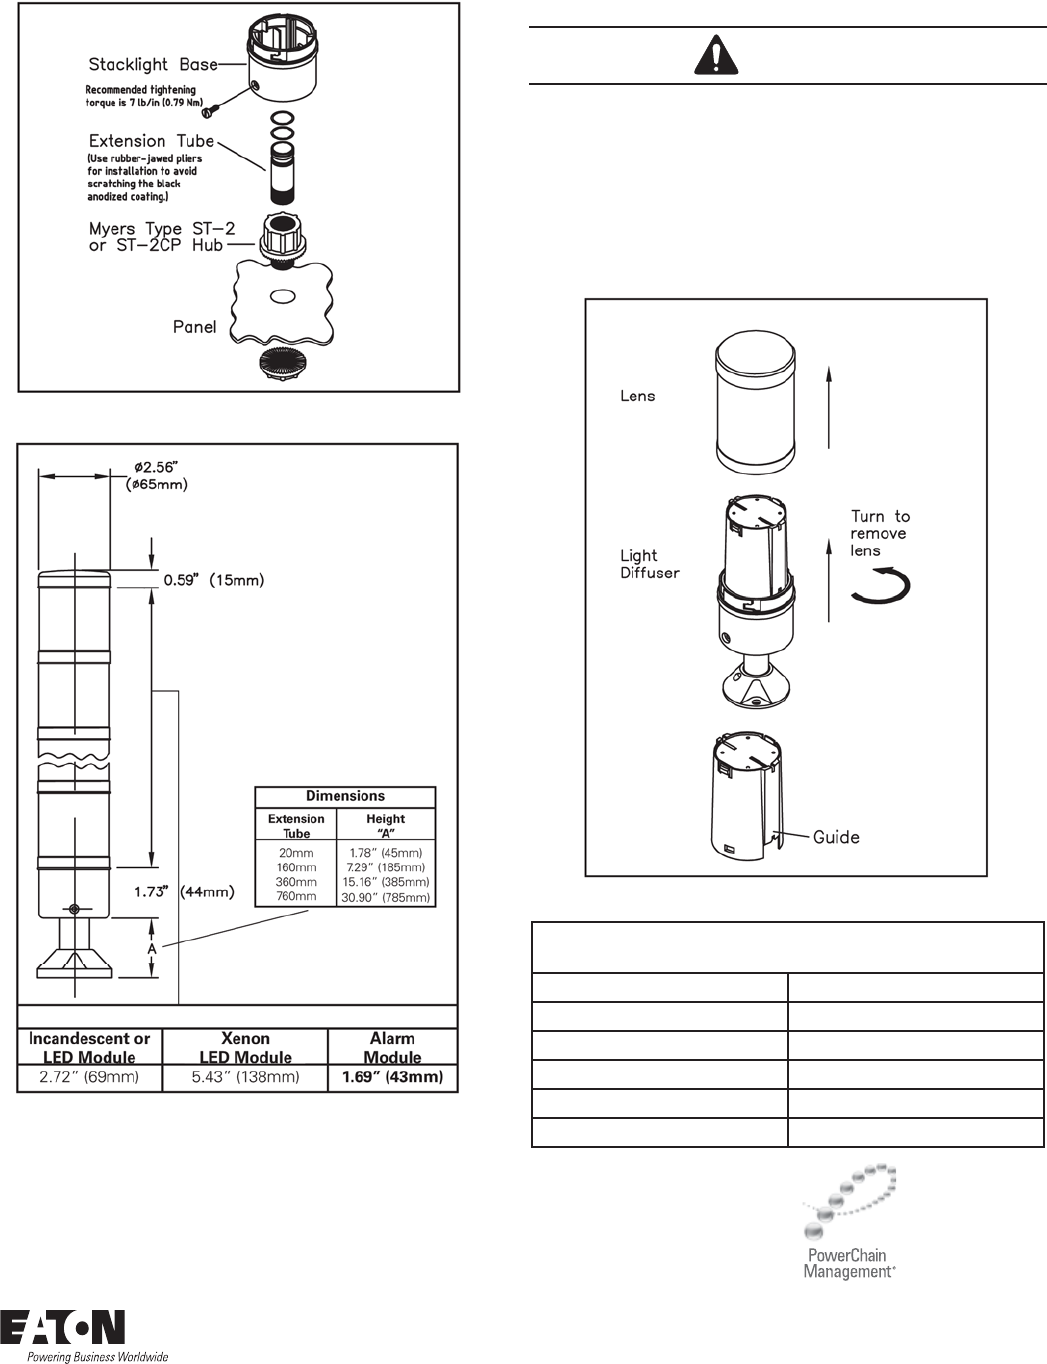
Fig. 9 Threaded 3/4” NPT Conduit Mounting
Disasssembly and Lamp Replacement
Fig. 10 Assembled Stacklight Dimensions
Fig. 11 ???
WARNING
TURN OFF POWER BEFORE DISASSEMBLY!
Remove lens by turning counterlockwise to disengage the
bayonets.
Remove the light diffuser by pulling upwards to dis en gage the
clips.
Replace lamp and reassemble in reverse order.
E22BA3 lamp removal tool is available to aid in lamp removal and
installation.
INCANDESCENT LAMP
REPLACEMENT
Description Catalog No.
12V (BA15d) 6 watts E26S8
24V (BA15d) 6 watts E26S9
48V (BA15d) 6 watts E26S10
110/130V (BA15d) 6 watts E26S11
220/240V (BA15d) 6 watts E26S12
