Live Agent Developer's Guide Dev
User Manual:
Open the PDF directly: View PDF ![]() .
.
Page Count: 60
- About This Guide
- Prerequisites
- API Versions
- Customize Deployments with the Deployment APIs
- Create Deployments
- Log Deployment Activity with the Deployment APIs
- Customize Your Chat Window with the Deployment APIs
- Customize Chat Buttons with the Deployment APIs
- Find and Create Records Automatically with the Deployment APIs
- Customize Automated Chat Invitations with the Deployment APIs
- Deployment API Code Sample
- Use Pre-Chat to Gather Visitor Information and Set Context for the Agent
- Implement a Custom Chat Window Using Visualforce
- Use Post-Chat to Wrap Up the Chat Interaction with Your Customer
- Set Up Direct-to-Agent Chat Routing with the Deployment APIs
© Copyright 2000–2017 salesforce.com, inc. All rights reserved. Salesforce is a registered trademark of salesforce.com, inc.,
as are other names and marks. Other marks appearing herein may be trademarks of their respective owners.

CONTENTS
Chapter 1: About This Guide ............................................1
Chapter 2: Prerequisites ...............................................2
Chapter 3: API Versions ...............................................3
Chapter 4: Customize Deployments with the Deployment APIs ..................4
Create Deployments ....................................................4
Log Deployment Activity with the Deployment APIs ...............................5
enableLogging ....................................................5
Customize Your Chat Window with the Deployment APIs ...........................9
setChatWindowHeight ...............................................9
setChatWindowWidth ...............................................9
Customize Chat Buttons with the Deployment APIs ...............................10
showWhenOnline .................................................10
showWhenOffline ..................................................11
addButtonEventHandler .............................................12
startChat .......................................................14
startChatWithWindow ...............................................14
Corresponding Calls for Chat Buttons ....................................15
Find and Create Records Automatically with the Deployment APIs ....................16
addCustomDetail .................................................16
findOrCreate .....................................................17
setName .......................................................20
Search for Knowledge Articles with the Deployment APIs .......................20
Find and Create Records Deployment API Code Sample .......................21
Customize Automated Chat Invitations with the Deployment APIs ....................22
setCustomVariable ................................................22
rejectChat ......................................................23
addButtonEventHandler .............................................23
Automated Chat Invitation Code Sample .................................25
Deployment API Code Sample ............................................27
Chapter 5: Use Pre-Chat to Gather Visitor Information and Set Context for the
Agent ............................................................31
Find and Create Records Automatically with the Pre-Chat APIs .......................31
findOrCreate.map .................................................31
findOrCreate.saveToTranscript ........................................35
findOrCreate.showOnCreate .........................................36
findOrCreate.linkToEntity .............................................37
findOrCreate.displayToAgent .........................................37
Find and Create Records Pre-Chat API Code Sample .........................38
Access Chat Details with the Pre-Chat APIs ...................................39
preChatInit ......................................................39
Pre-Chat Form Code Sample .............................................40
Chapter 6: Implement a Custom Chat Window Using Visualforce ...............44
Live Agent Visualforce Components ........................................44
Live Agent Visualforce Components Code Sample ..............................45
Chapter 7: Use Post-Chat to Wrap Up the Chat Interaction with Your Customer .....49
Post-Chat Code Sample ................................................49
Chapter 8: Set Up Direct-to-Agent Chat Routing with the Deployment APIs ........53
Direct-to-Agent Routing with the Deployment APIs ...............................53
Direct-to-Agent Routing Code Sample ...................................53
Fallback Routing in Pre-Chat Forms .........................................55
Fallback Routing Code Sample ........................................55
Contents

CHAPTER 1 About This Guide
Customize Live Agent to fit your company’s needs. This guide provides several examples to help you understand and create customized
chat windows, buttons, forms, and pages.
Live Agent lets service organizations connect with customers or website visitors in real time through a Web-based, text-only live chat.
You can customize Live Agent to create a personalized chat experience for your customer service agents and the customers they serve
using custom code. In this guide, we’ll show you how to:
•Customize deployments using the Deployment API.
•Customize the appearance of customer-facing chat windows using Visualforce pages and components.
•Create pre-chat forms to gather information from customers before they begin a chat with an agent.
•Create post-chat pages that appear to customers after a chat is complete.
Additionally, you can customize these and other Live Agent components through Salesforce settings. For more information, see “Customize
Your Live Agent Implementation” in the Salesforce help.
1

CHAPTER 2 Prerequisites
Before you customize Live Agent, make sure:
•Live Agent is enabled in your organization.
•Your administrator has granted you a Live Agent feature license. Although you can customize the product without a feature license,
having one will allow you to access and test your customizations.
•You’ve created a Force.com site and uploaded images as static resources for your chat buttons and windows. If you plan to customize
Live Agent without using a Force.com site, skip this step.
Note: When using a Force.com site for Live Agent custom chat pages, avoid using the path “/liveagent” in the URL. This path
sometimes causes errors with the incoming and outgoing chat notification sounds, so agents will be unable to hear their chat
updates.
SEE ALSO:
Creating and Editing Force.com Sites
2
CHAPTER 3 API Versions
Different methods and parameters are available in different versions of Live Agent’s APIs. Before you begin developing with the Deployment
API or the Pre-Chat API, make sure you’re using the correct API version number in your code.
Deployment API Versions
You can find out what version of the Deployment API your organization uses from the deployment code that’s generated after you
create a deployment.
Summer ’13 and earlier releases support version 28.0 of the Deployment API. The URL for API version 28.0 looks like this:
https://hostname.salesforceliveagent.com/content/g/deployment.js
Winter ’14 supports version 29.0 of the Deployment API. The URL for API version 29.0 contains the version number:
https://hostname.salesforceliveagent.com/content/g/js/29.0/deployment.js
Note: To use new methods and parameters in your deployments, you must update the deployment code on each of your Web
pages to use the URL for version 29.0 of the Deployment API.
Pre-Chat Information API Versions
Winter ’14 supports version 29.0 of the Pre-Chat API. The URL for API version 29.0 contains the version number:
https://hostname.salesforceliveagent.com/content/g/js/29.0/prechat.js
You can find your organization’s hostname by looking in the deployment code that’s generated after you create a deployment.
3

CHAPTER 4 Customize Deployments with the
Deployment APIs
Customize deployments using the Live Agent Deployment API.
A deployment is a place on your company’s website that’s enabled for Live Agent. A deployment consists of a few lines of JavaScript
that you add to a Web page. Your organization can have a single Live Agent deployment or multiple deployments. For example, if you
have a single service center that supports multiple websites, creating a separate deployment for each site enables you to present multiple
chat windows to your visitors. Each deployment includes a chat window, which visitors use to chat with support agents.
The Deployment API is a JavaScript-based API that lets you customize your deployments to specify back-end functionality.
Create Deployments
Create a deployment to host Live Agent on your website. Each deployment includes a chat window, which visitors use to chat with
support agents.
Log Deployment Activity with the Deployment APIs
Log the activity that occurs in a particular deployment.
Customize Your Chat Window with the Deployment APIs
Customize the dimensions of your customer-facing chat windows. This doesn’t apply for mobile-based browsers.
Customize Chat Buttons with the Deployment APIs
Customize your chat buttons and set how chats start for your customers.
Find and Create Records Automatically with the Deployment APIs
Use the Deployment API to search for or create Salesforce records—like a case, contact, account, or lead—automatically when an
agent begins a chat with a customer.
Customize Automated Chat Invitations with the Deployment APIs
Customize automated chat invitations that appear to customers on your website.
Deployment API Code Sample
Test and preview how the Deployment API can help you customize your deployments.
Create Deployments
Create a deployment to host Live Agent on your website. Each deployment includes a chat window, which visitors use to chat with
support agents.
You can customize your Live Agent deployments using the Deployment API to meet your company’s needs. After completing these
steps, the deployment code generates for you to place on the pages that you want to enable for chat and tracking. Pages with the
deployment code are automatically tracked as part of the visitor’s chat session, and they’re shown to the agent in the Console when the
visitor requests a chat. This tracking also enables automated invitations to be presented to customers.
To create a deployment:
1. From Setup, enter Deployments in the Quick Find box, then select Deployments.
2. Click New.
3. Enter a name for the deployment. This name, or a version of it, automatically becomes the Developer Name.
4. Enter a title for the chat window.
4

5. Select Allow Visitors to Save Transcripts to let visitors download a copy of the chat session.
6. If you want to use branding images that you’ve hosted on a Force.com site, select the site to associate it with the deployment.
7. (Optional) In Chat Window Branding Image, select the graphic to appear in the chat window.
8. (Optional) In Mobile Chat Window Branding Image, select the graphic that visitors using mobile devices see in the
chat window.
9. Click Save. Salesforce generates the deployment code.
10. Copy the deployment code and paste it on each Web page where you want to deploy Live Agent. For best performance, paste the
code right before the closing body tag.
Example: For more information on creating a deployment, see “Create Live Agent Deployments.”
Log Deployment Activity with the Deployment APIs
Log the activity that occurs in a particular deployment.
Logging lets you store information about the activity that occurs within a customer’s Web browser as they chat with an agent through
a particular deployment. This is particularly helpful when you’re implementing automated invitations and you want to test or troubleshoot
your sending rules. You can add these methods as an additional script within the code that’s automatically generated when you create
a deployment.
Use the following deployment methods to enable logging on a particular deployment.
enableLogging
Use the enableLogging deployment method to enable logging on a particular deployment. Available in API versions 28.0 and
later.
enableLogging
Use the enableLogging deployment method to enable logging on a particular deployment. Available in API versions 28.0 and
later.
Usage
Enables logging for a particular deployment, allowing your Web browser’s JavaScript console to store information about the activity
that occurs within a deployment. You can retrieve the information from your browser’s developer console, so check the help for your
browser if you’re not sure how to find it.
Syntax
liveagent.enableLogging();
Parameters
None
5
Log Deployment Activity with the Deployment APIsCustomize Deployments with the Deployment APIs

Messages for Logged Events
MeaningTriggeredMessage
Live Agent endpoint URL, org ID and
deployment ID have been set, now waiting
for DOM to be ready before continuing.
When liveagent.init() is called, usually at
page load
System initialized. Waiting for the DOM to
be ready.
This means no DOM event listener was
found, which would be very rare. We would
During liveagent.init(), if there is an errorNo available event model. Exiting.
not be able to continue at this point, so it
would be a hard stop.
The page has fully loaded and the DOM is
ready, so we perform our first "ping" to the
Upon DOM ready of the pageDOM is ready. Setting up environment.
server, which is to get the
settings/information about the given
deployment ID.
The button is available for a chat request to
be made.
When the state of a button has changed to
online
Setting state for button {Button ID} to online
The button is not available for a chat request
to be made.
When the state of a button has changed to
offline
Setting state for button {Button ID} to offline
No session ID cookie was found, so a new
one must be generated. This means it was
During the first ping to the serverRequesting new session
the first time visiting the site with this
deployment code for this browsing session.
A session cookie exists, so it is reused. This
means the visitor has already been to this
During the first ping to the serverReusing existing session
site during this browsing session (e.g., going
from one page to another).
The server generated a new session ID, and
it is being stored as a session cookie named
"liveagent_sid.”
As a response to the first pingReceived new session ID
Indicates how frequently (in milliseconds)
the page will ping the Live Agent server.
As a response to the first pingPing rate set to {Rate}ms
The default is 50000 (50 seconds). This
effectively indicates when button refreshes
will occur.
Indicates the visitor is still connected to and
pinging the Live Agent server, meaning no
errors or disconnects have occurred.
When a ping to the server is madePinging server to keep presence
An error was thrown, whether in response
from the server or due to network
When an error occursDisconnecting from Live Agent
connectivity issues. Indicates that the visitor
will no longer ping Live Agent for this page
load (i.e., they will need to refresh).
6
enableLoggingCustomize Deployments with the Deployment APIs

MeaningTriggeredMessage
The Live Agent instance specified in the
deployment code is no longer valid for this
When an org has moved to a new core
instance
Received updated LiveAgent server url:
{URL}! Consider updating this site's
deployment code. org, so the new URL has been provided. For
better performance, we recommend
updating the deployment code if they
receive this.
A warning condition was encountered, but
processing can continue. The message
provides further details.
A non-fatal exception occurredServer Warning: {Message}
A warning condition was encountered, but
processing can continue. No message was
provided.
A non-fatal exception occurredServer sent an anonymous warning
An error condition was encountered, and
processing cannot be continued. The
message provides further details.
A fatal exception occurredServer Error: {Message}
An error condition was encountered, and
processing cannot be continued. No
message was provided.
A fatal exception occurredServer responded with an error
Evaluation of the filter logic for the given
invite button ID has begun. This means the
Rule evaluation has been triggeredGroup Start: Invite {Button ID} Rule
Evaluation
button is online and available for chat, and
the filter logic will be used to determine if
it should be displayed/presented or not.
An information log containing the string
representation of the filter logic of the invite
Rule evaluation has been triggeredFilter Logic: {Filter Logic}
rules as specified in the admin setup area.
Useful to understand how the rules will be
evaulated.
Standard rules are "Number of Page Views"
and "URL Match." They are part of the
When a standard rule is being evaluatedEvaluating StandardInviteRule
out-of-the-box rules that are provided in
the admin setup area.
Timer-based rules are "Seconds on Page"
and "Seconds on Site." They are part of the
When a timer-based rule is being evaluatedEvaluating TimerInviteRule
out-of-the-box rules as well, except these
rules will be re-evaluated again in the future
when the required number of seconds has
passed if the criteria was not met the first
time (e.g., on page load).
"Custom Variable" rules allow variable
names to be specified which will be
When a custom rule is being evaluatedEvaluating CustomInviteRule
compared against upon evaluating these
7
enableLoggingCustomize Deployments with the Deployment APIs

MeaningTriggeredMessage
rules. The "setCustomVariable" API is used
in conjunction with these to specify the
value to compare with against the value
specified in the admin setup area.
A "Custom Variable" rule was set up, but the
"setCustomVariable" API was never called
When a custom rule is being evaluatedCustomInviteRule evaluation failed due to
missing custom variable
with this variable name specified, therefore
the rule can not be evaluated.
A rule is being evaluated by comparing that
the two values match exactly.
When a rule with an "equals" comparator is
being evaluated
Evaluate: {From Value} == {To Value}
A rule is being evaluated by comparing that
the two values do not match.
When a rule with a "not equal to"
comparator is being evaluated
Not Equals - Evaluate: {From Value} != {To
Value}
A rule is being evaluated by comparing that
the first value starts with the second value.
When a rule with a "starts with" comparator
is being evaluated.
Starts With - Evaluate: {From Value} indexOf
{To Value} == 0
A rule is being evaluated by comparing that
the first value contains the second value.
When a rule with a "contains" comparator
is being evaluated
Contains - Evaluate: {From Value} indexOf
{To Value} != -1
A rule is being evaluated by comparing that
the first value does not contain the second
value.
When a rule with a "does not contain"
comparator is being evaluated
Does Not Contain - Evaluate: {From Value}
indexOf {To Value} == -1
A rule is being evaluated by comparing that
the first value is less than the second value.
When a rule with a "less than" comparator
is being evaluated
Less Than - Evaluate: {From Value} < {To
Value}
A rule is being evaluated by comparing that
the first value is greater than the second
value.
When a rule with a "greater than"
comparator is being evaluated
Greater Than - Evaluate: {From Value} > {To
Value}
A rule is being evaluated by comparing that
the first value is less than or equal to the
second value.
When a rule with a "less or equal"
comparator is being evaluated
Less or Equal - Evaluate: {From Value} <=
{To Value}
A rule is being evaluated by comparing that
the first value is greater than or equal to the
second value.
When a rule with a "greater or equal"
comparator is being evaluated
Greater or Equal - Evaluate: {From Value} >=
{To Value}
Indicates that an actual rule is being
evaluated.
When a rule is being evaluatedEvaluating Atom Node: {Rule ID}
When multiple rules are used, this indicates
when the criteria of a pair of rules must both
be "true."
When two rules are being evaluated with
an "AND" clause
Group Start: Evaluating And Node
When multiple rules are used, this indicates
when the criteria of a pair of rules must be
"true" for one of them.
When two rules are being evaluated with
an "OR" clause
Group Start: Evaluating Or Node
8
enableLoggingCustomize Deployments with the Deployment APIs
MeaningTriggeredMessage
This indicates to check for the opposite of
what the criteria evaluates to.
When two rules are being evaluated with a
"NOT" clause
Group Start: Evaluating Not Node
If the criteria for a timer-based rule is not
met, a delay is set to attempt to evaluate
When a timer-based rule has not yet met
the criteria
Setting invite delay to: {Invite Delay}
the rules again in the future when the
criteria will have been met.
Customize Your Chat Window with the Deployment APIs
Customize the dimensions of your customer-facing chat windows. This doesn’t apply for mobile-based browsers.
Use the following deployment methods to customize the height and width of the chat window. You can add either of these methods
as additional scripts within the code that’s automatically generated when you create a deployment.
Note: This isn’t applicable for mobile browsers, where chats open to the full page.
setChatWindowHeight
Use the setChatWindowHeight method to customize the height of your chat window.
setChatWindowWidth
Use the setChatWindowWidth method to customize the width of your chat window.
setChatWindowHeight
Use the setChatWindowHeight method to customize the height of your chat window.
Usage
Sets the height in pixels of the chat window that appears to customers. Available in API versions 28.0 and later.
Syntax
void setChatWindowHeight(Number height)
Parameters
Available VersionsDescriptionTypeName
Available in API versions 28.0 and later.The height in pixels of your custom chat
window.
Numberheight
setChatWindowWidth
Use the setChatWindowWidth method to customize the width of your chat window.
9
Customize Your Chat Window with the Deployment APIsCustomize Deployments with the Deployment APIs
Usage
Sets the width in pixels of the chat window that appears to customers. Available in API versions 28.0 and later.
Syntax
void setChatWindowWidth(Number width)
Parameters
Available VersionsDescriptionTypeName
Available in API versions 28.0 and later.The width in pixels of your custom chat
window.
Numberwidth
Customize Chat Buttons with the Deployment APIs
Customize your chat buttons and set how chats start for your customers.
Each chat button includes code that you place on your website to let customers start a chat. Live Agent automatically handles the
button's availability based on your agents’ availability and your org's settings. It also handles starting the chat request from the button.
Use the following deployment methods to customize your chat buttons and starting chats. You can add any of these methods as
additional scripts within the code that’s automatically generated when you create a deployment.
showWhenOnline
Use the showWhenOnline method to specify what customers see when a particular button is online.
showWhenOffline
Use the showWhenOffline method to specify what customers see when a particular button is offline.
addButtonEventHandler
Use the addButtonEventHandler method to define a chat button’s behavior when certain events occur. Available in API
versions 28.0 and later.
startChat
Use the startChat method to request a chat from a button in a new window.
startChatWithWindow
Use the startChatWithWindow method to request a chat from a button using the name of a window.
Corresponding Calls for Chat Buttons
Make sure your chats start correctly by aligning your calls when using buttons, direct-to-agent, and agent with fallback-to-button.
SEE ALSO:
Chat Routing Options
showWhenOnline
Use the showWhenOnline method to specify what customers see when a particular button is online.
10
Customize Chat Buttons with the Deployment APIsCustomize Deployments with the Deployment APIs
Usage
Displays a particular element when the specified button, agent, or agent-with-fallback-button is online. Available in API versions 28.0
and later.
Syntax
For a button, userId is optional: void showWhenOnline(String buttonId, Object element, (optional)
String userId)
For an agent, use userId instead of buttonId: void showWhenOnline(String userId, Object element)
For an agent with fallback-to-button, use both IDs (the element shows when either the agent or button is online): void
showWhenOnline(String buttonId, Object element, String userId)
Note: Any time you use both a buttonId and a userId, buttonId must appear first.
Parameters
Available VersionsDescriptionTypeName
Available in API versions 28.0 and later.The ID of the chat button for which to display
the specified element object when agents
StringbuttonId
that are associated with the button are
available to chat.
Available in API versions 28.0 and later.The element to be displayed when the
specified button is online.
Objectelement
Available in API versions 29.0 and later.The ID of the agent to associate with the
button. The element object is displayed
when that agent is available.
StringuserId
If you specify a button ID but not a user ID in your parameters, the element is displayed only if the button is online.
If you specify a user ID but not a button ID, the element is displayed only if the agent is online. For example, the following syntax tracks
an agent’s online status and sets the button to online when that agent is available and offline if unavailable.
liveagent.showWhenOnline('005xx000001Sv1m',
document.getElementById('liveagent_button_toAgent_online'));
If you specify a button ID and an agent ID, the element is displayed if either the button or the agent is online. For example, the following
syntax tracks the status of an agent and a button and displays the element if at least one skilled agent is available.
liveagent.showWhenOnline('573xx0000000006',
document.getElementById('liveagent_button_online_573xx0000000006_USER1'), '005xx000001Sv1m');
showWhenOffline
Use the showWhenOffline method to specify what customers see when a particular button is offline.
11
showWhenOfflineCustomize Deployments with the Deployment APIs
Usage
Displays a particular element when the specified button, agent, or agent-with-fallback-button is offline. Available in API versions 28.0
and later.
Syntax
For a button, userId is optional: void showWhenOffline(String buttonId, Object element, (optional)
String userId)
For an agent, use userId instead of buttonId: void showWhenOffline(String userId, Object element)
For an agent with fallback-to-button, use both IDs (the element shows when either the agent or button is offline): void
showWhenOffline(String buttonId, Object element, String userId)
Note: Any time you use both a buttonId and a userId, buttonId must appear first.
Parameters
Available VersionsDescriptionTypeName
Available in API versions 28.0 and later.The ID of the chat button for which to display
the specified element object when no
agents are available to chat.
StringbuttonId
Available in API versions 28.0 and later.The element to display when the specified
button is offline.
Objectelement
Available in API versions 29.0 and later.The ID of the agent to associate with the
button. The element object is displayed
when that agent is unavailable.
StringuserId
If you specify a button ID but not a user ID in your parameters, the element displays only if the button is offline.
If you specify a user ID but not a button ID, the element displays only if the agent is offline. For example, the following syntax tracks an
agent’s online status and sets the button to offline when that agent is unavailable.
liveagent.showWhenOffline('005xx000001Sv1m',
document.getElementById('liveagent_button_toAgent_offline'));
If you specify a button ID and an agent ID, the element displays if neither the button or the agent is available. For example, the following
syntax tracks the status of an agent and a button and displays the element if neither one is available.
liveagent.showWhenOffline('573xx0000000006',
document.getElementById('liveagent_button_offline_573xx0000000006_USER1'),
'005xx000001Sv1m');
addButtonEventHandler
Use the addButtonEventHandler method to define a chat button’s behavior when certain events occur. Available in API versions
28.0 and later.
12
addButtonEventHandlerCustomize Deployments with the Deployment APIs
Usage
Defines the behavior for a chat button when the following events occur:
•An agent is available to chat.
•No agents are available to chat.
The event “no agents are available to chat” occurs whenever a chat can’t reach an agent using the configured chat button. The event
occurs when:
•No agents are online.
•No agents assigned to the skills associated with the button are online.
•Online agents have the status Away.
•Online agents are at capacity (set with Live Agent Configurations, or Presence Configurations with Omni-Channel).
•Online agents are using Omni-Channel and are only available for other service channels.
Syntax
void addButtonEventHandler(String buttonId, Function callback)
Parameters
Available VersionsDescriptionTypeName
Available in API versions 28.0 and later.The ID of the chat button for which to define
the behavior when certain events occur.
StringbuttonId
Available in API versions 28.0 and later.The function to call when a particular event
occurs. You must specify the button’s behavior
functioncallback
for each of the required event types on page
13.
Event Types
Incorporate the following event types into your callback function to customize the behavior of your button when certain events
occur. You must specify the button’s behavior for each of the following event types.
DescriptionSyntaxEvent TypeFunction
Specifies the
behavior of the
liveagent.BUTTON_EVENT.BUTTON_AVAILABLEBUTTON_AVAILABLEcallback
button when the
criteria are met for
customers to be
able to chat with
an agent, such as
when an agent
with the correct
skills is available to
chat.
13
addButtonEventHandlerCustomize Deployments with the Deployment APIs

DescriptionSyntaxEvent TypeFunction
Specifies the
behavior of the
liveagent.BUTTON_EVENT.BUTTON_UNAVAILABLEBUTTON_UNAVAILABLE
button when no
agents are
available to chat.
startChat
Use the startChat method to request a chat from a button in a new window.
Usage
Requests a chat from the provided button in a new window.
Optionally, you can route chats from a specific button directly to the agent with the userId you specify. If the agent is unavailable,
you can route the chat to additional agents by specifying whether to fallback to the button’s routing rules (true) or not (false).
Syntax
void startChat(String buttonId, (optional) String userId, (optional) Boolean fallback)
Parameters
Available VersionsDescriptionTypeName
Available in API versions 28.0 and later.The ID of the chat button for which to request
a chat in a new window.
StringbuttonId
Available in API versions 29.0 and later.The Salesforce.com user ID of the agent to
whom to directly route chats from the button.
String(Optional) userId
Available in API versions 29.0 and later.Specifies whether to fall back to the button’s
routing rules (true) or not (false) if the
Boolean(Optional)
fallback
agent with the specified sfdcUserId is
unavailable.
startChatWithWindow
Use the startChatWithWindow method to request a chat from a button using the name of a window.
Usage
Requests a chat from the provided button using the provided window name. Available in API versions 28.0 and later.
14
startChatCustomize Deployments with the Deployment APIs

Syntax
void startChatWithWindow(String buttonId, String windowName, (optional) String userId,
(optional) Boolean fallback)
Parameters
Available VersionsDescriptionTypeName
Available in API versions 28.0 and later.The ID of the chat button for which to request
a chat in a new window.
StringbuttonId
Available in API versions 28.0 and later.The name of the window.StringwindowName
Available in API versions 29.0 and later.TheSalesforce user ID of the agent to whom to
directly route chats from the button.
String(Optional) userId
Available in API versions 29.0 and later.Specifies whether to fall back to the button’s
routing rules (true) or not (false) if the
Boolean(Optional)
fallback
agent with the specified sfdcUserId is
unavailable.
Corresponding Calls for Chat Buttons
Make sure your chats start correctly by aligning your calls when using buttons, direct-to-agent, and agent with fallback-to-button.
Keep in mind that the syntax for startChat also applies to startChatWithWindow, and the syntax for showWhenOnline
also applies to showWhenOffline.
Use the following corresponding calls when you’re creating chats with a button, direct-to-agent, and agent with fallback-to-button:
Call to
addButtonEventHandler
Call to showWhenOnline
(or showWhenOffline)
Call to startChat (or
startChatWithWindow)
Scenario
addButtonEventHandler(
String buttonId,
Function callback)
showWhenOnline(String
buttonId, Object
element, (optional)
String userId)
startChat(String
buttonId)
Button
addButtonEventHandler(
String userId,
Function callback)
showWhenOnline(String
userId, Object
element)
startChat(String
buttonId, String
userId, false)
Agent (no fallback)
Use multiple handlers.showWhenOnline(String
buttonId, Object
startChat(String
buttonId, String
userId, true)
Agent (fallback to button)
element, String
userId)
15
Corresponding Calls for Chat ButtonsCustomize Deployments with the Deployment APIs

Find and Create Records Automatically with the Deployment APIs
Use the Deployment API to search for or create Salesforce records—like a case, contact, account, or lead—automatically when an agent
begins a chat with a customer.
You can add any of these methods as additional scripts within the code that’s automatically generated when you create a deployment.
addCustomDetail
Use the addCustomDetail method to add custom details for each chat visitor.
findOrCreate
Use the findOrCreate method to find existing records or create new ones based on certain criteria.
setName
Use the setName method to set the visitor name displayed in the Live Agent console or the Salesforce console.
Search for Knowledge Articles with the Deployment APIs
Use the Deployment API to search for Knowledge articles based on the information that a customer provides in a pre-chat form.
Find and Create Records Deployment API Code Sample
Test and preview how automatically creating records can work with your Live Agent deployments using this code sample.
addCustomDetail
Use the addCustomDetail method to add custom details for each chat visitor.
Usage
Adds a new custom detail for the chat visitor. The Custom Detail is displayed to agents in the footer widget and in the Chat Details page
in the Salesforce Console while the chat is active. Available in API versions 28.0 and later.
Syntax
addCustomDetail(String label, String value, (optional) Boolean displayToAgent)
Parameters
Available VersionsDescriptionTypeName
Available in API versions 28.0 and later.The label for the custom detail—for
example, "Name".
Stringlabel
Available in API versions 28.0 and later.The value of the custom detail—for
example, "John Doe".
Stringvalue
Available in API versions 29.0 and later.Specifies whether to display the custom
details that customers provide in a pre-chat
form to the agent (true) or not (false).
Boolean(Optional)
displayToAgent
16
Find and Create Records Automatically with the Deployment
APIs
Customize Deployments with the Deployment APIs

findOrCreate
Use the findOrCreate method to find existing records or create new ones based on certain criteria.
Usage
Finds or creates a record of the specified type when an agent accepts a chat request.
Note: The findOrCreate method begins the API call that finds existing records or create new records when an agent begins
a chat with a customer. You must use this method before calling any of the other findOrCreate sub-methods for finding or
creating records with the Deployment API.
Available in API versions 29.0 and later.
Syntax
liveagent.findOrCreate(String EntityName)
Parameters
Available VersionsDescriptionTypeName
Available in API versions 29.0 and later.The type of record to search for or create when
an agent accepts a chat with a customer—for
example, a contact record.
StringEntityName
findOrCreate.map
Use the findOrCreate.map method to search for or create records that contain specific customer details.
findOrCreate.saveToTranscript
Use the findOrCreate.saveToTranscript method to save the record you find or create to the chat transcript associated
with the chat.
findOrCreate.showOnCreate
Use the findOrCreate.showOnCreate method to automatically open the record you create in a subtab in the Salesforce
console.
findOrCreate.linkToEntity
Use the findOrCreate.linkToEntity method to link the record you found or created to another record type.
findOrCreate.map
Use the findOrCreate.map method to search for or create records that contain specific customer details.
Usage
Searches for or creates records that contain customer data specified by the addCustomDetail Deployment API method. This
method maps the value of the custom details to the fields on the specified record in the Salesforce console.
You can call the findOrCreate.map method as many times as necessary to find the appropriate records. Call the method once
for every field and its corresponding custom detail value you want to search for.
17
findOrCreateCustomize Deployments with the Deployment APIs
Note: To find the API name of a field for a standard object, see our API documentation. For non-standard objects, look at the field
detail for the object under Setup.
Available in API versions 29.0 and later.
Syntax
liveagent.findOrCreate(Object EntityName).map(String FieldName, String DetailName,
Boolean doFind, Boolean isExactMatch, Boolean doCreate)
Parameters
Available VersionsDescriptionTypeName
Available in API versions 29.0 and later.The API name of the field in the record
EntityNameto which to map the
corresponding custom detail DetailName.
StringFieldName
Available in API versions 29.0 and later.The value of the custom detail to map to the
corresponding field FieldName.
StringDetailName
Available in API versions 29.0 and later.Specifies whether to search for a record that
contains the custom detail DetailName in
BooleandoFind
the field FieldName (true) or not
(false).
Available in API versions 29.0 and later.Specifies whether to search for a record that
contains the exact value of the custom detail
BooleanisExactMatch
DetailName you specified in the field
FieldName (true) or not (false).
Available in API versions 29.0 and later.Specifies whether to create a new record with
the custom detail DetailName in the field
BooleandoCreate
FieldName if one isn’t found (true) or not
(false).
findOrCreate.saveToTranscript
Use the findOrCreate.saveToTranscript method to save the record you find or create to the chat transcript associated
with the chat.
Usage
Saves the record that you found or created using the findOrCreate and findOrCreate.map Deployment API methods to
the chat transcript associated with the chat.
Available in API versions 29.0 and later.
Syntax
liveagent.findOrCreate(String EntityName).saveToTranscript(String TranscriptFieldName)
18
findOrCreateCustomize Deployments with the Deployment APIs

Parameters
Available VersionsDescriptionTypeName
Available in API versions 29.0 and later.The name of the field on the chat transcript
record to which to save the ID of the record
you found or created.
StringTranscriptFieldName
findOrCreate.showOnCreate
Use the findOrCreate.showOnCreate method to automatically open the record you create in a subtab in the Salesforce
console.
Usage
Opens the record you created using the findOrCreate and findOrCreate.map Deployment API methods automatically in
a subtab in the to the Salesforce console.
Available in API versions 29.0 and later.
Syntax
liveagent.findOrCreate(String EntityName).showOnCreate()
findOrCreate.linkToEntity
Use the findOrCreate.linkToEntity method to link the record you found or created to another record type.
Usage
Links the record that you found or created using the findOrCreate and findOrCreate.map Deployment API methods to
another record of a different record type that you created using a separate findOrCreate API call. For example, you can link a case
record you found within your organization to a contact record you create.
Note: You can only link records if the parent record is created with a findOrCreate API call. You can’t link a child record to
a record you found using the findOrCreate.linkToEntity method.
Available in API versions 29.0 and later.
Syntax
liveagent.findOrCreate(String EntityName).linkToEntity(String EntityName, String
FieldName)
Parameters
Available VersionsDescriptionTypeName
Available in API versions 29.0 and later.The type of record to which to link the child
record you found or created.
StringEntityName
19
findOrCreateCustomize Deployments with the Deployment APIs

Available VersionsDescriptionTypeName
Available in API versions 29.0 and later.The name of the API field in the record
EntityName to which to save the ID of the
child record you found or created.
StringFieldName
Note: To find the API name of a field for a standard object, see our API documentation. For non-standard objects, look at the field
detail for the object under Setup.
setName
Use the setName method to set the visitor name displayed in the Live Agent console or the Salesforce console.
Usage
Sets the visitor name displayed in the Salesforce console. The name will show in the chat’s primary tab, the agent’s chat log with the
chat transcript, and in the Live AgentSupervisor panel. Available in API versions 28.0 and later.
Syntax
setName(String name)
Parameters
Available VersionsDescriptionTypeName
Available in API versions 28.0 and later.The visitor name that appears in the Live Agent
console or the Salesforce console.
Stringname
Search for Knowledge Articles with the Deployment APIs
Use the Deployment API to search for Knowledge articles based on the information that a customer provides in a pre-chat form.
addCustomDetail.doKnowledgeSearch
Use the knowledgeSearch method to automatically search for Knowledge articles based on criteria in a pre-chat form.
addCustomDetail.doKnowledgeSearch
Use the knowledgeSearch method to automatically search for Knowledge articles based on criteria in a pre-chat form.
Usage
Retrieves a custom detail value from a pre-chat form when a customer requests a chat with an agent. After an agent accepts the chat
request, this value is used as a search keyword to find articles in the Knowledge One widget. The doKnowledgeSearch() method
conducts a search by using the value parameter in the addCustomDetail method. Available in API version 31.0 and later.
20
setNameCustomize Deployments with the Deployment APIs

Syntax
liveagent.addCustomDetail(String label, String value, (optional) Boolean
displayToAgent).doKnowledgeSearch()
Find and Create Records Deployment API Code Sample
Test and preview how automatically creating records can work with your Live Agent deployments using this code sample.
The following code searches for and creates records when an agent begins a chat with a customer using the following methods:
•addCustomDetail
•findOrCreate
•findOrCreate.map
•findOrCreate.saveToTranscript
•findOrCreate.linkToEntity
•findOrCreate.showOnCreate
<script type='text/javascript'>
/* Creates a custom detail called First Name and sets the value to "Jane" */
liveagent.addCustomDetail("First Name", "Jane");
/* Creates a custom detail called Last Name and sets the value to "Doe" */
liveagent.addCustomDetail("Last Name", "Doe");
/* Creates a custom detail called Phone Number and sets the value to "555-1212" */
liveagent.addCustomDetail("Phone Number", "415-555-1212");
/* Creates a custom detail called Case Subject and sets the value to "Best snowboard for
a beginner" and will perform a knowledge search when the chat is accepted for the agent
*/
liveagent.addCustomDetail("Case Subject", "Best snowboard for a
beginner").doKnowledgeSearch();
/* Creates a custom detail called Case Status and sets the value to "New" */
liveagent.addCustomDetail("Case Status", "New");
/* This does a non-exact search on cases by the value of the "Case Subject" custom detail.
If no results are found, it will create a case and set the case's subject and status
The case that's found or created will be associated to the chat and the case will open
in
the Console for the agent when the chat is accepted */
liveagent.findOrCreate("Case").map("Subject","Case
Subject",true,false,true).map("Status","Case
Status",false,false,true).saveToTranscript("CaseId").showOnCreate();
/* This searches for a contact whose first and last name exactly match the values in the
custom details for First and Last Name
If no results are found, it will create a new contact and set it's first name, last name,
and phone number to the values in the custom details */
liveagent.findOrCreate("Contact").map("FirstName","First
21
Find and Create Records Deployment API Code SampleCustomize Deployments with the Deployment APIs

Name",true,true,true).map("LastName","Last Name",true,true,true).map("Phone","Phone
Number",false,false,true);
/* The contact that's found or created will be saved or associated to the chat transcript.
The contact will be opened for the agent in the Console and the case is linked to the
contact record */
liveagent.findOrCreate("Contact").saveToTranscript("ContactId").showOnCreate().linkToEntity("Case","ContactId");
</script>
Customize Automated Chat Invitations with the Deployment APIs
Customize automated chat invitations that appear to customers on your website.
Use the following deployment methods to customize your automated chat invitations.
setCustomVariable
Use the setCustomVariable method to create customized criteria in your sending rules that must be met in order for your
automated invitation to be sent to customers.
rejectChat
Use the rejectChat method to reject and retract an invitation that’s been sent to a customer.
addButtonEventHandler
Use the addButtonEventHandler method to define an automated invitation’s behavior when certain events occur.
Automated Chat Invitation Code Sample
Test and preview how automated chat invitations can work on your website using this code sample.
setCustomVariable
Use the setCustomVariable method to create customized criteria in your sending rules that must be met in order for your
automated invitation to be sent to customers.
Usage
Creates customized criteria in your sending rules that must be met in order for your automated invitation to be sent to customers.
Specifies the comparison values for custom variables used in criteria for your sending rules. Available in API versions 28.0 and later.
Syntax
void setCustomVariable(String variableName, Object value)
Parameters
Available VersionsDescriptionTypeName
Available in API versions 28.0 and later.The name of the customized criteria for your
custom sending rule.
StringvariableName
22
Customize Automated Chat Invitations with the Deployment
APIs
Customize Deployments with the Deployment APIs

Available VersionsDescriptionTypeName
Available in API versions 28.0 and later.The comparison value for your custom sending
rule.
Objectvalue
rejectChat
Use the rejectChat method to reject and retract an invitation that’s been sent to a customer.
Usage
Rejects an invitation and causes it to be retracted.
Available in API versions 28.0 and later.
Syntax
void rejectChat(String buttonId)
Parameters
Available VersionsDescriptionTypeName
Available in API versions 28.0 and later.The ID of the chat button for which to reject
chats.
StringbuttonId
addButtonEventHandler
Use the addButtonEventHandler method to define an automated invitation’s behavior when certain events occur.
Usage
Defines the behavior for an invitation when the following events occur:
•The criteria are met for the invitation to appear on-screen.
•The criteria are not met for the invitation to appear on-screen.
•A customer accepts an invitation to chat.
•A customer rejects an invitation to chat.
The event “the criteria are not met for the invitation to appear on the screen” occurs when a chat can’t reach an agent using the configured
chat button or automated invitation. The event occurs when:
•No agents are online.
•No agents assigned to the skills associated with the button are online.
•Online agents have the status Away.
•Online agents are at capacity (set with Live Agent Configurations, or Presence Configurations with Omni-Channel).
•Online agents are using Omni-Channel and are only available for other service channels.
23
rejectChatCustomize Deployments with the Deployment APIs

Available in API versions 28.0 and later.
Syntax
void addButtonEventHandler(String buttonId, Function callback)
Parameters
Available VersionsDescriptionTypeName
Available in API versions 28.0 and later.The ID of the chat button associated with the
automated invitation for which to define the
behavior when certain events occur.
StringbuttonId
Available in API versions 28.0 and later.The function to call when a particular event
occurs. You must specify the invitation’s
functioncallback
behavior for each of the required event types
on page 24.
Event Types
Incorporate the following event types into your callback function to customize the behavior of your invitation when certain events
occur. You must specify the invitation’s behavior for each of the following event types.
DescriptionSyntaxEvent TypeFunction
Specifies the
behavior of the
liveagent.BUTTON_EVENT.BUTTON_AVAILABLEBUTTON_AVAILABLEcallback
automated
invitation when the
criteria are met for
the invitation to
appear on-screen.
Specifies the
behavior of the
liveagent.BUTTON_EVENT.BUTTON_UNAVAILABLEBUTTON_UNAVAILABLE
automated
invitation when the
criteria are not met
for the invitation to
appear on-screen.
Specifies the
behavior of the
liveagent.BUTTON_EVENT.BUTTON_ACCEPTEDBUTTON_ACCEPTED
automated
invitation when a
customer accepts
the invitation. This
event type is only
available for
24
addButtonEventHandlerCustomize Deployments with the Deployment APIs

DescriptionSyntaxEvent TypeFunction
automated chat
invitations.
Specifies the
behavior of the
liveagent.BUTTON_EVENT.BUTTON_REJECTEDBUTTON_REJECTED
automated
invitation when a
customer rejects
the invitation. This
event type is only
available for
automated chat
invitations.
Note: You might receive multiple events of the same type.
Automated Chat Invitation Code Sample
Test and preview how automated chat invitations can work on your website using this code sample.
The following code is for an automated chat invitation that uses the addButtonEventHandler() method to display a customized
invitation on a website. This invitation allows customers to start a chat with an agent when an agent with the correct skills is available
to chat.
<apex:page>
<!-- This section creates the div with the UI for chat invitation whose id is 573D01234567890
-->
<!-- For this usage, the "Animation" type of this invitation should be set to "Custom",
otherwise two invitations will appear (the Salesforce-provided one and this custom one).
-->
<div id="liveagent_invite_button_573D01234567890" style="display: none; position: fixed;
border: 2px solid darkblue; border-radius: 5px; background-color: lightblue; height: 100px;
width: 200px;">
<!-- Creates an "X" option to reject or close the invitation if it's offered -->
<div style="cursor: pointer; padding: 5px; right: 0px; position: absolute; color: darkred;
font-weight: bold;" onclick="liveagent.rejectChat('573D01234567890')">X</div>
<!-- Provides the Start Chat option for the customer to accept or start the chat for the
invitation -->
<div style="cursor: pointer; top: 42px; left: 65px; position: absolute;font-weight: bold;
font-size: 16px;" onclick="liveagent.startChat('573D01234567890')">Start Chat</div>
</div>
<!-- Live Agent Deployment Code that makes chat available -->
<script type='text/javascript'
src='https://c.la1s1.saleforceliveagent.com/content/g/js/36.0/deployment.js'></script>
<script type='text/javascript'>
<!-- Creates the callback function used for the Live Agent chat invitation to present it
25
Automated Chat Invitation Code SampleCustomize Deployments with the Deployment APIs

or not based on availability and the customer's interaction with it -->
function buttonCallback(e) {
<!-- When the chat invitation is online (i.e. at least one available, skilled agent),
display it at position top 200px and left 300px -->
if (e == liveagent.BUTTON_EVENT.BUTTON_AVAILABLE) {
document.getElementById('liveagent_invite_button_573D01234567890').style.display = '';
document.getElementById('liveagent_invite_button_573D01234567890').style.left = '300px';
document.getElementById('liveagent_invite_button_573D01234567890').style.top = '200px';
}
<!-- When the chat invitation is offline, don't display it -->
if (e == liveagent.BUTTON_EVENT.BUTTON_UNAVAILABLE) {
document.getElementById('liveagent_invite_button_573D01234567890').style.display = 'none';
}
<!-- When the chat invitation is accepted, stop displaying it -->
if (e == liveagent.BUTTON_EVENT.BUTTON_ACCEPTED) {
document.getElementById('liveagent_invite_button_573D01234567890').style.display = 'none';
}
<!-- When the chat invitation is rejected, stop displaying it -->
if (e == liveagent.BUTTON_EVENT.BUTTON_REJECTED) {
document.getElementById('liveagent_invite_button_573D01234567890').style.display = 'none';
}
}
<!-- Registers the function buttonCallback() above as the callback for the chat invitation
whose id is 573D01234567890 -->
liveagent.addButtonEventHandler('573D01234567890', buttonCallback);
// Let's say there is data available in JavaScript that you want to use in a custom sending
rule.
var shoppingCartValue = 123.45;
// To pass this data so it can be used in Sending Rules in Salesforce setup, call
setCustomVariable.
liveagent.setCustomVariable('shoppingCartValue', shoppingCartValue);
<!-- Live Agent deployment code that initializes chat for the deployment whose id is
572D01234567890 and org is 00DD01234567890 -->
liveagent.init('https://d.la1s1.salesforceliveagent.com/chat', '572D01234567890',
'00DD01234567890');
<!-- Enable Live Agent advanced logging to be available through the Browser's Developer
Console -->
liveagent.enableLogging();
</script>
</apex:page>
26
Automated Chat Invitation Code SampleCustomize Deployments with the Deployment APIs
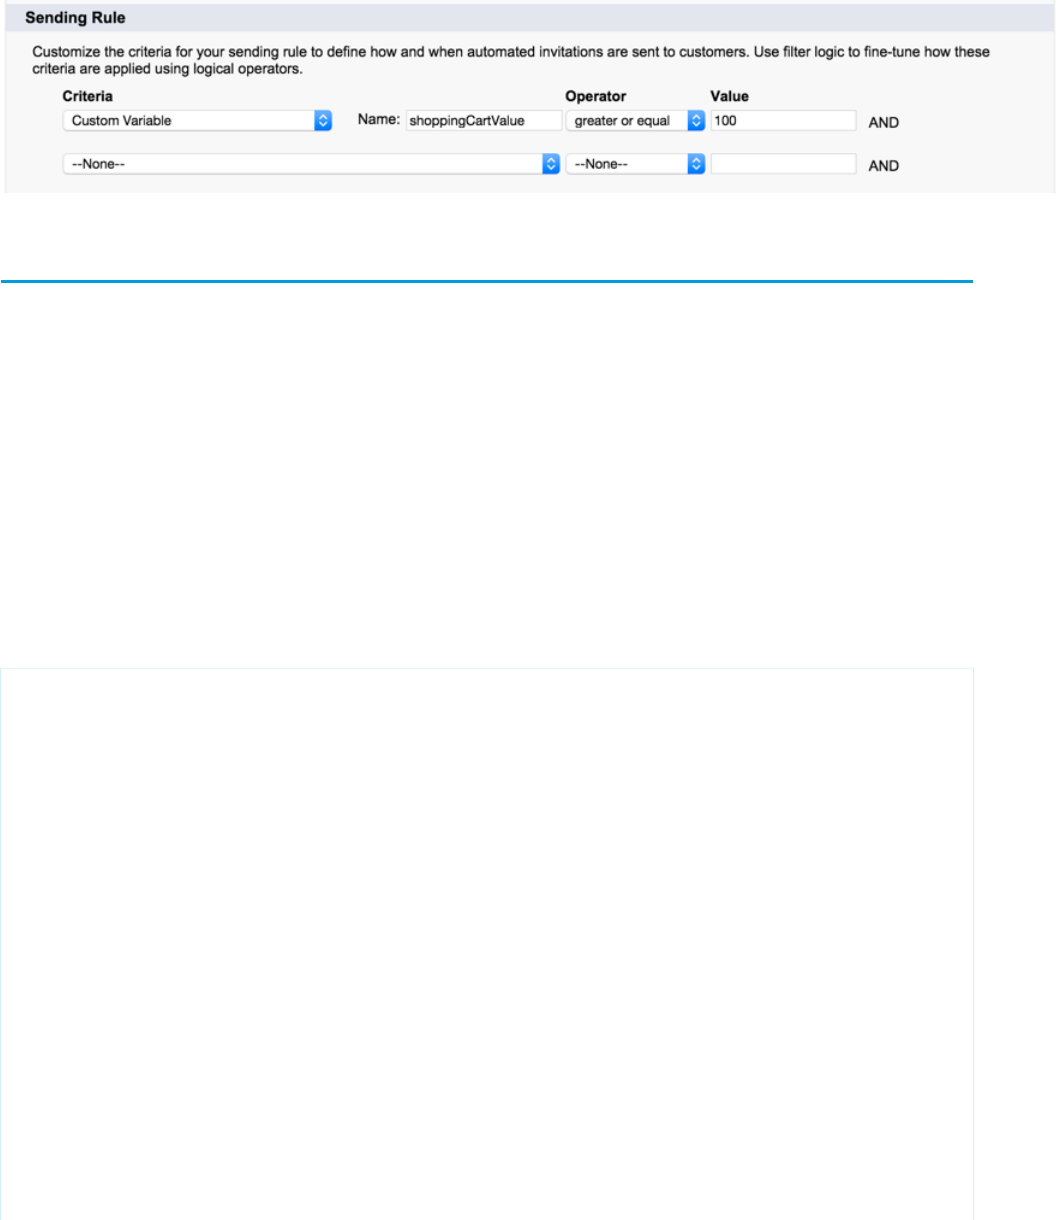
This code lets you pass data that’s available in JavaScript so it can be used in your invitation’s sending rules in Setup. This is an example
of how your settings might look:
Deployment API Code Sample
Test and preview how the Deployment API can help you customize your deployments.
This code sample creates a chat window that uses the following Deployment API methods:
•startChat
•showWhenOnline
•showWhenOffline
•addCustomDetail
•setName
•map
•setChatWindowWidth
•setChatWindowHeight
•doKnowledgeSearch
<apex:page showHeader="false">
<style> body { margin: 25px 0 0 25px; } </style>
<h1>Welcome to Support</h1>
<br />
Thank you for your interest.
<br /><br />
<!-- START Button code, Replace this section with your Live Agent button code snippet -->
<a id="liveagent_button_online_573B0000000033Y" href="javascript://Chat" style="display:
none;" onclick="liveagent.startChat('573B0000000033Y')">Chat Now</a>
<div id="liveagent_button_offline_573B0000000033Y" style="display: none;">Live Chat is
currently unavailable</div>
<script type="text/javascript">
if (!window._laq) { window._laq = []; }
window._laq.push(function(){
liveagent.showWhenOnline('573B0000000033Y',
document.getElementById('liveagent_button_online_573B0000000033Y'));
liveagent.showWhenOffline('573B0000000033Y',
document.getElementById('liveagent_button_offline_573B0000000033Y'));
});</script>
<!-- END Button code -->
27
Deployment API Code SampleCustomize Deployments with the Deployment APIs

<!-- Live Agent Deployment Code, replace with your org's values -->
<script type='text/javascript'
src='https://c.la.gus.salesforce.com/content/g/js/36.0/deployment.js'></script>
<!-- Deployment Code API examples -->
<script type='text/javascript'>
/* Adds a custom detail called Contact Email and sets it value to jane@doe.com */
liveagent.addCustomDetail('Contact E-mail', 'jane@doe.com');
/* Creates a custom detail called First Name and sets the value to Jane */
liveagent.addCustomDetail('First Name', 'Jane');
/* Creates a custom detail called Last Name and sets the value to Doe */
liveagent.addCustomDetail('Last Name', 'Doe');
/* Creates a custom detail called Phone Number and sets the value to 415-555-1212 */
liveagent.addCustomDetail('Phone Number', '415-555-1212');
/* An auto-query that searches Contacts whose Email field exactly matches 'jane@doe.com'.
If no result is found, it will create a Contact record with the email, first name, last
name, and phone number fields set to the custom detail values. */
liveagent.findOrCreate('Contact').map('Email','Contact
E-mail',true,true,true).map('FirstName','First Name',false,false,true).map('LastName','Last
Name',false,false,true).map('Phone','Phone Number',false,false,true);
/* The contact that's found or created will be saved or associated to the chat transcript.
The contact will be opened for the agent in the Console and the case is linked to the
contact record */
liveagent.findOrCreate('Contact').saveToTranscript('ContactId').showOnCreate().linkToEntity('Case','ContactId');
/* Creates a custom detail called Case Subject and sets the value to 'Refund policy for
products' and will perform a knowledge search when the chat is accepted for the agent */
liveagent.addCustomDetail('Case Subject','Refund policy for products').doKnowledgeSearch();
/* Creates a custom detail called Case Status and sets the value to 'New' */
liveagent.addCustomDetail('Case Status','New');
/* This does a non-exact search on cases by the value of the 'Case Subject' custom detail
If no results are found, it will create a case and set the case's subject and status.
The case that's found or created will be associated to the chat and the case will open in
the Console for the agent when the chat is accepted */
liveagent.findOrCreate('Case').map('Subject','Case
Subject',true,false,true).map('Status','Case
Status',false,false,true).saveToTranscript('CaseId').showOnCreate();
/* Saves the custom detail to a custom field on LiveChatTranscript at the end of a chat.
Assumes a custom field called Company__c was added to the Live Chat Transcript object */
liveagent.addCustomDetail('Company', 'Acme').saveToTranscript('Company__c');
/* For internal or technical details that don't concern the agent, set showToAgent to false
to hide them from the display. */
liveagent.addCustomDetail('VisitorHash', 'c6f440178d478e4326a1', false);
28
Deployment API Code SampleCustomize Deployments with the Deployment APIs
/* Sets the display name of the visitor in the agent console when engaged in a chat */
liveagent.setName('Jane Doe');
/* Sets the width of the chat window to 500px */
liveagent.setChatWindowWidth(500);
/* Sets the height of the chat window to 500px */
liveagent.setChatWindowHeight(500);
<!-- Live Agent Deployment Code to initialize, replace with your org's values -->
liveagent.init('https://d.la.gus.salesforce.com/chat', '572B000000003KL', '00DB00000000Rr8');
</script>
</apex:page>
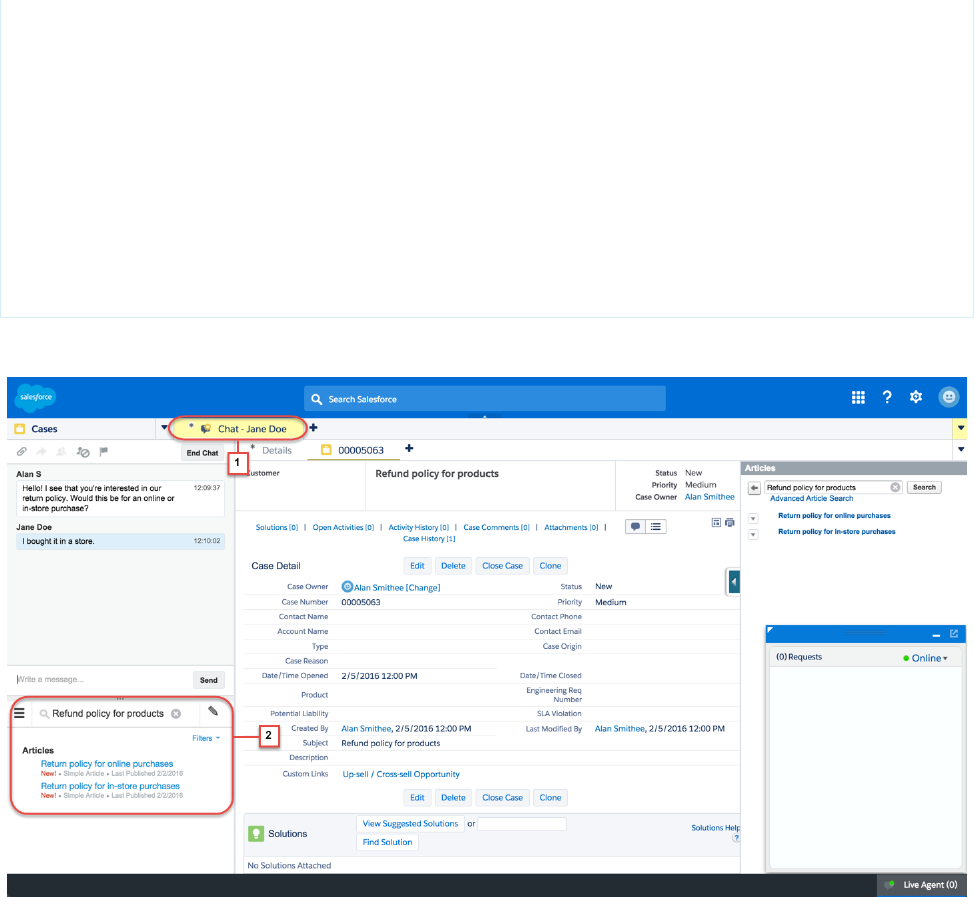
This code results in the following view for agents using the Console.
The name of the customer (Jane Doe for this example) appears in the Console from setName (1). When you call
addCustomDetail.doKnowledgeSearch, the search automatically appears in the Knowledge widget (2).
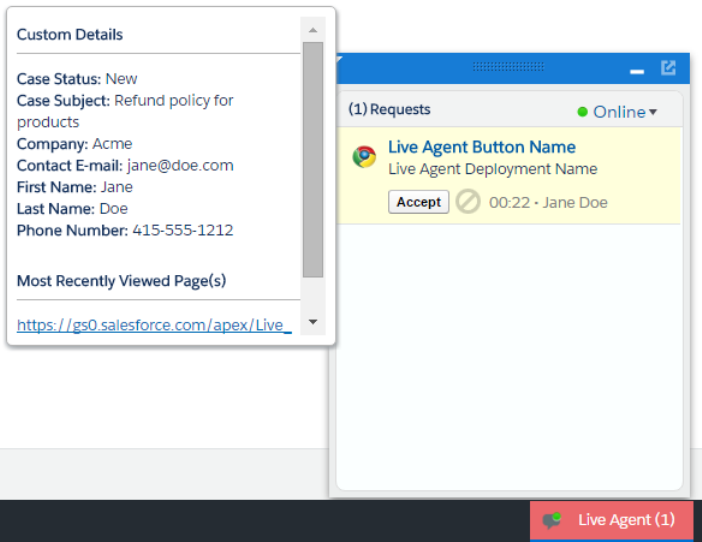
When the agent receives a chat, the set Custom Details appear in a hover window.
29
Deployment API Code SampleCustomize Deployments with the Deployment APIs
30
Deployment API Code SampleCustomize Deployments with the Deployment APIs

CHAPTER 5 Use Pre-Chat to Gather Visitor Information
and Set Context for the Agent
Use pre-chat forms in to collect information from visitors and customize their pre-chat experience.
A pre-chat form can gather information, such as a customer's name, email address, and reason for contacting customer support. This
information can help direct chat requests more efficiently and reduce the time agents spend collecting the information themselves. You
can also use this information to customize the customer's experience while they chat with the agent, such as including their first name
in the chat window.
You can create a Visualforce page to host your pre-chat form, or you can develop the form on your own. The information in this guide
focuses on using Visualforce.
Find and Create Records Automatically with the Pre-Chat APIs
Use the Pre-Chat API to search for or create customer records automatically when a customer completes a pre-chat form.
Access Chat Details with the Pre-Chat APIs
Use the Pre-Chat API to access custom details from the Deployment API and incorporate them into pre-chat.
Pre-Chat Form Code Sample
Test and preview how pre-chat forms can work for your agents and customers.
Find and Create Records Automatically with the Pre-Chat APIs
Use the Pre-Chat API to search for or create customer records automatically when a customer completes a pre-chat form.
findOrCreate.map
Use the findOrCreate.map method to search for or create records that contain specific customer details.
findOrCreate.saveToTranscript
Use the findOrCreate.saveToTranscript method to find or create a record and save it to the chat transcript associated
with the chat.
findOrCreate.showOnCreate
Use the findOrCreate.showOnCreate method to find or create a record and automatically open it in a subtab in the
Salesforce console.
findOrCreate.linkToEntity
Use the findOrCreate.linkToEntity method to link the record you found or created to another record type.
findOrCreate.displayToAgent
Use the findOrCreate.displayToAgent method to specify which pre-chat details will be displayed to agents for incoming
chats in the widget and in the Details tab when they receive a chat request.
Find and Create Records Pre-Chat API Code Sample
Test and preview how to automatically create records when a customer completes a pre-chat form using this code sample.
findOrCreate.map
Use the findOrCreate.map method to search for or create records that contain specific customer details.
31

Usage
Searches for or creates records that contain the customer data that’s specified in the pre-chat form that the customer completes. This
method maps the value of the custom details to the fields on the specified record in the Salesforce console.
You can call the findOrCreate.map method as many times as necessary to find the appropriate records. You can list multiple
fields and their corresponding details to map the detail values to the appropriate fields within the record.
Available in API versions 29.0 and later.
Syntax
<input type= "hidden" name= "liveagent.prechat.findorcreate.map: String entityName"
value= "String fieldName, String detailName;" />
Parameters
Available VersionsDescriptionTypeName
Available in API versions 29.0 and later.The type of record to search for or create when
an agent accepts a chat with a customer, for
example, a contact record
StringentityName
Available in API versions 29.0 and later.The name of the field in the record
EntityName to which to map the
corresponding custom detail value
StringfieldName
Available in API versions 29.0 and later.The value of the custom detail to map to the
corresponding field fieldName
StringdetailName
findOrCreate.map.doFind
Use the findOrCreate.map.doFind method to specify which fields to search against existing customer records when a
customer completes a pre-chat form.
findOrCreate.map.isExactMatch
Use the findOrCreate.map.isExactMatch method to specify whether a field value must exactly match the field value
in an existing record when you conduct a search with the findOrCreate.map method.
findOrCreate.map.doCreate
Use the findOrCreate.map.doCreate method to specify which fields in findOrCreate.map method to use to create
a new record if an existing record isn’t found.
findOrCreate.map.doFind
Use the findOrCreate.map.doFind method to specify which fields to search against existing customer records when a customer
completes a pre-chat form.
32
findOrCreate.mapUse Pre-Chat to Gather Visitor Information and Set Context
for the Agent

Usage
Specifies which fields in your findOrCreate.map method to use to search for an existing record. You can search for one or more
fields within records, but note that when multiple fields are specified, the logic relationship is AND. This means that all specified fields
must match an existing record for it to be found.
When using custom fields, follow these guidelines:
•Checkboxes have valid values true and false when trying to search or create related to custom fields.
•Dates use the format YYYY-MM-DD.
•Numbers in the Currency field don’t have a currency sign.
•Numbers in the Percentage field don’t have a percentage sign.
Available in API versions 29.0 and later.
Syntax
<input type= "hidden" name= "liveagent.prechat.findorcreate.map.doFind: String
entityName" value= "String fieldName, Boolean find;" />
Parameters
Available VersionsDescriptionTypeName
Available in API versions 29.0 and later.The type of record to search for or create when
an agent accepts a chat with a customer—for
example, a contact record.
StringentityName
Available in API versions 29.0 and later.The name of the API field to search for in
existing records.
StringfieldName
Note: To find the API name of a field
for a standard object, see our API
documentation. For non-standard
objects, look at the field detail for the
object under Setup.
Available in API versions 29.0 and later.Specifies whether to search for existing records
that contain the field fieldName (true)
or not (false).
Booleanfind
Note: You can specify only the fields
for which find equals true. The
method doesn’t search for records
containing fields for which find
equals false.
findOrCreate.map.isExactMatch
Use the findOrCreate.map.isExactMatch method to specify whether a field value must exactly match the field value in an
existing record when you conduct a search with the findOrCreate.map method.
33
findOrCreate.mapUse Pre-Chat to Gather Visitor Information and Set Context
for the Agent
Usage
Specifies which fields in your findOrCreate.map method require an exact field value match when you search for existing records.
You can specify this for one or more fields within records.
Available in API versions 29.0 and later.
Syntax
<input type= "hidden" name= "liveagent.prechat.findorcreate.map.isExactMatch: String
entityName" value= "String fieldName, Boolean exactMatch;" />
Parameters
Available VersionsDescriptionTypeName
Available in API versions 29.0 and later.The type of record to search for or create when
an agent accepts a chat with a customer—for
example, a contact record.
StringentityName
Available in API versions 29.0 and later.The API name of the field to search for in
existing records.
StringfieldName
Note: To find the API name of a field
for a standard object, see our API
documentation. For non-standard
objects, look at the field detail for the
object under Setup.
Available in API versions 29.0 and later.Specifies whether to search for existing records
that contain an exact match to the field
fieldName (true) or not (false).
Booleanfind
Note: You only need to specify fields
for which exactMatch equals
true. The method will not search for
records containing fields for which
exactMatch equals false.
findOrCreate.map.doCreate
Use the findOrCreate.map.doCreate method to specify which fields in findOrCreate.map method to use to create a
new record if an existing record isn’t found.
Usage
Specifies which fields in your findOrCreate.map method to use to create a new record if an existing record isn’t found. You can
specify one or more fields for creating new records.
Available in API versions 29.0 and later.
34
findOrCreate.mapUse Pre-Chat to Gather Visitor Information and Set Context
for the Agent
Syntax
<input type= "hidden" name= "liveagent.prechat.findorcreate.map.doCreate: String
entityName" value= "String fieldName, Boolean create;" />
Parameters
Available VersionsDescriptionTypeName
Available in API versions 29.0 and later.The type of record to create when an agent
accepts a chat with a customer and an existing
StringentityName
record isn’t found—for example, a contact
record.
Available in API versions 29.0 and later.The API name of the field to include in new
records.
StringfieldName
Note: The findOrCreate method
begins the API call that finds existing
records or create new records when an
agent begins a chat with a customer.
You must use this method before
calling any of the other
findOrCreate sub-methods for
finding or creating records with the
Deployment API.
Available in API versions 29.0 and later.Specifies whether to create a new record that
contains the field fieldName (true) or
not (false).
Booleancreate
Note: You only need to specify fields
for which create equals true. The
method will not create records
containing fields for which create
equals false.
findOrCreate.saveToTranscript
Use the findOrCreate.saveToTranscript method to find or create a record and save it to the chat transcript associated
with the chat.
Usage
Saves the record that you found or created using the findOrCreate.map.doCreate or findOrCreate.map.doFind
Pre-Chat API methods to the chat transcript associated with the chat when the chat ends.
Available in API versions 29.0 and later.
35
findOrCreate.saveToTranscriptUse Pre-Chat to Gather Visitor Information and Set Context
for the Agent

Syntax
<input type="hidden" name= "liveagent.prechat.findorcreate.saveToTranscript: String
entityName" value= "String transcriptFieldName" />
Parameters
Available VersionsDescriptionTypeName
Available in API versions 29.0 and later.The type of record to search for or create
when an agent accepts a chat with a
customer—for example, a contact record.
StringentityName
Available in API versions 29.0 and later.The API name of the field on the chat
transcript record to which to save the ID of
the record you found or created.
StringtranscriptFieldName
Note: To find the API name of a field for a standard object, see our API documentation. For non-standard objects, look at the field
detail for the object under Setup.
findOrCreate.showOnCreate
Use the findOrCreate.showOnCreate method to find or create a record and automatically open it in a subtab in the Salesforce
console.
Usage
Opens the record you created using the findOrCreate.map.doCreate and findOrCreate.map.doFind Pre-Chat API
methods automatically in a subtab in the to the Salesforce console.
Available in API versions 29.0 and later.
Syntax
<input type= "hidden" name= "liveagent.prechat.findorcreate.showOnCreate: String
entityName" value= "Boolean show" />
Parameters
Available VersionsDescriptionTypeName
Available in API versions 29.0 and later.The type of record to search for or create when
an agent accepts a chat with a customer—for
example, a contact record.
StringentityName
Available in API versions 29.0 and later.Specifies whether to display the record you
created in a subtab in the Salesforce console
(true) or not (false).
Booleanshow
36
findOrCreate.showOnCreateUse Pre-Chat to Gather Visitor Information and Set Context
for the Agent

findOrCreate.linkToEntity
Use the findOrCreate.linkToEntity method to link the record you found or created to another record type.
Usage
Links the record you’ve found or created using the findOrCreate.map.doFind and findOrCreate.map.doCreate
methods to another record of a different record type that you created using a separate findOrCreate.map API call. For example,
you can link a case record you found within your organization to a contact record you create.
The findOrCreate.linkToEntity method can’t be used to populate fields on records that you create by using the
findOrCreate API call. Instead, use the findOrCreate.map method to update field values on records.
Note: You can only link records if the parent record is created with a findOrCreate API call. You can’t link a child record to
a record you found using the findOrCreate.linkToEntity method.
Available in API versions 29.0 and later.
Syntax
<input type= "hidden" name= "liveagent.prechat.findorcreate.linkToEntity: String
entityName" value= "String parentEntityName, String fieldName" />
Parameters
Available VersionsDescriptionTypeName
Available in API versions 29.0 and later.The type of record which is linked to the parent
record you found or created.
StringentityName
Available in API versions 29.0 and later.The type of parent record to link to the child
record you found or created.
StringparentEntityName
Available in API versions 29.0 and later.The name of the field in the record
parentEntityName where the ID of the
child record you found or created is saved.
StringfieldName
findOrCreate.displayToAgent
Use the findOrCreate.displayToAgent method to specify which pre-chat details will be displayed to agents for incoming
chats in the widget and in the Details tab when they receive a chat request.
Usage
Specifies which pre-chat details to display to an agent in the Details tab in Salesforce console when the agent receives a chat request.
Typically, this method is only used to hide particular custom details from the agent but setting its value to false.
Available in API versions 29.0 and later.
37
findOrCreate.linkToEntityUse Pre-Chat to Gather Visitor Information and Set Context
for the Agent
Syntax
<input type= "hidden" name= "liveagent.prechat.findorcreate.displayToAgent: String
detailName" value= "Boolean display" />
Parameters
Available VersionsDescriptionTypeName
Available in API versions 29.0 and later.The name of the detail to display to an agent
when they receive a chat request.
StringdetailName
Available in API versions 29.0 and later.Specifies whether to display the custom detail
to an agent in the chat notifications and Details
tab (true) or not (false).
Booleandisplay
Note: You only need to specify details
for which display equals false.
The method will not display details for
which display equals false. If
you don’t specify the value of the
display parameter, the default value
is set to true.
Find and Create Records Pre-Chat API Code Sample
Test and preview how to automatically create records when a customer completes a pre-chat form using this code sample.
The following code searches for and creates records when a customer completes a pre-chat form using the following methods:
•findOrCreate.map
•findOrCreate.map.doFind
•findOrCreate.map.isExactMatch
•findOrCreate.map.doCreate
•findOrCreate.saveToTranscript
•findOrCreate.showOnCreate
•findOrCreate.linkToEntity
<form method="post" action="#">
<label>First Name: </label> <input type='text' name='liveagent.prechat:ContactFirstName'
/><br />
<label>Last Name: </label> <input type='text' name='liveagent.prechat:ContactLastName'
/><br />
<label>Subject: </label> <input type='text' name='liveagent.prechat:CaseSubject' /><br />
<input type="hidden" name="liveagent.prechat:CaseStatus" value="New" /><br />
<input type="hidden" name="liveagent.prechat.findorcreate.map:Contact"
value="FirstName,ContactFirstName;LastName,ContactLastName" />
<input type="hidden" name="liveagent.prechat.findorcreate.map.doFind:Contact"
value="FirstName,true;LastName,true" />
<input type="hidden" name="liveagent.prechat.findorcreate.map.isExactMatch:Contact"
38
Find and Create Records Pre-Chat API Code SampleUse Pre-Chat to Gather Visitor Information and Set Context
for the Agent
value="FirstName,true;LastName,true" />
<input type="hidden" name="liveagent.prechat.findorcreate.map.doCreate:Contact"
value="FirstName,true;LastName,true" />
<input type="hidden" name="liveagent.prechat.findorcreate.saveToTranscript:Contact"
value="ContactId" />
<input type="hidden" name="liveagent.prechat.findorcreate.showOnCreate:Contact" value="true"
/>
<input type="hidden" name="liveagent.prechat.findorcreate.linkToEntity:Contact"
value="Case,ContactId" />
<input type="hidden" name="liveagent.prechat.findorcreate.map:Case"
value="Subject,CaseSubject;Status,CaseStatus" />
<input type="hidden" name="liveagent.prechat.findorcreate.map.doCreate:Case"
value="Subject,true;Status,true" />
<input type="submit" value="Submit" />
</form>
Access Chat Details with the Pre-Chat APIs
Use the Pre-Chat API to access custom details from the Deployment API and incorporate them into pre-chat.
preChatInit
Use the preChatInit method to access the deployment information that has been passed into the chat through the
addCustomDetail Deployment API method.
preChatInit
Use the preChatInit method to access the deployment information that has been passed into the chat through the
addCustomDetail Deployment API method.
Usage
Extracts chat deployment information, including Custom Details, for use with pre-chat. When you use preChatInit, include the
prechat.js file in the same Apex page and with the same path as the deployment.js file.
Available in API versions 29.0 and later.
Syntax
liveagent.details.preChatInit(String chatUrl, function detailCallback, (optional) String
chatFormName)
Parameters
Available VersionsDescriptionTypeName
Available in API versions 29.0 and later.The URL of the chat to retrieve custom
details from.
StringchatUrl
39
Access Chat Details with the Pre-Chat APIsUse Pre-Chat to Gather Visitor Information and Set Context
for the Agent
Available VersionsDescriptionTypeName
Available in API versions 29.0 and later.Name of the JavaScript function to call
upon completion of the method.
StringdetailCallback
Available in API versions 29.0 and later.The name of the HTML form tag for the
pre-chat form to which to incorporate the
custom details.
String(Optional) chatFormName
Responses
Available VersionsDescriptionTypeName
Available in API versions 29.0 and later.An object containing the deployment
information included in the pre-chat form
using the preChatInit method.
Objectdetails
detailCallback
The detailCallback method specifies the behavior that occurs after the preChatInit method returns the details object.
Available VersionsDescriptionParametersSyntax
Available in API versions 29.0 and later.Specifies the actions to occur after the
custom details are retrieved using the
preChatInit method.
detailsfunction
myCallBack(details)
{ // Customer
specific code }
Pre-Chat Form Code Sample
Test and preview how pre-chat forms can work for your agents and customers.
The following code is for a pre-chat form that:
•Gathers the visitor’s first and last name, email address, phone number, and issue, and sets the values to Custom Details.
•Searches for a contact whose email exactly matches the value provided by the customer in the form. If there's no match, it creates
a Contact record and maps the values provided by the customer to the record’s fields.
•Creates a Case record to attach to the chat, and maps the details found to the record’s fields.
•Sets the found or created Contact record as the contact for the Case.
•Associates the records Contact and Case to the Live Chat Transcript record and opens them for the agent in the Console.
•Searches knowledge article based on the text, assuming that Knowledge is set up.
•Displays the visitor’s first and last name for the agent in the Console.
<apex:page showHeader="false">
<!-- This script takes the endpoint URL parameter passed from the deployment page and makes
it the action for the form -->
40
Pre-Chat Form Code SampleUse Pre-Chat to Gather Visitor Information and Set Context
for the Agent

<script type='text/javascript'>
(function() {
function handlePageLoad() {
var endpointMatcher = new RegExp("[\\?\\&]endpoint=([^&#]*)");
document.getElementById('prechatForm').setAttribute('action',
decodeURIComponent(endpointMatcher.exec(document.location.search)[1]));
} if (window.addEventListener) {
window.addEventListener('load', handlePageLoad, false);
} else { window.attachEvent('onload', handlePageLoad, false);
}})();
</script>
<h1>Live Agent Pre-Chat Form</h1>
<!-- Form that gathers information from the chat visitor and sets the values to Live Agent
Custom Details used later in the example -->
<form method='post' id='prechatForm'>
First name: <input type='text' name='liveagent.prechat:ContactFirstName' id='firstName'
/><br />
Last name: <input type='text' name='liveagent.prechat:ContactLastName' id='lastName'
/><br />
Email: <input type='text' name='liveagent.prechat:ContactEmail' id='email' /><br />
Phone: <input type='text' name='liveagent.prechat:ContactPhone' id='phone' /><br />
Issue: <input type='text' name='liveagent.prechat:CaseSubject' id='subject' /><br />
<!-- Hidden fields used to set additional custom details -->
<input type="hidden" name="liveagent.prechat:CaseStatus" value="New" /><br />
<!-- This example assumes that "Chat" was added as picklist value to the Case Origin
field -->
<input type="hidden" name="liveagent.prechat:CaseOrigin" value="Chat" /><br />
<!-- This example will set the Case Record Type to a specific value for the record
type configured on the org. Lookup the case record type's id on your org and set it here
-->
<input type="hidden" name="liveagent.prechat:CaseRecordType" value="012D00123456789"
/>
<!-- Used to set the visitor's name for the agent in the Console -->
<input type="hidden" name="liveagent.prechat.name" id="prechat_field_name" />
<!-- map: Use the data from prechat form to map it to the Salesforce record's fields -->
<input type="hidden" name="liveagent.prechat.findorcreate.map:Contact"
value="FirstName,ContactFirstName;LastName,ContactLastName;Email,ContactEmail;Phone,ContactPhone"
/>
<input type="hidden" name="liveagent.prechat.findorcreate.map:Case"
value="Subject,CaseSubject;Status,CaseStatus;Origin,CaseOrigin;RecordTypeId,CaseRecordType"
/>
<!-- doFind, doCreate and isExactMatch example for a Contact:
Find a contact whose Email exactly matches the value provided by the customer in the
form
If there's no match, then create a Contact record and set it's First Name, Last Name,
41
Pre-Chat Form Code SampleUse Pre-Chat to Gather Visitor Information and Set Context
for the Agent

Email, and Phone to the values provided by the customer -->
<input type="hidden" name="liveagent.prechat.findorcreate.map.doFind:Contact"
value="Email,true" />
<input type="hidden" name="liveagent.prechat.findorcreate.map.isExactMatch:Contact"
value="Email,true" />
<input type="hidden" name="liveagent.prechat.findorcreate.map.doCreate:Contact"
value="FirstName,true;LastName,true;Email,true;Phone,true" />
<!-- doCreate example for a Case: create a case to attach to the chat, set the Case Subject
to the value provided by the customer and set the case's Status and Origin fields -->
<input type="hidden" name="liveagent.prechat.findorcreate.map.doCreate:Case"
value="Subject,true;Status,true;Origin,true;RecordTypeId,true" />
<!-- linkToEntity: Set the record Contact record, found/created above, as the Contact on
the Case that's created -->
<input type="hidden" name="liveagent.prechat.findorcreate.linkToEntity:Contact"
value="Case,ContactId" />
<!-- showOnCreate: Open the Contact and Case records as sub-tabs to the chat for the agent
in the Console -->
<input type="hidden" name="liveagent.prechat.findorcreate.showOnCreate:Contact" value="true"
/>
<input type="hidden" name="liveagent.prechat.findorcreate.showOnCreate:Case" value="true"
/>
<!-- saveToTranscript: Associates the records found / created, i.e. Contact and Case, to
the Live Chat Transcript record. -->
<input type="hidden" name="liveagent.prechat.findorcreate.saveToTranscript:Contact"
value="ContactId" />
<input type="hidden" name="liveagent.prechat.findorcreate.saveToTranscript:Case"
value="CaseId" />
<!-- displayToAgent: Hides the case record type from the agent -->
<input type="hidden" name="liveagent.prechat.findorcreate.displayToAgent:CaseRecordType"
value="false" />
<!-- searchKnowledge: Searches knowledge article based on the text, this assumes that
Knowledge is setup -->
<input type="hidden" name="liveagent.prechat.knowledgeSearch:CaseSubject" value="true" />
<input type='submit' value='Chat Now' id='prechat_submit' onclick="setName()"/>
<!-- Set the visitor's name for the agent in the Console to first and last name provided
by the customer -->
<script type="text/javascript">
function setName() {
document.getElementById("prechat_field_name").value =
document.getElementById("firstName").value + " " +
document.getElementById("lastName").value;
}
</script>
<style type="text/css">
p {font-weight: bolder }
42
Pre-Chat Form Code SampleUse Pre-Chat to Gather Visitor Information and Set Context
for the Agent
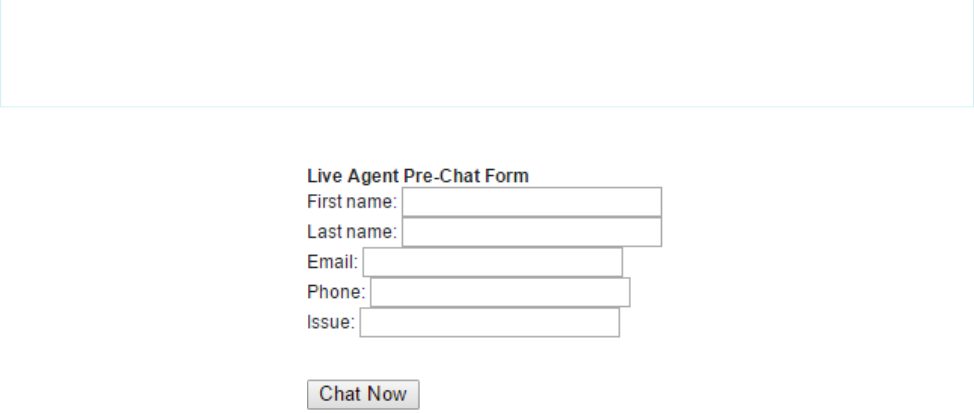
</style>
</form>
</apex:page>
This code results in a pre-chat form that looks like this:
43
Pre-Chat Form Code SampleUse Pre-Chat to Gather Visitor Information and Set Context
for the Agent
CHAPTER 6 Implement a Custom Chat Window Using
Visualforce
Chat windows are what visitors use to exchange messages with support agents. Each of your Live Agent deployments includes a chat
window. You can create a customized chat window by using Visualforce, and you can add styling and functionality with HTML, CSS, and
JavaScript.
Avoid linking to Salesforce CSS stylesheets when you customize your chat window. They aren’t versioned and can change without notice.
Instead, we recommend that you use Visualforce components that mimic Salesforce styles instead of directly referencing the stylesheets.
That way, you’re always in control of how your chat window looks. See Using Styles from Salesforce Stylesheets to lean how to disable our
stylesheets.
For more information on using Visualforce, see the Visualforce Developers’ Guide.
Live Agent Visualforce Components
Use Visualforce components to customize the appearance and behavior of chat windows.
Live Agent Visualforce Components Code Sample
Use this code sample to test and preview how Visualforce components can help you customize your chat windows.
Live Agent Visualforce Components
Use Visualforce components to customize the appearance and behavior of chat windows.
Live Agent includes the following customizable Visualforce components. These components are placed on your Visualforce form to
make certain functionality available and to customize the appearance of the chat window.
Chat windows have various states to inform chat visitors of their chat’s progress. The following components let you customize how the
chat window looks and behaves in these states to best help your visitors.
DescriptionComponent Name
The main parent element for any Live Agent chat window. This element is necessary
to do any additional customization of Live Agent. This component can only be used
once in a Live Agent deployment.
liveAgent:clientChat
The area in a Live Agent chat window that displays system alert messages (such as
"You have been disconnected").
liveAgent:clientChatAlertMessage
The area in a Live Agent chat window that displays system status messages, such as
"Chat session has been disconnected." Must be used within
liveAgent:clientChat. Each chat window can have only 1 message area.
liveAgent:clientChatMessages
The area in a Live Agent chat window that displays system status messages (such as
"You are being reconnected").
liveAgent:clientChatStatusMessage
A text label indicating a visitor's position in a queue for a chat session that’s initiated
by a button that uses push routing. (This component has no effect on buttons that
liveAgent:clientChatQueuePosition
use pull routing.) Must be used within liveAgent:clientChat. For more
information on this component, see Using
liveAgent:clientChatQueuePosition.
44
DescriptionComponent Name
The button within a Live Agent chat window when the chat is in a waiting state that
allows the visitor to cancel the chat. Must be used within
liveAgent:clientChat.
liveAgent:clientChatCancelButton
The button in a Live Agent chat window that a visitor clicks to save the chat transcript
as a local file. Must be used within liveAgent:clientChat. Each chat window
can have multiple save buttons.
liveAgent:clientChatSaveButton
The button within a Live Agent chat window that a visitor clicks to end a chat session.
Must be used within liveAgent:clientChat.
liveAgent:clientChatEndButton
The area in a Live Agent chat window that displays the chat conversation to a visitor.
Must be used within liveAgent:clientChat. Each chat window can have
only 1 chat log.
liveAgent:clientChatLog
The text box in a Live Agent chat window where a visitor types messages to a support
agent. Must be used within liveAgent:clientChat. Each chat window can
have only 1 input box.
liveAgent:clientChatInput
The button in a Live Agent chat window that a visitor clicks to send a chat message
to an agent. Must be used within liveAgent:clientChat. Each chat window
can have multiple send buttons.
liveAgent:clientChatSendButton
The area in a Live Agent chat window that displays the idle time-out alert (customer
warning) to a visitor.
liveAgent:clientChatLogAlertMessage
The file upload area in a Live Agent chat window where a visitor can send a file to
an agent. Must be used within liveAgent:clientChat.
liveAgent:clientChatFileTransfer
For more information about each of these components, see the Visualforce Component Guide.
Using liveAgent:clientChatQueuePosition
The liveAgent:clientChatQueuePosition component shows where in the chat queue a visitor is. In order for a chat to
enter the queue:
•The button from which the chat was requested must have queuing enabled.
•All online agents (with the relevant skills, if applicable) must be at capacity, causing a queue to form.
•The chat must be in the queue and not yet assigned to an agent.
If all three of these conditions aren’t met, liveAgent:clientChatQueuePosition doesn't display a value.
Live Agent Visualforce Components Code Sample
Use this code sample to test and preview how Visualforce components can help you customize your chat windows.
The following code sample shows a chat window that uses the following components:
•liveAgent:clientChat
•liveAgent:clientChatMessages
45
Live Agent Visualforce Components Code SampleImplement a Custom Chat Window Using Visualforce

•liveAgent:clientChatEndButton
•liveAgent:clientChatLog
•liveAgent:clientChatInput
<apex:page showHeader="false">
<style>
#liveAgentClientChat.liveAgentStateWaiting {
// The CSS class that is applied when the chat request is waiting to be accepted
// See "Waiting State" screenshot below
}
#liveAgentClientChat {
// The CSS class that is applied when the chat is currently engaged
// See "Engaged State" screenshot below
}
#liveAgentClientChat.liveAgentStateEnded {
// The CSS class that is applied when the chat has ended
// See "Ended State" screenshot below
}
body { overflow: hidden; width: 100%; height: 100%; padding: 0; margin: 0 }
#waitingMessage { height: 100%; width: 100%; vertical-align: middle; text-align: center;
display: none; }
#liveAgentClientChat.liveAgentStateWaiting #waitingMessage { display: table; }
#liveAgentSaveButton, #liveAgentEndButton { z-index: 2; }
.liveAgentChatInput {
height: 25px;
border-width: 1px;
border-style: solid;
border-color: #000;
padding: 2px 0 2px 4px;
background: #fff;
display: block;
width: 99%;
}
.liveAgentSendButton {
display: block;
width: 60px;
height: 31px;
padding: 0 0 3px;
position: absolute;
top: 0;
right: -67px;
}
#liveAgentChatLog {
width: auto;
height: auto;
top: 0px;
position: absolute;
overflow-y: auto;
left: 0;
right: 0;
bottom: 0;
}
</style>
<div style="top: 0; left: 0; right: 0; bottom: 0; position: absolute;">
46
Live Agent Visualforce Components Code SampleImplement a Custom Chat Window Using Visualforce
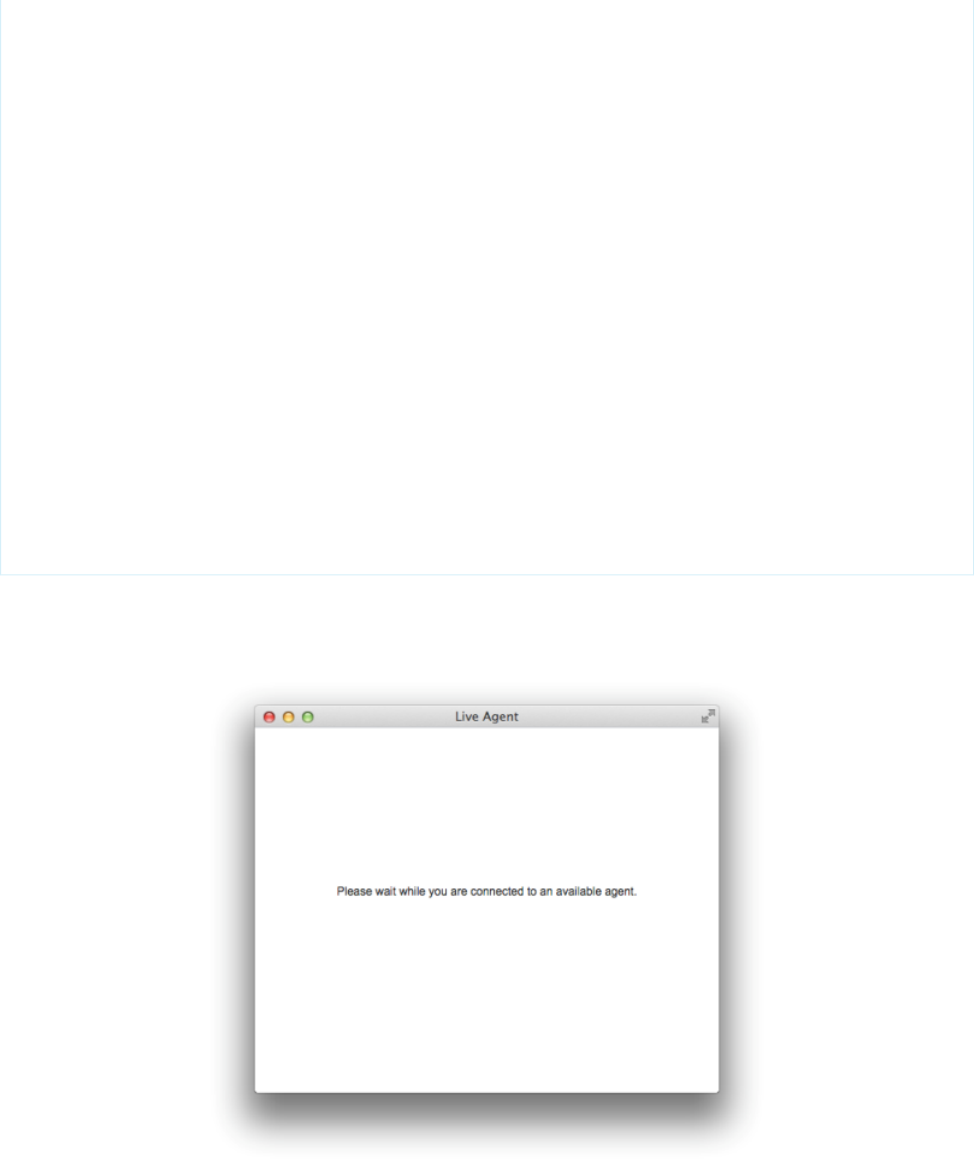
<liveAgent:clientChat>
<liveAgent:clientChatSaveButton />
<liveAgent:clientChatEndButton />
<div style="top: 25px; left: 5px; right: 5px; bottom: 5px; position: absolute; z-index:
0;">
<liveAgent:clientChatAlertMessage />
<liveAgent:clientChatStatusMessage />
<table id="waitingMessage" cellpadding="0" cellspacing="0">
<tr>
<td>Please wait while you are connected to an available agent.</td>
</tr>
</table>
<div style="top: 0; right: 0; bottom: 41px; left: 0; padding: 0; position: absolute;
word-wrap: break-word; z-index: 0;">
<liveAgent:clientChatLog />
</div>
<div style="position: absolute; height: auto; right: 0; bottom: 0; left: 0; margin-right:
67px;">
<liveagent:clientChatInput /><liveAgent:clientChatSendButton />
</div>
</div>
</liveAgent:clientChat>
</div>
</apex:page>
For an active chat, this code results in the following chat window states:
Chat Waiting
47
Live Agent Visualforce Components Code SampleImplement a Custom Chat Window Using Visualforce
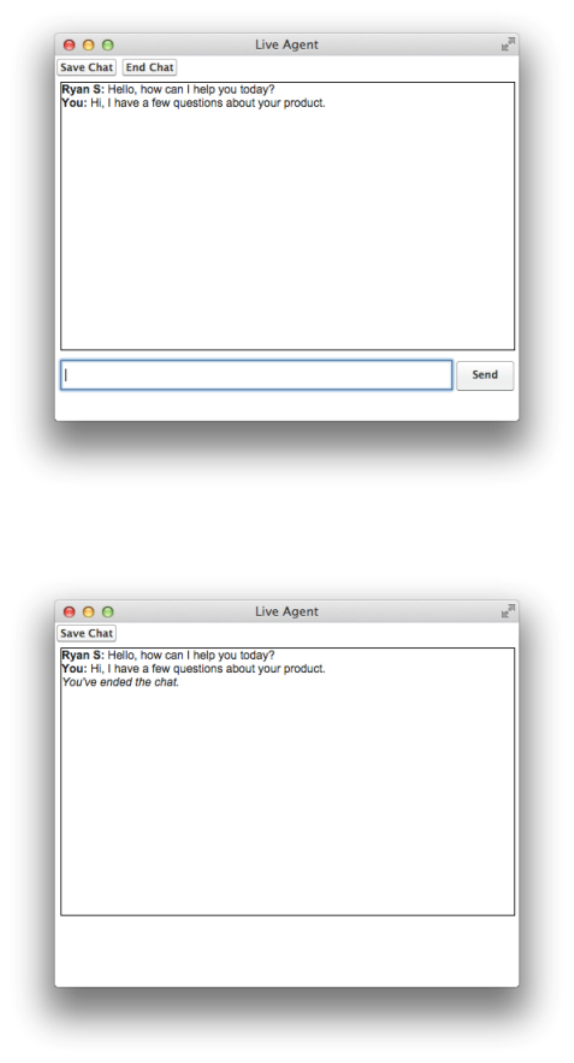
Chat in Progress
Chat Ended
48
Live Agent Visualforce Components Code SampleImplement a Custom Chat Window Using Visualforce
CHAPTER 7 Use Post-Chat to Wrap Up the Chat
Interaction with Your Customer
Post-chat pages let share information with customers at the end of a chat session. For example, you can direct your customers to another
Web page after they complete a chat with an agent, or forward them to a survey about their chat experience.
You can create a Visualforce page to host your post-chat page, or you can develop a page on your own and add the URL to your chat
button configuration. The information in this guide focuses on using Visualforce.
Post-Chat Code Sample
Test and preview how post-chat pages will work for your agents and customers using this code sample.
Post-Chat Code Sample
Test and preview how post-chat pages will work for your agents and customers using this code sample.
You can customize your post-chat page by including the variables you want to be displayed.
DescriptionPossible Variables
The timestamp when the system received the chat request.requestTime
The timestamp when the agent accepted the chat.startTime
The ID of the deployment.deploymentId
The Id of the button that originated the chat.buttonId
The unique chat key.chatKey
The last visited page value sent to the agent.lastVisitedPage
The first page the customer visited containing the deployment
code.
originalReferrer
Geo location latitude of the chat visitor.latitude
Geo location longitude of the chat visitor.longitude
Geo location city of the chat visitor..city
Geo location region of the chat visitor.region
Geo location country of the chat visitor.country
Salesforce organization ID that hosted the chat.organization
Reason for ending the chat. Possible values:disconnectedBy
•agent - the agent terminated the chat
•client - the chat visitor terminted the chat
49

DescriptionPossible Variables
•error - the system encountered an error that disconnected
the chat
•clientIdleTimeout - the chat visitor didn’t answer
within the alloted time (must have Idle Timeout configured)
•agentsUnavailable - there are no agents available to
receive the chat or there is no room in the queue
Language of the window as configured in the chat button.windowLanguage
A JSON representation of the chat data.chatDetails
A plain text copy of the transcript.transcript
A list of IDs attached to the chat session in JSON array format.attachedRecords
Description of any errors that occurred during the chat.error
This code sample creates a post-chat page that includes basic information about the chat.
<apex:page showHeader='false'>
<div id='details'>
<!-- This will present all the post chat parameters available to this page -->
<h1>Post Chat Page</h1>
<p>
<!-- These variables are passed to the post-chat page and can be used to
customize your post-chat experience -->
Request Time: <apex:outputText id='c_rt'
value='{!$CurrentPage.parameters.requestTime}' /><br/>
Start Time: <apex:outputText id='c_st'
value='{!$CurrentPage.parameters.startTime}' /><br/>
Deployment Id: <apex:outputText
value='{!$CurrentPage.parameters.deploymentId}' /><br/>
Button Id: <apex:outputText value='{!$CurrentPage.parameters.buttonId}'
/><br/>
Chat Key: <apex:outputText value='{!$CurrentPage.parameters.chatKey}'
/><br />
Last Visited Page: <apex:outputText
value='{!$CurrentPage.parameters.lastVisitedPage}' /><br/>
Original Referrer: <apex:outputText
value='{!$CurrentPage.parameters.originalReferrer}' /><br/>
<!-- When the GeoLocation is not available this will appear as Unknown
-->
Latitude: <apex:outputText value='{!$CurrentPage.parameters.latitude}'
/><br/>
Longitude: <apex:outputText value='{!$CurrentPage.parameters.longitude}'
/><br/>
City: <apex:outputText value='{!$CurrentPage.parameters.city}' /><br/>
Region: <apex:outputText value='{!$CurrentPage.parameters.region}' /><br/>
Country: <apex:outputText value='{!$CurrentPage.parameters.country}'
/><br/>
50
Post-Chat Code SampleUse Post-Chat to Wrap Up the Chat Interaction with Your
Customer

<!-- End of GeoLocation information -->
Organization: <apex:outputText
value='{!$CurrentPage.parameters.organization}' /><br/>
Disconnected By: <apex:outputText
value='{!$CurrentPage.parameters.disconnectedBy}' /><br/>
Window Language: <apex:outputText
value='{!$CurrentPage.parameters.windowLanguage}' /><br/>
Chat Details: <apex:outputText
value='{!$CurrentPage.parameters.chatDetails}' /><br />
Transcript: <apex:outputText value='{!$CurrentPage.parameters.transcript}'
/><br/>
Attached Records : <apex:outputText
value='{!$CurrentPage.parameters.attachedRecords}' /><br />
Error: <apex:outputText value='{!$CurrentPage.parameters.error}' /><br
/>
</p>
</div>
<hr/>
<!-- Message to show if chat is abandoned -->
<div id='abandoned' style='display: none;'>
We are sorry you decided to leave the chat. Feel free to initiate a new session.
</div>
<!-- Code to decide if we show the abandoned block or the full data -->
<script type='text/javascript'>
var requestTime = '{!$CurrentPage.parameters.requestTime}';
var startTime = '{!$CurrentPage.parameters.startTime}';
// when startTime doesn't have a value, it means the chat never started
if (!startTime) {
document.getElementById('details').style.display = 'none';
document.getElementById('abandoned').style.display = 'block';
}
</script>
</apex:page>
This code results in the following post-chat page for the agent:
51
Post-Chat Code SampleUse Post-Chat to Wrap Up the Chat Interaction with Your
Customer

This message shows if the chat is abandoned:
52
Post-Chat Code SampleUse Post-Chat to Wrap Up the Chat Interaction with Your
Customer

CHAPTER 8 Set Up Direct-to-Agent Chat Routing with
the Deployment APIs
You can route chats that originate from a specific button or invite to a specific agent by editing a few parameters in the Live Agent
Deployment API. You can set chats to fallback to another button or queue if the specified agent isn’t available.
Direct-to-agent routing lets your agents provide visitors with a way to contact them directly. This is useful when a visitor’s issue requires
a follow-up conversation, because the agent can provide a direct-to-agent link that ensures the visitor won’t have to start over with a
new agent.
Direct-to-Agent Routing with the Deployment APIs
You can set up direct-to-agent routing that lets you to route chats from a specific button to a single agent.
Fallback Routing in Pre-Chat Forms
Set fallback routing rules in pre-chat forms in case the agent specified for direct-to-agent routing isn’t available when a chat is
received.
Direct-to-Agent Routing with the Deployment APIs
You can set up direct-to-agent routing that lets you to route chats from a specific button to a single agent.
Use the following Deployment API methods to set up direct-to-agent routing with fallback routing enabled in case the agent isn’t
available for chat.
•startChat
•startChatWithWindow
•showWhenOnline
•showWhenOffline
Direct-to-Agent Routing Code Sample
Implement direct-to-agent routing using the Deployment API.
Direct-to-Agent Routing Code Sample
Implement direct-to-agent routing using the Deployment API.
The following code sample shows you how to set up direct-to-agent so your agents can send visitors a “Chat with Me” link.
<apex:page standardController="User" showHeader="false">
<h1>Direct-to-Agent Chat with {!user.name}</h1>
<!-- dta_online is displayed whenever the specific agent is available to chat. -->
<div id="dta_online" style="display: none;">
<!-- A valid button is required here even though it's direct-to-agent - some button
settings still apply. -->
<!-- {!left(user.id,15)} is needed to truncate an 18-char ID to the 15-char version
that Live Agent uses. -->
53

<a href="javascript://Chat" onclick="liveagent.startChat('573D01234567890',
'{!left(user.id,15)}')">Chat with {!user.name}!</a>
</div>
<!-- dta_offline is displayed if the specific agent is unavailable. -->
<div id="dta_offline" style="display: none;">
<!-- button_online is displayed if any agents are available to chat for the button.
-->
<div id="button_online" style="display: none;">Sorry, {!user.name} is not available.
If you’d like, you can
<a href="javascript://Chat" onclick="liveagent.startChat('573D01234567890')">start
a chat with another agent</a>.
</div>
<!-- button_offline is displayed if no agents are available to chat for the button.
-->
<div id="button_offline" style="display: none;">Sorry, all agents (including
{!user.name}) appear to be unavailable.</div>
</div>
<!-- Change the domain name to the correct one for your org. -->
<script type='text/javascript'
src='https://c.la1s1.saleforceliveagent.com/content/g/deployment.js'></script>
<script type='text/javascript'>
/* The following calls pass the user ID as the first argument and show whether the
agent is online.*/
liveagent.showWhenOnline('{!left(user.id,15)}', document.getElementById('dta_online'));
liveagent.showWhenOffline('{!left(user.id,15)}', document.getElementById('dta_offline'));
/* The following calls pass the button ID as the first argument and show whether
any agents are available to handle chats from the button. */
liveagent.showWhenOnline('573D01234567890', document.getElementById('button_online'));
liveagent.showWhenOffline('573D01234567890', document.getElementById('button_offline'));
/* This domain and the IDs are specific to your org, so replace these with your own.
*/
liveagent.init('https://d.la1s1.salesforceliveagent.com/chat', '572D01234567890',
'00DD01234567890');
</script>
</apex:page>
When you use this code sample with your org and call it ChatWithMe, agents can create a link that sends a chat request directly to them.
http://your.website/ChatWithMe?id=005D01234567890
You can make it even easier for agents to send a “chat with me” link by creating a Quick Text message that any agent can use:
http://your.website/ChatWithMe?id={!User_ID}
54
Direct-to-Agent Routing Code SampleSet Up Direct-to-Agent Chat Routing with the Deployment
APIs

The User ID spot in the link is automatically filled with the User ID of any agent who uses the Quick Text.
Fallback Routing in Pre-Chat Forms
Set fallback routing rules in pre-chat forms in case the agent specified for direct-to-agent routing isn’t available when a chat is received.
What if you set up direct-to-agent routing, but the agent you specified to receive the chats isn’t available? If the agent is offline, those
chats might be lost.
Luckily, if your organization uses pre-chat forms to gather customer information, you can set up fallback routing options for a button
that uses direct-to-agent routing.
This code sample demonstrates how to route chats using another button’s default routing rules if the agent assigned to that button
isn’t available. Let’s take a look at this section of code:
<h1>Pre-chat Form</h1>
<form method='post' id='prechatForm'>
Name: <input type='text' name='liveagent.prechat.name' id='prechat_field' /><br />
Email Address: <input type='text' name='liveagent.prechat:Email' /><br />
Department: <select name="liveagent.prechat.buttons">
<!-- Values are LiveChatButton and/or User IDs. -->
<option value="573D01234567890">Route through button 573D01234567890</option>
<option value="005D01234567890">Route to agent 005D01234567890</option>
<option value="005D01234567890_573D01234567890">Route to agent 005D01234567890
with Fallback to button 573D01234567890</option>
In this section, we specify that chats originating from the button should be routed to an agent with agent ID 005xx000001Sv1m. If that
agent isn’t available, incoming chats are routed based on the default routing rules for the button with button ID 573xx0000000001.
Fallback Routing Code Sample
Implement fallback routing rules in pre-chat forms so visitors can chat with another agent with the specified agent isn’t available.
Fallback Routing Code Sample
Implement fallback routing rules in pre-chat forms so visitors can chat with another agent with the specified agent isn’t available.
This sample creates a pre-chat form with fallback routing rules enabled. This form:
•Requests a visitor’s name and email address.
•Displays that information in the chat log and in the chat request window.
•Displays either a new or existing Contact record with the customer’s information in a new tab in the Salesforce console. The customer’s
name and email address are used to find an existing record. If no existing record is found, a new record is created and populated
with the customer’s information.
•Displays a drop-down list that lets visitors choose a different Live Agent button through which to route their chat request.
•Routes chats directly to a specific agent, or, if that agent is unavailable, routes those chats based on the button’s default routing
rules.
<apex:page showHeader="false">
<!-- This script takes the endpoint URL parameter passed from the deployment page
and makes it the action for the form -->
55
Fallback Routing in Pre-Chat FormsSet Up Direct-to-Agent Chat Routing with the Deployment
APIs

<script type="text/javascript">
(function() {
function handlePageLoad() {
var endpointMatcher = new RegExp("[\\?\\&]endpoint=([^&#]*)");
document.getElementById('prechatForm').setAttribute('action',
decodeURIComponent(endpointMatcher.exec(document.location.search)[1]));
}
if (window.addEventListener) {
window.addEventListener('load', handlePageLoad, false);
} else { window.attachEvent('onload', handlePageLoad, false);
}})();
</script>
<h1>Pre-chat Form</h1>
<form method='post' id='prechatForm'>
Name: <input type='text' name='liveagent.prechat.name' id='prechat_field' /><br />
Email Address: <input type='text' name='liveagent.prechat:Email' /><br />
Department: <select name="liveagent.prechat.buttons">
<!-- Values are LiveChatButton and/or User IDs. -->
<option value="573D01234567890">Route through button 573D01234567890</option>
<option value="005D01234567890">Route to agent 005D01234567890</option>
<option value="005D01234567890_573D01234567890">Route to agent 005D01234567890
with Fallback to button 573D01234567890</option>
</select><br />
<input type='submit' value='Request Chat' id='prechat_submit'/>
</form>
</apex:page>
56
Fallback Routing Code SampleSet Up Direct-to-Agent Chat Routing with the Deployment
APIs
